This is a modern-English version of Science in the Kitchen: A Scientific Treatise On Food Substances and Their Dietetic Properties, Together with a Practical Explanation of the Principles of Healthful Cookery, and a Large Number of Original, Palatable, and Wholesome Recipes, originally written by Kellogg, E. E. (Ella Ervilla).
It has been thoroughly updated, including changes to sentence structure, words, spelling,
and grammar—to ensure clarity for contemporary readers, while preserving the original spirit and nuance. If
you click on a paragraph, you will see the original text that we modified, and you can toggle between the two versions.
Scroll to the bottom of this page and you will find a free ePUB download link for this book.
| Note: |
Images of the original pages are available through the
Michigan State University Libraries. See http://digital.lib.msu.edu/projects/cookbooks/books/sciencekitchen/scie.pdf |

SCIENCE IN THE KITCHEN.
A SCIENTIFIC TREATISE ON FOOD SUBSTANCES AND THEIR DIETETIC PROPERTIES, TOGETHER WITH
A SCIENTIFIC TREATISE ON FOOD SUBSTANCES AND THEIR DIETETIC PROPERTIES, TOGETHER WITH
A PRACTICAL EXPLANATION OF THE PRINCIPLES OF HEALTHFUL COOKERY,
A PRACTICAL EXPLANATION OF THE PRINCIPLES OF HEALTHY COOKING,
AND A LARGE NUMBER OF ORIGINAL, PALATABLE, AND WHOLESOME RECIPES.
AND A LARGE NUMBER OF ORIGINAL, TASTY, AND HEALTHY RECIPES.
BY
MRS. E.E. KELLOGG, A.M.
Superintendent of the Sanitarium School of Cookery and of the Bay View Assembly School of Cookery, and Chairman of the World's Fair Committee on Food Supplies, for Michigan
1893
1893
PREFACE.
The interest in scientific cookery, particularly in cookery as related to health, has manifestly increased in this country within the last decade as is evidenced by the success which has attended every intelligent effort for the establishment of schools for instruction in cookery in various parts of the United States. While those in charge of these schools have presented to their pupils excellent opportunities for the acquirement of dexterity in the preparation of toothsome and tempting viands, but little attention has been paid to the science of dietetics, or what might be termed the hygiene of cookery.
The interest in scientific cooking, especially when it comes to cooking for health, has clearly grown in this country over the past ten years, as shown by the success of various efforts to set up cooking schools across the United States. While the people running these schools have provided their students with great chances to develop skills in making delicious and appealing dishes, there has been little focus on the science of dietetics or what could be called the hygiene of cooking.
A little less than ten years ago the Sanitarium at Battle Creek Mich., established an experimental kitchen and a school of cookery under the supervision of Mrs. Dr. Kellogg, since which time, researches in the various lines of cookery and dietetics have been in constant progress in the experimental kitchen, and regular sessions of the school of cookery have been held. The school has gradually gained in popularity, and the demand for instruction has become so great that classes are in session during almost the entire year.
A little less than ten years ago, the Sanitarium in Battle Creek, Michigan, set up an experimental kitchen and a cooking school supervised by Mrs. Dr. Kellogg. Since then, research in various areas of cooking and nutrition has been ongoing in the experimental kitchen, and regular cooking classes have been held. The school has steadily grown in popularity, and the demand for instruction has become so high that classes are held nearly all year round.
During this time, Mrs. Kellogg has had constant oversight of the cuisine of both the Sanitarium and the Sanitarium Hospital, preparing bills of fare for the general and diet tables, and supplying constantly new methods and original recipes to meet the changing and growing demands of an institution numbering always from 500 to 700 inmates.
During this time, Mrs. Kellogg has continuously overseen the cooking at both the Sanitarium and the Sanitarium Hospital, creating menus for the general and diet tables, and regularly providing new techniques and original recipes to meet the evolving and increasing needs of an institution that always has between 500 and 700 residents.
These large opportunities for observation, research, and experience, have gradually developed a system of cookery, the leading features of which are so entirely novel and so much in advance of the methods heretofore in use, that it may be justly styled, A New System of Cookery. It is a singular and lamentable fact, the evil consequences of which are wide-spread, that the preparation of food, although involving both chemical and physical processes, has been less advanced by the results of modern researches and discoveries in chemistry and physics, than any other department of human industry. Iron mining, glass-making, even the homely art of brick-making, and many of the operations of the farm and the dairy, have been advantageously modified by the results of the fruitful labors of modern scientific investigators. But the art of cookery is at least a century behind in the march of scientific progress. The mistress of the kitchen is still groping her way amid the uncertainties of mediæval methods, and daily bemoaning the sad results of the "rule of thumb." The chemistry of cookery is as little known to the average housewife as were the results of modern chemistry to the old alchemists; and the attempt to make wholesome, palatable, and nourishing food by the methods commonly employed, is rarely more successful than that of those misguided alchemists in transmuting lead and copper into silver and gold.
These big opportunities for observation, research, and experience have slowly created a cooking system that is completely new and far ahead of the methods previously used, making it rightfully called A New System of Cookery. It’s a strange and unfortunate reality, with widespread negative effects, that the preparation of food, which involves both chemical and physical processes, has progressed the least from modern research and discoveries in chemistry and physics compared to any other field. Iron mining, glass-making, even the basic craft of brick-making, and many farming and dairy operations have been positively transformed by the fruitful efforts of modern scientific researchers. But the art of cooking lags at least a century behind scientific advancement. The person in charge of the kitchen is still feeling their way through the uncertainties of medieval methods and often lamenting the poor outcomes of relying on “rule of thumb.” The chemistry of cooking is as unfamiliar to the average housewife as the results of modern chemistry were to the old alchemists; thus, the effort to create healthy, tasty, and nutritious food using common methods is rarely more successful than those confused alchemists trying to turn lead and copper into silver and gold.
The new cookery brings order from out the confusion of mixtures and messes, often incongruence and incompatible, which surrounds the average cook, by the elucidation of the principles which govern the operations of the kitchen, with the same certainty with which the law of gravity rules the planets.
The new cooking style brings order to the chaos of mismatched ingredients and messes that often surround the typical cook, by clearly explaining the principles that guide kitchen operations, just like the law of gravity governs the planets.
Those who have made themselves familiar with Mrs. Kellogg's system of cookery, invariably express themselves as trebly astonished: first, at the simplicity of the methods employed; secondly, at the marvelous results both as regards palatableness, wholesomeness, and attractiveness; thirdly, that it had never occurred to them "to do this way before."
Those who are familiar with Mrs. Kellogg's cooking system always express their surprise for three reasons: first, the simplicity of the methods used; second, the amazing results in terms of taste, healthiness, and presentation; and third, that it never occurred to them to do it this way before.
This system does not consist simply of a rehash of what is found in every cook book, but of new methods, which are the result of the application of the scientific principles of chemistry and physics to the preparation of food in such a manner as to make it the most nourishing, the most digestible, and the most inviting to the eye and to the palate.
This system isn't just a rehash of what's in every cookbook; it includes new methods that come from using the scientific principles of chemistry and physics in food preparation to make it the most nutritious, easy to digest, and visually appealing.
Those who have tested the results of Mrs. Kellogg's system of cookery at the Sanitarium tables, or in their own homes through the instruction of her pupils, have been most enthusiastic in their expressions of satisfaction and commendation. Hundreds of original recipes which have appeared in her department in Good Health, "Science in the Household", have been copied into other journals, and are also quite largely represented in the pages of several cook books which have appeared within the last few years.
Those who have tried the results of Mrs. Kellogg's cooking system at the Sanitarium or in their own homes through the training of her students have been very enthusiastic in their praise and satisfaction. Hundreds of original recipes featured in her section of Good Health, "Science in the Household," have been reprinted in other magazines and are also well-represented in several cookbooks that have come out in the past few years.
The great success which attended the cooking school in connection with the Bay View Assembly (the Michigan Chautauqua), as well as the uniform success which has met the efforts of many of the graduates of the Sanitarium school of cookery who have undertaken to introduce the new system through the means of cooking classes in various parts of the United States, has created a demand for a fuller knowledge of the system.
The great success of the cooking school associated with the Bay View Assembly (the Michigan Chautauqua), along with the consistent success achieved by many graduates of the Sanitarium school of cookery who have started cooking classes across different areas in the United States, has sparked a demand for a deeper understanding of the system.
This volume is the outgrowth of the practical and experimental work, and the popular demand above referred to. Its preparation has occupied the entire leisure time of the author during the last five or six years. No pains or expense has been spared to render the work authoritative on all questions upon which it treats, and in presenting it to the public, the publishers feel the utmost confidence that the work will meet the highest expectations of those who have waited impatiently for its appearance during the months which have elapsed since its preparation was first announced. PUBLISHERS.
This book comes from practical and experimental work, as well as the popular demand mentioned earlier. The author has dedicated all their free time to it over the past five or six years. Every effort and expense has been put into making this work reliable on all the topics it covers. In presenting it to the public, the publishers are fully confident that it will meet the highest expectations of those who have eagerly awaited its release in the months since its preparation was first announced. PUBLISHERS.
TABLE OF CONTENTS.
LIST OF ILLUSTRATIONS.
INTRODUCTION.
No one thing over which we have control exerts so marked an influence upon our physical prosperity as the food we eat; and it is no exaggeration to say that well-selected and scientifically prepared food renders the partaker whose digestion permits of its being well assimilated, superior to his fellow-mortals in those qualities which will enable him to cope most successfully with life's difficulties, and to fulfill the purpose of existence in the best and truest manner. The brain and other organs of the body are affected by the quality of the blood which nourishes them, and since the blood is made of the food eaten, it follows that the use of poor food will result in poor blood, poor muscles, poor brains, and poor bodies, incapable of first-class work in any capacity. Very few persons, however, ever stop to inquire what particular foods are best adapted to the manufacture of good blood and the maintenance of perfect health; but whatever gratifies the palate or is most conveniently obtained, is cooked and eaten without regard to its dietetic value. Far too many meals partake of the characteristics of the one described in the story told of a clergyman who, when requested to ask a blessing upon a dinner consisting of bread, hot and tinged with saleratus, meat fried to a crisp, potatoes swimming in grease, mince pie, preserves, and pickles, demurred on the ground that the dinner was "not worth a blessing." He might with equal propriety have added, "and not worth eating."
No single factor we control has a greater impact on our physical well-being than the food we eat. It’s not an exaggeration to say that well-chosen and properly prepared food makes those who can digest it well better equipped to handle life’s challenges and fulfill their purpose in the best way possible. The quality of the blood that nourishes the brain and other organs is affected by the food we consume, so eating poor-quality food leads to poor blood, weak muscles, ineffective brains, and unhealthy bodies that can’t perform well in any role. However, very few people stop to think about which foods are best for making good blood and staying healthy; instead, they choose whatever tastes good or is easy to get, cooking and eating it without considering its nutritional value. Many meals resemble the one described in a story about a clergyman who, when asked to bless a dinner of bread that was hot and tinged with baking soda, overly fried meat, greasy potatoes, mince pie, preserves, and pickles, declined, saying the meal was "not worth a blessing." He could have just as easily added, "and not worth eating."
The subject of diet and its relation to human welfare, is one deserving of the most careful consideration. It should be studied as a science, to enable us to choose such materials as are best adapted to our needs under the varying circumstances of climate growth, occupation, and the numerous changing conditions of the human system; as an art, that we may become so skilled in the preparation of the articles selected as to make them both appetizing and healthful. It is an unfortunate fact that even among experienced housekeepers the scientific principles which govern the proper preparation of food, are but little understood, and much unwholesome cookery is the result. The mechanical mixing of ingredients is not sufficient to secure good results; and many of the failures attributed to "poor material," "bad luck," and various other subterfuges to which cooks ignorance of scientific principles. The common method of blindly following recipes, with no knowledge of "the reason why," can hardly fail to be often productive of unsatisfactory results, which to the uninformed seem quite inexplicable.
The topic of diet and its connection to human well-being is one that deserves serious attention. It should be approached as a science, allowing us to select the best foods for our needs based on changing factors like climate, lifestyle, and the various evolving conditions of the human body; and as an art, so that we become skilled in preparing the foods we choose, making them both tasty and healthy. Unfortunately, even among experienced cooks, the scientific principles that dictate how to properly prepare food are often not well understood, leading to much unhealthy cooking. Simply mixing ingredients mechanically isn’t enough to achieve good results; many failures get blamed on "poor materials," "bad luck," and other excuses, which stem from cooks' lack of understanding of scientific principles. The common practice of mindlessly following recipes without knowing "the reason why" often leads to disappointing outcomes that seem baffling to those who are uninformed.
Cookery, when based upon scientific principles, ceases to be the difficult problem it so often appears. Cause and effect follow each other as certainly in the preparation of food as in other things; and with a knowledge of the underlying principles, and faithfulness in carrying out the necessary details, failure becomes almost an impossibility. There is no department of human activity where applied science offers greater advantages than in that of cookery, and in our presentation of the subjects treated in the following pages, we have endeavored, so far as consistent with the scope of this work, to give special prominence to the scientific principles involved in the successful production of wholesome articles of food. We trust our readers will find these principles so plainly elucidated and the subject so interesting, that they will be stimulated to undertake for themselves further study and research in this most important branch of household science. We have aimed also to give special precedence of space to those most important foods, the legumes, and grains and their products, which in the majority of cook books are given but little consideration or are even left out altogether, believing that our readers will be more interested in learning the many palatable ways in which these especially nutritious and inexpensive foods may be prepared, than in a reiteration of such dishes as usually make up the bulk of the average cook book.
Cooking, when grounded in scientific principles, stops being the tough challenge it often seems. Cause and effect occur just as surely in food preparation as in other areas; with an understanding of the fundamental principles and diligence in following necessary details, failure becomes nearly impossible. There’s no area of human activity where applied science provides greater benefits than in cooking, and in this presentation of the topics covered in the following pages, we’ve aimed, as much as possible within the scope of this work, to highlight the scientific principles involved in successfully creating nutritious food items. We hope our readers find these principles clearly explained and the subject so engaging that they feel encouraged to pursue further study and research in this essential aspect of household science. We also aimed to prioritize space for the most important foods, like legumes and grains and their products, which are often given little attention or even omitted from most cookbooks. We believe our readers will be more interested in discovering the many delicious ways to prepare these especially nutritious and affordable foods than in a repetition of the typical dishes that usually dominate the average cookbook.
For reasons stated elsewhere (in the chapter on Milk, Cream, and Butter), we have in the preparation of all recipes made use of cream in place of other fats; but lest there be some who may suppose because cream occupies so frequent a place in the recipes, and because of their inability to obtain that article, the recipes are therefore not adapted to their use, we wish to state that a large proportion of the recipes in which it is mentioned as seasoning, or for dressing, will be found to be very palatable with the cream omitted, or by the use of its place of some one of the many substitutes recommended. We ought also to mention in this connection, that wherever cream is recommended, unless otherwise designated, the quality used in the preparation of the recipes is that of single or twelve hour cream sufficiently diluted with milk, so that one fourth of each quart of milk is reckoned as cream. If a richer quality than this be used, the quantity should be diminished in proportion; otherwise, by the excess of fat, a wholesome food may become a rich, unhealthful dish.
For reasons explained in the chapter on Milk, Cream, and Butter, we've used cream in all the recipes instead of other fats. However, to those who might think that because cream is mentioned so often and they can't get it, these recipes aren't suitable for them, we want to clarify that many of the recipes that include cream as a seasoning or dressing can be quite tasty without it, or by substituting it with one of the many recommended alternatives. We should also note that when cream is suggested, unless stated otherwise, we mean single or twelve-hour cream diluted with milk, where one-fourth of each quart of milk is counted as cream. If a richer type is used, the amount should be reduced accordingly; otherwise, too much fat can turn a healthy dish into something rich and unhealthy.
In conclusion, the author desires to state that no recipe has been admitted to this work which has not been thoroughly tested by repeated trials, by far the larger share of such being original, either in the combination of the materials used, the method employed, or both materials and method. Care has been taken not to cumber the work with useless and indifferent recipes. It is believed that every recipe will be found valuable, and that the variety offered is sufficiently ample, so that under the most differing circumstances, all may be well served.
In conclusion, the author wants to emphasize that no recipe included in this work has been accepted without thorough testing through repeated trials, with most being original, either in the combination of ingredients used, the methods applied, or both. Care has been taken not to clutter the work with unnecessary or mediocre recipes. It is believed that every recipe will be valuable, and that the variety provided is ample enough to cater to different situations, ensuring that everyone can find what they need.
We trust therefore that those who undertake to use the work as a guide in their culinary practice, will not consider any given recipe a failure because success does not attend their first efforts. Perseverance and a careful study of the directions given, will assuredly bring success to all who possess the natural or acquired qualities essential for the practice of that most useful of the arts,—"Healthful Cookery."
We believe that those who use this work as a guide in their cooking will not view any recipe as a failure just because their first attempts don't succeed. With persistence and a close look at the instructions provided, anyone with the natural or learned skills needed for this valuable art—"Healthy Cooking"—will definitely achieve success.
ELLA E. KELLOGG.
ELLA E. KELLOGG.
Battle Creek, April 20, 1892.
Battle Creek, April 20, 1892.

Foods
 he purposes of food are to promote growth, to supply force and heat,
and to furnish material to repair the waste which is constantly taking
place in the body. Every breath, every thought, every motion, wears out
some portion of the delicate and wonderful house in which we live.
Various vital processes remove these worn and useless particles; and to
keep the body in health, their loss must be made good by constantly
renewed supplies of material properly adapted to replenish the worn and
impaired tissues. This renovating material must be supplied through the
medium of food and drink, and the best food is that by which the desired
end may be most readily and perfectly attained. The great diversity in
character of the several tissues of the body, makes it necessary that
food should contain a variety of elements, in order that each part may
be properly nourished and replenished.
he purposes of food are to promote growth, to supply force and heat,
and to furnish material to repair the waste which is constantly taking
place in the body. Every breath, every thought, every motion, wears out
some portion of the delicate and wonderful house in which we live.
Various vital processes remove these worn and useless particles; and to
keep the body in health, their loss must be made good by constantly
renewed supplies of material properly adapted to replenish the worn and
impaired tissues. This renovating material must be supplied through the
medium of food and drink, and the best food is that by which the desired
end may be most readily and perfectly attained. The great diversity in
character of the several tissues of the body, makes it necessary that
food should contain a variety of elements, in order that each part may
be properly nourished and replenished.
The purposes of food are to support growth, provide energy and warmth, and supply materials to repair the constant wear and tear occurring in the body. Each breath, thought, and movement depletes some part of the intricate and amazing structure in which we exist. Various essential processes eliminate these worn-out and useless components; to maintain good health, we must replace what is lost with regular supplies of materials that can effectively restore the damaged and worn tissues. This restorative material must come from food and drink, and the best food is that which helps achieve the desired results most efficiently and effectively. The significant differences in the composition of the body’s various tissues require that food contain a mix of elements, so each part can be appropriately nourished and restored.
The digestible food elements are often grouped, according to their chemical composition, into three classes; vis., carbonaceous, nitrogenous, and inorganic. The carbonaceous class includes starch, sugar, and fats; the nitrogenous, all albuminous elements; and the inorganic comprises the mineral elements.
The digestible food components are usually categorized by their chemical makeup into three classes: namely, carbon-based, nitrogen-based, and inorganic. The carbon-based class includes starch, sugar, and fats; the nitrogen-based class includes all protein elements; and the inorganic class consists of the mineral elements.
Starch is only found in vegetable foods; all grains, most vegetables, and some fruits, contain starch in abundance. Several kinds of sugar are made in nature's laboratory; cane, grape, fruit, and milk sugar. The first is obtained from the sugar-cane, the sap of maple trees, and from the beet root. Grape and fruit sugars are found in most fruits and in honey. Milk sugar is one of the constituents of milk. Glucose, an artificial sugar resembling grape sugar, is now largely manufactured by subjecting the starch of corn or potatoes to a chemical process; but it lacks the sweetness of natural sugars, and is by no means a proper substitute for them. Albumen is found in its purest, uncombined state in the white of an egg, which is almost wholly composed of albumen. It exists, combined with other food elements, in many other foods, both animal and vegetable. It is found abundant in oatmeal, and to some extent in the other grains, and in the juices of vegetables. All natural foods contain elements which in many respects resemble albumen, and are so closely allied to it that for convenience they are usually classified under the general name of "albumen." The chief of these is gluten, which is found in wheat, rye, and barley. Casein, found in peas, beans, and milk, and the fibrin of flesh, are elements of this class.
Starch is found only in plant-based foods; all grains, most vegetables, and some fruits contain a lot of starch. Several types of sugar are produced in nature; these include cane, grape, fruit, and milk sugars. Cane sugar comes from sugarcane, the sap of maple trees, and sugar beets. Grape and fruit sugars are present in most fruits and honey. Milk sugar is one of the components of milk. Glucose, an artificial sugar that resembles grape sugar, is now mainly produced by treating the starch from corn or potatoes with a chemical process; however, it isn't as sweet as natural sugars and is not really a suitable substitute. Albumen is found in its purest form in egg whites, which are almost entirely made up of albumen. It also exists combined with other food elements in many animal and plant foods. It's abundant in oatmeal, and to a lesser extent in other grains and vegetable juices. All natural foods contain elements that resemble albumen in many ways, and because of this, they are typically grouped under the general term "albumen." The most notable of these is gluten, which is present in wheat, rye, and barley. Casein, found in peas, beans, and milk, as well as fibrin from meat, are part of this group.
Fats are found in both animal and vegetable foods. Of animal fats, butter and suet are common examples. In vegetable form, fat is abundant in nuts, peas, beans, in various of the grains, and in a few fruits, as the olive. As furnished by nature in nuts, legumes, grains, fruits, and milk, this element is always found in a state of fine subdivision, which condition is the one best adapted to its digestion. As most commonly used, in the form of free fats, as butter, lard, etc., it is not only difficult of digestion itself, but often interferes with the digestion of the other food elements which are mixed with it. It was doubtless never intended that fats should be so modified from their natural condition and separated from other food elements as to be used as a separate article of food. The same may be said of the other carbonaceous elements, sugar and starch, neither of which, when used alone, is capable of sustaining life, although when combined in a proper and natural manner with other food elements, they perform a most important part in the nutrition of the body. Most foods contain a percentage of the mineral elements. Grains and milk furnish these elements in abundance. The cellulose, or woody tissue, of vegetables, and the bran of wheat, are examples of indigestible elements, which although they cannot be converted into blood in tissue, serve an important purpose by giving bulk to the food.
Fats are found in both animal and plant foods. Common examples of animal fats include butter and suet. In plant form, fats are plentiful in nuts, peas, beans, various grains, and a few fruits, like olives. When provided by nature in nuts, legumes, grains, fruits, and milk, this component is always found in a finely divided state, which is best suited for digestion. However, when used in the form of free fats, like butter or lard, it's not only hard to digest on its own but often hampers the digestion of other food elements mixed with . It was probably never meant for fats to be modified from their natural state and separated from other food elements to be consumed as a standalone food item. The same goes for other carbon-based elements, like sugar and starch; neither of which can sustain life when used alone, although when combined properly and naturally with other food elements, they play a crucial role in nourishing the body. Most foods contain a percentage of mineral elements, with grains and milk providing them abundantly. The cellulose, or fibrous tissue, in vegetables and the bran of wheat are examples of indigestible elements, which, while they can't be converted into blood in the body, are important for adding bulk to the food.
With the exception of gluten, none of the food elements, when used alone, are capable of supporting life. A true food substance contains some of all the food elements, the amount of each varying in different foods.
With the exception of gluten, none of the food components can support life on their own. A real food substance contains some of all the food components, with the amount of each varying across different foods.
1. They furnish material for the production of heat;
1. They provide resources for generating heat;
2. They are a source of force when taken in connection with other food elements;
2. They provide energy when combined with other food components;
3. They replenish the fatty tissues of the body. Of the carbonaceous elements,—starch, sugar, and fats,—fats produce the greatest amount of heat in proportion to quantity; that is, more heat is developed from a pound of fat than from an equal weight of sugar or starch; but this apparent advantage is more than counterbalanced by the fact that fats are much more difficult of digestion than are the other carbonaceous elements, and if relied upon to furnish adequate material for bodily heat, would be productive of much mischief in overtaxing and producing disease of the digestive organs. The fact that nature has made a much more ample provision of starch and sugars than of fats in man's natural diet, would seem to indicate that they were intended to be the chief source of carbonaceous food; nevertheless, fats, when taken in such proportion as nature supplies them, are necessary and important food elements.
3. They replenish the fatty tissue in the body. Among the carbon-based elements—starch, sugar, and fats—fats produce the most heat relative to their amount; that is, more heat is generated from a pound of fat than from an equal weight of sugar or starch. However, this apparent advantage is outweighed by the fact that fats are much harder to digest than the other carbon-based elements. If relied on to provide enough material for body heat, they could cause significant harm by overstraining and causing disease in the digestive organs. The reality that nature provides far more starch and sugars than fats in the human diet suggests that these are meant to be the primary source of carbon-based food. Nonetheless, fats, when consumed in the proportions that nature provides, are essential and important nutrients.
The nitrogenous food elements especially nourish the brain, nerves, muscles, and all the more highly vitalized and active tissues of the body, and also serve as a stimulus to tissue change. Hence it may be said that a food deficient in these elements is a particularly poor food.
The nitrogen-rich food elements especially nourish the brain, nerves, muscles, and all the more energized and active tissues of the body, and also act as a trigger for tissue change. So, it can be said that food lacking these elements is particularly bad for you.
The inorganic elements, chief of which are the phosphates, in the carbonates of potash, soda, and lime, aid in furnishing the requisite building material for bones and nerves.
The inorganic elements, mainly phosphates, in the carbonates of potash, soda, and lime, help provide the essential building material for bones and nerves.
Proper Combinations of Foods.—While it is important that our food should contain some of all the various food elements, experiments upon both animals and human beings show it is necessary that these elements, especially the nitrogenous and carbonaceous, be used in certain definite proportions, as the system is only able to appropriate a certain amount of each; and all excess, especially of nitrogenous elements, is not only useless, but even injurious, since to rid the system of the surplus imposes an additional task upon the digestive and excretory organs. The relative proportion of these elements necessary to constitute a food which perfectly meets the requirements of the system, is six of carbonaceous to one of nitrogenous. Scientists have devoted much careful study and experimentation to the determination of the quantities of each of the food elements required for the daily nourishment of individuals under the varying conditions of life, and it has come to be commonly accepted that of the nitrogenous material which should constitute one sixth of the nutrients taken, about three ounces is all that can be made use of in twenty-four hours, by a healthy adult of average weight, doing a moderate amount of work. Many articles of food are, however, deficient in one or the other of these elements, and need to be supplemented by other articles containing the deficient element in superabundance, since to employ a dietary in which any one of the nutritive elements is lacking, although in bulk it may be all the digestive organs can manage, is really starvation, and will in time occasion serious results.
Proper Combinations of Foods.—While it's important for our food to contain a variety of nutrients, studies on both animals and humans show that these nutrients, especially proteins and carbohydrates, need to be consumed in specific proportions, since our bodies can only absorb a limited amount of each. Any excess, particularly of proteins, is not only unnecessary but can be harmful, as it forces the digestive and excretory systems to work harder to eliminate the surplus. The ideal ratio of these nutrients for a balanced diet is six parts carbohydrates to one part protein. Scientists have conducted extensive research to determine the amounts of each nutrient required for daily nourishment, depending on individual lifestyles, and it is generally accepted that the protein portion should make up one sixth of total nutrients consumed. For a healthy adult with average weight who engages in moderate activity, about three ounces of protein is what can be effectively utilized in a day. However, many food items lack one of these essential nutrients and should be complemented with those that provide the missing element in abundance. Relying on a diet that is deficient in any essential nutrient, even if the total volume is manageable for the digestive system, is essentially a form of starvation and can lead to serious health issues over time.
It is thus apparent that much care should be exercised in the selection and combination of food materials. The table on page 484, showing the nutritive values of various foods, should be carefully studied. Such knowledge is of first importance in the education of cooks and housekeepers, since to them falls the selection of the food for the daily needs of the household; and they should not only understand what foods are best suited to supply these needs, but how to combine them in accordance with physiological laws.
It’s clear that a lot of attention should be paid to choosing and combining food ingredients. The table on page 484, which lists the nutritional values of different foods, should be examined thoroughly. This knowledge is crucial in training cooks and household managers, as they are responsible for selecting food to meet the daily needs of the home. They should not only know which foods best fulfill these needs but also how to combine them according to the rules of nutrition.
Condiments.—By condiments are commonly meant such substances as are added to season food, to give it "a relish" or to stimulate appetite, but which in themselves possess no real food value. To this category belong mustard, ginger, pepper, pepper sauce, Worcestershire sauce, cloves, spices, and other similar substances. That anything is needed to disguise or improve the natural flavor of food, would seem to imply either that the article used was not a proper alimentary substance, or that it did not answer the purpose for which the Creator designed it. True condiments, such as pepper, pepper sauce, ginger, spice, mustard, cinnamon, cloves, etc., are all strong irritants. This may be readily demonstrated by their application to a raw surface. The intense smarting and burning occasioned are ample evidence of the irritating character. Pepper and mustard are capable of producing powerfully irritating effects, even when applied to the healthy skin where wholly intact. It is surprising that it does not occur to the mother who applies a mustard plaster to the feet of her child, to relieve congestion of the brain, that an article which is capable of producing a blister upon the external covering of the body, is quite as capable of producing similar effects when applied to the more sensitive tissues within the body. The irritating effects of these substances upon the stomach are not readily recognized, simply because the stomach is supplied with very few nerves of sensation. That condiments induce an intense degree of irritation of the mucous membrane of the stomach, was abundantly demonstrated by the experiments of Dr. Beaumont upon the unfortunate Alexis St. Martin. Dr. Beaumont records that when St. Martin took mustard, pepper, and similar condiments with his food, the mucous membrane of his stomach became intensely red and congested, appearing very much like an inflamed eye. It is this irritating effect of condiments which gives occasion for their extended use. They create an artificial appetite, similar to the incessant craving of the chronic dyspeptic, whose irritable stomach is seldom satisfied. This fact with regard to condiments is a sufficient argument against their use, being one of the greatest causes of gluttony, since they remove the sense of satiety by which Nature says, "Enough."
Condiments.—Condiments are usually understood to be substances that are added to enhance the flavor of food or to stimulate appetite, but they don't have real nutritional value on their own. This category includes mustard, ginger, pepper, hot sauce, Worcestershire sauce, cloves, spices, and similar items. The need to mask or improve the natural flavor of food suggests that what’s being used isn’t a suitable food item or that it doesn’t fulfill the purpose for which it was intended. True condiments, like pepper, hot sauce, ginger, spices, mustard, cinnamon, cloves, etc., are all strong irritants. This is easily proven by applying them to a raw surface, where the intense stinging and burning show their irritating nature. Pepper and mustard can cause significant irritation, even on healthy skin that’s unbroken. It’s surprising that a mother who puts a mustard plaster on her child’s feet to relieve brain congestion doesn’t realize that something that can blister the outer skin can also cause similar effects on the more sensitive tissues inside the body. The irritating effects of these substances on the stomach aren't easily noticed because the stomach has very few sensation nerves. The fact that condiments cause intense irritation of the stomach’s mucous membrane was clearly shown by Dr. Beaumont's experiments on the unfortunate Alexis St. Martin. Dr. Beaumont noted that when St. Martin consumed mustard, pepper, and similar condiments with his food, the mucous membrane of his stomach became intensely red and congested, looking much like an inflamed eye. This irritating effect of condiments is what leads to their widespread use. They create an artificial appetite, much like the constant craving of someone with chronic indigestion, whose sensitive stomach is rarely satisfied. This aspect of condiments provides a strong argument against their use, as they are one of the leading causes of overeating, since they diminish the natural feeling of fullness that tells us when we’ve had enough.
To a thoroughly normal and unperverted taste, irritating condiments of all sorts are very obnoxious. It is true that Nature accommodates herself to their use with food to such a degree that they may be employed for years without apparently producing very grave results; but this very condition is a source of injury, since it is nothing more nor less than the going to sleep of the sentinels which nature has posted at the portal of the body, for the purpose of giving warning of danger. The nerves of sensibility have become benumbed to such a degree that they no longer offer remonstrance against irritating substances, and allow the enemy to enter into the citadel of life. The mischievous work is thus insidiously carried on year after year until by and by the individual breaks down with some chronic disorder of the liver, kidneys, or some other important internal organ. Physicians have long observed that in tropical countries where curry powder and other condiments are very extensively used, diseases of the liver, especially acute congestion and inflammation, are exceedingly common, much more so that in countries and among nations where condiments are less freely used. A traveler in Mexico, some time ago, described a favorite Mexican dish as composed of layers of the following ingredients: "Pepper, mustard, ginger, pepper, potato, ginger; mustard, pepper, potato, mustard, ginger, pepper." The common use of such a dish is sufficient cause for the great frequency of diseases of the liver among the Mexicans, noted by physicians traveling in that country. That the use of condiments is wholly a matter of habit is evident from the fact that different nations employ as condiments articles which would be in the highest degree obnoxious to people of other countries. For example, the garlic so freely used in Russian cookery, would be considered by Americans no addition to the natural flavors of food; and still more distasteful would be the asafetida frequently used as a seasoning in the cuisine of Persia and other Asiatic countries.
To someone with a completely normal and unaltered taste, irritating condiments of all kinds are very unpleasant. It's true that nature adapts to their use in food to the point where they can be consumed for years without seeming to cause serious issues; however, this very situation is harmful because it represents the slumbering of the sentinels nature has placed at the entrance to the body to warn of danger. The sensitivity of the nerves has dulled to such an extent that they no longer protest against irritating substances, allowing harmful elements to invade the stronghold of life. This damaging process stealthily continues year after year until eventually, the individual succumbs to some chronic illness affecting the liver, kidneys, or other vital internal organs. Doctors have long noted that in tropical regions where curry powder and other condiments are widely used, liver diseases—especially acute congestion and inflammation—are incredibly common, far more so than in countries and among people where condiments are used less frequently. A traveler in Mexico once described a popular Mexican dish made up of layers of these ingredients: "Pepper, mustard, ginger, pepper, potato, ginger; mustard, pepper, potato, mustard, ginger, pepper." The common consumption of such a dish likely contributes to the high incidence of liver diseases among Mexicans, as reported by visiting doctors. That the use of condiments is entirely a matter of habit is clear from the fact that different nations use items as condiments that would be highly objectionable to people from other countries. For instance, the garlic that is so commonly used in Russian cuisine would be viewed by Americans as no enhancement to the natural flavors of food; even less acceptable would be the asafetida often used as a seasoning in the cooking of Persia and other Asian nations.
The use of condiments is unquestionably a strong auxiliary to the formation of a habit of using intoxicating drinks. Persons addicted to the use of intoxicating liquors are, as a rule, fond of stimulating and highly seasoned foods; and although the converse is not always true, yet it is apparent to every thoughtful person, that the use of a diet composed of highly seasoned and irritating food, institutes the conditions necessary for the acquirement of a taste for intoxicating liquors. The false appetite aroused by the use of food that "burns and stings," craves something less insipid than pure cold water to keep up the fever the food has excited. Again, condiments, like all other stimulants, must be continually increased in quantity, or their effect becomes diminished; and this leads directly to a demand for stronger stimulants, both in eating and drinking, until the probable tendency is toward the dram-shop.
The use of condiments definitely plays a big role in developing a habit of drinking alcohol. People who are addicted to alcoholic beverages usually enjoy spicy and highly flavored foods; while this isn’t always the case in reverse, it’s clear to anyone who thinks about it that a diet of heavily seasoned and irritating foods creates the conditions needed to develop a taste for alcoholic drinks. The false hunger triggered by food that "burns and stings" craves something more exciting than plain cold water to sustain the excitement caused by the food. Additionally, just like all other stimulants, condiments need to be used in larger amounts over time, or their effects start to fade; this leads directly to a craving for stronger stimulants, both in food and drink, eventually pushing toward bars and liquor stores.
A more serious reason why high seasonings leads to intemperance, is in the perversion of the use of the sense of taste. Certain senses are given us to add to our pleasure as well as for the practical, almost indispensable, use they are to us. For instance, the sense of sight is not only useful, but enables us to drink in beauty, if among beautiful surroundings, without doing us any harm. The same of music and other harmonics which may come to us through the sense of hearing. But the sense of taste and was given us to distinguish between wholesome and unwholesome foods, and cannot be used for merely sensuous gratification, without debasing and making of it a gross thing. An education which demands special enjoyment or pleasure through the sense of taste, is wholly artificial; it is coming down to the animal plane, or below it rather; for the instinct of the brute creation teaches it merely to eat to live.
A more serious reason why strong flavors lead to excess is the misuse of our sense of taste. Certain senses are meant to enhance our enjoyment as well as serve practical, essential purposes. For example, the sense of sight not only helps us navigate the world, but it also allows us to appreciate beauty in our surroundings without causing us any harm. The same goes for music and other sounds we experience through our sense of hearing. However, the sense of taste was given to us to tell the difference between healthy and unhealthy foods, and using it solely for sensory pleasure reduces it to something crude and base. An education that prioritizes seeking special enjoyment or pleasure through taste is entirely artificial; it involves degrading ourselves to a primal level, or even lower, because the instinct of animals is simply to eat in order to survive.
Yet how wide-spread is this habit of sensuous gratification through the sense of taste! If one calls upon a neighbor, he is at once offered refreshments of some kind, as though the greatest blessing of life came from indulging the appetite. This evil is largely due to wrong education, which begins with childhood. When Johnnie sits down to the table, the mother says, "Johnnie, what would you like?" instead of putting plain, wholesome food before the child, and taking it as a matter of course that he will eat it and be satisfied. The child grows to think that he must have what he likes, whether it is good for him or not. It is not strange that an appetite thus pampered in childhood becomes uncontrollable at maturity; for the step from gormandizing to intoxication is much shorter than most people imagine. The natural, unperverted taste of a child will lead him to eat that which is good for him. But how can we expect the children to reform when the parents continually set them bad examples in the matter of eating and drinking?
Yet how widespread is this habit of seeking pleasure through taste! If someone visits a neighbor, they are immediately offered some kind of refreshments, as if the greatest blessing in life comes from indulging in what we eat. This issue largely stems from poor education that starts in childhood. When little Johnny sits down to eat, his mother asks, "Johnny, what would you like?" instead of simply serving plain, healthy food and assuming he will eat it and be satisfied. The child starts to believe he must have what he likes, regardless of whether it’s good for him or not. It’s not surprising that an appetite that is spoiled in childhood becomes uncontrollable later in life; the leap from overeating to addiction is much shorter than most people think. A child’s natural, uncorrupted taste will lead them to eat what's good for them. But how can we expect children to change when parents constantly set bad examples when it comes to eating and drinking?
The cultivation of a taste for spices is a degradation of the sense of taste. Nature never designed that pleasure should be divorced from use. The effects of gratifying the sense of taste differ materially from those of gratifying the higher senses of sight and hearing. What we see is gone; nothing remains but the memory, and the same is true of the sweetest sounds which may reach us through the ears. But what we taste is taken into the stomach and what has thus given us brief pleasure through the gratification of the palate, must make work in the alimentary canal for fourteen hours before it is disposed of.
The development of a liking for spices is a decline in our sense of taste. Nature never intended for pleasure to be separated from usefulness. The impact of satisfying our sense of taste is significantly different from that of satisfying our higher senses of sight and hearing. What we see disappears; all that’s left is the memory, and it’s the same for the most beautiful sounds we hear. But what we taste goes into our stomach, and what gives us momentary pleasure from our palate has to be processed in our digestive system for fourteen hours before it’s gone.
Variety in Food.—Simplicity of diet should be a point of first consideration with all persons upon whom falls the responsibility of providing the family bills of fare, since the simplest foods are, as a rule, the most healthful. Variety is needed; that is, a judicious mingling of fruits, grains, and vegetables; but the general tendency is to supply our tables with too many kinds and to prepare each dish in the most elaborate manner, until, in many households, the cooking of food has come to be almost the chief end of life. While the preparation of food should be looked upon as of so much importance as to demand the most careful consideration and thought as to its suitability, wholesomeness, nutritive qualities, and digestibility, it should by no means be made to usurp the larger share of one's time, when simpler foods and less labor would afford the partakers equal nourishment and strength.
Variety in Food.—Keeping a simple diet should be a top priority for anyone responsible for planning family meals, as simpler foods are generally healthier. Variety is important; that is, a thoughtful combination of fruits, grains, and vegetables; however, the common trend is to offer too many different types and to prepare each dish in a complex way, to the point where cooking has become almost the main focus of life in many households. While the preparation of food should be considered important enough to warrant careful thought regarding its suitability, healthiness, nutritional value, and digestibility, it shouldn't take up so much time when simpler foods and less effort can provide the same nourishment and strength for those eating them.
A great variety of foods at one meal exerts a potent influence in creating a love of eating, and is likewise a constant temptation to overeat. Let us have well-cooked, nutritious, and palatable food, and plenty of it; variety from day to day, but not too great a variety at each meal.
A wide range of foods at a single meal has a strong impact on developing a love for eating, and it also presents a constant temptation to overindulge. Let’s enjoy well-cooked, nutritious, and tasty food in abundance; provide different options each day, but not too much variety at each meal.
The prevalent custom of loading the table with a great number of viands, upon occasions when guests are to be entertained in our homes, is one to be deplored, since it is neither conducive to good health nor necessary to good cheer, but on the contrary is still laborious and expensive a practice that many are debarred from social intercourse because they cannot afford to entertain after the fashion of their neighbors. Upon this subject a well-known writer has aptly said: "Simplify cookery, thus reducing the cost of living, and how many longing individuals would thereby be enabled to afford themselves the pleasure of culture and social intercourse! When the barbarous practice of stuffing one's guests shall have been abolished, a social gathering will not then imply, as it does now, hard labor, expensive outlay, and dyspepsia. Perhaps when that time arise, we shall be sufficiently civilized to demand pleasures of a higher sort. True, the entertainments will then, in one sense, be more costly, as culture is harder to come by than cake. The profusion of viands now heaped upon the table, betrays poverty of the worst sort. Having nothing better to offer, we offer victuals; and this we do with something of that complacent, satisfied air with which some more northern tribes present their tidbits of whale and walrus."
The common practice of overloading the table with a huge variety of food when we host guests at home is something we should criticize. It’s neither good for our health nor necessary for having a good time; in fact, it's a burdensome and costly tradition that prevents many from socializing simply because they can't afford to entertain like their neighbors. A well-known writer once wisely said: "Simplify cooking to lower living costs, and how many eager individuals could then enjoy culture and social gatherings! When the outdated habit of overfeeding guests is gone, social events won’t mean, as they do now, hard work, high expenses, and indigestion. Maybe when that time comes, we’ll be civilized enough to seek more meaningful pleasures. Admittedly, these gatherings may become more costly in a way, since culture is harder to acquire than cake. The excessive food piled on the table now reveals a kind of poverty. When we have nothing better to offer, we resort to food, and we do so with a bit of that smug, satisfied attitude that some northern tribes show when presenting their small portions of whale and walrus."
TABLE TOPICS.
A man's food, when he has the means and opportunity of selecting it, suggests his moral nature. Many a Christian is trying to do by prayer that which cannot be done except through corrected diet.—Talmage.
A man's food, when he has the means and opportunity to choose it, reveals his moral character. Many Christians are trying to achieve through prayer what can only be accomplished through a proper diet.—Talmage.
Our pious ancestors enacted a law that suicides should be buried where four roads meet, and that a cart-load of stones should be thrown upon the body. Yet, when gentlemen or ladies commit suicide, not by cord or steel, but by turtle soup or lobster salad, they may be buried on consecrated ground, and the public are not ashamed to read an epitaph upon their tombstones false enough to make the marble blush.—Horace Mann.
Our devout ancestors made a law that people who died by suicide should be buried at crossroads, with a load of stones placed on their bodies. However, when men or women take their own lives not by hanging or cutting, but through turtle soup or lobster salad, they can be buried in hallowed ground, and no one feels ashamed to read a grave inscription so misleading it could make the marble blush.—Horace Mann.
It is related by a gentleman who had an appointment to breakfast with the late A.T. Stewart, that the butler placed before them both an elaborate bill of fare; the visitor selected a list of rare dishes, and was quite abashed when Mr. Stewart said, "Bring me my usual breakfast,—oatmeal and boiled eggs." He then explained to his friend that he found simple food a necessity to him, otherwise he could not think clearly. That unobscured brain applied to nobler ends would have won higher results, but the principle remains the same.—Sel.
It is recounted by a man who had a breakfast appointment with the late A.T. Stewart that the butler presented them with an elaborate menu. The guest chose a variety of rare dishes and felt quite embarrassed when Mr. Stewart said, "Just bring me my usual breakfast—oatmeal and boiled eggs." He then explained to his friend that he needed simple food to think clearly. That clear mind, focused on greater goals, could have achieved even more, but the principle remains unchanged.—Sel.
Study simplicity in the number of dishes, and a variety in the character of the meals.—Sel.
Study simplicity in the number of dishes and aim for variety in the character of the meals.—Sel.
I have come to the conclusion that more than half the disease which embitters life is due to avoidable errors in diet, ... and that more mischief, in the form of actual disease, of impaired vigor, and of shortened life, accrues to civilized man from erroneous habits of eating than from the habitual use of alcoholic drink, considerable as I know that evil to be.—Sir Henry Thompson.
I have realized that over half of the health issues that make life difficult are caused by avoidable mistakes in our diet, and that more harm, in terms of real illness, reduced energy, and a shorter lifespan, comes to civilized people from bad eating habits than from the regular consumption of alcohol, which I know is a significant problem. —Sir Henry Thompson.
The ancient Gauls, who were a very brave, strong, and hearty race, lived very abstemiously. Their food was milk, berries, and herbs. They made bread of nuts. They had a very peculiar fashion of wearing a metal ring around the body, the size of which was regulated by act of Parliament. Any man who outgrew in circumference his metal ring was looked upon as a lazy glutton, and consequently was disgraced.
The ancient Gauls, who were a brave, strong, and resilient people, lived very simply. Their diet consisted of milk, berries, and herbs. They made bread from nuts. They had a unique way of wearing a metal ring around their waist, the size of which was set by law. Any man who exceeded his ring's circumference was seen as a lazy glutton and was therefore disgraced.

THE DIGESTION OF FOODS.
![]() t is important that the housekeeper not only understand the nature and
composition of foods, but she should also know something of their
digestive properties, since food, to be serviceable, must be not only
nutritious, but easily digested. Digestion is the process by which food
rendered soluble, and capable of being absorbed for use in carrying on
the various vital processes.
t is important that the housekeeper not only understand the nature and
composition of foods, but she should also know something of their
digestive properties, since food, to be serviceable, must be not only
nutritious, but easily digested. Digestion is the process by which food
rendered soluble, and capable of being absorbed for use in carrying on
the various vital processes.
![]() It’s important for the housekeeper to not only understand the types and qualities of foods, but she should also have some knowledge of their digestive properties. For food to be helpful, it needs to be not just nutritious, but also easy to digest. Digestion is the process that makes food soluble and able to be absorbed for use in supporting various vital functions.
It’s important for the housekeeper to not only understand the types and qualities of foods, but she should also have some knowledge of their digestive properties. For food to be helpful, it needs to be not just nutritious, but also easy to digest. Digestion is the process that makes food soluble and able to be absorbed for use in supporting various vital functions.
The digestive apparatus consists of a long and tortuous tube called the alimentary canal, varying in length from twenty-five to thirty feet, along which are arranged the various digestive organs,—the mouth, the stomach, the liver, and the pancreas,—each of which, together with the intestines, has an important function to perform. In these various organs nature manufactures five wonderful fluids for changing and dissolving the several food elements. The mouth supplies the saliva; in the walls of the stomach are little glands which produce the gastric juice; the pancreatic juice is made by the pancreas; the liver secretes bile; while scattered along the small intestines are minute glands which make the intestinal juice. Each of these fluids has a particular work to do in transforming some part of the food into suitable material for use in the body. The saliva acts upon the starch of the food, changing it into sugar; the gastric juice digests albumen and other nitrogenous elements; the bile digests fat, and aids in the absorption of other food elements after they are digested; the pancreatic juice is not confined in its action to a single element, but digests starch, fats, and the albuminous elements after they have been acted upon by the gastric juice; the intestinal juice is capable of acting upon all digestible food elements.
The digestive system consists of a long and winding tube known as the alimentary canal, which varies in length from twenty-five to thirty feet. Along this canal are various digestive organs—the mouth, stomach, liver, and pancreas—each playing a crucial role, along with the intestines. In these organs, nature creates five amazing fluids that change and dissolve different food components. The mouth produces saliva; the stomach has small glands in its walls that create gastric juice; the pancreas makes pancreatic juice; the liver generates bile; and tiny glands scattered throughout the small intestines produce intestinal juice. Each of these fluids has a specific function in transforming parts of food into usable materials for the body. Saliva works on the starch in food, converting it into sugar; gastric juice digests protein and other nitrogenous compounds; bile breaks down fat and helps absorb other nutrients after digestion; pancreatic juice acts on starch, fats, and proteins after the gastric juice has done its work; and intestinal juice can work on all digestible food components.
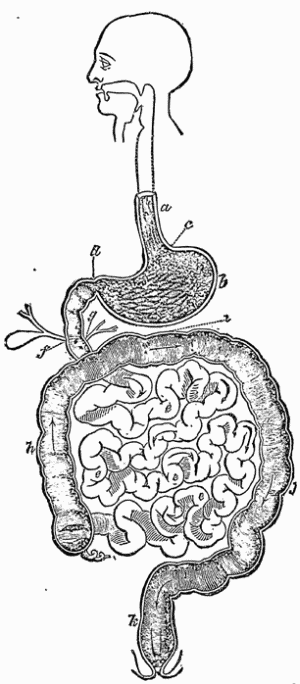
- a. Esophagus;
- b. Stomach;
- c. Cardiac Orifice;
- d. Pylorus;
- e. Small Intestine;
- f. Bile Duct;
- g. Pancreatic Duct;
- h. Ascending Colon;
- i. Transverse Colon;
- j. Descending Colon;
- k. Rectum.
The Digestion of a Mouthful of Bread—A mouthful of bread represents all, or nearly all, the elements of nutrition. Taking a mouthful of bread as a representative of food in general, it may be said that its digestion begins the moment that it enters the mouth, and continues the entire length of the alimentary canal, or until the digestible portion of the food has been completely digested and absorbed. We quote the following brief description of the digestive process from Dr. J.H. Kellogg's Second Book in Physiology[A]:—
The Digestion of a Mouthful of Bread—A mouthful of bread contains almost all the components of nutrition. If we consider a mouthful of bread as a sample of food in general, we can say that its digestion starts the instant it enters the mouth and continues throughout the entire digestive tract, or until the digestible part of the food has been fully digested and absorbed. We present the following brief explanation of the digestive process from Dr. J.H. Kellogg's Second Book in Physiology[A]:—
Good Health Pub. Co., Battle Creek, Mich.
Good Health Publishing Company, Battle Creek, Michigan.
"Mastication.—The first act of the digestive process is mastication, or chewing the food, the purpose of which is to crush the food and divide it into small particles, so that the various digestive fluids may easily and promptly come into contact with every part of it.
"Mastication.—The first step in the digestive process is mastication, or chewing food, which serves to break down the food and chop it into small pieces, allowing the different digestive fluids to quickly and easily access every part of it."
"Salivary Digestion.—During the mastication of the food, the salivary glands are actively pouring out the saliva, which mingles with the food, and by softening it, aids in its division and prepares it for the action of the other digestive fluids. It also acts upon the starch, converting a portion of it into grape-sugar.
"Salivary Digestion.—While chewing food, the salivary glands are actively releasing saliva, which mixes with the food, softening it and making it easier to break down, preparing it for the other digestive fluids. It also starts to break down starch, turning some of it into glucose."
"Stomach Digestion.—After receiving the food, the stomach soon begins to pour out the gastric juices, which first makes its appearance in little drops, like beads of sweat upon the face when the perspiration starts. As the quantity increases, the drops run together, trickle down the side of the stomach, and mingle with the food. The muscular walls of the stomach contract upon the food, moving it about with a sort of crushing action, thoroughly mixing the gastric juice with the food. During this process both the openings of the stomach are closed tightly. The gastric juice softens the food, digests albumen, and coagulates milk. The saliva continues its action upon starch for sometime after the food reaches the stomach.
"Stomach Digestion.—After the food arrives, the stomach quickly starts releasing gastric juices, which initially appear as tiny drops, similar to beads of sweat on your face when you start to perspire. As more juice is produced, the drops merge, flow down the side of the stomach, and mix with the food. The muscular walls of the stomach contract around the food, churning it with a kind of grinding motion, thoroughly blending the gastric juice with the food. During this process, both openings of the stomach are tightly closed. The gastric juice softens the food, digests protein, and curdles milk. Saliva continues to work on starch for a while after the food enters the stomach."
"After the food has remained in the stomach from one to three hours, or even longer, if the digestion is slow, or indigestible foods have been eaten, the contractions of the stomach become so vigorous that the more fluid portions of the food are squeezed out through the pylorus, the lower orifice of the stomach, thus escaping into the intestine. The pylorus does not exercise any sort of intelligence in the selection of food, as was once supposed. The increasing acidity of the contents of the stomach causes its muscular walls to contract with increasing vigor, until finally those portions of the food which may be less perfectly broken up, but which the stomach has been unable to digest, are forced through the pylorus.
"After the food has been in the stomach for one to three hours, or even longer if digestion is slow or hard-to-digest foods have been consumed, the stomach contractions become so strong that the more liquid parts of the food are pushed out through the pylorus, the lower opening of the stomach, and into the intestine. The pylorus doesn't choose food based on any sort of intelligence, as was once thought. The growing acidity of the stomach contents makes its muscular walls contract more forcefully until finally, any parts of the food that haven't been broken down well but that the stomach couldn't digest are pushed through the pylorus."
"Intestinal Digestion.—As it leaves the stomach, the partially digested mass of food is intensely acid, from the large quantity of gastric juices which it contains. Intestinal digestion cannot begin until the food becomes alkaline. The alkaline bile neutralizes the gastric juice, and renders the digesting mass slightly alkaline. The bile also acts upon the fatty elements of the food, converting them into an emulsion. The pancreatic juice converts the starch into grape-sugar, even acting upon raw starch. It also digest fats and albumen. The intestinal juice continues the work begun by the other digestive fluids, and, in addition, digests cane-sugar, converting it into grape-sugar.
"Intestinal Digestion.—As it leaves the stomach, the partially digested food is very acidic due to the large amount of gastric juices it has. Intestinal digestion can’t start until the food becomes alkaline. The alkaline bile neutralizes the gastric juice and makes the digesting mass slightly alkaline. The bile also breaks down the fatty components of the food, turning them into an emulsion. The pancreatic juice transforms starch into glucose, even acting on raw starch. It also digests fats and proteins. The intestinal juice continues the process started by the other digestive fluids and additionally digests sucrose, converting it into glucose."
"Other Uses of the Digestive Fluids.—In addition to the uses which we have already stated, several of the digestive fluids possess other interesting properties. The saliva aids the stomach by stimulating its glands to make gastric juice. The gastric juice and the bile are excellent antiseptics, by which the food is preserved from fermentation while undergoing digestion. The bile also stimulates the movements of the intestines by which the food is moved along, and aids absorption. It is remarkable and interesting that a fluid so useful as the bile should be at the same time composed of waste matters which are being removed from the body. This is an illustration of the wonderful economy shown by nature in her operations.
Other Uses of the Digestive Fluids.—Besides the uses we've already mentioned, several digestive fluids have other fascinating properties. Saliva helps the stomach by encouraging its glands to produce gastric juice. Gastric juice and bile are great antiseptics that keep food from fermenting while it's being digested. Bile also promotes the movement of the intestines, helping to move food along and aiding in absorption. It's remarkable and interesting that a fluid as beneficial as bile is made up of waste materials that are being removed from the body. This demonstrates the incredible efficiency of nature in its processes.
"The food is moved along the alimentary canal, from the stomach downward, by successive contractions of the muscular walls of the intestines, known as peristaltic movements, which occur with great regularity during digestion.
"The food moves through the digestive tract, from the stomach downward, by a series of contractions of the muscular walls of the intestines, called peristaltic movements, which happen regularly during digestion."
"Absorption.—The absorption of the food begins as soon as any portion has been digested. Even in the mouth and the esophagus a small amount is absorbed. The entire mucous membrane lining the digestive canal is furnished with a rich supply of blood-vessels, by which the greater part of the digestive food is absorbed.
"Absorption.—The absorption of food starts as soon as any part has been digested. Even in the mouth and the esophagus, a small amount is absorbed. The whole mucous membrane lining the digestive tract is supplied with a rich network of blood vessels, through which most of the digested food is absorbed."
"Liver Digestion.—The liver as well as the stomach is a digestive organ, and in a double sense. It not only secretes a digestive fluid, the bile, but it acts upon the food brought to it by the portal vein, and regulates the supply of digested food to the general system. It converts a large share of the grape-sugar and partially digested starch brought to it into a kind of liver starch, termed glycogen, which it stores up in its tissues. During the interval between the meals, the liver gradually redigests the glycogen, reconverting it into sugar, and thus supplying it to the blood in small quantities, instead of allowing the entire amount formed in digestion to enter the circulation at once. If too large an amount of sugar entered the system at once, it would be unable to use it all, and would be compelled to get rid of a considerable portion through the kidneys. The liver also completes the digestion of albumen and other food elements."
"Liver Digestion.—The liver, like the stomach, is a digestive organ in two ways. It not only produces a digestive fluid called bile, but it also processes the food delivered to it via the portal vein and controls the supply of digested food to the rest of the body. The liver converts a significant amount of grape sugar and partially digested starch into a type of liver starch known as glycogen, which it stores in its tissues. Between meals, the liver gradually converts glycogen back into sugar, releasing it into the blood in small amounts rather than letting all the sugar from digestion hit the bloodstream at once. If too much sugar entered the body at once, it wouldn't be able to utilize it all and would have to expel a large portion through the kidneys. The liver also completes the digestion of albumen and other nutrients."
| hrs | min | |
| Rice | 1 | 00 |
| Sago | 1 | 45 |
| Tapioca | 2 | 00 |
| Barley | 2 | 00 |
| Beans, pod, boiled | 2 | 30 |
| Bread, wheaten | 3 | 30 |
| Bread, corn | 3 | 15 |
| Apples, sour and raw | 2 | 00 |
| Apples, sweet and raw | 1 | 30 |
| Parsnips, boiled | 2 | 30 |
| Beets, boiled | 3 | 45 |
| Potatoes, Irish, boiled | 3 | 30 |
| Potatoes, Irish, baked | 2 | 30 |
| Cabbage, raw | 2 | 30 |
| Cabbage, boiled | 4 | 30 |
| Milk, boiled | 2 | 00 |
| Milk, raw | 2 | 15 |
| Eggs, hard boiled | 3 | 30 |
| Eggs, soft boiled | 3 | 00 |
| Eggs, fried | 3 | 30 |
| Eggs, raw | 2 | 00 |
| Eggs, whipped | 1 | 30 |
| Salmon, salted, boiled | 4 | 00 |
| Oysters, raw | 2 | 55 |
| Oysters, stewed | 3 | 30 |
| Beef, lean, rare roasted | 3 | 00 |
| Beefsteak, boiled | 3 | 00 |
| Beef, lean, fried | 4 | 00 |
| Beef, salted, boiled | 4 | 15 |
| Pork, roasted | 5 | 15 |
| Pork, salted, fried | 4 | 15 |
| Mutton, roasted | 3 | 15 |
| Mutton, broiled | 3 | 00 |
| Veal, broiled | 4 | 00 |
| Veal, fried | 4 | 30 |
| Fowls, boiled | 4 | 00 |
| Duck, roasted | 4 | 30 |
| Butter, melted | 3 | 30 |
| Cheese | 3 | 30 |
| Soup, marrowbone | 4 | 15 |
| Soup, bean | 3 | 00 |
| Soup, mutton | 3 | 30 |
| Chicken, boiled | 3 | 00 |
The time required for the digestion of food also depends upon the condition under which the food is eaten. Healthy stomach digestion requires at least five hours for its completion, and the stomach should have an hour for rest before another meal. If fresh food is taken before that which preceded it is digested, the portion of food remaining in the stomach is likely to undergo fermentation, thus rendering the whole mass of food unfit for the nutrition of the body, besides fostering various disturbances of digestion. It has been shown by recent observations that the length of time required for food to pass through the entire digestive process to which it is subjected in the mouth, stomach, and small intestines, is from twelve to fourteen hours.
The time it takes for food to digest also depends on how it’s eaten. A healthy stomach needs at least five hours to fully digest food, and it should rest for an hour before the next meal. If fresh food is consumed before the previous meal is digested, the leftover food in the stomach can start to ferment, making the whole mass of food unsuitable for the body's nutrition and causing various digestive issues. Recent studies have shown that it takes about twelve to fourteen hours for food to go through the complete digestive process in the mouth, stomach, and small intestines.
Hygiene of Digestion.—With the stomach and other digestive organs in a state of perfect health, one is entirely unconscious of their existence, save when of feeling of hunger calls attention to the fact that food is required, or satiety warns us that a sufficient amount or too much has been eaten. Perfect digestion can only be maintained by careful observance of the rules of health in regard to habits of eating.
Hygiene of Digestion.—When the stomach and other digestive organs are in excellent health, we usually don’t notice them, except when hunger reminds us that we need food, or fullness lets us know we’ve eaten enough or too much. Healthy digestion can only be achieved by carefully following health guidelines related to our eating habits.
On the subject of Hygiene of Digestion, we again quote a few paragraphs from Dr. Kellogg's work on Physiology, in which is given a concise summary of the more important points relating to this:—
On the topic of Digestive Hygiene, we will again reference a few paragraphs from Dr. Kellogg's work on Physiology, which provides a brief summary of the key points related to this:—
"The hygiene of digestion has to do with the quality and quantity of food eaten, in the manner of eating it.
"The hygiene of digestion relates to the quality and quantity of food consumed and the way it is eaten."
"Hasty Eating.—If the food is eaten too rapidly, it will not be properly divided, and when swallowed in coarse lumps, the digestive fluids cannot readily act upon it. On account of the insufficient mastication, the saliva will be deficient in quantity, and, as a consequence, the starch will not be well digested, and the stomach will not secrete a sufficient amount of gastric juice. It is not well to eat only soft or liquid food, as we are likely to swallow it without proper chewing. A considerable proportion of hard food, which requires thorough mastication, should be eaten at every meal.
"Hasty Eating.—If food is eaten too quickly, it won't be properly broken down, and when swallowed in large chunks, the digestive fluids can't effectively work on it. Because of insufficient chewing, there will be less saliva, which means that starch won't be digested well, and the stomach won't produce enough gastric juice. It's not ideal to eat only soft or liquid foods, as we tend to swallow them without proper chewing. A good amount of hard food, which requires thorough chewing, should be included in every meal."
"Drinking Freely at Meals is harmful, as it not only encourages hasty eating, but dilutes the gastric juice, and thus lessens its activity. The food should be chewed until sufficiently moistened by saliva to allow it to be swallowed. When large quantities of fluid are taken into the stomach, digestion does not begin until a considerable portion of the fluid has been absorbed. If cold foods or drinks are taken with the meal, such as ice-cream, ice-water, iced milk or tea, the stomach is chilled, and a long delay in the digestive process is occasioned.
"Drinking Freely at Meals is harmful because it not only promotes fast eating but also dilutes gastric juice, which reduces its effectiveness. Food should be chewed until it’s adequately moistened by saliva to make swallowing easier. When large amounts of liquid are consumed, digestion doesn’t start until a significant portion of that liquid has been absorbed. If cold foods or drinks, like ice cream, ice water, iced milk, or iced tea, are consumed with the meal, it chills the stomach and causes a long delay in the digestive process."
"The Indians of Brazil carefully abstain from drinking when eating, and the same custom prevails among many other savage tribes.
"The Indigenous people of Brazil avoid drinking while eating, and this custom is common among many other tribal groups."
"Eating between Meals.—The habit of eating apples, nuts, fruits, confectionery, etc., between meals is exceedingly harmful, and certain to produce loss of appetite and indigestion. The stomach as well as the muscles and other organs of the body requires rest. The frequency with which meals should be taken depends somewhat upon the age and occupation of an individual. Infants take their food at short intervals, and owing to its simple character, are able to digest it very quickly. Adults should not take food oftener than three times a day; and persons whose employment is sedentary say, in many cases at least, adopt with advantage the plan of the ancient Greeks, who ate but twice a day. The latter custom is quite general among the higher classes in France and Spain, and in several South American countries.
"Eating between Meals.—The habit of snacking on apples, nuts, fruits, sweets, etc., between meals is really harmful and likely to cause loss of appetite and indigestion. The stomach, along with the muscles and other organs of the body, needs rest. How often meals should be taken varies a bit depending on a person's age and job. Infants eat at short intervals and can digest their simple foods very quickly. Adults shouldn’t eat more than three times a day; and people with sedentary jobs might benefit from following the ancient Greeks’ practice of eating just twice a day. This habit is quite common among the higher classes in France and Spain, as well as in several South American countries."
"Simplicity in Diet.—Taking too many kinds of food at a meal is a common fault which is often a cause of disease of the digestive-organs. Those nations are the most hardy and enduring whose dietary is most simple. The Scotch peasantry live chiefly upon oatmeal, the Irish upon potatoes, milk, and oatmeal, the Italian upon peas, beans, macaroni, and chestnuts; yet all these are noted for remarkable health and endurance. The natives of the Canary Islands, an exceedingly well-developed and vigorous race, subsist almost chiefly upon a food which they call gofio, consisting of parched grain, coarsely ground in a mortar and mixed with water.
"Simplicity in Diet.—Eating too many different types of food in one meal is a common mistake that often leads to digestive issues. The strongest and most resilient nations have the simplest diets. Scottish peasants mainly eat oatmeal, the Irish focus on potatoes, milk, and oatmeal, and Italians consume peas, beans, macaroni, and chestnuts; yet all of these groups are known for their remarkable health and endurance. The people of the Canary Islands, a very well-developed and vigorous population, primarily eat a food they call gofio, made from parched grain that is coarsely ground in a mortar and mixed with water."
"Eating when Tired.—It is not well to eat when exhausted by violent exercise, as the system is not prepared to do the work of digestion well. Sleeping immediately after eating is also a harmful practice. The process of digestion cannot well be performed during sleep, and sleep is disturbed by the ineffective efforts of the digestive organs. Hence the well-known evil effects of late suppers.
Eating when Tired.—It's not a good idea to eat when you're worn out from intense exercise, as your body isn't ready to digest food properly. Going to sleep right after eating is also unhealthy. Digestion doesn't work well while you're asleep, and your sleep can be disrupted by the struggling digestive system. This is why late-night meals are known to have negative effects.
"Eating too Much.—Hasty eating is the greatest cause of over-eating. When one eats too rapidly, the food is crowded into the stomach so fast that nature has no time to cry, 'Enough,' by taking away the appetite before too much has been eaten. When an excess of food is taken, it is likely to ferment or sour before it can be digested. One who eats too much usually feels dull after eating.
"Eating Too Much.—Eating too quickly is the biggest reason for overeating. When you eat too fast, the food gets shoved into your stomach so quickly that your body doesn't have time to signal, 'That's enough,' by decreasing your appetite before you've eaten too much. If you consume too much food, it may ferment or spoil before your body can digest it. Someone who overeats often feels sluggish afterward."
"How Much Food is Enough?—The proper quantity for each person to take is what he is able to digest and utilize. This amount of various with each individual, at different times. The amount needed will vary with the amount of work done, mental or muscular; with the weather or the season of the year, more food being required in cold than in warm weather: with the age of an individual, very old and very young persons requiring less food than those of middle age. An unperverted appetite, not artificially stimulated, is a safe guide. Drowsiness, dullness, and heaviness at the stomach are indications of an excess of eating, and naturally suggest a lessening of the quantity of food, unless the symptoms are known to arise from some other cause.
"How Much Food is Enough?—The right amount of food for each person is what they can digest and make use of. This varies for each individual and changes at different times. The amount needed will depend on how much work is done, whether mental or physical; it also changes with the weather or the season, with more food needed in colder weather than in warmer. Age plays a role as well, with both very old and very young people requiring less food than those in their middle years. A natural appetite, not artificially stimulated, is a reliable guide. Feeling drowsy, sluggish, or heavy in the stomach indicates that one has eaten too much, suggesting a need to reduce food intake, unless these symptoms are known to be caused by something else."
"Excess of Certain Food Elements.—When sugar is too freely used, either with food or in the form of sweetmeats or candies, indigestion, and even more serious disease, is likely to result. Fats, when freely used, give rise to indigestion and 'biliousness.' An excess of albumen from the too free use of meat is harmful. Only a limited amount of this element can be used; an excess is treated as waste matter, and must be removed from the system by the liver and the kidneys. The majority of persons would enjoy better health by using meat more moderately than is customary in this country.
Excess of Certain Food Elements.—When sugar is consumed too frequently, whether with food or as sweets and candies, it can lead to indigestion and potentially more serious health issues. Overindulging in fats can cause indigestion and feelings of 'biliousness.' Consuming too much protein from excessive meat intake is harmful. Only a limited amount of protein should be eaten; too much is treated as waste and needs to be eliminated from the body by the liver and kidneys. The majority of people would experience better health by eating less meat than is typical in this country.
"Deficiency of Certain Food Elements.—A diet deficient in any important food element is even more detrimental to health than a diet in which certain elements are in excess.
"Deficiency of Certain Food Elements.—A diet lacking any essential food element is even more harmful to health than a diet that has too much of certain elements."
"The popular notion that beef-tea and meat extracts contain the nourishing elements of meat in a concentrated form, is a dangerous error. Undoubtedly many sick persons have been starved by being fed exclusively upon these articles, which are almost wholly composed of waste substances. Prof. Paule Bernard, of Paris, found that dogs fed upon meat extracts died sooner than those which received only water."
"The common belief that beef tea and meat extracts have the nutrients of meat in a concentrated form is a harmful misconception. It's clear that many sick people have been deprived of proper nutrition by being fed only these products, which are mostly made up of waste materials. Professor Paul Bernard from Paris discovered that dogs fed meat extracts died sooner than those that only got water."
Food combinations.—Some persons, especially those of weak digestive powers, often experience inconvenience in the use of certain foods, owing to their improper combinations with other articles. Many foods which are digested easily when partaken of alone or in harmonious combinations, create much disturbance when eaten at the same meal with several different articles of food, or with some particular article with which they are especially incompatible. The following food combinations are among the best, the relative excellence of each being indicated by the order in which they are named: Milk and grains; grains and eggs; grains and vegetables or meats; grains and fruits.
Food combinations.—Some people, particularly those with weak digestion, often have issues when certain foods are combined improperly. Many foods that are easy to digest on their own or in compatible combinations can cause discomfort when eaten together with a variety of other foods or with specific foods that don't mix well. The following food combinations are considered the best, listed in order of effectiveness: Milk and grains; grains and eggs; grains and vegetables or meats; grains and fruits.
Persons with sound stomachs and vigorous digestion will seldom experience inconvenience in making use of other and more varied combinations, but dyspeptics and persons troubled with slow digestion will find it to their advantage to select from the bill of fare such articles as best accord with each other, and to avoid such combinations as fruits and vegetables, milk and vegetables, milk and meats, sugar and milk, meat or vegetables, fats with fruits, meats, or vegetables, or cooked with grains.
People with healthy stomachs and strong digestion rarely have issues using a wider variety of combinations, but those with indigestion or slow digestion will benefit from choosing dishes from the menu that complement each other well. They should steer clear of combinations like fruits and vegetables, milk and vegetables, milk and meats, sugar and milk, meat or vegetables, fats with fruits, meats, or vegetables, or dishes cooked with grains.
TABLE TOPICS.
Now good digestion waits on appetite, and health on both—Shakespeare.
Now good digestion relies on appetite, and health depends on both—Shakespeare.
We live not upon what we eat, but upon what we digest.—Abernethy.
We don't live on what we eat, but on what we digest.—Abernethy.
If we consider the amount of ill temper, despondency, and general unhappiness which arises from want of proper digestion and assimilation of our food, it seems obviously well worth while to put forth every effort, and undergo any sacrifice, for the purpose of avoiding indigestion, with its resulting bodily ills; and yet year after year, from the cradle to the grave, we go on violating the plainest and simplest laws of health at the temptation of Cooks, caterers, and confectioners, whose share in shortening the average term of human life is probably nearly equal to that of the combined armies and navies of the world.—Richardson.
If we think about how much bad mood, sadness, and overall unhappiness come from not digesting and processing our food properly, it makes sense to do everything we can, and make any necessary sacrifice, to avoid indigestion and its related health issues. Yet, year after year, from birth to death, we continue to ignore the most basic and clear health rules because of the temptations from cooks, caterers, and candy makers, whose impact on reducing the average lifespan is likely almost as significant as that of all the world's armies and navies combined.—Richardson.
Almost every human malady is connected, either by highway or byway, with the stomach.—Sir Francis Head.
Almost every human illness is connected, either directly or indirectly, to the stomach.—Sir Francis Head.
It is a well-established fact that a leg of mutton caused a revolution in the affairs of Europe. Just before the battle of Leipsic, Napoleon the Great insisted on dining on boiled mutton, although his physicians warned him that it would disagree with him. The emperor's brain resented the liberty taken with its colleague, the stomach; the monarch's equilibrium was overturned, the battle lost, and a new page opened in history.—Sel.
It’s a well-known fact that a leg of mutton sparked a revolution in Europe. Right before the battle of Leipzig, Napoleon the Great insisted on having boiled mutton for dinner, even though his doctors warned him it wouldn’t sit well with him. The emperor’s mind rebelled against what was happening to his stomach; his balance was thrown off, the battle was lost, and a new chapter in history began.—Sel.
Galloping consumption at the dinner table is one of the national disorders.—Sel.
Galloping consumption at the dinner table is one of the national issues.—Sel.
The kitchen (that is, your stomach) being out of order, the garret (the head) cannot be right, and every room in the house becomes affected. Remedy the evil in the kitchen, and all will be right in parlor and chamber. If you put improper food into the stomach, you play the mischief with it, and with the whole machine besides.—Abernethy.
The kitchen (which means your stomach) is out of order, so the attic (your head) can’t be right, and every room in the house gets affected. Fix the problem in the kitchen, and everything will be fine in the living room and bedroom. If you eat the wrong foods, you mess it up, and the whole system suffers too.—Abernethy.
Cattle know when to go home from grazing, but a foolish man never knows his stomachs measures.—Scandinavian proverb.
Cattle know when to head home after grazing, but a foolish person never knows their limits.—Scandinavian proverb.
Enough is as good as a feast.
Enough is just as good as a feast.
Simplicity of diet is the characteristic of the dwellers in the Orient. According to Niebuhr, the sheik of the desert wants only a dish of pillau, or boiled rice, which he eats without fork or spoon. Notwithstanding their frugal fare, these sons of the desert are among the most hearty and enduring of all members of the human family. A traveler tells of seeing one of them run up to the top of the tallest pyramid and back in six minutes.
Simplicity in diet is a key trait of the people in the East. According to Niebuhr, a desert sheik only wants a dish of pilaf or boiled rice, which he eats with his hands. Despite their basic meals, these desert dwellers are among the most strong and resilient people in the world. A traveler recounts seeing one of them sprint to the top of the tallest pyramid and back in just six minutes.
One fourth of what we eat keeps us, and the other three fourths we keep at the peril of our lives.—Abernethy.
One-quarter of what we eat sustains us, while the other three-quarters we consume at the risk of our lives.—Abernethy.

COOKERY.
![]() t is not enough that good and proper food material be provided; it must
have such preparation as will increase and not diminish its alimentary
value. The unwholesomeness of food is quite as often due to bad cookery
as to improper selection of material. Proper cookery renders good food
material more digestible. When scientifically done, cooking changes each
of the food elements, with the exception of fats, in much the same
manner as do the digestive juices, and at the same time it breaks up the
food by dissolving the soluble portions, so that its elements are more
readily acted upon by the digestive fluids. Cookery, however, often
fails to attain the desired end; and the best material is rendered
useless and unwholesome by a improper preparation.
t is not enough that good and proper food material be provided; it must
have such preparation as will increase and not diminish its alimentary
value. The unwholesomeness of food is quite as often due to bad cookery
as to improper selection of material. Proper cookery renders good food
material more digestible. When scientifically done, cooking changes each
of the food elements, with the exception of fats, in much the same
manner as do the digestive juices, and at the same time it breaks up the
food by dissolving the soluble portions, so that its elements are more
readily acted upon by the digestive fluids. Cookery, however, often
fails to attain the desired end; and the best material is rendered
useless and unwholesome by a improper preparation.
![]() It’s not enough to just provide good and proper food; it also needs to be prepared in a way that enhances, not reduces, its nutritional value. Food can be unhealthy just as much because of poor cooking as it can be from the wrong ingredient choices. Proper cooking makes good food more digestible. When done scientifically, cooking alters each of the food components—except for fats—similarly to how digestive juices do, while also breaking down the food by dissolving the soluble parts, making it easier for the digestive fluids to work on its elements. However, cooking often fails to achieve its purpose, and the best ingredients can become useless and unhealthy due to improper preparation.
It’s not enough to just provide good and proper food; it also needs to be prepared in a way that enhances, not reduces, its nutritional value. Food can be unhealthy just as much because of poor cooking as it can be from the wrong ingredient choices. Proper cooking makes good food more digestible. When done scientifically, cooking alters each of the food components—except for fats—similarly to how digestive juices do, while also breaking down the food by dissolving the soluble parts, making it easier for the digestive fluids to work on its elements. However, cooking often fails to achieve its purpose, and the best ingredients can become useless and unhealthy due to improper preparation.
It is rare to find a table, some portion of the food upon which is not rendered unwholesome either by improper preparatory treatment, or by the addition of some deleterious substance. This is doubtless due to the fact that the preparation of food being such a commonplace matter, its important relations to health, mind, and body have been overlooked, and it has been regarded as a menial service which might be undertaken with little or no preparation, and without attention to matters other than those which relate to the pleasure of the eye and the palate. With taste only as a criterion, it is so easy to disguise the results of careless and improper cookery of food by the use of flavors and condiments, as well as to palm off upon the digestive organs all sorts of inferior material, that poor cookery has come to be the rule rather than the exception.
It’s uncommon to find a table where some part of the food isn’t made unhealthy either by poor preparation or by the addition of harmful substances. This is likely because food preparation is such a routine task that its important connections to health, mind, and body have been ignored. People often see it as a lowly job that can be done with little or no preparation and without paying attention to anything beyond what looks and tastes nice. When taste is the only standard, it’s really easy to cover up the effects of careless and poorly done cooking by using flavors and seasonings, as well as to feed the digestive system all kinds of subpar ingredients. Because of this, bad cooking has become more of the norm than the exception.
Another reason for this prevalence of bad cookery, is to be found in the fact that in so many homes the cooking is intrusted to an ignorant class of persons having no knowledge whatever of the scientific principles involved in this most important and practical of arts. An ethical problem which we have been unable to solve is the fact that women who would never think of trusting the care of their fine china and bric-a-brac to unskilled hands, unhesitatingly intrust to persons who are almost wholly untrained, the preparation of their daily food. There is no department of life where superior intelligence is more needed than in the selection and preparation of food, upon which so largely depend the health and physical welfare of the family circle.
Another reason for the prevalence of bad cooking is that in many homes, the cooking is left to people who have no knowledge of the scientific principles behind this important and practical skill. An ethical dilemma we haven't been able to resolve is that women who would never consider letting untrained hands handle their fine china and decorative items readily allow almost completely unqualified individuals to prepare their daily meals. There's no area of life where greater intelligence is more essential than in choosing and preparing food, which greatly affects the health and well-being of the family.
The evils of bad cookery and ill-selected food are manifold, so many, in fact, that it has been calculated that they far exceed the mischief arising from the use of strong drink; indeed, one of the evils of unwholesome food is its decided tendency to create a craving for intoxicants. Bad cookery causes indigestion, indigestion causes thirst, and thirst perpetuates drunkenness. Any one who has suffered from a fit of indigestion, and can recollect the accompanying headache and the lowness of spirits, varying in degree from dejection or ill-humor to the most extreme melancholy, until the intellectual faculties seemed dazed, and the moral feelings blunted, will hardly wonder that when such a condition becomes chronic, as is often the case from the use of improperly prepared food, the victim is easily led to resort to stimulants to drown depression and enliven the spirits.
The problems caused by bad cooking and poorly chosen food are numerous, so much so that it's estimated they far outweigh the issues caused by alcohol; in fact, one of the problems with unhealthy food is its strong tendency to create a craving for intoxicants. Poor cooking leads to indigestion, indigestion causes thirst, and thirst fuels drunkenness. Anyone who has dealt with indigestion and remembers the accompanying headache and low mood—ranging from simple unhappiness to deep sadness—until their thinking feels clouded and their moral feelings dulled, will hardly be surprised that when such a condition becomes chronic, often due to improperly prepared food, the person is easily tempted to turn to stimulants to escape their depression and lift their spirits.
A thorough practical knowledge of simple, wholesome cookery ought to form a part of the education of every young woman, whatever her station in life. No position in life is more responsible than that of the person who arranges the bills of fare and selects the food for the household; and what higher mission can one conceive than to intelligently prepare the wherewithal to make shoulders strong to bear life's burdens and heads clear to solve its intricate problems? what worthier work than to help in the building up of bodies into pure temples fit for guests of noble thoughts and high purposes? Surely, no one should undertake such important work without a knowledge of the principles involved.
A solid practical understanding of simple, healthy cooking should be part of every young woman's education, no matter her background. There's no role more responsible than that of the person who plans the meals and chooses the food for the household; and what greater purpose can there be than to thoughtfully prepare the means to make bodies strong enough to handle life’s challenges and minds clear enough to tackle its complex problems? What more valuable job is there than to contribute to building healthy bodies fit to host guests with noble thoughts and high ambitions? Surely, no one should take on such an important task without knowing the basic principles involved.
THE PRINCIPLES OF SCIENTIFIC COOKERY.
Cookery is the art of preparing food for the table by dressing, or by the application of heat in some manner.
Cookery is the art of preparing food for the table by seasoning it or by applying heat in some way.
Fuels.—Artificial heat is commonly produced by combustion, caused by the chemical action of the oxygen of the air upon the hydrogen and carbon found in fuel. The different fuels in common use for cooking purposes are hard wood, soft wood, charcoal, anthracite coal, bituminous coal, coke, lignite, kerosene oil, gasoline, and gas. As to their respective values, much depends upon the purpose for which they are to be used. Wood charcoal produces a greater amount of heat than an equal weight of any other fuel. Soft wood burns quicker and gives a more intense heat than hard wood, and hence is best for a quick fire. Hard wood burns slowly, produces a larger mass of coals, and is best where long-continued heat is desired. Anthracite coal kindles slowly, and burns with little flame or smoke, but its vapor is sulphurous, and on that account it should never be burned in an open stove, nor in one with an imperfect draft. Its heat is steady and intense. Bituminous coal ignites readily, burns with considerable flame and smoke, and gives a much less intense heat than anthracite, Lignite, or brown coal, is much less valuable as fuel. Coke is useful when a short, quick fire is needed. Kerosene and gas are convenient and economical fuels.
Fuels.—We usually create artificial heat through combustion, which happens when the oxygen in the air reacts with the hydrogen and carbon in fuels. The fuels typically used for cooking include hardwood, softwood, charcoal, anthracite coal, bituminous coal, coke, lignite, kerosene, gasoline, and gas. Their value varies based on how they are used. Wood charcoal produces more heat than an equal weight of any other fuel. Softwood burns faster and provides more intense heat than hardwood, making it ideal for a quick fire. Hardwood burns slowly, creates more coals, and is better for sustained heat. Anthracite coal ignites slowly and burns with little flame or smoke, but it releases sulfonous vapor, so it should never be used in an open stove or one with poor airflow. Its heat is steady and strong. Bituminous coal ignites easily, burns with a lot of flame and smoke, and produces much less heat than anthracite. Lignite, or brown coal, is not very valuable as fuel. Coke is useful for short, quick fires. Kerosene and gas are practical and cost-effective fuels.
Making Fires.—If coal is the fuel to be used, first clean out the stove by shaking the grate and removing all ashes and cinders. Remove the stove covers, and brush the soot and ashes out of all the flues and draft holes into the fire-box. Place a large handful of shavings or loosely twisted or crumpled papers upon the grate, over which lay some fine pieces of dry kindling-wood, arranged crosswise to permit a free draft, then a few sticks of hard wood, so placed as to allow plenty of air spaces. Be sure that the wood extends out to both ends of the fire-box. Replace the covers, and if the stove needs blacking, mix the polish, and apply it, rubbing with a dry brush until nearly dry, then light the fuel, as a little heat will facilitate the polishing. When the wood is burning briskly, place a shovelful or two of rather small pieces of coal upon the wood, and, as they ignite, gradually add more, until there is a clear, bright body of fire, remembering, however, never to fill the stove above the fire bricks; then partly close the direct draft. When wood or soft coal is used, the fuel may be added at the same time with the kindling.
Making Fires.—If you're using coal as the fuel, start by cleaning out the stove. Shake the grate to remove all ashes and cinders. Take off the stove covers, and brush the soot and ashes out of all the flues and draft holes into the firebox. Place a large handful of shavings or loosely twisted or crumpled papers on the grate, then lay some small pieces of dry kindling wood on top, arranged crosswise to allow for good airflow. Add a few sticks of hardwood, making sure to leave plenty of air spaces. Make sure the wood extends to both ends of the firebox. Put the covers back on, and if the stove needs polishing, mix the polish and apply it using a dry brush until it's nearly dry. Then light the fuel; a little heat will help with the polishing. When the wood is burning well, add a shovel or two of smaller pieces of coal on top of the wood. As they catch fire, gradually add more coal until you have a clear, bright fire, but be careful not to fill the stove above the fire bricks. Then, partially close the direct draft. If you're using wood or soft coal, you can add the fuel at the same time as the kindling.
Care of Fires.—Much fuel is wasted through the loss of heat from too much draft. Only just enough air should be supplied to promote combustion. A coal fire, when well kindled, needs only air enough to keep it burning. When the coal becomes red all through, it has parted with the most of its heat, and the fire will soon die unless replenished. To keep a steady fire, add but a small amount of fuel at a time, and repeat often enough to prevent any sensible decrease of the degree of heat. Rake the fire from the bottom, and keep it clear of ashes and cinders. If a very hot fire is needed, open the drafts; at other times, keep them closed, or partially so, and not waste fuel. There is no economy in allowing a fire to get low before fuel is added; for the fresh fuel cools the fire to a temperature so low that it is not useful, and thus occasions a direct waste of all fuel necessary to again raise the heat to the proper degree, to say nothing of the waste of time and patience. The addition of small quantities of fuel at short intervals so long as continuous heat is needed, is far better than to let the fuel burn nearly out, and then add a larger quantity. The improper management of the drafts and dampers has also much to do with waste of fuel. As stoves are generally constructed, it is necessary for the heat to pass over the top, down the back, and under the bottom of the oven before escaping into the flue, in order to properly heat the oven for baking. In order to force the heat to make this circuit, the direct draft of the stove needs to be closed. With this precaution observed, a quick fire from a small amount of fuel, used before its force is spent, will produce better results than a fire-box full under other circumstances.
Care of Fires.—A lot of fuel is wasted because of too much draft causing heat loss. You should only provide just enough air to support combustion. A coal fire, once properly started, requires only enough air to keep burning. When the coal turns red all the way through, it has lost most of its heat, and the fire will soon go out unless you add more fuel. To maintain a consistent fire, add small amounts of fuel at a time and do it often enough to avoid noticeable drops in heat. Rake the fire from the bottom and keep it clear of ashes and cinders. If you need a really hot fire, open the drafts; otherwise, keep them closed or partially open to avoid wasting fuel. It’s not economical to let a fire get low before adding fuel; the new fuel will cool the fire to a low temperature that becomes ineffective, leading to a direct waste of all the fuel needed to heat it back up again, not to mention the waste of time and patience. Adding small amounts of fuel at short intervals while continuous heat is required is much better than letting the fuel nearly burn out and then adding a larger amount. Poor management of drafts and dampers also contributes to fuel waste. Stoves are typically designed so that heat has to travel over the top, down the back, and under the bottom of the oven before going into the flue to properly heat the oven for baking. To make the heat follow this path, you need to close the direct draft of the stove. If you keep this in mind, a quick fire from a small amount of fuel used before it runs out will be more effective than a full firebox in other circumstances.
An item of economy for those who are large users of coal, is the careful sifting of the cinders from the ashes. They can be used to good advantage to put first upon the kindlings, when building the fire, as they ignite more readily than fresh coal, and give a greater, quicker heat, although much less enduring.
An economical tip for heavy coal users is to carefully sift the cinders from the ashes. They can be effectively used as the first layer on top of the kindling when starting a fire, since they catch fire more easily than new coal and provide a greater, quicker heat, even though it's not as lasting.
Roasting is cooking food in its own juices before an open fire. A clear fire with intense heat is necessary.
Roasting is cooking food in its own juices over an open flame. You need a strong fire with high heat.
Broiling, or grilling, is cooking by radiant heat over glowing coals. This method is only adapted to thin pieces of food with a considerable amount of surface. Larger and more compact foods should be roasted or baked. Roasting and broiling are allied in principle. In both, the work is chiefly done by the radiation of heat directly upon the surface of the food, although some heat is communicated by the hot air surrounding the food. The intense heat applied to the food soon sears its outer surfaces, and thus prevents the escape of its juices. If care be taken frequently to turn the food so that its entire surface will be thus acted upon, the interior of the mass is cooked by its own juices.
Broiling, or grilling, is cooking with direct heat over hot coals. This method works best for thin pieces of food that have a large surface area. Larger and denser foods should be roasted or baked. Roasting and broiling are similar in concept. In both methods, the cooking mainly happens through the heat radiation hitting the food's surface, although some heat comes from the hot air around it. The high heat quickly sears the outer layers of the food, sealing in the juices. If you remember to turn the food often so that all surfaces get heated, the inside cooks with its own juices.
Baking is the cooking of food by dry heat in a closed oven. Only foods containing a considerable degree of moisture are adapted for cooking by this method. The hot, dry air which fills the oven is always thirsting for moisture, and will take from every moist substance to which it has access a quantity of water proportionate to its degree of heat. Foods containing but a small amount of moisture, unless protected in some manner from the action of the heated air, or in some way supplied with moisture during the cooking process, come from the oven dry, hard, and unpalatable.
Baking is the process of cooking food using dry heat in a closed oven. Only foods that have a significant amount of moisture are suitable for this cooking method. The hot, dry air that fills the oven is always seeking moisture and will draw water from any moist substance it can reach, depending on how hot it is. Foods with very little moisture, unless they are somehow protected from the heated air or kept moist during cooking, will emerge from the oven dry, hard, and unappetizing.
Proper cooking by this method depends greatly upon the facility with which the heat of the oven can be regulated. When oil or gas is the fuel used, it is an easy matter to secure and maintain almost any degree of heat desirable, but with a wood or coal stove, especial care and painstaking are necessary.
Proper cooking with this method relies heavily on how well you can control the oven's heat. When you're using oil or gas as fuel, it's pretty easy to achieve and maintain the desired temperature. However, if you're using a wood or coal stove, you need to be especially careful and put in a lot of effort.
It is of the first importance that the mechanism of the oven to be used, be thoroughly understood by the cook, and she should test its heating capacity under various conditions, with a light, quick fire and with a more steady one; she should carefully note the kind and amount of fuel requisite to produce a certain degree of heat; in short, she should thoroughly know her "machine" and its capabilities before attempting to use it for the cooking of food. An oven thermometer is of the utmost value for testing the heat, but unfortunately, such thermometers are not common. They are obtainable in England, although quite expensive. It is also possible at the present time to obtain ranges with a very reliable thermometer attachment to the oven door.
It’s really important for the cook to thoroughly understand how the oven works, and she should test its heating ability in different situations, using a light, quick fire as well as a steadier one. She needs to carefully observe the type and amount of fuel needed to achieve a certain level of heat. In short, she should know her "machine" and what it can do before she tries to cook with it. An oven thermometer is extremely helpful for measuring the heat, but unfortunately, they’re not very common. They can be found in England, though they tend to be quite pricey. Nowadays, it's also possible to get ranges that come with a reliable thermometer attached to the oven door.

A cook of good judgment by careful observation and comparison of results, can soon learn to form quite a correct idea of the heat of her oven by the length of time she can hold her hand inside it without discomfort, but since much depends upon the construction of stoves and the kind of fuel used, and since the degree of heat bearable will vary with every hand that tries it, each person who depends upon this test must make her own standard. When the heat of the oven is found to be too great, it may be lessened by placing in it a dish of cold water.
A cook with good judgment can quickly figure out the temperature of her oven by how long she can keep her hand inside it without feeling uncomfortable, but since a lot depends on the type of stove and the fuel used, and since the level of heat that feels tolerable will vary for each person, everyone who uses this method needs to set their own standard. If the oven is too hot, she can reduce the temperature by putting a dish of cold water inside.
Boiling is the cooking of food in a boiling liquid. Water is the usual medium employed for this purpose. When water is heated, as its temperature is increased, minute bubbles of air which have been dissolved by it are given off. As the temperature rises, bubbles of steam will begin to form at the bottom of the vessel. At first these will be condensed as they rise into the cooler water above, causing a simmering sound; but as the heat increases, the bubbles will rise higher and higher before collapsing, and in a short time will pass entirely through the water, escaping from its surface, causing more or less agitation, according to the rapidity with which they are formed. Water boils when the bubbles thus rise to the surface, and steam is thrown off. If the temperature is now tested, it will be found to be about 212° F. When water begins to boil, it is impossible to increase its temperature, as the steam carries off the heat as rapidly as it is communicated to the water. The only way in which the temperature can be raised, is by the confinement of the steam; but owing to its enormous expansive force, this is not practicable with ordinary cooking utensils. The mechanical action of the water is increased by rapid bubbling, but not the heat; and to boil anything violently does not expedite the cooking process, save that by the mechanical action of the water the food is broken into smaller pieces, which are for this reason more readily softened. But violent boiling occasions an enormous waste of fuel, and by driving away in the steam the volatile and savory elements of the food, renders it much less palatable, if not altogether tasteless. The solvent properties of water are so increased by heat that it permeates the food, rendering its hard and tough constituents soft and easy of digestion.
Boiling is the process of cooking food in a boiling liquid. Water is the most commonly used medium for this purpose. When water is heated, tiny bubbles of air that were dissolved in it are released. As the temperature goes up, bubbles of steam start to form at the bottom of the pot. Initially, these bubbles condense as they rise through the cooler water above, creating a simmering sound; but as the heat increases, the bubbles can rise higher and higher before collapsing, eventually breaking through the surface of the water, which causes some agitation depending on how quickly they form. Water boils when the bubbles reach the surface and steam is released. If you check the temperature now, it will be around 212°F. When water starts to boil, you can't increase its temperature anymore, because the steam carries away heat just as quickly as it’s added to the water. The only way to raise the temperature is to trap the steam, but due to its enormous expansion, this isn't practical with regular cooking pots. The mechanical action of the water increases with rapid bubbling, but the heat does not; and boiling something violently doesn’t speed up the cooking process, except that the vigorous movement of the water breaks the food into smaller pieces, which makes them easier to soften. However, boiling violently wastes a lot of fuel and drives away the volatile and flavorful elements of the food, making it much less tasty, if not completely bland. The heat enhances water's solvent properties, allowing it to penetrate the food, making tough and hard parts soft and easier to digest.
The liquids mostly employed in the cooking of foods are water and milk. Water is best suited for the cooking of most foods, but for such farinaceous foods as rice, macaroni, and farina, milk, or at least part milk, is preferable, as it adds to their nutritive value. In using milk for cooking purposes, it should be remembered that being more dense than water, when heated, less steam escapes, and consequently it boils sooner than does water. Then, too, milk being more dense, when it is used alone for cooking, a little larger quantity of fluid will be required than when water is used.
The liquids most commonly used in cooking are water and milk. Water is ideal for preparing most foods, but for starchy items like rice, macaroni, and farina, milk, or at least a mix with milk, is better, as it boosts their nutritional value. When using milk for cooking, keep in mind that it’s denser than water, so less steam escapes when heated, causing it to boil faster than water. Also, since milk is denser, you’ll need a slightly larger amount of liquid compared to using water alone.
The boiling point for water at the sea level is 212°. At all points above the sea level, water boils at a temperature below 212°, the exact temperature depending upon the altitude. At the top of Mt. Blanc, an altitude of 15,000 feet, water boils at 185°. The boiling point is lowered one degree for every 600 feet increase in altitude. The boiling point may be increased by adding soluble substances to the water. A saturated solution of common baking soda boils at 220°. A saturated solution of chloride of sodium boils at 227°. A similar solution of sal-ammoniac boils at 238°. Of course such solutions cannot be used advantageously, except as a means of cooking articles placed in hermetically sealed vessels and immersed in the liquid.
The boiling point of water at sea level is 212°F. At all elevations above sea level, water boils at a temperature lower than 212°F, with the specific temperature depending on altitude. At the top of Mt. Blanc, which is 15,000 feet high, water boils at 185°F. The boiling point decreases by one degree for every 600 feet of elevation gain. You can raise the boiling point by adding soluble substances to the water. A saturated solution of regular baking soda boils at 220°F. A saturated solution of sodium chloride boils at 227°F. A similar solution of ammonium chloride boils at 238°F. Naturally, these solutions aren't practical for general use, except for cooking items placed in airtight containers submerged in the liquid.
Different effects upon food are produced by the use of hard and soft water. Peas and beans boiled in hard water containing lime or gypsum, will not become tender, because these chemical substances harden vegetable casein, of which element peas and beans are largely composed. For extracting the juices of meat and the soluble parts of other foods, soft water is best, as it more readily penetrates the tissue; but when it is desired to preserve the articles whole, and retain their juices and flavors, hard water is preferable.
Different effects on food come from using hard and soft water. Peas and beans boiled in hard water that contains lime or gypsum won’t become tender because these chemicals harden the vegetable casein, which makes up a large part of peas and beans. For extracting the juices from meat and the soluble parts of other foods, soft water is best since it penetrates the tissue more easily; however, if the goal is to keep the items whole and retain their juices and flavors, hard water is preferable.
Foods should be put to cook in cold or boiling water, in accordance with the object to be attained in their cooking. Foods from which it is desirable to extract the nutrient properties, as for broths, extracts, etc., should be put to cook in cold water. Foods to be kept intact as nearly as may be, should be put to cook in boiling water.
Foods should be cooked in either cold or boiling water, depending on the goal you're trying to achieve. If you want to extract the nutrients, like for broths or extracts, you should start with cold water. If you want to keep the food as intact as possible, you should use boiling water.
Hot and cold water act differently upon the different food elements. Starch is but slightly acted upon by cold water. When starch is added to several times its bulk of hot water, all the starch granules burst on approaching the boiling point, and swell to such a degree as to occupy nearly the whole volume of the water, forming a pasty mess. Sugar is dissolved readily in the either hot or cold water. Cold water extracts albumen. Hot water coagulates it.
Hot and cold water interact differently with various food elements. Starch is only slightly affected by cold water. When starch is mixed with several times its volume of hot water, all the starch granules burst as they near the boiling point and swell so much that they nearly fill the entire volume of the water, creating a thick paste. Sugar dissolves easily in both hot and cold water. Cold water extracts albumen, while hot water coagulates it.
Steaming, as its name implies, is the cooking of food by the use of steam. There are several ways of steaming, the most common of which is by placing the food in a perforated dish over a vessel of boiling water. For foods not needing the solvent powers of water, or which already contain a large amount of moisture, this method is preferable to boiling. Another form of cooking, which is usually termed steaming, is that of placing the food, with or without water, as needed, in a closed vessel which is placed inside another vessel containing boiling water. Such an apparatus is termed a double boiler. Food cooked in its own juices in a covered dish in a hot oven, is sometimes spoken of as being steamed or smothered.
Steaming, as the name suggests, is cooking food using steam. There are several methods for steaming, the most common being placing the food in a perforated dish over a pot of boiling water. For foods that don’t need the dissolving qualities of water or already have a lot of moisture, this method is better than boiling. Another cooking method often called steaming involves placing the food, with or without water as needed, in a closed container that goes inside a pot with boiling water. This setup is called a double boiler. Food cooked in its own juices in a covered dish in a hot oven is sometimes referred to as being steamed or smothered.
Stewing is the prolonged cooking of food in a small quantity of liquid, the temperature of which is just below the boiling point. Stewing should not be confounded with simmering, which is slow, steady boiling. The proper temperature for stewing is most easily secured by the use of the double boiler. The water in the outer vessel boils, while that in the inner vessel does not, being kept a little below the temperature of the water from which its heat is obtained, by the constant evaporation at a temperature a little below the boiling point.
Stewing is the slow cooking of food in a small amount of liquid, at a temperature just below the boiling point. Stewing shouldn't be confused with simmering, which involves a slow, steady boil. The ideal temperature for stewing is best achieved using a double boiler. The water in the outer pot boils, while the water in the inner pot stays just below that temperature, thanks to the continuous evaporation at a slightly lower temperature than the boiling point.
Frying, which is the cooking of food in hot fat, is a method not to be recommended—Unlike all the other food elements, fat is rendered less digestible by cooking. Doubtless it is for this reason that nature has provided those foods which require the most prolonged cooking to fit them for use with only a small proportion of fat, and it would seem to indicate that any food to be subjected to a high degree of heat should not be mixed and compounded largely of fats. The ordinary way of frying, which the French call sauteing, is by the use of only a little fat in a shallow pan, into which the food is put and cooked first on one side and then the other. Scarcely anything could be more unwholesome than food prepared in this manner. A morsel of food encrusted with fat remains undigested in the stomach because fat is not acted upon by the gastric juice, and its combination with the other food elements of which the morsel is composed interferes with their digestion also. If such foods are habitually used, digestion soon becomes slow and the gastric juice so deficient in quantity that fermentation and putrefactive changes are occasioned, resulting in serious disturbance of health. In the process of frying, the action of the heat partially decomposes the fat; in consequence, various poisonous substances are formed, highly detrimental to the digestion of the partaker of the food.
Frying, which is cooking food in hot fat, is a method that's not recommended. Unlike other food elements, fat becomes less digestible when cooked. It's likely for this reason that nature has provided foods needing long cooking times with only a small amount of fat, suggesting that any food exposed to high heat shouldn't be primarily made up of fats. The common method of frying, which the French call sauteing, uses just a little fat in a shallow pan, where the food is cooked first on one side and then the other. Very few things are as unhealthy as food prepared this way. A piece of food covered in fat stays undigested in the stomach because fat isn't broken down by gastric juice, and its combination with other food elements hinders their digestion too. If such foods are eaten regularly, digestion becomes slow, and the amount of gastric juice drops, leading to fermentation and putrefaction that disrupt health significantly. During frying, the heat partially breaks down the fat, resulting in various harmful substances that are very damaging to digestion for anyone consuming the food.
When vegetables, or other foods of ordinary temperature, are put into boiling water, the temperature of the water is lowered in proportion to the quantity and the temperature of the food thus introduced, and will not again boil until the mass of food shall have absorbed more heat from the fire. The result of this is that the food is apt to become more or less water-soaked before the process of cooking begins. This difficulty may be avoided by introducing but small quantities of the food at one time, so as not to greatly lower the temperature of the liquid, and then allowing the latter to boil between the introduction of each fresh supply, or by heating the food before adding it to the liquid.
When you put vegetables or other foods at room temperature into boiling water, the water's temperature drops depending on how much food you add and its temperature. It won’t start boiling again until the food absorbs more heat from the heat source. This means the food can end up getting waterlogged before cooking actually starts. You can avoid this issue by adding small amounts of food at a time so the liquid's temperature doesn’t drop too much, and letting the water boil again before adding more, or by heating the food before putting it in the liquid.
Evaporation is another principle often overlooked in the cooking of food, and many a sauce or gravy is spoiled because the liquid, heated in a shallow pan, from which evaporation is rapid, loses so much in bulk that the amount of thickening requisite for the given quantity of fluid, and which, had less evaporation occurred, would have made it of the proper consistency, makes the sauce thick and unpalatable. Evaporation is much less, in slow boiling, than in more rapid cooking.
Evaporation is another principle that is often overlooked in cooking, and many sauces or gravies end up ruined because the liquid, heated in a shallow pan where evaporation happens quickly, loses so much volume that the amount of thickening needed for the given quantity of liquid—something that would have achieved the right consistency with less evaporation—ends up making the sauce thick and unappetizing. Evaporation is significantly less during slow boiling than with faster cooking methods.
Measuring.—One of the most important principles to be observed in the preparation of food for cooking, is accuracy in measuring. Many an excellent recipe proves a failure simply from lack of care in this respect. Measures are generally more convenient than weights, and are more commonly used. The common kitchen cup, which holds a half pint, is the one usually taken as the standard; if any other size is used, the ingredients for the entire recipe should be measured by the same. The following points should be observed in measuring:—
Measuring.—One of the key principles to keep in mind when preparing food for cooking is accuracy in measuring. Many great recipes end up failing simply because of carelessness in this area. Measures are generally more convenient than weights, and are more commonly used. The standard kitchen cup, which holds half a pint, is typically considered the benchmark; if you use a different size, all the ingredients for the entire recipe should be measured using the same cup. The following points should be kept in mind when measuring:—
1. The teaspoons and tablespoons to be used in measuring, are the silver spoons in general use.
1. The teaspoons and tablespoons used for measuring are the silver spoons that are commonly used.
2. Any material like flour, sugar, salt, that has been packed, should either be sifted or stirred up lightly before measuring.
2. Any ingredients like flour, sugar, or salt that have been packed should be either sifted or lightly stirred before measuring.
3. A cupful of dry material is measured level with the top of the cup, without being packed down.
3. A cup of dry material is filled to the brim without being pressed down.
4. A cupful of liquid is all the cup will contain without running over. Hold the cup in a saucer while measuring, to prevent spilling the liquid upon the floor or table.
4. A cupful of liquid is all the cup can hold without spilling over. Keep the cup in a saucer while measuring to avoid spilling the liquid on the floor or table.
One heaping tablespoonful of sugar weighs one ounce.
One heaping tablespoon of sugar weighs one ounce.
Two round tablespoonfuls of flour weigh one ounce.
Two rounded tablespoons of flour weigh one ounce.
Two cupfuls of granulated sugar weigh one pound.
Two cups of granulated sugar weigh one pound.
Two cupfuls of meal weigh one pound.
Two cups of flour weigh one pound.
Four cupfuls of sifted flour weigh one pound.
Four cups of sifted flour weigh one pound.
One pint of oatmeal, cracked wheat, or other coarse grains, weighs about one pound.
One pint of oatmeal, cracked wheat, or other coarse grains, weighs about one pound.
One pint of liquid weighs one pound.
One pint of liquid weighs one pound.
One pint of meat chopped and packed solid weighs one pound.
One pint of chopped meat packed tightly weighs one pound.
Seven heaping tablespoonfuls of sugar = one cupful.
Seven heaping tablespoons of sugar = one cup.
Five heaping tablespoonfuls of flour = one cupful.
Five heaping tablespoons of flour = one cup.
Two cupfuls of liquid or dry material = one pint
Two cups of liquid or dry material = one pint
Four cupfuls of liquid or dry material = one quart.
Four cups of liquid or dry material = one quart.
By stirring is meant a continuous motion round and round with a spoon, without lifting it from the mixture, except to scrape occasionally from the sides of the dish any portion of the material that may cling to it. It is not necessary that the stirring should be all in one direction, as many cooks suppose. The object of the stirring is to thoroughly blend the ingredients, and this may be accomplished as well by stirring—in one direction as in another.
By stirring, we mean a constant motion round and round with a spoon, without lifting it from the mixture, except to occasionally scrape off any bits of the mixture that may stick to the sides of the dish. It's not necessary for the stirring to be all in one direction, as many cooks think. The goal of stirring is to completely mix the ingredients, and this can be done just as effectively by stirring in one direction as in another.
Beating is for the purpose of incorporating as much air in the mixture as possible. It should be done by dipping the spoon in and out, cutting clear through and lifting from the bottom with each stroke. The process must be continuous, and must never be interspersed with any stirring if it is desired to retain the air within the mixture.
Beating is meant to incorporate as much air into the mixture as possible. You should do this by dipping the spoon in and out, cutting through the mixture completely, and lifting from the bottom with each stroke. This process needs to be continuous and should never be interrupted with any stirring if you want to keep the air in the mixture.
Kneading is the mode by which materials already in the form of dough are more thoroughly blended together; it also serves to incorporate air. The process is more fully described in the chapter on "Bread,"
Kneading is the way to mix dough materials together more thoroughly; it also helps to add air. The process is explained in more detail in the chapter on "Bread,"
Temperature.—Many a cook fails and knows not why, because she does not understand the influence of temperature upon materials and food. Flour and liquids for unfermented breads cannot be too cold, while for bread prepared with yeast, success is largely dependent upon a warm and equable temperature throughout the entire process.
Temperature.—Many cooks struggle and don't know why because they don't understand how temperature affects ingredients and food. Flour and liquids for unleavened bread can’t be too cold, while for yeast-leavened bread, success depends heavily on maintaining a warm and steady temperature throughout the whole process.
Cooking Utensils.—The earliest cookery was probably accomplished without the aid of any utensils, the food being roasted by burying it in hot ashes or cooked by the aid of heated stones; but modern cookery necessitates the use of a greater or less variety of cooking utensils to facilitate the preparation of food, most of which are so familiar to the reader as to need no description. (A list of those needed for use will be found on page 66.) Most of these utensils are manufactured from some kind of metal, as iron, tin, copper, brass, etc. All metals are dissolvable in certain substances, and some of those employed for making household utensils are capable of forming most poisonous compounds when used for cooking certain foods. This fact should lead to great care on the part of the housewife, both in purchasing and in using utensils for cooking purposes.
Cooking Utensils.—The earliest cooking was likely done without any utensils, with food being roasted by burying it in hot ashes or cooked using heated stones. However, modern cooking requires a variety of cooking utensils to make food preparation easier, many of which are so familiar to the reader that they don't need description. (A list of those needed for use can be found on page 66.) Most of these utensils are made from some type of metal, such as iron, tin, copper, brass, etc. All metals can dissolve in certain substances, and some of those used for household utensils can create very toxic compounds when cooking certain foods. This fact should prompt the housewife to exercise great care in both purchasing and using cooking utensils.
Iron utensils, although they are, when new, apt to discolor and impart a disagreeable flavor to food cooked in them, are not objectionable from a health standpoint, if kept clean and free from rust. Iron rust is the result of the combination of the iron with oxygen, for which it has so great an affinity that it will decompose water to get oxygen to unite with; hence it is that iron utensils rust so quickly when not carefully dried after using, or if left where they can collect moisture. This is the reason why a coating of tallow, which serves to exclude the air and moisture, will preserve ironware not in daily use from rusting.
Iron utensils, although they tend to discolor and give food a bad taste when they're new, aren't harmful to your health as long as they're kept clean and free from rust. Rust forms when iron combines with oxygen, which it seeks out so eagerly that it will even break down water to find oxygen. That's why iron utensils rust quickly if they're not dried properly after use or are left in damp conditions. For this reason, a coating of tallow, which keeps out air and moisture, can protect ironware that isn't used daily from rusting.
"Porcelain ware" is iron lined with a hard, smooth enamel, and makes safe and very desirable cooking utensils. German porcelain ware is unexcelled for culinary purposes.
"Porcelain ware" is iron coated with a tough, smooth enamel, making it safe and highly desirable for cooking utensils. German porcelain ware is unmatched for culinary use.
"Granite ware" is a material quite recently come into use, the composition of which is a secret, although pronounced by eminent chemists to be free from all injurious qualities. Utensils made from it are light in weight, easily kept clean, and for most cooking purposes, are far superior to those made from any other material.
"Graniteware" is a material that has only recently been used, and its composition is a secret, although it has been confirmed by leading chemists to be free from any harmful qualities. Utensils made from it are lightweight, easy to clean, and for most cooking purposes, are far better than those made from any other material.
What is termed "galvanized iron" is unsuitable for cooking utensils, it being simply sheet iron coated with zinc, an exceedingly unsafe metal to be used for cooking purposes.
What we call "galvanized iron" isn't safe for cooking utensils because it's just sheet iron covered in zinc, which is a very unsafe metal for cooking.
Tin, which is simply thin sheet iron coated with tin by dipping several times into vats of the melted metal, is largely employed in the manufacture of cooking utensils. Tinware is acted upon by acids, and when used for holding or cooking any acid foods, like sour milk, sour fruits, tomatoes, etc., harmful substances are liable to be formed, varying in quantity and harmfulness with the nature of the acid contained in the food.
Tin, which is basically thin sheet iron dipped multiple times in melted tin, is commonly used to make cooking utensils. Tinware reacts with acids, and when it’s used to hold or cook acidic foods like sour milk, sour fruits, tomatoes, and so on, it can create harmful substances. The amount and danger of these substances depend on the type of acid in the food.
In these days of fraud and adulteration, nearly all the cheaper grades of tinware contain a greater or less amount of lead in their composition, which owing to its greater abundance and less price, is used as an adulterant of tin. Lead is also used in the solder with which the parts of tinware are united. The action of acids upon lead form very poisonous compounds, and all lead-adulterated utensils should be wholly discarded for cooking purposes.
In today's world of scams and fake products, almost all lower-quality tinware has some amount of lead mixed in because it's cheaper and more readily available than tin. Lead is also used in the solder that holds the pieces of tinware together. When acids come into contact with lead, they create highly poisonous compounds, so any tinware that has lead should be completely avoided for cooking.
Test for Lead-Adulterated Tin.—Place upon the metal a small drop of nitric acid, spreading it to the size of a dime, dry with gentle heat, apply a drop of water, then add a small crystal of iodide of potash. If lead is present, a yellowish color will be seen very soon after the addition of the iodide. Lead glazing, which is frequently employed on crockery and ironware in the manufacture of cooking utensils, may also be detected in the same manner.
Test for Lead-Adulterated Tin.—Put a small drop of nitric acid on the metal, spreading it to the size of a dime, then dry it with gentle heat. Apply a drop of water, and add a small crystal of potassium iodide. If lead is present, you’ll see a yellowish color shortly after adding the iodide. You can also detect lead glazing, commonly used on cookware and ironware, in the same way.
Cooking utensils made of copper are not to be recommended from the point of healthfulness, although many cooks esteem them because copper is a better conductor of heat than iron or tin. The acids of many fruits combine with copper to form extremely poisonous substances. Fatty substances, as well as salt and sugar, act upon copper to a greater or less degree, also vegetables containing sulfur in their composition and produce harmful compounds.
Cooking tools made of copper aren't recommended for health reasons, even though many chefs prefer them because copper conducts heat better than iron or tin. The acids in many fruits react with copper to create highly toxic substances. Fatty foods, along with salt and sugar, also affect copper to varying degrees, as do vegetables that contain sulfur, leading to the formation of harmful compounds.
Utensils made of brass, which is a compound of copper and zinc, are not safe to use for cooking purposes.
Utensils made of brass, which is a mixture of copper and zinc, are not safe to use for cooking.
TABLE TOPICS.
Bad cooking diminishes happiness and shortens life.—Wisdom of Ages.
Bad cooking reduces happiness and shortens life.—Wisdom of Ages.
Says Mrs. Partington: "Many a fair home has been desiccated by poor cooking, and a man's table has been the rock on which his happiness has split."
Says Mrs. Partington: "Many a lovely home has been ruined by bad cooking, and a man's dining table has been the foundation on which his happiness has fallen apart."
SIGNIFICANT FACT.—Lady—"Have you had much experience as a cook?" Applicant—"Oh, indeed I have. I was the cook of Mr. and Mrs. Peterby for three years."
SIGNIFICANT FACT.—Lady—"Have you had a lot of experience cooking?" Applicant—"Oh, absolutely. I cooked for Mr. and Mrs. Peterby for three years."
L.—"Why did you leave them?"
"Why did you leave them?"
A.—"I didn't leave them. They left me. They both died."
A.—"I didn't abandon them. They left me. They both passed away."
L.—"What of?"
"What’s up?"
A.—"Dyspepsia."
A.—"Indigestion."
Cooking is generally bad because people falling to routine; habit dulls their appreciation, and they do not think about what they are eating.—Didsbury.
Cooking is usually negative because people fall into a routine; habit dulls their appreciation, and they stop thinking about what they are eating.—Didsbury.
Lilly (Secretary of the cooking class)—"Now girls, we've learned nine cakes, two kinds of angel food, and seven pies. What next?"
Lilly (Secretary of the cooking class)—"Alright girls, we've covered nine cakes, two types of angel food, and seven pies. What's next?"
Susie (engaged)—"Dick's father says I must learn to bake bread."
Susie (engaged)—"Dick's dad says I have to learn how to bake bread."
Indignant chorus—"Bread? How absurd! What are bakers for?"
Indignant chorus—"Bread? That's ridiculous! What do we have bakers for?"
It is told of Philip Hecgnet, a French, physician who lived in the 17th, century, that when calling upon his wealthy patients, he used often to go to the kitchen and pantry, embrace the cooks and butlers, and exhort them to do their duty well. "I owe you so much gratitude, my dear friends," he would say; "you are so useful to us doctors; for if you did not keep on poisoning the people, we should all have to go to the poorhouse."
It is said that Philip Hecgnet, a French physician who lived in the 17th century, would often visit the kitchens and pantries while attending to his wealthy patients. He would hug the cooks and butlers and encourage them to do their jobs well. "I owe you so much gratitude, my dear friends," he would say; "you are incredibly helpful to us doctors; if you didn't keep poisoning the people, we would all end up in the poorhouse."
There are innumerable books of recipes for cooking, but unless the cook is master of the principles of his art, and unless he knows the why and the wherefore of its processes, he cannot choose a recipe intelligently and execute it successfully.—Richard Estcourt.
There are countless cookbooks available, but unless the cook understands the principles of their craft and knows the reasons behind the processes, they won't be able to select a recipe wisely and carry it out successfully.—Richard Estcourt.
They who provide the food for the world, decide the health of the world. You have only to go on some errands amid the taverns and hotels of the United States and Great Britain, to appreciate the fact that a vast multitude of the human race are slaughtered by incompetent cookery. Though a young woman may have taken lessons in music, and may have taken lessons in painting, and lessons in astronomy, she is not well educated unless she has taken lessons in dough!—Talmage.
They who supply the food for the world determine the health of the world. You only need to run some errands among the bars and hotels in the United States and Great Britain to realize that a huge number of people are harmed by poor cooking. Even if a young woman has taken lessons in music, painting, and astronomy, she is not truly educated unless she has learned about dough! —Talmage.

HOUSEHOLD WORKSHOP
![]() t is a mistake to suppose that any room, however small and unpleasantly
situated, is "good enough" for a kitchen. This is the room where
housekeepers pass a great portion of their time, and it should be one of
the brightest and most convenient rooms in the house; for upon the
results of no other department of woman's domain depend so greatly the
health and comfort of the family as upon those involved in this
"household workshop." The character of a person's work is more or less
dependent upon his surroundings, hence is it to be greatly wondered at
that a woman immured in a small, close, dimly-lighted room, whose only
outlook may be the back alley or the woodshed, supplies her household
with products far below the standard of health and housewifely skill?
t is a mistake to suppose that any room, however small and unpleasantly
situated, is "good enough" for a kitchen. This is the room where
housekeepers pass a great portion of their time, and it should be one of
the brightest and most convenient rooms in the house; for upon the
results of no other department of woman's domain depend so greatly the
health and comfort of the family as upon those involved in this
"household workshop." The character of a person's work is more or less
dependent upon his surroundings, hence is it to be greatly wondered at
that a woman immured in a small, close, dimly-lighted room, whose only
outlook may be the back alley or the woodshed, supplies her household
with products far below the standard of health and housewifely skill?
![]() It’s a mistake to think that any room, no matter how small and poorly located, is “good enough” for a kitchen. This is the space where housekeepers spend a lot of their time, and it should be one of the brightest and most functional areas in the house; because no other part of a woman’s responsibilities affects the health and comfort of the family as much as this “household workshop.” A person’s work is largely influenced by their environment, so is it any surprise that a woman confined to a small, stuffy, poorly-lit room, with nothing to look at but the back alley or the woodshed, provides her family with meals that are far from healthy and lacking in basic kitchen skills?
It’s a mistake to think that any room, no matter how small and poorly located, is “good enough” for a kitchen. This is the space where housekeepers spend a lot of their time, and it should be one of the brightest and most functional areas in the house; because no other part of a woman’s responsibilities affects the health and comfort of the family as much as this “household workshop.” A person’s work is largely influenced by their environment, so is it any surprise that a woman confined to a small, stuffy, poorly-lit room, with nothing to look at but the back alley or the woodshed, provides her family with meals that are far from healthy and lacking in basic kitchen skills?
Every kitchen should have windows on two sides of the room, and the sun should have free entrance through them; the windows should open from the top to allow a complete change of air, for light and fresh air are among the chief essentials to success in all departments of the household. Good drainage should also be provided, and the ventilation of the kitchen ought to be even more carefully attended to than that of a sleeping room. The ventilation of the kitchen should be so ample as to thoroughly remove all gases and odors, which, together with steam from boiling and other cooking processes, generally invade and render to some degree unhealthful every other portion of the house. It is the steam from the kitchen which gives a fusty odor to the parlor air and provides a wet-sheet pack for the occupant of the "spare bed." The only way of wholly eradicating this evil, is the adoption of the suggestion of the sanitary philosopher who places the kitchen at the top of the house.
Every kitchen should have windows on two sides of the room, allowing sunlight to come in freely; the windows should open from the top to ensure a complete change of air, as light and fresh air are essential for success in all areas of the household. Good drainage should also be implemented, and the kitchen's ventilation needs to be even more carefully addressed than that of a bedroom. The kitchen ventilation should be ample enough to completely eliminate all gases and odors, which, along with steam from boiling and other cooking processes, typically spread and make other areas of the house somewhat unhealthy. It’s the steam from the kitchen that leaves a musty smell in the living room and creates a damp environment for the person using the "spare bed." The only way to fully resolve this issue is to follow the suggestion of the sanitary philosopher who recommends placing the kitchen on the top floor of the house.
To lessen to discomforts from heat, a ventilator may be placed above the range, that shall carry out of the room all superfluous heat, and aid in removing the steam and odors from cooking food. The simplest form of such a ventilator this inverted hopper of sheet iron fitted above the range, the upper and smaller end opening into a large flue adjacent to the smoke flue for the range. Care must be taken, however, to provide an ample ventilating shaft for this purpose, since a strong draft is required to secure the desired results.
To reduce discomfort from heat, a fan can be installed above the stove to remove excess heat from the room and help get rid of steam and odors from cooking. The simplest design for such a fan is an inverted hopper made of sheet metal fitted above the stove, with the smaller top end connecting to a large duct next to the stove's smoke flue. However, it's important to ensure there is a large enough ventilation shaft for this purpose, as a strong draft is needed to achieve the best results.
There should be ample space for tables, chairs, range, sink, and cupboards, yet the room should not be so large as to necessitate too many steps. A very good size for the ordinary dwelling is 16 x 18 feet.
There should be plenty of space for tables, chairs, the range, sink, and cabinets, but the room shouldn't be so large that it requires too many steps. A good size for an average home is 16 x 18 feet.
Undoubtedly much of the distaste for, and neglect of, "housework," so often deplored in these days, arises from unpleasant surroundings. If the kitchen be light, airy, and tidy, and the utensils bright and clean, the work of compounding those articles of food which grace the table and satisfy the appetite will be a pleasant task, and one entirely worthy of the most intelligent and cultivated woman.
Undoubtedly, a lot of the dislike for and neglect of "housework," which is often criticized these days, comes from unpleasant surroundings. If the kitchen is bright, airy, and organized, and the utensils are shiny and clean, then preparing the food that decorates the table and satisfies the appetite will be an enjoyable task, one completely deserving of the most intelligent and educated woman.
It is desirable, from a sanitary standpoint, that the kitchen floor be made impervious to moisture; hence, concrete or tile floors are better than wooden floors. If wooden floors are used, they should be constructed of narrow boards of hard wood, carefully joined and thoroughly saturated with hot linseed oil, well rubbed in to give polish to the surface.
It’s important for hygiene that the kitchen floor is resistant to moisture; therefore, concrete or tile floors are preferable to wooden floors. If wooden floors are used, they should be made of narrow boards of hardwood, properly joined, and thoroughly soaked with hot linseed oil, well-rubbed in to give the surface a polished finish.
Cleanliness is the great desideratum, and this can be best attained by having all woodwork in and about the kitchen coated with varnish; substances which cause stain and grease spots, do not penetrate the wood when varnished, and can be easily removed with a damp cloth. Paint is preferable to whitewash or calcimine for the walls, since it is less affected by steam, and can be more readily cleaned. A carpet on a kitchen floor is as out of place as a kitchen sink would be in a parlor.
Cleanliness is the top priority, and the best way to achieve this is by coating all the woodwork in and around the kitchen with varnish. Stains and grease spots won't soak into the wood when it's varnished and can be easily wiped away with a damp cloth. Paint is better than whitewash or calcimine for the walls because it’s less impacted by steam and is easier to clean. A carpet on a kitchen floor is just as inappropriate as having a kitchen sink in a living room.
The elements of beauty should not be lacking in the kitchen. Pictures and fancy articles are inappropriate; but a few pots of easily cultivated flowers on the window ledge or arranged upon brackets about the window in winter, and a window box arranged as a jardiniere, with vines and blooming plants in summer, will greatly brighten the room, and thus serve to lighten the task of those whose daily labor confines them to the precincts of the kitchen.
The kitchen shouldn't lack elements of beauty. While pictures and fancy decor might not fit, a few pots of easy-to-grow flowers on the windowsill or arranged on shelves around the window in winter, along with a window box set up as a jardiniere with vines and flowering plants in summer, can really brighten up the space. This can make the daily work of those who spend a lot of time in the kitchen feel a bit lighter.
The Kitchen Furniture.—The furniture for a kitchen should not be cumbersome, and should be so made and dressed as to be easily cleaned. There should be plenty of cupboards, and each for the sake of order, should be devoted to a special purpose. Cupboards with sliding doors are much superior to closets. They should be placed upon casters so as to be easily moved, as they, are thus not only more convenient, but admit of more thorough cleanliness.
The Kitchen Furniture.—Kitchen furniture shouldn't be heavy or difficult to manage, and it should be designed in a way that makes it easy to clean. There should be plenty of cabinets, and each one should have a specific purpose for the sake of organization. Cabinets with sliding doors are much better than traditional closets. They should be on wheels so they can be easily moved, which not only makes them more convenient but also allows for more thorough cleaning.
Cupboards used for the storage of food should be well ventilated; otherwise, they furnish choice conditions for the development of mold and germs. Movable cupboards may be ventilated by means of openings in the top, and doors covered with very fine wire gauze which will admit the air but keep out flies and dust. All stationary cupboards and closets should have a ventilating flue connected with the main shaft by which the house is ventilated, or directly communicating with the outer air.
Cupboards used for food storage should be well-ventilated; otherwise, they create ideal conditions for mold and germs to grow. Movable cupboards can be ventilated with openings in the top and doors covered with very fine wire mesh that lets in air but keeps out flies and dust. All stationary cupboards and closets should have a ventilation duct connected to the main ventilation system of the house or directly opening to the outside air.
No kitchen can be regarded as well furnished without a good timepiece as an aid to punctuality and economy of time. An eight-day clock with large dial and plain case is the most suitable.
No kitchen can be considered well-equipped without a good clock to help with punctuality and time management. An eight-day clock with a large face and simple design is the best option.
Every kitchen should also be provided with a slate, with sponge and pencil attached, on one side of which the market orders and other memoranda may be jotted down, and on the other the bills of fare for the day or week. In households where servants are kept, the slate will save many a vexatious blunder and unnecessary call to the kitchen, while if one is herself mistress, cook, and housekeeper, it may prove an invaluable aid and time-saver if thus used.
Every kitchen should have a slate with a sponge and pencil attached. On one side, you can jot down market orders and other notes, and on the other, list the menu for the day or week. In homes with servants, the slate can prevent many annoying mistakes and unnecessary trips to the kitchen. If you're handling everything yourself—being the cook and housekeeper—it can be a valuable tool and save you a lot of time.

A Convenient Kitchen Table.
Lack of sufficient table room is often a great source of inconvenience to the housekeeper. To avoid this, arrange swinging tables or shelves at convenient points upon the wall, which may be put up or let down as occasion demands. For ordinary kitchen uses, small tables of suitable height on easy-rolling casters, and with zinc tops, are the most convenient and most easily kept clean. It is quite as well that they be made without drawers, which are too apt to become receptacles for a heterogeneous mass of rubbish. If desirable to have some handy place for keeping articles which are frequently required for use, an arrangement similar to that represented in the accompanying cut may be made at very small expense. It may be also an advantage to arrange small shelves about and above the range, on which may be kept various articles necessary for cooking purposes.
Lack of enough table space is often a big hassle for the housekeeper. To avoid this, set up folding tables or shelves at convenient spots on the wall, which can be put up or taken down as needed. For everyday kitchen use, small tables at a suitable height on easy-rolling wheels with zinc tops are the most convenient and easiest to clean. It's just as well if they’re made without drawers because those tend to turn into catch-alls for a bunch of junk. If you want to have a handy spot for keeping items that you need often, you can create an arrangement similar to what’s shown in the accompanying cut at a very low cost. It may also be helpful to put small shelves around and above the stove, where you can keep various cooking essentials.
One of the most indispensable articles of furnishing for a well-appointed kitchen, is a sink; however, a sink must be properly constructed and well cared for, or it is likely to become a source of great danger to the health of the inmates of the household. Earthen-ware is the best material for kitchen sinks. Iron is very serviceable, but corrodes, and if painted or enameled, this soon wears off. Wood is objectionable from a sanitary standpoint. A sink made of wood lined with copper answers well for a long time if properly cared for.
One of the most essential pieces of furniture for a well-equipped kitchen is a sink; however, a sink needs to be built properly and maintained well, or it can become a significant health risk for the people living in the home. Ceramic is the best material for kitchen sinks. Iron is quite practical, but it rusts, and if painted or coated, that quickly wears off. Wood is not ideal from a hygiene perspective. A sink made of wood lined with copper works well for a long time if taken care of properly.
The sink should if possible stand out from the wall, so as to allow free access to all sides of it for the sake of cleanliness, and under no circumstances should there be any inclosure of woodwork or cupboards underneath to serve as a storage place for pots and kettles and all kinds of rubbish, dust, and germs. It should be supported on legs, and the space below should be open for inspection at all times. The pipes and fixtures should be selected and placed by a competent plumber.
The sink should ideally be positioned away from the wall to provide easy access from all sides for cleanliness. There should never be any wooden enclosures or cabinets underneath that could be used for storing pots, kettles, or various types of junk, dust, and germs. It should be supported by legs, keeping the space beneath open for regular inspection. A qualified plumber should be responsible for choosing and installing the pipes and fixtures.
Great pains should be taken to keep the pipes clean and well disinfected. Refuse of all kinds should be kept out. Thoughtless housekeepers and careless domestics often allow greasy water and bits of table waste to find their way into the pipes. Drain pipes usually have a bend, or trap, through which water containing no sediment flows freely; but the melted grease which often passes into the pipes mixed with hot water, becomes cooled and solid as it descends, adhering to the pipes, and gradually accumulating until the drain is blocked, or the water passes through very slowly. A grease-lined pipe is a hotbed for disease germs.
Great effort should be made to keep the pipes clean and properly disinfected. All sorts of waste should be kept out. Careless housekeepers and neglectful staff often let greasy water and bits of food scraps get into the pipes. Drain pipes typically have a bend or trap that allows water without sediment to flow freely; however, the melted grease that often goes into the pipes mixed with hot water cools and solidifies as it moves down, sticking to the pipes and gradually building up until the drain is blocked or the water flows very slowly. A grease-filled pipe is a breeding ground for disease germs.
Water containing much grease should be cooled and the grease removed before being turned into the kitchen sink, while bits of refuse should be disposed of elsewhere, since prevention of mischief is in this case, as in most others, far easier than cure. It is customary for housekeepers to pour a hot solution of soda or potash down the sink pipes occasionally, to dissolve any grease which may tend to obstruct the passage; but this is only a partial safeguard, as there is no certainty that all the grease will be dissolved, and any particles adhering to the pipes very soon undergo putrefaction.
Water with a lot of grease should be cooled and the grease removed before it is poured down the kitchen sink, while any leftover scraps should be thrown away elsewhere, as preventing issues is, in this case as in many others, much easier than fixing them later. It's common for housekeepers to occasionally pour a hot solution of soda or potash down the sink pipes to dissolve any grease that might clog the pipes; however, this is only a partial solution, as there's no guarantee that all the grease will be dissolved, and any bits that stick to the pipes will quickly start to rot.
A frequent flushing with hot water is important; besides which the pipes should be disinfected two or three times a week by pouring down a gallon of water holding in solution a pound of good chloride of lime.
A regular flush with hot water is essential; in addition, the pipes should be disinfected two or three times a week by pouring down a gallon of water mixed with a pound of quality bleach.
Stoves and Ranges.—The furnishing of a modern kitchen would be quite incomplete without some form of stove or range. The multiplicity of these articles, manufactured each with some especial merit of its own, renders it a somewhat difficult task to make a choice among them. Much must, however, depend upon the kind of fuel to be used, the size of the household, and various other circumstances which make it necessary for each individual housekeeper to decide for herself what is best adapted to her wants. It may be said, in brief, that economy of fuel, simplicity of construction, and efficiency in use are the chief points to be considered in the selection of stoves and ranges.
Stoves and Ranges.—A modern kitchen wouldn’t be complete without some type of stove or range. With so many options available, each with its own unique benefits, choosing the right one can be a bit challenging. However, a lot depends on the type of fuel you plan to use, the size of your household, and other factors that require each person to figure out what works best for them. In short, the main things to consider when selecting stoves and ranges are fuel efficiency, ease of design, and overall performance.
A stove or range of plain finish is to be preferred, because it is much easier to keep clean, and will be likely to present a better appearance after a few months' wear than one of more elaborate pattern. But whatever stove or range is selected, its mechanism should be thoroughly understood in every particular, and it should be tested with dampers open, with dampers closed, and in every possible way, until one is perfectly sure she understands its action under all conditions.
A simple stove or range is preferable because it's much easier to keep clean and will look better after a few months of use compared to a more complicated design. However, no matter which stove or range is chosen, it's important to fully understand how it works, and it should be tested with the dampers open and closed, as well as in every possible way, until you're completely sure you know how it operates under all conditions.
Oil and Gas Stoves.—In many households, oil, gas, and gasoline stoves have largely taken the place of the kitchen range, especially during the hot weather of summer. They can be used for nearly every purpose for which a wood or a coal range is used; they require much less labor and litter, and can be instantly started into full force and as quickly turned out when no longer required, while the fact that the heat can be regulated with exactness, makes them superior for certain processes of cooking to any other stove. But while these stoves are convenient and economical, especially in small families, they should be used with much care. Aside from the danger from explosion, which is by no means inconsiderable in the use of gasoline and oil stoves, they are not, unless well cared for altogether healthful. Unless the precaution is taken to use them in well-ventilated rooms or to connect them with a chimney, they vitiate the atmosphere to a considerable extent with the products of combustion. Oil stoves, unless the wicks are kept well trimmed, are apt to smoke, and this smoke is not only disagreeable, but extremely irritating to the mucous membrane of the nose and throat. Oil stoves are constructed on the same principle as ordinary oil lamps, and require the same care and attention.
Quite recently there has been invented by Prof. Edward Atkinson a very unique apparatus for cooking by means of the heat of an ordinary kerosene lamp, called the "Aladdin Cooker." The food to be cooked is placed in a chamber around which hot water, heated by the flame of the lamp, circulates. The uniform heat thus obtained performs the process of cooking, slowly, but most satisfactorily and economically, the result being far superior to that obtained by the ordinary method of cooking by quick heat. The cooker is only used for stewing and steaming; but Mr. Atkinson has also invented an oven in which the heat is conveyed to the place where it is needed by a column of hot air instead of hot water. With this oven, which consists of an outer oven made of non-conducting material, and an inner oven made of sheet iron, with an intervening space between, through which the hot air circulates, no smoke or odor from the lamp can reach the interior.
Recently, Professor Edward Atkinson invented a unique cooking device using the heat of a standard kerosene lamp, called the "Aladdin Cooker." Food is placed in a chamber surrounded by water heated by the lamp's flame. This consistent heat cooks the food slowly, but very effectively and economically, resulting in far better outcomes than traditional quick-heating methods. The cooker is designed specifically for stewing and steaming; however, Mr. Atkinson has also created an oven that uses a column of hot air to direct heat where it's needed, instead of hot water. This oven features an outer shell made of insulating material and an inner shell made of sheet metal, with a space in between for circulating hot air, ensuring that no smoke or odor from the lamp reaches the inside.
Kitchen. Utensils.—The list of necessary kitchen utensils must of course be governed somewhat by individual circumstances, but it should not be curtailed for the sake of display in some other department, where less depends upon the results. A good kitchen outfit is one of the foundation-stones of good housekeeping. The following are some of the most essential:—
Kitchen. Utensils.—The list of essential kitchen utensils will naturally vary based on personal needs, but it shouldn’t be limited just to make a good impression elsewhere, where less is at stake. A well-equipped kitchen is a key element of effective home management. Here are some of the most important items:—

For the Tin Closet.-One dipper; one egg-beater; one two-quart pail; one four-quart pail; six brick-loaf bread pans; three shallow tins; three granite-ware pie tins; two perforated sheet iron pans for rolls, etc.; one set of measures, pint, quart, and two quart; two colanders; two fine wire strainers; one flour sifter; one apple corer; one set patty pans; two dripping pans; two sets gem irons; one set muffin rings; one toaster; one broiler; the six saucepans, different sizes; two steamers; six milk-pans; one dozen basins, different sizes; one chopping bowl and knife; six double boilers; two funnels, large and small; one can opener; griddle; kettles, iron and granite ware; two water baths.
For the Tin Closet.- One dipper; one egg beater; one two-quart bucket; one four-quart bucket; six brick loaf pans; three shallow tins; three enamel pie pans; two perforated sheet metal pans for rolls, etc.; one set of measuring cups, pint, quart, and two quart; two colanders; two fine mesh strainers; one flour sifter; one apple corer; one set of patty pans; two roasting pans; two sets of gem molds; one set of muffin rings; one toaster; one broiler; six saucepans, various sizes; two steamers; six milk pans; a dozen mixing bowls, various sizes; one chopping bowl and knife; six double boilers; two funnels, large and small; one can opener; griddle; kettles, iron and enamel; two water baths.
For the Dish Closet.—One half dozen iron-stone china cups; three quart bowls; three pint bowls; two large mixing bowls; two quart bowls with lip; six deep plates; three kitchen pitchers; one glass rolling pin; six wooden and six iron spoons, assorted sizes; six kitchen teaspoons; one stone baking pot; glass jars for stores; crocks and jars.
For the Dish Closet.—Six ironstone china cups; three quart bowls; three pint bowls; two large mixing bowls; two quart bowls with a lip; six deep plates; three kitchen pitchers; one glass rolling pin; six wooden and six iron spoons in various sizes; six kitchen teaspoons; one stone baking pot; glass jars for storage; crocks and jars.
The Pantry.—The pantry and china closet should have direct light and good ventilation. The dark, dingy places sometimes used for this purpose are germ breeders. There should be plenty of shelf room and cupboards for the fine glass and china-ware, with a well-arranged sink for washing the dishes. The sink for this purpose is preferably one lined with tinned or planished copper; for dishes will be less liable to become injured and broken then when washed in an iron or earthen-ware sink. Extension or folding shelves are a great convenience, and can be arranged for the sink if desired. The accompanying cuts illustrate a sink of four compartments for dish-washing, devised by the writer for use in the Sanitarium Domestic Economy kitchen, which can be closed and used as a table. Two zinc trays fit the top, upon which to place the dish drainers. If preferred, the top might be arranged as a drainer, by making it of well-seasoned hard wood, with a number of inclined grooves to allow the water to run into the sink. If the house be heated by steam, a plate-warmer is an important part of the pantry furnishing.
The Pantry.—The pantry and dish cabinet should have plenty of natural light and good airflow. Dark, musty spaces often used for this purpose can harbor germs. There should be ample shelving and cupboards for fine glassware and china, along with a well-organized sink for washing dishes. It's best if the sink is lined with tinned or polished copper; this helps prevent dishes from getting damaged and broken compared to washing them in an iron or ceramic sink. Extension or folding shelves are very useful and can be set up around the sink if needed. The illustrations show a sink with four compartments for dishwashing, designed by the author for use in the Sanitarium Domestic Economy kitchen, which can be closed off and used as a table. Two zinc trays fit on top for placing dish drainers. If preferred, the top could also function as a drainer, made from well-seasoned hardwood with several inclined grooves to let the water flow into the sink. If the house is heated with steam, a plate-warmer is an essential part of the pantry setup.

Compartment Sink for Dish-Washing. Open.
The refrigerator should not be connected with the kitchen drain pipe, and the greatest care should be taken to keep it clean and sweet. It should be thoroughly scrubbed with borax or sal-soda and water, and well aired, at least once a week. Strongly flavored foods and milk should not be kept in the same refrigerator. The ice to be used should always be carefully washed before putting in the refrigerator. Care should also be taken to replenish it before the previous supply is entirely melted, as the temperature rises when the ice becomes low, and double the quantity will be required to cool the refrigerator that would be necessary to keep it of uniform temperature if added before the ice was entirely out.
The refrigerator shouldn't be connected to the kitchen drain pipe, and it’s important to keep it clean and fresh. It should be thoroughly cleaned with borax or baking soda and water, and aired out at least once a week. Strong-smelling foods and milk shouldn't be stored together in the same refrigerator. Always wash the ice before putting it in the refrigerator. Make sure to refill the ice before the last batch completely melts, as the temperature goes up when the ice runs low, and you'll need double the amount of ice to cool the refrigerator if you add it only after it’s entirely out.
The Water Supply.—The water used for drinking and cooking purposes should receive equal consideration with the food supply, and from whatever source obtained, it should be frequently tested for impurities, since that which looks the most refreshing may be contaminated with organic poison of the most treacherous character.

Compartment Sink for Dish-Washing. Closed.
A good and simple test solution, which any housewife can use, may be prepared by dissolving twelve grains of caustic potash and three of permanganate of potash in an ounce of distilled water, or filtered soft water. Add a drop of this solution to a glass of the water to be tested. If the pink color imparted by the solution disappears at once, add another drop of the solution, and continue adding drop by drop until the pink color will remain for half an hour or more. The amount of the solution necessary to security permanent color is very fair index to the quality of the water. If the color imparted by the first one or two drops disappears within a half hour, the water should be rejected as probably dangerous. Water which is suspected of being impure may be rendered safe by boiling. Filters are only of service in removing suspended particles and the unpleasant taste of rain water; a really dangerous water is not rendered safe by filtering in the ordinary manner.
A simple and effective test solution that any homeowner can use can be made by dissolving twelve grains of caustic potash and three grains of permanganate of potash in an ounce of distilled water or filtered soft water. Add a drop of this solution to a glass of the water you're testing. If the pink color from the solution disappears immediately, add another drop, and keep adding drops one at a time until the pink color stays for half an hour or more. The amount of solution needed to keep the color is a good indicator of the water's quality. If the color from the first one or two drops disappears within half an hour, that water should be avoided as it may be dangerous. Water suspected of being contaminated can be made safe by boiling. Filters only help remove suspended particles and the unpleasant taste of rainwater; truly unsafe water isn’t made safe by normal filtering.
Cellars.—Sanitarians tell us that cellars should never be built under dwelling houses. Because of improper construction and neglect, they are undoubtedly the cause of much disease and many deaths. A basement beneath the house is advantageous, but the greatest of care should be given to construct it in accord with sanitary laws. It should be thoroughly drained that there may be no source of dampness, but should not be connected with a sewer or a cesspool. It should have walls so made as to be impervious to air and water. An ordinary brick or stone wall is inefficient unless well covered with good Portland cement polished smooth. The floors should likewise be covered with cement, otherwise the cellar is likely to be filled with impure air derived from the soil, commonly spoken of as "ground air," and which offers a constant menace to the health of those who live over cellars with uncemented walls and floors.
Cellars.—Health experts say that cellars should never be built beneath homes. Due to poor construction and lack of maintenance, they are certainly responsible for a lot of sickness and many deaths. Having a basement under the house can be beneficial, but it must be constructed with strict attention to health guidelines. It should be properly drained to prevent dampness and must not be connected to a sewer or cesspool. The walls should be built to keep out air and water. A regular brick or stone wall is not enough unless it’s well coated with smooth, high-quality Portland cement. The floors should also be paved with cement; otherwise, the cellar can fill with contaminated air from the ground, often referred to as "ground air," which poses a constant risk to the health of those living above cellars that have unsealed walls and floors.
Light and ventilation are quite as essential to the healthfulness of a cellar as to other rooms of the dwelling. Constantly during warm weather, and at least once a day during the winter season, windows should be opened wide, thus effecting a free interchange of air. All mold and mustiness should be kept out by thorough ventilation and frequent coats of whitewash to the walls. Vegetables and other decomposable articles, if stored in the basement, should be frequently sorted, and all decaying substances promptly removed. This is of the utmost importance, since the germs and foul gases arising from decomposing food stuffs form a deadly source of contamination through every crack and crevice.
Light and ventilation are just as important for the health of a basement as they are for other rooms in the house. During warm weather, and at least once a day in winter, windows should be opened wide to allow for a free flow of air. It's essential to keep out mold and mustiness through proper ventilation and regular coats of whitewash on the walls. If you’re storing vegetables or other perishable items in the basement, you should sort through them often and quickly remove anything that’s decaying. This is extremely important because the germs and foul gases from rotting food can contaminate the area through every crack and crevice.
KITCHEN CONVENIENCES.
In these days of invention and progress, much thought and ingenuity have been expended in making and perfecting labor-saving articles and utensils, which serve to make housework less of a burden and more of a delight.
In today's world of innovation and advancement, a lot of thought and creativity have gone into creating and improving labor-saving products and tools that make housework easier and more enjoyable.


The Steam-Cooker.—One of the most unique of these conveniences is the steam-cooker, one kind of which is illustrated by the accompanying cut. Steaming is, for many foods, a most economical and satisfactory method of cooking. Especially is this true respecting fruits, grains, and vegetables, the latter of which often have the larger proportion of their best nutritive elements dissolved and thrown away in the water in which they are boiled. In the majority of households it is, however, the method least depended upon, because the ordinary steamer over a pot of boiling water requires too much attention, takes up too much stove room, and creates too much steam in the kitchen, to prove a general favorite. The steam-cooker has an escape-steam tube through which all excess of steam and odors passes into the fire, and thus its different compartments may contain and cook an entire dinner, if need be, and over one stove hole or one burner of an oil or gasoline stove.
The Steam-Cooker.—One of the most unique conveniences is the steam-cooker, a type depicted in the accompanying image. Steaming is a very economical and effective way to cook many foods. This is especially true for fruits, grains, and vegetables, which often lose a significant portion of their best nutrients when boiled in water. However, in most households, this method is rarely used because a standard steamer over a pot of boiling water requires too much attention, takes up too much space on the stove, and creates too much steam in the kitchen to be a popular choice. The steam-cooker has an escape-steam tube that allows excess steam and odors to escape into the fire, so it can cook an entire dinner in its different compartments, all while using only one burner of a stove or an oil or gas stove.
The Vegetable Press.—The accompanying cut represents this handy utensil, which is equally useful as a potato and vegetable masher; as a sauce, gruel, and gravy strainer; as a fruit press, and for many other purposes for which a colander or strainer is needed, while it economizes both time and labor.
The Vegetable Press.—The image shows this handy tool, which is just as useful for mashing potatoes and vegetables as it is for straining sauces, gruels, and gravies. It also works as a fruit press and serves many other functions where a colander or strainer is needed, saving you both time and effort.


Lemon Drill.—This little article for extracting the juice of the lemon, and which can be purchased of most hardware dealers, is quite superior to the more commonly used lemon squeezer. Being made of glass, its use is not open to the danger that the use of metal squeezer is are from poisonous combinations of the acid and metal, while the juice extracted is free from pulp, seeds, and the oil of the skin.
Lemon Drill.—This handy tool for extracting lemon juice, which you can find at most hardware stores, is much better than the usual lemon squeezer. Made of glass, it doesn't carry the risk of harmful reactions between the acid and metal like a metal squeezer does. Plus, the juice it extracts is free from pulp, seeds, and the oil from the skin.
A Handy Waiter.—In many households where no help is employed, a labor-saving device like the one represented in the accompanying illustration, will be found of great service. It is a light double table on easy-rolling casters, and can be readily constructed by anyone handy in the use of tools. If preferred, the top may be covered with zinc. In setting or clearing the table, the dishes may be placed on the lower shelf, with the food on the top, and the table rolled from pantry to dining room, and from dining room to kitchen; thus accomplishing, with one trip, what is ordinarily done with hundreds of steps by the weary housewife. If desirable to reset the table at once after a meal, the waiter will be found most serviceable as a place whereon the glassware and silverware may be washed. It is equally serviceable for holding the utensils and material needed when cooking; being so easily moved, they can be rolled to the stove and is always convenient.
A Handy Waiter.—In many homes where there are no hired helpers, a labor-saving device like the one shown in the accompanying illustration can be extremely useful. It's a lightweight double table on easy-rolling wheels that anyone who is handy with tools can easily build. If you prefer, the top can be covered with zinc. When setting or clearing the table, dishes can go on the lower shelf and food on the top, allowing the table to be rolled from the pantry to the dining room and back to the kitchen; this way, one trip accomplishes what would normally take hundreds of steps for a tired housewife. If you want to reset the table quickly after a meal, the waiter is really helpful for holding the glassware and silverware while they’re being washed. It’s also great for keeping the utensils and ingredients you'll need when cooking; since it can be easily moved, you can roll it to the stove, making it always convenient.
Wall cabinet.—where cupboard space is limited, or where for convenience it is desirable to have some provision for supplies and utensils near the range and baking table, a wall cabinet offers a most convenient arrangement. It may be made of a size to fit in any convenient niche, and constructed plainly or made as ornamental as one pleases, with doors to exclude the dust, shelves on which to keep tin cans filled with rice, oatmeal, cracked wheat, and other grains; glass jars of raisins, sugar, citron, cornstarch, etc.; hooks on which may hang the measures, egg-beater, potato masher, and such frequently needed utensils; and with drawers for paring knives, spoons, and similar articles, the wall cabinet becomes a multum in parvo of convenience which would greatly facilitate work in many households.
Wall cabinet.—When cupboard space is limited, or when it’s convenient to have supplies and utensils close to the stove and baking area, a wall cabinet provides a very handy solution. It can be made to fit into any available space and can be designed simply or be as decorative as you like, featuring doors to keep out dust, shelves for storing tin cans of rice, oatmeal, cracked wheat, and other grains; glass jars for raisins, sugar, citron, cornstarch, and so on; hooks to hang measuring cups, an egg beater, a potato masher, and other frequently used utensils; and drawers for paring knives, spoons, and similar items. The wall cabinet becomes a multum in parvo of convenience that would make tasks easier in many homes.

Wall Cabinet.

Percolate Holder.
Kneading Table.—Much of the tiresome labor of bread-making can be avoided if one is supplied with some convenient table similar to the one represented in the cut, wherein the needed material and utensils may be kept in readiness at all times. The table illustrated has two large tin drawers, each divided into two compartments, in which may be kept corn meal, entire wheat, and Graham and white flours. Two drawers above provide a place for rolling-pin, bread mallet, gem irons, spoons, etc., while a narrow compartment just beneath the hardwood top affords a place for the kneading board. The table being on casters is easily moved to any part of the kitchen for use.
Kneading Table.—A lot of the hard work involved in making bread can be minimized if you have a handy table like the one shown in the picture, where you can keep all the necessary ingredients and tools ready to use at any time. The illustrated table features two large tin drawers, each split into two sections, for storing cornmeal, whole wheat, Graham flour, and white flour. Two additional drawers above offer space for a rolling pin, bread mallet, gem irons, spoons, and more, while a narrow slot just below the hardwood top provides a spot for the kneading board. The table is on casters, making it easy to move around the kitchen as needed.
Kneading Table.
Dish-Towel Rack.—Nothing adds more to the ease and facility with which the frequent dish-washings of the household may be accomplished than clean, well-dried towels. For quick drying,—an item of great importance if one would keep the towels fresh and sweet,—the towel rack represented in the cut, and which can be made by any carpenter, is a most handy device. When not in use, it can be turned up against the wall as illustrated. It is light, affords sufficient drying space so that no towel need be hung on top of another, and projecting out from the wall as it does, the free circulation of air between the towels soon dries them.
Dish-Towel Rack.—Nothing makes the frequent dishwashing in a household easier than having clean, well-dried towels. For quick drying—an important aspect for keeping the towels fresh and odor-free—the towel rack shown in the image, which any carpenter can make, is a very useful tool. When not in use, it can be folded up against the wall as shown. It’s lightweight, provides enough drying space so that no towel has to be laid on top of another, and since it extends out from the wall, the air circulates freely between the towels, allowing them to dry quickly.

Dish-Towel Rack.
 Vegetable Brush.
Kitchen Brushes.—These useful little articles can be put to such a
variety of uses that they are among the chiefest of household
conveniences. They are also so inexpensive, costing but five cents
apiece without handles and seven cents with handles, that no housewife
can afford to be without a supply of them. For the washing of dishes
with handles, the outside of iron kettles, and other cooking utensils
made of iron, they are especially serviceable. The smaller sizes are
likewise excellent for cleaning cut glass ware, Majolica ware,—in fact,
any kind of ware with raised figures or corrugated surfaces. For
cleaning a grater, nothing is superior to one of these little brushes.
Such a brush is also most serviceable for washing celery, as the
corrugated surface of the stalk makes a thorough cleaning with the hands
a difficult operation. Then if one uses a brush with handle, ice water,
which adds to the crispness of the celery, may be used for the cleaning,
as there will be no necessity for putting the hands in the water. A
small whisk broom is also valuable for the same purpose. Such vegetables
as potatoes, turnips, etc., are best cleaned with a brush. It makes the
work less disagreeable, as the hands need not be soiled by the process,
and in no other way can the cleaning be so well and thoroughly done.
Vegetable Brush.
Kitchen Brushes.—These useful little articles can be put to such a
variety of uses that they are among the chiefest of household
conveniences. They are also so inexpensive, costing but five cents
apiece without handles and seven cents with handles, that no housewife
can afford to be without a supply of them. For the washing of dishes
with handles, the outside of iron kettles, and other cooking utensils
made of iron, they are especially serviceable. The smaller sizes are
likewise excellent for cleaning cut glass ware, Majolica ware,—in fact,
any kind of ware with raised figures or corrugated surfaces. For
cleaning a grater, nothing is superior to one of these little brushes.
Such a brush is also most serviceable for washing celery, as the
corrugated surface of the stalk makes a thorough cleaning with the hands
a difficult operation. Then if one uses a brush with handle, ice water,
which adds to the crispness of the celery, may be used for the cleaning,
as there will be no necessity for putting the hands in the water. A
small whisk broom is also valuable for the same purpose. Such vegetables
as potatoes, turnips, etc., are best cleaned with a brush. It makes the
work less disagreeable, as the hands need not be soiled by the process,
and in no other way can the cleaning be so well and thoroughly done.
Vegetable Scrubber.
Kitchen Brushes.—These handy little tools can be used for so many things that they are among the most important household gadgets. They are also really affordable, costing just five cents each without handles and seven cents with handles, so no one should be without a few. They are especially useful for washing dishes with handles, the outsides of iron pots, and other iron cooking utensils. The smaller sizes are great for cleaning cut glass, Majolica ware, and really any kind of dish with raised designs or textured surfaces. When it comes to cleaning a grater, nothing beats one of these little brushes. They’re also super handy for washing celery, since the bumpy surface of the stalk makes it tough to clean with your hands. Plus, if you use a brush with a handle, you can wash it in ice water, which keeps the celery crisp, without needing to stick your hands in the water. A small whisk broom is also helpful for this purpose. For vegetables like potatoes and turnips, a brush works best. It makes the job less messy since your hands stay clean, and it’s the most effective way to get them really clean.
All brushes after being used should be carefully scalded and placed brush downward in a wire sponge basket, or hung up on hooks. If left around carelessly, they soon acquire the musty smell of a neglected dishcloth.
All brushes should be thoroughly rinsed and placed with the bristles facing down in a wire sponge basket or hung up on hooks after use. If left lying around carelessly, they quickly start to smell musty like a forgotten dishcloth.
TABLE TOPICS.
The kitchen is a chemical laboratory, in which are conducted a number of chemical processes by which our food is converted from its crudest state to condition more suitable for digestion and nutrition, and made more agreeable to the palate.—Prof. Matthew Williams.
The kitchen is like a chemistry lab where various chemical processes transform our food from its basic state into something that's easier to digest and healthier, while also making it tastier.—Prof. Matthew Williams.
Half the trouble between mistresses and maids arises from the disagreeable surroundings to which servants are confined. There is no place more dismal than the ordinary kitchen in city dwellings. It is half underground, ill-lighted, and unwholesome. What wonder, then, in the absence of sunlight, there is a lack of sunny temper and cheerful service? An ill-lighted kitchen is almost sure to be a dirty one, where germs will thrive and multiply. Let sanitary kitchens be provided, and we shall have more patient mistresses and more willing servants.—Sel.
Half the issues between mistresses and maids come from the unpleasant environments in which servants are kept. There’s no place more dreary than the typical kitchen in city apartments. It’s often half underground, poorly lit, and unhealthy. So it's no surprise that without sunlight, there's a lack of cheerful attitudes and positive service. A poorly lit kitchen is almost always a dirty one, where germs can thrive and multiply. If we provide sanitary kitchens, we’ll have more understanding mistresses and more eager servants. —Sel.
A sluggish housemaid exclaimed, when scolded for the uncleanliness of her kitchen, "I'm sure the room would be clean enough if it were not for the nasty sun, which is always showing the dirty corners."—Sel.
A slow housemaid exclaimed, when she was scolded for the mess in her kitchen, "I'm sure the room would be clean enough if it weren't for the annoying sunlight, which always highlights the dirty corners."—Sel.
If we would look for ready hands and willing hearts in our kitchens, we should make them pleasant and inviting for those who literally bear the "burden and heat of the day" in this department of our homes, where, emphatically, "woman's work is never done." We should no longer be satisfied to locate our kitchens in the most undesirable corner of the house. We should demand ample light,—sunshine if possible,—and justly too; for the very light itself is inspiring to the worker. It will stir up cheer and breed content in the minds of those whose lot is cast in this work-a-day room.—Sel.
If we want to find willing hands and enthusiastic hearts in our kitchens, we need to make them pleasant and inviting for those who truly carry the "burden and heat of the day" in this part of our homes, where, as we've all heard, "a woman's work is never done." We shouldn't just settle for placing our kitchens in the worst corner of the house. We should insist on plenty of light—sunshine if we can get it—because light itself inspires the person working there. It brings cheer and creates a sense of contentment in those who have to spend time in this everyday space.—Sel.
Any invention on the part of the housekeeper intended to be a substitute for watchfulness, will prove a delusion and a snare.—Sel.
Any attempt by the housekeeper to replace attentiveness will end up being a deceit and a trap.—Sel.
"The first wealth is health," says Emerson.
"The first wealth is health," says Emerson.
A knowledge of sanitary principles should be regarded as an essential part of every woman's education, and obedience to sanitary laws should be ranked, as it was in the Mosaic code, as a religious duty.—Sel.
A knowledge of sanitary principles should be seen as an essential part of every woman's education, and following sanitary laws should be considered, as it was in the Mosaic code, a religious duty.—Sel.
Much of the air of the house comes from the cellar. A heated house acts like a chimney. A German experimenter states that one half of the cellar air makes its way into the first story, one third into the second, and one fifth into the third.
Much of the air in the house comes from the basement. A heated house acts like a chimney. A German researcher claims that half of the basement air moves up to the first floor, a third to the second, and a fifth to the third.

CEREALS AND THEIR PREPARATION FOR THE TABLE
 ereal is the name given to those seeds used as food (wheat, rye, oats,
barley, corn, rice, etc.), which are produced by plants belonging to the
vast order known as the grass family. They are used for food both in the
unground state and in various forms of mill products.
ereal is the name given to those seeds used as food (wheat, rye, oats,
barley, corn, rice, etc.), which are produced by plants belonging to the
vast order known as the grass family. They are used for food both in the
unground state and in various forms of mill products.
Cereal refers to the seeds that are used for food (like wheat, rye, oats, barley, corn, rice, etc.), which come from plants in the large grass family. They can be consumed either whole or in different processed forms.
The grains are pre-eminently nutritious, and when well prepared, easily digested foods. In composition they are all similar, but variations in their constituent elements and the relative amounts of these various elements, give them different degrees of alimentary value. They each contain one or more of the nitrogenous elements,—gluten, albumen, caseine, and fibrin,—together with starch, dextrine, sugar, and fatty matter, and also mineral elements and woody matter, or cellulose. The combined nutritive value of the grain foods is nearly three times that of beef, mutton, or poultry. As regards the proportion of the food elements necessary to meet the various requirements of the system, grains approach more nearly the proper standard than most other foods; indeed, wheat contains exactly the correct proportion of the food elements.
The grains are incredibly nutritious, and when prepared properly, they are easy to digest. Their composition is similar, but differences in their components and the amounts of these elements give them varying levels of nutritional value. They each contain one or more nitrogenous elements—gluten, albumen, casein, and fibrin—along with starch, dextrin, sugar, fatty matter, mineral elements, and cellulose. The overall nutritional value of grain foods is nearly three times that of beef, lamb, or chicken. In terms of the proportions of food elements needed to meet the body's various requirements, grains come closer to the ideal standard than most other foods; in fact, wheat contains the exact right proportion of these food elements.
Being thus in themselves so nearly perfect foods, and when properly prepared, exceedingly palatable and easy of digestion, it is a matter of surprise that they are not more generally used; yet scarcely one family in fifty makes any use of the grains, save in the form of flour, or an occasional dish of rice or oatmeal. This use of grains is far too meager to adequately represent their value as an article of diet. Variety in the use of grains is as necessary as in the use of other food material, and the numerous grain preparations now to be found in market render it quite possible to make this class of foods a staple article of diet, if so desired, without their becoming at all monotonous.
Being such nearly perfect foods in themselves, and when properly prepared, incredibly tasty and easy to digest, it's surprising that they're not used more widely; however, hardly one family in fifty makes any use of grains, except in the form of flour, or an occasional dish of rice or oatmeal. This limited use of grains is far too small to truly reflect their value as a food source. Variety in the use of grains is just as crucial as with other types of food, and the many grain preparations available today make it entirely possible to incorporate these foods as a regular part of the diet without them becoming boring.
In olden times the grains were largely depended upon as a staple food, and it is a fact well authenticated by history that the highest condition of man has always been associated with wheat-consuming nations. The ancient Spartans, whose powers of endurance are proverbial, were fed on a grain diet, and the Roman soldiers who under Caesar conquered the world, carried each a bag of parched grain in his pocket as his daily ration.
In ancient times, grains were heavily relied upon as a basic food source, and history clearly shows that the most advanced societies have always been linked to wheat-eating cultures. The ancient Spartans, known for their legendary endurance, had a diet centered around grains, and the Roman soldiers under Caesar, who conquered much of the world, carried a bag of roasted grains in their pockets as their daily provisions.
Other nationalities at the present time make extensive use of the various grains. Rice used in connection with some of the leguminous seeds, forms the staple article of diet for a large proportion of the human race. Rice, unlike the other grain foods, is deficient in the nitrogenous elements, and for this reason its use needs to be supplemented by other articles containing an excess of the nitrogenous material. It is for this reason, doubtless, that the Hindoos use lentils, and the Chinese eat peas and beans in connection with rice.
Other nationalities today make extensive use of various grains. Rice, when paired with certain leguminous seeds, is a staple food for a large portion of the human population. However, unlike other grain foods, rice lacks nitrogenous elements, so it needs to be complemented with other foods that have higher levels of nitrogen. This is probably why Indians use lentils, and the Chinese include peas and beans with their rice.
We frequently meet people who say they cannot use the grains,—that they do not agree with them. With all deference to the opinion of such people, it may be stated that the difficulty often lies in the fact that the grain was either not properly cooked, not properly eaten, or not properly accompanied. A grain, simply because it is a grain, is by no means warranted to faithfully fulfil its mission unless properly treated. Like many another good thing excellent in itself, if found in bad company, it is prone to create mischief, and in many cases the root of the whole difficulty may be found in the excessive amount of sugar used with the grain.
We often come across people who claim they can’t eat grains because they don’t agree with them. While we respect their opinion, it’s important to point out that the problem often comes from the grain not being cooked properly, eaten the right way, or paired appropriately. A grain, just because it’s a grain, won’t necessarily do its job well unless it's treated correctly. Like many other good things that are excellent on their own, if they’re combined with the wrong ingredients, they can cause issues, and in many cases, the root of the problem may lie in the excessive sugar used with the grain.
Sugar is not needed with grains to increase their alimentary value. The starch which constitutes a large proportion of their food elements must itself be converted into sugar by the digestive processes before assimilation, hence the addition of cane sugar only increases the burden of the digestive organs, for the pleasure of the palate. The Asiatics, who subsist largely upon rice, use no sugar upon it, and why should it be considered requisite for the enjoyment of wheat, rye, oatmeal, barley, and other grains, any more than it is for our enjoyment of bread or other articles made from these same grains? Undoubtedly the use of grains would become more universal if they were served with less or no sugar. The continued use of sugar upon grains has a tendency to cloy the appetite, just as the constant use of cake or sweetened bread in the place of ordinary bread would do. Plenty of nice, sweet cream or fruit juice, is a sufficient dressing, and there are few persons who after a short trial would not come to enjoy the grains without sugar, and would then as soon think of dispensing with a meal altogether as to dispense with the grains.
Sugar isn't necessary with grains to boost their nutritional value. The starch, which makes up a large part of their food elements, needs to be turned into sugar by our digestive processes before the body can use it. So, adding cane sugar just makes it harder for our digestive system to work, all for the sake of taste. People in Asia, who mainly eat rice, don't use sugar with it, so why should we think it's needed for enjoying wheat, rye, oatmeal, barley, and other grains any more than it's required for enjoying bread or other foods made from these same grains? Using grains would likely become more common if they were served with little or no sugar. Keeping sugar on grains tends to spoil the appetite, just like constantly eating cake or sweetened bread instead of regular bread would. A rich, sweet cream or fruit juice is plenty of topping, and most people, after a short time, would learn to appreciate grains without sugar and would just as soon skip a meal altogether as skip the grains.
Even when served without sugar, the grains may not prove altogether healthful unless they are properly eaten. Because they are made soft by the process of cooking and on this account do not require masticating to break them up, the first process of digestion or insalivation is usually overlooked. But it must be remembered that grains are largely composed of starch, and that starch must be mixed with the saliva, or it will remain undigested in the stomach, since the gastric juice only digests the nitrogenous elements. For this reason it is desirable to eat the grains in connection with some hard food. Whole-wheat wafers, nicely toasted to make them crisp and tender, toasted rolls, and unfermented zwieback, are excellent for this purpose. Break two or three wafers into rather small pieces over each individual dish before pouring on the cream. In this way, a morsel of the hard food may be taken with each spoonful of the grains. The combination of foods thus secured, is most pleasing. This is a specially advantageous method of serving grains for children, who are so liable to swallow their food without proper mastication.
Even when served without sugar, grains may not be completely healthy unless eaten properly. Because cooking makes them soft and they don’t need to be chewed much, the first step of digestion, which involves mixing with saliva, is often missed. However, it’s important to remember that grains are mostly made up of starch, and starch needs to be mixed with saliva to digest properly; otherwise, it will stay undigested in the stomach since gastric juice only digests proteins. For this reason, it’s a good idea to eat grains along with some harder foods. Whole wheat wafers, nicely toasted to make them crisp and tender, toasted rolls, and unfermented zwieback are all great options for this. Break two or three wafers into small pieces over each individual dish before pouring on the cream. In this way, a bit of the hard food can be taken with each spoonful of grains. The combination of foods is really enjoyable. This method is especially beneficial for children, who tend to swallow their food without chewing properly.
Cooking of Grains.—All grains, with the exception of rice, and the various grain meals, require prolonged cooking with gentle and continuous heat, in order to so disintegrate their tissues and change their starch into dextrine as to render them easy of digestion. Even the so-called "steam-cooked" grains, advertised to be ready for use in five or ten minutes, require a much longer cooking to properly fit them for digestion. These so-called quickly prepared grains are simply steamed before grinding, which has the effect to destroy any low organisms contained in the grain. They are then crushed and shredded. Bicarbonate of soda and lime is added to help dissolve the albuminoids, and sometimes diastase to aid the conversion of the starch into sugar; but there is nothing in this preparatory process that so alters the chemical nature of the grain as to make it possible to cook it ready for easy digestion in five or ten minutes. An insufficiently cooked grain, although it may be palatable, is not in a condition to be readily acted upon by the digestive fluids, and is in consequence left undigested to act as a mechanical irritant.
Cooking of Grains.—All grains, except for rice and various grain meals, need to be cooked for a long time with gentle, consistent heat to break down their tissues and convert their starch into dextrin, making them easier to digest. Even the so-called "steam-cooked" grains that claim to be ready in five or ten minutes actually require much longer cooking to prepare them for digestion properly. These so-called quick grains are just steamed before being ground, which kills off any low organisms in the grain. They are then crushed and shredded. Baking soda and lime are added to help dissolve the proteins, and sometimes enzymes are included to assist in turning the starch into sugar; however, there’s nothing about this process that changes the grain enough to make it digestible in just five or ten minutes. Insufficiently cooked grain, even if it tastes good, isn't in a state that allows digestive fluids to act on it easily and is therefore left undigested, acting as a mechanical irritant.

For the proper cooking of grains the double boiler is the best and most convenient utensil for ordinary purposes. If one does not possess a double boiler, a very fair substitute may be improvised by using a covered earthen crock placed within a kettle of boiling water, or by using two pails, a smaller within a larger one containing boiling water.
For cooking grains properly, a double boiler is the best and most convenient tool for everyday use. If you don’t have a double boiler, you can easily make a good alternative by placing a covered clay pot inside a pot of boiling water, or by using two buckets, with a smaller one inside a larger one filled with boiling water.
A closed steamer or steam-cooker is also valuable for the cooking of grains. Grains may be cooked in an ordinary kettle, but the difficulties to be encountered, in order to prolong the cooking sufficiently and prevent burning, make it the least desirable utensil for this purpose.
A closed steamer or steam cooker is also great for cooking grains. While you can cook grains in a regular pot, the challenges of keeping the cooking going long enough and avoiding burning make it the least ideal tool for this.
Water is the liquid usually employed for cooking grains, but many of them are richer and finer flavored when milk is mixed with the water,—one part to two of water. Especially is this true of rice, hominy, and farina. When water is used, soft water is preferable to hard. No salt is necessary, but if used at all, it is generally added to the water before stirring in the grain or meal.
Water is the liquid typically used for cooking grains, but many grains taste richer and more flavorful when milk is added to the water—usually one part milk to two parts water. This is especially true for rice, hominy, and farina. If you’re using water, soft water is better than hard water. No salt is needed, but if you do add it, it’s generally mixed into the water before adding the grain or meal.
The quantity of liquid required varies with the different grains, the manner in which they are milled, the method by which they are cooked, and the consistency desired for the cooked grain, more liquid being required for a porridge than for a mush. The following table gives the time necessary for cooking and the quantity of liquid required for the various grains, with the exception of rice, when cooked in a double boiler or closed steamer, to produce a mush of ordinary consistency. If an ordinary kettle is used for cooking the grains, a larger quantity of water will be needed:—
The amount of liquid needed varies with different grains, how they are milled, how they are cooked, and the desired consistency of the cooked grain, with more liquid needed for porridge than for mush. The following table shows the cooking times and the amount of liquid required for various grains, except for rice, when cooked in a double boiler or closed steamer to achieve a standard mush consistency. If a regular kettle is used to cook the grains, a larger amount of water will be required:—
TABLE SHOWING PROPORTION OF GRAIN AND LIQUID REQUIRED,
WITH APPROXIMATE
TIME, WHEN A DOUBLE BOILER IS USED.
| Quantity of Grain. | Water Required. | Hours to Cook. | |
| Graham Grits | 1 part | 4 parts | 3 to 5 |
| Rolled Wheat | 1 " | 3 " | 3 to 4 |
| Cracked Wheat | 1 " | 4-1/2 " | 3 to 4 |
| Pearl Wheat | 1 " | 4 " | 4 to 5 |
| Whole Wheat | 1 " | 5 " | 6 to 8 |
| Rolled Oats | 1 " | 3 " | 3 to 4 |
| Coarse Oatmeal | 1 " | 4 " | 4 to 6 |
| Rolled Rye | 1 " | 3 " | 3 to 4 |
| Pearl Barley | 1 " | 5 " | 4 to 5 |
| Coarse Hominy | 1 " | 5 " | 6 to 10 |
| Fine Hominy | 1 " | 4 " | 4 to 6 |
| Cerealine | 1 " | 1 part | 1/2 |
All grains should be carefully looked over before being put to cook.
All grains should be carefully examined before cooking.
In the cooking of grains, the following points should be observed:—
In cooking grains, you should keep the following points in mind:—
1. Measure both liquid and grain accurately with the same utensil, or with two of equal size.
1. Measure both liquids and grains accurately with the same tool, or with two that are the same size.
2. Have the water boiling when the grain is introduced, but do not allow it to boil for a long time previous, until it is considerably evaporated, as that will change the proportion of water and grain sufficiently to alter the consistency of the mush when cooked. Introduce the grain slowly, so as not to stop the sinking to the bottom, and the whole becomes thickened. If the grain is cooked in a double boiler, this first boiling should be done with the inner dish directly over the fire, and when the grain has thickened or become "set," as it is termed, the dish should at once be placed in the outer boiler, the water in which should be boiling. It will then require no further care during the entire cooking, safe to keep the outer boiler filled and the water boiling. If the grain is to be cooked in a steam-cooker, as soon as set it may be turned into a china or an earthen dish, suitable for use on the table, and placed at once in the steamer to complete the cooking. If an ordinary kettle is used, it is well to place it upon an iron ring or brick on some part of the range were it will just simmer, for the remainder of the cooking.
2. Have the water boiling when you add the grain, but don’t let it boil for too long beforehand, as that will reduce the water amount and change the grain-to-water ratio, which will affect the texture of the mush when it’s cooked. Add the grain slowly to prevent it from settling at the bottom, causing the mixture to thicken. If you’re cooking the grain in a double boiler, start by boiling it in the inner pot directly over the heat. Once the grain has thickened or “set,” move the pot to the outer boiler, where the water should be boiling. After that, you won’t need to worry about it during the cooking process, just keep the outer boiler filled and the water boiling. If you’re using a steam cooker, once the grain has set, you can transfer it to a serving dish made of china or earthenware and put it in the steamer to finish cooking. If you’re using a regular kettle, it’s a good idea to place it on an iron ring or a brick on the stovetop in a spot where it will just simmer for the rest of the cooking time.
3. Stir the grain continuously until it has set, but not at all afterward. Grains are much more appetizing if, while properly softened, they can still be made to retain their original form. Stirring renders the preparation pasty, and destroys its appearance. Grains cooked in a double boiler will require no stirring, and there will be little danger of their being lumpy, underdone on top, and scorched at the bottom, as is so often the case when cooked in a single boiler.
3. Stir the grains continuously until they've solidified, but don't stir after that. Grains look a lot more appealing if they’re properly softened and still hold their original shape. Stirring makes the mixture pasty and ruins its appearance. Grains cooked in a double boiler won’t need stirring, and there's a lower chance of them being lumpy, undercooked on top, and burnt at the bottom, like what often happens when cooked in a single boiler.
4. Cook continuously. If it be necessary to replenish the water in the outer boiler at anytime, let it be done with water of boiling temperature. If it is desired to have the mush quite thick and dry, the boiler should be left uncovered during the latter part of the cooking. If preferred moist, keep the cover on.
4. Keep cooking continuously. If you need to add water to the outer boiler at any time, make sure it's boiling hot. If you want the mush to be thick and dry, leave the boiler uncovered towards the end of the cooking. If you prefer it to be moist, keep the lid on.
In the preparation of all mushes with meal or flour, it is a good plan to make the material into a batter with a portion of the liquid retained from the quantity given, before introducing it into the boiling water. This prevents the tendency to cook in lumps, so frequent when dry meal is scattered into boiling liquid. Care must be taken, however, to add the moistened portion very slowly, stirring vigorously meantime, so that the boiling will not be checked. Use warm water for moistening. The other directions given for the whole or broken grains are applicable to the ground products.
In preparing any mushes with meal or flour, it's a good idea to mix the ingredients into a batter using some of the liquid set aside from the amount you need, before adding it to the boiling water. This helps avoid clumping, which often happens when dry meal is sprinkled into boiling liquid. However, it’s important to add the moistened mixture very slowly while stirring vigorously so that the boiling isn’t interrupted. Use warm water for moistening. The other instructions provided for whole or broken grains also apply to ground products.
Place the grain, when sufficiently cooked, in the refrigerator or in some place where it will cool quickly (as slow cooling might cause fermentation), to remain overnight. If cooked in a porcelain-lined or granite-ware double boiler, it may be left undisturbed, if uncovered. If cooked in tin or iron, turn the grain into a large earthen or china dish. To heat in the morning, fill the outer boiler with boiling water, place the inner dish containing the grain therein, and steam until thoroughly heated. No stirring and no additional liquid will be necessary, and if placed upon the stove when beginning the preparations for breakfast, it will be ready for serving in good season. If the grain has been kept in an earthen dish, it may best be reheated by placing that inside the steam cooker or an ordinary steamer over a kettle of boiling water.
Place the cooked grain in the refrigerator or somewhere it can cool quickly (because slow cooling might cause fermentation) and let it sit overnight. If you cooked it in a porcelain-lined or granite double boiler, you can leave it uncovered. If you used tin or iron, transfer the grain to a large earthenware or china dish. To heat it up in the morning, fill the outer boiler with boiling water, place the inner dish with the grain inside it, and steam until it's thoroughly heated. You won’t need to stir or add extra liquid, and if you put it on the stove while preparing breakfast, it will be ready to serve in good time. If the grain has been stored in an earthen dish, it’s best to reheat it by placing that dish inside a steam cooker or a regular steamer over a pot of boiling water.
Cracked wheat, pearl wheat, oatmeal, and other course grain preparations to be reheated, require for cooking a half cup of water in addition to the quantity given in the table. For rolled wheat, rolled oats, rolled rye, and other crushed grains, no more is needed. Grains may be used for breakfast without reheating, if served with hot milk or cream. If one has an Aladdin oven, the problem of grains for breakfast may be easily solved by cooking them all night, and if started late in the evening, they may be thus cooked over a single burner oil stove with the flame turned low.
Cracked wheat, pearl wheat, oatmeal, and other coarse grain preparations that need to be reheated require an extra half cup of water in addition to what’s listed in the table. For rolled wheat, rolled oats, rolled rye, and other crushed grains, no additional water is necessary. Grains can be eaten for breakfast without reheating if served with hot milk or cream. If you have an Aladdin oven, you can easily solve the breakfast grain problem by cooking them overnight, and if you start late in the evening, you can cook them over a single burner oil stove with the flame turned low.
Grains an economical food.—While grains are pre-eminently among the most nutritious of foods, they are also among the most economical, the average price being from five to seven cents a pound, and even less when purchased in bulk. If it be objected that they require much fuel to secure the prolonged cooking necessary, we would say that a few cents' worth of oil a week and a small lamp stove will accomplish the cooking in a most efficient manner. For a hot-weather food there are few articles which give greater satisfaction and require less time and labor on the part of the housewife than grains, cooked by the aid of a small lamp stove.
Grains are an affordable food.—While grains are among the most nutritious foods, they are also very affordable, with an average price of five to seven cents per pound, and even cheaper when bought in bulk. If someone argues that they take a lot of fuel to cook for a long time, we would suggest that a few cents’ worth of oil a week and a small lamp stove can cook them very efficiently. For a food suitable for hot weather, there are few items that provide more satisfaction and require less time and effort from the housewife than grains, prepared using a small lamp stove.
WHEAT.
Wheat is of two principal kinds, characterized as soft and hard wheat, though there are hundreds of named varieties of the grain. The distinction between many of these is due to variation in the relative proportions of starch and nitrogenous matter. Some contain not more than eight per cent of nitrogenous elements, while others contain eighteen or twenty per cent, with a corresponding decrease in carbonaceous elements. This difference depends upon the soil, cultivation, season, climate, and other conditions under which the grain is produced.
Wheat comes in two main types: soft and hard wheat, although there are hundreds of named varieties of the grain. The differences among these varieties are largely due to the varying amounts of starch and protein. Some have as little as eight percent protein, while others have eighteen or twenty percent, which means they have fewer carbon-based elements. This variation is influenced by factors like soil, farming methods, season, climate, and other conditions where the grain is grown.
The structure of the wheat grain consists of an external tegument of a hard, woody nature, so coherent that it appears in the form of scales or bran when the wheat is ground, and an inner portion, more soft and friable, consisting of several cellular layers. The layer nearest the outer husk contains vegetable fibrin and fatty matter. The second layer is largely composed of gluten cells; while the center comprising the bulk of the grain, is chiefly made up of starch granules with a small proportion of gluten.
The structure of the wheat grain features an outer coating that is hard and woody, which is so tightly bound that it breaks into scales or bran when the wheat is milled. Inside, there's a softer, crumbly portion made up of several layers of cells. The layer closest to the outer husk contains plant protein and fat. The second layer is mostly made up of gluten cells, while the center, which makes up the majority of the grain, is primarily composed of starch granules with a small amount of gluten.

The structure of a wheat kernel is well illustrated in the accompanying cut. As will be seen, the different food elements are situated in different parts of the grain, and not uniformly distributed throughout its structure. The outer husk of the berry is composed wholly of innutritious and indigestible matter, but the thin layers which lie next this outer covering contain the larger proportion of the nitrogenous elements to be found in the entire kernel. The central portion consists almost wholly of farinaceous matter.
The structure of a wheat kernel is clearly shown in the accompanying cut. As you can see, the different nutrients are located in different parts of the grain and are not evenly spread throughout its structure. The outer husk of the berry is made up entirely of non-nutritious and indigestible material, but the thin layers just inside this outer covering hold a larger portion of the protein-rich elements found in the entire kernel. The central part is almost entirely made up of starchy material.
Phosphates and other mineral matter are present to some extent throughout the entire grain, but preponderates in the external part. Here is also found a peculiar, soluble, active principle called diastase, which possesses the power of converting starch into sugar. The dark color and marked flavor of Graham bread is undoubtedly due to the influence of this element.
Phosphates and other minerals are found throughout the entire grain, but are mostly concentrated in the outer part. Here, you can also find a unique, soluble, active component called diastase, which has the ability to turn starch into sugar. The dark color and distinct flavor of Graham bread is definitely a result of this element.
Until within a few years the unground grain was rarely used as an article of food, but people are beginning to appreciate its wholesomeness, and cracked, rolled, and pearled wheats are coming rapidly into favor. Cracked wheat is the grain cleaned and then cut into two or more pieces; in rolled wheat the grains are mashed between rollers, by which process they are thoroughly softened in every part, and are then easily cooked. Pearl wheat is the whole grain cleaned and dressed. The whole grain is also cooked sometimes in its natural state.
Until a few years ago, unground grain was rarely eaten, but people are starting to recognize its nutritional value, and cracked, rolled, and pearl wheat are becoming increasingly popular. Cracked wheat is made by cleaning the grain and then cutting it into two or more pieces; rolled wheat is flattened between rollers, which softens it completely, making it easy to cook. Pearl wheat is the whole grain that has been cleaned and polished. Sometimes, the whole grain is also cooked in its natural form.
Preparation and cooking.—Few articles of food show greater difference between good and poor cooking than the various grains. Dry, harsh, or underdone, they are as unwholesome as unpalatable. Like most of the grains, wheat, with the exception of new wheat boiled whole, should be put into boiling water and allowed to cook continuously but slowly until done. Any of the unground preparations require prolonged cooking. The average length of time and the approximate amount of water needed in cooking one cupful of the various wheat preparations in a double boiler is stated on page 82.
Preparation and cooking.—Few foods show a greater difference between good and bad cooking than grains. When they are dry, tough, or undercooked, they are as unwholesome as they are unappetizing. Like most grains, wheat, except for new wheat boiled whole, should be added to boiling water and cooked continuously but slowly until it is done. Any unground preparations require longer cooking. The average cooking time and the estimated amount of water needed for one cup of various wheat preparations in a double boiler are listed on page 82.
RECIPES.
Pearl Wheat.—Heat a quart of water to boiling in the inner dish of a double boiler, and stir into it one cup or one-half pint of pearl wheat. Let it boil rapidly until thickened and the wheat has ceased settling, then place in the outer boiler, in which the water should be boiling, and cook continuously from three to four hours.
Pearl Wheat.—Heat a quart of water to a boil in the inner pot of a double boiler, then stir in one cup or half a pint of pearl wheat. Let it boil vigorously until it thickens and the wheat stops settling, then transfer it to the outer pot, which should have boiling water, and cook continuously for three to four hours.
Boiled Wheat (sometimes called frumenty).—Select newly-cut wheat, well rubbed or threshed out. Look it over carefully, wash, and put to cook in five times its measure of cold water. Let it come to a boil, and cook gently until the grains burst open, and it can be readily mashed between the thumb and finger. This will require from four to ten hours, depending upon the age and variety of the wheat used. When done, it should be even full of a rich, thick liquor. If necessary, add more boiling water, but stir as little as possible. It may be served with cream, the same as other wheat preparations. It is also excellent served with lemon and other fruit sauces.
Boiled Wheat (sometimes called frumenty).—Choose freshly cut wheat that’s been properly rubbed or threshed. Inspect it carefully, wash it, and cook it in five times its volume of cold water. Bring it to a boil, then simmer until the grains burst open and can be easily mashed between your thumb and finger. This will take four to ten hours, depending on the age and type of wheat used. When it’s done, it should be filled with a rich, thick liquid. If needed, add more boiling water, but stir as little as possible. It can be served with cream, like other wheat dishes. It’s also great with lemon and other fruit sauces.
Wheat with Raisins.—Raisins or Zante currants may be added to any of the foregoing recipes, if desired. The raisins or currants should be well steamed previously, however, and stirred in lightly and evenly just before dishing. If cooked with the grain, they become soft, broken, and insipid. Figs, well steamed and chopped, may be added in the same way.
Wheat with Raisins.—You can add raisins or Zante currants to any of the recipes mentioned above if you'd like. Just make sure to steam the raisins or currants well beforehand, then gently mix them in just before serving. If you cook them with the grain, they'll turn soft, mushy, and bland. You can also add figs that have been steamed and chopped in the same way.
Wheat with Fresh Fruit.—Fresh whortleberries, blueberries, and blackberries stirred into any of the well-cooked wheat preparations just before serving, make a very desirable addition. A most delicious dish may be prepared by stirring into well-cooked cracked wheat a few spoonfuls of rather thick cream and some fresh wild blackberries. Serve hot.
Wheat with Fresh Fruit.—Fresh whortleberries, blueberries, and blackberries mixed into any well-cooked wheat dishes right before serving make a great addition. You can create a really tasty meal by mixing in well-cooked cracked wheat a few spoons of thick cream and some fresh wild blackberries. Serve hot.
Molded wheat.—Cracked wheat, rolled wheat, or pearl wheat, cooked according to the foregoing recipes, and turned into molds until cold, makes a very palatable dessert, and may be served with sugar and cream or with fruit juice. Bits of jelly placed on top of the molds in the form of stars or crosses, add to the appearance. Molded grains are also very nice served with fresh berries, either mashed or whole, arranged around the mold.
Molded wheat.—Cracked wheat, rolled wheat, or pearl wheat, cooked according to the previous recipes and set in molds until cool, makes a delicious dessert and can be served with sugar and cream or with fruit juice. Pieces of jelly placed on top of the molds in the shape of stars or crosses enhance the presentation. Molded grains are also great served with fresh berries, either mashed or whole, arranged around the mold.
FINER MILL PRODUCTS OF WHEAT.
The grain of wheat is inclosed in a woody envelope. The cellular layers just beneath contain the largest proportion of nitrogenous matter, in the form of gluten, and are hard of pulverization, while the starchy heart of the grain is easily crumbled into fine dust. Thus it will be readily understood that when the grain is subjected to an equal pulverizing force, the several portions will be likely to be crushed into particles of different sizes. The outer husk being toughest, will be the least affected, the nitrogenous or glutenous portion will be much finer, while the brittle starch will be reduced to powder. This first simple product of grinding is termed wheat meal, unbolted, or Graham flour, and of course contains all the elements of the grain. In ordinary milling, however, this is subjected to various siftings, boltings, or dressings, to separate the finer from the coarser particles, and then subdivided into various grades of flour, which vary much in composition and properties. The coarser product contains the largest proportion of nutrients, while in the finer portions there is an exclusion of a large part of the nitrogenous element of the grain. The outer portions of the wheat kernel, which contain the greater part of the nitrogenous element, are darker in color than the central, starchy portion. It will be apparent, then, that the finer and whiter the flour, the less nutriment it is likely to contain, and that in the use of superfine white flour the eye is gratified at the expense of the body.
The grain of wheat is enclosed in a tough outer layer. The cellular layers just underneath have the highest amount of nitrogenous matter, in the form of gluten, and are hard to grind, while the starchy center of the grain breaks down easily into fine dust. This means that when the grain is ground with equal force, different parts will likely break into particles of various sizes. The outer husk is the toughest and will be the least affected, the nitrogenous or gluten-rich part will be much finer, while the brittle starch will turn into powder. This initial simple product of grinding is called wheat meal, unbolted, or Graham flour, and it naturally contains all the components of the grain. In typical milling, however, this is subjected to different sifting, bolting, or dressing methods to separate the finer from the coarser particles, and then divided into various grades of flour, which differ significantly in composition and characteristics. The coarser product has the highest proportion of nutrients, while the finer portions lose a substantial amount of the grain's nitrogenous element. The outer parts of the wheat kernel, which hold most of the nitrogenous content, are darker in color than the central, starchy part. Therefore, it’s clear that the finer and whiter the flour, the less nutrition it is likely to have, and that using superfine white flour may look appealing but sacrifices nutritional value.
A preparation called farina, is made from the central portion of wheat, freed from bran, and crushed into granules. Another preparation, called Graham grits, is prepared by granulating the outer layers of the kernel together with the germ of the wheat. This preparation, comparatively a new one, includes the most nutritious properties of the grain, and its granular form renders it excellent for mushes as well as for other purposes. Farina is scarcely more nutritious than white flour, and should not be used as a staple food. Graham grits contains the best elements of the wheat grain in good proportion, and is one of the best preparations of wheat. Other preparations of wheat somewhat similar in character are farinose, germlet, etc.
A product called farina is made from the center part of wheat, stripped of bran, and crushed into granules. Another product, called Graham grits, is made by grinding the outer layers of the kernel along with the wheat germ. This newer preparation retains the most nutritious qualities of the grain, and its granular form makes it great for mushes and other uses. Farina is only slightly more nutritious than white flour and shouldn't be relied on as a main food source. Graham grits contain the best parts of the wheat grain in a good balance and is one of the top wheat products. Other similar wheat products include farinose, germlet, and so on.
RECIPES.
Farina.—Heat a pint of milk and one of water, or if preferred, a quart of milk, in the inner cup of a double boiler; and when boiling, stir in five tablespoonfuls of farina, moistened evenly with a little milk. Let it boil rapidly until well set, which will be in about five or eight minutes; then place in the outer boiler, and cook one hour. Serve cold or hot with a dressing of cream or fruit juices. Farina may be cooked in water alone, but on account of its lack of nutritive elements, it is more valuable if prepared with milk.
Farina.—Heat a pint of milk and a pint of water, or if you prefer, use a quart of milk, in the inner pot of a double boiler; and when it's boiling, stir in five tablespoons of farina, mixed with a little milk. Let it boil rapidly until it's thick, which will take about five to eight minutes; then move it to the outer pot and cook for another hour. Serve it cold or hot with cream or fruit juices. Farina can be cooked in just water, but since it lacks nutrients, it’s better to prepare it with milk.
Carefully look over, washed, and chop or cut quite finally, enough good figs to make a cupful. Stew in a pint of water, to which has been added a tablespoonful of sugar, until they are one homogeneous mass. If the figs are not of the best quality and do not readily soften, it is well, after stewing for a time, to rub them through a colander or vegetable press to break up the tough portions and make a smooth sauce. Put a spoonful of the hot fig sauce on each individual dish of farina, and serve with cream or without dressing.
Carefully wash and chop enough good figs to make a cupful. Stew them in a pint of water with a tablespoon of sugar until they form a smooth mixture. If the figs aren’t high quality and don’t soften easily, after stewing for a while, it’s a good idea to press them through a colander or vegetable press to break up the tough bits and create a smooth sauce. Place a spoonful of the hot fig sauce on each individual dish of farina, and serve with cream or without any dressing.
Molded Farina.—Farina to be used cold may be cooked in the same manner as before described, with two or three tablespoonfuls of sugar added at the same time with the farina, and when done, molded in cups previously wet with a little cold water. Serve with a dressing of fruit juice, whipped cream flavored with lemon, or mock cream flavored with cocoanut.
Molded Farina.—To prepare farina for serving cold, cook it just like previously described, adding two or three tablespoons of sugar at the same time as the farina. Once it's done, pour it into cups that have been lightly moistened with cold water. Serve it with a topping of fruit juice, whipped cream with a hint of lemon, or mock cream flavored with coconut.
Graham Grits.—To four parts of water boiling in the inner dish of a double boiler add slowly, so as not to stop the boiling of the water, one part of Graham grits. Stir until thickened, then place in the outer boiler, and steam from three to five hours. Serve hot with cream, or mold in cups previously dipped in cold water, and serve with a dressing of fruit juice. The fig sauce prepared as previously directed, is also excellent with Graham grits.
Graham Grits.—To four parts of water boiling in the inner dish of a double boiler, slowly add one part of Graham grits without stopping the boiling of the water. Stir until it thickens, then place it in the outer boiler, and steam for three to five hours. Serve hot with cream, or mold it in cups that have been dipped in cold water, and serve with a fruit juice dressing. The fig sauce made as directed earlier is also great with Graham grits.
Graham Mush No. 1.—Good flour is the first requisite for making good Graham mush. Poor Graham flour cannot be made into first-class mush. Flour made from the best white winter wheat is perhaps the best. It may be used either sifted or unsifted, as preferred. The proportion of flour and liquid to be used will necessarily vary somewhat with the quality of the flour, but in general, three parts water to one of flour will be needed. Too much flour not only makes the mush too thick, but gives it an underdone taste. Stir the dried flour rapidly into boiling water, (which should not cease to boil during the process), until a thick porridge is obtained. It is well to have it a little thinner at first than is desirable for serving, as it will thicken by cooking. Cook slowly at least one hour. A longer time makes it more digestible.
Graham Mush No. 1.—Good flour is the first requirement for making good Graham mush. Low-quality Graham flour won’t yield top-notch mush. Flour made from the best white winter wheat is probably the best choice. You can use it either sifted or unsifted, depending on your preference. The ratio of flour to liquid will vary slightly based on the flour's quality, but generally, you’ll need three parts water to one part flour. Using too much flour makes the mush too thick and gives it an undercooked flavor. Quickly stir the dry flour into boiling water (which should remain boiling during this process) until you achieve a thick porridge-like consistency. It's better to start with a slightly thinner mixture than you'd like to serve because it will thicken while cooking. Cook slowly for at least an hour. Cooking it longer makes it easier to digest.
Left-over Graham mush is nice spread on rather shallow tins, and simply heated quickly in a hot oven.
Leftover Graham mush spreads nicely on shallow pans and just needs to be heated quickly in a hot oven.
Graham Mush No. 2.—Moisten one pint of good Graham flour with a pint of warm water, or enough to make a batter thin enough to pour. (The quantity of water needed will vary a little with the fineness and quality of the flour.) Pour this batter into a quart of water boiling in the inner cup of a double boiler. Remember to add the batter sufficiently slow, so as not to stop the boiling of the water. When thickened, put into the outer boiler, and cook for one hour.
Graham Mush No. 2.—Wet one pint of good Graham flour with a pint of warm water, or just enough to make a batter that's thin enough to pour. (The amount of water required may vary slightly based on the texture and quality of the flour.) Pour the batter slowly into a quart of water that's boiling in the inner cup of a double boiler, being careful not to disrupt the boiling water. Once thickened, transfer it to the outer boiler and cook for one hour.
Graham Mush No. 3.—Prepare in the same way as above, using milk or part milk in the place of water. Left-over Graham mush at breakfast, which has been prepared with water, is very nice if, while it is still warm, a small quantity of hot milk is well stirred into it, and it is then set by to be reheated in a double boiler for dinner.
Graham Mush No. 3.—Prepare it the same way as mentioned above, using milk or part milk instead of water. Leftover Graham mush from breakfast, made with water, tastes great if you stir in a small amount of hot milk while it’s still warm, and then let it sit to be reheated in a double boiler for dinner.
Graham mush with Dates.—Prepare a mush as for Graham mush No. 2. When done, place in the dish in which the mush is to be served, some nice, fresh dates from which the stones have been removed. Pour the mush over them, and stir up lightly, taking care not to break the fruit, and serve. Raisins previously steamed, or figs steamed and cut into pieces, may be used instead of dates. Serve hot with cream, or mold, and serve cold.
Graham Mush with Dates.—Make the mush as you would for Graham mush No. 2. Once it's ready, put some nice, fresh dates that have had the pits removed in the dish where you'll serve the mush. Pour the mush over the dates and gently mix, being careful not to break the fruit, then serve. You can also use steamed raisins or steamed figs cut into pieces instead of dates. Serve it hot with cream, or let it cool and serve it cold.
Bran Jelly.—Select some clean wheat bran, sprinkle it slowly into boiling water as for Graham mush, stirring briskly meanwhile with a wooden spoon, until the whole is about the consistency of thick gruel. Cook slowly in a double boiler for two hours. Strain through a fine wire sieve placed over the top of a basin. When strained, reheat to boiling. Then stir into it a spoonful or so of sifted Graham flour, rubbed smooth in a little cold water. Boil up once; turn into molds previously wet in cold water, and when cool, serve with cream or fruit juice.
Bran Jelly.—Take some clean wheat bran and gradually sprinkle it into boiling water like you would for Graham mush, stirring quickly with a wooden spoon until it reaches a thick gruel consistency. Cook it slowly in a double boiler for two hours. Strain it through a fine wire sieve set over a bowl. Once strained, bring it back to a boil. Then mix in a spoonful or so of sifted Graham flour, which you’ve smoothed out in a little cold water. Boil it once more; pour it into molds that have been rinsed with cold water, and when it's cool, serve it with cream or fruit juice.
THE OAT, OR AVENA.
The ancient Greeks and Romans used oats, ranking them next in value to barley, which they esteemed above all other cereals. Although principally grown as food for horses, the oat, when divested of its husk and broken by a process of milling, is an exceedingly nutritious and valuable article of diet for human beings; and there is no article of food that has increased in general favor more rapidly in the last few years than this grain.
The ancient Greeks and Romans used oats, ranking them just below barley, which they valued above all other cereals. Although mainly grown for horse feed, oats, when hulled and processed through milling, are incredibly nutritious and a valuable part of human diets. In recent years, no food has gained popularity as quickly as this grain.
The Scotch have long been famed for their large consumption of oatmeal. It forms the staple article of diet for the peasantry, to which fact is generally attributed the fine physique and uniform health for which they, as a race, are particularly noted. It is related that Dr. Johnson, of dictionary fame, who never lost an opportunity to disparage the Scotch, on one occasion defined oats as, "In Scotland, food for men; in England, food for horses." He was well answered by an indignant Scotchman who replied, "Yes; and where can you find such fine men as in Scotland, or such horses as in England?"
The Scots have long been known for their high consumption of oatmeal. It makes up the main part of the diet for the peasantry, which many believe contributes to the strong physiques and overall good health that they, as a people, are particularly recognized for. It’s said that Dr. Johnson, famous for his dictionary, who never missed a chance to criticize the Scots, once defined oats as, "In Scotland, food for men; in England, food for horses." A frustrated Scotsman quickly responded, "Yes; and where can you find such fine men as in Scotland, or such horses as in England?"
Oatmeal justly ranks high as an alimentary substance. It contains about the same proportion of nitrogenous elements as wheat, and with the exception of maize, is richer in fatty matter than any other of the cultivated cereals. In general structure the oat resembles wheat.
Oatmeal rightfully ranks high as a food source. It has about the same amount of protein as wheat, and except for corn, it has more fat than any other cultivated grain. In general structure, oats are similar to wheat.
To prepare oats for food, the husk, which is wholly indigestible in character, must be thoroughly removed. To accomplish this, the grain is first kiln-dried to loosen the husk, and afterward submitted to a process of milling. Denuded of its integument, the nutritive part of the grain is termed groats; broken into finer particles, it constitutes what is known as oatmeal; rolled oats, or avena, is prepared by a process which crushes the kernels. Oatmeal varies also in degrees of trituration, some kinds being ground much finer than others. The more finely-ground products are sometimes adulterated with barley meal, which is cheaper than oatmeal and less nutritious. The black specks which are sometimes found in oatmeal are particles of black oats which have been ground in connection with the other.
To prepare oats for consumption, the inedible husk must be completely removed. First, the grains are kiln-dried to loosen the husk, and then they go through a milling process. Once stripped of its outer layer, the edible part of the grain is called groats; when broken into finer pieces, it’s known as oatmeal; rolled oats, or avena, are made by crushing the kernels. Oatmeal also comes in different levels of fineness, with some varieties being ground much finer than others. The more finely-ground products are sometimes mixed with barley meal, which is cheaper and less nutritious than oatmeal. The black specks occasionally found in oatmeal are bits of black oats that have been ground along with the other oats.
Oatmeal lacks the tenacity of wheaten flour, and cannot, without the addition of some other flour, be made into light bread. It is, however, largely consumed by the inhabitants of Scotland and the north of England, in the form of oatcakes. The oatmeal is mixed with water, kneaded thoroughly, then rolled into very thin cakes, and baked on an iron plate or griddle suspended over a fire. So much, however, depends upon the kneading, that it is said that the common inquiry before the engagement of a domestic servant in Scotland, is whether or not she is a good kneader of oatcakes.
Oatmeal doesn’t have the elasticity of wheat flour and can’t be made into light bread without mixing in some other flour. However, it is mostly eaten by people in Scotland and northern England in the form of oatcakes. The oatmeal is mixed with water, kneaded well, then rolled into very thin cakes and baked on an iron plate or griddle over a fire. A lot rides on the kneading, so it’s said that a common question before hiring a domestic worker in Scotland is whether or not she is good at kneading oatcakes.
The most common use of oatmeal in this country is in the form of mush or porridge. For this the coarser grades of meal are preferable. For people in health, there is no more wholesome article of diet than oatmeal cooked in this way and eaten with milk. For growing children, it is one of the best of foods, containing, as it does, a large proportion of bone and muscle-forming material, while to almost all persons who have become accustomed to its use, it is extremely palatable. The time required for its digestion is somewhat longer than that of wheaten meal prepared in the same manner. It is apt to disagree with certain classes of dyspeptics, having a tendency to produce acidity, though it is serviceable as an article of diet in some forms of indigestion. The manner of its preparation for the table has very much to do with its wholesomeness. Indeed, many objectionable dishes are prepared from it. One of these, called brose, much used in Scotland, is made by simply stirring oatmeal into some hot liquid, as beef broth, or the water in which a vegetable has been boiled. The result is a coarse, pasty mass of almost raw oatmeal, an extremely indigestible compound, the use of which causes water brash. A preparation called sowens, or flummery, made by macerating the husks of the oats in water from twenty-four to thirty-six hours, until the mixture ferments, then boiling down to the consistency of gruel, is a popular article of food among the Scotch and Welsh peasantry. When boiled down still more, so it will form a firm jelly when cold, the preparation is called budrum.
The most common way oatmeal is used in this country is as mush or porridge. For this, the coarser grades of oatmeal are better. For healthy people, there’s no healthier food than oatmeal prepared this way and eaten with milk. For growing children, it’s one of the best foods because it has a high proportion of bone and muscle-building nutrients, and for most who have gotten used to it, it’s very tasty. It takes a bit longer to digest than wheat meal made the same way. Some people with digestive issues might find it doesn’t sit well with them, as it can cause acidity, though it can be beneficial for certain types of indigestion. How it’s prepared plays a big role in how healthy it is. In fact, there are many unappetizing dishes made from it. One of these, called brose, commonly used in Scotland, is made by simply stirring oatmeal into hot liquid, like beef broth or the water used to boil vegetables. The result is a thick, pasty mass of almost raw oatmeal, which is very hard to digest and can lead to water brash. Another dish, called sowens or flummery, is made by soaking oat husks in water for twenty-four to thirty-six hours, until the mixture ferments, and then boiling it down to a gruel-like consistency. This is popular among the Scotch and Welsh peasantry. If it’s boiled down even more so it forms a firm jelly when cold, it’s called budrum.
Preparation and Cooking.—Oatmeal requires much cooking in order to break its starch cells; and the coarser the meal, the longer it should be allowed to cook. A common fault in the use of oatmeal is that it is served in an underdone state, which makes a coarse, indigestible dish of what, with more lengthy preparation, would be an agreeable and nutritious food. Like most of the grains, it is best put into boiling soft water, and allowed to cook continuously and slowly. It is greatly injured by stirring, and it is therefore preferably cooked in a double boiler or closed steamer. If it is necessary to use an ordinary kettle, place it on some part of the range where the contents will only simmer; or a hot brick may be placed under it to keep it from cooking too fast. It may be cooked the day previous, and warmed for use the same as other grains.
Preparation and Cooking.—Oatmeal needs a lot of cooking to break down its starch cells; the coarser the meal, the longer it should be cooked. A common mistake with oatmeal is serving it undercooked, resulting in a coarse, hard-to-digest dish that, with more time, could be a pleasant and nutritious food. Like most grains, it's best to add it to boiling soft water and let it cook steadily and slowly. Stirring it too much can really ruin it, so it's best to cook it in a double boiler or a closed steamer. If you need to use a regular pot, keep it on a part of the stove where it will only simmer, or put a hot brick underneath it to prevent it from cooking too fast. You can cook it the day before and reheat it like other grains.
RECIPES.
Oatmeal fruit mush.—Prepare the oatmeal as directed above, and stir in lightly, when dishing for the table, some sliced mellow and juicy raw sweet apples. Strawberry apples and other slightly tart apples are likewise excellent for the purpose. Well-ripened peaches and bananas may also be used, if care is taken to preserve the slices whole, so as to present an appetizing appearance. Both this and the plain oatmeal mush are best eaten with toasted whole-wheat wafers or some other hard food.
Oatmeal fruit mush.—Prepare the oatmeal as instructed above, and gently stir in some sliced sweet, ripe raw apples when serving. Strawberry apples and other slightly tart varieties work well too. You can also use perfectly ripe peaches and bananas, but make sure to keep the slices intact for a pleasing presentation. Both this dish and plain oatmeal are best enjoyed with toasted whole-wheat wafers or another crunchy accompaniment.
Oatmeal Blancmange No. 1.—Soak a cupful of coarse oatmeal over night in a pint and a half of water. In the morning, beat the oatmeal well with a spoon, and afterwards pass all the soluble portion through a fine strainer. Place the liquid in the inner dish of a double boiler, and cook for half an hour. Turn into cups, cool fifteen or twenty minutes, and serve warm with cream and sugar, or a dressing of fruit juice. A lemon sauce prepared as directed on page 354 likewise makes an excellent dressing.
Oatmeal Blancmange No. 1.—Soak a cup of coarse oatmeal overnight in a pint and a half of water. In the morning, mix the oatmeal thoroughly with a spoon, then strain the liquid through a fine strainer. Put the liquid in the inner pot of a double boiler and cook for thirty minutes. Pour into cups, let cool for fifteen or twenty minutes, and serve warm with cream and sugar, or with a drizzle of fruit juice. A lemon sauce made as instructed on page 354 also makes a great topping.
Oatmeal Blancmange No. 2.—Take a pint of well-cooked oatmeal, add to it a pint of milk, part cream if obtainable. Beat well together, and strain through a fine wire sieve. Turn the liquid into a saucepan, and boil for a few moments, until it is thick enough to drop from the point of a spoon; then turn into cups previously wet in cold water, and mold. Serve with a dressing of fruit juice or whipped cream slightly sweetened and flavored with lemon.
Oatmeal Blancmange No. 2.—Take a pint of well-cooked oatmeal, add a pint of milk, and some cream if you have it. Mix everything well and strain through a fine wire sieve. Pour the liquid into a saucepan and boil for a few moments until it thickens enough to drop from the tip of a spoon; then pour it into cups that have been wet with cold water and let it set. Serve with a drizzle of fruit juice or lightly sweetened whipped cream flavored with lemon.
Oatmeal with Apple.—Cold oatmeal which has been left over may be made into an appetising dish by molding in alternate layers with nicely-steamed tart apple, sprinkled lightly with sugar. Serve with cream. Other cooked fruit, such as cherries, evaporated peaches, and apricots may be used in the same way. A very pleasing dish is made by using between the layers ripe yellow peaches and plums sliced together, and lightly sprinkled with sugar.
Oatmeal with Apple.—Leftover cold oatmeal can be turned into a tasty dish by layering it with well-steamed tart apples and lightly sprinkling sugar in between. Serve it with cream. You can also use other cooked fruits like cherries, canned peaches, and apricots in the same way. A really delightful option is to use slices of ripe yellow peaches and plums between the layers, with a light sprinkle of sugar.
Oatmeal Porridge.—Into a quart and a half of water, which should be boiling in the inner dish of a double boiler, sprinkle one cup of rather coarse oatmeal. Boil rapidly, stirring meanwhile until the grain is set; then place in the outer boiler, and cook continuously for three hours or longer. A half cup of cream added just before serving, is a desirable addition.
Oatmeal Porridge.—In a quart and a half of boiling water in the inner dish of a double boiler, sprinkle one cup of coarse oatmeal. Boil quickly, stirring until the grains settle; then place it in the outer boiler and cook for three hours or more. Adding half a cup of cream just before serving is a nice touch.
BARLEY.
Description.—Barley is stated by historians to be the oldest of all cultivated grains. It seems to have been the principal bread plant among the ancient Hebrews, Greeks, and Romans. The Jews especially held the grain in high esteem, and sacred history usually uses it interchangeably with wheat, when speaking of the fruits of the Earth.
Description.—Historians say that barley is the oldest cultivated grain. It appears to have been the main bread grain for the ancient Hebrews, Greeks, and Romans. The Jews especially valued this grain, and sacred history often uses it interchangeably with wheat when referring to the fruits of the Earth.
Among the early Greeks and Romans, barley was almost the only food of the common people and the soldiers. The flour was made into gruel, after the following recipe: "Dry, near the fire or in the oven, twenty pounds of barley flour, then parch it. Add three pounds of linseed meal, half a pound of coriander seeds, two ounces of salt, and the water necessary." If an especially delectable dish was desired, a little millet was also added to give the paste more "cohesion and delicacy." Barley was also used whole as a food, in which case it was first parched, which is still the manner of preparing it in some parts of Palestine and many districts of India, also in the Canary Islands, where it is known as gofio. Of this custom a lady from Palestine writes: "The reapers, during barley harvest, take bunches of the half-ripe grain, and singe, or parch, it over a fire of thorns. The milk being still in the grain, it is very sweet, and is considered a delicacy."
Among the early Greeks and Romans, barley was almost the only food for the common people and soldiers. The flour was used to make gruel with this recipe: "Dry, near the fire or in the oven, twenty pounds of barley flour, then parch it. Add three pounds of linseed meal, half a pound of coriander seeds, two ounces of salt, and enough water." If a particularly tasty dish was wanted, a bit of millet was also added to give the mixture more "cohesion and delicacy." Barley was also used whole as food, where it was first parched, a method still used in some parts of Palestine and many areas in India, as well as the Canary Islands, where it is called gofio. A woman from Palestine describes this practice: "The reapers, during barley harvest, take bunches of the half-ripe grain and singe, or parch, it over a fire of thorns. With the milk still in the grain, it is very sweet and is considered a delicacy."
In the time of Charles I, barley meal took the place of wheat almost entirely as the food of the common people in England. In some parts of Europe, India, and other Eastern countries, it is still largely consumed as the ordinary farinaceous food of the peasantry and soldiers. The early settlers of New England also largely used it for bread making. At the present day only a very insignificant quantity of barley is used for food purposes in this country, and most of this in the unground state.
In the time of Charles I, barley meal almost completely replaced wheat as the food of the common people in England. In some parts of Europe, India, and other Eastern countries, it's still widely eaten as the regular grain-based food for peasants and soldiers. The early settlers of New England also used it a lot for making bread. Nowadays, only a tiny amount of barley is used for food in this country, and most of it is in its whole grain form.
Barley is less nutritious than wheat, and to many people is less agreeable in flavor. It is likewise somewhat inferior in point of digestibility. Its starch cells being less soluble, they offer more resistance to the gastric juice.
Barley is less nutritious than wheat and, for many people, less pleasant in taste. It's also somewhat inferior in terms of digestibility. Its starch cells are less soluble, making them more resistant to gastric juice.
There are several distinct species of barley, but that most commonly cultivated is designated as two-rowed, or two-eared barley. In general structure, the barley grain resembles wheat and oats.
There are several different types of barley, but the one most commonly grown is called two-rowed or two-eared barley. In general, barley grains look similar to those of wheat and oats.
Simply deprived of its outer husk, the grain is termed Scotch milled or pot barley. Subjected still further to the process by which the fibrous outer coat of the grain is removed, it constitutes what is known as pearl barley. Pearl barley ground into flour is known as patent barley. Barley flour, owing to the fact that it contains so small a proportion of gluten, needs to be mixed with wheaten flour for bread-making purposes. When added in small quantity to whole-wheat bread, it has a tendency to keep the loaf moist, and is thought by some to improve the flavor.
Simply stripped of its outer layer, the grain is called Scotch milled or pot barley. When it goes through an additional process that removes the fibrous outer coat, it becomes what is known as pearl barley. When pearl barley is ground into flour, it's referred to as patent barley. Barley flour, because it has such a low amount of gluten, needs to be mixed with wheat flour for baking bread. When added in small amounts to whole-wheat bread, it helps keep the loaf moist and is thought by some to enhance the flavor.
The most general use made of this cereal as a food, is in the form of pearl, or Scotch, barley. When well boiled, barley requires about two hours for digestion.
The most common way to use this cereal as food is in the form of pearl or Scotch barley. When properly cooked, barley takes about two hours to digest.
General Suggestions for Cooking Barley.—The conditions requisite for cooking barley are essentially the same as for oatmeal. It is best cooked slowly. Four parts of water to one of grain will be needed for steaming or cooking in a double boiler, and from four to five hours' time will be required, unless the grain has been previously soaked for several hours, in which case three hours will do. If the strong flavor of the grain is objected to, it may be soaked over night and cooked in fresh water. This method will, however, be a sacrifice of some of the nutriment contained in the grain. Barley thus soaked will require only three parts water to one of barley for cooking.
General Suggestions for Cooking Barley.—The conditions needed for cooking barley are basically the same as for oatmeal. It’s best cooked slowly. You’ll need four parts water to one part grain for steaming or cooking in a double boiler, and it will take about four to five hours, unless the grain has been soaked for several hours beforehand, in which case three hours will be enough. If you find the strong flavor of the grain unappealing, you can soak it overnight and cook it in fresh water. However, this method will sacrifice some of the nutrients in the grain. Barley that has been soaked will only need three parts water for every one part of barley when cooking.
RECIPES.
Baked Barley.—Soak six tablespoonfuls of barley in cold water over night. In the morning, turn off the water, and put the barley in an earthen pudding dish, and pour three and one half pints of boiling water over it; add salt if desired, and bake in a moderately quick oven about two and one half hours, or till perfectly soft, and all the water is absorbed. When about half done, add four or five tablespoonfuls of sugar mixed with grated lemon peel. It may be eaten warm, but is very nice molded in cups and served cold with cream.
Baked Barley.—Soak six tablespoons of barley in cold water overnight. In the morning, drain the water and place the barley in a baking dish. Pour three and a half pints of boiling water over it; add salt if you want, and bake in a moderately hot oven for about two and a half hours, or until perfectly soft and all the water is absorbed. When it’s about halfway done, mix in four or five tablespoons of sugar with grated lemon peel. It can be enjoyed warm, but it’s also great molded in cups and served cold with cream.
Pearl Barley with Raisins.—Carefully look over and wash a cupful of pearl barley. Cook in a double boiler in five cups of boiling water for four hours. Just before serving, add a cupful of raisins which have been prepared by pouring boiling water over them and allowing them to stand until swollen. Serve hot, with cream.
Pearl Barley with Lemon Sauce.—Pearl barley cooked in the same manner, but without the addition of the raisins, is excellent served with cream or with a lemon sauce prepared as directed on page 354.
Pearl Barley with Lemon Sauce.—Pearl barley can be cooked the same way, but without the raisins, and it tastes great served with cream or with a lemon sauce made as directed on page 354.
RICE.
Description.—Rice is one of the most abundantly used and most digestible of all the cereals. It grows wild in India, and it is probable that this is its native home. It is, however, now cultivated in most tropical and sub-tropical climates, and is said to supply the principal food for nearly one third of the human race. It is mentioned in history several hundred years before Christ. According to Soyer, an old writer on foods, the Greeks and Romans held rice in high esteem, believing it to be a panacea for chest and lung diseases.
Description.—Rice is one of the most widely consumed and easily digestible grains. It grows wild in India, which is likely its original home. However, it's now grown in many tropical and subtropical regions and is said to provide the main food source for nearly a third of the world's population. It's mentioned in historical records several hundred years before Christ. According to Soyer, an old food writer, the Greeks and Romans valued rice highly, thinking it could cure chest and lung diseases.
The grain is so largely grown and used by the Chinese that "fan," their word for rice, has come to enter into many compound words. A beggar is called a "tou-fan-tee," that is, "the rice-seeking one." The ordinary salutation, "Che-fan," which answers to our "How do you do?" means, "Have you eaten your rice?"
The grain is so widely grown and used by the Chinese that "fan," their word for rice, has become part of many compound words. A beggar is called a "tou-fan-tee," which means "the rice-seeking one." The common greeting, "Che-fan," which answers to our "How do you do?" means, "Have you eaten your rice?"
Rice requires a wet soil, and the fields in which the grain is raised, sometimes called "paddy" fields, are periodically irrigated. Before ripening, the water is drained off, and the crop is then cut with a sickle, made into shocks, stacked, threshed, and cleaned, much like wheat. The rice kernel is inclosed within two coverings, a course outer husk, which is easily removed, and an inner, reddish, siliceous coating.
Rice needs wet soil, and the fields where the grain is grown, often called "paddy" fields, are watered regularly. Before the rice ripens, the water is drained, and then the crop is cut with a sickle, bundled into shocks, stacked, threshed, and cleaned, similar to how wheat is processed. The rice kernel is enclosed in two layers: a rough outer husk that is easy to remove and a reddish, glassy inner coating.
"Paddy" is the name given in India to the rice grain when inclosed in its husk. The same is termed "rough rice" in this country. The outer husk of the rice is usually removed in the process of threshing, but the inner red skin, or hull, adheres very closely, and is removed by rubbing and pounding. The rough rice is first ground between large stones, and then conveyed into mortars, and pounded with iron-shod pestles. Thence, by fanning and screening, the husk is fully removed, and the grain divided into three different grades, whole, middlings, and small whole grains, and polished ready for market. The middlings consist of the larger broken pieces of the grain; the small rice, of the small fragments mixed with the chit of the grain. The broken rice, well dried, is sometimes ground into flour of different degrees of fineness. The small rice is much sweeter and somewhat superior in point of nutritive value to the large or head rice usually met with in commerce.
"Paddy" is the term used in India for rice grain when it's still in its husk. In the U.S., it's called "rough rice." The outer husk is usually removed during threshing, but the inner red skin, or hull, sticks tightly, and is taken off by rubbing and pounding. Rough rice is first ground between large stones and then placed into mortars to be pounded with iron-tipped pestles. After that, the husk is completely removed through fanning and screening, and the grain is sorted into three different grades: whole, middlings, and small whole grains, and polished for the market. Middlings are the larger broken pieces of the grain, while small rice consists of tiny fragments mixed with the grain's chit. Well-dried broken rice is sometimes ground into flour of various fineness. Small rice is sweeter and somewhat more nutritious than the larger or head rice typically found in stores.
Rice is characterized by a large percentage of starch, and is so deficient in other food elements that if used alone, unless consumed in very large quantities, it will not furnish the requisite amount of nitrogenous material necessary for a perfect health food. For this reason, it is necessary to supplement its use with some other food containing an excess of nitrogenous elements, as peas, beans, milk, etc. Associated with other articles rich in albuminous elements, rice is exceedingly valuable, and one of the most easily digested foods. Boiled or steamed rice requires but a little over one hour for digestion.
Rice has a high starch content and is lacking in other essential nutrients, so if eaten alone and not in large quantities, it won't provide enough protein needed for a balanced diet. For this reason, it’s important to pair it with other foods that are rich in protein, like peas, beans, or milk. When combined with other foods high in protein, rice is very valuable and one of the easiest foods to digest. Boiled or steamed rice takes just over an hour to digest.
Preparation and Cooking.—Rice needs to be thoroughly washed to remove the earthy taste it is so apt to have. A good way to do this is to put it into a colander, in a deep pan of water. Rub the rice well with the hands, lifting the colander in and out the water, and changing the water until it is clear; then drain. In this way the grit is deposited in the water, and the rice left thoroughly clean.
Preparation and Cooking.—Rice should be washed thoroughly to eliminate any earthy flavor. A good method is to place it in a colander within a deep pan of water. Rub the rice with your hands, lifting the colander in and out of the water, and change the water until it runs clear; then drain. This process removes the grit, leaving the rice completely clean.
The best method of cooking rice is by steaming it. If boiled in much water, it loses a portion of its already small percentage of nitrogenous elements. It requires much less time for cooking than any of the other grains. Like all the dried grains and seeds, rice swells in cooking to several times its original bulk. When cooked, each grain of rice should be separate and distinct, yet perfectly tender.
The best way to cook rice is by steaming it. If it’s boiled in too much water, it loses some of its already low amount of nitrogenous elements. It takes much less time to cook than other grains. Like all dried grains and seeds, rice expands several times its original size when cooked. When it’s done, each grain of rice should be separate and distinct, yet perfectly tender.
RECIPES.
Steamed Rice.—Soak a cup of rice in one and a fourth cups of water for an hour, then add a cup of milk, turn into an earthen dish suitable for serving it from at table, and place in a steam-cooker or a covered steamer over a kettle of boiling water, and steam for an hour. It should be stirred with a fork occasionally, for the first ten or fifteen minutes.
Steamed Rice.—Soak a cup of rice in one and a quarter cups of water for an hour, then add a cup of milk. Transfer it to a suitable dish for serving at the table, and place it in a steam cooker or a covered steamer over a pot of boiling water. Steam for an hour, stirring occasionally with a fork for the first ten to fifteen minutes.
Boiled Rice (Japanese method).—Thoroughly cleanse the rice by washing in several waters, and soak it overnight. In the morning, drain it, and put to cook in an equal quantity of boiling water, that is, a pint of water for a pint of rice. For cooking, a stewpan with tightly fitting cover should be used. Heat the water to boiling, then add the rice, and after stirring, put on the cover, which is not again to be removed during the boiling. At first, as the water boils, steam will puff out freely from under the cover, but when the water has nearly evaporated, which will be in eight to ten minutes, according to the age and quality of the rice, only a faint suggestion of steam will be observed, and the stewpan must then be removed from over the fire to some place on the range, where it will not burn, to swell and dry for fifteen or twenty minutes.
Boiled Rice (Japanese method).—Rinse the rice thoroughly by washing it in several changes of water, then soak it overnight. In the morning, drain the rice and cook it with an equal amount of boiling water, which means one pint of water for one pint of rice. Use a saucepan with a tight-fitting lid for cooking. Bring the water to a boil, then add the rice and stir it. After that, cover it and do not remove the lid during cooking. At first, as the water boils, you’ll see a lot of steam escaping from under the lid. But once most of the water has evaporated, which will take about eight to ten minutes depending on the age and quality of the rice, only a little steam will escape, and you should then move the saucepan off the heat to a spot on the stove where it won’t burn, letting it sit and steam for another fifteen to twenty minutes.
Rice to be boiled in the ordinary manner requires two quarts of boiling water to one cupful of rice. It should be boiled rapidly until tender, then drained at once, and set in a moderate oven to become dry. Picking and lifting lightly occasionally with a fork will make it more flaky and dry. Care must be taken, however, not to mash the rice grains.
Rice should be cooked the regular way with two quarts of boiling water for every cup of rice. It needs to be boiled quickly until it's tender, then drained immediately and placed in a moderate oven to dry out. Gently fluffing it occasionally with a fork will make it flakier and drier. Just be careful not to crush the rice grains.
Rice With Fig Sauce.—Steam a cupful of best rice as directed above, and when done, serve with a fig sauce prepared as directed on page 89. Dish a spoonful of the fig sauce with each saucer of rice, and serve with plenty of cream. Rice served in this way requires no sugar for dressing, and is a most wholesome breakfast dish.
Rice With Fig Sauce.—Steam a cup of high-quality rice as instructed above, and once it's done, serve it with a fig sauce made as described on page 89. Put a spoonful of the fig sauce on each plate of rice and serve with plenty of cream. Rice served this way doesn’t need any sugar for topping and makes for a very healthy breakfast option.
Orange Rice.—Wash and steam the rice according to directions already given. Prepare some oranges by separating into sections and cutting each section in halves, removing the seeds and all the white portion. Sprinkle the oranges lightly with sugar, and let them stand while the rice is cooking. Serve a portion of the orange on each saucerful of rice.
Orange Rice.—Rinse and steam the rice according to the instructions provided. Prepare some oranges by separating them into sections and cutting each section in half, removing the seeds and all the white part. Lightly sprinkle the oranges with sugar, and let them sit while the rice cooks. Serve a portion of the oranges on each plate of rice.
Browned Rice.—Spread a cupful of rice on a shallow baking tin, and put into a moderately hot oven to brown. It will need to be stirred frequently to prevent burning and to secure a uniformity of color. Each rice kernel, when sufficiently browned, should be of a yellowish brown, about the color of ripened wheat. Steam the same as directed for ordinary rice, using only two cups of water for each cup of browned rice, and omitting the preliminary soaking. When properly cooked, each kernel will be separated, dry, and mealy. Rice prepared in this manner is undoubtedly more digestible than when cooked without browning.
Browned Rice.—Spread a cup of rice on a shallow baking tray and place it in a moderately hot oven to brown. Make sure to stir it frequently to avoid burning and to achieve an even color. Each rice grain, once browned enough, should have a yellowish-brown color, similar to ripened wheat. Steam it just like regular rice, using only two cups of water for each cup of browned rice, and skip the initial soaking. When cooked correctly, each grain will be separate, dry, and fluffy. Rice prepared this way is definitely easier to digest than rice cooked without browning.
RYE.
Description.—Rye is much more largely grown and used in European countries that in America. In appearance it closely resembles wheat, although somewhat darker in color and smaller in size. Bread made from rye constitutes the staple food of the people in many parts of Europe. In nutritive value such bread nearly equals that made from wheat, but it has an acid taste not relished by persons unaccustomed to its use.
Description.—Rye is grown and used much more extensively in European countries than in America. It looks a lot like wheat, though it’s a bit darker and smaller. Bread made from rye is a staple food for many people in Europe. In terms of nutritional value, rye bread is nearly as good as wheat bread, but it has a tangy taste that people who aren’t used to it might not enjoy.
Rye is found in market deprived of its husk and crushed or rolled, and also in the form of meal and flour.
Rye is available in markets without its husk, either crushed or rolled, and also as meal and flour.
RECIPES.
MAIZE, OR INDIAN CORN.
Description.—There can be little doubt that maize is of American origin. The discoverers of the new world found it cultivated by the aborigines, and from the fact that corn was the generic term then largely used to designate grain (in old English, "corn" means grain), they named it "Indian corn." Since that time it has been carried to nearly every part of the globe, and probably it is more extensively used than any other one of the cereals, with the exception of rice. This is undoubtedly due to the fact that it is the most prolific of the grains, and is adapted to the widest range of climate.
Description.—There’s little doubt that corn is native to the Americas. The explorers of the New World found it being grown by the native people, and since "corn" was the common term at the time used to refer to grain (in old English, "corn" means grain), they called it "Indian corn." Since then, it has spread to almost every part of the world and is likely more widely used than any other cereal, except for rice. This is surely because it is the most productive of the grains and can thrive in a variety of climates.
Maize was the chief food of the slaves of Brazil, as it used to be of those in our own Southern States, and is very largely consumed in Mexico and Peru. It was used very little in Europe until the Irish famine in 1847; since then, it has become a staple food with the poorer classes.
Maize was the main food for slaves in Brazil, just like it was for those in our Southern States, and it is widely eaten in Mexico and Peru. It was hardly used in Europe until the Irish famine in 1847; since then, it has become a staple food for the lower class.
The varieties of corn are almost too numerous to be counted. For general purposes, however, they may be classified as field corn, sweet corn, and pop corn.
The types of corn are almost countless. For general purposes, though, they can be categorized as field corn, sweet corn, and popcorn.
Corn is characterized by an excess of fatty matter, containing upwards of three times the amount of that element to be found in wheat. Corn requires stronger powers of digestion than wheat, and is unsuited to some stomachs.
Corn is known for having a lot of fat, containing more than three times the amount found in wheat. Corn needs stronger digestive abilities than wheat and isn't suitable for some stomachs.
The skin of the corn kernel is thin, and when subjected to milling processes, is included in the grinding. When well ground, it can be digested, with the exception of the siliceous coating.
The skin of the corn kernel is thin, and when it goes through milling processes, it's included in the grinding. When it's ground well, it can be digested, except for the siliceous coating.
Sweet corn and some of the field varieties, form a nutritious and favorite food while green. The mature grain is used in many forms. The whole grain, hulled, is an agreeable food. Hulled, broken, or split to various degrees of fineness, it is known according to the size to which the grain has been reduced as hominy, fine hominy, or grits; or, if finer still, as samp. Subjected to a process of still finer trituration, it forms meal. Cornstarch consists of the farinaceous portions of the grain.
Sweet corn and some field varieties are a nutritious and popular food when they're green. The mature grain can be used in many ways. The whole grain, after it's hulled, is a tasty food. When hulled, broken, or split into different levels of coarseness, it’s called hominy, fine hominy, or grits, depending on how fine the grain is processed. If it's ground even finer, it turns into meal. Cornstarch is made from the starchy parts of the grain.
On account of the large proportion of fatty matter contained in maize, it acquires, if kept for some time and unpleasant, rancid taste, occasioned by the usual change which takes place in fat when exposed to the atmosphere.
Due to the high amount of fat in corn, it can develop an off-putting, rancid taste if stored for a while. This change happens because fat goes through a typical process when it’s exposed to air.
The new process granular meal, which is prepared from corn dried for a long period before grinding, becomes rank less quickly than that ground in the old way.
The new method of making granular meal, which is made from corn that has been dried for a long time before grinding, spoils less quickly than the old method.
Maize meal is very largely consumed in the form of mush or porridge. This, in Ireland, is termed "stirabout;" in Italy it is called "polenta;" and in British Honduras it is known as "corn lob."
Maize meal is mainly eaten as mush or porridge. In Ireland, it's called "stirabout"; in Italy, it's known as "polenta"; and in British Honduras, it's referred to as "corn lob."
General Suggestions for Cooking—Most of the various preparations from maize require prolonged cooking to render them wholesome; this is equally true respecting mushes prepared from samp or meal, a dish which unfortunately some cook in bygone days saw fit to term "hasty pudding." Unthinking people since, supposing it to have been so named because of the little time required to cook it, have commonly prepared it in fifteen or twenty minutes, whereas from one to two hours, or even longer, are necessary to cook it properly. Hulled corn, hominy, and grits, all require prolonged cooking. The time for cooking these preparations may be somewhat lessened if they are previously soaked over night. They should, however, be cooked in the same water in which they are soaked.
General Suggestions for Cooking—Most dishes made from corn need to be cooked for a long time to make them nutritious; this applies to mushes made from cornmeal or ground corn as well, a dish that some cooks in the past unfortunately called "hasty pudding." People who didn’t think it through assumed it was named for how quickly it could be made and typically cook it in fifteen to twenty minutes, when in reality it needs to be cooked properly for one to two hours, or even longer. Hulled corn, hominy, and grits all need extended cooking, too. The cooking time for these dishes can be slightly reduced if they’re soaked overnight, but they should still be cooked in the same water they were soaking in.
RECIPES.
Corn meal mush.—stir together one pint of cornmeal, one tablespoonful of flour, and one pint of cold milk. Turn this slowly, stirring well meanwhile, into one quart of boiling water, which should not cease to boil during the introduction of the batter. Cook three or four hours. If milk is not obtainable, water alone may be used, in which case two tablespoonfuls of flour will be needed. Cook in a double boiler.
Corn meal mush.—Mix together one pint of cornmeal, one tablespoon of flour, and one pint of cold milk. Gradually pour this mixture into one quart of boiling water, stirring well all the while. The water should remain boiling while you add the batter. Cook for three or four hours. If you can't get milk, just use water, but you'll need to add two tablespoons of flour. Cook it in a double boiler.
Corn meal cubes.—Left-over corn meal mush may be made into an appetizing dish by first slicing into rather thick slices, then cutting into cubes about one inch squares. Put the cubes into a tureen and turn over them a quantity of hot milk or cream. Cover the dish, let them stand until thoroughly heated through, then serve.
Corn meal cubes.—Leftover corn meal mush can be transformed into a delicious dish by first slicing it into rather thick pieces, then cutting those into one-inch cubes. Place the cubes in a serving dish and pour hot milk or cream over them. Cover the dish and let it sit until everything is heated through, then serve.
Samp.—Use one part of samp to four and one half parts of boiling water. It is the best plan to reserve enough of the water to moisten the samp before adding it to the boiling water, as it is much less likely to cook in lumps. Boil rapidly, stirring continuously, until the mush has well set, then slowly for from two to three hours.
Samp.—Use one part of samp to four and a half parts of boiling water. It's best to keep enough water aside to moisten the samp before adding it to the boiling water, as it’s much less likely to clump together. Boil quickly, stirring constantly, until the mush is well set, then simmer slowly for two to three hours.
Hulled Corn.—To Hull the Corn.—Put enough wood ashes into a large kettle to half fill it; then nearly fill with hot water, and boil ten minutes. Drain off the water from the ashes, turn it into a kettle, and pour in four quarts of clean, shelled field corn, white varieties preferred. Boil till the hulls rub off. Skim the corn out of the lye water, and put it into a tub of fresh cold water. To remove the hulls, scrub the corn well with a new stiff brush broom kept for the purpose, changing the water often. Put through half a dozen or more waters, and then take the corn out by handfuls, rubbing each well between the hands to loosen the remaining hulls, and drop again into clear water. Pick out all hulls. Cleanse the corn through several more waters if it is to be dried and kept before using. Well hulled corn is found in the markets.
Hulled Corn.—To Hull the Corn.—Fill a large kettle halfway with wood ashes, then nearly fill it with hot water and boil for ten minutes. Drain the water from the ashes, transfer it to a kettle, and add four quarts of clean, shelled field corn, preferably white varieties. Boil until the hulls come off. Skim the corn out of the lye water and place it in a tub of fresh cold water. To remove the hulls, scrub the corn thoroughly with a new stiff brush broom designated for this task, changing the water frequently. Use six or more water changes, then take the corn out by handfuls, rubbing each handful well between your hands to loosen any remaining hulls, and drop it back into clear water. Remove all hulls. Rinse the corn in several more waters if you plan to dry and store it before using. Well-hulled corn is available in the markets.
Coarse Hominy.—For coarse hominy use four parts of water or milk and water to one of grain. It is best steamed or cooked in a double boiler, though it may be boiled in a kettle over a slow fire. The only objection to this method is the need of frequent stirring to prevent sticking, which breaks and mashes the hominy. From four to five hours' slow cooking will be necessary, unless the grain has been previously soaked; then about one hour less will be required.
Coarse Hominy.—To prepare coarse hominy, use four parts water or milk and one part grain. It’s best to steam it or cook it in a double boiler, but you can also boil it in a kettle over a low flame. The downside to boiling is that you have to stir it often to stop it from sticking, which can break and mash the hominy. You’ll need to cook it slowly for about four to five hours, unless the grain has been soaked beforehand; in that case, you'll need about an hour less.
Popped Corn.—The small, translucent varieties of maize known as "pop corn," possessed the property, when gently roasted, of bursting open, or turning inside out, a process which is owing to the following facts: Corn contains an excess of fatty matter. By proper means this fat can be separated from the grain, and it is then a thick, pale oil. When oils are heated sufficiently in a vessel closed from the air, they are turned into gas, which occupies many times the bulk of the oil. When pop corn is gradually heated, and made so hot that the oil inside of the kernel turns to gas, being unable to escape through the hull of the kernel, the pressure finally becomes strong enough to burst the grain, and the explosion is so violent as to shatter it in a most curious manner.
Popped Corn.—The small, translucent types of corn known as "popcorn" have the unique ability to burst open or turn inside out when gently roasted. This happens due to a few reasons: Corn has a high fat content. With the right methods, this fat can be separated from the grain, resulting in a thick, pale oil. When oils are heated in a closed container, they turn into gas, which takes up much more space than the oil. As popcorn kernels are heated and the oil inside turns into gas, it can't escape through the hard outer shell. Eventually, the pressure becomes strong enough to make the kernel explode, causing a fascinating shattering effect.
Popped corn forms an excellent food, the starch of the grain being will cooked. It should, however, be eaten in connection with other food at mealtime, and not as a delicacy between meals. Ground pop corn is considered a delectable dish eaten with milk or cream; it also forms the base of several excellent puddings.
Popped corn is a great food, with the starch of the grain being well cooked. However, it should be eaten as part of a meal and not just as a snack between meals. Ground popcorn is seen as a tasty dish when eaten with milk or cream; it also serves as the base for several delicious puddings.
To pop the corn, shell and place in a wire "popper" over a bed of bright coals, or on the top of a hot stove; stir or shake continuously, so that each kernel may be subjected to the same degree of heat on all sides, until it begins to burst open. If a popper is not attainable, a common iron skillet covered tightly, and very lightly oiled on the bottom, may be used for the purpose. The corn must be very dry to begin with, and if good, nearly every kernel will pop open nicely. It should be used within twenty-four hours after popping.
To pop the corn, shell it and put it in a wire "popper" over hot coals, or on top of a hot stove; stir or shake it constantly so that each kernel gets evenly heated on all sides until it starts to burst open. If you don't have a popper, you can use a regular iron skillet with a tight lid, lightly oiled at the bottom. The corn needs to be very dry to start with, and if it's good quality, almost every kernel will pop perfectly. It should be eaten within twenty-four hours after popping.
MACARONI.
Description.—Macaroni is a product of wheat prepared from a hard, clean, glutenous grain. The grain is ground into a meal called semolina, from which the bran is excluded. This is made into a tasty dough by mixing with hot water in the proportion of two thirds semolina to one third water. The dough after being thoroughly mixed is put into a shallow vat and kneaded and rolled by machinery. When well rolled, it is made to assume varying shapes by being forced by a powerful plunger through the perforated head of strong steel or iron cylinders arranged above a fire, so that the dough is partially baked as it issues from the holes. It is afterwards hung over rods or laid upon frames covered with cloth, and dried. It is called by different names according to its shape. If in the shape of large, hollow cylinders, it is macaroni; if smaller in diameter, it is spaghetti; if fine, vermicelli; if the paste is cut into fancy patterns, it is termed pasta d'Italia.
Description.—Macaroni is made from wheat sourced from a hard, clean, gluten-rich grain. The grain is ground into a meal known as semolina, with the bran removed. This is turned into a flavorful dough by mixing two parts semolina with one part hot water. After being thoroughly mixed, the dough is placed in a shallow vat and kneaded and rolled by machines. Once well-rolled, it's shaped in different forms by being pushed through a perforated head of strong steel or iron cylinders heated over a fire, partially cooking the dough as it comes out of the holes. It is then hung on rods or spread out on cloth-covered frames to dry. It goes by different names based on its shape: if it’s shaped like large, hollow cylinders, it’s called macaroni; if it’s smaller in diameter, it’s spaghetti; if fine, it’s vermicelli; and if the paste is cut into decorative shapes, it’s referred to as pasta d'Italia.
Macaroni was formerly made only in Italy, but at present is manufactured to a considerable extent in the United States. The product, however, is in general greatly inferior to that imported from Italy, owing to the difference in the character of the wheat from which it is made, the Italian macaroni being produced from a hard, semi-translucent wheat, rich in nitrogenous elements, and which is only grown successfully in a hot climate. Like all cereal foods, macaroni should be kept in a perfectly dry storeroom.
Macaroni used to be made only in Italy, but now it's produced quite a bit in the United States. However, the American version is usually much less quality than the imported Italian kind, due to the difference in the type of wheat used. Italian macaroni is made from a hard, semi-translucent wheat that’s high in nitrogen, which only grows well in a hot climate. Like all cereal foods, macaroni should be stored in a completely dry place.
To Select Macaroni.—Good macaroni will keep in good condition for years. It is rough, elastic, and hard; while the inferior article is smooth, soft, breaks easily, becomes moldy with keeping. Inferior macaroni contains a large percentage of starch, and but a small amount of gluten. When put into hot water, it assumes a white, pasty appearance, and splits in cooking. Good macaroni when put into hot water absorbs a portion of the water, swells to nearly double its size, but perfectly retains its shape. Inferior macaroni is usually sold a few cents cheaper per pound than the genuine article. It contains a much smaller amount of gluten. The best quality of any shape one pleases can be bought in most markets for ten or fifteen cents a pound.
How to Choose Macaroni.—Good macaroni can last for years if stored properly. It should feel rough, elastic, and hard, while lower-quality macaroni is smooth, soft, breaks easily, and can become moldy over time. Inferior macaroni has a high starch content and a low gluten percentage. When cooked in hot water, it turns white and pasty and falls apart. In contrast, good macaroni absorbs some of the water when cooked, swells to almost double its size, but keeps its shape perfectly. You'll usually find inferior macaroni priced a few cents less per pound compared to the real deal. It contains much less gluten. You can buy the best quality of any shape you like at most grocery stores for ten or fifteen cents a pound.
To Prepare and Cook Macaroni.—Do not wash macaroni. If dusty, wipe with a clean, dry cloth. Break into pieces of convenient size. Always put to cook in boiling liquid, taking care to have plenty of water in the saucepan (as it absorbs a large quantity), and cook until tender. The length of time required may vary from twenty minutes, if fresh, to one hour if stale. When tender, turn into a colander and drain, and pour cold water through it to prevent the tubes from sticking together. The fluid used for cooking may be water, milk, or a mixture of both; also soup stock, tomato juice, or any preferred liquid.
How to Prepare and Cook Macaroni.—Don’t wash macaroni. If it’s dusty, wipe it down with a clean, dry cloth. Break it into manageable pieces. Always cook it in boiling liquid, making sure to have plenty of water in the pot since it absorbs a lot, and cook until it's soft. The cooking time can range from twenty minutes for fresh macaroni to one hour for stale. Once it’s tender, transfer it to a colander to drain, and rinse it with cold water to stop the tubes from sticking together. The liquid you use for cooking can be water, milk, or a mix of both; you can also use broth, tomato juice, or any liquid you prefer.
Macaroni serves as an important adjunct to the making of various soups, and also forms the basis of other palatable dishes.
Macaroni is an important addition to making different soups and also serves as the foundation for other tasty dishes.
RECIPES.
Home-Made Macaroni.—To four cupfuls of flour, add one egg well beaten, and enough water to make a dough that can be rolled. Roll thin on a breadboard and cut into strips. Dry in the sun. The best arrangement for this purpose is a wooden frame to which a square of cheese-cloth has been tightly tacked, upon which the macaroni may be laid in such a way as not to touch, and afterwards covered with a cheese-cloth to keep off the dust during the drying.
Homemade Macaroni.—Mix four cups of flour with one well-beaten egg and enough water to form a dough that can be rolled out. Roll it thin on a flat surface and cut it into strips. Let it dry in the sun. The best way to do this is to use a wooden frame with a square of cheesecloth tightly attached, where you can spread the macaroni out without letting the pieces touch each other. Cover it with another piece of cheesecloth to keep out dust while it dries.
Boiled Macaroni.—Break sticks of macaroni into pieces about an inch in length, sufficient to fill a large cup; put it into boiling water and cook until tender. When done, drained thoroughly, then add a pint of milk, part cream if it can be afforded, a little salt and one well-beaten egg; stir over the fire until it thickens, and serve hot.
Boiled Macaroni.—Break macaroni sticks into pieces about an inch long, enough to fill a large cup; put them into boiling water and cook until tender. Once cooked, drain thoroughly, then add a pint of milk, some cream if you can afford it, a little salt, and one well-beaten egg; stir over the heat until it thickens, and serve hot.
Macaroni with Cream Sauce.—Cook the macaroni as directed in the proceeding, and serve with a cream sauce prepared by heating a scant pint of rich milk to boiling, in a double boiler. When boiling, add a heaping tablespoonful of flour, rubbed smoothed in a little milk and one fourth teaspoonful of salt. If desired, the sauce may be flavored by steeping in the milk before thickening for ten or fifteen minutes, a slice of onion or a few bits of celery, and then removing with a fork.
Macaroni with Cream Sauce.—Cook the macaroni according to the instructions above, and serve it with a cream sauce made by heating just under a pint of rich milk to a boil in a double boiler. Once it’s boiling, add a heaping tablespoon of flour, blended with a little milk, and one-fourth teaspoon of salt. If you want, you can add flavor by steeping a slice of onion or a few pieces of celery in the milk for ten to fifteen minutes before thickening the sauce, and then remove them with a fork.
Macaroni with Tomato Sauce.—Break a dozen sticks of macaroni into two-inch lengths, and drop into boiling milk and water, equal parts. Let it boil for an hour, or until perfectly tender. In the meantime prepare the sauce by rubbing a pint of stewed or canned tomatoes through a colander to remove all seeds and fragments. Heat to boiling, thicken with a little flour; a tablespoonful to the pint will be about the requisite proportion. Add salt and if desired, a half cup of very thin sweet cream. Dish the macaroni into individual dishes, and serve with a small quantity of the sauce poured over each dish.
Macaroni with Tomato Sauce.—Break a dozen macaroni sticks into two-inch pieces and drop them into boiling milk and water, equal parts. Let it boil for an hour, or until it's perfectly tender. In the meantime, prepare the sauce by pushing a pint of stewed or canned tomatoes through a strainer to remove all seeds and bits. Heat it until boiling, then thicken with a bit of flour; a tablespoon for the pint should be about right. Add salt and, if you like, a half cup of very thin sweet cream. Serve the macaroni in individual bowls and pour a small amount of sauce over each serving.
Macaroni Baked with Granola.—Break macaroni into pieces about an inch in length sufficient to fill a large cup, and cook until tender in boiling milk and water. When done, drain and put a layer of the macaroni in the bottom of an earthen pudding dish, and sprinkle over it a scant teaspoonful of granola. Add a second and third layer and sprinkle each with granola; then turn over the whole a custard sauce prepared by mixing together a pint of milk, the well beaten yolks of two eggs or one whole egg, and one-fourth of a teaspoonful of salt. Care should be taken to arrange the macaroni in layers loosely, so that the sauce will readily permeate the whole. Bake for a few minutes only, until the custard has well set, and serve.
Baked Macaroni with Granola.—Break macaroni into pieces about an inch long to fill a large cup, and cook until tender in boiling milk and water. When done, drain and place a layer of macaroni at the bottom of a baking dish, then sprinkle a scant teaspoon of granola over it. Add a second and third layer, sprinkling each with granola; then pour over the whole a custard sauce made by mixing together a pint of milk, the well-beaten yolks of two eggs or one whole egg, and a quarter teaspoon of salt. Make sure to arrange the macaroni layers loosely so that the sauce can soak through. Bake for just a few minutes, until the custard is set, and serve.
Eggs and macaroni.—Break fifteen whole sticks of macaroni into two-inch lengths, and put to cook in boiling water. While the macaroni is cooking, boil the yolks of four eggs until mealy. The whole egg may be used if caught so the yolks are mealy in the whites simply jellied, not hardened. When the macaroni is done, drain and put a layer of it arranged loosely in the bottom of an earthen pudding dish. Slice the cooked egg yolks and spread a layer of them over the macaroni. Fill the dish with alternate layers of macaroni and egg, taking care to have the top layer of macaroni. Pour over the whole a cream sauce prepared as follows: Heat one and three fourths cup of rich milk to boiling, add one fourth teaspoonful of salt and one heaping spoonful of flour rubbed smooth in a little cold milk. Cook until thickened, then turn over the macaroni. Sprinkle the top with grated bread crumbs, and brown in a hot oven for eight or ten minutes. Serve hot.
Eggs and macaroni.—Break fifteen whole sticks of macaroni into two-inch pieces and cook them in boiling water. While the macaroni is cooking, boil the yolks of four eggs until they are mealy. You can use the whole egg if the yolks are mealy and the whites are just jellied, not hardened. When the macaroni is done, drain it and place a loose layer in the bottom of an earthen pudding dish. Slice the cooked egg yolks and layer them over the macaroni. Continue filling the dish with alternating layers of macaroni and egg, making sure the top layer is macaroni. Pour a cream sauce prepared as follows over the entire dish: Heat one and three-fourths cups of rich milk until it boils, add one-fourth teaspoon of salt and one heaping spoonful of flour mixed smoothly in a little cold milk. Cook until it thickens, then pour it over the macaroni. Top with grated bread crumbs and brown in a hot oven for eight to ten minutes. Serve hot.
TABLE TOPICS.
Sir Isaac Newton, when writing his grail work, "Principia," lived wholly upon a vegetable, diet.
Sir Isaac Newton, while writing his groundbreaking work, "Principia," lived entirely on a plant-based diet.
ROBERT COLLYER once remarked; "One great reason why I never had a really sick day in my life was that as boy I lived on oatmeal and milk and brown bread, potatoes and a bit of meat when I could get it, and then oatmeal again."
ROBERT COLLYER once said, "One big reason I never had a truly sick day in my life was that as a boy, I lived on oatmeal and milk, brown bread, potatoes, and a little bit of meat when I could get it, and then oatmeal again."
HOT-WEATHER DIET.—The sultry period of our summer, although comparatively slight and of short duration, is nevertheless felt by some people to be extremely oppressive, but this is mainly due to the practice of eating much animal food or fatty matters, conjoined as it often is with the habit of drinking freely of fluids containing more or less alcoholics. Living on cereals, vegetables, and fruits, and abstaining from alcoholic drinks, the same persons would probably enjoy the temperature, and be free from the thirst which is the natural result of consuming needlessly heating food.—Sir Henry Thompson.
HOT-WEATHER DIET.—The hot part of our summer, although relatively mild and brief, can feel really oppressive to some people. This is mostly because they eat a lot of meat or fatty foods and often drink beverages that contain alcohol. If those same individuals focused on eating grains, vegetables, and fruits while avoiding alcoholic drinks, they would likely enjoy the warm weather and not feel the excessive thirst that comes from eating heat-producing foods.—Sir Henry Thompson.
Mistress (arranging for dinner)—"Didn't the macaroni come from the grocer's, Bridget?"
Mistress (planning dinner)—"Did the macaroni come from the grocery store, Bridget?"
Bridget—"Yis, mum, but oi sint it back. Every won av thim leetle stims wuz impty."
Bridget—"Yes, mom, but I sent it back. Every one of those little stamps was empty."
Some years since, a great railroad corporation in the West, having occasion to change the gauge of its road throughout a distance of some five hundred miles, employed a force of 3,000 workmen upon the job, who worked from very early in the morning until late at night. Alcoholic drinks were strictly prohibited, but a thin gruel made of oatmeal and water was kept on hand and freely partaken of by the men to quench their thirst. The results were admirable; not a single workmen gave out under the severe strain, and not one lost a day from sickness. Thus this large body of men were kept well and in perfect strength and spirits, and the work was done in considerably less time than that counted on for its completion.
Some years ago, a major railroad company in the West needed to change the gauge of its tracks over a distance of about five hundred miles. They hired 3,000 workers for the task, and they worked from early morning until late at night. Alcohol was strictly forbidden, but a simple oatmeal and water porridge was provided for the men to satisfy their thirst. The results were impressive; not a single worker quit due to the intense workload, and no one missed a day because of illness. This large group of men remained healthy, strong, and in good spirits, and the job was completed much faster than expected.
In Scotch households oatmeal porridge is as inevitable as breakfast itself, except perhaps on Sundays, as this anecdote will illustrate. A mother and child were passing along a street in Glasgow, when this conversation was overheard:—
In Scottish homes, oatmeal porridge is just as common as breakfast itself, except maybe on Sundays, as this story will show. A mother and child were walking down a street in Glasgow when this conversation was heard:—
"What day is the morn, mither?"
"What day is it, Mom?"
"Sabbath, laddie."
"Sunday, kid."
"An' will wi hae tea to breakfast, mither?"
"Will we have tea for breakfast, Mom?"
"Aye, laddie, gin we're spared."
"Yes, kid, if we're lucky."
"An' gin we're no spared, will we hae parrich?"
"Then if we aren't spared, will we have porridge?"

BREADSTUFFS AND BREADMAKING
 lthough the grains form most nutritious and palatable dishes when
cooked in their unground state, this is not always the most convenient
way of making; use of them. Mankind from earliest antiquity has sought
to give these wonderful products of nature a more portable and
convenient form by converting them into what is termed bread, a word
derived from the verb bray, to pound, beat, or grind small, indicative
of the ancient manner of preparing the grain for making bread. Probably
the earliest form of bread was simply the whole grain moistened and then
exposed to heat. Afterward, the grains were roasted and ground, or
pounded between stones, and unleavened bread was made by mixing this
crude flour with water, and baking in the form of cakes. Among the many
ingenious arrangements used by the ancients for baking this bread, was a
sort of portable oven in shape something like a pitcher, in the inside
of which a fire was made. When the oven was well heated, a paste made of
meal and water was applied to the outside. Such bread was baked very
quickly and taken off in small, thin sheets like wafers. A flat cake was
the common form in which most of the bread of olden times was baked;
being too brittle to be cut with a knife, the common mode of dividing it
was by breaking and hence the expression "breaking bread" so common in
Scripture.
lthough the grains form most nutritious and palatable dishes when
cooked in their unground state, this is not always the most convenient
way of making; use of them. Mankind from earliest antiquity has sought
to give these wonderful products of nature a more portable and
convenient form by converting them into what is termed bread, a word
derived from the verb bray, to pound, beat, or grind small, indicative
of the ancient manner of preparing the grain for making bread. Probably
the earliest form of bread was simply the whole grain moistened and then
exposed to heat. Afterward, the grains were roasted and ground, or
pounded between stones, and unleavened bread was made by mixing this
crude flour with water, and baking in the form of cakes. Among the many
ingenious arrangements used by the ancients for baking this bread, was a
sort of portable oven in shape something like a pitcher, in the inside
of which a fire was made. When the oven was well heated, a paste made of
meal and water was applied to the outside. Such bread was baked very
quickly and taken off in small, thin sheets like wafers. A flat cake was
the common form in which most of the bread of olden times was baked;
being too brittle to be cut with a knife, the common mode of dividing it
was by breaking and hence the expression "breaking bread" so common in
Scripture.
Although grains create the most nutritious and tasty dishes when cooked whole, this isn't always the easiest way to use them. Since ancient times, people have tried to make these amazing natural products more portable and convenient by turning them into what we call bread, a word that comes from the verb bray, which means to pound, beat, or grind small, reflecting the old methods of preparing grain for bread-making. The earliest type of bread was likely just whole grain that was moistened and then heated. Later on, grains were roasted and ground or pounded between stones, and unleavened bread was made by mixing this rough flour with water and baking it into cakes. Among the various clever methods that ancient people used to bake this bread was a type of portable oven that looked somewhat like a pitcher, where a fire was created inside. When the oven was hot enough, a mixture of meal and water was spread on the outside. This bread was baked quickly and removed in small, thin sheets like wafers. A flat cake was the usual form of bread in ancient times; since it was too fragile to cut with a knife, people typically broke it apart, which is why the phrase "breaking bread" is so common in Scripture.
Various substances have been and are employed for making this needful article. Until the last few decades, barley was the grain most universally used. Chestnuts, ground to a flour, are made into bread in regions where these nuts abound. Quite recently, an immense peanut crop in the Southern States was utilized for bread-making purposes. In ancient times, the Thracians made to bread from a flour made from the water coltran, a prickly root of triangular form. In Syria, mulberries were dried and grounded to flour. Rice, moss, palm tree piths, and starch producing roots are used by different nationalities in the preparation of bread. In many parts of Sweden, bread is made from dried fish, using one half fish flour and one half barley flour; and in winter, flour made from the bark of trees is added. Desiccated tomatoes, potatoes, and other vegetables are also mixed with the cereals for bread-making. In India, the lower classes make their bread chiefly from millet. Moss bread is made in Iceland from the reindeer moss, which toward autumn becomes soft, tender, and moist, with a taste like wheat bran. It contains a large quantity of starch, and the Icelanders gather, dry, pulverize it, and thus prepare it for bread-making. The ancient Egyptians often made their bread from equal parts of the whole grain and meal.
Various substances have been used to make this essential item. Until the last few decades, barley was the most commonly used grain. In areas where they're plentiful, chestnuts are ground into flour to make bread. Recently, a huge peanut crop in the Southern States was used for bread-making. In ancient times, the Thracians made bread from flour made from water coltran, a prickly, triangular root. In Syria, mulberries were dried and ground into flour. Different cultures use rice, moss, palm tree piths, and starchy roots to prepare bread. In many parts of Sweden, bread is made from dried fish, using half fish flour and half barley flour; in winter, flour made from tree bark is added. Dried tomatoes, potatoes, and other vegetables are also combined with the grains for bread-making. In India, lower-class people mainly make their bread from millet. In Iceland, moss bread is made from reindeer moss, which becomes soft, tender, and moist in autumn, tasting like wheat bran. It has a high starch content, and Icelanders gather, dry, and grind it for bread-making. The ancient Egyptians often made their bread from equal parts of whole grain and meal.
The breadstuff's most universally used among civilized nations at the present time are barley, rye, oats, maize, buckwheat, rice, and wheat, of which the last has acquired a decided preference.
The most commonly used grains among civilized nations today are barley, rye, oats, corn, buckwheat, rice, and wheat, with wheat being the clear favorite.
If made in the proper manner and from suitable material, bread is, with the exception of milk, the article best fitted for the nourishment of the body, and if need be, can supply the place of all other foods. Good bread does not cloy the appetite as do many other articles of food, and the simplest bill of fare which includes light, wholesome bread, is far more satisfying than an elaborate meal without it. Were the tables of our land supplied with good, nutritious, well-baked bread, there would be less desire for cake, pastry, and other indigestible particles, which, under the present system of cookery, are allowed to compensate for the inferior quality and poor preparation of more wholesome foods.
If made the right way and using good ingredients, bread is, aside from milk, the best option for nourishing the body and can even replace all other foods if necessary. Good bread doesn’t overwhelm the appetite like many other food items do, and a simple menu of that includes light, healthy bread is much more satisfying than an elaborate meal without it. If our tables were filled with good, nutritious, well-baked bread, people would crave less cake, pastries, and other hard-to-digest options that, because of today's cooking practices, are used to make up for the poor quality and preparation of healthier foods.
Bread has been proverbially styled the "staff of life." In nearly all ancient languages the entomology of the word "bread" signifies all, indicating; that the bread of earlier periods was in truth what it should be at the present time,—a staff upon which all the functions of life might with safety depend.
Bread has been famously referred to as the "staff of life." In almost all ancient languages, the origin of the word "bread" means all, suggesting that the bread in earlier times was truly what it should be today—a support that all aspects of life could safely rely on.
Notwithstanding the important part bread was designed to play in the economy of life, it would be hardly possible to mention another aliment which so universally falls below the standard either through the manner of its preparation or in the material used.
Despite the important role bread was meant to have in everyday life, it's hard to find another food that consistently falls short of the standard due to how it's made or the ingredients used.
Bread, to answer the requirements of a good, wholesome article of food, beside being palatable, must be light, porous, and friable, so that it can be easily insalivated and digested. It should not contain ingredients which will in any way be injurious if taken into the system, but should contain as many as possible of the elements of nutrition. Wheat, the substance from which bread is most generally made, contains all the necessary food elements in proper proportions to meet the requirements of nutrition, and bread should also contain them. The flour, however, must be made from the whole grain of the wheat, with the exception of the outer husk.
Bread, to meet the standards of a good, nutritious food, must be tasty and also light, airy, and crumbly, so that it can be easily chewed and digested. It shouldn’t have any ingredients that could harm the body and should include as many nutritional elements as possible. Wheat, the main ingredient used to make bread, has all the essential food components in the right amounts to satisfy nutritional needs, and bread should include these as well. However, the flour must be made from the whole grain of the wheat, except for the outer husk.
What is ordinarily termed fine flour has a large part of the most nutritive properties of the grain left out, and unless this deficiency is made up by other foods, the use of bread made from such material will leave the most vital tissues of the body poorly nourished, and tend to produce innumerable bad results. People who eat bread made from fine white flour naturally crave the food elements which have been eliminated from the wheat, and are thus led to an excessive consumption of meat, and the nerve-starvation and consequent irritability thus induced may also lead to the use of alcoholic drinks. We believe that one of the strongest barriers women could erect against the inroads of intemperance would be to supply the tables of the land with good bread made from flour of the entire wheat.
What we usually call fine flour is missing many of the nutritious properties found in the whole grain. If those missing nutrients aren't replaced with other foods, eating bread made from this flour will leave the body's vital tissues undernourished and could lead to numerous negative effects. People who eat bread made from fine white flour naturally crave the nutrients that have been taken out of the wheat, which often results in them eating too much meat. This lack of essential nutrients can lead to nerve fatigue and irritability, which might cause some to turn to alcohol. We believe one of the strongest ways women can fight against the problem of excessive drinking is by providing good bread made from whole wheat flour at their tables.
The superiority of bread made from the entire wheat or unbolted meal has been attested by many notable examples in history. In England, under the administration of William Pitt, there was for several years such a scarcity of wheat that to make it hold out longer, a law was passed by Parliament that the army should be supplied with bread made of unbolted flour. This occasioned much murmuring on the part of the soldiers, but nevertheless the health of the army improved so greatly as to be a subject of surprise. The officers and the physicians at last publicly declared that the soldiers had never before been so robust and healthy.
The benefits of bread made from whole wheat or unrefined flour have been supported by many famous historical examples. In England, during William Pitt's time, there was a significant shortage of wheat that lasted for several years. To make the wheat last longer, Parliament passed a law requiring the army to be supplied with bread made from unrefined flour. This caused a lot of complaints among the soldiers, but surprisingly, the army's health improved significantly. Eventually, the officers and doctors publicly stated that the soldiers had never been as strong and healthy as they were at that time.
According to the eminent Prof. Liebig, whole-wheat bread contains 60 per cent more of the phosphate or bone forming material than does meat, and 200 per cent more gluten than white bread. To the lack of these elements in a food so generally used as white flour bread, is undoubtedly due the great prevalence of early decaying teeth, rickets, and other bone diseases. Indeed, so many are the evils attendant upon a continued use of fine flour bread that we can in a great measure agree with a writer of the last century who says, in a quaint essay still to be seen at the British Museum, that "fine flour, spirituous liquors, and strong ale-house beer are the foundations of almost all the poverty and all the evils that affect the labouring part of mankind."
According to the respected Prof. Liebig, whole-wheat bread has 60 percent more phosphate, which helps form bones, than meat, and 200 percent more gluten than white bread. The absence of these nutrients in widely consumed white flour bread is certainly linked to the high rates of early tooth decay, rickets, and other bone-related issues. In fact, there are so many problems associated with the regular consumption of fine flour bread that we can largely agree with a writer from the last century who stated in a quirky essay still available at the British Museum that "fine flour, alcoholic drinks, and strong ale-house beer are the foundation of almost all the poverty and all the problems that affect the working class."
Bread made from the entire wheat is looked upon with far more favor than formerly, and it is no longer necessary to use the crude products of the grain for its manufacture, since modern invention has worked such a revolution in milling processes that it is now possible to obtain a fine flour containing all the nutritious elements of the grain. The old-time millstone has been largely superceded by machinery with which the entire grain may be reduced to fine flour without the loss of any of its valuable properties. To be sure, the manufacture of fine white flour of the old sort, is still continued, and doubtless will be continued so long as color takes precedence over food value. The improved processes of milling have, however, enabled the millers to utilize a much larger proportion of the nutritious elements of the grain than formerly, and still preserve that whiteness is so pleasing to many consumers. Although it is true that there are brands of white flour which possess a large percentage of the nutrient properties of the wheat, it is likewise true that flour which contains all the nutritive elements is not white.
Bread made from whole wheat is much more popular now than it used to be, and there’s no need to use the rough products of the grain for making it anymore. Modern inventions have completely changed milling processes, so it’s now possible to get a fine flour that contains all the nutritious elements of the grain. The old millstone has mostly been replaced by machinery that can grind the entire grain into fine flour without losing any of its valuable properties. Of course, the production of fine white flour like in the past still continues and will probably keep going as long as appearance is prioritized over nutritional value. However, improved milling processes have allowed millers to make better use of a larger portion of the grain's nutritious elements while still keeping the whiteness that many consumers find appealing. While there are brands of white flour that have a significant amount of the wheat's nutrients, it’s also true that flour containing all the nutritious elements is not white.
Of flours made from the entire grain there are essentially two different varieties, that which is termed unbolted wheat meal or Graham flour, and that called wheat-berry, whole-wheat, or entire-wheat flour. The principal difference between the two consists in the preliminary treatment of the wheat kernel before reduction, Graham flour containing more or less of the flinty bran, which is wholly innutritious and to a sensitive stomach somewhat irritating. In the manufacture of whole or entire-wheat flour, the outer, flinty bran is first removed by special machinery, and then the entire grain pulverized, by some of approved method, to different grades of fineness. The absence of the indigestible bran renders the entire-wheat flour superior in this respect to Graham, though for many persons the latter is to preferred.
Of flours made from the whole grain, there are basically two types: what is called unbolted wheat meal or Graham flour, and what is known as wheat-berry, whole-wheat, or entire-wheat flour. The main difference between the two lies in how the wheat kernel is processed before milling. Graham flour contains varying amounts of the tough bran, which has no nutritional value and can be somewhat irritating to sensitive stomachs. In making whole or entire-wheat flour, the tough outer bran is first removed using special machinery, and then the whole grain is ground using an approved method to achieve different levels of fineness. The lack of indigestible bran makes entire-wheat flour better in this regard compared to Graham flour, although many people still prefer the latter.
How to Select Flour.—The first requisite in the making of good bread is good flour. The quality of a brand of flour will of course depend much upon the kind of grain from which it is prepared—whether new or old, perfect, or deteriorated by rust, mold, or exposure, and also upon the thoroughness with which it has been cleansed from dust, chaff, and all foreign substances, as well as upon the method by which it is ground. It is not possible to judge with regard to all these particulars by the appearance of the flour, but in general, good flour will be sweet, dry, and free from any sour or musty smell or taste. Take up a handful, and if it falls from the hand light and elastic, it is pretty sure to be good. If it will retain the imprint of the fingers and falls and a compact mass or a damp, clammy, or sticky to the touch, it is by no means the best. When and knead a little of it between the fingers; if it works soft and sticky, it is poor. Good flour, when made into dough, is elastic, and will retain its shape. This elastic property of good flour is due to the gluten which it contains. The more gluten and the stronger it is, the better the flour. The gluten of good flour will swell to several times its original bulk, while that of poor flour will not.
How to Select Flour.—The first requirement for making good bread is using good flour. The quality of a flour brand depends on the type of grain it comes from—whether it's fresh or old, perfect or damaged by rust, mold, or exposure—and also on how thoroughly it has been cleaned of dust, chaff, and other impurities, as well as the grinding process. You can't judge all these factors just by looking at the flour, but generally, good flour will be sweet, dry, and free from any sour or musty odors or tastes. Take a handful; if it falls from your hand light and elastic, it’s likely good. If it holds the imprint of your fingers and falls in a dense mass or feels damp, clammy, or sticky, it’s definitely not the best. When you knead a bit of it between your fingers, if it feels soft and sticky, it's low quality. Good flour, when turned into dough, is elastic and keeps its shape. This elastic quality comes from the gluten it contains. The more gluten and the stronger it is, the better the flour. The gluten in good flour will expand to several times its original size, while the gluten in poor flour won’t.
In buying white flour, do not select that which is pure white with a bluish tinge, but that which is of a creamy, yellowish-white tint. While the kinds of flour that contain the entire nutritive properties of the wheat will necessarily be darker in color, we would caution the reader not to suppose that because flour is dark in color it is for that reason good, and rich in nutritive elements. There are many other causes from which flour may be dark, such as the use of uncleansed or dark varieties of wheat, and the large admixture of bran and other grains; many unscrupulous millers and flour dealers make use of this fact to palm off upon their unsuspecting customers an inferior article. Much of the so-called Graham flour is nothing more than poor flour mixed with bran, and is in every way inferior to good white flour. Fine flour or made from the entire wheat may generally be distinguished from a spurious article by taking a small portion into the mouth and chewing it. Raw flour made from the entire grain has a sweet taste, and a rich, nutty flavor the same as that experienced in chewing a whole grain of wheat, and produces a goodly quantity of gum or gluten, while a spurious article tastes flat and insipid like starch, or has a bitter, pungent taste consequent upon the presence of impurities. This bitter taste is noticeable in bread made from such flour. A given quantity of poor flour will not make as much bread as the same quantity of good flour, so that adulteration may also be detected in this way. Doubtless much of the prejudice against the use of whole-wheat flour has arisen from the use of a spurious article.
In buying white flour, avoid the kind that is pure white with a bluish tint; instead, choose one that has a creamy, yellowish-white color. While flours that retain all the nutritious properties of wheat tend to be darker, don’t assume that dark flour is automatically good or rich in nutrients. There are many reasons why flour may be dark, such as using uncleaned or darker varieties of wheat, or a high mixture of bran and other grains. Unscrupulous millers and flour sellers often take advantage of this to sell an inferior product to unsuspecting customers. Much of what is called Graham flour is just low-quality flour mixed with bran and is in every way worse than good white flour. You can usually tell fine flour made from whole wheat from a fake product by taking a small amount and chewing it. Raw flour made from whole grains has a sweet taste and a rich, nutty flavor similar to that of chewing whole wheat grains, and it produces a decent amount of gum or gluten. In contrast, a fake product tastes flat and bland like starch or has a bitter, off-putting taste due to impurities. This bitter taste is evident in bread made from such flour. A certain amount of poor-quality flour won’t yield as much bread as the same amount of good flour, so you can also detect adulteration this way. Surely, much of the bias against whole-wheat flour has come from the use of these inferior products.
As it is not always possible to determine accurately without the aid of chemistry and a microscope whether flour is genuine, the only safe way is to purchase the product of reliable mills.
As it's not always possible to accurately determine whether flour is authentic without the help of chemistry and a microscope, the safest option is to buy from reputable mills.
It is always best to obtain a small quantity of flour first, and put it to the test of bread-making; then, if satisfactory, purchase that brand so long as it proves good. It is true economy to buy a flour known to be good even though it may cost more than some others. It is not wise to purchase too large a quantity at once unless one has exceptionally good facilities for storage, as flour is subject to many deteriorating influences. It is estimated that a barrel of good flour contains sufficient bread material to last one person one year; and from this standard it can be easily estimated in what proportion it is best to purchase.
It’s always a good idea to start with a small amount of flour and test it for bread-making. If it works out well, then you can buy that brand as long as it continues to perform well. It’s actually more cost-effective to buy a flour that’s known to be high quality, even if it’s pricier than some others. It's not wise to buy too much at once unless you have excellent storage options, since flour can be affected by many damaging factors. It’s estimated that a barrel of good flour has enough bread material to last one person a year, so you can easily figure out how much to buy based on that standard.
To Keep Flour.—Flour should always be kept in a tight receptacle, and in a cool, dry, well-ventilated place. It should not be allowed to remain in close proximity to any substances of strong odor, as it very readily absorbs odors and gaseous impurities. A damp atmosphere will cause it to absorb moisture, and as a result the gluten will lose some of its tenacity and become sticky, and bread made from the flour will be coarser and inferior in quality. Flour which has absorbed dampness from any cause should be sifted into a large tray, spread out thin and exposed to the hot sun, or placed in a warming oven for a few hours.
How to Store Flour.—Flour should always be stored in a sealed container, in a cool, dry, and well-ventilated area. It shouldn’t be kept close to any strong-smelling substances, as it easily picks up odors and gas impurities. A humid environment will cause it to absorb moisture, making the gluten less elastic and sticky, resulting in coarser and lower-quality bread. Flour that has become damp should be sifted into a large tray, spread out thinly, and exposed to direct sunlight or placed in a warm oven for a few hours.
Deleterious Adulterations of Flour.—Besides the fraud frequently practiced of compounding whole-wheat flour from inferior mill products, white flour is sometimes adulterated—more commonly, however, in European countries that in this—with such substances as alum, ground rice, plaster of Paris, and whiting. Alum is doubtless the most commonly used of all these substances, for the reason that it gives the bread a whiter color and causes the flour to absorb and retain a larger amount of water than it would otherwise hold. This enables the user to make, from an inferior brand of flour, bread which resembles that made from a better quality. Such adulteration is exceedingly injurious, as are other mineral substances used for a similar purpose.
Harmful Additives in Flour.—In addition to the fraud of mixing whole-wheat flour with lower-quality mill products, white flour is sometimes tainted—more often in European countries than here—with substances like alum, ground rice, plaster of Paris, and whiting. Alum is probably the most commonly used of these additives because it gives bread a lighter color and helps the flour absorb and retain more water than it normally would. This allows users to produce bread from a lower-quality flour that looks like it was made from a higher quality. Such adulteration is extremely harmful, as are other mineral substances used for similar reasons.
The presence of alum in flour or bread may be detected in the following way: Macerate a half slice of bread in three or four tablespoonfuls of water; strain off the water, and add to it twenty drops of a strong solution of logwood, made either from the fresh chips or the extract. Then add a large teaspoonful of a strong solution of carbonate of ammonium. If alum is present, the mixture will change from pink to lavender blue.
The presence of alum in flour or bread can be detected like this: Soak half a slice of bread in three or four tablespoons of water; strain the water off, then add twenty drops of a strong logwood solution made from either fresh chips or extract. Next, mix in a large teaspoonful of a strong ammonium carbonate solution. If alum is present, the mixture will change from pink to lavender blue.
The Journal of Trade gives the following simple mode of testing for this adulterant: "Persons can test the bread they buy for themselves, by taking a piece of it and soaking it in water. Take this water and mix it with an equal part of fresh milk, and if the bread contains alum, the mixture will coagulate. If a better test is required, boil the mixture, and it will form perfect clot."
The Journal of Trade provides a straightforward way to test for this contaminant: "People can check the bread they buy by taking a piece and soaking it in water. Then mix this water with an equal amount of fresh milk, and if the bread has alum in it, the mixture will curdle. For a more definitive test, boil the mixture, and it will create a solid clot."
Whiting can be detected by dipping the ends of the thumb and forefinger in sweet oil and rubbing the flour between them. If whiting is present, the flour will become sticky like putty, and remain white; whereas pure flour, when so rubbed, becomes darker in color, but not sticky. Plaster of Paris, chalk, and other alkaline adulterants may be detected by a few drops of lemon juice: if either be present, effervescence will take place.
Whiting can be found by dipping the tips of your thumb and forefinger in sweet oil and rubbing the flour between them. If whiting is there, the flour will get sticky like putty and stay white; however, pure flour, when rubbed this way, will darken in color but won't become sticky. You can check for plaster of Paris, chalk, and other alkaline additives by using a few drops of lemon juice: if any of these are present, you'll see fizzing.
Chemistry of Bread-Making.—Good flour alone will not insure good bread. As much depends upon its preparation as upon the selection of material; for the very best of flour may be transformed into the poorest of bread through improper or careless preparation. Good bread cannot be produced at random. It is not the fruit of any luck or chance, but the practical result of certain fixed laws and principles to which all may conform.
Chemistry of Bread-Making.—Good flour alone won't guarantee good bread. A lot depends on how it's prepared, just as much as the choice of ingredients; because even the finest flour can turn into terrible bread if not prepared properly or with care. Good bread cannot be made randomly. It’s not the result of luck or chance, but rather the practical outcome of specific fixed laws and principles that everyone can follow.
The first step in the conversion of flour into bread is to incorporate with it a given amount of fluid, by which each atom of flour is surrounded with a thin film of moisture, in order to hydrate the starch, to dissolve the sugar and albumen, and to develop the adhesiveness of the gluten, thus binding the whole into one coherent mass termed dough, a word from a verb meaning to wet or moisten. If nothing more be done, and this simple form of dough be baked, the starch granules will be ruptured by the heat and thus properly prepared for food; but the moistening will have developed the glue-like property of the gluten to the extent of firmly cementing the particles of flour together, so that the mass will be hard and tough, and almost incapable of mastication. If, however, the dough be thoroughly kneaded, rolled very thin, made into small cakes, and then quickly baked with sufficient heat, the result will be a brittle kind of bread termed unleavened bread, which, although it requires a lengthy process of mastication, is more wholesome and digestible than soft bread, which is likely to be swallowed insufficiently insalivated.
The first step in turning flour into bread is to mix in a specific amount of liquid, which coats each particle of flour with a thin layer of moisture. This hydrates the starch, dissolves the sugar and protein, and enhances the stickiness of the gluten, binding everything into a single cohesive mass called dough, a term derived from a verb meaning to wet or moisten. If nothing else is done and this simple dough is baked, the heat will break apart the starch granules, making them prepared for consumption. However, the moisture will have activated the glue-like quality of the gluten enough to firmly stick the flour particles together, resulting in a dense and tough mass that’s almost impossible to chew. But if the dough is kneaded well, rolled very thin, formed into small cakes, and quickly baked at a high temperature, it will produce a brittle type of bread known as unleavened bread, which, despite needing more chewing, is healthier and easier to digest than soft bread that may be swallowed without enough saliva.
The gluten of wheat flour, beside being adhesive, is likewise remarkably elastic. This is the reason why wheat flour is much more easily made into light bread than the product of other cereals which contain less or a different quality of gluten. Now if while the atoms of flour are supplied with moisture, they are likewise supplied with some form of gaseous substance, the elastic walls of the gluten cells will become distended, causing the dough to "rise," or grow in bulk, and at the same time become light, or porous, in texture.
The gluten in wheat flour is not only sticky but also very stretchy. This is why wheat flour is much better for making light bread compared to other grains that have less or a different type of gluten. If the flour particles are given moisture along with some kind of gas, the stretchy walls of the gluten cells will expand, causing the dough to "rise" or increase in size, while also becoming light and airy in texture.
This making of bread light is usually accomplished by the introduction of air into the dough, or by carbonic acid gas generated within the mass, either before or during the baking, by a fermentative or chemical process.
This process of making bread light is usually achieved by adding air into the dough or by carbon dioxide produced within the mixture, either before or during baking, through a fermentation or chemical process.
When air is the agency used, the gluten, by its glue-like properties, catches and retains the air for a short period; and if heat is applied before the air, which is lighter than the dough, rises and escapes, it will expand, and in expanding distend the elastic glutinous mass, causing it to puff up or rise. If the heat is sufficient to harden the gluten quickly, so that the air cells throughout the whole mass become firmly fixed before the air escapes, the result will be a light, porous bread. If the heat is not sufficient, the air does not properly expand; or if before a sufficient crust is formed to retain the air and form a framework of support for the dough, the heat is lessened or withdrawn, the air will escape, or contract to its former volume, allowing the distended glutinous cell walls to collapse; in either case the bread will be heavy.
When air is used, the gluten, because of its sticky properties, catches and holds the air for a short time; and if heat is applied before the air, which is lighter than the dough, rises and escapes, it will expand, causing the elastic gluten mass to puff up or rise. If the heat is strong enough to quickly set the gluten so that the air pockets throughout the entire mass become firmly fixed before the air escapes, the result will be a light, airy bread. If the heat isn't enough, the air won't expand properly; or if, before a strong crust forms to hold the air and create support for the dough, the heat is reduced or taken away, the air will escape or shrink back to its original size, causing the stretched gluten cell walls to collapse; in either case, the bread will be heavy.
If carbonic acid gas, generated within the dough by means of fermentation or by the use of chemical substances, be the means used to lighten the mass, the gluten by virtue of its tenacity holds the bubbles of gas as they are generated, and prevents the large and small ones from uniting, or from rising to the surface, as they seek to do, being lighter than the dough. Being thus caught where they are generated, and the proper conditions supplied to expand them, they swell or raise the dough, which is then termed a loaf. (This word "loaf" is from the Anglo-Saxon hlifian, to raise or lift up.) The structure is rendered permanent by the application of heat in baking.
If carbon dioxide gas, created in the dough through fermentation or by using chemicals, is what makes the mixture lighter, the gluten, due to its elasticity, traps the gas bubbles as they form. This prevents both the large and small bubbles from merging or rising to the surface, as they naturally want to do since they are lighter than the dough. As they are trapped where they are produced, and when the right conditions are provided for them to expand, they cause the dough to rise, which is then called a loaf. (The term "loaf" comes from the Anglo-Saxon hlifian, meaning to raise or lift up.) The structure is made permanent by the heat applied during baking.
BREAD MADE LIGHT BY FERMENTATION.
For general use, the most convenient form of bread is usually considered to be that made from wheat flour, raised or made light by some method of fermentation, although in point of nutritive value and healthfulness, it does not equal light, unfermented, or aërated bread made without the aid of chemicals.
For everyday use, the easiest type of bread is typically seen as that made from wheat flour, leavened or made light through some fermentation process, even though in terms of nutritional value and health benefits, it doesn't match up to light, unfermented, or aerated bread made without chemicals.
The Process of Fermentation.—Fermentation is a process of decomposition, and hence more or less destructive to the substances subjected to its influence. When animal and vegetable substances containing large amounts of nitrogenous elements are in a moist state and exposed to air, they very soon undergo a change, the result of which is decomposition or decay. This is occasioned by the action of germs, which feed upon nitrogenous substances, as do the various species of fungi. Meat, eggs, milk, and other foods rich in nitrogenous elements can be preserved but a short time if exposed to the atmosphere. The carbonaceous elements are different in this respect. When pure starch, sugar, or fat is exposed to the air in a moistened state, they exhibit the very little tendency to change or decay. Yet if placed in contact with decomposing substances containing nitrogen, they soon begin to change, and are themselves decomposed and destroyed. This communication of the condition of change from one class of substances to another, is termed fermentation. If a fermenting substance be added to a watery solution containing sugar, the sugar will be changed or decomposed, and two new substances, alcohol and carbonic acid gas, are produced.
The Process of Fermentation.—Fermentation is a decomposing process, which means it tends to break down the substances it's affecting. When animal and plant matter that has high nitrogen content is wet and exposed to air, it quickly starts to change, leading to decomposition or decay. This happens because of germs that feed on nitrogenous substances, similar to various types of fungi. Foods like meat, eggs, and milk, which are rich in nitrogen, can only be kept for a short time if they're exposed to the air. In contrast, carbon-based elements behave differently. When pure starch, sugar, or fat is exposed to damp air, they show very little tendency to change or decay. However, if they come into contact with decaying nitrogen-rich substances, they start to change and will decompose and spoil themselves. This transfer of decomposition from one type of substance to another is known as fermentation. If you add a fermenting substance to a sugar solution, the sugar will break down, creating two new substances: alcohol and carbon dioxide.
The different stages of fermentation are noted scientifically as alcoholic, acetous, and putrefactive. The first is the name given to the change which takes place in the saccharine matter of the dough, which results in the formation of alcohol and carbonic acid gas. This same change takes place in the saccharine matter of fruits under the proper with conditions of warmth, air, and moisture, and is utilized in the production of wines and fermented liquors.
The different stages of fermentation are scientifically categorized as alcoholic, acetous, and putrefactive. The first refers to the transformation that occurs in the sugary components of the dough, leading to the creation of alcohol and carbon dioxide. This same transformation happens in the sugary parts of fruits under the right conditions of warmth, air, and moisture, and it is used in the production of wines and fermented drinks.
In bread-making, the alcohol and carbonic acid gas produced during the fermentation, are formed from sugar,—that originally contained in the flour and the additional quantity formed from starch during the fermenting process. It is evident, therefore, that bread cannot be fermented without some loss in natural sweetness and nutritive value, and bread made after this method should be managed so as to deteriorate the material as little as possible.
In bread-making, the alcohol and carbon dioxide gas produced during fermentation come from sugar—both the sugar originally in the flour and the extra sugar created from starch during fermentation. It's clear, then, that bread can't be fermented without losing some of its natural sweetness and nutritional value, so bread made this way should be handled in a way that minimizes the deterioration of the ingredients as much as possible.
If this fermentation continues long enough, the acetous fermentation is set up, and acetic acid, the essential element of vinegar, is formed and the dough becomes sour. If the process of fermentation is very much prolonged, the putrefactive change is set up, and the gluten is more or less decomposed.
If this fermentation goes on for a long time, acetic fermentation starts, and acetic acid, the key component of vinegar, is produced, making the dough sour. If the fermentation is extended for too long, it leads to decay, and the gluten breaks down more or less.
If the dough be baked during the alcoholic and carbonic-acid stage of fermentation, the gas will render the loaf light and porous. The alcohol will be dissipated by the heat during the baking, or evaporated shortly afterward, provided the baking be thorough. If the fermentation is allowed to proceed until the acetous fermentation has begun, the loaf, when baked, will be "sad" and heavy, since there is no longer any gas to puff it up. If, however, during the first or alcoholic stage of fermentation, new material be added, the same kind of fermentation will continue for a certain period longer.
If the dough is baked during the alcoholic and carbon dioxide phase of fermentation, the gas will make the loaf light and airy. The alcohol will evaporate due to the heat during baking or shortly afterward, as long as the baking is done thoroughly. If fermentation is allowed to continue until the acidic fermentation starts, the loaf will turn out "sad" and heavy when baked, since there won't be any gas left to make it rise. However, if new ingredients are added during the first or alcoholic stage of fermentation, the same type of fermentation will continue for a while longer.
These facts serve to show that great care and attention are necessary to produce good bread by a fermentative process. If the fermentation has not been allowed to proceed far enough to generate a sufficient amount of gas to permeate the whole mass, the result will be a heavy loaf; and if allowed to proceed too far, acid fermentation begins, the gas escapes, and we have sour as well as heavy bread. It is not enough, however, to prevent bread from reaching the acetous or sour stage of fermentation. Bread may be over-fermented when there is no appreciable sourness developed. Fermentation may be carried so far as to destroy much of the richness and sweetness of the loaf, and yet be arrested by the baking process just before the acetous stage begins, so that it will be light and porous, but decidedly lacking in flavor and substance. Over-fermentation also develops in the bread various bitter substances which obscure the natural sweetness of the bread and give to it an unpleasant flavor. Many of these substances are more or less harmful in character, and include many poisons known as ptomaines, a class of chemical compounds produced by germs whenever fermentation or decomposition of organic matter takes place. Much skill is required to determine at what point to arrest the fermentation, in order to save the sweetness and richness of the bread.
These facts show that a lot of care and attention are needed to make good bread through fermentation. If fermentation isn't allowed to go far enough to produce enough gas to fill the entire dough, the result will be a dense loaf. Conversely, if it goes too far, acid fermentation starts, the gas escapes, and you end up with bread that’s both sour and heavy. However, just preventing bread from getting to the sour stage isn't enough. Bread can be over-fermented without developing a noticeable sour taste. Fermentation can go on long enough to diminish much of the richness and sweetness of the loaf, yet still be stopped by baking right before it turns sour, resulting in bread that’s light and airy but noticeably lacking in flavor and substance. Over-fermentation also creates various bitter compounds in the bread that mask its natural sweetness and give it an unpleasant taste. Many of these compounds can be harmful, including poisons known as ptomaines, which are produced by germs during fermentation or decay of organic materials. It takes considerable skill to know when to stop the fermentation process to preserve the sweetness and richness of the bread.
Fermentative Agents.—Fermentation in vegetable matter is always accompanied by the growth of living organisms. The development of these minute organisms is the exciting cause of fermentation and putrefaction. The germs or spores of some of these fermenting agents are always present in the air. It is well known to housekeepers that if a batter of flour and water and a little salt be kept in a jar of water at a temperature of from 100° to 110°, it will ferment in the course of five or six hours. Scientists assure us that this fermentation is occasioned by the introduction of the spores of certain species of fungi which are continually floating in the atmosphere, and the proper conditions of warmth and moisture being supplied, they at once begin to grow and multiply. This method of securing fermentation is utilized by housewives in making what is termed salt-rising bread. The raising of dough by this process is lengthy and uncertain, and a far more convenient method is to accelerate the fermentation by the addition of some active ferment. The ancient method of accomplishing this was by adding to the dough a leaven, a portion of old dough which had been kept until it had begun to ferment; but since the investigations of modern chemistry have made clear the properties of yeast, that has come to be considered the best agent for setting up the process of alcoholic fermentation in bread. The use of leaven is still practiced to somewhat in some European countries. The bread produced with leaven, although light and spongy in texture, has an unpleasant, sour taste, and is much less wholesome than that produced with fresh yeast.
Fermentative Agents.—Fermentation in plant matter always happens with the growth of living organisms. The growth of these tiny organisms causes fermentation and decay. The germs or spores of some of these fermenting agents are always in the air. It's well known among home cooks that if you keep a mixture of flour, water, and a bit of salt in a jar of water at a temperature between 100° and 110°, it will ferment in about five to six hours. Scientists tell us that this fermentation is caused by the introduction of spores from certain types of fungi that are constantly floating in the atmosphere, and once the right conditions of warmth and moisture are provided, they start to grow and multiply. This method of getting fermentation is used by homemakers to make what’s known as salt-rising bread. The process of rising dough this way is slow and unpredictable, and a much more convenient method is to speed up fermentation by adding some active ferment. The traditional way to do this was by adding a leaven, which is a piece of old dough that had been kept until it started to ferment; however, since modern chemistry has clarified the properties of yeast, yeast is now seen as the best agent for starting the alcoholic fermentation process in bread. The use of leaven is still practiced to some extent in a few European countries. Bread made with leaven, although light and spongy, has an unpleasant sour taste and is far less healthy than bread made with fresh yeast.
Yeast is a collection of living organisms or plants belonging to the family of fungi, which, like all other plants, require warmth, moisture, and food, in order to promote growth, and when properly supplied with these, they begin to grow and multiply rapidly. Fermentation will not take place at a temperature below 30°, it proceeds slowly at 45°, but from 70° to 90° it goes on rapidly. Fermentation may be arrested by the exhaustion of either the fermenting agent or the food supply, or by exposure to heat at the temperature of boiling water. This latter fact enables the housewife to arrest the process of fermentation, when the loaf has become sufficiently light, by baking it in a hot oven. Heat destroys most of the yeast cells; a few, however, remain in the loaf unchanged, and it is for this reason that yeast bread is considered less wholesome for dyspeptics than light unleavened bread. It is apparent, then, that the more thoroughly fermented bread is baked, the more wholesome it will be, from the more complete destruction of the yeast germs which it contains.
Yeast is a group of living organisms or plants in the fungi family that, like all plants, need warmth, moisture, and food to grow. When they get these conditions, they start to grow and multiply quickly. Fermentation doesn't happen at temperatures below 30°, goes slowly at 45°, but occurs rapidly between 70° and 90°. The fermentation process can stop if the fermenting agent or food supply runs out, or if it's exposed to heat at boiling water temperatures. This allows a cook to halt fermentation when the dough has risen enough by baking it in a hot oven. Heat kills most of the yeast cells, but a few still remain in the bread, which is why yeast bread is generally considered less healthy for those with digestive issues than light, unleavened bread. Therefore, the more thoroughly baked the fermented bread is, the healthier it will be, as more yeast germs are destroyed in the process.
Yeast.—Next to good flour, the most important requisite in the manufacture of fermented bread is good yeast. The best of flour used in conjunction with poor yeast will not produce good bread. The most convenient and reliable kind of marketable yeast, when fresh, is the compressed yeast. The dry though they are always ready for use, the quality of the bread they produce is generally inferior to that made with either compressed yeast or good liquid yeast. If this sort of yeast must be depended upon, the cakes known as "Yeast Foam" are the best of any with which we are acquainted.
Yeast.—After good flour, the most important ingredient for making fermented bread is quality yeast. Even the best of flour won't create good bread when combined with bad yeast. The most convenient and reliable type of market yeast, when fresh, is compressed yeast. While dry yeast is always ready to use, the bread made with it is usually of lower quality compared to bread made with compressed yeast or good liquid yeast. If you have to rely on this type of yeast, the cakes called "Yeast Foam" are the best option we know of.
Of homemade yeasts there are almost as many varieties as there are cooks. Their comparative value depends mainly upon the length of time they will keep good, or the facility with which they can be prepared. Essentially the same principles are involved in the making of them all; viz., the introduction of a small quantity of fresh, lively yeast into a mixture of some form of starch (obtained from flour, potato, or a combination of both) and water, with or without the addition of such other substances as will promote fermentation, or aid in preventing the yeast from souring. Under proper conditions of warmth, the small amount of original yeast begins to supply itself with food at once by converting the starch into dextrine, and then into grape sugar, and multiplies itself with great rapidity, and will continue to do so as long as there is material to supply it with the means of growth. While its growth is rapid, its decay is equally so; and unless some means of preservation be employed, the yeast will die, and the mixture become sour and foul. Ordinarily it can be kept good for several days, and under the best conditions, even three or four weeks. After it has been kept from four to six hours, it should be placed in some receptacle as nearly air-tight as possible and set in the cellar or refrigerator, where it can be kept at a temperature not conducive to fermentation. Thus the little yeast organisms will remain in a quiescent state, but yet alive and capable of multiplying themselves when again surrounded with favorable conditions.
There are nearly as many types of homemade yeast as there are cooks. Their effectiveness mainly depends on how long they stay fresh and how easily they can be made. The same basic principles apply to all of them: introducing a small amount of active yeast into a mixture of starch (from flour, potatoes, or both) and water, possibly with additional ingredients to encourage fermentation or prevent the yeast from going bad. With the right warmth, the initial small amount of yeast starts feeding on the starch by converting it into dextrin and then into glucose, rapidly multiplying as long as there’s enough material for it to thrive. While it grows quickly, it also spoils just as fast; without proper preservation, the yeast will die, and the mixture will turn sour and foul. Typically, it stays good for several days, and under optimal conditions, even three or four weeks. After about four to six hours, it should be placed in a nearly airtight container and stored in a cool place like a cellar or refrigerator, where the temperature prevents fermentation. This way, the yeast will remain dormant but alive, ready to multiply again when placed in favorable conditions.
The yeast should be kept in glass or glazed earthen ware. The vessel containing it should be washed and scalded with scrupulous care before new yeast is put in, since the smallest particle of sour or spoiled yeast will ruin the fresh supply in a very short time. It is generally conceded that yeast will keep longer if the material of which it is made be mixed with liquid of a boiling temperature, or cooked for a few minutes at boiling heat before adding the yeast. The reason for this undoubtedly lies in the fact that the boiling kills foreign germs, and thus prevents early souring or putrefaction. The yeast must not be added, however, until the liquid has cooled to a little more than blood heat, as too great heat will kill the yeast cells.
The yeast should be stored in glass or glazed earthenware. The container holding it must be cleaned and scalded with careful attention before new yeast is added, as even the tiniest bit of sour or spoiled yeast can spoil the fresh batch in no time. It's generally accepted that yeast lasts longer if the ingredients it's made from are mixed with liquid at a boiling temperature or cooked for a few minutes at boiling heat before adding the yeast. This is likely because boiling kills foreign germs, which helps prevent early souring or decay. However, the yeast must not be added until the liquid cools to just above body temperature, as too much heat will kill the yeast cells.
The starch of the potato is thought to furnish better material for the promotion of yeast growth than that of wheat flour; but whether the potato be first cooked, mashed, and then combined with the other ingredients, or grated raw and then cooked in boiling water, makes little difference so far as results are concerned, though the latter method may have the advantage of taking less time. If potatoes are used for this purpose, they should be perfectly mature. New ones will not answer.
The starch from potatoes is considered to provide better material for promoting yeast growth than wheat flour. However, it makes little difference whether the potatoes are first cooked, mashed, and then mixed with the other ingredients, or grated raw and then cooked in boiling water; although, the second method may save some time. If you use potatoes for this, they should be fully mature. New potatoes won't work.
Sugar assists in promoting the growth of the yeast plant, and a small amount is usually employed in making yeast. Hops serve to prevent the yeast from souring, and an infusion of them is frequently used for this purpose.
Sugar helps promote the growth of the yeast, and a small amount is typically used in making yeast. Hops help prevent the yeast from souring, and an infusion of them is often used for this purpose.
While it is essential that the water used should be boiling, it is also necessary that the mixture should cooled to a lukewarm temperature before the introduction of the original yeast, as intense heat will kill the yeast plant. Freezing cold will likewise produced the same result. While a cool temperature is one of the requisites for keeping yeast fresh, care must be taken, especially in winter, that it does not get chilled.
While it's important that the water used is boiling, it's also necessary for the mixture to cool to a lukewarm temperature before adding the original yeast, as high heat will kill the yeast. Freezing cold will have the same effect. Although a cool temperature is needed to keep yeast fresh, care must be taken, especially in winter, to ensure it doesn't get too cold.
When yeast is needed for bread, it is always the best plan to take a cup to the cellar or refrigerator for the desired quantity, and re-cover the jar as quickly as possible. A half hour in a hot kitchen would be quite likely to spoiled it. Always shake or stir the whole well before measuring out the yeast. In making yeast, used earthen bowls for mixing, porcelain-lined or granite-ware utensils for boiling, and silver or wooden spoons for stirring.
When you need yeast for bread, it's always best to take a cup from the cellar or refrigerator for the amount you need, and cover the jar again as quickly as you can. A half hour in a hot kitchen could easily spoil it. Always shake or stir the mixture well before measuring out the yeast. When making yeast, use earthen bowls for mixing, porcelain-lined or granite cookware for boiling, and silver or wooden spoons for stirring.
Bitter Yeast.—It sometimes happens that an excessive use of hops in the making of yeast gives to it so bitter a flavor as to communicate a disagreeable taste to the bread. To correct this bitterness, mix with the yeast a considerable quantity of water, and let it stand for some hours, when the thickest portion will have settled at the bottom. The water, which will have extracted much of the bitterness, can then be turned off and thrown away. Yeast also sometimes becomes a bitter from long keeping. Freshly burnt charcoal thrown into the yeast is said to absorb the odors and offensive matter and render the yeast more sweet; however, we do not recommend the use of any yeast so stale as to need sweetening or purifying. Yeast that is new and fresh is always best; old and stale yeast, even though it may still possess the property of raising the dough, will give an unpleasant taste to the bread, and is much less wholesome.
Bitter Yeast.—Sometimes, using too many hops when making yeast can create a bitter flavor that makes the bread taste unpleasant. To fix this bitterness, mix a good amount of water with the yeast and let it sit for several hours. The thickest part will settle at the bottom. You can then pour off the water, which will have removed much of the bitterness. Yeast can also turn bitter if it’s kept for too long. Adding freshly burnt charcoal to the yeast is said to absorb bad smells and impurities, making the yeast taste better; however, we don't suggest using any yeast that's so old that it needs to be sweetened or cleaned. Fresh yeast is always the best option; old and stale yeast, even if it can still help the dough rise, will result in bread that tastes bad and is much less healthy.
Tests for Yeast.—Liquid yeast, when good, is light in color and looks foamy and effervescent; it has a pungent odor somewhat similar to weak ammonia, and if tasted will have a sharp, biting flavor. Yeast is poor when it looks dull and watery, and has a sour odor. Compressed yeast, if good, breaks off dry and looks white; if poor, it appears moist and stringy.
Tests for Yeast.—Good liquid yeast is light in color, foamy, and bubbly; it has a strong smell similar to weak ammonia, and if you taste it, it will have a sharp, biting flavor. Yeast is bad when it looks dull and watery and has a sour smell. Good compressed yeast breaks off dry and looks white; poor compressed yeast appears moist and stringy.
If there is any question as to the quality of yeast, it is always best to test it before use by adding a little flour to a small quantity and setting it in a warm place. If it begins to ferment in the course of fifteen or twenty minutes, it is good.
If you're unsure about the quality of yeast, it's best to test it before using it. Just mix a little flour with a small amount of yeast and put it in a warm place. If it starts to ferment within fifteen or twenty minutes, it's good to use.
Starting the Bread.—Having secured good yeast, it is necessary in some way to diffuse it through the bread material so that it will set up an active fermentation, which, by the evolution of gas, will render the whole mass light and porous. As fermentation is more sure, more rapid, and requires less yeast to start it when set in action in a thin mixture than when introduced into stiff dough, the more common method of starting fermented bread is by "setting a sponge;" viz., preparing a batter of flour and liquid, to which potato is sometimes added, and into which the yeast is introduced. Some cooks, in making the batter, use the whole amount of liquid needed for the bread, and as the sponge rises, add flour in small quantities, beating it back, and allowing it to rise a second, third, or even fourth time, until sufficient flour has been added to knead; others use only half the liquid in preparing the sponge, and when it has well risen, prepare a second one by adding the remainder of the liquid and fresh flour, in which case the fermented batter acts as a double portion of yeast and raises the second sponge very quickly. The requisite amount of flour is then added, the dough kneaded, and the whole allowed to rise a third time in the loaf. Other cooks dispense altogether with the sponge, adding to the liquid at first the requisite amount of flour, kneading it thoroughly and allowing it to rise once in mass and again after molding into loaves. As to the superiority of one method over another, much depends upon their adaptability to the time and convenience of the user; light bread can be produced by either method. Less yeast but more time will be required when the bread is started with a sponge. The end to be attained by all is a complete and equal diffusion of gas bubbles generated during fermentation throughout the whole mass of dough.
Starting the Bread.—Once you've got good yeast, you need to mix it into the bread ingredients in a way that promotes active fermentation. This process will produce gas that makes the dough light and airy. Fermentation works better, happens faster, and requires less yeast if you start it in a thin mixture rather than in stiff dough. The typical way to kick off fermented bread is by "setting a sponge," which means making a batter of flour and liquid, sometimes adding potato, and mixing in the yeast. Some cooks use all the liquid needed for the bread when making the batter and, as the sponge rises, gradually add more flour, beating it down and letting it rise multiple times until there's enough flour to knead. Others only use half the liquid to prepare the sponge, and once it's risen well, they create a second one by adding the rest of the liquid and fresh flour. In this case, the fermented batter acts like a double dose of yeast, causing the second sponge to rise quickly. Once the right amount of flour is added, the dough is kneaded and allowed to rise one more time in the loaf shape. Other cooks skip the sponge altogether, mixing all the flour with the liquid from the start, kneading it thoroughly, and letting it rise once as a mass and again after shaping it into loaves. When it comes to which method is better, it often depends on the user's schedule and preferences; you can achieve light bread using either method. Using a sponge takes less yeast but more time. The goal for everyone is to ensure that gas bubbles created during fermentation are evenly distributed throughout the dough.
The preferable method of combining the materials needed for the batter is by first mingling the yeast with the water or milk. If condensed or dry yeast is used, previously dissolve it well in a half cupful or less of lukewarm water. Stir the flour slowly into the liquid mixture and beat it very thoroughly so that the yeast shall be evenly distributed throughout the whole.
The best way to combine the ingredients for the batter is to start by mixing the yeast with the water or milk. If you're using condensed or dry yeast, make sure to dissolve it well in half a cup or less of lukewarm water first. Gradually stir the flour into the liquid mixture and beat it very thoroughly so the yeast is evenly spread throughout.
Proportion of Materials Needed.—The material needed for making: the bread should all be carefully measured out beforehand and the flour well sifted. Many housekeepers fail in producing good bread, because they guess at the quantity of material to be used, particularly the flour, and with the same quantity of liquid will one time use much more flour that at another, thus making the results exceedingly variable. With this same brand of flour, this same quantity should always be used to produce a given amount of bread. This amount will depend upon the quality of the material used. Good flour will absorb a larger quantity of liquids than that of an inferior quality, and the amount of liquid a given quantity of flour will take up determines the quantity of bread that can be produced from it. This amount is chiefly dependent upon the proportion of gluten contained in the flour. One hundred pounds of good flour will absorb sufficient water to produce one hundred and fifty pounds of bread. One reason why bread retains so much water is that during the baking a portion of starch is converted into gum, which holds water more strongly than starch. Again: the gluten, when wet, is not easily dried, while the dry crust which forms around the bread in baking is merely impervious to water, and, like the skin of a baking potato, prevents the moisture from escaping.
Proportion of Materials Needed.—The ingredients for making the bread should be carefully measured out in advance, and the flour should be well sifted. Many cooks struggle to make good bread because they estimate the amount of ingredients, especially the flour, and use a different amount of flour each time with the same amount of liquid, leading to inconsistent results. The same type of flour should always be used in the same quantity to produce a specific amount of bread. This amount will depend on the quality of the ingredients. Good flour absorbs more liquid than lower-quality flour, and the amount of liquid that a certain quantity of flour can absorb determines how much bread can be made from it. This is mainly based on the amount of gluten in the flour. One hundred pounds of good flour can absorb enough water to yield one hundred and fifty pounds of bread. One reason bread holds so much water is that during baking, some of the starch converts into gum, which retains water more effectively than starch does. Additionally, wet gluten does not dry out easily, while the dry crust that forms around the bread during baking is simply waterproof and, like the skin of a baked potato, keeps the moisture from escaping.
Kinds of flour vary so considerably in respect to their absorbent properties that it is not possible to state the exact proportions of flour and liquid required; approximately, three heaping measures of flour for one scant measure of liquid, including the yeast, will in general be found a good proportion. Bread made from the entire wheat will require from one half to one cupful less flour than that made of white flour. A quart of liquid, including the yeast, is sufficient for three ordinary-sized loaves. One half or two thirds of a cup of homemade yeast, according to its strength, or one half a cake of compressed yeast dissolved in a half cup of lukewarm water, will be sufficient for one quart of liquid. It is a common mistake to use too much yeast. It lessens the time required, but the result is less satisfactory. Bread to be set over night requires less yeast.
The types of flour can vary a lot in how much liquid they absorb, so it’s hard to give exact amounts of flour and liquid needed. Generally, about three heaping cups of flour for one light cup of liquid, including the yeast, is a good ratio. Bread made from whole wheat flour will need about half to one cup less flour than bread made from white flour. One quart of liquid, including the yeast, is enough for three standard-sized loaves. You’ll need about half or two-thirds of a cup of homemade yeast, depending on its strength, or half a cake of compressed yeast dissolved in half a cup of lukewarm water for one quart of liquid. A common mistake is using too much yeast. While it reduces the rising time, the result is usually not as good. Bread that’s left to rise overnight needs less yeast.
Whether water or milk should be used for bread-making, depends upon taste and convenience. Bread retains more nearly the natural flavor of the grain if made with water, and is less apt to sour; at the same time, bread made with milk is more tender than that made with water. Bread made with milk requires from one half to one cupful less of flour.
Whether to use water or milk for making bread depends on personal preference and convenience. Bread made with water keeps the natural flavor of the grain more intact and is less likely to spoil; on the other hand, bread made with milk is softer than bread made with water. Bread made with milk needs about half to one cup less flour.
Potatoes are sometimes used in conjunction with flour for bread-making. They are by no means necessary when good flour is used, but bread made from inferior flour is improved by their use. Only potatoes that are fully matured should be used for this purpose, and they should be well cooked and smoothly mashed. Neither sugar nor salt is essential for the production of good bread, though most cook books recommend the use of one or both. The proportion of the former should not exceed one even tablespoonful to three pints of flour, and the very smallest amount of salt, never more than a half teaspoonful, and better less. No butter or other free fat is required; the tenderness of texture produced by its use can be secured as well by the use of unskimmed milk and thorough kneading.
Potatoes are sometimes used along with flour for making bread. They're not necessary when using good flour, but bread made with lower quality flour can benefit from them. Only fully matured potatoes should be used, and they need to be well cooked and smoothly mashed. Neither sugar nor salt is essential for making good bread, although most cookbooks suggest using one or both. The maximum amount of sugar should be just one tablespoon for every three pints of flour, and the smallest amount of salt should never exceed half a teaspoon, preferably even less. No butter or other added fats are needed; the tenderness that fat provides can be achieved with unskimmed milk and proper kneading.
Utensils.—For bread-making purposes, earthen or china ware is preferable to either tin or wooden utensils: being a poor conductor, it protects the sponge from the cold air much more effectually than tin, and is much more easily kept clean and sweet than wood. The utensil should be kept exclusively for the purpose of bread-making, and should never be allowed to contain any sour substance. The bowl should be thoroughly scalded before and after each using. Use silver or granite-ware spoons for stirring the bread. Iron and tin discolor the sponge. For measuring the material, particularly the liquid and the yeast, half-pint cups, divided by marks into thirds and fourths, as shown in the cut, are especially serviceable.
Utensils.—For making bread, it's better to use earthenware or china instead of tin or wooden utensils. Since earthenware is a poor conductor, it keeps the dough warmer than tin does, and it's easier to keep clean compared to wood. The utensil should be dedicated solely to bread-making and should never hold anything sour. Make sure to thoroughly scald the bowl before and after each use. Use silver or graniteware spoons for stirring the dough, as iron and tin can discolor it. For measuring ingredients, especially liquids and yeast, use half-pint measuring cups marked in thirds and fourths, as shown in the cut; they're particularly handy.


When to Set the Sponge.—The time to set the sponge for bread-making is a point each housekeeper must determine for herself. The fact before stated, that temperature controls the activity of fermentation, and that it is retarded or accelerated according to the conditions of warmth, enables the housewife, by keeping the bread-mixture at a temperature of about 50° F., to set her bread in the evening, if desired, and find it light and ready for further attention in the morning. In winter, the sponge will need to be prepared early in the evening and kept during the night at as even a temperature as possible. A good way to accomplish this is to cover the bowl with a clean napkin and afterwards wrap it about very closely with several folds of a woolen blanket. In extremely cold weather bottles of hot water may be placed around the bowl outside the wrappings. In case this plan is employed, care must be taken to have sufficient wrappings between the bread and the bottles to prevent undue heat, and the bottles should be covered with an additional blanket to aid in retaining the heat as long as possible.
When to Set the Sponge.—The right time to set the sponge for making bread is something each home cook needs to figure out for themselves. As mentioned before, temperature influences how fermentation works, and it can be slowed down or sped up based on how warm it is. By keeping the bread mixture at around 50° F, the home baker can set their bread in the evening if they want and find it light and ready for more steps in the morning. In winter, the sponge should be prepared early in the evening and kept at a consistent temperature overnight. A good way to do this is to cover the bowl with a clean napkin and then wrap it tightly with several layers of a wool blanket. During really cold weather, hot water bottles can be placed around the bowl outside the wrappings. If you use this method, make sure to have enough layers between the bread and the bottles to prevent too much heat, and the bottles should be covered with an extra blanket to help keep the heat for as long as possible.
If the sponge is set in the evening, if in very warm weather, it should be started as late as practicable, and left in a rather cool place. Cover closely to exclude the air, but do not wrap in flannel as in winter. It will be likely to need attention early in the morning.
If you prepare the sponge in the evening, especially when it's really warm outside, you should start it as late as possible and keep it in a cooler spot. Cover it tightly to keep the air out, but don’t wrap it in flannel like you would in winter. You’ll probably need to check on it early in the morning.
The liquid should never be so cold as to chill the yeast. Milk, if used, should be first sterilized by scalding, and then cooled before using.
The liquid should never be so cold that it damages the yeast. If you're using milk, it should be sterilized by scalding it first, and then allowed to cool before using.
After the sponge is prepared, the greatest care must be taken to keep it at an equable temperature. From 70° to 90° is the best range of temperature, 75° being considered the golden mean throughout the entire fermentative process of bread-making.
After the sponge is ready, you need to be very careful to maintain a steady temperature. The ideal temperature range is from 70° to 90°, with 75° being the perfect balance during the whole fermentation process of bread-making.
After fermentation has well begun, it will continue, but much more slowly if the temperature be gradually lowered to 45° or 50°. If it is necessary to hasten the rising, the temperature can be raised to 80° or 85°, but it will necessitate careful watching, as it will be liable to over-ferment, and become sour. Cold arrests the process of fermentation, while too great heat carries forward the work too rapidly. Too much stress cannot be laid upon the importance of an equable temperature. The housewife who permits the fermentation to proceed very slowly one hour, forces it rapidly by increased heat the next, and perhaps allows it to subside to a chilling temperature the third, will never be sure of good bread.
After fermentation has really gotten started, it will keep going, but much more slowly if the temperature is gradually lowered to 45° or 50°. If you need to speed things up, you can raise the temperature to 80° or 85°, but you’ll need to keep a close eye on it, as it could over-ferment and turn sour. Cold will stop the fermentation process, while too much heat will rush it along too quickly. You can't stress enough how important it is to maintain a stable temperature. A housewife who lets fermentation go very slowly for one hour, then speeds it up with extra heat the next, and perhaps allows it to cool down too much the third, will never be sure of making good bread.
Putting the bowl containing the sponge into a dish of warm (not hot) water, or keeping it in the warming oven, or on the back of the range, are all methods which may bring about good results, provided the same degree of heat can be maintained continuously; but if the fire is one which must be increased or diminished to suit the exigencies of household details, nothing but the closest and most careful attention will keep the sponge at uniform temperature. The better way is to cover the bowl with a napkin, and in cold weather wrap closely in several thicknesses of flannel, and place on a stand behind the stove, or in some place not exposed to draughts. A bread-raiser purposely arranged for keeping the bread at proper temperature is a great convenience. Two small and rather thick earthen ware crocks of the same size, serve very well for this purpose. Scald both with hot water, and while still warm, put the sponge in one, invert the other for a cover, and leave in a warm room. All flour used in the bread should be warm when added.
Putting the bowl with the sponge into a dish of warm (not hot) water, or keeping it in a warming oven, or on the back of the stove, are all methods that can lead to good results, as long as you can maintain the same level of heat continuously; however, if the fire needs to be adjusted to accommodate household tasks, only the closest and most careful attention will keep the sponge at a consistent temperature. A better approach is to cover the bowl with a napkin, and in cold weather, wrap it tightly in several layers of flannel, and place it on a stand behind the stove, or in a spot that’s not exposed to drafts. A bread proofer specifically designed to keep bread at the right temperature is very helpful. Two small and fairly thick clay pots of the same size work well for this purpose. Scald both with hot water, and while they are still warm, put the sponge in one, invert the other as a cover, and leave it in a warm room. All the flour used in the bread should be warm when added.
Lightness of the Bread.—The time required for bread in its different stages to grow light will vary according to the quantity and strength of the yeast used and the amount of warmth supplied. A thin batter is light enough when in appearance it resembles throughout a mass of sea foam. It will not greatly increase in bulk, but will be in the state of constant activity, sending up little bubbles of gas and emitting a sharp, pungent odor like fresh yeast.
Lightness of the Bread.—The time it takes for bread to rise will depend on how much and how strong the yeast is, as well as the warmth provided. A thin batter is considered light when it looks like a mass of sea foam. It won't expand much in size, but it will be actively creating small gas bubbles and giving off a strong, sharp smell similar to fresh yeast.
When the thicker batter or second sponge is sufficiently light, it will have risen to nearly double its original bulk and become cracked over the top like "crazed" china. It should never be allowed to rise to the point of sinking or caving in, and should be kneaded as soon as ready. If for any reason it is not possible to knead the bread at once when it has arrived at this stage, do not allow it to stand, but take a knife or spoon and gently beat it back a little. This dissipates some of the gas and reduces the volume somewhat. Let it rise again, which it will do in a short time, if it has not been allowed to become too light. If dough that has been kneaded and allowed to rise in mass, becomes sufficiently light at some inopportune moment for shaping into loaves, it may be kept from becoming too light and souring, by taking a knife and cutting it away from the sides of the bowl and gradually working it over toward the center. Re-cover and put in a warm place. It will soon assume its former bulk. This "cutting down" may be repeated several times if necessary, provided the bread has not been allowed to become too light at any time, and some cook's recommend it as a uniform practice. We do not, however, except in case of necessity; since, though it may possibly make the bread more light, the long-continued fermentation destroys more than is necessary of the food elements of the flour, and develops an unnecessary amount of the products of fermentation. Lightness is not the only requisite for bread, and should be secured with as little deterioration of the flour as possible.
When the thicker batter or second sponge is light enough, it will have risen to almost double its original size and developed cracks on the top like "crazed" china. It should never rise to the point where it starts sinking or caving in, and it should be kneaded as soon as it's ready. If for any reason you can't knead the bread right away at this stage, don't let it stand. Instead, take a knife or spoon and gently beat it down a bit. This will release some of the gas and slightly reduce the volume. Let it rise again, , which it will do shortly if it hasn’t become too light. If the dough has been kneaded and allowed to rise in bulk but becomes sufficiently light at an inconvenient time for shaping into loaves, you can prevent it from getting too light and souring by using a knife to cut it away from the sides of the bowl and gradually working it back toward the center. Cover it again and place it in a warm spot. It will soon return to its original size. This "cutting down" can be repeated several times if necessary, as long as the bread hasn’t become too light at any point, and some cooks recommend it as a standard practice. However, we do not, except when necessary; because while it might make the bread lighter, prolonged fermentation destroys more of the flour's nutrients than necessary and creates an excess of fermentation products. Lightness isn’t the only requirement for good bread, and it should be achieved with minimal loss of the flour’s quality.
An important point in the preparation of bread is to decide when it is sufficiently light after having been molded and placed in pans. The length of time cannot be given, because it will vary with the temperature, the quality of the flour, and the quantity added during the kneading. At a temperature of 75°, an hour or an hour and a half is about the average length of time needed. A loaf should nearly double its size after being placed in a pan, before baking; when perfectly risen, the bread feels light when lifted and weighed upon the hand. It is better to begin the baking before it has perfectly risen them to wait until it has become so light as to commence to fall, since if the fermentation proceeds too far, the sweetness of the grain will be destroyed, and the bread will be tasteless and innutritious, even if it does not reach the acetous stage.
An important factor in preparing bread is determining when it has risen enough after being shaped and placed in pans. The exact time can't be pinned down since it varies based on temperature, flour quality, and the amount used during kneading. At a temperature of 75°F, it typically takes about an hour to an hour and a half. A loaf should nearly double in size after being placed in a pan before baking; when it’s fully risen, the bread feels light when you lift it and hold it in your hand. It's better to start baking before it has fully risen rather than waiting until it becomes so light that it starts to fall, because if the fermentation goes too far, the grain's sweetness will be lost, resulting in bread that is bland and lacks nutrition, even if it hasn't reached the sour stage.
The exercise of a little judgment and careful attention to detail will soon enable a person successfully to determine the proper degree of lightness of bread in its various stages. Bread which passes the extreme point of fermentation, or in common phrase gets "too light," will have a strong acid odor, and will pull away from the bowl in a stringy mass, having a watery appearance very different from the fine, spongy texture of properly risen dough. The acidity of such dough may be neutralized by the addition of an alkali, and housewives who through carelessness and inattention have allowed their bread to become "sour," often resort to saleratus or soda to neutralize the acid. The result of such treatment is unwholesome bread, wholly unfit for food. It is better economy to throw away bread material which needs to be sweetened with soda than to run the risk of injury to health by using it.
The right amount of judgment and careful attention to detail will soon help someone accurately figure out how light the bread should be at its different stages. Bread that has gone too far in fermentation, or what people commonly call "too light," will have a strong acidic smell and will pull away from the bowl in a stringy mass, looking watery and very different from the nice, spongy texture of properly risen dough. You can neutralize the acidity of such dough by adding an alkali, and housewives who have carelessly let their bread go "sour" often use saleratus or baking soda to counteract the acid. However, this method results in unhealthy bread that’s completely unsuitable for eating. It's wiser to throw away bread dough that needs to be sweetened with soda than to risk your health by consuming it.
Kneading the Dough.—As fresh flour is added during the bread-making, it is necessary to mix it in thoroughly. As long as the batter is thin, this can be done by thoroughly beating the mixture with the addition of material; but when it is a thick dough, some other method must be adopted to bring about the desired result. The usual way is by mixing the dough to a proper consistency, and working it with the hands. This is termed kneading. Much of the excellence of bread depends upon the thoroughness of this kneading, since if the yeast is not intimately and equally mixed with every particle of flour, the bread will not be uniform; some portions will be heavy and compact, while others will be full of large, open cavities, from the excessive liberation of gas.
Kneading the Dough.—When adding fresh flour during bread-making, it's essential to mix it in well. While the batter is thin, you can achieve this by thoroughly beating the mixture as you add ingredients; however, when it becomes a thick dough, you'll need to use a different method to achieve the desired outcome. The usual approach is to mix the dough until it reaches the right consistency and then work it with your hands. This process is called kneading. The quality of the bread heavily relies on how well this kneading is done because if the yeast isn’t evenly mixed with every grain of flour, the bread won’t be consistent; some parts will be dense and heavy, while others will have large, open holes due to the excessive release of gas.
The length of time required for kneading depends upon the perfection with which the yeast cells have been previously diffused throughout the sponge, and upon the quality of the flour used in preparing the bread, much less time being required for kneading dough made from good flour. Some consider an hour none too long to knead bread. Such a lengthy process may be advantageous, since one of the objects of kneading is to render the glutinous parts of the flour so elastic that the dough may be capable of expanding to several times its bulk without cracking or breaking, but excellent results can be obtained from good flour with less labor. Bread has been kneaded all that is necessary when it will work clean of the board, and when, after a smart blow with the fist in the center of the mass, it will spring back to its original shape like an India rubber ball. Its elasticity is the surest test of its goodness; and when dough has been thus perfectly kneaded, it can be molded into any shape, rolled, twisted, or braided with ease. Chopping, cutting, stretching, and pulling—the dough are other methods for accomplishing the same end.
The time needed for kneading depends on how well the yeast cells have been spread throughout the sponge and the quality of the flour used to make the bread. Good flour requires much less kneading time. Some people think an hour is a reasonable amount of time to knead bread. While this lengthy process can be beneficial, since one goal of kneading is to make the gluten in the flour elastic enough for the dough to expand significantly without cracking or breaking, you can achieve great results with good flour in less time. Bread is kneaded just right when it comes off the board cleanly and, when you press your fist into the center of the dough, it bounces back like a rubber ball. Its elasticity is the best indicator of its quality; when dough has been kneaded perfectly, it can easily be shaped, rolled, twisted, or braided. Chopping, cutting, stretching, and pulling the dough are also other ways to achieve the same result.
If a large mass is to be kneaded, it is better to divide it into several portions and knead each separately. It is less laborious and more likely to result in an equal diffusion of the yeast. Bread is often spoiled by the addition of too much flour during kneading. Dough should always be kneaded as soft as it can be handled, and only sufficient flour added to prevent its sticking to the board. Stiff bread is close in texture, and after a day or two becomes dry and hard.
If you need to knead a large amount of dough, it's better to split it into smaller portions and knead each one individually. This makes it easier and helps the yeast spread evenly. Adding too much flour while kneading can ruin the bread. The dough should always be kneaded as soft as you can manage, adding just enough flour to keep it from sticking to the surface. Stiff bread has a dense texture and tends to get dry and hard after a day or two.
How to Manipulate the Dough in Kneading.—Sprinkle the board well with flour, and scrape the dough from the bowl with a knife. Dust the hands with flour, and then draw the dough with a rolling motion from the farthest side toward you, using the finger tips for the purpose, but pressing firmly down upon the mass with the palm of the hands. Reach forward again with the finger tips, and again press the ball of the hands upon the dough. Continue this process of manipulation until the mass is very much elongated; then turn at right angles and repeat the process, taking care that the finger tips do not break through the light film which will form upon the outside of soft dough when well managed. Keep the dough constantly in motion until it is smooth, elastic, and fine-grained. The hands and the board may need a light dusting of flour at frequent intervals. If the dough sticks, lift it quickly, and clean the board, that it may be kept smooth. The dough will not stick if kept in constant motion. Do not rub off little wads of dough either from the hands or the board and keep kneading them into the loaf; they will seriously injure the uniform texture of the bread.
How to Manipulate the Dough in Kneading.—Sprinkle the board generously with flour, and use a knife to scrape the dough out of the bowl. Dust your hands with flour, then pull the dough towards you by rolling it, using your fingertips but pressing down firmly with your palms. Reach forward again with your fingertips and press the palms of your hands onto the dough. Keep doing this until the dough is stretched out a lot; then turn it at a right angle and repeat the process, making sure that your fingertips don’t break the light crust that forms on the outside of well-kneaded soft dough. Keep the dough moving constantly until it’s smooth, elastic, and has a fine texture. You might need to lightly dust your hands and the board with flour from time to time. If the dough sticks, quickly lift it and clean the board to keep it smooth. The dough won’t stick if you keep it in motion. Don’t rub off little bits of dough from your hands or the board and knead them back into the loaf; they’ll ruin the even texture of the bread.
How Many Times Shall Bread be Kneaded?—As the objects to be attained in kneading dough are to render the gluten more elastic and thoroughly to diffuse the yeast, it will be seen that there has been sufficient kneading when all the flour necessary for the bread has been added. Furthermore, it must be apparent that continued manipulation of the dough at this stage will dissipate and press out the little vesicles of gas held in place by the elastic gluten, and thus lose in part what so much pains has been taken to secure. At whatever stage the requisite amount of flour be added, the dough should then be thoroughly kneaded once for all. If allowed to rise in bulk, when light it should be shaped into loaves with the greatest care, handled lightly, and worked as little as possible, and if at all diminished, allowed to rise again before baking.
How Many Times Shall Bread be Kneaded?—The purpose of kneading dough is to make the gluten more elastic and to evenly distribute the yeast. You'll know you've kneaded enough when all the flour needed for the bread has been added. It's important to note that if you keep manipulating the dough at this point, you'll break down the little gas bubbles that the elastic gluten holds, which will partially undo the work you've put in. Whenever you add the right amount of flour, knead the dough thoroughly just once. If you let the dough rise in bulk, once it's light, carefully shape it into loaves, handle it gently, and work it as little as possible. If the dough starts to deflate, let it rise again before baking.
Dryness of the Surface.—Bread in all stages should be covered over the top, since it rises much more evenly, and does not have a stiff, dried surface, as when placed in a warm place exposed to air. It sometimes happens that this precaution is forgotten or not sufficiently attended to, and a dry crust forms and over the dough, which, if kneaded into the loaves, leaves hard, dry spots in the bread. In case of such a mishap, take the dry crust off, dissolve it in a little warm water, add flour enough to mold, make it into a small loaf, and raise it separately.
Dryness of the Surface.—Bread at all stages should be covered on top, as it rises more evenly and doesn't create a hard, dried surface like it does when left in a warm, open area. Sometimes this step is overlooked or not done carefully, resulting in a dry crust forming over the dough. If kneaded into the loaves, this can leave hard, dry spots in the bread. If this happens, remove the dry crust, dissolve it in a bit of warm water, add enough flour to form a small loaf, and let it rise separately.
Size of Loaves.—The lightness of the bread after baking depends upon the perfection with which the little air-cells, formed during the fermenting process, have become fixed by the heat during the baking. The heat expands the carbonic acid gas contained within the open spaces in the dough, and at the same time checks further development of gas by destroying the yeast plant. The sooner, then, that the cells can be made permanent after the arrest of fermentation, the more light and porous the bread will be. Although this fixing of the cells is largely dependent upon the degree of heat maintained, it likewise in a measure depends upon the size of the loaf, as the heat will penetrate and fix the cells of a small loaf throughout much sooner than, those of a large one. Therefore, bake in small loaves, and have a separate pan for each, as that admits of an equal degree of heat to all sides. This aids in a more rapid fixing of the air-cells and likewise gives more crust, which is the sweetest and most digestible part of the bread.
Size of Loaves.—The lightness of the bread after baking relies on how well the tiny air pockets created during fermentation have been set by the heat during baking. The heat causes the carbon dioxide gas trapped in the dough to expand, while also stopping further gas production by killing the yeast. Therefore, the quicker these pockets can be made permanent after fermentation stops, the lighter and airier the bread will be. While the ability to set these pockets largely depends on the temperature maintained, it also somewhat depends on the size of the loaf, since heat will penetrate and set the pockets in a small loaf much faster than in a large one. So, bake in small loaves, and use a separate pan for each, as that allows for an equal heat distribution on all sides. This helps in quickly setting the air pockets and also results in more crust, which is the sweetest and easiest part of the bread to digest.
Sheet-iron pans, about eight inches in length, four in width, and five in depth, are the most satisfactory. After the dough is molded, divide it into loaves which will fill such pans to the depth of two inches. Let them rise until double their first volume, and then put them in the oven. In baking, the loaves will rise still higher, and if about five inches high when done, will have expanded to about the right proportions.
Sheet metal pans, about eight inches long, four inches wide, and five inches deep, work best. After shaping the dough, divide it into loaves that will fill these pans to a depth of two inches. Let them rise until they’re double their original size, then put them in the oven. While baking, the loaves will rise even more, and if they are about five inches high when done, they will have expanded to the right proportions.

Proper Temperature of the Oven.—The objects to be attained in the baking of bread are to break up the starch and gluten cells of the Sour so as to make them easily digestible, to destroy the yeast plant, and render permanent the cells formed by the action of the carbonic acid gas. To accomplish well these ends, the loaf must be surrounded by a temperature ranging from 400° to 600°. The oven should be one in which the heat is equal in all parts, and which can be kept at a steady, uniform heat. Old-fashioned brick ovens were superior in this respect to most modern ranges. The fire for baking bread should be of sufficient strength to keep the oven heated for at least an hour. If the oven has tendency to become too hot upon the bottom, a thin, open grate, broiler, or toasting rack, should be placed underneath the tins to allow a circulation of air and avoid danger of burning. If the heat be insufficient, fermentation will not cease until the bread has become sour; the cells will be imperfectly fixed or entirely collapsed; too little of the moisture will have evaporated, and the result will be a soft, wet, and pasty or sour loaf. If the heat be too great, the bread will be baked before it has perfectly risen, or a thick, burned crust will be produced, forming a non-conducting covering to the loaf, which will prevent the heat from permeating the interior, and thus the loaf will have an overdone exterior, but will be raw and doughy within. If, however, the temperature of the oven be just right, the loaf will continue for a little time to enlarge, owing to the expansion of the carbonic acid gas, the conversion of the water into steam, and the vaporizing of the alcohol, which rises in a gaseous form and is driven off by the heat; a nicely browned crust will be formed over the surface, the result of the rapid evaporation of water from the surface and consequent consolidation of the dough of this portion of the loaf, and a chemical change caused by the action of the heat upon the starch by which is converted into dextrine, finally assuming a brown color due to the production of a substance known to the chemist as assama.
Proper Temperature of the Oven.—The goals of baking bread are to break down the starch and gluten cells of the sourdough to make them easier to digest, to kill the yeast, and to set the cells formed by the carbon dioxide gas. To do this effectively, the loaf needs to be in a temperature range of 400° to 600°. The oven should be evenly heated throughout and maintain a steady, uniform temperature. Traditional brick ovens were better at this than most modern ones. The fire for baking bread should be strong enough to keep the oven heated for at least an hour. If the oven tends to get too hot at the bottom, a thin, open grate, broiler, or toasting rack should be placed under the pans to allow air circulation and prevent burning. If the heat is too low, fermentation won't stop until the bread turns sour; the cells will either be poorly formed or completely collapsed; too little moisture will evaporate, resulting in a soft, wet, and sour loaf. If the heat is too high, the bread will bake before it has risen properly, leading to a thick, burned crust that acts as an insulating layer, preventing heat from reaching the inside, resulting in a loaf that is overcooked on the outside but raw and doughy inside. However, if the oven temperature is just right, the loaf will continue to expand for a bit due to the carbon dioxide gas expanding, water turning into steam, and alcohol vaporizing and being released by the heat; a nicely browned crust will form on the surface as water evaporates quickly, consolidating the dough in that area, along with a chemical reaction from the heat acting on the starch, transforming it into dextrin, which eventually turns brown due to a substance known to chemists as assama.
Bread is often spoiled in the baking. The dough may be made of the best of flour and yeast, mixed and kneaded in the most perfect manner, and may have risen to the proper degree of lightness' before going to the oven, yet if the oven is either too hot or not hot enough, the bread will be of an inferior quality.
Bread often gets ruined during baking. The dough might be made from the best flour and yeast, mixed and kneaded perfectly, and might have risen to just the right level of fluffiness before going into the oven. However, if the oven is too hot or not hot enough, the bread will turn out poorly.
Without an oven thermometer, there is no accurate means of determining the temperature of the oven; but housekeepers resort to various means to form a judgment about it. The baker's old-fashioned method is to throw a handful of flour on the oven bottom. If it blackens without igniting, the heat is deemed sufficient. Since the object for which the heat is desired is to cook the flour, not to burn it, it might be supposed that this would indicate too high a temperature; but the flour within the loaf to be baked is combined with a certain amount of moisture, the evaporation of which lowers the temperature of the bread considerably below that of the surrounding heated atmosphere. The temperature of the inner portion of the loaf cannot exceed 212° so long as it continues moist. Bread might be perfectly cooked at this temperature by steam, but it would lack that most digestible portion of the loaf, the crust.
Without an oven thermometer, there’s no accurate way to tell the oven's temperature, but cooks use various methods to estimate it. An old-fashioned technique used by bakers is to toss a handful of flour onto the bottom of the oven. If it darkens without catching fire, the heat is considered adequate. Since the goal is to cook the flour rather than burn it, one might think this means the temperature is too high; however, the flour in the loaf being baked is mixed with some moisture, and the evaporation of that moisture lowers the bread’s internal temperature significantly below that of the surrounding hot air. The temperature inside the loaf can’t exceed 212°F as long as it stays moist. Bread can be fully cooked at this temperature using steam, but it would miss out on developing that most digestible part of the loaf, the crust.
A common way of ascertaining if the heat of the oven is sufficient, is to hold the bare arm inside it for a few seconds. If the arm cannot be held within while thirty is counted, it is too hot to begin with. The following test is more accurate: For rolls, the oven should be hot enough to brown a teaspoonful of flour in one minute, and for loaves in five minutes.
A common way to check if the oven is hot enough is to hold your bare arm inside for a few seconds. If you can’t keep it there while counting to thirty, it’s too hot to use. A more precise test is: For rolls, the oven should be hot enough to brown a teaspoon of flour in one minute, and for loaves in five minutes.
The temperature should be high enough to arrest the fermentation, which it will do at a point considerably below the boiling point of water, and at the same time to form a shell or crust, which will so support the dough as to prevent it from sinking or collapsing when the evolution of carbonic acid gas shall cease; but it should not be hot enough to brown the crust within ten or fifteen minutes. The heat should increase for the first fifteen minutes, remain steady for the next fifteen minutes, and may then gradually decrease during the remainder of the baking. If by any mischance the oven be so hot as to brown the crust too soon, cover the loaf with a clean paper for a few minutes. Be careful that no draught reaches the bread while baking; open the oven door very seldom, and not at all for the first ten minutes. If it is necessary to turn the loaf, try to do so without bringing it to the air. From three fourths of an hour to an hour is usually a sufficient length of time to bake an ordinary sized loaf. Be careful not to remove the bread from the oven until perfectly done. It is better to allow it to bake ten minutes too long than not long enough. The crust of bread, when done, should be equally browned all over.
The temperature should be high enough to stop the fermentation, which will happen at a point well below the boiling point of water, while also forming a shell or crust that supports the dough so it doesn't sink or collapse when the carbon dioxide production stops. However, it shouldn’t be hot enough to brown the crust within the first ten or fifteen minutes. The heat should increase during the first fifteen minutes, stay steady for the next fifteen minutes, and then gradually decrease for the rest of the baking. If by chance the oven is too hot and the crust starts to brown too soon, cover the loaf with a clean piece of paper for a few minutes. Make sure no drafts hit the bread while it’s baking; open the oven door very rarely and not at all for the first ten minutes. If you need to turn the loaf, try to do it without exposing it to the air. Baking an average-sized loaf usually takes between three-quarters of an hour to an hour. Be careful not to take the bread out of the oven until it’s fully done. It’s better to bake it for an extra ten minutes than to take it out too soon. The crust should be evenly browned all over when it’s done.
The common test for well-baked bread is to tap it on the bottom with the finger; if it is light and well done, it will sound hollow; heavy bread will have a dull sound. A thoroughly baked loaf will not burn the hand when lifted upon it from the pan.
The usual way to check if bread is baked well is to tap the bottom with your finger; if it feels light and is cooked properly, it will sound hollow; if the bread is heavy, it will make a dull sound. A fully baked loaf won’t burn your hand when you lift it out of the pan.
Care of Bread after Baking.—When done, remove the loaves from the tins, and tilt them upon edge so that the air may circulate freely on all sides of them to prevent "sweating." Do not, however, lay them on a pine shelf or table to absorb the odor of the wood. A large tin dripping pan turned over upon the table does very well to tilt them on. If they are turned often, so that they will not soften on one side, but a fine wire bread cooler is the best thing. If this is not obtainable, a fair substitute can be easily improvised by tacking window-screen wire to a light frame of sufficient size to hold the requisite number of loaves. If the bread is left exposed to the air until cold, the crust will be crisp; if a soft crust is desired, it can be secured by brushing the top of the loaf while hot, with tepid water, and covering with several thicknesses of a clean bread cloth.
How to Store Bread after Baking.—Once the loaves are done, take them out of the pans and position them on their sides to allow air to circulate around them and prevent "sweating." However, avoid placing them on a pine shelf or table to prevent them from absorbing the wood's scent. A large tin dripping pan turned upside down on the table works well for this purpose. If you rotate them frequently to avoid softening on one side, that can help, but a fine wire bread cooler is the best option. If you can’t find one, you can easily make a substitute by attaching window-screen wire to a lightweight frame that can hold the right number of loaves. If the bread is left out in the air until it cools down, the crust will be crisp; if you want a soft crust, you can achieve that by brushing the top of the loaf with warm water while it's still hot and covering it with several layers of a clean bread cloth.
If by accident any portion of the crust is burnt, grate it away as soon as cold; this is preferable to cutting or clipping it off.
If you accidentally burn any part of the crust, grate it off as soon as it cools; this is better than cutting or trimming it off.
Best Method of Keeping Bread.—When the bread is quite cold, put it away in a bread box, which should be of tin, or of wood lined with tin, convenient in form and supplied with a well-fitting cover. Never use an unlined wooden box of any kind, as it cannot easily be kept fresh and free from musty odors, which bread so readily absorbs.
Best Method of Keeping Bread.—Once the bread has cooled down, store it in a bread box made of tin or wood lined with tin. The box should be easy to use and have a snug-fitting lid. Avoid using any unlined wooden box, as it’s hard to keep it fresh and free from musty smells that bread can easily take on.
Stone and earthen ware are not open to this objection, but they are likely to collect moisture, and hence are not equal to a tin receptacle. Do not keep bread in the cellar or any other damp place, nor in a close closet, where there are other foods from which it can absorb odors. The bread box should be kept well covered, and free from crumbs and stale bits. It should be carefully washed in boiling soapsuds, scalded, and dried, every two or three days. If cloths are used to wrap or cover the bread, they too should be washed and scalded every week, and oftener if at any time the loaf about which they are wrapped becomes moldy or musty.
Stone and ceramic containers don't have this issue, but they can hold moisture, making them less effective than a tin container. Avoid storing bread in the cellar or any damp area, and keep it out of tightly sealed cupboards where it can soak up odors from other foods. The bread box should always be well-covered and free of crumbs and stale pieces. It needs to be thoroughly cleaned with boiling soapy water, rinsed, and dried every two or three days. If you use cloths to wrap or cover the bread, those should also be washed and scalded weekly, and more frequently if the loaf they cover becomes moldy or has a musty smell.
Test of Good Fermented Bread.—A loaf of good bread, well risen and perfectly baked, may be taken in the hands, and, with the thumb on the top crust and fingers upon the bottom of the loaf, pressed to less than half its thickness, and when the pressure is removed, it will immediately expand like a sponge, to its former proportions.
Test of Good Fermented Bread.—A loaf of good bread, properly risen and perfectly baked, can be held in your hands, with your thumb on the top crust and your fingers underneath. If you press it to less than half its thickness, once you take the pressure off, it will quickly return to its original size, just like a sponge.
Good yeast bread, while it should be firm and preserve a certain amount of moisture, will, when cold, crumble easily when rubbed between the fingers. If, instead, it forms a close, soggy mass, it may be regarded as indigestible. This is one reason why hot, new yeast bread and biscuit are so indigestible. In demonstration of this, take a small lump of new bread, gently roll it into a ball, and put into a glass of water, adding a similar quantity of stale bread of the same kind also. The latter will crumble away very soon, while the former will retain its form for hours, reminding one of its condition in the stomach, "as hard as a bullet," for a long time resisting the action of the gastric juice, although, meanwhile, the yeast germs which have not been killed in the oven are converting the mass into a lump of yeast, by which the whole contents of the stomach are soured. A soluble article like salt or sugar in fine powdered form is much more easily and quickly dissolved than the same article in solid lumps, and so it is with food. The apparent dryness of stale bread is not caused by its loss of moisture; for if carefully weighed, stale bread will be found to contain almost exactly the same proportion of water as new bread that has become cold. The moisture has only passed into a state of concealment, as may be demonstrated by subjecting a stale loaf inclosed in a tightly-sealed receptacle to a temperature equal to boiling heat in an oven for half an hour, when it will again have the appearance of new bread.
Good yeast bread should be firm and retain some moisture, but when it's cold, it will crumble easily when you rub it between your fingers. If it instead becomes a dense, soggy mass, you can consider it indigestible. This is one reason why hot, fresh yeast bread and biscuits can be hard to digest. To see this in action, take a small piece of fresh bread, gently roll it into a ball, and place it in a glass of water, adding an equal amount of stale bread of the same type as well. The stale bread will break apart quickly, while the fresh bread will maintain its shape for hours, similar to how it might behave in the stomach, remaining "as hard as a bullet," resisting the action of gastric juice for a long time. Meanwhile, the yeast germs that survived the baking process are turning the mass into a lump of yeast, which can sour the entire contents of the stomach. A soluble substance like salt or sugar in fine powdered form dissolves much faster than the same substance in solid chunks, and the same goes for food. The dry appearance of stale bread isn't because it has lost moisture; if you weigh it carefully, you’ll find that stale bread contains almost the same amount of water as cold new bread. The moisture has just become less visible, as you can show by placing a stale loaf in a tightly sealed container at a temperature equal to boiling heat in an oven for half an hour, at which point it will look like new bread again.
Hot bread eaten with butter is still more unwholesome, for the reason that the melted grease fills up the pores of the bread, and further interferes with the action of the digestive fluids.
Hot bread eaten with butter is even more unhealthy because the melted fat clogs the pores of the bread, which further disrupts the action of the digestive fluids.
Whole-wheat flour ferments more readily and rises more quickly than does white flour, hence bread made with it needs more careful management, as it is more liable to sour. The novice in bread-making should not undertake the preparation of bread with whole-wheat flour, until she has thoroughly mastered all the details of the art by practical experience, and can produce a perfect loaf from white flour.
Whole-wheat flour ferments more easily and rises faster than white flour, so bread made with it requires more careful handling, as it is more likely to go sour. A beginner in bread-making should not try making bread with whole-wheat flour until she has fully mastered all the details of the craft through hands-on experience and can create a perfect loaf with white flour.
Breads from whole-wheat and Graham flours require less yeast and less flour than bread prepared from white flour. A slower process of fermentation is also advantageous.
Breads made from whole-wheat and Graham flours need less yeast and less flour than bread made from white flour. A slower fermentation process is also beneficial.
Such breads will be lighter if at least one third white flour be employed in their manufacture. When the bread is made with a sponge, this white flour may be utilised for the purpose. Thus the length of time the whole-wheat flour will be undergoing fermentation will be somewhat lessened, and its liability to become sour diminished. This plan is a preferable one for beginners in bread-making.
Such breads will be lighter if at least one-third white flour is used in their preparation. When the bread is made with a sponge, this white flour can be used for that purpose. This way, the fermentation time for the whole wheat flour will be slightly reduced, and its risk of becoming sour will be lower. This approach is better for beginners in bread-making.
Graham and whole-wheat flour breads must be kneaded longer than white-flour bread, and require a hotter oven at first and a longer time for baking. Much Graham and whole-wheat bread is served insufficiently baked, probably owing to the fact that, being dark in color, the crust appears brown very soon, thus deluding the cook into supposing that the loaf is well baked. For thorough baking, from one to one and a half hours are needed, according to the size of the loaf and the heat of the oven.
Graham and whole-wheat flour breads need to be kneaded longer than white-flour bread and require a hotter oven at first and a longer baking time. Many Graham and whole-wheat breads are often underbaked, probably because the dark color means the crust looks brown quickly, tricking the cook into thinking the loaf is fully baked. For proper baking, it takes between one to one and a half hours, depending on the size of the loaf and the temperature of the oven.
Toast.—Toasting, if properly done, renders bread more digestible, the starch being converted into dextrine by the toasting process; but by the ordinary method of preparing toast, that of simply browning each side, only the surfaces of the slices are really toasted, while the action of the heat upon the interior of the slice, it is rendered exactly in the condition of new bread, and consequently quite as indigestible. If butter is added while the toast is hot, we have all the dyspepsia-producing elements of new bread and butter combined. Although considered to be the dish par excellence for invalids, nothing could be more unwholesome than such toast. To properly toast the bread, the drying and browning should extend throughout the entire thickness of the slice. Bread may be thus toasted before an open fire, but the process would be such a lengthy and troublesome one, it is far better to secure the same results by browning the bread in a moderate oven.
Toast.—When done right, toasting makes bread easier to digest because the starch turns into dextrine through the toasting process. However, with the usual way of making toast—just browning each side—only the surfaces of the slices get toasted. The heat doesn't really affect the inside of the slice, which stays just like fresh bread, making it just as hard to digest. Adding butter while the toast is hot combines all the digestive issues of fresh bread and butter. Even though it's thought to be the best dish for people who are unwell, such toast is actually very unhealthy. To toast bread properly, the drying and browning need to go all the way through the slice. While you can toast bread in front of an open fire, that process takes too long and is a hassle, so it's much easier to get the same results by browning the bread in a moderate oven.
Steamed Bread.—Steaming stale bread is as open to objection as the surface toasting of bread, if steamed so as to be yielding and adhesive. It is not, perhaps, as unwholesome as new bread, but bread is best eaten in a condition dry and hard enough to require chewing, that its starch may be so changed by the action of the saliva as to be easily digested.
Steamed Bread.—Steaming old bread is just as questionable as toasting it on the outside, especially if it becomes soft and sticky. It might not be as unhealthy as fresh bread, but bread is best consumed when it’s dry and hard enough to need chewing so that the starch can be changed by saliva for easier digestion.
LIQUID YEAST.
RECIPES.
Raw Potato Yeast.—Mix one fourth of a cup of flour, the same of white sugar, and a teaspoonful of salt to a paste with a little water. Pare three medium-size, fresh, and sound potatoes, and grate them as rapidly as possible into the paste; mix all quickly together with a silver spoon, then pour three pints of boiling water slowly over the mixture, stirring well at the same time. If this does not rupture the starch cells of the flour and potatoes so that the mixture becomes thickened to the consistency of starch, turn it into a granite-ware kettle and boil up for a minute, stirring well to keep it from sticking and burning. If it becomes too much thickened, add a little more boiling water. It is impossible to give the exact amount of water, since the quality of the flour will vary, and likewise the size of the potatoes; but three pints is an approximate proportion. Strain the mixture through a fine colander into an earthen bread bowl, and let it cool. When lukewarm, add one cup of good, lively yeast. Cover with a napkin, and keep in a moderately warm place for several hours, or until it ceases to ferment. As it begins to ferment, stir it well occasionally, and when well fermented, turn into a clean glass or earthen jar. The next morning cover closely, and put in the cellar or refrigerator, not, however, in contact with the ice. It is best to reserve enough for the first baking in some smaller jar, so that the larger portion need not be opened so soon. Always shake the yeast before using.
Raw Potato Yeast.—Combine one fourth of a cup of flour, the same amount of white sugar, and a teaspoon of salt with a little water to form a paste. Peel three medium-sized, fresh potatoes and grate them quickly into the paste; mix everything together with a silver spoon. Slowly pour three pints of boiling water over the mixture while stirring well at the same time. If this doesn't break down the starch cells of the flour and potatoes so that the mixture thickens like starch, transfer it to a granite-ware pot and boil for a minute, stirring continuously to prevent sticking and burning. If it gets too thick, add a bit more boiling water. The exact amount of water can vary because it depends on the flour quality and potato size, but three pints is a good estimate. Strain the mixture through a fine colander into a ceramic bread bowl and let it cool. When it's lukewarm, add one cup of active yeast. Cover it with a cloth and keep it in a moderately warm spot for several hours, or until fermentation stops. As it starts to ferment, stir it occasionally, and when it’s fully fermented, transfer it into a clean glass or ceramic jar. The next morning, seal it tightly and store it in the cellar or refrigerator, but avoid direct contact with ice. It's a good idea to set aside enough for the first baking in a smaller jar so the larger portion doesn’t have to be opened immediately. Always shake the yeast before use.
Raw Potato Yeast No. 2.—This is made in the same manner as the preceding, with this exception, that one fourth of a cup of loose hops tied in a clean muslin bag, is boiled in the water for five minutes before pouring it into the potato and flour mixture. Many think the addition of the hops aids in keeping the yeast sweet for a longer period. But potato yeast may be kept sweet for two weeks without hops, if cared for, and is preferred by those who dislike the peculiar flavor of the bread made from hop yeast.
Raw Potato Yeast No. 2.—This is made in the same way as the previous one, with the exception that a quarter cup of loose hops, tied in a clean muslin bag, is boiled in the water for five minutes before pouring it into the potato and flour mixture. Many believe that adding hops helps keep the yeast fresh for a longer time. However, potato yeast can stay fresh for two weeks without hops if taken care of, and is preferred by those who don’t like the unique flavor of bread made from hop yeast.
Hop Yeast.—Put half a cup of loose hops, or an eighth of an ounce of the pressed hops (put up by the Shakers and sold by druggists), into a granite-ware kettle; pour over it a quart of boiling water, and simmer about five minutes. Meanwhile stir to a smooth paste in a tin basin or another saucepan, a cup of flour, and a little cold water. Line a colander with a thin cloth, and strain the boiling infusion of hops through it onto the flour paste, stirring continually. Boil this thin starch a few minutes, until it thickens, stirring constantly that no lumps be formed. Turn it into a large earthen bowl, add a tablespoonful of salt and two of white sugar, and when it has cooled to blood heat, add one half cup of lively yeast, stirring all well together. Cover the bowl with a napkin, and let it stand in some moderately warm place twenty-four hours, or until it ceases to ferment or send up bubbles, beating back occasionally as it rises; then put into a wide-mouthed glass or earthen jar, which has been previously scalded and dried, cover closely, and set in a cool place. Yeast made in this manner will keep sweet for two weeks in summer and longer in winter.
Hop Yeast.—Put half a cup of loose hops, or an eighth of an ounce of pressed hops (from the Shakers and sold by pharmacies), into a granite pot; pour a quart of boiling water over it and let it simmer for about five minutes. Meanwhile, mix a cup of flour with a little cold water in a tin bowl or another pot until it forms a smooth paste. Line a colander with a thin cloth, and strain the hot hop mixture through it onto the flour paste, stirring continuously. Cook this thin starch for a few minutes until it thickens, stirring constantly to avoid lumps. Transfer it to a large earthen bowl, add a tablespoon of salt and two tablespoons of white sugar, and when it cools to body temperature, stir in half a cup of active yeast. Cover the bowl with a cloth and let it sit in a moderately warm spot for twenty-four hours, or until it stops bubbling and fermenting, occasionally pushing it down if it rises; then transfer to a wide-mouthed glass or earthen jar that has been scalded and dried, cover it tightly, and place it in a cool spot. Yeast made this way will stay fresh for two weeks in summer and longer in winter.
Boiled Potato Yeast.—Peel four large potatoes, and put them to boil in two quarts of cold water. Tie two loose handfuls of hops securely in a piece of muslin, and place in the water to boil with the potatoes. When the potatoes are tender, remove them with a perforated skimmer, leaving the water still boiling. Mash them, and work in four tablespoons of flour and two of sugar. Over this mixture pour gradually the boiling hop infusion, stirring constantly, that it may form a smooth paste, and set it aside to cool. When lukewarm, add a gill of lively yeast, and proceed as in the preceding recipe.
Boiled Potato Yeast.—Peel four large potatoes and boil them in two quarts of cold water. Securely tie two loose handfuls of hops in a piece of muslin and add it to the boiling water with the potatoes. Once the potatoes are tender, remove them with a slotted spoon, keeping the water boiling. Mash the potatoes and mix in four tablespoons of flour and two tablespoons of sugar. Gradually pour the boiling hop infusion over this mixture while stirring continuously until it forms a smooth paste. Set it aside to cool. When it’s lukewarm, add a gill of active yeast and proceed as described in the previous recipe.
Boiled Potato Yeast No. 2.—To one teacupful of very smoothly mashed, mealy potato, add three teaspoonfuls of white sugar, one teaspoonful of salt, and one cup of lively yeast, or one cake of Yeast Foam, dissolved in a very little water. The potatoes should be warm, but not hot enough to destroy the yeast. Allow this to stand until light, when it is ready for use.
Boiled Potato Yeast No. 2.—Take one cup of very finely mashed, fluffy potato, and mix in three teaspoons of white sugar, one teaspoon of salt, and one cup of active yeast, or one cake of Yeast Foam, dissolved in a small amount of water. The potatoes should be warm, but not so hot that it kills the yeast. Let this mixture sit until it becomes light and bubbly, which means it's ready to use.
FERMENTED BREADS.
In the preparation of breads after the following recipes, the measure of flour should be heaping.
In making bread using the following recipes, the amount of flour should be heaping.
RECIPES.
Milk Bread With White Flour.—Scald and cool on pint of unskimmed milk. Add to the milk when lukewarm, one fourth of a cup, or three tablespoonfuls, of liquid yeast, and three cups of flour. Give the batter a vigorous beating, turn it into a clean bread bowl or a small earthen crock, cover, and let it rise over night. In the morning, when well risen, add two or three cupfuls of warm flour, or sufficient to knead. Knead well until the dough is sufficiently elastic to rebound when struck forcibly with the fist. Allow it to rise again in mass; then shape into loaves; place in pans; let it stand until light, and bake. If undesirable to set the bread over night, and additional tablespoonfuls or two of cheese may be used, to facilitate the rising.
Milk Bread With White Flour.—Scald and cool one pint of whole milk. When the milk is lukewarm, add one-fourth cup (or three tablespoons) of liquid yeast and three cups of flour. Beat the mixture well, then pour it into a clean bowl or a small earthenware pot, cover it, and let it rise overnight. In the morning, once it has risen well, add two or three cups of warm flour, or enough to knead the dough. Knead the dough until it’s elastic enough to spring back when you punch it. Let it rise again as a mass, then shape it into loaves, place them in pans, and let them sit until they are light before baking. If you don’t want to let the bread rise overnight, you can add an extra tablespoon or two of cheese to help it rise.
Vienna Bread.—Into a pint of milk sterilized by scalding, turn a cup and a half of boiling water. When lukewarm, add one half cup of warm water, in which has been dissolved a cake of compressed yeast, and a quart of white flour. Beat the batter thus made very thoroughly, and allow it to rise for one hour; then add white flour until the dough is of a consistency to knead. Knead well, and allow it to rise again for about three hours, or until very light. Shape into four loaves, handling lightly. Let it rise again in the pans, and bake. During the baking, wash the tops of the loaves with a sponge dipped in milk, to glaze them.
Vienna Bread.—Pour a pint of sterilized milk that's been scalded into a bowl, then add a cup and a half of boiling water. Once it's lukewarm, mix in half a cup of warm water that has a dissolved cake of compressed yeast and a quart of white flour. Stir the batter really well and let it rise for an hour. Then, gradually add more white flour until the dough is easy to knead. Knead it thoroughly and let it rise again for about three hours, or until it's very light. Shape it into four loaves, being gentle. Let it rise again in the pans, then bake. While it's baking, brush the tops of the loaves with a sponge dipped in milk to give them a glaze.
Water Bread.—Dissolve a tablespoonful of sugar in a pint of boiling water. When lukewarm, add one fourth of a cup full of liquid yeast, and sufficient flour to make a batter thick enough to drop from the spoon. Beat vigorously for ten minutes, turn into a clean, well-scalded bread bowl, cover (wrapping in a blanket if in cold weather), and let it rise over night. In the morning, when well risen, add flour to knead. Knead well for half an hour, cover, and let it become light in mass. When light, shape into loaves, allow it to rise again, and bake.
Water Bread.—Dissolve a tablespoon of sugar in a pint of boiling water. Once it's lukewarm, add a quarter cup of liquid yeast and enough flour to create a batter thick enough to drop from a spoon. Beat it hard for ten minutes, then transfer it to a clean, well-scalded bread bowl. Cover it (use a blanket if it's cold outside) and let it rise overnight. In the morning, when it's risen well, add more flour for kneading. Knead it thoroughly for half an hour, cover it, and let it puff up. Once it's light, shape it into loaves, let it rise again, and then bake.
Fruit Roll.—Take some bread dough prepared as for Milk Bread, which has been sufficiently kneaded and is ready to mold, and roll to about one inch in thickness. Spread over it some dates which have been washed, dried, and stoned, raisins, currants, or chopped figs. Roll it up tightly into a loaf. Let and it rise until very light, and bake.
Fruit Roll.—Take some bread dough prepared like Milk Bread, which has been kneaded properly and is ready to shape, and roll it out to about one inch thick. Spread some washed, dried, and pitted dates, raisins, currants, or chopped figs over the dough. Roll it up tightly into a loaf. Let it rise until very light, then bake.
Fruit Loaf.—Set a sponge with one pint of rich milk, one fourth cup of yeast, and a pint of flour, over night. In the morning, add two cups of Zante currents, one cup of sugar, and three cups of flour, or enough to make a rather stiff dough. Knead well, and set to rise; when light, mold into loaves; let it rise again, and bake.
Fruit Loaf.—Prepare a sponge with one pint of rich milk, one fourth cup of yeast, and a pint of flour, and let it sit overnight. In the morning, mix in two cups of Zante currants, one cup of sugar, and three cups of flour, or enough to create a firm dough. Knead thoroughly, let it rise; when it’s light, shape it into loaves; allow it to rise again, and then bake.
Potato Bread.—Cook and mash perfectly smooth, potatoes to make a cupful. Add a teaspoonful of best white sugar, one cup and a half of warm water, and when the mixture is lukewarm, one half cup of yeast, prepared as directed for Boiled Potato Yeast No. 2, and flour to make a very thick batter. Allow it to rise over night. In the morning, add a pint of warm water and flour enough to knead. The dough will need to be considerably stiffer than when no potato is used, or the result will be a bread too moist for easy digestion. Knead well. Let it rise, mold into four loaves, and when again light, bake.
Potato Bread.—Cook and mash smooth potatoes to make a cupful. Add a teaspoon of the best white sugar, one and a half cups of warm water, and when the mixture is lukewarm, add half a cup of yeast, prepared as directed for Boiled Potato Yeast No. 2, along with enough flour to make a very thick batter. Let it rise overnight. In the morning, add a pint of warm water and enough flour to knead. The dough should be considerably stiffer than when no potato is used, or the bread will be too moist for easy digestion. Knead well. Let it rise, shape it into four loaves, and when it’s risen again, bake.
Whole Wheat Bread.—The materials needed for the bread are: one pint of milk, scalded and cooled, one quart of wheat berry flour, one pint Minnesota spring wheat flour, one third cup of a soft yeast, or one fourth cake of compressed yeast, dissolved in one third cup of cold water. Stir enough flour into the milk to make a stiff batter, put in the yeast, and let it rise until foamy. Have the milk so warm that, when the flour is put in, the batter will be of a lukewarm temperature. Wrap in a thick blanket, and keep at an equable temperature. When light, stir in, slowly, warm flour to make a soft dough. Knead for fifteen minutes, and return to the bowl (which has been washed and oiled) to rise again. When risen to double its size, form into two loaves, place in separate pans, let rise again, and bake from three fourths to one and one half hours, according to the heat of the oven.
Whole Wheat Bread.—To make the bread, you’ll need: one pint of milk, heated and then cooled, one quart of wheat berry flour, one pint of Minnesota spring wheat flour, one third cup of soft yeast, or one fourth of a cake of compressed yeast, dissolved in one third cup of cold water. Mix enough flour into the milk to create a thick batter, add the yeast, and let it rise until it’s bubbly. Make sure the milk is warm enough that when the flour is added, the batter feels lukewarm. Cover it with a thick blanket and keep it at a consistent temperature. Once it’s risen, gradually stir in warm flour to create a soft dough. Knead for fifteen minutes, then return it to a greased bowl to rise again. When it has doubled in size, shape it into two loaves, place them in separate pans, let them rise again, and bake for three quarters to one and a half hours, depending on the oven's heat.
Whole-Wheat Bread No. 2.—Scald one pint of unskimmed milk; when lukewarm, add one half cup of liquid yeast, or one fourth cake of compressed yeast, dissolved in one half cup of warm water, and a pint of Pillsbury's best white flour. Beat this batter thoroughly, and allow it to rise. When well risen, add three and two thirds cups of wheat berry flour. Knead thoroughly, and allow it to become light in mass; then shape into two loaves, allow it to rise again, and bake.
Whole-Wheat Bread No. 2.—Heat one pint of whole milk until it's warm; when it cools to lukewarm, mix in half a cup of liquid yeast or a quarter of a cake of compressed yeast that’s been dissolved in half a cup of warm water, along with a pint of high-quality white flour from Pillsbury. Mix this batter well and let it rise. Once it has risen nicely, add three and two-thirds cups of whole wheat flour. Knead it well and let it expand; then shape it into two loaves, let it rise again, and bake.
Miss. B's One-Rising Bread.—Sift and measure three and three fourths cups of wheat berry flour. Scald and cool a pint of unskimmed milk. When lukewarm, add one tablespoonful of lively liquid yeast. By slow degrees add the flour, beating vigorously until too stiff to use a spoon, then knead thoroughly for half an hour, shape into a loaf, place in a bread pan, cover with a napkin in warm weather, wrap well with blankets in cold weather, and let rise over night. In the morning, when perfectly light, pat in a well heated oven, and bake.
Miss B's One-Rising Bread.—Sift and measure 3¾ cups of wheat berry flour. Scald and cool 1 pint of whole milk. When it’s lukewarm, add 1 tablespoon of active liquid yeast. Gradually mix in the flour, beating vigorously until it's too thick to use a spoon, then knead thoroughly for 30 minutes, shape it into a loaf, place in a bread pan, cover with a cloth in warm weather, wrap it well with blankets in cold weather, and let it rise overnight. In the morning, when it’s perfectly risen, put it in a well-heated oven and bake.
Potato Bread with Whole Wheat Flour.—Take a half gill of liquid yeast made as for Boiled Potato Yeast No. 2, and add milk, sterilised and cooled to lukewarm, to make a pint. And one cup of well-mashed, mealy potato and one cup of white flour, or enough to make a rather thick batter Beat thoroughly, cover, and set to rise. When well risen, add sufficient whole-wheat flour to knead. The quantity will vary somewhat with the brand of flour used, but about four and one fourth cupfuls will in general be needed. Knead well, let it rise in mass and again in the loaf, and bake.
Potato Bread with Whole Wheat Flour.—Start with half a gill of liquid yeast prepared like Boiled Potato Yeast No. 2, then add lukewarm sterilized milk to make a pint. Mix in one cup of well-mashed, starchy potato and one cup of white flour, or enough to form a thick batter. Beat thoroughly, cover it, and let it rise. Once it has risen well, add enough whole-wheat flour to knead. The amount will vary depending on the brand of flour, but generally around four and one-fourth cups will be needed. Knead well, let it rise in bulk, then again in the loaf, and bake.
Rye Bread.—Prepare a sponge over night with white flour as for Water Bread. In the morning, when light, add another tablespoonful of sugar, and rye flour to knead. Proceed as directed for the Water Bread, taking care to use only enough rye flour to make the dough Just stiff enough to mold. Use white flour for dusting than kneading board, as the rye flour is sticky.
Rye Bread.—Make a sponge overnight with white flour like you would for Water Bread. In the morning, when it's bubbly, add another tablespoon of sugar and rye flour to knead. Follow the instructions for Water Bread, making sure to use just enough rye flour to create a dough that’s firm enough to shape. Use white flour to dust the kneading board, since rye flour can be sticky.
Graham Bread.—Take two tablespoonfuls of lively liquid yeast, or a little less than one fourth cake of compressed yeast, dissolved in a little milk, and add new milk, scalded and cooled to lukewarm, to make one pint. Add one pint of white flour, beat very thoroughly, and set to rise. When very light, add three find one half cupfuls of sifted Graham flour, or enough to make a dough that can be molded. Knead well for half an hour. Place in a clean, slightly oiled bread bowl, cover, and allow it to rise. When light, shape into a loaf: allow it to rise again, and bake.
Graham Bread.—Take two tablespoons of active liquid yeast, or just under a quarter of a compressed yeast cake, dissolved in a bit of milk, and then add scalded and cooled milk to make a total of one pint. Mix in one pint of white flour, beat it well, and let it rise. When it’s very fluffy, add three and a half cups of sifted Graham flour, or enough to create a dough that can be shaped. Knead it well for half an hour. Place it in a clean, lightly oiled bread bowl, cover it, and let it rise. Once it’s fluffy, shape it into a loaf, let it rise again, and then bake.
Graham Bread No. 2.—Mix well one pint of white and two pints of best Graham flour. Prepare a batter with a scant pint of milk, scalded and cooled, two table spoonfuls of liquid yeast, or a little less than one fourth of a cake of compressed yeast, dissolved in two table spoonfuls of milk, and a portion of the mixed flour. Give it a vigorous beating, and put it in a warm place to rise. When well risen, add more flour to make a dough sufficiently stiff to knead. There will be some variation in the amount required, dependent upon the brands of flour used, but in general, two and one half pints of the flour will be enough for preparing the sponge and kneading the dough. Knead thoroughly for twenty-five or thirty minutes. Put into a clean and slightly oiled bread bowl, cover, and set to rise again. When double its first bulk, mold into a loaf; allow it to rise again, and bake.
Graham Bread No. 2.—Blend together one pint of white flour and two pints of high-quality Graham flour. Make a batter using just under a pint of milk that has been scalded and cooled, two tablespoons of liquid yeast, or a little less than a quarter of a cake of compressed yeast dissolved in two tablespoons of milk, along with some of the mixed flour. Beat it vigorously and place it in a warm spot to rise. Once it has risen well, add more flour to create a dough that's firm enough to knead. The exact amount of flour needed may vary based on the type of flour used, but generally, two and a half pints will be sufficient for creating the sponge and kneading the dough. Knead thoroughly for twenty-five to thirty minutes. Place it in a clean, slightly oiled bowl, cover it, and let it rise again. When it has doubled in size, shape it into a loaf, allow it to rise once more, and then bake.
Graham Bread No. 3.—Mix three pounds each of Graham and Minnesota spring wheat flour. Make a sponge of one and a half pints of warm water, one half cake compressed yeast, well dissolved in the water, and flour to form a batter. Let this rise. When well risen, add one and a half pints more of warm water, one half cup full of New Orleans molasses, and sufficient flour to knead. Work the bread thoroughly, allow it to rise in mass; then mold, place in pans, and let it rise again. The amount of material given is sufficient for four loaves of bread.
Graham Bread No. 3.—Combine three pounds each of Graham flour and Minnesota spring wheat flour. Create a sponge using one and a half pints of warm water, half a cake of compressed yeast, well dissolved in the water, and enough flour to form a batter. Allow this to rise. Once it has risen well, add another one and a half pints of warm water, half a cup of New Orleans molasses, and enough flour to knead. Knead the bread thoroughly, let it rise in bulk, then shape it, place it in pans, and let it rise again. The amount of ingredients provided is enough for four loaves of bread.
Raised Biscuit.—These may be made from dough prepared by any of the preceding recipes for bread. They will be more tender if made with milk, and if the dough is prepared expressly for biscuits, one third cream may be used. When the dough has been thoroughly kneaded the last time, divide into small, equal-sized pieces. A quantity of dough sufficient for one loaf of bread should be divided into twelve or sixteen such portions. Shape into smooth, round biscuits, fit closely into a shallow pan, and let them rise until very light. Biscuit should be allowed to become lighter than bread before putting in the oven, since, being so much smaller, fermentation is arrested much sooner, and they do not rise as much in the oven as does bread.
Raised Biscuit.—These can be made from dough prepared using any of the previous bread recipes. They'll be more tender if made with milk, and if the dough is specifically for biscuits, you can use one-third cream. After kneading the dough thoroughly one last time, divide it into small, equal-sized pieces. A batch of dough meant for one loaf of bread should be divided into twelve or sixteen portions. Shape them into smooth, round biscuits, pack them closely in a shallow pan, and let them rise until they're really light. Biscuits should rise more than bread before going into the oven because they are smaller, so their fermentation stops sooner, and they won’t rise as much in the oven as bread does.
Rolls.—Well kneaded and risen bread dough is made into a variety of small forms termed rolls, by rolling with the hands or with a rolling-pin, and afterward cutting or folding into any shape desired, the particular manner by which they are folded and shaped giving to the rolls their characteristic names. Dough prepared with rich milk or part cream makes the best rolls. It may be divided into small, irregular portions, about one inch in thickness, and shaped by taking each piece separately in the left hand, then with the thumb and first finger of the right hand, slightly stretch one of the points of the piece and draw it over the left thumb toward the center of the roll, holding it there with the left thumb. Turn the dough and repeat the operation until you have been all around the dough, and each point has been drawn in; then place on the pan to rise. Allow the rolls to become very light, and bake. Rolls prepared in this manner are termed Imperial Rolls, and if the folding has been properly done, when well baked they will be composed of a succession of light layers, which can be readily separated.
Rolls.—Well-kneaded and risen bread dough is shaped into various small forms known as rolls by rolling it with your hands or a rolling pin, and then cutting or folding it into any desired shape. The specific way they are folded and shaped gives the rolls their distinct names. Dough made with rich milk or some cream creates the best rolls. It can be divided into small, uneven pieces about an inch thick, and shaped by taking each piece in your left hand. Then, with your right thumb and index finger, slightly stretch one point of the piece and pull it over your left thumb towards the center of the roll, holding it in place with your left thumb. Rotate the dough and repeat this until you've worked around the entire piece and each point is drawn in; then place it on the pan to rise. Let the rolls get very light and bake them. Rolls made this way are called Imperial Rolls, and if folded correctly, they will consist of several light layers that can be easily separated once baked.
French Rolls may be made by shaping each portion of dough into small oval rolls quite tapering at each end, allowing them to become light, and baking far enough apart so that one will not touch another.
French Rolls can be made by shaping each piece of dough into small oval rolls that taper at both ends, letting them rise until they're light, and baking them spaced apart so that they don’t touch each other.
If, when the dough is light and ready to shape, it be rolled on the board until about one eighth of an inch in thickness, and cut into five-inch squares, then divided through the center into triangles, rolled up, beginning with the wide side, and placed in the pan to rise in semicircular shape, the rolls are called Crescents.
If the dough is light and ready to shape, roll it out on the board until it's about one-eighth of an inch thick, then cut it into five-inch squares. Next, divide those squares in half to make triangles, roll them up starting from the wide side, and place them in the pan to rise in a semicircular shape; these rolls are called Crescents.
The light, rolled dough, may be formed into a Braid by cutting into strips six inches in length and one in width, joining the ends of each three, and braiding.
The light, rolled dough can be made into a Braid by cutting it into strips six inches long and one inch wide, then joining the ends of each set of three and braiding them together.
The heat of the oven should be somewhat greater for roils and biscuit than for bread. The time required will depend upon the heat and the size of the roll, but it will seldom exceed one half hour. Neither rolls nor biscuits should be eaten hot, as they are then open to the same objections as other new yeast bread.
The oven temperature should be a bit higher for rolls and biscuits than for bread. The cooking time will vary based on the heat and the size of the roll, but it usually won’t take more than half an hour. Both rolls and biscuits shouldn't be eaten while hot, as they have the same drawbacks as other fresh yeast bread.
Brown Bread.—To one and one fourth cups of new milk which has been scalded and cooled, add one fourth of a cup of lively yeast, three tablespoonfuls of sugar, and one cup each of white flour, rye flour or sifted rye meal, and yellow corn meal. With different brands of flour there may need to be some variation in the quantity of liquid to be used. The mixture should be thick enough to shape. Allow it to rise until light and cracked over the top; put into a bread pan, and when again well risen, bake for an hour and a half or two hours in an oven sufficiently hot at first to arrest fermentation and fix the bread cells, afterwards allowing the heat to diminish somewhat, to permit a slower and longer baking. Graham flour may be used in place of rye, if preferred.
Brown Bread.—Start with one and a quarter cups of fresh milk that has been heated and then cooled. Add a quarter cup of active yeast, three tablespoons of sugar, and one cup each of white flour, rye flour or sifted rye meal, and yellow cornmeal. Depending on the brand of flour, you might need to adjust the amount of liquid. The mixture should be thick enough to mold. Let it rise until it’s airy and has cracks on top; then transfer it to a bread pan, and when it has risen again, bake it for an hour and a half to two hours in a hot oven initially to stop fermentation and set the bread structure, then reduce the heat a bit to allow for slower, longer baking. You can use Graham flour instead of rye if you prefer.
Fruit Loaf With Graham and Whole-Wheat Flour.—Dissolve one fourth cake of compressed yeast in a pint of sterilized milk; and a pint of white flour; heat thoroughly, and set to rise. When well risen, add three and one fourth cups of flour (Graham and whole-wheat, equal proportions, thoroughly mixed), or sufficient to knead. Knead well for half an hour, and just at the last add a cup of raisins, well washed, dried, and dusted with flour. Let the loaf rise in mass; then shape, put in the pan, allow it to become light again, and bake.
Fruit Loaf With Graham and Whole-Wheat Flour.—Dissolve a quarter cake of compressed yeast in a pint of sterilized milk along with a pint of white flour; heat it thoroughly and let it rise. Once it has risen well, mix in three and a quarter cups of flour (equal parts Graham and whole-wheat, thoroughly blended), or enough to knead the dough. Knead the dough well for half an hour, and at the end, add a cup of raisins, washed, dried, and coated with flour. Let the loaf rise as a whole; then shape it, place it in the pan, allow it to rise again, and bake.
Raised Corn Bread.—Into two cupfuls of hot mush made from white granular corn meal, stir two cupfuls of cold water. Beat well, and add one half cup of liquid yeast, or one half cake of compressed yeast, dissolved in one half cup of warm water, and two teaspoonfuls of granulated sugar. Stir in white or sifted Graham flour to make it stiff enough to knead. Knead very thoroughly, and put in a warm place to rise. When light, molded into three loaves, put into pans, and allow it to rise again. When well risen, bake at least for three fourths of an hour.
Raised Corn Bread.—In a bowl, combine two cups of hot corn mush made from white granular cornmeal with two cups of cold water. Mix well, then add half a cup of liquid yeast or half a cake of compressed yeast dissolved in half a cup of warm water, along with two teaspoons of granulated sugar. Stir in enough white or sifted Graham flour to make the dough firm enough to knead. Knead thoroughly and place it in a warm spot to rise. Once it has risen, shape it into three loaves, place them in pans, and let them rise again. When risen well, bake for at least three-quarters of an hour.
Corn Cake.—Sterilise a cupful of rich milk or thin cream. Cool to lukewarm, and dissolve in it half a cake of compressed yeast Add two small cupfuls of white flour; beat very thoroughly, and put in a warm place to rise. When light, add a cup of lukewarm water or milk, and two cups of best yellow cornmeal. Turn into a shallow square pan, and leave until again well risen. Bake in a quick oven. A tablespoonful of sugar may be added with the corn meal, if desired.
Corn Cake.—Sterilize a cup of rich milk or thin cream. Let it cool to lukewarm, then dissolve in it half a cake of compressed yeast. Add two small cups of white flour; mix thoroughly, and set it in a warm place to rise. Once it's light, stir in a cup of lukewarm water or milk, along with two cups of the best yellow cornmeal. Pour the mixture into a shallow square pan, and let it rise again until well puffed up. Bake in a hot oven. You can add a tablespoon of sugar with the cornmeal if you like.
Oatmeal bread.—Mix a quart of well-cooked oatmeal mush with a pint of water, beating it perfectly smooth; add a cupful of liquid yeast and flour to make a stiff batter. Cover, and let it rise. When light, add sufficient flour to mold; knead as soft as possible, for twenty or thirty minutes; shape into four or more loaves, let it rise again, and bake.
Oatmeal bread.—Combine a quart of cooked oatmeal with a pint of water, mixing it until it's completely smooth; then add a cup of liquid yeast and enough flour to create a thick batter. Cover it and let it rise. Once it's airy, add enough flour to shape it; knead it as softly as you can for twenty to thirty minutes; form it into four or more loaves, let it rise again, and bake.
Milk Yeast Bread.—Prepare the yeast the day before by scalding three heaping teaspoonfuls of fresh cornmeal with boiling milk. Set in a warm place until light (from seven to ten hours); then put in a cool place until needed for use. Start the bread by making a rather thick batter with one cupful of warm water, one teaspoonful of the prepared yeast, and white flour. Put in a warm place to rise. When light, add to it a cupful of flour scalded with a cupful of boiling milk, and enough more flour to make the whole into a rather stiff batter. Cover, and allow it to rise. When again well risen, add flour enough to knead. Knead well; shape into a loaf; let it rise, and bake. Three or four cupfuls of white flour will be needed for all purposes with the amount of liquid given; more liquid and flour may be added in forming the second sponge if a larger quantity of bread is desired. In preparing both yeast and bread, all utensils used should first be sterilized by scalding in hot sal-soda water.
Milk Yeast Bread.—The day before, prepare the yeast by scalding three heaping teaspoons of fresh cornmeal with boiling milk. Let it sit in a warm place until it gets light (about seven to ten hours); then move it to a cool spot until you're ready to use it. To start the bread, make a thick batter using one cup of warm water, one teaspoon of the prepared yeast, and white flour. Place it in a warm area to rise. Once it's light, mix in a cup of flour that has been scalded with a cup of boiling milk, and add enough more flour to create a thick batter. Cover it and let it rise again. When it's risen well, add enough flour to knead. Knead it well; shape it into a loaf; let it rise, and then bake. You will need three or four cups of white flour for everything based on the amount of liquid provided; you can add more liquid and flour in forming the second sponge if you want to make a larger batch of bread. Make sure to sterilize all the utensils you use by scalding them in hot sal-soda water before preparing both the yeast and the bread.
Graham Salt-Rising Bread.—Put two tablespoonfuls of milk into a half-pint cup, add boiling water to fill the cup half full, one half teaspoonful of sugar, one fourth teaspoonful of salt, and white flour to make a rather stiff batter. Let it rise over night. In the morning, when well risen, add a cup and a half of warm water, or milk scalded and cooled, and sufficient white flour to form a rather stiff batter. Cover, and allow it again to rise. When light, add enough sifted Graham flour to knead. When well kneaded, shape into a loaf; allow it to become light again in the pan, and bake. All utensils used should be first well sterilized by scalding in hot sal-soda water.
Graham Salt-Rising Bread.—Put two tablespoons of milk into a half-pint cup, add boiling water to fill the cup halfway, then mix in half a teaspoon of sugar, a quarter teaspoon of salt, and enough white flour to create a fairly stiff batter. Let it rise overnight. In the morning, once it’s well risen, add a cup and a half of warm water or milk that’s been scalded and cooled, plus enough white flour to form a stiff batter. Cover it and let it rise again. When it’s light, mix in enough sifted Graham flour to knead the dough. Once well kneaded, shape it into a loaf, let it rise again in the pan, and then bake it. Make sure to sterilize all utensils by scalding them in hot sal-soda water first.
UNFERMENTED BREADS.
The earliest forms of bread were made without fermentation. Grain was broken as fine as possible by pounding on smooth stones, made into dough with pure water, thoroughly kneaded, and baked in some convenient way. Such was the "unleavened breads" or "Passover cakes" of the Israelites. In many countries this bread is the only kind used. Unleavened bread made from barley and oats is largely used by the Irish and Scotch peasantry. In Sweden an unleavened bread is made of rye meal and water, flavored with anise seed, and baked in large, thin cakes, a foot or more in diameter.
The earliest kinds of bread were made without fermentation. Grain was ground as fine as possible by being pounded on smooth stones, mixed into dough with clean water, thoroughly kneaded, and baked in some convenient way. This was the "unleavened bread" or "Passover cakes" of the Israelites. In many countries, this bread is the only type used. Unleavened bread made from barley and oats is commonly used by Irish and Scottish peasants. In Sweden, an unleavened bread is made from rye flour and water, flavored with anise seed, and baked in large, thin cakes that are a foot or more in diameter.

Mexican Woman Making Tortillas
Some savage tribes subsists chiefly upon excellent corn bread, made simply of meal and water. Unleavened bread made of corn, called tortillas, forms the staple diet of the Mexican Indians. The corn, previously softened by soaking in lime water, is ground to a fine paste between a stone slab and roller called a metate, then patted and tossed from hand to hand until flattened into thin, wafer-like cakes, and baked over a quick fire, on a thin iron plate or a flat stone.
Some primitive tribes primarily rely on delicious corn bread, which is made simply from cornmeal and water. Unleavened corn bread, known as tortillas, is the main part of the diet for the Mexican Indians. The corn is first softened by soaking it in lime water, then it’s ground into a fine paste using a stone slab and a roller called a metate. After that, it’s patted and tossed from hand to hand until it's flattened into thin, wafer-like cakes, which are baked quickly on a thin iron plate or a flat stone.
Unquestionably, unleavened bread, well kneaded and properly baked, is the most wholesome of all breads, but harder to masticate than that made light by fermentation, but this is an advantage; for it insures more thorough mixing with that important digestive agent, the saliva, than is usually given to more easily softened food.
Unquestionably, unleavened bread, well-kneaded and properly baked, is the healthiest of all breads, but it's tougher to chew than the bread made fluffy by fermentation. However, this is actually a benefit because it ensures better mixing with the essential digestive agent, saliva, compared to softer foods.

Stone Metate.
What is usually termed unfermented bread, however, is prepared with flour and liquid, to which shortening—of some kind is added, and the whole made light by the liberation of gas generated within the dough during the process of baking. This is brought about either by mixing with the flour certain chemical substances, which, when wet and brought into contact, act upon each other so as to set free carbonic acid gas, which expands and puffs up the loaf; or by introducing into the dough some volatile substance as carbonate of ammonia, which the heat during baking will, cause to vaporize, and which in rising produces the same result.
What people usually call unfermented bread is made with flour and liquid, to which some kind of fat is added, making the whole mixture light by releasing gas that forms in the dough while baking. This can happen either by mixing in certain chemical substances with the flour that, when wet and combined, react to release carbon dioxide gas, which causes the loaf to expand; or by adding a volatile substance like ammonium carbonate, which vaporizes in the heat of baking and creates the same effect.
Carbonic acid gas maybe for this purpose developed by the chemical decomposition of bicarbonate of potassa (saleratus), or bicarbonate of soda, by some acid such as sour milk, hydrochloric acid, tartaric acid, nitrate of potassa, or the acid phosphate of lime.
Carbonic acid gas can be produced for this purpose through the chemical breakdown of potassium bicarbonate (baking soda) or sodium bicarbonate, using an acid like sour milk, hydrochloric acid, tartaric acid, potassium nitrate, or calcium acid phosphate.
The chemical process of bread-raising originally consisted in adding to the dough definite proportions of muriatic acid and carbonate of soda, by the union of which carbonic acid gas and common salt were produced. This process was soon abandoned, however, on account of the propensity exhibited by the acid for eating holes in the fingers of the baker as well as in his bread pans; and a more convenient one for hands and pans, that of using soda or salaratus with cream of tartar or sour milk, was substituted. When there is an excess of soda, a portion of it remains in the loaf uncombined, giving to the bread a yellow color and an alkaline taste, and doing mischief to the delicate coating of the stomach. Alkalies, the class of chemicals to which soda and salaratus belong, when pure and strong, are powerful corrosive poisons. The acid used with the alkali to liberate the carbonic-acid gas in the process of bread-making, if rightly proportioned, destroys this poisonous property, and unites with it to form a new compound, which, although not a poison, is yet unwholesome.
The chemical process of making bread rise originally involved adding specific amounts of hydrochloric acid and baking soda to the dough. This combination produced carbon dioxide gas and table salt. However, this method was quickly abandoned because the acid tended to create holes in both the baker's fingers and his bread pans. A more user-friendly method using baking soda or baking powder with cream of tartar or sour milk took its place. When there's too much baking soda, some of it stays in the loaf unreacted, causing the bread to have a yellow color and an alkaline taste, which can be harmful to the delicate lining of the stomach. Alkalines, which include baking soda and baking powder, are strong corrosive poisons when pure. The acid used with the alkali to release carbon dioxide gas during bread-making, if measured correctly, neutralizes this toxic effect and combines with the alkali to form a new compound that, while not toxic, is still unhealthy.
We can hardly speak too strongly in condemnation of the use of chemicals in bread-making, when we reflect that the majority of housewives who combine sour milk and salaratus, or cream of tartar and soda, more frequently than otherwise guess at the proportions, or measure them by some "rule of thumb," without stopping to consider that although two cups of sour milk may at one time be sufficiently acid to neutralize a teaspoonful of saleratus, milk may vary in degree of acidity to such an extent that the same quantity will be quite insufficient for the purpose at another time; or that though a teaspoonful of some brand of cream of tartar will neutralize a half teaspoonful of one kind of soda, similar measures will not always bring about the same result. Very seldom, indeed, will the proportions be sufficiently exact to perfectly neutralise the alkali, since chemicals are subject to variations in degree of strength, both on account of the method by which they are manufactured and the length of time they have been kept, to say nothing of adulterations to which they may have been subjected, and which are so common that it is almost impossible to find unadulterated cream of tartar in the market.
We can't stress enough how wrong it is to use chemicals in bread-making when we think about how most home bakers who mix sour milk with baking soda or cream of tartar and baking soda often just guess at the measurements or use some "rule of thumb." They don't realize that while two cups of sour milk might be acidic enough to neutralize a teaspoon of baking soda one time, the acidity can change so much that the same amount might not work the next time. Or that a teaspoon of one brand of cream of tartar may neutralize half a teaspoon of a specific type of baking soda, but the same measurements won't always lead to the same result. It's very rare for the proportions to be accurate enough to completely neutralize the alkali, since chemicals can vary in strength due to how they're made and how long they've been stored. Not to mention, they often get mixed with other substances, and it's so common that it's almost impossible to find pure cream of tartar on the market.
Baking powders are essentially composed of bicarbonate of soda and cream of tartar, mixed in the proper proportions to exactly neutralize each other, and if they were always pure, would certainly be as good as soda and cream of tartar in any form, and possess the added advantage of perfect proportions; but as was demonstrated not long ago by the government chemist, nearly every variety of baking powder in the market is largely adulterated with cheaper and harmful substances. Alum, a most frequent constituent of such baking powders, is exceedingly injurious to the stomach. Out of several hundred brands of baking powder examined, only one was found pure.
Baking powders mainly consist of baking soda and cream of tartar, mixed in the right amounts to perfectly neutralize each other. If they were always pure, they would be just as effective as baking soda and cream of tartar in any form and would have the added benefit of perfect proportions. However, as recently shown by the government chemist, nearly every type of baking powder available is mostly tainted with cheaper and harmful substances. Alum, which is a common ingredient in these baking powders, is extremely harmful to the stomach. Out of several hundred brands of baking powder tested, only one was found to be pure.
Even when in their purest state, these chemicals are not harmless, as is so generally believed. It is a very prevalent idea that when soda is neutralized by an acid, both chemical compounds are in some way destroyed or vaporized in the process, and in some occult manner escape from the bread during the process of baking. This is altogether an error. The alkali and acid neutralize each other chemically, but they do not destroy each other. Their union forms a salt, exactly the same as the Rochelle salts of medicine, a mild purgative, and if we could collected from the bread and weigh or measure it, we would find nearly as much of it as there was of the baking powder in the first place. If two teaspoonfuls of baking powder to the quart of flour be used, we have remaining in the bread made with that amount of flour 165 grains of crystallized Rochelle salts, or 45 grains more than this to be found in a Seidlitz powder. It may be sometimes useful to take a dose of salts, but the daily consumption of such chemical substances in bread can hardly be considered compatible with the conditions necessary for the maintenance of health. These chemical substances are unusable by the system, and must all be removed by the liver and excretory organs, thus imposing upon them an extra and unnecessary burden. It has also been determined by scientific experimentation that the chemicals found in baking powders in bread retard digestion.
Even when these chemicals are in their purest form, they're not harmless, contrary to popular belief. Many people think that when soda reacts with an acid, both chemical compounds are somehow destroyed or vaporized, and mysteriously disappear from the bread during baking. This is completely wrong. The alkali and acid neutralize each other chemically, but they don't destroy each other. Their combination creates a salt, just like the Rochelle salts used in medicine, which is a mild laxative. If we collected and measured this from the bread, we would find almost as much as there was baking powder initially. If two teaspoons of baking powder are added to a quart of flour, the bread made with that amount would still contain 165 grains of crystallized Rochelle salts, which is 45 grains more than what's found in a Seidlitz powder. While taking a dose of salts can sometimes be beneficial, consuming such chemical substances daily through bread isn't exactly aligned with what’s necessary for good health. These chemicals aren't usable by the body and must be eliminated by the liver and excretory organs, placing an extra and unnecessary burden on them. Scientific experiments have also shown that the chemicals in baking powders can slow down digestion.

These substances are, fortunately, not needed for the production of good light bread. The purpose of their use is the production of a gas; but air is a gas much more economical and abundant than carbonic-acid gas, and which, when introduced into bread and subjected to heat, has the property of expanding, and in doing, puffing up the bread and making it light. Bread made light with air is vastly superior to that compounded with soda or baking powder, in point of healthfulness, and when well prepared, will equal it in lightness and palatableness. The only difficulty lies in catching and holding the air until it has accomplished the desired results. But a thorough understanding of the necessary conditions and a little practice will soon enable one to attain sufficient skill in this direction to secure most satisfactory results.
These substances aren’t necessary for making good light bread. They’re used to create gas, but air is a much more economical and plentiful gas than carbon dioxide. When air is mixed into bread and heated, it expands, puffing up the bread and making it light. Bread that is lightened with air is far healthier than that made with soda or baking powder, and when made well, it can match their lightness and flavor. The main challenge is capturing and retaining the air until it achieves the desired results. However, with a solid understanding of the necessary conditions and a bit of practice, anyone can develop the skills needed to produce excellent outcomes.

All breads, whether fermented or unfermented, are lighter if baked in some small form, and this is particularly true of unfermented breads made light with air. For this reason, breads made into a dough are best baked in the form of rolls, biscuits, or crackers, and batter breads in small iron cups similar to those in the accompanying illustration. These cups or "gem irons" as they are sometimes called, are to be obtained in various shapes and sizes, but for this purpose the more shallow cups are preferable. For baking the dough breads a perforated sheet of Russia iron or heavy tin, which any tinner can make to fit the oven, is the most serviceable, as it permits the hot air free access to all sides of the bread at once. If such is not obtainable, the upper oven grate, carefully washed and scoured, may be used Perforated pie tins also answer very well for this purpose.
All breads, whether fermented or not, turn out lighter when baked in smaller sizes, especially true for unfermented breads that rely on air to rise. For this reason, dough breads are best baked as rolls, biscuits, or crackers, while batter breads should be baked in small iron cups like those shown in the illustration. These cups, sometimes called "gem irons," come in various shapes and sizes, but shallower cups work better for this purpose. For baking dough breads, a perforated sheet of Russia iron or heavy tin, which any tinsmith can make to fit your oven, is the most effective choice, as it allows hot air to circulate around all sides of the bread. If that’s not available, the upper oven grate, thoroughly cleaned and scoured, can be used. Perforated pie tins also work well for this purpose.
The heat of the oven for baking should be sufficient to form a slight crust over all sides of the bread before the air escapes, but not sufficient to brown it within the first fifteen minutes. To aid in forming the crust on the sides and bottom of batter breads, the iron cups should be heated previous to introducing the batter. The degree of heat required for baking will be about the same as for fermented rolls and biscuit, and the fire should be so arranged as to keep a steady but not greatly increasing heat.
The oven temperature for baking should be high enough to create a slight crust on all sides of the bread before the air escapes, but not so high that it browns within the first fifteen minutes. To help form the crust on the sides and bottom of batter breads, the iron cups should be heated before adding the batter. The required baking temperature will be similar to that needed for fermented rolls and biscuits, and the heat should be set to maintain a steady, but not significantly increasing, temperature.

Making Unfermented Bread.
Air is incorporated into batter breads by brisk and continuous agitating and beating; into dough breads by thorough kneading, chopping, or pounding.
Air is mixed into batter breads by fast and constant stirring and beating; into dough breads by properly kneading, chopping, or pounding.
Whatever the process by which the air is incorporated, it must be continuous. For this reason it is especially essential in making aërated bread that every thing be in readiness before commencing to put the bread together. All the materials should be measured out, the utensils to be used in readiness, and the oven properly heated. Success is also dependent upon the dexterity with which the materials when ready are put together. Batter bread often proves a failure although the beating is kept up without cessation, because it is done slowly and carelessly, or interspersed with stirring, thus permitting the air to escape between the strokes.
Whatever the method used to incorporate air, it must be continuous. For this reason, it’s especially important when making aerated bread that everything is ready before starting to assemble the bread. All the ingredients should be measured out, the utensils should be prepared, and the oven should be properly heated. Success also relies on how skillfully the ingredients are combined when ready. Batter bread often fails even if the beating is continuous because it's done too slowly and carelessly, or mixed with stirring, allowing the air to escape between strokes.
If the bread is to be baked at once, the greater the dispatch with which it can be gotten into a properly-heated oven the lighter it will be. Crackers, rolls and other forms of dough breads often lack in lightness because they were allowed to stand some time before baking. The same is true of batter breads. If, for any reason, it is necessary to keep such breads for any length of time after being prepared, before baking, set the dish containing them directly on ice.
If the bread is to be baked right away, the quicker it can go into a properly heated oven, the lighter it will be. Crackers, rolls, and other types of bread often aren't light because they sat for a while before baking. The same goes for batter breads. If you need to keep these breads for a bit after preparing them, before baking, place the dish directly on ice.
The lightness of aërated bread depends not only upon the amount of air incorporated in its preparation, but also upon the expansion of the air during the baking. The colder the air, the greater will be its expansion upon the application of heat. The colder the materials employed, then, for the bread-making, the colder will be the air confined within it, and the lighter will be the bread. For this reason, in making batter bread, it will be found a good plan, when there is time, to put the materials together, and place the dish containing the mixture on ice for an hour or two, or even over night. When ready to use, beat thoroughly for ten or fifteen minutes to incorporate air, and bake in heated irons. Rolls and other breads made into a dough, may be kneaded and shaped and put upon ice to become cold. Thus treated, less kneading is necessary than when prepared to be baked at once.
The lightness of aerated bread depends not just on how much air is mixed in during its preparation, but also on how the air expands while baking. The colder the air, the more it expands when heated. So, if the materials used for making the bread are colder, the air trapped inside will also be colder, making the bread lighter. For this reason, when making batter bread, it's a good idea to mix the ingredients and place the dish with the batter in the fridge for an hour or two, or even overnight, if you have the time. When you’re ready to bake, beat it thoroughly for ten to fifteen minutes to incorporate air, and then bake in heated pans. Rolls and other breads made into dough can also be kneaded, shaped, and placed in the fridge to cool down. This way, you’ll need to knead less than if you were baking them right away.
Many of the recipes given for the batter breads include eggs. The yolk is not particularly essential, and if it can be put to other uses, may be left out. The white of an egg, because of its viscous nature, when beaten, serves as a sort of trap to catch and hold air, and added to the bread, aids in making it light. Very nice light bread may be made without eggs, but the novice in making aërated breads will, perhaps, find it an advantage first to become perfectly familiar with the processes and conditions involved, by using the recipes with eggs before attempting those without, which are somewhat more dependent for success upon skill and practice.
Many of the recipes for batter breads call for eggs. The yolk isn't really necessary, and if it can be used in other ways, it can be omitted. The egg white, due to its thick consistency, acts like a trap to capture and hold air when beaten, which helps make the bread light. You can make very nice light bread without eggs, but a beginner making airy breads might find it beneficial to become completely familiar with the processes and conditions involved by starting with recipes that include eggs before trying the ones without, which rely more on skill and practice for success.
When egg is used in the bread, less heating of the irons will be necessary, and not so hot an oven as when made without.
When egg is added to the bread, less heat will be needed for the irons, and a cooler oven can be used compared to when it's made without.
If the bread, when baked, appears light, but with large holes in the center, it is probable that either the irons or the oven was too hot at first. If the bread after baking, seems sticky or dough-like in the interior, it is an indication that either it was insufficiently baked, or that not enough flour in proportion to the liquid has been used. It should be stated, that although the recipes given have been prepared with the greatest care, and with the same brands of flour, careful measurement, and proper conditions, prove successful every time, yet with different brands of flour some variation in quantity may needed,—a trifle more or less,—dependent upon the absorbent properties of the flour, and if eggs are used, upon the size of the eggs.
If the bread looks light after baking but has large holes in the center, it probably means that either the pans or the oven were too hot at the start. If the bread seems sticky or doughy on the inside after baking, it indicates that it was either not baked long enough or that there wasn’t enough flour compared to the liquid used. It should be noted that even though the recipes provided have been prepared very carefully with the same brands of flour, accurate measurements, and the right conditions, which lead to success every time, different brands of flour may require slight adjustments in quantity—either a bit more or less—based on the flour's ability to absorb moisture, and if eggs are included, depending on their size.
A heavy bread may be the result of the use of poor flour, too much flour, careless or insufficient beating, so that not enough air was incorporated, or an oven not sufficiently hot to form a crust over the bread before the air escaped. Breads made into a dough, if moist and clammy, require more flour or longer baking. Too much flour will make them stiff and hard.
A dense bread can come from using low-quality flour, too much flour, not mixing it enough, which means not enough air was added, or an oven that wasn't hot enough to create a crust before the air escaped. Doughs that are moist and sticky need either more flour or a longer baking time. Too much flour will make them tough and hard.
The length of time requisite for baking aërated breads made with whole-wheat, wheat berry, or Graham flours, will vary from forty minutes to one hour, according to the kind and form in which the bread is baked, and the heat of the oven.
The time needed to bake aerated breads made with whole-wheat, wheat berry, or Graham flours will range from forty minutes to one hour, depending on the type and shape of the bread being baked, as well as the oven temperature.
The irons in which batter breads are to be baked should not be smeared with grease; if necessary to oil them at all, they should only be wiped out lightly with a clean, oiled cloth. Irons well cared for, carefully washed, and occasionally scoured with Sapolio to keep them perfectly smooth, will require no greasing whatever.
The pans used for baking batter breads shouldn’t be coated with grease; if you need to oil them at all, just lightly wipe them with a clean, oiled cloth. Well-maintained pans that are carefully washed and occasionally scrubbed with Sapolio to keep them perfectly smooth won’t need any greasing at all.
In filling the irons, care should be taken to fill each cup at first as full as it is intended to have; it, as the heat of the irons begins the cooking of the batter as soon as it is put in, and an additional quantity added has a tendency to make the bread less light.
In filling the pans, make sure to fill each cup to the intended level right from the start since the heat from the pans starts cooking the batter as soon as it's added. Adding more batter afterward can make the bread dense.
RECIPES.
Whole-Wheat Puffs.—Put the yolk of an egg into a basin, and beat the white in a separate dish to a stiff froth. Add to the yolk, one half a cupful of rather thin sweet cream and one cupful of skim milk. Beat the egg, cream, and milk together until perfectly mingled and foamy with air bubbles; then add, gradually, beating well at the same time, one pint of wheat berry flour. Continue the beating vigorously and without interruption for eight or ten minutes; then stir in, lightly, the white of the egg. Do not beat again after the white of the egg is added, but turn at once into heated, shallow irons, and bake for an hour in a moderately quick oven. If properly made and carefully baked, these puffs will be of a fine, even texture throughout, and as light as bread raised by fermentation.
Whole-Wheat Puffs.—Put the yolk of an egg into a bowl and beat the white in a separate dish until stiff. Add half a cup of thin sweet cream and one cup of skim milk to the yolk. Mix the egg, cream, and milk together until it’s fully combined and bubbly; then gradually add one pint of wheat berry flour while beating well. Keep beating vigorously for eight to ten minutes; then gently fold in the egg white. Do not beat again after adding the white; pour the mixture immediately into heated shallow pans and bake for an hour in a moderately hot oven. If done correctly, these puffs will have a nice, even texture and will be as light as bread made with yeast.
Whole-Wheat Puffs No. 2.—Make a batter by beating together until perfectly smooth the yolk of one egg, one and one half cups of new or unskimmed milk, and one pint of whole-wheat flour. Place the dish containing it directly upon ice, and leave for an hour or longer. The bread may be prepared and left on the ice over night, if desired for breakfast. When ready to bake the puffs, whip the white of the egg to a stiff froth, and after vigorously beating the batter for ten minutes, stir in lightly the white of the egg; turn at once into heated irons, and bake. If preferred, one third white flour and two thirds sifted Graham flour may be used in the place of the wheat berry flour.
Whole-Wheat Puffs No. 2.—Make a batter by mixing until completely smooth the yolk of one egg, one and a half cups of whole milk, and one pint of whole-wheat flour. Set the dish containing it directly on ice and let it chill for an hour or longer. You can prepare the batter and keep it in the fridge overnight if you want it for breakfast. When you’re ready to bake the puffs, whip the egg white until it’s stiff, and after beating the batter for ten minutes, gently fold in the egg white. Immediately pour it into preheated irons and bake. If you prefer, you can replace one-third of the whole-wheat flour with white flour and use two-thirds sifted Graham flour instead.
Whole-Wheat Puffs No. 3.—Take one cupful of sweet cream (twelve-hour cream), one half cupful of soft ice water, and two slightly rounded cupfuls of wheat berry flour. Beat the material well together, and set the dish containing it on ice for an hour or more before using. When ready to bake, beat the mixture vigorously for ten minutes, then turn into heated iron cups (shallow ones are best), and bake for about an hour in a quick oven.
Whole-Wheat Puffs No. 3.—Take one cup of sweet cream (twelve-hour cream), half a cup of cold water, and two slightly heaping cups of wheat berry flour. Mix everything together well, then place the bowl in the fridge for an hour or more before using. When you're ready to bake, beat the mixture vigorously for ten minutes, then pour it into heated iron cups (shallow ones work best), and bake for about an hour in a hot oven.
Graham Puffs.—Beat together vigorously until full of air bubbles, one pint of unskimmed milk, the yolk of one egg, and one pint and three or four tablespoonfuls of Graham flour, added a little at a time. When the mixture is light and foamy throughout, stir in lightly and evenly the white of the egg, beaten to a stiff froth; turn into heated irons, and bake in a rather quick oven. Instead of all Graham, one third white flour may be used if preferred.
Graham Puffs.—Whisk together well until it's full of air bubbles, one pint of whole milk, the yolk of one egg, and one pint plus three or four tablespoons of Graham flour, adding it gradually. When the mixture is light and frothy throughout, gently fold in the egg white, beaten to stiff peaks; pour into heated molds, and bake in a relatively hot oven. If you prefer, you can use one-third all-purpose flour instead of all Graham flour.
Graham Puffs No. 2.—Beat the yolks of two eggs in two cupfuls of ice water; then add gradually, beating well meantime, three and one fourth cupfuls of Graham flour. Continue the beating, after all the flour is added, until the mixture is light and full of air bubbles. Add last the whites of the eggs, beaten to a stiff froth, and bake at once in heated irons.
Graham Puffs No. 2.—Whisk the yolks of two eggs in two cups of ice water; then gradually add, while mixing well, three and one fourth cups of Graham flour. Keep mixing after all the flour is incorporated until the mixture is light and full of air bubbles. Finally, fold in the egg whites that have been beaten until stiff, and bake immediately in heated irons.
Graham Gems.—Into two cupfuls of unskimmed milk which has been made very cold by standing on ice, stir gradually, sprinkling it from the hand, three and one fourth cupfuls of Graham flour. Beat vigorously for ten minutes or longer, until the batter is perfectly smooth and full of air bubbles. Turn at once into hissing hot gem irons, and bake in a hot oven. If preferred, the batter may be prepared, and the dish containing it placed on ice for an hour or longer; then well beaten and baked. Graham gems may be made in this manner with soft water instead of milk, but such, in general, will need a little more flour than when made with milk. With some ovens, it will be found an advantage in baking these gems to place them on the upper grate for the first ten minutes or until the top has been slightly crusted, and then change to the bottom of the oven for the baking.
Graham Gems.—In two cups of very cold whole milk, which has been chilled on ice, gradually stir in three and one fourth cups of Graham flour, sprinkling it in from your hand. Beat the mixture vigorously for at least ten minutes, until the batter is completely smooth and filled with air bubbles. Immediately pour it into hot gem irons and bake in a hot oven. If you prefer, you can prepare the batter and then chill it in the dish on ice for an hour or longer; after that, beat it well and bake. You can also make Graham gems using soft water instead of milk, but you may need to add a bit more flour in that case. Some ovens may benefit from placing the gems on the top rack for the first ten minutes, until the tops have slightly crusted, and then moving them to the bottom of the oven for the rest of the baking.
Crusts.—Beat together very thoroughly one cupful of ice-cold milk, and one cupful of Graham flour. When very light and full of air bubbles, turn into hot iron cups, and bake twenty-five or thirty minutes. The best irons for this purpose are the shallow oblong, or round cups of the same size at the bottom as at the top. Only a very little batter should be put in each cup. The quantity given is sufficient for one dozen crusts.
Crusts.—Mix together one cup of ice-cold milk and one cup of Graham flour until it’s really well combined and bubbly. When the mixture is light and full of air, pour it into hot iron cups and bake for twenty-five to thirty minutes. The best cups for this are the shallow oblong or round ones that are the same size at the top and bottom. Only add a small amount of batter to each cup. This recipe makes enough for a dozen crusts.
Blueberry Gems.—To one cupful of rich milk add one tablespoonful of sugar, and the yolk of an egg. Beat well till full of air bubbles; then add gradually one cupful of Graham flour, and one cupful of white flour, or white corn meal. Beat vigorously until light; stir in the beaten white of the egg, and one cupful of fresh, sound blueberries. Bake in heated irons, in a moderately quick oven. Chopped or sour apples may be used in place of the berries.
Blueberry Gems.—Combine one cup of whole milk with one tablespoon of sugar and the yolk of an egg. Whisk well until it's full of air bubbles; then gradually mix in one cup of Graham flour and one cup of all-purpose flour or white cornmeal. Beat vigorously until light; fold in the beaten egg white and one cup of fresh, good blueberries. Bake in heated molds in a moderately hot oven. Chopped or sour apples can be used instead of the berries.
Sally Lunn Gems.—Beat together the yolk of one egg, two tablespoonfuls of sugar, and one cupful of thin, ice-cold, sweet cream. Add slowly, beating at the same time, one cup and two tablespoonfuls of sifted Graham flour. Beat vigorously, until full of air bubbles, add the white of the egg beaten stiffly, and bake in heated irons.
Sally Lunn Gems.—Whisk together the yolk of one egg, two tablespoons of sugar, and one cup of thin, ice-cold sweet cream. Gradually add, while mixing, one cup and two tablespoons of sifted Graham flour. Mix thoroughly until it's full of air bubbles, then gently fold in the stiffly beaten egg white, and bake in heated irons.
Corn Puffs.—Mingle the yolk of one egg with one cupful of rich milk. Add to the liquid one cupful of flour, one-half cupful of fine, yellow corn meal, and one-fourth cupful of sugar, all of which have previously been well mixed together. Place the batter on ice for an hour, or until very cold. Then beat it vigorously five or ten minutes, till full of air bubbles; stir in lightly the stiffly beaten white of the egg, and put at once into heated irons. Bake in a moderately quick oven, thirty or forty minutes.
Corn Puffs.—Combine the yolk of one egg with one cup of rich milk. Add to the mixture one cup of flour, half a cup of fine yellow cornmeal, and a quarter cup of sugar, all of which should be thoroughly blended first. Chill the batter in the refrigerator for an hour, or until it’s very cold. Then beat it vigorously for five to ten minutes, until it's full of air bubbles; gently fold in the stiffly beaten egg white, and immediately pour it into heated molds. Bake in a moderately hot oven for thirty to forty minutes.
Corn Puffs No. 2.—Scald two cupfuls of fine white corn meal with boiling water. When cold, add three tablespoonfuls of thin sweet cream, and the yolk of one egg. Beat well, and stir in lastly the white of the egg, beaten to a stiff froth. The batter should be sufficiently thin to drop easily from a spoon, but not thin enough to pour. Bake in heated irons, in a moderately quick oven.
Corn Puffs No. 2.—Pour boiling water over two cups of fine white cornmeal. Once it cools, mix in three tablespoons of thin sweet cream and the yolk of one egg. Mix well, and then gently fold in the egg white that has been beaten until stiff. The batter should be thin enough to drop easily from a spoon but not so thin that it pours. Bake in heated molds in a moderately hot oven.
Corn Puffs No. 3.—Take one cupful of cold mashed potato, and one cupful of milk, rubbed together through a colander to remove all lumps. Add the yolk of one well beaten, egg, and then stir in slowly, beating vigorously meantime, one cupful of good corn meal. Lastly, stir in the white of the egg beaten to a stiff froth, and bake in heated irons, in a rather quick oven.
Corn Puffs No. 3.—Take one cup of cold mashed potatoes and one cup of milk, and mix them together through a strainer to get rid of all lumps. Add the yolk of one well-beaten egg, and then slowly mix in, while beating vigorously, one cup of good cornmeal. Finally, fold in the egg white that has been beaten to stiff peaks, and bake in heated molds in a fairly hot oven.
Corn Puffs No. 4.—Beat together one and one-half cupfuls of unskimmed milk and the yolks of two eggs, until thoroughly blended. Add two cupfuls of flour, and one cupful best granular corn meal. Beat the batter thoroughly; stir in lightly the whites of the eggs, beaten to a stiff froth, turn into heated irons, and bake.
Corn Dodgers No. 2.—Mix one tablespoonful of sugar with two cups best corn meal. Scald with one cup of boiling water. Add rich milk to make a batter thin enough to drop from a spoon. Lastly, add one egg, yolk and white beaten separately, and bake on a griddle in the oven from three fourth of an hour to one hour.
Corn Dodgers No. 2.—Combine one tablespoon of sugar with two cups of premium cornmeal. Pour in one cup of boiling water. Add rich milk until the batter is thin enough to drop from a spoon. Finally, mix in one egg, with the yolk and white beaten separately, and bake on a griddle in the oven for 45 minutes to an hour.
Hoe Cakes.—Scald one pint of white corn meal, with which, if desired, a tablespoonful of sugar, and one half teaspoonful of salt have been mixed, with boiling milk, or water enough to make a batter sufficiently thick not to spread. Drop on a hot griddle, in large or small cakes, as preferred, about one half inch in thickness. Cook slowly, and when well browned on the under side, turn over. The cake may be cooked slowly, until well done throughout, or, as the portion underneath becomes well browned the first browned crust may be peeled off with a knife, and the cake again turned. As rapidly as a crust becomes formed and browned, one may be removed, and the cake turned, until the whole is all browned. The thin wafer-like crusts are excellent served with hot milk or cream.
Hoe Cakes.—Scald one pint of white cornmeal, mixed with a tablespoon of sugar and half a teaspoon of salt, using boiling milk or enough water to create a batter that's thick enough not to spread. Drop onto a hot griddle in either large or small cakes, about half an inch thick. Cook slowly, and when well browned on the bottom, flip it over. You can cook the cake slowly until it's fully done, or when the underside is nicely browned, peel off the browned crust with a knife and flip it again. As soon as a crust forms and browns, it can be removed, and the cake turned until everything is browned. The thin, wafer-like crusts are great served with hot milk or cream.
Oatmeal Gems.—To one cupful of well-cooked oatmeal add one half cupful of rich milk or thin cream, and the yolk of one egg. Beat all together thoroughly; then add, continuing to beat, one and one third cupfuls of Graham flour, and lastly the stiffly beaten white of the egg. Bake in heated irons. If preferred, one cupful of white flour may be used in place of the Graham.
Oatmeal Gems.—To one cup of well-cooked oatmeal, add half a cup of rich milk or thin cream, and the yolk of one egg. Beat everything together thoroughly; then, while continuing to beat, add one and a third cups of Graham flour, and finally, the stiffly beaten egg white. Bake in heated irons. If you prefer, you can use one cup of white flour instead of the Graham.
Pop Overs.—For the preparation of these, one egg, one cupful of milk, and one scant cupful of white flour are required. Beat the egg, yolk and white separately. Add to the yolk, when well beaten, one half of the milk, and sift in the flour a little at a time, stirring until the whole is a perfectly smooth paste. Add the remainder of the milk gradually, beating well until the whole is an absolutely smooth, light batter about the thickness of cream. Stir in the stiffly beaten white of the egg, and bake in hot earthen cups or muffin rings, and to prevent them from sticking, sift flour into the rings after slightly oiling, afterward turning them upside down to shake off all of the loose flour.
Pop Overs.—To make these, you'll need one egg, one cup of milk, and just under one cup of white flour. Separate the egg and beat the yolk and white separately. Once the yolk is well beaten, mix in half of the milk and gradually sift in the flour, stirring until it becomes a completely smooth paste. Slowly add the rest of the milk, mixing well until you have a smooth, light batter that's about the thickness of cream. Gently fold in the beaten egg white, and bake in hot earthen cups or muffin rings. To prevent sticking, sift some flour into the rings after lightly oiling them, then turn them upside down to shake off any excess flour.
Bean Gems.—Prepare the gems in the same manner as for Whole-Wheat Puffs, using one half cup of milk, one egg, one cup of cooked beans which have been rubbed through a colander and salted, and one cup and one tablespoonful of white flour. A little variation in the quantity of the flour may be necessary, dependent upon the moisture contained in the beans, although care should be taken to have them quite dry.
Bean Gems.—Make the gems the same way as you would for Whole-Wheat Puffs, using half a cup of milk, one egg, one cup of cooked beans that have been pressed through a colander and salted, and one cup plus one tablespoon of white flour. You might need to slightly adjust the amount of flour depending on how much moisture is in the beans, but be careful to ensure they are quite dry.
Breakfast Rolls.—Sift a pint and a half of Graham flour into a bowl, and into it stir a cupful of very cold thin cream or unskimmed milk. Pour the liquid into the flour slowly, a few spoonfuls at a time, mixing each spoonful to a dough with the flour as fast as poured in. When all the liquid has been added, gather the fragments of dough together, knead thoroughly for ten minutes or longer, until perfectly smooth and elastic. The quantity of flour will vary somewhat with the quality, but in general, the quantity given will be quite sufficient for mixing the dough and dusting the board. When well kneaded, divide into two portions; roll each over and over with the hands, until a long roll about once inch in diameter is formed; cut this into two-inch lengths, prick with a fork and place on perforated tins, far enough apart so that one will not touch another when baking. Each roll should be as smooth and perfect as possible, and with no dry flour adhering. Bake at once, or let stand on ice for twenty minutes. The rolls should not be allowed to stand after forming, unless on ice. From thirty to forty minutes will be required for baking. When done, spread on the table to cool, but do not pile one on top of another.
Breakfast Rolls.—Sift 1.5 pints of Graham flour into a bowl, and stir in 1 cup of very cold thin cream or whole milk. Slowly pour the liquid into the flour, a few spoonfuls at a time, mixing each spoonful into a dough as you go. Once all the liquid is added, bring the dough together and knead it thoroughly for about ten minutes or until it's smooth and elastic. The amount of flour needed may vary depending on its quality, but generally, the amount listed will be sufficient for mixing the dough and dusting the surface. After kneading, divide the dough into two portions; roll each one in your hands until you form a long roll about an inch in diameter. Cut each roll into two-inch lengths, prick them with a fork, and place them on perforated baking trays, leaving enough space between each roll so they don’t touch while baking. Each roll should be as smooth and perfect as possible, with no dry flour sticking to it. Bake them right away, or let them sit on ice for twenty minutes. Don’t let the rolls sit out after shaping them, unless they’re on ice. They will take about thirty to forty minutes to bake. Once done, spread them out on the table to cool, but don’t stack them on top of each other.
Very nice rolls may be made in the same manner, using for the wetting ice-cold soft water. They requite a longer kneading, are more crisp, but less tender than those made with cream.
Very nice rolls can be made the same way, using ice-cold soft water for wetting. They need a longer kneading, are crisper, but less tender than those made with cream.
With some brands of Graham flour the rolls will be much lighter if one third white flour be used. Whole-wheat flour may be used in place of Graham, if preferred.
With some brands of Graham flour, the rolls will be much lighter if you use one third white flour. You can also use whole-wheat flour instead of Graham if you prefer.
Cream Graham Rolls.—To one half cup cold cream add one half cup of soft ice water. Make into a dough with three cups of Graham flour, sprinkling in slowly with the hands, beating at the same time, so as to incorporate as much air as possible, until the dough is too stiff to be stirred; then knead thoroughly, form into rolls, and bake.
Cream Graham Rolls.—Mix half a cup of cold cream with half a cup of soft ice water. Gradually add three cups of Graham flour while mixing with your hands and beating to incorporate as much air as you can, until the dough becomes too stiff to mix. Then knead it thoroughly, shape it into rolls, and bake.
Cream Mush Rolls.—Into a cupful of cold Graham mush beat thoroughly three tablespoonfuls of thick, sweet cream. Add sufficient Graham flour to make a rather stiff dough, knead thoroughly, shape into roils, and bake. Corn meal, farina, and other mushes may be used in the place of the Graham mush, if preferred.
Cream Mush Rolls.—In a cup of cold Graham mush, mix in three tablespoons of thick, sweet cream until well combined. Add enough Graham flour to form a fairly stiff dough, knead thoroughly, shape into rolls, and bake. If you prefer, you can substitute cornmeal, farina, or other types of mush for the Graham mush.
Beaten Biscuit.—Into a quart of whole-wheat flour mix a large cup of must be very stiff, and rendered soft and pliable by thorough kneading and afterward pounding with a mallet for at least half an hour in the following manner: Pound the dough oat flat, and until of the same thickness throughout; dredge lightly with flour; double the dough over evenly and pound quickly around the outside, to fasten the edges together and thus retain the air within the dough. When well worked, the dough will appear flaky and brittle, and pulling a piece off it quickly will cause a sharp, snapping sound. Mold into small biscuits, making an indenture in the center of each with the thumb, prick well with a fork, and place on perforated sheets, with a space between, and put at once into the oven. The oven should be of the same temperature as for rolls. If they are "sad" inside when cold, they were not well baked, as they should be light and tender. If preferred, use one third white flour, instead of all whole-wheat. Excellent results are also obtained by chopping instead of pounding the dough.
Beaten Biscuit.—In a quart of whole-wheat flour, mix in a large cup of water. The dough must be very stiff, then softened and made pliable through thorough kneading and pounding with a mallet for at least half an hour. Here’s how: Pound the dough flat and make it the same thickness all around; lightly dust with flour; fold the dough evenly in half and quickly pound around the edges to seal them, trapping air inside. When it's well worked, the dough should look flaky and brittle, and if you quickly pull off a piece, it should make a sharp snapping sound. Shape into small biscuits, making a thumbprint in the center of each, prick them well with a fork, and place them on perforated sheets, leaving space between them before putting them in the oven. The oven temperature should be the same as for rolls. If they feel dense when cold, they weren’t baked long enough; they should be light and tender. If preferred, you can use one-third white flour instead of all whole-wheat. Great results can also be achieved by chopping the dough instead of pounding it.
Cream Crisps.—Make a dough of one cupful of thin cream, and a little more than three cups of Graham flour. Knead until smooth, then divide the dough into several pieces, and place in a dish on ice for an hour, or until ice cold. Roll each piece separately and quickly as thin as brown paper. Cut with a knife into squares, prick with a fork, and bake on perforated tins, until lightly browned on both sides.
Cream Crisps.—Make a dough using one cup of heavy cream and just over three cups of Graham flour. Knead it until it's smooth, then divide the dough into a few pieces and place them in a dish in the fridge for an hour, or until they’re super cold. Roll each piece out quickly and thinly, like brown paper. Cut into squares with a knife, prick them with a fork, and bake on perforated trays until they’re lightly browned on both sides.
Cream Crisps No. 2.—Into two and one half cups of cold cream or rich milk, sprinkle slowly with the hands, beating meanwhile to incorporate air, four cups of best Graham flour, sifted with one half cup of granulated sugar. Add flour to knead; about two and one fourth cups will be required. When well kneaded, divide into several portions, roll each as thin as a knife blade, cut into squares, prick well with a fork, and bake.
Cream Crisps No. 2.—In two and a half cups of cold cream or rich milk, slowly sprinkle in while beating to incorporate air, four cups of the best Graham flour sifted with half a cup of granulated sugar. Add flour to knead; about two and a quarter cups will be needed. Once well kneaded, divide into several portions, roll each out as thin as a knife blade, cut into squares, prick well with a fork, and bake.
Graham Crisps.—Into one half cupful of ice-cold soft water, stir slowly, so as to incorporate as much air as possible, enough Graham flour to make a dough stiff enough to knead. A tablespoonful of sugar may be added to the water before stirring in the flour, if desired. After kneading fifteen minutes, divide the dough into six portions; roll each as thin as brown paper, prick with a fork, and bake on perforated tins, turning often until both sides are a light, even brown. Break into irregular pieces and serve.
Graham Crisps.—Into half a cup of ice-cold water, slowly stir in enough Graham flour to create a dough that's stiff enough to knead, making sure to incorporate as much air as possible. If you want, you can add a tablespoon of sugar to the water before mixing in the flour. After kneading for fifteen minutes, divide the dough into six portions; roll each one as thin as brown paper, prick with a fork, and bake on perforated trays, turning often until both sides are a light, even brown. Break into irregular pieces and serve.
Graham Crackers.—Make a dough of one cup of cream and Graham flour sufficient to make a soft dough. Knead thoroughly, and place on ice for half an hour; then roll thin, cut into small cakes with a cookie-cutter, prick with a fork, and bake on floured pans, in a brisk oven. A tablespoonful of sugar may be added if desired.
Graham Crackers.—Make a dough with one cup of cream and enough Graham flour to create a soft dough. Knead thoroughly, then chill in the fridge for half an hour. After that, roll it out thin, cut into small shapes with a cookie cutter, poke holes with a fork, and bake on floured pans in a hot oven. You can add a tablespoon of sugar if you like.
Fruit Crackers.—Prepare a dough with one cup of cold sweet cream and three cups of Graham flour, knead well, and divide into two portions. Roll each quite thin. Spread one thickly with dates or figs seeded and chopped; place the other one on top and press together with the rolling pin. Cut into squares and bake. An additional one fourth of a cup of flour will doubtless be needed for dusting the board and kneading.
Fruit Crackers.—Make a dough using one cup of cold sweet cream and three cups of Graham flour. Knead it well and divide it into two parts. Roll each part out thin. Spread one part generously with chopped, pitted dates or figs; place the other part on top and press them together with a rolling pin. Cut into squares and bake. You will likely need an extra quarter cup of flour for dusting the board and for kneading.
TABLE TOPICS.
Behind the nutty loaf is the mill wheel; behind the mill is the wheat field; on the wheat field rests the sunlight; above the sun is God.—James Russell Lowell.
Behind the nutty loaf is the mill wheel; behind the mill is the wheat field; on the wheat field rests the sunlight; above the sun is God.—James Russell Lowell.
Bread forms one of the most important parts of the ration of the German soldier. In time of peace, the private soldier is supplied day by day with one pound and nine ounces of bread; when fighting for the Fatherland, every man is entitled to a free ration of over two pounds of bread, and field bakery trains and steam ovens for providing the large amount of bread required, form a recognized part of the equipment of the German army.
Bread is a key part of the German soldier's diet. In peacetime, each soldier gets a daily supply of one pound and nine ounces of bread; during wartime, everyone is entitled to over two pounds of bread per day. Field bakery units and steam ovens, designed to meet the high demand for bread, are standard equipment for the German army.
The wandering Arab lives almost entirely upon bread, with a few dates as a relish.
The wandering Arab mostly survives on bread, with some dates as an occasional treat.
According to Count Rumford, the Bavarian wood-chopper, one of the most hardy and hard-working men in the world, receives for his weekly rations one large loaf of rye bread and a small quantity of roasted meal. Of the meal he makes an infusion, to which he adds a little salt, and with the mixture, which he calls burned soup, he eats his rye bread. No beer, no beef, no other food than that mentioned, and no drink but water; and yet he can do more work and enjoys a better digestion and possesses stronger muscles than the average American or Englishman, with their varied dietary.
According to Count Rumford, the Bavarian woodcutter, one of the toughest and hardest-working men in the world, gets a large loaf of rye bread and a small amount of roasted meal for his weekly rations. He makes an infusion with the meal, adds a little salt, and uses the mixture, which he calls burnt soup, to eat his rye bread. No beer, no beef, no other food besides what’s mentioned, and no drink other than water; yet he can do more work, enjoys better digestion, and has stronger muscles than the average American or Englishman, who have a more varied diet.
The following truthful bit of Scandinavian history well illustrates the influence of habits of frugality upon national character: "The Danes were approaching, and one of the Swedish bishops asked how many men the province of Dalarna could furnish.
The following true piece of Scandinavian history clearly shows the impact of frugal habits on national character: "The Danes were coming, and one of the Swedish bishops asked how many men the province of Dalarna could provide."
"'At least twenty thousand,' was the reply; 'for the old men are just as strong and brave as the young ones.'
"'At least twenty thousand,' was the reply; 'because the older men are just as strong and brave as the younger ones.'"
"'But what do they live upon?'
"'But what do they survive on?'"
"'Upon bread and water. They take little account of hunger and thirst, and when corn is lacking, they make their bread out of tree bark.'
"'With just bread and water. They hardly think about hunger and thirst, and when there's no grain, they make their bread from tree bark.'"
"'Nay,' said the bishop, 'a people who eat tree bark and drink water, the devil himself could not vanquish!' and neither were they vanquished. Their progress was one series of triumphs, till they placed Gustavus Vasa on the throne of Sweden."
"'No,' said the bishop, 'a people who eat tree bark and drink water, even the devil himself couldn't defeat!' and they were not defeated. Their journey was filled with victories until they put Gustavus Vasa on the throne of Sweden."
The word biscuit embodies the process by which this form of bread was made from time immemorial down to within the last century. Bis (twice), and coctus (cooked), show that they were twice baked.
The word biscuit represents the method by which this type of bread has been made from ancient times until about a hundred years ago. Bis (twice) and coctus (cooked) indicate that they were baked twice.
Fragments of unfermented bread were discovered in the Swiss lake-dwellings, which belong to the Neolithic age.
Fragments of unfermented bread were found in the Swiss lake-dwellings that date back to the Neolithic age.
Fermented bread is seldom seen in Northern Europe and Asia except among the rich or the nobility. At one time, the captain of an English vessel requested a baker of Gottenburg to bake a large quantity of loaves of raised bread. The baker refused to undertake an order of such magnitude, saying it would be quite impossible to dispose of so much, until the captain agreed to take and pay for it all.
Fermented bread is rarely found in Northern Europe and Asia, except among the wealthy or the nobility. At one point, the captain of an English ship asked a baker in Gottenburg to make a large batch of raised bread. The baker declined to take on such a big order, saying it would be nearly impossible to sell that much until the captain agreed to take all of it and pay for it.
I made a study of the ancient and indispensable art of bread-making, consulting such authorities as offered, going back to the primitive days and first invention of the unleavened kind, and traveling gradually down in my studies through that accidental souring of the dough which it is supposed taught the leavening process, and through the various fermentations thereafter till I came to "good, sweet, wholesome bread,"—the staff of life. Leaven, which some deemed the soul of bread, the spiritus which fills its cellular tissues, which is religiously preserved like the vestal fire,—some precious bottleful, I suppose, brought over in the Mayflower, did the business for America, and its influence is still rising, swelling, spreading in cerulean billows over the land,—this seed I regularly and faithfully procured from the village, until one morning I forgot the rules and scalded my yeast; by which accident I discovered that even this was not indispensable, and I have gladly omitted it ever since. Neither did I put any soda or other acid or alkali into my bread. It would seem that I made it according to the recipe which Marcus Porcius Cato gave about two centuries before Christ: "Make kneaded bread thus: Wash your hands and trough well. Put the meal into the trough, add water gradually, and knead it thoroughly. When you have needed it well, mold it, and bake it under a cover," that is in a baking kettle.—Thoreau in Walden.
I studied the ancient and essential art of making bread, looking at various sources for guidance, tracing back to the early days and the first creation of unleavened bread, and gradually working my way through the accidental souring of dough that supposedly led to the leavening process, exploring different fermentations until I reached “good, sweet, wholesome bread”—the staff of life. Leaven, which some considered the soul of bread, the spiritus that fills its cellular structure, was carefully preserved like a sacred flame—perhaps some precious bottle brought over on the Mayflower, worked wonders for America, and its influence continues to rise, swell, and spread in blue waves across the land. I regularly and diligently obtained this yeast from the village, until one morning I forgot the rules and scalded my yeast; this accident taught me that it wasn’t essential after all, and I’ve happily left it out ever since. I also didn’t add any soda or other acids or alkalis to my bread. It seems that I made it based on the recipe that Marcus Porcius Cato provided about two centuries before Christ: “Make kneaded bread like this: Wash your hands and trough thoroughly. Put the flour in the trough, gradually add water, and knead it well. Once you’ve kneaded it sufficiently, shape it and bake it covered,” that is, in a baking pot.—Thoreau in Walden.

FRUITS
 f all the articles which enter the list of foods, none are more
wholesome and pleasing than the fruits which nature so abundantly
provides. Their delicate hues and perfect outlines appeal to our sense
of beauty, while their delicious flavors gratify our appetite. Our
markets are supplied with an almost unlimited variety of both native and
tropical fruits, and it might be supposed that they would always appear
upon the daily bill of fare; yet in the majority of homes this is rarely
the case. People are inclined to consider fruit, unless the product of
their own gardens, a luxury too expensive for common use. Many who use a
plentiful supply, never think of placing it upon their tables, unless
cooked. Ripe fruit is a most healthful article of diet when partaken of
at seasonable times; but to eat it, or any other food, between meals, is
a gross breach of the requirements of good digestion.
f all the articles which enter the list of foods, none are more
wholesome and pleasing than the fruits which nature so abundantly
provides. Their delicate hues and perfect outlines appeal to our sense
of beauty, while their delicious flavors gratify our appetite. Our
markets are supplied with an almost unlimited variety of both native and
tropical fruits, and it might be supposed that they would always appear
upon the daily bill of fare; yet in the majority of homes this is rarely
the case. People are inclined to consider fruit, unless the product of
their own gardens, a luxury too expensive for common use. Many who use a
plentiful supply, never think of placing it upon their tables, unless
cooked. Ripe fruit is a most healthful article of diet when partaken of
at seasonable times; but to eat it, or any other food, between meals, is
a gross breach of the requirements of good digestion.
Of all the foods available, none are as wholesome and enjoyable as the fruits that nature provides in abundance. Their vibrant colors and perfect shapes appeal to our sense of beauty, while their delightful flavors satisfy our cravings. Our markets offer an almost endless selection of both local and tropical fruits, and one might think they would always be part of our daily meals; however, in most homes, this is seldom the case. People often view fruit, unless it comes from their own gardens, as a luxury that's too expensive for everyday use. Many who enjoy plenty of fruit still don't consider serving it fresh at their meals unless it's cooked. Ripe fruit is a highly nutritious food when eaten at the right times; but eating it, or any food, between meals is a serious violation of good digestion guidelines.
Fruits contain from seventy-five to ninety-five per cent of water, and a meager proportion of nitrogenous matter; hence their value as nutrients, except in a few instances, is rather small; but they supply a variety of agreeable acids which refresh and give tone to the system, and their abundant and proper use does much to keep the vital machinery in good working order.
Fruits are made up of about seventy-five to ninety-five percent water and have a small amount of protein; therefore, their nutritional value is fairly low, except in a few cases. However, they provide a range of tasty acids that refresh and energize the body, and using them regularly helps keep our vital systems running smoothly.
Aside from the skin and seeds, all fruits consist essentially of two parts,—the cellulose structure containing the juice, and the juice itself. The latter is water, with a small proportion of fruit sugar (from one to twenty per cent in different varieties), and vegetable acids. These acids are either free, or combined with potash and lime in the form of acid salts. They are mallic, citric, tartaric, and pectic acids. The last-named is the jelly-producing principle.
Aside from the skin and seeds, all fruits are basically made up of two parts: the cellulose structure that holds the juice and the juice itself. The juice is mostly water, with a small amount of fruit sugar (ranging from one to twenty percent, depending on the variety), and vegetable acids. These acids can either be free or combined with potash and lime as acid salts. They include malic, citric, tartaric, and pectic acids. Pectic acid is the key component that produces jelly.
While the juice, as we commonly find it, is readily transformable for use in the system, the cellular structure of the fruit is not so easily digested. In some fruits, as the strawberry, grape, and banana, the cell walls are so delicate as to be easily broken up; but in watermelons, apples, and oranges, the cells are coarser, and form a larger bulk of the fruit, hence are less easily digested. As a rule, other points being equal, the fruits which yield the richest and largest quantity of juices, and also possess a cellular framework the least perceptible on mastication, are the most readily digested. A certain amount of waste matter is an advantage, to give bulk to our food; but persons with weak stomachs, who cannot eat certain kinds of fruit, are often able to digest the juice when taken alone.
While juice, as we usually find it, is easily processed in the body, the cell structure of the fruit is not as easily digested. In some fruits, like strawberries, grapes, and bananas, the cell walls are so delicate that they break down easily; but in watermelons, apples, and oranges, the cells are tougher and make up a larger part of the fruit, making them harder to digest. Generally, all else being equal, the fruits that produce the richest and largest amounts of juice, along with a cellular structure that is less noticeable when chewed, are digested more easily. Some waste matter is beneficial as it adds bulk to our food; however, people with sensitive stomachs, who can’t eat certain types of fruit, often find they can digest the juice on its own.
Unripe fruits differ from ripe fruits in that they contain, starch, which during ripening is changed into sugar, and generally some proportion of tannic acid, which gives them their astringency. The characteristic constituent of unripe fruit, however, is pectose, an element insoluble in water, but which, as maturation proceeds, is transformed into pectic and pectosic acids. These are soluble in boiling water, and upon cooling, yield gelatinous solutions. Their presence makes it possible to convert the juice of ripe fruits into jelly. Raw starch in any form is indigestible, hence unripe fruit should never be eaten uncooked. As fruit matures, the changes it undergoes are such as best fit for consumption and digestion. The following table shows the composition of the fruits in common use:—
Unripe fruits are different from ripe fruits because they contain starch, which turns into sugar as they ripen, and they usually have some amount of tannic acid, giving them an astringent taste. The main component of unripe fruit is pectose, which is insoluble in water but changes into pectic and pectosic acids during ripening. These acids dissolve in boiling water and form gelatinous solutions when cooled. This is what allows the juice of ripe fruits to be turned into jelly. Raw starch in any form is indigestible, so unripe fruit should never be eaten uncooked. As fruit ripens, it undergoes changes that make it more suitable for eating and digestion. The following table shows the composition of commonly used fruits:—
ANALYSIS.
| Water. | Albumen. | Sugar. | Free Acid. | Pectose. | Cellulose. | Mineral Matter. | |
| Apples | 83.0 | 0.4 | 6.8 | 1.0 | 5.2 | 3.2 | 0.4 |
| Pears | 84.0 | 0.3 | 7.0 | 0.1 | 4.6 | 3.7 | 0.3 |
| Peaches | 85.0 | 0.5 | 1.8 | 0.7 | 8.0 | 3.4 | 0.6 |
| Grapes | 80.0 | 0.7 | (Glucose.) 13.0 | (Tartaric.) 0.8 | 3.1 | 2.0 | 0.4 |
| Plums | 82.0 | 0.2 | 3.6 | 0.5 | 5.7 | X | 0.6 |
| Gooseberries | 86.0 | 0.4 | 7.0 | 1.5 | 1.9 | 2.7 | 0.5 |
| Strawberries | 87.6 | 0.5 | 4.5 | 1.3 | 0.1 | X | 0.6 |
| Raspberries | 86.+ | 0.5 | 4.7 | 1.3 | 1.7 | X | 0.4 |
| Currants | 85.2 | 0.4 | 6.4 | 1.8 | 0.2 | X | 0.5 |
| Blackberries | 86.4 | 0.5 | 4.4 | 1.1 | 1.4 | X | 0.4 |
| Cherries | 75.0 | 0.9 | 13.1 | 0.3 | 2.2 | X | 0.6 |
| Apricots | 85.0 | .08 | 1.0 | X | 5.9 | X | 0.8 |
| Oranges | 86.0 | [A] | 8 to 10 | X | X | X | X |
| Dates | 20.8 | 6.6 | 54.0 | (Fat.) 0.2 | 12.3 | 5.5 | 1.6 |
| Bananas | 73.9 | 4.8 | 19.7[B] | (Fat.) 0.6 | X | 0.2 | 0.8 |
| Turkey Figs | 17.5 | 6.1 | 57.5 | (Fat.) 0.9 | 8.4[C] | 7.3 | 2.3 |
[Table Note A: Small quantities of albumen, citric acid, citrate of potash, cellulose, etc.]
[Table Note A: Small amounts of egg white, citric acid, potassium citrate, cellulose, etc.]
[Table Note B: Sugar and pectose.]
[Table Note B: Sugar and pectin.]
[Table Note C: Starch, pectose, etc.]
[Table Note C: Starch, pectose, etc.]
There is a prevailing notion that the free use of fruits, especially in summer, excites derangement of the digestive organs. When such derangement occurs, it is far more likely to have been occasioned by the way in which the fruit was eaten than by the fruit itself. Perhaps it was taken as a surfeit dish at the end of a meal. It may have been eaten in combination with rich, oily foods, pastry, strong coffee, and other indigestible viands, which, in themselves, often excite an attack of indigestion. Possibly it was partaken of between meals, or late at night, with ice cream and other confections, or it was swallowed without sufficient mastication. Certainly, it is not marvelous that stomach and bowel disorders do result under such circumstances. The innocent fruit, like many other good things, being found in "bad company," is blamed accordingly. An excess of any food at meals or between meals, is likely to prove injurious, and fruits present no exception to this rule. Fruit taken at seasonable times and in suitable quantities, alone or in combination with proper foods, gives us one of the most agreeable and healthful articles of diet. Fruit, fats, and meats do not affiliate, and they are liable to create a disturbance whenever taken together.
There's a common belief that eating fruits, especially in the summer, disrupts the digestive system. When such disruption happens, it’s usually more about how the fruit was consumed than the fruit itself. Maybe it was eaten as a dessert after a meal or combined with rich, greasy foods, pastries, strong coffee, and other heavy dishes that often cause indigestion on their own. It could have been eaten between meals or late at night with ice cream and sweets, or simply swallowed without enough chewing. It's not surprising that stomach and bowel issues arise in these situations. The innocent fruit, like many other good things, gets blamed when it's found in "bad company." Overindulging in any food, whether at meals or in between, can be harmful, and fruits are no exception. When eaten at the right times and in appropriate amounts, either on their own or with suitable foods, fruit is one of the most enjoyable and healthy parts of our diet. Fruits, fats, and meats don’t mix well and can cause discomfort when consumed together.
Partially decayed, stale, and over-ripe, as well as unripe fruit, should never be eaten. According to M. Pasteur, the French scientist, all fruits and vegetables, when undergoing even incipient decay, contain numerous germs, which, introduced into the system, are liable to produce disturbances or disease. Perfectly fresh, ripe fruit, with proper limitations as to quantity and occasion, may be taken into a normal stomach with impunity at any season.
Partially decayed, stale, and overripe, as well as unripe fruit, should never be eaten. According to M. Pasteur, the French scientist, all fruits and vegetables, even when they show the first signs of decay, contain many germs that can cause disturbances or disease when introduced into the body. Perfectly fresh, ripe fruit, when consumed in moderation and on the right occasions, can be safely eaten in a normal stomach at any time of year.
It is especially important that all fruits to be eaten should not only be sound in quality, but should be made perfectly clean by washing if necessary, since fruit grown near the ground is liable to be covered with dangerous bacteria (such as cause typhoid fever or diphtheria), which exist in the soil or in the material used in fertilizing it.
It is especially important that all fruits meant for eating are not only of good quality but also thoroughly washed when necessary, as fruit grown close to the ground can be covered with harmful bacteria (like those that cause typhoid fever or diphtheria) that are present in the soil or in the fertilizer used.
Most fruits, properly used, aid digestion either directly or indirectly. The juicy ones act as dilutents, and their free use lessens the desire for alcohol and other stimulants. According to German analysts, the apple contains a larger percentage of phosphorus than any other fruit, or than any vegetable. In warm weather and in warm climates, when foods are not needed for a heat-producing purpose, the diet may well consist largely of fruits and succulent vegetables, eaten in combination with bread and grains. In case of liver and kidney affections, rheumatism, and gout, the use of fruit is considered very beneficial by many scientific authorities.
Most fruits, when used properly, help digestion either directly or indirectly. Juicy fruits act as diluents, and consuming them often reduces the need for alcohol and other stimulants. According to German researchers, apples have a higher percentage of phosphorus than any other fruit or vegetable. In warm weather and climates, when the body doesn’t need as much heat-producing food, a diet consisting mainly of fruits and fresh vegetables, eaten alongside bread and grains, is quite suitable. For conditions like liver and kidney issues, rheumatism, and gout, many scientific experts believe that eating fruit is very beneficial.
To serve its best purpose, raw fruit should be eaten without sugar or other condiments, or with the addition of as small a quantity as possible.
To get the most benefits from raw fruit, it should be eaten without sugar or other toppings, or with just a tiny amount added.
It is a disputed question whether fruits should begin or end the meal; but it is generally conceded by those who have given the matter attention, that fruit eaten at the beginning of a meal is itself the more readily digested, and aids in the digestion of other foods, since fruits, like soups, have the property of stimulating the flow of the digestive juices. Something, however, must depend upon the character of the fruit; oranges, melons, and like juicy fruits, are especially useful as appetizers to begin the meal, while bananas and similar fruits agree better if taken with other food, so as to secure thorough mixture with saliva. This is true of all fruits, except such pulpy fruits as strawberries, peaches, melons, grapes, and oranges. It is often erroneously asserted that fruit as dessert is injurious to digestion. For those people, however, who regulate their bill of fare in accordance with the principles of hygiene, a simple course of fruit is not only wholesome, but is all that is needed after a dinner; and much time, labor, and health will be saved when housekeepers are content to serve desserts which nature supplies all ready for use, instead of those harmful combinations in the preparing of which they spend hours of tiresome toil.
It's a debated topic whether fruits should start or finish a meal; however, most experts agree that eating fruit at the start of a meal is easier to digest and helps digest other foods because fruits, like soups, stimulate the production of digestive juices. That said, the type of fruit does matter; juicy fruits like oranges and melons are particularly good as appetizers to kick off the meal, while bananas and similar fruits are better consumed with other foods to ensure they mix well with saliva. This applies to all fruits, except for juicy ones like strawberries, peaches, melons, grapes, and oranges. It's a common misconception that having fruit for dessert is bad for digestion. For those who follow healthy eating principles, a straightforward serving of fruit after dinner is not only healthy but is all that is needed; it also saves time, effort, and health when cooks choose to serve desserts that nature has readily prepared instead of spending hours on unhealthy combinations.
Description.—For convenience, fruits may be grouped together; as, pomaceous fruits, including the apple, quince, pear, etc.; the drupaceous fruits, those provided with a hard stone surrounded by a fleshy pulp, as the peach, apricot, plum, cherry, olive, and date; the orange or citron group, including the orange, lemon, lime, citron, grape fruit, shaddock, and pomegranate; the baccate or berry kind, comprising the grape, gooseberry, currant, cranberry, whortleberry, blueberry, and others; the arterio group, to which belong raspberries, strawberries, dewberries, and blackberries; the fig group; the gourd group, including—melons and cantaloupes; and foreign fruits.
Description.—For convenience, fruits can be categorized; for example, pomaceous fruits like apples, quinces, and pears; drupaceous fruits, which have a hard stone surrounded by fleshy pulp, such as peaches, apricots, plums, cherries, olives, and dates; the orange or citron group, which includes oranges, lemons, limes, citrons, grapefruits, shaddocks, and pomegranates; the baccate or berry type, featuring grapes, gooseberries, currants, cranberries, whortleberries, blueberries, and others; the arterio group, which includes raspberries, strawberries, dewberries, and blackberries; the fig group; the gourd group, encompassing melons and cantaloupes; and exotic fruits.
It is impossible, in the brief scope of this work, to enumerate the infinite varieties of fruit; but we will briefly speak of some of the most common found in the gardens and markets of this latitude.
It’s not possible, in the limited scope of this work, to list all the endless types of fruit; but we will briefly discuss some of the most common ones found in the gardens and markets in this area.
We find the apple mentioned in the mythologies of the Greeks, Druids, and Scandinavians. The Thebans offered apples instead of sheep as a sacrifice to Hercules, a custom derived from the following circumstance:—
We find the apple referenced in the mythologies of the Greeks, Druids, and Scandinavians. The Thebans offered apples instead of sheep as a sacrifice to Hercules, a custom that originated from the following circumstance:—
"At one time, when a sacrifice was necessary, the river Asopus had so inundated the country that it was impossible to take a sheep across it for the purpose, when some youths, recollecting that the Greek word melon signified both sheep and an apple, stuck wooden pegs into the fruit to represent legs, and brought this vegetable quadruped as a substitute for the usual offering. After this date, the apple was considered as especially devoted to Hercules."
"At one point, when a sacrifice was needed, the Asopus River had flooded the area so much that it was impossible to get a sheep across for that purpose. Some young men, remembering that the Greek word melon meant both sheep and apple, inserted wooden pegs into the fruit to represent legs and brought this fruit animal as a replacement for the usual offering. After that, the apple became especially associated with Hercules."
In ancient times, Greece produced most excellent apples. They were the favorite dessert of Phillip of Macedon and Alexander the Great, the latter causing them to be served at all meals. Doubtless they came to be used to excess; for it is recorded of the Athenian lawgiver, Solon, that he made a decree prohibiting a bridegroom from partaking of more than one at his marriage banquet, a law which was zealously kept by the Greeks, and finally adopted by the Persians. In Homer's time the apple was regarded as one of the precious fruits. It was extensively cultivated by the Romans, who gave to new varieties the names of many eminent citizens, and after the conquest of Gaul, introduced its culture into Southwestern Europe, whence it has come to be widely diffused throughout all parts of the temperate zone.
In ancient times, Greece produced exceptional apples. They were the favorite dessert of Philip of Macedon and Alexander the Great, the latter ensuring they were served at every meal. It’s likely they were consumed excessively; it's recorded that the Athenian lawmaker Solon made a rule preventing a groom from having more than one apple at his wedding feast, a law that was strictly followed by the Greeks and eventually adopted by the Persians. In Homer's era, the apple was considered one of the valuable fruits. It was widely cultivated by the Romans, who named new varieties after many notable citizens, and after conquering Gaul, they introduced its cultivation into Southwestern Europe, from where it spread widely across all temperate regions.
Apples were introduced into the United States by the early settlers, and the first trees were planted on an island in Boston Harbor, which still retains the name of Apple Island. The wild crab tree is the parent of most of the cultivated varieties.
Apples were brought to the United States by the early settlers, and the first trees were planted on an island in Boston Harbor, which still goes by the name of Apple Island. The wild crab apple tree is the ancestor of most of the cultivated varieties.
The Pear.—The origin of the pear, like that of the apple, is shrouded in obscurity, though Egypt, Greece, and Palestine dispute for the honor of having given birth to the tree which bears this prince of fruits. Theophrastus, a Greek philosopher of the fourth century, speaks of the pear in terms of highest praise; and Galen, the father of medical science, mentions the pear in his writings as possessing "qualities which benefit the stomach." The pear tree is one of the most hardy of all fruit trees, and has been known to live several hundred years.
The Pear.—The origin of the pear, like that of the apple, is unclear, though Egypt, Greece, and Palestine all claim to be the birthplace of the tree that produces this royal fruit. Theophrastus, a Greek philosopher from the fourth century, speaks of the pear with high praise, and Galen, the father of medical science, refers to the pear in his writings as having "qualities that benefit the stomach." The pear tree is one of the hardiest of all fruit trees and can live for several hundred years.
The Quince.—This fruit appears to have been a native of Crete, from whence it was introduced into ancient Greece; and was largely cultivated by both Greeks and Romans. In Persia, the fruit is edible in its raw state; but in this country it never ripens sufficiently to be palatable without being cooked. The fruit is highly fragrant and exceedingly acid, and for these reasons it is largely employed to flavor other fruits.
The Quince.—This fruit seems to have originated in Crete, from where it was brought to ancient Greece; it was extensively grown by both the Greeks and Romans. In Persia, the fruit can be eaten raw; however, in this region, it never ripens enough to be enjoyable unless cooked. The fruit has a strong aroma and is very tart, which is why it is often used to add flavor to other fruits.
The Peach.—This fruit, as its botanical name, prinus Persica, indicates, is a native of Persia, and was brought from that country to Greece, from whence it passed into Italy. It is frequently mentioned by ancient writers, and was regarded with much esteem by the people of Asia. The Romans, however, had the singular notion that peaches gathered in Persia contained a deadly poison, but if once transplanted to another soil, this injurious effect was lost. In composition, the peach is notable for the small quantity of saccharine matter it contains in comparison with other fruits.
The Peach.—This fruit, as its botanical name, prinus Persica, suggests, is originally from Persia and was brought from there to Greece, then moved on to Italy. It’s often mentioned by ancient writers and was highly valued by people in Asia. However, the Romans had a strange belief that peaches picked in Persia were poisonous, but that this harmful effect disappeared if they were planted in another location. In terms of composition, the peach stands out for having a low amount of sugar compared to other fruits.
The Plum.—The plum is one of the earliest of known fruits. Thebes, Memphis, and Damascus were noted for the great number of their plum trees in the early centuries. Plum trees grow wild in Asia, America, and the South of Europe, and from these a large variety of domestic plum fruits have been cultivated.
Plums are more liable than most other fruits to produce disorders of digestion, and when eaten raw should be carefully selected, that they be neither unripe nor unripe. Cooking renders them less objectionable.
Plums are more likely than most other fruits to cause digestive issues, and when eaten raw, they should be carefully chosen to ensure they are neither unripe nor overripe. Cooking them makes them easier to digest.
The Apricot.—This fruit seems to be intermediate between the peach and the plum, resembling the former externally, while the stone is like that of the plum. The apricot originated in Armenia, and the tree which bears the fruit was termed by the Romans "the tree of Armenia." It was introduced into England in the time of Henry VIII. The apricot is cultivated to some extent in the United States, but it requires too much care to permit of its being largely grown, except in certain sections.
The Apricot.—This fruit is kind of a mix between the peach and the plum, looking like the peach on the outside, but having a stone similar to that of the plum. The apricot came from Armenia, and the Romans called the tree that produces it "the tree of Armenia." It was brought to England during the reign of Henry VIII. The apricot is grown in some parts of the United States, but it demands a lot of care, so it can't be widely cultivated except in certain areas.
The Cherry.—The common garden cherry is supposed to have been derived from the two species of wild fruit, and historians tell us that we are indebted to the agricultural experiments of Mithridates, the great king of ancient Pontus, for this much esteemed fruit. It is a native of Asia Minor, and its birthplace.
The Cherry.—The common garden cherry is believed to have come from two species of wild fruit, and historians say we owe its existence to the agricultural experiments of Mithridates, the great king of ancient Pontus, for this highly regarded fruit. It originates from Asia Minor, which is its birthplace.
The Olive.—From time immemorial the olive has been associated with history. The Scriptures make frequent reference to it, and its cultivation was considered of first importance among the Jews, who used its oil for culinary and a great variety of other purposes. Ancient mythology venerated the olive tree above all others, and invested it with many charming bits of fiction. Grecian poets sang its praises, and early Roman writers speak of it with high esteem. In appearance and size the fruit is much like the plum; when ripe, it is very dark green, almost black, and possesses a strong, and, to many people, disagreeable flavor. The pulp abounds in a bland oil, for the production of which it is extensively cultivated in Syria, Egypt, Italy, Spain, and Southern France. The fruit itself is also pickled and preserved in various ways, but, like all other similar commodities when thus prepared, it is by no means a wholesome article of food.
The Olive.—The olive has been linked to history for as long as we can remember. It’s frequently mentioned in the Scriptures, and its farming was considered very important among the Jews, who used its oil for cooking and many other uses. Ancient mythology held the olive tree in high regard, weaving it into many delightful stories. Greek poets celebrated it, and early Roman writers spoke of it with great respect. The fruit looks and feels similar to a plum; when it's ripe, it turns very dark green, almost black, and has a strong flavor that many find unappealing. The flesh is rich in mild oil, and it’s extensively grown in Syria, Egypt, Italy, Spain, and Southern France. The fruit can also be pickled and preserved in various ways, but like other similar products prepared this way, it's not really considered a healthy food choice.
The Date.—The date is the fruit of the palm tree so often mentioned in the Sacred Writings, and is indigenous to Africa and portions of Asia. The fruit grows in bunches which often weigh from twenty to twenty-five pounds, and a single tree will bear from one to three thousand pounds in a season. The date is very sweet and nutritious. It forms a stable article of diet for the inhabitants of some parts of Egypt, Arabia, and Persia, and frequently forms the chief food of their horses, dogs, and camels. The Arabs reduce dried dates to a meal, and make therefrom a bread, which often constitutes their sole food on long journeys through the Great Desert. The inhabitants of the countries where the date tree flourishes, put its various productions to innumerable uses. From its leaves they make baskets, bags, mats, combs, and brushes; from its stalks, fences for their gardens; from its fibers, thread, rope, and rigging; from its sap, a spirituous liquor; from its fruit, food for man and beast; while the body of the tree furnishes them with fuel. The prepared fruit is largely imported to this country. That which is large, smooth, and of a soft reddish yellow tinge, with a whitish membrane between the flesh and stone, is considered the best.
The Date.—The date is the fruit of the palm tree often mentioned in the Sacred Writings, and it is native to Africa and parts of Asia. The fruit grows in bunches that usually weigh between twenty and twenty-five pounds, and a single tree can produce up to three thousand pounds in a season. Dates are very sweet and nutritious. They are a staple food for people in certain regions of Egypt, Arabia, and Persia, and they often serve as the main food for their horses, dogs, and camels. The Arabs grind dried dates into a flour and make a bread from it, which frequently becomes their only food during long journeys through the Great Desert. The people in the areas where the date tree grows utilize its various products in countless ways. They make baskets, bags, mats, combs, and brushes from its leaves; fences for their gardens from its stalks; thread, rope, and rigging from its fibers; a fermented drink from its sap; food for both humans and animals from its fruit; while the trunk of the tree provides them with fuel. The processed fruit is widely imported to this country. The ones that are large, smooth, soft, and have a reddish-yellow color with a whitish membrane between the flesh and the pit are considered the best.
The Orange.—According to some authors, the far-famed "golden fruit of the Hesperides," which Hercules stole, was the orange; but it seems highly improbable that it was known to writers of antiquity. It is supposed to be indigenous to Central and Eastern Asia. Whatever its nativity, it has now spread over all the warmer regions of the earth. The orange tree is very hardy in its own habitat, and is one of the most prolific of all fruit-bearing trees, a single tree having been known to produce twenty thousand good oranges in a season. Orange trees attain great age. There are those in Italy and Spain which are known to have flourished for six hundred years. Numerous varieties of the orange are grown, and are imported to our markets from every part of the globe. Florida oranges are among the best, and when obtained in their perfection, are the most luscious of all fruits.
The Orange.—Some authors claim that the famous "golden fruit of the Hesperides," which Hercules stole, was the orange; however, it's very unlikely that it was known to ancient writers. It’s thought to be native to Central and Eastern Asia. Regardless of its origins, it has now spread to all the warmer regions of the world. The orange tree is quite resilient in its natural environment and is one of the most productive fruit-bearing trees, with a single tree known to produce up to twenty thousand good oranges in a season. Orange trees can live for a long time. There are some in Italy and Spain that have been thriving for six hundred years. Many varieties of oranges are grown and are imported to our markets from all over the world. Florida oranges are among the best, and when they're at their peak, they are the most delicious of all fruits.
The Lemon.—This fruit is supposed to be a native of the North of India, although it is grown in nearly all sub-tropical climates. In general, the fruit is very acid, but in a variety known as the sweet lemon, or bergamot (said to be a hybrid of the orange and lemon), the juice is sweet. The sour lemon is highly valued for its antiscorbutic properties, and is largely employed as a flavoring ingredient in culinary preparations, and in making a popular refreshing beverage.
The Lemon.—This fruit is believed to have originated in Northern India, although it’s cultivated in almost all subtropical climates. Generally, the fruit is quite sour, but there’s a type known as the sweet lemon or bergamot (thought to be a hybrid of the orange and lemon), which has sweet juice. The sour lemon is highly valued for its vitamin C content and is widely used as a flavoring in cooking and in making a popular refreshing drink.
The Citron.—The citron is a fruit very similar to the lemon, though larger in size and less succulent. It is supposed to be identical with the Hebrew tappuach, and to be the fruit which is mentioned in the English version of the Old Testament as "apple." The citron is not suitable for eating in its raw state, though its juice is used in connection with water and sugar to form an excellent acid drink. Its rind, which is very thick, with a warty and furrowed exterior, is prepared in sugar and largely used for flavoring purposes.
The Citron.—The citron is a fruit that looks a lot like a lemon, but it's bigger and less juicy. It's thought to be the same as the Hebrew tappuach, and it's the fruit referred to as "apple" in the English version of the Old Testament. The citron isn't really meant to be eaten raw, but its juice can be mixed with water and sugar to make a delicious sour drink. Its thick rind, which has a bumpy and ridged surface, is candied and commonly used for flavoring.
The Lime.—The fruit of the lime is similar to the lemon, though much smaller in size. It is a native of Eastern Asia, but has long been cultivated in the South of Europe and other sub-tropical countries. The fruit is seldom used except for making acidulous drinks, for which it is often given the preference over the lemon.
The Lime.—The lime is a fruit that's similar to the lemon, but it's much smaller. It originally comes from Eastern Asia, but it's been grown for a long time in Southern Europe and other subtropical regions. People usually only use the fruit for making tangy drinks, and often prefer it to the lemon for this purpose.
The Grape Fruit.—This fruit, a variety of shaddock, belongs to the great citrus family, of which there are one hundred and sixty-nine known varieties. The shaddock proper, however, is a much larger fruit, frequently weighing from ten to fourteen pounds. Although a certain quantity of grape fruit is brought from the West Indies, our principal supply is derived from Florida. It is from two to four times the size of an ordinary orange, and grows in clusters. It is rapidly gaining in favor with fruit lovers. Its juice has a moderately acid taste and makes a pleasing beverage. The pulp, carefully separated, is also much esteemed.
The Grape Fruit.—This fruit, a type of shaddock, is part of the large citrus family, which has one hundred and sixty-nine known varieties. The shaddock itself, however, is a much larger fruit, often weighing between ten and fourteen pounds. While some grape fruit comes from the West Indies, the majority of our supply is sourced from Florida. It's two to four times bigger than a regular orange and grows in clusters. It's quickly becoming popular among fruit enthusiasts. Its juice has a moderately tart flavor and makes a refreshing drink. The pulp, when separated, is also highly valued.
The Pomegranate.—This fruit has been cultivated in Asia from earliest antiquity, and is still quite generally grown in most tropical climes. In the Scriptures it is mentioned with the vine, fig, and olive, among the pleasant fruits of the promised land. It is about the size of a large peach, of a fine golden color, with a rosy tinge on one side. The rind is thick and leathery. The central portion is composed of little globules of pulp and seeds inclosed in a thin membrane, each seed being about the size of a red currant. It is sub-acid, and slightly bitter in taste. The rind is strongly astringent, and often used as a medicine.
The Pomegranate.—This fruit has been grown in Asia since ancient times and is still widely cultivated in many tropical regions. In the Scriptures, it is mentioned alongside the vine, fig, and olive as one of the delightful fruits of the promised land. It's about the size of a large peach, with a beautiful golden color and a rosy hue on one side. The skin is thick and leathery. Inside, it contains little bubbles of pulp and seeds surrounded by a thin membrane, with each seed roughly the size of a red currant. The taste is somewhat sour and slightly bitter. The skin is very astringent and is often used in medicine.
The Grape.—Undoubtedly the grape was one of the first fruits eaten by mankind, and one highly valued from antiquity down to the present time. Although this fruit is often sadly perverted in the manufacture of wine, when rightly used it is one of the most excellent of all fruits. The skins and seeds are indigestible and should be rejected, but the fresh, juicy pulp is particularly wholesome and refreshing. Several hundred varieties of the grape are cultivated. Some particularly sweet varieties are made into raisins, by exposure to the sun or to artificial heat. Sun-dried grapes make the best raisins. The so-called English or Zante currant belongs to the grape family, and is the dried fruit of a vine which grows in the Ionian Islands and yields a very small berry. The name currant, as applied to these fruits, is a corruption of the word Corinth, where the fruit was formerly grown.
The Grape.—Without a doubt, the grape was one of the first fruits consumed by humans and has been highly valued from ancient times to today. Although this fruit is often misused in the production of wine, when used properly, it is one of the best fruits available. The skins and seeds are hard to digest and should be discarded, but the fresh, juicy flesh is especially healthy and refreshing. There are several hundred varieties of grapes grown. Some particularly sweet varieties are turned into raisins by being dried in the sun or with artificial heat. Sun-dried grapes produce the best raisins. The so-called English or Zante currant is part of the grape family, and it's the dried fruit of a vine that grows in the Ionian Islands, producing very small berries. The name currant is actually a variation of the word Corinth, where this fruit was once cultivated.
The Gooseberry.—The gooseberry probably derives its name from gorse or goss, a prickly shrub that grows wild in thickets and on hillsides in Europe, Asia, and America. It was known to the ancients, and is mentioned in the writings of Theocritus and Pliny. Gooseberries were a favorite dish with some of the emperors, and were extensively cultivated in gardens during the Middle Ages. The gooseberry is a wholesome and agreeable fruit, and by cultivation may be brought to a high state of perfection in size and flavor.
The Gooseberry.—The gooseberry likely gets its name from gorse or goss, a spiky shrub that grows wild in thickets and on hillsides across Europe, Asia, and America. It was known to ancient cultures, as mentioned in the writings of Theocritus and Pliny. Gooseberries were a popular dish among some emperors and were widely grown in gardens during the Middle Ages. The gooseberry is a healthy and tasty fruit, and with proper cultivation, it can be developed to a high level of size and flavor.
The Currant.—This fruit derives its name from its resemblance to the small grapes of Corinth, sometimes called Corinthus, and is indigenous to America, Asia, and Europe. The fruit is sharply acid, though very pleasant to the taste. Cultivation has produced white currants from the red, and in a distinct species of the fruit grown in Northern Europe and Russia, the currants are black or yellow.
The Currant.—This fruit gets its name from looking like the small grapes of Corinth, also known as Corinthus, and it originates from America, Asia, and Europe. The fruit has a tangy taste but is quite enjoyable. Cultivation has led to the development of white currants from the red ones, and in a distinct species that grows in Northern Europe and Russia, the currants can be black or yellow.
The Whortleberry and Blueberry.—These are both species of the same fruit, which grows in woods and waste places in the North of Europe and America. Of the latter species there are two varieties, the high-bush and the low-bush, which are equally palatable. The fruit is very sweet and pleasant to the taste, and is one of the most wholesome of all berries.
The Whortleberry and Blueberry.—These are two types of the same fruit that grow in forests and neglected areas in Northern Europe and America. There are two varieties of the latter species: the high-bush and the low-bush, both of which taste great. The fruit is very sweet and enjoyable, making it one of the healthiest berries around.
The Cranberry.—A German writer of note insists that the original name of this fruit was cram-berry, because after dinner, when one was filled with other food, such was its pleasant and seductive flavor that he could still "cram" quite a quantity thereof, in defiance of all dietetic laws. Other writers consider the name a corruption of craneberry, so called because it is eagerly sought after by the cranes and other birds which frequent the swamps and marshes where it chiefly grows. The fruit is extremely acid, and is highly valued for sauces and jellies. Cranberries are among the most convenient fruits for keeping. Freezing does not seem to hurt them, and they may be kept frozen all winter, or in water without freezing, in the cellar, or other cool places, for a long period.
The Cranberry.—A well-known German writer claims that the original name of this fruit was cram-berry, because after dinner, when someone was full from other foods, its delightful and tempting flavor made it possible to still "cram" in quite a bit, going against all dietary rules. Other writers think the name is a mispronunciation of craneberry, named because cranes and other birds that inhabit the swamps and marshes where it mostly grows eagerly seek it out. The fruit is very tart and is highly valued for sauces and jellies. Cranberries are among the easiest fruits to store. Freezing doesn’t seem to damage them, and they can be kept frozen all winter, or in water without freezing, in the cellar or other cool spots, for a long time.
The Strawberry.—The flavor of antiquity rests upon the wild strawberry. Its fruit was peddled by itinerant dealers about the streets of ancient Grecian and Roman cities. Virgil sings of it in pastoral poems, and Ovid mentions it in words of praise. The name by which the fruit was known to the Greeks indicates its size; with the Latins its name was symbolic of its perfume. The name strawberry probably came from the old Saxon streawberige, either from some resemblance of the stems to straw, of from the fact that the berries have the appearance when growing of being strewn upon the ground. In olden times, children strung the berries upon straws, and sold so many "straws of berries" for a penny, from which fact it is possible the name may have been derived. The strawberry is indigenous to the temperate regions of both the Eastern and Western Hemispheres, but it seems to have been matured in gardens, only within the last two centuries.
The Strawberry.—The taste of the wild strawberry carries a sense of history. Its fruit was sold by street vendors in ancient Greek and Roman cities. Virgil praises it in his pastoral poems, and Ovid applauds it in his writings. The name the Greeks used for the fruit reflects its size, while the Latins associated its name with its fragrance. The name strawberry likely comes from the old Saxon streawberige, which could refer to the stems resembling straw or to the way the berries seem to be scattered on the ground when they grow. In the past, children would thread the berries onto straws and sell them as "straws of berries" for a penny, which may be where the name originated. The strawberry is native to the temperate areas of both the Eastern and Western Hemispheres, but it seems to have only been cultivated in gardens in the last two centuries.
The Raspberry.—This fruit grows in both a wild and a cultivated state. It derives its name from the rough rasps or spines with which the bushes are covered. Among the ancients it was called "the bramble of Mt. Ida," because it was abundant upon that mountain. It is a hardy fruit, found in most parts of the world, and is of two special varieties, the black and the red.
The Raspberry.—This fruit grows in both wild and cultivated forms. It gets its name from the rough spines that cover the bushes. In ancient times, it was referred to as "the bramble of Mt. Ida" because it was plentiful on that mountain. It’s a hardy fruit found in many parts of the world, existing in two main varieties: black and red.
The Mulberry.—Different varieties of the mulberry tree produce white, red, and black mulberries of fine aromatic flavor, and acidulous or sweet taste. Persia is supposed to be the native home of this fruit, from whence it was carried, at an early date, to Asia Minor and to Greece. The Hebrews were evidently well acquainted with it. It was also cultivated by the farmers of Attica and Peloponnesus. The ancient mulberry was considered the wisest and most prudent of trees, because it took care not to put forth the smallest bud until the cold of winter had disappeared, not to return. Then, however, it lost no time, but budded and blossomed in a day. Several varieties are found in the United States.
The Mulberry.—Different types of mulberry trees produce white, red, and black mulberries that have a pleasant aroma and can taste acidic or sweet. It's believed that this fruit originates from Persia and was introduced to Asia Minor and Greece at an early date. The Hebrews were clearly familiar with it, and it was also grown by farmers in Attica and Peloponnesus. The ancient mulberry tree was thought to be the wisest and most careful of trees because it wouldn't produce any buds until winter was completely gone. Once it did, though, it quickly budded and bloomed within a day. Several varieties can be found in the United States.
The Fig.—In the most ancient histories, the fig tree is referred to as among the most desirable productions of the earth. It was the only tree in the garden of Eden of which the Sacred Writings make particular mention. Among the inhabitants of ancient Syria and Greece, it formed one of the principal articles of food. Its cultivation was, and is still, extensively carried on in nearly all Eastern countries; also in Spain, Southern France, and some portions of the United States. The fruit is pear-shaped, and consists of a pulpy mass full of little seeds. Dried and compressed figs are largely imported, and are to be found in all markets. Those brought from Smyrna are reputed to be the best.
The Fig.—In the oldest histories, the fig tree is mentioned as one of the most sought-after products of the earth. It was the only tree in the Garden of Eden specifically mentioned in the Scriptures. For the people of ancient Syria and Greece, it was a key food source. Its cultivation has been, and continues to be, widely practiced in almost all Eastern countries, as well as in Spain, Southern France, and some areas of the United States. The fruit is shaped like a pear and consists of a pulpy mass filled with tiny seeds. Dried and compressed figs are widely imported and can be found in all markets, with those from Smyrna being regarded as the best.
The Banana.—This is essentially a tropical fruit growing very generally in the East, the West Indies, South American countries, and some of the Southern States. The plant is an annual, sending up stems to the height of ten or fifteen feet, while drooping from the top are enormous leaves three or four feet in length, and looking, as one writer has aptly said, like "great, green quill pens." It is planted in fields like corn, which in its young growth it much resembles. Each plant produces a single cluster of from eighty to one hundred or more bananas, often weighing in the aggregate as high as seventy pounds. The banana is exceedingly productive. According to Humboldt, a space of 1,000 feet, which will yield only 38 pounds of wheat, or 462 pounds of potatoes, will produce 4,000 pounds of bananas, and in a much shorter period of time. It is more nutritious than the majority of fruits, and in tropical countries is highly valued as a food, affording in some localities the chief alimentary support of the people. Its great importance as a food product is shown by the fact that three or four good sized bananas are equal in nutritive value to a pound of bread. The amount of albumen contained in a pound of bananas is about the same as that found in a pound of rice, and the total nutritive value of one pound of bananas is only a trifle less than that of an equal quantity of the best beefsteak.
The Banana.—This is basically a tropical fruit that grows widely in the East, the West Indies, South American countries, and some Southern States. The plant is an annual, reaching heights of ten to fifteen feet, with huge leaves that are three or four feet long, resembling, as one writer has famously described, "great, green quill pens." It is cultivated in fields like corn, which it closely resembles in its early growth. Each plant produces a single bunch of eighty to one hundred or more bananas, often weighing up to seventy pounds in total. The banana is incredibly productive. According to Humboldt, an area of 1,000 feet that yields only 38 pounds of wheat or 462 pounds of potatoes can produce 4,000 pounds of bananas, and in a much shorter time. It is more nutritious than most fruits and is highly valued as a food source in tropical countries, providing the main dietary support for the people in some regions. Its importance as a food product is highlighted by the fact that three or four decent-sized bananas have the same nutritional value as a pound of bread. The amount of protein in a pound of bananas is similar to that found in a pound of rice, and the overall nutritional value of one pound of bananas is only slightly less than that of an equal amount of the best beefsteak.
The unripe fruit, which contains a considerable percentage of starch, is often dried in the oven and eaten as bread, which, in this state, it considerably resembles in taste and appearance. Thus prepared, it may be kept for a long time, and is very serviceable for use on long journeys. The variety of the banana thus used is, however, a much larger kind than any of those ordinarily found in our Northern markets, and is known as the plantain. The dried plantain, powdered, furnishes a meal of fragrant odor and bland taste, not unlike common wheat flour. It is said to be easy of digestion, and two pounds of the dry meal or six pounds of the fruit is the daily allowance for a laborer in tropical America.
The unripe fruit, which has a high starch content, is often dried in the oven and eaten like bread, resembling it quite a bit in taste and appearance. When prepared this way, it can be stored for a long time and is very useful for long journeys. The type of banana used in this way is much larger than the ones usually found in our Northern markets and is called the plantain. The dried plantain, when powdered, provides a meal with a pleasant aroma and mild flavor, similar to regular wheat flour. It is said to be easy to digest, and a laborer in tropical America typically consumes two pounds of the dry meal or six pounds of the fruit daily.
The Pineapple.—This delicious fruit is a native of South America, where it grows wild in the forests. It is cultivated largely in tropical America, the West Indies, and some portions of Europe. The fruit grows singly from the center of a small plant having fifteen or more long, narrow, serrated, ridged, sharp-pointed leaves, seemingly growing from the root. In general appearance it resembles the century plant, though so much smaller that twelve thousand pineapple plants may be grown on one acre. From the fibers of the leaves is made a costly and valuable fabric called pina muslin.
The Pineapple.—This tasty fruit is originally from South America, where it grows wild in the forests. It's mostly grown in tropical America, the West Indies, and some parts of Europe. The fruit develops individually from the center of a small plant that has fifteen or more long, narrow, serrated, ridged, sharp-pointed leaves that seem to sprout from the root. In general, it looks like a century plant, but it's much smaller, allowing for up to twelve thousand pineapple plants to be grown on one acre. From the fibers of the leaves, a costly and valuable fabric called pina muslin is made.
Nothing can surpass the rich, delicate flavor of the wild pineapple as found in its native habitat. It is in every way quite equal to the best cultivated variety. The most excellent pineapples are imported from the West Indies, but are seldom found in perfection in out Northern markets.
Nothing can beat the rich, delicate flavor of wild pineapple in its natural environment. It truly matches the best cultivated varieties in every way. The finest pineapples come from the West Indies, but they're rarely found in perfect condition in our Northern markets.
FRESH FRUIT FOR THE TABLE.
All fruit for serving should be perfectly ripe and sound. Immature fruit is never wholesome, and owing to the large percentage of water in its composition, fruit is very prone to change; hence over-ripe fruit should not be eaten, as it is liable to ferment and decompose in the digestive tract.
All fruit served should be perfectly ripe and in good condition. Underripe fruit is never healthy, and because it has a high water content, fruit can spoil quickly; therefore, overripe fruit should not be eaten, as it can ferment and rot in the digestive system.
Fruit which has begun, however slightly, to decay, should be rejected. Juice circulates through its tissues in much the same manner as the blood circulates through animal tissues, though not so rapidly and freely. The circulation is sufficient, however, to convey to all parts the products of decomposition, when only a small portion has undergone decay, and although serious results do not always follow the use of such fruit, it certainly is not first-class food.
Fruit that has started to decay, even just a little, should be thrown away. Juice moves through its tissues similarly to how blood moves through animal tissues, although not as quickly or freely. The circulation is enough to spread the products of decomposition to all parts, even when only a small part has begun to break down, and while serious consequences don't always occur from eating such fruit, it's definitely not top-quality food.
If intended to be eaten raw, fruit should be well ripened before gathering, and should be perfectly fresh. Fruit that has stood day after day in a dish upon the table, in a warm room, is far less wholesome and tempting than that brought fresh from the storeroom or cellar. All fruits should be thoroughly cleansed before serving. Such fruit as cherries, grapes, and currants may be best washed by placing in a colander, and dipping in and out of a pan of water until perfectly clean, draining and drying before serving.
If you plan to eat fruit raw, it should be fully ripe before picking and must be really fresh. Fruit that has been sitting out in a dish on the table in a warm room for days is much less healthy and appealing than fruit taken straight from the pantry or cellar. Always make sure to wash all fruits thoroughly before serving. Fruits like cherries, grapes, and currants are best cleaned by placing them in a colander and dipping them in and out of a bowl of water until they're completely clean, then draining and drying them before serving.
DIRECTIONS FOR SERVING FRUITS.
Apples.—In serving these, the "queen of all fruits," much opportunity is afforded for a display of taste in their arrangement. After wiping clean with a damp towel, they may be piled in a fruit basket, with a few sprigs of green leaves here and there between their rosy cheeks. The feathery tops of carrots and celery are pretty for this purpose. Oranges and apples so arranged, make a highly ornamental dish.
Apples.—When serving these, the "queen of all fruits," there are many ways to show off your style in how you arrange them. After wiping them down with a damp cloth, you can stack them in a fruit basket, adding a few sprigs of green leaves here and there among their rosy surfaces. The feathery tops of carrots and celery look nice for this. Oranges and apples arranged this way create a beautiful centerpiece.
Raw mellow sweet apples make a delicious dish when pared, sliced, and served with cream.
Raw, sweet apples are a delicious treat when peeled, sliced, and served with cream.
Bananas.—Cut the ends from the fruit and serve whole, piled in a basket with oranges, grapes, or plums. Another way is to peel, slice, and serve with thin cream. Bananas are also very nice sliced, sprinkled lightly with sugar, and before it had quite dissolved, covered with orange juice. Sliced bananas, lightly sprinkled with sugar, alternating in layers with sections of oranges, make a most delicious dessert.
Bananas.—Trim the ends off the bananas and serve them whole, stacked in a basket with oranges, grapes, or plums. Another option is to peel, slice, and serve them with a drizzle of cream. Bananas are also great sliced, lightly dusted with sugar, and then drizzled with orange juice before the sugar completely dissolves. Sliced bananas, lightly sprinkled with sugar and layered alternately with orange segments, create a truly tasty dessert.
Currants.—Large whole clusters may be served on the stem, and when it is possible to obtain both red and white varieties, they make a most attractive dish. Put them into cold water for a little time, cool thoroughly, and drain well before using. Currants, if picked from the stems after being carefully washed and drained, may be served lightly sprinkled with sugar. Currants and raspberries served together, half and half, or one third currants two thirds raspberries, are excellent. Only the ripest of currants should be used.
Currants.—You can serve large bunches of currants still on the stem, and if you can get both red and white kinds, they create a really appealing dish. Soak them in cold water for a bit, rinse thoroughly, and drain well before using. Currants that have been carefully washed and drained can be served lightly dusted with sugar. Mixing currants and raspberries—either equally or with a ratio of one part currants to two parts raspberries—is fantastic. Just make sure to use only the ripest currants.
Melons.—Watermelons should be served very cold. After being well washed on the outside, put on ice until needed. Cut off a slice at the ends, that each half may stand upright on a plate, and then cut around in even slices. Instead of cutting through the center into even halves, the melon may be cut in points back and forth around the entire circumference, so that when separated, each half will appear like a crown. Another way is to take out the central portion with a spoon, in cone-shaped pieces, and arrange on a plate with a few bits of ice. Other melons may be served in halves, with the seeds removed. The rough skin of the cantaloupe should be thoroughly scrubbed with a vegetable brush, then rinsed and wiped, after which bury the melon in broken ice till serving time; divide into eighths or sixteenths, remove the seeds, reconstruct the melon, and serve surrounded with ice, on a folded napkin, or arranged on a bed of grape leaves. Do not cool the melon by placing ice upon the flesh, as the moisture injures the delicate flavor.
Melons.—Watermelons should be served very cold. After washing the outside thoroughly, place them on ice until you're ready to serve. Cut a slice off each end so that each half can stand upright on a plate, and then slice evenly around. Instead of cutting it directly in half, you can create pointed slices all around the circumference so that when you separate the halves, they look like crowns. Another method is to scoop out the central part with a spoon in cone-shaped pieces and arrange them on a plate with some ice. Other melons can be served in halves after removing the seeds. For cantaloupe, scrub the rough skin well with a vegetable brush, rinse it, and pat it dry, then bury the melon in crushed ice until it’s time to serve. Cut it into eighths or sixteenths, remove the seeds, put the melon back together, and serve it surrounded by ice, on a folded napkin, or arranged on a bed of grape leaves. Don’t cool the melon by putting ice on the flesh, as the moisture can ruin its delicate flavor.
Oranges.—Serve whole or cut the skin into eighths, halfway down, separating it from the fruit, and curling it inward, thus showing half the orange white and the other half yellow; or cut the skin into eighths, two-thirds down, and after loosening from the fruit, leave them spread open like the petals of a lily. Oranges sliced and mixed with well ripened strawberries, in the proportion of three oranges to a quart of berries, make—a palatable dessert.
Oranges.—Serve them whole or cut the skin into eighths, halfway down, separating it from the fruit and curling it inward, so that one half of the orange is white and the other half is yellow; or cut the skin into eighths, two-thirds down, and after loosening it from the fruit, leave them spread open like the petals of a lily. Sliced oranges mixed with well-ripened strawberries, using a ratio of three oranges to a quart of berries, create a delicious dessert.
Peaches and Pears.—Pick out the finest, and wipe the wool from the peaches. Edge a plate with uniform sized leaves of foliage plant of the same tints as the fruit, and pile the fruit artistically upon it, tucking sprays or tips of the plant between. Bits of ice may also be intermingled. Yellow Bartlett pears and rosy-cheeked peaches arranged in this way are most ornamental.
Peaches and Pears.—Select the best ones and remove the fuzz from the peaches. Decorate a plate with evenly sized leaves from a foliage plant that matches the colors of the fruit, then creatively stack the fruit on top, tucking in sprigs or tips of the plant between them. You can also add some bits of ice for effect. Yellow Bartlett pears and rosy peaches arranged this way look very attractive.
Peaches and Cream.—Pare the peaches just as late as practicable, since they become discolored by standing. Always use a silver knife, as steel soon blackens and discolors the fruit. If sugar is to be used, do not add it until the time for serving, as it will start the juice, and likewise turn the fruit brown, destroying much of its rich flavor. Keep on ice until needed for the table. Add cream with each person's dish.
Peaches and Cream.—Peel the peaches as close to serving time as possible, since they turn brown if left out. Always use a silver knife, because steel will quickly darken and discolor the fruit. If you're going to add sugar, wait until right before serving, as it will release the juice and also brown the fruit, ruining much of its delicious flavor. Keep them on ice until it's time to serve. Add cream to each person's dish.
Pineapples.—The pineapple when fresh and ripened to perfection, is as mellow and juicy as a ripe peach, and needs no cooking to fit it for the table. Of course it must be pared, and have the eyes and fibrous center removed. Then it may be sliced in generous pieces and piled upon a plate, or cut into smaller portions and served in saucers. No condiments are necessary; even the use of sugar detracts from its delicate flavor. Pineapples found in our Northern markets are, however, generally so hard and tough as to require cooking, or are valuable only for their juice, which may be extracted and used for flavoring other fruits. When sufficiently mellow to be eaten raw, they are usually so tart as to seem to require a light sprinkling of sugar to suit most tastes. Pineapples pared, cut into dice or small pieces, lightly sprinkled with sugar, to which just before serving, a cup of orange juice is added, form a delicious dish.
Pineapples.—A fresh, perfectly ripe pineapple is as sweet and juicy as a ripe peach and doesn’t need cooking to be enjoyed. It should be peeled, and the eyes and fibrous center removed. Then, you can slice it into generous pieces and arrange it on a plate, or cut it into smaller portions and serve in bowls. No additional toppings are needed; even sugar can overwhelm its delicate flavor. However, pineapples in our Northern markets are often so hard and tough that they need to be cooked or are only useful for extracting juice, which can be used to flavor other fruits. When they are ripe enough to eat raw, they're usually so tart that a light sprinkle of sugar is often needed to suit most tastes. Pineapples that are peeled, cut into small cubes, lightly sprinkled with sugar, and then mixed with a cup of orange juice just before serving create a delicious dish.
Pressed Figs.—Look over carefully, and select only such as are perfectly good. They may be served dry, mixed with bunches of raisins, or steamed over a kettle of boiling water. Steamed figs make an excellent breakfast dish, and are considered much more wholesome then when used dry. Steamed raisins are likewise superior to dried raisins.
Pressed Figs.—Examine them closely and choose only those that are in perfect condition. They can be served dry, combined with clusters of raisins, or steamed over boiling water. Steamed figs make a great breakfast option and are considered much healthier than when served dry. Steamed raisins are also better than dried ones.
Raspberries, Blackberries, Dewberries, Blueberries and Whortleberries, require careful looking over to remove all insects, stems, and over-ripe fruit. Blueberries and whortleberries frequently need to be washed. They are then drained by spreading on a sieve or colander. Perfectly ripe, they are more healthful without condiments; but sugar and cream are usually considered indispensable.
Raspberries, blackberries, dewberries, blueberries, and whortleberries, need to be thoroughly checked to get rid of all insects, stems, and overripe fruit. Blueberries and whortleberries often need to be washed. After washing, they should be drained by spreading them on a sieve or colander. When perfectly ripe, they are healthier without any toppings; but sugar and cream are usually seen as essential.
If necessary to wash strawberries, they should be put into cold water, a few at a time, pushed down lightly beneath the water several times until entirely clean, then taken out one by one, hulled, and used at once. Like all other small fruits and berries they are more wholesome served without cream, but if cream is used, each person should be allowed to add it to his own dish, as it quickly curdles and renders the whole dish unsightly; if allowed to stand, it also impairs the flavor of the fruit.
If you need to wash strawberries, put them in cold water, a few at a time, and gently push them down beneath the water a few times until they're completely clean. Then take them out one by one, remove the stems, and use them right away. Like all other small fruits and berries, they taste better without cream, but if you do use cream, everyone should add it to their own dish because it curdles quickly and makes the presentation look bad. If it sits too long, it also ruins the flavor of the fruit.
Frosted Fruit.—Prepare a mixture of the beaten white of egg, sugar, and a very little cold water. Dip nice bunches of clean currants, cherries, or grapes into the mixture; drain nearly dry, and roll lightly in powdered sugar. Lay them on white paper to dry. Plums, apricots, and peaches may be dipped in the mixture, gently sprinkled with sugar, then allowed to dry. This method of preparing fruit is not to be commended for its wholesomeness, but it is sometimes desirable for ornament.
Frosted Fruit.—Mix together beaten egg whites, sugar, and a tiny bit of cold water. Dip fresh bunches of clean currants, cherries, or grapes into the mixture; let them drain almost dry, then lightly roll them in powdered sugar. Place them on white paper to dry. Plums, apricots, and peaches can also be dipped in the mixture, gently sprinkled with sugar, and then left to dry. This way of preparing fruit isn't exactly healthy, but it can be nice for decoration.
KEEPING FRESH FRUIT.
Of the numerous varieties of fruits grown in this country, apples and pears are about the only ones that can be kept for any length of time without artificial means. As soon as fruit has attained its maturity, a gradual change or breaking down of tissues begins. In some fruits this process follows rapidly; in other it is gradual. There is a certain point at which the fruits are best suited for use. We call it mellowness, and say that the fruit is in "good eating condition." When this stage has been reached, deterioration and rotting soon follow. In some fruits, as the peach, plum, and early varieties of apples and pears, these changes occur within a few days after maturity, and it is quite useless to attempt to keep them; in others, like the later varieties of apples and pears, the changes are slow but none the less certain. To keep such fruits we must endeavor to retard or prolong the process of change, by avoiding all conditions likely to hasten decay. Even with ordinary care, sound fruit will keep for quite a length of time; but it can be preserved in better condition and for a longer period by careful attention to the following practical points:—
Of the many types of fruits grown in this country, apples and pears are pretty much the only ones that can be stored for a long time without artificial methods. Once fruit reaches maturity, a gradual breakdown of its tissues begins. In some fruits, this process happens quickly; in others, it’s more gradual. There’s a specific point where the fruits are best for eating. We call it ripeness, and say that the fruit is in "good eating condition." Once this stage is reached, deterioration and rotting follow soon after. In some fruits, like peaches, plums, and early varieties of apples and pears, these changes happen within just a few days after they ripen, making it pretty pointless to try to store them; in others, like the later varieties of apples and pears, the changes are slow but still certain. To store these fruits, we need to slow down or extend the change process by avoiding any conditions that could speed up decay. Even with regular care, healthy fruit can last for quite a while; however, it can be kept in better condition and for a longer time with careful attention to the following practical points:—
1. If the fruit is of a late variety, allow it to remain on the tree as long as practicable without freezing.
1. If the fruit is from a late variety, let it stay on the tree as long as possible without freezing.
2. Always pick and handle the fruit with the greatest care.
2. Always choose and handle the fruit with great care.
3. Gather the fruit on a dry, cool day, and place in heaps or bins for two or three weeks.
3. Pick the fruit on a dry, cool day, and stack it in piles or bins for two or three weeks.
4. Carefully sort and pack in barrels, placing those most mellow and those of different varieties in different barrels; head the barrels, label, and place in a cool, dry place where the temperature will remain equable. Some consider it better to keep fruit in thin layers upon broad shelves in a cool place. This plan allows frequent inspection and removal of all affected fruit without disturbance of the remainder.
4. Carefully sort and pack into barrels, putting the mellow ones and different varieties in separate barrels; seal the barrels, label them, and store them in a cool, dry place where the temperature stays steady. Some people think it’s better to keep fruit in thin layers on wide shelves in a cool area. This method allows for regular checking and easy removal of any spoiled fruit without bothering the rest.
5. Warmth and moisture are the conditions most favorable to decomposition, and should be especially guarded against.
5. Warmth and moisture are the conditions most conducive to decomposition, and should be particularly avoided.
6. The best temperature for keeping fruit is about 34° F., or 2° above freezing.
6. The ideal temperature for storing fruit is around 34°F, or 2°F above freezing.
Another method which is highly recommended is to sprinkle a layer of sawdust on the bottom of a box, and then put in a layer of apples, not allowing them to tough each other. Upon this pack more sawdust; then another layer of apples, and so on until the box is filled. After packing, place up from the ground, in a cellar or storeroom, and they will keep perfectly, retaining their freshness and flavor until brought out. The Practical Farmer gives the following rough but good way to store and keep apples: "Spread plenty of buckwheat chaff on the barn floor, and on this place the apples, filling the interstices with the chaff. Cover with the chaff and then with straw two or three feet deep. The advantage of this is that covering and bedding in chaff excludes cold, prevents air currents, maintains a uniform temperature, absorbs the moisture of decay, and prevents the decay produced by moisture."
Another highly recommended method is to put a layer of sawdust at the bottom of a box, then add a layer of apples without letting them touch each other. On top of that, add more sawdust; then another layer of apples, and keep going until the box is full. After packing, lift it off the ground and place it in a cellar or storeroom, and they will stay fresh and flavorful until you're ready to use them. The Practical Farmer suggests this simple yet effective way to store apples: "Spread a lot of buckwheat chaff on the barn floor, and place the apples on it, filling the gaps with the chaff. Cover them with chaff and then add two or three feet of straw on top. The benefit of this method is that the chaff covering keeps out the cold, stops air currents, maintains an even temperature, absorbs decay moisture, and prevents decay caused by moisture."
The ordinary cellar underneath the dwelling house is too warm and damp for the proper preservation of fruit, and some other place should be provided if possible. A writer in the American Agriculturist thus calls attention to an additional reason why fruit should not be stored beneath living-rooms: "After late apples are stored for the winter, a gradual change begins within the fruit. It absorbs oxygen from the air of the room, and gives off carbonic acid gas. Another change results in the formation of water, which is given off as moisture. The taking up of oxygen by the fruit and the giving off of carbonic acid, in a short time so vitiates the atmosphere of the room in which the fruit is kept, that it will at once extinguish a candle, and destroy animal life. An atmosphere of this kind tends to preserve the fruit. There being little or no oxygen left in the air of the room, the process of decay is arrested. Hence it is desirable that the room be air tight, in order to maintain such an atmosphere."
The regular cellar beneath the house is too warm and damp for properly storing fruit, and another location should be arranged if possible. A writer in the American Agriculturist points out another reason why fruit shouldn't be kept under living areas: "After late apples are stored for the winter, a gradual change starts within the fruit. It takes in oxygen from the air in the room and releases carbon dioxide. Another change leads to the formation of water, which is released as moisture. The absorption of oxygen by the fruit and the release of carbon dioxide quickly pollutes the air in the room where the fruit is stored, to the point where it can extinguish a candle and harm living beings. This kind of atmosphere helps preserve the fruit. With little or no oxygen left in the room's air, the decay process slows down. Therefore, it's ideal for the room to be airtight to maintain such an atmosphere."
The production of carbonic acid shows that a cellar in or under a dwelling, is an improper place for storing fresh fruit. When the gas is present in the air in sufficient proportion, it causes death, and a very small quantity will cause headache, listlessness, and other unpleasant effects. No doubt many troubles attributed to malaria, are due to gases from vegetables and fruits stored in the cellar. A fruit cellar should be underneath some other building rather than the dwelling, or a fruit house may be built entirely above the ground. A house to keep fruit properly must be built upon the principle of a refrigerator. Its walls, floor, and ceiling should be double, and the space between filled with sawdust. The doors and windows should be double; and as light is undesirable, the windows should be provided with shutters. There should be a small stove for use if needed to keep a proper temperature in severe weather.
The production of carbon dioxide indicates that a basement in or under a house is not a suitable place for storing fresh fruit. When the gas is present in the air in enough quantity, it can be fatal, and even a very small amount can lead to headaches, fatigue, and other uncomfortable effects. Many problems attributed to malaria are likely caused by gases from fruits and vegetables stored in the basement. A fruit cellar should be located beneath another building rather than the house, or a fruit storage house can be built entirely above ground. A proper fruit storage facility needs to operate on the principle of a refrigerator. Its walls, floor, and ceiling should be double-layered, with the space in between filled with sawdust. The doors and windows should also be double; since light is not desired, the windows should have shutters. There should be a small stove available for use if necessary to maintain the right temperature during harsh weather.
To Keep Grapes.—Select such bunches as are perfect, rejecting all upon which there are any bruised grapes, or from which a grape has fallen. Spread them upon shelves in a cool place for a week or two. Then pack in boxes in sawdust which has been recently well dried in an oven. Bran which has been dried may also be used. Dry cotton is employed by some. Keep in a cool place.
To Keep Grapes.—Choose perfect bunches and discard any with bruised grapes or where grapes have fallen off. Lay them out on shelves in a cool area for a week or two. After that, pack them in boxes lined with sawdust that has been freshly dried in an oven. Dried bran can also be used. Some people use dry cotton. Store them in a cool place.
Some consider the following a more efficient method: select perfect bunches, and dip the broken end of the stems in melted paraffine or sealing wax. Wrap separately in tissue paper, hang in a cool place, or pack in sawdust.
Some people think the following is a better method: choose perfect bunches and dip the broken ends of the stems in melted paraffin or sealing wax. Wrap each one in tissue paper, hang them in a cool spot, or pack them in sawdust.
To Keep Lemons and Oranges.—Lemons may be kept fresh for weeks by placing them in a vessel of cold water in a very cool cellar or ice house. Change the water every day. Oranges may be kept in the same way. The usual method employed by growers for keeping these fruits is to wrap each one separately in tissue paper, and put in a cool, dry place.
How to Store Lemons and Oranges.—You can keep lemons fresh for weeks by putting them in a container of cold water in a cool cellar or ice house. Change the water daily. You can store oranges the same way. The common method used by growers to keep these fruits fresh is to wrap each one individually in tissue paper and store them in a cool, dry place.
COOKED FRUIT.
Perfectly ripe fruit is, as a rule, more desirable used fresh than in any other way. Fruits which are immature, require cooking. Stewing and baking are the simplest methods of preparation.
Perfectly ripe fruit is usually more desirable when eaten fresh than in any other form. Immature fruits need to be cooked. Stewing and baking are the easiest preparation methods.
General Suggestions for Cooking Fruit.—The utensils for stewing should be porcelain-lined, or granite ware. Fruit cooked in tin loses much of its delicate flavor; while if it be acid, and the tin of poor quality, there is always danger that the acid of the fruit acting upon the metal will form a poisonous compound. Cover with a china plate or granite-ware cover, never with a tin one, as the steam will condense and run down into the kettle, discoloring the contents. Use only silver knives for preparing the fruit, and silver or wooden spoons for stirring. Prepare just before cooking, if you would preserve the fruit perfect in flavor, and unimpaired by discoloration. In preparing apples, pears, and quinces for stewing, it is better to divide the fruit into halves or quarters before paring. The fruit is more easily handled, can be pared thinner and cored more quickly. Peaches, apricots, and plums, if divided and stoned before paring, can be much more easily kept whole.
General Suggestions for Cooking Fruit.—Use porcelain-lined or granite cookware for stewing. Fruit cooked in tin tends to lose its delicate flavor; if the fruit is acidic and the tin is low quality, there's a risk that the acid could react with the metal, creating a harmful compound. Cover with a china plate or granite lid, never with a tin one, as steam will condense and drip back into the pot, discoloring the fruit. Only use silver knives for preparing the fruit, and silver or wooden spoons for stirring. Prepare the fruit just before cooking to keep its flavor intact and prevent discoloration. When getting apples, pears, and quinces ready for stewing, it’s better to cut the fruit into halves or quarters before peeling. This makes it easier to handle, allows for thinner peeling, and speeds up coring. For peaches, apricots, and plums, if you pit and slice them before peeling, they’ll be much easier to keep intact.
Cook in a small quantity of boiling water, and if economy is a point to be considered, do not add sugar until the fruit is done. Sugar boiled with an acid will be converted into glucose, two and one half pounds of which only equal one pound of cane sugar in sweetening properties. It will require a much larger amount of sugar to sweeten fruit if added before the cooking process is completed. Fruit should be cooked by stewing, or by gentle simmering; hard boiling will destroy the fine flavor of all fruits, and especially of berries and other small fruits. Cinnamon, cloves, or other spices, should not be added, as their stronger flavors deaden or obliterate the natural flavor, which should always be preserved as perfectly as possible. If desirable to add some foreign flavor, let it be the flavor of another fruit, or the perfume of flowers. For Instance, flavor apple with lemon, pineapple, quince, or rose water.
Cook in a small amount of boiling water, and if saving money is important, don’t add sugar until the fruit is finished cooking. Sugar boiled with an acid turns into glucose, and two and a half pounds of glucose only equals one pound of cane sugar in sweetness. If you add sugar before the cooking process is done, you'll need a lot more to sweeten the fruit. Fruit should be cooked by stewing or gentle simmering; hard boiling will ruin the delicate flavor of all fruits, especially berries and other small fruits. Don’t add cinnamon, cloves, or other spices, as their strong flavors can overpower the natural taste, which should be preserved as much as possible. If you want to add another flavor, consider using the essence of another fruit or floral scents. For example, flavor apple with lemon, pineapple, quince, or rose water.
Unripe fruit is improved by making the cooking quite lengthy, which acts in the place of the ripening process, changing the starchy matter to saccharine elements. In cooking fruit, try to preserve its natural form. The more nearly whole it is, the better it looks, and the more natural will be its flavor.
Unripe fruit gets better when you cook it for a long time, mimicking the ripening process and turning the starches into sugars. When cooking fruit, aim to keep its natural shape. The more intact it is, the better it looks, and the more authentic its flavor will be.
Apples are best cooked by baking. Pears and quinces are also excellent baked. The oven should be only moderately hot; if the heat is too great, they brown on the outside before they are done throughout. In cooking fruit by any method, pains should be taken to cook together such as are of the same variety, size, and degree of hardness; if it is to be cut in pieces, care should be taken to have the pieces of uniform size.
Apples are best when baked. Pears and quinces are great when baked too. The oven should be moderately hot; if it’s too hot, they will brown on the outside before they're fully cooked inside. No matter the method, make sure to cook fruits of the same variety, size, and hardness together. If you're cutting them into pieces, ensure the pieces are uniform in size.
RECIPES.
Baked Apples.—Moderately tart apples or very juicy sweet ones are best for baking. Select ripe apples, free from imperfections, and of nearly equal size. Wipe carefully and remove the blossom ends. Water sufficient to cover bottom of the baking dish, should be added if the fruit is not very juicy. If the apples are sour and quite firm, a good way is to pare them before baking, and then place them in an earthen pie dish with a little hot water. If they incline to brown too quickly, cover the tops with a granite-ware pie dish. If the syrup dries out, add a little more hot water. When done, set them away till nearly cold, then transfer to a glass dish, pour the syrup, which should be thick and amber colored, over them. Sour apples are excellent pared, cored, and baked with the centers filled with sugar, jelly, or a mixture or chopped raisins and dates. They should be put into a shallow earthen dish with water sufficient to cover the bottom, and baked in a quick oven, basting often with the syrup. Sweet apples are best baked without paring. Baked apples are usually served as a relish, but with a dressing of cream they make a most delicious dessert.
Baked Apples.—For baking, use moderately tart apples or very juicy sweet ones. Choose ripe apples that are free from defects and are about the same size. Wipe them carefully and remove the blossom ends. If the fruit isn’t very juicy, add enough water to cover the bottom of the baking dish. If the apples are sour and firm, a good method is to peel them before baking, then place them in a ceramic pie dish with a bit of hot water. If they start to brown too quickly, cover the tops with a granite pie dish. If the syrup dries out, add a little more hot water. Once done, set them aside until they're nearly cold, then transfer them to a glass dish and pour the syrup, which should be thick and amber-colored, over them. Sour apples taste great when peeled, cored, and baked with the centers filled with sugar, jelly, or a mix of chopped raisins and dates. Place them in a shallow ceramic dish with enough water to cover the bottom, and bake in a hot oven, basting often with the syrup. Sweet apples are best baked without peeling. Baked apples are usually served as a side dish, but with a drizzle of cream, they make a delicious dessert.
Citron Apples.—Select a few tart apples of the same degree of hardness, and remove the cores. Unless the skins are very tender, it is better to pare them. Fill the cavities with sugar, first placing in each apple a few bits of chopped citron. If the skins have been removed, place the stuffed apples on a flat earthen dish with a tablespoonful of water on the bottom; cover closely, and bake till perfectly tender, but not till they have fallen to pieces. If the skins are left on, they may be baked without covering. When cold, serve in separate dishes, with or without a spoonful or two of whipped cream on each apple.
Citron Apples.—Choose a few tart apples that are similar in hardness and take out the cores. If the skins aren’t very soft, it’s better to peel them. Fill the hollow centers with sugar, adding a few pieces of chopped citron to each apple first. If you've peeled the apples, place the stuffed ones on a flat ceramic dish with a tablespoon of water at the bottom; cover it tightly and bake until they are perfectly tender but not falling apart. If you leave the skins on, they can be baked uncovered. Once they're cool, serve them in separate bowls, with or without a spoonful or two of whipped cream on top of each apple.
Baked Pears.—Hard pears make an excellent dessert when baked. Pare, halve, remove seeds, and place in a shallow earthen dish, with a cup of water to each two quarts of fruit. If the pears are sour, a little sugar may be added. Bake, closely covered, in a moderate oven until tender. Serve with sugar and cream. Tart pears are the best for baking, as the sweet varieties are often tasteless.
Baked Pears.—Hard pears make a delicious dessert when baked. Peel, cut in half, remove the seeds, and place them in a shallow dish. Add one cup of water for every two quarts of fruit. If the pears are sour, you can add a bit of sugar. Bake them, covered tightly, in a moderate oven until they are tender. Serve with sugar and cream. Tart pears are the best for baking, as the sweet ones often lack flavor.
Baked Apple Sauce.—Pare, core, and quarter apples to fill an earthen crock or deep pudding dish, taking care to use apples of the same degree of hardness, and pieces of the same size. For two quarts of fruit thus prepared, add a cup of water, and if the apples are sour, a cup of sugar. Cover closely, and bake in a moderate oven several hours, or until of a dark red color.
Baked Apple Sauce.—Peel, core, and quarter apples to fill a clay pot or deep baking dish, making sure to use apples that are similar in firmness and pieces that are the same size. For two quarts of prepared fruit, add a cup of water, and if the apples are tart, add a cup of sugar. Cover tightly, and bake in a moderate oven for several hours, or until it turns a dark red color.
Sweet apples and quinces in the proportion of two parts of apple to one of quince, baked in this way, are also good. Cut the apples into quarters, but slice the quinces much thinner, as they are more difficult to cook. Put a layer of quince on the bottom of the dish, alternating with a layer of apple, until the dish is full. Add cold water to half cover the fruit, and stew in the oven well covered, without stirring, until tender.
Sweet apples and quinces in a 2-to-1 ratio of apple to quince, prepared this way, are also delicious. Cut the apples into quarters, but slice the quinces much thinner since they take longer to cook. Place a layer of quince at the bottom of the dish, alternating with layers of apple, until the dish is full. Pour in cold water to half cover the fruit, and bake in the oven, covered tightly, without stirring, until tender.
Pears may be cooked in a similar way, and both apples and pears thus cooked may be canned while hot and kept for a long period.
Pears can be cooked in a similar way, and both apples and pears prepared this way can be canned while hot and stored for a long time.
Apples Stewed Whole.—Take six large red apples, wash carefully, and put in a fruit kettle with just enough boiling water to cover. Cover the kettle, and cook slowly until the apples are soft, with the skins broken and the juice a rich red color. After removing the apples, boil the juice to a syrup, sweeten, and pour over the apples.
Whole Stewed Apples.—Take six large red apples, wash them carefully, and place them in a pot with just enough boiling water to cover. Cover the pot and cook slowly until the apples are soft, with the skins broken and the juice a deep red color. After removing the apples, boil the juice until it turns into a syrup, sweeten it, and pour it over the apples.
Steamed Apples.—Select pound sweets of uniform size, wipe, cut out the blossom-ends, and pack in a large pudding dish. Pour in a cupful of water, cover the dish closely, set in a moderate oven, and steam till the apples are tender. Remove from the dish, and pour the liquor over them frequently as they cool.
Steamed Apples.—Choose a pound of sweet apples that are all about the same size, wash them, remove the blossom ends, and place them in a large pudding dish. Add a cup of water, cover the dish tightly, put it in a moderate oven, and steam until the apples are soft. Take them out of the dish and pour the juice over them regularly as they cool.
Compote of Apples.—Pare and extract the cores from moderately tart, juicy apples. Place them in a deep pudding dish with just enough water to cover them. Cover, place in a moderate oven, and stew until they are tender. Remove the apples and place in a deep dish to keep hot. Measure the juice and pour it into a saucepan, add a few bits of lemon rind, and boil up until thickened almost like a jelly. While the juice is boiling, heat some sugar, one tablespoonful to each cup of juice, in the oven, and add to the juice when thickened. Pour scalding hot over the apples, and cover until cold.
Compote of Apples.—Peel and core some moderately tart, juicy apples. Put them in a deep dish with just enough water to cover them. Cover the dish, place it in a moderate oven, and simmer until the apples are soft. Take the apples out and transfer them to a deep dish to keep warm. Measure the juice and pour it into a saucepan, add a few pieces of lemon peel, and bring it to a boil until it thickens to almost jelly-like consistency. While the juice is boiling, heat some sugar, about one tablespoon for each cup of juice, in the oven, and stir it into the juice once it has thickened. Pour it piping hot over the apples, and cover them until they cool.
Apple Compote No. 2.—Pare eight or ten rather tart, finely flavored and easy-cooking apples, carefully removing the cores, and put them into a broad, shallow, granite-ware saucepan with just enough hot water to cover the bottom. Cover tightly and place over the fire. The steam will cook the apples tender in a short time. Do not allow them to fall to pieces. Make a syrup by dissolving one cup of sugar in a pint of hot water. Add three teaspoonfuls of the juice of canned pineapple, and pour over the apples while both are hot.
Apple Compote No. 2.—Peel eight or ten slightly tart, flavorful, and quick-cooking apples, making sure to remove the cores, and place them in a wide, shallow, granite saucepan with just enough hot water to cover the bottom. Cover tightly and set it over the heat. The steam will soften the apples in no time. Be careful not to let them break apart. Prepare a syrup by dissolving one cup of sugar in a pint of hot water. Add three teaspoons of juice from canned pineapple, and pour it over the apples while both are still hot.
Stewed Pears.—Select some fine Bartlett pears which are ripe, but have hardly begun to soften; remove the skins, cut in halves or quarters, and take out the seeds. Put loosely in a granite-ware kettle, and add a pint of water for three and a half quarts of fruit. Cover closely, and when it begins to boil, set it where it will just simmer until the top pieces are tender. Serve cold. Sugar will not be necessary if the fruit is of good quality.
Stewed Pears.—Choose some good Bartlett pears that are ripe but not too soft. Peel them, cut them in half or quarters, and remove the seeds. Place them loosely in a heavy pot and add a pint of water for every three and a half quarts of fruit. Cover it tightly, and when it starts to boil, reduce the heat to let it simmer gently until the top pieces are soft. Serve cold. If the fruit is high quality, you won’t need to add sugar.
Smooth Apple Sauce.—If fruit is not sufficiently perfect to be cut into uniform quarters, a good way to prepare it is to pare, core, and slice into thin slices. Cook in as small a quantity of water as possible, the fruit covered closely, so that the top portion will steam tender as soon as the bottom, and when done rub through a colander, or beat smooth with a wooden spoon or an egg beater. Let it cool before adding sugar. A little lemon peel may be added to the fruit just long enough before it is done to flavor it, if desired.
Smooth Apple Sauce.—If the fruit isn't quite perfect for cutting into even quarters, a good way to prepare it is to peel, core, and slice it thinly. Cook it with just a little water, covering it tightly so the top steams tender as quickly as the bottom. When it's done, press it through a colander, or mash it smooth with a wooden spoon or an egg beater. Let it cool before adding sugar. If desired, you can add a bit of lemon peel to the fruit just before it's finished cooking to give it some flavor.
Boiled Apples with Syrup.—Halve and remove the cores of a half dozen nice apples, leaving the skins on. Boil till tender in sufficient water to cover them. Take out with a fork into a glass dish. Add to the juice three or four slices of a large lemon; boil for ten or fifteen minutes; sweeten to taste; then pour over the apples, and cool.
Boiled Apples with Syrup.—Cut a half dozen nice apples in half and take out the cores, keeping the skins on. Boil them in enough water to cover them until they're tender. Use a fork to take them out and place them in a glass dish. Add three or four slices of a large lemon to the juice; boil for ten to fifteen minutes; sweeten to your liking; then pour over the apples and let cool.
Stewed Apples.—Select fine fruit of a sub-acid flavor and not over-ripe. Pare, remove the cores and all blemishes, and divide into sixths if large, into quarters if small. Put into a porcelain or granite-ware kettle with enough boiling water to cook and leave a good liquor. Cover, and simmer gently, without stirring, from one to two hours. Do not add sugar till cold. Be careful not to break the fruit in serving.
Stewed Apples.—Choose good-quality fruit with a slightly tart flavor and not too ripe. Peel, core, and remove any imperfections, then cut into sixths if large or quarters if small. Place them in a porcelain or granite pot with enough boiling water to cook and create a nice sauce. Cover and simmer gently without stirring for one to two hours. Don't add sugar until it's cool. Be careful not to break the fruit when serving.
Sweet Apple Sauce with Condensed Apple Juice.—For the juice, wash, divide, and core rather tart apples and cook until softened with one cup of water for every six pounds of fruit. When soft, put into a percolater and drain off the juice or extract it with a fruit press. Boil until it is reduced one half. Skim if needed while boiling, and if not perfectly clear allow it to settle before using. A considerable quantity of the juice may be thus prepared and put into stone jars, to be used as needed. For the sauce, pare, core, and quarter sweet apples. Put into a porcelain kettle with enough of the condensed juice to cover. Cook slowly until tender.
Sweet Apple Sauce with Condensed Apple Juice.—To make the juice, wash, cut, and core some tart apples, then cook them in a pot with one cup of water for every six pounds of apples until they’re soft. Once they’re softened, put them in a strainer or use a fruit press to extract the juice. Boil the juice down until it’s reduced by half. Skim off any foam if necessary while boiling, and if it’s not completely clear, let it settle before using. You can prepare a large amount of juice like this and store it in glass jars for later use. For the sauce, peel, core, and quarter some sweet apples. Place them in a pot with enough of the condensed juice to cover them. Cook slowly until they’re tender.
Apples with Raisins.—Pare, core, and quarter a dozen or more medium sized sour apples. Clean thoroughly one fourth as many raisins as apples, and turn over them a quart of boiling water. Let them steep until well swollen, then add the apples, and cook until tender. Sugar to sweeten may be added if desired, although little will be needed unless the apples are very tart. Dried apples soaked over night may be made much more palatable by stewing with raisins or English currants, in the same way.
Apples with Raisins.—Peel, core, and quarter a dozen or more medium-sized sour apples. Thoroughly clean one fourth as many raisins as apples, and pour a quart of boiling water over them. Let them soak until they're plump, then add the apples, and cook until they're tender. You can add sugar to sweeten if you want, but you probably won’t need much unless the apples are really tart. Dried apples that have soaked overnight can taste a lot better if you stew them with raisins or currants in the same way.
Peaches, Plums, Cherries, Berries, and all small fruits may be cooked for sauce by stewing in a small amount of water, adding sugar to sweeten when done.
Peaches, Plums, Cherries, Berries, and all small fruits can be cooked for sauce by stewing them in a little water, and adding sugar to sweeten them when they're done.
Baked Apples.—Take any good tart apples; peel, cut in halves, and remove the cores. Scatter a few spoonfuls of sugar in the bottom of a dish, and lay the apples in, flat side down; add a teacupful of cold water, and bake till tender. Let stand in the dish till cold, then take up the pieces in a vegetable dish, and poor over them what juice remains. Sweet apples are good baked in this way without sugar.
Baked Apples.—Take any good tart apples; peel them, cut them in half, and remove the cores. Sprinkle a few spoonfuls of sugar in the bottom of a dish, and place the apples in, flat side down; add a cup of cold water, and bake until they’re tender. Let them sit in the dish until they’re cool, then transfer the pieces to a serving dish and pour over any remaining juice. Sweet apples also taste great baked this way without sugar.
Baked Pears.—Peel ripe pears; cut in halves, and pack in layers in a stone ware jar. Strew a little sugar over each layer, and add a small cupful of water, to prevent burning. Cover tightly, and bake three or four hours in a well-heated oven. Let them get very cold, and serve with sweet cream.
Baked Pears.—Peel ripe pears, cut them in half, and pack them in layers in a stoneware jar. Sprinkle a little sugar over each layer and add a small cup of water to prevent burning. Cover it tightly and bake for three or four hours in a hot oven. Allow them to cool completely, then serve with sweet cream.
Cranberries.—Cranberries make an excellent sauce, but the skins are rather hard of digestion, and it is best to exclude them. Stew in the proportion of a quart of berries to a pint of water, simmering gently until the skins have all burst, and the quantity is reduced to a pint. Put through a colander to remove the skins, and when nearly cool, add for the quart of berries two thirds of a cup of sugar.
Cranberries.—Cranberries are great for making sauce, but the skins are tough to digest, so it's better to remove them. Cook one quart of berries with one pint of water, gently simmering until all the skins have burst and the mixture reduces to one pint. Strain it through a colander to get rid of the skins, and when it's almost cool, add two-thirds of a cup of sugar for every quart of berries.
Cranberries with Raisins.—Cook the cranberries as in the preceding recipe, and when rubbed through the colander, add for every pound of cranberries before cooking, one fourth pound of raisins which have been steeped for half an hour in just sufficient boiling water to cover. A little less sugar will be needed to sweeten than when served without the raisins.
Cranberries with Raisins.—Cook the cranberries as in the previous recipe, and when you strain them through the colander, add a fourth of a pound of raisins that have been soaked for half an hour in just enough boiling water to cover them for every pound of cranberries before cooking. You will need slightly less sugar to sweeten than if served without the raisins.
Cranberries and Sweet Apples.—Stew equal parts of cranberries and sweet apples together. Mash, rub through a fine sieve or colander to remove the skins and make the whole homogeneous. This makes a very palatable sauce without the addition of sugar. California prunes and cranberries stewed together in equal proportion, in a small quantity of water, also make a nice sauce without sugar.
Cranberries and Sweet Apples.—Cook equal parts of cranberries and sweet apples together. Mash them, then strain through a fine sieve or colander to get rid of the skins and create a smooth mixture. This results in a tasty sauce without needing any sugar. Stewing California prunes and cranberries together in equal amounts, with a little water, also creates a nice sauce without sugar.
Oranges and Apples.—The mild, easy cooking, tart varieties of apples make an excellent sauce stewed with one third sliced oranges from which the seeds have been removed. Pare, core, and slice the apples, and cook gently so as to preserve the form of both fruits until the apples are tender. Add sugar to sweeten, and if desired a very little of the grated yellow of the orange rind.
Oranges and Apples.—The mild, easy-cooking, tart varieties of apples make a great sauce when stewed with one-third of sliced oranges, with the seeds taken out. Peel, core, and slice the apples, and cook gently to keep the shape of both fruits until the apples are tender. Add sugar to sweeten, and if you like, just a bit of grated orange peel.
Stewed Raisins.—Soak a pint of good raisins, cleaned and freed from stems, in cold water for several hours. When ready to cook, put them, with the water in which they were soaked, in a fruit kettle and simmer until the skins are tender. Three or four good-sized figs, chopped quite fine, cooked with the raisins, gives an additional richness and thickness of juice. No sugar will be needed.
Stewed Raisins.—Soak a pint of good raisins, cleaned and stemmed, in cold water for several hours. When you’re ready to cook, place them along with the soaking water in a fruit kettle and simmer until the skins are tender. Adding three or four large figs, chopped finely, cooked with the raisins, enhances the flavor and thickens the juice. No sugar is necessary.
Dried Apples.—Good apples properly dried make a very palatable sauce; but unfortunately the fruit generally selected for drying is of so inferior a quality that if cooked in its fresh state it would not be good. The dried fruit in most of our markets needs to be looked over carefully, and thoroughly washed before using. Put into a granite-ware kettle, cover with boiling water, and cook gently until tender. Fresh steam-dried or evaporated apples will cook in from one half to three fourths of an hour; if older, they may require from one to two more hours. Add boiling water, as needed, during the cooking. If when tender they are lacking in juice, add a little boiling water long enough before lifting from the fire to allow it to boil up once. If the fruit is very poor, a few very thin slices of the yellow portion of lemon or orange rind added a half hour before it is done, will sometimes be an improvement.
Dried Apples.—Good apples that are dried properly make a really tasty sauce; but unfortunately, the fruit usually used for drying is so low quality that it wouldn't even be good if cooked fresh. The dried fruit you find in most of our markets should be checked carefully and washed thoroughly before using. Put it in a granite kettle, cover it with boiling water, and cook gently until tender. Fresh steam-dried or evaporated apples will cook in about half an hour to 45 minutes; if they're older, they might need one to two more hours. Add boiling water as needed while cooking. If they're tender but lack juice, add a little boiling water just long enough before taking them off the heat to let it boil once. If the fruit is really poor, adding a few very thin slices of the yellow part of lemon or orange peel about half an hour before it's done can sometimes help.
Dried Apples with Other Dried Fruit.—An excellent sauce may be made by cooking a few dried plums with dried or evaporated apples. Only enough of the plums to give a flavor to the apples will be needed; a handful of the former to a pound of apples will be sufficient. Dried cherries, raisins, English currants, dried apricots, prunelles, and peaches are also excellent used in combination with dried apples.
Dried Apples with Other Dried Fruit.—You can make a delicious sauce by cooking a few dried plums with dried or evaporated apples. You only need enough plums to add flavor to the apples; a handful of plums for every pound of apples will be enough. Dried cherries, raisins, English currants, dried apricots, prunelles, and peaches also work well when combined with dried apples.
Dried Apricots and Peaches.—These fruits, if dried with the skins on, need, in addition to the preparation for cooking recommended for dried apples, a thorough rubbing with the fingers, while being washed, to remove the down. Put into boiling water in about the proportion of two parts of fruit to three of water. If the fruit was pared before drying, a little more water will be required. Cook quickly, but gently, until just tender, and take from the fire as soon as done. If too soft, they will be mushy and insipid.
Dried Apricots and Peaches.—These fruits, when dried with the skins on, require, in addition to the cooking prep suggested for dried apples, a thorough rubbing with your fingers while washing to get rid of the fuzz. Place them in boiling water at a ratio of about two parts fruit to three parts water. If the fruit was peeled before drying, you'll need a bit more water. Cook quickly but gently until they are just tender, and remove from heat as soon as they’re done. If they get too soft, they will become mushy and bland.
Small Fruits.—These when dried must be carefully examined, thoroughly washed, and then cooked rather quickly in boiling water. They swell but little, do not require much water, and usually cook in a few minutes. They should be taken from the fire as soon as soft, as long standing makes them insipid.
Small Fruits.—These should be carefully checked when dried, thoroughly washed, and then cooked quickly in boiling water. They don't swell much, don't need a lot of water, and typically cook in just a few minutes. Remove them from the heat as soon as they're soft, as leaving them too long can make them tasteless.
Prunes.—Use only the best selected prunes. Clean by putting them into warm water; let them stand a few minutes, rubbing them gently between the hands to make sure that all dust and dirt is removed; rinse, and if rather dry and hard, put them into three parts of water to one of prunes; cover closely, and let them simmer for several hours. If the prunes are quite easily cooked, less water may be used. They will be tender, with a thick juice. The sweet varieties need no sugar whatever. Many persons who cannot eat fruit cooked with sugar, can safely partake of sweet prunes cooked in this way. A slice of lemon added just before the prunes are done, is thought an improvement.
Prunes.—Use only the finest prunes. Clean them by soaking in warm water; let them sit for a few minutes, gently rubbing them between your hands to ensure all dust and dirt is removed; rinse them off, and if they seem dry and hard, use three parts water to one part prunes; cover tightly, and let them simmer for several hours. If the prunes cook easily, you can use less water. They should end up tender with a thick juice. The sweet varieties don’t need any sugar at all. Many people who can’t eat fruit cooked with sugar can enjoy sweet prunes prepared this way. Adding a slice of lemon just before the prunes are finished is considered a nice touch.
Prune Marmalade.—Cook sweet California prunes as directed above. When well done, rub through a colander to remove the skins and stones. No sugar is necessary. If the pulp is too thin when cold, it may be covered in an earthen pudding dish and stewed down by placing in a pan of hot water in a moderate oven.
Prune Marmalade.—Cook sweet California prunes as instructed above. Once cooked, strain them through a colander to get rid of the skins and pits. No sugar is needed. If the pulp is too thin after it cools, you can put it in a ceramic pudding dish and simmer it by placing it in a pan of hot water in a moderate oven.
THE PRESERVATION OF FRUIT.
Fresh fruit is so desirable, while at the same time the season during which most varieties can be obtained is so transient, that various methods are resorted to for preserving it in as nearly a natural state as possible. The old-fashioned plans of pickling in salt, alcohol, or vinegar, or preserving in equal quantities of sugar, are eminently unhygienic. Quite as much to be condemned is the more modern process of keeping fruit by adding to it some preserving agent, like salicylic acid or other chemicals. Salicylic acid is an antiseptic, and like many other substances, such as carbolic acid, creosote, etc., has the power of preventing the decay of organic substances. Salicylic acid holds the preference over other drugs of this class, because it imparts no unpleasant flavor to the fruit. It is nevertheless a powerful and irritating drug, and when taken, even in small doses, produces intense burning in the stomach, and occasions serious disturbances of the heart and other organs. Its habitual use produces grave diseases.
Fresh fruit is highly sought after, but the season when most varieties are available is so brief that different methods are used to preserve it as close to its natural state as possible. Traditional methods like pickling in salt, alcohol, or vinegar, or preserving with equal parts sugar, are not very hygienic. Equally concerning is the more modern practice of keeping fruit by adding preserving agents like salicylic acid or other chemicals. Salicylic acid is an antiseptic and, like many other substances such as carbolic acid and creosote, prevents the decay of organic materials. Salicylic acid is preferred over other drugs in this category because it doesn’t alter the fruit’s taste. However, it is still a potent and irritating substance, and even small doses can cause severe burning in the stomach and lead to serious issues with the heart and other organs. Regular use can lead to serious health problems.
What is sold as antifermentive is simply the well-known antiseptic, salicylate of soda. It should be self-evident to one at all acquainted with the philosophy of animal existence, that an agent which will prevent fermentation and decay must be sufficiently powerful in its influence to prevent digestion also.
What is marketed as antifermentive is just the well-known antiseptic, salicylate of soda. It should be obvious to anyone familiar with the principles of animal life that an agent capable of stopping fermentation and decay must also be strong enough to hinder digestion.
The fermentation and decay of fruits as well as that of all other organic substances, is occasioned by the action of those minute living organisms which scientists call germs, and which are everywhere present. These germs are very much less active in a dry, cold atmosphere, and fruit may be preserved for quite a long period by refrigeration, an arrangement whereby the external air is excluded, and the surrounding atmosphere kept at an equal temperature of about 40° F. The most efficient and wholesome method of preserving fruit, however, is destruction of the germs and entire exclusion from the air. The germs are destroyed at a boiling temperature; hence, if fruit be heated to boiling, and when in this condition sealed in air-tight receptacles, it will keep for an unlimited period.
The fermentation and decay of fruits, along with all other organic materials, are caused by tiny living organisms that scientists refer to as germs, which are found everywhere. These germs become much less active in a dry, cold environment, so fruit can be preserved for a long time using refrigeration, which keeps the outside air out and maintains a steady temperature of about 40° F. However, the most effective and safest way to preserve fruit is by eliminating the germs and completely keeping it away from air. The germs are destroyed at boiling temperatures; therefore, if you heat fruit to a boil and then seal it in airtight containers, it will last indefinitely.
CANNING FRUIT.
Canning consists in sealing in air-tight cans or jars, fruit which has been previously boiled. It is a very simple process, but requires a thorough understanding of the scientific principles involved, and careful management, to make it successful. The result of painstaking effort is so satisfactory, however, it is well worth all the trouble, and fruit canning need not be a difficult matter if attention is given to the following details:—
Canning involves sealing fruit that has been boiled into airtight cans or jars. It's a straightforward process, but it requires a solid understanding of the scientific principles at play and careful management to be successful. The outcome of this careful work is so rewarding that it's absolutely worth the effort, and fruit canning doesn't have to be complicated if you pay attention to the following details:—
Select self-sealing glass cans of some good variety. Tin cans give more trouble filling and sealing, are liable to affect the flavor of the fruit, and unless manufactured from the best of material, to impair its wholesomeness. Glass cans may be used more than once, and are thus much more economical. Those with glass covers, or porcelain-lined covers, are best. Test the cans to see if they are perfect, with good rubbers and covers that fit closely, by partly filling them with cold water, screwing on the tops, and placing bottom upward upon the table for some time before using. If none of the water leaks out, they may be considered in good condition. If the cans have been previously used, examine them with special care to see that both cans and covers have been carefully cleaned, then thoroughly sterilize them, and fit with new rubbers when necessary.
Choose self-sealing glass jars of a good variety. Tin cans are more difficult to fill and seal, can alter the flavor of the fruit, and if not made from high-quality materials, can compromise its freshness. Glass jars can be reused multiple times, making them much more cost-effective. Those with glass lids or porcelain-lined lids are the best options. Test the jars to ensure they are perfect, with good gaskets and tightly fitting lids, by partially filling them with cold water, screwing on the tops, and placing them upside down on the table for a while before using. If no water leaks out, they are in good condition. If the jars have been used before, inspect them carefully to ensure both jars and lids are thoroughly cleaned, then sterilize them completely and replace gaskets as needed.
Cans and covers should be sterilized by boiling in water for half an hour, or by baking in an oven, at a temperature sufficient to scorch paper, for two hours. The cans should be placed in the water or oven when cold, and the temperature allowed to rise gradually, to avoid breaking. They should be allowed to cool gradually, for the same purpose.
Cans and lids should be sterilized by boiling them in water for thirty minutes or by baking them in an oven at a temperature high enough to scorch paper for two hours. Place the cans in the water or oven when they are cold, and let the temperature increase gradually to prevent breaking. They should also be allowed to cool down gradually for the same reason.
Select only the best of fruit, such as is perfect in flavor and neither green nor over-ripe. Fruit which has been shipped from a distance, and which is consequently not perfectly fresh, contains germs in active growth, and if the least bit musty, it will be almost sure to spoil, even though the greatest care may be taken in canning.
Select only the best fruit, which should be perfect in flavor and neither underripe nor overripe. Fruit that has been shipped from far away and is not perfectly fresh contains germs that are actively growing, and if it’s even slightly musty, it will almost definitely spoil, no matter how carefully you try to can it.
Poor fruit will not be improved by canning; over-ripe fruit will be insipid and mushy; and though cooking will soften hard fruit, it cannot impart to it the delicate flavors which belong to that which is in its prime. The larger varieties of fruit should not be quite soft enough for eating. Choose a dry day for gathering, and put up at once, handling as little as possible. Try to keep it clean enough to avoid washing. If the fruit is to be pared, use a silver knife for the purpose, as steel is apt to discolor the fruit. If the fruit is one needing to be divided or stoned, it will be less likely to become broken if divided before paring.
Poor fruit won't get better by canning; overripe fruit will be bland and mushy; and while cooking can soften hard fruit, it can't bring out the delicate flavors of fruit that's at its peak. The larger types of fruit shouldn't be too soft for eating. Choose a dry day for picking, and can it right away, handling it as little as possible. Try to keep it clean enough to avoid washing. If the fruit needs to be peeled, use a silver knife, since steel can discolor it. If the fruit needs to be cut or pitted, it's less likely to get ruined if you do that before peeling.
Cook the fruit slowly in a porcelain-lined or granite-ware kettle, using as little water as possible. It is better to cook only small quantities at a time in one kettle. Steaming in the cans is preferable to stewing, where the fruit is at all soft. To do this, carefully fill the cans with fresh fruit, packing it quite closely, if the fruit is large, and set the cans in a boiler partly filled with cold water, with something underneath them to prevent breaking,—muffin rings, straw, or thick cloth, or anything to keep them from resting on the bottom of the boiler (a rack made by nailing together strips of lath is very convenient); screw the covers on the cans so the water cannot boil into them, but not so tightly as to prevent the escape of steam; heat the water to boiling, and steam the fruit until tender. Peaches, pears, crab apples, etc., to be canned with a syrup, may be advantageously cooked by placing on a napkin dropped into the boiling syrup.
Cook the fruit slowly in a porcelain-lined or granite kettle, using as little water as possible. It's better to cook small amounts at a time in one kettle. Steaming in jars is preferable to stewing if the fruit is at all soft. To do this, carefully fill the jars with fresh fruit, packing it closely if the fruit is large, and place the jars in a boiler that's partially filled with cold water, using something underneath them to prevent breakage—like muffin rings, straw, thick cloth, or anything to keep them off the bottom of the boiler (a rack made from nailing together strips of wood is very handy); screw the covers onto the jars tightly enough that water can't boil into them, but not so tight that steam can't escape; heat the water to boiling, and steam the fruit until it's tender. Peaches, pears, crab apples, etc., that are canned with syrup can be efficiently cooked by placing them on a napkin in the boiling syrup.
Fruit for canning should be so thoroughly cooked that every portion of it will have been subjected to a sufficient degree of heat to destroy all germs within the fruit, but overcooking should be avoided. The length of time required for cooking fruits for canning, varies with the kind and quality of fruit and the manner of cooking. Fruit is more frequently spoiled by being cooked an insufficient length of time, than by overcooking. Prolonged cooking at a boiling temperature is necessary for the destruction of certain kinds of germs capable of inducing fermentation. Fifteen minutes may be considered as the shortest time for which even the most delicate fruits should be subjected to the temperature of boiling water, and thirty minutes will be required by most fruits. Fruits which are not perfectly fresh, or which have been shipped some distance, should be cooked not less than thirty minutes. The boiling should be very slow, however, as hard, rapid boiling will break up the fruit, and much of its fine flavor will be lost in the steam.
Fruit for canning should be cooked thoroughly so that every piece has been exposed to enough heat to kill all germs, but it’s important not to overcook it. The cooking time for canning fruits varies depending on the type and quality of the fruit and how it’s cooked. Fruits are often ruined by not being cooked long enough rather than by overcooking. Prolonged cooking at a boiling temperature is essential to eliminate certain germs that can cause fermentation. Fifteen minutes is the minimum time that even the most delicate fruits should be cooked in boiling water, while most fruits will need about thirty minutes. Fruits that aren’t perfectly fresh or have traveled some distance should be cooked for at least thirty minutes. However, the boiling should be gentle, as fast, hard boiling will break up the fruit and result in a loss of much of its great flavor in the steam.
Cooking the sugar with the fruit at the time of canning, is not to be recommended from an economical standpoint; but fruit thus prepared is more likely to keep well than when cooked without sugar; not, however, because of the preservative influence of the sugar, which is too small in amount to prevent the action of germs, as in the case of preserves, but because the addition of sugar to the water or fruit juice increases its specific gravity, and thus raises the boiling point. From experiments made, I have found that the temperature of the fruit is ordinarily raised about 5° by the addition of the amount of sugar needed for sweetening sub-acid fruit. By the aid of this additional degree of heat, the germs are more certainly destroyed, and the sterilization of the fruit will be accomplished in a shorter time.
Cooking the sugar with the fruit during canning isn't advisable from a cost perspective; however, fruit prepared this way is more likely to stay fresh compared to when cooked without sugar. This isn't due to the sugar's preservative qualities, which are too minimal to stop germs, as seen in preserves, but rather because adding sugar to the water or fruit juice increases its specific gravity, which raises the boiling point. From my experiments, I've found that adding the sugar needed to sweeten slightly sour fruit typically raises the fruit's temperature by about 5°. With this extra degree of heat, germs are more effectively eliminated, allowing the sterilization of the fruit to happen in less time.
Another advantage gained in cooking sugar with the fruit at the time of canning, is that the fruit may be cooked for a longer time without destroying its form, as the sugar abstracts the juice of the fruit, and thus slightly hardens it and prevents its falling in pieces.
Another benefit of cooking sugar with the fruit during the canning process is that the fruit can be cooked for a longer time without losing its shape, as the sugar draws out the juice from the fruit, which slightly firms it up and helps prevent it from breaking apart.
The temperature to which the fruit is subjected may also be increased by the same method as that elsewhere described for sterilizing milk, the covers of the cans being screwed down tightly before they are placed in the sterilizer, or as soon as the boiling point is approached, so that the steam issues freely from the can. See page 396. If this method is employed, it must be remembered that the cans should not be removed from the sterilizer until after they have become cold, or nearly so, by being allowed to stand over night.
The temperature that the fruit is exposed to can also be raised using the same method described for sterilizing milk. The lids of the cans should be screwed on tightly before placing them in the sterilizer, or as soon as the boiling point is reached, allowing the steam to escape freely from the can. See page 396. If you use this method, remember that the cans shouldn’t be taken out of the sterilizer until they’ve cooled down, or are close to it, by letting them sit overnight.
Use the best sugar, two tablespoonfuls to a quart of fruit is sufficient for most sub-acid fruits, as berries and peaches; plums, cherries, strawberries, and currants require from five to eight tablespoonfuls of sugar to a quart. Have the sugar hot, by spreading it on tins and heating in the oven, stirring occasionally. See that; it does not scorch. Add it when the fruit is boiling. Pears, peaches, apples, etc., which contain a much smaller quantity of juice than do berries, may be canned in a syrup prepared by dissolving a cup of sugar in two or three cups of water. Perfect fruit, properly canned, will keep without sugar, and the natural 'flavor of the fruit is more perfectly retained when the sugar is left out, adding the necessary amount when opened for use.
Use the best sugar; two tablespoons for a quart of fruit is enough for most sub-acid fruits like berries and peaches. Plums, cherries, strawberries, and currants need five to eight tablespoons of sugar per quart. Heat the sugar by spreading it on baking sheets and placing it in the oven, stirring occasionally to prevent it from burning. Add it when the fruit is boiling. Pears, peaches, apples, and similar fruits, which have much less juice than berries, can be canned in a syrup made by dissolving a cup of sugar in two or three cups of water. Perfectly canned fruit can last without sugar, and you'll retain the fruit's natural flavor better if you add the sugar when you serve it.
If the fruit is to be cooked previous to being put in the cans, the cans should be heated before the introduction of the fruit, which should be put in at a boiling temperature. Various methods are employed for this purpose. Some wrap the can in a towel wrung out of hot water, keeping a silver spoon inside while it is being filled; others employ dry heat by keeping the cans in a moderately hot oven while the fruit is cooking.
If the fruit needs to be cooked before putting it in the cans, the cans should be heated up first, and the fruit should be added while it's boiling hot. There are different ways to do this. Some people wrap the can in a towel soaked in hot water and keep a silver spoon inside while filling it; others use dry heat by placing the cans in a moderately hot oven while the fruit is cooking.
Another and surer way is to fill a large dishpan nearly full of scalding (not boiling) water, then gradually introduce each can, previously baked, into the water, dip it full of water, and set it right side up in the pan. Repeat the process with other cans until four or five are ready. Put the covers likewise into boiling water. Have in readiness for use a granite-ware funnel and dipper, also in boiling water; a cloth for wiping the outside of the cans, a silver fork or spoon, a dish for emptyings, and a broad shallow pan on one side of the range, half filled with boiling water, in which to set the cans while being filled. When everything is in readiness, the fruit properly cooked, and at a boiling temperature, turn one of the cans down in the water, roll it over once or twice, empty it, and set in the shallow pan of hot water; adjust the funnel, and then place first in the can a quantity of juice, so that when the fruit is put in, no vacant places will be left for air, which is sometimes quite troublesome if this precaution is not taken; then add the fruit. If any bubbles of air chance to be left, work them out with a fork or spoon handle, which first dip in boiling water, and then quickly introduce down the sides of the jar and through the fruit in such a way that not a bubble will remain. Fill the can to overflowing, remembering that any vacuum invites the air to enter; use boiling water or syrup when there is not enough juice. Skim all froth from the fruit, adding more juice if necessary; wipe the juice from the top of the can, adjust the rubber, put on the top, and screw it down as quickly as possible. If the fruit is cooked in the cans, as soon as it is sufficiently heated, fill the can completely full with boiling juice, syrup, or water; run the handle of a silver spoon around the inside of the can, to make sure the juice entirely surrounds every portion of fruit, and that no spaces for air remain, put on the rubbers, wipe off all juice, and seal quickly.
Another and more reliable method is to fill a large dishpan almost to the top with scalding (not boiling) water, then gradually add each can, which should be pre-baked, into the water, making sure it's fully submerged, and set it upright in the pan. Repeat this with other cans until you have four or five ready. Also, place the covers in boiling water. Have a granite-ware funnel and dipper ready, also in boiling water; a cloth for wiping the outside of the cans; a silver fork or spoon; a dish for emptying; and a broad shallow pan on one side of the stove, half-filled with boiling water, to hold the cans while you fill them. Once everything is ready, the fruit is cooked properly, and at a boiling temperature, turn one of the cans upside down in the water, roll it over once or twice, empty it, and set it in the shallow pan of hot water; adjust the funnel, and then first pour a bit of juice into the can, so that when the fruit is added, there won't be any empty spaces for air, which can be a hassle if you don't take this precaution; then add the fruit. If any air bubbles remain, use a fork or spoon handle, first dipped in boiling water, and then quickly slide it down the sides of the jar and through the fruit to make sure no bubbles are left. Fill the can to the brim, keeping in mind that any vacuum will let air in; use boiling water or syrup if there's not enough juice. Skim off any froth from the fruit, adding more juice if needed; wipe away any juice from the top of the can, adjust the rubber, put on the cap, and screw it down as quickly as you can. If the fruit is cooked in the cans, as soon as it’s heated enough, fill the can completely with boiling juice, syrup, or water; run the handle of a silver spoon around the inside of the can to ensure that the juice completely surrounds all the fruit and that no air spaces remain, put on the rubbers, wipe off any juice, and seal quickly.

Canning Utensils.
As the fruit cools, the cover can be tightened, and this should be promptly done again and again as the glass contracts, so that no air may be allowed to enter.
As the fruit cools, the lid can be tightened, and this should be done repeatedly as the glass contracts, ensuring that no air can get in.
If convenient to fill the cans directly from the stove, the fruit may be kept at boiling heat by placing the kettle on a lamp stove on the table, on which the other utensils are in readiness. Many failures in fruit canning are due to neglect to have the fruit boiling hot when put into the cans.
If it's convenient to fill the cans straight from the stove, you can keep the fruit at a rolling boil by setting the kettle on a lamp stove on the table, where the other tools are ready. Many fruit canning failures happen because the fruit isn’t boiling hot when it goes into the cans.
When the cans are filled, set them away from currents of air, and not on a very cold surface, to avoid danger of cracking. A good way is to set the cans on a wet towel, and cover with a woolen cloth as a protection from draughts.
When the cans are filled, move them away from drafts and avoid placing them on a very cold surface to prevent cracking. A good approach is to place the cans on a damp towel and cover them with a wool cloth for protection from drafts.
After the cans have cooled, and the tops have been screwed down tightly, place them in a cool place, bottom upward, and watch closely for a few days. If the juice begins to leak out, or any appearance of fermentation is seen, it is a sign that the work has failed, and the only thing to do is to open the can immediately, boil the fruit, and use as quickly as possible; recanning will not save it unless boiled a long time. If no signs of spoiling are observed within two or three weeks, the fruit may be safely stored away in a dark, cool place. If one has no dark storeroom, it is an advantage to wrap each can in brown paper, to keep out the light.
After the cans have cooled and the tops have been screwed on tightly, place them upside down in a cool area and keep an eye on them for a few days. If any juice starts to leak out or you notice signs of fermentation, it means the process has failed, and you should open the can right away, boil the fruit, and use it as soon as possible; recaning won't fix it unless it’s boiled for a long time. If you don't see any signs of spoilage within two or three weeks, the fruit can be safely stored in a dark, cool place. If you don't have a dark storage area, it's a good idea to wrap each can in brown paper to block out the light.
Sometimes the fruit will settle so that a little space appears at the top. If you are perfectly sure that the can is tight, do not open to refill, as you will be unable to make it quite as tight again, unless you reheat the fruit, in which case you would be liable to have the same thing occur again. Air is dangerous because it is likely to contain germs, though in itself harmless.
Sometimes the fruit will settle, creating a little space at the top. If you're absolutely sure that the can is sealed tightly, don't open it to refill, as you won't be able to seal it as tightly again unless you reheat the fruit, which could lead to the same issue happening again. Air is risky because it can contain germs, even though it's harmless on its own.
If mold is observed upon the top of a can, it should be opened, and the fruit boiled and used at once, after carefully skimming out all the moldy portions. If there is evidence of fermentation, the fruit should be thrown away, as it contains alcohol.
If you see mold on top of a can, it should be opened, and the fruit should be boiled and used immediately after carefully removing all the moldy parts. If there are signs of fermentation, the fruit should be discarded, as it contains alcohol.
If care be taken to provide good cans, thoroughly sterilized, and with perfectly fitting covers; to use only fruit in good condition; to have it thoroughly cooked, and at boiling temperature when put into the can; to have the cans well baked and heated, filled completely and to overflowing, and sealed at once while the fruit is still near boiling temperature, there will be little likelihood of failure.
If you make sure to use good cans that are completely sterilized and have perfectly fitting lids; use only fruit that’s in good condition; cook it thoroughly and keep it at boiling temperature when putting it in the can; ensure the cans are well heated and filled to the brim, sealing them immediately while the fruit is still near boiling temperature, there will be little chance of failure.
Fruit purchased in tin cans should be selected with the utmost care, since unscrupulous dealers sometimes use cans which render the fruit wholly—unfit for food.
Fruit bought in cans should be chosen very carefully, as dishonest sellers sometimes use cans that make the fruit completely unfit for consumption.
The following rules which we quote from a popular scientific journal should be 'carefully observed in selecting canned fruit:—
The following rules, which we’ve taken from a well-known scientific journal, should be carefully followed when choosing canned fruit:—
"Reject every can that does not have the name of the manufacturer or firm upon it, as well as the name of the company and the town where manufactured. All 'Standards' have this. When the wholesale dealer is ashamed to have his name on the goods, be shy of him.
"Reject any can that doesn't have the manufacturer's name or the company and town where it was made. All 'Standards' have this. If the wholesale dealer is embarrassed to put their name on the product, be cautious of them."
"Reject every article of canned goods which does not show the line of resin around the edge of the solder of the cap, the same as is seen on the seam at the side of the can.
"Reject any canned goods that don't have a line of resin around the edge of the solder on the cap, just like the seam on the side of the can."
"Press up the bottom of the can; if decomposition is beginning, the tin will rattle the same as the bottom of your sewing-machine oil can does. If the goods are sound, it will be solid, and there will be no rattle to the tin.
"Press the bottom of the can; if it’s starting to decompose, it will rattle just like the bottom of your sewing machine oil can does. If the contents are good, it will be solid, and you won’t hear any rattling from the can."
"Reject every can that show any rust around the cap on the inside of the head of the can. Old and battered cans should be rejected; as, if they have been used several times, the contents are liable to contain small amounts of tin or lead"
"Reject any can that shows any rust around the inside of the cap. Old and damaged cans should be discarded; if they have been used multiple times, the contents may contain small amounts of tin or lead."
RECIPES.
To Can Strawberries.—These are generally considered more difficult to can than most other berries. Use none but sound fruit, and put up the day they are picked, if possible. Heat the fruit slowly to the boiling point, and cook fifteen minutes or longer, adding the sugar hot, if any be used, after the fruit is boiling. Strawberries, while cooking, have a tendency to rise to the top, and unless they are kept poshed down, will not be cooked uniformly, which is doubtless one reason they sometimes fail to keep well. The froth should also be kept skimmed off. Fill the cans as directed on page 197, taking special care to let out every air bubble, and to remove every particle of froth from the top of the can before sealing. If the berries are of good size, the may be cooked in the cans, adding a boiling syrup prepared with one cup of water and one of sugar for each quart can of fruit.
To Can Strawberries.—These are generally seen as more challenging to can than most other berries. Use only fresh fruit and can them on the same day they are picked, if possible. Slowly heat the fruit to boiling and cook for at least fifteen minutes, adding the sugar while it’s hot, if you’re using any, after the fruit starts boiling. Strawberries tend to float to the top while cooking, and if they’re not kept pressed down, they won’t cook evenly, which is probably why they sometimes don’t store well. Be sure to skim off any froth as well. Fill the cans as directed on page 197, making sure to release every air bubble and remove any froth from the top of the can before sealing. If the berries are a good size, they can be cooked in the cans, adding a boiling syrup made with one cup of water and one cup of sugar for each quart can of fruit.
If after the cans are cold, the fruit rises to the top, as it frequently does, take the cans and gently shake until the fruit is well saturated with the juice and falls by its own weight to the bottom, or low enough to be entirely covered with the liquid.
If, after the cans are cold, the fruit rises to the top, which often happens, take the cans and gently shake them until the fruit is well soaked with the juice and falls by its own weight to the bottom, or low enough to be completely covered with the liquid.
To Can Raspberries, Blackberries, and Other Small Fruits.—Select none but good, sound berries; those freshly picked are best; reject any green, over-ripe, mashed, or worm-eaten fruit. If necessary to wash the berries, do so by putting a quart at a time in a colander, and dipping the dish carefully into a pan of clean water, letting it stand for a moment. If the water is very dirty, repeat the process in a second water. Drain thoroughly, and if to be cooked previous to putting in the cans, put into a porcelain kettle with a very small quantity of water, and heat slowly to boiling. If sugar is to be used, have it hot, but do not add it until the fruit is boiling; and before doing so, if there is much juice, dip out the surplus, and leave the berries with only a small quantity, as the sugar will have a tendency to draw out more juice, thus furnishing plenty for syrup.
To Can Raspberries, Blackberries, and Other Small Fruits.—Only choose good, fresh berries; freshly picked ones are the best. Discard any that are green, overripe, squished, or infested. If you need to wash the berries, do it by placing a quart at a time in a colander and gently dipping it into a pan of clean water, letting it sit for a moment. If the water is really dirty, repeat the process with a second water. Make sure to drain thoroughly, and if you're cooking them before putting in the cans, place them in a porcelain pot with just a little water, and heat slowly until boiling. If you’re using sugar, make sure it’s hot, but don’t add it until the fruit is boiling. If there’s a lot of juice, scoop out the excess before adding the sugar, and leave the berries with just a small amount, since the sugar will pull out more juice, creating enough for syrup.
Raspberries are so juicy that they need scarcely more than a pint of water to two quarts of fruit.
Raspberries are so juicy that they hardly need more than a pint of water for every two quarts of fruit.
The fruit may be steamed in the cans if preferred. When thoroughly scalded, if sugar is to be used, fill the can with a boiling syrup made by dissolving the requisite amount of sugar in water; if to be canned without sugar, fill up the can with boiling water or juice.
The fruit can be steamed in the cans if you like. When it's thoroughly heated, if you want to use sugar, fill the can with boiling syrup made by dissolving the right amount of sugar in water; if you're canning it without sugar, fill the can with boiling water or juice.
Seal the fruit according to directions previously given.
Seal the fruit according to the instructions provided earlier.
To Can Gooseberries.—Select such as are smooth and turning red, but not fully ripe; wash and remove the stems and blossom ends. For three quarts of fruit allow one quart of water. Heat slowly to boiling; cook fifteen minutes, add a cupful of sugar which has been heated dry in the oven: boil two or three minutes longer, and can.
To Can Gooseberries.—Choose those that are smooth and starting to turn red, but not completely ripe; wash them and take off the stems and blossom ends. For three quarts of fruit, use one quart of water. Heat slowly until it boils; cook for fifteen minutes, then add a cup of sugar that has been heated dry in the oven: boil for two or three more minutes, and then can.
To Can Peaches.—Select fruit which is perfectly ripe and sound, but not much softened. Free-stone peaches are the best. Put a few at a time in a wire basket, and dip into boiling water for a moment, and then into cold water, to cool fruit sufficiently to handle with comfort. The skins may then be rubbed or peeled off easily, if done quickly, and the fruit divided into halves; or wipe with a clean cloth to remove all dirt and the wool, and with a silver knife cut in halves, remove the stone, and then pare each piece, dropping into cold water at once to prevent discoloration. Peaches cut before being pared are less likely to break in pieces while removing the stones. When ready, pour a cupful of water in the bottom of the kettle, and fill with peaches, scattering sugar among the layers in the proportion of a heaping tablespoonful to a quart of fruit. Heat slowly, boil fifteen minutes or longer till a silver fork can be easily passed through the pieces; can in the usual way and seal; or, fill the cans with the halved peaches, and place them in a boiler of warm water with something underneath to avoid breaking; cook until perfectly tender. Have ready a boiling syrup prepared with one half cup of sugar and two cups of water, and pour into each can all that it will hold, remove air bubbles, cover and seal. A few of the pits may be cooked in the syrup, and removed before adding to the fruit, when their special flavor is desired.
To Can Peaches.—Choose peaches that are perfectly ripe and firm, but not overly soft. Free-stone peaches are the best choice. Place a few at a time into a wire basket and dip them into boiling water for a moment, then transfer them to cold water to cool down enough to handle comfortably. The skins can then be easily rubbed or peeled off if done quickly, and the fruit can be cut into halves. Alternatively, wipe them with a clean cloth to remove any dirt and fuzz, then use a silver knife to cut them in half, remove the pit, and then peel each half, dropping them into cold water immediately to prevent browning. Peaches that are cut before peeling are less likely to break apart while removing the pits. When you’re ready, pour a cup of water into the bottom of the pot, fill it with peaches, and sprinkle sugar between the layers using about a heaping tablespoon for every quart of fruit. Heat slowly and boil for fifteen minutes or more until a silver fork can easily pass through the pieces; can them as usual and seal. Alternatively, fill the jars with the halved peaches, place them in a pot of warm water with something underneath to prevent breakage, and cook until they are perfectly tender. Prepare a boiling syrup with half a cup of sugar and two cups of water, pouring it into each jar to the top, removing any air bubbles, covering, and sealing. You can also cook a few of the pits in the syrup, then remove them before adding the syrup to the fruit for their unique flavor if desired.
ANOTHER METHOD.—After paring and halving the fruit, lay a clean napkin in the bottom of a steamer; fill with fruit. Steam until a fork will easily penetrate the pieces. Have ready a boiling syrup prepared as directed above, put a few spoonfuls in the bottom of the hot cans, and dip each piece of fruit gently in the hot syrup; then as carefully place it in the jars. Fill with the syrup, and finish in the usual way.
ANOTHER METHOD.—After cutting and halving the fruit, place a clean napkin at the bottom of a steamer; fill it with the fruit. Steam until a fork easily goes through the pieces. Prepare a boiling syrup as directed above, pour a few spoonfuls into the bottom of the hot jars, and gently dip each piece of fruit in the hot syrup; then carefully place it in the jars. Fill with the syrup and finish as usual.
Peaches canned without sugar, retain more nearly their natural flavor. To prepare in this way, allow one half pint of water to each pound of fruit. Cook slowly until tender, and can in the usual manner. When wanted for the table, open an hour before needed, and sprinkle lightly with sugar.
Peaches canned without sugar keep more of their natural flavor. To prepare them this way, use half a pint of water for each pound of fruit. Cook slowly until they're tender, and then can them as usual. When you're ready to serve, open the can an hour beforehand and sprinkle lightly with sugar.
To Can Pears.—The pears should be perfectly ripened, but not soft. Pare with a silver knife, halve or quarter, remove the seeds and drop into a pan of cold water to prevent discoloration. Prepare a syrup, allowing a cup of sugar and a quart of water to each two quarts of fruit. When the syrup boils, put the pears into it very carefully, so as not to bruise or break them, and cook until they look clear and can be easily pierced with a fork. Have the cans heated, and put in first a little of the syrup, then pack in the pears very carefully; fill to overflowing with the scalding syrup, and finish as previously directed. The tougher and harder varieties of pears must be cooked till nearly tender in hot water, or steamed over a kettle of boiling water, before adding to the syrup, and may then be finished as above. If it is desirable to keep the pears whole, cook only those of a uniform size together; or if of assorted sizes, put the larger ones into the syrup a few minutes before the smaller ones. Some prefer boiling the kins of the pears in the water of which the syrup is to be made, and skimming them out before putting in the sugar. This is thought to impart a finer flavor. Pears which are very sweet, or nearly tasteless, may be improved by using the juice of a large lemon for each quart of syrup. Pears may be cooked in the cans, if preferred.
To Can Pears.—The pears should be perfectly ripe, but not mushy. Peel them with a silver knife, cut them in half or quarters, remove the seeds, and drop them into a pan of cold water to keep them from turning brown. Make a syrup using one cup of sugar and one quart of water for every two quarts of fruit. Once the syrup is boiling, carefully add the pears to avoid bruising or breaking them, and cook until they look clear and can be easily pierced with a fork. Heat the cans, add a little syrup first, then pack the pears in carefully; fill to the brim with the hot syrup, and finish as previously instructed. Tougher and harder varieties of pears need to be cooked until almost tender in hot water or steamed over a kettle of boiling water before being added to the syrup, and then can be finished as described above. If you want to keep the pears whole, cook only those of similar size together; if they are different sizes, add the larger ones to the syrup a few minutes before the smaller ones. Some people prefer to boil the skins of the pears in the water for the syrup, then remove them before adding the sugar. This is thought to give a better flavor. Very sweet or nearly flavorless pears can be enhanced by adding the juice of a large lemon for each quart of syrup. Pears can be cooked in the cans if that's your preference.
To Can Plums.—Green Gages and Damsons are best for canning. Wipe clean with a soft cloth. Allow a half cup of water and the same of sugar to every three quarts of fruit, in preparing a syrup. Pick each plum with a silver fork to prevent it from bursting, and while the syrup is heating, turn in the fruit, and boil until thoroughly done. Dip carefully into hot jars, fill with syrup, and cover immediately.
How to Can Plums.—Green Gages and Damsons are the best for canning. Wipe them clean with a soft cloth. Use half a cup of water and half a cup of sugar for every three quarts of fruit when making the syrup. Use a silver fork to prick each plum to prevent it from bursting, and while the syrup heats up, add the fruit and boil until fully cooked. Carefully transfer to hot jars, fill with syrup, and cover right away.
Blackberries put up with equal quantities of blue or red plums, or in the proportion of one to three of the sour fruit, are much better than either of these fruits canned separately. Black caps are much better if canned with currants, in the proportion of one part currants to four of black caps.
Blackberries mix well with equal amounts of blue or red plums, or in a one-to-three ratio with the sour fruit, and they taste much better than either of these fruits canned on their own. Black caps are much improved when canned with currants, in a ratio of one part currants to four parts black caps.
Red and black raspberries, cherries and raspberries, are also excellent combinations.
Red and black raspberries, cherries, and raspberries are also great together.
Quinces with Apples.—Pare and cut an equal quantity of firm sweet apples and quinces. First stew the quinces till they are tender in sufficient water to cover. Take them out, and cook the apples in the same water. Lay the apples and quinces in alternate layers in a porcelain kettle or crock. Have ready a hot syrup made with one part sugar to two and a half parts water, pour over the fruit, and let it stand all night. The next day reheat to boiling, and can.
Quinces with Apples.—Peel and slice equal amounts of firm, sweet apples and quinces. First, simmer the quinces in enough water to cover them until they're tender. Remove them, and cook the apples in the same water. Layer the apples and quinces alternately in a porcelain pot or jar. Prepare a hot syrup using one part sugar to two and a half parts water, pour it over the fruit, and let it sit overnight. The next day, bring it back to a boil and can it.
Quinces and sweet apples may be canned in the same way as directed below for plums and sweet apples, using equal parts of apples and quinces, and adding sugar when opened.
Quinces and sweet apples can be canned just like the instructions below for plums and sweet apples, using equal parts of apples and quinces, and adding sugar when served.
Plums with Sweet Apples.—Prepare the plums, and stew in water enough to cover. When tender, skim out, add to the juice an equal quantity of quartered sweet apples, and stew until nearly tender. Add the plumbs again, boil together for a few minutes, and can. When wanted for the table, open, sprinkle with sugar if any seems needed, let stand awhile and serve.
Plums with Sweet Apples.—Prepare the plums and simmer them in enough water to cover. Once they're tender, remove them, add an equal amount of quartered sweet apples to the juice, and cook until they’re almost tender. Add the plums back in, boil everything together for a few minutes, and then can it. When you're ready to serve, open the jar, sprinkle with sugar if needed, let it sit for a bit, and serve.
To Can Grapes.—Grapes have so many seeds that they do not form a very palatable sauce when canned entire. Pick carefully from the stems, wash in a colander the same as directed for berries, and drain. Remove the skins, dropping them into one earthen crock and the pulp into another. Place both crocks in kettles of hot water over the stove, and heat slowly, stirring the pulp occasionally until the seeds will come out clean.
Canning Grapes.—Grapes have so many seeds that they don’t make a tasty sauce when canned whole. Carefully pick them off the stems, wash them in a colander just like you would for berries, and let them drain. Remove the skins, putting them into one ceramic pot and the pulp into another. Put both pots in kettles of hot water on the stove and heat slowly, stirring the pulp occasionally until the seeds come out clean.
Then rub the pulp through a colander, add the skins to it, and a cupful of sugar for each quart of pulp. Return to the fire, boil twenty minutes until the skins are tender, and can; or, if preferred, the whole grapes may be heated, and when well scalded so that the seeds are loosened, pressed through a colander, thus rejecting both seeds and skins, boiled, then sweetened if desired, and canned.
Then strain the pulp through a colander, add the skins to it, and a cup of sugar for each quart of pulp. Put it back on the heat, boil for twenty minutes until the skins are tender, and can it; or, if you prefer, the whole grapes can be heated, and once they’re well scalded so the seeds are loosened, press them through a colander, discarding both seeds and skins, then boil, sweeten if you want, and can.
To Can Apples.—Prepare and can the same as pears, when fresh and fine in flavor. If old and rather tasteless, the following is a good way:—several thin slices of the yellow part of the rind, four cups of sugar, and three pints of boiling water. Pare and quarter the apples, or if small, only halve them, and cook gently in a broad-bottomed closely-covered saucepan, with as little water as possible, till tender, but not broken; then pour the syrup over them, heat all to boiling, and can at once. The apples may be cooked by steaming over a kettle of hot water, if preferred. Care must be taken to cook those of the same degree of hardness together. The slices of lemon rind should be removed from the syrup before using.
To Can Apples.—Prepare and can them just like pears when they are fresh and flavorful. If they are old and lack taste, try this method: use several thin slices of the yellow part of the rind, four cups of sugar, and three pints of boiling water. Peel and quarter the apples, or if they're small, just cut them in half, and cook gently in a wide-bottomed saucepan, tightly covered, with as little water as possible until they're tender but not mushy; then pour the syrup over them, bring everything to a boil, and can immediately. You can also steam the apples over a kettle of hot water if you prefer. Be sure to cook apples of similar firmness together. Remove the lemon rind slices from the syrup before using.
To Can Pineapples.—The writer has had no experience in canning this fruit, but the following method is given on good authority: Pare very carefully with a silver knife, remove all the "eyes" and black specks; then cut the sections in which the "eyes" were, in solid pieces clear down to the core. By doing this all the valuable part of the fruit is saved, leaving its hard, woody center. As, however, this contains considerable juice, it should be taken in the hands and wrung as one wrings a cloth, till the juice is extracted, then thrown away. Prepare a syrup with one part sugar and two parts water, using what juice has been obtained in place of so much water. Let it boil up, skim clean, then add the fruit. Boil just as little as possible and have the fruit tender, as pineapples loses its flavor by overcooking more readily than any other fruit. Put into hot cans, and seal.
How to Can Pineapples.—The author hasn't canned this fruit before, but here's a reliable method: Carefully peel with a silver knife, removing all the "eyes" and dark spots; then cut out the sections where the "eyes" were, in solid pieces all the way down to the core. This way, you save all the good parts of the fruit while leaving behind the hard, woody center. However, since this center has a lot of juice, squeeze it like you would wring out a cloth until the juice is extracted, then discard it. Make a syrup using one part sugar and two parts water, substituting the juice you've collected for some of the water. Bring it to a boil, skim off any foam, then add the fruit. Cook it just enough to make the fruit tender, as pineapples lose their flavor faster than other fruits when overcooked. Pack into hot jars and seal.
FRUIT JELLIES.
The excess of sugar commonly employed in preparing jellies often renders them the least wholesome of fruit preparations, and we cannot recommend our readers to spend a great amount of time in putting up a large stock of such articles.
The high amount of sugar typically used in making jellies often makes them the least healthy of fruit preparations, and we can’t advise our readers to invest a lot of time in making a large supply of these products.
The juice of some fruits taken at the right stage of maturity may be evaporated to a jelly without sugar, but the process is a more lengthy one, and requires a much larger quantity of juice than when sugar is used.
The juice from certain fruits harvested at the right level of ripeness can be evaporated into a jelly without sugar, but this method takes longer and needs a significantly larger amount of juice compared to when sugar is added.
Success in the preparation of fruit jellies depends chiefly upon the amount of pectose contained in the fruit. Such fruits as peaches, cherries, and others containing but a small proportion of pectose, cannot be made into a firm jelly. All fruit for jelly should, if possible, be freshly picked, and before it is over-ripe, as it has then a much better flavor. The pectose, the jelly-producing element, deteriorates with age, so that jelly made from over-ripe fruit is less certain to "form." If the fruit is under-ripe, it will be too acid to give a pleasant flavor. Examine carefully, as for canning, rejecting all wormy, knotty, unripe, or partially decayed fruit. If necessary to wash, drain very thoroughly.
Success in making fruit jellies mainly depends on the amount of pectose in the fruit. Fruits like peaches, cherries, and others that have a low pectose content can't be turned into a firm jelly. Ideally, all fruit for jelly should be freshly picked and not overripe, as it has a much better flavor at that stage. The pectose, which is the ingredient that helps form the jelly, breaks down as the fruit ages, so jelly made from overripe fruit is less likely to set properly. If the fruit is under-ripe, it will be too acidic to taste good. Carefully examine the fruit as you would for canning, and discard any wormy, knotted, unripe, or partially spoiled pieces. If you need to wash the fruit, make sure to drain it very thoroughly.
Apples, quinces, and similar fruits may require to be first cooked in a small amount of water. The juice of berries, currants, and grapes, may be best extracted by putting the fruit in a granite-ware double boiler, or a covered earthen crock placed inside a kettle of boiling water, mashing as much as possible with a spoon, and steaming without the addition of water until the fruit is well scalded and broken.
Apples, quinces, and similar fruits might need to be cooked first in a little bit of water. The juice from berries, currants, and grapes is best extracted by placing the fruit in a granite-ware double boiler or a covered earthen pot inside a kettle of boiling water, mashing it as much as you can with a spoon, and steaming it without adding water until the fruit is thoroughly heated and broken down.
For straining the juice, have a funnel-shaped bag made of coarse flannel or strong, coarse linen crash. The bag will be found more handy if a small hoop of wire is sewn around the top and two tapes attached to hang it by while the hot juice is draining, or a wooden frame to support the bag may be easily constructed like the one shown on page 74. A dish to receive the juice should be placed underneath the bag, which should first be wrung out of hot water, and the scalded fruit, a small quantity at a time, turned in; then with two large spoons press the sides of the bag well, moving the fruit around in the bag to get out all the juice, and removing the pressed pulp and skins each time before putting in a fresh supply of the hot fruit. If a very clear jelly is desired, the juice must be allowed to drain out without pressing or squeezing. The juice of berries, grapes, and currants may be extracted without the fruit being first scalded, if preferred, by putting the fruit into an earthen or granite-ware dish, and mashing well with a wooden potato masher, then putting into a jelly bag and allowing the juice to drain off for several hours.
To strain the juice, use a funnel-shaped bag made of coarse flannel or sturdy, rough linen. The bag is easier to handle if a small wire hoop is sewn around the top and two straps are attached for hanging it while the hot juice drains. Alternatively, you can easily build a wooden frame to support the bag, similar to the one shown on page 74. Place a dish underneath the bag to catch the juice, which should first be rinsed out with hot water. Put a small amount of scalded fruit in at a time, then use two large spoons to press the sides of the bag, moving the fruit around to extract all the juice. Remove the pressed pulp and skins before adding fresh hot fruit each time. If you want a clear jelly, let the juice drain without pressing or squeezing. You can also extract juice from berries, grapes, and currants without scalding the fruit first if you prefer, by placing the fruit in a ceramic or granite dish, mashing it thoroughly with a wooden potato masher, and then putting it in a jelly bag to let the juice drain for several hours.
When strained, if the jelly is to be prepared with sugar, measure the juice and pour it into a granite or porcelain fruit kettle with a very broad bottom, so that as much surface can be on the stove possible. It is better to boil the juice in quantities of not more than two or three quarts at a time, unless one has some utensil in which a larger quantity can be cooked with no greater depth of liquid than the above quantity would give in a common fruit kettle. The purpose of the boiling is to evaporate the water from the juice, and this can best be accomplished before the sugar is added. The sugar, if boiled with the juice, also darkens the jelly.
When straining, if you're making jelly with sugar, measure the juice and pour it into a large granite or porcelain fruit kettle with a wide bottom to maximize the surface area on the stove. It's best to boil the juice in batches of no more than two or three quarts at a time, unless you have a pot that allows a larger quantity to be cooked without more liquid depth than what a regular fruit kettle would provide. The goal of boiling is to evaporate the water from the juice, which works best before adding the sugar. Boiling the sugar with the juice can also darken the jelly.
The average length of time required for boiling the juice of most berries, currants, and grapes, extracted as previously directed, before adding the sugar, is twenty minutes from the time it begins to bubble all over its surface. It is well to test the jelly occasionally, however, by dropping a small quantity on a plate to cool, since the quantity of juice and the rapidity with which it is boiled, may necessitate some variation in time. In wet season, fruits of all kinds absorb more moisture and a little longer boiling may be necessary. The same is true of the juice of fruits gathered after a heavy rain. Jellies prepared with sugar are generally made of equal measures of juice, measured before boiling, and sugar; but a very scant measure of sugar is sufficient, and a less amount will suffice for many fruits. White granulated sugar is best for all jellies. While the juice is heating, spread the sugar evenly on shallow tins, and heat in the oven, stirring occasionally to keep it from scorching. If portions melt, no great harm will be done, as the melted portions will form in lumps when turned into the juice, and can be removed with a spoon. When the juice has boiled twenty minutes, turn in the sugar, which should be so hot that the hand cannot be borne in it with comfort, stirring rapidly until it is all dissolved. Let the syrup boil again for three or four minutes, then take immediately from the fire. Heat the jelly glasses (those with glass covers are best), by rolling in hot water, and place them in a shallow pan partially filled with hot water, or stand them on a wet, folded towel while filling. If it is desired to have the jelly exceptionally clear and nice, it may be turned through a bag of cheese cloth, previously wrung out of hot water, into the jelly glasses. If the covers of the glasses are not tight fitting, a piece of firm paper should be fitted over the top before putting on the cover, to make it air tight. Pint self-sealing fruit cans are excellent for storing jelly, and if it is sealed in them in the same manner as canned fruit, will keep perfectly, and obviate any supposed necessity for the use of brandied paper as a preservative measure. Label each variety, and keep in some cool, dry place. If the jelly is not sufficiently firm when first made, set the glasses in the sunshine for several days, until the jelly becomes more firm. This is better than reheating and boiling again, as it destroys less of the flavor of the fruit.
The average time needed to boil the juice of most berries, currants, and grapes, extracted as previously described, before adding sugar is twenty minutes from the moment it starts bubbling all over the surface. It’s a good idea to occasionally test the jelly by dropping a small amount on a plate to cool, as the amount of juice and how quickly it boils may require some adjustments in time. During wet seasons, fruits tend to absorb more moisture, so a slightly longer boiling time might be needed. The same applies to juice from fruits picked after heavy rain. Jellies made with sugar are typically prepared using equal amounts of juice and sugar, measured before boiling; however, a very small amount of sugar is usually enough, and even less works for many fruits. White granulated sugar is ideal for all jellies. While the juice is heating, spread the sugar evenly on shallow pans and warm it in the oven, stirring occasionally to prevent scorching. If some portions melt, it’s not a big deal, as the melted bits will lump together when mixed with the juice and can be easily removed with a spoon. Once the juice has boiled for twenty minutes, add the sugar, which should be hot enough that it’s uncomfortable to touch, stirring quickly until it’s all dissolved. Let the syrup boil again for three or four minutes, then remove from the heat immediately. Heat the jelly jars (jars with glass lids are best) by rolling them in hot water, and place them in a shallow pan partially filled with hot water, or set them on a damp, folded towel while you fill them. If you want the jelly to be exceptionally clear and nice, you can strain it through a cheesecloth bag that has been wrung out in hot water into the jelly jars. If the lids of the jars don’t fit tightly, place a piece of sturdy paper over the top before sealing to make it airtight. Pint self-sealing jars are great for storing jelly, and if you seal them like you would canned fruit, they’ll keep perfectly and eliminate the need for using brandied paper as a preservative. Label each type and store them in a cool, dry place. If the jelly isn’t firm enough right after making it, place the jars in the sun for a few days until the jelly firms up more. This method is better than reheating and boiling again, as it preserves more of the fruit's flavor.
RECIPES.
Apple Jelly.—Cut nice tart apples in quarters, but unless wormy, do not peel or core. Put into a porcelain kettle with a cup of water for each six pounds of fruit, and simmer very slowly until the apples are thoroughly cooked. Turn into a jelly-bag, and drain off the juice. If very tart, allow three fourths of a pound of sugar to each pint of juice. If sub-acid, one half pound will be sufficient. Put the sugar into the oven to heat. Clean the kettle, and boil the juice therein twenty minutes after it begins to boil thoroughly. Add the sugar, stirring until well dissolved, let it boil up once again, and remove from the fire. The juice of one lemon may be used with the apples, and a few bits of lemon rind, the yellow portion only, cooked with them to give them a flavor, if liked. One third cranberry juice makes a pleasing combination.
Apple Jelly.—Cut tart apples into quarters, but don’t peel or core them unless they’re wormy. Place them in a porcelain pot with a cup of water for every six pounds of fruit, and simmer very slowly until the apples are fully cooked. Pour the mixture into a jelly bag and let the juice drain out. If the juice is very tart, use three-fourths of a pound of sugar for each pint of juice. If it’s slightly tart, half a pound will be enough. Heat the sugar in the oven. Clean the pot, and boil the juice in it for twenty minutes after it starts to boil well. Add the sugar, stirring until it’s completely dissolved, let it boil up once more, and then take it off the heat. You can also use the juice of one lemon and a few pieces of lemon peel, just the yellow part only, cooked with the apples for extra flavor, if desired. Adding a third of cranberry juice makes a nice combination.
Apple Jelly without Sugar.—Select juicy, white fleshed, sub-acid fruit, perfectly sound and mature but not mellow. The snow apple is one of the best varieties for this purpose. Wash well, slice, and core without removing the skins, and cook as directed in the preceding recipe. Drain off the juice, and if a very clear jelly is desired, filter it through a piece of cheese cloth previously wrung out of hot water. Boil the juice,—rapidly at first, but more gently as it becomes thickened,—until of the desired consistency. The time required will vary with the quantity of juice, the shallowness of the dish in which it is boiled, and the heat employed. One hour at least, will be required for one or two quarts of juice. When the juice has become considerably evaporated, test it frequently by dipping a few drops on a plate to cool; and when it jellies sufficiently, remove at once from the fire. A much larger quantity of juice will be needed for jelly prepared in this manner than when sugar is used, about two quarts of juice being required for one half pint of jelly. Such jelly, however, has a most delicious flavor, and is excellent served with grains. Diluted with water, it forms a most pleasing beverage.
Apple Jelly without Sugar.—Choose juicy, white-fleshed, slightly tart fruit that is perfectly sound and ripe but not overripe. The snow apple is one of the best varieties for this. Wash the fruit well, slice, and core it without peeling the skins, then cook as directed in the previous recipe. Drain the juice, and if you want a very clear jelly, filter it through a piece of cheesecloth that has been wrung out of hot water. Boil the juice—start off rapidly, but then simmer more gently as it thickens—until it reaches the desired consistency. The time it takes will vary based on how much juice you have, the depth of the pot you’re using, and the heat level. At least one hour will be needed for one or two quarts of juice. Once the juice has evaporated significantly, test it often by placing a few drops on a plate to cool; when it gels enough, take it off the heat right away. You will need a much larger quantity of juice to make jelly this way compared to using sugar—about two quarts of juice will make half a pint of jelly. However, this jelly has a wonderful flavor and is excellent served with grains. When mixed with water, it makes a very enjoyable drink.
Berry and Currant Jellies.—Express the juice according to the directions already given. For strawberries, red raspberries, and currants, allow three fourths of a pound of sugar to a pint of juice. Black raspberries, if used alone, need less sugar. Strawberry and black raspberry juice make better jelly if a little lemon juice is used. The juice of one lemon to each pint of fruit juice will be needed for black raspberries. Two parts red or black raspberries with one part currants, make a better jelly than either alone. Boil the juice of strawberries, red raspberries, and currants twenty minutes, add the sugar, and finish, as previously directed. Black raspberry juice is much thicker, and requires less boiling.
Berry and Currant Jellies.—Extract the juice following the previously provided instructions. For strawberries, red raspberries, and currants, use three-quarters of a pound of sugar for every pint of juice. Black raspberries, when used alone, require less sugar. Strawberry and black raspberry juice create a better jelly if you add a bit of lemon juice. You will need the juice of one lemon for every pint of black raspberry juice. A mixture of two parts red or black raspberries to one part currants yields a better jelly than using either on their own. Boil the juice from strawberries, red raspberries, and currants for twenty minutes, add the sugar, and finish it as previously instructed. Black raspberry juice is much thicker and doesn't need as much boiling.
Crab Apple Jelly.—Choose the best Siberian crab apples; cut into pieces, but do not pare or remove seeds. Place in a porcelain-lined or granite-ware double boiler, with a cup of water for each six pounds of fruit, and let them remain on the back of the range, with the water slowly boiling, seven or eight hours. Leave in the boiler or turn into a large china bowl, and keep well covered, all night. In the morning drain off the juice and proceed as for apple jelly, using from one half to three fourths of a pound of sugar to one of juice.
Crab Apple Jelly.—Select the best Siberian crab apples; cut them up, but don't peel or remove the seeds. Put them in a porcelain-lined or granite double boiler, adding a cup of water for every six pounds of fruit, and let them cook on the back burner, with the water gently boiling, for seven or eight hours. Leave them in the boiler or transfer to a large china bowl, and cover well overnight. In the morning, drain the juice and continue as you would for apple jelly, using between half and three-quarters of a pound of sugar for every pound of juice.
Peach Jelly.—Stone, pare, and slice the peaches, and steam them in a double boiler. Express the juice, and add for each pint of peach juice the juice of one lemon. Measure the juice and sugar, using three fourths of a pound of sugar for each pint of juice, and proceed as already directed. Jelly prepared from peaches will not be so firm as many fruit jellies, owing to the small amount of pectose contained in their composition.
Peach Jelly.—Pit, peel, and slice the peaches, then steam them in a double boiler. Squeeze out the juice, and for every pint of peach juice, add the juice of one lemon. Measure the juice and sugar, using three-quarters of a pound of sugar for each pint of juice, and follow the previous instructions. Jelly made from peaches won't be as firm as many other fruit jellies because they contain a smaller amount of pectin.
A mixture of apples and peaches, in the proportion of one third of the former to two thirds of the latter, makes a firmer jelly than peaches alone. The apples should be pared and cored, so that their flavor will not interfere with that of the peaches.
A mix of apples and peaches, with one third apples to two thirds peaches, creates a firmer jelly than just using peaches. The apples should be peeled and cored so their flavor doesn’t clash with that of the peaches.
Quince Jelly.—Clean thoroughly good sound fruit, and slice thin. Put into a double boiler with one cup of water for each five pounds of fruit, and cook until softened. Express the juice, and proceed as with other jellies, allowing three fourths of a pound of sugar to each pint of juice. Tart or sweet apples may be used with quinces, in equal proportions, and make a jelly of more pleasant flavor than quinces used alone. The seeds of quinces contain considerable gelatinous substance, and should be cooked with the quince for jelly making.
Quince Jelly.—Thoroughly clean good quality fruit and slice it thin. Place it in a double boiler with one cup of water for every five pounds of fruit, and cook until softened. Extract the juice and continue as you would with other jellies, using three-quarters of a pound of sugar for each pint of juice. You can mix tart or sweet apples with quinces in equal amounts, which creates a jelly with a more pleasant flavor than using quinces alone. The seeds of quinces have a lot of gelatinous substance and should be cooked with the quinces for making jelly.
FRUIT JUICES.
As sauces for desserts and for summer beverages for sick or well, the pure juices of fruits are most wholesome and delicious. So useful are they and so little trouble to prepare, that no housewife should allow the fruit season to pass by without putting up a full stock. Strawberries, raspberries, blackberries, currants, grapes, and cherries are especially desirable. In preparing them, select only the best fruit, ripe, but not over-ripe. Extract the juice by mashing the fruit and slowly heating in the inner cup of a double boiler, till the fruit is well scalded; too long heating will injure its color. Strain through a jelly bag and let it drain slowly for a long time, but do not squeeze, else some of the pulp will be forced through. Reheat slowly to boiling and can the same as fruit. It may be put up with or without sugar. If sugar is to be used, add it hot as for jelly, after the juice is strained and reheated to boiling. For strawberries and currants, raspberries and cherries, use one cup of sugar to a quart of juice. Black raspberries and grapes require less sugar, while blueberries and blackberries require none at all, or not more than a tablespoonful to the quart. A mixed juice, of one part currants and two parts red or black raspberries, has a very superior flavor.
As sauces for desserts and summer drinks for anyone feeling unwell or just fine, fresh fruit juices are super healthy and tasty. They're so easy to make that no home cook should let the fruit season go by without stocking up. Strawberries, raspberries, blackberries, currants, grapes, and cherries are particularly great choices. When making them, only choose the best fruit—ripe, but not overripe. Extract the juice by mashing the fruit and gently heating it in the inner cup of a double boiler until the fruit is well heated; avoid cooking it too long, or it will lose its color. Strain it through a jelly bag and let it drain slowly for a long time, but don't squeeze it, or some pulp will get through. Reheat it slowly until it boils and can it just like you would with fruit. You can mix it with sugar or leave it out. If you're adding sugar, mix it in while it's hot, just like you would for jelly, after straining and reheating to a boil. For strawberries, currants, raspberries, and cherries, use one cup of sugar per quart of juice. Black raspberries and grapes need less sugar, while blueberries and blackberries can go without, or use just a tablespoon per quart. A mix of one part currants and two parts red or black raspberries creates a really great flavor.
RECIPES.
Grape Juice, or Unfermented Wine.—Take twenty-five pounds of some well ripened very juicy variety of grapes, like the Concord. Pick them from the stems, wash thoroughly, and scald without the addition of water, in double boilers until the grapes burst open; cool, turn into stout jelly bags, and drain off the juice without squeezing. Let the juice stand and settle; turn off the top, leaving any sediment there may be. Add to the juice about four pounds of best granulated sugar, reheat to boiling, skim carefully, and can the same as fruit. Keep in a cool, dark place. The wine, if to be sealed in bottles, will require a corker, and the corks should first be boiled in hot water and the bottles well sterilized.
Grape Juice, or Unfermented Wine.—Take twenty-five pounds of well-ripened, juicy grapes, like Concords. Remove them from the stems, wash them thoroughly, and heat them in double boilers without adding water until they burst open. Let them cool, then pour the mixture into strong jelly bags and drain the juice without squeezing. Allow the juice to sit and settle; pour off the top, leaving any sediment behind. Add about four pounds of the best granulated sugar to the juice, reheat it to a boil, skim off any foam, and can it like you would fruit. Store in a cool, dark place. If you’re sealing the wine in bottles, you’ll need a corker, and the corks should be boiled in hot water first, with the bottles being thoroughly sterilized.
Grape Juice No. 2.—Take grapes of the best quality, picked fresh from the vines. Wash well after stripping from the stems, rejecting any imperfect fruit. Put them in a porcelain or granite fruit kettle with one pint of water to every three quarts of grapes, heat to boiling, and cook slowly for fifteen minutes or longer, skimming as needed. Turn off the juice and carefully filter it through a jelly bag, putting the seeds and skins into a separate bag to drain, as the juice from them will be less clear. Heat again to boiling, add one cupful of hot sugar to each quart of juice, and seal in sterilized cans or bottles. The juice from the skins and seeds should be canned separately.
Grape Juice No. 2.—Choose the best quality grapes, freshly picked from the vines. Wash them thoroughly after removing them from the stems, discarding any that are not perfect. Place them in a porcelain or granite fruit kettle with one pint of water for every three quarts of grapes, bring to a boil, and simmer slowly for at least fifteen minutes, skimming off any foam as needed. Turn off the heat and carefully strain the juice through a jelly bag, placing the seeds and skins in a separate bag to drain, as the juice from them will be less clear. Bring the juice back to a boil, adding one cup of hot sugar for each quart of juice, and seal it in sterilized cans or bottles. The juice from the skins and seeds should be canned separately.
Another Method.—Wash the grapes, and express the juice without scalding the fruit. Strain the juice three or four times through muslin or cheese cloth, allowing it to stand and settle for some time between each filtering. To every three pints of juice add one of water and two cupfuls of sugar. Heat to boiling, and keep at that temperature for fifteen minutes, skim carefully, and bottle while at boiling heat. Set away in a cool, dark place.
Another Method.—Wash the grapes and squeeze out the juice without heating the fruit. Strain the juice three or four times through muslin or cheesecloth, letting it sit and settle for a while between each filtering. For every three pints of juice, add one pint of water and two cups of sugar. Bring it to a boil and maintain that temperature for fifteen minutes, skimming carefully, then bottle it while it's still boiling. Store it in a cool, dark place.
Fruit Syrup.—Prepare the juice expressed from strawberries, raspberries, currants, or grapes, as directed above for fruit juices. After it has come to a boil, add one pound of sugar to every quart of juice. Seal in pint cans. It may be diluted with water to form a pleasing beverage, and is especially useful in flavoring puddings and sauces.
Fruit Syrup.—Make juice by squeezing strawberries, raspberries, currants, or grapes, following the instructions above for fruit juices. Once it reaches a boil, add one pound of sugar for every quart of juice. Seal in pint jars. It can be mixed with water to create a refreshing drink and is particularly good for adding flavor to puddings and sauces.
Currant Syrup.—Boil together a pint of pure currant juice and one half pound of best white sugar for ten minutes, and can or bottle while at boiling temperature. One or two spoonfuls of the syrup in a glass of water makes a most refreshing drink. Two parts currants and one of red raspberries may be used in place of all currants, if preferred.
Currant Syrup.—Boil together a pint of pure currant juice and half a pound of the best white sugar for ten minutes, and can or bottle while it's still boiling. One or two spoonfuls of the syrup in a glass of water makes a really refreshing drink. You can use two parts currants and one part red raspberries instead of just currants if you prefer.
Orange Syrup.—Select ripe and thin-skinned fruit. To every pint of the juice add one pound of sugar, the juice of one lemon, and a little of the grated rind. Boil for fifteen minutes, removing all scum as it rises. If the syrup is not clear, strain through a piece of cheese cloth, and reheat. Can and seal while boiling hot.
Orange Syrup.—Choose ripe, thin-skinned oranges. For every pint of juice, add one pound of sugar, the juice of one lemon, and a bit of the grated rind. Boil for fifteen minutes, skimming off any foam that forms. If the syrup isn't clear, strain it through a piece of cheesecloth and reheat. Jar and seal while it's still boiling hot.
Lemon Syrup.—Grate the yellow portion of the rind of six lemons, and mix with three pounds of best granulated white sugar. Add one quart of water and boil until it thickens. Strain, add the juice of the six lemons, carefully leaving out the pulp and seeds; boil ten minutes, and bottle. Diluted with two thirds cold water, it forms a delicious and quickly prepared lemonade.
Lemon Syrup.—Zest the yellow part of the rind from six lemons and mix it with three pounds of the finest granulated white sugar. Add one quart of water and boil until it thickens. Strain the mixture, then add the juice from the six lemons, making sure to exclude the pulp and seeds; boil for ten minutes, then bottle it up. When mixed with two-thirds cold water, it creates a tasty and easy-to-make lemonade.
DRYING FRUIT.
This method of preserving fruit, except in large establishments where it is dried by steam, is but little used, since canning is quicker and superior in every way. Success in drying fruits is dependent upon the quickness with which, they can be dried, without subjecting them to so violent a heat as to burn them or injure their flavor.
This method of preserving fruit, except in large operations where it's dried using steam, isn't used much because canning is faster and better in every way. Successfully drying fruits relies on how quickly they can be dried without exposing them to such high heat that it burns them or harms their flavor.
Pulpy fruits, such as berries, cherries, plums, etc., should be spread on some convenient flat surface without contact with each other, and dried in the sun under glass, or in a moderate oven. They should be turned daily. They will dry more quickly if first scalded in a hot oven. Cherries should be first stoned and cooked until well heated through and tender, then spread on plates, and the juice (boiled down to a syrup) poured over them. When dried, they will be moist. Pack in jars. Large fruit, such as apples, pears, and peaches, should be pared, divided, and the seeds or stones removed. If one has but a small quantity, the best plan is to dry by mean of artificial heat; setting it first in a hot oven until heated through, which process starts the juice and forms a film or crust over the cut surfaces, thus holding the remaining: quantity of juice inside until it becomes absorbed in the tissues. The drying process may be finished in a warming oven or some place about the range where the fruit will get only moderate heat. If a larger quantity of fruit is to be dried, after being heated in the oven, it may be placed in the hot sun out of doors, under fine wire screens, to keep off the flies; or may be suspended for the ceiling in some way, or placed upon a frame made to stand directly over the stove. As the drying proceeds, the fruit should be turned occasionally, and when dry enough, it should be thoroughly heated before it is packed away, to prevent it from getting wormy.
Pulpy fruits like berries, cherries, and plums should be laid out on a flat surface without touching each other, and dried in the sun under glass or in a moderate oven. Turn them daily. They’ll dry faster if you first scald them in a hot oven. Cherries should be pitted and cooked until heated through and tender, then spread on plates, and topped with juice that’s been boiled down to a syrup. When dried, they will be moist. Pack them in jars. For larger fruits like apples, pears, and peaches, peel, slice, and remove the seeds or stones. If you have only a small amount, the best method is to dry them using artificial heat; start by placing them in a hot oven until heated through, which will release the juice and create a film over the cut surfaces, keeping the rest of the juice inside until it gets absorbed. The drying can be completed in a warming oven or a spot near the stove where the fruit will receive moderate heat. If you have a larger quantity to dry, after heating in the oven, you can place it outside in the hot sun under fine wire screens to keep off flies; or you may hang it from the ceiling or use a frame to place it over the stove. As the drying continues, turn the fruit occasionally, and once it’s dry enough, make sure to heat it thoroughly before packing it away to prevent it from getting wormy.
NUTS.
The nuts, or shell fruits, as they are sometimes termed, form a class of food differing greatly from the succulent fruits. They are more properly seeds, containing, in general, no starch, but are rich in fat and nitrogenous elements in the form of vegetable albumen and casein. In composition, the nuts rank high in nutritive value, but owing to the oily matter which they contain, are difficult of digestion, unless reduced to a very minutely divided state before or during mastication. The fat of nuts is similar in character to cream, and needs to be reduced to the consistency of cream to be easily digested. Those nuts, such as almonds, filberts, and pecans, which do not contain an excess of fat, are the most wholesome. Nuts should be eaten, in moderation, at the regular mealtime, and not partaken of as a tidbit between meals. It is likewise well to eat them in connection with some hard food, to insure their thorough mastication. Almonds and cream crisps thus used make a pleasing combination.
The nuts, sometimes called shell fruits, are a type of food that is really different from juicy fruits. They're more like seeds, generally contain no starch, and are high in fat and proteins like vegetable albumen and casein. They have a high nutritional value, but their oily content makes them hard to digest unless they're very finely ground before or while chewing. The fat in nuts is similar to cream, and it needs to be broken down to a creamy consistency to be easily digested. Nuts like almonds, hazelnuts, and pecans, which aren't overly fatty, are the healthiest options. They should be eaten in moderation at mealtimes and not as snacks between meals. It's also better to consume them with something hard to ensure they are fully chewed. Almonds and cream crisps are a nice combination when enjoyed this way.
Most of the edible nuts have long been known and used as food. The Almond was highly esteemed by the ancient nations of the East, its native habitat, and is frequently referred to in sacred history. It is grown extensively in the warm, temperate regions of the Old World. There are two varieties, known as the bitter and the sweet almond. The kernel of the almond yields a fixed oil; that produced from the bitter almond is much esteemed for flavoring purposes, but it is by no means a safe article to use, at it possesses marked poisonous qualities. Fresh, sweet almonds are a nutritive, and, when properly eaten, wholesome food. The outer brown skin of the kernel is somewhat bitter, rough, and irritating to the stomach but it can be easily removed by blanching.
Most edible nuts have long been known and used as food. The almond was highly valued by ancient Eastern nations, where it originates, and is often mentioned in sacred texts. It is widely cultivated in the warm, temperate regions of the Old World. There are two types: bitter and sweet almonds. The almond kernel produces a fixed oil; the oil from the bitter almond is popular for flavoring, but it’s not safe to use since it has toxic qualities. Fresh sweet almonds are nutritious and, when eaten properly, are healthy food. The outer brown skin of the kernel is somewhat bitter, rough, and can irritate the stomach, but it can be easily removed by blanching.
Blanched almonds, if baked for a short time, become quite brittle, and may be easily pulverized, and are then more easily digested. Bread made from almonds thus baked and pulverized, is considered an excellent food for persons suffering with diabetes.
Blanched almonds, when baked for a short time, become very brittle and can be easily ground into a powder, making them easier to digest. Bread made from these baked and ground almonds is seen as a great food option for people dealing with diabetes.
Brazil Nuts are the seeds of a gigantic tree which grows wild in the valleys of the Amazon, and throughout tropical America. The case containing these seeds is a hard, woody shell, globular in form, and about the size of a man's head. It is divided into four cells, in each of which are closely packed the seeds which constitute the so-called nuts, of commerce. These seeds are exceedingly rich in oil, one pound of them producing about nine ounces of oil.
Brazil Nuts are the seeds of a massive tree that grows naturally in the valleys of the Amazon and throughout tropical America. The shell containing these seeds is hard and woody, round in shape, and roughly the size of a person’s head. It is divided into four compartments, each filled with the seeds that make up the so-called nuts found in stores. These seeds are extremely high in oil content, with one pound producing about nine ounces of oil.
The Cocoanut is perhaps the most important of all the shell fruits, if we may judge by the variety of uses to which the nut and the tree which bears it can be put. It has been said that nature seldom produces a tree so variously useful to man as the cocoanut palm. In tropical countries, where it grows abundantly, its leaves are employed for thatching, its fibers for manufacturing many useful articles, while its ashes produce potash in abundance. The fruit is eaten raw, and in many ways is prepared for food; it also yields an oil which forms an important article of commerce. The milk of the fruit is a cooling beverage, and the woody shell of the nut answers very well for a cup from which to drink it. The saccharine juice of the tree also affords an excellent drink; and from the fresh young stems is prepared a farinaceous substance similar to sago.
The Cocoanut is probably the most significant of all the shell fruits, judging by the many ways the nut and the tree that produces it can be used. It’s been said that nature rarely creates a tree as versatile for humans as the cocoanut palm. In tropical regions, where it grows in abundance, its leaves are used for thatching, its fibers are made into various useful products, and its ashes yield plenty of potash. The fruit can be eaten raw and is prepared for food in various ways; it also produces an oil that is a key commercial product. The milk from the fruit is a refreshing drink, and the hard shell of the nut makes a great cup for enjoying it. The sweet juice from the tree offers an excellent beverage; additionally, the fresh young stems can be turned into a starchy substance similar to sago.
The cocoanuts grow in clusters drooping from the tuft of long, fringed leaves which crown the branchless trunk of the stately palm. The cocoanut as found in commerce is the nut divested of its outer sheath, and is much smaller in size than when seen upon the tree. Picked fresh from the tree, the cocoanut consists first of a green outer covering; next of a fibrous coat, which, if the nut is mature, is hairy-like in appearance; and then of the woody shell, inside of which is the meat and milk. For household purposes the nuts are gathered while green, and before the inner shell has become solidified; the flesh is then soft like custard, and can be easily eaten with a teaspoon, while a large quantity of delicious, milk-like fluid is obtainable from each nut.
The coconuts grow in clusters hanging down from the tuft of long, fringed leaves that top the trunk of the tall palm. The coconut sold in stores is the nut stripped of its outer shell and is much smaller than what you see on the tree. When picked fresh from the tree, the coconut has a green outer layer; beneath that is a fibrous coat, which, if the nut is mature, looks hairy; and then there's the hard shell, which holds the meat and milk inside. For everyday use, the nuts are collected while they're still green, before the inner shell hardens; the flesh is then soft like custard and can be easily scooped out with a teaspoon, and each nut contains a lot of delicious, milk-like liquid.
The Chestnut is an exception to most nuts in its composition. It contains starch, and about fifteen per cent of sugar. No oil can be extracted from the chestnut. In Italy, and other parts of Southern Europe, the chestnut forms an important article of food. It is sometimes dried and ground into flour, from which bread is prepared. The chestnut is a nutritious food, but owing to the starch it contains, is more digestible when cooked. The same is true of the Acorn, which is similar in character to the chestnut. In the early ages, acorns were largely used for food, and are still used as a substitute for bread in some countries.
The Chestnut is different from most nuts in its makeup. It has starch and about fifteen percent sugar. No oil can be extracted from the chestnut. In Italy and other parts of Southern Europe, the chestnut is an important food source. It’s sometimes dried and ground into flour to make bread. The chestnut is nutritious, but because of the starch it contains, it’s easier to digest when cooked. The same applies to the Acorn, which is similar to the chestnut. In ancient times, acorns were commonly eaten, and they are still used as a bread substitute in some countries.
The Hazelnut, with the Filbert and Cobnut, varieties of the same nut obtained by cultivation, are among the most desirable nuts for general consumption.
The Hazelnut, along with the Filbert and Cobnut, which are cultivated varieties of the same nut, are some of the most sought-after nuts for everyday consumption.
The Walnut, probably a native of Persia, where in ancient times it was so highly valued as to be considered suited only for the table of the king, is now found very commonly with other species of the same family, the Butternut and Hickory nut, in most temperate climates.
The Walnut, likely originally from Persia, where it was so prized in ancient times that it was thought to be fit only for the king's table, is now commonly found alongside other members of the same family, the Butternut and Hickory nut, in most temperate climates.
The Pecan, a nut allied to the hickory nut, and grown extensively in the Mississippi Valley and Texas, is one of the most easily digested nuts.
The Pecan, a nut related to the hickory nut and widely grown in the Mississippi Valley and Texas, is one of the easiest nuts to digest.
The Peanut or Groundnut is the seed of an annual, cultivated extensively in most tropical and sub-tropical countries. After the plant has blossomed, the stalk which produced the flower has the peculiarity of bending down and forcing itself under ground so that the seeds mature some depth beneath the surface. When ripened, the pods containing the seeds are dug up and dried. In tropical countries the fresh nuts are largely consumed, and are thought greatly to resemble almonds in flavor. In this country they are more commonly roasted. They are less easily digested than many other nuts because of the large amount of oily matter which they contain.
The Peanut or Groundnut is a seed from a plant that’s grown widely in most tropical and subtropical countries. After the plant blooms, the stem that produced the flower bends down and pushes itself into the ground so that the seeds develop some distance below the surface. Once they’re ripe, the pods with the seeds are dug up and dried. In tropical countries, fresh peanuts are eaten a lot and are considered to taste quite a bit like almonds. In this country, they’re usually roasted. They are harder to digest than many other nuts because of the high amount of oil they contain.
RECIPES.
To Blanch Almonds.—Shell fresh, sweet almonds, and pour boiling water over them; let them stand for two or three minutes, skim out, and drop into cold water. Press between the thumb and finger, and the kernels will readily slip out of the brown covering. Dry between clean towels. Blanched almonds served with raisins make an excellent dessert.
To Blanch Almonds.—Shell fresh, sweet almonds and pour boiling water over them; let them sit for two or three minutes, skim them out, and drop them into cold water. Squeeze between your thumb and finger, and the kernels will easily slip out of the brown skin. Dry them between clean towels. Blanched almonds served with raisins make a great dessert.
Boiled Chestnuts.—The large variety, knows as the Italian chestnut, is best for this purpose. Remove the shells, drop into boiling water, and boil for ten minutes, take out, drop into cold water, and rub off the brown skin. Have some clean water boiling, turn the blanched nuts into it, and cook until they can be pierced with a fork. Drain thoroughly, put into a hot dish, dry in the oven for a few minutes, and serve. A cream sauce or tomato sauce may be served with them if liked.
Boiled Chestnuts.—The large variety, known as the Italian chestnut, is best for this purpose. Remove the shells, drop them into boiling water, and boil for ten minutes. Take them out, drop them into cold water, and rub off the brown skin. Have some clean water boiling, turn the blanched nuts into it, and cook until they can be pierced with a fork. Drain thoroughly, put them in a hot dish, dry in the oven for a few minutes, and serve. A cream sauce or tomato sauce can be served with them if desired.
TABLE TOPICS.
Who lives to eat, will die by eating.—Sel.
Who lives to eat will die from eating.—Sel.
Fruit bears the closest relation to light. The sun pours a continuous flood of light into the fruits, and they furnish the best portion of food a human being requires for the sustenance of mind and body.—Alcott.
Fruit has the closest connection to light. The sun continuously pours light into the fruits, and they provide the best part of the food that a person needs for the nourishment of both mind and body.—Alcott.
The famous Dr. John Hunter, one of the most eminent physicians of his time, and himself a sufferer from gout, found in apples a remedy for this very obstinate and distressing malady. He insisted that all of his patients should discard wine and roast beef, and make a free use of apples.
The renowned Dr. John Hunter, one of the leading physicians of his time, who also dealt with gout himself, discovered that apples could be a solution for this stubborn and painful condition. He recommended that all his patients avoid wine and roast beef and regularly consume apples.
Do not too much for your stomach, or it will abandon you.—Sel.
Don't overindulge, or your stomach will turn against you.—Sel.
The purest food is fruit, next the cereals, then the vegetables. All pure poets have abstained almost entirely from animal food. Especially should a minister take less meat when he has to write a sermon. The less meat the better sermon.—A. Bronson Alcott.
The healthiest food is fruit, followed by grains, and then vegetables. All true poets have mostly avoided meat. A minister should especially eat less meat when preparing a sermon. The less meat, the better the sermon.—A. Bronson Alcott.
There is much false economy: those who are too poor to have seasonable fruits and vegetables, will yet have pie and pickles all the year. They cannot afford oranges, yet can afford tea and coffee daily.—Health Calendar.
There is a lot of misguided saving: those who can't afford seasonal fruits and vegetables will still have pie and pickles all year round. They can't spend on oranges, yet they can buy tea and coffee every day.—Health Calendar.

LEGUMES
 he legumes, to which belong peas, beans, and lentils, are usually
classed among vegetables; but in composition they differ greatly from
all other vegetable foods, being characterized by a very large
percentage of the nitrogenous elements, by virtue of which they possess
the highest nutritive value. Indeed, when mature, they contain a larger
proportion of nitrogenous matter than any other food, either animal or
vegetable. In their immature state, they more nearly resemble the
vegetables. On account of the excess of nitrogenous elements in their
composition, the mature legumes are well adapted to serve as a
substitute for animal foods, and for use in association with articles in
which starch or other non-nitrogenous elements are predominant; as, for
example, beans or lentils with rice, which combinations constitute the
staple food of large populations in India.
he legumes, to which belong peas, beans, and lentils, are usually
classed among vegetables; but in composition they differ greatly from
all other vegetable foods, being characterized by a very large
percentage of the nitrogenous elements, by virtue of which they possess
the highest nutritive value. Indeed, when mature, they contain a larger
proportion of nitrogenous matter than any other food, either animal or
vegetable. In their immature state, they more nearly resemble the
vegetables. On account of the excess of nitrogenous elements in their
composition, the mature legumes are well adapted to serve as a
substitute for animal foods, and for use in association with articles in
which starch or other non-nitrogenous elements are predominant; as, for
example, beans or lentils with rice, which combinations constitute the
staple food of large populations in India.
Legumes, which include peas, beans, and lentils, are generally considered vegetables; however, they differ significantly in their composition from other vegetable foods. They are characterized by a high percentage of nitrogenous elements, which gives them the highest nutritional value. In fact, when they are mature, they have a greater amount of nitrogenous matter than any other food, whether animal or vegetable. When they are not fully mature, they resemble other vegetables more closely. Due to their high nitrogen content, mature legumes are a great alternative to animal proteins and work well with foods that are high in starch or other non-nitrogenous elements. For example, combining beans or lentils with rice creates staple meals for many people in India.
The nitrogenous matter of legumes is termed legumin, or vegetable casein, and its resemblance to the animal casein of milk is very marked. The Chinese make use of this fact, and manufacture cheese from peas and beans. The legumes were largely used as food by the ancient nations of the East. They were the "pulse" upon which the Hebrew children grew so fair and strong. According to Josephus, legumes also formed the chief diet of the builders of the pyramids. They are particularly valuable as strength producers, and frequently form a considerable portion of the diet of persons in training as athletes, at the present day. Being foods possessed of such high nutritive value, the legumes are deserving of a more extended use than is generally accorded them in this country. In their mature state they are, with the exception of beans, seldom found upon the ordinary bill of fare, and beans are too generally served in a form quite difficult of digestion, being combined with large quantities of fat, or otherwise improperly prepared. Peas and lentils are in some respects superior to beans, being less liable to disagree with persons of weak digestion, and for this reason better suited to form a staple article of diet.
The nitrogen-containing substances in legumes are called legumin, or vegetable casein, and they closely resemble the animal casein found in milk. The Chinese take advantage of this and make cheese from peas and beans. Ancient Eastern nations relied heavily on legumes as food. They were the "pulse" that helped the Hebrew children grow strong and healthy. Josephus noted that legumes were also the main food source for the builders of the pyramids. They are especially valuable for building strength and often make up a significant part of the diet for today’s athletes in training. Given their high nutritional value, legumes deserve to be used more widely than they are in this country. In their mature form, they are rarely included in regular meals, and beans are usually served in ways that are hard to digest, often mixed with a lot of fat or not prepared properly. Peas and lentils are, in some ways, better than beans because they are less likely to upset the stomach, making them more suitable as a staple food.
All the legumes are covered with a tough skin, which is in itself indigestible, and which if not broken by the cooking process or by thorough mastication afterward, renders the entire seed liable to pass through the digestive tract undigested, since the digestive fluids cannot act upon the hard skin. Even when the skins are broken, if served with the pulp, much of the nutritive material of the legume is wasted, because it is impossible for the digestive processes to free it from the cellulose material of which the skins are composed. If, then, it be desirable to obtain from the legumes the largest amount of nutriment and in the most digestible form, they must be prepared in some manner so as to reject the skins. Persons unable to use the legumes when cooked in the ordinary way, usually experience no difficulty whatever in digesting them when divested of their skins. The hindrance which even the partially broken skins are to the complete digestion of the legume, is well illustrated by the personal experiments of Prof. Strümpell, a German scientist, who found that of beans boiled with the skins on he was able to digest only 60 per cent of the nitrogenous material they contained. When, however, he reduced the same quantity of beans to a fine powder previous to cooking, he was enabled to digest 91.8 per cent of it.
All legumes have a tough outer skin that's indigestible. If this skin isn’t broken down during cooking or thoroughly chewed afterward, the whole seed can pass through the digestive system undigested because the digestive fluids can't penetrate the hard skin. Even when the skins are broken, serving them with the pulp leads to losing much of the legume's nutritional value, since it's hard for the digestive process to separate it from the cellulose in the skins. Therefore, to get the most nutrients from legumes in the easiest-to-digest form, they need to be prepared in a way that removes the skins. People who can't digest legumes when cooked normally usually have no problem digesting them when the skins are removed. The issue that even partially broken skins cause for fully digesting the legume is highlighted by the personal experiments of Prof. Strümpell, a German scientist, who discovered that when he boiled beans with the skins on, he could only digest 60 percent of the nitrogenous material they contained. However, when he ground the same amount of beans into a fine powder before cooking, he was able to digest 91.8 percent of it.
The fact that the mature legumes are more digestible when prepared in some manner in which the skins are rejected, was doubtless understood in early times, for we find in a recipe of the fourteenth century, directions given "to dry legumes in an oven and remove the skins away before using them."
The fact that mature legumes are easier to digest when cooked in a way that removes the skins was likely understood long ago. In a 14th-century recipe, we see instructions that say "to dry legumes in an oven and take the skins off before using them."
The green legumes which are more like a succulent vegetable are easily digested with the skins on, if the hulls are broken before being swallowed. There are also some kinds of beans which, in their mature state, from having thinner skins, are more readily digested, as the Haricot variety.
The green legumes that are more like juicy vegetables are easy to digest with the skins on, as long as the hulls are broken before swallowing. There are also some types of beans, like the Haricot variety, which have thinner skins when mature and are easier to digest.
Suggestions for Cooking.—The legumes are best cooked by stewing or boiling, and when mature, require prolonged cooking to render them tender and digestible. Slow cooking, when practicable, is preferable. Dry beans and peas are more readily softened by cooking if first soaked for a time in cold water. The soaking also has a tendency to loosen the skins, so that when boiled or stewed, a considerable portion of them slip off whole, and being lighter, rise to the top during the cooking, and can be removed with a spoon; it likewise aids in removing the strong flavor characteristic of these foods, which is considered objectionable by some persons. The length of time required for soaking will depend upon the age of the seed, those from the last harvest needing only a few hours, while such as have been kept for two or more years require to be soaked twelve or twenty-four hours. For cooking, soft water is best. The mineral elements in hard water have a tendency to harden the casein, of which the legumes a largely composed, thus rendering it often very difficult to soften them.
Cooking Tips.—Legumes are best when stewed or boiled, and when they're mature, they need to be cooked for a long time to make them tender and easy to digest. Whenever possible, slow cooking is preferable. Dry beans and peas soften more easily if they're soaked in cold water beforehand. Soaking also helps to loosen the skins, allowing a lot of them to come off whole during boiling or stewing. These skins are lighter and will float to the top while cooking, making them easy to remove with a spoon. Soaking also helps reduce the strong flavor that some people find off-putting. The soaking time depends on how old the seeds are. Freshly harvested ones need just a few hours, while those that have been stored for two years or more need to soak for twelve to twenty-four hours. For cooking, using soft water is ideal. The minerals in hard water can toughen the casein, which makes up a large part of legumes, making it harder to soften them.
The dry, unsoaked legumes are generally best put to cook in cold water, and after the boiling point is reached, allowed to simmer gently until done. Boiling water may be used for legumes which have been previously soaked. The amount of water required will vary somewhat with the heat employed and the age and condition of the legume, as will also the time required for cooking, but as a general rule two quarts of soft water for one pint of seeds will be quite sufficient. Salt should not be added until the seeds are nearly done, as it hinders the cooking process.
The dry, unsoaked legumes are usually best cooked in cold water. Once the water reaches a boil, let them simmer gently until they're done. For legumes that have been soaked beforehand, you can use boiling water. The amount of water needed will vary a bit depending on the heat level used and the age and condition of the legumes, as will the cooking time. However, as a general guideline, two quarts of soft water for one pint of seeds should be sufficient. Avoid adding salt until the seeds are nearly cooked, as it can slow down the cooking process.
PEAS.
Description.—The common garden pea is probably a native of countries bordering on the Black Sea. A variety known as the gray pea (pois chiche) has been used since a very remote period. The common people of Greece and Rome, in ancient times made it an ordinary article of diet. It is said that peas were considered such a delicacy by the Romans that those who coveted public favor distributed them gratuitously to the people in order to buy votes.
Description.—The common garden pea likely originates from countries around the Black Sea. A type known as the gray pea (pois chiche) has been used for a very long time. In ancient Greece and Rome, it was a regular part of the diet for common folks. It's said that the Romans regarded peas as such a delicacy that those seeking public approval would hand them out for free to win votes.
Peas were introduced into England from Holland in the time of Elizabeth, and were then considered a great delicacy. History tells us that when the queen was released from her confinement in the tower, May 19, 1554, she went to Staining to perform her devotions in the church of Allhallows, after which she dined at a neighboring inn upon a meal of which the principal dish was boiled peas. A dinner of the same kind, commemorative of the event, was for a long time given annually at the same tavern.
Peas were brought to England from Holland during Elizabeth's reign and were regarded as a luxury food. According to history, when the queen was freed from her imprisonment in the tower on May 19, 1554, she went to Staining to pray at Allhallows Church, after which she had a meal at a nearby inn that featured boiled peas as the main dish. For many years, a dinner commemorating this event was held annually at the same tavern.
Peas, when young, are tender and sweet, containing a considerable quantity of sugar. The nitrogenous matter entering into their composition, although less in quantity when unripe, is much more easily digested than when the seeds are mature.
Peas, when they're young, are tender and sweet, containing a lot of sugar. The nitrogenous compounds in them, although present in smaller amounts when they're unripe, are much easier to digest than when the seeds are fully mature.
When quite ripe, like other leguminous seeds, they require long cooking. When very old, no amount of boiling will soften them. When green, peas are usually cooked and served as a vegetable; in their dried state, they are put to almost every variety of use in the different countries where they are cultivated.
When fully ripe, like other legumes, they need to be cooked for a long time. When they’re very old, no amount of boiling will make them tender. When they’re green, peas are typically cooked and served as a vegetable; in their dried form, they are used in nearly every type of dish in the various countries where they’re grown.
In the southeast of Scotland, a favorite food is made of ground peas prepared in thick cakes and called peas-bainocks.
In the southeast of Scotland, a popular dish is made from ground peas shaped into thick cakes, known as peas-bainocks.
Dried peas for culinary use are obtainable in two forms; the split peas, which have had the tough envelope of the seed removed, and the green or Scotch peas.
Dried peas for cooking come in two forms: split peas, which have had their tough outer shell removed, and green or Scotch peas.
The time required for cooking will vary from five to eight hours, depending upon the age of the seed and the length of time it has been soaked previous to cooking.
The cooking time will range from five to eight hours, depending on the age of the seed and how long it has been soaked before cooking.
RECIPES.
Peas Puree.—Soak a quart of Scotch peas in cold water over night. In the morning, drain and put them to cook in boiling water. Cook slowly until perfectly tender, allowing them to simmer very gently toward the last until they become as dry as possible. Put through a colander to render them homogeneous and remove the skins. Many of the skins will be loosened and rise to the top during the cooking, and it is well to remove these with a spoon so as to make the process of rubbing through the colander less laborious. Season with salt if desired, and a cup of thin cream. Serve hot.
Peas Puree.—Soak a quart of Scotch peas in cold water overnight. In the morning, drain them and cook in boiling water. Cook slowly until they’re perfectly tender, letting them simmer very gently at the end until they’re as dry as possible. Pass through a colander to make them smooth and remove the skins. Many of the skins will loosen and float to the top during cooking, so it’s a good idea to remove these with a spoon to make the process of straining through the colander easier. Season with salt if you like, and add a cup of thin cream. Serve hot.
Mashed Peas.—Soak and cook a quart of peas as for Peas Puree When well done, if the Scotch peas, rub through a colander to remove the skins. If the split peas are used, mash perfectly smooth with a potato masher. Season with a teaspoonful of salt and a half cup of sweet cream, if desired. Beat well together, turn into an earthen or granite-ware pudding dish, smooth the top, and bake in a moderate oven until dry and mealy throughout, and nicely browned on top. Serve hot like mashed potato, or with a tomato sauce prepared as follows: Heat a pint of strained, stewed tomato, season lightly with salt, and when boiling, thicken with a tablespoonful of flour rubbed smooth in a little cold water.
Mashed Peas.—Soak and cook a quart of peas just like you would for Peas Puree. When they're well cooked, if you're using Scotch peas, push them through a colander to get rid of the skins. If you’re using split peas, mash them until they're completely smooth with a potato masher. Season with a teaspoon of salt and half a cup of sweet cream, if you like. Mix it all together, pour it into an earthen or graniteware baking dish, smooth out the top, and bake in a moderate oven until it’s dry and fluffy throughout, and nicely browned on top. Serve hot like mashed potatoes, or with a tomato sauce made by heating a pint of strained, stewed tomatoes, seasoning lightly with salt, and thickening when boiling with a tablespoon of flour mixed smooth in a little cold water.
Peas Cakes.—Cut cold mashed peas in slices half an inch in thickness, brush lightly with cream, place on perforated tins, and brown in the oven. If the peas crumble too much to slice, form them into small cakes with a spoon or knife, and brown as directed. Serve hot with or without a tomato sauce. A celery sauce prepared as directed in the chapter on Sauces, is also excellent.
Peas Cakes.—Slice cold mashed peas into half-inch thick pieces, lightly brush them with cream, place them on perforated baking trays, and brown them in the oven. If the peas fall apart too much to slice, shape them into small cakes using a spoon or knife and brown them as instructed. Serve hot with or without a tomato sauce. A celery sauce made as described in the chapter on Sauces is also excellent.
BEANS.
Description.—Some variety of the bean family has been cultivated and used for culinary purposes from time immemorial. It is frequently mentioned in Scripture; King David considered it worthy of a place in his dietary, and the prophet Ezekiel was instructed to mix it with the various grains and seeds of which he made his bread.
Among some ancient nations the bean was regarded as a type of death, and the priests of Jupiter were forbidden to eat it, touch it, or even pronounce its name. The believer in the doctrine of transmigration of souls carefully avoided this article of food, in the fear of submitting beloved friends to the ordeal of mastication.
Among certain ancient cultures, the bean was seen as a symbol of death, and the priests of Jupiter were not allowed to eat it, touch it, or even say its name. Those who believed in the idea of reincarnation went out of their way to avoid this food, fearing that they might subject their dear friends to the ordeal of eating it.
At the present day there is scarcely a country in hot or temperate climates where the bean is not cultivated and universally appreciated, both as a green vegetable and when mature and dried.
Nowadays, there’s hardly a country in warm or mild climates where beans aren’t grown and widely enjoyed, both as a fresh vegetable and when they’re mature and dried.
The time required to digest boiled beans is two and one half hours, and upwards.
The time it takes to digest boiled beans is two and a half hours or more.
In their immature state, beans are prepared and cooked like other green vegetables. Dry beans may be either boiled, stewed, or baked, but whatever the method employed, it must be very slow and prolonged. Beans to be baked should first be parboiled until tender. We mention this as a precautionary measure lest some amateur cook, misled by the term "bake," should repeat the experiment of the little English maid whom we employed as cook while living in London, a few years ago. In ordering our dinner, we had quite overlooked the fact that baked beans are almost wholly an American dish, and failed to give any suggestions as to the best manner of preparing it. Left to her own resources, the poor girl did the best she knew how, but her face was full of perplexity as she placed the beans upon the table at dinner, with, "Well, ma'am, here are the beans, but I don't see how you are going to eat them." Nor did we, for she had actually baked the dry beans, and they lay there in the dish, as brown as roasted coffee berries, and as hard as bullets.
In their immature state, beans are prepared and cooked like other green vegetables. Dry beans can be boiled, stewed, or baked, but no matter the method used, it has to be very slow and prolonged. Beans meant for baking should first be parboiled until tender. We mention this as a precaution so that some amateur cook, misled by the term "bake," doesn’t repeat the mistake of the little English maid we hired as a cook while living in London a few years ago. When we ordered our dinner, we completely overlooked that baked beans are mostly an American dish and didn't offer any suggestions on the best way to prepare it. Left to her own devices, the poor girl did her best, but she looked perplexed as she brought the beans to the table at dinner, saying, "Well, ma'am, here are the beans, but I don’t see how you’re going to eat them." Neither did we, because she had actually baked the dry beans, and they sat in the dish, as brown as roasted coffee beans and as hard as bullets.
Beans to be boiled or stewed do not need parboiling, although many cooks prefer to parboil them, to lessen the strong flavor which to some persons is quite objectionable.
Beans that will be boiled or stewed don’t need to be parboiled, although many cooks prefer to parboil them to reduce the strong flavor, which some people find quite unpleasant.
From one to eight hours are required to cook beans, varying with the age and variety of the seed, whether it has been soaked, and the rapidity of the cooking process.
Cooking beans takes anywhere from one to eight hours, depending on the age and type of the beans, whether they've been soaked, and how quickly you’re cooking them.
RECIPES.
Baked Beans.—Pick over a quart of best white beans and soak in cold water over night. Put them to cook in fresh water, and simmer gently till they are tender, but not broken. Let them be quite juicy when taken from the kettle. Season with salt and a teaspoonful of molasses. Put them in a deep crock in a slow oven. Let them bake two or three hours, or until they assume a reddish brown tinge, adding boiling water occasionally to prevent their becoming dry. Turn, into a shallow dish, and brown nicely before sending to the table.
Baked Beans.—Sort through a quart of your best white beans and soak them in cold water overnight. Cook them in fresh water and let them simmer gently until they’re tender but not broken. Make sure they’re still a bit juicy when you take them off the heat. Season with salt and a teaspoon of molasses. Transfer them to a deep dish and place it in a slow oven. Bake for two to three hours, or until they turn a reddish-brown color, adding boiling water occasionally to keep them from drying out. Serve them in a shallow dish and brown them nicely before bringing them to the table.
Boiled Beans.—Pick over some fresh, dry beans carefully, and wash thoroughly. Put into boiling water and cook gently and slowly until tender, but not broken. They should be moderately juicy when done. Serve with lemon juice, or season with salt and a little cream as preferred.
Boiled Beans.—Carefully sort through some fresh, dry beans, and rinse them well. Place them in boiling water and cook gently and slowly until they are tender but not mushy. They should be moderately juicy when finished. Serve with lemon juice, or season with salt and a bit of cream, depending on your preference.
The colored varieties, which are usually quite strong in flavor, are made less so by parboiling for fifteen or twenty minutes and then pouring the water off, adding more of boiling temperature, and cooking slowly until tender.
The colored varieties, which are typically very strong in flavor, are toned down by parboiling for fifteen or twenty minutes, then draining the water, adding more boiling water, and cooking slowly until they're tender.
Beans Boiled in a Bag.—Soak a pint of white beans over night. When ready to cook, put them into a clean bag, tie up tightly, as the beans have already swelled, and if given space to move about with the boiling of the water will become broken and mushy. Boil three or four hours. Serve hot.
Beans Boiled in a Bag.—Soak a pint of white beans overnight. When you're ready to cook, place them in a clean bag and tie it up tightly. The beans have already expanded, and if they have space to move around while boiling, they'll break apart and become mushy. Boil for three to four hours. Serve hot.
Scalloped Beans.—Soak a pint of white beans over night in cold water. When ready to cook, put into an earthen baking dish, cover well with new milk, and bake in a slow oven for eight or nine hours; refilling the dish with milk as it boils away, and taking care that the beans do not at any time get dry enough to brown over the top till they are tender. When nearly done, add salt to taste, and a half cup of cream. They may be allowed to bake till the milk is quite absorbed, and the beans dry, or may be served when rich with juice, according to taste. The beans may be parboiled in water for a half hour before beginning to bake, and the length of time thereby lessened. They should be well drained before adding the milk, however.
Scalloped Beans.—Soak a pint of white beans overnight in cold water. When you're ready to cook, put them in an earthen baking dish, cover them well with fresh milk, and bake in a low oven for eight or nine hours; refill the dish with milk as it boils away, and make sure the beans don't get too dry to brown on top until they are tender. When they're almost done, add salt to taste and half a cup of cream. You can let them bake until the milk is mostly absorbed and the beans are dry, or serve them when they're still juicy, depending on your preference. You can also parboil the beans in water for half an hour before starting to bake, which will cut down the baking time. Just be sure to drain them well before adding the milk.
Stewed Beans.—Soak a quart of white beans in water over night. In the morning drain, turn hot water over them an inch deep or more, cover, and place on the range where they will only just simmer, adding boiling water if needed. When nearly tender, add salt to taste, a tablespoonful of sugar if desired, and half a cup of good sweet cream. Cook slowly an hour or more longer, but let them be full of juice when taken up, never cooked down dry and mealy.
Stewed Beans.—Soak a quart of white beans in water overnight. In the morning, drain them, pour enough hot water over them to cover by an inch or more, cover the pot, and place it on the stove so it simmers gently, adding boiling water if necessary. When the beans are almost tender, add salt to taste, a tablespoon of sugar if you want, and half a cup of good sweet cream. Cook slowly for another hour or more, but make sure they are still juicy when you serve them; they should never be cooked down to a dry, mealy texture.
Mashed Beans.—Soak over night in cold water, a quart of nice white beans. When ready to cook, drain, put into boiling water, and boil till perfectly tender, and the water nearly evaporated. Take up, rub through a colander to remove the skins, season with salt and a half cup of cream, put in a shallow pudding dish, smooth the top with a spoon, and brown in the oven.
Mashed Beans.—Soak a quart of nice white beans in cold water overnight. When you're ready to cook, drain the beans, place them in boiling water, and boil until they're perfectly tender and most of the water has evaporated. Drain, put them through a colander to remove the skins, season with salt and half a cup of cream, transfer to a shallow baking dish, smooth the top with a spoon, and brown it in the oven.
Stewed Lima Beans.—Put the beans into boiling water, and cook till tender, but not till they fall to pieces. Fresh beans should cook an hour or more, and dry ones require from two to three hours unless previously soaked. They are much better to simmer slowly than to boil hard. They should be cooked nearly dry. Season with salt, and a cup of thin cream, to each pint of beans. Simmer for a few minutes after the cream is turned in. Should it happen that the beans become tender before the water is sufficiently evaporated, do not drain off the water, but add a little thicker cream, and thicken the whole with a little flour. A little flour stirred in with the cream, even when the water is nearly evaporated may be preferred by some.
Stewed Lima Beans.—Put the beans into boiling water and cook until they're tender, but not mushy. Fresh beans should cook for an hour or more, while dry ones need about two to three hours unless they've been soaked beforehand. It's better to simmer them slowly than to boil them hard. Cook them until they're almost dry. Season with salt and add a cup of thin cream for each pint of beans. Let it simmer for a few minutes after adding the cream. If the beans get tender before the water evaporates enough, don't drain the water; instead, add a bit more cream and thicken everything with some flour. Some prefer to stir a little flour into the cream, even when the water is almost gone.
Succotash.—Boil one part Lima beans and two parts sweet corn separately until both are nearly tender. Put them together, and simmer gently till done. Season with salt and sweet cream. Fresh corn and beans may be combined in the same proportions, but as the beans will be likely to require the most time for cooking, they should be put to boil first, and the corn added when the beans are about half done, unless it is exceptionally hard, in which case it must be added sooner.
Succotash.—Boil one part Lima beans and two parts sweet corn separately until both are almost tender. Combine them and simmer gently until fully cooked. Season with salt and sweet cream. Fresh corn and beans can be mixed in the same proportions, but since the beans will take longer to cook, start boiling them first. Add the corn when the beans are about halfway done, unless the corn is really hard, in which case it should be added sooner.
Pulp Succotash.—Score the kernels of some fresh green corn with a sharp knife blade, then with the back of a knife scrape out all the pulp, leaving the hulls on the cob. Boil the pulp in milk ten or fifteen minutes, or until well done. Cook some fresh shelled beans until tender, and rub them through a colander. Put together an equal quantity of the beans thus prepared and the cooked corn pulp, season with salt and sweet cream, boil together for a few minutes, and serve. Kornlet and dried Lima beans may be made into succotash in a similar manner.
Pulp Succotash.—Slice the kernels off some fresh green corn using a sharp knife, then use the back of the knife to scrape out all the pulp, leaving the husks on the cob. Boil the pulp in milk for about ten to fifteen minutes, or until it’s cooked through. Cook some fresh shelled beans until they’re tender, and push them through a colander. Combine an equal amount of the prepared beans and the cooked corn pulp, season with salt and sweet cream, boil together for a few minutes, and serve. You can also make succotash using corn and dried Lima beans in a similar way.
LENTILS.
Description.—Several varieties of the lentil are cultivated for food, but all are nearly alike in composition and nutritive value. They have long been esteemed as an article of diet. That they were in ordinary use among the Hebrews is shown by the frequent mention of them in Scripture. It is thought that the red pottage of Esau was made from the red variety of this legume.
Description.—Several types of lentils are grown for food, but they are all quite similar in their makeup and nutritional value. They have long been valued as a food source. The fact that they were commonly used by the Hebrews is evident from their frequent mentions in the Scriptures. It's believed that the red stew of Esau was made from the red variety of this legume.
The ancient Egyptians believed that a diet of lentils would tend to make their children good tempered, cheerful, and wise, and for this reason constituted it their principal food. A gravy made of lentils is largely used with their rice by the natives of India, at the present day.
The ancient Egyptians believed that a diet of lentils would help make their children good-natured, happy, and smart, which is why it was their main food. Today, a lentil gravy is commonly served with rice by the locals in India.
The meal which lentils yield is of great richness, and generally contains more casein than either beans or peas. The skin, however, is tough and indigestible, and being much smaller than peas, when served without rejecting the skins, they appear to be almost wholly of tough, fibrous material; hence they are of little value except for soups, purees, toasts, and other such dishes as require the rejection of the skin. Lentils have a stronger flavor than any of the other legumes, and their taste is not so generally liked until one has become accustomed to it.
The meal made from lentils is very nutritious and typically has more casein than beans or peas. However, the skin is tough and hard to digest, and since lentils are much smaller than peas, if you don't remove the skins when serving, they mostly seem like tough, fibrous material. Because of this, they're not very valuable except for soups, purees, toasts, and other dishes that require removing the skin. Lentils have a stronger flavor than other legumes, and most people don't really enjoy their taste until they get used to it.
Lentils are prepared and cooked in the same manner as dried peas, though they require somewhat less time for cooking.
Lentils are prepared and cooked just like dried peas, but they need a bit less time to cook.
The large dark variety is better soaked for a time previous to cooking, or parboiled for a half hour and then put into new water, to make them less strong in flavor and less dark in color.
The large dark variety should be soaked for a while before cooking, or parboiled for half an hour and then placed in fresh water, to reduce their strong flavor and dark color.
RECIPES.
Lentil Gravy with Rice.—Rub a cupful of cooked lentils through a colander to remove the skins, add one cup of rich milk, part cream if it can be afforded, and salt if desired. Heat to boiling, and thicken with a teaspoonful of flour rubbed smooth in a little cold milk. Serve hot on nicely steamed or boiled rice, or with well cooked macaroni.
Lentil Gravy with Rice.—Pass a cup of cooked lentils through a strainer to get rid of the skins, then add a cup of rich milk, and some cream if you can. Add salt to taste. Heat it until it boils, and thicken it with a teaspoon of flour mixed smoothly in a little cold milk. Serve it hot over nicely steamed or boiled rice, or with well-cooked macaroni.
TABLE TOPICS.
The men who kept alive the flame of learning and piety in the Middle Ages were mainly vegetarians.—Sir William Axon.
The men who kept the spirit of learning and faith alive during the Middle Ages were mostly vegetarians.—Sir William Axon.
According to Xenophon, Cyrus, king of Persia, was brought up on a diet of water, bread, and cresses, till his fifteenth year, when honey and raisins were added; and the family names of Fabii and Lentuli were derived from their customary diet.
According to Xenophon, Cyrus, king of Persia, was raised on a diet of water, bread, and cresses until he was fifteen, when honey and raisins were added; and the family names Fabii and Lentuli came from their usual diet.
Thomson, in his poem, "The Seasons," written one hundred and sixty years ago, pays the following tribute to a diet composed of seeds and vegetable products:—
Thomson, in his poem, "The Seasons," written one hundred sixty years ago, pays the following tribute to a diet made up of seeds and plant-based products:—
Most assuredly I do believe that body and mind are much influenced by the kind of food habitually depended upon. I can never stray among the village people of our windy capes without now and then coming upon a human being who looks as if he had been split, salted, and dried, like the salt fish which has built up his arid organism. If the body is modified by the food which nourishes it, the mind and character very certainly will be modified by it also. We know enough of their close connection with each other to be sure of what without any statistical observation to prove it.—Oliver Wendell Holmes.
I'm definitely convinced that our body and mind are greatly affected by the type of food we regularly eat. Whenever I walk through the village people of our windy coasts, I often encounter someone who looks like they’ve been split, salted, and dried, much like the salted fish that has shaped their barren body. If our bodies change based on the food that sustains them, then it’s clear that our minds and character will change as well. We know enough about how closely they are linked to be sure of this without needing any statistical evidence to back it up. —Oliver Wendell Holmes.
The thoughts and feelings which the food we partake of provokes, are not remarked in common life, but they, nevertheless, have their significance. A man who daily sees cows and calves slaughtered, or who kills them himself, hogs "stuck," hens "plucked," etc., cannot possibly retain any true feeling for the sufferings of his own species....Doubtless, the majority of flesh-eaters do not reflect upon the manner in which this food comes to them, but this thoughtlessness, far from being a virtue, is the parent of many vices....How very different are the thoughts and sentiments produced by the non-flesh diet!—Gustav Von Struve.
The thoughts and feelings that the food we eat provoke aren't usually noticed in everyday life, but they are important. A person who sees cows and calves being slaughtered daily, or who does it themselves, along with pigs being killed and chickens being plucked, cannot genuinely feel empathy for the suffering of their own kind.... Surely, most meat-eaters don’t think about how this food gets to them, but this lack of awareness, rather than being a good thing, is the root of many problems.... The thoughts and feelings that come from a plant-based diet are so much different!—Gustav Von Struve.
That the popular idea that beef is necessary for strength is not a correct one, is well illustrated by Xenophon's description of the outfit of a Spartan soldier, whose dietary consisted of the very plainest and simplest vegetable fare. The complete accoutrements of the Spartan soldier, in what we would call heavy marching order, weighed seventy-five pounds, exclusive of the camp, mining, and bridge-building tools and the rations of bread and dried fruit which were issued in weekly installments, and increased the burden of the infantry soldier to ninety, ninety-five, or even to a full hundred pounds. This load was often carried at the rate of four miles an hour for twelve hours per diem, day after day, and only when in the burning deserts of southern Syria did the commander of the Grecian auxiliaries think prudent to shorten the usual length of the day's march.
The common belief that beef is essential for strength is clearly disproven by Xenophon's account of a Spartan soldier's gear, whose diet consisted of very simple vegetarian food. The full gear of a Spartan soldier, in what we would consider heavy marching order, weighed seventy-five pounds, not including the camp, mining, and bridge-building equipment, as well as the weekly rations of bread and dried fruit, which pushed the infantry soldier's load to ninety, ninety-five, or even a full hundred pounds. This weight was often carried at a pace of four miles an hour for twelve hours a day, day in and day out, and only in the scorching deserts of southern Syria did the commander of the Greek auxiliaries find it wise to shorten the usual length of the day's march.
DIET OF TRAINERS.—The following are a few of the restrictions and rules laid down by experienced trainers:—
DIET OF TRAINERS.—Here are some of the restrictions and rules established by experienced trainers:—
Little salt. No course vegetables. No pork or veal. Two meals a day; breakfast at eight and dinner at two. No fat meat is allowed, no butter or cheese, pies or pastry.
Little salt. No hearty vegetables. No pork or veal. Two meals a day; breakfast at eight and dinner at two. No fatty meat is allowed, no butter or cheese, pies or pastries.

VEGETABLES
 egetables used for culinary purposes comprise roots and tubers, as
potatoes, turnips, etc.; shoots and stems, as asparagus and sea-kale;
leaves and inflorescence, as spinach and cabbage; immature seeds,
grains, and seed receptacles, as green peas, corn, and string-beans; and
a few of the fruity products, as the tomato and the squash. Of these the
tubers rank the highest in nutritive value.
egetables used for culinary purposes comprise roots and tubers, as
potatoes, turnips, etc.; shoots and stems, as asparagus and sea-kale;
leaves and inflorescence, as spinach and cabbage; immature seeds,
grains, and seed receptacles, as green peas, corn, and string-beans; and
a few of the fruity products, as the tomato and the squash. Of these the
tubers rank the highest in nutritive value.
Vegetables used in cooking include roots and tubers like potatoes and turnips; shoots and stems such as asparagus and sea-kale; leaves and flowers like spinach and cabbage; immature seeds, grains, and seed pods such as green peas, corn, and green beans; and a few fruits like tomatoes and squash. Among these, tubers have the highest nutritional value.
Vegetables are by no means the most nutritious diet, as water enters largely into their composition; but food to supply perfectly the needs of the vital economy, must contain water and indigestible as well as nutritive elements. Thus they are dietetically of great value, since they furnish a large quantity of organic fluids. Vegetables are rich in mineral elements, and are also of service in giving bulk to food. An exclusive diet of vegetables, however, would give too great bulk, and at the same time fail to supply the proper amount of food elements. To furnish the requisite amount of nitrogenous material for one day, if potatoes alone were depended upon as food, a person would need to consume about nine pounds; of turnips, sixteen pounds; of parsnips, eighteen pounds; of cabbage, twenty-two pounds. Hence it is wise to use them in combination with other articles of diet—grains, whole-wheat bread, etc.—that supplement the qualities lacking in the vegetables.
Vegetables aren’t the most nutritious option since they contain a lot of water; however, a complete diet needs to have water along with indigestible and nutritious elements. Because of this, they have significant dietary value as they provide a good amount of organic fluids. Vegetables are high in minerals and help add bulk to meals. Relying solely on vegetables for nutrition could lead to excessive bulk while not providing enough essential food elements. For instance, to get enough nitrogen for a day, one would need to eat about nine pounds of potatoes, sixteen pounds of turnips, eighteen pounds of parsnips, and twenty-two pounds of cabbage. Therefore, it’s smart to mix them with other foods—like grains and whole-wheat bread—that can fill in the gaps in the vegetables' nutrition.
To Select Vegetables.—All roots and tubers should be plump, free from decay, bruises, and disease, and with fresh, unshriveled skins. They are good from the time of maturing until they begin to germinate. Sprouted vegetables are unfit for food. Potato sprouts contain a poison allied to belladonna. All vegetables beginning to decay are unfit for food.
Choosing Vegetables.—All roots and tubers should be firm, free from rot, bruises, and diseases, and have fresh, smooth skins. They are good from the time they mature until they start to sprout. Sprouted vegetables are not safe to eat. Potato sprouts have a toxin similar to that found in belladonna. Any vegetables that are starting to decay are not safe for consumption.
Green vegetables to be wholesome should be freshly gathered, crisp, and juicy; those which have lain long in the market are very questionable food. In Paris, a law forbids a market-man to offer for sale any green vegetable kept more than one day. The use of stale vegetables is known to have been the cause of serious illness.
Green vegetables should be fresh, crisp, and juicy to be healthy; those that have been sitting around in the market for too long are not reliable food. In Paris, there's a law that prevents market sellers from offering any green vegetables that have been stored for more than one day. Using old vegetables is known to have caused serious health issues.
Keeping Vegetables—If necessary to keep green vegetables for any length of time, do not put them in water, as that will dissolve and destroy some of their juices; but lay them in a cool, dark place,—on a stone floor is best,—and do not remove their outer leaves until needed. They should be cooked the day they are gathered, if possible. The best way to freshen those with the stems when withered is to cut off a bit of the stem or stem-end, and set only the cut part in water. The vegetables will then absorb enough water to replace what has been lost by evaporation.
Keeping Vegetables—If you need to store green vegetables for a while, don’t put them in water, as that will wash away and damage some of their juices. Instead, keep them in a cool, dark place—preferably on a stone floor—and don’t remove their outer leaves until you’re ready to use them. If possible, cook them on the same day they are harvested. To refresh those with wilting stems, just cut off a small portion of the stem and place the cut end in water. The vegetables will then take in enough water to replace what they’ve lost through evaporation.
Peas and beans should not be shelled until wanted. If, however, they are not used as soon as shelled, cover them with pods and put in a cool place.
Peas and beans shouldn’t be shelled until you need them. However, if you’re not using them right after shelling, cover them with their pods and store them in a cool place.
Winter vegetables can be best kept wholesome by storing in a cool, dry place of even temperature, and where neither warmth, moisture, nor light is present to induce decay or germination. They should be well sorted, the bruised or decayed, rejected, and the rest put into clean bins or boxes; and should be dry and clean when stored. Vegetables soon absorb bad flavors if left near anything odorous or decomposing, and are thus rendered unwholesome. They should be looked over often, and decayed ones removed. Vegetables, to be kept fit for food, should on no account be stored in a cellar with barrels of fermenting pickle brine, soft soap, heaps of decomposing rubbish, and other similar things frequently found in the dark, damp vegetable cellars of modern houses.
Winter vegetables can be kept fresh by storing them in a cool, dry place with a consistent temperature, away from warmth, moisture, or light that can cause spoilage or sprouting. They should be sorted carefully, discarding any bruised or spoiled ones, and the remaining vegetables should be placed in clean bins or boxes; they should be dry and clean before storage. Vegetables can easily absorb unpleasant flavors if left near anything smelly or rotting, making them unfit to eat. They should be checked regularly, and any spoiled ones should be removed. To keep vegetables safe for consumption, they shouldn't be stored in a cellar with barrels of fermenting pickle brine, soft soap, piles of rotting garbage, or similar items often found in the dark, damp vegetable cellars of modern homes.
Preparation and Cooking.—Most vegetables need thorough washing before cooking. Roots and tubers should be well cleaned before paring. A vegetable brush or a small whisk broom is especially serviceable for this purpose. If necessary to wash shelled beans and peas, it can best be accomplished by putting them in a colander and dipping in and out of large pans of water until clean. Spinach, lettuce, and other leaves may be cleaned the same way.
Preparation and Cooking.—Most vegetables need to be washed thoroughly before cooking. Roots and tubers should be cleaned well before peeling. A vegetable brush or a small whisk broom works especially well for this. If you need to wash shelled beans and peas, it’s best to put them in a colander and dip them in and out of large pots of water until they’re clean. Spinach, lettuce, and other leafy greens can be cleaned the same way.
Vegetables admit of much variety in preparation for the table, and are commonly held to require the least culinary skill of any article of diet. This is a mistake. Though the usual processes employed to make vegetables palatable are simple, yet many cooks, from carelessness or lack of knowledge of their nature and composition, convert some of the most nutritious vegetables into dishes almost worthless as food or almost impossible of digestion. It requires no little care and skill to cook vegetables so that they will neither be underdone nor overdone, and so that they will retain their natural flavors.
Vegetables can be prepared in a variety of ways and are often thought to need the least cooking skill of any food. This is a misconception. While the typical methods to make vegetables tasty are straightforward, many cooks, due to carelessness or lack of understanding of their qualities and composition, turn some of the most nutritious vegetables into dishes that are nearly worthless as food or very hard to digest. It takes a good amount of care and skill to cook vegetables so that they are neither undercooked nor overcooked, and so that they keep their natural flavors.
A general rule, applicable to all vegetables to be boiled or stewed, is to cook them in as little water as may be without burning. The salts and nutrient juices are largely lost in the water; and if this needs to be drained off, much of the nutriment is apt to be wasted. Many cooks throw away the true richness, while they serve the "husks" only. Condiments and seasonings may cover insipid taste, but they cannot restore lost elements. Vegetables contain so much water in their composition that it is not necessary to add large quantities for cooking, as in the case of the grains and legumes, which have lost nearly all their moisture in the ripening process. Some vegetables are much better cooked without the addition of water.
A general rule for boiling or stewing vegetables is to use as little water as possible without scorching them. Many of the salts and nutrients are lost in the water, and if you need to drain it, a lot of the nutrition can be wasted. Many cooks discard the real richness while only serving the "husks." Seasonings can mask bland flavors, but they can't bring back lost nutrients. Vegetables have so much water in them that you don't need to add much for cooking, unlike grains and legumes, which lose almost all their moisture during ripening. Some vegetables are much better cooked without adding any water.
Vegetables to be cooked by boiling should be put into boiling water; and since water loses its goodness by boiling, vegetables should be put in as soon as the boiling begins. The process of cooking should be continuous, and in general gentle heat is best. Remember that when water is boiling, the temperature is not increased by violent bubbling. Keep the cooking utensil closely covered. If water is added, let it also be boiling hot.
Vegetables that need to be boiled should be added to boiling water. Since water loses its quality when boiled, add the vegetables as soon as the water starts boiling. The cooking process should be continuous, and gentle heat is usually the best approach. Keep in mind that when water is boiling, the temperature doesn’t get any higher with vigorous bubbling. Keep the cooking pot covered tightly. If you need to add water, make sure it's boiling hot as well.
Vegetables not of uniform size should be so assorted that those of the same size may be cooked together, or large ones may be divided. Green vegetables retain their color best if cook rapidly. Soda is sometimes added to the water in which the vegetables are cooked, for the purpose of preserving their colors, but this practice is very harmful.
Vegetables that aren't all the same size should be sorted so that those that are uniform in size can be cooked together, or larger ones can be cut up. Green vegetables keep their color best when cooked quickly. Some people add baking soda to the water when cooking vegetables to help maintain their color, but this is actually very harmful.
Vegetables should be cooked until they are perfectly tender but not overdone. Many cooks spoil their vegetables by cooking them too long, while quite as many more serve them in an underdone state to preserve their form. Either plan makes them less palatable, and likely to be indigestible.
Vegetables should be cooked until they're perfectly tender but not overcooked. Many cooks ruin their vegetables by cooking them too long, while just as many serve them undercooked to keep their shape. Both approaches make them less tasty and likely to be hard to digest.
Steaming or baking is preferable for most vegetables, because their finer flavors are more easily retained, and their food value suffers less diminution. Particularly is this true of tubers.
Steaming or baking is better for most vegetables because it helps keep their delicate flavors and nutritional value intact. This is especially true for tubers.
The time required for cooking depends much upon the age and freshness of the vegetables, as well as the method of cooking employed. Wilted vegetables require a longer time for cooking than fresh ones.
The time it takes to cook depends a lot on the age and freshness of the vegetables, as well as the cooking method used. Wilted vegetables take longer to cook than fresh ones.
Potatoes, baked, 30 to 45 minutes.
Potatoes, baked, 30 to 45 minutes.
Potatoes, steamed, 20 to 40 minutes.
Potatoes, steamed, 20 to 40 minutes.
Potatoes, boiled (in jackets), 20 to 25 minutes after the water is fairly boiling.
Potatoes, boiled (in their skins), for 20 to 25 minutes after the water is at a good boil.
Potatoes, pared, about 20 minutes if of medium size; if very large, they will require from 25 to 45 minutes.
Potatoes, peeled, take about 20 minutes if they are medium-sized; if they are very large, they will need 25 to 45 minutes.
Green corn, young, from 15 to 20 minutes.
Green corn, young, for 15 to 20 minutes.
Peas, 25 to 30 minutes.
Peas, 25-30 minutes.
Asparagus, 15 to 20 minutes, young; 30 to 50 if old.
Asparagus, 15 to 20 minutes for young ones; 30 to 50 for older ones.
Tomatoes, 1 to 2 hours.
Tomatoes, 1 to 2 hrs.
String beans and shelled beans, 45 to 60 minutes or longer.
String beans and shelled beans, cook for 45 to 60 minutes or longer.
Beets, boiled, 1 hour if young; old, 3 to 5 hours.
Beets, boiled, 1 hour if young; 3 to 5 hours if old.
Beets, baked, 3 to 6 hours. Carrots, 1 to 2 hours.
Beets, baked, 3 to 6 hours. Carrots, 1 to 2 hours.
Parsnips, 45 minutes, young; old, 1 to 2 hours.
Parsnips, 45 minutes for young ones; 1 to 2 hours for older ones.
Turnips, young, 45 minutes; old, 1-1/2 to 2 hours.
Turnips, young, 45 minutes; old, 1.5 to 2 hours.
Winter squash, 1 hour. Cabbage, young, 1 hour; old, 2 to 3 hours.
Winter squash, 1 hour. Young cabbage, 1 hour; old cabbage, 2 to 3 hours.
Vegetable oysters, 1 to 2 hours.
Vegetable oysters, 1 to 2 hours.
Celery, 20 to 30 minutes.
Celery, 20-30 minutes.
Spinach, 20 to 60 minutes or more.
Spinach, 20 to 60 minutes or longer.
Cauliflower, 20 to 40 minutes.
Cauliflower, 20 to 40 mins.
Summer squash, 20 to 60 minutes.
Summer squash, 20 to 60 minutes.
If vegetables after being cooked cannot be served at once, dish them up as soon as done, and place the dishes in a bain marie or in pans of hot water, where they will keep of even temperature, but not boil. Vegetables are never so good after standing, but they spoil less kept in this way than any other. The water in the pans should be of equal depth with the food in the dishes. Stewed vegetables and others prepared with a sauce, may, when cold, be reheated in a similar manner.
If cooked vegetables can't be served right away, plate them as soon as they're done and put the dishes in a bain marie or in hot water pans, where they'll stay at a consistent temperature without boiling. Vegetables don't taste as good after sitting for a while, but keeping them this way preserves them better than any other method. The water in the pans should be at the same level as the food in the dishes. Stewed vegetables and those made with sauce can also be reheated in the same way when they've cooled down.

Bain Marie.
If salt is to be used to season, one third of a teaspoonful for each pint of cooked vegetables is an ample quantity.
If you're using salt to season, a third of a teaspoon for each pint of cooked vegetables is more than enough.
THE IRISH POTATO.
Description.—The potato, a plant of the order Solanaceae, is supposed to be indigenous to South America. Probably it was introduced into Europe by the Spaniards early in the sixteenth century, but cultivated only as a curiosity. To Sir Walter Raleigh, however, is usually given the credit of its introduction as a food, he having imported it from Virginia to Ireland in 1586, where its valuable nutritive qualities were first appreciated. The potato has so long constituted the staple article of diet in Ireland, that it has come to be commonly, though incorrectly, known as the Irish potato.
Description.—The potato, a plant from the order Solanaceae, is believed to be native to South America. It was likely brought to Europe by the Spaniards in the early sixteenth century, but initially grown mainly as a curiosity. Sir Walter Raleigh is often credited with introducing it as a food, as he brought it from Virginia to Ireland in 1586, where its valuable nutritional benefits were first recognized. The potato has been such a fundamental part of the diet in Ireland that it has come to be commonly, though incorrectly, referred to as the Irish potato.
The edible portion of the plant is the tuber, a thick, fleshy mass or enlarged portion of an underground stem, having upon its surface a number of little buds, or "eyes," each capable of independent growth. The tuber is made up of little cells filled with starch granules, surrounded and permeated with a watery fluid containing a small percentage of the albuminous or nitrogenous elements. In cooking, heat coagulates the albumen within and between the cells, while the starch granules absorb the watery portion, swell, and distend the cells. The cohesion between these is also destroyed, and they easily separate. When these changes are complete, the potato becomes a loose, farinaceous mass, or "mealy." When, however, the liquid portion is not wholly absorbed, and the cells are but imperfectly separated, the potato appears waxen, watery, or soggy. In a mealy state the potato is easily digested; but when waxy or water-soaked, it is exceedingly trying to the digestive powers.
The edible part of the plant is the tuber, a thick, fleshy mass or enlarged section of an underground stem, with several small buds, or "eyes," on its surface, each capable of growing independently. The tuber is composed of tiny cells filled with starch granules, surrounded and filled with a watery fluid that contains a small amount of protein or nitrogenous elements. When cooked, heat causes the protein to coagulate within and between the cells, while the starch granules absorb the water, swell, and stretch the cells. The connection between them also breaks down, allowing them to separate easily. Once these changes are complete, the potato becomes a loose, fluffy mass, or "mealy." However, when the liquid isn't fully absorbed and the cells are only partially separated, the potato looks waxy, watery, or soggy. In its mealy state, the potato is easy to digest; but when it’s waxy or waterlogged, it is quite difficult for the digestive system to handle.
It is obvious, then, that the great desideratum in cooking the potato, is to promote the expansion and separation of its cells; in other words, to render it mealy. Young potatoes are always waxy, and consequently less wholesome than ripe ones. Potatoes which have been frozen and allowed to thaw quickly are much sweeter and more watery, because in thawing the starch changes into sugar. Frozen potatoes should be thawed in cold water and cooked at once, or kept frozen until ready for use.
It is clear, then, that the main goal in cooking potatoes is to encourage the expansion and separation of their cells; in other words, to make them fluffy. Young potatoes are always waxy and therefore less nutritious than mature ones. Potatoes that have been frozen and then thawed quickly are much sweeter and more watery because the starch changes to sugar during thawing. Frozen potatoes should be thawed in cold water and cooked immediately, or kept frozen until you're ready to use them.
Preparation and Cooking.—Always pare potatoes very thin. Much of the most nutritious part of the tuber lies next its outer covering; so care should be taken to waste as little as possible. Potatoes cooked with the skins on are undoubtedly better than those pared. The chief mineral element contained in the potato is potash, an important constituent of the blood. Potash salts are freely soluble in water, and when the skin is removed, there is nothing to prevent these salts from escaping into the water in which the potato is boiled. If the potato is cooked in its "jacket," the skin, which does not in general burst open until the potato is nearly done, serves to keep this valuable element largely inside the potato while cooking. For the same reason it is better not to pare potatoes and put them in water to soak over night, as many cooks are in the habit of doing, to have them in readiness for cooking for breakfast.
Preparation and Cooking.—Always peel potatoes very thinly. A lot of the most nutritious part of the tuber is located just under the skin, so you should try to waste as little as possible. Potatoes cooked with the skins on are definitely better than those that are peeled. The main mineral found in potatoes is potash, which is an important component of blood. Potash salts dissolve easily in water, and when the skin is taken off, there's nothing to stop these salts from leaching into the water while the potato is boiled. If the potato is cooked in its "jacket," the skin, which generally doesn't burst until the potato is almost done, helps to keep this valuable element mostly inside the potato while it cooks. For the same reason, it’s also better not to peel potatoes and soak them in water overnight, as many cooks do to prepare them for breakfast.
Potatoes to be pared should be first washed and dried. It is a good plan to wash quite a quantity at one time, to be used as needed. After paring, drop at once into cold water and rinse them thoroughly. It is a careless habit to allow pared potatoes to fall among the skins, as in this way they become stained, and appear black and discolored after cooking. Scrubbing with a vegetable brush is by far the best means for cleaning potatoes to be cooked with the skins on.
Potatoes that need to be peeled should first be washed and dried. It’s a good idea to wash a whole batch at once for later use. After peeling, immediately drop them into cold water and rinse them well. It’s careless to let peeled potatoes mix with the skins, as they can get stained and turn black and discolored after cooking. Using a vegetable brush is definitely the best way to clean potatoes that you plan to cook with the skins on.
When boiled in their skins, the waste, according to Letheby, is about three per cent, while without them it is not less than fourteen per cent, or more than two ounces in every pound. Potatoes boiled without skins should be cooked very gently.
When boiled in their skins, the waste, according to Letheby, is about three percent, while without them, it’s at least fourteen percent, or more than two ounces in every pound. Potatoes boiled without skins should be cooked very gently.
Steaming, roasting, and baking are much better methods for cooking potatoes than boiling, for reasons already given. Very old potatoes are best stewed or mashed. When withered or wilted, they are freshened by standing in cold water for an hour or so before cooking. If diseased or badly sprouted, potatoes are wholly unfit for food.
Steaming, roasting, and baking are way better ways to cook potatoes than boiling, for the reasons mentioned earlier. Old potatoes are best when stewed or mashed. If they’re shriveled or wilted, you can freshen them up by soaking them in cold water for about an hour before cooking. If potatoes are diseased or badly sprouted, they are completely unfit to eat.
RECIPES.
Boiled Potatoes (in Jackets).—Choose potatoes of uniform size, free from specks. Wash and scrub them well with a coarse cloth or brush; dig out all eyes and rinse in cold water; cook in just enough water to prevent burning, till easily pierced with a fork, not till they have burst the skin and fallen in pieces. Drain thoroughly, take out the potatoes, and place them in the oven for five minutes, or place the kettle back on the range; remove the skins, and cover with a cloth to absorb all moisture, and let them steam three or four minutes. By either method they will be dry and mealy. In removing the skins, draw them off without cutting the potatoes.
Boiled Potatoes (in Jackets).—Select potatoes that are the same size and free from blemishes. Wash and scrub them thoroughly with a rough cloth or brush; remove all eyes and rinse them in cold water. Cook them in just enough water to avoid burning, until you can easily pierce them with a fork, but don’t let them burst their skins and fall apart. Drain them well, take the potatoes out, and put them in the oven for five minutes, or place the kettle back on the stove; peel off the skins, and cover them with a cloth to catch all moisture, allowing them to steam for three or four minutes. With either method, they will turn out dry and fluffy. When peeling the skins, pull them off without cutting into the potatoes.
Boiled Potatoes (without Skins).—Pare very thin, and wash clean. If not of an equal size, cut the larger potatoes in two. Cook in only sufficient water to prevent burning until a fork will easily pierce their center; drain thoroughly, place the kettle back on the range, cover with a cloth to absorb the moisture, and let them dry four or five minutes. Shake the kettle several times while they are drying, to make them floury.
Boiled Potatoes (without Skins).—Peel them thin and wash them well. If the potatoes are not all the same size, cut the larger ones in half. Cook them in just enough water to avoid burning until a fork easily goes through the center; then, drain them well, put the pot back on the stove, cover it with a cloth to soak up the moisture, and let them dry for four or five minutes. Shake the pot a few times while they are drying to make them fluffy.
Steamed Potatoes.—Potatoes may be steamed either with or without the skin. Only mature potatoes can be steamed. Prepare as for boiling; place in a steamer, over boiling water, and steam until tender. If water is needed to replenish, let it always be boiling hot, and not allow the potatoes to stop steaming, or they will be watery. When done, uncover, remove the potatoes to the oven, and let them dry a few minutes. If peeled before steaming, shake the steamer occasionally, to make them floury.
Steamed Potatoes.—You can steam potatoes either with or without the skin. Only fully mature potatoes can be steamed. Prepare them as you would for boiling; place them in a steamer over boiling water, and steam until they are tender. If you need to add water, make sure it's boiling hot, and keep the potatoes steaming or they might become watery. Once they’re done, uncover them, transfer the potatoes to the oven, and let them dry for a few minutes. If you peel them before steaming, shake the steamer occasionally to keep them fluffy.
Roasted Potatoes.—Potatoes are much more rich and mealy roasted than cooked in any other way. Wash them very carefully, dry with a cloth, and wrap in tissue paper; bury in ashes not too hot, then cover with coals and roast until tender. The coals will need renewing occasionally, unless the roasting is done very close to the main fire.
Roasted Potatoes.—Potatoes are way richer and creamier when roasted compared to any other cooking method. Clean them thoroughly, dry them with a cloth, and wrap them in tissue paper; then bury them in warm ashes, and cover with coals, roasting until they're tender. You'll need to replace the coals now and then unless you're roasting them really close to the main fire.
Baked Potatoes.—Choose large, smooth potatoes as near the same size as possible; wash and scrub with a brush until perfectly clean; dry with a cloth, and bake in a moderately hot oven until a fork will easily pierce them, or until they yield to pressure between the fingers. They are better turned about occasionally. In a slow oven the skins become hardened and thickened, and much of the most nutritious portion is wasted. When done, press each one till it bursts slightly, as that will allow the steam to escape, and prevent the potatoes from becoming soggy. They should be served at once, in a folded napkin placed in a hot dish. Cold baked potatoes may be warmed over by rebaking, if of good quality and not overdone the first time.
Baked Potatoes.—Choose large, smooth potatoes that are as similar in size as possible; wash and scrub them with a brush until they're completely clean; dry with a cloth, and bake in a moderately hot oven until a fork easily pierces them, or until they give when pressed with your fingers. It's best to turn them occasionally. In a slow oven, the skins can become hard and thick, wasting much of the nutritious part. When they're done, press each one until it slightly bursts to let the steam escape and keep the potatoes from getting soggy. Serve them right away, wrapped in a folded napkin on a hot dish. If cold baked potatoes are of good quality and weren’t overcooked the first time, you can reheat them by baking again.
Stuffed Potato.—Prepare and bake large potatoes of equal size, as directed in the preceding recipe. When done, cut them evenly three fourths of an inch from the end, and scrape out the inside, taking care not to break the skins. Season the potato with salt and a little thick sweet cream, being careful not to have it too moist, and beat thoroughly with a fork until light; refill the skins with the seasoned potato, fit the broken portions together, and reheat in the oven. When hot throughout, wrap the potatoes in squares of white tissue paper fringed at both ends. Twist the ends of the paper lightly together above the fringe, and stand the potatoes in a vegetable dish with the cut end uppermost. When served, the potatoes are held in the hand, one end of the paper untwisted, the top of the potato removed, and the contents eaten with a fork or spoon.
Stuffed Potato.—Prepare and bake large potatoes of the same size, as directed in the previous recipe. When they are done, cut them evenly about three-quarters of an inch from one end and scoop out the insides, being careful not to break the skins. Season the potato with salt and a bit of thick sweet cream, making sure it’s not too runny, and mash it thoroughly with a fork until fluffy; refill the skins with the seasoned potato, press the broken parts back together, and heat them up in the oven. When they’re hot all the way through, wrap the potatoes in squares of white tissue paper that are fringed at both ends. Twist the ends of the paper lightly together above the fringe and place the potatoes in a vegetable dish with the cut end facing up. When serving, hold the potatoes in your hand, untwist one end of the paper, remove the top of the potato, and eat the insides with a fork or spoon.
Stuffed Potatoes No. 2.—Prepare large, smooth potatoes, bake until tender, and cut them in halves; scrape out the inside carefully, so as not to break the skins; mash smoothly, mix thoroughly with one third freshly prepared cottage cheese; season with nice sweet cream, and salt if desired. Fill the shells with the mixture, place cut side uppermost, in a pudding dish, and brown in the oven.
Stuffed Potatoes No. 2.—Prepare large, smooth potatoes, bake them until they’re tender, and cut them in half; carefully scoop out the insides without breaking the skins. Mash them until smooth, then mix thoroughly with one-third freshly made cottage cheese. Season with some nice sweet cream and salt if you'd like. Fill the shells with the mixture, placing the cut side up in a baking dish, and brown in the oven.
Mashed Potatoes.—Peel and slice potatoes enough to make two quarts; put into boiling water and cook until perfectly tender, but not much broken; drain, add salt to taste; turn into a hot earthen dish, and set in the oven for a few moments to dry. Break up the potatoes with a silver fork; add nearly a cup of cream, and beat hard at least five minutes till light and creamy; serve at once, or they will become heavy. If preferred, the potatoes may be rubbed through a hot sieve into a hot plate, or mashed with a potato beetle, but they are less light and flaky when mashed with a beetle. If cream for seasoning is not obtainable, a well-beaten egg makes a very good substitute. Use in the proportion of one egg to about five potatoes. For mashed potatoes, if all utensils and ingredients are first heated, the result will be much better.
Mashed Potatoes.—Peel and slice enough potatoes to make two quarts; place them in boiling water and cook until they're tender but not too mushy; drain, add salt to taste; transfer to a hot earthen dish, and put it in the oven for a few moments to dry. Break up the potatoes with a silver fork; add nearly a cup of cream, and beat hard for at least five minutes until light and creamy; serve immediately, or they will become heavy. If you prefer, the potatoes can be pushed through a hot sieve into a hot plate, or mashed with a potato masher, but they won't be as light and flaky when mashed with a masher. If cream for seasoning isn't available, a well-beaten egg works as a great substitute. Use about one egg for every five potatoes. For better mashed potatoes, heat all utensils and ingredients first.
New Potatoes.—When potatoes are young and freshly gathered, the skins are easiest removed by taking each one in a coarse cloth and rubbing it; a little coarse salt used in the cloth will be found serviceable for this purpose. If almost ripe, scrape with a blunt knife, wash very clean, and rinse in cold water. Boiling is the best method of cooking; new potatoes are not good steamed. Use only sufficient water to cover, and boil till tender. Drain thoroughly, cover closely with a clean cloth, and dry before serving.
New Potatoes.—When potatoes are young and freshly harvested, it's easiest to remove the skins by taking each one in a coarse cloth and rubbing it. Using a bit of coarse salt in the cloth can help with this process. If they are almost ripe, scrape them with a blunt knife, wash them thoroughly, and rinse in cold water. Boiling is the best way to cook them; new potatoes don't steam well. Use just enough water to cover them, and boil until they're tender. Drain well, cover tightly with a clean cloth, and let them dry before serving.
Creamed Potatoes.—Take rather small, new potatoes and wash well; rub off all the skins; cut in halves, or if quite large, quarter them. Put a pint of divided potatoes into a broad-bottomed, shallow saucepan; pour over them a cup of thin sweet cream, add salt if desired; heat just to the boiling point, then allow them to simmer gently till perfectly tender, tossing them occasionally in the stewpan to prevent their burning on the bottom. Serve hot.
Mashed Potatoes.—Take small, new potatoes and wash them well; peel off all the skins; cut them in half, or in quarters if they are large. Place a pint of the chopped potatoes into a wide, shallow saucepan; pour a cup of thin sweet cream over them, add salt if you want; heat them just until they start to boil, then let them simmer gently until they're perfectly soft, stirring occasionally to prevent them from sticking to the bottom. Serve hot.
Scalloped Potatoes.—Pare the potatoes and slice thin; put them in layers in an earthen pudding dish, dredge each layer lightly with flour, and salt, and pour over all enough good, rich milk to cover well. Cover, and bake rather slowly till tender, removing the cover just long enough before the potatoes are done, to brown nicely. If preferred, a little less milk may be used, and a cup of thin cream added when the potatoes are nearly done.
Scalloped Potatoes.—Peel the potatoes and slice them thin; layer them in a casserole dish, lightly dust each layer with flour and salt, and pour enough good, rich milk over everything to cover it well. Cover the dish and bake slowly until tender, removing the cover just long enough before the potatoes are finished to let them brown nicely. If you prefer, you can use a bit less milk and add a cup of thin cream when the potatoes are almost done.
Stewed Potato.—Pare the potatoes and slice rather thin. Put into boiling water, and cook until nearly tender, but not broken. Have some rich milk boiling in the inner dish of a double boiler, add to it a little salt, then stir in for each pint of milk a heaping teaspoonful of corn starch or rice flour, rubbed smooth in a little cold milk. Stir until it thickens. Drain the potatoes, turn them into the hot sauce, put the dish in the outer boiler, and cook for a half hour or longer. Cold boiled potatoes may be sliced and used in the same way. Cold baked potatoes sliced and stewed thus for an hour or more, make a particularly appetizing dish.
Stewed Potato.—Peel the potatoes and slice them thin. Put them in boiling water and cook until they’re almost tender, but not mushy. Heat some rich milk in the inner pot of a double boiler, add a little salt, then stir in a heaping teaspoon of cornstarch or rice flour for each pint of milk, mixed with a bit of cold milk until smooth. Stir until it thickens. Drain the potatoes, add them to the hot sauce, place the dish in the outer boiler, and cook for about half an hour or longer. You can also slice and use cold boiled potatoes in the same way. Cold baked potatoes sliced and stewed for an hour or more make a particularly tasty dish.
Potatoes Stewed with Celery.—Pare and slice the potatoes, and put them into a stewpan with two or three tablespoonfuls of minced celery. Use only the white part of the celery and mince it finely. Cover the whole with milk sufficient to cook and prevent burning, and stew until tender. Season with cream and salt.
Potatoes Stewed with Celery.—Peel and slice the potatoes, and place them in a saucepan with two or three tablespoons of chopped celery. Only use the white part of the celery and chop it finely. Cover everything with enough milk to cook and prevent burning, and simmer until tender. Season with cream and salt.
Potato Snowballs.—Cut largo potatoes into quarters; if small, leave them undivided; boil in just enough water to cover. When tender, drain and dry in the usual way. Take up two or three pieces at a time in a strong, clean cloth, and press them compactly together in the shape of balls. Serve in a folded napkin on a hot dish.
Potato Snowballs.—Cut large potatoes into quarters; if they’re small, leave them whole. Boil them in just enough water to cover. When they’re tender, drain and dry them as usual. Take two or three pieces at a time in a strong, clean cloth, and press them tightly together into the shape of balls. Serve in a folded napkin on a hot dish.
Potato Cakes with Egg.—Bake nice potatoes till perfectly tender; peel, mash thoroughly, and to each pint allow the yolks of two eggs which have been boiled until mealy, then rubbed perfectly smooth through a fine wire sieve, and one half cup of rich milk. Add salt to taste, mix all well together, form the potato into small cakes, place them on oiled tins, and brown ten or fifteen minutes in the oven.
Potato Cakes with Egg.—Bake nice potatoes until they’re perfectly tender; peel, mash thoroughly, and for each pint, add the yolks of two eggs that have been boiled until dry, then rub them completely smooth through a fine wire sieve, along with half a cup of rich milk. Add salt to taste, mix everything well together, shape the potato into small cakes, place them on greased baking sheets, and bake for ten to fifteen minutes in the oven until browned.
Potato Puff.—Mix a pint of mashed potato (cold is just as good if free from lumps) with a half cup of cream and the well-beaten yolk of an egg; salt to taste and beat till smooth; lastly, stir in the white of the egg beaten to a stiff froth. Pile up in a rocky form on a bright tin dish, and bake in a quick oven until heated throughout and lightly browned. Serve at once.
Potato Puff.—Combine a pint of mashed potatoes (cold works just as well if it's lump-free) with half a cup of cream and a well-beaten egg yolk; add salt to taste and beat until smooth. Finally, fold in the egg white whipped to a stiff peak. Shape it into a mound on a shiny baking sheet and bake in a hot oven until warmed through and lightly browned. Serve immediately.
Ornamental Potatoes.—No vegetable can be made palatable in so many ways as the potato, and few can be arranged in such pretty shapes. Mashed potatoes made moist with cream, can easily be made into cones, pyramids, or mounds. Cold mashed potatoes may be cut into many fancy shapes with a cookie-cutter, wet with a little cold water, and browned in the oven.
Ornamental Potatoes.—No vegetable can be prepared in as many delicious ways as the potato, and few can be shaped as beautifully. Creamy mashed potatoes can easily be formed into cones, pyramids, or mounds. Cold mashed potatoes can be cut into various fun shapes using a cookie cutter, slightly dampened with cold water, and then baked in the oven until golden.
Mounds of potatoes are very pretty smoothed and strewn with well-cooked vermicelli broken into small bits, and then lightly browned in the oven.
Mounds of potatoes look really nice when they're smooth and topped with well-cooked vermicelli broken into tiny pieces, then lightly browned in the oven.
Scoring the top of a dish of mashed potato deeply in triangles, stars, and crosses, with the back of a carving knife, and then browning lightly, gives a very pretty effect.
Scoring the top of a dish of mashed potatoes in triangles, stars, and crosses with the back of a carving knife, and then lightly browning it, creates a really nice effect.
Vegetable Hash.—With one quart finely sliced potato, chop one carrot, one red beet, one white turnip, all boiled, also one or two stalks of celery. Put all together in a stewpan, cover closely, and set in the oven; when hot, pour over them a cup of boiling cream, stir well together, and serve hot.
Vegetable Hash.—Take one quart of finely sliced potatoes, and chop up one carrot, one red beet, and one white turnip, all boiled. Also, include one or two stalks of celery. Combine everything in a stewpan, cover it tightly, and place it in the oven; once it's hot, pour a cup of boiling cream over it, stir everything well together, and serve hot.
THE SWEET POTATO.
Description.—The sweet potato is a native of the Malayan Archipelago, where it formerly grew wild; thence it was taken to Spain, and from Spain to England and other parts of the globe. It was largely used in Europe as a delicacy on the tables of the rich before the introduction of the common potato, which has now taken its place and likewise its name. The sweet potato is the article referred as potato by Shakespeare and other English writers, previous to the middle of the seventeenth century.
Description.—The sweet potato originates from the Malayan Archipelago, where it used to grow wild; it was then brought to Spain, and from Spain to England and other parts of the world. In Europe, it was primarily enjoyed as a delicacy on the tables of the wealthy before the common potato was introduced and eventually took its place and its name. The sweet potato is what Shakespeare and other English writers referred to as potato before the mid-seventeenth century.
In selecting sweet potatoes, choose firm, plump roots, free from any sprouts; if sprouted they will have a poor flavor, and are likely to be watery.
In choosing sweet potatoes, pick firm, plump roots that are free of any sprouts; if they have sprouted, they will taste bad and are likely to be watery.
The sweet potato is best cooked with the skin on; but all discolored portions and the dry portion at each end, together with all branchlets, should be carefully removed, and the potato well washed, and if to be baked or roasted, well dried with a cloth before placing in the oven.
The sweet potato is best cooked with the skin on; however, all discolored parts and the dry ends, along with any branchlets, should be carefully removed. The potato should be thoroughly washed, and if it will be baked or roasted, it should be dried well with a cloth before being placed in the oven.
The average time required for boiling is about fifty minutes; baking, one hour; steaming, about one hour; roasting, one and one half hours.
The average time needed for boiling is about fifty minutes; baking takes one hour; steaming takes about one hour; and roasting takes one and a half hours.
RECIPES.
Baked Sweet Potatoes.—Select those of uniform size, wash clean, cutting out any imperfect spots, wipe dry, put into moderately hot oven, and bake about one hour, or until the largest will yield to gentle pressure between the fingers. Serve at once without peeling. Small potatoes are best steamed, since if baked, the skins will take up nearly the whole potato.
Baked Sweet Potatoes.—Choose sweet potatoes that are similar in size, wash them thoroughly, remove any bad spots, dry them off, place them in a moderately hot oven, and bake for about an hour, or until the largest one can be gently squeezed with your fingers. Serve immediately without peeling. Small potatoes are better steamed because if baked, the skins will absorb most of the potato.
Baked Sweet Potato No. 2.—Select potatoes of medium size, wash and trim but do not pare, and put on the upper grate of the oven. For a peek of potatoes, put in the lower part of the oven in a large shallow pan a half pint of hot water. The water may be turned directly upon the oven bottom if preferred. Bake slowly, turning once when half done. Serve in their skins, or peel, slice, and return to the oven until nicely browned.
Baked Sweet Potato No. 2.—Choose medium-sized potatoes, wash and trim them but don’t peel. Place them on the top rack of the oven. For a hint of moisture, put half a pint of hot water in a large shallow pan on the bottom rack of the oven. If you prefer, you can pour the water directly onto the oven floor. Bake slowly, turning the potatoes once when they are halfway done. Serve them in their skins, or peel and slice them, then put them back in the oven until they are nicely browned.
Boiled Sweet Potatoes.—Choose potatoes of equal size; do not pare, but after cleaning them well and removing any imperfect spots, put into cold water and boll until they can be easily pierced with a fork; drain thoroughly, and lay them on the top grate in the oven to dry for five or ten minutes. Peel as soon as dry, and send at once to the table, in a hot dish covered with a folded napkin. Sweet potatoes are much better baked than boiled.
Boiled Sweet Potatoes.—Choose potatoes that are the same size; don’t peel them, but after washing them thoroughly and removing any bad spots, place them in cold water and boil until they can be easily pierced with a fork; drain thoroughly, and set them on the top rack in the oven to dry for five to ten minutes. Peel them as soon as they’re dry, and serve immediately on a hot dish covered with a folded napkin. Sweet potatoes taste much better baked than boiled.
Potato Hash.—Take equal parts of cold Irish and sweet potatoes; chop fine and mix thoroughly; season with salt if desired, and add sufficient thin cream to moisten well. Turn into a stewpan, and heat gently until boiling, tossing continually, that all parts become heated alike, and serve at once.
Potato Hash.—Take equal parts of cold Irish and sweet potatoes; chop them finely and mix well. Season with salt if you want, and add enough thin cream to moisten everything. Transfer to a saucepan and heat gently until it comes to a boil, stirring constantly so that it heats evenly, and serve immediately.
Roasted Sweet Potatoes.—Wash clean and wipe dry, potatoes of uniform size, wrap with tissue paper, cover with hot ashes, and then with coals from a hardwood fire; unless near the main fire, the coals will need renewing a few times. This will require a longer time than by any other method, but they are much nicer. The slow, continuous heat promotes their mealiness. When tender, brush the ashes off with a broom, and wipe with a dry cloth. Send to the table in their jackets.
Roasted Sweet Potatoes.—Clean and dry uniform-sized potatoes, wrap them in tissue paper, and cover with hot ashes, then with coals from a hardwood fire; if not close to the main fire, you will need to replace the coals a few times. This method takes longer than others, but they turn out much better. The slow, steady heat helps them become fluffy. Once they’re tender, brush off the ashes with a broom and wipe them with a dry cloth. Serve them at the table with their skins on.
TURNIPS.
Description.—The turnip belongs to the order Cruciferæ, signifying "cross flowers," so called because their four petals are arranged in the form of a cross. It is a native of Europe and the temperate portions of Asia, growing wild in borders of fields and waste places. The ancient Roman gastronomists considered the turnip, when prepared in the following manner, a dish fit for epicures: "After boiling, extract the water from them, and season with cummin, rue or benzoin, pounded in a mortar; afterward add honey, vinegar, gravy, and boiled grapes. Allow the whole to simmer, and serve."
Description.—The turnip is part of the order Cruciferæ, which means "cross flowers" because their four petals are arranged in a cross shape. It's originally from Europe and the temperate areas of Asia, growing wild along field edges and in abandoned places. Ancient Roman food lovers thought the turnip, prepared this way, was a dish for gourmets: "After boiling, drain the water, and season with cumin, rue, or benzoin, ground in a mortar; then add honey, vinegar, gravy, and boiled grapes. Let it all simmer and serve."
Under cultivation, the turnip forms an agreeable culinary esculent; but on account of the large proportion of water entering into its composition, its nutritive value is exceedingly low. The Swedish, or Rutabaga, variety is rather more nutritive than the white, but its stronger flavor renders it less palatable. Unlike the potato, the turnip contains no starch, but instead, a gelatinous substance called pectose, which during the boiling process is changed into a vegetable jelly called pectine. The white lining just inside the skin is usually bitter; hence the tuber should be peeled sufficiently deep to remove it. When well cooked, turnips are quite easily digested.
Under cultivation, the turnip is a pleasant vegetable to eat; however, due to its high water content, its nutritional value is very low. The Swedish, or Rutabaga, variety is somewhat more nutritious than the white turnip, but its stronger flavor makes it less enjoyable to eat. Unlike potatoes, turnips have no starch; instead, they contain a gelatinous substance called pectose, which turns into a vegetable jelly called pectine during cooking. The white layer just beneath the skin is usually bitter, so the tuber should be peeled deeply enough to remove it. When cooked properly, turnips are quite easy to digest.
Preparation and Cooking.—Turnips are good for culinary purposes only from the time of their ripening till they begin to sprout. The process of germination changes their proximate elements, and renders them less fit for food. Select turnips which are plump and free from disease. A turnip that is wilted, or that appears spongy, pithy, or cork-like when cut, is not fit for food.
Preparation and Cooking.—Turnips are best for cooking from the time they ripen until they start to sprout. Once they begin to germinate, their nutritional composition changes, making them less suitable for eating. Choose turnips that are firm and healthy. A turnip that is wilted or looks spongy, pithy, or corky when cut is not good to eat.
Prepare turnips for cooking by thoroughly washing and scraping, if young and tender, or by paring if more mature. If small, they may be cooked whole; if large, they should be cut across the grain into slices a half inch in thickness. If cooked whole, care must be taken to select those of uniform size; and if sliced, the slices must be of equal thickness.
Prepare turnips for cooking by washing them well and scraping if they’re young and tender, or by peeling if they’re more mature. If they’re small, you can cook them whole; if they’re large, cut them across the grain into half-inch thick slices. If you’re cooking them whole, make sure to choose ones that are all about the same size; when sliced, the pieces should be evenly thick.
RECIPES.
Boiled Turnips.—Turnips, like other vegetables, should be boiled in as small an amount of water as possible. Great care must be taken, however, that the kettle does not get dry, as scorched turnip is spoiled. An excellent precaution, in order to keep them from scorching in case the water becomes low, is to place an inverted saucer or sauce-dish in the bottom of the kettle before putting in the turnips. Put into boiling water, cook rapidly until sufficiently tender to pierce easily with a fork; too much cooking discolors and renders them strong in flavor. Boiled turnips should be drained very thoroughly, and all water pressed out before preparing for the table. The age, size, and variety of the turnip will greatly vary the time necessary for its cooking. The safest rule is to allow plenty of time, and test with a fork. Young turnips will cook in about forty-five minutes; old turnips, sliced, require from one and a quarter to two hours. If whole or cut in halves, they require a proportionate length of time. White turnips require much, less cooking than yellow ones.
Boiled Turnips.—Turnips, like other vegetables, should be boiled in as little water as possible. However, make sure that the kettle doesn’t run dry, as burnt turnips are ruined. A good way to prevent them from scorching if the water gets low is to place an upside-down saucer or sauce dish at the bottom of the kettle before adding the turnips. Put them in boiling water and cook quickly until they are tender enough to easily pierce with a fork; overcooking can discolor them and make their flavor too strong. Boiled turnips should be drained very thoroughly, pressing out all the water before serving. The age, size, and type of turnip will significantly affect the cooking time. The safest approach is to allow plenty of time and test with a fork. Young turnips will cook in about forty-five minutes; old turnips, when sliced, take from one and a quarter to two hours. If they are whole or halved, they will need a proportionate amount of time. White turnips require much less cooking than yellow ones.
Baked Turnips.—Select turnips of uniform size; wash and wipe, but do not pare; place on the top grate of a moderately hot oven; bake two or more hours or until perfectly tender; peel and serve at once, either mashed or with cream sauce. Turnips are much sweeter baked than when cooked in any other way.
Baked Turnips.—Choose turnips that are the same size; wash and dry them, but don’t peel; put them on the top rack of a moderately hot oven; bake for two hours or more until they’re completely tender; peel and serve immediately, either mashed or with a cream sauce. Baked turnips taste much sweeter than when prepared using any other method.
Creamed Turnips.—Pare, but do not cut, young sweet white turnips; boil till tender in a small quantity of water; drain and dry well. Cook a tablespoonful of flour in a pint of rich milk or part cream; arrange the turnips in a baking dish, pour the sauce over them, add salt if desired, sprinkle the top with grated bread crumbs, and brown in a quick oven.
Creamed Turnips.—Peel, but do not slice, young sweet white turnips; boil them until tender in a small amount of water; drain and dry them thoroughly. Cook a tablespoon of flour in a pint of rich milk or some cream; place the turnips in a baking dish, pour the sauce over them, add salt if desired, sprinkle grated breadcrumbs on top, and brown in a hot oven.
Mashed Turnips.—Wash the turnips, pare, and drop into boiling water. Cook until perfectly tender; turn into a colander and press out the water with a plate or large spoon; mash until free from lumps, season with a little sweet cream, and salt if desired. If the turnips are especially watery, one or two hot, mealy potatoes mashed with them will be an improvement.
Mashed Turnips.—Wash the turnips, peel them, and put them in boiling water. Cook until they’re completely tender; drain them in a colander and press out the water with a plate or large spoon; mash until there are no lumps, and season with a little cream and salt if you like. If the turnips are particularly watery, mashing in one or two hot, starchy potatoes will make it better.
Scalloped Turnips.—Prepare and boil whole white turnips until nearly tender; cut into thin slices, lay in an earthen pudding dish, pour over them a white sauce sufficient to cover, made by cooking a tablespoonful of flour in a pint of milk, part cream if preferred, until thickened. Season with salt, sprinkle the top lightly with grated bread crumbs, and bake in a quick oven until a rich brown. Place the baking dish on a clean plate, and serve. Rich milk or cream may be used instead of white sauce, if preferred.
Scalloped Turnips.—Prepare and boil whole white turnips until they are almost tender; slice them thinly, lay them in a baking dish, and pour over enough white sauce to cover, which is made by cooking a tablespoon of flour in a pint of milk, using cream if you prefer, until it thickens. Add a pinch of salt, sprinkle the top lightly with grated breadcrumbs, and bake in a hot oven until it turns a rich brown. Place the baking dish on a clean plate, and serve. You can also use rich milk or cream instead of white sauce if you prefer.
Turnips with Cream Sauce.—Wash and pare the turnips, cut them into half-inch dice, and cook in boiling water until tender. Meanwhile prepare a cream sauce as directed for Scalloped Turnips, using thin cream in place of milk. Drain the turnips, pour the cream sauce over them, let them boil up once, and serve.
Turnips with Cream Sauce.—Wash and peel the turnips, cut them into half-inch cubes, and cook in boiling water until soft. At the same time, make a cream sauce as you would for Scalloped Turnips, using thin cream instead of milk. Drain the turnips, pour the cream sauce over them, let them come to a boil once, and serve.
PARSNIPS.
Description.—The common garden parsnip is derived by cultivation from the wild parsnip, indigenous to many parts of Europe and the north of Asia, and cultivated since Roman times. It is not only used for culinary purposes, but a wine is made from it. In the north of Ireland a table beer is brewed from its fermented product and hops.
Description.—The common garden parsnip is cultivated from the wild parsnip, which is native to various regions in Europe and northern Asia, and has been grown since Roman times. It's used not just in cooking; a type of wine is also made from it. In northern Ireland, a table beer is brewed from its fermented product along with hops.
The percentage of nutritive elements contained in the parsnip is very small; so small, indeed, that one pound of parsnips affords hardly one fifth of an ounce of nitrogenous or muscle-forming material. The time required for its digestion, varies from two and one half to three and one half hours.
The percentage of nutrients in parsnips is quite low; so low, in fact, that one pound of parsnips provides barely one-fifth of an ounce of nitrogen or muscle-building material. The time it takes to digest them ranges from two and a half to three and a half hours.
Preparation and Cooking.—Wash and trim off any rough portions: scrape well with a knife to remove the skins, and drop at once into cold water to prevent discoloration. If the parsnips are smooth-skinned, fresh, and too small to need dividing, they need only be washed thoroughly before cooking, as the skins can be easily removed by rubbing with a clean towel. Reject those that are wilted, pithy, coarse, or stringy. Large parsnips should be divided, for if cooked whole, the outside is likely to become soft before the center is tender. They may be either split lengthwise or sliced. Parsnips may be boiled, baked, or steamed; but like all other vegetables containing a large percentage of water, are preferable steamed or baked.
Preparation and Cooking.—Wash and cut off any rough parts: scrape well with a knife to remove the skins, and immediately drop them into cold water to prevent discoloration. If the parsnips are smooth-skinned, fresh, and small enough not to need cutting, just wash them thoroughly before cooking, as the skins can be easily removed by rubbing with a clean towel. Discard any that are wilted, pithy, coarse, or stringy. Large parsnips should be cut, because if cooked whole, the outside is likely to get soft before the center is tender. You can either split them lengthwise or slice them. Parsnips can be boiled, baked, or steamed; but like all other vegetables with a high water content, they are best steamed or baked.
The time required for cooking young parsnips, is about forty-five minutes; when old, they require from one to two hours.
The time needed to cook young parsnips is about forty-five minutes; for older ones, it takes between one to two hours.
RECIPES.
Baked Parsnips.—Wash, thoroughly, but do not scrape the roots; bake the same as potatoes. When tender, remove the skins, slice, and serve with cream or an egg sauce prepared as directed for Parsnips with Egg Sauce. They are also very nice mashed and seasoned with cream. Baked and steamed parsnips are far sweeter than boiled ones.
Baked Parsnips.—Wash them thoroughly, but don't scrape the roots; bake them like you would potatoes. When they're tender, remove the skins, slice them, and serve with cream or an egg sauce made as directed for Parsnips with Egg Sauce. They're also great mashed and seasoned with cream. Baked and steamed parsnips are much sweeter than boiled ones.
Baked Parsnips No. 2.—Wash, scrape, and divide; drop into boiling water, a little more than sufficient to cook them, and boil gently till thoroughly tender. There should remain about one half pint of the liquor when the parsnips are done. Arrange on an earthen plate or shallow pudding dish, not more than one layer deep; cover with the juice, and bake, basting frequently until the juice is all absorbed, and the parsnips delicately browned. Serve at once.
Baked Parsnips No. 2.—Wash, peel, and cut them; drop into boiling water, enough to cook them, and simmer gently until they're completely tender. There should be about half a pint of liquid left when the parsnips are done. Arrange them on a ceramic plate or a shallow dish, no more than one layer deep; pour the liquid over the top, and bake, basting often until the liquid is fully absorbed and the parsnips are lightly browned. Serve immediately.
Mashed Parsnips.—Wash and scrape, dropping at once into cold water to prevent discoloration. Slice thinly and steam, or bake whole until perfectly tender. When done, mash until free from lumps, removing all hard or stringy portions; add salt to taste and a few spoonfuls of thick sweet cream, and serve.
Mashed Parsnips.—Wash and peel, dropping them right into cold water to keep them from turning brown. Slice them thin and steam, or bake them whole until they’re completely tender. Once done, mash them until smooth, discarding any hard or stringy bits; add salt to taste and a few spoonfuls of thick cream, and serve.
Parsnips with Egg Sauce.—Scrape, wash, and slice thinly, enough parsnips to make three pints; steam, bake, or boil them until very tender. If boiled, turn into a colander and drain well. Have ready an egg sauce, for preparing which heat a pint of rich milk or very thin cream to boiling, stir into it a level tablespoonful of flour rubbed smooth with a little milk. Let this boil a few minutes, stirring constantly until the flour is well cooked and the sauce thickened; then add slowly the well-beaten yolk of one egg, stirring rapidly so that it shall be well mingled with the whole; add salt to taste; let it boil up once, pour over the parsnips, and serve. The sauce should be of the consistency of thick cream.
Parsnips with Egg Sauce.—Peel, wash, and slice enough parsnips to make three pints. Steam, bake, or boil them until they're very tender. If boiled, transfer them to a colander and let them drain well. Prepare an egg sauce by heating a pint of rich milk or very thin cream until it boils. Stir in a level tablespoon of flour that’s been mixed with a little milk. Let it boil for a few minutes, stirring constantly until the flour is fully cooked and the sauce thickens. Then, slowly add the well-beaten yolk of one egg, stirring quickly to incorporate it fully; season with salt to taste. Let it come to a boil once, pour it over the parsnips, and serve. The sauce should have the consistency of thick cream.
Parsnips with Potatoes.—Wash, scrape, and slice enough parsnips to make two and a half quarts. Pare and slice enough potatoes to make one pint. Cook together in a small quantity of water. When tender, mash smoothly, add salt, the yolks of two eggs well beaten, and a cup of rich milk. Beat well together, put into an earthen or china dish, and brown lightly in the oven.
Parsnips with Potatoes.—Wash, peel, and slice enough parsnips to make two and a half quarts. Peel and slice enough potatoes to make one pint. Cook them together in a small amount of water. When they're tender, mash them until smooth, add salt, the yolks of two beaten eggs, and a cup of rich milk. Mix everything well, place it in a ceramic or glass dish, and lightly brown it in the oven.
Stewed Parsnips with Celery.—Prepare and steam or boil some nice ones until about half done. If boiled, drain thoroughly; add salt if desired, and a tablespoonful of minced celery. Turn rich boiling milk over them, cover, and stew fifteen or twenty minutes, or till perfectly tender.
Stewed Parsnips with Celery.—Prepare and steam or boil some nice parsnips until they're about halfway done. If boiled, drain them well; add salt if you like, and a tablespoon of minced celery. Pour hot boiling milk over them, cover, and stew for fifteen to twenty minutes, or until they're completely tender.
CARROTS.
Description.—The garden carrot is a cultivated variety of a plant belonging to the Umbettiferæ, and grows wild in many portions of Europe. The root has long been used for food. By the ancient Greeks and Romans it was much esteemed as a salad. The carrot is said to have been introduced into England by Flemish refugees during the reigns of Elizabeth and James I. Its feathery leaves were used by the ladies as an adornment for their headdresses, in place of plumes. Carrots contain sugar enough for making a syrup from them; they also yield by fermentation and distillation a spirituous liquor. In Germany they are sometimes cut into small pieces, and roasted as a substitute for coffee.
Description.—The garden carrot is a cultivated type of plant that belongs to the Umbettiferæ family and grows wild in many parts of Europe. Its root has long been eaten as food. The ancient Greeks and Romans valued it as a salad. It’s said that Flemish refugees introduced the carrot to England during the reigns of Elizabeth and James I. Women used its feathery leaves as a decoration for their headdresses instead of plumes. Carrots have enough sugar to make syrup from them; they can also be fermented and distilled to produce an alcoholic drink. In Germany, they are sometimes chopped up and roasted as a coffee substitute.
Starch does not enter into the composition of carrots, but a small portion of pectose is found instead. Carrots contain more water than parsnips, and both much cellulose and little nutritive material. Carrots when well cooked form a wholesome food, but one not adapted to weak stomachs, as they are rather hard to digest and tend to flatulence.
Starch isn’t part of carrots, but they do contain a bit of pectose. Carrots hold more water than parsnips, and both have a lot of cellulose and few nutrients. When cooked properly, carrots make a healthy food choice, but they aren’t ideal for sensitive stomachs because they can be tough to digest and may cause gas.
RECIPES.
Carrots with Egg Sauce.—Wash and scrape well; slice and throw into boiling water, or else steam. When tender, drain thoroughly, and pour over them a sauce prepared the same as for parsnips (page 244), with the addition of a tablespoonful of sugar. Let them boil up once, and serve.
Carrots with Egg Sauce.—Wash and peel well; slice and add to boiling water, or steam. When they are tender, drain thoroughly and pour over them a sauce made the same way as for parsnips (page 244), with an added tablespoon of sugar. Let them come to a boil once, and serve.
BEETS.
Description.—The beet is a native of the coasts of the Mediterranean, and is said to owe its botanical name, beta, to a fancied resemblance to the Greek letter B. Two varieties are in common use as food, the white and the red beet; while a sub-variety, the sugar beet, is largely cultivated in France, in connection with the beet-sugar industry in that country. The same industry has recently been introduced into this country. It is grown extensively in Germany and Russia, for the same pose, and is also used there in the manufacture of alcohol.
Description.—The beet originates from the Mediterranean coasts and is believed to get its botanical name, beta, from its resemblance to the Greek letter B. Two main types are commonly consumed, the white and the red beet. A subtype, the sugar beet, is widely grown in France for the beet-sugar industry. This industry has recently been brought to this country as well. It's also extensively cultivated in Germany and Russia for the same purpose and is used there to make alcohol.
The beet root is characterized by its unusual amount of sugar. It is considered more nutritive than any other esculent tuber except the potato, but the time required for its digestion exceeds that of most vegetables, being three and three fourths hours.
The beetroot is known for its high sugar content. It's considered more nutritious than any other edible tuber except for the potato, but it takes longer to digest than most vegetables, specifically three hours and forty-five minutes.
Preparation and Cooking.—Beets, like other tubers, should be fresh, unshriveled, and healthy. Wash carefully, scrubbing with a soft brush to remove all particles of dirt; but avoid scraping, cutting, or breaking, lest the sweet juices escape. In handling for storage, be careful not to bruise or break the skins; and in purchasing from the market, select only such as are perfect.
Preparation and Cooking.—Beets, like other tubers, should be fresh, firm, and healthy. Wash them thoroughly, using a soft brush to scrub off any dirt, but be careful not to scrape, cut, or break them so the sweet juices don’t escape. When storing, handle them gently to avoid bruising or breaking the skins; and when buying from the market, choose only ones that are in perfect condition.
Beets may be boiled, baked, or steamed. In boiling, if the skin is cut or broken, the juice will escape in the water, and the flavor will be injured; for this reason, beets should not be punctured with a fork to find if done. When tender, the thickest part will yield readily to pressure of the fingers. Beets should be boiled in just as little water as possible, and they will be much better if it has all evaporated by the time they are cooked.
Beets can be boiled, baked, or steamed. When boiling them, if the skin is cut or broken, the juice will leak into the water, ruining the flavor; for this reason, don’t poke them with a fork to check if they're done. When they're tender, the thickest part will give easily when you press it with your fingers. Beets should be boiled in as little water as possible, and they're much tastier if there's no water left by the time they're done cooking.
Young beets will boil in one hour, while old beets require from three to five hours; if tough, wilted, and stringy, they cannot be boiled tender. Baked beets require from three to six hours.
Young beets will boil in one hour, while older beets need three to five hours; if they’re tough, wilted, and stringy, they won't boil tender. Baked beets take three to six hours.
RECIPES.
Baked Beets.—Beets are far better baked than boiled, though it takes a longer time to cook properly. French cooks bake them slowly six hours in a covered dish, the bottom of which is lined with well-moistened rye straw; however, they may be baked on the oven grate, like potatoes. Wipe dry after washing, and bake slowly. They are very nice served with a sauce made of equal quantities of lemon juice and whipped cream, with a little salt.
Baked Beets.—Beets are much better when baked rather than boiled, even though it takes longer to cook them right. French chefs bake them slowly for six hours in a covered dish lined with damp rye straw; however, you can also bake them directly on the oven rack, like potatoes. Just wash them, dry them off, and bake slowly. They taste great when served with a sauce made of equal parts lemon juice and whipped cream, plus a pinch of salt.
Baked Beets No. 2.—Wash young and tender beets, and place in an earthen baking dish with a very little water; as it evaporates, add more, which must be of boiling temperature. Set into a moderate oven, and according to size of the beets, bake slowly from two to three hours. When tender, remove the skins and dress with lemon juice or cream sauce.
Baked Beets No. 2.—Wash young and tender beets, and put them in a clay baking dish with a little water; as it evaporates, add more boiling water. Place it in a moderate oven, and depending on the size of the beets, bake slowly for two to three hours. Once they're tender, peel off the skins and serve with lemon juice or cream sauce.
Beet Greens.—Take young, tender beets, clean thoroughly without separating the tops and roots. Examine the leaves carefully, and pick off inferior ones. Put into boiling water, and cook for nearly an hour. Drain, press out all water, and chop quite fine. Serve with a dressing of lemon juice or cream, as preferred.
Beet Greens.—Take young, tender beets, clean them thoroughly without separating the tops and roots. Check the leaves carefully and remove any that are not good. Place them into boiling water and cook for almost an hour. Drain, squeeze out all the water, and chop them finely. Serve with a dressing of lemon juice or cream, based on your preference.
Beet Salad No. 2.—Chop equal parts of boiled beets and fresh young cabbage. Mix thoroughly, add salt to taste, a few tablespoonfuls of sugar, and cover with diluted lemon juice. Equal quantities of cold boiled beets and cold boiled potatoes, chopped fine, thoroughly mixed, and served with a dressing of lemon juice and whipped cream, make a palatable salad. Care should be taken in the preparation of these and the preceding salad, not to chop the vegetables so fine as to admit of their being eaten without mastication.
Beet Salad No. 2.—Chop equal amounts of boiled beets and fresh young cabbage. Mix well, add salt to taste, a few tablespoons of sugar, and drizzle with diluted lemon juice. Equal amounts of cold boiled beets and cold boiled potatoes, finely chopped, mixed together, and served with a dressing of lemon juice and whipped cream, create a tasty salad. Be careful when preparing these and the previous salad; don’t chop the vegetables too finely so they can be eaten without chewing.
CABBAGE.
Description.—The common white garden cabbage is one of the oldest of cultivated vegetables. A variety of the plant known as red cabbage was the delight of ancient gourmands more than eighteen centuries ago. The Egyptians adored it, erected altars to it, and made it the first dish at their repasts. In this they were imitated by the Greeks and Romans.
Description.—The common white garden cabbage is one of the oldest cultivated vegetables. A type of this plant known as red cabbage was a favorite of ancient food lovers over eighteen centuries ago. The Egyptians loved it, built altars for it, and made it the first dish at their meals. The Greeks and Romans followed their example.
Hippocrates, the Father of Medicine, considered the cabbage one of the most valuable of remedies, and often prescribed a dish of boiled cabbage to be eaten with salt for patients suffering with violent colic. Erasistratus looked upon it as a sovereign remedy against paralysis, while Cato in his writings affirmed it to be a panacea for all diseases, and believed the use the Romans made of it to have been the means whereby they were able, during six hundred years, to do without the assistance of physicians, whom they had expelled from their territory. The learned philosopher, Pythagoras, composed books in which he lauded its wonderful virtues.
Hippocrates, the Father of Medicine, saw cabbage as one of the most valuable remedies and often recommended a dish of boiled cabbage with salt for patients suffering from severe colic. Erasistratus viewed it as a powerful treatment for paralysis, while Cato claimed in his writings that it was a cure-all for every illness and believed that the Romans' use of it allowed them to go without doctors for six hundred years after expelling them from their land. The scholar Pythagoras wrote books praising its incredible benefits.
The Germans are so fond of cabbage that it enters into the composition of a majority of their culinary products. The cabbage was first raised in England about 1640, by Sir Anthony Ashley. That this epoch, important to the English horticultural and culinary world, may never be forgotten, a cabbage is represented upon Sir Anthony's monument.
The Germans love cabbage so much that it’s a key ingredient in many of their dishes. Cabbage was first grown in England around 1640 by Sir Anthony Ashley. To ensure that this significant moment in English gardening and cooking isn’t forgotten, a cabbage is shown on Sir Anthony’s monument.
The nutritive value of the cabbage is not high, nearly ninety per cent being water; but it forms an agreeable variety in the list of vegetable foods, and is said to possess marked antiscorbutic virtue. It is, however, difficult of digestion, and therefore not suited to weak stomachs. It would be impossible to sustain life for a lengthened period upon cabbage, since to supply the body with sufficient food elements, the quantity would exceed the rate of digestion and the capacity of the stomach.
The nutritional value of cabbage isn’t very high, as nearly ninety percent of it is water; however, it adds a nice variety to the selection of vegetables and is said to have significant anti-scurvy properties. That said, it’s hard to digest, making it unsuitable for people with weak stomachs. It would be impossible to live for an extended time on cabbage alone, as you'd need to eat so much to get enough nutrients that it would overwhelm your digestive system and your stomach’s capacity.
M. Chevreul, a French scientist, has ascertained that the peculiar odor given off during the boiling of cabbage is due to the disengagement of sulphureted hydrogen. Cabbage is said to be more easily digested raw than cooked.
M. Chevreul, a French scientist, found that the unique smell released while boiling cabbage comes from the release of hydrogen sulfide. It's said that cabbage is easier to digest when it's raw compared to when it's cooked.
Preparation and Cooking.—A good cabbage should have a well-developed, firm head, with fresh, crisp leaves, free from worm-holes and decayed portions. To prepare for cooking, stalk, shake well to free from dirt, and if there are any signs of insects, lay in cold salted water for an hour or so to drive them out. Rinse away the salt water, and if to be boiled, drop into a small quantity of boiling water. Cover closely and boil vigorously until tender. If cooked slowly, it will be watery and stringy, while overdone cabbage is especially insipid and flavorless. If too much water has been used, remove the cover, that evaporation may go on more rapidly; if too little, replenish with boiling water. Cabbage should be cooked in a porcelain-lined or granite-ware sauce pan or a very clean iron kettle. Cabbage may also be steamed, but care must be taken to have the process as rapid as possible. Fresh young cabbage will cook in about one hour; old cabbage requires from two to three hours.
Preparation and Cooking.—A good cabbage should have a well-formed, firm head, with fresh, crisp leaves, free from worm holes and any decayed parts. To prepare for cooking, remove the stalk, shake it well to get rid of dirt, and if you notice any signs of insects, soak it in cold salted water for about an hour to flush them out. Rinse off the salt water, and if you're boiling it, add the cabbage to a small amount of boiling water. Cover it tightly and boil vigorously until tender. If you cook it slowly, it will become watery and stringy, while overcooked cabbage is especially bland and tasteless. If you have added too much water, uncover the pot to allow for faster evaporation; if too little water has been added, top it up with boiling water. Cabbage should be cooked in a porcelain-lined or granite cookware or a very clean cast iron pot. Cabbage can also be steamed, but be sure to keep the process as quick as possible. Fresh young cabbage will cook in about an hour; older cabbage takes about two to three hours.
RECIPES.
Boiled Cabbage.—Carefully clean a nice head of cabbage, divide into halves, and with a sharp knife slice very thin, cutting from the center of the head outward. Put into boiling water, cover closely, and cook rapidly until tender; then turn into a colander and drain, pressing gently with the back of a plate. Return to the kettle, add salt to taste, and sufficient sweet cream to moisten well, heat through if at all cooled, dish, and serve at once. If preferred, the cream may be omitted, and the cabbage served with tomato sauce or lemon juice as a dressing.
Boiled Cabbage.—Carefully clean a nice head of cabbage, cut it in half, and use a sharp knife to slice it very thin, starting from the center of the head and moving outward. Place it in boiling water, cover it tightly, and cook quickly until it’s tender; then pour it into a colander to drain, pressing gently with the back of a plate. Return it to the pot, add salt to taste, and enough sweet cream to moisten it well, heating it through if it's cooled at all. Serve immediately. If you prefer, you can skip the cream and serve the cabbage with tomato sauce or lemon juice as a dressing.
Cabbage and Tomatoes.—Boil finely chopped cabbage in as little water as possible. When tender, add half the quantity of hot stewed tomatoes, boil together for a few minutes, being careful to avoid burning, season with salt if desired, and serve. If preferred, a little sweet cream may be added just before serving.
Cabbage and Tomatoes.—Boil finely chopped cabbage in as little water as possible. When it's tender, add half the amount of hot stewed tomatoes, boil together for a few minutes, making sure not to burn it, season with salt if desired, and serve. If you'd like, a little sweet cream can be added just before serving.
Mashed Cabbage.—Cut a fine head of cabbage into quarters, and cook until tender. A half hour before it is done, drop in three good-sized potatoes. When done, take all up in a colander together, press out the water, and mash very fine. Season with cream, and salt if desired.
Mashed Cabbage.—Cut a nice head of cabbage into quarters and cook it until tender. About half an hour before it's finished, add in three medium-sized potatoes. Once everything is cooked, drain it all together in a colander, press out the water, and mash it very well. Season with cream and add salt if you want.
Stewed Cabbage. Chop nice cabbage quite fine, and put it into boiling water, letting it boil twenty minutes. Turn into a colander and drain thoroughly; return to the kettle, cover with milk, and let it boil till perfectly tender; season with salt and cream to taste. The beaten yolk of an egg, stirred in with the cream, is considered an improvement by some.
Stewed Cabbage. Chop the cabbage finely and put it in boiling water, allowing it to boil for twenty minutes. Drain it in a colander until fully drained; return it to the pot, cover with milk, and let it boil until it's completely tender; season with salt and cream to your taste. Some people think adding a beaten egg yolk mixed with the cream is a nice touch.
CAULIFLOWER AND BROCCOLI.
Description.—These vegetables are botanically allied to the cabbage, and are similar in composition. They are entirely the product of cultivation, and constitute the inflorescence of the plant, which horticultural art has made to grow into a compact head of white color in the cauliflower, and of varying shades of buff, green, and purple in the broccoli. There is very little difference between the two aside from the color, and they are treated alike for culinary purposes. They were known to the Greeks and Romans, and highly appreciated by connoisseurs. They are not as nutritious as the cabbage, but have a more delicate and agreeable flavor.
Description.—These vegetables are related to cabbage and have a similar makeup. They are completely cultivated by humans and consist of the flower cluster of the plant, which gardening has shaped into a compact white head in cauliflower and various shades of buff, green, and purple in broccoli. The differences between the two are minimal aside from their color, and they are used in cooking in the same way. They were known to the Greeks and Romans and appreciated by gourmet enthusiasts. While they are not as nutritious as cabbage, they have a lighter and more pleasant flavor.
Preparation and Cooking.—The leaves should be green and fresh, and the heads of cauliflower creamy white; when there are dark spots, it is wilted. The color of broccoli will depend upon the variety, but the head should be firm, with no discolorations. To prepare, pick off the outside leaves, cut the stalk squarely across, about two inches below the flower, and if very thick, split and wash thoroughly in several waters; or better still, hold it under the faucet, flower downward, and allow a constant stream of water to fall over it for several minutes; then place top downward in a pan of lukewarm salted water, to drive out any insects which may be hidden in it; examine carefully for worms just the color of the stalk; tie in a net (mosquito netting, say) to prevent breaking, or place the cauliflower on a plate in a steamer, and boil, or steam, as is most convenient. The time required for cooking will vary from twenty to forty minutes.
Preparation and Cooking.—The leaves should be green and fresh, and the heads of cauliflower should be creamy white; if there are dark spots, it’s wilted. The color of broccoli will vary depending on the type, but the head should be firm and free of discolorations. To prepare, remove the outside leaves, cut the stalk straight across about two inches below the flower, and if it’s very thick, split it and wash it well in several rinses; or better yet, hold it under the faucet with the flower facing down and let a steady stream of water run over it for several minutes. Then place it top down in a pan of lukewarm salted water to flush out any hidden insects; check carefully for worms that are the same color as the stalk. Tie it in a net (like mosquito netting) to avoid breaking, or put the cauliflower on a plate in a steamer, and boil or steam it in the way that’s most convenient. The cooking time will vary from twenty to forty minutes.
RECIPES.
(The recipes given are applicable to both broccoli and cauliflower.)
(The recipes provided work for both broccoli and cauliflower.)
Boiled Cauliflower.—Prepare, divide into neat branches, and tie securely in a net. Put into boiling milk and water, equal quantities, and cook until the main stalks are tender. Boil rapidly the first five minutes, afterward more moderately, to prevent the flower from becoming done before the stalks. Serve on a hot dish with cream sauce or diluted lemon juice.
Boiled Cauliflower.—Prepare the cauliflower by cutting it into neat branches and tying them securely in a net. Place it in a pot of boiling milk and water in equal amounts, and cook until the main stalks are tender. Boil vigorously for the first five minutes, then reduce the heat to prevent the florets from cooking too quickly compared to the stalks. Serve hot on a dish with cream sauce or a splash of diluted lemon juice.
Browned Cauliflower.—Beat together two eggs, a little salt, four tablespoonfuls of sweet cream, and a small quantity of grated bread crumbs well moistened with a little milk, till of the consistency of batter. Steam the cauliflower until tender, separate it into small bunches, dip each top in the mixture, and place in nice order in a pudding dish; put in the oven and brown.
Browned Cauliflower.—Whisk together two eggs, a pinch of salt, four tablespoons of heavy cream, and a small amount of grated bread crumbs soaked in a bit of milk until the mixture is like batter. Steam the cauliflower until it’s tender, break it into small florets, dip each top in the mixture, and arrange them neatly in a baking dish; then put it in the oven to brown.
Cauliflower with Egg Sauce.—Steam the cauliflower until tender, separate into small portions, dish, and serve with an egg sauce prepared as directed for parsnips on page 244.
Cauliflower with Egg Sauce.—Steam the cauliflower until it's tender, break it into small pieces, place it on a dish, and serve it with an egg sauce made according to the instructions for parsnips on page 244.
Cauliflower with Tomato Sauce.—Boil or steam the cauliflower until tender. In another dish prepare a sauce with a pint of strained stewed smooth in a little water, and salted to taste. When the cauliflower is tender, dish, and pour over it the hot tomato sauce. If preferred, a tablespoonful of thick sweet cream may be added to the sauce before using.
Cauliflower with Tomato Sauce.—Boil or steam the cauliflower until it's tender. In another pot, prepare a sauce using a pint of strained stewed tomatoes, mixing it smooth with a little water and adding salt to taste. Once the cauliflower is tender, serve it and pour the hot tomato sauce over it. If you like, you can add a tablespoon of thick sweet cream to the sauce before serving.
SPINACH.
Preparation and Cooking.—Use only tender plants or the tender leaves of the older stalks, and be sure to have enough, as spinach shrinks greatly. A peck is not too much for a family of four or five. Pick it over very carefully, trim off the roots and decayed leaves, and all tough, stringy stalks, and the coarse fibers of the leaves, as those will not cook tender until the leaves are overdone. Wash in several waters, lifting grit. Shake each bunch well. Spinach is best cooked in its own juices; this may be best accomplished by cooking it in a double boiler, or if placed in a pot and slowly heated, it will however, be stirred frequently at first, to prevent burning; cover closely and cook until tender. The time required will vary from twenty minutes to half an hour or more. If water is used in the cooking, have a half kettleful boiling when the spinach is put in, and continue to boil rapidly until the leaves are perfectly tender; then drain in a colander, press with the back of a plate to extract all water, chop very fine, and either serve with lemon juice as a dressing, or add a half cup of sweet cream with or without a teaspoonful of sugar. Boil up once, stirring constantly, and serve very hot. A garnish of sliced boiled eggs is often employed with this vegetable.
Preparation and Cooking.—Only use tender plants or the tender leaves from older stalks, and make sure you have enough, as spinach shrinks a lot. A peck is plenty for a family of four or five. Carefully sort through it, trimming off the roots, any wilted leaves, tough, stringy stalks, and the coarse fibers of the leaves, since those won’t cook tender until the rest is overdone. Wash it in several rounds of water to remove grit. Shake each bunch well. Spinach is best cooked in its own juices; you can do this effectively in a double boiler, or if you cook it in a pot, heat it slowly while stirring frequently at first to prevent burning. Cover it tightly and cook until tender. Cooking time will range from twenty minutes to half an hour or more. If you’re using water, have a half kettleful boiling when you add the spinach, then keep it boiling quickly until the leaves are perfectly tender; afterward, drain it in a colander, press with the back of a plate to remove excess water, chop it finely, and either serve with lemon juice as a dressing, or mix in half a cup of sweet cream, with or without a teaspoon of sugar. Bring it to a boil while stirring constantly, and serve it very hot. A garnish of sliced boiled eggs is often added with this vegetable.
CELERY.
Description.—The common celery is a native of Great Britain. In its wild state it has a strong, disagreeable taste and smell, and is known as smallage. By cultivation it becomes more mild and sweet. It is usually eaten uncooked as a salad herb, or introduced into soups as a flavouring. In its raw state, it is difficult of digestion.
Description.—Common celery is native to Great Britain. In its wild form, it has a strong, unpleasant taste and smell, and it's known as smallage. Through cultivation, it becomes milder and sweeter. It's typically eaten raw as a salad herb or added to soups for flavor. In its raw state, it's hard to digest.
Celery from the market may be kept fresh for some time by wrapping the bunches in brown paper, sprinkling them with water, then wrapping in a damp cloth and putting in some cool, dark place.
Celery from the market can stay fresh for a while if you wrap the bunches in brown paper, sprinkle them with water, then wrap them in a damp cloth and store them in a cool, dark place.
RECIPES.
Stewed Celery.—Cut the tender inner parts of celery heads into pieces about a finger long. The outer and more fibrous stalks may be saved to season soups. Put in a stewpan, and add sufficient water to cover; then cover the pan closely, and set it where it will just simmer for an hour, or until the celery is perfectly tender. When cooked, add a pint of rich milk, part cream if you have it, salt to taste, and when boiling, stir in a tablespoon of flour rubbed smooth in a little milk. Boil up once and serve.
Stewed Celery.—Chop the tender inner parts of celery heads into pieces about the length of a finger. You can save the outer, more fibrous stalks to add flavor to soups. Place them in a pot and add enough water to cover the celery; then cover the pot tightly and let it simmer for an hour, or until the celery is completely tender. Once it's cooked, stir in a pint of rich milk, adding cream if you have it, and salt to taste. When it’s boiling, mix in a tablespoon of flour that has been blended smooth with a little milk. Bring it to a boil again and serve.
Stewed Celery No. 2.—Cut the white part of fine heads of celery into small pieces, blanch in boiling water, turn into a colander, and drain. Heat a cup and a half of milk to boiling in a stewpan; add the celery, and stew gently until tender. Remove the celery with a skimmer, and stir into the milk the beaten yolks of two eggs and one half cup of cream. Cook until thickened; pour over the celery, and serve.
Stewed Celery No. 2.—Cut the white parts of fresh celery into small pieces, blanch them in boiling water, then transfer to a colander to drain. Heat a cup and a half of milk in a saucepan until it boils; add the celery and simmer gently until tender. Remove the celery with a slotted spoon, and mix the beaten yolks of two eggs and half a cup of cream into the milk. Cook until thickened; pour over the celery, and serve.
Celery with Tomato Sauce.—Prepare the celery as in the preceding recipe, and cook until tender in a small quantity of boiling water. Drain in a colander, and for three cups of stewed celery prepare a sauce with a pint of strained stewed tomato, heated to boiling and thickened with a tablespoonful of flour rubbed smooth in a little cold water. If desired, add a half cup of thin cream. Turn over the celery, and serve hot.
Celery with Tomato Sauce.—Prepare the celery as described in the previous recipe, and cook it until tender in a small amount of boiling water. Drain it in a colander, and for three cups of cooked celery, make a sauce using a pint of strained stewed tomatoes, heated until boiling and thickened with a tablespoon of flour mixed smoothly in a little cold water. If you like, add a half cup of light cream. Pour the sauce over the celery and serve hot.
ASPARAGUS.
Description.—The asparagus is a native of Europe, and in its wild state is a sea-coast plant. The young shoots form the edible portion. The plant was known to the ancient Greeks and Romans, who not only used it as a table delicacy but considered it very useful in the treatment of internal diseases. Roman cooks provided themselves with a supply of the vegetable for winter use by cutting fine heads and drying them. When wanted, they were put into hot water and gently cooked.
Description.—Asparagus is native to Europe and grows wild along coastlines. The young shoots are the edible part. It was known to the ancient Greeks and Romans, who not only enjoyed it as a delicacy but also found it helpful in treating internal health issues. Roman chefs made sure to have this vegetable on hand for winter by cutting the tender tops and drying them. When needed, they would soak them in hot water and cook them gently.
The asparagus is remarkable as containing a crystalline alkaloid called asparagin, which is thought to possess diuretic properties.
The asparagus is notable for containing a crystalline alkaloid called asparagin, which is believed to have diuretic properties.
Preparation and Cooking.—Select fresh and tender asparagus. Those versed in its cultivation, assert that it should be cut at least three times a week, and barely to the ground. If it is necessary to keep the bunches for some time before cooking, stand them, tops uppermost, in water about one half inch deep, in the cellar or other cool place. Clean each stalk separately by swashing back and forth in a pan of cold water till perfectly free from sand, then break off all the tough portions, cut in equal lengths, tie in bunches of half a dozen or more with soft tape, drop into boiling water barely sufficient to cover, and simmer gently until perfectly tender.
Preparation and Cooking.—Choose fresh and tender asparagus. Experts in growing it say it should be cut at least three times a week and very close to the ground. If you need to keep the bunches for a while before cooking, stand them upright in water about half an inch deep in a cool place like a cellar. Clean each stalk individually by swishing it back and forth in a pan of cold water until it’s completely free of sand, then break off the tough parts, cut them into equal lengths, tie them in bunches of six or more with soft tape, drop them into barely boiling water to cover, and simmer gently until they’re perfectly tender.
If the asparagus is to be stewed, break: (not cut) into small pieces; when it will not snap off quickly, the stalk is too tough for use.
If you're going to stew the asparagus, break it (don’t cut it) into small pieces; if it doesn’t snap off easily, the stalk is too tough to use.
Asparagus must be taken from the water just as soon as tender, while yet firm in appearance. If boiled soft, it loses its flavor and is uninviting. It is a good plan when it is to be divided before cooking, if the stalks are not perfectly tender, to boil the hardest portions first. Asparagus cooked in bunches is well done, if, when held by the thick end in a horizontal position between the fingers, it only bends lightly and does not fall heavily down.
Asparagus should be taken out of the water as soon as it’s tender but still looks firm. If you boil it until it’s soft, it loses its flavor and becomes unappetizing. A good approach, if you're going to cut it before cooking, is to boil the tougher parts first if the stalks aren't perfectly tender. Asparagus cooked in bunches is done well if, when held by the thick end horizontally between your fingers, it only bends slightly and doesn't droop down heavily.
The time required for boiling asparagus depends upon its freshness and age. Fresh, tender asparagus cooks in a very few minutes, so quickly, indeed, that the Roman emperor Augustus, intimating that any affair must be concluded without delay, was accustomed to say, "Let that be done quicker than you can cook asparagus." Fifteen or twenty minutes will suffice if young and fresh; if old, from thirty to fifty minutes will be required.
The time it takes to boil asparagus depends on how fresh or old it is. Fresh, tender asparagus cooks in just a few minutes, so quickly, in fact, that the Roman emperor Augustus used to say, "Let that be done quicker than you can cook asparagus," to imply that things should be done without delay. If the asparagus is young and fresh, about fifteen to twenty minutes will be enough; if it's older, it may take thirty to fifty minutes.
Asparagus with Cream Sauce.—Thoroughly wash, tie in small bunches, and put into boiling water; boil till perfectly tender. Drain thoroughly, untie the bunches, place the stalks all the same way upon a hot plate, with a dressing prepared as follows: Let a pint of sweet cream (about six hours old is best) come to the boiling point, and stir into it salt to taste and a level tablespoonful of flour rubbed smooth with a little cold cream.
Asparagus with Cream Sauce.—Wash thoroughly, tie in small bunches, and place in boiling water; cook until perfectly tender. Drain well, untie the bunches, and arrange the stalks in the same direction on a hot plate. Prepare a dressing as follows: Heat a pint of sweet cream (about six hours old is ideal) until it boils, then stir in salt to taste and a level tablespoon of flour mixed smoothly with a little cold cream.
Asparagus with Egg Sauce.—Prepare and cook asparagus as directed above. When tender, drain thoroughly, and serve on a hot dish or on slices of nicely browned toast, with an egg sauce prepared in the following manner: Heat a half cup of rich milk to boiling, add salt, and turn into it very slowly the well-beaten yolk of an egg, stirring constantly at the same time. Let the whole just thicken, and remove from the fire at once.
Asparagus with Egg Sauce.—Prepare and cook the asparagus as instructed above. Once tender, drain it well and serve on a hot plate or atop slices of golden-brown toast, with an egg sauce made as follows: Heat half a cup of rich milk until it boils, add salt, and very slowly stir in the well-beaten yolk of an egg, mixing constantly. Allow it to thicken slightly, then remove from the heat immediately.
Stewed Asparagus.—Wash, break into inch pieces, simmer till tender in water just to cover, add sufficient rich milk, part cream if convenient, to make a gravy, thicken slightly with flour, a teaspoonful to a pint of milk; add salt if desired, boil up together once, and serve.
Stewed Asparagus.—Wash and break into one-inch pieces, then simmer until tender in just enough water to cover. Add enough rich milk, and some cream if possible, to create a gravy. Slightly thicken with a teaspoon of flour for every pint of milk. Add salt if you like, bring to a boil once, and serve.
SEA-KALE.
Description.—This plant, a native of Britain, and much esteemed as a vegetable in England and on the Continent, is also in its wild state a sea-coast plant. When properly cooked, it is nutritious and easy of digestion. In appearance and flavor it greatly resembles asparagus, and the suggestions for cooking and recipes given for that vegetable are applicable to sea-kale.
Description.—This plant, which is native to Britain and highly valued as a vegetable in England and across Europe, also grows wild along the coast. When cooked correctly, it is nutritious and easy to digest. It looks and tastes a lot like asparagus, so the cooking tips and recipes meant for asparagus work just as well for sea-kale.
LETTUCE AND RADISH.
Description.—These two vegetables, although wholly different, the one being the leaf of a plant, the other the root, are both so commonly served as relishes that we will speak of them together. Both have long been known and used. Wild lettuce is said to be the bitter herb which the Hebrews ate with the Paschal lamb. The ancient Greek and Roman epicures valued lettuce highly, and bestowed great care upon its cultivation, in some instances watering the plants with sweet wine instead of water, in order to communicate to them a delicate perfume and flavor. The common garden lettuce of the present day is a hardy plant, which supplies an agreeable, digestible, and, when served with a wholesome dressing, unobjectionable salad.
Description.—These two vegetables, though completely different—one being a leaf and the other a root—are often served as side dishes, so we’ll discuss them together. Both have been known and used for a long time. Wild lettuce is believed to be the bitter herb that the Hebrews ate with the Paschal lamb. Ancient Greek and Roman gourmets valued lettuce highly and took great care in its cultivation, sometimes watering the plants with sweet wine instead of water to give them a delicate fragrance and flavor. The common garden lettuce we have today is a robust plant that provides a pleasant, easily digestible salad, especially when dressed with a healthy dressing.
The common radish is supposed to be indigenous to China. Ancient writers on foods mention the radish as used by the early Greeks and Romans, who fancied that at the end of three years its seed would produce cabbages. They had also the singular custom of making the radish the ignominious projectile with which in times of tumult the mob pursued persons whose political opinions had made them obnoxious. When quiet was restored, the disgraced vegetable was boiled and eaten with oil and vinegar. Common garden radishes are of different shapes and of various colors on the outside, there being black, violet, red, and white radishes. The inside portion of all, however, is white. They are sometimes cooked, but more commonly served raw. A dish of crisp, coral radishes adds beauty to the appearance of the table, but they are not possessed of a high nutritive value, being very similar to the turnip in composition, and unless very young, tender, and when eaten thoroughly masticated, are quite difficult of digestion.
The common radish is believed to be native to China. Ancient writers on food mention that early Greeks and Romans used radishes, thinking that after three years, the seeds would grow into cabbages. They also had the unusual custom of using radishes as a disgraceful projectile during times of unrest, targeting people whose political views made them unpopular. When peace was restored, the shamed vegetable was boiled and eaten with oil and vinegar. Common garden radishes come in different shapes and a variety of colors, including black, violet, red, and white, but the inside of all of them is white. They can be cooked but are usually served raw. A dish of crisp, red radishes adds a nice touch to the table, but they aren’t very nutritious, being similar in composition to turnips. Unless they are very young and tender and properly chewed, they can be quite hard to digest.
RECIPES.
Lettuce.—Wash well, put into cold water, and set on ice or on the cellar bottom for an hour or more before using. Dry the leaves with a soft towel and use whole or tear into convenient pieces with a silver fork; never cut with a knife. Serve with a dressing prepared of equal quantities of lemon juice and sugar, diluted with a little ice water; or, with a dressing of cream and sugar, in the proportion of three or four tablespoonfuls of thin cream to a teaspoonful of sugar. The dressing may be prepared, and after the sugar is dissolved, a very little lemon juice (just enough to thicken the cream slightly, but not sufficient to curdle it) may be added if desired.
Lettuce.—Wash thoroughly, soak in cold water, and chill on ice or in the bottom of the fridge for an hour or more before using. Pat the leaves dry with a soft towel and either leave them whole or tear them into manageable pieces with a silver fork; never cut them with a knife. Serve with a dressing made of equal parts lemon juice and sugar, mixed with a bit of ice water; or with a cream and sugar dressing, using three or four tablespoons of thin cream for every teaspoon of sugar. The dressing can be made ahead, and once the sugar is dissolved, a tiny bit of lemon juice (just enough to slightly thicken the cream, but not so much that it curdles) can be added if desired.
CYMLING, SUMMER SQUASH, or VEGETABLE MARROW.
Description.—The vegetable marrow (sometimes called cymling) is thought to be a variety of the common gourd, from which also the pumpkin and winter squash appear to have been derived. It is easily digested, but on account of the abundance of water in its composition, its nutritive value is very low.
Preparation and Cooking.—When very young, most varieties need no preparation for cooking, aside from washing thoroughly. After cooking, the skin can be easily rubbed off and the seeds removed. If more mature, pare thinly, and if large, divide into halves or quarters and scoop out the seeds. Summer squashes are better steamed than boiled. If boiled, they should be cooked in so little water that it will be quite evaporated when they are tender. From twenty to sixty minutes will be required for cooking.
Preparation and Cooking.—When very young, most types don’t need any preparation before cooking, other than a good wash. After cooking, the skin can be easily rubbed off and the seeds taken out. If they are more mature, peel them thinly, and if they are large, cut them in half or quarters and scoop out the seeds. Summer squashes are better steamed than boiled. If boiled, use so little water that it will be almost completely evaporated by the time they’re tender. Cooking will take between twenty to sixty minutes.
RECIPES.
Mashed Squash.—Wash, peel, remove seeds, and steam until tender. Place the squash in a clean cloth, mash thoroughly, squeeze until the squash is quite dry, or rub through a fine colander and afterward simmer until neatly dry; season with cream, and a little salt if desired, and heat again before serving. A teaspoonful of sugar may be added with the cream, if desired.
Mashed Squash.—Wash, peel, remove the seeds, and steam until tender. Place the squash in a clean cloth, mash it well, then squeeze until the squash is dry, or push it through a fine strainer and then simmer until it's dry. Season with cream and a bit of salt if you want, and heat it again before serving. You can also add a teaspoon of sugar with the cream if you like.
Squash with Egg Sauce.—Prepare, steam till tender, cut into pieces, and serve with an egg sauce made the same as directed for asparagus, page 256.
Squash with Egg Sauce.—Prepare, steam until tender, cut into pieces, and serve with an egg sauce made the same way as instructed for asparagus, page 256.
Stewed Squash.—Prepare, cut into pieces, and stew until tender in a small quantity of boiling water; drain, pressing out all the water; serve on toast with cream or white sauce. Or, divide in quarters, remove the seeds, cook in a double boiler, in its own juices, which when done may be thickened with a little flour. Season with salt if desired, and serve hot.
Stewed Squash.—Prepare by cutting into pieces and stewing until tender in a small amount of boiling water; drain, pressing out all the water; serve on toast with cream or white sauce. Alternatively, cut into quarters, remove the seeds, cook in a double boiler in its own juices, which can be thickened with a little flour when done. Season with salt if you like, and serve hot.
WINTER SQUASHES.
The winter squash and pumpkin are allied in nature to the summer squash.
The winter squash and pumpkin are related to summer squash.
To boil or steam, from thirty minutes to one hour's time will be needed; to bake, one to two hours.
To boil or steam, you’ll need about thirty minutes to one hour; to bake, it will take one to two hours.
RECIPES.
Baked Squash..—The hard-shell varieties are best for baking. Wash, divide, and lay, shells downward, on the top grate of the oven, or place in a shallow baking dish with a little boiling water. Boil until tender, serve in the shell, or scrape out the soft part, mash and serve with two largo tablespoonful of cream to a pint of squash. If preferred, the skins may be removed before baking, and the squash served the same as sweet potato, for which it makes a good substitute.
Baked Squash..—The hard-shell types are best for baking. Wash, cut in half, and place them cut side down on the top rack of the oven, or put them in a shallow baking dish with a little boiling water. Boil until soft, serve in the skin, or scoop out the soft part, mash it, and mix in two large tablespoons of cream for every pint of squash. If you prefer, you can remove the skin before baking, and serve the squash like you would sweet potatoes, which it makes a good substitute for.
THE PUMPKIN.
Description.—When our forefathers came to this country, they found the pumpkin growing in the Indian cornfields, and at once made use of it. Although as food it did not supply what its handsome exterior promised, yet in the absence of other fruits and relishes, of which the exigencies of a new country deprived them, they soon found the pumpkin quite palatable; and the taste, cultivated through necessity, has been handed down through generations, until the pumpkin stewed and baked in pies, has become an established favorite.
Description.—When our ancestors arrived in this country, they discovered pumpkins growing in the Indian cornfields and quickly started using them. Even though it didn’t provide as much food as its attractive appearance suggested, they had limited options due to the challenges of a new land, so they soon found pumpkins to be quite tasty. This preference, developed out of necessity, has been passed down through generations, and now pumpkin, whether stewed or baked into pies, has become a beloved staple.
RECIPES.
Stewed Pumpkin—Select a good, ripe pumpkin, and cut in halves; remove the seeds, slice halfway around, pare, cut into inch pieces, put over the fire in a kettle containing a small quantity of boiling water, and stew gently, stirring frequently until it breaks to pieces. Cool, rub through a colander, and place where it will just simmer, but not burn, until the water is all evaporated and the pumpkin dry. Pumpkin for pies is much richer baked like squash, and rubbed through a colander after the skin has been removed.
Stewed Pumpkin—Choose a good, ripe pumpkin and cut it in half; remove the seeds, slice halfway around, peel, and cut it into one-inch pieces. Put the pieces in a pot with a small amount of boiling water, and gently stew, stirring often until it breaks apart. Let it cool, then push it through a colander, and leave it on low heat just to simmer, but not burn, until all the water has evaporated and the pumpkin is dry. Pumpkin for pies tastes much richer when baked like squash and then pushed through a colander after the skin has been removed.
Dried Pumpkin.—Pumpkin may be dried and kept for future use. The best way is first to cut and stew the pumpkin, then spread on plates, and dry quickly in the oven. Dried in this manner, it is easily softened, when needed, by soaking in a small quantity of water, and is considered nearly as good as that freshly stewed.
Dried Pumpkin.—You can dry pumpkin and store it for later use. The best method is to first cut and cook the pumpkin, then spread it out on plates and dry it quickly in the oven. Dried this way, it can be easily softened when needed by soaking in a small amount of water, and is seen as nearly as good as fresh stew.
TOMATO.
Description.—The tomato, or "love apple," as it was called in the early part of the century, is a native of South America and Mexico. It was formerly regarded as poisonous, and though often planted and prized as a curiosity in the flower garden, it has only within the last half century come to be considered as a wholesome article of diet. Botanically, it is allied to the potato. It is an acid fruit, largely composed of water, and hence of low nutritive value; but it is justly esteemed as a relish, and is very serviceable to the cook in the preparation of soups and various mixed dishes.
Description.—The tomato, once known as the "love apple," is originally from South America and Mexico. It was previously thought to be poisonous, and although it was often grown and appreciated as a novelty in flower gardens, it has only been considered a healthy food option in the last fifty years. Botanically, it is related to the potato. It is an acidic fruit, mostly made up of water, which means it has low nutritional value; however, it is highly valued as a flavor enhancer and is very useful for cooks when making soups and various mixed dishes.
Preparation and Cooking.—Tomatoes to be served in an uncooked state should be perfectly ripe and fresh. The medium-sized, smooth ones are the best. To peel, pour scalding water over them; let them remain for half a minute, plunge into cold water, allow them to cool, when the skins can be easily rubbed off. Tomatoes should always be cooked in porcelain or granite ware; iron makes them look dark, and being slightly acid in character, they are not wholesome cooked in tin vessels.
Preparation and Cooking.—Tomatoes meant to be eaten raw should be perfectly ripe and fresh. The medium-sized, smooth ones are the best. To peel them, pour boiling water over them; let them sit for thirty seconds, then plunge them into cold water and let them cool, after which the skins can be easily rubbed off. Tomatoes should always be cooked in porcelain or granite cookware; using iron makes them look dark, and since they are slightly acidic, they are not healthy when cooked in tin.
Tomatoes require cooking a long time; one hour is needed, and two are better.
Tomatoes need to be cooked for a long time; one hour is necessary, and two hours are even better.
RECIPES.
Baked Tomatoes No. 2. Wash and wipe a quantity of smooth, even-sized tomatoes; remove the stems with a sharp-pointed knife. Arrange on an earthen pudding or pie dish, and bake whole in a moderate oven. Serve with cream.
Baked Tomatoes No. 2. Wash and dry a batch of smooth, evenly-sized tomatoes; cut off the stems with a sharp knife. Place them in a baking dish and bake them whole in a moderate oven. Serve with cream.
Scalloped Tomatoes.—Take a pint of stewed tomatoes, which have been rubbed through a colander, thicken with one and one fourth cups of lightly picked crumbs of Graham or whole-wheat bread, or a sufficient quantity to make it quite thick, add salt if desired, and a half cup of sweet cream, mix well, and bake for twenty minutes. Or, fill a pudding dish with alternate layers of peeled and sliced tomatoes and bread crumbs, letting the topmost layer be of tomatoes. Cover, and bake in a moderate oven for an hour or longer, according to depth. Uncover, and brown for ten or fifteen minutes.
Scalloped Tomatoes.—Take a pint of stewed tomatoes, which have been pushed through a colander, thicken with one and a quarter cups of lightly packed crumbs from Graham or whole-wheat bread, or enough to make it quite thick. Add salt if you want, and half a cup of heavy cream, mix well, and bake for twenty minutes. Alternatively, fill a baking dish with layers of peeled and sliced tomatoes and breadcrumbs, making sure the top layer is tomatoes. Cover and bake in a moderate oven for an hour or longer, depending on how deep it is. Uncover and brown for ten to fifteen minutes.
Stewed Corn and Tomatoes.—Boil dried or fresh corn until perfectly tender, add to each cup of corn two cups of stewed, strained tomatoes, either canned or freshly cooked. Salt to taste, boil together for five or ten minutes, and serve plain or with a little cream added.
Stewed Corn and Tomatoes.—Boil dried or fresh corn until it’s nice and tender, then mix in two cups of stewed, strained tomatoes for every cup of corn, using either canned or freshly cooked tomatoes. Add salt to taste, boil everything together for five to ten minutes, and serve it plain or with a splash of cream.
Tomato Salad No. 2.—Use one half small yellow tomatoes and one half red. Slice evenly and lay in the dish in alternate layers. Powder lightly with sugar, and turn over them a cupful of orange juice to a pint of tomato, or if preferred, the juice of lemons may be used instead. Set on ice and cool before serving.
Tomato Salad No. 2.—Use half small yellow tomatoes and half red. Slice them evenly and arrange them in alternating layers in the dish. Lightly sprinkle with sugar, and pour over them a cup of orange juice for each pint of tomatoes, or if you prefer, you can use lemon juice instead. Chill on ice before serving.
Broiled Tomatoes.—Choose perfectly ripened but firm tomatoes of equal size. Place them on a wire broiler, and broil over glowing coals, from three to eight minutes, according to size, then turn and cook on the other side. Broil the stem end first. Serve hot with salt to season, and a little cream.
Broiled Tomatoes.—Select perfectly ripe but firm tomatoes of the same size. Put them on a wire rack and broil over hot coals, for three to eight minutes, depending on their size, then flip and cook the other side. Start broiling from the stem end. Serve hot with salt for seasoning and a little cream.
Stewed Tomatoes.—Peel and slice the tomatoes. Put them into a double boiler, without the addition of water, and stew for an hour or longer. When done, serve plain with a little sugar added, or season with salt and a tablespoonful of rather thick sweet cream to each pint of tomatoes. If the tomatoes are thin and very juicy, they may be thickened with a little flour rubbed smooth in a little cold water. They are much better, however, to stew a longer time until the water they contain is sufficiently evaporated to make them of the desired consistency. The stew may also be thickened, if desired, by the addition of bread crumbs, rice, or macaroni.
Stewed Tomatoes.—Peel and slice the tomatoes. Put them in a double boiler without any water, and stew for an hour or more. Once they're done, serve them plain with a bit of sugar added, or season with salt and a tablespoon of fairly thick sweet cream for each pint of tomatoes. If the tomatoes are thin and very juicy, you can thicken them with a bit of flour mixed smoothly in some cold water. However, it's better to stew them for a longer time until enough of the water evaporates to achieve the desired consistency. You can also thicken the stew by adding bread crumbs, rice, or macaroni if you like.
EGG PLANT.
RECIPES.
Scalloped Egg Plant.—Pare a fresh egg plant. If large, divide in quarters, if small, in halves, and put to cook in boiling water. Cook until it can be easily pierced with a straw, and drain in a colander. Turn into a hot dish, and beat with a silver fork until finely broken. Measure the egg plant, and add to it an equal quantity of graded bread crumbs, a little salt, and a tablespoonful of thick sweet cream. Lastly, add one well beaten egg. Put in an earthen pudding dish, and brown in the oven until the egg is set, and the whole is heated throughout but not dry.
Scalloped Eggplant.—Peel a fresh eggplant. If it's large, cut it into quarters; if it's small, cut it in half, and cook it in boiling water. Cook until it can be easily pierced with a straw, then drain it in a colander. Transfer it to a hot dish and mash it with a silver fork until it's finely broken. Measure the eggplant and add an equal amount of bread crumbs, a little salt, and a tablespoon of thick sweet cream. Finally, stir in one well-beaten egg. Place it in an earthen pudding dish and bake in the oven until the egg is set and the entire dish is heated through but not dry.
Baked Egg Plant.—Wash and cook whole in boiling water until tender. Divide in halves, remove the inside with a spoon, taking care not to break the skin. Beat the egg plant smooth with a fork. Season with salt and cream, and if desired, a stalk of celery or a small slice of onion very finely minced, for flavor. Put back in the skin, sprinkle the top with bread crumbs, and brown the outside uppermost in the oven.
Baked Eggplant.—Wash and cook whole in boiling water until tender. Cut in half, scoop out the insides with a spoon, making sure not to break the skin. Mash the eggplant until smooth with a fork. Season with salt and cream, and if you want, add a stalk of celery or a small slice of very finely minced onion for flavor. Put the mixture back in the skin, sprinkle the top with bread crumbs, and brown the outside side up in the oven.
CUCUMBER.
Description.—The cucumber is a native of Southern Asia, although it is quite commonly cultivated in most civilized countries. It formed a part of the dietary of the Israelites when in Egypt, where it grew very plentifully. The ancient Greeks held the cucumber in high esteem, and attributed to it wonderful properties.
The cucumber is not a nutritious vegetable, and when served in its raw state, as it so generally is, dressed with salt, vinegar, pepper, and similar condiments, it is an exceedingly indigestible article. If it is to be eaten at all, it should first be cooked. It may be pared, divided in quarters, the seeds removed, and cooked in a small quantity of water until perfectly tender, and served on toast with an egg sauce or a cream sauce; or it may be prepared the same as directed for Escalloped Egg Plant.
The cucumber isn't a nutritious vegetable, and when it's served raw, which is pretty common, topped with salt, vinegar, pepper, and similar dressings, it's really hard to digest. If you're going to eat it, it's best to cook it first. You can peel it, cut it into quarters, remove the seeds, and cook it in a little bit of water until it's completely tender. Then serve it on toast with an egg sauce or a cream sauce; or you can prepare it just like you would with Escalloped Egg Plant.
SALSIFY, OR VEGETABLE OYSTER.
Description.—The vegetable oyster plant, sometimes called purple goat's-beard, or salsify, is indigenous to some portions of Great Britain. The long, slender root becomes fleshy and tender under cultivation, with a flavor, when cooked, somewhat resembling that of the mollusk for which it is named. On this account, it is much esteemed for soups. A variety of the plant grows near the line of perpetual snow, and forms the principal article of fresh vegetable food in the dietary of Kurdistan.
Description.—The vegetable oyster plant, sometimes known as purple goat's-beard or salsify, is native to certain areas of Great Britain. When cultivated, the long, thin root becomes fleshy and tender, and when cooked, it has a flavor that somewhat resembles the mollusk it's named after. Because of this, it's highly valued for soups. A variety of this plant grows near the snow line and is a key source of fresh vegetable food in the diet of Kurdistan.
Preparation and Cooking.—Select fresh and unshriveled roots, wash and scrape well, dropping into cold water as soon as cleaned, to prevent discoloration. If the roots are covered with cold water for a half hour or more before scraping, they can be cleaned much easier. Use a porcelain-lined kettle, for cooking, as an iron one will discolor it and injure its flavor. From twenty minutes to one hour, according to age, is required to cook it tender.
Preparation and Cooking.—Choose fresh, firm roots, wash and scrub them thoroughly, and drop them into cold water immediately after cleaning to avoid discoloration. Soaking the roots in cold water for thirty minutes or longer before scrubbing makes them easier to clean. Use a porcelain-lined pot for cooking because an iron pot will discolor it and ruin its flavor. Cooking time can range from twenty minutes to one hour, depending on their age, to ensure they are tender.
RECIPES.
Scalloped Vegetable Oysters.—Boil two quarts of sliced vegetable oysters in about two quarts of water until very tender. Skim them out, and fill a pudding dish with alternate layers of crumbs and oysters, having a layer of crumbs for the top. To the water in which they were boiled, add a pint and a half of thin cream, salt to taste, boil up, and thicken with a heaping tablespoonful or two of flour rubbed smooth in a little cold cream. Pour this over the oysters and crumbs, and bake a half hour. If this is not enough to cover well, add more cream or milk. Stewed tomatoes are a nice accompaniment for escalloped vegetable oysters.
Scalloped Vegetable Oysters.—Boil two quarts of sliced vegetable oysters in about two quarts of water until they are very tender. Remove them from the water and layer them in a baking dish with alternate layers of breadcrumbs and oysters, finishing with a layer of breadcrumbs on top. To the water you cooked the oysters in, add a pint and a half of thin cream, salt to taste, bring it to a boil, and thicken it with one or two heaping tablespoons of flour mixed well in a little cold cream. Pour this mixture over the oysters and breadcrumbs, and bake for half an hour. If it doesn't cover the dish well, add more cream or milk. Stewed tomatoes make a great side dish for scalloped vegetable oysters.
Stewed Vegetable Oysters.—Wash, scrape, and cut into slices not more than one half inch in thickness. Put into a small quantity of boiling water and cook until tender. If a large quantity of water is used, the savory juices escape, and leave the roots very insipid. When tender, pour in a cup of rich milk and simmer for five or ten minutes; add a little flour rubbed smooth in milk, and salt if desired; boil up once, and serve as a vegetable or on slices of nicely browned toast. If preferred, a well-beaten egg may be used in the place of flour.
Stewed Vegetable Oysters.—Wash, scrape, and slice them into pieces no thicker than half an inch. Place them in a small amount of boiling water and cook until tender. Using too much water will cause the tasty juices to escape, leaving the roots bland. Once tender, add a cup of rich milk and let it simmer for five to ten minutes; then mix in a little flour blended with milk and salt to taste; bring it to a boil once, and serve it as a side dish or on slices of nicely browned toast. If you prefer, you can use a well-beaten egg instead of flour.
GREEN CORN, PEAS, AND BEANS.
Description.—Corn, peas, and beans in their immature state are so nearly allied to vegetables, that we give in this connection recipes for cooking green corn, green beans, and green peas. A general rule applicable to all is that they should, when possible, be cooked and eaten the day they are gathered, as otherwise they lose much of their sweetness and flavor. For corn, select young, tender, well-filled ears, from which the milk will spurt when the grain is broken with the finger nail. Beans and peas are fresh only when the pods are green, plump, snap crisply when broken, and have unshriveled stems. If the pods bend and appear wilted, they are stale. Corn, peas, and beans are wholesome and nutritious foods when thoroughly cooked and sufficiently masticated, but they are almost indigestible unless the hull, or skin, of each pea, bean, or grain of corn, be broken before being swallowed.
Description.—Corn, peas, and beans when they are not fully mature are so closely related to vegetables that we include recipes for cooking fresh corn, green beans, and green peas here. A general rule for all of them is that they should be cooked and eaten on the same day they are picked, as they lose a lot of their sweetness and flavor otherwise. For corn, choose young, tender ears that are well-filled, and when you break a grain with your fingernail, the milk should spurt out. Beans and peas are fresh only if the pods are green, plump, snap crisply when broken, and have smooth stems. If the pods bend and look wilted, they are past their prime. Corn, peas, and beans are healthy and nutritious foods when well-cooked and properly chewed, but they can be quite hard to digest unless the hull or skin of each pea, bean, or grain of corn is broken before swallowing.
RECIPES FOR CORN.
Baked Corn.—Select nice fresh ears of tender corn of as nearly equal size as possible. Open the husks and remove all the silk from the corn; replace and tie the husks around the ears with a thread. Put the corn in a hot oven, and bake thirty minutes or until tender. Remove the husks before serving.
Baked Corn.—Choose fresh, tender ears of corn that are as close to the same size as you can find. Open the husks and take off all the silk from the corn; then close the husks back up and tie them around the ears with a piece of string. Place the corn in a hot oven and bake for thirty minutes or until it's tender. Take off the husks before serving.
Baked Corn No. 2.—Scrape enough corn from the cob (as directed below for Corn Pulp) to make one and a half quarts. Put into a baking dish, season with salt if desired, add enough milk, part cream if convenient, barely to cover the corn, and bake in a hot oven twenty-five or thirty minutes.
Baked Corn No. 2.—Remove enough corn from the cob (as instructed below for Corn Pulp) to make one and a half quarts. Place it in a baking dish, season with salt if you like, add enough milk, and some cream if it's easy, just enough to barely cover the corn, and bake in a hot oven for twenty-five to thirty minutes.
Boiled Green Corn.—Remove the husks and every thread of the silk fiber. Place in a kettle, the larger ears at the bottom, with sufficient boiling water nearly to cover. Cover with the clean inner husks, and cook from twenty to thirty minutes, according to the age of the corn; too much cooking hardens it and detracts from its flavor. Try a kernel, and when the milk has thickened, and a raw taste is no longer apparent, it is sufficiently cooked. Green corn is said to be sweeter, boiled with the inner husks on. For cooking in this way, strip off all outer husks, and remove the silk, tying the inner husk around the ear with a bit of thread, and boil. Remove from the kettle, place in a heated dish, cover with a napkin and serve at once on the cob. Some recommend scoring or splitting the corn by drawing a sharp knife through each row lengthwise. This is a wise precaution against insufficient mastication.
Boiled Green Corn.—Remove the husks and all the silk threads. Place the corn in a pot, with the larger ears at the bottom, and add enough boiling water to nearly cover it. Cover with the clean inner husks and cook for twenty to thirty minutes, depending on the corn's age; overcooking makes it tough and dulls the flavor. Test a kernel, and when the milk has thickened and there’s no raw taste left, it's done. Green corn is said to be sweeter when boiled with the inner husks on. To cook this way, strip off all the outer husks, remove the silk, and tie the inner husk around the ear with a bit of thread before boiling. After boiling, take it out of the pot, place it on a heated dish, cover it with a napkin, and serve immediately on the cob. Some suggest scoring or splitting the corn by running a sharp knife through each row lengthwise. This is a smart move to help with chewing.
Stewed Corn Pulp.—Take six ears of green corn or enough to make a pint of raw pulp; with a sharp knife cut a thin shaving from each row of kernels or score each kernel, and with the back of the knife scrape out the pulp, taking care to leave the hulls on the cob. Heat a cup and a half of rich milk—part cream if it can be afforded—to boiling, add the corn, cook twenty or thirty minutes; season with salt and a teaspoonful of sugar if desired.
Stewed Corn Pulp.—Take six ears of fresh corn or enough to make a pint of raw pulp; with a sharp knife, shave off a thin layer from each row of kernels or score each kernel, then use the back of the knife to scrape out the pulp, making sure to leave the husks on the cob. Heat one and a half cups of rich milk—use part cream if possible—until it boils, then add the corn and cook for twenty to thirty minutes; season with salt and a teaspoon of sugar if you like.
Corn Pudding.—One quart of corn pulp prepared as for stewing, one quart of milk, three eggs, and a little salt. Mix the corn with a pint of the milk, and heat it to boiling. Break the eggs into the remainder of the milk, and add it to the corn, turn all into an oiled pudding dish, and bake slowly until the custard is well set.
Corn Pudding.—One quart of corn pulp prepared for stewing, one quart of milk, three eggs, and a pinch of salt. Mix the corn with a pint of the milk and heat it until it boils. Beat the eggs into the remaining milk, then combine it with the corn. Pour everything into an oiled pudding dish and bake slowly until the custard is fully set.
Stewed Green Corn.—Cut the corn from the cob and with the back of the knife scrape off all the pulp, being careful to leave the hull on the cob. Put into a stewpan with half as much water as corn, cover closely and stew gently until thoroughly cooked, stirring frequently to prevent the corn from sticking to the pan; add cream or milk to make the requisite amount of juice, and season with salt if desired. A teaspoonful of white sugar may be added if desired.
Stewed Green Corn.—Remove the corn from the cob and use the back of the knife to scrape off all the pulp, making sure to leave the hull on the cob. Place it in a pot with half as much water as corn, cover it tightly, and simmer gently until fully cooked, stirring often to keep the corn from sticking to the pot; add cream or milk to achieve the desired amount of liquid, and season with salt if you like. You can also add a teaspoon of sugar if you want.
Cold boiled corn cut from the cob and stewed a few minutes in a little milk, makes a very palatable dish.
Cold boiled corn cut from the cob and cooked for a few minutes in a little milk makes a very tasty dish.
Summer Succotash.—This maybe made by cooking equal quantities of shelled beans and corn cut from the cob, separately until tender, and then mixing them; or the beans may be cooked until nearly soft, an equal quantity of shaved corn added, and the whole cooked fifteen or twenty minutes or longer. Season with cream, and salt if desired.
Summer Succotash.—You can make this by cooking equal amounts of shelled beans and corn cut from the cob separately until they're tender, and then mixing them together. Alternatively, you can cook the beans until they're almost soft, add an equal amount of shaved corn, and cook the whole mixture for fifteen to twenty minutes or longer. Season with cream and add salt if you like.
Dried Corn.—The sweet varieties of corn taken when young and tender and properly dried, furnish an excellent material for nearly all purposes to which green corn is put. Take green corn, just right for eating, have it free from silk; cut the fleshy portion from the cob with a sharp knife, then with the back of the knife gently press the remaining pulp from the cob. Spread thinly on plates and put into an oven hot enough to scald, not scorch it. Watch closely for a half hour or more, turning and stirring frequently with a fork. When thus thoroughly scalded, the corn may be left without further attention if placed in a moderate oven, save an occasional stirring to prevent its sticking to the plate, until the drying is complete, which ought to be in about forty-eight hours; however, if one can spend the time to watch closely and stir very frequently, the drying may be completed in a single afternoon in a rather hot oven. Be careful that it does not scorch.
Dried Corn.—The sweet types of corn picked when they're young and tender and properly dried provide excellent material for almost any purpose that green corn is used for. Take fresh corn at its peak for eating, making sure it's free from silk; cut the juicy part from the cob with a sharp knife, then use the back of the knife to gently press the remaining pulp from the cob. Spread it out thinly on plates and place it in an oven hot enough to scald, but not scorch it. Keep an eye on it for about half an hour or more, turning and stirring frequently with a fork. Once it’s thoroughly scalded, you can leave it with minimal attention if you put it in a moderate oven, just stirring occasionally to prevent it from sticking to the plate, until it's completely dried, which should take about forty-eight hours. However, if you can dedicate the time to watch it closely and stir often, you could finish drying it in just one afternoon in a hot oven. Be careful to avoid scorching it.
When needed for use, soak over night and cook in accordance with recipes for Stewed Corn, Succotash, etc., pages 265, 234, only remembering to allow a longer time.
When needed, soak overnight and cook according to the recipes for Stewed Corn, Succotash, etc., pages 265, 234, keeping in mind to allow more time.
RECIPES FOR PEAS.
Stewed Peas.—If from the garden, pick and shell the peas with clean hands; if from the market, wash the pods before shelling, so that the peas will not require washing, as they are much better without. When shelled, put into a colander and sift out the fine particles and undeveloped blossoms. If not of equal growth, sort the peas and put the older ones to cook ten minutes before the others. Use a porcelain kettle, with one half pint of boiling water for each quart of peas, if young and tender; older ones, which require longer stewing, need more. Cover closely, and simmer gently till tender. The time required for young peas is from twenty-five to thirty minutes; older ones require forty to fifty minutes. Serve without draining, season with salt and enough sweet cream to make them as juicy as desired. If preferred, the juice may be thickened with a little flour.
Stewed Peas.—If you're using fresh peas from the garden, pick and shell them with clean hands. For peas from the market, wash the pods before shelling so the peas won't need washing afterward, as they taste better that way. Once shelled, place them in a colander to remove any small particles and undeveloped flowers. If the peas are not all the same size, sort them and cook the larger ones for ten minutes before adding the smaller ones. Use a porcelain pot, adding half pint of boiling water for each quart of young, tender peas; older peas that need more cooking will require more water. Cover tightly and simmer gently until tender. Young peas should take about twenty-five to thirty minutes, while older peas will need forty to fifty minutes. Serve them without draining, seasoning with salt and enough sweet cream to make them as juicy as you like. If you prefer, you can thicken the juice with a little flour.
The peas may be purposely stewed in a larger quantity of water, and served in their own juices thickened with a little flour and seasoned with salt.
The peas can be intentionally cooked in more water, then served in their own juices thickened with a bit of flour and seasoned with salt.
RECIPES FOR BEANS.
Lima Beans.—Lima beans are not good until they are full grown and have turned white. Shell, wash, cover with boiling water, and cook about one hour or until tender. Let the water nearly evaporate, and add milk or cream thickened with a little flour. Season with salt to taste, boil up once, and serve.
Lima Beans.—Lima beans are only good when they are fully grown and have turned white. Shell them, wash them, cover with boiling water, and cook for about an hour or until tender. Let the water almost evaporate, then stir in milk or cream thickened with a bit of flour. Season with salt to taste, bring to a boil, and serve.
String Beans.—Wash well in cold water. Remove the strong fiber, or strings, as they are called, by paring both edges with a sharp knife; few cooks do this thoroughly. Break off stems and points, carefully rejecting any imperfect or diseased pods. Lay a handful evenly on a board and cut them all at once into inch lengths. Put in a porcelain kettle, cover with boiling water, and cook from one to three hours, according to age and variety, testing frequently, as they should be removed from the kettle just as soon as done. When very young and tender, only water sufficient to keep them from burning will be needed. When done, add a half cup of thin cream, and salt to taste. If the quantity of juice is considerable, thicken with a little flour.
String Beans.—Rinse thoroughly in cold water. Remove the tough fibers, known as strings, by trimming both ends with a sharp knife; not many cooks do this properly. Snap off the stems and tips, discarding any imperfect or spoiled pods. Spread a handful evenly on a cutting board and cut them all at once into one-inch pieces. Place them in a porcelain pot, cover with boiling water, and cook for one to three hours, depending on their age and type, checking frequently to ensure they are removed from the pot as soon as they’re done. When very young and tender, you’ll only need enough water to prevent burning. Once cooked, add a half cup of light cream and salt to taste. If there’s a lot of juice, thicken it with a little flour.
THE ONION.
The onion belongs to a class of foods containing an acrid oil of a strongly irritating character, on which account it cannot be considered a wholesome food when eaten raw, as it so generally is. The essential oil is, however, quite volatile, so that when cooked, after being first parboiled in two or three waters, its irritating properties are largely removed. The varieties grown in warm climates are much milder and sweeter than those grown in colder countries. The onion is valuable for flavoring purposes. It may also be boiled and served whole with a cream sauce, or cut in quarters and prepared as directed for Scalloped Turnips, page 242.
The onion is part of a group of foods that have a strong, irritating oil, which is why it's not really a healthy option when eaten raw, even though that's how most people consume it. However, the essential oil is quite volatile, so when it's cooked, especially after being boiled in two or three batches of water, its irritating qualities are mostly eliminated. The onions grown in warmer climates are much milder and sweeter than those from colder regions. Onions are great for adding flavor. They can also be boiled and served whole with a cream sauce, or cut into quarters and prepared like Scalloped Turnips, page 242.
CANNING VEGETABLES.
Most housekeepers experience more difficulty in canning and keeping vegetables than fruit. This is frequently owing to lack of care to secure perfect cans, covers, and rubbers, and to cook the vegetables thoroughly. Whatever is to be canned must be cooked sufficiently to be eaten, and must be boiling at the time it is put into the cans. Care as to the cleanliness of the cans and their sterilization is also important, and after the canning process is completed, all vegetables put up in glass should be kept in a cool, dark place. The general directions given for canning fruits should be followed in canning vegetables.
Most home cooks find canning and preserving vegetables more challenging than fruit. This is often due to not properly securing the cans, lids, and seals, and not cooking the vegetables thoroughly. Anything meant for canning must be cooked enough to be edible and should be boiling when placed in the cans. It's also crucial to ensure the cans are clean and sterilized. After canning, any vegetables stored in glass jars should be kept in a cool, dark place. The general guidelines for canning fruit should also be applied when canning vegetables.
RECIPES.
Canned Corn.—Select corn just ripe enough for table use, and prepare as directed for stewed corn. It will require from twelve to fifteen ears to fill sufficiently each quart can. To insure success, the cans should be so full that when the corn is shrunken by the cooking, the can will still be well filled. Pack the corn in the cans, working it down closely by means of the small end of a potato masher, so the milk will cover the corn and completely fill the can; heap a little more corn loosely on the top, and screw the covers on sufficiently tight to prevent water from getting into the can. Place the cans in a boiler, on the bottom of which has been placed some straw or a rack; also take care not to let the cans come in contact with each other, by wrapping each in a cloth or by placing a chip between them. A double layer of cans may be placed in the boiler, one on top of the other, if desirable, provided there is some intervening substance. Fill the boiler with cold water so as completely to cover the cans; place over the fire, bring gradually to a boil, and keep boiling steadily for four hours. Remove the boiler from the fire, and allow the cans to cool gradually, tightening the covers frequently as they cool.
Canned Corn.—Choose corn that's perfectly ripe for eating and prepare it like you would for stewed corn. You'll need about twelve to fifteen ears to fill each quart can properly. To ensure success, the cans should be packed full enough that when the corn shrinks during cooking, they still remain well filled. Pack the corn tightly into the cans using the small end of a potato masher, so the milk covers the corn and fills the can completely; then add a little more corn on top loosely, and fasten the lids tightly enough to keep water out. Place the cans in a boiler, on a layer of straw or a rack at the bottom; make sure the cans don’t touch by wrapping each in cloth or placing a chip between them. You can stack a double layer of cans in the boiler if needed, as long as there’s something in between them. Fill the boiler with cold water to completely cover the cans; put it on the heat, bring it to a boil gradually, and let it boil steadily for four hours. Once done, take the boiler off the heat and let the cans cool down gradually, tightening the lids occasionally as they cool.
Canned Corn and Tomatoes.—Use about one third corn and two thirds tomatoes, or in equal portions if preferred. Cook the tomatoes in a double boiler for an hour and a half or longer; and in another double boiler, when the tomatoes are nearly done, cook the corn in its own juices until thoroughly done. Turn them together, heat to boiling, and can at once.
Canned Corn and Tomatoes.—Use about one third corn and two thirds tomatoes, or equal amounts if you like. Cook the tomatoes in a double boiler for an hour and a half or longer; and in another double boiler, when the tomatoes are almost done, cook the corn in its own juices until it's fully cooked. Combine them, heat to boiling, and can immediately.
As they are best cooked in their own juices, peel, slice, put into a double boiler or a porcelain fruit-kettle set inside a dish filled with boiling water, and cook from one to two hours. Cooked in the ordinary way, great care will be required to keep the fruit from burning. When thoroughly cooked—simple scalding will not do—put into cans, and be sure that all air bubbles are expelled before sealing. Wrap in dark brown paper, and put in a cool, dry, dark place.
As they cook better in their own juices, peel and slice the fruit, then place it in a double boiler or a porcelain fruit kettle set in a dish of boiling water. Cook for one to two hours. If you cook it the regular way, you need to be very careful to prevent the fruit from burning. Once it's thoroughly cooked—just scalding isn't enough—transfer it to cans, making sure to eliminate all air bubbles before sealing. Wrap the cans in dark brown paper and store them in a cool, dry, dark place.
Canned Tomatoes No. 2.—Cut the fruit into thick slices, let it stand and drain until a large portion of the juice has drained off; then pack solid in new or perfect cans. Allow them to stand a little time, then again drain off the juice; fill up a second time with sliced tomatoes, and screw on the top of the cans without the rubbers. Pack into a wash boiler as directed for canning corn, and boil for two hours, then put on the rubbers and seal. When cold, tighten the covers and put away.
Canned Tomatoes No. 2.—Slice the tomatoes into thick pieces and let them sit to drain off a significant amount of juice; then pack them tightly into new or perfect cans. Allow them to sit for a bit, then drain off the juice again; fill up the cans a second time with sliced tomatoes and screw on the tops without the rubber seals. Place the cans in a wash boiler as instructed for canning corn, and boil for two hours, then put on the rubber seals and seal them. Once cool, tighten the lids and store them away.
Shelled beans may be canned in the same way.
Shelled beans can be canned in the same way.
TABLE TOPICS.
The word "vegetarian" is not derived from "vegetable," but from the Latin, homo vegetus, meaning among the Romans a strong, robust, thoroughly healthy man.
The word "vegetarian" doesn't come from "vegetable"; it actually comes from the Latin term, homo vegetus, which meant a strong, healthy man among the Romans.
AN INTELLECTUAL FEAST.—Professor Louis Agassiz in his early manhood visited Germany to consult Oken, the transcendentalist in zoölogical classification. "After I had delivered to him my letter of introduction," he once said to a friend, "Oken asked me to dine with him, and you may suppose with what joy I accepted the invitation. The dinner consisted only of potatoes, boiled and roasted; but it was the best dinner I ever ate; for there was Oken. Never before were such potatoes grown on this planet; for the mind of the man seemed to enter into what we ate sociably together, and I devoured his intellect while munching his potatoes."
AN INTELLECTUAL FEAST.—Professor Louis Agassiz, when he was young, went to Germany to talk to Oken, the transcendentalist known for his work on animal classification. "After I handed him my letter of introduction," he once told a friend, "Oken invited me to dinner, and you can imagine how happily I accepted. The dinner was just potatoes, both boiled and roasted; but it was the best meal I've ever had because Oken was there. Never before had potatoes tasted so good; it felt like his intellect joined us at the table, and I soaked it all in while eating those potatoes."
Dr. Abernethy's recipe for using cucumbers: "Peel the cucumber, slice it, pepper it, put vinegar to it, then throw it out the window."
Dr. Abernethy's recipe for using cucumbers: "Peel the cucumber, slice it, add pepper, pour vinegar on it, then toss it out the window."
A green son of the Emerald Isle was eating sweet corn from the cob for the first time. He handed the cob to the waiter, and asked, "Will you plaze put some more beans on my shtick?"
A young man from Ireland was eating sweet corn from the cob for the first time. He handed the cob to the waiter and asked, "Can you please put some more beans on my plate?"
A French physician styles spinach, le balai de l'estomac (broom of the stomach).
A French doctor calls spinach, the broom of the stomach.
An ox is satisfied with the pasture of an acre or two; one wood suffices for several elephants. Man alone supports himself by the pillage of the whole earth and sea. What? Has Nature indeed given us so insatiable a stomach, while she has given us so insignificant bodies? No; it is not the hunger of our stomachs, but insatiable covetousness which costs so much.—Seneca.
An ox is content with an acre or two of grass; one forest is enough for several elephants. Only humans rely on the exploitation of the entire earth and sea for sustenance. Really? Has Nature truly given us such an insatiable appetite while providing us with such small bodies? No; it's not the hunger of our stomachs, but the endless greed that demands so much.—Seneca.
The oftener we go to the vegetable world for our food, the oftener we go to the first and therefore the cheapest source of supply. The tendencies of all advanced scholars in thrift should be to find out plans for feeding all the community, as far as possible, direct from the lap of earth; to impress science into our service so that she may prepare the choicest viands minus the necessity of making a lower animal the living laboratory for the sake of what is just a little higher than cannibal propensities.
The more we rely on the vegetable world for our food, the more we tap into the original and therefore the most affordable source of sustenance. All forward-thinking individuals focused on saving money should aim to discover ways to provide food for everyone in the community directly from the earth; to utilize science to help us prepare the best meals without the need to use lower animals as experiments merely for something that is only slightly better than cannibalism.
—Dr. B.W. Richardson.
—Dr. B.W. Richardson.
A VOICE FROM THE CORN.
A voice from the corn.

SOUPS
 oup is an easily made, economical, and when properly prepared from
healthful and nutritious material, very wholesome article of diet,
deserving of much more general use than is commonly accorded it.
oup is an easily made, economical, and when properly prepared from
healthful and nutritious material, very wholesome article of diet,
deserving of much more general use than is commonly accorded it.
Soup is easy to make, budget-friendly, and when made with healthy and nutritious ingredients, it’s a very wholesome food option that deserves to be used much more widely than it usually is.
In general, when soup is mentioned, some preparation of meat and bones is supposed to be meant; but we shall treat in this chapter of a quite different class of soups, viz., those prepared from the grains, legumes, and vegetables, without the previous preparation of a "stock." Soups of this character are in every way equal, and in many points superior to those made from meat and bones. If we compare the two, we shall find that soups made from the grains and legumes rank much higher in nutritive value than do meat soups. For the preparation of the latter, one pound of meat and bones, in about equal proportion, is required for each quart of soup. In the bone, there is little or no nourishment, it being valuable simply for the gelatine it contains, which gives consistency to the soup; so in reality there is only one half pound of material containing nutriment, for the quart of soup. Suppose, in comparison we take a pea soup. One half pound of peas will be amply enough for a quart. As we take an equal amount of material as basis for each soup, we can easily determine their relative value by comparing the amount of nutritive material contained in peas with that of beef, the most commonly used material for meat soups. As will be seen by reference to the table of food analyses on page 486, peas contain 87.3 parts nutritive material, while lean beef contains only 28 parts in one hundred. Thus the pea soup contains more than three times as much nourishment as does the beef soup.
In general, when soup is mentioned, it usually refers to some kind of preparation involving meat and bones; however, in this chapter, we will discuss a completely different category of soups, namely those made from grains, legumes, and vegetables, without first preparing a "stock." Soups of this type are just as good, and in many ways superior, to those made from meat and bones. When comparing the two, we find that soups made from grains and legumes have a much higher nutritional value than meat soups. To make the latter, you need about one pound of meat and bones, roughly in equal amounts, for each quart of soup. The bones provide little or no nourishment, being valuable only for the gelatin they contain, which gives the soup its texture; so essentially, there is only half a pound of nutritious material in a quart of soup. Now, let's compare that to pea soup. Half a pound of peas is more than enough for a quart. Since we use the same amount of base material for each soup, we can easily assess their relative value by looking at the nutritional content of peas compared to beef, the most commonly used meat for soups. As shown in the food analysis table on page 486, peas contain 87.3 parts of nutritious material, while lean beef has only 28 parts per hundred. Therefore, pea soup provides over three times the nourishment of beef soup.
Soups prepared from grains and legumes are no more expensive than meat soups, and many kinds cost much less, while they have the added advantage of requiring less time and no more labor to prepare.
Soups made from grains and legumes aren't any more expensive than meat soups, and many varieties cost a lot less. Plus, they have the added benefit of taking less time and no extra effort to prepare.
The greater bulk of all meat soups is water, holding in solution the essence of meat, the nutritive value of which is of very doubtful character.
The majority of all meat soups is water, which dissolves the essence of meat, the nutritional value of which is quite questionable.
When properly prepared, the solid matter which enters into the composition of vegetable soups, is so broken up in the process of cooking, that it is more easily digested than in any other form.
When cooked properly, the solid ingredients in vegetable soups are broken down so much that they are easier to digest than in any other form.
Taken hot at the beginning of a meal, soup stimulates the flow of the digestive juices, and on account of the bulk, brings a sense of satiety before an excessive quantity of food has been taken.
Taken hot at the beginning of a meal, soup stimulates the flow of digestive juices and, due to its volume, creates a feeling of fullness before overeating occurs.
In preparing soups from grains, legumes, and vegetables, the material should be first cooked in the ordinary manner, using as small an amount of water as practicable, so as the more thoroughly to disintegrate or break it up. If the material be legumes or grains, the cooking should be slow and prolonged. The purpose to be attained in the cooking of all foods is the partial digestion of the food elements; and in general, with these foods, the more slowly (if continuous) the cooking is done, the more completely will this be brought about.
In making soups from grains, legumes, and vegetables, you should first cook the ingredients in the usual way, using as little water as possible to break them down effectively. If you’re using legumes or grains, cook them slowly and for a longer time. The goal of cooking all foods is to partially digest the food components; generally, the slower and more continuous the cooking, the more complete this process will be.
When the material is cooked, the next step is to make it homogeneous throughout, and to remove any skins or cellulose material it may contain. To do this, it should be put through a colander. The kind of colander depends upon the material. Peas and beans require a fine colander, since the skins, of which we are seeking to rid them, would easily go through a coarse one. To aid in this sifting process, if the material be at all dry, a small quantity of liquid may be added from time to time. When the colander process is complete, a sufficient amount of milk or other liquid may be added to make the whole of the consistency of rather thick cream.
When the material is cooked, the next step is to make it smooth and to remove any skins or fibrous bits it may have. To do this, you should pass it through a colander. The type of colander used depends on the material. Peas and beans need a fine colander, since the skins we want to remove would easily slip through a coarse one. To help with this sifting process, if the material is somewhat dry, you can add a little liquid from time to time. Once the colander process is finished, add enough milk or another liquid to make the whole mixture the consistency of thick cream.

If the material is now cold, it must be reheated, and the salt, if any is to be used, added. The quantity of salt will depend somewhat upon the taste of the consumer; but in general, one half teaspoonful to the pint of soup will be an ample supply. If any particular flavor, as of onion or celery, is desired, it may be imparted to the soup by adding to it a slice of onion or a few stalks of celery, allowing them to remain during the reheating. By the time the soup is well heated, it will be delicately flavored, and the pieces of onion or celery may be removed with a fork or a skimmer. It is better, in general, to cook the soup all that is needed before flavoring, since if allowed to boil, all delicate flavors are apt to be lost by evaporation. When reheated, add to the soup a quantity of cream as seasoning, in the proportion of one cup of thin cream for every quart or three pints of soup.
If the material is now cold, it needs to be reheated, and any salt should be added at this point. The amount of salt will depend somewhat on the consumer's taste; but generally, half a teaspoon per pint of soup is plenty. If you want a specific flavor, like onion or celery, you can add a slice of onion or a few stalks of celery to the soup while reheating it. By the time the soup is hot, it will be lightly flavored, and you can remove the onion or celery pieces with a fork or skimmer. It's usually better to cook the soup before adding flavoring since boiling can cause delicate flavors to evaporate. When reheating, also add a cup of thin cream for every quart or three pints of soup to enhance the seasoning.
If it is desired to have the soup especially light and nice, beat or whip the cream before adding, or beat the hot soup with an egg beater for a few minutes after adding the cream. The well-beaten yolk of an egg for every quart or three pints of soup, will answer as a very fair substitute for cream in potato, rice, and similar soups. It should not be added to the body of the soup, but a cupful of the hot soup may be turned slowly onto the egg, stirring all the time, in order to mix it well without curdling, and then the cupful stirred into the whole. Soups made from legumes are excellent without cream.
If you want the soup to be especially light and nice, whip the cream before adding it, or beat the hot soup with an egg beater for a few minutes after adding the cream. A well-beaten egg yolk for every quart or three pints of soup works as a good substitute for cream in potato, rice, and similar soups. It shouldn't be added directly to the soup; instead, you can slowly mix a cup of the hot soup into the egg while stirring continuously to combine it without curdling, and then stir that mixture into the whole pot. Soups made from legumes are great without cream.
The consistency of the soup when done should be about that of single cream, and equal throughout, containing no lumps or fragments of material. If it is too thick, it may be easily diluted with hot milk or water; if too thin, it will require the addition of more material, or may be thickened with a little flour or cornstarch rubbed to a cream with a small quantity of milk, used in the proportion of one tablespoonful for a quart of soup,—heaping, if flour; scant, if cornstarch,—and remembering always to boil the soup five or ten minutes after the flour is added, that there may be no raw taste.
The soup should have a consistency similar to single cream and be smooth throughout, without any lumps or bits. If it’s too thick, you can easily thin it out with hot milk or water; if it’s too thin, you’ll need to add more ingredients or thicken it with a bit of flour or cornstarch mixed with a small amount of milk. Use one tablespoon for every quart of soup—heaping if you use flour, scant if you use cornstarch—and always remember to boil the soup for another five to ten minutes after adding the flour to avoid any raw taste.
The addition of the flour or cornstarch gives a smoothness to their consistency which is especially desirable for some soups. A few spoonfuls of cooked oatmeal or cracked wheat, added and rubbed through the colander with the other material, is valuable for the same purpose. Browned flour prepared by spreading a cupful thinly on shallow tins, and placing in a moderately hot oven, stirring frequently until lightly and evenly browned, is excellent to use both for thickening and flavoring certain soups.
The addition of flour or cornstarch makes their consistency smooth, which is especially nice for some soups. A few spoonfuls of cooked oatmeal or cracked wheat, added and pushed through the colander with the other ingredients, is useful for the same reason. Browned flour, made by spreading a cup thinly on shallow pans and putting it in a moderately hot oven, stirring often until it's lightly and evenly browned, is great for both thickening and adding flavor to certain soups.
If whole grains, macaroni, vermicelli, or shredded vegetables are to be used in the soup, cook them separately, and add to the soup just before serving.
If you're using whole grains, macaroni, vermicelli, or shredded vegetables in the soup, cook them separately and add them to the soup just before serving.
The nutritive value of soup depends of course upon its ingredients, and these should be so chosen and combined as to produce the best possible food from the material employed. Milk is a valuable factor in the preparation of soups. With such vegetables as potatoes, parsnips, and others of the class composed largely of starch, and containing but a small proportion of the nitrogenous food elements, its use is especially important as an addition to their food value, as also to their palatableness. Very good soups may, however, be made from legumes, if carefully cooked with water only.
The nutritional value of soup depends on its ingredients, which should be chosen and combined to produce the best possible food from what's used. Milk is a valuable component in soup preparation. For starchy vegetables like potatoes and parsnips, which have a low amount of protein, adding milk is especially important to enhance their nutritional value and flavor. However, very good soups can also be made from legumes if they're cooked carefully with just water.
Soups offer a most economical way of making use of the "left-over" fragments which might otherwise be consigned to the refuse bucket. A pint of cold mashed potatoes, a cupful of stewed beans, a spoonful or two of boiled rice, stewed tomatoes, or other bits of vegetables and grains, are quite as good for soup purposes as fresh material, provided they have been preserved fresh and sweet. To insure this it is always best to put them away in clean dishes; if retained in the dish from which they were served, the thin smears and small crumbs on the sides which spoil much sooner than the larger portion, will help to spoil the rest. One may find some difficulty in rubbing them through the colander unless they are first moistened. Measure the cold food, and then determine how much liquid will be needed, and add a part of this before attempting to put through the colander.
Soups provide a really cost-effective way to utilize "left-over" bits that would otherwise end up in the trash. A pint of cold mashed potatoes, a cup of stewed beans, a spoonful or two of boiled rice, stewed tomatoes, or other scraps of vegetables and grains are just as good for making soup as fresh ingredients, as long as they've been kept fresh and clean. To ensure this, it’s always best to store them in clean containers; if you leave them in the dish they were served in, the little smudges and crumbs around the edges, which spoil much faster than the larger portion, will ruin the rest. You might have some trouble getting them through the colander unless you moisten them first. Measure the cold food, then figure out how much liquid you'll need, and add some of it before trying to push it through the colander.
It is difficult to give specific directions for making soups of fragments, as the remnants to be utilized will vary so much in character as to make such inapplicable, but the recipes given for combination soups will perhaps serve as an aid in this direction. Where a sufficient amount of one kind of food is left over to form the basis of a soup or to serve as a seasoning, it can be used in every way the same as fresh material. When, however, there is but a little of various odds and ends, the general rule to be observed is to combine only such materials as harmonize in taste.
It’s tough to provide specific instructions for making soups from leftovers since the scraps you have will vary so much that it makes it hard to apply them. However, the recipes for combination soups might help. If you have enough of one type of food leftover to form the base of a soup or to use as seasoning, you can treat it just like fresh ingredients. But if you only have small amounts of different leftovers, the general rule to follow is to mix only those ingredients that taste good together.
Soups prepared from the grains, legumes, and vegetables, are so largely composed of food material that it is important that they be retained in the mouth long enough for proper insalivation; and in order to insure this, it is well to serve with the soup croutons, prepared by cutting stale bread into small squares or cubes, and browning thoroughly in a moderate oven. Put a spoonful or two of the croutons in each plate, and turn the hot soup over them. This plan also serves another purpose,—that of providing a means whereby the left-over bits of stale bread may be utilized to advantage.
Soups made from grains, legumes, and vegetables are so full of food that it's important to keep them in your mouth long enough for proper saliva mixing. To help with this, it's a good idea to serve the soup with croutons, which are made by cutting stale bread into small squares or cubes and browning them thoroughly in a moderate oven. Place a spoonful or two of the croutons in each bowl and pour the hot soup over them. This method also helps make good use of leftover bits of stale bread.
RECIPES.
Asparagus Soup.—Wash two bunches of fresh asparagus carefully, and cut into small pieces. Put to cook in a quart of boiling water, and simmer gently till perfectly tender, when there should remain about a pint of the liquor. Turn into a colander, and rub all through except the hard portion. To a pint of asparagus mixture add salt and one cup of thin cream and a pint of milk; boil up for a few minutes, and serve.
Asparagus Soup.—Wash two bunches of fresh asparagus thoroughly, and cut them into small pieces. Cook them in a quart of boiling water, and let it simmer gently until they are completely tender, leaving about a pint of the liquid. Pour it into a colander and strain everything through except for the tough parts. To the pint of asparagus mixture, add salt, one cup of light cream, and a pint of milk; bring it to a boil for a few minutes, and then serve.
Baked Bean Soup.—Soak a half pint of white beans over night. In the morning turn off the water, and place them in an earthen dish with two or two and one half quarts of boiling water; cover and let them simmer in a moderate oven four or five hours. Also soak over night a tablespoonful of pearl tapioca in sufficient water to cover. When the beans are soft, rub through a colander, after which add the soaked tapioca, and salt if desired; also as much powdered thyme as can be taken on the point of a penknife and sufficient water to make the soup of proper consistency if the water has mostly evaporated. Return to the oven, and cook one half hour longer. A little cream may be added just before serving.
Baked Bean Soup.—Soak half a pint of white beans overnight. In the morning, drain the water and place the beans in a baking dish with two to two and a half quarts of boiling water; cover and let them simmer in a moderate oven for four to five hours. Also soak a tablespoon of pearl tapioca in enough water to cover it overnight. When the beans are soft, pass them through a colander, then add the soaked tapioca, salt if you like, and a small amount of powdered thyme (about what you can scoop with the tip of a knife). If most of the water has evaporated, add enough to achieve the right soup consistency. Return it to the oven and cook for another half hour. You can add a splash of cream just before serving.
Bean and Corn Soup.—Cold boiled or stewed corn and cold baked beans form the basis of this soup. Take one pint of each, rub through a colander, add a slice of onion, three cups of boiling water or milk, and boil for ten minutes. Turn through the colander a second time to remove the onion and any lumps or skins which may remain. Season with salt and a half cup of cream. If preferred, the onion may be omitted.
Bean and Corn Soup.—Cold boiled or stewed corn and cold baked beans are the main ingredients for this soup. Take one pint of each, mash them through a strainer, add a slice of onion, three cups of boiling water or milk, and boil for ten minutes. Strain again to remove the onion and any lumps or skins still left. Season with salt and half a cup of cream. If you prefer, you can skip the onion.
Bean and Hominy Soup.—Soak separately in cold water over night a cupful each of dry beans and hominy. In the morning, boil them together till both are perfectly tender and broken to pieces. Rub through a colander, and add sufficient milk to make three pints. Season with salt, and stir in a cup of whipped cream just before serving. Cold beans and hominy may be utilized for this soup.
Bean and Hominy Soup.—Soak a cup each of dry beans and hominy in cold water overnight. In the morning, boil them together until both are tender and broken apart. Strain through a colander and add enough milk to make three pints. Season with salt, and stir in a cup of whipped cream just before serving. You can also use cold beans and hominy for this soup.
Bean and Potato Soup.—Soak a half pint of dry white beans over night; in the morning drain and put to cook in boiling water. When tender, rub through a colander. Prepare sliced potato sufficient to make one quart, cook in as small a quantity of water as possible, rub through a colander, and add to the beans. Add milk or water sufficient to make two quarts, and as much prepared thyme as can be taken on the point of a penknife, with salt to season. Boil for a few minutes, add a teacup of thin cream, and serve.
Bean and Potato Soup.—Soak half a pint of dry white beans overnight; in the morning, drain them and cook in boiling water. When they're tender, mash them through a colander. Prepare enough sliced potatoes to make one quart, cook them in as little water as possible, mash through a colander, and mix with the beans. Add enough milk or water to make two quarts, along with a small amount of prepared thyme (about the size of what you can scoop with the tip of a penknife) and salt to taste. Boil for a few minutes, add a teacup of light cream, and serve.
Bean and Tomato Soup.—Take one pint of boiled or a little less of mashed beans, one pint of stewed tomatoes, and rub together through a colander. Add salt, a cup of thin cream, one half a cup of nicely steamed rice, and sufficient boiling water to make a soup of the proper consistency. Reheat and serve.
Black Bean Soup.—Soak a pint of black beans over night in cold water. When ready to cook, put into two and one half quarts of fresh water, which should be boiling, and simmer until completely dissolved, adding more boiling water from time to time if needed. There should be about two quarts of all when done. Rub through a colander, add salt, a half cup of cream, and reheat. When hot, turn through a soup strainer, add two or more teaspoonfuls of lemon juice, and serve.
Black Bean Soup.—Soak a pint of black beans overnight in cold water. When you're ready to cook, put them into two and a half quarts of boiling fresh water and let them simmer until completely soft, adding more boiling water as needed. You should end up with about two quarts when it's done. Strain through a colander, then add salt, half a cup of cream, and reheat. Once it's hot, pass it through a soup strainer, add two or more teaspoons of lemon juice, and serve.
Black Bean Soup No. 2.—Soak a pint of black beans in water over night. Cook in boiling water until tender, then rub through a colander. Add sufficient boiling water to make about two quarts in all. Add salt, and one half a small onion cut in slices to flavor. Turn into a double boiler and reheat. When sufficiently flavored, remove the onion with a skimmer, thicken the soup with two teaspoonfuls of browned flour, turn through the soup strainer and serve. If desired, a half cup of cream may be added, and the onion flavor omitted.
Black Bean Soup No. 2.—Soak a pint of black beans in water overnight. Cook them in boiling water until they're tender, then strain them through a colander. Add enough boiling water to make about two quarts in total. Season with salt and add half of a small onion, sliced, to enhance the flavor. Transfer to a double boiler and reheat. Once the flavor is to your liking, remove the onion with a skimmer, thicken the soup with two teaspoons of browned flour, strain it again, and serve. If you want, you can also add half a cup of cream and skip the onion flavor.
Bran Stock.—For every quart of stock desired, boil a cup of good wheat bran in three pints of water for two or three hours or until reduced one third. This stock may be made the base of a variety of palatable and nutritious soups by flavoring with different vegetables and seasoning with salt and cream. An excellent soup may be prepared by flavoring the stock with celery, or by the addition of a quantity of strained stewed tomato sufficient to disguise the taste of the stock. It is also valuable in giving consistence to soups, in the preparation of some of which it may be advantageously used in place of other liquid.
Bran Stock.—To make a quart of stock, boil a cup of good wheat bran in three pints of water for two or three hours, or until the amount is reduced by a third. This stock can serve as a base for a variety of tasty and nutritious soups by adding different vegetables and seasoning with salt and cream. You can create an excellent soup by adding celery to the stock, or by mixing in enough strained stewed tomatoes to mask the flavor of the stock. It's also useful for thickening soups, and in some recipes, it can be used instead of other liquids.
Brown Soup.—Simmer together two pints of sliced potatoes and one third as much of the thin brown shavings (not thicker than a silver dime) from the top of a loaf of whole-wheat bread, in one quart of water. The crust must not be burned or blackened, and must not include any of the soft portion of the loaf. When the potatoes are tender, mash all through a colander. Flavor with a cup of strained, stewed tomatoes, a little salt, and return to the fire; when hot, add a half cup of cream, and boiling water to make the soup of proper consistency, and serve at once. If care has been taken to prepare the crust as directed, this soup will have a brown color and a fine, pungent flavor exceedingly pleasant to the taste.
Brown Soup.—Simmer two pints of sliced potatoes with one-third as much of the thin brown shavings (no thicker than a silver dime) from the top of a loaf of whole-wheat bread in one quart of water. Make sure the crust isn't burned or blackened, and avoid including any of the soft part of the loaf. Once the potatoes are tender, mash everything through a colander. Add a cup of strained, stewed tomatoes, a little salt, and return it to the heat; when it's hot, stir in a half cup of cream and boiling water to get the soup to the right consistency, and serve immediately. If you’ve prepared the crust as directed, this soup will have a brown color and a nice, sharp flavor that's very enjoyable.
Canned Green Pea Soup.—Rub a can of green peas through a colander to remove the skins. Add a pint of milk and heat to boiling. If too thin, thicken with a little flour rubbed smooth in a very little cold milk. Season with salt and a half cup of cream. A small teaspoonful of white sugar may be added if desired.
Canned Green Pea Soup.—Pass a can of green peas through a colander to get rid of the skins. Add a pint of milk and heat until boiling. If it’s too thin, thicken it with a bit of flour mixed with a small amount of cold milk. Season with salt and half a cup of cream. If you like, you can add a small teaspoon of white sugar.
Green peas, instead of canned, may be used when procurable. When they have become a little too hard to serve alone, they can be used for soup, if thoroughly cooked.
Green peas, instead of canned ones, can be used when available. If they become a bit too tough to serve on their own, they can be used for soup, as long as they are cooked thoroughly.
Canned Corn Soup.—Open a can of green corn, turn it into a granite-ware dish, and thoroughly mash with a potato-masher until each kernel is broken, then rub through a colander to remove the skins. Add sufficient rich milk to make the soup of the desired consistency, about one half pint for each pint can of corn will be needed. Season with salt, reheat, and serve. If preferred, a larger quantity of milk and some cream may be used, and the soup, when reheated, thickened with a little corn starch or flour. It may be turned through the colander a second time or not, as preferred.
Canned Corn Soup.—Open a can of sweet corn, pour it into a heavy pot, and mash it thoroughly with a potato masher until every kernel is broken. Then, strain it through a colander to remove the skins. Add enough rich milk to achieve your desired thickness; about half a pint for each pint can of corn should do the trick. Season with salt, reheat it, and serve. If you like, you can use more milk and some cream, and when you reheat the soup, you can thicken it with a bit of cornstarch or flour. You can also strain it through the colander a second time or skip that step, depending on your preference.
Carrot Soup.—For a quart of soup, slice one large carrot and boil in a small quantity of water for two hours or longer, then rub it through a colander, add a quart of rich milk, and salt to season. Reheat, and when boiling, thicken with two teaspoonfuls of flour rubbed smooth in a little cold milk.
Carrot Soup.—To make a quart of soup, slice one large carrot and boil it in a small amount of water for two hours or longer. Then, strain it through a colander, add a quart of rich milk, and season with salt. Reheat, and once it's boiling, thicken it with two teaspoons of flour mixed smooth in a little cold milk.
Celery Soup.—Chop quite fine enough fresh, crisp celery to make a pint, and cook it until tender in a very little boiling water. When done, heat three cupfuls of rich milk, part cream if it can be afforded, to boiling, add the celery, salt to season, and thicken the whole with a tablespoonful of flour rubbed smooth in a little cold milk; or add to the milk before heating a cupful of mashed potato, turn through a colander to remove lumps, reheat, add salt and the celery, and serve.
Celery Soup.—Finely chop enough fresh, crisp celery to make a pint and cook it until tender in a small amount of boiling water. Once it's done, heat three cups of rich milk, preferably with some cream if possible, until it boils. Add the celery, season with salt, and thicken it all with a tablespoon of flour mixed smooth in a little cold milk. Alternatively, you can add a cup of mashed potato to the milk before heating, strain through a colander to get rid of lumps, reheat, then add salt and the celery before serving.
Celery Soup No. 2.—Cook in a double boiler a cupful of cracked wheat in three pints of water for three or four hours. Rub the wheat through a colander, add a cup of rich milk, and if needed, a little boiling water, and a small head of celery cut in finger lengths. Boil all together for fifteen or twenty minutes, until well flavored, remove the celery with a fork, add salt, and serve with or without the hard-boiled yolk of an egg in each soup plate.
Celery Soup No. 2.—In a double boiler, cook a cup of cracked wheat in three pints of water for three to four hours. Strain the wheat through a colander, add a cup of rich milk, and if needed, a bit of boiling water, along with a small head of celery cut into finger-length pieces. Boil everything together for fifteen to twenty minutes until it’s well flavored, remove the celery with a fork, add salt, and serve with or without a hard-boiled egg yolk in each soup bowl.
Chestnut Soup.—Shell and blanch a pint of Italian chestnuts, as directed on page 215, and cook in boiling milk until tender. Rub the nuts through a colander, add salt and sufficient milk and cream to make a soup of the proper consistency, reheat and serve.
Chestnut Soup.—Shell and blanch a pint of Italian chestnuts, as directed on page 215, and cook in boiling milk until soft. Push the nuts through a strainer, add salt and enough milk and cream to get the soup to the right consistency, then reheat and serve.
Combination Soup.—This soup is prepared from material already cooked, and requires two cups of cracked wheat, one and one half cups of Lima beans, one half cup of black beans, and one cup of stewed tomato. Rub the material together through a colander, adding, if needed, a little hot water to facilitate the sifting. Add boiling water to thin to the proper consistency, season with salt and if it can be afforded a little sweet cream,—the soup is, however, very palatable without the cream.
Combination Soup.—This soup is made from ingredients that are already cooked and requires two cups of cracked wheat, one and a half cups of Lima beans, half a cup of black beans, and one cup of stewed tomatoes. Mash the ingredients together through a colander, adding a bit of hot water if necessary to help with the straining. Pour in boiling water to achieve the right consistency, season with salt, and if you can, add a little sweet cream — though the soup is quite tasty even without the cream.
Combination Soup No. 2.—Take three and one half cups of mashed (Scotch) peas, one cup each of cooked rice, oatmeal, and hominy, and two cups of stewed tomato. Rub the material through a colander, add boiling water to thin to the proper consistency, season with salt, reheat, and add, just before serving, two cups of cooked macaroni. If preferred, a cup of cream may be used in place of the tomato, or both may be omitted.
Combination Soup No. 2.—Take 3 and a half cups of mashed (Scotch) peas, 1 cup each of cooked rice, oatmeal, and hominy, and 2 cups of stewed tomatoes. Push everything through a colander, add boiling water to reach the right consistency, season with salt, reheat, and just before serving, stir in 2 cups of cooked macaroni. If you want, you can use 1 cup of cream instead of the tomatoes, or skip both entirely.
Cream Pea Soup.—Soak three fourths of a pint of dried Scotch peas over night in a quart of water. In the morning put to cook in boiling water, cover closely and let them simmer gently four or five hours, or until the peas are very tender and well disintegrated; then rub through a colander to remove the skins. If the peas are very dry, add a little water or milk occasionally, to moisten them and facilitate the sifting. Just before the peas are done, prepare potatoes enough to make a pint and a half, after being cut in thin slices. Cook the potatoes until tender in a small amount of water, and rub them through a colander. Add the potatoes thus prepared to the sifted peas, and milk enough to make three and one half pints in all. Return to the fire, and add a small head of celery cut finger lengths, and let the whole simmer together ten or fifteen minutes, until flavored. Remove the celery with a fork, add salt and a cup of thin cream. This should make about two quarts of soup. If preferred, the peas may be cooked without soaking. It will, however, require a little longer time.
Cream Pea Soup.—Soak three-quarters of a pint of dried Scotch peas overnight in a quart of water. In the morning, cook them in boiling water, cover tightly, and let them simmer gently for four to five hours or until the peas are very tender and well broken down; then strain through a colander to remove the skins. If the peas are very dry, add a little water or milk now and then to keep them moist and help with the straining. Just before the peas are done, prepare enough potatoes to make a pint and a half after cutting them into thin slices. Cook the potatoes in a small amount of water until tender, then push them through a colander. Combine the prepared potatoes with the strained peas and enough milk to make a total of three and a half pints. Return it to the heat and add a small head of celery cut into finger lengths, letting everything simmer together for ten to fifteen minutes to blend the flavors. Remove the celery with a fork, add salt, and a cup of thin cream. This should yield about two quarts of soup. If you prefer, you can cook the peas without soaking, but it will take a little longer.
Cream Barley Soup.—Wash a cup of pearl barley, drain and simmer slowly in two quarts of water for four or five hours, adding boiling water from time to time as needed. When the barley is tender, strain off the liquor, of which there should be about three pints; add to it a portion of the cooked barley grains, salt, and a cup of whipped cream, and serve. If preferred, the beaten yolk of an egg may be used instead of cream.
Cream Barley Soup.—Rinse a cup of pearl barley, drain it, and let it simmer slowly in two quarts of water for four to five hours, adding boiling water occasionally as needed. Once the barley is tender, strain off the liquid, which should be about three pints; mix in some of the cooked barley grains, salt, and a cup of whipped cream, then serve. If you prefer, you can use a beaten egg yolk instead of cream.
Green Corn Soup.—Take six well-filled ears of tender green corn. Run a sharp knife down the rows and split each grain; then with the back of a knife, scraping from the large to the small end of the ear, press out the pulp, leaving the hulls on the cob. Break the cobs if long, put them in cold water sufficient to cover, and boil half an hour. Strain off the water, of which there should be at least one pint. Put the corn water on again, and when boiling add the corn pulp, and cook fifteen minutes, or until the raw taste is destroyed. Rub through a rather coarse colander, add salt and a pint of hot unskimmed milk; if too thin, thicken with a little cornstarch or flour, boil up, and serve. If preferred, a teaspoonful of sugar may be added to the soup. A small quantity of cooked macaroni, cut in rings, makes a very pretty and palatable addition to the soup. The soup is also excellent flavored with celery.
Green Corn Soup.—Take six ears of tender green corn. Use a sharp knife to cut down the rows and split each kernel; then, using the back of the knife, scrape from the thick end to the narrow end of the ear to push out the pulp, leaving the husks on the cob. Break the cobs if they're long, put them in enough cold water to cover, and boil for half an hour. Strain the water, which should be about one pint. Put the corn water back on the heat, and when it's boiling, add the corn pulp and cook for fifteen minutes, or until the raw taste is gone. Push it through a fairly coarse colander, add salt and a pint of hot whole milk; if it’s too thin, thicken it with a little cornstarch or flour, bring it to a boil, and serve. If you like, you can add a teaspoon of sugar to the soup. A small amount of cooked macaroni, cut into rings, makes a lovely and tasty addition to the soup. The soup also tastes great with celery flavoring.
Green Pea Soup.—Gently simmer two quarts of shelled peas in sufficient water to cook, leaving almost no juice when tender. Rub through a colander, moistening if necessary with a little cold milk. Add to the sifted peas an equal quantity of rich milk and a small onion cut in halves. Boil all together five or ten minutes until the soup is delicately flavored, then remove the onion with a skimmer; add salt if desired, and serve. If preferred, a half cup of thin cream may be added just before serving. Celery may be used in place of the onion, or both may be omitted.
Green Pea Soup.—Gently simmer two quarts of shelled peas in enough water to cook, leaving almost no liquid when they're tender. Strain through a colander, adding a little cold milk if needed to keep it moist. Mix in an equal amount of rich milk and a small onion cut in half. Boil everything together for five or ten minutes until the soup is delicately flavored, then remove the onion with a skimmer; add salt if you want, and serve. If you prefer, you can add half a cup of light cream just before serving. Celery can be used instead of the onion, or you can skip both.
Green Bean Soup.—Prepare a quart of fresh string beans by pulling off ends and strings and breaking into small pieces. Boil in a small quantity of water. If the beans are fresh and young, three pints will be sufficient; if wilted or quite old, more will be needed, as they will require longer cooking. There should be about a teacupful and a half of liquid left when the beans are perfectly tender and boiled in pieces. Rub through a colander, return to the kettle, and for each cup of the bean pulp add salt, a cup and a half of unskimmed milk; boil together for a few minutes, thicken with a little flour, and serve. The quart of beans should be sufficient for three pints of soup.
Green Bean Soup.—Prepare a quart of fresh green beans by snapping off the ends and strings and breaking them into small pieces. Boil them in a small amount of water. If the beans are fresh and young, three pints will be enough; if they're wilted or quite old, you'll need more since they will take longer to cook. There should be about a teacup and a half of liquid remaining when the beans are perfectly tender and cooked. Pass them through a colander, return them to the pot, and for each cup of bean pulp, add salt and a cup and a half of whole milk; boil together for a few minutes, thicken with a bit of flour, and serve. A quart of beans should be enough for three pints of soup.
Kornlet and Tomato Soup—Put together equal quantities of kornlet and strained stewed tomato, season with salt and heat to boiling; add for each quart one fourth to one half cup of hot thin cream, thicken with a tablespoonful of flour rubbed smooth in a little water, and serve. Cooked corn rubbed through a colander may also be used for this soup.
Kornlet and Tomato Soup—Mix equal amounts of kornlet and strained stewed tomatoes, season with salt, and bring to a boil. For each quart, add one-fourth to one-half cup of hot thin cream, then thicken with a tablespoon of flour mixed smoothly in a little water, and serve. You can also use cooked corn that has been passed through a colander for this soup.
Lentil Soup.—Simmer a pint of lentils in water until tender. If desired to have the soup less dark in color and less strong in flavor, the lentils may be first parboiled for a half hour, and then drained and put into fresh boiling water. Much valuable nutriment is thus lost, however. When perfectly tender, mash through a colander to remove all skins; add salt and a cup of thin cream, and it too thick, sufficient boiling milk or water to thin to the proper consistency, heat again to boiling, and serve. If preferred, an additional quantity of liquid may be added and the soup slightly thickened with browned flour.
Lentil Soup.—Simmer a pint of lentils in water until they’re tender. If you want the soup to be lighter in color and flavor, you can first parboil the lentils for half an hour, then drain them and put them in fresh boiling water. However, doing so will lose a lot of valuable nutrients. Once the lentils are perfectly tender, mash them through a colander to get rid of all the skins; add salt and a cup of thin cream. If it's too thick, add enough boiling milk or water to reach the right consistency, heat it again until boiling, and serve. If you prefer, you can add more liquid and thicken the soup slightly with browned flour.
Lentil and Parsnip Soup.—Cook together one pint of lentils and one half a small parsnip, sliced, until tender in a small quantity of boiling water. When done, rub through a colander, and add boiling water to make a soup of the proper consistency. Season with salt and if desired a little cream.
Lentil and Parsnip Soup.—Cook one pint of lentils and half a small sliced parsnip together until they're tender in a small amount of boiling water. Once cooked, strain it through a colander and add boiling water to achieve the right soup consistency. Season with salt and, if you like, add a bit of cream.
Lima Bean Soup.—Simmer a pint of Lima beans gently in just sufficient water to cook and not burn, until they have fallen to pieces. Add more boiling water as needed. When done, rub the beans through a colander. Add rich milk or water to make of the proper consistency, and salt to season; reheat and serve. White beans may be used in place of Lima beans, but they require more prolonged cooking. A heaping tablespoonful of pearl tapioca or sago previously soaked in cold water, may be added to the soup when it is reheated, if liked, and the whole cooked until the sago is transparent.
Lima Bean Soup.—Gently simmer a pint of Lima beans in just enough water to cook them without burning, until they break apart. Add more boiling water as needed. Once they're done, mash the beans through a colander. Stir in rich milk or water to achieve the right consistency, and add salt to taste; then reheat and serve. You can substitute white beans for Lima beans, but they need to cook longer. If you like, you can add a heaping tablespoon of pearl tapioca or sago that has been soaked in cold water to the soup while it's being reheated, and cook it until the sago is transparent.
Macaroni Soup.—Heat a quart of milk, to which has been added a tablespoonful of finely grated bread crust (the brown part only, from the top of the loaf) and a slice of onion to flavor, in a double boiler. When the milk is well flavored, remove the onion, turn through a colander, add salt, and thicken with two teaspoonfuls of flour rubbed smooth in a little cold milk. Lastly add one cupful of cooked macaroni, and serve.
Macaroni Soup.—Heat a quart of milk, adding a tablespoon of finely grated bread crust (just the brown part from the top of the loaf) and a slice of onion for flavor, in a double boiler. Once the milk is well flavored, take out the onion, strain it through a colander, add salt, and thicken with two teaspoons of flour mixed smoothly in a little cold milk. Finally, stir in one cup of cooked macaroni, and serve.
Oatmeal Soup.—Put two heaping tablespoonfuls of oatmeal into a quart of boiling water, and cook in a double boiler for two hours or longer. Strain as for gruel, add salt if desired, and two or three stalks of celery broken into finger lengths, and cook again until the whole is well flavored with the celery, which may then be removed with a fork; add a half cup of cream, and the soup is ready to serve. Cold oatmeal mush may be thinned with milk, reheated, strained, flavored, and made into soup the same as fresh material. A slice or two of onion may be used with the celery for flavoring the soup if desired, or a cup of strained stewed tomato may be added.
Oatmeal Soup.—Put two heaping tablespoons of oatmeal into a quart of boiling water and cook in a double boiler for two hours or longer. Strain it like you would for gruel, add salt if you want, and two or three stalks of celery broken into finger-length pieces, then cook again until it’s well flavored with the celery, which you can then remove with a fork. Add half a cup of cream, and the soup is ready to serve. Cold oatmeal mush can be thinned with milk, reheated, strained, flavored, and turned into soup just like fresh ingredients. You can also add a slice or two of onion with the celery for extra flavor if you like, or include a cup of strained stewed tomato.
Parsnip Soup.—Take a quart of well scraped, thinly sliced parsnips, one cup of bread crust shavings (prepared as for Brown Soup), one head of celery, one small onion, and one pint of sliced potatoes. The parsnips used should be young and tender, so that they will cook in about the same length of time as the other vegetables. Use only sufficient water to cook them. When done, rub through a colander and add salt and sufficient rich milk, part cream if desired, to make of the proper consistency. Reheat and serve.
Parsnip Soup.—Take a quart of well-scraped, thinly sliced parsnips, one cup of bread crust scraps (prepared like for Brown Soup), one head of celery, one small onion, and one pint of sliced potatoes. The parsnips should be young and tender, so they will cook in about the same time as the other vegetables. Use just enough water to cook them. Once done, pass through a colander and add salt and enough rich milk, cream if you want, to reach the right consistency. Reheat and serve.
Parsnip Soup No. 2.—Wash, pare, and slice equal quantities of parsnips and potatoes. Cook, closely covered, in a small quantity of water until soft. If the parsnips are not young and tender, they must be put to cook first, and the potatoes added when they are half done. Mash through a colander. Add salt, and milk to make of the proper consistency, season with cream, reheat and serve.
Parsnip Soup No. 2.—Wash, peel, and slice equal amounts of parsnips and potatoes. Cook them, covered tightly, in a small amount of water until they’re soft. If the parsnips aren’t young and tender, cook them first and add the potatoes when they’re halfway done. Mash through a strainer. Add salt and milk to reach the right consistency, season with cream, reheat, and serve.
Pea and Tomato Soup.—Soak one pint of Scotch peas over night. When ready to cook, put into a quart of boiling water and simmer slowly until quite dry and well disintegrated. Rub through a colander to remove the skins. Add a pint of hot water, one cup of mashed potato, two cups of strained stewed tomato, and one cup of twelve-hour cream. Turn into a double-boiler and cook together for a half hour or longer; turn a second time through a colander or soup strainer and serve. The proportions given are quite sufficient for two quarts of soup. There may need to be some variation in the quantity of tomato to be used, depending upon its thickness. If very thin, a larger quantity and less water will be needed. The soup should be a rich reddish brown in color when done. The peas may be cooked without being first soaked, if preferred.
Pea and Tomato Soup.—Soak one pint of Scotch peas overnight. When you're ready to cook, put them into a quart of boiling water and simmer slowly until they're completely soft and broken down. Pass the mixture through a colander to remove the skins. Add a pint of hot water, one cup of mashed potatoes, two cups of strained stewed tomatoes, and one cup of twelve-hour cream. Pour it into a double boiler and cook everything together for half an hour or longer; then strain it again through a colander or soup strainer and serve. The amounts given are enough for two quarts of soup. You might need to adjust the amount of tomato depending on its thickness. If the tomatoes are very thin, use more of them and less water. The soup should be a rich reddish-brown color when it's finished. You can also cook the peas without soaking them first, if you prefer.
Plain Rice Soup.—Wash and pick over four tablespoonfuls of rice, put it in an earthen dish with a quart of water, and place in a moderate oven. When the water is all absorbed, add a quart of rich milk, and salt if desired; turn into a granite kettle and boil ten minutes, or till the rice is done. Add a half cup of sweet cream and serve. A slice of onion or stalk of celery can be boiled with the soup after putting in the kettle, and removed before serving, if desired to flavor.
Plain Rice Soup.—Rinse and sort through four tablespoons of rice, then place it in a ceramic dish with a quart of water and set it in a moderate oven. Once the water has been fully absorbed, add a quart of rich milk and salt to taste; transfer to a metal pot and boil for ten minutes, or until the rice is cooked. Stir in half a cup of sweet cream and serve. You can boil a slice of onion or a stalk of celery with the soup after it goes in the pot and remove it before serving for added flavor, if you want.
Potato and Rice Soup.—Cook a quart of sliced potatoes in as little water as possible. When done, rub through a colander. Add salt, a quart of rich milk, and reheat. If desired, season with a slice of onion, a stalk of celery, or a little parsley. Just before serving, add a half cup of cream and a cup and a half of well-cooked rice with unbroken grains. Stir gently and serve at once.
Potato and Rice Soup.—Cook a quart of sliced potatoes in as little water as you can. Once they're done, push them through a colander. Add salt, a quart of rich milk, and heat it up again. If you want, season with a slice of onion, a stalk of celery, or a bit of parsley. Just before serving, stir in half a cup of cream and a cup and a half of well-cooked, unbroken-grain rice. Mix gently and serve immediately.
Potato Soup.—For each quart of soup required, cook a pint of sliced potatoes in sufficient water to cover them. When tender, rub through a colander. Return to the fire, and add enough rich, sweet milk, part cream if it can be afforded to make a quart in all, and a little salt. Let the soup come to a boil, and add a teaspoonful of flour or corn starch, rubbed to a paste with a little water; boil a few minutes and serve. A cup and a half of cold mashed potato or a pint of sliced baked potato can be used instead of fresh material; in which case add the milk and heat before rubbing through the colander. A slice of onion or a stalk of celery may be simmered in the soup for a few minutes to flavor, and then removed with a skimmer or a spoon. A good mixed potato soup is made by using one third sweet and two thirds Irish potatoes, in the same manner as above.
Potato Soup.—For each quart of soup you need, cook a pint of sliced potatoes in enough water to cover them. When they’re tender, mash them through a colander. Put them back on the heat and add enough rich, sweet milk, including cream if you can, to make a quart total, along with a bit of salt. Bring the soup to a boil, then mix in a teaspoonful of flour or corn starch that’s been blended into a paste with a little water; boil for a few minutes and serve. You can also use a cup and a half of cold mashed potatoes or a pint of sliced baked potatoes instead of fresh ones; in that case, just add the milk and heat it before mashing it through the colander. A slice of onion or a stalk of celery can be simmered in the soup for a few minutes for flavor, then removed with a skimmer or spoon. A great mixed potato soup can be made by using one-third sweet potatoes and two-thirds Irish potatoes, prepared in the same way as above.
Sago and Potato Soup.—Prepare the soup as directed for Potato Soup, from fresh or cold mashed potato, using a little larger quantity of milk or cream, as the sago adds thickness to the soap. When seasoned and ready to reheat, turn a second time through the colander, and add for each quart of soup, one heaping tablespoonful of sago which has been soaked for twenty minutes in just enough water to cover. Boil together five or ten minutes, or until the sago is transparent, and serve.
Sago and Potato Soup.—Make the soup following the Potato Soup recipe, using fresh or leftover mashed potatoes, and a slightly larger amount of milk or cream, since the sago will thicken the soup. Once seasoned and ready to reheat, strain it again through a colander, and for every quart of soup, add one heaping tablespoon of sago that has been soaked for twenty minutes in enough water to cover it. Boil together for five to ten minutes, or until the sago is clear, and then serve.
Scotch Broth.—Soak over night two tablespoonfuls of pearl barley and one of coarse oatmeal, in water sufficient to cover them. In the morning, put the grains, together with the water in which they were soaked, into two quarts of water and simmer for several hours, adding boiling water as needed. About an hour before the soup is required, add a turnip cut into small dice, a grated carrot, and one half cup of fine pieces of the brown portion of the crust of a loaf of whole-wheat bread. Rub all through a colander, and add salt, a cup of milk, and a half cup of thin cream. This should make about three pints of soup.
Scotch Broth.—Soak two tablespoons of pearl barley and one tablespoon of coarse oatmeal in enough water to cover them overnight. In the morning, put the grains along with the soaking water into two quarts of water and simmer for several hours, adding boiling water as needed. About an hour before the soup is ready, add a turnip diced into small cubes, a grated carrot, and half a cup of fine pieces of the crust from a loaf of whole-wheat bread. Rub everything through a colander, then add salt, a cup of milk, and half a cup of thin cream. This should make about three pints of soup.
Split Pea Soup.—For each quart of soup desired, simmer a cupful of split peas very slowly in three pints of boiling water for six hours, or until thoroughly dissolved. When done, rub through a colander, add salt and season with one half cup of thin cream. Reheat, and when boiling, stir into it two teaspoonfuls of flour rubbed smooth in a little cold water. Boil up until thickened, and serve. If preferred, the cream may be omitted and the soup flavored with a little celery or onion.
Split Pea Soup.—For every quart of soup you want, slowly simmer a cup of split peas in three pints of boiling water for six hours, or until they are fully dissolved. Once done, strain it through a colander, add salt, and mix in half a cup of light cream. Reheat, and when it's boiling, stir in two teaspoons of flour that you've mixed with a little cold water. Bring it to a boil until it thickens, and serve. If you prefer, you can skip the cream and add some celery or onion for flavor.
Swiss Potato Soup.—Pare and cut up into small pieces, enough white turnips to fill a pint cup, and cook in a small quantity of water. When tender, add three pints of sliced potatoes, and let them boil together until of the consistency of mush. Add hot water if it has boiled away so that there is not sufficient to cook the potatoes. When done, drain, rub through a colander, add a pint and a half of milk and a cup of thin cream, salt if desired, and if too thick, a little more milk or a sufficient quantity of hot water to make it of the proper consistency. This should be sufficient for two and a half quarts of soup.
Swiss Potato Soup.—Peel and chop enough white turnips to fill a pint cup, and cook them in a small amount of water. Once they're tender, add three pints of sliced potatoes, and let everything boil together until it reaches a mushy consistency. If the water has boiled away and there isn't enough to cook the potatoes, add hot water. When it's ready, drain it, push through a colander, add a pint and a half of milk and a cup of light cream, salt if you want, and if it's too thick, add a bit more milk or enough hot water to reach the right consistency. This should make about two and a half quarts of soup.
Swiss Lentil Soup.—Cook a pint of brown lentils in a small quantity of boiling water. Add to the lentils when about half done, one medium sized onion cut in halves or quarters. When the lentils are tender, remove the onion with a fork, and rub the lentils through a colander. Add sufficient boiling water to make three pints in all. Season with salt, reheat to boiling, and thicken the whole with four table spoonfuls of browned flour, rubbed to a cream in a little cold water.
Swiss Lentil Soup.—Cook a pint of brown lentils in a small amount of boiling water. When the lentils are about halfway done, add one medium-sized onion, cut in halves or quarters. Once the lentils are tender, remove the onion with a fork and strain the lentils through a colander. Add enough boiling water to make a total of three pints. Season with salt, bring it back to a boil, and thicken the mixture with four tablespoons of browned flour mixed to a smooth paste with a little cold water.
Tomato and Macaroni Soup.—Break a half dozen sticks of macaroni into small pieces, and drop into boiling water. Cook for an hour, or until perfectly tender. Rub two quarts of stewed or canned tomatoes through a colander, to remove all seeds and fragments. When the macaroni is done, drain thoroughly, cut each piece into tiny rings, and add it to the strained tomatoes. Season with salt, and boil for a few minutes. If desired, just before serving add a cup of thin cream, boil up once, and serve immediately. If the tomato is quite thin, the soup should be slightly thickened with a little flour before adding the macaroni.
Tomato and Macaroni Soup.—Break a half dozen sticks of macaroni into small pieces and drop them into boiling water. Cook for an hour, or until perfectly tender. Pass two quarts of stewed or canned tomatoes through a colander to remove all seeds and bits. When the macaroni is done, drain it well, cut each piece into tiny rings, and add it to the strained tomatoes. Season with salt and boil for a few minutes. If you want, just before serving, stir in a cup of thin cream, boil it once more, and serve right away. If the tomato is too thin, slightly thicken the soup with a little flour before adding the macaroni.
Tomato Cream Soup.—Heat two quarts of strained, stewed tomatoes to boiling; add four tablespoonfuls of flour rubbed smooth in a little cold water. Let the tomatoes boil until thickened, stirring constantly that no lumps form; add salt to season. Have ready two cups of hot rich milk or thin cream. Add the cream or milk hot, and let all boil together for a minute or two, then serve.
Tomato Cream Soup.—Heat two quarts of strained, stewed tomatoes until boiling; then stir in four tablespoons of flour mixed with a little cold water until smooth. Let the tomatoes boil until they thicken, stirring constantly to prevent lumps; season with salt to taste. Prepare two cups of hot, rich milk or thin cream. Add the hot cream or milk and let everything boil together for a minute or two, then serve.
Canned okra and tomatoes need only to be rubbed through a colander, scalded and seasoned, to make a most excellent soup. If preferred, one or two potatoes may be sliced and cooked, rubbed through a colander, and added.
Canned okra and tomatoes just need to be passed through a colander, heated, and seasoned to create a really great soup. If you want, you can slice and cook one or two potatoes, pass them through a colander, and add them in.
Tomato Soup with Vermicelli—Cook a cupful of broken vermicelli in a pint of boiling water for ten minutes. Turn into a colander to drain. Have boiling two quarts of strained, stewed tomatoes, to which add the vermicelli. If preferred, the tomato may be thickened slightly with a little cornstarch rubbed smooth in cold water before adding the vermicelli. Salt to taste, and just before serving turn in a cup of hot, thin cream. Let all boil up for a moment, then serve at once.
Tomato Soup with Vermicelli—Cook a cup of broken vermicelli in a pint of boiling water for ten minutes. Drain it in a colander. Boil two quarts of strained, stewed tomatoes, then add the vermicelli. If you prefer, you can thicken the tomatoes slightly with a little cornstarch mixed well in cold water before adding the vermicelli. Add salt to taste, and just before serving, stir in a cup of hot, thin cream. Let it all boil for a moment, then serve immediately.
Vegetable Oyster Soup.—Scrape all the outer covering and small rootlets from vegetable oysters, and lay them in a pan of cold water to prevent discoloration. The scraping can be done much easier if the roots are allowed first to stand in cold water for an hour or so. Slice rather thin, enough to make one quart, and put to cook in a quart of water. Let them boil slowly until very tender. Add a pint of milk, a cup of thin cream, salt, and when boiling, a tablespoonful or two of flour, rubbed to a cream with a little milk. Let the soup boil a few minutes until thickened, and serve.
Vegetable Oyster Soup.—Clean all the outer skin and small roots from the vegetable oysters, and place them in a pan of cold water to keep them from turning brown. It’s easier to scrape them if you let the roots soak in cold water for about an hour first. Slice them fairly thin to make one quart, and cook in a quart of water. Let them simmer until they're very tender. Then, add a pint of milk, a cup of light cream, salt, and once boiling, stir in one or two tablespoons of flour mixed with a little milk to make a smooth paste. Let the soup boil for a few minutes until it thickens, then serve.
Vegetable Soup.—Simmer together slowly for three or four hours, in five quarts of water, a quart of split peas, a slice of carrot, a slice of white turnip, one cup of canned tomatoes, and two stalks of celery cut into small bits. When done, rub through a colander, add milk to make of proper consistency, reheat, season with salt and cream, and serve.
Vegetable Soup.—Slowly simmer for three to four hours in five quarts of water, one quart of split peas, a slice of carrot, a slice of white turnip, one cup of canned tomatoes, and two stalks of celery chopped into small pieces. When finished, strain through a colander, add milk to achieve the right consistency, reheat, season with salt and cream, and serve.
Vegetable Soup No. 2.—Prepare and slice a pint of vegetable oysters and a pint and a half of potatoes. Put the oysters to cook first, in sufficient water to cook both. When nearly done, add the potatoes and cook all till tender. Rub through a colander, or if preferred, remove the pieces of oysters, and rub the potato only through the colander, together with the water in which the oysters were cooked, as that will contain all the flavor. Return to the fire, and add salt, a pint of strained, stewed tomatoes, and when boiling, the sliced oysters if desired, a cup of thin cream and a cup of milk, both previously heated; serve at once.
Vegetable Soup No. 2.—Prepare and slice a pint of vegetable oysters and a pint and a half of potatoes. Start cooking the oysters in enough water to cook both ingredients. When they're nearly done, add the potatoes and cook everything until tender. Pass it through a colander, or if you prefer, remove the oyster pieces and just pass the potatoes through the colander, along with the water they were cooked in, as it will hold all the flavor. Return it to the heat and add salt, a pint of strained, stewed tomatoes, and once it’s boiling, add the sliced oysters if you want, along with a cup of heated thin cream and a cup of heated milk; serve immediately.
Vegetable Soup No. 3.—Soak a cupful of white beans over night in cold water. When ready to cook, put into fresh boiling water and simmer until tender. When nearly done, add three large potatoes sliced, two or three slices of white turnip, and one large parsnip cut in slices. When done, rub through a colander, add milk or water to make of proper consistency, season with salt and cream, reheat and serve. This quantity of material is sufficient for two quarts of soup.
Vegetable Soup No. 3.—Soak a cup of white beans overnight in cold water. When you're ready to cook, place them in fresh boiling water and simmer until they're tender. When they are almost done, add three large sliced potatoes, two or three slices of white turnip, and one large sliced parsnip. Once it's all cooked, strain it through a colander, add milk or water to reach the right consistency, season with salt and cream, reheat, and serve. This amount is enough for two quarts of soup.
Vegetable Soup No. 4.—Prepare a quart of bran stock as previously directed. Heat to boiling, and add to it one teaspoonful of grated carrot, a slice of onion, and a half cup of tomato. Cook together in a double boiler for half an hour. Remove the slice of onion, and add salt and a half cup of turnip previously cooked and cut in small dice.
Vegetable Soup No. 4.—Make a quart of bran stock as instructed before. Bring it to a boil, then add one teaspoon of grated carrot, a slice of onion, and half a cup of tomato. Cook everything together in a double boiler for thirty minutes. Take out the slice of onion, then season with salt and add half a cup of turnip that’s already been cooked and diced small.
Vermicelli Soup.—Lightly fill a cup with broken vermicelli. Turn it into a pint of boiling water, and cook for ten or fifteen minutes. Drain off all the hot water and put into cold water for a few minutes. Turn into a colander and drain again; add three pints of milk, salt to taste, and heat to boiling. Have the yolks of three eggs well beaten, and when the soup is boiling, turn it gradually onto the eggs, stirring briskly that they may not curdle. Return to the kettle, reheat nearly to boiling, and serve at once.
Vermicelli Soup.—Lightly fill a cup with broken vermicelli. Pour it into a pint of boiling water and cook for ten to fifteen minutes. Drain all the hot water and put it in cold water for a few minutes. Transfer to a colander and drain again; add three pints of milk, salt to taste, and heat until boiling. Beat the yolks of three eggs well, and when the soup is boiling, slowly pour it onto the eggs, stirring vigorously to prevent them from curdling. Return to the pot, reheat almost to boiling, and serve immediately.
Vermicelli Soup No. 2.—Cook a cupful of sliced vegetable oysters, a stalk or two of celery, two slices of onion, a parsnip, and half a carrot in water just sufficient to cover well. Meanwhile put a cupful of vermicelli in a quart of milk and cook in a double boiler until tender. When the vegetables are done, strain off the broth and add it to the vermicelli when cooked. Season with salt and a cup of cream. Beat two eggs light and turn the boiling soup on the eggs, stirring briskly that they may not curdle. Reheat if not thickened, and serve.
Vermicelli Soup No. 2.—Cook a cup of sliced vegetable oysters, a stalk or two of celery, two slices of onion, a parsnip, and half a carrot in enough water to cover them well. Meanwhile, place a cup of vermicelli in a quart of milk and cook in a double boiler until tender. Once the vegetables are done, strain the broth and add it to the cooked vermicelli. Season with salt and a cup of cream. Beat two eggs lightly and slowly pour the boiling soup over the eggs, stirring quickly to prevent them from curdling. Reheat if not thickened, and serve.
TABLE TOPICS.
Soup rejoices the stomach, and disposes it to receive and digest other food.—Brillat Savarin.
Soup delights the stomach and prepares it to accept and digest other food.—Brillat Savarin.
To work the head, temperance must be carried into the diet.—Beecher.
To keep the mind sharp, moderation should be practiced in what we eat.—Beecher.
To fare well implies the partaking of such food as does not disagree with body or mind. Hence only those fare well who live temperately.—Socrates.
To do well means to eat food that doesn’t upset your body or mind. So, only those who live moderately truly do well.—Socrates.
The aliments to which the cook's art gives a liquid or semi-liquid form, are in general more digestible.—Dictionaire de Medicine.
The foods that the cook's art transforms into a liquid or semi-liquid form are generally easier to digest.—Dictionaire de Medicine.
In the most heroic days of the Grecian army, their food was the plain and simple produce of the soil. When the public games of ancient Greece were first instituted, the athleta, in accordance with the common dietetic habits of the people, were trained entirely on vegetable food.
In the most heroic days of the Greek army, their food was the plain and simple produce of the land. When the public games of ancient Greece were first started, the athleta, following the usual eating habits of the people, were trained solely on plant-based food.
The eating of much flesh fills us with a multitude of evil diseases and multitudes of evil desires.—Perphyrises, 233 A.D.
The consumption of too much meat leads to a variety of harmful diseases and a lot of negative desires.—Perphyrises, 233 A.D.

BREAKFAST DISHES
 good breakfast is the best capital upon which people who have real
work to do in the world can begin the day. If the food is well selected
and well cooked, it furnishes both cheer and strength for their daily
tasks. Poor food, or good food poorly prepared, taxes the digestive
powers more than is due, and consequently robs brain and nerves of
vigor. Good food is not rich food, in the common acceptation of the
term; it is such food as furnishes the requisite nutriment with the
least fatigue to the digestive powers. It is of the best material,
prepared in the best manner, and with pleasant variety, though it may be
very simple.
good breakfast is the best capital upon which people who have real
work to do in the world can begin the day. If the food is well selected
and well cooked, it furnishes both cheer and strength for their daily
tasks. Poor food, or good food poorly prepared, taxes the digestive
powers more than is due, and consequently robs brain and nerves of
vigor. Good food is not rich food, in the common acceptation of the
term; it is such food as furnishes the requisite nutriment with the
least fatigue to the digestive powers. It is of the best material,
prepared in the best manner, and with pleasant variety, though it may be
very simple.
A good breakfast is the best foundation for people who have real work to do in the world to start their day. If the food is well chosen and well cooked, it provides both cheer and strength for their daily tasks. Poor food, or good food that’s poorly made, puts extra strain on the digestive system and consequently takes away energy from the brain and nerves. Good food isn't necessarily fancy food; it’s the kind of food that provides the necessary nutrients with minimal strain on digestion. It consists of high-quality ingredients, prepared well, and with a nice variety, even if it’s very simple.
"What to get for breakfast" is one of the most puzzling problems which the majority of housewives have to solve. The usually limited time for its preparation requires that it be something easily and quickly prepared; and health demands that the bill of fare be of such articles as require but minimum time for digestion, that the stomach may have chance for rest after the process of digestion is complete, before the dinner hour. The custom of using fried potatoes or mushes, salted fish or meats, and other foods almost impossible of digestion, for breakfast dishes, is most pernicious. These foods set completely at variance all laws of breakfast hygiene. They are very difficult of digestion, and the thirst-provoking quality of salted foods makes them an important auxiliary to the acquirement of a love of intoxicating drinks. We feel very sure that, as a prominent temperance writer says, "It very often happens that women who send out their loved ones with an agony of prayer that they may be kept from drink for the day, also send them with a breakfast that will make them almost frantic with thirst before they get to the first saloon."
"What to have for breakfast" is one of the most confusing problems that many homemakers face. The typically limited time for preparation means that it needs to be something easy and quick to make; plus, health requires that the menu includes items that take very little time to digest, so the stomach can rest after digestion is done, before dinner time. The habit of serving fried potatoes or cereals, salted fish or meats, and other foods that are almost impossible to digest for breakfast is really harmful. These foods completely contradict the principles of breakfast hygiene. They're hard to digest, and the thirst-inducing nature of salted foods makes them a big factor in developing a craving for alcoholic drinks. We are quite certain that, as a well-known temperance author says, "It often happens that women who send their loved ones off with a desperate prayer for them to avoid drinking for the day, also send them off with a breakfast that will leave them nearly desperate with thirst before they even reach the first bar."
The foods composing the breakfast menu should be simple in character, well and delicately cooked, and neatly served. Fruits and grains and articles made from them offer the requisites for the ideal breakfast. These afford ample provision for variety, are easily made ready, and easily digested, while at the same time furnishing excellent nutriment in ample quantity and of the very best quality. Meats, most vegetables, and compound dishes, more difficult of digestion, are better reserved for the dinner bill of fare. No vegetable except the potato is especially serviceable as a breakfast food, and it is much more readily digested when baked than when prepared in any other manner. Stewing requires less time for preparation, but about one hour longer for digestion.
The foods that make up the breakfast menu should be simple, well-cooked, and neatly presented. Fruits, grains, and items made from them provide the essentials for an ideal breakfast. They offer plenty of variety, are easy to prepare, and are easy to digest while also providing excellent nutrition in sufficient quantity and top quality. Meats, most vegetables, and complex dishes, which are harder to digest, are better suited for lunch or dinner. The only vegetable that works well for breakfast is the potato, and it’s digested much more easily when baked rather than cooked in any other way. Stewing takes less time to prepare but takes about an hour longer to digest.
As an introduction to the morning meal, fresh fruits are most desirable, particularly the juicy varieties, as oranges, grape fruit, melons, grapes, and peaches, some one of which are obtainable nearly the entire year. Other fruits; such as apples, bananas, pears, etc., though less suitable, may be used for the same purpose. They are, however, best accompanied with wafers or some hard food, to insure their thorough mastication.
As a start to the breakfast, fresh fruits are highly recommended, especially the juicy ones like oranges, grapefruit, melons, grapes, and peaches, most of which are available almost year-round. Other fruits, such as apples, bananas, and pears, while not as ideal, can still be used for the same purpose. However, they are best served with wafers or some crunchy food to ensure they're properly chewed.
For the second course, some of the various cereals, oatmeal, rye, corn, barley, rice, or one of the numerous preparations of wheat, well cooked and served with cream, together with one or more unfermented breads (recipes for which have been given in a previous chapter), cooked fruits, and some simple relishes, are quite sufficient for a healthful and palatable breakfast.
For the second course, a selection of cereals like oatmeal, rye, corn, barley, rice, or any of the many wheat preparations, cooked well and served with cream, along with one or more types of unleavened bread (recipes for which were provided in a previous chapter), cooked fruits, and some simple sides, make for a healthy and tasty breakfast.
If, however, a more extensive bill of fare is desired, numerous delicious and appetizing toasts may be prepared according to the recipes given in this chapter, and which, because of their simple character and the facility with which they can be prepared, are particularly suitable as breakfast dishes. The foundation of all these toasts is zwieback, or twice-baked bread, prepared from good whole-wheat or Graham fermented bread cut in uniform slices not more than a half inch thick, each slice being divided in halves, placed on tins, or what is better, the perforated sheets recommended for baking rolls, and baked or toasted in a slow oven for a half hour or longer, until it is browned evenly throughout the entire slice. The zwieback may be prepared in considerable quantity and kept on hand in readiness for use. It will keep for any length of time if stored in a dry place.
If you prefer a more extensive menu, you can make a variety of delicious and appealing toasts using the recipes in this chapter. Because of their simplicity and ease of preparation, they are especially suitable for breakfast. The base for all these toasts is zwieback, or twice-baked bread, made from good whole-wheat or Graham fermented bread sliced into uniform pieces no more than half an inch thick. Each slice should be cut in half, arranged on baking sheets, or ideally on the perforated sheets recommended for baking rolls, and baked or toasted in a slow oven for half an hour or longer until evenly browned throughout. You can prepare zwieback in large quantities and store it for later use. It will last indefinitely if kept in a dry place.
Stale bread is the best for making zwieback, but it should be good, light bread; that which is sour, heavy, and not fit to eat untoasted, should never be used. Care must be taken also not to scorch the slices, as once scorched, it is spoiled. Properly made, it is equally crisp throughout, and possesses a delicious, nutty flavor.
Stale bread is the best for making zwieback, but it should be good, light bread; bread that is sour, heavy, and not suitable for eating untoasted should never be used. You also need to be careful not to burn the slices, because once they're burned, they're ruined. When made properly, it is evenly crispy and has a delicious, nutty flavor.
Its preparation affords an excellent opportunity for using the left-over slices of bread, and it may be made when the oven has been heated for other purposes, as after the baking of bread, or even during the ordinary cooking, with little or no additional heat. If one possesses an Aladdin oven, it can be prepared to perfection.
Its preparation provides a great chance to use up leftover slices of bread, and it can be made when the oven has already been heated for other purposes, like after baking bread or even during regular cooking, with little or no extra heat needed. If you have an Aladdin oven, it can be made perfectly.
Zwieback may also be purchased in bulk, all ready for use, at ten cents a pound, from the Sanitarium Food Co., Battle Creek, Mich., and it is serviceable in so many ways that it should form a staple article of food in every household.
Zwieback can also be bought in bulk, all set to use, for ten cents a pound from the Sanitarium Food Co., Battle Creek, Mich., and it’s versatile in so many ways that it should be a staple food item in every household.
For the preparation of toasts, the zwieback must be first softened with some hot liquid, preferably thin cream. Heat the cream (two thirds of a pint of cream will be sufficient for six half slices) nearly to boiling in some rather shallow dish. Put the slices, two or three at a time, in it, dipping the cream over them and turning so that both sides will become equally softened. Keep the cream hot, and let the slices remain until softened just enough so that the center can be pierced with a fork, but not until at all mushy or broken. With two forks or a fork and a spoon, remove each slice from the hot cream, draining as thoroughly as possible, and pack in a heated dish, and repeat the process until as much zwieback has been softened as desired. Cover the dish, and keep hot until ready to serve. Special care should be taken to drain the slices as thoroughly as possible, that none of them be wet and mushy. It is better to remove them from the cream when a little hard than to allow them to become too soft, as they will soften somewhat by standing after being packed in the dish. Prepare the sauce for the toast at the same time or before softening the slices, and pour into a pitcher for serving. Serve the slices in individual dishes, turning a small quantity of the hot sauce over each as served.
To prepare the toasts, first soften the zwieback in some hot liquid, ideally thin cream. Heat two-thirds of a pint of cream in a shallow dish until it's almost boiling. Dip two or three slices at a time into the cream, ensuring both sides are evenly softened. Keep the cream hot and let the slices soak just until the center can be pierced with a fork, but don’t let them get mushy or break apart. Using two forks or a fork and a spoon, carefully remove each slice from the hot cream, draining them as well as you can, and place them in a warm serving dish. Repeat this process until you’ve softened as much zwieback as you need. Cover the dish and keep it warm until you’re ready to serve. Be extra cautious to drain the slices thoroughly so they don’t end up wet and mushy. It’s better to take them out of the cream while they're still a bit firm than to let them soften too much, as they will continue to soften a bit after being packed. Prepare the sauce for the toast at the same time or before you soften the slices, and pour it into a pitcher for serving. Serve the slices in individual dishes, spooning a small amount of the hot sauce over each as you serve.
RECIPES.
Apple Toast.—Fresh, nicely flavored apples stewed in a small quantity of water, rubbed through, a colander, sweetened, then cooked in a granite-ware dish in a slow oven until quite dry, make a nice dressing for toast. Baked sweet or sour apples rubbed through a colander to remove cores and skins, are also excellent. Soften slices of zwieback in hot cream, and serve with a spoonful or two on each slice. If desired, the apple may be flavored with a little pineapple or lemon, or mixed with grape, cranberry, or apricot, thus making a number of different toasts.
Apple Toast.—Fresh, flavorful apples cooked in a little water, strained through a colander, sweetened, and then baked in a granite dish at a low temperature until quite dry, make a delicious topping for toast. Baked sweet or sour apples, also strained to remove cores and skins, work perfectly. Soak slices of zwieback in hot cream and serve with a spoonful or two of the apple mixture on each slice. If you want, you can add a bit of pineapple or lemon flavor, or mix in grape, cranberry, or apricot, creating several different varieties of toast.
Apricot Toast.—Stew some nice dried apricots as directed on page 191. When done, rub through a fine colander to remove all skins and to render them homogeneous. Add sugar to sweeten, and serve as a dressing on slices of zwieback which have been previously softened in hot cream. One half or two thirds fresh or dried apples may be used with the apricots, if preferred.
Apricot Toast.—Cook some good dried apricots as instructed on page 191. Once they're ready, pass them through a fine sieve to get rid of the skins and make them smooth. Add sugar to taste, and serve as a topping on slices of zwieback that have been softened in hot cream. You can use half or two-thirds fresh or dried apples with the apricots, if you like.
Asparagus Toast.—Prepare asparagus as directed on page 255. When tender, drain off the liquor and season it with a little cream, and salt if desired. Moisten nicely browned zwieback in the liquor and lay in a hot dish; unbind the asparagus, heap it upon the toast, and serve.
Asparagus Toast.—Prepare asparagus as directed on page 255. When it's tender, drain the liquid and season it with a little cream and salt if you like. Soak nicely browned zwieback in the liquid and place it in a warm dish; arrange the asparagus on top of the toast and serve.
Banana Toast.—Peel and press some nice bananas through a colander. This may be very easily done with a potato masher, or if preferred a vegetable press may be used for the purpose. Moisten slices of zwieback with hot cream and serve with a large spoonful of the banana pulp on each slice. Fresh peaches may be prepared and used on the toast in the same way.
Banana Toast.—Peel some ripe bananas and mash them through a colander. You can easily do this with a potato masher, or if you prefer a vegetable press, that works too. Moisten slices of zwieback with hot cream and top each slice with a generous spoonful of the banana pulp. You can also prepare fresh peaches and use them on the toast in the same way.
Turn a can of well-kept berries into a colander over an earthen dish, to separate the juice from the berries. Place the juice in a porcelain kettle and heat to boiling. Thicken to the consistency of cream with flour rubbed smooth in a little water; a tablespoonful of flour to the pint of juice will be about the right proportion. Add the berries and boil up just sufficiently to cook the flour and heat the berries; serve hot. If cream for moistening the zwieback is not obtainable, a little juice may be reserved without thickening, and heated in another dish to moisten the toast; of if preferred, the fruit may be heated and poured over the dry zwieback without being thickened, or it may be rubbed through a colander as for Apricot Toast.
Pour a can of well-kept berries into a colander over a dish to separate the juice from the berries. Put the juice in a porcelain kettle and heat it until it boils. Thicken it to the consistency of cream with flour mixed smoothly in a little water; about a tablespoon of flour per pint of juice should work. Add the berries and boil just enough to cook the flour and warm the berries; serve hot. If you can't get cream to moisten the zwieback, you can save a little juice without thickening it and heat it in another dish to moisten the toast. Alternatively, you can heat the fruit and pour it over the dry zwieback without thickening it, or you can mash it through a colander like you would for Apricot Toast.
Celery Toast.—Cut the crisp white portion of celery into inch pieces, simmer twenty minutes or half an hour, or until tender, in a very little water; add salt and a cup of rich milk. Heat to boiling, and thicken with a little flour rubbed smooth in a small quantity of milk—a teaspoonful of flour to the pint of liquid. Serve hot, poured over slices of zwieback previously moistened with cream or hot water.
Celery Toast.—Cut the crunchy white part of the celery into inch-long pieces, simmer for twenty to thirty minutes, or until soft, in just a little water; add salt and a cup of rich milk. Heat until boiling, then thicken with a bit of flour mixed smoothly in a small amount of milk—a teaspoon of flour for every pint of liquid. Serve hot, poured over slices of zwieback that have been moistened with cream or hot water.
Cream Toast—For this use good Graham or whole-wheat zwieback. Have a pint of thin sweet cream scalding hot, salt it a little if desired, and moisten the zwieback in it as previously directed packing it immediately into a hot dish; cover tightly so that the toast may steam, and serve. The slices should be thoroughly moistened, but not soft and mushy nor swimming in cream; indeed, it is better if a little of the crispness still remains.
Cream Toast—For this, use good Graham or whole-wheat zwieback. Have a pint of hot sweet cream, just below boiling, and add a pinch of salt if you like. Soak the zwieback in it as instructed, packing it right away into a hot dish; cover tightly so it can steam, and serve. The slices should be well-soaked, but not soggy or floating in cream; in fact, it's better if they still have a bit of crispness.
Gravy Toast.—Heat a quart and a cupful of rich milk to boiling, add salt, and stir into it three scant tablespoonfuls of flour which has been rubbed to a smooth paste in a little cold milk. This quantity will be sufficient for about a dozen slices of toast. Moisten slices of zwieback with hot water and pack in a heated dish. When serving, pour a quantity of the cream cause over each slice.
Gravy Toast.—Heat a quart and a cup of rich milk until it boils, then add salt and stir in three slightly heaping tablespoons of flour that has been mixed into a smooth paste with a little cold milk. This amount will be enough for about a dozen slices of toast. Soak slices of zwieback in hot water and arrange them in a warm dish. When serving, pour some of the cream sauce over each slice.
Grape Toast.—Stem well-ripened grapes, wash well, and scald without water in a double boiler until broken; rub through a colander to remove sends and skins, and when cool, sweeten to taste. If the toast is desired for breakfast, the grapes should be prepared the day previous. Soften the toast in hot cream, as previously directed, and pack in a tureen. Heat the prepared grapes and serve, pouring a small quantity over each slice of toast. Canned grapes may be used instead of fresh ones, if desired.
Grape Toast.—Remove the stems from ripe grapes, wash them thoroughly, and then heat in a double boiler without water until they break apart; press through a colander to get rid of seeds and skins, and once cooled, sweeten to your liking. If you want to serve this for breakfast, prepare the grapes the day before. Soak the toast in hot cream, as described earlier, and arrange it in a serving dish. Warm up the prepared grapes and serve them by pouring a small amount over each slice of toast. You can use canned grapes instead of fresh ones if you prefer.
Lentil Toast.—Lentils stewed as directed for Lentil Gravy on page 226 served as a dressing on slices of zwieback moistened with hot cream or water, makes a very palatable toast. Browned flour may be used to thicken the dressing if preferred.
Lentil Toast.—Lentils cooked according to the instructions for Lentil Gravy on page 226 can be used as a topping on slices of zwieback soaked in hot cream or water, which creates a delicious toast. If you prefer, you can use browned flour to thicken the topping.
Prune Toast.—Cook prunes as directed on page 191, allowing them to simmer very slowly for a long time. When done, rub through a colander, and if quite thin, they should be stewed again for a time, until they are about the consistency of marmalade. Moisten slices of zwieback with hot cream, and serve with a spoonful or two of the prune dressing on each. One third dried apple may be used with the prune, if preferred.
Prune Toast.—Cook prunes as directed on page 191, letting them simmer very slowly for a long time. When they're done, push them through a colander, and if the mixture is too thin, cook it again for a while until it’s about the consistency of marmalade. Soak slices of zwieback in hot cream, and serve with a spoonful or two of the prune sauce on each. One third dried apple can be added to the prunes if you prefer.
Peach Toast.—Stew nice fresh peaches in a small quantity of water; when tender, rub through a colander, and if quite juicy, place on the back of the range where they will cook very slowly until nearly all the water has evaporated, and the peach is of the consistency of marmalade. Add sugar to sweeten, and serve the same as prunes, on slices of zwieback previously moistened with hot cream. Canned peaches may be drained from their juice and prepared in the same manner. Dried or evaporated peaches may also be used. Toast with dried-peach dressing will be more delicate in flavor if one third dried apples be used with the peaches.
Peach Toast.—Cook fresh peaches in a little bit of water; when they're soft, strain them through a colander. If they're very juicy, place them on the back of the stove to cook slowly until most of the water evaporates and the peaches reach a marmalade-like consistency. Add sugar to taste, and serve like prunes on slices of zwieback that have been lightly soaked in hot cream. You can also use canned peaches, just drain them from their juice and prepare them in the same way. Dried or evaporated peaches work too. The toast with dried-peach topping will taste more delicate if you mix in one-third dried apples with the peaches.
Snowflake Toast.—Heat to boiling a quart of milk to which a half cup of cream, and a little salt have been added. Thicken with a tablespoonful of flour rubbed smooth in a little cold milk. Have ready the whites of two eggs beaten to a stiff froth; and when the sauce is well cooked, turn a cupful of it on the beaten egg, stirring well meanwhile so that it will form a light, frothy mixture, to which add the remainder of the sauce. If the sauce is not sufficiently hot to coagulate the albumen, it may be heated again almost to the boiling point, but should not be allowed to boil. The sauce should be of a light, frothy consistency throughout. Serve as dressing on nicely moistened slices of zwieback.
Snowflake Toast.—Bring a quart of milk to a boil and add half a cup of cream and a pinch of salt. Thicken it with a tablespoon of flour mixed smoothly in a little cold milk. Have the whites of two eggs beaten until stiff ready; when the sauce is well cooked, pour a cup of it onto the beaten egg while stirring well to create a light, frothy mixture, then add the rest of the sauce. If the sauce isn’t hot enough to cook the egg whites, heat it again until it’s almost boiling, but don’t let it actually boil. The sauce should be consistently light and frothy. Serve it as a topping on lightly moistened slices of zwieback.
Tomato Toast.—Moisten slices of zwieback in hot cream, and serve with a dressing prepared by heating a pint of strained stewed tomato to boiling, and thickening with a tablespoonful of corn starch or flour rubbed smooth in a little cold water. Season with salt and a half cupful of hot cream. The cream may be omitted, if preferred.
Tomato Toast.—Soak slices of zwieback in hot cream, and serve with a sauce made by heating a pint of strained stewed tomatoes until boiling, then thickening it with a tablespoon of corn starch or flour mixed smoothly in a bit of cold water. Add salt and half a cup of hot cream. If you prefer, you can skip the cream.
Vegetable Oyster Toast.—Cook a quart of cleaned, sliced vegetable oysters in a quart of water until very tender; add a pint and a half of rich milk, salt to taste, and thicken the whole with two tablespoonfuls of flour rubbed to a smooth paste with a little milk. Let it boil for a few minutes, and serve as a dressing on slices of well-browned toast previously moistened with hot water or cream.
Vegetable Oyster Toast.—Cook a quart of cleaned, sliced vegetable oysters in a quart of water until very tender; add one and a half pints of rich milk, salt to taste, and thicken everything with two tablespoons of flour mixed into a smooth paste with a little milk. Let it boil for a few minutes, and serve it as a dressing on slices of nicely browned toast that have been moistened with hot water or cream.
MISCELLANEOUS BREAKFAST DISHES.
Blackberry Mush.—Rub a pint of canned or fresh stewed and sweetened blackberries, having considerable juice, through a fine colander or sieve to remove the seeds. Add water to make a pint and a half cupful in all, heat to boiling, and sprinkle into it a cupful of sifted Graham flour, or sufficient to make a mush of desired thickness. Cook as directed for Graham Mush, page 90. Serve hot with cream.
Blackberry Mush.—Mash a pint of canned or fresh stewed and sweetened blackberries, making sure there's plenty of juice, through a fine strainer or sieve to get rid of the seeds. Add water until you have a total of a pint and a half cupful, bring it to a boil, and gradually stir in a cupful of sifted Graham flour, or enough to achieve your desired thickness. Cook as instructed for Graham Mush, page 90. Serve hot with cream.
Dry Granola.—This prepared food, made from wheat, corn, and oats, and obtainable from the Sanitarium Food Co., Battle Creek, Mich., forms an excellent breakfast dish eaten with cold or hot milk and cream. Wheatena, prepared wholly from wheat; Avenola, made from oats and wheat; and Gofio, made from parched grains, all obtainable from the same firm, are each delicious and suitable foods for the morning meal.
Dry Granola.—This ready-to-eat food, made from wheat, corn, and oats, available from the Sanitarium Food Co. in Battle Creek, Mich., makes a great breakfast dish when paired with cold or hot milk and cream. Wheatena, made entirely from wheat; Avenola, made from oats and wheat; and Gofio, made from roasted grains, all from the same company, are each tasty and great options for breakfast.
Frumenty.—Wash well a pint of best wheat, and soak for twenty-four hours in water just sufficient to cover. Put the soaked wheat in a covered earthen baking pot or jar, cover well with water, and let it cook in a very slow oven for twelve hours. This may be done the day before it is wanted, or if one has a coal range in which a fire may be kept all night, or an Aladdin oven, the grain may be started in the evening and cooked at night. When desired for use, put in a saucepan with three pints of milk, a cupful of well-washed Zante currants, and one cup of seeded raisins. Boil together for a few minutes, thicken with four tablespoonfuls of flour rubbed smooth in a little cold milk, and serve.
Frumenty.—Rinse a pint of the best wheat thoroughly and soak it in just enough water to cover for twenty-four hours. Place the soaked wheat in a covered earthen baking pot or jar, add more water to cover it well, and cook it in a very low oven for twelve hours. You can do this the day before you need it, or if you have a coal stove that can keep a fire all night, or an Aladdin oven, you can start the grain in the evening and let it cook overnight. When you're ready to use it, combine it in a saucepan with three pints of milk, a cup of well-rinsed Zante currants, and one cup of seeded raisins. Boil everything together for a few minutes, thicken with four tablespoons of flour mixed smoothly in a little cold milk, and serve.
Macaroni with Raisins.—Break macaroni into inch lengths sufficient to fill a half-pint cup. Heat four cups of milk, and when actively boiling, put in the macaroni and cook until tender. Pour boiling water over a half cup of raisins, and let them stand until swelled. Ten or fifteen minutes before the macaroni is done, add the raisins. Serve hot with or without the addition of cream. Macaroni cooked in the various ways as directed in the chapter on Grains, is also suitable for breakfast dishes.
Macaroni with Raisins.—Break macaroni into 1-inch pieces to fill a half-pint cup. Heat four cups of milk, and when it’s boiling, add the macaroni and cook until it's tender. Pour boiling water over half a cup of raisins and let them soak until they swell. About ten or fifteen minutes before the macaroni is done, add the raisins. Serve hot, with or without cream. Macaroni prepared in the different ways mentioned in the chapter on Grains is also great for breakfast dishes.
Macaroni with Kornlet.—Break macaroni into inch lengths and cook in boiling milk and water. Prepare the kornlet by adding to it an equal quantity of rich milk or thin cream, and thickening with a little flour, a tablespoonful to the pint. When done, drain the macaroni, and add the kornlet in the proportion of a pint of kornlet mixture to one and one half cups of macaroni. Mix well, turn into an earthen dish, and brown in a moderate oven. Left-over kornlet soup, if kept on ice, may be utilized for this breakfast dish, and the macaroni may be cooked the day before. Green corn pulp may be used in place of the kornlet.
Macaroni with Kornlet.—Break the macaroni into inch-long pieces and cook it in boiling milk and water. For the kornlet, mix it with an equal amount of rich milk or light cream, thickening it with a little flour—about a tablespoon per pint. Once cooked, drain the macaroni and combine it with the kornlet mixture, using one pint of kornlet for one and a half cups of macaroni. Stir well, transfer to a baking dish, and brown in a moderate oven. Any leftover kornlet soup can be refrigerated and used for this breakfast dish, and the macaroni can be cooked the day before. You can also replace the kornlet with green corn pulp.
Rice with Lemon.—Wash a cup of rice and turn it into three pints of boiling water, let it boil vigorously until tender, and turn into a colander to drain. While still in the colander and before the rice has become at all cold, dip quickly in and out of a pan of cold water several times to separate the grains, draining well afterward. All should be done so quickly that the rice will not become too cold for serving; if necessary to reheat, place for a few moments in a dish in a steamer over a kettle of boiling water. Serve with a dressing of lemon previously prepared by cutting two fresh lemons in thin, wafer-like slices, sprinkling each thickly with sugar, and allowing them to stand for an hour or more until a syrup is formed. When the rice is ready to serve, lay the slices of lemon on top of it, pouring the syrup over it, and serve with a slice or two of the lemon for each dish.
Rice with Lemon.—Rinse a cup of rice and add it to three pints of boiling water. Let it boil vigorously until tender, then pour it into a colander to drain. While the rice is still in the colander and hasn't cooled down, quickly dip it in and out of a pan of cold water several times to separate the grains, then drain well. Do everything quickly so the rice doesn’t get too cold to serve; if you need to reheat it, place it in a dish in a steamer over a pot of boiling water for a few moments. Serve it with a dressing made by slicing two fresh lemons into thin, wafer-like slices, sprinkling each slice generously with sugar, and letting them sit for an hour or more until syrup forms. When the rice is ready to serve, lay the lemon slices on top, pour the syrup over it, and add a slice or two of lemon on each plate.
TABLE TOPICS.
The lightest breakfast is the best.—Oswald.
The lightest breakfast is the best.—Oswald.
A NEW NAME FOR BREAKFAST.—"Tum, mamma, leth's go down to tupper," said a little toddler to her mother, one morning, recently.
A NEW NAME FOR BREAKFAST.—"Mom, let's go down for lunch," said a little toddler to her mother one morning recently.
"Why, we don't have supper in the morning," replied the mother.
"Well, we don’t have dinner in the morning," replied the mother.
"Den leth's do down to dinner," urged the little one.
"Let’s go down to dinner," urged the little one.
"But we don't have dinner in the morning," corrected the mother.
"But we don't have dinner in the morning," the mother replied.
"Well, den, leth's do down any way," pleaded the child.
"Well, then, let's go down anyway," pleaded the child.
"But try and think what meal we have in the morning," urged mamma.
"But just think about what meal we have in the morning," urged Mom.
"I know," said the toddler, brightening up.
"I know," said the toddler, getting excited.
"What meal do we have in the morning?"
"What do we have for breakfast?"
"Oatmeal. Tum on; leth's do."—Sel.
"Oatmeal. Turn on; let's do."—Sel.
Seneca, writing to a friend of his frugal fare which he declares does not cost a sixpence a day, says:—
Seneca, writing to a friend about his simple meals which he claims don't cost a penny a day, says:—
"Do you ask if that can supply due nourishment? Yes; and pleasure too. Not indeed, that fleeting and superficial pleasure which needs to be perpetually recruited, but a solid and substantial one. Bread and polenta certainly is not a luxurious feeding, but it is no little advantage to be able to receive pleasure from a simple diet of which no change of fortune can deprive one."
"Are you wondering if it can provide proper nourishment? Yes, and enjoyment too. Not the temporary and shallow pleasure that requires constant replenishment, but a deep and meaningful one. Bread and polenta may not be extravagant food, but it’s a real benefit to find joy in a simple diet that no change in fortune can take away."
Health is not quoted in the markets because it is without price.—Sel.
Health isn’t traded on the markets because it has no price. —Sel.
It is a mistake to think that the more a man eats, the fatter and stronger he will become.—Sel.
It’s a misconception to believe that the more a man eats, the fatter and stronger he will get.—Sel.

DESSERTS
 ustom has so long established the usage of finishing the dinner with a
dessert of some kind, that a menu is considered quite incomplete
without it; and we shall devote the next few pages to articles which may
be deemed appropriate and healthful desserts, not because we consider
the dessert itself of paramount importance, for indeed we do not think
it essential to life or even to good living, but because we hope the
hints and suggestions which our space permits, may aid the housewife in
preparing more wholesome, inexpensive dishes in lieu of the indigestible
articles almost universally used for this purpose.
ustom has so long established the usage of finishing the dinner with a
dessert of some kind, that a menu is considered quite incomplete
without it; and we shall devote the next few pages to articles which may
be deemed appropriate and healthful desserts, not because we consider
the dessert itself of paramount importance, for indeed we do not think
it essential to life or even to good living, but because we hope the
hints and suggestions which our space permits, may aid the housewife in
preparing more wholesome, inexpensive dishes in lieu of the indigestible
articles almost universally used for this purpose.
Tradition has long established that dinner should end with some kind of dessert, so a menu is seen as pretty incomplete without one; therefore, we’ll spend the next few pages discussing desserts that are both suitable and healthy. It’s not because we believe dessert is the most important part of the meal—actually, we don’t think it’s essential for life or even for enjoyable living—but we hope that the tips and ideas we can offer will help homemakers prepare healthier, affordable dishes instead of the heavy options that are commonly used today.
We see no objection to the use of a dessert, if the articles offered are wholesome, and are presented before an abundance has already been taken. As usually served, the dessert is but a "snare and delusion" to the digestive organs. Compounded of substances "rich," not in food elements, but in fats, sweets, and spices, and served after enough has already been eaten, it offers a great temptation to overeat; while the elements of which it is largely composed, serve to hamper the digestive organs, to clog the liver, and to work mischief generally. At the same time it may be remarked that the preparation of even wholesome desserts requires an outlay of time and strength better by far expended in some other manner. Desserts are quite unnecessary to a good, healthful, nutritious dietary. The simplest of all desserts are the various nuts and delicious fruits with which nature has so abundantly supplied us, at no greater cost than their harmful substitutes, and which require no expenditure of time or strength in their preparation. If, however, other forms of dessert are desired, a large variety may be prepared in a simple manner, so as to be both pleasing and appetizing.
We have no issue with having dessert, as long as the items offered are healthy and served before people have already eaten too much. Usually, dessert is just a "trap and trick" for the digestive system. It's made up of ingredients that are "rich," not in nutritional value, but in fats, sugar, and spices, and when eaten after a meal, it leads to overeating. The components mainly consist of things that can hinder digestion, clog the liver, and cause general problems. Additionally, it's worth noting that making even healthy desserts requires a significant amount of time and effort that could be better spent elsewhere. Desserts are completely unnecessary for a good, healthy, and nutritious diet. The simplest desserts are the various nuts and delicious fruits that nature provides us, at no greater cost than their unhealthy alternatives, and they don’t require any preparation time or effort. However, if different types of dessert are desired, a wide variety can be made simply to be enjoyable and appealing.
GENERAL SUGGESTIONS.
In the preparation of desserts, as in that of all other foods it is essential that all material used shall be thoroughly good of its kind. If bread is to be used, the crumbs should be dry and rather stale, but on no account use that which is sour or moldy. Some housekeepers imagine that if their bread happens to spoil and become sour, although it is hardly palatable enough for the table, it may be advantageously used to make puddings. It is indeed quite possible to combine sour bread with other ingredients so as to make a pudding agreeable to the palate; but disguising sour bread makes sweets and flavors by no means changes it into a wholesome food. It is better economy to throw sour bread away at once than to impose it upon the digestive organs at the risk of health and strength.
In making desserts, just like with any other food, it's crucial to use high-quality ingredients. If bread is involved, the crumbs should be dry and somewhat stale, but definitely avoid anything that's sour or moldy. Some cooks think that if their bread goes bad and turns sour, even if it's not good enough for the table, it can still be used to make puddings. While it's possible to mix sour bread with other ingredients to create a somewhat tasty pudding, masking sour bread doesn't make it healthy. It's actually a better choice to throw away sour bread than to risk your health by eating it.
Bread which has begun to show appearance of mold should never be used; for mold is a poison, and very serious illness has resulted from the eating of puddings made from moldy bread.
Bread that shows signs of mold should never be used; mold is toxic, and consuming puddings made from moldy bread can lead to very serious illness.
Eggs, to be used for desserts, should always be fresh and good. Cooks often imagine that an egg too stale to be eaten in any other way will do very well for use in cakes and puddings, because it can be disguised so as not to be apparent to the taste; but stale eggs are unfit for food, either alone or in combination with other ingredients. Their use is often the occasion of serious disturbances of the digestive organs. Most desserts in which eggs are used will be much lighter if the yolks and whites are beaten separately. If in winter, and eggs are scarce, fewer may be used, and two tablespoonfuls of dry snow for each omitted egg stirred in the last thing before baking.
Eggs meant for desserts should always be fresh and of good quality. Cooks often think that an egg too old to eat in any other way will still work fine in cakes and puddings because it can be masked enough not to be noticed in taste; however, stale eggs are not safe to eat, whether alone or with other ingredients. Their use can often lead to serious digestive issues. Most desserts that include eggs will turn out much lighter if you beat the yolks and whites separately. In winter, when eggs are hard to come by, you can use fewer eggs and add two tablespoons of dry snow for each egg you leave out, mixing it in just before baking.
Milk, likewise, should always be sweet and fresh. If it is to be heated, use a double boiler, so that there will be no danger of scorching. If fresh milk is not available, the condensed milk found at the grocer's is an excellent substitute. Dissolve according to directions, and follow the recipe the same as with fresh milk, omitting one half or two thirds the given amount of sugar.
Milk should always be sweet and fresh. If you need to heat it, use a double boiler to avoid scorching. If fresh milk isn't available, the condensed milk from the grocery store is a great substitute. Just dissolve it according to the instructions and follow the recipe as you would with fresh milk, using half or two-thirds of the specified amount of sugar.
If dried sweet fruits, raisins, or currants are to be used, look them over carefully, put them in a colander, and placing it in a pan of warm water, allow the currants to remain until plump. This will loosen the dirt which, while they are shriveled, sticks in the creases, and they may then be washed by dipping the colander in and out of clean water until they are free from sediment; rinse in two waters, then spread upon a cloth, and let them get perfectly dry before using.
If you’re using dried sweet fruits like raisins or currants, check them carefully and place them in a colander. Put the colander in a pan of warm water and let the currants sit until they puff up. This will help loosen any dirt that gets stuck in the folds when they’re shriveled. You can then wash them by dipping the colander in and out of clean water until they’re free of sediment. Rinse them in two batches of water, spread them out on a cloth, and let them dry completely before using.
It is a good plan, after purchasing raisins and currants, to wash and dry a quantity, and store in glass cans ready for use. To facilitate the stoning of raisins, put them into a colander placed in a dish of warm water until plump; then drain, when the seeds can be easily removed.
It’s a good idea, after buying raisins and currants, to wash and dry a batch, then store them in glass jars for easy access. To make removing the seeds from raisins easier, soak them in a colander placed in a dish of warm water until they become plump; then drain them, and the seeds can be removed easily.
For desserts which are to be molded, always wet the molds in cold water before pouring in the desserts.
For desserts that need to be molded, always rinse the molds with cold water before pouring in the mixtures.
SUGGESTIONS FOR FLAVORING, ETC.
To Prepare Almond Paste.—Blanch the nuts according to directions given on page 215. Allow them to dry thoroughly, and pound in a mortar to a smooth paste. They can be reduced much easier if dried for a day or two after blanching. During the pounding, sprinkle with a few drops of cold water, white of egg, rose water, or lemon juice, to prevent them from oiling.
How to Make Almond Paste.—Blanch the nuts as directed on page 215. Let them dry completely, then grind them in a mortar until you have a smooth paste. It’s much easier to grind them if you let them dry for a day or two after blanching. While grinding, add a few drops of cold water, egg white, rose water, or lemon juice to keep them from becoming oily.
Cocoanut Flavor.—Cocoanut, freshly grated or desiccated, unless in extremely fine particles, is a very indigestible substance, and when its flavor is desired for custards, puddings, etc., it is always better to steep a few tablespoonfuls in a pint of milk for twenty minutes or a half hour, and strain out the particles. The milk should not be allowed to boil, as it will be likely to curdle. One tablespoonful of freshly grated cocoanut or two of the desiccated will give a very pleasant and delicate flavor; and if a more intense flavor is desired, use a larger quantity.
Coconut Flavor.—Coconut, whether freshly grated or dried, unless in very fine particles, is tough to digest. When you want its flavor for custards, puddings, etc., it’s always better to soak a few tablespoons in a pint of milk for twenty minutes or half an hour, then strain out the bits. Don’t let the milk boil, as it might curdle. One tablespoon of freshly grated coconut or two of the dried version will add a nice, delicate flavor; if you want a stronger flavor, use more.
Orange and Lemon Flavor.—Orange or lemon flavor may be obtained by steeping a few strips of the yellow part of the rind of lemon or orange in milk for twenty minutes. Skim out the rind before using for desserts. Care should be taken to use only the yellow part, as the white will impart a bitter flavor. The grated rind may also be used for flavoring, but in grating the peel, one must be careful to grate very lightly, and thus use only the outer yellow portion, which contains the essential oil of the fruit. Grate evenly, turning and working around the lemon, using as small a surface of the grater as possible, in order to prevent waste. Generally, twice across the grater and back will be sufficient for removing all the yellow skin from one portion of a lemon. A well-grated lemon should be of exactly the same shape as before, with no yellow skin remaining, and no deep scores into the white. Remove the yellow pulp from the grater with a fork.
Orange and Lemon Flavor.—You can get orange or lemon flavor by steeping a few strips of the yellow part of the lemon or orange rind in milk for twenty minutes. Be sure to remove the rind before using the milk for desserts. Make sure to use only the yellow part, as the white part will taste bitter. You can also use grated rind for flavoring, but when grating the peel, be careful to grate just the outer yellow layer, which contains the fruit's essential oil. Grate evenly, turning and moving around the lemon, using as small a section of the grater as possible to avoid waste. Usually, going across the grater twice and back is enough to remove all the yellow skin from one piece of lemon. A well-grated lemon should keep its shape, with no yellow skin left and no deep cuts into the white part. Use a fork to remove the yellow pulp from the grater.
To Color Sugar.—For ornamenting the meringues of puddings and other desserts, take a little of the fresh juice of cranberries, red raspberries, currants, black raspberries, grapes, or other colored juices of fruits, thicken it stiff with the sugar, spread on a plate to dry, or use at one. It may be colored yellow with orange peel strained through a cloth, or green with the juice of spinach. Sugar prepared in this manner is quite as pretty and much more wholesome than the colored sugars found in market, which are often prepared with poisonous chemicals.
To Color Sugar.—To decorate the meringues of puddings and other desserts, take a little fresh juice from cranberries, red raspberries, currants, black raspberries, grapes, or other colorful fruit juices, thicken it with sugar until it’s stiff, spread it on a plate to dry, or use it immediately. You can make it yellow by straining orange peel through a cloth or green with spinach juice. Sugar made this way is just as beautiful and much healthier than the colored sugars sold in stores, which are often made with toxic chemicals.
FRUIT DESSERTS.
RECIPES.
Apple Dessert.—Pare some large tart apples, remove the cores, put into the cavities a little quince jelly, lemon flavored sugar, or grated pineapple and sugar, according to the flavor desired. Have as many squares of bread with the crust taken off as there are apples, and place a filled apple on each piece of bread, on earthen pie plates; moisten well with a little quince jelly dissolved in water, lemon juice, or pineapple juice, according to the filling used. Cover closely, and bake in a rather quick oven till the apples are tender. Serve with whipped cream and sugar.
Apple Dessert.—Peel some large tart apples, remove the cores, and fill the cavities with a bit of quince jelly, lemon-flavored sugar, or grated pineapple and sugar, depending on the desired flavor. Have as many slices of bread with the crusts removed as there are apples, and place a filled apple on each piece of bread on earthen pie plates. Moisten well with some quince jelly dissolved in water, lemon juice, or pineapple juice, based on the filling used. Cover tightly and bake in a fairly hot oven until the apples are tender. Serve with whipped cream and sugar.
Apple Meringue Dessert.—Pare and core enough tart, easy-cooking apples to make a quart when stewed. Cover closely and cook slowly till perfectly tender, when they should be quite dry. Mash through a colander, add a little sugar and a little grated pineapple or lemon peel. Beat light with a silver fork, turn into a pudding dish, and brown in a moderate oven ten or fifteen minutes. Then cover with a meringue made with two tablespoonfuls of sugar and the beaten whites of two eggs, and return to the oven for a moment to brown. Serve cold.
Apple Meringue Dessert.—Peel and core enough tart, quick-cooking apples to make a quart when stewed. Cover tightly and cook slowly until they are perfectly tender and quite dry. Pass them through a colander, add a little sugar and some grated pineapple or lemon zest. Beat lightly with a silver fork, pour into a pudding dish, and brown in a moderate oven for ten to fifteen minutes. Then cover with a meringue made from two tablespoons of sugar and the beaten whites of two eggs, and return to the oven for a moment to brown. Serve cold.
Apple Rose Cream.—Wash, core, slice, and cook without paring, a dozen fresh snow apples until very dry. When done, rub through a colander to remove the skins, add sugar to sweeten, and the whites of two eggs; beat vigorously with an egg beater until stiff, add a teaspoonful of rose water for flavoring, and serve at once, or keep on ice. It is especially important that the apples be very dry, otherwise the cream will not be light. If after rubbing through the colander, there is still much juice, they should be cooked again until it has evaporated; or they may be turned into a jelly bag and drained. Other varieties of apple may be used, and flavored with pineapple or vanilla. Made as directed of snow apples or others with white flesh and red skins, the cream should be of a delicate pink color, making a very dainty as well as delicious dessert.
Apple Rose Cream.—Wash, core, slice, and cook a dozen fresh snow apples without peeling them until they are very dry. Once done, push them through a colander to remove the skins, add sugar to taste, and the whites of two eggs; beat vigorously with an egg beater until stiff, then stir in a teaspoon of rose water for flavor, and serve immediately or chill on ice. It’s crucial that the apples are very dry; otherwise, the cream won’t be light. If there’s still a lot of juice after pushing through the colander, cook them again until the juice evaporates, or you can strain them using a jelly bag. You can use other types of apples and flavor it with pineapple or vanilla. Made as directed with snow apples or other apples with white flesh and red skins, the cream should have a delicate pink color, making it a very elegant and delicious dessert.
Apple Snow.—Pare and quarter some nice tart apples. Those that when cooked will be whitest in color are best. Put them into a china dish, and steam until tender over a kettle of boiling water. When done, rub through a colander or beat with a fork until smooth, add sugar to sweeten and a little grated lemon rind, and beat again. For every cup and a half of the prepared apple allow the white of one egg, which beat to a stiff froth, adding the apple to it a little at a time, beating all together until, when taken up in a spoon, it stands quite stiff. Serve cold, with or without a simple custard prepared with a pint of hot milk, a tablespoonful of sugar, and the yolks of two eggs.
Apple Snow.—Peel and cut some nice tart apples into quarters. The ones that will turn the whitest when cooked are the best. Place them in a china dish and steam until they're tender over a pot of boiling water. When they're done, push them through a colander or mash with a fork until smooth, adding sugar to taste and a bit of grated lemon peel, then mix again. For every cup and a half of the prepared apples, use the white of one egg, which you should whip until it's very stiff. Gradually add the apple mixture, beating everything together until it holds its shape when lifted with a spoon. Serve it cold, with or without a simple custard made from a pint of hot milk, a tablespoon of sugar, and the yolks of two eggs.
Baked Apples with Cream.—Pare some nice juicy sweet apples, and remove the cores without dividing. Bake until tender in a covered dish with a spoonful or two of water on the bottom. Serve with whipped cream. Or, bake the apples without paring and when done, remove the skins, and serve in the same manner. The cream may be flavored with a little lemon or rose if desired. Lemon apples and Citron apples, prepared as directed on pages 186 and 187, make a most delicious dessert served with whipped cream and sugar, or with mock cream flavored with cocoanut.
Baked Apples with Cream.—Peel some nice juicy sweet apples, and remove the cores without cutting them in half. Bake until tender in a covered dish with a spoonful or two of water at the bottom. Serve with whipped cream. Alternatively, bake the apples unpeeled, and once they're done, remove the skins, and serve them the same way. The cream can be flavored with a bit of lemon or rose if you like. Lemon apples and Citron apples, prepared as directed on pages 186 and 187, make a delicious dessert when served with whipped cream and sugar, or with mock cream flavored with coconut.
Baked Sweet Apple Dessert.—Wash and remove the cores from a dozen medium-sized sweet apples, and one third as many sour ones, and bake until well done. Mash through a colander to make smooth and remove the skins. Put into a granite-ware dish, smooth the top with a knife, return to the oven and bake very slowly until dry enough to keep its shape when cut. Add if desired a meringue made by heating the white of one egg with a tablespoonful of sugar. Cut into squares, and serve in individual dishes. The meringue may be flavored with lemon or dotted with bits of colored sugar.
Baked Sweet Apple Dessert.—Wash and core a dozen medium-sized sweet apples and about a third as many sour ones, then bake until they're fully cooked. Push them through a colander to get a smooth puree and remove the skins. Transfer the mixture to a granite dish, smooth the top with a knife, put it back in the oven, and bake at a low temperature until it’s dry enough to hold its shape when cut. If you like, add a meringue made by heating the white of one egg with a tablespoon of sugar. Cut into squares and serve in individual dishes. The meringue can be flavored with lemon or sprinkled with bits of colored sugar.
Bananas in Syrup.—Heat in a porcelain kettle a pint of currant and red raspberry juice, equal parts, sweetened to taste. When boiling, drop into it a dozen peeled bananas, and simmer very gently for twenty minutes. Remove the bananas, boil the juice until thickened to the consistency of syrup, and pour over the fruit. Serve cold.
Bananas in Syrup.—In a porcelain kettle, heat a pint of currant and red raspberry juice, using equal parts and sweetening to taste. Once it’s boiling, add a dozen peeled bananas and let them simmer very gently for twenty minutes. Take out the bananas, then boil the juice until it thickens to a syrupy consistency, and pour it over the fruit. Serve chilled.
Fresh Fruit Compote.—Flavor three tablespoonfuls of sugar by mixing with it a little of the grated yellow rind of an orange, or by rubbing it over the orange to extract the oil. If the latter method is used, the square lump sugar will be preferable. Pare, quarter, and slice three medium-sized tart apples. Peel, remove the seeds, and cut in quite fine pieces three oranges. Put the fruit in alternate layers in a glass dish. Sweeten a cupful of fresh or canned raspberry juice with the flavored sugar, and turn it over the fruit. Put the dish on ice to cool for a half hour before serving.
Fresh Fruit Compote.—To flavor three tablespoons of sugar, mix in a bit of grated yellow orange rind, or rub the sugar over the orange to extract the oil. If you choose the latter method, use square lump sugar for best results. Peel, quarter, and slice three medium tart apples. Peel and remove the seeds from three oranges, then chop them into small pieces. Layer the fruit alternately in a glass dish. Sweeten a cup of fresh or canned raspberry juice with the flavored sugar, then pour it over the fruit. Chill the dish in the ice for half an hour before serving.
Grape Apples.—Sweeten a pint of fresh grape juice with a pint of sugar, and simmer gently until reduced one third. Pare and core without dividing, six or eight nice tart apples, and stew very slowly in the grape juice until tender, but not broken. Remove the apples and boil the juice (if any remain) until thickened to the consistency of syrup. Serve cold with a dressing of whipped cream. Canned grape pulp or juice may be utilized for this purpose. Sweet apples may be used instead of tart ones, and the sugar omitted.
Grape Apples.—Sweeten a pint of fresh grape juice with a pint of sugar, and simmer gently until it's reduced by one third. Peel and core six or eight nice tart apples without cutting them in half, and cook them very slowly in the grape juice until they’re tender but not falling apart. Take the apples out and boil the juice (if there's any left) until it thickens to a syrupy consistency. Serve it cold with whipped cream on top. You can also use canned grape pulp or juice for this. You can swap the tart apples for sweet ones and skip the sugar if you prefer.
Peach Cream.—Pare and stone some nice yellow peaches, and mash with a spoon or press through a colander with a potato masher. Allow equal quantities of the peach pulp and cream, add a little sugar to sweeten, and beat all together until the cream is light. Serve in saucers or glasses with currant buns. A banana cream may be prepared in the same manner.
Peach Cream.—Peel and pit some fresh yellow peaches, then mash them with a spoon or press them through a colander using a potato masher. Combine equal amounts of the peach pulp and cream, add a little sugar to sweeten, and whip everything together until the cream is fluffy. Serve in small bowls or glasses alongside currant buns. You can make banana cream using the same method.
Prune Dessert.—Prepare some prune marmalade as directed on page 191. Put in a square granite-ware dish, which place inside another dish containing hot water, and cook it in a slow oven until the marmalade is dry enough to retain its shape when cut with a knife. If desired add a meringue as for baked sweet apple dessert, dotting the top with pink sugar. Serve in squares in individual dishes.
Prune Dessert.—Make some prune marmalade as instructed on page 191. Pour it into a square dish made of graniteware, and place that dish inside another dish filled with hot water. Bake it in a low oven until the marmalade is firm enough to hold its shape when sliced with a knife. If you like, top it with a meringue like you would for a baked sweet apple dessert, sprinkling pink sugar on top. Serve it cut into squares in individual dishes.
DESSERTS MADE OF FRUIT WITH GRAINS, BREAD, ETC.
RECIPES.
Apple Sandwich.—Mix half a cup of sugar with the grated yellow rind of half a lemon. Stir half a cup of cream into a quart of soft bread crumbs; prepare three pints of sliced apples, sprinkled with the sugar; fill a pudding dish with alternate layers of moistened crumbs and sliced apples, finishing with a thick layer of crumbs. Unless the apples are very juicy, add half a cup of cold water, and unless quite tart, have mixed with the water the juice of half a lemon. Cover and bake about one hour. Remove the cover toward the last, that the top may brown lightly. Serve with cream. Berries or other acid fruits may be used in place of apples, and rice or cracked wheat mush substituted for bread crumbs.
Apple Sandwich.—Combine half a cup of sugar with the grated yellow rind of half a lemon. Mix half a cup of cream into a quart of soft bread crumbs; prepare three pints of sliced apples, sprinkled with the sugar; layer a pudding dish with alternating layers of moistened crumbs and sliced apples, finishing with a thick layer of crumbs. If the apples aren’t very juicy, add half a cup of cold water, and if they’re not very tart, mix the juice of half a lemon with the water. Cover and bake for about an hour. Remove the cover toward the end so the top can brown lightly. Serve with cream. You can use berries or other sour fruits instead of apples, and replace the bread crumbs with rice or cracked wheat mush.
Apple Sandwich No. 2.—Prepare and stew some apples as for sauce, allowing them to become quite dry; flavor with lemon, pineapples, quince, or any desired flavor. Moisten slices of zwieback in hot cream as for toast. Spread a slice with the apple mixture, cover with a second slice of the moistened zwieback, then cut in squares and serve, with or without a dressing of mock cream. If desired to have the sandwiches particularly dainty, cut the bread from which the zwieback is prepared in rounds, triangles, or stars before toasting.
Apple Sandwich No. 2.—Prepare and cook some apples like you would for sauce, letting them get quite dry; add flavor with lemon, pineapple, quince, or any other flavor you like. Soak slices of zwieback in hot cream like you would toast. Spread a slice with the apple mixture, cover it with another slice of the soaked zwieback, then cut into squares and serve, with or without a drizzle of mock cream. If you want the sandwiches to look particularly fancy, cut the bread used for the zwieback into rounds, triangles, or star shapes before toasting.
Baked Apple Pudding.—Pour boiling water over bread crumbs; when soft, squeeze out all the water, and line the bottom and sides of an oiled earthen pudding dish with the crumbs. Fill the interior with sliced apples, and cover with a layer of bread crumbs. Bake in a covered dish set in a pan of hot water, until the apples are tender; then remove the cover and brown. Loosen the pudding with a knife, invert on a plate, and it will turn out whole. Serve with sugar and cream.
Baked Apple Pudding.—Pour boiling water over bread crumbs; once they’re soft, squeeze out all the water and line the bottom and sides of a greased earthen pudding dish with the crumbs. Fill the middle with sliced apples, and top with another layer of bread crumbs. Bake in a covered dish placed in a pan of hot water until the apples are soft; then remove the cover and allow it to brown. Use a knife to loosen the pudding, flip it onto a plate, and it will come out intact. Serve with sugar and cream.
Barley Fruit Pudding.—Mix together a pint of cold, well steamed pearl barley, a cup of finely minced tart apples, three fourths of a cup of chopped and seeded raisins, a third of a cup of sugar, and a cup of boiling water and turn into a pudding dish; cover, and place the dish in the oven in a pan of hot water, and bake slowly an hour and a half, or until the water has become quite absorbed and the fruit tender. Serve warm with a water, adding sugar to taste, and thickening with a half teaspoonful of cornstarch. Any tart fruit jelly may be used, or the pudding may be served with cream and sugar flavored with a little grated lemon rind.
Barley Fruit Pudding.—Combine a pint of cold, well-cooked pearl barley, a cup of finely chopped tart apples, three-quarters of a cup of chopped and pitted raisins, a third of a cup of sugar, and a cup of boiling water in a pudding dish. Cover it and place the dish in the oven in a pan of hot water, and bake slowly for an hour and a half, or until the water is mostly absorbed and the fruit is tender. Serve warm with water, adding sugar to taste and thickening with half a teaspoon of cornstarch. You can use any tart fruit jelly, or serve the pudding with cream and sugar, flavored with a bit of grated lemon peel.
Barley Fig Pudding.—One pint of well-steamed pearl barley, two cups of finely chopped best figs, one half cup of sugar, one half cup of thin sweet cream, and one and one half cups of fresh milk. Mix all thoroughly, turn into an earthen pudding dish; place it in the oven in a pan half full of hot water, and bake slowly till the milk is nearly absorbed. The pudding should be stirred once or twice during the baking, so that the figs will be distributed evenly, instead of rising to the top.
Barley Fig Pudding.—One pint of well-steamed pearl barley, two cups of finely chopped quality figs, half a cup of sugar, half a cup of thin sweet cream, and one and a half cups of fresh milk. Mix everything thoroughly, pour it into an earthen pudding dish; place it in the oven in a pan half full of hot water, and bake slowly until the milk is nearly absorbed. Stir the pudding once or twice during baking to make sure the figs are evenly distributed instead of floating to the top.
Blackberry Cornstarch Pudding.—Take two quarts of well-ripened blackberries which have been carefully looked over, put them into a granite-ware boiler with half a cup of water, and stew for twenty minutes. Add sugar to sweeten, and three heaping tablespoonfuls of cornstarch rubbed to a cream with a little cold water. Cook until thickened, pour into molds, and cool. Serve cold with milk or cream. Other fresh or canned berries may be used in the same way.
Blackberry Cornstarch Pudding.—Take two quarts of ripe blackberries, making sure to sort through them carefully. Place them in a pot with half a cup of water and simmer for twenty minutes. Add sugar to taste, along with three heaping tablespoons of cornstarch mixed with a bit of cold water. Cook until thickened, pour into molds, and let cool. Serve chilled with milk or cream. You can use other fresh or canned berries in the same way.
Cocoanut and Cornstarch Blancmange.—Simmer two tablespoonfuls of desiccated cocoanut in a pint of milk for twenty minutes, and strain through a fine sieve. If necessary, add more cold milk to make a full pint. Add a tablespoonful of sugar, heat to boiling, and stir in gradually two tablespoonfuls of cornstarch rubbed smooth in a very little cold milk. Cook five minutes, turn into cups, and serve cold with fruit sauce or cream.
Coconut and Cornstarch Pudding.—Simmer two tablespoons of shredded coconut in a pint of milk for twenty minutes, then strain through a fine sieve. If needed, add more cold milk to make a full pint. Add one tablespoon of sugar, bring to a boil, and slowly stir in two tablespoons of cornstarch mixed with a small amount of cold milk. Cook for five minutes, pour into cups, and serve chilled with fruit sauce or cream.
Cornstarch Blancmange.—Stir together two tablespoonfuls of cornstarch, half a cup of sugar, the juice and a little of the grated rind of one lemon; braid the whole with cold water enough to dissolve well. Then pour boiling water over the mixture, stirring meanwhile, until it becomes transparent. Allow it to bubble a few minutes longer, pour into molds, and serve cold with cream and sugar.
Cornstarch Blancmange.—Mix together two tablespoons of cornstarch, half a cup of sugar, the juice, and a bit of the grated rind of one lemon; blend it all with enough cold water to dissolve well. Then pour boiling water over the mixture, stirring constantly, until it becomes clear. Let it bubble for a few more minutes, pour it into molds, and serve chilled with cream and sugar.
Cornstarch with Raisins.—Measure out one pint of rich milk. Rub two tablespoonfuls of cornstarch perfectly smooth with a little of the milk, and heat the remainder to boiling, adding to it a tablespoonful of sugar. Add the braided cornstarch, and let it cook until it thickens, stirring constantly. Then add a half cup of raisins which have been previously steamed. This may be served hot with sugar and cream, or turned into cups and molded, and served cold with lemon, orange, or other fruit sauce for dressing.
Cornstarch with Raisins.—Measure out one pint of whole milk. Mix two tablespoons of cornstarch until smooth with a bit of the milk, and heat the rest until it boils, adding a tablespoon of sugar. Stir in the mixed cornstarch and let it cook until it thickens, stirring constantly. Then add half a cup of raisins that have been steamed beforehand. This can be served hot with sugar and cream or poured into cups to mold, then served cold with a lemon, orange, or other fruit sauce as dressing.
Cornstarch Fruit Mold.—Heat a quart of strawberry, raspberry, or currant juice, sweetened to taste, to boiling. If the pure juice of berries is used, it may be diluted with one cup of water to each pint and a half of juice. Stir in four tablespoonfuls of cornstarch well braided with a little of the juice reserved for this purpose. Boil until the starch is well cooked, stirring constantly. Pour into molds previously wet with cold water, and cool. Serve with cream and sugar. A circle of fresh berries around the mold when served adds to its appearance.
Cornstarch Fruit Mold.—Heat a quart of strawberry, raspberry, or currant juice, adding sugar to taste, until it boils. If you're using pure berry juice, you can mix it with one cup of water for every pint and a half of juice. Stir in four tablespoons of cornstarch that have been mixed with a little of the reserved juice. Boil until the starch is fully cooked, stirring constantly. Pour into molds that have been rinsed with cold water, then let it cool. Serve with cream and sugar. Adding a circle of fresh berries around the mold when serving makes it look even better.
Cornstarch Fruit Mold No. 2.—Wash, stone, and stew some nice French prunes, add sugar to sweeten, and if there is not an abundance of juice, a little boiling water. For every one fourth pound of prunes there should be enough juice to make a pint in all, for which add two tablespoonfuls of cornstarch, rubbed smooth in a little cold water, and boil three or four minutes. Pour into cups previously wet in cold water, and mold. Serve cold with whipped cream. Other dried or canned fruits, as apricots, peaches, cherries, etc., may be used in place of prunes, if preferred.
Cornstarch Fruit Mold No. 2.—Wash, pit, and stew some nice French prunes, add sugar to sweeten, and if there isn’t a lot of juice, add a bit of boiling water. For every quarter pound of prunes, there should be enough juice to make a pint in total; for this, add two tablespoons of cornstarch, mixed smoothly in a little cold water, and boil for three to four minutes. Pour into cups that have been rinsed in cold water and let set. Serve cold with whipped cream. Other dried or canned fruits, like apricots, peaches, cherries, etc., can be used instead of prunes if you prefer.
Cracked-Wheat Pudding.—A very simple pudding may be made with two cups of cold, well-cooked cracked wheat, two and a half cups of milk, and one half cup of sugar. Let the wheat soak in the milk till thoroughly mixed and free from lumps, then add the sugar and a little grated lemon peel, and bake about three fourths of an hour in a moderate oven. It should be of a creamy consistency when cold, but will appear quite thin when taken from the oven. By flavoring the milk with cocoanut, a different pudding may be produced. Rolled or pearl wheat may be used for this pudding. A cupful of raisins may be added if desired.
Cracked-Wheat Pudding.—You can make a very simple pudding with two cups of cold, well-cooked cracked wheat, two and a half cups of milk, and half a cup of sugar. Let the wheat soak in the milk until it's fully mixed and smooth, then stir in the sugar and some grated lemon peel. Bake for about 45 minutes in a moderate oven. It should have a creamy texture when cool, but will look quite thin when it comes out of the oven. You can also flavor the milk with coconut for a different twist. Rolled or pearl wheat can be used for this pudding. If you want, you can add a cup of raisins.
Cracked-Wheat Pudding No. 2.—Four and one half cups of milk, a very scant half cup of cracked wheat, one half cup of sugar; put together in a pudding dish, and bake slowly with the dish covered and set in a pan of hot water for three or four hours, or until the wheat is perfectly tender, as may be ascertained by dipping a few grains with a spoon out from the side of the dish.
Cracked-Wheat Pudding No. 2.—Four and a half cups of milk, just under half a cup of cracked wheat, and half a cup of sugar; mix them in a pudding dish, and bake slowly with the dish covered, placed in a pan of hot water for three to four hours, or until the wheat is completely tender, which you can check by scooping out a few grains with a spoon from the side of the dish.
Farina Blancmange.—Heat a quart of milk, reserving one half cup, to boiling. Then add two tablespoonfuls of sugar, and four heaping tablespoonfuls of farina, previously moistened with the reserved half cup of milk. Let all boil rapidly for a few minutes till the farina has well set, then place in a double boiler, or a dish set in a pan of boiling water, to cook an hour longer. Mold in cups previously wet with cold water. Serve with sugar and cream flavored with vanilla or a little grated lemon rind, mock cream, or cocoanut sauce.
Farina Blancmange.—Heat a quart of milk, saving half a cup, until it boils. Then add two tablespoons of sugar and four heaping tablespoons of farina, which you’ve already mixed with the reserved half cup of milk. Let everything boil quickly for a few minutes until the farina thickens nicely, then transfer it to a double boiler, or a dish placed in a pan of boiling water, and cook for another hour. Pour the mixture into cups that you've rinsed with cold water. Serve it with sugar and cream flavored with vanilla or a bit of grated lemon zest, mock cream, or coconut sauce.
Much variety may be given this simple dessert by serving it with a dressing of fruit juices; red raspberry, strawberry, grape, current, cranberry, cherry, and plum are all very good. If desired, the milk with which the blancmange is prepared may be first flavored with cocoanut, thus making a different blancmange. Fresh fruit, as sliced banana, blueberries, or strawberries, lightly stirred in just before molding, make other excellent varieties.
You can add a lot of variety to this simple dessert by serving it with fruit juice toppings like red raspberry, strawberry, grape, currant, cranberry, cherry, and plum, all of which are really good. If you like, you can flavor the milk used to prepare the blancmange with coconut first, creating a different version. Adding fresh fruit, like sliced bananas, blueberries, or strawberries, stirred in just before pouring into the mold, also makes for some excellent variations.
Farina Fruit Mold.—Put a quart of well-sweetened red raspberry juice into the inner cup of a double boiler. Heat to boiling, and stir in four heaping tablespoonfuls of farina first moistened with a little of the juice. Boil up until thickened, then set into the outer boiler, the water in which should be boiling, and cook for one hour. Pour into molds previously wet in cold water, and cool. Serve with whipped cream or mock cream. Currant, strawberry, cherry, or blackberry juice may be used instead of raspberry. If water be added to dilute the juice, a little more farina will be needed.
Farina Fruit Mold.—Put a quart of well-sweetened red raspberry juice into the inner cup of a double boiler. Heat it until boiling, then stir in four heaping tablespoons of farina that has been moistened with a little of the juice. Boil until it thickens, then place it in the outer boiler, which should have boiling water in it, and cook for one hour. Pour into molds that have been rinsed with cold water, and let it cool. Serve with whipped cream or a substitute cream. You can also use currant, strawberry, cherry, or blackberry juice instead of raspberry. If you add water to dilute the juice, you'll need a little more farina.
Fruit Pudding.—Measure out one quart of rich new milk, reserving half a pint to wet five large rounded tablespoonfuls of sifted flour. Add to the milk one even cup of sugar, turn in the flour mixture and heat to boiling in a farina kettle, stirring all the while to prevent lumps, and cook till it thickens, which will be about ten minutes after it begins to boil. Remove from the stove, and beat while it is cooling. When cool, add sliced bananas or whole strawberries, whortleberries, raspberries, blackberries, sliced apricots, or peaches. Serve cold.
Fruit Pudding.—Measure out one quart of rich whole milk, saving half a pint to mix with five large rounded tablespoons of sifted flour. Add one cup of sugar to the milk, stir in the flour mixture, and heat everything in a double boiler, stirring constantly to avoid lumps. Cook until it thickens, which should take about ten minutes after it starts boiling. Remove from the heat and beat the mixture as it cools. Once cool, add sliced bananas or whole strawberries, blueberries, raspberries, blackberries, sliced apricots, or peaches. Serve cold.
Jam Pudding.—Make a jam by mashing well some fresh raspberries or blueberries and sweetening to taste. Spread over slices of fresh, light bread or buns, and pile in layers one above another in a pudding dish. Pour over the layers enough rich milk or thin cream heated to scalding, to moisten the whole. Turn a plate over the pudding, place a weight upon it, and press lightly till cold. Cut in slices, and serve with or without a cream dressing.
Jam Pudding.—Make some jam by mashing fresh raspberries or blueberries well and sweetening to your liking. Spread it over slices of fresh, soft bread or buns, and stack them in layers in a pudding dish. Pour enough rich milk or thin cream, heated until it’s hot but not boiling, over the layers to moisten everything. Cover the pudding with a plate, weight it down lightly, and let it cool. Cut into slices and serve with or without a cream dressing.
Plain Fruit Pudding or Brown Betty.—Chop together one part seeded raisins and two parts good tart apples. Fill a pudding dish with alternate layers of the fruit and bread crumbs, finishing with the bread crumbs on top. Unless the apples are very juicy, moisten the whole with a tablespoonful of lemon juice in a cup of cold water, for a pudding filling a three-pint dish. Cover the dish and place it in a moderate oven in a pan of hot water, and bake nearly an hour; then remove from the pan, uncover, and brown nicely. Serve warm with cream and sugar, or with an orange or lemon sauce. Seeded cherries may be used in place of the apples and raisins. In that case, each layer of fruit should be sprinkled lightly with sugar, and the water omitted.
Plain Fruit Pudding or Brown Betty.—Chop together one part seeded raisins and two parts tart apples. Fill a pudding dish with alternating layers of the fruit and breadcrumbs, finishing with breadcrumbs on top. If the apples aren't very juicy, moisten the entire mixture with a tablespoon of lemon juice mixed in a cup of cold water, for a pudding that fills a three-pint dish. Cover the dish and place it in a moderate oven in a pan of hot water, and bake for nearly an hour; then take it out of the pan, uncover it, and brown it nicely. Serve warm with cream and sugar, or with an orange or lemon sauce. Seeded cherries can be substituted for the apples and raisins. In that case, sprinkle a little sugar on each layer of fruit and skip the water.
Prune Pudding.—Moisten rather thin slices of stale bread in hot milk and place in a pudding dish with alternate layers of stewed prunes from which the stones have been removed, finishing with bread on top. Pour over the whole a little more hot milk or pure juice or both, and bake in a moderate over three fourths of an hour. Serve hot or cold with orange or lemon sauce.
Prune Pudding.—Soak thin slices of stale bread in hot milk and layer them in a pudding dish with stewed prunes that have had the pits removed, finishing with a layer of bread on top. Pour a bit more hot milk or pure juice (or both) over everything, and bake in a moderate oven for about 45 minutes. Serve it hot or cold with orange or lemon sauce.
Rice Meringue.—Steam a cupful of rice as directed on page 99 until tender and dry. Heap it loosely on a glass dish, and dot with squares of cranberry or currant jelly. Beat with the whites of two eggs to a stiff froth with one third cup of sugar, and pile it roughly over the rice. Serve with cream.
Rice Meringue.—Steam a cup of rice as directed on page 99 until it’s tender and dry. Pile it loosely on a glass dish and top with pieces of cranberry or currant jelly. Whip the whites of two eggs to a stiff froth with one-third cup of sugar, then roughly spoon it over the rice. Serve with cream.
Rice Snowball.—Wash a cupful of good rice and steam until half done. Have pared and cored without dividing, six large, easy cooking tart apples. Put a clean square of cheese cloth over a plate, place the apples on it, and fill them and all the interstices between with rice. Put the remainder of the rice over and around the apples; tie up the cloth, and cook in a kettle of boiling water until the apples are tender. When done, lift from the water and drain well, untie the cloth, invert the pudding upon a plate and remove the cloth. Serve hot with cream and sugar or cocoanut sauce.
Rice Snowball.—Rinse a cup of good rice and steam it until it’s halfway cooked. Take six large tart apples, peel and core them without cutting them in half. Place a clean square of cheesecloth over a plate, arrange the apples on it, and fill them and the spaces between with rice. Add the rest of the rice on top and around the apples; tie up the cloth, and cook it in a pot of boiling water until the apples are tender. Once done, lift it from the water and drain it well, untie the cloth, flip the pudding onto a plate, and remove the cloth. Serve hot with cream and sugar or coconut sauce.
Rice Fruit Dessert.—Cold boiled rice, molded so that it can be sliced, may be utilized in making a variety of delicious desserts. A nice pudding may be prepared by filling a dish with alternate layers of half-inch slices of molded rice and grated tart raw apples the same thickness. Grate a little lemon rind over each layer. Cover, and place in the oven in a pan of boiling water, and bake for an hour. Serve with sugar and cream. Stoned cherries or peaches may be used instead of the apple.
Rice Fruit Dessert.—Cold boiled rice, shaped so it can be sliced, can be used to make a variety of tasty desserts. You can prepare a lovely pudding by layering half-inch slices of molded rice with grated tart raw apples of the same thickness in a dish. Grate a bit of lemon zest over each layer. Cover the dish and place it in the oven in a pan of boiling water, then bake for an hour. Serve with sugar and cream. You can also use pitted cherries or peaches instead of the apples.
Rice Dumpling.—Steam a teacup of rice until tender, and line an oiled earthen pudding dish, pressing it up around the sides and over the bottom. Fill the crust thus made with rather tart apples cut in small slices; cover with rice, and steam until the apples are tender, which may be determined by running a broom-straw through them. Let stand until cold, then turn from the dish, and serve with sugar and cream. Any easy cooking tart fruit, as stoned cherries, gooseberries, etc., may be used in place of the apples when preferred.
Rice Dumpling.—Steam a cup of rice until it's tender, then spread it in an oiled baking dish, pressing it up along the sides and across the bottom. Fill the crust with some tangy apples sliced small, then cover it with rice and steam until the apples are soft, which you can check by poking them with a straw. Let it cool, then flip it out of the dish and serve with sugar and cream. You can also use other easy-to-cook tart fruits, like pitted cherries, gooseberries, etc., instead of apples if you prefer.
Rice Cream Pudding.—Take one cup of good well-washed rice, one scant cup of sugar, and eight cups of new milk, with a little grated lemon rind for flavoring. Put all into an earthen pudding dish, and place on the top of the range. Heat very slowly until the milk is boiling, stirring frequently, so that the rice shall not adhere to the bottom of the dish. Then put into a moderately hot oven, and bake without stirring, till the rice is perfectly tender, which can be ascertained by dipping a spoon in one side and taking out a few grains. It should be, when cold, of a rich, creamy consistency, with each grain of rice whole. Serve cold. It is best if made the day before it is needed. If preferred, the milk may be first flavored with cocoanut, according to the directions given on page 298.
Rice Cream Pudding.—Take one cup of well-washed rice, one scant cup of sugar, and eight cups of fresh milk, with a bit of grated lemon peel for flavor. Combine everything in a baking dish and place it on the stove. Heat it slowly until the milk starts to boil, stirring frequently to prevent the rice from sticking to the bottom. Then transfer it to a moderately hot oven and bake without stirring until the rice is completely tender. You can check if it’s done by dipping a spoon into one side and taking out a few grains. When it's cold, it should have a rich, creamy texture with each grain of rice intact. Serve it chilled. It's best made the day before you need it. If you prefer, you can flavor the milk with coconut first, according to the instructions on page 298.
Rice Pudding with Raisins.—Wash thoroughly one half cup of rice, and soak for two hours in warm water. Drain off the water, add two tablespoonfuls of sugar, one half cup of raisins, and four cups of milk. Put in an earthen pudding dish and cook for two hours in a moderate oven, stirring once or twice before the rice begins to swell, then add a cup of hot milk, and cook for an hour longer.
Rice Pudding with Raisins.—Thoroughly wash half a cup of rice and soak it in warm water for two hours. Drain the water, then add two tablespoons of sugar, half a cup of raisins, and four cups of milk. Place the mixture in an earthenware pudding dish and bake it in a moderate oven for two hours, stirring once or twice before the rice starts to swell. After that, add a cup of hot milk and continue to cook for another hour.
Red Rice Mold.—Take one and one half pints of red currants and one half pint of red raspberries, and follow directions on page 209 for extracting their juice. The juice may be diluted with one part water to two of juice if desired. Sweeten to taste, and for each pint when boiling stir in two tablespoonfuls of ground rice or rice flour rubbed smooth in a little of the juice which may be retained for the purpose. Pour into molds, cool, and serve with whipped cream.
Red Rice Mold.—Take 1 and ½ pints of red currants and ½ pint of red raspberries, then follow the directions on page 209 to extract their juice. If you want, you can dilute the juice with one part water to two parts juice. Sweeten to your taste, and for each pint while boiling, stir in 2 tablespoons of ground rice or rice flour mixed smoothly with a little of the juice that you can save for this purpose. Pour into molds, let it cool, and serve with whipped cream.
Rice and Fruit Dessert.—Steam a cup of good well-washed rice in milk till tender. Prepare some tart apples by paring, dividing midway between the stem and blow ends, and removing the cores. Fill the cavities with quince or pineapple jelly; put the apples in a shallow stewpan with a half cup of water, cover, and steam till nearly tender. Put the rice, which should be very moist, around the bottom and sides of a pudding dish; place the apples inside, cover, and bake ten minutes. Serve with cream flavored with quince or lemon.
Rice and Fruit Dessert.—Steam a cup of good, well-washed rice in milk until it’s tender. Prepare some tart apples by peeling, cutting them in half between the stem and blossom ends, and removing the cores. Fill the cavities with quince or pineapple jelly; place the apples in a shallow saucepan with half a cup of water, cover, and steam until they’re almost tender. Put the rice, which should be very moist, around the bottom and sides of a pudding dish; place the apples inside, cover, and bake for ten minutes. Serve with cream flavored with quince or lemon.
Rice and Tapioca Pudding.—Soak one half cup of tapioca over night in a cup of water; in the morning drain off the water if any remains. Add to the tapioca half a cup of rice, one cup of sugar, one cup of raisins, and eight cups of new milk, with a little grated lemon rind for flavoring. Put all in an earthen pudding dish on the top of the range, where it will heat very gradually to the boiling point, stirring frequently. When the milk boils, put the pudding in the oven, and bake till the rice grains are perfectly tender but not broken and mushy. From twenty minutes to half an hour is usually sufficient. When taken from the oven, it will appear quite thin, but after cooling will be of a delicious, creamy consistency. Serve cold.
Rice and Tapioca Pudding.—Soak ½ cup of tapioca overnight in 1 cup of water; in the morning, drain off any remaining water. Add to the tapioca ½ cup of rice, 1 cup of sugar, 1 cup of raisins, and 8 cups of fresh milk, along with a little grated lemon rind for flavor. Place everything in an earthen pudding dish on the stove, where it will heat slowly to boiling, stirring frequently. When the milk boils, put the pudding in the oven and bake until the rice grains are completely tender but not broken or mushy. This usually takes about 20 to 30 minutes. When it comes out of the oven, it will look quite thin, but after cooling, it will have a delicious, creamy consistency. Serve cold.
Rice-Flour Mold.—Braid two tablespoonfuls of rice flour with a little milk and stir the mixture into a pint of boiling milk to which has been added three tablespoonfuls of sugar, and a little salt if desired. Let this boil until it thickens, then mold, and serve with cream and sugar or with lemon, orange, or other fruit sauce.
Rice-Flour Mold.—Mix two tablespoons of rice flour with a bit of milk and stir this mixture into a pint of boiling milk that has three tablespoons of sugar and a pinch of salt added, if you like. Let it boil until it thickens, then mold it and serve with cream and sugar or with lemon, orange, or another fruit sauce.
Rice and Stewed Apple Dessert.—Steam or bake some rice in milk until tender, sweeten slightly and spread a layer of the rice half an inch thick on the bottom of a pudding dish, then a layer of lemon-flavored apple sauce, which has been rubbed through a colander and afterward simmered on the range until stiff. If preferred, the sauce may be prepared by first baking the apples, and then rubbing the pulp through a colander. Add another layer of rice, then one of sauce, and so on until the dish is full. Bake in a moderate oven and serve hot. If the apples are not very tart, part stewed and sifted cranberries may be used with them.
Rice and Stewed Apple Dessert.—Steam or bake some rice in milk until it's tender, sweeten it a little, and spread a layer of rice about half an inch thick on the bottom of a pudding dish. Then add a layer of lemon-flavored apple sauce, which has been strained through a colander and simmered on the stove until it thickens. If you prefer, you can make the sauce by baking the apples first and then straining the pulp through a colander. Add another layer of rice, then another layer of sauce, and continue this process until the dish is full. Bake in a moderate oven and serve hot. If the apples aren't very tart, you can mix in some cooked and strained cranberries with them.
Rice and Strawberry Dessert.—Soak a cup of rice in one and a half cups of new milk; place all in an earthen dish, and steam an hour, or until dry and tender, stirring occasionally for the first fifteen minutes. When the rice is done, place in the bottom of cups previously moistened with cold water, five nice hulled strawberries in the shape of a star. Carefully fill the interstices between the berries with the cooked rice, and put in a layer of rice. Add next a layer of strawberries, then another of rice. Press firmly into the cups, and set away to cool. When well molded, turn into saucers, and pile whipped cream around each mold; sprinkle with sugar and serve.
Rice and Strawberry Dessert.—Soak a cup of rice in one and a half cups of fresh milk; put everything in an earthen dish, and steam for an hour, or until it’s dry and tender, stirring occasionally for the first fifteen minutes. Once the rice is done, place five nice hulled strawberries in a star shape at the bottom of cups that have been moistened with cold water. Carefully fill the spaces between the berries with cooked rice, then add a layer of rice. Next, add another layer of strawberries, followed by another layer of rice. Press everything firmly into the cups and set aside to cool. When they’re well molded, turn them out onto saucers, pile whipped cream around each mold, sprinkle with sugar, and serve.
A little care in forming the stars and filling the molds makes this a delicious and pretty dessert. If preferred, the dessert may be prepared in one large mold, and a larger number of berries arranged in the form of a cross in the bottom of the dish, covering with rice, and adding as many alternate layers of berries and rice as desired.
A little attention to making the stars and filling the molds makes this a tasty and attractive dessert. If you prefer, you can prepare the dessert in one large mold, arranging more berries in a cross shape at the bottom of the dish, covering them with rice, and adding as many alternating layers of berries and rice as you like.
Stewed Fruit Pudding.—Take a deep, square or oblong granite-ware or earthen dish; cut strips of stale bread uniformly an inch in width and three fourths of an inch in thickness, and place them in the mold with spaces between them equal to their width. Or, fit the strips around the bottom of a round, earthen pudding dish, like the spokes of a wheel, with stewed or canned fruit, sweetened to taste; whortleberries are best, but apricots, cherries, currants, strawberries, and gooseberries may all be used. Separate the juice from the berries by turning them into a colander. Fill the interstices between the bread with hot fruit, using just as little juice as possible. Cover with another layer, this time placing the strips of bread over the fruit in the first layer, and leaving the spaces for fruit over the bread in the first layer. Fill the dish with these layers of fruit and bread, and when full, pour over all the hot fruit juice. Put a plate with a weight on it on the top to press it firmly. Dip off any juice that may be pressed out, and set the pudding in the refrigerator to cool and press. When cold, it will turn out whole, and can be cut in slices and served with whipped cream or cocoanut sauce.
Stewed Fruit Pudding.—Take a deep, square, or rectangular dish made of granite or earthenware. Cut strips of stale bread, each one inch wide and three-quarters of an inch thick, and arrange them in the mold with spaces between them that are equal to their width. Alternatively, fit the strips around the bottom of a round pudding dish, like spokes on a wheel, and fill it with stewed or canned fruit, sweetened to your liking; whortleberries are the best choice, but you can also use apricots, cherries, currants, strawberries, and gooseberries. Strain the juice from the berries by putting them in a colander. Fill the gaps between the bread with heated fruit, using as little juice as possible. Add another layer on top, this time placing the strips of bread over the fruit from the first layer, leaving gaps for fruit over the bread below. Continue filling the dish with these layers of fruit and bread, and when it’s full, pour the hot fruit juice over everything. Put a plate with some weight on top to press it down firmly. Remove any juice that may seep out, and place the pudding in the refrigerator to cool and set. Once chilled, it will unmold in one piece and can be sliced and served with whipped cream or coconut sauce.
Strawberry Minute Pudding.—Cook a quart of ripe strawberries in a pint of water till well scalded. Add sugar to taste. Skim out the fruit, and into the boiling juice stir a scant cup of granulated wheat flour previously rubbed to a paste with a little cold water; cook fifteen or twenty minutes, pour over the fruit, and serve cold with cream sauce.
Strawberry Minute Pudding.—Cook a quart of ripe strawberries in a pint of water until well heated. Add sugar to taste. Remove the fruit, and into the boiling juice stir in a little less than a cup of granulated wheat flour that you've mixed into a paste with some cold water; cook for fifteen to twenty minutes, pour over the fruit, and serve cold with cream sauce.
Sweet Apple Pudding.—Pare, core, and slice enough ripe, juicy sweet apples to fill a pint bowl. Heat a quart of new milk to scalding in a double boiler. Pour it hot over one cup of good granulated cornmeal, and beat very thoroughly to remove all lumps. Return to the double boiler, and cook until the meal is set. The batter then should be about the consistency of corn mush. Remove from the fire, add a pint of cold milk, stir in the sliced apples, one third of a cup of sugar or molasses, and a teaspoonful of flour rubbed smooth in a very little milk. Turn all into a deep earthen crock or pudding dish, and bake slowly from three to four hours, stirring frequently the first hour. It should be moderately browned on top when done. Serve warm or cold.
Sweet Apple Pudding.—Peel, core, and slice enough ripe, juicy sweet apples to fill a pint bowl. Heat a quart of fresh milk until it's scalding in a double boiler. Pour it hot over one cup of good granulated cornmeal and mix thoroughly to eliminate all lumps. Return it to the double boiler and cook until the mixture is set. The batter should have a consistency similar to corn mush. Remove from heat, add a pint of cold milk, mix in the sliced apples, one third of a cup of sugar or molasses, and a teaspoon of flour dissolved in a small amount of milk. Pour everything into a deep earthenware crock or pudding dish and bake slowly for three to four hours, stirring frequently during the first hour. It should be moderately browned on top when it's done. Serve warm or cold.
Whortleberry Pudding.—One quart of new milk, one quart of fine bread crumbs, two quarts of fresh whortleberries, one or two tablespoonfuls of sugar. Heat the milk to boiling; fill a pudding dish with alternate layers of bread crumbs and berries, beginning and ending with crumbs. Add the sugar to the milk, let it dissolve, and pour the whole over the pudding. Cover closely, and bake in a slow oven within a pan of hot water nearly an hour. Serve warm with cream or cocoanut sauce.
Whortleberry Pudding.—One quart of fresh milk, one quart of fine bread crumbs, two quarts of fresh whortleberries, one or two tablespoons of sugar. Heat the milk until it boils; fill a pudding dish with alternating layers of bread crumbs and berries, starting and ending with crumbs. Add the sugar to the milk, let it dissolve, and pour everything over the pudding. Cover tightly and bake in a slow oven placed in a pan of hot water for about an hour. Serve warm with cream or coconut sauce.
DESSERTS WITH TAPIOCA, SAGO, MONICA, AND SEA MOSS.
Both pearl and flake tapioca are suitable for these desserts. They should be soaked for some hours before using, and it is always best to soak over night if convenient. The flake tapioca requires longer soaking and cooking than the pearl tapioca. For soaking, use one and a half cups of water for each cup of flake tapioca, and one pint of water for a cup of pearl tapioca. For cooking, three or four additional cups of water will be required for each cup of tapioca, depending upon, the articles used with it. A double boiler should be used for the cooking.
Both pearl and flake tapioca are great for these desserts. They should be soaked for several hours before using, and it's always best to soak them overnight if you can. Flake tapioca needs longer soaking and cooking compared to pearl tapioca. For soaking, use one and a half cups of water for each cup of flake tapioca, and one pint of water for a cup of pearl tapioca. For cooking, you'll need three or four more cups of water for each cup of tapioca, depending on what else you're using with it. A double boiler should be used for cooking.
RECIPES.
Apple Tapioca.—Soak a cupful of pearl tapioca over night. In the morning simmer in a quart of boiling water until transparent and thickened. Arrange in the bottom of a pudding dish four or five good-sized tart apples, which have been pared, cored, and the cavities filled with sugar. Squeeze the juice of a lemon and grate a very little of the rind over the apples. Pour the tapioca over the fruit. Set the dish inside a pan filled with hot water, cover, and bake one hour, or until the apples are done. Serve with sugar and cream. It is best nearly cold. Fresh peaches, pared and stewed, may be used in place of apples, if preferred.
Apple Tapioca.—Soak a cup of pearl tapioca overnight. In the morning, simmer it in a quart of boiling water until it’s transparent and thickened. Arrange four or five medium-sized tart apples in the bottom of a pudding dish. Peel and core the apples, filling the cavities with sugar. Squeeze the juice of a lemon and grate just a little of the rind over the apples. Pour the tapioca over the fruit. Place the dish inside a pan filled with hot water, cover it, and bake for one hour, or until the apples are tender. Serve with sugar and cream. It’s best when it’s nearly cold. If you prefer, you can use fresh peaches, peeled and stewed, instead of apples.
Apple Tapioca No. 2.—Soak a half cup of tapioca in a cap of tepid water, for at least three hours. Pare, core, and quarter nice tart apples to fill a two-quart pudding dish nearly half full. Add four cups of water and one of sugar to the soaked tapioca, pour it over the apples, and bake two or three hours in a slow oven. Serve with whipped cream.
Apple Tapioca No. 2.—Soak half a cup of tapioca in a bit of warm water for at least three hours. Peel, core, and quarter some nice tart apples to fill a two-quart pudding dish almost halfway. Add four cups of water and one cup of sugar to the soaked tapioca, pour it over the apples, and bake for two to three hours in a low oven. Serve with whipped cream.
Blackberry Tapioca.—Soak a cup of tapioca over night. When ready to cook, add three cups of boiling water and cook in a double boiler until transparent and smooth. Sprinkle a quart of fresh blackberries with sugar, and stir lightly into the tapioca. Pour into molds and serve cold with cream and sugar. Other fresh berries may be used in the same way.
Blackberry Tapioca.—Soak a cup of tapioca overnight. When you're ready to cook, add three cups of boiling water and cook in a double boiler until it's transparent and smooth. Sprinkle a quart of fresh blackberries with sugar, and gently stir them into the tapioca. Pour into molds and serve cold with cream and sugar. You can use other fresh berries in the same way.
Cherry Pudding.—Soak and cook a half cup of tapioca in a pint of water until transparent. Have a pint of fresh pitted cherries in an earthen pudding dish. Sprinkle them well with sugar, pour over them the cooked tapioca, and bake for an hour in a moderate oven. Serve hot with or without cream.
Cherry Pudding.—Soak and cook half a cup of tapioca in a pint of water until it’s transparent. Place a pint of fresh pitted cherries in a ceramic pudding dish. Sprinkle them generously with sugar, then pour the cooked tapioca over the cherries, and bake for an hour in a moderate oven. Serve hot with or without cream.
Fruit Tapioca.—Cook three fourths of a cup of tapioca in four cups of water until smooth and transparent Stir into it lightly a pint of fresh strawberries, raspberries, currants, or any small fruit, adding sugar as required. For variety a cup of canned quinces or apricots may be substituted for fresh fruit. Serve warm or cold with whipped cream or mock cream.
Fruit Tapioca.—Cook ¾ cup of tapioca in 4 cups of water until it's smooth and clear. Gently stir in 1 pint of fresh strawberries, raspberries, currants, or any small fruit, adding sugar to taste. For a twist, you can use 1 cup of canned quinces or apricots instead of fresh fruit. Serve warm or cold with whipped cream or a cream alternative.
Molded Tapioca with Fruit.—Simmer one half cup of desiccated cocoanut in a pint of milk for twenty minutes. Strain out the cocoanut, and add milk to make a full pint. Add one half cup of sugar and one half cup of tapioca previously soaked over night. Let the whole simmer until the tapioca is transparent. Dip some cups in cold water, drain, and lay fresh strawberries, currants, or cherries in the bottom of each in the form of a star or cross. Pour the tapioca into the molds gently, so as not to displace the fruit. When cold, turn out and serve with whipped cream or fruit sauce. Raisins may be substituted for fresh fruit, or bits of jelly may be placed around the mold after it has cooled, if preferred.
Molded Tapioca with Fruit.—Simmer half a cup of shredded coconut in a pint of milk for twenty minutes. Strain out the coconut and add milk to bring it back to a full pint. Mix in half a cup of sugar and half a cup of tapioca that has soaked overnight. Let the mixture simmer until the tapioca is clear. Dip some cups in cold water, drain, and arrange fresh strawberries, currants, or cherries in the bottom of each cup in a star or cross shape. Carefully pour the tapioca into the molds, being sure not to disturb the fruit. Once cool, turn out the molds and serve with whipped cream or fruit sauce. You can substitute raisins for fresh fruit, or add bits of jelly around the mold after it cools, if you prefer.
Pineapple Tapioca.—Soak one cup of tapioca over night in one and one half cups of water. Add two and one half cups of water and cook in a double boiler until transparent, then add one cup of sugar and one juicy pineapple minced fine with a sharp knife. Mold, and serve cold with or without cream.
Pineapple Tapioca.—Soak one cup of tapioca overnight in one and a half cups of water. Add two and a half cups of water and cook in a double boiler until it’s transparent, then stir in one cup of sugar and one juicy pineapple, finely chopped with a sharp knife. Mold it and serve cold with or without cream.
Prune and Tapioca Pudding.—Soak one half cup of tapioca over night. In the morning cook until transparent in two cups of water. Stew two cups of well-washed and stoned prunes in a quart of water till perfectly tender; then add the juice of a good lemon and two tablespoonfuls of sugar, and boil till the syrup becomes thick and rich. Turn the prunes into a pudding dish, cover with the cooked tapioca, and add a little grated lemon rind. Bake lightly. Serve without dressing or with sugar and cream or almond sauce. If preferred, the prunes and tapioca may be placed in the dish in alternate layers, having the top one of tapioca.
Prune and Tapioca Pudding.—Soak half a cup of tapioca overnight. In the morning, cook it in two cups of water until it's clear. Simmer two cups of well-washed and pitted prunes in a quart of water until they're completely soft; then add the juice of a fresh lemon and two tablespoons of sugar, and cook until the syrup thickens and becomes rich. Pour the prunes into a pudding dish, cover them with the cooked tapioca, and sprinkle a bit of grated lemon zest on top. Bake lightly. Serve plain or with sugar and cream or almond sauce. If you prefer, you can layer the prunes and tapioca in the dish, with tapioca on top.
Tapioca and Fig Pudding.—Cook three fourths of a cup of tapioca as for Apple Tapioca. Have ready two cups of finely sliced or chopped tart apples, and one cup of chopped figs, which have first been lightly steamed. If preferred, raisins may be used in place of half the figs. Put the fruit in the bottom of the pudding dish, turn the tapioca over it, and bake till the fruit is very soft. If the apples are not very tart, sprinkle the juice of a lemon over them before adding the figs and tapioca.
Tapioca and Fig Pudding.—Cook three-quarters of a cup of tapioca like you would for Apple Tapioca. Have two cups of finely sliced or chopped tart apples and one cup of chopped figs, which should be lightly steamed first, ready. If you prefer, you can use raisins instead of half the figs. Place the fruit at the bottom of the pudding dish, pour the tapioca on top of it, and bake until the fruit is very soft. If the apples aren’t very tart, sprinkle some lemon juice over them before adding the figs and tapioca.
A nice fruit pudding can also be made by using half canned pears and half apples, or canned quinces may be substituted for figs.
A delicious fruit pudding can also be made by using half canned pears and half apples, or you can swap out the figs for canned quinces.
Peach Tapioca.—For this will be needed a quart of nicely canned peaches, a cup of tapioca, and from one half to three fourths of a cup of sugar, according to the sweetness of the peaches. Soak the tapioca over night in just enough water to cover. When ready to cook, put in a double boiler with three cups of water, and cook for an hour. Remove from the fire and add to it the juice from the peaches, of which there should be a cup and a half, which has been secured by draining the peaches in a colander, and stir it well into the tapioca. Place a layer of this mixture in an oiled pudding dish, add the peaches, cover with the remainder of the tapioca, and bake for an hour in a moderate oven.
Peach Tapioca.—For this, you will need a quart of nicely canned peaches, a cup of tapioca, and between half a cup to three-quarters of a cup of sugar, depending on how sweet the peaches are. Soak the tapioca overnight in just enough water to cover it. When you're ready to cook, put it in a double boiler with three cups of water and cook for an hour. Remove from heat and add a cup and a half of the peach juice, which you can get by draining the peaches in a colander, and stir it well into the tapioca. Place a layer of this mixture in an oiled pudding dish, add the peaches, cover with the remaining tapioca, and bake for an hour in a moderate oven.
Tapioca Jelly.—Soak a cup of tapioca in a pint of water over night. Add another pint and cook until transparent and smooth. Add three tablespoonfuls of lemon juice and four tablespoonfuls of sugar; beat well together and tun into molds. Serve cold. No dressing is required. This may be varied by using unsweetened currant, grape, or other acid fruit juice in place of lemon. Fruit jelly may be used if the juice is not easily obtained. Add when the tapioca is well cooked, and stir until dissolved.
Tapioca Jelly.—Soak a cup of tapioca in a pint of water overnight. Add another pint of water and cook until it's clear and smooth. Mix in three tablespoons of lemon juice and four tablespoons of sugar; stir well and pour into molds. Serve it cold. No dressing is needed. You can switch it up by using unsweetened currant, grape, or other tart fruit juice instead of lemon. If you can't get the juice easily, fruit jelly works too. Add it once the tapioca is fully cooked, and stir until it's dissolved.
Red Sago Mold.—Take a quart of red raspberry juice, pure or diluted with one third water, and sweeten to taste. Have ready one half cup of best sago which has soaked for twenty minutes in just enough water to cover. Drain off any water that may remain. Add the sago to the juice, and cook until the sago is transparent, then turn into molds. Serve cold with cream. Cranberry or strawberry juice may be used in place of the raspberry, if preferred.
Red Sago Mold.—Take a quart of red raspberry juice, either pure or mixed with one third water, and sweeten to your liking. Prepare half a cup of high-quality sago that has soaked for twenty minutes in just enough water to cover it. Drain any excess water. Add the sago to the juice and cook until the sago is clear, then pour it into molds. Serve cold with cream. You can also use cranberry or strawberry juice instead of raspberry if you prefer.
Sago Fruit Pudding.—Soak a small cup of sago an hour in just enough water to cover. Drain off any water that may not be absorbed. Mix two thirds of a cup of sugar with this sago, and stir all into a quart of boiling water. Let it boil until the sago is perfectly transparent and pour in a pint of nicely hulled strawberries. Turn into molds to cool, or serve warm with cream, as preferred. Tapioca can be used instead of sago, but needs longer soaking. Raspberries, stoned cherries, or currants can be used in place of strawberries.
Sago Fruit Pudding.—Soak a small cup of sago for an hour in just enough water to cover it. Drain off any excess water that hasn't been absorbed. Mix two-thirds of a cup of sugar with the sago, and stir it all into a quart of boiling water. Let it boil until the sago is completely transparent, then add a pint of nicely hulled strawberries. Pour it into molds to cool, or serve it warm with cream, depending on your preference. You can use tapioca instead of sago, but it requires a longer soaking time. Raspberries, pitted cherries, or currants can be substituted for strawberries.
Manioca with Fruit.—Pare, core, and quarter six medium-sized tart apples, and put them to cook in a quart of boiling water. Add a cup of sugar, and cook without stirring until softened, then sprinkle into the water in which they are cooking five tablespoonfuls of manioca, and cook until it is transparent, which will be in about ten minutes. Flavor with a little grated lemon rind, and serve hot with sugar and cream, or mold, as preferred. Canned peaches, apricots, or cherries may be used in a similar manner, adding boiling water if there is not sufficient juice to properly cook the manioca. Or the manioca may be first cooked in boiling water, using four scant tablespoonfuls for a pint of water, and when transparent, turning it over sliced bananas, pineapples, or oranges, molding and serving with cream and sugar.
Manioca with Fruit.—Peel, core, and quarter six medium-sized tart apples, then cook them in a quart of boiling water. Add a cup of sugar, and cook without stirring until they're soft. Next, sprinkle in five tablespoons of manioca and cook until it’s transparent, which should take about ten minutes. Add a little grated lemon zest for flavor, and serve hot with sugar and cream or mold, as you prefer. You can also use canned peaches, apricots, or cherries in the same way, adding boiling water if there's not enough juice to cook the manioca properly. Alternatively, you can cook the manioca first in boiling water, using four scant tablespoons for a pint of water. Once it's transparent, top it with sliced bananas, pineapples, or oranges, mold it, and serve with cream and sugar.
Raspberry Manioca Mold.—Heat a pint of water, and when boiling, sprinkle into it four scant tablespoonfuls of manioca and cook for ten minutes or until transparent, stirring continually. When transparent and thickened, remove from the fire and add a tablespoonful of lemon juice and one cup of sugar. Place a layer of the cooked manioca in the bottom of a pudding dish, add a layer of freshly picked red raspberries, then another of the manioca, filling the dish in alternate layers with one of manioca for the top. Set away in some cool place until well molded. Serve in slices with cream flavored with rose. Other fresh berries may be used instead of raspberries.
Raspberry Manioca Mold.—Boil a pint of water, and once it's boiling, gradually stir in four heaping tablespoons of manioca and cook for ten minutes or until it becomes clear, stirring constantly. Once it's clear and thickened, take it off the heat and mix in a tablespoon of lemon juice and one cup of sugar. Layer some of the cooked manioca in the bottom of a pudding dish, then add a layer of fresh red raspberries, followed by another layer of manioca, continuing to alternate layers until the dish is filled, finishing with a layer of manioca on top. Store it in a cool place until it's fully set. Serve in slices with cream flavored with rose. You can substitute other fresh berries for raspberries.
Sea Moss Blancmange.—Wash the moss well in several waters, and soak in a very little cold water for an hour before using. It is hardly possible to give exact directions for making this blancmange, owing to the difficulty of accurately measuring the moss, but in general, a small handful will be ample for a quart of milk. Add the moss, when washed, to the milk, and cook in a double boiler until the milk has become thickened and glutinous. Add sugar to sweeten, flavor with vanilla or rose water, and strain through a fine sieve into cups previously wet in cold water, and mold. This may be varied by using boiling water instead of milk for cooking, adding the juice of one or two lemons and a little grated rind to flavor.
Sea Moss Blancmange.—Rinse the moss thoroughly in several changes of water and soak it in a small amount of cold water for an hour before using. It's hard to provide exact instructions for making this blancmange since measuring the moss accurately can be tricky, but generally, a small handful is enough for a quart of milk. After washing, add the moss to the milk and cook it in a double boiler until the milk thickens and becomes somewhat gelatinous. Sweeten it with sugar, add flavoring with vanilla or rose water, and strain it through a fine sieve into cups that have been lightly moistened with cold water to set. You can also switch things up by using boiling water instead of milk for cooking, and add the juice and some grated peel of one or two lemons for flavor.
DESSERTS MADE WITH GELATINE.
Gelatine is an article largely employed in making delicate and dainty dishes. It is economical and convenient, because the dessert can be prepared several hours before needed; but it must be stated that it has in itself little or no food value, and there is great liability of its being unwholesome. A writer in the Anti-Adulteration Journal, a short time since, speaking of the use of gelatine, says:—
Gelatin is a product commonly used to create delicate and fancy dishes. It's cost-effective and easy to use since desserts can be made several hours in advance; however, it's important to note that it offers little to no nutritional value, and there's a significant chance it can be unhealthy. A writer in the Anti-Adulteration Journal recently commented on the use of gelatin, stating:—
"The nutritive value of pure gelatine has been shown to be very low in the scale of foods. The beef gelatine of the markets that is used by bakers, is far from being pure gelatine. It frequently has a very disagreeable, fetid odor, and has evidently begun to decompose during the process of manufacture. After a thorough drying, putrefaction does not take place as long as it remains dry. But suppose that gelatine which has thus begun to decompose during the drying process, containing, perhaps, putrefactive germs in the dried state, be dissolved in water, and in hot weather, kept in this condition for a few hours previous to being used; the result would be rapid putrefaction. The putrefaction would be checked by freezing; but the bacteria causing it are not killed by the low temperature. As soon as the dessert is melted or eaten, they resume their activity in the body, and may cause sickness. It is a well-known fact that gelatine is an excellent medium in which to cultivate various kinds of micro-organisms; and if the conclusions here mentioned be correct, it seems that gelatine should be used with great care in connection with food preparations. When used carelessly, it may do a great deal of harm. I wish to impress those who use it with the importance of guarding against its dangers. Gelatine should not be allowed to remain in solution for many hours before using, especially in hot weather.
The nutritional value of pure gelatin is known to be quite low compared to other foods. The beef gelatin found in stores, which bakers often use, is far from pure gelatin. It often has a very unpleasant, foul smell and seems to have started decomposing during production. After it's thoroughly dried, it won't decompose as long as it stays dry. But if gelatin starts to break down during the drying process and contains possibly harmful bacteria in its dried form, dissolving it in water and keeping it that way for a few hours, especially in hot weather, could lead to rapid decomposition. Freezing can stop the decomposition, but the bacteria causing it aren't killed by the cold. Once the dessert is thawed or eaten, they can become active again in the body and might cause illness. It's well known that gelatin is a great environment for growing different types of microorganisms, and if the points made here are accurate, gelatin should be handled very carefully when it comes to food preparation. If used carelessly, it can cause serious harm. I want to emphasize to those who use it the importance of being cautious about its potential risks. Gelatin should not be allowed to sit in solution for many hours before use, especially in warm weather.
A "box" of gelatine is used to signify a two-ounce package. If half a box is called for, divide it by cutting the box and its contents in halves rather than by emptying the box and then attempting to make a division.
A "box" of gelatin refers to a two-ounce package. If you need half a box, just cut the box and its contents in half instead of emptying it and trying to divide it afterward.
To prepare gelatine for desserts, first soak it till soft in a small quantity of cold water (a cupful to one box of gelatine is sufficient); fifteen minutes will suffice if it is stirred frequently; then dissolve in boiling liquid. Do not cook the gelatine, and after it is dissolved, always strain through a cloth strainer before using.
To prepare gelatin for desserts, first soak it in a small amount of cold water until it's soft (a cup of water for one box of gelatin is enough); fifteen minutes should do if you stir it often. Then dissolve it in boiling liquid. Do not cook the gelatin, and after it's dissolved, always strain it through a cloth strainer before using.
In winter, a two-ounce package will solidify two quarts of liquid, including the water in which the gelatine is soaked. In summer, a little less liquid should be used. Gelatine desserts must be left on ice or in a cool place until hardened, but they should not be served at the table so cold as to interfere with the digestion of other foods.
In winter, a two-ounce package will set two quarts of liquid, including the water used to soak the gelatin. In summer, a bit less liquid should be used. Gelatin desserts need to be kept on ice or in a cool place until they’re firm, but they shouldn’t be served at the table so cold that it disrupts the digestion of other foods.
RECIPES.
Apples in Jelly.—Pare and core without cutting open, a half dozen medium-sized tart apples of the same degree of hardness. Fill the centers with a little grated lemon rind and sugar. Steam until tender but not broken. Have ready half a package of gelatine which has been soaked for an hour in just enough water to cover. Prepare a syrup with one cup of sugar and a pint of water. When boiling, turn the syrup over the gelatine, stirring well to dissolve it, and add the juice of half a lemon. Strain, place the apples in a deep dish with a little space between each; turn the mixture over them, and set in the ice box to cool. Serve with or without a little whipped cream.
Apples in Jelly.—Peel and core six medium-sized tart apples of similar firmness without cutting them open. Fill the centers with a bit of grated lemon peel and sugar. Steam until they're tender but not falling apart. Prepare half a package of gelatin that has soaked for an hour in just enough water to cover it. Make a syrup using one cup of sugar and a pint of water. When it's boiling, pour the syrup over the gelatin, stirring well to dissolve it, and add the juice of half a lemon. Strain the mixture, then place the apples in a deep dish with some space between each one; pour the mixture over them, and put it in the fridge to cool. Serve with or without some whipped cream.
Apple Shape.—Steam some nice tart apples. When tender, rub through a colander. Have two thirds of a box of gelatine soaked in just enough water to cover; pour over it a cup and a half of boiling water; when well dissolved, strain and add a pint of the sifted apples sweetened to taste, and one half cup of grated fresh or canned pineapple, or if preferred, one half cup of the juice of canned pineapple. Turn into cups previously wet in cold water, and mold. Serve with a little cream. Canned peaches, apricots, and other fruit may be used the same as apples, if preferred. Rub the fruit with but little juice through a colander, and proceed as above.
Apple Shape.—Steam some tart apples until they're soft. When they're tender, push them through a colander. Soak two-thirds of a box of gelatin in just enough water to cover it; then pour in a cup and a half of boiling water. Once it's fully dissolved, strain it and mix in a pint of the sifted apples sweetened to your liking, along with half a cup of grated fresh or canned pineapple, or if you prefer, half a cup of pineapple juice from a can. Pour the mixture into cups that have been rinsed in cold water to help with unmolding. Serve it with a little cream. Canned peaches, apricots, and other fruits can also be used in place of apples if you prefer. Just rub the fruit with a little juice through a colander and follow the same steps as above.
Banana Dessert.—Dissolve half a box of gelatine in a half cup of warm water. Heat three cups of rich milk to boiling, and add to it one cup of sugar and turn over the well-dissolved gelatine and strain. Let it partly cool, and mix in three or four bananas, sliced thin or chopped fine. Turn all into a mold previously wet with cold water, and leave till hardened, which may require several hours unless the mold be placed on ice. When well molded, turn into a glass dish, serve with whipped cream flavored with vanilla or lemon.
Banana Dessert.—Dissolve half a box of gelatin in half a cup of warm water. Heat three cups of rich milk to a boil, then add one cup of sugar and the well-dissolved gelatin. Strain the mixture. Let it cool slightly, then stir in three or four bananas, sliced thin or finely chopped. Pour everything into a mold that you've rinsed with cold water and let it set until hardened, which may take several hours unless the mold is placed on ice. Once it's well set, turn it out into a glass dish and serve with whipped cream flavored with vanilla or lemon.
Clear Dessert—Soak a box of gelatine in a large bowl with half a cup of cold water. When soft, pour over it three pints of boiling water, add the juice of three large lemons and two cups of sugar. Stir well, strain, and pour into molds previously wet with cold water. Put into the refrigerator until hardened. Serve with whipped cream. Quince, apricot, orange, or pineapple juice may be substituted for lemon, and thus a variety of desserts may be made.
Clear Dessert—Soak a box of gelatin in a large bowl with half a cup of cold water. Once it's soft, pour in three pints of boiling water, add the juice of three large lemons and two cups of sugar. Mix well, strain, and pour into molds that have been rinsed with cold water. Place in the refrigerator until set. Serve with whipped cream. You can also replace lemon juice with quince, apricot, orange, or pineapple juice for a variety of desserts.
Fruit Foam Dessert.—Soak half a package of gelatine in half a cup of cold water until soft. Heat to boiling two and one half cups of red raspberry, currant, strawberry, or grape juice, sweetened to taste, and pour over the soaked gelatine. Stir until perfectly dissolved, then strain, and set the dish in ice water to cool. When it is cold and beginning to thicken, beat the whites of three eggs to a stiff froth and stir into the thickening gelatine. Beat thoroughly for fifteen minutes with an egg beater, or whip till the whole is of a solid foam stiff enough to retain its shape. Turn into molds previously wet with cold water, or pile roughly in large spoonfuls in a glass dish. Set away in the refrigerator until needed. Serve with a little whipped cream piled lightly around it.
Fruit Foam Dessert.—Soak half a package of gelatin in half a cup of cold water until it softens. Heat two and a half cups of red raspberry, currant, strawberry, or grape juice, sweetened to your liking, until it boils, then pour it over the softened gelatin. Stir until completely dissolved, then strain it and place the dish in ice water to cool. Once it's cold and starting to thicken, beat the whites of three eggs until they form stiff peaks and fold them into the thickening gelatin. Beat thoroughly for fifteen minutes with an egg beater, or whisk until the mixture is a solid foam that holds its shape. Pour into molds that have been rinsed with cold water, or spoon it into a glass dish. Store in the refrigerator until you're ready to serve. Serve with a little whipped cream placed lightly around it.
Fruit Shape.—Take a quart of nicely canned red raspberries, sweetened to taste; turn into a colander and drain off the juice, taking care to keep the fruit as perfect as possible. Put two thirds of a box of gelatine to soak in just enough of the juice to cover. When the gelatine is ready, heat the remainder of the juice to boiling and pour over it. When well dissolved, add the fruit, turn into cups, and mold. Serve with cream. Peaches, strawberries, apricots, and other canned fruit may be used in place of the raspberries, if preferred.
Fruit Shape.—Take a quart of nicely canned red raspberries, sweetened to your liking; pour into a colander and drain off the juice, being careful to keep the fruit as intact as possible. Soak two thirds of a box of gelatin in just enough of the juice to cover it. Once the gelatin is ready, heat the rest of the juice until boiling and pour it over the gelatin. When it’s fully dissolved, add the fruit, pour into cups, and let it set. Serve with cream. You can also use peaches, strawberries, apricots, and other canned fruits instead of the raspberries, if you prefer.
Gelatine Custard.—Soak a quarter of a box of gelatine in one fourth of a cup of cold water till soft; then pour over it three fourths of a cup of boiling water, and stir until dissolved. Beat the yolks of two eggs and three tablespoonfuls of sugar to a cream; pour over it slowly, stirring continuously, a pint of boiling milk, and cook in a double boiler until it thickens. Then add the gelatine mixture, which should first be strained, the whites of the two eggs beaten stiff, and a little vanilla for flavoring. Beat all well together, turn into molds previously wet in cold water, and place on ice to harden. Serve with fruit sauce.
Gelatin Custard.—Soak a quarter of a box of gelatin in a fourth of a cup of cold water until it softens; then pour three fourths of a cup of boiling water over it and stir until it dissolves. Beat the yolks of two eggs and three tablespoons of sugar until creamy; slowly pour in a pint of boiling milk while stirring continuously, and cook in a double boiler until it thickens. Then add the strained gelatin mixture, the stiffly beaten egg whites, and a little vanilla for flavor. Mix everything well, pour into molds that have been rinsed with cold water, and place in the ice to set. Serve with fruit sauce.
Layer Pudding.—Divide a package of gelatine into three portions, and put each to soak in one third of a cup of cold water. Heat one and one fourths cups of water to boiling, add the juice of one lemon and two thirds of a cup of sugar. Turn this slowly, stirring well meanwhile, over the well-beaten yolks of two eggs. Cook in a double boiler five minutes, or until the mixture thickens. Pour the hot custard over one portion of the soaked gelatine, and stir it until dissolved. Strain, add a little grated lemon rind for flavoring, and turn into a broad, shallow dish to mold. A square granite-ware baking tin is admirable for this purpose.
Layer Pudding.—Divide a package of gelatin into three parts and soak each in one third of a cup of cold water. Heat one and a quarter cups of water until it boils, then add the juice of one lemon and two thirds of a cup of sugar. Slowly pour this mixture over the well-beaten yolks of two eggs while stirring well. Cook in a double boiler for five minutes, or until the mixture thickens. Pour the hot custard over one portion of the soaked gelatin and stir until it dissolves. Strain the mixture, add a bit of grated lemon zest for flavor, and pour it into a broad, shallow dish to set. A square granite baking pan works perfectly for this.
Take one and one half cups of raspberry, strawberry, grape, or currant juice, sweetened to taste; heat to boiling and pour over the second portion of the soaked gelatine. Stir till well dissolved, strain, and turn into a shallow mold like that containing the first portion.
Take one and a half cups of raspberry, strawberry, grape, or currant juice, sweetened to your liking; heat it until it boils and pour it over the second portion of the soaked gelatin. Stir until fully dissolved, strain, and pour it into a shallow mold like the one used for the first portion.
Heat one and one half cups of rich milk to boiling, add one half cup of sugar, and pour over the third portion of soaked gelatine. Strain and cool a little, flavor with vanilla or a few chopped bananas; or, if preferred, flavor the milk with cocoanut before using, as directed on page 298. Pour into a third mold like the others to cool. When all are cold, arrange in layers, the yellow at the bottom and the white at the top. The whites of the eggs may be used for meringue, or for making a whipped cream sauce to serve with the pudding.
Heat one and a half cups of rich milk until it’s boiling, then add half a cup of sugar and pour it over a third of the soaked gelatin. Strain and let it cool a bit, then flavor it with vanilla or some chopped bananas; alternatively, you can flavor the milk with coconut before using, as directed on page 298. Pour into a third mold like the others to cool. Once everything is cold, arrange in layers, with the yellow layer at the bottom and the white layer on top. You can use the egg whites for meringue or to make a whipped cream sauce to serve with the pudding.
Lemon Jelly.—Soak one half box of gelatine in a scant cup of cold water until soft. Then pour over it one pint of boiling water and stir until well dissolved. Add one cup of sugar, the yellow rind of one lemon, and one half cup of lemon juice. Strain, put into molds previously wet in cold water, and place in the ice chest to harden. If preferred, the above may be cooled in a shallow dish and cut into irregular shapes to be served with a custard sauce. Use only the yolks of eggs in making the custard, that it may have a rich color, using two yolks in place of one whole egg.
Lemon Jelly.—Soak half a box of gelatin in a little bit of cold water until it softens. Then, pour in one pint of boiling water and stir until it's fully dissolved. Add one cup of sugar, the yellow zest of one lemon, and half a cup of lemon juice. Strain the mixture, pour it into molds that have been rinsed with cold water, and refrigerate until it sets. If you prefer, you can cool the mixture in a shallow dish and cut it into irregular shapes to serve with a custard sauce. Use only the egg yolks to make the custard for a richer color, using two yolks instead of one whole egg.
Jelly with Fruit.—Soak a package of gelatine in a cup of cold water until soft; then pour over it one quart and a cup of boiling water. Strain, add the juice of four lemons and twelve tablespoonfuls of sugar. Cool a little of the gelatine in a mold, and as soon as set, scatter in some nice currants or seedless raisins; add another layer of gelatine, and when set, scatter in more fruit; continue until the mold is full, having gelatine at the top. Fresh fruit, currants, grapes, cherries, plums, peaches, etc., may be used in place of raisins, if preferred.
Jelly with Fruit.—Soak a package of gelatin in a cup of cold water until it’s soft; then pour one quart and one cup of boiling water over it. Strain, and add the juice of four lemons and twelve tablespoons of sugar. Cool a bit of the gelatin in a mold, and as soon as it sets, sprinkle in some nice currants or seedless raisins; add another layer of gelatin, and when that sets, sprinkle in more fruit; keep going until the mold is full, making sure there's gelatin on top. You can use fresh fruit like currants, grapes, cherries, plums, peaches, etc., instead of raisins if you prefer.
Orange Dessert.—Soak one third of a cup of gelatine in one third of a cup of cold water until soft; then pour over it one third of a cup of boiling water. Add a scant cup of sugar, the juice of one lemon, and a cupful of orange juice and pulp. Set the dish containing the mixture in a pan of ice water until it begins to harden. Have ready the whites of three eggs well whipped, add to the jelly, and beat all together until light and stiff enough to drop. Pour into molds wet in cold water, and lined with sections of oranges, from which seeds and white fiber have been removed.
Orange Dessert.—Soak 1/3 cup of gelatin in 1/3 cup of cold water until it’s soft; then pour 1/3 cup of boiling water over it. Add just under 1 cup of sugar, the juice of 1 lemon, and 1 cup of orange juice and pulp. Set the dish with the mixture in a pan of ice water until it starts to set. Have the whites of 3 eggs whipped well, add them to the jelly, and beat everything together until it’s light and stiff enough to hold its shape. Pour into molds that have been rinsed with cold water and lined with orange segments, with seeds and white pith removed.
Oranges in Jelly.—Pare divide, and take out the seeds from four or five sweet oranges, being careful to remove all the white rind and shreds. Place in a deep dish and pour over them a syrup prepared as for Apples in Jelly, using the juice of a whole lemon. Set in the ice box over night. A very little orange peel may be grated into the syrup if liked; and if the oranges are very sweet, less sugar will be required. If one can afford to use orange juice in place of the water in making the syrup, the dessert will be greatly improved.
Oranges in Jelly.—Peel, segment, and remove the seeds from four or five sweet oranges, making sure to take off all the white pith and bits. Place them in a deep dish and pour over a syrup prepared like the one for Apples in Jelly, using the juice of a whole lemon. Chill in the fridge overnight. You can grate a small amount of orange peel into the syrup if you like; and if the oranges are very sweet, you’ll need less sugar. If you can use orange juice instead of water for the syrup, it will greatly enhance the dessert.
Orange Jelly.—Soak one quarter of a box of gelatine until soft in just enough cold water to cover. Then pour over it one half cup of boiling water. Stir until well dissolved, add the juice of one small lemon, one cupful of orange juice, and one half cup of sugar. Strain, turn into molds previously wet in cold water, and set on ice to harden. Strawberry, raspberry, and other fruit juices may be used in a similar manner.
Orange Jelly.—Soak one quarter of a box of gelatin in just enough cold water to cover it until soft. Then pour one half cup of boiling water over it. Stir until fully dissolved, then add the juice of one small lemon, one cup of orange juice, and one half cup of sugar. Strain the mixture, pour it into molds that have been rinsed with cold water, and place them on ice to set. You can use strawberry, raspberry, and other fruit juices in the same way.
Snow Pudding.—Soak one fourth of a box of gelatine until soft in an equal measure of cold water. Then pour over it one cup of boiling water, and add one fourth of a cup of strained lemon juice and one cup of sugar; stir till the sugar is all dissolved. Strain into a large china dish, and set in ice water to cool. Let it stand until cold and beginning to thicken. Have ready the whites of three eggs beaten to a stiff froth, and add to the gelatine as it begins to thicken; beat all together for fifteen or twenty minutes, until it is of a solid foam and stiff enough to hold its shape. Turn into molds and keep in a cool place till needed. A half dozen finely sliced or chopped bananas stirred in toward the last, makes a nice variation. Serve with custard sauce made with the yolks of the eggs and flavored with rose or vanilla. Orange, quince, or pineapple juice may be substituted for lemon, for a change.
Snow Pudding.—Soak a quarter of a box of gelatin in an equal amount of cold water until it's soft. Then pour one cup of boiling water over it, and add a quarter cup of strained lemon juice and one cup of sugar; stir until the sugar dissolves completely. Strain into a large china dish and place it in ice water to cool. Let it sit until it's cold and starts to thicken. Have the whites of three eggs beaten to stiff peaks ready, and add them to the gelatin as it begins to thicken; beat everything together for fifteen to twenty minutes until it forms a solid foam that's stiff enough to hold its shape. Pour into molds and keep in a cool place until needed. Stirring in a half dozen finely sliced or chopped bananas towards the end makes a nice variation. Serve with a custard sauce made with the egg yolks and flavored with rose or vanilla. You can also use orange, quince, or pineapple juice instead of lemon for a change.
This dessert is best if made several hours before it is needed and set in the refrigerator to keep cold.
This dessert is best if made a few hours in advance and chilled in the refrigerator.
DESSERTS WITH CRUSTS.
RECIPES.
Apple Tart.—Pare and slice some quick-cooking, tart apples, and place them in the bottom of a pudding dish, with a tablespoonful of water. Cover with a crust prepared in the following manner: Into a cup of thin cream stir a gill of yeast and two cups of flour; let this become very light, then add sufficient flour to mix soft. Knead for fifteen or twenty minutes very thoroughly, roll evenly, and cover the apples; put all in a warm place until the crust has become very light, then bake. If the apples do not bake easily, they may be partially cooked before putting on the crust. Dish so that the fruit will be uppermost, and serve cold with cream and sugar, cocoanut sauce, or mock cream.
Apple Tart.—Peel and slice some quick-cooking, tart apples, and place them at the bottom of a pudding dish with a tablespoon of water. Cover with a crust made as follows: In a cup of light cream, mix in a gill of yeast and two cups of flour; let this rise until very light, then add enough flour to make a soft dough. Knead thoroughly for fifteen to twenty minutes, roll it out evenly, and cover the apples; set everything in a warm place until the crust has risen well, then bake. If the apples aren't cooking through easily, you can partially cook them before adding the crust. Serve the tart with the fruit on top and enjoy it cold with cream and sugar, coconut sauce, or mock cream.
Gooseberry Tart.—Fill a pudding dish with well prepared green gooseberries, adding a tablespoonful or two of water. Cover with a crust as for Apple Tart, and when light, bake in a moderately quick oven. Cut the crust into the required number of pieces, and dish with gooseberries heaped on top. Serve cold with sugar and cream.
Gooseberry Tart.—Fill a baking dish with well-prepared green gooseberries, adding a tablespoon or two of water. Cover it with a crust like you would for Apple Tart, and when it's puffed up, bake in a moderately hot oven. Cut the crust into the desired number of pieces, and serve with the gooseberries piled on top. Serve cold with sugar and cream.
Cherry Tart.—Prepare the same as for Apple Tart, with stoned cherries, only omitting the water, as the cherries will be sufficiently juicy of themselves. If the fruit is very juicy, sprinkle a tablespoonful of flour over it before putting on the crust. Plum and peach tart may be made in the same manner, and are both very nice.
Cherry Tart.—Make it the same way as an Apple Tart, using pitted cherries, but skip the water since the cherries will have enough juice on their own. If the fruit is really juicy, sprinkle a tablespoon of flour over it before adding the crust. You can make plum and peach tarts in the same way, and they are both very tasty.
Strawberry and other Fruit Shortcakes.—Beat together one cup of thin cream, slightly warmed, a tablespoonful of yeast, and two small cups of flour. Set in a warm place till very light. Add sufficient warm flour to mix soft, and knead thoroughly for fifteen or twenty minutes. Divide into two equal portions, and roll into sheets about one half inch in thickness, making the center a very little thinner than the edges, so that when risen, the center will not be highest. Place in tins, and set in a warm place until perfectly risen, or until they have doubled their first thickness. Bake quickly. When cold, spread one cake with fruit, and cover with the other. If the fruit is large, it may be chopped fine with a knife, or mashed with a spoon. A little lemon juice added to peaches is an addition for shortcake.
Strawberry and other Fruit Shortcakes.—Mix together one cup of slightly warmed cream, one tablespoon of yeast, and two small cups of flour. Let it sit in a warm place until it’s very fluffy. Add enough warm flour to make a soft dough, and knead it well for fifteen to twenty minutes. Divide the dough into two equal parts, and roll each part into sheets about half an inch thick, making the center slightly thinner than the edges so that when it rises, the center won't be the highest point. Place them in tins, and leave them in a warm spot until they’ve fully risen or have doubled in thickness. Bake quickly. Once cooled, spread one cake with fruit and top it with the other. If the fruit is large, you can chop it finely with a knife or mash it with a spoon. Adding a bit of lemon juice to peaches enhances the shortcake.
Lemon Shortcake.—Prepare the crust as for Fruit Shortcake. For the filling, grate the yellow portion only of the lemon, and squeeze the juice into a bowl; add a cupful of sugar. Braid a tablespoonful of flour smooth with two tablespoonfuls of water, add enough boiling water, stirring well meanwhile, to make a teacupful. Add this to the other ingredients, beat well together, and place the bowl in a basin of boiling water or over the teakettle. Cook until about as thick as boiled custard. Fill this between the shortcakes and serve.
Lemon Shortcake.—Make the crust just like you would for Fruit Shortcake. For the filling, grate only the yellow part of the lemon and squeeze the juice into a bowl; add a cup of sugar. Mix a tablespoon of flour smoothly with two tablespoons of water, then add enough boiling water while stirring to make a teacup full. Combine this with the other ingredients, mix thoroughly, and place the bowl in a basin of boiling water or over the kettle. Cook until it's about as thick as custard. Layer this between the shortcakes and serve.
Cream.—Heat one half cup of milk and the same of thin cream to boiling, add two tablespoonfuls of sugar, and thicken with one teaspoonful of cornstarch rubbed smooth in a little cold milk. Turn the hot sauce over the beaten white of two eggs, stirring rapidly meanwhile, until the egg is thoroughly mingled with the whole. Allow it to become cold before using.
Cream.—Heat half a cup of milk and half a cup of light cream until boiling. Add two tablespoons of sugar and thicken with one teaspoon of cornstarch mixed well in a small amount of cold milk. Pour the hot mixture over the whipped egg whites of two eggs, stirring quickly until the eggs are fully combined. Let it cool before using.
Raised Pie.—Prepare the dough as for shortcake. Divide in two portions, spread one on the tin, and cover with a layer of easy-cooking tart apples sliced in eighths. Put two or three spoonfuls of rather thick sweet cream over the apples, and cover with the top crust. Let the crusts rise until very light, and bake. Peaches may be used in the same manner.
Raised Pie.—Make the dough just like you would for shortcake. Split it into two parts, spread one part in the pan, and add a layer of easy-cooking tart apples cut into eighths. Spoon two or three tablespoons of fairly thick sweet cream over the apples, then place the top crust over it. Let the crusts rise until they’re nice and fluffy, then bake. You can use peaches in the same way.
Baked Apple Loaf.—Prepare some dough as for buns on page 347, leaving out the sugar, and when ready for the last melding, cut it into three portions. Put some flour on the bread board, mold the dough well, and roll as thin as pie crust in such shape as will fit a shallow baking tin. Spread over the tin, and cover the dough with a layer of easy-cooking, sour apples sliced very thin, or with very stiff apple marmalade. Cover this with a second layer of dough, then add another layer of apples, and cover with the third portion of the dough. Pinch the edges of the dough well together, let the loaf rise till very light, then bake. Eat cold with sugar and cream. If the apples will not cook quickly, they may be first steamed until nearly tender. If the crust appears too hard when taken from the oven, cover with a wet napkin and allow it to steam for a little time until softened.
Baked Apple Loaf.—Make some dough like you would for buns on page 347, skipping the sugar. When it's ready for the final mixing, divide it into three parts. Dust some flour on the countertop, knead the dough well, and roll it out as thin as pie crust, shaped to fit a shallow baking pan. Lay it in the pan, then top the dough with a layer of thinly sliced, easy-cooking sour apples or some thick apple marmalade. Add a second layer of dough on top, then another layer of apples, and finally cover it with the last portion of dough. Pinch the edges of the dough together tightly, let the loaf rise until it's very fluffy, then bake. Serve it cold with sugar and cream. If the apples aren’t cooking fast enough, you can steam them until they are nearly tender. If the crust seems too hard when you take it out of the oven, cover it with a damp cloth and let it steam for a little while to soften.
CUSTARD PUDDINGS.
Very much depends upon the baking in all puddings made with milk and eggs.
Very much depends on the cooking for all puddings made with milk and eggs.
A custard pudding made with one egg, and slowly baked, will be much thicker and nicer than one made with more eggs, baked in too hot an oven.
A custard pudding made with one egg and baked slowly will be much thicker and better than one made with more eggs and baked in an oven that's too hot.
A custard pudding baked too quickly or too long will have the eggs mixed with the farinaceous substance and the milk turned to whey, while one more carefully baked will have eggs and milk formed into a thick custard on the top.
A custard pudding baked too quickly or for too long will end up with the eggs mixed in with the floury substance and the milk separated into whey, while one that is baked more carefully will have the eggs and milk set into a thick custard on top.
Custard puddings and all other baked puddings which require to be cooked slowly, are best cooked in an earthen dish set in the oven in a pan of hot water, and baked only till the pudding is set. If it is desirable to use with eggs any ingredient which requires a lengthy cooking, it is much better to cook it partially before adding the eggs. Many custard desserts are much more dainty and more easily served when cooked in cups than when baked in a large dish. The blue willow pattern stoneware cups and the blue and white Japanese ware are very suitable for this purpose. When cooking, set the cups, allowing one for each person, in the oven in a dripping pan containing hot water, and bake. Serve without removing from the cups.
Custard puddings and other baked puddings that need slow cooking are best made in a clay dish placed in the oven inside a pan of hot water, baking only until the pudding is set. If you want to use any ingredient that requires a long cooking time with eggs, it's better to cook it partially before mixing in the eggs. Many custard desserts are much more elegant and easier to serve when cooked in cups rather than in a large dish. The blue willow pattern stoneware cups and the blue and white Japanese dishes work really well for this. When cooking, place the cups—one for each person—in the oven in a deep pan filled with hot water and bake. Serve them without taking them out of the cups.
If desired to stir beaten eggs into heated milk, add a few spoonfuls of cold milk to the eggs, and pour the mixture, a little at a time, into the hot milk, taking care to stir it constantly.
If you want to mix beaten eggs into hot milk, add a few spoonfuls of cold milk to the eggs, then pour the mixture slowly into the hot milk while stirring constantly.
A nice way to flavour custards and meringues for custard puddings is to beat fruit jelly with the whites of the eggs; red raspberry, quince, and pineapple jellies give especially nice flavours.
A great way to add flavor to custards and meringues for custard desserts is to mix fruit jelly with the egg whites. Red raspberry, quince, and pineapple jellies provide particularly good flavors.
RECIPES.
Apple Custard.—Bake good tart apples; when done, remove the pulp, and rub through a sieve; sweeten, and flavour with grated pineapple or grated orange or lemon rind. Put in a glass dish, and cover with a plain custard prepared as directed on page 328. Bits of jelly may be scattered over the top of the custard.
Apple Custard.—Bake some good tart apples; once they're done, scoop out the pulp and push it through a sieve. Sweeten it, and add flavor with grated pineapple or the zest of an orange or lemon. Pour it into a glass dish and top it with a basic custard made as directed on page 328. You can sprinkle bits of jelly on top of the custard.
Apple Custard No. 2.—Peel, halve, and core eight or ten medium-sized sour apples. Have prepared a syrup made with a cup of water, the juice of one lemon, a little grated rind, and a half cup of sugar. When the sugar is dissolved, add the fruit, and simmer till tender but not fallen to pieces. Skim out the apples, draining thoroughly, and lay them in a glass dish. Boil up the syrup until thick, and poor it over the apples. Make a soft boiled custard with a pint of milk, yolks of three eggs, and two tablespoonfuls of sugar. When cold, spread over the apples; whip the whites to a stiff froth, flavor with lemon, and pile irregularly upon the top. Brown lightly in the oven.
Apple Custard No. 2.—Peel, halve, and core eight to ten medium-sized sour apples. Prepare a syrup using one cup of water, the juice of one lemon, a bit of grated lemon peel, and half a cup of sugar. Once the sugar has dissolved, add the apples and simmer until they’re tender but not mushy. Remove the apples, making sure to drain them well, and arrange them in a glass dish. Boil the syrup until it thickens, then pour it over the apples. Make a soft custard by combining one pint of milk, the yolks of three eggs, and two tablespoons of sugar. Once it’s cool, spread it over the apples; whip the egg whites until stiff, flavor with lemon, and pile them on top in a rugged shape. Lightly brown in the oven.
Apple Custard No. 3.—Pare and remove the cores from a dozen tart apples, and fill the cavities with black raspberry, quince, or grape jelly. Put them in a covered baking dish with a tablespoonful of water, and steam in the oven till tender but not fallen to pieces. Then cover the apples with a raw custard made by cooking two tablespoonfuls of flour rubbed smooth with a little milk, in a quart of milk, till just thickened, and adding, when cold, the yolks of two eggs well beaten with two heaping tablespoonfuls of sugar, and lastly the whites of the eggs whipped to a stiff froth. Bake in a dish set in a pan of hot water, until the custard has set, but not till it separates.
Apple Custard No. 3.—Peel and core a dozen tart apples, then fill the centers with black raspberry, quince, or grape jelly. Place them in a covered baking dish with a tablespoon of water, and steam them in the oven until they're tender but not falling apart. Next, cover the apples with a raw custard made by cooking two tablespoons of flour mixed smoothly with a little milk in a quart of milk, until it thickens just slightly, and add, when cool, the yolks of two eggs that have been well beaten with two heaping tablespoons of sugar, and finally fold in the whipped egg whites until stiff. Bake in a dish placed in a pan of hot water until the custard is set, but not so long that it separates.
Apple Cornstarch Custard.—Cover the bottom of a small earthen-ware pudding dish an inch or more in depth with apples stewed until very dry, sweetened and flavored with a teaspoonful of rose water. Heat a cup of milk to boiling, and stir into it a tablespoonful of cornstarch rubbed smooth in a little cold milk, and one fourth cup of sugar; cook until thickened, then add the yolk of one egg, and pour the whole over the apple. Meringue the top with the white of the egg beaten stiff with a tablespoonful of sugar, and flavored with a little rose water.
Apple Cornstarch Custard.—Fill the bottom of a small baking dish with an inch or more of apples that have been cooked down until very dry, sweetened, and flavored with a teaspoon of rose water. Heat a cup of milk until it's boiling, then stir in a tablespoon of cornstarch that's been mixed with a bit of cold milk and a quarter cup of sugar; cook until it thickens. Next, add the yolk of one egg and pour the mixture over the apples. Top it with a meringue made from the egg white whipped stiff with a tablespoon of sugar and a little rose water for flavor.
Apple and Bread Custard.—For this is required one cup of finely rolled bread crumbs, two eggs, one half cup of sugar, one cup minced sour apples, and one quart of milk. Beat the sugar and yolks together, add the milk, bread, and fruit, and lastly the well-beaten whites of the eggs. Bake in a dish set in a pan of hot water till firm but not dry.
Apple and Bread Custard.—For this, you need one cup of finely rolled bread crumbs, two eggs, half a cup of sugar, one cup of chopped sour apples, and one quart of milk. Beat the sugar and egg yolks together, then add the milk, bread, and fruit, followed by the well-beaten egg whites. Bake in a dish placed in a pan of hot water until it's firm but not dry.
Almond Cornstarch Pudding.—Blanch one and one half ounces of sweet almonds, and reduce them to a paste as directed on page 298; or if obtainable, almondine may be used instead of the prepared almonds. Heat a quart of milk, and while boiling, stir into it four tablespoonfuls of cornstarch which has been braided smooth with a little cold milk; let it thicken over the fire, stirring all the time. Then add two tablespoonfuls of thick, sweet cream. Lastly, stir in two or three well-beaten eggs and a tablespoonful of rose water. Let it come just to the boiling point, and remove from the stove. Keep in a cold place till needed. Serve with hot mock cream or with grape pulp as dressing.
Almond Cornstarch Pudding.—Blanch 1.5 ounces of sweet almonds and grind them into a paste as directed on page 298; or, if available, you can use almondine instead of the prepared almonds. Heat a quart of milk, and while it's boiling, stir in four tablespoons of cornstarch that has been mixed smooth with a little cold milk; let it thicken over the heat, stirring constantly. Then add two tablespoons of thick, sweet cream. Finally, stir in two or three well-beaten eggs and a tablespoon of rose water. Bring it just to a boil, then remove from the stove. Keep it in a cool place until needed. Serve with hot mock cream or grape pulp as a topping.
Almond Cream.—Heat a pint of milk, and when boiling stir into it two tablespoonfuls of cornstarch rubbed smooth in a little cold milk, also one fourth cup of sugar and three tablespoonfuls of almondine. Cook until thickened, and pour it, stirring constantly meanwhile, over the beaten whites of two eggs. Set on ice to cool, and serve with grape pulp as dressing. A cupful of blanched and chopped almonds may be used instead of almondine if that is not obtainable. The pudding will then require an additional one fourth cup of sugar.
Almond Cream.—Heat a pint of milk, and when it boils, stir in two tablespoons of cornstarch that you’ve mixed smoothly with a little cold milk, along with one-fourth cup of sugar and three tablespoons of almond extract. Cook until it thickens, stirring constantly, then pour it over the beaten whites of two eggs. Chill it in the fridge to cool, and serve with grape pulp as a topping. If almond extract isn’t available, you can use a cup of blanched and chopped almonds instead, but you'll need to add another one-fourth cup of sugar.
Apple Charlotte.—Take three cups of nicely stewed tart apples which have been beaten smooth or rubbed through a colander and sweetened to taste. If the sauce is thin and very juicy, place it upon the range, and simmer slowly till it is of the consistency of thick marmalade or jelly. Add to the apples four tablespoonfuls of grated fresh or canned pineapple for flavoring. Remove the hard crusts from slices of light whole-wheat bread, spread them quite thickly with the prepared apple, and pack in layers in a pudding mold. Cover with a simple custard made of a quart of milk, three tablespoonfuls of sugar, and two eggs. Let it stand half an hour, then bake. Do not press the bread or beat it after the custard is turned on, as that will be likely to make the pudding heavy. Other fruit marmalade may be used in place of the apple preparation if preferred.
Apple Charlotte.—Take three cups of nicely stewed tart apples that have been mashed or pushed through a strainer and sweetened to your taste. If the sauce is thin and very juicy, put it on the stove and simmer slowly until it reaches the consistency of thick marmalade or jelly. Add four tablespoons of grated fresh or canned pineapple for flavor. Remove the hard crusts from slices of light whole-wheat bread, spread them generously with the prepared apple, and stack in layers in a pudding mold. Top with a simple custard made from a quart of milk, three tablespoons of sugar, and two eggs. Let it sit for half an hour, then bake. Don’t press the bread or stir it after pouring on the custard, as that can make the pudding heavy. You can use other fruit marmalade instead of the apple mixture if you prefer.
Banana Custard.—Prepare a custard as directed for Plain Custard with a quart of milk, two well-beaten eggs, four tablespoonfuls of sugar, and one of cornstarch. When the custard is cool, pour it over four thinly sliced yellow bananas, over which a tablespoonful of sugar and a teaspoonful of water have been sprinkled. Serve cold.
Banana Custard.—Make a custard as instructed for Plain Custard using a quart of milk, two well-beaten eggs, four tablespoons of sugar, and one tablespoon of cornstarch. Once the custard has cooled, pour it over four thinly sliced yellow bananas that have had a tablespoon of sugar and a teaspoon of water sprinkled on top. Serve chilled.
Boiled Custard Bread Pudding.—Crumble enough of the soft portion of stale whole-wheat bread to lightly fill a pint bowl. Heat a pint of milk to boiling. Stir into it, as soon as it boils, two eggs, yolks and whites well beaten separately, two heaping tablespoonfuls of sugar, a little grated lemon rind, and the light bread crumbs; stir rapidly till the whole thickens, pour into a deep dish, and when cold, dot the top with bits of currant or cranberry jelly.
Boiled Custard Bread Pudding.—Crumble enough of the soft part of stale whole-wheat bread to lightly fill a pint bowl. Heat a pint of milk until it boils. As soon as it boils, stir in two eggs (yolks and whites beaten separately), two heaping tablespoons of sugar, a bit of grated lemon zest, and the bread crumbs. Stir quickly until everything thickens, then pour into a deep dish. Once it's cool, top with bits of currant or cranberry jelly.
Bread and Fruit Custard.—Take for this, two cups of grated bread crumbs, two cups of finely chopped tart apples, one cup of English currants or stoned raisins, mixed with a very little chopped citron for flavor, two tablespoonfuls of sugar, three cups of milk, and two eggs. Beat the yolks of the eggs and the sugar together, then add the milk, bread, fruit, and lastly the well-beaten whites of the eggs. Bake in a dish set within a pan of hot water, until the custard is set.
Bread and Fruit Custard.—For this, take two cups of grated bread crumbs, two cups of finely chopped tart apples, one cup of English currants or pitted raisins, mixed with a small amount of chopped citron for flavor, two tablespoons of sugar, three cups of milk, and two eggs. Beat the egg yolks and sugar together, then add the milk, bread, fruit, and finally the well-beaten egg whites. Bake in a dish placed in a pan of hot water until the custard sets.
Bread Custard Pudding.—Take one cup of finely powdered bread crumbs, one half cup of sugar, one quart of milk, and the beaten yolks of three eggs and whites of two. Mix the bread and milk, and when well softened, add the beaten yolks, sugar, and lastly the well-beaten whites; beat all together thoroughly, season with a little grated lemon rind; place the pudding dish in the oven in a pan of hot water, and bake till firm and lightly brown. Take from the oven, cover the top with a layer of apple marmalade made without sugar, or with some tart fruit jelly; add to this a meringue made of the white of the remaining egg and a tablespoonful of sugar, beaten to a stiff froth, and place in the oven a moment to brown lightly.
Bread Custard Pudding.—Take one cup of finely ground bread crumbs, half a cup of sugar, one quart of milk, and the beaten yolks of three eggs plus the whites of two. Mix the bread and milk, and once it’s well softened, add the beaten yolks, sugar, and finally the well-beaten whites; mix everything together thoroughly, and season with a little grated lemon zest. Place the pudding dish in the oven inside a pan of hot water, and bake until firm and lightly browned. Remove from the oven, cover the top with a layer of unsweetened apple marmalade or some tart fruit jelly; add to this a meringue made from the white of the remaining egg and a tablespoon of sugar, beaten to stiff peaks, and put it back in the oven for a moment to lightly brown.
Fresh fruit, strawberries, raspberries, chopped peaches, currants, cherries, or shredded oranges are equally as good as the marmalade or jelly for the top dressing, and may be used to vary this pudding in a number of different ways. Canned fruits, if well drained from juice, especially apricots and peaches, are excellent for this purpose. A cocoanut custard pudding may be made of the above by flavoring the milk before using, with two tablespoonfuls of desiccated cocoanut Another variety still may be made by adding to the first recipe half a cup of Zante currants and the same of seedless raisins, or a half cup of finely shredded, tender citron.
Fresh fruit like strawberries, raspberries, chopped peaches, currants, cherries, or shredded oranges work just as well as marmalade or jelly for the topping, and can be used to customize this pudding in various ways. Canned fruits, if properly drained of their juice, especially apricots and peaches, are great for this purpose. You can make a coconut custard pudding using the aforementioned fruits by flavoring the milk beforehand with two tablespoons of desiccated coconut. Another variation can be made by adding half a cup of Zante currants and half a cup of seedless raisins, or a half cup of finely shredded, tender citron to the original recipe.
Bread and Apricot Pudding.—Fill a pudding dish with alternate layers of bread crumbs and canned apricots well drained from juice. Pour over it a custard made with two eggs, one half cup of sugar, and a pint of milk. Bake one half hour, or only until the custard is set. Canned peaches, to which a teaspoonful of lemon juice has been added after draining, may be used in place of apricots.
Bread and Apricot Pudding.—Layer a pudding dish with breadcrumbs and well-drained canned apricots. Pour a custard made from two eggs, half a cup of sugar, and a pint of milk over it. Bake for half an hour, or just until the custard is set. You can substitute canned peaches for apricots, adding a teaspoon of lemon juice after draining.
Caramel Custard.—Turn one fourth of a cup of sugar into a stewpan, and stir it over the fire until it becomes liquid and brown. Scald a cup and a half of milk, and add the browned sugar. Beat two eggs thoroughly, add to them one half cup cold milk, and turn the mixture slowly, stirring constantly that no lumps form, into the scalding milk; continue to stir until the custard thickens. Set away to cool, and serve in glasses.
Caramel Custard.—Put a quarter cup of sugar in a saucepan and stir it over heat until it melts and turns brown. Heat a cup and a half of milk until it's scalding, then add the browned sugar. Beat two eggs well, mix in half a cup of cold milk, and gradually stir this mixture into the hot milk, stirring constantly to avoid lumps. Keep stirring until the custard thickens. Let it cool, then serve in glasses.
Carrot Pudding.—Take two cups of carrots, boiled tender and rubbed through a colander, one pint of milk, two thirds of a cup of sugar, and two well beaten eggs. Flavor with vanilla, and having beaten all well together, turn into an earthen pudding dish, set the dish in a pan of hot water, and place in the oven. Bake only till the custard sets.
Carrot Pudding.—Take two cups of tender boiled carrots, mashed through a colander, one pint of milk, two-thirds of a cup of sugar, and two well-beaten eggs. Add vanilla for flavor, and after mixing everything together thoroughly, pour it into an earthenware pudding dish. Put the dish in a pan of hot water and place it in the oven. Bake just until the custard sets.
Cocoanut Cornstarch Pudding.—Simmer a cupful of grated cocoanut in a quart of milk for twenty minutes. Strain the milk to remove the cocoanut, adding enough more milk to make a full quart. With a small portion of it braid smoothly one and one half tablespoonfuls of cornstarch or rice flour, and put the remainder in a saucepan over the fire. When the milk is boiling, add the cornstarch, stirring constantly until it thickens; then remove from the fire and cool. Next add two tablespoonfuls of sugar and two well-beaten eggs. Bake in a moderate oven, in a dish set in a pan of hot water, until the custard is well set.
Coconut Cornstarch Pudding.—Simmer a cup of grated coconut in a quart of milk for twenty minutes. Strain the milk to remove the coconut, adding enough more milk to make a full quart. With a small portion of it, mix smoothly one and a half tablespoons of cornstarch or rice flour, and put the remainder in a saucepan over the heat. When the milk is boiling, add the cornstarch, stirring constantly until it thickens; then remove from the heat and let it cool. Next, add two tablespoons of sugar and two well-beaten eggs. Bake in a moderate oven, in a dish placed in a pan of hot water, until the custard is set.
Cocoanut Custard.—Flavor a pint of milk with cocoanut, add a tablespoonful of sugar and two well-beaten eggs, and boil till set in a double boiler or a bowl set in a dish of boiling water. Richer custards may be made by using three or four eggs, but the richer the custard the more likely it is to curdle and become watery, as well as being less wholesome.
Coconut Custard.—Flavor a pint of milk with coconut, add a tablespoon of sugar and two well-beaten eggs, and boil until it thickens in a double boiler or a bowl placed in a pot of boiling water. You can make richer custards by using three or four eggs, but the richer the custard, the higher the chances it will curdle and become watery, as well as being less healthy.
Coconut Rice Custard.—Flavor one quart of milk quite strongly with coconut, as previously directed. Add to it one and one half cups of boiled rice, one cup of raisins, one half cup of sugar, and lastly three well-beaten eggs. Set the pudding dish in a pan of hot water, and bake till the custard is well set.
Corn Meal Pudding.—Heat a quart of milk lacking two thirds of a cupful, to boiling. Moisten three tablespoonfuls of nice granulated corn meal with the two thirds of a cup of milk, and stir gradually into the boiling milk. Let it boil up until set, turn into a double boiler, and cook for an hour. Then add a tablespoonful of thick sweet cream, one half a cup of molasses or sugar, a quart of cold milk, a little salt if desired, and lastly, two well-beaten eggs. Mix thoroughly. Pour into a pudding dish and bake one hour. A cup of currants or seeded raisins may be used to give variety.
Corn Meal Pudding.—Heat a quart of milk, subtracting two-thirds of a cupful, to boiling. Soak three tablespoons of good granulated cornmeal with the two-thirds of a cup of milk, then slowly stir it into the boiling milk. Allow it to boil until it thickens, then transfer it to a double boiler and cook for an hour. After that, mix in a tablespoon of thick sweet cream, half a cup of molasses or sugar, a quart of cold milk, a pinch of salt if you like, and finally, two well-beaten eggs. Stir well. Pour the mixture into a pudding dish and bake for an hour. You can add a cup of currants or seeded raisins for a twist.
Corn Meal and Fig Pudding.—Beat together a scant cup of best sifted corn meal with a cupful of molasses, and stir the mixture gradually into a quart of boiling milk. Cook ten or twelve minutes, or until well thickened, then set aside to cool. Add a cupful of finely chopped figs, one and two thirds cups of cold milk, part cream if it can be afforded, and when the mixture is cool, add two well-beaten eggs. Pour into a pudding dish and bake in a moderate, steady oven for three or more hours; the longer the better. When the pudding has baked an hour, pour over it a cupful of cold milk. Do not stir the pudding, but allow the milk to soak in gradually, a pint of finely sliced or chopped sweet apples may be used in place of figs for variety, or if preferred, both may be omitted.
Corn Meal and Fig Pudding.—Mix together a little less than a cup of the best sifted corn meal with a cup of molasses, then gradually stir this into a quart of boiling milk. Cook for ten to twelve minutes, or until it thickens well, then set it aside to cool. Add a cup of finely chopped figs, one and two-thirds cups of cold milk, and some cream if you can afford it. Once the mixture is cool, mix in two well-beaten eggs. Pour it into a pudding dish and bake in a moderate, steady oven for three hours or more; the longer, the better. After the pudding has baked for an hour, pour a cup of cold milk over it. Do not stir the pudding; just let the milk soak in gradually. You can replace the figs with a pint of finely sliced or chopped sweet apples for a change, or if you prefer, you can leave both out.
Cornstarch Meringue.—Heat one and one half pints of milk to boiling, and then stir in gradually two tablespoonfuls of cornstarch which has been previously rubbed smooth in a little cold milk. When the starch has thickened, allow it partially to cool, and then add, stirring continuously meanwhile, the yolks of two eggs which have been previously well beaten with three table spoonfuls of sugar. Let the whole simmer for a minute or two longer, turn into a dish, meringue with the whites of the eggs, and when cold, dot with lumps of strawberry jelly.
Cornstarch Meringue.—Heat one and a half pints of milk until it boils, then gradually stir in two tablespoons of cornstarch that’s been mixed smooth in a little cold milk. Once the starch has thickened, let it cool slightly, and while stirring continuously, add the yolks of two eggs that you’ve beaten well with three tablespoons of sugar. Let everything simmer for another minute or two, pour it into a dish, top with meringue made from the egg whites, and when it's cool, add dollops of strawberry jelly.
Cracked Wheat Pudding.—Beat two cups of cold steamed cracked wheat in two cups of rich milk until so thoroughly mingled that no lumps remain. Add one cup of canned sweet cherries well drained from juice, one half cup of sugar, and two eggs, whites and yolks beaten separately. Bake in a slow oven till the custard is set.
Cup Custard.—Into four cups of milk stir the yolks of three eggs and one whole one well beaten. Add four tablespoonfuls of sugar, and strain the mixture into cups; place these in a dripping pan full of hot water, grate a little lemon rind over the top of each, and bake in a moderate oven. If preferred, the milk may be first flavoured with cocoanut. It is also better to have the milk nearly hot when stirring in the egg. Half a cupful of the milk should be reserved to add to the egg before turning into the heated portion.
Cup Custard.—In four cups of milk, mix the yolks of three eggs and one whole egg that’s been beaten well. Add four tablespoons of sugar and strain the mixture into cups. Put the cups in a baking pan filled with hot water, grate a bit of lemon zest on top of each, and bake in a moderate oven. If you prefer, you can flavor the milk with coconut first. It's also better to use milk that's nearly hot when mixing in the eggs. Reserve half a cup of the milk to mix with the eggs before adding it to the hot milk mixture.
Farina Custard.—Flavor a quart of milk with cocoanut as directed on page 298. Cook two tablespoonfuls of farina in the flavored milk for twenty minutes, in a double boiler; then set aside to cool. When nearly cold, add two tablespoonfuls of sugar and the well-beaten yolks of two eggs. Beat all together very thoroughly, and lastly stir in the whites of the eggs which have been previously beaten to a stiff froth. Bake in one dish set inside another filled with hot water, just long enough to set the custard. Serve cold.
Farina Custard.—Flavor a quart of milk with coconut as directed on page 298. Cook two tablespoons of farina in the flavored milk for twenty minutes in a double boiler; then set aside to cool. When it's almost cold, add two tablespoons of sugar and the well-beaten yolks of two eggs. Mix everything together thoroughly, and finally fold in the egg whites that have been beaten to stiff peaks. Bake in a single dish placed inside another filled with hot water, just long enough to set the custard. Serve cold.
Floating Island.—Make a custard of a pint of milk flavored with cocoanut, and the yolks of three eggs; sweeten to taste, and steam in a double boiler. When done, turn into a glass dish. Have the whites of the eggs whipped to a stiff froth, and drop for a few seconds on the top of a pan of scalding hot water, turning so that both sides may be alike coagulated but not hardened; skim off, and put in islands on the top of the custard. When quite cold, drop bits of different colored jellies on the islands, and keep in a cool place till needed. Or put a spoonful of fruit jelly in the bottom of small glasses, and fill with the custard with a spoonful of the white on top.
Floating Island.—Make a custard using a pint of milk flavored with coconut and the yolks of three eggs; sweeten to your taste and steam it in a double boiler. Once it's ready, pour it into a glass dish. Whip the egg whites until they're stiff, and briefly place them on top of a pan of boiling water, turning them so both sides are set but not hard. Remove and place the whipped whites onto the custard in island shapes. When completely cool, add small pieces of various colored jellies on top of the islands, and store in a cool place until you're ready to serve. Alternatively, you can add a spoonful of fruit jelly to the bottom of small glasses and fill them with custard, topped with a spoonful of the whipped egg whites.
Fruit Custard.—Heat a pint of red raspberry, strawberry, or currant juice to boiling, and stir into it two tablespoonfuls or cornstarch rubbed smooth in a little cold water. Stir constantly until thickened, then add half a cup of sugar, or less if the fruit juice has been sweetened; take from the fire and stir in the stiffly beaten whites of three eggs, stirring all the time so that the hot mixture will coagulate the egg. Make a custard of a pint of milk, the yolks of the three eggs, and three tablespoonfuls of sugar. When done, set on the ice to cool. Dish in a glass dish when cold, placing the fruit mixture by spoonfuls on top, and serve.
Fruit Custard.—Boil a pint of red raspberry, strawberry, or currant juice, then mix in two tablespoons of cornstarch that have been dissolved in a bit of cold water. Keep stirring until it thickens, then add half a cup of sugar (or less if the fruit juice is already sweet). Remove from heat and gently fold in the stiffly beaten whites of three eggs, stirring continuously to prevent the eggs from cooking. Prepare a custard using a pint of milk, the yolks of the three eggs, and three tablespoons of sugar. Once it’s ready, set it aside to cool in the fridge. When chilled, serve in a glass dish, spooning the fruit mixture on top.
Graham Grits Pudding.—Heat two cups of milk in a double boiler. When boiling, stir in one cup of Graham grits moistened with one cup of cold milk. Cook for an hour and a half in a double boiler, then remove from the fire and cool. Add three tablespoonfuls of sugar, three fourths of a cup of finely chopped apples, and one fourth of a cup of chopped raisins, and two well-beaten eggs. Bake three fourths of an hour in a moderate oven.
Graham Grits Pudding.—Heat two cups of milk in a double boiler. When it starts to boil, stir in one cup of Graham grits that have been mixed with one cup of cold milk. Cook for an hour and a half in the double boiler, then take it off the heat and let it cool. Add three tablespoons of sugar, three-quarters of a cup of finely chopped apples, one-quarter of a cup of chopped raisins, and two well-beaten eggs. Bake for 45 minutes in a moderate oven.
Ground Rice Pudding.—Simmer a few pieces of thinly cut lemon rind or half a cup of cocoanut, very slowly in a quart of milk for twenty minutes, or until the milk is well flavored. Strain the milk through a fine strainer to remove the lemon rind or cocoanut, and put into a saucepan to boil. Mix four large tablespoonfuls of ground rice smooth with a little cold milk, and add to the boiling milk. Cook until the whole has thickened, then set aside to cool. When nearly cold, add two tablespoonfuls of sugar and two well-beaten eggs. Bake in a gentle oven in a dish placed in a pan of hot water, until the whole is lightly browned.
Ground Rice Pudding.—Gently simmer a few pieces of thinly sliced lemon peel or half a cup of shredded coconut in a quart of milk for twenty minutes, or until the milk is nicely flavored. Strain the milk through a fine sieve to remove the lemon peel or coconut, and pour it into a saucepan to heat until boiling. Mix four large tablespoons of ground rice with a little cold milk until smooth, then add it to the boiling milk. Cook until it thickens, then set aside to cool. Once it's nearly cool, stir in two tablespoons of sugar and two well-beaten eggs. Bake in a low oven in a dish placed in a pan of hot water until the top is lightly browned.
Lemon Pudding.—Grate the rind of one lemon; soften one pint of bread crumbs in one quart of sweet milk, add the yolks of two eggs, and half a cup of sugar mixed with grated lemon rind. Bake twenty minutes. Beat to a froth the whites of the eggs, the juice of the lemon, and half a cup of sugar. Spread over the top, and return to the oven for five minutes. This may be baked in cups if preferred.
Lemon Pudding.—Grate the rind of one lemon. Soak one pint of bread crumbs in one quart of sweet milk, then mix in the yolks of two eggs and half a cup of sugar combined with the grated lemon rind. Bake for twenty minutes. Whip the egg whites, the lemon juice, and half a cup of sugar until frothy. Spread this mixture on top, and put it back in the oven for five minutes. You can also bake this in cups if you prefer.
Lemon Cornstarch Pudding.—Beat the yolks of two eggs in a pudding dish; add a cupful of sugar; dissolve four tablespoonfuls of cornstarch in a little cold water, stir it into two teacupfuls of actively boiling water; when thickened, add the juice of two lemons with a little grated peel; turn over the eggs and sugar, beating well to mix all together, and bake about fifteen minutes. If desired, the beaten whites of the eggs may be used to meringue the top. Serve either cold or hot.
Lemon Cornstarch Pudding.—Whisk the yolks of two eggs in a pudding dish; add a cup of sugar; dissolve four tablespoons of cornstarch in a little cold water, then stir it into two cups of boiling water; when it thickens, add the juice of two lemons along with a bit of grated peel; pour this mixture over the eggs and sugar, beating well to combine everything, and bake for about fifteen minutes. If you like, you can use the beaten egg whites to make a meringue on top. Serve it warm or cold.
Lemon Cornstarch Pudding No. 2.—Mix together one half cup of cornstarch, one half cup of sugar, the juice and a portion of the grated rind of one medium-sized lemon. Add to these ingredients just enough cold water to dissolve thoroughly, then pour boiling water over the mixture until it becomes thickened and looks transparent. Stir continuously and boil for a few minutes until the starch is cooked. Take from the fire, and add gradually, with continuous stirring, the well-beaten yolks of three eggs. Whip the whites of the eggs with a teaspoonful of quince jelly to a stiff froth, and pour over the pudding; then brown in the oven. Orange juice with a very little of the grated rind, or pineapple juice may be substituted for the lemon, if preferred.
Lemon Cornstarch Pudding No. 2.—Combine half a cup of cornstarch, half a cup of sugar, the juice, and some grated rind of one medium lemon. Add just enough cold water to mix smoothly, then pour boiling water over the mixture until it thickens and looks clear. Stir continuously and boil for a few minutes until the starch is cooked. Remove from heat, and gradually stir in the well-beaten yolks of three eggs. Whip the egg whites with a teaspoon of quince jelly until stiff, and pour over the pudding; then brown in the oven. You can also use orange juice with a bit of grated rind or pineapple juice instead of lemon if you prefer.
Macaroni Pudding.—Break sufficient macaroni to make a pint in inch lengths, put into a double boiler, turn over it three pints of milk, and cook until tender. Turn into a pudding dish, add a pint of cold milk, two thirds of a cup of sugar, one egg, and the yolks of two others well beaten. Bake from twenty minutes to one half hour. When done, cool a little, spread the top with some mashed fresh berries or grape marmalade, and meringue with the whites of the eggs and a tablespoonful of sugar.
Macaroni Pudding.—Break enough macaroni to make a pint into one-inch pieces, place it in a double boiler, pour three pints of milk over it, and cook until it's tender. Transfer it to a pudding dish, add a pint of cold milk, two-thirds of a cup of sugar, one egg, and the yolks of two other eggs, all well beaten. Bake for twenty minutes to half an hour. Once done, let it cool slightly, spread the top with some mashed fresh berries or grape marmalade, and top it with a meringue made from the egg whites and a tablespoon of sugar.
Molded Rice or Snow Balls.—Steam a pint of well-cleaned rice until tender, as directed on page 99, and tarn Into cups previously wet in cold water, to mold. When perfectly cold, place in a glass dish, and pour over them a cold custard made of a pint of milk, half a cup of sugar, a teaspoonful of cornstarch, and one egg. Or, if preferred, the rice balls may be served in individual dishes with the custard sauce, or with a dressing of fruit juice.
Molded Rice or Snow Balls.—Steam a pint of well-cleaned rice until it’s tender, as directed on page 99, and then turn it into cups that have been briefly wet in cold water to mold. Once completely cool, place them in a glass dish and pour over a cold custard made from a pint of milk, half a cup of sugar, a teaspoon of cornstarch, and one egg. Alternatively, the rice balls can be served in individual dishes with the custard sauce or topped with fruit juice.
Orange Float.—Heat one quart of water, the juice of two lemons, and one and one half cupfuls of sugar. When boiling, stir into it four tablespoonfuls of cornstarch rubbed smooth in a very little water. Cook until the whole is thickened and clear. When cool, stir into the mixture five nice oranges which have been sliced, and freed from seeds and all the white portions. Meringue, and serve cold.
Orange Float.—Heat one quart of water, the juice of two lemons, and one and a half cups of sugar. Once it’s boiling, stir in four tablespoons of cornstarch mixed with a little water until smooth. Cook until the mixture is thickened and clear. Once cool, add five sliced oranges, making sure to remove the seeds and all the white parts. Top with meringue and serve chilled.
Orange Custard.—Turn a pint of hot milk over two cups of stale bread crumbs and let them soak until well softened: add the yolks of two eggs, and beat all together until perfectly smooth; add a little of the grated rind and the juice of three sweet oranges, and sugar to taste. Lastly add the whites of the eggs beaten to a stiff froth, turn into cups, which place into a moderate oven in a pan of hot water, and bake twenty minutes, or until the custard is well set but not watery.
Orange Custard.—Pour a pint of hot milk over two cups of stale bread crumbs and let them soak until they are nice and soft. Add the yolks of two eggs and mix everything together until it’s perfectly smooth. Then add some grated rind and the juice of three sweet oranges, along with sugar to taste. Finally, fold in the egg whites that have been beaten to stiff peaks, pour the mixture into cups, place them in a moderate oven in a pan of hot water, and bake for twenty minutes, or until the custard is firm but not watery.
Orange Pudding.—Pare and slice six sweet Florida oranges, removing the seeds and all the white skin and fibers. Place in the bottom of a glass dish. Make a custard by stirring two table spoonfuls of cornstarch braided with a little milk into a pint of boiling milk, and when thickened, adding gradually, stirring constantly meanwhile, one egg and the yolk of a second egg well beaten with one fourth cup of sugar. When partially cool, pour over the oranges. Whip the white of the second egg to a stiff froth with one fourth cup of sugar which has been flavored by rubbing over some orange peel, and meringue the top of the pudding. Fresh strawberries, raspberries, or peaches may be substituted for oranges in making this dessert, if preferred.
Orange Pudding.—Peel and slice six sweet Florida oranges, removing the seeds and all the white pith. Place them at the bottom of a glass dish. To make the custard, mix two tablespoons of cornstarch with a little milk into a pint of boiling milk, and once it thickens, gradually add one egg and the yolk of a second egg that have been well beaten with one fourth cup of sugar, stirring constantly. When it’s partially cool, pour it over the oranges. Whip the egg white from the second egg with one fourth cup of sugar that has been flavored by rubbing it over some orange peel until it forms stiff peaks, and spread it on top of the pudding. If you prefer, you can substitute fresh strawberries, raspberries, or peaches for the oranges when making this dessert.
Peach Meringue.—To every pint of stewed or canned peaches, sweetened to taste, stir in the beaten yolks of two eggs. Bake in a deep pudding dish fifteen minutes, then cover with the whites of the two eggs beaten till very light with two tablespoonfuls of sugar. Brown in the oven, and serve cold with whipped cream. For peaches, substitute any other stewed fruit desired.
Peach Meringue.—For every pint of stewed or canned peaches, sweetened to your liking, mix in the beaten yolks of two eggs. Bake in a deep pudding dish for fifteen minutes, then top with the beaten whites of the two eggs that you've whipped until very light with two tablespoons of sugar. Brown it in the oven and serve cold with whipped cream. You can use any other stewed fruit you prefer instead of peaches.
Picnic Pudding.—Thicken a pint of strawberry or raspberry juice, sweetened to taste, with two tablespoonfuls of corn starch, as for Fruit Custard. Turn into the bottom of cups previously wet with cold water, or a large mold, as preferred. In a second dish heat to boiling a pint of milk, flavored with cocoanut, to which a tablespoonful of sugar has been, added. Stir into it two tablespoonfuls of cornstarch rubbed smooth in a little cold milk, and cook thoroughly. When done, cool slightly and turn into the molds on the top of the pink portion, which should be sufficiently cool so that it will not mix. A third layer may be added by cooking two tablespoonfuls of cornstarch and one of sugar, rubbed smooth in a little milk, in a pint of boiling milk, and stirring in, just as it is taken from the stove, the well-beaten yolks of two eggs.
Picnic Pudding.—Thicken a pint of strawberry or raspberry juice, sweetened to your liking, with two tablespoons of cornstarch, just like you would for Fruit Custard. Pour this into the bottom of cups that have been rinsed with cold water, or into a large mold, whichever you prefer. In another pot, heat a pint of milk, flavored with coconut and sweetened with a tablespoon of sugar, until it boils. Mix in two tablespoons of cornstarch that have been smoothed out in a little cold milk, and cook until it's well done. Once it's ready, let it cool slightly and pour it into the molds on top of the pink layer, ensuring it’s cool enough so they don’t mix. You can add a third layer by cooking two tablespoons of cornstarch and one tablespoon of sugar, smoothed out in a bit of milk, into a pint of boiling milk. Just as you take it off the heat, stir in the well-beaten yolks of two eggs.
Plain Cornstarch Pudding.—Heat to boiling a pint and a half of milk, with a few bits of the yellow rind of a lemon to flavor it. While the milk is heating, rub four large spoonfuls of cornstarch to a cream with half a cup of cold milk; beat well together the yolks of three eggs, three tablespoonfuls of sugar, and half a cup of cold milk, and whip the whites of the eggs to a stiff froth. When the milk is actively boiling, remove the bits of lemon rind with a skimmer, and stir in the starch mixture; stir constantly and boil three or four minutes—until the starch is well cooked; then add gradually, stirring well meanwhile, the yolks and sugar. Remove from the fire, and stir the beaten whites lightly through the whole. Serve with a dressing of fruit juice or fruit syrup; if in the season of fresh berries, the pudding may be dressed with a few spoonfuls of mashed strawberries, raspberries, or currants.
Plain Cornstarch Pudding.—Bring a pint and a half of milk to a boil, adding a few pieces of lemon peel for flavor. While the milk heats, mix four large spoonfuls of cornstarch with half a cup of cold milk until smooth; separately, beat together the yolks of three eggs, three tablespoons of sugar, and half a cup of cold milk, and whip the egg whites until stiff. Once the milk is boiling, remove the lemon peel with a skimmer and mix in the cornstarch mixture; stir constantly and let it boil for three to four minutes until the cornstarch is fully cooked. Gradually add the yolks and sugar while stirring well. Take it off the heat and gently fold in the beaten egg whites. Serve it with a drizzle of fruit juice or syrup; if fresh berries are in season, you can top the pudding with a few spoonfuls of mashed strawberries, raspberries, or currants.
Plain Custard.—Heat a pint of milk to boiling, and stir in a tablespoonful of cornstarch nabbed smooth in a little milk; let the milk and starch boil together till they thicken; then cool and add one well-beaten egg and two tablespoonfuls of sugar. Cook in the oven in a dish set inside another filled with hot water, or in a double boiler. The milk may be previously flavored with orange, lemon, or cocoanut.
Plain Custard.—Heat a pint of milk until it boils, then stir in a tablespoon of cornstarch mixed smoothly in a bit of milk; allow the milk and starch to boil together until they thicken. After that, let it cool and add one well-beaten egg and two tablespoons of sugar. Bake in the oven in a dish placed inside another filled with hot water, or use a double boiler. You can flavor the milk beforehand with orange, lemon, or coconut.
Prune Pudding.—Heat two and one half cups of milk to boiling, then stir in gradually a heaping tablespoonful of cornstarch which has been rubbed smooth in a little cold milk; let this boil and thicken for a minute, then remove from the fire. When cool, add three well-beaten eggs, two tablespoonfuls of sugar, and a cupful of prunes which have been stewed, then drained of all juice, the stones removed, and the prunes chopped fine. Pour into a pudding dish and bake twenty minutes. Serve with or without cream.
Prune Pudding.—Heat two and a half cups of milk until it boils, then gradually stir in a heaping tablespoon of cornstarch that has been mixed smooth with a little cold milk; let it boil and thicken for a minute, then take it off the heat. Once it cools, add three well-beaten eggs, two tablespoons of sugar, and a cup of prunes that have been stewed, drained of all juice, pitted, and chopped finely. Pour into a pudding dish and bake for twenty minutes. Serve with or without cream.
Prime Whip.—Sift through a colander some stewed sweet California prunes which have been thoroughly drained from juice, and from which the stones have been removed. Beat the whites of three eggs to a stiff froth, and add two cups of the sifted prunes; beat all together thoroughly; turn into a pudding dish, and brown in the oven fifteen minutes. Serve cold, with a little cream or custard for dressing. Almond sauce also makes an excellent dressing.
Prime Whip.—Drain some stewed sweet California prunes using a colander, making sure they've had all their juice removed and the pits taken out. Whip the whites of three eggs until stiff, then mix in two cups of the drained prunes; beat everything together well. Pour into a pudding dish and bake in the oven for fifteen minutes until browned. Serve chilled, with a bit of cream or custard on top. Almond sauce is also a great option for a topping.
Rice Apple Custard Pudding.—Pare, and remove the cores without dividing from a sufficient number of apples to cover the bottom of a two-quart pudding dish. Fill the cavities of the apples with a little grated lemon rind and sugar, and put them into the oven with a tablespoon of water on the bottom of the dish. Cover, and steam till the apples are tender, but not fallen to pieces. Then pour over them a custard made with two cups of boiled rice, a quart of milk, half a cup of sugar, and two eggs.
Rice Apple Custard Pudding.—Peel and core enough apples to cover the bottom of a two-quart pudding dish. Fill the centers of the apples with a bit of grated lemon zest and sugar, and place them in the oven with a tablespoon of water in the bottom of the dish. Cover and steam until the apples are tender but not mushy. Then pour over them a custard made with two cups of cooked rice, a quart of milk, half a cup of sugar, and two eggs.
Rice Custard Pudding.—Take one and one half cups of nicely steamed rice, four tablespoonfuls of sugar, and a pint of milk; heat to boiling in a saucepan. Then stir in very carefully the yolk of one egg and one whole egg, previously well beaten together with a few spoonfuls of milk reserved for the purpose. Let the whole boil up till thickened, but not longer, as the custard will whey and separate. When partly cool, flavor with a little vanilla or lemon, turn into a glass dish, and meringue with the white of the second egg beaten to a stiff froth. Cold steamed rice may be used by soaking it in hot milk until every grain is separate.
Rice Custard Pudding.—Take 1.5 cups of nicely steamed rice, 4 tablespoons of sugar, and a pint of milk; heat in a saucepan until boiling. Then carefully stir in the yolk of one egg and one whole egg, which you've beaten together with a few tablespoons of reserved milk. Allow the mixture to boil until thickened, but don’t let it boil too long, or the custard will separate and become watery. Once it's partly cool, add a little vanilla or lemon for flavor, pour it into a glass dish, and top with meringue made from the beaten white of the second egg, whipped to a stiff froth. You can also use cold steamed rice by soaking it in hot milk until each grain is separate.
Rice Snow.—Into a quart of milk heated to boiling, stir five tablespoonfuls of rice flour previously braided with a very little cold milk; add one half cup of sugar. Let the whole boil up together till well cooked and thickened; then remove from the stove, and stir in lightly the beaten whites of four eggs. Mold, and serve cold with foam sauce.
Rice Snow.—In a quart of milk heated to boiling, stir in five tablespoons of rice flour that you've mixed with a bit of cold milk; add half a cup of sugar. Let everything boil together until it's well cooked and thickened; then take it off the heat and gently fold in the beaten whites of four eggs. Mold it and serve cold with foam sauce.
Rice Snow with Jelly.—Steam or bake a teacupful of best rice in milk until the grains are tender. Pile it up on a dish roughly. When cool, lay over it squares of jelly. Beat the whites of two eggs and one third of a cup of sugar to a stiff froth, and pile like snow over the rice. Serve with cream sauce.
Rice Snow with Jelly.—Steam or bake a teacup of the best rice in milk until the grains are soft. Pile it loosely on a plate. Once cool, place squares of jelly on top. Whip the whites of two eggs with one third of a cup of sugar until stiff, and spread it like snow over the rice. Serve with cream sauce.
Rice with Eggs.—Steam rice as previously directed, and when sufficiently cooked, stir into half of it while hot, the yolks of one or two eggs well beaten with a little sugar. Into the other half, the whites of the eggs, sweetened and beaten to a stiff froth, may be lightly stirred while the rice is still hot enough to set the eggs. Serve with the yellow half in the bottom of the dish, and the white part piled on top covered with whipped cream flavored with lemon or vanilla.
Rice with Eggs.—Steam rice as directed earlier, and once it’s cooked, mix in the yolks of one or two eggs that have been well beaten with a bit of sugar while the rice is still hot. In the other half, lightly fold in the egg whites, which should be sweetened and whipped to a stiff peak, while the rice is still warm enough to cook the eggs. Serve by placing the yellow mixture at the bottom of the dish, and then pile the white part on top, drizzling it with whipped cream flavored with lemon or vanilla.
Snow Pudding.—Heat one half pint each of water and milk together, to boiling, stir into this a tablespoonful of cornstarch rubbed smooth in a little cold milk, and cook for five minutes. Cool partially and add the whites of two well-beaten eggs. Turn into molds and set in the ice box to cool. Serve with a cream made by stirring into a half pint of boiling milk the yolks of two eggs, a teaspoonful of cornstarch rubbed smooth in a little cold milk, and half a cup of sugar. Cook until well thickened. Cool and flavor with a little lemon or vanilla. Or, if preferred, serve with a dressing of fruit juice.
Snow Pudding.—Heat 1/2 pint of water and 1/2 pint of milk together until boiling. Stir in a tablespoon of cornstarch mixed smoothly in a bit of cold milk, and cook for five minutes. Let it cool slightly, then add the whites of two well-beaten eggs. Pour into molds and place in the fridge to chill. Serve with a cream made by mixing the yolks of two eggs into 1/2 pint of boiling milk, adding a teaspoon of cornstarch mixed smoothly in a bit of cold milk, and half a cup of sugar. Cook until it thickens nicely. Cool and add a little lemon or vanilla for flavor. Alternatively, serve with a drizzle of fruit juice.
Steamed Custard.—Heat a pint of milk, with which has been well beaten two eggs and one third of a cup of sugar, in a double boiler until well thickened. When done, turn into a glass dish, and grate a little of the yellow rind of lemon over the top to flavor. If desired to have the custard in cups, remove from the fire when it begins to thicken, turn into cups, and finish in a steamer over a kettle of boiling water.
Steamed Custard.—Heat a pint of milk mixed with two well-beaten eggs and one-third of a cup of sugar in a double boiler until it thickens. Once ready, pour it into a glass dish and grate a bit of lemon zest on top for flavor. If you prefer to serve the custard in cups, take it off the heat as it starts to thicken, pour it into cups, and finish cooking them in a steamer over a pot of boiling water.
Strawberry Charlotte.—Fit slices of nice plain buns (those made according to recipe on page 347 are nice for this) in the bottom of a pudding dish, and cover with a layer of hulled strawberries; add another layer of the buns cut in slices, a second layer of strawberries, and then more slices of buns. Make a custard in the following manner: Heat a scant pint of milk to boiling in the inner cup of a double boiler, and stir into it gradually, beating thoroughly at the same time, an egg which has been previously well beaten with half a cup of sugar, a teaspoonful of cornstarch, and a spoonful or two of milk until perfectly smooth. Cook together in the double boiler until well set. Cool partially, and pour over the buns and strawberries. Place a plate with a weight upon it on the top of the charlotte, and set away to cool.
Strawberry Charlotte.—Cut slices of plain buns (the ones made using the recipe on page 347 work well) and layer them at the bottom of a pudding dish. Then, add a layer of hulled strawberries; follow this with another layer of the sliced buns, another layer of strawberries, and then more slices of buns. Prepare a custard like this: Heat just under a pint of milk to boiling in the inner cup of a double boiler, and gradually stir in, while beating continuously, an egg that you’ve beaten well with half a cup of sugar, a teaspoon of cornstarch, and a spoonful or two of milk until it's completely smooth. Cook this mixture together in the double boiler until it thickens properly. Let it cool slightly, then pour it over the buns and strawberries. Finally, place a plate with some weight on top of the charlotte and set it aside to cool.
Pop Corn Pudding.—Take a scant pint of the pop corn which is ground and put up in boxes, or if not available, freshly popped corn, rolled fine, is just as good. Add to it three cups of new milk, one half cup of sugar, two whole eggs and the yolk of another, well beaten. Bake in a pudding dish placed inside another filled with hot water, till the custard is set. Cover with a meringue made of the remaining white of egg, a teaspoonful of sugar, and a sprinkling of the pop corn.
Pop Corn Pudding.—Take just under a pint of popcorn that’s been ground and packaged, or if that’s not available, freshly popped corn ground finely works just as well. Mix in three cups of fresh milk, half a cup of sugar, two whole eggs, and the yolk of another egg, all beaten together. Bake in a pudding dish placed inside another dish filled with hot water until the custard is set. Top it with a meringue made from the remaining egg white, a teaspoon of sugar, and a sprinkle of popcorn.
Sago Custard Pudding.—Put one half cup of sago and a quart of rich milk into the inner cup of a double boiler, or a basin set inside a pan of boiling water, and let it simmer until the sago has thickened the milk and become perfectly transparent. Allow it to cool, then add a cup of sugar, two well-beaten eggs, and a little of the grated rind of a lemon. Turn into a pudding dish, and bake only till the custard has set.
Sago Custard Pudding.—Take half a cup of sago and a quart of rich milk and place them in the inner cup of a double boiler or in a bowl set over a pot of boiling water. Let it simmer until the sago thickens the milk and becomes completely transparent. Allow it to cool, then mix in a cup of sugar, two well-beaten eggs, and a bit of grated lemon rind. Pour it into a pudding dish and bake just until the custard has set.
Sago and Fruit Custard Pudding.—Soak six table spoonfuls of sago in just enough water to cover it, for twenty minutes. Meanwhile pare and remove the cores from half a dozen or more tart apples, and fill the cavities with a mixture of grated lemon rind and sugar. Place the apples in the bottom of a pudding dish, with a tablespoonful of water; cover, and set in the oven to bake. Put the soaked sago with a quart of milk into a double boiler. Let it cook until the sago is clear and thick; then add three fourths of a cup of sugar and two well-beaten eggs. Pour the sago custard over the apples, which should be baked tender but not mushy. Put the pudding dish in the oven in a pan of hot water, and bake till the custard is well set. Serve cold.
Sago and Fruit Custard Pudding.—Soak six tablespoons of sago in just enough water to cover it for twenty minutes. Meanwhile, peel and remove the cores from six or more tart apples, and fill the cavities with a mix of grated lemon zest and sugar. Place the apples in the bottom of a pudding dish with a tablespoon of water; cover and put it in the oven to bake. In a double boiler, combine the soaked sago with a quart of milk. Cook until the sago is clear and thick; then add three-quarters of a cup of sugar and two well-beaten eggs. Pour the sago custard over the apples, which should be baked until tender but not mushy. Place the pudding dish in a pan of hot water in the oven and bake until the custard is set. Serve cold.
Snowball Custard.—Flavor a pint of milk by sleeping in it three or four slices of the yellow rind of a lemon for twenty minutes or more. Skim out the rind; let the milk come to the boiling point, and drop into it the well-beaten whites of two eggs, in tablespoonfuls, turning each one over carefully, allowing them to remain only long enough to become coagulated but not hardened, and then place the balls upon a wire sieve to drain. Afterward stir into the scalding milk the yolks of the eggs and one whole one well beaten, together with two tablespoonfuls of sugar. Stir until it thickens. Pour this custard into a glass dish, and lay the white balls on top.
Snowball Custard.—Flavor a pint of milk by soaking three or four slices of lemon peel in it for twenty minutes or more. Remove the peel; heat the milk until it starts to boil, then gently drop in the well-beaten whites of two eggs, spoon by spoon, carefully turning each one over, letting them stay just long enough to set but not harden, and then drain the balls on a wire sieve. Next, mix the yolks of the eggs, plus one whole egg that’s been well beaten, into the hot milk along with two tablespoons of sugar. Stir until it thickens. Pour this custard into a glass dish and place the white balls on top.
Tapioca Custard.—Soak a cup of pearl tapioca over night in sufficient water to cover. When ready to prepare the custard, drain off the water if any remain, and add one quart of milk to the tapioca; place in a double boiler and cook until transparent; then add the well-beaten yolks of three eggs or the yolks of two and one whole one, mixed with three fourths of a cup of sugar. Let it cook a few minutes, just long enough for the custard to thicken and no more, or it will whey and be spoiled; flavor with a little vanilla and turn into a glass dish. Cover the top with the whites beaten stiffly with a tablespoonful of sugar, and dot with bits of jelly, or colored sugar prepared by mixing sugar with cranberry or raspberry juice and allowing it to dry. For variety, the custard may be flavored with grated lemon rind and a tablespoonful of lemon juice whipped up with the whites of the eggs, or other flavor may be dispensed with, and the meringue flavored by beating with a tablespoonful of quince jelly with the whites of the eggs.
Tapioca Custard.—Soak a cup of pearl tapioca overnight in enough water to cover it. When you're ready to make the custard, drain off any remaining water and add one quart of milk to the tapioca; place it in a double boiler and cook until it becomes transparent. Then add the well-beaten yolks of three eggs, or the yolks of two eggs plus one whole egg, mixed with three-quarters of a cup of sugar. Let it cook for a few minutes—just long enough for the custard to thicken, but not too long, or it will separate and spoil. Add a little vanilla for flavor and transfer it to a glass dish. Cover the top with the egg whites beaten stiff with a tablespoon of sugar, and dot with pieces of jelly or colored sugar made by mixing sugar with cranberry or raspberry juice and letting it dry. For a twist, you can flavor the custard with grated lemon zest and a tablespoon of lemon juice whipped together with the egg whites, or skip the flavoring entirely and beat a tablespoon of quince jelly into the egg whites for the meringue.
Tapioca Pudding.—Soak a cupful of tapioca over night in just enough water to cover. In the morning, add to it one quart of milk, and cook in a double boiler until transparent. Add three eggs well beaten, one half cup of sugar, one half cup of chopped raisins, and a very little chopped citron. Bake till the custard is set. Serve warm or cold as preferred.
Tapioca Pudding.—Soak a cup of tapioca overnight in just enough water to cover it. In the morning, add one quart of milk and cook in a double boiler until it becomes transparent. Stir in three well-beaten eggs, half a cup of sugar, half a cup of chopped raisins, and a small amount of chopped citron. Bake until the custard is set. Serve warm or cold, depending on your preference.
Vermicelli Pudding.—Flavor two and one half cups of milk with lemon as directed on page 229. Drop into it, when boiling, four ounces of vermicelli, crushing it lightly with one hand while sprinkling it in, and stir to keep it from gathering in lumps. Let it cook gently in a double boiler, stirring often until it is tender and very thick. Then pour it into a pudding dish, let it cool, and add a tablespoonful of rather thick sweet cream if you have it (it does very well without), half a cup of sugar, and lastly, two well-beaten eggs. Bake in a moderately hot oven till browned over the top.
Vermicelli Pudding.—Flavor two and a half cups of milk with lemon as instructed in page 229. When the milk is boiling, add four ounces of vermicelli, breaking it up lightly with one hand as you sprinkle it in, and stir to prevent it from clumping. Let it cook gently in a double boiler, stirring often until it’s tender and very thick. Then pour it into a pudding dish, let it cool, and add a tablespoon of thick sweet cream if you have it (it's fine without), half a cup of sugar, and finally, two well-beaten eggs. Bake in a moderately hot oven until the top is browned.
White Custard No. 2.—Cook a half cup of farina in a quart of milk in a double boiler, for an hour. Remove from the stove, and allow it to become partially cool, then add one half cup of sugar, the whites of two eggs, and one half the yolk of one egg. Turn into a pudding dish, and bake twenty minutes or until the custard is well set.
White Custard No. 2.—Cook half a cup of farina in a quart of milk in a double boiler for one hour. Remove it from the stove and let it cool slightly, then stir in half a cup of sugar, the whites of two eggs, and half the yolk of one egg. Pour it into a pudding dish and bake for twenty minutes or until the custard is firm.
STEAMED PUDDING.
The following precautions are necessary to be observed in steaming puddings or desserts of any sort:—
The following precautions need to be followed when steaming puddings or any type of dessert:—
1. Have the water boiling rapidly when the pudding is placed in the steamer, and keep it constantly boiling.
1. Make sure the water is boiling vigorously when you put the pudding in the steamer, and keep it boiling continuously.
2. Replenish, if needed, with boiling water, never with cold.
2. If needed, add boiling water, never cold.
3. Do not open the steamer and let in the air upon the pudding, until it is done.
3. Don't open the steamer and let air in on the pudding until it's done.
RECIPES.
Batter Pudding.—Beat four eggs thoroughly; add to them a pint of milk, and if desired, a little salt. Sift a teacupful of flour and add it gradually to the milk and eggs, beating lightly the while. Then pour the whole mixture through, a fine wire strainer into a small pail with cover, in which it can be steamed. This straining is imperative. The cover of the pail should be tight fitting, as the steam getting into the pudding spoils it. Place the pail in a kettle of boiling water, and do not touch or move it until the pudding is done. It takes exactly an hour to cook. If moved or jarred during the cooking, it will be likely to fall. Slip it out of the pail on a hot dish, and serve with cream sauce. A double boiler with tightly fitting cover is excellent for cooking this pudding.
Batter Pudding.—Thoroughly beat four eggs and mix in a pint of milk, adding a little salt if you like. Sift a teacup of flour and gradually mix it into the milk and eggs while gently beating. Strain the mixture through a fine wire strainer into a small covered container suitable for steaming. This straining is essential. The cover of the container needs to fit tightly, as any steam getting into the pudding can ruin it. Place the container in a pot of boiling water and do not touch or move it until the pudding is done. It will take exactly one hour to cook. If it’s moved or shaken during cooking, it’s likely to collapse. Carefully slide it out of the container onto a hot dish and serve with cream sauce. A double boiler with a tight-fitting lid works great for cooking this pudding.
Bread and Fruit Custard.—Soak a cupful of finely grated bread crumbs in a pint of rich milk heated to scalding. Add two thirds of a cup of sugar, and the grated yellow rind of half a lemon. When cool, add two eggs well beaten. Also two cups of canned apricots or peaches drained of juice, or, if preferred, a mixture of one and one half cups of chopped apples, one half cup of raisins, and a little citron. Turn into a pudding dish, and steam in a steamer over a kettle of boiling water for two hours. The amount of sugar necessary will vary somewhat according to the fruit used.
Bread and Fruit Custard.—Soak a cup of finely grated bread crumbs in a pint of scalding hot milk. Add two-thirds of a cup of sugar and the grated yellow rind of half a lemon. Once it's cool, mix in two well-beaten eggs. You can also add two cups of canned apricots or peaches (drained of juice), or if you prefer, a mix of one and a half cups of chopped apples, half a cup of raisins, and a little citron. Pour it into a pudding dish and steam it over a kettle of boiling water for two hours. The amount of sugar needed may vary depending on the fruit you use.
Rice Balls.—Steam one cup of rice till tender. Wring pudding cloths about ten inches square out of hot water, and spread the rice one third of an inch over the cloth. Put a stoned peach or apricot from which the skin has been removed, in the center, filling the cavity in each half of the fruit with rice. Draw up the cloth until the rice smoothly envelops the fruit, tie, and steam ten or fifteen minutes. Remove the cloth carefully, turn out into saucers, and serve with sauce made from peach of apricot juice. Easy-cooking tart apples may also be used. Steam them thirty minutes, and serve with sugar and cream.
Rice Balls.—Steam one cup of rice until it's tender. Wring out pudding cloths about ten inches square from hot water, and spread the rice about a third of an inch thick over the cloth. Place a pitted peach or apricot, with the skin removed, in the center, filling the cavity in each half of the fruit with rice. Gather the cloth so that the rice neatly wraps around the fruit, tie it up, and steam for ten to fifteen minutes. Carefully remove the cloth, place it onto saucers, and serve with a sauce made from peach or apricot juice. You can also use easy-cooking tart apples. Steam those for thirty minutes, and serve with sugar and cream.
Steamed Bread Custard.—Cut stale bread in slices, removing hard crusts. Oil a deep pudding mold, and sprinkle the bottom and sides with Zante currants; over these place a layer of the slices of bread, sprinkled with currants; add several layers, sprinkling each with the currants in the same manner. Cover with a custard made by beating together three or four eggs, three tablespoonfuls of sugar, and one quart of milk. Put the pudding in a cool place for three hours; at the end of that time, steam one and a quarter hours. Serve with mock cream flavored with vanilla. Apple marmalade may be used to spread between the slices in place of currants, if preferred.
Steamed Bread Custard.—Slice stale bread, removing the hard crusts. Grease a deep pudding mold and sprinkle the bottom and sides with Zante currants. Layer the slices of bread on top, adding more currants between each layer. Cover everything with a custard made by whisking together three or four eggs, three tablespoons of sugar, and one quart of milk. Let the pudding sit in a cool place for three hours; then steam it for one and a quarter hours. Serve with mock cream flavored with vanilla. If you prefer, you can use apple marmalade instead of currants between the slices.
Steamed Fig Pudding.—Moisten two cupfuls of finely grated Graham bread crumbs with half a cup of thin sweet cream. Mix into it a heaping cupful of finely chopped fresh figs, and a quarter of a cup of sugar. Add lastly a cup of sweet milk. Turn all into a pudding dish, and steam about two and one half hours. Serve as soon as done, with a little cream for dressing, or with orange or lemon sauce.
Steamed Fig Pudding.—Soak two cups of finely grated Graham bread crumbs in half a cup of light sweet cream. Stir in a heaping cup of finely chopped fresh figs and a quarter cup of sugar. Finally, add a cup of sweet milk. Pour everything into a pudding dish and steam for about two and a half hours. Serve right after it's done, with a little cream on top, or with orange or lemon sauce.
PASTRY AND CAKE.
So much has been said and written about the dietetic evils of these articles that their very names have been almost synonymous with indigestion and dyspepsia. That they are prolific causes of this dire malady cannot be denied, and it is doubtless due to two reasons; first, because they are generally compounded of ingredients which are in themselves unwholesome, and rendered doubly so by their combination; and secondly, because tastes have become so perverted that an excess of these articles is consumed in preference to more simple and nutritious food.
So much has been said and written about the harmful effects of these foods that their very names have become almost synonymous with indigestion and upset stomach. It's undeniable that they are significant contributors to this serious issue, and this can likely be attributed to two reasons: first, they are usually made up of ingredients that are unhealthy on their own, and become even worse when combined; and second, people's tastes have changed so much that they prefer to consume an excess of these foods instead of simpler and more nutritious options.
As has been elsewhere remarked, foods containing an excess of fat, as do most pastries and many varieties of cake, are exceedingly difficult of digestion, the fat undergoing in the stomach no changes which answer to the digestion of other elements of food, and its presence interferes with the action of the gastric juice upon other elements. In consequence, digestion proceeds very slowly, if at all, and the delay often occasions fermentative and putrefactive changes in the entire contents of the stomach.
As mentioned before, foods that are high in fat, like most pastries and many types of cake, are really hard to digest. The fat doesn’t break down in the stomach like other food elements do, and it blocks the stomach acid from working on them. As a result, digestion is slow, if it happens at all, and this delay often leads to fermentation and decay of everything else in the stomach.
It is the indigestibility of fat, and this property of delaying the digestion of other foods, chiefly that render pastry and cakes so deleterious to health.
It’s the difficulty of digesting fat, and this quality of slowing down the digestion of other foods, that mainly makes pastries and cakes so harmful to health.
We do not wish to be understood as in sympathy with that class of people who maintain that dyspepsia is a disciplinary means of grace, when, after having made the previous statement, we proceed to present recipes for preparing the very articles we have condemned. Pie and cake are not necessarily utterly unwholesome; and if prepared in a simple manner, may be partaken of in moderation by persons with good digestion. Nevertheless, they lack the wholesomeness of more simple foods, and we most fully believe that would women supply their tables with perfectly light, sweet, nutritious bread would cease. However, if pies and cakes must needs be, make them as simple as possible.
We don’t want to be seen as agreeing with those who think that indigestion is a form of moral teaching. After saying that, we’re now going to share recipes for the very things we’ve criticized. Pie and cake aren’t always completely unhealthy; if made simply, they can be enjoyed in moderation by people with good digestion. That said, they aren't as healthy as simpler foods, and we truly believe that if women served only light, sweet, nutritious bread, we would see a decrease in these heavy desserts. However, if you have to make pies and cakes, keep them as simple as you can.
General Suggestions for Making Pies.—Always prepare the filling for pies before making the crust, if the filling is to be cooked in the crust. Have all the material for the crust on the table, measured and in readiness, before beginning to put together. Follow some of the simple recipes given in these pages. Have all the material cold, handle the least possible to make it into a mass, and do not knead at all.
General Suggestions for Making Pies.—Always prepare the filling for pies before making the crust if the filling needs to be cooked in the crust. Have all the ingredients for the crust ready and measured out on the table before you start. Follow some of the simple recipes provided here. Keep all the ingredients cold, handle them as little as possible to bring them together, and do not knead at all.
When the crust is ready, roll it out quickly to about one half inch in thickness, then fold up like a jelly roll, and cut from the end only sufficient for one crust at a time. Lay this, the flat side upon the board, and roll evenly in every direction, until scarcely more than an eighth of an inch in thickness, and somewhat larger than the baking plate, as it will shrink when lifted from the board.
When the crust is ready, roll it out quickly to about half an inch thick, then fold it up like a jelly roll, and cut from the end, just enough for one crust at a time. Place this, flat side down, on the board, and roll it out evenly in all directions until it's barely more than an eighth of an inch thick and slightly larger than the baking plate, since it will shrink when lifted from the board.
Turn one edge over the rolling pin, and carefully lift it onto the plate. If there is to be an upper crust, roll that in the same manner, make a cut in the center to allow the steam to escape, fill the pie, slightly rounding it in the center, and lift on the upper crust; press both edges lightly together; then, lifting the pie in the left hand, deftly trim away all overhanging portions of crust with a sharp knife; ornament the edge if desired, and put at once into the oven, which should be in readiness at just the right temperature, a rather moderate oven being best for pies.
Turn one edge over the rolling pin and carefully lift it onto the plate. If you're adding a top crust, roll that out in the same way, make a cut in the center to let the steam escape, fill the pie, slightly rounding it in the center, and place the top crust on. Press both edges together gently; then, holding the pie in your left hand, skillfully trim off any excess crust with a sharp knife. You can decorate the edge if you want, and then immediately place it in the oven, which should be preheated to the perfect temperature; a moderately hot oven is best for pies.
The under crust of lemon, pumpkin, custard, and very juicy fruit pies, filled before baking, is apt to become saturated and softened with the liquid mixture, if kept for any length of time after baking. This may be prevented in a measure by glazing the crust, after it is rolled and fitted on the plate, with the beaten white of an egg, and placing in the oven just a moment to harden the egg before filling; or if the pie is one of fruit, sprinkle the crust with a little flour and sugar, brushing the two together with the hand before; adding the filling. During the baking, the flour and melted sugar will adhere together, tending to keep the juice from contact with the crust.
The bottom crust of lemon, pumpkin, custard, and very juicy fruit pies, when filled before baking, is likely to get soggy and soft from the liquid filling if left for too long after baking. You can help prevent this by glazing the crust with a beaten egg white after it's rolled out and placed in the pan, then briefly putting it in the oven to set the egg before adding the filling. If you're making a fruit pie, you can also sprinkle a little flour and sugar on the crust, mixing them together with your hands before adding the filling. As the pie bakes, the flour and melted sugar will stick together, helping to keep the juice from touching the crust.
Pies are more wholesome if the crusts are baked separately and filled for use as needed. This is an especially satisfactory way to make pies of juicy fruit, as it does away largely with the saturated under crusts, and the flavor of the fruit can be retained much more perfectly. Pies with one crust can be made by simply fitting the crust to the plate, pricking it lightly with a fork to prevent its blistering while baking, and afterward filling when needed for the table. For pies with two crusts, fit the under crust to the plate, and fill with clean pieces of old white linen laid in lightly to support the upper crust. When baked, slip the pie on a plate, lift off the upper crust, take out the pieces of cloth, and just before serving, fill with fruit, which should be previously prepared.
Pies are healthier if the crusts are baked separately and filled as needed. This is especially great for making pies with juicy fruit because it reduces the soggy bottom crusts, and the fruit's flavor can be preserved much better. For pies with one crust, just fit the crust into the plate, prick it lightly with a fork to prevent it from blistering while baking, and then fill it when you're ready to serve. For pies with two crusts, place the bottom crust in the plate, and fill it with clean pieces of old white linen laid in lightly to support the top crust. When baked, move the pie to a plate, gently remove the top crust, take out the pieces of cloth, and just before serving, fill it with fruit that has been prepared in advance.
Canned peaches filled into such a crust make a delicious pie. Strawberries, cherries, gooseberries, and other juicy fruits, that lose so much of their flavor in baking, may be lightly scalded, the juice thickened a little with flour if desired, sweetened to taste, and filled into such a crust. An excellent pie may be made in this manner from apples, stewed carefully so as to keep the slices whole, sweetened to taste, and flavored with lemon, orange, or grated pineapple. One pineapple will be sufficient for four pies. Fresh fruit for filling may be used without cooking, if desired. If desired, several crusts may be baked and put away unfilled. When needed, the crusts may be placed for a few minutes in a hot oven until heated through, then filled with freshly prepared fruit.
Canned peaches in a crust make a tasty pie. Strawberries, cherries, gooseberries, and other juicy fruits that lose a lot of their flavor when baked can be lightly cooked, their juice thickened a bit with flour if you want, sweetened to your liking, and then placed in a crust. You can make an excellent pie this way from apples, cooked carefully to keep the slices intact, sweetened as you prefer, and flavored with lemon, orange, or grated pineapple. One pineapple is enough for four pies. You can use fresh fruit for filling without cooking it, if you choose. If you want, you can bake several crusts and store them unfilled. When you need them, just place the crusts in a hot oven for a few minutes until warmed through, then fill them with freshly prepared fruit.
In preparing material for custard or pumpkin pies, if the milk used be hot, the pies will be improved and the time of baking be considerably shortened.
In preparing ingredients for custard or pumpkin pies, using hot milk will enhance the pies and significantly reduce the baking time.
Tin or granite-ware plates are preferable to earthen ones for pies, as they bake better on the bottom. The perforated pans are superior in some respects. No greasing is needed; simply rub them well with flour. The time required for baking pies varies from one half to three fourths of an hour. The dampers should be so adjusted as to bake the bottom crust first.
Tin or granite-ware plates are better than earthen ones for pies because they bake the bottom more effectively. Perforated pans have some advantages too. You don't need to grease them; just make sure to rub them well with flour. Baking pies usually takes between half an hour to three quarters of an hour. The dampers should be adjusted to bake the bottom crust first.
After baking, remove at once to heated earthen plates, or set the tins upon small supports, so that the air can circulate underneath them.
After baking, immediately move to heated clay plates or place the tins on small supports to allow air to circulate underneath.
RECIPES.
Paste for Pies.—Sift together equal parts of Graham grits and white flour (Graham flour will do if the grits are not obtainable, but the grits will produce a more crisp and tender crust), and wet with very cold, thin sweet cream. Have the flour also as cold as possible, since the colder the material, the more crisp the paste; mix together very quickly into a rather stiff dough. Do not knead at all, but gather the fragments lightly together, roll out at once, fill and bake quickly, since much of the lightness of the crust depends upon the dispatch with which the pie is gotten into the oven after the materials are thrown together. If for any reason it is necessary to defer the baking, place the crust in the ice-chest till needed.
Paste for Pies.—Sift together equal parts of Graham crumbs and white flour (Graham flour can be used if the crumbs aren't available, but the crumbs will give you a crisper and more tender crust). Wet with very cold, thin sweet cream. Also, make sure the flour is as cold as possible since the colder the ingredients, the crispier the paste. Mix everything quickly into a firm dough. Don't knead it at all; just gather the bits together lightly, roll it out right away, fill it, and bake quickly, because a lot of the crust's fluffiness relies on how fast you get the pie into the oven after mixing the ingredients. If you need to wait before baking for any reason, store the crust in the fridge until you’re ready.
Granola Crust.—For certain pies requiring an under crust only, the prepared granola manufactured by the Sanitarium Food Co. makes a superior crust. To prepare, moisten with thin sweet cream—one half cup of cream for every two thirds cup of granola is about the right proportion, and will make sufficient crust for one pie. Flour the board, and lift the moistened granola onto it, spreading it as much as possible with the hands. Dredge lightly with flour over the top, and roll out gently to the required size without turning. The material, being coarse and granular, will break apart easily, but may be as easily pressed together with the fingers. Change the position of the rolling pin often, in order to shape the crust without moving it. When well roiled, carefully slip a stiff paper under it, first loosening from the board with a knife if necessary, and lift it gently onto the pan. Press together any cracks, trim the edges, fill, and bake at once. Use the least flour possible in preparing this crust, and bake as soon as made, before the moisture has become absorbed. Such a crust is not suited for custard or juicy fruit pies, but filled with prune, peach, or apple marmalade, it makes a most delicious and wholesome pie. A cooked custard may be used in such a crust.
Granola Crust.—For some pies that only need a bottom crust, the granola made by Sanitarium Food Co. creates an excellent crust. To make it, moisten with light sweet cream—about half a cup of cream for every two-thirds cup of granola is the right amount, and that will be enough for one pie. Dust the surface with flour and place the moistened granola on it, spreading it as much as you can with your hands. Sprinkle a little flour on top, then gently roll it out to the desired size without flipping. Since the granola is coarse and grainy, it might break apart, but you can easily press it back together with your fingers. Frequently change the position of the rolling pin to shape the crust without shifting it. Once it’s rolled out well, carefully slide a sturdy piece of paper underneath, loosening it from the board with a knife if needed, and lift it gently onto the pie pan. Press together any cracks, trim the edges, fill it, and bake immediately. Use the least amount of flour possible when making this crust, and bake right away before it absorbs too much moisture. This crust isn’t suitable for custard or juicy fruit pies, but it’s perfect filled with prune, peach, or apple marmalade, creating a delicious and wholesome pie. You can use a cooked custard in this crust.
Paste for Tart Shells.—Take one half cup of rather thin sweet cream, which has been placed on ice until very cold; add to it the stiffly beaten whites of two eggs, and whip all together briskly for ten minutes. Add sufficient white flour to roll. Cut into the required shape, bake quickly, but do not brown. Fill after baking. This paste, rolled thin and cut into shapes with a cookie-cutter, one half of them baked plain for under crusts, the other half ornamented for tops by cutting small holes with a thimble or some fancy mold, put together with a layer of some simple fruit jelly between them, makes a most attractive looking dessert. It is likewise very nice baked in little patty pans, and afterward filled with apple or peach marmalade, or any of the following fillings:—
Dough for Tart Shells.—Take half a cup of fairly thin sweet cream that has been chilled until very cold. Add the stiffly beaten whites of two eggs and whip everything together vigorously for ten minutes. Mix in enough white flour to make it rollable. Cut into the desired shapes and bake quickly, but avoid browning. Fill after baking. This dough, rolled thin and cut into shapes with a cookie cutter, with half baked plain for the bottom crusts and the other half decorated for the tops by making small holes with a thimble or some fancy mold, layered with some simple fruit jelly in between, creates a very appealing dessert. It also works well baked in small patty pans and later filled with apple or peach marmalade, or any of the following fillings:—
Cream Filling.—One cup of rich milk (part cream if it can be afforded) heated to boiling. Into this stir one scant tablespoonful of flour previously braided smooth with a little cold milk. Add to this the well-beaten yolk of one egg and one tablespoonful of sugar. Turn this mixture into the hot milk and stir until it thickens. Flavor with a little grated lemon rind, vanilla, or, if preferred, flavor the milk with cocoanut before using. Fill the tart shells, and meringue with the white of the egg beaten stiff with a tablespoonful of sugar.
Cream Filling.—Heat one cup of rich milk (you can use part cream if you want) until it's boiling. Slowly stir in one heaping tablespoon of flour that’s been mixed smooth with a little cold milk. Add the well-beaten yolk of one egg and one tablespoon of sugar. Pour this mixture into the hot milk and stir until it thickens. Add a bit of grated lemon zest, vanilla, or if you prefer, flavor the milk with coconut before using. Fill the tart shells, and top with meringue made from the egg white whipped stiff with a tablespoon of sugar.
Tapioca Filling.—Soak one tablespoonful of tapioca over night in one cup of water; mash and stir the tapioca, simmer gently until clear and thick, adding enough water to cook it well; add half a cup of white sugar and a tablespoonful each of lemon and orange juice. If desired, a little raspberry or currant juice may be added to make the jelly of a pink color.
Tapioca Filling.—Soak one tablespoon of tapioca overnight in one cup of water; mash and stir the tapioca, then simmer gently until it's clear and thick, adding enough water to cook it properly. Mix in half a cup of white sugar and a tablespoon each of lemon and orange juice. If you want, you can add a little raspberry or currant juice to give the jelly a pink color.
Apple Custard Pie.—Stew good dried apples till perfectly tender and there remains but very little juice. Rub through a colander. For each pie use one cup of the sifted apples, one and a half cups of rich milk, two eggs, five tablespoonfuls of sugar, and a little grated lemon rind for flavoring. Bake with under crust only. Stewed fresh apples, beaten smooth or rubbed through a colander, can be used if preferred. The eggs may be omitted, and one half cup more of the sifted apples, with more sugar, may be used instead.
Apple Custard Pie.—Cook good dried apples until they're really tender and just a little juice is left. Push them through a strainer. For each pie, use one cup of the sifted apples, one and a half cups of rich milk, two eggs, five tablespoons of sugar, and a bit of grated lemon rind for flavor. Bake with only a bottom crust. You can also use stewed fresh apples, mashed smooth or strained, if you prefer. If you want to skip the eggs, you can add an extra half cup of sifted apples and more sugar instead.
Banana Pie.—For each pie required prepare a custard with one and one half cups of milk, the yolks of two eggs, and two heaping tablespoonfuls of sugar. Mash two large bananas through a colander, strain the custard over them, and beat well together. Bake in an under crust only, and meringue the top with the whites of the eggs beaten to a stiff froth with two tablespoonfuls of sugar.
Banana Pie.—For each pie needed, prepare a custard using one and a half cups of milk, the yolks of two eggs, and two heaping tablespoons of sugar. Mash two large bananas through a strainer, pour the custard over them, and mix well. Bake using only a bottom crust, and top with meringue made from the egg whites beaten to stiff peaks with two tablespoons of sugar.
Bread Pie.—Soak a slice of very light bread in a pint of rich milk. When it is quite soft, rub through a colander and afterward beat well through the milk. Add one well-beaten egg, four tablespoonfuls of sugar, and a little grated lemon rind for flavor. Bake with under crust only, till the custard is set. This is sufficient for one pie.
Bread Pie.—Soak a slice of very light bread in a pint of rich milk. Once it’s really soft, push it through a colander and then mix it well with the milk. Add one beaten egg, four tablespoons of sugar, and a bit of grated lemon zest for flavor. Bake with just a bottom crust until the custard is set. This is enough for one pie.
Cocoanut Pie.—Flavor a pint of milk with two tablespoonfuls of desiccated, or finely grated fresh cocoanut according to directions on page 298; strain, and add enough fresh milk to make a pint in all. Add three tablespoonfuls of sugar, heat, and as the milk comes to a boil, add a tablespoonful of cornstarch rubbed smooth in a little cold milk. Boil for a minute or two till the cornstarch thickens the milk; then remove from the stove. Allow it to get cold, and then stir in one well-beaten egg; bake in an under crust. Tie a tablespoonful of desiccated cocoanut in a clean cloth, and pound it as fine as flour; mix it with a tablespoonful of sugar and the white of an egg beaten to a stiff froth. When the pie is done, spread this over the top, and brown in the oven for a moment only.
Coconut Pie.—Flavor a pint of milk with two tablespoons of desiccated or finely grated fresh coconut according to directions on page 298; strain, and add enough fresh milk to make a pint in total. Add three tablespoons of sugar, heat, and as the milk begins to boil, add a tablespoon of cornstarch mixed smooth in a little cold milk. Boil for a minute or two until the cornstarch thickens the milk; then remove from the heat. Let it cool, and then stir in one well-beaten egg; bake in a bottom crust. Tie a tablespoon of desiccated coconut in a clean cloth and pound it until it’s as fine as flour; mix it with a tablespoon of sugar and the white of an egg beaten to a stiff peak. When the pie is done, spread this mixture over the top and brown it in the oven for just a moment.
Cocoanut Pie No. 2.—Steep one half cup of cocoanut in a pint of milk for one half hour. Strain out the cocoanut and add sufficient fresh milk to make a pint. Allow it to become cold, then add a quarter of a cup of sugar and two well-beaten eggs. Bake with an under crust only. When done, the top may be covered with a meringue the same as in the preceding recipe.
Coconut Pie No. 2.—Soak half a cup of coconut in a pint of milk for half an hour. Strain out the coconut and add enough fresh milk to make a pint. Let it cool, then mix in a quarter cup of sugar and two well-beaten eggs. Bake with only a bottom crust. Once done, the top can be covered with a meringue, just like in the previous recipe.
Dried Apple Pie.—Stew good dried apples till perfectly tender in as small a quantity of water as possible. When done, rub through a colander; they should be about the consistency of fruit jam; if not, a little flour may be added. Sweeten to taste, fill under crusts with the mixture, and bake. If lemon flavor is liked, a few pieces of the yellow rind may be added to the apples a little while before they are tender. If the apples are especially tasteless, lemon juice or some sour apple jelly should be added after rubbing through the colander. The crusts may first be baked, and filled with the mixture when needed; in which case the sauce should be simmered lightly till of the desired consistency. The top may be ornamented with strips or rings of crust, if desired.
Dried Apple Pie.—Cook good dried apples until they're tender in as little water as possible. Once done, strain them through a colander; they should be about the same texture as fruit jam; if they aren’t, you can add a bit of flour. Sweeten to taste, fill under crusts with the mixture, and bake. If you like lemon flavor, you can add some pieces of the yellow rind to the apples shortly before they become tender. If the apples are especially bland, add lemon juice or some sour apple jelly after straining through the colander. You can bake the crusts first and fill them with the mixture when you're ready; in that case, simmer the sauce lightly until it reaches the desired consistency. You can decorate the top with strips or rings of crust if you want.
Farina Pie.—Cook one fourth cup of farina in a double boiler for an hour in three cups of rich milk. Allow it to become cool, then add one half cup of sugar, the yolks of two eggs, and a little grated lemon rind. Bake with under crust only. Meringue the top with the white of the egg beaten to a stiff froth with one tablespoonful of sugar and a little grated lemon rind for flavoring. The quantity given is sufficient for two small pies.
Farina Pie.—Cook 1/4 cup of farina in a double boiler for an hour using 3 cups of whole milk. Let it cool, then mix in 1/2 cup of sugar, the yolks of 2 eggs, and a bit of grated lemon zest. Bake with only a bottom crust. Top it with meringue made from the egg whites whipped to stiff peaks with 1 tablespoon of sugar and a little grated lemon zest for flavor. This recipe makes enough for 2 small pies.
Fruit Pies.—Apples, peaches, and all small fruits and berries may be made into palatable pies without rich crusts or an excess of sugar, or the addition of unwholesome spices and flavorings. Bake the crust separately, and fill when needed with prepared fruit; or, fill with the fruit, using only sufficient sugar to sweeten; add no spices, and bake quickly. Prepare apples for pies by paring, coring, and dividing in eighths. Peaches are best prepared in a similar manner. Fill crusts in which the fruit is to be baked quite full and slightly heaping in the center. If flavoring is desired, let it be that of some other fruit. For apple pies, a teaspoonful or two of pineapple juice, a little grated lemon or orange peel, or a little strawberry or quince syrup, may be used for flavoring. For pies made of apples, peaches, and fruits which are not very juicy, add a tablespoonful or so of water or fruit juice; but for very juicy fruits and berries, dredge the under crust with a tablespoonful of sugar and a little flour mixed together before filling, or stir a spoonful of flour into the fruit so that each berry or piece may be separately floured.
Fruit Pies.—You can make delicious pies with apples, peaches, and all types of small fruits and berries without using rich crusts or too much sugar, and without adding unhealthy spices and flavorings. Bake the crust separately, and fill it with prepared fruit when needed; or fill it with fruit, using just enough sugar to sweeten; add no spices, and bake quickly. Prepare apples for pies by peeling, coring, and slicing them into eighths. Peaches should be prepared in a similar way. Fill the crusts you're baking the fruit in quite full, with a slight mound in the center. If you want to add flavor, choose that of another fruit. For apple pies, you can use a teaspoon or two of pineapple juice, some grated lemon or orange peel, or a bit of strawberry or quince syrup for flavoring. For pies made with apples, peaches, and fruits that aren’t very juicy, add about a tablespoon of water or fruit juice; but for very juicy fruits and berries, sprinkle the bottom crust with a tablespoon of sugar mixed with a little flour before filling it, or mix a spoonful of flour into the fruit so that each berry or piece is lightly coated.
Grape Jelly Pie.—Cook perfectly ripe, purple grapes; rub them through a colander to remove the seeds and skins. Return the pulp to the fire and thicken with rice flour or cornstarch, to the consistency of thick cream or jelly, and sweeten to taste. Fill an under crust with the mixture, and bake. The top may be ornamented with pastry cut in fancy shapes if desired.
Grape Jelly Pie.—Cook ripe purple grapes until soft; pass them through a strainer to get rid of the seeds and skins. Put the pulp back on the heat and thicken it with rice flour or cornstarch until it reaches a thick cream or jelly-like consistency, and sweeten to your liking. Pour the mixture into a pie crust and bake. You can decorate the top with pastry cut into fun shapes if you want.
Jelly Custard Pie.—Dissolve three tablespoonfuls of nice, pure fruit jelly in very little warm water, add one and one half cups of milk and two well-beaten eggs, stirring the whites in last. Bake with under crust only. Jellies are usually so sweet that no sugar is needed. Apple, raspberry, currant, strawberry, and quince jellies all make nice pies, prepared in this way.
Jelly Custard Pie.—Dissolve three tablespoons of good, pure fruit jelly in a little warm water, then add one and a half cups of milk and two well-beaten eggs, folding in the egg whites last. Bake with only the bottom crust. Jellies are generally sweet enough that you won’t need to add any sugar. Apple, raspberry, currant, strawberry, and quince jellies all make delicious pies when prepared this way.
Lemon Pie.—Take four tablespoonfuls of lemon juice (one large lemon or two small ones will yield about this quantity), the grated yellow portion only of the rind of half a lemon, and two thirds of a cup of sugar. Beat the lemon juice and sugar together. Braid a slightly heaping tablespoonful of cornstarch with as little water as possible, and pour over it, stirring constantly, one half pint of boiling water, to thicken the starch. Add the lemon and sugar to the starch, and let it cool; then stir in the yolks of two eggs and half the white of one, well beaten together. Beat thoroughly, pour into a deep crust, and bake. When done, cover with the remaining whites of the eggs, beaten with one and a half tablespoonfuls of sugar, and brown lightly in the oven.
Lemon Pie.—Take four tablespoons of lemon juice (one large lemon or two small ones will provide about this amount), the grated yellow part of the rind from half a lemon, and two-thirds of a cup of sugar. Mix the lemon juice and sugar together. Combine a slightly heaping tablespoon of cornstarch with just enough water to make a paste, and then slowly add half a pint of boiling water while stirring constantly to thicken the starch. Add the lemon and sugar mixture to the starch and let it cool; then stir in the yolks of two eggs and half the white of one egg, all beaten together. Mix thoroughly, pour into a deep pie crust, and bake. Once done, top with the remaining egg whites, beaten with one and a half tablespoons of sugar, and lightly brown in the oven.
Lemon Meringue Custard.—Heat two cups of milk to boiling, add a tablespoonful of cornstarch well braided with a little cold milk; let the whole simmer till thickened, stirring constantly. Allow it to cool, add one third of a cup of sugar and the beaten yolks of two eggs. Bake in an under crust, and cover with a meringue made of the whites of the eggs beaten to a stiff froth with two tablespoonfuls of sugar mixed with grated lemon peel. If liked, a spoonful of lemon juice may be added, a few drops at a time, during the beating of the meringue.
Lemon Meringue Custard.—Heat two cups of milk until it boils, then add a tablespoon of cornstarch mixed well with a little cold milk; let it simmer until it thickens, stirring constantly. Let it cool, then add one-third cup of sugar and the beaten yolks of two eggs. Bake in a bottom crust, and top with a meringue made from the egg whites beaten to stiff peaks with two tablespoons of sugar mixed with grated lemon peel. If desired, you can add a spoonful of lemon juice, a few drops at a time, while beating the meringue.
One-Crust Peach Pie.—Pare and remove the stones from ripe, nice flavored peaches; stew till soft in the smallest quantity of water possible without burning. Rub through a colander, or beat smooth with a large spoon. Add sugar as required. Bake with one crust. If the peach sauce is evaporated until quite dry, it is very nice baked in a granola crust. When done, meringue with the whites of two eggs whipped stiff with two tablespoonfuls of sugar. The flavor is improved by adding by degrees to the egg while whipping, a tablespoonful of lemon juice. Return to the oven and brown lightly. Serve cold.
One-Crust Peach Pie.—Peel and pit ripe, flavorful peaches; cook them until soft in just enough water to prevent burning. Pass them through a colander or mash smooth with a large spoon. Add sugar to taste. Bake with a single crust. If the peach filling thickens and dries out, it’s great baked in a granola crust. Once it's done, top with meringue made from the whites of two eggs whipped stiff with two tablespoons of sugar. For extra flavor, gradually add a tablespoon of lemon juice to the egg while whipping. Return to the oven and lightly brown the top. Serve cold.
Canned peaches or stewed dried peaches may be used in place of the fresh ones. In using the dried peaches, carefully examine and wash; soak them over night in cold water, and stew them in the same water until soft enough to rub through the colander. For each pie, add two tablespoonfuls of sweet cream, and sufficient sugar to sweeten; too much, sugar destroys the flavor of the fruit. Evaporated peaches, soaked over night and stewed carefully until tender, then removed from the syrup, which may be sweetened and boiled until thick and rich and afterward turned over the peaches, makes a delicious pie. Bake in one crust, with or without a meringue.
Canned peaches or stewed dried peaches can be used instead of fresh ones. When using dried peaches, make sure to examine and wash them thoroughly; soak them overnight in cold water, and cook them in the same water until they’re soft enough to push through a colander. For each pie, add two tablespoons of heavy cream and enough sugar to sweeten it; using too much sugar can ruin the fruit's flavor. Evaporated peaches, soaked overnight and cooked carefully until tender, can be removed from the syrup, which can be sweetened and boiled until thick and rich, then poured over the peaches to make a delicious pie. Bake in one crust, with or without a meringue.
Orange Pie.—Rub smooth a heaping tablespoonful of cornstarch in three tablespoonfuls of water; pour over it a cup of boiling water, and cook until clear, stirring frequently that no lumps form. Add one cupful of sour orange juice, a little grated rind, and the juice of one lemon, with two eggs. Bake with under crust only. Meringue the top when baked, with the whites of the eggs well beaten with a tablespoonful of sugar, and a very little grated orange peel sprinkled over it.
Orange Pie.—Mix a heaping tablespoon of cornstarch with three tablespoons of water until smooth; then pour in a cup of boiling water and cook until it’s clear, stirring often to prevent lumps. Add one cup of sour orange juice, a bit of grated rind, the juice of one lemon, and two eggs. Bake with just the bottom crust. Once baked, top it with meringue made from the beaten egg whites mixed with a tablespoon of sugar, and sprinkle a small amount of grated orange peel on top.
Peach Custard Pie.—Cover a pie plate with an under crust. Take fresh peaches, pare, halve, and stone them, and place a layer, hollow side up, in the pie. Prepare a custard with one egg, one cup of milk, and three tablespoonfuls of sugar. Pour the custard over the peaches, and bake. If the quantity given will not entirely cover the peaches, a little more must be prepared. Canned peaches which are not broken can be used instead of fresh ones. The pieces should be drained free from juice, and less sugar used.
Peach Custard Pie.—Line a pie plate with a bottom crust. Take fresh peaches, peel, halve, and pit them, then place a layer, cut side up, in the pie. Make a custard with one egg, one cup of milk, and three tablespoons of sugar. Pour the custard over the peaches and bake. If this amount doesn't completely cover the peaches, you might need to make a little more. You can also use canned peaches that aren’t broken instead of fresh ones. Make sure to drain them well and use less sugar.
Prune Pie.—Prepare and cook sweet California prunes as directed for Prune Marmalade. Fill an under crust and bake. The top may be ornamented with strips of crust or pastry leaves; or if desired, may be meringued with the whites of two eggs beaten to a stiff froth with two tablespoonfuls of sugar and a little grated lemon peel. This pie is excellent baked in a granola crust.
Prune Pie.—Prepare and cook sweet California prunes according to the instructions for Prune Marmalade. Fill a bottom crust and bake. You can decorate the top with strips of crust or pastry leaves; or if you prefer, you can top it with meringue made from the whites of two eggs whipped to stiff peaks with two tablespoons of sugar and a bit of grated lemon peel. This pie tastes great baked in a granola crust.
Pumpkin Pie.—To prepare the pumpkin, cut into halves, remove the seeds, divide into moderately small pieces, and bake in the oven until thoroughly done. Then scrape from the shell, rub through a colander, and proceed as follows: For one and one third pints of the cooked pumpkin use one quart of hot, rich, sweet milk. Add one half cup of sugar and the well-beaten yolks of three eggs, beat well together, add the whites of the eggs beaten to a stiff froth, and beat thoroughly. Line the tins with a stiff cream paste, fill, and bake in a moderate oven till the pies are barely firm in the center, or till the custard is well set.
Pumpkin Pie.—To prepare the pumpkin, cut it in half, remove the seeds, chop it into moderately small pieces, and bake in the oven until fully cooked. Then scrape the flesh from the shell, press it through a colander, and follow these steps: For one and one-third pints of the cooked pumpkin, use one quart of hot, rich, sweet milk. Add half a cup of sugar and the well-beaten yolks of three eggs, mix them well, then fold in the beaten egg whites until they’re stiff, and mix thoroughly. Line the pie tins with a sturdy cream paste, fill them up, and bake in a moderate oven until the pies are just set in the center or the custard is well firm.
Pumpkin Pie No. 2.—For each pie desired, take one half pint of baked pumpkin, a pint of rich milk, one third of a cup of sugar, and two eggs. Mix the sugar and eggs, add the pumpkin, and lastly the milk, which should be hot, and beat all together with an egg beater until very light. Fill the crust, and bake slowly.
Pumpkin Pie No. 2.—For each pie you want, take half a pint of baked pumpkin, a pint of rich milk, one-third cup of sugar, and two eggs. Mix the sugar and eggs, then add the pumpkin, and finally add the hot milk. Beat everything together with an egg beater until it's light and fluffy. Fill the crust and bake slowly.
Pumpkin Pie without Eggs.—Prepare the pumpkin as previously directed. For two medium-sized pies, heat a pint and a half of milk in a farina kettle, and when scalding, stir into it two scant tablespoonfuls of white flour rubbed smooth in a little cold milk. Cook, stirring often, until it thickens. Add half a cup of sugar, or a little less of syrup, to a pint and a half of the sifted pumpkin, and after beating well together, stir this into the hot milk. Bake in an under crust; or, for three pies, take one quart and a cupful of pumpkin, three fourths of a cup of sugar, two thirds of a cup of best New Orleans molasses, and three pints of hot milk. Beat all together thoroughly. Line deep plates with a cream crust, and bake an hour and a half in a moderate oven.
Pumpkin Pie without Eggs.—Prepare the pumpkin as instructed earlier. For two medium-sized pies, heat one and a half pints of milk in a pot, and when it's steaming, stir in two slightly heaping tablespoons of white flour mixed with a little cold milk. Cook, stirring frequently, until it thickens. Add half a cup of sugar, or a bit less syrup, to one and a half pints of sifted pumpkin, and after mixing well, combine this with the hot milk. Bake in a bottom crust; or, for three pies, use one quart and one cup of pumpkin, three-quarters of a cup of sugar, two-thirds of a cup of top-quality New Orleans molasses, and three pints of hot milk. Mix everything together thoroughly. Line deep plates with a cream crust and bake for an hour and a half in a moderate oven.
Simple Custard Pie.—For one pie, take one pint of milk, two well-beaten eggs, one third of a cup of sugar, and a little grated lemon rind for flavor. Bake in an under crust. If eggs are scarce, a very good pie can be made by using only one egg, and a tablespoonful of cornstarch, with the above proportions of milk and sugar; in which case, heat the milk to scalding, stir in the cornstarch, and cook till thickened; cool, and then add the well-beaten egg. If preferred, the crust may be baked before filling, and the custard steamed, meanwhile.
Simple Custard Pie.—To make one pie, take one pint of milk, two well-beaten eggs, a third of a cup of sugar, and a bit of grated lemon rind for flavor. Bake in a bottom crust. If eggs are hard to come by, you can still make a good pie by using just one egg and a tablespoon of cornstarch, keeping the same amounts of milk and sugar. In this case, heat the milk until it’s almost boiling, stir in the cornstarch, and cook until it thickens; then let it cool and add the well-beaten egg. If you prefer, you can bake the crust before filling it, and steam the custard while that’s happening.
Squash Pie.—Squash prepared as directed for pumpkin, and flavored with rose water, makes an excellent pie. Or, for each pie desired, take one pint of rich milk (part cream if it can be afforded), add one cup of nicely baked mealy squash which has been rubbed through a colander, one third of a cup of sugar, and two well-beaten eggs. Beat all together thoroughly. Bake in a deep pan slowly and carefully until firm.
Squash Pie.—Prepare the squash as you would for pumpkin, and add rose water for flavor to create a delicious pie. For each pie you want, take one pint of rich milk (use part cream if possible), add one cup of well-baked, soft squash that has been pushed through a strainer, one third of a cup of sugar, and two beaten eggs. Mix everything together thoroughly. Bake in a deep pan slowly and carefully until firm.
Squash Pie without Eggs.—Bake the squash in the shell; when done, remove with a spoon and mash through a colander. For one pie, take eight tablespoonfuls of the squash, half a cup of sugar, and one and one third cups of boiling milk. Pour the milk slowly over the squash, beating rapidly meanwhile to make the mixture light. Bake in one crust.
Squash Pie without Eggs.—Bake the squash in its shell; when it's done, scoop it out and mash it through a strainer. For one pie, use eight tablespoons of the squash, half a cup of sugar, and one and one-third cups of boiling milk. Slowly pour the milk over the squash while beating it quickly to make the mixture light. Bake in one crust.
Sweet Potato Pie.—Bake sufficient sweet potatoes to make a pint of pulp when rubbed through a colander; add a pint of rich milk, a scant cup of sugar, salt if desired, the yolks of two eggs, and a little grated lemon rind for flavor. Bake with under crust. When done, meringue with the whites of the eggs beaten up with a tablespoonful of sugar.
Sweet Potato Pie.—Bake enough sweet potatoes to create a pint of pulp when you push them through a colander; add a pint of creamy milk, just under a cup of sugar, salt if you want, the yolks of two eggs, and a bit of grated lemon rind for flavor. Bake with a bottom crust. Once it's done, top it with meringue made from the beaten egg whites mixed with a tablespoon of sugar.
CAKE.
General Suggestions.—Always sift the flour for cake before measuring out the amount required. Use the best granulated white sugar. Eggs for use in cake are better to have the yolks and whites beaten separately. Beat the former until they cease to froth and begin to thicken as if mixed with flour. Beat the whites until stiff enough to remain in the bowl if inverted. Have the eggs and dishes cool, and if practicable, beat in a cool room. Use earthen or china bowls to beat eggs in.
General Suggestions.—Always sift the flour for cake before measuring the amount you need. Use the best granulated white sugar. It's better to beat the yolks and whites of the eggs separately for cake. Beat the yolks until they stop frothing and start to thicken, like they’ve been mixed with flour. Beat the whites until they’re stiff enough to stay in the bowl when turned upside down. Make sure the eggs and bowls are cool, and if possible, beat them in a cool room. Use ceramic or glass bowls to beat the eggs.
If fruit is to be used, it should be washed and dried according to directions given on page 298, and then dusted with flour, a dessertspoonful to the pound of fruit. For use in cup cake or any other cake which requires a quick baking, raisins should be first steamed. If you have no patent steamer, place them in a close covered dish within an ordinary steamer, and cook for an hour over a kettle of boiling water. This should be done the day before they are to be used.
If you're using fruit, it should be washed and dried according to the instructions on page 298, and then coated with flour, about a tablespoon for each pound of fruit. For recipes like cupcakes or any cake that bakes quickly, raisins should be steamed first. If you don't have a special steamer, put them in a tightly covered dish inside a regular steamer, and cook for an hour over a pot of boiling water. This should be done the day before you plan to use them.
Use an earthen or granite-ware basin for mixing cake. Be very accurate in measuring the materials, and have them all at hand and all utensils ready before beginning to put the cake together. If it is to be baked at once, see that the oven also is at just the right temperature. It should be less hot for cake than for bread. Thin cakes require a hotter oven than those baked in loaves. They require from fifteen to twenty minutes to bake; thicker loaves, from thirty to sixty minutes. For loaf cakes the oven should be at such a temperature that during the first half of the time the cake will have risen to its full height and just begun to brown.
Use an earthenware or granite-ware bowl to mix the cake. Be precise when measuring the ingredients, and have everything ready, including all the utensils, before you start putting the cake together. If you're baking it right away, make sure the oven is at the right temperature. It should be cooler for cake than for bread. Thin cakes need a hotter oven than those baked in loaves. They take about fifteen to twenty minutes to bake; thicker loaves take between thirty to sixty minutes. For loaf cakes, the oven should be set to a temperature that allows the cake to rise to its full height and just start to brown in the first half of the baking time.
The recipes given require neither baking powder, soda, nor saleratus. Yeast and air can be made to supply the necessary lightness, and their use admits of as great a variety in cakes as will be needed on a hygienic bill of fare.
The recipes provided don't need baking powder, baking soda, or saleratus. Yeast and air can create the required lightness, and using them allows for a wide variety of cakes that will fit a healthy menu.
In making cake with yeast, do not use very thick cream, as a rich, oily batter retards fermentation and makes the cake slow in rising. If the cake browns too quickly, protect it by a covering of paper. If necessary to move a cake in the oven, do it very gently. Do not slam the oven door or in any way jar a cake while baking, lest it fall. Line cake tins with paper to prevent burning the bottom and edges. Oil the paper, not the tins, very lightly. Cake is done when it shrinks from the pan and stops hissing, or when a clean straw run into the thickest part comes up clean.
When making cake with yeast, avoid using very thick cream, as a rich, oily batter slows down fermentation and makes the cake rise slowly. If the cake browns too quickly, cover it with paper. If you need to move a cake in the oven, do it gently. Don’t slam the oven door or shake the cake while it’s baking, or it might fall. Line cake pans with paper to prevent burning the bottom and edges. Lightly oil the paper, not the pans. The cake is done when it pulls away from the pan and stops hissing, or when a clean straw inserted into the thickest part comes out clean.
As soon as possible after baking, remove from the pan, as, if allowed to remain in the pan, it is apt to become too moist.
As soon as you can after baking, take it out of the pan, because if you leave it in too long, it can get too moist.
RECIPES.
Apple Cake.—Scald a cup of thin cream and cool to blood heat, add one and a half cups of sifted white flour, one fourth of a cup of sugar, and a gill of liquid yeast or one half cake of compressed yeast dissolved in a gill of thin cream. Beat well together, set in a warm place, and let it rise till perfectly light. When well risen, add one half cup of sugar mixed with one half cup of warm flour. Beat well and set in a warm place to rise again. When risen a second time, add two eggs, whites and yolks beaten separately, and about one tablespoonful of flour. Turn the whole into three round shallow baking tins, which have been previously oiled and warmed, and place where it will rise again for an hour, or until it is all of a foam. Bake quickly in a moderately hot oven. Make this the day before it is needed, and when ready to use prepare a filling as follows: Beat together the whites of two eggs, one half cup of sugar, the juice of one lemon, and two large tart apples well grated. Heat in a farina kettle until all are hot; cool, and spread between the layers of cake. This should be eaten the day the filling is prepared.
Apple Cake.—Heat a cup of cream until it's hot but not boiling, then let it cool to lukewarm. Add one and a half cups of sifted white flour, a quarter cup of sugar, and a gill of liquid yeast or half a cake of compressed yeast dissolved in a gill of cream. Mix everything well, put it in a warm spot, and let it rise until it's very fluffy. Once it's risen, mix in half a cup of sugar and half a cup of warm flour. Beat well and let it rise again in a warm area. When it has risen a second time, add two eggs (with the whites and yolks beaten separately) and about a tablespoon of flour. Pour the mixture into three round shallow baking tins that have been oiled and warmed, then let it rise again for an hour or until it's bubbly. Bake quickly in a moderately hot oven. Make this a day before you need it, and when you’re ready to use it, prepare the filling as follows: Beat together the egg whites of two eggs, half a cup of sugar, the juice of one lemon, and two large tart apples that have been grated. Heat in a double boiler until everything is hot; let it cool and then spread it between the layers of cake. This should be eaten the day the filling is made.
Cocoanut Custard Cake.—Make the cake as directed in the preceding recipe. For the filling, prepare a soft custard by heating just to the boiling point one pint of rich milk previously flavored with cocoanut; into which stir A tablespoonful of cornstarch braided with a little milk, and let it boil until thickened. Beat together an egg and one third of a cup of sugar, and turn the hot mixture slowly over it, stirring constantly till the custard thickens. When cold, spread between the layers of raised cake.
Coconut Custard Cake.—Make the cake according to the previous recipe. For the filling, prepare a soft custard by heating one pint of rich milk, flavored with coconut, just until it almost boils. Stir in a tablespoon of cornstarch mixed with a little milk and let it cook until it thickens. Beat together an egg and one-third of a cup of sugar, then slowly pour the hot mixture over it, stirring constantly until the custard thickens. Once it's cool, spread it between the layers of the risen cake.
Cream Cake.—Prepare the cake as above. Spread between the layers when cold a cream made as follows: Stir into one half pint of boiling milk two teaspoonfuls of cornstarch rubbed smooth in a little cold milk. Take with two tablespoonfuls of sugar; return to the rest of the custard and cook, stirring constantly until quite thick. Cool and flavor with a teaspoonful of vanilla or rose water.
Cream Cake.—Make the cake as described earlier. Once it’s cool, spread a cream mixture between the layers prepared like this: Mix two teaspoons of cornstarch with a bit of cold milk until smooth, then stir it into half a pint of boiling milk. Add two tablespoons of sugar; mix it back into the custard and cook while stirring constantly until it thickens. Let it cool, then add a teaspoon of vanilla or rose water for flavor.
Delicate Cup Cake.—This cake contains no soda or baking powder, and to make it light requires the incorporation of as much air as possible. In order to accomplish this, it should be put together in the same manner as directed for Batter Breads (page 154). Have all material measured and everything in readiness before beginning to put the cake together, then beat together the yolk of one egg, one cup of sugar, and one cup of very cold sweet cream, until all of a foam; add a little grated lemon rind for flavoring; stir in slowly, beating briskly all the time, two cups of granular white flour (sometimes termed gluten flour) or Graham meal. When all the flour is added, add lastly the beaten whites of two eggs, stirring just enough to mix them well throughout the whole; turn at once into slightly heated gem irons which have been previously oiled, and bake in a moderately quick oven. If made according to directions, this cake will be very light and delicate. It will not puff up much above its first proportions, but will be light throughout.
Delicate Cup Cake.—This cake doesn’t use soda or baking powder, and to make it light, you need to incorporate as much air as possible. To achieve this, it should be prepared in the same way as Batter Breads (page 154). Have all your ingredients measured and ready before you start making the cake. Beat together the yolk of one egg, one cup of sugar, and one cup of very cold sweet cream until it's frothy; add a little grated lemon rind for flavor. Slowly stir in, while beating vigorously the entire time, two cups of granular white flour (also known as gluten flour) or Graham meal. Once all the flour is added, gently mix in the beaten whites of two eggs, just enough to combine everything. Immediately pour the mixture into slightly heated gem irons that have been oiled, and bake in a moderately hot oven. If you follow the instructions, this cake will turn out very light and delicate. It won’t rise much beyond its initial size, but will be light throughout.
A nice cake may be prepared in the same manner with Graham meal or even white flour, by the addition of a heaping tablespoonful of cornstarch sifted into the flour, in the way in which baking powder is ordinarily mixed with flour before using.
A good cake can be made in the same way using Graham flour or even white flour, by adding a heaping tablespoon of cornstarch sifted into the flour, just like you would normally mix baking powder with flour before using it.
Fig Layer Cake.—Prepare the cake as directed for Apple Cake. Chop one half pound of figs very fine, add one half cup of sugar, one cup of water and boil in a farina kettle until soft and homogeneous. Cool, and spread between the cakes. Or chop steamed figs very fine, mix with an equal quantity of almondine, and use.
Fig Layer Cake.—Make the cake as instructed for Apple Cake. Finely chop half a pound of figs, add half a cup of sugar, one cup of water, and boil in a farina kettle until soft and smooth. Let it cool and spread it between the cake layers. Alternatively, finely chop steamed figs, mix with an equal amount of almondine, and use that.
Gold and Silver Cake.—Prepare the cake as for Apple Cake. When it has risen the second time, measure out one third of it, and add the yolks of the eggs to that portion with a little grated lemon rind for flavoring; add the whites with some very finely pulverized desiccated cocoanut to the other two thirds. Make two sheets of the white and one of the yellow. Allow them to become perfectly light before baking. When baked, place the yellow portion between the two white sheets, binding them together with a little frosting or white currant jelly.
Gold and Silver Cake.—Prepare the cake just like you would for Apple Cake. When it has risen a second time, measure out one third of it and mix in the egg yolks along with a bit of grated lemon zest for flavor. Fold the egg whites and some finely crushed dried coconut into the remaining two thirds. Create two layers of the white batter and one layer of the yellow batter. Let them rise completely before baking. Once baked, place the yellow layer between the two white layers, holding them together with a bit of frosting or white currant jelly.
Icing for Cakes.—Since icing adds to the excess of sugar contained in cakes, it is preferable to use them without it except when especially desired for ornament. An icing without eggs may be prepared by boiling a cup of granulated sugar in five tablespoonfuls of sweet milk for five minutes, then beating until cool enough to spread. One with egg may be easily made of six tablespoonfuls of powdered sugar, the white of one egg, and one teaspoonful of boiling water mixed without beating. A colored icing may be made by using a teaspoonful of boiling cranberry juice or other red fruit juice instead of water. The top of the icing may be ornamented with roasted almonds, bits of colored sugar or frosted fruits, directions for the preparation of all of which have already been given.
Icing for Cakes.—Since icing adds extra sugar to cakes, it's better to leave it off unless it's specifically wanted for decoration. You can make an egg-free icing by boiling a cup of granulated sugar in five tablespoons of sweet milk for five minutes, then beating it until it cools enough to spread. An icing with egg is easily made with six tablespoons of powdered sugar, the white of one egg, and one teaspoon of boiling water mixed together without beating. For a colored icing, use a teaspoon of boiling cranberry juice or another red fruit juice instead of water. You can decorate the top of the icing with roasted almonds, pieces of colored sugar, or frosted fruits, with instructions for preparing all of these already provided.
Orange Cake.—Prepare the cake as for Apple Cake, and bake in two layers. For the filling, take two good-sized, juicy oranges. Flavor two tablespoonfuls of sugar by rubbing it over the skin of the oranges, then peel, remove the white rind, and cut into small pieces, discarding the seeds and the central pith. Put the orange pulp in a china bowl, and set in a dish of boiling water. When it is hot, stir in a heaping teaspoonful of cornstarch which has been braided smooth in two spoonfuls of water. Stir constantly until the starch has cooked, and the whole becomes thickened. Beat the yolk of one egg to a cream with two tablespoonfuls of sugar. Stir this very gradually, so as not to lump, into the orange mixture, and cook two or three minutes longer. Remove from the fire, and when cool, spread between the cakes. If the oranges are not very tart, a little lemon juice is an improvement. Meringue the top of the cake with the white of the egg beaten up with the two tablespoonfuls of sugar flavored with orange.
Orange Cake.—Make the cake like you would for Apple Cake, and bake it in two layers. For the filling, use two large, juicy oranges. Rub the skin of the oranges with two tablespoons of sugar to add flavor, then peel them, remove the white pith, and chop into small pieces, tossing out the seeds and central pith. Put the orange pulp in a bowl, and place it in a dish with boiling water. Once it’s hot, stir in a heaping teaspoon of cornstarch that’s been blended smoothly with two tablespoons of water. Keep stirring until the starch has cooked and the mixture thickens. Beat the yolk of one egg until creamy with two tablespoons of sugar. Gradually stir this into the orange mixture to avoid lumps, and cook for an additional two or three minutes. Take it off the heat, and once it cools, spread it between the cake layers. If the oranges aren’t very tart, adding a bit of lemon juice will enhance the flavor. Top the cake with meringue made from the egg white whipped with the two tablespoons of sugar flavored with orange.
Fruit Cake.—Make a sponge of one pint of thin cream which has been scalded and cooled to lukewarm, one gill of liquid yeast or one half cake of compressed yeast dissolved in a gill of cream, one half cup of sugar, and two and one half cups of flour. Beat all together very thoroughly and let rise until light. When light, add another half cup of sugar, one half cup of rather thick cream which has been scalded and cooled, one cup of warm flour, and after beating well together, set away to rise again. When well risen, add one cup of seeded raisins, one fourth cup of citron chopped fine, one half cup of Zante currants, two well-beaten eggs, and about one and one third cups of flour. Turn into a brick loaf bread pan, let it rise until very light, and bake. When done, remove from the pan and set away until at least twenty-four hours old before using.
Fruit Cake.—Make a sponge by combining one pint of warm, scalded cream that has cooled down, one gill of liquid yeast or half a cake of compressed yeast dissolved in a gill of cream, half a cup of sugar, and two and a half cups of flour. Mix everything together thoroughly and let it rise until light. Once it’s risen, add another half cup of sugar, half a cup of thick cream that has been scalded and cooled, one cup of warm flour, and after mixing well, set it aside to rise again. When it has risen well, add one cup of seeded raisins, a fourth cup of finely chopped citron, half a cup of Zante currants, two well-beaten eggs, and about one and one-third cups of flour. Pour the mixture into a brick loaf bread pan, let it rise until very light, and then bake. When done, take it out of the pan and let it cool for at least twenty-four hours before using.
Loaf Cake.—Scald a cup of rather thin cream, and cool to blood heat. Add one and one half cups of warm flour, one half a cup of sugar, and one fourth cake of compressed yeast dissolved in two tablespoonfuls of thin cream or as much of liquid yeast. Beat well, and let rise until perfectly light; then add one half cup more of sugar mixed with one half cup of warm flour. Beat well, and set away to rise a second time. When again well risen, add the whites of three eggs beaten to a stiff froth, one half cup of warm flour, and a little grated lemon rind, or two teaspoonfuls of rose water to flavor. Turn into a brick loaf bread pan lined with oiled paper, allow it to become perfectly light again, and bake. This cake, like other articles made with yeast, should not be eaten within at least twenty-four hours after baking.
Loaf Cake.—Heat a cup of thin cream until it's scalding, then let it cool to body temperature. Mix in one and a half cups of warm flour, half a cup of sugar, and a quarter of a cake of compressed yeast dissolved in two tablespoons of thin cream or an equivalent amount of liquid yeast. Blend well and let it rise until it’s fluffy; then add half a cup of sugar mixed with half a cup of warm flour. Mix again and allow to rise a second time. When it has risen well, fold in the beaten whites of three eggs, half a cup of warm flour, and a bit of grated lemon zest or two teaspoons of rose water for flavor. Pour the mixture into a brick loaf pan lined with oiled paper, let it rise until it’s fluffy again, and then bake. This cake, like other yeast-based goods, shouldn’t be eaten for at least twenty-four hours after baking.
Plain Buns.—These are the simplest of all cakes. Dissolve half a small cake of compressed yeast in a cup of thin cream which has been previously warmed to blood heat, add two cups of warm flour, and beat thoroughly together. Put in a warm place, and let it rise till very light. Add three tablespoonfuls of sugar mixed well with a half cup of warm flour, one half cup of Zante currants, and sufficient flour to make of the consistency of dough. Buns should be kneaded just as soft as possible, and from fifteen to twenty minutes. Shape into biscuits a little larger than an English walnut, place them on tins far enough apart so they will not touch each other when risen. Put in a warm place till they have risen to twice their first size, then bake in a moderately quick oven. If desired, the currants may be omitted and a little grated lemon rind for flavoring added with the sugar, or a bit of citron may be placed in the top of each bun when shaping. When taken from the oven, sprinkle the top of each with moist sugar if desired, or glace by brushing with milk while baking.
Plain Buns.—These are the simplest of all cakes. Dissolve half a small cake of compressed yeast in a cup of warm cream that’s heated to about body temperature. Add two cups of warm flour and mix thoroughly. Set it in a warm spot and let it rise until it's very light. Mix in three tablespoons of sugar combined with half a cup of warm flour, half a cup of Zante currants, and enough flour to make the mixture dough-like. Knead the dough as softly as possible for about fifteen to twenty minutes. Shape it into biscuits a little larger than an English walnut, and place them on baking sheets with enough space in between to avoid touching while they rise. Let them sit in a warm place until they've doubled in size, then bake in a moderately hot oven. If you want, you can skip the currants and add a bit of grated lemon zest for flavor with the sugar, or place a small piece of candied citron on top of each bun when shaping. After taking them out of the oven, you can sprinkle the tops with moist sugar if you like, or brush them with milk while baking for a glazed effect.
Sponge Cake.—For this will be required four eggs, one cup of sugar, one tablespoonful of lemon juice with a little of the grated rind, and one cup of white flour. Success in the making of sponge cake depends almost wholly upon the manner in which it is put together. Beat the yolks of the eggs until very light and thick, then add the sugar little by little, beating it in thoroughly; add the lemon juice and the grated rind. Beat the whites of the eggs until perfectly stiff and firm, and fold or chop them very lightly into the yolk mixture. Sift the flour with a sifter little by little over the mixture and fold it carefully in. On no account stir either the white of the eggs or the flour in, since stirring will drive out the air which has been beaten into the eggs. Do not beat after the flour is added. The cake, when the flour is all in, should be stiff and spongy. If it is liquid in character, it will be apt to be tough and may be considered a failure. Bake in a shallow pan in a rather hot oven fifteen or twenty minutes.
Sponge Cake.—For this, you will need four eggs, one cup of sugar, one tablespoon of lemon juice with a bit of the grated rind, and one cup of white flour. The key to making a successful sponge cake is how you combine the ingredients. Beat the egg yolks until they are very light and thick, then gradually add the sugar, mixing it in thoroughly; add the lemon juice and the grated rind. Beat the egg whites until they are perfectly stiff and firm, and gently fold or chop them into the yolk mixture. Sift the flour little by little over the mixture and carefully fold it in. Under no circumstances should you stir the egg whites or the flour, as stirring will remove the air that has been whipped into the eggs. Do not beat again after adding the flour. The batter, once all the flour is incorporated, should be thick and spongy. If it’s too liquid, it may turn out tough and could be considered a failure. Bake in a shallow pan in a fairly hot oven for fifteen to twenty minutes.

TABLE TOPICS.
If families could be induced to substitute the apple—sound, ripe, and luscious—for the pies, cakes, candies, and other sweetmeats with which children are too often stuffed, there would be a diminution of doctors' bills, sufficient in a single year to lay up a stock of this delicious fruit for a season's use.—Prof. Faraday.
If families could be encouraged to replace apples—fresh, ripe, and delicious—with the pies, cakes, candies, and other sweets that children often overindulge in, there would be a decrease in doctors' bills that could, in just one year, provide enough savings to stock up on this tasty fruit for an entire season.—Prof. Faraday.
Food for repentance—mince pie eaten late at night.
Food for repentance—mince pie eaten late at night.
Young Student—"This cook book says that pie crust needs plenty of shortening. Do you know what that means, pa?"
Young Student—"This cookbook says that pie crust needs a lot of shortening. Do you know what that means, Dad?"
Father—"It means lard."
Dad—"It means lard."
"But why is lard called shortening, pa?"
"But why do they call lard shortening, Dad?"
"Because it shortens life."
"Because it shortens your life."
The health journals and the doctors all agree that the best and most wholesome part of the New England country doughnut is the hole. The larger the hole, they say, the better the doughnut.
The health magazines and the doctors all agree that the best and healthiest part of the New England country doughnut is the hole. They say that the bigger the hole, the better the doughnut.
An old gentleman who was in the habit of eating a liberal slice of pie or cake just before retiring, came home late one evening after his wife had gone to bed. After an unsuccessful search in the pantry, he called to his wife, "Mary, where is the pie?" His good wife timidly acknowledged that there was no pie in the house. Said her husband, "Then where is the cake?" The poor woman meekly confessed that the supply of cake was also exhausted; at which the disappointed husband cried out in a sharp, censorious tone, "Why, what would you do if somebody should be sick in the night?"
An older man who usually enjoyed a generous slice of pie or cake before bed came home late one evening after his wife had already gone to sleep. After searching the pantry without success, he called out to his wife, "Mary, where’s the pie?" His wife softly admitted that there was no pie in the house. The husband asked, "Then where’s the cake?" The poor woman reluctantly confessed that they had also run out of cake; at which point the disappointed husband exclaimed in a critical tone, "Well, what would you do if someone got sick in the night?"
Woman (to tramp)—"I can give you some cold buckwheat cakes and a piece of mince pie." Tramp—(frightened) "What ye say?" Woman—"Cold buckwheat cakes and mince pie." Tramp—(heroically) "Throw in a small bottle of pepsin, Madam, and I'll take the chances."
Woman (to tramp)—"I can offer you some cold buckwheat cakes and a piece of mince pie." Tramp—(scared) "What did you say?" Woman—"Cold buckwheat cakes and mince pie." Tramp—(bravely) "Add a small bottle of pepsin, ma'am, and I'll take my chances."

GRAVIES AND SAUCES
![]() ravies for vegetables, sauces for desserts, and similar foods thickened
with flour or cornstarch, are among the most common of the poorly
prepared articles of the cuisine, although their proper preparation is
a matter of considerable importance, since neither a thin, watery sauce
nor a stiff, paste-like mixture is at all palatable. The preparation of
gravies and sauces is a very simple matter when governed by that
accuracy of measurement and carefulness of detail which should be
exercised in the preparation of all foods. In consistency, a properly
made sauce should mask the back of the spoon; that is to say, when
dipped into the mixture and lifted out, the metal of the spoon should
not be visible through it as it runs off. The proportion of material
necessary to secure this requisite is one tablespoonful of flour,
slightly rounded, for each half pint of water or stock. If the sauce be
made of milk or fruit juice, a little less flour will be needed. If
cornstarch be used, a scant instead of a full tablespoonful will be
required. The flour, or cornstarch should be first braided or rubbed
perfectly smooth in a very small amount of the liquid reserved for the
purpose (salt or sugar, if any is to be used, being added to the flour
before braiding with the liquid), and then carefully added to the
remaining liquid, which should be actively boiling. It should then be
continuously stirred until it has thickened, when it should be allowed
to cook slowly for five or ten minutes until the starch or flour is well
done. If through any negligence to observe carefully these simple
details, there should be lumps in the sauce, they must be removed before
serving by turning the whole through a fine colander or wire strainer.
ravies for vegetables, sauces for desserts, and similar foods thickened
with flour or cornstarch, are among the most common of the poorly
prepared articles of the cuisine, although their proper preparation is
a matter of considerable importance, since neither a thin, watery sauce
nor a stiff, paste-like mixture is at all palatable. The preparation of
gravies and sauces is a very simple matter when governed by that
accuracy of measurement and carefulness of detail which should be
exercised in the preparation of all foods. In consistency, a properly
made sauce should mask the back of the spoon; that is to say, when
dipped into the mixture and lifted out, the metal of the spoon should
not be visible through it as it runs off. The proportion of material
necessary to secure this requisite is one tablespoonful of flour,
slightly rounded, for each half pint of water or stock. If the sauce be
made of milk or fruit juice, a little less flour will be needed. If
cornstarch be used, a scant instead of a full tablespoonful will be
required. The flour, or cornstarch should be first braided or rubbed
perfectly smooth in a very small amount of the liquid reserved for the
purpose (salt or sugar, if any is to be used, being added to the flour
before braiding with the liquid), and then carefully added to the
remaining liquid, which should be actively boiling. It should then be
continuously stirred until it has thickened, when it should be allowed
to cook slowly for five or ten minutes until the starch or flour is well
done. If through any negligence to observe carefully these simple
details, there should be lumps in the sauce, they must be removed before
serving by turning the whole through a fine colander or wire strainer.
![]() Gravies for vegetables, sauces for desserts, and similar dishes thickened with flour or cornstarch are among the most commonly poorly prepared items in the cuisine. However, getting them right is crucial since a thin, watery sauce or a thick, paste-like mixture is definitely not appetizing. Making gravies and sauces is quite straightforward if you measure accurately and pay attention to the details, similar to how you should approach all cooking. A well-made sauce should coat the back of the spoon; in other words, when dipped into the mixture and lifted out, the spoon's metal shouldn't be visible as the sauce drips off. To achieve this consistency, use one slightly rounded tablespoon of flour for every half pint of water or stock. If you're making a sauce with milk or fruit juice, you’ll need a little less flour. When using cornstarch, use a scant tablespoon instead of a full one. First, the flour or cornstarch should be blended or rubbed smooth with a small amount of the liquid set aside for this purpose (add salt or sugar, if needed, to the flour before mixing it with the liquid). Then, carefully add it to the rest of the liquid, which should be boiling actively. Stir continuously until it thickens, then let it simmer slowly for five to ten minutes until the starch or flour is fully cooked. If any lumps form due to neglecting these simple steps, strain the sauce through a fine colander or wire strainer before serving.
Gravies for vegetables, sauces for desserts, and similar dishes thickened with flour or cornstarch are among the most commonly poorly prepared items in the cuisine. However, getting them right is crucial since a thin, watery sauce or a thick, paste-like mixture is definitely not appetizing. Making gravies and sauces is quite straightforward if you measure accurately and pay attention to the details, similar to how you should approach all cooking. A well-made sauce should coat the back of the spoon; in other words, when dipped into the mixture and lifted out, the spoon's metal shouldn't be visible as the sauce drips off. To achieve this consistency, use one slightly rounded tablespoon of flour for every half pint of water or stock. If you're making a sauce with milk or fruit juice, you’ll need a little less flour. When using cornstarch, use a scant tablespoon instead of a full one. First, the flour or cornstarch should be blended or rubbed smooth with a small amount of the liquid set aside for this purpose (add salt or sugar, if needed, to the flour before mixing it with the liquid). Then, carefully add it to the rest of the liquid, which should be boiling actively. Stir continuously until it thickens, then let it simmer slowly for five to ten minutes until the starch or flour is fully cooked. If any lumps form due to neglecting these simple steps, strain the sauce through a fine colander or wire strainer before serving.
The double boiler is the best utensil for the preparation of sauces and gravies, since it facilitates even cooking and renders them less liable to become scorched. The inner cup should be placed on the top of the range until the sauce has become thickened, as in the cooking of grains, and afterwards placed in the outer boiler to continue the cooking as long as needed.
The double boiler is the ideal tool for making sauces and gravies because it allows for even cooking and reduces the risk of burning. The inner pot should be set on the stove until the sauce thickens, similar to cooking grains, and then moved to the outer boiler to keep cooking for as long as necessary.
Cream gravies for vegetables may be delicately flavored with celery, by steeping a few bits of celery in the milk for a few minutes, and removing with a fork before adding the thickening. Sauces for puddings may be similarly flavored, by steeping cocoanut or bits of orange or lemon rind in the milk.
Cream gravies for vegetables can be lightly flavored with celery by soaking a few pieces of celery in the milk for a few minutes and then removing them with a fork before adding the thickening agent. Sauces for puddings can be flavored in the same way by soaking coconut or pieces of orange or lemon peel in the milk.
GRAVIES AND SAUCES FOR VEGETABLES.
RECIPES.
Brown Sauce.—Heat a pint of thin cream, and when boiling, add half a teaspoonful of salt and a tablespoonful of flour browned in the oven as directed on page 274, and rubbed to a smooth paste with a little cold milk. Allow it to boil rapidly, stirring constantly until thickened; then cook more slowly, in a double boiler, for five or ten minutes. If desired, the milk may be flavored with onion before adding the flour. This makes a good dressing for potatoes.
Brown Sauce.—Heat a pint of thin cream, and when it starts boiling, add half a teaspoon of salt and a tablespoon of flour that has been browned in the oven as directed on page 274, and mixed into a smooth paste with a little cold milk. Let it boil rapidly, stirring constantly until it thickens; then let it cook more slowly in a double boiler for five to ten minutes. If you want, you can flavor the milk with onion before adding the flour. This makes a great dressing for potatoes.
Cream or White Sauce.—Heat a pint of rich milk, part cream if it can be afforded, to boiling, and stir into it one tablespoonful of flour previously rubbed smooth in a little milk. Season with salt, and cook in a double boiler five or ten minutes, stirring frequently that no lumps be formed. If lumps are found in the sauce, turn it quickly through a fine, hot colander into the dish in which it is to be served.
Cream or White Sauce.—Heat a pint of rich milk, adding some cream if you can afford it, until it boils, then stir in one tablespoon of flour that has been mixed smooth with a little milk. Season with salt, and cook it in a double boiler for five to ten minutes, stirring often to prevent lumps. If you find any lumps in the sauce, pour it quickly through a fine, hot strainer into the dish you'll use for serving.
Egg Sauce.—Heat a pint of milk to boiling, and stir in a dessertspoonful of flour rubbed smooth in a little milk. Stir constantly until the sauce is well thickened; add the well-beaten yolk of an egg, turning it in very slowly and stirring rapidly so that it shall be well mingled. Boil up once only, add a very little salt, and serve. The egg makes an excellent substitute for cream.
Egg Sauce.—Heat a pint of milk until it boils, then stir in a dessert spoonful of flour mixed smoothly in a bit of milk. Keep stirring constantly until the sauce thickens nicely; then add the well-beaten yolk of an egg, mixing it in slowly while stirring quickly so that it's fully combined. Let it come to a boil just once, add a pinch of salt, and serve. The egg is a great alternative to cream.
Pease Gravy.—A gravy prepared either of dried or green peas as directed for Lentil Gravy on page 226, makes a suitable dressing for baked potatoes. Lentil gravy is also good for the same purpose. The addition of a little lemon juice to the lentil gravy makes another variety.
Pease Gravy.—A gravy made from either dried or green peas, as described for Lentil Gravy on page 226, is a great topping for baked potatoes. Lentil gravy works well for this too. Adding a bit of lemon juice to the lentil gravy creates a different variation.
Tomato Gravy.—A gravy made of tomatoes as directed on page 261, is excellent to use on baked or boiled sweet potatoes.
Tomato Gravy.—A gravy made from tomatoes as instructed on page 261, is great to use on baked or boiled sweet potatoes.
Tomato Cream Gravy.—Prepare a gravy as for Cream Sauce, using a slightly heaping measure of flour. When done, add, just before serving, for each quart of the cream sauce, one cup of hot, stewed tomato which has been put through a fine colander to remove all seeds. Beat it thoroughly into the sauce and serve on boiled or baked potato.
Tomato Cream Gravy.—Make a gravy similar to a Cream Sauce, using a slightly heaping amount of flour. When it's ready, just before serving, add one cup of hot, stewed tomatoes (passed through a fine strainer to remove the seeds) for each quart of cream sauce. Mix it thoroughly into the sauce and serve over boiled or baked potatoes.
SAUCES FOR DESSERTS AND PUDDINGS.
RECIPES.
Almond Sauce.—Heat a pint of rich milk in the inner cup of a double boiler, placed directly upon the stove. When the milk is boiling, stir into it a heaping tablespoonful of flour which has been rubbed to a cream in a little cold milk. Boil rapidly until thickened, stirring constantly; then add three tablespoonfuls of almondine; place in the outer boiler, and cook for five or ten minutes longer.
Almond Sauce.—Heat a pint of rich milk in the inner bowl of a double boiler on the stove. Once the milk is boiling, stir in a heaping tablespoon of flour that has been mixed into a cream with a bit of cold milk. Boil quickly until it thickens, stirring constantly; then add three tablespoons of almondine. Place it in the outer boiler and cook for another five to ten minutes.
Cocoanut Sauce.—Flavor a pint of new milk with cocoanut, as directed on page 298. Skim out the cocoanut, and add enough fresh milk to make one pint. Heat the milk to boiling, add two tablespoonfuls of sugar, thicken with two even spoonfuls of cornstarch, and proceed in the same manner as for Mock Cream.
Coconut Sauce.—Flavor a pint of fresh milk with coconut, as directed on page 298. Strain out the coconut, and add enough fresh milk to equal one pint. Heat the milk to boiling, stir in two tablespoons of sugar, thicken with two level tablespoons of cornstarch, and follow the same steps as for Mock Cream.
Cream Sauce.—Beat together two thirds of a cup of sugar, one tablespoonful of thick, sweet cream, and one egg. Wet half a teaspoonful of cornstarch with a little milk, and stir in with the mixture; then add five tablespoonfuls of boiling milk, stirring rapidly all the time. Pour into the inner cup of a double boiler; have the water in the outer cup boiling, and cook five minutes. Flavor to taste.
Cream Sauce.—Mix together two-thirds of a cup of sugar, one tablespoon of thick, sweet cream, and one egg. Dissolve half a teaspoon of cornstarch in a little milk, and stir that into the mixture; then add five tablespoons of boiling milk, stirring quickly the whole time. Pour it into the inner cup of a double boiler; make sure the water in the outer cup is boiling, and cook for five minutes. Add flavor to taste.
Cranberry Pudding Sauce.—To a quart of boiling water add two cups of sugar, and when well dissolved, one quart of carefully sorted cranberries. Mash the berries as much as possible with a silver spoon, and boil just seven minutes. Turn through a colander to remove skins, cool and serve.
Cranberry Pudding Sauce.—In a quart of boiling water, add two cups of sugar, and once it's fully dissolved, stir in one quart of carefully sorted cranberries. Use a silver spoon to mash the berries as much as you can, and boil for exactly seven minutes. Strain it through a colander to remove the skins, then cool it down and serve.
Custard Sauce.—Rub two teaspoonfuls of flour to a smooth paste with half a cup of new milk. Heat two and a half cups of fresh milk in a double boiler to scalding, then stir in the braided flour; heat again, stirring constantly till just to the boiling point, but no longer; remove from the stove and cool a little. Beat together one egg, three tablespoonfuls of sugar, and a little lemon rind for flavoring. Turn the hot milk over this, a little at a time, stirring briskly meanwhile. Return the whole to the double boiler, and cook, stirring frequently, until when a spoon is dipped into the custard a coating remains upon it. Then remove at once from the fire. If the spoon comes out clean, the custard is not sufficiently cooked.
Custard Sauce.—Mix two teaspoons of flour into a smooth paste with half a cup of fresh milk. Heat two and a half cups of fresh milk in a double boiler until it's scalding, then stir in the flour mixture; heat it again, stirring constantly until it just reaches boiling point, but not any longer; take it off the heat and let it cool a bit. Beat together one egg, three tablespoons of sugar, and a little lemon zest for flavor. Slowly pour the hot milk over this mixture, stirring quickly as you go. Put everything back into the double boiler and cook, stirring often, until a layer coats the back of a spoon when dipped in the custard. Then take it off the heat immediately. If the spoon comes out clean, the custard isn’t cooked enough.
Egg Sauce.—Separate the yolks and whites of three eggs. Beat the whites to a stiff froth, and stir in very gently, so as not to let the air out of the beaten whites, one cup of powdered sugar and a teaspoonful of vanilla or lemon flavoring powder. Lastly, stir in carefully the beaten yolks of the eggs, and serve at once.
Egg Sauce.—Separate the yolks and whites of three eggs. Whip the whites until they're stiff, then gently fold in one cup of powdered sugar and a teaspoon of vanilla or lemon flavoring, being careful not to lose the air in the whipped whites. Finally, carefully mix in the beaten yolks, and serve immediately.
Foamy Sauce.—Beat one egg or the whites of two very thoroughly with one half cup of sugar and a little grated lemon rind. Pour on this very slowly, stirring constantly to make it smooth, one cup of boiling milk, part cream if it can be afforded. If the whites alone are used, they should not be beaten stiff. If preferred, the lemon may be omitted and a tablespoonful or two of currant juice or quince jelly added last as flavoring.
Foamy Sauce.—Whisk one egg or the whites of two very well with half a cup of sugar and a bit of grated lemon zest. Gradually pour in one cup of boiling milk while continuously stirring to keep it smooth, adding cream if possible. If only the whites are used, they shouldn't be beaten too stiff. If you like, you can skip the lemon and add one or two tablespoons of currant juice or quince jelly at the end for flavor.
Fruit Cream.—Take the juice pressed from a cupful of fresh strawberries, red raspberries, or black caps, add to it one third of a cup of sugar, and place in the ice chest till chilled. Set a cup of sweet cream also on ice till very cold. When thoroughly cold, whip with an egg beater till the froth begins to rise, then add to it the cold fruit juice and beat again. Have ready the white of one egg beaten to a stiff froth, which add to the fruit cream, and whip till no more froth will rise. This makes a delicious dressing for simple grain molds and blancmanges, but is so rich it should be used rather sparingly. Serve as soon as possible after being prepared. Fruit syrup, in the proportion of two or three tablespoonfuls to the pint of cream, may be used in the same manner when the fresh juice is not available. The juice of orange, quince, and pineapple may also be used in the same manner as that of berries.
Fruit Cream.—Take the juice from a cup of fresh strawberries, raspberries, or blackberries, add one third of a cup of sugar, and chill it in the fridge. Also chill a cup of heavy cream until it’s really cold. Once both are cold, whip the cream with an electric mixer until it starts to thicken, then mix in the cold fruit juice and whip again. Prepare the white of one egg by beating it until it forms stiff peaks, then fold it into the fruit cream and whip until no more bubbles form. This creates a delicious topping for simple grain molds and custards, but it’s quite rich, so use it sparingly. Serve as soon as possible after making. If fresh juice isn’t available, you can use fruit syrup at a ratio of two or three tablespoons per pint of cream in the same way. The juice from oranges, quinces, and pineapples can also be used just like berry juice.
Fruit Sauce.—Heat a pint of red raspberry, currant, grape, strawberry, apricot, or any other fruit juice to scalding, and stir in a tablespoonful of cornstarch previously rubbed to a cream with a little cold water. Cook till it thickens; then add sugar according to the acidity of the fruit. Strain and cool before using. If fruit juice is not available, two or three tablespoonfuls of pure fruit jelly may be dissolved in a pint of hot water and used instead of the juice. A mixture of red and black raspberry juice, or currant and raspberry, will be found acceptable for variety.
Fruit Sauce.—Heat a pint of red raspberry, currant, grape, strawberry, apricot, or any other fruit juice until it's scalding, and stir in a tablespoon of cornstarch that you've mixed into a smooth paste with a bit of cold water. Cook it until it thickens; then add sugar based on how sour the fruit is. Strain and let it cool before using. If you don’t have fruit juice, you can dissolve two or three tablespoons of pure fruit jelly in a pint of hot water and use that instead. A blend of red and black raspberry juice, or currant and raspberry, will also offer a nice variety.
Fruit Sauce No. 2.—Mash a quart of fresh berries, add one cup of sugar, beat very thoroughly together, and set away until needed. Just before it is wanted for serving, turn into a granite fruit kettle and heat nearly to boiling, stirring constantly to avoid burning. Serve hot with hot or cold puddings, or molded desserts.
Fruit Sauce No. 2.—Mash a quart of fresh berries, add one cup of sugar, mix together really well, and set aside until needed. Just before you're ready to serve, pour it into a granite fruit kettle and heat it almost to boiling, stirring constantly to prevent it from burning. Serve it hot with hot or cold puddings, or molded desserts.
Lemon Pudding Sauce.—Heat to boiling, in a double boiler, a pint of water in which are two slices of lemon, and stir into it a dessertspoonful of cornstarch; cook four to five minutes, or until it thickens. Squeeze the juice from one large lemon, and mix it with two thirds of a cup of sugar. Add this to the cornstarch mixture, and allow the whole to boil up once, stirring constantly; then take from the fire. Leave in the double boiler, surrounded by the hot water, for ten minutes. Cool to blood heat before serving.
Lemon Pudding Sauce.—In a double boiler, bring a pint of water with two lemon slices to a boil, and stir in a tablespoon of cornstarch. Cook for four to five minutes, or until it thickens. Squeeze the juice from one large lemon and mix it with two-thirds of a cup of sugar. Add this to the cornstarch mixture and let it boil once while stirring constantly; then remove from heat. Keep it in the double boiler surrounded by hot water for ten minutes. Let it cool to room temperature before serving.
Mock Cream.—Heat a pint of fresh, unskimmed milk in a double boiler. When the milk is boiling, stir in two tablespoonfuls of sugar, and two even tablespoonfuls of cornstarch which has first been rubbed smooth in a very little cold milk. Bring just to a boil, stirring constantly; then pour the hot mixture, a little at a time, beating thoroughly all the while, over the well-beaten white of one egg. Put again into the double boiler, return to the fire, and stir till it thickens to the consistency of cream.
Mock Cream.—Heat a pint of fresh, whole milk in a double boiler. Once the milk is boiling, stir in two tablespoons of sugar and two tablespoons of cornstarch that has been mixed with a small amount of cold milk until smooth. Bring it just to a boil while stirring constantly; then gradually pour the hot mixture over the well-beaten egg white, beating thoroughly all the while. Place it back into the double boiler, return it to the heat, and stir until it thickens to the consistency of cream.
Orange Sauce.—Squeeze a cupful of juice from well-flavored, sour oranges. Heat a pint of water, and when boiling, thicken with a tablespoonful of cornstarch. Add the orange juice, strain, and sweeten to taste with sugar that has been flavored by rubbing over the yellow rind of an orange until mixed with the oil in the rind. If a richer sauce is desired, the yolk of an egg may be added lastly, and the sauce allowed to cook until thickened.
Orange Sauce.—Squeeze a cup of juice from flavorful, sour oranges. Heat a pint of water, and when it’s boiling, thicken it with a tablespoon of cornstarch. Add the orange juice, strain it, and sweeten to your liking with sugar that’s been flavored by rubbing it over the yellow rind of an orange until it mixes with the oil in the rind. If you want a richer sauce, you can add an egg yolk at the end, and let the sauce cook until it thickens.
Red Sauce.—Pare and slice a large red beet, and simmer gently in three cups of water for twenty minutes, or until the water is rose colored, then add two cups of sugar, the thin yellow rind and juice of one lemon, and boil until the whole is thick syrup. Strain, add a teaspoonful of rose water or vanilla, and serve.
Red Sauce.—Peel and slice a large red beet, then simmer gently in three cups of water for twenty minutes, or until the water turns rose-colored. Next, add two cups of sugar, the thin yellow rind and juice of one lemon, and boil until it becomes a thick syrup. Strain, add a teaspoon of rose water or vanilla, and serve.
Rose Cream.—Remove the thick cream from the top of a pan of cold milk, taking care not to take up any of the milk. Add sugar to sweeten and a teaspoonful or two of rose water. Beat with an egg beater until the whole mass is thick. Good thick cream, beaten in this manner, makes nearly double its original quantity.
Sago Sauce.—Wash one tablespoonful of sago in two or three waters, then put it into a saucepan with three fourths of a cup of hot water, and some bits of lemon peel. Simmer gently for ten minutes, take out the lemon peel, add half a cup of quince or apricot juice; and if the latter, the strained juice of half a lemon, and sugar to taste. Beat together thoroughly.
Sago Sauce.—Rinse one tablespoon of sago in two or three changes of water, then place it in a saucepan with three-quarters of a cup of hot water and some pieces of lemon peel. Let it simmer gently for ten minutes, remove the lemon peel, and stir in half a cup of quince or apricot juice; if using apricot, add the strained juice of half a lemon and sugar to taste. Mix everything thoroughly.
Whipped Cream Sauce.—Beat together with an egg beater until of a stiff froth one cup of sweet cream which has been cooled to a temperature of 64° or less, one teaspoonful of vanilla or a little grated lemon rind, and one half cup of powdered white sugar, and the whites of one or two eggs. The sauce may be variously flavored with a little fruit jelly beaten with the egg, before adding to the cream.
Whipped Cream Sauce.—Using an egg beater, whip together until it reaches a stiff froth: one cup of sweet cream that's been chilled to 64°F or lower, one teaspoon of vanilla or a bit of grated lemon zest, half a cup of powdered white sugar, and the whites of one or two eggs. You can also add different flavors to the sauce by mixing in a bit of fruit jelly with the egg before adding it to the cream.
TABLE TOPICS.
Whether or not life is worth living, all depends upon the liver.—Sel.
Whether life is worth living or not all depends on the person living it.—Sel.
Diet cures mair than doctors.—Scotch Proverb.
Diet cures more than doctors.—Scotch Proverb.
According to the ancient Hindu Scriptures, the proper amount of food is half of what can be conveniently eaten.
According to the ancient Hindu Scriptures, the right amount of food is half of what can be comfortably eaten.
Every hour you steal from digestion will be reclaimed by indigestion.—Oswald.
Every hour you take away from digestion will be paid back with indigestion.—Oswald.
"Very few nations in the world," says a sagacious historian, "produce better soldiers than the Russians. They will endure the greatest fatigues and sufferings with patience and calmness. And it is well know that the Russian soldiers are from childhood nourished by simple and coarse vegetable food. The Russian Grenadiers are the finest body of men I ever saw,—not a man is under six feet high. Their allowance consists of eight pounds of black bread, and four pounds of oil per man for eight days."
"Very few countries in the world," says a wise historian, "produce better soldiers than the Russians. They can handle the toughest hardships and challenges with patience and composure. It's well known that Russian soldiers grow up eating simple, hearty vegetarian food. The Russian Grenadiers are the best group of men I've ever seen—none are shorter than six feet. Their rations include eight pounds of black bread and four pounds of oil per soldier for eight days."
Colonel Fitzgibbon was, many years ago, colonial agent at London for the Canadian Government, and wholly dependent upon remittances from Canada for his support. On one occasion these remittances failed to arrive, and it being before the day of cables, he was obliged to write to his friends to ascertain the reason of the delay. Meanwhile he had just one sovereign to live upon. He found he could live upon a sixpence a day,—four pennyworth of bread, one pennyworth of milk, and one pennyworth of sugar. When his remittances arrived a month afterward, he had five shillings remaining of his sovereign, and he liked his frugal diet so well that he kept it up for several years.
Colonel Fitzgibbon was, many years ago, a colonial agent in London for the Canadian Government, relying completely on money sent from Canada to support himself. One time, those remittances didn’t come through, and since it was before the days of cables, he had to reach out to his friends to find out what was causing the hold-up. In the meantime, he had just one sovereign to live on. He discovered he could survive on just sixpence a day—four pence for bread, one penny for milk, and one penny for sugar. When his remittances finally arrived a month later, he had five shillings left from his sovereign, and he enjoyed his simple diet so much that he continued it for several years.
An hour of exercise to every pound of food.—Oswald.
An hour of exercise for every pound of food.—Oswald.

BEVERAGES
 he use of beverages in quantities with food at mealtime is prejudicial
to digestion, because they delay the action of the gastric juice upon
solid foods. The practice of washing down food by copious draughts of
water, tea, or coffee is detrimental, not only because it introduces
large quantities of fluid into the stomach, which must be absorbed
before digestion can begin, but also because it offers temptation to
careless and imperfect mastication, while tea and coffee also serve as a
vehicle for an excessive use of sugar, thus becoming a potent cause of
indigestion and dyspepsia. It is best to drink but sparingly, if at all,
at mealtimes. Consideration should also be given to the nature of the
beverage, since many in common use are far from wholesome. Very cold
fluids, like iced water, iced tea, and iced milk, are harmful, because
they cool the contents of the stomach to a degree at which digestion is
checked. If drunk at all, they should be taken only in small sips and
retained in the mouth until partly warmed.
he use of beverages in quantities with food at mealtime is prejudicial
to digestion, because they delay the action of the gastric juice upon
solid foods. The practice of washing down food by copious draughts of
water, tea, or coffee is detrimental, not only because it introduces
large quantities of fluid into the stomach, which must be absorbed
before digestion can begin, but also because it offers temptation to
careless and imperfect mastication, while tea and coffee also serve as a
vehicle for an excessive use of sugar, thus becoming a potent cause of
indigestion and dyspepsia. It is best to drink but sparingly, if at all,
at mealtimes. Consideration should also be given to the nature of the
beverage, since many in common use are far from wholesome. Very cold
fluids, like iced water, iced tea, and iced milk, are harmful, because
they cool the contents of the stomach to a degree at which digestion is
checked. If drunk at all, they should be taken only in small sips and
retained in the mouth until partly warmed.
Drinking beverages in large amounts with food at mealtime is bad for digestion because it slows down the action of gastric juices on solid food. The habit of washing down meals with lots of water, tea, or coffee is harmful, not only because it fills the stomach with a lot of liquid that needs to be absorbed before digestion can start, but also because it encourages careless chewing. Additionally, tea and coffee often lead to excessive sugar intake, becoming significant causes of indigestion and dyspepsia. It’s best to drink only a little, if anything, during meals. The type of beverage matters too, as many commonly consumed drinks are not healthy. Very cold drinks, like iced water, iced tea, and iced milk, are detrimental because they cool the stomach's contents, which can hinder digestion. If you choose to drink them, do so in small sips and keep them in your mouth until they warm up a bit.
Tea is often spoken of as the "cup that cheers but not inebriates." "The cup that may cheer yet does injury" would be nearer the truth, for there is every evidence to prove that this common beverage is exceedingly harmful, and that the evils of its excessive use are second only to those of tobacco and alcohol. Tea contains two harmful substances, theine and tannin,—from three to six per cent of the former and more than one fourth its weight of the latter. Theine is a poison belonging to the same class of poisonous alkaloids, and is closely allied to cocaine. It is a much more powerful poison than alcohol, producing death in less than one hundredth part the deadly dose of alcohol; and when taken in any but the smallest doses, it produces all the symptoms of intoxication. Tannin is an astringent exercising a powerful effect in delaying salivary and stomach digestion, thus becoming one of the most common causes of digestive disorders. It is also a matter of frequent observation that sleeplessness, palpitation of the heart, and various disorders of the nervous system frequently follow the prolonged use of tea. Both theine and tannin are more abundant in green than in black tea.
Tea is often referred to as the "cup that cheers but not inebriates." However, "the cup that may cheer yet does harm" is closer to the truth, as there is plenty of evidence showing that this common drink is very harmful, and that the negative effects of its excessive use are only second to those of tobacco and alcohol. Tea contains two harmful substances, theine and tannin—between three to six percent of the former and more than a quarter of its weight in the latter. Theine is a poison that belongs to the same class of harmful alkaloids and is closely related to cocaine. It is a much stronger poison than alcohol, causing death in less than one-hundredth of the lethal dose of alcohol; and when taken in anything other than the smallest amounts, it produces all the signs of intoxication. Tannin is an astringent that significantly delays the digestion of saliva and food in the stomach, thus becoming one of the most common causes of digestive issues. It's also frequently noted that sleeplessness, heart palpitations, and various nervous system disorders often follow prolonged tea consumption. Both theine and tannin are more prevalent in green tea than in black tea.
The dependence of the habitual tea-drinker upon the beverage, and the sense of loss experienced when deprived of it, are among the strongest proofs of its evil effects, and should be warnings against its use. No such physical discomfort is experienced when deprived of any article of ordinary food. The use of tea makes one feel bright and fresh when really exhausted; but, like all other stimulants, it is by exciting vital action above the normal without supplying extra force to support the extra expenditure. The fact that a person feels tired is evidence that the system demands rest, that his body is worn and needs repair; but the relief experienced after a cup of tea is not recuperation. Instead, it indicates that his nerves are paralyzed so that they are insensible to fatigue.
The dependence of regular tea drinkers on the beverage, along with the feeling of loss when they can't have it, are some of the strongest signs of its negative effects and should serve as warnings against its consumption. No similar physical discomfort occurs when someone is without regular food. Drinking tea can make a person feel energized and refreshed even when they are truly exhausted; however, like all stimulants, it boosts vital activity beyond normal levels without providing additional strength to support that increased activity. Feeling tired is a sign that the body needs rest and repair; yet, the relief felt after having a cup of tea isn't actual recovery. Instead, it shows that the nerves are so overstimulated that they don't register fatigue.
Some people suppose the manner of preparing tea has much to do with its deleterious effects, and that by infusion for two or three minutes only, the evils resulting from the tannin will be greatly lessened. This, however, is a delusion, if the same amount of tea be used proportionate to the water; for tannin in its free state, the condition in which it is found in tea is one of the most readily soluble of substances; and tea infused for two minutes is likely to hold nearly as much tannin in solution as that infused for a longer period.
Some people believe that the way tea is made affects its negative impacts, and that by steeping it for just two or three minutes, the harmful effects of tannin will be significantly reduced. However, this is a misconception, if the same amount of tea is used in relation to the water; because tannin in its free state, which is how it exists in tea, is one of the most soluble substances. Tea steeped for two minutes is likely to contain almost as much tannin in solution as tea steeped for a longer time.
Tea is not a food, and it can in no wise take the place of food, as so many people attempt to make it, without detriment to health in every respect.
Tea isn't food, and it can't replace food, despite what many people try to claim, without harming health in every way.
Coffee, cocoa, and chocolate rank in the same category with tea, as beverages which are more or less harmful. Coffee contains caffein, a principle identical with theine and a modified form of tannin, though in less quantity than tea. Cocoa and chocolate contain substances similar to theine and equally harmful, though usually present in much less proportion than in tea.
Coffee, cocoa, and chocolate fall into the same category as tea, as drinks that can be somewhat harmful. Coffee has caffeine, which is similar to theine and a modified version of tannin, though in smaller amounts than tea. Cocoa and chocolate have substances like theine that can be harmful too, but they're usually found in much smaller amounts than in tea.
Custom has made the use of these beverages so common that most people seldom stop to inquire into their nature. Doubtless the question arises in many minds; If these beverages contain such poisons, why do they not more commonly produce fatal results?—Because a tolerance of the poison is established in the system by use, as in the case of tobacco and other narcotics and stimulants; but that the poisons surely though insidiously are doing their work is attested by the prevalence of numerous disorders of the digestive and nervous systems, directly attributable to the use of these beverages.
Custom has made these drinks so common that most people hardly ever stop to think about what they really are. Surely, many wonder: If these drinks contain harmful substances, why don’t they usually cause deadly outcomes?—Because regular use builds up a tolerance to the poison in the body, similar to what happens with tobacco and other drugs; however, it’s clear that these poisons, though stealthy, are doing their damage, as shown by the high rates of various digestive and nervous system disorders that can be directly linked to these drinks.
Both tea and coffee are largely adulterated with other harmful substances, thus adding another reason why their use should be discarded. It is stated on good authority that it is almost impossible to obtain unadulterated ground coffee.
Both tea and coffee are often mixed with other harmful substances, providing another reason to avoid them. Reliable sources indicate that it's nearly impossible to find pure ground coffee.
In view of all these facts, it certainly seems wisest if a beverage is considered essential, to make use of one less harmful. Hot milk, hot water, hot lemonade, caramel coffee, or some of the various grain coffees, recipes for which are give in the following pages, are all excellent substitutes for tea and coffee, if a hot drink is desired.
In light of all these facts, it definitely makes the most sense that if a drink is deemed essential, to choose one that’s less harmful. Hot milk, hot water, hot lemonade, caramel coffee, or various grain coffees—recipes for which are provided in the following pages—are all great alternatives to tea and coffee if a warm drink is wanted.
RECIPES.
Caramel Coffee.—Take three quarts best bran, one quart corn meal, three tablespoonfuls of molasses; mix and brown in the oven like ordinary coffee. For every cup of coffee required, use one heaping tablespoonful of the caramel. Pour boiling water over it, and steep, not boil, for fifteen or twenty minutes.
Caramel Coffee.—Take three quarts of the best bran, one quart of cornmeal, and three tablespoons of molasses; mix and brown in the oven like regular coffee. For each cup of coffee you need, use one heaping tablespoon of the caramel. Pour boiling water over it, and let it steep, not boil, for fifteen to twenty minutes.
Caramel Coffee No. 2.—Take one cup each of white flour, corn meal, unsifted Graham flour, and molasses. Mix well, and form into cakes half an inch thick and a little larger around than a silver dollar. If the molasses is not thin enough to take up all the dry material, one fourth or one half a cup of cold water may be added for that purpose. Bake the cakes in the oven until very dark brown, allowing them to become slightly scorched. When desired for use, take one cake for each cup of coffee required, pour sufficient water over them, and steep, not boil, twenty minutes.
Caramel Coffee No. 2.—Take one cup each of white flour, cornmeal, unsifted Graham flour, and molasses. Mix well and shape into cakes that are half an inch thick and slightly larger than a silver dollar. If the molasses is too thick to absorb all the dry ingredients, you can add a quarter to half a cup of cold water. Bake the cakes in the oven until they are very dark brown, allowing them to get a little scorched. When you're ready to use them, take one cake for each cup of coffee you need, pour enough water over them, and steep (don’t boil) for twenty minutes.
Caramel Coffee No. 3.—To three and one half quarts of bran and one and one half quarts of corn meal, take one pint of New Orleans molasses and one half pint of boiling water. Put the water and molasses together and pour them over the bran and corn meal which have been previously mixed. Rub all well together, and brown slowly in the oven, stirring often, until a rich dark brown. Use one heaping tablespoonful of coffee to each small cup of boiling water, let it just boil up, then steep on the back of the stove for five or ten minutes.
Caramel Coffee No. 3.—For three and a half quarts of bran and one and a half quarts of cornmeal, take one pint of New Orleans molasses and half a pint of boiling water. Mix the water and molasses together, then pour them over the bran and cornmeal that you've already combined. Mix everything well and bake slowly in the oven, stirring often, until it turns a rich dark brown. Use one heaping tablespoon of coffee for each small cup of boiling water, let it come to a boil, then steep on the back of the stove for five to ten minutes.
Mrs. T's Caramel Coffee.—Make a rather thick batter of Graham grits or Graham meal and milk, spread it in shallow pans and bake in a moderate oven until evenly done throughout. Cut the cake thus prepared into thin strips, which break into small uniform pieces and spread on perforated tins or sheets and brown in the oven. Each piece should be very darkly and evenly browned, but not burned. For each cup of coffee required, steep a small handful in boiling water for ten or fifteen minutes, strain and serve.
Mrs. T's Caramel Coffee.—Make a thick batter using Graham grits or Graham meal mixed with milk. Spread it in shallow pans and bake in a moderate oven until it's cooked evenly throughout. Cut the cake into thin strips, which will break into small, uniform pieces. Spread these pieces on perforated trays or sheets and brown them in the oven. Each piece should be very dark and uniformly browned, but not burnt. For each cup of coffee you need, steep a small handful in boiling water for ten to fifteen minutes, strain, and serve.
Parched Grain Coffee.—Brown in the oven some perfectly sound wheat, sweet corn, barley, or rice, as you would the coffee berry. If desired, a mixture of grains may be used. Pound or grind fine. Mix the white of an egg with three tablespoonfuls of the ground grain, and pour over it a quart of boiling water. Allow it to come just to the boiling point, steep slowly for twelve or fifteen minutes, and serve.
Parched Grain Coffee.—Roast some good quality wheat, sweet corn, barley, or rice in the oven, just like you would with coffee beans. If you want, you can mix different grains. Crush or grind them finely. Combine the whites of an egg with three tablespoons of the ground grain, and pour a quart of boiling water over it. Let it reach just boiling, then steep slowly for twelve to fifteen minutes, and serve.
Wheat, Oats and Barley Coffee.—Mix together equal quantities of these grains, brown in the oven like ordinary coffee, and grind. To one quart of boiling water take three tablespoonfuls of the prepared coffee mixed with the white of an egg, and steep in boiling water ten or fifteen minutes.
Wheat, Oats, and Barley Coffee.—Combine equal amounts of these grains, roast them in the oven like regular coffee, and then grind them. For one quart of boiling water, use three tablespoons of the prepared coffee mixed with the egg white, and let it steep in boiling water for ten to fifteen minutes.
RECIPES FOR COLD BEVERAGES.
Blackberry Beverage.—Crush a quart of fresh blackberries, and pour over them a quart of cold water; add a slice of lemon and a teaspoonful of orange water, and let it stand three or four hours. Strain through a jelly bag. Sweeten to taste with a syrup prepared by dissolving white sugar in hot water, allowing it to become cold before using. Serve at once with bits of broken ice in the glasses, or place the pitcher on ice until ready to serve.
Blackberry Beverage.—Mash a quart of fresh blackberries, then pour a quart of cold water over them. Add a slice of lemon and a teaspoon of orange water, and let it sit for three to four hours. Strain it through a jelly bag. Sweeten to your liking with a syrup made by dissolving white sugar in hot water, letting it cool before using. Serve immediately with pieces of broken ice in the glasses, or keep the pitcher on ice until you're ready to serve.
Fruit Beverage.—A great variety of pleasant, healthful drinks may be made by taking equal quantities of water and the juice of currants, strawberries, raspberries, cherries, or a mixture of two kinds, as raspberries and currants, sweetening to taste, and putting into each glass a small lump of ice. Directions for the preparation of fruit juices will be found on page 209.
Fruit Beverage.—You can make a wide range of delicious and healthy drinks by mixing equal parts of water and juice from currants, strawberries, raspberries, cherries, or a combination like raspberries and currants. Sweeten to your liking and add a small ice cube to each glass. You can find instructions for preparing fruit juices on page 209.
Another.—Extract the juice from three lemons and as many sour oranges, add a quart of cold water, sugar or syrup to sweeten, half a teaspoonful of rose water, and a cup of pure grape juice; or the rose water and grape juice may be omitted and two tablespoonfuls of strawberry, raspberry, or cherry juice used instead, and the whole poured over half a dozen slices of pineapple, and allowed to stand until well flavored before using.
Another.—Squeeze the juice from three lemons and as many sour oranges, then mix it with a quart of cold water, sugar or syrup for sweetness, half a teaspoon of rose water, and a cup of pure grape juice. Alternatively, you can skip the rose water and grape juice and use two tablespoons of strawberry, raspberry, or cherry juice instead. Pour everything over six slices of pineapple and let it sit until well blended before serving.
Fruit Cordial.—Crush a pint of blackberries, raspberries, grapes, currants, or cherries, adding the juice of two sour oranges, and a sliced lemon; pour over all a quart of cold water. Stir the mixture frequently and let it stand for two hours, then strain and add a syrup made by dissolving white sugar in boiling water, sufficient to sweeten. Cool on ice and serve.
Fruit Cordial.—Mash a pint of blackberries, raspberries, grapes, currants, or cherries, then mix in the juice of two sour oranges and a sliced lemon; pour in a quart of cold water. Stir the mixture often and let it sit for two hours, then strain it and add a syrup made by dissolving white sugar in boiling water, enough to sweeten it. Chill on ice and serve.
Lemonade.—Use three large or four medium-sized lemons for each quart of water, and from six to eight tablespoonfuls of sugar. Rub or squeeze the lemons till soft. Cut a slice or two from each, and extract the juice with a lemon drill; strain the juice through a fine wire strainer to remove the seeds and bits of pulp, and pour it over the sugar. Add the slices of lemon, and pour over all a very little boiling water to thoroughly dissolve the sugar; let it stand ten or fifteen minutes, then add the necessary quantity of cold water, and serve. Or rub the sugar over the outside of the lemons to flavor it, and make it into a syrup by adding sufficient boiling water to dissolve it. Extract and strain the lemon juice, add the prepared syrup and the requisite quantity of cold water, and serve.
Lemonade.—Use three large or four medium-sized lemons for each quart of water, and six to eight tablespoons of sugar. Rub or squeeze the lemons until they're soft. Cut a slice or two from each lemon and extract the juice using a lemon juicer; strain the juice through a fine wire strainer to remove the seeds and bits of pulp, and pour it over the sugar. Add the lemon slices and pour just a little boiling water over everything to fully dissolve the sugar; let it sit for ten to fifteen minutes, then add the necessary amount of cold water and serve. Alternatively, rub the sugar over the outside of the lemons to flavor it, and make a syrup by adding enough boiling water to dissolve it. Extract and strain the lemon juice, add the prepared syrup and the right amount of cold water, and serve.
Oatmeal Drink.—Boil one fourth of a pound of oatmeal in three quarts of water for half an hour, then add one and one half tablespoonfuls of sugar, strain and cool. It may be flavored with a little lemon or raspberry syrup if desired; or the sugar may be omitted and a quart of milk added. Cool on ice and serve.
Oatmeal Drink.—Boil a quarter pound of oatmeal in three quarts of water for thirty minutes, then add one and a half tablespoons of sugar, strain, and let it cool. You can flavor it with a bit of lemon or raspberry syrup if you want; or you can skip the sugar and add a quart of milk. Chill it over ice and serve.
Orangeade.—Pare very thin from one orange a few bits of the yellow rind. Slice three well-peeled sour oranges, taking care to remove all the white portion and all seeds. Add the yellow rind and a tablespoonful of sugar; pour over all a quart of boiling water. Cover the dish, and let it remain until the drink is cold. Or, if preferred, the juice of the oranges may be extracted with a lemon drill and strained as for lemonade.
Orangeade.—Remove a few thin pieces of the yellow rind from one orange. Slice three well-peeled sour oranges, making sure to eliminate all the white part and any seeds. Add the yellow rind and a tablespoon of sugar; then pour a quart of boiling water over everything. Cover the dish and let it sit until the drink cools. Alternatively, if you prefer, you can extract the juice from the oranges with a lemon juicer and strain it like you would for lemonade.
TABLE TOPICS.
The nervousness and peevishness of our times are chiefly attributable to tea and coffee. The digestive organs of confirmed coffee drinkers are in a state of chronic derangement which reacts on the brain, producing fretful and lachrymose moods. The snappish, petulant humor of the Chinese can certainly be ascribed to their immoderate fondness for tea.—Dr. Bock.
The anxiety and irritability of our times are mainly due to tea and coffee. The digestive systems of regular coffee drinkers are often out of balance, which affects their brains, leading to cranky and tearful moods. The irritable and moody nature of the Chinese can definitely be linked to their excessive love for tea.—Dr. Bock.
Dr. Ferguson, an eminent physician who has carefully investigated the influence of tea and coffee upon the health and development of children, says he found that children who were allowed these beverages gained but four pounds a year between the ages of thirteen and sixteen, while those who had been allowed milk instead, gained fifteen pounds in weight during the same period.
Dr. Ferguson, a well-known doctor who has thoroughly studied the effects of tea and coffee on the health and growth of children, says he found that kids who were allowed these drinks only gained four pounds a year between the ages of thirteen and sixteen, while those who were given milk instead gained fifteen pounds during the same time.
Dr. Richardson, the eminent English physician and scientist, asserts that the misery of the women of the poorer classes of the population in England is more than doubled by the use of tea, which only soothes or stimulates to intensify the after-coming depression and languor.
Dr. Richardson, the renowned English doctor and scientist, claims that the suffering of women in the lower classes of England is more than doubled by their tea consumption, which merely eases or energizes them but ultimately amplifies the subsequent feelings of depression and fatigue.
A physician recommended a lady to abandon the use of tea and coffee. "O, but I shall miss it so," said she.
A doctor advised a woman to stop drinking tea and coffee. "Oh, but I will miss it so much," she said.
"Very likely," replied her medical adviser, "but you are missing health now, and will soon lose it altogether if you do not."
"Very likely," her doctor replied, "but you're not healthy right now, and you'll completely lose your health soon if you don't."
Dr. Stenhouse, of Liverpool, once made a careful analysis of a sample package of black tea, which was found to contain "some pure Congo tea leaves, also siftings of Pekoe and inferior kinds, weighing together twenty-seven per cent of the whole. The remaining seventy-three per cent was composed of the following substances; Iron, plumbago, chalk, China-clay, sand, Prussian-blue, tumeric, indigo, starch, gypsum, catechu, gum, the leaves of the camelia, sarangna, Chlorantes officinalis, elm, oak, willow, poplar, elder, beach, hawthorn, and sloe."
Dr. Stenhouse from Liverpool once conducted a detailed analysis of a sample package of black tea, which was found to contain "some pure Congo tea leaves, along with sifting of Pekoe and inferior types, making up twenty-seven percent of the total. The remaining seventy-three percent consisted of the following substances: iron, graphite, chalk, china clay, sand, Prussian blue, turmeric, indigo, starch, gypsum, catechu, gum, leaves from the camellia, sarangna, Chlorantes officinalis, elm, oak, willow, poplar, elder, beech, hawthorn, and sloe."

MILK CREAM BUTTER
MILK.
 hemically considered, the constituents of milk are nitrogenous matter
(consisting of casein and a small proportion of albumen), fat, sugar of
milk, mineral matter, and water, the last constituting from sixty-five
to ninety per cent of the whole.
hemically considered, the constituents of milk are nitrogenous matter
(consisting of casein and a small proportion of albumen), fat, sugar of
milk, mineral matter, and water, the last constituting from sixty-five
to ninety per cent of the whole.
Chemically, milk is made up of proteins (which include casein and a small amount of albumen), fat, lactose, minerals, and water, with water making up about sixty-five to ninety percent of the total.
The proportion of these elements varies greatly in the milk of different animals of the same species and of the same animals at different times, so that it is not possible to give an exact analysis.
The amount of these elements changes a lot in the milk of different animals of the same species and in the same animals at different times, which makes it impossible to provide an exact analysis.
The analysis of an average specimen of cow's milk, according to Letheby, is:—
The analysis of an average sample of cow's milk, according to Letheby, is:—
| Nitrogenous matter | 4.1 |
| Fat | 3.9 |
| Sugar of milk | 5.2 |
| Mineral matter | 0.8 |
| Water | 86.0 |
If a drop of milk be examined with a microscope, it will be seen as a clear liquid, holding in suspension a large number of minute globules, which give the milk its opacity or white color. These microscopic globules are composed of fatty matter, each surrounded by an envelope of casein, the principal nitrogenous element found in milk. They are lighter than the surrounding liquid, and when the milk remains at rest, they gradually rise to the top and form cream. Casein, unlike albumen, is not coagulated by heat; hence when milk is cooked, it undergoes no noticeable change, save the coagulation of the very small amount of albumen it contains, which, as it solidifies, rises to the top, carrying with it a small portion of the sugar and saline matter and some of the fat globules, forming a skin-like scum upon the surface. Casein, although not coagulable by heat, is coagulated by the introduction into the milk of acids or extract of rennet. The curd of cheese is coagulated casein. When milk is allowed to stand for some time exposed to warmth and air, a spontaneous coagulation occurs, caused by fermentative changes in the sugar of milk, by which it is converted into lactic acid through the action of germs.
If you look at a drop of milk under a microscope, you'll see that it appears as a clear liquid containing many tiny globules, which are responsible for milk's white color. These microscopic globules are made up of fat, each surrounded by a layer of casein, the main nitrogen-containing substance found in milk. They are lighter than the surrounding liquid, and when the milk sits still, they slowly rise to the top and create cream. Unlike albumen, casein doesn't clump together when heated. So, when milk is cooked, it doesn't change much, except for the coagulation of the tiny amount of albumen it contains, which solidifies and floats to the top, taking some sugar, salt, and fat globules with it to form a skin-like film on the surface. Although casein doesn't coagulate from heat, it does coagulate when acids or rennet extract are added to the milk. The curd in cheese is coagulated casein. If milk is left standing in warmth and air for a while, a natural coagulation happens due to fermentative changes in the milk sugar, turning it into lactic acid through the action of germs.
Milk is sometimes adulterated by water, the removal of more or less of the cream, or the addition of some foreign substance to increase its density.
Milk is sometimes watered down, has varying amounts of cream taken out, or has some other substance added to make it thicker.
The quality of milk is more or less influenced by the food upon which the animal is fed. Watery milk may be produced by feeding a cow upon sloppy food.
The quality of milk is largely influenced by the diet of the animal. Feeding a cow sloppy food can result in watery milk.
The milk of diseased animals should never be used for food. There is no way by which such milk can invariably be detected, but Prof. Vaughan, of Michigan University, notes the following kinds of milk to be avoided:
The milk from sick animals should never be used for food. There's no foolproof way to identify such milk, but Prof. Vaughan from Michigan University points out the following types of milk to steer clear of:
1. Milk which becomes sour and curdles within a few hours after it has been drawn, and before any cream forms on its surface. This is known in some sections as 'curdly' milk, and it comes from cows with certain inflammatory affections of the udder, or digestive diseases, or those which have been overdriven or worried.
1. Milk that sours and curdles within a few hours after being collected, before any cream has a chance to form on its surface. This is referred to in some areas as 'curdly' milk, and it comes from cows with specific inflammatory conditions of the udder, digestive issues, or those that have been overworked or stressed.
2. "Bitter-sweet milk" has cream of a bitter taste, is covered with 'blisters,' and frequently with a fine mold. Butter and cheese made from such milk cannot be eaten on account of the disagreeable taste.
2. "Bitter-sweet milk" has a creamy, bitter flavor, is covered with 'blisters,' and often has a fine mold. Butter and cheese made from this milk can't be eaten because of the unpleasant taste.
4. 'Blue milk' is characterized by the appearance on its surface, eighteen or twenty-four hours after it is drawn, of small, indigo-blue spots, which rapidly enlarge until the whole surface is covered with a blue film. If the milk be allowed to stand a few days, the blue is converted into a greenish or reddish color. This coloration of the milk is due to the growth of microscopic organisms. The butter made from 'blue milk' is dirty-white, gelatinous, and bitter.
4. 'Blue milk' is marked by the appearance of small, indigo-blue spots on its surface, eighteen to twenty-four hours after it's drawn, which quickly grow until the entire surface is covered with a blue film. If the milk is left to sit for a few days, the blue changes to a greenish or reddish color. This milk coloration is caused by the growth of microscopic organisms. The butter made from 'blue milk' is off-white, gelatinous, and has a bitter taste.
5. 'Barnyard milk' is a term used to designate milk taken from unclean animals, or those which have been kept in filthy, unventilated stables. The milk absorbs and carries the odors, which are often plainly perceptible. Such milk may not be poisonous, but it is repulsive.
5. 'Barnyard milk' refers to milk taken from dirty animals or those kept in filthy, stuffy stables. The milk picks up and carries the odors, which are often easily noticeable. While this milk may not be harmful, it is unappealing.
There is no doubt that milk often serves as the vehicle for the distribution of the germs of various contagious diseases, like scarlet fever, diphtheria, and typhoid fever, from becoming contaminated in some way, either from the hands of milkers or from water used as an adulterant or in cleansing the milk vessels. Recent investigations have also shown that cows are to some extent subject to scarlet fever, the same as human beings, and that milk from infected cows will produce the same disease in the consumer.
There’s no doubt that milk often acts as a way for the spread of germs from various contagious diseases, like scarlet fever, diphtheria, and typhoid fever, to enter our systems. This contamination can happen through the hands of milkers or water used to dilute the milk or clean the containers. Recent studies have also shown that cows can catch scarlet fever, just like humans, and that milk from infected cows can cause the same disease in those who drink it.
Milk should not be kept in brass or copper vessels or in earthen-ware lined with lead glazing; for if the milk becomes acid, it is likely to unite with the metal and form a poisonous compound. Glass and granite ware are better materials in which to keep milk.
Milk shouldn't be stored in brass or copper containers or in pottery lined with lead glaze; if the milk sours, it can react with the metal and create a toxic compound. Glass and granite are safer options for storing milk.
Milk should never be allowed to stand uncovered in an occupied room, especially a sitting-room or bedroom, as its dust is likely to contain disease-germs, which falling into the milk, may become a source of serious illness to the consumer. Indeed it is safest to keep milk covered whenever set away, to exclude the germs which are at all times present in the air. A good way is to protect the dishes containing milk with several layers of cheese-cloth, which will permit the air but not the germs to circulate in and out of the pans. Neither should it be allowed to stand where there are strong odors, as it readily takes up by absorption any odors to which it is exposed.
Milk should never be left uncovered in a room that’s being used, especially in a living room or bedroom, since dust can carry germs that might get into the milk and could lead to serious illness for anyone who drinks it. It’s safest to keep milk covered whenever it’s stored to block germs that are always in the air. A good method is to cover the containers with several layers of cheesecloth, which allows air to flow in and out but keeps germs out. Additionally, milk shouldn’t be allowed to sit near strong smells, as it easily absorbs any odors around it.
A few years ago Dr. Dougall, of Glasgow, made some very interesting experiments on the absorbent properties of milk. He inclosed in jars a portion of substances giving off emanations, with a uniform quantity of milk, in separate vessels, for a period of eight hours, at the end of which time samples of the milk were drawn off and tested. The result was that milk exposed to the following substances retained odors as described:—
A few years ago, Dr. Dougall from Glasgow conducted some fascinating experiments on the absorbent properties of milk. He placed jars containing different substances that gave off emissions alongside uniform amounts of milk in separate containers for eight hours. After this period, samples of the milk were taken and tested. The results showed that the milk exposed to the following substances retained odors as described:—
Coal gas, distinct; paraffine oil, strong; turpentine, very strong; onions, very strong; tobacco smoke, very strong; ammonia, moderate; musk, faint; asafetida, distinct; creosote, strong; cheese (stale), distinct; chloroform, moderate; putrid fish, very bad; camphor, moderate; decayed cabbage, distinct.
Coal gas, distinct; paraffin oil, strong; turpentine, very strong; onions, very strong; tobacco smoke, very strong; ammonia, moderate; musk, faint; asafetida, distinct; creosote, strong; cheese (stale), distinct; chloroform, moderate; rotten fish, very bad; camphor, moderate; decayed cabbage, distinct.
These facts clearly indicate that if the emanations to which milk is exposed are of a diseased and dangerous quality, it is all but impossible that the milk can remain free from dangerous properties.
These facts clearly show that if the substances that milk comes into contact with are unhealthy and harmful, it's nearly impossible for the milk to stay free from harmful qualities.
Too much pains cannot be taken in the care of milk and vessels containing it. Contact with the smallest quantity of milk which has undergone fermentation will sour the whole; hence the necessity for scrupulous cleanliness of all vessels which have contained milk before they are used again for that purpose.
Too much care can't be taken in looking after milk and the containers that hold it. Contact with even a tiny bit of milk that has spoiled will sour the entire batch; that's why it's essential to ensure that all containers that have held milk are thoroughly cleaned before being reused for that purpose.
In washing milk dishes, many persons put them first into scalding water, by which means the albumen in the milk is coagulated; and if there are any crevices or seams in the pans or pails, this coagulated portion is likely to adhere to them like glue, and becoming sour, will form the nucleus for spoiling the next milk put into them. A better way is first to rinse each separately in cold water, not pouring the water from one pan to another, until there is not the slightest milky appearance in the water, then wash in warm suds, or water containing sal-soda, and afterward scald thoroughly; wipe perfectly dry, and place if possible where the sun will have free access to them until they are needed for further use. If sunshine is out of the question, invert the pans or cans over the stove, or place for a few moments in a hot oven.
In washing milk dishes, many people first soak them in hot water, which causes the protein in the milk to clump together; if there are any spots or seams in the pans or buckets, this clumped section can stick to them like glue and, when it goes bad, can spoil the next batch of milk put in. A better approach is to rinse each item separately in cold water without transferring water from one container to another until there's no milky look to the water. Then wash them in warm, soapy water or in water with sal-soda, and afterward scald them thoroughly; wipe them completely dry and, if possible, leave them in a sunny spot until you're ready to use them again. If there's no sunlight available, flip the pans or containers upside down over the stove or place them in a hot oven for a few moments.
The treatment of milk varies with its intended use, whether whole or separated from the cream.
The way milk is processed depends on how it's going to be used, whether it's whole or has been separated from the cream.
Cream rises best when the milk is quite warm or when near the freezing-point. In fact, cream separates more easily from milk at the freezing-point than any other, but it is not thick and never becomes so. An intermediate state seems to be unfavorable to a full rising of the cream.
Cream rises best when the milk is warm or close to freezing. In fact, cream separates more easily from milk at freezing than at any other temperature, but it isn’t thick and never becomes thick. An in-between temperature seems to prevent the cream from rising fully.
A temperature of 56° to 60°F. is a good one. Milk to be used whole should be kept at about 45° and stirred frequently.
A temperature of 56° to 60°F is ideal. Whole milk should be stored at around 45°F and stirred often.
All milk obtained from city milkmen or any source not certainly known to be free from disease-germs, should be sterilized before using. Indeed, it is safest always to sterilize milk before using, since during the milking or in subsequent handling and transportation it is liable to become infected with germs.
All milk obtained from city milkmen or any source that isn't definitely known to be free from disease-causing germs should be sterilized before use. In fact, it's safest to always sterilize milk before using it, since it can become contaminated with germs during milking or later handling and transportation.
To Sterilize Milk for Immediate Use.—Put the milk as soon as received into the inner dish of a double boiler, the outer vessel of which should be filled with boiling water. Cover and heat the milk rapidly to as near the boiling point as possible. Allow it to remain with the water in the outer boiler actively boiling for half an hour, then remove from the stove and cool very quickly. This may be accomplished by pouring into shallow dishes, and placing these in cold water, changing the water as frequently as it becomes warm, or by using pieces of ice in the water. It is especially important to remember that the temperature of the milk should be raised as rapidly as possible, and when the milk is sufficiently cooked, cooled very quickly. Either very slow heating or slow cooling may prove disastrous, even when every other precaution is taken.
How to Sterilize Milk for Immediate Use.—As soon as you receive the milk, pour it into the inner pot of a double boiler. The outer pot should be filled with boiling water. Cover it and heat the milk quickly, getting it as close to boiling as possible. Let it stay with the water in the outer pot actively boiling for half an hour, then take it off the heat and cool it down quickly. You can do this by pouring it into shallow dishes and placing those dishes in cold water, changing the water as often as it warms up, or by using ice in the water. It’s really important to remember that you need to raise the milk’s temperature quickly, and once it’s cooked, cool it down fast. Heating or cooling too slowly can cause problems, even if you take every other precaution.
Or, well-cleaned glass fruit cans may be nearly filled with milk, the covers screwed on loosely, then placed in a kettle of cold water, gradually heated to boiling and kept at that temperature for a half hour or longer, then gradually cooled. Or, perfectly clean bottles may be filled with milk to within two inches of the top, the neck tightly closed with a wad of cotton, and the bottles placed in a steam cooker, the water in which should be cold at the start, and steamed for half an hour.
Or, you can fill well-cleaned glass fruit jars almost to the top with milk, screw the lids on loosely, and then put them in a pot of cold water. Gradually heat it to boiling and keep it at that temperature for half an hour or longer, then let it cool down slowly. Alternatively, perfectly clean bottles can be filled with milk up to two inches from the top, tightly closed with a cotton wad, and then put in a steam cooker with cold water at the beginning, steaming them for half an hour.
This cooking of milk, while it destroys many of the germs contained in milk, particularly the active disease-germs which are liable to be found in it, thus rendering it more wholesome, and improving its keeping qualities somewhat, does not so completely sterilize the milk that it will not undergo fermentative changes. Under varying conditions some thirty or forty different species of germs are to be found in milk, some of which require to be subjected to a temperature above that of boiling water, in order to destroy them. The keeping quality of the milk may be increased by reboiling it on three successive days for a half hour or longer, and carefully sealing after each boiling.
This process of heating milk kills a lot of the bacteria in it, especially the harmful ones that can cause disease, making it safer to drink and slightly better at staying fresh. However, it doesn’t completely sterilize the milk, so it can still ferment. Depending on different conditions, there can be about thirty to forty types of bacteria found in milk, some of which need to be heated to a temperature higher than boiling water to eliminate them. You can extend the milk's shelf life by boiling it again for half an hour or more on three consecutive days and sealing it carefully after each boil.
To Sterilize Milk to Keep.—This is a somewhat more difficult operation, but it may be done by boiling milk sealed in very strong bottles in a saturated solution of salt. The milk used should be perfectly fresh. It is best, when possible, to draw the milk from the cow directly into the bottles. Fill the bottles to within two inches of the top, cork them immediately and wire the corks down firmly and place them in the cold salt solution. Boil fifteen minutes or half an hour. Allow the solution to cool before removing them. If the bottles are removed from the solution while hot, they will almost instantly break. When cold, remove the bottles, and cover the tops with sealing wax. Store in a cool place, shake thoroughly once or twice a week. Milk sterilized in this manner will keep indefinitely.
How to Sterilize Milk for Preservation.—This is a somewhat more challenging process, but it can be done by boiling milk sealed in very sturdy bottles within a saturated salt solution. The milk used should be completely fresh. Ideally, you should draw the milk directly from the cow into the bottles. Fill the bottles to within two inches of the top, cork them right away, secure the corks tightly with wire, and then place them in the cold salt solution. Boil for fifteen minutes to half an hour. Let the solution cool before taking the bottles out. If you remove the bottles while they're still hot, they will likely break immediately. Once cool, take out the bottles and seal the tops with sealing wax. Store them in a cool place and shake thoroughly once or twice a week. Milk sterilized this way will remain good indefinitely.
Condensed milk, when not thoroughly boiled in the process of condensation, is liable to harbor disease-germs the same as any other milk.
Condensed milk, if not boiled properly during the condensation process, can contain disease-causing germs just like any other milk.
CREAM.
Cream varies in composition according to the circumstances under which it rises.
Cream changes in composition depending on the conditions in which it forms.
The composition of an average specimen as given by Letherby is:—
The composition of an average specimen, as stated by Letherby, is:—
| Nitrogenous matter | 2.7 |
| Fat | 26.7 |
| Sugar of milk | 2.8 |
| Mineral matter | 1.8 |
| Water | 66.0 |
In the process of churning; the membranes of casein which surround each of the little globules constituting the cream are broken, and the fat of which they are composed becomes a compact mass known as butter. The watery looking residue containing casein, sugar of milk, mineral matter, and a small proportion of fat, comprises the buttermilk.
In the process of churning, the membranes of casein that surround each of the tiny globules making up the cream are broken, and the fat they contain turns into a solid mass known as butter. The watery leftover that includes casein, lactose, minerals, and a small amount of fat is called buttermilk.
Skim-milk, or milk from which the cream has been removed, and buttermilk are analogous in chemical composition.
Skim milk, or milk that has had the cream taken out, and buttermilk are similar in chemical composition.
The composition of each, according to Dr. Edward Smith, is:—
The makeup of each, according to Dr. Edward Smith, is:—
SKIM-MILK.
| Nitrogenous matter | 4.0 |
| Sugar | 3.8 |
| Fat | 1.8 |
| Mineral matter | 0.8 |
| Water | 88.0 |
BUTTERMILK.
| Nitrogenous matter | 4.1 |
| Sugar | 3.6 |
| Fat | 0.7 |
| Mineral matter | 0.8 |
| Water | 88.0 |
Skim-milk and buttermilk, when the butter is made from sweet cream and taken fresh, are both excellent foods, although lacking the fat of new milk.
Skim milk and buttermilk, when the butter is made from fresh sweet cream, are both great foods, even though they don't have the fat content of whole milk.
Cream is more easily digested than butter, and since it contains other elements besides fat, is likewise more nutritious. In cream the fat is held in the form of an emulsion which allows it to mingle freely with water. As previously stated, each atom of fat is surrounded with a film of casein. The gastric juice has no more power to digest casein than it has free fat, and the little particles of fat thus protected are carried to the small intestines, where the pancreatic juice digests them, and on their way they do not interfere with the stomach digestion of other foods, as the presence of butter and other free fats may do.
Cream is easier to digest than butter, and since it has other components besides fat, it's also more nutritious. In cream, the fat is in the form of an emulsion, which allows it to mix well with water. As mentioned earlier, each fat atom is surrounded by a layer of casein. The gastric juice can't digest casein any better than it can free fat, so the small fat particles that are protected like this move to the small intestines, where the pancreatic juice breaks them down. Along the way, they don’t disrupt the stomach's digestion of other foods, unlike butter and other free fats might.
It is because of its greater wholesomeness that in the directions for the preparation of foods given in this work we have given preference to the use of cream over that of butter and other free fats. The usual objection to its use is its expense, and the difficulty of obtaining it from city dealers. The law of supply and cost generally corresponds with that of demand, and doubtless cream would prove no exception if its use were more general.
It’s because of its higher nutritional value that in the food preparation guidelines in this work, we prefer using cream over butter and other fats. The common concern about using cream is its cost and the challenge of finding it from city vendors. Typically, the law of supply and price aligns with demand, and cream would likely follow this trend if it were more widely used.

Cream may be sterilized and preserved in a pure state for some time, the same as milk.
Cream can be sterilized and kept in a pure state for a while, just like milk.
Milk requires especial care to secure a good quality and quantity of cream. Scrupulous cleanliness, good ventilation, and an unvarying temperature are absolute essentials. The common custom of setting milk in pans is objectionable, not only because of the dust and germs always liable to fall into the milk, but also from the difficulty of keeping milk thus set at the proper temperature for cream-rising. Every family using milk in any quantity ought to have a set of creameries of large or small capacity according to circumstances, in which the milk supply can be kept in a pure, wholesome condition, and so arranged as to facilitate the full rising of the cream if desired. A very simple and satisfactory creamery, with space for ice around the milk, similar to that represented in the accompanying cut, may be constructed by any tinman.
Milk requires special care to ensure good quality and quantity of cream. Strict cleanliness, proper ventilation, and a consistent temperature are absolutely essential. The usual practice of placing milk in pans is undesirable, not only because dust and germs can easily contaminate the milk, but also due to the difficulty of maintaining the right temperature for cream to rise. Every household that uses milk regularly should have a set of creamers, whether large or small, depending on their needs, where the milk can be kept pure and fresh, and designed to promote the complete rising of the cream if desired. A very simple and effective creamery, with space for ice around the milk, like the one shown in the accompanying image, can be built by any tinsmith.
The plan of scalding milk to facilitate the rising of the cream is excellent, as it not only secures a more speedy rising, but serves to destroy the germs found in the milk, thus lessening its tendency to sour. The best way to do this is to heat the milk in a double boiler, or a dish set inside another containing hot water, to a temperature of 150° to 165°F. as indicated by wrinkles upon its surface. The milk must not, however, be allowed to come to a boil. When scalded, it should be cooled at once to a temperature of about 60° F. and kept thus during the rising of the cream.
The method of scalding milk to help the cream rise is great because it not only speeds up the rising process but also kills the germs in the milk, reducing the chance of it souring. The best way to do this is to heat the milk in a double boiler or in a bowl placed inside another bowl filled with hot water, bringing it to a temperature of 150° to 165°F, which you can tell by the wrinkles on its surface. However, the milk must not be allowed to boil. Once scalded, it should be cooled down immediately to about 60°F and kept at that temperature while the cream rises.
BUTTER.
Of all foods wholly composed of fat, good fresh butter is the most wholesome. It should, however, be used unmelted and taken in a finely divided state, and only in very moderate quantities. If exposed to great heat, as on hot buttered toast, meats, rich pastry, etc., it is quite indigestible. We do not recommend its use either for the table or for cooking purposes when cream can be obtained, since butter is rarely found in so pure a state that it is not undergoing more or less decomposition, depending upon its age and the amount of casein retained in the butter through the carelessness of the manufacturer.
Of all foods made entirely of fat, good fresh butter is the healthiest. However, it should be used unmelted and in small amounts. When exposed to high heat, like on hot buttered toast, meats, or rich pastries, it can be hard to digest. We don’t recommend using it for meals or cooking when cream is available since butter often isn’t completely pure and can be somewhat decomposed, depending on its age and the amount of casein left in it due to the manufacturer’s negligence.
Casein, on exposure to air in a moist state, rapidly changes into a ferment, which, acting upon the fatty matter of the butter, produces rancidity, rendering the butter more or less unwholesome. Poor, tainted, or rancid butter should not be used as food in any form.
Casein, when it comes into contact with air while moist, quickly transforms into a ferment that reacts with the fat in the butter, causing it to become rancid and making the butter unhealthy to consume. Poor-quality, tainted, or rancid butter shouldn't be eaten in any way.
Good butter is pale yellow, uniform throughout the whole mass, and free from rancid taste or odor. White lumps in it are due to the incorporation of sour milk with the cream from which it was produced. A watery, milk-like fluid exuding from the freshly cut surface of butter, is evidence that insufficient care was taken to wash out all the buttermilk, thus increasing its liability to spoil.
Good butter is a light yellow color, consistent throughout, and doesn’t have any rancid taste or smell. White clumps in it are caused by sour milk mixing with the cream used to make it. If a watery, milk-like liquid seeps from the freshly cut surface of the butter, it shows that not enough care was taken to rinse out all the buttermilk, making it more prone to spoilage.
The flavor and color of butter vary considerably, according to the breed and food of the animal from which the milk was obtained. An artificial color is often given to butter by the use of a preparation of annatto.
The taste and color of butter can vary a lot, depending on the breed and diet of the animal that produced the milk. Often, a synthetic coloring is added to butter using a preparation of annatto.
Both salt and saltpeter are employed as preservatives for butter; a large quantity of the former is often used to increase the weight of the butter.
Both salt and saltpeter are used as preservatives for butter; a large amount of the former is often added to increase the weight of the butter.
Artificial Butter.—Various fraudulent preparations are sold as butter. Oleomargarine, one of the commonest, is made from tallow or beef-fat, cleaned and ground like sausage, and heated, to separate the oil from the membranes. It is then known as "butter-oil," is salted, cooled, pressed, and churned in milk, colored with annatto, and treated the same as butter. Butterine, another artificial product, is prepared by mixing butter-oil and a similar oil obtained from lard, then churning them with milk.
Artificial Butter.—Various fake products are sold as butter. Oleomargarine, one of the most common, is made from tallow or beef fat, cleaned and ground like sausage, then heated to separate the oil from the membranes. It’s then called "butter-oil," salted, cooled, pressed, and churned with milk, colored with annatto, and processed like butter. Butterine, another artificial product, is made by mixing butter-oil with a similar oil derived from lard, then churning them with milk.
An eminent analyst gives the following excellent way of distinguishing genuine butter from oleomargarine:—"When true butter is heated over a clear flame, it 'browns' and gives out a pleasant odor,—that of browned butter. In heating there is more or less sputtering, caused by minute particles of water retained in washing the butter. On the bottom of the pan or vessel in which true butter is heated, a yellowish-brown crust is formed, consisting of roasted or toasted casein. When oleomargarine is heated under similar circumstances, it does not 'brown,' but becomes darker by overheating, and when heated to dryness, gives off a grayish steam, smelling of tallow. There is no 'sputtering' when it is being heated, but it boils easily. If a pledget of cotton or a wick saturated with oleomargarine be set on fire and allowed to burn a few moments before being extinguished, it will give out fumes which are very characteristic, smelling strongly of tallow, while true butter behaves very differently."
An expert analyst provides the following great method to tell genuine butter from margarine: "When real butter is heated over a clear flame, it 'browns' and releases a pleasant smell—the aroma of browned butter. While heating, there's some sputtering due to tiny water droplets left from washing the butter. At the bottom of the pan where real butter is heated, you’ll see a yellowish-brown crust forming, made up of roasted or toasted casein. On the other hand, when margarine is heated in the same way, it doesn’t 'brown'; instead, it darkens when overheated, and if heated until dry, it emits gray steam that smells like tallow. There’s no 'sputtering' while it heats, but it boils easily. If a piece of cotton or a wick soaked in margarine is lit and allowed to burn for a bit before being put out, it will produce fumes that are very distinctive, with a strong tallow smell, while real butter reacts quite differently."

Butter in Ancient Times.—Two kinds of butter seem to have been known to the ancient Jews, one quite like that of the present day, except that it was boiled after churning, so that it became in that warm climate practically an oil; the other, a sort of curdled milk. The juice of the Jerusalem artichoke was mixed with the milk, when it was churned until a sort of curd was separated. The Oriental method of churning was by putting the milk into a goat-skin and swinging and shaking the bag until the butter came, as illustrated in the accompanying cut.
Butter in Ancient Times.—It seems that the ancient Jews knew two types of butter: one similar to what we have today, except that they boiled it after churning, which made it turn into a sort of oil in that warm climate; and the other, a type of curdled milk. They mixed the juice of the Jerusalem artichoke with the milk and churned it until a type of curd was formed. The traditional method of churning involved placing the milk in a goat-skin bag and swinging and shaking it until the butter was produced, as shown in the accompanying illustration.
An article still sold as butter in Athens is made by boiling the milk of goats, allowing it to sour, and then churning in a goat-skin. The result is a thick, white, foamy substance appearing more like cream than butter.
An article still sold as butter in Athens is made by boiling goat's milk, letting it sour, and then churning it in a goat-skin. The result is a thick, white, foamy substance that looks more like cream than butter.
Butter-Making.—The manufacture of good butter is dependent upon good cows and the care given them, as well as most careful treatment of the milk and cream. The milk to be used for butter making, as indeed for all purposes, should be most carefully strained through a wire strainer covered with three or four thicknesses of perfectly clean cheese cloth.
Butter-Making.—Making good butter relies on having healthy cows and providing them with proper care, along with taking great care of the milk and cream. The milk intended for butter making, as well as for any other use, should be carefully strained through a wire strainer lined with three or four layers of perfectly clean cheesecloth.
The following points given by an experienced dairyman will be found worthy of consideration by all who have to do with the manufacture of this article:—
The following points from an experienced dairyman should be taken into account by everyone involved in making this product:—
"Milk is almost as sensitive to atmospheric changes as mercury itself. It is a question among many as to what depth milk should be set to get the most cream. It does not make so much difference as to the depth as it does the protection of the milk from acid or souring. As soon as the milk begins to sour, the cream ceases to rise.
"Milk is nearly as susceptible to changes in the atmosphere as mercury. There’s ongoing debate about how deep the milk should be stored to get the maximum cream. The depth isn’t as important as keeping the milk safe from acid or spoilage. Once the milk starts to sour, the cream stops rising."
"With a clear, dry atmosphere the cream will rise clean in the milk; but in that condition of the atmosphere which readily sours the milk, the cream will not rise clean, but seems to hang in the milk, and this even when the milk is protected by being set in water.
"With a clear, dry atmosphere, the cream will rise pure in the milk; but in an atmosphere that quickly sours the milk, the cream won't rise cleanly, but appears to linger in the milk, even when the milk is kept safe by being placed in water."
"The benefit of setting milk in cold water is that the water protects the milk from becoming acid until the cream has time to rise. For cream to rise readily on milk set in cold water, the atmosphere in the room should be warmer than the water. As much cream will rise on milk set in cold water in one hour as on milk not set in water in twenty-four hours. The milk should be skimmed while sweet, and the cream thoroughly stirred at each skimming.
"The advantage of placing milk in cold water is that the water keeps the milk from turning sour until the cream has a chance to rise. For cream to rise easily on milk kept in cold water, the room temperature should be warmer than the water. The same amount of cream will rise from milk in cold water in one hour as from milk not placed in water in twenty-four hours. The milk should be skimmed while it's still fresh, and the cream should be stirred well each time it’s skimmed."
"Cream skimmed from different milkings, if churned at the same time in one churn, should be mixed eight to ten hours before churning; then the cream will all come alike.
"Cream taken from different milkings, if churned together at the same time in one churn, should be mixed eight to ten hours before churning; this way, the cream will all come out consistently."
"The keeping qualities of butter depend principally upon two things: First, the buttermilk must be all gotten out; and secondly, the grain of the butter should be kept as perfect as possible. Butter should not be allowed to be churned after it has fairly come, and should not be gathered compactly in the churn in taking out, but the buttermilk should be drained from the butter in the churn, through a hair sieve, letting the butter remain in the churn. Then take water and turn it upon the butter with sufficient force to pass through the butter, and in sufficient quantity to rinse the buttermilk all out of the butter. With this process of washing the butter the grain is not injured or mashed, and is thus far kept perfect. And in working in the salt the ladle or roll or worker, whatever it is, should never be allowed to slip on the butter,—if it does, it will destroy the grain,—but it should go upon the butter in a pressing or rolling motion."
"The quality of butter preservation mainly depends on two things: First, all the buttermilk must be completely removed; and second, the texture of the butter should be kept as flawless as possible. Butter shouldn't be churned once it has fully formed, and it shouldn't be packed tightly in the churn when being removed. Instead, the buttermilk should be drained from the butter in the churn using a fine sieve, allowing the butter to stay in the churn. Then, use water to pour over the butter with enough force to wash through it, using enough water to rinse out all the buttermilk. This washing process keeps the texture intact and prevents it from getting damaged. When adding salt, the tool being used—whether it’s a ladle, roller, or some other implement—should never slip on the butter; doing so will ruin the texture. It should apply a pressing or rolling motion on the butter."
Test the temperature of the cream with a thermometer, and churn it at 60° in summer and 62° in winter. If the butter is soft, it may be hardened by pouring onto it while working a brine made by dissolving a pint of salt in ten quarts of water. The salt used in the butter should be carefully measured, three fourths of an ounce of salt to the pound being the usual allowance.
Test the temperature of the cream with a thermometer, and churn it at 60°F in summer and 62°F in winter. If the butter is soft, you can harden it by pouring a brine made by dissolving a pint of salt in ten quarts of water over it while working. The salt used in the butter should be measured carefully, with the usual amount being three fourths of an ounce of salt per pound.
Butter, like milk, absorbs odors readily, and should never be allowed to remain in occupied rooms or any place exposed to strong or foul odors, but be kept covered in a cold place.
Butter, like milk, easily takes on odors and should never be left in occupied rooms or anywhere with strong or unpleasant smells. It should always be kept covered in a cool place.
CHEESE.
Cheese is a product of milk prepared by separating the casein, with more or less of the cream, according to the manner in which it has been prepared, from the other ingredients of the milk. It is an article, which, although possessing a large proportion, of nutritive material, is very difficult of digestion, and the use of which is very questionable, not only for this reason, but because it is very liable to contain a poison called tyrotoxicon, capable of producing most violent and indeed fatal results, according to the remarkable researches of Prof. Vaughan of Michigan University. This poison is sometimes found in ice cream and custards, cream-puffs, etc., made from stale milk or cream.
Cheese is made from milk by separating the casein, along with varying amounts of cream, depending on how it’s processed, from the other components of the milk. It's a food that, while rich in nutrients, can be hard to digest, and its consumption is questionable, not just for this reason but also because it can contain a toxin called tyrotoxicon, which can cause severe and even fatal effects, according to the notable research by Prof. Vaughan from Michigan University. This toxin can occasionally be present in ice cream, custards, cream puffs, and other items made from stale milk or cream.
It is much better to use milk in its fresh, natural state than in any of its products. Made into either butter or cheese, we lose some of its essential elements, so that what is left is not a perfect food.
It’s much better to use milk in its fresh, natural form than in any of its products. When it’s made into butter or cheese, we lose some of its essential elements, so what remains isn’t a complete food.
RECIPES.
To prepare hot milk, heat it in a double boiler until a wrinkled skin appears upon the surface. In the double boiler it may be kept at the proper temperature for a long time without difficulty, and thus prepared, it forms one of the most healthful of foods.
To prepare hot milk, heat it in a double boiler until a thin skin forms on the surface. In the double boiler, it can be kept at the right temperature for a long time easily, and when prepared this way, it becomes one of the healthiest foods.
Milk, either cold or hot, should be taken a few sips only at a time, and not be drank in copious draughts when used in connection with other foods at mealtime. It will then coagulate in the stomach in small flakes much more easily digested than the large mass resulting when a large quantity is swallowed at a time.
Milk, whether cold or hot, should be consumed in just a few sips at a time, and shouldn’t be drunk in large gulps when eaten with other foods at mealtimes. This way, it will clump in the stomach into small flakes that are much easier to digest than the large mass that forms when a lot is swallowed at once.
Devonshire or Clotted Cream.—This is prepared as follows: Strain the milk as it comes fresh from the cow into a deep pan which will fit tightly over a kettle in which water can be boiled, and set away in a cool well-ventilated place, where it should be allowed to remain undisturbed from eight to twelve hours or longer. Then take the pan up very carefully so as not to disturb the cream, place over a kettle of water, heat to near the boiling point, or until a rim of bubbles half an inch wide forms all around the dish of milk. It must not, however, be allowed to boil, or the cream will be injured. Now lift the pan again with equal care back to a cool place and allow it to stand from twelve to twenty-four hours longer. The cream should be a compact mass of considerable thickness, and may be divided with a knife into squares of convenient size before skimming. It is delicious for use on fruit and grains.
Devonshire or Clotted Cream.—This is made as follows: Strain the milk right after it's fresh from the cow into a deep pan that fits tightly over a kettle filled with boiling water, and set it aside in a cool, well-ventilated spot, where it should sit undisturbed for eight to twelve hours or even longer. Then, carefully lift the pan without disturbing the cream, place it over the kettle of water, and heat it until it's close to boiling, or until a half-inch-wide ring of bubbles forms around the edge of the milk. It must not actually boil, or the cream will be ruined. Now, gently move the pan back to a cool place and let it sit for another twelve to twenty-four hours. The cream should become a thick, solid mass, and you can cut it into squares of convenient size before skimming. It's delicious on fruit and grains.
Cottage Cheese.—This dish is usually prepared from milk which has curdled from lack of proper care, or from long standing exposed to the air, and which is thus in some degree decomposing. But the fact that the casein of the milk is coagulated by the use of acids makes it possible to prepare this dish in a more wholesome manner without waiting for decomposition of the milk. Add to each four quarts of milk one cupful of lemon juice; let it stand until coagulated, then heat slowly, but do not boil, until the curd has entirely separated from the whey. Turn the whole into a colander lined with a square of clean cheese cloth, and drain off the whey. Add to the curd a little salt and cream, mix all together with a spoon or the hands, and form into cakes or balls for the table. The use of lemon gives a delicious flavor, which may be intensified, if desired, by using a trifle of the grated yellow rind.
Cottage Cheese.—This dish is usually made from milk that has gone bad due to improper storage or has been left out for too long, leading to some degree of spoilage. However, because the casein in the milk can be coagulated with acids, it’s possible to prepare this dish in a healthier way without waiting for the milk to spoil. For every four quarts of milk, add one cup of lemon juice; let it sit until it coagulates, then heat it slowly without letting it boil, until the curd completely separates from the whey. Pour everything into a colander lined with a clean cheesecloth and drain off the whey. Add a bit of salt and cream to the curd, mix everything together with a spoon or your hands, and shape it into cakes or balls for serving. The lemon adds a delicious flavor, which you can enhance if you like by adding a little bit of the grated yellow rind.
Cottage Cheese from Buttermilk.—Place a pail of fresh buttermilk in a kettle of boiling water, taking care to have sufficient water to come up even with the milk in the pail. Let the buttermilk remain until it is heated throughout to about 140°, which can be determined by keeping a thermometer in the milk and stirring it frequently. When it is sufficiently heated, empty the curd into strong muslin bags and hang up to drain for several hours. If properly scalded and drained, the curd will be quite dry and may be seasoned and served the same as other cottage cheese. If scalded too much, it will be watery.
Cottage Cheese from Buttermilk.—Put a container of fresh buttermilk in a pot of boiling water, making sure there's enough water to reach the same level as the milk in the container. Let the buttermilk stay until it's heated all the way through to about 140°, which you can check by using a thermometer in the milk and stirring it often. Once it's heated properly, pour the curd into sturdy muslin bags and hang them up to drain for several hours. If it’s heated and drained correctly, the curd will be quite dry and can be seasoned and served like other cottage cheese. If it's overheated, it will be too watery.
Cottage Cheese with Sour Milk.—Take a pan of newly-loppered thick sour milk, and place it over a kettle of boiling water until the whey separates from the curd, breaking and cutting the curd as the milk becomes warmed, so as to allow the whey to settle. The milk should be well scalded, but not allowed to boil, as that will render the curd tough and leathery. Have ready a clean piece of cheese cloth spread inside a colander, dip the curd into it, and leave it to drain. If preferred, the corners of the cloth may be tied with a string, thus forming a bag in which the cheese may be hung up to drain. When well drained, remove the dry curd to a dish, rub it fine with the hands, add salt, and season with sweet cream, beating it well through the curd with a silver fork. It may be shaped into balls with the hands or pressed in large cups or bowls.
Cottage Cheese with Sour Milk.—Take a pan of freshly separated thick sour milk and set it over a pot of boiling water until the whey separates from the curd, breaking and cutting the curd as the milk warms to help the whey settle. The milk should be heated but not boiled, as boiling will make the curd tough and rubbery. Have a clean piece of cheesecloth ready, placed inside a colander, then pour the curd into it and let it drain. If you prefer, you can tie the corners of the cloth with string, creating a bag to hang the cheese for draining. Once it’s well drained, transfer the dry curd to a dish, crumble it by hand, add salt, and mix in sweet cream, beating it thoroughly through the curd with a silver fork. It can be shaped into balls by hand or pressed into large cups or bowls.
French Butter.—Fill a large, wide-mouthed glass bottle or jar about half full of thick sweet cream. Cork tightly, and with one end of the bottle in each hand shake it vigorously back and forth until the butter has separated from the milk, which it will generally do in a few minutes. Work out the buttermilk, make into small pats, and place on ice until ready to serve. As a rule this butter is not washed or salted, as it is intended for immediate use.
French Butter.—Fill a large, wide-mouthed glass bottle or jar about halfway with thick sweet cream. Seal it tightly, and hold one end of the bottle in each hand. Shake it back and forth vigorously until the butter separates from the milk, which usually happens in a few minutes. Remove the buttermilk, shape the butter into small pats, and place them on ice until you're ready to serve. Typically, this butter is not washed or salted, as it’s meant for immediate use.
Emulsified Butter.—Boil the butter with water for half an hour to destroy any germs it may contain; use plenty of water and add the butter to it while cold. When boiled, remove from the fire and allow it to become nearly cold, when the butter will have risen to the top and may be removed with a skimmer, or it may be separated from the water by turning the whole after cooling into a clean strainer cloth placed inside a colander. The butter may be pressed in the cloth if any water still remains. If hardened, reheat just sufficient to soften, and add to it, while still liquid, but cooled to about blood heat, the yolk of one egg for each tablespoonful of butter, and stir until very thoroughly mingled.
Emulsified Butter.—Boil the butter with water for half an hour to kill any germs it may have; use plenty of water and add the cold butter to it. Once boiled, take it off the heat and let it cool down nearly completely, allowing the butter to rise to the top, where it can be skimmed off. Alternatively, after cooling, you can pour everything into a clean strainer cloth placed inside a colander to separate the butter from the water. If there's still water left, you can press the butter in the cloth. If the butter has hardened, gently reheat it until just softened, then add the yolk of one egg for each tablespoon of butter while it’s still liquid but cooled to about body temperature, and stir until completely combined.
Or, add to each tablespoonful of the liquid butter two level tablespoonfuls of flour, rub together thoroughly, and cook until thickened in a half cupful of boiling water. If cream is not obtainable and butter must be used for seasoning, it is preferable to prepare it in one of the above ways for the purpose, using the quantity given as an equivalent of one cupful of thin cream. It will be evident, however, that these preparations will not only season but thicken whatever they are used in, and that additional liquid should be used on that account.
Or, to each tablespoon of melted butter, add two heaping tablespoons of flour, mix them together well, and cook until thick in half a cup of boiling water. If cream isn't available and butter needs to be used for flavoring, it's better to prepare it using one of the methods above, using the amount specified as a substitute for one cup of light cream. However, it's clear that these mixtures will not only add flavor but also thicken whatever they're added to, so additional liquid should be included for that reason.
TABLE TOPICS.
A little six-year-old boy went into the country visiting. About the first thing he got was a bowl of bread and milk. He tasted it, and then hesitated a moment, when his mother asked if he didn't like it; to which he replied, smacking his lips, "Yes, ma'am. I was only wishing that our milkman in town would keep a cow!"
A little six-year-old boy went to the countryside for a visit. The first thing he got was a bowl of bread and milk. He tasted it and then paused for a moment when his mother asked if he didn't like it. He responded, smacking his lips, "Yes, ma'am. I was just wishing that our milkman in town would have a cow!"
When Horace Greeley was candidate for the presidency, he at one time visited New Orleans, whose old creole residents gave him a dinner; and to make it as fine an affair as possible, each of the many guests was laid under contribution for some of the rarest wines in his cellar. When dinner was announced, and the first course was completed, the waiter appeared at Mr. Greeley's seat with a plate of shrimp. "You can take them away," he said to the waiter, and then added to the horrified French creole gentleman who presided, "I never eat insects of any kind." Later on, soup was served, and at the same time a glass of white wine was placed at Mr. Greeley's right hand. He pushed it quietly away, but not unobserved by the chief host. "Do you not drink wine?" he asked.
When Horace Greeley was running for president, he once visited New Orleans, where the local Creole residents hosted a dinner for him. To make it a special event, each of the many guests contributed some of the rarest wines from their cellars. When dinner was announced and the first course was finished, a waiter brought a plate of shrimp to Mr. Greeley's table. "You can take those away," he said to the waiter, then added to the shocked French Creole gentleman in charge, "I never eat insects of any kind." Later, when soup was served, a glass of white wine was placed at Mr. Greeley's right hand. He quietly pushed it aside, but the main host noticed. "Do you not drink wine?" he asked.
"No," answered Mr. Greeley; "I never drink any liquors."
"No," Mr. Greeley replied, "I never drink alcohol."
"Is there anything you would like to drink with your soup?" the host then asked, a little disappointed.
"Is there anything you’d like to drink with your soup?" the host then asked, slightly disappointed.
"If you've got it," answered Mr. Greeley, "and it isn't any trouble, I'd like a glass of fresh buttermilk."
"If you've got it," replied Mr. Greeley, "and it's not too much trouble, I'd love a glass of fresh buttermilk."
Said the host afterward in his broken English, "Ze idea of electing to ze presidency a man vot drink buttermilk vis his soup!"
Said the host later in his broken English, "The idea of electing a man who drinks buttermilk with his soup to the presidency!"
Old friendships are often destroyed by toasted cheese, and hard salted meat has often led to suicide.—Sydney Smith.
Old friendships can often fall apart over grilled cheese, and tough salted meat has frequently been a trigger for despair.—Sydney Smith.
A German sitting beside a Spanish officer on board a Havana steamer, was munching Limberger cheese with evident satisfaction when it occurred to him that he ought to offer some to his neighbor, who very coolly declined. "You think it unhealthful to eat that?" inquired the German in polite astonishment. "Unhealthful?" exclaimed the Hidalgo, with a withering look and a gasp for a more adequate word; "No, sir: I think it an unnatural crime!"—Oswald.
A German sitting next to a Spanish officer on a steamer in Havana was happily munching on Limburger cheese when he realized he should offer some to his neighbor, who calmly refused. "Do you think it's unhealthy to eat that?" the German asked, surprised. "Unhealthy?" the Hidalgo shot back, giving him a scornful look and searching for a better word; "No, sir: I think it's an unnatural crime!"—Oswald.
Good for Dyspepsia.—"Really, don't you think cheese is good for dyspepsia?" said an advocate of the use of this common article of food. "Why, my uncle had dyspepsia all his life, and he took a bit of cheese at the close of every meal!"
Good for Indigestion.—"Honestly, don't you think cheese is good for indigestion?" said someone who supports using this common food. "Well, my uncle had indigestion his whole life, and he ate a piece of cheese at the end of every meal!"
Mattieu Williams tells us, "When common sense and true sentiment supplant mere unreasoning prejudice, vegetables oils and vegetable fats will largely supplant those of animal origin in every element of our dietary."
Mattieu Williams tells us, "When common sense and genuine feeling replace blind prejudice, vegetable oils and fats will mainly replace those from animal sources in every part of our diet."

EGGS
 s will be seen from the analysis given below, an egg is particularly
rich in nitrogenous elements. It is indeed one of the most highly
concentrated forms of nitrogenous food, about one third of its weight
being solid nutriment, and for this reason is often found serviceable in
cases of sickness where it is desirable to secure a large amount of
nourishment in small bulk.
s will be seen from the analysis given below, an egg is particularly
rich in nitrogenous elements. It is indeed one of the most highly
concentrated forms of nitrogenous food, about one third of its weight
being solid nutriment, and for this reason is often found serviceable in
cases of sickness where it is desirable to secure a large amount of
nourishment in small bulk.
As shown in the analysis below, an egg is especially high in nitrogenous compounds. It's actually one of the most concentrated sources of nitrogen-rich food, with roughly one third of its weight made up of solid nutrients. Because of this, it's often useful in situations of illness where getting a lot of nutrition in a small amount is important.
Composition of the white of an ordinary hen's egg.
| Nitrogenous matter | 20.4 |
| Fatty matter | 10.0 |
| Mineral matter | 1.6 |
| Water | 68.0 |
Composition of the yolk.
| Nitrogenous matter | 1.0 |
| Fatty matter | 30.7 |
| Mineral matter | 1.3 |
| Water | 52.0 |
The white of egg is composed mainly of albumen in a dissolved state, inclosed in layers of thin membrane. When beaten, the membranes are broken, and the liberated albumen, owing to its viscous or glutinous nature, entangles and retains a large amount of air, thus increasing to several times its original bulk.
The white of an egg mostly consists of albumen in a dissolved form, surrounded by layers of thin membrane. When whipped, the membranes break, and the released albumen, because of its thick and sticky consistency, traps and holds a lot of air, causing it to swell to several times its original size.
The yolk contains all the fatty matter, and this, with a modified form of albumen called vitellin, forms a kind of yellow emulsion. It is inclosed in a thin membrane, which separates it from the surrounding white.
The yolk has all the fat, and along with a modified type of protein called vitellin, it forms a kind of yellow mixture. It's enclosed in a thin membrane that separates it from the surrounding egg white.
The yolk, being lighter than the white, floats to that portion of the egg which is uppermost, but is held in position by two membranous cords, one from each end of the egg. The average weight of an egg is about two ounces, of which ten per cent consists of shell, sixty of white, and thirty of yolk.
The yolk, being lighter than the white, rises to the top part of the egg but is kept in place by two membrane cords, one from each end of the egg. The average weight of an egg is about two ounces, with ten percent being the shell, sixty percent the white, and thirty percent the yolk.
How to Choose Eggs.—The quality of eggs varies considerably, according to the food upon which the fowls are fed. Certain foods communicate distinct flavors, and it is quite probable that eggs may be rendered unwholesome through the use of filthy or improper food; hence it is always best, when practicable, to ascertain respecting the diet and care of the fowls before purchasing eggs.
How to Choose Eggs.—The quality of eggs can vary a lot, depending on what the hens are fed. Certain foods give eggs their unique flavors, and it's likely that eggs can become unhealthy if the hens eat dirty or unsuitable food; therefore, it’s always a good idea to check the diet and care of the hens before buying eggs, whenever possible.
On no account select eggs about the freshness of which there is any reason to doubt. The use of stale eggs may result in serious disturbances of the digestive organs.
On no account should you choose eggs if you have any doubts about their freshness. Using stale eggs can lead to serious digestive issues.
An English gentleman who has investigated the subject quite thoroughly, finds upon careful microscopical examination that stale eggs often contain cells of a peculiar fungoid growth, which seems to have developed from that portion of the egg which would have furnished material for the flesh and bones of the chick had the process of development been continued. Experiments with such eggs upon dogs produce poisonous effects.
An English gentleman who has looked into this topic quite thoroughly finds that, upon careful microscopic examination, stale eggs often contain cells of a strange fungus. This growth appears to come from the part of the egg that would have turned into the flesh and bones of a chick if development had continued. Experiments with such eggs on dogs show poisonous effects.
There are several ways of determining with tolerable accuracy respecting the freshness of an egg. A common test is to place it between the eye and a strong light. If fresh, the white will appear translucent, and the outline of the yolk can be distinctly traced. By keeping, eggs become cloudy, and when decidedly stale, a distinct, dark, cloud-like appearance may be discerned opposite some portion of the shell. Another test is to shake the egg gently at the ear; if a gurgle or thud is heard, the egg is bad. Again, eggs may be tested by dropping into a vessel containing a solution of salt and water, in the proportion of a tablespoonful to a quart. Newly laid eggs will sink; if more than six days old, they will float in the liquid; if bad, they will be so light as to ride on the surface of the brine. The shell of a freshly laid egg is almost full; but owing to the porous character of the shell, with age and exposure to air a portion of the liquid substance of which the egg is composed evaporates, and air accumulates in its place at one of the extremities of the shell. Hence an egg loses in density from day to day, and the longer the egg has been kept, the lighter it becomes, and the higher it will rise in the liquid.
There are several ways to accurately check how fresh an egg is. A common test is to hold it between your eye and a bright light. If it's fresh, the white will look translucent, and you can clearly see the outline of the yolk. As eggs age, the white becomes cloudy, and when they're definitely stale, you’ll notice a dark, cloudy appearance on part of the shell. Another test is to gently shake the egg next to your ear; if you hear a gurgling sound or a thud , the egg is bad. You can also test eggs by dropping them into a container of saltwater, using a tablespoon of salt for every quart of water. Freshly laid eggs will sink; if they're older than six days, they'll float; if they're bad, they'll be so light that they'll stay on top of the brine. The shell of a freshly laid egg is nearly full; however, due to the porous nature of the shell, as the egg ages and is exposed to air, some of the liquid inside evaporates, and air enters at one end of the shell. This means an egg loses density over time, and the longer it's kept, the lighter it gets, causing it to rise higher in the liquid.
An egg that will float on the surface of the liquid is of too questionable a character to be used without breaking, and is apt to be unfit for use at all.
An egg that floats on the surface of the liquid is too questionable to use without breaking, and it's likely not fit for use at all.
How to Keep Eggs.—To preserve the interior of an egg in its natural state, it is necessary to seal the pores of the shell air-tight, as the air which finds its way into the egg through the pores of the shell causes gradual decomposition. Various methods are devised to exclude the air and thus preserve the egg. A good way is to dip perfectly fresh eggs into a thick solution of gum-arabic,—equal parts of gum and water,—let the eggs dry and dip them again, taking care that the shells are entirely covered with the solution each time. When dry, wrap separately in paper and pack in a box of sawdust, bran, salt, or powdered charcoal, and cover tightly to keep out the air.
How to Keep Eggs.—To keep the inside of an egg in its natural state, you need to seal the shell's pores completely, because air that gets in through the shell causes slow decay. There are various methods to keep the air out and preserve the egg. One effective way is to dip perfectly fresh eggs into a thick solution of gum arabic—using equal parts of gum and water—let the eggs dry, and dip them again, making sure the shells are fully covered with the solution each time. Once dry, wrap each egg in paper and pack them in a box with sawdust, bran, salt, or powdered charcoal, then seal it tightly to keep the air out.
There is a difference of opinion as to which end should be placed down in packing; most authorities recommend the smaller end. However, an experienced poultryman offers the following reasons for packing with the larger end down: "The air-chamber is in the larger end, and if that is placed down, the yolk will not break through and touch the shell and thereby spoil. Another thing: if the air-chamber is down, the egg is not so liable to shrink away."
There’s a disagreement about which end should be positioned down when packing eggs; most experts suggest the smaller end. However, an experienced poultry farmer provides these reasons for packing with the larger end down: “The air chamber is at the larger end, and if that end is down, the yolk won’t break through and touch the shell, which would ruin it. Additionally, if the air chamber is down, the egg is less likely to shrink.”
It would be well for housekeepers to make the test by packing eggs from the same lot each way and noting the result.
It would be a good idea for housekeepers to test by packing eggs from the same batch in different ways and observing the outcome.
Melted wax or suet may be used to coat the shells. Eggs are sometimes immersed and kept in a solution of lime water, a pound of lime to a gallon of cold water, or simply packed in bran or salt, without a previous coating of fat or gum. By any of these methods they will keep for several weeks. Eggs, however, readily absorb flavors from surrounding substances, and for that reason lime water or salt solution are somewhat objectionable. Nothing of a disagreeable odor should be placed near eggs.
Melted wax or suet can be used to coat the shells. Eggs are sometimes dipped and stored in a solution of lime water, mixing one pound of lime with a gallon of cold water, or simply packed in bran or salt, without any prior coating of fat or gum. Using any of these methods, they can be preserved for several weeks. However, eggs can easily absorb flavors from nearby substances, which makes lime water or salt solution a bit problematic. Nothing with an unpleasant odor should be placed near eggs.
Eggs for boiling may be preserved by placing in a deep pan, and pouring scalding water over them. Let them stand half a minute, drain off the water, and repeat the process two or three times. Wipe dry, and when cool, pack in bran.
Eggs for boiling can be preserved by placing them in a deep pan and pouring hot water over them. Let them sit for half a minute, drain the water, and repeat this process two or three times. Wipe them dry, and once they're cool, pack them in bran.
Eggs should be kept in a cool, not cold, place and handled carefully, as rough treatment may cause the mingling of the yolk and white by rupturing the membrane which separates them; then the egg will spoil quickly.
Eggs should be stored in a cool, not cold, place and handled gently, as rough handling can break the membrane that keeps the yolk and white separate, causing them to mix and making the egg spoil quickly.
The time required for the digestion of a perfectly cooked egg varies from three to four hours.
The time it takes to digest a perfectly cooked egg is between three to four hours.
It is generally conceded that eggs lightly cooked are most readily digested. What is generally termed a hard-boiled egg is not easily acted upon by the digestive juices, and any other manner of cooking by which the albumen becomes hardened and solid offers great resistance to digestion.
It is widely agreed that softly cooked eggs are the easiest to digest. A hard-boiled egg, as it's commonly called, is not easily broken down by digestive juices, and any cooking method that hardens and solidifies the egg white makes it much harder to digest.
To Beat Eggs.—This may seem trivial, but no dish requiring eggs can be prepared in perfection, unless they are properly beaten, even if every other ingredient is the best. An egg-beater or an egg-whip is the most convenient utensil for the purpose; but if either of these is not to be had, a silver fork will do very well, and with this the beating should be done in sharp, quick strokes, dipping the fork in and out in rapid succession, while the egg should grow firmer and stiffer with every stroke. When carelessly beaten, the result will be a coarse and frothy instead of a thick and cream-like mass. Use a bowl in beating eggs with an egg-beater, and a plate when a fork or egg-whip is employed.
How to Beat Eggs.—This might seem unimportant, but no dish that uses eggs can be made perfectly unless they are beaten properly, even if all the other ingredients are top-notch. An egg beater or an egg whip is the easiest tool for this; however, if you don’t have one, a silver fork works just fine. Use sharp, quick strokes to beat the eggs, dipping the fork in and out rapidly, while the egg should become firmer and stiffer with each stroke. If beaten carelessly, the result will be a coarse and frothy mixture instead of a thick and creamy one. Use a bowl when beating eggs with an egg beater, and a plate when using a fork or egg whip.
If the white and yolk are used separately, break the shells gently about the middle, opening slowly so as to let the white fall into the dish, while retaining the yolk in one half of the shell. If part of the white remains, turn the yolk from the one half to the other till the white has fallen. Beat the yolks until they change from their natural orange color to a much lighter yellow. The whites should be beaten until firm and dry enough not to fall from the bowl if turned upside down. The yolk should always be beaten first, since, if the white is left to stand after being beaten, a portion of the air, which its viscous nature allows it to catch up, escapes and no amount of beating will render it so firm a second time. Eggs which need to be washed before breaking should always be wiped perfectly dry, that no water may become mingled with the egg, as the water may dilute the albumen sufficiently to prevent the white from becoming firm and stiff when beaten.
If you're using the egg white and yolk separately, gently crack the shells around the middle and open them slowly so the egg white can fall into the dish while keeping the yolk in one half of the shell. If some white remains, transfer the yolk back and forth between the halves until the white has completely fallen. Beat the yolks until their natural orange color turns to a much lighter yellow. The egg whites should be beaten until they’re firm and dry enough not to fall out of the bowl if turned upside down. Always beat the yolks first because if the whites sit after being beaten, some of the air they’ve trapped will escape, and no amount of beating will make them as firm again. Eggs that need to be washed before breaking should always be wiped completely dry to avoid any water mixing with the egg, as this can dilute the albumen enough to prevent the white from becoming firm and stiff when beaten.
In cold weather, it is sometimes difficult to beat the whites as stiff as desirable. Albumen is quite susceptible to temperature, and this difficulty may be overcome by setting the dish in which the eggs are beaten into warm water—not hot by any means—during the process of beating. In very hot weather it is often advantageous to leave the eggs in cold or ice water for a short time before beating. When a number of eggs are to be used, always break each by itself into a saucer, so that any chance stale egg may not spoil the whole. If the white or yolk of an egg—is left over, it may be kept for a day or two if put in a cool place, the yolk thoroughly beaten, the white unbeaten.
In cold weather, it can be tricky to whip egg whites to the desired stiffness. Egg whites are quite sensitive to temperature, and you can overcome this by placing the bowl you're using to beat the eggs in warm water—not hot—while you beat them. In very hot weather, it's often helpful to chill the eggs in cold or ice water for a little while before you start beating. If you're using several eggs, always crack each one into a separate small dish to prevent a bad egg from ruining the whole batch. If you have any leftover egg white or yolk, you can store it for a day or two in a cool place, making sure to beat the yolk thoroughly and leave the egg white unbeaten.
RECIPES.
Eggs In Shell.—The usual method of preparing eggs for serving in this way is to put them into boiling water, and boil or simmer until they are considered sufficiently cooked. Albumen, of which the white of the egg is composed, is easiest digested when simply coagulated. The yolk, if cooked at all, is easiest digested when dry and mealy. Albumen coagulates at 160°, and when the boiling point is reached, it becomes hardened, tough, and leathery, and very difficult of digestion. If the egg were all albumen, it might be easily and properly cooked by dropping into boiling water, allowing it to remain for a few seconds, and removing it, since the shell of the egg would prevent its becoming sufficiently heated in so short a time as to become hardened; but the time necessary to cook properly the white of the egg would be insufficient for the heat to penetrate to and cook the yolk; and if it is desirable to cook the yolk hard, the cooking process should be carried on at a temperature below the boiling point, subjecting the egg to a less degree of heat, but for a longer time. The most accurate method is to put the eggs into water of a temperature of 160°, allowing them to remain for twenty minutes and not permitting the temperature of the water to go above 165°. Cooked in this way, the white will be of a soft, jelly-like consistency throughout, while the yolks will be hard. If it is desired to have the yolks dry and mealy, the temperature of the water must be less, and the time of cooking lengthened. We have secured the most perfect results with water at a temperature of 150°, and seven hours' cooking. The temperature of the water can be easily tested by keeping in it an ordinary thermometer, and if one possesses a kerosene or gas stove, the heat can be easily regulated to maintain the required temperature.
Eggs In Shell.—The standard way to prepare eggs for serving like this is to place them in boiling water and boil or simmer until they're cooked enough. The albumen, which makes up the egg white, is digested most easily when it’s just coagulated. The yolk, if cooked, is easiest to digest when it’s dry and crumbly. Albumen coagulates at 160°F, and when boiling point is reached, it becomes hard, tough, and leathery, making it difficult to digest. If the egg were all albumen, it could be easily and properly cooked by dropping it into boiling water for a few seconds and then taking it out, since the shell would keep it from getting too hot too quickly; however, the time needed to cook the egg white properly wouldn’t be enough for the heat to reach and cook the yolk. If you want a hard-cooked yolk, the cooking should happen at a temperature below boiling, exposing the egg to less heat for a longer time. The best method is to put the eggs in water heated to 160°F, letting them sit for twenty minutes without allowing the water temperature to go above 165°F. Cooked this way, the egg white will have a soft, jelly-like consistency all the way through, while the yolks will be firm. If you want the yolks to be dry and crumbly, the water temperature should be lower and the cooking time should be extended. The best results have been achieved with water at 150°F and seven hours of cooking. You can easily check the water temperature with an ordinary thermometer, and if you have a kerosene or gas stove, you can easily adjust the heat to maintain the right temperature.
Another method, although less sure, is to pour boiling water into a saucepan, draw it to one side of the range where it will keep hot, but not boil, put in the eggs, cover, and let stand for twenty minutes. If by either method it is desired to have the yolk soft-cooked, lessen the time to ten minutes or so, according to the hardness desired. Eggs are best served as soon as done, as the white becomes more solid by being kept in a hot shell.
Another method, though not as reliable, is to pour boiling water into a saucepan, then move it to one side of the stove where it will stay hot but not boil. Place the eggs in, cover it, and let it sit for twenty minutes. If you want the yolk to be soft-cooked using either method, reduce the time to about ten minutes, depending on how soft you want them. Eggs are best served right after they’re done, as the whites get firmer if they’re kept in a hot shell.
It should be remarked that the time necessary to cook eggs in the shell will vary somewhat with the firmness of the shell, the size of the eggs, and the number cooked together.
It’s worth noting that the time it takes to cook eggs in their shells can vary based on the thickness of the shell, the size of the eggs, and how many are being cooked at the same time.
Eggs in Sunshine.—Take an earthen-ware dish which will stand heat and also do to use in serving the eggs. Oil it and break therein as many eggs as desired; sprinkle lightly with salt, and put into the oven for two or more minutes till the eggs are set. Have ready some hot tomato sauce prepared as for Tomato Toast; pour the sauce over them, and serve.
Eggs in Sunshine.—Get an oven-safe dish that you can also use to serve the eggs. Grease it and crack in as many eggs as you like; lightly sprinkle with salt, and bake in the oven for a couple of minutes until the eggs are firm. Prepare some hot tomato sauce like you would for Tomato Toast; pour the sauce over the eggs, and serve.
Eggs Poached in Tomatoes.—Take a pint of stewed tomatoes, cooked until they are homogeneous or which have been rubbed through a colander; season with salt if desired, and heat. When just beginning to boil, slip in gently a half dozen eggs, the shells of which have been so carefully broken that the yolks are intact. Keep the tomato just below the boiling point until the eggs are cooked. Lift the whites carefully with a fork as they cook, until they are firm, then prick them and let the yellow mix with the tomato and the whites. The whole should be quite soft when done, but showing the red of the tomatoes and the white and yellow of the eggs quite distinctly. Serve on toast. If the flavor is agreeable, a little onion.
Eggs Poached in Tomatoes.—Take a pint of stewed tomatoes, cooked until smooth or strained through a colander; season with salt if you like, and heat. When they start to boil, gently slip in six eggs, making sure to break the shells carefully so the yolks stay whole. Keep the tomatoes just below boiling until the eggs are cooked. Use a fork to carefully lift the egg whites as they cook until they’re firm, then prick them to let the yolks mix with the tomatoes and the whites. The finished dish should be soft but clearly show the red of the tomatoes along with the white and yellow of the eggs. Serve on toast. If you like, add a bit of onion for flavor.
Eggs in Cream.—Put a half cupful or more of cream into a shallow earthen dish, and place the dish in a kettle or pan of boiling water. When the cream is hot, break in as many eggs as the bottom of the dish will hold, and cook until well set, basting them occasionally over the top with the hot cream. Or, put a spoonful or two of cream into individual egg or vegetable dishes, break a fresh egg in each, and cook in the oven or in a steamer over a kettle of boiling water until the white of the egg is well set.
Eggs in Cream.—Pour half a cup or more of cream into a shallow dish, then place the dish in a pot or pan of boiling water. Once the cream is hot, crack in as many eggs as the bottom of the dish can hold, and cook until they're set, occasionally spooning some of the hot cream over the top. Alternatively, add a spoonful or two of cream into individual egg or vegetable dishes, crack a fresh egg into each, and cook in the oven or in a steamer over a pot of boiling water until the egg whites are fully set.
Poached or Dropped Eggs.—Break each egg into a saucer by itself. Have a shallow pan half filled with scalding, not boiling, water on the stove. If desired, a little salt and a tablespoonful of lemon juice may be added. Slip the eggs gently from the saucer upon the top of the water, holding the edge of the saucer under water to prevent the eggs from scattering; dip the water over them with a spoon and let them stand five minutes, or until the yolk is covered with a film, and the white is firm but not hardened; keep the water just below the boiling point. Take out the eggs one by one on a skimmer, and serve in egg-saucers, or on slices of nicely browned toast moistened with a little sweet cream, as preferred. If one is especially particular to keep the shape of the eggs, an egg poacher should be used, or a set of muffin-rings may be laid in the bottom of the pan, and the eggs turned into the rings.
Poached or Dropped Eggs.—Crack each egg into a separate saucer. Have a shallow pan filled halfway with hot, but not boiling, water on the stove. If you want, you can add a bit of salt and a tablespoon of lemon juice. Gently slide the eggs from the saucer into the hot water, keeping the edge of the saucer underwater to prevent the eggs from spreading out; use a spoon to dip water over them and let them cook for five minutes, or until the yolk is covered with a thin film and the white is firm but not hard; maintain the water just below boiling. Remove the eggs one at a time using a skimmer, and serve them in egg cups or on slices of nicely toasted bread moistened with a little sweet cream, according to your preference. If you want to keep the shape of the eggs, use an egg poacher or place a set of muffin rings in the bottom of the pan and pour the eggs into the rings.
Poached Eggs with Cream Sauce.—Poach eggs as in the foregoing, and pour over them a sauce made according to direction on page 351.
Poached Eggs with Cream Sauce.—Poach the eggs as described earlier, and pour a sauce over them made following the instructions on page 351.
Quickly Prepared Eggs.—A good way to cook quickly a large number of eggs, is to use a large-bottomed earthen dish, which will stand the heat and in which the eggs may be served. Oil it well; break the requisite number of eggs separately, and turn each carefully into the dish; sprinkle lightly with salt; set the dish in the oven or in a steamer over a kettle of boiling water for a few minutes until the eggs are set, then serve.
Quickly Prepared Eggs.—A great way to quickly cook a lot of eggs is to use a wide, sturdy dish that can handle heat and is suitable for serving. Grease it well; crack the eggs separately and gently pour each one into the dish; lightly sprinkle with salt; place the dish in the oven or over a steamer above a pot of boiling water for a few minutes until the eggs are set, then serve.
Whirled Eggs.—Have a small kettle of water heated almost to boiling, and with a wooden spoon, stir it rapidly round and round in the same direction until a miniature whirlpool is produced. Have ready some eggs broken in separate cups, and drop them carefully one at a time into the whirling water, the stirring of which must be kept up until the egg is a soft round ball. Remove with a skimmer, and serve on cream toast.
Whirled Eggs.—Heat a small pot of water until it’s almost boiling, and use a wooden spoon to stir it quickly in the same direction until a small whirlpool forms. Have some eggs broken into separate cups, and carefully drop them one at a time into the swirling water, continuing to stir until each egg forms a soft round ball. Remove with a slotted spoon, and serve on cream toast.
OMELETS.
RECIPES.
Plain Omelet.—Beat the yolks of three eggs to a cream and beat the whites to a stiff froth. Add to the yolks three tablespoonfuls of milk or cream, one tablespoonful of finely grated bread crumbs, and season lightly with salt; lastly, fold, not stir, the whites lightly in. An omelet pan is the best utensil for cooking, but if that is not to be had, an earthen-ware pudding dish which will stand the heat is good; an iron spider will do, but a larger omelet would need to be prepared. A tin saucepan is apt to cook the omelet so rapidly as to burn it in spots. Whatever the utensil used, it should be hot, the fire clear and steady, and all in readiness by the time the eggs are beaten.
Plain Omelet.—Beat the yolks of three eggs until creamy and whip the whites until stiff. Mix three tablespoons of milk or cream, one tablespoon of finely grated bread crumbs, and lightly season with salt into the yolks. Then gently fold in the whites without stirring. An omelet pan is the best tool for cooking, but if you don't have one, a heat-resistant earthenware dish works well; a cast-iron skillet will also do, but a larger omelet may need to be cooked. A tin saucepan often cooks the omelet too quickly, causing it to burn in spots. Regardless of the utensil used, it should be hot, the fire should be clear and steady, and everything should be ready by the time the eggs are beaten.
Oil the dish well and gently pour in the omelet mixture; cover, and place the pan on the range where the heat will be continuous. Do not stir, but carefully, as the egg sets, lift the omelet occasionally by slipping a broad-bladed knife under it, or with a fork by dipping in here and there. It should cook quickly, but not so quickly as to burn. From three to five minutes will generally be ample time. When the middle of the omelet is set, it may be put into a hot oven to dry the top. As soon as the center is dry, it should be removed immediately, as it will be hard and indigestible if overdone. To dish, loosen from the pan by running a knife under it, lay a hot platter, bottom upward, over the pan, and invert the latter so as to shake out the omelet gently, browned side uppermost; or if preferred, double one part over the other before dishing. Serve at once, or it will fall.
Oil the dish well and gently pour in the omelet mixture; cover it and place the pan on the stove where the heat will be steady. Don’t stir, but occasionally lift the omelet carefully with a broad knife or a fork as the eggs set. It should cook quickly, but not so fast that it burns. Generally, three to five minutes will be enough time. Once the middle of the omelet is set, you can put it in a hot oven to dry the top. As soon as the center is dry, take it out immediately, since it will become hard and hard to digest if overcooked. To serve, loosen it from the pan by running a knife under it, place a hot plate, bottom side up, over the pan, and invert the pan to gently shake out the omelet with the browned side up; or, if you prefer, fold one side over the other before serving. Serve immediately, or it will fall.
An omelet of three eggs is sufficient for two or three persons; if more is desired, a second omelet of three eggs may be made. Larger ones are not so light nor so easily prepared. The dish used should be reserved for that purpose alone, and should be kept as smooth and dry as possible. It is better to keep it clean by wiping with a coarse towel than by washing; if the omelet comes from the pan perfectly whole and leaving no fragments behind.
An omelet made with three eggs is enough for two or three people; if you need more, you can make a second omelet with three eggs. Larger omelets aren't as fluffy and are more complicated to make. The pan should be dedicated to this use only and kept as smooth and dry as possible. It's better to clean it by wiping with a coarse towel rather than washing it, especially if the omelet comes out of the pan intact without any pieces left behind.
Foam Omelet.—Prepare as above, leaving out the white of one egg, which must be beaten to a stiff froth and spread over the top of the omelet after it is well set. Let this white just heat through by the time the omelet is done. Fold the omelet together, and dish. The whites will burst out around the edges like a border of foam.
Foam Omelet.—Make it as described above, but skip the white of one egg, which should be beaten until stiff and spread over the top of the omelet once it’s mostly cooked. Let the egg white just heat through by the time the omelet is finished. Fold the omelet over and serve. The whites will spill out around the edges like a border of foam.
Fancy Omelets.—Various fancy omelets may be made by adding other ingredients and preparing the same as for plain omelets. Two or three tablespoonfuls of orange juice instead of milk, with a little grated rind for flavor and three tablespoonfuls of sugar, may be combined with the eggs and called an orange omelet.
Fancy Omelets.—You can make different fancy omelets by adding other ingredients while cooking them like you would a plain omelet. Instead of using milk, try adding two or three tablespoons of orange juice, a bit of grated rind for flavor, and three tablespoons of sugar mixed with the eggs to create an orange omelet.
A little cold cauliflower or cooked asparagus chopped very fine and mixed in when the omelet is ready for the pan, may be denominated a vegetable omelet.
A bit of cold cauliflower or cooked asparagus, finely chopped and mixed in just before the omelet goes in the pan, can be called a vegetable omelet.
TABLE TOPICS.
The candidates for ancient athletic games were dieted on boiled grain, with warm water, cheese, dried figs, but no meat.
The athletes competing in ancient games ate a diet of boiled grains, warm water, cheese, and dried figs, but no meat.
An unpleasant reminder.—(Scene, Thanksgiving dinner, everybody commenting on the immense size of the turkey.) An appalling silence fell upon the crowd when Tommy cried out, "Mamma, is that the old sore-headed turkey?"
An unpleasant reminder.—(Scene: Thanksgiving dinner, everyone commenting on the huge turkey.) An uncomfortable silence descended on the crowd when Tommy shouted, "Mom, is that the old grumpy turkey?"
The eminent Prof. Wilder was reared a vegetarian, having passed his earlier years without even knowing that flesh food was ever eaten by human beings. When six years old, he saw on the table for the first time, a roasted chicken, at which he gazed for some moments in great bewilderment, when he seemed to make a discovery, and in his astonishment burst out with the remark, "I'll bet that's a dead hen!"
The renowned Prof. Wilder was raised as a vegetarian, having spent his early years unaware that people even ate meat. When he was six years old, he saw a roasted chicken on the table for the first time. He stared at it in confusion for a while, and then he seemed to realize something, exclaiming in surprise, "I bet that's a dead hen!"
A story is told of a minister who was spending the day in the country, and was invited to dine. There was chicken for dinner, much to the grief of a little boy of the household, who had lost his favorite hen to provide for the feast. After dinner, prayer was proposed, and while the preacher was praying, a poor little lonesome chicken came running under the house, crying for its absent mother. The little boy shouted, "Peepy! Peepy! I didn't kill your mother! They killed her for that big preacher's dinner!" The "Amen" was said very suddenly.
A story is told of a minister who was spending the day in the countryside and was invited to dinner. They served chicken, much to the dismay of a little boy in the household who had lost his favorite hen to contribute to the meal. After dinner, someone suggested they pray, and while the preacher was praying, a lonely little chick came running under the house, calling for its missing mother. The little boy shouted, "Peepy! Peepy! I didn't kill your mother! They killed her for that big preacher's dinner!" The "Amen" was said very abruptly.

MEATS
 his is the term usually applied to the flesh and various organs of such
animals, poultry, and game as are used for food. This class of foods
contains representatives of all nutritive elements, but is especially
characterized by as excess of albuminous matter. But in actual nutritive
value flesh foods do not exceed various other food materials. A
comparison of the food grains with beefsteak and other flesh foods,
shows, in fact, that a pound of grain is equivalent in food value to two
or three pounds of flesh.
his is the term usually applied to the flesh and various organs of such
animals, poultry, and game as are used for food. This class of foods
contains representatives of all nutritive elements, but is especially
characterized by as excess of albuminous matter. But in actual nutritive
value flesh foods do not exceed various other food materials. A
comparison of the food grains with beefsteak and other flesh foods,
shows, in fact, that a pound of grain is equivalent in food value to two
or three pounds of flesh.
This term usually refers to the meat and various organs of animals, poultry, and game that are used for food. This category of foods includes all the essential nutrients but is especially noted for its high protein content. However, in terms of actual nutritional value, meat does not surpass various other food sources. A comparison of grains with beef steak and other meats shows that, in fact, a pound of grain can provide as much nutritional value as two or three pounds of meat.
At present time there is much question in the minds of many intelligent, thinking people as to the propriety of using foods of this class, and especially of their frequent use. Besides being in no way superior to vegetable substances, they contain elements of an excrementitious character, which cannot be utilized, and which serve only to clog and impede the vital processes, rendering the blood gross, filling the body with second-hand waste material which was working its way out of the vital domain of the animal when slaughtered. To this waste matter, consisting of unexpelled excretions, are added those produced by the putrefactive processes which so quickly begin in flesh foods exposed to air and warmth.
At this time, there are many questions among intelligent, thoughtful people about whether it's appropriate to consume foods in this category, especially on a regular basis. Not only are they no better than plant-based foods, but they also contain elements that are essentially waste products, which can't be used by the body and only serve to clog and hinder vital processes, making the blood unhealthy and filling the body with leftover waste material that was in the animal's system when it was slaughtered. This waste matter, which includes unremoved excretions, is joined by those produced from the decay processes that quickly start in meat exposed to air and warmth.
That flesh foods are stimulating has been shown by many observations and experiments.
That meat is stimulating has been shown by many observations and experiments.
Flesh foods are also specially liable to be diseased and to communicate to the consumer the same disease. The prevalence of disease among animals used for food is known to be very great, and their transmission to man is no longer a matter of dispute. It has been abundantly proved that such diseases as the parasitic, tuberculous, erysipelatous, and foot and mouth diseases are most certainly communicable to man by infected flesh. All stall and sty fed animals are more or less diseased. Shut up in the dark, cut off from exercise, the whole fattening process is one of progressive disease. No living creature could long retain good health under such unnatural and unwholesome conditions. Add to this the exhaustion and abuse of animals before slaughtering; the suffering incident to long journeys in close cars, often without sufficient food and water; and long drives over dusty roads under a burning sun to the slaughter house, and it will be apparent to all thoughtful persons that such influences are extremely liable to produce conditions of the system that render the flesh unfit for food.
Flesh foods are particularly prone to diseases that can transfer to consumers. It's well-known that the rate of disease among animals raised for food is quite high, and their transfer to humans is no longer in question. It has been clearly demonstrated that diseases like parasitic infections, tuberculosis, erysipelas, and foot-and-mouth disease can definitely be passed to people through contaminated meat. Animals raised in stalls and pens tend to be quite unhealthy. Confined in dark spaces and deprived of exercise, the entire fattening process leads to ongoing health issues. No living being can maintain good health in such unnatural and unhealthy conditions. Additionally, when you consider the exhaustion and mistreatment of animals before they are slaughtered; the suffering caused by long trips in cramped vehicles—often without enough food and water; and long drives over dusty roads in the scorching sun to the slaughterhouse, it becomes clear to any thoughtful person that these factors are highly likely to create conditions in the body that make the meat unsuitable for consumption.
Thousands of animals are consumed each year which were slaughtered just in time to save them from dying a natural death. It is a common thing for cattle owners, as soon as an animal shows symptoms of decline, to send it to the butcher at once; and when epidemics of cattle diseases are prevalent, there can be no doubt that the meat markets are flooded with diseased flesh.
Thousands of animals are killed each year just to prevent them from dying a natural death. It's common for cattle owners to send an animal to the butcher as soon as it starts showing signs of illness; and when there are outbreaks of cattle diseases, it's clear that the meat markets are flooded with contaminated meat.
There are few ways in which we can more effectually imperil our health than in partaking freely of diseased animal food. This is no new theory. The Jews have for ages recognized this danger, and their laws require the most careful examination of all animals to be used as food, both before and after slaughtering. Their sanitary regulations demand that beast or fowl for food must be killed by bleeding through the jugular vein, and not, according to custom, by striking on the head, or in some violent way. Prior to the killing, the animal must be well rested and its respiration normal; after death the most careful dissection and examination of the various parts are made by a competent person, and no flesh is allowed to be used for food which has not been inspected and found to be perfectly sound and healthy. As a result, it is found in many of our large cities that only about one in twenty of the animals slaughtered is accepted as food for a Jew. The rejected animals are sold to the general public, who are less scrupulous about the character of their food, and who are in consequence more subject to disease and shorter-lived than are Jews.
There are few ways we can more seriously jeopardize our health than by consuming contaminated animal products. This isn’t a new idea. For generations, Jewish communities have recognized this risk, and their laws require thorough inspections of all animals intended for food, both before and after slaughter. Their health guidelines stipulate that animals or birds meant for consumption must be killed by bleeding them through the jugular vein, rather than, as is commonly done, by striking them on the head or using some other violent method. Before being killed, the animal must be well-rested and have normal breathing; after death, a qualified individual conducts a careful dissection and examination of the different parts, with no flesh being deemed fit for consumption unless it has been inspected and found to be perfectly sound and healthy. Consequently, it’s observed that in many large cities, only about one in twenty slaughtered animals is accepted as food by Jews. The animals that are rejected are sold to the general public, who tend to be less particular about the quality of their food and, as a result, are more prone to illness and generally have shorter lifespans than Jews.
Trichinæ, tapeworms, and various other parasites which infest the flesh of animals, are so common that there is always more or less liability to disease from these sources among consumers of flesh foods.
Trichinella, tapeworms, and other parasites that infest animal flesh are so common that there is always some risk of disease from these sources among meat eaters.
Meat is by no means necessary for the proper maintenance of life or vigorous health, as is proved by the fact that at least "four tenths of the human race," according to Virey, "subsist exclusively upon a vegetable diet, and as many as seven tenths are practically vegetarians." Some of the finest specimens of physical development and mental vigor are to be found among those who use very little or no animal food. Says St. Pierre, a noted French author, "The people living upon vegetable foods are of all men the handsomest, the most vigorous, the lease exposed to disease and passion; and they are those whose lives last longest."
Meat is definitely not essential for sustaining life or maintaining good health, as shown by the fact that about "four tenths of the human race," according to Virey, "subsist exclusively on a plant-based diet, and as many as seven tenths are essentially vegetarians." Some of the best examples of physical fitness and mental sharpness can be found among those who consume very little or no animal products. Noted French author St. Pierre says, "People who eat plant foods are the best-looking, the strongest, the least likely to get sick or be driven by desire; and they are those whose lives are the longest."
The use of large quantities of animal food, however free from disease germs, has a tendency to develop the animal propensities to a greater or less degree, especially in the young, whose characters are unformed. Among animals we find the carnivorous the most vicious and destructive, while those which subsist upon vegetable foods are by nature gentle and tractable. There is little doubt that this law holds good among men as well as animals. If we study the character and lives of those who subsist largely upon animal food, we are apt to find them impatient, passionate, fiery in temper, and in other respects greatly under the dominion of their lower natures.
The use of large amounts of animal food, even when free from disease germs, tends to enhance animal instincts to varying degrees, especially in young animals whose personalities are still developing. Among animals, carnivorous species are often the most aggressive and destructive, while those that eat plant-based diets are generally more gentle and manageable. There’s little doubt that this principle applies to humans as well as animals. If we examine the character and lives of people who consume a lot of animal food, we tend to find them impatient, passionate, fiery in temperament, and otherwise largely influenced by their baser instincts.
There are many other objections to the use of this class of foods—so many in fact that we believe the human race would be far healthier, better, and happier if flesh foods were wholly discarded. If, however, they are to be used at all, let them be used sparingly and prepared in the simplest and least harmful manner. Let them be cooked and served in their own juices, not soaked in butter or other oils, or disguised by the free use of pepper, mustard, catsup, and other pungent sauces. Salt also should be used only in the smallest possible quantities, as it hardens the fiber, rendering it more difficult of digestion.
There are plenty of other reasons against using this type of food—so many, in fact, that we think humanity would be much healthier, better, and happier if meat-based foods were completely eliminated. However, if they are to be consumed at all, they should be used sparingly and prepared in the simplest and least harmful way. They should be cooked and served in their own juices, not drowned in butter or other oils, or covered up with lots of pepper, mustard, ketchup, and other strong sauces. Salt should also be used only in the smallest amounts, as it toughens the fibers, making them harder to digest.
We can conceive of no possible stretch of hygienic laws which admits the use of pork; so we shall give it and its products no consideration in our pages.
We can’t imagine any interpretation of hygiene laws that allows for the use of pork; therefore, we won’t discuss it or its products in our pages.
Such offal as calves' brains, sheep's kidneys, beef livers, and other viscera, is not fit food for any one but a scavenger. The liver and kidneys are depurating organs, and their use as food is not only unwholesome but often exceedingly poisonous.
Such organs like calves' brains, sheep's kidneys, beef livers, and other viscera are not suitable food for anyone except a scavenger. The liver and kidneys are filtering organs, and eating them is not only unhealthy but can often be extremely toxic.
Meat pies, scallops, sauces, fricassees, pâtés, and other fancy dishes composed of a mixture of animal foods, rich pastry, fats, strong condiments, etc., are by no means to be recommended as hygienic, and will receive no notice in these pages.
Meat pies, scallops, sauces, fricassees, pâtés, and other elaborate dishes made from a mix of animal products, rich pastry, fats, strong seasonings, etc., are definitely not recommended for their health benefits and will not be discussed in this document.
In comparative nutritive value, beef ranks first among the flesh foods. Mutton, though less nutritive, is more easily digested than beef. This is not appreciable to a healthy person, but one whose digestive powers are weak will often find that mutton taxes the stomach less than beef.
In terms of nutritional value, beef is the top choice among meats. Mutton, while not as nutritious, is easier to digest than beef. This difference isn't noticeable for a healthy person, but someone with weak digestion may find that mutton is less taxing on the stomach than beef.
Veal or lamb is neither so nutritious nor so easily digested as beef or mutton. Flesh from different animals, and that from various parts of the same animal, varies in flavor, composition, and digestibility. The mode of life and the food of animals influence in a marked manner the quality of the meat. Turnips give a distinctly recognizable flavor to mutton. The same is true of many fragrant herbs found by cattle feeding in pastures.
Veal or lamb isn't as nutritious or easy to digest as beef or mutton. Meat from different animals, and even from different parts of the same animal, varies in taste, composition, and how easy it is to digest. The lifestyle and diet of animals significantly affect the quality of the meat. Turnips add a distinctly recognizable flavor to mutton. The same goes for many aromatic herbs that cattle eat while grazing in pastures.
Good beef is firm and elastic to the touch; when pressed with the finger, no impression is left. It should be so dry upon the surface as scarcely to moisten the fingers. Meat that is wet, sodden, and flabby should not be eaten. Good beef is marbled with spots of white fat. The suet should be dry and crumble easily. If the fat has the appearance of wet parchment or is jelly-like, the beef is not good. Yellow fat is an indication of old, lean animals.
Good beef is firm and springy to the touch; when you press it with your finger, it shouldn't leave an impression. The surface should be so dry that it barely moistens your fingers. You shouldn't eat meat that is wet, soggy, or soft. Good beef has streaks of white fat throughout. The fat should be dry and break apart easily. If the fat looks like wet parchment or is jelly-like, the beef isn’t good. Yellow fat suggests that the animal was old and lean.
Good beef has little or no odor. If any odor is perceptible, it is not disagreeable. Diseased meat has a sickly odor, resembling the breath of feverish persons. When such meat is roasted, it emits a strong, offensive smell. The condition of a piece of beef may be ascertained by dipping a knife in hot water, drying it, and passing it through the meat. Apply to the nose on withdrawal, and if the meat is not good, a disagreeable odor will be quite perceptible.
Good beef has little to no smell. If there is any smell, it's not unpleasant. Meat that is diseased has a sickly odor, similar to the breath of someone with a fever. When this kind of meat is cooked, it gives off a strong, offensive smell. You can check the condition of a piece of beef by dipping a knife in hot water, drying it, and then running it through the meat. Bring the knife to your nose after removing it, and if the meat is bad, an unpleasant odor will be noticeable.
Good beef will not shrink greatly in cooking. In boiling or stewing, the shrinkage is computed to be about one pound in four; in baking, one and one fourth pounds in four. Beef of a close, firm fiber shrinks less than meat of coarse fiber.
Good beef won't shrink much while cooking. When boiling or stewing, the shrinkage is estimated to be about one pound out of four; when baking, it's one and a quarter pounds out of four. Beef with a tight, firm texture shrinks less than meat with a coarse texture.
Good veal is slightly reddish or pink, and the fat should be white and clear. Avoid veal without fat, as such is apt to be too young to be wholesome.
Good veal is a bit reddish or pink, and the fat should be white and clear. Avoid veal with no fat, as it is likely too young to be healthy.
Good mutton should be firm and compact, the flesh, fine-grained and bright-red, with an accumulation of very hard and clear white fat along the borders of the muscles.
Good mutton should be firm and compact, the meat fine-grained and bright red, with a layer of very hard and clear white fat along the edges of the muscles.
Meat should not be kept until decomposition sets in, as by the putrefaction of the albuminous elements certain organic poisons are generated, and flesh partaken of in this condition is liable to result in serious illness. Meat containing white specks is probably infested by parasites and should not be used as food.
Meat shouldn’t be kept until it starts to rot because the breakdown of protein elements can produce harmful organic toxins, and eating meat in this state can lead to serious health issues. Meat with white spots is likely infested with parasites and shouldn’t be eaten.
One of the most common methods is that of immersion in a brine made of a solution of common salt to which a small portion of saltpeter has been added. This abstracts the juice from the meat and also lessens the tendency to putrefaction. Salt is used in various other ways for preserving meat. It should be remarked, however, that cured and dried meats are much more difficult to digest than fresh meat, and the nature of the meat itself is so changed by the process as to render its nutritive value much less.
One of the most common methods is soaking meat in a brine made of regular salt, with a little saltpeter added. This pulls the juice out of the meat and also reduces the chance of spoilage. Salt is used in many other ways to preserve meat. However, it's important to note that cured and dried meats are much harder to digest than fresh meat, and the meat's original qualities are altered by the process, making it much less nutritious.
Meat is sometimes packed in salt and afterward dried, either in the sun or in a current of dry air. Both salting and smoking are sometimes employed. By these means the juices are abstracted by the salt, and at the same time the flesh is contracted and hardened by the action of creosote and pyroligneous acid from the smoke.
Meat is sometimes cured in salt and then dried, either in the sun or in a stream of dry air. Both salting and smoking are sometimes used. This process draws out the juices with the salt, and at the same time, the meat is toughened and firmed up by the effects of creosote and pyroligneous acid from the smoke.
What is termed "jerked" beef is prepared by drying in a current of warm air at about 140°. This dried meat, when reduced to a powder and packed in air-tight cans, may be preserved for a long time. When mixed with fat, it forms the pemmican used by explorers in Arctic voyages.
What we call "jerked" beef is made by drying it in warm air at around 140°F. This dried meat, when ground into a powder and stored in airtight containers, can last a long time. When combined with fat, it creates the pemmican used by explorers on Arctic journeys.
Meat is also preserved by cooking and inclosing in air-tight cans after the manner of canning fruit. This process is varied in a number of ways.
Meat is also preserved by cooking and sealing it in airtight cans, similar to how fruit is canned. This process can be varied in several ways.
The application of cold has great influence in retarding decomposition, and refrigeration and freezing are often employed for the preservation of flesh foods.
The use of cold is very effective in slowing down decomposition, and refrigeration and freezing are often used to preserve meat.
All of these methods except the last are open to the objection that while they preserve the meat, they greatly lessen its nutritive value. It should also be understood that the decomposition of its flesh begins almost the moment an animal dies, and continues at a slow rate even when the flesh is kept at a low temperature. The poisons resulting from this decomposition are often deadly, and are always detrimental to health.
All of these methods, except for the last one, can be criticized for preserving the meat while significantly reducing its nutritional value. It's important to note that the breakdown of the flesh starts almost immediately after an animal dies and continues at a slow pace, even when the meat is stored at a low temperature. The toxins that come from this decomposition can be fatal and are always harmful to health.
The Preparation and Cooking of Meat.—Meat, when brought from the market, should be at once removed from the paper in which it is wrapped, as the paper will absorb the juices of the meat; and if the wrapping is brown paper, the meat is liable to taste of it. Joints of meat should not be hung with the cut surface down, as the juices will be wasted.
Preparing and Cooking Meat.—When you bring meat home from the market, you should remove it from the packaging immediately, as the paper can soak up the meat's juices; if it's wrapped in brown paper, the meat may end up tasting like it. Meat cuts should not be hung with the cut side down, as this will waste the juices.
Meat kept in a refrigerator should not be placed directly on the ice, but always upon plates or shelves, as the ice will freeze it or else draw out its juices.
Meat stored in a refrigerator shouldn’t be placed directly on the ice, but should always be on plates or shelves, as the ice will freeze it or draw out its juices.
If meat is accidentally frozen, it should be thoroughly thawed in cold water before cutting. Meat should not be cleaned by washing with water, as that extracts the nutritive juices, but by thoroughly wiping the outside with a damp cloth. The inside needs no cleaning.
If meat is accidentally frozen, it should be completely thawed in cold water before cutting. Meat should not be washed with water for cleaning, as that removes the nutritious juices; instead, wipe the outside well with a damp cloth. The inside doesn’t need cleaning.
Meat may be cooked by any of the different methods of cookery,—boiling, steaming, stewing, roasting, broiling, baking, etc.,—according as the object is to retain the nutriment wholly within the meat; to draw it all out into the water, as in soups or broths; or to have it partly in the water and partly in the meat, as in stews. Broiling is, however, generally conceded to be the most wholesome method, but something will necessarily depend upon the quality of the meat to be cooked.
Meat can be prepared using various cooking methods—boiling, steaming, stewing, roasting, broiling, baking, etc.—depending on whether the goal is to keep all the nutrients inside the meat, to extract them into the water, as in soups or broths, or to have some nutrients both in the water and in the meat, like in stews. Broiling is generally considered the healthiest method, but the quality of the meat being cooked also plays a significant role.
Meat which has a tough, hard fiber will be made tenderest by slow, continuous cooking, as stewing. Such pieces as contain a large amount of gelatine—a peculiar substance found in the joints and gristly parts of meat, and which hardens in a dry heat—are better stewed than roasted.
Meat that has tough, hard fibers becomes tender through slow, continuous cooking, like stewing. Cuts that have a lot of gelatin—a unique substance found in the joints and chewy parts of meat, which hardens with dry heat—are better when stewed rather than roasted.
Boiling.—The same principles apply to the boiling of all kinds of meats. The purpose to be attained by this method is to keep the nutritive juices so far as possible intact within the meat; consequently, the piece to be cooked should be left whole, so that only a small amount of surface will be exposed to the action of the water. Since cold water extracts albumen, of which the juices of the meat are largely composed, while hot water coagulates it, meat to be boiled should be plunged into boiling water sufficient to cover it and kept there for five or ten minutes, by which time the albumen over the entire surface will have become hardened, thus forming a coat through which the juices cannot escape. Afterward the kettle, closely covered, may be set aside where the water will retain a temperature of about 180°. A small portion of albumen from the outer surface will escape into the water in the form of scum, and should be removed.
Boiling.—The same principles apply to boiling all types of meat. The goal of this method is to keep the nutritious juices as intact as possible within the meat; therefore, the piece being cooked should remain whole, minimizing the surface area exposed to the water. Since cold water extracts albumen, which makes up a large part of the meat's juices, and hot water coagulates it, the meat should be placed in boiling water that covers it completely and kept there for five to ten minutes. By this time, the albumen on the entire outer surface will have hardened, forming a barrier that prevents the juices from escaping. After that, the pot, tightly covered, can be set aside where the water maintains a temperature of about 180°. A small amount of albumen from the outer surface will escape into the water as scum and should be removed.
Meat cooked in this way will require a longer time than when the water is kept boiling furiously, but it is superior in every respect and more digestible. Something depends upon the shape of the piece cooked, thin pieces requiring less time than a thick, cubical cut; but approximately, first allowing fifteen or twenty minutes for the heat to penetrate the center of the meat, at which time the real process of cooking begins, it will require from twelve to fifteen minutes for every pound cooked.
Meat cooked this way will take longer than if the water is kept boiling vigorously, but it’s better in every way and easier to digest. The shape of the meat matters too; thin pieces need less time than thick, cubical cuts. Generally, you should first allow fifteen to twenty minutes for the heat to reach the center of the meat, at which point the actual cooking starts, and it will take about twelve to fifteen minutes for each pound of meat.
Stewing.—While the object in boiling is to preserve the juices within the meat as much as possible, in stewing, the process is largely reversed; the juices are to be partly extracted. Some of the juices exist between the fibers, and some are found within the fibers. The greater the surface exposed, the more easily these juices will be extracted; hence meat for stewing should be cut into small pieces and cooked in a small quantity of water. Since cold water extracts the albuminous juices, while boiling water hardens them into a leathery consistency, water used for stewing should be neither cold nor boiling, but of a temperature which will barely coagulate the albumen and retain it in the meat in as tender a condition as possible; i.e., about 134° to 160°. To supply this temperature for the prolonged process of cooking necessary in stewing, a double boiler of some form is quite necessary. Put the pieces of meat to be stewed in the inner dish, add hot water enough to cover, fill the outer boiler with hot water, and let this outer water simmer very gently until the meat is perfectly tender. The length of time required will be greater than when meat is stewed directly in simmering water, but the result will be much more satisfactory. The juices should be served with the meat.
Stewing.—While the goal of boiling is to keep the juices inside the meat as much as possible, stewing does the opposite; it partly extracts the juices. Some of the juices are located between the fibers, while others are found within the fibers. The more surface area that is exposed, the more easily these juices can be extracted; therefore, meat for stewing should be cut into small pieces and cooked with a small amount of water. Since cold water pulls out the albuminous juices, and boiling water toughens them into a leathery texture, the water used for stewing should be neither cold nor boiling but at a temperature that barely coagulates the albumen and keeps the meat as tender as possible; i.e., about 134° to 160°. To maintain this temperature during the long cooking process required for stewing, a double boiler is essential. Place the pieces of meat in the inner dish, add enough hot water to cover them, fill the outer boiler with hot water, and let this outer water simmer very gently until the meat is completely tender. The cooking time will be longer than if the meat were stewed directly in simmering water, but the result will be much more satisfying. The juices should be served with the meat.
Another method of steaming, sometimes called smothering, is that of cooking meat in a tightly covered jar in a moderate oven for an hour (the moderate heat serves to draw out the juice of the meat), after which the heat is increased, and the meat cooked in its own juices one half hour for each pound.
Another way to steam, sometimes referred to as smothering, involves cooking meat in a tightly sealed jar in a moderate oven for an hour (the moderate heat helps to extract the meat's juices). After that, the heat is raised, and the meat is cooked in its own juices for half an hour for each pound.
Roasting.—This method, which consists in placing meat upon a revolving spit and cooking it before an open fire, is much less employed now than formerly, when fireplaces were in general use. What is ordinarily termed roasting is in reality cooking meat it in own juices in a hot oven. In cooking meat by this method it is always desirable to retain the juices entirely within the meat, which can be best accomplished by first placing the clean-cut sides of the meat upon a smoking-hot pan over a quick fire; press the meat close to the pan until well scared and slightly browned, then turn over and sear the opposite side in the same manner. This will form a coating of hardened albumen, through which the interior juices cannot escape. Put at once into the oven, arrange the fire so that the heat will be firm and steady but not too intense, and cook undisturbed until tender.
Roasting.—This method involves putting meat on a rotating spit and cooking it over an open fire. It's not as commonly used today as it was in the past when fireplaces were standard. What we usually call roasting is actually cooking meat in its own juices in a hot oven. When using this method, it's important to keep the juices inside the meat, which can be best achieved by first placing the clean-cut sides of the meat on a very hot pan over a high heat; press the meat down until it's nicely seared and slightly browned, then flip it over and sear the other side the same way. This will create a hardened layer that keeps the juices from escaping. Immediately place it in the oven, adjust the fire so that the heat is consistent and steady but not too intense, and cook undisturbed until tender.
Basting is not necessary if the roast is carefully seared and the oven kept at proper temperature. When the heat of the oven is just right, the meat will keep up a continuous gentle sputtering in the pan. If no sputtering can be heard, the heat is insufficient. The heat is too great when the drippings burn and smoke.
Basting isn't needed if the roast is properly seared and the oven temperature is maintained correctly. When the oven heat is ideal, the meat will create a steady, soft sizzling sound in the pan. If you don't hear any sizzling, the heat is too low. If the drippings burn and smoke, the heat is too high.
Broiling.—This is the method employed for cooking thin cuts of meat in their own juices over glowing coals. When properly done, broiled meat contains a larger amount of uncoagulated albumen than can be secured by cooking in any other manner; hence it is the most wholesome. For broiling, a bed of clear, glowing coals without flame is the first essential. Coke, charcoal, or anthracite coal serves best for securing this requisite.
Broiling.—This is the technique used for cooking thin slices of meat in their own juices over hot coals. When done correctly, broiled meat has more uncoagulated albumen than can be achieved by any other cooking method, making it the healthiest option. For broiling, the first essential is a bed of clear, glowing coals without flames. Coke, charcoal, or anthracite coal work best for achieving this.
In an ordinary stove, the coals should be nearly to the top of the fire-box, that the meat may be held so as almost to touch the fire. No utensil is better for ordinary purposes than a double wire broiler. First, rub it well with a bit of suet, then put in the meat with the thickest part in the center. Wrap a coarse towel around the hand to protect it from the heat, hold the meat as near the fire as possible, so as to sear one side instantly, slowly count ten, then turn and sear the other side. Continue the process, alternating first one side and then the other, slowly counting ten before each turning, until the meat is sufficiently done. Successful broiling is largely dependent upon frequent turning. The heat, while it at once sears the surface, starts the flow of the juices, and although they cannot escape through the hardened surface, if the meat were entirely cooked on one side before turning, they would soon come to the top, and when it was turned over, would drip into the fire. If the meat is seared on both sides, the juices will be retained within, unless the broiling is too prolonged, when they will ooze out and evaporate, leaving the meat dry and leathery. Salt draws out the juices, and should not be added until the meat is done. As long as meat retains its juices, it will spring up instantly when pressed with a knife; when the juices have begun to evaporate, it will cease to do this. Broiled meats should be served on hot dishes.
In a regular stove, the coals should be nearly at the top of the firebox so that the meat is close enough to almost touch the fire. A double wire broiler is the best tool for everyday use. First, rub it well with a piece of suet, then place the meat in it with the thickest part in the center. Wrap a coarse towel around your hand to protect it from the heat, and hold the meat as close to the fire as possible to sear one side immediately. Count to ten slowly, then turn it over to sear the other side. Keep repeating this process, switching sides each time and counting to ten before each turn, until the meat is cooked to your liking. Successful broiling relies heavily on frequent turning. The heat quickly sears the surface, starting the flow of juices. If the meat is fully cooked on one side before turning, those juices will rise to the top and drip into the fire when flipped. If both sides are seared, the juices will stay inside, unless the broiling goes on too long, in which case they will leak out and evaporate, leaving the meat dry and tough. Salt draws out the juices, so it shouldn't be added until the meat is done. As long as the meat retains its juices, it will spring back immediately when pressed with a knife; when the juices start to evaporate, it will stop doing that. Broiled meats should be served on hot plates.
BEEF.
Economy and Adaptability in Selection.—While the greatest care should be exercised in the selection of beef as regards its soundness and wholesomeness, it must likewise be selected with reference to economy and adaptability for cooking purposes, pieces from different portions of the animal being suitable for cooking only in certain ways. Ox beef is said to be best. That beef is most juicy and tender which has fine streaks of fat intermingled with the lean. Beef which is coarse-grained and hard to cut is apt to be tough. An economical piece of beef to purchase is the back of the rump. It is a long piece with only a small portion of bone, and weighs about ten pounds. The thickest portion may be cut into steaks, the thin, end with bone may be utilized for soups and stews, while the remainder will furnish a good roast. Only a small portion of choice tender lean meat is to be found in one animal, and these are also the most expensive; but the tougher, cheaper parts, if properly cooked, are nearly as nutritious.
Economy and Adaptability in Selection.—While it’s important to be careful when selecting beef for its quality and safety, it’s also essential to choose it based on cost and how well it can be cooked. Different cuts from the animal work better for certain cooking methods. Ox beef is often considered the best. The juiciest and most tender beef has fine streaks of fat mixed with the lean meat. Beef that is coarse and hard to slice tends to be tough. A cost-effective cut to buy is the back of the rump. It’s a long cut with only a small amount of bone, weighing about ten pounds. You can cut the thickest part into steaks, use the thinner end with bone for soups and stews, and the rest will make a good roast. There’s only a small amount of high-quality tender meat on each animal, and it tends to be the most expensive; however, the tougher, less expensive cuts can be nearly as nutritious if cooked properly.
RECIPES.
Broiled Beef.—Beef for broiling should be juicy and have a tender fiber. Steaks cut from three parts of the beef are in request for this purpose,—tenderloin, porterhouse, and round steak. The last-named is the more common and economical, yet it is inferior in juice and tenderness to the other two. Steak should be cut three fourths of an inch or more in thickness. If it is of the right quality, do not pound it; if very tough, beat with a steak-mallet or cut across it several times on both sides with a sharp knife. Wipe, and remove any bone and superfluous fat. Have the fire in readiness, the plates heating, then proceed as directed on page 398.
Broiled Beef.—For broiling, beef should be juicy and have a tender texture. The best cuts for this purpose are from three parts of the beef—tenderloin, porterhouse, and round steak. Round steak is more common and budget-friendly, but it lacks the juiciness and tenderness of the other two. The steak should be cut at least three-fourths of an inch thick. If it’s good quality, don’t pound it; if it’s very tough, you can either beat it with a steak mallet or score it several times on both sides with a sharp knife. Wipe off any residue, and remove any bones and excess fat. Have the fire ready, and heat the plates, then proceed as directed on page 398.
Cold-Meat Stew.—Cut pieces of cold roast beef into thick slices and put into a stewpan with six or eight potatoes, a good-sized bunch of celery cut into small pieces; and a small carrot cut in dice may be added if the flavor is liked. Cover with hot water, and simmer for three fourths of an hour. Thicken with a little browned flour.
Cold-Meat Stew.—Slice leftover roast beef into thick pieces and place them in a pot with six or eight potatoes, a good-sized bunch of celery chopped into small bits, and a small diced carrot if you like the flavor. Cover everything with hot water and let it simmer for about 45 minutes. Thicken the stew with a little browned flour.
Pan-broiled Steak.—In the absence of the necessary appliances for broiling over coals, the following method may be employed. Heat a clean skillet to blue heat, rub it with a bit of suet, just enough to keep the meat from sticking, but leave no fat in the pan. Lay in the steak, pressing it down to the pan, and sear quickly on one side; turn, and without cutting into the meat, sear upon the other. Keep the skillet hot but do not scorch; cook from five to ten minutes, turning frequently, so as not to allow the juices to escape. Add no salt until done. Serve on hot plates. This method is not frying, and requires the addition of no water, butter, or stock.
Pan-broiled Steak.—If you don't have the right equipment to broil over coals, you can use this method. Heat a clean skillet until it’s really hot, then rub it with a little suet—just enough to prevent the meat from sticking, but don’t leave any fat in the pan. Place the steak in the pan, pressing it down, and quickly sear one side; then turn it over and sear the other side without cutting into the meat. Keep the skillet hot but don’t let it burn; cook for about five to ten minutes, turning frequently to keep the juices inside. Don’t add any salt until it’s done. Serve it on hot plates. This method isn’t frying and doesn’t require any water, butter, or stock.
Pan-broiled Steak No.2.—Take a smooth pancake-griddle, or in lieu of anything better, a clean stove-griddle may be used; heat very hot and sear each side of the steak upon it. When well seared, lift the steak into a hot granite-ware or sheet-iron pan, cover, and put into a hot oven for two or three minutes, or until sufficiently cooked.
Pan-broiled Steak No.2.—Use a smooth pancake griddle, or if you don't have that, a clean stove griddle will work instead; heat it really hot and sear each side of the steak on it. Once well seared, move the steak into a hot granite or sheet iron pan, cover it, and place it in a hot oven for two to three minutes, or until it's cooked enough.
Roast Beef.—The sirloin and rib and rump pieces are the best cuts for roasting. Wipe, trim, and skewer into shape. Sear the cut surfaces and proceed as directed on page 397, cooking twenty minutes to the pound if it is to be rare, less half an hour deducted on account of soaring. The application of salt and water has a tendency to toughen the meat and draw out its juices; so if it is desired to have the meat juicy and tender, it is better to cook without basting. Unless the heat of the oven is allowed to become too great, when meat is cooked after this manner there will be a quantity of rich, jelly-like material in the pan, which with the addition of a little water and flour may be made into a gravy.
Roast Beef.—The sirloin, rib, and rump cuts are the best for roasting. Clean, trim, and shape them using skewers. Sear the exposed surfaces and follow the instructions in page 397, cooking for twenty minutes per pound if you want it rare, reducing the time by half an hour for medium. Adding salt and water can make the meat tough and draw out its juices; so if you want juicy and tender meat, it's better not to baste. As long as the oven temperature isn’t too high, cooking this way will result in a rich, jelly-like liquid in the pan, which you can turn into gravy by adding a little water and flour.
Smothered Beef.—Portions from the round, middle, or face of the rump are generally considered best for preparing this dish. Wipe with a clean wet cloth, put into a smoking-hot skillet, and carefully sear all cut surfaces. Put into a kettle, adding for a piece of beef weighing about six pounds, one cup of hot water. Cover closely and cook at a temperature just below boiling, until the meat is tender but not broken. As the water boils away, enough more boiling water may be added to keep the meat from burning. Another method of securing the same results is to cut the beef into small pieces and put into a moderate oven inside a tightly covered jar for an hour. Afterward increase the heat and cook closely covered until the meat is tender. Thicken and season the juice, and serve as a gravy.
Smothered Beef.—Cuts from the round, middle, or face of the rump are usually the best for this dish. Wipe with a clean, damp cloth, place it in a hot skillet, and carefully sear all the cut surfaces. Transfer to a pot, adding one cup of hot water for a piece of beef weighing about six pounds. Cover tightly and cook at a temperature just below boiling until the meat is tender but not falling apart. As the water evaporates, add more boiling water to prevent the meat from burning. Alternatively, you can cut the beef into small pieces and place it in a tightly covered jar in a moderate oven for an hour. Then increase the heat and cook covered until the meat is tender. Thicken and season the juices, and serve as a gravy.
Vegetables with Stewed Beef.—Prepare the beef as directed for Stewed Beef, and when nearly tender, add six or eight potatoes. Just before serving, thicken the gravy with a little browned flour braided in cold water, and add a cup of strained, stewed tomato and a teaspoonful of chopped parsley.
Vegetables with Stewed Beef.—Prepare the beef as instructed for Stewed Beef, and when it’s almost tender, add six to eight potatoes. Just before serving, thicken the gravy with a bit of browned flour mixed in cold water, and stir in a cup of strained, stewed tomatoes and a teaspoon of chopped parsley.
Stewed Beef.—The aitch-bone and pieces from the shin, the upper part of the chuck-rib and neck of beef, are the parts most commonly used for stewing. All meat for stews should be carefully dressed and free from blood. Those portions which have bone and fat, as well as lean beef, make much better-flavored stews than pieces which are wholly lean. The bones, however, should not be crushed or splintered, but carefully sawed or broken, and any small pieces removed before cooking. It is generally considered that beef which has been previously browned makes a much more savory stew, and it is quite customary first to brown the meat by frying in hot fat. A much more wholesome method, and one which will have the same effect as to flavor, is to add to the stew the remnants of roasts or steak. It is well when selecting meat for a stew to procure a portion, which, like the aitch-bone, has enough juicy meat upon it to serve the first day as a roast for a small family. Cut the meat for a stew into small pieces suitable for serving, add boiling water, and cook as directed on page 396. Remove all pieces of bone and the fat before serving. If the stew is made of part cooked and part uncooked meat, the cooked meat should not be added until the stew is nearly done. The liquor, if not of the proper consistency when the meat is tender, may be thickened by adding a little flour braided in cold water, cooking these after four or five minutes.
Stewed Beef.—The aitch-bone and pieces from the shin, the upper part of the chuck-rib and neck of beef, are the cuts most commonly used for stewing. All meat for stews should be carefully cleaned and free from blood. Portions that include bone and fat, as well as lean beef, create much better-flavored stews than cuts that are entirely lean. The bones should not be crushed or splintered, but carefully sawed or broken, and any small pieces removed before cooking. It's generally believed that beef that has been browned beforehand makes for a more flavorful stew, and it’s quite common to first brown the meat by frying it in hot fat. A healthier method, which achieves the same flavor outcome, is to add the leftovers from roasts or steak to the stew. When selecting meat for a stew, it's a good idea to choose a cut like the aitch-bone that has enough juicy meat on it to serve as a roast for a small family on the first day. Cut the meat for the stew into small, serving-sized pieces, add boiling water, and cook as directed on page 396. Remove all pieces of bone and fat before serving. If the stew is made with partially cooked and partially uncooked meat, the cooked meat should be added only when the stew is almost done. If the liquid is not the right consistency once the meat is tender, you can thicken it by adding a little flour mixed with cold water and cooking for another four or five minutes.
MUTTON.
The strong flavor of mutton is said to be due to the oil from the wool, which penetrates the skin, or is the result, through heedlessness or ignorance of the butcher, in allowing the wool to come in contact with the flesh. There is a quite perceptible difference in the flavor of mutton from a sheep which had been for some time sheared of its woolly coat and that from one having a heavy fleece.
The strong taste of mutton is thought to come from the oil in the wool, which seeps into the skin, or is caused, due to carelessness or ignorance on the part of the butcher, by letting the wool touch the meat. There is a noticeable difference in the taste of mutton from a sheep that has been sheared for a while compared to one that has a thick fleece.
The smallest proportion of both fat and bone to muscle is found in the leg; consequently this is the most valuable portion for food, and is likewise the most economical, being available for many savory dishes. On account of the disagreeable adhesive qualities of its fat when cold, mutton should always be served hot.
The smallest ratio of fat and bone to muscle is in the leg; therefore, this is the most valuable part for food and is also the most cost-effective, as it can be used in many tasty dishes. Due to the unpleasant sticky nature of its fat when cold, mutton should always be served hot.
RECIPES.
Boiled Leg of Mutton.—Wipe carefully, remove the fat, and put into boiling water. Skim, and cook as directed on page 395, twelve minutes for each pound.
Boiled Leg of Mutton.—Wipe it down carefully, trim off the fat, and place it in boiling water. Skim the surface, and cook according to the instructions on page 395, for twelve minutes per pound.
Broiled Chops.—The best-flavored and most tender chops are those from the loins. Remove carefully all the pink skin above the fat, scraping it off if possible without cutting into the lean. Wipe with a wet cloth, and broil in the same manner as beefsteak over hot coals or in a hot skillet, turning frequently until done; five or eight minutes will suffice to cook. Sprinkle salt on each side, drain on paper, and serve hot.
Broiled Chops.—The tastiest and most tender chops come from the loins. Carefully remove all the pink skin above the fat, scraping it off if you can without cutting into the meat. Wipe it down with a wet cloth, and broil it just like you would a beef steak over hot coals or in a hot skillet, turning it often until it’s cooked; five to eight minutes should be enough. Sprinkle salt on both sides, let it drain on paper, and serve hot.
Pot-roast Lamb.—For this purpose a stone jar or pot is best, although iron or granite-ware will do; wipe the meat well and gash with a sharp knife. If crowded closely in the pot, all the better; cover with a lid pressed down firmly with a weight to hold it if it does not fit tightly. No water is needed, and no steam should be allowed to escape during the cooking. Roast four or five hours in a moderate oven.
Pot-roast Lamb.—For this, a stone jar or pot works best, although iron or granite cookware is fine too; make sure to wipe the meat well and cut slashes into it with a sharp knife. If you can fit the meat closely in the pot, that's better; cover it with a lid held down tightly, using a weight if it doesn’t fit snugly. No water is needed, and you shouldn't let any steam escape while it cooks. Roast for four to five hours in a moderate oven.
Roast Mutton.—The best pieces for this purpose are those obtained from the shoulder, and saddle, loin, and haunches. Wipe carefully, sear the cut surfaces, and proceed as directed for roasting beef. Cook slowly without basting, and unless desired rare, allow twenty-five or thirty minutes to the pound. A leg of mutton requires a longer time to roast than a shoulder. When sufficiently roasted, remove from the pan and drain off all the grease.
Roast Mutton.—The best cuts for this are from the shoulder, saddle, loin, and haunches. Wipe them down well, sear the cut surfaces, and follow the instructions for roasting beef. Cook slowly without basting, and unless you want it rare, allow twenty-five to thirty minutes per pound. A leg of mutton takes longer to roast than a shoulder. Once it's roasted enough, take it out of the pan and drain off all the grease.
Stewed Mutton Chop.—Wipe, trim off the fat, and remove the bone from two or three pounds of chops. Put into the inner dish of a double boiler with just enough hot water to cover; add a minced stalk of celery, a carrot, and a white turnip cut in dice; cover, and cook until the chops are tender. Sliced potato may be added if liked, when the meat is nearly done. Remove the grease and thicken the liquor with a little browned flour braided with thin cream.
Stewed Mutton Chop.—Wipe, trim off the fat, and remove the bone from two or three pounds of chops. Place them in the inner dish of a double boiler with just enough hot water to cover; add a minced stalk of celery, a diced carrot, and a white turnip diced. Cover and cook until the chops are tender. If you like, you can add sliced potatoes when the meat is nearly done. Remove the grease and thicken the liquid with a bit of browned flour mixed with thin cream.
Stewed Mutton Chop No. 2.—Prepare the chops as in the preceding. Place a layer of meat in a deep baking dish, and then a layer of sliced potato, sprinkled with a little minced celery. Add two or more layers of meat, alternating with layers of potatoes. Cover with boiling water and bake closely covered in a very moderate oven two and a half hours.
Stewed Mutton Chop No. 2.—Prepare the chops the same way as before. Place a layer of meat in a deep baking dish, then add a layer of sliced potatoes, sprinkled with a bit of minced celery. Continue with two or more layers of meat, alternating with layers of potatoes. Cover with boiling water and bake tightly covered in a low oven for two and a half hours.
POULTRY AND GAME.
Poultry and game differ from other animal foods in the relative quantity of fat and the quality of their juices. The fat of birds is laid up underneath the skin and in various internal parts of the body, while but a small proportion is mingled with the fibers or the juices of the flesh. The flesh of the chicken, turkey, and guinea-fowl is more delicately flavored, more tender and easy to digest, than that of geese and ducks. Chickens broiled require three hours for digestion; when boiled or roasted, four hours are needed.
Poultry and game are different from other meats in how much fat they contain and the quality of their juices. The fat in birds is stored under the skin and in various internal organs, while only a small amount is mixed with the meat fibers or juices. The meat of chicken, turkey, and guinea fowl has a more delicate flavor, is more tender, and is easier to digest than that of geese and ducks. Broiled chicken takes about three hours to digest; when boiled or roasted, it requires four hours.
The flesh of poultry is less stimulating than beef, and is thus considered better adapted for invalids. The flesh of wild fowl contains less fat than that of poultry; it is also tender and easy of digestion. Different birds and different parts of the same bird, vary considerably in color and taste. The breed, food, and method of fattening, influence the quality of this class of foods. Fowls poorly fed and allowed wide range are far from cleanly in their habits of eating; in fact, they are largely scavengers, and through the food they pick up, often become infested with internal parasites, and affected with tuberculosis and other diseases which are liable to be communicated to those who eat their flesh.
The meat of poultry is less stimulating than beef, making it better suited for those who are unwell. Wild birds have less fat than domesticated poultry; they are also tender and easy to digest. Different types of birds and different parts of the same bird can vary quite a bit in color and flavor. The breed, diet, and method of raising them all impact the quality of this food group. Chickens that are poorly fed and allowed to roam freely often have unclean eating habits; in fact, they tend to scavenge and can pick up harmful food that leads to infestations of internal parasites, tuberculosis, and other diseases that can be transmitted to people who eat their meat.
Suggestions for the Selection of Poultry and Game.—The first care in the selection of poultry should be its freedom from disease. Birds deprived of exercise, shut up in close cages, and regularly stuffed with as much corn or soft food as they can swallow, may possess the requisite fatness, but it is of a most unwholesome character. When any living creature ceases to exercise, its excretory organs cease to perform their functions thoroughly, and its body becomes saturated with retained excretions.
Suggestions for the Selection of Poultry and Game.—The first priority in choosing poultry should be ensuring it's free from disease. Birds that are kept in cramped cages and overfed with corn or soft food may appear fat, but that fat is very unhealthy. When any living animal stops exercising, its waste removal organs don't work properly, and its body can become filled with trapped waste.
A stall-fed fowl may be recognized by the color of its fat, which is pale white, and lies in thick folds beneath the skin along the lower half of the backbone. The entire surface of the body presents a more greasy, uninviting appearance than that of fowls permitted to live under natural conditions.
A stall-fed chicken can be identified by the color of its fat, which is pale white and appears in thick layers under the skin along the lower part of the backbone. The overall surface of the body looks greasier and less appealing compared to chickens that are allowed to live in natural conditions.
Never purchase fowls which have been sent to the market undrawn. All animals intended for use as food should be dressed as quickly as possible after killing. Putrefactive changes begin very soon after death, and the liver and other viscera, owing to their soft texture and to the quantity of venous blood they retain, advance rapidly in decomposition. When a fowl or animal is killed, even if the large arteries at the throat are cut, a large quantity of blood remains in and around the intestines, owing to the fact that only through the capillaries of the liver can the blood in the portal system find its way into the large vessels which convey it to the heart, and which at death are cut off from the general circulation at both ends by a capillary system. This leaves the blood-vessels belonging to the portal circulation distended with venous blood, which putrefies very quickly, forming a virulent poison. The contents of the intestines of all creatures are always in a more or less advanced state of putrescence, ready to undergo rapid decomposition as soon as the preservative action of the intestinal fluids ceases. It will readily be seen, then, that the flesh of an undrawn fowl must be to a greater or less degree permeated with the poisonous gases and other products of putrefaction, and is certainly quite unfit for food.
Never buy birds that have been sent to the market without being properly prepared. All animals meant for food should be dressed as soon as possible after they are killed. Decomposition starts very quickly after death, and the liver and other internal organs, because of their soft texture and the amount of venous blood they hold, break down rapidly. When a bird or animal is killed, even if the major arteries in the neck are severed, a significant amount of blood remains in or around the intestines. This is because blood can only move from the portal system into the large vessels that send it to the heart through the capillaries of the liver, which are blocked off from the general circulation at both ends by a capillary network at the time of death. As a result, the blood vessels associated with the portal circulation become filled with venous blood, which decomposes quickly and creates a dangerous poison. The contents of the intestines of all animals are always in a more or less decayed state, ready to decompose rapidly as soon as the preserving action of the intestinal fluids stops. It will be obvious, then, that the flesh of an unprepared bird must be, to some degree, filled with toxic gases and other decomposition products, making it certainly unfit for consumption.
Young fowls have soft, yellow feet, a smooth, moist skin, easily torn with a pin, wings which will spring easily, and a breastbone which will yield to pressure. Pinfeathers are an indication of a young bird; older fowls are apt to have sharp scales, long hairs, long, thin necks, and flesh with a purplish tinge.
Young birds have soft, yellow feet, smooth, moist skin that can be easily pierced with a pin, wings that spring back easily, and a breastbone that bends under pressure. Pinfeathers indicate a young bird; older birds tend to have sharp scales, long feathers, long, thin necks, and flesh with a purplish hue.
Poultry should be entirely free from disagreeable odors. Methods are employed for sweetening fowls which have been kept too long in market, but if they need such attention, bury them decently rather than cook them for the table.
Poultry should be completely free from any unpleasant smells. There are techniques to mask the odor of chickens that have been in the market for too long, but if they require such treatment, it’s better to bury them properly instead of cooking them for dinner.
Turkeys should have clear, full eyes, and soft, loose spurs. The legs of young birds are smooth and black; those of older ones, rough and reddish.
Turkeys should have bright, full eyes and soft, flexible spurs. The legs of young birds are smooth and black, while those of older ones are rough and reddish.
Geese and ducks, when freshly killed, have supple feet. If young, the windpipe and beak can be easily broken by pressure of the thumb and forefinger. Young birds also have soft, white fat, tender skin, yellow feet, and legs free from hairs.
Geese and ducks, when freshly killed, have flexible feet. If they're young, you can easily break the windpipe and beak with just your thumb and forefinger. Young birds also have soft, white fat, tender skin, yellow feet, and legs that are free from hair.
The legs of young pigeons are flesh-colored. When in good condition, the breast should be full and plump, and if young, it is of a light reddish color. Old pigeons have dark flesh; squabs always have pinfeathers.
The legs of young pigeons are a flesh tone. When they're healthy, the breast should be full and plump, and if they're young, it will have a light reddish hue. Older pigeons have dark flesh; squabs always have pinfeathers.
Partridges, when young, have dark bills and yellow legs.
Partridges, when they're young, have dark beaks and yellow legs.
The breast of all birds should be full and plump. Birds which are diseased always fall away on the breast, and the bone feels sharp and protrudes.
The breast of all birds should be full and plump. Birds that are sick always lose weight on the breast, and the bone feels sharp and sticks out.
Fowls should be picked, if possible, while the body retains some warmth, as scalding is apt to spoil the skin and parboil the flesh. When all the feathers but the soft down have been removed, a little hot water may be poured on, when the down can be easily rubbed off with the palm of the hand. Wipe dry, and singe the hairs off by holding the bird by the legs over the flame of a candle, a gas-jet, or a few drops of alcohol poured on a plate and lighted. To dress a bird successfully, one should have some knowledge of its anatomy, and it is well for the amateur first to dress one for some dish in which it is not to be cooked whole, when the bird may be opened, and the position of its internal organs studied.
Fowl should be plucked, if possible, while the body is still warm, as scalding can ruin the skin and partially cook the flesh. Once all the feathers except for the soft down are removed, you can pour a little hot water on it, which makes it easy to rub off the down with your hand. Wipe it dry and singe the hairs off by holding the bird by the legs over a candle flame, a gas flame, or a few drops of alcohol on a plate that you light. To successfully dress a bird, you should have some understanding of its anatomy, and it’s advisable for beginners to first dress a bird for a dish in which it won’t be cooked whole, so they can open it up and examine the position of its internal organs.
Remove the head, slip the skin back from the neck, and cut it off close to the body, take out the windpipe and pull out the crop from the end of the neck. Make an incision through the skin a little below the leg-joint, bend the leg at this point and break off the bone. If care has been taken to cut only through the skin, the tendons of the leg may now be easily removed with the fingers.
Remove the head, pull the skin back from the neck, and cut it off close to the body. Take out the windpipe and pull out the crop from the end of the neck. Make a cut in the skin just below the leg joint, bend the leg at this point, and break off the bone. If you’ve only cut through the skin, you can now easily remove the tendons of the leg with your fingers.
If the bird is to be cut up, remove the legs and wings at the joints. Then beginning near the vent, cut the membrane down between the breastbone and tail to the backbone on each side, and separate just below the ribs. The internal organs can now been seen and easily removed, and the body of the bird divided at its joints.
If you're going to carve the bird, start by cutting off the legs and wings at the joints. Next, starting near the vent, make a cut through the membrane between the breastbone and tail, all the way down to the backbone on each side, and then separate just below the ribs. Now you can see the internal organs and easily take them out, and the bird's body can be divided at its joints.
If desired to keep the fowl whole, after removing the windpipe and crop, loosen the heart, liver, and lungs by introducing the forefinger at the neck; cut off the oil-sack, make a slit horizontally under the tail, insert the first and middle fingers, and after separating the membranes which lie close to the body, press them along within the body until the heart and liver can be felt. The gall bladder lies directly under the left lobe of the liver, and if the fingers are kept up, and all adhesions loosened before an effort is made to draw the organs out, there will be little danger of breaking it. Remove everything which can be taken out, then hold the, fowl under the faucet and cleanse thoroughly.
If you want to keep the bird whole, after taking out the windpipe and crop, use your forefinger to loosen the heart, liver, and lungs through the neck. Cut off the oil sack, make a horizontal slit under the tail, insert your first and middle fingers, and gently separate the membranes that are close to the body. Press these membranes inside the body until you can feel the heart and liver. The gallbladder is located directly under the left lobe of the liver, and if you keep your fingers on top and loosen any adhesions before trying to pull the organs out, you are less likely to break it. Remove everything that can be taken out, then hold the bird under the faucet and clean it thoroughly.
To Truss a Fowl or Bird.—Twist the tips of the wings back under the shoulder and bend the legs as far up toward the breast as possible, securing them in that position by putting a skewer through one thigh into the body and out through the opposite thigh. Then bring the legs down and fasten close to the vent.
To Truss a Fowl or Bird.—Twist the tips of the wings back under the shoulders and bend the legs as far up toward the breast as you can, securing them in that position by putting a skewer through one thigh into the body and out through the opposite thigh. Then bring the legs down and fasten them close to the vent.
RECIPES.
Birds Baked in Sweet Potatoes.—Small birds, of which the breast is the only suitable portion for eating, may be baked in the following manner: Cut a sweet potato lengthwise; make a cavity in each half. Place the breast of the bird therein; fit, and tie together carefully; bake until the potato is soft. Serve in the potato.
Birds Baked in Sweet Potatoes.—Small birds, where only the breast is good for eating, can be baked like this: Cut a sweet potato in half lengthwise; create a space in each half. Place the bird's breast inside each half; secure them together carefully; bake until the potato is soft. Serve in the potato.
Boiled Fowl.—After cleaning and dividing the fowl, put into boiling water, and proceed as directed on page 395.
Boiled Chicken.—After cleaning and cutting up the chicken, place it in boiling water, and follow the instructions on page 395.
Broiled Fowl.—A young bird well dressed and singed is best for this purpose. Split down the middle of the back, wipe clean with a damp cloth, twist the top of the wings from the second joint; spread out flat, and with a rolling pin break the projecting breastbone so that the bird will lie flat upon the broiler. When ready to cook, place it skin uppermost and sear the under side by pressing it on a hot pan; then broil the same as beefsteak over glowing coals.
Broiled Fowl.—A young bird that is properly prepared and singed is best for this recipe. Split it down the middle of the back, wipe it clean with a damp cloth, twist the tops of the wings from the second joint; spread it out flat, and use a rolling pin to break the protruding breastbone so that the bird lies flat on the broiler. When ready to cook, place it skin side up and sear the underside by pressing it onto a hot pan; then broil it like you would a steak over glowing coals.
Roast Chicken.—Dress carefully, singe, wash, and wipe dry. Put into a pan of the proper size, add a cup of boiling water, and cook very slowly for the first half hour, then increase the heat, baste frequently, turn occasionally so that no portion will brown too fast. Cook from one to two hours according to size and age of the bird. It is usually considered essential to stuff a fowl for roasting, but a dressing compounded of melted fat and crumbs seasoned with herbs and strong condiments is not to be recommended.
Roast Chicken.—Prepare the chicken carefully by singeing, washing, and drying it. Place it in a suitably sized pan, add a cup of boiling water, and cook very slowly for the first half hour. Then, increase the heat, baste it frequently, and turn it occasionally to ensure even browning. Cook for one to two hours, depending on the size and age of the bird. It's generally thought necessary to stuff a chicken for roasting, but using a filling made of melted fat and breadcrumbs seasoned with herbs and strong spices is not recommended.
If a dressing is considered necessary, it may be made of a quart of crumbs of rather stale whole-wheat bread, moistened with cream, to which add a small handful of powdered and sifted sage leaves which have been dried in the oven until crisp. Add salt as desired, a well-beaten egg, and a little chopped celery.
If a dressing is needed, you can use a quart of slightly stale whole-wheat bread crumbs, moistened with cream. Then, add a small handful of powdered and sifted sage leaves that have been dried in the oven until they're crisp. Season with salt to your taste, mix in a well-beaten egg, and add a bit of chopped celery.
Roast Turkey.—Pluck, singe, and dress the turkey; wash thoroughly and wipe with a dry cloth. If dressing is to be used, stuff the body full, sew up, and truss. Place in a dripping-pan, add a pint of boiling water, and put in an oven so moderate that the turkey will not brown for the first hour; afterward the heat may be somewhat increased, but at no time should the oven be very hot. After the bird becomes brown, baste it occasionally with the water in the pan, dredging lightly with flour. Cook until the legs will separate from the body; three or four hours will be necessary for a small turkey. One half hour to the pound is the usual rule. When tender, remove the stuffing and serve it hot, placing the turkey on a large hot platter to be carved. It may be garnished with parsley or celery leaves and served with cranberry sauce.
Roast Turkey.—After cleaning and prepping the turkey, wash it well and dry it with a cloth. If you’re using stuffing, fill the cavity, sew it shut, and tie the legs. Put it in a roasting pan, add a pint of boiling water, and place it in an oven at a moderate temperature so that the turkey doesn't brown for the first hour; you can increase the heat a bit afterward, but keep it from getting too hot at any time. Once the turkey starts to brown, baste it occasionally with the pan juices, lightly sprinkling flour on it. Cook until the legs easily pull away from the body; for a small turkey, expect this to take three to four hours. A general rule is about half an hour per pound. When it’s tender, take out the stuffing and serve it hot, placing the turkey on a large hot platter for carving. You can garnish it with parsley or celery leaves and serve it with cranberry sauce.
Ducks and geese may be prepared and roasted in the same manner, but less time will suffice for cooking, about one and one third hours for ducks of ordinary size, and about three hours for a young goose.
Ducks and geese can be cooked and roasted in the same way, but they need less time for cooking—about one and a third hours for regular-sized ducks and about three hours for a young goose.
A stuffing of mashed potato seasoned with onion, sage, and salt is considered preferable for a goose. Equal parts of bread crumbs and chopped apples moistened in a little cream are also used for this purpose.
A stuffing made of mashed potatoes seasoned with onion, sage, and salt is preferred for a goose. Equal parts of bread crumbs and chopped apples mixed with a bit of cream are also used for this.
Smothered Chicken.—Cut two chickens into joints and put in a closely covered kettle with a pint of boiling water. Heat very slowly to boiling, skim, keep covered, and simmer until tender and the water evaporated; add salt, turn the pieces, and brown them in their own juices.
Smothered Chicken.—Cut two chickens into pieces and place them in a tightly covered pot with a pint of boiling water. Heat very slowly until it starts to boil, skim off the foam, keep it covered, and let it simmer until tender and most of the water is gone; add salt, turn the pieces over, and brown them in their own juices.
Stewed Chicken.—Divide a chicken into pieces suitable for serving, and stew as directed for beef on page 400. Old fowls left whole and stewed in this manner for a long time and afterward roasted, are much better than when prepared in any other way. If a gravy is desired, prepare as for stewed beef. Other poultry may be stewed likewise.
Stewed Chicken.—Cut a chicken into serving-sized pieces and stew it like you would for beef on page 400. Whole old chickens stewed for a long time and then roasted are much better than any other method. If you want gravy, make it the same way as for stewed beef. You can also stew other types of poultry this way.
FISH.
Fish is a less stimulating article of food than other meats. Edible fish are generally divided into two classes, those of white flesh and those more or less red. The red-fleshed fish, of which the salmon is a representative, have their fat distributed throughout the muscular tissues, while in white fish the fat is stored up in the liver; hence the latter class is much easier of digestion, and being less stimulating, is to be recommended as more wholesome. Different kinds of fish have different nutritive values. Their flavor and wholesomeness are greatly influenced by the nature of their food and the condition of the water in which they are caught; those obtained in deep water with strong currents are considered superior to those found in shallow water. Fish are sometimes poisonous, owing no doubt to the food they eat.
Fish is generally a less stimulating food option than other meats. Edible fish are typically grouped into two categories: those with white flesh and those with more red flesh. The red-fleshed fish, like salmon, have fat spread throughout their muscle tissue, while in white fish, the fat is mainly stored in the liver. This makes white fish much easier to digest and, being less stimulating, it's often recommended as a healthier choice. Different types of fish offer different nutritional benefits. Their taste and healthiness are heavily affected by the type of food they eat and the condition of the water where they are caught. Fish caught in deep water with strong currents are usually considered better than those found in shallow water. Some fish can be poisonous, likely due to their diet.
Like all animal foods, fish are subject to parasites, some of which take up their abode in the human body when fish infected with them are eaten. An eminent scientist connected with the Smithsonian Institution, contributed an article to Forest and Stream a few years ago, in which he stated that in the salmon no less than sixteen kinds of parasitic worms have been discovered, and undoubtedly many others remain unknown; four species were tapeworms, and four, roundworms. The yellow perch is known to be infested with twenty-three species of parasitic worms.
Like all animal foods, fish can have parasites, some of which can end up in the human body when we eat infected fish. A well-known scientist from the Smithsonian Institution wrote an article for Forest and Stream a few years ago, where he mentioned that no fewer than sixteen types of parasitic worms have been found in salmon, and many others likely remain unknown; four types were tapeworms, and four were roundworms. The yellow perch is known to be infested with twenty-three types of parasitic worms.
The pike carries with him at least twenty kinds, while many other varieties of fish are equally infested.
The pike has at least twenty types of parasites, and many other kinds of fish are just as affected.
Fish have been highly lauded as a food particularly suited to the development of the brain and nervous system. This no doubt has arisen from the fact that fish contain a considerable amount of phosphorus. Phosphorus is also present in the human brain, and for this reason it has been supposed that fish must be excellent nutriment for the brain; but the truth is, there is no such thing as any special brain or nerve food. What is good to build up one part of the body is good for the whole of it; a really good food contains the elements to nourish every organ of the body.
Fish have been highly praised as a food that’s great for brain and nervous system development. This likely comes from the fact that fish have a lot of phosphorus in them. Phosphorus is also found in the human brain, so it’s been assumed that fish are excellent brain food; however, the reality is that there’s no special food for the brain or nerves. What’s beneficial for one part of the body is beneficial for the whole body; truly good food contains the nutrients needed to nourish every organ.
Salted fish, like salted meat, is deprived of most of its nutriment during the curing process, and being rendered much more difficult of digestion, possesses very little value as a food.
Salted fish, like salted meat, loses most of its nutrients during the curing process and becomes much harder to digest, making it of very little value as food.
Shell-Fish (Oysters, Clams, Scallops, Lobsters, Crabs,etc.).—Although considered a luxury by epicures, shellfish are not possessed of a high nutritive value. The whole class are scavengers by nature and according to recent researches it appears that they are not altogether safe articles of diet. Many cases of severe and extensive sickness have been traced to the use of clams and oysters. Investigations made to ascertain the cause show the poisonous part of the mussel to be the liver. Rabbits and other small animals inoculated with the poison died in one or two minutes. Not all mussels are thus poisonous, but inasmuch as there is an abundance of wholesome food, it would certainly seem the part of wisdom to discard shellfish altogether.
Shellfish (Oysters, Clams, Scallops, Lobsters, Crabs, etc.).—While often seen as a luxury by food enthusiasts, shellfish don’t offer a lot of nutritional value. They are naturally scavengers, and recent studies suggest that they might not be completely safe to eat. There have been many cases of serious illness linked to clams and oysters. Research into the causes revealed that the toxic part of mussels is the liver. Rabbits and other small animals exposed to this poison died within one or two minutes. Not all mussels are toxic, but since there’s plenty of healthy food available, it seems wise to avoid shellfish entirely.
Fish should be cleaned as soon as possible after being caught. To do this, lay the fish upon a board, and holding it by the tail, scrape off the scales with a dull knife held nearly flat, working from the tail toward the head. Scrape slowly, and rinse the knife frequently in cold water. Cut off the head and fins, make an opening from the gills halfway down the lower part of the body, scrape out the entrails and every particle of blood. Remove the white part that lies along the backbone, then thoroughly rinse and wipe dry.
Fish should be cleaned as soon as possible after being caught. To do this, lay the fish on a board and hold it by the tail. Use a dull knife held nearly flat to scrape off the scales, starting from the tail and moving toward the head. Scrape slowly and rinse the knife often in cold water. Cut off the head and fins, then make an opening from the gills halfway down the underside of the body. Remove the entrails and all the blood. Take off the white part along the backbone, then rinse thoroughly and wipe dry.
Keep in a cool place until ready to cook, but do not place directly on ice, as that will have a tendency to soften the flesh. Fresh fish should never be allowed to soak in water. If salt fish is to be used, it should be freshened by placing it skin-side up in cold water, and soaking for several hours, changing the water frequently.
Keep in a cool place until you're ready to cook, but don’t put it directly on ice, since that will tend to soften the flesh. Fresh fish should never be soaked in water. If you're using salt fish, it should be freshened by placing it skin-side up in cold water and soaking for several hours, changing the water often.
Frozen fish should be placed in cold water to thaw, and when thawed, should be cooked immediately.
Frozen fish should be put in cold water to defrost, and once it's thawed, it should be cooked right away.
Fish is cooked by nearly all methods, but retains more nourishment when broiled or baked. It should be thoroughly cooked, being both indigestible and unpalatable when underdone.
Fish can be prepared using almost any cooking method, but it keeps more nutrients when broiled or baked. It should be cooked all the way through, as it becomes hard to digest and tastes unpleasant when undercooked.
Boiled fish is usually dependent for flavor upon some kind of rich sauce so incompatible with healthy digestion that we do not recommend this method.
Boiled fish typically relies on some kind of rich sauce for flavor, which is so hard on healthy digestion that we don’t recommend this method.
RECIPES.
Baked Fish.—Select a perfectly fresh, properly dressed fish. Rinse thoroughly and wipe dry. Fold it together and place in a dripping pan with a cup of boiling water. Cook slowly and steadily until tender. A fish weighing three or four pounds will require at least two hours. If desired, the fish may be lightly dredged with flour, toward the last, as it begins to brown.
Baked Fish.—Choose a perfectly fresh and properly cleaned fish. Rinse it well and pat it dry. Fold it up and put it in a roasting pan with a cup of boiling water. Cook it slowly and steadily until it’s tender. A fish that weighs three or four pounds will need at least two hours. If you want, you can lightly coat the fish with flour toward the end, as it starts to brown.
Broiled Fish.—Thoroughly clean the fish, and if small, split down the back. Fish of larger size should be cut into inch slices. Use a double wire broiler well oiled with a bit of suet. Lay the fish, with its thickest part next the center of the broiler, skin uppermost, and broil over a bed of clear coals until the flesh-side is of an even brown. The time required will vary, according to the size of the fish, from five to twenty minutes; then turn and brown on the other side. If the fish be very thick, when both sides are browned, put the broiler in the oven over a dripping pan and cook until done.
Broiled Fish.—Clean the fish thoroughly, and if it’s small, split it down the back. For larger fish, cut into one-inch slices. Use a double wire broiler lightly coated with some fat. Place the fish, with its thickest part in the center of the broiler and skin side up, and broil over a bed of clear coals until the flesh side is a nice even brown. The cooking time will depend on the size of the fish and can take anywhere from five to twenty minutes; then flip it over and brown the other side. If the fish is very thick, once both sides are browned, place the broiler in the oven over a roasting pan and continue cooking until it’s done.
MEAT SOUP.
Soups made from meat require first the preparation of a special material called stock, a liquid foundation upon which to begin the soup.
Soups made from meat first need a special ingredient called stock, a liquid base to start the soup.
Beef, veal, mutton, and poultry are all made into stock in the same manner, so that general rules for its preparation will be sufficient for all meat soups.
Beef, veal, lamb, and chicken are all made into stock in the same way, so general guidelines for its preparation will work for any meat soups.
The principal constituents of meat and bones, the material from which stock is compounded, are fiber, albuminous elements, gelatinous substances, and flavoring matters. The albuminous elements are found only in the flesh. The gelatinous substance found in bones, skin, and tendons, is almost devoid of nutriment. In selecting material for stock, therefore, it is well to remember that the larger the proportion of lean meat used, the more nutritious will be the soup.
The main components of meat and bones, which are used to make stock, include fiber, protein elements, gelatinous substances, and flavoring components. The protein elements are present only in the meat. The gelatinous substances found in bones, skin, and tendons have very little nutritional value. When choosing materials for stock, it’s important to keep in mind that the higher the amount of lean meat used, the more nutritious the soup will be.
But little else than gelatine is obtained from the bones, and although serviceable in giving consistency, a soup made principally from bones is not valuable as a food. The amount of bone used for soup should never exceed the flesh material in weight. The bones, trimmings, and remnants of steaks, chops, and roasts may be advantageously utilized for soups. Bits of roast meat and roast gravies are especially serviceable material, since they are rich in the flavoring elements of meat. It should be remembered, however, that these flavoring matters are chiefly excrementitious or waste substances, derived from the venous blood of the animal.
But not much more than gelatin comes from bones, and while it helps to thicken the soup, a broth primarily made from bones isn’t very nutritious. The amount of bone used in soup should never outweigh the amount of meat. Bones, trimmings, and scraps from steaks, chops, and roasts can be used effectively for soups. Leftover bits of roast meat and gravy are particularly useful because they add a lot of meat flavor. However, it's important to note that these flavorful components are mostly waste products derived from the animal's venous blood.
The greatest care must be observed to keep the scraps perfectly sweet and fresh until needed, as stale meat is exceedingly unwholesome. If the scraps are mostly cooked meats and bones, a small portion of raw, lean meat should be used with them; it need not be of the choicest quality; tough, coarse meat, when fresh and good, can be advantageously used for soup stock.
The utmost care must be taken to keep the scraps completely fresh and sweet until they're needed, as stale meat is very unhealthy. If the scraps are mostly cooked meats and bones, a small amount of raw, lean meat should be added; it doesn’t have to be top quality; tough, coarse meat, when fresh and good, can be effectively used for soup stock.
If fresh material is to be procured, select for beef soups a piece from the shin or lower round; the same choice of pieces may be made of veal; of mutton, pieces from the forequarter and neck are best.
If you're getting fresh ingredients, choose a cut from the shin or lower round for beef soups; the same cuts work for veal; for mutton, pieces from the forequarter and neck are best.
In preparing meat for soup, if it is soiled, scrub the outside thoroughly with a clean cloth wet in cold water, or cut away the soiled portion. Break the bones into as small pieces as convenient; cut the meat into inch dice, remove the marrow from the bones, and put it aside. If added to the stock, it will make it greasy.
In getting meat ready for soup, if it's dirty, scrub the outside well with a clean cloth soaked in cold water, or cut off the dirty part. Break the bones into smaller pieces as easily as possible; cut the meat into one-inch cubes, remove the marrow from the bones, and set it aside. If it's added to the stock, it will make it greasy.
Having selected proper material and prepared it for use, the next step is to extract the juices. To do this put it into cold water, bring very gradually to the boiling point,—an hour is not too long for this,—then cook slowly but continuously. In the observation of these simple measures lies the secret of success in stock-making.
Having chosen the right ingredients and got them ready, the next step is to extract the juices. To do this, put them in cold water, gradually bring it to a boil—taking about an hour is fine for this—and then cook it slowly but steadily. Sticking to these simple steps is the key to success in making stock.
The albuminous elements of the meat, which are similar in character to the white of an egg, are readily dissolved in cold or tepid water, but boiling water coagulates them. If the meat is put into boiling water, the albumen coagulates, or hardens, forming a sort of crust on the outside of the meat, which prevents the inner juices from escaping; on the contrary, if the meat is put to cook in cold water, and is gradually raised to the boiling point, the soaking and simmering will easily extract and dissolve the juices.
The protein components of the meat, which are similar to egg whites, dissolve easily in cold or lukewarm water, but boiling water causes them to harden. When meat is placed in boiling water, the protein hardens, creating a barrier on the outside that keeps the inner juices from escaping. In contrast, if the meat is cooked in cold water and gradually brought to a boil, the soaking and simmering will effectively extract and dissolve the juices.
Salt likewise hinders the extraction of the meat juices, and should not be added to stock during its preparation.
Salt also prevents the extraction of the meat juices and shouldn’t be added to the stock while it’s being prepared.
The best utensil for use in the preparation of stock is a soup digester. This is a porcelain-lined kettle, resting on standards, with a cover fitting closely into a groove, so that no steam can escape except through a valve in the top of the cover. In this the meat can be placed and allowed to cook for hours without burning. An ordinary granite-ware kettle with tightly fitting cover set on a stove ring or brick, answers quite well. It should, however, be kept entirely for this purpose. A double boiler is also suitable.
The best tool for making stock is a soup digester. This is a porcelain-lined kettle that sits on a stand, with a tightly fitting lid that seals into a groove, allowing steam to escape only through a valve on top. You can put the meat in there and let it cook for hours without burning. A regular granite-ware kettle with a snug lid placed on a stove ring or brick works well too, but it should be reserved just for this use. A double boiler is also a good option.
The correct proportion of water is to be used is about one quart to each pound of meat and bones, though this will vary somewhat with the material and the length of time required for cooking. The scum which is thrown to the surface of the water during the cooking process is composed of blood and other impurities, and should be removed as rapidly as it rises. If allowed to remain after the water reaches the boiling point, it will become incorporated into the stock and injure it in flavor and wholesomeness.
The right amount of water to use is about one quart for every pound of meat and bones, although this can change a bit depending on the ingredients and how long you need to cook it. The foam that forms on the surface of the water while cooking is made up of blood and other impurities, and it should be removed as quickly as it rises. If it’s left in after the water starts boiling, it will mix into the stock and negatively affect its taste and quality.
If the meat and bones are well cut and broken, the juices ought to be all extracted, with proper cooking, in three or four hours. Longer cooking will render the stock thicker and more gelatinous but not more nutritious, and too long cooking will detract from its flavor. As soon as the meat will fall from the bones, the stock should be removed from the pot and strained at once.
If the meat and bones are properly chopped and broken, the juices should be fully extracted through proper cooking in three to four hours. Cooking it longer will make the stock thicker and more gelatinous, but it won’t increase the nutritional value, and cooking it too long will reduce its flavor. As soon as the meat falls away from the bones, the stock should be taken out of the pot and strained immediately.

A good way to strain stock is to place a colander over an earthen crock or jar (the colander should fit inside the jar), with a cloth strainer within the colander. Then dip the contents of the stock kettle into the colander, and leave it there to drain for fifteen or twenty minutes. Do not squeeze the cloth, and when well drained, throw the scraps away.
A good way to strain stock is to place a colander over a clay pot or jar (the colander should fit inside the jar), with a cloth strainer inside the colander. Then pour the contents of the stock pot into the colander and let it drain for fifteen to twenty minutes. Don't squeeze the cloth, and once it's well drained, throw away the scraps.
French cooks, with their propensity for economy, sometimes select a good quality of beef, cook it so as to retain a portion of the juices in the meat, and make it serve both for preparing the soup and for boiled beef on the bill of fare. The meat is not cut up, but is heated quickly and removed as soon as tender, so that only part of the juices are extracted.
French cooks, known for their knack for being economical, sometimes choose a good quality cut of beef, cook it in a way that keeps some of the juices in the meat, and use it for both the soup and the boiled beef on the menu. The meat isn't chopped up; instead, it’s quickly heated and taken off the heat as soon as it’s tender, so that only some of the juices are released.
Set the stock where it will become cold. The more rapidly it cools, the more delicate will be its flavor, and the better it will keep. The fat will rise to the surface, and can be easily removed when desired. If the quantity of fat in the material used was considerable, a solid cake will cover the top. This fat, by excluding the air, helps keep the stock sweet, and should not be removed until the stock is needed.
Set the stock in a cool place. The faster it cools, the more delicate its flavor will be, and the longer it'll keep. The fat will rise to the surface and can be easily removed when needed. If there’s a lot of fat in the ingredients, a solid layer will form on top. This fat helps keep the stock fresh by blocking out air, so don’t remove it until you need the stock.
If only a portion is to be used at one time, the remainder with the fat should be reheated and cooled, that a new crust may be formed. In winter, stock may be kept several days, if care is thus taken to reheat it. In summer, unless kept in a very cold place, it will spoil in a few hours.
If only a part is going to be used at once, the leftovers with the fat should be reheated and cooled so a new crust can form. In winter, stock can be kept for several days if you take care to reheat it like this. In summer, unless it's stored in a really cold spot, it will go bad in just a few hours.
Soup should never be greasy, and hence, before using the stock, every particle of the fat should be removed. To accomplish this, loosen the cake of fat from the dish with a knife, and if solid, it will sometimes come off whole; if soft, remove all that is possible without cutting into the stock, and afterwards wipe the top of the jellied stock with a cloth wrung out of very hot water, which will readily absorb any lingering portion of fat. If the stock is not jellied, skim off all the fat possible, and then turn the stock through a napkin wrung out of ice water. This will harden the grease, which will adhere to the napkin. It is always better to prepare stock long enough before it is needed to allow it to become perfectly cold; if, however, it is necessary to use the stock very soon after it is prepared, the fat may be quickly hardened by turning the stock into a dripping pan or some other shallow dish, and placing it on ice in a cool place; if there is no time for this, strain several times through a napkin wrung out of ice-cold water, removing the particles of fat each time and wringing the cloth anew before straining again. A little cold water poured into hot stock will also cause the grease to rise so that it can be easily skimmed off; but this method weakens the stock.
Soup should never be greasy, so before using the stock, remove every bit of fat. To do this, loosen the layer of fat from the dish with a knife; if it's solid, it may come off in one piece. If it's soft, take off as much as you can without cutting into the stock, then wipe the top of the jellied stock with a cloth soaked in very hot water, which will easily soak up any leftover fat. If the stock isn't jellied, skim off as much fat as possible, then strain the stock through a napkin soaked in ice water. This will harden the grease, making it stick to the napkin. It's always best to make the stock far enough in advance so it can cool completely; however, if you need to use it soon after it's made, you can quickly harden the fat by pouring the stock into a shallow dish and putting it on ice in a cool spot. If there's no time for that, strain it several times through a napkin soaked in ice-cold water, removing the fat each time and rinsing the cloth before straining again. Pouring a little cold water into hot stock will also make the fat rise so you can skim it off easily, but this method weakens the stock.
Stock may be prepared from one kind of meat only, or from two or more different kinds mixed together. Chicken stock is generally conceded to be better if a small portion of beef is combined with the fowl. Beef and veal are largely used together; but mutton on account of its strong flavor is better used alone.
Stock can be made from just one type of meat or by mixing two or more different kinds. It's widely accepted that chicken stock tastes better when a bit of beef is added to the chicken. Beef and veal are often used together, while mutton, due to its strong flavor, is usually better when used alone.
Stock, when prepared from a single kind of meat, is termed simple stock or broth. When prepared from two or more kinds of flesh cooked together, or when stock prepared separately from different kinds of meat are mixed together, the result is termed compound stock or double broth. With either of these stocks as a foundation, an innumerable variety of soups may be prepared, either by serving them as plain broth or by the addition of some of the various grains and vegetables, the distinctive name of each soup being given it according to its principal solid ingredient.
Stock made from one type of meat is called simple stock or broth. When it's made from two or more types of meat cooked together, or when separate stocks from different meats are combined, it's referred to as compound stock or double broth. With either of these stocks as a base, you can create countless varieties of soups, serving them as plain broth or adding various grains and vegetables. The unique name for each soup comes from its main solid ingredient.
To Clarify Soup Stock.—Having removed all the fat from the stock, add to it before reheating, the shell of an egg, and the whole of one egg well beaten, with a little cold water, for every three pints of soup. Place the soup over the fire and stir it constantly to keep the egg from setting until it is hot. Simmer for fifteen minutes, removing the scum as it rises, and strain through a flannel cloth or napkin laid in a colander. It is also a good plan to place a fine wire strainer on the napkin to catch the shells and scum. Do not squeeze the cloth or stir the liquid with a spoon to hasten the straining process. If the cloth is clogged so that the stock does not run through well, carefully change it in the colander so that the liquid will run down upon a clean portion. When strained, it may be reheated, seasoned, and served as clear soup.
To Clarify Soup Stock.—After removing all the fat from the stock, add the shell of an egg and one beaten egg mixed with a little cold water for every three pints of soup before reheating. Put the soup on the stove and stir it constantly to prevent the egg from cooking until it’s hot. Simmer for fifteen minutes, removing the foam that forms on the surface, and strain it through a piece of flannel or a napkin placed in a colander. It’s also a good idea to use a fine mesh strainer on top of the napkin to catch the shells and foam. Don’t squeeze the cloth or stir the liquid with a spoon to speed up the straining process. If the cloth gets blocked and the stock isn’t draining well, carefully change it in the colander so the liquid can flow down onto a clean area. Once strained, it can be reheated, seasoned, and served as clear soup.
RECIPES.
Asparagus Soup.—This soup is prepared in every way like the one on page 276, except that while stock made from veal is used instead of milk. Green pea soup, celery soup, green corn soup, and green bean soup may be prepared according to the recipes already given for these soups by substituting for milk the same quantity of the stock of veal or chicken.
Asparagus Soup.—This soup is made just like the one on page 276, but with stock made from veal instead of milk. Green pea soup, celery soup, green corn soup, and green bean soup can be made using the same recipes provided for these soups by replacing the milk with the same amount of veal or chicken stock.
Barley, Rice, Sago, or Tapioca Soup.—Any kind of stock may be used in making these soups, though chicken and mutton stock are generally considered preferable. Prepare the grains, the sago, or the tapioca, by steaming or boiling till well cooked, and add to the stock, which should be at boiling temperature. Season and serve.
Barley, Rice, Sago, or Tapioca Soup.—You can use any kind of stock to make these soups, though chicken and mutton stock are usually seen as the best options. Cook the grains, sago, or tapioca by steaming or boiling them until they're fully cooked, then add them to the stock, which should be boiling hot. Season as desired and serve.
Caramel for Coloring Soup Brown.—Melt a half pint of sugar and one tablespoonful of water in a saucepan over the fire; stir constantly until it is of a dark brown color; then add a half pint of boiling water, simmer ten minutes, strain, and put into an air-tight can or bottle. When needed, mix such a quantity with the soup as will give the desired degree of color.
Caramel for Coloring Soup Brown.—Melt half a pint of sugar and one tablespoon of water in a saucepan over heat; stir constantly until it turns a dark brown color; then add half a pint of boiling water, simmer for ten minutes, strain, and store in an airtight container or bottle. When needed, mix in enough to the soup to achieve the desired color.
Julienne Soup.—Take an equal proportion of carrot, parsnip, turnip, celery, and string beans, cut into thin pieces of inch lengths, sufficient to make one pint. Simmer the vegetables gently in a small quantity of water until tender, but not long enough to destroy their shape. Heat a quart of clear stock to boiling, add vegetables, salt to taste, and serve.
Julienne Soup.—Take equal amounts of carrot, parsnip, turnip, celery, and string beans, cut into thin pieces about an inch long, to make one pint. Simmer the vegetables gently in a small amount of water until they are tender, but not long enough to lose their shape. Heat a quart of clear stock to a boil, add the vegetables, season with salt to taste, and serve.
Other vegetables, as peas, asparagus, etc. may be used in the season. Sometimes the vegetables are cut into dice or fancy shapes with a vegetable cutter. It makes little difference about the shape, so that the pieces are small and uniform in size. Such vegetables as potatoes, carrots, or turnips, when used for soups, are easiest cut, after paring in the usual manner, by taking the vegetable in the left hand, holding it on the table or board between thumb and finger, and with the right hand cutting downward in even slices not over one third of an inch wide, to within a quarter of an inch of the bottom. Turn the vegetable and repeat the process, cutting across the first slices. Again lay the vegetable on its side, and make a third series of cuts, which will divide it into cubes. If several kinds of vegetables are used, those which require a longer time for cooking should be cut into smaller pieces.
Other vegetables, like peas and asparagus, can be used in season. Sometimes the vegetables are chopped into dice or fancy shapes using a vegetable cutter. The shape doesn’t matter much, as long as the pieces are small and uniform in size. For veggies like potatoes, carrots, or turnips, when using them in soups, they’re easiest to cut after peeling in the usual way. Hold the vegetable in your left hand, resting it on the table or cutting board between your thumb and fingers, and with your right hand, make even downward slices no thicker than a third of an inch, stopping about a quarter of an inch from the bottom. Turn the vegetable and repeat the process, cutting across the first slices. Then lay the vegetable on its side and make a third set of cuts to divide it into cubes. If using multiple types of vegetables, cut those that take longer to cook into smaller pieces.
Vermicelli or Macaroni Soups.—Drop into boiling water and cook the macaroni about one hour, the vermicelli ten minutes. Drain well, dash cold water through them to separate the pieces, which are apt to stick together, and add to boiling stock (beef and veal are preferable) in the proportion of a pint of cooked macaroni or vermicelli to a quart of soup. Salt to taste and serve.
Vermicelli or Macaroni Soups.—Add the macaroni to boiling water and cook for about an hour, while the vermicelli should only take ten minutes. Drain them well, rinse with cold water to break up any pieces that may stick together, and then mix into boiling stock (beef and veal are best) at a ratio of a pint of cooked macaroni or vermicelli to a quart of soup. Season with salt to taste and serve.
Puree with Chicken.—Take a quart of chicken stock from which the fat has been removed. Add a stalk or two of celery cut into finger-lengths, and a slice of onion, and put to boil. Beat together the mashed yolk of two hard boiled eggs, and a half cup of sweet cream. Chop the white meat of the chicken until fine as meal and beat with the egg mixture. Add slowly a cup and a half of hot milk. Remove the celery and onion from the hot stock, and stir all together. Boil up, salt to taste, and serve. If too thick, a little more stock or milk can be added.
Puree with Chicken.—Take a quart of chicken stock with the fat removed. Add a couple of stalks of celery cut into finger-length pieces, and a slice of onion, and bring to a boil. Combine the mashed yolks of two hard-boiled eggs with half a cup of heavy cream. Chop the white meat of the chicken until it’s as fine as flour and mix it with the egg mixture. Gradually add a cup and a half of hot milk. Remove the celery and onion from the hot stock, then stir everything together. Bring to a boil, season with salt to taste, and serve. If it’s too thick, you can add a bit more stock or milk.
Tapioca Cream Soup.—Soak two tablespoonfuls of tapioca over night. Heat a quart of stock prepared from the white meat of chicken, to boiling, in a saucepan. Then stir the tapioca in gradually. Move the saucepan to the side of the range where it will simmer till the tapioca is transparent. Have ready in a large dish a mixture prepared by beating together very thoroughly the yolks of three eggs and four tablespoonfuls of sweet cream. When the tapioca is clear, remove the stock from the range and pour it very gradually onto the egg mixture, stirring briskly all the time, so that the egg will not curdle. Season with salt if desired. The soup may be returned to the stove and warmed before serving if necessary, but it must not be boiled or allowed to stand a long time.
Tapioca Cream Soup.—Soak two tablespoons of tapioca overnight. Heat a quart of chicken stock to boiling in a saucepan. Gradually stir in the tapioca. Move the saucepan to a cooler part of the stove and let it simmer until the tapioca is transparent. In a large bowl, whisk together the yolks of three eggs and four tablespoons of heavy cream until well combined. Once the tapioca is clear, remove the stock from the heat and slowly pour it into the egg mixture, stirring constantly to prevent the eggs from curdling. Add salt to taste if desired. The soup can be returned to the stove and warmed before serving if needed, but don't let it boil or sit for too long.
TABLE TOPICS.
Animal food is one of the greatest means by which the pure sentiment of the race is depressed.—Alcott.
Animal food is one of the biggest reasons why the true feelings of humanity are diminished.—Alcott.
An English medical author says, "It is no doubt true that the constant use of animal food disqualifies the mind for literary application. We can scarcely imagine a philosopher living on horse flesh like a Tartar, or on buffalo meat like an Indian; and it is a fact that these tribes appear incapable of civilization until they acquire the habit of using a less stimulating diet, and begin to cultivate the fruits of the earth for their own use. The difference, in the success of Christian missions, between such people and those whose chief sustenance is farinaceous food, is very striking and worthy of especial notice. In the East, and in Polynesia, literature and Christian doctrines are seized upon with avidity. But in vain were the most earnest labors of the best men to introduce reading and writing among the American Indians until they had first been taught to grow corn and to eat bread."
An English medical writer says, "It's definitely true that frequently eating meat can make it harder for the mind to focus on literature. We can hardly picture a philosopher who lives on horse meat like a Tartar or on buffalo meat like an Indian; and it's a fact that these groups seem unable to advance in civilization until they start adopting a less stimulating diet and begin to grow crops for themselves. The contrast in the success of Christian missions between these people and those whose main diet consists of grains is very noticeable and deserves special attention. In the East and in Polynesia, literature and Christian teachings are eagerly embraced. But despite the best efforts of dedicated individuals, introducing reading and writing to the American Indians was futile until they were first taught to cultivate corn and eat bread."
An American gentleman traveling in the East met a Brahmin priest, who refused to shake hands with him for fear of pollution. The reason he assigned was that Americans eat hogs. Said the priest, "Why, I have heard that in America they put hogs' flesh in barrels and eat it after it has been dead six months! Horrible!"
An American man traveling in the East met a Brahmin priest, who wouldn’t shake hands with him because he was concerned about pollution. The priest explained that Americans eat pigs. He said, "I’ve heard that in America, they put pig meat in barrels and eat it after it’s been dead for six months! That’s terrible!"
Pork is by no means a favorite food in Scotland. King James is said to have abhorred pork almost as much as he did tobacco. He said, "If I were to give a banquet to the devil, I would provide a loin of pork and a poll of ling, with a pipe of tobacco for digestion!" —Scott.
Pork is definitely not a popular food in Scotland. King James is believed to have hated pork almost as much as he disliked tobacco. He said, "If I were to host a banquet for the devil, I would serve a loin of pork and a poll of ling, along with a pipe of tobacco for digestion!" —Scott.
The Hindu would as soon think of becoming a cannibal as of eating swine's flesh. It is stated that the Indian mutiny so frightful in its results originated in a fear among the Sepoys that they would be forced to eat pork. A lady in India had an amusing experience which illustrates the Hindu sentiment on the subject of pig. Arriving late at a grand dinner, she and her husband saw the first course being carried in as they went down the hall. A row of khitmutgars was drawn up, waiting to follow the dish into the dining-room, and serve their respective employers; as a dish of ham was carried by, each man gravely and deliberately spat upon it! Needless to say, Mrs. B. and her lord waited for the second course.
The Hindu would just as soon think about becoming a cannibal as eating pork. It's said that the Indian mutiny, with its terrible consequences, started because the Sepoys feared they would be forced to eat pig. A lady in India had a funny experience that shows the Hindu attitude toward pigs. Arriving late at a fancy dinner, she and her husband saw the first course being brought in as they walked down the hall. A line of waiters was lined up, ready to follow the dish into the dining room and serve their respective guests; as a plate of ham passed by, each man solemnly and deliberately spat on it! Unsurprisingly, Mrs. B. and her husband decided to wait for the second course.
Both the ancient Syrians and Egyptians abstained from flesh-eating out of dread and abhorrence, and when the latter would represent any thing as odious or disagreeable by hieroglyphics, they painted a fish.
Both the ancient Syrians and Egyptians avoided eating meat out of fear and disgust, and when the Egyptians wanted to depict something as repulsive or unpleasant in hieroglyphics, they painted a fish.
Yes, Agassiz does recommend authors to eat fish because the phosphorus in it makes brains. So far you are correct. But I cannot help you to a decision about the amount you need to eat—at least with certainty. If the specimen composition you send is about your fair usual average, I should judge that perhaps a couple of whales would be all you want for the present; not the largest kind, but simply good, middling-sized whales!—Mark Twain's Letter to a Young Author.
Yes, Agassiz does suggest that writers eat fish because the phosphorus in it supports brain function. So far, you're right. But I can’t tell you exactly how much you should eat—at least not for sure. If the sample composition you sent is around your usual average, I'd say maybe a couple of whales would be all you need for now; not the biggest ones, just decent-sized whales!—Mark Twain's Letter to a Young Author.

FOOD FOR THE SICK
 here is no branch of the culinary art which requires more skill than
that of preparing food for the sick and feeble. The purpose of food at
all times is to supply material for repairing—the waste which is
constantly be chosen with reference to its nutritive value. But during
illness and convalescence, when the waste is often much greater and the
vital powers less active, it is of the utmost importance that the food
should be of such a character as will supply the proper nutrition. Nor
is this all; an article of food may contain all the elements of
nutrition in such proportions as to render it a wholesome food for those
in health, and not be a proper food for the sick, for the reason that
its conversion into blood and tissue lays too great a tax upon the
digestive organs. Food for the sick should be palatable, nutritious and
easily assimilated. To discriminate as to what food will supply these
requisites, one must possess some knowledge of dietetics and physiology,
as well as of the nature of the illness with which the patient is
suffering; and such a knowledge ought to be part of the education of
every woman, no matter to what class of society she belongs.
here is no branch of the culinary art which requires more skill than
that of preparing food for the sick and feeble. The purpose of food at
all times is to supply material for repairing—the waste which is
constantly be chosen with reference to its nutritive value. But during
illness and convalescence, when the waste is often much greater and the
vital powers less active, it is of the utmost importance that the food
should be of such a character as will supply the proper nutrition. Nor
is this all; an article of food may contain all the elements of
nutrition in such proportions as to render it a wholesome food for those
in health, and not be a proper food for the sick, for the reason that
its conversion into blood and tissue lays too great a tax upon the
digestive organs. Food for the sick should be palatable, nutritious and
easily assimilated. To discriminate as to what food will supply these
requisites, one must possess some knowledge of dietetics and physiology,
as well as of the nature of the illness with which the patient is
suffering; and such a knowledge ought to be part of the education of
every woman, no matter to what class of society she belongs.
There is no area of cooking that demands more skill than preparing food for the sick and weak. The primary goal of food is to provide materials for repair—the constant waste must be selected for its nutritional value. However, during illness and recovery, when the waste is often much greater and the body’s resources are limited, it is crucial that the food provides the right nutrition. Furthermore, a food item might have all the nutritional components suitable for healthy individuals but still not be appropriate for the sick, as converting it into blood and tissue may overstrain the digestive system. Food for those who are unwell should be tasty, nutritious, and easy to digest. To determine which foods will meet these needs, one must have some understanding of dietetics and physiology, as well as the specific illness affecting the patient; this knowledge should be part of the education for every woman, regardless of her social class.
There are no special dishes suitable alike for all cases. Hot buttered toast, tea, rich jellies, and other dainties so commonly served to the sick, are usually the very worst articles of diet of which they could partake. As a general rule, elaborate dishes are not suitable.
There are no special dishes that are appropriate for every situation. Hot buttered toast, tea, rich jellies, and other treats that are often given to the sick are usually the worst choices they could make. Generally speaking, fancy dishes are not suitable.
Well-cooked gruel, a nicely broiled steak, a glass of milk, or some refreshing drink often serve far better than foods which combine a greater variety of ingredients, and require more extensive preparation. The simplest foods are always the best, because the most readily assimilated.
Well-cooked porridge, a perfectly grilled steak, a glass of milk, or some refreshing drink often work much better than meals that combine a wider variety of ingredients and need more complicated preparation. The simplest foods are always the best because they are the easiest to digest.
Scrupulous neatness and care in all the minute particulars of the cooking and serving of food for invalids, will add much to its palatableness. The clean napkin on the tray, the bright silver, and dainty china plate, with perhaps a sprig of leaves and flowers beside it, thinly sliced bread, toast or cracker, and the light cup partly filled with hot gruel, are far more appetizing to the invalid than coarse ware, thickly cut bread, and an overflowing cup of gruel, though the cooking may be just as perfect. Anything that suggests excess or weight fatigues the sick. The appearance of milk served in a bowl, water in a mug, beef-tea in a saucer, though seemingly a trivial thing, is often sufficient to remove all desire for food.
Scrupulous neatness and care in all the tiny details of cooking and serving food for patients will greatly enhance its appeal. A clean napkin on the tray, shiny silverware, and a delicate china plate with maybe a sprig of leaves and flowers alongside it, thinly sliced bread, toast or crackers, and a light cup partially filled with hot gruel are much more appetizing to the patient than coarse dishes, thickly cut bread, and a full cup of gruel, even if the cooking is just as perfect. Anything that suggests excess or heaviness tires out the sick. The sight of milk served in a bowl, water in a mug, or beef-tea in a saucer, though it may seem trivial, is often enough to kill any desire for food.
So far as practicable, the wants of the patient should be anticipated, and the meal served, a surprise. The capricious appetite of an invalid may sometimes be coaxed by arranging his simple food upon a tray so planned that in the napery and service-ware used, some one particular color predominates, and if this color be selected to accord or harmonize as far as possible with the food allowed, the tout ensemble presents a pleasing fancy, which will tempt the eye, and through its influence, the appetite of the patient. For example: an invalid whose dietary must consist of fruit and grains, might be served to a "purple" dinner, with bill of fare including a fresh, cool bunch of purple grapes, a glass of unfermented grape juice, a saucer of blackberry mush, a plate of nicely toasted wafers, Graham puffs or zwieback, with stewed prunes, or a slice of prune toast served on dishes decorated with purple. Tie the napkin with a bow of purple ribbon, and place a bunch of purple pansies just within its folds. The monotonous regimen of a poor dyspeptic which poached eggs, beaten biscuit, wheat gluten, eggnog, with, perhaps, stewed peaches or an orange, are served on gilt-band china with a spray of goldenrod, a bunch of marigolds, or a water-lily to give an additional charm.
As much as possible, the patient's needs should be anticipated, and the meal served should be a surprise. The changing appetite of someone who's unwell can sometimes be enticed by arranging their simple food on a tray designed so that one particular color stands out. If this color is chosen to match or complement the food as closely as possible, the overall presentation becomes visually appealing, which can stimulate the patient's appetite. For example, a patient whose diet consists of fruits and grains might enjoy a "purple" dinner, featuring fresh, cool purple grapes, a glass of unfermented grape juice, a saucer of blackberry mush, a plate of nicely toasted wafers, Graham puffs, or zwieback, along with stewed prunes or a slice of prune toast served on purple-decorated dishes. Tie the napkin with a purple ribbon bow and place a bunch of purple pansies within its folds. The dull routine of a dyspeptic’s diet, which may include poached eggs, beaten biscuits, wheat gluten, and eggnog, perhaps accompanied by stewed peaches or an orange, can be served on gilt-banded china with a spray of goldenrod, a bunch of marigolds, or a water lily to add extra charm.
Foods which are ordered to be served hot, should be hot, not merely warm, when they reach the patient. To facilitate this, let the dish in which the food is to be served, stand in hot water for a few moments; take out, wipe dry, turn in the hot food, place on the tray, and serve. An oil stove, alcohol lamp, or a pocket stove is very convenient for warming gruels, broths and other similar foods, as either can be made ready for use in a moment, and will heat the small quantity of food necessary for an invalid in one fourth the time in which it could be accomplished over the range, if necessary to reduce the fire.
Foods that need to be served hot should be hot, not just warm, when they reach the patient. To make this happen, let the dish used for serving the food sit in hot water for a few moments; then take it out, dry it off, add the hot food, place it on the tray, and serve. An oil stove, alcohol lamp, or pocket stove is very handy for warming gruels, broths, and similar foods, as any of these can be ready to use in no time and will heat the small amount of food needed for a patient in a quarter of the time it would take on the stove, especially if the fire needs to be reduced.
In the preparation of food for the sick, a scrupulously clean dish for cooking is of the first importance. It is a good plan in every household to reserve one or two cooking utensils for this purpose, and not be obliged to depend upon those in daily use. Utensils used for the cooking of fruits, vegetables, meat, etc., unless cleaned with the utmost call will sometimes impart a sufficiently unpleasant flavor to the food to render it wholly unpalatable to an invalid whose senses are preternaturally acute.
In preparing food for sick people, having a clean cooking dish is extremely important. It's a good idea for every household to set aside one or two cooking utensils specifically for this purpose, rather than relying on those used every day. Utensils used for cooking fruits, vegetables, meat, etc., if not cleaned thoroughly, can sometimes give the food an off-putting flavor that makes it completely unappetizing for an invalid whose senses are heightened.
GRUELS
These simple foods, the base of which is usually some one of the grains, play an important part in the dietary for the sick, if properly prepared; but the sloppy messes sometimes termed gruel, the chief merit of which appears to be that they "are prepared in ten minutes," are scarcely better than nothing at all. Like other dishes prepared from the grains, gruel needs a long, continuous cooking. When done, it should be the very essence of the grain, possessing all its nutritive qualities, but in such form as to be readily assimilated. For the making of gruels, as for the cooking of grains for any other purpose, the double boiler is the best utensil.
These simple foods, usually based on one of the grains, are really important in the diet for the sick when prepared correctly; however, the slushy mixtures sometimes called gruel, which seem to only have the benefit of being "ready in ten minutes," are hardly better than nothing. Like other grain-based dishes, gruel requires long, steady cooking. When it's finished, it should capture the true essence of the grain, offering all its nutritional benefits but in a form that's easy to digest. For making gruels, just like cooking grains for other uses, a double boiler is the best tool.


If it is desirable to strain the gruel before serving, have a fine wire strainer of a size to stand conveniently within a large bowl or basin, turn the gruel into this, and rub it through with a wooden or silver spoon, using a second spoon, if necessary, to remove that which hangs beneath the sieve. On no account use the first spoon for the latter operation, as by so doing one is apt to get some of the hulls into the gruel and destroy its smoothness. When as much of the gruel as possible has been rubbed through the sieve, pour the strained liquid into a clean dish, reheat to boiling, and season as desired before serving. An extension strainer which can be fitted over any sized dish is also serviceable for straining gruels.
If you want to strain the gruel before serving, get a fine wire strainer that fits conveniently over a large bowl or basin. Pour the gruel into the strainer and use a wooden or silver spoon to push it through, using a second spoon if needed to help remove anything that’s stuck under the sieve. Don’t use the first spoon for this last part, as that could let some of the hulls mix back into the gruel and ruin its smooth texture. Once you’ve pushed through as much of the gruel as possible, pour the strained liquid into a clean dish, reheat it until it’s boiling, and season it as you like before serving. An extension strainer that can fit over any size dish is also useful for straining gruels.
Gruels, like all other foods, should be retained in the mouth for proper insalivation, and it is well to eat them with wafers or some hard food, when solid food is allowed.
Gruels, like all other foods, should be kept in the mouth for proper salivation, and it's good to eat them with wafers or some hard food when solid food is allowed.
RECIPES.
Arrowroot Gruel.—Rub a dessertspoonful of pure arrowroot to a thin paste in two tablespoonfuls of cold water, and stir it into a half pint of boiling water, or, if preferred, a cup and a third of boiling milk, and stir rapidly until thickened and clear. If desired, a little lemon peel for flavoring may be infused in the water or milk, before adding the arrowroot. Sweeten, if allowed, and serve.
Arrowroot Gruel.—Mix a tablespoon of pure arrowroot with two tablespoons of cold water to make a smooth paste, then stir it into half a pint of boiling water or, if you prefer, one and a third cups of boiling milk. Stir quickly until it thickens and becomes clear. If you want, you can add a bit of lemon peel for flavor by infusing it in the water or milk before adding the arrowroot. Sweeten it, if allowed, and serve.
Barley Gruel.—Wash three heaping tablespoonfuls of pearl barley, drop it into a pint of boiling water, and parboil five minutes. Pour this water off and add a quart of fresh boiling water. Let it simmer gently for three hours. Strain, season, and serve. A small piece of lemon rind added to the gruel a half hour before it is done, gives it a very agreeable flavor. Equal quantities of milk and barley gruel make a very nourishing drink; the milk, however, should not be added to the gruel until needed, as in a warm atmosphere it undergoes quite rapid change, and is likely to ferment. A little lemon juice, with sugar to sweeten to taste, is sometimes preferred as seasoning for barley gruel.
Barley Gruel.—Rinse three heaping tablespoons of pearl barley, put it into a pint of boiling water, and parboil for five minutes. Drain this water and add a quart of fresh boiling water. Let it simmer gently for three hours. Strain, season, and serve. Adding a small piece of lemon peel to the gruel half an hour before it's done gives it a really nice flavor. Equal parts of milk and barley gruel create a nourishing drink; however, don't add the milk to the gruel until you're ready to use it, as it can spoil quickly in warm conditions and may ferment. Some people prefer to season barley gruel with a little lemon juice and sugar to taste.
Farina Gruel.—Moisten two table spoonfuls of farina with a very little cold milk, and stir it into a cupful of boiling water. Boil until it thickens, add a cupful of new milk, turn into a double boiler, and cook again for twenty or thirty minutes. Strain if necessary, season with salt or sugar, and serve.
Farina Gruel.—Dampen two tablespoons of farina with a small amount of cold milk, then mix it into a cup of boiling water. Cook until it thickens, add a cup of fresh milk, transfer to a double boiler, and cook again for twenty to thirty minutes. Strain if needed, season with salt or sugar, and serve.
Flour Gruel.—Rub one heaping tablespoonful of whole-wheat flour to a thin paste with three tablespoonfuls of cold milk, and stir it into a pint of boiling milk. Cook for ten or twelve minutes. Season with salt, strain if necessary, and while hot, stir in the beaten white of one egg. The egg may be omitted if preferred; or the yolk of the egg and a little sugar may be used instead, if the patient's condition will allow it.
Flour Gruel.—Mix one heaping tablespoon of whole-wheat flour into a smooth paste with three tablespoons of cold milk, then stir it into a pint of boiling milk. Cook for ten to twelve minutes. Add salt to taste, strain if needed, and while it's hot, mix in the beaten egg white. You can skip the egg if you want; alternatively, you can use the egg yolk and a bit of sugar if the patient's condition allows it.
Graham Gruel.—Heat three cups of water in the inner dish of a double boiler, and when vigorously boiling stir into it carefully, a little at a time, so as not to check the boiling, one scant cup of Graham flour which has been rubbed perfectly smooth in a cup of warm, not hot, water. Stir until thickened, then place in the outer boiler and cook for an hour or longer. When done, strain if necessary, season with salt if desired, and a half cup of sweet cream.
Graham Gruel.—Boil three cups of water in the inner bowl of a double boiler, and when it’s vigorously boiling, gradually stir in one scant cup of Graham flour that has been mixed until smooth in a cup of warm, not hot, water. Stir until it thickens, then transfer to the outer boiler and cook for an hour or longer. When it’s done, strain if needed, season with salt if you want, and add half a cup of sweet cream.
Graham Grits Gruel.—Cook three heaping tablespoonfuls of Graham grits in a quart of boiling water, as directed in the chapter on Grains, for three hours. Turn through a soup strainer to remove any lumps, season with half a cup of cream, and salt if desired. Well cooked Graham grits may be made into gruel by thinning with water or milk, straining and seasoning as above.
Graham Grits Gruel.—Cook three heaping tablespoons of Graham grits in a quart of boiling water, following the instructions in the chapter on Grains, for three hours. Strain through a soup strainer to remove any lumps, then add half a cup of cream and salt if you like. Well-cooked Graham grits can be turned into gruel by thinning with water or milk, straining, and seasoning as described above.
Gruel of Prepared Flour.—Knead a pint of flour with water into a ball, and tie firmly in a linen cloth; put it into a granite-ware basin or kettle, cover with boiling water, and boil slowly, replenishing with boiling water as needed, for twelve hours. Put it before the fire to dry. Afterward remove the cloth, and also a thick skin which will have formed over the ball. Dry the interior again. When needed for use, rub a tablespoonful of the prepared flour smooth with three spoonfuls of cold milk, and stir it into a pint of boiling milk. Cook from three to five minutes. Season with salt if desired.
Gruel of Prepared Flour.—Knead a cup of flour with water into a ball, wrap it tightly in a linen cloth, and place it in a granite or metal bowl or pot. Cover it with boiling water and let it simmer slowly, adding boiling water as needed, for twelve hours. Then set it by the fire to dry. After that, remove the cloth and peel off the thick skin that forms over the ball. Dry the inside again. When you’re ready to use it, mix a tablespoon of the prepared flour with three tablespoons of cold milk until smooth, and stir it into a pint of boiling milk. Cook for three to five minutes. Add salt if you want.
Indian Meal Gruel.—Make a thin paste of one teaspoonful of flour, two tablespoonfuls of best cornmeal, and a little water. Stir this into a quart of boiling water, or milk and water in equal proportions, as preferred. Boil until the meal has set, stirring constantly; then turn into a double boiler and cook for an hour and half or two hours. Season with salt, and strain. If too thick, thin with milk or cream.
Indian Meal Gruel.—Make a thin paste with one teaspoon of flour, two tablespoons of the best cornmeal, and a little water. Stir this mixture into a quart of boiling water or a mix of equal parts milk and water, depending on your preference. Boil until the meal thickens, stirring constantly; then transfer it to a double boiler and cook for an hour and a half to two hours. Season with salt and strain. If it's too thick, thin it out with milk or cream.
Lemon Oatmeal Gruel.—The United States Dispensary recommends the following method of preparing oatmeal gruel for fever patients; "Rub one heaping tablespoonful of fine oatmeal smooth in a little cold water; stir this into three pints of boiling water. Cook until the quantity is reduced to two pints; then strain, and let it cool and settle. When it is quite cold, pour the clear gruel from the sediment, add the juice of a lemon, and sugar to sweeten slightly. If desirable to serve it warm, reheat before adding the lemon juice." Freshly cooked oatmeal may be thinned with boiling water, strained and seasoned in the same manner.
Lemon Oatmeal Gruel.—The United States Dispensary suggests the following way to prepare oatmeal gruel for patients with fever: "Mix one heaping tablespoon of fine oatmeal with a little cold water until smooth; then stir this into three pints of boiling water. Cook until the amount is reduced to two pints; then strain it and let it cool and settle. Once it's completely cold, pour the clear gruel off the sediment, add the juice of a lemon, and a bit of sugar to sweeten it. If you prefer to serve it warm, reheat it before adding the lemon juice." Freshly cooked oatmeal can be thinned with boiling water, strained, and seasoned in the same way.
Milk Porridge.—Take one pint of milk and the same quantity of water, and heat to boiling. Stir in two heaping tablespoonfuls of cornmeal or Graham grits, boil, stirring continuously, until the meal has set, then turn into a double boiler and cook for two hours or longer. Season with salt, and a tablespoonful of sweet cream if allowed.
Milk Porridge.—Take one pint of milk and an equal amount of water, and bring to a boil. Gradually stir in two heaping tablespoons of cornmeal or Graham grits, and keep boiling while stirring continuously until the mixture thickens. Then transfer it to a double boiler and cook for two hours or longer. Add salt and a tablespoon of sweet cream if permissible.
Oatmeal Gruel.—Into one quart of boiling water stir two heaping tablespoonfuls of fine oatmeal; let it boil until it thickens, stirring all the time; then turn into a double boiler and cook for three and a half or four hours. Strain before serving. A little cream may also be added, unless contra-indicated by the patient's condition.
Oatmeal Gruel.—Into one quart of boiling water, stir in two heaping tablespoons of fine oatmeal; let it boil until it thickens, stirring constantly; then transfer it to a double boiler and cook for three and a half to four hours. Strain before serving. A little cream can also be added, unless contraindicated by the patient’s condition.
Oatmeal Gruel No. 2.—Pound one half cup of coarse oatmeal until it is mealy. The easiest way to do this is to tie the oatmeal in a coarse cloth and pound it with a wooden mallet. Put it in a pint bowl, and fill the bowl with cold water. Stir briskly for a few moments until the water is white, then allow the meal to settle. Pour off the water, being careful to get none of the sediment. Fill the bowl a second time with cold water, stir thoroughly, let settle, and pour off the water as before. Do this the third time. Boil the liquid one half hour, strain, and serve hot. If very thick, a little cream or milk may be added.
Oatmeal Gruel No. 2.—Grind half a cup of coarse oatmeal until it’s fine. The easiest way to do this is to put the oatmeal in a piece of coarse cloth and pound it with a wooden mallet. Place it in a pint bowl and fill the bowl with cold water. Stir quickly for a few moments until the water turns white, then let the meal settle. Carefully pour off the water, making sure not to include any of the sediment. Fill the bowl with cold water again, stir well, let it settle, and pour off the water as before. Do this a third time. Boil the liquid for half an hour, strain, and serve hot. If it's too thick, you can add a little cream or milk.
Peptonized Gluten Gruel.—Prepare the gruel as directed for Gluten Gruel No. 1. Strain if needed, cook to lukewarm, and turn it into a pitcher, which place in a dish containing hot water even in depth with the gruel in the pitcher; add the peptonizing fluid or powder, stir well, and let it stand in the hot water bath for ten minutes. The temperature must not be allowed to rise over 130°. Put into a clean dish and serve at once, or place on ice till needed. Other well-cooked gruels maybe peptonized in the same way.
Peptonized Gluten Gruel.—Make the gruel as instructed for Gluten Gruel No. 1. Strain if necessary, cook until lukewarm, and pour it into a pitcher. Place the pitcher in a dish filled with hot water that matches the level of the gruel inside the pitcher. Add the peptonizing fluid or powder, stir well, and let it sit in the hot water bath for ten minutes. Make sure the temperature doesn’t exceed 130°. Transfer to a clean dish and serve immediately, or refrigerate until needed. You can also peptonize other well-cooked gruels in the same way.
Raisin Gruel.—Stone and quarter two dozen raisins and boil them twenty minutes in a small quantity of water. When the water has nearly boiled away, add two cups of new milk. When the milk is boiling, add one heaping tablespoonful of Graham or whole-wheat flour which has been rubbed to a thin paste with a little cold milk. Boil until thickened, stirring all the time; then turn into a double boiler and cook for twenty minutes or half an hour. Season with salt and serve.
Raisin Gruel.—Chop two dozen raisins into small pieces and boil them for twenty minutes in a little bit of water. When most of the water is gone, add two cups of fresh milk. Once the milk is boiling, stir in one heaping tablespoon of Graham or whole-wheat flour that has been mixed into a smooth paste with a bit of cold milk. Keep boiling until it thickens, stirring constantly; then transfer it to a double boiler and cook for another twenty to thirty minutes. Season with salt and serve.
PREPARATIONS OF MILK.
Milk Diet.—An almost exclusive milk diet is sometimes a great advantage in cases of sickness. It is usually necessary to begin the use of the milk in moderate quantities, gradually withdrawing the more solid food and increasing the quantity of milk. In the course of a week, all other food should be withdrawn, and the quantity of milk increased to three or four quarts a day. Milk is easily digested, and hence may be taken at more frequent intervals than other food.
Milk Diet.—A nearly all-milk diet can be really beneficial in times of illness. It’s typically important to start with small amounts of milk, slowly reducing solid foods while increasing the milk intake. Within a week, all other foods should be eliminated, and the milk amount should be increased to three or four quarts a day. Milk is easy to digest, so it can be consumed more often than other foods.
RECIPES.
Koumiss.—Dissolve one fourth of a two-cent cake of compressed yeast, and two teaspoonfuls of white sugar, in three tablespoonfuls of lukewarm water. Pour this into a quart bottle and add sufficient fresh, sweet milk to nearly fill. Shake well, and place in a room of the temperature of 70° to 80° F., and allow it to ferment about six hours. Cork tightly and tie the cork in. Put in a cool place, act above 60° and let it remain a week, when it will be ready for use. In making koumiss be sure that the milk is pure, the bottle sound, and the yeast fresh. Open the bottle with a champagne tap. If there is any curd or thickening resembling cheese, the fermentation has been prolonged beyond the proper point, and the koumiss should not be used.
Koumiss.—Dissolve a quarter of a two-cent cake of compressed yeast and two teaspoons of white sugar in three tablespoons of lukewarm water. Pour this into a quart bottle and add enough fresh, sweet milk to almost fill it. Shake well and place it in a room with a temperature of 70° to 80° F, allowing it to ferment for about six hours. Cork it tightly and secure the cork. Store it in a cool place, above 60°, and let it sit for a week, when it will be ready to use. When making koumiss, ensure the milk is pure, the bottle is intact, and the yeast is fresh. Open the bottle with a champagne tap. If there is any curd or thickening that looks like cheese, it means the fermentation has gone on too long, and the koumiss should not be used.
Into a gallon jar of water, put a piece of lime the size of one's fist. Cover the jar and let the lime settle over night. In the morning, draw the water off the top with a syphon, being careful not to move the jar so as to mix again the particles of lime with the water.
Into a gallon jar of water, put a piece of lime the size of your fist. Cover the jar and let the lime settle overnight. In the morning, siphon off the water on top, being careful not to move the jar so you don’t mix the lime particles back in with the water.
Two tablespoonfuls of the lime water is usually sufficient for a pint of milk.
Two tablespoons of the lime water is usually enough for a pint of milk.
Peptonized Milk for Infants.—One gill of cows' milk, fresh and unskimmed; one gill of pure water; two tablespoonfuls of rich, sweet cream; two hundred grains of milk sugar, one and one fourth grains of extractum pancreatis; four grains of sodium bicarbonate. Put the above in a clean nursing bottle, and place the bottle in water so warm that the whole hand cannot be held in it longer for one minute without pain. Keep the milk at this temperature for exactly twenty minutes. Prepare fresh just before using.
Peptonized Milk for Infants.—One gill of whole, fresh cow's milk; one gill of pure water; two tablespoons of rich, sweet cream; two hundred grains of milk sugar; one and a quarter grains of extract of pancreas; four grains of baking soda. Combine these in a clean nursing bottle, and place the bottle in water that's so warm you can't keep your whole hand in it for longer than a minute without feeling pain. Maintain the milk at this temperature for exactly twenty minutes. Prepare fresh just before using.
BEEF-TEA, BROTHS, ETC.
Beef tea and meat broths are by no means so useful as foods for the sick as is generally supposed. The late Dr. Austin Flint used to say of these foods, that "the valuation by most persons outside of the medical profession, and by many within it, of beef tea or its analogues, the various solutions, most of the extracts, and the expressed juice of meat, is a delusion and a snare which has led to the loss of many lives by starvation.
Beef tea and meat broths are not as helpful as people typically think for sick individuals. The late Dr. Austin Flint used to say that "the way most people, both outside and inside the medical field, value beef tea or similar products, like different solutions, most extracts, and the juice from meat, is a misconception and a trap that has resulted in many deaths due to starvation."
"The quantity of nutritive material in these preparations is insignificant or nil, and it is vastly important that they should be reckoned as of little or no value, except as indirectly conducive to nutrition by acting as stimulants for the secretion of the digestive fluids, or as vehicles for the introduction of the nutritive substances. Furthermore, it is to be considered that water and pressure not only fail to extract the alimentary principles of meat, but that the excrementitious principles, or the products of destructive assimilation, are thereby extracted."
"The amount of nutrients in these products is negligible or none, and it's crucial to consider them as having little or no value, except in the way they may help digestion by stimulating the release of digestive fluids or as a means to deliver nutrients. Additionally, it's important to note that water and pressure not only don't extract the nutritional components of meat but also remove waste products or the byproducts of breaking down food."
Vegetable broths prepared from grains and legumes possess a much higher nutritive value, while they lack the objectionable features of meat broths.
Vegetable broths made from grains and legumes have a much higher nutritional value, and they don't have the undesirable qualities of meat broths.
RECIPES.
Beef Extract.—Take a pound of lean beef, cut it up into small dice, and put into a glass fruit jar. Screw on the cover tightly, put the jar into a vessel filled with cold water to a depth sufficient to come to the top of contents of the jar, and set over a slow fire. As soon as the water boils, set where it will keep just boiling, but no more; and cook for an hour or an hour and a quarter. Then strain, season, and serve. If preferred, a double boiler may be used for the preparation of the extract.
Beef Extract.—Take a pound of lean beef, chop it into small cubes, and place it in a glass fruit jar. Screw the lid on tightly, then put the jar into a pot filled with cold water, enough to reach the top of the contents of the jar, and set it over low heat. Once the water boils, adjust it to maintain a gentle simmer without boiling too hard; cook for about hour or an hour and a quarter. Then strain, season, and serve. If you prefer, you can use a double boiler to make the extract.
Beef Juice.—Cut a thick slice of round steak, trim off every particle of fat, and broil it over a clear fire just long enough to heat it throughout. Next gash it in many places with a sharp knife, and with the aid of a beef-juice press or lemon squeezer, press out all the juice into a bowl set in hot water, salt but very slightly, remove all globules of fat, and serve. This may also be frozen and given the patient in small lumps, if so ordered.
Beef Juice.—Cut a thick slice of round steak, trim off all the fat, and broil it over a hot fire just long enough to heat it through. Then, score it in several places with a sharp knife, and using a beef-juice press or lemon squeezer, squeeze all the juice into a bowl set in hot water. Add just a little salt, remove any fat globules, and serve. This can also be frozen and given to the patient in small pieces if instructed.
Beef Tea.—Take a pound of fresh, lean, juicy beef of good flavor,—the top of the round and the back and middle of the rump are the best portions for the purpose,—from which all fat, bones, and sinews have been carefully removed; cut into pieces a quarter of an inch square, or grind in a sausage-cutter. Add a quart of cold water, and put into a clean double boiler. Place over the fire, and heat very slowly, carefully removing all scum as it rises. Allow it to cook gently for two or three hours, or until the water has been reduced one half. Strain, and put away to cool. Before using, remove all fat from the surface, and season. In reheating, a good way is to place a quantity in a cup, and set the cup into hot water until the tea is sufficiently hot. This prevents waste, and if the patient is not ready for the tea, it can be easily kept hot.
Beef Tea.—Take a pound of fresh, lean, juicy beef with good flavor—top round and the center and back of the rump are the best cuts for this—removing all fat, bones, and sinews carefully. Cut it into pieces about a quarter of an inch square, or grind it in a meat grinder. Add a quart of cold water and place it in a clean double boiler. Set it on the stove and heat very slowly, carefully skimming off any scum that rises. Let it cook gently for two to three hours, or until the water has reduced by half. Strain it and set aside to cool. Before using, skim off all fat from the surface and season to taste. When reheating, a good method is to pour some into a cup and place that cup in hot water until the tea is hot enough. This prevents waste, and if the patient isn't ready for the tea, it can be easily kept warm.
Beef Broth and Oatmeal.—Rub two tablespoonfuls of oatmeal smooth in an equal quantity of cold water, and stir into a quart of boiling beef broth. Cook in a double broiler for two hours, strain, and season with salt and a little cream if allowed. Or, thin well-cooked oatmeal mush with beef-tea; strain, reheat, season, and serve.
Beef Broth and Oatmeal.—Rub two tablespoons of oatmeal smooth in the same amount of cold water, and stir it into a quart of boiling beef broth. Cook in a double boiler for two hours, strain, and season with salt and a bit of cream if permitted. Alternatively, thin well-cooked oatmeal mush with beef broth; strain, reheat, season, and serve.
Bottled Beef Tea.—Cut two pounds of round steak into small dice, rejecting all skin and fat. Put it into a glass fruit jar with one cup of cold water. Cover the can sufficiently tight to prevent any water from boiling in, and place it on a wisp of straw or a muffin ring in a kettle of cold water. Heat very gradually, and keep it just below the boiling point for two or more hours; or, place the can in a deep dish of hot water, and cook in a moderate oven for three hours. Allow the meat to cook thus four or five hours, or until it appears white, by which time it will have discharged all its juice. Turn the liquor off, strain through a piece of muslin or cheese cloth laid in a colander, and cool; then if any fat has been left, it will harden on the top, and can be removed. When needed for use, reheat, season, and serve.
Bottled Beef Tea.—Cut two pounds of round steak into small cubes, discarding all skin and fat. Place it into a glass fruit jar with one cup of cold water. Seal the jar tightly to prevent any water from boiling in, and set it on a layer of straw or a muffin ring in a kettle filled with cold water. Heat very slowly, keeping it just below the boiling point for two or more hours; alternatively, place the jar in a deep dish of hot water and cook in a moderate oven for three hours. Allow the meat to cook for four to five hours, or until it turns white, by which time it will have released all its juice. Pour off the liquid, strain it through a piece of muslin or cheesecloth set in a colander, and let it cool; if any fat remains, it will harden on the surface and can be removed. When ready to use, reheat, season, and serve.
Chicken Broth.—Take a well dressed, plump spring chicken, cut it into half-inch pieces, cracking well all the bones; add cold water,—a quart to the pound of meat and bones,—and cook the same as beef-tea. Allow the broth to cool before using, and carefully skim off all particles of fat before reheating. If allowed, a tablespoonful of steamed rice may be added to the broth, or a well-beaten egg may be stirred in while hot just before serving. Heat until the whole becomes thickened, but do not boil.
Chicken Broth.—Take a well-prepared, plump spring chicken, cut it into half-inch pieces, and crack all the bones well. Add cold water—a quart for every pound of meat and bones—and cook it just like beef tea. Let the broth cool before using, and carefully skim off all the fat particles before reheating. If you like, you can add a tablespoon of steamed rice to the broth, or stir in a well-beaten egg while it's hot just before serving. Heat it until it thickens, but do not let it boil.
If preferred, the broth may be prepared by using only the white portion of the chicken in connection with lean beef. This is liked better by some to whom the strong flavor of the chicken is not pleasant. Or, prepare equal quantity of rich milk, season with salt, reheat, and serve. The broth may be flavored with celery if allowed.
If you want, you can make the broth using just the white meat of the chicken along with some lean beef. Some people prefer this because they find the strong taste of chicken unappealing. Alternatively, you can use the same amount of rich milk, add salt to taste, reheat it, and serve. You can also add celery to the broth for extra flavor if it's allowed.
If preferred, a tablespoonful of rice which has been soaked for an hour in a little warm water, or a tablespoonful of cooked barley, may be simmered in the broth for a half hour before serving. Season with salt as desired.
If you want, a tablespoon of rice that has been soaked for an hour in a bit of warm water, or a tablespoon of cooked barley, can be simmered in the broth for half an hour before serving. Season with salt to taste.
Vegetable Broth No. 2.—Pick over and wash a cup of dried Scotch peas, and put to cook in a quart of cold water, cook slowly in a double boiler or in a kettle placed on the range where they will just simmer, until but a cupful of liquid remains. Strain off the broth, add salt and one third of a cupful of the liquor, without pulp, from well-stewed tomatoes. Serve hot.
Vegetable Broth No. 2.—Sort and wash a cup of dried Scotch peas, then cook them in a quart of cold water. Cook slowly in a double boiler or in a pot on the stove where they will just simmer, until only a cup of liquid is left. Strain the broth, add salt, and one third of a cup of the liquid, without the pulp, from well-stewed tomatoes. Serve hot.
RECIPES FOR PANADA.
GRAINS FOR THE SICK.
For invalids able to digest solid food, rice, cracked wheat, Graham grits, oatmeal, barley, farina and other grains may be prepared and cooked as previously directed in the chapter on Grains.
For people who can digest solid food, rice, cracked wheat, Graham grits, oatmeal, barley, farina, and other grains can be prepared and cooked as directed in the chapter on Grains.
The various cooked preparations of grains—granola, wheatena, avenola, wheat gluten and gluten meal—manufactured by the Sanitarium Food Co., Battle Creek, Mich., form excellent articles of diet for many invalids, when served with hot milk or cream, or prepared in the form of mush. Several recipes for their use have already been given in preceding chapters; the following are a few additional ones:—
The different cooked grain products—granola, wheatena, avenola, wheat gluten, and gluten meal—made by Sanitarium Food Co. in Battle Creek, Michigan, are great dietary options for many people who are unwell, especially when served with hot milk or cream or made into mush. Several recipes for using these grains have already been provided in previous chapters; here are a few more:—
RECIPES.
Gluten Mush.—Heat together a cup of thin cream and three cups of water; when boiling, sift in lightly with the fingers, stirring continuously meanwhile, enough wheat gluten to make a mush of the desired consistency. Boil up once and serve. A few blanched or roasted almonds may be stirred in just before serving, if desired.
Gluten Mush.—Heat a cup of light cream and three cups of water together; when it boils, slowly sift in enough wheat gluten with your fingers, stirring constantly to achieve the desired consistency. Bring it to a boil once more and serve. You can mix in some blanched or roasted almonds just before serving, if you like.
MEATS FOR THE SICK.
All meats for the sick should be prepared in the very simplest way, served with the plainest possible dressing, and without the use of condiments other than salt.
All meats for the sick should be prepared in the simplest way, served with the plainest dressing possible, and without any condiments other than salt.
RECIPES.
Broiled Steak.—Take a half pound of round steak and a slice of tenderloin; wipe well with a clean, wet cloth. Have a clear fire; place the meat in an open wire broiler or on a gridiron over the coals, and cook, turning as often as you can count ten, for four or five minutes, if the slices are about one inch thick; then with a lemon squeezer squeeze the juice from the round steak over the tenderloin, season with a little salt, and serve at once on a hot plate.
Broiled Steak.—Take half a pound of round steak and a slice of tenderloin; wipe them down with a clean, damp cloth. Prepare a clear fire; place the meat in an open wire broiler or on a grill over the coals, and cook, turning it as often as you can count to ten, for about four or five minutes if the slices are around one inch thick; then use a lemon squeezer to squeeze the juice from the round steak over the tenderloin, season with a bit of salt, and serve immediately on a hot plate.
Chicken.—For an invalid, the breast of a tender chicken broiled quickly over hot coals is best. For directions for broiling chicken see page 406.
Chicken.—For someone who's unwell, the breast of a tender chicken grilled quickly over hot coals is ideal. For instructions on grilling chicken, see page 406.
Chicken Jelly.—Dress a small chicken. Disjoint, break or pound the bones, and cut the meat into half-inch pieces. Remove every particle of fat possible. Cover with cold water, heat very slowly, and simmer gently until the meat is in rags, and the liquid reduced about one half. Strain off the liquor, cool, and remove all the fat. To make the broth more clear, add the shell and white of an egg, then reheat slowly, stirring all the time until hot. Strain through a fine cloth laid inside of a colander. Salt and a little lemon may be added as seasoning. Pour into small cups, and cool.
Chicken Jelly.—Prepare a small chicken. Disjoint it, break or pound the bones, and cut the meat into half-inch pieces. Remove as much fat as possible. Cover the chicken with cold water, heat it very slowly, and let it simmer gently until the meat falls apart and the liquid is reduced by about half. Strain the liquid, let it cool, and remove all the fat. To clarify the broth, add the shell and white of an egg, then reheat slowly, stirring constantly until hot. Strain it through a fine cloth placed in a colander. You can add salt and a bit of lemon for seasoning. Pour it into small cups and let it cool.
Minced Chicken.—Stew the breast of a young chicken until tender; mince fine with a sharp knife. Thicken the liquor in which it was stewed with a little flour, add salt and a little cream if allowed, then the minced chicken, and serve hot on zwieback, softened with cream as directed in the chapter on Breakfast Dishes.
Minced Chicken.—Cook the breast of a young chicken until it's tender; then chop it finely with a sharp knife. Thicken the broth it was cooked in with a bit of flour, add salt and some cream if allowed, then mix in the minced chicken, and serve hot on zwieback softened with cream as described in the chapter on Breakfast Dishes.
Minced Steak.—Mince some nice, juicy steak with a chopping knife, or in a sausage-cutter, rejecting as much of the fiber as possible; make into small cakes and broil the same as steak. Salt lightly when done, and for dressing use a little beef juice prepared as directed on page 427. It may be thickened with a little flour as for gravy, if preferred.
Minced Steak.—Chop some nice, juicy steak with a knife or use a meat grinder, removing as much of the tough parts as you can. Shape it into small patties and grill them like you would a steak. Lightly salt them after cooking, and for sauce, use a bit of beef broth prepared as instructed on page 427. You can thicken it with a little flour, like you would for gravy, if you'd like.
Scraped Steak.—Take a small piece of nice, juicy steak, and with a blunt case-knife or tablespoon, scrape off all the pulp, being careful to get none of the fibers. Press the pulp together in the form of patties, and broil quickly over glowing coals. Salt lightly, and serve hot. It is better to be as rare as the patient can take it. Instead of butter, turn a spoonful or two of thick, hot beef juice over the steak, if any dressing other than salt is required.
Scraped Steak.—Take a small piece of good, juicy steak, and with a blunt knife or tablespoon, scrape off all the meat, being careful to not get any of the fibers. Press the meat together to form patties, and quickly grill them over hot coals. Lightly salt and serve hot. It’s best if it’s as rare as the person can handle. Instead of butter, pour a spoonful or two of thick, hot beef juice over the steak if any seasoning other than salt is needed.
EGGS FOR THE SICK.
RECIPES.
Floated Egg.—Separate the white from the yolk, and drop the yolk, taking great care not to break it, into boiling, salted water. Cook until hard and mealy. In the meantime, beat the white of the egg until stiff and firm. When the yolk is cooked, remove it from the water with a skimmer. Let the water cease to boil, then dip the beaten white in spoonfuls on the top of the scalding water, allowing it to remain for a second or two until coagulated, but not hardened. Arrange the white in a hot egg saucer, and place the cooked yolk in the center, or serve on toast. This makes a very pretty, as well as appetising dish, if care is taken to keep the yolk intact.
Floated Egg.—Separate the egg white from the yolk, then carefully drop the yolk into boiling, salted water, making sure not to break it. Cook until it's hard and crumbly. In the meantime, whip the egg white until it's stiff and firm. Once the yolk is cooked, use a skimmer to remove it from the water. Let the water stop boiling, then carefully spoon the beaten white onto the surface of the hot water, letting it sit for a second or two until it sets, but doesn’t harden. Arrange the white in a warm egg dish, and place the cooked yolk in the center, or serve it on toast. This creates a very attractive and appetizing dish, provided you keep the yolk intact.
Gluten Meal Custard.—Beat together thoroughly, one pint of rich milk, one egg, and four tablespoonfuls of gluten meal. Add a little salt if desired, and cook with the dish set in another containing boiling water, until the custard has set. Or, turn the custard into cups, which place in a dripping pan partly filled with hot water, and cook in a moderate oven until the custard is set.
Gluten Meal Custard.—Mix together one pint of whole milk, one egg, and four tablespoons of gluten meal until well combined. If you want, add a pinch of salt, and cook the mixture in a dish placed in another dish filled with boiling water until the custard is firm. Alternatively, pour the custard into cups, set them in a baking pan partially filled with hot water, and bake in a moderate oven until the custard is set.
Gluten Custard.—Into a quart of boiling milk stir four tablespoonfuls of wheat gluten moistened with a little of the milk, which may be reserved for the purpose. Allow it to cook until thickened. Cool to lukewarm temperature, and add three well-beaten eggs, and a trifle of salt, if desired. Turn into cups, and steam over a kettle of boiling water until the custard is set.
Gluten Custard.—In a quart of boiling milk, stir in four tablespoons of wheat gluten that you've moistened with a bit of the milk, which you can set aside for this purpose. Let it cook until it thickens. Allow it to cool to a lukewarm temperature, then add three well-beaten eggs and a pinch of salt, if you like. Pour the mixture into cups and steam over a kettle of boiling water until the custard is set.
Steamed Eggs.—Break an egg into an egg saucer, sauce-dish, or patty pan, salt very slightly, and steam until the white has just set. In this way, it will retain its shape perfectly, and not be mixed with the few drops of water so annoying to invalids, and so hard to avoid in dishing a poached egg from water.
Steamed Eggs.—Crack an egg into an egg cup, small dish, or patty pan, add a tiny pinch of salt, and steam until the white is just set. This method keeps it perfectly shaped and prevents it from mixing with the few drops of water, which can be frustrating for those who are unwell and hard to avoid when serving a poached egg from water.
REFRESHING DRINKS AND DELICACIES FOR THE SICK.
In many fevers and acute diseases, but little food is required, and that of a character which merely appeases hunger and quenches thirst, without stimulation and without affording much nourishment.
In many fevers and acute illnesses, only a small amount of food is needed, and it should be the kind that just satisfies hunger and thirst, without providing stimulation or significant nourishment.
Preparations from sago, tapioca, and other farinaceous substances are sometimes serviceable for this purpose. Oranges, grapes, and other perfectly ripened and juicy fruits are also most excellent. They are nature's own delicacies, and serve both for food and drink. They should not, however, be kept in the sick room, but preserved in some cool place, and served when needed, as fresh and in as dainty a manner as possible. Like all food provided for the sick, they should be arranged to please the eye as well as the palate. The capricious appetite of an invalid will often refuse luscious fruit from the hand of a nurse, which would have been gladly accepted had it been served on dainty china, with a clean napkin and silver.
Preparations made from sago, tapioca, and other starchy foods are sometimes useful for this purpose. Oranges, grapes, and other perfectly ripe and juicy fruits are also excellent choices. They are nature's treats and serve as both food and drink. However, they shouldn't be kept in the sick room; instead, they should be stored in a cool place and served when needed, as fresh and attractively as possible. Like all food meant for the sick, they should be arranged to please both the eye and the taste. An ill person's unpredictable appetite may often turn down delicious fruit from a nurse but would gladly accept it if served on pretty china, with a clean napkin and silverware.
The juice of the various small fruits and berries forms a basis from which may be made many refreshing drinks especially acceptable to the dry, parched mouth of a sick person.
The juice from different small fruits and berries creates a foundation for many refreshing drinks that are especially satisfying for the dry, parched mouth of someone who is sick.
Fruit juices can be prepared with but little trouble. For directions see page 209.
Fruit juices can be made with minimal effort. For instructions, see page 209.
Beverages from fruit juices are prepared by using a small quantity of the juice, and sufficient cold water to dilute it to the taste. If it is desirable to use such a drink for a sick person in some household where fruit juices have not been put up for the purpose, the juice may be obtained from a can of strawberries, raspberries, or other small fruit, by turning the whole into a coarse cloth and straining off the juice; or a tablespoonful of currant or other jelly may be dissolved in a tumbler of warm water, and allowed to cool. Either will make a good substitute for the prepared fruit juice, though the flavor will be less delicate. The hot beverages and many of the cold ones given in the chapter on Beverages will be found serviceable for the sick, as will also the following additional ones:—
Beverages made from fruit juices are prepared by using a small amount of juice and enough cold water to dilute it to taste. If you need to make such a drink for someone who is sick in a household where fruit juices aren’t available, you can get juice from a can of strawberries, raspberries, or other small fruits by pouring the contents into a coarse cloth and straining out the juice; or you can dissolve a tablespoon of currant or other jelly in a glass of warm water and let it cool. Either option will serve as a good substitute for the prepared fruit juice, although the flavor might not be as delicate. The hot beverages and many of the cold ones mentioned in the chapter on Beverages will be helpful for the sick, along with the following additional options:—
RECIPES.
Almond Milk—Blanch a quarter of a pound of shelled almonds by pouring over them a quart of boiling water, and when the skins soften, rubbing them off with a coarse towel. Pound the almonds in a mortar, a few at a time, adding four or five drops of milk occasionally, to prevent their oiling. About one tablespoonful of milk in all will be sufficient. When finely pounded, mix the almonds with a pint of milk, two tablespoonfuls of sugar, and a little piece of lemon rind. Place the whole over the fire to simmer for a little time. Strain, if preferred, and serve cold.
Almond Milk—Start by blanching a quarter of a pound of shelled almonds by pouring a quart of boiling water over them. Once the skins soften, rub them off with a rough towel. Crush the almonds in a mortar, doing a few at a time, and add four or five drops of milk now and then to keep them from getting oily. You’ll need about one tablespoon of milk in total. Once they’re finely crushed, mix the almonds with a pint of milk, two tablespoons of sugar, and a small piece of lemon rind. Heat the mixture on the stove and let it simmer for a bit. If you prefer, strain it, and serve it cold.
Apple Beverage No. 2.—Bake two large, sour apples, and when tender, sprinkle a tablespoonful of sugar over them, and return to the oven until the sugar is slightly browned. Break and mash the apples with a silver spoon, pour over them a pint of boiling water; cover and let stand until cold; then strain and serve.
Apple Beverage No. 2.—Bake two large, tart apples, and when they're soft, sprinkle a tablespoon of sugar over them, then put them back in the oven until the sugar is lightly browned. Mash the apples with a silver spoon, pour a pint of boiling water over them; cover and let it sit until it cools down; then strain and serve.
Barley Lemonade.—Put a half cup of pearl barley into a quart of cold water, and simmer gently until the water has become mucilaginous and quite thick. This will take from an hour to an hour and a half. The barley will absorb most of the water, but the quantity given should make a teacupful of good, thick barley water. Add to this two teaspoonfuls of lemon juice and a tablespoonful of sugar. Let it get cold before serving. By returning the barley to the stewpan with another quart of cold water, and simmering for an hour or an hour and a half longer, a second cap of barley water may be obtained, almost as good as the first.
Barley Lemonade.—Put half a cup of pearl barley into a quart of cold water and simmer gently until the water becomes thick and slimy. This will take about an hour to an hour and a half. The barley will soak up most of the water, but this amount should give you a teacup full of nice, thick barley water. Add two teaspoons of lemon juice and a tablespoon of sugar. Let it chill before serving. By putting the barley back in the pot with another quart of cold water, and simmering for another hour to an hour and a half, you can make a second batch of barley water that’s almost as good as the first.
Crust Coffee.—Brown slices of Graham bread in a slow oven until very ark in color. Break in pieces and roll fine with a rolling pin. A quantity of this material may be prepared at one time and stored in glass fruit cans for use. When needed, pour a cupful of actively boiling water over a dessertspoonful of the prepared crumbs, let it steep for a few moments, then strain and serve.
Crust Coffee.—Brown slices of Graham bread in a slow oven until very dark in color. Break into pieces and roll fine with a rolling pin. You can prepare a batch of this ahead of time and store it in glass jars for later use. When you need it, pour a cup of boiling water over a dessert spoonful of the crumbs, let it steep for a few moments, then strain and serve.
Egg Lemonade.—Beat the white of an egg to a stiff froth, then mix with it the juice of a small lemon, and one tablespoonful of sugar. Add a half pint of cold water. Or, beat together with an egg beater a tablespoonful of lemon juice, a teaspoonful of sugar, the white of an egg and a cup of cold water, until thoroughly mingled, then serve at once.
Egg Lemonade.—Whip the egg white until it's stiff, then mix in the juice of a small lemon and a tablespoon of sugar. Add half a pint of cold water. Alternatively, use an egg beater to combine a tablespoon of lemon juice, a teaspoon of sugar, the egg white, and a cup of cold water until it's well blended, then serve immediately.
Flaxseed Tea.—Take an ounce of whole flaxseed, half an ounce of crushed licorice root, an ounce of refined sugar, and four tablespoonfuls of lemon juice. Pour a quart of boiling water over them; keep near the fire for four hours, and then strain off the liquid. The flaxseed should not be crushed, as the mucilage is in the outer part of the kernel, and if braised, the boiling water will extract the oil of the seed, and render the decoction nauseous. Make fresh daily.
Flaxseed Tea.—Take an ounce of whole flaxseed, half an ounce of crushed licorice root, an ounce of sugar, and four tablespoons of lemon juice. Pour a quart of boiling water over them; let it sit near the heat for four hours, and then strain the liquid. The flaxseed should not be crushed, because the mucilage is in the outer part of the kernel, and if crushed, the boiling water will extract the oil from the seed, making the tea taste bad. Make fresh daily.
Hot lemonade.—Put in a glass a thin slice of lemon and the juice of half a small lemon, being careful to remove all seeds; mix with it one dessertspoonful of white sugar, and fill the glass with boiling water. Or, remove the peel of a lemon in very thin parings, turn one pint of boiling water over them, letting it stand for a few moments covered. Remove the peel, add the juice of a lemon and one tablespoonful of sugar, and serve.
Hot lemonade.—In a glass, add a thin slice of lemon and the juice of half a small lemon, making sure to take out all the seeds; mix in one dessert spoonful of white sugar, then fill the glass with boiling water. Alternatively, peel a lemon in very thin strips, pour one pint of boiling water over them, and let it steep for a few moments covered. Remove the peel, add the lemon juice and one tablespoon of sugar, and serve.
Irish Moss Lemonade.—Soak one fourth of a cup of Irish moss in cold water until it begins to soften; then work it free from sand and tiny shells likely to be on it, and thoroughly wash. Put it in a granite-ware basin, and pour over it two cups of boiling water. Leave on the back of the range where it will keep hot, but not boil, for half an hour; strain, add the juice of one lemon, and sugar to taste. Drink hot or cold, as preferred.
Irish Moss Lemonade.—Soak ¼ cup of Irish moss in cold water until it starts to soften; then remove any sand and tiny shells that might be on it, and wash it thoroughly. Place it in a granite basin and pour 2 cups of boiling water over it. Let it sit on the back of the stove where it will stay hot but not boil for 30 minutes; strain, then add the juice of one lemon and sugar to taste. Enjoy it hot or cold, whichever you prefer.
Tamarind Water.—Boil four ounces of tamarinds and the same of raisins slowly, in three quarts of water, for fifteen or twenty minutes, or until the water is reduced nearly one fourth; strain while hot into a bowl with a small slice of lemon peel in it. Set away until cold before using.
Tamarind Water.—Boil four ounces of tamarinds and the same amount of raisins slowly in three quarts of water for fifteen to twenty minutes, or until the water is reduced by nearly one fourth; strain while hot into a bowl with a small slice of lemon peel in it. Set aside until cool before using.
BREAD.
For invalids who are able to partake of solid foods, the Breakfast Rolls, Whole-wheat Puffs, Beaten Biscuit, Crisps, and other unfermented breads, directions for the preparation of which are given in the chapter on Bread, will be found excellent.
For those who can eat solid foods, the Breakfast Rolls, Whole-wheat Puffs, Beaten Biscuit, Crisps, and other unleavened breads, with preparation instructions provided in the chapter on Bread, will be excellent.
The various crackers, wafers, and invalid foods manufactured by the Sanitarium Food Co., Battle Creek, Mich., are also to be recommended. Zwieback, prepared as directed on page 289, will be found serviceable and wholesome to be used with broths and gruels. It may be prepared so as to look especially tempting by cutting off the crust of the bread, and cutting the slice into fancy shapes with a cookie-cutter before toasting. In cases where their use is allowable, many of the various toasts given under the head of Breakfast Dishes will be relished.
The different crackers, wafers, and specialty foods made by the Sanitarium Food Co. in Battle Creek, Mich., are worth recommending. Zwieback, made as instructed on page 289, is useful and nutritious for pairing with broths and gruels. You can make it look especially appealing by trimming the crust off the bread and using a cookie cutter to shape the slices before toasting. In situations where they're appropriate, many of the toasts listed under Breakfast Dishes will be enjoyed.
RECIPES.
Diabetic Biscuit.—Make a stiff dough of Graham or entire-wheat flour and water. Knead thoroughly, and let it stand three hours; then place on a sieve under a faucet, turn a stream of water over the dough, and wash out the starch, kneading and working with the hands so that all portions of the dough will be equally washed. When the starch has been all washed out, as will be indicated by the water running off clear, the dough will be a rubber-like, glutinous mass. It may then be cut into long strips, and these divided into equal-sized pieces or cubes. Place the pieces on shallow baking pans in a rather hot oven, which, after a short time, should be allowed to cool to moderate heat, and bake for two hours, when they should be of a dark, rich brown color and light and crisp throughout. If tough, they need rebaking. If the oven is too hot, the pieces will puff up, becoming mere hollow shells; if not sufficiently hot, they will not rise properly.
Diabetic Biscuit.—Make a stiff dough using Graham or whole wheat flour and water. Knead it well and let it sit for three hours. Then, place it on a sieve under a faucet, run a stream of water over the dough, and wash out the starch, kneading and working it with your hands to ensure all parts of the dough are equally washed. When the starch is completely washed out—indicated by the water running off clear—the dough will become a rubbery, sticky mass. You can then cut it into long strips and divide those into equally sized pieces or cubes. Arrange the pieces on shallow baking pans in a hot oven, then after a short time, reduce the temperature to moderate heat, and bake for two hours until they’re a dark, rich brown color and light and crispy throughout. If they turn out tough, they need to be baked again. If the oven is too hot, the pieces will puff up and become hollow shells; if it's not hot enough, they won't rise properly.
Gluten Meal Gems.—Beat together one half cup of ice water, one half cup of thick, sweet cream, and one egg; then add one cup and a tablespoonful of the gluten meal prepared by the Sanitarium Food Co. Turn into slightly heated gem irons, and bake in a moderately hot oven from one half to three fourths of an hour.
JELLIES AND OTHER SIMPLE DESSERTS FOR THE SICK.
Invalids whose digestion will allow of other than the plainest foods will find most of the desserts made with fruits and those with fruits and grains given in the chapter on Desserts, excellent for their use. The following are a few additional recipes of a similar character:—
Invalids whose digestion can handle more than just the simplest foods will find most of the desserts made with fruits and those with fruits and grains provided in the chapter on Desserts to be great for their needs. Here are a few more recipes of a similar nature:—
RECIPES.
Arrowroot Jelly.—Rub two heaping teaspoonfuls of arrowroot smooth in a very little cold water, and stir it into a cupful of boiling water, in which should be dissolved two teaspoonfuls of sugar. Stir until clear, allowing it to boil all the time; lastly, add a teaspoonful of lemon juice. Serve cold, with cream and sugar if allowed.
Arrowroot Jelly.—Mix two heaping teaspoons of arrowroot with a small amount of cold water until smooth, then stir it into a cup of boiling water that has two teaspoons of sugar dissolved in it. Keep stirring until it’s clear, letting it boil the whole time. Finally, add a teaspoon of lemon juice. Serve it cold, with cream and sugar if allowed.
Arrowroot Blancmange.—Rub two and a half tablespoonfuls of best arrowroot smooth in half a cup of cold milk, and stir slowly into two and one half cups of boiling new milk. When it begins to thicken, add three fourths of a cup of sugar, and cook, stirring constantly for several minutes. Turn into molds and cool. Serve with fruit juice or fruit sauces.
Arrowroot Blancmange.—Mix two and a half tablespoons of the best arrowroot until smooth in half a cup of cold milk, then slowly stir it into two and a half cups of boiling fresh milk. Once it starts to thicken, add three fourths of a cup of sugar and cook, stirring constantly for a few minutes. Pour into molds and let it cool. Serve with fruit juice or fruit sauces.
Iceland Moss Jelly.—Wash about four ounces of moss very clean in lukewarm water. Boil slowly in a quart of cold water. When quite dissolved, strain it onto a tablespoonful of currant or raspberry jelly, stirring so as to blend the jelly perfectly with the moss. Turn into a mold, and cool.
Iceland Moss Jelly.—Wash about four ounces of moss thoroughly in lukewarm water. Simmer it slowly in a quart of cold water. Once it’s completely dissolved, strain it into a tablespoon of currant or raspberry jelly, stirring to mix the jelly smoothly with the moss. Pour it into a mold and let it cool.
White Custard.—Beat the whites of three eggs to a stiff froth, add a little salt if desired, and two tablespoonfuls of sugar. A bit of grated lemon rind may also be used for flavoring. Add lastly a pint of new milk, little by little, beating thoroughly all the while. Bake in cups set in a pan of hot water. When firm in the center, take out and set in a cool place.
White Custard.—Whip the whites of three eggs until stiff, adding a pinch of salt if you like, along with two tablespoons of sugar. You can also mix in some grated lemon zest for flavor. Gradually add a pint of fresh milk while continuing to beat the mixture well. Bake in cups placed in a pan of hot water. Once firm in the center, remove and let cool in a cool place.
TABLE TOPICS.
Regimen is better than physic.—Voltaire.
Lifestyle is better than medicine.—Voltaire.
Many dishes have induced many diseases.—Seneca.
Many dishes have caused many diseases.—Seneca.
Dr. Lyman Beecher tells the following story of his aunt, which well illustrates a popular notion that sick people should be fed with all sorts of dainties, no matter what the nature of the disease. When a boy eight or nine years of age, he was one day suffering in the throes of indigestion, as the result of having swallowed a large amount of indigestible mince pie. His kind-hearted aunt noticed the pale and distressed look on his face, and said to him, with genuine sympathy in her voice, "Lyman, you look sick. You may go into the pantry and help yourself to a nice piece of fruit cake just warm from the oven."
Dr. Lyman Beecher shares a story about his aunt that perfectly illustrates the common belief that sick people should be served all kinds of treats, regardless of their illness. When he was about eight or nine years old, he experienced severe indigestion after eating a lot of heavy mince pie. His caring aunt saw the pale, upset expression on his face and, with genuine sympathy, said to him, "Lyman, you look unwell. You can go to the pantry and take a nice piece of fruit cake that just came out of the oven."
Fix on that course of life which is the most excellent, and custom will render it the most delightful.—Pythagoras.
Focus on the path of life that is the best, and repetition will make it the most enjoyable.—Pythagoras.
A MERE indigestion can temporarily metamorphose the character. The eel stews of Mohammed II. kept the whole empire in a state of nervous excitement, and one of the meat-pies which King Philip failed to digest caused the revolt of the Netherlands.—Oswald.
A simple case of indigestion can temporarily change someone's personality. The eel stews of Mohammed II kept the entire empire in a constant state of anxiety, and one meat pie that King Philip couldn't digest led to the revolt of the Netherlands.—Oswald.
Few seem conscious that there is such a thing as physical morality. Man's habitual words and acts imply that they are at liberty to treat their bodies as they please. The fact is, that all breaches of the laws of health are physical sins.—Herbert Spencer.
Few seem to realize that there is something called physical morality. People often behave as if they have the freedom to do whatever they want with their bodies. The truth is, all violations of health laws are physical sins.—Herbert Spencer.
Practical right and good conduct are much more dependent on health of body than on health of mind.—Prof. Schneider.
Practical rights and good behavior rely much more on physical health than on mental health.—Prof. Schneider.
Dr. Abernathy's reply to the Duke of York when consulted about his health was, "Cut off the supplies and the enemy will soon leave the citadel."
Dr. Abernathy's response to the Duke of York when asked about his health was, "Cut off the supplies and the enemy will quickly abandon the fortress."

FOOD FOR THE AGED AND THE VERY YOUNG.
FOOD FOR THE AGED
 ne of the first requisites of food for the aged is that it shall be
easy of digestion, since with advancing age and decreasing physical
energy, digestion and assimilation may be taken with impunity at an
earlier period of life, overtax the enfeebled organs and prove highly
injurious. The fact that the vital machinery is worn and weakened with
age has led to the popular notion that old people require a stimulating
diet as a "support" for their declining forces. That this is an error is
apparent from the fact that stimulation either by drink or food lessens
instead of reinforces vital strength, thus defeating the very purpose
desired. Flesh food in quantities is a peculiarly unsuitable diet for
the aged, not alone because it is stimulating, but because it produces a
tendency to plethora, a condition which is especially inimical to the
health of old persons. Eminent authorities on diet also reason that the
loss of the teeth at this period, whereby thorough mastication of flesh
food is done with difficulty, even with the best artificial aids, should
be considered a sign that nature intends such foods to be discarded by
the old.
ne of the first requisites of food for the aged is that it shall be
easy of digestion, since with advancing age and decreasing physical
energy, digestion and assimilation may be taken with impunity at an
earlier period of life, overtax the enfeebled organs and prove highly
injurious. The fact that the vital machinery is worn and weakened with
age has led to the popular notion that old people require a stimulating
diet as a "support" for their declining forces. That this is an error is
apparent from the fact that stimulation either by drink or food lessens
instead of reinforces vital strength, thus defeating the very purpose
desired. Flesh food in quantities is a peculiarly unsuitable diet for
the aged, not alone because it is stimulating, but because it produces a
tendency to plethora, a condition which is especially inimical to the
health of old persons. Eminent authorities on diet also reason that the
loss of the teeth at this period, whereby thorough mastication of flesh
food is done with difficulty, even with the best artificial aids, should
be considered a sign that nature intends such foods to be discarded by
the old.
One of the first requirements for food for seniors is that it should be easy to digest. As people get older and their physical energy decreases, what they could handle easily in their youth may overwhelm their weakened organs and be harmful. The fact that the body deteriorates and becomes weaker with age has led many to believe that older individuals need a stimulating diet to "support" their declining vitality. This belief is misguided, as stimulation from food or drink actually diminishes rather than boosts vital strength, thereby undermining the intended goal. Consuming large amounts of meat is especially unsuitable for the elderly, not only because it is stimulating but also because it tends to lead to excess, a condition that is particularly harmful to their health. Experts on nutrition also argue that the loss of teeth at this stage, which makes it difficult to chew meat properly even with the best dentures, should be seen as a sign that nature intends for older adults to avoid such foods.
A milk, grain, and fruit diet is undoubtedly the one best suited to the average person in old age. Vegetables and legumes in well-prepared soups may also be used to advantage. Directions for such soups, as also for cooking grains and grain products, will be found in the preceding pages.
A diet of milk, grains, and fruits is definitely the best choice for most older adults. Well-prepared soups with vegetables and legumes can also be beneficial. You can find recipes for those soups, along with instructions for cooking grains and grain products, in the previous pages.
The following bills of fare, one for each season of the year, will perhaps serve to illustrate how a varied and appetizing regimen may be provided without the use of flesh foods:—
The following menus, one for each season of the year, will likely demonstrate how a diverse and appealing diet can be created without using meat:—
|
BREAKFAST Fresh Fruits Graham Grits and Cream Prune Toast Graham Puffs Cream Crisps Strawberries Caramel Coffee or Hot Milk DINNER Vegetable Broth with Toasted Rolls Baked Potato with Pease Gravy Stewed Asparagus Cracked Wheat and Cream Whole-Wheat Bread Canned Berries Manioca with Fruit Caramel Coffee or Hot Milk |
BREAKFAST Fresh Fruits Rolled Oats and Cream Baked Sweet Apples Macaroni with Cream Sauce Whole-Wheat Puffs Stewed Peaches Caramel Coffee or Hot Milk DINNER Lentil Soup Baked Potato with Cream Sauce Escalloped Tomato Green Corn Pulp Browned Rice and Cream Fruit Bread Lemon Apple Sauce Prune Pie Caramel Coffee or Hot Milk |
|
BREAKFAST Fresh Fruits Blackberry Mush and Cream Cream Toast Graham Crusts Blueberries Caramel Coffee or Hot Milk DINNER Green Pea Soup Mashed Potato Macaroni with Tomato Sauce Pearl Barley and Cream Cream Rolls Blackberries Stewed Fruit Pudding Caramel Coffee or Hot Milk |
BREAKFAST Fresh Fruits Rolled Wheat and Cream Tomato Toast Corn Bread Graham Gems Stewed Prunes Caramel Coffee or Hot Milk DINNER Vegetable Oyster Soup Baked Sweet Potato Mashed Peas Steamed Rice with Fig Sauce Graham Bread Stewed Dried Fruit Apples Caramel Coffee or Hot Milk |
In the selection of a dietary for elderly persons, much must depend upon their physical condition, the daily amount of exercise to which they are accustomed, their habits in earlier life, and a variety of other circumstances.
In choosing a diet for older adults, a lot depends on their physical health, the amount of exercise they're used to getting each day, their lifelong habits, and various other factors.
The quantity as well as quality of food for the aged should receive consideration. Diminished bodily activity and the fact that growth has ceased, render a smaller amount of food necessary to supply needs; and a decrease in the amount taken, in proportion to the age and the activity of the subject, must be made or health will suffer. The system will become clogged, the blood filled with imperfectly elaborated material, and gout, rheumatism, apoplexy, or other diseased conditions will be the inevitable result. The digestion of heavy meals is a tax upon vital powers at any time of life, but particularly so as age advances; and for him who has passed his first half-century, over-feeding is fraught with great danger. Cornaro, an Italian of noble family, contemporary with Titian in the sixteenth century, after reaching his eighty-third year wrote several essays upon diet and regimen for the aged, in one of which he says: "There are old lovers of feeding who say that it is necessary that they should eat and drink a great deal to keep up their natural heat, which is constantly diminishing as they advance in years; and that it is therefore their duty to eat heartily and of such things as please their palate, be they hot, cold, or temperate, and that if they were to lead a sober life, it would be a short one. To this I answer; Our kind Mother Nature, in order that old men may live to still greater age, has contrived matters so that they may be able to subsist on little, as I do; for large quantities of food cannot be digested by old and feeble stomachs."
The amount and quality of food for seniors should be taken into account. Reduced physical activity and the fact that growth has stopped mean that less food is needed to meet their needs; if the amount consumed decreases based on age and activity level, health will suffer. The body will become sluggish, the blood will be filled with poorly processed materials, and conditions like gout, rheumatism, stroke, or other health issues will be the unavoidable outcome. Digesting heavy meals strains vital energy at any age, but especially as one gets older; for someone over fifty, overeating is very risky. Cornaro, an Italian nobleman who lived at the same time as Titian in the sixteenth century, wrote several essays on diet and lifestyle for the elderly after reaching eighty-three. In one of his writings, he states: "There are elderly food enthusiasts who believe they need to eat and drink a lot to maintain their natural warmth, which gradually decreases with age; hence, they think they must eat well and enjoy whatever pleases their taste, regardless of whether it's hot, cold, or moderate, and that leading a sober life would mean a short one. To this, I respond: Our kind Mother Nature has arranged things so that older men can live to even greater ages by managing to survive on little, just as I do; because large amounts of food cannot be digested by old and weak stomachs."
Cornaro lived to be one hundred years old, doubtless owing largely to his simple, frugal habits.
Cornaro lived to be a hundred years old, likely thanks in large part to his simple, frugal lifestyle.
DIET FOR THE YOUNG.
A very large share of the mortality among young children results from dietetic errors which proper knowledge and care on the part of those who have them in charge might commonly avoid. From infancy to the age of twelve or eighteen months, milk is the natural and proper food. Milk contains all the food elements except starch, which cannot be digested by very young children, owing to the insufficient formation of digestive elements of the salivary secretion during the first few months. If the child is deprived of the milk provided by nature, the best artificial food is cow's milk; it, however, requires very careful selection and intelligent preparation. The animal from which the milk comes, should be perfectly healthy and well cared for. The quality of her food should also receive attention, as there is little doubt that disease is often communicated to infants by milk from cows improperly fed and cared for. An eminent medical authority offers the following important points on this subject:—
A significant portion of the deaths among young children is due to dietary mistakes that proper knowledge and attention from caregivers could usually prevent. From birth to about twelve or eighteen months, milk is the natural and appropriate food. Milk provides all the necessary nutrients except starch, which very young children can't digest because their digestive enzymes haven't fully developed in the first few months. If a child is not given the milk that nature intended, the best alternative is cow's milk; however, it requires careful selection and proper preparation. The cow producing the milk must be completely healthy and well cared for. The quality of her diet should also be considered, as there's little doubt that illnesses can often be transmitted to infants through milk from poorly fed and cared-for cows. A prominent medical expert highlights the following crucial points on this topic:—
"The cow selected for providing the food for an infant should be between the ages of four and ten years, of mild disposition, and one which has been giving milk from four to eight weeks. She should be fed on good, clean grain, and hay free from must. Roots, if any are fed, should be of good quality, and she should have plenty of good clean water from a living spring or well. Her pasture should be timothy grass or native grass free from weeds; clover alone is bad. She should be cleaned and cared for like a carriage horse, and milked twice a day by the same person and at the same time. Some cows are unfit by nature for feeding infants."
"The cow chosen to provide milk for an infant should be between four and ten years old, with a gentle temperament, and should have been milking for four to eight weeks. She must be fed quality clean grains and hay that is free from mold. If roots are included in her diet, they should be of high quality, and she should always have access to fresh, clean water from a spring or well. Her pasture should consist of timothy grass or native grass that is weed-free; clover alone is not good. She should be cleaned and cared for like a prize horse, and milked twice a day by the same person at the same time. Some cows simply aren’t suitable for providing milk for infants."
Milk from the same animal should be used if possible. Changing from one cow's milk to another, or the use of such milk as is usually supplied by city milkmen, often occasions serious results. The extraction of the heat from the milk immediately after milking and before it is used or carried far, especially in hot weather, is essential. While the milk itself should be clean and pure, it should also be perfectly fresh and without any trace of decomposition. To insure all these requisites, besides great care in its selection, it must be sterilized, and if not intended for immediate use, bottled and kept in a cool place until needed. It is not safe to feed young children upon unsterilized milk that has stood a few hours. Even fresh milk from the cleanest cows, unless drawn into bottles and sealed at once, contains many germs. These little organisms, the cause of fermentation and decomposition, multiply very rapidly in milk, and as they increase, dangers from the use of the milk increase.
Milk from the same animal should be used whenever possible. Switching from one cow's milk to another, or using milk typically provided by city milkmen, can often lead to serious issues. It's crucial to cool the milk right after it's been milked and before it’s used or transported, especially in hot weather. While the milk itself should be clean and pure, it also needs to be perfectly fresh and free of any signs of spoilage. To ensure these requirements are met, in addition to careful selection, the milk must be sterilized, and if it’s not going to be used right away, it should be bottled and stored in a cool place until it’s needed. It’s not safe to give young children unsterilized milk that has been sitting out for a few hours. Even fresh milk from the cleanest cows can contain many germs unless it’s put into bottles and sealed immediately. These tiny organisms, which cause fermentation and spoilage, multiply quickly in milk, and as their numbers rise, so do the dangers associated with consuming that milk.
There is no doubt that cholera infantum and other digestive disturbances common among young children would be greatly lessened by the use of properly sterilized milk. Directions for sterilizing milk, and additional suggestions respecting points to be considered in its selection, are to be found in the chapter on Milk, etc.
There’s no doubt that cholera infantum and other digestive issues commonly seen in young children would be significantly reduced by using properly sterilized milk. Instructions for sterilizing milk, along with extra suggestions about what to consider when choosing it, can be found in the chapter on Milk, etc.
Cow's milk differs from human milk in that it contains nearly three times as much casein, but only two thirds as much fat and three fourths as much sugar. Cow's milk is usually slightly acid, while human milk is alkaline. The casein of cow's milk forms large, hard curds, while that of breast milk forms fine, soft curds. These facts make it important that some modification be made in cow's milk to render it acceptable to the feeble stomach of an infant. Cases are rare where it is safe to feed a child under nine months of age on pure, undiluted cow's milk. A common method of preparing cow's milk so as to make it suitable for infant feeding, is to dilute it with pure water, using at first only one third or one fourth milk, the proportion of milk being gradually increased as the child's stomach becomes accustomed to the food and able to bear it, until at the age of four months the child should be taking equal parts of milk and water. When sterilized milk is to be thus diluted, the water should be first boiled or added before sterilizing. A small amount of fine white sugar, or what is better, milk sugar, should be added to the diluted milk. Barley water, and thin, well-boiled, and carefully strained oatmeal gruel thoroughly blended with the milk are also used for this purpose. A food which approximates more nearly the constituents of mother's milk may be prepared as follows:—
Cow's milk is different from human milk because it has nearly three times as much casein but only two-thirds as much fat and three-fourths as much sugar. Cow's milk is usually slightly acidic, while human milk is alkaline. The casein in cow's milk forms large, hard curds, whereas breast milk forms fine, soft curds. These differences make it crucial to modify cow's milk to make it suitable for an infant's sensitive stomach. It's rare that it's safe to give pure, undiluted cow's milk to a child under nine months old. A common method to prepare cow's milk for infants is to dilute it with pure water, starting with one-third or one-fourth milk, and gradually increasing the milk ratio as the child's stomach adjusts, so that by four months, the child should be consuming equal parts milk and water. When sterilizing the milk to dilute it, the water should either be boiled first or added before the sterilization process. A small amount of fine white sugar or, preferably, milk sugar should be added to the diluted milk. Barley water and thin, well-boiled, and carefully strained oatmeal gruel mixed into the milk are also used for this purpose. A food that more closely resembles the composition of mother's milk can be prepared as follows:—
Artificial Human Milk No. 2.—Meigs's formula: Take two tablespoonfuls of cream of medium quality, one tablespoonful of milk, two of lime water, and three of water to which sugar of milk has been added in the proportion of seventeen and three fourths drams to the pint. This saccharine solution must be prepared fresh every day or two and kept in a cool place. A child may be allowed from half a pint to three pints of this mixture, according to age.
Artificial Human Milk No. 2.—Meigs's formula: Mix two tablespoons of medium-quality cream, one tablespoon of milk, two tablespoons of lime water, and three tablespoons of water with added milk sugar, using seventeen and three-fourths drams for each pint. This sugary solution should be made fresh every day or two and stored in a cool place. Depending on their age, a child can have between half a pint and three pints of this mixture.
Peptonized milk, a formula for the preparation of which may be found on page 426, is also valuable as food for infants, especially for those of weak digestion.
Peptonized milk, a formula for which can be found on page 426, is also useful as food for babies, particularly for those with weak digestion.
Prepared Foods for Infants.—Of prepared infant foods we can recommend that manufactured by the Sanitarium Food Co., Battle Creek, Mich., as thoroughly reliable. There are hundreds of prepared infant foods in the market, but most of them are practically worthless in point of food value, being often largely composed of starch, a substance which the immature digestive organs of a young child are incapable of digesting. Hundreds of infants are yearly starved to death upon such foods.
Prepared Foods for Infants.—We recommend the infant food made by the Sanitarium Food Co. in Battle Creek, Michigan, as a trustworthy option. There are countless prepared infant foods available, but most are essentially worthless in terms of nutritional value, often made up mostly of starch, which the underdeveloped digestive systems of young children cannot process. Each year, hundreds of infants suffer serious consequences due to these types of foods.
All artificial foods require longer time for digestion than the food supplied by nature; and when making use of such, great care should be taken to avoid too frequent feeding. It is absolutely essential for the perfect health of an infant as well as of grown people, that the digestive organs shall enjoy a due interval of rest between the digestion of one meal and the taking of another. As a rule, a new-born infant may be safely fed, when using human milk, not oftener than once in every three or four hours. When fed upon artificial food, once in five or six hours is often enough for feeding. The intervals between meals in either case should be gradually prolonged as the child grows older.
All artificial foods take longer to digest than natural foods, so when using them, it's important to be careful about how often you feed. It's crucial for both infants and adults to give their digestive organs a proper break between meals. Generally, a newborn can be safely fed human milk no more than once every three or four hours. If they're on artificial food, feeding them once every five or six hours is usually sufficient. As the child gets older, the intervals between meals should gradually be stretched out.
"During the first week of a child's life, the weight of the food given should be 1/100 of the weight of the infant at birth. The daily additional amount of food required for a child amounts to about one fourth of a dram, or about one ounce at the end of each month. A child gains in weight from two thirds of an ounce to one ounce per day during the first five months of its life, and an average of one half as much daily during the balance of the first year.
"During the first week of a baby's life, the amount of food given should be 1/100 of the baby's birth weight. The daily increase in food needed for a baby is about a quarter of a dram, or roughly one ounce by the end of each month. A baby gains weight from two-thirds of an ounce to one ounce each day during the first five months of life, and an average of half that daily for the rest of the first year."
"From a series of tables which have been prepared, as the result of experiments carefully conducted in large lying-in establishments, we have devised this rule:—
"Based on a series of tables we've created from carefully conducted experiments in large maternity institutions, we've developed this rule:—"
"To find the amount of food required by a child at each feeding during the first year of life, divide the weight of the child at birth by 100 and add to this amount 3/100 of the gain which the child has made since birth. Take, for example, a child which weighs 7-1/2 lbs—at birth, or 120 ounces. Dividing by 100 we have 1.2 oz. Estimating the weight according to the rule above given, the child at the end of nine months will have gained 210 oz. Dividing this by 100 and multiplying by 3, we have 6.3 oz. Adding to this our previous result, 1.3, we have 7.5 oz, as the amount of food required at each feeding at the end of nine months by a child which weighed 7-1/2 lbs. at birth. To save mothers the trouble of making these calculations, we have prepared the following table, which will be found to hold good for the average child weighing 7-1/2 lbs. at birth. This is rather more than the ordinary child weighs, but we have purposely chosen a large child for illustration, as it is better that the child should have a slight excess of food than too little.
"To determine how much food a child needs at each feeding during their first year, take the child's birth weight in pounds and divide it by 100. Then, add to that amount 3/100 of the weight the child has gained since birth. For instance, if a child weighs 7.5 lbs at birth, or 120 ounces, dividing by 100 gives us 1.2 oz. If the child gains 210 oz by the end of nine months, dividing that by 100 and multiplying by 3 results in 6.3 oz. Adding this to our previous result of 1.2 oz, we find that the child needs 7.5 oz of food at each feeding after nine months if they weighed 7.5 lbs at birth. To make it easier for parents, we have created the following table, which is applicable for the average child weighing 7.5 lbs at birth. This is slightly more than the typical birth weight, but we've intentionally chosen a larger child for this example, as it's better for a child to have a little extra food rather than not enough."
AGE OF CHILD.
| 1 week | 1 month | 2 months | 3 months | 4 months | 6 months | 9 months | 12 months | |
| Amount of each feeding in ounces | 1 | 1½-2 | 3 | 4 | 5 | 6 | 7½ | 9 |
| Number of feedings | 10 | 8 | 6 | 6 | 6 | 6 | 5 | 5 |
| Amount of food daily, in ounces | 10 | 12-16 | 18 | 24 | 30 | 36 | 37½ | 45 |
| Interval between feedings, in hours | 2 | 2½ | 3 | 3 | 3 | 3 | 3½ | 3½ |
"In the above table the first column represents quantities for the first week, the second for the end of the second month, the third for the end of the third month, etc. It need not be mentioned that the change in quantity should be even more gradual than represented in the table.
"In the table above, the first column shows quantities for the first week, the second is for the end of the second month, the third is for the end of the third month, and so on. It's unnecessary to state that the change in quantity should be even more gradual than what’s shown in the table."
"Attention should also be called to the fact that the time mentioned as the interval for feeding at different ages, does not apply to the whole twenty-four hours. Even during the first week, the child is expected to skip two feedings during the night, making the interval four hours instead of two. By the end of the second month, the interval between the feedings at night becomes six hours, and at the end of the ninth month, six and one half hours.
"Attention should also be drawn to the fact that the time given for feeding at different ages doesn't apply to the entire twenty-four hours. Even during the first week, the baby is expected to skip two feedings at night, making the interval four hours instead of two. By the end of the second month, the interval between nighttime feedings becomes six hours, and by the end of the ninth month, it's six and a half hours."
"From personal observation we judge that in many cases children will do equally well if allowed a longer interval between feedings at night. The plan of feeding five times daily instead of six, may be begun at as early an age as six months in many instances."
"From personal observation, we believe that in many cases, children can do just as well if they have a longer gap between nighttime feedings. The approach of feeding five times a day instead of six can often start as early as six months."
Manner of Feeding Artificial Foods.—All artificial foods are best fed with a teaspoon, as by this method liability to over-feeding and danger from unclean utensils are likely to be avoided. If a nursing-bottle is used, it should be of clear flint glass so that the slightest foulness may be easily detected, and one simple in construction, which can be completely taken apart for cleaning. Those furnished with conical black rubber caps are the best. Each time after using, such a bottle should have the cap removed, and both bottle and cap should be thoroughly cleansed, first with cold water, and then with warm water in which soda has been dissolved in the proportion of a teaspoonful to a pint of water. They should then be kept immersed in weak soda solution until again needed, when both bottle and cap should be thoroughly rinsed in clean boiled water before they are used. Neglect to observe these precautions is one of the frequent causes of stomach disturbances in young children. It is well to keep two bottles for feeding, using them alternately.
How to Feed with Artificial Foods.—All artificial foods are best fed with a teaspoon, as this method helps prevent overfeeding and reduces the risk of using dirty utensils. If a nursing bottle is used, it should be made of clear flint glass so that any dirt can be easily seen, and it should have a simple design that can be completely taken apart for cleaning. Bottles with conical black rubber caps are the best choice. After each use, the cap should be removed, and both the bottle and cap should be thoroughly cleaned, first with cold water, and then with warm water mixed with soda in a ratio of one teaspoon to a pint of water. They should then be kept submerged in a weak soda solution until needed again, at which point both the bottle and cap should be thoroughly rinsed in clean boiled water before use. Failing to follow these precautions is a common cause of stomach issues in young children. It's a good idea to keep two bottles for feeding and use them alternately.
Diet for Older Children.—No solid food or table-feeding of any kind should be given to a child until it has the larger share of its first, or milk teeth. Even then it must not be supposed that because a child has acquired its teeth, it may partake of all kinds of food with impunity. It is quite customary for mothers to permit their little ones to sit at the family table and be treated to bits of everything upon the bill of fare, apparently looking upon them as miniature grown people, with digestive ability equal to persons of mature growth, but simply lacking in, stomach capacity to dispose of as much as older members of the family. The digestive apparatus of a child differs so greatly from that of an adult in its anatomical structure and in the character and amount of the digestive fluids, that it is by no means proper to allow a child to eat all kinds of wholesome foods which a healthy adult stomach can consume with impunity, to say nothing of the rich, highly seasoned viands, sweetmeats, and epicurean dishes which seldom fail to form some part of the bill of fare. It is true that many children are endowed with so much constitutional vigor that they do live and seemingly thrive, notwithstanding dietetic errors; but the integrity of the digestive organs is liable to be so greatly impaired by continued ill-treatment that sooner or later in life disease results. Till the age of three years, sterilized milk, whole-wheat bread in its various forms, such of the grains as contain a large share of gluten, prepared in a variety of palatable ways, milk and fruit toasts, and the easily digested fruits, both raw and cooked, form the best dietary. Strained vegetable soups may be occasionally added for variety. For from three to six years the same simple regimen, with easily digested and simply prepared vegetables, macaroni, and legumes prepared without skins, will be all-sufficient. If desserts are desirable, let them be simple in character and easily digestible. Tea, coffee, hot bread and biscuit, fried foods of all kinds, salted meats, preserves, rich puddings, cake, and pastries should be wholly discarded from the children's bill of fare.
Diet for Older Children.—No solid food or table-feeding of any kind should be given to a child until they have most of their first, or milk teeth. Even then, it shouldn't be assumed that just because a child has teeth, they can eat all kinds of food without consequences. It's common for parents to let their little ones sit at the family table and try bits of everything on the menu, treating them like mini adults with the same ability to digest as grown-ups, but simply lacking the stomach capacity to handle the same amounts. The digestive system of a child is very different from that of an adult in both structure and the nature and amount of digestive fluids, so it's not appropriate to allow a child to eat all the wholesome foods that a healthy adult stomach can manage without issues, not to mention the rich, highly seasoned dishes, sweets, and gourmet meals that are often included in the menu. It's true that many children have enough natural strength to survive and appear to thrive despite dietary mistakes; however, the integrity of their digestive organs can be seriously compromised by ongoing poor treatment, leading to health issues sooner or later. Until the age of three, sterilized milk, whole-wheat bread in various forms, grains high in gluten prepared in different tasty ways, milk and fruit toasts, and easily digestible fruits, both raw and cooked, make up the best diet. Strained vegetable soups can be occasionally added for variety. From ages three to six, the same simple diet, along with easily digestible and simply prepared vegetables, macaroni, and legumes without skins, will be sufficient. If desserts are desired, they should be simple and easy to digest. Tea, coffee, hot bread and biscuits, fried foods of all kinds, salted meats, preserves, rich puddings, cake, and pastries should be completely removed from children's meals.
It is especially important that a dietary for children should contain an abundance of nitrogenous material. It is needed not only for repairs, but must be on deposit for the purpose of food. Milk, whole-wheat bread, oatmeal, barley, and preparations of wheat, contain this element in abundance, and should for this reason be given great prominence in the children's dietary.
It’s really important for a child’s diet to include plenty of protein. It's necessary not just for growth and repair, but also as a source of energy. Foods like milk, whole-wheat bread, oatmeal, barley, and wheat products have a lot of this nutrient and should play a key role in what children eat.
Flesh foods are in no way necessary for children, since the food elements of which they are composed can be supplied from other and better sources, and many prominent medical authorities unite in the opinion that such foods are decidedly deleterious, and should not be used at all by children under eight or ten years of age. Experiments made by Dr. Camman, of New York, upon the dietary of nearly two hundred young children in an orphan's home, offer conclusive evidence that the death rate among children from gastro-intestinal troubles is greatly lessened by the exclusion of meat from their dietary. Dr. Clouston, of Edinburgh, an eminent medical authority, states that in his experience, those children who show the greatest tendencies to instability of the brain, insanity, and immoral habits are, as a rule, those who use animal food in excess; and that he has seen a change of diet to milk and farinaceous food produce a marked change in their nervous irritability.
Flesh foods aren't necessary for children since the nutrients in them can be obtained from other, better sources. Many leading medical experts agree that these foods can actually be harmful and shouldn't be consumed by kids under eight or ten years old. Research conducted by Dr. Camman from New York on the diets of nearly two hundred young children in an orphanage provides clear evidence that removing meat from their diets significantly reduces the death rate from gastrointestinal issues. Dr. Clouston from Edinburgh, a respected medical expert, observes that children who tend to be more unstable mentally, exhibit signs of insanity, or show immoral behavior usually consume too much animal food. He has seen that switching their diet to milk and starch-based foods leads to a notable improvement in their nervous irritability.
Scores of other authorities corroborate. Dr. Clouston's observation, and assert that children fed largely on flesh foods have capricious appetites, suffer more commonly from indigestion in its various forms, possess an unstable nervous system, and have less resisting power in general.
Many other experts agree with Dr. Clouston's observation and claim that children who primarily eat meat tend to have unpredictable appetites, experience indigestion more often in its different forms, have an unstable nervous system, and generally have lower resistance to illness.
Candy and similar sweets generally given to children as a matter of course, may be excluded from their dietary with positive benefit in every way. It is true, as is often stated in favor of the use of these articles, that sugar is a food element needed by children; but the amount required for the purpose of growth and repair is comparatively small, and is supplied in great abundance in bread, grains, fruits, and other common articles of food. If an additional quantity is taken, it is not utilized by the system, and serves only to derange digestion, impair appetite, and indirectly undermine the health.
Candy and other sweets typically given to kids can be eliminated from their diets with clear benefits in every way. While it's often claimed that sugar is a necessary food for children, the amount needed for growth and repair is actually quite small and is easily provided by bread, grains, fruits, and other everyday foods. If they consume extra sugar, their bodies don’t make use of it, leading to digestive issues, reduced appetite, and, ultimately, poorer health.
Children are not likely to crave candy and other sweets unless a taste for such articles has been developed by indulgence in them; and their use, since they are seldom taken at mealtime, helps greatly to foster that most pernicious habit of childhood—eating between meals. No food, except at their regular mealtimes, should be the universal rule for children from babyhood up; and although during their earliest years they require food at somewhat shorter intervals than adults, their meal hours should be arranged for the same time each day, and no piecing permitted. Parents who follow the too common practice of giving their little ones a cracker or fruit between meals are simply placing them under training for dyspepsia, sooner or later. Uninterrupted digestion proceeds smoothly and harmoniously in a healthy stomach; but interruptions in the shape of food sent down at all times and when the stomach is already at work, are justly resented, and such disturbances, if long continued, are punished by suffering.
Kids are not likely to crave candy and other sweets unless they’ve developed a taste for them through indulging. Since sweets are rarely eaten during mealtimes, this habit really encourages the unhealthy practice of snacking between meals. The general rule for children from infancy onward should be no food except at their regular mealtimes. While young children may need food at shorter intervals than adults, their mealtime should be at the same time each day, and snacking should not be allowed. Parents who often give their little ones a cracker or fruit between meals are just setting them up for digestive issues down the line. Healthy stomachs digest food smoothly and without interruption, but eating at all times—especially when the stomach is already working—can lead to discomfort, and if this continues for a long time, it can result in pain.
The appetite of a child is quite as susceptible of education, in both a right and wrong direction, as are its mental or moral faculties; and parents in whose hands this education mainly rests should give the subject careful consideration, since upon it the future health and usefulness of their children not a little devolve. We should all be rulers of our appetites instead of subject to them; but whether this be so or not, depends greatly upon early dietetic training. Many a loving mother, by thoughtless indulgence of her child, in season and out of season, in dainties and tidbits that simply serve to gratify the palate, is fostering a "love of appetite" which may ruin her child in years to come. There are inherited appetites and tendencies, it is true; but even these may be largely overcome by careful early training in right ways of eating and drinking. It is possible to teach very young children to use such food as is best for them, and to refrain from the eating of things harmful; and it should be one of the first concerns of every mother to start her children on the road to manhood and womanhood, well trained in correct dietetic habits.
The eating habits of a child can be just as influenced by education, in both positive and negative ways, as their mental or moral development; and parents, who have the main responsibility for this education, should take the topic seriously, as it significantly impacts their children's future health and well-being. We should all learn to control our appetites rather than being controlled by them, and whether we achieve this largely depends on early dietary training. Many caring mothers, by thoughtlessly indulging their children with treats at all times, are nurturing a "love of appetite" that could harm their child in the long run. It's true that some appetites and tendencies are inherited; however, these can be largely managed through careful early training in healthy eating habits. It's possible to teach very young children to choose foods that are best for them and to avoid harmful items, and it should be a top priority for every mother to guide her children towards adulthood with proper dietary habits.
TABLE TOPICS.
Jean Jacques Rousseau holds that intemperate habits are mostly acquired in early boyhood, when blind deference to social precedents is apt to overcome our natural antipathies, and that those who have passed that period in safety, have generally escaped the danger of temptation. The same holds good of other dietetic abuses. If a child's natural aversion to vice has never been wilfully perverted, the time will come when his welfare may be intrusted to the safe-keeping of his protective instincts. You need not fear that he will swerve from the path of health when his simple habits, sanctioned by nature and inclination, have acquired the additional strength of long practice. When the age of blind deference is past, vice is generally too unattractive to be very dangerous.—Oswald.
Jean Jacques Rousseau believes that unhealthy habits are mainly formed in early childhood, when our tendency to follow social norms can overpower our natural dislikes. Those who go through this stage without falling into bad habits usually avoid the risks of temptation later on. The same is true for other unhealthy behaviors. If a child's natural dislike for wrongdoing hasn't been intentionally changed, eventually their protective instincts can be trusted to take care of their well-being. You don't need to worry that they will stray from healthy choices once their simple habits, supported by nature and their desires, have gained the added strength of experience. After the stage of blind conformity, vice usually becomes unappealing enough to be less harmful.—Oswald.
That a child inherits certain likes and dislikes in the matter of food cannot be questioned, and does not in the least forbid the training of the child's taste toward that which is healthful and upbuilding; it merely adds an element to be considered in the training.—Sel.
That a child inherits specific preferences and aversions when it comes to food is undeniable, and it doesn't prevent us from guiding the child's taste toward what's healthy and beneficial; it simply introduces another factor to consider in the process of training.—Sel.
Prevention is better than cure. It is worth a life effort to lift a man from degradation. To prevent his fall is better.—Gough.
Prevention is better than treatment. It's worthwhile to dedicate your life to helping someone rise from a low point. Stopping his decline is more effective.—Gough.
A cynical French writer of the last century intending a satire upon the principles of vegetarianism adopted by Phillippe Hecquet, puts into the mouth of one of the characters in his book what, in the grossly voluptuous life of that country and time, the author no doubt imagined to be the greatest absurdities conceivable in reference to diet, but which, in the light of present civilization are but the merest hygienic truths. A doctor had been called to a gouty and fever-stricken patient. "Pray what is your ordinary diet?" asked the physician.
A cynical French writer from the last century, who meant to satirize the principles of vegetarianism adopted by Phillippe Hecquet, puts into the mouth of one of his characters what he probably thought were the most absurd dietary ideas in the overly indulgent lifestyle of his time and place. However, in today's world, these ideas are simply basic health facts. A doctor had been called to a patient suffering from gout and fever. "What do you usually eat?" asked the physician.
"My usual food," replied the patient, "is broth and juicy meat."
"My usual food," replied the patient, "is broth and tender meat."
"Broth and juicy meat!" cried the doctor, alarmed. "I do not wonder to find you sick; such dishes are poisoned pleasures and snares that luxury spreads for mankind, so as to ruin them the more effectually.... How old are you, pray?"
"Broth and juicy meat!" the doctor exclaimed, worried. "It's no surprise you're sick; those kinds of meals are tempting traps that luxury lays for people, designed to bring about their downfall even more effectively... How old are you, by the way?"
"I am in my sixty-ninth year," replied the patient.
"I am 69 years old," replied the patient.
"Exactly," ... said the physician; "if you had drunk nothing else than pure water all your life, and had been satisfied with simple nourishment,—such as boiled apples for example,—you would not now be tormented with the gout, and all your limbs would perform their functions with ease."
"Exactly," ... said the doctor; "if you had only ever drunk pure water and been content with simple foods—like boiled apples for instance—you wouldn't be suffering from gout now, and all your limbs would be functioning smoothly."
Dr. Horace Bushnell says: "The child is taken when his training begins in a state of naturalness as respects all the bodily tastes and tempers, and the endeavour should be to keep him in that key, to let no stimulation of excess or delicacy disturb the simplicity of nature, and no sensual pleasure in the name of food become a want or expectation of his appetite. Any artificial appetite begun is the beginning of distemper, disease, and a general disturbance of natural proportion. Nine tenths of the intemperate drinking begins, not in grief and destitution, as we so often hear, but in vicious feeding."
Dr. Horace Bushnell says: "A child starts out in a natural state regarding all their physical preferences and moods, and the goal should be to maintain that simplicity. We shouldn't let any excesses or delicate experiences disrupt the purity of nature, nor should any pleasures disguised as food create habits or expectations in their appetite. Any artificial craving that develops is the start of imbalance, illness, and a general disruption of natural proportions. Most irresponsible drinking doesn’t start from sadness and lack, as we often hear, but from unhealthy eating habits."
Always let the food be simply for nourishment—never more, never less. Never should food be taken for its own sake, but for the sake of promoting bodily and mental activity. Still less should the peculiarities of food, its taste or delicacy ever become an object in themselves, but only a means to make it good, pure, wholesome nourishment; else in both cases the food destroys health.—Froebel.
Always see food as just a source of nourishment—never more, never less. Food should never be consumed for its own enjoyment but to support physical and mental activity. Even less should the unique qualities of food, like its flavor or delicacy, become an end in themselves; they should only serve to ensure it is good, pure, and wholesome nourishment; otherwise, in both cases, the food harms health.—Froebel.

FRAGMENTS & LEFT-OVER FOODS
 conomy, one of the cardinal principles of success in the details of
housekeeping, as in all other occupations in life, consists not alone in
making advantageous use of fresh material, but in carefully preserving
and utilizing the "left-over" fragments and bits of food which accrue in
every household. Few cooks can make such perfect calculation respecting
the desires and needs of their families as to provide just enough and no
more, and the improvident waste of the surplus thus prepared, is in many
homes fully equal to one half the first cost of the meal. Scarcely
anything need ever be wasted—certainly nothing which was at first well
cooked. There are ways of utilizing almost every kind of cooked food so
that it will be quite as appetizing and nutritious as when first
prepared.
conomy, one of the cardinal principles of success in the details of
housekeeping, as in all other occupations in life, consists not alone in
making advantageous use of fresh material, but in carefully preserving
and utilizing the "left-over" fragments and bits of food which accrue in
every household. Few cooks can make such perfect calculation respecting
the desires and needs of their families as to provide just enough and no
more, and the improvident waste of the surplus thus prepared, is in many
homes fully equal to one half the first cost of the meal. Scarcely
anything need ever be wasted—certainly nothing which was at first well
cooked. There are ways of utilizing almost every kind of cooked food so
that it will be quite as appetizing and nutritious as when first
prepared.
Economy, one of the key principles for success in managing a household, just like in any other area of life, isn't just about making good use of fresh ingredients; it also involves carefully saving and using the leftover bits and pieces of food that accumulate in every home. Few cooks can accurately predict the cravings and needs of their families well enough to prepare exactly the right amount, which often leads to wasting a sizable portion of what was made—sometimes up to half the original cost of the meal. Hardly anything needs to be thrown away—definitely nothing that was properly cooked to begin with. There are methods to use nearly every type of cooked food so that it remains just as tasty and nutritious as when it was first made.
All left-over foods, as grains, vegetables, or others of a moist character, should be removed to clean dishes before putting away. Unless this precaution is observed, the thin smears and tiny bits about the edges of the dish, which become sour or moldy much sooner than the larger mass, are apt to spoil the whole. They should also be set on ice or be kept in a cool, dry place until needed. Left-over foods of any kind, to be suitable again for use, must be well preserved. Sour or moldy fragments are not fit for food.
All leftover foods, like grains, vegetables, or anything else moist, should be removed to clean dishes before storing. If this step isn't taken, the small smears and tiny bits around the edges of the dish, which spoil faster than the larger portion, can ruin everything. They should also be kept on ice or in a cool, dry spot until needed. Any kind of leftover food must be well-preserved to be suitable for use again. Sour or moldy pieces aren't safe to eat.
Uses of Stale Bread.—If properly made from wholesome and nutritious material and well preserved, there are few other foods that can be combined into more varied and palatable dishes than left-over bread. To insure the perfect preservation of the fragments, the loaf itself should receive good care. Perfectly sweet, light, well-baked bread has not the same propensity to mold as a poorer loaf; but the best of bread is likely to become musty if its surroundings are not entirely wholesome. The receptacle used for keeping the loaves should be frequently washed, scalded, and well dried. Crumbs and fragments should be kept in a separate receptacle and as thoroughly cared for. It is well in cutting bread not to slice more than will be needed, and to use one loaf before beginning on another. Bread grows stale much faster after being cut.
Uses of Stale Bread.—If made from healthy and nutritious ingredients and stored properly, there are very few foods that can be turned into as many diverse and tasty dishes as leftover bread. To ensure the best preservation of the pieces, the loaf itself should be taken care of. Fresh, light, well-baked bread doesn't mold as easily as lower quality bread; however, even the best bread can become stale if it's not kept in a clean environment. The container used for storing the loaves should be cleaned, scalded, and dried often. Crumbs and leftover pieces should be kept in a separate container and also taken care of properly. It’s a good idea to only slice as much bread as you'll need and to finish one loaf before starting another. Bread goes stale much quicker once it's been cut.
Whole or half slices of bread which have become too dry to be palatable may be utilized for making zwieback, directions for the use and preparation of which are given on page 289.
Whole or half slices of bread that have become too dry to eat can be used to make zwieback. Instructions for how to make it are provided on page 289.
Broken pieces of bread not suitable for zwieback, crusts, and trimmings of the loaf make excellent croutons, a most palatable accompaniment for soups, gruels, hot milk, etc. To prepare the croutons cut the fragments as nearly uniform in size as possible,—half-inch cubes are convenient,—and place them on tins in a warming oven to dry. Let them become crisply dry, and lightly browned, but not scorched. They are preferable to crackers for use in soups, and require so little work to prepare, and are so economical withal, that one who has once tried them will be likely to keep a supply on hand. The crumbs and still smaller fragments may be utilized for thickening soups and for various dressings and puddings, recipes for many of which are given in preceding chapters.
Broken pieces of bread that aren't good for zwieback, crusts, and scraps from the loaf make great croutons, which are a delicious addition to soups, gruels, hot milk, and more. To prepare the croutons, cut the pieces into uniform sizes as much as possible—half-inch cubes work well—and spread them on trays in a warming oven to dry. Let them get nice and crispy, lightly browned, but not burnt. They’re better than crackers for soups and are so easy to prepare and cost-effective that once you try them, you'll likely want to keep some on hand. The crumbs and smaller pieces can also be used to thicken soups and for various dressings and puddings, with many recipes provided in the earlier chapters.
If crumbs and small bits of bread accumulate more rapidly than they can be used, they may be carefully dried, not browned, in a warming oven, after which put them in a mortar and pound them, or spread them upon an old bread board, fold in a clean cloth and roll them with a rolling pin until fine. Prepared thus, stored in glass fruit cans and put away in a dry place, they will keep almost indefinitely, and can be used when needed. For preparing escalloped vegetables of all kinds, these prepared crumbs are excellent; they give a fine, nutty flavor to the dish, which fresh crumbs do not possess.
If crumbs and small pieces of bread pile up faster than you can use them, you can carefully dry them in a warming oven without toasting them. After that, put them in a mortar and grind them, or spread them on an old breadboard, fold them in a clean cloth, and roll them with a rolling pin until they’re fine. When prepared this way and stored in glass jars in a dry place, they will last almost indefinitely and can be used whenever needed. These prepared crumbs are excellent for making baked vegetables of all kinds; they add a nice, nutty flavor to the dish that fresh crumbs don’t have.
Left-over Grains.—Left-over grains, if well kept, may be reheated in a double boiler without the addition of water, so as to be quite as palatable as when freshly cooked. Small quantities of left-over grains can be utilized for preparing various kinds of desserts, where the ingredients require previous cooking. Rice, barley, pearl wheat, and other whole grains can be satisfactorily used in soups in which a whole grain is required; oatmeal, rolled oats, corn meal, grits, etc., with the addition of a little milk and cream, may be made into delicious gruels; they may also be used advantageously in the preparation of vegetable soups, many of which are even improved by the addition of a few spoonfuls of well-kept cooked oatmeal or rolled oats. The left-over grains may also be utilized in a variety of breads, directions for the preparation of which are given in the chapter on Bread.
Left-over Grains.—Left-over grains, when stored properly, can be reheated in a double boiler without adding water, making them just as tasty as when they were freshly cooked. Small amounts of left-over grains can be used to make various desserts that need ingredients to be pre-cooked. Rice, barley, pearl wheat, and other whole grains can be effectively used in soups that require whole grains; oatmeal, rolled oats, cornmeal, grits, etc., with a little milk and cream, can be turned into delicious gruels; they can also enhance vegetable soups, many of which improve with the addition of a few spoonfuls of well-stored cooked oatmeal or rolled oats. The left-over grains can also be incorporated into various breads, with preparation instructions provided in the chapter on Bread.
Left-over Vegetables.—Left-over portions of most varieties of vegetables can be best utilized for soups as stated on page 275. Cold mashed potato may be made into potato cakes as directed on page 237 of the chapter on Vegetables, where will also be found many other recipes, suited to the use of these left-over foods.
Left-over Vegetables.—You can make the most of leftover vegetables by using them in soups, as mentioned on page 275. Cold mashed potatoes can be turned into potato cakes following the instructions on page 237 in the chapter on Vegetables, which also includes many other recipes for using these leftover foods.
Left-over Meats.—Most cook books offer numerous recipes for croquettes, hashes, and fried dishes prepared from remnants of meat and fish, which, although they serve the purpose of using up the fragments, are not truly economical, because they are generally far from wholesome. Most fragments of this character are more digestible served cold as a relish, or utilized for soups and stews, than compounded into fancy dishes requiring to be fried and highly seasoned or served with rich sauces.
Left-over Meats.—Most cookbooks provide a lot of recipes for croquettes, hashes, and fried dishes made from leftover meat and fish. While these recipes help use up scraps, they're not really cost-effective because they're often not very healthy. Most of these scraps are easier to digest when served cold as a condiment, or used for soups and stews, rather than being turned into elaborate dishes that need to be fried and heavily seasoned or served with rich sauces.
TABLE TOPICS.
"Care preserves what Industry gains. He who attends to his business diligently, but not carefully, throws away with one hand what he gathers with the other."—Colton.
"Care keeps what Industry earns. Someone who works hard at their job but not wisely wastes what they collect."—Colton.
"What does cookery mean?"
"What does cooking mean?"
It means the knowledge of all fruits and herbs and balms and spices—it means carefulness, and inventiveness, and watchfulness, and willingness, and readiness of appliance. It means the economy of your great grandmothers and the science of modern chemists,—it means much tasting and no wasting.—Ruskin.
It means knowing about all fruits, herbs, balms, and spices—it means being careful, creative, observant, willing, and ready to put things into action. It means the resourcefulness of your great-grandmothers and the science of today’s chemists—it involves a lot of tasting and absolutely no wasting.—Ruskin.
Bad cooking is waste—waste of money and loss of comfort. Whom God has joined in matrimony, ill-cooked joints and ill-boiled potatoes have very often put asunder.—Smiles.
Bad cooking is a waste—waste of money and loss of comfort. Those whom God has brought together in marriage have often been driven apart by poorly cooked meat and overcooked potatoes.—Smiles.
Never sacrifice the more precious things—time, health, temper, strength—in attempting to save the less precious—money.—Sel.
Never give up the more valuable things—time, health, patience, strength—in trying to save the less valuable—money.—Sel.
Learn by how little life may be sustained and how much nature requires. The gifts of Cerea and water are sufficient nourishment for all peoples.—Pharsalia.
Learn how little life needs to be sustained and how much nature requires. The gifts of earth and water provide enough nourishment for everyone.—Pharsalia.

THE ART OF DINING
 uman nature is so susceptible to externals, while good digestion is so
dependent upon interior conditions, that all the accessories of pleasant
surroundings—neatness, cheeriness, and good breeding—should be brought
into requisition for the daily gathering of the family at mealtime. The
dining room should be one of the airiest, choicest rooms in the house,
with a pleasant outlook, and, if possible, with east windows, that the
morning sun may gladden the breakfast hour with its cheering rays. Let
plants, flowers, birds, and pictures have a place in its appointments,
that the association with things bright and beautiful may help to set
the keynote of our own lives in cheerful accord. A dark, gloomy,
ill-ventilated room brings depression of spirits, and will make the most
elaborate meal unsatisfactory; while the plainest meal may seem almost a
feast when served amid attractive surroundings. Neatness is an important
essential; any home, however humble, may possess cleanliness and order,
and without these, all charms of wealth and art are of little account.
uman nature is so susceptible to externals, while good digestion is so
dependent upon interior conditions, that all the accessories of pleasant
surroundings—neatness, cheeriness, and good breeding—should be brought
into requisition for the daily gathering of the family at mealtime. The
dining room should be one of the airiest, choicest rooms in the house,
with a pleasant outlook, and, if possible, with east windows, that the
morning sun may gladden the breakfast hour with its cheering rays. Let
plants, flowers, birds, and pictures have a place in its appointments,
that the association with things bright and beautiful may help to set
the keynote of our own lives in cheerful accord. A dark, gloomy,
ill-ventilated room brings depression of spirits, and will make the most
elaborate meal unsatisfactory; while the plainest meal may seem almost a
feast when served amid attractive surroundings. Neatness is an important
essential; any home, however humble, may possess cleanliness and order,
and without these, all charms of wealth and art are of little account.
Human nature is highly influenced by our environment, while good digestion relies heavily on our internal state, so it's essential to create a pleasant atmosphere for family mealtimes. The dining room should be one of the brightest, most inviting spaces in the house, ideally with east-facing windows to let in the morning sun and brighten breakfast with its warm light. Incorporate plants, flowers, birds, and artwork to promote a connection with beauty that sets a positive tone for our lives. A dark, gloomy, or poorly ventilated room can bring down our spirits and make even the most elaborate meal feel disappointing; conversely, the simplest meal can feel like a feast when served in an appealing setting. Cleanliness is crucial; any home, no matter how modest, can be clean and orderly, and without these, all the luxuries of wealth and art mean little.
A thorough airing each morning and opening of the windows a few minutes after each meal to remove the odor of food, are important items in the care of the dining room. The furnishing may be simple and inexpensive,—beauty in a home is not dependent upon expense,—but let it be substantial, tasteful, harmonious in color and soft in tone, nothing gaudy or showy. Use no heavy draperies, and have no excess of ornament and bric-a-brac to catch dust and germs. A hard-finished wood floor is far superior to a carpet in point of healthfulness, and quite as economical and easy to keep clean. The general furnishing of the room, besides the dining table and chairs, should include a sideboard, upon which may be arranged the plate and glassware, with drawers for cutlery and table linen; also a side-table for extra dishes needed during the service of a meal.
A thorough airing each morning and opening the windows for a few minutes after each meal to get rid of food odors are important tasks in taking care of the dining room. The furnishings can be simple and affordable—beauty in a home doesn't rely on cost—but they should be sturdy, tasteful, well-coordinated in color, and soft in tone, avoiding anything gaudy or flashy. Don't use heavy drapes or have too much decoration and knick-knacks that collect dust and germs. A hard-wood floor is much healthier than a carpet and is just as economical and easy to clean. Besides the dining table and chairs, the room should have a sideboard for arranging dishes and glassware, with drawers for cutlery and table linens; also, a side table for any extra dishes needed during a meal.
An open fireplace, when it can be afforded, aids in ventilation as well as increases the cheerful aspect of the room.
An open fireplace, when it's affordable, helps with ventilation and makes the room feel more cheerful.
A moveable china closet with glass encasements for keeping the daintier china, glass, or silver ware not in common use is often a desirable article of furniture in small homes; or a shallow closet may be built in the wall of the dining-room for this purpose. A good size for such a closet is twelve inches deep and three feet wide. Four shelves, with one or more drawers below, in which may be kept the best table napery, afford ample space in general. The appearance of the whole may be made very pleasing by using doors of glass, and filling in the back and sides of the shelves with velvet paper in dark-brown, dull-red, or any shade suitable for background, harmonizing with the general furnishing of the room. The shelves should be of the same material and have the same finish as the woodwork of the room. The upper side may be covered with felt if desired; and such artistic taste may be displayed in the arrangement of the china as to make the closet ornamental as well as convenient.
A movable china cabinet with glass doors for storing fine china, glassware, or silver that isn’t used daily is often a great piece of furniture for small homes. Alternatively, a shallow cabinet can be built into the wall of the dining room for this purpose. A good size for such a cabinet is twelve inches deep and three feet wide. Four shelves, with one or more drawers underneath for storing the best table linens, provide ample space overall. The design can be very attractive by using glass doors and lining the back and sides of the shelves with velvet paper in dark brown, dull red, or any color that matches the room’s decor. The shelves should be made of the same material and finished to match the woodwork of the room. The top may be covered with felt if desired, and artistic arrangement of the china can make the cabinet both beautiful and functional.
Table-Talk.—A sullen, silent meal is a direct promoter of dyspepsia. "Laugh and grow fat" is an ancient adage embodying good hygienic doctrine. It has long been well understood that food digests better when seasoned with agreeable conversation, and it is important that unpleasant topics should be avoided. Mealtime should not be made the occasion to discuss troubles, trials, and misfortunes, which rouse only gloomy thoughts, impair digestion, and leave one at the close of the meal worried and wearied rather than refreshed and strengthened. Let vexatious questions be banished from the family board. Fill the time with bright, sparkling conversation, but do not talk business or discuss neighborhood gossip. Do not let the food upon the table furnish the theme of conversation; neither praise nor apology are in good taste. Parents who make their food thus an especial topic of conversation are instilling into their children's minds a notion that eating is the best part of life, whereas it is only a means to a higher end, and should be so considered. Of all family gatherings the meals should be the most genial and pleasant, and with a little effort they may be made most profitable to all. It is said of Dr. Franklin that he derived his peculiarly practical turn of mind from his father's table talk.
Table-Talk.—A gloomy, quiet meal directly contributes to indigestion. "Laugh and get fat" is an old saying that captures good health advice. It's been understood for a long time that food digests better when accompanied by enjoyable conversation, so it's crucial to steer clear of unpleasant topics . Mealtime shouldn't become an opportunity to discuss problems, hardships, and misfortunes, which only bring on negative thoughts, hinder digestion, and leave you feeling anxious and tired instead of refreshed and energized. Let annoying questions be off-limits at the family table. Fill the time with lively, engaging conversation, but avoid talking business or sharing neighborhood gossip. Don't let the food on the table become the focus of discussion; both praise and excuses are in poor taste. Parents who make food a primary topic of conversation teach their children that eating is the best part of life, when it should be regarded as just a means to a greater end. Of all family gatherings, meals should be the most cheerful and enjoyable, and with a bit of effort, they can be truly beneficial for everyone. It's said that Dr. Franklin gained his practical mindset from the conversations at his father's table.
Let themes of conversation be of general interest, in which all may take a part. If there are children, a pleasant custom for the breakfast hour is to have each in turn relate something new and instructive, that he or she has read or learned in the interval since the breakfast hour of the previous day. This stimulates thought and conversational power, while music, history, adventure, politics, and all the arts and sciences offer ample scope for securing interesting items.
Let the topics of conversation be of general interest, so everyone can participate. If there are children, a nice tradition for breakfast is to have each person take turns sharing something new and informative that they’ve read or learned since the last breakfast. This encourages thinking and improves conversational skills, while music, history, adventure, politics, and all the arts and sciences provide plenty of material for interesting discussions.
Another excellent plan is the selection of a special topic for conversation for each meal or for the meals of a day or a week, a previous announcement of the topic being made, that all, even the youngest, may have time to prepare something to say of it. The benefits from such social intercourse around the board can hardly be over-estimated; and if thus the mealtime is prolonged, and too much appears to be taken out of the busy day, be sure it will add to their years in the end, by increasing health and happiness.
Another great idea is to choose a specific topic for conversation at each meal, or for the meals of a day or a week, with a prior announcement so everyone, even the youngest, has time to think of something to say about it. The benefits of this social interaction at the table are immense; and if mealtime ends up being longer and seems to take away from the busy day, it will definitely contribute to a longer life in the end, by boosting health and happiness.
Table Manners.—Good breeding and true refinement are nowhere more apparent than in manners at table. These do not relate alone to the proper use of knife and fork, napkin and spoon, but to habits of punctuality, neatness, quietness, order, and that kind thoughtfulness and courteous attention which spring from the heart—"in honor preferring one another." The purpose of eating should not be merely the appeasement of hunger or the gratification of the palate, but the acquiring of strength for labor or study, that we may be better fitted for usefulness in the world. Consequently, we should eat like responsible beings, and not like the lower orders of animals.
Table Manners.—Good manners and genuine refinement are most evident in how we behave at the table. This goes beyond just using a knife and fork, napkin, and spoon; it also involves being punctual, tidy, calm, organized, and showing the kind thoughtfulness and polite attentiveness that come from the heart—“in honor preferring one another.” Eating shouldn’t just be about satisfying our hunger or enjoying our food; it should be about gaining strength for work or study so that we can be more useful in the world. Therefore, we should eat like responsible individuals, not like lower animals.
Good table manners cannot be put on for special occasions and laid aside like a garment. Persons not wont to observe the rules of politeness in the every-day life of their own households can never deceive others into thinking them well bred on "company" occasions. Ease and refinement of manners are only acquired by habitual practice, and parents should early accustom their children by both precept and example to observe the requirements of good behavior and politeness at table. Elaborate details are not necessary. We subjoin a few of the more simple rules governing table etiquette:—
Good table manners can't just be turned on for special occasions and then set aside like a piece of clothing. People who don’t stick to the rules of politeness in their everyday lives at home can’t fool others into thinking they’re well-mannered when they’re with guests. Grace and refinement in manners come from regular practice, so parents should teach their children early, through both instruction and example, to follow the standards of good behavior and politeness at the table. We don't need to go into elaborate details. Here are a few simple rules for table etiquette:—
1. Eat slowly, never filling the mouth very full and avoiding all appearance of greediness.
1. Eat slowly, never overfilling your mouth, and steer clear of any signs of greed.
2. Masticate thoroughly, keeping the lips closed. Eating and drinking should be noiseless.
2. Chew thoroughly with your lips closed. Eat and drink quietly.
3. Never speak with the mouth full, nor interrupt another when talking. Any remark worthy of utterance will keep.
3. Never speak with your mouth full, and don’t interrupt someone when they’re talking. Any comment worth saying can wait.
4. Do not express a choice for any particular portion or dish, unless requested to do so; and do not find fault with the food. If by chance anything unpleasant is found in it, do not call the attention of others to the fact by either remark or manner.
4. Don’t show a preference for any specific dish or item unless asked; and don’t criticize the food. If you happen to find something unappealing in it, don’t draw attention to it with comments or your behavior.
5. Sit conveniently near the table, but not crowded up close against it; and keep the hands, when not in use to convey food to the mouth, in the lap, beneath the table, never resting upon the table, toying with knife, fork, or spoon.
5. Sit comfortably close to the table, but don’t crowd it; keep your hands in your lap, under the table, when you’re not using them to bring food to your mouth. Never rest them on the table or play with your knife, fork, or spoon.
6. Do not tilt back your chair, or lean upon the table with the elbow, or drum with the fingers.
6. Don't lean back in your chair, rest your elbows on the table, or tap your fingers.
7. It is contrary to good breeding to shovel one's food into the mouth with a knife. Everything which can be eaten with a fork should be taken with that utensil alone. If necessary, use the knife for dividing the food, and afterward the fork to convey it to the mouth. Use a spoon for soups and juicy foods.
8. Bread should be broken, not cut. In eating large fruits, like apples or pears, divide with a knife, and take in small portions, holding the knife by the handle rather than the blade.
8. Bread should be torn apart, not sliced. When eating large fruits like apples or pears, cut them with a knife and take small pieces, holding the knife by the handle instead of the blade.
9. Soup is eaten from the side of the spoon, which is filled without noisily touching the plate.
9. Soup is eaten from the side of the spoon, which is filled without noisily hitting the plate.
10. Seeds or stones to be rejected should be taken from the lips with a spoon, never with the fingers. The mouth should not go to the food, but the food to the mouth.
10. Seeds or stones that need to be removed should be taken from the lips with a spoon, never with your fingers. The food should come to your mouth, not the other way around.
11. Do not crumble food about your plate, nor in any avoidable way soil the table linen.
11. Don’t scatter food all over your plate or unnecessarily dirty the tablecloth.
12. Do not hang the napkin about the neck like a bib, but unfold and lay across the lap in such a manner that it will not slide to the floor. Carefully wipe the mouth before speaking, and as often at other times as may keep the lips perfectly clean of food and drink. At the close of a meal, if at home, fold the napkin neatly and place it in the ring. If at a hotel or away from home, leave the napkin unfolded by your plate.
12. Don’t drape the napkin around your neck like a bib, but unfold it and lay it across your lap so it doesn’t slip to the floor. Wipe your mouth carefully before speaking, and do so at other times to keep your lips clean of food and drink. At the end of a meal, if you’re at home, fold the napkin neatly and place it in the ring. If you’re at a hotel or away from home, leave the napkin unfolded by your plate.
13. Do not appear impatient to be served, and ordinarily at the home meals wait until all are served before commencing to eat. At a public table where waiters are provided, it is proper to begin eating as soon as the food is served. This is admissible because the wants of other guests are supposed to be similarly looked after.
13. Don't seem impatient to be served, and usually at home meals, wait until everyone has been served before you start eating. At a public dining table where there are waiters, it's okay to start eating as soon as the food is served. This is acceptable because it's assumed that other guests' needs are taken care of in the same way.
14. Never reach across a neighbor's plate for anything. If something beyond him is needed, ask to have it passed to you.
14. Never reach across someone else's plate for anything. If you need something that's beyond their reach, just ask them to pass it to you.
15. Do not tilt your plate or scrape it for the last atom of food.
15. Don't tilt your plate or scrape it for the last bit of food.
16. Drink very sparingly, if at all, while eating, and then do not pour the liquid down the throat like water turned from a pitcher.
16. Drink very little, if at all, while eating, and don’t gulp the liquid down like water from a pitcher.
17. Children should not be allowed to use their fingers to aid themselves in eating. If their hands are too small or too awkward to use a fork, a piece of bread or cracker may be held in the left hand to aid in pushing the food upon the fork or spoon.
17. Kids shouldn’t use their fingers to eat. If their hands are too small or too awkward to handle a fork, they can hold a piece of bread or a cracker in their left hand to help push the food onto the fork or spoon.
18. To help one's self to butter or any other food from a common dish with one's own knife or spoon is a gross breach of table etiquette.
18. Taking butter or any other food from a shared dish with your own knife or spoon is a serious violation of table manners.
19. Never use the handkerchief unnecessarily at the table, and do not cough or sneeze if avoidable.
19. Don't use your handkerchief at the table unless you really need to, and try to avoid coughing or sneezing if you can.
20. It is not considered proper to pick the teeth at table. If this becomes absolutely necessary, a napkin should be held before the mouth.
20. It's not considered polite to pick your teeth at the table. If it’s absolutely necessary, you should hold a napkin in front of your mouth.
21. When a meal or course is finished, lay the knife and fork side by side upon the plate.
21. When a meal or course is done, place the knife and fork side by side on the plate.
22. Except at a hotel or boarding house, it is not proper to leave the table before the rest of the family or guests, without asking the hostess to excuse you.
22. Except at a hotel or boarding house, it’s not polite to leave the table before the rest of the family or guests without asking the hostess for permission.
23. If a guest declines a dish, he need give no reason. "No, I thank you," is quite sufficient. The host or hostess should not insist upon guests' partaking of particular dishes, nor put anything upon their plates which they have declined.
23. If a guest declines a dish, they don't need to give a reason. "No, thank you," is completely enough. The host or hostess shouldn't push guests to eat certain dishes or put anything on their plates that they've turned down.
The Table.—None will deny that the appearance of the table affects one's enjoyment of the food upon it. A well-appointed table with its cloth, though coarse in texture, perfectly clean and neatly laid, its glass and china bright and shining, and the silver showing by its glistening surface evidence of frequent polishings, gives far more comfort and enjoyment than one where little attention is given to neatness, order, or taste. In many families, effort is made to secure all these important accessories when guests have been invited; but for common use, anything is considered "good enough for just one's own folks." This ought not to be, and mothers who permit such a course, need not be surprised if their children exhibit a lack of self-respect and genuineness as well as awkwardness and neglect of manners.
The Table.—No one can argue that how the table looks impacts how much you enjoy the food served on it. A well-set table with a cloth, even if it's a bit rough, but perfectly clean and neatly arranged, with bright, shiny glassware and china, and silver that gleams from regular polishing, brings much more comfort and satisfaction than one that neglects neatness, order, or style. In many households, people make an effort to have all these important elements ready when guests are invited; but for everyday use, anything is deemed "good enough for just family." This shouldn't be the case, and mothers who allow this attitude shouldn't be surprised if their children lack self-respect and authenticity, as well as exhibiting awkwardness and bad manners.
The table around which the family meals are taken, ought to be at all times the model of what it should be when surrounded by guests. As a writer has well said, "There is no silent educator in the household that has higher rank than the table. Surrounded each day by the family who are eager for refreshment of body and spirit, its impressions sink deep; and its influences for good or ill form no mean part of the warp and woof of our lives. Its fresh damask, bright silver, glass, and china, give beautiful lessons in neatness, order, and taste; its damask soiled, rumpled, and torn, its silver dingy, its glass cloudy, and china nicked, annoy and vex us at first, and then instill their lessons of carelessness and disorder. An attractive, well-ordered table is an incentive to good manners, and being a place where one is incited to linger, it tends to control the bad habits of fast eating; while, on the contrary, an uninviting, disorderly table gives license to bad manners, and encourages the haste which is proverbial among Americans. The woman, then, who looks after her table in these particulars, is not doing trivial work, for it rests with her to give silently these good or bad lessons in manners and morals to her household as they surround the daily board."
The table where the family eats should always be a model of how it should look when guests are present. As a writer has aptly said, "There is no silent educator in the household that ranks higher than the table. Surrounded each day by family who are eager for physical and mental nourishment, its impact runs deep; and its influences for better or worse play a significant role in the fabric of our lives. Its fresh tablecloth, shiny silverware, clean glassware, and beautiful china teach valuable lessons in neatness, order, and taste; whereas a soiled, wrinkled, and torn tablecloth, dull silver, cloudy glass, and chipped china annoy and frustrate us initially, and eventually instill lessons of carelessness and disorder. An attractive, well-set table encourages good manners, and being a place where people want to linger, it helps curb the bad habit of eating too quickly; however, an unappealing, messy table permits bad manners and promotes the rush that’s often seen among Americans. Therefore, the woman who takes care of her table in these ways is not engaging in trivial work, because it is her responsibility to silently impart these good or bad lessons in manners and morals to her family as they gather around the daily meal."
A well-appointed table requires very little time and labor. No pretense or ostentation is necessary; neatness and simplicity are far more pleasing.
A nicely set table takes very little time and effort. There's no need for pretense or showiness; cleanliness and simplicity are much more enjoyable.
Setting the Table.—Lay a piece of double-faced canton flannel underneath the tablecloth. Even coarse napery will present a much better appearance with a sub-cover than if spread directly upon the table. It will likewise lessen noise in changing courses and the likelihood of injury to the table from hot dishes. Spread the tablecloth evenly, without wrinkles, and so that the center fold shall be exactly in the middle, parallel with the sides of the table. Mats, if used, should be placed exactly straight and with regularity. If meat is served, spread a large napkin with points toward the center of the table at the carver's place, to protect the tablecloth. Place the plates upon the table, right side up, at even distances from each other and straight with the cloth and the edge of the table. Lay the napkins directly in front or at the right of each plate. Place the fork at the left, the knife on the right with the edge toward the plate, beyond this the soup spoon and two teaspoons, and at the front of these set the glass, cream glass, and individual butter plate if these are used.
Setting the Table.—Put a piece of double-faced canton flannel under the tablecloth. Even simple linens will look much better with an underlayer than if they're placed directly on the table. This will also reduce noise when changing courses and lessen the risk of damaging the table from hot dishes. Spread the tablecloth evenly, without wrinkles, ensuring that the center fold is perfectly aligned with the middle of the table, parallel to the sides. If you're using placemats, they should be aligned straight and consistently. If you're serving meat, lay a large napkin with the points towards the center of the table at the carver's spot to protect the tablecloth. Place the plates on the table, right side up, evenly spaced from each other and straight in line with the cloth and the table's edge. Set the napkins directly in front of or to the right of each plate. Place the fork to the left, the knife on the right with the edge facing the plate, followed by the soup spoon and two teaspoons, and at the front of these set the glass, cream glass, and individual butter plate if those are used.
A center piece consisting of a vase of freshly cut flowers, a pot of ferns, a jar of small plants in bloom, a dish of well-polished red apples, peaches, or other seasonable fruit, will add a touch of beauty and attractiveness. If the serving is to be done from the table by members of the family, place large spoons near dishes to be served, also the proper number and kind of separate dishes for the purpose. If fruit is to be served, a finger bowl should be placed for each person. If the service is by course, the extra dishes, knives, forks, and spoons needed, also the finger bowls, water service, and cold foods in reserve for a renewed supply or for other courses, should be made ready and arranged upon the sideboard.
A centerpiece featuring a vase of fresh flowers, a pot of ferns, a jar of blooming small plants, and a dish of shiny red apples, peaches, or other seasonal fruit will add a touch of beauty and appeal. If family members will be serving from the table, place large spoons next to the dishes, along with the appropriate number and type of serving dishes. If fruit is being served, provide a finger bowl for each person. If the meal is served in courses, make sure to have extra plates, knives, forks, and spoons ready, along with finger bowls, water service, and cold foods set aside for refills or additional courses on the sideboard.
The soup ladle should be placed in front of the lady of the house, who always serves the soup; and if meat is served, the carving knife and fork must, of course, be placed before the carver's place. The necessary dishes for each course should be brought on with the food, those for the first course being placed upon the table just a moment before dinner is announced.
The soup ladle should be set in front of the woman of the house, who usually serves the soup; and if meat is served, the carving knife and fork should, of course, be set at the carver's spot. The necessary dishes for each course should be brought out with the food, and those for the first course should be placed on the table just a moment before dinner is announced.
The arrangement of all dishes and foods upon the table should be uniform, regular, and tasteful, so as to give an orderly appearance to the whole. The "dishing up" and arranging of the food are matters of no small importance, as a dull appetite will often be sharpened at the sight of a daintily arranged dish, while the keenest one may have its edge dulled by the appearance of a shapeless mass piled up with no regard to looks. Even the simplest food is capable of looking its best, and the greatest care should be taken to have all dishes served neatly and tastefully.
The arrangement of all dishes and foods on the table should be consistent, organized, and visually appealing to create an orderly look overall. How the food is presented and arranged is very important because a lackluster appetite can often be perked up by a beautifully arranged dish, while even the strongest hunger can be diminished by a messy, unappealing pile of food. Even the simplest meals can look great, and it’s essential to serve all dishes neatly and tastefully.
The table should not be set for breakfast the night before nor kept so from one meal to another, unless carefully covered with a cloth thick enough to prevent the dust from accumulating upon the dishes. The plates and glasses should then be placed bottom-side up and turned just before mealtime. No food of any kind should ever be allowed to remain uncovered upon the table from one meal to another. The cloth for covering the table should be carefully shaken each time before using, and always used the same side up until washed.
The table shouldn't be set for breakfast the night before or left that way between meals unless it's properly covered with a thick cloth to keep dust off the dishes. Plates and glasses should be stored upside down and flipped right before mealtime. No food should ever be left uncovered on the table from one meal to the next. The cloth used to cover the table should be shaken out each time before use and should always be placed with the same side up until it's washed.
Plates and individual meat dishes should be warmed, especially in winter; but the greatest care should be taken that no dish becomes hot, as that not only makes it troublesome to handle, but is ruinous to the dishes.
Plates and individual meat dishes should be warmed, especially in winter; but great care should be taken that no dish becomes hot, as that not only makes it difficult to handle, but can ruin the dishes.
The Service of Meals.—There are few invariable rules for either table-setting or service. We will offer a few suggestions upon this point, though doubtless other ways are equally good. A capital idea for the ordinary home meal, when no servant is kept, especially if in the family there are older children, is to make different members of the family responsible for the proper service of some dish or course. The fruit, which should be the first course at breakfast, may be prepared and placed upon fruit plates with the proper utensils for eating—napkins and finger bowls at each place before the meal is announced. If apples or bananas are served, a cracker should be placed upon each plate to be eaten in connection with the fruit. Oranges and grapes are, however, to be preferred when obtainable; the former may be prepared as directed on page 180. The hot foods may be dished, and the dishes placed on a side table in a bain marie, the hot water in which should be as deep as the food within the dishes. The foods will thus be in readiness, and will keep much better than if placed upon the table at the beginning of the meal. When the fruit is eaten, some member of the family may remove the fruit plates, and bring the hot grains, toasts, and other foods, placing them, together with the necessary individual dishes, before those who have their serving in charge. One member may be selected to pass the bread, another to dish the sauce, etc.; and thus each child, whether boy or girl—even those quite young—may contribute to the service, and none be overburdened, while at the same time it will be a means of teaching a due regard for the comfort and enjoyment of others.
The Service of Meals.—There are a few consistent rules for setting the table or serving meals. Here are some suggestions on this topic, although there are certainly other equally good methods. A great idea for an everyday family meal, especially when there are older kids and no servant, is to assign different family members the responsibility of properly serving a certain dish or course. The fruit, which should be the first course at breakfast, can be prepared and set on fruit plates with the right utensils for eating—napkins and finger bowls placed at each setting before the meal is announced. If apples or bananas are served, a cracker should be placed on each plate to enjoy with the fruit. However, oranges and grapes are preferred when available; the oranges can be prepared as directed on page 180. The hot foods can be served and placed on a side table in a bain marie, with the hot water deep enough to match the food in the dishes. This way, the food will be prepared and kept better than if it were put on the table at the start of the meal. When the fruit is finished, a family member can take away the fruit plates and bring out the hot grains, toasts, and other foods, placing them along with the necessary individual dishes in front of those responsible for serving. One person may be chosen to pass the bread, another to serve the sauce, and so on; this way, each child, whether a boy or girl—even the younger ones—can contribute to the service without anyone being overwhelmed, while also learning to be considerate of the comfort and enjoyment of others.
If the meal is dinner, usually consisting of three courses, after the soup has been eaten, it may be the duty of some member of the family to remove the soup plates and place the vegetables, grains, and meats if any are to served, before those chosen to serve them. At the close of this course, another may remove the dishes and food, crumb the cloth, and place the dessert, with the proper dishes for serving, before the lady of the house or her oldest daughter, one of whom usually serves it.
If the meal is dinner, typically made up of three courses, after the soup is finished, it may be the responsibility of some member of the family to clear the soup plates and serve the vegetables, grains, and meats if any are to be served, before those designated to serve them. At the end of this course, another person may take away the dishes and food, clean the tablecloth, and set out the dessert with the appropriate serving dishes for the lady of the house or her oldest daughter, who usually serves it.
If a servant is employed, the following is an excellent plan of service: The soup plates or bowls should be placed hot upon the table, with the tureen of soup before the lady of the house, and the glasses filled before the dinner is announced.
If a servant is hired, here's a great way to set up the service: The soup plates or bowls should be placed hot on the table, with the soup tureen in front of the lady of the house, and the glasses should be filled before dinner is announced.
Grace having been said, the servant removes the cover of the soup tureen, and standing at the left of the lady, takes up with her left hand a soup plate, which she changes to the palm of her right hand and holds at the edge of the soup tureen until the lady has filled it, then carries it, still holding it upon the palm of the hand, and places it before the head of the table. In the same manner all are served to soup. If bowls instead of plates are used, a small silver or lacquered tray may be used on which to carry the bowl. While the soup is being eaten, the servant goes to the kitchen and brings in the hot dishes and foods for the next course, and places them upon the side table. When the soup has been finished, beginning with the one who sits at the head of the table, the servant places before each person in turn a hot dinner plate, at the same time removing his soup plate to the sideboard or pantry. After changing all the plates, she removes the soup tureen, and if meat is to be served, places that before the carver with the individual plates, which, when he has placed a portion thereon, she serves to each in turn; then she takes the potato and other vegetables upon her tray, and serves them, going to the left of each person when passing them a dish, but placing individual dishes at the right; next she passes the bread, refills the glasses, taking each one separately to the sideboard, and then serves the grains.
After saying grace, the servant lifts the cover off the soup tureen. Standing on the lady's left, she picks up a soup plate with her left hand, transfers it to her right hand, and holds it at the edge of the soup tureen until the lady fills it. Then, she carries it, still resting on her palm, and places it in front of the head of the table. Everyone is served soup in the same way. If bowls are used instead of plates, a small silver or lacquered tray can be used to carry the bowl. While the soup is being eaten, the servant goes to the kitchen to bring in the hot dishes for the next course and sets them on the side table. Once the soup is finished, starting with the person at the head of the table, the servant places a hot dinner plate before each guest, while also removing their soup plate to the sideboard or pantry. After changing all the plates, she takes away the soup tureen. If meat is being served, she places it in front of the carver along with individual plates. Once he serves a portion on each plate, she distributes them to each person in turn. Then, she takes the potatoes and other vegetables on her tray and serves them, passing them to the left of each person but placing individual dishes on the right. Next, she passes the bread, refills the glasses one by one from the sideboard, and then serves the grains.
When every one has finished the course, she begins the clearing of the table by first removing all large dishes of food; after that the plates and all soiled dishes, mats, and all table furniture except the glasses, napkin rings, and center-pieces. Lastly she removes all crumbs with a brush or napkin. When done, she places in front of each person a plate with a doily and finger bowl upon it, and then brings the dessert and dessert dishes, placing them before the lady of the house, and passes these for her as in the other courses. If the dessert is pudding, a spoon or fork should be placed on the plate at one side of the finger bowl. If the dessert is fruit, a fruit napkin may be used in place of the doily, the real purpose of which is to prevent the bowl from sliding about the plate in moving it. A fork and silver knife, or knife and spoon as the fruit may require, should be served with it.
When everyone has finished the meal, she starts clearing the table by first taking away all the large dishes of food; after that, she removes the plates, all the dirty dishes, mats, and everything on the table except for the glasses, napkin rings, and centerpieces. Finally, she sweeps away all the crumbs with a brush or napkin. Once she's done, she puts a plate in front of each person with a doily and finger bowl on it, and then she brings out the dessert and dessert dishes, placing them in front of the hostess, and serves them for her just like with the other courses. If the dessert is pudding, a spoon or fork should be placed on the plate next to the finger bowl. If the dessert is fruit, a fruit napkin can be used instead of the doily, which is mainly there to stop the bowl from sliding around the plate while it's being moved. A fork and silver knife, or a knife and spoon based on the type of fruit, should be served with it.
Soup, food in individual dishes, clean plates, and finger bowls should be set down before people at their right hand.
Soup, individual dishes, clean plates, and finger bowls should be placed in front of people on their right side.
When removing soiled dishes after a course, always exchange them for clean ones, remembering that the only time when it is allowable to leave the table without plates is when it is being cleared for the dessert.
When taking away dirty dishes after a course, always replace them with clean ones, keeping in mind that the only time it's okay to leave the table without plates is when it's being cleared for dessert.
In serving grains either dish them in small dishes before serving or pass clean saucers at the same time for each to help himself, and in all cases see that each person is served to cream, sugar, and a teaspoon, with grains.
In serving grains, either dish them into small bowls before serving or pass around clean saucers for everyone to help themselves. In all cases, make sure each person gets cream, sugar, and a teaspoon along with their grains.
Pass the bread two or three times during each meal, and keep careful watch that all are well supplied.
Pass the bread two or three times during each meal, and make sure everyone has enough.
Pour hot milk and all beverages on the side table; fill only three fourths full, and serve the same as anything else in individual dishes, placing the glass at each person's right hand.
Pour hot milk and all drinks on the side table; fill each container only three-quarters full, and serve them just like anything else in individual dishes, placing the glass at each person's right hand.
Waiters should be noiseless and prompt, and neatly attired in dress suitable to their occupation.
Waiters should be quiet and quick, and neatly dressed in attire appropriate for their job.
Suggestions Concerning Dinner Parties.—Much of the success of a dinner party depends upon the guests selected; and the first point for consideration by the lady who decides upon entertaining her friends thus, should be the congeniality of those whom she desires to invite, remembering that after the first greetings the guests see very little of their hostess, and consequently their enjoyment must largely depend upon each other. It is customary to issue invitations in the name of the host and hostess, from five to ten days in advance of the occasion. Printed or written invitations may be used. The following is a proper form:—
Suggestions for Dinner Parties.—A lot of the success of a dinner party relies on the guests chosen; so the first thing for the host or hostess to consider when planning to entertain friends is the compatibility of those they want to invite, keeping in mind that after the initial greetings, the guests will spend most of the time with each other rather than the host. Invitations should typically be sent out in the names of both the host and hostess, about five to ten days before the event. You can use either printed or handwritten invitations. Here’s a proper format:—
|
Mr. and Mrs. George Brown request the pleasure of Mr. and Mrs. Henry Clark's company at dinner December 5th, at four o'clock. 24 Maple Avenue. |
If the dinner is given in especial honor to some stranger, a second card is inclosed on which is written:—
If the dinner is held in special honor of a guest, a second card is included that says:—
|
To meet Mrs. Harold Brooks of Philadelphia. Mrs. Harold Brooks from Philadelphia. |
Invitations to a dinner should be promptly accepted or declined, and if accepted, the engagement should on no account be lightly broken.
Invitations to dinner should be accepted or declined right away, and if accepted, the commitment should never be taken lightly.
Unless one has a large establishment, and is very sure of good service, the bill of fare selected should not be an elaborate one, and the choice of dishes should be confined to those which one is used to preparing, and which in cost will not exceed one's means. It is the quality of the dinner which pleases, and not the multiplicity of dishes. Small dinners for not less than six or more than ten guests are always the most pleasant, and for those of moderate means or those unaccustomed to dinner-giving are by far the most suitable.
Unless you have a big venue and are confident in providing good service, the menu you choose shouldn’t be too elaborate. Stick to dishes that you know how to prepare and that won’t cost more than you can afford. It’s the quality of the meal that matters, not the number of dishes. Smaller dinners with six to ten guests are usually the most enjoyable, and they’re definitely the best option for those with a limited budget or those who aren’t used to hosting.
The arrangement and adornment of the table afford an opportunity for the display of much artistic taste and skill. An expensive outlay is by no means necessary, as highly pleasing effects may be produced by the addition of a few choice, well-arranged flowers or blossoming plants to a table already well laid with spotless linen, bright silver, and clean glass and china ware. A profusion of ornament should be avoided, large pieces of plate, and high, elaborate designs of flowers or fruit should not be used, as they obstruct the intercourse of the guests.
The way you set and decorate the table provides a chance to show off your artistic taste and skills. You don't need to spend a lot of money; you can create a beautiful atmosphere by adding a few well-arranged flowers or blooming plants to a table that’s already set with clean linen, shiny silverware, and clear glass and dishes. Avoid overcrowding with decorations; large serving dishes and tall, complicated arrangements of flowers or fruit should be left out, as they get in the way of guests chatting with each other.
A center piece of flowers, with a small bouquet tied with ribbon for each guest, is quite sufficient. Low dishes filled with violets or pansies; a basket filled with oranges, mingled with orange leaves and blossoms; bowls of ferns and roses; a block of ice wreathed in ferns, with an outer circle of water lilies; dishes of vari-colored grapes resting amid the bright leaves of the foliage plant, are some of many pleasing designs which may be employed for the adornment of the dinner table. The amount of space occupied with decorations must depend upon the style of service employed. If no calculation need be made for placing the different dishes composing the dinner, a strip of colored plush or satin bordered with ivy, smilax, or some trailing vine, is quite frequently used for the decoration of a long table.
A centerpiece of flowers, with a small bouquet tied with ribbon for each guest, is more than enough. Low dishes filled with violets or pansies; a basket filled with oranges, mixed with orange leaves and blossoms; bowls of ferns and roses; a block of ice surrounded by ferns, with an outer ring of water lilies; dishes of assorted grapes resting among the bright leaves of the foliage plant are just some of the attractive designs that can be used to decorate the dinner table. The amount of space taken up by decorations will depend on the style of service used. If there’s no need to plan where to place the different dishes making up the dinner, a strip of colored plush or satin bordered with ivy, smilax, or some trailing vine is often used to decorate a long table.
A very pleasing custom consists in selecting some especial color for the decorations with which the table napery, dishes, and even the food to be served shall accord; as, for example, a "pink" dinner, with roses as the chief flower, strawberries, pink lemonade, and other pink attractions; or a "yellow" luncheon, served on napery etched with yellow, with vases of goldenrod for center pieces, and dainty bouquets of the same tied with yellow ribbon at each plate, while yellow tapers in golden candlesticks cast a mellow light over all, during the serving of a bill of fare which might include peaches and cream, oranges, pumpkin pie, and other yellow comestibles.
A really nice tradition involves choosing a specific color for the decorations that match the table linens, dishes, and even the food being served. For example, you might have a "pink" dinner, featuring roses as the main flower, strawberries, pink lemonade, and other pink treats. Or you could host a "yellow" lunch, served on yellow-etched table linens, with vases of goldenrod as centerpieces and pretty bouquets tied with yellow ribbon at each plate. Yellow candles in golden candlesticks provide a warm glow while you enjoy a menu that could include peaches and cream, oranges, pumpkin pie, and other yellow foods.
The menu cards afford much opportunity for adding attractiveness to a company dinner. If one possesses artistic skill, a floral decoration or a tiny sketch, with an appropriate quotation, the guest's name, and date of the dinner, make of the cards very pleasing souvenirs. A proper quotation put after each dish is much in vogue as a means of promoting conversation. The quotations are best selected from one author.
The menu cards offer a great chance to make a company dinner more appealing. If you have some artistic talent, a floral design or a small sketch, along with a fitting quote, the guest's name, and the date of the dinner, can turn the cards into lovely keepsakes. Adding a relevant quote after each dish is quite popular for encouraging conversation. It's best to choose quotes from a single author.
There are no absolute rules for the service of company dinners, much depending upon social conditions and established customs. Two modes are in general use,—placing the dishes upon the table to be dished by the host and hostess, and placing all food upon the side table to be dished and served by a waiter. When the latter method is used, it is quite customary to place the plates of soup upon the table before dinner is announced. As many knives, forks, and spoons as will be needed for the courses may be placed beside each plate, or they may be brought in with the course, as preferred. Clean plates are necessary for every course. The manner of serving is essentially like that already described.
There are no strict rules for hosting company dinners; it really depends on social norms and traditions. There are generally two common approaches: serving dishes on the table for the host and hostess to dish out, or putting all the food on a side table to be served by a waiter. When using the second method, it’s pretty standard to set out the soup plates on the table before dinner is announced. You can place as many knives, forks, and spoons as needed for the courses next to each plate, or you can bring them in with each course, whichever you prefer. Clean plates are required for every course. The serving style is basically the same as previously described.
Care should be taken to have the dining room at an agreeable temperature, neither too warm nor too cold.
Care should be taken to keep the dining room at a comfortable temperature, not too warm and not too cold.
At large dinner parties, each gentleman, as he enters, receives a card upon which is written the name of the lady he is to take in to dinner, to whom the hostess at once presents him. When dinner is announced, the host leads the way with the oldest or most distinguished lady or the one to whom the dinner is given, while the hostess follows last, with the most honored gentleman. The host places the lady whom he escorts on his right. If the number is small, the host indicates the places the guests should occupy as they enter the room; if the party is large, the menu card at each plate bears the name of the guest for whom it is designed. The lady escorted by the host should be the first one served.
At big dinner parties, each man gets a card with the name of the woman he’ll be taking to dinner as he arrives, and the hostess introduces them right away. When it’s time for dinner, the host leads the way with the oldest or most distinguished lady, or the one being honored at the dinner, while the hostess brings up the rear with the most esteemed gentleman. The host seats the lady he’s with on his right. If the group is small, the host indicates where guests should sit as they enter the room; if the party is large, each menu card at the table shows the name of the guest it’s meant for. The lady who is with the host should be the first one served.
Soup is always taken and tasted, whether liked or not; after the first course, it is proper to accept or refuse a dish, as preferred.
Soup is always served and tasted, whether you like it or not; after the first course, it’s polite to accept or decline a dish, as you wish.
No well-bred hostess ever apologizes for the food upon her table or urges anything upon her guests when once declined. No orders should be given to servants during the meal; everything that will contribute to the proper serving of the dinner should be arranged beforehand, and all necessary instructions given.
No proper hostess ever apologizes for the food on her table or insists on anything to her guests after they've declined. No commands should be given to staff during the meal; everything that will help serve dinner properly should be set up in advance, and all necessary instructions should be provided.
At the close of the dinner, the hostess gives the sign for retiring.
At the end of dinner, the hostess signals that it's time to leave.
TABLE TOPICS.
Do not bring disagreeable things to the table in your conversation any more than you would in your dishes.—Sel.
Do not bring up unpleasant topics in your conversation any more than you would include them in your meals.—Sel.
Courtesy in the mistress of the house consists in feeding conversation; never in usurping it.—Mme. Swetchine
Courtesy in the home involves nurturing conversation; it’s never about taking it over.—Mme. Swetchine
Good humor and good health follow a good meal; and by a good meal we mean anything, however simple, well dressed in its way.—Smiles.
Good humor and good health come after a good meal; and by a good meal we mean anything, no matter how simple, presented nicely in its own way.—Smiles.
Unquiet meals make ill digestion.—Shakespeare.
Stressful meals upset digestion.—Shakespeare.
Eat slowly and do not season your food with care.—Sel.
Eat slowly and don’t season your food too much.—Sel.
To rise from the table able to eat a little more is a proverbially good rule for every one. There is nothing more idiotic than forcing down a few mouthfuls, because they happen to remain on one's plate after hunger is satisfied, and because they may be "wasted" if left. It is the most serious waste to overtax the stomach with even half an ounce more than it can take care of.—Sel.
To get up from the table able after having a bit more food is a widely accepted advice for everyone. There’s nothing more foolish than forcing down a few bites just because they’re still on your plate after you’re full, and because they might be "wasted" if you don’t eat them. It’s actually the biggest waste to overload your stomach with even half an ounce more than it can handle.—Sel.
I pray you, O excellent wife! cumber not yourself and me to get a curiously rich dinner for this man and woman who have just alighted at our gate.... These things, if they are desirous of them, they can get for a few shillings at any village inn; but rather let that stranger see, if he will, in your looks, accents, and behavior, your heart and earnestness, your thought and will, that which he cannot buy at any price in any city, and which he may travel miles and dine sparely and sleep hardly to behold.—Emerson.
I beg you, my wonderful wife! Don’t stress yourself or me trying to prepare an incredibly lavish dinner for this man and woman who have just arrived at our gate.... If they want such things, they can easily find them for a few shillings at any village inn; instead, let that stranger see, if he chooses, in your expressions, voice, and demeanor, your heart and sincerity, your thoughts and intentions, which can't be bought at any price in any city, and for which he may have to travel far, eat simply, and sleep rough just to experience.—Emerson.

AFTER MEAL TIME
 o no other department of domestic work perhaps is so little thought
given or so little science applied as to the routine work of clearing
the table and washing the dishes after mealtime. Any way to accomplish
the object, seems to be the motto in very many households. But even for
these prosaic tasks there is a best way, which, if employed, may make of
an otherwise irksome service a really pleasurable one.
o no other department of domestic work perhaps is so little thought
given or so little science applied as to the routine work of clearing
the table and washing the dishes after mealtime. Any way to accomplish
the object, seems to be the motto in very many households. But even for
these prosaic tasks there is a best way, which, if employed, may make of
an otherwise irksome service a really pleasurable one.
No other area of household duties gets as little thought or scientific approach as clearing the table and washing the dishes after a meal. For many families, the motto seems to be just get it done any way you can. However, even for these mundane chores, there is a better way to do it that can transform an otherwise tedious task into an enjoyable experience.
Clearing the Table.—First of all, put back the chairs, and brush up the crumbs from the floor, then collect all untouched foods and store them away in clean dishes; next gather the silver, place it handles upward in pitchers or other deep dishes, and pour hot water over it. For gathering the silver a compartment tray in which knives, forks, and spoons may be placed separately is important. Many of the scratches and marks on their silver ware, which housekeepers deplore, come from the careless handling together of forks, knives, and spoons. Now in a deep basin upon a tray, collect all the refuse and partly eaten foods, carefully emptying cups, glasses, finger bowls, etc., and scraping all dishes which contained food as clean as possible; for no crumbs or particles of food should be introduced into the dishwater. Pile the dishes as fast as cleaned upon a second tray in readiness for washing. It saves much liability of breakage in transferring from the dining room to the kitchen, if each kind of soiled dishes is packed by itself.
Clearing the Table.—First, put the chairs back and sweep up the crumbs from the floor. Then, gather all the untouched food and store it in clean dishes. Next, collect the silverware, placing it handles up in pitchers or other deep dishes, and pour hot water over it. Using a compartment tray to keep knives, forks, and spoons separate is important for gathering the silver. Many of the scratches and marks on silverware that housekeepers complain about come from carelessly storing forks, knives, and spoons together. Now, in a deep basin on a tray, collect all the leftover and partially eaten food, carefully emptying cups, glasses, finger bowls, etc., and scraping all dishes that held food as clean as possible; no crumbs or food particles should go into the dishwater. Stack the cleaned dishes onto a second tray, ready for washing. It reduces the risk of breakage when transferring from the dining room to the kitchen if each type of soiled dish is packed separately.
Wipe carefully, if not needing to be washed, and replenish all salts, granola cups, and sugar bowls before putting away. Gather the soiled napkins for the laundry, and put those clean enough to be used again in their proper places. Especial care must be taken, however, so to designate those reserved for future use that each shall receive the same again, as nothing is more disgusting to a sensitive person than to be tendered a napkin which has been used by some one else. Some form of napkin holder should be considered an essential part of the table furnishing. If rings cannot be afforded, ordinary clothes pins, gilded and decorated with a bit of ribbon, make very pretty substitutes.
Wipe carefully, unless they need washing, and restock all the salts, granola cups, and sugar bowls before putting them away. Collect the soiled napkins for laundry, and put the clean ones that can be reused back in their proper places. Special care should be taken to clearly mark those set aside for future use, so that each one gets used again, as nothing is more off-putting to a sensitive person than being handed a napkin that someone else has used. Some type of napkin holder should be considered a must-have for the table setting. If rings can't be afforded, regular clothespins, painted and decorated with a bit of ribbon, make lovely substitutes.
Brush the tablecloth, fold in its creases, also the sub-cover of canton flannel, and lay both away until again needed.
Brush off the tablecloth, smooth out the creases, and also the under-cover of canton flannel, then put both away until they're needed again.
Washing the Dishes.—Plenty of hot water and clean towels are the essential requisites for expeditious and thorough dish-washing. A few drops of crude ammonia added to the water will soften it and add to the luster of the silver and china. Soap may be used or not according to circumstances; all greasy dishes require a good strong suds. There should also be provided two dish drainers or trays, unless there is a stationary sink with tray on which to drain the dishes. For washing glassware and fine china, papier-maché tubs are preferable to anything else, as they are less liable to occasion breakage of the ware. If many dishes are to be washed, frequent changes of water will be necessary as the first becomes either cold or dirty. Perfectly sweet, clean dishes are not evolved from dirty dishwater. The usual order given for the washing of dishes is, glasses, silver, fine china, cups, saucers, pitchers, plates and other dishes. This is, however, based upon the supposition that cups and saucers are used for beverages, and plates are soiled by the use of various greasy foods; but in families where tea and coffee and animal foods are dispensed with, and saucers are used for grains with cream dressing, the plates are often cleaner than the saucers and should be washed first.
Washing the Dishes.—You need plenty of hot water and clean towels for fast and thorough dishwashing. Adding a few drops of regular ammonia to the water will soften it and enhance the shine of your silver and china. Use soap as needed; any greasy dishes require a strong suds. Make sure to have two dish drainers or trays unless there's a stationary sink with a tray to drain the dishes. For cleaning glassware and fine china, papier-maché tubs are better than anything else because they're less likely to break the items. If you have many dishes to wash, you’ll need to change the water often as it gets cold or dirty. You won’t get perfectly clean dishes from dirty dishwater. The typical order for washing dishes is glasses, silver, fine china, cups, saucers, pitchers, plates, and other dishes. This is usually based on the idea that cups and saucers are used for drinks and that plates get dirty from greasy foods; but in families where tea, coffee, and animal products are avoided, and saucers are used for grains with cream dressing, the plates are often cleaner than the saucers and should be washed first.
The general rule to be followed is always to wash the dishes least soiled first, and all of one kind together. The latter item is specially important, since much of the nicking of dishes and breaking of handles from cups, covers, and pitchers is the result of piling dishes promiscuously together while washing.
The basic rule to follow is to always wash the least dirty dishes first and to wash similar items together. This is especially important because a lot of the chipping and breaking of dishes and handles from cups, lids, and pitchers happens when dishes are mixed together while washing.
It is quite as easy to finish washing one kind before beginning on another as to do it in any less safe and systematic way, and if wiped in the same order, it does away with the need of sorting when putting the dishes away.
It’s just as easy to finish washing one type of dish before starting another as it is to do it in a less safe and organized way, and if you wipe them in the same order, it eliminates the need to sort them when putting the dishes away.
If for any reason the dishes must wait for a time before being washed, the best plan is to pack them carefully into large pans, cover with warm water, and let them soak. When ready to wash them, prepare hot suds and clear water for rinsing in additional pans. Do not use too hot water, as a high temperature will break glass and "check" the enamel of ordinary ware. The law of expansion holds good with both china and glassware, and all glass and glazed wares should be dipped into hot water in such a manner that all its surfaces may receive the heat and expand together.
If for any reason the dishes need to sit for a while before washing, the best approach is to pack them carefully into large pans, cover them with warm water, and let them soak. When you're ready to wash them, prepare hot soapy water and clean water for rinsing in separate pans. Avoid using water that’s too hot, as a high temperature can break glass and chip the enamel on regular dishware. The principle of expansion applies to both china and glassware, so all glass and glazed items should be immersed in hot water in a way that allows all their surfaces to receive heat and expand uniformly.
All dishes used for milk should be first thoroughly rinsed in cold water before being washed in hot water or suds.
All dishes that are used for milk should be rinsed thoroughly in cold water before being washed in hot water or with soap.
Be sure that the inside of all cups and pitchers is thoroughly clean. It is a good plan to have a mop made by fastening finger-lengths of coarse cotton twin to a suitable handle, for washing the inside of pitchers.
Make sure that the insides of all cups and pitchers are completely clean. It's a good idea to create a mop by attaching finger-lengths of coarse cotton twine to a suitable handle for washing the insides of pitchers.
In cleaning forks, spoons, or cups, which have been employed in beating or eating eggs, rinse them in cold water before putting them into hot suds, as hot water cooks the egg and causes it to adhere. Common table salt is said to be excellent for removing the egg tarnish from silver. Clean Dover egg beaters by beating a dish of cold water, or by holding under a stream of cold water from the faucet, then carefully rinse and wipe perfectly dry. Do not put the upper part of the beater into hot water, as it will remove the oil from the wheels so that they will not work easily.
In cleaning forks, spoons, or cups that have been used for beating or eating eggs, rinse them in cold water before putting them into hot soapy water, because hot water cooks the egg and makes it stick. Regular table salt is believed to be great for getting rid of egg stains on silver. To clean Dover egg beaters, either beat them in a bowl of cold water or hold them under a stream of cold water from the faucet, then carefully rinse and wipe them completely dry. Do not put the top part of the beater in hot water, as it will strip the oil from the wheels and make them hard to use.
Grain-boilers and mush-kettles should be allowed to cool, then filled with cold water and allowed to soak during the meal hour, when they can be easily cleaned.
Grain boilers and mush kettles should be allowed to cool, then filled with cold water and soaked during mealtime, when they can be easily cleaned.
Tin dishes should be washed with hot suds as soon as possible after using.
Tin dishes should be washed with hot soapy water as soon as possible after use.

Dishcloth
Dish Cloth
For cleaning; iron pots, use soft water and soap or washing-soda with a wire dishcloth or kettle scraper. If the food adheres to the sides, fill with cold water and soak. Kettles and all dishes placed over a fire should be cleaned on the outside as well as the inside. To remove the soot, rub first with pieces of dry paper and afterward with damp paper; then wash with hot suds and a cloth. Kettles and saucepans burned on the inside may he cleaned by putting a little cold water and ashes in them and allowing them to soak on the range until the water is warm. Porcelain-lined and granite-ware utensils stained from food burning on, may be cleaned after soaking for a time in a solution of sal-soda, which may be prepared by pouring boiling water over the soda in the proportion of two pints of water to one pound of sal-soda, and stirring until dissolved. It may be prepared in quantity and stored in a stone jar until needed.
For cleaning iron pots, use soft water and soap or washing soda along with a wire scrubber or kettle scraper. If food sticks to the sides, fill the pot with cold water and let it soak. Kettles and all dishes that are placed over the fire should be cleaned on both the outside and the inside. To remove soot, start by rubbing with dry paper, then follow up with damp paper; after that, wash with hot soapy water and a cloth. Kettles and saucepans that are burned on the inside can be cleaned by putting a bit of cold water and ashes in them and letting them soak on the stove until the water is warm. Porcelain-lined and granite cookware that is stained from burnt food can be cleaned by soaking in a solution of sal soda. To make this solution, pour boiling water over the soda in the ratio of two pints of water to one pound of sal soda, and stir until dissolved. You can prepare it in bulk and store it in a stone jar until you need it.
Wash wooden ware and bread boards with cold water and sand soap. In scraping dough from the bread board, always scrape with the grain of the wood and be careful not to roughen the surface.
Wash wooden utensils and cutting boards with cold water and sand soap. When scraping dough off the cutting board, always scrape with the grain of the wood and make sure not to roughen the surface.
Steel knives and forks with ivory or wooden handles should not be put into dishwater. Hot water will expand the steel and cause the handles to crack. Wash them thoroughly with the dishcloth, scour with bath brick, and wipe dry.
Steel knives and forks with ivory or wooden handles shouldn't be put in dishwater. Hot water will expand the steel and cause the handles to crack. Wash them thoroughly with a dishcloth, scrub with a scouring pad, and dry them off.
All tin and iron dishes should be thoroughly dried before putting away, to prevent rusting.
All tin and iron dishes should be completely dried before storing them to avoid rust.
If draining is considered preferable to wiping dishes, a good plan, if one has not a patent dish drainer, is to fold an old tablecloth in several thicknesses and spread upon the table. Wash the dishes carefully and rinse in hot water. Place a cup or bowl bottom upward, lay a plate on each side, then one between and above them, with two more on the outside, and so on, not permitting them to touch more than necessary.
If draining is seen as better than wiping dishes, a smart approach, if you don’t have a dish drainer, is to fold an old tablecloth in several layers and spread it on the table. Wash the dishes thoroughly and rinse them in hot water. Place a cup or bowl upside down, then set a plate on each side of it, and one on top, with two more on the outside, making sure they barely touch each other.
Dishcloths and Towels.—No dishes or utensils can be well cared for without good, clean dishcloths and towels, and plenty of them. An excellent dishcloth may be either knit or crocheted in some solid stitch of coarse cotton yarn. Ten or twelve inches square is a good size. Several thicknesses of cheese-cloth basted together make good dishcloths, as do also pieces of old knitted garments and Turkish toweling. If a dish mop is preferred, it may be made as follows: Cut a groove an inch from the end of a stick about a foot in length and of suitable shape for a handle; cut a ball of coarse twine, into nine-inch lengths, and lay around the stick with the middle of the strands against the groove; wind a fine wire or cord around the twine to fasten it in the groove; then shake down the twine, so it will lie all one way like a mop, and fasten it to the handle by tying a second cord around it on the outside.
Dishcloths and Towels.—You can't take good care of your dishes or utensils without plenty of clean dishcloths and towels. A great dishcloth can be either knit or crocheted in a solid stitch using coarse cotton yarn. A size of ten to twelve inches square works well. You can also make good dishcloths by basting several layers of cheesecloth together, or by using bits of old knitted clothes and Turkish toweling. If you prefer a dish mop, here’s how to make one: Cut a groove about an inch from the end of a stick that's about a foot long and has a suitable shape for a handle. Take coarse twine and cut it into nine-inch lengths, then lay it around the stick with the middle of the strands against the groove. Wrap a fine wire or cord around the twine to secure it in the groove, then shake the twine down so it all hangs in one direction like a mop, and tie it to the handle with a second cord around the outside.
Towels for drying dishes should be of three different grades,—fine ones without lint for glass, silver, and fine china; coarser ones for the ordinary table ware, and still another quality for pans, kettles, and other kitchen ware. The right size is a yard in length and half as wide, with the ends hemmed. As to material, fine checked linen is usually employed for glass and silver towels, and crash for ordinary dishes, for iron and tinware towels which have become somewhat worn, or a coarse bag opened and hemmed, may be used. Old, half-worn tablecloths may be cut into excellent dish towels.
Towels for drying dishes should come in three different types: fine, lint-free ones for glass, silver, and delicate china; coarser ones for regular dinnerware; and a different quality for pots, pans, and other kitchen items. The ideal size is one yard long and half a yard wide, with the edges hemmed. For material, fine checked linen is typically used for towels meant for glass and silver, and crash fabric is used for everyday dishes. Towels that are a little worn can be used for iron and tinware, or you can use a coarse bag that’s been cut and hemmed. Old, slightly worn tablecloths can also be repurposed into great dish towels.
It is of the greatest importance that all dishcloths, mops, and towels be kept perfectly sweet and clean. Greasy dishcloths and sour towels are neither neat nor wholesome and are a most fertile source of germs, often breeding disease and death. After each dish washing, the dishcloth, towels, and mops should be thoroughly washed in hot water with plenty of soap, well rinsed and hung up to dry either upon a line out of doors or a rack made for the purpose near the kitchen range. If care is always taken to clean the dishes as much as possible before washing and to change the suds as often as they become dirty, the towels will not be hard to keep clean and sweet-smelling. Those used during the week should go into the wash as regularly as other household articles. Dish towels are also much better for being ironed. It gives them a "surface" which facilitates the drying operation.
It’s really important that all dishcloths, mops, and towels are kept completely clean and fresh. Dirty dishcloths and smelly towels are neither tidy nor healthy and can easily lead to germs, often causing illness and even death. After each time you do the dishes, the dishcloths, towels, and mops should be washed in hot water with plenty of soap, rinsed well, and hung up to dry outside on a line or on a rack near the kitchen. If you always clean the dishes as much as possible before washing and change the soapy water when it gets dirty, it won't be hard to keep the towels clean and smelling fresh. Those used during the week should be washed just like other household items. Dish towels also work better when they’re ironed, as it gives them a surface that helps them dry faster.
The Care of Silver, Glass, Etc.—If silver is well washed in hot water containing a few drops of ammonia, and carefully dried with a fine, soft towel, it will keep bright for a long time without other cleaning. If special cleaning is necessary, try the following: Place the silver in a pan of hot water, then with a soft cloth, soaped and sprinkled with powdered borax, scour the silver well; afterward rinse in clear cold water, and dry with a clean cloth. If a more thorough cleaning is needed, apply moistened Spanish whiting with a silver brush and soft flannel, afterward polishing with dry whiting and chamois skin. Frequent scouring should be avoided by careful washing, as too much rubbing wears out plated ware and dulls the best of silver. Silver ware and plate which is not in ordinary use can be kept from tarnishing by varnishing with collodion, a solution of gun-cotton in ether. The articles should be carefully brushed in this colorless varnish with an elastic brush, taking care that the entire surface is covered. The film of collodion will protect the underlying metal from the action of the sulphurous vapors to which is due the blackening of silver.
The Care of Silver, Glass, Etc.—If you wash silver well in hot water with a few drops of ammonia and carefully dry it with a soft, fine towel, it will stay shiny for a long time without needing cleaning. If you need to clean it more thoroughly, try this: Place the silver in a pan of hot water, then use a soft cloth that has been soaped and sprinkled with powdered borax to scrub the silver well; afterward, rinse it in clear cold water and dry it with a clean cloth. If it needs an even deeper clean, apply moistened Spanish whiting using a silver brush and soft flannel, and then polish it with dry whiting and chamois skin. To avoid frequent scrubbing, wash carefully, as too much rubbing can wear out plated ware and dull even the best silver. Silverware and plates that aren’t used often can be protected from tarnishing by varnishing with collodion, a solution of gun-cotton in ether. You should carefully brush the entire surface of the items with this colorless varnish using a flexible brush, ensuring complete coverage. The collodion film will protect the underlying metal from the sulphurous vapors that cause silver to blacken.
Tinware which has become blackened may be made to look bright and shining again by rubbing with a damp cloth dipped in sal-soda. Afterward wipe dry. Sand soap or sapolio may be used for the same purpose.
Tinware that has turned black can be made to look bright and shiny again by rubbing it with a damp cloth soaked in sal-soda. Afterwards, wipe it dry. Sand soap or sapolio can be used for the same purpose.
Cut-glass ware which has become in any way blurred or tarnished can be restored by polishing it with a soft piece of newspaper. First rub well with a piece slightly moistened and afterward repeat the process with dry paper. Rubbing with a soft brush dipped in fine, soft whiting is another method often employed for the same purpose. Cut-glass water-bottles dim or stained on the inside are best cleaned by rinsing with dilute muriatic acid, then carefully rinsing several times in clear cold water to remove all trace of the acid, which is a poison.
Cut-glass items that have become cloudy or tarnished can be restored by polishing them with a soft piece of newspaper. First, rub them well with a slightly damp piece and afterward repeat the process with dry paper. Using a soft brush dipped in fine, soft whiting is another common method for this purpose. To clean cut-glass water bottles that are dull or stained on the inside, it's best to rinse them with a diluted solution of muriatic acid, and then carefully rinse several times with clear, cold water to ensure all traces of the acid are removed, as it is poisonous.
All fine china should be handled carefully in washing and drying. There will be less danger of breakage if the china is gradually heated by allowing it to stand in a pan of warm water before being put into hot water. The same is true of all table ware, and is of especial importance in cold weather.
All fine china should be handled carefully when washing and drying. There's less risk of breaking it if you gradually heat the china by letting it sit in a pan of warm water before placing it in hot water. This also applies to all tableware, and it's especially important in cold weather.
Brass faucets and other brass or copper articles may be cleaned by rubbing with whiting wet with aqua ammonia.
Brass faucets and other brass or copper items can be cleaned by rubbing them with whiting dampened with ammonia.
Yellowed ivory handles may be restored to their original whiteness by rubbing with sandpaper and emery; mineral soap or pumice stone may be used for the same purpose. Nice table cutlery packed away for a season may be kept from rusting by covering the metal portion with a thin coating of paraffine. Rust may be removed from steel by scouring with emery and oil; but if there is much corrosion, some weak muriatic acid will be needed. This, however, will take some of the metal with the rust, and must be washed off quickly.
Yellowed ivory handles can be brought back to their original whiteness by rubbing them with sandpaper and emery. You can also use mineral soap or pumice stone for the same effect. Nice table cutlery that's been stored away for a season can be protected from rust by applying a thin layer of paraffin to the metal parts. To remove rust from steel, scrub it with emery and oil; however, if there's a lot of corrosion, you'll need some diluted muriatic acid. Just keep in mind that this will remove some of the metal along with the rust, so it has to be washed off quickly.
Trays and japanned goods should never have boiling water poured over them, as it will make the varnish crack and peel. If a tray is badly soiled, wet with a sponge moistened in warm water and soap, and rub with a dry cloth; if it looks smeary, dust on a little flour and rub again. Marks and scratches may sometimes be removed by rubbing with a flannel cloth dipped in sweet oil.
Trays and coated items should never have boiling water poured on them, as it will cause the finish to crack and peel. If a tray is really dirty, dampen a sponge with warm soapy water and wipe it down, then use a dry cloth to buff it. If it looks streaky, sprinkle a little flour on it and rub again. Marks and scratches can sometimes be removed by rubbing with a flannel cloth dipped in sweet oil.
Stains upon table linen made by acids and vinegar may be removed by simply washing in clear water; berry stains are easily taken out by pouring boiling water over them; peach stains are best removed by soaking for some time in cold water and then washing with soap before allowing warm water to touch them. Chlorine water or a solution of chloride of lime will remove fruit stains, and vegetable colors. Coffee stains rubbed with a mixture of warm water and the yolk of egg, are said to disappear when the mixture is washed off with clean warm water. Sour buttermilk well rubbed into the material, dried in, and afterward washed out in several waters, is said to be effectual in removing tea stains. All stains should be removed as soon as possible after being made, and always before putting the linen into the wash.
Stains on tablecloths caused by acids and vinegar can be removed by simply washing them in clear water. Berry stains are easily eliminated by pouring boiling water over them. Peach stains are best removed by soaking in cold water for a while, then washing with soap before allowing warm water to touch them. Chlorine water or a solution of lime chloride can get rid of fruit stains and vegetable colors. For coffee stains, rubbing a mixture of warm water and egg yolk is said to make them disappear when rinsed with clean warm water. Sour buttermilk rubbed well into the fabric, allowed to dry, and then washed out in multiple rinses is said to effectively remove tea stains. All stains should be treated as soon as possible after they occur and always before putting the linen in the wash.
In washing table linen, housekeepers should remember that hard rubbing is the worst wear which it can receive. If soaked over night, a gentle squeezing will usually be quite sufficient to remove all soil, or if a little borax (a handful to ten gallons of water) or household ammonia in the proportion of two tablespoonfuls to a pail of water be added, two or three hours' soaking will suffice. Care should also be taken in hanging and fastening properly upon the line. Fold the cloth over the line six or eight inches at least, and in such a manner as to keep the thread straight, and fasten with three or more clothes pins. Table linen is often sadly frayed at the corners by being pinned so that all strain comes upon the corners, and if left to whip in the wind, is soon ruined. Napkins in summer are much nicer if dried upon the grass. Only the merest trifle of starch, if any, should be used for table linen.
When washing table linens, housekeepers should remember that hard rubbing is the worst thing you can do. If soaked overnight, a gentle squeeze is usually enough to remove all dirt. Alternatively, if you add a little borax (about a handful to ten gallons of water) or household ammonia (two tablespoons to a bucket of water), soaking for two or three hours will do the trick. You should also take care when hanging and securing the linens on the line. Fold the cloth over the line by at least six or eight inches to keep the thread straight and secure it with three or more clothespins. Table linens often get badly frayed at the corners if they are pinned in a way that puts all the strain on the corners, and if left to flap in the wind, they can get ruined quickly. Napkins dry much nicer on the grass in the summer. Only a small amount of starch, if any, should be used for table linens.
Table linen should be taken from the line while still damp, folded evenly lengthwise with the selvage together, then folded lengthwise again, rolled tight, and wrapped in damp towels so that the outside will not become dry, and ironed the same day. The irons should be heavy and as hot as possible without danger of scorching, and the board should be well padded with several thicknesses of flannel. Iron the linen in single folds, keeping a damp cloth over portions which will not be immediately reached. When the entire surface has been ironed, fold evenly lengthwise and with the selvage edges toward the ironer, again go over the entire upper side; then fold with the just completed portion inside, iron again, and so continue until the whole is ironed and folded. Both napkins and tablecloths are ironed in this way. They should be thoroughly dried with the iron and well aired before being laid away, in order to bring out the patterns well and to give them the desirable glossy finish.
Table linen should be taken from the line while it's still damp, folded evenly lengthwise with the selvage together, then folded lengthwise again, rolled tightly, and wrapped in damp towels to prevent the outside from drying out, and ironed the same day. The irons should be heavy and as hot as possible without risking scorching, and the board should be well padded with several layers of flannel. Iron the linen in single folds, keeping a damp cloth over parts that won't be ironed immediately. Once the entire surface has been ironed, fold it evenly lengthwise with the selvage edges toward the ironer, go over the entire upper side again; then fold with the freshly ironed portion inside, iron again, and keep repeating until everything is ironed and folded. Both napkins and tablecloths are ironed this way. They should be thoroughly dried with the iron and well aired before being stored to accentuate the patterns and give them a nice glossy finish.
Colored table linen should be washed in tepid water containing a little powdered borax, which serves to set the color. Very little, if any, soap should be used. Rinse in tepid water containing a small quantity of boiled starch; dry in the shade, and iron while yet damp.
Colored table linen should be washed in lukewarm water with a bit of powdered borax to help set the color. Use very little soap, if any at all. Rinse in lukewarm water with a small amount of boiled starch, dry in the shade, and iron while still damp.
Table linen should be carefully darned at once when it begins to wear and become thin, and may thus be preserved for a long time. When new, it should be washed before being made up, and the threads raveled or drawn, so as to make the ends exactly straight. Napkins should be washed before being cut apart. When not required for regular use, the linen should be folded loosely, and laid away without ironing in some place where it will not be subjected to pressure. When needed, it can be quickly dampened and ironed.
Table linen should be mended right away when it starts to wear and get thin, which can help it last a long time. When new, it should be washed before being sewn, and the threads should be unraveled or pulled to make the ends perfectly straight. Napkins should be washed before they are cut apart. When not needed for everyday use, the linen should be folded loosely and stored without ironing in a spot where it won't get pressed. When needed, it can be easily dampened and ironed.
The Garbage.—What to do with the waste accumulating from preparation of foods is a question of no small importance. The too frequent disposition of such material is to dump it into a waste-barrel or garbage box near the back door, to await the rounds of the scavenger. Unless more than ordinary precautions in regard to cleanliness are observed, such a proceeding is fraught with great danger. The bits of moist food, scraps of meat, vegetables, and other refuse, very quickly set up a fermentative process, which, under the sun's rays, soon breeds miasm and germs; especially is this true if the receptacle into which the garbage is thrown is not carefully cleaned after each emptying.
The Garbage.—What to do with the waste that builds up from preparing food is an important question. The usual practice is to just throw it into a waste barrel or garbage bin near the back door and wait for the garbage collectors. If you don't take extra care with cleanliness, this can be very risky. Bits of wet food, meat scraps, vegetables, and other waste can quickly start to decompose, and under the sun, this can lead to bad smells and germs; this is especially true if the container used for the garbage isn't properly cleaned after each time it's emptied.
A foul-smelling waste-barrel ought never to be permitted under any circumstances. The best plan is to burn all leavings and table refuse as fast as made, which may be done without smell or smoke by opening all the back drafts of the kitchen range, and placing them on the hot coals to dry and burn. Some housekeepers keep in one end of the sink a wire dish drainer into which all fruit and vegetable parings are put. If wet, the water quickly drains from them, and they are ready to be put into the stove, where a very little fire soon reduces them to ashes. All waste products which cannot well be burned, may be buried at a distance from the house, but not too much in one spot, and the earth should be carefully covered over afterward. Under no circumstances should it be scattered about on the surface of the ground near the back door, as heedless people are apt to do.
A smelly waste barrel should never be allowed, no matter what. The best approach is to burn all leftovers and kitchen scraps as soon as they’re made. This can be done without any odor or smoke by opening all the back drafts of the kitchen stove and placing the scraps on the hot coals to dry out and burn. Some people keep a wire dish drainer at one end of the sink where they put all fruit and vegetable peels. If they're wet, the water will drain quickly, and they’re ready to go in the stove, where a small fire will turn them to ashes in no time. Any waste that can't be easily burned can be buried away from the house, but not all in one place, and the soil should be carefully covered afterward. Under no circumstances should it be left scattered on the ground near the back door, as careless people often do.
If the table refuse must be saved and fed to animals, it should be carefully sorted, kept free from all dishwater, sour milk, etc., and used as promptly as possible. It is a good plan to have two tightly covered waste pails of heavy tin to be used on alternate days. When one is emptied, it may be thoroughly cleansed and left to purify in the air and sunshine while the other is in use. Any receptacle for waste should be entirely emptied and thoroughly disinfected each day with boiling suds and an old broom. This is especially imperative if the refuse is to be used as food for cows, since the quality of the milk is more or less affected by that of the food.
If table scraps need to be saved and fed to animals, they should be carefully sorted, kept free of dishwater, sour milk, and the like, and used as soon as possible. It’s a good idea to have two tightly covered trash cans made of heavy metal to use on alternate days. When one is emptied, it can be thoroughly cleaned and left to air out in the sunshine while the other is being used. Any container for waste should be completely emptied and thoroughly disinfected every day with boiling soap and an old broom. This is especially important if the scraps are going to be used as feed for cows, as the quality of the milk can depend on the quality of the food.
TABLE TOPICS.
A woman cannot work at dressmaking, tailoring, or any other sedentary employment, ten hours a day, year in and out, without enfeebling her constitution, impairing her eyesight, and bringing on a complication of complaints; but she can sweep, cook, wash, and do the duties of a well-ordered house, with modern arrangements, and grow healthier every year. The times in New England when all women did housework a part of every day, were the times when all women were healthy.—Harriet Beecher Stowe.
A woman can't work in dressmaking, tailoring, or any other desk job for ten hours a day, year after year, without weakening her body, damaging her eyesight, and causing a mix of health issues; but she can sweep, cook, wash, and handle the responsibilities of a well-organized home with modern conveniences, and get healthier every year. The times in New England when all women did housework every day were the times when all women were healthy.—Harriet Beecher Stowe.
The best ways are commonly the easiest ways and those that give most comfort to the household. Know how is a great labor-saving invention, on which there is no patent.—Sel.
The best methods are usually the simplest ones that provide the most comfort to the home. Know how is a fantastic time-saving innovation that isn't patented.—Sel.

A YEAR'S BREAKFASTS & DINNERS
 hat to get for the family meals is frequently a most perplexing
problem, especially when one remembers the many important points that
should enter into the arrangement of the daily bill of fare. A
well-arranged menu should be composed of articles which supply the
requisite amount of food elements for proper nutrition, palatably
prepared. These should be adapted to the season and also to the family
purse. There should be an agreeable and pleasing change from day to day,
with never too great variety at one meal, and no incongruous association
of foods that do not harmonize, upon the same bill of fare. The amount
of time and strength available for the preparation of the meal must also
receive consideration. The problem would be easier of solution could one
select her menu wholly from fresh material each time; but in most
households the odds and ends and "left-over" foods must be utilized, and
if possible compounded into dishes that will not have the savor of
yesterday's breakfast or dinner.
hat to get for the family meals is frequently a most perplexing
problem, especially when one remembers the many important points that
should enter into the arrangement of the daily bill of fare. A
well-arranged menu should be composed of articles which supply the
requisite amount of food elements for proper nutrition, palatably
prepared. These should be adapted to the season and also to the family
purse. There should be an agreeable and pleasing change from day to day,
with never too great variety at one meal, and no incongruous association
of foods that do not harmonize, upon the same bill of fare. The amount
of time and strength available for the preparation of the meal must also
receive consideration. The problem would be easier of solution could one
select her menu wholly from fresh material each time; but in most
households the odds and ends and "left-over" foods must be utilized, and
if possible compounded into dishes that will not have the savor of
yesterday's breakfast or dinner.
Figuring out what to make for family meals is often a tricky problem, especially when considering all the important points that should go into planning the daily menu. A well-organized menu should include items that provide the right nutrients for good health, prepared in a tasty way. These choices should fit the season and the family budget. There should be a nice and enjoyable change each day, with not too much variety at one meal, and no mismatched foods that don’t go well together on the same menu. The amount of time and energy available for cooking must also be taken into account. The task would be simpler if one could choose the menu entirely from fresh ingredients each time; however, in most households, odds and ends and leftover foods need to be used up, and if possible, turned into dishes that don’t taste like yesterday’s breakfast or dinner.
The making of a bill of fare offers opportunity for thought and study under all circumstances; but it is often particularly difficult for the housewife long accustomed to the use of foods of a different character, to make up a menu of hygienic dishes properly adapted to all requirements. For such of our readers as need aid in this direction, we give in this chapter bills of fare for fifty-two weeks' breakfasts and dinners. Not that we presume to have arranged a model dietary which every one can adopt,—individual preferences, resources, and various other conditions would preclude that,—but we have endeavored to prepare a list of menus suitable for use should circumstances admit, and which we trust may be found helpfully suggestive of good, hygienic living.
Creating a meal plan provides an opportunity for reflection and learning in any situation; however, it can be especially challenging for a homemaker who’s used to cooking with different types of food to put together a menu of healthy dishes that meet all needs. For those readers who need assistance in this area, we offer meal plans for fifty-two weeks of breakfasts and dinners in this chapter. We don’t claim to have created a perfect diet that everyone can follow—personal tastes, resources, and many other factors would make that impossible—but we have tried to compile a list of menus that can be useful when circumstances allow, and we hope they will inspire you to embrace healthy living.
We have given meats no place upon these bills of fare, as we wished particularly to illustrate how good, substantial menus of appetizing variety can be provided without their use; but such of our readers as desire this class of foods will have no difficulty in supplementing the bills we have arranged by adding such meats as accord with their tastes and purses, while our chapter on Meats will give them all needed information as to their preparation.
We haven't included meats on these menus because we wanted to show how good and satisfying meals with appetizing variety can be created without them. However, readers who want this type of food can easily add any meats that fit their preferences and budgets to the menus we've provided. Our chapter on Meats will supply all the information they need for preparation.
In arranging the bills of fare it has been presupposed that the housewife has provided herself with at least a moderate allowance of canned or dried vegetables and fruits during their season, for use throughout the year. Effort has also been made to suggest an ample variety of seasonable and wholesome articles and to make provision for any probable left-over foods; and to illustrate how by planning and thinking beforehand the same material may be used to form the base of two different dishes for successive days, enough of which for both may often be cooked at the same time, thus economizing in time and fuel.
In organizing the menus, it is assumed that the housewife has stocked up on a reasonable supply of canned or dried vegetables and fruits during their peak seasons for use throughout the year. Efforts have also been made to suggest a good variety of fresh and healthy ingredients and to plan for any likely leftover foods. Additionally, it shows how, by planning ahead, the same ingredients can be used to create two different dishes on consecutive days, allowing for enough to be cooked at the same time, saving both time and energy.
No particular year has been taken, as we desired the menus to be adapted to all years, and as no dates could be given, we have taken even weeks, ending each with a Sabbath menu, beginning with the first month of the year.
No specific year has been chosen because we wanted the menus to be suitable for any year, and since no dates could be provided, we have used even weeks, ending each with a Sabbath menu, starting with the first month of the year.
A third meal, if desired, whether it be luncheon or supper, should, for health's sake, be so simple in character that we have not deemed it necessary to give bills of fare. Breads, fruits, and grains, with milk, cream, and some simple relish, tastefully served, offer ample provision for a healthful and nourishing repast.
No mention has been made of beverages upon the bills of fare. If any are used, hot milk or caramel coffee are to be preferred. Cooked fruit, either fresh, dried, or canned, is desirable for every meal, but the kind—as also of the fresh fruit upon the breakfast bill—may be arranged according to individual preferences and resources. The use of cream, sugar, and other accessories should be suited to circumstances.
No drinks are listed on the menu. If any are served, hot milk or caramel coffee are recommended. Cooked fruit, whether fresh, dried, or canned, is good for every meal, but the type—just like the fresh fruit on the breakfast menu—can be chosen based on personal preferences and availability. The use of cream, sugar, and other extras should fit the situation.
It is intended that croutons be served with the soups, and in arranging the variety of breads, an effort has been made to provide one of harder texture for use with grains and other soft foods. The wafers mentioned are the whole-wheat and gluten wafers manufactured by the Sanitarium Food Co., which by many families are considered more convenient for general use as a hard bread than the crisps, sticks, etc., which upon some of the menus are designed for the same purpose.
It’s meant that croutons will be served with the soups, and when arranging the different types of bread, we’ve tried to include one that has a firmer texture for pairing with grains and other soft dishes. The wafers mentioned are the whole-wheat and gluten wafers made by the Sanitarium Food Co., which many families find more convenient as a hard bread option than the crisps, sticks, etc., that appear on some of the menus meant for the same purpose.
Less variety may be used, and changes made to suit the taste and circumstances of those providing and partaking of the meals; but whatever is subtracted should still leave upon the bill of fare the more nutritious articles, like grains, whole-wheat bread, and other foods rich in nerve and muscle forming elements.
Less variety might be used, and adjustments can be made to fit the preferences and situations of those preparing and enjoying the meals; however, whatever is removed should still ensure that the menu includes more nutritious items, like grains, whole-wheat bread, and other foods high in elements that build nerves and muscles.
Whether the housewife follows the bills of fare given with such modifications as are best suited to the needs of her household, or provides some of her own choosing, she will find it a great saving of vexation and trouble to make them out for several days or a week ahead, at one time, rather than from day to day or from meal to meal. She can then plan her work and her resources so as the more nearly to make "both ends meet," and can provide a more varied fare, while if changes are needed, they can be easily made by substituting one article for another, as circumstances demand.
Whether the housewife follows the meal plans provided with adjustments that best suit her household's needs or selects her own, she'll find it saves a lot of frustration and hassle to plan out meals for several days or even a week at a time instead of figuring them out day by day or meal by meal. This way, she can organize her tasks and resources to better "make ends meet" and offer a more varied menu. If adjustments are necessary, it's easy to swap one item for another as needed.
In the arrangement of her menus she will find it well to select first the grain and breads to be used, since being among the most nutritious of all foods, they may well form the chief and staple food, around which all other articles upon the bill of fare are grouped. If the grain chosen be rice, farina, or one largely composed of starch, the remainder of the menu should include some foods rich in nitrogenous elements, such as macaroni, whole-wheat or Graham breads, the legumes, eggs, etc. If the choice of grain be one containing a high percentage of nitrogenous material, less of this element will be required in the accompanying foods. As an aid in determining the nutritive value of any given food substance, the following table, presenting the results of the chemical analysis of the more common articles used as food, which we have compiled from the most recent scientific authorities, will be found helpful:—
In planning her menus, it's best to start by selecting the grains and breads, since they are among the most nutritious foods and can serve as the main component and staple around which all other items on the menu are organized. If the chosen grain is rice, farina, or one that is mostly starch, the rest of the menu should include foods rich in protein, like macaroni, whole-wheat or Graham breads, legumes, eggs, etc. If the grain selected has a high protein content, less of this element will be needed in the accompanying foods. To help determine the nutritional value of any food item, the following table, which shows the results of chemical analyses of common foods and has been compiled from the latest scientific resources, will be useful:—
TABLE SHOWING THE NUTRITIVE VALUES OF COMMON FOOD SUBSTANCES.
| FOOD SUBSTANCES. | Water. | Albuminous elements. | Starch. | Grape Sugar. | Cane Sugar. | Free Fat. | Free Acid. | Pectose. | Non-Nitrog. Substances.[1] | Salts. | Cellulose. | Propor. Carbon to Nitrogenous. | Total Nutritive Value. |
| GRAINS. | |||||||||||||
| Wheat, Poland | 13.2 | 21.5 | 61.9 | X | 1.5 | X | X | X | 1 | X | 2.9 | 86.8 | |
| Wheat, Michigan White | 12.8 | 11.6 | 71. | X | 1.3 | X | X | X | 1.6 | 1.7 | 6.2 | 85.5 | |
| Wheat, Michigan Diehle | 12.2 | 13.8 | 72.2 | X | X | X | X | X | 1.8 | X | 5.2 | 87.8 | |
| Wheat, Japanese | 12.4 | 16.5 | 65.1 | X | 1.6 | X | X | X | 1.5 | 2.9 | 4. | 84.7 | |
| Rye, Winter | 8.7 | 11. | 74.6 | X | 1.9 | X | X | X | 2.3 | 1.5 | 6.9 | 89.8 | |
| Rye, German | 8. | 14. | 78. | X | X | X | X | X | X | X | 5.5 | 92. | |
| Barley | 24. | 10.5 | 66.7 | X | 2.4 | X | X | X | 2.6 | 3.8 | 6.5 | 82.2 | |
| Barley, So. Russian | 4. | 12.7 | 70.9 | X | X | X | X | X | 2.4 | X | 5.5 | 86. | |
| Oats | 12. | 10.7 | 58.3 | X | 7.8 | X | X | X | 3.3 | 17.9 | 5.2 | 86.7 | |
| Corn, Flint | 13.1 | 10.2 | 68.5 | X | 4.8 | X | X | X | 1.4 | 1.7 | 7.1 | 84.9 | |
| Corn, Dent | 13.4 | 9.4 | 68.5 | X | 5. | X | X | X | 1.5 | 2.2 | 7.8 | 84.4 | |
| Corn, Sweet | 13.4 | 11.4 | 62.7 | X | 7.8 | X | X | X | 1.8 | 2.9 | 6.1 | 83.7 | |
| Rice | 12.6 | 6.7 | 78.5 | X | .9 | X | X | X | .8 | .5 | 11.8 | 86.9 | |
| Millet | 11.8 | 10.5 | 68.2 | X | 4.2 | X | X | X | 2.8 | 2.5 | 6.9 | 85.7 | |
| Buckwheat | 12.7 | 10. | 71.8 | X | 1.4 | X | X | X | 1.9 | 1.7 | 7.3 | 85.6 | |
| Iceland Moss | 16. | 22. | 36.3 | X | 1.4 | X | X | X | 1.4 | 2.9 | 2.6 | 81.1 | |
| FOOD SUBSTANCES. | Water. | Albuminous elements. | Starch. | Grape Sugar. | Cane Sugar. | Free Fat. | Free Acid. | Pectose. | Non-Nitrog. Substances.[1] | Salts. | Cellulose. | Propor. Carbon to Nitrogenous. | Total Nutritive Value. |
| FLOUR. | |||||||||||||
| Graham | 13. | 11.7 | 69.9 | X | 1.7 | X | X | X | 1.8 | 1.9 | 6.1 | 85.1 | |
| Wheat | 11.6 | 11.1 | 75.4 | X | 1.1 | X | X | X | .6 | .2 | 6.8 | 88.2 | |
| Rye | 13.7 | 11.6 | 69.7 | X | 2. | X | X | X | 1.4 | 1.6 | 6.1 | 84.7 | |
| Barley | 14.8 | 11.4 | 71.2 | X | 1.5 | X | X | X | .6 | .5 | 6.3 | 84.7 | |
| Oat | 7.7 | 15.1 | 67.2 | X | 7.1 | X | X | X | 2. | .9 | 4.9 | 91.4 | |
| Corn | 14.2 | 9.7 | 69.5 | X | 3.8 | X | X | X | 1.3 | 1.5 | 7.5 | 84.3 | |
| Buckwheat | 13.5 | 8.9 | 74.3 | X | 1.6 | X | X | X | 1. | .7 | 8.5 | 83.8 | |
| Bean | 10.3 | 23.2 | 59.4 | X | 2.1 | X | X | X | 3.3 | 1.7 | 2.6 | 88. | |
| Pea | 11.4 | 25.2 | 57.2 | X | 2. | X | X | X | 2.9 | 1.3 | 2.3 | 87.3 | |
| Banana | 14.9 | 2.9 | 77.9 | X | .5 | X | X | X | 2.2 | 1.6 | 27. | 83.5 | |
| Arrowroot | 18. | X | 82. | X | X | X | X | X | X | X | 82. | 82. | |
| FOOD SUBSTANCES. | Water. | Albuminous elements. | Starch. | Grape Sugar. | Cane Sugar. | Free Fat. | Free Acid. | Pectose. | Non-Nitrog. Substances.[1] | Salts. | Cellulose. | Propor. Carbon to Nitrogenous. | Total Nutritive Value. |
| BREADS. | |||||||||||||
| Barley | 12.4 | 9.4 | 64.4 | 4.7 | 1. | X | X | X | 3.8 | 4.3 | 7.4 | 83.3 | |
| Whole Wheat | 13. | 8.7 | 60. | 4. | 6. | X | X | X | 3. | 5.3 | 8. | 81.7 | |
| White | 45.1 | 5.3 | 46. | 2.3 | .8 | X | X | X | .5 | X | 9.2 | 54.9 | |
| Rye | 42.3 | 6.1 | 46.9 | 2.3 | .4 | X | X | X | 1.5 | .5 | 8.1 | 57.2 | |
| Swedish Speise Brod | 12. | 10. | 72.3 | 3.1 | 1.6 | X | X | X | X | 1. | 7. | 87. | |
| Zwieback, White | 13.3 | 8.5 | 73.3 | 1.8 | 1. | X | X | X | .6 | 1.5 | 9. | 83.2 | |
| Rye | 11.6 | 9.3 | 67.2 | 3.6 | 1. | X | X | X | 2.1 | 4.7 | 7.7 | 83.7 | |
| Macaroni | 13.1 | 9. | 76.8 | X | .3 | X | X | X | .8 | X | 8.5 | 86.9 | |
| Manna | 15.3 | 1.9 | 18.1 | 49.[2] | X | X | X | 5.6 | X | 10.1 | 67. | 72.7 | |
| FOOD SUBSTANCES. | Water. | Albuminous elements. | Starch. | Grape Sugar. | Cane Sugar. | Free Fat. | Free Acid. | Pectose. | Non-Nitrog. Substances.[1] | Salts. | Cellulose. | Propor. Carbon to Nitrogenous. | Total Nutritive Value. |
| FRESH FRUITS. | |||||||||||||
| Apple | 84.8 | .4 | X | 7.2 | X | .8 | 4.8 | X | .5 | 1.5 | 18. | 13.7 | |
| Apricot | 81.2 | .5 | X | 4.6 | X | 1.2 | 5.4 | X | .8 | 5.3 | 9.2 | 13.5 | |
| Blackberry | 86.4 | .5 | X | 4.1 | X | .2 | 1.4 | X | .4 | 7. | 6.2 | 8.1 | |
| Banana | 73. | 1.9 | X | X | .6 | X | X | 23.9 | 1. | .3 | .3 | 26.7 | |
| Cherry | 79.8 | .7 | X | 10.2 | X | .9 | 1.8 | X | .7 | 5.9 | 14.5 | 14.8 | |
| Cranberry | 89.6 | .1 | X | 1.5 | X | 3.3 | X | X | .2 | 6.3 | 15. | 4.1 | |
| Currant | 84.7 | .5 | X | 6.4 | X | 2.3 | .9 | X | .7 | 4.6 | 12.8 | 10.7 | |
| Grape | 78.2 | .6 | X | 14.3 | X | .8 | 2. | X | .5 | 3.6 | 13.8 | 18.2 | |
| Gooseberry | 85.7 | .5 | X | 7.1 | X | 1.4 | 1.4 | X | .4 | 3.5 | 14.2 | 10.8 | |
| Pear | 83.2 | .4 | X | 8.2 | X | .2 | 3.3 | X | .3 | 4.4 | 20.5 | 12.4 | |
| Prune | 81.2 | .8 | X | 6.2 | X | .8 | 4.9 | X | .7 | 5.5 | 7.7 | 13.4 | |
| Plum | 84.9 | .4 | X | 3.6 | X | 2.5 | 4.6 | X | .7 | 4.3 | 9. | 10.8 | |
| Peach | 80. | .7 | X | 4.5 | X | .9 | 7.1 | X | .7 | 6.1 | 6.4 | 13.9 | |
| Raspberry | 85.7 | .4 | X | 3.9 | X | 1.4 | .7 | X | .5 | 7.4 | 9.7 | 6.9 | |
| Strawberry | 87.6 | 1.1 | X | 6.3 | .5 | .9 | .5 | X | .8 | 2.3 | 6.1 | 10.1 | |
| Whortleberry | 78.4 | .8 | X | 5. | X | 1.6 | .9 | X | 1. | 12.3 | 6.2 | 9.3 | |
| FOOD SUBSTANCES. | Water. | Albuminous elements. | Starch. | Grape Sugar. | Cane Sugar. | Free Fat. | Free Acid. | Pectose. | Non-Nitrog. Substances.[1] | Salts. | Cellulose. | Propor. Carbon to Nitrogenous. | Total Nutritive Value. |
| DRIED FRUITS. | |||||||||||||
| Prune | 29.3 | 2.3 | .2 | 44.5 | .5 | X | 2.7 | 4.3 | 13.4 | 1.4 | 1.5 | 19.6 | 69.2 |
| Pear | 29.4 | 2. | 10.8 | 29.1 | .4 | X | .8 | 4.5 | 14.9 | 1.7 | 6.9 | 19.9 | 63.7 |
| Apple | 27.9 | 1.3 | 5.6 | 42.8 | .8 | X | 3.6 | 4.8 | 6.5 | 1.6 | 5.1 | 37.8 | 67. |
| Cherry | 49.8 | 2. | X | 31.2 | X | .3 | X | X | 14.3 | 1.6 | 2.4 | 15.7 | 47.8 |
| Raisin | 32. | 3.4 | X | 54.6 | X | .6 | X | X | 7.5 | 1.2 | 1.7 | 23. | 66.3 |
| Fig | 31.2 | 4. | X | 49.8 | X | X | X | X | X | 2.9 | 12.1 | 12.4 | 36.7 |
| Date | 33. | 9. | X | X | 58. | X | X | X | X | X | X | 6.4 | 67. |
| FOOD SUBSTANCES. | Water. | Albuminous elements. | Starch. | Grape Sugar. | Cane Sugar. | Free Fat. | Free Acid. | Pectose. | Non-Nitrog. Substances.[1] | Salts. | Cellulose. | Propor. Carbon to Nitrogenous. | Total Nutritive Value. |
| NUTS. | |||||||||||||
| Chestnut | 7.3 | 14.6 | 69. | X | X | 2.4 | X | X | X | 3.3 | 3.4 | 4.8 | 89.3 |
| Walnut | 7.2 | 15.8 | 13. | X | X | 57.4 | X | X | X | 2. | 4.6 | 4.4 | 88.2 |
| Hazelnut | 7.1 | 17.4 | 7.2 | X | X | 62.6 | X | X | X | 2.5 | 3.2 | 4. | 89.7 |
| Sweet Almond | 6.2 | 23.5 | 7.8 | X | X | 53. | X | X | X | 3. | 6.5 | 2.6 | 87.3 |
| Peanut | 6.5 | 26.3 | 1.8 | X | X | 46.2 | X | X | X | 3.3 | 13.9 | 1.7 | 79.6 |
| Cocoanut | 46.5 | 5.6 | 8. | X | X | 35.9 | X | X | X | 1. | 2.9 | 7.8 | 50.5 |
| Syrup | 24.6 | X | X | 26.2 | 44.9 | X | X | X | 2. | 2.3 | X | 71. | 75.4 |
| Honey | 20.6 | .8 | X | 72.8 | 1.8 | X | X | X | 3.8 | .2 | X | 91. | 78.1 |
| FOOD SUBSTANCES. | Water. | Albuminous elements. | Starch. | Grape Sugar. | Cane Sugar. | Free Fat. | Free Acid. | Pectose. | Non-Nitrog. Substances.[1] | Salts. | Cellulose. | Propor. Carbon to Nitrogenous. | Total Nutritive Value. |
| VEGETABLES. | |||||||||||||
| Carrot | 85.8 | 1.2 | X | X | .3 | X | X | 9.2 | 1. | 1.5 | .2 | 11.7 | |
| Winter Cabbage | 80. | 4. | X | 1.2 | .9 | X | X | 10.4 | 1.6 | 1.9 | .5 | 18.1 | |
| Red Cabbage | 90. | 1.8 | X | 1.7 | .2 | X | X | 4.2 | .8 | 1.3 | 1. | 8.7 | |
| White Cabbage | 90. | 1.9 | X | 2.3 | .2 | X | X | 2.6 | 1.2 | 1.8 | 1.3 | 8.2 | |
| Spinach | 38.5 | 3.5 | X | .1 | .6 | X | X | 4.3 | 2. | 1. | .2 | 10.5 | |
| Celery | 84.1 | 1.5 | X | .8 | .4 | X | X | 11. | .8 | 1.4 | .8 | 14.5 | |
| Head Lettuce | 94.3 | 1.4 | X | X | .3 | X | X | 2.2 | 1. | .8 | 1.8 | 4.9 | |
| Potato | 75. | 2.2 | X | X | .2 | X | X | 21. | 1. | .6 | .1 | 24.4 | |
| White Turnip | 92.5 | 1.5 | X | X | .2 | X | X | 3. | .7 | 2.1 | .1 | 5.4 | |
| Beet | 87.5 | 1.3 | X | X | .1 | X | X | 9. | 1.1 | 1. | .1 | 11.5 | |
| Sugar Beet | 71.6 | 2. | X | 12.6 | .5 | X | X | .7 | 1. | 11.6 | 21.5 | 23.3 | |
| Parsnip | 82. | 1.2 | X | X | .6 | X | X | 7.2 | 1. | 8. | .5 | 10. | |
| Sweet Potato | 71.8 | 1. | X | X | .2 | X | X | 25.3 | .7 | 1. | .2 | 27.2 | |
| Cucumber | 95.2 | 1.2 | X | 1. | X | X | X | 1.4 | .4 | .8 | .8 | 4. | |
| Asparagas | 93.7 | 1.8 | X | .4 | .3 | X | X | 2.3 | .5 | 1. | .4 | 5.3 | |
| Cauliflower | 90.9 | 2.3 | X | 1.2 | .3 | X | X | 3.4 | .8 | .9 | .6 | 8.2 | |
| Melon | 90.4 | 1. | X | 2.2 | .3 | X | X | 4. | .7 | 1.4 | 2.1 | 3.8 | |
| Squash | 90.3 | 1.1 | X | 1.4 | .1 | X | X | 5.2 | .7 | 1.2 | 1.3 | 8.5 | |
| Onion | 86. | 1.7 | X | 2.8 | .1 | X | X | 8. | .7 | .7 | 1.7 | 13.3 | |
| Pumpkin | 90.3 | 1.1 | 5.1 | 1.5 | .1 | X | X | X | .7 | 1.2 | 6. | 8.5 | |
| Tomato | 92.4 | 1.6 | X | 2.5 | .3 | 1.8 | X | X | .6 | .8 | 1.8 | 6.8 | |
| Peas, green, garden | 78.4 | 6.4 | 12. | X | X | .5 | X | X | X | .8 | 1.9 | 2. | 19.7 |
| Peas, small | 10.3 | 24.6 | 52.6 | X | X | 3.5 | X | X | X | 2.6 | 6.4 | 2.2 | 83.3 |
| Peas, African | 6.5 | 23.4 | 57.8 | X | X | 6. | X | X | X | 3. | 3.3 | 2.7 | 90.2 |
| Peas, green shelled | 12.7 | 21.7 | 57.7 | X | X | 1.9 | X | X | X | 2.8 | 3.2 | 2.7 | 84.1 |
| Beans, field | 13.5 | 25. | 48.3 | X | X | 1.7 | X | X | X | 3.5 | 8. | 2. | 78.5 |
| Beans, French or Kidney | 11. | 23.7 | 55.6 | X | X | 2.2 | X | X | X | 3.7 | 3.8 | 2.4 | 85.2 |
| Beans, white | 15. | 26.9 | 48.8 | X | X | 3. | X | X | X | 3.5 | 2.8 | 1.9 | 82.2 |
| Beans, Lima | 9. | 21.9 | 60.6 | X | X | 1.6 | X | X | X | 2.9 | 4. | 3.1 | 93. |
| Beans, String beans | 88.7 | 2.7 | 5.5 | 1.2 | X | .1 | X | X | X | .6 | 1.2 | 2.5 | 10.1 |
| Lentils | 12.3 | 25.9 | 53. | X | X | 1.9 | X | X | X | 3. | 3.9 | 2.1 | 83.8 |
| Lentils, German | 11.7 | 33. | 30.3 | X | X | 8.7 | X | X | X | 2.7 | 13.6 | 1.2 | 74.7 |
| FOOD SUBSTANCES. | Water. | Albuminous elements. | Starch. | Grape Sugar. | Milk Sugar. | Free Fat. | Free Acid. | Pectose. | Non-Nitrog. Substances.[1] | Salts. | Cellulose. | Propor. Carbon to Nitrogenous. | Total Nutritive Value. |
| MILK AND BUTTER. | |||||||||||||
| Mother's milk | 89.2 | .9 | X | X | 5.4 | 3.2 | X | X | X | .4 | X | X | X |
| Cows' milk | 86. | 4.1 | X | X | 5.2 | 3.9 | X | X | X | .8 | X | 2.2 | 14. |
| Cream | 66. | 2.7 | X | X | 2.8 | 26.7 | X | X | X | 1.8 | X | 11. | 34. |
| Swedish Butter | 13.8 | .6 | X | X | .6 | 84.4 | X | X | X | .6 | X | 141. | 86.2 |
| French Butter | 12.6 | X | X | X | .2 | 86.4 | X | X | X | .8 | X | 86.6 | 87.4 |
| Cheese, Stilton | 32. | 26.2 | X | X | 34.5 | 3.3 | X | X | X | 4. | X | 1.4 | 68. |
| Skimmed milk | 88. | .4 | X | X | 3.8 | 1.8 | X | X | X | .8 | X | 1.4 | 10.4 |
| Buttermilk | 88. | 4.1 | X | X | 3.6 | .7 | X | X | X | .8 | X | 1. | 9.2 |
| Milk of Cow Tree | 58. | 1.7 | X | 2.8 | X | 35.2 | X | X | X | .5 | X | 2.2 | 40.2 |
| FOOD SUBSTANCES. | Water. | Albuminous elements. | Starch. | Grape Sugar. | Cane Sugar. | Free Fat. | Free Acid. | Pectose. | Non-Nitrog. Substances.[1] | Salts. | Cellulose. | Propor. Carbon to Nitrogenous. | Total Nutritive Value. |
| MEATS. | |||||||||||||
| Lean Beef | 72. | 19.3 | X | X | X | 3.6 | X | X | X | 5.1 | X | .18 | 28. |
| Lean Mutton | 72. | 18.3 | X | X | X | 4.9 | X | X | X | 4.8 | X | .26 | 28. |
| Veal | 63. | 16.3 | X | X | X | 15.8 | X | X | X | 4.7 | X | .93 | 37. |
| Pork | 39. | 9.8 | X | X | X | 49.9 | X | X | X | 2.3 | X | .49 | 61. |
| Poultry | 74. | 21. | X | X | X | 3.8 | X | X | X | 1.2 | X | .18 | 26. |
| White Fish | 78. | 18.1 | X | X | X | 2.9 | X | X | X | 1. | X | .16 | 22. |
| Salmon | 77. | 16.1 | X | X | X | 5.5 | X | X | X | 1.4 | X | .34 | 23. |
| Entire Egg | 74. | 14. | X | X | X | 10.5 | X | X | X | 1.5 | X | .75 | 26. |
| White of Egg | 78. | 20.4 | X | X | X | X | X | X | X | 1.6 | X | X | 22. |
| Yolk of Egg | 52. | 16. | X | X | X | 30.7 | X | X | X | 1.3 | X | 1.9 | 48. |
[1] Chiefly sugar and starch.
Mostly sugar and starch.
[2] Mannite
Mannitol
BILLS OF FARE FOR EVERY DAY IN THE YEAR.
In the following pages will be found a breakfast and dinner bill of fare for every day in the year, beginning with January 1. We would particularly recommend a trial of their use by the young and inexperienced matron just entering upon housekeeping, whose desire should be to begin right—provide simple and healthful as well as palatable food for her family. To many such we trust that our "year's breakfasts and dinners" may come like the grateful suggestions of a helpful friend. An explanation of the bills of fare has been given in the preceding pages, and need not be repeated here.
In the following pages, you'll find a breakfast and dinner menu for every day of the year, starting with January 1. We highly recommend that new and inexperienced homemakers give them a try, as they should aim to start off on the right foot—serving simple, healthy, and tasty meals for their families. We hope that our "year's breakfasts and dinners" will feel like thoughtful suggestions from a helpful friend to many. An explanation of the menus has already been provided in the earlier pages and doesn't need to be repeated here.
FIRST WEEK | |
FIRST DAYBREAKFASTFresh Fruit Rolled Oats Gravy Toast Corn Puffs Breakfast Rolls Stewed Fruit DINNER Vegetable Oyster Soup Baked Potato with Tomato Cream Sauce Mashed Peas Baked Squash Rolled Rye Whole-Wheat Bread Cream Crisps Stewed Fruit Pop Corn Pudding |
SECOND DAYBREAKFASTFresh Fruit Cerealine Snowflake Toast Whole-Wheat Puffs Toasted Wafers Baked Sweet Apples Stewed Fruit DINNER Swiss Potato Soup Baked Potato and Pease Gravy Macaroni with Kornlet Stewed Lima Beans Pearl Barley Corn Cake Cream Crisps Stewed Fruit Cracked Wheat Pudding |
THIRD DAYBREAKFASTFresh Fruit Rice with Fig Sauce Cream Toast Breakfast Rolls Whole-Wheat Bread Baked Sweet Apples Stewed Fruit DINNER Lima Bean Soup Mashed Potato Scalloped Vegetable Oysters Hominy Graham Puffs Oatmeal Bread Toasted Wafers Stewed Fruit Simple Custard Pie |
FOURTH DAYBREAKFASTFresh Fruit Rolled Wheat Dry Toast with Hot Cream Hominy Gems Toasted Wafers Baked Sweet Potatoes with Tomato Gravy Celery Stewed Fruit DINNER Tomato Cream Soup Boiled Potatoes with Cream Sauce Mashed Peas Baked Chestnuts Whole-Wheat Puffs Graham Bread Rice Stewed Fruit Stewed Fruit Pudding |
FIFTH DAYBREAKFASTFresh Fruit Mixed Mush Browned Sweet Potato Macaroni with Cream Sauce Baked Sweet Apples Graham Bread Corn Puffs Toasted Wafers Stewed Fruit DINNER Cream Pea Soup Mashed Potatoes Baked Cabbage Stewed Corn Pearl Wheat Zwieback Current Puffs Graham Bread Stewed Fruit Apple Tart |
SIXTH DAYBREAKFASTFresh Fruit Graham Grits Toasted Wafers Celery Toast Raised Biscuit Whole-Wheat Puffs Baked Sweet Apples Stewed Fruit DINNER Corn Soup Baked Squash Mashed Beans Rolled Rye Beaten Biscuit Graham Bread Stewed Fruit Apple Meringue Desert |
SABBATHBREAKFASTOranges Oatmeal Prune Toast Baked Sour Apples Breakfast Rolls Fruit Bread Stewed Fruit DINNER Tomato and Macaroni Soup Canned Green Peas Scalloped Potato Steamed Rice Whole-Wheat Bread Plain Buns Zwieback Stewed Fruit Fresh Fruit and Nuts | |
SECOND WEEK | |
FIRST DAYBREAKFASTFresh Fruit Graham Mush with Dates Cream Toast Toasted Rolls Fruit Bread Whole-Wheat Puffs Stewed Fruit DINNER Combination Soup Boiled Potato with Cream Sauce Pease Cakes Stewed Celery Cracked Wheat Whole-Wheat Bread Sally Lunn Gems Zwieback Stewed Fruit Apple Tapioca |
SECOND DAYBREAKFASTFresh Fruit Plum Porridge Strawberry Toast Whole-Wheat Bread Graham Crisps Pop Overs Baked Apples Stewed Fruit DINNER Celery Soup No. 2. Mashed Squash Mashed Potato Chopped Turnip Rolled Wheat Graham Crisps Rye Gems Stewed Fruit Cream Rice Pudding |
THIRD DAYBREAKFASTFresh Fruit Granola Fruit Mush Corn Cake Toasted Wafers Graham Puffs Boiled Macaroni Stewed Fruit DINNER Swiss Potato Soup Baked Sweet Potato Boiled Beets, Sliced Succotash Graham Grits Graham Bread Toasted Rolls Stewed Fruit Cornstarch Meringue |
FOURTH DAYBREAKFASTFresh Fruit Oatmeal Snowflake Toast Toasted Wafers Currant Puffs Graham Bread Baked Apples Stewed Fruit DINNER Oatmeal Soup Mashed Sweet Potato Scalloped Tomatoes Farina Graham Fruit Bread Crusts Zwieback Stewed Fruit Apple Pie |
FIFTH DAYBREAKFASTFresh Fruit Graham Apple Mush Gravy Toast Breakfast Rolls Graham Fruit Bread Macaroni with Kornlet Stewed Fruit DINNER Vegetable Soup Mashed Potato Cabbage Salad Mashed Peas with Tomato Sauce Pearl Barley Toasted Wafers Vienna Bread Whole-Wheat Puffs Stewed Fruit Rice Mold with Fruit Sauce |
SIXTH DAYBREAKFASTFresh Fruit Orange Rice Blackberry Toast Currant Puffs Graham Crisps Baked Apples Stewed Fruit DINNER Cream Barley Soup Potato Puffs Baked Beets Stewed Corn and Tomatoes Pearl Wheat Parker House Rolls Zwieback Corn Puffs Stewed Fruit Prune Pudding |
SABBATHBREAKFASTFresh Fruit Rolled Oats Grape Toast Toasted Wafers Fruit Bread Whole-Wheat Puffs Cup Custard Stewed Fruit DINNER Cream Pea Soup Stewed Potato Canned Okra and Tomato Browned Rice Beaten Biscuits Graham Crackers Fruit Bread Stewed Fruit Prune Pie with Granola Crust | |
THIRD WEEK | |
FIRST DAYBREAKFASTFresh Fruit Graham Mush with Raisins Gravy Toast Toasted Beaten Biscuit Whole-Wheat Puffs Baked Potato with Celery Sauce Stewed Fruit DINNER Baked Bean Soup Steamed Potatoes with Pease Gravy Scalloped Vegetable Oysters Mashed Parsnip Graham Grits Whole-Wheat Bread Rye Gems Toasted Wafers Stewed Fruit Bread Custard Pudding |
SECOND DAYBREAKFASTFresh Fruit Rolled Oats Peach Toast Cottage Cheese Hoe Cake Graham Wafers Graham Puffs Stewed Fruit DINNER Lentil and Parsnip Soup Mashed Potato Celery Hulled Corn Scalloped Tomato Macaroni with Raisins Raised Corn Bread Cream Crisps Stewed Fruit Farina Blancmange |
THIRD DAYBREAKFASTFresh Fruit Oatmeal Porridge Celery Toast Potato Cakes Cream Rolls Whole-Wheat Bread Zwieback Baked Sweet Apples Stewed Fruit DINNER Cream Rice Soup Boiled Potato with Brown Sauce Stewed Cabbage Mashed Split Peas Boiled Wheat Whole-Wheat Bread Toasted Rolls Currant Puffs Stewed Fruit Corn Meal Pudding |
FOURTH DAYBREAKFASTFresh Fruit Rolled Rye Apricot Toast Crusts Toasted Wafers Corn Puffs Granola Baked Apples Stewed Fruit DINNER Cream Pea Soup Mashed Potato Cabbage Hash Stewed Vegetable Oysters Graham Mush Graham Puffs Buns Toasted Wafers Stewed Fruit Cornstarch with Raisins |
FIFTH DAYBREAKFASTFresh Fruit Rice with Fig Sauce Graham Gruel Lentil Toast Beaten Biscuits Graham Gems Zwieback Baked Potato with Cream Gravy Stewed Fruit DINNER Mixed Potato Soup Macaroni with Kornlet Baked Beans Graham Grits Toasted Beaten Biscuit Whole-Wheat Bread Sally Lunn Gems Stewed Fruit Fig Pudding with Orange Sauce |
SIXTH DAYBREAKFASTFresh Fruit Brewis Blackberry Toast Toasted Wafers Whole-Wheat Puffs Graham Bread Macaroni with Tomato Sauce Stewed Fruit DINNER Canned Green Pea Soup Boiled Potato Corn and Tomato Mashed Lentils and Beans Farina Graham Crusts Zwieback Cream Crisps Stewed Fruit Rice and Tapioca Pudding |
SABBATHBREAKFASTFresh Fruit Granola Fruit Mush Grape Toast Graham Fruit Bread Beaten Biscuit Baked Sour Apples Stewed Fruit DINNER Canned Corn Soup Creamed Potatoes Mashed Peas Cold Boiled Beets, sliced Steamed Rice Graham Bread Beaten Biscuit Toasted Wafers Stewed Fruit Raised Jelly Cake Fresh Fruit | |
FOURTH WEEK | |
FIRST DAYBREAKFASTFresh Fruit Cerealine Flakes Snowflake Toast Toasted Beaten Biscuit Whole-Wheat Bread Corn Puffs Steamed Figs Stewed Fruit DINNER Pea and Tomato Soup Baked Potatoes with Brown Sauce Cabbage Salad Parsnips with Egg Sauce Cracked Wheat Whole-Wheat Bread Rye Gems Sticks Stewed Fruit Rice and Stewed Apple Dessert |
SECOND DAYBREAKFASTFresh Fruit Oatmeal Prune Toast Pop Overs Whole-Wheat Bread Cream Rolls Baked Apples Stewed Fruit DINNER Vegetable Oyster Soup Boiled Potato with Lentil Gravy Turnips in Juice Celery with Tomato Cracked Wheat Toasted Rolls Raised Biscuit Oatmeal Gems Stewed Fruit Tapioca and Fig Pudding |
THIRD DAYBREAKFASTFresh Fruit Graham Mush with Dates Gravy Toast Hoe Cake Graham Sticks Whole-Wheat Bread Boiled Macaroni Baked Chestnuts Stewed Fruit DINNER Celery Soup No. 2 Mashed Sweet Potato Chopped Beets Succotash Graham Grits Toasted Wafers Graham Bread Currant Puffs Stewed Fruit Banana Dessert |
FOURTH DAYBREAKFASTFresh Fruit Rolled Wheat Apple Toast Graham Puffs Zwieback Graham Bread Baked Bananas Stewed Fruit DINNER Parsnip Soup No. 2 Scalloped Potatoes Stewed Lima Beans Macaroni with Egg Sauce Farina Graham Crisps Crescents Whole-Wheat Puffs Stewed Fruit Prune Dessert |
FIFTH DAYBREAKFASTFresh Fruit Cerealine Cakes Gravy Toast Bean Gems Graham Crisps Fruit Bread Baked Apples Stewed Fruit DINNER Vegetable Soup Baked Potato with Tomato Cream Sauce Stewed Parsnip with Celery Mashed Peas Pearl Wheat Toasted Wafers Fruit Bread Graham Gems Stewed Fruit Lemon Pie |
SIXTH DAYBREAKFASTFresh Fruit Oatmeal Porridge Cream Toast Breakfast Rolls Whole-Wheat Bread Corn Puffs Macaroni with Raisins Stewed Fruit DINNER Cream Pea Soup Stewed Potato Hulled Corn Chopped Turnip Rolls Toasted Wafers Graham Gems Stewed Fruit Molded Cracked Wheat with Fruit Sauce |
SABBATHBREAKFASTFresh Fruit Rolled Rye Prune Toast Pulled Bread Fruit Rolls Toasted Wafers Citron Apples Stewed Fruit DINNER Lentil Soup Macaroni with Tomato Sauce Stewed Corn Steamed Rice Cream Crisps Whole-Wheat Bread Stewed Fruit Caramel Custards Fruit and Nuts | |
FIFTH WEEK | |
FIRST DAYBREAKFASTFresh Fruit Plum Porridge Tomato Toast Whole-Wheat Puffs Whole-Wheat Bread Toasted Rolls Baked Apples Stewed Fruit DINNER Canned Okra and Tomato Soup Baked Sweet Potatoes Mashed Cabbage Pease Cakes Boiled Wheat Oatmeal Crisps Graham Gems Whole-Wheat Bread Stewed Fruit Carrot Pudding |
SECOND DAYBREAKFASTFresh Fruit Oatmeal Porridge Banana Toast Whole-Wheat Puffs Zwieback Rye Bread Browned Sweet Potato Baked Sour Apples Stewed Fruit DINNER Bean and Potato Soup Potatoes Stewed with Celery Egg Macaroni Stewed Carrots Hominy Rye Bread Sticks Currant Buns Stewed Fruit Prune Whip |
THIRD DAYBREAKFASTFresh Fruit Corn Meal Mush Snowflake Toast Hominy Gems Sticks Whole-Wheat Bread Baked Sweet Apples Stewed Fruit DINNER Brown Soup Baked Potato with Cream Sauce Scalloped Turnip Mashed Chestnuts Lentil Puree with Lemon Graham Grits Graham Bread Beaten Biscuit Rye Gems Stewed Fruit Cream Rice Pudding |
FOURTH DAYBREAKFASTFresh Fruit Graham Apple Mush Blackberry Toast Toasted Wafers Graham Bread Whole-Wheat Puffs Stewed Fruit DINNER Black Bean Soup Mashed Potato Scalloped Tomatoes Stewed Vegetable Oysters Pearl Wheat Sally Lemon Gems Graham Bread Zwieback Stewed Fruit Apple Tart |
FIFTH DAYBREAKFASTFresh Fruit Oatmeal Vegetable Oyster Toast Graham Bread Toasted Wafers Corn Cake Baked Sweet Potato Stewed Fruit DINNER Vegetable Soup Baked Potato Stewed Beans Kornlet Chopped Beets Browned Rice Rye Gems Toasted Wafers Whole-Wheat Bread Stewed Fruit Orange Pudding |
SIXTH DAYBREAKFASTFresh Fruit Boiled Oats Strawberry Toast Graham Gems Hoe Cakes Toasted Wafers Macaroni with Kornlet Stewed Fruit DINNER Tomato and Vermicelli Soup Browned Potato Cabbage Salad Baked Squash Mashed Peas Rice Whole-Wheat Puffs Toasted Wafers Graham Bread Stewed Fruit Baked Corn Meal Pudding |
SABBATHBREAKFASTFresh Fruit Lemon Rice Dry Toast with Hot Cream Fruit Bread Beaten Biscuit Graham Crackers Baked Sour Apples Stewed Fruit DINNER Canned Pea Soup Chopped Sweet Potatoes Stewed Lima Beans Celery Boiled Wheat Beaten Biscuit Whole-Wheat Bread Toasted Wafers Stewed Fruit Squash Pie | |
SIXTH WEEK | |
FIRST DAYBREAKFASTFresh Fruit Graham Mush with Dates Poached Eggs on Toast Corn Cakes Toasted Beaten Biscuit Whole-Wheat Bread Stewed Fruit DINNER Bean and Hominy Soup Potato Rice Turnips with Cream Sauce Mashed Parsnips Baked Barley Whole-Wheat Bread Cream Graham Rolls Stewed Fruit Plain Fruit Pudding |
SECOND DAYBREAKFASTFresh Fruit Rice with Fig Sauce Gravy Toast Toasted Rolls Whole-Wheat Puffs Crescents Baked Sweet Apples Stewed Fruit DINNER Swiss Lentil Soup Baked Potato Boiled Beets Stewed Cabbage Mashed Squash Cracked Wheat Graham Raised Biscuit Cream Crisps Stewed Fruit Farina Blancmange with Mock Cream |
THIRD DAYBREAKFASTFresh Fruit Oatmeal Dry Toast with Hot Cream Whole-Wheat Bread Cream Crisps Graham Puffs Lemon Apples Macaroni with Cream Sauce Stewed Fruit DINNER Velvet Soup Mashed Potato Mashed Peas Vegetable Hash Graham Grits Graham Bread Sticks Toasted Wafers Stewed Fruit Cracked Wheat Pudding |
FOURTH DAYBREAKFASTFresh Fruit Corn Meal Mush Gravy Toast Toasted Wafers Currant Puffs Baked Sour Apples Stewed Fruit DINNER Pea and Tomato Soup Boiled Potato with Cream Sauce Browned Parsnips Baked Turnip Pearl Wheat Whole-Wheat Puffs Graham Bread Toasted Wafers Stewed Fruit Almond Cornstarch Pudding |
FIFTH DAYBREAKFASTFresh Fruit Corn Meal Porridge Cream Toast Zwieback Whole-Wheat Puffs Toasted Wafers Macaroni with Egg Sauce Stewed Fruit DINNER Plain Rice Soup Potato Snowballs Carrots with Egg Sauce Mashed Beans Rolled Wheat Fruit Loaf Crusts Toasted Wafers Stewed Fruit Apple Tart |
SIXTH DAYBREAKFASTFresh Fruit Rolled Oats Prune Toast Graham Rolls Fruit Bread Bean Gems Stewed Fruit DINNER Vegetable Broth Baked Potato Scalloped Vegetable Oysters Hulled Corn Pearl Barley Toasted Wafers Zwieback Whole-Wheat Puffs Stewed Fruit Floating Islands Oranges |
SABBATHBREAKFASTFresh Fruit Rolled Wheat with Raisins Blackberry Toast Graham Raised Biscuit Toasted Wafers Breakfast Rolls Stewed Fruit Baked Sour Apples DINNER Canned Green Corn Soup Stewed Potato Macaroni with Tomato Sauce Rice Buns Toasted Wafers Beaten Biscuit Stewed Fruit Bread Custard Almonds | |
SEVENTH WEEK | |
FIRST DAYBREAKFASTFresh Fruit Cerealine Flakes Dry Toast with Hot Cream Whole-Wheat Puffs Toasted Rolls Steamed Figs Stewed Fruit DINNER Cream Barley Soup Steamed Potatoes with Cream Sauce Baked Parsnips Scalloped Beans Browned Rice Toasted Wafers Whole Wheat Puffs Graham Crisps Stewed Fruit. Cocoanut Blancmange or Fresh Fruit |
SECOND DAYBREAKFASTFresh Fruit Rice with Lentil Gravy Snowflake Toast Crusts Toasted Wafers Corn Puffs Baked Apples Stewed Fruit DINNER Combination Soup Baked Potato Mashed Squash Turnips in Juice Graham Grits Graham Crisps Whole-Wheat Bread Zwieback Stewed Fruit Orange Float |
THIRD DAYBREAKFASTFresh Fruit Rolled Wheat Lentil Toast Granola Toasted Wafers Graham Puffs Creamed Potatoes Celery Stewed Fruit DINNER Bean and Tomato Soup Mashed Potatoes Scalloped Vegetable Oysters Macaroni with Tomato Sauce Cracked Wheat Corn Bread Whole-Wheat Puffs Graham Crackers Stewed Fruit Apples or Bananas |
FOURTH DAYBREAKFASTFresh Fruit Corn Meal Mush Apple Toast Rye Bread Pop Overs Toasted Wafers Roasted Almonds Stewed Fruit DINNER Brown Soup Baked Potatoes Carrots with Egg Sauce Mashed Peas Corn Meal Cubes with Hot Cream Rye Bread Graham Sticks Stewed Fruit Farina Fruit Mold |
FIFTH DAYBREAKFASTFresh Fruit Rolled Oats Dry Toast with Hot Cream Corn Puffs Toasted Wafers Rye Bread Steamed Figs Stewed Fruit DINNER Cream Pea Soup Boiled Potato with Brown Sauce Baked Cabbage Stewed Corn Rolled Rye Currant Puffs Toasted Wafers Graham Bread Stewed Fruit Date Pudding with Lemon Sauce |
SIXTH DAYBREAKFASTFresh Fruit Oatmeal Porridge Snowflake Toast Zwieback Whole-Wheat Puffs Crescents Boiled Macaroni Baked Apples Stewed Fruit DINNER Corn Soup Steamed Potatoes with Cream Sauce Stewed Lima Beans Baked Beets Pearl Wheat Vienna Bread Graham Crisps Oatmeal Gems Stewed Fruit Apple Manioca or Fresh Fruit |
SABBATHBREAKFASTFresh Fruit Oatmeal Tomato Toast Currant Buns Toasted Wafers Citron Apples Stewed Fruit DINNER Canned Pea Soup Stewed Potato Succotash Graham Grits Whole-Wheat Bread Toasted Wafers Graham Rolls with Fruit Jelly Stewed Fruit Bananas | |
EIGHTH WEEK | |
FIRST DAYBREAKFASTFresh Fruit Plum Porridge Peach Toast Whole-Wheat Puffs Whole-Wheat Bread Granola Toasted Wafers Stewed Fruit DINNER Vegetable Soup Potato Rice Scalloped Tomatoes Mashed Parsnips Boiled Wheat Zwieback Whole-Wheat Bread Sally Lunn Gems Stewed Fruit Oranges and Nuts |
SECOND DAYBREAKFASTFresh Fruit Rice with Fig Sauce Gravy Toast Hoe Cake Toasted Wafers Whole-Wheat Bread Stewed Fruit DINNER Lima Bean Soup Boiled Potatoes Mashed Turnips Canned Green Peas Pearl Barley Fruit Loaf Beaten Biscuit Farina Blancmange with Fruit Sauce Stewed Fruit |
THIRD DAYBREAKFASTFresh Fruit Oatmeal Banana Toast Corn Puffs Toasted Beaten Biscuit Baked Apples Stewed Fruit DINNER Lentil and Parsnip Soup Scalloped Potato Chopped Cabbage Hulled Corn Graham Apple Mash Graham Puffs Fruit Bread Toasted Wafers Stewed Fruit Grape Apples |
FOURTH DAYBREAKFASTFresh Fruit Brewis Cream Toast Macaroni with Cream sauce Corn Puffs Graham Bread Toasted Wafers Stewed Fruit Dates DINNER Tomato and Macaroni Soup Potato Puffs Stewed Split Peas Sliced Beets Crusts Graham Bread Fruit Rolls Molded Cracked Wheat with Fruit Juice Stewed Fruit Bananas |
FIFTH DAYBREAKFASTFresh Fruit Graham Grits Prune Toast Peas Puree Fruit Rolls Rye Gems Baked Apples Stewed Fruit DINNER Potato Soup with Vermicelli Boiled Potato with Brown Sauce Mashed Squash Baked Beans Pearl Wheat Graham Bread Toasted Wafers Granola Gems Stewed Fruit Apple Tart |
SIXTH DAYBREAKFASTFresh Fruit Wheat Porridge Gravy Toast Graham Puffs Hoe Cake Toasted Wafers Lemon Apples Stewed Fruit DINNER Pea and Tomato Soup Steamed Potato Stewed Corn Macaroni Baked with Granola Graham Grits Whole-Wheat Bread Bean Gems Toasted Wafers Stewed Fruit Orange Custard |
SABBATHBREAKFASTFresh Fruit Orange Rice Strawberry Toast Beaten Biscuit Fruit Bread Roasted Almonds Stewed Fruit DINNER Creamed Corn Soup Creamed Potatoes Macaroni with Tomato Baked Wheat Beaten Biscuit Fruit Bread Toasted Wafers Stewed Fruit Cocoanut Layer Cake California Grapes | |
NINTH WEEK | |
FIRST DAYBREAKFASTFresh Fruit Graham Mush with Dates Gravy Toast Graham Gems Toasted Beaten Biscuit Whole-Wheat Bread Baked Apples Stewed Fruit DINNER Brown Soup Mashed Potato Stewed Lima Beans Baked Beets Graham Grits Graham Gems Whole-Wheat Bread Graham Crackers Stewed Fruit Snowball Custard or Fresh Fruit |
SECOND DAYBREAKFASTFresh Fruit Graham Grits Gruel, with Croutons Apple and Prune Toast Whole-Wheat Puffs Toasted Wafers Lemon Apples Stewed Fruit DINNER Lima Bean and Tapioca Soup Beet Hash Stewed Vegetable Oysters Mashed Peas with Tomato Sauce Rice with Raisins Raised Biscuit Cream Crisps Stewed Fruit Apple Rose Cream |
THIRD DAYBREAKFASTFresh Fruit Oatmeal Tomato Toast Raised Biscuits Crusts Toasted Wafers Baked Apples Stewed Fruit DINNER Scalloped Potatoes Cabbage Celery Stewed Tomato Baked Squash Pearl Wheat Whole-Wheat Bread Graham Crackers Whole-Wheat Puffs Stewed Fruit Rice Fruit Pudding |
FOURTH DAYBREAKFASTFresh Fruit Rolled Wheat Apple Toast Breakfast Rolls Whole-Wheat Bread Steamed Figs Stewed Fruit DINNER Black Bean Soup Mashed Potato Scalloped Potato Baked Parsnips Rolled Rye Toasted Rolls Whole-Wheat Bread Currant Puffs Stewed Fruit Baked Apple Loaf |
FIFTH DAYBREAKFASTFresh Fruit Rolled Oats Snowflake Toast Whole-Wheat Puffs Date Bread Toasted Wafers Granola Stewed Fruit DINNER Parsnip Soup Baked Potato with Cream Sauce Mashed Lentils with Beans Boiled Macaroni Farina Whole-Wheat Bread Cream Crisps Stewed Fruit Apple and Fig Tapioca |
SIXTH DAYBREAKFASTFresh Fruit Corn Meal Mush Lentil Toast Cream Crisps Date Bread Graham Puffs Baked Apples Stewed Fruit DINNER Macaroni Soup Stewed Split Peas Scalloped Turnip Browned Rice Corn Meal Mush Rolls Whole-Wheat Bread Toasted Wafers Stewed Fruit Farina Custard or Fresh Fruit |
SABBATHBREAKFASTFresh Fruit Granola Fruit Mush Prune Toast Graham Fruit Bread Toasted Rolls Baked Sour Apples Stewed Fruit DINNER Tomato Cream Soup Potato Cakes Stewed Corn Steamed Rice Beaten Biscuits Buns Stewed Fruit Apple Pie or Fresh Fruit | |
TENTH WEEK | |
FIRST DAYBREAKFASTFresh Fruit Cerealine Flakes Dry Toast with Hot Cream Toasted Beaten Biscuits Corn Cakes Granola Stewed Fruit DINNER Potato Soup Scalloped Beans Macaroni baked with Granola Graham Grits Graham Crisps Pop Overs Whole-Wheat Bread Stewed Fruit Stewed Fruit Pudding |
SECOND DAYBREAKFASTFresh Fruit Oatmeal Strawberry Toast French Rolls Toasted Wafers Baked Apples Stewed Fruit DINNER Combination Soup Scalloped Potato Browned Parsnips Hulled Corn Graham Apple Mush Rye Bread Zwieback Whole-Wheat Puffs Stewed Fruit Cocoanut Cornstarch Pudding |
THIRD DAYBREAKFASTFresh Fruit Graham Grits Gravy Toast Graham Gems Rye Bread Toasted Wafers Steamed Figs Stewed Fruit DINNER Parsnip Soup No. 2. Boiled Potatoes with Tomato Cream Sauce Mashed Peas Chopped Cabbage Pearl Barley Crusts Corn Dodgers Graham Crackers Stewed Fruit Cream Rice Pudding |
FOURTH DAYBREAKFASTFresh Fruit Rolled Oats Blackberry Toast Whole-Wheat Puffs Toasted Wafers Baked Apples Stewed Fruit DINNER Cream Pea Soup Potato Rice Succotash Stewed Tomato Cracked Wheat with Raisins Rye Bread Sticks Graham Puffs Stewed Fruit Bread Pudding or Fresh Fruit |
FIFTH DAYBREAKFASTFresh Fruit Rolled Rye Cream Toast Graham Gems Hoe Cake Toasted Wafers Baked Potato with Cream Gravy Roasted Almonds Stewed Fruit DINNER Lentil Soup Steamed Potato with Brown Sauce Cabbage Celery Carrots with Egg Sauce Macaroni with Kornlet Farina Graham Bread Toasted Wafers Currant Puffs Stewed Fruit Baked Apples with Whipped Cream |
SIXTH DAYBREAKFASTFresh Fruit Rolled Wheat with Dates Boiled Macaroni Graham Biscuits Breakfast Rolls Baked Apples Stewed Fruit DINNER Carrot Soup Baked Potatoes Mashed Turnips Baked Squash Hominy Graham Bread Toasted Rolls Whole-Wheat Puffs Stewed Fruit Banana Shortcake Nuts |
SABBATHBREAKFASTFresh Fruit Boiled Wheat Grape Toast Fruit Bread Beaten Biscuits Citron Apples Stewed Fruit DINNER Tomato and Macaroni Soup Browned Potatoes Canned Green Peas Steamed Rice Fruit Bread Toasted Wafers Beaten Biscuit Stewed Fruit Almond Cream | |
ELEVENTH WEEK | |
FIRST DAYBREAKFASTFresh Fruit Browned Rice Gravy Toast Whole-Wheat Puffs Toasted Beaten Biscuits Macaroni with Raisins Steamed Figs Stewed Fruit DINNER Pea and Tomato Soup Scalloped Potatoes Mashed Parsnips Hulled Corn Mixed Mush Rye Gems Corn Bread Toasted Wafers Stewed Fruit Apple Custard or Fresh Fruit |
SECOND DAYBREAKFASTFresh Fruit Corn Meal Mush Apricot Toast Graham Gems Corn Bread Toasted Wafers Baked Apples Stewed Fruit DINNER Plain Rice Soup Mashed Potato Scalloped Turnip Stewed Split Peas Farina Fruit Mush Whole-Wheat Bread Sally Lunn Gems Zwieback Stewed Fruit Rice and Tapioca Pudding |
THIRD DAYBREAKFASTFresh Fruit Parched Farinose Tomato Toast Whole-Wheat Bread Toasted Wafers Pop Overs Browned Corn Meal Mush Baked Apples Stewed Fruit DINNER Brown Soup Stewed Potatoes Chopped Beets Mashed Lima Beans Pearl Wheat Pulled Bread Toasted Wafers Whole-Wheat Puffs Stewed Fruit Bread and Fruit Custard |
FOURTH DAYBREAKFASTFresh Fruit Oatmeal Dry Toast with Hot Cream Whole-Wheat Puffs Toasted Wafers Roasted Almonds Stewed Fruit DINNER Oatmeal Soup Boiled Potato Cabbage and Tomato Mashed Peas Rice Cream Rolls Whole-Wheat Bread Stewed Fruit Tapioca Lemon Jelly |
FIFTH DAYBREAKFASTFresh Fruit Corn Meal Gruel with Croutons Boiled Macaroni Graham Gems Rolls Whole-Wheat Bread Baked Potato with Gravy Cottage Cheese Stewed Fruit DINNER Baked Bean Soup Mashed Potato Carrots with Egg Sauce Scalloped Tomato Graham Grits Graham Bread Buns Cream Crisps Stewed Fruit Dried Apple Pie or Fresh Fruit |
SIXTH DAYBREAKFASTFresh Fruit Rolled Rye Graham Bread Breakfast Rolls Potato Cakes Peas Puree Baked Apples Stewed Fruit DINNER Cream Barley Soup Boiled Potato with Cream Sauce Succotash Macaroni with Tomato Sauce Rolled Wheat with Raisins Graham Puffs Whole-Wheat Bread Toasted Wafers Stewed Fruit Graham Grits Pudding |
SABBATHBREAKFASTFresh Fruit Rolled Oats Prune Toast Fruit Rolls Graham Biscuit Baked Apples Stewed Fruit DINNER Lima Bean Soup Stewed Potato Cold Sliced Beets Kornlet Steamed Rice Graham Bread Toasted Wafers Fruit Rolls Stewed Fruit Fresh Fruit and Nuts | |
TWELFTH WEEK | |
FIRST DAYBREAKFASTFresh Fruit Cerealine Flakes Whole-Wheat Puffs Toasted Wafers Baked Potato with Cream Sauce Steamed Eggs Stewed Fruit DINNER Cream Pea Soup Mashed Potatoes Scalloped Tomatoes Stewed Cabbage Pearl Barley Cream Crisps Graham Bread Stewed Fruit Farina Blancmange with Cocoanut Sauce |
SECOND DAYBREAKFASTFresh Fruit Oatmeal Apple and Apricot Toast Cream Rolls Graham Bread Baked Apples Stewed Fruit DINNER Pea and Tomato Soup Potato Rice Creamed Parsnips Chopped Turnip Graham Mush Crusts Graham Bread Cream Rolls Stewed Fruit Prune and Tapioca Pudding |
THIRD DAYBREAKFASTFresh Fruit Corn Meal Mush with Fruit Cream Toast Whole-Wheat Puffs Toasted Wafers Parker House Rolls Baked Apples Stewed Fruit DINNER Vegetable Broth Baked Potato and Brown Sauce Boiled Beets Corn and Tomato Graham Grits Mush Rolls Whole-Wheat Bread Sally Lunn Gems Stewed Fruit Cream Rice Pudding |
FOURTH DAYBREAKFASTFresh Fruit Plum Porridge Prune Toast Toasted Rolls Whole-Wheat Bread Citron Apples Stewed Fruit DINNER Tomato and Vermicelli Soup Beet Hash Mashed Peas Macaroni with Kornlet Orange Rice Whole-Wheat Bread Toasted Wafers Currant Puffs Stewed Fruit Apple Sago Pudding |
FIFTH DAYBREAKFASTFresh Fruit Browned Rice Gravy Toast Whole-Wheat Puffs Toasted Wafers Stewed Potatoes Pease Cakes with Tomato Sauce Stewed Fruit DINNER Black Bean Soup No. 2. Mashed Potato Mashed Parsnips Stewed Corn Rolled Rye Corn Bread Toasted Wafers Whole-Wheat Puffs Stewed Fruit Banana Dessert |
SIXTH DAYBREAKFASTFresh Fruit Rolled Oats Blackberry Toast Macaroni with Raisins Pop Overs Toasted Wafers Baked Apples Stewed Fruit DINNER Potato Soup Potato Puff Scalloped Tomato Baked Beans Cracked Wheat Graham Bread Sticks Currant Puffs Stewed Fruit Malaga Grapes |
SABBATHBREAKFASTFresh Fruit Rolled Wheat Tomato Toast Buns Beaten Biscuit Baked Apples Cup Custard Stewed Fruit DINNER Tomato and Macaroni Soup Stewed Potato Canned String Beans Boiled Wheat Whole-Wheat Bread Toasted Wafers Buns Lemon Shortcake Nuts | |
THIRTEENTH WEEK | |
FIRST DAYBREAKFASTFresh Fruit Graham Mush with Dates Cream Toast Breakfast Rolls with Fruit Jelly Toasted Wafers Whole-Wheat Bread Stewed Fruit DINNER Bean and Potato Soup Mashed Potato Beets with Cream Sauce Macaroni baked with Granola Pearl Barley with Raisins Toasted Rolls Whole-Wheat Bread Rye Gems Stewed Fruit Lemon Apples with Whipped Cream |
SECOND DAYBREAKFASTFresh Fruit Oatmeal Porridge Poached Eggs on Toast Graham Puffs Toasted Wafers Potato Cakes Cottage Cheese Stewed Fruit DINNER Swiss Lentil Soup Mashed Potato Cabbage Salad Mashed Turnip Graham Grits Graham Bread Cream Crisps Stewed Fruit Baked Apple Dessert |
THIRD DAYBREAKFASTFresh Fruit Corn Meal Mush Snowflake Toast Oatmeal Gems Toasted Wafers Fruit Bread Baked Apples Stewed Fruit DINNER Potato Soup Baked Potatoes with Tomato Cream Sauce Mashed or Stewed Peas Canned Corn Graham Mush Pulled Bread Fruit Bread Graham Crackers Stewed Fruit Apple Tart |
FOURTH DAYBREAKFASTFresh Fruit Plum Porridge Dry Toast with Hot Cream Graham Bread Toasted Wafers Corn Puffs Creamed Potatoes Stewed Fruit DINNER Cream Pea Soup Potato Rice Tomato and Macaroni Hulled Corn Rice Graham Bread Rye Gems Toasted Wafers Stewed Fruit Raised Pie or Fresh Fruit |
FIFTH DAYBREAKFASTFresh Fruit Rolled Wheat Apple Toast Whole-Wheat Puffs Toasted Wafers Breakfast Rolls Baked Bananas Stewed Fruit DINNER Brown Soup Creamed Potatoes Chopped Turnips Parsnips with Cream Sauce Cracked Wheat Toasted Rolls Date Bread Whole-Wheat Puffs Stewed Fruit Rice Cream Pudding |
SIXTH DAYBREAKFASTFresh Fruit Cerealine Flakes Prune Toast Macaroni with Egg Sauce Date Bread Toasted Wafers Graham Gems Baked Apples Stewed Fruit DINNER Bean and Tomato Soup Boiled Potatoes Macaroni and Lentil Gravy Stewed Carrots Graham Grits Cream Crisps Rye Gems Stewed Fruit Cracked Wheat Pudding |
SABBATHBREAKFASTFresh Fruit Rolled Oats Gravy Toast Breakfast Rolls Toasted Wafers Fruit Bread Cup Custard Baked Apples Stewed Fruit DINNER Tomato Soup with Vermicelli Warmed-over Potato Canned Green Peas Cold Sliced Beets Rolled Wheat Whole-Wheat Bread Beaten Biscuit Stewed Fruit Prune Pie Fruit | |
FOURTEENTH WEEK | |
FIRST DAYBREAKFASTFresh Fruit Rice with Steamed Figs Cream Toast Whole-Wheat Puffs Toasted Rolls Fruit Bread Granola Stewed Fruit DINNER Canned Corn Soup Baked Potatoes with Cream Sauce Scalloped Tomatoes Mashed Peas Browned Rice Whole-Wheat Bread Beaten Biscuit Toasted Wafers Stewed Fruit Stewed Fruit Pudding |
SECOND DAYBREAKFASTFresh Fruit Oatmeal Peach Toast Cream Rolls Whole-Wheat Bread Graham Gems Dates Stewed Fruit DINNER Cream Pea Soup Creamed Potatoes Baked Cabbage Macaroni with Tomato Sauce Hominy Toasted Rolls Corn Puffs Whole-Wheat Bread Stewed Fruit Fruit Cornstarch Pudding |
THIRD DAYBREAKFASTFresh Fruit Granola Fruit Mush Snowflake Toast Whole-Wheat Puffs Toasted Wafers Parker House Rolls Lemon Apples Stewed Fruit DINNER Bean and Hominy Soup Mashed Potatoes Mashed Lentils Turnips with Cream Sauce Farina Vienna Bread Sally Lunn Gems Toasted Wafers Stewed Fruit Banana Dessert or Fresh Fruit |
FOURTH DAYBREAKFASTFresh Fruit Rolled Oats Lentil Toast Currant Puffs Breakfast Rolls Graham Bread Potato Cakes Granola Stewed Fruit DINNER Tomato Cream Soup Scalloped Potatoes Baked or Stewed Beans Macaroni Baked with Granola Rice Vienna Bread Toasted Rolls Whole-Wheat Puffs Stewed Fruit Prune Dessert Nuts |
FIFTH DAYBREAKFASTFresh Fruit Rolled Wheat Gravy Toast Graham Bread Breakfast Rolls Rice and Corn Cakes Baked Apples Roasted Almonds Stewed Fruit DINNER Pea and Tomato Soup Mashed Potato Mashed Parsnips Succotash Graham Grits Raised Corn Bread Graham Gems Toasted Rolls Stewed Fruit Rice and Tapioca Pudding |
SIXTH DAYBREAKFASTFresh Fruit Graham Grits Gruel with Croutons Strawberry Toast Macaroni with Raisins Cream Rolls Corn Bread Graham Puffs Stewed Fruit DINNER Swiss Lentil Soup Potato Cakes Chopped Cabbage Stewed Corn and Tomatoes Pearl Barley Toasted Rolls Graham Bread Pop Overs Stewed Fruit Bread Pudding or Fresh Fruit |
SABBATHBREAKFASTFresh Fruit Rolled Oats Prune Toast Currant Buns Beaten Biscuit Toasted Wafers Baked Apples Stewed Fruit White Custard in Cups DINNER Cream Barley Soup Baked Potatoes with Tomato Cream Sauce Stewed Lima Beans Rice Graham Bread Beaten Biscuit Toasted Wafers Stewed Fruit Apple Pie Oranges | |
FIFTEENTH WEEK | |
FIRST DAYBREAKFAST Fresh Fruit Graham Fruit Mush Dry Toast with Hot Cream Whole-Wheat Puffs Toasted Beaten Biscuit Graham Bread Baked Bananas Stewed Fruit DINNER Bean and Potato Soup Mashed Potato Cabbage Celery Scalloped Tomato Lentil Puree Cerealine Graham Bread Corn Puffs Toasted Wafers Stewed Fruit Rice and Tapioca Pudding |
SECOND DAYBREAKFASTFresh Fruit Rolled Oats Tomato Toast Whole-Wheat Puffs Toasted Wafers Graham Bread Macaroni with Cream Sauce Granola Stewed Fruit DINNER Canned Corn Soup Broiled Potato Stewed Parsnips Mashed Peas Farina with Maple Syrup Graham Puffs Cream Crisps Stewed Fruit Lemon Apples with Almond Sauce |
THIRD DAYBREAKFASTFresh Fruit Rice with Lentil Gravy Poached Egg on Toast Whole-Wheat Puffs Breakfast Rolls Granola Stewed Fruit DINNER Cream Rice Soup Boiled Potato Mashed Turnip Pease Cakes with Tomato Sauce Graham Grits Rye Bread Crusts Toasted Wafers Stewed Fruit Oatmeal Blancmange Nuts |
FOURTH DAYBREAKFASTFresh Fruit Rolled Wheat Apple and Apricot Toast Macaroni with Tomato Sauce Breakfast Rolls Rye Bread Graham Puffs Roasted Almonds Stewed Fruit DINNER Swiss Potato Soup Baked Potatoes with Tomato Cream Sauce Hulled Corn Boiled Beets Boiled Wheat with Lemon Sauce Toasted Rolls Currant Puffs Rye Bread Stewed Fruit Tapioca Custard |
FIFTH DAYBREAKFASTFresh Fruit Oatmeal Snowflake Toast Whole-Wheat Puffs Graham Bread Toasted Wafers Baked Apples Stewed Fruit DINNER Carrot Soup Scalloped Potato Mashed Beans Cold Boiled Beets, sliced Rolled Rye Graham Bread Whole-Wheat Puffs Graham Crackers Stewed Fruit Cornstarch with Raisins |
SIXTH DAYBREAKFASTFresh Fruit Frumenty Blueberry Toast Breakfast Rolls Corn Puffs Toasted Wafers Baked Apples Stewed Fruit DINNER Combination Soup Mashed Potatoes Stewed Split Peas Cabbage Salad Cracked Wheat with Raisins Toasted Rolls Currant Puffs Graham Bread Stewed Fruit Rice Snowball |
SABBATHBREAKFASTFresh Fruit Oatmeal Blackberry Toast Raised Corn Bread Crescents Fruit Rolls Citron Apples Stewed Fruit DINNER Cream Pea Soup Canned String Beans or Kornlet Macaroni, Tomato Sauce Rice with Oranges Fruit Rolls Graham Bread Toasted Wafers Stewed Fruit Nuts | |
SIXTEENTH WEEK | |
FIRST DAYBREAKFASTFresh Fruit Granola Fruit Mush Cream Toast Whole-Wheat Puffs Toasted Rolls Graham Bread Steamed Figs Stewed Fruit DINNER Lima Bean Soup Potato Rice Chopped Beets Egg and Macaroni Pearl Wheat Graham Bread Sally Lunn Gems Toasted Wafers Stewed Fruit Cottage Cheese Nuts |
SECOND DAYBREAKFASTFresh Fruit Cerealine Flakes Grape Toast Graham Bread Whole-Wheat Puffs Cream Rolls Stewed Fruit DINNER Pea and Tomato Soup Baked Potatoes Stewed Cabbage Stewed Dried Corn Rolled Wheat Graham Bread Rye Gems Toasted Rolls Stewed Fruit Rice Meringue |
THIRD DAYBREAKFASTFresh Fruit Oatmeal Snowflake Toast Whole-Wheat Puffs Toasted Wafers Fruit Bread Baked Apples Stewed Fruit DINNER Corn Soup Cabbage Hash Stewed Split Peas Scalloped Tomato Steamed Rice Graham Bread Cream Crisps Oatmeal Gems Stewed Fruit Prune Dessert |
FOURTH DAYBREAKFASTFresh Fruit Rolled Oats Tomato Toast Breakfast Rolls Whole-Wheat Puffs Toasted Wafers Cottage Cheese Baked Apples Stewed Fruit DINNER Oatmeal Soup Baked Potatoes Succotash Macaroni Baked with Granola Farina with Maple Syrup Graham Bread Crusts Toasted Wafers Stewed Fruit Lemon Apples with Cocoanut Sauce |
FIFTH DAYBREAKFASTFresh Fruit Rolled Wheat Prune Toast Corn Puffs Graham Bread Toasted Wafers Plain Omelet Stewed Fruit DINNER Cream Barley Soup Potato Snowballs Baked Turnips Lentil Puree with Lemon Browned Rice Graham Crisps Currant Puffs Stewed Fruit Corn Meal Pudding |
SIXTH DAYBREAKFASTFresh Fruit Rolled Rye Gravy Toast Macaroni with Egg Sauce Whole-Wheat Puffs Breakfast Rolls Baked Apples Stewed Fruit DINNER Lentil and Parsnip Soup Boiled Potatoes with Brown Sauce Chopped Beets Mashed Peas Graham Grits Toasted Rolls Graham Puffs Stewed Fruit Farina Custard |
SABBATHBREAKFASTFresh Fruit Rice with Fig Sauce Peach Toast Sticks Fruit Crackers Graham Bread Baked Apples Stewed Fruit DINNER Canned Pea Soup Stewed Potato Canned Okra and Tomatoes Boiled Wheat Toasted Wafers Graham Raised Biscuit Stewed Fruit Pineapple Tapioca Nuts | |
SEVENTEENTH WEEK | |
FIRST DAYBREAKFASTFresh Fruit Browned Rice Strawberry Toast Whole-Wheat Puffs Graham Bread Toasted Wafers Stewed Fruit DINNER Plain Rice Soup Mashed Potato Scalloped Beans Macaroni with Tomato Rolled Rye Graham Bread Crusts Toasted Wafers Stewed Fruit Bread Custard |
SECOND DAYBREAKFASTFresh Fruit Graham Apple Mush Tomato Toast Whole-Wheat Puffs Breakfast Rolls Roasted Almonds Stewed Fruit DINNER Brown Soup Boiled Potatoes with Cream Sauce Chopped Cabbage Mashed Lentils Pearl Wheat with Raisins Graham Bread Toasted Wafers Granola Gems Stewed Fruit Apple Custard |
THIRD DAYBREAKFASTFresh Fruit Oatmeal Lentil Toast Toasted Rolls Graham Crackers Currant Puffs Stewed Potatoes Cottage Cheese Stewed Fruit DINNER Black Bean Soup Mashed Potatoes Canned Green Peas Boiled Macaroni Pearl Wheat Oatmeal Crisps Whole-Wheat Puffs Graham Bread Stewed Fruit Cornstarch Meringue or Fresh Fruit |
FOURTH DAYBREAKFASTFresh Fruit Wheat Porridge with Croutons Banana Toast Molded Rice with Custard Sauce Whole-Wheat Puffs Sticks Stewed Fruit DINNER Potato Soup Baked Potatoes with Brown Sauce Mashed Turnips Stewed Split Peas Pearl Barley with Raisins Whole-Wheat Bread Rye Gems Toasted Wafers Stewed Fruit Prune and Tapioca Pudding |
FIFTH DAYBREAKFASTFresh Fruit Rolled Oats Dry Toast with Hot Cream Whole-Wheat Puffs Breakfast Rolls Granola Roasted Almonds Stewed Fruit DINNER Split Pea Soup Creamed Potatoes Scalloped Tomatoes Chopped Beets Graham Grits Pop Overs Toasted Wafers Graham Fruit Bread Stewed Fruit Rice Cream Pudding |
SIXTH DAYBREAKFASTFresh Fruit Mixed Mush Snowflake Toast Macaroni with Tomato Sauce Toasted Rolls Fruit Bread Corn Puffs Stewed Fruit DINNER Baked Bean Soup Mashed Potato Macaroni with Kornlet Stewed Carrots Rolled Rye Whole-Wheat Bread Mush Rolls Graham Gems Stewed Fruit Cornstarch Blancmange with Fruit Sauce |
SABBATHBREAKFASTFresh Fruit Rolled Oats Prune Toast Graham Raised Biscuits Toasted Rolls Steamed Figs Stewed Fruit DINNER Tomato Soup with Vermicelli Broiled Potato Canned Corn Whole-Wheat Bread Beaten Biscuit Rolled Wheat Stewed Fruit Custard Pie | |
EIGHTEENTH WEEK | |
FIRST DAYBREAKFASTFresh Fruit Granola Banana Mush Gravy Toast Macaroni with Egg Sauce Whole-Wheat Puffs Toasted Beaten Biscuits Stewed Fruit DINNER Corn Soup Mashed Potatoes Spinach Stewed Lima Beans Graham Grits Whole-Wheat Bread Toasted Wafers Crusts Stewed Fruit |
SECOND DAYBREAKFASTFresh Fruit Oatmeal Apricot Toast Toasted Wafers Whole-Wheat Puffs Cream Rolls Lettuce Stewed Fruit DINNER Bean Soup Steamed Potatoes Stewed Asparagus Scalloped Tomato Pearl Wheat Whole-Wheat Bread Sticks Graham Puffs Stewed Fruit Graham Grits Pudding |
THIRD DAYBREAKFASTFresh Fruit Oatmeal Porridge with Croutons Blueberry Toast Macaroni with Cream Sauce Toasted Rolls Whole-Wheat Puffs Steamed Figs Stewed Fruit DINNER Macaroni Soup Potato Rice Stewed Cabbage Pearl Barley Whole-Wheat Bread Oatmeal Crisps Currant Puffs Egg Sandwich Cottage Cheese Stewed Fruit Molded Tapioca |
FOURTH DAYBREAKFASTFresh Fruit Graham Grits Gravy Toast Whole-Wheat Puffs Toasted Wafers Granola Lettuce Stewed Fruit DINNER Cream Barley Soup Cabbage Hash Asparagus Points Boiled Macaroni Browned Rice Graham Bread Sally Lunn Gems Mush Rolls Stewed Fruit Fig Pudding with Orange Sauce |
FIFTH DAYBREAKFASTFresh Fruit Rolled Oats Tomato Toast Macaroni with Kornlet Whole-Wheat Puffs Toasted Rolls Graham Bread Stewed Fruit DINNER Potato Soup Boiled Potatoes with Tomato Cream Sauce Mashed Peas Spinach Graham Bread Crusts Toasted Wafers Rolled Rye Stewed Fruit Nuts |
SIXTH DAYBREAKFASTFresh Fruit Plum Porridge Snowflake Toast Rye Puffs Toasted Wafers Breakfast Rolls Almonds Stewed Fruit DINNER Cream Pea Soup Mashed Potatoes Lettuce Egg and Macaroni Farina Whole-Wheat Puffs Toasted Wafers Oatmeal Bread Stewed Fruit Prune Whip |
SABBATHBREAKFASTFresh Fruit Rolled Wheat Prune Toast Plain Buns Oatmeal Bread Cream Rolls Toasted Wafers Cup Custard Stewed Fruit DINNER Canned Green Pea Soup Creamed Potato Mashed Lima Beans Steamed Rice Oatmeal Bread Fruit Rolls Toasted Wafers Stewed Fruit Banana Dessert | |
NINETEENTH WEEK | |
FIRST DAYBREAKFASTFresh Fruit Graham Mash with Dates Cream Toast Whole-Wheat Puffs Toasted Rolls Baked Potato with Cream Sauce Lettuce Stewed Fruit DINNER Lima Bean Soup Scalloped Potatoes Stewed Asparagus Egg Sandwich Granola Fruit Mush Rice and Corn Cakes Cream Rolls Toasted Wafers Almond Cornstarch Pudding |
SECOND DAYBREAKFASTFresh Fruit Rolled Oats Asparagus Toast Toasted Wafers Whole-Wheat Puffs Toasted Rolls Cottage Cheese Stewed Fruit DINNER Potato Soup Boiled Potato Mashed Peas Scalloped Tomato Pearl Wheat Sally Lunn Gems Graham Bread Toasted Wafers Stewed Fruit Custard Pie |
THIRD DAYBREAKFASTFresh Fruit Steamed Rice Lentil Toast Whole-Wheat Puffs Graham Bread Toasted Wafers Lettuce Stewed Fruit DINNER Pea and Tomato Soup Mashed Potatoes Radishes Asparagus with Cream Sauce Macaroni Baked with Granola Cracked Wheat Whole-Wheat Bread Zwieback Graham Puffs Stewed Fruit Rice Cream Pudding |
FOURTH DAYBREAKFASTFresh Fruit Rolled Wheat Tomato Toast Whole-Wheat Puffs Breakfast Rolls Baked Apples Stewed Fruit DINNER Asparagus Soup Baked Potato with Cream Sauce Mashed Beans Lettuce Farina Whole-Wheat Bread Oatmeal Crisps Graham Gems Stewed Fruit Molded Wheat with Fruit Sauce |
FIFTH DAYBREAKFASTFresh Fruit Graham Mush Peach Toast Whole-Wheat Puffs Breakfast Rolls Toasted Wafers Steamed Figs Stewed Fruit DINNER Cream Pea Soup Baked Potatoes Spinach Succotash Rolled Rye Toasted Wafers Graham Bread Currant Puffs Stewed Fruit Farina Fruit Mold |
SIXTH DAYBREAKFASTFresh Fruit Graham Grits Gravy Toast Macaroni with Cream Sauce Cream Rolls Graham Bread Rye Gems Lettuce Stewed Fruit DINNER Corn and Bean Soup Boiled Potatoes Fresh or Canned Green Peas Scalloped Tomatoes Cracked Wheat with Raisins Toasted Wafers Cream Rolls Whole-Wheat Bread Stewed Fruit Plain Custard |
SABBATHBREAKFASTFresh Fruit Oatmeal Prune Toast Beaten Biscuit Toasted Wafers Baked Apples Stewed Fruit DINNER Asparagus Soup Stewed Potato Macaroni with Tomato Fruit Bread Beaten Biscuit Toasted Wafers Rice Stewed Fruit Pineapple | |
TWENTIETH WEEK | |
FIRST DAYBREAKFASTFresh Fruit Cerealine Flakes Dry Toast with Hot Cream Whole-Wheat Puffs Graham Bread Toasted Beaten Biscuit Lettuce Stewed Fruit DINNER Potato Soup Baked Potatoes with Tomato Cream Sauce Stewed Split Peas Spinach Boiled Wheat Whole-Wheat Puffs Toasted Wafers Fruit Bread Stewed Fruit Cocoanut Cornstarch Pudding |
SECOND DAYBREAKFASTFresh Fruit Graham Grits Asparagus Toast Macaroni with Egg Sauce Whole-Wheat Puffs Cream Crisps Stewed Fruit DINNER Cream Pea Soup Scalloped Potatoes Hulled Corn Asparagus with Egg Sauce Graham Grits Whole-Wheat Bread Graham Puffs Cream Crisps Stewed Fruit Banana Custard |
THIRD DAYBREAKFASTFresh Fruit Rolled Oats Snowflake Toast Breakfast Rolls Rye Gems Toasted Wafers Steamed Figs Stewed Fruit DINNER Tomato and Rice Soup Mashed Potatoes Lettuce Stewed Lima Beans Hominy Graham Bread Toasted Wafers Crusts Stewed Fruit Snowball Custard |
FOURTH DAYBREAKFASTFresh Fruit Oatmeal Porridge Berry Toast Macaroni with Cream Sauce Graham Crisps Hominy Gems Lettuce Stewed Fruit DINNER Asparagus Soup Baked Potatoes Scalloped Tomatoes Stewed Corn Graham Grits Graham Bread Bean Gems Toasted Wafers Stewed Fruit Prune Dessert |
FIFTH DAYBREAKFASTFresh Fruit Rice with Raisins Tomato Toast Graham Gems Toasted Wafers Cream Rolls Cottage Cheese Stewed Fruit DINNER Corn and Tomato Soup Creamed Potatoes Mashed Peas Spinach Cracked Wheat Toasted Wafers Sally Lunn Gems Stewed Fruit Rice and Tapioca Pudding |
SIXTH DAYBREAKFASTFresh Fruit Rolled Wheat Asparagus Toast Whole-Wheat Puffs Toasted Wafers Toasted Rolls Cup Custard Stewed Fruit DINNER Baked Bean Soup Mashed Potatoes Stewed Asparagus Lettuce Macaroni with Tomato Sauce Baked Barley Whole-Wheat Bread Crusts Toasted Wafers Stewed Fruit Molded Rice with Fruit Sauce |
SABBATHBREAKFASTFresh Fruit Rolled Rye Prune Toast Cream Rolls Fruit Bread Toasted Wafers Roasted Almonds Stewed Fruit DINNER Kornlet Soup Canned Okra and Tomato Mashed Peas Rice Fruit Bread Beaten Biscuit Stewed Fruit Pineapple Tapioca | |
TWENTY-FIRST WEEK | |
FIRST DAYBREAKFASTFresh Fruit Farina with Fig Sauce Snowflake Toast Corn Puffs Graham Bread Toasted Wafers Stewed Fruit DINNER Kornlet and Tomato Soup Stuffed Potato Stewed Beans Macaroni with Egg Sauce Cracked Wheat with Raisins Graham Bread Whole-Wheat Puffs Toasted Wafers Stewed Fruit Cornstarch Blancmange |
SECOND DAYBREAKFASTFresh Fruit Frumenty Dry Toast with Hot Cream Pease Paree Breakfast Rolls Graham Puffs Toasted Wafers Stewed Fruit DINNER Bean and Tapioca Soup Baked Potato with Pease Gravy Stewed Dried Corn Scalloped Tomato Browned Rice Graham Bread Rolls Rye Gems Stewed Fruit Cracked Wheat Pudding |
THIRD DAYBREAKFASTFresh Fruit Granola Mush Dried Apple and Apricot Toast Raised Biscuit Breakfast Rolls Toasted Wafers Stewed Fruit DINNER Macaroni Soup Mashed Potato Succotash Canned Green Peas Whole-Wheat Puffs Toasted Wafers Fruit Roll Stewed Fruit Lemon Cornstarch Pudding |
FOURTH DAYBREAKFASTFresh Fruit Jellied Oatmeal Lentil Toast Whole-Wheat Puffs Toasted Wafers Lettuce Stewed Fruit DINNER Oatmeal Soup Boiled Potato with Tomato Cream Sauce Mashed Lentils with Beans Macaroni with Tomato Sauce Hominy Fruit Rolls Graham Crisps Stewed Fruit Rice Snowball |
FIFTH DAYBREAKFASTFresh Fruit Orange Rice Gravy Toast Macaroni with Cream Sauce Graham Crisps Whole-Wheat Puffs Graham Bread Stewed Fruit DINNER Bean and Hominy Soup Potato Puff Stewed Split Peas Stewed Asparagus Pearl Barley with Lemon Sauce Graham Bread Rye Gems Toasted Wafers Stewed Fruit Orange Float |
SIXTH DAYBREAKFASTFresh Fruit Rye Mush Prune Toast Graham Bread Corn Puffs Toasted Wafers Cottage Cheese Stewed Fruit DINNER Black Bean Soup Stewed Potato Spinach Stewed Corn and Tomato Graham Grits Raised Corn Bread Toasted Wafers Graham Puffs Stewed Fruit Farina Fruit Mold |
SABBATHBREAKFASTFresh Fruit Rolled Oats Grape Toast Currant Buns Beaten Biscuit Toasted Wafers Lettuce Stewed Fruit DINNER Canned Green Pea Soup Stewed Potato Macaroni with Kornlet Rice Beaten Biscuit Graham Bread Stewed Fruit Loaf Cake Bananas | |
TWENTY-SECOND WEEK | |
FIRST DAYBREAKFASTFresh Fruit Graham Mush with Dates Gravy Toast Whole-Wheat Puffs Toasted Beaten Biscuit Steamed Figs Stewed Fruit DINNER Cream Pea Soup Mashed Potatoes Spinach Stewed Dried Corn Rolled Wheat Graham Bread Rye Gems Sticks Bread Custard Stewed Fruit |
SECOND DAYBREAKFASTFresh Fruit Oatmeal Dry Toast with Hot Cream Macaroni with Raisins Graham Gems Toasted Wafers Steamed Figs Stewed Fruit DINNER Oatmeal Soup Boiled Potatoes Scalloped Tomato Mashed Lima Beans Boiled Wheat Graham Bread Rye Puffs Toasted Wafers Stewed Fruit Macaroni Pudding |
THIRD DAYBREAKFASTFresh Fruit Plum Porridge Prune Toast Breakfast Rolls Whole-Wheat Puffs Graham Crackers Lettuce Stewed Fruit DINNER Bean and Tomato Soup Mashed Potatoes Stewed Split Peas Radishes Asparagus with Cream Sauce Rolled Wheat Whole-Wheat Bread Currant Puffs Toasted Wafers Stewed Fruit Fresh Fruit |
FOURTH DAYBREAKFASTFresh Fruit Rice with Fig Sauce Gravy Toast Toasted Rolls Graham Bread Crusts Stewed Fruit DINNER Pea and Tomato Soup Broiled Potato Lettuce Hominy Egg and Macaroni Oatmeal Bread Sally Lunn Gems Graham Crisps Stewed Fruit Molded Wheat with Fruit Sauce |
FIFTH DAYBREAKFASTFresh Fruit Graham Grits Poached Egg on Toast Hominy Gems Graham Crisps Toasted Wafers Stewed Fruit DINNER Macaroni Soup Mashed Potato Stewed Asparagus Scalloped Beans Cracked Wheat Oatmeal Bread Cream Rolls Graham Gems Stewed Fruit Stewed Fruit Pudding |
SIXTH DAYBREAKFASTFresh Fruit Graham Gruel with Croutons Asparagus Toast Whole-Wheat Puffs Toasted Rolls Potato Cakes Lettuce Stewed Fruit DINNER Potato Soup Baked Potatoes Spinach Succotash Granola Fruit Mush Currant Puffs Sticks Graham Bread Stewed Fruit Tapioca Jelly |
SABBATHBREAKFASTFresh Fruit Rolled Wheat Prune Toast Fruit Bread Cream Rolls Graham Crisps Lettuce Stewed Fruit DINNER Tomato with Vermicelli Soup Mashed Peas Creamed Potato Lettuce Browned Rice Fruit Bread Beaten Biscuit Stewed Fruit Custard Pie | |
TWENTY-THIRD WEEK | |
FIRST DAYBREAKFASTFresh Fruit Cerealine Flakes Banana Toast Beaten Biscuit Graham Puffs Lettuce Stewed Fruit DINNER Cream Pea Soup Baked Potato with Brown Sauce Scalloped Tomato Asparagus with Egg Sauce Graham Grits Fruit Bread Graham Gems Toasted Wafers Stewed Fruit Banana Shortcake |
SECOND DAYBREAKFASTFresh Fruit Jellied Oatmeal Asparagus Toast Graham Gems Cream Mush Rolls Stewed Fruit DINNER Cream Rice Soup Baked Beans Stewed Dried Corn Lettuce Cracked Wheat with Raisins Crusts Toasted Wafers Raised Biscuit Stewed Fruit Almond Cream |
THIRD DAYBREAKFASTFresh Fruit Graham Mush Snowflake Toast Whole-Wheat Bread Toasted Wafers Currant Puffs Cup Custard Stewed Fruit DINNER Bean and Tapioca Soup Mashed Potato Green Peas Macaroni Baked with Granola Rice Whole-Wheat Bread Toasted Wafers Crusts Stewed Fruit Floating Islands |
FOURTH DAYBREAKFASTFresh Fruit Mixed Mush Tomato Toast Whole-Wheat Bread Graham Puffs Toasted Wafers Lettuce Stewed Fruit DINNER Split Pea Soup Potato Cakes Spinach Macaroni with Tomato Sauce Rolled Rye Sally Lunn Gems Cream Mush Rolls Toasted Wafers Stewed Fruit Cocoanut Rice Custard |
FIFTH DAYBREAKFASTFresh Fruit Rolled Wheat Prune Toast Whole-Wheat Bread Toasted Rolls Graham Gems Stewed Fruit DINNER Brown Soup Baked Potato Stewed Asparagus Mashed Lentils with Beans Graham Grits Whole-Wheat Bread Cream Crisps Stewed Fruit Farina Pie |
SIXTH DAYBREAKFASTFresh Fruit Graham Grits Porridge with Croutons Asparagus Toast Whole-Wheat Puffs Cream Crisps Crescents Stewed Fruit White Custard in Cups DINNER Cream Barley Soup Steamed Potato Green Peas Stewed Corn and Tomato Granola Fruit Mush Graham Gems Cream Crisps Graham Bread Stewed Fruit Banana Dessert |
SABBATHBREAKFASTFresh Fruit Rolled Rye Grape Toast Macaroni with Cream Sauce Crescents Fruit Rolls Steamed Figs Stewed Fruit DINNER Tomato Soup with Vermicelli Stewed Asparagus Mashed Peas Rice with Raisins Graham Biscuit Fruit Rolls Toasted Wafers Stewed Fruit Nuts | |
TWENTY-FOURTH WEEK | |
FIRST DAYBREAKFASTFresh Fruit Graham Mush with Figs Gravy Toast Whole-Wheat Puffs Toasted Rolls Graham Bread Roasted Almonds Stewed Fruit DINNER Vegetable Broth with Croutons Baked Potato Asparagus Points Cauliflower with Tomato Sauce Rolled Rye Whole-Wheat Bread Crusts Toasted Wafers Stewed Fruit Rice Meringue |
SECOND DAYBREAKFASTFresh Fruit Granola Fruit Mush Cream Toast Whole-Wheat Puffs Toasted Wafers Fruit Crackers Fresh Strawberries DINNER Asparagus Soup Scalloped Potatoes Spinach with Cream Stewed Corn Cottage Cheese Pearl Barley Sticks Graham Gems Whole-Wheat Bread Stewed Fruit Farina Custard |
THIRD DAYBREAKFASTFresh Fruit Graham Gruel with Croutons Snowflake Toast Graham Puff Toasted Wafers Breakfast Rolls Strawberries DINNER Cream Barley Soup Stewed Potatoes Asparagus with Green Peas Scalloped Tomato Graham Bread Toasted Wafers Currant Puffs Stewed or Fresh Berries Oatmeal Blancmange with Fruit Sauce |
FOURTH DAYBREAKFASTFresh Fruit Browned Rice Tomato Toast Boiled Macaroni Whole-Wheat Puffs Breakfast Rolls Lettuce Stewed Fruit DINNER Lentil Soup Mashed Potatoes Green Peas Macaroni Baked with Granola Graham Grits Whole-Wheat Bread Whole-Wheat Puffs Graham Crisps Fresh or Stewed Berries Bread Custard |
FIFTH DAYBREAKFASTFresh Fruit Plum Porridge Gravy Toast Whole-Wheat Puffs Toasted Rolls Strawberries DINNER Plain Rice Soup Potato Cakes Mashed Split Peas Stewed Corn and Tomato Pearl Wheat Whole-Wheat Bread Toasted Rolls Graham Gems Stewed Fruit Strawberry Shortcake |
SIXTH DAYBREAKFASTFresh Fruit Rolled Oats Fresh Berry Toast Whole-Wheat Bread Graham Crusts Toasted Wafers Lettuce Fresh or Stewed Berries DINNER Corn and Bean Soup Baked Potato Boiled Macaroni Asparagus with Egg Sauce Rolled Wheat Whole-Wheat Bread Toasted Wafers Rye Gems Strawberries Lemon Cornstarch Pudding |
SABBATHBREAKFASTFresh Fruit Rolled Wheat Prune Toast Graham Raised Biscuit Toasted Wafers Cream Rolls Cup Custard Strawberries DINNER Green Pea Soup Canned Okra and Tomato Stewed Asparagus Rice Fruit Rolls Graham Bread Toasted Wafers Strawberries Sliced Pineapple | |
TWENTY-FIFTH WEEK | |
FIRST DAYBREAKFASTFresh Fruit Cerealine Flakes Fresh Berry Toast Whole-Wheat Puffs Toasted Rolls Graham Bread Lettuce Stewed Fruit DINNER Plain Rice Soup Mashed Potato Mashed Peas Macaroni with Tomato Sauce Rolled Wheat Graham Bread Sally Lunn Gems Sticks Stewed Fruit Gooseberry Tart |
SECOND DAYBREAKFASTFresh Fruit Rolled Rye Dry Toast with Hot Cream Lettuce Whole-Wheat Puffs Sticks Toasted Wafers Stewed or Fresh Berries DINNER Cream Pea Soup Potato Cakes Spinach Scalloped Tomato Boiled Wheat Whole-Wheat Bread Rye Puffs Toasted Wafers Strawberries Molded Rice with Strawberry Sauce |
THIRD DAYBREAKFASTFresh Fruit Graham Mush Prune Toast Cream Rolls Fruit Bread Toasted Wafers Lettuce Strawberries DINNER Swiss Potato Soup Boiled Potato with Tomato Cream Sauce Green Peas Macaroni with Kornlet Molded Wheat with Fruit Sauce Fruit Bread Whole-Wheat Puffs Toasted Wafers Cherries on Stems |
FOURTH DAYBREAKFASTFresh Fruit Graham Grits Gruel with Croutons Gravy Toast Rice with Lentil Gravy Whole-Wheat Puffs Graham Bread Toasted Wafers Stewed Fruit DINNER Tomato and Macaroni Soup Baked Potato String Beans Asparagus with Egg Sauce Baked Barley Currant Puffs Graham Bread Toasted Wafers Strawberries Slice Pineapple |
FIFTH DAYBREAKFASTFresh Fruit Browned Rice Grape Toast Whole-Wheat Puffs Toasted Wafers Cream Rolls Lettuce Fresh or Stewed Berries DINNER Swiss Lentil Soup Baked Potato Green Peas Summer Squash Farina with Bananas Whole-Wheat Bread Toasted Rolls Graham Gems Strawberry Shortcake |
SIXTH DAYBREAKFASTFresh Fruit Rolled Oats Cream Toast Macaroni with Tomato Sauce Graham Gems Toasted Wafers Cottage Cheese Stewed Fruit DINNER Green Pea Soup Mashed Potato Scalloped Cauliflower Stewed Lima Beans Graham Grits Toasted Wafers Currant Puffs Oatmeal Bread Stewed Fruit Farina Blancmange with Cocoanut Sauce |
SABBATHBREAKFASTFresh Fruit Granola Fruit Mush Snowflake Toast Beaten Biscuit Date Bread Toasted Wafers Strawberries DINNER Canned Corn Soup Potato Cakes String Beans Rice Date Bread Beaten Biscuit Toasted Wafers Stewed Fruit Strawberry Pie | |
TWENTY-SIXTH WEEK | |
FIRST DAYBREAKFASTFresh Fruit Granola Fruit Mush Strawberry Toast Whole-Wheat Puffs Toasted Beaten Biscuit Stewed Fruit DINNER String Bean Soup Mashed Potato Mashed Peas Chopped Cabbage Boiled Wheat Whole-Wheat Bread Cream Crisps Toasted Wafers Stewed Fruit Tapioca Dessert with Strawberries |
SECOND DAYBREAKFASTFresh Fruit Plum Porridge Gravy Toast Whole-Wheat Bread Cream Crisps Lettuce Breakfast Rolls and Currant Jelly DINNER Pea and Tomato Soup Baked Potato Summer Squash Browned Cauliflower Pearl Wheat Crusts White Bread Toasted Wafers Stewed Fruit Strawberry Sandwich |
THIRD DAYBREAKFASTFresh Fruit Graham Mush Cherry Toast Whole-Wheat Puffs White Bread Graham Crackers Strawberries DINNER Potato Soup Green Peas Mashed Lentils Lettuce Browned Rice Whole-Wheat Bread Rye Gems Graham Crisps Stewed Fruit Cherry Tart |
FOURTH DAYBREAKFASTFresh Fruit Graham Grits Fresh Berry Toast Graham Crisps Graham Bread French Rolls Steamed Figs Stewed Fruit DINNER Bean and Potato Soup Mashed Potato Cauliflower with Tomato Sauce Macaroni Baked with Granola Cracked Wheat with Raisins Graham Bread Cream Mush Rolls Whole-Wheat Puffs Stewed Fruit Farina Blancmange |
FIFTH DAYBREAKFASTFresh Fruit Rice with Fig Sauce Snowflake Toast Whole-Wheat Puffs Toasted Rolls Graham Bread Lettuce Stewed Fruit DINNER Tomato and Vermicelli Soup Broiled Potato Succotash Summer Squash Pearl Barley Cream Rolls Crusts Zwieback Graham Bread Rice Cream Pudding |
SIXTH DAYBREAKFASTFresh Fruit Cerealine Flakes Prune Toast Cottage Cheese Cream Rolls Toasted Wafers Graham Bread Stewed Fruit DINNER Cream Barley Soup Boiled Potato Mashed Split Peas Scalloped Tomato Farina with Banana Toasted Wafers Graham Puffs Stewed Fruit Strawberry Minute Pudding |
SABBATHBREAKFASTFresh Fruit Rolled Wheat Banana Toast Currant Buns Toasted Wafers Breakfast Rolls Strawberries DINNER Cream Pea Soup Stewed Potato String Beans Rice Whole-Wheat Bread Toasted Wafers Cream Rolls Stewed Fruit Fresh Cherries Banana Dessert | |
TWENTY-SEVENTH WEEK | |
FIRST DAYBREAKFASTFresh Fruit Graham Mush Cream Toast Boiled Macaroni Whole-Wheat Puffs Toasted Rolls Fresh or Stewed Berries DINNER Potato Soup with Vermicelli Mashed Potato Beet Greens Pease Cakes with Tomato Sauce Pearl Wheat White Bread Graham Crisps Currant Puffs Stewed Fruit Prune Whip |
SECOND DAYBREAKFASTFresh Fruit Boiled Wheat Fresh Berry Toast Whole-Wheat Puffs Breakfast Rolls Toasted Wafers Roasted Almonds Stewed Fruit DINNER Cream Pea Soup Broiled Potatoes Summer Squash Cauliflower with Tomato Sauce Graham Grits Graham Bread Crusts Fruit Crackers Toasted Wafers Stewed or Fresh Berries Fruit Shape |
THIRD DAYBREAKFASTFresh Fruit Rice Snowflake Toast Graham Gems Toasted Wafers Fruit Rolls Fresh Berries DINNER Lentil Soup Mashed Potato Green Peas Scalloped Tomatoes Browned Rice Fruit Rolls Toasted Wafers Graham Bread Stewed Fruit Fresh Cherries |
FOURTH DAYBREAKFASTFresh Fruit Rolled Wheat Tomato Toast Toasted Fruit Rolls Graham Puffs Lettuce Stewed Fruit DINNER Tomato and Macaroni Soup Beets and Potato String Beans Pearl Barley Pop Overs Graham Bread Toasted Wafers Fresh or Stewed Fruit Gooseberry Tart |
FIFTH DAYBREAKFASTFresh Fruit Cracked Wheat Porridge with Croutons Macaroni with Raisins Whole-Wheat Puffs Breakfast Rolls Graham Crackers Lettuce Stewed Fruit DINNER Cream Barley Soup Baked Potato Spinach Green Peas Cracked Wheat Rye Puffs Oatmeal Bread Graham Crisps Fruit Foam |
SIXTH DAYBREAKFASTFresh Fruit Cerealine Fresh Berry Toast Whole-Wheat Puffs Toasted Rolls Graham Crisps Roasted Almonds Stewed Fruit DINNER Green Pea Soup Mashed Potato Stewed Lima Beans Stewed Dried or Fresh Corn Rice Oatmeal Bread Whole-Wheat Puffs Toasted Wafers Stewed Fruit Strawberry Shortcake |
SABBATHBREAKFASTFresh Fruit Granola Fruit Mush Gravy Toast Fruit Rolls Raised Biscuit Toasted Wafers Stewed Fruit Baked Bananas DINNER Tomato and Vermicelli Soup Broiled Potato Macaroni with Cream Sauce Browned Rice Beaten Biscuit Fruit Rolls Strawberries Nuts | |
TWENTY-EIGHTH WEEK | |
FIRST DAYBREAKFASTFresh Fruit Rice with Raisins Cherry Toast Toasted Beaten Biscuit Graham Puffs Stewed or Fresh Berries DINNER Cream Barley Soup Baked Potatoes with Tomato Cream Sauce Summer Squash Green Peas Cracked Wheat Graham Puffs Toasted Wafers Stewed Fruit Rice and Strawberry Dessert |
SECOND DAYBREAKFASTFresh Fruit Rolled Wheat Gravy Toast Whole-Wheat Puffs Toasted Wafers Graham Bread Lettuce Stewed Fruit DINNER Green Pea Soup Macaroni Baked with Granola String Beans Lettuce Boiled Wheat Cream Rolls Graham Bread Stewed Fruit Berry Sandwich (prepared like Apple Sandwich) |
THIRD DAYBREAKFASTFresh Fruit Rolled Rye Fresh Berry Toast Whole-Wheat Puffs Toasted Wafers Graham Bread Cup Custard Stewed Fruit DINNER Tomato and Macaroni Soup Creamed Potato Mashed Peas Cottage Cheese Pearly Wheat Graham Bread Toasted Wafers Crusts Stewed Fruit Farina Fruit Mold |
FOURTH DAYBREAKFASTFresh Fruit Molded Rice with Fresh Berries Dry Toast with Hot Cream Graham Raised Biscuit Toasted Wafers Stewed Fruit DINNER Pea and Tomato Soup Mashed Potato Beet Greens Stewed Dried Corn Graham Grits Graham Puffs Toasted Wafers Vienna Bread Stewed Fruit Fruit Tapioca |
FIFTH DAYBREAKFASTFresh Fruit Plum Porridge Snowflake Toast Vienna Bread Crusts Toasted Wafers Lettuce Stewed or Fresh Berries DINNER Potato and Sago Soup Stewed Lima Beans Radishes Boiled Macaroni Hominy Cream Rolls Graham Bread Stewed Fruit Berry Shortcake with Prepared Cream |
SIXTH DAYBREAKFASTFresh Fruit Granola Fruit Mush Tomato Toast French Rolls Graham Puffs Toasted Wafers Stewed Fruit DINNER Lentil Soup Mashed Potato String Beans Canned Kornlet Cream Rolls Graham Puffs Toasted Wafers Stewed Fruit Red Sago Mold |
SABBATHBREAKFASTFresh Fruit Cerealine Prune Toast Fruit Bread Beaten Biscuit Toasted Wafers Steamed Figs Cottage Cheese Stewed or Fresh Berries DINNER String Bean Soup Macaroni with Egg Sauce New Beets with Lemon Dressing Rice Beaten Biscuit Toasted Wafers Plain Buns Stewed Fruit Fruit and Nuts | |
TWENTY-NINTH WEEK | |
FIRST DAYBREAKFASTFresh Fruit Brewis Tomato Toast Whole-Wheat Puffs Toasted Beaten Biscuit Lettuce Stewed Fruit DINNER Potato Soup Mashed Peas Beet Greens Pearl Wheat Whole-Wheat Bread Buns Toasted Wafers Stewed Fruit Banana Dessert |
SECOND DAYBREAKFASTFresh Fruit Cerealine Dry Toast with Hot Cream Fresh Tomato Salad Graham Crisps Whole-Wheat Puffs Stewed Fruit DINNER Cream Pea Soup Steamed Potato String Beans Baked Cabbage Graham Grits Graham Crisps Whole-Wheat Bread Pop Overs Stewed Fruit Cream Rice Pudding |
THIRD DAYBREAKFASTFresh Fruit Graham Mush Strawberry Toast Graham Crisps Whole-Wheat Puffs Molded Rice with Currant Sauce DINNER Lentil Soup New Beets and Potato Summer Squash Green Peas Farina Crusts Graham Bread Toasted Wafers Fresh Berries Stewed Fruit Pudding |
FOURTH DAYBREAKFASTFresh Fruit Snowflake Toast Rice with Lentil Gravy Graham Raised Biscuits Breakfast Rolls Toasted Wafers Fresh or Stewed Berries DINNER Cream Barley Soup Mashed Potato Scalloped Egg Plant Cauliflower with Tomato Sauce Molded Wheat with Fruit Sauce Cream Rolls Graham Puffs Toasted Wafers Stewed or Fresh Berries Raspberry Manioca Pudding |
FIFTH DAYBREAKFASTFresh Fruit Rolled Wheat Gravy Toast Cream Rolls Currant Puffs Toasted Wafers Radishes Stewed Fruit DINNER String Bean Soup Scalloped Potato Baked Beets Spinach Boiled Wheat with Lemon Sauce Whole-Wheat Bread Toasted Rolls Graham Gems Fresh Berries Prune Dessert |
SIXTH DAYBREAKFASTFresh Fruit Graham Gruel with Croutons Fresh Berry Toast Fruit Crackers Breakfast Rolls Graham Bread Stewed or Fresh Berries DINNER Green Pea Soup Creamed Potato Cabbage Salad Macaroni baked with Granola Rolled Rye Whole-Wheat Bread Toasted Wafers Beaten Biscuit Berry Pie |
SABBATHBREAKFASTFresh Fruit Rolled Oats Fresh Black Raspberry Toast Graham Bread Beaten Biscuit Toasted Wafers Stewed Fruit Cup Custard DINNER Tomato and Macaroni Soup Stewed Potato String Beans Boiled Wheat with Raisins Fruit Rolls Toasted Wafers Graham Bread Fresh Berries Bananas | |
THIRTIETH WEEK | |
FIRST DAYBREAKFASTFresh Fruit Farina with Bananas Gravy Toast Whole-Wheat Bread Fruit Rolls Toasted Beaten Biscuit Stewed or Fresh Berries DINNER Baked Bean Soup Stewed Potato Green Peas Lettuce Graham Grits Graham Puffs Cream Crisps Black Raspberries Rice Custard Shape |
SECOND DAYBREAKFASTFresh Fruit Rolled Oats Banana Toast Graham Gems Sticks Toasted Wafers Stewed or Fresh Berries DINNER Velvet Soup Baked Potato Mashed Peas Macaroni with Tomato Pearl Wheat Currant Puffs Toasted Wafers Vienna Bread Stewed Fruit Farina Blancmange with Raspberry Juice |
THIRD DAYBREAKFASTFresh Fruit Cracked Wheat Fresh Raspberry Toast Whole-Wheat Puffs Toasted Wafers Parker House Rolls Lettuce Stewed Fruit DINNER Cream Pea Soup Browned Potatoes Chopped Cabbage Green Corn Rice Whole-Wheat Bread Toasted Wafers Graham Gems Stewed Fruit Black Raspberry Shortcake |
FOURTH DAYBREAKFASTFresh Fruit Cerealine Dry Toast with Hot Cream Whole-Wheat Puffs Graham Crisps Cup Custard Fresh Berries DINNER Black Bean Soup Mashed Potato Mashed Turnip String Beans Graham Mush Graham Bread Cream Rolls Pop Overs Stewed Fruit Raspberry Tapioca |
FIFTH DAYBREAKFASTFresh Fruit Graham Grits Cream Toast Fresh Tomatoes Whole-Wheat Bread Toasted Wafers Cream Rolls Stewed Fruit DINNER Celery Soup No. 2 Broiled Potato Beet Greens Scalloped Cauliflower Pearl Wheat Whole-Wheat Puffs Toasted Wafers Graham Fruit Bread Fresh Berries Snow Pudding |
SIXTH DAYBREAKFASTFresh Fruit Plum Porridge Prune Toast Cottage Cheese Cream Rolls Fruit Bread Toasted Wafers Stewed or Fresh Berries DINNER Lima Bean Soup Steamed Potato Boiled Beets Scalloped Egg Plant Cracked What Fruit Bread Graham Gems Toasted Wafers Stewed Fruit Pudding |
SABBATHBREAKFASTFresh Fruit Rolled Rye Fresh Berry Toast Beaten Biscuit Graham Puffs Cup Custard Stewed Fruit DINNER Green Corn Soup Mashed Peas Cold Boiled Beets, Sliced Rice with Raisins Buns Beaten Biscuit Toasted Wafers Nuts Fresh or Stewed Fruit | |
THIRTY-FIRST WEEK | |
FIRST DAYBREAKFASTFresh Fruit Browned Rice Snowflake Toast Macaroni with Raisins Graham Crackers Graham Puffs Buns Stewed Fruit DINNER Pea and Tomato Soup Potato Rice Baked Corn Celery Graham Grits Currant Puffs Graham Bread Toasted Wafers Stewed or Fresh Fruit Red Rice Mold |
SECOND DAYBREAKFASTFresh Fruit Rolled Wheat Gravy Toast Boiled Macaroni with Cottage Cheese Graham Bread Rye Puffs Toasted Wafers Stewed Fruit DINNER Brown Soup Baked Potatoes Green Peas Beet Greens Boiled Wheat Graham Biscuit Crusts Toasted Wafers Stewed or Fresh Berries Rice Custard Pudding |
THIRD DAYBREAKFASTFresh Fruit Graham Mush with Dates Cream Toast Graham Puffs Sticks Pulled Bread Stewed Fruit DINNER Cream Barley Soup Mashed Potato String Beans Summer Squash Cracked Wheat with Whortleberries Pulled Bread Graham Gems Toasted Wafers Stewed Fruit Watermelon |
FOURTH DAYBREAKFASTFresh Fruit Rolled Oats Tomato Toast Toasted Wafers Graham Bread Stewed or Fresh Berried Cream Graham Rolls with Raspberry Jelly DINNER String Bean Soup Stewed Split Peas Beets and Potato Pearl Wheat Graham Bread Toasted Rolls Rye Gems Stewed Fruit Whortleberry Pudding |
FIFTH DAYBREAKFASTFresh Fruit Graham Grits Celery Toast Graham Gems Cream Rolls Toasted Wafers Fresh Berries DINNER Swiss Potato Soup Stewed Lima Beans Lettuce Boiled Macaroni Whole-Wheat Puffs Toasted Rolls Fruit Crackers Fresh Berries Fruit Tapioca |
SIXTH DAYBREAKFASTFresh Fruit Rice with Lemon Fresh Berry Toast Cream Mush Rolls Graham Puffs Toasted Wafers Stewed Fruit DINNER Bean and Potato Soup Green Corn Pulp Stewed Potato Chopped Turnip Graham Grits Pop Overs Graham Bread Toasted Wafers Fresh Berries Cream Rice Pudding Stewed Fruit |
SABBATHBREAKFASTFresh Fruit Cracked Wheat with Blueberries Prune Toast Graham Crisps Raised Biscuit Stewed Fruit DINNER Green or Canned Pea Soup Creamed Potato Kornlet Celery Graham Grits Whole-Wheat Bread Fruit Rolls Stewed Fruit Fresh Fruit | |
THIRTY-SECOND WEEK | |
FIRST DAYBREAKFASTFresh Fruit Graham Mush Fresh Black Raspberry Toast Fresh Tomatoes Whole-Wheat Puffs Toasted Wafers Fruit Rolls Stewed or Fresh Berries DINNER Cream Rice Soup Boiled Potato with Brown Sauce Green Corn Pulp String Beans Pearl Wheat with Whortleberries Graham Gems Cream Crisps Stewed Fruit Raspberry Manioca Pudding |
SECOND DAYBREAKFASTFresh Fruit Graham Grits Gravy Toast Lettuce Breakfast Rolls Whortleberry Gems Toasted Wafers Fresh or Stewed Berries DINNER Green Corn Soup Beets and Potato Scalloped Egg Plant Boiled Wheat Graham Bread Toasted Wafers Crusts Stewed or Fresh Berries Whortleberry Pie |
THIRD DAYBREAKFASTFresh Fruit Oatmeal Dry Toast with Hot Cream Fresh Tomatoes Graham Puffs Breakfast Rolls Stewed or Fresh Berries Raspberry Jelly DINNER Tomato Cream Soup Potato Rice Stewed Lima Beans Radishes Green Corn Pudding Graham Mush with Berries Graham Gems Oatmeal Crisps Graham Bread Stewed Fruit Cream Rice Pudding |
FOURTH DAYBREAKFASTFresh Fruit Rolled Wheat Tomato Toast Oatmeal Crisps Graham Bread Baked Sweet Apples Stewed Fruit DINNER Lima Bean Soup Mashed Potato Scalloped Cauliflower Mashed Peas Graham Grits Graham Bread Toasted Wafers Whortleberry Gems Stewed or Fresh Fruit Molded Tapioca |
FIFTH DAYBREAKFASTFresh Fruit Graham Grits Gruel with Croutons Fresh Berry Toast Whole-Wheat Puffs Graham Bread Breakfast Rolls Lettuce Baked Sweet Apples Fresh Berries DINNER Cream Pea Soup Cracked Potato Scalloped Turnip Beet Greens Cracked Wheat with Blackberries Graham Bread Toasted Rolls Crusts Fresh or Stewed Fruit Banana Dessert |
SIXTH DAYBREAKFASTFresh Fruit Graham Mush with Blueberries Gravy Toast Fresh Tomatoes French Rolls Toasted Wafers Graham Puffs Fresh or Stewed Fruit DINNER Vegetable Broth Baked Potato Summer Squash Boiled Beets, sliced, with Cream Sauce Pearl Barley Graham Bread Whortleberry Gems Toasted Wafers Fresh Berries Damsons |
SABBATHBREAKFASTFresh Fruit Blackberry Mush Prune Toast Crusts Toasted Wafers Graham Bread Baked Sweet Apples Fresh Berries DINNER Tomato and Vermicelli Soup Stewed Potato Cold Sliced Beets Green Corn Pulp Rice Graham Bread Toasted Wafers Beaten Biscuit Stewed Fruit Blackberry Pie | |
THIRTY-THIRD WEEK | |
FIRST DAYBREAKFASTFresh Fruit Cerealine Flakes Snowflake Toast Beaten Biscuit Graham Bread Toasted Wafers Fresh Berries DINNER Green Pea Soup Scalloped Potato Boiled Corn Cauliflower with Egg Sauce Graham Grits Graham Puffs Toasted Wafers Sliced Peaches Nuts |
SECOND DAYBREAKFASTFresh Fruit Rolled Rye Cream Toast Whortleberry Gems Toasted Wafers Cream Rolls Fresh Blackberries DINNER Pea and Tomato Soup Baked Potato String Beans Macaroni with Tomato Sauce Farina with Banana Cream Rolls Toasted Wafers Graham Puffs Stewed Fruit Plums and Peaches |
THIRD DAYBREAKFASTFresh Fruit Rice with Peaches Blackberry Toast Fresh Tomatoes Whole-Wheat Puffs Sticks Toasted Wafers Stewed Fruit DINNER String Bean Soup Mashed Potato Baked Green Corn Scalloped Egg Plant Graham Grits Whole-Wheat Bread Graham Puffs Toasted Wafers Stewed Fruit Fresh Fruit |
FOURTH DAYBREAKFASTFresh Fruit Blackberry Mush Tomato Toast Baked Sweet Apples Graham Gems Toasted Wafers Raised Graham Biscuit Fresh Berries DINNER Celery Soup No. 2 Boiled Potato Macaroni baked with Granola Succotash Browned Rice Whole-Wheat Bread Toasted Wafers Graham Puffs Stewed Fruit Blackberry Cornstarch Pudding |
FIFTH DAYBREAKFASTFresh Fruit Oatmeal Porridge Berry Toast Beaten Biscuit Graham Bread Toasted Wafers Baked Sweet Apples Stewed Fruit DINNER Brown Soup Scalloped Potato Chopped Cabbage Mashed Peas Rice Graham Bread Sticks Stewed or Fresh Berries Bread Custard |
SIXTH DAYBREAKFASTFresh Fruit Granola Apple Mush Gravy Toast Whole-Wheat Puffs Toasted Wafers Graham Fruit Rolls Stewed Fruit DINNER Cream Pea Soup Boiled Potatoes Green Corn Sliced Tomatoes Cracked Wheat with Blackberries Graham Bread Fruit Rolls Rye Gems Sliced Peaches Pears |
SABBATHBREAKFASTFresh Fruit Rolled Oats Prune Toast Sliced Tomatoes Fruit Bread Cream Crisps Stewed or Sliced Peaches DINNER Green Corn Soup Boiled Macaroni Stewed Tomatoes Rice Fruit Bread Cream Crisps Toasted Wafers Stewed or Fresh Fruit Blackberry or Peach Pie | |
THIRTY-FOURTH WEEK | |
FIRST DAYBREAKFASTFresh Fruit Blackberry Mush Gravy Toast Graham Puffs Fruit Bread Toasted Wafers Baked Sweet Apples Stewed Fruit DINNER Tomato Cream Soup Potato Snowballs Stewed Corn Stewed Lima Beans Rolled Wheat Rye Puffs Cream Rolls Graham Bread Sliced Peaches Nuts |
SECOND DAYBREAKFASTFresh Fruit Oatmeal Porridge Cream Toast Sliced Tomato Graham Crisps Graham Bread Rye Gems Stewed Fruit DINNER Lima Bean Soup Mashed Potato Summer Squash Baked Beets with Lemon Dressing Pearl Barley Graham Bread Crusts Toasted Wafers Stewed or Fresh Berries Peach Tapioca |
THIRD DAYBREAKFASTFresh Fruit Rolled Wheat Tomato Toast Cottage Cheese Whole-Wheat Puffs Graham Bread Toasted Wafers Stewed Fruit DINNER Oatmeal Soup Broiled Potato Scalloped Tomatoes Green Corn Pulp Graham Grits French Rolls Cream Crisps Fresh Fruit Sliced Sweet Apples and Cream |
FOURTH DAYBREAKFASTFresh Fruit Rolled Rye Peach Toast Macaroni with Corn Pulp Fresh Tomatoes Cream Rolls Vienna Bread Toasted Wafers Stewed Fruit DINNER String Bean Soup Mashed Potato Scalloped Egg Plant Cabbage and Tomato Pearl Wheat Toasted Wafers Beaten Biscuit Vienna Bread Stewed Fruit Fruit Shape |
FIFTH DAYBREAKFASTFresh Fruit Granola Peach Mush Dry Toast with Hot Cream Celery Whole-Wheat Puffs Cream Rolls Graham Crackers Stewed Fruit DINNER White Celery Soup Steamed Potato Chopped Beets Mashed Peas Farina with Bananas Whole-Wheat Bread Cream Rolls Rye Puffs Sliced Peaches Baked Apple Dessert |
SIXTH DAYBREAKFASTFresh Fruit Graham Grits Berry Toast Baked Sweet Apples Fresh Tomatoes Currant Puffs Toasted Rolls Stewed Fruit DINNER Cream Pea Soup Baked Potato Stewed Celery Cauliflower with Tomato Sauce Boiled Wheat Whole-Wheat Puffs Graham Crackers Crescents Stewed Fruit Sago Fruit Pudding |
SABBATHBREAKFASTFresh Fruit Steamed Rice Tomato Toast Fruit Bread Toasted Wafers Breakfast Rolls Baked Sweet Apples Stewed Fruit DINNER Cream Barley Soup Creamed Potato Green Peas Pearl Wheat Fruit Bread Rolls Graham Crackers Sliced Peaches Nuts Tapioca Custard | |
THIRTY-FIFTH WEEK | |
FIRST DAYBREAKFASTFresh Fruit Graham Mush with dates Sliced Tomatoes Macaroni with Egg Sauce Whole-Wheat Puffs Cream Rolls Stewed Fruit DINNER Baked Bean Soup Steamed Potato Stewed Tomato Mashed Split Peas Rolled Rye Graham Bread Graham Puffs Toasted Wafers Stewed Fruit Peach Shortcake |
SECOND DAYBREAKFASTFresh Fruit Granola Peach Mush Cream Toast Sliced Tomatoes Graham Bread Graham Crisps Stewed Fruit DINNER Celery Soup No. 2. Boiled Potato Shelled Beans Cauliflower with Tomato Sauce Graham Grits Graham Bread Oatmeal Gems Toasted Wafers Stewed Fruit Baked Sweet Apples with Whipped Cream |
THIRD DAYBREAKFASTFresh Fruit Oatmeal Tomato Toast Macaroni Baked with Corn Pulp Whole-Wheat Bread Graham Puffs Toasted Wafers Stewed Fruit DINNER Cream Rice Soup Mashed Potato Stewed Celery Mashed Lentils and Beans Rolled Wheat Whole-Wheat Bread Crusts Toasted Wafers Stewed Fruit Peach Meringue |
FOURTH DAYBREAKFASTFresh Fruit Peach Mush Snowflake Toast Whole-Wheat Puffs Sticks Date Bread Baked Sweet Apples Stewed Fruit DINNER Black Bean Soup Potato Snowballs Corn and Tomatoes Scalloped Egg Plant Cracked Wheat Date Bread Graham Gems Toasted Wafers Stewed Fruit Grapes |
FIFTH DAYBREAKFASTFresh Fruit Rolled Oats Peach Toast Whole-Wheat Bread Breakfast Rolls Graham Gems Baked Pears Stewed Fruit DINNER Tomato and Macaroni Soup Boiled Potato Baked Corn Celery Pearl Barley Whole-Wheat Bread Graham Puffs Toasted Wafers Stewed Fruit Peach Shortcake |
SIXTH DAYBREAKFASTFresh Fruit Cerealine Flakes Strawberry Toast Macaroni with Cream Sauce Sliced Tomato Graham Puffs Parker House Rolls Toasted Wafers Stewed Fruit DINNER Potato Soup Baked Sweet Potato Mashed Peas Cauliflower with Egg Sauce Graham Grits Granola Fruit Rolls Graham Puffs Stewed Fruit Rice Cream Pudding |
SABBATHBREAKFASTFresh Fruit Rolled Wheat with Blackberries and Cream Prune Toast Fruit Rolls Raised Graham Biscuit Toasted Wafers Fresh Tomatoes Stewed Fruit DINNER Cream Pea Soup Mashed Sweet Potato String Beans Pearl Wheat with Peaches and Cream Buns Cream Rolls Toasted Wafers Nuts | |
THIRTY-SIXTH WEEK | |
FIRST DAYBREAKFASTFresh Fruit Graham Mush Blackberry Toast Sliced Tomato Currant Puffs Cream Rolls Toasted Wafers Baked Apples Stewed Fruit DINNER Sweet Potato Soup Steamed Potato Boiled Beets Stewed Lima Beans Rolled Wheat Buns Graham Puffs Toasted Wafers Stewed Fruit Peach Sandwich |
SECOND DAYBREAKFASTFresh Fruit Rolled Wheat Apricot Toast Zwieback Graham Puffs Breakfast Rolls Lemon Apples Stewed Fruit DINNER Lima Bean Soup Potato Stewed with Celery Mashed Squash Scalloped Tomatoes Farina Whole-Wheat Bread Toasted Rolls Graham Gems Sliced Peaches Bran Jelly with Fruit Sauce |
THIRD DAYBREAKFASTFresh Fruit Granola Apple Mush Blueberry Toast Cream Rolls Whole-Wheat Puffs Toasted Wafers Sliced Tomatoes Stewed Fruit DINNER Corn and Bean Soup Baked Potato Stewed Tomato Scalloped Cauliflower Pearl Wheat Whole-Wheat Bread Toasted Rolls Corn Puffs Stewed Fruit Farina Custard |
FOURTH DAYBREAKFASTFresh Fruit Oatmeal Tomato Toast Whole-Wheat Puffs Graham Bread Toasted Wafers Baked Sweet Apples Stewed Fruit DINNER Tomato and Rice Soup Baked Sweet Potato Mashed Beans Green Peas Graham Grits Oatmeal Bread Graham Puffs Toasted Wafers Sliced Peaches Red Rice |
FIFTH DAYBREAKFASTFresh Fruit Cracked Wheat Banana Toast Baked Sweet Apples Oatmeal Bread Graham Gems Toasted Wafers Stewed Fruit DINNER Celery Soup Mashed Potato Baked Tomato Baked Green Corn Graham Grits Graham Bread Sticks Rye Puffs Stewed Fruit Baked Apple Dessert |
SIXTH DAYBREAKFASTFresh Fruit Rice Cream Toast Whole-Wheat Puffs Corn Cakes Sticks Sliced Tomatoes Stewed Fruit DINNER Potato and Rice Soup Macaroni Baked with Granola Mashed Cabbage String Beans Pearl Wheat Pop Overs Cream Crisps Graham Bread Stewed Fruit Almonds |
SABBATHBREAKFASTFresh Fruit Rolled Oats Tomato Toast Toasted Wafers Fruit Rolls Raised Biscuit Baked Pears Stewed Fruit DINNER Green Corn Soup Tomato and Macaroni Stewed Potato Rolled Wheat Fruit Bread Cream Crisps Stewed Fruit Peach Pie Grapes | |
THIRTY-SEVENTH WEEK | |
FIRST DAYBREAKFASTFresh Fruit Cerealine Flakes Toast with Egg Sauce Fruit Bread Breakfast Rolls Toasted Wafers Baked Sweet Apples Sliced Peaches DINNER Green Bean Soup Mashed Potato Baked Squash Corn Pudding Graham Grits Graham Bread Currant Puffs Toasted Wafers Stewed Fruit Peach Shortcake |
SECOND DAYBREAKFASTFresh Fruit Peach Mush Tomato Toast Macaroni with Kornlet Graham Bread Cream Mush Rolls Stewed Fruit DINNER Cream Pea Soup Baked Potato Shelled Beans Cauliflower with Tomato Sauce Browned Rice Toasted Rolls Graham Bread Whole-wheat Puffs Stewed Fruit Jam Pudding |
THIRD DAYBREAKFASTFresh Fruit Oatmeal Porridge Peach Toast Sliced Tomato Graham Crisps Graham Gems Stewed Fruit DINNER Cream Barley Soup Scalloped Potato Beet Salad Macaroni with Tomato Sauce Rice Whole-Wheat Bread Toasted Wafers Graham Gems Stewed Fruit Molded Wheat with Grape Sauce |
FOURTH DAYBREAKFASTFresh Fruit Graham Grits Dry Toast with Tomato Gravy Whole-Wheat Bread Crusts Breakfast Rolls Baked Pears Stewed Fruit DINNER White Celery Soup Baked Sweet Potato Mashed Peas Scalloped Tomatoes Pearl Wheat Whole-Wheat Bread Beaten Biscuit Graham Crackers Stewed Fruit Cocoanut Rice Custard |
FIFTH DAYBREAKFASTFresh Fruit Rolled Oats Macaroni with Apple Sauce Sliced Tomato Whole-Wheat Puffs Toasted Wafers Stewed Fruit DINNER Lentil Soup Mashed Potato Baked Squash String Beans Rolled Rye Whole-Wheat Bread Crusts Graham Crisps Stewed Fruit Peach Pudding or Fresh Fruit |
SIXTH DAYBREAKFASTFresh Fruit Graham Mush with Fruit Gravy Toast Whole-Wheat Puffs Crescents Toasted Wafers Baked Apples Stewed Fruit DINNER Split Pea Soup Baked Potato Baked Tomato Green Corn Pulp Rice Fruit Loaf Graham Gems Sticks Stewed Fruit Sweet Apple Pie or Fresh Fruit |
SABBATHBREAKFASTFresh Fruit Rolled Wheat Peach Toast Sliced Tomato Baked Pears Fruit Bread Beaten Biscuit Stewed Fruit DINNER Green Corn Soup Stewed Lima Beans Mashed Sweet Potato Rice with Peaches Beaten Biscuit Currant Buns Stewed Fruit Pears | |
THIRTY-EIGHTH WEEK | |
FIRST DAYBREAKFASTFresh Fruit Peach Mush Dry Toast with Hot Cream Macaroni with Tomato Sauce Toasted Beaten Biscuit Fruit Bread Stewed Fruit DINNER Bean and Tapioca Soup Mashed Potato Stewed Celery Baked Squash Rolled Wheat Whole-Wheat Bread Currant Puffs Toasted Wafers Stewed Fruit Peach Tapioca |
SECOND DAYBREAKFASTFresh Fruit Rolled Rye Lentil Toast Sliced Tomato Cream Rolls Graham Puffs Toasted Wafers Stewed Fruit DINNER Lentil Soup Potato Snowballs Stewed Tomato Egg and Macaroni Browned Rice Whole-Wheat Bread Toasted Rolls Crusts Stewed Fruit Plain Fruit Pudding |
THIRD DAYBREAKFASTFresh Fruit Oatmeal Sweet Apple Toast Cottage Cheese Whole-Wheat Puffs French Rolls Graham Crisps Stewed Fruit DINNER Plain Rice Soup Baked Potato with Celery Sauce Shelled Beans Baked Corn Farina with Fresh Fruit Graham Puffs Oatmeal Crisps Stewed Fruit Fresh Fruit, or Sweet Apple Pudding |
FOURTH DAYBREAKFASTFresh Fruit Rice with Peaches Tomato Toast Whole-Wheat Puffs Oatmeal Crisps Breakfast Rolls Sliced Peaches DINNER Shelled Bean Soup Mashed Sweet Potato Scalloped Tomatoes Celery Pearl Wheat Toasted Rolls Buns Graham Puffs Stewed Fruit Apple Manioca |
FIFTH DAYBREAKFASTFresh Fruit Rolled Oats Strawberry Toast Graham Bread Toasted Wafers Rye Gems Baked Sweet Apples Stewed Fruit DINNER Oatmeal Soup Mashed Potato Mashed Squash Boiled Macaroni Browned Rice Graham Bread Beaten Biscuit Fruit Crackers Stewed Fruit Cup Custard |
SIXTH DAYBREAKFASTFresh Fruit Cerealine Macaroni with Raisins Slice Tomatoes Cream Rolls Whole-Wheat Puffs Toasted Wafers Stewed Fruit DINNER Brown Soup Boiled Potato Stewed Celery Pease Cakes with Tomato Sauce Graham Grits Raised Biscuit Graham Gems Toasted Wafers Stewed Fruit Grape Tart |
SABBATHBREAKFASTFresh Fruit Rice Grape Toast Fruit Bread Beaten Biscuit Baked Apples Stewed Fruit DINNER Tomato and Vermicelli Soup Mashed Sweet Potato Stewed Corn Boiled Wheat Fruit Bread Beaten Biscuits Stewed Fruit Farina Blancmange with Grape Sauce | |
THIRTY-NINTH WEEK | |
FIRST DAYBREAKFASTFresh Fruit Granola Fruit Mush Gravy Toast Whole-Wheat Puffs Toasted Wafers Stewed Fruit DINNER Bean and Tomato Soup Mashed Potato Boiled Green Corn String Beans Rolled Wheat Toasted Wafers Whole-Wheat Bread Corn Puffs Stewed Fruit Stewed Fruit Pudding |
SECOND DAYBREAKFASTFresh Fruit Peach Mush Snowflake Toast Graham Puffs Cream Rolls Baked Pears Stewed Fruit DINNER Green Bean Soup Potato Cakes Stewed Tomato Baked Beets Cracked Wheat Pop Overs Toasted Wafers Graham Bread Stewed Fruit Bread Custard |
THIRD DAYBREAKFASTFresh Fruit Oatmeal Tomato Toast Graham Bread Corn Puffs Graham Crisps Baked Sweet Apples Stewed Fruit DINNER Mixed Potato Soup Baked Potato Chopped Beets Succotash Graham Grits Graham Bread Toasted Wafers Rye Gems Stewed Fruit Cracked Wheat Pudding |
FOURTH DAYBREAKFASTFresh Fruit Plum Porridge Cream Toast Cottage Cheese Whole-Wheat Puffs Toasted Wafers Graham Bread Stewed Fruit DINNER Pea and Tomato Soup Mashed Potato Stewed Celery Corn Pudding Rolled Wheat Graham Puffs Toasted Wafers Buns Stewed Fruit Rice and Tapioca Pudding |
FIFTH DAYBREAKFASTFresh Fruit Rolled Oats Tomato Toast Whole-Wheat Puffs Raised Biscuit Toasted Wafers Baked Sour Apples Stewed Fruit DINNER Green Corn Soup Steamed Potato Mashed Squash Scalloped Turnip Rolled Wheat Crusts Toasted Wafers Graham Bread Stewed Fruit Lemon Cornstarch Pudding |
SIXTH DAYBREAKFASTFresh Fruit Oatmeal Gruel with Croutons Grape Toast Macaroni with Kornlet Cream Rolls Graham Puffs Stewed Fruit DINNER Swiss Potato Soup Creamed Potato Celery Macaroni with Tomato Sauce Cracked Wheat Graham Bread Toasted Rolls Fruit Crackers Stewed Fruit Snowball Custard |
SABBATHBREAKFASTFresh Fruit Rice with Peaches Apricot Toast Toasted Wafers Fruit Rolls Whole-Wheat Bread Stewed Fruit DINNER Cream Pea Soup Chopped Sweet Potato Sliced Tomato Rice Whole-Wheat Bread Fruit Rolls Toasted Wafers Stewed Fruit Grape Pie | |
FORTIETH WEEK | |
FIRST DAYBREAKFASTFresh Fruit Grape Mush Cream Toast Graham Gems Toasted Rolls Steamed Figs Stewed Fruit DINNER Potato and Vermicelli Soup Boiled Macaroni Stewed Lima Beans Boiled Corn Cracked Wheat Whole-Wheat Puffs Corn Cakes Toasted Wafers Stewed Fruit Cornstarch Meringue |
SECOND DAYBREAKFASTFresh Fruit Rolled Oats Celery Toast Baked Sweet Potatoes Whole-Wheat Puffs Toasted Wafers Graham Bread Tomato Salad DINNER Lima Bean Soup Mashed Potato Scalloped Tomatoes Green Corn Cakes Mixed Mush Sally Lunn Gems Graham Bread Toasted Wafers Stewed Fruit Rice Snow |
THIRD DAYBREAKFASTFresh Fruit Rice Tomato Toast Graham Crisps Raised Biscuit Grape Apples Stewed Fruit DINNER Brown Soup Potato Snowballs Stewed Split Peas Scalloped Cauliflower Graham Grits Whole-Wheat Bread Graham Crisps Corn Puffs Stewed Fruit Farina Blancmange with Grape Sauce |
FOURTH DAYBREAKFASTFresh Fruit Granola Apple Mush Grape Toast Cream Rolls Rye Gems Whole-Wheat Bread Cup Custard Stewed Fruit DINNER Pea and Tomato Soup Baked Potato Baked Squash Boiled Beets with Cream Sauce Pearl Wheat Whole-Wheat Puffs Sticks Raised Corn Bread Stewed Fruit Nuts |
FIFTH DAYBREAKFASTFresh Fruit Rolled Rye Gravy Toast Oatmeal Crisps Corn Bread Whole-Wheat Puffs Baked Apples Stewed Fruit DINNER Vegetable Soup Mashed Potato Scalloped Egg Plant Macaroni with Tomato Sauce Rolls Toasted Wafers Graham Bread Farina Stewed Fruit Almond Cornstarch Pudding with Grape Sauce |
SIXTH DAYBREAKFASTFresh Fruit Grape Mush Cream Toast Fruit Bread Graham Puffs Toasted Wafers Granola Baked Apples Stewed Fruit DINNER Baked Bean Soup Potato Rice Mashed Squash Boiled Green Corn Graham Mush Fruit Bread Toasted Wafers Graham Puffs Stewed Fruit Apple Sandwich |
SABBATHBREAKFASTFresh Fruit Rice with Fig Sauce Peach Toast Sliced Tomato Fruit Bread Beaten Biscuit Toasted Wafers Stewed Fruit DINNER Tomato and Vermicelli Soup Mashed Sweet Potato Green Corn Pulp Boiled Wheat Fruit Bread Beaten Biscuit Grape Tarts Stewed Fruit | |
FORTY-FIRST WEEK | |
FIRST DAYBREAKFASTFresh Fruit Browned Rice Grape Toast Toasted Beaten Biscuit Graham Puffs Baked Sweet Apples Stewed Fruit DINNER Corn and Tomato Soup Sweet Potato Cakes Shelled Beans Macaroni Baked with Granola Farina Graham Puffs Zwieback Cream Rolls Stewed Fruit Fresh Fruit |
SECOND DAYBREAKFASTFresh Fruit Granola Apple Mush Gravy Toast Sliced Tomato Toasted Rolls Corn Dodgers Stewed Fruit DINNER Shelled Bean Soup Baked Potato with Brown Sauce Chopped Cabbage Baked Tomato Pearl Barley Graham Puffs Sticks Rye Bread Stewed Fruit Rice Cream Pudding |
THIRD DAYBREAKFASTFresh Fruit Oatmeal Porridge Dry Toast with Hot Cream Rye Bread Toasted Wafers Graham Puffs Baked Sour Apples Stewed Fruit DINNER Tomato and Rice Soup Steamed Potato with Cream Sauce Baked Squash Mashed Peas Graham Apple Mush Rye Bread Zwieback Graham Gems Stewed Fruit Fresh Fruit |
FOURTH DAYBREAKFASTFresh Fruit Graham Mush with dates Gravy Toast Rye Bread Toasted Wafers Corn Puffs Lemon Apples Stewed Fruit DINNER Cream Pea Soup Scalloped Potato Chopped Turnip Macaroni Baked with Kornlet Steamed Rice Toasted Wafers Currant Puffs Rye Bread Stewed Fruit Cornmeal Pudding |
FIFTH DAYBREAKFASTFresh Fruit Rolled Rye Tomato Toast Graham Bread Breakfast Rolls Baked Sweet Apples Stewed Fruit DINNER Swiss Potato Soup Baked Beans Boiled Macaroni Boiled Wheat Graham Bread Toasted Wafers Whole-Wheat Puffs Stewed Fruit Rice and Tapioca Pudding |
SIXTH DAYBREAKFASTFresh Fruit Rice with Lentil Gravy Gravy Toast Sliced Tomato Graham Puffs Toasted Wafers Stewed Fruit DINNER Corn and Bean Soup Mashed Potato Scalloped Tomato Stewed Celery Cracked Wheat Graham Bread Zwieback Crusts Stewed Fruit Graham Grits Pudding |
SABBATHBREAKFASTFresh Fruit Rolled Oats Grape Toast Graham Raised Biscuit Toasted Wafers Breakfast Rolls Baked Sweet Apples Cup Custard Stewed Fruit DINNER Tomato and Macaroni Soup Broiled Potato Stewed Corn Browned Rice Graham Biscuit Beaten Biscuit Stewed Fruit Apple Pie | |
FORTY-SECOND WEEK | |
FIRST DAYBREAKFASTFresh Fruit Cerealine Flakes Gravy Toast Caked Peas Whole-Wheat Puffs Toasted Beaten Biscuit Stewed Fruit DINNER Celery Soup Boiled Potato with Tomato Cream Sauce Baked Cauliflower Shelled Beans Graham Grits Currant Puffs Cream Rolls Toasted Wafers Stewed Fruit Tapioca Grape Jelly |
SECOND DAYBREAKFASTFresh Fruit Oatmeal Tomato Toast Whole-Wheat Puffs Toasted Rolls Bakes Apples Stewed Fruit DINNER Potato Soup Mashed Peas Mashed Cabbage Cracked Wheat Whole-Wheat Puffs Graham Crisps Stewed Fruit Rice Cream Pudding |
THIRD DAYBREAKFASTFresh Fruit Graham Mush Grape Toast Cream Rolls Toasted Wafers Graham Gems Baked Apples Stewed Fruit DINNER Cream Pea Soup Steamed Potato Boiled Beets Celery Tomato and Macaroni Rice Parker House Rolls Graham Gems Toasted Wafers Stewed Fruit Cracked Wheat Pudding |
FOURTH DAYBREAKFASTFresh Fruit Steamed Rice with Grape Sauce Prune Toast Graham Bread Toasted Wafers Crusts Baked Pears Stewed Fruit DINNER Swiss Lentil Soup Baked Potato Baked Squash Chopped Cabbage Boiled Wheat Graham Bread Rye Gems Toasted Wafers Stewed Fruit Rice Snowballs |
FIFTH DAYBREAKFASTFresh Fruit Rolled Oats Lentil Toast Whole-Wheat Puffs Toasted Wafers Graham Bread Stewed Fruit DINNER Tomato and Macaroni Soup Baked Sweet Potato Stewed Celery Boiled Green Corn Rolled Rye Graham Bread Currant Puffs Sticks Stewed Fruit Molded Wheat with Grape Sauce |
SIXTH DAYBREAKFASTFresh Fruit Oatmeal Gruel with Croutons Tomato Toast Graham Crisps Graham Bread Pop Overs Stewed Fruit DINNER Green Corn Soup Chopped Potato Baked Beans Mashed Squash Farina Cream Mush Rolls Vienna Bread Stewed Fruit Stewed Fruit Pudding |
SABBATHBREAKFASTFresh Fruit Cracked Wheat with Raisins Prune Toast Vienna Bread Beaten Biscuit Toasted Rolls Baked Apples Stewed Fruit DINNER Bean and Potato Soup Stewed Corn Boiled Macaroni Granola Fruit Mush Buns Beaten Biscuit Toasted Wafers Stewed Fruit Nuts Fresh Fruit | |
FORTY-THIRD WEEK | |
FIRST DAYBREAKFASTFresh Fruit Stewed Fruit Granola Apple Mush Dry Toast with Hot Cream Whole-Wheat Puffs Toasted Beaten Biscuit Baked Apples Stewed Fruit DINNER Celery Soup Mashed Potato Scalloped Tomato Mashed Peas Graham Grits Corn Puffs Cream Crisps Graham Gems Stewed Fruit Fresh Fruit |
SECOND DAYBREAKFASTFresh Fruit Rolled Wheat Tomato Toast Cream Rolls Whole-Wheat Bread Graham Gems Grape Apples Stewed Fruit DINNER Cream Pea Soup Baked Potatoes with Brown Sauce Shelled Beans Corn and Tomato Graham Grits Toasted Rolls Whole-Wheat Bread Currant Puffs Stewed Fruit Bake Sweet Apples with Whipped Cream |
THIRD DAYBREAKFASTFresh Fruit Oatmeal Porridge with Croutons Grape Toast Whole-Wheat Puffs Sticks Fruit Crackers Bake Sweet Apples Stewed Fruit DINNER Plain Rice Soup Baked Potatoes with Celery Sauce Mashed Beans Parsnip with Cream Sauce Graham Grits Corn Bread Whole-Wheat Puffs Toasted Wafers Stewed Fruit Apple Tart |
FOURTH DAYBREAKFASTFresh Fruit Rolled Oats Gravy Toast Cream Rolls Whole-Wheat Bread Toasted Wafers Baked Sweet Apples Stewed Fruit DINNER Bean and Tomato Soup Mashed Potato Chopped Beets Macaroni Baked with Granola Rice Whole-Wheat Bread Graham Gems Cream Crisps Stewed Fruit Farina Blancmange |
FIFTH DAYBREAKFASTFresh Fruit Oatmeal Blancmange with Grape Sauce Sweet Apple Toast Corn Meal Gruel with Croutons Whole-Wheat Puffs Cream Crisps French Rolls Stewed Fruit DINNER Tomato Cream Soup Mashed Potato Mashed Squash Baked Turnip Pearl Wheat with Raisins Whole-Wheat Bread Graham Crisps Toasted Wafers Stewed Fruit Rice Custard |
SIXTH DAYBREAKFASTFresh Fruit Rolled Rye Peach Toast Whole-Wheat Puffs Graham Bread Toasted Wafers Baked Pears Stewed Fruit DINNER Cream Barley Soup Scalloped Potato Succotash Scalloped Tomato Graham Grits Graham Puffs Graham Bread Sticks Stewed Fruit Plain Fruit Pudding |
SABBATHBREAKFASTFresh Fruit Granola Fruit Mush Prune Toast Beaten Biscuit Buns Toasted Wafers Baked Chestnuts Cup Custard Stewed Fruit DINNER Corn Soup Canned Green Peas Tomato and Macaroni Graham Grits Fruit Bread Toasted Wafers Stewed Fruit Squash Pie | |
FORTY-FOURTH WEEK | |
FIRST DAYBREAKFASTAlmonds with Wafers Cerealine Steamed Eggs Baked Potato Toasted Beaten Biscuit Graham Gems Stewed Fruit DINNER Potato Soup Macaroni with Cream Sauce Mashed Beans Baked Corn Browned Rice Graham Bread Cream Crisps Graham Gems Stewed Fruit Baked Sweet Apple Pudding |
SECOND DAYBREAKFASTFresh Fruit Rolled Oats Cream Toast Whole-Wheat Puffs Cream Crisps Fruit Rolls Baked Sweet Apples Stewed Fruit DINNER Bean and Tomato Soup Potato Rice Mashed Squash Stewed Celery Cracked Wheat Graham Puffs Fruit Rolls Toasted Wafers Stewed Fruit Macaroni Pudding |
THIRD DAYBREAKFASTFresh Fruit Granola Peach Mush Snowflake Toast Macaroni with Kornlet Cream Mush Rolls Fruit Loaf Graham Crackers Stewed Fruit DINNER Oatmeal Soup Potato Cakes Celery Cauliflower with Tomato Sauce Hominy Fruit Loaf Toasted Rolls Graham Puffs Stewed Fruit Snow Pudding |
FOURTH DAYBREAKFASTFresh Fruit Cracked Wheat Dry Toast with Hot Cream Hominy Gems Toasted Wafers Graham Bread Cottage Cheese Stewed Fruit DINNER Black Bean Soup Potato Snowballs Scalloped Tomato Parsnip with Egg Sauce Rolled Wheat Corn Puffs Whole-Wheat Bread Cream Crisps Stewed Fruit Farina Blancmange |
FIFTH DAYBREAKFASTFresh Fruit Graham Grits Berry Toast Whole-Wheat Puffs Toasted Wafers Crescents Granola Baked Sweet Apples Stewed Fruit DINNER Cream Barley Soup Mashed Potato Carrots with Egg Sauce Scalloped Beans Rice Graham Bread Crusts Toasted Wafers Stewed Fruit Prune and Tapioca Pudding |
SIXTH DAYBREAKFASTFresh Fruit Rolled Wheat with Baked Apples Gravy Toast Toasted Wafers Graham Bread Cream Rolls and Crab Apple Jelly Stewed Fruit DINNER Tomato and Macaroni Soup Baked Sweet Potato Stewed Celery Shelled Beans Pearl Barley with Raisins Graham Bread Corn Cake Toasted Wafers Stewed Fruit Tapioca Custard |
SABBATHBREAKFASTFresh Fruit Rolled Oats Blackberry Toast Beaten Biscuits Fruit Bread Lemon Apples Stewed Fruit DINNER Plain Rice Soup Warmed-over Sweet Potato Stewed Corn Boiled Wheat Graham Bread Beaten Biscuit Toasted Wafers Stewed Fruit Nuts | |
FORTY-FIFTH WEEK | |
FIRST DAYBREAKFASTFresh Fruit Oatmeal Porridge Dry Toast with Hot Cream Corn Puffs Toasted Wafers Fruit Loaf Roasted Almonds Stewed Fruit DINNER Vegetable Soup Steamed Potatoes with Tomato Cream Sauce Stewed Cabbage Mashed Squash Pearl Wheat Graham Bread Crusts Toasted Wafers Stewed Fruit Sago Pudding |
SECOND DAYBREAKFASTFresh Fruit Samp and Milk Gravy Toast Whole-Wheat Puffs Toasted Wafers Hoe Cake Baked Apples Stewed Fruit DINNER Swiss Lentil Soup Mashed Potatoes Celery and Tomato Turnip with Cream Sauce Oatmeal Crisps Graham Bread Toasted Wafers Graham Grits Stewed Fruit Baked Corn Meal Pudding |
THIRD DAYBREAKFASTFresh Fruit Rolled Oats Banana Toast Breakfast Rolls Toasted Wafers Graham Bread Granola Baked Sweet Apples Stewed Fruit DINNER Swiss Potato Soup Mashed Potato Mashed Peas Broccoli with Egg Sauce Cracked Wheat with Raisins Toasted Rolls Graham Puffs Stewed Fruit Nuts |
FOURTH DAYBREAKFASTFresh Fruit Plum Porridge Berry Toast Graham Crackers Hoe Cake Whole-Wheat Puffs Baked Apples Stewed Fruit DINNER Tomato and Macaroni Soup Boiled Potato with Celery Sauce Baked Beets Stewed Lima Beans Farina Raised Corn Cake Toasted Wafers Cream Rolls Stewed Fruit Apple Tart |
FIFTH DAYBREAKFASTFresh Fruit Rice with Fig Sauce Cream Toast Currant Puffs Graham Bread Toasted Wafers Baked Apples Stewed Fruit DINNER Cream Pea Soup Browned Potatoes Succotash Steamed Squash Graham Grits Graham Bread Rye Gems Toasted Wafers Stewed Fruit Farina Custard |
SIXTH DAYBREAKFASTFresh Fruit Oatmeal Lentil Toast Macaroni with Tomato Sauce Cream Rolls Rye Bread Toasted Wafers Stewed Fruit Roasted Almonds DINNER Potato Soup Potato Puff Browned Parsnips Celery Mashed Peas Rolled Wheat Rye Bread Whole-Wheat Puffs Graham Crisps Apple Rose Cream |
SABBATHBREAKFASTFresh Fruit Rolled Wheat Prune Toast Fruit Bread Beaten Biscuit White Custard in Cups Stewed Fruit DINNER Cream Pea Soup Stewed Potato Kornlet and Tomato Rice Rye Bread Buns Toasted Wafers Stewed Fruit Apple Pie Fresh Fruit | |
FORTY-SIXTH WEEK | |
FIRST DAYBREAKFASTFresh Fruit Graham Mush with Dates Gravy Toast Rye Bread Toasted Wafers Whole-Wheat Puffs Steamed Figs Stewed Fruit DINNER Canned Green Pea Soup Scalloped Potatoes Baked Beans Macaroni with Egg Farina Pop Overs Toasted Wafers Rye Bread Stewed Fruit Rice Cream Pudding |
SECOND DAYBREAKFASTFresh Fruit Graham Grits Blackberry Toast Rice with Lentil Gravy Graham Puffs Toasted Wafers Rye Bread Baked Apples Stewed Fruit DINNER Bean and Hominy Soup Boiled Potatoes Stewed Celery Creamed Parsnips Pearl Wheat Raised Corn Bread Toasted Wafers Graham Gems Stewed Fruit |
THIRD DAYBREAKFASTFresh Fruit Samp and Milk Dry Toast with Hot Cream Corn Puffs Toasted Wafers Breakfast Rolls Baked Apples Stewed Fruit DINNER Brown Soup Scalloped Potatoes Beet Salad Mashed Turnips Boiled Wheat Hoe Cake Toasted Rolls Graham Bread Stewed Fruit Cracked Wheat Pudding |
FOURTH DAYBREAKFASTFresh Fruit Rolled Oats Tomato Toast Rice and Corn Puffs Graham Bread Toasted Wafers Baked Apples Stewed Fruit DINNER Potato Soup Macaroni Baked with Granola Succotash Baked Squash Pearl Barley Pulled Bread Oatmeal Crisps Graham Puffs Stewed Fruit Apple Tart |
FIFTH DAYBREAKFASTFresh Fruit Rolled Wheat Celery Toast Baked Potato with Cream Sauce Corn Cakes Pulled Bread Oatmeal Crisps Stewed Fruit DINNER Cream Barley Soup Baked Sweet Potato Scalloped Tomatoes Celery Pearl Wheat Rye Gems Graham Bread Toasted Wafers Stewed Fruit Bread Custard |
SIXTH DAYBREAKFASTFresh Fruit Mixed Mush Snowflake Toast Graham Bread Cream Rolls Steamed Figs Stewed Fruit DINNER Tomato Cream Soup Potatoes Stewed with Celery Parsnips with Egg Sauce Mashed Peas Oatmeal Blancmange with Cranberry Sauce Graham Bread Toasted Wafers Raised Corn Cake Stewed Fruit Nuts |
SABBATHBREAKFASTFresh Fruit Rice with Fig Sauce Cream Toast Whole-Wheat Puffs Buns Toasted Wafers Baked Apples Stewed Fruit DINNER Canned Corn Soup Canned Peas Macaroni with Egg Sauce Cracked Wheat Toasted Wafers Beaten Biscuit Fruit Bread Stewed Fruit Cranberry Pie | |
FORTY-SEVENTH WEEK | |
FIRST DAYBREAKFASTFresh Fruit Corn Meal Mush and Milk Gravy Toast Whole-Wheat Puffs Fruit Bread Toasted Beaten Biscuit Baked Chestnuts Stewed Fruit DINNER Combination Soup Baked Potato with Brown Sauce Scalloped Turnips Mashed Squash Graham Grits Raised Corn Cake Graham Gems Toasted Wafers Stewed Fruit Apple Tapioca |
SECOND DAYBREAKFASTFresh Fruit Graham Gruel with Toasted Wafers Blueberry Toast Breakfast Rolls Corn Bread Baked Apples Stewed Fruit DINNER Swiss Potato Soup Baked Sweet Potato Mashed Beans Stewed Sweet Corn Cracked Wheat Toasted Rolls Pulled Bread Graham Puffs Stewed Fruit Rice Cream Pudding |
THIRD DAYBREAKFASTFresh Fruit Rolled Wheat with Raisins Banana Toast Hoe Cake Toasted Wafers Whole-Wheat Puffs Stewed Fruit DINNER Vegetable Oyster Soup Boiled Potatoes with Tomato Cream Sauce Mashed Parsnips Mashed Lentils Graham Grits Whole-Wheat Bread Bean Gems Toasted Wafers Stewed Fruit Almonds |
FOURTH DAYBREAKFASTFresh Fruit Oatmeal Cream Toast Potato Cakes Celery Corn Bread Graham Gems Toasted Wafers Stewed Fruit DINNER Parsnip Soup Scalloped Potatoes Mashed Peas Macaroni with Tomato Sauce Steamed Rice Whole-Wheat Bread Graham Gems Toasted Wafers Stewed Fruit Cup Custards |
FIFTH DAYBREAKFASTFresh Fruit Oatmeal Porridge with Toasted Wafers Gravy Toast Whole-Wheat Puffs Hoe Cakes Steamed Figs Stewed Fruit DINNER Cream Pea Soup Baked Potato Boiled Macaroni Stewed Cabbage and Tomato Graham Grits Zwieback Graham Bread Corn Puffs Stewed Fruit Apple Rose Cream |
SIXTH DAYBREAKFASTFresh Fruit Rolled Oats Tomato toast Macaroni with Kornlet Whole-Wheat Bread Toasted Wafers Rye Gems Stewed Fruit DINNER Plain Rice Soup Mashed Potatoes Baked Squash Scalloped Beans Graham Mush Whole-Wheat Bread Oatmeal Crisps Graham Crusts Stewed Fruit Baked Apple Loaf |
SABBATHBREAKFASTFresh Fruit Rolled Rye Prune Toast Beaten Biscuit Whole-Wheat Bread Graham Crackers Grape Apples Stewed Fruit DINNER Lima Bean Soup Mashed Sweet Potatoes Scalloped Tomato Rice Fruit Bread Beaten Biscuit Stewed Fruit Farina Blancmange | |
FORTY-EIGHTH WEEK | |
FIRST DAYBREAKFASTFresh Fruit Graham Mash with Dates Blackberry Toast Whole-Wheat Puffs Fruit Bread Toasted Wafers Baked Apples Stewed Fruit DINNER Green Pea Soup Boiled Potato with Cream Sauce Mashed Lima Beans Stewed Vegetable Oysters Graham Grits Corn Puffs Toasted Wafers Graham Crusts Stewed Fruit Rice Custard Pudding |
SECOND DAYBREAKFASTBaked Chestnuts Samp and Milk Vegetable Oyster Toast Creamed Potatoes Toasted Wafers Graham Bread Whole-Wheat Puffs Stewed Fruit DINNER Bean and Tomato Soup Mashed Potato Stewed Split Peas Macaroni with Egg Cracked Wheat Parker House Rolls Sticks Corn Puffs Stewed Fruit Prune Tapioca |
THIRD DAYBREAKFASTFresh Fruit Rolled Oats Prune Toast Graham Sticks Fruit Loaf Baked Apples Roasted Almonds Stewed Fruit DINNER Swiss Potato Soup Baked Potato Boiled Beets with Cream Sauce Macaroni with Tomato Sauce Rolled Wheat Fruit Loaf Rye Gems Toasted Wafers Stewed Fruit Baked Apples with Whipped Cream |
FOURTH DAYBREAKFASTFresh Fruit Steamed Rice Lentil Toast Whole-Wheat Puffs Graham Crisps Fruit Bread DINNER Vegetable Oyster Soup Mashed Potato Parsnips with Egg Sauce Succotash Boiled Wheat with Lemon Sauce Graham Crisps Beaten Biscuit Whole-Wheat Puffs Cocoanut Blancmange Cranberry Jelly |
FIFTH DAYBREAKFASTFresh Fruit Oatmeal Gruel with Croutons Tomato Toast Macaroni with Raisins Whole-Wheat Puffs Toasted Wafers Beaten Biscuit Stewed Fruit Baked Apples DINNER Cream Barley Soup Mashed Sweet Potato Mashed Peas Stewed Celery Hominy Cream Crisps Corn Cake Graham Bread Stewed Fruit Apple Tart |
SIXTH DAYBREAKFASTFresh Fruit Graham Apple Mush Tomato Toast Cream Crisps Graham Bread Hominy Gems Baked Apples Stewed Fruit DINNER Cream Pea soup Boiled Potato Scalloped Tomatoes Mashed Squash Cracked Wheat with Raisins Graham Bread Rye Gems Toasted Wafers Stewed Fruit Baked Apples with Cream Sauce |
SABBATHBREAKFASTFresh Fruit Rice with Raisins Prune toast Toasted Wafers Crescents Graham Bread Baked Apples Cup Custards Stewed Fruit DINNER Tomato and Macaroni Soup Canned Sweet Corn Cold Boiled Beets, Sliced Graham Grits Beaten Biscuit Graham Bread Toasted Wafers Stewed Fruit Prune Pie | |
FORTY-NINTH WEEK. | |
FIRST DAYBREAKFASTFresh Fruit Graham Mush with Chopped Figs Gravy Toast Cream Rolls Corn Gems Baked Chestnuts Stewed Fruit DINNER Canned Corn Soup Mashed Potato Chopped Beets Stewed Parsnips with Celery Rolled Wheat Toasted Rolls Whole-Wheat Puffs Graham Bread Stewed Fruit Fig Pudding with Orange Sauce |
SECOND DAYBREAKFASTFresh Fruit Oatmeal Cracker Toast Graham Sticks Currant Puff Graham Bread Baked Apples Stewed Fruit DINNER Cream Pea Soup Potato Rice Chopped Cabbage Scalloped Vegetable Oysters Browned Rice Graham Sticks Raised Corn Cake Stewed Fruit Cracked Wheat Pudding |
THIRD DAYBREAKFASTFresh Fruit Granola Fruit Mush Cream Toast Boiled Macaroni Hoe Cake Whole-Wheat Bread Toasted Wafers Baked Apples Stewed Fruit DINNER Vegetable Oyster Soup Steamed Potato with Cream Sauce Stewed Corn and Tomatoes Mashed Squash Mixed Mush Pop Overs Toasted Wafers Cream Rolls Stewed Fruit Cornstarch Blancmange |
FOURTH DAYBREAKFASTFresh Fruit Graham Grits Strawberry Toast Whole-Wheat Puffs Graham Bread Cream Rolls Baked Chestnuts Stewed Fruit DINNER Pea and Tomato Soup Mashed Potato Stewed Pumpkin Macaroni Baked with Granola Pearl Barley Graham Bread Sally Lunn Gems Toasted Rolls Stewed Fruit Molded Tapioca |
FIFTH DAYBREAKFASTFresh Fruit Graham Mush Tomato Toast Potato Cakes Graham Bread Rye Gems Toasted Wafers Stewed Fruit DINNER Tomato and Macaroni Soup Potato Snow Stewed Parsnips Chopped Turnip Rolled Rye Graham Bread Toasted Wafers Graham Crusts Stewed Fruit Prune Dessert |
SIXTH DAYBREAKFASTFresh Fruit Rolled Oats Gravy Toast Whole-Wheat Puffs Toasted Wafers Hoe Cake Baked Apples Stewed Fruit DINNER Mixed Potato Soup Macaroni with Cream Sauce Stewed Beans Scalloped Tomato Pearl Wheat Pulled Bread Corn Cakes Stewed Fruit Farina Custard |
SABBATHBREAKFASTFresh Fruit Rolled Oats Prune Toast Fruit Bread Cream Rolls Toasted Wafers Steamed Figs Cup Custard Stewed Fruit DINNER Vegetable Oyster Soup Macaroni with Kornlet Canned String Beans Steamed Rice Graham Fruit Bread Cream Rolls Cranberry Jelly Fresh Fruit | |
FIFTIETH WEEK | |
FIRST DAYBREAKFASTFresh Fruit Cerealine Flakes Baked Potato with Cream Gravy Toasted Wafers Whole-Wheat Puffs Hoe Cake Baked Chestnuts Stewed Fruit DINNER Velvet Soup Broiled Potato Succotash Baked Squash Cracked Wheat Toasted Rolls Graham Bread Crusts Stewed Fruit Rice Cream Pudding |
SECOND DAYBREAKFASTFresh Fruit Corn Meal Mush Cream Toast Cream Rolls Granola Gems Graham Bread Baked Apples Stewed Fruit DINNER Brown Soup Baked Potato Stewed Celery Mashed Peas with Tomato Sauce Graham Grits French Rolls Rye Bread Toasted Wafers Stewed Fruit Apple Snow |
THIRD DAYBREAKFASTFresh Fruit Rolled Wheat Grape Toast Graham Crisps Rye Bread Graham Puffs Lemon Apples Stewed Fruit DINNER Cream Pea Soup Mashed Potato Mashed Parsnips Macaroni with Egg Pearl Wheat with Raisins Rye Bread Toasted Wafers Currant Puffs Stewed Fruit California Grapes |
FOURTH DAYBREAKFASTFresh Fruit Oatmeal Tomato Toast Whole-Wheat Puffs Graham Sticks Corn Cakes Granola Baked Apples Stewed Fruit DINNER Parsnip Soup Potato Rice Steamed Squash Baked Beans Cracked Wheat Raised Biscuit Toasted Wafers Graham Gems Stewed Fruit Farina Blancmange with Cranberry Dressing |
FIFTH DAYBREAKFASTFresh Fruit Graham Apple Mush Blackberry Toast Macaroni with Cream Sauce Whole-Wheat Puffs Graham Bread Toasted Wafers Stewed Fruit DINNER Baked Bean Soup Potato Cakes Scalloped Tomatoes Stewed Vegetable Oysters Rice Graham Bread Oatmeal Crisps Beaten Biscuit Stewed Fruit Tapioca Jelly |
SIXTH DAYBREAKFASTFresh Fruit Rolled Rye Snowflake Toast Toasted Wafers Graham Bread Corn Puffs Citron Apples Stewed Fruit DINNER Vegetable Oyster Soup Baked Sweet Potato Mashed Peas Boiled Beets with Lemon Dressing Graham Grits Pulled Bread Graham Crusts Stewed Fruit |
SABBATHBREAKFASTFresh Fruit Rice with Fig Sauce Gravy Toast Fruit Bread Toasted Wafers Cream Rolls Grape Apples Stewed Fruit DINNER Kornlet Soup Mashed Sweet Potato Pease Cakes Browned Rice Buns Pulled Bread Cream Rolls Stewed Fruit Bananas | |
FIFTY-FIRST WEEK | |
FIRST DAYBREAKFASTFresh Fruit Cerealine Flakes Cream Toast Graham Puffs Fruit Bread Toasted Wafers Baked Apples Stewed Fruit DINNER Swiss Lentil Soup Boiled Potatoes with Cream Sauce Scalloped Tomato Stewed Vegetable Oysters Pearl Barley Graham Bread Rye Gems Toasted Wafers Lemon Apples Stewed Fruit |
SECOND DAYBREAKFASTFresh Fruit Oatmeal Vegetable Oyster Toast Lentil Puree Toasted Wafers Corn Puffs Graham Bread Stewed Fruit DINNER Pea and Tomato Soup Mashed Potato Mashed Turnip Parsnip with Egg Sauce Graham Grits Raised Corn Cake Graham Sticks Stewed Fruit Ground Rice Pudding |
THIRD DAYBREAKFASTFresh Fruit Graham Mush with Raisins Tomato Toast Graham Bread Toasted Wafers Whole-Wheat Puffs Stewed Fruit DINNER Parsnip Soup Baked Potato Mashed Squash Stewed Lima Beans Cracked Wheat Graham Bread Cream Crisps Pop Overs Stewed Fruit Bread Custard |
FOURTH DAYBREAKFASTFresh Fruit Plum Porridge Dry Toast with Hot Cream Whole-Wheat Bread Cream Crisps Hoe Cake Granola Baked Apples Stewed Fruit DINNER Vermicelli Soup Baked Potato with Pease Gravy Boiled Beets Stewed Tomatoes Graham Grits Whole-Wheat Bread Toasted Wafers Beaten Biscuit Cranberry Tarts |
FIFTH DAYBREAKFASTFresh Fruit Rolled Oats Gravy Toast Baked Sweet Potato Whole-Wheat Bread Toasted Wafers Graham Puffs Stewed Fruit DINNER Tomato and Macaroni Soup Baked Potatoes with Brown Sauce Mashed Peas Stewed Dried Corn Rice Whole-Wheat Bread Toasted Wafers Rye Gems Stewed Fruit Nuts and Oranges |
SIXTH DAYBREAKFASTFresh Fruit Corn Meal Mush Apricot Toast Whole-Wheat Puffs Toasted Wafers Breakfast Rolls Steamed Figs Stewed Fruit DINNER Cream Pea Soup Boiled Potato Stewed Carrots Celery Mashed Chestnuts Cracked Wheat Raised Corn Cake Toasted Wafers Fruit Bread Stewed Fruit Rice Cream Pudding |
SABBATHBREAKFASTFresh Fruit Rolled Oats Grape Toast Beaten Biscuit Roasted Almonds Stewed Fruit DINNER Tomato and Vermicelli Soup Boiled Macaroni Canned String Beans Steamed Rice Beaten Biscuit Fruit Bread Toasted Wafers Stewed Fruit Fresh Fruit | |
FIFTY-SECOND WEEK | |
FIRST DAYBREAKFASTFresh Fruit Plum Porridge Strawberry Toast Toasted Wafers Hoe Cake Graham Puffs Baked Chestnuts Stewed Fruit DINNER Vegetable Oyster Soup Baked Potato Cabbage and Tomato Hulled Corn or Hominy Graham Grits Whole-Wheat Puffs Graham Sticks Fruit Bread Stewed Fruit Snow Pudding |
SECOND DAYBREAKFASTFresh Fruit Corn Meal Mush Tomato Toast Whole-Wheat Puffs Toasted Wafers Baked Apples Stewed Fruit DINNER Lentil Soup Mashed Potato Boiled Macaroni Canned Okra and Tomato Corn Bread Graham Puffs Toasted Wafers Stewed Fruit Fresh Fruit and Nuts |
THIRD DAYBREAKFASTFresh Fruit Rolled Oats Dry Toast with Hot Cream Currant Puffs Rye Bread Toasted Wafers Baked Apples Stewed Fruit DINNER Lima Bean Soup Scalloped Potato Mashed Peas Baked Squash Celery Rice with Raisins Rye Bread Graham Crusts Toasted Wafers Stewed Fruit Apple Manioca |
FOURTH DAYBREAKFASTBaked Chestnuts Rolled Wheat Gravy Toast Baked Sweet Potato with Tomato Sauce Cream Rolls Graham Puffs Granola Stewed Fruit DINNER Cream Pea Soup Baked Potato Stewed Tomatoes Scalloped Vegetable Oysters Graham Grits Graham Bread Toasted Wafers Buns Stewed Fruit Apple Tart |
FIFTH DAYBREAKFASTFresh Fruit Cracked Wheat Vegetable Oyster Toast Graham Bread Crusts Toasted Wafers Baked Apples Stewed Fruit DINNER Potato Soup Baked Beans Stewed Parsnips Pearl Wheat Graham Bread Currant Puffs Toasted Wafers Stewed Fruit Rice Cream Pudding |
SIXTH DAYBREAKFASTFresh Fruit Graham Mush with Dates Snowflake Toast Graham Bread Toasted Wafers Whole-Wheat Puffs Baked Apples Stewed Fruit DINNER Black Bean Soup Mashed Potato Kornlet and Tomato Macaroni baked with Granola Farina Graham Bread Crescents Cream Rolls Stewed Fruit Cracked Wheat Pudding |
SABBATHBREAKFASTFresh Fruit Rolled Oats Blackberry Toast Pulled Bread Buns Beaten Biscuit Baked Chestnuts Citron Apples Stewed Fruit DINNER Canned Green Pea Soup Broiled Potato Macaroni with Egg Sauce Steamed Rice with Raisins Buns Beaten Biscuit Toasted Wafers Stewed Fruit Farina Pie | |
COUNTING THE COST.
The expense of the menus given will vary somewhat with the locality and the existing market prices. The following analysis of several similar bills of fare used in widely different localities will serve to show something of the average cost. The first of these were taken at random from the daily menus, during the month of January, of a Michigan family of seventeen persons, grown persons and hearty, growing children, none younger than six years. In the estimates made of the cost of material, wherever fractions occurred, the next higher whole number was taken. No butter was used, a small pitcher of cream for each individual supplying its place. The milk used for cooking was not counted, since in this case most of the cream had been removed, and its cost reckoned at the entire cost of the milk itself, or twenty cents a quart, allowing four quarts of milk at five cents a quart for one quart of cream.
The cost of the menus will vary depending on the location and current market prices. The following analysis of several similar menus from different areas will give an idea of the average cost. The first example was randomly selected from the daily menus during January for a Michigan family of seventeen people, consisting of adults and hearty, growing children, none younger than six years old. In estimating the cost of materials, where there were fractions, the next higher whole number was used. No butter was included; instead, each person had a small pitcher of cream. The milk used in cooking wasn't counted since most of the cream had been taken out, and its cost was considered as the total cost of the milk, which was twenty cents per quart, allowing four quarts of milk at five cents per quart for one quart of cream.
BILLS OF FARE.
The following bills of fare were used by an Iowa family of six persons. The prices given were those current in that locality in the month of March.
The following menus were used by a family of six in Iowa. The prices listed were those that were common in that area during the month of March.
|
BREAKFAST Apples Rolled Oats Tomato Toast Toasted Wafers Graham Gems Patent Flour Bread Dried Apple Sauce Cream Hot Milk |
Cost:
Average cost for each person, 9 1/2 cents. |
|
DINNER Canned Corn Soup with Croutons Scalloped Tomato Parsnip with Egg Sauce Graham Mush Buns Whole-Wheat Bread Cup Custard Cream Hot Milk |
Cost:
Average cost, 10 cents apiece. |
The material for the bills of fare given on the next page was reckoned at prices current in a city in northern West Virginia, in the autumn, and was for a family of six persons.
The prices for the menus listed on the next page were based on current rates in a northern West Virginia city during the fall and were intended for a family of six.
|
BREAKFAST Browned Rice Graham Crisps Whole-Wheat Puffs Dried Peach Sauce Cream Hot Milk |
Cost:
Total, 42 cents, or 7 cents for each individual. |
|
DINNER Tomato Soup with Croutons Baked Potatoes Mashed Peas Rolled Wheat Whole-Wheat Bread Orange Rice Cream Hot Milk |
Cost:
Total, 60 cents, or exactly 10 cents apiece. |
The following four days' bills of fare,—the first two served by a Michigan lady to her family of four persons, the second used by an Illinois family of eight,—although made up of much less variety, serve to show how one may live substantially even at a very small cost.
The next four days' menus—the first two prepared by a Michigan woman for her family of four, the second used by an Illinois family of eight—despite having less variety, demonstrate how one can eat well on a tight budget.
|
BREAKFAST NO. 1 Apples Graham Mush with Dates Toasted Wafers Bread Dried Apples Stewed with Cherries Milk Cream |
Cost:
Total, 20 cents, or 5 cents apiece. |
|
DINNER NO. 1 Baked Potatoes with Gravy Mashed Peas Oatmeal Blancmange Whole-Wheat Bread Stewed Fruit Milk Cream |
Cost:
Total cost, 20 cents, or 5 cents apiece. |
|
BREAKFAST NO. 2 Apples Graham Grits Zwieback Cream Milk |
Cost:
Total, 20 cents, or 5 cents per person. |
|
DINNER NO. 2 Pea and Tomato Soup Scalloped Potatoes Graham Rolls Rice Custard Milk Cream |
Cost:
Total, 20 cents, or 5 cents each. |
TABLE TOPICS.
The food on which the man who would be healthy should live must be selected so as to ensure variety without excess.—Dr. Richardson.
The food that a health-conscious person should eat needs to be chosen to provide variety without overdoing it.—Dr. Richardson.
Hearty foods are those in which there is an abundance of potential energy.—Prof. Atwater.
Hearty foods are those that are rich in potential energy.—Prof. Atwater.
AN OLD-FASHIONED RECIPE FOR A LITTLE HOME COMFORT.—Take of thought for self one part, two parts of thought for family; equal parts of common sense and broad intelligence, a large modicum of the sense of fitness of things, a heaping measure of living above what your neighbors think of you, twice the quantity of keeping within your income, a sprinkling of what tends to refinement and aesthetic beauty, stirred thick with the true brand of Christian principle, and set it to rise.—Sel.
AN OLD-FASHIONED RECIPE FOR A LITTLE HOME COMFORT.—Take one part of self-reflection, two parts of consideration for family; equal parts of common sense and broad intelligence, a generous amount of understanding what's appropriate, a big dose of living above what your neighbors think of you, twice as much of sticking to your budget, a dash of what promotes refinement and beauty, stirred well with genuine Christian values, and let it rise.—Sel.

A BATCH OF DINNERS
HOLIDAY DINNERS,
 Special dinner for a holiday celebration has so long been a
time-honored custom in most families, that the majority of housewives
consider it indispensable. While we admire the beautiful custom of
gathering one's friends and neighbors around the hospitable board, and
by no means object to a special dinner on holiday occasions, yet we are
no wise in sympathy with the indiscriminate feastings so universally
indulged in at such dinners, whereby stomachs are overloaded with a
decidedly unhealthful quality of food, to be followed by dull brains and
aching heads for days to come.
Special dinner for a holiday celebration has so long been a
time-honored custom in most families, that the majority of housewives
consider it indispensable. While we admire the beautiful custom of
gathering one's friends and neighbors around the hospitable board, and
by no means object to a special dinner on holiday occasions, yet we are
no wise in sympathy with the indiscriminate feastings so universally
indulged in at such dinners, whereby stomachs are overloaded with a
decidedly unhealthful quality of food, to be followed by dull brains and
aching heads for days to come.
A special dinner for a holiday celebration has long been a cherished tradition in most families, and most homemakers see it as essential. While we appreciate the lovely custom of bringing friends and neighbors together around a welcoming table, and we certainly don't mind a special dinner on holidays, we aren't on board with the excessive feasting that often happens at these dinners. This leads to overstuffed stomachs filled with unhealthy food, resulting in sluggish minds and pounding headaches for days afterward.
And this is not the extent of the evil. Holiday feasting undoubtedly has much to do with the excessive use of intoxicants noticeable at such times. Tempted to overeat by the rich and highly seasoned viands which make up the bill of fare, the heaviness resulting from a stomach thus overburdened creates a thirst not readily satisfied. A person who has noted how frequently one is called upon to assuage thirst after having eaten too heartily of food on any occasion, will hardly doubt that indigestible holiday dinners are detrimental to the cause of total abstinence.
And this isn't all of the problem. Holiday feasting definitely contributes to the excessive use of alcohol often seen during these times. Tempted to overeat by the rich and flavorful dishes on the menu, the heaviness from a stomach that’s been overstuffed creates a thirst that isn’t easily quenched. Anyone who has noticed how often people need to drink something after indulging too much on any occasion will likely agree that heavy holiday meals are harmful to the goal of total abstinence.
Then, for the sake of health and the cause of temperance, while an ample repast is provided, let not the bill of fare be so lavish as to tempt to gormandizing; and let the viands be of the most simple and wholesome character practicable, although, of course, inviting. As an aid in this direction, we offer the following bills of fare;—
Then, for the sake of health and the cause of moderation, while a generous meal is served, let the menu not be so extravagant as to encourage overeating; and let the dishes be as simple and healthy as possible, although still appealing. To help with this, we present the following menus;—
THANKSGIVING MENUS. | |
|
NO. 1 Tomato Soap with Pasta d'Italia Stuffed Potatoes Canned Asparagus Pulp Succotash Celery Graham Grits Fruit Rolls Graham Puffs Buns Canned Peaches Pumpkin Pie Baked Chestnuts Grape Apples Fresh Fruits |
NO. 2 Vegetable Oyster Soup Potato Puff Roasted Sweet Potatoes Parsnip Stewed with Celery Beet Salad Boiled Wheat with Raisins Cream Crisps Whole-Wheat Bread Crescents with Peach Jelly Canned Fruit Cranberry Tarts Almonds and Pecans |
HOLIDAY MENUS. | |
|
NO. 1 Canned Corn Soup Mashed Sweet Potato Macaroni with Tomato Sauce Canned Wax Beans or Cabbage Salad Steamed Rice Graham Puffs Fruit Bread Toasted Wafers Canned Strawberries Malaga Grapes Loaf Cake with Roasted Almonds Bananas in Syrup |
NO. 2 Pea and Tomato Soup Ornamental Potatoes Scalloped Vegetable Oysters Egg and Macaroni Farina with Fig Sauce Sally Lunn Gems Beaten Biscuit Graham Bread Apply Jelly Canned Gooseberries Prune Pie with Granola Crust Citron Apples Pop Corn |
PICNIC DINNERS
A picnic, to serve its true end, ought to be a season of healthful recreation; but seemingly, in the general acceptation of the term, a picnic means an occasion for a big dinner composed of sweets and dainties, wines, ices, and other delectable delicacies, which tempt to surfeiting and excess. The preparation necessary for such a dinner usually requires a great amount of extra and wearisome labor, while the eating is very apt to leave results which quite overshadow any benefit derived from the recreative features of the occasion. It is generally supposed that a picnic is something greatly conducive to health; but where everything is thus made subservient to appetite, it is one of the most unhygienic things imaginable.
A picnic, to truly fulfill its purpose, should be a time for healthy recreation; however, in common understanding, a picnic usually refers to a big meal filled with sweets and treats, wines, ice creams, and other delicious foods that often lead to overindulgence. The effort needed to prepare such a meal typically involves a lot of extra and exhausting work, and the aftermath of the eating tends to overshadow any benefits gained from the fun aspects of the event. It's generally believed that a picnic is very good for health, but when everything is centered around satisfying cravings, it can actually be one of the most unhealthy things imaginable.

A Picnic Dinner
The lunch basket should contain ample provision for fresh-air-sharpened appetites, but let the food be as simple as possible, and of not too great variety. Good whole-wheat or Graham bread in some form, with well sterilized milk and cream, or a soup previously prepared from grains or legumes, which can be readily heated with the aid of a small alcohol or kerosene stove, and plenty of fruit of seasonable variety, will constitute a very good bill of fare. If cake is desirable, let it be of a very simple kind, like the buns or raised cake for which directions are given in another chapter. Beaten biscuits, rolls, and crisps are also serviceable for picnic dinners. Fruit sandwiches—made by spreading slices of light whole-wheat or Graham bread with a little whipped cream and then with fresh fruit jam lightly sweetened, with fig sauce or steamed figs chopped, steamed prunes or sliced bananas—are most relishable. These should be made on the ground, just before serving, from material previously prepared. An egg sandwich may be prepared in the same manner by substituting for the fruit the hard-boiled yolks of eggs chopped with a very little of the whitest and tenderest celery, and seasoned lightly with salt. Two pleasing and palatable picnic breads may be made as follows:—
The lunch basket should have enough food for fresh-air sharpened appetites, but keep the meals as simple as possible and not too varied. Good whole-wheat or Graham bread in some form, along with well-sterilized milk and cream, or a soup made from grains or legumes that can be easily heated with a small alcohol or kerosene stove, plus plenty of in-season fruit, will make a great meal. If cake is desired, it should be a simple kind, like the buns or raised cake outlined in another chapter. Beaten biscuits, rolls, and crisps also work well for picnic dinners. Fruit sandwiches—made by spreading slices of light whole-wheat or Graham bread with a little whipped cream and then with lightly sweetened fresh fruit jam, fig sauce, or chopped steamed figs, steamed prunes, or sliced bananas—are very tasty. These should be assembled on-site just before serving, using ingredients prepared earlier. An egg sandwich can be made in the same way by replacing the fruit with chopped hard-boiled yolks of eggs, mixed with a little bit of the finest and softest celery, and seasoned lightly with salt. Two enjoyable and tasty picnic breads can be prepared as follows:—
RECIPES.
Picnic Biscuit.—Prepare a dough as for Raised Biscuit, page 145, and when thoroughly kneaded the last time, divide, and roll both portions to about one fourth of an inch in thickness. Spread one portion with stoned dates, or figs that have been chopped or cut fine with scissors, cover with the second portion, and cut into fancy shapes. Let the biscuits rise until very light, and bake. Wash the tops with milk to glace before baking.
Picnic Biscuit.—Make a dough like you would for Raised Biscuit, page 145, and after kneading it well one last time, divide it and roll out both pieces to about a quarter of an inch thick. Spread one piece with pitted dates or finely chopped figs, cover it with the second piece, and cut into fun shapes. Let the biscuits rise until they’re nice and fluffy, then bake. Brush the tops with milk to glaze them before baking.
If provision can be made for the reheating of foods, a soup, or grain, macaroni with tomato sauce, or with egg or cream sauce, or some similar article which can be cooked at home, transported in sealed fruit cans, and reheated in a few moments on the grounds, is a desirable addition to the picnic bill of fare.
If there’s a way to reheat food, a soup or grain, macaroni with tomato sauce, or with egg or cream sauce, or something similar that can be cooked at home, packed in sealed fruit cans, and reheated quickly on-site, it’s a great addition to the picnic menu.
Recipes for suitable beverages for such occasions will be found in the chapter on Beverages.
Recipes for appropriate drinks for these occasions can be found in the chapter on Beverages.
SCHOOL LUNCHES.
Mothers whose children are obliged to go long distances to school, are often greatly perplexed to know what to put up for the noonday lunch which shall be both appetizing and wholesome. The conventional school lunch of white bread and butter, sandwiches, pickles, mince or other rich pie, with a variety of cake and cookies, is scarcely better than none at all; since on the one hand there is a deficiency of food material which can be used for the upbuilding of brains, muscles, and nerves; while on the other hand it contains an abundance of material calculated to induce dyspepsia, headache, dullness of intellect, and other morbid conditions. Left in an ante-room, during the school session, until, in cold weather, it becomes nearly frozen, and then partaken of hurriedly, that there may be more time for play, is it to be wondered at that the after-dinner session drags so wearily, and that the pupils feel sleepy, dull, and uninterested? Our brains are nourished by blood made from the food we eat; and if it be formed of improper or unwholesome food, the result will be a disordered organ, incapable of first-class work.
Mothers whose children have to travel long distances to school often struggle to figure out what to pack for lunch that is both tasty and healthy. The usual school lunch of white bread and butter, sandwiches, pickles, rich pies, and a variety of cakes and cookies is hardly better than nothing at all; on one hand, it lacks the nutritious materials needed for building strong brains, muscles, and nerves, while on the other, it contains too much that can cause upset stomach, headaches, lack of focus, and other health issues. Left in a hallway during school hours, and in cold weather, nearly frozen, then eaten quickly to allow more time for play, is it any wonder that the afternoon classes drag on and students feel sleepy, dull, and uninterested? Our brains rely on blood made from the food we consume; if that food is poor quality or unhealthy, the outcome will be a disordered organ that can't perform at its best.
Again, the extra work imposed upon the digestive organs and the liver in getting rid of the excess of fats and sugar in rich, unwholesome foods, continually overtaxes these organs.
Again, the extra strain placed on the digestive system and the liver to eliminate the excess fats and sugars from rich, unhealthy foods consistently overwhelms these organs.
It can hardly be doubted that a large majority of the cases of so-called overwork from which school children suffer, are caused by violation of hygienic laws regarding food and diet rather than by an excess of brain work; or in other words, had the brain been properly nourished by an abundance of good, wholesome food, the same amount of work could have been easily accomplished with no detriment whatever.
It’s pretty clear that most of the so-called overwork that school kids experience is due to the neglect of proper hygiene in their food and diet, rather than too much studying. In other words, if their brains had been well-nourished with plenty of good, healthy food, they could have easily handled the same amount of work without any negative effects.
Whenever practicable, children should return to their homes for the midday lunch, since under the oversight of a wise mother there will be fewer violations of hygienic laws, and the walk back to the school room will be far more conducive to good digestion than the violent exercise or the sports so often indulged in directly after eating. When this is impracticable, let the lunch be as simple as possible, and not so ample as to tempt the child to overeat. Good whole-wheat or Graham bread of some kind, rolls, crisps, beaten biscuit, sticks, fruit rolls, and wafers, with a cup of canned fruit or a bottle of rich milk as an accompaniment, with plenty of nice, fresh fruits or almonds or a few stalks of celery, is as tempting a lunch as any child need desire. It would be a good plan to arrange for the heating of a portion of the milk to be sipped as a hot drink. In many school rooms the ordinary heating stove will furnish means for this, or a little alcohol stove or a heating lamp may be used for the purpose, under the supervision of the teacher.
Whenever possible, children should go home for lunch, as a caring mother can help ensure better hygiene, and the walk back to school will aid digestion much more than the rough play or sports that often happen right after eating. If going home isn’t an option, the lunch should be simple and not too large to avoid tempting the child to overeat. Good whole-wheat or Graham bread, rolls, crisps, beaten biscuits, sticks, fruit rolls, and wafers, accompanied by a cup of canned fruit or a bottle of rich milk, along with lots of fresh fruits or almonds or a few stalks of celery, makes for an appealing lunch for any child. It would also be wise to arrange to heat some of the milk to drink warm. In many classrooms, a standard heating stove can provide this, or a small alcohol stove or heating lamp can be used for this purpose under the teacher's supervision.
Furnish the children with apples, oranges, bananas, pears, grapes, filberts, and almonds in place of rich pie and cake. They are just as cheap as the material used for making the less wholesome sweets, and far easier of digestion. An occasional plain fruit or grain pudding, cup custard, or molded dessert may be substituted for variety. Fruit sandwiches, or a slice of Stewed Fruit Pudding prepared as directed on page 308 are also suitable for this purpose.
Provide the kids with apples, oranges, bananas, pears, grapes, hazelnuts, and almonds instead of rich pies and cakes. They cost about the same as the ingredients used for less healthy sweets and are much easier to digest. An occasional simple fruit or grain pudding, custard cup, or molded dessert can be added for variety. Fruit sandwiches or a slice of Stewed Fruit Pudding made according to page 308 are also good options.
Rice prepared as directed below makes a wholesome and appetizing article for the lunch basket:—
Rice prepared as directed below makes a healthy and tasty option for the lunch box:—
Creamy Rice.—Put a pint of milk, one quarter of a cup of best Carolina rice, a tablespoonful of sugar, and a handful of raisins into an earthen-ware dish, and place on the top of the range where it will heat very slowly to boiling temperature. Stir frequently, so that the rice will not adhere to the bottom of the dish. When boiling, place in the oven, and bake till the rice is tender, which can be ascertained by dipping a spoon into one side and taking out a few grains. Twenty minutes will generally be sufficient.
Creamy Rice.—Put a pint of milk, a quarter cup of the best Carolina rice, a tablespoon of sugar, and a handful of raisins into a ceramic dish, and set it on the stove to heat very slowly until it boils. Stir frequently so the rice doesn’t stick to the bottom of the dish. Once it’s boiling, move it to the oven and bake until the rice is tender, which you can check by dipping a spoon into one side and taking out a few grains. Twenty minutes is usually enough.
Much care should be used in putting up the lunch to have it as neat and dainty as possible. A basket of suitable size covered with a clean white napkin is better for use than the conventional dinner pail, in which air-tight receptacle each food is apt to savor of all the others, making the entire contents unappetizing, if not unwholesome.
A lot of care should go into packing the lunch to make it as neat and appealing as possible. A basket of the right size covered with a clean white napkin is much better than the typical lunch box, where each food item tends to mix flavors, making the whole meal unappetizing, if not unhealthy.
SABBATH DINNERS.
One of the most needed reforms in domestic life is a change to more simple meals on the Sabbath. In many households the Sabbath is the only day in the week when all the members of the family can dine together, and with an aim to making it the most enjoyable day of all, the good housewife provides the most elaborate dinner of the week, for the preparation of which she must either spend an unusual amount of time and labor the day previous or must encroach upon the sacred rest day to perform the work.
One of the most necessary changes in home life is to simplify meals on the Sabbath. In many families, the Sabbath is the only day of the week when everyone can have dinner together, and in an effort to make it the most enjoyable day of all, the dedicated homemaker prepares the most elaborate dinner of the week. This means she either has to spend an excessive amount of time and effort the day before or has to cut into the sacred rest day to get everything ready.
Real enjoyment ought not to be dependent upon feasting and gustatory pleasures. Plain living and high thinking should be the rule at all times, and especially upon the Sabbath day. Nothing could be more conducive to indigestion and dyspepsia than this general custom of feasting on the Sabbath. The extra dishes and especial luxuries tempt to over-indulgence of appetite; while the lack of customary exercise and the gorged condition of the stomach incident upon such hearty meals, fosters headaches and indigestion and renders brain and mind so inactive that the participants feel too dull for meditation and study, too sleepy to keep awake during service, too languid for anything but dozing and lounging, and the day that should have fostered spiritual growth is worse than thrown away. Nor is this all; the evil effects of the indigestion occasioned are apt to be felt for several succeeding days, making the children irritable and cross, and the older members of the family nervous and impatient,—most certainly an opposite result from that which ought to follow a sacred day of rest.
Real enjoyment shouldn't rely on feasting and food pleasures. Simplicity and deep thinking should always be the standard, especially on the Sabbath. Nothing is more likely to cause indigestion and upset stomach than this common habit of feasting on the Sabbath. The extra dishes and special treats lead to over-indulgence of appetite; while the lack of usual exercise and the bloated condition of the stomach following such heavy meals, cause headaches and indigestion and make the brain and mind so sluggish that participants feel too dull for reflection and study, too sleepy to stay awake during service, too lethargic for anything but napping and lounging, wasting a day that should have encouraged spiritual growth. And there's more; the negative effects of the indigestion can last for several days, making children irritable and cranky, and the older family members anxious and impatient—definitely the opposite outcome that should come from a sacred day of rest.
Physiologically such feasting is wrong. The wear and consequent repair incident upon hard labor, calls for an equivalent in food; but when no labor is performed, a very moderate allowance—is all that is necessary, and it should be of easy digestibility. Let the Sabbath meals be simple, and served with abundant good cheer and intelligent thought as an accompaniment.
Physiologically, this kind of feasting is unhealthy. The wear and tear from hard work requires a corresponding intake of food; however, when no labor is done, only a modest amount is needed, and it should be easy to digest. Sabbath meals should be simple, served with plenty of good cheer and thoughtful conversation alongside.
Let as much as possible of the food be prepared and the necessary work be done the day previous, so that the cook may have ample opportunity with the other members of the family to enjoy all Sabbath privileges. This need by no means necessitate the use of cold food nor entail a great amount of added work in preparation. To illustrate, take the following—
Let as much food as possible be prepared and all necessary tasks completed the day before, so that the cook can have plenty of time to enjoy all the Sabbath privileges with the rest of the family. This doesn't have to mean serving cold food or require a lot of extra effort in preparation. For example, consider the following—
SABBATH BILL OF FARE. | |
|
BREAKFAST Fresh Fruit Rolled Wheat with Cream Prune Toast Whole-Wheat Bread Toasted Waters Buns Fresh Strawberries | |
|
DINNER Canned Green Corn Soup Creamed Potato Green Peas Tomato and Macaroni Rice Toasted Wafers Beaten Biscuit Buns Canned Peaches Fruit and Nuts | |
Both the rolled wheat and rice may be prepared the day previous, as may also the prune sauce for the toast, the buns, bread, and nearly all the other foods. The potatoes can be boiled and sliced, the corn for the soup rubbed through the colander and placed in the ice chest, the green peas boiled but not seasoned, and the macaroni cooked and added to the tomato but not seasoned. The berries may be hulled, the nuts cracked, and the canned fruit opened. If the table is laid over night and covered with a spread to keep off dust, a very short time will suffice for getting the Sabbath breakfast. Heat the rolled wheat in the inner dish of a double boiler. Meanwhile moisten the toast; and heat the prune sauce.
Both the rolled wheat and rice can be prepared the day before, just like the prune sauce for the toast, the buns, bread, and nearly all the other foods. The potatoes can be boiled and sliced, the corn for the soup pushed through the colander and placed in the fridge, the green peas boiled but not seasoned, and the macaroni cooked and mixed with the tomato but not seasoned. The berries can be hulled, the nuts cracked, and the canned fruit opened. If the table is set up the night before and covered with a cloth to keep off the dust, a very short time will be enough to get the Sabbath breakfast ready. Heat the rolled wheat in the inner dish of a double boiler. Meanwhile, moisten the toast and heat the prune sauce.
To prepare the dinner, all that is necessary is to add to the material for soup the requisite amount of milk and seasoning, and heat to boiling; heat and season the peas and macaroni; make a cream sauce and add the potatoes; reheat the rice, which should have been cooked by steaming after the recipe given on page 99.
To make the dinner, all you need to do is add the right amount of milk and seasoning to the soup ingredients and bring it to a boil; heat and season the peas and macaroni; make a cream sauce and mix in the potatoes; and reheat the rice, which should have been steamed according to the recipe found on page 99.
All may be done in half an hour, while the table is being laid, and with very little labor.
Everything can be done in half an hour while the table is being set up, and it requires very little effort.
TABLE TOPICS.
It is said that Worcester sauce was first introduced as a medicine, the original formula having been evolved by a noted physician to disguise the assafetida which it contains, for the benefit of a noble patient whose high living had impaired his digestion.
It is said that Worcestershire sauce was first introduced as a medicine, the original formula having been developed by a well-known physician to mask the asafoetida it contains, for the benefit of a noble patient whose lavish lifestyle had upset his digestion.
A good dinner sharpens wit, while it softens the heart.—Daran.
A good dinner sharpens your mind and warms your heart.—Daran.
Small cheer and great welcome make a merry feast.—Shakespeare.
Small joy and a warm welcome create a joyful celebration.—Shakespeare.
INDEX.
Download ePUB
If you like this ebook, consider a donation!