This is a modern-English version of Handbook on Japanning: 2nd Edition: For Ironware, Tinware, Wood, Etc. With Sections on Tinplating and Galvanizing, originally written by Brown, William Norman.
It has been thoroughly updated, including changes to sentence structure, words, spelling,
and grammar—to ensure clarity for contemporary readers, while preserving the original spirit and nuance. If
you click on a paragraph, you will see the original text that we modified, and you can toggle between the two versions.
Scroll to the bottom of this page and you will find a free ePUB download link for this book.
A HANDBOOK ON JAPANNING
FOR IRONWARE, TINWARE, WOOD, ETC.
WITH SECTIONS ON TIN-PLATING AND GALVANIZING
BY
WILLIAM N. BROWN
"THE OIL AND COLOUR TRADES JOURNAL" OFFICES
8 BROADWAY, LUDGATE, E.C.
1913
CONTENTS.
| PAGE | ||
| SECTION I. | ||
| INTRODUCTION. | 1-5 | |
| Priming or Preparing the Surface to be Japanned | 4 | |
| The First Stage in the Japanning of Wood or of Leather without a Priming | 5 | |
| SECTION II. | ||
| JAPAN GROUNDS. | 6-19 | |
| White Japan Grounds | 7 | |
| Blue Japan Grounds | 9 | |
| Scarlet Japan Ground | 9 | |
| Red Japan Ground | 10 | |
| Bright Pale Yellow Grounds | 10 | |
| Green Japan Grounds | 10 | |
| Orange-Coloured Grounds | 11 | |
| Purple Grounds | 11 | |
| Black Grounds | 11 | |
| Common Black Japan Grounds on Metal | 12 | |
| Tortoise-shell Ground | 12 | |
| Painting Japan Work | 13 | |
| Varnishing Japan Work | 17 | |
| SECTION III. | ||
| JAPANNING OR ENAMELLING METALS. | 20-28 | |
| Enamelling Bedstead Frames and similar large pieces | 24 | |
| Japanning Tin, such as Tea-trays and similar goods | 25 | |
| Enamelling Old Work | 27 | |
| SECTION IV. | ||
| THE ENAMELLING AND JAPANNING STOVE—PIGMENTS SUITABLE FOR JAPANNING WITH NATURAL LACQUER—MODERN METHODS OF JAPANNING WITH NATURAL JAPANESE LACQUER. | 29-48 | |
| Appliances and Apparatus used in Japanning and Enamelling | 29 | |
| Modern Japanning and Enamelling Stoves | 34 | |
| Stoves heated by direct fire | 34 | |
| Stoves heated by hot-water pipes | 36 | |
| Pigments suitable for Japanning with Natural Lacquer | 45 | |
| White Pigments | 45 | |
| Red Pigments | 46 | |
| Blue Pigment | 46 | |
| Yellow Pigments | 46 | |
| Green Pigment | 46 | |
| Black Pigment | 46 | |
| Methods of Application | 46 | |
| Modern Methods of Japanning and Enamelling with Natural Japanese Lacquer | 47 | |
| SECTION V. | ||
| COLOURS FOR POLISHED BRASS.—MISCELLANEOUS. | 49-57 | |
| Painting on Zinc or on Galvanized Iron | 49 | |
| Bronzing Compositions | 49 | |
| Golden Varnish for Metal | 51 | |
| Carriage Varnish | 51 | |
| Metal Polishes | 51 | |
| Black Paints | 52 | |
| Black Stain for Iron | 53 | |
| Varnishes for Ironwork | 55 | |
| SECTION VI. | ||
| PROCESSES FOR TIN-PLATING. | 58-60 | |
| Amalgam Process | 59 | |
| Immersion Process | 59 | |
| Battery Process | 59 | |
| Weigler's Process | 60 | |
| Hern's Process | 60 | |
| SECTION VII. | ||
| GALVANIZING. | 61-66 | |
| INDEX. | 67-69 | |
HANDBOOK ON JAPANNING.
SECTION I.
INTRODUCTION.
Japanning, as it is generally understood in Great Britain, is the art of covering paper, wood, or metal with a more or less thick coating of brilliant varnish, and hardening the same by baking it in an oven at a suitable heat. It originated in Japan—hence its name—where the natives use a natural varnish or lacquer which flows from a certain kind of tree, and which on its issuing from the plant is of a creamy tint, but becomes black on exposure to the air. It is mainly with the application of "japan" to metallic surfaces that we are concerned in these pages. Japanning may be said to occupy a position midway between painting and porcelain enamelling, and a japanned surface differs from an ordinary painted surface in being far more brilliant, smoother, harder, and more durable, and also in retaining its gloss permanently, in not being easily injured by hot water or by being placed near a fire; while real good japanning is characterised by great lustre and adhesiveness to the metal to which it has been applied, and its non-liability to chipping—a fault which, as a rule, stamps the common article.
Japanning, as it's commonly understood in Great Britain, is the technique of coating paper, wood, or metal with a thick layer of shiny varnish and hardening it by baking in an oven at the right temperature. It originated in Japan—hence the name—where locals use a natural varnish or lacquer from a specific type of tree. When first harvested, it's creamy but turns black when exposed to air. Our focus in this text is mostly on applying "japan" to metal surfaces. Japanning can be seen as sitting between painting and porcelain enameling. A japanned surface is notably more brilliant, smoother, harder, and more durable than a regular painted surface. It also maintains its gloss over time, resists damage from hot water, and withstands being near heat. Quality japanning is marked by a high shine and strong adhesion to the metal it coats, and it doesn't chip easily—a flaw typically found in lower-quality items.
If the English process of japanning be more simple and produces a less durable, a less costly coating than the Japanese method, yet its practice is not so injurious to the health. Indeed, it is a moot point in how far the Japanese themselves now utilize their classical process, as the coat of natural japan on all the articles exhibited at the recent Vienna exhibition as being coated with the natural lacquer, when recovered after six months' immersion in sea water through the sinking of the ship, was destroyed, although it stood perfectly well on the articles of some age. In the English method, where necessary, a priming or undercoat is employed. It is customary to fill up any uneven surface, any minute holes or pores, and to render the surface to be japanned uniformly smooth. But such an undercoat or priming is not always applied, the coloured varnish or a proper japan ground being applied directly on the surface to be japanned. Formerly this surface usually, if not always, received a priming coat, and it does so still where the surface is coarse, uneven, rough, and porous. But where the surface is impervious and smooth, as in the case of metallic surfaces, a priming coat is not applied. It is also unnecessary to apply such a coat in the case of smooth, compact, grained wood. The reason for using this coating is that it effects a considerable saving in the quantity of varnish used, and because the matter of which the priming is composed renders the surface of the body to be varnished uniform, and fills up all pores, cracks, and other inequalities, and by its use it is easy after rubbing and water polishing to produce an even surface on which to apply the varnish. The previous application of this undercoat was thus an advantage in the case of coarse, uneven surfaces that it formed a first and sort of obligatory initial stage in the process of japanning. This initial coating is still applied in many instances. But it has its drawbacks, and these drawbacks are incidental to the nature of the priming coat which consists of size and whiting. The coats or layers of japan proper, that is of varnish and pigment applied over such a priming coat, will be continually liable to crack or peel off with any violent shock, and will not last nearly so long as articles japanned with the same materials and altogether in the same way but without the undercoat. This defect may be readily perceived by comparing goods that have been in use for some time in the japanning of which an undercoat has been applied with similar goods in which no such previous coat has been given. Provided a good japan varnish and appropriate pigments have been used and the japanning well executed, the coats of japan applied without a priming never peel or crack or are in any way damaged except by violence or shock, or that caused by continual ordinary wear and tear caused by such constant rubbing as will wear away the surface of the japan. But japan coats applied with a priming coat crack and fly off in flakes at the slightest concussion, at any knock or fall, more especially at the edges. Those Birmingham manufacturers who were the first to practise japanning only on metals on which there was no need for a priming coat did not of course adopt such a practice. Moreover, they found it equally unnecessary in the case of papier-mâché and some other goods. Hence Birmingham japanned goods wear better than those goods which receive a priming previous to japanning.
If the English method of japanning is simpler and produces a coating that is less durable and less expensive than the Japanese technique, it’s also less harmful to health. It’s debatable how much the Japanese still use their traditional process, especially since the natural lacquer on items showcased at the recent Vienna exhibition was damaged after six months in seawater due to a ship sinking, even though it had held up fine on older items. In the English method, a primer or undercoat is used when needed. It’s standard practice to smooth out any uneven surface, tiny holes, or pores, creating a uniformly smooth area for japanning. However, sometimes the colored varnish or proper japan ground is applied directly onto the surface without an undercoat. In the past, a priming coat was usually applied to practically any surface, and it still is when the surface is coarse, uneven, rough, or porous. But when the surface is smooth and impervious, like metal surfaces, a primer is not necessary. The same goes for smooth, compact, grained wood. The reason for using this undercoat is that it saves a significant amount of varnish and makes the surface uniform by filling in pores, cracks, and other imperfections. After rubbing and water polishing, it’s easier to achieve a smooth surface for varnishing. The previous application of this undercoat was beneficial for coarse, uneven surfaces since it served as an essential initial step in japanning. This initial coating is still applied in many cases. However, it has drawbacks related to the nature of the priming layer, which consists of size and whiting. The layers of actual lacquer applied over this undercoat are more likely to crack or peel off with any strong impact and don’t last as long as items that are japanned using the same materials but without an undercoat. This issue becomes clear when comparing items that have been used for a while where a primer was applied with similar items that did not receive this prior coat. Provided that quality japanning varnish and pigments are used and the process is well done, the layers applied without a primer do not peel, crack, or experience damage except from extreme force or normal wear and tear from continual rubbing that wears down the surface of the japan. However, japan coats that include a primer can crack and flake off at the slightest impact, especially at the edges. Those Birmingham manufacturers who were the first to practice japanning exclusively on metals, which didn't require a primer, didn't adopt this practice. They also found it unnecessary for papier-mâché and some other materials. Hence, Birmingham japanned goods last longer than those that receive a primer before japanning.
The usual priming, where one is applied, consists of Paris white (levigated whiting) made into a thin paste with size. The size should be of a consistency between the common double size and glue, and mixed with as much Paris white as will give it a good body so that it will hide the surface on which it is applied. But in particular work glovers' or parchment size instead of common size is used, and this is still further improved by the addition of one-third of isinglass, and if the coat be not applied too thickly it will be much less liable to peel or crack. The surface should be previously prepared for this priming by being well cleaned and by being brushed over with hot size diluted with two-thirds of water, that is provided the size be of the usual strength. The priming is then evenly and uniformly applied with a brush and left to dry. On a fairly even surface two coats of priming properly applied should suffice. But if it will not take a proper water polish, owing to the uneven surface not being effectually filled up, one or more additional coats must be applied. Previous to the last coat being applied, the surface should be smoothed by fine glass paper. When the last coat of priming is dry the water polish is applied. This is done by passing a fine wet rag or moistened sponge over the surface until the whole appears uniformly smooth and even. The priming is now complete and the surface ready to take the japan ground or the coloured varnish.
The usual priming involves using Paris white (levigated whiting) mixed into a thin paste with size. The size should be a consistency between regular double size and glue, combined with enough Paris white to give it a good texture that will cover the surface it's applied to. However, for specific tasks, glovers' or parchment size is used instead of regular size, which is further enhanced by adding one-third isinglass. If the coat isn't applied too thickly, it will be less likely to peel or crack. The surface should be prepared for this priming by thoroughly cleaning it and brushing it over with hot size diluted with two-thirds water, assuming the size is of the usual strength. The priming is then applied evenly with a brush and left to dry. On a relatively even surface, two coats of priming applied correctly should be enough. If it won't hold a proper water polish due to the uneven surface not being effectively filled, one or more additional coats should be applied. Before applying the last coat, the surface should be smoothed with fine sandpaper. Once the last coat of priming is dry, the water polish is applied by wiping a fine wet rag or moistened sponge over the surface until it looks uniformly smooth and even. The priming is now complete, and the surface is ready for the Japan ground or colored varnish.
[The leather is first securely stretched on a frame or board.] In this case, that is when no priming coat is previously applied, the best way to prepare the surface is to apply three coats of coarse varnish (1 lb. seed-lac, 1 lb rosin to 1 gallon methylated spirit, dissolve and filter). This varnish, like all others formed from methylated spirits, must be applied in a warm place and all dampness should be avoided, for either cold or moisture chills it and thus prevents it taking proper hold of the surface on which it is applied. When the work is prepared thus, or by the priming made of size and whiting already described, the japan proper is itself applied.
[The leather is first securely stretched on a frame or board.] In this case, when no priming coat has been applied beforehand, the best way to prepare the surface is to apply three coats of coarse varnish (1 lb. seed-lac, 1 lb rosin to 1 gallon methylated spirit, dissolve and filter). This varnish, like all others made from methylated spirits, needs to be applied in a warm environment, and all moisture should be avoided, as either cold or dampness can cool it down and prevent it from adhering properly to the surface. Once the work is prepared this way, or by using the previously mentioned size and whiting priming, the actual japan can be applied.
SECTION II.
JAPAN GROUNDS.
The japan ground properly so called consists of the varnish and pigment where the whole surface is to be of one simple colour, or of the varnish, with or without pigment, on which some painting or other form of decoration is afterwards to be applied. It is best to form this ground with the desired pigment incorporated with shellac varnish, except in the case of a white japan ground which requires special treatment, or when great brilliancy is a desideratum and other methods must be adopted. The shellac varnish for the japan ground is best prepared as follows: shellac 11/4 lb., methylated spirits 1 gallon. Dissolve in a well-corked vessel in a warm place and with frequent shaking. After two or three days the shellac will be dissolved. It is then recommended to filter the solution through a flannel bag, and when all that will come through freely has done so the varnish should be run into a proper sized vessel and kept carefully corked for use. The bag may then be squeezed with the hand till the remainder of the fluid varnish is forced through it, and this if fairly clear may be used for rough purposes or added to the next batch. Pigments of any nature whatever may be used with the shellac varnish to give the desired tint to the ground, and where necessary they may be mixed together to form any compound colour, such as blue and yellow to form green. The pigments used for japan grounds should all be previously ground very smooth in spirits of turpentine, so smooth that the paste does not grate between the two thumb nails, and then only are they mixed with the varnish. This mixture of pigment and varnish vehicle should then be spread over the surface to be japanned very carefully and very evenly with a camel-hair brush. As metals do not require a priming coat of size and whiting, the japan ground may be applied to metallic surfaces forthwith without any preliminary treatment except thorough cleansing, except in the cases specially referred to further on. On metallic surfaces three to four coats are applied, and in the interval between each coat the articles must be stoved in an oven heated to from 250° to 300° F.
The Japan ground, properly known, consists of the varnish and pigment where the entire surface is meant to be one solid color, or just the varnish, with or without pigment, on which some painting or other decoration will be applied later. It's best to create this ground using the desired pigment mixed with shellac varnish, except for a white Japan ground which requires special treatment, or when high brilliance is needed, where different methods must be used. The shellac varnish for the Japan ground is best prepared as follows: shellac 11/4 lb., methylated spirits 1 gallon. Dissolve it in a well-corked container in a warm place, shaking it frequently. After two or three days, the shellac will be dissolved. It's then recommended to filter the solution through a flannel bag, and once all that can pass through easily has done so, the varnish should be poured into a suitably sized container and kept securely corked for later use. The bag can then be squeezed by hand until any remaining fluid varnish is pushed through, and this, if it's fairly clear, can be used for rough purposes or added to the next batch. Pigments of any kind can be used with the shellac varnish to achieve the desired tint for the ground, and if necessary, they can be mixed together to create any compound color, such as mixing blue and yellow to make green. The pigments used for Japan grounds should all be ground very finely in turpentine, so that the paste doesn’t feel gritty when rubbed between two thumbs, and only then should they be mixed with the varnish. This mixture of pigment and varnish should be applied to the surface to be japanned very carefully and evenly with a camel-hair brush. Since metals don’t require a primer of size and whiting, the Japan ground can be applied directly to metal surfaces without any preliminary treatment, except for thorough cleaning, unless specified otherwise. On metallic surfaces, three to four coats should be applied, and between each coat, the items must be baked in an oven heated to between 250° to 300° F.
The formation of a perfectly white japan ground and of the first degree of hardness has always been difficult to attain in the art of japanning, as there are few or no substances that can be so dissolved as to form a very hard varnish coat without being so darkened in the process as to quite degrade or spoil the whiteness of the colour. The following process, however, is said to give a composition which yields a very near approach to a perfect white ground: Take flake white or white lead washed and ground up with the sixth of its weight of starch and then dried, temper it properly for spreading with mastic varnish made thus: Take 5 oz. of mastic in powder and put it into a proper vessel with 1 lb. of spirits of turpentine; let them boil at a gentle heat till the mastic be dissolved, and, if there appear to be any turbidity, strain off the solution through flannel. Apply this intimate and homogeneous mixture on the body to be japanned, the surface of which has been suitably prepared either with or without the priming, then varnish it over with five or six coats of the following varnish: Provide any quantity of the best seed-lac and pick out of it all the clearest and whitest grains, take of this seed-lac 1/2 lb. and of gum anime 3/4 lb., pulverize the mixture to a coarse powder and dissolve in a gallon of methylated spirits and strain off the clear varnish. The seed-lac will give a slight tint to this varnish, but it cannot be omitted where the japanned surface must be hard, though where a softer surface will serve the purpose the proportion of seed-lac may be diminished and a little turpentine oleo-resin added to the gum anime to take off the brittleness. A very good varnish entirely free from brittleness may, it is said, be formed by dissolving gum anime in old nut or poppy oil, which must be made to boil gently when the gum is put into it. After being diluted with turps the white ground may be applied in this varnish, and then a coat or two of the varnish itself may be applied over it. These coats, however, take a long time to dry, and, owing to its softer nature, this japanned surface is more readily injured than that yielded by the shellac varnish.
Creating a perfectly white japanning surface with a high level of hardness has always been challenging. This is because there are very few substances that can dissolve to form a hard varnish without darkening the color and ruining its whiteness. However, the process outlined below is said to produce a composition that closely resembles a perfect white surface: Use flake white or white lead, washed and ground up with one-sixth of its weight in starch, then dried. Prepare it properly for spreading with mastic varnish made by taking 5 oz. of powdered mastic and placing it in a suitable container with 1 lb. of turpentine. Let them boil gently until the mastic dissolves; if there's any turbidity, strain the solution through flannel. Apply this smooth and uniform mixture to the surface to be japanned, which should be properly prepared with or without priming. After that, varnish it with five or six coats of the following varnish: Take any amount of the best seed-lac and select the clearest and whitest pieces, then take ½ lb. of this seed-lac and ¾ lb. of gum anime. Pulverize this mixture into a coarse powder, dissolve it in a gallon of methylated spirits, and strain off the clear varnish. The seed-lac will impart a slight tint to the varnish, but it's necessary for achieving a hard japanned surface. If a softer surface suffices, you can reduce the amount of seed-lac and add a bit of turpentine oleo-resin to the gum anime to reduce brittleness. A very good varnish that's free from brittleness can be made by dissolving gum anime in old nut or poppy oil, which should be gently boiled when the gum is added. After diluting it with turpentine, apply the white ground in this varnish, followed by one or two coats of the varnish itself. However, these coats take a long time to dry, and due to its softer nature, this japanned surface is more vulnerable to damage than the one made with shellac varnish.
According to Mr. Dickson, "the old way of making a cream enamel for stoving (a white was supposed to be impossible) was to mix ordinary tub white lead with the polishing copal varnish and to add a modicum of blue to neutralize the yellow tinge, stove same in about 170°F. and then polish as before described". "This," continues Mr. Dickson, "would at the best produce but a very pale blue enamel or a cream. It was afterwards made with flake white or dry white lead ground in turps only and mixed with the polishing copal varnish with the addition of tints as required, by which means a white of any required character could be produced."
According to Mr. Dickson, "the old method of creating a cream enamel for stoving (a true white was considered impossible) involved mixing regular tub white lead with polishing copal varnish and adding a little blue to counteract the yellowish tint, then baking it at around 170°F, and finally polishing it as previously described." "This," Mr. Dickson adds, "would at most result in only a very pale blue enamel or a cream. Later on, it was made using flake white or dry white lead ground in turpentine only and mixed with the polishing copal varnish, with added tints as needed, allowing for a white of any desired quality to be produced."
Authorities state that these may be formed from bright Prussian blue or verditer glazed over with Prussian blue or of smalt. By bright Prussian blue possibly a genuine Prussian blue toned down to a sky blue with white lead is meant, and by verditer the variety known as refiners' blue verditer, and as to smalt it must not be forgotten that it changes its colour in artificial light. Be that as it may, the pigment may be mixed with the shellac varnish according to the instructions already given, but as the shellac will somewhat injure the tone of the pigment by imparting a yellow tinge to it where a bright true blue is required, the directions already given as regards white grounds must be carried out.
Authorities say that these may be made from bright Prussian blue or verditer glazed with Prussian blue, or from smalt. By bright Prussian blue, they likely mean a real Prussian blue that’s lightened to a sky blue with white lead, and by verditer, they are referring to the type known as refiners' blue verditer. It’s important to remember that smalt can change color under artificial light. Regardless, the pigment can be mixed with the shellac varnish following the earlier instructions, but since the shellac can slightly alter the pigment's color by giving it a yellowish tint where a bright true blue is needed, the previous guidelines about white grounds should be followed.
The basis of this japan ground is made up with madder lake ground in oil of turpentine, this constitutes the first ground; when this is perfectly dry a second coat of lake and white in copal varnish is applied, and the last coat is made up of lake in a mixture of copal varnish and turpentine varnish.
The base of this Japanese ground is created using madder lake mixed with turpentine oil, which forms the first layer; once this is completely dry, a second layer of lake and white in copal varnish is applied, and the final layer consists of lake combined with a mix of copal varnish and turpentine varnish.
Orpiment or King's yellow may be used, and the effect is enhanced by dissolving powdered turmeric root in the methylated spirits from which the upper or polishing coat is made, which methylated spirits must be strained from off the dregs before the seed-lac is added to it to form the varnish. The seed-lac varnish is not so injurious to yellow pigments as it is to the tone of some other pigments, because, being tinged a reddish yellow, it does little more than intensify or deepen the tone of the pigment.
Orpiment or King's yellow can be used, and the effect is improved by dissolving powdered turmeric root in the methylated spirits used for the upper or polishing coat. This methylated spirits should be strained from the dregs before adding the seed-lac to create the varnish. The seed-lac varnish is less harmful to yellow pigments than it is to the hues of some other pigments because, being slightly reddish-yellow, it mainly enhances or deepens the pigment's tone.
Green japan grounds are produced by mixing Prussian blue or distilled verdigris with orpiment, and the effect is said to be extremely brilliant by applying them on a ground of leaf gold. Any of them may be used with good seed-lac varnish, for reasons already given. Equal parts by weight of rosin, precipitated rosinate of copper, and coal-tar solvent naphtha will give a varnish which, when suitably thinned and the coats stoved at a heat below 212° F., will give a green japan second to none as a finishing coat as regards purity of tone at least. To harden it and render it more elastic half of the rosin might be replaced by equal weights of a copal soluble in solvent naphtha and boiled linseed oil, so that the mixture would stand thus: rosinate of copper 1 lb., rosin 1/2 lb., boiled oil 1/4 lb., hard resin (copal) 1/4 lb., solvent naphtha 1 lb. When heated to a high temperature this rosinate of copper varnish yields a magnificent ruby bronze coloration, especially on glass. Verdigris dissolves in turpentine, and successful attempts might be made to make a green japan varnish from it on the lines indicated for rosinate of copper.
Green japan grounds are made by mixing Prussian blue or distilled verdigris with orpiment, creating an effect that is said to be extremely vibrant when applied over a base of leaf gold. Any of these can be effectively used with good seed-lac varnish, for the reasons mentioned earlier. Equal parts by weight of rosin, precipitated copper rosinate, and coal-tar solvent naphtha will produce a varnish that, when properly thinned and baked at a temperature below 212° F, provides a green japan that excels as a finishing coat, especially in terms of tone purity. To improve hardness and elasticity, you can replace half of the rosin with equal weights of a copal that dissolves in solvent naphtha and boiled linseed oil, resulting in the following mixture: copper rosinate 1 lb., rosin ½ lb., boiled oil ¼ lb., hard resin (copal) ¼ lb., solvent naphtha 1 lb. When heated to a high temperature, this copper rosinate varnish produces an impressive ruby bronze color, particularly on glass. Verdigris dissolves in turpentine, and efforts can be made to create a green japan varnish from it following the same methods used for copper rosinate.
Orange-coloured grounds may be formed by mixing vermilion or red lead with King's yellow, or orange lake or red orpiment (? realgar) will make a brighter orange ground than can be produced by any mixture.
Orange-colored grounds can be made by mixing vermilion or red lead with King's yellow, or orange lake or red orpiment (possibly realgar) will create a brighter orange ground than any mixture can produce.
Purple grounds may be produced by the admixture of lake or vermilion with Prussian blue. They may be treated as the other coloured grounds as regards the varnish vehicle.
Purple grounds can be made by mixing lake or vermilion with Prussian blue. They can be handled like other colored grounds when it comes to the varnish medium.
Black grounds may be formed either from lamp black or ivory black, but ivory black is preferable to lamp black, and possibly carbon black or gas black to either. These may be always applied with the shellac varnish as a vehicle, and their upper or polishing coats may consist of common seed-lac varnish. But the best quality of ivory black ground in the best super black japan yields, after suitable stoving, a very excellent black indeed, the purity of tone of which may be improved by adding a little blue in the grinding.
Black grounds can be made from either lamp black or ivory black, but ivory black is usually preferred over lamp black, and possibly carbon black or gas black over both. These can always be mixed with shellac varnish as a medium, and the top or polishing layers can be made with regular seed-lac varnish. However, the highest quality of ivory black ground in the finest super black japan produces, after proper drying, a truly exceptional black. The purity of the tone can be enhanced by adding a bit of blue during the grinding process.
Common black japan grounds on metal by means of heat are procured in the following manner: The surface to be japanned must be coated over with drying oil, and when it is moderately dry must be put into a stove of such heat as will change the oil black without burning it. The stove should not be too hot when the oil is put into it nor the heat increased too fast, either which error would make it blister, but the slower the heat is increased and the longer it is continued, provided it be restrained within a due degree, the harder will be the coat of japan. This kind of japan requires no polish, having received from the heat, when properly regulated, a sufficiently bright surface.
Common black japanning on metal using heat is done like this: First, the surface that needs japanning must be covered with drying oil. Once it’s somewhat dry, it should be placed in a stove heated just enough to turn the oil black without burning it. The stove shouldn't be too hot when the oil goes in, and the heat shouldn't be increased too quickly; either mistake could cause blisters. The slower the heat is increased and the longer it’s maintained—within a proper limit—the harder the japanned coat will be. This type of japanning doesn't need polishing, as the heat, when correctly managed, provides a bright enough surface.
This beautiful ground, produced by heat, is valued not only for its hardness and its capacity to stand a heat greater than that of boiling water, but also for its fine appearance. It is made by means of a varnish prepared thus: Take one gallon of good linseed oil and half a pound of umber, boil them together until the oil becomes very brown and thick, strain it then through a coarse cloth and set it again to boil, in which state it must be continued until it acquires a consistency resembling that of pitch; it will then be fit for use. Having thus prepared the varnish, clean well the surface which is to be japanned; then apply vermilion ground in shellac varnish or with drying oil, very thinly diluted with oil of turpentine, on the places intended to imitate the more transparent parts of the tortoise-shell. When the vermilion is dry, brush the whole over with the black varnish thinned to the right consistency with oil of turpentine. When set and firm put the work into a stove where it may undergo a very strong heat, which must be continued a considerable time, for three weeks or even a month so much the better. This ground may be decorated with painting and gilding in the same way as any other varnished surface, which had best be done after the ground has been hardened, but it is well to give a second annealing at a very gentle heat after it has been finished. A very good black japan may be made by mixing a little japan gold size with ivory or lamp-black, this will develop a good gloss without requiring to be varnished afterwards.
This beautiful surface, created through heat, is appreciated not just for its toughness and ability to withstand temperatures higher than boiling water, but also for its attractive look. It's made by preparing a varnish in this way: Take one gallon of high-quality linseed oil and half a pound of umber, boil them together until the oil turns very brown and thick, then strain it through a coarse cloth and put it back on the heat, where it should remain until it reaches a consistency similar to pitch; at that point, it will be ready to use. Once the varnish is prepared, thoroughly clean the surface that will be japanned; then apply vermilion mixed in shellac varnish or with drying oil, very lightly diluted with turpentine, to the areas meant to mimic the more transparent parts of tortoiseshell. After the vermilion dries, brush the entire surface with the black varnish thinned to the right consistency with turpentine. Once set and firm, place the work in a stove, where it should endure a very high heat for a substantial period—ideally three weeks or even a month, if possible. This surface can be decorated with painting and gilding just like any other varnished surface, preferably after the ground has hardened, but it's good to do a second gentle heating after it’s finished. A high-quality black japan can be created by mixing a little japan gold size with ivory or lamp-black, which will produce a nice gloss without needing any additional varnish.
Japan work should be painted with real "enamel paints," that is with paints actually ground in varnish, and in that case all pigments may be used and the peculiar disadvantages, which attend several pigments with respect to oil or water, cease with this class of vehicle, for they are secured by it when properly handled from the least danger of changing or fading. The preparation of pigments for this purpose consists in bringing them to a due state of fineness by grinding them on a stone with turpentine. The best varnish for binding and preserving the pigments is shellac. This, when judiciously handled, gives such a firmness and hardness to the work that, if it be afterwards further secured with a moderately thick coat of seed-lac varnish, it will be almost as hard and durable as glass. The method of painting in varnish is, however, far more tedious than with an oil or water vehicle. It is, therefore, now very usual in japan work for the sake of dispatch, and in some cases in order to be able to use the pencil (brush) more freely, to apply the colours in an oil vehicle well diluted with turps. This oil (or japanners' gold size) may be made thus: Take 1 lb. of linseed oil and 4 oz. of gum anime, set the oil in a proper vessel and then add the gum anime powder, stirring it well until the whole is mixed with the oil. Let the mixture continue to boil until it appears of a thick consistence, then strain the whole through a coarse cloth and keep it for use. The pigments are also sometimes applied in a gum-water vehicle, but work so done, it has been urged, is not nearly so durable as that done in varnish or oil. However, those who formerly condemned the practice of japanning water-coloured decorations allowed that amateurs, who practised japanning for their amusement only and thus might not find it convenient to stock the necessary preparations for the other methods, might paint with water-colours. If the pigments are ground in an aqueous vehicle of strong isinglass size and honey instead of gum water the work would not be much inferior to that executed with other vehicles. Water-colours are sometimes applied on a ground of gold after the style of other paintings, and sometimes so as to produce an embossed effect. The pigments in this style of painting are ground in a vehicle of isinglass size corrected with honey or sugar-candy. The body with which the embossed work is raised is best formed of strong gum water thickened to a proper consistency with armenian bole and whiting in equal parts, which, being laid on in the proper figures and repaired when dry, may be then painted with the intended pigments in the vehicle of isinglass size or in the general manner with shellac varnish. As to the comparative value of pigments ground in water and ground in oil, that is between oil-colours and water-colours in enamelling and japanning, there seems to have been a change of opinion for some time back, especially as regards the enamelling of slate. The marbling of slate (to be enamelled) in water-colours is a process which Mr. Dickson says well repays study. It is greatly developed in France and Germany. The process is a quick one and the pigments are said to stand well and to maintain their pristine hue, yet if many strikingly natural effects result from the use of this process, its use has not spread in Great Britain, being confined wholly and solely to the marbling of slate (except in the case of wall-paper which is water-marbled in a somewhat similar way).
Japan work should be done with real "enamel paints," meaning paints that are actually ground in varnish. This way, all pigments can be used, and the specific drawbacks of some pigments concerning oil or water are eliminated with this type of medium, provided they are executed correctly to avoid any risk of changing or fading. The preparation of pigments for this purpose involves grinding them on a stone with turpentine until they reach the right fineness. The best varnish for binding and preserving the pigments is shellac. When applied expertly, it adds such firmness and hardness to the work that if it is later topped with a moderately thick layer of seed-lac varnish, it will be nearly as hard and durable as glass. However, painting with varnish is significantly more time-consuming than using an oil or water medium. Consequently, it is now quite common in Japan work, for the sake of efficiency, and at times to allow for a freer use of the brush, to apply colors in an oil medium diluted with turpentine. This oil (or japanners' gold size) can be made by taking 1 lb. of linseed oil and 4 oz. of gum anime. Place the oil in an appropriate vessel, add the powdered gum anime, and stir well until everything is blended. Let the mixture boil until it thickens, then strain it through a coarse cloth and store it for later use. Pigments are sometimes applied in a gum-water medium as well, but it has been argued that work done this way is not nearly as durable as that made with varnish or oil. Nonetheless, those who initially disapproved of japanning with water-colored decorations acknowledged that hobbyists, who pursued japanning for fun and might not want to stockpile all the necessary preparations for the other methods, could use watercolors. If the pigments are ground in a watery medium made with strong isinglass size and honey rather than gum water, the results would be somewhat comparable to those achieved with other mediums. Watercolors are sometimes applied over a gold background like other paintings, and at times to create an embossed effect. In this style, the pigments are ground in an isinglass size medium mixed with honey or sugar-candy. The base for the embossed work is best made from strong gum water thickened to the right consistency with equal parts of Armenian bole and whiting, which can then be painted with the desired pigments in isinglass size or in the general manner with shellac varnish once it is laid on in the appropriate patterns and dried. Regarding the relative value of pigments ground in water versus those ground in oil—comprising oil colors and water colors in enameling and japanning—opinions have seemed to shift recently, especially concerning the enameling of slate. The marbling of slate (to be enamored) with watercolors is a process that Mr. Dickson believes deserves further study. It has been extensively developed in France and Germany. The process is quick, and the pigments are said to hold well and retain their original color, yet despite the strikingly natural effects that arise from using this technique, it has not gained popularity in Great Britain, being limited solely to the marbling of slate (except in the case of wallpaper, which is water-marbled in a somewhat similar manner).
"In painting in oil-colour," says Mr. Dickson, "the craftsman trusts largely to his badger-hair brush to produce his effects of softness and marbly appearance; but in painting in water-colours, this softness, depth, and marbly appearance are produced mostly by the colour placed upon the surface, and left entirely untouched by badger or any other brush. The colour drying quickly, does not allow much time for working, and when dry it cannot be touched without spoiling the whole of the work. The difference first of all between painting in water and in oil colour, is that a peculiar grain exists with painting in water that it is absolutely impossible to get in oil. The charm of a marble is, I think, its translucency as much as its beautiful colour; it is to that translucency (for in marble fixed we have no transparency) that it owes its softness of effect, which makes marble of such decorative value. This translucency can only be obtained by thin glazes of colour, by which means each succeeding glaze only partly covers the previous one, the character of the marble being thus produced. This is done sometimes in oil-colour in a marvellous manner, but even the best of oil-painting in marble cannot stand the comparison of water-colour, and it is only by comparison that any accurate judgment can be formed of any work. The production of marbles in water-colour has a depth, softness, and stoniness that defies oil-painting, and in some cases will defy detection unless by an expert of marbles. It may be that first of all the materials employed are more in keeping with the real material, as no oil enters into the composition of real marble, and by using the medium of water we thus start better, but the real secret is that by using water as a medium the colours take an entirely different effect. In painting in water-colour greys of any tint or strength can be obtained suitable for the production of a marble of greyish ground, by pure white, tinted as required, being applied of different thicknesses of colour, all the modulations of tone being obtained by the difference in the thickness of the colour applied."
"In oil painting," says Mr. Dickson, "the artist often relies heavily on their badger-hair brush to create softness and a marbled look. However, in watercolor painting, this softness, depth, and marbled effect come primarily from the color applied directly onto the surface, left completely untouched by badger or any other brush. Since the paint dries quickly, there's limited time for adjustments, and once dry, it cannot be altered without ruining the entire piece. The main difference between watercolor and oil painting is that watercolor has a unique texture that you simply cannot achieve with oil. The beauty of marble lies in its translucency as much as its stunning color; it's this translucency (since fixed marble isn't transparent) that gives it a soft effect, making marble so valuable for decoration. This translucency can only be achieved through thin layers of color, where each subsequent layer partially covers the previous one, thus creating the character of marble. While this can also be accomplished in oil painting in remarkable ways, even the finest oil renditions of marble can't compare to watercolor. Real comparisons are necessary to form an accurate judgment of any artwork. Watercolor marbles exhibit a depth, softness, and stone-like quality that oil painting cannot replicate, and in some cases, distinguishing them requires an expert in marbles. It may be that the materials used align more closely with the actual material, as there’s no oil in real marble, and by using water as a medium, we have a better starting point. But the true secret is that using water changes how the colors behave entirely. In watercolor painting, shades of grey of any hue or intensity can be achieved for creating a marble-like grey background, using pure white, tinted as needed, with different thicknesses of color applied, and all the variations in tone are achieved through these differences in applied thickness."
Varnishing is the last and the finishing process in japanning. It consists in (1) applying, and (2) polishing the outer coats of varnish, which are equally necessary whether the plain japan ground be painted on or not. This is best done in a general way with common seed-lac varnish, except on those occasions where other methods have been shown to be more expedient, and the same reasons, which decide as to the propriety of using the different varnishes as regards the colours of the ground, hold equally with those of the painting, for where brightness is a material point and a tinge of yellow would injure it, seed-lac must give way to the whiter resins; but where hardness and tenacity are essential it must be adhered to, and where both are necessary a mixed varnish must be used. This mixed varnish should be made from the picked seed-lac as directed in the case of the white japan grounds. The common seed-lac varnish may be made thus: Take 11/2 lb. of seed-lac and wash it well in several waters, then dry it and powder it coarsely and put it with a gallon of methylated spirits into a Bohemian glass flask so that it be not more than two-thirds full. Shake the mixture well together and place the flask in a gentle heat till the seed-lac appears to be dissolved, the shaking being in the meantime repeated as often as may be convenient; then pour off all the clear and strain the remainder through a coarse cloth. The varnish so prepared must be kept for use in a well-corked glass vessel. The whiter seed-lac varnishes are used in the same manner as the common, except as regards the substances used in polishing, which, where a pure white or the greater clearness or purity of other pigments is in question, should be itself white, while the browner sorts of polishing dust, as being cheaper and doing their business with greater dispatch, may be used in other cases. The pieces of work to be varnished should be placed near the fire or in a warm room and made perfectly dry, and then the varnish may be applied with a flat camel-hair brush made for the purpose. This must be done very rapidly, but with great care; the same place should not be passed twice over in laying on one coat if it can possibly be avoided. The best way of proceeding is to begin in the middle and pass the brush to one end, then with another stroke from the middle pass it to the other end, taking care that before each stroke the brush be well supplied with varnish; when one coat is dry another must be laid over it in like manner, and this must be continued five or six times. If on trial there be not a sufficient thickness of varnish to bear the polish without laying bare the painting or ground colour underneath more varnish must be applied. When a sufficient number of coats of varnish is so applied the work is fit to be polished, which must be done in common work by rubbing it with a piece of cloth or felt dipped in tripoli or finely ground pumice-stone. But towards the end of the rubbing a little oil of any kind must be used with the powder, and when the work appears sufficiently bright and glossy it should be well rubbed with the oil alone to clean it from the powder and to give it a still greater lustre. In the case of white grounds, instead of the tripoli, fine putty or whiting should be used, but they should be washed over to prevent the danger of damaging the work from any sand or any other gritty matter that may happen to be mixed with them. It greatly improves all kinds of japan work to harden the varnish by means of heat, which, in every degree that can be applied short of what would burn or calcine the matter, tends to give it a firm and strong texture where metals form the body; therefore a very hot stove may be used, and the stoving may be continued for a considerable time, especially if the heat be gradually increased. But where wood or papier-mâché is in question, heat must be applied with great caution.
Varnishing is the final step in japanning. It involves (1) applying and (2) polishing the outer layers of varnish, which are essential regardless of whether the plain japan base is painted or not. This is typically done with standard seed-lac varnish, unless other methods are proven to be more efficient. The same considerations that determine the suitability of various varnishes based on the colors of the base apply equally to the painting. If brightness is crucial and a hint of yellow would spoil it, seed-lac should be replaced with whiter resins. However, if durability and adhesion are vital, seed-lac must be used, and when both qualities are needed, a mixed varnish should be employed. This mixed varnish should be made from selected seed-lac as outlined for white japan bases. The basic seed-lac varnish can be prepared this way: Take 11/2 lb. of seed-lac, wash it thoroughly in several waters, dry it, and then coarsely powder it. Combine it with a gallon of methylated spirits in a Bohemian glass flask, filling it no more than two-thirds full. Shake the mixture well and place the flask in a gentle heat until the seed-lac dissolves, shaking it repeatedly as needed. Then, pour off the clear liquid and strain the rest through a coarse cloth. The varnish prepared must be stored in a tightly corked glass container. The whiter seed-lac varnishes are used similarly to the common ones, except for the polishing materials, which should be white when a pure white finish or clarity of other pigments is important. In other situations, cheaper brown polishing dust can be used since it works more quickly. The pieces to be varnished should be positioned near a heat source or in a warm space and allowed to dry completely. The varnish can then be applied with a flat camel-hair brush specifically made for this task. This should be done quickly but with great care; ideally, do not go over the same spot twice with a single coat if possible. The best approach is to start in the middle, brushing towards one end, then from the middle to the other end, ensuring the brush is well-loaded with varnish before each stroke. Once one coat is dry, another should be applied in the same way, repeating this process five or six times. If tests show the varnish isn't thick enough to withstand polishing without exposing the painting or base color beneath, more varnish should be added. Once enough coats have been applied, the work can be polished, typically by rubbing it with a cloth or felt dipped in tripoli or finely ground pumice stone. Towards the end of the polishing, a little oil should be mixed with the powder, and when the work looks sufficiently bright and glossy, it should be rubbed well with just the oil to remove any powder and enhance the shine. For white bases, instead of tripoli, fine putty or whiting can be used, but they should be washed first to avoid harming the work with any sand or gritty particles that might be mixed in. Hardening the varnish with heat significantly improves all types of japan work. Applying heat, as long as it doesn't burn or damage the material, gives it a firm and strong texture, especially when metals are involved. Therefore, a very hot stove can be utilized, and the heating should continue for a good amount of time, particularly if the temperature is gradually increased. However, caution is needed when applying heat to wood or papier-mâché.
SECTION III.
JAPANNING OR ENAMELLING METALS.
In japanning metals, all good work of which should be stoved, they have to be first thoroughly cleaned, and then the japan ground applied with a badger or camel-hair brush or other means, very carefully and evenly. Metals usually require from three to five coats, and between each application must be dried in an oven heated from 250° to 300° F.—about 270° being the average. It has already been seen that the best grounds for japanning are formed of shellac varnish, the necessary pigments for colouring being added thereto, being mixed with the shellac varnish after they have been ground into a high degree of smoothness and fineness in spirits of turpentine. In japanning it is best to have the oven at rather a lower temperature, increasing the heat after the work has been placed in the oven. When a sufficient number of coats have been laid on—which will usually be two only—the work must be polished by means of a piece of cloth or felt dipped in tripoli or finely powdered pumice-stone. For white grounds fine putty powder or whiting must be employed, a final coat being afterwards given, and the work stoved again. The last coat of all is one of varnish. And here, as a preliminary remark, it is advisable that all enamels and japans should be purchased ready-made, as any attempt to make such is almost sure to end in disaster, while, owing to the fact that such are only required for small jobs; it would involve too much trouble and would not pay. It is for this reason that few japan recipes are given, as, although many are available, they do not always turn out as suitable for the purpose as could be desired, in addition to which the ready-made articles can be purchased at a very reasonable price and are much better prepared. The operator should procure his enamels a shade or two lighter than he desires to see in the finished article, allowing the chemical action due to the stoving to tone the colours down. Another necessity is to keep the enamel thoroughly well mixed by well stirring it every time it is used, as if this is not done the actual colouring matter is apt to sink to the bottom, the ultimate result being that streaky work is produced in consequence of this indifferent mixing of the enamelling materials.
In japanning metals, which should all be baked afterward, you need to start by thoroughly cleaning them. Then, apply the japan ground using a badger or camel-hair brush or other methods, carefully and evenly. Metals usually require three to five coats, and between each application, they should be dried in an oven heated to between 250° and 300°F—around 270°F is average. It's been noted that the best grounds for japanning come from shellac varnish, to which the necessary colored pigments are added after they’ve been ground very finely in turpentine. When japanning, it’s better to keep the oven at a lower temperature initially and increase the heat once the work is inside. After applying a sufficient number of coats—which is typically two—the work should be polished with a cloth or felt dipped in tripoli or finely powdered pumice stone. For white grounds, use fine putty powder or whiting, then apply a final coat and stove it again. The last coat should be varnish. As a preliminary note, it’s advisable to buy all enamels and japans pre-made, as trying to make your own will likely end in failure, and since they’re only needed for small projects, it would be too much hassle and not worth it. This is why few japan recipes are provided; although many are out there, they don’t always work as well as intended, and the pre-made options are available at a reasonable price and are better prepared. The operator should choose enamels that are a shade or two lighter than the desired final appearance, to account for the chemical changes from baking that will tone down the colors. It’s also essential to keep the enamel thoroughly mixed by stirring it well every time you use it; otherwise, the coloring matter may settle at the bottom, leading to streaky results due to poor mixing of the enameling materials.
It is hardly necessary to state that all japanning or enamelling work must be done in a room or shop absolutely free from dust or dirt, and as far away as possible from any window or other opening leading to the open air, for two reasons—one being that the draught therefrom may cool the oven or stove, and the other that the air may convey particles of dust into the enamelling shop. In fact, it cannot be too much impressed upon the workmen that one of the primary secrets of successful enamelling is absolute cleanliness; consequently all precautions must be taken to ensure that the enamel is perfectly free from grit and dust, and it must be so kept by frequent straining through fine muslin, flannel, or similar material. The work having been thoroughly cleaned and freed from all grease and other foreign matter, it must be suspended or held immediately over the pan elsewhere referred to, and the enamel poured on with an ordinary iron ladle, or covered by means of the brush. When it has been permitted to drain thoroughly, the work should be hung on the hooks on the rods in the oven as seen in the explanatory sketch, care being observed that no portion of the work is in such a position that any superfluous enamel cannot easily drain off—in other words, the work must lie or hang that it is always, as it were, on the slant. Always bear in mind when shutting the oven door to do so gently, as if a slam is indulged in all the gas jets will be blown out, and an explosion would probably result.
It's almost unnecessary to mention that all japanning or enameling work needs to be done in a space that's completely free of dust and dirt, and as far away as possible from any windows or openings to the outside for two reasons—first, the draft can cool the oven or stove, and second, the air might carry dust particles into the enameling area. In fact, it's crucial for the workers to understand that a key secret to successful enameling is complete cleanliness; therefore, all measures must be taken to ensure that the enamel is completely free from grit and dust, and this must be maintained by frequently straining it through fine muslin, flannel, or similar materials. Once the item has been thoroughly cleaned and free of grease and other contaminants, it should be suspended or held directly over the pan mentioned earlier, and the enamel poured on using a standard iron ladle or applied with a brush. After allowing it to drain completely, the work should be hung on the hooks on the rods in the oven as shown in the explanatory sketch, ensuring that no part of the work is positioned so that any excess enamel cannot easily drain off—in other words, the work must lie or hang in a way that it’s always slightly tilted. Always remember to close the oven door gently; if it’s slammed, all the gas jets will be blown out, which could lead to an explosion.
Should the job in hand be a large one, it will be found as well to get a cheaper enamel for the first coat, but if the work is only a small job, it will not be necessary to have more than one enamel, of which a couple of coats at least will be required. When the first coat has thoroughly dried and hardened, the surface will have to be thoroughly rubbed till it is perfectly smooth with tripoli powder and fine pumice-stone, and afterwards hand-polished with rotten-stone and putty powder. And here it may be remarked that the finer the surface is got up with emery powder and other polishing agents the better will be the enamelling and ultimate finish. The rubbing down being finished, another coat of enamel must be applied and the work baked as before, care being always taken to keep the enamel in a sufficiently fluid condition as to enable it to flow and run off the work freely. It can easily be thinned with a little paraffin. A third coat will frequently be advisable, as it improves the finish.
If the job you’re working on is large, it’s a good idea to use a cheaper enamel for the first coat; however, if it’s just a small project, you only need one enamel, and at least a couple of coats will be necessary. After the first coat has completely dried and hardened, the surface needs to be thoroughly sanded until it’s perfectly smooth using tripoli powder and fine pumice stone, and then hand-polished with rotten stone and putty powder. It's worth noting that the smoother the surface is made with emery powder and other polishing agents, the better the enameling and final finish will be. Once the sanding is done, another coat of enamel should be applied, and the work should be baked as before, making sure to keep the enamel fluid enough to flow and run off the work easily. You can easily thin it with a little paraffin. A third coat is often a good idea, as it enhances the finish.
In enamelling cycles, it is well to hang the front forks crown uppermost when they are undergoing the final baking, and it is advisable to bear in mind that wheels require an enamel that will stove at a lower temperature than is called for for other parts of the machine. Some japanners advocate the fluid being put on with camel-or badger-hair brushes, and for the best descriptions of work, final coats, and such like, I agree with them; but this is a detail which can be left to the operator's own fancy, the class of work, etc.; but I would remind him that applying enamel with a brush requires much care and a certain amount of "knack". It is something like successful lacquering in brasswork—it looks very simple, but is not. Each succeeding coat of japan gives a more uniform and glossy surface, and for this reason it may, in some cases, be necessary to repeat the operation no fewer than half a dozen times, the final coat being generally a layer of clear varnish only, to add to the lustre.
In enameling cycles, it’s best to hang the front forks crown side up during the final baking process, and it's important to remember that wheels need an enamel that can cure at a lower temperature than other parts of the machine. Some japanners recommend using camel or badger hair brushes for applying the enamel, and for high-quality work like final coats, I agree with them; however, this detail can be left to the operator's preference and the type of work. Still, I would remind them that applying enamel with a brush takes a lot of care and a certain skill. It’s similar to achieving a good finish in brasswork—it seems straightforward, but it’s not. Each layer of japanning creates a more uniform and glossy surface, which is why it might be necessary to repeat the process at least six times, with the final coat usually being a clear varnish to enhance the shine.
Care must be taken for light-coloured japans or enamels not to have the temperature sufficiently high to scorch, or the surface will be discoloured, as they require a lower temperature for fixing than the dark japans, which, provided the article is not likely to be injured by the heat, are usually dried at a somewhat high temperature. The preceding instructions apply only to the best descriptions of work.
Take care with light-colored japans or enamels so that the temperature doesn’t get too high and scorch them, or else the surface will get discolored. They need a lower temperature for setting compared to dark japans, which can typically be dried at a higher temperature as long as the item won't be damaged by the heat. The above instructions apply only to the best quality work.
When pouring enamel by means of the ladle over pieces of work, do not agitate the liquid too much—at the same time taking care to keep it well mixed—so as to form air bubbles, as this will cause trouble, and in pouring over the work do it with an easy and gentle and not too hurried a motion. In japanning curved pieces, such as mud-guards, etc., in hanging up the work in the oven see that the liquid does not run to extremities and there form ugly blots or blotches of enamel.
When pouring enamel with a ladle over pieces of work, avoid agitating the liquid too much while ensuring it stays well mixed, as this can create air bubbles that will cause issues. When pouring, do it smoothly and gently, without rushing. For curved pieces like mudguards, when hanging them up in the oven, make sure the liquid doesn’t run to the edges and create unsightly blobs or blotches of enamel.
When white or other light tones are used for japanning they are mixed with japanners' varnish, and these require more careful heating in the oven or stove than darker tints or brown or black.
When white or other light colors are used for japanning, they’re mixed with japanners' varnish, and these need more careful heating in the oven or stove than darker shades or brown or black.

At Fig. 1 is shown a trough in which large pieces, such as bedsteads, bicycle frames, etc., are dipped or immersed. For the first-mentioned class of work such high finish is not required as for bicycles, and consequently the enamel need not be applied with a brush, nor will it be necessary to rub down the work between each coat, but instead the pieces can be literally dipped in the tank of liquid, then allowed to drain on to the dripping-board—the superfluous enamel thus finding its way back into the trough or tank, the dripped articles being afterwards placed in the oven to harden. The trough must be of sufficient dimensions to allow the pieces of work to be completely immersed, and the dripping-board should be set at an angle of about 45°.
At Fig. 1 is a trough where large items, like bed frames and bicycle parts, are dipped or immersed. For the first type of work, a high finish isn't as crucial as it is for bicycles, so the enamel doesn’t need to be applied with a brush, and it’s not necessary to sand down the surfaces between each coat. Instead, the pieces can simply be dipped in the liquid tank and then allowed to drain on the dripping board, with the excess enamel flowing back into the trough or tank. After dripping, the items are placed in the oven to harden. The trough should be large enough to fully submerge the pieces, and the dripping board should be tilted at about a 45° angle.
Bedstead frames will never require more than two coats and the commoner class of goods only one. I would not advise the tradesman in a small way of business to go to the expense of a trough, etc., as it calls for much more room than is ordinarily available, but if he has the necessary plant for bicycle work he can, of course, do an occasional job of the other kind.
Bed frames will only need two coats, and the more standard items only one. I wouldn’t recommend a small business owner spend money on a trough, as it takes up more space than is usually available. However, if they have the right setup for bicycle work, they can certainly take on an occasional job of a different kind.
For japanning sheet-iron articles, which are really tin goods, such as tea-trays and similar things, first scour them well with a piece of sandstone, which will effectually remove all the scales and make the surface quite smooth. Then give the metal a coating of vegetable black, which must be mixed with super black japan varnish, thinned with turps, and well strained. Only a small quantity of this varnish is necessary, as it will dry dead. The article must then be placed in the stove to harden at a temperature of 212° F., there to remain for from ten to twelve hours. When taken out of the stove, the articles must be allowed to get cold, after which they must be given a coat of super black japan, which, if necessary, must be thinned with turps, a stiff, short bristle brush being employed, and the varnish put on sparingly, so that it will not "run" when it gets warm. Two coats of this varnish on top of the vegetable black coating are usually sufficient, when done properly, but a third coating much improves the work, and from ten to twelve hours' hardening will be necessary between each coating. The small lumps which will be more or less certain to arise will require to be rubbed down between each application by a small and smooth piece of pumice-stone.
To japanned sheet-iron items, which are actually tin products like tea trays and similar items, first, scrub them well with a piece of sandstone to effectively remove all scales and smooth the surface. Next, apply a coating of vegetable black mixed with super black japan varnish, thinned with turpentine, and well strained. Only a small amount of this varnish is needed, as it will dry flat. Then, place the item in the stove to harden at a temperature of 212°F, where it should stay for about ten to twelve hours. Once removed from the stove, let the items cool down, and then apply a coat of super black japan varnish, which may need to be thinned with turpentine. Use a stiff, short-bristled brush to apply the varnish sparingly, so it won’t drip when warm. Typically, two coats of this varnish over the vegetable black base are sufficient when applied correctly, but a third coat greatly improves the finish, necessitating another ten to twelve hours of hardening between each coat. Any small lumps that inevitably form should be smoothed down with a small, smooth piece of pumice stone between each application.
If it is desired to add gold or bronze bands or any kind of floral or other kind of fancy decorations, these are painted on, after the ground japanning has been done, in japanners' gold size, and then the gold leaf is applied, or the bronze or other metal powder is dusted on, after which the objects so treated are again placed in the stove, where they will not require to be kept near so long as for ordinary japanning. After they have been removed, the gilt or bronzed portions must be treated with a protecting coat of white spirit varnish. Transfers can be applied in the same way.
If you want to add gold or bronze bands or any kind of floral or decorative accents, you paint these on after the base japanning is done, using japanners' gold size. Then, apply the gold leaf or dust on the bronze or other metal powder. After that, the treated items go back into the stove, where they won't need to be kept as long as with regular japanning. Once they're taken out, the gilt or bronzed areas should be covered with a protective coat of white spirit varnish. Transfers can be applied in the same way.
Tinned iron goods are the most largely japanned, and for these brown and black colours are principally employed. Both are obtained by the use of brown japan, the metal having a preliminary coating of black paint when black is required. Only one coating of brown japan is given to cheap goods, but for better articles two or more are applied. For these it is possible that a final dressing with pumice-stone, then with rotten-stone, and rubbed with a piece of felt or cloth, or even the palm of the hand, may be necessary, but as a rule not.
Tinned iron goods are primarily finished with japanning, using mainly brown and black colors. Both colors are achieved with brown japan, with a base layer of black paint applied when black is needed. Cheap items receive only one coat of brown japan, while higher-quality products get two or more coats. For these better items, it might be necessary to do a final polishing with pumice stone, then with rotten stone, and to buff it using a piece of felt or cloth, or even the palm of the hand, although this is usually not required.
Large numbers of articles of the above description, such as tea-trays, tea-canisters, cash-boxes, coal-boxes, and similar goods, are japanned at Birmingham, and it is to such that the preceding instructions apply.
Large numbers of items like tea trays, tea canisters, cash boxes, coal boxes, and similar products are lacquered in Birmingham, and these are the ones the previous instructions refer to.
In all cases of re-enamelling old work, it is absolutely necessary to remove all traces of the first enamelling, and if this has been well done in the first instance, it will prove no mean job. The best way to clean the work is to soak it in a strong "lye" of hot potash, when the softened enamel can be wiped or brushed off—this latter method being pursued in the more intricate and ungetatable portions of the work. New work, which has not been enamelled, can be treated in the same way for the removal of all grease, stains, finger-marks, etc., and too much attention cannot be paid to the initial preparation of the surface of the metal, to have it thoroughly even and smooth, as it adds so much to the ultimate finish and appearance of the work. Plenty of labour must be bestowed before the final coat, as any blemish will show through this finishing, and so mar what would otherwise be a highly satisfactory bit of work. In all kinds of bicycle work, whether new or old, the most satisfactory results are obtained by the application of at least two, and sometimes four or five, successive coats of good but thin enamel, as this will impart the necessary perfect coat, combined with durability, a high finish, and a good colour. A good enamel should be sufficiently hard, so as not to be scratched on the merest touch or rubbing. It will, of course, be understood that no solder-work must be put into the stove, or the pieces will separate. Should any of this work be discovered, the pieces must be taken apart, and then brazed together before being enamelled, and put in the stove.
In all cases of re-enameling old work, it’s absolutely necessary to remove all traces of the original enamel. If this was done well initially, it can be quite a task. The best way to clean the work is to soak it in a strong hot potash lye, which allows the softened enamel to be wiped or brushed off—this latter method being used for the more intricate and hard-to-reach areas. New work that hasn’t been enameled can be treated the same way to remove grease, stains, fingerprints, etc., and it’s crucial to focus on the initial preparation of the metal’s surface, ensuring it's thoroughly even and smooth, as this greatly enhances the final finish and appearance of the work. A lot of effort should be put in before the final coat because any imperfections will show through the finishing, ruining what could otherwise be a highly satisfactory piece of work. In all kinds of bicycle work, whether new or old, the best results come from applying at least two, and sometimes four or five, successive coats of good but thin enamel, as this provides the necessary perfect coat that combines durability, a high finish, and a good color. A good enamel should be hard enough not to get scratched with the slightest touch or rubbing. It should be understood that no soldered work should go into the stove, or the pieces will separate. If any of this work is discovered, the pieces must be taken apart and brazed together before being enameled and put in the stove.
SECTION IV.
THE ENAMELLING AND JAPANNING STOVE—PIGMENTS SUITABLE FOR JAPANNING WITH NATURAL LACQUER—MODERN METHODS OF JAPANNING WITH NATURAL JAPANESE LACQUER.
Besides the various enamels or japans and varnishes of various colourings and the stove, which will be found described and illustrated, together with the trough, in other pages, the worker will need some iron pots or cauldrons in which to boil the potash "lye" for the cleansing, more particularly, of old work, some iron ladles both for this work and for pouring the japan on the articles to be covered therewith, a few badger tools and brushes for small fine work, some hooks for the stove, a pair of pliers, a few bits of broom handle cut into short lengths and made taper, so as to fit into the tubes, etc., of bicycles and other work, so as to keep the hands as free from the japan as possible, some emery powder, pumice-stone powder, tripoli, putty powder, whiting, and a piece of felt or cloth. If he is also doing any common work, a stumpy brush of bristles and a soft leather will also be requisite, together with a file or two. These will about comprise the whole of the articles required, not very expensive, all of which will really not be required by a beginner.
Besides the various enamels, japans, and varnishes in different colors, as well as the stove, which will be described and illustrated on other pages, the worker will need some iron pots or cauldrons for boiling the potash "lye" to clean, especially old items. He'll also need some iron ladles for this task and for pouring the japan onto the items to be coated. Additionally, a few badger tools and brushes for detailed work, some hooks for the stove, a pair of pliers, and several short pieces of broom handle shaped to fit into the tubes of bicycles and other projects to keep hands as clean as possible from the japan are necessary. He'll need emery powder, pumice stone powder, tripoli, putty powder, whiting, and a piece of felt or cloth. If he is doing any general work, a sturdy bristle brush and soft leather will also be needed, along with a file or two. These will cover all the items required, which aren't very expensive and may not all be necessary for a beginner.
Owing largely to the strides made in the cycle trade enamelling is stoved by means of gas, and of this a plentiful supply is necessary. Enamelling stoves may really be described as hot-air cupboards or ovens, and for a stove which will answer most requirements—say one of 6 feet by 6 feet by 31/2 feet—six rows of atmospheric burners will be necessary to heat it, while it will be also advisable to fix pipes of 11/4 inch internal diameter from the gas meter to the stove. The atmospheric burners can be made from the requisite number of pieces of 11/4-inch gas tube 31/2 feet in length, one end of each being stopped, and having 1/3-inch holes drilled therein at intervals of about 1 inch, the other end being left open for the insertion of ordinary 3/8-inch brass gas taps. Another plan preferred by some japanners is to have three rows of burners the full length of the stove, which, under some circumstances, due to structural conditions, will be found more suitable. Anyway, whatever the position of the stove, allowance must be made for a temperature up to 400° F. to be raised. In old-fashioned ovens the heat is applied by means of external flues, in which hot air or steam is circulated, but this system is generally unsatisfactory, the supply of heat having to be controlled by dampers or stop-cocks, and this has given place to the gas apparatus. Another simple form of oven, though not one which I shall recommend, is a species of sheet-iron box, which is encased by another and larger box of the same shape, so placed that from 2 to 3 inches of interspace exists between the two boxes. To this interspace heat is applied, and a flue will have to be affixed to this apparatus to carry off the vapours which arise from the enamel or japan. For amateur or intermittent jobbing work the oven illustrated in Figs. 2 and 3 is about as good as any, though to guard against fire it would be as well to have a course of brickwork beneath the oven, while if this is not possible on account of want of height, a sheet or so of zinc or iron will help to mitigate the danger. It is also advisable, if the apartment is a low-pitched one, to have a sheet of iron or zinc suspended by four corner chains from the ceiling in order to protect this from firing through the heat from the enamelling oven. Of course, it will be understood that every portion of the stove must be put together with rivets, no soldered work being permissible.
Thanks to advancements in the cycle industry, enamelling is done using gas, and a steady supply is essential. Enamelling stoves can be described as hot-air cupboards or ovens. For a stove that meets most needs—say one that measures 6 feet by 6 feet by 31/2 feet—six rows of atmospheric burners will be needed to heat it. It’s also a good idea to install pipes with a 11/4-inch internal diameter from the gas meter to the stove. The atmospheric burners can be made from the necessary number of pieces of 11/4-inch gas tube, each 31/2 feet long, with one end sealed and 13/8-inch holes drilled at intervals of about 1 inch. The other end should be left open for the insertion of standard 3/8-inch brass gas taps. Some japanners prefer to install three rows of burners along the entire length of the stove, which might be more suitable depending on structural conditions. In any case, the stove should be able to reach a temperature of up to 400° F. Traditional ovens use external flues to circulate hot air or steam, but this method is generally unsatisfactory because it requires controlling heat with dampers or stop-cocks, leading to a shift toward gas appliances. Another simple type of oven, though not one I would recommend, consists of a sheet-iron box surrounded by a larger box of the same shape, allowing for a 2 to 3-inch space between the two. Heat is applied to this space, and a flue needs to be installed to vent the vapors that arise from the enamel or japan. For amateur or occasional work, the oven shown in Figs. 2 and 3 is quite decent, although to prevent fire hazards, it's best to have a layer of brickwork underneath the oven. If height is an issue, using a sheet of zinc or iron will help minimize the risk. It’s also wise, especially in a low-ceilinged room, to hang a sheet of iron or zinc from the ceiling using four corner chains to protect it from heat from the enamelling oven. It should be understood that every part of the stove must be assembled using rivets; soldered work is not acceptable.

To those who wish to construct their own stove, it will be found that the framework can be shaped out of 1-inch angle iron, the panels or walls being constructed of sheet-iron of about 18 gauge, the whole being riveted together. The front will be occupied in its entire space by a door, which will require to be hung on strong iron hinges, and the framework of this door should be constructed of 1 inch by 1/4 inch iron—a rather stouter material will really be no disadvantage—to which the sheet-iron plates must be riveted. In the centre of the door must be cut a slit, say 11/2 inches by 9 inches, which will require to be covered with mica or talc behind which must be placed the thermometer, so as it can be seen during the process of stoving, without the necessity of opening the door, which, of course, more or less cools the oven. And, by the way, this thermometer must register higher than the highest temperature the oven is capable of reaching. Above is shown a sketch of the stove, interior and exterior, which will give an idea of what a japanner's stove is like.
For those who want to build their own stove, you can use 1-inch angle iron for the framework, and the walls can be made from 18-gauge sheet iron, all riveted together. The front will have a door that takes up the entire space, which should be hung on strong iron hinges. The door's frame should be made from 1 inch by ¼ inch iron—a slightly sturdier material will actually be beneficial—and the sheet-iron plates must be riveted to it. In the center of the door, you need to cut a slit about 1½ inches by 9 inches, which should be covered with mica or talc. Behind this, you’ll place a thermometer so that you can check the temperature while the stove is in use without having to open the door, which would cool down the oven. Additionally, this thermometer should be able to register temperatures higher than the maximum the oven can reach. Above is a sketch of the stove, both inside and out, to give you an idea of what a japanner's stove looks like.

Inside the stove it will be necessary to fix rows of iron rods, some four inches from the top, from which to suspend the work, or angle-iron ledges can be used on which the rods or bars can be fixed, these arrangements being varied according to the particular description of work, individual fancy, or other circumstances. Large S hooks are about the handiest to use. A necessary adjunct of the stove is a pan, which can be made by any handy man or tinworker, which should be made to fit the bottom of the stove above the gas jets, it being arranged that it rests on two side ledges, or along some rods. One a couple of inches in depth will be found sufficient, and it will repay its cost in the saving of enamel, it being possible with its use to enamel a bicycle with as little as a gallon of enamel. Some workmen have the tray made with a couple of hinged side flaps, to turn over and cover up the pan when not in use, but this is a matter of fancy. Of course, they must always be covered up when not in use. For those who would prefer to use Bunsen burners, I show at Fig. 4 a sketch of the best to employ, these having three rows of holes in each.
Inside the stove, you’ll need to attach rows of iron rods, about four inches from the top, to hang your work from. You can also use angle-iron ledges to secure the rods or bars, with variations depending on the specific work, personal preference, or other factors. Large S hooks are usually the easiest to work with. A crucial part of the stove is a pan, which can be made by any handy person or tinworker. It should fit at the bottom of the stove above the gas jets, resting on two side ledges or along some rods. A depth of a couple of inches will be enough, and it pays for itself by saving enamel, allowing you to enamel a bicycle with as little as a gallon of enamel. Some workers have the tray made with a couple of hinged side flaps to cover the pan when it’s not in use, but that’s up to personal preference. They should always be covered when not in use. For those who prefer using Bunsen burners, I’ve included a sketch at Fig. 4 showing the best option to use, which has three rows of holes in each.

When brick ovens are employed they must be lined with sheet-iron, and in these very rare circumstances where gas is not available, the stove can be heated with coal or wood, which will, of course, involve a total alteration in the structural arrangements. I have not given the details here, as I do not think the necessity will ever arise for their use, and for the same reason I have refrained from giving the particulars for heating by steam and electricity, or the other methods which have been adopted by various workers, as there is no question but that a gas stove or oven, as described, is about the best and handiest for jobbers or amateurs.
When using brick ovens, they need to be lined with sheet iron. In the rare cases where gas isn't available, the stove can be heated with coal or wood, which will completely change the structural setup. I haven't included the details here because I don't think there will ever be a need for them. For the same reason, I also haven't provided info on heating with steam or electricity, or other methods used by different workers, since it’s clear that a gas stove or oven, as described, is the best and most convenient option for DIYers or amateurs.
The modern japanning and enamelling stove consists of a compartment capable of being heated to any desired temperature, say 100° to 400° F., and at the same time, except as regards ventilation, capable of being hermetically sealed so as to prevent access of dust, soot, and dirt of all kinds to mar the beauty and lustre of the object being enamelled or japanned. Such a stove may be heated—
The modern japanning and enamelling stove has a compartment that can be heated to any temperature you want, typically between 100° and 400° F. It can also be tightly sealed, aside from ventilation, to keep out dust, soot, and dirt that might ruin the beauty and shine of the item being enamelled or japanned. This type of stove can be heated—
1. By a direct coal, coke, wood, peat, or gas fire (which surrounds the inner isolated chamber) (Fig. 5).
1. By a direct coal, coke, wood, peat, or gas fire (which surrounds the inner isolated chamber) (Fig. 5).
2. By heated air.
2. Using hot air.
3. By steam or hot-water pipes, coils of which circulate round the interior of the stove or under the floor.
3. Using steam or hot-water pipes, with coils that run around the inside of the stove or beneath the floor.
Such ovens may be either permanent, that is, built into masonry, or portable.
Such ovens can be either permanent, meaning built into masonry, or portable.

1. Stoves heated by direct fire.—These were, of course, the form in which japanning ovens were constructed somewhat after the style of a drying kiln. Fig. 5, Greuzburg's japanning oven heated on the outside by hot gases from furnace. The oven is built into brickwork, and the hot gases circulate in the flues between the brickwork and the oven, and its erection and the arrangement of the heating flues are a bricklayer's job. Coke containing much sulphur is objectionable as a fuel for enamel stoves Mr. Dickson emphasizes this very forcibly. He says: "In the days when stoves were heated by coke furnaces, and the heat distributed by the flues, the principal trouble was the escape of fumes of sulphur which caused dire disaster to all the enamels by entering into their composition and preventing their ever drying, not to speak of hardening. I have known enamels to be in the stoves with heat to 270° for two and three days, and then be soft. The sulphur also caused the enamels to crack in a peculiar manner, much like a crocodile skin, and work so affected could never be made satisfactory, for here again we come back to the first principle, that if the foundation be not good, the superstructure can never be permanent. The enamels, being permeated with sulphur and other products from the coke, could never be made satisfactory, and the only way was to clean it all off. The other principal troubles are the blowing of the work in air bubbles, which is caused mainly by the heat being too suddenly applied to the articles, but these are very small matters to the experienced craftsman."
1. Stoves heated by direct fire.—These were, of course, the type in which japanning ovens were built somewhat like a drying kiln. Fig. 5, Greuzburg's japanning oven is heated externally by hot gases from a furnace. The oven is integrated into brickwork, and the hot gases flow through the flues between the brickwork and the oven, making the setup and arrangement of the heating flues a job for a bricklayer. Coke that contains a lot of sulfur is not a good choice for fuel in enamel stoves, as Mr. Dickson strongly points out. He states: "In the times when stoves were heated by coke furnaces and the heat was distributed through the flues, the main problem was the release of sulfur fumes which caused major issues for all the enamels by mixing into their composition and preventing them from drying, let alone hardening. I have seen enamels that were in the stoves at a heat of 270° for two to three days and then still be soft. The sulfur also made the enamels crack in a unique way, resembling crocodile skin, and work affected in this way could never be satisfactory, because we return to the fundamental principle that if the foundation isn’t solid, the superstructure can never be stable. The enamels, tainted with sulfur and other byproducts from the coke, could never be made satisfactory, and the only solution was to clean it all off. Other main issues include the formation of air bubbles in the work, which is primarily caused by applying heat too suddenly to the items, but these are minor problems for the skilled craftsman."
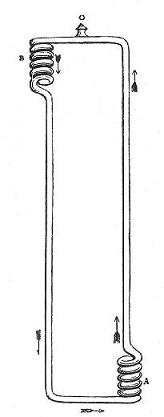
2. Stoves heated by hot-water pipes.—Let us first of all consider the principle on which these are constructed. In Perkins' apparatus for conveying heat through buildings by the circulation of water in small-bore hot-water pipes an endless tube or pipe is employed, the surface of which is occasionally increased by spiral or other turnings where the heat is to be given off or acquired: the annexed figure may serve to illustrate this principle; it represents a strong wrought-iron tube of about one inch diameter completely filled with water; the spiral A passes through a furnace where it is highly heated, and the water is consequently put into motion in the direction of the arrows; the boiling of the water or formation of steam is prevented by the pressure, whence the necessity of the extreme perfection and strength of the tube. B represents a second coil which is supposed to be in an apartment where the heat is to be given out. C is a screw stopper by which the water may be occasionally replenished. By this form of apparatus the water may be heated to 300° or 400°, or even higher, so as occasionally to singe paper. A larger tube and lower temperature are, however, generally preferable.[1]
2. Stoves heated by hot-water pipes.—First, let’s look at how these are built. In Perkins' system, heat is distributed throughout buildings using small-diameter hot-water pipes that circulate water. It uses a continuous tube or pipe, which sometimes has spiral or other shapes where heat is released or absorbed. The diagram below illustrates this principle; it shows a sturdy wrought-iron tube about one inch in diameter that’s completely filled with water. The spiral A runs through a furnace, where it gets very hot, causing the water to move in the direction of the arrows. The water doesn’t boil or turn into steam because of the pressure, so the tube needs to be extremely well-made and strong. B shows a second coil, which is assumed to be in a room where heat needs to be released. C is a screw stopper that allows the water to be refilled as needed. With this setup, the water can be heated to 300° or 400°, or even higher, to the point where it can singe paper. However, a larger tube with a lower temperature is generally preferred.[1]

The principle of Perkins' invention has, during the last eighty years, i.e. since the date of the invention in 1831, been very extensively applied not only for the heating of buildings of every description, but it has also been utilized for numerous industrial purposes which require an atmosphere heated up to 600° F. The principle lends itself specially to the design of apparatus for raising and maintaining heat evenly and uniformly, and also very economically for such purposes as enamelling, japanning, and lacquering.
The principle of Perkins' invention has, over the last eighty years, since its creation in 1831, been widely used not just for heating all kinds of buildings but also for various industrial applications that need temperatures up to 600° F. This principle is particularly suited for designing equipment that raises and maintains heat evenly and efficiently for purposes like enameling, japanning, and lacquering.
The distinctive feature of this apparatus when applied to moderate temperatures lies in the adoption of a closed system of piping of small bore, a certain portion of which is wound into a coil and placed in a furnace situated in any convenient position outside the drying chamber or hot closet. The circulation is thus hermetically sealed and so proportioned that while a much higher temperature can be attained than is possible with a system of pipes open to the atmosphere, yet a certain and perfectly safe maximum cannot by any possibility be exceeded.
The unique aspect of this device when used at moderate temperatures is its use of a closed piping system with small diameter pipes. Part of this system is coiled and placed in a furnace located conveniently outside the drying chamber or hot closet. This setup creates a completely sealed circulation that is designed so that, while it can reach much higher temperatures than an open piping system could, it also ensures that a specific maximum temperature is never exceeded, guaranteeing safety.
The efficiency of the apparatus increases within certain limits in proportion to the pressure employed, which fact explains the exceedingly economical results obtained, while the fact that, owing to the high temperature used, a small-bore pipe can be made more effective than the larger pipes used in any open system, accounts for the lower first cost of the Perkins' apparatus.
The efficiency of the system increases up to a point with the pressure used, which explains the highly economical results achieved. Additionally, because of the high temperature involved, a small pipe can work better than the larger ones found in any open system, which is why Perkins' system is less expensive upfront.

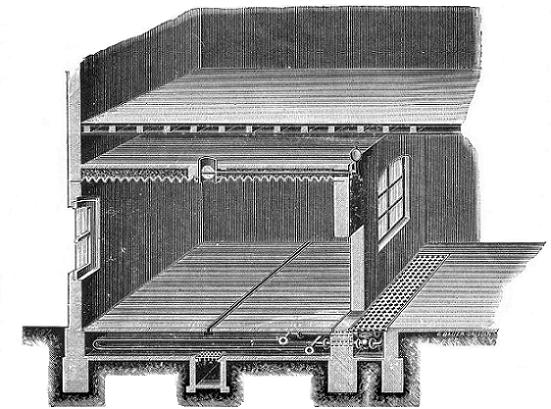

It will be seen from the various illustrations that the articles to be treated are absolutely isolated from actual contact with the fire or the fire gases and other impurities which must be an objection to all methods of heating by means which are not of a purely mechanical nature. This principle not only recommends itself as scientifically correct and suited to the purpose in view, but is also a very simple and practical one. It affords the means of applying the heat at the point where it is required to do the work without unduly heating parts where heat is unnecessary; it secures absolute uniformity, perfect continuity, and the highest possible fuel economy.
It can be seen from the various illustrations that the items being discussed are completely separated from direct contact with the fire, fire gases, and other impurities, which must be seen as a drawback to any heating methods that aren’t purely mechanical. This principle not only proves to be scientifically valid and appropriate for the intended purpose, but it is also very straightforward and practical. It allows for the application of heat exactly where it’s needed without excessively heating areas where it isn’t required; it ensures complete uniformity, perfect continuity, and the highest level of fuel efficiency.


The arrangement of fixing the pipes round the lower walls of the room in this form of stove is somewhat cumbersome, but in a roomy stove this slight drawback is not felt quite so much. However, it seems a good principle to leave every inch of internal space available for the goods to be enamelled or japanned, This principle is carried out to the letter in the other form of stoves described and illustrated in the sequel.
The setup for fixing the pipes around the lower walls of the room in this type of stove is a bit clunky, but in a spacious stove, this minor issue is not as noticeable. Still, it’s a good idea to keep every bit of internal space available for the items to be enamelled or japanned. This idea is followed exactly in the other types of stoves described and illustrated later on.
The figure shows a section through single chamber japanning and enamelling oven heated by hot-water pipes (steel) closed at both ends and partially filled with water which always remains sealed up therein, and never evaporates until the pipes require to be refilled.
The figure shows a section of a single chamber japanning and enameling oven that is heated by closed steel hot-water pipes at both ends, which are partially filled with water that stays sealed inside and never evaporates until the pipes need to be refilled.
This stove may be heated (1) by hot-water pipes (iron), (2) by super-heated water, (3) by steam, but only to 80° C. The different compartments may be heated to uniform or to different temperatures with hot water; the stoke-hole is at the side and thus quite separated from the stove proper.
This stove can be heated (1) by hot-water pipes (iron), (2) by super-heated water, or (3) by steam, but only up to 80° C. The different compartments can be heated to the same temperature or to varying temperatures using hot water; the firebox is on the side, which keeps it separate from the main stove.
The ovens must be on the ground floor, so that the super-heated steam from the basement may be available.
The ovens need to be on the ground floor so that the super-heated steam from the basement can be accessed.

White Pigments.—Barium sulphate and bismuth oxychloride. These two are used for the white lacquer or as a body for coloured lacquers. When the lacquer is to be dried at a high temperature barium sulphate is preferable, but when it is dried at an ordinary temperature bismuth oxychloride is better. Since the lacquer is originally of a brown colour the white lacquer is not pure white, but rather greyish or yellowish. Many white pigments, such as zinc oxide, zinc sulphide, calcium carbonate, barium carbonate, calcium sulphate, lead white, etc., turn brown to black, and no white lacquer can be obtained with them.
White Pigments.—Barium sulfate and bismuth oxychloride. These two are used for white lacquer or as a base for colored lacquers. When the lacquer needs to dry at a high temperature, barium sulfate is the better choice, but if it dries at normal temperatures, bismuth oxychloride is preferred. Since the lacquer starts off as a brown color, the white lacquer is not pure white, but rather has a grayish or yellowish tint. Many white pigments, like zinc oxide, zinc sulfide, calcium carbonate, barium carbonate, calcium sulfate, lead white, etc., will turn brown to black, so none of them can produce true white lacquer.
Red Pigments.—Vermilion and red oxide of iron. These two are used for the red lacquer, but vermilion should be stoved at a low temperature.
Red Pigments.—Vermilion and red oxide of iron. These two are used for red lacquer, but vermilion should be heated at a low temperature.
Blue Pigment.—Prussian blue.
Blue Pigment.—Prussian blue.
Yellow Pigments.—Cadmium sulphide, lead chromate and orpiment.
Yellow Pigments.—Cadmium sulfide, lead chromate, and orpiment.
Green Pigment.—Chromium oxide (? Guignet's green).
Green Pigment.—Chromium oxide (Guignet's green).
Black Pigment.—Lamp black. This is one of the pigments for black lacquer, but does not give a brilliant colour, therefore it is better to prepare the black lacquer by adding iron powder or some compound of iron to the lacquer.
Black Pigment.—Lamp black. This is one of the pigments used for black lacquer, but it doesn't produce a vibrant color. So, it's better to make the black lacquer by mixing in iron powder or some iron compound.
Various mixed colours are obtained by mixing some of the above-mentioned pigments.
Various mixed colors are created by combining some of the pigments mentioned above.
Examples of application are as follows:—
Examples of application are as follows:—
(1) Golden Yellow.—Finished lacquer, 10 parts; gamboge, 1 to 3; solvent, 5. If utensils are lacquered with this thin lacquer and dried for about 2 hours in an air-oven at a temperature of 120° C. a beautiful hard coating of golden colour is obtained.
(1) Golden Yellow.—Finished lacquer, 10 parts; gamboge, 1 to 3; solvent, 5. If you coat the utensils with this thin lacquer and dry them for about 2 hours in an air-oven at a temperature of 120° C., you'll get a beautiful hard coating of golden color.
(2) Black.—Black lacquer, 10 parts; solvent 2 to 4. Utensils lacquered with this lacquer are dried for about an hour at 130° to 140° C.
(2) Black.—Black lacquer, 10 parts; solvent 2 to 4. Utensils lacquered with this lacquer should be dried for about an hour at 130° to 140° C.
(3) Red.—Vermilion, 10 parts; finished lacquer, 4; solvent, 2. This lacquer is dried for about an hour at 130° to 140° C.
(3) Red.—Vermilion, 10 parts; finished lacquer, 4; solvent, 2. This lacquer is dried for about an hour at 266° to 284° F.
(5) Green.—Barium sulphate, 100 parts; chromic oxide, 20 to 50; finished lacquer, 40 to 50; solvent, 20. This is dried for about 10 minutes at 160° C.
(5) Green.—Barium sulfate, 100 parts; chromic oxide, 20 to 50; finished lacquer, 40 to 50; solvent, 20. This is dried for about 10 minutes at 160° C.
(6) Yellow.—Barium sulphate, 100 parts; lead chromate, 40; finished lacquer, 40; solvent, 20. This is dried for about 15 minutes at 150° C.
(6) Yellow.—Barium sulfate, 100 parts; lead chromate, 40; finished lacquer, 40; solvent, 20. This is dried for about 15 minutes at 150° C.
Almost all pigments other than the above-mentioned are blackened by contact with lacquer or suspend its drying quality.
Almost all pigments besides the ones mentioned above turn black when they come into contact with lacquer or stop drying properly.
Several organic lakes can be used for coloured lacquers, that is to say, Indian yellow, thioflavin, and auramine lake for a yellow lacquer; fuchsine, rhodamine, and chloranisidin lake for a red; diamond sky blue, and patent nileblue lake for a blue; acid green, diamond green, brilliant milling green, vert-methyl lake, etc., for a green; methyl violet, acid violet, and magenta lake for a violet; phloxine lake for a pink. These lakes, however, are decomposed more or less on heating and fail to give proper colours when dried at a high temperature.
Several organic lakes can be used for colored paints, such as Indian yellow, thioflavin, and auramine lake for yellow; fuchsine, rhodamine, and chloranisidin lake for red; diamond sky blue and patent nileblue lake for blue; acid green, diamond green, brilliant milling green, vert-methyl lake, etc., for green; methyl violet, acid violet, and magenta lake for violet; and phloxine lake for pink. However, these lakes tend to break down to some extent when heated and do not produce the right colors when dried at high temperatures.
Urushiol, the principal constituent of Japanese lacquer, does not according to the Japanese investigator, Kisaburo Miryama, dry by itself at ordinary temperatures, but can be dried with ease at a temperature above 96° C. In the same way, lacquer that has been heated to a temperature above 70° C. and has entirely lost its drying quality can be easily dried at a high temperature. In this method of japanning the higher the temperature is, the more rapidly does the drying take place; for instance, a thin layer of urushiol, or lacquer, hardens within 5 hours at 100° C., within 30 minutes at 150° C., and within 10 minutes at 180° C. Japanning at a high temperature with natural lacquer does not require the presence of the enzymic nitrogenous matter in the lacquer, and gives a transparent coating which is quite hard and resistant to chemical and mechanical action; in these respects it is distinguished from that dried at an ordinary temperature. During the drying, oxygen is absorbed from the atmosphere and at the same time a partial decomposition takes place.
Urushiol, the main component of Japanese lacquer, doesn’t dry on its own at normal temperatures, according to Japanese researcher Kisaburo Miryama, but can easily dry at temperatures above 96° C. Similarly, lacquer that has been heated to over 70° C. and lost its drying ability can be dried quickly at a higher temperature. In this japanning method, the higher the temperature, the faster the drying occurs; for example, a thin layer of urushiol or lacquer hardens in 5 hours at 100° C., in 30 minutes at 150° C., and in just 10 minutes at 180° C. High-temperature japanning with natural lacquer doesn’t need the enzymatic nitrogenous material in the lacquer, resulting in a clear coating that is very hard and resistant to chemical and mechanical effects; this sets it apart from lacquer that dries at regular temperatures. During the drying process, oxygen is absorbed from the air while a partial decomposition happens.
This method of japanning has its application in lacquering metal work, glass, porcelain, earthenware, canvas, papier-mâché, etc.; because the drying is affected in a short time, and the coating thus obtained is much more durable than the same obtained by the ordinary method.
This method of japanning can be used on metal work, glass, porcelain, earthenware, canvas, papier-mâché, and more; it dries quickly, and the finish you get is much more durable than the one produced by traditional methods.
For practical purposes it is better to thin the lacquer with turpentine oil or other solvent in order to facilitate the lacquering and lessen the drying time of the lacquer. Since the lacquer-coating turns brown at a high temperature, lacquers of a light colour should be dried at 120° to 150° C.; and even those of a deep colour must not be heated above 180° C. Most pigments are blackened by lacquer; therefore the varieties of coloured lacquers are very limited.
For practical purposes, it’s better to thin the lacquer with turpentine oil or another solvent to make the lacquering process easier and decrease the drying time of the lacquer. Since the lacquer coating turns brown at high temperatures, light-colored lacquers should be dried at 120° to 150° C.; even dark-colored ones shouldn’t be heated above 180° C. Most pigments get darkened by lacquer; so, the options for colored lacquers are quite limited.
FOOTNOTES:
[1] A question has been raised concerning the safety of Perkins' apparatus, not merely as relates to the danger of explosion, but also respecting that of high temperature; and it has been asserted that the water may be so highly heated in the tubes as to endanger the charring and even inflammation of paper, wood, and other substances in their contact or vicinity: such no doubt might be the case in an apparatus expressly intended for such purposes, but in the apparatus as constructed by Perkins, with adequate dampers and safety valves, and used with common care, no such result can ensue. Paper bound round an iron tube is not affected till the temperature exceeds 400°; from 420° to 444° it becomes brown or slightly singed; sulphur does not inflame below 540°.
[1] A question has come up about the safety of Perkins' apparatus, not just regarding explosion risks, but also regarding high temperatures. It's been claimed that the water in the tubes could get so hot that it might char or even ignite paper, wood, and other materials nearby. That could be true for equipment specifically designed for those conditions, but with the apparatus built by Perkins, which has proper dampers and safety valves, and when used with common care, that situation shouldn't happen. Paper wrapped around an iron tube doesn't get affected until the temperature exceeds 400°; between 420° and 444° it turns brown or gets slightly scorched; and sulfur doesn't ignite below 540°.
SECTION V.
COLOURS FOR POLISHED BRASS—MISCELLANEOUS.
Painting on zinc or galvanized iron is facilitated by employing a mordant of 1 quart of chloride of copper, 1 of nitrate of copper, and 1 of sal-ammoniac, dissolved in 64 parts of water. To thin mixture add 1 part of commercial hydrochloric acid. This is brushed over the zinc, and dries a dull-grey colour in from twelve to twenty-four hours, paint adhering perfectly to the surface thus formed.
Painting on zinc or galvanized iron is made easier by using a mordant made of 1 quart of copper chloride, 1 quart of copper nitrate, and 1 quart of sal ammoniac, dissolved in 64 parts of water. To thin the mixture, add 1 part of commercial hydrochloric acid. This is brushed onto the zinc and dries to a dull grey color in twelve to twenty-four hours, allowing the paint to adhere perfectly to the surface created.
The following are the formulæ for a variety of baths, designed to impart to polished brass various colours. The brass objects are put into boiling solutions composed of different salts, and the intensity of the shade obtained is dependent upon duration of the immersion. With a solution composed of sulphate of copper, 120 grains; hydrochlorate of ammonia, 30 grains; and water 1 quart, greenish shades are obtained. With the following solution, all the shades of brown, from orange-brown to cinnamon, are obtained: chlorate of potash, 150 grains; sulphate of copper, 150 grains; and water, 1 quart. The following solution gives the brass first a rosy tint, and then colours it violet and blue: sulphate of copper, 435 grains; hyposulphite of soda, 300 grains; cream of tartar, 150 grains; and water, 1 pint. Upon adding to this solution ammoniacal sulphate of iron, 300 grains, and hyposulphite of soda, 300 grains, there are obtained, according to the duration of the immersion, yellowish, orange, rosy, and then bluish shades. Upon polarizing the ebullition, the blue tint gives way to yellow, and finally to a pretty grey. Silver, under the same circumstances, becomes very beautifully coloured. After a long ebullition in the following solution, we obtain a yellow-brown shade, and then a remarkable fire-red: chlorate of potash, 75 grains; carbonate of nickel, 30 grains; salt of nickel, 75 grains; and water, 10 oz. The following solution gives a beautiful dark-brown colour: chlorate of potash, 75 grains; salt of nickel, 150 grains; and water, 10 oz. The following gives in the first place, a red, which passes to blue, then to pale lilac, and finally to white: orpiment, 75 grains; crystallized sal-sodæ, 150 grains; and water, 10 oz. The following gives a yellow-brown: salt of nickel, 75 grains; sulphate of copper, 75 grains; chlorate of potash, 75 grains; and water, 10 oz. On mixing the following solutions, sulphur separates, and the brass becomes covered with iridescent crystallizations: (1) cream of tartar, 75 grains; sulphate of copper, 75 grains; and water, 10 oz. (2) Hyposulphite of soda, 225 grains; and water, 5 oz. Upon leaving the brass objects immersed in the following mixture, contained in corked vessels, they at length acquire a very beautiful blue colour: hepar of sulphur, 75 grains; ammonia, 75 grains; and water, 4 oz.
The following are the formulas for various baths aimed at giving polished brass different colors. The brass items are placed in boiling solutions made from different salts, and the depth of the color achieved depends on how long they are immersed. Using a solution consisting of 120 grains of copper sulfate, 30 grains of ammonia chloride, and 1 quart of water results in greenish hues. The next solution provides a range of brown shades, from orange-brown to cinnamon: 150 grains of potassium chlorate, 150 grains of copper sulfate, and 1 quart of water. The following mixture first gives the brass a rosy tint, then turns it violet and blue: 435 grains of copper sulfate, 300 grains of sodium hyposulfite, 150 grains of cream of tartar, and 1 pint of water. If you add 300 grains of ammonium iron sulfate and 300 grains of sodium hyposulfite to this solution, the shades can vary from yellowish, orange, rosy, and then blue depending on the duration of immersion. By controlling the boiling, the blue color transitions to yellow and finally to a nice grey. Silver, under the same conditions, also takes on beautiful colors. After a prolonged boil in the following solution, you will get a yellow-brown shade followed by a striking fire-red: 75 grains of potassium chlorate, 30 grains of nickel carbonate, 75 grains of nickel salt, and 10 oz of water. The next solution yields a lovely dark-brown color: 75 grains of potassium chlorate, 150 grains of nickel salt, and 10 oz of water. The subsequent solution first gives a red hue, which turns to blue, then pale lilac, and finally white: 75 grains of orpiment, 150 grains of crystallized soda, and 10 oz of water. The next one results in a yellow-brown color: 75 grains of nickel salt, 75 grains of copper sulfate, 75 grains of potassium chlorate, and 10 oz of water. Mixing the following solutions causes sulfur to separate, covering the brass with iridescent crystals: (1) 75 grains of cream of tartar, 75 grains of copper sulfate, and 10 oz of water. (2) 225 grains of sodium hyposulfite and 5 oz of water. If you leave the brass objects immersed in the following mixture in corked containers, they will eventually take on a very beautiful blue color: 75 grains of sulfur hepar, 75 grains of ammonia, and 4 oz of water.
Take 2 oz. of gum sandarach, 1 oz. of litharge of gold, and 4 oz. of clarified linseed oil, which boil in a glazed earthenware vessel till the contents appear of a transparent yellow colour. This will make a good varnish for the final coating for enamelled and japanned goods.
Take 2 oz. of gum sandarach, 1 oz. of litharge of gold, and 4 oz. of clarified linseed oil, and boil them in a glazed earthenware pot until the mixture turns a clear yellow color. This will create a good varnish for the final coating on enamelled and japanned items.
The following is used for the wheels, springs, and carriage parts of coaches and other vehicles: Take of pale African copal 8 lb.; fuse, and add 21/2 gallons of clarified linseed oil; boil until very stringy, then add 1/4 lb. each of dry copperas and litharge; boil, and thin with 51/2 gallons of turpentine; then mix while hot with the following varnish, and immediately strain the mixture into a covered vessel. Gum anime, 8 lb.; clarified linseed oil, 21/2 gallons; 1/4 lb. each of dried sugar of lead and litharge; boil, and thin with 51/2 gallons of turpentine; and mix it while hot as above directed. Of course these quantities will only do for big jobs, and as it has to do with metal, it has been thought advisable to include the formula in this handbook.
The following is used for the wheels, springs, and carriage parts of coaches and other vehicles: Take 8 lbs. of pale African copal; fuse it and add 2½ gallons of clarified linseed oil; boil until it becomes very stringy, then add ¼ lb. each of dry copperas and litharge; boil, and thin with 5½ gallons of turpentine; then mix while hot with the following varnish, and immediately strain the mixture into a covered container. Gum anime, 8 lbs.; clarified linseed oil, 2½ gallons; ¼ lb. each of dried sugar of lead and litharge; boil, and thin with 5½ gallons of turpentine; and mix it while hot as directed above. Of course, these quantities will only work for large jobs, and since it involves metal, it was decided to include the formula in this handbook.
The active constituent of all metal polishes is generally chalk, rouge, or tripoli, because these produce a polish on metallic surfaces. The following recipes give good polishing soaps:—
The main ingredient in all metal polishes is usually chalk, rouge, or tripoli, as these create a shine on metal surfaces. The following recipes provide effective polishing soaps:—
(1) 20 to 25 lb. liquid soap is intimately mixed with about 80 lb. of Swedish chalk and 1/2 lb. Pompeiian red. (2) 25 lb. liquid coco-nut oil soap is mixed with 2 lb. tripoli, and 1 lb. each alum, tartaric acid, and white lead. (3) 25 lb. liquid coco-nut oil soap is mixed with 5 lb. rouge and 1 lb. ammonium carbonate. (4) 24 lb. coco-nut oil are saponified with 12 lb. soda lye of 38° to 40° B., after which 3 lb. rouge, 3 lb. water, and 32 grammes ammonia are mixed in. Good recipes for polishing pomades are as follows: (1) 5 lb. lard and yellow vaseline is melted and mixed with 1 lb. fine rouge. (2) 2 lb. palm oil and 2 lb. vaseline are melted together, and then 1 lb. rouge, 400 grains tripoli, and 20 grains oxalic acid are stirred in. (3) 4 lb. fatty petroleum and 1 lb. lard are heated and mixed with 1 lb. of rouge. The polishing pomades are generally perfumed with essence of myrbane. Polishing powders are prepared as follows: (1) 4 lb. magnesium carbonate, 4 lb. chalk, and 7 lb. rouge are intimately mixed. (2) 4 lb. magnesium carbonate are mixed with 150 grains fine rouge. An excellent and harmless polishing water is prepared by shaking together 250 grains floated chalk, 1 lb. alcohol, and 20 grains ammonia. Gilded articles are most readily cleansed with a solution of 5 grains borax in 100 parts water, by means of a sponge or soft brush. The articles are then washed in pure water, and dried with a soft linen rag. Silverware is cleansed by rubbing with a solution of sodium hyposulphite.
(1) 20 to 25 lb. of liquid soap is thoroughly mixed with about 80 lb. of Swedish chalk and 1/2 lb. of Pompeiian red. (2) 25 lb. of liquid coconut oil soap is combined with 2 lb. of tripoli and 1 lb. each of alum, tartaric acid, and white lead. (3) 25 lb. of liquid coconut oil soap is blended with 5 lb. of rouge and 1 lb. of ammonium carbonate. (4) 24 lb. of coconut oil is saponified with 12 lb. of soda lye at 38° to 40° B., then 3 lb. of rouge, 3 lb. of water, and 32 grams of ammonia are mixed in. Good recipes for polishing pomades are as follows: (1) 5 lb. of lard and yellow vaseline are melted and mixed with 1 lb. of fine rouge. (2) 2 lb. of palm oil and 2 lb. of vaseline are melted together, then 1 lb. of rouge, 400 grains of tripoli, and 20 grains of oxalic acid are stirred in. (3) 4 lb. of fatty petroleum and 1 lb. of lard are heated and combined with 1 lb. of rouge. The polishing pomades are usually scented with essence of myrbane. Polishing powders are made as follows: (1) 4 lb. of magnesium carbonate, 4 lb. of chalk, and 7 lb. of rouge are thoroughly mixed. (2) 4 lb. of magnesium carbonate are blended with 150 grains of fine rouge. An excellent and safe polishing water is made by shaking together 250 grains of floated chalk, 1 lb. of alcohol, and 20 grains of ammonia. Gilded items are most easily cleaned with a solution of 5 grains of borax in 100 parts water, using a sponge or soft brush. The items are then rinsed in clean water and dried with a soft linen cloth. Silverware is cleaned by rubbing with a solution of sodium hyposulphite.
Carbon, in one form or another, is the base of all black pigments. By far the most common of these, as used in structural plants, is graphite. Other black pigments are lamp-black (including carbon black) and bone-black, the former being produced in many grades, varying in price from twopence to half a crown per pound. Bone-black, which is refuse from the sugar-house black, varies in the percentage of carbon contained, which is usually about 10 or 12 per cent, the remainder being the mineral matter originally present in the bone, and containing 3 or 4 per cent of carbonate, whilst most of the remainder is phosphate of lime. Lamp-black is an absolutely impalpable powder, which having a small amount of greasy matter in it, greatly retards the drying of the oil with which it may be mixed. For this reason it is not used by itself, but is added in small quantity to other paints, which it affects by changing their colour, and probably their durability. For example, it is a common practice to add it to red lead, in order to tone down its brilliant colour, and also to correct the tendency it has to turn white, due to the conversion of the red oxide of lead into the carbonate.
Carbon, in one form or another, is the foundation of all black pigments. The most common of these, as used in structural materials, is graphite. Other black pigments include lampblack (which includes carbon black) and bone black. Lamp-black is produced in various grades, with prices ranging from two pence to half a crown per pound. Bone black is a byproduct from sugar refining and varies in carbon content, usually around 10 or 12 percent, with the rest being mineral matter originally found in the bone, containing 3 or 4 percent carbonate, while most of the remaining portion is phosphate of lime. Lamp-black is an extremely fine powder that contains a small amount of greasy matter, which significantly slows down the drying time of any oil it's mixed with. Because of this, it’s not used on its own but added in small amounts to other paints, where it alters their color and possibly affects their durability. For example, it’s common to mix it with red lead to tone down its bright color and to counteract its tendency to turn white due to the conversion of red oxide of lead into carbonate.
For colouring iron and steel a dead black of superior appearance and permanency, the following is a good formula: 1 part bismuth chloride, 2 parts mercury bi-chloride, 1 part copper chloride, 6 parts hydrochloric acid, 5 parts alcohol, and 50 parts lamp-black, these being all well mixed. To use this preparation successfully—the article to be blacked or bronzed being first made clean and free from grease—it is applied with a swab or brush, or, better still, the object may be dipped into it; the liquid is allowed to dry on the metal, and the latter is then placed in boiling water, the temperature being maintained for half an hour. If, after this, the colour is not so dark as is desired, the operation has simply to be repeated, and the result will be found satisfactory. After obtaining the desired degree of colour, the latter is fixed, as well as much improved generally, by placing for a few minutes in a bath of boiling oil, or by coating the surface with oil, and heating the object till the oil is completely driven off The intense black obtained by this method is admirable.
To achieve a high-quality, permanent deep black finish on iron and steel, you can use the following formula: 1 part bismuth chloride, 2 parts mercury bichloride, 1 part copper chloride, 6 parts hydrochloric acid, 5 parts alcohol, and 50 parts lamp-black, all well mixed. For best results, make sure the item you want to blacken or bronze is clean and free of grease before applying this mixture with a swab or brush, or, even better, dip the object directly into it. Allow the liquid to dry on the metal, then place it in boiling water for half an hour. If the color isn’t as dark as you want it to be afterward, just repeat the process for a more satisfactory result. Once you achieve the desired color, you can fix it and enhance the finish by placing it in a bath of boiling oil for a few minutes, or by applying oil to the surface and heating the object until all the oil evaporates. The deep black produced by this method is excellent.
Another black coating for ironwork, which is really a lacquer, is obtained by melting ozokerite, which becomes a brown resinous mass, with a melting-point at 140° F. The melted mass is then further heated to 212° F., the boiling-point of water. The objects to be lacquered are scoured clean by rubbing with dry sand, and are dipped in the melted mass. They are then allowed to drip, and the ozokerite is ignited by the objects being held over a fire. After the ozokerite has burned away, the flame is extinguished, and the iron acquires a firmly adhering black coating, which resists atmospheric influences, as well as acids and alkalies. If the black iron vessels are to contain alkaline liquids, the above operation is repeated.
Another black coating for metalwork, which is actually a lacquer, is made by melting ozokerite, which turns into a brown resinous substance with a melting point of 140°F. The melted substance is then heated further to 212°F, which is the boiling point of water. The items to be lacquered are cleaned thoroughly by rubbing them with dry sand, and then they are dipped into the melted substance. They are allowed to drip, and the ozokerite is ignited by holding the items over a fire. After the ozokerite has burned away, the flame is put out, and the metal gets a strong black coating that withstands weather conditions and is resistant to acids and bases. If the black metal containers are meant to hold alkaline liquids, this process is repeated.
A good cheap stock black paint or varnish for ironwork is prepared, as follows: Clear (solid) wood tar, 10 lb.; lamp black or mineral black, 11/4 b.; oil of turpentine, 51/2 quarts. The tar is first heated in a large iron pot to boiling-point, or nearly so, and the heat is continued for about 4 hours. The pot is then removed from the fire out of doors, and while still warm, and not hot, the turpentine, mixed with the black, is stirred in. If the varnish is too thick to dry quickly, add more turpentine. Benzine can be used instead of turpentine, but the results are not so good. Asphaltum is preferable to the cheap tar.
A good, affordable black paint or varnish for ironwork can be made like this: 10 lbs. of clear (solid) wood tar, 1¼ lbs. of lamp black or mineral black, and 5½ quarts of turpentine. First, heat the tar in a large iron pot until it almost boils, and keep it on the heat for about 4 hours. Then, take the pot outside, and while it's still warm—not hot—stir in the turpentine mixed with the black. If the varnish is too thick to dry quickly, add more turpentine. You can use benzene instead of turpentine, but it won't yield as good results. Asphaltum is better than cheap tar.
To make another good black varnish for ironwork, take 8 lb. of asphaltum and fuse it in an iron kettle, then add 2 gallons of boiled linseed oil, 1 lb. of litharge, 1/2 lb. of sulphate of zinc (add these slowly, or the mixture will boil over), and boil them for about 3 hours. Then, add 11/2 lb. of dark gum amber, and boil for 2 hours longer, or until the mass will become quite thick when cool. After this it should be thinned with turpentine to the proper consistency.
To make another good black varnish for ironwork, take 8 lbs. of asphalt and melt it in an iron kettle. Then add 2 gallons of boiled linseed oil, 1 lb. of litharge, and ½ lb. of zinc sulfate (add these slowly, or the mixture will boil over), and let them boil for about 3 hours. After that, add 1½ lbs. of dark gum amber and boil for 2 more hours, or until the mixture becomes quite thick when it cools. Finally, it should be thinned with turpentine to get the right consistency.
A reliable authority gives the following as a very good recipe for ironwork varnish. Take 2 lb. of tar oil, 1/2 lb. of pounded resin, and 1/2 lb. of asphaltum, and dissolve together, and then mix while hot in an iron kettle, taking all care to prevent the flames getting into contact with the mixture. When cold the varnish is ready for application to outdoor ironwork. Another recipe is to take 3 lb. of powdered resin, place it in a tin or iron vessel, and add thereto 21/2 pints of spirits of turpentine, which well shake, and then let it stand for a day or two, giving it an occasional shake. Then add to it 5 quarts of boiled oil, shake it thoroughly well all together, afterwards letting it stand in a warm room till it gets clear. The clear portion can then be drawn off and used, or reduced with spirits of turpentine till of the requisite consistency. For making a varnish suitable for iron patterns, take sufficient oil of turpentine for the purpose of the job in hand, and drop into it, drop by drop, some strong commercial oil of vitriol, when the acid will cause a dark syrupy precipitate in the oil of turpentine, and continue to add the drops of vitriol till the precipitate ceases to act, after which pour off the liquid and wash the syrupy mass with water, when it will be ready for use. When the iron pattern is to be varnished, it must be heated to a gentle degree, the syrupy product applied, and then the article allowed to dry.
A trusted source provides the following excellent recipe for ironwork varnish. Take 2 lbs. of tar oil, ½ lb. of crushed resin, and ½ lb. of asphaltum, dissolve them together, and then mix while hot in an iron pot, taking care to ensure that flames do not touch the mixture. Once it cools, the varnish is ready to be applied to outdoor ironwork. Another recipe involves taking 3 lbs. of powdered resin, placing it in a tin or iron container, and adding 2½ pints of turpentine. Shake it well and let it sit for a day or two, occasionally shaking it. Then add 5 quarts of boiled oil, mix it thoroughly, and let it sit in a warm room until it clears. The clear portion can be drawn off for use, or thinned with turpentine to achieve the desired consistency. For making a varnish suitable for iron patterns, take enough turpentine for the job and gradually add strong commercial sulfuric acid drop by drop until a dark syrupy precipitate forms in the turpentine. Continue adding drops of acid until the precipitate stops forming, then pour off the liquid and wash the syrupy residue with water, making it ready for use. When it's time to varnish the iron pattern, it should be gently heated, the syrupy product applied, and then allowed to dry.
A fine black varnish suitable for the covering of broken places in sewing machines and similar articles, where the japanned surface has become injured or scratched, can be made by taking some fine lamp-black or ivory-black, and thoroughly mixing it with copal varnish. The black must be in a very fine powder, and to mix the more readily it should be made into a pasty mass with turpentine. For the ordinary repairing shop this will be found very handy.
A nice black varnish that works well for covering up damaged spots on sewing machines and similar items, where the painted surface has gotten scratched or nicked, can be created by mixing fine lamp-black or ivory-black with copal varnish. The black should be in a very fine powder, and to make it easier to mix, it should be turned into a paste with turpentine. This will be really useful in a regular repair shop.
The following is a simple way for tarring sheet-iron pipes to prevent rusting. The sections as made should be coated with coal tar, and then filled with light wood shavings, and the latter set alight. The effect of this treatment will be to render the iron practically proof against rust for an indefinite period, rendering future painting unnecessary. It is important, of course, that the iron should not be made too hot, or kept hot for too long a time, lest the tar should be burnt off.
The following is a simple method for coating sheet-iron pipes to prevent rust. The sections should be covered with coal tar and then filled with light wood shavings, which are then set on fire. This process will make the iron nearly resistant to rust for a long time, eliminating the need for future painting. It's important that the iron doesn't get too hot or stay hot for too long, as this could burn off the tar.
Another good black enamel for small articles can be made by mixing 1 lb. of asphaltum with 1 lb. of resin in 4 lb. of tar oil, well heating the whole in an iron vessel before applying.
Another good black enamel for small items can be made by mixing 1 lb. of asphaltum with 1 lb. of resin in 4 lb. of tar oil, heating everything up well in an iron container before applying.
A good brown japan can be prepared by separately heating equal quantities of amber and asphaltum, and adding to each one-half the quantity by weight of boiled linseed oil. Both compounds are then mixed together. Copal resin may be substituted for the amber, but it is not so durable. Oil varnish made from amber is highly elastic. If it is used to protect tin-plate printing, when the plates after stoving have been subsequently rolled so as to distort the letters, the varnish has in no way suffered, and its surface remains unbroken.
A good brown Japan can be made by heating equal amounts of amber and asphaltum separately, then adding half that weight of boiled linseed oil to each. Both mixtures are then combined. You can use copal resin instead of amber, but it's not as durable. Oil varnish made from amber is very flexible. If it's used to protect tin-plate printing, the varnish remains intact when the plates are rolled and the letters get distorted; its surface stays unbroken.
A bronzing composition for coating iron consists of 120 parts mercury, 10 parts tin, 20 parts green vitriol, 120 parts water, and 15 parts hydrochloric acid of 1.2 specific gravity.
A bronzing mixture for coating iron includes 120 parts mercury, 10 parts tin, 20 parts green vitriol, 120 parts water, and 15 parts hydrochloric acid with a specific gravity of 1.2.
SECTION VI.
PROCESSES FOR TIN-PLATING.
In these days of making everything look what it is not, perhaps the best and cheapest substitute for silver as a white coating for table ware, culinary vessels, and the many articles requiring such a coating, is pure tin. It does not compare favourably with silver in point of hardness or wearing qualities, but it costs very much less than silver, is readily applied, and can be easily kept clean and bright. In tinning hollow ware on the inside the metal article is first thoroughly cleansed by pickling it in dilute muriatic or sulphuric acid and then scouring it with fine sand. It is then heated over a fire to about the melting-point of tin, sprinkled with powdered resin, and partly filled with melted pure grain tin covered with resin to prevent its oxidation. The vessel is then quickly turned and rolled about in every direction, so as to bring every part of the surface to be covered in contact with the molten metal. The greater part of the tin is then thrown out and the surface rubbed over with a brush of tow to equalize the coating; and if not satisfactory the operation must be repeated. The vessels usually tinned in this manner are of copper and brass, but with a little care in cleaning and manipulating, iron can also be satisfactorily tinned by this means. The vessels to be tinned must always be sufficiently hot to keep the metal contained in them thoroughly fused. This is covering by contact with melted tin.
In today's world, where things often look different from what they really are, a great and affordable alternative to silver for a white coating on tableware, cooking pots, and various items that need such a finish is pure tin. While it doesn't match silver in terms of hardness or durability, it's much cheaper, easy to apply, and simple to keep clean and shiny. For tinning hollow ware on the inside, the metal item is first cleaned thoroughly by soaking it in a diluted solution of muriatic or sulfuric acid and then scouring it with fine sand. Next, it's heated over a fire to about the melting point of tin, sprinkled with powdered resin, and partially filled with melted pure grain tin covered in resin to stop it from oxidizing. The container is then quickly turned and rolled in all directions to make sure every area of the surface that needs coating comes into contact with the molten metal. Most of the tin is then emptied out, and the surface is brushed with tow to smooth out the coating; if it doesn't look good enough, the process has to be done again. The vessels typically tinned this way are made of copper and brass, but with a bit of care in cleaning and handling, iron can also be effectively tinned using this method. The items to be tinned should always be hot enough to keep the metal inside fully melted. This process involves coating through contact with melted tin.
The amalgam process is not so much used as it was formerly. It consists in applying to the clean and dry metallic surface a film of a pasty amalgam of tin with mercury, and then exposing the surface to heat, which volatilizes the latter, leaving the tin adhering to the metal.
The amalgam process isn't used as much as it used to be. It involves applying a paste of tin and mercury to a clean, dry metal surface, and then heating it up. This heat causes the mercury to evaporate, leaving the tin stuck to the metal.
The immersion process is the best adapted to coating articles of brass or copper. When immersed in a hot solution of tin properly prepared the metal is precipitated upon their surfaces. One of the best solutions for this purpose is the following:—
The immersion process is the most suitable for coating brass or copper items. When these metals are dipped in a properly prepared hot tin solution, the metal coats their surfaces. One of the best solutions for this purpose is the following:—
| Ammonia alum | 171/4 oz. |
| Boiling | 121/2 lb. |
| Protochloride of tin | 1 oz. |
The articles to be tinned must be first thoroughly cleansed, and then kept in the hot solution until properly whitened. A better result will be obtained by using the following bath, and placing the pieces in contact with a strip of clean zinc, also immersed:—
The items to be canned need to be thoroughly cleaned first and then kept in the hot solution until they are properly whitened. You’ll get better results by using the following bath and placing the pieces in contact with a strip of clean zinc, which should also be immersed:—
| Bitartrate of potassium | 14 | oz. |
| Soft water | 24 | " |
| Protochloride of tin | 1 | " |
It should be boiled for a few minutes before using.
It should be boiled for a few minutes before using it.
The following is one of the best solutions for plating with tin by the battery process:—
The following is one of the best solutions for tin plating using the battery process:—
| Potassium pyrophosphate | 12 | oz. |
| Protochloride of tin | 41/2 | " |
| Water | 20 | " |
The anode or feeding-plate used in this bath consists of pure Banca tin. This plate is joined to the positive (copper or carbon) pole of the battery, while the work is suspended from a wire connected with the negative (zinc) pole. A moderately strong battery is required, and the work is finished by scratch-brushing.
The anode or feeding plate used in this bath is made of pure Banca tin. This plate is connected to the positive (copper or carbon) terminal of the battery, while the work is hung from a wire linked to the negative (zinc) terminal. A moderately strong battery is necessary, and the finishing is done by scratch-brushing.
In Weigler's process a bath is prepared by passing washed chlorine gas into a concentrated aqueous solution of stannous chloride to saturation, and expelling excess of gas by warming the solution, which is then diluted with about ten volumes of water, and filtered, if necessary. The articles to be plated are pickled in dilute sulphuric acid, and polished with fine sand and a scratch-brush, rinsed in water, loosely wound round with zinc wire or tape, and immersed in the bath for ten or fifteen minutes at ordinary temperatures. The coating is finished with the scratch-brush and whiting. By this process cast-or wrought-iron, steel, copper, brass, and lead can be tinned without a separate battery. The only disadvantage of the process is that the bath soon becomes clogged up with zinc chloride, and the tin salt must be frequently removed. In Hern's process a bath composed of—
In Weigler's method, a bath is made by passing cleaned chlorine gas into a concentrated aqueous solution of stannous chloride until it's saturated, then warming the solution to drive off the excess gas. After that, the solution is diluted with about ten times its volume of water and filtered if necessary. The items to be plated are immersed in a weak sulfuric acid solution, polished using fine sand and a scratch brush, rinsed in water, loosely wrapped in zinc wire or tape, and then placed in the bath for ten to fifteen minutes at room temperature. The coating is finished with the scratch brush and whiting. This method allows cast or wrought iron, steel, copper, brass, and lead to be tinned without needing a separate battery. The main drawback of this process is that the bath quickly gets clogged with zinc chloride, so the tin salt has to be removed regularly. In Hern's method, a bath made of—
| Tartaric acid | 2 | oz. |
| Water | 100 | " |
| Soda | 3 | " |
| Protochloride of tin | 3 | " |
is employed instead of the preceding. It requires a somewhat longer exposure to properly tin articles in this than in Weigler's bath. Either of these baths may be used with a separate battery.
is used instead of the previous one. It needs a bit more time to correctly tin items in this than in Weigler's bath. Either of these baths can be used with a separate battery.
SECTION VII.
GALVANIZING.
Galvanizing, as a protecting surface for large articles, such as enter into the construction of bridges, roofs, and shipwork, has not quite reached the point of appreciation that possibly the near future may award to it. Certain fallacies existed for a long time as to the relative merits of the dry or molten and the wet or electrolytical methods of galvanizing. The latter was found to be costly and slow, and the results obtained were erratic and not satisfactory, and soon gave place to the dry or molten bath process, as in practice at the present day; but the difficulty of management in connexion with large baths of molten material, and the deterioration of the bath, and other mechanical causes, limit the process to articles of comparatively small size and weight. The electro deposition of zinc has been subject to many patents, and the efforts to introduce it have been lamentable in both a mechanical and financial sense. Most authorities recommend a current density of 18 or 20 ampères per square foot of cathode surface, and aqueous solutions of zinc sulphate, acetate or chloride, ammonia, chloride or tartrate, as being the most suitable for deposition. Electrolytes made by adding caustic potash or soda to a suitable zinc salt have been found to be unworkable in practice on account of the formation of an insoluble zinc oxide on the surface of the anode and the resultant increased electrical resistance; the electrolytes are also constantly getting out of order, as more metal is taken out of the solution than could possibly be dissolved from the anodes by the chemicals set free on account of this insoluble scale or furring up of the anodes, which sometimes reaches one-eighth of an inch in thickness. To all intents and purposes the deposits obtained from acid solutions under favourable circumstances are fairly adhesive when great care has been exercised to thoroughly scale and clean the surface to be coated, which is found to be the principal difficulty in the application of any electro-chemical process for copper, lead, or tin, as well as for zinc, and that renders even the application of paint or other brush compounds to futile unless honestly complied with. Unfortunately these acid zinc coatings are of a transitory nature, Their durability being incomparable with hot galvanizing, as the deposit is porous and retains some of the acid salts, which cause a wasting of the zinc, and consequently the rusting of the iron or steel. Castings coated with acid zinc rust comparatively quickly, even when the porosity has been reduced by oxidation, aggravated no doubt by some of the corroding agents—sal-ammoniac, for instance—being forced into the pores of the metal. Other matters of serious moment in the electro-zincing process, apart from the slowness of the operation, were the uncertain nature, thickness, and extent of the coating on articles of irregular shape, and the formation of loose, dark-coloured patches on the work; the unhealthy and non-metallic look and want of brilliancy and the lustre prevented engineers and the trade from accepting the process or its results, except for the commoner articles of use. To obviate any tendency of the paint to peel off from the zinc surface, as it generally manifests a disposition to do, it is recommended to coat all the zinc surfaces, previous to painting them, with the following compound: 1 part chloride of copper, 1 part nitrate of copper, 1 part sal-ammoniac, dissolved in 61 parts of water, and then add 1 part commercial hydrochloric acid. When the zinc is brushed over with this mixture it oxidizes the surface, turns black, and dries in from twelve to twenty-four hours, and may then be painted over without any danger of peeling. Another and more quickly applied coating consists of, bi-chloride of platinum, 1 part dissolved in 10 parts of distilled water, and applied either by a brush or sponge. It oxidizes at once, turns black, and resists the weak acids, rain, and the elements generally.
Galvanizing, used as a protective surface for large items like those found in bridge construction, roofing, and shipbuilding, hasn't yet received the recognition it might earn in the near future. For a long time, there were misconceptions about the relative advantages of dry or molten versus wet or electrolytic methods of galvanizing. The latter was discovered to be expensive and slow, with inconsistent and unsatisfactory results, leading to a shift toward the dry or molten bath process, which is used today. However, managing large baths of molten material and the deterioration of the bath, along with other mechanical issues, limit this process to relatively small and lightweight items. The electroplating of zinc has seen many patents, but attempts to implement it have often failed both mechanically and financially. Most experts recommend a current density of 18 or 20 amperes per square foot of cathode surface, using aqueous solutions of zinc sulfate, acetate, or chloride, ammonia, chloride, or tartrate as the most effective for deposition. Electrolytes created by adding caustic potash or soda to a suitable zinc salt have proven impractical because they form an insoluble zinc oxide on the anode's surface, increasing electrical resistance. These electrolytes also frequently malfunction as more metal is removed from the solution than can be dissolved from the anodes due to the buildup of this insoluble layer, which can be as thick as one-eighth of an inch. In general, the deposits obtained from acid solutions, under optimal conditions, can be fairly adhesive if great care is taken to thoroughly scale and clean the surface being coated. This issue is a significant hurdle in applying any electrochemical process for copper, lead, tin, and zinc and makes even painting or using other brush-on compounds ineffective unless done properly. Unfortunately, these acid zinc coatings have a temporary nature. They are far less durable compared to hot galvanizing, as the deposit is porous and holds onto some acid salts, leading to the gradual depletion of the zinc and resulting in rusting of the iron or steel. Castings coated with acid zinc tend to rust fairly quickly, even when the porosity has been minimized through oxidation, likely worsened by the presence of corrosive agents—like sal-ammoniac—being forced into the metal's pores. Other significant issues in the electro-zincing process, aside from the slow operation, include the unpredictable nature, thickness, and extent of the coating on irregularly shaped items, and the creation of loose, dark patches; the dull, non-metallic appearance and lack of shine made engineers and the industry reluctant to adopt this process or its outcomes, except for more common items. To prevent paint from peeling off the zinc surface, which it tends to do, it's advised to treat all zinc surfaces before painting with this mixture: 1 part copper chloride, 1 part copper nitrate, and 1 part sal-ammoniac dissolved in 61 parts of water, then add 1 part commercial hydrochloric acid. When the zinc is coated with this solution, it oxidizes the surface, turning it black, and it dries within twelve to twenty-four hours, allowing for safe painting afterwards. Another quicker option for coating is a solution of 1 part platinum dichloride dissolved in 10 parts of distilled water, applied with a brush or sponge. It oxidizes immediately, turns black, and resists weak acids, rain, and the elements in general.
Zinc surfaces, after a brief exposure to the air, become coated with a thin film of oxide—insoluble in water—which adheres tenaciously, forming a protective coating to the underlying zinc. So long as the zinc surface remains intact, the underlying metal is protected from corrosive action, but a mechanical or other injury to the zinc coating that exposes the metal beneath, in the presence of moisture causes a very rapid corrosion to be started, the galvanic action being changed from the zinc positive to zinc negative, and the iron, as the positive element in the circuit, is corroded instead of the zinc. When galvanized iron is immersed in a corrosive liquid, the zinc is attacked in preference to the iron, provided both the exposed parts of the iron and the protected parts are immersed in the liquid. The zinc has not the same protective quality when the liquid is sprinkled over the surface and remains in isolated drops. Sea air, being charged with saline matters, is very destructive to galvanized surfaces, forming a soluble chloride by its action. As zinc is one of the metals most readily attacked by acids, ordinary galvanized iron is not suitable for positions where it is to be much exposed to an atmosphere charged with acids sent into the air by some manufactories, or to the sulphuric acid fumes found in the products of combustion of rolling mills, iron, glass, and gas works, etc., and yet we see engineers of note covering-in important buildings with corrugated and other sheets of iron, and using galvanized iron tie rods, angles, and other constructive shapes in blind confidence of the protective power of the zinc coating; also in supreme indifference as to the future consequences and catastrophes that arise from their unexpected failure. The comparative inertia of lead to the chemical action of many acids has led to the contention that it should form as good, if not a better, protection of iron than zinc, but in practice it is found to be deficient as a protective coating against corrosion. A piece of lead-coated iron placed in water will show decided evidences of corrosion in twenty-four hours. This is to be attributed to the porous nature of the coating, whether it is applied by the hot or wet (acid) process. The lead does not bond to the plate as well as either of the other metals—zinc, tin, copper, or any alloys of them. The following table gives the increase in weight of different articles due to hot galvanizing:—
Zinc surfaces, after only a short time in the air, get covered with a thin layer of oxide that doesn’t dissolve in water. This layer sticks strongly and protects the zinc underneath. As long as the zinc surface stays intact, the metal below is safe from corrosion. However, if the zinc coating gets damaged or worn away, exposing the metal underneath, and moisture is present, corrosion can start quickly. The galvanic action flips from zinc being positive to zinc being negative, causing the iron, acting as the positive element, to corrode instead of the zinc. When galvanized iron is immersed in a corrosive liquid, the zinc is attacked before the iron, as long as both the exposed iron and the protected areas are submerged. The zinc doesn't provide the same protection when the liquid is just sprinkled on and stays in droplets. Sea air, which contains salt, can be very harmful to galvanized surfaces, creating a soluble chloride. Since zinc is one of the metals most easily affected by acids, regular galvanized iron isn’t suitable for areas exposed to acidic environments from certain factories or to sulfuric acid fumes from rolling mills, glass works, gas works, etc. Yet, we see reputable engineers covering important buildings with corrugated and other iron sheets and using galvanized iron tie rods, angles, and other construction shapes, trusting blindly in the protective abilities of the zinc layer, seemingly indifferent to the future risks and disasters that might come from their unexpected failures. The relative resistance of lead to the chemical effects of many acids has led to the argument that it should offer as good, if not better, protection for iron compared to zinc. However, in practice, lead proves insufficient as a protective coating against corrosion. A piece of lead-coated iron placed in water will show signs of corrosion within twenty-four hours. This is due to the porous quality of the coating, whether applied by the hot or wet (acid) method. The lead doesn’t bond as well to the plate compared to zinc, tin, copper, or any of their alloys. The following table shows the increase in weight of different items due to hot galvanizing:—
| Description of Article | Weight of Zinc per Square foot | Percentage of Increase of Weight |
|
| Thin sheet-iron | 1.196 oz. | 18.2 | |
| 5/16-in. plates | 1.76 " | 2.0 | |
| 4-in. cut nails | 2.19 " | 6.72 | |
| 7/8-in. die bolt and nut | approximately 1.206 oz. | 1.00 |
Tin is often added to the hot bath for the purpose of obtaining a smoother surface and larger facets, but it is found to shorten the life of the protective coating very considerably.
Tin is often added to the hot bath to achieve a smoother surface and larger facets, but it significantly shortens the lifespan of the protective coating.
A portion of a zinc coating applied by the hot process was found to be very brittle, breaking when attempts were made to bend it; the average thickness of the coating was .015 inch. An analysis gave the following result: tin, 2.20; iron, 3.78; arsenic, a trace; zinc (by difference), 94.02. A small quantity of iron is dissolved from all the articles placed in the molten zinc bath, and a dross is formed amounting in many cases to 25 per cent of the whole amount of zinc used. The zinc-iron alloy is very brittle, and contains by analysis 6 per cent of iron, and is used to cast small art ornaments from. A hot galvanizing plant, having a bath capacity of 10 feet by 4 feet by 41/2 feet outside dimensions, and about 1 inch in thickness, will hold 28 tons of zinc. With equal amounts of zinc per unit of area, the zinc coating put on by the cold process is more resistant to the corroding action of a saturated solution of copper sulphate than is the case with steel coated by the ordinary hot galvanizing process; or, to put it in another form, articles coated by the cold process should have an equally long life under the same conditions of exposure that hot galvanized articles are exposed to, and with less zinc than would be necessary in the ordinary hot process. The hardness of a zinc surface is a matter of some importance. With this object in view aluminium has been added from a separate crucible to the molten zinc at the moment of dipping the article to be zinced, so as to form a compound surface of zinco-aluminium, and to reduce the ashes formed from the protective coverings of sal-ammoniac, fat, glycerine, etc. The addition of the aluminium also reduces the thickness of the coating applied. Cold and hot galvanized plates appear to stand abrasion equally well. Both pickling and hot galvanizing reduce the strength, distort and render brittle iron and steel wires of small sections.
A section of a zinc coating applied using the hot process was very brittle and broke when attempts were made to bend it; the average thickness was .015 inches. An analysis showed the following results: tin, 2.20; iron, 3.78; arsenic, a trace; and zinc (by difference), 94.02. A small amount of iron dissolves from all items placed in the molten zinc bath, forming a dross that can make up about 25 percent of the total zinc used. The zinc-iron alloy is very brittle and contains 6 percent iron, which is used to cast small decorative items. A hot galvanizing plant with dimensions of 10 feet by 4 feet by 4.5 feet on the outside and about 1 inch thick can hold 28 tons of zinc. When equal amounts of zinc are applied per unit area, the zinc coating from the cold process is more resistant to corrosion from a saturated solution of copper sulfate than the case with steel coated using the ordinary hot galvanizing method; in other words, items coated by the cold process should last just as long under the same exposure conditions as hot galvanized items, while using less zinc than required in the standard hot process. The hardness of a zinc surface is quite important. To achieve this, aluminum has been added from a separate crucible to the molten zinc just as the item is dipped, creating a compound surface of zinc-aluminum and reducing the residue created from protective layers of sal-ammoniac, fat, glycerin, etc. The addition of aluminum also decreases the thickness of the coating applied. Cold and hot galvanized plates seem to resist abrasion equally well. Both pickling and hot galvanizing diminish the strength, distort, and make iron and steel wires of small sections brittle.
INDEX.
A
Amalgam process in tin-plating, 59.
Appliances and apparatus used in japanning and enamelling, 29.
B
Battery process in tin-plating, 59.
Black grounds, 11.
—— japan grounds on metal, common, 12.
—— paints, 52.
—— pigment, 46.
—— stain for iron, 53.
—— varnish for sewing machines, 56.
Blue japan grounds, 9.
—— pigment, 46.
Brass, polished, colours for, 49-57.
Brick ovens, 33.
Bright pale yellow grounds, 10.
Bronzing composition, 49.
Brown japan, 57.
Bunsen burner, 33.
C
Carriage varnish, 51.
Colours for polished brass, 49.
Common black japan grounds on metal, 12.
Composition for bronzing, 49.
Cream enamel, 8.
E
Enamelling and japanning stoves, 29-46.
—— —— —— —— heated by direct fire, 34.
—— —— —— —— heated by hot-water pipes, 36.
—— or japanning metals, 20-28.
—— old work, 27.
F
First stage in the japanning of wood, 5.
—— —— in the japanning of leather, without a priming, 5.
G
Galvanized iron, painting on, 49.
Galvanizing, 61-66.
Golden varnish for metal, 51.
Green japan grounds, 10.
—— pigment, 46.
Ground, red japan, 10.
—— scarlet japan, 9.
—— tortoise-shell, 12.
Grounds, black, 11.
—— black japan, 12.
—— blue japan, 9.
—— bright pale yellow, 10.
—— green japan, 10.
—— japan, 6-19.
—— orange-coloured, 11.
—— purple, 11.
—— white japan, 7
H
Heating stoves by direct fire, 34.
—— —— by hot-water pipes, 36.
Hern's process in tin-plating, 60.
I
Immersion process in tin-plating, 59.
Iron, black stain for, 53.
—— galvanized, painting on, 49.
Ironwork, varnishes for, 55.
J
Japan, brown, 57.
—— ground, red, 10.
—— —— scarlet, 9.
—— grounds, 6-19.
—— —— black, 12.
—— —— blue, 9.
—— —— green, 10.
—— —— white, 7.
—— work, painting, 13.
—— —— varnishing, 17.
Japanese gold size, 14.
Japanese lacquer, 47.
Japanning and enamelling stoves, 34.
—— —— —— —— heated by direct fire, 34.
—— —— —— —— heated by hot-water pipes, 36.
—— leather without a priming, first stage, 5.
—— or enamelling metals, 20-28.
—— tin, 25.
—— wood, first stage, 5.
L
Lacquer, Japanese, 47.
M
Metal, golden varnish for, 51.
—— polishes, 51.
Metals, japanning or enamelling, 20-28.
Modern japanning and enamelling stoves, 34.
N
Natural Japanese lacquer, 47.
—— lacquer, 45.
O
Oil vehicle, 14.
Old work, enamelling, 27.
Orange-coloured grounds, 11.
P
Painting japan work, 13.
—— on galvanized iron, 49.
—— —— zinc, 49.
Paints, black, 52.
Pigments suitable for japanning with natural lacquer, 45.
—— black, 46.
—— blue, 46.
—— green, 46.
—— red, 46.
—— white, 45.
—— yellow, 46.
Polished brass, colours for, 49.
Preparing the surface to be japanned, 4.
Priming the surface to be japanned, 4.
Processes for tin-plating, 58.
Purple grounds, 11.
R
Red japan ground, 10.
—— pigments, 46.
S
Scarlet japan ground, 9.
Sewing machines, black varnish for, 56.
Shellac varnish, 6.
Stoves, modern japanning and enamelling, 34.
Stove, the enamelling and japanning, 29-45.
Surface to be japanned, priming or preparing the, 4.
T
Tin, japanning, 25.
Tin-plating, colours for, 58.
Tin-plating, amalgam process, 59.
—— battery process, 59.
—— Hern's process, 60.
—— immersion process, 59.
—— Weigler's process, 60.
Tortoise-shell ground, 12.
U
Urushiol, 47.
V
Varnish, carriage, 51,
—— for iron and steel, 57.
—— for metal, golden, 51.
—— shellac, 6.
Varnishes for iron work, 55.
Varnishing japan work, 17.
W
Weigler's process of tin-plating, 60.
White japan grounds, 7.
—— pigments, 45.
Wood, first stage in the japanning of, 5.
Y
Yellow grounds, bright pale, 10.
—— pigments, 46.
Z
Zinc, painting on, 49.
A
Amalgam process in tin-plating, 59.
Tools and equipment used in japanning and enameling, 29.
B
Battery process in tin-plating, 59.
Black grounds, 11.
—— Japan grounds on metal, common, 12.
—— paints, 52.
—— pigment, 46.
—— stain for iron, 53.
—— varnish for sewing machines, 56.
Blue Japan grounds, 9.
—— pigment, 46.
Brass, polished, colors for, 49-57.
Brick ovens, 33.
Bright pale yellow grounds, 10.
Bronzing composition, 49.
Brown Japan, 57.
Bunsen burner, 33.
C
Carriage varnish, 51.
Colors for polished brass, 49.
Common black Japan grounds on metal, 12.
Composition for bronzing, 49.
Cream enamel, 8.
E
Enameling and japanning stoves, 29-46.
—— —— —— —— heated by direct fire, 34.
—— —— —— —— heated by hot-water pipes, 36.
—— or japanning metals, 20-28.
—— old work, 27.
F
First stage in the japanning of wood, 5.
—— —— in the japanning of leather, without a priming, 5.
G
Galvanized iron, painting on, 49.
Galvanizing, 61-66.
Golden varnish for metal, 51.
Green Japan grounds, 10.
—— pigment, 46.
Ground, red Japan, 10.
—— scarlet Japan, 9.
—— tortoise-shell, 12.
Grounds, black, 11.
—— black Japan, 12.
—— blue Japan, 9.
—— bright pale yellow, 10.
—— green Japan, 10.
—— Japan, 6-19.
—— orange-colored, 11.
—— purple, 11.
—— white Japan, 7
H
Heating stoves by direct fire, 34.
—— —— by hot-water pipes, 36.
Hern's process in tin-plating, 60.
I
Immersion process in tin-plating, 59.
Iron, black stain for, 53.
—— galvanized, painting on, 49.
Ironwork, varnishes for, 55.
J
Japan, brown, 57.
—— ground, red, 10.
—— —— scarlet, 9.
—— grounds, 6-19.
—— —— black, 12.
—— —— blue, 9.
—— —— green, 10.
—— —— white, 7.
—— work, painting, 13.
—— —— varnishing, 17.
Japanese gold size, 14.
Japanese lacquer, 47.
Japanning and enameling stoves, 34.
—— —— —— —— heated by direct fire, 34.
—— —— —— —— heated by hot-water pipes, 36.
—— leather without a priming, first stage, 5.
—— or enameling metals, 20-28.
—— tin, 25.
—— wood, first stage, 5.
L
Lacquer, Japanese, 47.
M
Metal, golden varnish for, 51.
—— polishes, 51.
Metals, japanning or enameling, 20-28.
Modern japanning and enameling stoves, 34.
N
Natural Japanese lacquer, 47.
—— lacquer, 45.
O
Oil vehicle, 14.
Old work, enameling, 27.
Orange-colored grounds, 11.
P
Painting Japan work, 13.
—— on galvanized iron, 49.
—— —— zinc, 49.
Paints, black, 52.
Pigments suitable for japanning with natural lacquer, 45.
—— black, 46.
—— blue, 46.
—— green, 46.
—— red, 46.
—— white, 45.
—— yellow, 46.
Polished brass, colors for, 49.
Preparing the surface to be japanned, 4.
Priming the surface to be japanned, 4.
Processes for tin-plating, 58.
Purple grounds, 11.
R
Red Japan ground, 10.
—— pigments, 46.
S
Scarlet Japan ground, 9.
Sewing machines, black varnish for, 56.
Shellac varnish, 6.
Stoves, modern japanning and enameling, 34.
Stove, the enameling and japanning, 29-45.
Surface to be japanned, priming or preparing the, 4.
T
Tin, japanning, 25.
Tin-plating, colors for, 58.
Tin-plating, amalgam process, 59.
—— battery process, 59.
—— Hern's process, 60.
—— immersion process, 59.
—— Weigler's process, 60.
Tortoise-shell ground, 12.
U
Urushiol, 47.
V
Varnish, carriage, 51,
—— for iron and steel, 57.
—— for metal, golden, 51.
—— shellac, 6.
Varnishes for ironwork, 55.
Varnishing Japan work, 17.
W
Weigler's process of tin-plating, 60.
White Japan grounds, 7.
—— pigments, 45.
Wood, first stage in the japanning of, 5.
Y
Yellow grounds, bright pale, 10.
—— pigments, 46.
Z
Zinc, painting on, 49.
ABERDEEN: THE UNIVERSITY PRESS
ENAMELS AND ENAMELLING
An Introduction to the Preparation and Application of all kinds of Enamels for Technical and Artistic Purposes.
Second and Enlarged Edition.
Demy 8vo. 194 Pages.
Price 10s. 6d. net. (Post Free, 10s. 10d. Home; 11s. Abroad.)
SCOTT, GREENWOOD & SON,
THE MANUFACTURE OF VARNISHES.
BY
J.G. McINTOSH.
Based on and including the work of
ACH. LIVACHE.
IN THREE VOLUMES.
VOLUME II.—VARNISH MATERIALS AND OIL-VARNISH MAKING. Demy 8vo. 70 Illustrations. 220 pp. Price 10s. 6d. net. (Post free, 10s. 10d. home; 11s. 3d. abroad.)
VOLUME III.—SPIRIT VARNISHES AND SPIRIT VARNISH MATERIALS. Demy 8vo. 64 Illustrations. 464 pp. Price 12s. 6d. net. (Post free, 13s. home; 13s. 6d. abroad.)
Send for Catalogue giving List of Contents of above works from
SCOTT, GREENWOOD & SON,
For the latest recipes, etc., on Japanning you should read
Oil & Colour Trades Journal.
OIL, PAINT, VARNISH,
SOAP, GLUE, DRYSALTERY,
AND ALLIED TRADES.
THE OIL AND COLOUR TRADES JOURNAL OFFICES,
Download ePUB
If you like this ebook, consider a donation!