This is a modern-English version of Camp Life in the Woods and the Tricks of Trapping and Trap Making, originally written by Gibson, W. Hamilton (William Hamilton).
It has been thoroughly updated, including changes to sentence structure, words, spelling,
and grammar—to ensure clarity for contemporary readers, while preserving the original spirit and nuance. If
you click on a paragraph, you will see the original text that we modified, and you can toggle between the two versions.
Scroll to the bottom of this page and you will find a free ePUB download link for this book.
CAMP LIFE IN THE WOODS
AND THE
TRICKS OF TRAPPING
AND
TRAP MAKING
CONTAINING
Containing
COMPREHENSIVE HINTS ON CAMP SHELTER, LOG HUTS, BARK SHANTIES, WOODLAND BEDS AND BEDDING, BOAT AND CANOE BUILDING, AND VALUABLE SUGGESTIONS ON TRAPPERS' FOOD, ETC. WITH EXTENDED CHAPTERS ON THE TRAPPER'S ART, CONTAINING ALL THE "TRICKS" AND VALUABLE BAIT RECIPES OF THE PROFESSION; FULL DIRECTIONS FOR THE USE OF THE STEEL TRAP, AND FOR THE CONSTRUCTION OF TRAPS OF ALL KINDS; DETAILED INSTRUCTIONS FOR THE CAPTURE OF ALL FUR-BEARING ANIMALS; VALUABLE RECIPES FOR THE CURING AND TANNING OF FUR SKINS, ETC., ETC.
COMPREHENSIVE TIPS ON CAMP SHELTER, LOG CABINS, BARK SHACKS, WOODS BEDS AND BEDDING, BOAT AND CANOE CONSTRUCTION, AND USEFUL SUGGESTIONS ON TRAPPER'S FOOD, ETC. WITH EXTENDED CHAPTERS ON THE TRAPPING CRAFT, FEATURING ALL THE "TRICKS" AND VALUABLE BAIT RECIPES OF THE TRADE; COMPLETE DIRECTIONS FOR USING STEEL TRAPS, AND FOR BUILDING TRAPS OF ALL KINDS; DETAILED INSTRUCTIONS FOR CAPTURING ALL FUR-BEARING ANIMALS; VALUABLE RECIPES FOR CURING AND TANNING FUR SKINS, ETC., ETC.
BY
BY
AUTHOR OF "PASTORAL DAYS"
AUTHOR OF "PASTORAL DAYS"
ILLUSTRATED BY THE AUTHOR
Illustrated by the author
Page 1
TO
MY BELOVED FRIENDS
MR. AND MRS. F. W. GUNN,
KIND INSTRUCTORS, AND PARTICIPANTS
IN THE BRIGHTEST JOYS OF MY YOUTH,
THIS BOOK IS
AFFECTIONATELY DEDICATED BY
THE AUTHOR.
Page 1
TO
MY DEAR FRIENDS
MR. AND MRS. F. W. GUNN,
GENEROUS TEACHERS, AND SHARE IN
THE GREATEST HAPPINESS OF MY YOUTH,
THIS BOOK IS
WARMLY DEDICATED BY
The Author.
 f all the various subjects in the catalogue of
sports and pastimes, there is none more sure of arousing the
enthusiasm of our American boys generally, than that which forms the
title of this book. Traps and Trapping, together with its kindred
branches, always have been and always will be subjects of
great interest among boys, and particularly so to those who live in
the country.
f all the various subjects in the catalogue of
sports and pastimes, there is none more sure of arousing the
enthusiasm of our American boys generally, than that which forms the
title of this book. Traps and Trapping, together with its kindred
branches, always have been and always will be subjects of
great interest among boys, and particularly so to those who live in
the country.
Of all the different topics in the catalog of sports and activities, none excites American boys more than the one featured in this book. Traps and Trapping, along with related areas, have always been and will always be greatly interesting to boys, especially those who live in rural areas.
It is a fact to be regretted that we have so few examples of "Boys' Books" published in this country. There are a few English works of this character, that are very excellent as far as they go, but are nevertheless incomplete and unsatisfactory to the wants of American boys, dwelling largely on sports which are essentially English, and merely touching upon or utterly excluding other topics which are of the utmost interest to boys of this country. In no one of these books, so far as the author of the present volume knows, is the subject of Traps considered to any fair extent, and those examples which are given, represent only the most common and universal varieties already known to the general public.
It’s unfortunate that there are so few "Boys' Books" published in this country. There are a few English works in this genre that are quite good, but they still fall short of meeting the needs of American boys, focusing mainly on sports that are mainly English while either touching on or completely ignoring other topics that are extremely relevant to boys here. To the best of the author’s knowledge, none of these books adequately cover the subject of traps, and the examples provided only showcase the most common types that everyone already knows about.
Page 4 With these facts in mind, the author has entered with zealous enthusiasm upon the preparation of a work which shall fill this odd and neglected corner in literature, and judging from the reminiscences of his own boyish experiences, he feels certain that in placing such a volume within reach of the public, he supplies a long felt want in the hearts of his boy-friends throughout the land.
Page 4 With these facts in mind, the author has enthusiastically taken on the task of creating a work that will address this unusual and overlooked area of literature. Based on his own childhood memories, he is confident that by making this book available to the public, he is meeting a long-standing desire in the hearts of his young male friends across the country.
Far be it from us in the publication of this volume, to be understood as encouraging the wanton destruction of poor innocent animals. Like all kindred sports, hunting and fishing for example, the sport of Trapping may be perverted and carried to a point where it becomes simple cruelty, as is always the case when pursued for the mere excitement it brings. If the poor victims are to serve no use after their capture, either as food, or in the furnishing of their plumage or skins for useful purposes, the sport becomes heartless cruelty, and we do not wish to be understood as encouraging it under any such circumstances. In its right sense trapping is a delightful, healthful, and legitimate sport, and we commend it to all our boy-readers.
It is certainly not our intention in publishing this book to promote the senseless destruction of innocent animals. Like other related activities, such as hunting and fishing, trapping can be twisted and taken to an extreme where it turns into mere cruelty, especially when it's done just for the thrill of it. If the unfortunate animals captured are not going to be used in any way—either as food or for their feathers or skins for practical purposes—then it crosses the line into heartless cruelty, and we don’t want to imply that we support it in any situation. In its proper context, trapping is an enjoyable, healthy, and valid pastime, and we encourage all our young readers to give it a try.
It shall be the object of the author to produce a thoroughly practical volume, presenting as far as possible such examples of the trap kind as any boy, with a moderate degree of ingenuity, could easily construct, and furthermore to illustrate each variety with the utmost plainness, supplemented with the most detailed description.
It is the author's goal to create a completely practical book, showcasing examples of traps that any boy with a reasonable amount of creativity can easily build, and to explain each type as clearly as possible, with the most detailed descriptions.
With the exception of all "clap-trap," our volume will embrace nearly every known example of the various devices used for the capture of Bird, Beast, or Fowl, in all countries, simplifying such as are impracticable on account of their complicated structure, and modifying others to the peculiar adaptation of the American Trapper.
With the exception of all "clap-trap," our book will include nearly every known example of the different devices used to catch birds, animals, or fowl in all countries, simplifying those that are too complicated to use and adjusting others to better suit the unique needs of the American trapper.
Devices, which inflict cruelty and prolonged suffering, shall, as far as possible, be excluded, as this is not a necessary qualification in any trap, and should be guarded against wherever possible. Following out the suggestion conveyed under the Page 5 title of "The Trapper," we shall present full and ample directions for baiting traps, selections of ground for setting, and other hints concerning the trapping of all our principal game and wild animals, valuable either as food or for their fur. In short, our book shall form a complete trapper's guide, embracing all necessary information on the subject, anticipating every want, and furnishing the most complete and fully illustrated volume on this subject ever presented to the public. In vain did the author of this work, in his younger days, search the book stores and libraries in the hopes of finding such a book, and many are the traps and snares which necessity forced him to invent and construct for himself, for want of just such a volume. Several of these original inventions will appear in the present work for the first time in book form, and the author can vouch for their excellence, and he might almost say, their infallibility, for in their perfect state he has never yet found them to "miss" in a single instance.
Devices that cause cruelty and prolonged suffering should, as much as possible, be excluded, since this isn't a necessary feature of any trap and should be avoided wherever possible. Following the idea put forward in the Page 5 titled "The Trapper," we will provide comprehensive instructions for baiting traps, choosing locations for setting them, and additional tips for trapping all our key game and wild animals, which are valuable either as food or for their fur. In short, our book will serve as a complete guide for trappers, covering all essential information on the topic, anticipating every need, and offering the most thorough and fully illustrated volume ever presented to the public on this subject. In his younger days, the author of this work searched bookstores and libraries in vain for such a book, and he had to invent and build many traps and snares out of necessity due to the lack of such a resource. Several of these original inventions will appear in this work for the first time in printed form, and the author can attest to their effectiveness; he could almost say they are foolproof, as he has never seen them fail even once in their perfect state.
As the writer's mind wanders back to his boyish days, there is one autumn in particular which shines out above all the rest; and that was when his traps were first set and were the chief source of his enjoyment. The adventurous excitement which sped him on in those daily tramps through the woods, and the buoyant, exhilarating effect of the exercise can be realized only by those who have had the same experience. The hope of success, the fears of disappointment, the continual suspense and wonder which fill the mind of the young trapper, all combine to invest this sport with a charm known to no other. Trapping does not consist merely in the manufacture and setting of the various traps. The study of the habits and peculiarities of the different game—here becomes a matter of great importance; and the study of natural history under these circumstances affords a continual source of pleasure and profit.
As the writer reminisces about his childhood, one autumn stands out above all the rest; that was when he first set his traps, which became his main source of joy. The thrill of adventure that fueled his daily hikes through the woods, along with the refreshing excitement of the exercise, can only be truly understood by those who have experienced it themselves. The hope of success, the fear of disappointment, and the constant suspense and curiosity filling the mind of the young trapper all combine to give this activity a unique charm. Trapping isn't just about making and setting various traps. Understanding the habits and characteristics of different game is crucial; and studying natural history in this context provides an ongoing source of enjoyment and insight.
Among the most useful, although the most cruel, of inventions used by the professional trapper are the steel traps; so much so that the author would gladly omit them. But as they Page 6 are of such unfailing action, of such universal efficacy, and in many cases are the only ones that can be used, any book on trapping would certainly be incomplete without them. The scope of our volume not only embraces the arts of trapping and trap-making, but extends further into the subject of the wild life of a trapping campaign,—containing full directions for building log cabins, and shanties; boats and canoes; hints on food and cooking utensils; also full directions for the curing and tanning of fur skins,—in short, a complete repository of all useful information pertaining to the life and wants of a professional trapper.
Among the most useful, yet also the most brutal, inventions used by professional trappers are steel traps; so much that the author would prefer to leave them out. However, since they are so reliable, widely effective, and often the only option available, any book on trapping would be incomplete without them. Our book not only covers the skills of trapping and trap-making but also delves deeper into the wildlife aspects of a trapping expedition—providing detailed instructions for building log cabins and shanties, constructing boats and canoes, tips on food and cooking gear, as well as comprehensive guidance for curing and tanning fur skins—in short, a complete resource of all essential information related to the life and needs of a professional trapper.
In the preparation of the work no pains have been spared to insure clearness in general directions, and every point which would be likely to puzzle the reader has been specially covered by separate illustration. In this particular it stands unique in the list of boys' books. Every difficulty has been anticipated, and in every instance the illustrations will be found thoroughly comprehensive and complete. That the care and thoroughness which has been displayed throughout the work, and to which its pages will bear witness, may meet with the appreciation and enthusiastic approval of every boy-reader throughout the land, is the most earnest hope of
In preparing this work, every effort has been made to ensure clarity in the overall instructions, and each aspect that might confuse the reader has been specifically addressed with separate illustrations. In this way, it stands out among boys' books. Every challenge has been foreseen, and in each case, the illustrations are designed to be completely clear and thorough. It is our sincere hope that the diligence and attention to detail shown throughout this work, which is evident in its pages, will be appreciated and enthusiastically approved by every boy-reader across the country.
THE AUTHOR.
THE AUTHOR.
TRAPS FOR LARGE GAME.
Traps for big game.
Introduction.—THE DEAD FALL.—Honey as Bait for Bears.—THE GUN TRAP.—Peculiar Habits of the Puma.—"Baiting" for the Puma.—Caution required in Setting the Gun Trap.—Several Guns used.—Different Modes of Setting.—Various animals to which the Gun Trap is adapted.—THE BOW TRAP.—Vane and Barb for Arrows.—Best Wood for Bow.—A Second Example of Bow Trap.—Arrows Barbed and Poisoned.—THE DOWN FALL; or Hippopotamus Trap.—The terrible Harpoon used by the African Trapper.—Different Modes of Setting the Down Fall.—Modification of the Down Fall for small animals.—THE BEAR TRAP.—Various Methods of Setting.—Honey as Bait for Bear.—Bait for Puma.—THE PITFALL.—Use of the Trap in Asia as a means of defence against the Tiger.—Disposition of the Bait.—Wonderful agility of the Puma.—Niceties required in the construction of the Pitfall.—THE LOG COOP TRAP.—Various animals for which it is adapted.—Different Modes of Setting.—THE CORRALL OR HOPO of Africa.—Its Construction and Appalling Effects.—THE NET TRAP.—Its Use in the Capture of the Lion and the Tiger.—American animals to which it may be adapted.—Two Methods of Setting.—BIRD LIME.—Its Use for the Capture of the Lion and Tiger.
Introduction.—THE DEAD FALL.—Honey as Bait for Bears.—THE GUN TRAP.—Unique Behavior of the Puma.—"Baiting" for the Puma.—Caution Needed When Setting the Gun Trap.—Multiple Guns Used.—Different Ways to Set It Up.—Various Animals That the Gun Trap Can Catch.—THE BOW TRAP.—Vane and Barb for Arrows.—Best Wood for the Bow.—Another Example of the Bow Trap.—Barbed and Poisoned Arrows.—THE DOWN FALL; or Hippopotamus Trap.—The Fearsome Harpoon Used by the African Trapper.—Different Ways to Set the Down Fall.—Adjustments of the Down Fall for Smaller Animals.—THE BEAR TRAP.—Various Methods of Setting It Up.—Honey as Bait for the Bear.—Bait for Puma.—THE PITFALL.—Use of the Trap in Asia as a Defense Against the Tiger.—Placement of the Bait.—Remarkable Agility of the Puma.—Precision Required in Building the Pitfall.—THE LOG COOP TRAP.—Various Animals It Can Capture.—Different Ways to Set It Up.—THE CORRAL OR HOPO of Africa.—Its Structure and Horrifying Effects.—THE NET TRAP.—Its Use in Capturing Lions and Tigers.—American Animals It Can Be Used For.—Two Methods of Setting It Up.—BIRD LIME.—Its Use for Capturing Lions and Tigers.
SNARES OR NOOSE TRAPS.
Snares or noose traps.
General Remarks.—Requisite Materials for Snaring.—THE QUAIL SNARE.—"Sucker Wire" Nooses.—Six Quail caught at a time.—HOOP NOOSES.—HORSE HAIR NOOSES.—HEDGE NOOSES.—Peculiarities of the Grouse.—Selection of Ground.—THE TRIANGLE TREE SNARE.—A Hawk captured by the device.—The Wire Noose, as arranged for the capture of the Woodchuck, Muskrat, and House Rat.—THE TWITCH-UP.—Selection of Ground for Setting.—Various Modes of Constructing the Traps.—THE POACHERS' SNARE.—Its portability.—THE PORTABLE SNARE.—Its Peculiar Advantages.—The "Simplest" Snare.—The valuable principle on which it is Constructed.—Its Portability.—Various Adaptations of the Principle.—THE QUAIL SNARE.—Its ample capabilities of Capture.—Peculiarities of the Quail.—Successful Baits.—THE BOX SNARE.—Modification in a very small scale.—THE DOUBLE BOX SNARE.—The Animals for which it is Adapted.—GROUND SNARES.—THE OLD-FASHIONED SPINGLE.—THE IMPROVED SPINGLE.—Objections to Ground Snares.—THE FIGURE FOUR GROUND SNARE.—THE PLATFORM SNARE.
General Remarks.—Required Materials for Snaring.—THE QUAIL SNARE.—"Sucker Wire" Nooses.—Catch Six Quail at Once.—HOOP NOOSES.—HORSE HAIR NOOSES.—HEDGE NOOSES.—Unique Features of the Grouse.—Choosing the Right Ground.—THE TRIANGLE TREE SNARE.—A Hawk Caught with This Method.—The Wire Noose, Set Up for Capturing the Woodchuck, Muskrat, and House Rat.—THE TWITCH-UP.—Choosing Ground for Setting.—Different Ways to Construct the Traps.—THE POACHERS' SNARE.—Its Ease of Transport.—THE PORTABLE SNARE.—Its Key Advantages.—The "Simplest" Snare.—The Valuable Principle Behind Its Design.—Its Portability.—Various Adaptations of the Principle.—THE QUAIL SNARE.—Its Great Capture Potential.—Unique Features of the Quail.—Effective Baits.—THE BOX SNARE.—A Small-Scale Modification.—THE DOUBLE BOX SNARE.—The Animals It Targets.—GROUND SNARES.—THE OLD-FASHIONED SPINGLE.—THE IMPROVED SPINGLE.—Issues with Ground Snares.—THE FIGURE FOUR GROUND SNARE.—THE PLATFORM SNARE.
TRAPS FOR FEATHERED GAME.
Bird traps.
THE SIEVE TRAP.—THE BRICK TRAP.—THE COOP TRAP—Improved Method of Setting.—Defects of the old style.—THE BAT FOWLING NET.—Its Use in England.—How the Dark Lantern is Used by Bird Catchers.—THE CLAP NET.—Its Extensive Use in Foreign Countries.—Decoy Birds.—The "Bird Whistle" used in place of decoy.—Wonderful Skill attained in the Use of the Bird Whistle.—Selection of Trapping Ground.—THE BIRD WHISTLE Described.—Its Use and Marvelous Capabilities.—THE WILD GOOSE TRAP.—Its Extensive Use in the Northern Cold Regions for the Capture of the Goose and Ptarmigan.—Tame Goose Used as Decoys.—Gravel as Bait.—THE TRAP CAGE.—A Favorite Trap among Bird Catchers.—Call Birds.—THE SPRING NET TRAP.—Rubber Elastic as Spring Power.—A SIMPLER NET TRAP.—Common Faults in many Bird Traps.—Complicated Construction as Unnecessary Feature.—Requisites of a good Bird Trap.—Hints on Simple Mechanism.—Different Modes of Constructing Hinge.—Hoop Iron Used as Spring Power.—Manner of Tempering Spring.—THE UPRIGHT NET TRAP.—A Second Method of Constructing Platform.—THE BOX OWL TRAP.—Ventilation a Desirable Feature in all Box Traps.—Tin Catch for Securing Cover in Place.—Peculiar Mode of Baiting for Birds.—Modification of Perch.—Baiting for the Owl.—Locality for Setting.—The Owl in Captivity.—Its Food.—Hints on the Care of the Bird.—THE BOX BIRD TRAP.—Cigar Box Used as a Trap.—THE PENDANT BOX TRAP.—Ventilation.—Simple Mechanism.—Care in Construction of Bearings.—THE HAWK TRAP.—A "Yankee" Invention.—Stiff-Pointed Wires Effectually Use in the Capture of the Hawk.—Owl also Captured by the Same Device.—THE WILD DUCK NET.—Its Use in Chesapeake Bay.—Manner of Constructing the Net.—Decoy Ducks.—Bait for the Ducks.—THE HOOK TRAP.—Its cruel Mode of Capture.—Peculiar Bait for Ducks.—THE "FOOL'S CAP" TRAP.—Its Successful Use in the Capture of the Crow.—Shrewdness of the Crow.—Strange antics of a Crow when Captured in the Trap.—Bird Lime the Secret of its Success.—Wonderful Tenacity of the Cap.—Different Modes of Setting.—BIRD LIME Described.—Its astonishing "Sticky" Qualities.—The Bird Lime of the Trade.—Various "Home-Made" Recipes.—Manner of Using Bird Lime.—Limed Twigs.—The Owl Used as a Decoy in connection with Bird Lime.—Bird Lime used in the Capture of the Humming Bird.—A Flower Converted into a Trap.—Masticated Wheat as Bird Lime.—Its Ready Removal from the Feathers.—Delicate Organization of the Humming Bird.—Killed by Fright.—Use of its Plumage.—Snares for the Humming Bird.—Blow Guns Successfully Used for its Capture.—Killed by Concussion.—Disabled by a Stream of Water.
THE SIEVE TRAP.—THE BRICK TRAP.—THE COOP TRAP—Improved Methods of Setting.—Problems with the old style.—THE BAT FOWLING NET.—Its Use in England.—How bird catchers use the dark lantern.—THE CLAP NET.—Its Widespread Use in Foreign Countries.—Decoy Birds.—The "Bird Whistle" used instead of a decoy.—Incredible Skill Achieved with the Bird Whistle.—Choosing Trapping Ground.—THE BIRD WHISTLE Described.—Its Function and Amazing Capabilities.—THE WILD GOOSE TRAP.—Its Widespread Use in the Northern Cold Regions to Capture Geese and Ptarmigan.—Tame Goose Used as Decoys.—Gravel as Bait.—THE TRAP CAGE.—A Popular Trap Among Bird Catchers.—Call Birds.—THE SPRING NET TRAP.—Rubber Elastic as Spring Power.—A SIMPLER NET TRAP.—Common Issues in Many Bird Traps.—Complicated Designs as an Unnecessary Feature.—Requirements for a Good Bird Trap.—Tips on Simple Mechanisms.—Different Ways to Build Hinge.—Hoop Iron Used as Spring Power.—How to Temper Spring.—THE UPRIGHT NET TRAP.—A Second Way to Build Platform.—THE BOX OWL TRAP.—Ventilation is a Desirable Feature in All Box Traps.—Tin Catch for Securing Cover in Place.—Unique Method for Baiting Birds.—Modification of Perch.—Baiting for the Owl.—Location for Setting.—The Owl in Captivity.—Its Diet.—Tips on Caring for the Bird.—THE BOX BIRD TRAP.—Cigar Box Used as a Trap.—THE PENDANT BOX TRAP.—Ventilation.—Simple Mechanism.—Care in Constructing Bearings.—THE HAWK TRAP.—A "Yankee" Invention.—Stiff-Pointed Wires Effectively Used to Capture Hawks.—Owls Also Captured by the Same Device.—THE WILD DUCK NET.—Its Use in Chesapeake Bay.—How to Construct the Net.—Decoy Ducks.—Bait for the Ducks.—THE HOOK TRAP.—Its Cruel Method of Capture.—Unique Bait for Ducks.—THE "FOOL'S CAP" TRAP.—Its Successful Use in Capturing Crows.—Crows' Cleverness.—Strange Antics of a Crow When Caught in the Trap.—Bird Lime Secrets of its Success.—Incredible Stickiness of the Cap.—Different Ways to Set.—BIRD LIME Described.—Its Amazing "Sticky" Qualities.—Commercial Bird Lime.—Various "Homemade" Recipes.—How to Use Bird Lime.—Limed Twigs.—The Owl Used as a Decoy with Bird Lime.—Bird Lime Used to Capture Humming Birds.—A Flower Turned into a Trap.—Masticated Wheat as Bird Lime.—Easy Removal from Feathers.—Delicate Nature of the Humming Bird.—Killed by Fright.—Use of its Plumage.—Snares for Humming Birds.—Blow Guns Effectively Used to Capture Them.—Killed by Impact.—Disabled by a Stream of Water.
MISCELLANEOUS TRAPS.
Miscellaneous traps.
THE COMMON BOX TRAP.—Two Modes of Setting.—Animals for which it is Adapted.—A Modification of the Trap.—ANOTHER BOX TRAP.—THE FIGURE FOUR TRAP.—Its Advantages.—THE DOUBLE ENDER.—A Favorite Trap in New England.—Simplicity of Construction.—The Rabbit's Fondness for Salt.—Its Use as a Bait.—THE SELF SETTING TRAP.—Animals for which it is adapted.—THE DEAD FALL.—Various Methods of Construction.—Animals for which it is usually Set.—Remarkable Cunning of some Animals.—The Precautions which it Necessitates.—Bait for the Muskrat.—Various Baits for the Mink.—Skunk Baits.—A Fox Entrapped by a Dead Fall.—Slight Modification in the Arrangement of Pieces.—Live Duck used as Bait.—Another Arrangement for the Dead Fall.—Trap Sprung by the Foot of the Animal.—THE FIGURE FOUR TRAP.—Applied to the Dead Fall.—THE GAROTTE.—Its Singular Mode of Capture.—Its Common Victims.—THE BOW TRAP.—An oddity of the Trap Kind.—Its Singular mechanism.—THE MOLE TRAP.—A Much-needed Contrivance.—Subterranean Mode of Setting.—Its Unfailing Success.—A FISH TRAP.—A Section of Stove Pipe used as a Trap.—Its Various Victims.—Adjustment of the Bait.—Curious Mode of Capture.
THE COMMON BOX TRAP.—Two Ways to Set It.—Animals It's Suitable For.—A Modification of the Trap.—ANOTHER BOX TRAP.—THE FIGURE FOUR TRAP.—Its Benefits.—THE DOUBLE ENDER.—A Popular Trap in New England.—Easy to Make.—The Rabbit's Love for Salt.—Using It as Bait.—THE SELF SETTING TRAP.—Animals It's Suitable For.—THE DEAD FALL.—Different Ways to Build It.—Animals It’s Typically Set For.—The Cleverness of Some Animals.—The Precautions It Requires.—Bait for the Muskrat.—Various Baits for the Mink.—Skunk Baits.—A Fox Caught by a Dead Fall.—Minor Changes in the Setup of Pieces.—Live Duck Used as Bait.—Another Setup for the Dead Fall.—Trap Triggered by the Animal's Foot.—THE FIGURE FOUR TRAP.—Used with the Dead Fall.—THE GAROTTE.—Its Unique Method of Capture.—Its Common Targets.—THE BOW TRAP.—An Unusual Type of Trap.—Its Unique Mechanism.—THE MOLE TRAP.—A Much-Needed Device.—Underground Way of Setting It.—Its Reliable Success.—A FISH TRAP.—A Section of Stove Pipe Used as a Trap.—Its Various Victims.—Bait Adjustment.—Interesting Method of Capture.
HOUSEHOLD TRAPS.
Home traps.
A Chapter Dedicated to Pestered Housekeepers.—The Domestic Cat as a Household Trap.—The Rat.—Its Proverbial Shrewdness and Cunning.—THE BARREL TRAP.—Its unlimited Capabilities of Capture—Other Advantages.—"Baiting" for Rats.—A Second Form of Barrel Trap.—Various other Devices adapted to the capture of the Rat.—The Steel Trap.—Hints on Setting.—Necessary Precautions.—THE BOX DEAD FALL.—THE BOARD FLAP.—THE BOX PIT FALL.—Animals for which it may be set.—Its Extensive Capabilities of Capture.—Its Self-Setting Qualities.—The principle Utilized for the Capture of the Muskrat.—THE CAGE TRAP.—THE JAR TRAP.—A Preserve Jar Converted into a Mouse Trap.—Its Complete Success.—BOWL TRAPS.—Two Methods.—FLY PAPER.—Recipe for Making.—FLY TRAP.
A Chapter Dedicated to Pestered Housekeepers.—The Domestic Cat as a Household Trap.—The Rat.—Its Known Cleverness and Deviousness.—THE BARREL TRAP.—Its unlimited Capture Potential —Other Benefits.—"Baiting" for Rats.—A Second Type of Barrel Trap.—Various other Devices designed to catch the Rat.—The Steel Trap.—Tips on Setting.—Necessary Precautions.—THE BOX DEAD FALL.—THE BOARD FLAP.—THE BOX PIT FALL.—Animals it can be set for.—Its Wide Capture Potential.—Its Self-Setting Features.—The principle Used for Catching the Muskrat.—THE CAGE TRAP.—THE JAR TRAP.—A Preserve Jar Turned into a Mouse Trap.—Its Total Success.—BOWL TRAPS.—Two Techniques.—FLY PAPER.—Recipe for Making.—FLY TRAP.
STEEL TRAPS AND THE ART OF TRAPPING.
STEEL TRAPS AND THE ART OF TRAPPING.
General Remarks.—Advantages of the Steel Trap.—Its extensive use in the business of Trapping.—Hints on the Selection of Traps.—REQUISITES OF A GOOD STEEL TRAP.—The Newhouse Trap.—Various sizes.—Rat Trap.—Muskrat Trap.—Mink Trap.—Fox Trap.—Otter Trap.—Beaver Trap.—"Great Bear Tamer."—Small Bear Trap.—HINTS ON BAITING THE STEEL TRAP.—The Staked Pen.—Old Method of Baiting.—Its Objections.—Advantages of the New Method.—THE SPRING POLE.—Its Service to the Trapper.—THE SLIDING POLE.—Advantages of its Use in the Capture of Aquatic Animals.—THE CLOG.—Objections against Securing the Steel Trap to a Stake.—Method of Attaching the Clog.—THE GRAPPLING IRON.—THE SEASON FOR TRAPPING.—Best condition for Furs.—THE ART OF TRAPPING.—Antiquity of the Sport.—Necessary Qualifications for Successful Trapping.—The Study of Natural History a source of pleasure and profit.—The Professional Trapper's most serious Page vi Obstacles.—Marvellous Cunning of many Animals.—Necessity of the Study of their Habits.—"Practical Natural History."—Trapping Without Bait.—Run-ways or By-paths.—How Utilized by the Trapper.—How Detected.—Favorable Localities for the Setting of the Steel Trap.—Natural Advantages.—Entrapping animals through their Sense of Smell.—Remarkable Power of Scent Baits.—Their great value in the Capture of the Beaver.—Caution in Handling the Steel Trap.—Effect of the Touch of the Hand.—Buckskin Gloves a Necessary Requisite.—MEDICINES, OR SCENT BAITS.—Their Great Importance in the Art of Trapping.—CASTOREUM OR BARKSTONE.—How Obtained.—Castoreum Composition.—Recipe for Making.—How Used.—MUSK—ASSAFŒTIDA.—OIL OF RHODIUM.—FISH OIL.—Its General Use in the Capture of Aquatic Animals.—Valuable Recipe for its Manufacture.—OIL OF SKUNK.—How Obtained.—How Eradicated from Hands or Clothing.—OIL OF AMBER.—OIL OF AMBERGRIS.—OIL OF ANISE.—Its General Use as a "Universal Medicine."—SWEET FENNEL.—CUMMIN—FENUGREEK— LAVENDER—COMPOUND MEDICINE—THE TRAIL—Its Object and Value.—Various Modes of Making.—HOW TO TRAP.—General Remarks.—THE FOX.—Its Scientific Classification.—The Various American Species.—The Red Fox.—The Cross Fox.—Why so Named.—The Black or Silver Fox.—The Great Value of its Fur.—The Prairie Fox.—The Kit or Swift Fox.—The Gray Fox.—Similarity in the General Characteristics of the Various Species.—Food of the Fox.—Its Home.—Its consummate Craft.—Instances of its Cunning.—Baffling the Hounds.—How to Trap the Fox.—Preparation of the Trap.—Adverse Effect of Human Scent.—Necessity of handling Trap with Gloves.—The "Bed."—"Baiting" the Bed Necessary.—Precautions in Setting the Trap.—The "Tricks of the Trapper" Illustrated.—How to Proceed in case of Non-Success.—The Scent-Baits Utilized.—Various Modes of Setting the Trap.—The Baits Commonly Used.—The Dead Fall as a Means of Capture.—Common Mode of Skinning the Fox.—Directions for Stretching Skin.—THE WOLF.—The Various Species.—Fierce Characteristics of the Wolf.—Its Terrible Inroads among Herds and Flocks.—The Gray Wolf.—The Coyote or Common Prairie Wolf.—The Texan Wolf.—Home of the Wolf.—Number of Young.—Cunning of the Wolf.—Caution Required in Trapping.—How to Trap the Wolf.—Preparation of Trap.—Various Ways of Setting the Trap.—Use of the Trail and Scent Baits.—"Playing Possum."—The Dead Fall and "Twitch-up" as Wolf Traps.—Directions for Skinning the Wolf and Stretching the Pelt.—THE PUMA.—Its Scientific Classification.—Its Life and Habits.—Its Wonderful Agility.—Its Skill as an Angler.—Its Stealth.—Various Traps Used in the Capture of the Puma.—The Gun Trap.—The Bow Trap.—The Dead Fall.—Trap for Taking the Animal Alive.—Log Coop Trap.—The Pit Fall.—Bait for the Puma.—The Steel Trap.—Common Mode of Setting.—Selection of Locality for Trapping.—How to Skin the Puma.—Directions for Stretching the Pelt.—THE CANADA LYNX.—Description of the Animal.—Its Life and Habits.—Its Food.—Its Peculiar Appearance when Running.—Easily Killed.—The Dead Fall as a Lynx Trap.—Peculiar Manner of Construction for the Purpose.—The Gun Trap.—The Bow Trap.—The Twitch-up.—Young of the Lynx.—Value of its Fur.—The Steel Trap.—Various Methods of Setting.—Directions for Skinning the Animal and Stretching the Pelt.—THE WILD CAT.—Its Resemblance to the Domestic Species.—Its Strange Appetite.—Its Home.—Number of Young.—Haunts of the Wild Cat.—Its Nocturnal Marauding expeditions.—Its Lack of Cunning.—How to Trap the Wild Cat.—An Entire Colony Captured.—Ferocity of the Wild Cat.—The Twitch-up.—Its Common Use in the Capture of the Wild Cat.—Other Successful Traps.—Various Baits for the Wild Cat.—Directions for Skinning the Animal, and Stretching the Pelt.—THE BEAR.—The Various American Species.—The Grizzly.—Its Enormous Size and Power.—Its Terrible Fury.—Description of the Animal.—Food of the Grizzly.—The Black Bear or Musquaw.—Its General Description.—Bear Hunting.—Danger of the Sport.—Food of the Bear.—Its Fondness for Pigs.—Honey Its Special Delight.—The Cubs.—The Flesh of the Bear as Food.—"Bears' Grease."—Hibernation of the Bear.—Traps for the Bear.—The Dead Page vii Fall.—Pit-fall.—Giant Coop.—Gun Trap.—The Steel Trap.—The Clog and Grappling-Iron.—Their Advantages.—How to Trap the Bear.—Various Methods of Adjusting Traps.—Natural Advantages.—Honey as Bait.—Other Baits.—Scent Baits.—Skinning the Bear.—Directions for Stretching the Pelt.—THE RACCOON.—Classification—Cunning and Stealth of the Animal.—Characteristic Features.—The "Coon Chase."—How the Raccoon is Hunted.—The "Tree'd Coon."—Varied Accomplishments of the Raccoon.—Its Home and Family.—The "Coon" as a Pet.—Its Cunning Ways.—Its Extensive Bill of Fare.—Life and Habits of the Raccoon.—Remarkable Imprint of its Paw.—Season for Trapping the Coon.—How to Trap the Coon.—Various Modes of Setting the Trap.—Use of the "medicines" or "Scent Baits."—Other Traps for the Animal.—Directions for Removing the Skin, and Stretching the Pelt.—THE BADGER.—Its Peculiar Markings.—Use of the Hair.—Nest of the Badger.—Number of Young.—Food of the Animal.—Its Remarkable Fondness for Honey.—Its Cunning.—Remarkable Instincts.—Its Shrewdness.—How to Trap the Badger.—Various Baits.—Use of "Medicine."—Capture of the Animal by Flooding its Burrow.—How to Skin the Badger.—Directions for Stretching the Pelt.—THE BEAVER.—Description of the Animal.—Its Nature and Habits.—The Beaver Village.—The "Lodges," or Beaver Houses.—Remarkable Construction of the Huts.—The Dam of the Beaver.—Wonderful Skill shown in its Construction.—Nocturnal Habits of the Beaver.—Remarkable Engineering Instincts of the Animal.—How the Beaver Cuts Timber.—How the Dam is Constructed.—The Formation of "Reefs."—The Tail of the Beaver as a Means of Transportation.—Subterranean Passage to the Huts.—How Beavers are Hunted.—Young of the Beaver.—How to Trap the Beaver.—The Necessary Precautions.—Castoreum or Bark Stone.—Its Great Value in the Capture of the Beaver.—Various Methods of Setting the Trap.—How to Apply the Castoreum.—Use of the Sliding Pole.—Food of the Beaver.—Directions for Skinning the Animal and Stretching the Pelt.—THE MUSK-RAT.—General Description of the Animal.—Its Beaver-like Huts.—Its Nocturnal Habits.—Its Food.—The Flesh of the Musk-rat as an Article of Diet.—Description of the Hut.—Extensive Family of the Musk-Rat.—Its Home.—How the Musk-Rat swims beneath Unbroken Ice.—How it is Killed by being Driven Away from its Breath.—Spearing the Musk-Rat.—Construction of the Spear.—How to Trap the Musk-Rat.—Use of the Sliding Pole.—Various Modes of Setting Trap.—The Spring Pole.—Scent Baits.—Various Devices for Capturing the Musk-Rat.—The Barrel-Trap.—Remarkable Success of the Trap.—The Trail.—Skinning the Musk-Rat.—How to Stretch the Pelt.—THE OTTER.—Description of the Animal.—Beauty of its Fur.—How the "Otter Fur" of Fashion is Prepared.—Food of the Otter.—Its Natural Endowments for Swimming.—Habitation of the Otter.—Its Nest and Young.—The Track or "Seal" of the animal.—How the Otter is Hunted.—Its Fierceness when Attacked.—The Otter as a Pet.—Fishing for its Master.—The Otter "Slide."—How Utilized by the Trapper.—Playfulness of the Otter.—How the Animal is Trapped.—Various Modes of Setting Trap.—The Sliding Pole.—The Spring Pole.—Scent Baits.—How Applied.—Necessary Precautions.—How to Skin the Otter.—Directions for Stretching the Pelt.—THE MINK.—Its Form and Color.—Value of the Fur.—Habits of the Animal.—Its Diet.—Its Perpetual Greed.—Ease with which it may be Trapped.—Habitation of the Mink.—Its Nest and Young.—How to Trap the Mink.—Various Methods of Setting the Trap.—Baits.—The Sliding Pole.—"Medicine."—The Runways of the Mink.—How Utilized in Trapping.—The Trail.—Various Traps Used in the Capture of the Mink.—How to Skin the Animal.—THE PINE MARTEN.—Description of the Animal.—Its Natural Characteristics.—Its Nocturnal Habits.—Its Wonderful Stealth and Activity.—Its "Bill of Fare."—Its Strange mode of Seizing Prey.—The Marten as a Pet.—Its Agreeable Odor.—Various Traps Used in the Capture of the Marten.—Baits for the Marten.—The Steel Trap.—Several Modes of Setting.—Directions for Skinning the Animal.—THE FISHER.—Its Form and Color.—Its Habitation and Young.—How the Animal is Trapped.—Various Methods.—The Spring Pole.—Baits for the Fisher.—Principal Devices Used in its Capture.—The Skin.—How Page viii Removed and Stretched.—THE SKUNK.—Its Fetid Stench.—Origin of the Odor.—Its Effect on Man and Beast.—"Premonitory Symptoms" of Attack.—Acrid Qualities of the Secretion.—Its Terrible Effect on the Eyes.—Interesting Adventure with a Skunk.—"Appearances are often Deceitful."—The Skunk as a Pet.—Color of the Animal.—Habits of the Animal.—Its Food.—Its Young.—"Alaska Sable."—How to Trap the Skunk.—Various Traps Used.—The Steel Trap.—Different Modes of Setting.—Baits.—The Dead Fall.—Modifications in its Construction.—The Twitch-up.—Its Peculiar Advantages for the Capture of the Skunk.—Chloride of Lime as Antidote.—Method of Eradicating the Odor from the Clothing.—Directions for Removing and Stretching the Skin.—THE WOLVERINE.—Its Desperate Fierceness and voracity.—Its General Characteristics.—Its Form and Color.—Food of the Wolverine.—Its Trap-Robbing Propensities.—How to Trap the Wolverine.—Baits.—Use of the "Medicine."—The Gun Trap and Dead Fall.—The Steel Trap.—Various Modes of Setting.—Home and Young of the Animal.—How the Skin should be Removed and Stretched.—THE OPOSSUM.—Description of the Animal.—Its Nature and Habits.—Its Home.—Remarkable Mode of Carrying its Young.—Nocturnal Habits of the Animal.—Its Food.—Its Especial Fondness for Persimmons.—Its Remarkable Tenacity as a Climber.—"Playing Possum."—How the Opossum is Hunted.—How Trapped.—Various Devices Used in its Capture.—Scent Baits.—How the Skin is Removed and Stretched.—THE RABBIT.—Wide-spread Distribution of the Various Species.—Their Remarkable Powers of Speed.—Nest of the Rabbit.—Its Prolific Offspring.—Food of the Rabbit.—Its Enemies.—Various Devices Used in Trapping the Animal.—Necessary Precautions in Skinning the Rabbit.—THE WOODCHUCK.—Description of the Animal.—Its Habits.—Its Burrows.—Its Food.—Toughness of the Skin.—Its Use.—Nest of the Animal.—The Woodchuck as Food.—How the Animal is Trapped.—The Steel Trap.—The Spring Pole.—The Twitch-up.—How the Woodchuck is "Drowned Out."—The Turtle as a Ferret.—Smoking the Burrows.—Directions for Skinning the Animal.—THE GOPHER.—Its Burrows.—Its Food.—Remarkable Cheek Pouches of the Animal.—Their Use.—How to Trap the Animal.—How the Skin is Removed.—THE MOLE.—Its Varied Accomplishments.—Its Remarkable Dwellings.—Complicated Structure of the Habitation.—The Fury and Voracity of the Mole.—Peculiarities of Its Fur.—A Waistcoat of Mole Skins.—Odor of the Mole.—Mole Traps.—Various Species of the Mole.—The Mole of the Cape of Good Hope.—Marvellous Beauty of Its Fur.—SQUIRRELS.—Their General Peculiarities of Form and Habit.—Their Food.—Their Provident Instincts.—"Nutting" in Midwinter.—The Nest of the Squirrel.—Burrowing Squirrels.—The Various American Species.—The Grey Squirrel.—The Chipmunk.—The Chickaree.—The Flying Squirrel, &c.—How Squirrels are Trapped.—Various Traps Used in their Capture.—Removal of Skin.—THE DEER.—Difficulty of Hunting the Animal in Dry Seasons.—Various American Species of the Deer.—How the Deer is Trapped.—Peculiar Construction of the Trap.—Scent Bait for the Deer.—Various Methods of Setting the Trap.—Violence of the Deer when Trapped.—The Clog.—Dead Falls.—Food of the Deer.—Deer "Yards."—Natural Enemies of the Deer.—How the Deer is Hunted.—"Still Hunting."—The Deer's Acute Sense of Smell.—How to Detect the Direction of the Wind.—Natural Habits of the Deer.—"Night Hunting."—Luminosity of the Eyes of the Deer at Night.—Hunting the deer with dogs.—"Deer Licks."—How Salt is used in Hunting the Deer.—Hunting from a Scaffolding.—Peculiar Sight of the Deer.—"Salt Licks" used in Night Hunting.—Head Lantern.—How made.—How used.—The fiery Eyes of the Deer.—"Fox Fire" or Phosphorescent wood.—How used by the Hunter.—Seasons for Deer Hunting.—How to skin the Deer.—THE MOOSE.—Description of the animal.—Immense size of its Horns.—Moose yards.—Hunted on Snow shoes.—The dangers of Moose Hunting.—Exquisite sense of Smell.—How the Moose is Trapped.—Directions for removing the Skin of the Animal.—ROCKY MOUNTAIN SHEEP.—Description of the Animal.—Its enormous Horns.—Habits of the creature.—Its flesh as Food.—How the Animal is Trapped.—THE BUFFALO.—Its Habits.—Its Food.—Buffalo-grass.—How the Animal is Hunted and Trapped.—Buffalo Page ix flesh as Food.—Buffalo skins.—THE PRONG HORN ANTELOPE.—Description of the Animal.—Peculiarity of Horn.—How the creature is Hunted and Destroyed by the Indians.—Remarkable sense of Smell of the Animal.—Its Beauty and grace.—Flesh of the Antelope a Food.—How the Animal is Trapped.—Various Traps used in their Capture.—The Dead-fall.—Pit-fall.—How to remove the Hide of the Animal.—SHOOTING AND POISONING.—"Shot furs."—"Poisoned furs."—"Trapped furs."—Their relative Value in the Fur Market.—Effect of grazing shot on fur.—Effect of Poison on Fur.—Remarks on the use of Poison.—Strychnine.—Poisoning Wolves.—Recipe for mixing the Poison.—Poisoning the Bear.—How the Dose is Prepared.
General Remarks.—Advantages of the Steel Trap.—Its extensive use in trapping business.—Tips on Choosing Traps.—REQUIREMENTS OF A GOOD STEEL TRAP.—The Newhouse Trap.—Different sizes.—Rat Trap.—Muskrat Trap.—Mink Trap.—Fox Trap.—Otter Trap.—Beaver Trap.—"Great Bear Tamer."—Small Bear Trap.—TIPS ON BAITING THE STEEL TRAP.—The Staked Pen.—Old Baiting Method.—Its Disadvantages.—Benefits of the New Method.—THE SPRING POLE.—Its Role for the Trapper.—THE SLIDING POLE.—Benefits in Capturing Aquatic Animals.—THE CLOG.—Concerns about Securing the Steel Trap to a Stake.—How to Attach the Clog.—THE GRAPPLING IRON.—TRAPPING SEASON.—Best conditions for Furs.—THE ART OF TRAPPING.—Ancient Roots of the Sport.—Essential Skills for Successful Trapping.—Studying Natural History for enjoyment and profit.—The Professional Trapper's most significant obstacles.—Incredible Cleverness of many Animals.—Importance of Studying Their Behaviors.—"Practical Natural History."—Trapping Without Bait.—Runways or By-paths.—How Trappers Use Them.—How to Spot Them.—Favorable Locations for Setting Steel Traps.—Natural Advantages.—Using Animals' Sense of Smell to Entice Them.—Power of Scent Baits.—Their value in Capturing Beaver.—Caution When Handling Steel Traps.—Impact of Human Touch.—Buckskin Gloves are Essential.—MEDICINES, OR SCENT BAITS.—Their Crucial Role in Trapping.—CASTOREUM OR BARKSTONE.—How to Obtain It.—Castoreum Composition.—Recipe for Making It.—How to Use It.—MUSK—ASSAFŒTIDA.—OIL OF RHODIUM.—FISH OIL.—Its General Use in Capturing Aquatic Animals.—Valuable Recipe for Making It.—OIL OF SKUNK.—How to Obtain It.—How to Remove It from Hands or Clothing.—OIL OF AMBER.—OIL OF AMBERGRIS.—OIL OF ANISE.—Its Common Use as a "Universal Medicine."—SWEET FENNEL.—CUMMIN—FENUGREEK—LAVENDER—COMPOUND MEDICINE—THE TRAIL—Its Purpose and Value.—Different Ways to Create It.—HOW TO TRAP.—General Remarks.—THE FOX.—Its Scientific Classification.—The Various American Species.—The Red Fox.—The Cross Fox.—Reason for Its Name.—The Black or Silver Fox.—Value of Its Fur.—The Prairie Fox.—The Kit or Swift Fox.—The Gray Fox.—Similarities in Characteristics of the Various Species.—Fox Diet.—Its Habitat.—Its Extreme Cunning.—Examples of Its Cleverness.—Outsmarting Hounds.—How to Trap the Fox.—Trap Preparation.—Negative Impact of Human Scent.—Importance of Handling Traps with Gloves.—The "Bed."—"Baiting" the Bed is Necessary.—Precautions When Setting the Trap.—Illustrating "The Trapper's Tricks."—What to Do If You Don’t Succeed.—The Scent-Baits Used.—Different Ways to Set the Trap.—Common Baits Used.—The Dead Fall as a Capture Method.—Normal Way to Skin the Fox.—Instructions for Stretching Skin.—THE WOLF.—The Various Species.—Fierce Nature of the Wolf.—Its Devastating Impact on Herds and Flocks.—The Gray Wolf.—The Coyote or Common Prairie Wolf.—The Texan Wolf.—Wolf Habitat.—Number of Young.—Wolf Cunning.—Caution Needed in Trapping.—How to Trap the Wolf.—Trap Preparation.—Various Trap Setting Methods.—Using Trails and Scent Baits.—"Playing Possum."—The Dead Fall and "Twitch-up" as Wolf Traps.—Instructions for Skinning the Wolf and Stretching the Pelt.—THE PUMA.—Its Scientific Classification.—Its Life and Habits.—Its Amazing Agility.—Its Fishing Skills.—Its Stealth.—Different Traps Used for Capturing the Puma.—The Gun Trap.—The Bow Trap.—The Dead Fall.—Trap for Capturing Alive.—Log Coop Trap.—The Pit Fall.—Bait for the Puma.—The Steel Trap.—Common Trap Setting Method.—Choosing Trap Locations.—How to Skin the Puma.—Instructions for Stretching the Pelt.—THE CANADA LYNX.—Description of the Animal.—Its Life and Habits.—Its Diet.—Its Unique Look When Running.—Easily Killed.—The Dead Fall as a Lynx Trap.—Special Construction for This Purpose.—The Gun Trap.—The Bow Trap.—The Twitch-up.—Lynx Young.—Value of Its Fur.—The Steel Trap.—Various Setting Methods.—Instructions for Skinning the Animal and Stretching the Pelt.—THE WILD CAT.—Its Similarity to Domestic Species.—Its Strange Appetite.—Its Home.—Number of Young.—Wild Cat Haunts.—Its Nighttime Raids.—Its Lack of Cunning.—How to Trap the Wild Cat.—An Entire Colony Captured.—Wild Cat Ferocity.—The Twitch-up.—Commonly Used for Capturing the Wild Cat.—Other Successful Traps.—Various Baits for the Wild Cat.—Instructions for Skinning the Animal and Stretching the Pelt.—THE BEAR.—The Various American Species.—The Grizzly.—Its Huge Size and Strength.—Its Terrifying Fury.—Description of the Animal.—Grizzly Diet.—The Black Bear or Musquaw.—Its General Description.—Bear Hunting.—The Risks of the Sport.—Bear Diet.—Its Love for Pigs.—Honey as Its Favorite.—The Cubs.—Bear Meat as Food.—"Bears' Grease."—Bear Hibernation.—Bear Traps.—The Dead Fall.—Pit-fall.—Giant Coop.—Gun Trap.—The Steel Trap.—The Clog and Grappling-Iron.—Their Benefits.—How to Trap a Bear.—Different Trap Adjustment Methods.—Natural Advantages.—Honey as Bait.—Other Baits.—Scent Baits.—Skinning the Bear.—Instructions for Stretching the Pelt.—THE RACCOON.—Classification—Cunning and Stealth of the Animal.—Distinct Features.—The "Coon Chase."—How Raccoons are Hunted.—The "Tree'd Coon."—Various Skills of the Raccoon.—Its Home and Family.—The "Coon" as a Pet.—Its Cunning Nature.—Its Diverse Diet.—Raccoon Life and Habits.—Remarkable Paw Imprint.—Season for Trapping Raccoons.—How to Trap a Raccoon.—Different Trap Setting Methods.—Use of "medicines" or "Scent Baits."—Other Traps for the Animal.—Instructions for Skinning and Stretching the Pelt.—THE BADGER.—Its Unique Markings.—Use of Its Fur.—Badger Nest.—Number of Young.—Its Diet.—Remarkable Love for Honey.—Its Cunning Nature.—Incredible Instincts.—Its Craftiness.—How to Trap the Badger.—Various Baits.—Use of "Medicine."—Capture by Flooding Its Den.—How to Skin the Badger.—Instructions for Stretching the Pelt.—THE BEAVER.—Description of the Animal.—Its Nature and Habits.—Beaver Village.—"Lodges," or Beaver Houses.—Incredible Construction of Huts.—The Beaver Dam.—Amazing Skill in Building It.—Beaver Nocturnal Habits.—Remarkable Engineering Instincts.—How Beavers Cut Wood.—How the Dam Is Built.—Formation of "Reefs."—The Beaver's Tail as a Transportation Tool.—Underground Passage to Huts.—How Beavers are Hunted.—Young Beavers.—How to Trap Beavers.—Necessary Precautions.—Castoreum or Bark Stone.—Its Value in Capturing Beavers.—Different Trap Setting Methods.—How to Apply Castoreum.—Using the Sliding Pole.—Beaver Diet.—Instructions for Skinning and Stretching the Pelt.—THE MUSK-RAT.—General Description of the Animal.—Its Beaver-like Huts.—Its Nocturnal Lifestyle.—Its Diet.—Musk-rat Meat as Food.—Description of Its Hut.—Large Musk-Rat Families.—Its Habitat.—How the Musk-Rat Swims Under Ice.—How to Kill Them by Driving Them from Their Breath.—Spearing Musk-Rats.—Building the Spear.—How to Trap the Musk-Rat.—Using the Sliding Pole.—Different Trap Setting Methods.—The Spring Pole.—Scent Baits.—Different Devices for Capturing Musk-Rats.—The Barrel-Trap.—Great Success of This Trap.—The Trail.—Skinning the Musk-Rat.—How to Stretch the Pelt.—THE OTTER.—Description of the Animal.—Beauty of Its Fur.—How "Otter Fur" of Fashion Is Prepared.—Otter Diet.—Its Natural Swimming Abilities.—Otter Habitats.—Its Nest and Young.—The Track or "Seal" of the Animal.—How Otters are Hunted.—Their Fierce Nature When Attacked.—Otters as Pets.—Fishing for Their Owners.—The Otter "Slide."—How Trappers Use It.—Playfulness of the Otter.—How the Animal Is Trapped.—Different Trap Setting Methods.—The Sliding Pole.—The Spring Pole.—Scent Baits.—How to Apply Them.—Necessary Precautions.—How to Skin the Otter.—Instructions for Stretching the Pelt.—THE MINK.—Its Shape and Color.—Value of Its Fur.—Animal Habits.—Its Diet.—Its Constant Greed.—How Easily It Can Be Trapped.—Mink Habitat.—Its Nest and Young.—How to Trap the Mink.—Different Trap Setting Methods.—Baits.—The Sliding Pole.—"Medicine."—Mink Runways.—How They're Used in Trapping.—The Trail.—Different Traps for Mink Capture.—How to Skin the Animal.—THE PINE MARTEN.—Description of the Animal.—Its Natural Traits.—Its Nocturnal Lifestyle.—Incredible Stealth and Activity.—Its "Bill of Fare."—Its Unique Prey-Catching Method.—The Marten as a Pet.—Its Pleasant Scent.—Different Traps Used for Capturing Martens.—Baits for Martens.—The Steel Trap.—Multiple Setting Methods.—Instructions for Skinning the Animal.—THE FISHER.—Its Shape and Color.—Its Habitat and Young.—How the Animal Is Trapped.—Different Methods.—The Spring Pole.—Baits for the Fisher.—Main Devices Used for Its Capture.—The Skin.—How to Remove and Stretch It.—THE SKUNK.—Its Pungent Stench.—How the Odor Originates.—Effects on Humans and Animals.—"Warning Signs" of Attack.—Acrid Qualities of the Secretion.—Its Terrible Impact on Eyes.—Interesting Encounter with a Skunk.—"Appearances Can Be Deceptive."—The Skunk as a Pet.—Color of the Animal.—Animal Habits.—Its Diet.—Its Young.—"Alaska Sable."—How to Trap the Skunk.—Different Traps Used.—The Steel Trap.—Different Setting Methods.—Baits.—The Dead Fall.—Adjustments in Its Design.—The Twitch-up.—Its Unique Benefits for Skunk Capture.—Chloride of Lime as an Antidote.—How to Eliminate the Odor from Clothing.—Instructions for Skinning and Stretching the Skin.—THE WOLVERINE.—Its Fierce Nature and Voracity.—General Traits.—Its Form and Color.—Wolverine Diet.—Its Trap-Robbing Behavior.—How to Trap the Wolverine.—Baits.—Using "Medicine."—The Gun Trap and Dead Fall.—The Steel Trap.—Various Setting Methods.—Its Home and Young.—How to Properly Remove and Stretch the Skin.—THE OPOSSUM.—Description of the Animal.—Its Nature and Habits.—Its Home.—Unique Method of Carrying Young.—Nocturnal Behavior.—Its Diet.—Particular Love for Persimmons.—Its Tenacity as a Climber.—"Playing Possum."—How to Hunt Opossums.—How to Trap Them.—Different Devices for Capture.—Scent Baits.—How to Remove and Stretch the Skin.—THE RABBIT.—Wide Distribution of Various Species.—Amazing Speed Abilities.—Rabbit Nest.—Its Prolific Offspring.—Rabbit Diet.—Its Enemies.—Different Devices Used for Trapping the Animal.—Necessary Precautions When Skinning the Rabbit.—THE WOODCHUCK.—Description of the Animal.—Its Habits.—Its Burrows.—Its Food.—Toughness of Its Skin.—Its Uses.—Animal Nest.—Woodchuck as Food.—How the Animal is Trapped.—The Steel Trap.—The Spring Pole.—The Twitch-up.—How the Woodchuck is "Drowned Out."—The Turtle as a Ferret.—Smoking the Burrows.—Instructions for Skinning the Animal.—THE GOPHER.—Its Burrows.—Its Food.—Remarkable Cheek Pouches of the Animal.—Their Purpose.—How to Trap It.—How to Remove the Skin.—THE MOLE.—Its Various Skills.—Remarkable Dwellings.—Complex Construction of Its Habitat.—Fury and Greed of the Mole.—Peculiarities of Its Fur.—A Waistcoat Made from Mole Skins.—Odor of the Mole.—Mole Traps.—Different Mole Species.—The Mole of the Cape of Good Hope.—Incredible Beauty of Its Fur.—SQUIRRELS.—Their General Traits.—Their Food.—Their Instincts of Preservation.—"Nut Gathering" in Winter.—Squirrel Nest.—Burrowing Squirrels.—Various American Species.—The Grey Squirrel.—The Chipmunk.—The Chickaree.—The Flying Squirrel, etc.—How Squirrels Are Trapped.—Different Traps Used for Their Capture.—Skin Removal.—THE DEER.—Challenges of Hunting in Dry Seasons.—Various American Deer Species.—How to Trap a Deer.—Unique Trap Construction.—Scent Bait for Deer.—Different Trap Setting Methods.—Deer Fury When Trapped.—The Clog.—Dead Falls.—Deer Diet.—Deer "Yards."—Natural Enemies of Deer.—How to Hunt Deer.—"Still Hunting."—Deer's Sharp Sense of Smell.—How to Determine Wind Direction.—Deer Natural Behaviors.—"Night Hunting."—Deer's Eye Luminescence at Night.—Hunting Deer with Dogs.—"Deer Licks."—Salt Usage in Deer Hunting.—Hunting from Elevated Platforms.—Deer Sight.—"Salt Licks" in Night Hunting.—Head Lantern.—How It’s Made.—How It's Used.—Deer's Glowing Eyes.—"Fox Fire" or Phosphorescent Wood.—How That’s Used by Hunters.—Deer Hunting Seasons.—How to Skin a Deer.—THE MOOSE.—Description of the Animal.—Immense Size of Its Antlers.—Moose Yards.—Hunted on Snowshoes.—Dangers of Moose Hunting.—Exquisite Sense of Smell.—How to Trap a Moose.—Instructions for Skinning the Animal.—ROCKY MOUNTAIN SHEEP.—Description of the Animal.—Its Huge Antlers.—Animal Habits.—Its Meat as Food.—How the Animal Is Trapped.—THE BUFFALO.—Its Habits.—Its Diet.—Buffalo Grass.—How the Animal is Hunted and Trapped.—Buffalo Meat as Food.—Buffalo Hides.—THE PRONGHORN ANTELOPE.—Description of the Animal.—Distinctive Horns.—How the Animal is Hunted and Killed by Indians.—Remarkable Sense of Smell of the Animal.—Its Beauty and Grace.—Antelope Meat as Food.—How the Animal is Trapped.—Different Traps Used for Capture.—The Dead-fall.—Pit-fall.—How to Remove the Hide from the Animal.—SHOOTING AND POISONING.—"Shot furs."—"Poisoned furs."—"Trapped furs."—Their Relative Value in the Fur Market.—Impact of Shot on Fur.—Impact of Poison on Fur.—Remarks on Poison Use.—Strychnine.—Poisoning Wolves.—Recipe for Mixing Poison.—Poisoning Bears.—How to Prepare the Dose.
CAMPAIGN LIFE IN THE WILDERNESS.
Wilderness Campaign Life.
Introductory Remarks.—"Amateur Trapping."—PLAN OF CAMPAIGN.—Selection of Trapping-ground.—Advantages of a Watered District.—Labor of transportation lightened by Boating.—Lakes, Ponds and Streams.—The Adirondacks and Alleghanies.—Remarks on the "Home Shanty."—Selection of Site for building.—Value of a good Axe.—Remarks on the Bark Shanty.—Its value in case of Storms.—Wise fore-sight.—Remarks on the Indian Birch-bark Canoe.—Dug-out and Bateau.—Commencement of Trapping Season.—Advantages of preliminary preparation.—Extensive route of the Professional Trapper.—Sixty pounds of Personal Luggage.—How the traps and provisions are distributed among the Trapping lines.—Use of the "Home Shanty."—"Keeping Shanty."—Necessity of its being Guarded.—Wolves and Bears as thieves.—Steel Traps considered.—Number used in a Professional Campaign.—Number for an Amateur Campaign.—Their Probable Cost.—The average size of Trap.—Dead-falls, Twitchups, &c., considered.—Requisite Tools for a Campaign.—A "House-wife" a valuable necessity.—"Cleanliness next to Godliness."—The Trappers' Light.—Comparative value of Lanterns and Candles.—The Trappers' Personal outfit.—The jack-knife.—The Pocket-Compass.—Necessity of preparing for Emergencies.—Shot guns and Rifles.—Both combined in the same weapon.—Oil for Fire Arms.—Fat of the Grouse Used on Fire Arms.—Fishing tackle.—The Trappers' portable stove.—The Stove versus The Open Fire.—The Trapper's Clothing.—The Material and Color.—Boots.—High-topped Boots.—Short Boots.—Their Relative Qualities.—Waterproof Boot Dressing.—Recipe.—The Trapping Season.—Hints on Trapping-lines.—The "Wheel" plan.—Mode of following the lines.—"Trap Robbers" or "Poachers."—How to guard against them.—Hiding furs.—How to store Traps from Season to Season.—Gnats and Mosquitoes.—The "Smudge."—How made.—FOOD AND COOKING UTENSILS.—"Roughing it."—"A chance Chip for a Frying Pan."—A "happy medium" between two extremes.—Cosy and Comfortable living on a Campaign.—Portable Food.—Combined Nutriment and lightness in weight to be desired.—The Trappers' Culinary Outfit.—Indian meal as Food.—The Trappers' "Staff of Life."—Wheat flour.—Salt Pork.—Seasoning.—Pork Fritters a luxury.—Cooking Utensils.—The "Telescope" drinking cup.—Recipe for making Pork Fritters.—"Chop Sticks" à la "Chinee."—A Flat Chip as a Plate.—Boiled Mush.—Old "Stand by."—Recipe.—Fried Mush.—Indian meal Cakes.—Recipe.—Johnny Cake.—Recipe.—Hoe Cakes.—Recipe.—Fresh fish.—How to Cook fish in a most Delicious manner.—Prof. Blot, and Delmonico, out-done.—The "NE PLUS ULTRA" of delicacies.—All the sweet Juices of the Fish preserved.—Disadvantages of the ordinary method of cooking.—Partridge, Duck, Quail, Cooked deliciously.—Roasting unrivalled!—Hints on Broiling.—An extemporized Spider or Toaster.—Roasting on a spit.—Venison, Bear, and Moose Meat broiled in the best style.—Venison cutlets.—The Camp fire.—Usual mode Page x of building Fire.—How the Kettle is suspended.—"Luxuries" considered.—The Knapsack a desirable Acquisition.—Matches.—The Bottle Match-safe.—Waterproof Matches.—How made.—Lucifer Matches.—Recipe for Waterproof preparation.—The Pocket Sun Glass.—A necessary adjunct to a Trapper's Outfit.—Its Advantages in case of Emergency.—"Touch wood" or "Punk Tinder," valuable in lighting fires.—How to light Fires without matches or Sun glass.—How to light a fire without Matches, Sun Glass, Powder, or Percussion Caps.—A last Resort.—Matches best in the long run.—The Portable Camp Stove described.—Its accompanying Furniture.—The Combination Camp-knife.—Hint on Provisions.—Potatoes as food.—Beans.—"Self raising" Wheat flour.—Light Bread, Biscuit and Pancakes in Camp.—Various accessories.—Olive Oil for purpose of Frying.—Pork.—Indian meal.—Crackers.—Wheaten Grits.—Rice and Oatmeal.—Tea and Coffee.—Soups.—Liebig's Extract of Beef.—Canned Vegetables.—Lemonade.—Waterproof bags for provisions.—Painted bags.—Caution!—Waterproof preparation.—Air-tight jars for Butter.—Knapsack or Shoulder Basket.—Venison as food.—To preserve the overplus of meat.—"Jerked Venison" Recipe and Process.—Moose and Bear meat and Fish, similarly prepared.—How to protect provisions from Wolves.—The Moufflon and Prong-horn as food.—"Small game," Squirrels, Rabbits, and Woodchucks.—"Skunk Meat" as a delicacy.—The Buffalo as food.—Grouse, the universal Food of Trappers and Hunters.—Various species of Grouse.—The Sage Cock.—The Ptarmigan.—How they are trapped by the Indians in the Hudson's Bay Country.—Waterfowl.—Sea and Inland Ducks.—Various species of Duck.—Mallard. —Muscovy.—Wigeon.—Merganser.—Canvass Back.—Teal, &c.—Wild Geese.—Fish as food.—Angling and Spearing.—Salmon Spearing in the North.—Description of the Salmon Spear used by the Indians.—Salmon Spearing at night.—Requisites of a good Spearsman.—Fishing through the Ice.—Cow's udder and Hogs liver as Bait.—Other Baits.—Assafœtida and Sweet Cicely as fish Baits.—Trout fishing with Tip-up's.—Pickerel fishing in Winter.—Pickerel Spearing through the Ice.—The Box Hut.—The "Fish Lantern" or Fish Trap.—Fish Attracted by light.—Light as Bait.—How the Fish Lantern is made and used.—THE TRAPPER'S SHELTER.—Introductory remarks.—The Perils of a Life in the Wilderness.—A Shelter of some form a Necessity.—The Log Shanty.—Full directions for building.—Ingenious manner of constructing roof.—How the Chimney is built.—Spacious interior of the Shanty.—THE BARK SHANTY.—A Temporary structure.—Full directions for its construction.—Selection of building site.—TENTS.—Advantages of their use.—Various kinds of Tents.—The House Tent.—The Fly Tent.—The Shelter Tent.—Directions for making the Tent.—Tent Cloth.—How to render tents Water and Fire-resistant.—Valuable recipe.—BEDS AND BEDDING.—Perfect rest and comfort to the tired Trapper.—A portable Spring bed for the woods.—A Hammock bed.—Bed Clothes.—The Canton Flannel Bag.—Hammocks.—TENT CARPETING.—Spruce and Hemlock boughs as bedding.—How to cover the ground evenly.—The Rubber Blanket.
Introductory Remarks.—"Amateur Trapping."—PLAN OF CAMPAIGN.—Choosing Trapping Ground.—Benefits of a Watered Area.—Easier transportation with Boating.—Lakes, Ponds, and Streams.—The Adirondacks and Alleghenies.—Notes on the "Home Shanty."—Choosing a Site for Building.—Importance of a Good Axe.—Notes on the Bark Shanty.—Its use during Storms.—Smart Planning.—Notes on the Indian Birch-bark Canoe.—Dug-out and Bateau.—Start of Trapping Season.—Benefits of Being Prepared.—Long Routes for Professional Trappers.—Sixty Pounds of Personal Gear.—How Traps and Supplies are Split Along the Trapping Lines.—Use of the "Home Shanty."—"Keeping Shanty."—It Needs Protection.—Wolves and Bears as Thieves.—Considering Steel Traps.—Number Used in a Professional Campaign.—Number for an Amateur Campaign.—Estimated Cost.—Average Size of Trap.—Dead-falls, Twitch-ups, etc., discussed.—Necessary Tools for a Campaign.—A "House-wife" is an Important Tool.—"Cleanliness next to Godliness."—Trappers' Light.—Comparing Lanterns and Candles.—Trappers' Personal Gear.—The Jack-Knife.—The Pocket Compass.—Importance of Preparing for Emergency Situations.—Shotguns and Rifles.—Both in One Weapon.—Oil for Firearms.—Grouse Fat Used for Firearms.—Fishing Gear.—Portable Stove for Trappers.—Stove vs. Open Fire.—Trappers' Clothing.—Material and Color Choices.—Boots.—High-top Boots.—Short Boots.—Their Relative Qualities.—Waterproof Boot Treatment.—Recipe.—The Trapping Season.—Tips on Trapping Lines.—The "Wheel" Approach.—Following the Lines.—"Trap Robbers" or "Poachers."—How to Protect Against Them.—Hiding Furs.—Storing Traps From Season to Season.—Gnats and Mosquitoes.—The "Smudge."—How to Make It.—FOOD AND COOKING UTENSILS.—"Roughing It."—"A Chance Chip for a Frying Pan."—Finding a "Happy Medium" Between Two Extremes.—Cozy and Comfortable Living While Campaigning.—Portable Food.—Need for Lightweight and Nutritious Options.—Trappers' Cooking Gear.—Indian Meal as Food.—Trappers' "Staff of Life."—Wheat Flour.—Salt Pork.—Seasonings.—Pork Fritters as a Treat.—Cooking Utensils.—The "Telescope" Drinking Cup.—Recipe for Making Pork Fritters.—"Chop Sticks" à la "Chinee."—A Flat Chip for a Plate.—Boiled Mush.—Old "Stand By."—Recipe.—Fried Mush.—Indian Meal Cakes.—Recipe.—Johnny Cake.—Recipe.—Hoe Cakes.—Recipe.—Fresh Fish.—How to Cook Fish in a Delicious Way.—Prof. Blot and Delmonico, Outdone.—The "NE PLUS ULTRA" of Delicacies.—Preserving All the Sweet Juices of the Fish.—Disadvantages of the Common Cooking Methods.—Partridge, Duck, Quail, Cooked to Perfection.—Roasting Unmatched!—Tips on Broiling.—An Improvised Spider or Toaster.—Roasting on a Spit.—Venison, Bear, and Moose Meat Broiled Perfectly.—Venison Cutlets.—The Campfire.—Common Way to Build a Fire.—How to Suspend the Kettle.—"Luxuries" Considered.—A Knapsack is a Great Asset.—Matches.—The Bottle Match-safe.—Waterproof Matches.—How They’re Made.—Lucifer Matches.—Recipe for Waterproofing Preparation.—The Pocket Sun Glass.—A Must-Have for a Trapper's Gear.—Its Benefits in Case of Emergency.—"Touch Wood" or "Punk Tinder," Useful for Starting Fires.—How to Light Fires Without Matches or a Sun Glass.—How to Ignite a Fire Without Matches, a Sun Glass, Powder, or Percussion Caps.—A Last Resort.—Matches Are Best in the Long Run.—Description of the Portable Camp Stove.—Its Additional Equipment.—The Combination Camp Knife.—Tips on Supplies.—Potatoes as Food.—Beans.—"Self-Raising" Wheat Flour.—Light Bread, Biscuits, and Pancakes in Camp.—Various Accessories.—Olive Oil for Frying.—Pork.—Indian Meal.—Crackers.—Wheaten Grits.—Rice and Oatmeal.—Tea and Coffee.—Soups.—Liebig's Extract of Beef.—Canned Veggies.—Lemonade.—Waterproof Bags for Supplies.—Painted Bags.—Caution!—Waterproof Treatment.—Air-tight Jars for Butter.—Knapsack or Shoulder Basket.—Venison as Food.—How to Preserve Extra Meat.—"Jerked Venison" Recipe and Process.—Moose, Bear Meat, and Fish Prepared Similarly.—How to Protect Supplies from Wolves.—Moufflon and Pronghorn as Food.—"Small Game," Squirrels, Rabbits, and Woodchucks.—"Skunk Meat" as a Delicacy.—Buffalo as Food.—Grouse, the Universal Food for Trappers and Hunters.—Different Species of Grouse.—Sage Cock.—Ptarmigan.—How Indians Trap Them in the Hudson's Bay Area.—Waterfowl.—Sea and Inland Ducks.—Various Duck Species.—Mallard.—Muscovy.—Wigeon.—Merganser.—Canvasback.—Teal, etc.—Wild Geese.—Fish as Food.—Angling and Spearing.—Salmon Spearing Up North.—Description of the Salmon Spear Used by the Indians.—Salmon Spearing at Night.—Traits of a Good Spear Fisher.—Ice Fishing.—Cow's Udder and Hog's Liver as Bait.—Other Baits.—Assafœtida and Sweet Cicely as Fish Baits.—Trout Fishing with Tip-ups.—Pickerel Fishing in Winter.—Pickerel Spearing Through the Ice.—The Box Hut.—The "Fish Lantern" or Fish Trap.—Fish Attracted by Light.—Light as Bait.—How the Fish Lantern is Made and Used.—THE TRAPPER'S SHELTER.—Introductory Remarks.—The Dangers of Living in the Wilderness.—Some Form of Shelter is Necessary.—The Log Shanty.—Complete Instructions for Building.—Clever Method for Constructing the Roof.—How to Build the Chimney.—Spacious Interior of the Shanty.—THE BARK SHANTY.—A Temporary Structure.—Complete Directions for Its Construction.—Choosing a Building Site.—TENTS.—Advantages of Using Them.—Different Kinds of Tents.—The House Tent.—The Fly Tent.—The Shelter Tent.—Instructions for Making the Tent.—Tent Fabric.—How to Make Tents Water and Fire Resistant.—Valuable Recipe.—BEDS AND BEDDING.—Perfect Rest and Comfort for the Tired Trapper.—A Portable Spring Bed for the Woods.—A Hammock Bed.—Bedding.—The Canton Flannel Bag.—Hammocks.—TENT CARPETING.—Spruce and Hemlock Boughs as Bedding.—How to Evenly Cover the Ground.—The Rubber Blanket.
THE TRAPPER'S MISCELLANY.
The Trapper's Collection.
Warning to the Novice.—Winged Cannibals of the Woods.—INSECT OINTMENTS.—Mosquitoes and Gnats.—Their aversion to the scent of Pennyroyal.—Pennyroyal Ointment.—Recipe.—Mutton tallow Ointment.—Tar and Sweet Oil Liniment.—Recipe.—Its effect on the Complexion.—Invasions of Insects by night.—Their pertinacity and severity.—The experience of our Adirondack guide.—The bloodthirsty propensities of the Mosquito admirably depicted.—The "Smudge" Smoke versus Insect Bites.—"Punkeys" and "Midgets."—Their terrible voracity.—Painful effects of their Bites.—Pennyroyal an effective Antidote.—Depraved Page xi appetite of the mosquito.—A Warning to the Intemperate.—Use and abuse of Alcohol.—A Popular error corrected.—A substitute for Whiskey and Brandy.—Red Pepper Tea.—Its great value as a remedy in Illness.—The Mosquitoes' favorite Victim.—Result of the bite of the insect.—The Mosquito Head-Net.—Directions for making the Net.—Netting attachment for the Hat.—Portable Sun Shade or Hat brim.—Netting attachment for the Hat brim.—BOAT BUILDING.—A Boat of some kind a necessity to the Trapper.—The "Dug-Out" or Log-Canoe.—Requisite Tools for its Manufacture.—Selection of the Log.—Directions for making the boat.—Remarkable thinness to which they may be reduced.—Lightness of the boat.—How to gauge the thickness.—How to stop leaks.—THE INDIAN OR BIRCH BARK CANOE.—The Indian as a Canoe-maker.—His remarkable skill.—Perfection of the Indian made Canoe.—Description of the Canoe.—Capacity of the various sizes.—How to construct a Bark Canoe.—Selection of Bark.—How to prevent Leaks.—Material used by the Indians in sewing the Bark.—Advantages of the Birch Bark Canoe.—Basswood, Hemlock, and Spruce Bark Canoes.—A LIGHT HOME-MADE BOAT.—Selection of Boards.—Directions for making the Boat.—Caulking the seams.—Value of Pitch for waterproofing purposes.—How it should be applied.—THE SCOW.—How to construct the ordinary Flat-bottomed Boat.—The Mud-stick.—SNOW SHOES.—A necessity for winter travel.—The "Snow Shoe Race."—The mysteries of a Snow Shoe.—"Taming the Snow Shoe."—How to make the Snow Shoe.—Complicated Net-work.—Two methods of attaching the Net-work.—How the Snow Shoe is worn.—THE TOBOGGAN OR INDIAN SLEDGE.—Its value to the Trapper.—Winter Coasting.—Great sport with the Toboggan.—How to make a Toboggan.—Selection of Boards.—How the Sledge is used.—CURING SKINS.—Importance of Curing Skins properly.—Valuable hints on Skinning Animals.—How to dry Skins.—How to dress Skins for Market.—Astringent preparations.—Recipe.—STRETCHERS.—How skins are stretched.—The Board Stretcher.—How it is made and used.—The Wedge Stretcher.—How made and used.—The Bow Stretcher.—The Hoop Stretcher.—TANNING SKINS.—To Tan with the hair on.—Preparation of Skin for Tanning.—Tanning Mixture.—Recipe.—Second Mixture.—Recipe.—Third Mixture and Recipe.—How the Skin is softened and finished.—HOW TO TAN MINK AND MUSKRAT SKINS.—Preparation of Skin.—Tanning Mixtures.—Various Recipes.—"Fleshing."—The Fleshing-knife.—Substitute for the Fleshing-knife.—HOW TO TAN THE SKINS OF THE BEAVER, OTTER, RACCOON, AND MARTEN.—Tanning Mixtures.—How to soften the Skin.—Simple Tanned Skin.—Recipe for removing the fur.—How to finish the Skin.—OBSERVATIONS ON THE HISTORY OF FURS AND THE FUR TRADE.—Some bits of History in connection with Furs.—Ancient use of Furs.—Furs a medium of Exchange.—Furs and Fashion.—Extravagance in Fur Costume.—Choice Furs as Badges of Rank.—Their use restricted to Royal Families.—The Early Fur Trade of Europe.—A Tribute paid in Furs.—Early History of the Fur Trade in America.—Origin of the Hudson's Bay Company.—Hostility of the French Canadian Traders.—Establishment of the North West Company.—Competition and War.—Consolidation of the two Companies.—Great sales of the Hudson's Bay Company.—Importance of the Fur Trade.—Cities founded by the enterprise of the Trapper.—St. Paul.—Montreal and Mackinaw.—Fortunes built up on Fur Traffic.—John Jacob Astor.—Mink and Muskrat Skins.—Their extensive use in America.—Estimated value of the annual yield of Raw Furs throughout the World.—Classification of Furs by American Dealers.—"Home" Furs.—"Shipping" Furs.—Table of Sales of Hudson's Bay Company, in 1873.—March Sale.—September Sale.—Price according to Quality.—Estimated average per Skin.—List of American "Shipping" Furs.—List of American "Home" Furs.—MARKET VALUE OF FUR SKINS.—Eccentricities of the Fur Market.—Demand governed by Fashion.—How Fashion runs the Fur Trade.—The Amateur Trapper and the Fur Trade.—Difficulty of a profitable disposal of Furs.—Advice to the Novice.—How to realize on the sale of Furs.—TABLE OF VALUES OF AMERICAN FUR SKINS.—A complete list of American Fur bearing Animals.—Various prices of Skins according to Quality.—USES OF AMERICAN FURS AT HOME AND ABROAD.—The Silver Fox.—Fifty Guineas for a Fur Skin.—Red Fox Fur.—Its Page xii use in Oriental Countries.—Beaver Fur.—Its various uses.—Raccoon Skins, a great Staple for Russia and Germany.—Bear Skins and their various uses.—Lynx, Fisher, and Marten Skins.—The Mink.—Use of its hair for Artists pencils.—Muskrat Skins.—Three millions annually exported to Germany alone.—Their extensive use among the American poorer classes.—Otter Fur.—Sleigh Robes from Wolf Skins.—Rabbit Fur.—Its use in the Manufacture of Hats.—Breeding Rabbits for their Fur.—The Wolverine.—Skunk Fur, dignified by the name of Alaska Sable.—Large shipments to Foreign Countries.—How the Fur of the Badger is used.—Opossum, Puma, and Wild Cat Fur.—Robes for the Fashionable.—Squirrel and Mole skins.
Warning to the Beginner.—Winged Cannibals of the Forest.—INSECT OINTMENTS.—Mosquitoes and Gnats.—They dislike the scent of Pennyroyal.—Pennyroyal Ointment.—Recipe.—Mutton Tallow Ointment.—Tar and Sweet Oil Liniment.—Recipe.—Its effect on the Complexion.—Nighttime insect invasions.—Their persistence and severity.—Insights from our Adirondack guide.—The mosquito's bloodthirsty nature described brilliantly.—"Smudge" smoke versus insect bites.—"Punkeys" and "Midgets."—Their insatiable hunger.—Painful effects of their bites.—Pennyroyal as an effective antidote.—The mosquito’s warped appetite.—A Caution for the Excessive Drinkers.—Use and misuse of Alcohol.—A common misconception addressed.—An alternative for Whiskey and Brandy.—Red Pepper Tea.—Its significant value as a remedy during Illness.—The mosquitoes’ preferred Victim.—Consequences of an insect bite.—The Mosquito Head-Net.—Instructions for making the Net.—Netting attachment for the Hat.—Portable Sun Shade or Hat brim.—Netting attachment for the Hat brim.—BOAT BUILDING.—Some sort of boat is essential for the Trapper.—The "Dug-Out" or Log Canoe.—Necessary Tools for its Construction.—Choosing the Log.—Instructions for making the boat.—Remarkable thinness they can achieve.—Lightness of the boat.—How to measure the thickness.—How to repair leaks.—THE INDIAN OR BIRCH BARK CANOE.—The Indian as a Canoe-maker.—His incredible craftsmanship.—Perfection of the Indian-made Canoe.—Description of the Canoe.—Capacity of different sizes.—How to build a Bark Canoe.—Selecting Bark.—How to prevent Leaks.—Materials used by the Indians for sewing Bark.—Benefits of the Birch Bark Canoe.—Basswood, Hemlock, and Spruce Bark Canoes.—A LIGHT HOMEMADE BOAT.—Choosing Boards.—Instructions for building the Boat.—Caulking the seams.—Importance of Pitch for waterproofing.—How it should be applied.—THE SCOW.—How to build a typical Flat-bottomed Boat.—The Mud-stick.—SNOW SHOES.—Essential for winter travel.—The "Snow Shoe Race."—Understanding the Snow Shoe.—"Mastering the Snow Shoe."—How to make the Snow Shoe.—Intricate Net-work.—Two ways to attach the Net-work.—How the Snow Shoe is worn.—THE TOBOGGAN OR INDIAN SLEDGE.—Its usefulness to the Trapper.—Winter Coasting.—Great fun with the Toboggan.—How to make a Toboggan.—Choosing Boards.—How the Sledge is used.—CURING SKINS.—Significance of properly curing Skins.—Helpful tips on Skinning Animals.—How to dry Skins.—How to prepare Skins for Market.—Astringent preparations.—Recipe.—STRETCHERS.—How skins are stretched.—The Board Stretcher.—How it is made and utilized.—The Wedge Stretcher.—How it's made and used.—The Bow Stretcher.—The Hoop Stretcher.—TANNING SKINS.—To Tan with the hair intact.—Preparing Skin for Tanning.—Tanning Mixture.—Recipe.—Second Mixture.—Recipe.—Third Mixture and Recipe.—How the Skin is softened and finished.—HOW TO TAN MINK AND MUSKRAT SKINS.—Preparing the Skin.—Tanning Mixtures.—Various Recipes.—"Fleshing."—The Fleshing-knife.—Substitute for the Fleshing-knife.—HOW TO TAN THE SKINS OF THE BEAVER, OTTER, RACCOON, AND MARTEN.—Tanning Mixtures.—How to soften the Skin.—Simple Tanned Skin.—Recipe for removing the fur.—How to finish the Skin.—OBSERVATIONS ON THE HISTORY OF FURS AND THE FUR TRADE.—Some historical tidbits about Furs.—Ancient use of Furs.—Furs as a medium of Exchange.—Furs and Fashion.—Extravagance in Fur Attire.—Choosing Furs as Badges of Rank.—Their use limited to Royal Families.—The Early Fur Trade in Europe.—A Tribute paid in Furs.—The Early History of the Fur Trade in America.—Origin of the Hudson's Bay Company.—Conflict with the French Canadian Traders.—Formation of the North West Company.—Competition and Conflict.—Merger of the two Companies.—Significant sales by the Hudson's Bay Company.—Importance of the Fur Trade.—Cities established due to Trapping ventures.—St. Paul.—Montreal and Mackinaw.—Wealth amassed through Fur Trading.—John Jacob Astor.—Mink and Muskrat Skins.—Their widespread use in America.—Estimated value of the annual yield of Raw Furs worldwide.—Classification of Furs by American Dealers.—"Home" Furs.—"Shipping" Furs.—Sales data from the Hudson's Bay Company in 1873.—March Sale.—September Sale.—Prices based on Quality.—Estimated average per Skin.—List of American "Shipping" Furs.—List of American "Home" Furs.—MARKET VALUE OF FUR SKINS.—Quirks of the Fur Market.—Demand influenced by Fashion.—How Fashion shapes the Fur Trade.—The Amateur Trapper and the Fur Market.—Challenges in profitably selling Furs.—Advice for Beginners.—How to profit from selling Furs.—TABLE OF VALUES OF AMERICAN FUR SKINS.—A comprehensive list of American Fur-bearing Animals.—Various prices for Skins based on Quality.—USES OF AMERICAN FURS AT HOME AND ABROAD.—The Silver Fox.—Fifty Guineas for a Fur Skin.—Red Fox Fur.—Its use in Eastern Countries.—Beaver Fur.—Its various applications.—Raccoon Skins, a key item for Russia and Germany.—Bear Skins and their various uses.—Lynx, Fisher, and Marten Skins.—The Mink.—Use of its fur for Artists’ pencils.—Muskrat Skins.—Three million exported annually to Germany alone.—Their extensive use among lower-income Americans.—Otter Fur.—Sleigh Robes made from Wolf Skins.—Rabbit Fur.—Its role in Hat Manufacturing.—Breeding Rabbits for their Fur.—The Wolverine.—Skunk Fur, elevated by the title of Alaska Sable.—Large exports to Foreign Countries.—How Badger Fur is utilized.—Opossum, Puma, and Wildcat Fur.—Robes for the Fashionable.—Squirrel and Mole skins.

FULL PAGES.
FULL PAGES.
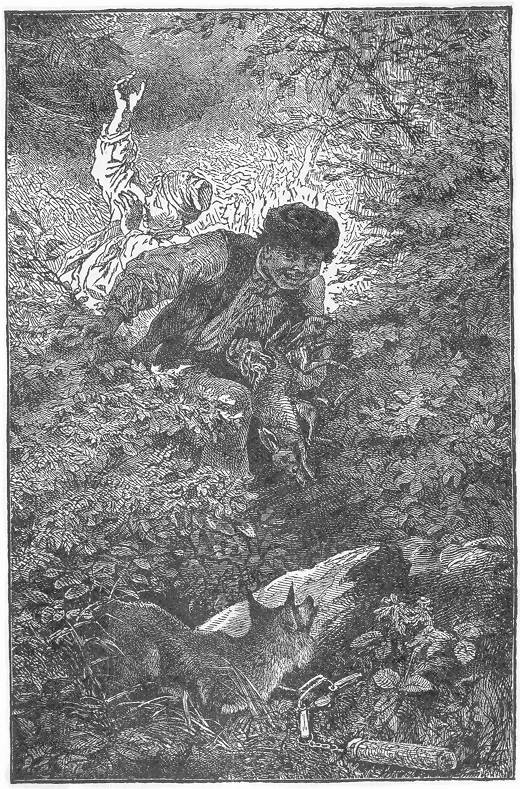
| 1. | Caught at last. |
| 2. | Traps for Large Game. |
| 3. | Snares or Noose Traps. |
| 4. | Traps for Feathered Game. |
| 5. | Miscellaneous Traps. |
| 6. | Household Traps. |
| 7. | Steel Traps, and the art of Trapping. |
| 8. | Almost Persuaded.—to face. |
| 9. | The Campaign. |
| 10. | Trapper's Miscellany. |
Page xiv ILLUSTRATIONS IN THE TEXT.
ILLUSTRATIONS IN THE TEXT.
| 11. | "Preface". |
| 12. | Initial to Preface. |
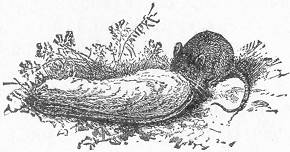
| 13. | End piece to Preface. |
| 14. | "Contents". |
| 15. | "Illustrations". |
| 16. | Initial to Book I. |
| 17. | Dead fall for large Animals. |
| 18. | Explanatory drawing of pieces. |
| 19. | The Gun Trap. |
| 20. | The Bow Trap. |
| 21. | " " " arrangement of parts. |
| 22. | " " " Section. |
| 23. | Foot String Bow Trap. |
| 24. | The Down fall. |
| 25. | The Bear Trap. |
| 26. | End piece to Book I. |
| 27. | Initial to Book II. |
| 28. | Quail Nooses. |
| 29. | Hedge Nooses. |
| 30. | The Triangle Snare. |
| 31. | The Twitch-up. |
| 32. | Method of Setting. |
| 33. | " " " No. 2. |
| 34. | " " " No. 3. |
| 35. | " " " No. 4. |
| 36. | " " " No. 5. |
| 37. | The Poacher's Snare. |
| 38. | The Portable Snare. |
| 39. | The "Simplest" Snare. |
| 40. | Modification No. 2. |
| 41. | " " 3. |
| 42. | The Quail Snare. |
| 43. | The Box Snare. |
| 44. | The Double Box Snare. |
| 45. | The Old fashioned Springle. |
| 46. | The Improved Springle. |
| 47. | The Figure Four Ground Snare. |
| 48. | The Platform Snare. |
| 49. | End piece. |
| 50. | Initial to Book III. |
| 51. | The Brick Trap. |
| 52. | Method of Setting. |
| 53. | The Coop Trap. |
| 54. | The Bat fowling Net. |
| 55. | The Clap Net. |
| 56. | The Bird Whistle. |
| 57. | The Trap Cage. |
| 58. | Diagrams of Cage. |
| 59. | The Spring Net Trap. |
| 60. | Page 15 Section of Spring Net Trap. |
| 61. | A Simpler Net Trap. |
| 62. | The Upright Net Trap. |
| 63. | Second Method " |
| 64. | The Box Owl Trap. |
| 65. | The Box Bird Trap. |
| 66. | The Pendant Box Bird Trap. |
| 67. | The Hawk Trap. |
| 68. | The Wild Duck Net. |
| 69. | The Hook Trap. |
| 70. | The Fool's Cap Trap. |
| 71. | The Limed Twig. |
| 72. | Humming-bird Trap. |
| 73. | Initial to Book IV. |
| 74. | The Common Box Trap. |
| 75. | Two Modes of Setting. |
| 76. | Box Trap. |
| 77. | The Figure Four Trap. |
| 78. | Parts of " |
| 79. | The "Double Ender". |
| 80. | The Self-Setting Trap. |
| 81. | The Dead fall. |
| 82. | Method No. 2. |
| 83. | The Garotte. |
| 84. | Arrangement of "Setting". |
| 85. | The Bow Garotte Trap. |
| 86. | A Fish Trap. |
| 87. | End Piece "Maternal advice". |
| 88. | Initial to Book V. |
| 89. | The Barrel Trap. |
| 90. | The Box Dead Trap. |
| 91. | The Board Flap. |
| 92. | The Box Pit-fall. |
| 93. | Diagram of " |
| 94. | Cage Trap. |
| 95. | Initial to Book VI. |
| 96. | Steel Trap. No. (0) or Rat Trap. |
| 97. | Steel Trap. No. 1, or Muskrat Trap. |
| 98. | " " No. 2, or Mink Trap. |
| 99. | " " No. 2-1/2, or Fox Trap. |
| 100. | " " No. 3, or Otter Trap. |
| 101. | " " No. 4, or Beaver Trap. |
| 102. | "The Great Bear Tamer," Steel Trap. |
| 103. | Steel Trap No. 5, or Small Bear Trap. |
| 104. | Steel Trap set in pen. |
| 105. | The Spring Pole. |
| 106. | The Sliding pole. |
| 107. | The Grappling Iron. |
| 108. | The Wolf. |
| 109. | The Puma. |
| 110. | The Canada Lynx. |
| Page 16 111. | The Wild Cat. |
| 112. | The Bear. |
| 113. | The Raccoon. |
| 114. | The Badger. |
| 115. | The Beaver. |
| 116. | The Otter. |
| 117. | The Mink. |
| 118. | The Marten. |
| 119. | The Skunk. |
| 120. | The Wolverine. |
| 121. | The Opossum. |
| 122. | The Squirrel. |
| 123. | The Moose. |
| 124. | Initial to Book VII. |
| 125. | Portable Drinking Cup. |
| 126. | The Home Shanty. |
| 127. | The Shelter tent. |
| 128. | The Trapper's Bed. |
| 129. | End Piece. |
| 130. | Initial to Book VIII. |
| 131. | Head Net. |
| 132. | Portable Hat-brim. |
| 133. | Hat-brim with netting attachment. |
| 134. | The Dug-out or Log Canoe. |
| 135. | The Birch-Bark Canoe. |
| 136. | A Light Home-made Boat. |
| 137. | Diagram view of Boat—. |
| 138. | The Snow Shoe. |
| 139. | The Toboggan or Indian Sledge. |
| 140. | The Board Stretcher. |
| 141. | The Wedge Stretcher. |
| 142. | The Bow Stretcher. |
| 143. | "The End". |

Page 17 BOOK I.
TRAPS FOR LARGE GAME.
Traps for big game.
 owever free our forests may be from the lurking
dangers of a tropical jungle, they nevertheless shelter a few large
and formidable beasts which are legitimate and deserving subjects
of the Trapper's Art. Chief among them are the Puma, or Cougar,
Bear, Lynx, Wolf and Wolverine.
owever free our forests may be from the lurking
dangers of a tropical jungle, they nevertheless shelter a few large
and formidable beasts which are legitimate and deserving subjects
of the Trapper's Art. Chief among them are the Puma, or Cougar,
Bear, Lynx, Wolf and Wolverine.
Even though our forests are free from the hidden dangers of a tropical jungle, they still hide some large and powerful animals that are legitimate and worthy targets for trapping. The main ones include the Puma, or Cougar, Bear, Lynx, Wolf, and Wolverine.
Although commonly taken in steel traps, as described respectively in a later portion of this work, these animals are nevertheless often captured by Deadfalls and other devices, which are well known to the professional Trapper, and which serve excellently in cases of emergency, or in the scarcity of steel traps.
Although usually caught in steel traps, as explained later in this work, these animals are often captured by deadfalls and other methods that are well-known to professional trappers and work effectively in emergencies or when steel traps are in short supply.
THE DEAD-FALL.
There are several varieties of this trap, some of which are described
in other parts of this volume. In general construction they all
bear a similarity, the methods of setting being slightly changed
to suit the various game desired for capture. For large animals,
and particularly the Bear, the trap is sprung by the pressure of
the animal's foot, while reaching for the bait. Select some favorite
haunt of the Bear, and proceed to construct a pen of large stakes.
These should consist of young trees, or straight branches, about
three inches in diameter, and should be of such a length as to
reach a height of four or five feet when set in the ground, this
being the required height of the pen. Its width should be about
two and a half or three feet; its depth, four feet; and the top
should be roofed over with cross pieces of timber, to prevent the
bait from being
Page 18
taken from above. A straight log, about eight inches in diameter,
and six feet in length should now be rolled against the opening
of the pen, and hemmed in by two upright posts, one on each side,
directly on a line with the sides of the enclosure. Another log,
or tree trunk, of the same diameter, and about fifteen or twenty
feet in length, should next be procured. Having this in readiness,
we will now proceed to the construction of the other pieces. In
order to understand the arrangement of these, we present a separate
drawing of the parts
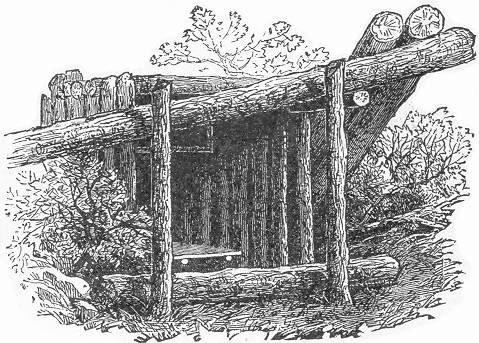 as they appear when the trap is set (a).
An upright post, is supplied at the upper end with a notch, having
its flat face on the lower side. This post should be driven into
the ground in the left hand back corner of the pen, and should be
three feet or more in height. Another post (b) of similar
dimensions, is provided with a notch at its upper end, the notch
being reversed, i. e., having its flat side uppermost.
This post should be set in the ground, outside of the pen,
on the right hand side and on a line with the first. A third post
(c), is provided with a crotch on its upper end. This should
be planted outside of the pen on the right hand side, and on a line
with the front. The treadle piece consists of a forked branch,
about three feet
Page 19
in length, supplied with a square board secured across its ends.
At the junction of the forks, an augur hole is bored, into which a
stiff stick about three feet in length is inserted. This is shown
at (h). Two poles, (d) and (e), should next be
procured, each about four feet in length. These complete the number
of pieces, and the trap may then be set. Pass the pole (d)
as they appear when the trap is set (a).
An upright post, is supplied at the upper end with a notch, having
its flat face on the lower side. This post should be driven into
the ground in the left hand back corner of the pen, and should be
three feet or more in height. Another post (b) of similar
dimensions, is provided with a notch at its upper end, the notch
being reversed, i. e., having its flat side uppermost.
This post should be set in the ground, outside of the pen,
on the right hand side and on a line with the first. A third post
(c), is provided with a crotch on its upper end. This should
be planted outside of the pen on the right hand side, and on a line
with the front. The treadle piece consists of a forked branch,
about three feet
Page 19
in length, supplied with a square board secured across its ends.
At the junction of the forks, an augur hole is bored, into which a
stiff stick about three feet in length is inserted. This is shown
at (h). Two poles, (d) and (e), should next be
procured, each about four feet in length. These complete the number
of pieces, and the trap may then be set. Pass the pole (d)
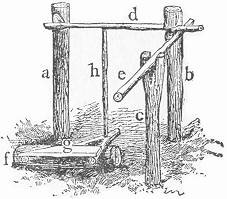 between the stakes of the pen, laying one end in the notch in the post
(a), and holding the other beneath the notch in the upright
(b). The second pole (e) should then be adjusted,
one end being placed in the crotch post (c), and the other
caught beneath the projecting end of the pole (d), as is fully
illustrated in the engraving. The dead-log should then be rested on
the front extremity of the pole last adjusted, thus effecting an
equilibrium.
between the stakes of the pen, laying one end in the notch in the post
(a), and holding the other beneath the notch in the upright
(b). The second pole (e) should then be adjusted,
one end being placed in the crotch post (c), and the other
caught beneath the projecting end of the pole (d), as is fully
illustrated in the engraving. The dead-log should then be rested on
the front extremity of the pole last adjusted, thus effecting an
equilibrium.
There are several types of this trap, some of which are explained elsewhere in this book. In general, they all have a similar construction, with slight variations in the setup to target different types of game. For larger animals, especially bears, the trap is triggered by the pressure of the animal's foot while trying to reach for the bait. Choose a popular spot for bears and start building a pen using large stakes. These should be young trees or straight branches about three inches in diameter, and long enough to be four or five feet high when planted in the ground, which is the necessary height for the pen. The width should be around two and a half or three feet, and the depth should be four feet. The top should be covered with crosspieces to keep the bait from being Page 18 taken from above. Next, roll a straight log about eight inches in diameter and six feet long against the opening of the pen, secured by two upright posts on either side, lined up with the sides of the enclosure. Then, obtain another log or tree trunk of the same diameter, around fifteen or twenty feet long. With this ready, we can move on to build the other components. To explain how these fit together, we present a separate drawing of the parts.
as they appear when the trap is set (a).
An upright post should have a notch at the top, with its flat face facing down. Plant this post in the left back corner of the pen, making sure it’s at least three feet tall. Another post (b) of similar height should have a notch at the top too, but this one should be flipped, with the flat side facing up. This post goes in the ground outside the pen, on the right side and aligned with the first post. A third post (c) should have a fork at the top and should be placed outside the pen, on the right side and aligned with the front. The treadle piece consists of a forked branch about three feet long, with a square board secured across its ends. Drill a hole at the fork’s intersection, where a stiff stick about three feet long will be inserted. This is illustrated at (h). Next, you’ll need two poles, (d) and (e), each about four feet long. Once you have all the pieces, the trap can be set up. Place pole (d)
between the stakes of the pen, resting one end in the notch of post (a) and holding the other end under the notch of post (b). Then, take the second pole (e) and position one end in the fork of post (c), while the other end catches under the overhanging end of pole (d), as shown in the illustration. Finally, place the dead log on the front end of the last-adjusted pole to achieve balance.
The treadle-piece should now be placed in position over a short stick of wood (f), with its platform raised in front, and the upright stick at the back secured beneath the edge of the latch pole (d).
The treadle piece should now be positioned over a short piece of wood (f), with its platform elevated at the front, and the upright stick at the back secured under the edge of the latch pole (d).
The best bait consists of honey, for which Bears have a remarkable fondness. It may be placed on the ground at the back part of the enclosure, or smeared on a piece of meat hung at the end of the pen. The dead-log should now be weighted by resting heavy timbers against its elevated end, as seen in the main drawing, after which the machine is ready for its deadly work.
The best bait is honey, which Bears really love. You can put it on the ground at the back of the enclosure or spread it on a piece of meat hung at the end of the pen. Now, the dead-log should be weighted down by placing heavy timbers against its raised end, as shown in the main drawing, after which the machine is ready to do its deadly work.
A Bear will never hesitate to risk his life where a feast of honey is in view, and the odd arrangement of timbers has no fears for him after that tempting bait has once been discovered. Passing beneath the suspended log, his heavy paw encounters the broad board on the treadle-piece, which immediately sinks with his weight. The upright pole at the back of the treadle is thus raised, forcing the latch-piece from the notch: this in turn sets free the side pole, and the heavy log is released falling with a crushing weight over the back of hapless Bruin.
A bear won't think twice about risking his life when there's a feast of honey in sight, and the strange arrangement of timber doesn't scare him once he finds that tempting treat. As he walks under the hanging log, his heavy paw hits the wide board on the treadle, which immediately sinks under his weight. The upright pole at the back of the treadle gets lifted, pushing the latch out of its notch; this releases the side pole, and the heavy log falls down, crushing poor Bruin beneath it.
There are many other methods of setting the Dead-fall, several of which appear in another section of this book. The above is the one more commonly used for the capture of Bears, Page 20 but the others are equally applicable and effective when enlarged to the proper size.
There are many other ways to set the Dead-fall, several of which are covered in another section of this book. The one mentioned above is the most commonly used for capturing bears, Page 20 but the others are also just as applicable and effective when scaled to the right size.
In South America and other countries, where Lions, Tigers, Leopards, and Jaguars abound, these and other rude extempore traps are almost the only ones used, and are always very successful. The pit-fall often allures the Bengal Tiger to his destruction, and the Leopard often terminates his career at the muzzle of a rifle baited as seen in our page illustration. A gun thus arranged forms a most sure and deadly trap, and one which may be easily extemporized at a few moments' warning, in cases of emergency. The Puma of our northern forests, although by no means so terrible a foe as the Leopard, is still a blood-thirsty creature, and while he shuns the gaze of man with the utmost fear, he is nevertheless constantly on the alert to spring upon him unawares, either in an unguarded moment or during sleep. A hungry Puma, who excites suspicion by his stealthy prowling and ominous growl, may easily be led to his destruction at the muzzle of a gun, baited as we shall now describe.
In South America and other countries where lions, tigers, leopards, and jaguars are plentiful, these and other makeshift traps are nearly the only ones used, and they are always very effective. The pitfall often lures the Bengal tiger to its doom, and the leopard frequently meets its end at the barrel of a rifle baited like the one shown in our page illustration. A gun set up this way creates a reliable and deadly trap that can be quickly assembled in a moment of need. The puma in our northern forests, while not as formidable a foe as the leopard, is still a fierce predator. Although it avoids human sight with great caution, it is always on the lookout to ambush unsuspecting people, either when they let their guard down or while they are sleeping. A hungry puma, whose stealthy actions and ominous growls raise suspicions, can easily be led to its capture by a baited gun, as we will now explain.
THE GUN TRAP.
After a Puma has succeeded in capturing his prey, and has satisfied his appetite by devouring a portion of its carcass, he leaves the remainder for a second meal, and his early return to a second banquet is almost a matter of certainty. Where such a remnant of a bygone feast is found, the capture of the Cougar is an easy matter. Any carcass left in a neighborhood where Pumas are known to exist is sure to attract them, and day after day its bulk will be found to decrease until the bones only remain. By thus "baiting" a certain place and drawing the Pumas thither, the way is paved for their most certain destruction. The gun-trap is very simply constructed, and may be put in working order in a very few moments. The weapon may be a rifle or shot-gun. In the latter case it should be heavily loaded with buck-shot. The stock should be first firmly tied to some tree, or secured in a stout crotch driven into the ground, the barrel being similarly supported.
After a Puma catches its prey and satisfies its hunger by eating part of the carcass, it leaves the rest for a second meal, and it's almost guaranteed that it will return for that second feast. When a leftover from a previous meal is found, capturing the Cougar becomes easy. Any carcass left in an area where Pumas are known to live will definitely attract them, and day after day, it will gradually disappear until only the bones remain. By "baiting" a specific spot and drawing the Pumas there, the path is set for their inevitable capture. The gun trap is very simply made and can be set up in just a few moments. The weapon can be a rifle or a shotgun. If using a shotgun, it should be loaded heavily with buckshot. The stock should be securely tied to a tree or positioned in a strong fork stuck into the ground, with the barrel supported in a similar way.
The gun should be about three feet from the ground, and should be aimed at some near tree to avoid possible accident to a chance passer-by within its range. The gun should then be cocked, but not capped, due caution being always used, and the cap adjusted the very last thing after the trap is baited and Page 21 set. Where a rifle is used, the cartridge should not be inserted until the last thing.
The gun should be about three feet off the ground and aimed at a nearby tree to prevent any accidents to an unsuspecting passerby within its range. The gun should then be cocked, but not capped, always exercising caution, and the cap should be adjusted as the very last step after the trap is baited and Page 21 set. If using a rifle, the cartridge should be added as the final step.
It is next necessary to cut a small sapling about a foot or two in length. Its diameter should allow it to fit snugly inside the guard in front of the trigger, without springing the hammer. Its other end should now be supported by a very slight crotch, as shown in our illustration. Another sapling should next be procured, its length being sufficient to reach from the muzzle of the gun to the end of the first stick, and having a branch stub or hook on one end. The other extremity should be attached by a string to the tip of the first slick.
Next, you need to chop a small sapling about a foot or two long. It should be thick enough to fit snugly inside the guard in front of the trigger without triggering the hammer. The other end should now rest on a slight crotch, as shown in our illustration. Then, get another sapling long enough to reach from the muzzle of the gun to the end of the first stick, and it should have a branch stub or hook on one end. The other end should be tied with a string to the tip of the first stick.
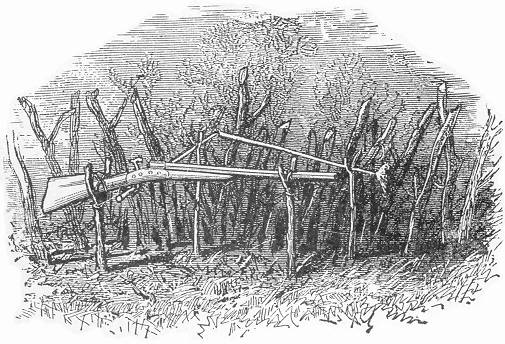
Now take a portion of the carcass and draw it firmly over the hook in the long stick. Prop the latter in such a position as that the bait shall hang directly in front of the muzzle. The crotch supporting the bait stick should be firmly implanted in the ground in order to hold the bait from being drawn to either side of the muzzle.
Now take a piece of the carcass and secure it tightly over the hook on the long stick. Position the stick so that the bait hangs directly in front of the muzzle. Make sure the fork supporting the bait stick is firmly planted in the ground so that the bait doesn't shift to either side of the muzzle.
The gun-trap is now set, and its merits may be tested. Before adjusting the cap the pieces should be tried several times to insure their perfect working. A slight pull on the bait from the front will draw the short stick forward. This immediately Page 22 acts on the trigger and causes the hammer to snap. By a few trials, the sticks can be arranged so as to spring the trigger easily, and where a hair trigger is used, a mere touch on the bait will suffice to discharge the gun. When all is found to work perfectly, the trap should be surrounded by a rude pen of sticks and branches, extending two or three feet beyond the muzzle, in order to insure an approach directly in the aim of the gun. The cap should now be placed on the nipple, after which the deadly device may be left to do its certain work. The remaining portion of the carcass should be removed, and where the locality is likely to be frequented by other hunters or trappers, it is well to put up a "danger" signal to guard against accident. If desired two or three guns may be arranged like the spokes of a wheel, all aiming near the bait. Even with one gun the victim stands but little chance, but where two or three pour their contents into his body, his death is an absolute certainty.
The gun trap is now set, and its effectiveness can be tested. Before securing the cap, the components should be tried several times to ensure they function perfectly. A gentle pull on the bait from the front will move the short stick forward, which will immediately Page 22 activate the trigger and cause the hammer to snap. With a few adjustments, the sticks can be arranged to easily spring the trigger, and if a hair-trigger mechanism is used, just a slight touch on the bait will be enough to fire the gun. Once it all works perfectly, the trap should be surrounded by a crude pen of sticks and branches, extending two to three feet beyond the muzzle, to guarantee an approach directly in the line of the gun. Now, the cap should be placed on the nipple, after which this deadly device can be left to do its job. The remaining part of the carcass should be removed, and in areas likely to be visited by other hunters or trappers, it’s a good idea to put up a "danger" sign to prevent accidents. If desired, two or three guns can be arranged like the spokes of a wheel, all aimed near the bait. Even with just one gun, the victim has little chance, but with two or three firing into their body, death is a sure thing.
By fastening the gun three feet above ground the load is discharged upward into the mouth of its victim, and thus directly through the brain. Where two or more guns are used, it is advisable to aim at least one in such a direction as will send its charge into the breast of the animal.
By securing the gun three feet off the ground, the shot is fired upward into the mouth of its target, directly penetrating the brain. When using two or more guns, it's recommended to aim at least one so that its shot hits the chest of the animal.
The Indian Panther is very commonly taken by the gun trap, and even Lions are sometimes secured by the same device, only increased in power by a larger number of guns.
The Indian Panther is often caught using a gun trap, and sometimes Lions are also captured by this method, just with more guns for added strength.
There are several other methods of setting the gun trap. One way consists in attaching a string to the finger piece of the trigger, passing it back through a small staple or screw eye inserted in the under side of the stock for that purpose, and then drawing the string forward and attaching it to the top of the bait stick. This latter is stuck in the ground directly in front of the muzzle and the bait secured to its extremity. When the tempting morsel is grasped, the bait stick is drawn forward and the string pulled, the result of course being the discharge of the gun. By still another method, an elastic is passed through the screw eye in the stock and over the finger piece of the trigger, thus tending continually to draw it back and spring the hammer. To set the gun a short stick is inserted behind the finger piece, thus overcoming the power of the elastic. It should be very delicately adjusted, so that a mere touch will dislodge it. Its length should be about six inches, and to its other end the bait stick should be attached and arranged as first described. Although a rather dangerous trap to be set at random it is nevertheless Page 23 often utilized and has brought many a dreaded marauder to his doom.
There are several other methods for setting the gun trap. One way is to attach a string to the trigger's finger piece, thread it back through a small staple or screw eye placed on the underside of the stock for that purpose, and then pull the string forward and attach it to the top of the bait stick. This stick is pushed into the ground directly in front of the muzzle, and the bait is secured to its end. When the tempting bait is taken, the bait stick is pulled forward, and the string is yanked, causing the gun to fire. Another method involves passing an elastic band through the screw eye in the stock and over the trigger's finger piece, which continuously pulls it back and releases the hammer. To set the gun, a short stick is placed behind the finger piece, countering the elastic's force. It should be delicately adjusted, so a light touch will dislodge it. It should be about six inches long, and the bait stick should be attached to the other end and set up as described earlier. Although it's a rather dangerous trap to set randomly, it is still often used and has captured many a feared intruder.
The bear, lynx, and other large animals are sometimes taken by the gun trap, but it is most generally set for the Puma.
The bear, lynx, and other large animals are sometimes caught in the gun trap, but it's mostly set for the puma.
THE BOW TRAP.
This device does duty in India and Southern Asia, where it is known as the tiger trap.
This device is used in India and Southern Asia, where it's called the tiger trap.
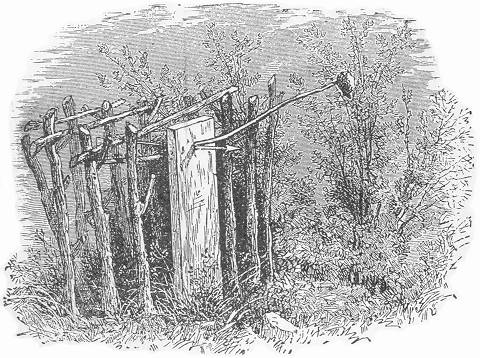
It is easily constructed as follows: First cut a stout board five inches in width, two and a half feet in length and about two inches in thickness. Shave off one end to a point so that it may be driven into the ground. At the other extremity, in the middle of the board and about two inches from the edge, a hole one half an inch in diameter and three quarters of an inch in height, should be made; two auger holes, one directly above the other with the sides flatly trimmed, will answer perfectly. The arrow should next be constructed. This should be made of seasoned oak or ash, two feet in length, perfectly straight, smooth and round, Page 24 and one third of an inch in diameter. One end should be notched for the bow string and vaned with thin feathers after the manner of ordinary arrows. The other extremity should be armed with a steel barb sharply pointed, and firmly riveted in place. Any blacksmith can forge such a tip; the shape of which is plainly seen in our engraving. The bow should consist of a piece of stout seasoned hickory, oak or ash four feet long, if such a bow is not at hand, a stout sapling may be used. The bow string may consist of cat-gut, or stout Indian twine.
It's easy to make as follows: First, cut a sturdy board that’s five inches wide, two and a half feet long, and about two inches thick. Sharpen one end to a point so it can be driven into the ground. At the other end, in the middle of the board and about two inches from the edge, drill a hole that's half an inch in diameter and three-quarters of an inch deep. Two auger holes, one directly above the other with flat sides, will work perfectly. Next, make the arrow. It should be made of seasoned oak or ash, two feet long, perfectly straight, smooth, and round, Page 24 and one third of an inch in diameter. One end should be notched for the bowstring and fletched with thin feathers like regular arrows. The other end should have a steel tip that’s sharply pointed and securely attached. Any blacksmith can create such a tip, the shape of which is clearly shown in our engraving. The bow should be made from a sturdy piece of seasoned hickory, oak, or ash, four feet long. If you don’t have a bow like that, a strong sapling can be used. The bowstring can be made of catgut or strong Indian twine.
Before setting the trap, it is advisable to attract the game to
the spot selected as already alluded to in connection with the
gun trap, and particularly so when the Puma is the victim sought.
In our illustration we see the trap as it appears when set, and
the same precaution of aiming at some tree should be exercised
as advise with the gun trap. The bow should first be secured in
place directly beneath and one eighth of an inch from the edge
of the hole in the board, as seen at (a). Two large wire
 staples may be used for this purpose, being passed over the bow
through holes in the board and clinched on the opposite side. The
bend of the bow and length of string should now be determined, one
end of the latter being attached to the tip of the bow and the
other end supplied with a loop. The board should then be driven
into the ground to the depth of about eight inches. We will next
take up the arrow. Pass the barb through the hole in the board
and adjust the notch over the bow-string, draw the arrow back and
release the string. If the arrow slide easily and swiftly, through
the board, keeping true to its aim, the contrivance is in perfect
working order and is ready to be set. This is accomplished by the
very simple and ingenious mechanical arrangement, shown at (b).
On the under side of the arrow just behind the barb, a flat notch
one eighth of an inch in depth and two and a half inches in length
is cut, with rounded ends, as seen in the illustration. The bait
stick should consist of a sapling about three feet in length, the
large end being trimmed so
Page 25
as to fit in the hole over the arrow while the notch in the latter
rests in the bottom of the aperture as seen in the illustration
staples may be used for this purpose, being passed over the bow
through holes in the board and clinched on the opposite side. The
bend of the bow and length of string should now be determined, one
end of the latter being attached to the tip of the bow and the
other end supplied with a loop. The board should then be driven
into the ground to the depth of about eight inches. We will next
take up the arrow. Pass the barb through the hole in the board
and adjust the notch over the bow-string, draw the arrow back and
release the string. If the arrow slide easily and swiftly, through
the board, keeping true to its aim, the contrivance is in perfect
working order and is ready to be set. This is accomplished by the
very simple and ingenious mechanical arrangement, shown at (b).
On the under side of the arrow just behind the barb, a flat notch
one eighth of an inch in depth and two and a half inches in length
is cut, with rounded ends, as seen in the illustration. The bait
stick should consist of a sapling about three feet in length, the
large end being trimmed so
Page 25
as to fit in the hole over the arrow while the notch in the latter
rests in the bottom of the aperture as seen in the illustration
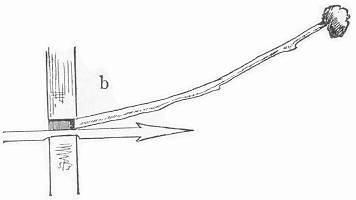 (b). The trap may then be set. Draw back the arrow, until
the notch rests in the hole in the board. Insert the bait stick
very lightly above the arrow as shown at (b), propping
it in place at the angle seen in the main drawing. The bait for a
puma should consist of a portion of some carcass, or if for other
animals, any of the baits given in our section on "trapping" may
be used. In order to secure the bait firmly to the bait stick, a
small hole and a peg at the side of the baited end will effectually
prevent its removal and the trap will thus most surely be sprung.
The prop which sustains the bait stick need be only a small crotch
inserted a little to one side of the trap. The bow should now be
surrounded by a wide pen, allowing room for the spring of the ends.
The top of the enclosure should also be guarded by a few sticks or
branches laid across. Directly in front of the trap and extending
from it, a double row of rough stakes three feet high should be
constructed, thus insuring an approach in the direct range of the
arrow. Without this precaution the bait might be approached from
the side, and the arrow pass beneath the head of the animal, whereas
on the other hand it is sure to take effect in the neck or breast
of its victim. Of course the success of this trap depends entirely
upon the strength of the bow. When a large and powerful one is
used its effect is almost surely fatal.
(b). The trap may then be set. Draw back the arrow, until
the notch rests in the hole in the board. Insert the bait stick
very lightly above the arrow as shown at (b), propping
it in place at the angle seen in the main drawing. The bait for a
puma should consist of a portion of some carcass, or if for other
animals, any of the baits given in our section on "trapping" may
be used. In order to secure the bait firmly to the bait stick, a
small hole and a peg at the side of the baited end will effectually
prevent its removal and the trap will thus most surely be sprung.
The prop which sustains the bait stick need be only a small crotch
inserted a little to one side of the trap. The bow should now be
surrounded by a wide pen, allowing room for the spring of the ends.
The top of the enclosure should also be guarded by a few sticks or
branches laid across. Directly in front of the trap and extending
from it, a double row of rough stakes three feet high should be
constructed, thus insuring an approach in the direct range of the
arrow. Without this precaution the bait might be approached from
the side, and the arrow pass beneath the head of the animal, whereas
on the other hand it is sure to take effect in the neck or breast
of its victim. Of course the success of this trap depends entirely
upon the strength of the bow. When a large and powerful one is
used its effect is almost surely fatal.
Before setting the trap, it's a good idea to lure the game to the chosen spot, as mentioned earlier with the gun trap, especially when targeting a Puma. In our illustration, we see how the trap looks when it's set, and the same caution of aiming at a tree applies as advised with the gun trap. First, secure the bow in place directly beneath and one-eighth of an inch from the edge of the hole in the board, as shown at (a). Use two large wire staples for this purpose, threading them over the bow through holes in the board and clinching them on the other side. Next, determine the bow's bend and the string's length, attaching one end of the latter to the tip of the bow and making a loop at the other end. Drive the board into the ground to a depth of about eight inches. Now, let's prepare the arrow. Pass the barb through the hole in the board and adjust the notch over the bowstring, pull the arrow back, and release the string. If the arrow slides easily and swiftly through the board, staying on target, the setup is working perfectly and ready to be set. This is done with the simple yet clever mechanical mechanism shown at (b). On the underside of the arrow, just behind the barb, cut a flat notch one-eighth of an inch deep and two and a half inches long, with rounded ends, as illustrated. The bait stick should be a sapling about three feet long, trimmed at the large end to fit into the hole over the arrow while the notch sits in the bottom of the opening as shown in the illustration. The trap can now be set. Pull back the arrow until the notch rests in the hole in the board. Insert the bait stick very lightly above the arrow as shown at (b), propping it at the angle seen in the main drawing. The bait for a puma should be part of a carcass, or for other animals, use any baits listed in our section on "trapping." To secure the bait tightly to the bait stick, create a small hole and insert a peg at the side of the baited end to effectively prevent it from being removed, thus ensuring the trap will spring. The prop holding up the bait stick can just be a small crotch placed slightly off to the side of the trap. The bow should be encircled by a wide pen, allowing enough room for it to spring. The top of the enclosure should also be covered with a few sticks or branches laid across. Right in front of the trap and extending from it, build a double row of rough stakes three feet high to ensure an approach in the direct path of the arrow. Without this precaution, the bait might be approached from the side, causing the arrow to miss the animal's head, while on the other hand, it will definitely hit the neck or chest of its target. The trap’s success entirely depends on the bow's strength. When a large and powerful bow is used, its effect is almost certainly fatal.
Another form of the bow trap, much used in the capture of the tiger, forms the subject of our next illustration: no bait is here used. The trap is set at the side of the beaten path of the tiger and is sprung by the animal pressing against a string in passing. The bow is large and powerful and is secured to two upright posts about eight inches apart. The string is drawn back and a blunt stick is then inserted between the bow string and the inside centre of the bow, thus holding the latter in a bent position. A stout stick, with a flattened end is next inserted between the end of the blunt stick and the inside of the bow, the Page 26 remaining part of the stick extending downwards, as our illustration shows. To the lower end of this stick a string is attached and carried across the path in the direct range of the arrow, being secured to a stake on the opposite side. The arrow is generally barbed with a steel or flint point, and wound with thread saturated with a deadly poison. This is now rested on the top of the bow between the upright parts, and its notch caught in the bow-string. Everything is then in readiness. The tiger soon steals along his beaten track. He comes nearer and nearer the trap until at last his breast presses the string. Twang, goes the bow and the arrow is imbedded in the flesh of its victim. He writhes for a few moments, until he is released from his torments by the certain death which follows the course of the poison through his veins.
Another version of the bow trap, commonly used to catch tigers, is the focus of our next illustration: no bait is needed here. The trap is set beside the tiger's usual path and is triggered by the animal brushing against a string while passing by. The bow is large and powerful, attached to two upright posts about eight inches apart. The string is pulled back, and a blunt stick is inserted between the bowstring and the center of the bow, keeping it in a bent position. Next, a strong stick with a flat end is placed between the end of the blunt stick and the inside of the bow, with the remaining part of the stick extending downward, as our illustration shows. A string is attached to the lower end of this stick and stretched across the path directly in line with the arrow, secured to a stake on the opposite side. The arrow is typically barbed with a steel or flint tip and wrapped with thread soaked in a lethal poison. This arrow is then rested on top of the bow between the upright parts, and its notch is caught in the bowstring. Everything is set. The tiger quietly approaches his familiar trail, inching closer to the trap until his chest presses against the string. Twang goes the bow, and the arrow embeds itself in the flesh of its target. The tiger writhes for a few moments until he is freed from his suffering by the certain death that follows as the poison spreads through his veins.

The use of the poison is very dangerous: a mere scratch through the skin is likely to prove fatal, and the trapper is thus likely to prove his own victim. Poisoned arrows are little used by trappers; and the bow trap, when properly constructed, is sufficiently effective without the venom.
The use of the poison is extremely dangerous: even a small scratch through the skin could be deadly, putting the trapper at risk of becoming a victim themselves. Poisoned arrows are rarely used by trappers, and when built correctly, the bow trap works well enough without the poison.
THE DOWN-FALL.
This is the famous harpoon trap, so commonly used in Africa for
the capture of the hippopotamus. There is no reason why
Page 27
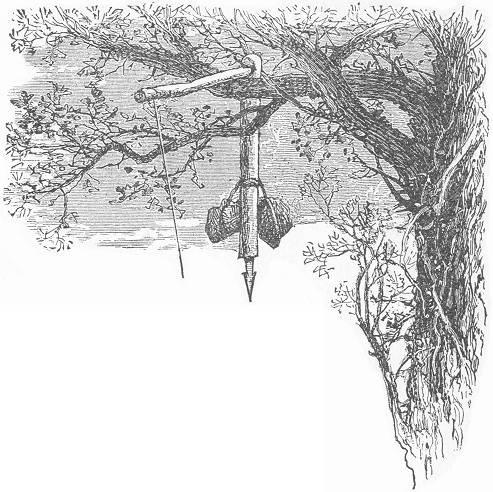 it may not be successfully employed in our own country for taking
large game, or modified on a reduced scale for smaller animals.
it may not be successfully employed in our own country for taking
large game, or modified on a reduced scale for smaller animals.
This is the well-known harpoon trap, widely used in Africa to catch hippopotamuses. There’s no reason why
Page 27
it can't be successfully used in our own country for hunting large game, or adjusted on a smaller scale for smaller animals.
The hippopotamus makes his daily rounds in regular beaten pathways; and the trapper, knowing this peculiarity, turns it to advantage. This is a common habit with many animals; and these "runways" are easily detected by the matted leaves and grass and the broken twigs. Over such a beaten track the harpoon-trap is suspended.
The hippopotamus follows the same paths every day, and the trapper takes advantage of this habit. Many animals do this, and these "runways" can be spotted easily by the flattened leaves and grass and the snapped twigs. The harpoon trap is set up over these well-worn trails.
The harpoon used by the native African trappers somewhat resembles a double-barbed arrowhead, and has a reflexed prong on the shaft just behind the barbs,—a sort of combination between a spear and a fish-hook. It is a terrible weapon; and, when once launched into the flesh of its victim, its withdrawal is impossible, on account of the reflexed barb. Any sharp steel shaft will answer the purpose of the harpoon; it should be eight or ten inches in length, and filed to a keen point. We will now construct the trap. The first requisite is a straight section of the branch of some tree. This should be about four inches in diameter, and four feet in length. Into one end of this beam the harpoon should be firmly imbedded, allowing the point to project about six inches. This beam should then be Page 28 weighted with two large stones, attached firmly by a rope, about eighteen inches above the harpoon. At about six inches from the other end of the log a notch should be cut, having its flat side uppermost, as shown plainly in our illustration. The implement is now ready.
The harpoon used by the native African trappers looks a bit like a double-barbed arrowhead and has a bent prong on the shaft just behind the barbs—a sort of mix between a spear and a fish-hook. It's a deadly weapon; once it's in the flesh of its target, you can't pull it out because of the bent barb. Any sharp steel shaft will work as a harpoon; it should be eight to ten inches long and sharpened to a fine point. Now, let’s build the trap. The first thing you need is a straight section of tree branch. It should be about four inches in diameter and four feet long. At one end of this beam, the harpoon should be securely embedded, with the point sticking out about six inches. This beam should then be Page 28 weighted with two large stones tied securely by a rope, about eighteen inches above the harpoon. Approximately six inches from the other end of the log, you should cut a notch with the flat side facing up, as clearly shown in our illustration. The trap is now ready.
Select some favorably situated tree, whose branches extend over the pathway chosen for the trap. By the aid of a rope secured to the log, and thrown over the limb, the weighted beam may be drawn up into the tree. While thus held by a person below, the trapper should climb the tree to complete operations. For this purpose, a smaller branch about three feet in length should be cut. One end should be flattened off on both sides, so as to fit in the notch in the beam; and the part which rests on the limb, as seen in the illustration, should also be flattened to prevent turning. A piece of stout Indian twine should next be fastened to the unwhittled end of the stick, which may then be adjusted in the notch of the harpoon beam, as seen in the engraving. The string may then be thrown down, and grasped by the companion below, who holds it firmly, after which the original rope may be removed. It will be noticed that the weight of the harpoon and accompaniments rests on the short arm of the lever which passes over the limb of the tree, and the tension on the string from the long arm is thus very slight. This precaution is necessary for the perfect working of the trap. To complete the contrivance, a small peg with a rounded notch should be cut, and driven into the ground directly plumb beneath the long end of the lever. It should be inserted into the earth only sufficiently to hold the string without pulling out, and the side of the notch should face the path; its height should be about a foot. Into the notch the string should be passed, being afterwards drawn across the path and secured on the opposite side at the same height. The trap is now set; and woe to the unlucky quadruped that dares make too free with that string! A very slight pressure from either side is equally liable to slip the string from the notch, or loosen the peg from the ground; and the result is the same in either case,—down comes the weighted harpoon, carrying death and destruction to its victim.
Select a well-placed tree with branches that extend over the path chosen for the trap. Using a rope attached to the log and thrown over a limb, the weighted beam can be pulled up into the tree. While held by someone below, the trapper should climb up to finish the setup. For this, a smaller branch about three feet long should be cut. One end should be flattened on both sides to fit into the notch of the beam, and the part that rests on the limb, as shown in the illustration, should also be flattened to prevent turning. Next, a piece of sturdy twine should be attached to the unshaped end of the stick, which can then be adjusted in the notch of the harpoon beam, as depicted in the engraving. The string can then be thrown down and held firmly by the person below, after which the original rope can be removed. You’ll notice that the weight of the harpoon and its components rests on the short arm of the lever that goes over the tree limb, making the tension on the string from the long arm very slight. This step is crucial for the trap to work properly. To finish, a small peg with a rounded notch should be cut and driven into the ground directly below the long end of the lever. It should be pushed into the ground just enough to hold the string without pulling out, and the side of the notch should face the path; its height should be about a foot. The string should be passed through the notch, then pulled across the path and secured on the opposite side at the same height. The trap is now set; and any unfortunate animal that ventures too close to that string will be in trouble! A slight pressure from either side could slip the string from the notch or loosen the peg from the ground; in either case, the result will be the same—down comes the weighted harpoon, bringing death and destruction to its target.
For large animals, this mode of setting will be found to work perfectly. When constructed on a smaller scale, it may be slightly modified. It will be noticed that, when the string is approached from one side, it is merely slipped out of the notch,—a slight pressure being sufficient to dislodge it,—while the pressure Page 29 from the opposite direction must be strong enough to lift the peg out of the ground bodily. This is easily done when the peg is lightly inserted; but, to insure success, even with light pressure from either side, an additional precaution may be used, if desired. Instead of fastening the end of the string securely to some object on the further side of the path, it is well to provide the end of the cord with a ring or loop, which should be passed over a nail or short peg driven in some tree or branch, or fastened into an upright stake, firmly embedded into the ground. The nail should point in the opposite direction from the notch in the peg, and its angle should incline slightly toward the path. It will thus be seen that an approach from one side forces the string from the notch in the peg, while an opposite pressure slides the ring from the nail.
For large animals, this setting method works perfectly. When it's made on a smaller scale, it may need some adjustments. You'll notice that if you approach the string from one side, it simply slips out of the notch—just a little pressure is enough to dislodge it—while the pressure from the other side needs to be strong enough to lift the peg completely out of the ground. This is easy to do when the peg is lightly inserted; however, to ensure success, even with light pressure from either side, you can take an extra precaution if you want. Instead of securely attaching the end of the string to something on the other side of the path, it’s better to attach a ring or loop to the end of the cord. This should be placed over a nail or a short peg driven into a tree branch or secured to an upright stake firmly planted in the ground. The nail should point away from the notch in the peg, and its angle should lean slightly toward the path. This way, approaching from one side causes the string to come out of the notch in the peg, while pressure from the other side slides the ring off the nail.
This mode of setting is especially desirable for small animals, on account of its being more sensitive.
This way of setting is especially good for small animals because it’s more sensitive.
Such a trap may be successfully used for the puma, bear, and the lynx. When constructed for smaller animals, the harpoon may be dispensed with, a large stone being equally effective in its death-dealing qualities
Such a trap can be effectively used for the puma, bear, and lynx. When made for smaller animals, the harpoon can be left out, as a large stone is just as effective in causing their death.
THE BEAR TRAP.
This trap is constructed after the idea of the old-fashioned box or rabbit trap, and has been the means of securing many a hungry bear, or even puma, whose voracity has exceeded its cunning. The lynx and wild-cat are also among its occasional victims; and inasmuch as its prisoners are taken alive great sport is often realized before the captive is brought under control.
This trap is designed based on the old-fashioned box or rabbit trap and has successfully caught many hungry bears or even pumas, whose greed has outsmarted their cleverness. Lynxes and wildcats are also occasional victims; since the animals are caught alive, there's often a lot of excitement before the captive is managed.
Our illustration gives a very clear idea of the affair. The sides are built of stout young tree-trunks, cut into sections and firmly driven into the ground close together. For a large animal,—a bear, for instance,—the enclosure should be about seven feet deep, two and a half feet wide, and four feet high. The top should be built in with the sides, after the manner of the log cabin, described in page (244.) The two posts at the entrance should be first set up. On the back side of each, near the end, a deep notch should be cut for the reception of the cross piece at the top. This should likewise be notched in a similar manner on both sides of each end, so as to fit singly into the notches in the uprights on the one side, and into the second pair of uprights Page 30 on the other. These latter should next be inserted firmly into the ground, having been previously notched on both sides of their upper ends, as described for the cross piece. They may either be fixed in place and the cross piece sprung in between them at the top, or the latter may be held in the notches of the first pair, while the second are being inserted. Continue thus until the full length of the sides are reached, when the end may be closed by an upright wall of plain logs, either hammered into the ground, after the manner of the sides, or arranged one above another in notches between the two end uprights. The sliding door is next required. This should be large enough to cover the opening, and should be made of stout board slabs, firmly secured by cross pieces. It should be made to slide smoothly into grooves cut into perpendicular logs situated on each side of the opening, or may be arranged to slip easily between the flattened side of one log on each side and the front of the pen. Either way works well. In the latter an additional upright or short board should be inserted in the ground at the edges of the sliding door, to prevent the latter from being forced to either side by the efforts of the enclosed captive.
Our illustration provides a clear idea of the setup. The sides are made from strong young tree trunks, cut into sections and securely driven into the ground close together. For a large animal — like a bear — the enclosure should be about seven feet deep, two and a half feet wide, and four feet high. The top should be constructed with the sides, similar to the log cabin described in page (244.). The two posts at the entrance should be set up first. A deep notch should be cut near the end on the back side of each post to hold the crosspiece at the top. This crosspiece should also have notches cut on both sides of each end to fit into the notches of the uprights on one side and the second pair of uprights on the other side. The latter should then be firmly inserted into the ground, having been notched on both sides of their upper ends as described for the crosspiece. They can either be fixed in place, with the crosspiece slid in between them at the top, or the crosspiece can be held in the notches of the first pair while the second pair is being inserted. Continue this process until the full length of the sides is completed, then close the end with an upright wall of plain logs, either hammered into the ground like the sides or stacked one above the other in notches between the two end uprights. Next, you'll need a sliding door. This should be large enough to cover the opening and made from sturdy board slabs, secured with crosspieces. It should slide smoothly into grooves cut into vertical logs on each side of the opening or be designed to slip easily between the flattened sides of one log on each side and the front of the pen. Either option works well. In the latter case, an additional upright or short board should be placed in the ground at the edges of the sliding door to prevent it from being pushed to either side by the efforts of the enclosed captive.
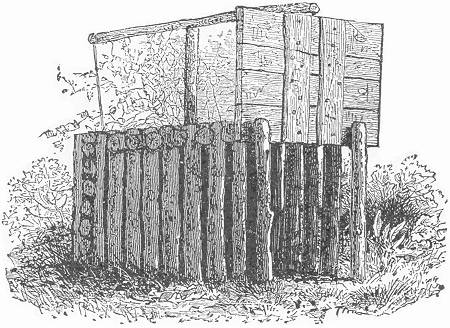
There are two or three ways of setting the trap, depending upon the desired game. For a bear it is arranged as in our illustration. An upright post, two feet in length, should be cut Page 31 to an edge at one end, and wedged in between the logs at the top of the trap, near the middle. Across the top of this, a pole seven feet in length, should be rested; one end being attached by a loop, or secured in a notch in the sliding door, and the other supplied with a strong string about four feet in length, with a stick eight inches in length secured to its end. Through the centre log, in the back of the pen, and about two feet from the ground, an auger hole should be made. The bait stick with bait attached should be inserted through this hole from the inside, and the spindle caught on the outside between its projecting end and a nail driven in the adjoining upright. This principle is clearly illustrated on page 105 at (a), and, if desired, the method (b) may be used also. For a bear, the bait should consist of a piece of meat scented with burnt honey-comb. The odor of honey will tempt a bear into almost any trap, and even into such close quarters as the above he will enter without the slightest suspicion, when a feast of honey is in view.
There are a couple of ways to set the trap, depending on the type of game you want. For a bear, it's set up as shown in our illustration. You should cut a vertical post two feet long, tapering to a point at one end, and wedge it between the logs at the top of the trap, near the center. Rest a seven-foot pole across the top of this; one end should be attached by a loop or secured in a notch in the sliding door, while the other end should have a strong string about four feet long, with a stick eight inches long attached to it. Make an auger hole about two feet off the ground through the back center log of the pen. Insert the bait stick with the bait into this hole from the inside, and catch the spindle on the outside between its projecting end and a nail driven into the adjacent upright. This principle is clearly illustrated on page 105 at (a), and if you prefer, the method in (b) can be used as well. For bait, a piece of meat scented with burnt honeycomb should be used. The smell of honey will lure a bear into almost any trap, and even into tight spaces like this one, he will enter without a hint of suspicion when he senses a honey feast waiting.
For the cougar, or puma, the best bait is a live lamb or a young pig, encaged in a small pen erected at the end of the trap. A fowl is also excellent. When thus baited, the setting of the trap is varied. The upright post at the top of the trap is inserted nearer the front, and the cross pole is stouter. The auger hole is bored in the top of the trap, through the centre of one of the logs, and about twenty inches from the back end of the trap. The spindle is dispensed with and the end of the string is provided with a large knot, which is lowered through the auger hole, and is prevented from slipping back by the insertion of a stick beneath. This stick should be about three feet in length, and of such a size at the end as will snugly fit into the auger hole. It should be inserted delicately, merely enough to hold the knot from slipping back, and so as to be easily released by a slight movement in any direction.
For the cougar, or puma, the best bait is a live lamb or a young pig, kept in a small pen at the end of the trap. A chicken is also a good option. When baiting the trap, the setup changes. The vertical post at the top of the trap is positioned closer to the front, and the cross pole is thicker. An auger hole is drilled in the top of the trap, through the center of one of the logs, and about twenty inches from the back end. The spindle is omitted, and the end of the string has a large knot that is lowered through the auger hole, held in place by a stick underneath. This stick should be about three feet long, and thick enough at the end to fit snugly into the auger hole. It should be placed carefully, just enough to keep the knot from slipping back, and easily removable with a slight push in any direction.
This mode of setting is more fully detailed on page 52. As the puma steals in upon his prey he dislodges the stick, the lid falls, and he finds himself imprisoned with his intended victim. This trap is much used in India and Asia for the capture of the tiger, and the jaguar of South America is frequently entrapped by the same devices.
This method of trapping is explained in more detail at page 52. As the puma sneaks up on its prey, it knocks the stick away, the lid drops, and it ends up trapped with its target. This trap is commonly used in India and Asia to catch tigers, and jaguars in South America are often caught using similar techniques.
THE PIT-FALL.
The tiger is the scourge of India and Southern Asia and some sections of these countries are so terribly infested with Page 32 the brutes that the inhabitants are kept in a continual state of terror by their depredations. Many methods are adopted by the natives for the destruction of the terrible creatures, some of which have already been described. The pit-fall is still another device by which this lurking marauder is often captured and destroyed. It sometimes consists of a mere pit covered and baited in the haunts of the tiger, or is constructed in a continuous deep ditch surrounding the habitations of the natives, and thus acting as a secure protection. The pit is about twelve feet deep and ten feet in width, and its outside edge is lined with a hedge five or six feet in height. As the fierce brute steals upon his intended prey, he nears the hedge and at one spring its highest branch is cleared. He reaches the earth only to find himself at the bottom of a deep pit, from which there is no hope of escape, and where he speedily becomes the merciless victim of a shower of deadly arrows and bullets.
The tiger is a menace in India and Southern Asia, and some areas in these countries are so badly overrun by these animals that the locals live in constant fear of their attacks. The natives use various methods to eliminate these dangerous creatures, some of which have already been mentioned. One effective technique is the pitfall trap, which is often used to capture and kill this stealthy predator. This trap can be a simple pit covered and baited in the tiger's territory, or it can be part of a large deep ditch that encircles the villages for added protection. The pit is about twelve feet deep and ten feet wide, with its edge surrounded by a hedge that stands five or six feet tall. As the fierce animal approaches its intended prey, it draws near the hedge and jumps over it, only to find itself plunging into a deep pit where it has no chance of escape, quickly becoming a victim of a barrage of lethal arrows and bullets.
Happily we have no tigers in the United States, but the puma and the lynx are both fit subjects for the pit-fall. These animals cannot be said to exist in such numbers as to become a scourge and a stranger to the inhabitants of any neighborhood, and for this reason the "Moat" arrangement of the pit-fall is not required. The simple pit is often used, and when properly constructed and baited is a very sure trap. The hole should be about twelve feet in depth and eight feet across, widening at the bottom. Its opening should be covered with slicks, earth and leaves, so arranged as to resemble the surroundings as much as possible, but so lightly adjusted as that they will easily give way at a slight pressure. One edge of the opening should now be closely built up with stakes firmly inserted into the ground, and so constructed as to form a small pen in the middle, in which to secure the bait, generally a live turkey, goose, or other fowl. The other three sides should also be hedged in by a single row of upright stakes three or four feet in height, and a few inches apart in order that the hungry puma may whet his appetite by glimpses between them.
Luckily, there are no tigers in the United States, but both the puma and the lynx are suitable for a pitfall trap. These animals aren’t numerous enough to become a nuisance or unfamiliar to the residents of any area, so a "Moat" setup for the pitfall isn't necessary. The simple pit is often used, and when it's built and baited correctly, it’s a very sure trap. The hole should be about twelve feet deep and eight feet wide, expanding at the bottom. Its opening should be covered with branches, soil, and leaves, arranged to blend in with the environment as much as possible, but loosely enough so they will collapse under slight pressure. One side of the opening should be built up with stakes firmly driven into the ground, creating a small pen in the center to hold the bait, usually a live turkey, goose, or other bird. The other three sides should also be bordered by a single row of upright stakes three or four feet tall, spaced a few inches apart, so the hungry puma can get sight of the bait through the gaps.
They should be firmly imbedded in the earth directly at the edge of the pit, and as far as possible trimmed of their branches on the inside. There will thus be a small patch of solid ground for the feet of the fowl, which should be tied by the leg in the enclosure. Our trap is now set, and if there is a puma in the neighborhood he will be sure to pay it a call and probably a visit.
They should be securely planted in the ground right at the edge of the pit, and trimmed of any branches on the inside as much as possible. This will create a small solid patch of ground for the birds, which should be tied by the leg in the enclosure. Our trap is now set, and if there's a puma nearby, it will definitely come to check it out and likely stop by for a visit.
Spying his game, he uses every effort to reach it through the Page 33 crevices between the stakes. The cries of the frightened fowl arouse and stimulate his appetite, and at last exasperated by his futile efforts to seize his victim, he springs over the fence of stakes and is lodged in the depths of the pit.
Spying his game, he does everything he can to reach it through the Page 33 gaps between the stakes. The cries of the scared birds excite his hunger, and finally, frustrated by his unsuccessful attempts to catch his prey, he leaps over the fence of stakes and ends up deep in the pit.
The puma is very agile of movement, and unless the pit is at least twelve feet in depth there is danger of his springing out. Any projecting branch on the inside of the stakes affords a grasp for his ready paw, and any such branch, if within the reach of his leap, is sure to effect his escape. For this reason it is advisable to trim smoothly all the projections and leave no stub or knot hole by which he could gain the slightest hold. The construction of a pit-fall is a rather difficult operation on account of the digging which it necessitates. On this account it is not so much used as many other traps which are not only equally effective but much more easily constructed. The following is an example:—
The puma is very agile, and if the pit isn't at least twelve feet deep, there's a risk of him jumping out. Any branch sticking out on the inside of the stakes provides a grip for his quick paw, and if it's within his jumping reach, he will definitely escape. For this reason, it's best to smooth out all projections and not leave any stubs or knots that he could grab onto. Building a pitfall is quite challenging because of the digging involved. Because of this, it's not used as much as other traps that are not only just as effective but also much easier to build. Here’s an example:—
THE LOG COOP TRAP.
This is commonly set for bears, although a deer or a puma becomes its frequent tenant. As its name implies it consists of a coop of logs, arranged after the principle of the Coop Trap described on page 67. The logs should be about eight feet in length, notched at the ends as described for the Log Cabin, page (244). Lay two of the logs parallel about seven feet apart. Across their ends in the notches, lay two others and continue building up in "cob-house" fashion until the height of about six feet is reached. The corners may be secured as they are laid by spikes, or they may be united afterward in mass by a rope firmly twisted about them from top to bottom. Logs should now be laid across the top of the coop and firmly secured by the spikes or rope knots. There are several ways of setting the trap. A modification of that described on page 67 works very well, or an arrangement of spindle and bait stick, as in the Box Trap, page 105, may also be employed. In the latter case, the bait stick is either inserted between the logs at the back of the coop, or a hole is bored through one of them for this purpose. For this mode of setting, the coop should be constructed beneath some tree. It is set by means of a rope attached to the upper edge of one of its sides the rope being thrown over a limb of the tree and the loose end brought down and secured to the bait stick by a spindle, as described Page 34 for the trap on page (195). The limb here acts in place of the tall end piece of the Box Trap, and by raising the coop up to such an angle as that it will be nearly poised, the setting may be made so delicate that a mere touch on the bait stick from the interior will dislodge the pieces and let fall the enclosure. The simplest mode of setting the trap is that embodied in the "snare" method on page (52). The rope is here provided with a knot, which must pass easily between the logs, or through the hole at the back of the coop, the length of rope being so arranged as that the coop shall be sufficiently raised where the knot projects into the interior. The introduction of the bait stick beneath the knot will thus prevent the latter from being drawn back, and thus our trap is set. The bait stick in any case should be about two feet in length; and with this leverage but a slight touch will be required to spring the pieces. In the latter method the limb of the tree is not necessary. A stout crotched stake driven into the ground about twenty feet, at the back of the coop, will answer every purpose, and the coop may be constructed wherever desired. This is a most excellent trap for large animals. It secures the game alive, and is thus often productive of most exciting sport. For the bear, the bait should consist of honey or raw meat. Full directions for baiting all kinds of American game are given under their respective heads in another part of this book. The Coop Trap may be constructed of any dimensions, from the small example on page (67) to the size above described.
This is usually set for bears, but deer or pumas often use it too. As the name suggests, it’s made of logs arranged like the Coop Trap described on page 67. The logs should be about eight feet long, notched at the ends as detailed for the Log Cabin, page (244). Place two logs parallel about seven feet apart. Then lay two more across their ends in the notches and keep building up in a "cob-house" style until it reaches about six feet high. You can secure the corners with spikes as you go, or tie them together later with a rope twisted tightly from top to bottom. Next, place logs across the top of the coop and secure them with spikes or rope knots. There are a few ways to set the trap. A variation of the method described on page 67 works well, or you can use a spindle and bait stick as in the Box Trap, page 105. In this case, the bait stick is either inserted between the logs at the back of the coop or a hole is drilled through one of them for this purpose. For this method, the coop should be built under a tree. It’s set using a rope tied to the upper edge of one side; the rope is thrown over a tree limb and the loose end is brought down and attached to the bait stick with a spindle, as described on Page 34 for the trap on page (195). The limb acts like the tall end piece of the Box Trap, and by raising the coop at an angle, it can be set so delicately that a slight touch on the bait stick from inside will knock down the pieces and drop the enclosure. The simplest way to set the trap is the "snare" method described on page (52). Here the rope has a knot that should pass easily between the logs or through the hole at the back of the coop, with the length arranged so the coop is raised enough for the knot to stick inside. Inserting the bait stick under the knot will keep it from being pulled back, thus setting the trap. The bait stick should be about two feet long; with this leverage, just a light touch will trigger the pieces. In this method, the tree limb isn’t necessary. A strong forked stake driven into the ground about twenty feet behind the coop will work just as well, allowing the coop to be built wherever you want. This is an excellent trap for large animals, securing them alive and often leading to some thrilling sport. For bears, use honey or raw meat as bait. Full instructions for baiting different types of American game can be found in their sections elsewhere in this book. The Coop Trap can be made to any size, from the small example on page (67) to the larger one described above.
There are several other inventions commonly used for the capture of large animals in various parts of the globe, which would be of little avail in this country. Such is the African Corrall, or Hopo, by which whole herds of quaggas, elands, and buffalo are often destroyed. The trap consists of two hedges in the form of the letter V, which are very high and thick at the angle. Instead of the hedges being joined at this point, they are made to form a lane about two hundred feet in length, at the extremity of which a giant pit is formed. Trunks of trees are laid across the margins to prevent the animals from escaping. The opening of this pit is then covered with light reeds and small green boughs. The hedges often extend miles in length and are equally as far apart at these extremities. The tribe of hunters make a circle, three or four miles around the country adjacent to the opening, and gradually closing up are almost sure to enclose a large body of game, which, by shouts and skilfully hurled Javelins, they drive into the narrowing walls Page 35 of the Hopo. The affrighted animals rush headlong to the gate presented at the end of the converging hedges and here plunge pell-mell into the pit, which is soon filled with a living mass. Some escape by running over the others; and the natives, wild with excitement, spear the poor animals with mad delight, while others of the brutes are smothered and crushed by the weight of their dead and dying companions. It is a most cruel and inhuman device, and its effects are sometimes appalling.
There are several other inventions commonly used for capturing large animals around the world that wouldn’t work well in this country. One example is the African Corral, or Hopo, which often results in the slaughter of whole herds of quaggas, elands, and buffalo. The trap consists of two fences shaped like the letter V, which are very high and thick at the point where they meet. Instead of being joined at this point, they create a lane about two hundred feet long, at the end of which there’s a large pit. Tree trunks are placed across the edges to prevent the animals from escaping. The opening of this pit is then covered with light reeds and small green branches. The fences can stretch for miles and are just as far apart at the ends. The group of hunters creates a circle three or four miles around the area near the opening, and by slowly closing in, they almost always manage to surround a large group of game, which they drive into the narrowing walls of the Hopo with shouts and expertly thrown javelins. The panicked animals rush towards the entrance formed by the converging fences and then tumble into the pit, quickly filling it with a mass of live animals. Some escape by climbing over the others; meanwhile, the natives, caught up in excitement, stab the unfortunate animals with wild joy, while others are smothered and crushed under the weight of their dead and injured companions. It is an extremely cruel and inhumane method, and its consequences can be horrific.
THE NET TRAP.
The lion and tiger are often taken in a net, which is secured to a frame work and suspended over a tempting bait. When the latter is touched the net falls, and the victim becomes entangled in the meshes and is securely caught. So far as we know, this mode of capture is never tried in this country. For the puma, lynx and wild-cat we fancy it might work admirably. The net should be of stout cord, and should be secured to a heavy square frame work, tilted as in the coop trap, already described. There should be plenty of slack in the net, and the looseness should be drawn flat over the framework in folds. The contrivance may be set by a large figure four trap, page (107), or the device described under the coop trap, page (67).
The lion and tiger are often captured using a net that's attached to a frame and hung over an enticing bait. When the bait is touched, the net drops, trapping the animal in its mesh and securing the catch. As far as we know, this method of capture is never used in this country. For the puma, lynx, and wildcat, we think it could work brilliantly. The net should be made of strong cord and attached to a heavy square frame, tilted like the coop trap mentioned earlier. There should be plenty of slack in the net, which should be laid flat over the frame in folds. The setup can be triggered by a large figure four trap, page (107), or the device explained under the coop trap, page (67).
The use of bird lime, for the capture of a tiger, certainly seems odd; but it is, nevertheless, a common mode of taking the animal, in the countries where this marauder abounds. The viscid, tenacious preparation known as bird lime is described on page (97) and is familiar to most of our readers. For the capture of birds it is unfailing, when once their delicate plumage comes in contact with it. Its effect on the tiger is surprising, and many a hunter has secured his striped foe by its aid. For this purpose, the cans of the preparation are arranged on elevated boards around a bed of leaves, in which the bait is placed. A small platform is so placed that the tiger shall step upon it in reaching for the bait, which, by the aid of strings, tilts the boards and tips off the cans. The lime spills on its victim and over the bed of leaves, and the tiger, in his endeavors to free himself from the sticky substance only succeeds in spreading it, and as he rolls and tumbles on the ground he soon becomes completely smeared and covered with the dry leaves, from which it is impossible for him to extricate himself.
The use of bird lime to catch a tiger might seem strange, but it's actually a common method in places where this predator is found. The sticky, gooey substance known as bird lime is described on page (97) and is well-known to most of our readers. It works flawlessly for catching birds once their delicate feathers touch it. Its effect on the tiger is surprising, and many hunters have successfully captured their striped enemy with its help. To do this, cans of the substance are set up on raised boards around a bed of leaves where the bait is placed. A small platform is arranged so that when the tiger steps on it to reach the bait, it tilts the boards and tips over the cans. The lime spills onto the tiger and over the bed of leaves, and as it tries to free itself from the sticky stuff, it only ends up spreading it around. Rolling and tumbling on the ground, the tiger soon gets completely covered and smeared with the dry leaves, making it impossible for it to escape.
In his frantic rage he writhes upon the ground and becomes Page 36 an easy prey to the hunter, who is generally on hand for the fray.
In his wild anger, he writhes on the ground and becomes Page 36 an easy target for the hunter, who is usually nearby for the fight.
Steel traps are much used for the capture of large game, and are made in sizes especially adapted for the purpose. These are described under the proper head, in another portion of this work; and the various baits and modes of setting required for the different animals, are clearly set forth under their respective titles of the latter, in the section "Art of Trapping."
Steel traps are widely used to capture large game and are made in specific sizes for this purpose. These are detailed in another section of this work, and the various baits and methods of setting required for different animals are clearly outlined under their respective titles in the section "Art of Trapping."
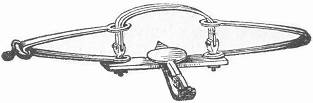
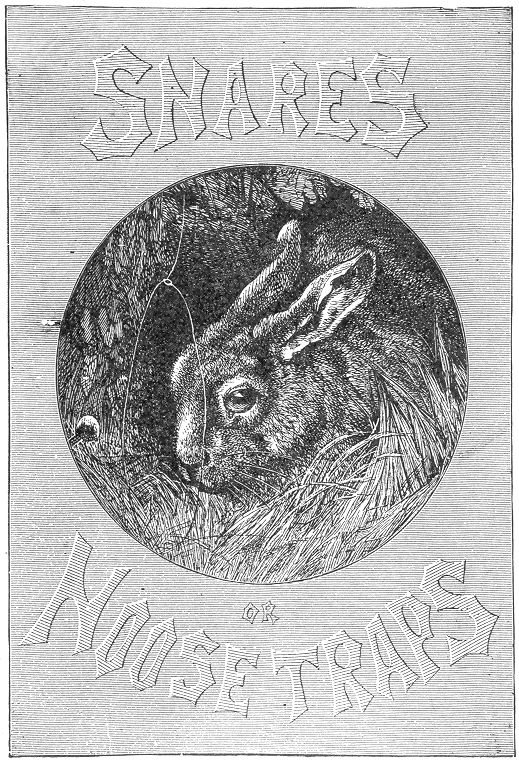
Page 39 BOOK II.
SNARES OR NOOSE TRAPS.
Snares or noose traps.
 hese devices, although properly coming under
the head of "traps," differ from them in the sense in which they
are generally understood. A snare naturally implies an
entanglement; and for this reason the term is applied to
those contrivances which secure their victims by the aid of strings
or nooses. Inventions of this kind are among the most useful and
successful to the professional Trapper, and their varieties are
numerous. The "Twitch-up" will be recognized as a familiar example
by many of our country readers, who may have seen it during their
rambles, cautiously set in the low underbrush, awaiting its prey,
or perhaps holding aloft its misguided victim.
hese devices, although properly coming under
the head of "traps," differ from them in the sense in which they
are generally understood. A snare naturally implies an
entanglement; and for this reason the term is applied to
those contrivances which secure their victims by the aid of strings
or nooses. Inventions of this kind are among the most useful and
successful to the professional Trapper, and their varieties are
numerous. The "Twitch-up" will be recognized as a familiar example
by many of our country readers, who may have seen it during their
rambles, cautiously set in the low underbrush, awaiting its prey,
or perhaps holding aloft its misguided victim.
These devices, while categorized as "traps," differ from the typical understanding of the term. A snare suggests an entanglement; that’s why the term is used for contraptions that capture their targets using strings or nooses. These types of inventions are some of the most efficient and effective tools for the professional Trapper, and there are many variations. The "Twitch-up" will be a familiar example for many of our rural readers, who may have come across it during their walks, carefully placed in the low underbrush, waiting for its prey, or maybe already holding its unsuspecting victim.
Snares are among the most interesting and ingenious of the trap kind, besides being the most sure and efficacious. They possess one advantage over all other traps; they can be made in the woods, and out of the commonest material.
Snares are some of the most interesting and clever traps, and they are also the most reliable and effective. They have one advantage over all other traps: they can be set up in the woods using the simplest materials.
Let the young trapper supply himself with a small, sharp hatchet, and a stout, keen edged jack-knife,—these being the only tools required. He should also provide himself with a coil of fine brass "sucker wire," or a quantity of horse-hair nooses (which will be described further on), a small ball of tough twine and a pocket full of bait, such as apples, corn, oats and the like, of course depending upon the game he intends to trap. With these, his requirements are complete, and he has the material for a score of capital snares, which will do him much excellent service if properly constructed. Perhaps the most common of the noose traps is the ordinary
Let the young trapper equip himself with a small, sharp hatchet and a sturdy, finely edged jackknife—these are the only necessary tools. He should also get a coil of fine brass "sucker wire" or some horsehair nooses (which will be explained later), a small ball of strong twine, and a pocket full of bait, such as apples, corn, oats, and similar items, depending on the game he plans to trap. With these, he has everything he needs and the materials for a number of great snares, which will serve him well if made correctly. Perhaps the most common type of noose trap is the ordinary
QUAIL SNARE,
which forms the subject of our first illustration. This consists
of a series of nooses fastened to a strong twine or wire. They
Page 40
may be of any number, and should either consist of fine wire,
horse-hair, or fine fish-line. If of wire, common brass "sucker
wire," to be found in nearly all hardware establishments and country
stores, is the best. Each noose should be about four inches in
diameter. To make it, a small loop should be twisted on one end of
the wire, and the other passed through it, thus making a slipping
loop, which will be found to work very easily. Fifteen or twenty of
these nooses should be made, after which they should be fastened
either to a stout string or wire, at distances of about four inches
from each other, as seen in our illustration. Each end of the long
string supporting the nooses should then be fastened to a wooden
peg. After selecting the ground, the pegs should be driven into
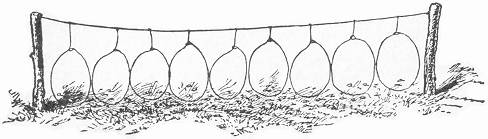 the earth, drawing the string tightly, as seen in our illustration.
The ground around the nooses should then be sprinkled with corn,
oats, and the like, and the trap is set. As a general thing, it
is advisable to set it in a neighborhood where quails are known
to abound; and as they run all over the ground in search of food,
they are sure to come across the bait strewn for them, and equally
as certain to be caught and entangled in the nooses. The writer
has known as many as six quails to be thus caught at a time, on
a string of only twelve nooses. Partridges and woodcock will
occasionally be found entangled in the snare, and it will oft-times
happen that a rabbit will be secured by the device.
the earth, drawing the string tightly, as seen in our illustration.
The ground around the nooses should then be sprinkled with corn,
oats, and the like, and the trap is set. As a general thing, it
is advisable to set it in a neighborhood where quails are known
to abound; and as they run all over the ground in search of food,
they are sure to come across the bait strewn for them, and equally
as certain to be caught and entangled in the nooses. The writer
has known as many as six quails to be thus caught at a time, on
a string of only twelve nooses. Partridges and woodcock will
occasionally be found entangled in the snare, and it will oft-times
happen that a rabbit will be secured by the device.
which is the focus of our first example. This consists of a series of nooses attached to a strong twine or wire. They Page 40 can be of any number, and should be made of fine wire, horse-hair, or fishing line. If you use wire, common brass "sucker wire," which is available at most hardware stores and country shops, is the best option. Each noose should be about four inches in diameter. To create it, twist a small loop at one end of the wire and pass the other end through it, forming a slipping loop that works very easily. Make fifteen to twenty of these nooses, then attach them to a sturdy string or wire, spaced about four inches apart, as shown in our example. Each end of the long string holding the nooses should then be secured to a wooden peg. After choosing the location, drive the pegs into the ground, pulling the string tight, as illustrated. The area around the nooses should be sprinkled with corn, oats, and similar bait, and then the trap is set. Generally, it's best to place it in an area where quails are known to be plentiful; as they scavenge for food, they're likely to encounter the bait and get caught in the nooses. The author has seen as many as six quails caught at once on a string of just twelve nooses. Partridges and woodcock may also get tangled in the trap, and it's not uncommon for a rabbit to be caught by this method.
HOOP NOOSES.
This is a variation from the above, the noose being attached to a barrel hoop and the latter being fastened to two stout posts, which are firmly driven into the ground. By their scattering the bait inside the hoop, and adjusting the loops, the contrivance is complete.
This is a variation from the above, with the noose attached to a barrel hoop and the hoop secured to two sturdy posts that are firmly driven into the ground. By spreading the bait inside the hoop and adjusting the loops, the setup is complete.
This is a very old and approved method.
This is a very old and proven method.
In the initial (T) at the head of this section we give also Page 41 another suggestion for a noose trap. The cross pieces are tacked to the top of the upright, and a noose suspended from each end,—the bait adjusted as there seen.
In the initial (T) at the beginning of this section, we provide also Page 41 another idea for a noose trap. The cross pieces are nailed to the top of the upright, and a noose is hung from each end—the bait set as shown.
We have mentioned horse-hair nooses as being desirable, and they are commonly used; but, as it takes considerable time to make them, and the wire answering the purpose fully as well, we rather recommend the wire in preference. We will give a few simple directions, however, for the making of the horse-hair nooses, in case our readers might desire to use them instead.
We have talked about horse-hair nooses being useful, and they are commonly used; however, since it takes a lot of time to make them, and wire works just as well, we recommend using wire instead. Still, we’ll provide some simple instructions for making horse-hair nooses, in case any of our readers want to use them instead.
Select long, stout hairs from the tail of any horse, (we would recommend that it be a good tempered horse), take one of the hairs and double it in the middle, hold the double between the thumb and fore-finger of the left hand, letting the two ends hang from the under side of the thumb, and keeping the hairs between the thumb and finger, about a third of an inch apart. Now proceed to twist the two hairs toward the end of the finger, letting them twist together as the loop emerges on the upper side of the thumb.
Select long, thick hairs from the tail of any horse (we suggest using a well-tempered horse). Take one of the hairs and fold it in half, holding the loop between your thumb and index finger of your left hand, allowing the two ends to hang from the underside of your thumb, and keeping the hairs about a third of an inch apart between your thumb and finger. Now, start twisting the two hairs toward the tip of your finger, allowing them to twist together as the loop comes up on the top side of your thumb.
A little practice will overcome what at first seems very difficult. To keep the two hairs between the fingers at the right distance of separation, and at the same time to twist them and draw the loop from between the fingers as they are twisted, seems quite a complicated operation; and so it will be found at first. But when once mastered by practice, the twisting of five nooses a minute will be an easy matter. When the entire length of the hairs are twisted, the ends should be cut off even and then passed through the small loop at the folded end. The noose is then ready to be fastened to the main string of support. Horse-hair nooses are commonly used in nearly all snares as they are always to be had, and possess considerable strength. The fine brass wire is also extensively used, and the writer rather prefers it. It is very strong and slips easily, besides doing away with the trouble of twisting the loops, which to some might be a very difficult and tedious operation. We recommend the wire, and shall allude to it chiefly in the future, although the horse-hair may be substituted whenever desired.
A little practice will help you get through what initially seems very difficult. Keeping the two hairs between your fingers at the right distance while twisting them and pulling the loop from between your fingers as they're twisted seems pretty complicated at first. But once you get the hang of it with practice, twisting five nooses a minute will become easy. After twisting the entire length of the hairs, you should cut the ends evenly and pass them through the small loop at the folded end. The noose is then ready to be attached to the main support string. Horsehair nooses are commonly used in almost all traps since they are always available and are quite strong. Fine brass wire is also widely used, and I personally prefer it. It's very strong, slips easily, and eliminates the hassle of twisting the loops, which some may find quite difficult and tedious. I recommend the wire and will mostly refer to it in the future, although horsehair can be used whenever needed.
There is another modification of the foregoing quail-traps very
commonly utilized by professional trappers of many countries. A
low hedge is constructed, often hundreds of feet in length small
openings are left here and there, in which the nooses are placed,
as in the accompanying engraving. The bait is strewn around on both
sides of the hedge, and the grouse or other game, on its discovery,
are almost sure to become entangled
Page 42
sooner or later. It is a well-known fact about these birds, that
they will always seek to pass under an object which comes
in their way rather than fly over it; and although the hedge of
this trap is only a foot or more in height, the birds will almost
invariably run about until they find an opening, in preference to
flying over it. It is owing to this peculiarity of habit that they
are so easily taken by this method. Our illustration gives only a
very short section of hedge; it may be extended to any length. The
writer's experience with the hedge nooses has been very satisfactory,
although never using a length greater than ten feet. It is well
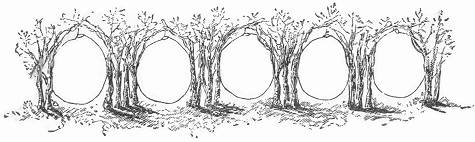 to set the hedge in the locality where quails or partridges are
known to run. And in setting, it is always desirable to
build the hedge so that it will stretch over some open ground,
and connect with two trees or bushes. Cedar boughs are excellent
for the purpose, but any close brushwood will answer very well.
Strew the ground with corn, oats and the like. A small quantity
only is necessary.
to set the hedge in the locality where quails or partridges are
known to run. And in setting, it is always desirable to
build the hedge so that it will stretch over some open ground,
and connect with two trees or bushes. Cedar boughs are excellent
for the purpose, but any close brushwood will answer very well.
Strew the ground with corn, oats and the like. A small quantity
only is necessary.
There’s another way to set up quail traps that’s commonly used by professional trappers in various countries. A low hedge is built, often hundreds of feet long, with small openings left here and there for the nooses, as shown in the accompanying illustration. Bait is scattered around on both sides of the hedge, and when grouse or other game discover it, they almost always end up getting trapped sooner or later. It's a well-known fact that these birds prefer to go under anything in their path instead of flying over it; even though the hedge of this trap is only about a foot high, the birds tend to run around until they find an opening rather than flying over. This behavior makes them easy to catch using this method. Our illustration shows just a small section of hedge, but it can be extended as needed. My experience with hedge nooses has been very positive, even though I’ve never used a length longer than ten feet. It's a good idea to place the hedge in areas where quails or partridges are known to run. When setting it up, it’s best to build the hedge so that it spans some open ground and connects with two trees or bushes. Cedar branches work great for this, but any dense brush will be effective too. Scatter a small amount of corn, oats, and similar bait on the ground; only a little is necessary.
There is another noose trap commonly used abroad, and very little
known here. It is a tree trap, and goes by the name of the
"triangle snare." It is not designed for the capture of any
particular kind of bird, although it often will secure fine
and rare specimens. It consists of a sapling of wood, bent and tied
in the form of a triangle, as shown in our illustration. This may
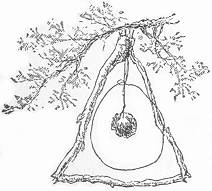 be of any size, depending altogether on the bird the young trapper
fancies to secure. A noose should be suspended in the triangle from
its longest point. This noose should hang as indicated in our
illustration, falling low enough to leave a space of an inch or
so below it at the bottom of the triangle. The bait, consisting
of a piece of an apple, a berry, insect, or piece of
Page 43
meat, according to the wish of the trapper, should then be suspended
in the centre of the noose, after which the contrivance should be
hung in some tree to await events. As they are so easily made and
can be carried with so little trouble, it is an excellent plan to
set out with a dozen or so, hanging them all in different parts of
the woods; as, under circumstances of so many being set, scarcely
a day will pass in which the trapper will not be rewarded by some
one of the snares. The writer once knew of a case where a hawk
was captured by one of these simple devices. In this case it had
been set expressly, and the wire was extra strong. This trap, we
believe, is quite common in parts of Germany, but, as far as we
know, has not been utilized to any great extent in our country.
We recommend it with great confidence.
be of any size, depending altogether on the bird the young trapper
fancies to secure. A noose should be suspended in the triangle from
its longest point. This noose should hang as indicated in our
illustration, falling low enough to leave a space of an inch or
so below it at the bottom of the triangle. The bait, consisting
of a piece of an apple, a berry, insect, or piece of
Page 43
meat, according to the wish of the trapper, should then be suspended
in the centre of the noose, after which the contrivance should be
hung in some tree to await events. As they are so easily made and
can be carried with so little trouble, it is an excellent plan to
set out with a dozen or so, hanging them all in different parts of
the woods; as, under circumstances of so many being set, scarcely
a day will pass in which the trapper will not be rewarded by some
one of the snares. The writer once knew of a case where a hawk
was captured by one of these simple devices. In this case it had
been set expressly, and the wire was extra strong. This trap, we
believe, is quite common in parts of Germany, but, as far as we
know, has not been utilized to any great extent in our country.
We recommend it with great confidence.
There’s another noose trap commonly used abroad that’s not well-known here. It’s a tree trap called the "triangle snare." It’s not made for catching any specific type of bird, but it often manages to catch fine and rare specimens. It consists of a sapling bent and tied into a triangle shape, as shown in our illustration. This can be any size, depending on the bird the young trapper wants to catch. A noose should be hung inside the triangle from its longest point. This noose should hang as shown in our illustration, with about an inch or so of space below it at the bottom of the triangle. The bait—like a piece of apple, a berry, an insect, or a piece of Page 43 meat, based on the trapper’s preference—should then be placed in the center of the noose, after which the device should be hung in a tree to wait for action. Since they’re easy to make and can be carried without much hassle, it’s a great idea to set out with a dozen or so, placing them in different spots in the woods. With so many set, it’s unlikely a day will go by without the trapper being rewarded by at least one of the snares. I once heard of a hawk being caught in one of these simple traps. In this case, it was set specifically for that purpose, and the wire was extra strong. This trap is fairly common in parts of Germany, but as far as we know, it’s not been used much in our country. We recommend it with great confidence.
For the capture of woodchucks, muskrats and house-rats, the wire noose may also be adapted to good purpose. Many a woodchuck has been secured by the aid of this simple invention. It is only necessary to arrange the loop in the opening of the burrow, securing the wire to a stout stick, firmly driven into the ground. If properly "set" the animal, on emerging from the burrow, will become entangled, and by his efforts to disengage himself will only tighten the loop and thus render escape impossible. For rats, the noose should be attached to a nail, and the wire similarly arranged over the hole.
For trapping woodchucks, muskrats, and house rats, a wire noose can also be very effective. Many woodchucks have been caught using this simple invention. You just need to place the loop at the entrance of the burrow and secure the wire to a sturdy stick, firmly driven into the ground. If set up correctly, when the animal comes out of the burrow, it will get caught in the noose, and as it struggles to free itself, it will only tighten the loop, making escape impossible. For rats, the noose should be attached to a nail, with the wire arranged over the hole in the same way.
The slipping-noose thus simply adapted becomes a most effective trap, and is always sure to hold its victim when once within its grasp, as every struggle only tends to draw the noose tighter. They are quick in their action, and produce death without much pain, and for this reason are to be commended.
The slipping noose, once adjusted, becomes a highly effective trap, and it always secures its prey as soon as it’s caught, since any struggle only tightens the loop. They act quickly, causing death with little pain, which is why they are praiseworthy.
THE "TWITCH-UP."
Our next example of the snare, we imagine, is one which all our
boy-readers will immediately recognize; for it would certainly
seem that any country boy who does not know the "Twitch-up" must
be far behind the times, and live in a locality where there are
no rabbits, quail, or even boys, besides himself, to suggest it.
This snare is a universal favorite among nearly all country
boys, and our illustration will immediately bring it to mind. Its
name, "The Twitch-up," conveys perfectly its method of working.
Our illustration represents the trap as it appears when set. It
has many varieties, of which we will select the best. They may
be divided into two classes—those with upright nooses, and
those in which the noose is
Page 44
spread on the ground, the latter of which are commonly called "ground
snares." We will give our attention first to the "upright" style.
These are rather entitled to preference on account of the harmless
death which they inflict, invariably catching by the neck. Whereas
the ground nooses as frequently lift their prey into the air by
their feet, and thus prolong their suffering. Twitch-ups are the
most successful and sure of any snares, and that, too, without
being complicated. The writer, in his younger days, was quite an
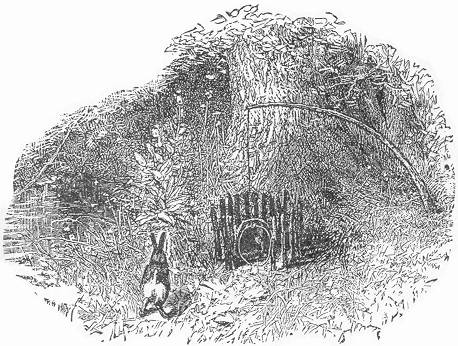 expert in trapping, and he can truthfully say that he found more
enjoyment and had better success with these than with any other
kinds of traps he employed.
expert in trapping, and he can truthfully say that he found more
enjoyment and had better success with these than with any other
kinds of traps he employed.
Our next example of the snare is one that all our young readers will instantly recognize. It seems like any country boy who hasn’t heard of the "Twitch-up" must be pretty out of touch and live in a place where there are no rabbits, quail, or even other boys to teach him about it. This snare is a universal favorite among almost all country boys, and our illustration will quickly jog your memory. The name "The Twitch-up" clearly describes how it works. Our illustration shows the trap as it looks when it’s set. There are many types of this trap, but we’ll focus on the best ones. They can be divided into two categories—those with upright nooses and those that spread the noose on the ground, which are commonly referred to as "ground snares." We’ll start with the "upright" style. These are generally preferred because they cause a quick and painless death, catching the prey by the neck. In contrast, ground nooses often lift their catch by their feet, prolonging their suffering. Twitch-ups are the most effective and reliable of all snares, and they’re simple to set up. The author, in his younger days, was quite skilled at trapping, and he can honestly say that he enjoyed and succeeded more with these than with any other types of traps he used.
They are generally set in thickets or woods where either rabbits or partridges are known to abound. Having arrived at his chosen trapping ground, the young trapper should first select some slender, elastic sapling; that of the hickory is the best, and is generally to be found in open woods—if not, some other kind will answer very well. It should be about five or six feet in length, (trimmed of its branches,) and in diameter need be no larger than an axe-handle or a broom-stick. When this is decided, some spot about five feet distant from the sapling should then be selected. The hatchet and knife will now come into excellent use, in cutting the sticks for the little inclosure shown Page 45 in our drawing. This should be about eight or ten inches in diameter, and of about the same height. The sticks should be driven into the ground in a circle, leaving an open space of about six inches on one side. A stout switch as large as a man's little finger, and nearly two feet long, should then be cut and nicely sharpened at both ends. This should then be driven into the ground in the form of an arch, at the opening of the inclosure.
They are typically found in dense bushes or forests where rabbits or partridges are known to thrive. Once the young trapper arrives at his selected trapping area, he should first pick a slender, flexible sapling; hickory is the best choice and is usually found in open woods—if not, any other type will work just fine. It should be about five or six feet long (with its branches trimmed) and no thicker than an axe handle or a broomstick. After deciding on this, he should choose a spot about five feet away from the sapling. A hatchet and knife will be very useful for cutting the sticks needed for the small enclosure shown Page 45 in our drawing. This enclosure should be about eight to ten inches in diameter and roughly the same height. The sticks should be driven into the ground in a circle, leaving an open space of about six inches on one side. A strong stick, about the thickness of a man's little finger and nearly two feet long, should then be cut and sharpened at both ends. This stick should be driven into the ground in an arch shape at the opening of the enclosure.
We will now ask our readers to turn their attention to the next illustration, in order to understand what is to follow. This picture shows the method of setting the trap.
We now ask our readers to focus on the next illustration to understand what comes next. This picture shows how to set the trap.
After the arch is firmly fixed in its place, a short piece of stick
should be cut, of a length corresponding to the height of the arch.
To the middle of this stick the bait should be attached, being
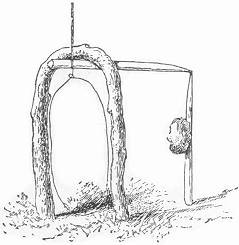 either tied to it or stuck on a plug driven into the stick, the
latter being sharpened on one end. Next proceed to cut another
stick, of about six inches in length; let this be flattened on
one end. The wire noose should then be fastened to the opposite
end. The noose in this case should be large enough to fill the
opening of the arch. We will now go back to the sapling again.
It should be bent down slightly, and a piece of the strong twine
should be tied to its tip. Taking hold of the string, proceed to
bend down the end of the sapling, in the direction of the inclosure,
until it draws with a force strong enough to lift a rabbit if he
were tied to the end of it. Thus holding it down with the string
against the front of the inclosure, cut off the twine at the place
where it crosses the top of the arch, as this will be the required
length. It is now necessary to tie the end of this string to the
same piece of wood and at the same place to which the noose was
tied. When this is done the trap may be set as shown in the cut.
The spring sapling should be bent as seen in the first illustration.
The piece of wood holding the noose should be passed beneath the
top of the arch, as far as it will go, with its long end pointing
inside the inclosure. By now supporting the inside end with the
bait stick, and carefully adjusting the noose so as to completely
fill the arch, the trap will be set.
either tied to it or stuck on a plug driven into the stick, the
latter being sharpened on one end. Next proceed to cut another
stick, of about six inches in length; let this be flattened on
one end. The wire noose should then be fastened to the opposite
end. The noose in this case should be large enough to fill the
opening of the arch. We will now go back to the sapling again.
It should be bent down slightly, and a piece of the strong twine
should be tied to its tip. Taking hold of the string, proceed to
bend down the end of the sapling, in the direction of the inclosure,
until it draws with a force strong enough to lift a rabbit if he
were tied to the end of it. Thus holding it down with the string
against the front of the inclosure, cut off the twine at the place
where it crosses the top of the arch, as this will be the required
length. It is now necessary to tie the end of this string to the
same piece of wood and at the same place to which the noose was
tied. When this is done the trap may be set as shown in the cut.
The spring sapling should be bent as seen in the first illustration.
The piece of wood holding the noose should be passed beneath the
top of the arch, as far as it will go, with its long end pointing
inside the inclosure. By now supporting the inside end with the
bait stick, and carefully adjusting the noose so as to completely
fill the arch, the trap will be set.
Once the arch is securely in place, you should cut a short piece of stick that matches the height of the arch. Attach the bait to the middle of this stick, either by tying it on or placing it on a sharpened plug driven into the stick.
Next, cut another stick about six inches long and flatten one end. Then, fasten a wire noose to the opposite end. The noose should be big enough to fill the opening of the arch. Now, go back to the sapling. Bend it down slightly and tie a piece of strong twine to its tip. Hold the string and bend the end of the sapling toward the enclosure until it has enough force to lift a rabbit if it were tied to the end. Keeping it held down with the string at the front of the enclosure, cut the twine where it crosses the top of the arch, as this will be the necessary length. Next, tie the end of this string to the same piece of wood where the noose was attached. Once this is done, the trap can be set as shown in the image. The spring sapling should be bent as seen in the first illustration. The piece of wood holding the noose should be placed beneath the top of the arch as far as it can go, with the long end pointing inside the enclosure. By supporting the inside end with the bait stick and carefully adjusting the noose to completely fill the arch, the trap will be set.
Page 46 In order to reach the bait, the rabbit or bird must necessarily pass its head through the noose, after which, if the bait be scarcely touched, the animal's doom is sealed, and he is lifted into the air, generally suffering almost instant death. It is well known that in the case of a rabbit the neck is broken by a very slight blow, a strong snap of the finger being often sufficient. It is therefore safe to conclude that when thus suddenly caught and lifted by the noose, death must occur almost instantaneously from the same cause.
Page 46 To reach the bait, the rabbit or bird must pass its head through the noose. After that, if the bait is barely touched, the animal’s fate is sealed, and it gets lifted into the air, usually facing almost immediate death. It’s well known that for a rabbit, a very light blow can break its neck, with a strong snap of the finger often being enough. Therefore, it's safe to say that when suddenly caught and lifted by the noose, death occurs almost instantly from the same reason.
It is not really necessary for success that the force of the sapling should be strong enough to lift the rabbit from the ground, as a mere strong tightening of the noose would be sufficient to cause strangulation and death. But we recommend the former method as being less painful and more rapid in its effects.
It’s not actually essential for the sapling's strength to be enough to lift the rabbit off the ground, since just a strong pull on the noose would be enough to cause strangulation and death. However, we suggest the first method because it’s less painful and works faster.
If the young trapper should experience any difficulty in finding saplings of the right size, in the locality where he desires to set his traps, the difficulty may be easily mended by cutting the poles elsewhere, and carrying them to his trapping-ground, this answering the purpose equally well. They should be sharpened nicely on the large end, and firmly stuck into ground. The "Twitch-up" may be used for the capture of all varieties of game, and when set with the noose in the opening of a hollow tree, a stray coon will occasionally be entrapped.
If the young trapper has trouble finding saplings of the right size in the area where he wants to set his traps, he can easily fix this by cutting poles from another location and bringing them to his trapping site, which works just as well. They should be sharpened nicely at the thicker end and securely placed in the ground. The "Twitch-up" can be used to catch all kinds of game, and when the noose is set in the opening of a hollow tree, a wandering raccoon might occasionally get caught.
The next figure represents another method of constructing this
trap, The picture explains itself. Instead of the arch, two notched
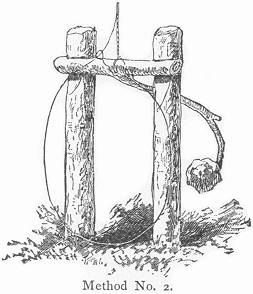 sticks are driven into the ground, one on each side of the opening
of the pen, The other piece should be of the shape shown in the
figure, made either in one piece or in two pieces fastened together.
They may all be constructed from twigs in the woods. Let the noose
and draw-string now be fastened to the middle of the cross piece,
and when set it will appear as in our figure. It will easily be
seen that a slight pull on the bait will turn the cross piece from
beneath the notches, and allow it to fly into the air.
sticks are driven into the ground, one on each side of the opening
of the pen, The other piece should be of the shape shown in the
figure, made either in one piece or in two pieces fastened together.
They may all be constructed from twigs in the woods. Let the noose
and draw-string now be fastened to the middle of the cross piece,
and when set it will appear as in our figure. It will easily be
seen that a slight pull on the bait will turn the cross piece from
beneath the notches, and allow it to fly into the air.
The next figure shows another way to construct this trap. The picture is self-explanatory. Instead of an arch, two notched
sticks are driven into the ground, one on each side of the opening of the pen. The other piece should look like what's shown in the figure, made either as a single piece or in two pieces joined together. All parts can be made from twigs found in the woods. Now, attach the noose and draw-string to the middle of the cross piece, and when it's set, it will look like in our figure. It's easy to see that a slight tug on the bait will move the cross piece out from under the notches, causing it to spring into the air.
In our next instance the same principle is employed. The
Page 47
notched pegs are here driven in the back part of the pen, about
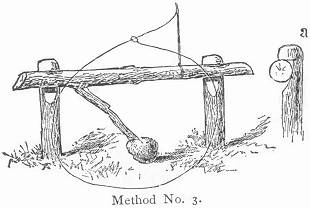 five inches apart, with their notches towards the front. A forked
bait stick of the shape shown is then procured. The draw-string
should be attached near the end furthest from the fork. By now
inserting the ends lightly beneath the notches in the pegs, at
the same time letting the bait incline near the ground, the trap
will be set on a very slight lift, as the bait will dislodge the
pieces. Of course the noose must be arranged in the opening of the
pen, as in the previous varieties. The bait stick in both cases
should be set cautiously beneath the notches, as shown at (a),
so that the slightest turn will cause it to roll out of position.
five inches apart, with their notches towards the front. A forked
bait stick of the shape shown is then procured. The draw-string
should be attached near the end furthest from the fork. By now
inserting the ends lightly beneath the notches in the pegs, at
the same time letting the bait incline near the ground, the trap
will be set on a very slight lift, as the bait will dislodge the
pieces. Of course the noose must be arranged in the opening of the
pen, as in the previous varieties. The bait stick in both cases
should be set cautiously beneath the notches, as shown at (a),
so that the slightest turn will cause it to roll out of position.
In our next example, the same principle is used. The
Page 47
notched pegs are installed at the back of the pen, about
five inches apart, with their notches facing the front. A forked bait stick, shaped as shown, is then obtained. The drawstring should be attached near the end farthest from the fork. By gently inserting the ends beneath the notches in the pegs while allowing the bait to lean close to the ground, the trap will be set with a very slight lift, as the bait will dislodge the pieces. Naturally, the noose has to be placed in the opening of the pen, just like in the previous designs. The bait stick in both scenarios should be carefully positioned beneath the notches, as shown at (a), so that the slightest movement will cause it to roll out of place.
A fourth method of snaring is shown in our next figure. In this
instance the original arch is used, or else some circular opening
constructed in the front of the pen. Inside, at the back part of
the inclosure, a smaller arch is placed. Two sticks are then to
be made similar to those mentioned in our first example of the
"Twitch-up." Let the draw-string be tied to the end of one of these
sticks; after which it should be passed under the inside arch, being
brought out in front of it, and there supported by the bait-stick,
as seen in our illustration. The noose should then be attached
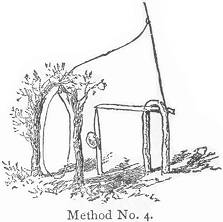 to the draw-string above the pen, and afterward brought down and
arranged in front of the opening. The trap is then set, and will
be found on trial to work admirably.
to the draw-string above the pen, and afterward brought down and
arranged in front of the opening. The trap is then set, and will
be found on trial to work admirably.
A fourth method of trapping is shown in our next figure. In this case, the original arch is used, or a circular opening built into the front of the pen. Inside, at the back of the enclosure, a smaller arch is placed. Two sticks should be made just like those mentioned in our first example of the "Twitch-up." Tie the draw-string to the end of one of these sticks; then pass it under the inside arch, bringing it out in front and supporting it with the bait-stick, as shown in our illustration. The noose should then be attached to the draw-string above the pen and brought down to be positioned in front of the opening. The trap is then set and will work perfectly upon testing.
One of the simplest as well as surest of "Twitch-up" traps
forms the subject of our next illustration. Like the foregoing
varieties it is of course to be surrounded by its pen, and supplied
with a circular opening or arch at one side, in which to hang the
noose. It is constructed of three twigs. A simple crotch (a)
should be firmly inserted in the ground at
Page 48
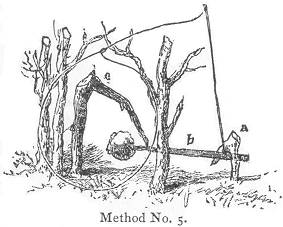 the back part of the pen; (b) the bait stick, consists of a
straight twig, five or six inches in length, and should be attached
to the draw-string at about half an inch from the large end; (c)
is another forked stick with unequal arms, the long one being driven
into the ground near the opening of the pen and a little to one side,
letting the remaining arm point directly towards the crotch-stick
at the back of the pen. The noose having been attached to the
draw-string, the trap may now be set. Lower the bait stick and pass
the large end under the crotch at the back of the pen, catching
the baited end underneath the tip of the forked stick near the
pen's opening. Arrange the noose in front of the entrance, and
the thing is done. A mere touch on the bait will suffice to throw
the pieces asunder. It is an excellent plan to sharpen the point of
the forked stick (c) where it comes in contact with the bait
stick, in order to make the bearing more slight, and consequently
more easily thrown from its balance.
the back part of the pen; (b) the bait stick, consists of a
straight twig, five or six inches in length, and should be attached
to the draw-string at about half an inch from the large end; (c)
is another forked stick with unequal arms, the long one being driven
into the ground near the opening of the pen and a little to one side,
letting the remaining arm point directly towards the crotch-stick
at the back of the pen. The noose having been attached to the
draw-string, the trap may now be set. Lower the bait stick and pass
the large end under the crotch at the back of the pen, catching
the baited end underneath the tip of the forked stick near the
pen's opening. Arrange the noose in front of the entrance, and
the thing is done. A mere touch on the bait will suffice to throw
the pieces asunder. It is an excellent plan to sharpen the point of
the forked stick (c) where it comes in contact with the bait
stick, in order to make the bearing more slight, and consequently
more easily thrown from its balance.
One of the simplest and most reliable "Twitch-up" traps is the focus of our next example. Like the previous types, it should be surrounded by its pen and have a circular opening or arch on one side to hang the noose. It's made from three twigs. A simple crotch (a) should be firmly stuck in the ground at
Page 48
the back of the pen; (b) the bait stick is a straight twig about five or six inches long and should be attached to the draw-string approximately half an inch from the thicker end; (c) is another forked stick with uneven arms, with the longer arm driven into the ground near the pen's opening and slightly to one side, allowing the shorter arm to point directly at the crotch stick at the back of the pen. Once the noose has been fastened to the draw-string, the trap is ready to be set. Lower the bait stick and pass the thicker end under the crotch at the back of the pen, catching the baited end underneath the tip of the forked stick near the pen's opening. Position the noose in front of the entrance, and it’s complete. A simple touch on the bait will be enough to set the trap off. It's a good idea to sharpen the point of the forked stick (c) where it meets the bait stick to make the pressure lighter and thus easier to knock off balance.
THE POACHER'S' SNARE.
Our next example represents one of the oldest and best snares in existence,—simple in construction, and almost infallible in its operations. It is the one in most common use among the poachers of England, hence its name. The pieces are three in number, and may be cut from pine wood, affording easy and profitable employment for the jack-knife during odd hours and rainy days, when time hangs heavily.
Our next example is one of the oldest and best traps around—simple to make and almost foolproof in how it works. It's the most commonly used by poachers in England, which is why it has this name. There are three pieces, and you can cut them from pine wood, making it easy and rewarding to use a pocket knife during free time or on rainy days when you're bored.
The pieces are so simple in form and easy of construction that a sufficient number for fifty traps might be whittled in less than two hours, by any smart boy, who is at all "handy" with his jack-knife.
The pieces are so simple in shape and easy to make that a smart kid who's good with his pocket knife could carve enough for fifty traps in under two hours.
If a few good broad shingles can be found, the work is even much
easier,—mere splitting and notching being then all that is
necessary. The bait stick should be about eight inches long, pointed
at one end, and supplied with a notch in the other at about half
an inch from the tip. The upright
Page 49
stick should be considerably shorter than the bait stick, and have
a length of about ten inches, one end being nicely pointed, and the
broad side of the other extremity supplied with a notch similar
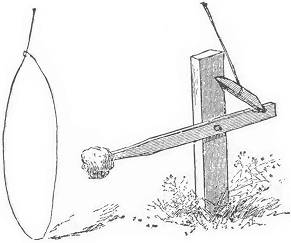 to the bait stick. About four inches from the blunt end, and on the
narrow side of the stick, a square notch should be cut, sufficiently
large to admit the bait stick loosely. The catch piece now remains.
This should be about two and a-half inches in width, and bevelled
off at each end into a flat edge. The shapes of the different pieces,
together with their setting, will be readily understood by a look
at our illustration.
to the bait stick. About four inches from the blunt end, and on the
narrow side of the stick, a square notch should be cut, sufficiently
large to admit the bait stick loosely. The catch piece now remains.
This should be about two and a-half inches in width, and bevelled
off at each end into a flat edge. The shapes of the different pieces,
together with their setting, will be readily understood by a look
at our illustration.
If you can find a few good broad shingles, the work becomes much easier—just splitting and notching is all that's needed. The bait stick should be about eight inches long, pointed at one end, with a notch on the other end about half an inch from the tip. The upright
Page 49
stick should be considerably shorter than the bait stick, around ten inches long, with one end nicely pointed and the broad side of the other end having a notch similar to the bait stick. About four inches from the blunt end, on the narrow side of the stick, a square notch should be cut, large enough to fit the bait stick loosely. Next is the catch piece. This should be about two and a half inches wide, beveled at each end into a flat edge. You can easily understand the shapes of the different pieces and how they fit together by looking at our illustration.
A hundred of these pieces will make a small bundle, and may be easily carried by the young trapper, together with his other necessaries, as he starts off into the woods. He will thus be supplied with parts for thirty-three traps, all ready to be set, only requiring the stakes for the pens, which may be easily cut in the woods. Having selected a flexible sapling about five feet in length, and having stripped it of its branches, proceed to adjust the pieces. Take one of the upright sticks, and insert it firmly in the ground, with its upper notch facing the sapling, and at about four feet distant from it. Bend down the "springer," and by its force determine the required length for the draw-string attaching one end to the tip of the sapling, and the other near the end of a catch piece, the latter having its bevelled side uppermost. The wire noose should then be attached to the draw-string about six inches above the catch-piece. The pen should now be constructed as previously directed. Its entrance should be on the side furthest from the springer, and should be so built as that the peg in the ground shall be at the back part of the enclosure. The pen being finished, the trap may be set.
A hundred of these pieces will make a small bundle, which a young trapper can easily carry along with his other supplies when heading into the woods. This will give him enough parts for thirty-three traps, all ready to be set, needing only the stakes for the pens, which can be easily cut from trees. After selecting a flexible sapling that’s about five feet long and stripping it of its branches, he can start assembling the pieces. He should take one of the upright sticks and securely insert it into the ground with its upper notch facing the sapling, about four feet away. He'll then bend down the "springer" and use its force to measure the needed length for the drawstring, attaching one end to the tip of the sapling and the other near the end of a catch piece, making sure the bevelled side is facing up. The wire noose should be attached to the drawstring about six inches above the catch piece. The pen should now be built as directed earlier, with the entrance on the side furthest from the springer. It should be constructed so that the peg in the ground is at the back of the enclosure. Once the pen is complete, the trap can be set.
Insert the bait stick with bait attached into the square notch in the side of the upright peg; or, if desired, it may be adjusted by a pivot or nail through both sticks, as seen in our illustration, always letting the baited end project toward the Page 50 opening. Draw down the catch piece, and fit its ends into the notches in the back of the upright peg and extremity of the bait-stick. By now pulling the latter slightly, and gently withdrawing the hand, the pieces will hold themselves together, only awaiting a lift at the bait to dislodge them. Adjust the wire loop at the opening of the pen, and you may leave the trap with the utmost confidence in its ability to take care of itself, and any unlucky intruder who tries to steal its property.
Insert the bait stick with the bait attached into the square notch on the side of the upright peg; alternatively, you can adjust it using a pivot or nail through both sticks, as shown in our illustration, always ensuring the baited end sticks out toward the Page 50 opening. Pull down the catch piece and fit its ends into the notches on the back of the upright peg and the end of the bait stick. By gently pulling the bait stick slightly and withdrawing your hand, the pieces will hold themselves together, just waiting for a pull at the bait to release them. Adjust the wire loop at the opening of the pen, and you can leave the trap with complete confidence in its ability to take care of itself and any unfortunate intruder who tries to steal its property.
Most of the snares which we shall describe are constructed from rough twigs, as these are always to be found in the woods, and with a little practice are easily cut and shaped into the desired forms. If desired, however, many of them may be whittled from pine wood like the foregoing, and the pieces carried in a bundle, ready for immediate use. In either case, whether made from the rough twigs or seasoned wood, it is a good plan to have them already prepared, and thus save time at the trapping ground when time is more valuable.
Most of the traps we'll describe are made from rough twigs, which are always available in the woods, and with a bit of practice, you can easily cut and shape them into the needed forms. However, if you prefer, many of them can also be carved from pine wood like the ones mentioned earlier, and the pieces can be carried in a bundle, ready for immediate use. In either case, whether made from rough twigs or seasoned wood, it's a good idea to have them prepared in advance to save time at the trapping site when every moment counts.
THE PORTABLE SNARE.
This is simply a modification of the snare just described, but possesses decided advantages over it in many respects. In the first place, it requires little or no protection in the shape of an enclosure. It can be set in trees or in swamps, or in short in any place where an upright elastic branch can be found or adjusted. Like the foregoing, it is to be commended for its portability, fifty or sixty of the pieces making but a small parcel, and furnishing material for a score of traps. We call it the "portable snare" partly in order to distinguish it from the one just described, but chiefly because this particular variety is generally called by that name in countries where it is most used.
This is just a variation of the snare we just talked about, but it has several clear advantages. First of all, it doesn't need much protection or an enclosure. It can be set up in trees, swamps, or pretty much anywhere you can find or adjust an upright elastic branch. Like the previous one, it’s lightweight and easy to carry, with fifty or sixty of these pieces taking up little space and providing enough materials for a bunch of traps. We refer to it as the "portable snare" to differentiate it from the one we just described, but mainly because that’s what it's commonly called in the places where it's most frequently used.
It is composed of three pieces, all to be cut from a shingle or thin board. Let the first be about eight inches long, and three-quarters of an inch in width. This is for the upright. An oblong mortise should be cut through this piece, one inch in length, and beginning at about an inch from the end of the stick. Three inches from the other end, and on one of the broad sides of the stick, a notch should be made, corresponding in shape to that shown in our illustration. The bait stick should be four or five inches long, one end fitting easily into the mortise, where it should be secured by a wire or smooth nail Page 51 driven through so as to form a hinge, on which it will work easily. On the upper side of this stick, and two inches distant from the pivot, a notch should be cut, similar to that in the upright. The catch piece should be about two inches in length, and bevelled off to a fiat edge at each end. This completes the pieces.
It consists of three parts, all of which should be cut from a shingle or thin board. The first piece should be about eight inches long and three-quarters of an inch wide. This will be the upright. An oblong mortise should be cut through this piece, one inch long, starting about an inch from the end of the stick. Three inches from the other end, on one of the broad sides of the stick, carve a notch that matches the shape shown in our illustration. The bait stick should be four to five inches long, with one end fitting easily into the mortise, secured by a wire or smooth nail driven through to act as a hinge, allowing it to move freely. On the upper side of this stick, two inches from the pivot, cut a notch similar to the one in the upright. The catch piece should be about two inches long, with both ends beveled to a flat edge. This completes the parts.
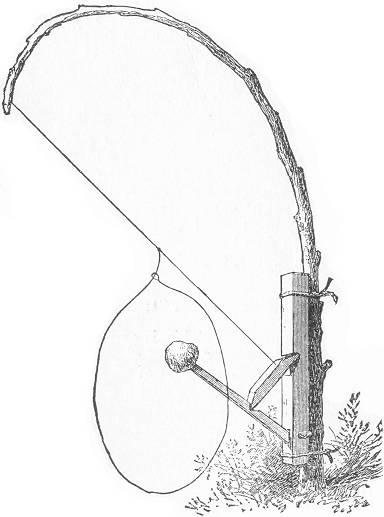
To set the trap, it is only necessary to find some stout sapling, after which the upright stick may be attached to it close to the ground, by the aid of two pieces of stout iron wire, twisted firmly around both. It is well to cut slight grooves at each end of the upright for the reception of the wires, in order to prevent slipping. Tie a strong piece of twine around one Page 52 end of the catch piece, knotting it on the beveled side. Cut the string about two feet in length, and attach the other end to the tip of the sapling. Adjust the bait stick on its pivot. By now lowering the catch piece, and lodging the knotted end beneath the notch in the upright and the other end in the notch on the bait stick, the pieces will appear as in our drawing. Care should be taken to set the catch pieces as slightly as possible in the notches, in order to insure sensitiveness. At about four inches from the catch piece, the wire noose should be attached and arranged in a circle directly around the bait. By now backing up the trap with a few sticks to prevent the bait from being approached from behind, the thing is complete, and woe to the misguided creature that dares to test its efficacy. By adjusting the drawstring so far as the upper end of the catch piece, the leverage on the bait stick is so slight as to require a mere touch to overcome it; and we may safely say that, when this trap is once baited, it will stay baited, so far as animal intruders are concerned, as we never yet have seen a rabbit or bird skilful enough to remove the tempting morsel before being summarily dealt with by the noose on guard duty.
To set the trap, you just need to find a sturdy sapling. Then, attach an upright stick to it close to the ground using two pieces of strong iron wire, twisted tightly around both. It's a good idea to cut small grooves at each end of the upright for the wires to sit in, which helps prevent slipping. Tie a strong piece of twine around one Page 52 end of the catch piece, tying a knot on the beveled side. Cut the string to about two feet in length and attach the other end to the tip of the sapling. Adjust the bait stick on its pivot. Then lower the catch piece and place the knotted end beneath the notch in the upright and the other end in the notch on the bait stick; the pieces will look like our drawing. Be careful to set the catch pieces lightly in the notches to ensure it’s sensitive. About four inches from the catch piece, attach the wire noose and arrange it in a circle around the bait. To finish, back up the trap with a few sticks to stop the bait from being approached from behind. Now it's complete, and any creature that mistakenly tries to test it will be in trouble. By adjusting the drawstring at the upper end of the catch piece, the leverage on the bait stick is minimal, so it only takes a slight touch to trigger it. We can confidently say that once this trap is baited, it will remain baited, as we’ve never seen a rabbit or bird clever enough to take the tempting treat without being caught by the noose.
For portability, however, the following has no equal.
For portability, though, nothing compares to this.
THE "SIMPLEST" SNARE.
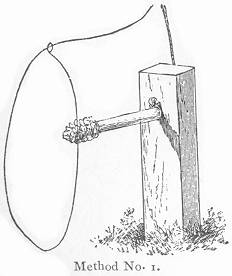 This is one of the most ingenious and effective devices used in
the art of trapping; and the principle is so simple and universal
in its application to traps in general as to become a matter of
great value to all who are at all interested in the subject. There
is scarcely a trap of any kind which could not be set with the
knotted string and bait stick, at the expense of a little thought
and ingenuity. The principle is easily understood by a look at our
engraving, which probably represents the simplest twitch-up
it is possible to construct. A stout wooden peg, having a hole the
size of a lead pencil near the top, is driven firmly into the
Page 53
ground. The "knot" is made on the end of the draw-string, and passed
through the hole in the peg from behind, being secured in place by
the insertion of the bait stick in front. The latter should be about
four inches long, and should be inserted very lightly,—merely
enough to prevent the knot from slipping back. The noose should
be fastened to the draw-string six or seven inches from the knot,
and arranged in front of the bait at the opening of the pen, which
should be constructed as previously directed. The peg should be
about six inches long and the hole should be made with a 1-3 inch
auger. Dozens of these pegs may be carried without inconvenience,
and utilized in the same number of snares, in a very short time.
We have already described the so-called "portable snare;" but,
for portability, there is no noose-trap to be compared with the
above. We give also a few other applications of the same principle.
This is one of the most ingenious and effective devices used in
the art of trapping; and the principle is so simple and universal
in its application to traps in general as to become a matter of
great value to all who are at all interested in the subject. There
is scarcely a trap of any kind which could not be set with the
knotted string and bait stick, at the expense of a little thought
and ingenuity. The principle is easily understood by a look at our
engraving, which probably represents the simplest twitch-up
it is possible to construct. A stout wooden peg, having a hole the
size of a lead pencil near the top, is driven firmly into the
Page 53
ground. The "knot" is made on the end of the draw-string, and passed
through the hole in the peg from behind, being secured in place by
the insertion of the bait stick in front. The latter should be about
four inches long, and should be inserted very lightly,—merely
enough to prevent the knot from slipping back. The noose should
be fastened to the draw-string six or seven inches from the knot,
and arranged in front of the bait at the opening of the pen, which
should be constructed as previously directed. The peg should be
about six inches long and the hole should be made with a 1-3 inch
auger. Dozens of these pegs may be carried without inconvenience,
and utilized in the same number of snares, in a very short time.
We have already described the so-called "portable snare;" but,
for portability, there is no noose-trap to be compared with the
above. We give also a few other applications of the same principle.
This is one of the most clever and effective devices used in trapping; and the principle is so simple and widely applicable that it becomes very valuable to anyone interested in the topic. There’s hardly a type of trap that couldn’t be set with a knotted string and bait stick, with just a bit of thought and creativity. The principle is easy to grasp by looking at our illustration, which likely shows the simplest twitch-up you can make. A sturdy wooden peg, with a hole the size of a pencil near the top, is firmly driven into the Page 53 ground. The "knot" is tied at the end of the drawstring and passed through the hole in the peg from behind, secured in place by inserting the bait stick in front. The bait stick should be about four inches long and should be inserted lightly—just enough to keep the knot from slipping back. The noose should be tied to the drawstring six or seven inches from the knot and arranged in front of the bait at the opening of the pen, which should be built as previously instructed. The peg should be about six inches long, and the hole should be made with a 1-3 inch auger. You can carry dozens of these pegs without hassle, using them in the same number of snares in no time. We have already talked about the so-called "portable snare," but for portability, there’s no noose trap that compares to this one. We also provide a few other uses of the same principle.
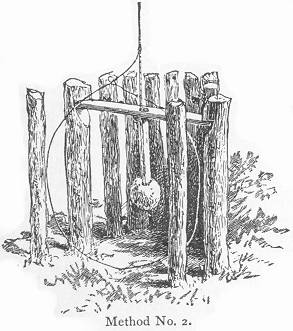 In the second example, a horizontal stick is used instead of the
peg, the hole being made in its centre. Its ends are caught in
notches in opposite sticks at the back part of the pen, and the
noose arranged at the opening.
In the second example, a horizontal stick is used instead of the
peg, the hole being made in its centre. Its ends are caught in
notches in opposite sticks at the back part of the pen, and the
noose arranged at the opening.
In the second example, a horizontal stick replaces the peg, with a hole drilled in its center. The ends are secured in notches on opposite sticks at the back of the pen, and the noose is set at the opening.
Again, by a third method (see engraving next page), these notched sticks may be driven into the ground first, and a row of twigs continued on them on both sides, thus leaving a passageway between as represented in the illustration. A noose may then be set at each opening, with the bait in the middle; so that, at whichever side it is approached, the result is the same, besides affording a chance of securing two birds at the same time.
Again, using a third method (see the engraving on the next page), these notched sticks can be driven into the ground first, and a line of twigs can be placed on them on both sides, creating a passageway between them as shown in the illustration. A noose can then be set at each opening, with the bait in the middle; so that, no matter which side it’s approached from, the outcome is the same, while also allowing the chance to catch two birds at once.
THE QUAIL SNARE.
That quails are sociable in their habits, and that they run together in broods in search of their food, is a fact well known Page 54 to all sportsmen. A most excellent opportunity is thus afforded the hunter to secure several at one shot, and the same advantage may be gained by the trapper by specially arranging for it. For this purpose there is no invention more desirable or effective than the snare we next illustrate; and on account of the companionable habits of the quail, it is just as sure to catch six birds as one. The principle on which the trap works, is the same as in the three foregoing.
That quails are social creatures and that they gather in groups to search for food is a fact well known to all hunters. This creates a great opportunity for the hunter to catch several at once, and the same benefit can be utilized by trappers who set up for it. For this purpose, there is no invention more useful or effective than the snare we will illustrate next; because of the sociable nature of quails, it is just as likely to catch six birds as it is to catch one. The principle behind how the trap works is the same as in the three previous examples.
Two notched pegs are first driven into the ground, about four inches
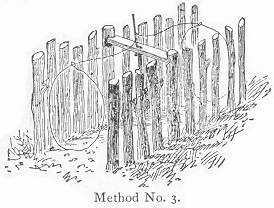 apart, and the flat stick with the hole in the centre caught beneath
these summits, as just described. It should be firmly secured;
several nooses are next to be attached to the drawstring, and the
trap set as already directed.
apart, and the flat stick with the hole in the centre caught beneath
these summits, as just described. It should be firmly secured;
several nooses are next to be attached to the drawstring, and the
trap set as already directed.
Two notched pegs are first hammered into the ground, about four inches apart, and the flat stick with the hole in the center is placed under these ends, as previously described. It should be secured tightly; next, several loops are to be added to the drawstring, and the trap should be set as instructed earlier.
The best bait consists of a "nub" of pop-corn, firmly impaled on
the spindle, together with a few loose grains scattered on the ground
right beneath it. The nooses should be arranged around the bait so
as to touch or overlap each other, and the bait stick introduced
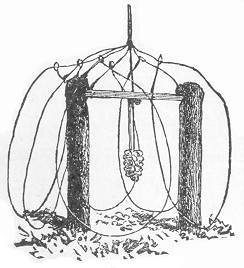 into the hole a little more firmly than when set with one noose. The
quail on reaching the trap all rush for the corn on the ground,
and thus fill nearly if not all the nooses. When the supply here
is exhausted, then united attacks are directed towards the "nub"
on the bait stick, which soon becomes loosened: the knot is thus
released and each noose will probably launch a victim in mid-air.
This invention is original with the author of this work, so far
as he knows; and it will be found the simplest as well as most
effective quail snare in existence. Pop-corn is mentioned as bait
partly on account of its being a favorite food with the quail; but
particularly because the pecking which it necessitates
Page 55
in order to remove the grains from the cob, is sure to spring the
trap. If pop corn cannot be had, common Indian corn will answer
very well. Oats or buckwheat may also be used, as the ground bait,
if desired.
into the hole a little more firmly than when set with one noose. The
quail on reaching the trap all rush for the corn on the ground,
and thus fill nearly if not all the nooses. When the supply here
is exhausted, then united attacks are directed towards the "nub"
on the bait stick, which soon becomes loosened: the knot is thus
released and each noose will probably launch a victim in mid-air.
This invention is original with the author of this work, so far
as he knows; and it will be found the simplest as well as most
effective quail snare in existence. Pop-corn is mentioned as bait
partly on account of its being a favorite food with the quail; but
particularly because the pecking which it necessitates
Page 55
in order to remove the grains from the cob, is sure to spring the
trap. If pop corn cannot be had, common Indian corn will answer
very well. Oats or buckwheat may also be used, as the ground bait,
if desired.
The best bait is a chunk of popcorn, securely stuck on the stick, along with a few loose kernels scattered on the ground right underneath it. The nooses should be arranged around the bait to touch or overlap, and the bait stick should be pushed into the hole a bit more firmly than when it’s set with just one noose. When the quail reach the trap, they all rush for the corn on the ground, filling nearly all the nooses. Once that supply is gone, they turn their attention to the chunk on the bait stick, which soon gets loosened: the knot is then released, and each noose will likely fling a victim into the air. This idea is original to the author of this work, as far as he knows; and it will be found to be the simplest and most effective quail snare available. Popcorn is suggested as bait partly because it’s a favorite food for quail; but especially because the pecking needed to get the kernels off the cob will surely trigger the trap. If popcorn isn’t available, regular corn will work just fine. Oats or buckwheat can also be used as ground bait, if preferred.
THE BOX SNARE.
This is a most unique device, and will well repay anyone who may
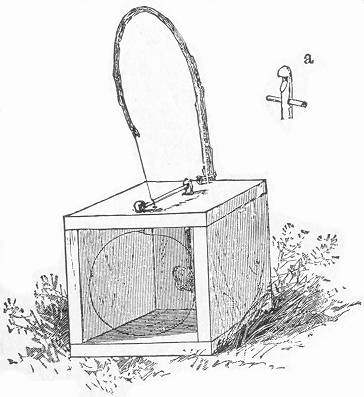 desire to test its merits. It may be set for rabbits, coon, or
feathered game, of course varying the size of the box accordingly. For
ordinary purposes, it should be seven or eight inches square, leaving
one end open. Place it in the position shown in the illustration
and proceed to bore an auger hole in the top board, one and a half
inches from the back edge.
desire to test its merits. It may be set for rabbits, coon, or
feathered game, of course varying the size of the box accordingly. For
ordinary purposes, it should be seven or eight inches square, leaving
one end open. Place it in the position shown in the illustration
and proceed to bore an auger hole in the top board, one and a half
inches from the back edge.
This is a truly unique device and is sure to be worthwhile for anyone who wants to try it out.
It can be set up for rabbits, raccoons, or birds, just remember to adjust the size of the box accordingly. For typical use, it should be about seven or eight inches square, leaving one end open. Place it as shown in the illustration and then drill an auger hole in the top board, one and a half inches from the back edge.
This is for the reception of the bait stick. Directly opposite to this and an inch from the front edge of the board a notched peg should be inserted. A gimlet hole should now be bored on a line between the auger hole and notched peg, and half an inch from the latter. A small stout screw eye should next be inserted at the rear edge of the board, and another one fastened to the back board, two inches from the bottom. With these simple preparations the box is complete. The bait stick should be about five or six inches long and supplied with a notch at the upper end. It should be of such a size as to pass easily into the auger hole, and provided with a peg inserted through it at about an inch and a half from the notched end, as shown in our illustration at (a). The object of this peg is to prevent the bait stick from being drawn entirely through the hole by the Page 56 force of the pull from above. The catch piece should be only long enough to secure its ends beneath the notches in the peg at the top of the box and the projecting bait stick. It should be bevelled off at the tips as in the instances previously described, and attached to a piece of sucker wire, the point of attachment being at about an inch from the end of the stick. The wire should be about two and a half feet in length, the catch piece being fastened at about six inches from one end. To set this neat little invention it is first necessary to procure a strong and elastic switch about four feet in length, sharpen it slightly at the large end and insert it firmly in the screw eye at the back of the box, securing it in place at the top by strings through the screw eye at that place. By now attaching the short end of the wire to the tip of the sapling, inserting the bait stick from the inside of the box, and securing the catch piece in the notches, the other pieces will be in equilibrium, and the only remaining thing to be done is to pass the long end of the wire through the gimlet hole, and form it into a slipping noose which shall completely fill the opening of the box. In order to reach the bait the animal must pass his head through the noose, and it can be easily seen that the slightest pull on that tempting morsel will release the catch piece and tighten the wire around the neck of the intruder. Where the trap is small and the captured animal is large, it will sometimes happen that the box will be carried a distance of several feet before overpowering its victim; but it is sure to do it in the end if the spring powers of the sapling are strong and it is firmly secured to the box. If desired, the box may be tied to a neighboring stone or tree to prevent any such capers; but it will generally be found unnecessary, and a few minutes' search will always reveal it with its unlucky captive.
This is for the bait stick setup. Directly opposite this and an inch from the front edge of the board, a notched peg should be inserted. Now, a small hole should be bored on a line between the auger hole and notched peg, and half an inch from the latter. A small sturdy screw eye should be placed at the back edge of the board, and another one attached to the back board, two inches from the bottom. With these simple preparations, the box is complete. The bait stick should be about five or six inches long with a notch at the upper end. It should be sized to fit easily into the auger hole and have a peg inserted about an inch and a half from the notched end, as shown in our illustration at (a). The purpose of this peg is to keep the bait stick from being pulled all the way through the hole by the force from above. The catch piece should be just long enough to secure its ends beneath the notches in the peg at the top of the box and the protruding bait stick. It should be beveled off at the tips as previously described, and attached to a piece of wire, connected about an inch from the end of the stick. The wire should be about two and a half feet long, with the catch piece attached about six inches from one end. To set up this handy invention, first, you need to find a strong and flexible switch about four feet long, sharpen it slightly at the large end, and insert it firmly into the screw eye at the back of the box, securing it at the top with string threaded through the screw eye there. By attaching the short end of the wire to the tip of the sapling, inserting the bait stick from inside the box, and securing the catch piece in the notches, the other parts will be in balance. The only remaining task is to pass the long end of the wire through the small hole and form it into a slipping noose that completely fills the opening of the box. To reach the bait, the animal must push its head through the noose, and it’s clear that even the slightest tug on that tempting morsel will release the catch piece and tighten the wire around the intruder's neck. If the trap is small and the captured animal is large, it may occasionally happen that the box gets carried a few feet before overpowering its victim; but it will certainly do so in the end if the spring power of the sapling is strong and it’s securely attached to the box. If you want, the box can be tied to a nearby stone or tree to prevent it from moving; however, this is usually unnecessary, and a quick search will often show it with its unfortunate captive.
We have described the box with its spring attached; but this is not a requisite, as it may be used with growing sapling when required.
We’ve described the box with its spring attached, but this isn’t necessary, as it can be used with a growing sapling when needed.
The same trap may be constructed of a pasteboard box and whalebone, for the capture of small birds, and used with good success. The size we have mentioned is adaptable for rabbits and animals of the same size, but is really larger than necessary for feathered game.
The same trap can be made from a cardboard box and whalebone to catch small birds, and it works quite well. The size we've mentioned is suitable for rabbits and similar-sized animals, but it's actually bigger than needed for birds.
THE DOUBLE BOX SNARE.
This is another embodiment of the same principle which has already been described, viz.—the knotted string. By many it Page 57 is considered an improvement on the box snare just mentioned, owing to the possibility of its taking two victims at the same time. It may be set for rabbits, mink, or muskrat, and will be found very efficient.
This is another version of the same principle that has already been described, namely—the knotted string. Many people consider it an improvement over the previously mentioned box snare because it can capture two victims at once. It can be used for rabbits, mink, or muskrats, and is known to be very effective.
It consists of a box about eight inches square, one foot in length,
and open at both ends. In the centre of the top board a hole of the
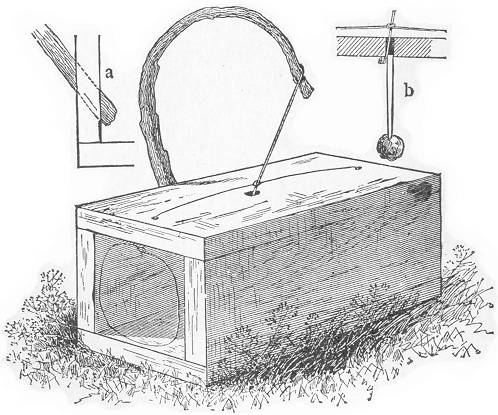 diameter of a lead pencil should be bored, and a smaller aperture
also made in the middle of each end near the edge as seen in the
accompanying engraving. The spring is next required. This should
consist of an elastic switch or small pole, three or more feet
in length. It should be inserted in a slanting auger hole, made
through the middle of one of the side boards near the bottom at
the angle shown at (a). Should the switch fit loosely it
may be easily tightened by a small wedge driven in beside it. The
bait stick (b) should be about four inches in length, and
large enough to fit easily into the hole in the centre of the top
board. Next procure a stout bit of cord about eight inches in length.
Tie one end to the tip of
Page 58
the switch and provide the other with a large double knot. A second
knot should then be made, about an inch and a half above the first.
A piece of sucker wire is the next necessity. Its length should be
about five feet, and its centre should be tied over the uppermost
knot in the string. If the bait is now in readiness, the trap may
be set. Bend down the switch until the end knot will pass through
the hole in the centre of the board. When it appears in the inside
of the box, it should then be secured by the insertion of the top
of the bait stick, as shown at (b). This insertion need be
only very slight, a sixteenth of an inch being all that is sufficient
to prevent the knot from slipping back. The spring is thus held
in the position seen in the drawing, and the loose ends of the
sucker wire should then be passed downward through the small holes
and arranged in nooses at both openings of the box. Our trap is
now set, and the unlucky creature which attempts to move that bait
from either approach, will bring its career to an untimely end.
The bait stick may be so delicately adjusted as to need only the
slightest touch to dislodge it. Such a fine setting is to be guarded
against, however, being as likely to be sprung by a mouse as by
a larger animal. The setting is easily regulated, being entirely
dependent upon the slight or firm insertion of the bait stick.
Among all the "modi operandi" in the construction of traps, there
is scarcely one more simple than the principle embodied in this
variety, and there is none more effective.
diameter of a lead pencil should be bored, and a smaller aperture
also made in the middle of each end near the edge as seen in the
accompanying engraving. The spring is next required. This should
consist of an elastic switch or small pole, three or more feet
in length. It should be inserted in a slanting auger hole, made
through the middle of one of the side boards near the bottom at
the angle shown at (a). Should the switch fit loosely it
may be easily tightened by a small wedge driven in beside it. The
bait stick (b) should be about four inches in length, and
large enough to fit easily into the hole in the centre of the top
board. Next procure a stout bit of cord about eight inches in length.
Tie one end to the tip of
Page 58
the switch and provide the other with a large double knot. A second
knot should then be made, about an inch and a half above the first.
A piece of sucker wire is the next necessity. Its length should be
about five feet, and its centre should be tied over the uppermost
knot in the string. If the bait is now in readiness, the trap may
be set. Bend down the switch until the end knot will pass through
the hole in the centre of the board. When it appears in the inside
of the box, it should then be secured by the insertion of the top
of the bait stick, as shown at (b). This insertion need be
only very slight, a sixteenth of an inch being all that is sufficient
to prevent the knot from slipping back. The spring is thus held
in the position seen in the drawing, and the loose ends of the
sucker wire should then be passed downward through the small holes
and arranged in nooses at both openings of the box. Our trap is
now set, and the unlucky creature which attempts to move that bait
from either approach, will bring its career to an untimely end.
The bait stick may be so delicately adjusted as to need only the
slightest touch to dislodge it. Such a fine setting is to be guarded
against, however, being as likely to be sprung by a mouse as by
a larger animal. The setting is easily regulated, being entirely
dependent upon the slight or firm insertion of the bait stick.
Among all the "modi operandi" in the construction of traps, there
is scarcely one more simple than the principle embodied in this
variety, and there is none more effective.
It consists of a box about eight inches square, one foot long, and open at both ends. In the center of the top board, a hole the size of a pencil should be drilled, with smaller holes made in the middle of each end near the edge, as shown in the accompanying illustration. Next, you'll need a spring. This should be an elastic switch or small pole, three feet or more in length. It should be inserted at an angle through a hole made in the middle of one of the side boards near the bottom at the angle shown at (a). If the switch fits loosely, you can easily tighten it with a small wedge driven in next to it. The bait stick (b) should be about four inches long and thick enough to fit easily into the hole in the center of the top board. Next, get a strong piece of cord about eight inches long. Tie one end to the tip of the switch and make a large double knot on the other end. Then, make a second knot about an inch and a half above the first one. A piece of wire is next; it should be about five feet long, with the center tied over the uppermost knot in the string. If the bait is ready, the trap can be set. Bend down the switch until the end knot passes through the hole in the center of the board. When it appears inside the box, secure it by inserting the top of the bait stick, as shown at (b). This insertion only needs to be slight; just a sixteenth of an inch is enough to stop the knot from slipping back. The spring is now held in the position shown in the drawing, and the loose ends of the wire should be passed through the small holes and arranged into loops at both openings of the box. The trap is now set, and any creature that tries to take the bait from either side will meet an unfortunate end. The bait stick can be adjusted so delicately that it only needs the slightest touch to dislodge it. However, be careful with such a fine setting, as it could be triggered by a mouse just as easily as by a larger animal. The setting is easy to regulate and depends on how lightly or firmly the bait stick is inserted. Among all the methods of constructing traps, there is hardly one simpler than this design, and there’s none more effective.
The box snare already described may be set by the same method, and indeed the principle may be applied to almost any trap, from the simplest snare described on page (52) to the largest dead-fall.
The box snare mentioned earlier can be set up using the same method, and really, this principle can be applied to nearly any trap, from the simplest snare outlined on page (52) to the biggest dead-fall.
GROUND SNARES.
THE OLD-FASHIONED SPRINGLE.
This is the variety of snare which has been in very common use
for ages, and has always been the one solitary example of a noose
trap which our "boys' books" have invariably pounced upon for
illustration. For the capture of small birds it works very nicely;
and as without it our list of traps would be incomplete, we will
give an illustration of it as it appears when
Page 59
set and ready for its work. In constructing the affair it is first
necessary to cut a flexible twig of willow or bramble about eighteen
inches in length, and form it into a loop as seen at (a),
securing the tips by a few circuits of string, and allowing the
larger end to project an inch or more beyond the other. This loop,
which is called the "spreader," should now be laid down flat; and
on the upper side of the large end and about an inch from its tip,
a notch should be cut as our illustration shows. The spring should
next be procured, and should consist of a pliant, elastic switch,
about four feet in length. A piece of fish line about two feet
long, should now be fastened to the tip of the switch, and the
loose end of the cord attached to a catch piece of the shape shown
at (b). This catch may be about an inch and a half long,
and should be whittled off to an edge on one end, the string being
attached at about its centre. A slipping noose, made from strong
horse hair, or piece of fine wire about two feet long, should now
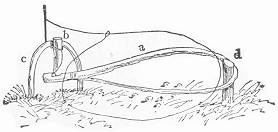 be fastened to the string about two inches above the catch. Having
the switch thus prepared, it is ready to be inserted in the ground
at the place selected for the trap. When this is done, another
small flexible twig about a foot in length should cut, and being
sharpened at both ends, should be inserted in the ground in the
form of an arch (c), at about three feet distant from the
spring, and having its broad side toward it. Insert the notch of
the spreader exactly under the top of the arc, and note the spot
where the curved end of the former touches the ground. At this
point a peg (d) should be driven leaving a projecting portion
of about two inches. The pieces are now ready to be
Page 60
adjusted. Pass the curved end of the spreader over the peg, bringing
the notched end beneath the arc with the notch uppermost. Draw down
the catch piece, and pass it beneath the arc from the opposite
side letting the bevelled end catch in the notch in the spreader,
the other end resting against the upper part of the arc. Arrange
the slipping noose over the spreader as our drawing indicates,
bringing it inside the peg, as there shown, as otherwise
it would catch upon it when the snare is sprung. Strew the bait,
consisting of berries, bird-seed, or the like, inside the
spreader, and all is ready. Presently a little bird is seen to
settle on the ground in the neighborhood of the trap; he spies
the bait and hopping towards it, gradually makes bold enough to
alight upon the spreader, which by his weight immediately falls,
the catch is released, the switch flies up, and the unlucky bird
dangles in the air by the legs. If the trapper is near he can easily
release the struggling creature before it is at all injured, otherwise
it will flutter itself into a speedy death.
be fastened to the string about two inches above the catch. Having
the switch thus prepared, it is ready to be inserted in the ground
at the place selected for the trap. When this is done, another
small flexible twig about a foot in length should cut, and being
sharpened at both ends, should be inserted in the ground in the
form of an arch (c), at about three feet distant from the
spring, and having its broad side toward it. Insert the notch of
the spreader exactly under the top of the arc, and note the spot
where the curved end of the former touches the ground. At this
point a peg (d) should be driven leaving a projecting portion
of about two inches. The pieces are now ready to be
Page 60
adjusted. Pass the curved end of the spreader over the peg, bringing
the notched end beneath the arc with the notch uppermost. Draw down
the catch piece, and pass it beneath the arc from the opposite
side letting the bevelled end catch in the notch in the spreader,
the other end resting against the upper part of the arc. Arrange
the slipping noose over the spreader as our drawing indicates,
bringing it inside the peg, as there shown, as otherwise
it would catch upon it when the snare is sprung. Strew the bait,
consisting of berries, bird-seed, or the like, inside the
spreader, and all is ready. Presently a little bird is seen to
settle on the ground in the neighborhood of the trap; he spies
the bait and hopping towards it, gradually makes bold enough to
alight upon the spreader, which by his weight immediately falls,
the catch is released, the switch flies up, and the unlucky bird
dangles in the air by the legs. If the trapper is near he can easily
release the struggling creature before it is at all injured, otherwise
it will flutter itself into a speedy death.
This is the type of snare that has been widely used for ages and has always been the go-to example of a noose trap that our "boys' books" love to illustrate. It works great for catching small birds, and since we need it for our list of traps to be complete, we'll show what it looks like when
Page 59
set and ready to go.
To build it, first cut a flexible twig from a willow or bramble about eighteen inches long and shape it into a loop as shown at (a), securing the ends with a few wraps of string, and letting the larger end stick out an inch or more beyond the other. This loop, called the "spreader," should lie flat, and about an inch from the tip of the larger end, you should cut a notch as illustrated. Next, get a spring made of a pliant, elastic switch that's about four feet long. Now attach a piece of fishing line about two feet long to the tip of the switch, and tie the loose end of the line to a catching piece shaped as shown at (b). This catching piece should be about an inch and a half long, with one end tapered to a point, and the string should be attached roughly at its center.
A slipping noose, made from strong horsehair or a piece of fine wire about two feet long, should now be attached to the string about two inches above the catch.
Once the switch is prepared, it’s ready to be placed in the ground at your chosen trap location. After that, cut another small, flexible twig about a foot long, sharpen it at both ends, and insert it into the ground to form an arch (c) about three feet away from the switch, with its broad side facing the spring. Position the notch of the spreader directly under the top of the arch and mark where the curved end of the spreader touches the ground. Drive a peg (d) at this point, leaving about two inches sticking out. Now everything is ready to be Page 60 adjusted.
Pass the curved end of the spreader over the peg, bringing the notched end underneath the arch with the notch facing up. Pull down the catching piece and push it under the arch from the opposite side, letting the beveled end catch in the notch of the spreader, with the other end resting against the top of the arch. Set the slipping noose over the spreader as shown in the drawing, making sure it goes inside the peg, or else it will get stuck on it when the snare is triggered. Scatter the bait—such as berries, birdseed, or similar—inside the spreader, and you’re all set.
Soon, a little bird lands nearby; it sees the bait, hops over, and eventually gathers enough courage to land on the spreader, which immediately drops under its weight, releasing the catch, sending the switch flying up, and the unfortunate bird dangles in the air by its legs. If the trapper is close by, they can easily free the struggling creature before it gets hurt; otherwise, it will flail until it meets a quick demise.
THE IMPROVED SPRINGLE.
The accompanying cut illustrates an improvement on the last mentioned
trap, whereby it can be used for the capture of larger game, and
with most excellent success. In place of the "spreader" a crotched
stick is used, the crotch of which catches around the peg, the other
end being supplied with a notch as in the case of the spreader.
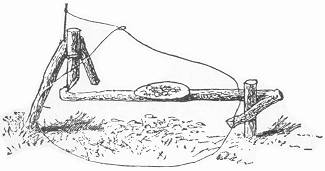 On the upper side of this stick a small pasteboard platform is
tacked, over which and beneath which the bait is thrown. Instead
of the arc, a stout crotch stick is substituted. The noose should
be at least ten inches in diameter and constructed of sucker wire.
It should be arranged on the ground around the bait and inside
of the peg. When the snare is set, the crotched end of the bait
stick will thus rest near the earth, the notched end only being
lifted in order to reach the catch piece. It is well to insert
a few small sticks inside the edge of the noose in order to keep
it in correct position. If properly set, the quail or partridge
in approaching the
Page 61
trap will have to step inside the noose in order to reach
the bait, and while thus regaling itself with a choice meal of
oats, berries, or other delicacies, will be sure to press upon the
bait stick either by pecking, or treading upon it, and will thus
set the catch piece free, only to find itself secured by a grasp
from which he will never escape alive. This is a very effectual
snare; but on account of its securing its victim by the legs and
thus torturing them to death, it is to be deprecated. We would
recommend in preference, those varieties already described as being
fully as successful, and far less cruel. They effect almost instant
death, either by broken necks or strangulation, and are in this
regard among the most humane traps on record.
On the upper side of this stick a small pasteboard platform is
tacked, over which and beneath which the bait is thrown. Instead
of the arc, a stout crotch stick is substituted. The noose should
be at least ten inches in diameter and constructed of sucker wire.
It should be arranged on the ground around the bait and inside
of the peg. When the snare is set, the crotched end of the bait
stick will thus rest near the earth, the notched end only being
lifted in order to reach the catch piece. It is well to insert
a few small sticks inside the edge of the noose in order to keep
it in correct position. If properly set, the quail or partridge
in approaching the
Page 61
trap will have to step inside the noose in order to reach
the bait, and while thus regaling itself with a choice meal of
oats, berries, or other delicacies, will be sure to press upon the
bait stick either by pecking, or treading upon it, and will thus
set the catch piece free, only to find itself secured by a grasp
from which he will never escape alive. This is a very effectual
snare; but on account of its securing its victim by the legs and
thus torturing them to death, it is to be deprecated. We would
recommend in preference, those varieties already described as being
fully as successful, and far less cruel. They effect almost instant
death, either by broken necks or strangulation, and are in this
regard among the most humane traps on record.
The accompanying image shows an improved version of the previous trap, which can successfully capture larger game. Instead of using a "spreader," a forked stick is used, where the fork catches around the peg, and the other end has a notch like the spreader.
On top of this stick, a small piece of cardboard is attached, and the bait is placed over and under it. Instead of the arc, a strong forked stick is used. The noose should be at least ten inches in diameter and made of sturdy wire. It should be placed on the ground around the bait and inside the peg. When the snare is set, the forked end of the bait stick will rest close to the ground, with only the notched end raised to access the catch piece. It's useful to put a few small sticks inside the edge of the noose to keep it in the right position. If set up correctly, the quail or partridge will have to step inside the noose to reach the bait, and while enjoying a tasty meal of oats, berries, or other treats, it will definitely press on the bait stick by pecking or stepping on it, which will release the catch piece but result in it being trapped in a way it cannot escape alive. This is a very effective snare; however, since it catches its victim by the legs and causes them to suffer, it is not advisable. We recommend the varieties mentioned earlier that are just as successful but much less cruel. They result in almost instant death, either by breaking the necks or strangulation, making them some of the most humane traps available.
THE FIGURE FOUR GROUND SNARE.
For simplicity in construction there are few snare traps which
can compare with this variety, although it is somewhat similar
to those last mentioned, and like them, catches by the feet. The
trap consists of three pieces. A catch piece about three inches
long, a bait stick of about six inches, and a stout crotch of the
proportionate size shown in our illustration, a glance at which
will make the setting too clear to need description. Be careful
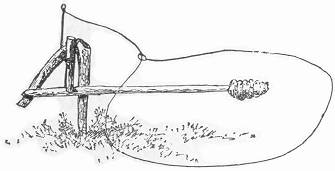 that the bait stick is set fine and rests just beneath
the tip of the catch-piece so that a mere touch on the bait
will release it. Arrange the noose as in the instance last described,
and bait either as therein directed or with an apple or nubbin
of corn, as our accompanying cut indicates. Always remembering
that the noose should be sufficiently large to require the birds
to step inside of it in order to reach the bait.
that the bait stick is set fine and rests just beneath
the tip of the catch-piece so that a mere touch on the bait
will release it. Arrange the noose as in the instance last described,
and bait either as therein directed or with an apple or nubbin
of corn, as our accompanying cut indicates. Always remembering
that the noose should be sufficiently large to require the birds
to step inside of it in order to reach the bait.
For easy construction, there are few snare traps that can match this type, although it's somewhat similar to the ones mentioned earlier, and like them, it catches by the feet. The trap is made up of three parts: a catch piece about three inches long, a bait stick around six inches, and a sturdy crotch of the proper size shown in our illustration, which will make setting it clear enough that it doesn't require further explanation. Be careful
to set the bait stick properly so that it rests just below the tip of the catch piece, allowing a light touch on the bait to release it. Arrange the noose as described earlier, and bait it according to those instructions or with an apple or chunk of corn, as shown in the accompanying image. Always remember that the noose should be large enough for the birds to step inside it to reach the bait.
THE PLATFORM SNARE.
This odd invention will be found to work capitally as a game trap,
and the only extra requisite necessary consists of a slab or light
board about seven inches wide, and a foot in length. Having selected
the spot for the trap, proceed to cut a stiff
Page 62
switch about five feet in length, and having sharpened the larger
end to a nice point, insert it firmly into the ground in a slanting
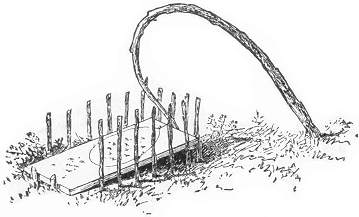 direction as our drawing illustrates. Next bend down the tip of
the sapling, and resting one end of the board on the ground, catch
the tip of the switch against the other end, as our illustration
also shows. A little experimenting will soon determine the right
place for the board, after which two pegs should be driven in the
ground at its edge to hold it against the pressure on the opposite
end. This being done fasten a wire noose to the tip of the switch,
after which the pen is the only thing required. This should be
built of simple little twigs arranged around three sides of the
board, leaving the front end open. To set the snare, lower the
switch and raising the board slightly at the back end, catch the
tip of the springer behind it, afterwards arranging the noose over
the platform, and scattering the bait inside. If the trap has been
constructed properly and set "fine" it will take but a very slight
weight on the platform to lower it from its bearing, the weight of
an ordinary bird being sufficient, and the springer thus released
will fly forward either catching its victim by the neck or legs,
as the case may be. It may sometimes be found necessary to cut
a slight notch in the end of the springer to receive the board,
but in every case it should be tried several times in order to
be sure that it works sensitively.
direction as our drawing illustrates. Next bend down the tip of
the sapling, and resting one end of the board on the ground, catch
the tip of the switch against the other end, as our illustration
also shows. A little experimenting will soon determine the right
place for the board, after which two pegs should be driven in the
ground at its edge to hold it against the pressure on the opposite
end. This being done fasten a wire noose to the tip of the switch,
after which the pen is the only thing required. This should be
built of simple little twigs arranged around three sides of the
board, leaving the front end open. To set the snare, lower the
switch and raising the board slightly at the back end, catch the
tip of the springer behind it, afterwards arranging the noose over
the platform, and scattering the bait inside. If the trap has been
constructed properly and set "fine" it will take but a very slight
weight on the platform to lower it from its bearing, the weight of
an ordinary bird being sufficient, and the springer thus released
will fly forward either catching its victim by the neck or legs,
as the case may be. It may sometimes be found necessary to cut
a slight notch in the end of the springer to receive the board,
but in every case it should be tried several times in order to
be sure that it works sensitively.
This unusual invention works really well as a game trap, and the only extra item you need is a slab or light board about seven inches wide and a foot long. Once you choose the spot for the trap, cut a stiff switch about five feet long. Sharpen one end to a nice point and stick it firmly into the ground at a slant, as shown in our drawing.
Next, bend down the tip of the sapling, and placing one end of the board on the ground, hook the tip of the switch against the other end, as illustrated. A little trial and error will help you find the right spot for the board, after which you should drive in two pegs at its edge to hold it down against the pressure on the opposite end. Once that's done, attach a wire noose to the tip of the switch, and all that's left is to build the pen. This can be made from simple twigs arranged around three sides of the board, leaving the front open. To set the snare, lower the switch while raising the back end of the board slightly, catching the tip of the switch behind it. Then, arrange the noose over the platform and scatter some bait inside. If the trap is built correctly and set "fine," a very light weight on the platform will trigger it, and even the weight of a common bird will be enough. The released switch will then spring forward, catching its prey by the neck or legs, depending on the situation. Sometimes you may need to carve a small notch in the end of the switch for the board, but in every case, you should test it several times to ensure it works smoothly.
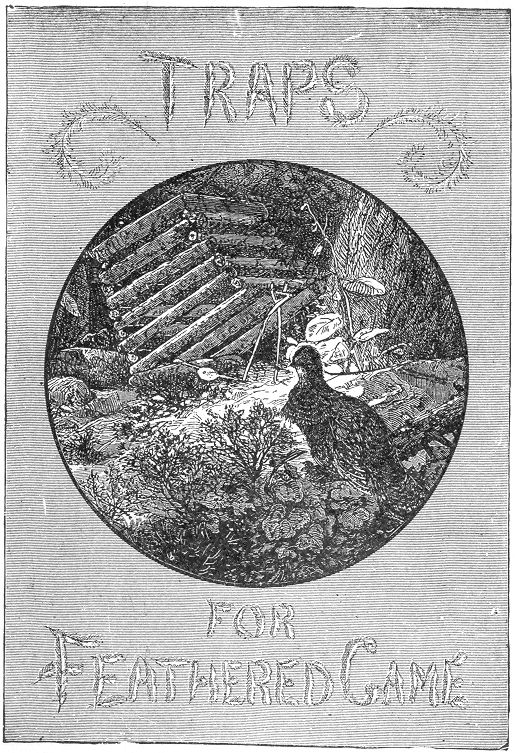
Page 65 BOOK III.
TRAPS FOR FEATHERED GAME.
Bird traps.
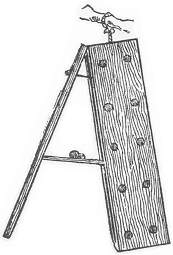 mong the following will be found the various net
and cage traps commonly used in the capture of winged game, besides
several other unique devices in the shape of box traps, etc., many
of which are original with the author of this work and appear in
the present volume for the first time in book form. Commonest among
bird-catching machines, is the well known invention of
mong the following will be found the various net
and cage traps commonly used in the capture of winged game, besides
several other unique devices in the shape of box traps, etc., many
of which are original with the author of this work and appear in
the present volume for the first time in book form. Commonest among
bird-catching machines, is the well known invention of
You will find various net and cage traps that are commonly used to capture birds, along with several other unique devices like box traps, many of which are original creations by the author of this work and are appearing in book form for the first time in this volume. The most common bird-catching device is the well-known invention of
THE SIEVE TRAP.
This device certainly possesses one great advantage:—it is not complicated. Any one possessed of a sieve and a piece of string can get up the trap at two minutes' notice, and provided he has patience, and can wait for his little bird, he is almost sure to be rewarded for his pains,—if he wait long enough. This of course depends upon circumstances: when the birds are plenty and are not shy, it is a common thing to secure three or four at once in a very few minutes, while at other times an hour's patient waiting is unrewarded.
This device definitely has a major advantage: it's not complicated. Anyone with a sieve and a piece of string can set up the trap in just two minutes, and as long as they have some patience and can wait for their little bird, they are likely to be rewarded for their efforts—if they wait long enough. Of course, this depends on the circumstances: when birds are abundant and not skittish, it's common to catch three or four at once in just a few minutes, while at other times, an hour of patient waiting might yield nothing.
The trap consists only of a sieve tilted up on edge and thus propped in position by a slender stick. To this stick a string or thread is attached and the same carried to some near place of concealment, when the trapper may retire out of sight and watch for his "little bird." The ground beneath the sieve is strewn with bread crumbs, seed or other bait, and while the unsuspecting birds are enjoying their repast, the string is pulled and they are made prisoners. The sieve may be arranged with a spindle as described for the coop trap, page (68), and may thus be left to take care of Page 66 itself. Where the birds are plenty and easily captured, the former method answers the purpose perfectly, but when tedious waiting is likely to ensue the self-acting trap is better.
The trap is simply a sieve propped up on its side by a thin stick. A string or thread is attached to this stick and then taken to a nearby hiding spot, allowing the trapper to step back out of view and keep an eye on his "little bird." The ground under the sieve is scattered with bread crumbs, seeds, or other bait, and while the unsuspecting birds are enjoying their meal, the string is pulled, trapping them. The sieve can also be set up with a spindle like the one used for the coop trap, page (68), allowing it to operate automatically. When birds are plentiful and easy to catch, the first method works perfectly, but if waiting around for a long time is expected, the self-acting trap is a better option.
THE BRICK TRAP.
This is a very old invention, and has always been one of the three or four stereotyped specimens of traps selected for publication in all Boys' Books. It is probably well known to most of our readers.
This is a very old invention and has always been one of the few classic examples of traps featured in all Boys' Books. It's likely familiar to most of our readers.
Take four bricks, and arrange them on the ground, as seen in our
engraving, letting them rest on their narrow sides. If properly
arranged, they should have a space between them, nearly as large
as the broad surface of the brick. A small, forked twig of the
shape shown in the separate drawing (b) having a small piece
cut away from each side of the end, should then be procured. Next
cut a slender stick, about four inches in length, bluntly pointed
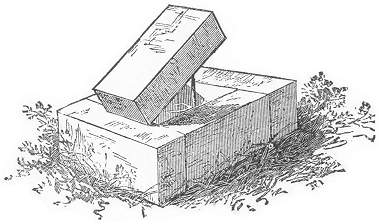 at each end. A small plug with a flat top should now be driven
into the ground, inside the trap, about three inches from either
of the end bricks and projecting about two inches from the ground.
The trap is then ready to be set. Lay the flat end of the forked
twig over the top of the plug, with the forks pointing forward,
or toward the end of the enclosure nearest the plug. The pointed
stick should then be adjusted, placing one end on the flat end of
the fork, over the plug, and the other beneath the fifth brick,
which should be rested upon it. The drawing (b) clearly shows
the arrangement of the pieces. The bait, consisting of berries,
bird-seed, or other similar substances should then be scattered
on the ground on the inside of the enclosure. When
Page 67
the bird flies to the trap he will generally alight on the forked
twig, which by his weight tilts to one side and dislodges the pieces,
thus letting fall the sustained brick.
at each end. A small plug with a flat top should now be driven
into the ground, inside the trap, about three inches from either
of the end bricks and projecting about two inches from the ground.
The trap is then ready to be set. Lay the flat end of the forked
twig over the top of the plug, with the forks pointing forward,
or toward the end of the enclosure nearest the plug. The pointed
stick should then be adjusted, placing one end on the flat end of
the fork, over the plug, and the other beneath the fifth brick,
which should be rested upon it. The drawing (b) clearly shows
the arrangement of the pieces. The bait, consisting of berries,
bird-seed, or other similar substances should then be scattered
on the ground on the inside of the enclosure. When
Page 67
the bird flies to the trap he will generally alight on the forked
twig, which by his weight tilts to one side and dislodges the pieces,
thus letting fall the sustained brick.
Take four bricks and arrange them on the ground like you see in the picture, resting them on their narrow sides. If set up correctly, there should be a gap between them that's almost as wide as the brick's broader surface. You should then get a small forked twig shaped like the one in the separate drawing (b), with a small piece cut off both sides at the end. Next, cut a slender stick about four inches long, with a blunt point at each end.
Now, drive a small plug with a flat top into the ground inside the trap, about three inches from each end brick, sticking up about two inches from the ground. The trap is now ready to be set. Place the flat end of the forked twig over the top of the plug, with the forks pointing forward, toward the end of the enclosure that's closest to the plug. Adjust the pointed stick so that one end rests on the flat end of the fork above the plug, and the other end is underneath the fifth brick that will rest upon it. The drawing (b) shows how to arrange the pieces clearly. Scatter the bait, which can be berries, birdseed, or similar items, on the ground inside the enclosure. When Page 67 a bird flies to the trap, it will usually land on the forked twig, which will tilt to one side under its weight and cause the pieces to fall, dropping the supported brick.
It is not intended to kill the bird, and when rightly constructed
will capture it alive. Care is necessary in setting the topmost
brick in such a position that it will fall aright, and completely
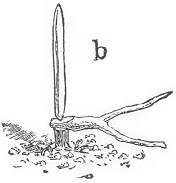 cover the open space. This is a very simple and effectual little
contrivance, and can be made with a box instead of bricks,
if desired. A piece of board may also be substituted for the top
brick, and the enclosure beneath made larger by spreading the bricks
further apart, thus making a more roomy dungeon for the captive
bird.
cover the open space. This is a very simple and effectual little
contrivance, and can be made with a box instead of bricks,
if desired. A piece of board may also be substituted for the top
brick, and the enclosure beneath made larger by spreading the bricks
further apart, thus making a more roomy dungeon for the captive
bird.
It’s not meant to kill the bird, and when set up correctly, it will catch it alive. Care is needed when placing the top brick so that it falls properly and completely covers the opening.
This is a very simple and effective little device, and you could use a box instead of bricks, if you prefer. A piece of wood can also replace the top brick, and you can make the space underneath bigger by spreading the bricks further apart, thus creating a more spacious area for the captured bird.
THE COOP TRAP.
This is another excellent device for the capture of birds and large feathered game, and is used to a considerable extent by trappers throughout the country. Like the brick trap, it secures its victims without harm and furnishes the additional advantage of good ventilation for the encaged unfortunate. Any ordinary coop may be used in the construction of this trap, although the homely one we illustrate is most commonly employed on account of its simplicity and easy manufacture. It also does away with the troublesome necessity of carrying a coop to the trapping ground, as it can be made in a very few minutes with common rough hewn twigs by the clever use of the jack knife. The only remaining requisites consist of a few yards of very stout Indian twine, several small squares of brown pasteboard, a dozen tacks and a number of pieces of board five inches square, each one having a hole through its centre, as our engraving (b) indicates. Having these, the young trapper starts out with material sufficient Page 68 for several coops, and if he is smart will find no difficulty in making and setting a dozen traps in a forenoon.
This is another great device for catching birds and large game birds, and it's used quite a bit by trappers all over the country. Like the brick trap, it captures its targets without harm and provides the added benefit of good ventilation for the trapped animals. Any regular coop can be used to build this trap, although the simple one we show is most commonly used because it’s easy to make. It also eliminates the hassle of carrying a coop to the trapping site, as it can be put together in just a few minutes with some rough-hewn twigs using a jackknife. The only other things needed are a few yards of strong Indian twine, several small squares of brown pasteboard, a dozen tacks, and some square pieces of board measuring five inches, each with a hole in the center, as our illustration (b) shows. With these, the young trapper can head out with enough materials for several coops, and if he's resourceful, he shouldn't have any trouble making and setting a dozen traps in the morning.
In constructing the coop, the first thing to be done is to cut
four stout twigs about an inch in thickness and fifteen inches
in length and tie them together at the corners, letting the knot
come on the inside as our illustration (a) explains and
 leaving a loose length of about two feet of string from each corner.
This forms the base of the coop. Next collect from a number of
twigs of about the same thickness, and from them select two more
corresponding in length to the bottom pieces. Having placed the
base of the coop on the ground, and collected the strings inside
proceed to lay the two selected sticks across the ends of the
Page 69
uppermost two of the square, and directly above the lower two.
Another pair of twigs exactly similar in size should then be cut
and laid across the ends of the last two, and directly above the
second set of the bottom portion, thus forming two squares of equal
size, one directly over the other. The next pair of sticks should
be a trifle shorter than the previous ones and should be placed a
little inside the square. Let the next two be of the same size as
the last and also rest a little inside of those beneath them, thus
forming the commencement of the conical shape which our engraving
presents. By thus continuing alternate layers of the two sticks
cob-house fashion, each layer being closer than the one previous,
the pyramid will be easily and quickly formed. After ten or a dozen
sets have been laid in place, the arm should be introduced into
the opening at the top, and the four cords drawn out, letting each
one lay along its inside corner of the pyramid. Taking the strings
loosely in the left hand and having the twigs in readiness, proceed
to build up the sides until the opening at the top is reduced to
only four or five inches across. The square board will now come
into play. Pass the ends of the cords through the hole in its centre
and rest the edge of the board on the top pair of sticks, taking
care that it is the tip of the grain of the wood instead of its
side, as otherwise it would be likely to crack from the pressure
that is about to be brought upon it. Have ready a stout peg of
hard wood, and laying it over the hole in the board, and between
the strings, proceed to tie the latter as tightly as possible over
it. By now turning the peg, the cords will be twisted and tightened
and the various pieces of the coops will be drawn together with
great firmness, in which state they may be secured by the aid of
a tack driven in the top board against the end of the peg as shown
at (b). Thus we have a neat and serviceable coop, which will
last for many seasons. To set the affair it is necessary
to cut three sticks of the shapes shown in our illustration. The
prop piece is a slender forked twig about ten inches in length
from the tip to the base of the crotch. The spindle is another
hooked twig of the same length: the bait piece is quite similar
to the latter, only an inch shorter and supplied with a square
notch at the tip. It is also slightly whittled off on the upper
side to receive the square of pasteboard or tin, which is to hold
the bait and which may be easily fastened in place by a tack. All of
these twigs may be easily found in any thicket by a little practice
in searching. In setting the trap, it is only necessary to raise
up one side of the coop to the height of the prop stick, insert
the short arm of the
Page 70
spindle through the fork and beneath the edge of the coop. While
holding it thus in position, hook the crotch of the bait stick
around the lower piece at the back of the coop, and pushing the
end of the spindle inside the coop, catch it in the notch of the
bait stick where it will hold, and the trap is ready to be baited.
The bait may consist of oats, wheat, "nannie berries" or the like,
and should be strewn both on the platform and over the ground directly
beneath and around it. If properly set, a mere peck at the
corn will be sufficient to dislodge the pieces and the coop will
fall over its captive. It is not an uncommon thing to find two
or even three quail encaged in a trap of this kind at one fall,
and after the first momentary fright is over, they seem to resign
themselves to their fate and take to their confinement as naturally
as if they had been brought up to it.
leaving a loose length of about two feet of string from each corner.
This forms the base of the coop. Next collect from a number of
twigs of about the same thickness, and from them select two more
corresponding in length to the bottom pieces. Having placed the
base of the coop on the ground, and collected the strings inside
proceed to lay the two selected sticks across the ends of the
Page 69
uppermost two of the square, and directly above the lower two.
Another pair of twigs exactly similar in size should then be cut
and laid across the ends of the last two, and directly above the
second set of the bottom portion, thus forming two squares of equal
size, one directly over the other. The next pair of sticks should
be a trifle shorter than the previous ones and should be placed a
little inside the square. Let the next two be of the same size as
the last and also rest a little inside of those beneath them, thus
forming the commencement of the conical shape which our engraving
presents. By thus continuing alternate layers of the two sticks
cob-house fashion, each layer being closer than the one previous,
the pyramid will be easily and quickly formed. After ten or a dozen
sets have been laid in place, the arm should be introduced into
the opening at the top, and the four cords drawn out, letting each
one lay along its inside corner of the pyramid. Taking the strings
loosely in the left hand and having the twigs in readiness, proceed
to build up the sides until the opening at the top is reduced to
only four or five inches across. The square board will now come
into play. Pass the ends of the cords through the hole in its centre
and rest the edge of the board on the top pair of sticks, taking
care that it is the tip of the grain of the wood instead of its
side, as otherwise it would be likely to crack from the pressure
that is about to be brought upon it. Have ready a stout peg of
hard wood, and laying it over the hole in the board, and between
the strings, proceed to tie the latter as tightly as possible over
it. By now turning the peg, the cords will be twisted and tightened
and the various pieces of the coops will be drawn together with
great firmness, in which state they may be secured by the aid of
a tack driven in the top board against the end of the peg as shown
at (b). Thus we have a neat and serviceable coop, which will
last for many seasons. To set the affair it is necessary
to cut three sticks of the shapes shown in our illustration. The
prop piece is a slender forked twig about ten inches in length
from the tip to the base of the crotch. The spindle is another
hooked twig of the same length: the bait piece is quite similar
to the latter, only an inch shorter and supplied with a square
notch at the tip. It is also slightly whittled off on the upper
side to receive the square of pasteboard or tin, which is to hold
the bait and which may be easily fastened in place by a tack. All of
these twigs may be easily found in any thicket by a little practice
in searching. In setting the trap, it is only necessary to raise
up one side of the coop to the height of the prop stick, insert
the short arm of the
Page 70
spindle through the fork and beneath the edge of the coop. While
holding it thus in position, hook the crotch of the bait stick
around the lower piece at the back of the coop, and pushing the
end of the spindle inside the coop, catch it in the notch of the
bait stick where it will hold, and the trap is ready to be baited.
The bait may consist of oats, wheat, "nannie berries" or the like,
and should be strewn both on the platform and over the ground directly
beneath and around it. If properly set, a mere peck at the
corn will be sufficient to dislodge the pieces and the coop will
fall over its captive. It is not an uncommon thing to find two
or even three quail encaged in a trap of this kind at one fall,
and after the first momentary fright is over, they seem to resign
themselves to their fate and take to their confinement as naturally
as if they had been brought up to it.
When building the coop, the first step is to cut four sturdy twigs that are about an inch thick and fifteen inches long, and tie them together at the corners, making sure the knots are on the inside as shown in our illustration (a).
Leave about two feet of loose string from each corner. This creates the base of the coop. Next, gather several twigs of similar thickness and choose two that are the same length as the bottom pieces. Once the base is on the ground and the strings are gathered inside, lay the two selected sticks across the ends of the top two squares, directly above the lower two. Cut another pair of twigs of the same size and lay them across the ends of the last two, positioning them directly above the second set of the bottom portion, creating two equal squares, one on top of the other. The next pair of sticks should be slightly shorter than the first ones and positioned a little inside the square. The following two should be the same size as the last ones and also rest a bit inside those below them, starting to form the conical shape shown in our engraving. By continuing to alternate layers of the two types of sticks in a cob-house fashion, where each layer is closer than the previous one, the pyramid will take shape easily. After placing ten or twelve sets, insert your arm through the opening at the top and pull out the four cords, letting each one drape along the inside corner of the pyramid. Hold the strings loosely in your left hand and have the twigs ready, then build up the sides until the opening at the top shrinks to about four or five inches wide. Now, use the square board. Thread the ends of the cords through the hole in its center and rest the edge of the board on the top pair of sticks, ensuring it's the end grain of the wood that's on top, since the side could crack under the pressure about to be applied. Prepare a strong peg made of hardwood, lay it over the hole in the board, between the strings, and tie the strings tightly over it. By turning the peg, the cords will twist and tighten, drawing the coop parts together securely, which can then be secured with a tack driven into the top board against the peg as illustrated at (b). Now we have a neat and functional coop that will last for many seasons.
To set the trap, you need to cut three sticks in the shapes shown in our illustration. The prop stick is a slim forked twig about ten inches long from the tip to the base of the fork. The spindle is another hooked twig of the same length; the bait stick is similar to the spindle but an inch shorter and has a square notch at the tip. It’s slightly whittled down on the upper side to hold a square piece of pasteboard or tin, which will secure the bait and can easily be attached with a tack. You can find all these twigs in any thicket with a bit of practice. To set the trap, simply lift one side of the coop to the height of the prop stick, insert the short arm of the spindle through the fork under the edge of the coop. While holding it in place, hook the fork of the bait stick around the lower piece at the back of the coop, and push the end of the spindle inside the coop into the notch of the bait stick where it will stay, and now the trap is ready to be baited. The bait can be oats, wheat, "nannie berries," or something similar, and should be scattered both on the platform and around the ground directly beneath it. If set up correctly, a simple peck at the corn will be enough to knock the pieces over, causing the coop to fall on its captive. It’s not unusual to find two or even three quails trapped this way, and after an initial fright, they seem to accept their situation and adapt to their confinement as if they had always lived in it.
The method of setting the coop trap above described is a great improvement on the old style of setting, and is an improvement original with the author of this work. In the old method a semi-circular hoop of rattan is used in place of the bait stick above. The ends of the rattan are fastened to one of the lower back pieces of the coop, and the hoop is just large enough to fit inside the opening of the coop. This rattan rests just above the ground, and the spindle catches against its inside edge in place of the notch in the bait stick already described, the bait being scattered inside the hoop. When the bird approaches, it steps upon the rattan, and thus pressing it downward releases the spindle and the coop falls; but experience has shown the author that it does not always secure its intruders, but as often falls upon their backs and sends them off limping to regain their lost senses. By the author's improvement it will be seen that the whole body of the bird must be beneath the coop before the bait sticks can be reached and that when properly set it is absolutely certain to secure its victim. The author can recommend it as infallible, and he feels certain that anyone giving both methods a fair trial will discard the old method as worthless in comparison.
The method for setting the coop trap described above is a significant improvement over the old style, and it's an innovation by the author of this work. In the old method, a semi-circular hoop made of rattan is used instead of the bait stick mentioned earlier. The ends of the rattan are attached to one of the lower back pieces of the coop, and the hoop is just large enough to fit inside the coop’s opening. This rattan is positioned just above the ground, and the spindle catches against its inside edge instead of the notch in the bait stick. Bait is scattered inside the hoop. When a bird approaches, it steps on the rattan, pressing it down, which releases the spindle and causes the coop to fall. However, the author has found that this method doesn’t always trap the birds; sometimes, it just falls on their backs, causing them to escape while disoriented. With the author's improvement, it ensures that the entire body of the bird must be beneath the coop before it can reach the bait sticks. When set correctly, it will definitely secure its target. The author highly recommends it as foolproof, and he is confident that anyone who tests both methods thoroughly will find the old method to be completely ineffective in comparison.
THE BAT FOWLING NET.
With English bird-catchers this contrivance is in common use, but so far as we know it has not been utilized to any great extent in this country. It is chiefly used at night by the aid of a lantern, and large numbers of sparrows and other birds are often secured.
With English bird-catchers, this device is commonly used, but, as far as we know, it hasn't been widely used in this country. It's mainly used at night with the help of a lantern, and large numbers of sparrows and other birds are often caught.
Page 71
Our illustration gives a very clear idea of the net, which may be
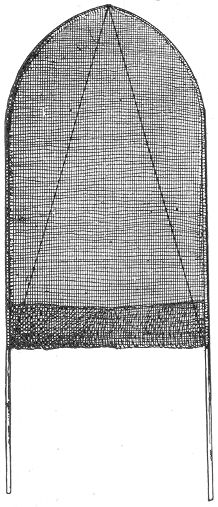 constructed as follows: Procure two light flexible poles, about
eight feet in length; to the tip of each a cord should be attached,
and the same secured to the middle of the pole, having drawn down
the tip to the bend, shown in our engraving. The two bent ends
should now be attached together by a hinge of leather. A piece
of mosquito netting is next in order, and it should be of such
a size as to cover the upper bent halves of the poles, as seen
in the illustration—the bottom edge being turned up into a
bag, about ten inches in depth. The contrivance is now complete,
and is used as follows: Three persons are generally required, and
a dark night is chosen. Hay stacks, evergreens, and thick bushes
offer a favorite shelter to numerous small birds, and it is here that
they are sought by the bird-hunters. A breezy night is preferable,
as the birds perch low, and are not so easily startled by unusual
sounds.
constructed as follows: Procure two light flexible poles, about
eight feet in length; to the tip of each a cord should be attached,
and the same secured to the middle of the pole, having drawn down
the tip to the bend, shown in our engraving. The two bent ends
should now be attached together by a hinge of leather. A piece
of mosquito netting is next in order, and it should be of such
a size as to cover the upper bent halves of the poles, as seen
in the illustration—the bottom edge being turned up into a
bag, about ten inches in depth. The contrivance is now complete,
and is used as follows: Three persons are generally required, and
a dark night is chosen. Hay stacks, evergreens, and thick bushes
offer a favorite shelter to numerous small birds, and it is here that
they are sought by the bird-hunters. A breezy night is preferable,
as the birds perch low, and are not so easily startled by unusual
sounds.
Page 71
Our illustration provides a clear idea of the net, which can be
made like this: Get two lightweight, flexible poles, about eight feet long; attach a cord to the tip of each pole, securing it to the middle of the pole while bending the tip down, as shown in our image. Now, connect the two bent ends together with a leather hinge. Next, take a piece of mosquito netting that is large enough to cover the upper bent halves of the poles, as seen in the illustration, with the bottom edge folded up into a bag about ten inches deep. The setup is now complete and is used as follows: Typically, three people are needed, and they choose a dark night. Hay stacks, evergreens, and thick bushes provide ideal cover for many small birds, which is where bird hunters look for them. A breezy night is preferred because the birds tend to perch low and are less likely to be scared by unusual noises.
Great caution, however, is used in the approach. One party holds the light, which is generally a dark lantern, another takes the net, and the third arms himself with a switch with which to beat the bushes. The net is first held upright about a foot from the bush, and the light thrown upon the back of it. The bush is then moderately beaten, and the birds affrighted and bewildered fly against the net, which is instantly closed. The bird is thus captured, and when a full roost can be discovered a large number may be taken in a single night. The lantern should be closed while not in actual use, and everything should be done as quietly as possible. The dark lantern in itself is useful without the net. The light often so bewilders the bird that it flies directly in the face of the lantern and flutters to the ground, where it may be easily taken with the hand.
Great care is taken when getting close. One person holds the light, usually a dark lantern, another has the net, and a third carries a switch to beat the bushes. The net is first held up about a foot away from the bush, and the light is aimed at the back of it. The bush is then gently beaten, causing the startled birds to fly into the net, which is immediately closed. This way, the bird is caught, and when a full roost is found, many can be captured in one night. The lantern should be kept closed when not in use, and everything should be done quietly. The dark lantern is useful even without the net. The light often confuses the bird so much that it flies right into the lantern and falls to the ground, where it can be easily picked up by hand.
Page 72 THE CLAP NET.
In Asia, Africa, South America and Europe, this trap is a common resource for the capture of wild birds of various kinds. It may be called a "decoy" trap, from the fact that "call birds" are generally used in connection with it. They are placed at distances around the trap, and attract the wild birds to the spot by their cries. These birds are especially trained for the purpose, but almost any tamed bird that chirps will attract its mates from the near neighborhood, and answer the purpose very well. Sometimes the "decoys" are entirely dispensed with, and the "bird whistle" used in their stead. This will be described hereafter, and inasmuch as the training of a "decoy" would be a rather difficult matter, we rather recommend the use of the bird whistle. The skill and absolute perfection of mimicry which is often attained by bird fanciers with the use of this little whistle, is something surprising.
In Asia, Africa, South America, and Europe, this trap is a common tool for capturing various wild birds. It's often referred to as a "decoy" trap because "call birds" are usually used alongside it. These birds are placed around the trap at different distances to lure wild birds with their calls. These birds are specially trained for this purpose, but almost any tame bird that chirps can attract its nearby mates and serve the purpose quite well. Sometimes, the "decoys" are completely omitted, and a "bird whistle" is used instead. This will be explained later, and since training a "decoy" can be quite challenging, we recommend using the bird whistle. The skill and remarkable mimicry that many bird enthusiasts achieve with this small whistle is truly impressive.
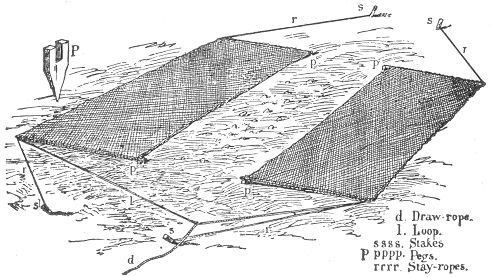
No matter what the species of bird—whether crow, bobolink, thrush or sparrow, the song or call is so exactly imitated as to deceive the most experienced naturalist, and even various birds themselves. Of course this requires practice, but even a tyro may soon learn to use the whistle to good advantage.
No matter what kind of bird it is—whether it's a crow, bobolink, thrush, or sparrow—the song or call is imitated so perfectly that it can fool even the most experienced naturalist and other birds as well. Of course, this takes practice, but even a beginner can quickly learn to use the whistle effectively.
The clap net commonly used, is a large contrivance—so large that several hundred pigeons are often caught at once. It is "sprung" by the bird-hunter, who lies in ambush watching for the game. The net is generally constructed as follows, and may be made smaller if desired:—
The clap net that's typically used is a big device—big enough that it can catch several hundred pigeons at once. It's "sprung" by the bird hunter, who hides and waits for the birds. The net is usually made like this, but it can be made smaller if needed:—
Page 73 Procure two pieces of strong thread netting, each about fifteen feet in length, and five feet in width. Four wooden rods one inch in thickness and five feet in length are next required. These may be constructed of pine, ash, or any other light wood, and one should be securely whipped to each end of the netting.
Page 73 Get two pieces of sturdy netting, each about fifteen feet long and five feet wide. Next, you'll need four wooden rods that are one inch thick and five feet long. These can be made from pine, ash, or any other lightweight wood, and one should be securely attached to each end of the netting.
Now by the aid of a gimlet or a red-hot iron, the size of a slate pencil, bore a hole through one end of every piece one inch from the tip, taking care that the ends selected lay on the same side of the net. The other extremities of the four poles should be supplied, each with a large screw eye. Four pegs are next in order—one of which is shown separate at (P). It should be about eight inches in length, and three inches in width, and an inch in thickness, and sharpened to a point at one end. The other end should be supplied with a notch two inches in depth and of such a width as will easily secure the perforated end of one of the poles already described. By the use of the gimlet or a red-hot nail, a hole should now be bored through the side of every peg across the centre of the notch for the reception of a wire pin or smooth nail.
Now, using a gimlet or a red-hot iron the size of a pencil, drill a hole through one end of each piece one inch from the tip, making sure the ends you choose are on the same side of the net. The other ends of the four poles should each have a large screw eye attached. Next, you need four pegs—one of which is shown separately at (P). They should be about eight inches long, three inches wide, and one inch thick, with a point sharpened at one end. The other end should have a notch two inches deep and wide enough to easily secure the drilled end of one of the previously mentioned poles. Using the gimlet or a red-hot nail, drill a hole through the side of each peg, across the center of the notch, to hold a wire pin or smooth nail.
The nets may now be rolled up on the poles, and the trapper may thus easily carry them to his selected trapping ground. This should be smooth and free from stones and irregularities. Unroll the nets and spread them flatly on the ground, as seen in the illustration. Let the perforated ends of the poles be innermost, and allow a space of six feet between the inner edges of the nets. Draw the net flatly on the ground, and drive one of the notched pegs at each of the inside corners, securing the poles into the slots by the aid of the wire pins or nails. Next cut four stakes eight or ten inches long. The places for these may be seen by a look at our engraving. Each one should be inserted five feet distant from the notched peg, and exactly on a line with the inside edge of the net—one for each corner. They should slant from the net in every case. To each one of these stakes a stay-rope should be secured, and the other end passed through the screw eye of the nearest pole, drawing the string tightly, so as to stretch the net perfectly square. Next, take a piece of cord, about twenty feet in length, and fasten it across the ends of the net into the screw eyes in the poles. This is the loop to which the draw-string is attached, and either end of the net may be chosen for this purpose. To this loop and a little one side of the middle, the draw-string should be fastened. If secured exactly in the middle of the loop, the two nets will strike when the draw-rope is pulled, whereas when adjusted Page 74 a little to one side, the nearest net will move a trifle faster than the other, and they will overlap neatly and without striking—completely covering the ground between them. When the trap is spread the draw-rope should extend to some near shelter where the bird-catcher may secrete himself from view. Spreading the bait on the ground between the nets, and arranging his call birds at the proper distances, he awaits his opportunity of springing his nets. At the proper minute, when the ground is dotted with his game, he pulls the draw-string, and the birds are secured.
The nets can now be rolled up on the poles, allowing the trapper to easily carry them to his chosen trapping spot. This area should be smooth and free of rocks and uneven surfaces. Unroll the nets and lay them flat on the ground, as shown in the illustration. Make sure the perforated ends of the poles are facing inward, leaving a six-foot gap between the inner edges of the nets. Lay the net flat on the ground, and drive one of the notched pegs into each of the inside corners, securing the poles into the slots with wire pins or nails. Next, cut four stakes about eight to ten inches long. You can see where these should go by looking at our engraving. Each stake should be placed five feet away from the notched peg and directly in line with the inside edge of the net—one for each corner. They should always slant away from the net. Attach a stay rope to each stake and thread the other end through the screw eye of the nearest pole, pulling the string tight to make the net perfectly square. Then, take a piece of cord about twenty feet long and secure it across the ends of the net into the screw eyes on the poles. This loop will be where the drawstring attaches, and you can choose either end of the net for this. The drawstring should be tied to this loop and a little to one side of the center. If it’s tied exactly in the middle of the loop, the two nets will hit each other when the drawstring is pulled. However, if you adjust it slightly to one side, the nearest net will move a bit faster than the other, allowing them to overlap neatly without colliding—completely covering the ground between them. When the trap is set, the drawstring should reach some nearby shelter where the bird-catcher can hide from view. He’ll spread bait on the ground between the nets and place his call birds at the right distances, waiting for the moment to spring his nets. At the perfect time, when the ground is filled with birds, he pulls the drawstring, and the birds are caught.
Immense numbers of wild fowl are often captured in this way.
Huge numbers of wild birds are often caught this way.
The "bird whistle," already alluded to, is often used with good effect, it being only sufficient to attract the birds to such a proximity to the net as will enable them to spy the bait, after which their capture is easily effected.
The "bird whistle," mentioned earlier, is often used effectively; it’s just enough to draw the birds close enough to the net so they can see the bait, after which catching them is easy.
THE BIRD WHISTLE.
This instrument, also known as the prairie whistle, is clearly
shown in our illustration. It is constructed as follows: First,
procure a piece of morocco or thin leather. From it cut a circular
piece one inch and a quarter in diameter. Through the centre of
this disc, cut a round hole, one-third of an inch in diameter. A
semi-circular piece of tin is next required. It should be of the
shape of an arc, as seen in our illustration; its width across
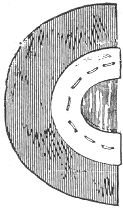 the ends being about three-quarters of an inch, and its entire
length being pierced with a row of fine holes. Next procure a piece
of thin sheet India rubber or gold beater's skin. Cut a strip about
an inch in length by half an inch in width, and lay one of its long
edges directly across the opening in the leather disc. Fold the
leather in half (over the rubber), and draw the latter tightly. Next
lay on the arc of tin in the position shown in the illustration, and
by the aid of a fine needle and thread sew it through the holes,
including both leather and rubber in the stitches. When this is
done, the whistle is complete. If the gold beater's skin is not
attainable, a good substitute may be found in the thin outer membrane
of the leaf of a tough onion or leak, the pulp being scraped away.
the ends being about three-quarters of an inch, and its entire
length being pierced with a row of fine holes. Next procure a piece
of thin sheet India rubber or gold beater's skin. Cut a strip about
an inch in length by half an inch in width, and lay one of its long
edges directly across the opening in the leather disc. Fold the
leather in half (over the rubber), and draw the latter tightly. Next
lay on the arc of tin in the position shown in the illustration, and
by the aid of a fine needle and thread sew it through the holes,
including both leather and rubber in the stitches. When this is
done, the whistle is complete. If the gold beater's skin is not
attainable, a good substitute may be found in the thin outer membrane
of the leaf of a tough onion or leak, the pulp being scraped away.
This instrument, also known as the prairie whistle, is clearly shown in our illustration. It's made like this: First, get a piece of morocco or thin leather. Cut a circular piece that's one and a quarter inches in diameter. In the center of this disc, cut a round hole that's one-third of an inch in diameter. Next, you'll need a semi-circular piece of tin that looks like an arc, as shown in our illustration; it should be about three-quarters of an inch wide across the ends, and its entire length should have a row of fine holes punched in it. Then, get a piece of thin sheet India rubber or gold beater's skin. Cut a strip that's about an inch long and half an inch wide, and lay one of its long edges directly across the opening in the leather disc. Fold the leather in half (over the rubber) and pull the rubber tightly. Then, place the arc of tin in the position shown in the illustration and use a fine needle and thread to sew it through the holes, stitching both the leather and rubber. Once that's done, the whistle is complete. If gold beater's skin isn't available, a good alternative is the thin outer membrane of a tough onion or leek, with the pulp scraped away.
Page 75 To use the whistle, place it against the roof of the mouth, tin side up, and with the edge of the rubber towards the front. When once wet, it will adhere to the roof of the mouth, and by skilful blowing, it can be made to send forth a most surprising variety of sounds. The quack of the duck and the song of the thrush may be made to follow each other in a single breath, and the squeal of a pig or the neigh of a horse are equally within its scope. In short, there is scarcely any animal, whether bird or quadruped, the cry of which may not be easily imitated by a skilful use of the prairie whistle, or, indeed, as it might with propriety be called, the "menagerie whistle."
Page 75 To use the whistle, put it against the roof of your mouth, with the tin side facing up and the edge of the rubber at the front. Once it’s wet, it will stick to the roof of your mouth, and by blowing skillfully, you can produce a surprising variety of sounds. You can make the quack of a duck and the song of a thrush follow one another in a single breath, and you can just as easily mimic the squeal of a pig or the neigh of a horse. In short, there’s hardly any animal, whether bird or four-legged, whose call can’t be easily imitated with a skilled use of the prairie whistle, or what could also be aptly called the “menagerie whistle.”
THE WILD GOOSE TRAP.
In our northern cold regions, where the wild geese and ptarmigan flock in immense numbers, this trap is commonly utilized. It consists merely of a large net fifty feet in length, and fifteen in width, arranged on a framework, and propped in a slanting position by two poles, after the manner of the sieve trap. It is generally set on the ice; and the trapper, after attaching his strings to the props, and sprinkling his bait at the foot of the net, retires to a distance to await his chances. Tame geese are often used as decoys, and sometimes the bird whistle already described is used for the same purpose. For the capture of the ptarmigan, the bait consists of a heap of gravel. It is hard to imagine a less tempting allurement, but as the food of the birds during the winter is sapless and hard, it becomes necessary for them to swallow a considerable amount of gravel to promote digestion. The great depth of the snow renders this commodity very scarce during the winter season; and the Indians, taking advantage of this fact, succeed in capturing immense numbers of the game in nets by the use of that simple allurement. The gravel is packed on the surface of a pile of snow, placed under the centre of the net, and the draw-string is carried to some neighboring shrubbery or place of concealment, where the trapper can always get at it without being seen by the birds under the net.
In our cold northern regions, where wild geese and ptarmigans gather in huge numbers, this trap is commonly used. It consists of a large net, fifty feet long and fifteen feet wide, set up on a frame and held at an angle by two poles, similar to a sieve trap. It’s usually placed on the ice; the trapper attaches strings to the supports and sprinkles bait at the base of the net before moving away to wait for his chance. Tame geese are often used as decoys, and sometimes the described bird whistle is used for the same purpose. To catch ptarmigans, the bait consists of a pile of gravel. It’s hard to believe this would be tempting, but since the birds’ winter food is tough and lacking in moisture, they need to eat a lot of gravel to help with digestion. The deep snow makes gravel very scarce during winter, and the Indians take advantage of this, successfully capturing large numbers of game in nets using this simple bait. The gravel is placed on top of a snow pile, positioned under the center of the net, and the drawstring is led to nearby bushes or a hidden spot where the trapper can access it without being seen by the birds beneath the net.
When everything is thus prepared, the hunters start out into the adjacent woods and willows, and drive their game toward the nets. This is generally an easy matter, and, no sooner do the birds come in sight of the heap of gravel, than they fly towards it en masse, and the ground beneath the net is soon Page 76 covered with the hungry game. The hunter then goes to the end of the line, and, with a sudden pull, hauls down the stakes: the net fans over the birds, and they are prisoners.
When everything is ready, the hunters head into the nearby woods and willows, driving their game toward the nets. This is usually pretty easy, and as soon as the birds see the pile of gravel, they fly towards it all at once, and the ground under the net quickly becomes Page 76 covered with the hungry game. The hunter then goes to the end of the line and, with a quick pull, brings down the stakes: the net spreads over the birds, making them prisoners.
Hundreds of ptarmigan are often thus caught by a single sweep of the net. The trap is simply arranged, and may be constructed on a reduced scale for smaller birds, if desired.
Hundreds of ptarmigan can often be caught in a single sweep of the net. The trap is straightforward to set up and can be made smaller for smaller birds if needed.
THE TRAP CAGE.
Among bird-catchers generally, this is the favorite and most universal
trap; and, where a decoy bird is used, it is particularly
successful. The cage is arranged in two compartments,
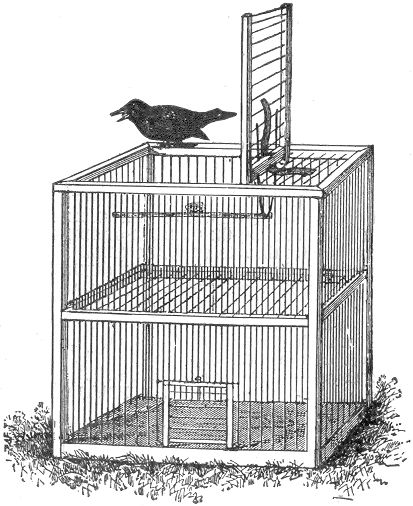 Page 77
one above the other,—the lower one being occupied by the
call-birds. The making of the cage requires considerable ingenuity
and much patience; and, for the benefit of those who may desire
to exercise that patient ingenuity, we will subjoin a few hints,
which may help them along in their efforts. For an ordinary cage,
the height should be about one foot, the broad sides the same, and
the top and other two sides eight inches. First cut four corner
uprights. These should be three-quarters of an inch square, and one
foot in length. Next cut a bottom board of pine, twelve inches by
eight inches, and one inch in thickness. From each of its corners,
cut a small cube of the wood, exactly three-quarters of an inch
Page 77
one above the other,—the lower one being occupied by the
call-birds. The making of the cage requires considerable ingenuity
and much patience; and, for the benefit of those who may desire
to exercise that patient ingenuity, we will subjoin a few hints,
which may help them along in their efforts. For an ordinary cage,
the height should be about one foot, the broad sides the same, and
the top and other two sides eight inches. First cut four corner
uprights. These should be three-quarters of an inch square, and one
foot in length. Next cut a bottom board of pine, twelve inches by
eight inches, and one inch in thickness. From each of its corners,
cut a small cube of the wood, exactly three-quarters of an inch
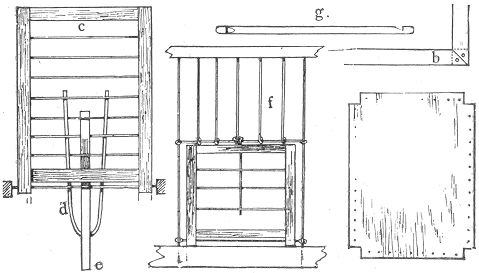 square, thus leaving four notches, which will exactly receive the
ends of the uprights, as seen at (a). Before adjusting these
pieces, the four sides of the boards should be pierced with small
holes, as is also shown in the diagram (a). These may be
punched with a brad-awl, and should be about half an inch apart,
and three-eighths of an inch from the edge of the board. Each one
of the uprights may then be secured in place by two long brads, one
being hammered each way into each side of the notch. Next proceed
to cut four more of the square sticks. Two of these should be one
foot in length, and the remaining two eight inches. The corners
of these should now be neatly bevelled off, so as to fit after
the manner of a picture-frame. They should then be attached to
Page 78
the upper ends of the uprights by a brad through the corner of
each, as seen at (b), the dotted lines indicating the end
of the upright beneath. These sticks should likewise be pierced
with holes to correspond with those in the bottom board, and running
up and down in the direction of the wires.
square, thus leaving four notches, which will exactly receive the
ends of the uprights, as seen at (a). Before adjusting these
pieces, the four sides of the boards should be pierced with small
holes, as is also shown in the diagram (a). These may be
punched with a brad-awl, and should be about half an inch apart,
and three-eighths of an inch from the edge of the board. Each one
of the uprights may then be secured in place by two long brads, one
being hammered each way into each side of the notch. Next proceed
to cut four more of the square sticks. Two of these should be one
foot in length, and the remaining two eight inches. The corners
of these should now be neatly bevelled off, so as to fit after
the manner of a picture-frame. They should then be attached to
Page 78
the upper ends of the uprights by a brad through the corner of
each, as seen at (b), the dotted lines indicating the end
of the upright beneath. These sticks should likewise be pierced
with holes to correspond with those in the bottom board, and running
up and down in the direction of the wires.
Among bird-catchers, this trap is the most popular and widely used; especially when a decoy bird is involved, it works particularly well. The cage consists of two levels,
Page 77
with one compartment on top of the other—the lower compartment is for the call-birds. Building the cage takes a good amount of creativity and patience, so for those who want to put that patience and ingenuity to use, we’ll provide a few tips to help you out. For a standard cage, it should be about one foot tall, with the sides also one foot wide, and the top and the other two sides should be eight inches. Start by cutting four corner uprights; these should be three-quarters of an inch square and one foot long. Then, cut a bottom board from pine that is twelve inches by eight inches and one inch thick. From each corner of this board, remove a small cube of wood measuring exactly three-quarters of an inch square, leaving four notches that will fit the ends of the uprights, as shown in (a). Before fitting these pieces together, make sure to drill small holes in the four sides of the boards, as illustrated in the diagram (a). These can be punched with a brad-awl, spaced about half an inch apart and three-eighths of an inch from the edge of the board. Each upright can then be secured in place with two long brads, hammering one into each side of the notch. Next, cut four more square pieces of wood. Two of these should be one foot long, while the other two should be eight inches. The corners of these pieces should be neatly beveled to fit like a picture frame. Attach them to Page 78 the upper ends of the uprights with a brad through each corner, as shown in (b), with the dotted lines indicating the end of the upright below. These sticks should also have holes drilled to match those in the bottom board, running vertically in line with the wires.
The middle tier of braces are next required. Two of these should be ten and a half inches in length, and the other two six and a-half, and the ends should be perfectly smooth. These should now be punched with holes corresponding with those above, after which they may be inserted between the uprights as seen in the engraving, and secured by a brad at each end.
The middle tier of braces is next needed. Two of these should be ten and a half inches long, and the other two should be six and a half inches long, with the ends being perfectly smooth. Now, these should be punched with holes matching those above, after which they can be placed between the uprights as shown in the illustration, and secured with a brad at each end.
The trap door is shown separate at (c). The side sticks should be eight inches in length, and one-half an inch square, and the top and bottom sticks five inches in length. They should be set in between the side sticks, and the lower one should be secured about half an inch above the lower ends of the uprights, as seen in the illustration. The holes should be made in the side pieces, and the wire run across from side to side, as shown. Annealed iron, or copper wire is best for this purpose. The door should now be pivoted or hinged at the top of the cage, between the long sides, in such a position as that the top end shall rest on one of the narrow upper edges of the cage. A stiff wire should be used for the hinge, being passed through the top pieces of the cage into the lower ends of the door pieces. The cage may now be wired throughout. This is an easy matter, if the holes are properly made. About thirty yards of the wire will be required: iron wire is generally used. It should be about the size of a hair-pin, and should work easily. Commence by passing it from the under side of the bottom board through one of the holes next to the corner. Pass the wire upward, through the centre braces, again upward through the top piece and across to the opposite broad side and corresponding hole. From this point it should pass downwards, through centre brace, and again through the bottom. Draw the wire tightly and passing it upward through the hole next to it, bring it over the top of the cage and around again to the bottom edge from which it started. Continue thus until the hinge of the door is reached; after which the wire should be passed up and down on the same side and thus carried around the small end of the cage until it finally meets at the door hinge on the opposite side. The two halves of the cage should now be separated by a grating of wire, as seen in the main illustration. This Page 79 may be accomplished either by passing the wire from side to side, around the base of each upright wire, or an additional horizontal row of holes below the others may be punched for the purpose. The door through which the call-bird is introduced should next be made in the bottom section. There are two ways of doing this: one method consists in sawing a hole three inches square in the bottom board of the cage; and a cover consisting of a piece of tin is made to slide beneath the heads of four tacks, two of which are placed on each side of the opening. This form of door is perhaps the simplest of the two. The other is shown separate at (f), together with its mode of attachment.
The trap door is shown separately at (c). The side sticks should be eight inches long and half an inch square, while the top and bottom sticks should be five inches long. They should be positioned between the side sticks, with the lower stick secured about half an inch above the lower ends of the uprights, as depicted in the illustration. Holes should be made in the side pieces, and the wire should be run across from side to side, as shown. Annealed iron or copper wire works best for this purpose. The door should now be pivoted or hinged at the top of the cage, between the long sides, so that the top end rests on one of the narrow upper edges of the cage. A stiff wire should be used for the hinge, which should be passed through the top pieces of the cage and into the lower ends of the door pieces. The cage can now be wired throughout. This is easy to do if the holes are properly made. About thirty yards of wire will be needed: iron wire is commonly used. It should be about the size of a hairpin and should work easily. Start by passing the wire from the underside of the bottom board through one of the holes next to the corner. Pass the wire upward, through the center braces, then upward again through the top piece and across to the opposite broad side through the corresponding hole. From this point, it should pass downward, through the center brace, and then again through the bottom. Pull the wire tight and pass it upward through the next hole, bringing it over the top of the cage and around to the bottom edge where you started. Continue this way until you reach the hinge of the door; after that, the wire should be passed up and down on the same side and carried around the small end of the cage until it eventually meets at the door hinge on the opposite side. The two halves of the cage should now be separated by a wire grating, as shown in the main illustration. This Page 79 can be accomplished by either running the wire from side to side around the base of each upright wire or by punching an additional horizontal row of holes below the others for this purpose. The door for introducing the call-bird should next be made in the bottom section. There are two ways to do this: one method involves sawing a three-inch square hole in the bottom board of the cage, and a cover made from a piece of tin is created to slide beneath the heads of four tacks, two of which are placed on each side of the opening. This type of door is perhaps the simplest of the two. The other method is shown separately at (f), along with its mode of attachment.
It consists of two side pieces of wood, about a third of an inch square, and three inches in length, and two shorter ones, two inches in length. These are arranged into a square framework by a board in each corner. Four holes are to be pierced in each side piece, at equal distances. Commencing at the top, the door should then be wired as directed for the cage. The lowest hole on each side should be left open for a separate piece of wire. The cage should now receive attention. The broad side is generally selected for the door. Find the seven centre wires and connect them across the middle by another horizontal bit of wire. This may be easily done with a pair of pincers, by compressing a loop at each end of the wire around the two which run perpendicularly at its ends. When this is performed the five intermediate wires should be cut off about a quarter of an inch below the horizontal wire, and the projecting tips looped back over the cross piece, and made fast by the pincers. The lower parts of the upright wires may now be cut off close to the board. We will now take up the door. Pass a piece of wire through the holes at the bottom, clap the door over the opening, and loop the ends of the projecting wire loosely around the upright wires at each side. This will allow the door to slide easily up and down. Another wire should now be interlaced downwards through the centre of the door, and bent into a ring at the top. Let the door rest on the bottom of the cage, and, while in this position, adjust the ring at the top around the central wire directly behind it. The door is then complete, and, if properly made, will look neat and work easily.
It consists of two side pieces of wood, about a third of an inch square, and three inches long, and two shorter pieces, two inches long. These are arranged into a square frame with a board at each corner. Four holes should be drilled in each side piece, spaced evenly. Starting from the top, the door should then be wired as instructed for the cage. The lowest hole on each side should be left open for a separate piece of wire. The cage should now be addressed. The wide side is usually chosen for the door. Locate the seven center wires and connect them across the middle with another horizontal piece of wire. This can be easily done with a pair of pliers by compressing a loop at each end of the wire around the two that run perpendicularly at its ends. Once this is done, the five intermediate wires should be cut off about a quarter of an inch below the horizontal wire, and the protruding tips should be looped back over the cross piece and secured with the pliers. The lower parts of the upright wires can now be cut off close to the board. Now, let's work on the door. Thread a piece of wire through the holes at the bottom, position the door over the opening, and loosely wrap the ends of the protruding wire around the upright wires on each side. This will allow the door to slide up and down easily. Another wire should now be threaded downwards through the center of the door and bent into a ring at the top. Let the door rest on the bottom of the cage, and while in this position, adjust the ring at the top around the central wire directly behind it. The door is then complete, and, if made correctly, will look tidy and function smoothly.
The "trap" at the top of the cage is next in order. To complete this it is first necessary to interweave a stiff wire loop, as seen at (d). The loop should extend on the inside of the lower piece of the door and about two inches below it. The Page 80 spring power consists of a piece of stiff hoop-skirt wire, interwoven between the wires of the top of the cage, and those of the door, while the latter is shut. The force of this will be sufficient to bring down the door with a snap; and for further security a catch, such as is described in page (88), may be added if desired.
The "trap" at the top of the cage is next. To set this up, you first need to weave a stiff wire loop, as shown at (d). The loop should extend on the inside of the lower part of the door and about two inches below it. The Page 80 spring mechanism consists of a piece of stiff hoop-skirt wire, woven between the wires at the top of the cage and those of the door while the door is closed. This will provide enough force to slam the door shut; for extra security, you can add a catch, like the one described in page (88), if you want.
The spindle is next required. This is shown at (g), and consists of a small perch of wood seven inches in length, and notched at each end. In setting the trap, the door should be raised as seen in the main illustration. One of the notches in the spindle should now be caught beneath the loop and the other around one of the central wires in the end of the cage. The bait, consisting of a berry, bird-seed, or what-not, may be either fastened to the spindle or placed beneath on the wires. The call-bird having been introduced, the trap may now be left to itself. If the call-bird is well trained it will not be many minutes before the birds of the neighborhood will be attracted to the spot by its cries. Ere long one less cautious than the rest will be seen to perch upon the top of the cage. He soon discovers the bait, and alighting upon the perch, throws it asunder, and in an instant the trap door closes over its captive. The cage is sometimes constructed double, having two compartments beneath for call-birds, and two traps above, in general resembling two of the single traps placed side by side. The decoy bird is not an absolute necessity to the success of the trap. Many birds are caught simply by the bait alone. The trap cage, when constructed on a larger scale, is often successfully employed in the capture of the owl. In this case it is baited with a live mouse or bird, and set during the evening in a conspicuous place. A trap working on this principle, being especially adapted to the capture of the owl, will be noticed hereafter.
The spindle is next needed. This is shown at (g) and consists of a small wooden rod seven inches long, with notches at each end. When setting the trap, raise the door as shown in the main illustration. One of the notches in the spindle should now be caught under the loop, and the other around one of the central wires at the end of the cage. The bait, which can be a berry, birdseed, or something similar, can either be secured to the spindle or placed underneath on the wires. Once the call bird is inside, the trap can be left alone. If the call bird is well trained, it won’t be long before local birds are drawn to the area by its calls. Soon, one of the bolder birds will be seen landing on top of the cage. It quickly notices the bait and, as it lands on the perch, knocks it aside, causing the trap door to close over its capture. The cage is sometimes built double, with two compartments below for call birds and two traps above, generally resembling two single traps placed side by side. The decoy bird isn’t essential for the trap's success; many birds are caught just by the bait alone. A larger version of the trap cage can also be effective in capturing owls. In this case, it’s baited with a live mouse or bird and set up in a visible spot during the evening. A trap designed with this principle, specifically for capturing owls, will be discussed later.
THE SPRING NET TRAP.
Although slightly complicated in construction, our next illustration presents one of the prettiest bird traps on record, and may be made in the following manner, and by frequently referring to the picture, our explanation will be easily understood.
Although a bit complex in design, our next illustration shows one of the prettiest bird traps ever recorded. It can be made in the following way, and by frequently referring to the picture, our explanation will be easy to understand.
The first step is to make or procure a low flat box, about fifteen inches long, by ten inches in width, with a depth of about two inches. Next fasten an interior box, of the same Page 81 height, leaving a space of about three-quarters of an inch between them all round. A platform should now be made. Let it be of such a size that it will just fit in the interior box, with a very slight space all around its edge. It should then be pivoted in the upper part of this box by two small slender pins, one being driven through into its edge, at the centre of each end. Let it be sensitively poised. The next thing to be done, is to arrange the spindle and catch. The latter should consist of a tack or small bit of wood fastened on the middle of the platform, about an inch from one end, as seen both in the main illustration and in the diagram at (b).
The first step is to create or get a shallow box, about fifteen inches long, ten inches wide, and around two inches deep. Next, attach a smaller interior box of the same height, leaving a gap of about three-quarters of an inch between them all around. Now, you need to make a platform. It should be sized so that it fits inside the smaller box with a tiny gap all around the edge. Then, pivot it at the top of this box using two small slender pins, one driven through its edge at the center of each end. Make sure it's balanced carefully. The next thing to do is set up the spindle and catch. The catch should be a tack or a small piece of wood attached to the middle of the platform, about an inch from one end, as shown in both the main illustration and the diagram at (b).
The spindle should consist of a flat piece of wood, secured with
a leather hinge to the edge of the outside box, directly opposite
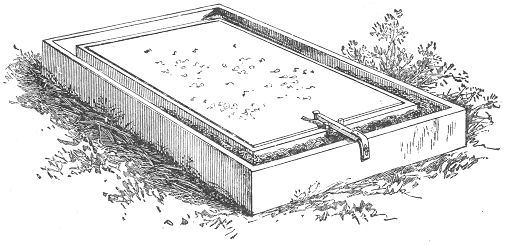 the catch. Let it be long enough to reach and barely hold itself
beneath the catch. When thus in its position, two small plugs should
next be driven into the edge of the inner box, one on each side of
the spindle, thus holding it in place. A glance at our illustration
makes this clear. The netting and "hoop" are next in order. The hoop
should consist of an iron wire of the diameter of common telegraph
wire.
the catch. Let it be long enough to reach and barely hold itself
beneath the catch. When thus in its position, two small plugs should
next be driven into the edge of the inner box, one on each side of
the spindle, thus holding it in place. A glance at our illustration
makes this clear. The netting and "hoop" are next in order. The hoop
should consist of an iron wire of the diameter of common telegraph
wire.
The spindle should be a flat piece of wood, attached with a leather hinge to the edge of the outer box, directly across from
the catch. It should be long enough to reach and just hold itself beneath the catch. Once in position, two small plugs should be inserted into the edge of the inner box, one on each side of the spindle, securing it in place. A look at our illustration makes this clear. The netting and "hoop" come next. The hoop should be made of iron wire with the same diameter as standard telegraph wire.
For a box of the size we have given, a length of about twenty-eight inches will be found to answer. Before making the hoop, however, its hinges should be ready for it. Two screw eyes, or staples of bent wire should be driven into the bottom of the box between the two walls, one in the exact middle of each side. The iron wire should now be bent so as to fit round and settle into the space between the boxes, letting each end rest Page 82 over the screws in the bottom. It will be found that there will be enough surplus wire on each end to form into a loop with the pincers. These loops should be passed through the screws or rings already inserted, and then pinched together; the hinge will thus be made, and will appear as at (c). If properly done, they should allow the hoop to pass freely from one end of the box to the other, and settle easily between the partitions. If this hinge should prove too complicated for our young readers, they may resort to another method, which, although not so durable, will answer very well. In this case the wire will only need to reach to the exact middle of the long sides. No surplus being necessary, a length of twenty-six inches will be exactly right. On each end a short loop of tough Indian twine should be tied. By now fastening these loops to the bottom of the box with tacks, in the place of screws, it will form a hinge which will answer the purpose of the more complicated one.
For a box of the size we've specified, a length of about twenty-eight inches will work well. Before making the hoop, though, its hinges should be prepared. Drive two screw eyes or bent wire staples into the bottom of the box between the two walls, one exactly in the middle of each side. Now, bend the iron wire to fit around and settle into the space between the boxes, letting each end rest Page 82 over the screws in the bottom. You’ll find that there will be enough excess wire on each end to form a loop with pliers. These loops should go through the screws or rings that have already been inserted, then pinched together; this will create the hinge, which will look like (c). If done correctly, the hoop should move freely from one end of the box to the other and fit easily between the partitions. If this hinge seems too complicated for our younger readers, they can use a simpler method that, while not as durable, will work just fine. In this case, the wire just needs to reach the exact middle of the long sides. Since no excess is needed, a length of twenty-six inches will be just right. Tie a short loop of tough Indian twine at each end. By fastening these loops to the bottom of the box with tacks instead of screws, it will create a hinge that serves the purpose of the more complex one.

The netting should consist of common mosquito gauze, or, if this cannot be had, any thin cloth may be substituted. It should be sewed fast to the iron wire, from hinge to hinge, and then, with the hoops resting in its groove, the netting should be drawn over the platform, and tacked to the bottom of the groove, on its remaining half. It should rest loosely over the platform to allow plenty of space for the bird.
The netting should be made of regular mosquito netting, or if that's not available, any thin fabric can work. It should be securely sewn to the iron wire, from hinge to hinge. Then, with the hoops placed in their groove, the netting should be stretched over the platform and fastened to the bottom of the groove on the other half. It should hang loosely over the platform to give the bird plenty of space.
But one more addition, and the trap is finished. We have mentioned the use of elastics in other varieties: they are of equal use here, and should be attached to the hoop as seen at (a) in the section drawing, the remaining ends being fastened to the bottom of the groove, as there indicated. These elastics should be placed on both sides, and stretched to such a tension as will draw the hoop quickly from one side to the other.
But one more addition, and the trap is complete. We've talked about using elastics in other types: they’re just as useful here and should be attached to the hoop as shown at (a) in the section drawing, with the other ends secured to the bottom of the groove as indicated. These elastics should be placed on both sides and stretched to a tension that will pull the hoop quickly from one side to the other.
It will now be easy to set the trap. Draw the hoop back to the opposite end, tucking the netting into the groove; lower the spindle over it, resting it between the two little plugs, and securing its end beneath the catch on the platform. If the bait, Page 83 consisting of bread-crumbs, berries, insects, or the like, be now sprinkled on the platform, the trap is ready for its feathered victim. It will easily be seen that the slightest weight on either side of this poised platform will throw the catch from the end of the spindle, and release the hoop and the platform in an instant is covered by the net, capturing whatever unlucky little bird may have chanced to jump upon it. This is a very pretty little trap, and will well repay the trouble of making it.
It’s now simple to set the trap. Pull the hoop back to the opposite end, tucking the netting into the groove; lower the spindle over it, resting it between the two small plugs, and secure its end under the catch on the platform. If the bait, Page 83, which can be bread crumbs, berries, insects, or something similar, is sprinkled on the platform, the trap is ready for its feathered target. It's easy to see that even the slightest weight on either side of this balanced platform will trip the catch at the end of the spindle, and in an instant, the hoop will drop and the platform will be covered by the net, capturing any unfortunate little bird that happens to land on it. This is a really nice little trap, and it’s definitely worth the effort to make it.
A SIMPLER NET TRAP.
Much ingenuity has been displayed in the construction of bird traps
of various kinds, but often the ingenuity has been misplaced, and
the result has been so complicated as to mar its usefulness for
practical purposes. The examples of net traps presented in this
volume are so simple that the merest tyro can readily understand
them. What can be more so than the present example, and yet it is
as sure in its effect, and surer than those other varieties
of more complicated construction. One necessary element in a trap
of any kind is, that the bearings are slight and that they spring
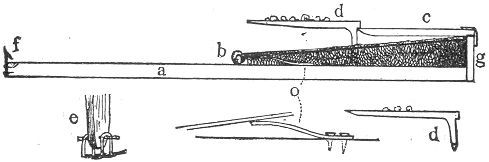 easily. To obtain this requisite it is necessary to overcome friction
as much as possible, using only a small number of pieces, and having
as few joints and hinges only as are absolutely necessary. The present
variety possesses advantages on this account. It is constructed
somewhat on the principle of the ordinary steel trap, and also
resembles in other respects the one we have just described, although
much simpler. We give only a section drawing, as this will be
sufficient. The long side of a flat board of about eight by sixteen
inches is shown at (a); (b) indicates the loops of a bent
wire, to which the netting is attached, as in the trap just described,
Page 84
the loops being fastened to the board as in the other variety;
(g) consists of a small bit of wood an inch or so in length
and half an inch in width. It should be tacked on to the middle
of the one end of the board and project about a half inch above
the surface. To the top of this the spindle (c) should be
attached by a leather or staple hinge. The spindle should be of
light pine, five inches in length and a quarter of an inch square,
bevelled; on the under side of one end (d) is the catch
or bait piece, and should be whittled out of a shingle or pine
stick of the shape shown, the width being about a half an inch
or less. One side should be supplied with a slight notch for the
reception of the spindle, and the other should project out two
or three inches, being covered on the top with a little platform
of pasteboard, tin, or thin wood either glued or tacked in place.
To attach this piece to the main board, two small wire staples
may be used, one being inserted into the bottom end of the piece
and the other being hooked through it, and afterward tacked to
the bottom of the trap, thus forming a loop hinge. Another method
is to make a hole through the lower tip of the bait piece by the
aid of a red-hot wire, as seen at (d), afterwards inserting
a pin and overlapping its ends with two staples driven into the
bottom board, as shown at (e). In our last mentioned net
trap the spring power consisted of rubber elastic, and the same
may be used in this case, if desired, but by way of variety we
here introduce another form of spring which may be successfully
employed in the construction of traps of various kinds. It is shown
at (o) and consists merely of a piece of tempered hoop iron,
so bent as to act with an upward pressure. It should be about three
inches long by half an inch wide. About three-quarters of an inch
should be allowed for the two screws by which it is to be attached
to the board. The rest should be bent upward and thus tempered by
first heating almost to redness, and then cooling in cold water.
easily. To obtain this requisite it is necessary to overcome friction
as much as possible, using only a small number of pieces, and having
as few joints and hinges only as are absolutely necessary. The present
variety possesses advantages on this account. It is constructed
somewhat on the principle of the ordinary steel trap, and also
resembles in other respects the one we have just described, although
much simpler. We give only a section drawing, as this will be
sufficient. The long side of a flat board of about eight by sixteen
inches is shown at (a); (b) indicates the loops of a bent
wire, to which the netting is attached, as in the trap just described,
Page 84
the loops being fastened to the board as in the other variety;
(g) consists of a small bit of wood an inch or so in length
and half an inch in width. It should be tacked on to the middle
of the one end of the board and project about a half inch above
the surface. To the top of this the spindle (c) should be
attached by a leather or staple hinge. The spindle should be of
light pine, five inches in length and a quarter of an inch square,
bevelled; on the under side of one end (d) is the catch
or bait piece, and should be whittled out of a shingle or pine
stick of the shape shown, the width being about a half an inch
or less. One side should be supplied with a slight notch for the
reception of the spindle, and the other should project out two
or three inches, being covered on the top with a little platform
of pasteboard, tin, or thin wood either glued or tacked in place.
To attach this piece to the main board, two small wire staples
may be used, one being inserted into the bottom end of the piece
and the other being hooked through it, and afterward tacked to
the bottom of the trap, thus forming a loop hinge. Another method
is to make a hole through the lower tip of the bait piece by the
aid of a red-hot wire, as seen at (d), afterwards inserting
a pin and overlapping its ends with two staples driven into the
bottom board, as shown at (e). In our last mentioned net
trap the spring power consisted of rubber elastic, and the same
may be used in this case, if desired, but by way of variety we
here introduce another form of spring which may be successfully
employed in the construction of traps of various kinds. It is shown
at (o) and consists merely of a piece of tempered hoop iron,
so bent as to act with an upward pressure. It should be about three
inches long by half an inch wide. About three-quarters of an inch
should be allowed for the two screws by which it is to be attached
to the board. The rest should be bent upward and thus tempered by
first heating almost to redness, and then cooling in cold water.
A lot of creativity has gone into designing bird traps of different kinds, but often this creativity has been misdirected, resulting in traps that are too complicated for practical use. The net traps shown in this book are so straightforward that even a total beginner can easily understand them. What could be simpler than the current example? Yet, it works as effectively and even better than those more complex types. One important feature of any trap is that the moving parts should be minimal and should operate easily.
To achieve this, it's essential to minimize friction by using as few pieces as possible, keeping joints and hinges to a bare minimum. This design has benefits in this regard. It’s based on the principle of a typical steel trap and shares similarities with the one we've just discussed, but it’s much simpler. We only provide a section drawing, as that will suffice. The long side of a flat board measuring about eight by sixteen inches is labeled as (a); (b) shows the loops of a bent wire to which the netting is attached, similar to the previously described trap, with the loops secured to the board in the same way as in the other design; (g) is a small piece of wood about an inch long and half an inch wide. It should be tacked to the middle of one end of the board, sticking up about half an inch above the surface. The spindle (c) should be attached to the top of this piece using a leather or staple hinge. The spindle needs to be made of lightweight pine, five inches long and a quarter of an inch square, bevelled; the underside of one end (d) contains the catch or bait piece, which should be whittled from a shingle or pine stick shaped as shown, with a width of around half an inch or less. One side should have a small notch to fit the spindle, while the other side should extend two or three inches, covered on top with a little platform made of pasteboard, tin, or thin wood, glued or tacked in place. To attach this piece to the main board, you can use two small wire staples—one inserted into the bottom end of the piece and the other hooked through it and then tacked to the trap's bottom, creating a loop hinge. Alternatively, you can make a hole through the lower tip of the bait piece with a heated wire, as shown at (d), then insert a pin and overlap its ends with two staples driven into the bottom board, as illustrated at (e). In the previously mentioned net trap, rubber elastic was used for the spring power, and you can use the same in this trap if you want. However, to mix things up, we’re introducing another type of spring that can also be effectively used in various traps. It’s depicted at (o) and consists of a piece of tempered hoop iron bent to provide upward pressure. It should measure about three inches long and half an inch wide. Leave about three-quarters of an inch for the two screws that will attach it to the board. The rest should be bent upward and tempered by heating it almost to red hot and then cooling it in cold water.
One of these springs should be fastened to the board on each side, directly under the wire and quite near the hinge, in the position shown in the main drawing. Now draw back the net, lower the spindle and catch its extremity in the notch of the bait piece, and the trap is set as in our illustration. Sprinkle the bait on the platform, and lay the machine on the ground where birds are known to frequent; and it is only a matter of a few hours or perhaps minutes, before it will prove its efficacy. In order to prevent the bird from raising the wire and thereby Page 85 escaping, it is well to fasten a little tin catch (f) at the end of the board. This will spring over the wire and hold it in its place.
One of these springs should be attached to the board on each side, right under the wire and close to the hinge, in the position shown in the main drawing. Now pull back the net, lower the spindle, and catch its end in the notch of the bait piece, and the trap is set as illustrated. Sprinkle the bait on the platform and place the machine on the ground where birds are known to hang out, and it will only take a few hours or maybe just minutes before it proves effective. To stop the bird from lifting the wire and escaping, it’s a good idea to attach a small tin catch (f) at the end of the board. This will spring over the wire and keep it in place.
THE UPRIGHT NET TRAP.
The following is another novelty in the way of a bird-trap, somewhat similar to the one we have just described, in its manner of working.
The following is another new type of bird trap, somewhat similar to the one we just described, in how it operates.
Procure two pieces of board about a foot square. Nail one to the edge of the other, as represented in our engraving. A stout wire is the next requisite. It should be about thirty inches long, and bent either into a curve or into two corners, making three equal sides. Each end of the wire should then be bent into a very small loop for the hinge. On to this wire the netting should then be secured as in the two previous examples, after which the ends of the wire may be tied with string or hinged on wire staples into the angle of the two boards, as seen in our illustration. Allow the wire now to lie flat on the bottom board, and then proceed to tack the netting around the edges of the upright board. Two elastics should next be fastened to the wire on each side, securing their loose ends to the bottom of the trap. They should be tightly drawn so as to bring the wire down with a snap. The spindle of this trap should be about eight or nine inches long, square and slender,—the lower end being flattened, and the upper end secured to the top edge of the upright board by a hinge of leather or string. An excellent hinge may be made with a piece of leather an inch and a half long, by half an inch in width, one half of the length being tied around the end of the spindle, and the other tacked on to the upper edge of the board.
Get two square pieces of board, each about a foot wide. Nail one to the edge of the other, as shown in our picture. Next, you'll need a strong wire, around thirty inches long, bent either into a curve or into two corners, forming three equal sides. Each end of the wire should be bent into a small loop to function as a hinge. Then, secure the netting to this wire as shown in the two previous examples. After that, the ends of the wire can be tied with string or hinged on wire staples into the angle of the two boards, as illustrated. Let the wire rest flat on the bottom board, then proceed to tack the netting around the edges of the upright board. Next, attach two elastics to the wire on each side, securing their loose ends to the bottom of the trap. They should be pulled tightly so that the wire snaps down. The spindle of this trap should be about eight or nine inches long, square and slender, with the lower end flattened and the upper end attached to the top edge of the upright board by a hinge made of leather or string. A great hinge can be made using a piece of leather that is an inch and a half long and half an inch wide, with one half tied around the end of the spindle and the other half tacked onto the upper edge of the board.
The platform is given by itself at (a) in the same picture. It may be made of very thin wood—cigar box wood, for instance, or even thick pasteboard. It consists of three pieces. The piece which is hinged into the angle of the boards should be about three inches in length; the platform piece ought not to be more than four inches square, and the upright piece only long enough to reach the tip of the spindle when the platform is raised, as shown in our engraving. The hinge piece should be cut to an edge on that end where the leather is fastened, the opposite end being bevelled off in order that the platform may rest and be tacked or glued firmly upon it. The diagram (a) will make this all very clear.
The platform is illustrated by itself at (a) in the same image. It can be made from very thin wood—like cigar box wood, for example—or even thick cardboard. It consists of three pieces. The piece that is hinged into the angle of the boards should be about three inches long; the platform piece should be no larger than four inches square, and the upright piece should be just long enough to reach the tip of the spindle when the platform is elevated, as shown in our engraving. The hinge piece should have one edge cut to a point where the leather is attached, while the opposite end should be beveled so that the platform can rest and be tacked or glued securely onto it. The diagram (a) will clarify everything.
When the platform is all made and fastened in its place, the
Page 86
trap may be set. Draw the hoop back as far as possible, and lower
the spindle over its edge, catching it behind the upright stick on
the platform. If the trap is properly constructed, the pressure
of the spindle on the platform will suffice to hold it up as seen
in our illustration. The upright stick on the back of the platform
should never be more than an inch and a half from the back of the
trap. If need be, a slight notch may be made in the end of the
spindle and a small tack driven into the back of the upright stick
to correspond to it. By thus fitting the notch under the head of the
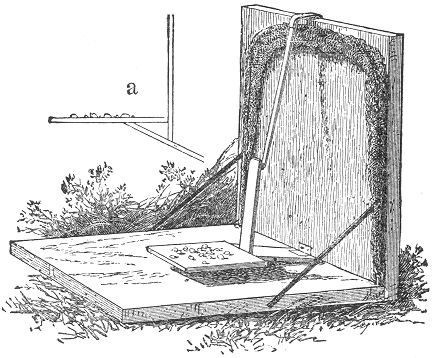 tack, it will be sure to hold the platform in the right position.
But it should be carefully tested before setting, to see that it
springs easily.
tack, it will be sure to hold the platform in the right position.
But it should be carefully tested before setting, to see that it
springs easily.
When the platform is all set up and secured in place, the
Page 86
trap can be activated. Pull the hoop back as far as possible, and lower the spindle over its edge, securing it behind the upright stick on the platform. If the trap is built correctly, the pressure of the spindle on the platform will be enough to keep it raised, as shown in our illustration. The upright stick at the back of the platform should never be more than an inch and a half away from the back of the trap. If necessary, a small notch can be made at the end of the spindle and a small tack driven into the back of the upright stick to match it. By fitting the notch under the head of the
tack, it will definitely keep the platform in the correct position. However, it should be tested carefully before setting to ensure that it springs easily.
When thus set sprinkle the bait on the platform, scattering a little also on the bottom of the trap and on the ground directly around it. The little birds will soon spy the tempting morsels, and alighting on the trap are misled, and the slightest peck or pressure on the platform where the bait is most bounteously spread brings down the wire and net with a snap, and the little creature is secured without harm.
When you're ready, sprinkle the bait on the platform, scattering a bit on the bottom of the trap and on the ground around it. The little birds will quickly notice the tasty morsels, and when they land on the trap, they're tricked. Just the slightest peck or pressure on the platform where the bait is generously spread triggers the wire and net to snap down, capturing the little creature unharmed.
Our next illustration shows another method of constructing the platform.
It should be about three or four inches square,
Page 87
and on the middle of one of its edges the upright catch piece should
be fastened. This piece, as will be seen in our engraving, should
be cut spreading at the bottom so as to admit of being secured to
the platform by two brads, the tip being cut to a point. The total
length of this piece should not be over two and a half inches. When
tacked in place, a third brad should be inserted between the other
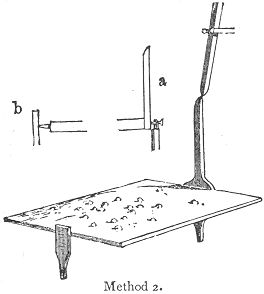 two and exactly in the centre of the side of the platform. This
latter brad is to act as the pivot, or hinge, and should project
about a quarter of an inch, as seen at (a). On the opposite
edge of the platform another larger brad should be driven, having
its end filed to a blunt point, as in (b). If the filing
would be too tedious, a plug of hard wood of the required shape
would answer every purpose. The upright props which support the
platform should be cut of thin wood. Let one be an inch and a half
long and half an inch wide, the other being an inch in length.
Each should have one end whittled to a point, which will admit
of its being inserted in a gimlet hole in the bottom of the trap.
These gimlet holes should be made at least half an inch in depth.
Make the first at about an inch or so from the back of the trap.
Into this insert the shorter pieces, broadside front. Lay the pivot
brad of the platform on the top of this piece and insert over it
a small wire staple, as seen at (a). Elevate the platform
evenly and determine the spot for the other gimlet hole, which
should be directly beneath the point of the filed brad. Be sure
that it is in the middle of the board, so that the platform may
set squarely, and be perfectly parallel with the sides. Insert
the remaining prop in its place, and the platform is complete. The
overhanging spindle now requires a little attention. This should
be whittled off on each side, bringing it to a point at the tip.
On each side of the spindle a long plug should then be driven into
the back piece, as our illustration shows. These should be far
enough apart to allow the spindle to pass easily between them. The
setting of the trap is plainly shown in our
Page 88
engraving. The spindle being lowered between the plugs is caught
finely on the tip of the catch-piece. The blunt point at the opposite
end of the platform should have a slight hollow made for it in the
prop against which it presses. If the platform be now strewn with
bait, the little machine is ready. It is certainly very simple and
will be found very effective.
two and exactly in the centre of the side of the platform. This
latter brad is to act as the pivot, or hinge, and should project
about a quarter of an inch, as seen at (a). On the opposite
edge of the platform another larger brad should be driven, having
its end filed to a blunt point, as in (b). If the filing
would be too tedious, a plug of hard wood of the required shape
would answer every purpose. The upright props which support the
platform should be cut of thin wood. Let one be an inch and a half
long and half an inch wide, the other being an inch in length.
Each should have one end whittled to a point, which will admit
of its being inserted in a gimlet hole in the bottom of the trap.
These gimlet holes should be made at least half an inch in depth.
Make the first at about an inch or so from the back of the trap.
Into this insert the shorter pieces, broadside front. Lay the pivot
brad of the platform on the top of this piece and insert over it
a small wire staple, as seen at (a). Elevate the platform
evenly and determine the spot for the other gimlet hole, which
should be directly beneath the point of the filed brad. Be sure
that it is in the middle of the board, so that the platform may
set squarely, and be perfectly parallel with the sides. Insert
the remaining prop in its place, and the platform is complete. The
overhanging spindle now requires a little attention. This should
be whittled off on each side, bringing it to a point at the tip.
On each side of the spindle a long plug should then be driven into
the back piece, as our illustration shows. These should be far
enough apart to allow the spindle to pass easily between them. The
setting of the trap is plainly shown in our
Page 88
engraving. The spindle being lowered between the plugs is caught
finely on the tip of the catch-piece. The blunt point at the opposite
end of the platform should have a slight hollow made for it in the
prop against which it presses. If the platform be now strewn with
bait, the little machine is ready. It is certainly very simple and
will be found very effective.
Our next illustration shows another way to build the platform. It should be about three or four inches square, Page 87 and on the middle of one of its edges, the upright catch piece should be attached. This piece, as shown in our engraving, should be cut to spread at the bottom so it can be secured to the platform with two brads, with the tip shaped to a point. The total length of this piece shouldn’t be more than two and a half inches. Once attached, a third brad should be added between the other two and positioned exactly in the center of the platform's side. This brad will act as the pivot, or hinge, and should stick out about a quarter of an inch, as seen at (a). On the opposite edge of the platform, another larger brad should be driven in, with its end filed to a blunt point, as shown in (b). If filing is too tedious, a hardwood plug shaped as needed would work just fine. The upright supports for the platform should be made of thin wood. One should be an inch and a half long and half an inch wide, while the other is an inch long. Both ends should be whittled to a point so they can be inserted into a gimlet hole in the bottom of the trap. These holes should be at least half an inch deep. The first hole should be made about an inch or so from the back of the trap. Insert the shorter prop, broadside front, into this hole. Lay the pivot brad of the platform on top of this piece and put a small wire staple over it, as seen at (a). Raise the platform evenly and find the spot for the other gimlet hole, which should be directly under the point of the filed brad. Make sure it’s in the center of the board so that the platform sets squarely and is perfectly parallel with the sides. Insert the remaining prop in its place, and the platform is complete. The overhanging spindle now needs some attention. This should be whittled down on each side, tapering to a point at the tip. Drive a long plug into the back piece on each side of the spindle, as our illustration shows. These should be spaced far enough to let the spindle pass easily between them. The setting of the trap is clearly illustrated in our Page 88 engraving. The spindle being lowered between the plugs catches nicely on the tip of the catch piece. The blunt point at the opposite end of the platform should have a slight hollow made for it in the support against which it presses. If the platform is now strewn with bait, the little machine is ready. It’s definitely very simple and will be found to be quite effective.
THE BOX OWL TRAP.
The use of a box trap for the capture of an owl is certainly an odd idea, but we nevertheless illustrate a contrivance which has been successfully used for that purpose.
The use of a box trap to catch an owl may seem strange, but we still show a device that has been successfully used for that purpose.
The box in this case should be of the proportions shown in our engraving, and well ventilated with holes, as indicated. (This ventilation is, by-the-way, a good feature to introduce in all traps.) Having made or selected a suitable box—say, fourteen or more inches wide, provided with a cover, working on a hinge—proceed to fasten on the outside of the lid a loop of stiff wire, bent in the shape shown at (e). This may be fastened to the cover by means of small staples, or even tacks, and should project over the edge about two inches. When this is done, the lid should be raised to the angle shown in our illustration, and the spot where the end of the wire loop touches the back of the box should be marked and a slit cut through the wood at this place, large enough for the angle of the loop to pass through. Two elastics should now be fastened to the inside of the box, being secured to the bottom at the side, and the other to the edge of the cover, as seen in the illustration. They should be sufficiently strong to draw down the cover quickly. The perch, or spindle, should consist of a light stick of wood, as shown at (b,) one end provided with a slight notch, and the other fastened to the inside of the front of the box by a string or leather hinge, (c,) keeping the notch on the upper side of the stick. It will be now seen that by opening the cover, until the loop enters through the groove, and by then hooking the notch in the spindle under the loop as seen at (a) the trap will be set, and if properly done it will be found that a very slight weight on the spindle will set it free from the loop and let the cover down with swiftness.
The box in this situation should have the dimensions shown in our engraving and should be well-ventilated with holes, as indicated. (This ventilation, by the way, is a good feature to include in all traps.) Once you’ve made or chosen a suitable box—about fourteen inches or wider, with a cover that opens on a hinge—attach a loop of stiff wire on the outside of the lid, shaped like the one shown at (e). You can secure this with small staples or even tacks, ensuring it extends over the edge by about two inches. After that, lift the lid to the angle shown in our illustration, mark the spot where the end of the wire loop touches the back of the box, and cut a slit through the wood there, large enough for the angle of the loop to fit through. Next, two elastics should be attached to the inside of the box; one secured to the bottom at the side and the other to the edge of the cover, as shown in the illustration. They should be strong enough to quickly pull down the cover. The perch, or spindle, should be a light stick of wood, as shown at (b), with one end having a slight notch, and the other end attached to the inside front of the box with a string or leather hinge (c), keeping the notch on the upper side of the stick. Now, you can see that by opening the cover until the loop goes into the groove and then hooking the notch in the spindle under the loop as shown at (a), the trap will be set. If done correctly, a very light weight on the spindle will release it from the loop and quickly let the cover down.
To secure the cover in place a small tin catch should now be applied to the front edge of the box, as shown in the illustration. A piece of tin two inches in length by a half an inch in breadth will answer for this purpose. One end should be bent Page 89 down half an inch at a pretty sharp angle, and the other attached by two tacks, to the edge of the box, in the position shown in the cut. This precaution will effectually prevent the escape of whatever bird, large or small, the trap may chance to secure. It is a necessary feature of the trap, as without it the elastics might be torn asunder and the lid thereby easily raised.
To keep the cover in place, a small tin catch should be attached to the front edge of the box, as shown in the illustration. A piece of tin that is two inches long and half an inch wide will work for this. Bend one end down half an inch at a sharp angle, and attach the other end with two tacks to the edge of the box, in the position shown in the picture. This will effectively prevent any bird, big or small, that the trap might catch from escaping. It's an important part of the trap because without it, the elastics could be pulled apart, allowing the lid to be easily lifted.
This trap may be baited in a variety of ways. As it is particularly
designed for a bird trap, it is well to sprinkle the bottom
of the box with berries, bird-seed, small insects, such as crickets,
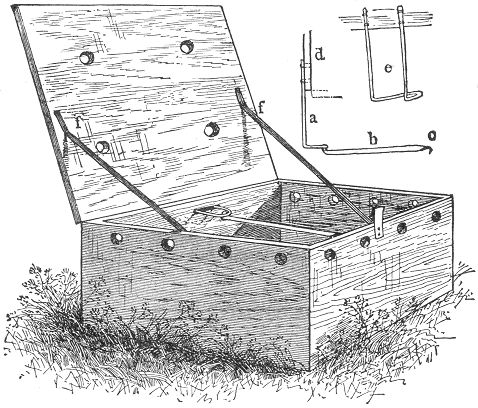 grasshoppers, etc. These latter are very apt to jump out, and it
may be well to fasten one or two of them to the bottom with a pin
through the body, just behind the head.
grasshoppers, etc. These latter are very apt to jump out, and it
may be well to fasten one or two of them to the bottom with a pin
through the body, just behind the head.
This trap can be baited in different ways. Since it's specifically designed for a bird trap, it's a good idea to sprinkle the bottom of the box with berries, birdseed, and small insects like crickets,
grasshoppers, and others. These insects tend to jump out easily, so it might be a good idea to secure one or two of them to the bottom with a pin through their bodies, just behind their heads.
There are many kinds of birds which live almost exclusively on insects; and as this bait is of rather a lively kind, there is scarcely any other method to retain them in their position. A bird on approaching this trap will almost irresistibly alight on the perch, and if not at first, it is generally sure to do so before long. If desired, a pasteboard platform may be fastened on Page 90 the top of the perch with small tacks, and the bait scattered upon it. This will act in the same manner, and might, perhaps, be a trifle more certain. We will leave it to our readers to experiment upon.
There are many types of birds that primarily feed on insects, and since this bait is quite lively, there’s hardly any other way to keep them in place. When a bird approaches this trap, it will almost automatically land on the perch, and if it doesn't do so right away, it’s usually only a matter of time. If you want, you can attach a pasteboard platform to the top of the perch with small tacks and scatter the bait on it. This will work in the same way and might even be a little more effective. We'll let our readers experiment with this.
We have given this variety the name of "owl-trap," because it may be used with success in this direction. When set for this purpose, it should be baited with a live mouse, small rat or bird, either fastened to the bottom of the trap, if a bird, or set in with the trap inclosing it, if a mouse. A small bird is the preferable bait, as it may be easily fastened to the bottom of the box by a string, and as a general thing is more sure to attract the attention of the owl by its chirping.
We named this type of trap the "owl-trap" because it works well for catching owls. When using it for this purpose, you should bait it with a live mouse, small rat, or bird. If you're using a bird, fasten it to the bottom of the trap; if you’re using a mouse, place it inside the trap. A small bird is the best bait since it can be easily attached to the bottom of the box with a string and is generally more likely to catch the owl's attention with its chirping.
The trap should be set in an open, conspicuous spot, in the neighborhood where the owls in the night are heard to "hoot." The chances are that the box will contain an owl on the following morning.
The trap should be placed in a visible, open area, in the vicinity where the owls can be heard "hooting" at night. It’s likely that the box will have an owl inside it by the next morning.
This bird is a very interesting and beautiful creature, and if our young reader could only catch one, and find rats and mice enough to keep it well fed, he would not only greatly diminish the number of rats in his neighborhood, but he would realize a great deal of enjoyment in watching and studying the habits of the bird.
This bird is a really interesting and beautiful creature, and if our young reader could just catch one and find enough rats and mice to keep it well-fed, he wouldn't only reduce the number of rats in his neighborhood, but he would also have a lot of fun watching and studying the bird's habits.
Should it be difficult to supply the above mentioned food, raw meat will answer equally well. The bird should either be kept in a cage or inclosure and in the latter case, its wings will require to be clipped.
Should it be hard to provide the food mentioned above, raw meat will work just as well. The bird should either be kept in a cage or an enclosure, and in the latter case, its wings will need to be clipped.
THE BOX BIRD TRAP.
Here we have another invention somewhat resembling the foregoing. Our engraving represents the arrangement of the parts as the trap appears when set.
Here we have another invention that's somewhat similar to the previous one. Our illustration shows how the parts are arranged when the trap is set.
The box may be of almost any shape. A large sized cigar box has
been used with excellent success, and for small birds is just the
thing. The cover of the box in any case should work on a hinge of
some sort. The trap is easily made. The first thing to be done
is to cut an upright slot, about two inches in length, through
the centre of the backboard, commencing at the upper edge. To the
inside centre edge of the cover a small square strap, about four
inches in length, should then be secured. It should be so adjusted
as that one-half shall project toward the inside of the box, as
seen in the illustration, and at the same time pass easily through
the slot beneath where the cover
Page 91
is closed. The lid should now be supplied with elastics as described
in the foregoing. Next in order comes the bait stick. Its shape
is clearly shown in our illustration, and it may be either cut in
one piece or consist of two parts joined together at the angle.
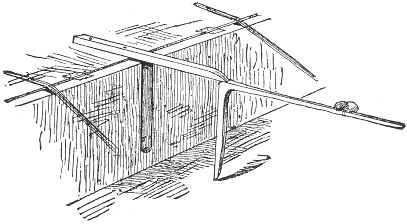 To the long arm the bait should be attached and the upright portion
should be just long enough to suspend the cover in a position on
a line with the top of the box. The trap may now be set, as seen
in our illustration, and should be supplied with the necessary
tin catch, described in the foregoing.
To the long arm the bait should be attached and the upright portion
should be just long enough to suspend the cover in a position on
a line with the top of the box. The trap may now be set, as seen
in our illustration, and should be supplied with the necessary
tin catch, described in the foregoing.
The box can be almost any shape. A large cigar box works really well and is perfect for small birds. The lid of the box should have some kind of hinge. Making the trap is simple. First, cut a vertical slot about two inches long in the middle of the back panel, starting from the top edge. Next, attach a small square strap, about four inches long, to the inner center edge of the lid. It should be positioned so that half of it sticks out towards the inside of the box, as shown in the illustration, and can easily slide through the slot below where the lid closes. Now, add some elastics to the lid as previously described. The next step is to create the bait stick. Its shape is clearly illustrated, and you can either cut it from one piece or make it from two parts joined together at an angle.
Attach the bait to the long arm, and the upright part should be just long enough to hold the lid in a position level with the top of the box. The trap can now be set, as shown in our illustration, and it should include the necessary tin catch mentioned earlier.
THE PENDENT BOX TRAP.
This invention is original with the author of this work, and when properly made and set will prove an excellent device for the capture of small birds.
This invention is original to the author of this work, and when made and set up correctly, it will be a great tool for capturing small birds.
The general appearance of the trap, as set, is clearly shown in our illustration. A thin wooden box is the first requisite, it should be about a foot square and six inches in depth, and supplied with a close fitting cover, working on hinges. The sides should then be perforated with a few auger holes for purposes of ventilation.
The overall look of the trap, as set up, is clearly shown in our illustration. A slim wooden box is the first essential; it should be about a foot square and six inches deep, with a snug-fitting cover on hinges. The sides should then be drilled with a few holes for ventilation.
Two elastics are next in order, and they should be attached to the cover and box, one on each side, as shown at (a.) They should be drawn to a strong tension, so as to hold the cover firmly against the box.
Two elastics come next, and they should be attached to the cover and box, one on each side, as shown at (a.) They should be pulled tight to securely hold the cover against the box.
The mechanism of the trap centres in the bait stick which differs in construction from any other described in this book.
The trap's mechanism revolves around the bait stick, which is built differently than any other described in this book.
It should be made about the size of a lead pencil, and eleven Page 92 inches or so in length, depending of course upon the size of the box.
It should be about the size of a lead pencil, and around eleven Page 92 inches long, depending, of course, on the size of the box.
It should then be divided in two pieces by a perfectly flat cut, the longer part being six inches in length. This piece should be attached to the back board of the box by a small string and a tack, as shown at (c), its end being bluntly pointed. Its attachment should be about five inches above the bottom board, and in the exact centre of the width of the back.
It should then be split into two pieces with a perfectly straight cut, with the longer piece measuring six inches long. This piece should be attached to the back board of the box using a small string and a tack, as shown at (c), with its end being bluntly pointed. It should be attached about five inches above the bottom board and exactly in the center of the back's width.
Near the flat end of the other piece the bait consisting of a berry
or other fruit, should be secured, and the further extremity of
the stick should then be rounded to a blunt point. The trap is now
easily set. Raise the lid and lift the long stick to the position
given in the illustration. Adjust the flat end of the bait stick
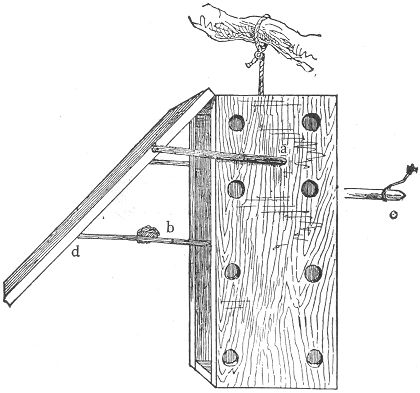 against that of the former, and allow the pressure of the lid to
bear against the blunt point of the short stick at (d),
as shown in the illustration, a straight dent being made in the
cover to receive it, as also in the back of the box for the other
piece. If properly constructed, this pressure will be sufficient
to hold the sticks end to end, as our engraving
Page 93
represents, and the trap is thus set. The slightest weight on the
false perch thus made will throw the parts asunder, and the cover
closes with a snap.
against that of the former, and allow the pressure of the lid to
bear against the blunt point of the short stick at (d),
as shown in the illustration, a straight dent being made in the
cover to receive it, as also in the back of the box for the other
piece. If properly constructed, this pressure will be sufficient
to hold the sticks end to end, as our engraving
Page 93
represents, and the trap is thus set. The slightest weight on the
false perch thus made will throw the parts asunder, and the cover
closes with a snap.
At the flat end of the other piece, secure the bait, which can be a berry or other fruit, and then round off the further end of the stick to create a blunt point. The trap is now easy to set. Raise the lid and lift the long stick to the position shown in the illustration. Adjust the flat end of the bait stick
against the flat end of the other stick, allowing the pressure of the lid to press against the blunt point of the short stick at (d), as shown in the illustration, while a straight dent is made in the cover to accommodate it, as well as in the back of the box for the other piece. If constructed properly, this pressure will be enough to keep the sticks aligned end to end, as depicted in our engraving
Page 93
and the trap is now set. The slightest weight on the false perch will trigger the mechanism, causing the parts to separate, and the cover will close with a snap.
The greatest difficulties in constructing the trap will be found in the bearings of the bait sticks (b), the ends of which must be perfectly flat and join snugly, in order to hold themselves together. The box may now be suspended in a tree by the aid of a string at the top. The first bird that makes bold enough to alight on the perch is a sure captive, and is secured without harm. If desired, the elastic may be attached to the inside of the cover, extending to the back of the box, as seen in the initial at the head of this chapter. If the elastic in any event shows tendencies toward relaxing, the tin catch described on page 88 should be adjusted to the lower edge of the box to insure capture.
The biggest challenges in setting up the trap will be with the bait sticks (b), whose ends need to be perfectly flat and fit together tightly to stay solid. The box can now be hung from a tree using a string at the top. The first bird brave enough to land on the perch will be caught for sure, without any harm. If you want, you can attach the elastic to the inside of the lid, extending to the back of the box, as shown in the illustration at the beginning of this chapter. If the elastic starts to lose tension, the tin catch mentioned on page 88 should be fixed to the bottom edge of the box to ensure a successful capture.
THE HAWK TRAP.

Our illustration represents a hawk in a sad plight. The memory of a recent feast has attracted it to the scene of many of Page 94 its depredations: but the ingenious farmer has at last outwitted his feathered foe and brought its sanguinary exploits to a timely end. This trap is a "Yankee" invention and has been used with great success in many instances where the hawk has become a scourge to the poultry yard. The contrivance is clearly shown in an illustration, consisting merely of a piece of plank two feet square, set with stiff perpendicular pointed wires.
Our illustration shows a hawk in a tough situation. The memory of a recent meal has drawn it back to the place where it has caused so much trouble: but the clever farmer has finally outsmarted his feathered enemy and put a stop to its bloody attacks. This trap is a "Yankee" invention and has been used successfully in many cases where the hawk has become a menace to the chicken coop. The design is clearly depicted in an illustration, made up of just a two-foot square piece of wood set with stiff upright pointed wires.
This affair was set on the ground in a conspicuous place, the board covered with grass, and the nice fat Poland hen which was tied to the centre proved a morsel too tempting for the hawk to resist. Hence the "fell swoop" and the fatal consequences depicted in our illustration. The owl has also been successfully captured by the same device.
This setup was made in a prominent location, with the board covered in grass, and the plump Polish hen tied at the center proved to be too tempting for the hawk to pass up. Thus, the "fell swoop" and the deadly outcomes shown in our illustration. The owl has also been successfully caught using the same method.
THE WILD DUCK NET.
Following will be found two examples of traps in very common use
for the capture of wild ducks, and in the region of Chesapeake
bay, immense numbers of the game are annually taken by their aid.
The first is the well known net trap, so extensively used in nearly
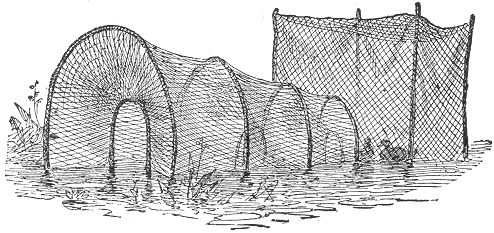 all countries, both for the capture of various kinds of fish as
well as winged game. Our illustration gives a very clear idea of
the construction of the net, and an elaborate description is almost
superfluous. It consists of a graduated series of hoops covered
by a net work. From each a converging net extends backward ending
in a smaller hoop which is held in position by cords extending
therefrom to the
Page 95
next larger hoop. The depth of these converging nets should extend
backward about three or four feet from the large hoop; and the
distance between these latter should be about five feet. The length
of the net should be about twenty feet, terminating in a "pound"
or netted enclosure, as seen in the illustration. The trap may be
set on shore or in the water as seen. "Decoy" birds are generally
used, being enclosed in the pound.
all countries, both for the capture of various kinds of fish as
well as winged game. Our illustration gives a very clear idea of
the construction of the net, and an elaborate description is almost
superfluous. It consists of a graduated series of hoops covered
by a net work. From each a converging net extends backward ending
in a smaller hoop which is held in position by cords extending
therefrom to the
Page 95
next larger hoop. The depth of these converging nets should extend
backward about three or four feet from the large hoop; and the
distance between these latter should be about five feet. The length
of the net should be about twenty feet, terminating in a "pound"
or netted enclosure, as seen in the illustration. The trap may be
set on shore or in the water as seen. "Decoy" birds are generally
used, being enclosed in the pound.
Here are two common types of traps used to catch wild ducks, especially in the Chesapeake Bay area, where large numbers of them are captured each year. The first is the well-known net trap, which is widely used around the world for catching both fish and birds.
Our illustration clearly shows how the net is constructed, so a detailed description isn't really necessary. It consists of a series of hoops covered by a network of netting. Each hoop has a net that narrows down towards the back, ending in a smaller hoop that is held in place by cords attached to the next larger hoop. The depth of these nets should extend about three or four feet back from the large hoop, and the distance between the large hoops should be about five feet. The overall length of the net should be around twenty feet, culminating in a "pound" or netted enclosure, as shown in the illustration. The trap can be set on land or in water, as depicted. "Decoy" birds are usually placed inside the pound to attract other ducks.
When set on land the bait consisting of corn or other grain should be spread about the entrance and through the length of the net.
When placed on land, the bait made of corn or other grains should be scattered around the entrance and along the length of the net.
It is remarkable that a duck which so easily finds its way within the netted enclosure, should be powerless to make its escape, but such seems to be the fact, and even a single hoop with its reflex net, has been known to secure a number of the game.
It’s surprising that a duck, which can easily navigate within the netted area, is unable to escape, but that’s how it is. Even a single hoop with its angled net has been known to catch several of the game.
THE HOOK TRAP
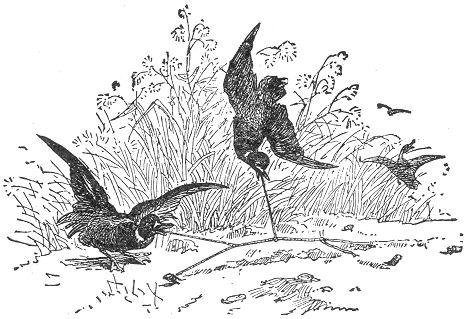
Our second example is one which we are almost tempted to exclude on account of its cruelty, but as our volume is especially devoted to traps of all kinds and as this is a variety in very common use, we feel bound to give it a passing notice. Our illustration fully conveys its painful mode of capture, and a beach at low water is generally the scene of the slaughter. A long stout cord is first stretched across the sand and secured Page 96 to a peg at each end. To this shorter lines are attached at intervals, each one being supplied with a fish hook baited with a piece of the tender rootstock of a certain water reed, of which the ducks are very fond. The main cord and lines are then imbedded in the sand, the various baits only appearing on the surface, and the success of the device is equal to its cruelty.
Our second example is one we almost want to leave out because of its cruelty, but since our book focuses on different types of traps and this one is widely used, we feel it’s necessary to mention it briefly. Our illustration clearly shows its painful method of capturing animals, and a beach at low tide is usually where the slaughter happens. A long, strong cord is first stretched across the sand and secured to a peg at each end. Shorter lines are attached at intervals, each with a fish hook baited with a piece of the tender rootstock of a certain water reed, which ducks love. The main cord and lines are then buried in the sand, with the different baits just sticking out on the surface, and the effectiveness of this trap is as high as its cruelty.
THE "FOOL'S CAP" TRAP.
Of all oddities of the trap kind, there is, perhaps, no one more
novel and comical than the "Fool's Cap" crow-trap, which forms
the subject of our present illustration. Crows are by no means
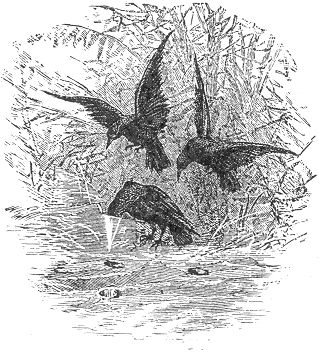 easy of capture in any form of trap, and they are generally as
coy and as shrewd in their approach to a trap as they are bold in
their familiarity and disrespect for the sombre scarecrows in the
com field. But this simple device will often mislead the smartest
and shrewdest crow, and make a perfect fool of him, for it
is hard to imagine a more ridiculous sight than is furnished by
the strange antics and evolutions of a crow thus embarrassed with
his head imbedded in a cap which he finds impossible to remove, and
which he in vain endeavors to shake off by all sorts of gymnastic
performance. The secret of the little contrivance is easily told.
The cap consists of a little cone of stiff paper, about three or
four inches in diameter at the opening. This is imbedded in the
ground, up to its edge, and a few grains of corn are dropped into
it. The inside edge of the
Page 97
opening is then smeared with bird-lime, a substance of which
we shall speak hereafter.
easy of capture in any form of trap, and they are generally as
coy and as shrewd in their approach to a trap as they are bold in
their familiarity and disrespect for the sombre scarecrows in the
com field. But this simple device will often mislead the smartest
and shrewdest crow, and make a perfect fool of him, for it
is hard to imagine a more ridiculous sight than is furnished by
the strange antics and evolutions of a crow thus embarrassed with
his head imbedded in a cap which he finds impossible to remove, and
which he in vain endeavors to shake off by all sorts of gymnastic
performance. The secret of the little contrivance is easily told.
The cap consists of a little cone of stiff paper, about three or
four inches in diameter at the opening. This is imbedded in the
ground, up to its edge, and a few grains of corn are dropped into
it. The inside edge of the
Page 97
opening is then smeared with bird-lime, a substance of which
we shall speak hereafter.
Of all the strange traps out there, there's probably nothing more unique and entertaining than the "Fool's Cap" crow trap, which is the focus of our illustration. Crows are known to be tough to catch in any type of trap, and they are usually as cautious and clever when approaching a trap as they are bold and dismissive of the gloomy scarecrows in the cornfield. However, this simple device can often trick even the smartest crow and make a complete fool of him, as it's hard to imagine a more ridiculous sight than a crow struggling with its head stuck in a cap that it can't remove, trying everything to shake it off through all sorts of acrobatics. The secret behind this little contraption is quite simple. The cap is a small cone made of stiff paper, about three or four inches wide at the opening. It's pushed into the ground up to its edge, and a few grains of corn are tossed inside it. The inside edge of the opening is then covered with bird-lime, a substance we'll discuss later.
The crow, on endeavoring to reach the corn, sinks his bill so deep in the cone as to bring the gummy substance in contact with the feathers of his head and neck, to which it adheres in spite of all possible efforts on the part of the bird to throw it off.
The crow, while trying to get to the corn, plunges his beak so deep into the cone that the sticky substance sticks to the feathers on his head and neck, which clings on no matter how hard the bird tries to shake it off.
The cones may be made of a brownish-colored paper if they are to be placed in the earth, but of white paper when inserted in the snow. It is an excellent plan to insert a few of these cones in the fresh corn hills at planting season, as the crows are always on the watch at this time, and will be sure to partake of the tempting morsels, not dreaming of the result. The writer has often heard of this ingenious device, and has read of its being successfully employed in many instances, but he has never yet had an opportunity of testing it himself. He will leave it for his readers to experiment upon for themselves.
The cones can be made from brown paper if they're going to be placed in the ground, but should be made of white paper if they're going into the snow. It's a great idea to put a few of these cones in the fresh corn hills during planting season, since crows are always on the lookout at this time and will definitely take the bait, unaware of the consequences. The author has often heard about this clever trick and has read about its successful use in many cases, but he has never had the chance to try it himself. He'll leave it for readers to experiment with on their own.
BIRD LIME.
This substance so called to which we have above alluded, and which
is sold in our bird marts under that name, is a viscid, sticky
preparation, closely resembling a very thick and gummy varnish.
It is astonishingly "sticky," and the slightest quantity between
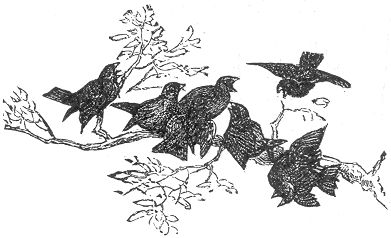 the fingers will hold them together with remarkable tenacity. What
its effect must be on the feathers of a bird can easily be imagined.
the fingers will hold them together with remarkable tenacity. What
its effect must be on the feathers of a bird can easily be imagined.
This substance we've mentioned, sold in our bird shops under that name, is a sticky, gooey preparation that looks a lot like thick, gummy varnish. It’s incredibly “sticky,” and even a tiny bit between your fingers can hold them together with surprising strength. You can easily imagine how it affects a bird's feathers.
This preparation is put up in boxes of different sizes, and may be had from any of the taxidermists or bird-fanciers in any of Page 98 our large towns or cities. Should a home made article be required, an excellent substitute may be prepared from the inner bark of the "slippery elm." This should be gathered in the spring or early summer, cut into very small pieces or scraped into threads, and boiled in water sufficient to cover them until the pieces are soft and easily mashed. By this time the water will be pretty much boiled down, and the whole mass should then be poured into a mortar and beaten up, adding at the same time a few grains of wheat. When done, the paste thus made may be put into an earthen vessel and kept. When required to be used, it should be melted or softened over the fire, adding goose grease or linseed oil, instead of water. When of the proper consistency it may be spread upon sticks or twigs prepared for it, and which should afterwards be placed in the locality selected for the capture of the birds.
This preparation comes in boxes of various sizes and can be found with any taxidermists or bird enthusiasts in any of Page 98 our large towns or cities. If a homemade option is needed, a great substitute can be made from the inner bark of the "slippery elm." This should be collected in the spring or early summer, chopped into very small pieces or scraped into threads, and boiled in enough water to cover it until the pieces are soft and easy to mash. By this time, a lot of the water will have evaporated, and the entire mixture should be poured into a mortar and mashed, while adding a few grains of wheat. Once finished, the paste can be stored in an earthen vessel. When you need to use it, melt or soften it over the fire, adding goose grease or linseed oil instead of water. When it reaches the right consistency, it can be spread on sticks or twigs prepared for it, which should then be placed in the area chosen for capturing the birds.
An excellent bird-lime may be made also from plain linseed-oil, by boiling it down until it becomes thick and gummy. Thick varnish either plain or mixed with oil, but always free from alcohol, also answers the purpose very well. The limed twigs may be either set in trees or placed on poles and stuck in the ground.
An excellent bird-lime can also be made from plain linseed oil by boiling it down until it becomes thick and sticky. Thick varnish, whether plain or mixed with oil but always without alcohol, works just as well. The limed twigs can be placed in trees or set on poles stuck in the ground.
If any of our readers chance to become possessed of an owl, they may look forward to grand success with their limed twigs. It is a well known fact in natural history that the owl is the universal enemy of nearly all our smaller birds. And when, as often happens, a swarm of various birds are seen flying frantically from limb to limb, seeming to centre on a particular tree, and filling the air with their loud chirping, it may be safely concluded that some sleepy owl has been surprised in his day-dozing, and is being severely pecked and punished for his nightly depredations.
If any of our readers happen to own an owl, they can expect great success with their limed twigs. It's a well-known fact in nature that the owl is the enemy of almost all our smaller birds. And when, as is often the case, a group of different birds is seen flying frantically from branch to branch, seemingly focused on a specific tree and filling the air with their loud chirping, it’s safe to conclude that some sleepy owl has been caught dozing during the day and is being harshly pecked for its nighttime hunting.
Profiting from this fact, the bird catcher often utilizes the owl with great success. Fastening the bird in the crotch of some tree, he adjusts the limed twigs on an sides, even covering the neighboring branches with the gummy substance. No sooner is the owl spied by one bird than the cry is set up, and a score of foes are soon at hand, ready for battle. One by one they alight on the beguiling twigs, and one by one find themselves held fast. The more they flutter the more powerless they become, and the more securely are they held. In this way many valuable and rare birds are often captured.
Taking advantage of this fact, the bird catcher frequently uses the owl with great success. He secures the bird in the fork of a tree, arranges the sticky twigs on either side, and even coats the nearby branches with the sticky substance. As soon as one bird spots the owl, the alarm is sounded, and soon a group of enemies arrives, ready to attack. One by one, they land on the tempting twigs, and one by one, they find themselves stuck. The more they flap around, the more helpless they become, and the more securely they are trapped. This way, many valuable and rare birds are often captured.
Page 99 THE HUMMING BIRD TRAP.
One of the most ingenious uses to which bird lime is said to have been applied with success, is in the capture of humming-birds. The lime in this instance is made simply by chewing a few grains of wheat in the mouth until a gum is formed. It is said that by spreading this on the inside opening of the long white lily or trumpet-creeper blossom, the capture of a humming-bird is almost certain, and he will never be able to leave the flower after once fairly having entered the opening. There can be no doubt but that this is perfectly practicable, and we recommend it to our readers.
One of the most clever ways that bird lime is reportedly used successfully is in catching hummingbirds. In this case, the lime is simply made by chewing a few grains of wheat in your mouth until a gum forms. It’s said that by spreading this on the inside opening of a long white lily or trumpet-creeper flower, capturing a hummingbird is almost guaranteed, and it won’t be able to leave the flower once it’s fully entered the opening. There’s no doubt that this is entirely doable, and we suggest our readers try it.
The object in making the bird-lime from wheat consists in the fact that this is more easily removed from the feathers than the other kinds.
The reason for making bird-lime from wheat is that it's easier to remove from the feathers than other types.
We would not wish our readers to infer from this that a humming-bird might be captured or kept alive, for of all birds, they are the most fragile and delicate, and would die of fright, if from nothing else. They are chiefly used for ornamental purposes, and may be caught in a variety of ways. A few silk nooses hung about the flowers where the birds are seen to frequent, will sometimes succeed in ensnaring their tiny forms.
We wouldn’t want our readers to think that a hummingbird could be caught or kept alive, because out of all birds, they’re the most fragile and delicate, and would die of fright, if nothing else. They are mainly used for decorative purposes and can be caught in different ways. A few silk loops hung around the flowers where the birds often visit can sometimes succeed in trapping their tiny bodies.
The blow-gun is often used with good success, and the concussion from a gun loaded simply with powder, and aimed in the direction of the bird, will often stun it so that it will fall to the ground. If a strong stream of water be forced upon the little creature, as it is fluttering from flower to flower, the result is the same, as the feathers become so wet that it cannot fly.
The blowgun is frequently effective, and the shock from a gun loaded only with powder, aimed at the bird, can often stun it enough for it to drop to the ground. If a strong spray of water hits the small creature while it flutters from flower to flower, the outcome is similar, as the feathers get so wet that it can’t fly.
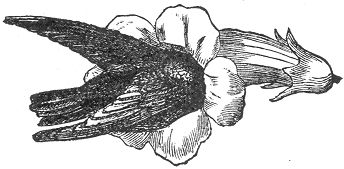

Page 103 BOOK IV.
MISCELLANEOUS TRAPS.
MISCELLANEOUS TRAPS.
THE COMMON BOX TRAP.
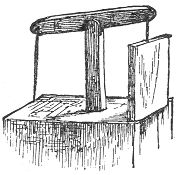 he following chapter includes a variety of traps
which have not been covered by any of the previous titles. Several
novelties are contained in the list, and also a number of well
known inventions.
he following chapter includes a variety of traps
which have not been covered by any of the previous titles. Several
novelties are contained in the list, and also a number of well
known inventions.
The following chapter includes a variety of traps that haven’t been discussed in any of the earlier sections. The list contains several new items, as well as a number of familiar inventions.
There is probably no more familiar example of the trap kind than that of the common wooden box-trap, better known, perhaps, by our country boys as the rabbit-trap. A glance at our illustration, will readily bring it to mind, and easily explain its working to those not particularly acquainted with it. These traps may be made of any size, but, being usually employed in catching rabbits, require to be made quite large. They should be made of hard seasoned wood—oak or chestnut is the best—and of slabs about an inch in thickness. The pieces may be of the following dimensions: let the bottom board be 20+7 in.; side board, 20+9 in.; lid board 19+7 in., and the end piece of lid 7 in. square.
There’s probably no more familiar example of a trap than the common wooden box trap, which is often referred to by our country kids as the rabbit trap. A quick look at our illustration will easily remind you of it and explain how it works to those who aren’t familiar. These traps can be made in various sizes, but since they are typically used to catch rabbits, they need to be fairly large. They should be built from hard, seasoned wood—oak or chestnut is the best choice—and made from slabs about an inch thick. The pieces should have the following dimensions: the bottom board should be 20+7 inches; the side board, 20+9 inches; the lid board, 19+7 inches; and the end piece of the lid should be 7 inches square.
The tall end piece should be about 16 inches high by 7 broad. Let this be sharpened on the upper end, as seen in the engraving, and furnished with a slight groove on the summit, for the reception of the cord. Now to put the pieces together.
The tall end piece should be about 16 inches high and 7 inches wide. Make sure to sharpen the upper end, as shown in the illustration, and add a small groove at the top to hold the cord. Now, let's assemble the pieces together.
Nail the two sides to the edge of the bottom board, and fit in between them the high end piece, securing that also, with nails through the bottom and side boards. Next nail the lid board on to the small, square end piece, and fit the lid thus made neatly into its place.
Nail the two sides to the edge of the bottom board, and insert the high end piece between them, securing it also with nails through the bottom and side boards. Next, nail the lid board onto the small, square end piece and fit the lid you've just made neatly into its place.
To make the hinge for the lid, two small holes should be bored through the sides of the trap, about four inches from the tall end, and half an inch from the upper edge of each board. Let Page 104 small nails now be driven through these holes into the edge of the lid, and it will be found to work freely upon them.
To create the hinge for the lid, drill two small holes through the sides of the trap, about four inches from the tall end and half an inch from the upper edge of each board. Let Page 104 small nails be driven through these holes into the edge of the lid, and it will work smoothly on them.
The principal part of the trap is now made, but what remains to be
done is of great importance. The "spindle" is a necessary feature
in nearly all traps, and the box-trap is useless without it. In
this case it should consist merely of a round stick of about the
thickness of a lead pencil, and we will say, 7 or 8 in. in length.
One end should be pointed and the other should have a small notch
cut in it, as seen in the separate drawing of the stick. The spindle
being ready, we must have some place to put it. Another hole should
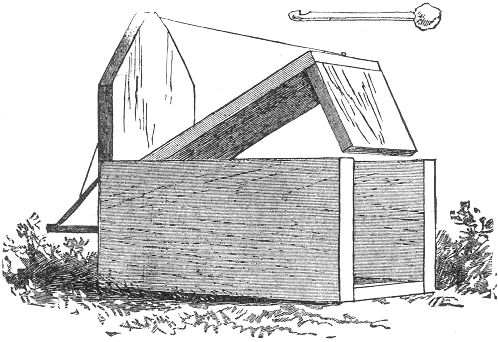 be bored through the middle of the high end piece, and about 4 in.
from the bottom. This hole should be large enough to allow the
spindle to pass easily through it. If our directions have been
carefully followed, the result will now show a complete, closefitting
trap.
be bored through the middle of the high end piece, and about 4 in.
from the bottom. This hole should be large enough to allow the
spindle to pass easily through it. If our directions have been
carefully followed, the result will now show a complete, closefitting
trap.
The main part of the trap is now done, but what’s left is really important. The "spindle" is a key part of almost all traps, and the box-trap won’t work without it. For this, it should just be a round stick about the thickness of a pencil, let’s say 7 or 8 inches long. One end should be pointed, and the other should have a small notch cut into it, as shown in the separate drawing of the stick. Once the spindle is ready, we need to find a place to put it. Another hole should be drilled through the middle of the high end piece, about 4 inches from the bottom. This hole should be big enough to let the spindle pass through easily. If you’ve followed these instructions carefully, the result will be a complete, well-fitting trap.
In setting the trap there are two methods commonly employed, as shown at a and b. The string, in either case, must be fastened to the end of the lid.
In setting the trap, there are two methods usually used, as shown at a and b. The string, in both cases, must be attached to the end of the lid.
In the first instance (a) the lid is raised and made fast by the brace, holding itself beneath the tip of the projecting spindle, and a nail or plug driven into the wood by the side of the hole. Page 105 Of course, when the spindle is drawn or moved from the inside the brace will be let loose and the lid will drop.
In the first instance (a), the lid is lifted and secured by the brace, which keeps it under the tip of the projecting spindle, with a nail or peg driven into the wood next to the hole. Page 105 Naturally, when the spindle is pulled or moved from the inside, the brace will release, and the lid will fall.
In the other method (b) the spindle is longer, and projects several inches on the outside of the hole. The brace is also longer, and catches itself in the notch on the end of the spindle, and another slight notch in the board, a few inches above the hole.
In the other method (b), the spindle is longer and extends several inches outside the hole. The brace is also longer and fits into the notch at the end of the spindle, as well as another small notch in the board a few inches above the hole.
When the bait is touched from the inside, the brace easily flies
out and the lid falls, securing its victim. Either way is sure
to succeed, but if there is any preference it is for the former
(a). It is a wise plan to have a few holes through the trap
in different places, to allow for ventilation, and it may be found
necessary to line the cracks with tin, as sometimes the enclosed
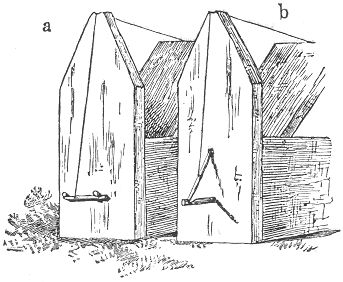 creature might otherwise gnaw through and make its escape. If there
is danger of the lid not closing tightly when sprung, a stone may
be fastened upon it to insure that result.
creature might otherwise gnaw through and make its escape. If there
is danger of the lid not closing tightly when sprung, a stone may
be fastened upon it to insure that result.
When the bait is touched from the inside, the latch easily pops open and the lid falls, trapping its victim. Either way works, but if there's a preference, it's the former (a). It's a smart idea to add a few holes in the trap for ventilation, and you might need to line the cracks with tin, since the trapped creature might chew through and escape. If there's a chance the lid won't close tightly when triggered, you can secure a stone on top to ensure it stays shut.
This trap is usually set for rabbits, and these dimensions are especially calculated with that idea. Rabbits abound in all our woods and thickets, and may be attracted by various baits. An apple is most generally used. The box-trap may be made of smaller dimensions, and set in trees for squirrels with very good success.
This trap is usually used for catching rabbits, and its size is designed with that in mind. Rabbits are plentiful in our woods and bushes, and they can be lured in with different types of bait. An apple is the most commonly used bait. The box trap can also be made smaller and placed in trees to catch squirrels with great success.
There is still another well known form of this trap represented in the tail piece at the end of this section. The box is first constructed of the shape already given, only having the lid piece Page 106 nailed firmly in the top of the box. The tall end piece is also done away with. The whole thing thus representing a simple oblong box with one end open. Two slender cleats should be nailed on each side of this opening, on the interior of the box, to form a groove into which a square end board may easily slide up and down, the top board being slightly sawn away to receive it. An upright stick should then be erected on the top centre of the box, in the tip of which a straight stick should be pivoted, working easily therein, like the arms of a balance. To one end of this balance, the end board should be adjusted by two screw eyes, and to the other the string with spindle attached. By now lowering the spindle to its place, the further end of the balance will be raised and with it the end board, and on the release of the spindle the board will fall. This plan is quite commonly adopted but we rather prefer the former. But as each has its advantages we present them both.
There’s another well-known version of this trap shown in the tail piece at the end of this section. The box is first built in the shape already described, with the lid piece Page 106 nailed securely on the top. The tall end piece is also removed. The whole setup looks like a simple rectangular box with one end open. Two thin strips should be nailed on each side of this opening, inside the box, to create a groove where a square end board can slide up and down easily, with the top board slightly cut to fit it. A vertical stick should then be placed at the top center of the box, with a straight stick that pivots easily at the tip, like the arms of a balance scale. One end of this balance should be connected to the end board using two screw eyes, and the other end should hold the string with the spindle attached. By lowering the spindle into place, the other end of the balance will rise along with the end board, and when the spindle is released, the board will drop. This design is quite commonly used, but we prefer the earlier version. However, since each has its benefits, we're presenting both.
ANOTHER BOX TRAP.
This works after the manner of the ordinary wire rat-trap; our illustration explains itself.
This functions like a regular wire rat trap; our illustration explains it clearly.
The box should be of the shape there shown, with one of its end
pieces arranged on hinges so as to fall freely. An elastic should
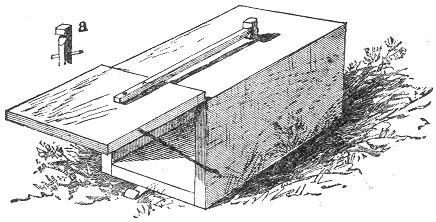 be fastened from the inside of this end to the inner surface of
the top of the box, to insure its closing. If desired an elastic
may be adjusted at the side as shown in the cut and a catch piece
of stout tin should be attached to the bottom of the trap to secure
the lid when it falls. A small hole should then be bored in the
top, near the further end of the trap, and
Page 107
the spindle, having a notch on its upper end, passed through the
hole thus made. The top of the spindle is shown at (a). It
should be held in its place by a small plug or pin through it,
below the surface of the box. A slender stick, long enough to reach
and catch beneath the notch in the spindle should now be fastened
to the lid and the trap is complete. It may be baited with cheese,
bread, and the like, and if set for squirrels, an apple answers
every purpose.
be fastened from the inside of this end to the inner surface of
the top of the box, to insure its closing. If desired an elastic
may be adjusted at the side as shown in the cut and a catch piece
of stout tin should be attached to the bottom of the trap to secure
the lid when it falls. A small hole should then be bored in the
top, near the further end of the trap, and
Page 107
the spindle, having a notch on its upper end, passed through the
hole thus made. The top of the spindle is shown at (a). It
should be held in its place by a small plug or pin through it,
below the surface of the box. A slender stick, long enough to reach
and catch beneath the notch in the spindle should now be fastened
to the lid and the trap is complete. It may be baited with cheese,
bread, and the like, and if set for squirrels, an apple answers
every purpose.
The box should be shaped as shown, with one end piece on hinges so it can open freely. An elastic should be attached from the inside of this end to the inner surface of the top of the box to ensure it closes properly. If you want, an elastic can also be added at the side, as shown in the image, and a sturdy tin catch should be affixed to the bottom of the trap to secure the lid when it closes. A small hole should then be drilled in the top, near the far end of the trap, and the spindle, which has a notch at the upper end, should be passed through the hole. The top of the spindle is shown at (a). It should be kept in place by a small plug or pin below the surface of the box. A slim stick, long enough to reach and catch under the notch in the spindle, should now be attached to the lid, and the trap is complete. It can be baited with cheese, bread, and similar items, and if you're setting it for squirrels, an apple works perfectly.
When constructed on a larger and heavier scale it may be used for the capture of rabbits and animals of a similar size, but for this purpose the previous variety is preferable.
When built on a larger and heavier scale, it can be used to catch rabbits and animals of a similar size, but for this purpose, the earlier version is better.
THE FIGURE FOUR TRAP.
One of the most useful as well as the most ancient inventions in
the way of traps is the common Figure Four Trap, which forms
the subject of our next illustration. It is a very ingenious
contrivance, and the mechanism, consists merely of three sticks.
It possesses great advantages in the fact that it may be used in
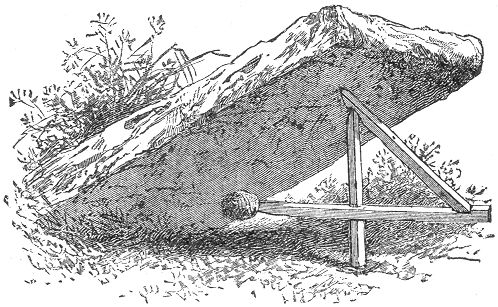 a variety of ways, and a number of the machines may be carried by
the young trapper with very little inconvenience. Our illustration
shows the trap already set, only awaiting for a slight touch at
the bait to bring the heavy stone to the ground. A box may be
substituted for the stone, and the animal may thus be
Page 108
captured alive. The three sticks are represented separate at a.
b. and c. Of course, there is no regular size for
them, as this would greatly depend upon the purpose for which they
are designed to be used. If for rabbits, the following proportions
will answer very well. The sticks should all be square, and about
half an inch in thickness. The bait-stick, (a) should be
about nine or ten inches in length, one end being pointed and the
other furnished with a notch, as indicated. The upright stick,
(b) should be a little shorter, one end being whittled to
a rather sharp edge. At about three or four inches from the other
end, and on the side next to that whittled, a square notch should
be cut. This should be about a third of an inch in depth and half
an inch in width, being so cut as exactly to receive the bait-stick
without holding it fast. The remaining stick (c) should have
a length of about seven or eight inches, one end being whittled,
as in the last, to an edge, and the other end furnished with a
notch on the same side of the stick.
a variety of ways, and a number of the machines may be carried by
the young trapper with very little inconvenience. Our illustration
shows the trap already set, only awaiting for a slight touch at
the bait to bring the heavy stone to the ground. A box may be
substituted for the stone, and the animal may thus be
Page 108
captured alive. The three sticks are represented separate at a.
b. and c. Of course, there is no regular size for
them, as this would greatly depend upon the purpose for which they
are designed to be used. If for rabbits, the following proportions
will answer very well. The sticks should all be square, and about
half an inch in thickness. The bait-stick, (a) should be
about nine or ten inches in length, one end being pointed and the
other furnished with a notch, as indicated. The upright stick,
(b) should be a little shorter, one end being whittled to
a rather sharp edge. At about three or four inches from the other
end, and on the side next to that whittled, a square notch should
be cut. This should be about a third of an inch in depth and half
an inch in width, being so cut as exactly to receive the bait-stick
without holding it fast. The remaining stick (c) should have
a length of about seven or eight inches, one end being whittled,
as in the last, to an edge, and the other end furnished with a
notch on the same side of the stick.
One of the most useful and oldest inventions for trapping is the common Figure Four Trap, which is the focus of our next illustration. It’s a clever device that consists of just three sticks. It has great advantages because it can be used in various ways, and a young trapper can carry several of these setups with minimal hassle. Our illustration shows the trap already set, waiting for a light touch on the bait to trigger the heavy stone to drop. A box can be used instead of the stone, allowing the animal to be captured alive. The three sticks are shown separately at a, b, and c. There’s no standard size for them, as it really depends on what they are being used for. If set for rabbits, the following dimensions work well. The sticks should all be square and about half an inch thick. The bait stick (a) should be about nine or ten inches long, with one end pointed and the other end notched as shown. The upright stick (b) should be a bit shorter, with one end sharpened. About three or four inches from the other end, on the side that’s sharpened, a square notch should be cut. This notch should be about a third of an inch deep and half an inch wide, cut to fit the bait stick without holding it tightly. The remaining stick (c) should be around seven or eight inches long, with one end sharpened as before, and the other end notched on the same side of the stick.
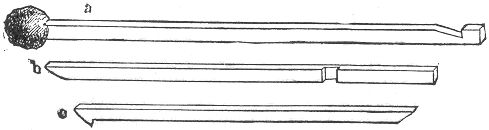
When these are finished, the trap may be set in the following manner: Place the upright stick, (b) with its pointed end uppermost. Rest the notch of the slanting stick, (c) on the summit of the upright stick, placing the stone upon its end, and holding the stick in position with the hand. By now hooking the notch in the bait-stick on the sharpened edge of the slanting stick and fitting it into the square notch in the upright, it may easily be made to catch and hold itself in position. The bait should always project beneath the stone. In case a box is used instead of a stone, the trap may be set either inside of it or beneath its edge. Where the ground is very soft, it would be well to rest the upright stick on a chip or small flat stone, as otherwise it is apt to sink into the earth by degrees and spring by itself.
When you’ve finished these steps, set the trap as follows: Place the upright stick, (b), with the pointed end facing up. Rest the notch of the slanting stick, (c), on top of the upright stick, placing the stone on its end and holding it in position with your hand. Then, hook the notch of the bait stick onto the sharpened edge of the slanting stick and fit it into the square notch of the upright, allowing it to catch and hold itself in place. The bait should always hang below the stone. If you use a box instead of a stone, the trap can be set either inside the box or under its edge. If the ground is very soft, it’s a good idea to rest the upright stick on a chip or a small flat stone, as it might sink into the earth over time and spring by itself.
When properly made, it is a very sure and sensitive trap, and the bait, generally an apple, or "nub" of corn is seldom more than touched when the stone falls.
When made correctly, it's a very reliable and sensitive trap, and the bait, usually an apple or a handful of corn, is rarely more than just brushed when the stone drops.
Page 109 THE "DOUBLE ENDER."
This is what we used to call it in New England and it was a great
favorite among the boys who were fond of rabbit catching. It was
constructed of four boards two feet in length by nine inches in
breath secured with nails at their edges, so as to form a long
square box. Each end was supplied with a heavy lid working on two
hinges. To each of these lids a light strip of wood was fastened,
the length of each being sufficient to reach nearly to the middle
of the top of the box, as seen in the illustration. At this point
a small auger hole was then made downward through the board. A
couple of inches of string was next tied to the tip of each stick
and supplied with a large knot at the end. The trap was then set on
the simple principle of which there are so many examples throughout
the pages of this work. The knots were lowered through the auger
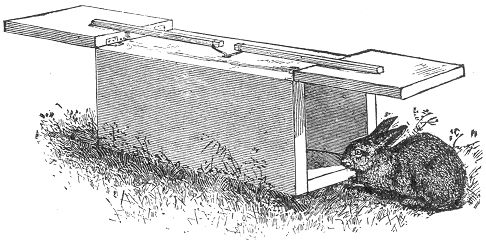 hole and the insertion of the bait stick inside the box held them
in place. The edge of the bottom board on each end of the trap
should be supplied with a tin catch such as is described on page 88 in order to hold the lid in place after
it has fallen. No matter from which end the bait is approached
it is no sooner touched than both ends fall and "bunny"
is prisoner. Like many other of our four-footed game, the rabbit
manifests a peculiar liking for salt and may be regularly attracted
to a given spot by its aid. A salted cotton string is sometimes
extended several yards from the trap for the purpose of leading
them to it, but this seems a needless precaution, as the rabbit
is seldom behind hand in discerning a tempting bait when it is
within his reach.
hole and the insertion of the bait stick inside the box held them
in place. The edge of the bottom board on each end of the trap
should be supplied with a tin catch such as is described on page 88 in order to hold the lid in place after
it has fallen. No matter from which end the bait is approached
it is no sooner touched than both ends fall and "bunny"
is prisoner. Like many other of our four-footed game, the rabbit
manifests a peculiar liking for salt and may be regularly attracted
to a given spot by its aid. A salted cotton string is sometimes
extended several yards from the trap for the purpose of leading
them to it, but this seems a needless precaution, as the rabbit
is seldom behind hand in discerning a tempting bait when it is
within his reach.
This is what we used to call it in New England, and it was a favorite among the boys who liked catching rabbits. It was made from four boards, two feet long and nine inches wide, secured with nails at the edges to form a long square box. Each end had a heavy lid that opened on two hinges. A light strip of wood was attached to each lid, long enough to reach nearly to the middle of the top of the box, as shown in the illustration. At this point, a small auger hole was drilled downward through the board. A couple of inches of string were then tied to the end of each stick, with a large knot at the end. The trap was then set based on a simple principle that is common throughout this work. The knots were lowered through the auger hole, and inserting the bait stick inside the box kept them in place. The edge of the bottom board on each side of the trap should have a tin catch like the one described on page 88 to hold the lid in place after it falls. No matter which end the bait is approached from, as soon as it's touched, both ends fall, and "bunny" becomes a captive. Like many other four-legged game, rabbits have a particular liking for salt and can be regularly lured to a specific spot with it. A salted cotton string is sometimes extended several yards from the trap to lead them to it, but this seems unnecessary since rabbits quickly recognize tempting bait when it’s within reach.
Page 110 THE SELF SETTING TRAP.
One of the oldest known principles ever embodied in the form of a trap is that which forms the subject of the accompanying illustration. It is very simple in construction, sure in its action; and as its name implies, resets itself after each intruder has been captured.
One of the oldest known principles ever made into a trap is depicted in the illustration alongside this text. It's very simple to build, reliable in its function, and as its name suggests, it resets itself after capturing each intruder.
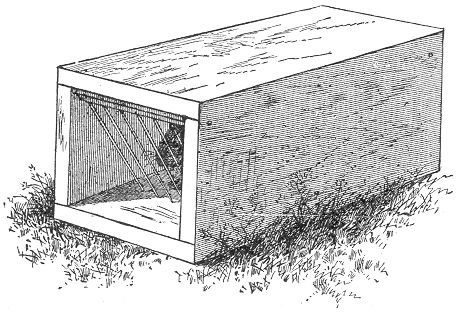
It is well adapted for Rabbits and Coons and when made on a small scale, may be successfully employed in taking rats and mice. It is also extensively used in the capture of the Mink and Muskrat, being set beneath the water, near the haunts of the animals and weighted by a large stone. Of course the size of the box will be governed by the dimensions of the game for which it is to be set. Its general proportions should resemble those of the illustration, both ends being open. A small gate, consisting of a square piece of wood supplied with a few stiff wires is then pivoted inside each opening, so as to work freely and fall easily when raised. The bait is fastened inside at the centre of the box. The animal, in quest of the bait, finds an easy entrance, as the wires lift at a slight pressure, but the exit after the gate has closed is so difficult that escape is almost beyond the question.
It works well for rabbits and raccoons, and when made on a small scale, it can effectively catch rats and mice. It’s also widely used to trap mink and muskrats, set under the water near their usual spots and weighted down with a heavy stone. Naturally, the size of the box should match the size of the game you're targeting. Its overall dimensions should be similar to the illustration, with both ends open. A small door made from a square piece of wood attached with a few stiff wires is then pivoted inside each opening, allowing it to move freely and fall easily when lifted. The bait is secured in the center of the box. The animal, searching for the bait, finds it easy to get in since the wires lift with a light touch, but escaping after the door closes is so difficult that it’s nearly impossible.
The wires should be so stiff as to preclude the possibility of them being bent by struggles of the imprisoned creature in his Page 111 efforts to escape, and to insure further strength it is advisable to connect the lower ends of the wires by a cross piece of finer wire, twisted about each.
The wires should be stiff enough to prevent bending from the struggles of the trapped animal in his Page 111 efforts to escape. To ensure even more strength, it's a good idea to connect the lower ends of the wires with a cross piece made of thinner wire, twisted around each one.
The simultaneous capture of two rabbits in a trap of this kind is a common occurrence.
The simultaneous capture of two rabbits in a trap like this is a common event.
THE DEAD-FALL.
In strolling through the woods and on the banks of streams in the
country, it is not an uncommon thing to stumble against a contrivance
resembling in general appearance our next illustration. Throughout
New England, the "dead-fall," as this is called, has always been
a most popular favorite among trappers, young and old; and there
is really no better rough and ready trap for large game. To entrap
a fox by any device is no easy matter; but the writer remembers
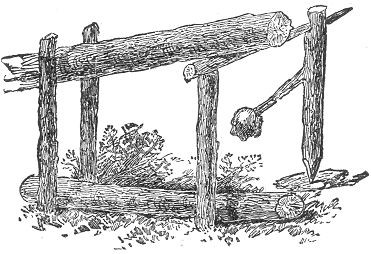 one case where Reynard was outwitted, and the heavy log of the
"dead-fall" put a speedy end to his existence. The trap was set in
a locality where the fox had made himself a nuisance by repeated
nocturnal invasions among the poultry, and the bait was cleverly
calculated to decoy him. A live duck was tied within the pen, and
the morsel proved too tempting for him to resist. Thrusting his
head beneath the suspended log, in order to reach his prey, he thus
threw down the slender framework of support; and the log, falling
across his neck, put him to death.
one case where Reynard was outwitted, and the heavy log of the
"dead-fall" put a speedy end to his existence. The trap was set in
a locality where the fox had made himself a nuisance by repeated
nocturnal invasions among the poultry, and the bait was cleverly
calculated to decoy him. A live duck was tied within the pen, and
the morsel proved too tempting for him to resist. Thrusting his
head beneath the suspended log, in order to reach his prey, he thus
threw down the slender framework of support; and the log, falling
across his neck, put him to death.
While walking through the woods and by the streams in the countryside, it's not unusual to come across a setup that looks somewhat like our next image. In New England, the "dead-fall," as it’s known, has always been a popular choice among trappers, both young and old; and there really is no better simple trap for large game. Catching a fox is no easy task; however, I remember one time when Reynard was outsmarted, and the heavy log of the "dead-fall" quickly ended his life. The trap was placed in an area where the fox had become a problem by frequently invading the poultry at night, and the bait was cleverly designed to lure him in. A live duck was tied inside the pen, and the temptation was too great for him to resist. When he pushed his head under the hanging log to get to the duck, he accidentally knocked down the delicate frame holding it up; the log fell across his neck and killed him.
Our illustration gives a very correct idea of the general construction of the "dead-fall," although differing slightly in its mode of setting from that usually employed.
Our illustration provides a clear idea of the overall design of the "dead-fall," even though it varies slightly in how it's set up compared to the typical method used.
Page 112 A pen of rough sticks is first constructed, having an open front. A log about seven or eight feet in length, and five or six inches in diameter, should then be procured. An ordinary fence rail will answer the purpose very well, although the log is preferable. Its large end should be laid across the front of the pen, and two stout sticks driven into the ground outside of it, leaving room for it to rise and fall easily between them and the pen, a second shorter log being placed on the ground beneath it, as described for the bear-trap, page (17). A look at our illustration fully explains the setting of the parts. A forked twig, about a foot in length, answers for the bait-stick. The lower end should be pointed, and the fork, with its bait, should incline toward the ground, when set. The upper end should be supplied with a notch, square side down, and directly above the branch which holds the bait. Another straight stick, about fourteen inches in length, should then be cut. Make it quite flat on each end. A small thin stone, chip of wood, or the like, is the only remaining article required. Now proceed to raise the log, as shown in the drawing, place one end of the straight stick beneath it, resting its tip on the flat top of the upright stick on the outside of the log. The baitstick should now be placed in position inside the inclosure, resting the pointed end on the chip, and securing the notch above, as seen in the illustration, beneath the tip of the flat stick. When this is done, the trap is set, but, there are a few little hints in regard to setting it finely,—that is, surely,—which will be necessary. It is very important to avoid bringing too much of the weight of the log on the flat stick, as this would of course bear heavily on the bait-stick, and render considerable force necessary to spring the trap. The leverage at the point where the log rests on the flat stick should be very slight, and the log should be so placed that the upright shall sustain nearly all the weight. By this method, very little pressure is brought to bear on the bait-stick, and a very slight twitch will throw it out of poise. The fork of the bait-stick should point to the side of the inclosure, as, in this case, when the bait is seized by the unlucky intruder, the very turning of the fork forces the notch from beneath the horizontal stick, and throws the parts asunder.
Page 112 First, build a pen using rough sticks with an open front. Next, find a log about seven or eight feet long and five or six inches in diameter. An ordinary fence rail works fine, but a log is better. Lay the wider end across the front of the pen and drive two sturdy sticks into the ground outside of it, allowing the log to rise and fall easily between them and the pen. Place a second shorter log on the ground beneath it, as described for the bear trap, page (17). A look at our illustration clearly shows the setting of the parts. A forked twig about a foot long serves as the bait-stick. The lower end should be pointed, and the fork with its bait should tilt toward the ground when set. The upper end should have a notch, square side down, positioned directly above the branch that holds the bait. Next, cut another straight stick about fourteen inches long, making both ends flat. A small thin stone, wood chip, or similar item is the last thing you need. Now, raise the log as shown in the drawing and place one end of the straight stick beneath it, resting its tip on the flat top of the upright stick outside of the log. The bait-stick should be positioned inside the enclosure, with the pointed end resting on the chip and the notch secured above, as seen in the illustration, under the tip of the flat stick. When this is completed, the trap is set, but there are a few tips to ensure it is set correctly—that is, effectively. It's crucial to avoid letting too much weight from the log rest on the flat stick, as this would put significant pressure on the bait-stick and require considerable force to spring the trap. The leverage where the log rests on the flat stick should be minimal, and the log should be positioned so that the upright stick supports nearly all the weight. This way, little pressure is placed on the bait-stick, and a slight twitch will easily throw it out of balance. The fork of the bait-stick should point towards the side of the enclosure, so that when the bait is grabbed by the unfortunate intruder, the movement of the fork will dislodge the notch from beneath the horizontal stick, causing the parts to break apart.
If the trap is set for muskrats, minks, skunks, or animals of similar size, the weight of the log will generally be found sufficient to effect their death; but, if desired, a heavy stone Page 113 may be rested against it, or the raised end weighted with other logs (see p. 18), to make sure. When set for a coon or fox, this precaution is necessary. To guard against the cunning which some animals possess, it is frequently necessary to cover the top of the pen with cross-sticks, as there are numerous cases on record where the intended victims have climbed over the side of the inclosure, and taken the bait from the inside, thus keeping clear of the suspended log, and springing the trap without harm to themselves. A few sticks or branches laid across the top of the inclosure will prevent any such capers; and the crafty animals will either have to take the bait at the risk of their lives, or leave it alone.
If the trap is set for muskrats, minks, skunks, or similarly sized animals, the weight of the log is usually enough to kill them. However, if needed, a heavy stone Page 113 can be placed against it, or the raised end can be weighed down with other logs (see p. 18) to ensure effectiveness. This precaution is necessary when trapping raccoons or foxes. To guard against the cleverness some animals have, it’s often essential to cover the top of the pen with cross-sticks. There are many reported cases where the intended victims have climbed over the sides of the enclosure and taken the bait from the inside, avoiding the suspended log and triggering the trap without getting hurt. A few sticks or branches placed across the top of the enclosure will prevent such antics; as a result, the clever animals will either have to take the bait at the risk of their lives or leave it alone.
For trapping the muskrat, the bait may consist of carrots, turnips, apples, and the like. For the mink, a bird's head, or the head of a fowl, is the customary bait; and the skunk may usually be taken with sweet apples, meats, or some portion of a dead fowl.
For trapping muskrats, you can use bait like carrots, turnips, apples, and similar items. For mink, a bird's head or the head of a small bird is the usual bait; and skunks can typically be caught with sweet apples, meat, or parts of a dead bird.
In the case of the fox, which we have mentioned, the setting of the trap was somewhat varied; and in case our readers might desire to try a similar experiment, we will devote a few lines to a description of it. In this instance, the flat stick which supported the log was not more than eight inches in length; and instead of the bait-stick, a slight framework of slender branches was substituted. This frame or lattice-work was just large enough to fill the opening of the pen, and its upper end supported the flat stick. The duck was fastened to the back part of the pen, which was also closed over the top. The quacking of the fowl attracted the fox; and as he thrust his head through the lattice to reach his prey, the frame was thrown out of balance and Reynard paid the price of his greed and folly.
In the case of the fox we mentioned earlier, the trap setup was a bit different; and in case our readers want to try something similar, we’ll spend a few lines describing it. In this scenario, the flat stick that held up the log was only about eight inches long; and instead of using a bait stick, we used a simple framework made of thin branches. This frame or lattice work was just big enough to cover the opening of the pen, and its top end held up the flat stick. The duck was secured at the back of the pen, which was also closed off at the top. The duck’s quacking caught the fox’s attention; and when he stuck his head through the lattice to get to his meal, the frame became unbalanced and Reynard paid the price for his greed and foolishness.
There is another mode of adjusting the pieces of the dead-fall,
commonly employed by professional trappers, whereby the trap is sprung
by the foot of the animal in quest of the bait. This construction
is shown correctly in the accompanying cut, which gives the front
view, the pen being made as before. The stout crotch represented
at (a) is rested on the summit of a strong peg, driven into
the ground beneath the outside edge of the suspended log;
(b) is the treacherous stick which seals the doom of any
animal that dares rest his foot upon it. This piece should be long
enough to stretch across and overlap the guard-pegs at each side of
the opening. To set the trap, rest the short crotch of (a) on
the top of the peg, and lower the log upon it, keeping the leverage
slight, as directed in our last example, letting much of the weight
come on the top of the
Page 114
peg. The long arm of the crotch should be pressed inward from the
front, and one end of the stick (b) should then be caught
between its extreme tip, and the upright peg about ten inches above
the ground. By now fastening the bait to a peg at the back part of
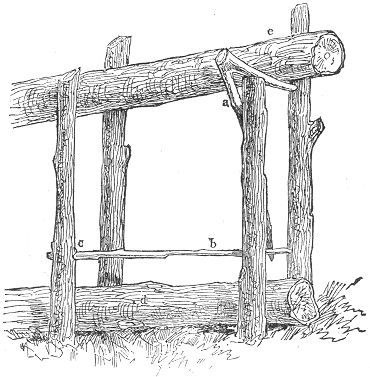 the pen, the affair is in working order, and will be found perfectly
reliable. The ground log (d) being rested in place as seen
in the illustration. To make assurance doubly sure, it is well
to cut a slight notch in the upright stick at (c) for the
reception of the foot-piece (b). By this precaution the
stick, when lowered, is bound to sink at the right end, thus ensuring
success.
the pen, the affair is in working order, and will be found perfectly
reliable. The ground log (d) being rested in place as seen
in the illustration. To make assurance doubly sure, it is well
to cut a slight notch in the upright stick at (c) for the
reception of the foot-piece (b). By this precaution the
stick, when lowered, is bound to sink at the right end, thus ensuring
success.
There’s another way to set up the dead-fall trap, often used by professional trappers, where the trap is triggered by the animal stepping on the bait. This setup is shown correctly in the accompanying image, which presents the front view, with the pen made as before. The sturdy crotch at (a) rests on top of a strong peg driven into the ground beneath the outside edge of the hanging log; (b) is the dangerous stick that seals the fate of any animal that dares to step on it. This stick should be long enough to stretch across and overlap the guard pegs on either side of the opening. To set the trap, place the short part of (a) on top of the peg, and lower the log onto it, maintaining a slight leverage as we showed in our previous example, allowing most of the weight to rest on the top of the
Page 114
peg. Press the long arm of the crotch inward from the front, and one end of the stick (b) should be caught between its tip and the upright peg about ten inches off the ground. By attaching the bait to a peg at the back of
the pen, the trap is ready to go and will be completely reliable. The ground log (d) should be placed as shown in the image. To ensure extra security, it’s a good idea to cut a small notch in the upright stick at (c) to hold the foot-piece (b). With this precaution, when the stick is lowered, it will definitely drop at the right end, ensuring success.
The Figure-Four Trap, already described in another part of this book, is also well adapted to the dead-fall, and is much used. It should be made of stout pieces and erected at the opening of the pen, with the bait pointing toward the interior, the heavy log being poised on its summit.
The Figure-Four Trap, described elsewhere in this book, is great for use with dead-falls and is quite popular. It should be constructed from sturdy materials and set up at the entrance of the pen, with the bait facing inwards, and the heavy log balanced on top.
THE GARROTE.
There is another variety of trap, somewhat resembling the dead-fall, but which seizes its prey in a little different manner. Page 115 This trap, which we will call the Garrote, is truly represented by our illustration. A pen is first constructed, similar to that of the dead-fall. At the opening of the pen, two arches are fastened in the ground. They should be about an inch apart. A stout forked stick should then be cut, and firmly fixed in the earth at the side of the arches, and about three feet distant.
There’s another type of trap that’s somewhat like the dead-fall, but it catches its prey in a slightly different way. Page 115 This trap, which we'll call the Garrote, is accurately depicted in our illustration. First, a pen is built, similar to that of the dead-fall. At the entrance of the pen, two arches are secured in the ground. They should be about an inch apart. A sturdy forked stick should then be cut and firmly planted in the ground next to the arches, about three feet away.
Our main illustration gives the general appearance of the trap,
but we also subjoin an additional cut, showing the "setting" or
arrangement of the pieces. They are three in number, and consist:
First, of a notched peg, which is driven into the ground at the back
part of the pen, and a little to one side. Second, of a forked twig,
the branch of which should point downward with the bait attached to
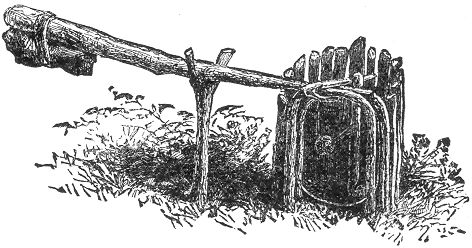 its end. The third stick being the little hooked piece catching beneath
the arches. The first of these is too simple to need description.
The second should be about eight inches long; a notch should be
cut in each end. The upper one being on the side from which the
branch projects, and the other on the opposite side of the
stick, and at the other end, as is made plain by our illustration.
The third stick may consist merely of a hooked crotch of some twig,
as this is always to be found. Indeed, nearly all the parts
of this trap may be found in any woods; and, with the exception
of a jack-knife, bait, and string, the trapper need not trouble
himself to carry any materials whatever. When the three pieces
are thus made the trap only awaits the "Garrote." This should be
made from a stiff pole, about six feet in length, having a heavy
stone tied to its large end, and a loop of the shape of the letter
U, or a slipping noose, made of stout cord or wire, fastened
Page 116
at the smaller end. To arrange the pieces for their destructive
work, the pole should be bent down so that the loop shall fall
between the arches. The "crotch stick" should then be hooked beneath
the front of the arch, letting its arm point inward. After this
the bait stick should be placed in its position, with the bait
pointing downward, letting one end catch beneath the notch in the
ground-peg, and the other over the tip of the crotch stick. This
done, and the trap is set.
its end. The third stick being the little hooked piece catching beneath
the arches. The first of these is too simple to need description.
The second should be about eight inches long; a notch should be
cut in each end. The upper one being on the side from which the
branch projects, and the other on the opposite side of the
stick, and at the other end, as is made plain by our illustration.
The third stick may consist merely of a hooked crotch of some twig,
as this is always to be found. Indeed, nearly all the parts
of this trap may be found in any woods; and, with the exception
of a jack-knife, bait, and string, the trapper need not trouble
himself to carry any materials whatever. When the three pieces
are thus made the trap only awaits the "Garrote." This should be
made from a stiff pole, about six feet in length, having a heavy
stone tied to its large end, and a loop of the shape of the letter
U, or a slipping noose, made of stout cord or wire, fastened
Page 116
at the smaller end. To arrange the pieces for their destructive
work, the pole should be bent down so that the loop shall fall
between the arches. The "crotch stick" should then be hooked beneath
the front of the arch, letting its arm point inward. After this
the bait stick should be placed in its position, with the bait
pointing downward, letting one end catch beneath the notch in the
ground-peg, and the other over the tip of the crotch stick. This
done, and the trap is set.
Our main illustration shows what the trap generally looks like, but we also include an additional diagram that displays how the pieces are arranged. There are three pieces in total: First, a notched peg that is driven into the ground at the back of the pen, slightly off to one side. Second, a forked twig, with the branch pointing downward and the bait attached to its end. The third piece is a small hooked stick that catches underneath the arches. The first piece is simple enough that it doesn’t need description. The second piece should be about eight inches long, with a notch cut at each end. The notch on the upper end should be on the side from which the branch extends, and the other notch should be on the opposite side of the stick at the opposite end, as shown in our illustration. The third piece can just be a hooked fork from any twig, which is usually easy to find. In fact, almost all the parts of this trap can be found in any woods; apart from a jackknife, bait, and string, the trapper won’t need to carry any additional materials. Once the three pieces are prepared, the trap is just waiting for the "Garrote." This should be made from a sturdy pole about six feet long, with a heavy stone tied to the thicker end, and a U-shaped loop or a slipping noose made of strong cord or wire tied to the thinner end. To set up the pieces for their destructive function, the pole should be bent down so that the loop falls between the arches. The "crotch stick" should then be hooked under the front of the arch, with its arm pointing inward. After this, the bait stick should be positioned with the bait hanging downward, allowing one end to catch beneath the notch in the ground peg while the other end rests over the tip of the crotch stick. Once this is done, the trap is set.
Like the dead-fall, the bait stick should point toward the side
of the pen, as the turning involved in pulling it toward the front
is positively sure to slip it loose from its catches. Be
careful to see that the loop is nicely arranged between the arches,
and that the top of the pen is covered with a few twigs. If these
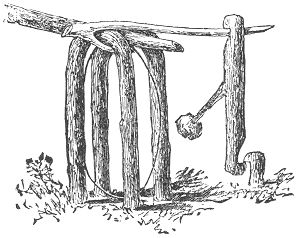 directions are carefully followed, and if the young trapper has
selected a good trapping ground, it will not be a matter of many
days before he will discover the upper portion of the arches occupied
by some rabbit, muskrat, or other unlucky creature, either standing on
its hind legs, or lifted clean off the ground. Coons are frequently
secured by this trap, although, as a general thing, they don't
show much enthusiasm over traps of any kind, and seem to prefer
to get their food elsewhere, rather than take it off the end of
a bait stick.
directions are carefully followed, and if the young trapper has
selected a good trapping ground, it will not be a matter of many
days before he will discover the upper portion of the arches occupied
by some rabbit, muskrat, or other unlucky creature, either standing on
its hind legs, or lifted clean off the ground. Coons are frequently
secured by this trap, although, as a general thing, they don't
show much enthusiasm over traps of any kind, and seem to prefer
to get their food elsewhere, rather than take it off the end of
a bait stick.
Like the dead-fall, the bait stick should point toward the side of the pen, since pulling it toward the front will definitely cause it to slip loose from its catches. Make sure the loop is properly arranged between the arches and that the top of the pen is covered with a few twigs. If these directions are carefully followed, and if the young trapper has chosen a good trapping ground, it won’t take long before he finds the upper part of the arches occupied by some rabbit, muskrat, or other unlucky animal, either standing on its hind legs or lifted completely off the ground. Raccoons are often caught by this trap, although generally, they don’t seem very interested in traps and prefer to find their food elsewhere instead of taking it from the end of a bait stick.
THE BOW TRAP.
This most excellent and unique machine is an invention of the author's, and possesses great advantages, both on account of its durability and of the speedy death which it inflicts.
This exceptional and one-of-a-kind machine is the author's invention, offering significant benefits due to its durability and the quick death it delivers.
Procure a board about two feet in length, by five or six in width,
and commencing at about nine inches from one end, cut a hole four
or more inches square. This may readily be done with a narrow saw,
by first boring a series of gimlet holes in which to insert it.
There will now be nine inches of board on one side of the hole
and eleven on the other. The shorter end constituting the top of
the trap. On the upper edge of the hole
Page 117
a row of stout tin teeth should be firmly tacked, as seen in the
illustration. On the other side of the cavity, and three inches
from it a small auger hole (the size of a lead pencil), should
be bored. After which it should be sand-papered and polished on
the interior, by rubbing with some smooth, hard tool, inserted
inside. A round plug of wood should next be prepared. Let it be
about half an inch in length, being afterwards bevelled nearly
the whole length of one side, as shown at (b), leaving a
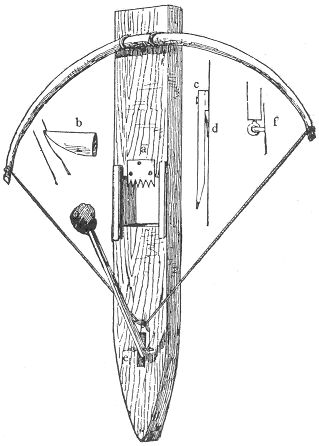 little over an eighth of an inch of the wood unwhittled. This little
piece of wood is the most important part, of the trap, and should
be made very carefully. The remaining end of the board below the
auger hole should now be whittled off to a point, in order that
it may be driven into the ground. The next requisites consist of
two pieces of wood, which are seen at the sides of the square hole,
in our illustration, and also seen at (c), side view. These
Page 118
pieces should be about six inches in length and about an inch square.
A thin piece being cut off from one side of each, to the distance
of four inches, and ending in a square notch. The other end should
be rounded off, as is also there plainly indicated. Before adjusting
the pieces in place, two tin catches should be fastened to the board,
one on each side of the hole. This catch is shown at (d),
and consists merely of a piece of tin, half an inch in width, and
three-quarters of an inch in length, tacked to the wood, and having
its end raised, as indicated. Its object is to hold the bow-string
from being pulled down after once passing it. The upper edge of
these catch-pieces should be about an inch and a half from the top
of the hole, and, if desired, two or three of them may be arranged
one above the other, so that wherever the string may stop against
the neck of the inmate it will be sure to hold. The catches being
in place, proceed to adjust the pieces of wood, letting the notch
be on a line with the top of the pole, or a little above it. Each
piece should be fastened with two screws to make secure.
little over an eighth of an inch of the wood unwhittled. This little
piece of wood is the most important part, of the trap, and should
be made very carefully. The remaining end of the board below the
auger hole should now be whittled off to a point, in order that
it may be driven into the ground. The next requisites consist of
two pieces of wood, which are seen at the sides of the square hole,
in our illustration, and also seen at (c), side view. These
Page 118
pieces should be about six inches in length and about an inch square.
A thin piece being cut off from one side of each, to the distance
of four inches, and ending in a square notch. The other end should
be rounded off, as is also there plainly indicated. Before adjusting
the pieces in place, two tin catches should be fastened to the board,
one on each side of the hole. This catch is shown at (d),
and consists merely of a piece of tin, half an inch in width, and
three-quarters of an inch in length, tacked to the wood, and having
its end raised, as indicated. Its object is to hold the bow-string
from being pulled down after once passing it. The upper edge of
these catch-pieces should be about an inch and a half from the top
of the hole, and, if desired, two or three of them may be arranged
one above the other, so that wherever the string may stop against
the neck of the inmate it will be sure to hold. The catches being
in place, proceed to adjust the pieces of wood, letting the notch
be on a line with the top of the pole, or a little above it. Each
piece should be fastened with two screws to make secure.
Get a board that's about two feet long and five or six inches wide. Starting about nine inches from one end, cut a hole that’s four inches or more square. You can easily do this with a narrow saw by first drilling a series of small holes for the saw to fit into. You’ll have nine inches of board on one side of the hole and eleven inches on the other. The shorter end will be the top of the trap. On the upper edge of the hole, a row of strong tin teeth should be securely nailed down, as shown in the illustration. On the other side of the hole, about three inches from it, drill a small hole the size of a pencil. Then, sand the inside smooth by rubbing it with a hard, smooth tool inserted inside. Next, make a round plug of wood that’s about half an inch long, tapering nearly the entire length on one side, as shown at (b), leaving just over an eighth of an inch unshaped. This little piece is the most crucial part of the trap, so make it carefully. The part of the board below the drill hole should be sharpened to a point so it can be pushed into the ground. You’ll also need two pieces of wood, as seen on the sides of the square hole in our illustration, and at (c) from the side view. These pieces should be about six inches long and about an inch square. Cut a thin slice from one side of each piece, four inches down, ending in a square notch. Round off the other end, as indicated. Before you position the pieces, attach two tin catches to the board, one on each side of the hole. This catch is shown at (d), and consists of a piece of tin, half an inch wide and three-quarters of an inch long, nailed to the wood with its end lifted, as shown. Its purpose is to keep the bowstring from being pulled down after it passes through. The top edge of these catch pieces should be about an inch and a half from the top of the hole, and if you want, you can stack two or three of them so that wherever the string hits against the neck of the trap, it will hold. Once the catches are in place, adjust the pieces of wood so the notch is in line with or slightly above the top of the pole. Secure each piece with two screws to keep them in place.
We will now give our attention to the bait stick. This should be about six inches in length, and square, as our illustration shows. There are two ways of attaching the bait-stick to the board, both shown at (e) and (f). The former consists merely of a screw eye inserted into the end of the stick, afterwards hinged to the board by a wire staple. The point for the hinge, in this case, should be about an inch below the auger hole. In the other method (f), the bait stick should be a half inch longer, and the spot for the hinge a quarter inch lower. At about a quarter of an inch from the square end of the bait stick a small hole should be made by the use of a hot wire. An oblong mortice should next be cut in the board, so as to receive this end of the stick easily. A stout bit of wire should then be inserted in the little hole in the stick, and laying this across the centre of the mortice, it should be thus secured by two staples, as the drawing shows. This forms a very neat and simple hinge. To determine the place for the catch, insert the flat end of the little plug fairly into the auger-hole above the hinge. Draw up the bait stick, and at the point where it comes in contact with the point of the plug, cut a square notch, as shown in (b). Everything now awaits the bow. This should be of hickory or other stout wood; it is well to have it seasoned, although a stout sapling will answer the purpose very well. It should be fastened to the top of the board by two heavy staples, or nails driven on each side of it. The string should be heavy Indian twine. Our Page 119 illustration shows the trap, as it appears when ready for business. The plug is inserted, as already described, with the bevelled face downward, and square end in the hole. Draw down the bow-string and pass it beneath the plug, at the same time catching the tip of the latter in the notch of the bait stick. If properly constructed the string will thus rest on the slight uncut portion of the under side of the peg, and the trap is thus set. If the bait is pushed when approached, the notch is forced off from the plug, and the string flies up with a twang! securing the neck of its victim, and producing almost instant death. If the bait is pulled, the bait stick thus forces the plug into the hole in the board, and thus slides the cord on to the bevel, which immediately releases it, and the bow is sprung. So that no matter whether the bait is pushed or drawn towards the front, the trap is equally sure to spring.
We will now focus on the bait stick. It should be about six inches long and square, as shown in our illustration. There are two ways to attach the bait stick to the board, both illustrated at (e) and (f). The first method simply involves inserting a screw eye into the end of the stick, which is then hinged to the board using a wire staple. The hinge point should be about an inch below the auger hole. In the second method (f), the bait stick should be half an inch longer, and the hinge point should be a quarter inch lower. About a quarter inch from the square end of the bait stick, a small hole should be made with a hot wire. Next, cut an oblong mortice in the board to receive this end of the stick easily. A sturdy piece of wire should then be inserted into the little hole in the stick and placed across the center of the mortice, secured by two staples as shown in the drawing. This creates a neat and simple hinge. To determine where to place the catch, insert the flat end of the little plug into the auger hole above the hinge. Pull up the bait stick, and at the point where it touches the tip of the plug, cut a square notch, as shown in (b). Everything is now ready for the bow. It should be made from hickory or another strong wood; it's best if it's seasoned, though a strong sapling will work fine too. Attach it to the top of the board with two heavy staples or nails driven on each side. The string should be made of heavy Indian twine. Our Page 119 illustration shows the trap as it looks when ready to be used. The plug is inserted as previously described, with the beveled face down and the square end in the hole. Pull down the bowstring and pass it under the plug while catching the tip of the plug in the notch of the bait stick. If constructed properly, the string will rest on the small uncut section of the underside of the peg, setting the trap. If the bait is pushed when approached, the notch is forced off the plug, and the string snaps up with a twang! catching its victim's neck and causing almost instant death. If the bait is pulled, the bait stick pushes the plug into the hole in the board, sliding the cord onto the bevel, which immediately releases it and springs the bow. So, whether the bait is pushed or pulled towards the front, the trap is guaranteed to spring.
In setting this curious machine, it is only necessary to insert it into the ground, and surround the bait with a slight pen, in order that it may not be approached from behind. By now laying a stone or a pile of sticks in front of the affair, so that the bait may be more readily reached, the thing is ready. Care is required in setting to arrange the pieces delicately. The plug should be very slightly inserted into the auger hole, and the notch in the bait stick should be as small as possible, and hold. All this is made clear in our illustration (b).
In setting up this curious machine, all you need to do is insert it into the ground and surround the bait with a small enclosure to prevent it from being accessed from behind. By placing a stone or a pile of sticks in front of the setup, you make it easier for the bait to be reached, and then it’s ready to go. You must handle the pieces carefully when setting it up. The plug should be barely inserted into the auger hole, and the notch in the bait stick should be as small as possible while still holding it in place. All of this is shown in our illustration (b).
By observing these little niceties the trap becomes very sure and sensitive.
By paying attention to these little details, the trap becomes very reliable and responsive.
Bait with small apple, nub of corn, or the like.
Bait with a small apple, a piece of corn, or something similar.
THE MOLE TRAP.
If there is anyone subject upon which the ingenuity of the farmers has been taxed, it is on the invention of a mole trap which would effectually clear their premises of these blind burrowing vermin. Many patented devices of this character are on the market, and many odd pictured ideas on the subject have gone the rounds of the illustrated press, but they all sink into insignificance when tested beside the trap we here present. It has no equal among mole traps, and it can be made with the utmost ease and without cost. The principle on which it works is the same as the Fish Trap on page 120.
If there's one thing that has really challenged farmers’ creativity, it’s coming up with a mole trap that can effectively clear their land of these blind, burrowing pests. There are many patented devices available, and plenty of quirky designs have circulated in magazines, but they all pale in comparison to the trap we’re presenting here. It truly has no rival among mole traps, and it can be made easily and at little cost. The way it works is based on the same principle as the Fish Trap on page 120.
Construct a hollow wooden tube about five inches in diameter, and eight inches in length. A section of a small tree, neatly excavated with a large auger is just the thing. Through Page 120 the centre of one of the sides a small hole the size of a lead pencil should be bored, this being the upper side. About half an inch distant from each end a smaller hole should be made for the passage of the noose. The spring should consist either of a stout steel rod, whalebone or stiff sapling, a foot or more in length, inserted downward through holes in the side of the tube after the manner of the Fish Trap already alluded to. No bait is required. A simple stick the size of the central hole at one end, and an inch in width at the other being sufficient. The trap is set as described in the other instances, and as the introduction of the spindle-stick is sometimes attended with difficulty owing to its position inside the trap, the bottom of the latter is sometimes cut away for two or three inches to facilitate the operation. The trap is then to be imbedded within the burrow of the mole. Find a fresh tunnel and carefully remove the sod above it. Insert the trap and replace the turf. The first mole that starts on his rounds through that burrow is a sure prisoner, no matter from which side he may approach.
Construct a hollow wooden tube about five inches in diameter and eight inches long. A section of a small tree, neatly hollowed out with a large auger, works perfectly. Through Page 120 the center of one end, bore a small hole the size of a lead pencil; this will be the top side. About half an inch from each end, make a smaller hole for the noose. The spring should be made from either a sturdy steel rod, whalebone, or a stiff sapling, at least a foot long, inserted downward through holes in the side of the tube, similar to the Fish Trap mentioned earlier. No bait is needed. A simple stick, the size of the central hole at one end and an inch wide at the other, will suffice. Set the trap as described in other cases, and since inserting the spindle-stick can sometimes be tricky because of its position inside the trap, the bottom of the trap can be cut away for two or three inches to make this easier. Then, place the trap inside the mole's burrow. Find a fresh tunnel and carefully remove the sod above it. Insert the trap and replace the turf. The first mole that comes through that burrow will be a guaranteed capture, no matter from which direction it approaches.
Immense numbers of these troublesome vermin have been taken in a single season by a dozen such traps, and they possess great advantages over all other mole traps on account of their simplicity and unfailing success.
Huge numbers of these annoying pests have been caught in a single season using a dozen of these traps, and they have significant advantages over all other mole traps because of their simplicity and consistent effectiveness.
A FISH TRAP.
Our list of traps would be incomplete without a Fish Trap, and
although we have mentioned some contrivances in this line under
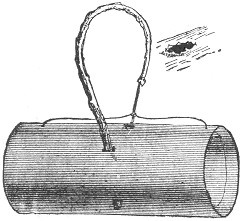 our article on "Fishing" we here present one which is both new
and novel.
our article on "Fishing" we here present one which is both new
and novel.
Our list of traps wouldn’t be complete without a Fish Trap, and even though we’ve covered some devices in this area in our article on "Fishing," we’re introducing one here that is both new and unique.
Its mode of construction is exactly similar to the Double Box Snare, page (57). A section of stove-pipe one foot in length should first be obtained. Through the iron at a point equidistant from the ends, a hole should be made with some smooth, sharp pointed instrument, the latter being forced outward from the inside of the pipe, thus causing the ragged edge of the hole to appear on the outside, as seen in our illustration. The diameter of the aperture Page 121 should be about that of a lead pencil. Considering this as the upper side of the pipe, proceed to pierce two more hole's downward through the side of the circumference, for the admission of a stout stick or steel rod. This is fully explained in our illustration. The further arrangement of bait stick and nooses is exactly identical with that described on page (57). It may be set for suckers, pickerel, and fish of like size, the bait stick being inserted with sufficient firmness to withstand the attacks of smaller fish. The bait should be firmly tied to the stick, or the latter supplied with two hooks at the end on which it should be firmly impaled. To set the trap, select a locality abounding in fish. Place a stone inside the bottom of the pipe, insert the bait stick and arrange the nooses.
Its construction method is just like the Double Box Snare, page (57). Start with a section of stove-pipe that's one foot long. Make a hole in the iron, evenly spaced from both ends, using a smooth, sharp tool. Push the tool outward from the inside of the pipe, which will create a jagged edge on the outside, as shown in our illustration. The diameter of the hole should be about the size of a pencil. Considering this as the upper side of the pipe, drill two more holes downward through the side of the pipe for a sturdy stick or steel rod. This is thoroughly explained in our illustration. The setup for the bait stick and nooses is the same as described on page (57). You can use it for suckers, pickerel, and similarly sized fish, ensuring the bait stick is secured enough to resist smaller fish. The bait should be tightly attached to the stick, or the stick should be equipped with two hooks at the end where the bait should be secured. To set the trap, choose a spot rich in fish. Place a stone at the bottom of the pipe, insert the bait stick, and arrange the nooses.
By now quietly grasping the curve of the switch the trap may be easily lowered to the bottom. The bait soon attracts a multitude of small fishes; these in turn attract the pickerel to the spot, and before many minutes the trap is sprung and may be raised from the water with its prisoner. This odd device is an invention of the author's, and it is as successful as it is unique.
By now, gently holding the curved switch, the trap can be easily lowered to the bottom. The bait quickly draws in a bunch of small fish; these, in turn, lure the pickerel to the area, and in just a few minutes, the trap is triggered and can be lifted from the water with its catch. This unusual device is the author's invention and is both successful and one-of-a-kind.
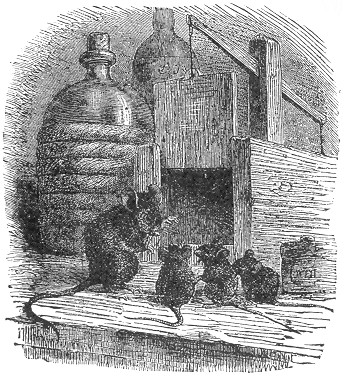
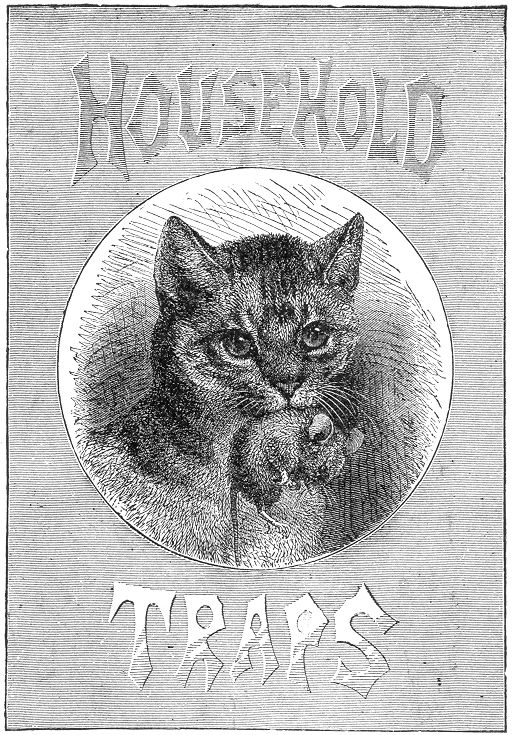
Page 125 BOOK V.
HOUSEHOLD TRAPS.
Home Traps.
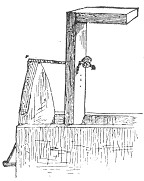 or the most effectual domestic trap on record
see our page title to this section. There are several others also
which have done good service in many households, and for the sake
of pestered housekeepers generally, we devote a corner of our volume
for their especial benefit.
or the most effectual domestic trap on record
see our page title to this section. There are several others also
which have done good service in many households, and for the sake
of pestered housekeepers generally, we devote a corner of our volume
for their especial benefit.
For the most effective home trap on record, check out our section title. There are also several others that have been very helpful in many homes, and for the sake of overwhelmed housekeepers everywhere, we dedicate a section of our book for their special benefit.
Foremost in the list of domestic pests the rat stands pre-eminent, and his proverbial shrewdness and cunning render his capture often a very difficult, if not an impossible task. We subjoin, however, a few hints and suggestions of practical value, together with some perfected ideas in the shape of traps, by which the average rat may be easily outwitted and led to his destruction.
Foremost among household pests, rats are the most prominent, and their well-known cleverness and cunning make catching them often very challenging, if not impossible. However, we provide a few practical tips and suggestions, along with some refined trap designs, that can easily outsmart the average rat and lead to its capture.
First on the list is
First on the list is
THE BARREL TRAP.
This most ingenious device possesses great advantages in its capabilities of securing an almost unlimited number of the vermin in quick succession. It also takes care of itself, requires no re-baiting or setting after once put in working order, and is sure death to its prisoners.
This clever device has significant benefits in its ability to catch almost unlimited pests rapidly. It also operates on its own, doesn't need to be rebaited or reset once it's working, and guarantees certain death for its captives.
A water-tight barrel is the first thing required. Into this pour
water to the depth of a foot. Next dampen a piece of very thick
paper, and stretch it over the top of the barrel, tying it securely
below the upper hoops. When the paper dries it will become thoroughly
flat and tightened. Its surface should then be strewn with bits
of cheese, etc., and the barrel so placed
Page 126
that the rats may jump upon it from some neighboring surface. As
soon as the bait is gone, a fresh supply should be spread on the
paper and the same operation repeated for several days, until the
rats get accustomed to visit the place for their regular rations,
fearlessly and without suspicion. This is "half the battle," and
the capture of the greedy victims of misplaced confidence is now
an easy matter. The bait should again be spread as before and a
few pieces of the cheese should be attached to the paper with gum.
It is a good plan to smear parts of the paper with gum arabic,
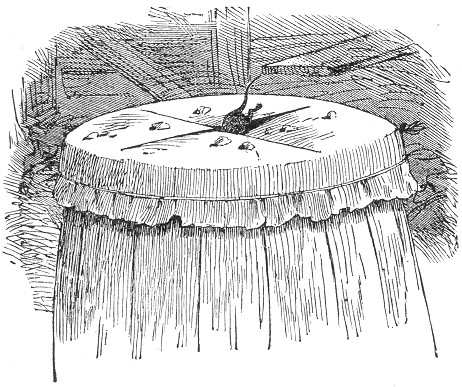 sprinkling the bait upon it. When dry, cut a cross in the middle
of the paper, as seen in the illustration, and leave the barrel
to take care of itself and the rats. The first one comes along,
spies the tempting morsels, and with his accustomed confidence,
jumps upon the paper. He suddenly finds himself in the water at
the bottom of the barrel, and the paper above has closed and is
ready to practice its deception on the next comer. There is not
long to wait. A second victim soon tumbles in to keep company with
the first. A third and a fourth soon follow, and a dozen or more are
Page 127
sometimes thus entrapped in a very short space of time. It is a
most excellent and simple trap, and if properly managed, will most
effectually curtail the number of rats in any pestered neighborhood.
sprinkling the bait upon it. When dry, cut a cross in the middle
of the paper, as seen in the illustration, and leave the barrel
to take care of itself and the rats. The first one comes along,
spies the tempting morsels, and with his accustomed confidence,
jumps upon the paper. He suddenly finds himself in the water at
the bottom of the barrel, and the paper above has closed and is
ready to practice its deception on the next comer. There is not
long to wait. A second victim soon tumbles in to keep company with
the first. A third and a fourth soon follow, and a dozen or more are
Page 127
sometimes thus entrapped in a very short space of time. It is a
most excellent and simple trap, and if properly managed, will most
effectually curtail the number of rats in any pestered neighborhood.
A watertight barrel is the first thing you need. Pour water into it to a depth of a foot. Next, dampen a large piece of thick paper and stretch it over the top of the barrel, tying it securely below the upper hoops. When the paper dries, it will become flat and tight. Scatter bits of cheese and similar bait on the surface, and position the barrel so that rats can jump onto it from a nearby surface. Once the bait is gone, spread a fresh supply on the paper and repeat this for several days, until the rats get used to visiting for their regular meals, doing so boldly and without suspicion. This is "half the battle," and capturing the greedy victims of misplaced trust becomes easy. The bait should be spread again as before, and a few pieces of cheese should be attached to the paper with gum. It's a good idea to smear some parts of the paper with gum arabic.
When dry, cut a cross in the middle of the paper, as shown in the illustration, and leave the barrel to do its job with the rats. The first one comes along, notices the tempting morsels, and jumps onto the paper with its usual confidence. Suddenly, it finds itself in the water at the bottom of the barrel, and the paper above closes, ready to trick the next one. It won't take long for another victim to fall in to join the first. A third and a fourth will follow soon after, and sometimes a dozen or more get trapped in a very short time. It’s a simple and effective trap, and if done right, it will significantly reduce the number of rats in any infested area.
By some, it is considered an improvement to place in the bottom of the barrel a large stone, which shall project above the water sufficiently to offer a foothold for one rat. The first victim, of course, takes possession of this retreat and on the precipitate arrival of the second a contest ensues for its occupancy. The hubbub which follows is said to attract all the rats in the neighborhood to the spot, and many are thus captured.
By some, it’s seen as an upgrade to put a large stone at the bottom of the barrel, so it sticks out above the water enough to provide a foothold for one rat. The first rat to discover this hideout settles in, and when the second rat shows up, a struggle breaks out over the space. The noise that follows apparently draws all the rats in the area to the scene, leading to many being caught.
We can hardly recommend the addition of the stone as being an improvement. The rat is a most notoriously shrewd and cunning animal, and the despairing cries of his comrades must rather tend to excite his caution and suspicion. By the first method the drowning is soon accomplished and the rat utters no sound whereby to attract and warn his fellows. This contrivance has been thoroughly tested and has proved its efficacy in many households by completely ridding the premises of the vermin.
We can barely endorse adding the stone as an improvement. Rats are incredibly clever and sly, and the desperate cries of their companions will likely just make them more cautious and suspicious. With the first method, the drowning happens quickly, and the rat doesn't make any noise to alert its friends. This setup has been thoroughly tested and has shown its effectiveness in many homes by completely getting rid of the pests.
Another excellent form of Barrel Trap is that embodying the principle described in page (131). A circular platform should be first constructed and hinged in the opening of the barrel This may be done by driving a couple of small nails through the sides of the barrel into a couple of staples inserted near the opposite edges of the platform. The latter should be delicately weighted, as described on the above mentioned page, and previously to setting, should be baited in a stationary position for several days to gain the confidence of the rats. The bait should at last be secured to the platform with gum, and the bottom of the barrel of course filled with water, as already described. This trap possesses the same advantages as the foregoing. It is self-setting, and unfailing in its action.
Another great type of Barrel Trap is the one that follows the principle described in page (131). First, a circular platform should be built and hinged at the opening of the barrel. This can be done by driving a couple of small nails through the sides of the barrel into a couple of staples placed near the opposite edges of the platform. The platform should be lightly weighted, as mentioned on the previously referenced page, and before setting it, it should be baited in a stationary position for several days to get the rats used to it. The bait should finally be secured to the platform with gum, and the bottom of the barrel should be filled with water, as already described. This trap has the same benefits as the previous one. It is self-setting and reliable in its action.
Another method consists in half-filling the barrel with oats, and allowing the rats to enjoy their repast there for several days. When thus attracted to the spot, remove the oats, and pour the same bulk of water into the barrel, sprinkling the surface thickly with the grain. The delusion is almost perfect, as will be effectually proven when the first rat visits the spot for his accustomed free lunch. Down he goes with a splash, is soon drowned, and sinks to the bottom. The next shares the same fate, and several more are likely to be added to the list of misguided victims.
Another method involves filling half the barrel with oats and letting the rats feast there for a few days. Once they're drawn to the spot, remove the oats and pour the same amount of water into the barrel, generously sprinkling the surface with grain. The trick is almost flawless, as will be clearly demonstrated when the first rat shows up for its usual free meal. Down it goes with a splash, quickly drowns, and sinks to the bottom. The next one faces the same fate, and several more are likely to be added to the list of unfortunate victims.
The steel-trap is often used, but should always be concealed from view. It is a good plan to set it in a pan covered with meal, and placed in the haunts of the rats. The trap may also be set at the mouth of the rats' hole, and covered with a piece of dark-colored cloth or paper. The runways between boxes, boards, and the like offer excellent situations for the trap, which should be covered, as before directed.
The steel trap is commonly used but should always be kept out of sight. A smart method is to set it in a pan covered with meal and place it in areas where rats are found. You can also set the trap at the entrance of a rat hole and cover it with a piece of dark cloth or paper. The paths between boxes, boards, and similar items are great spots for the trap, which should be covered as mentioned earlier.
Without one precaution, however, the trap may be set in vain. Much of the so-called shrewdness of the rat is nothing more than an instinctive caution, through the acute sense of smell which the animal possesses; and a trap which has secured one victim will seldom extend its list, unless all traces of its first occupant are thoroughly eradicated. This may be accomplished by smoking the trap over burning paper, hens' feathers or chips, taking care to avoid a heat so extreme as to affect the temper of the steel springs. All rat-traps should be treated the same way, in order to insure success, and the position and localities of setting should be frequently changed.
Without one precaution, though, the trap might be useless. A lot of what people think of as the cleverness of rats is really just their instinctive caution, thanks to their strong sense of smell. A trap that has caught one rat will rarely catch more unless all signs of its first victim are completely removed. You can do this by smoking the trap over burning paper, chicken feathers, or wood chips, being careful not to use such high heat that it ruins the steel springs. All rat traps should be treated this way to ensure success, and you should frequently change the position and location where you're setting them.
THE BOX DEAD-FALL.
This trap is an old invention, simplified by the author, and for
the capture of rats and mice will prove very effectual. It consists
of a box, constructed of four slabs of 3-4 inch boarding, and open
at both ends. The two side boards should be 10 x 18 inches; top
and bottom boards, 6 x 18 inches. For the centre of the latter,
a square piece should be removed by the aid of the saw. The width
of this piece should be four inches, and the length eight inches.
Before nailing the boards together, the holes thus left in the
bottom board should be supplied with a treadle platform, working
on central side pivots. The board for this treadle should be much
thinner and lighter than the rest of the trap, and should fit loosely
in place, its surface being slightly below the level of the bottom
board. This is shown in the interior of the trap. The pivots should
be inserted in the exact centre of the sides, through holes made
in the edge of the bottom board. These holes may be bored with
a gimlet or burned with a red-hot wire. The pivots may
Page 129
consist of stout brass or iron wire; and the end of one should
be flattened with the hammer, as seen in (a). This pivot
should project an inch from the wood, and should be firmly
inserted in the treadle-piece. The platform being thus arranged,
proceed to fasten the boards together, as shown in the illustration,
the top and bottom boards overlapping the others. We will now give
our attention to the stick shown at (b). This should be
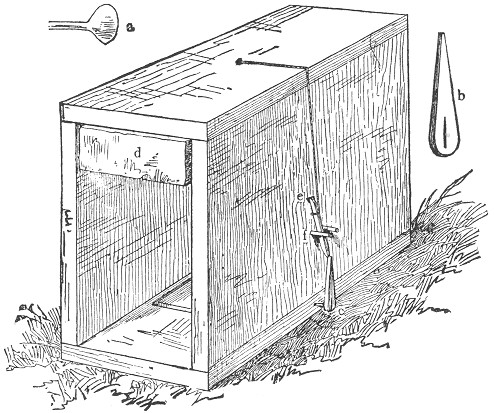 whittled from a piece of hard wood, its length being three inches,
and its upper end pointed as seen. The lower end should be pierced
with a crevice, which should then be forced over the flattened
extremity of the point (a) as shown at (c), pointed
end uppermost. The weight (d) is next in order. This should
consist of a heavy oak plank two inches in thickness, and of such
other dimensions as will allow it to fit loosely in the box, and
fall from top to bottom therein without catching between two sides.
A stout staple should be driven in the centre of its upper face,
and from this a stout string should be passed upward through a
hole in the centre of the box. We are now ready for the spindle
(e). This should be about three inches in length, and bluntly
Page 130
pointed at each end, a notch being made to secure it at a point five
inches above the pivot (c). To set the trap, raise the weight,
as seen in the illustration; draw down the string to the point
(e), and attach it to the spindle one-half an inch from
its upper end, which should then be inserted in the notch, the
lower end being caught against the extremity of the pivot stick.
The parts are now adjusted, and even in the present state the trap
is almost sure to spring at the slightest touch on the treadle-piece.
An additional precaution is advisable, however. Two small wooden
pegs (f) should be driven, one on each side of the spindle,
thus preventing any side-movement of the latter. It will now be
readily seen that the slightest weight on either end of the
treadle-piece within the trap must tilt it to one side, thus throwing
the pivot-piece from its bearing on the spindle; and the latter
being released, lets fall the weight with crushing effect upon
the back of its hapless victim.
whittled from a piece of hard wood, its length being three inches,
and its upper end pointed as seen. The lower end should be pierced
with a crevice, which should then be forced over the flattened
extremity of the point (a) as shown at (c), pointed
end uppermost. The weight (d) is next in order. This should
consist of a heavy oak plank two inches in thickness, and of such
other dimensions as will allow it to fit loosely in the box, and
fall from top to bottom therein without catching between two sides.
A stout staple should be driven in the centre of its upper face,
and from this a stout string should be passed upward through a
hole in the centre of the box. We are now ready for the spindle
(e). This should be about three inches in length, and bluntly
Page 130
pointed at each end, a notch being made to secure it at a point five
inches above the pivot (c). To set the trap, raise the weight,
as seen in the illustration; draw down the string to the point
(e), and attach it to the spindle one-half an inch from
its upper end, which should then be inserted in the notch, the
lower end being caught against the extremity of the pivot stick.
The parts are now adjusted, and even in the present state the trap
is almost sure to spring at the slightest touch on the treadle-piece.
An additional precaution is advisable, however. Two small wooden
pegs (f) should be driven, one on each side of the spindle,
thus preventing any side-movement of the latter. It will now be
readily seen that the slightest weight on either end of the
treadle-piece within the trap must tilt it to one side, thus throwing
the pivot-piece from its bearing on the spindle; and the latter
being released, lets fall the weight with crushing effect upon
the back of its hapless victim.
This trap is an old design, simplified by the author, and it will be very effective for capturing rats and mice. It consists of a box made from four boards that are 3-4 inches thick, open at both ends. The two side boards should measure 10 x 18 inches, while the top and bottom boards should be 6 x 18 inches. A square section should be cut out from the center of the bottom board using a saw. The width of this section should be four inches, and the length should be eight inches. Before nailing the boards together, the openings left in the bottom board should be fitted with a treadle platform that pivots on central side pivots. This treadle board should be thinner and lighter than the other parts of the trap, and it should fit loosely, sitting slightly below the level of the bottom board. This is illustrated in the interior of the trap. The pivots should be inserted exactly in the center of the sides through holes made in the edge of the bottom board. These holes can be drilled with a gimlet or burned with a hot wire. The pivots can be made from sturdy brass or iron wire; one end should be flattened with a hammer, as shown in (a). This pivot should stick out an inch from the wood and should be firmly secured in the treadle piece. Once the platform is set up, proceed to fasten the boards together as depicted in the illustration, with the top and bottom boards overlapping the others. Now let's focus on the stick shown at (b). This should be carved from a piece of hardwood, measuring three inches in length, with a pointed end, as illustrated. The lower end should have a crevice cut into it so that it can be fitted over the flattened end of the point as seen in (c), with the pointed end facing up. Next, we need the weight (d). This should be a heavy oak plank, two inches thick, and sized to fit loosely in the box, allowing it to drop from top to bottom without getting stuck between the sides. A sturdy staple should be hammered into the center of its top side, and a thick string should be passed up through a hole in the center of the box. Now we move on to the spindle (e). This should be about three inches long with blunt points on each end, and a notch should be made to hold it in place five inches above the pivot (c). To set the trap, lift the weight as shown in the illustration; pull down the string to point (e) and attach it to the spindle half an inch from the top, which should then be placed in the notch, with the lower end wedged against the end of the pivot stick. The components are now in place, and even in this state, the trap will likely spring at the slightest pressure on the treadle piece. However, it's a good idea to take an extra precaution. Two small wooden pegs (f) should be hammered in, one on each side of the spindle, to prevent any lateral movement of it. It will now be clear that the lightest weight on either end of the treadle piece will tilt it, displacing the pivot piece from its position on the spindle. When the spindle is disengaged, it drops the weight down onto the unfortunate victim with a crushing force.
The trap is very effective, and is easily constructed. The bait should be rested in the centre of the treadle platform. Built on a larger scale, this device may be successfully adapted to the capture of the mink, martien, and many other varieties of game.
The trap works great and is easy to build. The bait should be placed in the center of the treadle platform. If made larger, this device can be successfully used to catch minks, martens, and many other types of game.
THE BOARD-FLAP.

Page 131 For the capture of mice this is both a simple and effective contrivance, and it may be enlarged so as to be of good service for larger animals. Procure two boards, one foot square and one inch thick, and secure them together by two hinges, as in the illustration. Assuming one as the upper board, proceed to bore a gimlet hole three inches from the hinges. This is for the reception of the bait stick, and should be cut away on the inside, as seen in the section (a), thus allowing a free play for the stick. Directly beneath this aperture, and in the lower board, a large auger hole should be made. A stout bit of iron wire, ten inches in length, is now required. This should be inserted perpendicularly in the further end of the lower slab, being bent into a curve which shall slide easily through a gimlet hole in the edge of the upper board. This portion is very important, and should be carefully constructed. The bait stick should be not more than three inches in length, supplied with a notch in its upper end, and secured in the aperture in the board by the aid of a pivot and staples, as is clearly shown in our drawing. The spindle is next in order. It should consist of a light piece of pine eight and a half inches in length, and brought to an edge at each end. A tack should now be driven at the further edge of the upper board on a line with the aperture through which the wire passes. Our illustration represents the trap as it appears when set. The upper band is raised to the full limit of the wire. One end of the spindle is now adjusted beneath the head of the tack, and the other in the notch in the bait stick. The wire thus supports the suspended board by sustaining the spindle, which is held in equilibrium. A slight touch on the bait stick soon destroys this equilibrium: a flap ensues, and a dead mouse is the result. The object of the auger hole in the lower board consists in affording a receptacle for the bait when the boards come together, as otherwise it would defeat its object, by offering an obstruction to the fall of the board, and thus allow its little mouse to escape.
Page 131 This is a simple and effective way to catch mice, and it can be adapted for larger animals. Get two boards, each one foot square and one inch thick, and attach them together with two hinges, as shown in the illustration. Taking one board as the top one, drill a small hole three inches from the hinges for the bait stick. This hole should be slightly cut away inside, as seen in the section (a), to allow the stick to move freely. Directly below this hole in the lower board, drill a large hole. Next, you’ll need a sturdy piece of iron wire that is ten inches long. Insert it vertically at the end of the lower board and bend it into a curve that can easily slide through a hole in the upper board's edge. This part is crucial and needs to be made carefully. The bait stick should be no longer than three inches with a notch at the top, held in place by a pivot and staples, as shown in our drawing. Next comes the spindle. It should be a lightweight piece of pine, eight and a half inches long, tapered at both ends. Drive a tack at the edge of the upper board in line with the hole where the wire passes through. Our illustration shows the trap when it’s set up. The upper board is lifted to the wire's limit. One end of the spindle goes under the tack, and the other fits into the notch of the bait stick. The wire supports the upper board by holding the spindle balanced. A gentle nudge on the bait stick disrupts this balance, causing the board to drop, and you get a dead mouse. The purpose of the large hole in the lower board is to hold the bait when the boards close; otherwise, it would block the board's fall and let the little mouse escape.
It is, therefore, an essential part of the trap, and should be carefully tested before being finally set.
It is, therefore, a crucial component of the trap and should be thoroughly tested before being set up for good.
THE BOX PIT-FALL.
We now come to a variety of trap which differs in its construction from any previously described. It secures its victims alive, and without harm, and, when well made, is very successful. Page 132 It may be set for squirrels, chipmunks, rats, mice, and the like, and on a large scale for muskrats and mink.
We now encounter a different type of trap that has a unique design compared to those we've discussed before. It captures its prey alive and unharmed, and when crafted properly, it is quite effective. Page 132 It can be used to catch squirrels, chipmunks, rats, mice, and similar animals, as well as on a larger scale for muskrats and mink.
The trap is very easily made, and is represented in section in
our illustration, showing the height and interior of the box. For
ordinary purposes the box should be about twelve or fourteen inches
square, with a depth of about eighteen inches. A platform consisting
of a piece of tin should then be procured. This should be just
large enough to fit nicely to the outline of the interior of the
box without catching. On two opposite sides of this piece of tin,
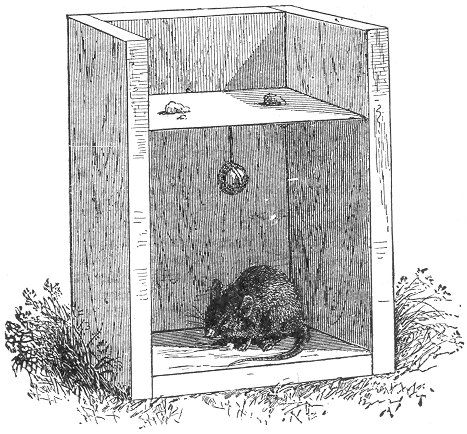 and at the middle of each of those sides, a small strip of the
same material should be wired, or soldered in the form of a loop,
as shown in the separate diagram at (b). These loops should
be only large enough to admit the end of a shingle-nail. A scratch
should now be made across the tin from loop to loop, and on the
centre of this scratch another and larger strip of tin should be
fastened in a similar manner as shown in our diagram, at (a),
this being for the balance weight. The
Page 133
latter may consist of a small stone, piece of lead, or the like,
and should be suspended by means of a wire bent around it, and
secured in a hole in the tin by a bend or knot in the other extremity.
Further explanations are almost superfluous, as our main illustration
fully explains itself.
and at the middle of each of those sides, a small strip of the
same material should be wired, or soldered in the form of a loop,
as shown in the separate diagram at (b). These loops should
be only large enough to admit the end of a shingle-nail. A scratch
should now be made across the tin from loop to loop, and on the
centre of this scratch another and larger strip of tin should be
fastened in a similar manner as shown in our diagram, at (a),
this being for the balance weight. The
Page 133
latter may consist of a small stone, piece of lead, or the like,
and should be suspended by means of a wire bent around it, and
secured in a hole in the tin by a bend or knot in the other extremity.
Further explanations are almost superfluous, as our main illustration
fully explains itself.
The trap is very easy to make and is illustrated in our section showing the height and interior of the box. For typical use, the box should be about twelve to fourteen inches square, with a depth of about eighteen inches. You should then get a piece of tin for the platform. It should be just the right size to fit neatly inside the box without getting stuck. On two opposite sides of this piece of tin,
in the center of each of those sides, a small strip of the same material should be attached, either wired or soldered into a loop, as shown in the separate diagram at (b). These loops should be just large enough to fit the end of a shingle nail. Now make a scratch across the tin from loop to loop, and in the center of this scratch, fasten a larger strip of tin in the same way as shown in our diagram at (a), which will serve as the balance weight. The
Page 133
weight can be a small stone, piece of lead, or something similar, and should be suspended using a wire wrapped around it, secured in a hole in the tin by bending or knotting the other end. Further explanations are almost unnecessary since our main illustration explains itself fully.
After the weight is attached, the platform should be secured in
its place, about five inches from the top of the box. To accomplish
this and form the hinges, two shingle-nails should be driven through
the side of the box into the tin loops prepared for them. To do
this nicely requires some considerable accuracy and care, and it
should be so done that the platform will swing with perfect freedom
and ease, the weight below bringing it to a horizontal poise after
a few vibrations. Care should be taken that the weight is not too
heavy, as, in such a case, the platform will not be sensitive on its
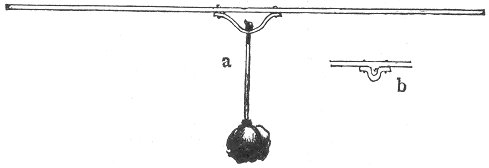 balance, and, consequently, would not work so quickly and surely.
The weight should be just heavy enough to restore the platform
to its perfect poise, and no more. This can be easily regulated by
experiment. The bait should then be strewn on both sides of the
platform, when the trap is set, and the luckless animal, jumping
after the bait, feels his footing give way, and suddenly finds
himself in the bottom of a dark box, from which it is impossible
for him to escape except by gnawing his way out. To prevent this,
the interior of the box may be lined with tin.
balance, and, consequently, would not work so quickly and surely.
The weight should be just heavy enough to restore the platform
to its perfect poise, and no more. This can be easily regulated by
experiment. The bait should then be strewn on both sides of the
platform, when the trap is set, and the luckless animal, jumping
after the bait, feels his footing give way, and suddenly finds
himself in the bottom of a dark box, from which it is impossible
for him to escape except by gnawing his way out. To prevent this,
the interior of the box may be lined with tin.
After the weight is attached, the platform should be secured in place, about five inches from the top of the box. To do this and create the hinges, two shingle nails should be driven through the side of the box into the tin loops made for them. Achieving this properly requires a good amount of accuracy and care, and it should be done so that the platform swings freely and easily, with the weight below settling it into a horizontal position after a few movements. It's important that the weight isn't too heavy, because if it is, the platform won't be sensitive enough on its balance, and therefore, it won't work as quickly or reliably. The weight should be just heavy enough to bring the platform back to its perfect balance, and no more. This can be easily adjusted through experimentation. The bait should then be scattered on both sides of the platform when the trap is set, and when the unfortunate animal jumps for the bait, it will feel its footing give way and suddenly find itself at the bottom of a dark box, from which it can't escape unless it gnaws its way out. To prevent this, the inside of the box can be lined with tin.
By fastening the bait—a small lump or piece—on each side of the tin, the trap will continually reset itself, and, in this way, two or three individuals may be taken, one after the other. Muskrats are frequently caught in this trap, it being generally buried in the ground so that its top is on a level with the surface. In this case it is necessary to arrange the platform lower down in the box, and the latter should be of much larger dimensions than the one we have described.
By attaching the bait—a small chunk or piece—on each side of the tin, the trap will keep resetting itself, allowing two or three animals to be caught one after the other. Muskrats are often caught in this trap, as it is usually buried in the ground so that its top is level with the surface. In this case, it’s important to position the platform lower inside the box, and the box should be significantly larger than the one we described.
Page 134 For ordinary purposes the box should either be set in the ground or placed near some neighboring object which will afford easy access to it. No less than a dozen rats have been caught in a trap of this kind in a single night.
Page 134 For everyday use, the box should either be buried in the ground or placed near something nearby that makes it easy to get to. At least a dozen rats can be caught in this type of trap in one night.
CAGE TRAP.
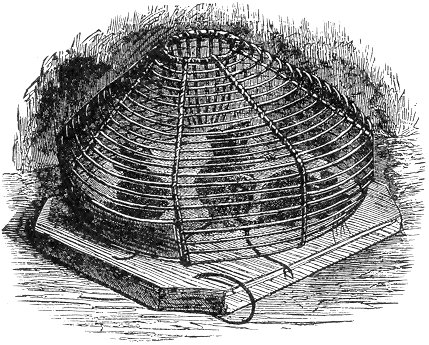
The common cage trap is well known to most of our readers, and for the capture of rats and mice, it is one of the most efficacious devices in existence. The construction of one of these traps is quite a difficult operation, and we would hesitate before advising our inventive reader to exercise his patience and ingenuity in the manufacture of an article which can be bought for such a small price, and which, after all, is only a mouse trap. If it were a device for the capture of the mink or otter, it might then be well worth the trouble, and would be likely to repay the time and labor expended upon it. We imagine that few would care to exercise their skill over a trap of such complicated structure, while our pages are filled with other simpler and equally effective examples.
The common cage trap is familiar to most of our readers, and for catching rats and mice, it’s one of the most effective tools available. Building one of these traps can be quite tricky, and we would hesitate to recommend that our creative readers use their patience and skills to make something that can be purchased for such a low price, especially since it’s just a mouse trap. If it were a tool for catching a mink or otter, it might be worth the effort and could justify the time and work put into it. We believe that not many would want to challenge themselves with a trap of such a complex design when our pages are filled with other simpler and equally effective options.
For the benefit, however, of such as are of an inventive turn of mind, we subjoin an illustration of the trap to serve as a guide. The principle upon which it works is very simple. The bait is Page 135 strewn inside the cage, and the rats or mice find their only access to it through the hole at the top. The wires here converge at the bottom, and are pointed at the ends. The passage downwards is an easy matter, but to escape through the same opening is impossible, as the pointed ends of the wires effectually prevent the ascent. It is a notable fact, however, that the efforts to escape through this opening are very seldom made. The mode of entering seems to be absolutely forgotten by the captive animals, and they rush frantically about the cage, prying between all the wires in their wild endeavors, never seeming to notice the central opening by which they entered. This is easily explained by the fact that the open grating admits the light from all sides, and the enclosed victims are thus attracted to no one spot in particular, and naturally rush to the extreme edges of the trap, in the hope of finding an exit.
For the benefit of those with a creative mindset, we're including an illustration of the trap as a guide. The principle behind it is quite simple. The bait is Page 135 scattered inside the cage, and the rats or mice can only reach it through the hole at the top. The wires converge at the bottom and are pointed at the ends. Going down is easy, but getting out through the same opening is impossible, as the pointed ends of the wires effectively stop them from climbing back up. Interestingly, the attempts to escape through this opening are rarely made. The captive animals seem to forget how they entered and frantically dart around the cage, trying to squeeze between the wires in their desperate attempts, never noticing the central opening they came through. This is easy to explain; the open grating lets in light from all sides, so the trapped animals get distracted by all the light and rush toward the edges of the trap, hoping to find a way out.
If a thick cloth be placed over the cage, leaving the opening at the top uncovered, the confined creatures are soon attracted by the light, and lose no time in rushing towards it, where their endeavors to ascend are effectually checked by the pointed wires. Profiting by this experiment, the author once improvised a simple trap on the same principle, which proved very effectual. We will call it
If a thick cloth is put over the cage, leaving the top opening uncovered, the trapped creatures are quickly drawn to the light and waste no time trying to get to it, where their attempts to climb are effectively blocked by the sharp wires. Taking advantage of this experiment, the author once came up with a simple trap based on the same idea, which turned out to be very effective. We will call it
THE JAR TRAP.
In place of the wire cage, a glass preserve-jar was substituted. A few bits of cheese were then dropped inside, and the top of a funnel inserted into the opening above. This completed the trap, and it was set on the floor near the flour barrel. On the following morning the jar was occupied by a little mouse, and each successive night for a week added one to the list of victims. A stiff piece of tin, bent into the required shape, may be substituted for the funnel top, or even a very heavy piece of pasteboard might answer.
Instead of the wire cage, a glass jar was used. A few pieces of cheese were dropped inside, and the top of a funnel was placed in the opening. This finished the trap, which was set on the floor near the flour barrel. The next morning, the jar had a little mouse inside, and every night for a week, another mouse was caught. A stiff piece of tin, shaped correctly, could replace the funnel top, or even a heavy piece of cardboard might work.
BOWL TRAPS.
Very effective extempore traps may be set up in a few minutes by the use of a few bowls. There are two methods commonly employed. One consists of the bowl and a knife-blade. An ordinary tableknife is used and a piece of cheese is firmly forced on to the end of the blade, the bowl is then balanced on the edge, allowing the bait to project about an inch and a half beneath the bowl. The odor of cheese will attract a mouse Page 136 almost anywhere, and he soon finds his way to the tempting morsel in this case. A very slight nibble is sufficient to tilt the blade and the bowl falls over its prisoner.
Very effective traps for catching mice can be set up in just a few minutes using some bowls. There are two common methods. One involves a bowl and a knife blade. You take a regular table knife and press a piece of cheese firmly onto the end of the blade, then balance the bowl on the edge so that the bait hangs about an inch and a half below the bowl. The smell of the cheese will attract a mouse almost anywhere, and he'll quickly find his way to the tempting treat. A tiny nibble is enough to tip the blade, and the bowl falls over its catch.
In the second method a thimble is used in place of the knife. The cheese is forced into its interior, and the open end of the thimble inserted far beneath the bowl, allowing about half its length to project outward.
In the second method, a thimble is used instead of a knife. The cheese is pushed inside it, and the open end of the thimble is inserted deep beneath the bowl, allowing about half of its length to stick out.
The mouse is thus obliged to pass under the bowl in order to reach the bait, and in his efforts to grasp the morsel, the thimble is dislodged and the captive secured beneath the vessel. Where a small thimble is used, it becomes necessary to place a bit of pasteboard or flat chip beneath it, in order to raise it sufficiently to afford an easy passage for the mouse. Both of these devices are said to work excellently.
The mouse has to go under the bowl to get to the bait, and while trying to grab the food, the thimble tips over and traps it underneath. If a small thimble is used, you need to put a piece of cardboard or a flat chip under it to lift it enough for the mouse to pass through easily. Both of these methods are said to work very well.
FLY PAPER.
A sheet of common paper, smeared with a mixture composed of molasses one part, and bird-lime six parts (see page 97), will be found to attract large numbers of flies and hold them prisoners upon its surface.
A sheet of regular paper, coated with a mix of one part molasses and six parts bird-lime (see page 97), will attract many flies and keep them stuck on its surface.
Spruce gum, warmed on the fire, and mixed with a little linseed oil, is also excellent. For a genuine fly trap, the following stands unrivalled.
Spruce gum, heated on the fire and blended with a bit of linseed oil, is also great. For a real fly trap, the following is unmatched.
FLY TRAP.
Take a tumbler, and half-fill it with strong soap suds. Cut a circle of stiff paper which will exactly fit into the top of the glass. In the centre of the paper cut a hole half an inch in diameter, or, better still, a slice of bread may be placed on the glass. Smear one side of the disc with molasses, and insert it in the tumbler with this side downward. Swarms of flies soon surround it, and one by one find their way downward through the hole. Once below the paper, and their doom is sealed. For a short time the molasses absorbs their attention, and they, in turn, absorb the molasses.
Take a tumbler and fill it halfway with strong soap suds. Cut a circle out of stiff paper that perfectly fits on top of the glass. In the center of the paper, cut a hole that’s half an inch in diameter, or even better, you can place a slice of bread on the glass. Spread molasses on one side of the disc and place it in the tumbler with the molasses side down. Swarms of flies quickly gather around it, and one by one, they find their way through the hole. Once they’re below the paper, their fate is sealed. For a little while, the molasses captures their attention, and they, in turn, get stuck in the molasses.
In their efforts to escape, they one by one precipitate themselves in the soap suds below, where they speedily perish. The tumbler is soon half-filled with the dead insects, and where a number of the traps are set in a single room, the apartment is soon ridden of the pests.
In their attempts to escape, they each fall into the soap suds below, where they quickly drown. The tumbler is soon half-filled with the dead insects, and when several traps are placed in one room, the space is quickly cleared of the pests.
Page 137 BOOK VI.
STEEL TRAPS AND THE ART OF TRAPPING.
STEEL TRAPS AND THE ART OF TRAPPING.
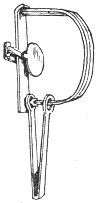 assing from our full and extended illustrated
list of extempore, or "rough and ready" examples of the trap kind, we
will now turn our attention to the consideration of that well-known
implement, the trade steel trap. Although the foregoing varieties
often serve to good purpose, the Steel Trap is the principal device
used by professional trappers, and possesses great advantages over
all other traps. It is portable, sets easily and quickly, either
on land or beneath the water; can be concealed with ease; secures its
victims without injury to their fur, and by the application of the
spring or sliding pole (hereafter described) will most effectually
prevent the captive from making his escape by self-amputation, besides
placing him beyond the reach of destruction by other animals.
assing from our full and extended illustrated
list of extempore, or "rough and ready" examples of the trap kind, we
will now turn our attention to the consideration of that well-known
implement, the trade steel trap. Although the foregoing varieties
often serve to good purpose, the Steel Trap is the principal device
used by professional trappers, and possesses great advantages over
all other traps. It is portable, sets easily and quickly, either
on land or beneath the water; can be concealed with ease; secures its
victims without injury to their fur, and by the application of the
spring or sliding pole (hereafter described) will most effectually
prevent the captive from making his escape by self-amputation, besides
placing him beyond the reach of destruction by other animals.
Moving on from our complete and detailed illustrated list of on-the-spot or "quick and easy" examples of traps, we will now focus on the well-known tool, the trade steel trap. While the previous types can be useful, the Steel Trap is the main device used by professional trappers and has significant advantages over all other traps. It's lightweight, easy to set up quickly, whether on land or underwater; it can be easily hidden; it secures its targets without damaging their fur, and with the use of a spring or sliding pole (which will be described later), it effectively prevents the trapped animal from escaping by self-amputation, while also keeping it safe from being harmed by other animals.
The author has known trappers who have plied their vocation largely by the aid of the various hand made traps, described in the earlier pages of this book, and with good success. But in the regular business of systematic trapping, their extensive use is not common. The experience of modern trappers generally, warrants the assertion that for practical utility, from every point of view, the steel trap stands unrivalled.
The author has known trappers who have pursued their profession mainly using the handmade traps described in the earlier pages of this book, and they have found good success. However, in the regular business of systematic trapping, these traps aren't commonly used. The experience of modern trappers generally supports the claim that for practical utility, in every way, the steel trap is unmatched.
These traps are made of all sizes, from that suitable for the capture of the house rat, to the immense and wieldy machine adapted to the grizzly, and known as the "bear tamer."
These traps come in all sizes, from those designed to catch a house rat to the huge and clumsy machine made for catching a grizzly, known as the "bear tamer."
They may be bought at almost any hardware shop, although a large portion of the traps ordinarily sold are defective. They should be selected with care, and the springs always tested Page 138 before purchase. Besides the temper of the spring, there are also other necessary qualities in a steel trap, which we subjoin in order that the amateur may know how to judge and select his weapons judiciously.
They can be found at nearly any hardware store, but many of the traps typically sold are faulty. They should be chosen carefully, and the springs should always be tested Page 138 before buying. In addition to the spring's tension, there are other important qualities to look for in a steel trap, which we list so that beginners can know how to evaluate and choose their equipment wisely.
REQUISITES OF A GOOD STEEL TRAP.
1. The jaws should not be too thin nor sharp cornered. In the cheaper class of steel traps the jaws approach to the thinness of sheet-iron, and the result is that the thin edges often sever the leg of their would-be captive in a single stroke. At other times the leg is so deeply cut as to easily enable the animal to gnaw or twist it off. This is the common mode of escape, with many animals.
1. The jaws shouldn't be too thin or have sharp corners. In cheaper steel traps, the jaws can become as thin as sheet metal, which often causes the sharp edges to cut through the leg of the animal in one snap. Sometimes, the leg is cut so badly that the animal can easily gnaw or twist it off. This is a common way for many animals to escape.
2. The pan should not be too large. This is a very common fault with many steel traps and often defeats its very object. Where the pan is small, the foot of the animal in pressing it, will be directly in the centre of the snap of the jaw, and he is thus firmly secured far up on the leg. On the other hand, a large pan nearly filling the space between the jaws as the trap is set, may be sprung by a touch on its extreme edge, and the animal's toe is thus likely to get slightly pinched, if indeed the paw is not thrown off altogether by the forcible snap of the jaw.
2. The pan shouldn't be too big. This is a common mistake with many steel traps and often undermines their purpose. When the pan is small, the animal's foot pressing down will be right in the center of the trap's jaws, securely catching it higher up on the leg. On the other hand, a large pan that almost fills the space between the jaws when the trap is set can be triggered by just a light touch on its edge, which may only pinches the animal's toe, or worse, the paw could be entirely thrown off by the sudden snap of the jaws.
3. The springs should be strong, scientifically tempered, and proportioned. The strength of a perfectly tempered spring will always remain the same, whether in winter or summer, never losing its elasticity. The best of tempering, however, is useless in a spring badly formed or clumsily tapered.
3. The springs should be strong, scientifically treated, and properly sized. The strength of a perfectly treated spring will always stay consistent, whether it’s winter or summer, never losing its flexibility. However, even the best treatment is pointless if a spring is poorly shaped or awkwardly tapered.
4. The jaws should be so curved as to give the bow of the spring a proper sweep to work upon. The jaws should lie flat when open, and should always work easily on their hinges.
4. The jaws should be curved in a way that allows the bow of the spring to move smoothly. The jaws should lie flat when open and should always operate easily on their hinges.
5. Every trap should be furnished with a strong chain with ring and swivel attached, and in every case the swivel should turn easily.
5. Every trap should have a sturdy chain with a ring and swivel attached, and in all cases, the swivel should rotate smoothly.
The celebrated "Newhouse Trap" embodies all the above requisites, and has deservedly won a reputation for excellence second to no other in this or any other country.
The famous "Newhouse Trap" includes all the necessary features and has justly earned a reputation for excellence that is unmatched in this country or anywhere else.
They are made in eight sizes, as follows:
They come in eight sizes, listed below:
 This is the smallest size and is known as the RAT TRAP. It has a
single spring, and the jaws spread three and a half inches when
set.
This is the smallest size and is known as the RAT TRAP. It has a
single spring, and the jaws spread three and a half inches when
set.
This is the smallest size and is called the RAT TRAP. It has a single spring, and the jaws open three and a half inches when it's set.
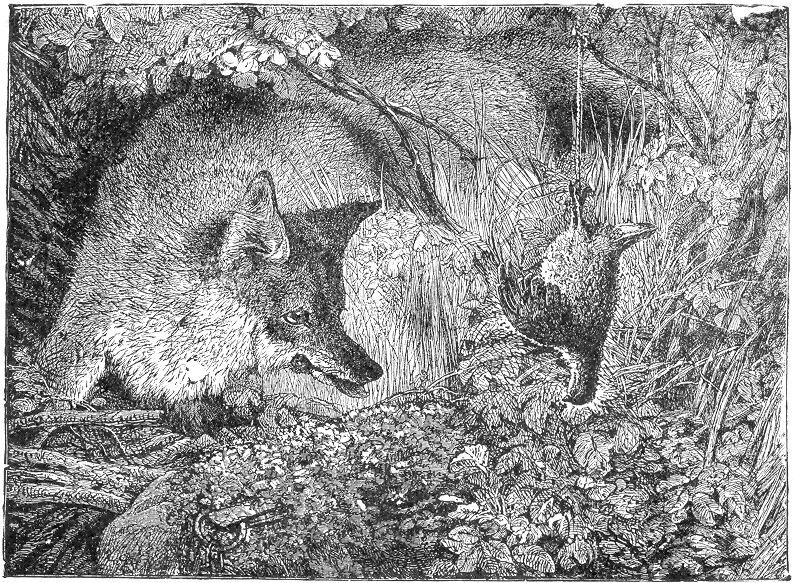
Page 141
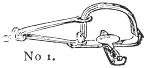 This size is called the MUSKRAT TRAP, and the jaws spread four
inches. It is especially designed for the capture of the mink, marten,
and animals of similar size.
This size is called the MUSKRAT TRAP, and the jaws spread four
inches. It is especially designed for the capture of the mink, marten,
and animals of similar size.
Page 141
This size is known as the MUSKRAT TRAP, and the jaws open four inches. It's specifically made for catching mink, marten, and animals of similar size.
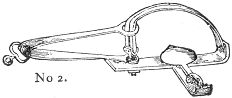 This is known in the trade as the MINK TRAP, and the jaws spread
nearly five inches. It is adapted for the fox, raccoon, or fisher.
This is known in the trade as the MINK TRAP, and the jaws spread
nearly five inches. It is adapted for the fox, raccoon, or fisher.
This is referred to in the industry as the MINK TRAP, and the jaws open up to nearly five inches. It is suitable for trapping foxes, raccoons, or fishers.
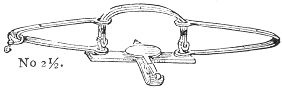 This size is called the FOX TRAP. The spread of the jaws is the
same as in the foregoing, but the trap is provided with two springs,
and consequently has double the power. It is strong enough for
the otter, and is generally used for the capture of the fox and
fisher.
This size is called the FOX TRAP. The spread of the jaws is the
same as in the foregoing, but the trap is provided with two springs,
and consequently has double the power. It is strong enough for
the otter, and is generally used for the capture of the fox and
fisher.
This size is known as the FOX TRAP. The jaw spread is the same as mentioned earlier, but this trap has two springs, giving it twice the power. It's strong enough for catching otters and is commonly used to trap foxes and fishers.
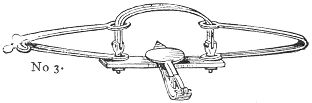 No.3 goes by the name of the OTTER TRAP. The jaws spread five and
a half inches, and the powerful double springs do excellent service
in the capture of the beaver, fox, badger, opossum, wild cat, and
animals of like size.
No.3 goes by the name of the OTTER TRAP. The jaws spread five and
a half inches, and the powerful double springs do excellent service
in the capture of the beaver, fox, badger, opossum, wild cat, and
animals of like size.
No. 3 is called the OTTER TRAP. The jaws open five and a half inches, and the strong double springs work really well for catching beavers, foxes, badgers, opossums, wildcats, and animals of similar size.
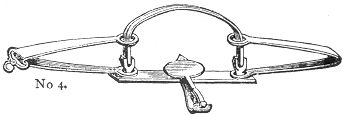 Commonly called the BEAVER TRAP. Jaws spread six and a half inches.
This size is especially adapted to the wolf, lynx or wolverine. It
may also be set for deer, and extra sets of jaws are made expressly
for this purpose, being easily inserted in the place of the ordinary
jaws, when desired.
Commonly called the BEAVER TRAP. Jaws spread six and a half inches.
This size is especially adapted to the wolf, lynx or wolverine. It
may also be set for deer, and extra sets of jaws are made expressly
for this purpose, being easily inserted in the place of the ordinary
jaws, when desired.
Commonly known as the BEAVER TRAP. The jaws open six and a half inches wide. This size is particularly suitable for catching wolves, lynxes, or wolverines. It can also be set for deer, and additional jaws specifically designed for this purpose can be easily swapped in for the regular jaws when needed.
Page 142
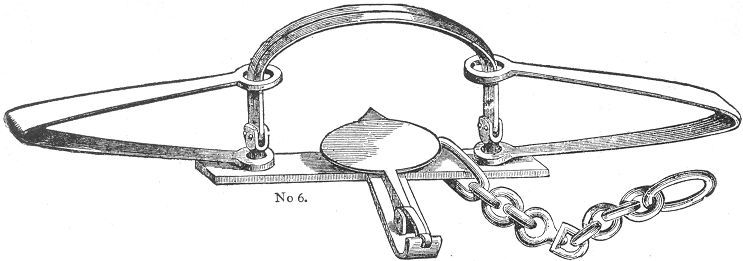 This is known as the "GREAT BEAR TAMER," and is a most formidable
weapon. The jaws spread sixteen inches, and the weight of the machine
is forty-two pounds. It is extensively used in the capture of the
moose and grizzly bear, and is the largest and most powerful steel
trap made in this or any other country. The springs possess most
tremendous power, and require to be set by a lever, as the weight
of an ordinary man has not the slightest effect upon them. This
lever may be easily applied, as follows: Have at hand four stout
straps, supplied with buckles. These should always be carried by
the trapper, where the larger double-spring traps are used. To
adjust the lever, cut four heavy sticks about three feet long.
Take two of them and secure their ends together, side by side,
with one of the straps. Now insert the spring of the trap between
them, near the strap. Bear down heavily on the other extremity of
the lever, and the spring will be found to yield easily, after
which the remaining ends of the levers should be secured by a second
strap. The other spring should now be treated in the same way,
after which the jaws should be spread and the pan adjusted. The
removal of the straps and
Page 143
levers is now an easy matter, after which the trap is set. The stoutest
spring is easily made to yield by such treatment.
This is known as the "GREAT BEAR TAMER," and is a most formidable
weapon. The jaws spread sixteen inches, and the weight of the machine
is forty-two pounds. It is extensively used in the capture of the
moose and grizzly bear, and is the largest and most powerful steel
trap made in this or any other country. The springs possess most
tremendous power, and require to be set by a lever, as the weight
of an ordinary man has not the slightest effect upon them. This
lever may be easily applied, as follows: Have at hand four stout
straps, supplied with buckles. These should always be carried by
the trapper, where the larger double-spring traps are used. To
adjust the lever, cut four heavy sticks about three feet long.
Take two of them and secure their ends together, side by side,
with one of the straps. Now insert the spring of the trap between
them, near the strap. Bear down heavily on the other extremity of
the lever, and the spring will be found to yield easily, after
which the remaining ends of the levers should be secured by a second
strap. The other spring should now be treated in the same way,
after which the jaws should be spread and the pan adjusted. The
removal of the straps and
Page 143
levers is now an easy matter, after which the trap is set. The stoutest
spring is easily made to yield by such treatment.
Page 142
This is called the "GREAT BEAR TAMER," and it’s a very powerful weapon. The jaws open sixteen inches wide, and the machine weighs forty-two pounds. It’s widely used for capturing moose and grizzly bears, and it’s the largest and most powerful steel trap made anywhere. The springs have incredible strength and need to be set with a lever, as the weight of an average person has no effect on them. To set the lever, you need four strong straps with buckles, which trappers should always carry when using larger double-spring traps. To prepare the lever, cut four sturdy sticks about three feet long. Take two of them and tie their ends together, side by side, with one of the straps. Then, place the trap's spring between them near the strap. Push down hard on the other end of the lever, and the spring will give way easily. After that, secure the ends of the levers with a second strap. Repeat the process for the other spring, then spread the jaws and adjust the pan. Removing the straps and Page 143 levers is now straightforward, and the trap is set. The strongest spring can be easily made to yield this way.
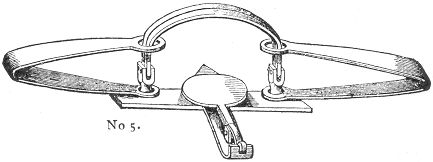
The SMALL BEAR TRAP. The jaws of this size spread nearly a foot, and the weight of the trap is seventeen pounds. It is used in the capture of the black bear, puma, and animals of similar size.
The SMALL BEAR TRAP. The jaws of this size spread almost a foot, and the trap weighs seventeen pounds. It’s used to capture black bears, cougars, and animals of similar size.
All of the foregoing are supplied with swivels and chains.
All of the above come with swivels and chains.
HINTS ON BAITING THE STEEL TRAP.
There is a very common and erroneous idea current among amateur
sportsmen and others in regard to the baiting of the steel trap;
viz., that the pan of the trap is intended for the bait.
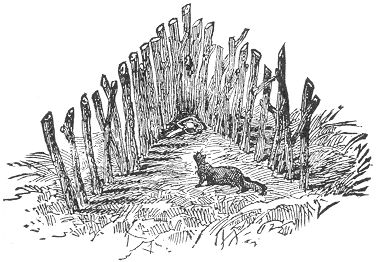 This was the old custom in the traps of bygone times, but no modern
trap is intended to be so misused, and would indeed often defeat
its object in such a case, wherein it will be easily
Page 144
seen. The object of the professional trapper is the acquisition
of furs; and a prime fur skin should be without break or bruise,
from nose to tail. A trap set as above described, would of course
catch its victim by the head or neck, and the fur would be more
or less injured at the very spot where it should be particularly
free from blemish.
This was the old custom in the traps of bygone times, but no modern
trap is intended to be so misused, and would indeed often defeat
its object in such a case, wherein it will be easily
Page 144
seen. The object of the professional trapper is the acquisition
of furs; and a prime fur skin should be without break or bruise,
from nose to tail. A trap set as above described, would of course
catch its victim by the head or neck, and the fur would be more
or less injured at the very spot where it should be particularly
free from blemish.
There's a very common and mistaken belief among amateur sports enthusiasts and others regarding how to bait a steel trap: that the pan of the trap is meant for the bait.
This used to be the old practice with traps from the past, but no modern trap is designed to be misused this way, and it would often undermine its purpose in doing so, as can be easily Page 144 seen. The goal of a professional trapper is to obtain furs; a prime fur skin should be flawless from nose to tail. A trap set up as described above would obviously catch its victim by the head or neck, which would injure the fur precisely at the spot it needs to be free of blemishes.
The true object of the steel trap is, that it shall take the animal by the leg, thus injuring the skin only in a part where it is totally valueless.
The real purpose of the steel trap is to catch the animal by the leg, causing damage to the skin only in a section where it is completely worthless.
We give, then, this imperative rule—Never bait a steel trap on the pan.
We give this important rule—Never bait a steel trap on the pan.
The pan is intended for the foot of the game, and in order to insure capture by this means, the bait should be so placed as that the attention of the animal will be drawn away from the trap; the latter being in such a position as will cause the victim to step in it when reaching for the tempting allurement.
The pan is meant for the foot of the game, and to ensure capture this way, the bait should be positioned to draw attention away from the trap; the trap itself should be placed so that the victim will step into it while reaching for the tempting lure.
There are several ways of doing this, one of which we here illustrate.
There are several ways to do this, and we will illustrate one of them here.
A pen of stakes, in the shape of the letter V, is first constructed. The trap is then set in the angle, and the bait attached to the end stake directly over it. Another method is shown in the picture on our title-page to this section, the bait being suspended on a stick above the trap. There are various other methods on the same principle, which will be described hereafter, under the titles of the various game.
A pen made of stakes, shaped like the letter V, is constructed first. The trap is then positioned in the angle, and the bait is attached to the end stake right above it. Another method is illustrated in the picture on our title page for this section, with the bait hanging on a stick above the trap. There are several other methods based on the same principle, which will be explained later under the titles of the various game.
THE SPRING POLE.
This is nearly always used in connection with the steel trap, in
the capture of the smaller land animals. It not only lifts the
creature into the air, and thus prevents its becoming a prey to
other animals, but it also guards against the escape of the victim
by the amputation of its own leg. This is a very common mode of
release with many kinds of game—notably the mink, marten,
and muskrat; and for the successful trapping of these, as well
as many other animals, the spring and sliding pole are absolute
necessities. It is a simple contrivance, consisting merely of a
pole inserted in the ground near the trap. The pole is then bent
down, and the trap chain secured to its end. A small, notched peg
is next driven into the ground and the top of the pole caught in
it, and thus held in a bent position. When the animal is caught, its
struggles release the pole, and the latter, flying up with a jerk,
Page 145
lifts the trap and its occupant high in the air, out of the reach
of marauders, and beyond the power of escape by self-amputation.
Even in the capture of large game the spring pole often serves to
good purpose. The struggles of a heavy animal are often so violent
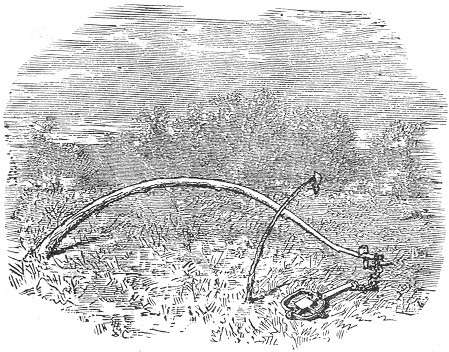 as to break a stout trap or chain; and the force of the spring
pole, although not sufficient to raise the animal from its feet,
often succeeds in easing the strain, and often thus saves a trap
from being broken to pieces. The power of the pole must of course
be proportionate to the weight of the desired game.
as to break a stout trap or chain; and the force of the spring
pole, although not sufficient to raise the animal from its feet,
often succeeds in easing the strain, and often thus saves a trap
from being broken to pieces. The power of the pole must of course
be proportionate to the weight of the desired game.
This is almost always used with the steel trap for catching smaller land animals. It not only lifts the creature into the air, preventing it from becoming prey to other animals, but it also stops the victim from escaping by amputating its own leg. This is a very common way of releasing many types of game—notably the mink, marten, and muskrat; and to successfully trap these animals, as well as others, the spring and sliding pole are essential. It’s a simple device, just a pole stuck in the ground near the trap. The pole is bent down, and the trap chain is attached to its end. A small, notched peg is then hammered into the ground to hold the top of the pole, keeping it bent. When the animal is caught, its struggles release the pole, which snaps up suddenly, lifting the trap and the animal high into the air, out of reach of predators and preventing escape through self-amputation. Even when capturing large game, the spring pole is still very useful. The struggles of a heavy animal can be so fierce that they break a sturdy trap or chain, and while the spring pole might not be strong enough to lift the animal off its feet, it often reduces the tension and can save the trap from being destroyed. The strength of the pole must, of course, match the weight of the target game.
THE SLIDING POLE.
The first impulse with almost every aquatic animal when caught in
a trap, is to plunge headlong into deep water. With the smaller
animals, such as the mink and muskrat, this is all that is desired by
the trapper, as the weight of the trap with the chain is sufficient
to drown its victim. But with larger animals, the beaver and otter
for instance, an additional precaution, in the shape of the "sliding
pole," is necessary. This consists of a pole about ten feet long,
smoothly trimmed of its branches, excepting at the tip, where a
few stubs should be left. Insert this end obliquely into the bed
of the stream, where the water is
Page 146
deep, and secure the large end to the bank by means of a hooked
stick, as seen in our illustration. The ring of the chain should
be large enough to slide easily down the entire length of the pole.
When the trap is set, the ring should be slipped on the large end
 of the pole, and held in place by resting a stick against it. The
animal, when caught, plunges off into deep water, and guided by
the pole, is led to the bottom of the river. The ring slides down
to the bed of the stream, and there holds its victim until drowned.
of the pole, and held in place by resting a stick against it. The
animal, when caught, plunges off into deep water, and guided by
the pole, is led to the bottom of the river. The ring slides down
to the bed of the stream, and there holds its victim until drowned.
The first instinct of almost every aquatic animal when caught in a trap is to dive into deep water. For smaller animals like mink and muskrat, that's exactly what the trapper wants, as the weight of the trap and chain is enough to drown them. However, larger animals like beavers and otters require an extra precaution in the form of a "sliding pole." This is a pole about ten feet long, smoothly stripped of branches except for a few stubs at the tip. Insert this end at an angle into the riverbed where the water is deep, and secure the larger end to the bank with a hooked stick, as shown in our illustration. The ring of the chain should be big enough to slide all the way down the pole. When the trap is set, the ring should be placed on the larger end of the pole and kept in place by leaning a stick against it. When caught, the animal dives into deep water and, guided by the pole, is led to the river bottom. The ring slides down to the riverbed and holds the animal in place until it drowns.
THE CLOG.
A trap which is set for heavy game should never be secured to a stake. Many of the larger and more powerful animals when caught in a trap thus secured, are apt either to pull or twist their legs off, or break both trap and chain to pieces. To guard against this, the chain should be weighted with a pole or small log, of a size proportionate to the dimensions of the game, its weight being merely sufficient to offer a serious incumbrance to the animal, without positively checking its movements. This impediment is called the "clog," and is usually attached to the ring of the trap chain by its larger end, the ring being slipped over the latter, and secured in place by a wedge. A look at our frontispiece will give a clear idea of both clog and attachment.
A trap set for large game should never be tied to a stake. Many of the bigger, stronger animals, when caught in a trap like that, might either pull or twist their legs off, or break both the trap and chain apart. To avoid this, the chain should be weighted down with a pole or small log, sized appropriately for the animal, with the weight just enough to provide a serious hindrance without completely stopping its movement. This hindrance is called the "clog," and it’s typically attached to the trap chain ring by its larger end, with the ring slipped over it and secured with a wedge. A look at our frontispiece will give a clear idea of both the clog and how it attaches.
Page 147 THE GRAPPLING IRON.
This answers the same purpose as the above, and is often used instead.
It is manufactured in connection with the larger steel traps, and
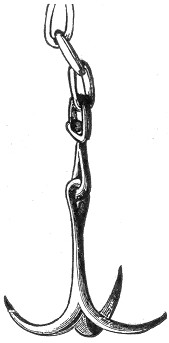 is attached to the chain by a swivel joint. Its general shape is
shown in an engraving, and it offers a serious resistance to the
victim, who endeavors to run away with it.
is attached to the chain by a swivel joint. Its general shape is
shown in an engraving, and it offers a serious resistance to the
victim, who endeavors to run away with it.
This serves the same purpose as the one above and is often used instead. It’s made in conjunction with the larger steel traps, and
is connected to the chain by a swivel joint. Its general shape is depicted in an engraving, and it provides significant resistance to the victim trying to escape with it.
THE SEASON FOR TRAPPING.
The business of trapping for profit must be confined to the season between the first of October and the beginning of May, as furs of all kinds are worthless when taken during the other months of the year. The reason for this is obvious. A "prime fur" must be "thick" and "full," and as all our fur-bearing animals shed their heavy winter coats as warm weather approaches, it necessarily follows that the capture at this season would be unprofitable. As the autumn approaches the new growth appears, and the fur becomes thick and glossy. By the middle of October most furs are in their prime, but the heart of winter is the best time for general trapping. The furs of the Page 148 mink, muskrat, fisher, marten and beaver are not in their perfect prime until this season. And all other furs are sure to be in good condition at this time.
The business of trapping for profit must be limited to the period between October 1 and early May, as furs of all kinds have no value when taken during the other months of the year. The reason for this is clear. A "prime fur" needs to be "thick" and "full," and since all our fur-bearing animals lose their heavy winter coats as warmer weather approaches, it follows that trapping during this time would not be profitable. As autumn arrives, new fur starts to grow, making it thick and glossy. By mid-October, most furs are in their prime, but the middle of winter is the best time for trapping overall. The furs of the Page 148 mink, muskrat, fisher, marten, and beaver are not at their perfect prime until this season. And all other furs are sure to be in good condition at this time.
THE ART OF TRAPPING.
From time immemorial, and in every nation of the world, the art of trapping has been more or less practised. By some as a means of supplying their wants in the shape of daily food, and by others for the purpose of merchandise or profit.
From ancient times, and in every country around the world, trapping has been practiced to varying degrees. Some people do it to meet their daily food needs, while others do it for trade or profit.
To be a clever and successful trapper, much more is required than is generally supposed. The mere fact of a person's being able to set a trap cleverly and judiciously forms but a small part of his proficiency; and unless he enters deeper into the subject and learns something of the nature and habits of the animals he intends to catch, his traps will be set in vain, or at best meet with but indifferent success. The study of natural history here becomes a matter of necessity as well as pleasure and profit. And unless the trapper thoroughly acquaints himself with the habits of his various game, the sagacity and cunning of his intended victim will often outwit his most shrewd endeavors, much to his chagrin. The sense of smell, so largely developed in many animals, becomes one of the trappers most serious obstacles, and seems at times to amount almost to positive reason, so perfectly do the creatures baffle the most ingenious attempts of man in his efforts to capture them. A little insight into the ways of these artful animals, however, and a little experience with their odd tricks soon enables one to cope with them successfully and overcome their whims. For the benefit of the amateur who has not had the opportunity of studying for himself, the peculiarities of the various game, the author appends a comprehensive chapter on "Practical Natural History," in which will be found full accounts of the peculiar habits and leading characteristics of all the various animals commonly sought by the trapper, together with detailed directions for trapping each variety, supplemented with a faithful portrait of the animal in nearly every instance. A careful reading of the above mentioned chapter will do much towards acquainting the novice with the ways of the sly creatures, which he hopes to victimize, and will thus prepare him to contend with them successfully.
To be a clever and successful trapper, much more is needed than most people think. Just being able to set a trap intelligently and skillfully is only a small part of the expertise required; unless he delves deeper into the topic and understands the nature and habits of the animals he wants to catch, his traps will likely be ineffective or, at best, only somewhat successful. Learning about natural history becomes essential, as well as enjoyable and profitable. If the trapper doesn’t thoroughly learn the behaviors of his target animals, their intelligence and cunning will often outsmart his best efforts, much to his disappointment. The sense of smell, highly developed in many animals, becomes one of the trapper's biggest challenges, often making it seem as if these creatures have a kind of reasoning, as they easily outmaneuver even the cleverest human traps. However, with some understanding of these cunning animals and a bit of experience with their strange behaviors, one can learn to handle them effectively and counter their tricks. For the benefit of the amateur who hasn’t had a chance to study this on their own, the author has included a comprehensive chapter on "Practical Natural History." This chapter provides detailed descriptions of the unique habits and main traits of all the different animals commonly targeted by trappers, along with step-by-step instructions for trapping each type, and often features a detailed illustration of the animal. A careful reading of this chapter will greatly help beginners learn about the sly creatures they aim to catch and thus prepare them to deal with them successfully.
In the art of trapping the bait is often entirely dispensed with, the traps being set and carefully concealed in the runways of the various animals. These by-paths are easily detected by an Page 149 experienced trapper, and are indicated either by footprints or other evidences of the animal, together with the matted leaves and broken twigs and grasses.
In the art of trapping, bait is often completely skipped, with traps being set and carefully hidden in the runways of different animals. An Page 149 experienced trapper can easily find these side paths, which are marked by footprints or other signs of the animal, along with matted leaves, broken twigs, and grasses.
Natural channels, such as hollow logs or crevices between rocks or fallen trees, offer excellent situations for steel traps, and a good trapper is always on the qui vive for such chance advantages, thus often saving much of the time and labor which would otherwise be spent in the building of artificial enclosures, etc.
Natural channels, like hollow logs or gaps between rocks or fallen trees, provide great opportunities for steel traps. A skilled trapper is always alert for these advantageous situations, often saving a lot of time and effort that would otherwise go into creating artificial enclosures, etc.
The most effective baits used in the art of trapping are those which are used to attract the animal through its sense of smell, as distinct from that of its mere appetite for food. These baits are known in the profession as "medicine," or scent baits and possess the most remarkable power of attracting the various animals from great distances, and leading them almost irresistibly to any desired spot. Such is the barks tone or castoreum, of such value in the capture of the beaver, and the oil of anise, so commonly used for the trapping of animals in general. These various substances will presently be considered under their proper heading.
The best baits used in trapping are those that attract animals through their sense of smell, rather than just their hunger for food. In the profession, these baits are called "medicine" or scent baits, and they have an impressive ability to draw various animals from far away, almost irresistibly leading them to a specific location. For example, castoreum, which is invaluable for catching beavers, and anise oil, which is commonly used for trapping animals in general. We will discuss these different substances in the appropriate sections.
Many detailed and specific directions on the subject of trapping will be found in the long chapter following; and, in closing our preliminary remarks, we would add just one more word of general caution, which the young trapper should always bear in mind.
Many detailed and specific instructions on trapping can be found in the long chapter that follows; and, as we wrap up our initial comments, we want to add one more general piece of advice that every young trapper should always keep in mind.
In all cases avoid handling the trap with the bare hand. Many an amateur has set and reset his traps in vain, and retired from the field of trapping in disgust, from the mere want of observing this rule. Animals of keen scent are quick in detecting the slightest odors, and that left by the touch of a human hand often suffices to drive the creature away from a trap which, under other circumstances, would have been its certain destruction. To be sure the various scent baits already alluded to, will in a measure overcome human traces, but not always effectually, and in order to insure success no precautions so simple should be neglected. A pair of clean buckskin gloves are valuable requisites to the trapper, and should always be "on hand" when setting or transporting traps.
In all cases, avoid handling the trap with bare hands. Many beginners have set and reset their traps in vain and left trapping in frustration simply because they didn’t follow this rule. Animals with a strong sense of smell are quick to detect even the slightest odors, and the scent left by human skin can often scare them away from a trap that, under normal circumstances, would have surely caught them. Although the different scent baits mentioned earlier can somewhat mask human scents, they don't always work effectively. To ensure success, no simple precautions should be overlooked. A pair of clean buckskin gloves is an essential tool for trappers and should always be on hand when setting or moving traps.
"MEDICINES," OR SCENT BAITS.
These form one of the most important requisites of the trapper's art. A trap baited simply with the food of the Page 150 required animal, may and often will be successful, but with the addition of the trapper's "medicine" judicially applied, success is almost a certainty. These scent baits are of various kinds, some being almost universal in their usefulness, while others are attractive only to some particular species of animal. We give a few of the recipes of the most valued preparations used by trappers throughout the land. The application and use of each is fully described in its proper place hereafter.
These are some of the most important essentials of a trapper's skills. A trap baited only with the food of the Page 150 animal might work, but adding the trapper's "medicine" skillfully used makes success almost guaranteed. These scent baits come in different types; some are nearly universally effective, while others attract only specific species. We’ll share a few of the recipes for the most prized preparations used by trappers everywhere. The application and use of each will be fully explained in the appropriate section later on.
CASTOREUM.
This substance, commonly known as "Barkstone," by trappers and fur dealers, is obtained from the beaver, and is a remarkable aid in the capture of that animal. It is an acrid secretion of a powerful musky odor, found in two glands beneath the root of the tail of the beaver. These glands are about two inches in length. They are cut out and the contents are squeezed into a small bottle. When fresh the substance is of a yellowish-red color, changing to a light-brown when dried. Both male and female animals yield the castoreum, but that of the male is generally considered the best. Castoreum is a commercial drug, and in many beaver countries it is quite an article of trade. There are other sacs lying directly behind the castor glands which contain a strong oil of rancid smell. This should not be confounded with the Castoreum.
This substance, commonly known as "Barkstone" by trappers and fur traders, is obtained from the beaver and is an excellent aid in capturing that animal. It is a strong-smelling secretion with a powerful musky odor, found in two glands located beneath the root of the beaver's tail. These glands are about two inches long. They are removed, and the contents are squeezed into a small bottle. When fresh, the substance is a yellowish-red color, changing to light brown when dried. Both male and female beavers produce castoreum, but the male's is usually regarded as the best. Castoreum is a commercial drug and is quite a valuable trade item in many beaver-rich areas. There are also other sacs located directly behind the castor glands that contain a strong oil with a rancid smell. This should not be confused with castoreum.
CASTOREUM COMPOSITION.
The Barkstone is used both pure and in combination with other substances, the following prescription being much used: Into the contents of about ten of the castor bags, mix two ground nutmegs, thirty or forty cloves, also powdered, one drop essence of peppermint, and about two thimblefuls of ground cinnamon. Into this stir as much whisky as will give the whole the consistency of paste, after which the preparation should be bottled and kept carefully corked. At the expiration of a few days the odor increases ten-fold in power and is ready for use. A bottle, if thus prepared, will retain its strength for nearly a half year, provided it is kept closely corked. A few drops of either the pure castoreum or the combination spread upon the bait or in the neighborhood of the trap, as described under the chapter on the Beaver, will entice that animal from a great distance.
The Barkstone can be used on its own or mixed with other ingredients. A common recipe is as follows: Take the contents of about ten castor bags and mix in two ground nutmegs, thirty or forty ground cloves, one drop of peppermint essence, and about two thimblefuls of ground cinnamon. Then add enough whisky to create a paste-like consistency. Once mixed, the preparation should be bottled and secured with a cork. After a few days, the scent increases in intensity tenfold and is ready to use. If prepared this way, a bottle will maintain its potency for almost six months, as long as it remains tightly corked. A few drops of either the pure castoreum or the mixture applied to bait or near the trap, as outlined in the chapter on the Beaver, will attract the animal from a significant distance.
Page 151 MUSK.
This substance is a secretion obtained from several different animals, notably the otter and muskrat. The glands which contain it are located similarly to the castor glands of the beaver, and the musk should be discharged into a vial, as previously described. The musk of the female muskrat is said to be the most powerful, and is chiefly used by trappers in the capture of that animal, the otter being chiefly attracted by its own musk.
This substance is a secretion collected from various animals, especially the otter and muskrat. The glands that hold it are positioned similarly to the castor glands of the beaver, and the musk should be collected into a vial, as mentioned earlier. It's believed that the musk from the female muskrat is the strongest and is mainly used by trappers when capturing that animal, while the otter is mainly drawn to its own musk.
ASSAFŒTIDA.
This foul smelling production seems to have a specially attractive fragrance to many animals, and for general use is much esteemed by trappers. It is a vegetable drug from Persia and the East Indies, and is imported in the form of concrete juice, of a brown color.
This foul-smelling substance appears to have a uniquely appealing scent for many animals, and it's highly valued by trappers for general use. It's a plant-based drug from Persia and the East Indies, and it's imported as a thick, brown juice.
OIL OF RHODIUM.
This is a vegetable oil obtained from a species of rose, and is quite costly. Its power of attracting animals is surprising, and it is in very common use among trappers.
This is a vegetable oil derived from a type of rose, and it is quite expensive. Its ability to attract animals is remarkable, and it is widely used among trappers.
FISH OIL.
This is especially useful in the capture of the majority of the fur tribe, and particularly the water animals.
This is especially helpful in catching most of the fur tribe, especially the aquatic animals.
The oil may be bought ready for use, or prepared with little trouble. The common method consists in cutting up fish of any kind, especially eels, into small bits, putting them in a bottle, and setting the latter in the full exposure to the sun. It should thus be left for about two weeks, at the end of which time a rancid oil will have formed. A few drops of this oil will entice many animals from surprising distances, often drawing their attention to a bait which otherwise they might never have scented.
The oil can be purchased ready-made or made with minimal effort. The usual method involves chopping up any type of fish, especially eels, into small pieces, putting them in a bottle, and placing that bottle in direct sunlight. It should be left there for about two weeks, after which a rancid oil will have formed. A few drops of this oil can attract many animals from surprising distances, often bringing their attention to bait they might not have noticed otherwise.
OIL OF SKUNK.
This, the ne plus ultra, or quintessence of diabolical stench, yields the tempting savor which irresistibly attracts many animals to their final doom. It is contained in a pouch beneath the insertion of the tail of the animal, and is spread abroad by the Page 152 creature with lavish extravagance when circumstances demand, or we might say when occasion permits. It may be taken from the animal and bottled as already described in other instances, chloride of lime being used to eradicate the stench from the hands.
This, the ne plus ultra, or essence of a terrible smell, produces a tempting odor that irresistibly draws many animals to their end. It’s found in a pouch under the animal's tail and is released by the Page 152 creature with excessive generosity when necessary, or we might say when the time is right. It can be extracted from the animal and stored in a bottle as described in previous examples, using lime chloride to remove the odor from the hands.
OIL OF AMBER.
This substance is frequently referred to in the following pages, and is a vegetable product of the amber gum of commerce. The Oil of Ambergris is also sometimes used by trappers, and is likewise known as Amber Oil. The two are thus often confounded, although the former is supposed to be most generally used.
This substance is often mentioned in the following pages and is a plant product derived from commercial amber gum. The Oil of Ambergris is also occasionally used by trappers and is often called Amber Oil. The two are frequently confused, even though the former is thought to be more commonly used.
OIL OF ANISE.
This is strongly recommended by many trappers as a most excellent "universal medicine." It is a vegetable product, and is obtainable at any drug store.
This is highly recommended by many trappers as a great "universal medicine." It's a plant-based product and can be found at any drug store.
SWEET FENNEL.
This plant is commonly cultivated all over the United States, and the seeds are often powdered and used as a scent bait. The Oil of Fennel is preferable, however, and may be had at almost any drug store.
This plant is widely grown throughout the United States, and the seeds are frequently ground into powder to be used as a scent bait. However, Fennel Oil is preferred and can be found at almost any pharmacy.
CUMMIN.
This is another plant, somewhat resembling the former, and, like it, cultivated for its seeds. It has an aromatic taste, and its strong pungent odor renders it of great value to the trapper. The seeds may be powdered and thus used, or the oil of the plant may be easily procured. The latter is preferable.
This is another plant that looks somewhat like the previous one and is also grown for its seeds. It has a fragrant taste, and its strong pungent smell makes it very valuable to trappers. The seeds can be ground into powder and used that way, or you can easily extract oil from the plant. The oil is the better option.
FENUGREEK.
Like the two foregoing this plant is valuable for its seeds, which are used for medicinal purposes. The oil or bruised seeds may be used.
Like the two mentioned before, this plant is valuable for its seeds, which are used for medicinal purposes. The oil or crushed seeds can be used.
LAVENDER.
This is another aromatic plant, the oil of which, either pure or diluted with alcohol, is much used in the trapper's art.
This is another fragrant plant, the oil of which, whether pure or mixed with alcohol, is commonly used in trapping.
Page 153 COMPOUND.
For ordinary use, a mixture of Assafœtida, Musk, Oil of Anise, and Fish Oil, together with a few drops of the Oil of Rhodium, is especially recommended by our most skilled trappers. This preparation contains the various substances which are known to attract the different fur bearing animals, and its use often insures success where anyone of the simple substances would be ineffectual.
For everyday use, a blend of asafoetida, musk, anise oil, and fish oil, along with a few drops of rose oil, is highly recommended by our top trappers. This mixture contains various ingredients that are known to attract different fur-bearing animals, and using it often guarantees success where any single ingredient would not be effective.
THE TRAIL.
The object of the "trail" consists in offering a leading scent which, when followed, will bring the animal to the various traps, and when properly made will be the means of drawing large numbers of game from all quarters and from great distances, whereas without it the traps might remain undiscovered.
The purpose of the "trail" is to provide a guiding scent that, when followed, will lead the animal to different traps. When done correctly, it will attract a large number of game from all directions and far away, while without it, the traps could go unnoticed.
Trails are sometimes made to connect a line of traps, as when set along the banks of streams for mink, etc., at other times, as in trapping the fox, for instance, they should extend from the trap on all sides, like the spokes of a wheel from the hub, thus covering considerable area, and rendering success more certain than it would be without this precaution.
Trails are sometimes created to link a series of traps, like when set along the banks of streams for mink, etc. Other times, such as when trapping foxes, they should fan out from the trap in all directions, like the spokes of a wheel coming from the center, covering a large area and making success more likely than it would be without this strategy.
The combination "medicine" just described is excellent for the purposes of a trail for minks, otter, muskrat, and many other animals.
The combination of "medicine" mentioned earlier is great for tracking minks, otters, muskrats, and many other animals.
Soak a piece of meat, or piece of wood in the preparation, and drag it along the ground between the traps. A dead fish smeared with the fluid will also answer the same purpose. The soles of the boots may also be smeared with the "medicine" and the trail thus accomplished. Trails of various kinds are considered under their respective and appropriate heads in the chapters on animals, all of which will be found useful and effective.
Soak a piece of meat or wood in the mixture, and drag it along the ground between the traps. A dead fish coated with the fluid will work just as well. You can also apply the "medicine" to the soles of your boots to create a trail. Different types of trails are covered under their respective categories in the chapters on animals, all of which will be practical and effective.
HOW TO TRAP.
In the following pages will be found full and ample directions for the trapping of all our leading game, together with detailed descriptions of peculiar habits of each species. The various articles contain careful descriptions, whereby the species may be readily recognized, and, in nearly every case, are accompanied by faithful illustrations. We add also valuable directions for the best manner of removing the skin of each animal, this being a matter of considerable importance, as affecting their pecuniary value.
In the following pages, you'll find complete and thorough instructions for trapping all our main game, along with detailed descriptions of the unique habits of each species. The various sections include careful descriptions that make it easy to identify the species, and in almost every case, they come with accurate illustrations. We also include helpful tips on the best way to skin each animal, which is quite important as it impacts their monetary value.
Page 154 THE FOX.
Foremost in the list of animals noted for their sly craft, and the hero of a host of fables and well-authenticated stories, in which artful cunning gains the advantage over human intelligence, Reynard, the fox, reigns supreme. There is scarcely a professional trapper in the land who has not, in his day, been hoodwinked by the wily strategy of this sly creature, whose extreme cunning renders him the most difficult of all animals to trap. The fox belongs to the Dog family, and there are six varieties inhabiting the United States. The red species is the most common and is too well known to need a description here. The Cross Fox considerably resembles the above, only being much darker in color, the red hair being thickly speckled with black. This species varies considerably in color in different individuals, often much resembling the red variety, and again approaching nearer in color to the Black or Silver Fox. This variation, together with the name of the animal, has given rise among trappers to the wide-spread belief of the animal being a cross between the two species which it so nearly resembles. It seems to be a permanent variety, however, the term cross being applied, we believe, on account of a dark marking on the back, between the shoulders of the animal, suggestive of that title. The Silver or Black Fox is the most beautiful and most rare of the genus, and yields the most valuable fur produced in this country. Its color is black, with the exception of the tip of the tail, which is white. The Prairie Fox is the largest of the species. It inhabits the Western Prairies, and in color resembles the common red variety, only being a trifle yellower.
At the top of the list of animals known for their cleverness, and the star of many fables and well-documented stories where crafty trickery outsmarts human intelligence, is Reynard, the fox. There's hardly a professional trapper in the country who hasn't been outsmarted by this clever creature, whose extreme cunning makes it the hardest animal to catch. The fox belongs to the Dog family, and there are six types found in the United States. The red fox is the most common and is too well-known to need a description here. The Cross Fox looks quite similar to the red fox but is much darker, with its reddish fur heavily sprinkled with black. This species varies greatly in color among individuals, often resembling the red fox but sometimes looking more like the Black or Silver Fox. This color variation, along with the name of the animal, has led trappers to widely believe that it's a hybrid of the two species it closely resembles. However, it seems to be a permanent variety; the term "cross" likely comes from a dark marking on its back, between its shoulders, which suggests that name. The Silver or Black Fox is the most beautiful and rarest of the species, producing the most valuable fur in the country. Its fur is black, except for the tip of its tail, which is white. The Prairie Fox is the largest type. It lives in the Western Prairies and is similar in color to the common red fox but slightly yellower.
The Kit, or Swift Fox, is smaller than the Red, and abounds in the Western States.
The Kit, or Swift Fox, is smaller than the Red and is found in abundance in the Western States.
The Gray Fox is a Southern variety, and is very beautiful. It is less daring and cunning than the Common Fox, and seldom approaches a farm-yard, where it is in close proximity to a dwelling.
The Gray Fox is a Southern type and is really beautiful. It's less bold and clever than the Common Fox and rarely gets close to a farmyard, where it's near a house.
The general habits and characteristics of all the foxes are similar. For natural cunning they take the lead of all other animals. They are all built for speed, and their senses of smell and hearing are acutely developed. Their food consists of wild fowl of all kinds, rabbits, squirrels, birds and their eggs, together with many kinds of ripe fruits, "sour grapes" not included. They live in burrows, often usurped, or crevices Page 155 between rocks; and their young, from three to nine in number, are brought forth in March.
The general habits and traits of all foxes are alike. They are the cleverest of all animals. They are built for speed, and their senses of smell and hearing are highly developed. Their diet includes all kinds of wild birds, rabbits, squirrels, birds and their eggs, as well as many types of ripe fruit, except for "sour grapes." They live in burrows, often taken over from other animals, or in crevices between rocks; their young, usually between three and nine, are born in March.
We are strongly tempted to narrate a few remarkable instances of the animal's cunning, but we forbear for want of space. Our reader must take it for granted that when he attempts to trap a fox, he will be likely to find more than his match in the superior craftiness of that animal. If the trap is overturned and the bait gone, or if repeatedly sprung and found empty, he must not be surprised or discouraged, for he is experiencing only what all other trappers have experienced before him. There are instances on record where this knowing creature has sprung the trap by dropping a stick upon the pan, afterwards removing the suspended bait to enjoy it at his leisure. His movements are as lithe and subtile as those of a snake, and when "cornered" there is no telling what caper that cunning instinct and subtlety of body will not lead him to perform. When pursued by hounds he has been known to lead them a long chase at full speed up to the crest of a hill: here he leaps a shrub, swiftly as an arrow, and landing on the ground on the opposite declivity quickly returns beneath the brushwood and crouches down closely upon the ground. Presently the hounds come along in full cry, and blazing scent they dart over the shrub in full pursuit, dash down the hillside, never stopping until at the bottom of the hill they find they are off the trail. As soon as the hounds are passed, sly Reynard cautiously takes to his legs: creeping adroitly back over the brow of the hill, he runs for a considerable distance on his back trail, and at last, after taking a series of long jumps therefrom returns to his covert at leisure. Page after page might be filled to the glory of this creature's cunning, but enough has been said to give the young trapper an insight into the character of the animal he hopes to victimize, and prepare him for a trial of skill which, without this knowledge, would be a most one-sided affair.
We really want to share some amazing stories about the cleverness of this animal, but we’ll hold back due to space limitations. The reader should understand that when trying to trap a fox, they will likely encounter an opponent more skillful than themselves. If the trap is flipped over and the bait is missing, or if it keeps getting set off and remains empty, they shouldn't be surprised or discouraged, as this is just what other trappers have faced before. There are documented cases where this smart creature triggered the trap by dropping a stick on the pan, then took the bait to enjoy it later. Its movements are as quick and subtle as a snake's, and when it’s “cornered,” there's no telling what clever trick that instinct and agility will inspire it to do. When chased by hounds, it can lead them on a long run up a hill at full speed; then it leaps over a bush, as fast as an arrow, and lands on the other side before quickly hiding under the bushes and lying low. Soon, the hounds come bounding along, following the scent, and they rush over the bush in hot pursuit, racing down the hill without stopping until they realize they’ve lost the trail at the bottom. As soon as the hounds pass, sly Reynard carefully gets up, skillfully making his way back over the top of the hill, running for quite a distance on his previous path, and finally, after a series of long jumps, returns to safety at his own pace. There's enough to fill pages praising this creature's cleverness, but what has been shared is enough to give the young trapper insight into the character of the animal they intend to catch and prepare them for a skill challenge that, without this knowledge, would be very lopsided.
We would not advise our young amateur to calculate very confidently on securing a fox at the first attempt, but we can truthfully vouch that if the creature can be caught at all, it can be done by following the directions we now give.
We wouldn't recommend that our young amateur expect to catch a fox on the first try, but we can honestly say that if the animal can be caught at all, it can be done by following the instructions we’re about to provide.
One of the most essential things in the trapping of this, as well as nearly all animals, is that the trap should be perfectly clean and free from rust. The steel trap No.2, page 141 is the best for animals of the size of the Fox. The trap should be washed in weak lye, being afterwards well greased and finally smoked over burning hen's feathers.
One of the most important things in trapping this and almost all animals is that the trap must be perfectly clean and rust-free. The steel trap No.2, page 141 is the best for animals the size of a fox. The trap should be cleaned with weak lye, then well greased, and finally smoked over burning hen feathers.
Page 156 All this and even more precaution is necessary. No matter how strongly scented the trap may be, with the smoke, or other substances, a mere touch of the bare hand will leave a human scent which the fox perceives as soon as the other, and this is enough to deaden his enthusiasm over the most tempting bait.
Page 156 All this and even more caution is necessary. No matter how strong the scent of the trap is, whether it’s from smoke or other substances, just a light touch from a bare hand will leave a human scent that the fox can detect just as quickly as everything else, and that’s enough to kill his interest in even the most enticing bait.
On this account, it is necessary always to handle the trap with buckskin gloves, never allowing the bare hand to come in contact with it, on any account, after once prepared for setting.
On this note, it's crucial to always handle the trap with buckskin gloves, never letting your bare hand touch it, under any circumstances, after it has been prepared for setting.
Before arranging the trap for its work, it is necessary to construct what is called a "bed." There are several methods of doing this; but from all we can learn from the most experienced trappers, the following is the most successful. The bed should be made on flat ground, using any of the following substances: Buckwheat chaff, which is the best, oat, wheat, or hay chaff, or in lieu of these, moss or wood ashes. Let the bed be three feet in diameter, and an inch and a half in depth. To insure success it is the best plan to bait the bed itself for several days with scraps of beef or cheese strewn upon, and near it. If the fox once visits the place, discovers the tempting morsels and enjoys a good meal unmolested, he will be sure to revisit the spot so long as he finds a "free lunch" awaiting him. When he is found to come regularly and take the bait, he is as good as caught, provided our instructions are carefully followed. Take the trap, previously prepared as already described, chain it securely to a small log of wood about two feet long. Dig a hole in the earth in the centre of the bed, large enough to receive the trap, with its log, and chain. Set the traps, supporting the pan by pushing some of the chaff beneath it. Now lay a piece of paper over the pan and sprinkle the chaff over it evenly and smoothly, until every trace of the trap and its appendages is obliterated. Endeavor to make the bed look as it has previously done, and bait it with the same materials. Avoid treading much about the bed and step in the same tracks as far as possible. Touch nothing with the naked hands. Cover up all the footprints as much as possible, and leave the trap to take care of itself and any intruder. If our directions have been accurately followed, and due care has been exercised on the part of the young trapper, there is every probability that the next morning will reward him with his fox. But if a day or two elapse without success, it is well to resort to the "scent baits" described on page 149. Take the trap out of the bed, and with a feather smear it with melted beeswax, or rub it with a little Oil of Rhodium, Assafœtida, or Musk. Oil of Amber, and Lavender water are also used for the same Page 157 purpose by many professional trappers. These are not always necessary but are often used as a last resort, and will most always insure success.
Before setting the trap, you need to create what’s called a "bed." There are several ways to do this, but based on what the most experienced trappers say, the following method is the most effective. The bed should be on flat ground and can be made using any of these materials: buckwheat chaff (the best option), oat, wheat, or hay chaff; or instead, you can use moss or wood ashes. Make the bed three feet wide and an inch and a half deep. To ensure success, it’s best to bait the bed itself for several days with scraps of beef or cheese scattered around it. If a fox visits the spot, finds the tasty morsels, and enjoys a good meal without being disturbed, he is likely to return as long as he knows there’s a "free lunch" waiting for him. Once he’s seen regularly taking the bait, he is practically caught as long as you follow these steps carefully. Take the trap you prepared earlier and chain it securely to a small log about two feet long. Dig a hole in the center of the bed big enough to fit the trap, log, and chain. Set the traps, propping up the pan with some of the chaff underneath it. Then, lay a piece of paper over the pan and evenly sprinkle chaff over it until there’s no trace of the trap and its parts. Try to make the bed look the same as it did before, and bait it with the same materials. Avoid walking around the bed too much and stick to the same paths as much as you can. Don’t touch anything with your bare hands. Cover any footprints as much as possible, and let the trap do its job. If you followed these instructions closely and took care as a young trapper, you have a good chance of finding a fox the next morning. However, if a day or two goes by without success, it’s a good idea to try the "scent baits" mentioned on page 149. Take the trap out of the bed and use a feather to coat it with melted beeswax, or rub it with a bit of Oil of Rhodium, Assafœtida, or Musk. Many professional trappers also use oil of amber and lavender water for the same purpose. These aren't always necessary but are often used as a last resort, and they usually guarantee success.
Another method of baiting is shown in our page illustration opposite, and consists in suspending the bait by a stick in such a position that the fox will be obliged to step upon the trap in order to reach it. The bed should be baited in this way several times before the trap is set. This method is very commonly employed.
Another method of baiting is shown in our page illustration opposite, and involves hanging the bait on a stick so that the fox has to step on the trap to get to it. The area should be baited this way several times before the trap is set. This method is widely used.
Another still, is to bury the dead body of a rabbit or bird in loose earth, covering the whole with chaff. Sprinkle a few drops of Musk, or Oil of Amber over the bed. After the fox has taken the bait, the place should be rebaited and the trap inserted in the mound and covered with the chaff, being scented as before.
Another option is to bury the dead body of a rabbit or bird in loose soil, covering it entirely with straw. Sprinkle a few drops of Musk or Amber Oil over the area. After the fox has taken the bait, the spot should be re-baited and the trap placed in the mound, then covered with straw and scented again as before.
Some trappers employ the following method with good results: The trap is set, in a spring or at the edge of a small shallow brook and attached by a chain to a stake in the bank, the chain being under water. There should be only about an inch and a half of water over the trap, and its distance from the shore should be about a foot and a half, or even less. In order to induce the fox to place his foot in the trap it is necessary to cut a sod of grass, just the size of the inside of the jaws of the trap, and place it over the pan, so that it will project above the water and offer a tempting foot rest for the animal while he reaches for the bait which rests in the water just beyond. To accomplish this device without springing the trap by the weight of the sod, it is necessary to brace up the pan from beneath with a small perpendicular stick, sufficiently to neutralize the pressure from above. The bait may be a dead rabbit or bird thrown on the water outside of the trap and about a foot from it, being secured by a string and peg. If the fox spies the bait he will be almost sure to step upon the sod to reach it, and thus get caught.
Some trappers use this method with great success: The trap is set in a spring or at the edge of a small, shallow stream and connected by a chain to a stake on the bank, with the chain submerged. There should only be about an inch and a half of water over the trap, and it should be placed roughly a foot and a half from the shore, or even closer. To encourage the fox to step into the trap, you need to cut a piece of grass sod just the size of the inside of the trap's jaws and place it over the pan, allowing it to rise above the water and serve as an enticing footrest while the fox reaches for the bait, which is in the water just beyond. To set this up without triggering the trap from the weight of the sod, you need to prop up the pan from underneath with a small vertical stick to counteract the pressure from above. The bait can be a dead rabbit or bird thrown into the water outside the trap, about a foot away, secured with a string and peg. If the fox sees the bait, he will likely step onto the sod to reach it and get caught.
If none of these methods are successful, the young trapper may at least content himself with the idea that the particular fox he is after is an old fellow and is "not to be caught with chaff" or any thing else,—for if these devices will not secure him nothing will. If he is a young and comparatively unsophisticated specimen, he will fall an easy victim to any of the foregoing stratagems.
If none of these methods work, the young trapper can at least find some comfort in knowing that the specific fox he's after is an old fellow and "won't be caught with chaff" or anything else—because if these tricks can't catch him, then nothing will. If he’s a young and relatively naïve trapper, he’ll easily fall for any of the previous tactics.
To skin the fox the pelt should be first ripped down each hind leg to the vent. The skin being cut loose around this point, the bone of the tail should next be removed. This may be done by holding a split stick tightly over the bone after which the latter may be easily pulled out of the skin.
To skin the fox, start by cutting down each back leg to the rear. Once the skin is cut free at this point, the tailbone should be removed next. You can do this by gripping a split stick tightly over the bone, after which it can be easily pulled out of the skin.
The hide should then be drawn back, and carefully removed, working with caution around the legs, and particularly so about the eyes, ears, and lips when these points are reached. The skin should be stretched as described on page 273.
The hide should then be pulled back and carefully taken off, being careful around the legs, especially around the eyes, ears, and lips when you get to those areas. The skin should be stretched as described on page 273.
THE WOLF.
The United States are blessed with several species of this animal. The Grey Wolf, which is the largest, and the smaller, Prairie Wolf or Coyote, being the most commonly known. There are also the White Wolf, Black Wolf and the Texan or Red Wolf. In outward form they all bear a considerable resemblance to each other, and their habits are generally similar in the different varieties.
The United States is home to several species of this animal. The Grey Wolf, which is the largest, and the smaller Prairie Wolf, or Coyote, are the most well-known. There are also the White Wolf, Black Wolf, and the Texan or Red Wolf. In appearance, they all look quite similar to each other, and their behaviors are generally alike across the different types.
Wolves are fierce and dangerous animals, and are very powerful of limb and fleet of foot. They are extremely cowardly in character, and will seldom attack man or animal except when by their greater numbers they would be sure of victory. Wolves are found in almost every quarter of the globe. Mountain and plain, field, jungle and prairie are alike infested with them, and they hunt in united bands, feeding upon almost any animal which by their combined attacks they can overpower.
Wolves are fierce and dangerous animals, powerful and fast. They can be cowardly, seldom attacking humans or other animals unless they can be sure of winning due to their numbers. Wolves are found almost everywhere around the world. They inhabit mountains, plains, fields, jungles, and prairies, hunting in packs and feeding on almost any animal they can overpower together.
Their inroads upon herds and sheep folds are sometimes horrifying, and a single wolf has been known to kill as many as forty sheep in a single night, seemingly from mere blood-thirsty desire.
Their attacks on herds and sheep pens are sometimes terrifying, and a single wolf has been known to kill as many as forty sheep in one night, apparently just from a bloodthirsty urge.
In the early colonization of America, wolves ran wild over the country in immense numbers, and were a source of great danger; but now, owing to wide-spread civilization, they have disappeared from the more settled localities and are chiefly found in Western wilds and prairie lands.
In the early days of American colonization, wolves roamed the land in huge numbers and posed a significant threat; however, due to widespread civilization, they have vanished from more populated areas and are mostly found in the remote western regions and prairies.
The Grey Wolf is the largest and most formidable representative of the Dog tribe on this continent. Its general appearance is truthfully given in our drawing. Its length, exclusive of the tail, is about four feet, the length of the tail being about a foot and a half. Its color varies from yellowish grey to almost Page 159 white in the northern countries, in which latitude the animal is sometimes found of an enormous size, measuring nearly seven feet in length. The fur is coarse and shaggy about the neck and haunches, and the tail is bushy. They abound in the region east of the Rocky Mountains and northward, and travel in packs of hundreds in search of prey. Bisons, wild horses, deer and even bears fall victims to their united fierceness, and human beings, too, often fall a prey to their ferocious attacks.
The Grey Wolf is the largest and most impressive member of the Dog family on this continent. Its overall appearance is accurately depicted in our drawing. Its length, not including the tail, is about four feet, while the tail itself is approximately a foot and a half long. Its color ranges from yellowish gray to nearly white in the northern regions, where the animal can sometimes grow to an enormous size, measuring close to seven feet in length. The fur is rough and shaggy around the neck and hindquarters, and the tail is bushy. They are plentiful in the area east of the Rocky Mountains and further north, traveling in packs of hundreds in search of food. Bison, wild horses, deer, and even bears often fall victim to their combined ferocity, and humans can also become targets of their brutal attacks.
The Coyote, or Common Prairie Wolf, also known as the Burrowing
Wolf, as its name implies inhabits the Western plains and prairies.
They are much smaller than the Grey Wolf, and not so dangerous. They
travel in bands and unitedly attack whatever animal they desire
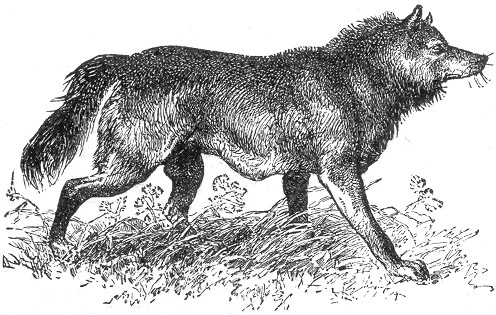 to kill. Their homes are made in burrows which they excavate in the
ground. The Texan Wolf inhabits the latitude of Texas and southward.
It is of a tawny red color and nearly as large as the grey species,
possessing the same savage nature.
to kill. Their homes are made in burrows which they excavate in the
ground. The Texan Wolf inhabits the latitude of Texas and southward.
It is of a tawny red color and nearly as large as the grey species,
possessing the same savage nature.
The Coyote, or Common Prairie Wolf, also called the Burrowing Wolf, lives in the Western plains and prairies, as its name suggests. They are much smaller than the Grey Wolf and not as dangerous. They travel in groups and work together to attack any animal they want to kill.
Their dens are made in burrows that they dig in the ground. The Texan Wolf is found in Texas and further south. It has a tawny red color and is almost as large as the grey species, sharing the same fierce nature.
In April or May the female wolf retires to her burrow or den, and her young, from six to ten in number, are brought forth.
In April or May, the female wolf goes to her burrow or den, where she gives birth to her young, usually between six and ten in number.
The wolf is almost as sly and cunning as the fox, and the same caution is required in trapping the animal. They are extremely keen scented, and the mere touch of a human hand on the trap is often enough to preclude the possibility of capture. A mere footprint, or the scent of tobacco juice, they look upon Page 160 with great suspicion, and the presence of either will often prevent success.
The wolf is nearly as sly and cunning as the fox, and you need to be just as careful when trying to trap it. They have an exceptional sense of smell, and even the slightest touch of a human hand on the trap can ruin your chances of catching one. A single footprint or the smell of tobacco juice raises their suspicion Page 160, and either of these can often lead to failure.
The same directions given in regard to trapping the fox are equally adapted for the wolf. The trap (size No, 4, page 141) should be smoked or smeared with beeswax or blood, and set in a bed of ashes or other material as therein described, covering with moss, chaff, leaves or some other light substance. The clog should be fully twice as heavy as that used for the fox. Some trappers rub the traps with "brake leaves," sweet fern, or even skunk's cabbage. Gloves should always be worn in handling the traps, and all tracks should be obliterated as much as if a fox were the object sought to be secured.
The same instructions for trapping the fox also apply to the wolf. The trap (size No. 4, page 141) should be smoked or coated with beeswax or blood, and placed in a bed of ashes or other materials as described, then covered with moss, chaff, leaves, or another light substance. The weight for the clog should be at least double that used for the fox. Some trappers use "brake leaves," sweet fern, or even skunk cabbage to rub on the traps. Always wear gloves when handling the traps, and make sure to erase any tracks as if you were trying to catch a fox.
A common way of securing the wolf consists in setting the trap in a spring or puddle of water, throwing the dead body of some large animal in the water beyond the trap in such a position that the wolf will be obliged to tread upon the trap, in order to reach the bait. This method is described both under the head of the Fox and the Bear.
A typical way to catch a wolf is by placing a trap in a spring or puddle of water, then throwing the carcass of a large animal into the water past the trap so that the wolf has to step on the trap to get to the bait. This method is also mentioned in the sections about the Fox and the Bear.
Another plan is to fasten the bait between two trees which are very close together, setting a trap on each side and carefully concealing them as already directed, and securing each to a clog of about twenty pounds in weight. The enclosure described on page 144 is also successful.
Another strategy is to tie the bait between two trees that are really close together, setting a trap on each side and carefully hiding them as previously mentioned, and attaching each to a weight of about twenty pounds. The enclosure described on page 144 is also effective.
There are various scent or trail baits used in trapping the wolf. Oil of Assafœtida is by many trappers considered the best, but Oil of Rhodium, powdered fennel, fenugreek and Cummin Oil are also much used. It is well to smear a little of the first mentioned oil near the traps, using any one of the other substances, or indeed a mixture of them all, for the trail. This may be made by smearing the preparation on the sole of the boots and walking in the direction of the traps, or by dragging from one trap to another a piece of meat scented with the substance, as described under the head of Mink.
There are different scent or trail baits used for trapping wolves. Many trappers believe that oil of assafœtida is the best option, but oil of rhodium, powdered fennel, fenugreek, and cumin oil are also widely used. It's a good idea to apply a bit of the first oil near the traps while using any of the other substances, or even a mix of them all, for the trail. This can be done by applying the mixture to the soles of your boots and walking towards the traps, or by dragging a piece of meat scented with the substance from one trap to another, as described under the section about mink.
The wolf is an adept at feigning death, playing "'possum" with a skill which would do credit to that veritable animal itself.
The wolf is skilled at pretending to be dead, “playing possum” with a talent that would impress even that actual animal.
A large dead-fall, constructed of logs, page 17, when skilfully scented and baited, will often allure a wolf into its clutches, and a very strong twitch-up, with a noose formed of heavy wire, or a strip of stout calf hide, will successfully capture the crafty creature.
A big dead-fall made of logs, page 17, when cleverly scented and baited, can often attract a wolf into its trap, and a strong twitch-up with a noose made of heavy wire or a thick strip of calf hide will effectively catch the cunning animal.
THE PUMA.
The puma, commonly known also as the panther or cougar, is the largest American representative of the Cat tribe, and for this reason is often dignified by the name of the "American Lion." It is found more or less abundantly throughout the United States; and although not generally considered a dangerous foe to mankind, it has often been known in the wild districts to steal upon the traveller unawares, and in many instances human beings have fallen a prey to the powerful claws and teeth of this powerful animal.
The puma, also known as the panther or cougar, is the largest member of the cat family in the Americas, which is why it's sometimes referred to as the "American Lion." It's found in varying numbers across the United States; while it’s not usually seen as a threat to people, there have been times in remote areas when it has quietly approached travelers, and in several cases, people have become victims of its strong claws and teeth.
The life of the puma is mostly in the trees. Crouching upon the branches it watches for, or steals, cat-like, upon its prey. Should a solitary animal pass within reach, the puma will not hesitate in pouncing upon the unfortunate creature; but if a herd of animals, or party of men, should be travelling together, the caution of the brute asserts itself, and he will often dog their footsteps for a great distance, in hopes of securing a straggler. Birds are struck down by a single blow of the puma's ready paw, and so quick are his movements that even though a bird has risen on the wing, he can often make one of his wonderful bounds, and with a light, quick stroke, arrest the winged prey before it has time to soar beyond reach. The puma is a good angler. Sitting by the water's edge he watches for his victims, and no sooner does an unfortunate fish swim within reach, than the nimble paw is outstretched, and it is swept out of the water on dry land, and eagerly devoured.
The life of the puma is mainly in the trees. Crouching on the branches, it watches for or stealthily approaches its prey like a cat. If a solitary animal comes within reach, the puma won’t hesitate to pounce on the unfortunate creature; but if a group of animals or a bunch of people is traveling together, the puma's caution kicks in, and it often follows them for a long distance, hoping to catch a straggler. Birds are taken down by a single swipe of the puma's swift paw, and its movements are so quick that even if a bird has taken flight, it can often leap gracefully and, with a light, swift strike, capture the bird before it has time to soar out of reach. The puma is also a skilled angler. Sitting by the water's edge, it watches for its victims, and as soon as a fish swims close enough, its nimble paw reaches out, pulling the fish from the water and eagerly devouring it.
A puma has been known to follow the track of travellers for days
together, only daring to show itself at rare intervals, and never
endeavoring to make an attack except through stealth. The animal
will often approach cautiously upon a traveller until sufficiently
near to make its fatal spring; but if the pursued party suddenly turn
round and face the crawling creature, the beast becomes discomfited
at once, and will retreat from the gaze which seems to it a positive
terror. So long as a puma can be kept in sight, no danger need be
feared from the animal but it will improve every opportunity of
springing unobservedly upon a heedless passer by. The total length
of the puma is six feet and a half, of which the tail occupies a
little over two feet. Its color is of a uniform light tawny tint,
fading into light grey on
Page 162
the under parts, and the tip of the tail is black. The puma is
one of the few members of the Cat tribe, which are without the
usual spots or stripes so observable in the tiger and leopard. The
lion has the same uniformity of color, and it is perhaps partly on
that account that the panther is so often known as the American lion.
In infancy the young pumas possess decided tiger-like markings, and
leopard-like spots, but these disappear altogether as the animal
increases in size. The cougar has learned by experience a wholesome
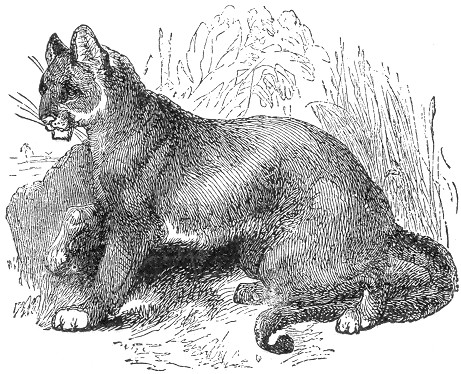 fear of man, and as civilization has extended throughout our country,
the animals have been forced to retire from the neighborhood of
human habitations and hide themselves in thick, uncultivated forest
lands.
fear of man, and as civilization has extended throughout our country,
the animals have been forced to retire from the neighborhood of
human habitations and hide themselves in thick, uncultivated forest
lands.
A puma is known to track travelers for days, only showing itself occasionally and never attacking head-on, preferring to strike from the shadows. The animal will often approach a traveler cautiously until it's close enough to pounce, but if the traveler suddenly turns to face the crouching puma, it becomes startled and quickly retreats, fearing the stare it finds terrifying. As long as a puma can be seen, there's no immediate danger from it, but the puma will seize any chance to leap unseen at an unsuspecting passerby. The puma's total length is about six and a half feet, with its tail measuring a little over two feet. Its fur is a consistent light tawny color that fades to light gray on the underside, while the tip of its tail is black. Unlike many members of the cat family, the puma lacks the typical spots or stripes seen in tigers and leopards. The lion shares this solid color, which is likely why the puma is often referred to as the American lion. Young pumas are born with noticeable tiger-like markings and leopard-like spots, but these fade completely as they grow. Cougars have learned to have a healthy fear of humans, and as civilization has spread across the country, they’ve been pushed away from human habitats into dense, unspoiled forests.
Sometimes, however, the animal, urged by fierce hunger, will venture on a marauding expedition for several miles, and although not an object of personal dread to the inhabitants, he often becomes a pestilent neighbor to the farmer, committing great ravages among his flocks and herds, and making sad havoc in his poultry yard. It is not the fortune of every puma, however, to reside in the neighborhood of such easy prey as pigs, sheep and poultry, and the greater number of these animals are Page 163 forced to depend for their subsistence on their own success in chasing or surprising the various animals on which they feed.
Sometimes, however, the animal, driven by intense hunger, will go on a raiding mission for several miles, and even though it's not a source of personal fear for the locals, it often becomes a troublesome neighbor to the farmer, causing significant damage to his livestock and wreaking havoc in his chicken coop. Not every puma, however, is lucky enough to live near easy prey like pigs, sheep, and poultry, and most of these animals are Page 163 forced to rely on their own skill in hunting or ambushing the different animals they feed on.
When a puma is treed by hunters, it is said to show great skill in selecting a spot wherein it shall be best concealed from the gazers below, and will even draw the neighboring branches about its body to hide itself from the aim of the hunter's rifle. While thus lying upon the branches the beast is almost invisible from below, as its fur, when seen, harmonizes so well with the the bark which covers the boughs, that the one can scarcely be distinguished from the other.
When a puma is chased up a tree by hunters, it’s known for being very clever in choosing a spot where it can hide from those below, even pulling nearby branches around itself to shield from the hunter's rifle. While lying on the branches, the animal is nearly impossible to see from below, as its fur blends perfectly with the bark covering the branches, making it hard to tell one from the other.
The puma loves to hide in the branches of trees, and from this eminence to launch itself upon the doomed animal that may pass within its reach. It may, therefore, be easily imagined how treacherous a foe the creature may be when ranging at will among the countless trees and jungles of our American forests.
The puma likes to hide in the branches of trees, and from this height, it can leap onto any unfortunate animal that comes within its reach. So, it's easy to see how deceptive a foe this creature can be as it moves freely among the countless trees and jungles of our American forests.
Although so stealthy and sly a creature the cougar possesses very little cunning and is easily trapped. The Gun trap, page 20, is commonly and successfully employed in South America in the capture of the jaguar, as our title illustration, page 15, represents, and it may also be used with the same success in trapping the puma. The Bow trap, page 23, and the dead-fall described in the early part of the book, will all be found to work admirably in the destruction of this treacherous beast.
Although the cougar is a stealthy and sly creature, it has very little cunning and is easy to trap. The Gun trap, page 20, is commonly and successfully used in South America to capture the jaguar, as shown in our title illustration, page 15, and it can also be just as effective in trapping the puma. The Bow trap, page 23, and the dead-fall described earlier in the book, will all work remarkably well in eliminating this treacherous beast.
The animal may be entrapped alive, should any of our young trappers dare to try the experiment.
The animal might be caught alive if any of our young trappers decide to give it a try.
There are two ways of accomplishing this. The first is by the aid of a huge coop of logs, as described on page 30 or 33, and the other by the Pit-fall, as exemplified on page 31. Huge twitch-ups may also be constructed, using very strong wire. The bait may consist of a fowl, sheep's head, or the heart of any animal. Fresh meat of any kind will answer the purpose, and in the case of the Pit-fall a live fowl is preferable to a dead one as it will attract the puma by its motions, or by its cackling, and thus induce him to spring upon his prey, which will precipitate him to the bottom of the pit and thus effect his capture.
There are two ways to achieve this. The first is with a large coop made of logs, as described on page 30 or 33, and the second is through the pitfall method, shown on page 31. You can also create large snares using very strong wire. The bait can be a bird, a sheep's head, or the heart of any animal. Fresh meat of any kind will do the job, and for the pitfall, a live bird is better than a dead one because its movement or clucking will attract the puma and encourage it to leap onto its prey, causing it to fall to the bottom of the pit and be captured.
They are commonly taken with the steel trap. The puma seldom leaves the vicinity of the carcass of an animal it has killed until it is all devoured. When such a carcass can be found the capture of the beast is easily effected. Set the trap, size No. 5, page 143, near the remains, and cover the carcass with leaves. The next visit of the animal will find him more attached to the place than ever,—so much so that he will be unable to "tear himself away."
They are usually caught with a steel trap. The puma rarely leaves the area around the carcass of an animal it has killed until it’s completely eaten. When such a carcass is found, capturing the beast is pretty straightforward. Set the trap, size No. 5, page 143, near the remains, and cover the carcass with leaves. The next time the animal visits, it will be even more attached to the spot—so much so that it won’t be able to "tear itself away."
THE CANADIAN LYNX.
The lynx represents another of the Cat tribe, and as its name implies is a native of the regions north of the United States, although sometimes found in upper Maine and on the lower borders of the great lakes. It is commonly known throughout Canada as the Peshoo, or "Le Chat."
The lynx is another member of the Cat family and, as its name suggests, it originates from areas north of the United States, although it can sometimes be found in northern Maine and along the lower edges of the Great Lakes. In Canada, it is commonly referred to as the Peshoo or "Le Chat."
Our illustration is a truthful representation of the animal. Its total length exceeds three feet, and its tail is a mere stub. The fur is thick, and the hairs are long, the general color being grey, sprinkled with black. The legs are generally darker than the body, and the ears are often edged with white. The limbs and muscles are very powerful, the paws are very large for the size of the animal, and are furnished with strong white claws, which are imbedded in the fur of the feet when not in use, they are shown in our illustration. The ears of the lynx form a distinct feature, by which the animal could be easily identified; they are long and tipped with stiff projecting hairs, giving the creature a very odd appearance.
Our illustration is an accurate depiction of the animal. It measures over three feet long, and its tail is just a small stub. The fur is dense, with long hairs, and the overall color is grey with black spots. The legs are usually darker than the body, and the ears often have white edges. The limbs and muscles are very strong, and the paws are quite large for the animal's size, equipped with strong white claws that retract into the fur of the feet when not in use, as shown in our illustration. The ears of the lynx are a notable feature that makes it easy to identify; they are long and tipped with stiff, upright hairs, giving the creature a very unusual look.
The peshoo can not be said to be a very dangerous animal, unless it is attacked, when it becomes a most ferocious antagonist. The writer knew of a gentleman who was pounced upon and very nearly killed by one of these infuriated creatures, and there are many like instances on record.
The peshoo can't be considered a very dangerous animal, unless it's provoked, at which point it becomes a fierce opponent. The author knew of a man who was suddenly attacked and almost killed by one of these enraged creatures, and there are many similar accounts documented.
The principal food of the lynx consists of the smaller quadrupeds, the American hare being its favorite article of diet. It is a good swimmer, and a most agile climber, chasing its prey among the branches with great stealth and dexterity. Like the wolf, fox, and many other flesh eating-animals, the lynx does not content itself with the creatures which fall by the stroke of its own talons, or the grip of its own teeth, but will follow the trail of the puma, in its nocturnal quest after prey, and thankfully partake of the feast which remains after its predecessor has satisfied its appetite.
The main food of the lynx consists of smaller mammals, with the American hare being its favorite. It’s a strong swimmer and an agile climber, skillfully chasing its prey through the branches with stealth and precision. Like the wolf, fox, and many other carnivorous animals, the lynx doesn’t limit itself to the animals it catches on its own. Instead, it will follow the trail of the puma during its nighttime hunt for food and gladly feast on the leftovers after the puma has eaten.
While running at full speed, the lynx presents a most ludicrous
appearance, owing to its peculiar manner of leaping. It progresses
in successive bounds, with its back slightly arched, and all the
feet striking the ground nearly at the same instant. Powerful as
the animal is, it is easily killed by a blow on the
Page 165
back, a slight stick being a sufficient weapon wherewith to destroy
the creature. For this reason the "Dead-fall" is particularly adapted
for its capture, and is very successful, as the animal possesses
very little cunning, and will enter an enclosure of any kind without
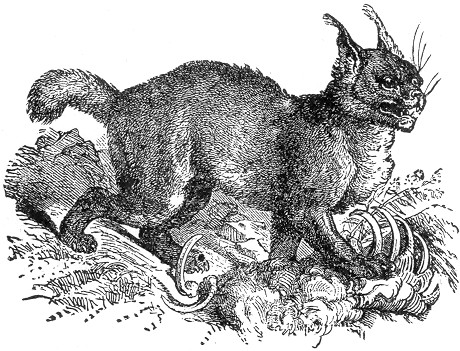 the slightest compunction, when a tempting bait is in view. The
dead-fall should of course be constructed on a large scale, and
it is a good plan to have the enclosure deep, and the bait as far
back as will necessitate the animal being well under the suspended
log in order to reach it. The bait may consist of a dead quadruped
or of fresh meat of any kind.
the slightest compunction, when a tempting bait is in view. The
dead-fall should of course be constructed on a large scale, and
it is a good plan to have the enclosure deep, and the bait as far
back as will necessitate the animal being well under the suspended
log in order to reach it. The bait may consist of a dead quadruped
or of fresh meat of any kind.
While running at full speed, the lynx looks pretty ridiculous because of its strange way of leaping. It moves in a series of bounds, with its back slightly arched, and all its feet hitting the ground almost at the same time. Despite being a powerful animal, it can be easily killed with a blow to the Page 165 back; even a light stick is enough to take it down. This is why the "Dead-fall" trap works well for catching it. The lynx doesn't have much cleverness and will enter any enclosure if it sees tempting bait.
The dead-fall should be made large, and it’s a good idea to make the enclosure deep, placing the bait far enough back that the animal has to get well under the hanging log to reach it. The bait can be a dead animal or fresh meat of any kind.
The Gun trap, page 20, and the Bow trap, page 23, will also be found efficient, and a very powerful twitch-up, constructed from a stout pole and extra strong wire will also serve to good purpose. The lynx is not so prolific as many of the feline tribe, the number of its young seldom exceeding two, and this only once a year. The fur of the animal is valuable for the purposes to which the feline skin is generally adapted, and commands a fair price in the market. Those who hunt or trap the lynx will do well to choose the winter months for the time of their operations, as during the cold season the animal possesses a thicker and warmer fur than it offers in the summer months.
The gun trap, page 20, and the bow trap, page 23, are also effective, and a strong twitch-up made from a sturdy pole and heavy-duty wire will be very useful. The lynx isn't as prolific as many other cats, with usually no more than two young each year. The animal's fur is valuable for the typical uses of feline skins and sells for a good price in the market. Those who hunt or trap lynx should focus on the winter months, as the animal has thicker, warmer fur during the cold season compared to summer.
When the steel trap is used, it should be of size No. 4, page 141, Page 166 set at the opening of a pen of stakes, the bait being placed at the back of the enclosure in such a position, as that the animal will be obliged to step upon the pan of the trap in order to reach it. Any of the devices described under "Hints on Baiting" will be found successful.
When using the steel trap, it should be size No. 4, page 141, Page 166 set at the entrance of a pen made of stakes, with the bait positioned at the back of the enclosure so that the animal has to step on the trap's pan to get to it. Any of the methods mentioned under "Hints on Baiting" will work effectively.
The skin of the animal may be removed as directed in the case of the fox, being drawn off the body whole, or it may be removed after the manner of the beaver, and similarly stretched.
The animal's skin can be taken off as described for the fox, pulled off the body in one piece, or it can be removed like that of the beaver and stretched in the same way.
THE WILD CAT.
This animal is one of the most wide-spread species of the Cat tribe, being found not only in America, but throughout nearly the whole of Europe as well as in Northern Asia. In many parts of the United States, where the wild cat was wont to flourish, it has become exterminated, owing to civilization and the destruction of forest lands.
This animal is one of the most widespread species in the cat family, found not only in America but throughout almost all of Europe and in Northern Asia as well. In many areas of the United States, where the wildcat used to thrive, it has become extinct due to civilization and the destruction of forests.
Many naturalists are of the opinion that the wild cat is the original progenitor of our domestic cat, but there is much difference of opinion in regard to the subject. Although they bear great resemblance to each other, there are several points of distinction between the two; one of the most decided differences being in the comparative length of the tails. The tail of the wild cat is little more than half the length of that of the domestic cat, and much more bushy.
Many naturalists believe that the wild cat is the ancestor of our domestic cat, but there's a lot of disagreement on this topic. While they look quite similar, there are several differences between the two; one of the most noticeable differences is the length of their tails. The tail of the wild cat is just over half the length of a domestic cat's tail and is much bushier.
The color of the wild animal is much more uniform than in the great raft of "domestic" mongrel specimens which make night hideous with their discordant yowls, although we sometimes see a high bred individual which, if his tail was cut off at half its length, might easily pass as an example of the wild variety.
The color of the wild animal is much more consistent than in the large group of "domestic" mutts that make the night unbearable with their loud yowls, though we occasionally spot a purebred individual that, if its tail were trimmed to half its length, could easily be mistaken for a member of the wild variety.
The ground tint of the fur in the wild cat is yellowish grey, diversified with dark streaks over the body and limbs, much after the appearance of the so-called "tiger cat." A row of dark streaks and spots extends along the spine, and the tail is thick, short and bushy, tipped with black and encircled with a number of rings of a dark hue. In some individuals the markings are less distinct, and they are sometimes altogether wanting, but in the typical wild cat they are quite prominent. The fur is rather long and thick, particularly so during the winter season, and always in the colder northern regions.
The fur of the wild cat has a yellowish-grey base color, marked with dark stripes on its body and limbs, similar to what people call the "tiger cat." A series of dark stripes and spots runs along its back, and its tail is thick, short, and bushy, with a black tip and several dark rings around it. In some individuals, the markings are less noticeable, and sometimes they can be completely absent, but in the typical wild cat, they stand out. The fur is relatively long and thick, especially during winter and in colder northern areas.
The amount of havoc which these creatures often occasion is surprising, and their nocturnal inroads, in poultry yards and Page 167 sheep folds, render them most hated pests to farmers in the countries where these animals abound. They seem to have a special appetite for the heads of fowls, and will often decapitate a half dozen in a single night, leaving the bodies in otherwise good condition to tell the story of their midnight murders. The home of the wild cat is made in some cleft of rock, or in the hollow of some aged tree, from which the creature issues in the dark hours and starts upon its marauding excursions. Its family numbers from three to six, and the female parent is smaller than the male, the total length of the latter being three feet.
The amount of chaos these creatures often cause is surprising, and their nighttime raids in poultry yards and Page 167 sheep pens make them the most despised pests for farmers in areas where these animals thrive. They seem to have a particular craving for the heads of birds and will often decapitate half a dozen in a single night, leaving the bodies in otherwise good condition to reveal the story of their midnight killings. The wild cat makes its home in a crevice of rock or in the hollow of an ancient tree, from which the creature comes out at night to embark on its raiding adventures. Its family typically consists of three to six, and the female is smaller than the male, with the latter's total length reaching three feet.
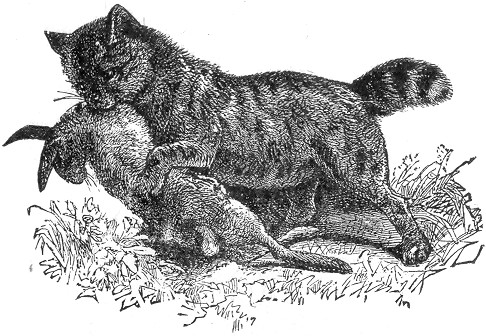
Inhabiting the most lonely and inaccessible ranges of rock and mountain, the wild cat is seldom seen during the daytime. At night, like its domestic relative, he prowls far and wide, walking with the same stealthy step and hunting his game in the same tiger-like manner. He is by no means a difficult animal to trap, being easily deceived and taking a bait without any hesitation. The wild cat haunts the shores of lakes and rivers, and it is here that the traps may be set for them. Having caught and killed one of the colony, the rest of them can be easily taken if the body of the dead victim be left near their hunting ground and surrounded with the traps carefully set and concealed beneath leaves moss or the like. Every wild cat Page 168 that is in the neighborhood will be certain to visit the body, and if the traps are rightly arranged many will be caught. The trap No. 3, page 141 is generally used. We would caution the young trapper in his approach to an entrapped wild cat, as the strength and ferocity of this animal under such circumstances, or when otherwise "hard pressed," is perfectly amazing. When caught in a trap they spring with terrible fury at any one who approaches them, not waiting to be assailed, and when cornered or hemmed in by a hunter they will often turn upon their pursuer, and springing at his face will attack him with most consummate fury, often inflicting serious and sometimes fatal wounds. When hunted and attacked by dogs, the wild cat is a most desperate and untiring fighter, and extremely difficult to kill, for which reason it has been truthfully said that "if a tame cat has nine lives, a wild cat must have a dozen."
Inhabiting the most remote and hard-to-reach rocky mountains, the wild cat is rarely spotted during the day. At night, like its domestic relative, it roams widely, moving with the same stealth and hunting its prey in a tiger-like fashion. It's not tough to trap since it can be easily fooled and will take bait without hesitation. The wild cat lingers along the shores of lakes and rivers, making these spots ideal for setting traps. After catching and killing one from a group, the rest can be easily captured if the dead animal is left near their hunting area, surrounded by traps carefully hidden under leaves, moss, or similar things. Every wild cat nearby will likely check out the body, and if the traps are set correctly, many will be caught. Trap No. 3, page 141, is commonly used. We advise young trappers to approach a trapped wild cat cautiously, as the strength and ferocity of this animal when it feels threatened is astonishing. When caught in a trap, they react with incredible anger at anyone who comes near, not waiting to be attacked. If cornered by a hunter, they may turn on their pursuer, leaping at their face and attacking with intense rage, often causing serious or even fatal injuries. When pursued by dogs, the wild cat becomes an incredibly determined and tireless fighter, making it very difficult to kill, which is why it’s rightly said that "if a tame cat has nine lives, a wild cat must have a dozen."
The twitch-up, erected on a large scale, is utilized to a considerable extent in England in the capture of these animals; and these, together with steel traps and dead-falls, are about the only machines used for their capture. We would suggest the garrote, bow and gun trap also as being very effective. The bait may consist of the head of a fowl or a piece of rabbit or fowl flesh: or, indeed, flesh of almost any kind will answer, particularly of the bird kind.
The twitch-up, built on a large scale, is widely used in England for capturing these animals; along with steel traps and dead-falls, these are practically the only devices used for this purpose. We also recommend the garrote, bow, and gun trap as being very effective. The bait can be the head of a bird or a piece of rabbit or chicken meat, or pretty much any type of flesh, especially from birds.
In skinning the wild cat the same directions given under the head of the Fox may be followed, or the pelt may be ripped up the belly and spread on a hoop stretcher, page 275.
In skinning the wildcat, you can follow the same instructions given for the Fox, or you can cut the pelt open along the belly and lay it out on a hoop stretcher, page 275.
THE BEAR.
There are several species of the Bear tribe which inhabit our continent, the most prominent of which are the Grizzly, and the Musquaw or common Black Bear. There is no other animal of this country which is more widely and deservedly dreaded than the grizzly bear. There are other creatures, the puma and wild cat, for instance, which are dangerous when cornered or wounded, but they are not given to open and deliberate attack upon human beings. The grizzly, however, or "Ephraim," as he is commonly termed by trappers, often displays a most unpleasant readiness to attack and pursue a man, even in the face of fire arms. In many localities, however, where hunting has been pursued to considerable extent, these animals have learned from experience a wholesome fear of man, and are not so ready to assume the offensive, but a "wounded" grizzly is one of the Page 169 most horrible antagonists of which it is possible to conceive, rushing upon its victim with terrible fury, and dealing most tearing and heavy blows with its huge claws.
There are several species of bears that live on our continent, the most notable being the Grizzly and the common Black Bear, also known as the Musquaw. No other animal in this country is more widely and rightly feared than the grizzly bear. There are other animals, like the puma and wildcat, which can be dangerous when cornered or injured, but they don’t typically attack humans outright. The grizzly, however, also called "Ephraim" by trappers, often shows a terrifying eagerness to charge at and chase a person, even when faced with firearms. In many areas where hunting has been common, these animals have learned to fear humans and are less likely to be aggressive, but a "wounded" grizzly is one of the most horrifying opponents imaginable, charging at its victim with brutal ferocity and delivering devastating blows with its massive claws.
In length this formidable animal often exceeds eight feet, and its color varies from yellowish to brownish black, and some specimens are found of a dirty grey color.
In length, this impressive animal often measures more than eight feet, and its color ranges from yellowish to brownish-black, with some specimens appearing a dirty gray.
The legs are usually darker than the rest of the body, and the face is generally of a lighter tint. The fore limbs of the animal are immensely powerful; and the foot of a full-grown individual is fully eighteen inches long, and armed with claws five inches in length. The grizzly inhabits the Rocky Mountain regions and northward, being found in considerable numbers in the western part of British America. Its hair is thick and coarse, except in the young animal, which possesses a beautiful fur.
The legs are usually darker than the rest of the body, and the face tends to be lighter. The animal's front limbs are extremely strong, and the foot of a fully grown individual is about eighteen inches long, with claws that are five inches long. The grizzly lives in the Rocky Mountain areas and further north, with significant populations in the western part of British Columbia. Its fur is thick and coarse, except for young animals, which have beautiful fur.
All other creatures seem to stand in fear of this formidable beast. Even the huge bison, or buffalo, of the Western Prairies sometimes falls a victim to the grizzly bear, and the very imprint of a bear's foot upon the soil is a warning which not even a hungry wolf will disregard.
All other creatures seem to fear this powerful beast. Even the massive bison, or buffalo, of the Western Prairies can sometimes become a target for the grizzly bear, and just the sight of a bear's footprint in the ground is a warning that even a hungry wolf won’t ignore.
Its food consists of whatever animal it can seize, whether human or otherwise. He also devours green corn, nuts, and fruits of all kinds. In his earlier years he is a good climber, and will ascend a tree with an agility which is surprisingly inconsistent with the unwieldy proportions of his body.
Its diet includes any animal it can catch, whether human or not. It also eats green corn, nuts, and various fruits. In its younger years, it climbs well and can scale a tree with agility that surprisingly contrasts with its bulky size.
The average weight of a full-grown grizzly is over eight hundred pounds, and the girth around the body is about eight feet.
The average weight of an adult grizzly bear is over eight hundred pounds, and the circumference around its body is about eight feet.
The Black bear, or Musquaw, which we illustrate is common throughout nearly all the half settled-districts of North America. But as the fur and fat are articles of great commercial value, the hunters and trappers have exercised their craft with such skill and determination that the animals are gradually decreasing in numbers. The total length of the black bear is seldom more than six feet, and its fur is smooth and glossy in appearance. The color of the animal is rightly conveyed by its name, the cheeks only partaking of a reddish fawn color.
The black bear, or Musquaw, that we’re showcasing is common in almost all the partially settled areas of North America. However, because its fur and fat are highly valuable commercially, hunters and trappers have become so skilled and determined that the population is slowly declining. The total length of a black bear is usually no more than six feet, and its fur looks smooth and shiny. The animal’s color is accurately reflected in its name, with only its cheeks showing a reddish fawn hue.
It possesses little of that fierceness which characterizes the grizzly, being naturally a very quiet and retiring creature, keeping itself aloof from mankind, and never venturing near his habitations except when excited by the pangs of fierce hunger. When pursued or cornered it becomes a dangerous antagonist; and its furious rage often results in fearful catastrophes to both man and beast. Nothing but a rifle ball in the right spot will Page 170 check the creature, when wrought up to this pitch of fury, and an additional wound only serves to increase its terrible ferocity. Bear-chasing is an extremely dangerous sport; and there are few bear-hunters in the land, however skilful, but what can show scars from the claws or teeth of some exasperated bruin.
It has little of the fierceness that defines the grizzly, being a naturally quiet and reserved animal. It keeps its distance from humans and only comes near their homes when driven by intense hunger. When chased or trapped, it becomes a dangerous opponent; its wild rage often leads to horrific outcomes for both people and animals. Only a bullet in the right place can stop it when it reaches this level of fury, and any extra injury just escalates its terrifying aggression. Bear hunting is a very risky activity; there are few bear hunters out there, no matter how skilled, who don't have scars from the claws or teeth of some angry bear.
The food of the black bear is mostly of a vegetable character,
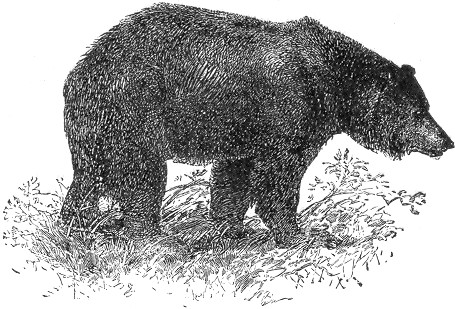 animal diet not being indulged in unless pressed by hunger. At
such times it seems to especially prefer a young pig as the most
desirable delicacy; and even full-grown hogs, it is said, are sometimes
lifted from their pens and carried off in his deadly embrace.
animal diet not being indulged in unless pressed by hunger. At
such times it seems to especially prefer a young pig as the most
desirable delicacy; and even full-grown hogs, it is said, are sometimes
lifted from their pens and carried off in his deadly embrace.
The black bear mainly eats plants,
only turning to animal food when extremely hungry. During those times, it tends to prefer a young pig the most; it's also said that it can sometimes grab full-grown hogs from their pens and carry them away.
Honey is his especial delight; and he will climb trees with great agility in order to reach a nest of bees, there being few obstacles which his ready claws and teeth will not remove where that dainty is in view. He is also very fond of acorns, berries, and fruits of all kinds.
Honey is his favorite treat, and he will climb trees with impressive agility to reach a beehive, as there are few obstacles his sharp claws and teeth won't overcome when that delicacy is in sight. He also really enjoys acorns, berries, and all kinds of fruits.
The young of the bear are produced in January or February, and are from one to four in number. They are very small and covered with grey hair, which coat they retain until they are one year of age. The flesh of the bear is held in high esteem among hunters, and when properly prepared is greatly esteemed by epicures.
The bear cubs are born in January or February, usually ranging from one to four in number. They are very small and covered in gray fur, which they keep until they turn one year old. The meat of the bear is highly valued by hunters, and when prepared correctly, it is considered a delicacy by food enthusiasts.
The fat of the animal is much used under the title of "Bear Page 171 grease," and is believed to be an infallible hair rejuvenator, and therefore becomes a valuable article of commerce.
The fat of the animal is widely known as "Bear Page 171 grease," and it is thought to be a guaranteed hair rejuvenator, making it a valuable commodity.
The bear generally hibernates during the winter, choosing some comfortable residence which it has prepared in the course of the summer, or perhaps betaking itself to the hollow of some tree. Sometimes, in case of early snow, the track of the bears may be distinguished, and if followed will probably lead to their dens, in which they can be secured with logs until it is desired to kill them.
The bear usually hibernates in the winter, picking a cozy spot it prepared during the summer or maybe taking shelter in a hollow tree. Sometimes, if snow comes early, you can see the bears' tracks, and if you follow them, they'll likely lead you to their dens, where you can block them in with logs until you're ready to hunt them.
The black bear has a habit of treading in a beaten track, which is easily detected by the eye of an experienced hunter or trapper, and turned to good account in trapping the animal.
The black bear tends to follow well-worn paths, which can easily be spotted by an experienced hunter or trapper, and this is helpful for catching the animal.
There are various modes of accomplishing this result. The bear Dead-fall, described on page 17, is, perhaps, the most commonly used, and the Pit-fall, page 31, and "Giant Coop" trap are also excellent. The Gun trap and stone dead-fall, page 20, we also confidently recommend. When a steel trap is used it requires the largest size, especially made for the purpose. It should be supplied with a short and very strong chain firmly secured to a very heavy clog or grappling-iron page 147. If secured to a tree or other stationary object, the captured animal is likely to gnaw or tear his foot away, if, indeed, he does not break the trap altogether by the quick tightening of the chain. The clog should be only heavy enough to be an impediment, and may consist of a log or heavy stone. The grappling-iron, however, is more often used in connection with the bear trap. It is a common method in trapping the bear to construct a pen of upright branches, laying the trap at its opening, and covering it with leaves. The bait is then placed at the back in such a position that the animal, on reaching for it, will be sure to put his foot in the trap.
There are several ways to achieve this result. The bear dead-fall, described on page 17, is probably the most commonly used, while the pit-fall, page 31, and "Giant Coop" trap are also effective options. We also confidently recommend the gun trap and stone dead-fall, page 20. When using a steel trap, it’s important to choose the largest size specifically made for this purpose. It should come with a short, strong chain securely attached to a heavy clog or grappling-iron page 147. If attached to a tree or another stationary object, the trapped animal might gnaw or tear off its foot, or even break the trap due to the sudden pull of the chain. The clog should be heavy enough to be an obstacle and can be a log or a large stone. However, the grappling-iron is more commonly used with the bear trap. A common method for trapping bears is to build a pen using upright branches, place the trap at the entrance, and cover it with leaves. The bait is then put at the back in a way that makes it likely for the animal to step into the trap while reaching for it.
An experienced trapper soon discovers natural openings between rocks or trees, which may be easily modified, and by the addition of a few logs so improved upon as to answer his purpose as well as a more elaborate enclosure, with much less trouble. Any arrangement whereby the bear will be obliged to tread upon the trap in order to secure the bait, is, of course, all that is required. The bait may be hung on the edge of a rock five feet from the ground, and the trap set on a smaller rock beneath it. He will thus be almost sure to rest his forefoot on the latter rock in order to reach the bait, and will thus be captured.
An experienced trapper quickly finds natural openings between rocks or trees that can be easily modified. By adding a few logs, these openings can be improved to serve his purpose just as well as a more complex enclosure, but with much less effort. Any setup that requires the bear to step on the trap to get to the bait is all that’s needed. The bait can be hung on the edge of a rock five feet off the ground, with the trap set on a smaller rock underneath. This way, the bear is likely to place its forefoot on the smaller rock to reach the bait and will get caught.
Another way is to set the trap in a spring of water or swampy Page 172 spot. Lay a lump of moss over the pan, suspending the bait beyond the trap. The moss will offer a natural foot-rest, and the offending paw will be secured.
Another way is to place the trap in a spring of water or swampy Page 172 area. Cover the pan with a piece of moss, hanging the bait just past the trap. The moss will provide a natural resting spot for the foot, and the troublesome paw will be caught.
Bears possess but little cunning, and will enter any nook or corner without the slightest compunction when in quest of food. They are especially fond of sweets, and, as we have said, are strongly attracted by honey, being able to scent it from a great distance. On this account it is always used, when possible, by trappers in connection with other baits. These may consist of a fowl, fruit, or flesh of any kind, and the honey should be smeared over it. Skunk cabbage is said to be an excellent bait for the bear; and in all cases a free use of the Oil of Anise page 152, sprinkling it about the traps, is also advisable. Should the device fail, it is well to make a trail (see page 153) in several directions from the trap, and extending for several rods. A piece of wood, wet with Oil of Anise, will answer for the purpose.
Bears aren't very clever and will go into any nook or cranny without a second thought when they're looking for food. They really love sweets and, as mentioned earlier, are highly attracted to honey, which they can smell from far away. That's why trappers often use it along with other bait when they can. This other bait can be anything like a bird, fruit, or any kind of meat, and the honey should be spread over it. Skunk cabbage is said to be a great bait for bears, and in all cases, using Oil of Anise page 152, sprinkled around the traps, is also recommended. If that method doesn't work, it's a good idea to create a trail (see page 153) in multiple directions from the trap, stretching out several yards. A wet piece of wood with Oil of Anise will do the trick.
The general method of skinning the bear consists in first cutting from the front of the lower jaw down the belly to the vent, after which the hide may be easily removed. The hoop-stretcher page 275, will then come into good use in the drying and preparing of the skin for market.
The basic method for skinning a bear starts by cutting from the front of the lower jaw down to the belly and then to the vent, making it easy to take off the hide. The hoop-stretcher page 275 will then be very useful for drying and preparing the skin for sale.
THE RACCOON.
Although allied to the Bear family, this animal possesses much in common with the fox, as regards its general disposition and character. It has the same slyness and cunning, the same stealthy tread, besides an additional mischievousness and greed. It is too common to need any description here, being found plentifully throughout nearly the whole United States. The bushy tail, with its dark rings, will be sufficient to identify the animal in any community. Raccoon hunts form the subject of many very exciting and laughable stories, and a "coon chase," to this day is a favorite sport all over the country. The raccoon, or "coon," as he is popularly styled, is generally hunted by moonlight. An experienced dog is usually set on the trail and the fugitive soon seeks refuge in a tree, when its destruction is almost certain. Hence the term "treed coon," as applied to an individual when in a dangerous predicament. Besides possessing many of the peculiarities of the fox, the "coon" has the additional accomplishment of being a most agile and expert climber, holding so firmly to the limb by its sharp claws as to defy all attempts to shake it off.
Although related to the bear family, this animal shares a lot in common with the fox in terms of its general behavior and character. It has the same slyness and cunning, the same stealthy movements, along with an extra bit of mischief and greed. It's so common that it doesn't need much description here, as it's found abundantly throughout almost the entire United States. The bushy tail with its dark rings is enough to identify the animal in any area. Raccoon hunts are the inspiration for many exciting and amusing stories, and a "coon chase" remains a popular sport across the country. The raccoon, or "coon," as it's commonly called, is typically hunted under the moonlight. An experienced dog is usually put on the trail, and the raccoon soon seeks refuge in a tree, where its capture is almost guaranteed. Hence the term "treed coon," used to describe someone in a dangerous situation. Besides having many traits similar to the fox, the "coon" also has the unique skill of being an agile and expert climber, gripping the branch so tightly with its sharp claws that it resists all attempts to shake it off.
Page 173 The home of the raccoon is generally in a hollow tree; the young are brought forth in May, and are from four to six in number.
Page 173 Raccoons usually make their homes in hollow trees. They give birth to their young in May, and typically have four to six babies.
In captivity this animal makes a very cunning and interesting pet, being easily tamed to follow its master, and when dainties are in view becomes a most adroit pickpocket. Its food is extensive in variety, thus making it quite an easy matter to keep the creature in confinement. Nuts and fruits of all kinds it eagerly devours, as well as bread, cake and potatoes. It manifests no hesitation at a meal of rabbit, rat, squirrel, or bird, and rather likes it for a change, and when he can partake of a dessert of honey or molasses his enjoyment knows no bounds. Frogs, fresh water clams, green corn, and a host of other delicacies come within the range of his diet, and he may sometimes be seen digging from the sand the eggs of the soft-shelled turtle, which he greedily sucks. We cordially recommend the coon as a pet. He becomes very docile, and is full of cunning ways, and if the young ones can be traced to their hiding-place in some hollow tree, and secured, if not too young, we could warrant our readers a great deal of real sport and pleasure in rearing the little animals and watching their ways.
In captivity, this animal makes a very clever and interesting pet. It can be easily trained to follow its owner, and when treats are around, it turns into a skilled thief. Its diet is quite varied, making it easy to keep this creature in confinement. It eagerly eats all kinds of nuts and fruits, as well as bread, cake, and potatoes. It has no issues with meals of rabbit, rat, squirrel, or bird, and enjoys these as a nice change. When it gets the chance to enjoy honey or molasses for dessert, its happiness knows no bounds. Frogs, fresh water clams, corn, and a variety of other treats are also on its menu, and it can sometimes be seen digging in the sand for soft-shelled turtle eggs, which it sucks down eagerly. We highly recommend the raccoon as a pet. They become very tame and are full of clever tricks. If you can find their young ones in a hollow tree and secure them, provided they aren’t too young, we can guarantee you'll have a lot of fun and joy raising these little animals and observing their behavior.
In cold climates the raccoon lies dormant in the winter, only venturing out on occasional mild days; but in the Southern States he is active throughout the year, prowling about by day and by night in search of his food, inserting his little sharp nose into every corner, and feeling with his slender paws between stones for spiders and bugs of all kinds. He spies the innocent frog with his head just out of the water, and pouncing upon him, he despatches him without a moment's warning. There seems to be no limits to his rapacity, for he is always eating and always hungry. The print of the raccoon's paw in the mud or snow is easily recognized, much resembling the impression made by the foot of a babe.
In cold climates, raccoons hibernate during the winter, only coming out on the occasional mild day. However, in the Southern States, they are active all year round, searching for food both day and night. They poke their little sharp noses into every corner and use their slender paws to feel between stones for spiders and bugs of all kinds. They spot an unsuspecting frog with its head barely above water and, without warning, they pounce and catch it. There seems to be no end to their greed, as they are always eating and perpetually hungry. The print of a raccoon's paw in the mud or snow is easily recognizable, resembling the footprint of a small child.
The best season for trapping the coon is late in the fall, winter, and early spring, or from and between the months of October and April. During this time the pelts are in excellent condition. Early in the spring when the snow is disappearing, the coons come out of their hiding places to start on their foraging tours; and at this time are particularly susceptible to a tempting bait, and they may be successfully trapped in the following manner:—
The best time to trap raccoons is late fall, winter, and early spring, specifically between October and April. During this period, their pelts are in great condition. In early spring, when the snow is melting, raccoons emerge from their dens to begin foraging; at this time, they are especially attracted to bait, making them easier to trap in the following way:—
Take a steel trap and set it on the edge of some pool, or stream
where the coons are known to frequent: let it be an inch
Page 174
or so under the water, and carefully chained to a clog. The bait
may consist of a fish, frog, or head of a fowl, scented with Oil
of Anise, and suspended over the traps about two feet higher, by
the aid of a sapling secured in the ground. (See title page at
the head of this section.) The object of this is to induce the
animal to jump for it, when he will land with his foot in the trap.
Another method is to construct a V shaped pen set the trap near
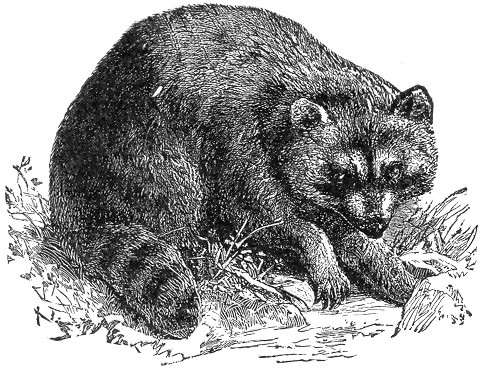 the entrance, and, fastening the bait in the angle, cover the trap
loosely with leaves, and scent the bait as before with the anise.
The trap should be at such a distance from the bait that the animal,
in order to reach it, will be obliged to tread upon the pan, which
he will be sure to do, his greed overcoming his discretion. Any
arrangement whereby the animal will be obliged to tread upon the
trap in order to reach the bait will be successful.
the entrance, and, fastening the bait in the angle, cover the trap
loosely with leaves, and scent the bait as before with the anise.
The trap should be at such a distance from the bait that the animal,
in order to reach it, will be obliged to tread upon the pan, which
he will be sure to do, his greed overcoming his discretion. Any
arrangement whereby the animal will be obliged to tread upon the
trap in order to reach the bait will be successful.
Set a steel trap at the edge of a pond or stream where raccoons are known to hang out. Make sure it's about an inch under the water and securely chained to a weight. For bait, use a fish, frog, or a bird's head, and add a drop of Oil of Anise for scent. Suspend it about two feet above the trap using a small tree secured in the ground. (See title page at the head of this section.) This method is meant to get the animal to jump for the bait, causing it to land with its foot in the trap. Another technique is to make a V-shaped enclosure and place the trap near the entrance. Fasten the bait at the corner of the V, lightly cover the trap with leaves, and scent the bait with anise as before. The trap should be positioned so that the animal has to step on the pan to reach the bait, which it will likely do because of its greed. Any setup that forces the animal to step on the trap to get to the bait will be effective.
The beaten track of the coons may often be discovered in soft ground, and a trap carefully concealed therein will soon secure its victim. Another method is to set the trap near the coon tracks, spreading a few drops of anise on the pan and covering the whole with leaves. The coon, attracted by the scent, will Page 175 feel around in the leaves for the bait, and thus "put his foot in it."
The worn path of raccoons can often be found in soft ground, and a trap hidden there will quickly catch one. Another way is to place the trap near the raccoon tracks, adding a few drops of anise on the pan and covering it with leaves. The raccoon, drawn in by the scent, will feel around in the leaves for the bait and will "put his foot in it."
In the South they construct a coon trap from a hollow log, either having the ends supplied with lids, which fall just like the Rat trap page 100 as the animal passes through, or else constructed with nooses, similar to the Box-snare, page 56. Box traps of a style similar to that described on page 103 are also excellent, and a strong twitch-up, of any of the various kinds we have described, will be found to work admirably.
In the South, they make a raccoon trap from a hollow log, either with lids at the ends that drop down like a rat trap page 100 as the animal goes through, or built with nooses, like the box snare page 56. Box traps like the one mentioned on page 103 are also great, and a sturdy twitch-up of any of the different types we've talked about will work really well.
Many of the suggestions in trapping the mink, page 190, will be found equally, serviceable in regard to the coon.
Many of the tips for trapping mink, page 190, will also be useful for trapping raccoons.
The skin of this animal should be removed as recommended for the fox, and similarly stretched. It may also be skinned by first ripping up the belly, and spread on a hoop stretcher. page 275.
The skin of this animal should be taken off as suggested for the fox, and equally stretched. It can also be skinned by first cutting open the belly and laid out on a hoop stretcher. page 275.
THE BADGER.
The American Badger is mostly confined to the Northwestern parts
of the United States, and it is a curious little animal. In size
its body is slightly smaller than the fox. Its general color is
grey, approaching to black on the head and legs. There is a white
streak extending from the tip of the animal's long nose over the
top of the head and fading off near the shoulders. The cheeks are
also white, and a broad and definitely marked black line extends
from the snout back around the eyes ending at the neck. The grey
of this animal is produced from the mixture of the varied tints
of its fur, each hair presenting a succession of shades. At the
root it is of a deep grey; this fades into a tawny yellow, and
is followed by a black, the hair being finally tipped with white.
The fur is much used in the manufacture of fine paint brushes, a
good "Badger blender" being a most useful accessory in the painter's
art. The badger is slow and clumsy in its actions, except when
engaged in digging, his capacities in this direction being so great
as to enable him to sink himself into the ground with marvellous
rapidity. The nest of the animal is made in the burrow, and the
young are three or four in number. His diet is as variable and
extensive as that of the coon, and consists of anything in any
way eatable. Snails, worms, rats, mice and moles, seem to have
a particular attraction for him; and he seems to take especial
delight in unearthing the stores of the wild bees, devouring honey,
wax and grubs together, and
Page 176
caring as little for the stings of the angry bees as he would of
the bills of so many mosquitoes, the thick coating of fur forming
a perfect protection against his winged antagonists. The badger
is very susceptible to human influence, and can be effectually
tamed with but little trouble. Although his general appearance
would not indicate it, he is a sly and cunning animal, and not
easily captured in a trap of any kind. He has been known to set
at defiance all the traps that were set for him, and to devour
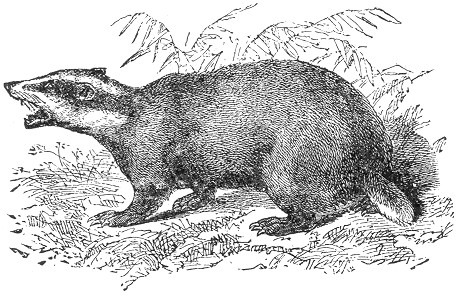 the baits without suffering for his audacity. He will sometimes
overturn a trap and spring it from the under side, before attempting
to remove the bait. Although not quite as crafty as the fox, it is
necessary to use much of the same caution in trapping the badger,
as a bare trap seldom wins more than a look of contempt from the
wary animal.
the baits without suffering for his audacity. He will sometimes
overturn a trap and spring it from the under side, before attempting
to remove the bait. Although not quite as crafty as the fox, it is
necessary to use much of the same caution in trapping the badger,
as a bare trap seldom wins more than a look of contempt from the
wary animal.
The American Badger is mostly found in the Northwestern parts of the United States, and it's a fascinating little creature. Its body is slightly smaller than that of a fox. The general color is gray, nearly black on the head and legs. There's a white stripe that runs from the tip of the animal's long nose over the top of its head and fades near the shoulders. The cheeks are also white, and a broad, clearly defined black line extends from the snout, around the eyes, and ends at the neck. The gray color comes from a mix of different shades in its fur, with each hair showing a range of colors. At the root, the hair is a deep gray, which fades into a tawny yellow, followed by black, and finally tipped with white. The fur is commonly used for making fine paintbrushes, with a good "Badger blender" being a very useful tool for artists. The badger is slow and clumsy in its movements, except when it’s digging; it can burrow into the ground with astonishing speed. The nest is made in the burrow, where the young are usually three or four in number. Its diet is broad and varied, just like that of a raccoon, consisting of whatever is edible. Snails, worms, rats, mice, and moles seem to particularly attract it; it especially enjoys digging up the food supplies of wild bees, feasting on honey, wax, and larvae, and it seems undeterred by angry bee stings, as its thick fur provides solid protection against its buzzing foes. The badger is very responsive to human influence and can be easily tamed with minimal effort. Despite its appearance, it is quite sly and cunning, making it difficult to catch in traps. It has been known to ignore traps that are set for it, devouring the bait without any consequences. Sometimes, it will even flip a trap and trigger it from underneath before trying to snatch the bait. While not as clever as a fox, trapping a badger requires much of the same careful approach, as an open trap often earns nothing but a disdainful look from the cautious animal.
The usual mode of catching the creature is to set the trap size No. 3 at the mouth of its burrow, carefully covering it with loose earth and securing it by a chain to a stake. Any of the methods used in trapping the fox will also be found to work admirably. The dead-fall or garrote will also do good service. Bait with a rat, mouse, or with whatever else the animal is especially fond, and scent with Oil of Anise or Musk. In early spring, while the ground is still hard, badgers are easily captured by flooding their burrows. After being satisfied that the animal is in its hole, proceed to pour in pailful after pailful of water at the entrance. He will not long be able Page 177 to stand this sort of thing, and he may be secured as he makes his exit at the opening of the burrow.
The typical way to catch the creature is to set a size No. 3 trap at the entrance of its burrow, covering it with loose dirt and securing it with a chain to a stake. Any methods used for trapping foxes will also work great. The dead-fall or garrote trap will also be effective. Bait it with a rat, mouse, or whatever else the animal particularly likes, and use Oil of Anise or Musk for scent. In early spring, when the ground is still hard, badgers can be easily caught by flooding their burrows. Once you’re sure the animal is inside, pour pail after pail of water at the entrance. It won’t take long before it can’t handle this, and you can catch it as it comes out of the burrow.
The skin should be removed whole, as in the case of the fox, or as described for the beaver, and stretched as therein indicated.
The skin should be taken off completely, like with the fox, or as explained for the beaver, and stretched as mentioned.
THE BEAVER.
The Beaver of North America has now a world-wide reputation for
its wonderful instinct and sagacity. The general appearance of
this animal is that of a very large muskrat with a broad flattened
tail, and the habits of both these animals are in many respects
alike. The beaver is an amphibious creature and social in its habits
of living, large numbers congregating together and forming little
villages, and erecting their dome-like huts like little Esquimaux.
The muskrat has this same propensity, but the habitation of the
beaver is on a much more extensive scale. These huts or "Beaver
lodges," are generally made in rivers and brooks; although sometimes
in lakes or large ponds. They are chiefly composed of branches,
moss, grass and mud, and are large enough to accommodate a family
of five or six. The form of the "lodges" is dome-like, and it varies
considerably in size. The foundation is made on the bottom of the
river, and the hut is built up like a mound, often twenty feet
in diameter and projecting several feet above the surface of the
water. The walls of this structure are often five or six feet thick,
and the roofs are all finished off with a thick layer of mud laid on
with marvellous smoothness. These huts form the winter habitations
of the beavers, and as this compost of mud, grass and branches
becomes congealed into a solid mass by the severe frosts of our
northern winter, it can easily be seen that they afford a safe
shelter against any intruder and particularly the wolverine, which
is a most deadly enemy to the beaver. So hard does this frozen mass
become as to defy even the edges of iron tools, and the breaking
open of the "Beaver houses" is at no time an easy task. Beavers
work almost entirely in the dark; and a pond which is calm and
placid in the day time will be found in the night to be full of
life and motion, and the squealing and splashing in the water will
bear evidence of their industry. Lest the beavers should not have
a sufficient depth of water at all seasons, they are in the habit
of constructing veritable dams to ensure that result. These dams
display a wonderful amount of reason and skill, and, together with
the huts, have won for the beaver a reputation
Page 178
for engineering skill which the creature truly deserves. In constructing
these ingenious dams the beavers, by the aid of their powerful teeth,
gnaw down trees sometimes of large size, and after cutting them into
smaller pieces float them on the water to the spot selected for
the embankment. In swift streams this embankment is built so as
 to arch against the current, thus securing additional strength,
and evincing an instinct on the part of the animal which amounts
almost to reason. In cutting down the trees the beaver gnaws a
circular cut around the trunk, cutting deepest on the side toward
the water, thus causing the trunk to fall into the stream. The
first step in constructing the embankment is to lay the logs down
cautiously in the required line of the dam, afterwards weighting
them with heavy stones, which the beavers by their united efforts
roll upon them. The foundation of the embankment is often ten feet
in width, and is built up by continued heaping of branches, stones
and mud, until it forms a barrier of immense strength and resisting
power. In many cases, through
Page 179
a lapse of years, and through a consequent accumulation of floating
leaves, twigs, and seeds of plants, these embankments become thickly
covered with vegetation, and, in many cases in the Hudson Bay country,
have even been known to nurture trees of considerable dimensions. The
broad flat tail of the animal serves a most excellent purpose, in
carrying the mud to the dams or huts, and in matting and smoothing
it into a solidity.
to arch against the current, thus securing additional strength,
and evincing an instinct on the part of the animal which amounts
almost to reason. In cutting down the trees the beaver gnaws a
circular cut around the trunk, cutting deepest on the side toward
the water, thus causing the trunk to fall into the stream. The
first step in constructing the embankment is to lay the logs down
cautiously in the required line of the dam, afterwards weighting
them with heavy stones, which the beavers by their united efforts
roll upon them. The foundation of the embankment is often ten feet
in width, and is built up by continued heaping of branches, stones
and mud, until it forms a barrier of immense strength and resisting
power. In many cases, through
Page 179
a lapse of years, and through a consequent accumulation of floating
leaves, twigs, and seeds of plants, these embankments become thickly
covered with vegetation, and, in many cases in the Hudson Bay country,
have even been known to nurture trees of considerable dimensions. The
broad flat tail of the animal serves a most excellent purpose, in
carrying the mud to the dams or huts, and in matting and smoothing
it into a solidity.
The Beaver of North America has gained a worldwide reputation for its remarkable instincts and intelligence. This animal looks like a very large muskrat with a broad, flat tail, and their habits are similar in many ways. The beaver is an amphibious creature that is social, living in large groups to form small villages and building dome-shaped huts similar to little Eskimo homes. The muskrat shares this social tendency, but beaver constructions are much larger in scale. These huts, known as "Beaver lodges," are typically built in rivers and streams, although they can also be found in lakes or large ponds. They are primarily made of branches, moss, grass, and mud, and are big enough to accommodate a family of five or six. The lodges are dome-shaped and vary considerably in size. They are built on the riverbed, rising like a mound, often twenty feet in diameter and several feet above the water's surface. The walls of these structures can be five or six feet thick, and the roofs are layered with a thick coat of mud applied with impressive smoothness. These huts serve as the beavers' winter homes, and as the mixture of mud, grass, and branches solidifies in the severe frosts of our northern winters, it becomes clear that they offer safe shelter from intruders, especially the wolverine, which is a deadly enemy of the beavers. This frozen mass can be so hard that it can withstand even iron tools, making it difficult to break into the "Beaver houses." Beavers mainly work in the dark; a pond that appears calm and still during the day is full of life and activity at night, with squeaking and splashing indicating their industriousness. To ensure they have enough water year-round, beavers build actual dams. These dams show an incredible amount of reasoning and skill, earning beavers a well-deserved reputation for engineering. When building these clever dams, beavers use their strong teeth to gnaw down trees, sometimes quite large, and then float the cut pieces to the chosen spot for the dam. In fast-moving streams, they construct the dam to arch against the current, providing extra strength and demonstrating an instinct that is nearly rational. While cutting down trees, the beaver gnaws a circular cut around the trunk, digging deeper on the side facing the water, causing the trunk to fall into the stream. The first step in building the dam is to carefully place the logs where needed, then weigh them down with heavy stones that the beavers roll onto them together. The foundation of the dam can often be ten feet wide and is built up by continuously adding branches, stones, and mud until it forms a barrier of enormous strength and durability. Over the years, as floating leaves, twigs, and plant seeds accumulate, these dams can become lushly covered with vegetation, and, in some cases in the Hudson Bay region, they have even been known to support trees of considerable size. The beaver's broad, flat tail is exceptionally useful for carrying mud to the dams or huts, as well as for matting and smoothing it to create solid structures.
The entrances to the various huts are all beneath the water, and they all open into one common ditch, which is purposely dug in the bed of the river, and is too deep to be entirely frozen. In the summer time the huts are vacated, and the beavers make their abode in burrows on the banks of the stream, which serve as a secure retreat at all times, and particularly in winter when their houses are molested. The Indians of the Northwest are aware of this fact, and turn it to good account in the capture of the animals.
The entrances to the different huts are all underwater, leading into a shared ditch that’s intentionally dug in the riverbed and is too deep to freeze completely. In the summer, the huts are empty, and the beavers move to burrows on the riverbanks, which provide a safe place to hide at all times, especially in winter when their homes are disturbed. The Native Americans from the Northwest know this and make good use of it when catching the animals.
When the beaver's village is in a small creek, or brook, it is first necessary to stake the water across both above and below the huts. The next thing is to ascertain the exact spots of the burrows in the banks, and when we consider the river is covered with ice, this seems a rather difficult problem. But this is where the Indian shows his skill. He starts upon the ice, provided with an ice chisel secured to a long, stout handle. With this he strikes upon the ice, following the edge of the stream. The sound of the blow determines to his practiced ear the direct spot opposite the opening of the burrows, and at this point a hole a foot in diameter is made through the ice. Following the edge of the bank he continues his search, and in like manner cuts the holes through the ice until all the retreats are discovered. While the expert Indians are thus engaged, the "squaws" are occupied in the more laborious work of breaking open the houses, and the beavers, alarmed at the invasion of their sanctums, make for the banks, and the ready huntsmen stationed at the various holes, watch for their victims beneath the openings, until a violent motion or discoloration of the water betrays their passage beneath. The entrance to the holes in the bank are then instantly closed with stakes and the beaver is made prisoner in his burrow. When the depth of the burrow will admit, the arm of the hunter is introduced, and the animal pulled out, but otherwise a long hook lashed to a pole is employed for this purpose. Scores of beavers are sometimes taken in this way in a few hours. Spearing is also often successfully resorted to, and when the ice is thin and transparent the beavers may be Page 180 clearly observed as they come to the surface, beneath the ice, for air.
When the beaver's village is in a small creek or brook, the first step is to block the water both above and below the huts. Next, it's important to pinpoint the exact locations of the burrows in the banks. Considering the river is covered in ice, this could seem like a tricky task. But this is where the Indian demonstrates his skill. He steps out onto the ice with an ice chisel attached to a long, sturdy handle. He strikes the ice along the edge of the stream. The sound of the blow helps his trained ear determine the exact spot directly across from the burrow openings, and at this spot, he makes a hole about a foot in diameter through the ice. Following the bank's edge, he continues his search, cutting more holes through the ice until all the burrows are found. While the skilled Indians are busy with this, the women are engaged in the more labor-intensive work of breaking open the beaver houses. Alarmed by the intrusion, the beavers flee toward the banks, and the waiting hunters at the various holes watch for their targets beneath the openings until a sudden movement or discoloration in the water reveals their passage. The entrances to the holes in the bank are quickly blocked with stakes, trapping the beaver in its burrow. If the burrow is deep enough, the hunter reaches in to pull the animal out; otherwise, a long hook attached to a pole is used for this. Dozens of beavers can sometimes be caught this way in just a few hours. Spearing is also a commonly successful method, and when the ice is thin and clear, the beavers can be clearly seen as they come to the surface beneath the ice for air.
The general color of the animal is reddish brown, this tint being imparted principally by the long hairs of the fur. There is an inner and softer down of a grey color, which lies next the skin, and which is the valuable growth of the fur. The total length of the animal is about three feet and a half, the flat, paddle-shaped, scale-covered tail being about a foot in length.
The overall color of the animal is reddish-brown, mainly due to the long hairs of its fur. Underneath, there’s a softer layer of grey down that sits close to the skin, which is the prized part of the fur. The total length of the animal is around three and a half feet, with its flat, paddle-shaped tail covered in scales measuring about a foot long.
The young are brought forth in April or May, from three to seven at a litter, and take to the water when a month old. The first four years in the beaver's life is spent under the "maternal roof," after which period they shift for themselves. To trap the beaver successfully, requires the utmost caution, as the senses of the animal are so keen, and he is so sagacious withal, that he will detect the recent presence of the trapper from the slightest evidences. The traps should be washed clean and soaked in ley, before using, and thereafter handled with gloves, as a mere touch of the finger will leave a scent which the acute sense of the beaver will easily perceive. All footprints should be carefully obliterated by throwing water upon them, and some trappers say that the mere act of spitting on the ground in the neighborhood of the traps has been known to thwart success.
The young beavers are born in April or May, usually in litters of three to seven, and they start entering the water by the time they’re a month old. The first four years of a beaver's life are spent under their mother’s care, and after that, they learn to fend for themselves. Successfully trapping beavers requires extreme caution because they have very sharp senses and are incredibly intelligent, able to notice even the slightest signs of a trapper’s presence. Traps should be thoroughly cleaned and soaked in lye before use, and they should be handled with gloves, as even a fingertip can leave a scent that the beaver can easily pick up. Any footprints should be carefully erased by throwing water on them, and some trappers even say that simply spitting on the ground near the traps can ruin their chances of success.
Almost the only bait used in trapping the beaver is the preparation called "barkstone" by the trappers, or "castoreum" in commerce. This substance is fully described on page 150 under the head of "Scent Baits."
Almost the only bait used in trapping beavers is a preparation called "barkstone" by trappers or "castoreum" in stores. This substance is fully described on page 150 under the section "Scent Baits."
To the barkstone the trapper is mostly indebted for his success, and the effect of its odor on the beaver is something surprising. Our best trappers inform us that these animals will scent this odor for a great distance, and will fairly "squeal with delight," not being easy until the savory bait is discovered, which almost invariably results in capture.
To the barkstone, the trapper owes much of his success, and the effect of its scent on the beaver is quite remarkable. Our best trappers tell us that these animals can smell this scent from far away, and they will practically "squeal with excitement," not resting until they find the tasty bait, which almost always leads to their capture.
Taking advantage of this curious propensity, the trapper always carries a supply of castoreum in a closed vessel.
Taking advantage of this curious tendency, the trapper always carries a supply of castoreum in a sealed container.
There are various ways of trapping the beaver, of which we shall present the best. An examination of the river bank will easily disclose the feeding place of the beavers, as evinced by the absence of the bark on the branches and trunks of trees. At this spot, in about four inches of water, set your trap, which should be a Newhouse No. 4. Weight the end of the chain with a stone as large as your head, and, if possible, rest it on the edge of some rock projecting into deep water, having a smaller rope or chain leading from the stone to the shore. A Page 181 small twig, the size of your little finger, should then be stripped of its bark, and after chewing or mashing one end, it should be dipped in the castoreum. Insert this stick in the mud, between the jaws of the trap, letting it project about six inches above the water. The beaver is soon attracted by the odor of the bait, and in reaching for it, his foot is caught in the trap. In his fright he will immediately jump for deep water, thus dislodging the stone, which will sink him to the bottom, and thus drown him. The smaller chain or rope will serve as a guide to the trap, and the victim may be drawn to the surface. Another plan is to set the trap in about a foot of water, chaining it fast to a stout pole securely driven in the mud further out in the stream, and near deep water. Bait as before. The trap being thus fastened will prevent the efforts of the animal to drag it ashore, where he would be certain to amputate his leg and walk off. There is another method, which is said to work excellently. The chain is secured to a very heavy stone, and sunk in deep water, and the trap set and baited near shore, in about a foot of water. This accomplishes the same purpose as the pole first described, and is even surer, as the animal will sometimes use his teeth in severing the wood, and thereby make his escape. In the case of the stone a duplicate rope or chain will be required to lift it in case of capture.
There are several ways to trap beavers, and we’ll go over the best methods. Checking the riverbank will quickly reveal where the beavers feed, as seen by the stripped bark on tree branches and trunks. In this area, set your trap about four inches underwater; it should be a Newhouse No. 4. Weigh the chain's end down with a stone the size of your head, and if you can, position it on the edge of a rock that juts into deeper water, with a smaller rope or chain running from the stone to the shore. A small twig, about the size of your pinky finger, should have its bark removed, and after chewing or mashing one end, dip it in castoreum. Insert this stick into the mud between the trap’s jaws, allowing it to stick about six inches above the water. The beaver will be lured by the scent of the bait, and when it reaches for it, its foot will get caught in the trap. In its panic, it will immediately jump toward deep water, dislodging the stone and sinking to the bottom, resulting in drowning. The smaller chain or rope will guide the trap so the caught beaver can be retrieved. Another method is to place the trap in about a foot of water, securely attaching it to a strong pole driven deep into the mud further out in the stream, near deeper water. Use the same bait. This setup ensures the animal can’t drag the trap ashore, where it might end up amputating its leg and escaping. There is another effective method where the chain is attached to a very heavy stone submerged in deep water, and the trap is set and baited close to the shore, in about a foot of water. This serves the same purpose as the pole method and is even more reliable since the animal may sometimes chew through wood and escape. If using the stone method, a duplicate rope or chain will be needed to lift it in case of a catch.
The trap may be set at the entrance to the holes in the banks, two or three inches under water, implanting the stick with the castoreum bait directly over the pan, a few inches above the water. If the water should be deep near this spot, it is an excellent plan to weight the end of the chain with a large stone with a "leader" from it also, as already described. Insert two or three sticks in the bank beneath the water, and rest the stone upon them.
The trap can be placed at the entrance to the holes in the banks, two or three inches underwater, positioning the stick with the castoreum bait directly over the pan, a few inches above the water. If the water is deep near this spot, it’s a good idea to weigh down the end of the chain with a heavy stone, using a "leader" from it as mentioned before. Place two or three sticks in the bank beneath the water and rest the stone on them.
When the beaver is caught he will turn a somersault into deep water, at the same time dislodging the stone, which will sink him. No sooner is a break ascertained in the dam than all the beavers unite in fixing it, and this peculiarity of habit may be turned to account in trapping them. Make a slight break in the dam, five inches across, beneath the water. On the under side of the break, and of course, on the inside of the dam, the trap should be set. The beavers will soon discover the leak and the capture of at least one is certain. The trap may be also set where the beavers are wont to crawl on shore, being placed several inches below the water in such a position that they will step on it when in the act of ascending the banks. Where the weighted stone is not used, the sliding pole page 145 Page 182 should always be employed, as it is necessary to drown the animal, to prevent amputation and escape.
When a beaver gets caught, it will flip into deep water, causing the stone to dislodge and sink it. Once a break in the dam is noticed, all the beavers come together to fix it, and this habit can be exploited for trapping them. Create a small break in the dam, about five inches wide, below the water. On the underside of the break, which is on the inside of the dam, set the trap. The beavers will quickly find the leak, and you’re guaranteed to catch at least one. You can also place the trap where the beavers typically crawl ashore, setting it a few inches below the water so that they step on it while climbing up the banks. If you’re not using a weighted stone, the sliding pole page 145 Page 182 should always be used, as it’s crucial to drown the animal to prevent it from getting its limbs amputated or escaping.
The food of the beaver consists chiefly of the bark of various trees, together with aquatic plants. The fur is valuable only in the late fall, winter, and early spring.
The beaver mainly eats the bark of different trees and aquatic plants. Its fur is only valuable in late fall, winter, and early spring.
In skinning the beaver, a slit is made from the under jaw to the vent, after which it is easily removed. It should be tacked to a flat board, fur side in, or stretched by means of a hoop, as described on page 275.
In skinning the beaver, make a cut from the under jaw to the vent, after which it can be easily removed. It should be pinned to a flat board, fur side in, or stretched using a hoop, as described on page 275.
THE MUSKRAT.
The muskrat, or musquash, is very much like a beaver on a small scale, and is so well-known throughout the United States that a detailed description or illustration will hardly be necessary. Reduce the size of the beaver to one foot in length, and add a long flattened tail, instead of the spatula-shaped appendage of this animal, and we will have a pretty good specimen of a muskrat. The body has that same thick-set appearance, and the gnawing teeth are very large and powerful. Like the beaver, the muskrat builds its dome-like huts in ponds or swamps, which it frequents; and although not as large as those of the beaver they are constructed in the same manner and of the same materials. Muskrats are mostly nocturnal in their habits; they are tireless swimmers, and in the winter travel great distances beneath the ice; all of which peculiarities are like the beaver. Their food is quite variable, consisting of grass and roots, oats, corn and other grain, apples and nuts, and even tomatoes, turnips, carrots, mussels and clams, whenever these can be found.
The muskrat, also known as musquash, is similar to a smaller version of a beaver and is so commonly found across the United States that a detailed description or illustration isn't really needed. Imagine reducing the beaver to about a foot in length and giving it a long, flattened tail instead of the beaver's paddle-shaped one, and you get a good idea of what a muskrat looks like. It has that same sturdy build, and its gnawing teeth are quite large and strong. Like beavers, muskrats build dome-shaped huts in the ponds or swamps they inhabit; while these huts are not as large as those of beavers, they are made in a similar way and from the same materials. Muskrats are mostly active at night; they are excellent swimmers and can travel long distances under the ice during winter, which is similar to beaver behavior. Their diet is quite varied and includes grass and roots, oats, corn, other grains, apples, nuts, and even tomatoes, turnips, carrots, mussels, and clams whenever they are available.
The muskrat is a native of all of the Eastern, Western, and Middle States and also the Southern States, with the exception of Georgia, Alabama and Florida. They are also found in Canada and the Arctic regions, and in the North-west. They are hunted and captured as a means of support to the native tribes of Indians who sell or trade the furs to Eastern dealers. The fur somewhat resembles that of the mink in texture, although not as fine, and the color varies from dark brown above to grey beneath. It is in its best condition during the winter, especially in March. The animal possesses a musky smell, from which it takes its name. It is said by many that the flesh of the animal, when carefully prepared, becomes quite palatable food.
The muskrat is found in all Eastern, Western, and Central States, as well as in the Southern States, except for Georgia, Alabama, and Florida. They're also present in Canada and the Arctic regions, and in the Northwest. Native tribes hunt and trap them for income, selling or trading the furs to dealers in the East. The fur has a texture similar to mink, though not as fine, and its color ranges from dark brown on top to grey underneath. The fur is at its best in winter, especially in March. The animal has a musky odor, which is where its name comes from. Many people say that the meat of the animal, when prepared properly, makes for quite tasty food.
Their houses are so nearly like those of the beaver that a Page 183 second description is scarcely necessary. They are often five or six feet in height, and the entrances are all under water. Dozens of these huts may often be seen in ponds and marshes, and sometimes they exist in such numbers as to give the appearance of a veritable Esquimaux village. These houses are used only in the winter season. In general the muskrat lives in burrows, which it excavates in the banks of ponds or streams, bringing forth its young, from three to nine in number, in the nest, which it forms at the end of the tunnel. They are very prolific, producing three litters a year. Like the beaver, otter and mink, the muskrat can travel long distances under the ice with only one supply of fresh air, and its method is certainly very interesting. Before plunging beneath the ice the animal fills its lungs with air, and when under the water it swims until it can no longer hold its breath. It then rises up beneath the ice, empties its lungs, the air remaining in bubbles beneath the ice. In a short time this air absorbs sufficient oxygen from the water and ice as to be life-sustaining, when the animal again inhales it and proceeds on its journey. It is by this means that the beaver, muskrat and mink are enabled to travel such great distances beneath unbroken ice, and it is certainly a very novel and interesting method. Where the ice is thin and transparent these animals are sometimes captured through the means of this habit. A heavy stroke on the frozen hut will drive its occupants to the water, and their course may easily be followed through the ice. If one of them is tracked, he will presently be seen to stop at the surface of the water for fresh oxygen, as already described. The bubbles will soon appear, and if the hunter immediately strikes with an axe or heavy stick directly on the spot, the submerged animal will be literally driven away from its breath, and will of course drown in a very few minutes. A short search will soon reveal the dead creature, after which he may be taken out through a hole cut in the ice. Otter and mink are sometimes taken in the same way. In many localities great numbers of muskrats are also captured by spearing, either through the ice or through the walls of their houses. In the latter case, two are often taken at once. This method is quite uncertain and unreliable, as the walls of the hut are often so firmly frozen as to defy the thrust of the hardest steel, and a fruitless attempt will drive the inmates from their house at once. The spear generally used consists of a single shaft of steel about eighteen inches in length and half an inch in diameter, barbed at the point, and is feruled to a Page 184 solid handle five feet long. In spearing through the hut the south side is generally selected, as being more exposed to the heat of the sun. Great caution is necessary, as the slightest noise will drive out the inmates. The spear should be thrust in a slanting direction, a few inches above the surface of the ice. Where many houses exist it is well to destroy all but one. Into this the whole tribe will centre, and by successive spearing they may all be captured. When the spear has been thrust into the house, it must be thus left until a hole is cut with a hatchet, through which to remove the game. Spearing through the ice is a better method, but for general service there is no means of capture more desirable than by trapping. The steel trap No. 1 or 2 is the size particularly adapted for the muskrat, and may be set in various ways. The most common method is to set the trap under two inches of water on the projecting logs or stones on the border of the streams where the "signs" of the animal indicate its recent presence. The trap should of course be secured by a chain, ringed to a sliding pole, page 145, which will lead the animal into deep water when captured, and thus effect its speedy death by drowning. In this case bait is not necessary. If their feeding grounds can be discovered, or if their tracks indicate any particular spot where they crawl ashore at the water's edge, at this point a trap may be set with good success. In this instance it is well also to set it under water, baiting with a piece of turnip, parsnip, apple, or the like, suspended a few inches above the pan of the trap. Late in the fall, when collecting their building material, they often form large beds of dried grasses and sticks, and a trap set in these beds and covered with some loose substance, such as grass, chaff, or the like, will often secure the animal. The trap, in this case should be attached to a spring-pole, page 145 as the muskrat is a wonderful adept at self-amputation, when its escape depends upon it.
Their houses are so similar to those of the beaver that a Page 183 second description is barely needed. They are often five or six feet tall, and the entrances are all underwater. You can often see dozens of these huts in ponds and marshes, and sometimes they exist in such numbers that it looks like a real Eskimo village. These homes are only used in the winter. Generally, the muskrat lives in burrows that it digs into the banks of ponds or streams, having its young—between three and nine—in the nest at the end of the tunnel. They reproduce quickly, having three litters a year. Like the beaver, otter, and mink, muskrats can travel long distances under the ice with just one breath of fresh air, and their method is definitely interesting. Before diving under the ice, the animal fills its lungs with air and swims underwater until it can no longer hold its breath. It then surfaces beneath the ice, exhales, and the air remains trapped in bubbles below the ice. Soon, this air absorbs enough oxygen from the water and ice to sustain life, allowing the animal to inhale again and continue its journey. This is how beavers, muskrats, and minks can travel great distances beneath solid ice, and it's certainly a unique and fascinating technique. When the ice is thin and clear, these animals can sometimes be caught because of this behavior. A strong blow to the frozen hut will scare its occupants into the water, and their path can easily be followed through the ice. If one is tracked, it will soon be seen surfacing for fresh oxygen, as previously described. The bubbles will emerge, and if the hunter quickly strikes with an axe or heavy stick right on the spot, the submerged animal will be forced away from its breath, and will likely drown in just a few minutes. A brief search will soon find the dead creature, which can then be retrieved through a hole cut in the ice. Otters and minks are sometimes caught in the same way. In many areas, a large number of muskrats are also captured by spearing, either through the ice or through the walls of their huts. In the latter case, two can often be taken at once. This method is quite uncertain and unreliable, as the walls of the hut can be frozen solid and resist even the hardest steel, and a failed attempt will scare the inhabitants from their home immediately. The spear used typically consists of a single steel shaft about eighteen inches long and half an inch in diameter, barbed at the tip, and attached to a Page 184 solid handle five feet long. When spearing through the hut, the south side is generally chosen, as it gets more sun. Great care is needed, as even the slightest noise will cause the occupants to flee. The spear should be positioned at a slight angle, a few inches above the surface of the ice. Where there are many huts, it's best to destroy all but one. All the muskrats will gather in this one, allowing them to be captured one after another. Once the spear is inserted into the house, it should be left until a hole is cut with a hatchet to remove the game. Spearing through the ice is a better method, but for regular use, trapping is the most effective means of capture. Steel trap No. 1 or 2 is the size best suited for muskrats and can be set in different ways. The most common method is to place the trap under two inches of water on projecting logs or stones at the edges of streams where there are signs of the animal's recent activity. The trap should be secured with a chain, attached to a ring that leads to a sliding pole, page 145, which will pull the animal into deep water when caught, quickly drowning it. In this case, bait is not necessary. If their feeding areas can be identified, or if tracks indicate a specific spot where they come ashore at the water’s edge, a trap can be set there with good results. In this instance, it is also advisable to set it underwater, using bait like a piece of turnip, parsnip, apple, or something similar, suspended a few inches above the trap's pan. Late in the fall, as they gather materials for building, they create large piles of dried grasses and sticks. A trap set in these piles and covered with loose material like grass or chaff will often catch the animal. In this situation, the trap should be attached to a spring-pole, page 145, because muskrats are very skilled at self-amputation when their escape is at stake.
The trap is sometimes set in the interior of the house, and may be accomplished by first breaking an opening in the wall, near the ice, the trap being inserted and set, afterwards covering it with the loose grass and moss, which is generally abundant in the interior of these huts. When this is done, the chain should be secured to a stick on the outside, and the hole repaired. No spring or sliding-pole is necessary in this method, as the animal when caught will immediately run for the water, and the weight of the trap will sink and drown its prisoner.
The trap is sometimes set inside the house and can be done by first creating an opening in the wall, near the ice. The trap is then inserted and set, and afterwards covered with the loose grass and moss that's usually plentiful in these huts. Once that's done, the chain should be secured to a stick outside, and the hole should be patched up. There's no need for a spring or sliding-pole in this method since the animal, when caught, will immediately run for the water, and the weight of the trap will sink and drown it.
Scent baits are sometimes used in trapping the muskrat, the Page 185 musk taken from the female animal being particularly valued. The Oils of Rhodium and Amber, page 151 are also successfully employed by many trappers; a few drops of either in the neighborhood of the trap, or directly upon it, being sufficient.
Scent baits are sometimes used to trap muskrats, with the musk from female animals being especially prized. The oils of rhodium and amber are also effectively used by many trappers; just a few drops of either near the trap, or directly on it, is enough.
Although steel traps are most generally used, there are several other devices which are equally if not even more desirable. Chief among these is the barrel trap, commonly and successfully employed in many parts of New England, where these animals often exist in such numbers as to render their destruction a matter of necessity.
Although steel traps are the most commonly used, there are several other devices that are equally, if not even more, desirable. The barrel trap is the most notable among these, widely and successfully used in many areas of New England, where these animals often thrive in such numbers that their removal becomes essential.
The above trap consists merely of an old barrel, sunk to its upper edge in the river bank, and about half filled with water. On the surface of the water a few light pieces of wood are floated, over which the bait, consisting of carrot, sweet apple, or turnip, is placed. A trail is then made by dragging a piece of scented meat from the barrel in various directions, and a few pieces of the bait are also strewn along these trails. The muskrats will thus be led to the barrel, and will be certain to jump in after the tempting morsels, and their escape is impossible. No less than a dozen muskrats have been thus caught in a single barrer in one night, and a few of these traps have been known almost to exterminate the musquashes in localities where they had previously existed in such numbers as to become a pestilence to the neighborhood.
The trap mentioned above is simply an old barrel, set into the riverbank up to its top edge, and filled about halfway with water. A few light pieces of wood float on the water's surface, on which the bait—like carrot, sweet apple, or turnip—is placed. A trail is then created by dragging a piece of scented meat from the barrel in different directions, and some bait is scattered along these trails. This methods leads the muskrats to the barrel, making them eager to jump in after the tempting treats, with no chance of escape. As many as a dozen muskrats have been caught in a single barrel overnight, and several of these traps have been known to nearly wipe out muskrats in areas where they had previously become so numerous that they were a nuisance to the community.
The skin of the muskrat may be removed in the same manner as hereinafter described for the otter, with the exception of the tail. This is considered the best method. It may also be taken off flat by ripping from the under jaw to the vent, and peeling around the eyes and mouth, letting the skin of the legs come off whole, without cutting.
The skin of the muskrat can be removed in the same way as described later for the otter, except for the tail. This is regarded as the best method. It can also be taken off flat by cutting from the under jaw to the vent and peeling around the eyes and mouth, allowing the skin of the legs to come off whole, without any cuts.
Another common method consists in cutting off the feet, and then ripping with a knife from the front of the lower jaw down the neck and belly to a point a little beyond the forelegs. The lips, eyes, and ears are then carefully skinned, and the hide is stripped backwards from the body. In the latter method the bow-stretcher, page 274, is used.
Another common method involves cutting off the feet, then slicing with a knife from the front of the lower jaw down through the neck and belly to just past the forelegs. The lips, eyes, and ears are then carefully skinned, and the hide is pulled off the body backwards. In this method, the bow-stretcher, page 274, is used.
Page 186 THE OTTER.
The fur of this animal is of such exquisite softness and beauty as to be in great demand for commercial purposes, bringing a very high price in the fur market.
The fur of this animal is incredibly soft and beautiful, making it highly sought after for commercial use, and it fetches a very high price in the fur market.
The otter cannot be said to be a common animal, although it is
found throughout the United States and Canada, being rather more
plentiful in the cold northern localities than in the southern
latitudes. It is an amphibious animal, and can remain for a long
time beneath the water. In size it is larger than a cat, and it
possesses a tapering tail some eighteen inches in length. Its fur
is of a rich brown color, and the hair is of two kinds, the one a
close, fine, and exquisitely soft down, which lies next the skin,
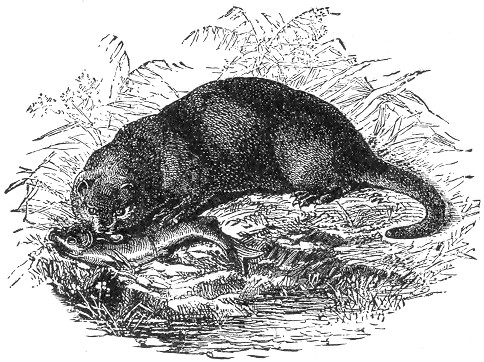 and which serves to protect the animal from the extremes of heat and
cold, and the other composed of long shining coarser hairs, which
permit the animal to glide easily through the water. In producing
the beautiful otter furs of fashion these long hairs are plucked
out, leaving only the softer down next the hide. The food of the
otter mostly consists of fish, for the pursuit of which he has
been admirably endowed by nature. His body is lithe and supple,
and his feet are furnished with a broad web, which connects the
toes, and is of infinite service
Page 187
in propelling the animal through the water when in search of his
finny prey. His long, broad and flat tail serves as a most effectual
rudder, and the joints of his powerful legs are so flexible as to
permit of their being turned in almost any direction.
and which serves to protect the animal from the extremes of heat and
cold, and the other composed of long shining coarser hairs, which
permit the animal to glide easily through the water. In producing
the beautiful otter furs of fashion these long hairs are plucked
out, leaving only the softer down next the hide. The food of the
otter mostly consists of fish, for the pursuit of which he has
been admirably endowed by nature. His body is lithe and supple,
and his feet are furnished with a broad web, which connects the
toes, and is of infinite service
Page 187
in propelling the animal through the water when in search of his
finny prey. His long, broad and flat tail serves as a most effectual
rudder, and the joints of his powerful legs are so flexible as to
permit of their being turned in almost any direction.
The otter isn't exactly a common animal, but it can be found all over the United States and Canada, being more abundant in the cold northern areas than in the southern regions. It's an amphibious creature that can stay underwater for a long time. It's larger than a cat and has a tapered tail that's about eighteen inches long. Its fur is a rich brown color and has two types of hair: one is short, fine, and incredibly soft down that lies close to the skin,
which helps protect the animal from extreme heat and cold, and the other is made up of long, shiny, coarser hairs that let the otter glide easily through the water. To create the beautiful otter furs used in fashion, these long hairs are removed, leaving just the softer down next to the skin. The otter primarily eats fish, and nature has equipped it perfectly for this. Its body is sleek and flexible, and its feet have broad webs connecting the toes, which are extremely helpful in propelling the animal through the water while it hunts for its fishy meals. Its long, broad, and flat tail acts like an effective rudder, and the joints in its strong legs are so flexible that they can move in almost any direction.
The habitation of the otter is made in the banks of the river which it frequents, or sometimes in a hollow log or crevice beneath rocks. The animal generally prefers to adopt and occupy a natural hollow or deserted excavation, rather than to dig a burrow for itself. The nest is composed of dry rushes, grasses and sticks, and the young, three or four in number, are produced in early spring.
The otter makes its home along the riverbanks it visits, or sometimes in a hollow log or crevice under rocks. Usually, the otter prefers to take over a natural hollow or abandoned burrow instead of digging one for itself. The nest is built with dry reeds, grasses, and sticks, and the young, typically three or four, are born in early spring.
The track which the otter makes in the mud or snow is easily distinguished from that of any other animal, on account of the "seal" or impression which is made by a certain ball on the sole of the foot. Otter hunting is a favorite sport in England, and indeed in the northern parts of our own country. Hounds are used to pursue the animal, and on account of the powerfully scented secretion with which the creature is furnished by nature, its track is readily followed. When attacked, the otter is a fierce and terrible fighter, biting and snapping with most deadly energy and never yielding as long as life remains in the body. The bite of an angry otter is extremely severe, and for this reason we would caution the amateur trapper on handling the animal should one be taken alive.
The track that an otter leaves in mud or snow is easy to tell apart from other animals because of the distinctive "seal" or impression made by a specific ball on the bottom of its foot. Otter hunting is a popular sport in England and also in the northern parts of our own country. Hounds are used to track the animal, and thanks to the strong-smelling secretion it naturally produces, its trail is easy to follow. When threatened, the otter fights fiercely, biting and snapping with deadly force and never backing down as long as it’s alive. An angry otter's bite is very severe, so we advise amateur trappers to be cautious when handling the animal if one is captured alive.
Although so fierce and savage when attacked, the otter is easily tamed when taken young, and can be taught to catch fish for the service of its master, rather than for the gratification of its own palate.
Although the otter is fierce and aggressive when threatened, it can be easily tamed if captured young, and can be trained to catch fish for its owner instead of just for its own enjoyment.
In the winter when the snow is on the ground, the otter navigates by sliding, and when on the ice he may often be seen to run a few steps and then throw himself on his belly and slide the distance of several feet. They are very fond of playing in the snow, and make most glorious use of any steep snow-covered bank, sloping toward the river. Ascending to the top of such an incline they throw themselves on the slippery surface and thus slide swiftly into the water. This pastime is often continued for hours, and is taken advantage of in trapping the playful creatures. A short search will reveal the place where they crawl from the water on to the bank, and at this spot, which will generally be shallow, a steel trap should be set on the bed of the river, about four inches under water. The trap should be secured by a stout chain, the latter being ringed to a sliding pole, page 145, which will lead the animal when caught into deep Page 188 water. If deep water is not near at hand, the spring pole, page 144, may be used, the object of either being to prevent the animal from gnawing off its leg and thus making its escape.
In the winter when the snow covers the ground, otters move by sliding, and when they’re on the ice, you can often spot them running a few steps before flopping onto their bellies and sliding several feet. They really enjoy playing in the snow and make great use of any steep snow-covered bank sloping down to the river. Climbing to the top of such a slope, they throw themselves onto the slippery surface and slide quickly into the water. This fun activity can go on for hours, making it easier to trap these playful animals. A quick search will show you where they climb out of the water onto the bank, and at this spot, which is usually shallow, a steel trap should be placed on the riverbed, about four inches underwater. The trap should be secured with a strong chain, which is attached to a sliding pole, page 145, that will guide the caught animal into deep water. If deep water isn’t nearby, a spring pole, page 144, can be used, with the aim of preventing the animal from chewing off its leg and escaping.
The trap may also be placed at the top or the slide, two or three feet back of the slope, a place being hollowed out to receive it and the whole covered with snow. To make success more certain a log may be laid on each side of the trap, thus forming an avenue in which the animal will be sure to run before throwing itself on the slope. Care should be taken to handle nothing with the bare hands, as the otter is very keen scented and shy. Anoint the trap with a few drops of fish oil or otter musk, see page 151. If none of these are handy, ordinary musk will answer very well.
The trap can also be positioned at the top or slide, two or three feet back from the slope, where a space has been cleared out to accommodate it, and then covered with snow. To improve the chances of success, you can place a log on either side of the trap, creating a path that the animal will likely follow before jumping onto the slope. It's important to handle everything without using bare hands, as otters have a strong sense of smell and are quite skittish. Apply a few drops of fish oil or otter musk to the trap, see page 151. If those aren't available, regular musk will work just fine.
The trap may also be set and weighted with a heavy stone and chain, as described for trapping the beaver. Another method still is to find some log in the stream having one end projecting above water. Sprinkle some musk on this projecting end and set the trap on the log in three or four inches of water, securing it firmly by a chain, also beneath the water.
The trap can also be set and weighed down with a heavy stone and chain, similar to trapping a beaver. Another method is to find a log in the stream with one end sticking out of the water. Sprinkle some musk on this exposed end and place the trap on the log in three or four inches of water, securing it firmly with a chain underneath the water.
A rock which projects over the stream may also be utilized in the same way as seen in the page title at the opening of this section. Smear the musk on the edge which juts into the water, and secure the trap by the chain as before. When the animal is caught he will fall or jump into the water, and the weight of the trap and chain will sink him. In every case it is necessary to obliterate every sign of human presence by throwing water over every foot print, and over everything with which the naked hands have come in contact. Where the traps are thus set in the water it should be done while wading or in a boat. In the winter when the ponds and rivers are frozen over the otters make holes through the ice at which they come up to devour their prey. Where the water is a foot deep beneath any of these holes the trap may be set in the bottom, the chain being secured to a heavy stone. When the otter endeavors to emerge from the hole he will press his foot on the trap and will thus be caught. If the water is deep beneath the hole the trap may be baited with a small fish attached to the pan, and then carefully lowered with its chain and stone to the bottom. For this purpose the Newhouse, No. 3, is best adapted, as the otter is in this case caught by the head.
A rock that sticks out over the stream can be used in the same way, as shown in the page title at the beginning of this section. Apply the musk to the edge that dips into the water, and secure the trap with the chain as before. When the animal gets caught, it will fall or jump into the water, and the weight of the trap and chain will pull it down. It's essential to erase all signs of human presence by splashing water over every footprint and everything that has been touched with bare hands. When setting the traps in the water, make sure to do it while wading or from a boat. In winter, when ponds and rivers are frozen, otters create holes in the ice where they surface to eat. If the water is a foot deep under any of these holes, the trap can be set on the bottom, and the chain can be secured to a heavy stone. When the otter tries to come up from the hole, it will push down on the trap and get caught. If the water is deep under the hole, the trap can be baited with a small fish attached to the pan and then gently lowered with its chain and stone to the bottom. For this, the Newhouse, No. 3, is best suited, as the otter will be caught by the head in this case.
The beaten track of the animal may often be discovered in the snow in the winter time, and a trap carefully sunk in such a furrow and covered so as to resemble its surroundings, will be likely to secure the first otter that endeavors to pass over it. A trap set at the mouth of the otter's burrow and carefully covered Page 189 is also often successful, using the sliding pole, page 145, to lead him into deep water.
The animal's path can often be found in the snow during winter, and a trap carefully placed in that trail and camouflaged to blend in with the area is likely to catch the first otter that tries to cross it. A trap set at the entrance of the otter's den and well-hidden is also frequently effective, using the sliding pole, page 145, to guide him into deeper water.
Every trapper has his pet theories and methods of trapping all the different animals, and the otter has its full share. We have given several of the best methods; and anyone of them will secure the desired result of capture, and all of them have stood the test of time and experience.
Every trapper has their favorite theories and techniques for trapping different animals, and otters are no exception. We have shared several of the best methods; any one of them will achieve the desired result of capture, and all of them have proven effective over time and through experience.
The skin of the otter should be removed whole, and the operation may be performed in the following manner: Slit down the hind legs to the vent; cut the skin loose around the vent, and slit up the entire length of the tail, freeing it from the bone. With the aid of the knife the skin should now be peeled off, drawing it backward and carefully cutting around the mouth and eyes before taking it from the head.
The skin of the otter should be taken off in one piece, and the process can be done like this: Cut down the back legs to the rear end; free the skin around the rear end, and cut up the whole length of the tail, separating it from the bone. Using the knife, the skin should now be pulled off, moving it backward and carefully cutting around the mouth and eyes before removing it from the head.
With the fur thus inside, the skin is ready for the stretcher as described on page 273, and the tail should be spread out and tacked around the edges.
With the fur on the inside, the skin is ready for the stretcher as described on page 273, and the tail should be spread out and tacked around the edges.
THE MINK.
This animal, as will be seen by our illustration, has a long, slender body, something like the weasel, to which scientific family it belongs. It inhabits the greater part of North America, and is also found abundantly in Northern Europe. The color of its fur varies considerably in different individuals, the general tint being a rich, dark brown. The chin and throat are light colored, sometimes white, and this spot varies considerably in size in different individuals, sometimes extending down on the throat to a considerable distance. The total length of the animal is from thirteen to sixteen inches, its size being variable.
This animal, as shown in our illustration, has a long, slim body, similar to a weasel, which is the scientific family it belongs to. It can be found in most of North America and is also common in Northern Europe. The color of its fur varies a lot among individuals, with the overall shade being a rich, dark brown. The chin and throat are lighter, sometimes white, and this area varies in size between individuals, sometimes stretching down the throat quite a bit. The total length of the animal ranges from thirteen to sixteen inches, and its size can vary.
The fur of the mink is excellent in quality, and has for many years been one of the "fancy furs" of fashion, a good prime skin often bringing from ten to twelve dollars. The introduction of the fur seal, however, and the universal demand for this as well as otter fur, has somewhat thrown the mink into comparative shade, although extra fine skins will still command high prices.
The quality of mink fur is top-notch and has been considered one of the trendy furs in fashion for many years, with a prime skin often selling for ten to twelve dollars. However, the rise of fur seal and the widespread demand for this and otter fur have somewhat overshadowed the mink, although exceptionally fine skins still fetch high prices.
The mink is an aquatic animal, inhabiting small rivers and streams,
and living somewhat after the manner of the otter. It has a most
wide range of diet, and will eat almost anything which is at all
eatable. Fishes, frogs, and muskrats are his especial delight,
and he will occasionally succeed in pouncing upon a snipe or wild
duck, which he will greedily devour. Crawfish,
Page 190
snails, and water insects of all kinds also come within the
range of his diet, and he sometimes makes a stray visit to some
neighboring poultry yard to satisfy the craving of his abnormal
hunger. A meal off from his own offspring often answers the same
purpose; and a young chicken in the egg he considers the ne plus
ultra of delicacies. The voracity of this animal is its leading
characteristic, and is so largely in excess of its cunning or sagacity
that it will often run headlong into a naked trap. Its sense of
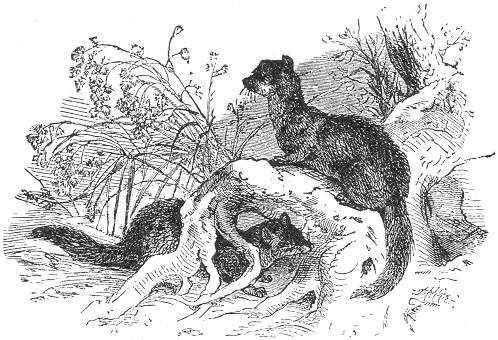 smell is exceedingly well developed, and through this faculty it
is often enabled to track its prey with ease and certainty. The
mink lives in burrows, in steep banks, or between rocks or the
roots of trees, and the young, five or six in number, are brought
forth in May.
smell is exceedingly well developed, and through this faculty it
is often enabled to track its prey with ease and certainty. The
mink lives in burrows, in steep banks, or between rocks or the
roots of trees, and the young, five or six in number, are brought
forth in May.
The mink is a semi-aquatic animal that lives in small rivers and streams, behaving somewhat like an otter. Its diet is very diverse, consuming almost anything edible. Fish, frogs, and muskrats are its favorites, and it will occasionally catch a snipe or wild duck, which it devours eagerly. Crayfish, snails, and all types of water insects are also part of its diet, and it sometimes makes a trip to a neighboring poultry yard to satisfy its unusual hunger. A meal of its own young often serves the same purpose, and it considers a young chicken in the egg to be the ultimate delicacy. The intense greediness of this animal is its defining trait, so much so that it often falls into a simple trap. Its sense of smell is extremely developed, allowing it to track its prey easily and reliably. The mink lives in burrows, steep banks, or between rocks or tree roots, and typically gives birth to five or six young in May.
The chief occupation of the mink consists in perpetual search for something to eat, and, when so engaged, he may be seen running along the bank of the stream, peering into every nook and corner, and literally "leaving no stone unturned" in its eager search. Taking advantage of this habit, it becomes an easy matter to trap the greedy animal. Set your trap, a Newhouse No. 2, in an inch of water near the edge of the stream, and directly in front of a steep bank or rock, on which you can place your bait. The bait may be a frog, fish, or head of a Page 191 bird, suspended about eighteen inches above the water, and should be so situated that in order to reach it, the mink will be obliged to tread upon the trap. The trap may also be set in the water and the bait suspended eighteen inches above it, by the aid of a switch planted in the mud near the trap. It is a good plan to scent the bait with an equal mixture of sweet oil and peppermint, with a little honey added. If there is deep water near, the sliding pole, page 145, should be used, and if not, the "spring pole" in every case, in order to prevent the captured mink from becoming a prey to larger animals, and also to guard against his escape by amputation, which he would otherwise most certainly accomplish.
The main job of the mink is constantly looking for something to eat. While doing this, you can spot it running along the stream's edge, checking every nook and cranny, and really "leaving no stone unturned" in its eager search. Taking advantage of this behavior makes it easy to trap the greedy creature. Just set your trap, a Newhouse No. 2, in an inch of water near the stream's edge, right in front of a steep bank or rock, where you can place your bait. The bait can be a frog, fish, or a bird's head, hung about eighteen inches above the water, positioned so the mink has to step on the trap to reach it. You can also set the trap in the water with the bait elevated eighteen inches above it, using a stick placed in the mud near the trap for support. It's a good idea to scent the bait with an equal mix of sweet oil and peppermint, plus a little honey. If there's deep water nearby, you should use the sliding pole, page 145, and if not, always use the "spring pole" to prevent the captured mink from being eaten by larger animals and to stop it from escaping by biting off its own leg, which it would definitely try to do.
The trap may be set on the land, near the water's edge, baiting as just described, and lightly covered with leaves or dirt. Any arrangement of the trap whereby the animal is obliged to tread upon it in order to secure the bait, will be found effectual.
The trap can be placed on the ground, close to the water's edge, baited as described earlier, and lightly covered with leaves or dirt. Any setup of the trap that forces the animal to step on it to get the bait will be effective.
The trap may be set at the foot of a tree, and the bait fastened to the trunk, eighteen inches above it. A pen, such as is described on page 144, may be constructed, and the trap and bait arranged as there directed. Minks have their regular beaten paths, and often visit certain hollow logs in their runways. In these logs they leave unmistakable signs of their presence, and a trap set in such a place is sure of success.
The trap can be placed at the base of a tree, with the bait tied to the trunk, eighteen inches above it. A pen, like the one described on page 144, can be built, and the trap and bait set up as instructed. Minks follow regular routes and often visit specific hollow logs in their paths. They leave clear signs of their presence in these logs, so a trap placed there is sure to be successful.
Some trappers set a number of traps along the stream at intervals of several rods, connecting them by a trail, see page 153, the mink being thus led directly and almost certainly to his destruction. This trail is made by smearing a piece of wood with the "medicine" described at page 153, and dragging it on the line of the traps. Any mink which crosses this trail will follow it to the first trap, when he will, in all probability, be captured. A dead muskrat, crow, fish, or a piece of fresh meat dragged along the line answers the same purpose. The beaten tracks of the mink may often be discovered, and a trap set in such a track and covered with leaves, dirt or the like, will often be successful.
Some trappers set a series of traps along the stream spaced a few yards apart, linking them with a trail, see page 153, which leads the mink directly and almost certainly to its doom. This trail is created by smearing a piece of wood with the "medicine" described at page 153, and dragging it along the line of the traps. Any mink that crosses this trail will follow it to the first trap, where it will likely get caught. A dead muskrat, crow, fish, or a piece of fresh meat dragged along the line serves the same purpose. The worn paths of the mink can often be found, and setting a trap in one of these paths and covering it with leaves, dirt, or similar materials can often lead to success.
Minks may also be easily caught in the dead-fall. Garrote trap or a twitch-up, baiting with fish, muskrat, flesh, or the head of a bird, of which the animal is especially fond. A liberal use of the "medicine" is also desirable.
Minks can also be easily caught in a dead-fall trap, a garrote trap, or a twitch-up, using bait like fish, muskrat, meat, or a bird's head, which the animal particularly likes. It’s also a good idea to use a generous amount of "medicine."
The fur of the mink is in its best condition in the late autumn, winter, and early spring, and the animal should be skinned as described for the fox.
The mink's fur is in its prime during late autumn, winter, and early spring, and the animal should be skinned as detailed for the fox.
Page 192 THE PINE MARTEN.
This animal belongs to the tribe of "weasels," and is closely allied
to the celebrated sable, which it greatly resembles. The pine marten
is so called because it inhabits the northern climates where pine
forests abound, and spends much of its life in the trees in search
of its prey. Its general appearance is truly represented in our
illustration, its fur being of a rich brown color, with a lighter
or white patch on the throat. Its total length, including the tail,
is about twenty-eight or thirty inches, of which the tail represents
ten inches. It is mostly confined to the forests in the far north,
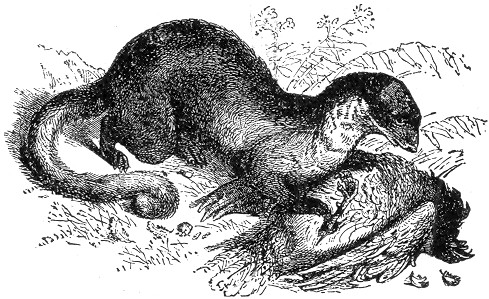 and is comparatively rare further south than the latitude of Maine
and the lakes. The fur of the pine marten is of considerable value,
particularly if the animal be killed in the winter. A really fine
skin is but little inferior to the celebrated sable, and is hardly
distinguishable from it. The hair is long and glossy, and the under
fur is beautifully soft and very thick. The dark colored skins are
the most valuable. Although so nearly like the sable, the same
comparison does not exist in regard to their proportionate market
values, the marten fur bringing a much lower price.
and is comparatively rare further south than the latitude of Maine
and the lakes. The fur of the pine marten is of considerable value,
particularly if the animal be killed in the winter. A really fine
skin is but little inferior to the celebrated sable, and is hardly
distinguishable from it. The hair is long and glossy, and the under
fur is beautifully soft and very thick. The dark colored skins are
the most valuable. Although so nearly like the sable, the same
comparison does not exist in regard to their proportionate market
values, the marten fur bringing a much lower price.
This animal is part of the "weasel" family and is closely related to the famous sable, which it closely resembles. The pine marten gets its name because it lives in northern regions where pine forests are common and spends a lot of time in trees looking for food. Its appearance is accurately depicted in our illustration, with fur that is a rich brown color and a lighter or white patch on its throat. Its total length, including the tail, is about twenty-eight to thirty inches, with the tail making up about ten inches of that. It primarily inhabits the forests of the far north,
and is relatively rare south of the latitude of Maine and the Great Lakes. Pine marten fur is quite valuable, especially if the animal is hunted in the winter. A top-quality skin is slightly less valuable than the renowned sable and can be hard to tell apart from it. The fur is long and shiny, and the underfur is incredibly soft and very thick. The darker skins are the most sought after. While the pine marten is very similar to the sable, there is a significant difference in their market values, with pine marten fur fetching a much lower price.
The marten is a shy and wary animal, withdrawing itself as far as possible from the sight of man, and building its habitation in the tops of trees, often seizing on the ready nest of some squirrel or bird, and adapting it to its purposes.
The marten is a shy and cautious animal, keeping its distance from humans and making its home in the tops of trees, often taking over the existing nest of a squirrel or bird and modifying it for its own use.
Page 193 It is a night prowler, and in the dark hours it traverses the trunks and branches of the trees in search of its prey. It moves with wonderful stealth and activity, and is enabled by its rapid and silent approach to steal unnoticed on many an unfortunate bird or squirrel, seizing it in its deadly grip before the startled creature can think to escape. Coming across a bird's nest, it makes sad havoc with the eggs or young, often adding the parent bird to his list of victims. Rabbits, partridges, and mice also fall into the marten's "bill of fare," and the list is often further increased by a visit to a poultry yard, when the animal murders and eats all it can and kills the rest for sport. In pouncing upon its prey, the marten invariably seizes its victim by the throat, often dispatching the luckless creature with a single bite.
Page 193 It’s a nighttime hunter, and during the dark hours, it moves through the trunks and branches of trees searching for its prey. It operates with remarkable stealth and agility, and its quick and silent approach allows it to sneak up on many an unsuspecting bird or squirrel, capturing it in its deadly grip before the startled animal has a chance to escape. When it finds a bird's nest, it wreaks terrible havoc on the eggs or young, often adding the parent bird to its list of victims. Rabbits, partridges, and mice are also on the marten's menu, and the list often grows when it visits a poultry yard, where it kills and eats as much as it can and kills the rest for fun. When it pounces on its prey, the marten always grabs its victim by the throat, often killing the unfortunate creature with a single bite.
The martens generally are said to be very susceptible to human influence when taken young, and are very lively in a state of domestication. They are among the most graceful of animals, and in place of the disagreeable scent which renders many of their tribe offensive, this creature possesses an odor which is quite agreeable, and for this reason is often called the sweet marten in contradistinction to the foul marten or pole cat of Britain, which is like unto our skunk in the disgusting stench which it exhales.
The martens are often thought to be highly influenced by humans when they’re young, and they are quite energetic when domesticated. They’re among the most graceful animals, and instead of the unpleasant smell that makes many of their relatives off-putting, this animal has a scent that is quite pleasant. For this reason, it's often referred to as the sweet marten, in contrast to the foul marten or polecat in Britain, which is similar to our skunk in the terrible odor it produces.
The dead-fall and Garrote traps are very successful in trapping the martin. They should be set several rods apart, in the forest or on the banks of streams, and a trail established by dragging a dead or roasted crow, entrails of a bird, or fresh meat from one trap to another, as described in relation to the mink, page 190. The twitch-up may also be used, and possesses the additional advantage of acting as a spring pole, thus holding the captured victim out of reach of larger animals, to which it might otherwise become a prey. Any of the varieties described under the title of "twitch-up" will answer the purpose, and a little experimenting will soon prove which one will be the most successful for this particular animal. The bait may consist of a bird's or fowl's head, fish, liver, or any fresh meat or entrails.
The dead-fall and Garrote traps are very effective for catching martins. They should be set several rods apart in the woods or along the banks of streams, and you can create a trail by dragging a dead or roasted crow, bird entrails, or fresh meat from one trap to the next, similar to what’s described for the mink, page 190. The twitch-up trap can also be used, and it has the added advantage of acting as a spring pole, keeping the captured animal safe from larger predators that might otherwise go after it. Any of the types mentioned under "twitch-up" will do the job, and a bit of experimentation will quickly show which one works best for this specific animal. The bait can be a bird's or fowl's head, fish, liver, or any fresh meat or entrails.
When the steel trap is employed, it should be of the size of Newhouse, No. 2-1/2, set on the ground beneath some rock, Page 194 and covered with leaves, rotten wood, or earth, and the bait fastened or suspended about eighteen inches above it, in such a position that the animal will be obliged to step upon the trap in order to reach it. An enclosure may be constructed of stones piled together, the trap being set and covered in the opening and the bait secured at the back. A staked pen, such as is described on page 143, with the trap and bait arranged as there directed, also works well. Wherever or however the trap is set, the bait should be so placed that the animal cannot possibly climb on any neighboring object to reach it. The hollow of a tree trunk forms an excellent situation for the trap, and the same hollow may also be baited at the back and a dead-fall constructed across its opening. The box or barrel pit-fall, described on page 127, is said to be very successful in trapping the marten, always baiting it with the platform secure for a few days before setting for capture. The same methods directed for the capture of the mink are also useful in trapping the marten. The animal should be skinned as described for the fox.
When using the steel trap, it should be the size of Newhouse, No. 2-1/2, placed on the ground under some rocks, Page 194 and covered with leaves, rotten wood, or dirt. The bait should be secured or hung about eighteen inches above the trap in a way that forces the animal to step on the trap to reach it. You can create an enclosure using a pile of stones, setting and covering the trap in the opening and placing the bait at the back. A staked pen, as described on page 143, with the trap and bait set up as directed, also works well. Wherever or however the trap is set, ensure the bait is placed so that the animal can't climb on anything nearby to access it. The hollow of a tree trunk is an excellent spot for the trap, and you can also bait the back of the hollow and set up a dead-fall across its opening. The box or barrel pit-fall, mentioned on page 127, is said to be very effective for trapping the marten, always baiting it with a secure platform for a few days before you set it for capture. The methods recommended for trapping mink are also useful for catching marten. The animal should be skinned as described for the fox.
THE FISHER.
This animal is classed among the martens, and is principally to be found in Canada and the Northern United States, where it is known as the black cat, or woodshock. In our natural histories it is described under the name of the pekan.
This animal is categorized as one of the martens and is mainly found in Canada and the Northern United States, where it’s called the black cat or woodshock. In our natural histories, it’s referred to as the pekan.
In general habits, this species resembles the other martens, but its body inclines more to the weasel shape. The fur is quite valuable, and much resembles the sable. Its color is generally of a greyish brown, the grey tint being found chiefly on the back, neck, head and shoulders, the legs, tail, and back of the neck being marked with dark brown. Like the marten, the fisher prowls by night, frequenting swampy places in quest of food.
In general habits, this species is similar to other martens, but its body is more weasel-like. The fur is quite valuable and closely resembles sable. Its color is mostly a grayish-brown, with the gray mainly on the back, neck, head, and shoulders, while the legs, tail, and back of the neck are marked with dark brown. Like the marten, the fisher hunts at night, often searching for food in swampy areas.
It builds its habitation in hollow trees, and in burrows, which it excavates in the banks of rivers or streams, and its young (generally twins) are produced in early spring. The trapping season for the fisher commences at about the middle of October, and extends to the middle of May, after which time the fur decreases in value.
It makes its home in hollow trees and in burrows that it digs into the banks of rivers or streams, and its young (usually twins) are born in early spring. The trapping season for the fisher starts around mid-October and lasts until mid-May, after which the fur loses value.
In trapping the fisher, the same plans may be used as for the marten and mink, as these animals much resemble each other in general habits. The steel trap arranged in an artificial or Page 195 natural enclosure, or otherwise so set as that the animal will be obliged to step on it in order to reach the bait, will be successful and the use of composition "scent bait," described on page 153 will be found to enhance success. In every case where the steel trap is used the spring pole, page 144, should always be employed, for the reasons already described.
In trapping the fisher, the same methods can be used as for the marten and mink, since these animals share similar habits. A steel trap placed in an artificial or natural enclosure, or set up in a way that forces the animal to step on it to reach the bait, will be effective. Using the "scent bait" composition mentioned on page 153 will also increase success. Whenever the steel trap is used, the spring pole, page 144, should always be used, for the reasons already explained.
Dead-falls, garrotes, box-traps, twitch-ups, or pit-falls, may all be employed to good advantage. Bait with a fish or bird, or fresh meat of any kind, and connect the various traps by a trail, as described for the mink and marten.
Dead-falls, garrotes, box traps, twitch-ups, or pitfall traps can all be used effectively. Bait them with fish, birds, or any kind of fresh meat, and connect the different traps with a trail, as outlined for the mink and marten.
Remove the skin as directed for the fox, and stretch as described on page 273.
Remove the skin as instructed for the fox, and stretch it as detailed on page 273.
THE SKUNK.
This disgusting animal has won the unenviable but deserving reputation of being the most foul-smelling creature on the face of the globe. He belongs to the weasel tribe, and all these animals are noted for certain odors which they possess, but the skunk is pre-eminent in the utter noisomeness of the horrid effluvium which it exhales.
This revolting animal has earned the unfortunate but well-deserved reputation of being the foulest-smelling creature on the planet. It belongs to the weasel family, and all these animals are known for certain odors they emit, but the skunk stands out for the extreme unpleasantness of the disgusting stench it releases.
This scent proceeds from a liquid secretion which collects in a gland beneath the insertion of the tail, and the animal has the power to eject or retain it at will.
This scent comes from a liquid secreted by a gland located beneath the base of the tail, and the animal can choose to release or hold onto it whenever it wants.
It must have been given to the creature as a means of defence, for there seems to be no animal that can withstand the influence of its fetid stench. Dogs are trained to hunt the animal, but until they have learned from experience the right method of attacking the fetid game, and have discovered the whereabouts of the animal's magazine of ammunition, they are of little use to the hunter, and are only too glad to plunge into some neighboring brook, or roll in some near earth, in hopes of ridding themselves of the stench which almost distracts them. The offensive propensities of the skunk are only exercised when the animal is alarmed or frightened. There are generally certain "premonitory symptoms" of attack which the creature usually exhibits, and it is well to retire from his "shooting range" as soon as they are observed.
It must have been given to the creature as a means of defense, since there doesn’t seem to be any animal that can stand the impact of its terrible odor. Dogs are trained to hunt this animal, but until they learn from experience the right way to approach the smelly target and find out where the creature stores its spray, they are not very helpful to the hunter. They are usually eager to jump into a nearby stream or roll in the dirt, hoping to get rid of the stench that nearly drives them crazy. The skunk only uses its nasty spray when it feels threatened or scared. There are usually some clear "warning signs" before it attacks, so it's smart to back away from its "range" as soon as you notice them.
When the animal is ready to discharge his battery, he suddenly elevates his large bushy tail, over his body, and turns his back on his enemy. The result of the discharge fills the air for a great distance around, and man and beast fly from the neighborhood of the indescribable and fetid effluvium, which fairly makes one's nostrils ache.
When the animal is ready to release its energy, it suddenly lifts its large, bushy tail over its body and turns its back on its enemy. The result of this release fills the air for a long way around, causing both people and animals to flee from the area of the unbearable and foul smell, which really makes one's nostrils ache.
Page 196 A single drop of this disgusting secretion on the clothes is enough to scent the whole garment, and it is almost impossible to rid the tainted fabric from the odor.
Page 196 Just one drop of this repulsive fluid on your clothes is enough to make the entire garment smell, and it’s nearly impossible to get the stinky fabric to lose the odor.
It is extremely acrid in quality, and if a very small quantity fall upon the eyes, it is very apt to produce permanent blindness.
It is very harsh in nature, and if even a tiny amount gets into the eyes, it can easily cause permanent blindness.
Dogs, in their first experiences with the skunk, are frequently
thus blinded, and there are well authenticated instances of human
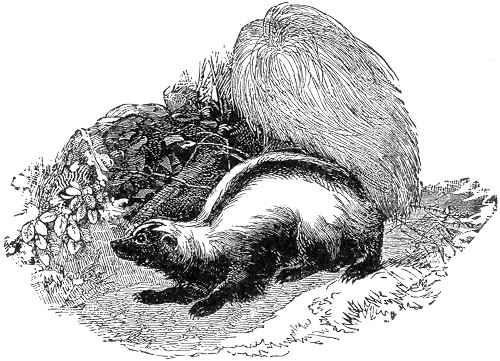 beings who have been deprived of their sight through their close
proximity to an infuriated skunk.
beings who have been deprived of their sight through their close
proximity to an infuriated skunk.
Dogs, in their first encounters with a skunk, often end up blinded, and there are credible reports of humans who have lost their sight due to being too close to an angry skunk.
The writer, in his extreme youth, learned, through dear experience, the putrid qualities of this noisome quadruped. It was on one bright Sunday, in New England, and he was out in his Sunday clothing, gathering wild strawberries. He suddenly discovered a pretty little playful animal with bushy tail, romping in the grass near him. The creature was seemingly gentle, and showed no inclination to run away, and the pet-loving nature of the writer prompted an irresistible desire to capture so pretty a creature. Encouraged by its gentle manner, he eagerly ran towards the tempting prize, and grasping it by the bushy tail, which the animal had raised perpendicularly, as if for a Page 197 handle, the pretty creature was locked in the affectionate embrace of its youthful admirer. But alas! he soon repented his rashness, and the treacherous "pet" was quickly flung away leaving its victim in such a foul state of overwhelming astonishment as can be more easily imagined than described.
The writer, when he was very young, learned through tough experience about the disgusting traits of this awful animal. It was a bright Sunday in New England, and he was out in his Sunday clothes collecting wild strawberries. Suddenly, he spotted a cute little playful animal with a bushy tail frolicking in the grass nearby. The creature appeared gentle and didn’t seem like it wanted to run away, and the writer’s affection for pets sparked an irresistible urge to catch such a lovely creature. Encouraged by its gentle behavior, he eagerly ran toward the enticing prize, and grabbing it by its bushy tail—raised straight up as if it were a handle—the pretty creature was caught in the affectionate grip of its youthful admirer. But alas! he quickly regretted his impulsiveness, and the deceitful "pet" was swiftly tossed away, leaving him in a state of such overwhelming shock that it's easier to imagine than to explain.
Every article of clothing worn on that eventful Sunday had to be buried, and it took weeks of Sundays before the odor could be thoroughly eradicated from the hair and skin of the individual who wore those Sunday garments. After this adventure, the youth became more cautious with respect to pretty little playful animals, with black and white fur and bushy tails.
Every piece of clothing worn on that memorable Sunday had to be buried, and it took weeks before the smell could be completely removed from the hair and skin of the person who wore those Sunday outfits. After this experience, the young person became more careful around cute little playful animals with black and white fur and fluffy tails.
There is hardly a farmer in the country but what has had some amusing or serious experience with the skunk, and almost every trapper has, at one time or another, served as a target for his shooting propensities. Natural histories are replete with anecdotes of which this animal is the mephitic hero, and volumes might be filled to the glory of his strong-smelling qualities.
There’s hardly a farmer in the country who hasn’t had some funny or serious experience with skunks, and almost every trapper has, at some point, become a target for their shooting habits. Nature books are full of stories featuring this animal as the smelly star, and whole books could be written about its strong odor.
Perhaps it is through the prejudice of the writer that he cannot enthusiastically recommend the skunk as a domestic pet; but it is nevertheless asserted, on good authority, that these animals, when reared from the young, become very interesting and playful in the household, and completely shut down on their objectionable faculties.
Perhaps it's the writer's bias that makes it hard to wholeheartedly recommend the skunk as a pet; however, it's still claimed by reliable sources that these animals, when raised from young, become quite engaging and playful in the home, and completely curb their undesirable traits.
Our illustration gives a very good idea of the animal, and it is so unlike any other creature that a further description will not be necessary. The prevailing colors are white and black; but these vary much in proportion, the animal sometimes being almost totally white, or altogether black. The fur is long, and comparatively coarse, being intermixed with long, glossy hairs, and is most valuable in the black animal. The body of the creature is about a foot and a half in length, exclusive of the tail, which adds about fourteen inches more.
Our illustration provides a clear depiction of the animal, and since it’s so different from any other creature, we don’t need to elaborate further. The main colors are white and black, but their proportions can vary a lot; sometimes the animal is nearly all white, or completely black. The fur is long and fairly coarse, mixed with long, shiny hairs, and is especially valuable in the black variant. The body of the creature measures about a foot and a half long, not including the tail, which adds around fourteen inches.
The skunk is generally nocturnal in its habits, secreting itself during the day in hollow trees, or crevices in rocks, or wood-piles. At night it ventures forth in quest of its food, which consists chiefly of grasshoppers, worms and other insects, wild fruit and such small animals in the shape of frogs, mice and birds as it can capture. The poultry yard often offers an irresistible temptation, and both fowls and eggs often serve to appease his appetite.
The skunk is mostly active at night, hiding during the day in hollow trees, rock crevices, or piles of wood. At night, it comes out to look for food, which mainly includes grasshoppers, worms, and other insects, wild fruit, and small animals like frogs, mice, and birds that it can catch. The chicken coop often presents an irresistible lure, and both the birds and their eggs frequently satisfy its hunger.
The skunk is common throughout the greater part of North America, and in many localities the numbers increase very Page 198 rapidly unless checked. The young are brought forth in burrows or holes in rocks during April or May, and are from six to nine in number.
The skunk is widespread across most of North America, and in many places, their numbers can grow quickly unless controlled. The young are born in burrows or rock crevices during April or May, and there are typically six to nine of them.
"Skunk fur" does not sound well when thought of in connection with a set of fashionable furs; and for this reason the pelt of this animal is dignified by the name of Alaska sable by all dealers in the article. When known by this fancy title it suddenly becomes a very popular addition to fashion's winter wardrobe, and is one of the leading furs which are exported to meet the demand of foreign countries. Foul as the animal is, it seldom soils its own fur with its offensive fluid; and when carefully skinned the fur is as saleable as that of any other animal.
"Skunk fur" doesn't sound great when you think of it in relation to stylish furs; that's why everyone who sells it calls it Alaska sable instead. With this fancier name, it quickly becomes a sought-after piece in winter fashion, and it's one of the top furs exported to satisfy the demand in foreign markets. Despite the animal's unpleasant nature, it rarely taints its own fur with its nasty liquid; and when properly skinned, the fur is as marketable as that of any other animal.
The Skunk is trapped in a variety of ways; and as the animal is not cunning, no great skill is required. The steel trap is most commonly used, as other wooden varieties, box traps or dead-falls, for instance, are apt to absorb and retain the stench of the animal. In using the steel trap the size No. 2 should be taken. It may be set at the entrance to their burrows or in their feeding grounds. It should be covered with loose earth or chaff, or some other light substance, and baited with small bits of meat, dead mice, or eggs placed around it. The enclosure illustrated on page 143 also answers well, and in all cases the spring pole, page 144, should be used. The dead-fall, page 107, is often employed, and the twitch-up, page 43, is a particularly effective contrivance for their capture, often preventing the evil consequences of the odor by causing instant dislocation of the neck, and this without injuring the fur. A stroke upon the backbone near the tail, by producing paralysis of the parts, also prevents the animal from using his offensive powers, and a dead-fall so constructed as to fall upon the animal at this part will accomplish the same effect. To manage this it is only necessary to place the bait far back in the enclosure, so that the skunk on reaching it will bring the rear portion of his body beneath the suspended log. The scent of the skunk is as we have said, almost ineradicable, but we would recommend chloride of lime as the most effectual antidote.
The skunk can be trapped in several ways; since the animal isn't very clever, you don't need much skill. The most commonly used trap is a steel trap, because wooden types, box traps, or dead-falls tend to absorb and hold onto the skunk's smell. When using a steel trap, you should choose size No. 2. It can be set at the entrance of their burrows or in areas where they feed. Cover it with loose dirt or straw, or another light material, and bait it with small pieces of meat, dead mice, or eggs placed around it. The enclosure shown on page 143 works well too, and in all cases, use the spring pole, page 144. The dead-fall, page 107, is frequently used, and the twitch-up, page 43, is particularly effective for capturing them. It often prevents the unpleasant smell by instantly breaking their necks without damaging the fur. A blow on the backbone near the tail can cause paralysis, which also stops the animal from using its defensive spray, and a dead-fall designed to drop on this area will achieve a similar result. To make this work, just place the bait at the back of the enclosure so that when the skunk reaches for it, its rear will be underneath the hanging log. As mentioned, the skunk's smell is nearly impossible to get rid of, but we recommend using chloride of lime as the most effective remedy.
It is also said by some trappers that the odor may be dissipated by packing the garment in fresh hemlock boughs, letting it thus remain for a couple of days. This is certainly a valuable hint if true, and is well worth remembering.
It’s also said by some trappers that the smell can be eliminated by packing the clothing in fresh hemlock branches and leaving it there for a couple of days. This is definitely a useful tip if it’s true, and it’s worth keeping in mind.
For skinning the skunk, see Beaver, Otter and Fox.
For skinning the skunk, see Beaver, Otter, and Fox.
Page 199 THE WOLVERINE.
This, one of the most ferocious as well as detestable of American animals, is principally found in British America and the upper portion of the United States. It has won a world wide reputation for its fierceness and voracity, and on this account is popularly known as the Glutton. It is not confined to America, but is also found in Siberia and Northern Europe.
This, one of the most fierce and unpleasant animals in America, is mainly found in Canada and the northern part of the United States. It has gained a global reputation for its aggression and insatiable appetite, which is why it’s commonly referred to as the Glutton. It’s not exclusive to America, as it can also be found in Siberia and Northern Europe.
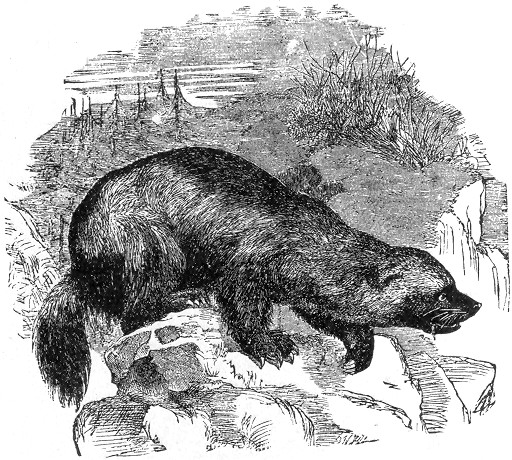
The general appearance of this animal, ugly in disposition as in appearance, is truthfully given in our illustration. It is not unlike a small bear in looks, and was formerly classed among that genus.
The overall look of this animal, as unpleasant in behavior as it is in looks, is accurately shown in our illustration. It resembles a small bear in appearance and was previously categorized in that genus.
The general color of the wolverine is dark brown. The muzzle, as far back as the eye-brows, is black, and the immense paws partake of the same hue. The claws of the animal are Page 200 long and almost white, forming a singular contrast to the jetty fur of the feet. So large are the feet of this animal, and so powerful the claws, that a mere look at them will tell the story of their death dealing qualities, a single stroke from one of them often being sufficient for a mortal wound. Although the wolverine is not as large as the bear, its foot prints in the snow are often mistaken for those of that creature, being nearly of the same size.
The general color of the wolverine is dark brown. The muzzle, extending back to the eyebrows, is black, and the large paws share the same color. The animal's claws are long and almost white, creating a striking contrast against the dark fur of its feet. The feet of this animal are so large, and the claws so powerful, that just a glance at them reveals their deadly nature; a single swipe can often deliver a fatal wound. Even though the wolverine isn't as big as a bear, its footprints in the snow are often confused with those of that creature, as they are nearly the same size.
The glutton feeds largely on the smaller quadrupeds, and is a most determined foe to the beaver during the summer months; the ice-hardened walls of their houses serving as a perfect protection against his attacks in the winter time.
The glutton primarily feeds on smaller four-legged animals and is a fierce enemy of the beaver during the summer. The ice-covered walls of their homes provide excellent protection against his attacks in the winter.
To the trapper of the north the wolverine is a most detested enemy, following the rounds of the traps and either detaching the baits or tearing away the dead animals which have fallen a prey to them. The trapper's entire circuit will be thus followed in a single night, and where the veritable "glutton" does not care to devour its victim it will satisfy its ferocious instinct by scratching it in pieces, leaving the mutilated remains to tell the story of its nocturnal visit.
To the northern trapper, the wolverine is a most hated enemy, stalking the lines of traps and either stealing the bait or dragging off the dead animals that have been caught. The wolverine will cover the trapper's entire route in just one night, and if the true "glutton" doesn’t want to eat its victim, it will still satisfy its brutal instincts by tearing it apart, leaving the mangled remains behind to tell the tale of its nighttime visit.
The wolverine is a dangerous foe to many animals larger than itself, and by the professional hunter it is looked upon as an ugly and dangerous customer.
The wolverine is a formidable enemy to many animals bigger than it is, and professional hunters see it as an ugly and dangerous creature.
There are several methods of trapping this horrid creature, and in many localities successful trapping of other animals will be impossible without first ridding the neighborhood of the wolverines. Dead-falls of large size will be found to work successfully, baiting with the body of some small animal, such as a rat or squirrel. A piece of cat, beaver or muskrat flesh is also excellent, and by slightly scenting with castoreum success will be made sure. Several of these traps may be set at intervals, and a trail made by dragging a piece of smoked beaver meat between them. The gun trap, as described on page 20, will also do good service in exterminating this useless and troublesome animal.
There are several ways to trap this annoying creature, and in many areas, successfully trapping other animals will be impossible without first getting rid of the wolverines. Large dead-falls tend to work well, especially when baited with the body of a small animal like a rat or squirrel. A piece of cat, beaver, or muskrat meat is also great, and by lightly scenting it with castoreum, you'll ensure success. You can set several of these traps at intervals and create a trail by dragging a piece of smoked beaver meat between them. The gun trap, as described on page 20, will also be effective in eliminating this useless and bothersome animal.
Steel traps of size No. 3 or 4 are commonly used to good purpose. They may be arranged in any of the various methods already described, the plan of the enclosure, page 143, being particularly desirable. In all cases the trap should be covered with leaves, moss or the like, and the bait slightly scented with castoreum. Like all voracious animals, the perpetual greed of the wolverine completely overbalances its caution, and thus renders its capture an easy task.
Steel traps of size No. 3 or 4 are often used effectively. They can be set up in any of the various methods previously described, with the design of the enclosure, page 143, being especially preferred. In all instances, the trap should be concealed with leaves, moss, or similar materials, and the bait should be lightly scented with castoreum. Like all greedy animals, the wolverine's constant hunger completely outweighs its caution, making it easy to trap.
Page 201 The home of the animal is generally in a crevice or cave between rocks, and its young, two or three in number, are brought forth in May.
Page 201 The animal typically lives in a crack or cave between rocks, and it usually gives birth to two or three young in May.
In removing the skin, it may be ripped up the belly, or taken off whole, as described for the fox.
In removing the skin, it can either be torn along the belly or taken off all at once, as mentioned for the fox.
THE OPOSSUM.
The opossum is found more or less throughout nearly all the United
States. In size it equals a large cat, the tail being about fifteen
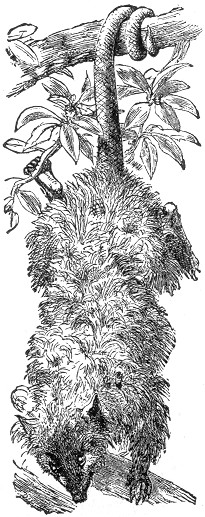 inches long, very flexible and covered with scales. The general
color of the fur is grayish-white, slightly tinged with yellow,
Page 202
and the legs are of a brownish hue, which color also surrounds the
eyes to some extent.
inches long, very flexible and covered with scales. The general
color of the fur is grayish-white, slightly tinged with yellow,
Page 202
and the legs are of a brownish hue, which color also surrounds the
eyes to some extent.
The opossum can be found pretty much all over the United States. It’s about the size of a large cat, with a tail that’s around fifteen inches long, very flexible, and covered in scales. The fur is generally grayish-white, with a slight yellow tint, and the legs are a brownish color that also partially surrounds the eyes.
The fur is comparatively soft and wooly, and thickly sprinkled with long hairs, white at the base and brown at the tips.
The fur is relatively soft and fluffy, and is thickly mixed with long hairs, white at the base and brown at the tips.
The nature and habits of the animal are very interesting. Its nest is made in some sheltered hollow in an old fallen or live tree, or beneath overhanging roots or rocks, and composed of moss and dead leaves. The young are produced in several litters during the year, and when born are transferred by the mother to a pouch situated in the lower front portion of her body. Here they remain and are nourished by the parent until they are five weeks old, at which time they emerge and travel with their mother, and their little ring tails do them good service in holding fast to their guardian. It is an amusing sight to see a family of young 'possums thus linked together, and so "attached to each other."
The animal's nature and habits are really fascinating. Its nest is built in a sheltered spot in an old fallen or live tree, or under overhanging roots or rocks, and is made up of moss and dead leaves. The mother gives birth to several litters throughout the year, and after they're born, she carries them to a pouch located on the lower front part of her body. They stay there and get nourishment from her until they’re five weeks old, at which point they come out and travel with their mother, using their little ring tails to hold on tightly to her. It's quite a charming sight to see a family of young 'possums all connected and so "attached to each other."
The opossum is a voracious and destructive animal, prowling about during the hours of darkness and prying into every nook and corner in hope of finding something that may satisfy the cravings of imperious hunger. Rats, mice, nuts, berries, birds, insects and eggs are all devoured by this animal; and when not content with these he does not hesitate to insinuate himself into the poultry yard, and make a meal on the fowls and young chickens. His fondness for fruit and Indian corn often leads him to commit great havoc among plantations and fruit trees, and his appetite for the fruit of the persimmon tree is proverbial. While feeding on these fruits he frequently hangs by his tail, as seen in our illustration, gathering the persimmons with his fore paws and eating them while thus suspended. He is a most agile climber, and his tenacity and terminal resources in this direction are admirably depicted in that well known Methodist sermon, as follows: "An' you may shake one foot loose, but 'tothers thar; an' you may shake all his feet loose, but he laps his tail around the lim' an' he clings forever."
The opossum is a greedy and destructive animal, prowling around at night and searching every nook and cranny in hopes of finding something to satisfy its insistent hunger. It eats rats, mice, nuts, berries, birds, insects, and eggs; and when it's not satisfied with these, it doesn’t hesitate to sneak into the poultry yard to feast on chickens and young birds. Its love for fruit and corn often causes significant damage to farms and orchards, and its craving for persimmons is well-known. While eating these fruits, it often hangs by its tail, as shown in our illustration, using its front paws to gather persimmons and munching on them while suspended. It’s an incredibly agile climber, and its persistence and skills in this area are beautifully illustrated in a famous Methodist sermon, which says: "An' you may shake one foot loose, but 'tothers thar; an' you may shake all his feet loose, but he laps his tail around the lim' an' he clings forever."
He is an adept at feigning death, "playing 'possum" so skilfully as frequently to deceive an expert.
He is skilled at pretending to be dead, "playing 'possum" so expertly that he often fools an expert.
"'Possums" are hunted in the Southern States much after the manner of coons; and to the negroes a "'possum hunt" signifies most unbounded sport."
"'Possums" are hunted in the Southern States much like raccoons, and for the Black community, a "'possum hunt" means a lot of fun."
Though cunning in many ways, the opossum is singularly simple in others. There is hardly any animal more easily captured; for it will walk into the clumsiest of traps, and permit itself to be ensnared by a device at which an American rat would look with utter contempt.
Though clever in many ways, the opossum is surprisingly simple in others. There’s hardly any animal that’s easier to catch; it will stroll right into the clumsiest traps and allow itself to be caught by a device that an American rat would utterly disdain.
Page 203 The dead-fall, garrote, or stout snare may all be employed, being baited with any of the substances already described. The steel trap 2-1/1 or 3 is most commonly used, being set in the haunts of the animal, and slightly scented with musk.
Page 203 You can use a dead-fall, garrote, or strong snare, baited with any of the substances mentioned earlier. The steel trap 2-1/1 or 3 is the most commonly used; it's placed in the animal's habitat and lightly scented with musk.
See Fox and Beaver, for directions for skinning, stretching, etc., etc.
See Fox and Beaver for instructions on skinning, stretching, and so on.
THE RABBIT.
The rabbit or "cotton tail," as he is familiarly termed, is too well-known to need any description here. From Maine to Texas our woods abound with these fleet-footed little creatures, of which there are several American species. They are the swiftest of all American quadrupeds, and have been known to clear over twenty feet in a single leap. They are all natural burrowers, although they often forego the trouble of excavating a home when one can be found already made, and which can be easily modified or adapted to their purposes. The common rabbit of New England often makes its home or "form," beneath a pile of brush or logs, or in crevices in rocks. Here it brings forth its young, of which there are often three or four litters a year. The creature becomes a parent at a very early age, and by the time that a rabbit is a year old it may have attained the dignity of a grand parent.
The rabbit, often called "cotton tail," is so well-known that it doesn’t need much description. From Maine to Texas, our forests are filled with these quick little animals, of which there are several American species. They are the fastest of all American mammals and can leap over twenty feet in a single bound. They naturally dig burrows, but often they skip the hassle of digging one when they can find a ready-made home that can be easily modified or adapted to suit their needs. The common rabbit in New England often makes its home or "form" under a pile of brush or logs, or in rock crevices. Here, it raises its young, usually having three or four litters a year. Rabbits become parents at a very young age, and by the time a rabbit is one year old, it may already be a grandparent.
The food of the rabbit consists of grasses, bark, leaves, bulbs, young twigs, buds, berries and the like, and of cultivated vegetables of all kinds, when opportunity favors. When surprised in the woods it manifests its alarm by violently striking the ground with its feet, causing the peculiar sound so often noticed at their first jump. The animal is fond of pursuing a beaten path in the woods, and is often snared at such places. Its enemies, beside man, are the lynx, and other carnivorous animals, hawks, owls, and even the domestic cat.
The rabbit's diet includes grasses, bark, leaves, bulbs, young twigs, buds, berries, and various cultivated vegetables when they get the chance. When it feels threatened in the woods, it reacts by thumping the ground with its feet, creating the distinct noise often heard when it first jumps. The rabbit tends to stick to well-worn paths in the woods and is frequently caught in traps along these routes. Its predators, besides humans, are lynxes, other carnivorous animals, hawks, owls, and even domestic cats.
The rabbit is a favorite game with all amateur sportsmen, and the devices used in its capture are multitudinous. It is by no means a difficult animal to trap, and a glance through the second and fourth sections of our book, will reveal many ingenious snares and other contrivances, commonly and successfully used.
The rabbit is a popular game among amateur sports enthusiasts, and there are many methods for catching it. It’s not a difficult animal to trap, and a look through the second and fourth sections of our book will show you plenty of clever traps and other devices that are commonly and successfully used.
The Box trap, page 103, is perhaps the most universal example of rabbit trap, but the Self-setting trap, page 110, and Double-ender, page 109, are also equally effective where the animal is desired to be taken alive. If this is not an object, the snare is to be recommended as simple in construction and sure in its result.
The Box trap, page 103, is probably the most common type of rabbit trap, but the Self-setting trap, page 110, and Double-ender, page 109, are also very effective if you want to catch the animal alive. If catching it alive isn't the goal, the snare is a good option as it's easy to make and reliable in its outcome.
The skin of the rabbit is very thin and tender, and should be carefully removed, either as described for the fox, or in the ordinary method, by incision up the belly. Full directions for curing and tanning the skins will be found under its proper head in a later portion of this work.
The skin of the rabbit is very thin and delicate and should be carefully removed, either as described for the fox or by the usual method, which involves cutting along the belly. Detailed instructions for curing and tanning the skins will be found under its proper section later in this work.
THE WOOD-CHUCK.
This animal also called the marmot, is so well-known to most of our readers, that a detailed description will not be necessary, suffice it to say that the general color is brownish grey above, changing to reddish brown on the under parts. The head, tail and feet partaking of a darker color. The length of the animal is about a foot and a-half, exclusive of the tail, which is four inches long.
This animal, also known as the marmot, is so familiar to most of our readers that a detailed description isn't necessary. It's enough to say that its general color is brownish-grey on top, shifting to reddish-brown underneath. The head, tail, and feet are darker in color. The animal is about a foot and a half long, not including the tail, which is four inches long.
The woodchuck is a clumsy looking animal, and anything but active in its movements. It is very unintelligent, and is always too ready to use its powerful teeth on the hand of any one who may attempt to handle it. It is naturally a timid animal, but when cornered or brought to bay, it fights most desperately.
The woodchuck looks pretty awkward and isn't very active. It's not very smart and is quick to bite anyone who tries to handle it. While it's normally a shy animal, when it feels trapped or threatened, it fights fiercely.
The woodchuck is an expert excavator, and where the animals exist in large numbers great damage is done by their united burrowing. They generally remain in their burrows during the day, only venturing out casually to see what is going on, and keeping near their entrance. Towards evening they start out to feed, devouring certain grasses and weeds, and also pumpkins and green corn with avidity, ever and anon sitting upright on their haunches, to see if the coast is clear. In case they are surprised in their meal, they hurry home in a pell-mell sort of a way, giving as much the appearance of rolling as running, but, nevertheless, getting over the ground with fair speed for such an unwieldy animal. The skin is loose and very tough, and possesses no commercial value, being principally used for whiplashes. Their burrows are generally on the slope of a hill, and often at the foot of a rock or tree. These tunnels vary from ten to thirty feet in length, sloping downward from the opening, afterward taking an upward turn and terminating in a roomy chamber, in which the animal sleeps in Page 205 winter and where the young from three to eight in number are brought forth. The woodchuck is found throughout nearly the whole of the United States, and is especially abundant in New England, where it is a decided nuisance. It is found as far south as Tennessee, and westward to the Rocky Mountains. The flesh of the woodchuck is by many much esteemed as food, particularly in the Fall. When used for this purpose, the animal should be skinned and carefully cleaned immediately after death, taking especial care to remove the masses of fat which lie inside of the legs, as these, if allowed to remain, are sure to taint the flesh in cooking.
The woodchuck is a skilled digger, and where these animals are plentiful, their burrowing can cause significant damage. They usually stay in their burrows during the day, only coming out occasionally to check what's happening, staying close to their entrance. In the evening, they venture out to feed, eagerly eating certain grasses, weeds, pumpkins, and green corn, often sitting up on their hind legs to ensure the area is safe. If they get startled while eating, they dash back home quickly, looking more like they’re rolling than running, but they still move pretty fast for such a bulky animal. Their skin is loose and tough but has no commercial value, mainly being used for whips. Their burrows are typically on a hill's slope and often located at the base of a rock or tree. These tunnels range from ten to thirty feet long, sloping down from the entrance before turning upward and ending in a spacious chamber where the animal hibernates in winter and where litters of three to eight young are born. The woodchuck is found across almost all of the United States, with a particularly large population in New England, where it's considered a significant nuisance. It extends as far south as Tennessee and west to the Rocky Mountains. Many people enjoy eating woodchuck meat, especially in the fall. When prepared for this, the animal should be skinned and cleaned right after it’s killed, making sure to remove the fat inside the legs, as leaving it on will spoil the meat during cooking.
The animals are easily caught by setting the traps at the entrance of their burrows, and carefully covering them with loose earth, no bait being required. They may also be captured by the aid of a spring-pole, with noose attached, the pole being bent down and caught under a notched stick, and the noose being arranged at the opening of the burrow, see page 43, the Woodchuck in passing in or out will become entangled in the noose, and in his efforts to escape the pole will be loosened from the peg, thus lifting the animal in mid-air. Woodchucks are also sometimes drowned out of their holes, and the turtle is often put to good use for the purpose of smoking the animals from their subterranean dwellings. A ball of wicking saturated with kerosene is attached by a wire to the tail of the reptile. When the ball is ignited the creature is introduced into the entrance of the hole, and of course in fleeing from its fiery pursuer it traverses the full length of the burrow, and as another matter of course drives out its other occupants, which are shot or captured as they emerge.
The animals are easily caught by placing traps at the entrance of their burrows and lightly covering them with loose dirt, with no bait needed. They can also be captured using a spring-pole with a noose attached, bending the pole down and securing it with a notched stick, and positioning the noose at the burrow entrance. When the Woodchuck tries to go in or out, it gets caught in the noose, and as it struggles to escape, the pole gets released from the peg, lifting the animal into the air. Woodchucks are sometimes also drowned out of their holes, and turtles are often used to smoke the animals out of their underground homes. A ball of wicking soaked in kerosene is attached to the turtle's tail with a wire. Once the ball is ignited, the turtle is introduced into the hole entrance, and as it flees from the flames, it travels through the length of the burrow, driving out any other occupants, which are then shot or captured as they come out.
The woodchunk's skin is generally taken off as described for the muskrat, and stretched accordingly.
The skin of the woodchuck is typically removed in the same way as for the muskrat and then stretched accordingly.
THE GOPHER.
This remarkable little animal somewhat resembles the Mole in its general appearance and habits. It is also commonly known as the Canada Pouched Rat, and is principally found west of the Mississippi and northward. It is a burrowing animal, and like the Mole drives its subterranean tunnels in all directions, throwing up little hillocks at regular intervals of from five to twenty feet. Its body is thick set and clumsy and about ten inches long, and its Mole-like claws are especially adapted for digging. Its food consists of roots and vegetables, and its Page 206 long and projecting incisors are powerful agents in cutting the roots which cross its path in making its burrow. The most striking characteristic of the animal, and that from which it takes its name, consists in the large cheek pouches which hang from each side of the mouth and extend back to to shoulders. They are used as receptacles of food which the animal hurriedly gathers when above ground, afterward returning to its burrow to enjoy its feast at its leisure. It was formerly very commonly and erroneously believed that the Gopher used its pouches in conveying the earth from its burrow, and this is generally supposed at the present day, but it is now known that the animal uses these pockets only for the conveyance of its food.
This unique little animal looks a bit like a mole in its overall appearance and behavior. It's also known as the Canada Pouched Rat and is mainly found west of the Mississippi and up north. It's a burrowing animal and, like moles, digs tunnels underground in all directions, creating small mounds every five to twenty feet. Its body is stocky and awkward, measuring about ten inches long, and its mole-like claws are well-suited for digging. Its diet consists of roots and vegetables, and its long, protruding incisors are powerful tools for cutting through the roots it encounters while burrowing. The most notable feature of this animal, which gives it its name, is the large cheek pouches that hang from either side of its mouth and extend back to its shoulders. These pouches are used to store food that the animal quickly gathers when it's above ground, and it later returns to its burrow to enjoy its meal at a more relaxed pace. It used to be widely and mistakenly believed that the Gopher used its pouches to carry dirt from its burrow, a notion that still persists today, but it's now understood that the animal only uses these pockets for transporting food.
The color of the fur is reddish-brown on the upper parts, fading to ashy-brown on the abdomen, and the feet are white.
The fur is reddish-brown on the top, fading to ashy-brown on the belly, and the feet are white.
In making its tunnels, the dirt is brought to the surface, thus making the little mounds after the manner of the mole. After having dug its tunnel for several feet the distance becomes so great as to render this process impossible, and the old hole is carefully stopped up and a new one made at the newly excavated end of the tunnel, the animal continuing on in its labors and dumping from the fresh orifice. These mounds of earth occur at intervals on the surface of the ground, and although no hole can be discovered beneath them, they nevertheless serve to indicate the track of the burrow, which lies several inches beneath.
In creating its tunnels, the dirt is brought to the surface, forming little mounds like those made by a mole. After digging its tunnel for several feet, the distance becomes too great to continue this process, so the old hole is carefully sealed off, and a new one is made at the newly dug end of the tunnel, with the animal continuing its work and dumping from the new opening. These mounds of earth appear at intervals on the surface, and even though no hole can be found beneath them, they still indicate the path of the burrow, which lies several inches below.
The Gopher is a great pest to western cultivators, and by its root feeding and undermining propensities does extensive injury to crops generally. They may be successfully trapped in the following manner: Strike a line between the two most recent earth mounds, and midway between them remove a piece of the sod. By the aid of a trowel or a sharp stick the burrow may now be reached. Insert your hand in the tunnel and enlarge the interior sufficiently to allow the introduction of No. (0) steel trap. Set the trap flatly in the bottom of the burrow, and then laying a piece of shingle or a few sticks across the excavation replace the sod. Several traps may be thus set in the burrows at considerable distances apart, and a number of the animals thus taken. The traps are sometimes inserted in the burrows from the hillocks, by first finding the hole and then enlarging it by inserting the arm and digging with the hand beneath. The former method, however, is preferable.
The gopher is a major pest for farmers in the west, and its tendency to feed on roots and undermine the soil causes significant damage to crops. They can be effectively trapped using the following method: Draw a line between the two most recent mounds of soil, and halfway between them, remove a piece of sod. Using a trowel or a sharp stick, you can reach the burrow. Insert your hand into the tunnel and make the interior large enough to fit a No. (0) steel trap. Place the trap flat at the bottom of the burrow, then cover the excavation with a piece of shingle or a few sticks before putting the sod back. You can set several traps in different burrows that are spaced apart, which allows for capturing multiple gophers. Sometimes, traps are placed in the burrows by starting at the mounds, locating the hole, and then enlarging it by inserting your arm and digging underneath. However, the first method is generally preferred.
The skin of the Gopher may be pulled off the body either by cutting up the hind less, as described in reference to the Fox, Page 207 or by making the incision from the lower jaw down the neck, as decided for the muskrat, a simple board stretcher being used.
The skin of the Gopher can be removed from the body either by cutting around the hindquarters, as mentioned in the section about the Fox, Page 207 or by making a cut from the lower jaw down the neck, similar to what is done for the muskrat, using a simple board stretcher.
THE MOLE.
Of all the mammalia the Mole is entitled to take the first place in the list of burrowers. This extraordinary creature does not merely dig tunnels in the ground and sit at the end of them, as is the case with many animals, but it forms a complicated subterranean dwelling place with chambers, passages and other arrangements of wonderful completeness. It has regular roads leading to its feeding grounds; establishes a system of communication as elaborate as that of a modern railway, or, to be more correct, as that of the subterranean network of the sewers of a city. It is an animal of varied accomplishments. It can run tolerably fast, it can fight like a bull-dog, it can capture prey under or above ground, it can swim fearlessly, and it can sink wells for the purpose of quenching its thirst. Take the mole out of its proper sphere, and it is awkward and clumsy as the sloth when placed on level ground, or the seal when brought ashore. Replace it in the familiar earth and it becomes a different being, full of life and energy, and actuated by a fiery activity which seems quite inconsistent with its dull aspect and seemingly inert form.
Of all the mammals, the mole deserves to be at the top of the burrowers list. This remarkable creature doesn’t just dig tunnels and hang out at the end of them like many animals; it builds a complex underground home with rooms, corridors, and other features of stunning intricacy. It has established pathways leading to its feeding areas and creates a communication system as detailed as a modern railway or, to be more accurate, like the intricate sewer network of a city. It’s a multifaceted animal. It can run fairly quickly, fight like a bulldog, catch prey both underground and above, swim fearlessly, and dig wells to satisfy its thirst. Take the mole out of its element, and it’s as awkward and clumsy as a sloth on flat ground or a seal on land. But put it back in its familiar dirt, and it transforms into a different creature, full of life and energy, driven by a fiery activity that seems completely at odds with its dull appearance and seemingly lifeless form.
We all know that the mole burrows under the ground, raising at intervals the little hillocks or "mole hills" with which we are so familiar; but most of us little know the extent or variety of its tunnels, or that the animal works on a regular system and does not burrow here and there at random. How it manages to form its burrows in such admirably straight lines, is not an easy problem, because it is always done in black darkness, and we know of nothing which can act as a guide to the animal. As for ourselves and other eye-possessing creatures, the feat of walking in a straight line with closed eyelids is almost an impossibility, and every swimmer knows the difficulty of keeping a straight course under water, even with the use of his eyes.
We all know that moles dig underground, creating the small mounds we call "mole hills." However, most of us are unaware of how extensive and varied their tunnels are or that moles operate on a regular system instead of just digging randomly. Figuring out how they manage to create such straight tunnels is a tough question because they do it in complete darkness, and we don’t know of anything that could help them navigate. For us and other creatures with eyes, walking in a straight line with our eyes closed is nearly impossible, and any swimmer will tell you how hard it is to maintain a straight path underwater, even when they can see.
The ordinary mole hills, so plentiful in our fields, present nothing particularly worthy of notice. They are merely the shafts through which the quadruped miner ejects the material which it has scooped out, as it drives its many tunnels through the soil, and if they be carefully opened after the rain has consolidated the heap of loose material, nothing more will be discovered than a simple hole leading into the tunnel. But let us Page 208 strike into one of the large tunnels, as any mole catcher will teach us, and follow it up to the real abode of the animal. The hill under which this domicile is hidden, is of considerable size, but is not very conspicuous, being always placed under the shelter of a tree, shrub, or a suitable bank, and would scarcely be discovered but by a practiced eye. The subterranean abode within the hillock is so remarkable that it involuntarily reminds the observer of the well-known "maze," which has puzzled the earliest years of youth throughout many generations. The central apartment, or "keep," if we so term it, is a nearly spherical chamber, the roof of which is almost on a level with the earth around the hill, and therefore situated at a considerable depth from the apex of the heap. Around this keep are driven two circular passages or galleries, one just level with the ceiling and the other at some height above. Five short descending passages connect the galleries with each other, but the only entrance into the keep is from the upper gallery, out of which three passages lead into the ceiling of the keep. It will be seen therefore that when the mole enters the house from one of its tunnels, it has first to get into the lower gallery to ascend thence into the upper gallery, and so descend into the central chamber. There is, however, another entrance into the keep from below. A passage dips downward from the centre of the chamber, and then, taking a curve upwards, opens into one of the larger burrows or high roads, as they may be fitly termed. It is a noteworthy fact that the high roads, of which there are several radiating in different directions, never open into the gallery opposite one of the entrances into the upper gallery. The mole therefore is obliged to go to the right or left as soon as it enters the domicile before it can find a passage to the upper gallery. By the continual pressure of the moles upon the walls of the passages and roof of the central chamber, they become quite smooth, hard, and polished, so that the earth will not fall in, even after the severest storm.
The ordinary molehills, which are so common in our fields, don't seem to stand out much. They're just the exits where the furry little diggers push out the dirt they've removed while tunneling through the soil. If you carefully dig into one after the rain has packed down the loose dirt, all you’ll find is a simple hole leading into the tunnel. But let’s Page 208 check out one of the larger tunnels, as any mole catcher would show us, and follow it to the mole’s actual home. The hill hiding this home is quite big but not very noticeable, usually found under a tree, bush, or a suitable bank, and would hardly be noticed unless you know what to look for. The underground home in the hillock is so interesting that it naturally reminds you of the classic "maze," which has puzzled kids for generations. The central room, or "keep," as we can call it, is a nearly spherical space where the ceiling is almost level with the ground around the hill, meaning it's quite deep from the top of the hill. Surrounding this keep are two circular tunnels, one just at the ceiling level and the other higher up. There are five short downward passages connecting the tunnels, but the only way into the keep is from the upper tunnel, from which three passages lead into the ceiling of the keep. So, when a mole enters its house through one of its tunnels, it first goes into the lower tunnel, then moves up into the upper tunnel, and finally descends into the central room. However, there’s another entrance into the keep from below. A tunnel drops down from the center of the room, then curves up to connect with one of the bigger burrows or main roads, as they might be called. Interestingly, these main roads, of which there are several stretching out in different directions, never connect to the gallery directly across from one of the entrances to the upper gallery. This means the mole has to go left or right as soon as it enters its home before it can reach the upper tunnel. The constant pressure from the moles on the walls of the passages and the roof of the central room makes them smooth, hard, and shiny, so the dirt doesn’t collapse even after the heaviest storm.
The use of so complicated a series of cells and passages is extremely doubtful, and our total ignorance of the subject affords another reason why the habits of this wonderful animal should be better studied.
The use of such a complex series of cells and passages is highly questionable, and our complete lack of knowledge on the subject gives us another reason to study the habits of this amazing animal more closely.
About the middle of June the moles begin to fall in love, and are as furious in their attachments as in all other phases of their nature. At that time two male moles cannot meet without mutual jealousy, and they straightway begin to fight, scratching, tearing, and biting with such insane fury that they seem unconscious Page 209 of anything except the heat of battle. Indeed the whole life of the mole is one of fury, and he eats like a starving tiger, tearing and rending his prey with claws and teeth, and crunching audibly the body of the worm between the sharp points. Magnify the mole to the size of the lion and you will have a beast more terrible than the world has yet seen. Though nearly blind, and therefore incapable of following its prey by sight, it would be active beyond conception, springing this way and that way as it goes along, leaping with lightness and quickness upon any animal which it meets, rending it in pieces in a moment, thrusting its blood-thirsty snout into the body of its victim, eating the still warm and bleeding flesh, and instantly searching for fresh prey. Such a creature would, without the least hesitation, devour a serpent twenty feet in length, and so terrible would be its voracity that it would eat twenty or thirty of such snakes in a day as easily as it devours the same number of worms. With one grasp of its teeth and one stroke of its claws, it could tear an ox asunder; and if it should happen to enter a fold of sheep or enclosure of cattle, it would kill them all for the mere lust of slaughter. Let, then, two of such animals meet in combat, and how terrific would be the battle! Fear is a feeling of which the mole seems to be utterly unconscious, and, when fighting with one of its own species, he gives his whole energies to the destruction of his opponent without seeming to heed the injuries inflicted upon himself. From the foregoing sketch the reader will be able to estimate the extraordinary energies of this animal, as well as the wonderful instincts with which it is endowed.
About the middle of June, moles start to fall in love and are as intense in their relationships as in every other part of their nature. During this time, two male moles can’t meet without feeling jealous, and they immediately start to fight, scratching, tearing, and biting with such wild fury that they seem oblivious to Page 209 anything except the battle’s heat. In fact, the mole’s entire life is full of rage, and it eats like a starving tiger, ripping and tearing its prey with claws and teeth, and crunching loudly the body of the worm between its sharp points. If you enlarged a mole to the size of a lion, you would have a creature more terrifying than the world has ever seen. Although nearly blind, and therefore unable to track its prey by sight, it would be incredibly agile, darting this way and that as it moves along, leaping quickly onto any animal it encounters, tearing it apart in an instant, jamming its bloodthirsty snout into its victim's body, consuming the still-warm, bleeding flesh, and immediately looking for more prey. Such a beast would, without hesitation, devour a serpent twenty feet long, and its insatiable hunger would allow it to eat twenty or thirty of those snakes in a day as easily as it devours the same number of worms. With a single bite and a swipe of its claws, it could rip an ox apart; and if it happened to enter a herd of sheep or cattle, it would kill them all just for the thrill of slaughter. Now, imagine two of these creatures battling; how terrifying that fight would be! Fear is something the mole seems entirely unaware of, and when it’s fighting another of its kind, it pours all of its energy into defeating its opponent, seemingly ignoring the injuries it suffers in return. From this description, the reader can appreciate the extraordinary power of this animal as well as the remarkable instincts it possesses.
The fur of the mole is noted for its clean, velvety aspect; and that an animal should be able to pass unsoiled through earth of all textures is a really remarkable phenomenon. It is partly to be explained by the character of the hair, and partly by that of the skin. The hair of the mole is peculiar on account of its want of "set." The tops of the hairs do not point in any particular direction, but may be pressed equally forward or backward or to either side. The microscope reveals the cause of this peculiarity. The hair is extremely fine at its exit from the skin, and gradually increases in thickness until it reaches its full width when it again diminishes. This alternation occurs several times in each hair, and gives the peculiar velvet-like texture with which we are all so familiar. There is scarcely any coloring matter in the slender portion of the hair, and the beautiful changeable coppery hues of the fur is Page 210 owing to this structure. Another reason for the cleanliness of the fur is the strong, though membranous muscle beneath the skin. While the mole is engaged in travelling, particularly in loose earth, the soil for a time clings to the fur; but at tolerably regular intervals the creature gives the skin a sharp and powerful shake, which throws off at once the whole of the mould that has collected upon the fur. Some amount of dust still remains, for, however clean the fur of a mole may seem to be, if the creature be placed for an hour in water, a considerable quantity of earth will be dissolved away and fall to the bottom of the vessel. The improvement in the fur after being well washed with soft tepid water and soap, is almost incredible. Many persons have been struck with such admiration for the fur of the mole, that they have been desirous of having a number of the skins collected and made into a waist-coat. This certainly can be done, but the garment thus made is so very hot that it can only be worn in winter. Such garments are very expensive, and owing to the tender quality of the skin, possess but little lasting powers. There is also a wonderfully strong smell about the mole; so strong, indeed, that dogs will sometimes point at moles instead of game, to the great disgust of their masters. This odor adheres obstinately to the skin, and even in furs which have been dried for more than ten years, this peculiar savor has been noticed.
The mole's fur is known for its clean, velvety look, and it's really impressive that an animal can move through all types of soil and still stay clean. This is partly explained by the structure of the hair and partly by that of the skin. The mole's hair is unique because it doesn’t have a specific direction. The tips of the hairs can be pushed equally forward, backward, or to either side. Looking at it under a microscope reveals why. The hair starts off very fine where it emerges from the skin, gradually getting thicker until it reaches its full width, after which it tapers again. This pattern occurs multiple times along each hair, creating the familiar velvet-like texture. The slender part of the hair has very little color, and the beautiful shifting coppery tones of the fur are Page 210 due to this structure. Another reason the fur stays clean is the strong, yet thin muscle beneath the skin. While the mole is moving, especially through loose dirt, some soil sticks to the fur; however, at fairly regular intervals, the mole shakes its skin vigorously, instantly shedding all the dirt that has collected. Some dust remains, because no matter how clean a mole’s fur may look, if the animal is placed in water for an hour, a significant amount of dirt will dissolve and settle at the bottom of the container. The improvement in the fur after being washed well with soft, warm water and soap is almost unbelievable. Many people have been so impressed with the mole's fur that they’ve wanted to collect several skins to make a waistcoat. While this can be done, the resulting garment is so warm that it can only be worn in winter. Such garments are quite expensive, and because of the delicate nature of the skin, they don’t last long. Additionally, the mole has a remarkably strong smell; so strong, in fact, that dogs will sometimes point out moles instead of game, which can frustrate their owners. This odor stubbornly clings to the skin, and even furs that have been dried for more than ten years still retain this distinct scent.
We have given much space to the mole, not particularly on account of its particular usefulness to the trapper, but because of its many claims to our notice. If the creature were a rare and costly inhabitant of some distant land, how deep would be the interest which it would incite. But because it is a creature of our country, and to be found in every field, there are but few who care to examine a creature so common, or who experience any feelings save those of disgust when they see a mole making its way over the ground in search of a soft spot in which to burrow.
We’ve spent a lot of time talking about the mole, not so much because it's particularly useful to trappers, but because it has many reasons for us to notice it. If this creature were a rare and expensive animal from some faraway place, think about how much interest it would generate. But since it’s a common animal in our country, found in every field, not many people take the time to examine such a familiar creature, or feel anything other than disgust when they see a mole moving across the ground searching for a nice spot to dig.
In many localities this interesting animal exists in such numbers as to become a positive nuisance, and the invention of a trap which would effectually curtail their depredations has been a problem to many a vexed and puzzled farmer.
In many places, this fascinating animal exists in such large numbers that it becomes quite a nuisance, and creating a trap that effectively reduces their destruction has been a challenge for many frustrated and confused farmers.
Mole traps of various kinds have found their way into our agricultural papers, but none has proved more effectual than the one we describe on page 119. An arrangement of the figure four, page 107, is also sometimes employed with good success. In this case the bait stick crosses the upright stick Page 211 close to the ground, and rests over the burrow of the mole, the earth being previously pressed down to the surrounding level. The stone should be narrow and very heavy, and of course no bait is required.
Mole traps of different types have appeared in our farming articles, but none have been more effective than the one we describe on page 119. A variation of the figure four, page 107, is also sometimes used with good results. In this setup, the bait stick crosses the upright stick Page 211 close to the ground and rests over the mole's burrow, with the soil pressed down to match the surrounding level. The stone should be narrow and very heavy, and of course, no bait is needed.
The pieces should be set carefully, and so adjusted that the lifting of the soil beneath the stick as the mole forces its way through the compressed earth will dislodge the bait stick and let down the stone with its crushing weight.
The pieces should be set carefully, and adjusted so that when the mole pushes through the compacted soil, it lifts the stick, dislodging the bait stick and allowing the stone to drop with its crushing weight.
Another method consists in embedding a deep flower pot in one of the main tunnels of the animal, and carefully replacing the soil above. The mole in traversing his burrow thus falls into the pit and is effectually captured. This is a very ingenious mode of taking the animal, and rewarded its inventor with seven moles on the first night of trial.
Another method involves placing a deep flower pot in one of the main tunnels of the animal and carefully covering it with soil. As the mole moves through its burrow, it falls into the pit and gets captured. This is a clever way to catch the animal, and the inventor caught seven moles on the first night of trying it out.
There are a number of other devices said to work excellently, but the above we believe to be the most effectual of all.
There are several other devices that are said to be very effective, but we believe the ones mentioned above to be the most effective of all.
There are several species of American moles, the star-nosed variety being familiar to most of us. The most common moles are the shrew moles, with pointed noses. The silver mole is a large species, of a changeable silvery color, found on the Western prairies. The Oregon mole is nearly black, with purplish or brownish reflections.
There are several types of American moles, with the star-nosed variety being the most recognizable to many of us. The most common moles are the shrew moles, which have pointed noses. The silver mole is a large species that has a variable silvery color and is found in the Western prairies. The Oregon mole is almost black and has purplish or brownish undertones.
The most beautiful of all the moles is found at the Cape of Good Hope. It is of about the size of the ordinary American species, and its soft fur glistens with brilliant green and golden reflections. The fur of this species is probably the most wonderful and beautiful in the whole animal kingdom.
The most beautiful of all the moles is found at the Cape of Good Hope. It's about the size of the regular American species, and its soft fur shines with brilliant green and golden reflections. The fur of this species is probably the most amazing and beautiful in the entire animal kingdom.
SQUIRRELS.
There are many species of squirrels found in the United States,
but their fur is of little value, and of trifling importance in
the fur trade; the squirrel fur of our markets being that of a
small grey European variety. Squirrels, as a class, possess much
the same peculiarities and habits. Their claws are particularly
adapted for life among the trees; their tails are long and bushy,
covering over the backs of the animals when in a sitting posture.
They are all lithe and quick of movement, and their senses of sight
and hearing are especially keen. They are constantly on the alert,
and are full of artifice when pursued. Their food consists chiefly
of nuts, fruits, and grain, but when pushed by hunger, there is
no telling what they will not eat. They generally provide for the
winter months by laying
Page 212
up a store of the foregoing provisions, either in holes in trees or
interstices in the bark, or in cavities under ground. The shag-bark
hickory offers an especial inducement to these provident creatures
in the numerous crevices and cracks throughout the bark. It is
not an uncommon thing to find whole handfuls of nuts carefully
packed away in one of these cracks, and a sharp stroke with an ax
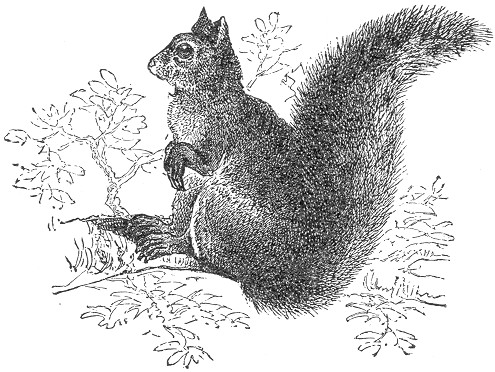 in the trunk of one of these trees will often dislodge numbers of
the nuts. The writer has many a time gone "nutting" in this way in
the middle of winter with good success. The nests of squirrels are
generally built in trees, either in a crotch between the branches
or in some deserted woodpecker's hole. Some species live in burrows
in the ground, and those individuals who are lucky enough to be in
the neighborhood of a barn often make their abode therein, taking
their regular three meals a day from the granary. In many localities
these animals thus become a perfect pest to the farmers, and their
destruction becomes a matter of urgent necessity.
in the trunk of one of these trees will often dislodge numbers of
the nuts. The writer has many a time gone "nutting" in this way in
the middle of winter with good success. The nests of squirrels are
generally built in trees, either in a crotch between the branches
or in some deserted woodpecker's hole. Some species live in burrows
in the ground, and those individuals who are lucky enough to be in
the neighborhood of a barn often make their abode therein, taking
their regular three meals a day from the granary. In many localities
these animals thus become a perfect pest to the farmers, and their
destruction becomes a matter of urgent necessity.
There are many types of squirrels found in the United States, but their fur is not very valuable and holds little significance in the fur trade; the fur typically sold in our markets comes from a small grey European variety. Squirrels, in general, have similar characteristics and habits. Their claws are well-adapted for life in the trees, and their tails are long and bushy, covering their backs when they sit. They are all agile and quick, with especially sharp eyesight and hearing. They are always on guard and can be quite clever when being chased. Their diet mainly consists of nuts, fruits, and grains, but when they are really hungry, they'll eat just about anything. They usually prepare for winter by storing provisions either in tree holes, under bark crevices, or underground. The shag-bark hickory especially attracts these resourceful animals because of the numerous cracks in its bark. It's common to find entire handfuls of nuts carefully stored in these cracks, and a strong blow with an ax on the trunk of one of these trees can often knock loose many of the nuts. The author has often gone "nutting" in this way during winter with good results. Squirrel nests are generally made in trees, either in the fork of branches or in abandoned woodpecker holes. Some species dig burrows in the ground, and those lucky enough to be near a barn often make their home there, enjoying regular meals from the granary. In many areas, these animals can become a real nuisance for farmers, making their removal an urgent task.
Squirrels, although resembling each other much as regards Page 213 their general habits, differ considerably in the size and color of the different species.
Squirrels, while looking quite similar in their overall behavior, vary significantly in size and color among the different species.
The principal varieties found on our continent are:—
The main types found on our continent are:—
The large grey squirrel, which is common in the Eastern and Middle States, and which is about two feet in length, including the tail. The common red squirrel, or chicaree, smaller than the foregoing, and found more or less all through the United States. The black squirrel, which is about the size of the grey, and found in the north-eastern part of the United States, near the great lakes. In the Southern States there is a variety known as the fox squirrel, about the size of the red squirrel, and quite variable in color. The Middle States furnishes a species called the cat squirrel, rather smaller than the preceding. Its tail is very broad, and its color varies from very light to very dark grey.
The large gray squirrel, common in the Eastern and Midwest regions, is about two feet long, including the tail. The common red squirrel, or chicaree, is smaller and found throughout much of the United States. The black squirrel is roughly the same size as the gray squirrel and is located in the northeastern part of the United States, near the Great Lakes. In the Southern States, there's a type known as the fox squirrel, which is about the size of the red squirrel and shows a wide range of colors. The Midwest has a species called the cat squirrel, which is a bit smaller than the previous one. Its tail is very broad, and its color can vary from very light to very dark gray.
The ground squirrel, or chipmuck, with its prettily striped sides, is common to most of our readers, its general color being red and the stripes being black and white.
The ground squirrel, or chipmunk, with its nicely striped sides, is familiar to most of our readers, its overall color being reddish and the stripes being black and white.
Another burrowing species, known as the Oregon or downy squirrel, is found in the Territory from which it takes its name, and also northward in British America. In size it resembles the chipmuck, and its color is light red above, pure white beneath, and silver grey at the sides.
Another burrowing species, known as the Oregon or downy squirrel, is found in the region after which it is named, as well as northward in Canada. It is similar in size to a chipmunk, with light red fur on top, pure white underneath, and silver-gray on the sides.
The beautiful silky variety, known as the flying squirrel, with its grey chinchilla-like fur and loose skin, is found throughout the United States east of the Mississippi.
The stunning silky type, known as the flying squirrel, with its gray chinchilla-like fur and loose skin, is found all across the United States east of the Mississippi.
Louisiana and Texas furnish the golden-bellied squirrel, which is about twenty inches in length, with tail golden yellow beneath, and golden grey above. The sooty squirrel is also found in this locality, being about the same size as the last mentioned, and black above and brownish red beneath.
Louisiana and Texas provide the golden-bellied squirrel, which is about twenty inches long, with a tail that’s golden yellow underneath and golden grey on top. The sooty squirrel is also found in this area, roughly the same size as the ones mentioned before, with black on top and brownish-red underneath.
There are other varieties in California known as the woolly, soft-haired, and weasel squirrels; and in the Western States we find the large red-tailed squirrels, which are about the size of the large grey variety of the Eastern and Middle States.
There are other types in California known as woolly, soft-haired, and weasel squirrels; and in the Western States, we find the large red-tailed squirrels, which are about the same size as the large grey variety found in the Eastern and Middle States.
Squirrels, as a tribe, are much sought for as pets, and most of the species are easily tamed.
Squirrels, as a group, are highly sought after as pets, and most species can be easily tamed.
When the animals exist in such numbers as to become a destructive Page 214 nuisance to the farm, the small-sized steel trap, No. 0, arranged with bait hung above it, will work to good advantage. Twitch-ups are also successful, and we might also recommend the traps on pages 107, 116 and 128 as worthy of trial when the animal is not desired to be captured alive.
When the animals are so numerous that they become a destructive nuisance to the farm, the small steel trap, No. 0, set with bait hanging above it, will be effective. Twitch-ups are also reliable, and we recommend the traps on pages 107, 116 and 128 as good options to try when you don't want to capture the animal alive.
Squirrels may be skinned either by ripping up the belly, or in a whole piece, as described in regard to the fox.
Squirrels can be skinned either by cutting open the belly or in one whole piece, just like with the fox.
We pause before going further into the mysteries of trapping in connection with the animals which we are about to consider, as they are generally exempt from the wiles of the trapper's art, coming more properly in the field of the hunter or sportsman. The idea of trapping a deer, for instance, seems barbarous indeed; but are not all the ways of deceiving and killing these splendid animals equally so? Are not the various strategies and cunning devices of the sportsman, by which these noble creatures are decoyed and murdered, equally open to the same objection? As far as barbarity goes, there is to us but little choice between the two methods; and, generally speaking, we decry them both, and most especially do not wish to be understood as encouraging the trapping of these animals, except where all other means have failed, and in cases where their capture becomes in a measure a matter of necessity. This is often the case in the experience of professional trappers. The life of the trapper during the trapping season is spent almost entirely in the wilderness, often many miles from any human habitation; and at times he is solely dependent upon his gun or trap for his necessary food.
We take a moment before diving deeper into the complexities of trapping related to the animals we're about to discuss, as they are usually not caught in the trapper's art, more fittingly belonging to the realm of hunters or sportsmen. The thought of trapping a deer, for example, seems quite cruel; but aren't all the methods of misleading and killing these magnificent animals just as brutal? Aren't the various tactics and clever devices used by sportsmen to lure and kill these noble creatures equally subject to the same criticism? In terms of cruelty, we see little difference between the two approaches; generally speaking, we condemn both, especially emphasizing that we don't wish to promote the trapping of these animals unless all other options have failed and capturing them becomes somewhat necessary. This is often true in the experiences of professional trappers. During trapping season, the trapper's life is mostly spent in the wilderness, often many miles away from any human settlement; at times, he relies solely on his gun or traps for essential food.
Sometimes in a dry season, when the leaves and twigs crackle under foot, the rifle is as good as useless, for it becomes impossible to approach a deer within shooting range. And there are other times when ammunition is exhausted, and the trapper is thus forced to rely only on his traps for his supply of food. In such circumstances, the necessities of the trapper are paramount, and the trapping of deer, in such straits, as the most desirable food is rather to be recommended than condemned. The same remarks also in a measure apply to the moose and prong-horn antelope, as well as to several other animals hereinafter mentioned, as they are generally considered more in the light of the hunter's than the trapper's game.
Sometimes during a dry season, when the leaves and twigs crunch underfoot, the rifle becomes almost useless because it's impossible to get close enough to a deer to take a shot. There are also times when the ammunition runs out, forcing the trapper to rely solely on traps for food. In these situations, the trapper's needs take priority, and trapping deer, under these circumstances, is more acceptable than frowned upon. The same can be said to some extent for moose and pronghorn antelope, as well as several other animals mentioned later, since they are generally seen more as the hunter's game than the trapper's.
Page 215 THE DEER.
There are upwards of eight varieties of this animal which inhabit North America. The common red or Virginian deer is found throughout the United States. The stag or Wapiti deer is now chiefly confined to the country west of the Mississippi and northward to British America. The moose we shall speak of hereafter. The Rocky Mountain mule deer, and the long-tailed deer of the same locality, are two more species, and there are also the black-tailed deer and the reindeer, the latter of which is a native of British America. The scope of our volume will not of course admit of detailed directions for trapping each variety, but, as the habits of all the species are in a measure similar, our remarks will apply to them in general, and particularly to the red or Virginian deer, which is the most important to American trappers.
There are more than eight types of this animal that live in North America. The common red or Virginian deer can be found across the United States. The stag or Wapiti deer is mainly located in the area west of the Mississippi and northward into Canada. We will discuss the moose later. The Rocky Mountain mule deer and the long-tailed deer from the same region are two other species, along with the black-tailed deer and the reindeer, which is native to Canada. This book won't cover detailed instructions for trapping each type, but since all the species have similar habits, our comments will generally apply to them, especially to the red or Virginian deer, which is the most important for American trappers.
The trap for taking deer should be large, strong, and covered with spikes. The Newhouse (No. 4) is particularly adapted, and is especially arranged for this purpose.
The deer trap should be big, sturdy, and have spikes on it. The Newhouse (No. 4) is specifically designed for this and works really well for that purpose.
When the path of the deer is discovered on the border of a stream or lake, the trap should be set beneath the surface of the water, near the tracks of the animal, and covered by a handful of dried grass thrown upon it. When thus set, it may either be left to run its chances, or success, further insured by the following precaution: In winter the principal food of the deer consists of the twigs, buds, and bark of various forest trees, and particularly those of the basswood and maple. In the season when the traps are set as above described, a most tempting bait is furnished by a large branch of either of those trees, freshly cut, and laid near the trap. The deer in feeding are thus almost sure to be captured. There are certain glands which are located on the inner side of the hind legs of the deer, and which emit a very strong and peculiar odor. The scent of these glands seems to attract the animal, and for this reason are cut out and used by trappers as a scent-bait. In the case already described, it is well to rub the glands on the twigs of the trees, thus serving as an additional attraction to the bait. There is still another method of trapping deer, which is commonly employed in the winter time. The trap is sunk in the snow at the foot of a tree, and the bait, consisting of an ear of corn or a few beards of other grain, is fastened to the tree, above the trap, three or more feet from the ground. The animal, in reaching for the bait, places its foot in the trap and is secured.
When the deer's path is found by the edge of a stream or lake, the trap should be placed below the water's surface, close to the animal's tracks, and covered with a handful of dried grass. Once set, it can either be left to chance, or its success can be enhanced with the following tip: During winter, the deer's main food includes the twigs, buds, and bark of various trees, especially basswood and maple. At the time traps are set as mentioned, a highly attractive bait can be used—a large, freshly cut branch from either tree, laid near the trap. This way, the deer are likely to get caught while feeding. There are specific glands located on the inner sides of the deer's hind legs that release a strong and unique scent. This scent appears to attract the animal, which is why trappers cut these glands out to use as scent bait. In the previously described case, it's useful to rub the glands on the twigs of the trees, adding further attraction to the bait. There's also another common method for trapping deer in winter. The trap is buried in the snow at the base of a tree, and the bait—either an ear of corn or some other grains—is tied to the tree, positioned three or more feet off the ground. As the deer reaches for the bait, it steps into the trap and gets caught.
Page 216 When first caught, the deer becomes very wild and violent; so much so that if the trap were chained or retarded by a heavy clog, the chain, or even the trap itself, would most likely be broken. The weight of a trap of this size is generally a sufficient impediment, no clog, or at best a very light one, being required. The first frantic plunge being over, the entrapped creature immediately yields and lies down upon the ground, and is always to be found within a few rods of where the trap was first sprung upon him. During the winter the traps may also be set in the snow, using the same bait already described. It is a common method to fell a small tree for the purpose, setting the traps beneath the snow, around the top branches. The deer, in browsing in the tender twigs or buds, are almost certain to be captured. Dead-falls of different kinds are sometimes used in trapping the deer, with good success; using the scent bait already described, together with the other bait. The food of the deer during the summer consists of nuts, fruits, acorns, grass, berries, and water plants, and when in convenient neighborhood of cultivated lands, they do not hesitate to make a meal from the farmer's turnips, cabbages, and grain.
Page 216 When first caught, the deer becomes very frantic and aggressive; so much so that if the trap was chained or weighed down by a heavy obstruction, the chain, or even the trap itself, would most likely break. The weight of a trap this size is usually enough to hold it in place, requiring no obstruction, or at most a very light one. After the initial chaotic struggle, the trapped animal quickly settles down and lies on the ground, typically found within a few yards of where the trap was first triggered. During winter, the traps can also be set in the snow, using the same bait described earlier. A common method is to cut down a small tree for this purpose, placing the traps under the snow around the top branches. The deer, when nibbling on the tender twigs or buds, are almost certain to get caught. Various types of dead-falls are sometimes used to trap deer with good results, using the scent bait mentioned earlier along with the other bait. The deer's diet during summer includes nuts, fruits, acorns, grass, berries, and aquatic plants, and when they are close to cultivated areas, they don't hesitate to snack on the farmer's turnips, cabbages, and grain.
As we have said, the winter food consists chiefly of the twigs of trees. When the snow is deep the deer form what are called "yards," about such trees as they particularly select for their browsing. These yards are made simply by tramping down the snow, and large numbers of the deer are often thus found together. As the supply of food is consumed, the yard is enlarged, so as to enclose other trees for browsing, and where deep snows abound throughout the winter, these enclosures often become quite extensive in area. Panthers, wolves, and wolverines take especial advantage of these, and easily secure their victims. By wolves especially entire herds of deer are thus destroyed, and whole yards depopulated in a single night. Panthers secrete themselves in the trees above the boughs overhanging the "yards," and, with stealthy movements, approach and pounce upon their unsuspecting prey. The blood-thirsty wolverine secretes himself in the nooks and by-ways to spring upon its tawny victim unawares. These, together with man, form the principal foes of the deer, and we can truthfully assert that the hunter is much more its enemy than the trapper.
As we mentioned, winter food mainly consists of tree twigs. When the snow is deep, deer create areas known as "yards" around the trees they choose for feeding. These yards are formed simply by trampling down the snow, and large groups of deer are often found together in them. As the food supply gets used up, the yard is expanded to include other trees for browsing, and in areas with heavy snowfall throughout the winter, these enclosures can become quite large. Panthers, wolves, and wolverines take advantage of these spots and easily catch their prey. Wolves, in particular, can wipe out entire herds of deer, completely emptying yards in a single night. Panthers hide in the trees above the branches overhanging the "yards" and stealthily move in to attack their unsuspecting victims. The bloodthirsty wolverine hides in the nooks and crannies to spring on its tawny prey unexpectedly. Together with humans, these animals are the main threats to deer, and it’s accurate to say that the hunter is a much bigger enemy than the trapper.
As we do not wish to encourage the wanton trapping of this noble creature, it would perhaps be well for us to devote also few words in describing the various modes of hunting the animal, Page 217 adopted by the "professional sportsmen" throughout the land. The most common method is that called "still hunting," most generally pursued in winter. The hunter is shod with deer-skin or other soft sandals, and starts out with his rifle and ammunition. Finding the fresh track of the deer, he cautiously and noiselessly follows up the trail, keeping a sharp lookout ahead. A practised deer-hunter becomes very skillful and accurate, and the animal is nearly always tracked to discovery, when he is shot. The deer's sense of smell is extremely acute, and, when in shooting range, it is very necessary to approach them in the face of the wind, the direction of which may be easily determined by holding the finger in the mouth for a moment, afterward pointing it upward toward the sky. The cool side of the finger will indicate the direction from which the wind blows, and toward that direction the deer should always be approached, or as far toward that direction as possible. It will sometimes happen that the hunter will surprise the buck, doe, and fawn together. In order to secure the three, shoot the doe first. The buck and fawn will remain near the spot. The buck should next be shot, and then the fawn, the charge being aimed at the breast. Never approach a wounded deer without reloading the gun, as he is often more frightened than hurt, and is likely to start and run away, unless prevented by another shot. During the snow season, deer are always watchful of their back track. They are generally at rest during the day, starting out late in the afternoon on their usual ramblings, which they continue through the night. During the dark hours they love to resort to the water side in quest of aquatic plants, and are here often taken by hunters, many of which consider "night hunting" the favorite and most exciting sport. It is pursued in the following manner: The hunter requires a boat or canoe, page 261, a good rifle, and a lamp. The lamp, with a screen or reflector behind it, is placed at the bow of the boat. One hunter takes the oar, and, with noiseless paddle, propels or sculls the boat from the stem. The armed hunter crouches behind the light, with the muzzle of his rifle projecting beyond the screen sufficiently to easily show the forward sight on the tip of the barrel. A dark lantern is sometimes used as a light. The eyes of the deer shine very perceptibly at night, and his presence on the banks is thus easily detected. If he is noiselessly approached, he will remain transfixed by the effect of the light from the boat, and he may be neared even to a very close range, when he is easily despatched. Hundreds of deer Page 218 are thus taken during the summer and autumn. Deer are also chased by dogs until they are forced to take refuge in the nearest rivers or lakes, when the hunter in his canoe overtakes and shoots them. Another method is frequently employed in the hunting of the deer. These animals are very fond of salt, and with it they are often decoyed to a spot where the hunter lies in wait for them. These places are called "deer licks," or salting places, and can be made as follows: Select a locality where deer are known to frequent, and place a handful of salt either on a smooth spot of ground or in the hollow of a log. A section of a log is sometimes slightly dug out at one end and the other inserted in the earth, the salt being placed in the hollow. The hunter secretes himself in a neighboring tree, sometimes erecting a bench or scaffolding for comfort, and, provided with gun and ammunition, he awaits the coming of the deer. Hunters say that a deer seldom looks higher than his head, and that a sportsman on one of these scaffoldings, even though he is clumsy in his movements, is seldom noticed by the animal.
As we don't want to promote the reckless trapping of this noble creature, it might be a good idea to spend a few words describing the different ways of hunting this animal, Page 217 used by "professional sportsmen" across the country. The most common method is called "still hunting," usually done in winter. The hunter wears deer-skin or other soft sandals and sets out with a rifle and ammunition. When he finds fresh deer tracks, he quietly and carefully follows the trail, staying alert. An experienced deer hunter becomes very skilled and precise, and the animal is almost always tracked down before being shot. The deer's sense of smell is extremely sharp, so when in shooting range, it's crucial to approach them into the wind. You can easily figure out which way the wind is blowing by holding a finger in your mouth for a moment and then pointing it upward. The cool side of your finger will show you where the wind is coming from, and you should always approach the deer from that direction, or as close to it as possible. Sometimes, the hunter may unexpectedly come across a buck, doe, and fawn together. To catch all three, shoot the doe first. The buck and fawn will stay near, so next, shoot the buck, followed by the fawn, aiming at its chest. Always reload your gun before approaching a wounded deer, as it may be more scared than hurt and could dart away unless you shoot it again. During the snowy season, deer are always mindful of their tracks. They rest during the day and venture out late in the afternoon, continuing their wandering through the night. During dark hours, they often go to the water's edge in search of aquatic plants, and hunters frequently catch them, many considering "night hunting" to be the most thrilling sport. It's done this way: The hunter needs a boat or canoe, page 261, a good rifle, and a lamp. The lamp, with a screen or reflector behind it, is placed at the front of the boat. One hunter uses an oar, quietly paddling the boat from the back. The armed hunter crouches behind the light, with the muzzle of his rifle sticking out just enough to easily see the front sight on the barrel. A dark lantern may also be used as a light. The eyes of the deer shine notably at night, making it easy to spot them near the banks. If approached quietly, they can be mesmerized by the light from the boat and can be brought very close for an easy shot. Hundreds of deer Page 218 are taken this way during summer and autumn. Deer can also be chased by dogs until they flee to the nearest rivers or lakes, where the hunter in his canoe catches up to them and shoots them. Another common method in deer hunting involves using salt. These animals love salt, and it can be used to lure them into a spot where the hunter is waiting. These places are known as "deer licks" or salting spots and can be set up like this: Choose an area known for deer activity and put a handful of salt either on a flat patch of ground or in the hollow of a log. Sometimes a section of a log is slightly hollowed out at one end and inserted into the ground, with the salt placed inside. The hunter hides in a nearby tree, sometimes making a bench or platform for comfort, and, with a gun and ammunition ready, waits for the deer to arrive. Hunters claim that a deer rarely looks above its head, and a hunter on one of these platforms, even if clumsy, is often unnoticed by the animal.
The salt lick is also utilized for night hunting. A head-lantern is generally required. This can be made in the following manner: Construct a cylinder of birch bark or paste-board or any like substance, ten inches in height, and of sufficient size to fit closely on the head. A circular partition should next be firmly inserted at about the middle of the cylinder, and the centre of the partition should be provided with a socket for the reception of a candle. On this end of the cylinder a piece should now be cut to admit of the passage of light from the candle on that side. Having this fire-hat at hand wait patiently for the game. When a significant noise is heard light the candle and place the cylinder on the head, with the open cut in front, thus directing the light toward the ground. As the deer approaches, his fiery eyes will easily be seen, and the light from the candle will shine sufficiently on the rifle to clearly reveal the sights and admit of a sure aim. There is still another method of night hunting by the salt lick. The rifle is aimed directly at the salted spot, and thus firmly fixed—this preparation being made in the daytime. When night approaches, the hunter finds a piece of phosphorescent wood or "fox fire," and places it on the ground, at a point which he has previously determined to be on a direct line of the aim of his gun. The "fox fire" is plainly seen from the tree, and as soon as it is darkened he knows that it is obscured by the deer, and he pulls the trigger and kills his game.
The salt lick is also used for night hunting. You usually need a head lantern. You can make one like this: Create a cylinder from birch bark, cardboard, or something similar, about ten inches tall, and big enough to fit snugly on your head. Next, insert a circular partition firmly in the middle of the cylinder, and make sure the center of the partition has a socket for a candle. Cut a piece from this end of the cylinder to let light from the candle shine through. With this fire hat ready, wait patiently for the game. When you hear a noticeable noise, light the candle and put the cylinder on your head with the cut side facing forward, directing the light down. As the deer gets closer, you’ll easily see its glowing eyes, and the candlelight will be bright enough to illuminate your rifle, allowing you to clearly see the sights and take a precise shot. There’s also another way to hunt at night using the salt lick. Aim your rifle directly at the salted area and secure it in place—do this during the day. When night falls, the hunter finds a piece of phosphorescent wood or "fox fire" and places it on the ground, aimed along the line of the gun. The "fox fire" is clearly visible from the tree, and as soon as it goes dark, the hunter knows the deer is blocking it, and he pulls the trigger to take his shot.
Deer are hunted at all seasons of the year, but ought not to Page 219 be hunted during the summer. The sport legitimately begins in September, when the buck begins to harden his horns, and when his flesh is in its best condition for food. In October the deer is more shy, and during this month and after, the sport is at its height. The deer should be skinned from an incision down the belly, and the hide spread on a hoop stretcher, page 275.
Deer are hunted throughout the year, but should not be hunted during the summer. The hunting season officially starts in September, when the buck begins to harden his antlers, and when his meat is at its best for eating. In October, the deer become more cautious, and hunting reaches its peak during this month and afterward. The deer should be skinned from an incision along the belly, and the hide should be spread on a hoop stretcher, page 275.
THE MOOSE.
We have already given so much space to the hunting of the deer
that we shall be obliged to cut short our remarks on the Moose,
particularly as it is a representative of the same family. This
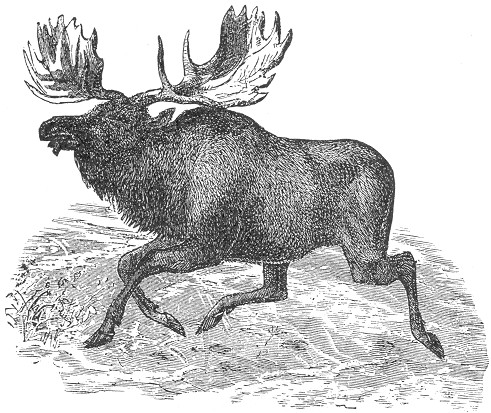 animal is the largest of the Deer tribe, being seven or eight feet
in height and often weighing over fifteen hundred pounds. It is
supplied with immense flat spreading horns, sometimes expanding to
the distance of six feet between the tips. It is found in Maine,
Oregon and Washington Territories, and in the neighborhood of the
great lakes, and inhabits the regions as far
Page 220
north as the Arctic Sea. Its color is yellowish brown. The fur is
thicker in winter than summer, and on the neck of the animal the
hair is very coarse and hangs in an immense tuft of over a foot
in length. The flesh is most excellent food and is much esteemed
by trappers. The habits of the moose are in most respects identical
with the deer, already described, and like them they form "yards"
during the winter season.
animal is the largest of the Deer tribe, being seven or eight feet
in height and often weighing over fifteen hundred pounds. It is
supplied with immense flat spreading horns, sometimes expanding to
the distance of six feet between the tips. It is found in Maine,
Oregon and Washington Territories, and in the neighborhood of the
great lakes, and inhabits the regions as far
Page 220
north as the Arctic Sea. Its color is yellowish brown. The fur is
thicker in winter than summer, and on the neck of the animal the
hair is very coarse and hangs in an immense tuft of over a foot
in length. The flesh is most excellent food and is much esteemed
by trappers. The habits of the moose are in most respects identical
with the deer, already described, and like them they form "yards"
during the winter season.
We've already covered a lot about deer hunting, so we'll have to shorten our discussion about the moose, especially since it belongs to the same family. This
animal is the largest member of the deer family, standing seven or eight feet tall and often weighing over fifteen hundred pounds. It has huge, flat, spreading antlers that can sometimes reach six feet wide between the tips. You can find them in Maine, Oregon, Washington, and around the Great Lakes, and they live as far north as the Arctic Sea. They have a yellowish-brown color. Their fur is thicker in the winter than in the summer, and the hair on their necks is very coarse, forming a large tuft of over a foot in length. The meat is excellent for food and highly valued by trappers. The moose's habits are mostly the same as those of the deer previously described, and like deer, they create "yards" during the winter season.
In the North the moose is hunted on snow-shoes by the natives, and in summer they are shot like the deer. They are often very dangerous and terrible creatures to hunt, and the utmost care and skill, as described in regard to the deer, is required on the part of the hunter in order to avoid detection through the exquisite sense of smell which the animal possesses. The moose is easily trapped. The Newhouse, No. 6, is especially adapted for the purpose, and it should be chained to a clog of stone or wood of over fifty pounds in weight. Set the trap in the "yard," or beneath the snow where the moose frequents, or in the summer, or fall seasons, as described for the deer, using the same methods in regard to baiting, etc.
In the North, natives hunt moose on snowshoes, and in the summer, they shoot them like deer. They can be very dangerous and challenging to hunt, so the hunter must use caution and skill to avoid being detected by the animal's keen sense of smell. Moose are easy to trap. The Newhouse No. 6 trap is especially good for this, and it should be secured to a heavy stone or wooden clog weighing over fifty pounds. Place the trap in the "yard," or under the snow in areas the moose frequent, or during the summer or fall, using the same baiting methods as for deer.
Skin after the manner of cattle, and stretch the hide on a hoop-spreader. Page 275.
Skin like cattle, and stretch the hide on a hoop-spreader. Page 275.
ROCKY MOUNTAIN SHEEP.
These creatures are natives of the entire range of the Rocky Mountains, and are especially prized on account of the superior quality of their flesh as food. They are much larger and more powerful than the domestic sheep, and the ram is provided with enormous curved horns. The wool of the animal is intermixed with coarse grey hairs, and the general appearance of the fur is russet grey, with the exception of the rump and under parts, which are of a dirty white color. The animal is generally very wary and retiring, and inhabits the most secluded and inaccessible mountain regions and rocky cliffs.
These animals are native to the entire Rocky Mountain range and are especially valued for the high quality of their meat. They are much larger and stronger than domestic sheep, and the male has huge curved horns. The wool is mixed with coarse gray hairs, and the overall fur is a russet gray, except for the back end and underbelly, which are a dirty white. Generally, these animals are very cautious and shy, living in the most remote and hard-to-reach mountain areas and rocky cliffs.
They are easily captured by the steel trap (No. 5) set in their haunts. The dead-fall is also used in some instances. Remove the skin as described for the deer.
They can easily be caught in the steel trap (No. 5) placed in their favorite areas. The dead-fall is also used in some cases. Remove the skin as explained for the deer.
THE BUFFALO.
The Buffaloes or Bison of the Western plains is too well known to need description. They travel in migrating herds of thousands, and are found from Texas to British America. Their food Page 221 consists chiefly of grass, of which the "Buffalo grass" is their great delight. They graze and travel through the day and rest by night. They are more the game of the hunter than the trapper, although the largest side Newhouse would effectually secure one of the animals. The Buffalo is generally hunted on horseback, the usual method being that of stealing into the drove while grazing, always moving against the wind in order to avoid being scented. The flesh is palatable and by many much relished. The Buffalo skins of commerce are furnished by the cows. The bull skins are almost devoid of fur on the hinder parts, the hair being confined to the huge heavy mass on the hump and mane. Skin the animal as described for the Moose.
The buffalo or bison of the Western plains is well-known enough that it doesn't need much description. They travel in migrating herds of thousands and can be found from Texas to Canada. Their diet mainly consists of grass, particularly the "buffalo grass," which they love. They graze and move around during the day and rest at night. They are more often hunted by sportsmen than by trappers, although a large enough setup from Newhouse could certainly catch one of these animals. Buffalo are generally hunted on horseback, with the common technique being to sneak into the herd while they're grazing, always moving against the wind to avoid being detected. The meat is tasty and enjoyed by many. The buffalo skins available in commerce come from the females. The male skins are nearly hairless on the back end, with hair mostly found on the large, heavy mass on the hump and mane. Skin the animal as described for the moose.
THE PRONG HORN ANTELOPE.
This sole American representative of the Antelope tribe we believe is seldom trapped; but as it is a well-known animal on the Western plains, a short mention of it is required here. In general shape this creature bears considerable resemblance to the deer, the form of the horn being its chief peculiarity, each one of which is provided with a single prong, from which the animal takes its name, of Prong Horn. The color of the body is brownish-yellow, with the exception of the rump and belly which are almost white. The Antelopes generally travel in herds, and are much hunted by the Indians who surround them and destroy them with heavy clubs. Like the deer, their sense of smell is especially keen and the same caution is required in hunting them. In size they are about the same as the Virginian Deer. They are wonderfully graceful in all their movements, and are even more fleet of foot than the deer. These Antelopes inhabit the Western Prairies and wooded borders from New Mexico northward, and their flesh is much esteemed as an article of diet. They may be caught in their feeding places, as recommended for the deer, using the same sized trap.
This only American member of the Antelope tribe is rarely trapped, but since it’s a well-known animal on the Western plains, it deserves a brief mention here. In general shape, this creature is quite similar to a deer, with the unique feature of its horns having a single prong, which gives the animal its name: Pronghorn. Its body is brownish-yellow, except for the rump and belly, which are almost white. Antelopes usually travel in herds and are heavily hunted by Indigenous people, who surround them and take them down with heavy clubs. Like deer, they have a sharp sense of smell, so the same caution is needed when hunting them. They’re about the same size as Virginia deer. They are incredibly graceful in all their movements and are even faster than deer. These antelopes live on the Western Prairies and wooded edges from New Mexico up north, and their meat is highly valued as food. They can be caught in their feeding areas, just like with deer, using traps of the same size.
The dead fall is also efficacious in their capture, and they are also sometimes taken in large pit-falls covered over with light sticks and leaves, to resemble the natural surroundings. On this false covering, the bait, consisting of green corn or other vegetables, is strewn and a high wall of logs or stones is erected around it, in order that the animal will be obliged to jump slightly in order to reach the bait.
The deadfall trap is also effective for catching them, and they are sometimes captured in large pits covered with light sticks and leaves to blend in with the natural surroundings. On this false cover, bait like green corn or other vegetables is scattered and a high wall of logs or stones is built around it, so the animal has to jump slightly to reach the bait.
Remove the hide as recommended for the deer.
Remove the hide as suggested for the deer.
Page 222 SHOOTING AND POISONING.
Until the introduction of the steel-trap, shooting was a common method of taking fur bearing animals, and even to the present day it is quite prevalent in some localities. Anyone who has had any experience with the fur trade must have learned that furs which are "shot," are much affected in value. Some furriers will not purchase such skins at any price; and they never meet with any but a very low offer. "Trapped furs" and "shot furs" are terms of considerable significance in the fur trade, and anyone who wishes to realize from a profitable sale of his furs, should use his gun as little as possible. A shot grazing through the fur of an animal cuts the hairs as if with a knife, and a single such furrow is often enough to spoil a skin. It is these oblique grazing shots which particularly damage the fur, and an animal killed with a shot gun is seldom worth skinning for the value of its pelt. If firearms are used, the rifle is preferable. If the animal chances to be hit broadside or by a direct penetrating bullet, the two small holes thus made may not particularly effect the value of its skin, although even then the chances are rather slight.
Until the steel trap was invented, hunting was a common way to catch fur-bearing animals, and even today, it's still a common practice in some areas. Anyone with experience in the fur trade knows that furs that are "shot" lose a lot of their value. Some furriers won't buy such skins at any price, and you’ll often only get a very low offer for them. "Trapped furs" and "shot furs" are important terms in the fur trade, so anyone looking to make a good sale should avoid using their gun as much as possible. A bullet grazing through an animal’s fur cuts the hairs like a knife, and even one such mark can ruin a pelt. It's those sideways grazing shots that really damage the fur, and an animal killed with a shotgun is rarely worth skinning for its fur. If firearms are necessary, a rifle is a better choice. If the animal happens to be hit from the side or with a direct bullet, the two small holes it leaves may not significantly affect the skin's value, but even then, the chances are still pretty slim.
Trapped furs are of the greatest value.
Trapped furs are very valuable.
The use of poison is objectionable as a means of capture in animals especially desired for their fur. Strychnine is the substance generally employed, and unless its victim is skinned immediately after death the pelt becomes considerably injured by the absorption of the poison. It has the effect of loosening the fur and the hair sheds easily.
The use of poison to capture animals, especially those valued for their fur, is unacceptable. Strychnine is the substance typically used, and if the animal isn't skinned immediately after death, the fur gets damaged from absorbing the poison. This causes the fur to loosen, and the hair falls out easily.
The poison is principally used in the capture of Wolves and animals considered in the light of vermin. For a wolf or fox, the poison is mixed with lard or tallow and spread on pieces of meat, or a small amount of the powder is inclosed in an incision in the bait. The amount sufficient for a single dose may be easily held on the point of a knife blade, and death ensues in a a very few moments after the bait is taken. For a Bear the dose should be a half thimbleful, and it should be deposited in the centre of a piece of honey comb, the cells being emptied of their honey for that purpose.
The poison is mainly used to catch wolves and other animals considered pests. For a wolf or fox, the poison is mixed with lard or fat and spread on pieces of meat, or a small amount of the powder is placed inside a cut in the bait. The amount needed for a single dose can easily fit on the tip of a knife blade, and death happens within just a few moments after the bait is eaten. For a bear, the dose should be about half a thimbleful, and it should be placed in the center of a piece of honeycomb, with the honey cells emptied for this purpose.
Other animals may be taken by proportionate quantities of the poison, but for general purposes we discourage its use.
Other animals might be affected by similar amounts of the poison, but for common use, we recommend avoiding it.
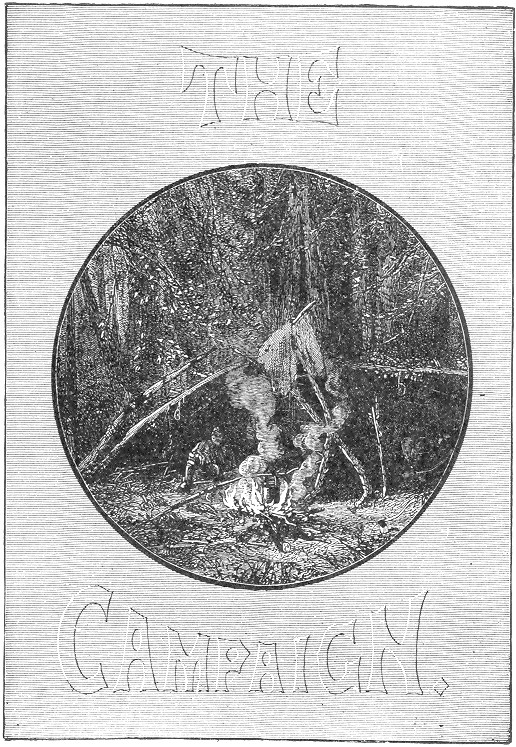
Page 225 BOOK VII.
CAMPAIGN LIFE IN THE WILDERNESS.
Wilderness Campaign Life.
 t has been the author's object in the
preparation of this book not simply to content the reader with a
mere superficial knowledge of so-called "Amateur trapping," but to
carry him further into the art professionally considered, and for
this reason we present in the following chapter a full catalogue
of the trapper's outfit, containing detailed descriptions of all
the necessaries for a most thorough campaign, including boats and
canoes, log cabins, shanties and tents, snow shoes and camp
furniture of all kinds, together with numerous and valuable hints
on trapper's food.
t has been the author's object in the
preparation of this book not simply to content the reader with a
mere superficial knowledge of so-called "Amateur trapping," but to
carry him further into the art professionally considered, and for
this reason we present in the following chapter a full catalogue
of the trapper's outfit, containing detailed descriptions of all
the necessaries for a most thorough campaign, including boats and
canoes, log cabins, shanties and tents, snow shoes and camp
furniture of all kinds, together with numerous and valuable hints
on trapper's food.
The author aims to provide readers with more than just a basic understanding of "amateur trapping." Instead, the goal is to delve deeper into the art from a professional perspective. For this reason, the next chapter includes a comprehensive catalog of the trapper's gear, featuring detailed descriptions of everything needed for a complete expedition—boats and canoes, log cabins, shanties and tents, snowshoes, and all types of camp furniture—along with many helpful tips on trapper's food.
PLAN OF CAMPAIGN.
The first thing to be considered in reference to a campaign is the selection of a trapping ground, and it is always desirable to choose a locality where travel by water can be resorted to as much as possible. Otter, mink, beaver and muskrat are among the most desirable game for the trapper, and as these are all amphibious animals, a watered district is therefore the best on all accounts. Lakes, ponds, and streams, bordered by wild woods, form the best possible grounds for general trapping, and the mountain lakes of the Adirondacks and Alleghenies, and all similar regions are especially desirable on this account. Almost any wild country, intersected with streams, lakes, and rivers, is apt to abound with game, and some trappers confine their labors to the borders of a single lake, and adjoining forest. This plan is especially to be recommended to the amateur, as much of the travelling to and fro can be done by boat, Page 226 the labor being thus much lightened. Having decided upon the seat of operations, the young trappers should immediately set to work at building their shanties and boats. The home shanty is of the greatest importance, and should be constructed first. Select some flat bit of land near the water and clear it of brush wood, or other rubbish and proceed to work as described on page 242. A good axe is the only tool required by an experienced trapper in the construction of such a shanty. Should the trapping lines be very extensive, additional bark shanties, page 245, will require to be made at intervals along the line, for sleeping stations and shelters in case of storm. The professional trapper generally attends to the building of his shanties and boats before the trapping season commences, and thus has everything in readiness for his campaign. If in a birch bark country the Indian canoe, page 260, is the most desirable craft, on account of its lightness and portability. The dug-out, or bateau, described on page 259, will also do good service.
The first thing to consider when planning a trapping campaign is choosing a trapping ground, and it’s always better to select a location where you can travel by water as much as possible. Otter, mink, beaver, and muskrat are some of the most sought-after animals for trappers, and since these are all amphibious, a water-rich area is the best choice for all purposes. Lakes, ponds, and streams surrounded by wild woods create the ideal setting for general trapping, and the mountain lakes of the Adirondacks and Alleghenies, as well as similar regions, are especially attractive for this reason. Almost any wilderness with streams, lakes, and rivers is likely to be filled with game, and some trappers focus their efforts on the edges of a single lake and the nearby forest. This approach is particularly recommended for beginners, as much of the travel can be done by boat, Page 226 making the work much easier. Once the location for operations is chosen, the young trappers should start building their shanties and boats right away. The main shanty is the most important and should be constructed first. Choose a flat piece of land near the water, clear away brush and debris, and proceed as outlined on page 242. An experienced trapper only needs a good axe to build this type of shanty. If the trapping lines are extensive, additional bark shanties, page 245, will need to be built at intervals along the line for sleeping and shelter in case of storms. Professional trappers usually build their shanties and boats before the trapping season starts, ensuring everything is ready for their campaign. In areas with birch bark, the Indian canoe, page 260, is the preferred vessel because of its lightness and portability. The dug-out or bateau, described on page 259, will also serve well.
The trapping season begins in October, and everything should be in readiness at this time, so that the trappers may devote all their time strictly to business.
The trapping season kicks off in October, and everything should be set by now, so the trappers can focus entirely on their work.
The route of the professional trapper often extends over fifty miles, and the number and weight of traps and provisions which these rough-and-ready individuals often carry as personal luggage is most astounding. Fifty or sixty pounds apiece is considered a fair burden, and they deem no one a fit physical subject for a campaign who cannot at least manage thirty pounds with comparative ease. The number of the trapping party generally consists of from two to four. A few days prior to the opening of the trapping season, the party start out, laden with their burden of traps and provisions, and deposit them at intervals along the line, the provisions being mainly kept in the "home shanty." Several trips may be necessary to complete these preparations, unless the trapping ground is readily accessible by wagon or boat, in which case the transportation is much easier.
The route of a professional trapper often spans over fifty miles, and the amount and weight of traps and supplies they carry as personal luggage is truly incredible. Fifty or sixty pounds each is considered a fair load, and they don’t see anyone as fit for a trip who can't manage at least thirty pounds with some ease. The trapping party usually has between two to four members. A few days before the trapping season starts, the group sets out, burdened with their traps and supplies, and places them at intervals along the route, with most of the food stored in the "home shanty." They may need to make several trips to finish these preparations, unless the trapping area is easily reachable by wagon or boat, in which case transporting supplies is much simpler.
The "home shanty" is generally built only when the trapping grounds are far in the wilderness, miles away from civilization. If the line extends from the outskirts of some town or village, such a hut may be dispensed with. It is used principally as a storehouse for furs, provisions, ammunition, tools, and other valuables, and also serves as a point of rendezvous, or a home, for the trappers, one of the number being generally left in charge to "keep shanty" while his companions are on their tramps in search of game. If desired, a boy may be taken Page 227 along for this especial purpose. In every case, some such guardian is very necessary, and particularly in wild districts, abounding in wolves and bears, as these animals have an odd trick of breaking into unguarded shanties, and often make sad havoc with its stores. Steel traps are almost exclusively used by the professional trapper, and the supply for a single campaign will often exceed one hundred and fifty. Many of the traps described in the early part of this work are also used, and for the amateur who has not the ready cash to layout in steel traps, are decidedly to be recommended and will be found very efficient. From thirty to fifty traps would be a fair number for an ordinary amateur trapping season, and the probable cost of such a lot would be from $15 to $25. The sizes of the traps will depend upon the game sought, No. 2-1/2 being a good average. With this supply, relying somewhat on dead-falls, twitch-ups, and the various other devices described in our early pages, we can guarantee lively sport, of course, presuming that good judgment has been used in the selection of a trapping ground. In later articles, under the proper headings, we give full details concerning food and cooking utensils, shelter and bedding, as well as many other requisites for the trapper's comfort. To complete the list he should provide himself with a good sharp axe, and hatchet, and if the log canoe is in anticipation he will also require the other tools mentioned on page 259 an oilstone being carried in order to keep the various tools in good repair; an auger, saw, and some large nails are also to be desired, and a small parcel containing needles, thread, pins, scissors, etc., will be found indispensable. "Cleanliness is next to Godliness," and there are no more luxurious necessities in camp life than a piece of soap and a clean towel. For light it is advisable to carry a supply of candles, or a lantern with a can of oil. The latter is, of course, more bulky, and for a campaign wholly on foot is hardly to be recommended on this account.
The "home shanty" is usually built only when the trapping grounds are deep in the wilderness, far from civilization. If the trapping line stretches from the edge of a town or village, this hut can often be skipped. It's mainly used as a storage space for furs, food, ammunition, tools, and other valuables, and also acts as a meeting point or home for the trappers, with one trapper typically left in charge to “keep shanty” while the others search for game. If needed, a boy can be taken along for this specific purpose. In any case, having some sort of guardian is crucial, especially in wild areas where wolves and bears roam, as these animals have a strange habit of breaking into unguarded shanties and often wreak havoc on the supplies. Professional trappers mostly use steel traps, and a single season's supply can easily exceed one hundred fifty traps. Many of the traps mentioned earlier in this text are also utilized, and for amateur trappers who don't have the cash to invest in steel traps, these alternatives are definitely recommended and quite effective. A reasonable number of traps for an average amateur trapping season would be between thirty and fifty, costing around $15 to $25. The size of the traps will depend on the game being pursued, with No. 2-1/2 being a good average size. With this setup, along with some dead-falls, twitch-ups, and various other methods discussed in the earlier pages, we can promise exciting sport, assuming good judgment in choosing a trapping area. In future articles, under the appropriate headings, we'll provide complete details about food and cooking tools, shelter and bedding, along with many other necessities for the trapper's comfort. To round out the list, he should make sure he has a sharp axe and hatchet, and if he's planning to use a log canoe, he'll also need the other tools mentioned on page 259, with an oilstone to keep the tools in good condition; an auger, saw, and some large nails would also be helpful, and a small kit with needles, thread, pins, scissors, etc., is essential. "Cleanliness is next to Godliness," and there are no more luxurious essentials in camp life than a bar of soap and a clean towel. For light, it's a good idea to pack candles or a lantern with a can of oil. The latter is bulkier and not really recommended for a trip entirely on foot for that reason.
Each trapper should be provided with a stout jack-knife, pocket-compass, and a supply of matches, a number of these being always carried on the person to provide for the emergencies to which the hunter is always subject.
Each trapper should have a sturdy pocket knife, a compass, and a supply of matches. Some matches should always be kept on hand to prepare for the emergencies that hunters often face.
One of the party should carry a double-barrelled shot-gun and another a rifle, or both may be combined in a single weapon. A revolver is also a desirable acquisition. Purified neats-foot oil should be used on the fire-arms, and in lieu of this, some trappers use the melted fat of the grouse for the same purpose. A good supply of fishing tackle is almost indispensable, and Page 228 with these valuable equipments the young trapper may defy the wilderness with all its hazards. With his traps, gun and rod, together with his store of provisions, he may look forward to a larder well stocked and may calculate on an appetite which will do it justice.
One person in the group should carry a double-barreled shotgun and another a rifle, or both might be combined into one weapon. A revolver is also a useful addition. Purified neatsfoot oil should be used on the firearms, and instead, some trappers use melted grouse fat for the same purpose. A good supply of fishing gear is nearly essential, and Page 228 with this valuable equipment, the young trapper can take on the wilderness and all its dangers. With his traps, gun, and rod, along with his stockpile of supplies, he can look forward to a well-stocked pantry and can count on an appetite that will do it justice.
The list of portable provisions and cooking utensils best adapted for a campaign are given under their proper title, and will be found to cover all the wants of the most fastidious. The stove is the most cumbersome article, but trappers generally dispense with its use altogether, looking at it rather in the light of a luxury as well as a nuisance. The open camp fire will answer every purpose, both for cooking and for comfort in cold weather.
The list of portable supplies and cooking tools that are best suited for a campaign is provided under their correct title and will meet the needs of even the most particular. The stove is the heaviest item, but trappers usually choose not to use it at all, viewing it more as a luxury and a hassle. An open campfire will serve every need, both for cooking and for warmth in cold weather.
For clothing it is desirable to carry at least two suits, in order to have a "change." They should be of woolen, and from the hunter's point of view, should be of a sombre shade, so as to be as inconspicuous as possible. The use of high-top boots is to be deprecated, as they are tiresome and unwieldy. Short boots, with thick, iron-pegged soles, are generally preferred by trappers, and in order to render them soft, pliable, and waterproof they may be soaked or smeared with a hot mixture, composed of one part rosin, two parts beeswax, and three parts tallow. Simple tallow, or even the fat of the deer, is sometimes used for the same purpose.
For clothing, it's important to bring at least two suits to have a “change.” They should be made of wool, and from a hunter's perspective, they should be a dark color to stay as hidden as possible. High-top boots are not ideal since they can be uncomfortable and bulky. Trappers usually prefer short boots with thick, iron-pegged soles. To make them soft, flexible, and waterproof, they can be soaked or rubbed with a hot mixture of one part rosin, two parts beeswax, and three parts tallow. Plain tallow or even deer fat is sometimes used for the same purpose.
Calculating on a successful campaign, a supply of board-stretchers, page 273, will be needed for the curing of the skins, and if our adventurous enthusiasts should extend their experience along into the winter, the toboggan and snow-shoes will come into good use for convenient winter travel.
Calculating on a successful campaign, a supply of board-stretchers, page 273, will be needed for curing the skins, and if our adventurous enthusiasts decide to keep exploring through the winter, the toboggan and snowshoes will be great for easy winter travel.
The trapping season properly commences in October and ends in April. The pelts of fur bearing animals are in their best condition during this time, and in the winter are in their prime. The various modes of setting and baiting traps for all our leading animals are clearly set forth in another part of this volume. And in the accompanying engravings will be found life like representations of each species.
The trapping season officially starts in October and runs through April. The fur of animals is in its best shape during this period, and especially at its peak in winter. Different methods for setting and baiting traps for all our main animals are detailed in another section of this book. You'll also find realistic illustrations of each species in the accompanying images.
In a trapping campaign it is an excellent plan to select a central point for the home shanty, extending the trapping lines in several directions therefrom, following the borders of the lakes or streams for the otter, beaver, mink and muskrat; and setting a few lines inland for the capture of martens, racoons, foxes, etc.
In a trapping campaign, it's a great idea to choose a central spot for your home cabin, extending your trapping lines in several directions from there. Follow the edges of the lakes or streams to catch otters, beavers, minks, and muskrats, and set a few lines further inland to capture martens, raccoons, foxes, and so on.
For an amateur campaign this a most excellent and convenient Page 229 arrangement, the lines may extend all the way from one to five miles each, and connect at their edges, the whole ground plan resembling the form of a wheel, the shanty corresponding to the hub, and the trapping lines the spokes, the tire representing the circuit connecting the various lines. Where the latter extend over many miles it is well to construct bark shanties at the limits. Let each trapper take a certain "spoke," and follow it to its terminus, returning on the adjacent line. On his arrival at the shanty he should immediately set to work skinning the animals taken, and stretching their furs. Full directions for skinning the various game are given under their respective titles, and the curing of skins is treated in detail in another chapter of this work. We also present a table of the comparative values of the various American furs at the present date of publication. Of course these values are constantly varying, but the table will serve at least to gauge the relative values of common and scarce furs. Great care should always be used in removing the skins from the various animals, as the final value of the fur much depends upon this. They should not be removed from the stretchers until perfectly dry, and should then be laid in a cool, airy place. When near a village or settlement it is advisable to send "into town" every few days with a batch of furs for safe keeping, and particularly so when the skins are valuable, and in cases where the home shanty is left unguarded. The value of prime otter or mink pelt is a matter of no small importance, and a good trapping ground furnishes a rare field for light fingered prowlers who are well posted on the market price of raw furs, and who are constantly on the lookout for such prizes, either in the shape of the prepared skin, or on the back of the live animal. These "trap robbers," or poachers, are the pests of trappers, and many have learned from dear experience the advisability of placing their choice furs beyond the reach of the marauders.
For an amateur campaign, this is a really excellent and convenient arrangement. The lines can stretch anywhere from one to five miles each and connect at their edges, making the entire layout look like a wheel, with the shanty as the hub and the trapping lines as the spokes, while the outer edge represents the circuit linking the various lines. When these lines stretch over many miles, it's a good idea to build bark shanties at the ends. Each trapper should take a specific "spoke" and follow it to its end, then return via the adjacent line. When they arrive back at the shanty, they should immediately start skinning the animals they've caught and stretching their furs. Full instructions for skinning different types of game are provided under their respective headings, and the process for curing skins is discussed in detail in another chapter of this book. We also include a table showing the current comparative values of various American furs at the time of publication. Of course, these values fluctuate constantly, but the table will at least help gauge the relative worth of common and rare furs. Care should always be taken when removing skins from the animals since the final value of the fur largely depends on this process. They shouldn't be taken off the stretchers until they are completely dry and should then be stored in a cool, well-ventilated area. When near a village or settlement, it's wise to send "into town" every few days with a batch of furs for safekeeping, especially when the skins are valuable and if the home shanty is left unattended. The worth of prime otter or mink pelts is quite significant, and a good trapping area attracts light-fingered thieves who know the market prices for raw furs and are always on the lookout for such treasures, either in the form of prepared skins or from the live animals themselves. These "trap robbers" or poachers are a major nuisance for trappers, and many have learned the hard way to keep their prized furs out of reach of these marauders.
The hut in which they are stored is nearly always kept guarded, and, where this is impracticable, the skins are hid in hollow trees, or carried to some near settlement, as we have already mentioned.
The hut where they are stored is almost always kept under guard, and when that's not feasible, the skins are hidden in hollow trees or taken to a nearby settlement, as we’ve already mentioned.
If the campaign proves successful and promises well for another season, it is customary to hide the traps beneath rocks, thus saving the labor of a second transportation. In order to keep the traps from rusting, it is well to cover them with oat or buckwheat chaff. The rock should be first rolled from its resting place, and a bed of the chaff made beneath it, in which the traps should be covered, the rock being afterwards replaced. In a few such Page 230 places all the traps may be effectually stored away, and they will be found in prime order and ready for business on the following season.
If the campaign is successful and looks good for another season, it's common to hide the traps under rocks, saving the effort of moving them again. To prevent the traps from rusting, it's a good idea to cover them with oat or buckwheat chaff. First, roll the rock away from where it sits, create a bed of chaff beneath it, cover the traps with it, and then put the rock back. In a few such Page 230 places, all the traps can be effectively stored, and they will be found in perfect condition and ready to use for the next season.
In the months of September and October trappers are much annoyed by gnats and mosquitoes, and, as a preventive against the attacks of these pests, we give on page 255 some valuable receipts, which have stood the test of time, and are still the most effective remedies. The "smudge," consisting of a smouldering pile of birch bark is also used where the insects infest the tents or shanties by night. The bark should be dry, and should not be allowed to blaze. The smudge is generally placed at the entrance of the tent, and the trapper may then take his choice between smoke or mosquitoes, both cannot exist together, and a tent infested with the blood-thirsty pests may be effectually cleared in a few minutes by the introduction of smoking brand for a few seconds. If the tent is now closely buttoned and the smudge kept burning directly outside, there will be no further trouble with the mosquitoes, and the odor of the smoke is, after all, but a slight annoyance and to some is even enjoyable after being once accustomed to it. When the home shanty is infested, it may be cleared in the same way, and by the aid of two or more smudges on the windward side may be kept free from the insects.
In September and October, trappers deal with a lot of annoyance from gnats and mosquitoes. To prevent these pests from bothering them, we provide some valuable tips on page 255 that have proven effective over time and are still the best remedies. One common method is the "smudge," which is a smoldering pile of birch bark used when the insects invade tents or cabins at night. The bark should be dry and not allowed to catch fire. The smudge is usually placed at the entrance of the tent, allowing the trapper to choose between smoke or mosquitoes; both can't coexist. A tent swarming with these bloodsucking pests can be cleared in just a few minutes by using a smoking brand for a few seconds. If the tent is properly closed and the smudge is kept burning just outside, there will be no more issues with mosquitoes. The smell of the smoke may be a minor annoyance, but for some, it's even pleasant once they get used to it. If the home cabin is infested, it can be cleared the same way, and with two or more smudges on the windward side, it can stay insect-free.
FOOD AND COOKING UTENSILS.
The professional trapper on a campaign depends much upon his traps for his food, and often entirely contents himself with the subsistence thus gained. We encourage and believe in "roughing it" to a certain extent, but not to that limit to which it is often carried by many professional "followers of the trap" throughout our country. The course of diet to which these individuals subject themselves, would often do better credit to a half civilized barbarian than to an enlightened white man, and when it comes to starting on a campaign with no provision for food excepting a few traps, a gun, and a box of matches, and relying on a chance chip for a frying-pan, he would rather be "counted out." In ordinary cases we see no necessity for such deprivation, and, on the other hand, we decry the idea of transporting a whole kitchen and larder into the woods. There is a happy medium between the two extremes, whereby a light amount of luggage in the shape of cooking utensils and closely packed portable food, may render the wild life of the trapper very cozy and comfortable, and his Page 231 meals a source of enjoyment, instead of a fulfilment of physical duty. What with the stock of traps, necessary tools, blankets, etc., the trapper's burden is bound to be pretty heavy, and it becomes necessary to select such food for transportation as shall combine the greatest amount of nutriment and the least possible weight, and to confine the utensils to those absolutely necessary for decent cooking.
The professional trapper on a job relies heavily on his traps for food and often fully satisfies himself with what he catches. We support and believe in "roughing it" to a degree, but not to the extent that many professional "trappers" do across the country. The diet these people stick to would often be more fitting for a half-civilized savage than for an educated person, and when it comes to starting a trip with nothing but a few traps, a gun, and a box of matches—depending on a random stick for a frying pan—they would rather not go at all. In normal situations, we see no need for such deprivation, and conversely, we reject the idea of bringing an entire kitchen and pantry into the wilderness. There’s a happy medium between the two extremes, where a small amount of luggage consisting of cooking tools and compact food can make the trapper’s outdoor life quite comfortable, and his meals a pleasure rather than just a necessity. Given the supply of traps, essential tools, blankets, etc., the trapper’s load is bound to be pretty heavy, so it’s important to choose food for transport that offers the maximum nutrition with the least weight and to limit the cooking tools to those absolutely essential for decent preparation.
The trapper's culinary outfit may then be reduced to the following items, and in them he will find a sufficiency for very passable living.
The trapper's cooking gear can then be simplified to these items, and with them, he'll have enough for a decent living.
One of the most nutritious and desirable articles of food consists of fine sifted Indian meal; and it is the only substantial article of diet which many trappers will deign to carry at all.
One of the most nutritious and sought-after foods is finely sifted cornmeal; and it’s the only substantial food item that many trappers will bother to carry at all.
By some it is mixed with twice its quantity of wheat flour, and is thus used in the preparation of quite a variety of palatable dishes. One or two pounds of salt pork will also be found a valuable addition; boxes of pepper and salt and soda should also be carried. With these simple provisions alone, relying on his gun, traps and fishing tackle for animal food, the young trapper may rely on three enjoyable meals a day, if he is anything of a cook. Pork fritters are not to be despised, even at a hotel table; and with the above they can be made to suit the palate of the most fastidious.
By some, it’s mixed with twice the amount of wheat flour and is used to prepare a variety of tasty dishes. One or two pounds of salt pork can also be a valuable addition; boxes of pepper, salt, and baking soda should be included as well. With just these simple supplies and relying on his gun, traps, and fishing gear for meat, the young trapper can enjoy three satisfying meals a day, as long as he knows how to cook a bit. Pork fritters aren’t to be overlooked, even at a hotel, and with the ingredients listed above, they can be made to please even the pickiest eaters.
Indian meal is a valuable accessory with cooks generally, and to
the trapper it often becomes his great "staff of life." If our
young enthusiast desires to try his hand at roughing it to the
fullest extent, compatible with common sense and the strength of an
ordinary physical constitution, he may endeavor to content himself
with the above portable rations; but with anything less it becomes
 too much like starvation to arouse our enthusiasm. For cooking
utensils, a small frying-pan and a deep tin basin are indispensable;
and a drinking cup is also to be desired. The kind known as the
telescope cup, constructed in three parts, which close within each
other, when not in use, possesses great advantages on account of
its portability. With these one can get along pretty decently.
too much like starvation to arouse our enthusiasm. For cooking
utensils, a small frying-pan and a deep tin basin are indispensable;
and a drinking cup is also to be desired. The kind known as the
telescope cup, constructed in three parts, which close within each
other, when not in use, possesses great advantages on account of
its portability. With these one can get along pretty decently.
Indian meals are a great option for cooks and often serve as the main source of food for trappers. If a young adventurer wants to really experience roughing it while still being sensible and considering their average physical abilities, they can take these portable rations; anything less feels too much like starvation to get us excited. For cooking, a small frying pan and a deep tin basin are essential, and having a drinking cup is also useful. The telescope cup, which consists of three parts that fit together when not in use, is especially handy because of its portability. With these items, one can manage quite well.
The pork fritters already mentioned form a favorite dish with trappers generally, and can be made in the following Page 232 way; have at hand a thick batter of the Indian meal and flour; cut a few slices of the pork, and fry them in the frying-pan until the fat is tried out; cut a few more slices of the pork; dip them in the batter and drop them in the bubbling fat, seasoning with salt and pepper; cook until light brown and eat while hot. The question now arises, "What shall we eat them with?" If you are "roughing it," such luxuries as plates and knifes and forks are surely out of the question; and you must content yourself with a pair of chop sticks "a la Chinee," or make your jackknife do double purpose, using a flat chip or stone as a plate. A small tin plate may be added to the list of utensils if desired, but we are now confining ourselves to the "lowest limit" of absolute necessities. That wholesome dish known as "boiled mush," may come under the above bill of fare; and fried mush is an old stand-by to the rough and ready trapper. In the first case the Indian meal is slowly boiled for one hour, and then seasoned as eaten. It is then allowed to cool, and is cut in slices and fried in fat. Indian meal cakes are easily made by dropping a quantity of the hot mush in the frying-pan, having previously stirred in a small quantity of soda, and turning it as soon as the lower side is browned. A Johnny cake thus made is always appetizing, and with the addition of a little sugar, it becomes a positive luxury. Hoe cakes, so much relished by many, can be made by mixing up a quantity into a thick mass, adding a little soda. Bake in the fire on a chip or flat stone. The trapper's ground is generally in the neighborhood of lakes or streams, and fresh fish are always to be had. They may be cooked in a manner which would tempt a city epicure; and when it comes to the cooking of a fresh brook trout, neither a Prof. Blot nor a Delmonico can compete with the trapper's recipe. The trout is first emptied and cleaned through a hole at the neck, if the fish is large enough to admit of it; if not, it should be done by a slit up the belly. The interior should be carefully washed and seasoned with salt and pepper; and in the case of a large fish, it should be stuffed with Indian meal. Build a good fire and allow the wood to burn down to embers; lay the fish in the hot ashes and cover it with the burning coals and embers; leave it thus for about half an hour, more or less, in proportion to the size of the fish (this may be easily determined by experiment); when done, remove it carefully from the ashes, and peel off the skin. The clean pink flesh and delicious savor which now manifest themselves will create an appetite where none before existed. All the delicate Page 233 flavor and sweet juices of the fish are thus retained, and the trout as food is then known in its perfection.
The pork fritters mentioned earlier are a favorite among trappers and can be made like this: have a thick batter ready using cornmeal and flour; slice some pork and fry it in a pan until the fat renders; slice a bit more pork, dip it in the batter, and drop it into the hot fat, seasoning with salt and pepper; cook until golden brown and eat while hot. Now, you might be wondering, "What do we eat them with?" If you're "roughing it," fancy things like plates, knives, and forks are out of the question; you’ll have to make do with chopsticks "Chinese style" or use your jackknife, with a flat chip or stone as a plate. A small tin plate can be added if you want, but we're keeping this to the essentials. That hearty dish called "boiled mush" can fit into this menu, and fried mush is a go-to for the rugged trapper. In the first case, cornmeal is boiled slowly for an hour and then seasoned as you eat it. Once it cools, it’s sliced and fried in fat. Cornmeal cakes are easy to make by dropping some hot mush in the pan, mixing in a little baking soda first, and flipping it as soon as the bottom is browned. A Johnny cake made this way is always tasty, and adding a bit of sugar makes it a real treat. Hoe cakes, enjoyed by many, are made by mixing the cornmeal into a thick dough, adding a little soda. They can be baked in the fire on a chip or flat stone. Trappers usually set up near lakes or streams, where fresh fish are always available. They can be cooked in ways that would satisfy a city foodie; when it comes to cooking fresh brook trout, even a high-class chef can't compete with a trapper's method. The trout is first cleaned through a hole at the neck if it’s big enough; if not, a cut along the belly works. Rinse the inside and season with salt and pepper; for larger fish, stuff it with cornmeal. Build a good fire and let the wood burn down to embers; place the fish in the hot ashes and cover it with burning coals. Leave it like that for about half an hour, more or less, depending on the size of the fish (you’ll learn by trial and error). When it’s done, carefully take it out of the ashes and remove the skin. The clean, pink flesh and delicious aroma that emerge will create an appetite where there was none before. All the delicate flavor and sweet juices of the fish are preserved, and the trout is then truly enjoyed in its best form.
By the ordinary method of cooking, the trout loses much of its original flavor by the evaporation of its juices; and although a delicious morsel in any event, it is never fully appreciated excepting after being roasted in the ashes, as above described.
By the usual way of cooking, the trout loses a lot of its original flavor due to the evaporation of its juices; and even though it's tasty no matter what, it’s never really appreciated until it’s roasted in the ashes, as mentioned above.
The other method consists in rolling the fish in the Indian meal and frying it in the frying-pan with a piece of the salt pork. Seasoning as desired.
The other method involves coating the fish in cornmeal and frying it in a pan with some salt pork. Season to taste.
Partridges, ducks, quail, and other wild fowl are most delicious when cooked in the ashes as described for the trout. The bird should be drawn in the ordinary manner, and the inside washed perfectly clean. It should then be embedded in the hot coals and ashes, the feathers having been previously saturated with water. When done, the skin and feathers will easily peel off, and the flesh will be found to be wonderfully sweet, tender, and juicy. A stuffing of pounded crackers and minced meat of any kind, with plenty of seasoning, greatly improves the result, or the Indian meal may be used if desired. A fowl thus roasted is a rare delicacy. A partridge, squirrel, pigeon, woodcock, or any other game can be broiled as well in the woods as at home, using a couple of green-branched twigs for a spider or "toaster," and turning occasionally. For this purpose the bird should be plucked of its feathers, cleanly drawn and washed, and spread out by cutting down the back. Venison, moose, or bear meat, can be deliciously roasted in joints of several pounds before a good fire, using a green birch branch as a spit, and resting it on two logs, situated on opposite sides of the fire. The meat can thus be occasionally turned and propped in place by a small stick, sprinkling occasionally with salt and pepper. The above manner of making the fire is that adopted by most woodsmen. Two large green logs, of several feet in length, being first laid down at about three feet distant, between these the fire is built, and when a kettle is used a heavy pole is so arranged as to project and hold it over the fire. A cutlet of venison fried in the pan is delicious, and a "Johnny cake" cooked in the fat of this meat is a decided dainty.
Partridges, ducks, quail, and other wild birds taste best when cooked in the ashes like the trout. The bird should be prepared in the usual way, making sure to clean the inside thoroughly. It should then be placed in the hot coals and ashes, with the feathers soaked in water beforehand. Once cooked, the skin and feathers will easily come off, revealing incredibly sweet, tender, and juicy meat. A stuffing made of crushed crackers and minced meat, seasoned generously, greatly enhances the flavor, or you can use cornmeal if you prefer. Roasting a bird this way is a rare treat. A partridge, squirrel, pigeon, woodcock, or any other game can also be grilled in the woods just as well as at home, using a couple of green branches as a rack or "toaster," and turning it occasionally. For this, the bird should be plucked, properly cleaned, and washed, then opened up by cutting along the back. For venison, moose, or bear meat, you can roast large pieces over a good fire using a green birch branch as a spit, balancing it on two logs placed opposite the fire. This way, the meat can be turned regularly and propped up with a small stick, while being sprinkled with salt and pepper. This method of building the fire is commonly used by woodsmen. Two large green logs, several feet long, are placed about three feet apart, and the fire is built in between these. When using a kettle, a heavy pole is arranged to hold it above the fire. A venison cutlet fried in a pan is delicious, and a "Johnny cake" cooked in the fat from this meat is quite a treat.
With the above hints for a "rough and ready" campaign, we think the young trapper ought to be able to get along quite comfortably.
With the tips above for a "rough and ready" campaign, we believe the young trapper should be able to manage quite comfortably.
We will now pass on to the consideration of what the average Page 234 professional trapper would call "luxuries." The stock of these depends much upon the location of the trapping ground. If accessible by wagon or boat, or both, they may be carried in unlimited quantities, but when they are to be borne on the back of the trapper through a pathless wilderness of miles, the supply will, of course, have to be cut short. When two or three start out together it becomes much easier, one carrying the traps and tools; another the guns, cooking utensils, etc.; the third confining his luggage to the food. One of the most necessary requisites for a journey on foot consists in a knapsack or large square basket, which can be easily strapped to the back of the shoulders, thus leaving the hands free. Matches are absolutely indispensable, and a good supply should be carried. They should always be enclosed in a large-mouthed bottle with a close fitting cork, to prevent their being damaged by moisture. For further safety in this regard the matches may be rendered perfectly water-proof by dipping their ends in thin mastic or shellac varnish. If not at hand, this varnish can be easily made by dissolving a small quantity of either sort of gum in three or four times its bulk of alcohol. It is well to dip the whole stick in the solution, thereby rendering the entire match impervious to moisture. Lucifer matches are the best, and, when thus prepared, they may lay in water for hours without any injury. It is a fearful thing to find oneself in the wilderness, cold and hungry, and without the means of lighting a fire, and to prepare for such an emergency it is always advisable to be provided with a pocket sun glass. So long as the sun shines a fire is thus always to be had, either by igniting a small quantity of powder (which the trapper is always supposed to carry) or using powdered "touch wood" or "punk tinder" in its place. Fine scrapings from dry wood will easily ignite by the sun glass, and by fanning the fire and adding additional fuel it will soon burst into flame. In cloudy weather, and in the absence of matches, a fire may easily be kindled by sprinkling a small quantity of powder on a large flat stone, setting a percussion cap in its midst, and covering the whole with dry leaves. A smart strike on the cap with a hammer will have the desired result, and by heaping additional fuel on the blazing leaves the fire soon reaches large proportions. If the young trapper should ever be so unfortunate as to find himself in the wild woods, chilled and hungry, minus matches, powder, caps, and sun glass, he may as a last resort try the following: Scrape some lint or cotton from some portion of the garment, or some Page 235 tinder from a dry stick, and lay it on the surface of some rough rock, white quartz rock if it can be found. Next procure a fragment of the same stone, or a piece of steel from some one of the traps, and strike its edge sharply, and with a skipping stroke into the further side of the tinder, the direction being such as will send the sparks thus produced into the inflammable material. Continue this operation until the tinder ignites. By now gently fanning the smoking mass it may easily be coaxed into flame. At least so our Adirondack guide told us last summer. The author has never had occasion to test the merits of the plan for himself, and has no special desire of being so placed, as that his life will hang upon its success. He presents it therefore as a mere suggestion without endorsing its practicability, and would rather prefer matches in the long run. The open fire generally serves both for purposes of warmth and cooking, but by many, a camp stove is considered a great improvement. Stoves of this character, and for this especial purpose, are in the market. They are small and portable, with pipe and furniture, all of which pack away closely into the interior. A fire is easily started in one of these stoves, and, by closing the damper, a slow fire may be kept up through the night. The stove is generally set up at the entrance of the tent, the pipe passing through the top, in a hole near the ridge pole. The furniture consists of three pots or kettles, which pack easily into each other, and when in the stove still leave ample room for a considerable amount of provisions.
We will now move on to what the average Page 234 professional trapper would refer to as "luxuries." The amount of these luxuries depends a lot on the location of the trapping area. If it's accessible by wagon or boat, or both, they can be brought in unlimited quantities. However, if they need to be carried on the trapper's back through a pathless wilderness for miles, the supply will obviously have to be limited. When two or three people set out together, it's much easier: one can carry the traps and tools, another the guns and cooking supplies, while the third focuses solely on food. One essential item for a journey on foot is a knapsack or a large square basket that can be easily strapped to the shoulders, keeping the hands free. Matches are absolutely essential, and a good supply should be carried. They should always be stored in a wide-mouthed bottle with a tight-fitting cork to prevent moisture damage. For extra protection, the matches can be made completely waterproof by dipping their tips in thin mastic or shellac varnish. If varnish is not available, it can be easily made by dissolving a small amount of gum in three or four times its volume of alcohol. It's advisable to dip the entire match in this solution to make it moisture-proof. Lucifer matches are the best option, and when prepared this way, they can sit in water for hours without any damage. It's a terrifying experience to be in the wilderness, cold and hungry, without a way to start a fire. To prepare for such emergencies, it's always smart to have a pocket sun glass. As long as the sun is shining, fire can be easily obtained, either by igniting a small amount of powder (which the trapper is always expected to carry) or by using powdered "touch wood" or "punk tinder." Fine shavings from dry wood can easily ignite with the sun glass, and by fanning the fire and adding more fuel, it will soon burst into flames. On cloudy days, without matches, a fire can easily be started by sprinkling some powder on a large flat stone, placing a percussion cap in the center, and covering it with dry leaves. A good hit on the cap with a hammer will create the desired effect, and by piling on additional fuel over the blazing leaves, the fire will quickly grow in size. If a young trapper is ever unfortunate enough to find themselves in the wild, cold and hungry, without matches, powder, caps, and a sun glass, they can as a last resort try this method: Scrape some lint or cotton from their clothing, or some tinder from a dry stick, and place it on the surface of a rough rock—white quartz rock if available. Then take a piece of the same stone or a piece of steel from one of the traps, and strike it sharply against the tinder, directing the sparks into the flammable material. Keep doing this until the tinder catches fire. Gently fanning the smoldering material will coax it into a flame. At least, that's what our Adirondack guide told us last summer. The author has never had to test this method themselves and prefers not to be in a situation where their life depends on it working. They offer it as just a suggestion without endorsing its reliability, and would rather have matches in the long run. The open fire typically serves both for warmth and cooking, but many consider a camp stove to be a significant improvement. Stoves designed for this purpose are available on the market. They are small and portable, with a pipe and accessories that all fit neatly inside. A fire is easy to get going in one of these stoves, and by closing the damper, a slow fire can be maintained through the night. The stove is usually set up at the entrance of the tent, with the pipe going through the top near the ridge pole. The accessories consist of three pots or kettles that fit easily into one another, leaving plenty of room for a significant amount of provisions when they're stored in the stove.
The kettles are made of block-tin, and frying-pans also, as these are much more light and portable than those made of iron. The lid may be used as a plate, and for this purpose the handle consists of an iron ring, which will fold flat against the surface when inverted. Knives, forks, and spoons are easily stowed away in the stove or knapsack, and a coffee-pot should always be carried. There is a knife known as the combination camp-knife, which is much used by hunters and trappers, and contains a spoon, fork, knife, and various other useful appendages, in a most compact form. It costs from one to two dollars.
The kettles are made of tin, and so are the frying pans, since they are much lighter and more portable than those made of iron. The lid can double as a plate, and for this purpose, the handle has an iron ring that folds flat against the surface when turned upside down. Knives, forks, and spoons can be easily packed away in the stove or backpack, and a coffee pot should always be included. There's a knife called a combination camp knife that's popular among hunters and trappers; it includes a spoon, fork, knife, and several other handy tools, all in a very compact design. It costs between one and two dollars.
For provisions, potatoes will be found excellent, both on account of their portability and the variety of ways in which they may be served. They are healthy and nutritions, and always palatable. Beans are also very desirable for the same reasons. Wheat flour will form a valuable addition to the trapper's larder, and particularly so, if the "self-raising" kind can be had. This Page 236 flour contains all the required ingredients for light bread and biscuit, and is sold by grocers generally, in packages of various sizes, with accompanying recipes. We strongly recommend it where a stove is employed; and to anyone who is fond of biscuit, bread, or pancakes, it will be appreciated. Butter, lard, sugar, salt, pepper and mustard are valuable accessories, and curry-powder, olive oil, and vinegar will often be found useful. Olive oil is often used by camping parties with the curry powder, and also as a substitute for lard in the frying-pan. Pork, Indian meal and crackers, wheaten grits, rice, and oat-meal are desirable, and coffee and tea are great luxuries. For soups, Liebig's extract of beef is a most valuable article, and with the addition of other ingredients, vegetables or meat, the result is a most delicious and nutritious dish. This extract is obtainable at almost any grocer's, and full directions and recipes accompany each jar. Canned vegetables are much to be desired on account of their portability, and are never so delicious as when cooked over a camp fire. Lemonade is always a luscious beverage, but never so much so as to a thirsty trapper. A few lemons are easily carried and will repay the trouble.
For supplies, potatoes are great because they're easy to transport and can be prepared in many different ways. They're healthy, nutritious, and always taste good. Beans are also very desirable for the same reasons. Wheat flour is a valuable addition to a trapper's supplies, especially if you can find the "self-raising" kind. This Page 236 flour includes all the necessary ingredients for light bread and biscuits, and it’s usually sold by grocers in various package sizes, complete with recipes. We highly recommend it if you have a stove, and anyone who enjoys biscuits, bread, or pancakes will appreciate it. Butter, lard, sugar, salt, pepper, and mustard are useful extras, while curry powder, olive oil, and vinegar can also be handy. Camping groups often use olive oil along with curry powder and as a lard substitute when frying. Pork, cornmeal, crackers, grits, rice, and oatmeal are good options, and coffee and tea are great treats. For soups, Liebig's extract of beef is incredibly valuable; when combined with other ingredients, like vegetables or meat, it creates a delicious and nutritious meal. This extract is available at nearly any grocery store, and each jar comes with full directions and recipes. Canned vegetables are highly sought after due to their portability and taste best when cooked over a campfire. Lemonade is always a refreshing drink, but it’s especially satisfying for a thirsty trapper. A few lemons are easy to carry and worth the effort.
All provisions, such as meal, flour, sugar, salt, crackers, and the like, should be enclosed in water-proof canvas bags, and labelled. The bags may be rendered water-proof either by painting, (in which case no lead or arsenic paints should be used) or by dipping in the preparation described on page 247. If these are not used, a rubber blanket, page 250, may be substituted, the eatables being carefully wrapped therein, when not in use. The butter and lard should be put up in air-tight jars, and should be kept in a cool place, either on the ground in a shady spot, or in some cool spring.
All provisions, like food, flour, sugar, salt, crackers, and similar items, should be stored in waterproof canvas bags and labeled. The bags can be made waterproof either by painting (but avoid using any lead or arsenic paints) or by dipping them in the preparation described on page 247. If these methods aren't used, a rubber blanket, page 250, can be used instead, wrapping the food items carefully when they're not in use. Butter and lard should be kept in airtight jars and stored in a cool place, either on the ground in a shady area or in a cool spring.
For a campaign on foot, the knapsack, or shoulder-basket, already alluded to on page 234, is an indispensable article. It should be quite large and roomy, say fifteen inches in depth and ten by twelve inches in its other dimensions. The material should be canvas, rubber cloth, or wicker, and, in any case, the opening at the top should have a water-proof covering extending well over the sides. The straps may consist of old suspender bands, fastened crosswise on the broad side of the bag. The capacity of such a knapsack is surprising, and the actual weight of luggage seems half reduced when thus carried on the shoulders. When three or four trappers start together, which is the usual custom, and each is provided with such a shoulder basket, the luggage can be thus divided, and the load for each individual much lightened.
For a walking campaign, the knapsack, or shoulder-basket, mentioned earlier on page 234, is an essential item. It should be quite large and spacious, about fifteen inches deep and ten by twelve inches in other dimensions. The material should be canvas, rubber cloth, or wicker, and in any case, the top opening should have a waterproof cover that extends well over the sides. The straps can be made from old suspenders, attached crosswise on the broad side of the bag. The carrying capacity of such a knapsack is impressive, and it feels like the actual weight of the luggage is cut in half when it's worn on the shoulders. When three or four trappers set out together, which is the usual practice, and each has a shoulder basket, the luggage can be divided up, significantly lightening each person's load.
Page 237 Venison is the trapper's favorite food, and in mild weather it sometimes happens that the overplus of meat becomes tainted before it can be eaten. To overcome this difficulty the following process is resorted to, for the preservation of the meat, and the result is the well-known and high-priced "jerked venison" of our markets. The flesh is first cut into small, thin strips, all the meat being picked off from the bones. The pieces are then placed on the inside of the hide of the animal and thoroughly mixed with salt, a pint and a half being generally sufficient. The salt being well worked in, the fragments should be carefully wrapped in the hide, and suffered to remain in this condition for two or three hours. The meat is then ready to be dried,—"jerked."
Page 237 Venison is the trapper's favorite food, and in mild weather, it sometimes happens that leftover meat spoils before it can be eaten. To solve this problem, the following process is used to preserve the meat, resulting in the well-known and expensive "jerked venison" found in our markets. The meat is first cut into small, thin strips, with all the flesh removed from the bones. The pieces are then placed inside the animal's hide and thoroughly mixed with salt, usually about a pint and a half. Once the salt is well worked in, the pieces should be wrapped carefully in the hide and left for two or three hours. The meat is then ready to be dried—"jerked."
Four forked poles should be first driven into the ground, about six feet apart, in the form of a square, the forks being four feet above ground. Lay two poles of green wood across the forks on the two opposite sides of the square, and cover the space between them by other poles laid across them, an inch or two inches apart. On to this mammoth gridiron the strips of flesh should now be spread, and a steady fire of birch or other clean, fresh wood should be kept steadily burning beneath for about twenty-four hours. At the end of this time the meat will have reduced much in size and weight. The salt will have been thoroughly dried in, and the flesh so prepared may be kept for almost any length of time. In its present condition it is excellent eating, and it is always at hand for frying, and may be cooked in a variety of ways. Moose and bear meat may be dried in a similar manner, using a proportionate amount of salt. Fish may also be prepared in the same way, for which purpose they should be scaled as usual and afterward spread open by cutting down the back, the bone being removed. We cordially recommend this method of preparing both flesh and fish, and no trapper's "recipe book" is complete without it.
Four forked poles should first be driven into the ground, about six feet apart, forming a square, with the forks four feet above the ground. Lay two poles of green wood across the forks on two opposite sides of the square, and cover the space between them with other poles laid across, one to two inches apart. On this large gridiron, the strips of meat should now be spread, and a steady fire of birch or other clean, fresh wood should be kept burning underneath for about twenty-four hours. After this time, the meat will have significantly reduced in size and weight. The salt will have been thoroughly dried in, and the flesh prepared in this way can be kept for a long time. In its current state, it is excellent to eat, readily available for frying, and can be cooked in many different ways. Moose and bear meat can be dried similarly, using a suitable amount of salt. Fish can also be prepared in the same manner, scaled as usual, and then opened up by cutting down the back, removing the bone. We highly recommend this method for preparing both meat and fish, and no trapper's "recipe book" is complete without it.
In localities where wolves abound, the nocturnal invasions of these creatures often render the keeping of fresh meat a very difficult task, and in this connection it may be well to give directions for the preservation of game desired to be used either as fresh meat or for purposes of drying.
In areas where wolves are plentiful, the nighttime raids of these animals often make it extremely challenging to keep fresh meat. In this context, it’s useful to provide guidance on how to preserve game that you want to use as fresh meat or for drying purposes.
The spring-pole is most commonly and successfully used.
The spring-pole is the most commonly and effectively used.
Select some stout sapling, bend it down, and cut off a limb several feet from the ground. Hang the meat in the crotch thus formed, and allow the tree to swing back. By dividing the meat into several parts it may thus all be protected. When Page 238 a moose or deer is killed at such a time or place, or under such circumstances as render its immediate dressing impossible, its carcass may be defended against mutilation by another means. Wolves are naturally sly and sagacious, and have a wholesome fear of a trap. Any unnatural arrangement of logs and stones immediately excites their suspicion, and the trapper takes advantage of this wary peculiarity to good purpose. Laying his dead game near some fallen tree or old log he strews a few branches over the carcass, or perhaps rests a log over it. Sometimes he hangs the entrails of the animal over the body, on a forked stick, anyone of which devices is said to have the desired result. The wolverine is another pest to the trapper, and not being so sly as the wolf, never hesitates to pounce upon any flesh within its reach. The former method, therefore, is always the safest plan for absolute protection against all animals.
Select a sturdy young tree, bend it down, and cut off a branch a few feet off the ground. Hang the meat in the split it creates, and let the tree swing back. By cutting the meat into several pieces, you can protect it all. When Page 238 a moose or deer is killed at a time or place that makes it impossible to dress it right away, you can protect the carcass from being eaten by other animals in another way. Wolves are naturally crafty and smart and have a healthy fear of traps. Any unnatural pile of logs and stones raises their suspicions, and the trapper takes advantage of this caution. He places his dead game near a fallen tree or old log, spreads a few branches over the carcass, or maybe lays a log on top of it. Sometimes he hangs the entrails over the body on a forked stick; any of these methods is said to be effective. The wolverine is another problem for the trapper, and unlike the wolf, it doesn’t hesitate to attack any meat within reach. Therefore, the first method is always the safest way to ensure complete protection against all animals.
The moose and deer are the favorite food of trappers in the country where these animals abound, and the trappers of the Far West find in the flesh of the Moufflon, or Rocky Mountain sheep, a delicacy which they consider superior to the finest venison. The prong-horn antelope of the Western plains is another favorite food-animal with hunters, and the various "small game," such as squirrels, rabbits, woodchucks, etc., are by no means to be despised. The author once knew a trapper who was loud in his praises of "skunk meat" for food, and many hunters can testify to its agreeable flavor when properly dressed and cooked. It is hard, to be sure, to getup much enthusiasm over a skunk, dead or alive, but where other food is not to be had we would discourage the young trapper from being too fastidious.
The moose and deer are the favorite food of trappers in areas where these animals are plentiful, and the trappers of the Far West consider the flesh of the Mouflon, or Rocky Mountain sheep, a delicacy that's even better than the best venison. The pronghorn antelope of the Western plains is another favorite among hunters, and various small game like squirrels, rabbits, woodchucks, and so on should not be overlooked. The author once met a trapper who enthusiastically praised "skunk meat" as food, and many hunters can vouch for its tasty flavor when it’s properly prepared and cooked. It’s definitely hard to get excited about a skunk, whether it’s dead or alive, but when other food isn't available, we would advise young trappers not to be too picky.
The buffalo, or bison, is the great resource of the trappers of the West. The tongue, tenderloin and brisket are generally preferred, but all the meat is eatable. The flesh of the cow is best. It much resembles beef, but has a more gamey flavor. In winged game there is no food superior to the flesh of the grouse, and the great number of the species and wide range of territory which they inhabit render them the universal food game of trappers throughout the world. The ruffed grouse or partridge, pinnated grouse or prairie hen, spruce or Canada grouse, and the cock-of-the-plains or sage cock, are familiar American examples of the family, and their near relatives, the ptarmigans, afford a valuable source of food to the trappers and hunters, as well as general inhabitants of our northern cold countries. Here they are known as "snow grouse," and there are several species. Page 239 The willow ptarmigan is the most common, and in Rome localities exists in almost incredible numbers. Flocks numbering several thousand have been frequently seen by travellers in the Hudson's Bay territory; and the surface of the snow in a desirable feeding ground, is often completely covered by the birds, in quest of the willow tops, which form their chief food during the winter season. The Indians and natives secure the birds in large numbers, by the trap described on page 75, and Hearne, the traveller and explorer of the Hudson's Bay region, asserts that he has known over three hundred to be thus caught in a single morning, by three persons.
The buffalo, or bison, is a key resource for the trappers in the West. While the tongue, tenderloin, and brisket are usually the favorites, all the meat is edible. The cow's meat is the best. It’s similar to beef but has a gamier taste. When it comes to birds, nothing beats the meat of the grouse, and their various species and broad range make them a staple food for trappers worldwide. The ruffed grouse or partridge, pinnated grouse or prairie hen, spruce or Canada grouse, and the cock-of-the-plains or sage grouse are common American examples of this family. Their close relatives, the ptarmigans, are also a valuable food source for trappers, hunters, and the general population in our colder northern regions. Here, they are known as "snow grouse," and there are several species. Page 239 The willow ptarmigan is the most common and can be found in incredible numbers in certain areas. Travelers in the Hudson's Bay territory have often seen flocks numbering in the thousands; the snow-covered ground in good feeding areas is frequently completely covered by the birds searching for willow tops, which are their main winter food. Indigenous people capture these birds in large quantities using traps described on page 75, and Hearne, a traveler and explorer in the Hudson's Bay region, claims he has seen over three hundred caught in a single morning by just three people.
Of water fowl, ducks and geese are especially to be recommended. The former are hunted with decoys and boats, and are sometimes trapped, as described on pages 94. The species are distinguished as sea ducks and river or inland ducks. The latter are considered the most desirable for food, being more delicate and less gamey in flavor than the salt-water, or fish-eating varieties. The mallard, teal, muscovy, widgeon, and wood-chuck are familiar species of the inland birds, and the merganser and canvass-back are the two most esteemed salt-water varieties. Wild geese are common throughout North America, and may be seen either in the early spring or late fall migrating in immense numbers. They form a staple article of food in many parts of British America, and great numbers are salted down for winter supply. They are trapped in large numbers, as described on page 75, and are hunted with tame geese as decoys, the hunter being secreted behind a screen or covert, and attracting the game by imitating their cries.
Ducks and geese are highly recommended among waterfowl. Ducks are often hunted using decoys and boats, and at times they are trapped, as mentioned on pages 94. The different types of ducks are classified as sea ducks and river or inland ducks. Inland ducks are considered the best for eating because they have a more delicate flavor and are less gamey compared to the saltwater or fish-eating types. Common inland species include mallard, teal, muscovy, widgeon, and wood-chuck, while merganser and canvasback are the two most valued saltwater varieties. Wild geese are common all over North America, appearing in huge numbers during early spring or late fall migrations. They are a staple food source in many areas of British America, with large quantities being preserved for winter. They are trapped in significant amounts, as explained on page 75, and hunters use tame geese as decoys. The hunters hide behind a screen or cover, drawing in the game by mimicking their sounds.
Fish form an agreeable change to the trapper's diet, and may be caught by the hook and line, or by spearing. The latter method requires considerable practice and skill, but is very successful. The Indians of the North are great experts in the use of the spear, and the number of salmon taken by them annually is enormous. The spear generally consists of five or six steel prongs an inch apart and barbed at the ends. It is mounted on a heavy handle, and when it strikes its victim its grip is sure death. The spearing is generally performed either at the spawning beds or at the falls.
Fish provide a nice change to the trapper's diet and can be caught using a hook and line or by spearing. The spearing method takes a lot of practice and skill but is very effective. The Indigenous people of the North are extremely skilled with the spear, and the number of salmon they catch each year is massive. The spear typically has five or six steel prongs spaced an inch apart, with barbs at the ends. It's attached to a heavy handle, and when it strikes its target, it guarantees a kill. Spearing usually happens either at the spawning grounds or at the waterfalls.
Salmon trout are generally speared in the night time by boat, the spawning ground, generally a gravel bank near the shore, being the seat of operations. A fire of pitch pine and birch bark is ignited on an elevated "jack" in the bow of the boat, the "jack" consisting of an ox-muzzle, or other concave wire contrivance Page 240 which will hold the inflammable materials. This is secured to a post or crotched stick, as a prop, and the spearman stands near the burning mass with his spear in readiness. As his companion in the stern of the boat paddles, he keenly watches for his victim, and, seeing his opportunity, makes his lunge and lands his prize. To become a successful spearman requires much practice and no small degree of skill. To retain one's balance, acquire quickness of stroke, and withal to regulate the aim so as to allow for the refraction of the light in the water, all tend to invest the sport with a degree of skill which only experience can master.
Salmon trout are usually speared at night from a boat, with the spawning ground typically being a gravel bank close to the shore where the action takes place. A fire made from pitch pine and birch bark is started on an elevated "jack" at the front of the boat, which is basically an ox-muzzle or some other concave wire setup Page 240 that holds the flammable materials. This is secured to a post or a forked stick for support, and the spearman stands close to the fire with his spear ready. While his partner in the back of the boat paddles, he carefully watches for his target, and when he sees a chance, he lunges and catches his prize. Becoming a skilled spearman takes a lot of practice and a good amount of skill. Maintaining balance, having quick reflexes, and adjusting for the light distortion in the water all add a level of skill to the activity that only experience can provide.
Fishing through the ice in winter is a rare sport, and large numbers of brook and lake trout are often taken at this season by cutting holes through the ice and fishing with hook and line. The baits commonly used consist of cow's udder or hog's liver, these being especially preferred on account of their toughness. Angle worms are also excellent, and any kind of raw meat may be used if other bait is not to be had.
Fishing through the ice in winter is a unique sport, and many brook and lake trout are often caught during this season by cutting holes in the ice and fishing with a hook and line. The baits typically used include cow's udder or pig's liver, as they're especially favored for their toughness. Nightcrawlers are also great, and any kind of raw meat can be used if other bait is unavailable.
It is asserted by some sportsmen that bait scented with assafœtida is much more attractive to the fish, and will insure a capture which would otherwise be impossible. Sweet cicily and anise are also used for the same purpose. When the trout bite lively, fishing through the ice is a most exciting sport, and by the aid of "tip-ups" a single person may command a great number of lines. The winter resort of the brook trout is in water two or three feet deep, over sandy beds. The lake trout frequent deeper water.
Some anglers claim that bait scented with asafoetida is way more appealing to fish and will guarantee a catch that would otherwise be impossible. Sweet cicely and anise are also used for the same reason. When the trout are biting actively, ice fishing can be super exciting, and with "tip-ups," one person can manage a lot of lines at once. In winter, brook trout are found in water that’s two to three feet deep over sandy bottoms. Lake trout prefer deeper water.
The holes are made in the ice at intervals of one or two rods, and a line set in each hole.
The holes are made in the ice at intervals of one or two rods, and a line is placed in each hole.
The "tip-up" consists of a narrow strip of lath or shingle, with a hole bored through it near the large end. At this end the line is attached, and the hook thrown in the water. A branch is now inserted through the aperture, and its ends are rested across the opening in the ice. No sooner does the fish bite than the long end tips straight in the air, and thus betrays its captive. Ten or fifteen of these contrivances will often keep one pretty busy, and do good service. By some an ordinary cut fish pole, arranged on a crotch, is used instead of the tip-ups just described. Pickerel fishing through the ice is a favorite winter sport in many localities. The line should be about thirty feet in length, and the bait should consist of a small, live fish, hooked through the back. A small cork float should be attached to the line at such a distance as will keep Page 241 the bait above the bottom, and the superfluous line should be laid in a loose coil near the hole, the end being attached to a small switch or bush, stuck up in the ice near by. The pickerel, on taking the bait, should be allowed to play out the whole line before being pulled in, as the fish requires this time to fully swallow his prey, after which the hook is sure to hold him firmly. Twenty or thirty lines may thus be attended at once, the bush or twig acting the part of a tip-up, or sentinel.
The "tip-up" consists of a narrow strip of wood or shingle, with a hole drilled through it near the larger end. At this end, the line is attached, and the hook is thrown into the water. A branch is then inserted through the hole, and its ends rest across the opening in the ice. As soon as a fish bites, the long end tips straight up in the air, revealing its catch. Having ten or fifteen of these setups can keep someone quite busy and be very effective. Some people use a regular fishing pole propped up on a forked stick instead of the tip-ups just described. Ice fishing for pickerel is a popular winter activity in many areas. The line should be about thirty feet long, and the bait should be a small live fish, hooked through the back. A small cork float should be attached to the line at a distance that keeps the bait off the bottom, and any excess line should be left in a loose coil near the hole, with the end tied to a small stick or bush stuck in the ice nearby. When the pickerel takes the bait, it should be allowed to pull out the entire line before reeling it in, as the fish needs this time to swallow its prey fully, after which the hook will hold firmly. You can manage twenty or thirty lines at once, with the stick or twig acting as a tip-up or lookout.
Pickerel spearing is another successful mode of capture during the winter months. A large hole is made in the ice, in about two feet of water, and covered by a spacious box or board hut, six or seven feet square, and provided with a door. The spearman, concealed within, lowers his bait, consisting of an artificial fish with silver fins, made especially for the purpose. This he continually twirls in the water, and as the pickerel approaches the bait, he gradually raises it, until the fish is decoyed nearly to the surface of the water, when a quick stroke of the spear secures his victim, and the line is again lowered. This is capital sport, and is very successful.
Pickerel spearing is another effective way to catch fish during the winter months. A large hole is cut in the ice, around two feet deep, and covered with a roomy box or board hut, about six or seven feet square, featuring a door. The spearman, hidden inside, lowers his bait, which is an artificial fish with silver fins, specially made for this purpose. He keeps twirling it in the water, and as the pickerel gets close to the bait, he slowly raises it until the fish is nearly at the surface, then he swiftly strikes with the spear to catch his prey, and the line is lowered again. This is great sport and very effective.
There is a very curious device for fishing by night commonly employed by some anglers, and sometimes known as the "lantern, or fish trap." Many kinds of fish are attracted by a light, but to use a light as a bait, submerged beneath the water, certainly seems odd. It may be done, however, in the following way: The "fish lantern" used for this purpose consists of a bottle containing a solution of phosphorus in sweet oil. Procure a piece of the stick phosphorus the size of a small cherry, and submerging in a saucer of water, proceed to cut it into small pieces. Have in readiness a three-ounce white glass bottle half filled with sweet oil. Drop the pieces of phosphorus into the oil and cork the bottle tightly. In the space of a few hours the phosphorus will have been completely dissolved, and the contents of the bottle will present a thick, luminous fluid, which in a dark room, will afford considerable light. This is the fish lantern. To use it, the cork is firmly inserted and the bottle, with fish line attached, is lowered through the hole in the ice. The water becomes luminous for several feet around, and the unusual brightness attracts the fish in large numbers. They are plainly, discernible, and are readily dispatched with the spear, or captured by a circular net, sunk on the bottom, beneath the luminous bait. This is certainly an odd way of catching fish, but it is often a very efficacious method.
There’s a pretty interesting device for night fishing that some anglers use, often called the "lantern" or "fish trap." Various types of fish are drawn to light, but using a light as bait, submerged underwater, definitely seems strange. However, it can be done like this: The "fish lantern" for this purpose consists of a bottle filled with a phosphorus solution in sweet oil. Get a piece of stick phosphorus about the size of a small cherry, and while it’s submerged in a dish of water, cut it into small pieces. Have a three-ounce white glass bottle half-filled with sweet oil ready. Drop the pieces of phosphorus into the oil and seal the bottle tightly. After a few hours, the phosphorus will dissolve completely, and the contents of the bottle will turn into a thick, glowing liquid, which will provide a good amount of light in a dark room. This is the fish lantern. To use it, firmly insert the cork and lower the bottle, with fishing line attached, through the hole in the ice. The water around it glows for several feet, and the unusual brightness attracts fish in large numbers. They become clearly visible and can be easily caught with a spear or trapped in a circular net placed on the bottom beneath the glowing bait. This may be an odd method of catching fish, but it’s often very effective.
It has not been our intention to enter very extensively into Page 242 the subject of fishing, but only to give such hints as will be found especially useful and practical to the trapper in relation to his food. The above methods, together with those of trolling and fly-fishing, are those most commonly employed by trappers and hunters generally, and we commend them to the amateur.
It hasn't been our goal to dive deeply into the topic of fishing, but rather to offer tips that will be particularly useful and practical for trappers regarding their food. The methods mentioned above, along with trolling and fly-fishing, are the most frequently used by trappers and hunters in general, and we recommend them to beginners.
We give, on page 120, a unique device for the capture of fish, which might also be found useful.
We provide, on page 120, a unique device for catching fish, which might also be handy.
With the above general remarks on the campaign, together with what follows in the detailed articles on the subject, we think that the ground will have been completely covered. Every possible requirement has been anticipated, and every ordinary emergency foreseen and provided against.
With the general comments about the campaign and the detailed articles that follow, we believe we have covered everything. We’ve anticipated every possible requirement and accounted for every typical emergency.
THE TRAPPER'S SHELTER.
The life of the professional trapper is a life of hardship and severe exposure, and a man not only requires considerable courage, but also great bodily vigor, in order to combat successfully the dangers of such a wild, adventuresome existence.
The life of a professional trapper is tough and demanding, and a person needs not just a lot of courage but also great physical strength to effectively face the dangers of such a wild and adventurous lifestyle.
The cold and the storm not only imperil his life, but he is often exposed to the attacks of wild beasts. A shelter, therefore, in one form or another, becomes a necessity while it is always a decided comfort, in comparison to a campaign without it.
The cold and the storm not only threaten his life, but he also often faces attacks from wild animals. A shelter, in one form or another, therefore becomes a necessity, and it is always a definite comfort compared to a struggle without it.
The reader will find below descriptions of the various shelters alluded to in other parts of this work, and used by trappers throughout the land.
The reader will find descriptions below of the various shelters mentioned in other sections of this work, which are used by trappers across the country.
The most substantial of these is the log shanty, commonly known among trappers as the "home shanty," on account of its being constructed as the only permanent shelter on the trapping line.
The most significant of these is the log shanty, commonly referred to by trappers as the "home shanty," because it is built as the only permanent shelter along the trapping line.
It is used as a "home," a place of rendezvous, and a storehouse for provisions, furs, and other necessities and valuables. Other temporary shelters, known as bark shanties, are also constructed along the trapping lines at intervals of five or ten miles, as resting places. These we describe under the proper title.
It serves as a "home," a meeting spot, and a storage space for supplies, furs, and other essentials and valuables. Other temporary shelters, called bark shanties, are also built along the trapping routes every five to ten miles, acting as rest areas. We discuss these under the appropriate title.
Although, to the amateur trapper, the log shanty is not likely to become a necessity, we will nevertheless describe its mode of construction, in order to satisfy our more earnest and adventurous readers, who aspire to a full taste of wild life.
Although the log cabin probably won't be essential for the beginner trapper, we will still describe how to build one to satisfy our more serious and adventurous readers who want to fully experience life in the wild.
Our illustration gives a very clear idea of such a shanty.
Our illustration provides a clear picture of what such a shanty looks like.
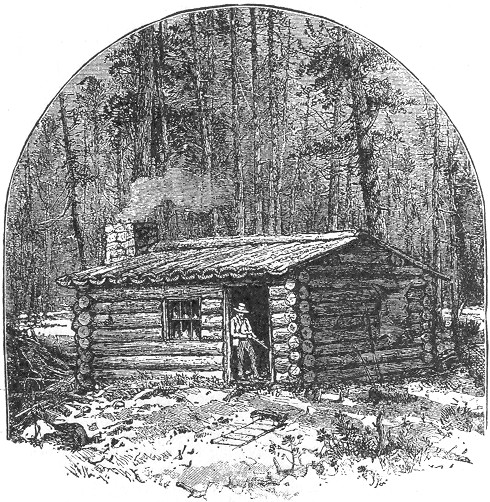
Page 244 It may be constructed of any size, but one of about twelve by ten feet will be found large enough for ordinary purposes. Select straight logs, about eight inches in diameter. The whole number required will be thirty-six. Of these one-half should be twelve feet in length and the other ten. These should now be built up in the square form, on a level piece of ground, laying the ends of the logs over each other, and securing them by notches at the corners, so deep as to allow the edges of the logs to meet. Lay two short logs first, and continue building until all the thirty-six logs are used, and we will now have four symmetrical sides about six feet in height. The place for the door should now be selected. The uppermost log should form its upper outline, and the two sides should be cleanly and straightly cut with a crosscut saw. The window openings, one or more, may next be cut, commencing beneath the second log from the top, and taking in three beneath it. Replace the logs above, and on the ends of those thus cut, both in windows and doors, proceed to spike a heavy plank, driving two nails into each log, about five inches apart, one above the other. This will hold them firmly in place, and offer a close-fitting jam for the door, and neat receptacle for the window sashes, which latter may now be put in after the ordinary manner.
Page 244 It can be built in any size, but one that's about twelve by ten feet is typically sufficient for regular use. Choose straight logs that are around eight inches in diameter. You'll need a total of thirty-six logs. Half of these should be twelve feet long and the other half should be ten feet long. Now, stack them in a square shape on flat ground, laying the ends of the logs over each other and securing them with notches at the corners, deep enough to make the edges of the logs meet. Start with two short logs, then continue stacking until all thirty-six logs are used up, which will give you four equal sides about six feet high. Now, decide where the door will go. The top log will form the upper edge of the door, and the two sides should be cut straight and cleanly with a crosscut saw. For the windows, cut one or more openings starting below the second log from the top, taking in three logs below it. Replace the logs above and on the ends of those that were cut for the windows and door, attach a heavy plank by driving two nails into each log about five inches apart, one above the other. This will hold them securely in place and create a snug fit for the door and a neat space for the window frames, which can now be installed in the usual way.
The gable ends should next be built upon the smaller sides of the hut. Commence by laying a long log (notched as before) across the top of the frame work, and about two feet inside the edge. This should of course be done on both sides of the hut, after which they should be overlapped at the corners with logs eight feet in length. Next lay two more long logs, parallel with the first two, and about a foot inside them, notching as before. The ends of these should be spanned with beams eight feet in length. Two more long logs are next in order—let them be one foot inside the last two. Overlap these with beams five feet and a half in length, and in the exact centre of these last pieces chop notches for a heavy log for a ridge pole. The gable outline, direct from the ridge pole to the eaves, should now be cut off by the aid of a sharp axe. This may be done either while the pieces are in position, or the line may be marked with a piece of chalk, and the logs taken down in order to accomplish it. The roof is now required. This should consist either of strips of bark or the rounded sides of logs split off and hollowed into troughs. The latter method is preferable, on account of its greater strength and durability, but the bark will answer the purpose very well, and is much more easily obtained. The manner of adjusting the roof pieces is clearly shown in our Page 245 illustration. The first row is laid on with the hollow side up, securing them at top and bottom by nails driven through each into the ridge pole and eaves-log, care being taken that one of these pieces projects well over the gable, on both ends of the hut. These pieces are now overlapped by the second row, and with the addition of the large piece which covers them all at the ridge pole, the roof is complete, and will stand a heavy rain with little or no leaking. The crevices should now be stopped with moss, dried grass or clay, after which the log cabin is complete. When the bark roof is made, additional poles may be inserted beneath as props. They should be three or four inches in diameter, and run parallel with the ridge pole, at intervals on the slope, notches being cut to secure them.
The gable ends should be built next on the shorter sides of the hut. Start by laying a long notched log across the top of the framework, about two feet in from the edge. This should be done on both sides of the hut, and then the corners should be overlapped with eight-foot logs. Next, lay down two more long logs, parallel to the first two, about a foot inside them, notching as before. The ends of these should be supported by beams that are eight feet long. Then, place two more long logs, one foot inside the last two. Overlap these with beams that are five and a half feet long, and in the center of these last pieces, make notches for a heavy log to serve as a ridge pole. Use a sharp axe to cut off the gable outline directly from the ridge pole to the eaves. This can either be done while the pieces are in place, or you can mark the line with chalk and take the logs down to cut them. Now, you need the roof. It should be made of either strips of bark or the rounded sides of logs that are split and hollowed into troughs. The latter method is better because it’s stronger and more durable, but the bark works well and is easier to get. The way to fit the roof pieces is shown clearly in our Page 245 illustration. The first row should be laid down with the hollow side up, securing them at the top and bottom with nails driven through each into the ridge pole and eaves-log, making sure that one of these pieces extends well over the gable at both ends of the hut. The second row will overlap these pieces, and with the addition of the large piece that covers them all at the ridge pole, the roof will be complete and can handle heavy rain with minimal leaking. The gaps should be filled with moss, dried grass, or clay, after which the log cabin will be finished. If you use a bark roof, additional poles can be added underneath as supports. These should be three or four inches in diameter and placed parallel to the ridge pole, at intervals on the slope, with notches cut to secure them.
Our engraving represents a chimney, which may be constructed if desired, but the necessity of this may be done away with by using a small camp stove, and making a small opening in the gable end of the hut for the passage of the pipe. If it stove should not be at hand, and our amateur should decide to "rough it" to the full extent, he may build his fire-place and chimney as follows: It will be necessary to cut away an opening in the logs at the gable end, as was done for the door and windows. This should be about three feet square, and the fire place should be built of stone and clay, or cement, to fill the opening, and project inside the hut.
Our engraving shows a chimney, which can be built if you want, but you can avoid the need for it by using a small camp stove and making a small opening in the gable end of the hut for the pipe. If a stove isn’t available and our novice decides to fully embrace the outdoors, he can build his fireplace and chimney like this: First, cut an opening in the logs at the gable end, just like was done for the door and windows. This opening should be about three feet square, and the fireplace should be made of stone and clay, or cement, to fill the opening and extend inside the hut.
The chimney may then be built up outside in the same manner, sufficiently high to overtop the gables.
The chimney can then be constructed on the outside in the same way, high enough to rise above the gables.
Inside the hut overhead will be found abundant room for the hanging of the skins, and any number of cross-poles may be rested across the beams. There are facilities for the swinging of a hammock, if desired, and, in fact, a hut constructed like the foregoing is a perfect one in its way. There are other methods of building a log cabin, but we will content ourselves with what we consider the best way of all, and pass on to the
Inside the hut, there's plenty of space for hanging the skins, and you can easily put up as many cross-poles as you need across the beams. If you want, there's also a setup for swinging a hammock, and honestly, a hut built like this one is pretty much ideal. There are other ways to build a log cabin, but we'll stick with what we think is the best way of all and move on to the
BARK SHANTY.
This is made by first driving into the ground two forked poles seven or eight feet in height and stout enough to sustain a ridge pole of moderate size. Against this ridge pole other poles should be rested at intervals of two feet, and sloping to the angle of forty-five degrees. The frame-work thus formed should now be covered with bark, commencing at the ground and allowing the edge of each piece to overlap the one beneath Page 246 after the manner of shingles, in order to shed the rain in case of storm. Spruce or birch bark are excellent for this purpose, and the pieces may be secured with nails, and kept flat by the weight of another series of poles rested against them. The sides of the shelter should be treated similarly, the front being usually left open to face the fire, which the trapper generally builds a few feet distant. In constructing a bark shanty, it is well to select some spot protected from the wind, close to the foot of a mountain or in the midst of trees, always letting the open side face the direction most sheltered.
This is made by first driving two forked poles into the ground that are seven or eight feet tall and strong enough to support a medium-sized ridge pole. Other poles should be leaned against this ridge pole at intervals of two feet, angled at about forty-five degrees. The frame created should now be covered with bark, starting from the ground and allowing each piece to overlap the one below it like shingles, to help shed rain in case of a storm. Spruce or birch bark works well for this, and you can secure the pieces with nails, keeping them flat by placing another set of poles against them. The sides of the shelter should be done similarly, with the front usually left open to face the fire, which the trapper typically builds a few feet away. When building a bark shanty, it's best to choose a spot that is protected from the wind, near the base of a mountain or among trees, always making sure the open side faces the most sheltered direction.
If desired, the front can be enclosed after the manner of the sides and top, but this is not required where the fire is used.
If you want, the front can be enclosed like the sides and top, but this isn’t necessary if the fire is being used.
This style of shelter is represented in our page title to this section, and certainly looks very comfortable.
This type of shelter is shown in the title of this section, and it definitely looks really comfortable.
TENTS.
Shanties like the foregoing are in general use among the old veteran trappers of all countries, and even to the amateur there is a charm in a shelter constructed from the rude materials of the woods which the portable tents do not possess.
Shanties like the ones above are commonly used by old veteran trappers from all over, and even to beginners, there’s something appealing about a shelter built from rough materials found in the woods that portable tents just can’t match.
Tents, however, are much used both by professionals and amateurs, and are indeed valuable acquisitions to the trapper's outfit, and where time is valuable, do away with the labor which the construction of a hut or shanty involves.
Tents, however, are widely used by both professionals and amateurs, and they are really valuable additions to a trapper's gear. When time is precious, they eliminate the work that goes into building a hut or shed.
Tents are of several kinds. Those most commonly used by the trapper are the house-tent, fly-tent, and half-tent, or shelter-tent.
Tents come in various types. The ones most frequently used by trappers are the house tent, fly tent, and half tent, or shelter tent.
The first of these is made for prop-poles and a ridge pole, closed on one end and buttoning up at the other. The sides are perpendicular for two or three feet, before the slope commences, and the stay-ropes are fastened to the eaves.
The first of these is designed for prop-poles and a ridge pole, closed at one end and buttoned up at the other. The sides are straight up for two or three feet before the slope begins, and the stay-ropes are attached to the eaves.
The fly-tent is generally a large, square piece of canvas, with ropes extending from opposite sides. This is thrown over a ridge pole, or over a rope extending between two trees, and the sides are held to the proper slope by tightening and pegging the side ropes to the ground. Fly-tents are also made with ends, which can be lowered, and the whole tent may be pegged close to the ground.
The fly-tent is usually a big, square piece of canvas, with ropes extending from opposite sides. This is thrown over a ridge pole or a rope stretched between two trees, and the sides are adjusted to the right slope by tightening and staking the side ropes into the ground. Fly-tents can also be made with ends that can be lowered, and the entire tent can be staked down close to the ground.
The shelter-tent, when erected, resembles, in general shape, the bark shanty already described. It consists of a strip of canvas, having each end cut off to a point. The tent is pitched over three slanting poles, and the ends are brought down and securely pegged. This is clearly shown in our illustration.
The shelter tent, once set up, generally looks like the bark hut we already talked about. It’s made from a piece of canvas with both ends pointed. The tent is raised over three angled poles, and the ends are pulled down and securely pegged into place. This is clearly shown in our illustration.
Page 247
We do not propose giving any extended directions for making tents,
as they are a staple article of trade, and, as a general thing, can
be bought for a figure which would render their domestic manufacture
of little saving or profit. The shelter-tent, however, is so useful
an affair, and withal so very simple made, that we will give a
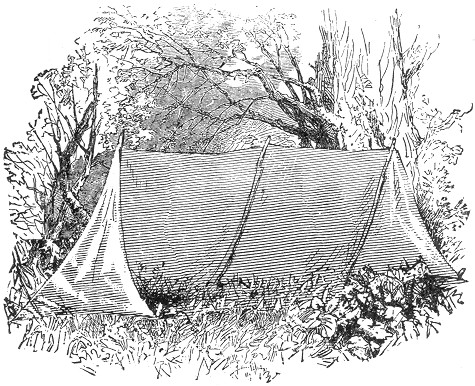 few directions in regard to its manufacture. It should be made
from stout cotton drilling, or very heavy sheeting. Let the
piece be about thirteen feet in length by six in width. Each end
of the piece should now be cut to a rectangular point, commencing
to cut at a distance of three feet from each corner. In order to
render the cloth waterproof, it should now be dipped in a pail
containing a solution of equal parts of alum and sugar of lead, a
couple of handfuls of each, in tepid water. It should be allowed to
remain several minutes in soak, being dipped and turned occasionally,
after which it should be spread out to dry. This treatment not
only renders the cloth impervious to rain, but the alum tends to
make it fire-proof also. A spark from the fire falling upon a tent
thus prepared, will often rest upon the cloth until it goes out,
without doing the slightest damage.
few directions in regard to its manufacture. It should be made
from stout cotton drilling, or very heavy sheeting. Let the
piece be about thirteen feet in length by six in width. Each end
of the piece should now be cut to a rectangular point, commencing
to cut at a distance of three feet from each corner. In order to
render the cloth waterproof, it should now be dipped in a pail
containing a solution of equal parts of alum and sugar of lead, a
couple of handfuls of each, in tepid water. It should be allowed to
remain several minutes in soak, being dipped and turned occasionally,
after which it should be spread out to dry. This treatment not
only renders the cloth impervious to rain, but the alum tends to
make it fire-proof also. A spark from the fire falling upon a tent
thus prepared, will often rest upon the cloth until it goes out,
without doing the slightest damage.
Page 247
We don’t recommend providing extensive instructions for making tents, as they are a common item in trade and can usually be purchased at a price that makes making them at home less cost-effective or profitable. However, the shelter tent is incredibly useful and quite easy to make, so we will give a
few tips on how to make one. It should be made from durable cotton drilling or very heavy fabric. The piece should be about thirteen feet long and six feet wide. Each end of the piece should be cut into a rectangular point, starting three feet from each corner. To make the cloth waterproof, dip it in a bucket containing a solution of equal parts alum and sugar of lead, using a couple of handfuls of each in warm water. Let it soak for several minutes, turning and dipping it occasionally, then spread it out to dry. This process not only makes the cloth resistant to rain, but the alum also helps make it fire-resistant. A spark from a fire landing on a tent treated this way will often sit on the fabric until it goes out without causing any damage.
Page 248 The manner of pitching the tent has already been alluded to, and is clear from our illustration. The poles should be three or four in number, and seven feet in length, inserted in the ground at the angle denoted. The two outside poles should be seven feet apart, and the intermediate ones equally disposed. The tent piece should now be laid over the poles, and the ends brought down and pegged to the ground at the apex, and rear corners of each side through loops, which should have been previously attached to these parts. A tent, thus arranged, affords a safe shelter from the wind or a moderate storm, and with a bright fire in front, is warm and comfortable.
Page 248 We've already talked about how to pitch the tent, and it’s clear from our illustration. You’ll need three or four poles, each seven feet long, placed in the ground at the indicated angle. The two outside poles should be seven feet apart, with the others spaced evenly between them. Next, lay the tent fabric over the poles, bringing down the ends to peg them to the ground at the top and back corners of each side through the loops that should have been attached beforehand. A tent set up this way provides safe shelter from the wind or a light storm, and with a nice fire in front, it’s warm and cozy.
BEDS AND BEDDING.
Many a trapper does away with these commodities, merely rolling
himself in a blanket and using his arm for a pillow; but we do
not propose to encourage or recommend any such half-way comfort as
this, when by a very little labor a portable bed can be prepared
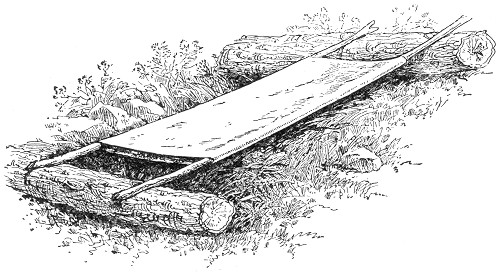 on which the weary hunter can rest as serenely as if slumbering
on the congenial softness of a hair mattress. A bed of this kind
we illustrate, and it can be made in the following manner: Procure
a large piece of canvas, sacking or other strong, coarse material
six and a half feet square. If a single piece of this size cannot
be found, several parts may he sewed together to the required
dimensions. After which two opposite sides should be firmly stitched
together, thus forming
Page 249
a bottomless bag, if we may be allowed to use the expression. Two
stout poles seven or eight feet in length and as large as the wrist
should now be cut. Insert them through the bag, allowing the ends
to project equally on each side. These ends should now be rested
on two logs, one placed across each end of the canvas. In order
to hold the poles in place notches should be cut in the logs at
such distances as will draw the bag to its full width. The interior
of the canvas should now be filled with dried grass, leaves, moss
or spruce boughs, after which the bedstead and bed is complete.
on which the weary hunter can rest as serenely as if slumbering
on the congenial softness of a hair mattress. A bed of this kind
we illustrate, and it can be made in the following manner: Procure
a large piece of canvas, sacking or other strong, coarse material
six and a half feet square. If a single piece of this size cannot
be found, several parts may he sewed together to the required
dimensions. After which two opposite sides should be firmly stitched
together, thus forming
Page 249
a bottomless bag, if we may be allowed to use the expression. Two
stout poles seven or eight feet in length and as large as the wrist
should now be cut. Insert them through the bag, allowing the ends
to project equally on each side. These ends should now be rested
on two logs, one placed across each end of the canvas. In order
to hold the poles in place notches should be cut in the logs at
such distances as will draw the bag to its full width. The interior
of the canvas should now be filled with dried grass, leaves, moss
or spruce boughs, after which the bedstead and bed is complete.
Many trappers get by with just rolling up in a blanket and using their arm as a pillow; however, we don’t suggest settling for such minimal comfort when, with just a little effort, you can make a portable bed.
This bed allows a tired hunter to rest just as peacefully as if sleeping on a comfortable mattress. We will show you how to make one: Get a large piece of canvas, sacking, or another strong, coarse material that measures six and a half feet square. If you can’t find a single piece that big, you can sew several pieces together to reach the required size. Then, stitch two opposite sides together, creating what we could call a bottomless bag.
Next, cut two sturdy poles that are seven or eight feet long and about as thick as your wrist. Slide them through the bag so that they stick out equally on both sides. These ends should rest on two logs, one at each end of the canvas. To keep the poles steady, cut notches in the logs at a distance that will stretch the bag to its full width. Finally, fill the inside of the canvas with dried grass, leaves, moss, or spruce branches, and your bed and bed frame will be complete.
The yielding elasticity of the poles and the softness of the warm filling in the bag, give the effect of a spring and straw mattress combined, lifting the sleeper above the cold, damp ground, and by the addition of a blanket above, insuring warmth on all sides. If the logs are not at hand four forked stakes may be used, driving them firmly into the ground at such distances as will draw the bag to its full width, when the poles are rested upon them. If by the weight of the body the forked props should tend to incline towards each other this trouble may be easily remedied by inserting short poles as braces between them. If desired a bed of this kind may be used as a hammock and hung in a tree without much trouble. It is only necessary to secure the long poles firmly at their full width by a stout brace pole at the ends, letting the latter be deeply notched at the tips in order to receive the bed supports. The joints should then be tightly bound with stout twine in order to prevent slipping, after which the bed may be hung in mid-air by ropes at each end, and the tired trapper may swing himself to sleep with perfect comfort and safety. For this purpose the ropes should be attached at the joints, using a loop of six feet for each end. In the centre of this loop a small one should be made by doubling the rope and winding twine about it, leaving only a small aperture. Through these small loops, by the aid of other ropes, the bed is attached to the tree. By using this precaution the unpleasant experience of being turned or dumped out of bed will be impossible. For bed clothes a woollen blanket should always be carried, and if convenient a large bag of thick Canton flannel is a most excellent acquisition.
The flexible poles and the soft, warm filling in the bag create a combined effect similar to a spring and straw mattress, lifting the sleeper off the cold, damp ground. Adding a blanket on top ensures warmth all around. If logs aren't available, you can use four forked stakes, firmly driving them into the ground at distances that allow the bag to expand fully when the poles rest on them. If the weight of the body causes the forked supports to lean toward each other, you can easily fix this by inserting short poles as braces between them. If you'd like, this type of bed can also be used as a hammock and hung in a tree without much hassle. Just make sure to secure the long poles at their full width with a sturdy brace pole at each end, making deep notches at the tips to hold the bed supports. Then, tightly bind the joints with strong twine to prevent slipping. After that, you can hang the bed in mid-air with ropes at each end, allowing the tired trapper to rock himself to sleep comfortably and safely. For this, the ropes should be attached at the joints, using a six-foot loop for each end. In the center of this loop, create a small one by doubling the rope and wrapping twine around it, leaving just a small opening. Through these small loops, use additional ropes to attach the bed to the tree. By taking this precaution, you can avoid the unpleasant experience of being rolled or dumped out of bed. For bedding, a wool blanket should always be carried, and if possible, a large bag of thick Canton flannel is a great addition.
Bags of this sort are in common use among amateur trappers, hunters and camping parties, and are very warm and comfortable. They should be nearly seven feet in length and of a "loose, easy fit." With one of these contrivances it is impossible to "kick the clothes off" and the warmth is continual instead Page 250 of "intermittent," and even on the bare ground it is said to be sufficient protection. Hammocks are also in very general use, but we can confidently recommend the suspended bed above described as decidedly preferable.
Bags like these are commonly used by amateur trappers, hunters, and camping groups, and they are very warm and comfortable. They should be about seven feet long and have a "loose, easy fit." With one of these bags, it’s impossible to "kick the clothes off," and the warmth is constant instead of "intermittent." Even on the bare ground, they provide enough protection. Hammocks are also widely used, but we can confidently recommend the suspended bed described above as definitely the better option.
There are various kinds of hammocks in the market, from the light fibered silk, weighing only a few ounces, to the large corded variety of several pounds weight and capable of holding many persons. They are an established article of trade, and as the details of their manufacture would be of little practical use to the reader, we will leave them without further consideration. They can be had at almost any sporting emporium, at comparatively small cost.
There are different types of hammocks available today, ranging from lightweight silk that weighs just a few ounces to larger corded ones that weigh several pounds and can support multiple people. They are a well-known trade item, and since the specifics of how they are made probably don't matter much to the reader, we won't go into that any further. You can find them at almost any sporting goods store for a relatively low price.
TENT CARPETING.
We have described a most excellent contrivance for a bedstead and recommend its use whenever possible; but when the bed is desired to be made on the ground the following method is usually employed, by which the whole interior of the tent, hut or shanty is carpeted with a soft, even covering of green.
We have described a great setup for a bed frame and recommend using it whenever possible; however, when a bed needs to be set up on the ground, the following method is typically used, which carpets the entire interior of the tent, hut, or shack with a soft, even layer of green.
Spruce or hemlock boughs are generally used, and should be from the tips of the branches where the wood is not too large. Commence at the back part of the shelter, and lay down a row of the boughs with the butt of the branch towards the front. Overlap these with another nearer row and continue the operation, laying the evergreen as evenly as possible until the whole interior is smoothly covered. The projecting ends at the front, should now be secured by the weight of a medium sized log, or by a pole pegged down firmly at intervals. A similar log should now be laid at the back portion of the shelter over the tips of the boughs after which the bed is complete, and will be found easy and comfortable in proportion to the care and skill shown in its construction. A blanket should be thrown over the boughs before reclining to rest, as the fresh green gives forth considerable dampness.
Spruce or hemlock branches are usually used, and they should be taken from the tips of the branches where the wood isn't too thick. Start at the back of the shelter and lay down a row of branches with the thicker end pointing towards the front. Overlap these with another row closer in and keep going, laying down the evergreen as evenly as possible until the entire interior is smoothly covered. The ends sticking out at the front should now be secured by the weight of a medium-sized log or by a pole firmly pegged down at intervals. A similar log should be placed at the back of the shelter over the tips of the branches, and then the bed will be complete, comfortable depending on the care and skill used in its construction. A blanket should be placed over the branches before lying down to rest, as the fresh green can be quite damp.
If possible a rubber blanket should be used for this purpose. These consist of thick Canton flannel, coated on one side with Indian rubber, and are used with the rubber side down. They are warm and comfortable, and a valuable acquisition to the trapper's outfit. There is a thinner and cheaper variety, having equal water-proof qualities but which does not possess the warmth of the former. Either will be found useful.
If possible, a rubber blanket should be used for this purpose. These blankets are made of thick Canton flannel, coated on one side with Indian rubber, and are used with the rubber side down. They are warm and comfortable, making them a valuable addition to a trapper's gear. There is a thinner and cheaper version that has similar waterproof qualities but doesn’t provide the warmth of the thicker one. Either option will be useful.
So much for beds and bedding. If the reader will now turn Page 251 his attention to the following section, "The Trapper's Miscellany," he will find much in detail of what has only been alluded to in the present chapter, besides other hints of great value in reference to a trapping campaign.
So much for beds and bedding. If the reader will now turn Page 251 his attention to the next section, "The Trapper's Miscellany," he will find detailed information on what has only been briefly mentioned in this chapter, along with other valuable tips regarding a trapping campaign.
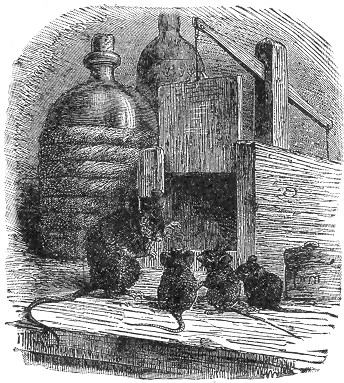
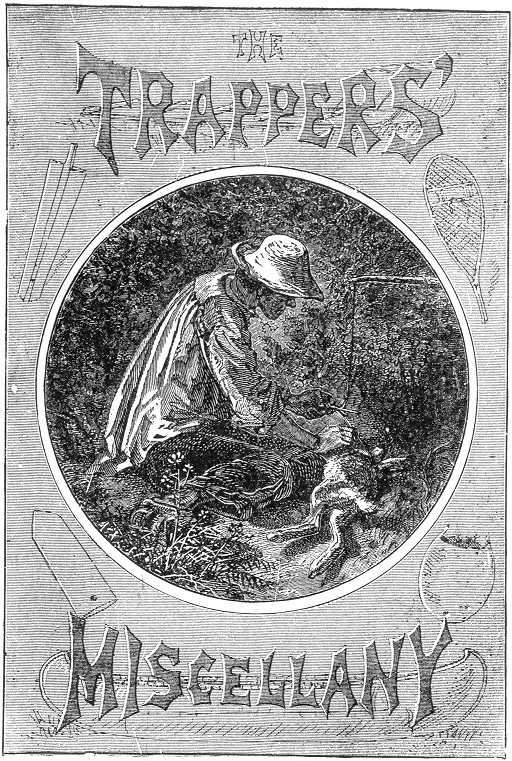
Page 255 BOOK VIII.
THE TRAPPER'S MISCELLANY.
The Trapper's Collection.
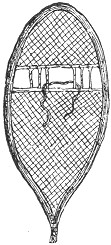 ur enthusiastic novice, as he starts out into the
wilderness, should not be unmindful of the swarms of blood-thirsty
flies, gnats and mosquitoes, which infest the woods in the summer
and early autumn, and are there lying in wait for him. These often
become a source of great annoyance to the woodsman, and more often
a source of positive bodily suffering.
ur enthusiastic novice, as he starts out into the
wilderness, should not be unmindful of the swarms of blood-thirsty
flies, gnats and mosquitoes, which infest the woods in the summer
and early autumn, and are there lying in wait for him. These often
become a source of great annoyance to the woodsman, and more often
a source of positive bodily suffering.
Our eager beginner, as he ventures into the wilderness, should be aware of the swarms of bloodthirsty flies, gnats, and mosquitoes that infest the woods during the summer and early autumn, lying in wait for him. These often become a major annoyance for the outdoorsman and, more frequently, a cause of genuine physical discomfort.
Although trapping is not generally carried on during this season, the preparations for the coming campaign, including the building of shanties, transporting of traps, etc., are generally made at this time, and unless some preventive is used, the persecutions of the mosquitoes and other winged vermin, become almost unbearable.
Although trapping usually doesn’t happen this season, people typically start preparing for the upcoming campaign by building shanties, moving traps, and so on. If no preventive measures are taken, the swarms of mosquitoes and other flying pests can become nearly unbearable.
INSECT OINTMENTS.
These insects seem to have a special aversion for the scent of pennyroyal—an herb growing commonly in sandy localities—and a single plant rubbed upon the face and hands will often greatly check their attacks.
These insects appear to really dislike the smell of pennyroyal—an herb found commonly in sandy areas— and just one plant rubbed on the face and hands can often significantly reduce their bites.
The oil of pennyroyal is better, however, and an ointment made by straining one ounce of the oil into two or three ounces of pure melted lard, or mutton tallow, forms an excellent antidote. This may be carried in a little box or bottle, in the pocket, and applied as occasion requires. Plain mutton tallow is also a most excellent ointment for general use, and in the case of bruises or slight wounds, will give great relief.
The pennyroyal oil is preferable, though, and an ointment made by mixing one ounce of the oil with two or three ounces of pure melted lard or mutton tallow creates a fantastic remedy. This can be kept in a small box or bottle in your pocket and applied when needed. Plain mutton tallow is also a great ointment for general use and provides significant relief for bruises or minor wounds.
Another preparation in very common use amongst hunters and woodsmen, although not quite as agreeable in odor, consists of a mixture of common tar and sweet oil, in equal parts. By some this liniment is considered superior to the other, inasmuch as it also prevents tanning, and is beneficial to the complexion.
Another preparation commonly used by hunters and outdoorsmen, although not as pleasant-smelling, is a mixture of regular tar and sweet oil, in equal parts. Some people think this liniment is better than the other because it also prevents tanning and is good for the skin.
Page 256 During the night time, the tent or shanty often becomes swarmed with the winged pests, and their nocturnal assaults are proverbial for their pertinacity and severity. Their thirst for blood overcomes every other instinct, and pennyroyal often ceases to have any effect. Our Adirondack guide, in narrating his experience with these insect vampires, even says that on a certain night, becoming exasperated at their indomitable perseverance, and, getting tired of the monotonous occupation of spreading ointment, he arose, lit his candle, and drove the creatures out of the tent. He then buttoned up the opening, and retired to rest. A storm came up in the night, and so completely had his canvas been riddled by the bills of the mosquitoes, that the rain poured through his tent as through a sieve.
Page 256 At night, the tent or shack often gets overwhelmed with buzzing pests, and their relentless attacks are well-known for their stubbornness and intensity. Their craving for blood overrides all other instincts, and pennyroyal usually stops being effective. Our Adirondack guide, sharing his story about these insect vampires, even mentions that one night, fed up with their unyielding persistence and tired of the repetitive task of applying ointment, he got up, lit his candle, and chased the bugs out of the tent. He then sealed the entrance and went back to bed. A storm rolled in that night, and his canvas was so badly perforated by the mosquitoes’ bills that the rain poured into his tent like it was a sieve.
We have heard of the man who, when pursued by hungry mosquitoes, took refuge beneath a large chaldron, and, by the aid of a stone, clinched the blood-thirsty bills as they protruded in quest of his life-blood, until, by the united efforts of the winged captives, the chaldron was lifted and wafted out of sight, as if it were a feather.
We’ve heard about the guy who, when chased by hungry mosquitoes, took shelter under a big pot, and, using a stone, pinned the bloodthirsty beaks as they reached out for his blood, until, with the combined strength of the trapped insects, the pot was lifted and carried away as if it were a feather.
One story is just as true as the other, and a summer in the Adirondack woods will tend to strengthen, rather than diminish, the belief in either.
One story is just as true as the other, and a summer in the Adirondack woods will likely strengthen, not weaken, the belief in either.
The smoke of smouldering birch bark will effectually drive away the mosquitoes from the tents at night. This method is commonly known as "the smudge," and is more fully described in another part of this work.
The smoke from burning birch bark will effectively keep the mosquitoes away from the tents at night. This technique is usually called "the smudge," and it's explained in more detail in another section of this work.
The smell of the smoke is often unpleasant at first, but it is always preferable to the insect bites.
The smell of the smoke can be off-putting at first, but it's always better than getting bitten by bugs.
Mosquitoes are not the only vampires which infest our wooded lands.
The "punkeys" and "midgets" can outstrip them for voracity and the
painful character of the wound which they inflict. The "punkey,"
or "black-fly," as it is called, is a small, black gnat, about the
size of a garden ant, and the bite of the insect often results
very seriously. The midget is a minute little creature, and is the
most everlastingly sticky and exasperating pest in the catalogue
of human torments. They fly in swarms of thousands, and go for their
victim "en masse" and the face, hands and neck are soon covered as
if with "hay seed." They stick where they first light, and commence
operations immediately. All endeavors to shake them off are fruitless,
and their combined attacks are soon most painfully realized. Their
bites produce great redness and swelling, and the itching is most
intolerable. Happily for the woodsman, the "smudge"
Page 257
and pennyroyal ointment are effectual preventives against the attacks
of both midgets and black flies, as well as mosquitoes; and no one
who values his life or good looks should venture on a woodland
excursion in the summer months without a supply of this latter
commodity. In conclusion, we would remark that, to the mosquito
the blood of the intemperate seems to have a special attraction,
and anyone who wishes to enjoy comparative freedom from the attacks
of these pests, should abstain from the use of alcoholic stimulants.
It is a too prevalent idea among trappers that whiskey and rum are
necessary adjuncts to a trapping campaign, and many a trapper would
about as soon think of leaving his traps at home as his whisky bottle.
This is all a mistake. Anyone who has not sufficient strength of
constitution to withstand the hardships and exposures of a trapping
life, without the especial aid of stimulants, should stay at home.
We are now alluding to the habitual use of such stimulants.
It is always well to be provided with a flask of whisky or brandy,
in case of illness, but it should only be resorted to in such an
event. For a mere chill, we recommend the use of red pepper tea. A
simple swallow of this drink, (made simply by soaking a red pepper
in a cup of hot water) will restore warmth much quicker than three
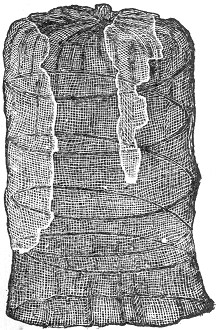 times the amount of any alcoholic stimulant. It is not our purpose to
extend into a lengthened temperance lecture, but only to discourage
the wide-spread idea that stimulants are necessities
in the life of the trapper. Midgets, musquitoes and punkeys delight
over a victim with alcohol in his veins, and while to a healthy
subject the bites are of only brief annoyance, to the intemperate
they often result in painful, obstinate sores.
times the amount of any alcoholic stimulant. It is not our purpose to
extend into a lengthened temperance lecture, but only to discourage
the wide-spread idea that stimulants are necessities
in the life of the trapper. Midgets, musquitoes and punkeys delight
over a victim with alcohol in his veins, and while to a healthy
subject the bites are of only brief annoyance, to the intemperate
they often result in painful, obstinate sores.
Mosquitoes aren't the only annoying pests in our wooded areas. The "punkeys" and "midgets" can actually be worse in terms of their eagerness to bite and the pain they cause. The "punkey," also known as the "black-fly," is a small, black gnat, about the size of a garden ant, and its bite can lead to serious consequences. The midget is an even tinier creature and is one of the most persistently annoying pests humans face. They swarm in thousands and attack their target all at once, quickly covering the face, hands, and neck like "hay seed." They cling where they first land and start biting immediately. Trying to shake them off is useless, and their collective attacks quickly become painfully obvious. Their bites cause significant redness and swelling, and the itching can be unbearable. Fortunately for those working in the woods, “smudge” Page 257 and pennyroyal ointment are effective at preventing bites from both midgets and black flies, as well as mosquitoes; anyone who cares about their wellbeing or appearance should never go on a summer woodland adventure without this stuff. Additionally, we should note that mosquitoes seem to have a particular attraction to the blood of those who drink heavily, so anyone wanting to avoid these pests should steer clear of alcohol. Many trappers mistakenly believe that whiskey and rum are essential for a trapping trip, and some would rather leave their traps behind than their whiskey. This is a mistake. Anyone who lacks the constitution to handle the challenges and exposure of a trapping lifestyle without stimulants should just stay home. We're talking about the habitual use of such stimulants here. It’s wise to keep a flask of whiskey or brandy handy for emergencies, but it should only be used when absolutely necessary. For just a chill, we recommend red pepper tea. A simple sip of this drink (made by soaking a red pepper in hot water) will warm you up much faster than three times the amount of any alcoholic drink. We're not trying to give a long lecture on temperance but rather to counter the common misconception that stimulants are necessary in a trapper’s life. Midgets, mosquitoes, and punkeys love a victim with alcohol in their system, and while the bites may only be a minor annoyance for a healthy person, for someone who drinks heavily, they can lead to painful, stubborn sores.
In addition to the various ointments used, it is well to be provided with a head-net, such as we illustrate. Nets of this kind are specially made for sportsmen, and consist of a spiral wire framework, covered with mosquito netting, and of such a size to slip easily on the head.
In addition to the different ointments used, it’s a good idea to have a head net, like the one we show. These nets are specifically designed for sports enthusiasts and consist of a spiral wire frame covered with mosquito netting, sized to fit comfortably on the head.
Page 258 They are easily made, as our engraving would indicate.
Page 258 They're easy to make, as our engraving shows.
A netting attachment for the hat is also an acquisition, especially in open woods, free from overhanging branches or dense thickets. Such a netting may be secured to the edge of the hat brim, and gathered with an elastic at the lower edge. This elastic will close snugly around the neck when in use, and at other times may be drawn above the brim and allowed to rest on top of the crown.
A netting attachment for the hat is also a great find, especially in open woods without overhanging branches or thick bushes. You can secure this netting to the edge of the hat brim and gather it with an elastic at the bottom edge. This elastic snugly fits around your neck when it's in use, and at other times, you can pull it up above the brim and let it rest on top of the crown.
The portable hat brim, which we illustrate, is an article of trade
in common use among sportsmen, and particularly the angler. Our
engraving (a) shows the article separate. It is made of
cloth, and is kept in its circular shape by a steel spring band
at the circumference, between the two sides. It may be attached
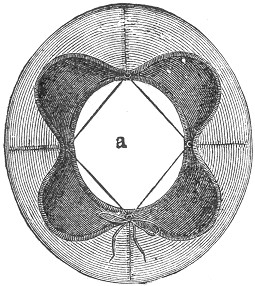 to any hat, and will act as a most effectual shelter to the rays
of a hot sun.
to any hat, and will act as a most effectual shelter to the rays
of a hot sun.
The portable hat brim we’re showcasing is a common accessory for sports enthusiasts, especially anglers. Our illustration (a) shows the item on its own. It’s made of cloth and maintains its circular shape thanks to a steel spring band around the edge, connecting the two sides. It can be attached to any hat and provides effective protection from the hot sun’s rays.
The netting above alluded to may be attached to such a brim, and applied to the edge of the hat when desired. This is shown at (b), which also indicates the manner of adjustment of the brim. Such a brim will often do good service, and may be obtained at almost any sporting emporium at trifling cost. It is portable in every sense of the word, being easily bent and packed away in the pocket.
The netting mentioned above can be attached to a brim and used on the edge of the hat when needed. This is shown at (b), which also illustrates how to adjust the brim. Such a brim can be very useful and can be found at nearly any sporting goods store for a low price. It's portable in every way, as it can be easily bent and packed away in your pocket.
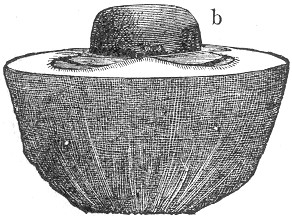
Page 259
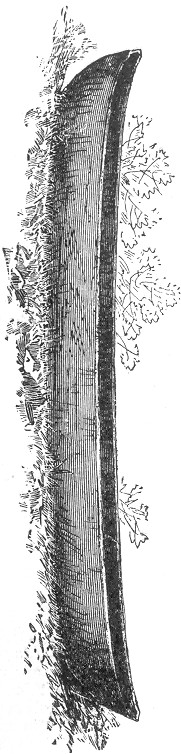 BOAT BUILDING.
Where trapping is carried on along the banks of the lakes and rivers, a boat of some kind becomes almost a positive necessity.
Where trapping is done along the banks of the lakes and rivers, having some kind of boat becomes almost essential.
The following examples represent those in most general use. Perhaps the most common form of the "rough and ready" order of boats, is that called the—
The following examples are the ones most commonly used. One of the most typical types of the "rough and ready" order of boats is known as the—
"DUG-OUT," OR LOG CANOE.
It's general appearance is well indicated by the accompanying illustration. With the proper tools, one of these canoes is easily made. A sharp axe, an adze, a shaving knife, a round edged adze, and a small auger, are principally necessary; and a cross-cut saw, broad-axe, sledge, and large sized chisel, will also be found useful.
Its overall appearance is clearly shown in the illustration. With the right tools, one of these canoes can be easily built. You mainly need a sharp axe, an adze, a shaving knife, a round-edged adze, and a small auger; a cross-cut saw, broad-axe, sledge, and large chisel will also come in handy.
In any case the log should not be much less than two feet in diameter, perfectly sound, and free from knots. If this precaution is observed, the result will be all the more satisfactory, and the canoe can be cut so thin, as to render it a light burden; being easily carried on the shoulders.
In any case, the log should be no less than two feet in diameter, completely solid, and free from knots. If you follow this precaution, the outcome will be much better, and the canoe can be made thin enough to be a light load, easily carried on your shoulders.
A pine log is generally chosen for a dug-out, on account of the lightness of the wood, and the ease with which it can be worked. Butternut, cottonwood and whitewood, are also excellent, and indeed almost any sound log of large size will answer the purpose.
A pine log is usually selected for a dugout because it's lightweight and easy to handle. Butternut, cottonwood, and whitewood are also great options, and really any solid, large log will work for the job.
For a dug-out of good size, the log should be ten or more feet in length. The first thing to be done is to cut a flat surface on one side of the log, from end to end. This indicates the bottom of the canoe. On the upper side the wood should be hewn away, in the curve shown on the upper outline of our illustration.
For a dugout of a decent size, the log should be at least ten feet long. The first step is to create a flat surface on one side of the log, from end to end. This will be the bottom of the canoe. On the top side, the wood should be shaped away, following the curve shown in the upper outline of our illustration.
Page 260 It is well to divide the log by notches into three equal lengths. In the centre division, the wood may be cut down to a straight line to a depth of about eight inches from the upper surface. The gradual curve to the bow and stern of the canoe should start from each end of this flat cut, and extend to the upper edge of the log, the guiding line being made on the sides of the log by a piece of chalk. The adze will come into good use in trimming off the wood on these curves. When this upper outline is accomplished, the log may be turned bottom side up, and the sides of the extremities rounded off. This may be done with an axe and adze, and when performed, the bottom curves should be made by chopping away the wood in the curves shown in the lower outline of our illustration. This curve should also be marked out with chalk, and should commence a little nearer the end of the log than the curve on the upper side. Shave off the wood to a blunt edge on this curve, at both bow and stern. The rough form of the canoe is now obtained, and by the aid of the draw-knife, or shaving-knife, it can be neatly and smoothly finished.
Page 260 It's a good idea to divide the log into three equal sections using notches. In the middle section, cut down to a straight line about eight inches deep from the top surface. The gentle curve to the bow and stern of the canoe should begin from each end of this flat cut, extending to the top edge of the log, with guiding lines drawn on the sides using a piece of chalk. The adze will be useful for refining the wood along these curves. Once the upper outline is finished, flip the log over and round off the sides at the ends. You can do this using an axe and adze, and to shape the bottom curves, remove the wood following the curves shown in the lower outline of our illustration. This curve should also be marked with chalk and should start a bit closer to the end of the log than the curve on the top side. Smooth the wood to a blunt edge along this curve at both the bow and stern. The basic shape of the canoe is now achieved, and with the help of a draw-knife or shaving-knife, it can be finished neatly and smoothly.
It is then ready to be "dug-out." The tools most useful for this purpose are the adze and axe, and sometimes the sledge and chisel. The digging out is of course the most tedious part; but with sharp tools it is a comparatively easy matter. When the great bulk of the wood is taken out, the interior should be finished with a howel or round adze; and the sides may be worked to one inch and a half in thickness if desired. The writer once saw one of these canoes of most exquisite workmanship, being only one inch in thickness, and so light as to be easily lifted with one hand. Of course such perfection as this is not necessary for ordinary purposes; although where the canoe is expected to be carried any great distance, it is well to thin it as much as possible. A gimlet or small auger may be used to gauge the thickness of the canoe, using it in the following manner: Supposing the required thickness of the wood is two inches, proceed to bore the hole from the inside of the canoe, and continue until the point of the gimlet or auger barely makes its appearance on the outside. Draw out the tool, and if the thickness measures more than is required, insert into the hole a slender piece of wood exactly two inches in length; push it in as far as it will go, and you may safely work until you reach the end of it. By this method the thickness may be gauged in different parts of the boat sufficiently to acquire a fair average thickness, and there is no danger of Page 261 cutting through. The gimlet should be allowed to extend outside of the canoe only sufficiently to be detected, and the holes thus made will seldom give any trouble as leaks. If, however, this should be the case, a little putty or pitch will remedy the difficulty.
It’s now ready to be “dug out.” The most useful tools for this task are the adze and axe, and sometimes the sledge and chisel. Digging out is definitely the most tedious part, but with sharp tools, it becomes relatively easy. Once most of the wood is removed, the inside should be finished with a howel or round adze, and the sides can be shaped to one and a half inches thick if desired. I once saw a canoe that was exquisitely crafted, only one inch thick, and so light it could be lifted with one hand. Of course, such perfection isn’t necessary for regular use; however, if the canoe needs to be carried a long distance, it’s best to thin it out as much as possible. A gimlet or small auger can be used to measure the thickness of the canoe, by following these steps: If you want the wood thickness to be two inches, start boring a hole from the inside of the canoe, continuing until the point of the gimlet or auger barely shows on the outside. Pull out the tool, and if the thickness measures more than required, insert a slender piece of wood that is exactly two inches long into the hole; push it in as far as it goes, and you can safely work until you reach the end. This way, you can measure the thickness in different areas of the boat to get an average thickness, and there’s no risk of cutting through. The gimlet should extend outside the canoe just enough to be noticed, and the holes made this way will rarely cause leaks. However, if they do, a bit of putty or pitch will fix the problem.
The "dug-out" may be constructed of any size, and of any desired shape, but the above is the usual type.
The "dug-out" can be built in any size and shape you want, but the one mentioned above is the typical type.
When leaks or cracks occur, they may be caulked with hemp, and smeared with pitch, which will render them thoroughly waterproof.
When leaks or cracks happen, they can be sealed with hemp and covered with pitch, making them completely waterproof.
For lightness and portability there is no boat more desirable or more unique than—
For lightness and portability, there’s no boat more desirable or unique than—
THE INDIAN OR BIRCH-BARK CANOE.
Where the white birch grows in perfection, and the trees attain a large size, the chief material of the birch bark canoe is at hand; and although we ordinary mortals could not be expected to attain to that perfection of skill which the Indians exhibit in the manufacture of these canoes, we nevertheless can succeed sufficiently well to answer all practical purposes. The Indian canoes are often perfect marvels of skill and combined strength and lightness. These half-civilized beings seem to take as naturally to the making of these commodities, as if it were almost an hereditary habit with them; and few men, even with the most exhaustive practice, can compete with the Indian in the combined result of strength, lightness, durability, external beauty, and nicety of work, which are the united characteristics of the typical bark canoe.
Where the white birch grows perfectly, and the trees reach a large size, the main material for birch bark canoes is readily available; and although we ordinary people might not achieve the same level of skill that the Indigenous peoples show in making these canoes, we can still do well enough to meet practical needs. The Indigenous canoes are often incredible feats of skill, strength, and lightness. These semi-civilized people seem to create these items as naturally as if it were an inherited practice; and few individuals, even with extensive practice, can match the Indigenous peoples in the blend of strength, lightness, durability, beauty, and craftsmanship that define the typical bark canoe.
The average length of the "Bark," as used by trappers, is about twelve feet, but they may be constructed of any desired dimensions, to the length of forty feet. A canoe of this size will carry fifteen or twenty persons, and may be transported with ease upon the shoulders of two strong men. The smaller size, above mentioned, is capable of carrying two persons, and is a light load for a single man.
The average length of the "Bark," used by trappers, is about twelve feet, but they can be made in any size up to forty feet long. A canoe of this size can carry fifteen to twenty people and can be easily carried on the shoulders of two strong men. The smaller size mentioned earlier can hold two people and is a manageable load for one person.
In constructing the bark canoe the first requisite is the gunwale,
or upper framework. This should consist of four strips of cedar,
ash, or other light, strong wood; two for each side of the boat.
For an ordinary sized canoe, their length should be about twelve
feet, width one inch, and thickness one-quarter of an inch. They
should be tied together in pairs at the ends, and the two pairs
then joined at the same place. The object of
Page 262
these pieces is to give strength and form to the canoe, and to
offer a firm security for the edges of the bark, which are secured
between them. The gunwale being prepared, we are now ready for
the birch bark. The bottom of a well made canoe should be in one
large piece, as our illustration indicates, if possible. Select
some large tree with the trunk free from knots or excrescences.
Mark off as great a length as possible, and chop a straight cut
in the bark through the whole length of the piece, after which
it should be carefully peeled from the wood. It will sometimes
happen, where large birches exist in perfection, that a single
piece may be found of sufficient size for a whole canoe, but this
is rather exceptional, and the bottom is generally pieced out,
as seen in our drawing. This piecing may be accomplished with an
awl and Indian twine, or by the aid of a large needle threaded
with the same, sewing with an over-and-over stitch around the edge
of each piece. Use as large pieces as are attainable, and continue
to sew them on until the area of bark measures about four and a
half feet in width by twelve feet in length, the dark colored sides
of the bark all facing the same way. Next select a fiat piece of
ground, and mark off a distance of ten feet, or two feet less than
the length of the gunwales. At each end of the space two tall stakes
should be driven into the ground about three inches apart. Now
turn the bark on the ground with its white side uppermost, and
fold it loosely and evenly through the long centre. In this folded
condition it should now be lifted by the upper edge and set between
the stakes. There will then be about a foot of projecting bark
beyond each pair of stakes. These ends should now be covered by
folding another piece of bark over them, sewing the edges firmly
to the sides of the rude form of the canoe, which now presents
itself. When this is done, each end should be supported on a log
or stone; this will cause the bottom line to sink downwards at
about the proper curve. We are now ready for the gunwale. Lay it
in the proper position, fitting the edges of the bark between the
two strips on each side, and sewing around the whole with a winding
stitch, exactly after the manner of the edge of an ordinary palm-leaf
fan. The inside of the canoe should now be lined with long strips
of cedar running through the entire length of the boat if possible,
but if not, should be so cut as to neatly overlap at the ends.
These pieces should be an inch or two in width, and from a quarter
to half an inch-in thickness. The ribs are then to be put in. These
are generally made from ash, one or two inches in width, and
Page 263
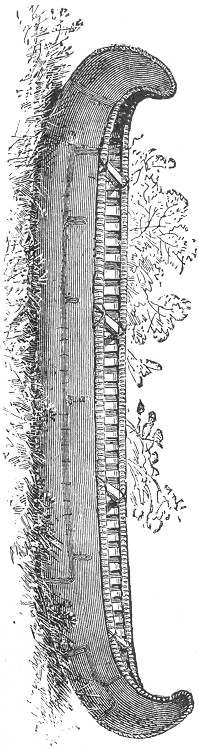 a quarter of an inch in thickness. Any light flexible wood will
answer the purpose, and even barrel hoops when attainable will do
very well. These ribs should be bent to fit the interior of the
canoe crosswise, either close together, or with equal distances
between them and the ends should then be firmly secured beneath the
gunwales by a continuous loop-stitch through the bark. For a canoe
of twelve feet in length, the width should be about two feet, and in
order to keep the gunwales firm, two or more cross-pieces should
be inserted, and lashed firmly at their ends as our illustration
shows. The centre third of the length of the canoe should be parallel
at the sides, and if two braces, two feet in length are placed at
each end of this third, the shape will be about perfect. We now
have a bark canoe of considerable strength and durability, and
it only awaits to be made water-proof for final use. In order to
accomplish this all the seams outside, and the entire interior of
the canoe should, be smeared with pitch, after which its floating
qualities may be tested with confidence. Should any leaks occur their
where-abouts are easily detected, and an additional application
of pitch will remedy the difficulty. The Indians in sewing their
bark canoes use tamarack roots, fibrous plants, and grasses, in
lieu of thread, and even with these inferior materials often attain
to such perfection in compact sewing, as to render the use of pitch
unnecessary for water-proof purposes. Such skill is rarely attained
by the white man, and the art of making a water-proof canoe, even
out of a single piece of bark, is by no means an easy task without
the aid of tar or pitch.
a quarter of an inch in thickness. Any light flexible wood will
answer the purpose, and even barrel hoops when attainable will do
very well. These ribs should be bent to fit the interior of the
canoe crosswise, either close together, or with equal distances
between them and the ends should then be firmly secured beneath the
gunwales by a continuous loop-stitch through the bark. For a canoe
of twelve feet in length, the width should be about two feet, and in
order to keep the gunwales firm, two or more cross-pieces should
be inserted, and lashed firmly at their ends as our illustration
shows. The centre third of the length of the canoe should be parallel
at the sides, and if two braces, two feet in length are placed at
each end of this third, the shape will be about perfect. We now
have a bark canoe of considerable strength and durability, and
it only awaits to be made water-proof for final use. In order to
accomplish this all the seams outside, and the entire interior of
the canoe should, be smeared with pitch, after which its floating
qualities may be tested with confidence. Should any leaks occur their
where-abouts are easily detected, and an additional application
of pitch will remedy the difficulty. The Indians in sewing their
bark canoes use tamarack roots, fibrous plants, and grasses, in
lieu of thread, and even with these inferior materials often attain
to such perfection in compact sewing, as to render the use of pitch
unnecessary for water-proof purposes. Such skill is rarely attained
by the white man, and the art of making a water-proof canoe, even
out of a single piece of bark, is by no means an easy task without
the aid of tar or pitch.
In building a bark canoe, the first essential component is the gunwale, or upper framework. This should be made up of four strips of cedar, ash, or other lightweight, strong wood—two for each side of the boat. For an average-sized canoe, each strip should be about twelve feet long, one inch wide, and a quarter of an inch thick. They should be tied together in pairs at the ends, and then the two pairs should be joined at the same place. The purpose of these pieces is to provide strength and shape to the canoe and to create a secure space for the edges of the bark, which will be held in place between them. Once the gunwale is prepared, we can move on to the birch bark. The bottom of a well-made canoe should ideally be one large piece, as our illustration shows. Choose a large tree with a trunk free from knots or bumps. Measure off as long a section as possible, and make a straight cut in the bark the entire length of the piece, after which it should be carefully peeled away from the wood. Sometimes, where large birch trees are found, a single piece may be available that is big enough for an entire canoe, but this is quite rare, and the bottom is usually made from multiple pieces, as seen in our drawing. This piecing can be done with an awl and Indian twine or with a large needle threaded with the same, sewing with an over-and-over stitch around the edge of each piece. Use the largest pieces you can get and keep sewing them together until the total area of bark measures about four and a half feet wide by twelve feet long, with the dark sides of the bark all facing the same way. Next, find a flat spot on the ground and measure out a distance of ten feet, or two feet less than the length of the gunwales. Drive two tall stakes into the ground about three inches apart at each end of this space. Now flip the bark over so the white side is facing up and fold it loosely and evenly through the center. In this folded position, lift it by the top edge and set it between the stakes. There should be about a foot of bark extending beyond each pair of stakes. These ends should be covered by folding another piece of bark over them and sewing the edges securely to the sides of the basic canoe shape that you now have. Once this is done, support each end on a log or stone; this will help create the correct curve for the bottom. Now we’re ready for the gunwale. Lay it in place, fitting the bark edges between the two strips on each side, and sew around the entire thing with a winding stitch, just like the edge of a typical palm-leaf fan. The interior of the canoe should now be lined with long strips of cedar running the length of the boat if possible, but if not, they should be cut to neatly overlap at the ends. These pieces should be one to two inches wide and a quarter to half an inch thick. Next, it's time to put in the ribs. These are usually made from ash, one or two inches wide, and a quarter of an inch thick. Any lightweight, flexible wood will work, and even barrel hoops can be used if available. These ribs should be bent to fit across the inside of the canoe, either placed close together or spaced evenly apart, and then secured under the gunwales with a continuous loop-stitch through the bark. For a twelve-foot canoe, the width should be around two feet, and to keep the gunwales stable, two or more crosspieces should be added and tightly laced at their ends, as our illustration demonstrates. The center third of the canoe's length should be parallel on the sides, and if you add two braces, two feet long, at each end of this third section, the shape will be nearly perfect. Now we have a bark canoe that is quite strong and durable, but it still needs to be made waterproof before use. To achieve this, all outer seams and the whole interior of the canoe should be coated with pitch, after which you can confidently test its floating capabilities. If any leaks happen, they can be easily found, and a little more pitch will fix the issue. When sewing their bark canoes, Indigenous people use tamarack roots, fibrous plants, and grasses instead of thread, and even with these less-than-ideal materials, they often achieve such skilled stitching that the use of pitch becomes unnecessary for waterproofing. Such skill is rarely matched by white craftsmen, and making a waterproof canoe from a single piece of bark is by no means an easy task without the help of tar or pitch.
Page 264 For the trapper we strongly recommend the birch "bark." With the above directions we are sure no one could go astray, and we are equally sure that a canoe made as we describe, would present advantages of lightness and portability which no other style of boat would possess. For temporary purposes, canoes can be made from basswood, hemlock, or spruce bark; but they are at best, very rude and clumsy in comparison with the birch bark. They are generally made after the principles of the above described; either sewing or nailing the edges of the bark together, and smearing every joint and seam profusely with pitch, and adding gunwales, lining, and ribs.
Page 264 For trappers, we highly recommend birch bark. With the directions provided, we're confident that no one could go wrong, and we're also sure that a canoe made as we describe would offer advantages in terms of lightness and portability that no other type of boat can match. For temporary uses, canoes can be created from basswood, hemlock, or spruce bark, but they will always be quite rough and awkward compared to those made from birch bark. They are generally constructed based on the principles mentioned above, either by sewing or nailing the bark edges together and applying a generous amount of pitch to every joint and seam, along with adding gunwales, lining, and ribs.
A LIGHT HOME-MADE BOAT.
The following gives an easy method of making a light and serviceable bateau, which any boy, with moderate ingenuity or skill, could easily construct:—
The following provides a simple way to make a lightweight and functional boat that any boy, with a bit of creativity or skill, could easily put together:—
Select two boards, about three-quarters of an inch in thickness, eighteen or twenty inches in width, and twelve feet in length, which we will consider the required length of the boat. These boards should be well seasoned, and free from knots, and at least one of the sides should be straight.
Select two boards, about three-quarters of an inch thick, eighteen or twenty inches wide, and twelve feet long, which we'll consider the necessary length of the boat. These boards should be well-seasoned, free of knots, and at least one side should be straight.
Next, with the aid of a draw-shave, proceed to shape the ends of one of the boards, as seen on our diagram, (e) representing the forward, (g) the stern. The curve of the bow should commence at about four feet from the end, and take a rounded slope upward, leaving about ten inches of width at the end of the board (e). The stern should be cut at the angle shown at (g), commencing at about two and a half feet from the extremity of the board and continuing upward to about ten inches from the upper edge. The board thus shaped should now be laid evenly on the other, and the outline of the cut portions carefully scratched upon it, after which the second board should be cut in a similar manner as the first, so as to form an exact duplicate.
Next, using a draw-shave, shape the ends of one of the boards as shown in our diagram, (e) for the front and (g) for the back. The curve of the bow should start about four feet from the end and have a gentle upward slope, leaving about ten inches of width at the end of the board (e). The back should be cut at the angle indicated at (g), starting about two and a half feet from the end of the board and continuing upward to about ten inches from the top edge. Once the board is shaped, lay it evenly on top of the other board and carefully trace the outline of the cut areas onto it. Then, cut the second board in the same way as the first to create an exact duplicate.
This being accomplished, the two should be laid evenly, one over the other, and the exact center of their long edges ascertained. Marking off about five inches on each side of this centre on both boards.
This done, the two should be placed flat, one on top of the other, and the exact center of their long edges identified. Marking off about five inches on each side of this center on both boards.
Next procure another board about ten inches in width, three feet
in length, and perfectly squared at the ends. Nail each end of
this piece securely and squarely in the space marked on each of
the long boards. Then turn the pieces carefully over and
Page 265
nail another board across the bottom, directly opposite the first.
 We will now leave them and give our attention to the bow piece, which
is the next requisite. This is shown at (a), and consists
of a solid piece of oak, or other hard wood, well seasoned, and
hewn out in the arrow shape, indicated in our illustration. It
should first be cut three-cornered, the inside face being about
eight inches, and the other two ten inches. Its length should be
about eleven inches, and its under side should be sloped off on a
line with the under curve of the bows. At about five inches from
the inner face, and on each side, a piece should be sawn out, one
inch in thickness, thus leaving on each side a notch which will
exactly receive the side-boards of the boat, as seen at (a).
We will now leave them and give our attention to the bow piece, which
is the next requisite. This is shown at (a), and consists
of a solid piece of oak, or other hard wood, well seasoned, and
hewn out in the arrow shape, indicated in our illustration. It
should first be cut three-cornered, the inside face being about
eight inches, and the other two ten inches. Its length should be
about eleven inches, and its under side should be sloped off on a
line with the under curve of the bows. At about five inches from
the inner face, and on each side, a piece should be sawn out, one
inch in thickness, thus leaving on each side a notch which will
exactly receive the side-boards of the boat, as seen at (a).
Next, get another board that’s about ten inches wide, three feet long, and perfectly squared at both ends. Securely nail each end of this piece in the spaces marked on each of the long boards. Then, carefully flip the pieces over and Page 265 nail another board across the bottom, directly opposite the first.
Now let’s move on to the bow piece, which is the next requirement. This is shown at (a) and consists of a solid piece of oak or another durable hardwood, well-seasoned and cut into an arrow shape as shown in our illustration. It should first be cut into a triangular shape, with the inside face measuring about eight inches and the other two sides about ten inches each. Its length should be roughly eleven inches, and the underside should be sloped to match the curve of the bows. At about five inches from the inner face, a piece should be cut out on each side, one inch thick, creating a notch on each side that will fit exactly with the side boards of the boat, as seen at (a).
The piece being thus ready, the bow ends of the boards should be
drawn together, fitted in the notches and securely spiked with
large nails. A bow piece of this kind adds greatly to the strength
of a boat, and will stand much rough usage. The board for the stem
should next be prepared. This should be ten inches in width and
two feet in length, and should be securely nailed between the ends
of the boards at the stem, as shown at (g), being afterwards
overlapped on the top by a board of similar size, as our illustration
shows, at (c). The bottom of the boat is now easily made by
nailing boards crosswise, sawing off the projecting ends close to
the curve of the side-boards. After the pieces are all nailed in
place, the seams and crevices should be caulked with hemp, using a
blunt chisel, or hard wooden wedge, and a mallet. The seats should
now be put in, as these are not only a matter of comfort, but of
necessity, acting as braces to the sides of the boat. They should
be two in number, one being placed three feet from the stern and
the other one foot beyond the brace board originally nailed across
the top of the boat. The seats should be cut at the ends in a curve
corresponding to the part of the boat in which they are placed,
and should be situated about a foot from the bottom of the boat,
their ends resting on short boards beneath them against the sides
of the boat. These are indicated by the dotted lines (h h)
in the diagram. When
Page 266
thus resting they should be securely fastened in place by strong
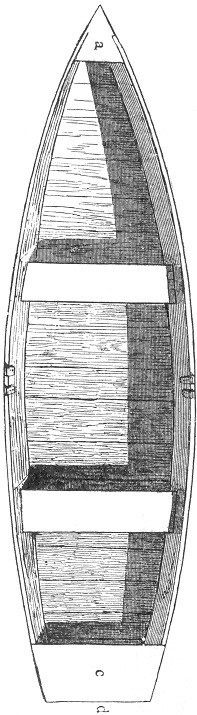 screws, driven through the sides of the boat into their ends (f
f), allowing some one to sit on the seat meanwhile to keep it
in place. Small cleats should now be tacked to the bottom of the
boat, beneath the seat and underneath the seat itself, in order
to keep the props in place; after which the original brace board
across the top of the boat may be knocked off and the bateau is
complete and ready for service. A boat thus made is quite comely
in shape, and may be painted to suit the fancy. Should a rudder
be required, the broad board at the stern offers a good place of
attachment, and oar-locks may be adjusted at the proper places.
These may consist of a pair of cleats attached to the inside of
the boat, as seen in the illustration. In case it may be found
difficult to obtain the large single boards for the sides of the
boat, two or more narrow ones will answer the purpose, although
not as perfectly. In this case they should first be firmly attached
together by cleats, securely screwed to the inside. When first put
on the water the boat will probably leak in places, but if left
to soak for a few hours the wood will generally swell sufficiently
to completely close the crevices. If, however, the leak should
continue, that particular part of the boat should be re-caulked
and smeared with pitch. This latter substance is of great value
to the trapper, not only in boat building but in the construction
of his shanties and in other various ways. It will most effectually
stop almost any leak in a canoe or boat, and of course should always
be applied hot.
screws, driven through the sides of the boat into their ends (f
f), allowing some one to sit on the seat meanwhile to keep it
in place. Small cleats should now be tacked to the bottom of the
boat, beneath the seat and underneath the seat itself, in order
to keep the props in place; after which the original brace board
across the top of the boat may be knocked off and the bateau is
complete and ready for service. A boat thus made is quite comely
in shape, and may be painted to suit the fancy. Should a rudder
be required, the broad board at the stern offers a good place of
attachment, and oar-locks may be adjusted at the proper places.
These may consist of a pair of cleats attached to the inside of
the boat, as seen in the illustration. In case it may be found
difficult to obtain the large single boards for the sides of the
boat, two or more narrow ones will answer the purpose, although
not as perfectly. In this case they should first be firmly attached
together by cleats, securely screwed to the inside. When first put
on the water the boat will probably leak in places, but if left
to soak for a few hours the wood will generally swell sufficiently
to completely close the crevices. If, however, the leak should
continue, that particular part of the boat should be re-caulked
and smeared with pitch. This latter substance is of great value
to the trapper, not only in boat building but in the construction
of his shanties and in other various ways. It will most effectually
stop almost any leak in a canoe or boat, and of course should always
be applied hot.
Once the piece is ready, the ends of the boards should be pulled together, fitted into the notches, and securely fastened with large nails. A bow piece like this greatly enhances the boat's strength and can withstand rough use. Next, prepare the board for the stem. This should be ten inches wide and two feet long, and it should be securely nailed between the ends of the boards at the stem, as shown in (g), with another board of similar size overlapping it on top, as illustrated in (c). The bottom of the boat can then be easily constructed by nailing boards across it, cutting off the excess ends close to the curve of the side boards. After securing all the pieces, the seams and gaps should be caulked with hemp using a blunt chisel or a hard wooden wedge and a mallet. Next, add the seats since they provide both comfort and structural support for the sides of the boat. You should install two seats: one three feet from the stern and the other one foot beyond the brace board previously nailed across the top of the boat. The ends of the seats should be curved to match the shape of the boat and should be positioned about a foot above the bottom, resting on short boards underneath that support them against the sides of the boat, indicated by the dotted lines (h h) in the diagram. Once in position, they should be securely fastened using strong screws driven through the sides of the boat into their ends (f f), while someone sits on the seat to keep it steady. Small cleats should then be added to the bottom of the boat, underneath the seats, to hold the supports in place; after this, the original brace board across the top can be removed, and the boat is complete and ready for use. A boat made this way looks quite nice and can be painted to match your style. If a rudder is needed, the wide board at the stern is a good spot to attach it, and oar-locks can be placed in the appropriate locations. These can be a pair of cleats attached to the inside of the boat, as shown in the illustration. If it's hard to find large single boards for the sides of the boat, you can use two or more narrower boards, although they won't work as well. In this case, they should first be securely joined together using cleats screwed to the inside. When first launched, the boat may leak a bit, but if you let it soak for a few hours, the wood will generally swell enough to close up the gaps completely. If leaks persist, you should re-caulk that section of the boat and apply pitch. This material is very useful for the trapper, not only in boat building but also for constructing shanties and other various uses. It effectively seals almost any leak in a canoe or boat, and should always be applied hot.
Page 267 THE SCOW.
The bateau we have above described is built so as to allow for considerable speed in the water, either in rowing or sculling; but where this speed is not especially desired the pointed bows may be dispensed with, and the sides of the boat made perfectly straight. In this case the bottom takes equal slopes at the ends, and both bow and stern are of the same width, and an ordinary flat-bottomed boat with parallel sides is the result. In many cases a scow of this kind answers every purpose, and is certainly much more easily made.
The boat we talked about earlier is designed to be quite fast on the water, whether you're rowing or sculling. However, if speed isn't a priority, you can skip the pointed ends and make the sides of the boat completely straight. In this case, the bottom slopes evenly at both ends, and both the front and back are the same width, resulting in a regular flat-bottomed boat with parallel sides. In many situations, this type of flat-bottomed boat works just fine and is definitely easier to construct.
We have thus described a few of the most common instances of boats used by trappers, and with our full description and illustrations no one can go astray. A boat of some kind is almost an indispensable requisite to the trapper, and anyone of the foregoing will be found sufficient for all ordinary purposes.
We have described a few of the most common types of boats used by trappers, and with our detailed description and illustrations, no one will get lost. A boat of some kind is almost essential for a trapper, and any of the ones mentioned will be enough for all regular needs.
A paddle may be used, and in shallow or muddy water a pusher or mud-stick will be found useful. This should consist of a pole seven or eight feet in length, supplied at the ends with an attachment of the shape of the letter U. This may be constructed in two pieces, firmly screwed to opposite sides of the end of the pole, and so formed as to present a curved crotch. Such a stick will be found very useful for pushing through weeds and muddy places. A simple pole trimmed so as to leave a crotch at the end will also answer the purpose very well.
A paddle can be used, and in shallow or muddy water, a pusher or mud stick is helpful. This should be a pole about seven or eight feet long, with U-shaped attachments at the ends. It can be made from two pieces securely screwed to opposite sides of the pole's end, creating a curved fork. This stick is great for pushing through weeds and muddy areas. A simple pole trimmed to leave a fork at the end will also work just as well.
SNOW-SHOES.
These commodities are almost indispensable to the trapper where he pursues his vocation in the winter time, during the prevalence of deep snows. When properly made they permit the wearer to walk over the surface of the snow with perfect ease; where, without them, travel would be extremely difficult if not impossible.
These items are nearly essential for the trapper during winter when the deep snow is prevalent. When made correctly, they allow the wearer to walk easily across the snow's surface; without them, traveling would be very challenging, if not impossible.
In the regions of perpetual snow, and also in Canada and neighboring districts, snow-shoes are very commonly worn. In the latter localities the "snow-shoe race" forms one of the favorite sports of the season, and young and old alike join in its mysteries. Like riding on the velocipede, walking on snow-shoes looks "easy enough," but we notice that a few somersaults are usually a convincing argument that the art is not as simple as it appears. The first experience on snow-shoes is Page 268 apt to be at least undignifying, if not discouraging, and in order to get used to the strange capers and eccentricities of an ordinarily well-behaved snow shoe, it requires considerable patience and practice. There is no telling where, in an unguarded moment, they will land you, and they seem to take especial delight in stepping on each other and turning their wearer upside down. The principal secret of success (and one may as well know it at the start, as to learn it at the expense of a pint of snow down his back) consists in taking steps sufficiently long to bring the widest portion of the stepping shoe beyond that of the other, keeping the feet rather far apart and stepping pretty high. By observing these precautions, and trusting in Providence, much embarrassment may be saved, and an hour's effort will thoroughly tame the unruly appendages, which at best do not permit of much grace or elegance of gait.
In areas with constant snow, as well as in Canada and surrounding regions, snowshoes are commonly used. In these places, the "snowshoe race" is one of the favorite sports of the season, attracting both young and old to participate. Just like riding a bike, walking on snowshoes looks "easy enough," but a few tumbles usually show that it's not as simple as it seems. The first time using snowshoes is often at least a little embarrassing, if not discouraging, and it takes a lot of patience and practice to get used to the awkward movements of a typically well-behaved snowshoe. You never know where they'll take you in an unguarded moment, and they have a tendency to step on each other and flip their wearer over. The key to doing well (and it’s better to know it upfront than to learn it the hard way with a bunch of snow down your back) is to take long enough steps to make sure the widest part of the shoe goes beyond the other one, keep your feet fairly apart, and lift your feet fairly high. By following these tips and trusting your luck, you can avoid a lot of embarrassment, and after an hour of practice, you'll get the hang of those unruly things, which, let's be honest, don’t offer much in terms of grace or elegance.
To the moose hunter snow-shoes are often an absolute necessity, and trapping in many cases would be impossible without them. They are thus brought fully within the scope of our volume, and we give a few simple directions for their manufacture. Our illustration gives the correct shape of the shoe. The framework should consist of a strip of ash, hickory or some other elastic wood, bent into the form indicated and wound around the ends with twine or strips of hide. The length of the piece should be about six feet, more or less, in proportion to the size of the individual who proposes to wear the shoe. If the bending should prove difficult it may be rendered an easy matter by the application of boiling water. Across the front part two strips of stout leather, or other tough hide, are then fastened, and these further secured together by three or four bands on each side of the middle, as our drawing shows.
For moose hunters, snowshoes are often absolutely essential, and trapping would be nearly impossible in many cases without them. They are definitely part of our discussion here, so we’ve included some simple instructions for making them. Our illustration shows the correct shape of the shoe. The framework should be made from a strip of ash, hickory, or another flexible wood, bent into the indicated shape and wrapped at the ends with twine or strips of hide. The length of the piece should be about six feet, give or take, depending on the size of the person who will wear the shoe. If bending the wood is tough, it can be made easier by using boiling water. At the front, two strong leather strips or other durable hide are attached, secured further together with three or four bands on each side of the middle, as illustrated in our drawing.
In the original Indian snow-shoe, from which our drawing was made, the net work was constructed from strips of moose hide, which were interlaced much after the manner of an ordinary cane-seated chair. Strips of leather, deer skin, or even split cane, above alluded to, may also be used, and the lacing may be either as our illustration represents, or in the simpler rectangular woof seen in ordinary cloth.
In the original Indian snowshoe, from which our drawing was made, the framework was made from strips of moose hide, woven together similar to a standard cane-seated chair. Strips of leather, deer skin, or even split cane, as mentioned earlier, can also be used, and the lacing can be done either as our illustration shows, or in the simpler rectangular weave seen in regular fabric.
In order to attach the interlacing to the bow the latter should be
wound with wide strips of cane, if it can be procured, or otherwise
with strips of tough skin. The loops thus formed offer a continuous
security, and the whole interior, with the exception of the space
at the front between the cross pieces, should be neatly filled
with the next work. It is well to run the first lines
Page 269
across the shoe, from side to side, passing through the windings
of the bow. Across them, in the form of the letter X, the two other
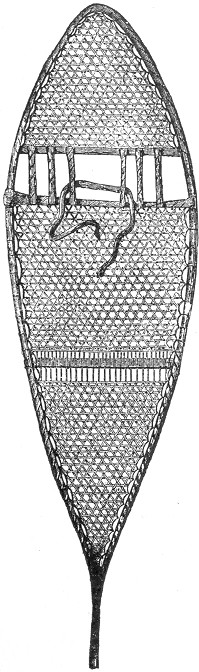 cords should be interlaced, after the manner shown in the cut.
This forms a secure and not very complicated network, and is the
style usually adopted by the Indian makers.
cords should be interlaced, after the manner shown in the cut.
This forms a secure and not very complicated network, and is the
style usually adopted by the Indian makers.
To attach the interlacing to the bow, you should wrap it with wide strips of cane, if available, or tough skin if not. The loops created provide consistent security, and the entire interior, except for the space at the front between the cross pieces, should be neatly filled with the next work. It's best to run the first lines Page 269 across the shoe, from side to side, threading through the windings of the bow. Then, crisscrossing them in an X shape, the two other cords should be woven in as shown in the image. This creates a secure and fairly simple network, which is the style commonly used by Indian makers.
There is another mode of attaching the lace-work to the bow which is also commonly employed, and consists in a series of holes bored at regular intervals through the wood. The winding is thus dispensed with, but the bow is sometimes weakened by the operation, and we are inclined to recommend the former method in preference. In attaching the shoe, the ball of the foot should be set on the second cross piece, and there secured by a strip of hide, which should be first adjusted as seen in the engraving, being afterward tied over the foot and then behind the ankle. Snow-shoes are made in other ways, but we believe that the typical Indian snow-shoe above described is the best.
There’s another way to attach the lace work to the bow that’s commonly used, which involves drilling a series of holes at regular intervals through the wood. This method avoids the winding, but it can sometimes weaken the bow, so we recommend the previous method instead. When attaching the shoe, the ball of the foot should be placed on the second crosspiece and secured with a strip of leather. This strip should first be adjusted as shown in the illustration, then tied over the foot and behind the ankle. Snowshoes can be made in various ways, but we think the typical Indian snowshoe described above is the best.
THE TOBOGGAN OR INDIAN SLEDGE.
For winter traffic over deep snows there is no better sled in the world than the Indian toboggan. To the trapper during a winter campaign it is often an indispensable convenience, and without it the Indian hunters of the North would find great difficulty in getting their furs to market. All through the winter season the various trading posts of Canada are constantly visited by numbers of Indian trappers, many of whom have travelled hundreds of miles on their snow-shoes with their Page 270 heavily laden toboggans. Arrived at their market they sell or trade their stock of furs, and likewise dispose of their toboggans, reserving only their snow-shoes to aid them in their long tramp homewards.
For winter travel over deep snow, there’s no better sled in the world than the Indian toboggan. For trappers during a winter season, it’s often an essential tool, and without it, the Indian hunters of the North would have a hard time getting their furs to market. Throughout the winter months, the various trading posts in Canada are regularly visited by many Indian trappers, lots of whom have traveled hundreds of miles on their snowshoes with their heavily loaded toboggans. Once they reach the market, they sell or trade their stock of furs, and also get rid of their toboggans, keeping only their snowshoes to help them on their long walk home.
In Canada and northward the toboggan is in very extensive use, both
for purposes of traffic and amusement. It is quite commonly met
with in the streets of various Canadian cities, and is especially
appreciated by the youthful population, who are fond of coasting
over the crust of snow. For this purpose there is no other sled
like it, and a toboggan of the size we shall describe will easily
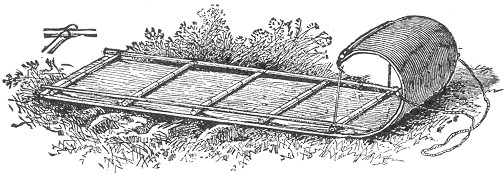 accommodate two or three boys, and will glide over a crust of snow
with great ease and rapidity. To the trapper it is especially valuable
for all purposes of transportation. The flat bottom rests upon
the surface of the snow, and the weight being thus distributed
a load of two or three hundred pounds will often make but little
impression and can be drawn with marvellous ease. Our illustration
gives a very clear idea of the sled, and it can be made in the
following way: the first requisite is a board about eight feet
in length and sixteen or more inches in width. Such a board may
be procured at any saw mill. Oak is the best wood for the purpose,
although hickory, basswood or ash will do excellently. It should
be planed or sawed to a thickness of about a third of an inch,
and should be free from knots. If a single board of the required
width is not easily found, two boards may be used, and secured
side by side by three cleats, one at each end and the other in
the middle, using wrought nails and clinching them deeply into the
board on the under side. The single board is much to be preferred,
if it can be had. The next requisites are seven or eight wooden
cross-pieces of a length equivalent to the width of the board.
Four old broom-sticks, cut in the required lengths, will answer
Page 271
this purpose perfectly, and if these are not at hand other sticks
of similar dimensions should be used. Two side pieces are next
needed. These should be about five feet in length, and in thickness
exactly similar to the cross pieces. Next procure a few pairs of
leather shoe-strings or some strips of tough calf skin. With these
in readiness we may now commence the work of putting the parts
together. Begin by laying the cross pieces at equal distances along
the board; across these and near their ends lay the two side pieces,
as seen in the illustration. By the aid of a gimlet or awl, four
holes should now be made through the board, beneath the end of each
cross piece, and also directly under the side piece. It is well to
mark with a pencil, the various points for the holes, after which
the sticks can be removed and the work much more easily performed.
The four holes should be about an inch apart, or so disposed as to
mark the four corners of a square inch. It is also necessary to
make other holes along the length of the cross pieces, as seen
in the illustration. The line on these can also be marked with
the pencil across the board, and the holes made afterwards. These
should also be an inch apart, and only two in number at each point,
one on each side of the stick. When all the holes are made the
board should be turned over, in order to complete preparations
on the other side. The object of these various holes is for the
passage of the leather shoe-strings for the purpose of securing
the cross pieces firmly to the board. In order to prevent these
loops from wearing off on the under side, small grooves should next
be made connecting the holes beneath, thus allowing the leather
string to sink into the wood, where it is securely protected from
injury. A narrow chisel is the best tool for this purpose, the making
of the grooves being much more easily and perfectly accomplished
with this than with the jack-knife. When the under side is thus
finished the board may be turned over and the cross pieces and
sides again arranged in place as already described. Secure the
pieces to the board by the leather strings through the various
holes, always knotting on the upper surface, and taking care that
the knots are firmly tied. The ends of all the cross pieces will
require a double cross stitch through the four holes beneath, in
order to secure the side pieces as well. This is plainly shown in
the small diagram (a). The front end of each side piece
underneath should now be sharpened to a point, to allow for the
bend at the front of the toboggan. The cross piece at this end
should be secured to the under side of the board, so that as it
bends over it will appear on the upper edge, as our
Page 272
illustration shows. The board should next be bent with a graceful
curve, and thus held in position by a rope or strip of leather at
each extremity of the end cross piece and attached to the ends of
the third cross piece, as seen in the engraving. If the bending is
difficult and there is danger of breaking the board, the application
of boiling water will render it pliable. The draw strings should
then be attached to the ends of the second cross piece, and our
toboggan is now complete.
accommodate two or three boys, and will glide over a crust of snow
with great ease and rapidity. To the trapper it is especially valuable
for all purposes of transportation. The flat bottom rests upon
the surface of the snow, and the weight being thus distributed
a load of two or three hundred pounds will often make but little
impression and can be drawn with marvellous ease. Our illustration
gives a very clear idea of the sled, and it can be made in the
following way: the first requisite is a board about eight feet
in length and sixteen or more inches in width. Such a board may
be procured at any saw mill. Oak is the best wood for the purpose,
although hickory, basswood or ash will do excellently. It should
be planed or sawed to a thickness of about a third of an inch,
and should be free from knots. If a single board of the required
width is not easily found, two boards may be used, and secured
side by side by three cleats, one at each end and the other in
the middle, using wrought nails and clinching them deeply into the
board on the under side. The single board is much to be preferred,
if it can be had. The next requisites are seven or eight wooden
cross-pieces of a length equivalent to the width of the board.
Four old broom-sticks, cut in the required lengths, will answer
Page 271
this purpose perfectly, and if these are not at hand other sticks
of similar dimensions should be used. Two side pieces are next
needed. These should be about five feet in length, and in thickness
exactly similar to the cross pieces. Next procure a few pairs of
leather shoe-strings or some strips of tough calf skin. With these
in readiness we may now commence the work of putting the parts
together. Begin by laying the cross pieces at equal distances along
the board; across these and near their ends lay the two side pieces,
as seen in the illustration. By the aid of a gimlet or awl, four
holes should now be made through the board, beneath the end of each
cross piece, and also directly under the side piece. It is well to
mark with a pencil, the various points for the holes, after which
the sticks can be removed and the work much more easily performed.
The four holes should be about an inch apart, or so disposed as to
mark the four corners of a square inch. It is also necessary to
make other holes along the length of the cross pieces, as seen
in the illustration. The line on these can also be marked with
the pencil across the board, and the holes made afterwards. These
should also be an inch apart, and only two in number at each point,
one on each side of the stick. When all the holes are made the
board should be turned over, in order to complete preparations
on the other side. The object of these various holes is for the
passage of the leather shoe-strings for the purpose of securing
the cross pieces firmly to the board. In order to prevent these
loops from wearing off on the under side, small grooves should next
be made connecting the holes beneath, thus allowing the leather
string to sink into the wood, where it is securely protected from
injury. A narrow chisel is the best tool for this purpose, the making
of the grooves being much more easily and perfectly accomplished
with this than with the jack-knife. When the under side is thus
finished the board may be turned over and the cross pieces and
sides again arranged in place as already described. Secure the
pieces to the board by the leather strings through the various
holes, always knotting on the upper surface, and taking care that
the knots are firmly tied. The ends of all the cross pieces will
require a double cross stitch through the four holes beneath, in
order to secure the side pieces as well. This is plainly shown in
the small diagram (a). The front end of each side piece
underneath should now be sharpened to a point, to allow for the
bend at the front of the toboggan. The cross piece at this end
should be secured to the under side of the board, so that as it
bends over it will appear on the upper edge, as our
Page 272
illustration shows. The board should next be bent with a graceful
curve, and thus held in position by a rope or strip of leather at
each extremity of the end cross piece and attached to the ends of
the third cross piece, as seen in the engraving. If the bending is
difficult and there is danger of breaking the board, the application
of boiling water will render it pliable. The draw strings should
then be attached to the ends of the second cross piece, and our
toboggan is now complete.
In Canada and further north, toboggans are widely used for both transportation and fun. They're commonly seen on the streets of various Canadian cities and are especially loved by young people who enjoy sliding over the snow. For this purpose, there's no other sled like it, and a toboggan of the size we'll describe can easily
carry two or three boys, gliding over a snow crust with great ease and speed. To trappers, it’s especially useful for transportation. The flat bottom sits on the snow's surface, and since the weight is evenly distributed, a load of two or three hundred pounds often leaves little imprint and can be pulled with remarkable ease. Our illustration gives a clear view of the sled, and it can be made in the following way: the first requirement is a board about eight feet long and at least sixteen inches wide. Such a board can be found at any sawmill. Oak is the best wood, but hickory, basswood, or ash will work well too. It should be planed or sawed to about a third of an inch thick and free of knots. If a single board of the required width is hard to find, two boards can be used side by side, secured with three cleats—one at each end and one in the middle—using wrought nails and clinching them deeply into the underside. A single board is much preferred if available. The next requirements are seven or eight wooden crosspieces that are the same length as the width of the board. Four old broomsticks, cut to the correct lengths, will work perfectly for this purpose, and if those aren't available, other sticks with similar dimensions can be used. Next, two side pieces are needed, each about five feet long and the same thickness as the crosspieces. Then, get a few pairs of leather shoelaces or some strips of tough calfskin. With everything ready, we can start assembling the parts. Begin by laying the crosspieces at equal distances along the board; then, near the ends, lay the two side pieces, as shown in the illustration. Using a gimlet or awl, make four holes through the board under each crosspiece and directly beneath the side pieces. It’s a good idea to mark the spots for the holes with a pencil, allowing for easier work afterward when removing the sticks. The four holes should be about an inch apart, forming the corners of a square inch. Other holes should be made along the length of the crosspieces, as illustrated. You can also mark the line for these holes with a pencil across the board and make the holes afterward. These should be spaced an inch apart, with only two holes at each point—one on each side of the stick. Once all the holes are made, flip the board over to prepare the other side. These holes are for the leather shoelaces to secure the crosspieces tightly to the board. To prevent these loops from wearing down on the underside, small grooves should be made connecting the holes underneath, allowing the leather string to sink into the wood where it’s protected from damage. A narrow chisel is the best tool for this; it’s much easier and creates better grooves than a jackknife. Once the underside is finished, the board can be flipped over, and the crosspieces and sides arranged again as described. Secure the pieces to the board with the leather strings through the holes, tying knots on the upper surface and ensuring they’re firmly knotted. The ends of all crosspieces will need a double cross stitch through the four holes below to secure the side pieces as well. This is clearly shown in the small diagram (a). The front end of each side piece underneath should be sharpened to a point to allow for the bend at the front of the toboggan. The crosspiece at this end should be secured to the underside of the board, so when it bends, it appears on the upper edge, as our
Page 272
illustration shows. Next, the board should be bent into a gentle curve, held in place by a rope or strip of leather at each end of the crosspiece attached to the ends of the third crosspiece, as seen in the engraving. If bending the board is difficult and you risk breaking it, applying boiling water can make it flexible. The drawstrings should then be attached to the ends of the second crosspiece, and your toboggan is now complete.
It may now be laden with two or three hundred pounds of merchandize and will be found to draw over the surface of the snow with perfect ease. For coasting over the crust there is nothing like it. Such a toboggan as we have described will easily accommodate three boys, the one at the stern being provided with a sharp stick for steering, and the front occupant holding firmly to the draw strings. The toboggan is easily made, and will do good service either for traffic or sport.
It can now carry two or three hundred pounds of merchandise and glides smoothly over the snow with complete ease. There’s nothing better for sliding over the snow crust than this. A toboggan like the one we described can comfortably fit three boys, with the one at the back using a sharp stick to steer, while the front person holds onto the ropes tightly. The toboggan is simple to make and is great for both transportation and fun.
CURING SKINS.
This department of the trapper's art is one of the most important and necessary, as affecting pecuniary profits. The value of a skin in the fur market depends entirely upon the care with which it is taken from the animal and afterward prepared, and without a knowledge on this subject the young trapper will in vain seek for high prices for his furs. Large quantities of valuable skins are sent to our markets annually by inexperienced amateur trappers, and in many cases rare and beautiful furs have been almost spoiled by want of care in skinning and curing. The rules are simple and easily followed, a little care being all that is necessary to insure most perfect success. In every case the skin should be removed shortly after death, or at least before it has become tainted with decay. Great pains should be taken in skinning. Avoid the adherence of flesh or fat to the skin, and guard against cutting through the hide, as a pierced skin is much injured in value. The parts about the eyes, legs and ears should be carefully removed. The various methods of skinning are described in our section on trapping, and in all cases the furs should be allowed to dry in a cool, airy place, free from the rays of the sun or the heat of a fire, and protected from rain.
This part of trapping is really important and necessary for making money. The value of a fur in the market depends entirely on how carefully it’s taken from the animal and prepared afterward. Without understanding this, new trappers will struggle to get good prices for their furs. Every year, lots of valuable skins are sent to our markets by inexperienced amateur trappers, and often, rare and beautiful furs are almost ruined because of poor skinning and curing. The rules are simple and easy to follow; a little care is all that's needed to ensure success. In every case, the skin should be removed shortly after death, or at least before it starts to decay. Great care should be taken while skinning. Avoid leaving bits of flesh or fat on the skin, and be careful not to cut through the hide, as a pierced skin loses much of its value. The areas around the eyes, legs, and ears should be carefully handled. The different skinning methods are explained in our trapping section, and in all cases, the furs should be dried in a cool, airy place, out of sunlight and away from fire heat, and protected from rain.
Astringent preparations of various kinds are used by many trappers, but they are by no means necessary. The most common dressing consists of equal parts of rock salt and alum dissolved in water. Into this a sufficient amount of coarse flour Page 273 or wheat bran is stirred to give the mixture the consistency of batter, after which it is spread thickly over the skin and allowed to dry.
Astringent mixtures of different types are used by many trappers, but they aren't absolutely necessary. The most common dressing is made by dissolving equal parts of rock salt and alum in water. Then, enough coarse flour or wheat bran is added to make the mixture thick like batter, which is then applied generously to the skin and left to dry.
It is afterwards scraped off, and in some cases a second application is made. This preparation is much used in dressing beaver, otter, mink and muskrat skins, but as many of our most successful and experienced trappers do without it, we fail to see the advantage of using it, as it is only an extra trouble. The simplest and surest way is to stretch the skin and to submit it to a gradual process of natural drying without any artificial heat or application of astringents to hasten the result.
It is then scraped off, and in some cases, a second application is done. This preparation is widely used for treating beaver, otter, mink, and muskrat skins, but since many of our most successful and experienced trappers manage without it, we don’t see the benefit of using it, as it only adds extra hassle. The easiest and most reliable way is to stretch the skin and let it dry naturally at a gradual pace without any artificial heat or astringents to speed up the process.
A very common mode of stretching skins consists in tacking them to a board, with the fur inwards, and allowing them to dry as already described.
A very common way to stretch hides is by tacking them to a board with the fur side facing in, and letting them dry as previously mentioned.
This method does very well for small skins, but for general purposes the "stretchers" are the only means by which a pelt may be properly cured and prepared.
This method works great for small hides, but for general use, the "stretchers" are the only way a pelt can be properly cured and prepared.
STRETCHERS.
The board stretcher is the simplest form and is in most common use
among trappers for the smaller animals. These stretchers are of
two kinds, the plain and the wedged. The plain stretcher consists
of a piece of board a quarter of an inch in thickness, about eighteen
inches long and six inches in width. One end of this board is rounded
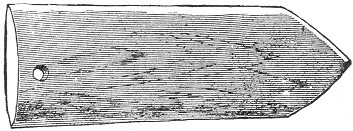 off, as seen in our illustration, and the sides should also be
whittled and smoothed to a blunt edge.
off, as seen in our illustration, and the sides should also be
whittled and smoothed to a blunt edge.
The board stretcher is the simplest type and is most commonly used by trappers for smaller animals. There are two kinds of these stretchers: the plain and the wedged. The plain stretcher is made from a piece of board that is a quarter of an inch thick, about eighteen inches long, and six inches wide. One end of this board is rounded, as shown in our illustration, and the sides should also be carved and smoothed to a blunt edge.
The board stretchers are used only for those skins which are taken off whole, that is, as described in the chapter on the otter. The skin should be drawn tightly over the blunt end of the board, and its edges either caught in notches cut in the edges of the square end or secured by a few tacks. This Page 274 stretcher is particularly adapted to the skins of muskrats, minks and animals of a like size. They are known in New England as "shingle stretchers," and are much to be recommended on account of their lightness and the ease with which they can be made and carried.
The board stretchers are used only for those skins that are taken off whole, as described in the chapter on the otter. The skin should be pulled tightly over the blunt end of the board, and its edges either secured in notches cut into the edges of the square end or held down with a few tacks. This Page 274 stretcher is designed specifically for the skins of muskrats, minks, and similarly sized animals. In New England, they are referred to as "shingle stretchers," and they are highly recommended due to their light weight and the simplicity with which they can be made and transported.
The wedge stretcher is rather more elaborate than the foregoing, and is said to be an improvement.
The wedge stretcher is a bit more complex than the previous one, and it's considered an upgrade.
The first requisite is a board of about three-eighths of an inch in
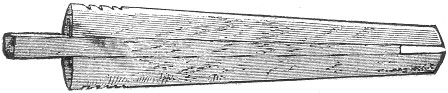 thickness, two feet or more in length, and three and a half inches
at one end tapering to the width of two inches at the other. This
end should now be rounded, and the edges of the board whittled off
to a blunt edge, as already described in the foregoing, commencing
near the centre of the board, and thinning to the edge, and finishing
with the notches at the square end. Now, by the aid of a rip-saw,
sever the board through the middle lengthwise.
thickness, two feet or more in length, and three and a half inches
at one end tapering to the width of two inches at the other. This
end should now be rounded, and the edges of the board whittled off
to a blunt edge, as already described in the foregoing, commencing
near the centre of the board, and thinning to the edge, and finishing
with the notches at the square end. Now, by the aid of a rip-saw,
sever the board through the middle lengthwise.
The first requirement is a board that's about three-eighths of an inch thick, at least two feet long, and three and a half inches wide at one end, tapering down to two inches at the other. This end should be rounded, and the edges of the board should be whittled down to a blunt edge, as previously described, starting near the center of the board and thinning out to the edge, finishing with notches at the square end. Now, using a rip-saw, cut the board in half lengthwise.
The wedge is the next thing to be constructed, and should consist of a piece of wood the thickness of the centre of the board and of the same length, tapering from an inch in width at one end to half an inch at the other.
The wedge is the next thing to be made and should be made from a piece of wood that is the same thickness as the center of the board and the same length, tapering from one inch wide at one end to half an inch at the other.
To use the stretcher the two boards are inserted into the skin, (the latter with the fur side inward). The wedge is then inserted between the large ends of the boards and driven in sufficiently to stretch the pelt to its full capacity, securing it in the notches by slight cuts in the hide, or by a tack or two at the edge. It should then he hung in a cool, airy place, and the pelt left to "season."
To use the stretcher, the two boards are placed into the skin (with the fur side facing inward). Then, the wedge is inserted between the larger ends of the boards and pushed in enough to stretch the pelt to its maximum size, securing it in the notches with small cuts in the hide or with a couple of tacks along the edge. It should then be hung in a cool, airy place, and the pelt left to "season."
The bow stretcher is another contrivance very commonly used for small skins like the foregoing. When this is used the pelt should be skinned as described on page 185, the initial cut commencing at the lower jaw and extending down between the fore legs, all the feet being previously cut off. The bow may consist of a switch of any elastic wood such as hickory iron wood, elm or birch. It should be about three or more feet in length, and as large as a man's thumb at the butt end. By bending it in the shape of the letter U it may easily be inserted in Page 275 the skin, the latter being fastened by catching the lip on each side into a sliver notch cut on each end of the bow, as our illustration indicates.
The bow stretcher is a tool commonly used for small hides like the ones mentioned above. When using this, the pelt should be skinned as described on page 185, starting with a cut at the lower jaw and extending down between the front legs, after cutting off all the feet. The bow can be made from any flexible wood like hickory, ironwood, elm, or birch. It should be about three feet or longer and as thick as a man's thumb at the thicker end. By bending it into a U shape, it can easily be inserted into Page 275 the skin, which is secured by catching the lip on each side into a notch cut at both ends of the bow, as shown in our illustration.
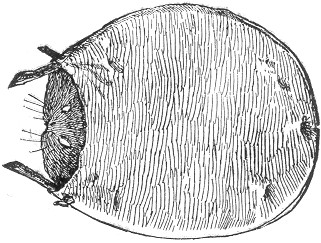
For large animals, such as the deer, bear, beaver, the hoop stretcher is generally employed.
For large animals like deer, bears, and beavers, the hoop stretcher is usually used.
THE HOOP STRETCHER.
This consists of a hoop made from one or more flexible switches tied together so as to form a circle. In order to be adapted to this mode of stretching, the skin should be flat, i. e. taken off as described on page 172, the initial cut extending from the lower jaw to the vent. The size of the hoop required depends upon the dimensions of the skin. Lay the latter upon some flat surface and so gauge the hoop as that it shall surround the pelt on all sides; after which the latter should be secured or laced to the hoop with twine at the edges. All loose parts should be drawn up, and the skin should everywhere be stretched like a drum head. When this is accomplished it is the custom with many trappers to apply the preparation described on page 273, particularly where the skin is thick and fatty. But we are rather disposed to discourage the use of any preparation whatever, in any case, as they are by no means necessary.
This consists of a hoop made from one or more flexible switches tied together to form a circle. To stretch the skin this way, it should be flat, i.e. taken off as described on page 172, with the initial cut extending from the lower jaw to the vent. The size of the required hoop depends on the dimensions of the skin. Place the skin on a flat surface and measure the hoop so that it surrounds the pelt on all sides; then secure or lace the edges of the skin to the hoop with twine. All loose parts should be pulled tight, and the skin should be stretched taut like a drum head. Once this is done, many trappers apply the preparation described on page 273, especially when the skin is thick and fatty. However, we generally advise against using any preparation at all, as they are not necessary.
In using the board stretchers the fur should always be on the inside, and when the hoop or bow is used it should be placed in such a position, that the air may circulate freely on both sides of the skin, which should not be removed until thoroughly dry.
In using the board stretchers, the fur should always be on the inside, and when the hoop or bow is used, it should be positioned so that air can circulate freely on both sides of the skin, which should not be removed until fully dry.
Page 276 TANNING SKINS.
In case some of our readers might desire to tan fur skins for their own domestic purposes, the subjoined directions will be found to be reliable, and for all ordinary requirements, sufficiently adequate.
In case some of our readers want to tan fur skins for their own personal use, the following instructions will be reliable and are adequate for all typical needs.
For tanning with the hair on, the skin should first be cleaned, every particle of loose fat or flesh, being removed, and the useless parts cut away. When this is done, it should be soaked for an hour or two in warm water. The following mixture should then be prepared: Take equal parts of borax, saltpetre, and sulphate of soda, and with them mix water sufficient to produce the consistency of thin batter.
For tanning with the hair on, the skin should first be cleaned, removing every bit of loose fat or flesh, and cutting away the useless parts. Once that's done, it should be soaked in warm water for an hour or two. Then, prepare the following mixture: Take equal parts of borax, saltpeter, and sulfate of soda, and mix them with enough water to achieve a thin batter consistency.
This preparation should be painted thickly on the flesh side of the skin, after which these sides should be doubled together and the pelt left in an airy place.
This mixture should be applied generously to the flesh side of the skin, then the sides should be folded together and the hide left in a well-ventilated area.
A second mixture should next be prepared. This should consist of two parts sal soda; three parts borax; four parts castile or other hard soap: all to be melted together over a slow fire. At the end of twenty-four hours, after the application of the first mixture, the second should be applied in a similar manner, and the fur again folded and left for the same length of time. Next, make a mixture equal parts of salt and alum, dissolved in warm water and thickened with coarse flour to the consistency of thin paste. Spread this thickly over the skin and allow it to dry, after which it should be scraped off with the bowl of a spoon. The skin should be tightly stretched during the operation, in order to prevent too great shrinkage. A single application of the last-named dressing, is generally sufficient for small skins; but a second or third treatment may be resorted to if required, to make the skin soft and pliable, after which it should be finished off with sand-paper and pumice stone. A skin may be thus dressed as soft as velvet, and the alum and salt will set the hair securely.
Next, prepare a second mixture. This should consist of two parts washing soda, three parts borax, and four parts Castile or another hard soap, all melted together over low heat. After twenty-four hours of applying the first mixture, apply the second in the same way, folding the fur and leaving it for the same duration. Then, make a mixture with equal parts salt and alum, dissolved in warm water and thickened with coarse flour to a thin paste consistency. Spread this thickly over the skin and let it dry, then scrape it off with the back of a spoon. Keep the skin tightly stretched during this process to prevent excessive shrinkage. Generally, a single application of this final dressing is enough for small skins, but a second or third treatment may be needed to make the skin soft and flexible. Finish it off with sandpaper and pumice stone. You can make the skin as soft as velvet this way, and the alum and salt will securely set the hair.
The above directions are excellent, for all general purposes, but we subjoin, in addition, a few other valuable hints and specific recipes in common use. Every trapper has his own peculiar hobby in regard to his tanning process, and the recipes are various and extensive. The above is one of the most reliable for general use. A common mode of tanning mink and muskrat skins is given in the following:—
The instructions above are great for general use, but we also want to add a few more useful tips and common recipes. Every trapper has their own unique approach to tanning, and the recipes can vary widely. The one mentioned above is among the most dependable for general purposes. A typical method for tanning mink and muskrat skins is provided in the following:—
TO TAN MINK AND MUSKRAT SKINS.
Before tanning, the skin should always be thoroughly cleansed Page 277 in warm water, and all fat and superfluous flesh removed. It should then be immersed in a solution made of the following ingredients: Five gallons of cold soft water; five quarts wheat bran; one gill of salt; and one ounce of sulphuric acid. Allow the skins to soak in the liquid for four or five hours. If the hides have been previously salted, the salt should be excluded from the mixed solution. The skins are now ready for the tanning liquor, which is made in the following way: into five gallons of warm, soft water, stir one peck of wheat bran and allow the mixture to stand in a warm room until fermentation takes place. Then add three pints of salt, and stir until it is thoroughly dissolved. A pint of sulphuric acid should then be poured in gradually, after which the liquor is ready. Immerse the skins and allow them to soak for three or four hours. The process of "fleshing" is then to be resorted to. This consists in laying the skin, fur side down, over some smooth beam, and working over the flesh side with a blunt fleshing tool. An old chopping knife, or tin candlestick, forms an excellent substitute for the ordinary fleshing knife, and the process of rubbing should be continued until the skin becomes dry, after which it will be found to be soft and pliable. The skin of the muskrat is quite tender, and the fleshing should be carefully performed.
Before tanning, the skin should always be thoroughly cleaned in warm water, and all fat and excess flesh removed. It should then be soaked in a solution made of the following ingredients: five gallons of cold soft water, five quarts of wheat bran, one gill of salt, and one ounce of sulfuric acid. Allow the skins to soak in the liquid for four or five hours. If the hides have been salted before, the salt should be excluded from the mixed solution. The skins are now ready for the tanning solution, which is made as follows: in five gallons of warm, soft water, stir in one peck of wheat bran and let the mixture sit in a warm room until it ferments. Then add three pints of salt and stir until it is completely dissolved. Gradually pour in one pint of sulfuric acid, after which the solution is ready. Immerse the skins and let them soak for three or four hours. The process of "fleshing" should then be done. This involves laying the skin, fur side down, over a smooth beam and working on the flesh side with a blunt fleshing tool. An old chopping knife or a tin candlestick makes a great substitute for a regular fleshing knife, and the rubbing should continue until the skin is dry, after which it will be soft and pliable. The skin of the muskrat is quite delicate, so the fleshing should be handled carefully.
HOW TO TAN THE SKINS OF BEAVER, OTTER, RACCOON, AND MARTEN.
These should be stretched on a board and smeared with a mixture composed of three ounces each, of salt and alum; three gills of water, and one drachm of sulphuric acid. This should be thickened with wheat bran or flour, and should be allowed to dry on the skin, after which it should be scraped off with a spoon. Next, take the skin from the board, roll it with the fur inside, and draw it quickly backward and forward, over a smooth peg, or through an iron ring. The skin should then be unfolded and rolled again the opposite way, and the operation repeated until the pelt is quite soft and flexible. This is a good way of softening all kinds of skins, and the above preparation will be found excellent for all ordinary purposes. The muskrat skin may be treated in the same manner as the above, if desired, and the process directed on the muskrat skin may also be applied to the pelts of the other animals.
These should be stretched on a board and covered with a mixture of three ounces each of salt and alum; three gills of water, and one drachm of sulfuric acid. This mixture should be thickened with wheat bran or flour and left to dry on the skin, after which it should be scraped off with a spoon. Next, remove the skin from the board, roll it with the fur side in, and pull it quickly back and forth over a smooth peg or through an iron ring. The skin should then be unfolded and rolled again the other way, repeating the process until the pelt is soft and flexible. This method works well for softening all kinds of skins, and the preparation mentioned is great for general use. You can treat muskrat skins in the same way as described above, and the same process can be used on the pelts of other animals.
To remove the fur for a simple tanned skin, the hide should be immersed in a liquid composed of—soft water, five gallons; slaked lime, four quarts; and wood ashes, four quarts. Allow Page 278 the skin to soak for a couple of days, after which the fur will readily slip off.
To remove the fur for a simple tanned skin, the hide should be soaked in a solution made of—soft water, 5 gallons; slaked lime, 4 quarts; and wood ashes, 4 quarts. Allow Page 278 the skin to soak for a few days, after which the fur will easily come off.
Another method—take equal parts wood ashes and slaked lime, and add water to the consistency of batter. Spread this over the inside of the skin, roll it up, and place it in a pail, covering it with water. Here let it remain from one to five days, or until the hair will shed easily, after which it should be finished with the fleshing knife and velveted with sand paper.
Another method—mix equal parts wood ashes and slaked lime, then add water until it has a batter-like consistency. Spread this mixture on the inside of the skin, roll it up, and put it in a bucket, covering it with water. Let it sit for one to five days, or until the hair comes off easily. After that, finish it with a fleshing knife and smooth it out with sandpaper.
OBSERVATIONS ON THE HISTORY OF FURS AND THE FUR TRADE.
In all cold climates, man has availed himself liberally of the warm covering with which nature has clothed the animals around him; but the wealth of the most favored nations has drawn to them the most beautiful furs, in whatever part of the world they are procured. Skins of animals were among the first materials used for clothing. Before Adam and Eve were driven from the Garden of Eden, they were furnished with coats of skins. The ancient Assyrians used the soft skins of animals to cover the couches or the ground in their tents, and the Israelites employed badger's skins and ram's skins, as ornamental hangings for the Tabernacle. The ancient heroes of the Greeks and Romans, are represented as being clothed in skins. Æneas, wearing for an outer garment, that of the lion, and Alcestes being formidably clad in that of the Libyan Bear. Herodotus speaks of those living near the Caspian Sea wearing seal skins, and Cæsar mentions that the skin of the reindeer formed in part the clothing of the Germans. In the early period, furs appear to have constituted the entire riches of the Northern countries, and they were almost the only exports. Taxes were paid on them, and they were the medium of exchange. So it was also in our own Western territories in the latter part of the last century, and is to the present day, to a great extent, among the Indians. In the eleventh century, furs had become fashionable throughout Europe, and the art of dyeing them, was practiced in the twelfth. In the history of the Crusades, frequent mention is made of the magnificent displays by the European Princes, of their dresses of costly furs, before the Court at Constantinople. But Richard I. of England, and Philip II. of France, in order to check the growing extravagance in their use, resolved that the choicer furs, ermine and sable amongst the number, should be omitted from their kingly wardrobes. Louis IX. followed their example in the next century, but not Page 279 until his extravagance had grown to such a pitch, that seven hundred and forty-six ermines were required for the lining of one of his surcoats. In the times, the use of the choicer furs, as those of the sable, ermine, gris, and Hungarian squirrel, was restricted to the royal families and the nobility, to whom they served as distinctive marks and badges of rank. These privileged persons applied them lavishly to their own use, and the fashion extended to the princes of other less civilized nations. Their royal use soon extended to Tartary, and the tents of the Khan were bedecked with the most rich and costly furs. In the following century, furs were commonly worn in England until their use was prohibited by Edward III., to all persons whose purse would not warrant a yearly expenditure of £100.
In all cold climates, people have made good use of the warm coverings that nature has provided through the animals around them; however, the wealth of the richest nations has attracted the most beautiful furs from anywhere in the world. Animal skins were among the first materials used for clothing. Before Adam and Eve were banished from the Garden of Eden, they were given coats made of animal skins. The ancient Assyrians covered their couches or the ground in their tents with soft animal skins, while the Israelites used badger skins and ram skins as decorative hangings for the Tabernacle. The ancient heroes of the Greeks and Romans are depicted wearing animal skins, with Æneas donning a lion's skin and Alcestes dramatically dressed in a Libyan bear's skin. Herodotus mentions that people living near the Caspian Sea wore seal skins, and Cæsar noted that reindeer skins formed part of the clothing for the Germans. In the early days, furs seemed to be the main wealth of the Northern countries and were nearly the only things exported. Taxes were paid on them, and they served as a form of currency. This was also true in our own Western territories in the latter part of the last century, and it remains largely the case among Native Americans today. By the eleventh century, furs had become fashionable all across Europe, and the art of dyeing them emerged in the twelfth century. In the history of the Crusades, there are frequent mentions of the extravagant displays of costly fur garments by European princes before the court in Constantinople. However, Richard I of England and Philip II of France sought to curb the growing extravagance of fur use by deciding to exclude the finer furs, including ermine and sable, from their royal wardrobes. Louis IX followed suit in the next century, but his indulgence had escalated to the point that seven hundred and forty-six ermines were needed for the lining of one of his surcoats. During this time, the use of finer furs, such as sable, ermine, gris, and Hungarian squirrel, was limited to royal families and nobility, serving as symbols of rank. These privileged individuals used them liberally, and the trend spread to the princes of other less developed nations. Their royal use eventually extended to Tartary, where the Khan's tents were adorned with the most luxurious and expensive furs. In the next century, furs were commonly worn in England until Edward III prohibited their use for anyone whose finances wouldn't allow for an annual spending of £100.
The early fur trade of Western Europe, was conducted through the merchants on the south coast of the Baltic, who received goods from the ports of Livonia. In the sixteenth century, a direct trade was opened between the English and Russians; and a company of the former, protected by the Czar, established trading posts on the White Sea, and a warehouse at Moscow, whence they sent trading parties to Persia and the countries on the Caspian Sea. The Czar sent rich presents of beautiful furs, to Queen Mary and Queen Elizabeth; but the latter prohibited the wearing of any but native furs, and the trade soon declined and was abandoned. In the 17th century, Siberia was conquered by the Russians, and its tribute was paid in furs. Large quantities were also furnished to China, but the choicest kinds—the precious ermine, the brilliant, fiery foxes, and the best sables, were taken to Moscow, for the use of the princes and nobles of Russia, Turkey, and Persia.
The early fur trade of Western Europe was carried out by merchants on the south coast of the Baltic, who received goods from the ports of Livonia. In the 16th century, a direct trade was established between the English and Russians; a group of English traders, backed by the Czar, set up trading posts on the White Sea and a warehouse in Moscow, from which they sent trading parties to Persia and the countries around the Caspian Sea. The Czar sent lavish gifts of beautiful furs to Queen Mary and Queen Elizabeth; however, the latter banned the wearing of anything other than local furs, leading the trade to decline and eventually fade away. In the 17th century, Siberia was conquered by the Russians, and its tribute was paid in furs. They also supplied large quantities to China, but the finest types—the precious ermine, the vibrant fiery foxes, and the best sables—were sent to Moscow for the princes and nobles of Russia, Turkey, and Persia.
In our own country, the early settlers of the Northern provinces, soon learned the value of the furs of the numerous animals which peopled the extensive rivers, lakes, and forests of these vast territories. They collected the skins in abundance, and found an increasing demand for them, with every new arrival of immigrants from the mother country. Trinkets, liquors, and other articles sought for by the native tribes, were shipped to Quebec, and from thence up the St. Lawrence to Montreal, which soon became the great trading post of the country. The various tribes of Indians were stimulated by trifling compensation, to pursue their only congenial and peaceful occupation; and the French settlers, readily assimilating to the Indian habits, became themselves expert hunters, trappers, and explorers.
In our own country, the early settlers in the Northern provinces quickly realized the importance of the furs from the many animals that populated the wide rivers, lakes, and forests of these vast areas. They gathered the skins in large quantities and found a growing demand for them with each new wave of immigrants from the homeland. Trinkets, alcohol, and other goods desired by the native tribes were sent to Quebec and then up the St. Lawrence to Montreal, which soon became the main trading hub of the country. The different tribes of Indians were motivated by small rewards to engage in their preferred and peaceful work, and the French settlers, adopting the Indian way of life, became skilled hunters, trappers, and explorers themselves.
The business prospered, and the English soon became interested and secured a share of the valuable trade. Many Page 280 wealthy and influential parties, connected with the government of Great Britain,—Prince Rupert and Lord Ashley, among the number—became deeply interested in this source of revenue; and after a successful enterprise, they obtained from Charles II., a charter of incorporation, giving to them full possession of the territory within the entrance of Hudson's Straits, not already granted to other subjects, or possessed by those of any other Christian prince or State. In this charter was included the monopoly, of all trade in these regions, and thus we see the origin of the Great Hudson's Bay Company, which is to-day, one of the largest organizations of its kind on the globe. The territory they claimed, extended from Hudson's Bay, west to the Pacific, and north to the Arctic Ocean, excepting that occupied by the French and Russians. They soon formed settlements upon the various rivers which empty into Hudson's Bay, and carried on their operations with immense vigor and success. They met with much opposition and open hostility from the French, and were subjected to vast expenses and losses, but in spite of all, they continued to prosper. Their forts or factories were extended further into the interior of British America, and their power was supreme throughout the country, and in a great measure over the Indians, whom they employed to collect their skins. In the course of time, the French Canadians organized themselves into a united band, under the name of the North West Company, and established their headquarters at Montreal. Their operations were carried on with great energy and profit, and many factories were built in the western portion of the Province. The company thus soon became a formidable competitor with the Hudson's Bay Company and for a period of two years, an actual state of war existed between them. This condition of affairs finally terminated in a consolidation of the two organizations, under the name of the Hudson's Bay Company, the privileges of which extended over all the territory formerly occupied by both.
The business thrived, and the English quickly took an interest, securing a stake in the lucrative trade. Many wealthy and influential individuals connected to the British government—including Prince Rupert and Lord Ashley—became very interested in this revenue source. After a successful venture, they received a charter of incorporation from Charles II, granting them full control over the territory within the entrance of Hudson's Straits that wasn’t already assigned to others or held by any other Christian prince or state. This charter included the monopoly on all trade in these areas, marking the beginning of the Great Hudson's Bay Company, which is now one of the largest organizations of its kind in the world. The territory they claimed stretched from Hudson's Bay westward to the Pacific and north to the Arctic Ocean, excluding areas occupied by the French and Russians. They quickly established settlements along the various rivers flowing into Hudson's Bay and operated with tremendous energy and success. They faced significant opposition and open hostility from the French, incurring substantial expenses and losses, yet they continued to thrive. Their forts or factories were pushed further into the interior of British America, and their influence was dominant throughout the region, largely over the Indigenous peoples they employed to gather furs. Over time, French Canadians united under the North West Company and set up their headquarters in Montreal. They operated with great momentum and profit, building numerous factories in the western part of the Province. The North West Company soon grew to be a serious competitor to the Hudson's Bay Company, and for two years, an actual state of war existed between them. This situation eventually concluded with the merger of the two organizations, now known as the Hudson's Bay Company, which held privileges across all the territory formerly occupied by both.
Thus, we have the history of the famous Hudson's Bay Company, from its origin to its perfect organization. It is a most stupendous concern, and its annual shipment of furs, is something amazing. Their great sales take place in the month of March, in order to be completed before Easter; and again in September, every year at London, and are attended by purchasers from nearly all parts of the world. Leipsic, the famous fur mart of Germany, is also the scene of a great annual fair, for the sale of skins.
Thus, we have the history of the renowned Hudson's Bay Company, from its beginnings to its well-developed structure. It's an enormous business, and its annual fur shipments are astonishing. Their major sales occur in March, so they wrap up before Easter, and again in September, every year in London, attracting buyers from almost every corner of the globe. Leipzig, the famous fur market in Germany, also hosts a large annual fair for selling furs.
The importance of the fur trade in this country, led to the Page 281 early settlement of the Western territories of the United States; and many a frontier city, like St. Paul, has been built up by the enterprise of the trapper. Mackinaw and Montreal owe much of their growth to the traffic of the fur trade; and many a kingly fortune—John Jacob Astor's, for instance—has been founded on peltry.
The fur trade's significance in this country led to the Page 281 early settlement of the Western territories of the United States. Many frontier cities, like St. Paul, were developed thanks to the efforts of trappers. Mackinaw and Montreal owe a lot of their growth to the fur trade, and many wealthy fortunes—like John Jacob Astor's, for example—were built on fur.
Besides the above fur sales in London a moderate portion of those annually collected in the United States are retained for use, amounting to about 150,000 mink and 750,000 muskrat skins, besides a number of other furs which are manufactured and worn.
Besides the fur sales in London, a fair amount of those collected each year in the United States is kept for use, totaling around 150,000 mink and 750,000 muskrat skins, along with several other furs that are processed and worn.
The annual yield of raw furs throughout the whole world is estimated at over twenty millions of dollars in value; and when we include the manufactured articles therefrom, the amount will swell to a hundred millions or over. This will serve to give some idea of the immensity and value of the business.
The yearly output of raw furs globally is estimated to be worth over twenty million dollars; when we factor in the manufactured goods made from them, the total can exceed a hundred million. This helps illustrate the scale and value of the industry.
American dealers divide our native furs into two classes, viz., home and shipping furs; the former being chiefly utilized in our own country, while the latter are exported to all parts of the world. New York City is the great fur mart and depot for the shipping trade in this country, and the annual value of its exports, in this one branch of trade is enormous.
American dealers categorize our local furs into two types: home and shipping furs. The home furs are mainly used in our country, while the shipping furs are sent to various parts of the world. New York City serves as the major fur market and distribution center for the shipping trade in this country, and the yearly value of its exports in this sector is massive.
The principal shipping furs are the silver, red and cross Fox, Wild Cat, Raccoon, Fisher, Muskrat and Skunk.
The main furs being shipped are silver, red, and cross fox, wildcat, raccoon, fisher, muskrat, and skunk.
Among the home furs are the Marten, Mink, Opossum, Wolf and Muskrat, the latter being extensively used both here and abroad.
Among the domestic furs are the Marten, Mink, Opossum, Wolf, and Muskrat, the latter being widely used both here and overseas.
In the following chapter will be found more detailed notes on the leading American furs, including their various uses and the different countries for which they are the especial staples.
In the next chapter, you will find more detailed notes on the main American furs, including their various uses and the different countries where they are the primary staples.
In order to give the reader some idea of the variety and magnitude of the yield of furs from our own country, we annex a table (p. 282) showing the sales of the Hudson's Bay Company, at London, in the year 1873.
In order to give the reader an idea of the variety and size of the fur yield from our country, we include a table (p. 282) showing the sales of the Hudson's Bay Company in London for the year 1873.
MARKET VALUE OF FUR SKINS.
Below will be found an authentic table of the comparative values of the various American furs at the present date of publication. The quotations are those of one of our largest fur dealers, as published in "THE HAT, CAP AND FUR TRADE REVIEW," the leading journal of the trade in America. Of course these values are constantly varying—keeping pace with the eccentricities of fashion and the demands of the fur trade; but Page 282 the table will serve at least to gauge the relative values, as between the two extremes of common and scarce furs. The fur market is a great deal like the stock market. It is constantly fluctuating, and a fur which is to-day among the novelties, may next year find itself on the low priced list. The demand for furs of any kind is nearly always governed by fashion, and of course the value is estimated on the demand. If the convention of fur dealers should decide to usher in Muskrat fur as the leading and most fashionable article in that line, the fashion would create the demand, the demand would be in turn supplied by the trappers throughout the country, and in proportion as the Muskrat skins became scarce, so their value would increase. In this way a skin which may be worth fifty cents at one time may soon acquire a value of twenty times that amount. The comparative value of skins is, therefore, constantly varying more or less; but the annexed table (page 283) will be found useful for general reference, and for approximate figures, will probably answer every purpose for some time to come.
Below is an authentic table of the comparative values of various American furs as of the publication date. The prices come from one of our largest fur dealers, as published in "THE HAT, CAP AND FUR TRADE REVIEW," the leading journal in the trade in America. These values are always changing—reflecting the whims of fashion and the demands of the fur market; but Page 282 the table will at least help gauge the relative values between common and rare furs. The fur market is a lot like the stock market. It’s constantly fluctuating, and a fur that’s in style today might be on the discount list next year. The demand for any type of fur is almost always driven by fashion, and the value is based on that demand. If fur dealers decide to promote Muskrat fur as the most fashionable item, the trend will create demand, which trappers across the country will fulfill, and as Muskrat skins become scarce, their value will rise. In this way, a skin that might be worth fifty cents today could quickly gain a value twenty times that amount. Thus, the comparative value of skins is always shifting to some degree; however, the attached table (page 283) will be useful for general reference and approximate figures, likely meeting your needs for some time.
| KINDS. | No. of Skins. March Sale. |
No. of Skins. Sept. Sale. |
Total No. | Price according to quality. |
Estimated average price per skin. |
|---|---|---|---|---|---|
| £ s. d. | |||||
| Badger | 2,700 | 2,700 | 1s. to 7s. | 1 06 | |
| Bear | 5,217 | 2,794 | 8,011 | 5s. to £8 10s. | 5 0 00 |
| Beaver | 111,993 | 37,052 | 149,045 | 4S. 3d. to 38s. 6d. | 1 00 00 |
| Fisher | 2,843 | 779 | 3,622 | 8s. to £3 5s. | 2 10 00 |
| Fox, Blue | 90 | 90 | 18s. to £4. | 2 10 00 | |
| " Cross | 1,818 | 471 | 2,289 | 5s. to £4. | 1 10 00 |
| " Kitt | 6,930 | 6,930 | 2s. 8d. to 28s. 10d. | 3 00 | |
| " Red | 6,914 | 1,383 | 8,297 | 4s. 6d. to 17s. | 10 00 |
| " Silver | 540 | 148 | 688 | £3 10s. to £21. | 10 00 00 |
| " White | 7,312 | 7,312 | 2s. to 14s. 9d. | 7 00 | |
| Lynx | 2,468 | 1,652 | 4,120 | 9s. 6d. to £1 14s. | 18 00 |
| Marten | 47,878 | 18,955 | 66,833 | 10s. to £3 19s. | 1 10 00 |
| Mink | 31,802 | 12,896 | 44,698 | 4s. to £1 8s. 6d. | 15 00 |
| Muskrat | 651,498 | 116,488 | 767,896 | 3d. to 16d. | 00 8 |
| Otter | 8,571 | 2,681 | 11,252 | 14s. to £3 18s. | 2 10 00 |
| " Sea | 98 | 98 | £4 10s. to £32. | 15 00 00 | |
| Rabbit | 10,029 | 0 | 10,029 | 3d. to 4d. | 00 3 |
| Raccoon | 3,582 | 3,582 | 1s. to 3s. 3d. | 2 6 | |
| Skunk | 1,691 | 1,691 | 2s. to 7s. | 4 00 | |
| Wolf | 6,216 | 188 | 6,404 | 6s. to £2 15s. | 15 00 |
| Wolverine | 1,770 | 320 | 2,090 | 8s. to £1 1s. | 15 00 |
Page 283 AMERICAN FUR SKINS—TABLE OF VALUES*
AMERICAN FUR SKINS—VALUE TABLE*
| Prime. | Seconds. | Thirds. | Fourths | ||
|---|---|---|---|---|---|
| Badger | $1.00 | $0.50 | $0.10 | ||
| Bear, Black | 18.00 | 9.00 | 1.00 | ||
| " Cub | 10.00 | 5.00 | 1.00 | ||
| " Brown | 7.00 | 4.00 | 1.00 | ||
| Beaver, California | per lb. | 1.25 | 75 | 50 | |
| " Southern | 1.00 | 75 | 40 | ||
| " Upper Missouri | 1.75 | 1.50 | 50 | ||
| " Lake Supr. and Canada. | 2.50 | 1.75 | 75 | ||
| Cat, Wild | 40 | 10 | |||
| " House | 15 | 10 | |||
| Deer, Florida | per lb. | 20 | |||
| " Missouri | 20 | ||||
| Elk and Moose | per lb. | 35 | 25 | ||
| Fisher, Southern | 7.00 | 5.00 | 1.00 | ||
| " Eastern and Canada | 10.00 | 8.00 | 2.00 | ||
| Fox, Silver | 100.00 | 25.00 | 1.00 | ||
| " Cross | 3.00 | 1.50 | 1.00 | ||
| " Blue | 15.00 | 5.00 | 1.00 | ||
| " White | 3.00 | 1.50 | |||
| " Red | 1.75 | 1.00 | 75 | 25 | |
| " Gray | 3.00 | 1.50 | 50 | 25 | |
| " Kitt | 50 | 25 | |||
| Lynx, Minnesota | 2.50 | 1.00 | |||
| " Canada | 4.00 | 2.00 | |||
| Marten, Dark | 10.00 | 6.00 | 2.00 | ||
| " Small Pale | 2.00 | 1.00 | 50 | ||
| Mink, Southern | 1.00 | 50 | 25 | 10 | |
| " Western | 1.25 | 1.00 | 50 | 10 | |
| " Middle States | 2.00 | 1.25 | 50 | 10 | |
| " Minnesota | 2.50 | 1.50 | 75 | 20 | |
| " New England | 3.50 | 1.75 | 1.00 | 20 | |
| " Quebec and Halifax | 4.00 | 2.00 | 1.00 | 20 | |
| Muskrat, Southern | 28 | 25 | 15 | 5 | |
| " Western | 30 | 28 | 18 | 6 | |
| " Northern | 32 | 30 | 20 | 8 | |
| " Eastern | 35 | 30 | 22 | 10 | |
| Opossum, Ohio | 30 | 20 | 10 | ||
| " Southern | 20 | 10 | |||
| Otter, Southern | 5.00 | 3.00 | 2.00 | 50 | |
| " Northern | 10.00 | 6.00 | 2.00 | 50 | |
| Rabbit | 3 | ||||
| Raccoon, Southern | 50 | 30 | 15 | 5 | |
| " Western | 1.00 | 50 | 20 | 5 | |
| " Michigan | 1.25 | 80 | 30 | 5 | |
| Seal, Hair | 60 | ||||
| " Fur | 10.00 | ||||
| Skunk, Black Cased | 1.00 | 60 | 40 | 10 | |
| " Half Stripe | 60 | 50 | 25 | 10 | |
| " White | 20 | 10 | |||
| Wolf, Timber | 3.00 | 1.50 | |||
| " Prairie | 1.00 | 75 | |||
| Wolverine | 5.00 | 2.00 | |||
| * From the "Hat Cap and Fur Trade Review." | |||||
Page 284 Notwithstanding all these advertised prices, the young trapper often experiences great difficulty in a profitable disposal of his furs. Like every other business, the fur trade runs in its regular grooves, and the average furrier will often pay an experienced professional five dollars for a skin for which he would not offer a dollar to an amateur. This certainly seems discouraging, but the knowledge of the fact is calculated to prevent greater discouragement.
Page 284 Despite all these advertised prices, the young trapper often has a hard time selling his furs at a profit. Like every other business, the fur trade follows its usual patterns, and the average furrier will readily pay an experienced professional five dollars for a skin that he wouldn’t pay a single dollar for from an amateur. This certainly seems discouraging, but understanding this fact is likely to prevent even greater discouragement.
We often see fancy prices advertised by fur dealers for first-class skins; but when the furs are sent, only a few are selected as "prime," the rest being rejected as worthless, or perhaps meeting with a meagre offer far below the regular rates. In this way the dealers have the opportunity of choice selection without incurring any risk. Many a young trapper has been thus disappointed, and has seen his small anticipated fortune dwindle down to very small proportions.
We often see high prices advertised by fur dealers for top-quality furs; but when the furs are sent, only a few are picked as "prime," while the rest are rejected as worthless or receive a very low offer compared to the usual rates. This way, dealers can choose what they want without taking any risks. Many young trappers have been disappointed this way, watching their small hopes for a fortune shrink down to almost nothing.
The fur trade is supplied through regular professional channels; and in giving our advice to the novice, we would recommend as the most satisfactory and profitable plan that he should make his sales to some local hunter or trapper, who has had experience with the fur trade, and who is satisfied to pay a fair price for the various skins with the probability of selling at an advance, and thus realizing a profit.
The fur trade is conducted through established professional channels. When advising beginners, we suggest that they sell their furs to a local hunter or trapper with experience in the fur trade, who is willing to pay a fair price for the various skins, knowing they can sell them for a profit later on.
In nearly every trapping locality such men are to be found, and although the prices earned may be below the market rates, the amateur takes none of the speculative risks of the business, and should be willing to take lower prices on this account.
In almost every trapping area, such individuals can be found, and even though the prices they earn may be lower than market rates, the amateur doesn't take on any of the business's speculative risks, and should be prepared to accept lower prices for that reason.
AMERICAN FUR SKINS—THEIR USES AT HOME AND ABROAD.
In the early history of fur apparel, its use was determined by climate; to-day, and especially in this country, it is regulated by the caprice of fashion. The mink for many years took the lead in the list of fashionable furs, but has of late been superseded by the introduction of the fur seal. The most choice and costly of our American furs at the present day is the Silver Fox. When highly dressed they are worth from 10 to 50 guineas each in the European market. They are principally bought by the Russians and Chinese.
In the early days of fur clothing, its use was determined by climate; today, especially in this country, it’s dictated by the whims of fashion. For many years, mink was the most popular among fashionable furs, but recently, it has been replaced by the fur seal. The most desirable and expensive American fur today is the Silver Fox. When well-prepared, they sell for between 10 to 50 guineas each in the European market. They are mainly purchased by Russians and Chinese buyers.
The skins of the Red Fox are purchased by the Chinese, Greeks, Persians, and other Oriental nations. They are made into linings for robes, etc., and ornamented with the black fur of the paws which is set on in spots or waves. The fur of the Page 285 Beaver was formerly highly prized in the manufacture of hats. and yielded a large portion of the profits of the Fur Companies, constituting the largest item in value among furs. Cheaper materials have since been substituted in making hats, and the demand for this purpose has been greatly reduced. By a new process the skin is now prepared as a handsome fur for collars and gauntlets, and its fine silky wool has been successfully woven. The soft, white fur from the belly of the animal, is largely used in France for bonnets.
The skins of the Red Fox are bought by the Chinese, Greeks, Persians, and other Eastern countries. They’re used as linings for robes and decorated with the black fur of the paws, applied in patches or wavy patterns. The fur of the Page 285 Beaver was once very valuable for making hats and represented a significant portion of the profits for the Fur Companies, marking it as the most valuable item among furs. Cheaper materials have since taken its place in hat making, leading to a sharp decline in demand for it. Now, through a new process, the skin is prepared as a stylish fur for collars and gloves, and its fine silky wool has been successfully woven. The soft, white fur from the animal's belly is widely used in France for bonnets.
Raccoon skins are the great staple for Russia and Germany, where, on account of their durability and cheapness, they are in demand for linings for coats, etc. Among the Bear skins, those of the black and grizzly are extensively used for military caps, housings, holsters, sleigh robes, etc.
Raccoon skins are a key product in Russia and Germany, where their durability and affordability make them popular for coat linings and similar uses. Among bear skins, black and grizzly skins are widely used for military caps, coverings, holsters, sleigh blankets, and more.
The fur of the Lynx is soft, warm and light, and is commonly dyed of a beautiful shining black. It is used for the facings and linings of cloaks, chiefly in America.
The fur of the Lynx is soft, warm, and lightweight, and is often dyed a beautiful, shiny black. It's used for the facings and linings of cloaks, mainly in America.
The Fisher yields a dark and full fur which is largely used in fashionable winter apparel.
The Fisher produces a thick and luxurious fur that's commonly used in trendy winter clothing.
The skin of the Marten, is richly dyed and utilized in choice furs and trimmings.
The fur of the marten is beautifully colored and used for high-quality fur clothing and decorations.
The Mink, like the two foregoing, belongs to the same genus as the Russian Sable, and its fur so much resembles the latter as to be sometimes mistaken for it. It is one of fashion's furs, and the hair of the tail is sometimes used in the manufacture of artist's pencils.
The Mink, like the two mentioned before, belongs to the same genus as the Russian Sable, and its fur is so similar that it can sometimes be mistaken for it. It is one of the trendy furs, and the hair from its tail is sometimes used to make artist's pencils.
The Muskrat produces the fur most worn by the masses, and is largely exported into Germany, France and England. It is estimated that over six millions of muskrat skins are annually taken in America, and of that number one-half are used in Germany alone.
The muskrat provides the fur that most people wear, and it's mostly exported to Germany, France, and England. It's estimated that over six million muskrat skins are taken in America each year, with half of that amount used in Germany alone.
The skin of the Otter is at present classed among the leading fashionable furs in this country. They are dyed of a deep purplish black color, and are made into sacques, muffs, etc. It is also used by the Russians, Greeks and Chinese. It is mostly an American product, but is also procured to some extent in the British Isles from a smaller variety of the species.
The otter's skin is currently considered one of the top trendy furs in this country. They are dyed a rich purplish-black color and transformed into coats, muffs, and more. It's also used by people in Russia, Greece, and China. While it's mainly produced in America, it is also sourced in smaller quantities from a less common variety found in the British Isles.
The skins of the Wolf are chiefly used for sleigh robes and such purposes. The fur of the Rabbit is mainly employed in the manufacture of felt, and is also utilized for lining and trimming. The business of breeding rabbits for their fur has been introduced into the United States, and large numbers have been successfully raised in Danbury, Conn., for felting purposes connected with the manufacture of hats.
The fur of the wolf is mainly used for making sleigh robes and similar items. Rabbit fur is primarily used to make felt and is also used for lining and trimming. Rabbit breeding for their fur has started in the United States, and many have been successfully raised in Danbury, Connecticut, for felting purposes related to hat production.
Page 286 The fur of the Wolverine or Glutton, finds a market for the most part in Germany, where it is used for trimmings and cloak linings.
Page 286 The fur of the Wolverine or Glutton is mostly sold in Germany, where it's used for trimming and lining cloaks.
The Skunk furnishes the fur known as Alaska Sable, which forms one of our staple pelts, many thousands being annually exported to Poland and the adjacent provinces.
The skunk provides the fur known as Alaska sable, which is one of our main types of pelts, with many thousands being exported each year to Poland and the surrounding areas.
The Badger yields a valuable and fashionable fur, which is also extensively used in the manufacture of artist's brushes; a good "badger blender" forming a valuable accessory to a painter's outfit. Shaving brushes by the thousand are annually made from the variegated hair of the badger.
The badger produces a valuable and trendy fur that's also widely used to make artist brushes; a good "badger blender" is an essential part of a painter's gear. Thousands of shaving brushes are made each year from the mixed hair of the badger.
The Opossum yields a fur in very common use among the masses, and the skins of the domestic Cat are utilized to a considerable extent in the manufacture of robes, mats, etc. The fur of the Puma and Wild Cat are also employed in this form, and may often be seen handsomely mounted and hanging on the backs of sleighs on our fashionable thoroughfares. Among the small game the skins of Squirrels are used for linings, and the soft, velvety fur of the Mole is manufactured into light robes, and very fine hats, and in theatrical paraphernalia is sometimes employed for artificial eyebrows.
The opossum provides a fur that is widely used by the general public, and domestic cat skins are also frequently used to make robes, mats, and other items. The fur of the puma and wildcat is similarly utilized, and you can often see them stylishly displayed on the backs of sleighs in our fashionable streets. Among small game, squirrel skins are used for linings, while the soft, velvety fur of the mole is turned into lightweight robes and fine hats, and it's sometimes used in theater costumes for fake eyebrows.
Full descriptions of the color of the various furs will be found in our lengthy illustrated chapter on our American animals.
Full descriptions of the colors of the different furs can be found in our detailed illustrated chapter on American animals.

A
A
Adirondack experiences with mosquitoes, 256.
Adirondack experiences with mosquitoes, __A_TAG_PLACEHOLDER_0__.
Air-tight Jar, for butter, &c., 236.
Air-tight jar for butter, etc. __A_TAG_PLACEHOLDER_0__.
Alaska Sable, 286.—See also Skunk.
Alaska Sable, __A_TAG_PLACEHOLDER_0__.—See also Skunk.
Alcohol, its use and abuse, 257.
Alcohol, its use and abuse, __A_TAG_PLACEHOLDER_0__.
Alum—used in waterproofing, 249.
Alum—used for waterproofing, __A_TAG_PLACEHOLDER_0__.
"Amateur Trapping," 225.
"Beginner Trapping," __A_TAG_PLACEHOLDER_0__.
American Lion.—See Puma.
American Lion.—See Cougar.
Ancient uses of Furs, 278.
Ancient uses of furs, __A_TAG_PLACEHOLDER_0__.
Apparatus for stretching skins, 273.
Device for stretching skins, __A_TAG_PLACEHOLDER_0__.
Arrows, poisoned, 26.
Poisoned arrows, __A_TAG_PLACEHOLDER_0__.
ART OF TRAPPING, 148.
Trapping Techniques, __A_TAG_PLACEHOLDER_0__.
B
B
Bags, Waterproof, for food, 236.
Waterproof bags for food, __A_TAG_PLACEHOLDER_0__.
Baiting the Steel Trap, 143.
Baiting the steel trap, __A_TAG_PLACEHOLDER_0__.
Baits for fishing, 240.
Fishing baits, __A_TAG_PLACEHOLDER_0__.
Baits, scent, 149.
Baits, scent, __A_TAG_PLACEHOLDER_0__.
Bait, Trapping without, 148.
Bait, without trapping, __A_TAG_PLACEHOLDER_0__.
BARK SHANTY.—
Tips on, __A_TAG_PLACEHOLDER_0__.
Construction details, __A_TAG_PLACEHOLDER_1__.
Bark-Stone.—See Castoreum.
Bark-Stone.—See Castoreum.
Bark-Stone composition.—See Castoreum.
Bark-Stone composition.—See Castoreum.
"Barque."—See Birch Bark Canoe.
"Barque."—See Birch Bark Canoe.
BARREL TRAPS, __A_TAG_PLACEHOLDER_0__, __A_TAG_PLACEHOLDER_1__, __A_TAG_PLACEHOLDER_2__.
Basswood-bark canoes, 264.
Basswood bark canoes, __A_TAG_PLACEHOLDER_0__.
Bateaux, 264.
Boats, __A_TAG_PLACEHOLDER_0__.
BAT FOWLING NET, 70.
Bat trapping net, __A_TAG_PLACEHOLDER_0__.
Baking, recipe for, 253.
Baking recipe for, __A_TAG_PLACEHOLDER_0__.
Bay Lynx.—See Wild Cat.
Bay Lynx.—See Wildcat.
Beans as food, 235.
Beans as food, __A_TAG_PLACEHOLDER_0__.
BEDS AND BEDDING, 248.
BEDS AND BEDDING, __A_TAG_PLACEHOLDER_0__.
Bed, spring, 248.
Bed, mattress, __A_TAG_PLACEHOLDER_0__.
" hammock, swinging, 249.
"hammock, swinging, __A_TAG_PLACEHOLDER_0__."
Bed clothes, 249.
Bedding, __A_TAG_PLACEHOLDER_0__.
Bird-Catching Net, 70.
Bird Net, __A_TAG_PLACEHOLDER_0__.
BIRD TRAPS, 65.
BIRD TRAPS, __A_TAG_PLACEHOLDER_0__.
BIRD WHISTLE, 72.
BIRD WHISTLE, __A_TAG_PLACEHOLDER_0__.
BISON.—See Buffalo.
BISON.—See Buffalo.
Black Fly.—See "Punkey."
Black Fly.—See "Punkey."
Wool blanket, __A_TAG_PLACEHOLDER_0__.
Rubber, __A_TAG_PLACEHOLDER_1__.
Use of, __A_TAG_PLACEHOLDER_2__.
Block-tin, used for kettles, &c., 235.
Block tin, used for kettles, etc., __A_TAG_PLACEHOLDER_0__.
Blossom, utilized as a trap, 99.
Blossom, used as bait, __A_TAG_PLACEHOLDER_0__.
BOARD FLAP, the, 130.
BOARD FLAP, the, __A_TAG_PLACEHOLDER_0__.
BOARD STRETCHERS, 273.
BOARD STRETCHERS, __A_TAG_PLACEHOLDER_0__.
Boiled Mush, 232.
Boiled mush, __A_TAG_PLACEHOLDER_0__.
" to fry, 232.
to fry, __A_TAG_PLACEHOLDER_0__.
II. SNARES OR NOOSE TRAPS, 39.
Snares or noose traps, __A_TAG_PLACEHOLDER_0__.
III. TRAPS FOR FEATHERED GAME, 65.
III. Traps for Birds, __A_TAG_PLACEHOLDER_0__.
IV. MISCELLANEOUS TRAPS, 103.
IV. OTHER TRAPS, __A_TAG_PLACEHOLDER_0__.
V. HOUSEHOLD TRAPS, 125.
V. HOUSEHOLD TRAPS, __A_TAG_PLACEHOLDER_0__.
VII. THE CAMPAIGN, 225.
VII. THE CAMPAIGN, __A_TAG_PLACEHOLDER_0__.
VIII. THE TRAPPER'S MISCELLANY, 255.
VIII. THE TRAPPER'S MISCELLANY, __A_TAG_PLACEHOLDER_0__.
Tips on boots, __A_TAG_PLACEHOLDER_0__.
Grease for, __A_TAG_PLACEHOLDER_1__.
Bottle Lantern, __A_TAG_PLACEHOLDER_0__.
" Match Safe, __A_TAG_PLACEHOLDER_1__.
BOW STRETCHER, for skins, 274.
BOW STRETCHER for skins, __A_TAG_PLACEHOLDER_0__.
BOW Traps, __A_TAG_PLACEHOLDER_0__, __A_TAG_PLACEHOLDER_1__, __A_TAG_PLACEHOLDER_2__.
Box Bird Traps, __A_TAG_PLACEHOLDER_0__, __A_TAG_PLACEHOLDER_1__, __A_TAG_PLACEHOLDER_2__, __A_TAG_PLACEHOLDER_3__.
BOX DEAD FALL, 128.
BOX DEAD FALL, __A_TAG_PLACEHOLDER_0__.
BOW OWL TRAP, 88.
Bow owl trap, __A_TAG_PLACEHOLDER_0__.
BOX PIT-FALL, 131.
BOX PITFALL, __A_TAG_PLACEHOLDER_0__.
BOX TRAP, the, 103.
BOX TRAP, the, __A_TAG_PLACEHOLDER_0__.
Two modes of setting, 105.
Two settings modes, __A_TAG_PLACEHOLDER_0__.
Box Traps, __A_TAG_PLACEHOLDER_0__, __A_TAG_PLACEHOLDER_1__, __A_TAG_PLACEHOLDER_2__, __A_TAG_PLACEHOLDER_3__, __A_TAG_PLACEHOLDER_4__, __A_TAG_PLACEHOLDER_5__, __A_TAG_PLACEHOLDER_6__, __A_TAG_PLACEHOLDER_7__, __A_TAG_PLACEHOLDER_8__.
BOX TRAP, pendent, 91.
BOX TRAP, hanging, __A_TAG_PLACEHOLDER_0__.
Brandy on a trapping campaign, 257.
Brandy on a trapping campaign, __A_TAG_PLACEHOLDER_0__.
Brass wire nooses, 41.
Brass wire loops, __A_TAG_PLACEHOLDER_0__.
Brick Trap, 66.
Brick Trap, __A_TAG_PLACEHOLDER_0__.
Broiling, recipes for, 233.
Broiling recipes, __A_TAG_PLACEHOLDER_0__.
Brook Trout, fishing through the ice, 240.
Brook Trout, ice fishing, __A_TAG_PLACEHOLDER_0__.
" To cook deliciously, 232.
To cook deliciously, __A_TAG_PLACEHOLDER_0__.
Bruises, ointment for, 255.
Bruises, ointment for, __A_TAG_PLACEHOLDER_0__.
Building the camp fire, 233.
Building the campfire, __A_TAG_PLACEHOLDER_0__.
Building boats, 259.
Building boats, __A_TAG_PLACEHOLDER_0__.
Butternut log, for canoe, 239.
Butternut log for canoe, __A_TAG_PLACEHOLDER_0__.
C
C
Cage traps for birds, 76.
Bird traps, __A_TAG_PLACEHOLDER_0__.
" " mice, 134.
mice, __A_TAG_PLACEHOLDER_0__.
Call Birds, how used, 72.
Call Birds, how to use, __A_TAG_PLACEHOLDER_0__.
CAMPAIGN LIFE IN THE WILDERNESS, 225.
Campaigning in the wild, __A_TAG_PLACEHOLDER_0__.
CAMPAIGN, PLAN OF, 225.
CAMPAIGN PLAN, __A_TAG_PLACEHOLDER_0__.
Camp Kettle, 235.
Camp Kettle, __A_TAG_PLACEHOLDER_0__.
" Knife, 235.
Knife, __A_TAG_PLACEHOLDER_0__.
Canada Grouse, 238.
Canada Grouse, __A_TAG_PLACEHOLDER_0__.
" Lynx.—See Lynx.
Lynx.—See Lynx.
" Moose.—See Moose.
Moose. — See Moose.
Candles, in camp, 227.
Candles at camp, __A_TAG_PLACEHOLDER_0__.
" Novel way of using, 218.
New way to use, __A_TAG_PLACEHOLDER_0__.
CANOES, remarks on, 226.
Canoes, comments on, __A_TAG_PLACEHOLDER_0__.
" Basswood-bark, 264.
" Basswood bark, __A_TAG_PLACEHOLDER_0__.
" Birch-bark, directions for building, 261.
Birch bark, instructions for building, __A_TAG_PLACEHOLDER_0__.
" Hemlock bark, 264.
Hemlock bark, __A_TAG_PLACEHOLDER_0__.
" Log.—See Dug-out.
Log.—Check out the dugout.
" Spruce bark, 264.
"Spruce bark, __A_TAG_PLACEHOLDER_0__."
Canton flannel bags, for bed clothes, 249.
Canton flannel bags for bedding, __A_TAG_PLACEHOLDER_0__.
Canvass-back Duck, as food, 239.
Canvass-back Duck, as food, __A_TAG_PLACEHOLDER_0__.
Canvas bags, waterproof, 236.
Waterproof canvas bags, __A_TAG_PLACEHOLDER_0__.
CAPTURE OF ANIMALS, 154.
ANIMAL CAPTURE, __A_TAG_PLACEHOLDER_0__.
CARPETING TENTS, 250.
Carpeted tents, __A_TAG_PLACEHOLDER_0__.
CASTOREUM COMPOSITION, 150.
CASTOREUM COMPOSITION, __A_TAG_PLACEHOLDER_0__.
Cat, wild.—See Wild Cat.
Wild Cat.
Caution in baiting steel traps, 113.
Be careful when setting steel traps, __A_TAG_PLACEHOLDER_0__.
Caution in handling steel traps, 149.
Caution with steel traps, __A_TAG_PLACEHOLDER_0__.
Chill, remedy for, 257.
Chill, fix for, __A_TAG_PLACEHOLDER_0__.
Chimney-fire in log shanty, 245.
Chimney fire in log cabin, __A_TAG_PLACEHOLDER_0__.
Chip as a plate, 232.
Chip as a plate, __A_TAG_PLACEHOLDER_0__.
Chip, for a frying pan, __A_TAG_PLACEHOLDER_0__, __A_TAG_PLACEHOLDER_1__.
Choosing a trapping ground, 225.
Choosing a trap site, __A_TAG_PLACEHOLDER_0__.
CLAP NET, 72.
CLAP NET, __A_TAG_PLACEHOLDER_0__.
Climate and fur apparel, 284.
Climate and fur fashion, __A_TAG_PLACEHOLDER_0__.
CLOG, THE, 146.
CLOG, THE, __A_TAG_PLACEHOLDER_0__.
Clothing, hints on, 228.
Clothing tips, __A_TAG_PLACEHOLDER_0__.
Coasting on the Indian sled, 270.
Coasting on the Indian sled, __A_TAG_PLACEHOLDER_0__.
Cock of the plains, 238.
Prairie chicken, __A_TAG_PLACEHOLDER_0__.
Coffee, 236.
Coffee, __A_TAG_PLACEHOLDER_0__.
Coffee-pot, 235.
Coffee maker, __A_TAG_PLACEHOLDER_0__.
Cold, remedy for, 257.
Cold remedy for __A_TAG_PLACEHOLDER_0__.
Combination camp-knife, 235.
Multi-tool camp knife, __A_TAG_PLACEHOLDER_0__.
COMMON BOX TRAP, 103.
COMMON BOX TRAP, __A_TAG_PLACEHOLDER_0__.
Compass, pocket, 227.
Compass, pocket, __A_TAG_PLACEHOLDER_0__.
Compound scent bait, __A_TAG_PLACEHOLDER_0__, __A_TAG_PLACEHOLDER_1__.
Concealing steel traps, 229.
Hiding steel traps, __A_TAG_PLACEHOLDER_0__.
Corrall, African trap, 34.
Corrall, African trap, __A_TAG_PLACEHOLDER_0__.
Cooking Tools for a Campaign, __A_TAG_PLACEHOLDER_0__, __A_TAG_PLACEHOLDER_1__.
Coon.—See Raccoon.
Raccoon.
COOP TRAP, 67.
COOP TRAP, __A_TAG_PLACEHOLDER_0__.
" For large game, 33.
For large game, __A_TAG_PLACEHOLDER_0__.
" Waterproof preparation for, 247.
Waterproof prep for, __A_TAG_PLACEHOLDER_0__.
"Cotton Tail."—See Rabbit.
"Cotton Tail." — See Rabbit.
Cougar.—See Puma.
Cougar — See Puma.
Crackers as food, 236.
Crackers as snacks, __A_TAG_PLACEHOLDER_0__.
Crow trap, 96.
Crow trap, __A_TAG_PLACEHOLDER_0__.
CUMMIN, used in trapping, 152.
CUMMIN, used in trapping, __A_TAG_PLACEHOLDER_0__.
Cup, portable, 231.
Portable cup, __A_TAG_PLACEHOLDER_0__.
CURING SKINS, 272.
Curing skins, __A_TAG_PLACEHOLDER_0__.
D
D
DEAD-FALLS, __A_TAG_PLACEHOLDER_0__, __A_TAG_PLACEHOLDER_1__, __A_TAG_PLACEHOLDER_2__, __A_TAG_PLACEHOLDER_3__, __A_TAG_PLACEHOLDER_4__.
" Box, 128.
Box, __A_TAG_PLACEHOLDER_0__.
" For large game, 17.
For big game, __A_TAG_PLACEHOLDER_0__.
" Stone, 29.
Stone, __A_TAG_PLACEHOLDER_0__.
" Weighted harpoon, 26.
Weighted harpoon, __A_TAG_PLACEHOLDER_0__.
" With figure four trap, 114.
"With figure four trap, __A_TAG_PLACEHOLDER_0__."
Decoys, __A_TAG_PLACEHOLDER_0__, __A_TAG_PLACEHOLDER_1__, __A_TAG_PLACEHOLDER_2__.
Decoy traps, __A_TAG_PLACEHOLDER_0__, __A_TAG_PLACEHOLDER_1__, __A_TAG_PLACEHOLDER_2__.
" Whistle, 74.
Whistle, __A_TAG_PLACEHOLDER_0__.
" Owl used as, 98.
Owl used as __A_TAG_PLACEHOLDER_0__.
Deer lick, the, 215.
Deer lick, the, __A_TAG_PLACEHOLDER_0__.
Deer meat, to dry, 237.
Dry venison, __A_TAG_PLACEHOLDER_0__.
Deer meat, to roast, 233.
Roast venison, __A_TAG_PLACEHOLDER_0__.
Delmonico outdone, 232.
Delmonico surpassed, __A_TAG_PLACEHOLDER_0__.
Detecting the direction of the wind by the finger, 217.
Detecting the direction of the wind with a finger, 217.
Devils' Lantern, 241.
Devils' Lantern, __A_TAG_PLACEHOLDER_0__.
Diet of the Trapper, 230.
Trapper's Diet, __A_TAG_PLACEHOLDER_0__.
"DOUBLE ENDER," the, 109.
"Double Ender," the, __A_TAG_PLACEHOLDER_0__.
Double traps, __A_TAG_PLACEHOLDER_0__, __A_TAG_PLACEHOLDER_1__, __A_TAG_PLACEHOLDER_2__, __A_TAG_PLACEHOLDER_3__.
DOWN FALL, the, 26.
DOWN FALL, the, __A_TAG_PLACEHOLDER_0__.
Dressing for fur, __A_TAG_PLACEHOLDER_0__, __A_TAG_PLACEHOLDER_1__.
Dressing for leather, 228.
Dressing in leather, __A_TAG_PLACEHOLDER_0__.
Dressing skins for market, 272.
Preparing skins for market, __A_TAG_PLACEHOLDER_0__.
" Home use, 276.
Home use, __A_TAG_PLACEHOLDER_0__.
Dried fish, 237.
Dried fish, __A_TAG_PLACEHOLDER_0__.
Dried venison, 237.
Dried deer meat, __A_TAG_PLACEHOLDER_0__.
Drilling, as tent material, 247.
Drilling, for tent fabric, __A_TAG_PLACEHOLDER_0__.
" Waterproof preparation for, 247.
Waterproof prep for, __A_TAG_PLACEHOLDER_0__.
Drying skins, __A_TAG_PLACEHOLDER_0__, __A_TAG_PLACEHOLDER_1__, __A_TAG_PLACEHOLDER_2__.
E
E
Eels, oil prepared from, 151.
Eel oil, __A_TAG_PLACEHOLDER_0__.
Elk.—See Moose.
Elk — See Moose.
"Ephraim."—See Bear.
"Ephraim."—See Bear.
Escaping from the mosquitoes, 255.
Escaping from the mosquitoes, __A_TAG_PLACEHOLDER_0__.
Creative frying pan, __A_TAG_PLACEHOLDER_0__.
"Toaster," __A_TAG_PLACEHOLDER_1__.
Extract of beef, Liebig's, 236.
Liebig's beef extract, __A_TAG_PLACEHOLDER_0__.
Extravagance in fur apparel, 279.
Luxury in fur clothing, __A_TAG_PLACEHOLDER_0__.
F
F
False bottom traps, __A_TAG_PLACEHOLDER_0__, __A_TAG_PLACEHOLDER_1__, __A_TAG_PLACEHOLDER_2__.
Fashion and fur, __A_TAG_PLACEHOLDER_0__, __A_TAG_PLACEHOLDER_1__, __A_TAG_PLACEHOLDER_2__.
FEATHERED GAME, TRAPS FOR, 65.
Bird hunting, traps for, __A_TAG_PLACEHOLDER_0__.
FIGURE FOUR SNARE, 61.
FIGURE FOUR SNARE, __A_TAG_PLACEHOLDER_0__.
FIGURE FOUR TRAP, 107.
Figure Four Leg Lock, __A_TAG_PLACEHOLDER_0__.
" Used with Dead-Fall, 114.
Used with Dead-Fall, __A_TAG_PLACEHOLDER_0__.
Finger, as a weather vane, 217.
Finger, like a weather vane, __A_TAG_PLACEHOLDER_0__.
Fire, to build, 227.
Fire, to cook, __A_TAG_PLACEHOLDER_0__.
" To light without matches, 234.
"To ignite without matches, __A_TAG_PLACEHOLDER_0__."
" With powder and cap, 234.
With powder and cap, __A_TAG_PLACEHOLDER_0__.
" Without "anything," 235.
"Without anything," __A_TAG_PLACEHOLDER_0__.
Fire arms, 227.
Firearms, __A_TAG_PLACEHOLDER_0__.
" Oil for, 227.
Oil for, __A_TAG_PLACEHOLDER_0__.
Fire bottle, 241.
Fire extinguisher, __A_TAG_PLACEHOLDER_0__.
Fire Hat for night hunting, 218.
Night hunting fire hat, __A_TAG_PLACEHOLDER_0__.
Fire-proof preparations for tents, 247.
Fireproof tent preparations, __A_TAG_PLACEHOLDER_0__.
Fish, for baking, __A_TAG_PLACEHOLDER_0__.
For drying, __A_TAG_PLACEHOLDER_1__.
For frying, __A_TAG_PLACEHOLDER_2__.
FISH-HOOK, trap for ducks, 95.
FISH-HOOK, duck trap, __A_TAG_PLACEHOLDER_0__.
Fishing gear, __A_TAG_PLACEHOLDER_0__, __A_TAG_PLACEHOLDER_1__, __A_TAG_PLACEHOLDER_2__.
Fish lantern, 241.
Fish lantern, __A_TAG_PLACEHOLDER_0__.
Fish, scented bait for __A_TAG_PLACEHOLDER_0__.
Spearing, __A_TAG_PLACEHOLDER_1__.
Flat-bottomed boats, __A_TAG_PLACEHOLDER_0__, __A_TAG_PLACEHOLDER_1__.
Flat bottomed sled.—See Toboggan
Flat-bottomed sled.—See Toboggan
Flower, converted into a trap, 99.
Flower, turned into a trap, __A_TAG_PLACEHOLDER_0__.
Fly, black.—See "Punkey."
Fly, black.—See "Punkey."
FLY-PAPER, to make, 136.
Fly paper, to make, __A_TAG_PLACEHOLDER_0__.
Fly Tent, the, 246.
Fly Tent, the, __A_TAG_PLACEHOLDER_0__.
Fly traps, 136.
Fly traps, __A_TAG_PLACEHOLDER_0__.
Food, portable, 230.
Food on-the-go, __A_TAG_PLACEHOLDER_0__.
FOOD AND COOKING UTENSILS, 230.
COOKING TOOLS, __A_TAG_PLACEHOLDER_0__.
"FOOLS' CAP" TRAP FOR CROWS, 96.
"Fools' Cap" Trap for Crows, __A_TAG_PLACEHOLDER_0__.
Forks, 235.
Forks, __A_TAG_PLACEHOLDER_0__.
Fortunes founded on peltry, 281.
Fortunes built on fur, __A_TAG_PLACEHOLDER_0__.
FOWLING NET, the, 70.
Fowling Net, the, __A_TAG_PLACEHOLDER_0__.
Fritters, pork, to cook, 231.
Fried pork fritters, to cook, __A_TAG_PLACEHOLDER_0__.
" An extemporized, 232.
An impromptu, __A_TAG_PLACEHOLDER_0__.
Fur Market, eccentricities of, 283.
Fur Market, quirks of, __A_TAG_PLACEHOLDER_0__.
Fur Trade Observations, __A_TAG_PLACEHOLDER_0__.
Vastness of, __A_TAG_PLACEHOLDER_1__.
G
G
Game, protected from wolves, 237.
Game, shielded from wolves, __A_TAG_PLACEHOLDER_0__.
GAROTTE TRAP, 114.
GAROTTE TRAP, __A_TAG_PLACEHOLDER_0__.
Gloves to be used in trapping, 149.
Trapping gloves, __A_TAG_PLACEHOLDER_0__.
Glutton.—See Wolverine.
Glutton. —See Wolverine.
Gnat, black.—See "Punkey."
Gnat, black.—See "Punkey."
Goose trap, 75.
Goose trap, __A_TAG_PLACEHOLDER_0__.
Grappling iron, the, 146.
Grappling hook, the, __A_TAG_PLACEHOLDER_0__.
Grease for boots and shoes, 228.
Shoe and boot grease, __A_TAG_PLACEHOLDER_0__.
"Great Bear Tamer," the, 142.
"Great Bear Tamer," the __A_TAG_PLACEHOLDER_0__.
Ground plan of trapping lines, 228.
Trap line layout, __A_TAG_PLACEHOLDER_0__.
Ground, selection for trapping, 225,
Trapping ground selection, __A_TAG_PLACEHOLDER_0__,
GROUND SNARES, 44.
Ground traps, __A_TAG_PLACEHOLDER_0__.
GUN TRAP, 20.
GUN TRAP, __A_TAG_PLACEHOLDER_0__.
H
H
Hair Nooses, 41.
Hair Ties, __A_TAG_PLACEHOLDER_0__.
Half tent, 246.
Half tent, __A_TAG_PLACEHOLDER_0__.
Hammocks, 250,
Hammocks, __A_TAG_PLACEHOLDER_0__,
Hammock bed, 249.
Hammock bed, __A_TAG_PLACEHOLDER_0__.
Hanging bed, 249.
Hanging bed, __A_TAG_PLACEHOLDER_0__.
Hare.—See Rabbit.
Hare.—See Rabbit.
HARPOON TRAP of Africa, 26.
HARPOON TRAP in Africa, __A_TAG_PLACEHOLDER_0__.
Brimmed hat, portable, __A_TAG_PLACEHOLDER_0__.
Netting attachment for, __A_TAG_PLACEHOLDER_1__.
Hat lantern for night hunting, 218.
Hat lantern for night hunting, __A_TAG_PLACEHOLDER_0__.
Hawk snare, 43.
Hawk trap, __A_TAG_PLACEHOLDER_0__.
HAWK TRAP, 93.
HAWK TRAP, __A_TAG_PLACEHOLDER_0__.
HEAD NET, 257.
HEAD NET, __A_TAG_PLACEHOLDER_0__.
HEDGE NOOSES, 41.
Hedge nooses, __A_TAG_PLACEHOLDER_0__.
Hemlock bark canoes, 264.
Hemlock bark canoes, __A_TAG_PLACEHOLDER_0__.
Hemlock boughs, as bedding, 250.
Hemlock branches for bedding, __A_TAG_PLACEHOLDER_0__.
Hemp for sealing boats, __A_TAG_PLACEHOLDER_0__, __A_TAG_PLACEHOLDER_1__.
"Hiding" steel traps, 229.
"Hiding" steel traps, __A_TAG_PLACEHOLDER_0__.
High top boots, 228.
High-top boots, __A_TAG_PLACEHOLDER_0__.
Hints on selection of trapping ground, 225.
Tips for choosing trapping areas, __A_TAG_PLACEHOLDER_0__.
Hints on skinning animals, 272.
Tips for skinning animals, __A_TAG_PLACEHOLDER_0__.
Hints on trapping, 148.
Trapping tips, __A_TAG_PLACEHOLDER_0__.
Hints on sale of furs, 283.
Tips for selling furs, __A_TAG_PLACEHOLDER_0__.
Hippopotamus trap, 26.
Hippo trap, __A_TAG_PLACEHOLDER_0__.
Historical items relating to furs and the fur trade, 278.
Historical items related to furs and the fur trade, 278.
Hoe cake, to cook, 232.
Hoe cake, to make, __A_TAG_PLACEHOLDER_0__.
Hogs carried off by bears, 170.
Bears took the pigs, __A_TAG_PLACEHOLDER_0__.
"Home Furs," 281.
"Home Furs," __A_TAG_PLACEHOLDER_0__.
HOME-MADE BOAT, 264.
Homemade boat, __A_TAG_PLACEHOLDER_0__.
Honey as bait, __A_TAG_PLACEHOLDER_0__, __A_TAG_PLACEHOLDER_1__, __A_TAG_PLACEHOLDER_2__.
Hook trap for ducks, 95.
Duck trap, __A_TAG_PLACEHOLDER_0__.
Hopo, African trap, 34.
Hopo, African trap, __A_TAG_PLACEHOLDER_0__.
Hoop nooses, 40.
Hoop nooses, __A_TAG_PLACEHOLDER_0__.
HOOP STRETCHER for skins, 275.
HOOP STRETCHER for hides, __A_TAG_PLACEHOLDER_0__.
Horse hair nooses, to make, 41.
Horsehair nooses, to create, __A_TAG_PLACEHOLDER_0__.
Hot drink for chills, 257.
Hot drink for chills, __A_TAG_PLACEHOLDER_0__.
HOUSEHOLD TRAPS, 125.
Household traps, __A_TAG_PLACEHOLDER_0__.
House Tent, 247.
House Tent, __A_TAG_PLACEHOLDER_0__.
HOW TO TRAP, 153.
HOW TO TRAP, __A_TAG_PLACEHOLDER_0__.
Humming bird, killed by concussion, 99.
Hummingbird, killed by shock, __A_TAG_PLACEHOLDER_0__.
" Snare, 99.
Snare, __A_TAG_PLACEHOLDER_0__.
" Trap, 99.
Trap, __A_TAG_PLACEHOLDER_0__.
" Various modes of capture, 99.
"Different ways to capture, __A_TAG_PLACEHOLDER_0__."
Hunting the deer, 217.
Deer hunting, __A_TAG_PLACEHOLDER_0__.
Hunting from trees, 218.
Tree hunting, __A_TAG_PLACEHOLDER_0__.
HUT, LOG.—See Log Shanty.
HUT, LOG.—See Log Cabin.
I
I
Improved springle, 60.
Improved spring, __A_TAG_PLACEHOLDER_0__.
INDIAN CANOE.—See BIRCH BARK CANOE.
INDIAN CANOE.—See BIRCH BARK CANOE.
Indian meal, as food, 231.
Indian meal, as food, __A_TAG_PLACEHOLDER_0__.
INDIAN SLEDGE.—See Toboggan.
INDIAN SLEDGE.—See Toboggan.
INDIAN SNOW SHOE, 268.
INDIAN SNOWSHOE, __A_TAG_PLACEHOLDER_0__.
Rubber blanket, __A_TAG_PLACEHOLDER_0__.
How to use, __A_TAG_PLACEHOLDER_1__.
INSECT OINTMENTS, 255.
Insect creams, __A_TAG_PLACEHOLDER_0__.
Insect bites, remedies for, 255.
Insect bite remedies, __A_TAG_PLACEHOLDER_0__.
" Sores resulting from, 257.
Sores from __A_TAG_PLACEHOLDER_0__.
Intemperance, 257.
Excess, __A_TAG_PLACEHOLDER_0__.
J
J
Jack knife, a valuable tool, 227.
Jackknife, a handy tool, __A_TAG_PLACEHOLDER_0__.
Jar, as a trap, 135.
Jar as a trap, __A_TAG_PLACEHOLDER_0__.
"Jerked Venison," 231.
"Beef Jerky," __A_TAG_PLACEHOLDER_0__.
Johnny cake, to cook, 232.
Johnny cake, to make, __A_TAG_PLACEHOLDER_0__.
K
K
Kettle, camp, 235.
Kettle, camping, __A_TAG_PLACEHOLDER_0__.
Backpack, __A_TAG_PLACEHOLDER_0__.
Instructions for making, __A_TAG_PLACEHOLDER_1__.
Knife, a necessary implement, 227.
Knife, an essential tool, __A_TAG_PLACEHOLDER_0__.
Knife, the combination camp, 235.
Knife, the combo camp, __A_TAG_PLACEHOLDER_0__.
Knives, table, 235.
Knives, table, __A_TAG_PLACEHOLDER_0__.
L
L
Lantern used by bird catchers, 71.
Lantern used by bird trappers, __A_TAG_PLACEHOLDER_0__.
Lantern trap for fish, 241.
Lantern trap for fish, __A_TAG_PLACEHOLDER_0__.
Large game, traps for, 17.
Large game traps for __A_TAG_PLACEHOLDER_0__.
Leather preservative, 228.
Leather conditioner, __A_TAG_PLACEHOLDER_0__.
"Le Chat."—See Lynx.
"Le Chat."—See Lynx.
Lemonade, 236.
Lemonade, __A_TAG_PLACEHOLDER_0__.
Liebig's extract of beef, 236.
Liebig's beef extract, __A_TAG_PLACEHOLDER_0__.
Light, the trapper's, 227.
Light, the trapper's tool, __A_TAG_PLACEHOLDER_0__.
Light home-made boat, 264.
Light DIY boat, __A_TAG_PLACEHOLDER_0__.
Liniment for wounds and bruises, 255.
Pain relief for wounds and bruises, __A_TAG_PLACEHOLDER_0__.
" Insect bites, 255.
Insect bites, __A_TAG_PLACEHOLDER_0__.
Lion, American.—See Puma.
Lion, American.—See Cougar.
Liver, as fish bait, 240.
Liver, used as fish bait, __A_TAG_PLACEHOLDER_0__.
LOG CABIN.—See Log Shanty.
LOG CABIN.—See Log Cabin.
Log Canoe.—See Dug-Out.
Log Canoe.—See Dugout.
LOG COOP TRAP, 33.
LOG COOP TRAP, __A_TAG_PLACEHOLDER_0__.
Lucifer Matches.—See Matches.
Lucifer Matches—See Matches.
"Luxuries," 234.
"Luxuries," __A_TAG_PLACEHOLDER_0__.
M
M
Mackinaw and the Fur Trade, 281.
Mackinaw and the Fur Trade, __A_TAG_PLACEHOLDER_0__.
Mallard Duck as food, 239.
Mallard Duck for food, __A_TAG_PLACEHOLDER_0__.
" to Cook.—See Duck.
to Cook.—See Duck.
MARKET VALUE OF FUR SKINS, 281.
MARKET VALUE OF FUR SKINS, __A_TAG_PLACEHOLDER_0__.
Marmot.—See Woodchuck.
Marmot.—Refer to Woodchuck.
Mastic Varnish used in water-proofing, 234.
Mastic varnish for waterproofing, __A_TAG_PLACEHOLDER_0__.
Meal, Indian, as food, 231.
Indian meal, __A_TAG_PLACEHOLDER_0__.
Meat, to dry, 237.
Drying meat, __A_TAG_PLACEHOLDER_0__.
"MEDICINES," OR SCENT BAITS, 149.
"Medicines," or scent baits, __A_TAG_PLACEHOLDER_0__.
Menagerie Whistle, 74.
Menagerie Whistle, __A_TAG_PLACEHOLDER_0__.
MISCELLANEOUS hints on trapping, 148.
MISCELLANEOUS tips on trapping, __A_TAG_PLACEHOLDER_0__.
MISCELLANY, the Trapper's, 255,
MISCELLANY, the Trapper's, __A_TAG_PLACEHOLDER_0__,
MISCELLANEOUS TRAPS, 103.
MISCELLANEOUS TRAPS, __A_TAG_PLACEHOLDER_0__.
Moose meat, to roast, 233.
Roast moose meat, __A_TAG_PLACEHOLDER_0__.
" Meat to dry, 237.
Meat to dry, __A_TAG_PLACEHOLDER_0__.
Mouse Traps, __A_TAG_PLACEHOLDER_0__, __A_TAG_PLACEHOLDER_1__, __A_TAG_PLACEHOLDER_2__, __A_TAG_PLACEHOLDER_3__, __A_TAG_PLACEHOLDER_4__.
Mud Stick or Pusher, 267.
Mud Stick or Pusher, __A_TAG_PLACEHOLDER_0__.
Mush, to boil, 232.
Mush, to boil, __A_TAG_PLACEHOLDER_0__.
to fry, 232.
to fry, __A_TAG_PLACEHOLDER_0__.
Musquaw.—See Bear.
Musquaw.—See Bear.
N
N
Natural History.
Necessity of its study in the art of Trapping,
148.
Natural History.
The importance of studying it in the art of trapping,
148.
Neatsfoot Oil for Fire Arms, 227.
Neatsfoot Oil for Guns, __A_TAG_PLACEHOLDER_0__.
NET:—
NET:—
" Bat fowling, 70.
Bat hunting, __A_TAG_PLACEHOLDER_0__.
" Bird catching, 70.
Bird catching, __A_TAG_PLACEHOLDER_0__.
" Clap, 72.
" Clap, __A_TAG_PLACEHOLDER_0__.
" Decoy, 72.
Decoy, __A_TAG_PLACEHOLDER_0__.
" Fish, use of, 241.
"Using fish, __A_TAG_PLACEHOLDER_0__."
Net for the head, 257.
Head net, __A_TAG_PLACEHOLDER_0__.
" Fowling, 70.
Fowling, __A_TAG_PLACEHOLDER_0__.
Netting attachment for Hat brim, 258.
Hat brim netting attachment, __A_TAG_PLACEHOLDER_0__.
NEWHOUSE TRAP, THE, 138.
NEWHOUSE TRAP, THE, __A_TAG_PLACEHOLDER_0__.
Night-fishing, 239.
Night fishing, __A_TAG_PLACEHOLDER_0__.
Nooses:—
Horsehair, __A_TAG_PLACEHOLDER_0__.
In hedges, __A_TAG_PLACEHOLDER_1__.
On hoops, __A_TAG_PLACEHOLDER_2__.
On string, __A_TAG_PLACEHOLDER_3__.
NOOSE TRAPS, 39.
Noose traps, __A_TAG_PLACEHOLDER_0__.
Nooses, wire, 41.
Nooses, wire, __A_TAG_PLACEHOLDER_0__.
Northwest Fur Company, 280.
Northwest Fur Co., __A_TAG_PLACEHOLDER_0__.
Nutting in Mid-winter, 212.
Nutting in winter, __A_TAG_PLACEHOLDER_0__.
O
O
Oar-locks, simple, 266.
Oar locks, simple, __A_TAG_PLACEHOLDER_0__.
Oat-meal as food, 236.
Oatmeal as food, __A_TAG_PLACEHOLDER_0__.
OBSERVATIONS ON THE HISTORY OF FURS AND THE FUR TRADE, 278.
OBSERVATIONS ON THE HISTORY OF FURS AND THE FUR TRADE, 278.
Oil, Fish.—
Used in trapping, __A_TAG_PLACEHOLDER_0__.
How to obtain, __A_TAG_PLACEHOLDER_1__.
Oil of Amber.—
Used in the art of trapping, 152.
Amber Oil.—
Used in trapping, __A_TAG_PLACEHOLDER_0__.
Oil of Ambergris.—
Used in the art of trapping, 152.
Ambergris Oil.—
Used in trapping, __A_TAG_PLACEHOLDER_0__.
Oil of Fenugreek:—
Its use In the art of trapping, 152.
Oil of Fenugreek:—
Its use in the art of trapping, 152.
Oil of Lavender:—
Its use in the art of trapping, 152.
Oil of Lavender:—
Its use in the craft of trapping, 152.
Oil:—
For guns, __A_TAG_PLACEHOLDER_0__.
For lighting, __A_TAG_PLACEHOLDER_1__.
Oil of Partridge:—
Its use, 227.
Oil of Partridge:—
Its use, __A_TAG_PLACEHOLDER_0__.
Oil of Pennyroyal:—
For insect bite, 255.
Pennyroyal Oil:—
For insect bites, __A_TAG_PLACEHOLDER_0__.
Ointment for Bruises and Wounds, __A_TAG_PLACEHOLDER_0__.
OINTMENT FOR INSECT BITES, 255.
Insect bite ointment, __A_TAG_PLACEHOLDER_0__.
OLD-FASHIONED SPRINGLE, 58.
OLD-FASHIONED SPRINGLE, __A_TAG_PLACEHOLDER_0__.
Olive Oil in cooking, 236.
Olive oil for cooking, __A_TAG_PLACEHOLDER_0__.
OWL TRAP, 88.
OWL TRAP, __A_TAG_PLACEHOLDER_0__.
P
P
Paint as a water-proof covering, 236.
Waterproof coating paint, __A_TAG_PLACEHOLDER_0__.
Painter, the.—See Puma.
Painter.—See Puma.
Panther, the.—See Puma.
Panther, the.—See Puma.
Furs:—
Fortunes built on, __A_TAG_PLACEHOLDER_0__.
Cities established on, __A_TAG_PLACEHOLDER_1__.
PENDENT BOX, BIRD TRAP, 91.
Pigeon box, bird trap, __A_TAG_PLACEHOLDER_0__.
Pennyroyal for insect bites, 255.
Pennyroyal for insect bites, __A_TAG_PLACEHOLDER_0__.
Pepper Tea as a remedy, 257.
Pepper tea as a remedy, __A_TAG_PLACEHOLDER_0__.
Peshoo, the.—See Lynx.
Peshoo, the.—See Lynx.
Phosphorus lantern for catching fish, 241.
Phosphorus lantern for fishing, __A_TAG_PLACEHOLDER_0__.
Pickerel fishing, 240.
Pickerel fishing, __A_TAG_PLACEHOLDER_0__.
" Spearing, 241.
Spearing, __A_TAG_PLACEHOLDER_0__.
" Trap for, 121.
Trap for, __A_TAG_PLACEHOLDER_0__.
" To cook, 233.
To cook, __A_TAG_PLACEHOLDER_0__.
Pigeon Net-trap, 72.
Pigeon net trap, __A_TAG_PLACEHOLDER_0__.
Pigs carried off by Bears, 170.
Bears took away the pigs, __A_TAG_PLACEHOLDER_0__.
Pine Log Canoe.—See Dug-out.
Pine Log Canoe.—See Dugout.
Pinnated Grouse, 238.
Pinnated Grouse, __A_TAG_PLACEHOLDER_0__.
Pitch for stopping leaks, __A_TAG_PLACEHOLDER_0__, __A_TAG_PLACEHOLDER_1__, __A_TAG_PLACEHOLDER_2__.
PLAN OF TRAPPING CAMPAIGN, 225.
TRAPPING CAMPAIGN PLAN, __A_TAG_PLACEHOLDER_0__.
Plates, substitutes for, __A_TAG_PLACEHOLDER_0__, __A_TAG_PLACEHOLDER_1__.
Platform snare. 61.
Platform trap. __A_TAG_PLACEHOLDER_0__.
Poachers, or trap robbers, 229.
Poachers, or trap thieves, __A_TAG_PLACEHOLDER_0__.
POACHER'S SNARE, 48.
Poacher's snare, __A_TAG_PLACEHOLDER_0__.
Pocket compass, 227.
Pocket compass, __A_TAG_PLACEHOLDER_0__.
POCKET HAT BRIM, 258.
Pocket hat brim, __A_TAG_PLACEHOLDER_0__.
" Sun-glass, 234.
Sunglasses, __A_TAG_PLACEHOLDER_0__.
Poisoned arrows, 26.
Poison arrows, __A_TAG_PLACEHOLDER_0__.
POISONING, 222.
POISONING, __A_TAG_PLACEHOLDER_0__.
Pop-corn as bait for Quail, 54.
Popcorn as quail bait, __A_TAG_PLACEHOLDER_0__.
Portable boats, 259.
Portable boats, __A_TAG_PLACEHOLDER_0__.
Portable food & cooking gear, __A_TAG_PLACEHOLDER_0__, __A_TAG_PLACEHOLDER_1__.
Pork as food, 231.
Pork for food, __A_TAG_PLACEHOLDER_0__.
" Fritters, 251.
Fritters, __A_TAG_PLACEHOLDER_0__.
" " To make, 232.
" To create, __A_TAG_PLACEHOLDER_0__.
"Possum."—See Opossum.
"Possum."—See Opossum.
Potatoes as food, 235.
Potatoes for food, __A_TAG_PLACEHOLDER_0__.
Pouched Rat.—See Gopher.
Pouched Rat.—See Gopher.
Prairie Hen, 238.
Prairie Hen, __A_TAG_PLACEHOLDER_0__.
Prairie Whistle, 74.
Prairie Whistle, __A_TAG_PLACEHOLDER_0__.
Precautions in handling steel traps, 156.
Steel trap handling precautions, __A_TAG_PLACEHOLDER_0__.
PREFACE, 3.
PREFACE, __A_TAG_PLACEHOLDER_0__.
Preparation of skins for market, 272.
Preparing skins for market, __A_TAG_PLACEHOLDER_0__.
Price Current of American Furs, 284.
Current Price of American Furs, __A_TAG_PLACEHOLDER_0__.
Prime fur, best season for, 147.
Prime fur, best season for, __A_TAG_PLACEHOLDER_0__.
Profit in selling furs, 233.
Profit in selling furs, __A_TAG_PLACEHOLDER_0__.
Provisions, to protect from Wolves, 237.
Measures to protect against wolves, __A_TAG_PLACEHOLDER_0__.
"Pusher."—See Mud stick.
"Pusher." — See Mud stick.
Putty, for stopping leaks, 261.
Putty for sealing leaks, __A_TAG_PLACEHOLDER_0__.
Q
Q
Snares, __A_TAG_PLACEHOLDER_0__,
__A_TAG_PLACEHOLDER_1__, __A_TAG_PLACEHOLDER_2__, etc.
To cook well, __A_TAG_PLACEHOLDER_3__.
Quotations of the Fur Market, 284.
Fur Market Quotes, __A_TAG_PLACEHOLDER_0__.
R
R
Rat:—
Snares for, __A_TAG_PLACEHOLDER_0__.
Trapping the, __A_TAG_PLACEHOLDER_1__.
Traps for, __A_TAG_PLACEHOLDER_2__,
__A_TAG_PLACEHOLDER_3__, __A_TAG_PLACEHOLDER_4__,
__A_TAG_PLACEHOLDER_5__, __A_TAG_PLACEHOLDER_6__,
__A_TAG_PLACEHOLDER_7__.
Rations for a Campaign, 230.
Supplies for a Campaign, __A_TAG_PLACEHOLDER_0__.
Raw Furs.—See Furs.
Raw Furs — See Furs.
Red Fox.—See Fox.
Red Fox — See Fox.
Red Squirrel.—See Squirrel.
Red Squirrel — See Squirrel.
Insect bite remedies, __A_TAG_PLACEHOLDER_0__.
For chills, __A_TAG_PLACEHOLDER_1__.
" For snaring, 39.
For trapping, __A_TAG_PLACEHOLDER_0__.
" For a trapping campaign, 227.
For a trapping campaign, __A_TAG_PLACEHOLDER_0__.
Revolver, 227.
Revolver, __A_TAG_PLACEHOLDER_0__.
Reynard caught in a trap, __A_TAG_PLACEHOLDER_0__, __A_TAG_PLACEHOLDER_1__.
Rice as food, 236.
Rice for meals, __A_TAG_PLACEHOLDER_0__.
Rifle and shotgun combo, __A_TAG_PLACEHOLDER_0__.
Oil for, __A_TAG_PLACEHOLDER_1__.
RIFLE TRAP, 20.
Rifle trap, __A_TAG_PLACEHOLDER_0__.
Roasting, recipes for, 233.
Roasting recipes, __A_TAG_PLACEHOLDER_0__.
Rocky Mountain Sheep.—See Big Horn.
Rocky Mountain Sheep — See Bighorn.
"Roughing it," 230.
"Living the simple life," __A_TAG_PLACEHOLDER_0__.
Rubber blanket, __A_TAG_PLACEHOLDER_0__.
How to use, __A_TAG_PLACEHOLDER_1__.
Ruffed Grouse.—See Partridge.
Ruffed Grouse—See Partridge.
Rum on a trapping campaign, 257.
Rum on a trapping campaign, __A_TAG_PLACEHOLDER_0__.
S
S
Sage Cock, the, 238.
Sage Cock, the, __A_TAG_PLACEHOLDER_0__.
Salmon, spearing, 239.
Salmon, spear fishing, __A_TAG_PLACEHOLDER_0__.
" Spear, 239.
Spear, __A_TAG_PLACEHOLDER_0__.
Salmon Trout, spearing, 239.
Salmon trout, spear fishing, __A_TAG_PLACEHOLDER_0__.
Salmon, to cook deliciously, 232.
Deliciously cook salmon, __A_TAG_PLACEHOLDER_0__.
Salt Lick, the, 218.
Salt Lick, the, __A_TAG_PLACEHOLDER_0__.
Sandpaper used in softening skins, 276.
Sandpaper for smoothing skin, __A_TAG_PLACEHOLDER_0__.
Salt Pork as food, 231.
Salt Pork as food, __A_TAG_PLACEHOLDER_0__.
SCENT BAITS, 149.
SCENT BAITS, __A_TAG_PLACEHOLDER_0__.
Scented baits for birds, 240.
Scented bird baits, __A_TAG_PLACEHOLDER_0__.
Scented baits for fish, 240.
Scented fish baits, __A_TAG_PLACEHOLDER_0__.
Season for Deer hunting, 218.
Deer hunting season, __A_TAG_PLACEHOLDER_0__.
Scow, 267.
Scowl, __A_TAG_PLACEHOLDER_0__.
Season for trapping, 147.
Trapping season, __A_TAG_PLACEHOLDER_0__.
Selection of trapping ground, 225.
Trapping ground selection, __A_TAG_PLACEHOLDER_0__.
Self-amputation as a means of escape with captured animals, 144.
Self-amputation as a way to escape when animals are captured, 144.
Self-amputation to prevent, __A_TAG_PLACEHOLDER_0__, __A_TAG_PLACEHOLDER_1__.
Self-raising flour, 235.
Self-rising flour, __A_TAG_PLACEHOLDER_0__.
SELF-SETTING TRAPS, __A_TAG_PLACEHOLDER_0__, __A_TAG_PLACEHOLDER_1__, __A_TAG_PLACEHOLDER_2__, __A_TAG_PLACEHOLDER_3__.
SHANTY:—
Bark.—See Bark Shanty.
"Home."—See Log Shanty.
Log.—See Log Shanty.
SHANTY:—
Bark.—See Bark Shanty.
"Home."—See Log Shanty.
Log.—See Log Shanty.
Shellac Varnish used in water-proofing, 234.
Shellac varnish for waterproofing, __A_TAG_PLACEHOLDER_0__.
SHELTER:—The trapper's remarks on, 226.
SHELTER:—The trapper's comments on, __A_TAG_PLACEHOLDER_0__.
Tent shelter, __A_TAG_PLACEHOLDER_0__.
Building details, __A_TAG_PLACEHOLDER_1__.
Shingle stretchers for skins, 274.
Shingle stretchers for skins, __A_TAG_PLACEHOLDER_0__.
SHOOTING AND POISONING, 222.
Shooting and poisoning, __A_TAG_PLACEHOLDER_0__.
Shot-gun Trap, 20.
Shotgun Trap, __A_TAG_PLACEHOLDER_0__.
Shot-gun combined with rifle, 267.
Shotgun and rifle combo, __A_TAG_PLACEHOLDER_0__.
SIEVE TRAP, 65.
Sieve trap, __A_TAG_PLACEHOLDER_0__.
Silver Fox, __A_TAG_PLACEHOLDER_0__.
Value of fur, __A_TAG_PLACEHOLDER_1__,
__A_TAG_PLACEHOLDER_2__.
Skinning animals, hints on, 272.
Animal skinning tips, __A_TAG_PLACEHOLDER_0__.
Sled, Indian.—See Toboggan.
Sled, Native American.—See Toboggan.
SLIDING POLE, 145.
POLE DANCING, __A_TAG_PLACEHOLDER_0__.
Slippery Elm used for bird-lime, 98.
Slippery Elm used for bird-lime, __A_TAG_PLACEHOLDER_0__.
"Small Game" as food, 237.
"Small Game" as food, __A_TAG_PLACEHOLDER_0__.
Smoking the steel trap, 128.
Smoking the steel trap, __A_TAG_PLACEHOLDER_0__.
SNARE.—
Box, 55.
Double box, 56.
Fig. Four, 62.
Hawk, 43.
Hedge, 42.
Hoop, 40.
Humming-bird, 99.
Knotted string, 52, 53,
54.
Pasteboard box, 56.
Platform, 61.
Poacher's, 48.
Portable, 48, 50,
52.
Quail, 53.
Rat, 43.
"Simplest," 52.
Springle, 58, 60.
Stovepipe, 120.
Tree, 42.
Triangle, 42.
Twitchup, 43.
Wood Chuck, 43.
SNARES, OR NOOSE TRAPS, 37.
SNARES, OR NOOSE TRAPS, __A_TAG_PLACEHOLDER_0__.
Snaring, requisites for, 39.
Snaring requirements for __A_TAG_PLACEHOLDER_0__.
Snow Grouse, the, 238.
Snow Grouse, the __A_TAG_PLACEHOLDER_0__.
SNOW-SHOES, 267.
Snowshoes, __A_TAG_PLACEHOLDER_0__.
Snow-shoe race, 267.
Snowshoe race, __A_TAG_PLACEHOLDER_0__.
Sores resulting from insect bites, 257.
Insect bite sores, __A_TAG_PLACEHOLDER_0__.
Soups, recipes for, 236.
Soup recipes, __A_TAG_PLACEHOLDER_0__.
Spearing Muskrats, 183.
Muskrat hunting, __A_TAG_PLACEHOLDER_0__.
Spider for cooking, 233.
Cooking spider, __A_TAG_PLACEHOLDER_0__.
Spoons, 235.
Spoons, __A_TAG_PLACEHOLDER_0__.
Spring-bed, 249.
Spring mattress, __A_TAG_PLACEHOLDER_0__.
Spring-net Traps, 80.
Spring-net Traps, __A_TAG_PLACEHOLDER_0__.
Spring-pole, the, 144.
Spring-pole, the, __A_TAG_PLACEHOLDER_0__.
Spring, to temper, 84.
Spring, to balance, __A_TAG_PLACEHOLDER_0__.
Spruce Bark Canoes, 264.
Spruce Bark Kayaks, __A_TAG_PLACEHOLDER_0__.
Spruce boughs as bedding, 250.
Spruce branches for bedding, __A_TAG_PLACEHOLDER_0__.
Spruce Grouse, 238.
Spruce Grouse, __A_TAG_PLACEHOLDER_0__.
Still hunting, 217.
Still searching, __A_TAG_PLACEHOLDER_0__.
Stimulants, 257.
Stimulants, __A_TAG_PLACEHOLDER_0__.
Stone Dead-fall, 29.
Stone Deadfall, __A_TAG_PLACEHOLDER_0__.
Storing traps in the woods, 229.
Storing traps in the woods, __A_TAG_PLACEHOLDER_0__.
Stovepipe fish-trap, 120.
Stovepipe fish trap, __A_TAG_PLACEHOLDER_0__.
STRETCHERS FOR SKINS, 273.
SKIN STRETCHERS, __A_TAG_PLACEHOLDER_0__.
Strychnine poisoning, 222.
Strychnine poisoning, __A_TAG_PLACEHOLDER_0__.
Sucker wire nooses, 41.
Sucker wire loops, __A_TAG_PLACEHOLDER_0__.
SWEET FENNEL.—
Oil used in trapping, 152,
SWEET FENNEL.—
Oil for trapping, __A_TAG_PLACEHOLDER_0__,
Swinging bed, 249.
Hanging bed, __A_TAG_PLACEHOLDER_0__.
Page 299 T
T
Table knife and bowl trap, 135.
Table knife and bowl trap, __A_TAG_PLACEHOLDER_0__.
Table showing sale of furs by Hudson Bay Company, 282.
Table showing sale of furs by Hudson Bay Company, 282.
Tallow, mutton, as ointment, 255.
Tallow, mutton, as lotion, __A_TAG_PLACEHOLDER_0__.
Tame Geese as decoys, 75.
Tame geese as decoys, __A_TAG_PLACEHOLDER_0__.
Tar for water-proofing, 264.
Tar for waterproofing, __A_TAG_PLACEHOLDER_0__.
Tea, 236.
Tea, __A_TAG_PLACEHOLDER_0__.
" Red pepper, as a remedy, 257.
Red pepper, as a remedy, __A_TAG_PLACEHOLDER_0__.
"Telescope" Drinking Cup, 231.
"Telescope" Mug, __A_TAG_PLACEHOLDER_0__.
Tempering iron spring, 84.
Tempering iron spring, __A_TAG_PLACEHOLDER_0__.
TENT CARPETING, 250.
TENT FLOORING, __A_TAG_PLACEHOLDER_0__.
Tiger captured with bird lime, 35.
Tiger caught with bird lime, __A_TAG_PLACEHOLDER_0__.
Tiger trap, 31.
Tiger trap, __A_TAG_PLACEHOLDER_0__.
Tinder, 234.
Tinder, __A_TAG_PLACEHOLDER_0__.
Tip-ups, 240.
Tip-ups, __A_TAG_PLACEHOLDER_0__.
Toaster, an extemporized, 233.
Toaster, a makeshift, __A_TAG_PLACEHOLDER_0__.
TOBOGGAN, OR INDIAN SLEDGE, 269.
Toboggan, or Indian sledge, __A_TAG_PLACEHOLDER_0__.
Tools required for canoe building, 259.
Canoe building tools needed, __A_TAG_PLACEHOLDER_0__.
TRAP.—
Arrow, 23, 25.
Barrel. 125, 127.
Bird, 65, 70,
73, 75,
88, 90,
91, 96.
Bow, 23, 25,
116.
Bowl, 135.
Box, 55, 56,
88, 90,
91, 103,
106, 109,
110.
Brick, 66.
Cage, 76, 134.
Cob house, 67.
Coon, 110, 116,
141.
Coop, 33, 67,
70.
Crow, 96.
Dead-fall, 17, 107,
111.
Decoy, 72, 76,
94.
Double ender, 109.
Down-fall, 26.
Duck, 94, 95.
Fish, 120.
Fish hook, 95.
Fly, 136.
Fool's-cap, 96.
Garotte, 114.
Gun, 20.
Harpoon, 26.
Hawk, 42, 93.
Hook, 95.
Jar, 135.
Mole, 119, 120.
Mouse, 130, 131,
134, 135.
Net, 70, 73,
75, 80,
83, 85.
Owl, 88.
Partridge, 43, etc.
Pendent Box, 91.
Pitfall, 11, 125,
127, 131.
Ptarmigan, 75.
Quail, 39, 40,
41, 53.
Rabbit, 43, 64,
103.
Rat, 43, 125,
127, 128,
131, 138.
Rifle, 20.
Self-setting, 110, 125,
127, 131.
Sieve, 65.
Spring net, 80, 83,
85.
Steel, 140.
The "Newhouse," 140.
Tree, 42, 91.
Upright net, 85.
Wild Duck, 94, 95.
Wild Goose, 75.
Woodchuck, 43.
Trapper's beds and bedding, 248.
Trapper's beds and bedding, __A_TAG_PLACEHOLDER_0__.
" Cooking utensils, 230.
Cooking tools, __A_TAG_PLACEHOLDER_0__.
" Diet, 230.
Diet, __A_TAG_PLACEHOLDER_0__.
TRAPPER'S MISCELLANY, 255.
TRAPPER'S MISCELLANY, __A_TAG_PLACEHOLDER_0__.
" Sled.—See Toboggan.
Sled—See Toboggan.
Trapping Lines, 226.
Trapping Lines, __A_TAG_PLACEHOLDER_0__.
Trap robbers, 220.
Trap thieves, __A_TAG_PLACEHOLDER_0__.
Tree hunting, 218.
Tree hunting, __A_TAG_PLACEHOLDER_0__.
Tree snare, 42.
Tree trap, __A_TAG_PLACEHOLDER_0__.
TRIANGLE SNARE, 42.
TRIANGLE SNARE, __A_TAG_PLACEHOLDER_0__.
Trout, to cook deliciously, 232.
Trout, for a tasty cook, __A_TAG_PLACEHOLDER_0__.
Tumbler fly-trap, 136.
Tumbler fly trap, __A_TAG_PLACEHOLDER_0__.
Twitch-up, __A_TAG_PLACEHOLDER_0__, __A_TAG_PLACEHOLDER_1__.
Poacher's, __A_TAG_PLACEHOLDER_2__.
Portable, __A_TAG_PLACEHOLDER_3__.
"Easiest," __A_TAG_PLACEHOLDER_4__.
U
U
UPRIGHT NET TRAP, 85.
UPRIGHT NET TRAP, __A_TAG_PLACEHOLDER_0__.
Use and abuse of Alcohol, 257.
Use and misuse of alcohol, __A_TAG_PLACEHOLDER_0__.
Uses of fur skins, 285.
Uses of fur, __A_TAG_PLACEHOLDER_0__.
V
V
Various uses of fur skins, 285.
Fur skin applications, __A_TAG_PLACEHOLDER_0__.
Varnish water-proof preparation for preserving matches, 234.
Varnish waterproof solution for keeping matches safe, 234.
" Canned, 236.
Canned, __A_TAG_PLACEHOLDER_0__.
Venison as food, __A_TAG_PLACEHOLDER_0__,
__A_TAG_PLACEHOLDER_1__.
To roast, __A_TAG_PLACEHOLDER_2__.
To preserve, __A_TAG_PLACEHOLDER_3__.
"Jerked," __A_TAG_PLACEHOLDER_4__.
Dried, __A_TAG_PLACEHOLDER_5__.
W
W
Walking on the snow, 267.
Walking on the snow, __A_TAG_PLACEHOLDER_0__.
War in the fur trade, 281.
Conflict in the fur trade, __A_TAG_PLACEHOLDER_0__.
Watch crystal as sun glass, 287.
Watch crystal as sun glass, __A_TAG_PLACEHOLDER_0__.
Water fowl as food, 239.
Waterfowl for food, __A_TAG_PLACEHOLDER_0__.
Waterproof app for boats, __A_TAG_PLACEHOLDER_0__, __A_TAG_PLACEHOLDER_1__, __A_TAG_PLACEHOLDER_2__.
" Canvas bags, for food, 236.
"Reusable canvas food bags, __A_TAG_PLACEHOLDER_0__."
Match safe, 234.
Matchbox, __A_TAG_PLACEHOLDER_0__.
Preparation, __A_TAG_PLACEHOLDER_0__, __A_TAG_PLACEHOLDER_1__, __A_TAG_PLACEHOLDER_2__.
" Varnish for matches, 234.
Varnish for matches, __A_TAG_PLACEHOLDER_0__.
Wedge stretcher for skins, 274.
Wedge stretcher for hides, __A_TAG_PLACEHOLDER_0__.
Weighted harpoon trap, 26.
Weighted harpoon trap, __A_TAG_PLACEHOLDER_0__.
Wheat flour as food, 235.
Wheat flour for food, __A_TAG_PLACEHOLDER_0__.
" Self-raising, 235.
Self-rising, __A_TAG_PLACEHOLDER_0__.
Wheel form of trapping lines, 229.
Wheel trap lines, __A_TAG_PLACEHOLDER_0__.
Whiskey on a trapping campaign, 257.
Whiskey on a trapping trip, __A_TAG_PLACEHOLDER_0__.
Whistlebird, 74.
Whistlebird, __A_TAG_PLACEHOLDER_0__.
White Birch Canoe, 261.
White Birch Canoe, __A_TAG_PLACEHOLDER_0__.
White-wood log for Dug-out, 259.
Whitewood log for dugout, __A_TAG_PLACEHOLDER_0__.
Wild Duck, to cook, 233.
Wild Duck, for cooking, __A_TAG_PLACEHOLDER_0__.
Wild Goose as food, 239.
Wild Goose as food, __A_TAG_PLACEHOLDER_0__.
Wild Goose to cook, 233.
Cook a wild goose, __A_TAG_PLACEHOLDER_0__.
Wild Goose trap, 75.
Wild Goose trap, __A_TAG_PLACEHOLDER_0__.
Wind, direction of, to detect by the finger, 217.
Wind, the direction of, can be sensed by touch, 217.
Winged vermin, 255.
Winged pests, __A_TAG_PLACEHOLDER_0__.
Winter fishing, 240.
Winter fishing, __A_TAG_PLACEHOLDER_0__.
Wire cage trap for birds, 76.
Bird cage trap, __A_TAG_PLACEHOLDER_0__.
" " For mice, 134.
For mice, __A_TAG_PLACEHOLDER_0__.
Wire nooses, 41.
Wire nooses, __A_TAG_PLACEHOLDER_0__.
Woodcock, to cook, 233.
Woodcock, for cooking, __A_TAG_PLACEHOLDER_0__.
Woodland beds and bedding, 249.
Woodland beds and bedding, __A_TAG_PLACEHOLDER_0__.
Wounds, ointment for, 255.
Ointment for wounds, __A_TAG_PLACEHOLDER_0__.
Download ePUB
If you like this ebook, consider a donation!