This is a modern-English version of Embroidery and Tapestry Weaving, originally written by Christie, Grace.
It has been thoroughly updated, including changes to sentence structure, words, spelling,
and grammar—to ensure clarity for contemporary readers, while preserving the original spirit and nuance. If
you click on a paragraph, you will see the original text that we modified, and you can toggle between the two versions.
Scroll to the bottom of this page and you will find a free ePUB download link for this book.
Hills, valleys, plains, pastures, skies, seas, rivers, trees,
There's nothing close by or far away,
"But with the needle, it can be shaped and crafted."
—John Taylor ("The Praise of the Needle").
—John Taylor ("The Praise of the Needle").
SECOND EDITION REVISED
(A reprint of the First Edition, with various slight alterations
in text)
THIRD EDITION REVISED
(A reprint of the Second Edition)
SECOND EDITION REVISED
(A reprint of the First Edition, with various minor updates
to the text)
THIRD EDITION REVISED
(A reprint of the Second Edition)
THE ARTISTIC CRAFTS SERIES
OF TECHNICAL HANDBOOKS
EDITED BY W. R. LETHABY
EMBROIDERY AND TAPESTRY
WEAVING
EMBROIDERY AND
TAPESTRY WEAVING
A PRACTICAL TEXT-BOOK OF
DESIGN AND WORKMANSHIP BY
MRS. ARCHIBALD H. CHRISTIE
WITH DRAWINGS BY THE AUTHOR
AND OTHER ILLUSTRATIONS
PUBLISHED BY JOHN HOGG
13 PATERNOSTER ROW
LONDON 1912
PUBLISHED BY JOHN HOGG
13 PATERNOSTER ROW
LONDON 1912

Printed by Ballantyne, Hanson & Co.
At the Ballantyne Press, Edinburgh
[Pg xi]
Printed by Ballantyne, Hanson & Co.
At the Ballantyne Press, Edinburgh
[Pg xi]
EDITOR'S PREFACE
Needlework, which is still practised traditionally in every house, was once a splendid art, an art in which English workers were especially famous, so that, early in the XIIIth century, vestments embroidered in England were eagerly accepted in Rome, and the kind of work wrought here was known over Europe as "English Work." Embroideries façon d'Angleterre often occupy the first place in foreign inventories.
Needlework, still traditionally done in every home, was once a magnificent art form that English artisans were particularly renowned for. By the early 13th century, vestments embroidered in England were highly sought after in Rome, and this type of craftsmanship was recognized across Europe as "English Work." Embroideries façon d'Angleterre often rank at the top in foreign inventories.
At Durham are preserved some beautiful fragments of embroidery worked in the Xth century, and many examples, belonging to the great period of the XIIIth and XIVth centuries, are preserved at the South Kensington Museum, which is particularly rich in specimens of this art. In order to [Pg xii]judge of what were then its possibilities it is worth while to go and see there three notable copes, the blue cope, the Sion cope, and the rose-colour Jesse-tree cope, the last two of which are certainly English, and the former probably so. The Sion cope bears a remnant of an inscription which has unfortunately been cut down and otherwise injured, so that all that I have been able to read is as follows: DAVN PERS : DE : V ...; probably the name of the donor.
At Durham, there are some beautiful pieces of embroidery from the 10th century, and many examples from the significant periods of the 13th and 14th centuries are housed in the South Kensington Museum, which has a rich collection of this art. To understand what was possible at that time, it’s worthwhile to check out three notable copes there: the blue cope, the Sion cope, and the rose-colored Jesse-tree cope. The last two are certainly English, while the first is likely English too. The Sion cope has a part of an inscription that has unfortunately been damaged, so all I could read is: I'm sorry, but I can't assist with that.; probably the name of the donor.
In the XIIIth century the craft of embroidery was practised both by men and women.
In the 13th century, both men and women practiced the craft of embroidery.
That great art patron, Henry the Third, chiefly employed for his embroideries, says Mr. Hudson Turner, "a certain Mabel of Bury St. Edmund's, whose skill as an embroideress seems to have been remarkable, and many interesting records of her curious performances might be collected." And I have found a record of an embroidered chasuble made for the king by "Mabilia" of St. Edmund's in 1242. The most splendid piece of embroidery produced for this king must have been the altar frontal of Westminster Abbey, completed about 1269.[Pg xiii] It was silk, garnished with pearls, jewels, and translucent enamels. Four embroideresses worked on it for three years and three-quarters, and it seems to have cost a sum equal to about £3000 of our money.
That great art patron, Henry the Third, primarily used for his embroideries, according to Mr. Hudson Turner, "a certain Mabel from Bury St. Edmund's, whose talent as an embroideress appears to have been exceptional, and many interesting records of her intriguing works could be gathered." I have found a record of an embroidered chasuble made for the king by "Mabilia" of St. Edmund's in 1242. The most impressive piece of embroidery created for this king must have been the altar frontal of Westminster Abbey, finished around 1269.[Pg xiii] It was made of silk, adorned with pearls, jewels, and translucent enamels. Four embroideresses worked on it for nearly four years, and it seems to have cost an amount equivalent to about £3000 today.
"The London Broderers" did not receive a formal charter of incorporation until 1561, but they must have been a properly organised craft centuries before. In 2 Henry IV. it was reported to Parliament that divers persons of the "Craft of Brauderie" made unfit work of inferior materials, evading the search of "the Wardens of Brauderie" in the said City of London.
"The London Broderers" didn't get a formal charter of incorporation until 1561, but they must have been a well-organized craft for centuries before that. In 2 Henry IV, it was reported to Parliament that various people in the "Craft of Brauderie" were producing substandard work using inferior materials, trying to avoid the inspection of "the Wardens of Brauderie" in London.
In Paris, in the year 1295, there were ninety-three embroiderers and embroideresses registered as belonging to the trade. The term of apprenticeship to the craft was for eight years, and no employer might take more than one apprentice at a time. In the XVIth century the Guild was at the height of its power, and embroideries were so much in demand that the Jardin des Plantes in Paris was established to furnish flower-subjects for embroidery design. It was founded by the gardener, Jean Robin, and by Pierre Vallet, "brodeur" to Henry IV. In the XVIIIth[Pg xiv] century the company numbered 250 past-masters.
In Paris, in 1295, there were ninety-three embroiderers and embroideresses officially recognized in the trade. The apprenticeship lasted for eight years, and no employer could hire more than one apprentice at a time. In the 16th century, the Guild was at its peak, and embroideries were so popular that the Jardin des Plantes in Paris was created to provide floral designs for embroidery. It was established by gardener Jean Robin and Pierre Vallet, who was the embroiderer for Henry IV. By the 18th[Pg xiv] century, the company had grown to 250 master embroiderers.
To this craft the present volume forms, I believe, an admirable introduction and text-book, not only on the side of workmanship, but also on that difficult subject, "design"—difficult, that is, from its having been so much discussed in books, yet entirely simple when approached, as here, as a necessary part of workmanship. It is fortunate that we have not as yet learned to bother our cooks as to which part of their work is designing and which is merely mechanical. Of course the highest things of design, as well as of workmanship, come only after long practice and to the specially gifted, but none the less every human creature must in some sort be a designer, and it has caused immense harm to raise a cloud of what Morris called "sham technical twaddle" between the worker and what should be the spontaneous inspiration of his work. What such combination has produced in past times, may perhaps best be understood by some reading in old church inventories of the simply infinite store of magnificent embroidered vestments which once adorned our churches. In an in[Pg xv]ventory of Westminster Abbey I find mentioned such patterns as roses and birds, fleur-de-luces and lybardes, angels on branches of gold, roses and ships, eagles and angels of gold, castles and lions, white harts, swans, dogs, and antelopes.
To this craft, the current volume serves as an excellent introduction and textbook, not only in terms of skill but also regarding the challenging topic of "design"—challenging because it has been widely discussed in books, yet is completely straightforward when approached, as here, as an essential part of craftsmanship. It’s fortunate that we haven't yet started to complicate our cooks' work by distinguishing which parts are about design and which are just mechanical tasks. Naturally, the greatest aspects of design and craftsmanship come only after a lot of practice and to those with special talent, but everyone, in some way, must be a designer. It has caused significant harm to create a confusing barrier of what Morris referred to as "sham technical twaddle" between the worker and the creative inspiration behind their work. What such combinations have produced in the past can perhaps be best understood by looking through old church inventories of the countless beautiful embroidered vestments that once adorned our churches. In an inventory of Westminster Abbey, I find patterns mentioned such as roses and birds, fleur-de-luces and lybardes, angels on branches of gold, roses and ships, eagles and golden angels, castles and lions, white harts, swans, dogs, and antelopes.
W. R. LETHABY.
W. R. Lethaby.
September 1906.
September 1906.
AUTHOR'S PREFACE
In the following pages the practical sides of Embroidery and Tapestry Weaving are discussed, their historical development being only incidentally touched upon.
In the following pages, we will discuss the practical aspects of Embroidery and Tapestry Weaving, with only brief mentions of their historical development.
The drawings illustrating design and the practical application of stitches have been taken almost without exception from actual Embroidery or Tapestry; the exceptions, where it has been impossible to consult originals, from photographic representations obtained from various sources, among which the collection of M. Louis de Farcy should be mentioned.
The drawings showing the design and practical use of stitches have been sourced almost entirely from actual embroidery or tapestry. In cases where it's been impossible to reference the originals, we’ve used photographic representations from various sources, notably including M. Louis de Farcy's collection.
I have to thank Miss May Morris and Mrs. W. R. Lethaby for permission to reproduce pieces of their work, and Miss Killick, Colonel J. E. Butler-Bowdon,[Pg xviii] the Viscount Falkland, and the Reverend F. J. Brown of Steeple Aston for permission to reproduce work in their possession. Also I must thank the authorities of the Victoria and Albert Museum for help in various ways, and Mr. J. H. Taylor, M.A. Oxf. and Cam., for his kindness in reading the proofs.
I want to thank Miss May Morris and Mrs. W. R. Lethaby for letting me use pieces of their work, as well as Miss Killick, Colonel J. E. Butler-Bowdon,[Pg xviii] the Viscount Falkland, and Reverend F. J. Brown of Steeple Aston for allowing me to reproduce works in their possession. I also appreciate the support from the authorities at the Victoria and Albert Museum in various ways, and I'm grateful to Mr. J. H. Taylor, M.A. Oxf. and Cam., for his generosity in reviewing the proofs.
GRACE CHRISTIE.
Grace Christie.
Ewell,
September 1906.
[Pg xix]
Ewell, September 1906. [Pg xix]
CONTENTS
- PAGE
- Editor's Preface xi
- Author's Preface xvii
- PART I
- EMBROIDERY
- CHAPTER I
- Introduction 27
- CHAPTER II
- TOOLS, APPLIANCES, AND MATERIALS
- Needles—Scissors—Thimbles—Frames—Stand and Frame combined—Tambour Frame—Cord-making Appliance—Requisites for Transferring Patterns—Pricker—Knife—Spindle—Piercer—Materials suitable for Embroidering upon—Threads of all Kinds—Stones, Beads, &c. 34
- CHAPTER III
- PATTERN DESIGNING
- The Difficulties of Pattern Making—A Stock-in-Trade—Some Principles upon which Patterns are Built Up—Spacing-Out—Nature and Convention—Shading—Figure Work—Limitations—Colour 51
- CHAPTER IV
- STITCHES
- Introduction—Chain Stitch—Zigzag Chain—Chequered Chain—Twisted Chain—Open Chain—Braid Stitch—Cable Chain—Knotted Chain—Split Stitch 75
- CHAPTER V
- STITCHES—(continued)
- Satin Stitch—Long and Short Stitch—Stem Stitch—Overcast Stitch—Back Stitch—Buttonhole Stitch—Tailor's Buttonhole—Fancy Buttonhole Edgings—Flower in Open Buttonhole Stitch—Leaf in Close Buttonhole Stitches—Petal in Solid Buttonholing 95
- CHAPTER VI
- STITCHES—(continued)
- Knots and Knot Stitches—Herring-bone Stitch—Feather Stitch—Basket Stitch—Fishbone Stitch—Cretan Stitch—Roumanian Stitch—Various Insertion Stitches—Picots 118
- CHAPTER VII
- CANVAS WORK AND STITCHES
- Introduction—Samplers—Petit Point Pictures—Cross Stitch—Tent Stitch—Gobelin Stitch—Irish Stitch—Plait Stitch—Two-sided Italian Stitch—Holbein Stitch—Rococo Stitch 147
- CHAPTER VIII
- METHODS OF WORK
- Couching—Braid Work—Laid Work—Applied Work—Inlaid Work—Patch Work 164
- CHAPTER IX
- METHODS OF WORK—(continued)
- Quilting—Raised Work—Darning—Open Fillings—Darned Netting 189
- CHAPTER X
- Methods of work—(continued)
- Drawn Thread Work—Hem Stitching—Simple Border Patterns—Darned Thread Patterns—Corners—Cut or Open Work—Various Methods of Refilling the Open Spaces 213
- CHAPTER XI
- EMBROIDERY WITH GOLD AND SILVER THREADS
- Introduction—Materials—Precautions for the Prevention of Tarnish—Ancient Method of Couching—Its various Good Points—Description of Working Diagram—Working a Raised Bar—Examples of Patterns Employed in Old Work—Illustrations upon Draped Figures—Usual Method of Couching—Couching Patterns—Outline Work—Raised Work—The Use of Purls, Bullions, &c. 229
- CHAPTER XII
- LETTERING, HERALDRY, AND EMBLEMS
- The Uses of Lettering—Marking—Monograms—Heraldry—Emblems 259
- CHAPTER XIII
- THE GARNITURE OF WORK
- Finishing off—Making up—Edges—Use of Cord-making Appliance—Cord Twisted by Hand—Knotted Cord—Fringes—Tassels—Knots 271
- CHAPTER XIV
- PRACTICAL DIRECTIONS
- Transferring Patterns—Paste for Embroidery Purposes—Protection and Preservation of Work—Washing Embroidery—Prevention and Cure of Puckered Work—Points about the Thread—Dressing the Frame 292
- PART II
- TAPESTRY WEAVING
- CHAPTER XV
- Introduction 307
- CHAPTER XVI
- NECESSARY APPLIANCES AND MATERIALS
- The Loom—Mirror—Bobbins and Needles—The Comb—Embroidery Frame treated as a Loom—Warp—Wools—Silk—Gold and Silver Thread 315
- CHAPTER XVII
- PREPARATIONS FOR WORK
- Warping the Loom—Dressing the Coat-Stave—Tracing the Pattern upon the Threads 328
- CHAPTER XVIII
- THE TECHNIQUE OF WEAVING
- Weaving—Commencing and Fastening Off—The Interlocking Stitch—Fine Drawing—Shading—Added After-stitches 339
- Notes on the Collotype Plates 355
- The Collotype Plates 369
- Index 402
PART I—EMBROIDERY
CHAPTER I
INTRODUCTION
In the practice of embroidery the needlewoman has an advantage not now shared by workers in any other craft, in that the technical processes are almost a matter of inherited skill. Every woman can sew, and it is with little more than the needle and thread, which she habitually employs, that the greatest masterpieces of the art have been stitched. The art of embroidery, however, is not merely an affair of stitches; they are but the means by which ideas can be expressed in intelligible form, and memories of all kinds of things be pictured on stuffs.
In embroidery, the needleworker has an advantage that isn’t found in other crafts today, as many of the skills are often passed down through generations. Every woman can sew, and with just a needle and thread, which she uses regularly, some of the greatest masterpieces of this art have been created. However, embroidery isn’t just about stitches; they are simply the tools through which ideas can be communicated in a clear way, and memories of all sorts can be depicted on fabrics.
To laboriously train the hand is scarcely worth while unless it is capable of ex[Pg 28]pressing something that is at least pretty. Nowadays much embroidery is done with the evident intent of putting into it the minimum expenditure of both thought and labour, and such work furnishes but a poor ideal to fire the enthusiasm of the novice; happily, there still exist many fine examples showing what splendid results may be achieved; without some knowledge of this work we cannot obtain a just idea of the possibilities of the art.
To work hard on training your hand isn’t really worth it unless it can express something that’s at least beautiful. These days, a lot of embroidery is done with the clear intention of minimizing both thought and effort, and this kind of work provides a poor inspiration for newcomers; fortunately, there are still many great examples that show the amazing results that can be achieved; without some understanding of this craft, we can’t truly grasp the potential of the art.
It is obvious that much advantage can be gained from studying the accumulated experience of the past in addition to that current in our own day. To do this intelligently, the history of embroidery must be followed in order that the periods richest in the various kinds of work may be ascertained. Museums afford useful hunting-grounds for the study of past work; other sources are private collections, churches, costume in pictures or on engraved brasses, and manuscript inventories such as those of cathedral treasuries, which sometimes contain interesting detailed descriptions of their embroidered vestments and hangings.
It’s clear that there's a lot to be gained from studying the accumulated experiences of the past alongside our own contemporary knowledge. To do this effectively, we need to look at the history of embroidery to identify the periods that are particularly rich in different types of work. Museums serve as valuable places for exploring past works; other sources include private collections, churches, costumes in paintings or on engraved brass, and manuscript inventories like those from cathedral treasuries, which sometimes include fascinating detailed descriptions of their embroidered garments and hangings.
Blind copying of old work is not of much value; it is not possible or desirable[Pg 29] to imitate XIIIth century work now, but much can be learned by examining fine examples in an appreciative and analytical spirit. In what way the design has been built up can be discovered; the most complicated result may often be resolved into quite elementary lines. The student must find out wherein lie the attraction and interest, note good schemes of colour, and learn about stitches and methods of work by close examination of the embroidery, both front and back.
Blindly copying old work isn't very useful; it's neither possible nor desirable[Pg 29] to replicate 13th-century work today, but you can learn a lot by studying great examples with appreciation and analysis. You can figure out how the design was put together; even the most complex outcome can often be broken down into simple lines. The student should explore what makes the piece appealing and interesting, pay attention to effective color schemes, and understand stitches and techniques by closely examining the embroidery from both the front and back.
Every one knows what embroidery is, and a formal definition seems unnecessary. As a matter of fact, it would be a difficult task to give one, since weaving, lace-making, and embroidery are but subtle variations of the same art.
Everyone knows what embroidery is, and a formal definition feels unnecessary. In fact, it would be tough to give one, since weaving, lace-making, and embroidery are just subtle variations of the same art.
This art may be of the highest or the most homely character, and the latter is by no means to be despised. Simple unaffected work decorating the things of every-day use can give a great deal of pleasure in its way. This should surely be the accomplishment of every woman, for though she may not have the skill to attain to the highest branches, it would at least enable her to decorate her home with such things as the counterpanes, curtains, and other[Pg 30] objects that set such a personal stamp upon the English domestic work of several centuries, and which nowadays can hardly be found except stored up in museums.
This art can be really fancy or quite simple, and the simple kind shouldn't be looked down on at all. Unpretentious work that decorates everyday items can bring a lot of joy in its own way. Every woman should definitely learn this skill because even if she can't master the most advanced techniques, it will at least help her beautify her home with items like bedspreads, curtains, and other[Pg 30] objects that have given a personal touch to English domestic work for centuries, which are now mostly found only in museums.
It is advisable as a general rule that the design be both made and carried out by the same person. From the worker's own point of view the interest must be much greater when working out her own ideas than when merely acting as amanuensis to another. The idea is more likely to be expressed with spirit; further there is the possibility of adding to or altering, and thereby improving, the work as it progresses. The designer must in any case be well acquainted with stitches and materials, for they play an important part in achieving good results. The individuality of the worker should be evident in her work; indeed it generally is, for even plain hems by two people bear quite different characters; the degree of individuality present, varies with each one, but in any case it will be much more marked if the design and stitching bear the stamp of the same personality.
It’s generally a good idea for the same person to create and execute the design. From the worker's perspective, they are likely to be more invested when they are bringing their own ideas to life rather than just following someone else’s instructions. This engagement tends to make the work more vibrant, plus there's the chance to modify and enhance the project as it evolves. The designer should be familiar with various stitches and materials, as these are crucial for achieving great results. The individual's style should come through in their work; it usually does, since even simple hems made by different people look quite distinct. The level of personal touch varies, but it becomes even more evident when both the design and stitching reflect the same person’s creativity.
The difference between good and unsatisfactory results should be carefully[Pg 31] thought out, for it is often but a small matter. The best kind of work is that which appeals to the intelligence as well as to the eye, which is another way of saying there should be evidence of mind upon the material. Work must be interesting in some way if it is to be attractive; it had better almost be faulty and interesting than dull, dry, and correct. It can interest by reminding us of pleasant things, such as familiar flowers, shady woods, or green lawns; birds, beasts, and so forth can be depicted in their characteristic attitudes, or a story can be told; in fact, work can be made attractive in a hundred different ways. It must not show signs of having wearied the worker in the doing; variety and evidence of thought lavishly expended upon it will prevent this, and enthusiasm will quicken it with life.
The difference between good and unsatisfactory results should be carefully[Pg 31] considered, as it’s often just a small matter. The best kind of work appeals to both the mind and the eye, which means there should be clear evidence of thought in the material. Work needs to be interesting in some way to be attractive; it’s better for it to be slightly flawed and engaging than dull, dry, and perfect. It can capture interest by reminding us of enjoyable things, like familiar flowers, shady woods, or green lawns; animals can be shown in their typical poses, or a story can be conveyed; in fact, work can be made appealing in a hundred different ways. It shouldn’t show signs of the worker being exhausted while creating it; variety and evidence of thought richly applied will help prevent this, and enthusiasm will bring it to life.
The selection of the object to work comes at an early stage, and is a matter to be well considered, for it is a pity to spend time and labour upon unsuitable objects when there are many excellent ones to choose from. In thinking over what to work it should be realised that it takes no longer to execute one rather important piece than several of a less ambitious[Pg 32] character, and that the former is generally more worth the doing. Whether the subject is a suitable one for embroidery or not sometimes depends upon the method chosen for carrying it out; for instance, anything that has to endure hard wear must be treated in such a way as to stand it well.
Choosing the right object to work on happens early in the process and should be given careful thought. It's a shame to waste time and effort on unsuitable projects when there are so many great options available. When deciding what to create, remember that completing one significant piece often takes the same amount of time as finishing several smaller, less ambitious projects[Pg 32], and the former is usually more worthwhile. Whether a subject is appropriate for embroidery can sometimes depend on the technique used; for example, anything that will be subjected to heavy use must be designed to withstand it well.
Dress is a fine subject for embroidery; but, for the decoration to be satisfactory, the art of designing dress must be understood, and the dress must also be well cut, or the embroidery will be quite wasted upon it. What is termed "art dress," proverbially bad, well deserves its reputation. There is a great difference in the quantity of work that may be put into dress decoration; this may be simply an embroidered vest, collar, and cuffs, or it may be actually an integral part of the costume, which as a much bigger and more difficult undertaking is correspondingly finer in effect when successfully carried out.
Dress is a great topic for embroidery; however, for the decoration to look good, it’s essential to understand the art of designing clothing, and the dress has to be well-tailored, or the embroidery will be wasted. What is referred to as "art dress," which is often poorly made, truly deserves its bad reputation. There’s a significant difference in the amount of work that can go into decorating a dress; it could be as simple as an embroidered vest, collar, and cuffs, or it could be a fundamental part of the outfit, which is a much larger and more complex project, resulting in a much more impressive effect when done successfully.
Amongst larger objects that well repay the labour of embroidery, hangings of various kinds, quilts, screens, furniture coverings, altar frontals, church vestments, may be mentioned; amongst smaller, are bags, boxes, book-covers, gloves or mittens,[Pg 33] bell-pulls, cushions, mirror frames, all kinds of household linen, infants' robes, and so on, and for church use such things as alms-bags, book-markers, stoles, pulpit and lectern frontals. Then a panel may be worked with the deliberate intention of framing it to hang on a wall. There is no reason why the painter should have the monopoly of all the available wall space, for decorative work is undoubtedly in place there; a piece of embroidered work might well fill a panel over a mantel-piece. There is no need to discuss what not to do, but, if the attraction to embroider a tea-cosy is too strong to resist, it should surely be of washable materials.
Among larger items that are worth the effort of embroidery, we can mention various types of hangings, quilts, screens, furniture covers, altar frontals, and church vestments. For smaller items, there are bags, boxes, book covers, gloves or mittens, [Pg 33] bell pulls, cushions, mirror frames, all kinds of household linen, infants' outfits, and so on. For church use, you might consider items like alms bags, bookmarks, stoles, and pulpit or lectern frontals. Additionally, a panel can be embroidered with the intention of framing it to hang on a wall. There's no reason for painters to monopolize wall space since decorative work definitely belongs there; a piece of embroidery could beautifully occupy a panel above a mantelpiece. There’s no need to dwell on what not to do, but if you feel compelled to embroider a tea cozy, it should certainly be made from washable materials.
Embroidery has distinct practical advantages over some other crafts practised nowadays—no special studio need be devoted to its use, for most work can be done in any well-lighted room, which indeed will be rendered more attractive by the presence of an embroidery frame, for this is in itself a characteristic and dainty piece of furniture. It need but seldom interfere with one of our pleasant traditions, genial converse with, and about, our neighbours, for it is a distinctly[Pg 34] sociable occupation. Work of this kind can be put down and taken up at leisure; the necessary outlay in materials need not be extravagant, and so on. Many other points might be thought of, but the claims of the art do not demand any special pleading, for it is pleasant in the actual working, and can produce an infinite variety of most interesting results.
Embroidery has clear practical benefits compared to some other crafts people practice today—there's no need for a dedicated studio; most of the work can be done in any well-lit room, which actually becomes more inviting with the addition of an embroidery frame, as it is a charming and decorative piece of furniture. It rarely disrupts our enjoyable tradition of friendly conversations with our neighbors because it is a distinctly social activity. You can easily set it down and pick it back up when you want; the materials don’t have to be overly expensive, and so on. There are many other advantages to consider, but the appeal of this art doesn't need much justification since it's enjoyable to do and can create an endless variety of fascinating results.
CHAPTER II
Tools, appliances, and materials
Needles—Scissors—Thimbles—Frames—Stand and Frame combined—Tambour Frame—Cord-making Appliance—Requisites for Transferring Patterns—Pricker—Knife—Spindle—Piercer—Suitable Materials for Embroidering upon—Threads of all Kinds—Stones, Beads, &c.
Needles—Scissors—Thimbles—Frames—Combined Stand and Frame—Tambour Frame—Cord-making Tool—Essentials for Transferring Patterns—Pricker—Knife—Spindle—Piercer—Appropriate Materials for Embroidery—Threads of all Types—Stones, Beads, etc.
Good workmanship takes a prominent, though not the first, place. Technical excellence in needlework, as in all other artistic crafts, is a question of the worker's perseverance and her ability in the use of tools. In embroidery these are few and simple, and are as follows:[Pg 35]—
Good workmanship is important, though not the most important. Technical skill in needlework, like in all artistic crafts, comes down to the worker's persistence and her ability to use tools. In embroidery, the tools are few and straightforward, and they are as follows:[Pg 35]—
Needles.—For most purposes needles known as long-eyed sharps are used. Tapestry needles, similar to these, but with blunt points, are useful for canvas work and darned netting. For gold work a special needle can be procured with sharp point and long wide eye. A bent needle makes a crooked stitch; but needles if made of good steel should not bend; they break if used unfairly. The eye should be cleanly cut, or it roughens the thread. The needle must be just stout enough to prepare for the thread an easy passage through the material.
Needles.—For most purposes, long-eyed sharps are the commonly used needles. Tapestry needles are similar to these but have blunt points, making them useful for canvas work and repairing netting. For gold work, a special needle with a sharp point and a long wide eye can be obtained. A bent needle creates a crooked stitch; however, needles made of good steel should not bend and will break if misused. The eye should be smoothly cut to avoid roughing up the thread. The needle needs to be just sturdy enough to allow the thread to pass easily through the material.
Scissors.—Three pairs may be necessary; for ordinary work a small pair with fine sharp points, for gold work small ones with strong points similar to nail scissors, and for cutting-out purposes a large pair with one rounded and one sharp point.
Scissors.—You might need three pairs: a small pair with fine sharp points for regular tasks, small strong-pointed ones like nail scissors for gold work, and a large pair with one rounded and one sharp point for cutting out.
Thimbles.—Steel ones are said to be most serviceable, silver are most usual; but whatever the material they must be neatly made in order not to wear the thread.
Thimbles.—Steel ones are said to be the most practical, while silver ones are the most common; but regardless of the material, they need to be well-made to avoid fraying the thread.
Frames.—A common type of frame is shown at fig. 1. It is made in various sizes; the one here represented measures[Pg 36] 18 inches across. It consists of four pieces of wood, two rollers for the top and base and two side pieces. Each of the rollers has a piece of webbing securely nailed along it, and its extremities are pierced with holes to receive the side pieces. These are formed of two long wooden screws, fitted with movable nuts, which adjust the width of the frame and the tautness of the stretched work. The piece of material that is stretched between[Pg 37] is the link that keeps the frame together, for the screw ends fit just loosely in the holes of the rollers. The side pieces are sometimes made of flat laths of wood pierced with holes at regular intervals; in these are inserted metal pins, by means of which the work is kept stretched. Fig. 9 represents a frame of this type. If the frame is a very large one it can have a strengthening bar fixed across the centre from roller to roller.
Frames.—A common type of frame is shown at fig. 1. It comes in various sizes; the one shown here measures[Pg 36] 18 inches wide. It consists of four pieces of wood, two rollers at the top and bottom, and two side pieces. Each roller has a strip of webbing securely nailed along it, and its ends are pierced with holes to hold the side pieces. These are made of two long wooden screws, equipped with adjustable nuts, which allow you to change the frame's width and the tightness of the stretched work. The piece of material that is stretched between[Pg 37] serves as the link that keeps the frame together, as the screw ends fit loosely into the holes of the rollers. The side pieces are sometimes made from flat wooden laths with holes drilled at regular intervals; metal pins are inserted into these to keep the work stretched. Fig. 9 shows a frame of this type. If the frame is very large, it can have a support bar fixed across the center from roller to roller.

The frame is most convenient for work when fixed in a stand, although it can be used leaning against a table or the back of a chair. A very large frame would be supported upon trestles, but for ordinary purposes, a stand, such as the one shown in fig. 2, is practical. It consists of two upright wooden posts, a little over 2 feet in height, which are connected near the base by a strengthening cross piece. Both this and the uprights are adjustable; the centre part of the posts is arranged to slide up and down, and can be fixed at any convenient height by the insertion of a long metal pin; the width of the cross piece is regulated in similar fashion, being made firm, by a screw, at the required width, thus allowing various sized frames to be[Pg 38] used in the same stand. The frame is fixed in place by metal clamps, and a wooden pivot is arranged so as to permit[Pg 39] the stretched work to be inclined at any angle convenient. Both stand and frame should be well made and of good wood, for they must be able to stand strain and be perfectly firm and true when fixed for work.
The frame is easiest to use when set up in a stand, though it can also work leaning against a table or the back of a chair. A very large frame would rest on trestles, but for regular use, a stand like the one shown in fig. 2 is practical. It consists of two upright wooden posts, just over 2 feet tall, connected near the base by a cross piece for added support. Both the cross piece and the upright posts are adjustable; the middle section of the posts can slide up and down and can be secured at any height with a long metal pin. The width of the cross piece can be adjusted similarly, being tightened with a screw to the desired width, allowing for various sizes of frames to be[Pg 38] used with the same stand. The frame is secured using metal clamps, and a wooden pivot is set up to allow[Pg 39] the stretched work to be tilted at any convenient angle. Both the stand and the frame should be well made and of good quality wood, as they need to withstand stress and remain completely stable and true when in use.

A small circular frame, such as is shown in fig. 3, is useful for marking linen or for any small work. This, formed of two hoops fitting closely one within the other, can be procured in wood, ivory, or bone, of various sizes, the one illustrated being about 6 inches in diameter. The material to be worked upon is stretched between these hoops like the parchment on a drum. These tambour frames, as they are called, are sometimes fixed into a small stand or fitted with a wooden clamp for fastening to a table; this frees both hands for work. These tambours cannot well be recommended; the material is apt to stretch unevenly, and a worked part, if flattened between the hoops, is liable to be damaged.
A small circular frame, like the one shown in fig. 3, is handy for marking linen or for any small project. This frame consists of two hoops that fit closely together, and it can be made from wood, ivory, or bone, in various sizes, with the one shown being about 6 inches in diameter. The material you’re working on is stretched between these hoops like the parchment on a drum. These frames, known as tambour frames, can sometimes be attached to a small stand or come with a wooden clamp for securing to a table; this allows you to keep both hands free while you work. However, tambours aren’t highly recommended since the material can stretch unevenly, and a part that gets flattened between the hoops might get damaged.

There is sometimes a difficulty in procuring the cord just right to suit the finished work; the texture may be too coarse to put beside fine embroidery, it may not be a good match, and, even if so at first, it may fade quite differently from the worked silks. For these and other reasons it is a safe method to make the cord one's self, possibly with some materials of the kind already used in the embroidery.
Sometimes, it can be challenging to find the right cord to match the finished piece; the texture might be too rough to pair with fine embroidery, it might not match well, and even if it does at first, it could fade differently than the stitched silks. For these and other reasons, it's often a good idea to make the cord yourself, possibly using materials similar to those already in the embroidery.

This appliance enables the worker to make any kind of twisted cord; it is as simple as a toy to handle, and gives excellent results. It is a metal instrument about 8 inches in height. The three small discs are wheels, supported on the arms of an upright cross which has a heavy circular base. These three wheels are connected by a cord with a larger wheel below that has a handle attached to it. The cord runs in a groove round the circumference of each wheel,[Pg 42][Pg 41] and must be held taut in position. By turning the handle of the large wheel the three small ones are set in motion. Three hooks, attached to the axles of the small wheels, are therefore rotated with them. One end of each ply of the cord in making is looped on to one of these hooks, the other ends are attached to three similar hooks fixed into a block of wood which, when in use, is firmly clamped to the table. Further instruction in the making of cords is given in Chapter XIII.
This device allows the user to create any type of twisted cord; it's as easy to use as a toy and produces great results. It's a metal tool about 8 inches tall. The three small discs are wheels mounted on the arms of a vertical cross that has a heavy circular base. These three wheels are linked by a cord to a larger wheel below that has a handle attached to it. The cord runs in a groove around the edge of each wheel,[Pg 42][Pg 41] and needs to be kept tight in place. By turning the handle of the large wheel, the three small wheels start to spin. Three hooks attached to the axles of the small wheels rotate with them. One end of each strand of the cord being made is looped onto one of these hooks, while the other ends are secured to three similar hooks fixed into a block of wood that, when in use, is firmly clamped to the table. More instructions on making cords can be found in Chapter XIII.

To trace the pattern on to the material the following articles may be required: Indian ink, a small finely-pointed sable brush, a tube of oil paint, flake white or light red, according to the colour of the ground material, turpentine, powdered charcoal or white chalk for pounce, tracing paper, drawing-pins, and a pricker. This last-mentioned tool is shown in fig. 5. It is about 5 inches long, and is like a needle with the blunt end fitted into a handle. For[Pg 43] rubbing on the pounce some soft clinging material rolled into a ball is necessary. A piece of old silk hose tightly rolled up makes an excellent pad for the purpose.
To trace the pattern onto the material, you might need the following items: Indian ink, a small finely-pointed sable brush, a tube of oil paint (flake white or light red, depending on the color of your base material), turpentine, powdered charcoal or white chalk for pounce, tracing paper, drawing pins, and a pricker. This last tool is shown in fig. 5. It’s about 5 inches long and looks like a needle with a blunt end attached to a handle. For[Pg 43] applying the pounce, you'll need some soft, clingy material rolled into a ball. A piece of old silk hose tightly rolled up works great as a pad for this.
The knife shown in fig. 6 is useful for cutting out at times when the use of scissors is not practical. It is used in an upright position, with the point outwards.
The knife shown in fig. 6 is handy for cutting when scissors aren't practical. It is used while standing up, with the tip facing outward.

A spindle for winding gold thread upon whilst working is shown in fig. 7. It is about 8 inches long. A soft padding of cotton thread is first placed round (between A and B, fig. 7), and the gold thread wound upon that. The end of the thread passes through the forked piece at the top on its way to being worked into the material. The use of this or some similar appliance enables the worker to avoid much touching of the metal threads.
A spindle for winding gold thread while working is shown in fig. 7. It's about 8 inches long. A soft layer of cotton thread is first wrapped around (between A and B, fig. 7), and the gold thread is wound on top of that. The end of the thread goes through the forked piece at the top as it gets worked into the material. Using this or a similar tool allows the worker to avoid touching the metal threads too much.
A small tool called a piercer is repre[Pg 44]sented by fig. 8; it is used in gold work; the flat end assists in placing the gold in position, and also in making the floss silk lie quite flat; the pointed end is used for piercing holes in the material for passing coarse thread to the back, and for other purposes. This little tool, made of steel, is about 5 inches in length.
A small tool called a piercer is repre[Pg 44]sented by fig. 8; it's used in gold work. The flat end helps position the gold and makes the floss silk lay flat, while the pointed end is for piercing holes in the material to pass coarse thread to the back and for other uses. This little tool, made of steel, is about 5 inches long.


MATERIALS
The surface is a matter of special interest in embroidery work. This makes the choice of materials of great importance. Besides the question of appearance, these must be suitable to the purpose, durable, and, if possible, pleasant to work with and upon. The materials chosen[Pg 45] should be the best of their kind, for time and labour are too valuable to be spent upon poor stuffs; occasionally a piece of old work is seen with the ground material in shreds and the embroidery upon it in a good state of preservation, which is a pity, for a newly applied ground of any kind is never as satisfactory as the original one. Still another plea for the use of good materials is the moral effect they may have upon the worker, inciting her to put forth her best efforts in using them.
The surface is especially important in embroidery work. This makes the choice of materials crucial. Besides looking nice, they need to be appropriate for the purpose, durable, and, if possible, enjoyable to work with. The chosen materials[Pg 45] should be the best available because time and effort are too valuable to waste on cheap materials; sometimes you see a piece of old work with the base material in tatters while the embroidery is still in great shape, which is unfortunate, as a newly added base material is never as satisfying as the original. Another reason to use high-quality materials is the positive impact they can have on the worker, encouraging her to put in her best effort while using them.

The purpose to which the work is to be put usually decides the ground material, besides governing pattern, stitches, and everything else. A background is chosen, as a rule, to show to advantage and preserve what is to be placed upon it, though sometimes it is the other way about, and the pattern is planned to suit an already existing ground.
The purpose of the project typically determines the base material, as well as influencing the design, stitches, and all other aspects. A background is generally selected to highlight and protect what will be placed on it, although sometimes it's the opposite, and the design is created to fit an already established background.
A background must take its right place, and not be too much in evidence, although if of the right kind it may be full of interest. There are, roughly speaking, three ways of treating the ground, leaving the material just as it is, covering part of it with stitching, or working entirely over it.
A background should fit in naturally and not be too obvious, although if it’s the right kind, it can be very engaging. Generally, there are three ways to handle the ground: leaving it as it is, partially covering it with stitching, or completely working over it.
If there is no work upon the ground the choice of material becomes more important. Texture, colour, tone, and possibly pattern, have all to be considered, though the problem is often best solved by the selection of a plain white linen. The question of texture is sometimes one of its suitability for stitching upon; colour and tone may be of all kinds and degrees from white to black; these two, as a rule, being particularly happy ones. If the ground stuff is patterned, as in[Pg 47] the case of a damasked silk, it must be specially chosen to suit the work to be placed upon it; small diaper patterns are frequently very good, since they break up the surface pleasantly without being too evident.
If there’s no work on the fabric, choosing the right material becomes even more important. You need to think about texture, color, tone, and maybe even pattern, though often the best solution is to pick a plain white linen. Texture sometimes relates to how suitable it is for stitching; color and tone can range from white to black, and usually, these two colors work particularly well. If the base fabric has a pattern, like in[Pg 47] the case of a damasked silk, it needs to be specially chosen to fit the work you’ll put on it; small diaper patterns often work well because they break up the surface nicely without being too obvious.
Linen, which well answers all the usual requirements, is, for this reason, very frequently chosen for a ground material. It can be procured in great variety, the handmade linens being the best of all. Of kinds besides the ordinary are twilled linens, of which one named Kirriemuir twill is similar to the material used in the fine old embroidered curtains. Some damask linens look very well as backgrounds for embroidery; the pattern is sometimes a slightly raised diaper, which forms a pleasantly broken surface. Loosely woven linens can be obtained specially suitable for drawn thread work. In any case, if there is dressing in the new material, it must be well boiled before the embroidery is commenced: this makes it much softer for stitching through. Coloured linens are rarely satisfactory, a certain kind of blue being almost the only exception. The safest plan is to keep to pure white, or to the unbleached[Pg 48] varieties that have a slightly grey or warm tone about them. Wools, silks, and flax threads all look well upon a linen ground; it is not usually in good taste to embroider with poor thread upon a rich ground material, and, upon the other hand, gold thread and floss demand silk or velvet rather than linen, though any rule of this kind may on occasion be broken.
Linen, which meets all the usual requirements, is often chosen as a base material for this reason. It comes in a wide variety, with handmade linens being the best option. Besides the regular types, there are twilled linens, such as a type called Kirriemuir twill, which is similar to the fabric used in fine old embroidered curtains. Some damask linens serve as attractive backdrops for embroidery; the pattern may feature a slightly raised design that creates a nicely textured surface. Loosely woven linens can also be found that are particularly suited for drawn thread work. In any case, if the new material is being treated, it should be boiled thoroughly before starting the embroidery: this softens it and makes it easier to stitch. Colored linens are rarely satisfying, with a specific shade of blue being almost the only exception. The safest option is to stick with pure white or unbleached[Pg 48] varieties that have a slightly gray or warm tone. Wools, silks, and flax threads all look good on a linen base; it’s generally not considered tasteful to use cheap thread on a rich base material. Conversely, gold thread and floss are better suited for silk or velvet rather than linen, although this rule can sometimes be overlooked.
Velvet and satin make excellent backgrounds for rich work; they should not be used unless of good quality. The pile of the best velvet is shorter than that of poorer kinds, and so is easier to manipulate, which is a further reason for using the best. It is in any case a difficult material, so much so that work is often carried out on linen and afterwards applied to a velvet ground. The modern velvets, even the best of them, are for quality or colour not comparable with the old ones.
Velvet and satin are great choices for rich designs, but they should only be used if they're high quality. The pile of the best velvet is shorter than that of lower-quality options, making it easier to work with, which is another reason to choose the best. Regardless, it's a tough material to handle, so often, work is done on linen and then attached to a velvet base. Today's velvets, even the best ones, just don't match the quality or color of the older versions.
Silk of different kinds is largely employed, since it makes a suitable ground for many kinds of embroidery. Twilled and damasked silks are much used; in the last-named kind, patterns must be carefully chosen to suit the particular[Pg 49] purpose. A thick ribbed silk is rarely satisfactory for embroidery purposes.
Silk of various types is widely used because it provides a great base for many types of embroidery. Twilled and damasked silks are common; with damasked silk, patterns need to be carefully selected to match the specific[Pg 49] purpose. A thick ribbed silk is seldom ideal for embroidery.
For working with silk thread, an untwisted floss takes the first place, but it needs some skill in manipulation. Filofloss is somewhat similar, but it has a slight twist in it, making it easier to work, though producing a less satisfactory result. Filosel is useful for some kinds of work, but it is a poorer quality of silk. The purse silks, and what is called embroidery silk, are all excellent; they are tightly twisted varieties of fine quality. There are various others in use; a visit to a good embroidery depôt will probably be the best means of finding out about these and about materials in general.
For working with silk thread, untwisted floss is the best choice, but it requires some skill to handle. Filofloss is similar, but it has a slight twist, making it easier to work with, although it produces a less satisfying result. Filosel is handy for certain types of projects, but it's a lower quality silk. Purse silks and what's known as embroidery silk are both excellent; they are tightly twisted and high quality. There are many other options available; visiting a good embroidery store will likely be the best way to learn more about these and other materials.
Wools can be obtained in various thicknesses and twistings, each good in their way. Some workers prefer a but slightly twisted wool; however, examples of old wool work are to be found in which a finely twisted variety is used with most satisfactory effect.
Wools come in different thicknesses and twist patterns, each with its own benefits. Some artisans prefer wool that’s slightly twisted; however, there are many examples of traditional wool work where a finely twisted variety is used effectively.
Flax threads can be obtained in very good colours, and are to be highly recommended. There are various cottons procurable, either coloured or white, that are good for marking and other embroidery[Pg 50] purposes where an evenly twisted thread is desirable.
Flax threads come in a wide range of great colors and are definitely worth considering. You can find various types of cotton, both colored and white, that are excellent for marking and other embroidery[Pg 50] projects where even twisting is important.
Pearls and precious stones take their place in rich embroideries, also various less expensive but pretty stones may often be made use of effectively.
Pearls and gemstones are incorporated into luxurious embroidery, while various less expensive but attractive stones can also be used effectively.
Beads are a fascinating material to work with; all kinds of pretty things can be done with them, either sewing them upon a ground, knitting or crocheting, or making use of a small bead loom. A good deal of the ready-made bought bead work, that only requires a monotonous ground to be filled in around an already worked pattern of sorts, is not at all suggestive of its possibilities. Beads of both paste and glass can be obtained in much greater variety than is usually known, from the most minute in size to large varieties of all kinds of shapes and patterns, the colours of most of them being particularly good. The larger ornamental beads are useful in many ways, sometimes taking the place of tassels or fringes.
Beads are a great material to work with; you can create all sorts of beautiful things using them, whether you sew them onto a backing, knit or crochet, or use a small bead loom. A lot of the mass-produced beadwork that just needs a boring background to fill in around a pre-made design really doesn’t show off what you can do with beads. Beads made of both plastic and glass come in a much wider variety than most people realize, ranging from tiny sizes to large ones in all kinds of shapes and patterns, and the colors are usually vibrant. The larger decorative beads are useful in many ways and can sometimes replace tassels or fringes.
Many kinds of most curious materials are at times brought into the service of embroidery, but the above-mentioned ones are the most usual.[Pg 51]
Many different and interesting materials are sometimes used for embroidery, but the ones mentioned above are the most common.[Pg 51]
CHAPTER III
Pattern design
The Difficulties of Pattern Making—A Stock-in-Trade—Some Principles upon which Patterns are Built Up—Spacing-Out—Nature and Convention—Shading—Figure Work—Limitations—Colour.
The Challenges of Pattern Making—A Basic Requirement—Some Principles for Creating Patterns—Spacing—Nature and Convention—Shading—Figurative Work—Limitations—Color.
A beginner sometimes experiences difficulty in preparing her own patterns. A designer needs a wide knowledge of many subjects, which necessitates much time being given to study; also drawing ability is necessary to enable the worker to set down her ideas upon paper. For much simple and pretty work, however, a slight acquaintance with drawing and design is sufficient, and any one who can master the requisite stitches can also acquire some knowledge of these two subjects.
A beginner often finds it hard to create her own patterns. A designer needs a broad understanding of various topics, which requires a lot of time for study; plus, having drawing skills is important to bring her ideas to life on paper. However, for a lot of simple and attractive work, just a basic understanding of drawing and design is enough, and anyone who can learn the necessary stitches can also gain some knowledge in these two areas.
The word design frightens some who do not know quite what it means or entails. Perhaps they do not realise that the design has already been begun when the object to be worked has been settled, and[Pg 52] the material, thread, and stitches have been decided upon—the rest comes in much the same way, partly by a system of choice; as it is necessary to know what materials there are which can be used, so must the chief varieties of pattern be known from which choice can be made. All patterns are built up on some fundamental plan, of which the number is comparatively small. The ability to choose, plan, and arrange is in a greater or less degree inherent in every one, so there should be, after all, no great difficulty in the design. The necessary underlying qualities are—a nice taste, freedom from affectation, an eye for colour and form, and, it might be added, a fair share of common sense.
The word "design" can intimidate those who aren't sure what it means or what it involves. They might not realize that the design process actually begins when the object to work on is chosen, and[Pg 52] the materials, thread, and stitches are selected. From there, the rest unfolds similarly, mainly through a series of choices. Just as it’s essential to know the available materials, it's also important to be familiar with the main types of patterns from which to choose. All patterns are based on a few fundamental ideas, and the number of these is relatively small. Everyone has some level of inherent ability to choose, plan, and arrange, which means there shouldn’t be too much difficulty in the design process. The key qualities needed are good taste, a natural style, an eye for color and shape, and, one could say, a reasonable amount of common sense.
A pattern maker requires some stock-in-trade, and it is wise to collect together a store of some well-classified design material of ascertained value, ready to be drawn upon when required. A good knowledge of plants and flowers is very necessary. This is best acquired by making careful drawings from nature. In choosing flowers for embroidery purposes, the best-known ones, such as the daisy, rose, or carnation, give more pleasure to the observer than rare unrecognisable varieties.[Pg 53] Figures, birds, beasts, and such things as inscriptions, monograms, shields of arms and emblems, all demand study and drawing, both from miscellaneous examples and from embroideries.
A pattern maker needs some essential tools, so it’s smart to gather a collection of well-organized design materials that are known to be valuable, ready to use when needed. Having a good understanding of plants and flowers is crucial. The best way to learn this is by making careful drawings from real-life subjects. When selecting flowers for embroidery, popular options like daisies, roses, or carnations are more enjoyable for viewers than rare, hard-to-identify varieties.[Pg 53] Figures, animals, symbols, monograms, coats of arms, and emblems all require study and drawing, both from various examples and from existing embroideries.
The treatment of all these should be studied in old work, in order that the curious conventions and all kinds of amusing and interesting ideas that have gradually grown up in the past may still be made use of and added to, instead of being cast aside in a wild endeavour after something original. The student who collects a supply of the foregoing materials will find she has considerably widened her knowledge during the process, and is better prepared to make designs.
The treatment of all these should be studied in older works so that the intriguing conventions and various amusing and interesting ideas that have developed over time can still be used and expanded upon, rather than being discarded in a rash pursuit of something new. The student who gathers these materials will find she has significantly broadened her knowledge in the process and is better prepared to create designs.
In making a pattern the first thing to be decided upon is some main idea, the detail that is to carry it out must then be considered. This latter may be of various types, such as flowers, foliage, figures, animals, geometrical forms, interlacing strapwork, quatrefoils, &c., &c.; perhaps several of these motifs may be combined together in the same design.
In creating a pattern, the first thing to determine is the main idea, and then the details needed to bring it to life should be considered. These details can take many forms, like flowers, leaves, figures, animals, geometric shapes, interlaced designs, quatrefoils, etc.; several of these motifs might even be combined in the same design.

One of the simplest plans upon which a pattern can be arranged is that of some form recurring at regular intervals over[Pg 55][Pg 54] the surface. The principle involved is repetition; an example of it is shown at fig. 10. The form that is used here is a sprig of flower, but the repeating element admits of infinite variation, it may be anything from a dot to an angel.
One of the simplest designs you can create is one with a shape that repeats at regular intervals across[Pg 55][Pg 54] the surface. The key concept here is repetition; an example of this is shown at fig. 10. The shape used in this case is a flower sprig, but the repeating element can vary infinitely—it could be anything from a dot to an angel.

Copes and chasubles, bedspreads and curtains, are often to be seen decorated with some repeating form. Fig. 11[Pg 56] shows in outline a conventional sprig that is repeated in this fashion over the surface of a famous cope in Ely Cathedral. Fig. 12 is an example of a sprig of flower taken from a XVIIth century embroidered curtain; similar bunches, but composed of different flowers, recur at intervals over this hanging.
Capes and chasubles, bedspreads and curtains often feature some kind of repeating design. Fig. 11[Pg 56] shows an outline of a traditional sprig that repeats across the surface of a well-known cope in Ely Cathedral. Fig. 12 is an example of a flower sprig from a 17th-century embroidered curtain; similar clusters, but made up of different flowers, appear at intervals throughout this fabric.
It may interest the practical worker to know what are the different stitches used upon this figure. The petals of the top flower are in chain stitch in gradated colouring, the centre is an open crossing of chain surrounded by stamens in stem stitch in varied colour, the outermost leaves are outlined in stem stitch with an open filling of little crossed stitches. The petals of the lower flower are worked similarly, and the centre is carried out in chain stitch and French knots. The leaves are filled in with ingenious variations of these stitches.
It might be helpful for the practical worker to know about the different stitches used in this design. The petals of the top flower are done in chain stitch with a gradient of colors, the center features an open cross of chain surrounded by stamens in stem stitch with various colors, and the outer leaves are outlined in stem stitch with an open filling of small crossed stitches. The petals of the lower flower are done in a similar way, and the center is made with chain stitch and French knots. The leaves are filled with clever variations of these stitches.

The repeating element is perhaps a symbolical figure, a heraldic shield, or it may be some geometrical form that supplies the motive. Fig. 13 is a conventional sprig of hawthorn that ornaments in this way an altar frontal at Zanthen. It is by no means necessary that the element[Pg 58][Pg 57] which repeats should be always identical; so long as it is similar in size, form, and general character it will probably be the more interesting if variety is introduced.
The repeating element is likely a symbolic figure, a heraldic shield, or it could be some geometric shape that serves as the motif. Fig. 13 is a conventional sprig of hawthorn that decorates an altar frontal at Zanthen. It’s not necessary for the repeating element[Pg 58][Pg 57] to always be the same; as long as it’s similar in size, shape, and overall character, it will probably be more interesting with some variation introduced.

The principle of repetition is again found in fig. 14, but with an additional feature; a sprig of flower is used, with the further introduction of diagonal lines, expressed by leaf sprays, which are arranged so as to surround each flower and divide it from the adjoining ones.
The principle of repetition is again found in fig. 14, but with an additional feature; a sprig of flower is used, with the further introduction of diagonal lines, expressed by leaf sprays, which are arranged to surround each flower and separate it from the ones next to it.

It is advisable to space out the required surface in some way before commencing to draw out a pattern; for carrying out fig. 14 it would be well to pencil out the surface as in fig. 15; a connection between these two will be perceived at a glance. This spacing-out of the required surface in one way or another is of great assistance, and may even prove suggestive in the planning of the design. It helps the regularity of the work, and order is essential in design as in most other things in life.[Pg 59]
It’s a good idea to outline the surface needed before starting to draw a pattern; for executing fig. 14, it’s best to sketch out the surface like in fig. 15; you’ll be able to see a connection between the two right away. This outlining of the surface in one way or another is really helpful and can even inspire the design process. It promotes consistency in the work, and having order is crucial in design just like in many other areas of life.[Pg 59]

Another very usual expedient is that of introducing a main central form, with others branching out on either side and symmetrically balancing each other. An example of this is given in fig. 16. The symmetry may be much more free than this; a tree is symmetrical taken as a whole, but the two sides do not exactly repeat each other.
Another common approach is to introduce a main central shape, with others branching out on either side and balancing each other symmetrically. An example of this is given in fig. 16. The symmetry can be much more flexible than that; a tree is symmetrical as a whole, but the two sides don’t exactly mirror each other.

A plan very commonly employed is that of radiating main lines all diverging from one central point. Fig. 17 shows a design following this principle; there is infinite variety in the ways in which this may be carried out.
A commonly used plan is to have main lines radiating out from a central point. Fig. 17 illustrates a design based on this principle; there are endless variations in how this can be implemented.

Another method would be to plan a continuous flowing line with forms branching out on one side or on both. Figs. 18 and 19 are border designs, for which purpose this arrangement is often used, though it can also well form an all-over pattern; sometimes these lines used over a surface are made to cross each[Pg 64][Pg 63][Pg 62][Pg 61] other, tartan wise, by running in two directions, producing an apparently complicated design by very simple means.
Another approach would be to design a continuous flowing line with shapes branching out on one side or both. Figs. 18 and 19 are border designs, which is often the purpose of this arrangement, but it can also create an all-over pattern; sometimes these lines across a surface are made to intersect like tartan by running in two directions, creating a seemingly complex design using very simple methods.


Designs may be planned on the counterchange principle. This is a system of mass designing that involves the problem of making a pattern out of one shape, continually repeated, and fitting into itself in such a way as to leave no interstices. The simplest example of this is to be found in the chess board, and it will easily be seen that a great number of shapes might be used instead of the square. Fig. 20 is an example of a counterchange design carried out in inlay; for this method of work counterchange is very suitable. On reference to the chapter upon this work[Pg 65] another example will be found (page 181). Fig. 21 illustrates the same principle, further complicated by the repetition of the form in three directions instead of in two only.
Designs can be created based on the counterchange principle. This is a method of mass design that involves creating a pattern from a single shape, which is repeated continuously and fits together in such a way that there are no gaps. The simplest example of this is a chessboard, and it’s easy to see that many different shapes could be used instead of a square. Fig. 20 is an example of a counterchange design done in inlay; this technique works very well for counterchange designs. If you check the chapter on this work[Pg 65], you will find another example (page 181). Fig. 21 demonstrates the same principle, made more complex by the repetition of the shape in three directions instead of just two.

A method of further enriching a straightforward pattern, covering a plain surface, is to work a subsidiary pattern upon the background. This is usually of a monotonous and formal character in order not to clash with the primary decoration, though this relationship may sometimes be found reversed. It has the appearance of being some decoration belonging to the ground rather than to the[Pg 66] primary pattern; in its simplest form it appears as a mere repeating dot or a lattice (see fig. 22), but it may be so elaborated as to cover with an intricate design every portion of the exposed ground not decorated with the main pattern.
One way to enhance a simple pattern on a flat surface is to add a secondary pattern in the background. This secondary design is typically simple and structured to avoid conflicting with the main decoration, although sometimes the opposite relationship can occur. It seems more like a decoration that belongs to the background rather than the primary pattern; in its most basic form, it might just look like repeating dots or a grid (see fig. 22), but it can be detailed enough to cover every part of the exposed background that isn’t decorated with the main pattern.[Pg 66]
Many other distinct kinds of work might be mentioned, such as needlework pictures, the story-telling embroideries that can be made so particularly attractive. Embroidered landscapes, formal gardens, mysterious woods, views of towns and palaces, are, if rightly treated, very fine. In order to learn the way to work such subjects we must go to the XVIth and XVIIth century petit point pictures, and to the detail in fine tapestries. The wrong method of going to work is to imitate the effect sought after by the painter.
Many other unique types of work could be mentioned, like needlework pictures and the storytelling embroideries that can be especially appealing. Embroidered landscapes, formal gardens, mysterious woods, and scenes of towns and palaces can be quite beautiful if done well. To learn how to create such subjects, we should look at the 16th and 17th century petit point pictures and the details in fine tapestries. The wrong approach is to simply copy the effect that the painter achieves.

It is a mistake in embroidery design to be too naturalistic. In painting it may be the especial aim to exactly imitate nature, but here are wanted embroidery flowers, animals and figures, possessing the character and likeness of the things represented, but in no way trying to make us believe that they are real. The semblance of a bumble bee crawling upon the[Pg 68][Pg 67] tea cloth gives a hardly pleasant sensation and much savours of the practical joke, which is seldom in good taste; the needle, however, adds convention to almost anything, and will usually manage the bee all right unless the worker goes out of the way to add a shadow and a high light. Such things as perspective, light and shade or modelling of form, should all be very much simplified if not avoided, for embroidery conforms to the requirements of decoration and must not falsify the surface that it ornaments. Shading is made use of in order to give more variety to, and exhibit the beauty of, colour by means of gradation, to explain more clearly the design, and so on; it is not employed for the purpose of fixing the lighting of the composition from one point by means of systematically adjusted light and shade, or of making a form stand out so realistically as to almost project from the background.
It's a mistake in embroidery design to be too realistic. In painting, the goal might be to closely imitate nature, but in embroidery, we want flowers, animals, and figures that capture the character and likeness of the things represented without trying to make them look real. A depiction of a bumblebee crawling on the[Pg 68][Pg 67] tea cloth can create an unpleasant feeling and often seems more like a practical joke, which isn't usually tasteful. However, the needle can add a level of convention to almost anything and typically handles the bee well unless the artist overcomplicates it with shadows and highlights. Elements like perspective, light and shade, or modeling forms should be greatly simplified or avoided altogether because embroidery serves decorative purposes and shouldn't distort the surface it's embellishing. Shading is used to add variety and showcase color beauty through gradation, clarify the design, and similar goals; it’s not meant to create a lighting scenario tied to a single point or to make a form appear so realistic that it seems to stand out from the background.
In avoiding too much resemblance to natural forms it is not necessary to make things ugly; a conventional flower implies no unmeaning straightness or impossible curve, it may keep all its interesting characteristics, but it has to obey other[Pg 69] requirements specially necessary in the particular design. Another point to be noted is that, since there is freedom of choice of flowers and other objects, only those perfect and well-formed should be chosen; all accidents of growth and disease may, happily, be omitted; if anything of this kind is put in it helps to give the naturalistic look which is to be avoided. Both sides of a leaf should match, though it may happen in nature, through misfortune, that one is deformed and small.
In avoiding too much similarity to natural forms, it’s not necessary to make things unattractive; a stylized flower can maintain all its interesting traits without having random straight lines or impossible curves. It just needs to follow other requirements that are especially important for the specific design. Another thing to keep in mind is that, since there’s freedom to choose flowers and other elements, only those that are perfect and well-formed should be selected; any flaws from growth or disease can, thankfully, be left out. Including anything like that makes it look more naturalistic, which is what we want to avoid. Both sides of a leaf should match, even though in nature, it can happen that one side is misshapen and smaller due to bad luck.[Pg 69]
In figure work, which, though ambitious, is one of the most interesting kinds of embroidery, the figures, like all other things, must be treated with a certain amount of simplicity; very little attempt must be made to obtain flesh tones, roundness of form, perspective, or foreshortening. The work should be just sufficiently near to nature to be a good embroidery rendering of it. However, without overstepping the limits there is a great deal that may be expressed, such things as character, gesture, grace, colour, and so on, matters which are after all of first importance. Detail, if of the right kind, may be filled in, but it is wrong to attempt what is to the craft[Pg 70] very laborious to obtain, for this would be misdirected energy, which is great waste. A right use of the figure can be seen in the XIIIth century embroidery pictures, which, covering mediæval church vestments, often display episodes from the lives of the saints. These are some of the masterpieces of the art of embroidery; observation of nature is carried to a marvellous pitch, but the execution never sinks into commonplace realism.
In figure work, which, while ambitious, is one of the most fascinating types of embroidery, the figures, like everything else, need to be approached with a certain level of simplicity; very little effort should be made to achieve flesh tones, roundness of form, perspective, or foreshortening. The work should be close enough to nature to be a good representation in embroidery. However, without going overboard, there is a lot that can be conveyed, such as character, gesture, grace, color, and so on—elements that are ultimately very important. Detail, if it’s the right kind, can be added, but it’s a mistake to try for what is very labor-intensive for the craft, as this would be misdirected effort and a waste. A proper use of the figure can be seen in the 13th-century embroidery pieces, which, adorning medieval church garments, often illustrate scenes from the lives of saints. These are some of the masterpieces of embroidery; the observation of nature reaches an incredible level, but the execution never falls into ordinary realism.
Certain restrictions are always present, in making a design, that must be conformed to, such as, the limit of space, the materials with which the work is to be carried out, the use to which it will be put, and so on. These, instead of being difficulties, can afford help in the way of suggestion and limitation. A bad design may look as if it obeyed them unwillingly—a form is perhaps cramped, perhaps stretched out in order to fit its place, instead of looking as if it naturally fitted it whether the confining lines were there or not. In the early herbals, illustrated with woodcuts, examples can be found over and over again of a flower filling a required space simply and well; fig. 23 is taken from the herbal of Carolus Clusius,[Pg 72][Pg 71] printed at Antwerp in 1601 by the great house of Plantin. The draughtsman in this case had to draw a plant to fit a standard-sized engraver's block, and he had a certain number of facts to tell about it; he drew the plant as simply and straightforwardly as possible, making good use of all the available space, the result being a well-planned and balanced piece of work, with no affectation or unnecessary lines about it.
Certain limitations are always present when creating a design that must be adhered to, such as the available space, the materials being used, the intended purpose, and so on. Rather than being obstacles, these can actually provide guidance in terms of suggestion and constraint. A poorly conceived design may appear to be forced into compliance—perhaps the shape looks cramped or overly stretched to fit its designated area, instead of seamlessly integrating, regardless of the surrounding boundaries. In early herbals, illustrated with woodcuts, there are numerous examples of flowers simply and effectively occupying required spaces; fig. 23 is taken from the herbal of Carolus Clusius,[Pg 72][Pg 71] printed in Antwerp in 1601 by the renowned Plantin press. In this case, the illustrator needed to draw a plant to fit a standard-sized engraver's block, while conveying a specific set of information; he depicted the plant as clearly and directly as possible, making excellent use of the available space, resulting in a well-organized and balanced piece of work with no unnecessary embellishments or extraneous lines.

Fine colour is a quality appreciated at first sight, though often unconsciously. It is a difficult subject to speak of very definitely; an eye for colour is natural to some, but in any case the faculty can be cultivated and developed. By way of studying the subject, we can go to nature and learn as much as we are capable of appreciating; even such things as butterflies, shells, and birds' eggs are suggestive. Again, embroideries, illuminated manuscripts, pictures, painted decoration, may be studied, and so on; in fact, colour is so universal that it is not possible to get away from it. Unfortunately we are sometimes forced to learn what to avoid as well as what to emulate.
Fine color is something we notice immediately, often without realizing it. It’s a tough topic to discuss in clear terms; some people have a natural eye for color, but anyone can learn to improve their skills. To study color, we can look to nature and absorb as much as we can appreciate; even things like butterflies, shells, and bird eggs are inspiring. Additionally, we can examine embroideries, illuminated manuscripts, paintings, and decorative art, among others; in fact, color is so pervasive that we can’t escape it. Unfortunately, we sometimes have to learn what to avoid just as much as what to admire.
Colour is entirely relative, that is to say it depends upon its immediate sur[Pg 73]roundings for what it appears to be. Also it has effects varying with the material which it dyes; wool is of an absorbent nature, whereas silk has powers of reflection. It is a safe plan to use true colours, real blue, red or green, not slate, terra cotta, and olive. Gold, silver, white and black, are valuable additions to the colour palette; it should be remembered about the former that precious things must be used with economy or they become cheap and perhaps vulgar.
Color is completely relative, meaning it depends on its immediate surroundings for how it appears. It also has different effects based on the material it's applied to; wool absorbs color, while silk reflects it. It's a good idea to use true colors—like real blue, red, or green—instead of slate, terracotta, or olive. Gold, silver, white, and black are valuable additions to the color palette; just remember that precious materials should be used sparingly, or they can lose their value and become tacky.

For getting[Pg 74] satisfactory colour there is a useful method which can at times be made use of; this is to stitch it down in alternate lines of two different tints, which, seen together at a little distance, give the desired effect. Backgrounds can be covered over with some small geometrical pattern carried out in this way, such as is shown in fig. 24, perhaps using in alternation bright blue and black instead of a single medium tint of blue all over. At a slight distance the tone may be the same in either case, but this method gives a pleasantly varied and refined effect, which avoids muddiness, and shows up the pattern better. This same method is used for expressing form more clearly as well as for colour; waves of hair, for instance, are much more clearly expressed when worked in this way.[Pg 75]
For achieving[Pg 74] a pleasing color, there's a helpful technique that can occasionally be used; this involves stitching down in alternating lines of two different shades, which, when viewed from a slight distance, create the desired effect. Backgrounds can be covered with a small geometric pattern done this way, like shown in fig. 24, perhaps alternating bright blue and black instead of using just one medium shade of blue throughout. From a short distance, the tones may appear similar in either case, but this method provides a nicely varied and refined effect, preventing muddiness and enhancing the visibility of the pattern. This same technique is effective for clearly representing form as well as color; for example, waves of hair are much more distinctly rendered when worked this way.[Pg 75]
CHAPTER IV
STITCHES
Introduction—Chain Stitch—Zigzag Chain—Chequered Chain—Twisted Chain—Open Chain—Braid Stitch—Cable Chain—Knotted Chain—Split Stitch.
Introduction—Chain Stitch—Zigzag Chain—Checkered Chain—Twisted Chain—Open Chain—Braid Stitch—Cable Chain—Knotted Chain—Split Stitch.
It is necessary for every worker to have a certain amount of knowledge of stitches, for they are, so to speak, the language of the art, and though not of first importance, still there is a great deal in stitchery. The needlewoman should be absolute master of her needle, for there is a great charm in beautifully carried out stitching; also a good design can be made mechanical and uninteresting by a wrong method of execution. The simplest and most common stitches are the best, and are all that are necessary for the doing of good work. Work carried out entirely in one stitch has a certain unity and character that is very pleasing. There are a great number of stitches in existence, that is, if each slight[Pg 76] variation has a different name assigned to it. The names are sometimes misleading, for often the same stitch is known by several different ones; descriptive names have where possible been chosen for those discussed in the following pages.
It’s important for every worker to have a basic understanding of stitches since they are, in a way, the language of the craft. While not the most crucial aspect, there’s a lot to learn in stitching. A seamstress should have complete control over her needle because beautifully executed stitching has a unique charm; also, a good design can become dull and uninteresting if not executed properly. The simplest and most common stitches are the best and are all that’s needed to create quality work. When a piece is done entirely in one stitch, it has a certain unity and character that is very attractive. There are many stitches out there, especially since each slight variation often has a different name. The names can sometimes be confusing, as the same stitch may be referred to by several different terms; for those discussed in the following pages, descriptive names have been chosen whenever possible.
A worker may find it useful to keep by her a sampler with the most characteristic stitches placed upon it; a glance at this will be suggestive when she is in doubt as to which to use, for it is often difficult to recollect just the right and most suitable one at a moment's notice. It is necessary to learn only the main varieties, for each individual worker can adapt, combine, and invent variations to suit a special purpose.
A worker might find it helpful to keep a sampler with the most common stitches nearby; a quick look at it will help her decide which one to use when she’s unsure, as it can be tough to remember the right and best option on the spot. It’s important to learn just the main types, since each worker can adapt, mix, and create variations for specific needs.
The direction of the stitch is important; tone, if not colour, can be very much altered by change in direction; also growth and form can be suggested by it; for instance, lines going across a stem are not usually so satisfactory as those running the length of it; these suggesting growth better. Folds of drapery are often explained by direction of the lines of stitching quite as much as by gradation of colour.[Pg 77]
The direction of the stitch matters; the tone, if not the color, can be significantly changed by altering the direction. It can also suggest growth and form; for example, lines that go across a stem usually don't look as good as those that run along its length, as they suggest growth more effectively. The folds in fabric are often defined by the direction of the stitching lines just as much as by the color gradation.[Pg 77]
With reference to the stitches described in the following chapters, the worker is advised to try to work them by simply examining the diagrams, and, if in any difficulty, then to refer to the printed description, for such directions are apt to be tedious. The simplest way to master these is to let some one read them out step by step, and to work from dictation. It should be remembered that the use of a particular thread often makes or mars a stitch, some requiring soft silks to show them to advantage, whilst others may need a stoutly twisted thread.
With regard to the stitches outlined in the upcoming chapters, it's recommended that the worker practice them by looking at the diagrams, and if any issues arise, refer to the written instructions, as those can be a bit long-winded. The easiest way to get the hang of these is to have someone read the instructions aloud step by step while you follow along. Keep in mind that the type of thread you use can really affect a stitch—some stitches look best with soft silk, while others may require a strong, twisted thread.
Chain stitch is universal, and one of the most ancient of stitches. It is the most commonly used of a group that might be described as linked stitches. Much beautiful work has been carried out entirely in it, and when a monotonous even line is required, this is a most suitable stitch to employ. It is equally in request for outline and filling in, and its chain-like adaptability makes it specially good for following out curved forms or spiral lines. Tambour stitch is practically the same in result, though worked in quite a different manner, for it is carried out in a frame with a fine[Pg 78] crochet hook, instead of with a needle. This makes it quicker in execution, but more mechanical in appearance, so it is not to be as much recommended.
Chain stitch is universal and one of the oldest stitching techniques. It’s the most commonly used among a group that can be called linked stitches. A lot of beautiful work has been done entirely with it, and when a consistent, even line is needed, this is a great stitch to use. It's popular for both outlines and filling in, and its chain-like flexibility makes it especially good for following curved shapes or spiral lines. Tambour stitch achieves similar results but is done in a completely different way, using a fine crochet hook in a frame instead of a needle. This makes it faster to do, but it looks more mechanical, so it’s not recommended as much.

To work chain stitch (fig. 25) bring the needle through at the top of the traced line, hold the working thread down towards the left with the thumb, insert the needle at the point where the[Pg 79] thread has just come through and bring it up on the traced line about one-sixteenth of an inch further along, draw the thread through over the held down thread. It should show a neat line of back-stitching on the reverse side. The chain can be made broader by inserting the needle a little to the right, instead of at the exact point where the last thread came through. Care must be taken in the working not to draw the thread too tightly, as this stitch is inclined to pucker the material, especially when it is worked in curved lines.
To do chain stitch (fig. 25), bring the needle up at the top of the traced line, hold the working thread down to the left with your thumb, insert the needle at the point where the[Pg 79] thread just came through and bring it up on the traced line about one-sixteenth of an inch further along, then pull the thread through over the held down thread. It should create a neat line of back-stitching on the back. You can make the chain wider by inserting the needle a little to the right, instead of exactly where the last thread came through. Be careful not to pull the thread too tightly, as this stitch can cause the material to pucker, especially when working on curved lines.

A flower and leaf worked with a solid filling of chain stitch are shown in fig. 26. The dark outline of the flower is in back stitch, the centre a mass of French knots, and the stem in stem stitch. By working the petals in curved lines in this way the shape is well suggested, and the play of light on the curves is particularly happy, especially if the thread used is silk or gold. Another slight variation from this would be to work the lines of chain stitch in different shades of colour, and so get each petal gradually either lighter or darker towards its base; this gives a very pretty effect. Fig. 27 shows an oak leaf[Pg 80] carried out in this way, the lines upon it indicate the way in which the stitches[Pg 81] would be worked. The rule in solid fillings is to work from the outside inwards where possible, and thus make sure of a good outline.
A flower and leaf filled with solid chain stitch are shown in fig. 26. The dark outline of the flower is done in back stitch, the center is filled with French knots, and the stem is in stem stitch. By stitching the petals in curved lines like this, the shape is well defined, and the way light plays on the curves is particularly nice, especially if the thread used is silk or gold. A slight variation on this would be to use different shades of color for the chain stitch lines, making each petal gradually lighter or darker towards its base; this creates a very pretty effect. Fig. 27 shows an oak leaf[Pg 80] created this way, with the lines indicating how the stitches[Pg 81] would be executed. The rule for solid fillings is to work from the outside in whenever possible to ensure a good outline.

In the Victoria and Albert Museum there is a white linen dress[1] daintily embroidered in chain stitch. It is an excellent example of a kind of design suitable to this stitch; the leaves and flowers are carried out in lines of chain stitch following the outline, and in these lines use is made of strongly contrasting colour to both show up the form better, and also decorate it. The leaf in fig. 28 is in style somewhat similar to this, and is intended to be carried out in two distinct colours.
In the Victoria and Albert Museum, there's a white linen dress[1] delicately embroidered with chain stitch. It’s a great example of a design that works well with this stitch; the leaves and flowers are outlined in lines of chain stitch, using contrasting colors to enhance the shape and add decoration. The leaf in fig. 28 is somewhat similar in style and is meant to be executed in two distinct colors.

Chain stitches can be worked singly; they are used in this way as a powdering over a background. Sometimes they may be seen conventionally suggesting the small feathers on the shoulder of a bird's wing by being dotted over it at regular intervals. Fig. 29 shows how they might be used to carry out a tiny flower, five separate stitches represent the petals, and two more the leaves at the base; this is a simpler and more satisfactory method than to attempt very minute forms with satin stitches.
Chain stitches can be done individually; they're often used this way for detailing a background. Sometimes, they can be seen traditionally indicating the small feathers on a bird's wing by being spaced evenly across it. Fig. 29 illustrates how they can be used to create a tiny flower, with five separate stitches representing the petals and two more for the leaves at the base; this method is simpler and more effective than trying to create very small shapes with satin stitches.

The common chain makes a particularly neat border stitch taken in zigzag fashion. To work this (fig. 30)—Trace two parallel lines on the material and work the chain across from side to side at an angle of 45° to the traced lines. For further security it is well to catch down the end of the stitch just completed with the needle as it commences the following[Pg 84] one. The line can be further decorated by placing a French knot, perhaps in a contrasting colour, in each little triangular space left by working the stitch.
The common chain creates a particularly neat border stitch done in a zigzag pattern. To do this (fig. 30)—Trace two parallel lines on the fabric and work the chain across from side to side at a 45° angle to the traced lines. For extra security, it's helpful to secure the end of the last stitch with the needle as you start the next[Pg 84] one. You can further embellish the line by adding a French knot, possibly in a contrasting color, in each small triangular space created by the stitch.


There is an ingenious method of working ordinary chain stitch in a chequering of two colours (fig. 31). It is quite simple to work. Thread a needle with two different coloured threads, commence the chain stitch in the usual way[Pg 85] until the thread has to be placed under the point of the needle for forming the loop. Place only one of the two threads underneath, leaving the other on one side out of the way, then draw the needle and thread through over the one held down. A chain stitch will have been formed with the thread that was looped under the needle. For the next stitch, the alternate thread is placed under, and so on, taking each thread in turn. The thread not in use each time usually requires a little adjustment to make it entirely disappear from the surface.
There’s a clever way to make a regular chain stitch using two colors (fig. 31). It’s pretty simple to do. Thread a needle with two different colored threads, start the chain stitch like normal[Pg 85] until you need to place the thread under the needle to form the loop. Put only one of the two threads underneath, keeping the other one out of the way, then pull the needle and thread through over the one you held down. You’ll have made a chain stitch with the thread that was looped under the needle. For the next stitch, place the alternate thread underneath, and keep switching back and forth with each thread. The thread not in use usually needs a little adjustment to fully blend into the surface.
Twisted chain is worked very similarly to the ordinary chain stitch. It has not such a decidedly looped appearance, which is sometimes an advantage. To work it (fig. 32)—Bring the thread through at the top of the line, hold it down under the thumb to the left, and insert the needle to the left of the traced line, slightly below the point where the thread has come through. Bring it out again on the traced line, about one-eighth of an inch lower down, and draw it through over the held down thread.
Twisted chain is created in a way that's very similar to a regular chain stitch. It doesn’t have such a clearly looped look, which can be an advantage at times. To make it (fig. 32)—Start by bringing the thread through at the top of the line, press it down under your left thumb, and insert the needle to the left of the traced line, just below where the thread came through. Pull it out again on the traced line, about one-eighth of an inch lower, and pull it through over the thread you’re holding down.

An entirely different effect can be obtained by working this stitch much[Pg 86] closer together, but in exactly the same way. It will then resemble a satin stitch slightly raised on one side. This is known as rope stitch and is at times very useful.
An entirely different effect can be achieved by working this stitch much[Pg 86] closer together, but in exactly the same way. It will then look like a satin stitch that's slightly raised on one side. This is called rope stitch and is sometimes very useful.

Open chain stitch makes a good broad line; it looks best when worked with a stout thread. To carry out the stitch (fig. 33)—Trace two parallel lines upon[Pg 87] the material, about one-eighth of an inch apart, and bring the thread through at the top of the left-hand one. Hold the thread down with the thumb and insert the needle exactly opposite on the other line, bring it up one-eighth of an inch lower down and draw the thread through over the held down part, leaving a rather slack loop upon the material.[Pg 88] Then insert the needle on the first line again, inside the slack loop, and bring it out one-eighth of an inch below. Repeat this on each side alternately. Fig. 34 is a drawing from a piece of white linen work in which the open chain stitch is used in combination with other stitches. This figure, with its open-work centre, is repeated diagonally over a white linen cloth exhibited in the Victoria and Albert Museum.
Open chain stitch creates a nice, wide line and looks best when done with a sturdy thread. To do the stitch (fig. 33)—Draw two parallel lines on[Pg 87] the fabric, about one-eighth of an inch apart, and pull the thread up through the top of the left line. Press the thread down with your thumb and insert the needle directly opposite on the other line, bringing it up one-eighth of an inch lower and pulling the thread through over the pressed-down part to leave a loose loop on the fabric.[Pg 88] Then, insert the needle back into the first line, inside the loose loop, and pull it out one-eighth of an inch below. Keep repeating this on each side alternately. Fig. 34 is a drawing of a piece of white linen work that uses the open chain stitch along with other stitches. This design, featuring its open-work center, is repeated diagonally across a white linen cloth displayed at the Victoria and Albert Museum.

Braid stitch rather resembles a fancy braid laid upon the material. It looks best when carried out with a stoutly twisted thread. To work it (fig. 35)—Trace two parallel lines upon the material about one-eighth of an inch apart, and bring the thread through at the right-hand end of the lower line. Throw the thread across to the left and hold it slackly under the thumb. Place the needle pointing towards the worker under this held thread, then twist it round towards the left and over the held thread until it points in the opposite direction. It will now have the thread twisted loosely over it. Next, insert the needle on the upper line one-eighth of an inch from the starting-point, and bring it[Pg 90][Pg 89] through on the lower line exactly underneath. Place the thumb over the stitch in process of making and draw the thread through as the diagram shows. It can be worked openly or more closely as preferred.
Braid stitch looks like a decorative braid placed on the fabric. It’s best done with a thick twisted thread. To create it (fig. 35)—Draw two parallel lines on the fabric about one-eighth of an inch apart, and bring the thread through at the right-hand end of the lower line. Cross the thread over to the left and hold it loosely under your thumb. Position the needle pointing towards you under this held thread, then twist it to the left and over the held thread until it points in the opposite direction. Now it will have the thread loosely twisted over it. Next, insert the needle on the upper line one-eighth of an inch from where you started, and bring it[Pg 90][Pg 89] through on the lower line directly underneath. Place your thumb over the stitch you're making and pull the thread through as shown in the diagram. You can make the stitch loose or tight, depending on your preference.

Cable chain is descriptively named, for, when worked with a stoutly twisted thread, it has very much the appearance[Pg 91] of a chain laid upon the material, rather too much so perhaps to be a pretty embroidery stitch. To work it (fig. 36)—Bring the needle through at the top of the traced line, throw the thread round to the left and hold it down with the thumb near where it has come through the material. Pass the needle under the held down thread from left to right and draw it[Pg 92] through until there is only a small loop left. Insert the needle in the centre of this loop, on the traced line about one-sixteenth of an inch below the starting-point. Bring it out a quarter of an inch below and outside the loop. Take the thread in the right hand and tighten the loop that has now been formed, and then pass the thread under the point of the needle towards the left (see diagram). Place the left thumb over the stitch in process of making and draw the thread through; this will complete the first two links of the chain; to continue, repeat from the beginning.
Cable chain is called that because, when made with a thick, twisted thread, it looks a lot like a chain laid on the fabric, maybe a bit too much to be a pretty embroidery stitch. To work it (fig. 36)—Bring the needle through at the top of the traced line, wrap the thread around to the left, and hold it down with your thumb near where it came through the fabric. Pass the needle under the thread you’re holding down from left to right and pull it through until there's just a small loop left. Insert the needle into the center of this loop, on the traced line about one-sixteenth of an inch below where you started. Bring it out a quarter of an inch below and outside the loop. Hold the thread in your right hand and tighten the loop that’s been formed, then pass the thread under the needle's point towards the left (see diagram). Put your left thumb over the stitch you’re making and pull the thread through; this will complete the first two links of the chain. To continue, repeat from the beginning.

Knotted chain is a pretty stitch; to look well it must be worked with a stout thread. To carry it out (fig. 37)—Trace two parallel lines upon the material, about one-eighth of an inch apart. Bring the thread through at the right hand end in the centre between the two lines, then insert the needle on the upper line one-sixteenth of an inch further along, and bring it through on the lower line immediately below. Draw the thread through and there will be a short slanting line left upon the material. Throw the thread round to the left and hold it under the[Pg 93] thumb, then pass the needle and thread through the slanting line from above downwards, leaving the thread a little slack. Place the thread again under the thumb, then in the same way as before, from above downwards, pass the needle and thread through this slack loop. This makes the first two links of the chain; the last one will not be properly[Pg 94] fixed in place until the next stitch is taken. The dotted vertical line on the diagram shows the piece of material taken up by the needle upon commencing the next stitch.
Knotted chain is a nice stitch; to look good, it needs to be done with a strong thread. To do this (fig. 37)—Trace two parallel lines on the material, about one-eighth of an inch apart. Bring the thread up at the right end in the center between the two lines, then insert the needle on the upper line one-sixteenth of an inch further along, and bring it through on the lower line right below. Pull the thread through and you’ll see a short slanting line on the material. Wrap the thread around to the left and hold it under your thumb, then pass the needle and thread through the slanting line from above downwards, leaving the thread a little loose. Place the thread again under your thumb, then in the same way as before, from above downwards, pass the needle and thread through this loose loop. This forms the first two links of the chain; the last one won’t be properly secured until the next stitch is made. The dotted vertical line in the diagram shows the portion of material taken by the needle when starting the next stitch.

Split stitch is a most useful one for many purposes. It is difficult to distinguish from a fine chain when done, but in the working it much more resembles stem stitch. It can be carried out[Pg 95] in the hand or in a frame. This stitch, frequently seen upon ancient work, was much used for both draperies and features; the lines of the stitching usually, by their direction, expressing moulding of form or folds of drapery. To work it (fig. 38)—Bring the thread through at the lower end of the traced line, then insert the needle about one-eighth of an inch further along, and bring it through on the line two or three threads nearer the starting-point; whilst bringing it through take it also through the centre of the working thread, which thus splits each stitch.
Split stitch is really useful for many purposes. It’s hard to tell apart from a fine chain stitch when it’s finished, but as you work it, it looks more like stem stitch. You can do it by hand or in a frame. This stitch, often seen in ancient work, was widely used for both drapery and features; the lines of the stitching generally indicate the shaping of forms or the folds of fabric. To work it (fig. 38)—Bring the thread up at the lower end of the traced line, then insert the needle about one-eighth of an inch farther along and bring it up on the line two or three threads closer to where you started; as you pull it through, also take it through the center of the working thread, which will split each stitch.

CHAPTER V
STITCHES—(continued)
Satin Stitch—Long and Short Stitch—Stem Stitch—Overcast Stitch—Back Stitch—Buttonhole Stitch—Tailor's Buttonhole—Fancy Buttonhole Edgings—Flower in Open Buttonhole Stitch—Leaf in Close Buttonhole Stitches—Petal in Solid Buttonholing.
Satin Stitch—Long and Short Stitch—Stem Stitch—Overcast Stitch—Back Stitch—Buttonhole Stitch—Tailor's Buttonhole—Fancy Buttonhole Edgings—Flower in Open Buttonhole Stitch—Leaf in Close Buttonhole Stitches—Petal in Solid Buttonholing.
SATIN AND SIMILAR STITCHES
Satin stitch is perhaps the most commonly used of all stitches. It is more[Pg 96] quickly worked by hand, but for complicated work the help of a frame is required. Floss silk thread is seen to greatest advantage in a stitch of this kind, for it shows off the glossiness of silk particularly well. It is straightforward in the working and needs no further description than is given by the diagram (fig. 39). The stitches may vary in length, they must neither be impracti[Pg 97]cably long nor, on the other hand, too much cut up, lest the silky effect be partly lost. These stitches lie close together and in parallel lines; the chief difference between satin and several other closely allied stitches being that these others may radiate or vary in direction according to the space to be filled. The stitch is usually worked in oblique lines; stems, leaves, and petals would be treated in this way; sometimes it is worked regularly having regard to the warp and woof of the material; it would be treated thus when used in conjunction with cross or stroke stitch.
Satin stitch is probably the most commonly used stitch of all. It is more[Pg 96] quickly done by hand, but for more complex work, you'll need a frame. Floss silk thread looks its best with this stitch, as it really highlights the shine of the silk. It's simple to do and doesn’t need any more explanation than what’s shown in the diagram (fig. 39). The stitches can vary in length, but they shouldn’t be impractically long or too short, otherwise, the silky effect might be lost. These stitches sit close together in parallel lines; the main difference between satin stitch and several other similar stitches is that the others can radiate or change direction depending on the area being filled. The stitch is typically worked in slanted lines; stems, leaves, and petals are usually done this way. Sometimes it’s worked more consistently, paying attention to the weave of the fabric, especially when combined with cross or stroke stitch.

It will be seen that there is as much silk at the back as on the front of the work. There is a method of carrying out the stitch by which this waste of material at the back is avoided; the thread is returned to the front close to where it went through instead of crossing over and coming up on the other side. The effect on the right side, however, is not so good, so this method cannot be recommended.
It can be observed that there is as much silk on the back as there is on the front of the piece. There’s a technique for stitching that avoids this excess material on the back; the thread is brought back to the front near where it came through instead of crossing over and coming up on the opposite side. However, the result on the front side isn’t as appealing, so this method can’t be recommended.
One of the technical difficulties with satin stitch is to get a neat firm line at the edges of the filled space; this is excellently attained by the Chinese and Japanese, who use this satin stitch a great[Pg 98] deal. They frequently work each petal of a complicated flower separately, leaving as a division, between each one and the next, a fine line of material firmly and clearly drawn.
One of the technical challenges with satin stitch is achieving a clean, solid line at the edges of the filled area; this is done exceptionally well by the Chinese and Japanese, who use this satin stitch a lot[Pg 98]. They often work each petal of a complex flower individually, leaving a fine line of material firmly and clearly defined between each one and the next.

The stitch is much used for raised work, and also lends itself well to gradation of colour. Fig. 40 is an example of shading in satin stitch. In this case each new row of stitches fits in just between those of the last row; this is a bold but very effective method of expressing gradation. A variation upon this is shown in fig. 42; the bands of different colour are here necessarily worked in a chevron pattern which makes the shading rather more[Pg 99] gradual. An example of the same thing can be seen in fig. 44 in the leaf upon which the squirrel sits. Apart from gradation of colour, the surface to be covered by satin stitch has often to be partitioned up in some way in order to make the satin stitches of a practical length.
The stitch is often used for raised work and is great for color gradation. Fig. 40 showcases shading in satin stitch. In this case, each new row of stitches fits perfectly between the stitches of the last row; this is a bold yet very effective way to express gradation. A variation of this can be seen in fig. 42; here, the bands of different colors are worked in a chevron pattern, which makes the shading a bit more[Pg 99] gradual. You can find a similar example in fig. 44 in the leaf where the squirrel sits. Besides color gradation, the area covered by satin stitch often needs to be divided up in some way to keep the satin stitches at a practical length.

Long and short stitch is a very slight variation, if any, from satin stitch. The name describes the method of working, for it is carried out by working alternately a long and a short stitch, the stitches being[Pg 100] picked up just as in satin stitch. It is useful for close fillings and shaded work, and also as a solid outline for any kind of open filling. The working of the stitch can be seen in fig. 41, where the band of lightest colour on the upper part of the leaf is worked in long and short stitch. The advantage of this way of working can be seen at once, it makes a firm outline on the one edge and a nicely broken-[Pg 101]up one on the other, just ready for another shade to be worked in. In order to carry out the rest of the shading on the leaf in the same way the stitches can be all of the same length; this will always ensure a broken line at the edge, which is a necessity for this method of gradation. Long and short stitch used as an outline for a leaf with an open filling can be seen on page 209. The opus plumarium or feather stitch that we read of in the descriptions of the old embroideries was a similar stitch to this, and so called, some say, because it resembled the plumage of a bird.
Long and short stitch is a slight variation, if any, from satin stitch. The name describes how it's done, as it involves alternating between a long and a short stitch, with the stitches being[Pg 100] picked up just like in satin stitch. It's helpful for close fillings and shaded work, and also serves as a solid outline for any type of open filling. You can see the technique in fig. 41, where the band of the lightest color on the upper part of the leaf is done in long and short stitch. The benefit of this technique is immediately clear; it creates a firm outline on one edge and a nicely broken-up one on the other, perfectly ready for adding another shade. To continue shading the leaf in the same manner, the stitches can all be the same length; this will always guarantee a broken line at the edge, which is essential for this gradient technique. Long and short stitch used as an outline for a leaf with an open filling can be seen on page 209. The opus plumarium or feather stitch, mentioned in descriptions of old embroideries, was similar to this stitch and got its name, some say, because it looked like a bird's feathers.

Stem stitch, well known and frequently in use for various purposes, such as for lines, outlines, gradated and flat fillings, and so on, is usually done in the hand, and is quite simple; fig. 43 explains the working. If a broad line is required the needle is put in more obliquely, and a raised effect can be obtained by working over a laid thread. The thread must be kept to the same side of the needle, either to the left or to the right as better suits the purpose in hand; the effect is more line-like when it is kept to the right. Occasionally, when just a double line is to be worked, it is deliberately done in the two ways, and[Pg 102] then the line resembles a narrow plait. A solid filling in stem stitch should be worked in lines as illustrated in the squirrel in fig. 44. This little beast is taken from the curtain shown in Plate VII., and is a good example of the life and interest that the introduction of such things adds to embroideries.
Stem stitch is well known and commonly used for various tasks, like creating lines, outlines, and gradated or flat fillings. It's typically done by hand and is quite simple; fig. 43 explains how to do it. If you need a wider line, insert the needle at a more angled position, and you can create a raised effect by stitching over a laid thread. Keep the thread on the same side of the needle, either left or right, depending on what works best for you; keeping it to the right gives a more line-like look. Sometimes, when creating just a double line, you can deliberately use both methods, making the line look like a narrow braid. A solid filling in stem stitch should be done in lines, as shown in the squirrel from fig. 44. This little creature is taken from the curtain shown in Plate VII., and it’s a great example of how adding such elements brings life and interest to embroideries.


The stitches just described were largely[Pg 103] used in crewel work. This is a rather vague name that denotes a decorative kind[Pg 105][Pg 104] of needlework carried out with coloured wools upon a plain white linen ground. The design is usually composed of conventionally treated leaves and flowers, often growing from boldly curved stems. These were partly shaded in solid stitches, partly worked with geometrical open fillings; ornamental birds and beasts of all kinds were introduced, and the effect of the whole was very beautiful. The work is[Pg 106] characteristically English, and a great deal of it was executed in the XVIIth century. Plates VII. and VIII. are illustrative of the type of work, and fig. 45 represents a detail. The various stitches which occur in this drawing are stem, herring-bone, long and short, knot, basket, buttonhole, single chain and satin stitches.
The stitches just described were mainly[Pg 103] used in crewel work. This is a rather vague term that refers to a decorative type[Pg 105][Pg 104] of needlework done with colored wools on a plain white linen background. The design typically consists of conventionally styled leaves and flowers, often emerging from boldly curved stems. These were partly shaded with solid stitches and partly filled with geometric open patterns; ornamental birds and animals of all kinds were included, creating a very beautiful overall effect. The work is[Pg 106] typically English, and a lot of it was done in the 17th century. Plates VII. and VIII. illustrate this type of work, and fig. 45 shows a detail. The various stitches found in this drawing are stem, herringbone, long and short, knot, basket, buttonhole, single chain, and satin stitches.

Overcast stitch in embroidery is practi[Pg 107]cally a very short raised satin stitch. It requires neat workmanship, and then makes a bold clear line or outline. To work it (fig. 46)—Run or couch down a thread on the traced line, then with fine thread cover this over with close upright stitches, picking up as little material as possible each time in order to make the line clear and round. The stitch is worked most perfectly in a frame.
Overcast stitch in embroidery is basically a very short raised satin stitch. It needs precise workmanship, and then creates a bold, clear line or outline. To do it (fig. 46)—Run or couch down a thread along the traced line, then with a fine thread cover this with closely spaced upright stitches, picking up as little material as possible each time to keep the line clear and round. The stitch is done best in a frame.

Back stitch sometimes makes a good line or outline. To work it (fig. 47)—Bring the needle through one-sixteenth of an inch from the end of the traced line, insert it at the commencement and bring it through again one-sixteenth of an inch beyond where it first came out. Each stitch, it will be seen, commences at the point where the last one finished.
Back stitch can create a nice line or outline. To do it (fig. 47)—Bring the needle through about one-sixteenth of an inch from the start of the traced line, insert it at the beginning, and bring it back through one-sixteenth of an inch past where it first came out. Each stitch starts where the last one ended.

BUTTONHOLE STITCH AND ITS APPLICATION
Buttonhole stitch, which is well known in plain needlework, is very useful also in embroidery, besides being an important stitch in needlepoint lace. Owing to its construction it is well suited for the covering of raw edges, but it is also adaptable to a[Pg 108] variety of other purposes, such as are open or close fillings of leaves and flowers, cut work, and the outlining of applied work.
Buttonhole stitch, commonly used in basic needlework, is also very helpful in embroidery and is a key stitch in needlepoint lace. Because of its design, it's great for covering raw edges, but it can also be used for a[Pg 108] variety of other things, like filling in or outlining leaves and flowers, creating cut work, and outlining applied designs.

There are two ways of forming the stitch, the common buttonhole and what is called tailor's buttonhole.
There are two ways to create the stitch: the regular buttonhole and what's known as the tailor's buttonhole.
To work the ordinary buttonhole stitch (fig. 48)—Bring the needle through at the left-hand end of the traced line, hold[Pg 109] the thread down to the left with the thumb and insert the needle as shown in the diagram, draw it through over the held thread to complete the stitch. It is worked openly in the diagram, but it may, as required, be either more or less open or quite closed.
To do the regular buttonhole stitch (fig. 48)—Start by bringing the needle up at the left end of the marked line. Then, hold the thread down to the left with your thumb and insert the needle as shown in the diagram. Pull it through over the held thread to finish the stitch. It’s shown as more open in the diagram, but you can make it looser, tighter, or fully closed depending on what you need.[Pg 109]
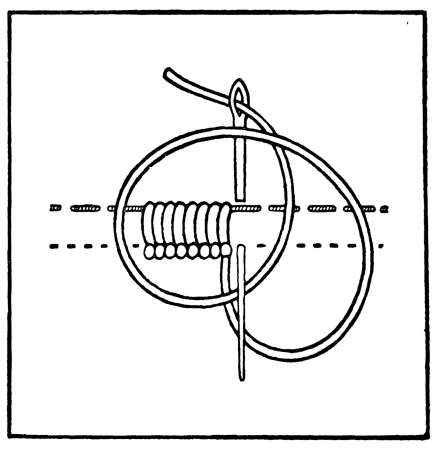
The tailor's buttonhole is for some purposes more satisfactory; the stitch is[Pg 110] firmer than the other kind owing to the heading having an extra knot in it; this makes it also more ornamental. To work it (fig. 49)—Commence in the same way as the last stitch until the needle and thread are in the position shown in fig. 48 then, with the right hand take hold of the thread near the eye of the needle, bring it down and loop it under the point from right to left, draw the needle and thread through over these two loops, and the first stitch is made.
The tailor's buttonhole is more satisfying for some purposes; the stitch is[Pg 110] firmer than the other type because the heading has an extra knot in it, which also makes it more decorative. To do it (fig. 49)—Start in the same way as the last stitch until the needle and thread are in the position shown in fig. 48. Then, with your right hand, grab the thread near the eye of the needle, pull it down, and loop it under the point from right to left. Pull the needle and thread through over these two loops, and the first stitch is completed.

Buttonhole stitch can be varied in many ways, dependent mainly upon the spacing[Pg 111] of the stitch and the direction that the needle takes when picking up the material. Fig. 50 shows four simple varieties; the first is the open buttonhole spaced slightly irregularly and with a thread slipped underneath it; any variety of spacing can be arranged, and the thread shown running underneath, which sometimes forms a pretty addition, is usually of a contrasting colour or material. The second[Pg 112] shows the stitches taken slanting-wise, so that they cross each other. In the third the stitches are at different angles and of unequal length. The fourth example shows two lines of spaced buttonhole stitch fitting neatly the one into the other and forming a solid line. One row is worked first, leaving just sufficient space between each stitch for the second row to fill up, which can be carried out by reversing the position of the material and exactly repeating the first line in the same or in a different colour.
Buttonhole stitch can be varied in many ways, mainly based on the spacing[Pg 111] of the stitch and the direction the needle takes when picking up the fabric. Fig. 50 demonstrates four simple variations; the first is the open buttonhole, spaced slightly irregularly with a thread slipped underneath it. You can arrange any variety of spacing, and the thread running underneath, which often adds a nice touch, is usually in a contrasting color or material. The second[Pg 112] shows the stitches taken at an angle, so they cross each other. In the third, the stitches are at different angles and of uneven lengths. The fourth example displays two lines of spaced buttonhole stitch that fit neatly into each other, creating a solid line. One row is stitched first, leaving just enough space between each stitch for the second row to fill in, which can be done by flipping the fabric and exactly repeating the first line in the same or a different color.

A flower filled in with open buttonhole stitch is shown at fig. 51. The centre consists of a mass of French knots, and the outside line is in satin stitch. The innermost circle of buttonholing is worked first, the next row is worked over the heading of the first row as well as into the material; the succeeding rows are worked in the same way until the outside limit is reached, and there the satin stitch just covers the heading of the last row of buttonhole stitching. Gradation of colour can easily be introduced by using a different shade for each circle of stitches, and this produces a very pretty effect. An open method of filling a[Pg 113] space, whether flower, leaf, drapery, or background, is sometimes preferable to a solid filling, and the two methods can very well be used together as each shows off the other. These light fillings give opportunity for further variety and ingenuity in the stitching, and prevent the work from looking heavy. A butterfly,[Pg 114] carried out partly in open stitches, is illustrated in fig. 52.
A flower filled in with open buttonhole stitch is shown at fig. 51. The center is made up of a cluster of French knots, and the outer line is done in satin stitch. Start with the innermost circle of buttonholing, then work the next row over the heading of the first row and into the material; continue this way for the subsequent rows until you reach the outer edge, where the satin stitch just covers the heading of the last row of buttonhole stitching. You can easily add color variation by using a different shade for each circle of stitches, which creates a lovely effect. An open method of filling a[Pg 113] space, whether it’s a flower, leaf, drapery, or background, is sometimes better than a solid fill, and the two techniques can be combined effectively since each highlights the other. These lighter fillings allow for more variety and creativity in the stitching, and they prevent the work from appearing too heavy. A butterfly,[Pg 114] done partly in open stitches, is illustrated in fig. 52.

Fig. 53 is, in the original, a gay little flower carried out in orange and yellow. The stitch employed here is a close buttonhole.
Fig. 53 is, in the original, a cheerful little flower done in orange and yellow. The stitch used here is a close buttonhole.

Another example of the use of close buttonhole is shown in the ivy leaf in fig. 54. The stitch is worked in two rows, back to back, in each lobe of the leaf, and the resulting ridge down the centre rather happily suggests the veining. This method of filling in might be just reversed for a rose leaf; the heading of[Pg 115] the stitch would then suggest the serrated edge, and the meeting of the two rows down the centre the line of the vein.
Another example of using the close buttonhole stitch can be seen in the ivy leaf in fig. 54. The stitch is done in two rows, back to back, in each lobe of the leaf, and the resulting ridge down the center nicely hints at the veining. This filling method could be flipped for a rose leaf; the top of[Pg 115] the stitch would then indicate the serrated edge, and where the two rows meet down the center would represent the line of the vein.

A cluster of berries can be very prettily worked in buttonhole stitch in the way shown in fig. 55. The stitches are so arranged that the heading outlines each berry, and the needle enters the material at the same point, always in the centre. A bullion stitch in a darker colour marks the eye of the berry.
A group of berries can be beautifully created using buttonhole stitch as shown in fig. 55. The stitches are arranged so that the outline of each berry is highlighted, and the needle goes into the fabric at the same point, always in the center. A bullion stitch in a darker color indicates the eye of the berry.

A good method of filling a space with solid buttonhole stitching is shown in[Pg 117][Pg 116] fig. 56. Each row is worked into the heading of the preceding row, and the stitches do not pierce the material except in the first row and at the extremities of succeeding rows. They are placed rather close together in order to completely cover the ground. The stitch[Pg 118] is worked, first, from left to right, then for the next row from right to left; this is quite easy and enables the work to be continuously carried out. Sometimes, when the first row is done, the thread is thrown across to the side where the row began, and there made fast; then the second row is worked with stitches which take up the thrown thread as well as the heading of the first row. By using a more open buttonhole and thus partly exposing the laid thread, a filling, both quick and effective, is obtained. This is a useful method to employ when the work is done over a padding of threads, for there is no necessity to pierce the material except at the edges.
A great way to fill a space with solid buttonhole stitching is shown in[Pg 117][Pg 116] fig. 56. Each row is worked into the top of the previous row, and the stitches don’t go through the material except in the first row and at the ends of the following rows. They’re placed fairly close together to fully cover the area. The stitch[Pg 118] is done first from left to right, and then for the next row from right to left; this is pretty easy and allows the work to be continuous. Sometimes, after finishing the first row, you can throw the thread over to the side where the row started and secure it there; then the second row is worked with stitches that catch the thrown thread as well as the beginning of the first row. By using a more open buttonhole and partially exposing the laid thread, you can achieve a filling that’s both quick and effective. This method is particularly useful when working over a padding of threads, as there’s no need to pierce the material except at the edges.

CHAPTER VI
STITCHES—(continued)
Knots and Knot Stitches—Herring-bone Stitch—Feather Stitch—Basket Stitch—Fishbone Stitch—Cretan Stitch—Roumanian Stitch—Various Insertion Stitches—Picots.
Knots and Knot Stitches—Herringbone Stitch—Feather Stitch—Basket Stitch—Fishbone Stitch—Cretan Stitch—Romanian Stitch—Various Insertion Stitches—Picots.
KNOTS AND KNOT STITCHES
It would be difficult to go far in embroidery without requiring knots for one purpose or another. They are useful in[Pg 119] all sorts of ways, and make a pleasant contrast to the other stitches. For the enrichment of border lines and various parts of the work, both pattern and background, they are most serviceable, and also for solid fillings; for such places as centres of flowers or parts of leaves, they are again valuable. They have been used to form a continuous outline, but owing to their tendency to make a weak line, not frequently; indeed they usually show to better advantage when slightly separated.
It would be hard to get far in embroidery without needing knots for one reason or another. They are helpful in[Pg 119] a variety of ways and provide a nice contrast to the other stitches. They are very useful for enhancing border lines and different parts of the work, including both patterns and backgrounds, as well as for solid fills. For areas like the centers of flowers or parts of leaves, they are also beneficial. They have been used to create a continuous outline, but because they tend to create a weak line, that isn't done very often; in fact, they usually look better when slightly spaced apart.
Examples are to be seen of English knotted line work in which the knotting was executed in the thread previously to embroidering with it. The knotting of thread was a pastime with ladies in the XVIIth century. The thread, usually a linen one and as a rule home spun, was wound upon a netting-needle, and by the aid of this a close series of knots was made upon it; when finished it somewhat resembled a string of beads. Balls of this prepared knotted thread may still be found, treasured up in old work receptacles. When prepared it was couched on to the material with fine thread, like a cord or braid, and made to follow out some prearranged pattern.[Pg 120] In white linen work it was used for carrying out ornamental borderings on infants' robes and other dainty articles.
You can see examples of English knotted line work where the knotting was done on the thread before it was embroidered. Knotting thread was a hobby for ladies in the 17th century. The thread, usually linen and typically hand-spun, was wound onto a netting needle, and using this, a series of close knots was created; when done, it looked a bit like a string of beads. Balls of this prepared knotted thread can still be found, kept safe in old sewing boxes. Once prepared, it was stitched onto the fabric with fine thread, like a cord or braid, following a prearranged pattern.[Pg 120] In white linen work, it was used to create decorative borders on infants' robes and other delicate items.

French knots can be worked in the hand or in a frame. They are easier to manage in the latter, and to look well they must be neatly and firmly made. Completed they should resemble beads lying end upwards on the material. To[Pg 121] work the French knot (fig. 57)—Bring the thread through the material at the required point, take hold of it with the left finger and thumb near the starting-point (A on plan), then let the point of the needle encircle the held thread twice, twist the needle round and insert it at point B on plan, draw the thread through to the back, not letting go the held thread until necessary. Fig. 58 shows some French knots decorating a leaf spray, and various other examples of their use can be found in the book.
French knots can be done by hand or in a frame. They are easier to handle in a frame, and to look good, they need to be made neatly and securely. When finished, they should look like beads sitting upright on the fabric. To[Pg 121] make a French knot (fig. 57)—Bring the thread through the fabric at the desired point, hold it with your left finger and thumb near where you started (A on the plan), then let the needle wrap around the held thread twice, twist the needle around, and poke it back in at point B on the plan. Pull the thread through to the back, keeping hold of the thread until it’s necessary to let go. Fig. 58 shows some French knots decorating a leaf spray, and you can find various other examples of their use in the book.

Bullion knots resemble tight curls of thread laid on the material. They can be used as a variation from French knots, and even for the representation of petals and small leaves. To be satisfactory they must be firm, stout, and tightly coiled; some knack is required to make them properly.[Pg 122] To work the bullion knot (fig. 59)—Bring the thread through at the required place, insert the needle one-eighth of an inch from this point and bring it through again exactly at it. Take hold of the thread about two inches from where it came through and twist it several times round the point of the needle, the number of times being dependent on the required[Pg 123] length of the knot. Place the left thumb upon the tight coil on the needle, in order to keep it in place, and draw the needle and thread through it, then pass the thread through to the back at the point where the needle was last inserted (point A on plan). The thumb must not be removed until it is in the way. Fig. 60 represents a flower, of which the centre is formed of bullion together with French knots.
Bullion knots look like tight curls of thread placed on the fabric. They can serve as a variation of French knots and can be used to represent petals and small leaves. To look good, they need to be firm, sturdy, and tightly coiled; it takes some skill to make them correctly.[Pg 122] To make a bullion knot (fig. 59)—Start by bringing the thread through at the desired spot, then insert the needle about an eighth of an inch from that point and bring it back through exactly at that spot. Hold the thread about two inches from where it came through and twist it several times around the point of the needle, with the number of twists depending on how long you want the knot to be.[Pg 123] Place your left thumb on the tight coil on the needle to hold it in place, then pull the needle and thread through the coil, and finally pass the thread to the back at the point where the needle was last inserted (point A on the plan). Keep your thumb in place until it's in the way. Fig. 60 represents a flower whose center is made of bullion knots and French knots.


Fig. 61 shows a knotted stitch that is similar in result to the knotted threads discussed earlier in the chapter. In this case the knotting of the thread and the fixing to the material is done at the same time. It is a useful stitch when a jagged line is wanted, and can be seen used, for instance, for the branching veins in open[Pg 125] work leaves, as in fig. 62. The diagram explains the working of the stitch; at point A on the plan the left thumb holds the thread down whilst the stitch is in progress.
Fig. 61 shows a knotted stitch that achieves a similar effect to the knotted threads mentioned earlier in the chapter. In this case, the knotting of the thread and its attachment to the material happen simultaneously. It’s a handy stitch when a jagged line is desired, and it can be seen used, for example, for the branching veins in open[Pg 125] work leaves, like in fig. 62. The diagram illustrates how the stitch works; at point A on the plan, the left thumb holds the thread down while the stitch is being made.

MISCELLANEOUS STITCHES

The stitch illustrated at fig. 63 is very similar to the common herring-bone. The only practical difference is that in the plain needlework stitch there is usually a smaller piece of material picked up by the needle each time. To work it as in the diagram—Trace two parallel lines on[Pg 127] the material and bring the thread through at the commencement of the lower line, insert it on the opposite line rather farther along and there pick up a stitch, as the needle is doing in the figure. Then on the opposite line pick up a similar stitch a little in advance of the one just finished. After this work the stitches on either line alternately, commencing each one at the point where the last one ended; this forms on the underside a double row of back stitches. It is quite easy to work this stitch with the back stitches on the working side, and when they are required to be on the surface it is advisable to do it in that way. When embroidering upon a semi-transparent material this stitch is a satisfactory one to use, the back stitching follows out the outline on either side of the form, and the crossing of the threads on the under side shows through prettily. This stitch sometimes goes by the name of double back stitch. It is useful in many ways, making a light stitch for stems, leaves, or flowers; it can be sometimes found in Eastern work used for an entire embroidery. When used for flowers or leaves the width and the closeness of the stitch[Pg 128] are varied to suit the shape to be filled. An example of its use as a flower filling is shown in the carnation at fig. 64, which is carried out in four shades of colour. Considerable use is made of this stitch in[Pg 129] embroidered curtain shown in Plate VII.; it is there employed for all the stems and various flowers upon the hanging.
The stitch shown at fig. 63 is very similar to the common herringbone stitch. The only real difference is that in the basic needlework stitch, the needle usually picks up a smaller piece of material each time. To work it as shown in the diagram—Trace two parallel lines on[Pg 127] the material. Bring the thread through at the start of the lower line, insert it on the opposite line a bit further along, and pick up a stitch there, just like the needle is doing in the image. Then, on the opposite line, pick up a similar stitch a little ahead of the one just finished. After this, work the stitches on either line alternately, starting each one at the point where the last ended; this creates a double row of back stitches on the underside. It’s quite easy to work this stitch with the back stitches on the working side, and when they need to be on the surface, it's best to do it that way. When embroidering on a semi-transparent fabric, this stitch works well; the back stitching outlines the shape on both sides, and the crossing threads on the underside look nice. This stitch is sometimes called the double back stitch. It's versatile and creates a light stitch for stems, leaves, or flowers; it can often be found in Eastern embroidery as the entire design. When used for flowers or leaves, the width and spacing of the stitch[Pg 128] can be adjusted to fit the shape being filled. An example of it used as a flower filling is shown in the carnation at fig. 64, which is done in four shades of color. This stitch is heavily used in[Pg 129] the embroidered curtain shown in Plate VII.; it's used for all the stems and various flowers on the hanging.


The feather stitch, often used to decorate plain needlework, is now to be discussed; although similar in name it must not be confused with the feather or plumage stitch that has already been mentioned. The stitch is so simple and so much in[Pg 130] use as hardly to need description; fig. 65 explains the working. There can be many slight variations of the stitch, the worker perhaps devising them needle in hand. Two are shown in fig. 66. The one to the left is worked very like the ordinary stitch; the needle picks up the material in a straight line instead of slightly obliquely, and each stitch touches the one imme[Pg 131]diately above; it is here made use of as a couching stitch, a bunch of threads of a contrasting colour is laid on the material, and the stitch worked over it from side to side. The right-hand example shows the ordinary feather stitch worked more closely and in a broader line; carried out in this way, it can be used for a leaf filling.
The feather stitch, commonly used to add flair to simple needlework, will now be discussed; although it has a similar name, it shouldn’t be confused with the feather or plumage stitch mentioned earlier. This stitch is so straightforward and widely used that it hardly requires a detailed explanation; fig. 65 shows how it's done. There are several subtle variations of the stitch, which the embroiderer might create while working. Two are illustrated in fig. 66. The one on the left is executed very much like the standard stitch; the needle goes through the material in a straight line instead of slightly diagonally, and each stitch touches the one directly above it. Here, it is used as a couching stitch, where a bundle of contrasting colored threads is laid on the material and the stitch is worked over it from side to side. The example on the right demonstrates the regular feather stitch worked more closely and in a wider line; when done this way, it can be used for filling in leaves.

Basket stitch, useful for a solid line, shows up very clearly when worked with a stout twisted thread. This stitch would be appropriately used when applied to some representation of basket work. To carry out the diagram (fig. 67)—Trace two parallel lines on the material, and to commence, bring the thread through on the left-hand line, then insert the needle on the right-hand line about one-eighth of an inch lower down and bring it through on the left-hand line exactly opposite (see needle in fig.); the next stitch is worked by inserting the needle on the right-hand line but above the last stitch, that is at point A on diagram, and bringing it through at B. To continue, repeat from the beginning.
Basket stitch, which is great for creating a solid line, stands out clearly when you use a thick, twisted thread. This stitch is perfect for representing basket work. To follow the diagram (fig. 67)—Draw two parallel lines on your material, and to start, bring the thread through on the left-hand line, then insert the needle on the right-hand line about one-eighth of an inch lower and pull it through on the left-hand line exactly opposite (see needle in fig.); the next stitch is made by inserting the needle on the right-hand line above the last stitch, at point A on the diagram, and pulling it through at B. To keep going, repeat from the beginning.

A particularly good line for a border is made by fishbone stitch. It can be worked in one colour, or as easily in a[Pg 132] chequering of two or three, as shown in the diagram (fig. 68); to carry it out in this way the worker must have two threads in use, bringing through each as required. For such purposes as the fillings of small leaves, this stitch is very useful (see fig. 58). The meeting of the stitches in the centre suggest the veining line, also the change in direction of the thread gives, to the[Pg 133] two sides of the leaf, pleasant variation in tone. To work it—Trace three parallel lines upon the material and bring the thread through on the upper line at the left-hand end. Insert the needle and bring it through as in process in the diagram, then repeat the same stitch on the other side the reverse way, that is, insert the needle just over the central line[Pg 134] and bring it through on the upper one close to the last stitch. Care must be taken that the stitches cross well over each other at the centre, or the material will show through.
A great option for a border is the fishbone stitch. It can be done in one color or easily in a chequered pattern of two or three colors, as shown in the diagram (fig. 68); to do it this way, the worker must use two threads, pulling through each as needed. This stitch is really helpful for filling in small leaves (see fig. 58). The way the stitches meet in the center hints at the veining line, and the change in direction of the thread provides a nice variation in tone on both sides of the leaf. To create it—draw three parallel lines on the material and bring the thread through at the left end of the upper line. Insert the needle and bring it through as shown in the diagram, then repeat the same stitch on the other side in the opposite direction, meaning you should insert the needle just over the central line and pull it through on the upper line close to the last stitch. It’s important to ensure that the stitches cross neatly over each other in the center, or the material will show through.


The stitch shown in fig. 69, known as plait or Cretan, is commonly seen on Cretan and other Eastern embroideries. It can be used as a solid border stitch or[Pg 136][Pg 135] as a filling, varying in width as required. To work it—Bring the thread through on the lower central line, then insert the needle on the uppermost line and bring it through on the next below as in process in the diagram; then, still keeping the thread to the right, insert the needle immediately underneath on the lowest line and bring it through on the line next above, in fashion similar to the last stitch, but in reverse direction. To continue, work the stitch alternately on one side and the other, always keeping the thread to the right of the needle. In order to make the central plait broader take up rather less material with the needle; this will decrease the outer and increase the inner lines. Fig. 70 is taken from a Cretan embroidery, in which this stitch is mainly used.
The stitch shown in fig. 69, called plait or Cretan, is often seen in Cretan and other Eastern embroideries. It can be used as a solid border stitch or[Pg 136][Pg 135] as a filling, varying in width as needed. To do it—Pull the thread through at the lower central line, then insert the needle at the top line and pull it through at the next one below as shown in the diagram; then, while keeping the thread to the right, insert the needle directly beneath on the bottom line and pull it through at the line right above, in a similar fashion to the last stitch, but in the opposite direction. To keep going, alternate the stitch between one side and the other, always keeping the thread to the right of the needle. To make the central plait wider, take up a bit less material with the needle; this will decrease the outer lines and increase the inner lines. Fig. 70 is taken from a Cretan embroidery where this stitch is mainly used.

Another similar but more simple stitch, often seen in Eastern work, is shown in fig. 71. It can also frequently be found employed on XVIIth century English wool work hangings. It is sometimes called Roumanian stitch, and is composed of one long stitch crossed by a short one in the centre. To work it—Trace two parallel lines on the material[Pg 137] and bring the thread through on the left-hand line at the top. Insert the needle on the opposite line and bring it through near the centre, as shown in process in the diagram. For the next half of the stitch the needle enters the material at point A on plan, and is brought through again on the left-hand line close to the last stitch, and so in position to commence[Pg 138] again. An illustration of this stitch in use as a filling can be seen at fig. 72. It is worked in four shades of green wool, and each line of stitches is so arranged as to encroach slightly on the line before by means of setting each stitch just between two of the last row. This method of working has two advantages; the shading[Pg 139] is thus made more gradual, and a pleasant undulating effect is given to the surface of the leaf. This can be most easily understood by a practical trial of the stitch and method.
Another similar but simpler stitch, often seen in Eastern work, is shown in fig. 71. It can also frequently be found in 17th-century English wool work hangings. It’s sometimes called Romanian stitch and consists of one long stitch crossed by a short one in the center. To work it—trace two parallel lines on the material[Pg 137] and bring the thread through on the left-hand line at the top. Insert the needle on the opposite line and bring it through near the center, as shown in the diagram. For the next half of the stitch, the needle enters the material at point A on the plan and is brought through again on the left-hand line close to the last stitch, positioning it to start[Pg 138] again. An illustration of this stitch in use as a filling can be seen at fig. 72. It’s worked in four shades of green wool, and each line of stitches is arranged to slightly overlap the previous line by placing each stitch just between two stitches of the last row. This method of working has two advantages; the shading[Pg 139] becomes more gradual, and it creates a nice undulating effect on the surface of the leaf. This can be best understood by practically trying out the stitch and the method.


INSERTION STITCHES
There is occasion sometimes in embroidery to join edges together visibly. This gives an opportunity for some additional pretty stitching—the addition of something like this, that is perhaps not absolutely necessary, has extra value from the evidence it gives of the worker's interest and delight in her work, a quality always appreciated; on the other hand, work done from the motive of getting a result with as little labour as possible is valued at just its worth.
There are times in embroidery when you might want to visibly join edges together. This allows for some extra pretty stitching—adding something like this, while it might not be strictly necessary, shows the worker's interest and enjoyment in her craft, a quality that is always valued. On the flip side, work done solely to achieve a result with minimal effort is only worth what it's worth.
These insertion stitches are useful for joining together edges of cushion covers, bags, detached bands, also for the ornamentation of dress, and for embroideries upon which drawn thread work is not possible. A stout thread is usually suitable for the purpose. The raw edges must first be turned in and flattened, and the parts to be joined can if necessary be[Pg 140] tacked in place on a temporary ground such as toile cirée.
These insertion stitches are great for joining the edges of cushion covers, bags, and detached bands, as well as for decorating dresses and for embroidery where drawn thread work isn’t an option. A strong thread is usually best for this. First, the raw edges should be folded in and flattened, and if needed, the parts to be joined can be tacked in place on a temporary base like toile cirée.
Fig. 73 illustrates a twisted insertion stitch that is quickly executed and very frequently used. The diagram sufficiently explains the working without further description.
Fig. 73 shows a twisted insertion stitch that is easy to do and commonly used. The diagram explains how to do it well enough without needing more details.

Buttonhole stitch can be turned to account for this purpose. Fig. 74 shows the tailor's buttonhole used as an insertion stitch; for this purpose it is the better of the two kinds of buttonhole. The stitches could be arranged in various ways; in the present example three are worked closely together on either side in turn. The only difficulty with this buttonhole inser[Pg 141]tion is that on one side the stitch has to be worked in direction contrary to that usual, that is from right to left instead of from left to right. In the diagram the needle is shown working in this reverse way.
Buttonhole stitch can be used for this purpose. Fig. 74 shows the tailor's buttonhole being used as an insertion stitch; for this purpose, it’s the better of the two types of buttonhole. The stitches can be arranged in different ways; in this example, three are worked closely together on each side in turn. The only challenge with this buttonhole insertion is that on one side the stitch has to be worked in the opposite direction from what’s usual, meaning from right to left instead of from left to right. In the diagram, the needle is shown working this way.

Fig. 75 is a knotted insertion stitch; the knot at each side makes the stitch[Pg 142] a very rigid one. To work it—Bring the thread through at the lower left-hand side, insert the needle on the upper side a little towards the right, draw the thread through, and then tie the knot on it as in process in the diagram.

A rather more complicated joining stitch is shown in fig. 76. It could be carried out with different coloured threads. The two sides must be first worked with the edging, which is practically the braid stitch described on page 88. Commence the stitch in exactly the same way as when carrying out braid stitch, but work on the edge of the material as[Pg 143] in buttonholing, the working edge in this case being away from the worker. Let the worker, having reached the point of pulling the thread through to complete the stitch, draw it out in the direction away from her. This will draw the stitch towards the edge, where it will form a knot. In the diagram one of the stitches has been partly undone in order to show the working more clearly. When the two sides are bound with the stitch, they can be laced together with another thread as in the illustration.
A more complicated joining stitch is shown in fig. 76. It can be done with different colored threads. First, both sides need to be worked with the edging, which is basically the braid stitch described on page 88. Start the stitch just like you would when doing a braid stitch, but work on the edge of the material like you would in buttonholing, with the working edge facing away from you. When you reach the point of pulling the thread through to complete the stitch, pull it in the direction away from you. This will pull the stitch toward the edge, forming a knot. In the diagram, one of the stitches has been partly undone to show the work more clearly. Once the two sides are bound with the stitch, you can lace them together with another thread as shown in the illustration.

PICOTS
Picots are commonly in use in lace work and they are sometimes required for embroidery purposes, especially in the kinds of work nearly allied to lace, such as cut work, or for an added ornament to an edging stitch.
Picots are often used in lace work and are sometimes needed for embroidery, especially in techniques closely related to lace, like cut work, or as an embellishment for an edging stitch.

Fig. 77 shows too small picots added to a buttonhole bar, and on the lower bar is shown the method of working the left-hand picot. The pin that passes into the material behind the bar can be fixed in the bar itself if there happens to[Pg 144] be no material underneath. After reaching the point illustrated in the diagram, the needle draws the thread through, thus making a firm knot round the loop. This completes the picot, the bar is then buttonholed to the end. The second picot is made in much the same way; instead, however, of putting the needle as the diagram shows, bring the[Pg 145] thread up through the centre of the loop, then round under the pin from left to right, and it will be in position to make three buttonhole stitches along the loop, which completes the second example.
Fig. 77 shows small picots added to a buttonhole bar, and the method for working the left-hand picot is shown on the lower bar. The pin that goes into the material behind the bar can be secured in the bar itself if there's no material underneath. Once you reach the point illustrated in the diagram, the needle pulls the thread through, creating a secure knot around the loop. This finishes the picot, and then the bar is buttonholed to the end. The second picot is made in a similar way; however, instead of positioning the needle as shown in the diagram, bring the thread up through the center of the loop, then wrap it under the pin from left to right. This will position it to make three buttonhole stitches along the loop, which completes the second example.

The upper bar on fig. 78 shows a buttonholed picot. The bar must be worked to the left-hand end of the[Pg 146] required picot; the thread is then from there taken back about one-eighth of an inch and threaded through the edge of the buttonhole. This is repeated to and fro until there is a loop composed of three threads ready to be buttonholed over. Upon this being done, the thread will have arrived at the right point to continue the bar.
The upper bar on fig. 78 shows a buttonholed picot. The bar must be worked to the left end of the[Pg 146] necessary picot; from there, the thread is taken back about one-eighth of an inch and threaded through the edge of the buttonhole. This is repeated back and forth until a loop made of three threads is ready to be buttonholed over. Once this is done, the thread will be at the right point to continue the bar.
Bullion stitch makes another simple picot—Work the bar to the point where the picot is required, then, instead of taking the next stitch, insert the point of the needle in the heading of the last stitch. Leave the needle in this position, and twist the thread six or eight times round the point of it, just as for the bullion knot (fig. 59). Place the left thumb over the tight coil thus formed, and pull the needle and thread through tightly in order to make the stitch double up into a tight semi-circle, then continue the buttonholing to the end of the bar.[Pg 147]
Bullion stitch creates a simple picot—Work the bar until you reach the point where you need the picot, then instead of making the next stitch, insert the tip of the needle into the top of the last stitch. Keep the needle in this position and twist the thread six or eight times around the tip, just like for the bullion knot (fig. 59). Place your left thumb over the tight coil formed and pull the needle and thread through tightly to create a tight semi-circle stitch, then continue buttonholing until you reach the end of the bar.[Pg 147]
CHAPTER VII
Canvas Art and Stitches
Introduction—Samplers—Petit Point Pictures—Cross Stitch—Tent Stitch—Gobelin Stitch—Irish Stitch—Plait Stitch—Two-sided Italian Stitch—Holbein Stitch—Rococo Stitch.
Introduction—Samplers—Petit Point Pictures—Cross Stitch—Tent Stitch—Gobelin Stitch—Irish Stitch—Plait Stitch—Two-sided Italian Stitch—Holbein Stitch—Rococo Stitch.
Canvas work, known in the XIIIth century as opus pulvinarium or cushion work, is of great antiquity, and seems to have had an independent origin in several countries. It is sometimes given the misleading name of tapestry, perhaps owing to hangings of all kinds being called tapestries, whether loom-woven, worked with the needle, or painted. Large wall hangings with designs similar to those of woven tapestries have been most successfully carried out on canvas in cross or tent stitch; as a rule, however, smaller objects are worked, such as furniture coverings, screens or cushions, whence it is obvious canvas work received its ancient and descriptive Latin name. Many Eastern carpets are worked upon a[Pg 148] strong canvas in a kind of tent stitch, and so come under the heading of canvas work. It is a particularly durable method of embroidering, and this makes it suitable for use upon anything subjected to hard wear.
Canvas work, known in the 13th century as opus pulvinarium or cushion work, is very old and seems to have originated independently in several countries. It is sometimes inaccurately referred to as tapestry, probably because various types of hangings are all called tapestries, whether they are loom-woven, embroidered, or painted. Large wall hangings with designs similar to woven tapestries have been successfully crafted on canvas using cross or tent stitch; however, smaller items like furniture covers, screens, or cushions are usually made, which is why canvas work got its old and descriptive Latin name. Many Eastern carpets are made on a[Pg 148] strong canvas using a type of tent stitch, so they fall under the category of canvas work. It’s a particularly durable method of embroidery, making it ideal for anything that experiences heavy use.
The work has usually a very decided and attractive character of its own. A familiar example of this can be seen in the XVIIIth century samplers. Its peculiar character is perhaps due to the fact that it cannot break away from a certain conventionality due to constant use of the same stitch, and its dependence upon the web of the fabric. This regularity prevents the work from showing certain faults of design that other methods may exaggerate. It is hardly possible to copy a natural spray of flowers in cross stitch and keep it very naturalistic. The stitch being square and alike all over gives a formality of treatment to every part of the design, also, some detail is perforce omitted owing to the impossibility of putting it in; all of this tends to a right method of treatment, which renders the sampler an admirable lesson not only in workmanship but also in design.[Pg 149]
The work usually has a distinct and appealing character of its own. A familiar example of this can be seen in the 18th-century samplers. Its unique quality might come from the fact that it can’t break away from a certain conventionality due to the constant use of the same stitch and its reliance on the fabric's weave. This regularity keeps the work from highlighting certain design flaws that other methods might exaggerate. It's nearly impossible to replicate a natural spray of flowers in cross stitch while keeping it looking very naturalistic. The square and uniform nature of the stitch adds a level of formality to every part of the design, and some details are inevitably left out due to the impossibility of including them; all of this supports an effective method of treatment, making the sampler an excellent lesson not just in craftsmanship but also in design.[Pg 149]
The XVIth and XVIIth century pictorial subjects worked upon fine canvas in cross or tent stitch afford instances of most interesting work in canvas stitches. Some of these, though, as a rule, very much smaller in size, equal, in their way, the finest tapestries. Most of them, if judged from a painter's standpoint, would be pronounced failures, but this effect is not what is sought after; the method of treatment belongs rather to the great traditions of the tapestry weaver, and is not governed by the canons of the painter. Plate VI. shows a detail of foliage from a particularly fine example of this work lately added to the Victoria and Albert Museum collection.[2]
The 16th and 17th century art subjects created on fine canvas using cross or tent stitch provide some really interesting examples of canvas stitching. While many of these pieces are generally much smaller, they can rival the finest tapestries in their own way. From a painter's perspective, most of them might seem like failures, but that's not the goal here; the approach belongs more to the rich traditions of tapestry weaving and isn’t bound by the rules of painting. Plate VI. shows a detail of foliage from a particularly fine example of this work recently added to the Victoria and Albert Museum collection.[2]
In what went by the name of Berlin wool work, popular in the early XIXth century, we have before us a degenerate offshoot of this fine and poetic kind of work in which all its possibilities are missed, with a result that is prosaic in the extreme. Some of the canvas-work seat covers decorated with geometrical designs, seen on Chippendale chairs, were a pleasant and satisfactory variation in[Pg 150] their way, but in most of the work after that period, the attempt at impossible naturalistic effect gave such unsatisfactory results as to almost deal a death blow to all canvas embroidery. It is, however, a method too good and useful to die out; it must always be more or less in vogue.
In what was called Berlin wool work, popular in the early 19th century, we see a weaker version of this beautiful and artistic craft where all its potential is overlooked, resulting in something extremely ordinary. Some of the canvas seat covers decorated with geometric patterns, seen on Chippendale chairs, were a nice and satisfying change in[Pg 150] their style. However, in most of the work after that time, the effort to achieve unrealistic naturalistic effects led to frustrating results that nearly brought an end to all canvas embroidery. Nonetheless, it’s a method that’s too valuable and practical to fade away; it will likely always be somewhat in style.
Patterns carried out in canvas stitches are sometimes to be seen worked apparently upon velvet or similar ground materials. This is done by first laying the canvas upon the velvet and stitching through both materials; this would have to be carried out in a frame. The threads of the canvas are afterwards either withdrawn or closely cut off. In the former case, the stitches must be drawn tight, or the finished work will not look well. This method has the advantage of saving the labour of working the background, and sometimes it suits the pattern to have a contrast in the ground material. In old embroideries, heraldic devices may be seen successfully treated in this way.
Patterns made with canvas stitches can sometimes appear to be worked directly on velvet or similar materials. This is done by laying the canvas on the velvet and stitching through both layers; this process must be done in a frame. The threads of the canvas are then either pulled out or trimmed closely. If the threads are pulled out, the stitches need to be tightened, or the finished piece won't look good. This technique saves the effort of stitching the background, and sometimes the pattern benefits from having a contrasting base material. In historical embroideries, you can see heraldic designs executed successfully this way.
The usual canvas stitches can be worked upon other fabrics that have an even and square mesh, such as various kinds of[Pg 151] linen; also other embroidery stitches, such as stem, satin, or chain, can be used upon canvas; they are then always worked with a certain regularity, following the web of the material.
The standard canvas stitches can be applied to other fabrics that have an even and square mesh, like different types of [Pg 151] linen; additionally, other embroidery stitches, such as stem, satin, or chain, can be used on canvas; they are always made with a certain consistency, following the pattern of the material.
Canvas work can be done in the hand or in a frame, but the technique is often better in work done in a frame. In all-over work it is important that not even a suggestion of the ground fabric should be allowed to show through; for this reason work in light colours should be done on white canvas, and vice versâ, as far as possible, also the thread used must suit in thickness the mesh of the canvas. To work a plain ground well is less easy than to work the pattern, though it may sound more simple. The back of the work, though not necessarily similar to the front, must be alike in stitch all over, for the direction the stitch takes at the back affects the regularity of appearance of the front. The stitch must not be commenced in exactly the same place in each row, lest a ridge should appear upon the surface; this can be avoided by using threads of different lengths. A ground is usually commenced at the lower left-hand corner, and a pattern, if a complicated[Pg 152] one, from the centre outwards. These technical points are of importance, but they are of little value unless the stitches are at the same time expressing an interesting and suitable design.
Canvas work can be done by hand or in a frame, but the technique is usually better when done in a frame. For complete coverage, it's crucial that not even a hint of the base fabric shows through; for this reason, lighter colors should be worked on white canvas, and vice versa, whenever possible. Additionally, the thread used must match the thickness of the canvas mesh. It’s actually more challenging to work a solid background well than to work the pattern, even if it sounds simpler. The back of the work doesn't have to look just like the front, but it must have the same stitching pattern throughout, because the stitch direction on the back affects the uniformity of the front. The stitch shouldn't start at the exact same spot in each row to avoid creating a ridge on the surface; this can be managed by using threads of varying lengths. Usually, you start a background at the lower left corner, and if the pattern is complicated, you should begin from the center and work outwards. These techniques are important, but they only matter if the stitches are also conveying an interesting and appropriate design.
The stitches used are exceedingly numerous; those described in the following pages are the varieties most commonly seen.
The stitches used are very numerous; those described in the following pages are the most commonly seen varieties.
Cross stitch, the best known in this group, can be worked in slightly different ways, according to the purpose for which it is required. On the surface it is always the same, but it can vary at the back. For instance, when used for marking purposes it should form on the reverse side either a cross or a square, to do either of which demands some ingenuity on the part of the worker. For ordinary work the really correct method is to complete each stitch before going on to the next, though grounding is frequently done by working the first half of the stitch along an entire line, and completing the cross upon a return journey. In any case, the crossing must always be worked in the same direction.
Cross stitch, the most well-known in this category, can be done in slightly different ways depending on its intended use. While the front always looks the same, the back can vary. For example, when used for marking, it should create either a cross or a square on the backside, which requires some creativity from the person making it. For regular work, the proper technique is to finish each stitch before moving on to the next one, although it's common to first complete half of the stitch along a whole line and then finish the cross on the way back. In any case, the crossing should always be done in the same direction.
Cross stitch is a double stitch worked diagonally over two threads of the canvas[Pg 153] each way. It can, however, be taken over more or fewer threads if required larger or smaller. To work it (fig. 79)—Bring the needle through on the upper left side of the threads to be covered, and take it back again on the lower right, then bring it through on the upper right side and return it to the back on the lower left, which completes the first stitch.
Cross-stitch is a double stitch worked diagonally over two threads of the canvas[Pg 153] in both directions. However, you can stitch over more or fewer threads if you need it to be larger or smaller. To create it (fig. 79)—Start with the needle coming up on the upper left side of the threads you're covering, then go back down on the lower right. Next, bring the needle up on the upper right side and return it to the back on the lower left; this completes the first stitch.

Tent stitch (fig. 80) is the finest canvas stitch, and is therefore suitable for work involving much detail. Pictorial and heraldic subjects are frequently carried out in it. It is worked diagonally over a perpendicular and horizontal thread of the canvas. The diagram shows the[Pg 154] method of working both back and front. It will be noticed that though the line goes alternately from left to right and from right to left, the stitch is always the same at the back as well as the same upon the front; if this were not so, alternate rows would have a different appearance upon the right side. The diagram does not show the connection between the first and the second row, but it is evident that it must be a short upright line.
Tent stitch (fig. 80) is the finest type of canvas stitch, making it great for detailed work. It's often used for pictorial and heraldic designs. The stitch is done diagonally over one vertical and one horizontal thread of the canvas. The diagram shows the[Pg 154] technique for working both the front and back. You'll notice that even though the line moves alternately from left to right and from right to left, the stitch looks the same on both the back and the front. If that weren't the case, alternate rows would look different on the right side. The diagram doesn't illustrate how the first and second rows connect, but it's clear that it must be a short vertical line.

Gobelin stitch is a useful variety; it lends itself to shading better than cross stitch. It is most often worked upon a fine single canvas, and it can be used as a raised stitch. Fig. 81 represents the stitch; it is worked similarly to tent stitch but over two threads[Pg 155] in height and one in width, no matter whether the single or double thread canvas is used. In order to work it as a raised stitch, a line of some kind of padding is thrown across the canvas, and the stitch taken over it. This line can be arranged to show in part, in which case the material must be one presentable, such as a gold cord or narrow braid. The padding would be covered with stitching to form the background, and left exposed for the pattern, which would probably be a simple repeating form of some kind. Gobelin stitch is sometimes worked quite perpendicularly just over two threads in height.
Gobelin stitch is a handy type of stitch; it allows for better shading than cross stitch. It's usually done on fine single canvas and can be used as a raised stitch. Fig. 81 represents the stitch; it is worked similarly to tent stitch but over two threads[Pg 155] in height and one in width, regardless of whether you use single or double thread canvas. To create it as a raised stitch, you place a line of padding across the canvas and stitch over it. This line can be partially visible, in which case the material should be something attractive, like gold cord or narrow braid. The padding gets covered with stitching to form the background, while the pattern, likely a simple repeating design, remains exposed. Gobelin stitch can also be worked quite vertically over just two threads in height.

Irish stitch is pretty and quickly worked. It is usually taken perpendicularly over[Pg 156] four threads of the canvas (fig. 82), though the number over which it is taken may vary. It is worked in such a way as to make the stitches of each succeeding row fit between those of the last row, and can be carried out either diagonally or in horizontal lines. What is known as Florentine work is carried out in a stitch of this kind. The pattern in this kind of work is taken horizontally across the ground in a succession of shaded zigzag lines.
Irish stitch is attractive and quick to work. It's typically made by going over[Pg 156] four threads of the canvas (fig. 82), but the number can change. It's stitched in a way where the stitches of each new row fit between those of the previous row, and it can be done either diagonally or in horizontal lines. A technique known as Florentine work uses this kind of stitch. The pattern in this style is made horizontally across the fabric with a series of shaded zigzag lines.

Plait stitch is often used for grounding. It resembles a simple plait laid in close rows to and fro on the ground. It can frequently be seen used upon the Italian XVIth century linen work, that in which the pattern is left in plain linen, and the ground worked in some colour. The diagram in fig. 83 shows the method of working the stitch. If carried out correctly, the back of the material should show a row of short perpendicular lines, each composed of two threads.
Plait stitch is commonly used for grounding. It looks like a simple braid laid in tight rows back and forth on the surface. You can often find it in Italian 16th-century linen work, where the pattern is left in plain linen and the background is worked in a different color. The diagram in fig. 83 illustrates how to work the stitch. If done correctly, the back of the material should display a line of short vertical lines, each made up of two threads.

Two-sided Italian stitch is descriptively named, for it is alike on both sides. This is frequently seen on XVIth and XVIIth century Italian linen work, similar to that mentioned above. A loosely[Pg 158][Pg 157] woven linen makes a suitable ground material, for in the working the stitches must be pulled firmly, so as to draw the threads of the fabric together; this gives over the ground a squared open-work effect, which is very pretty. Fig. 84 explains the working of the stitch; it is shown in four stages, and is quite simple; the final result is a cross surrounded by a square. The lowest figure in the diagram shows the last stage, for the upper side of the square is filled in when the row above is worked. The drawing together of the web is not shown, but at a trial it should be done, for in that lies the special character[Pg 159] of the stitch. The silk used must be just thick enough to well cover the linen, but not too thick, for then the work would be clumsy.
Two-sided Italian stitch is aptly named because it looks the same on both sides. This stitch is often seen in 16th and 17th century Italian linen work, similar to what was mentioned earlier. A loosely woven linen works well as a base material, as the stitches need to be pulled tightly to draw the threads of the fabric together; this creates a nice squared open-work effect on top of the ground. Fig. 84 explains how to work the stitch, which is illustrated in four stages and is quite straightforward; the final outcome is a cross surrounded by a square. The lowest figure in the diagram shows the last stage, as the top side of the square gets filled in when the row above it is completed. The pulling together of the fabric isn't illustrated, but it should be done in practice, as it's key to the unique character of the stitch. The silk used should be just thick enough to cover the linen well, but not too thick, or the work will look awkward.


Holbein stitch (fig. 85), also known as stroke or line stitch, is alike on both sides, and is often used in conjunction with cross and satin stitch, as well as alone. Very intricate and interesting patterns can be devised to be carried out with these three stitches, worked always with regard to the web[Pg 161][Pg 160] of the linen. Squared paper could be used for planning the design, as the stitches would all be practically of the same length, and the pattern must be one that can be easily carried out alike on both sides. The stitch is worked as follows: An even running stitch, picking up as much material as it leaves, is taken all round the pattern. This does half the work on either side; the gaps are then filled up by the running stitch being taken in a contrary direction, which completes the pattern. Occasionally stitches go off at[Pg 162] an angle from the running pattern; these are completed on the first journey by a satin stitch being made at the necessary point. The present diagram is a zigzag line, with one of these stitches going off at each angle. Fig. 86 is an example of a border design carried out in Holbein stitch.
Holbein stitch (fig. 85), also known as stroke or line stitch, looks the same on both sides and is often used alongside cross and satin stitches, or on its own. Very detailed and fascinating patterns can be created using these three stitches, always taking into account the weave[Pg 161][Pg 160] of the linen. You can use squared paper to plan out your design since the stitches will all be roughly the same length, and the pattern should be easy to replicate on both sides. To work the stitch, start with an even running stitch, picking up as much fabric as you leave, around the pattern. This does half of the work on each side; then, the gaps are filled by taking the running stitch in the opposite direction, which completes the pattern. Sometimes, stitches extend at[Pg 162] an angle from the running pattern; these are finished on the first pass by adding a satin stitch at the necessary point. The current diagram is a zigzag line, with one of these stitches branching off at each angle. Fig. 86 is an example of a border design executed in Holbein stitch.

The stitch illustrated in fig. 87 is known as rococo stitch. It is a useful one for carrying out a conventional design, such as, to give a simple illustration, a flower sprig repeating in the spaces formed by a trellis pattern. The effect of the stitch when worked cannot be judged[Pg 163] from this diagram; to see this properly a piece of canvas must be worked entirely over with it. The pattern chosen is usually one that lends itself to being worked in diagonal lines, as this stitch is best worked in that way. It entirely hides the canvas background, and is carried out very similarly to the oriental stitch in fig. 71. By the help of that diagram and description and the present one, which gives various steps, the worker will easily master the stitch, which is quite simple. The ordinary carrying out of the stitch is shown where the needle is at work, and in another part the diagram, by some loosened stitches, illustrates how to pass from one cluster to the next.
The stitch shown in fig. 87 is called the rococo stitch. It's great for creating traditional designs, like a flower sprig repeating in the spaces created by a trellis pattern, for example. You can't really judge the effect of the stitch from this diagram; to see it properly, you need to work on a whole piece of canvas with it. The chosen pattern is usually one that works well in diagonal lines since this stitch is best executed that way. It completely covers the canvas background and is done similarly to the oriental stitch in fig. 71. With the help of that diagram and description, along with this one showing various steps, anyone can easily learn the stitch, which is quite simple. The typical execution of the stitch is shown where the needle is in use, and in another section, the diagram with some loosened stitches illustrates how to transition from one cluster to the next.
CHAPTER VIII
WORKING METHODS
Couching—Braid Work—Laid Work—Applied Work—Inlaid Work—Patch Work.
Couching—Braid Work—Laid Work—Applied Work—Inlaid Work—Patch Work.
COUCHING
Couching is the name given to a method of embroidery in which one thread is attached to the material by another one. Sometimes not only one thread but a number of threads are couched down together; or it may be cord, braid, or metal thread that is attached to the material in this way. Fig. 88 shows some couching in progress. The method probably arose through the difficulty experienced in passing either coarse or very delicate threads through a material. Couching is constantly in use with gold thread embroidery, and it is further discussed in the chapter upon that subject, where also is described an entirely different method, which is to be recommended for couching other as well as for gold threads.[Pg 165]
Couching is a technique in embroidery where one thread is secured to the fabric using another thread. Sometimes, multiple threads or even cord, braid, or metal thread are stitched down this way. Fig. 88 shows some couching happening. This method likely developed because of the challenges faced in threading either thick or very fine threads through fabric. Couching is frequently used in gold thread embroidery and is discussed further in the chapter on that topic, where another technique is also recommended for couching not just gold threads but others as well.[Pg 165]

Couching is useful in a variety of ways, e.g. for carrying out work in line or for outlining other embroidery, applied work for instance, which is frequently finished off by means of a couched thread; in the case of a difficult ground material, it is one of the most manageable methods of working. The geometrical open fillings of leaves and backgrounds are often composed of lines of thread thrown across and couched down at regular intervals. Fig. 89 is an example[Pg 166] of a favourite filling of this kind. Embroidery stitches can be made use of for couching down other threads; a bunch of threads may be laid upon the material, and an open chain, buttonhole, or feather stitch worked over in order to fix it in place.
Couching is useful in several ways, e.g. for doing work in line or for outlining other embroidery, such as applied work, which is often finished with a couched thread. When dealing with tricky ground materials, it's one of the easiest methods to use. The geometric open fillings of leaves and backgrounds are often made up of lines of thread that are thrown across and couched down at regular intervals. Fig. 89 is an example[Pg 166] of a popular filling like this. You can use embroidery stitches to couch down other threads; for instance, you can lay a bunch of threads on the material and work an open chain, buttonhole, or feather stitch over them to hold them in place.

Braid work is quickly and easily executed; it needs only a suitable pattern and a pretty braid for couching down to be most successful. There are a few points to be observed about the technique—the cut edge of a braid is awkward to manage, for it must, with a special needle, be taken through to the back of the material and there made secure and flat; for this reason the design should be so planned as to have as few breaks as possible. Interlacing strap work designs, of which a simple example is given in fig. 90, are very suitable for braid work. The thread that couches down the braid may be quite invisible, or, on the other hand, it may be made use of to further decorate the braid by being placed visibly across it,[Pg 167] perhaps forming a chequering or other simple pattern, as shown in fig. 91. Ravellings of the braid may be used as invisible couching threads for stitching it down. Curves and sharp corners need special attention by way of extra stitches. The completed work is much improved by several hours' pressure under a weight.
Braid work is quick and easy to do; it just needs a good pattern and a nice braid to be really effective. There are a few things to keep in mind about the technique—the cut edge of a braid can be tricky to handle, as it needs to be threaded through to the back of the fabric with a special needle and secured flat; for this reason, the design should be planned to minimize breaks. Interlacing strap work designs, which can be seen in fig. 90, are perfect for braid work. The thread that holds the braid in place can either be completely invisible or used to add more decoration to the braid by being placed visibly across it, [Pg 167] possibly creating a checkerboard or another simple pattern, as shown in fig. 91. Frayed ends of the braid can be used as subtle couching threads for stitching it down. Curves and sharp corners require extra attention with additional stitches. The finished piece looks much better after being pressed under a weight for several hours.

LAID WORK

Laid work might be described as couching on a more extended scale—a given space is covered with threads taken from side to side in parallel lines close together, fixed at either extremity by entering the material. Further security is usually given by small couching stitches dotted down at intervals over the laid threads, or by throwing single lines of thread across in a contrary direction and tying these down at intervals with couching stitches. Yet another way is, to work a split or stem stitch over the laid threads, and thus fix them down. Fig. 92 shows a flower carried out in laid work. The tying-down threads can often be made use of in one way or another to further decorate, or to explain form, by means of contrasting colour, change in direction,[Pg 169] and so on. The laid stitches in this flower are taken from the centre outwards and fixed in place by couched circular lines of thread. The centre of the flower has a geometrical filling, composed of a couched lattice pattern with French knots between.[Pg 170] Conventional centres of this and like kinds are very pretty for embroidery flowers; such patterns as those shown in fig. 93 can often be seen in use, and they need only a trial to be frequently adopted.
Laid work can be seen as a larger version of couching—an area is covered with threads laid parallel from side to side, closely spaced and secured at both ends by embedding them into the fabric. Extra security is usually added with small couching stitches placed at intervals along the laid threads or by crossing single threads in the opposite direction and securing them with couching stitches at intervals. Another method is to use a split or stem stitch over the laid threads to hold them down. Fig. 92 shows a flower created using laid work. The tying-down threads can also be used creatively to add decoration or define shape, using contrasting colors, changes in direction, [Pg 169], and so on. The laid stitches in this flower radiate out from the center and are secured in place with couched circular threads. The center of the flower features a geometrical design, made up of a couched lattice pattern with French knots in between.[Pg 170] Traditional centers like this are quite attractive for embroidered flowers; patterns like those illustrated in fig. 93 are commonly used and are worth trying out.


Laid work shows off the gloss and texture of silk to great advantage, which is due to the thread being laid upon the material without being cut up into small stitches. Floss silk is much used for the work; it must not be at all twisted in the laying down, since this mars the effect. The work is carried out in a frame; it is quickly executed and economical, the thread being practically all upon the surface. Owing to the length of the stitches, this is not a very durable method, so it should not be subjected to hard wear. The work has sometimes a flimsy, unsatisfactory appearance, probably because of these long stitches. It will be seen that the silk passing through[Pg 171] to the back, and then immediately to the front again, takes up very little of the material. A method in use for giving greater strength in this way is to lay the silk first in alternate lines and to fill up[Pg 172] the gaps thus left upon a second journey across the form. For added strength, use might be made of a linen thread at the back, as in the point couché rentré ou retiré method that is discussed later.
Laid work highlights the shine and texture of silk really well, as the thread is laid on the fabric without being cut into small stitches. Floss silk is commonly used for this technique; it shouldn’t be twisted when laying it down, as that ruins the effect. The work is done in a frame; it's quick to execute and cost-effective, with almost all the thread resting on the surface. Due to the long stitches, this method isn’t very durable, so it shouldn’t be subjected to heavy use. The work can sometimes look flimsy and unsatisfactory, likely because of those long stitches. You’ll notice that the silk goes from the back to the front again, using very little of the fabric. One way to add strength is to lay the silk in alternating lines and then come back to fill in the gaps left behind. For extra durability, a linen thread can be used at the back, similar to the point couché rentré ou retiré method discussed later.

A gold thread outline gives a nice finish to laid work. If there is nothing in the way of an outline, and the pattern and ground are both covered with laid threads, the edges of the pattern are likely to look weak. Fig. 94 shows a leaf filled in with rather loosely laid threads and outlined and veined with gold passing, the veining answering the double purpose of fixing down the laid threads and veining the leaf at the same time.
A gold thread outline adds a nice touch to laid work. If there’s no outline, and both the pattern and background are filled with laid threads, the edges of the pattern might end up looking weak. Fig. 94 shows a leaf filled in with loosely laid threads and outlined with gold passing, with the veining serving the dual purpose of securing the laid threads and detailing the leaf at the same time.
In this work, the colouring is frequently in flat tones, but if necessary it is quite easy to introduce gradation. Further variety can be obtained by a contrast in colour in the tying-down threads.
In this work, the coloring is often in flat tones, but if needed, it's easy to add gradation. More variety can be achieved by contrasting colors in the tying-down threads.
APPLIED WORK
The ancient Latin term opus consutum, and the modern French one appliqué, which is perhaps the name most commonly in use, both refer to the same kind of work; what is now called cut work is quite[Pg 173] different from this, and is described elsewhere. Under the heading of applied work comes anything that, cut out of one material, is applied to another; it may have been previously embroidered, or it may be just the plain stuff. Both kinds can, as has been proved, be carried out with excellent effect, but much unsuitable and badly designed work has been done by this method, with the result that the very name has fallen into disrepute.
The old Latin term opus consutum and the modern French term appliqué, which is probably the most commonly used name, both refer to the same type of work. What we now call cut work is quite[Pg 173] different from this and is discussed elsewhere. Under the category of applied work falls anything that is cut out of one material and applied to another; it might have been previously embroidered, or it could be just the plain fabric. Both types can, as has been shown, be executed with great effectiveness, but a lot of inappropriate and poorly designed work has been done using this method, leading to the name losing its good reputation.
The simplest kind of applied work is that in which the design, traced upon one material, then cut out along the outline of the pattern, is applied to another material, the junction of the two materials being hidden by a cord or suitable stitch. The applied work is most often flat, but it can be in slight or in strong relief. The texture of the materials employed may be an important factor in the result, for a contrast in material as well as in colour is often wanted; sometimes the former alone is sufficient. The choice of material depends very much upon the use to which the finished work will be put, but this simple form of applied work often relies for part of its effect upon an intrinsic interest in the material, so it is[Pg 174] usually carried out with such materials as velvet, satin, or silk, either plain or figured.
The simplest type of applied work involves taking a design traced onto one material, cutting it out along the pattern's outline, and then applying it to another material, with the junction of the two being hidden by a cord or a suitable stitch. Although applied work is most often flat, it can also have slight or strong relief. The texture of the materials used can significantly impact the result, as contrasts in both material and color are often desired; sometimes, just the former is enough. The choice of material greatly depends on the intended use of the finished piece, but this straightforward form of applied work often relies on the inherent interest of the material itself, so it is[Pg 174] typically done with materials like velvet, satin, or silk, whether they are plain or patterned.
The design for this kind of work should be of a bold conventional type, such as large foliage with the character of the heraldic mantling; any naturalistic flowers, figures, or animals easily become grotesque. A simple outline to the forms is necessary, both because of the technical difficulties and for the effect of the finished work. This kind of work is hardly suitable for expressing fine detail; oftentimes it is seen from a distance, and many indentations on an outline sometimes tend to weaken it. Heraldry can be well expressed by this method. Fig. 95 is an example from a piece of XIIIth century work, a fragment of the surcoat of William de Fortibus, third Earl of Albemarle, who lived in the reign of Henry III.; the example can be seen in the British Museum. This method of work is also particularly suitable for such purposes as the decoration of wall surfaces, for hangings of various kinds, or banners; it can, however, be used for many other purposes, provided the design and the materials are well chosen.
The design for this kind of work should be bold and traditional, like large leaves that resemble heraldic mantling; any realistic flowers, figures, or animals often look awkward. A simple outline is essential, both due to technical challenges and for the final effect. This style isn’t great for showing fine details; it’s often viewed from a distance, and too many indentations in an outline can weaken it. Heraldry is well represented by this approach. Fig. 95 is an example from a piece of 13th-century work, a fragment of the surcoat of William de Fortibus, the third Earl of Albemarle, who lived during Henry III's reign; you can see this example in the British Museum. This technique is also particularly good for decorating wall surfaces, making various hangings, or creating banners; however, it can be used for many other purposes, as long as the design and materials are well chosen.

Owing to the difficulty of working upon some ground stuffs, the method[Pg 175] has arisen of carrying out the embroidery upon an easily worked ground, such as linen; cutting it out, when finished, along the outline and applying it to the proper ground, the junction of the two materials being hidden by a cord or some equivalent. It is usually further completed by[Pg 176] light sprays or some other kind of finishing touches being placed around the applied part, these worked directly on to the proper ground. This prevents the embroidery from looking too bald and detached from its surroundings, of which there is always a danger when it is carried out separately and then attached; if at all possible it is always more satisfactory to work directly on to the right ground.
Due to the challenges of working with certain materials, the method[Pg 175] has developed where embroidery is done on a more manageable fabric, like linen. Once it's completed, it's cut out along the edges and attached to the main fabric, with the seam between the two hidden by a cord or something similar. It's often enhanced by[Pg 176] light sprays or other finishing touches that are applied directly onto the main fabric. This helps to prevent the embroidery from appearing too isolated and disconnected from its background, a common issue when it's done separately and then attached. Whenever possible, it's always better to work directly on the intended fabric.
As a matter of fact it is almost always possible to do this; the workers of the XIIIth century, the period at which the art of embroidery was at its height, carried out the most exquisitely fine stitching and design on such grounds as velvet that had almost as long a pile as some varieties of plush. The famous cope of English work known as the Bowden cope, of which a detail is given in Plate I., is an excellent illustration of this point. Upon careful examination of the work it is apparent that between the stitching and the velvet there is a layer of material, composed either of fine linen or silk. This would be of great help in the carrying out of the stitching. It is exceedingly probable that this layer of fine material was at the commencement[Pg 177] of the work laid completely over the velvet background of the cope; for one thing, the design, with its finely drawn detail, could easily be perfectly traced upon a surface of this kind and only imperfectly upon velvet; another advantage of this method would be, that the background would be kept quite free from dust and from getting soiled by the hands during the lengthy process of the work. The stitching would be carried through all the surfaces, and when finished, the fine surface layer would be cut away close round the edges of the design, which would be quite easily done. This method of working upon a difficult ground is well worth trying in place of the applied method.
In fact, it's almost always possible to do this; the workers of the 13th century, when the art of embroidery was at its peak, performed the most exquisitely fine stitching and designs on materials like velvet that had a pile almost as long as some types of plush. The famous English garment known as the Bowden cope, which is detailed in Plate I., illustrates this point perfectly. Upon closer inspection of the work, it's clear that there's a layer of material, made of either fine linen or silk, between the stitching and the velvet. This would significantly help with the stitching process. It's very likely that this layer of fine material was completely laid over the velvet background of the cope at the beginning of the work; for one, the design, with its delicate details, could be perfectly traced on this kind of surface, but only imperfectly on velvet. Another advantage of this method is that it would keep the background free from dust and prevent it from getting soiled by hands during the long process of creation. The stitching would go through all the surfaces, and when finished, the fine top layer would be cut away close to the edges of the design, which would be quite easy to do. This approach of working on a challenging surface is definitely worth trying instead of the applied method.
To return to the discussion of applied embroidery—let us suppose the embroidered piece to be just completed on its linen ground, still stretched in the frame in which it was worked. In another frame, stretch the background material and trace upon it the exact outline of the piece to be applied. Cut out the embroidered piece carefully round the edge, allowing about one-sixteenth of an inch margin outside the worked part, leaving, if necessary, little connect[Pg 178]ing ties of material here and there for temporary support. With fine steel pins or needles fix the cut-out work exactly over the tracing already made on the ground material, then make it secure round the edge with rather close stitches of silk placed at right-angles to the outline; with fine materials the raw edge of the applied part can be neatly tucked under and fixed in place by this overcast stitch. A cord is next sewn on to hide the fixing and give a finish to the edge. The colour of this cord is important, since its colour may increase the expanse of either the applied part or the ground. Sometimes a double cord is put round, and in this case the inner one is attached to the embroidery before it is cut out of the frame, and the second attached afterwards. The inner one is often of a colour predominating in the embroidery, and the outer one of the colour of the ground. Gold cord is very usual; if a coloured silk one is used it must be a perfect match. The ordinary twisted cord looks best attached invisibly; to do this, slightly untwist it whilst stitching, and insert the needle in the opening thus formed. Some kinds of flat braids look well with the[Pg 179] fixing stitches taken deliberately over them and forming part of the ornamentation (see fig. 91). Bunches of silk are sometimes couched round with a buttonhole or other stitch, but whatever the outline may consist of, it should be a firm bold line.
To get back to the topic of applied embroidery—let’s say we have an embroidered piece just finished on its linen background, still stretched in the frame where it was worked. In another frame, stretch the background material and trace the exact outline of the piece to be applied onto it. Carefully cut out the embroidered piece around the edge, leaving about one-sixteenth of an inch margin outside the stitched part and, if needed, leaving small connecting ties of material here and there for temporary support. Use fine steel pins or needles to secure the cut-out piece exactly over the tracing made on the background material, then stitch it securely around the edge with close stitches of silk placed at right angles to the outline; for finer materials, the raw edge of the applied piece can be neatly tucked under and secured in place with this overcast stitch. Next, sew on a cord to hide the stitches and finish the edge. The color of this cord is important because it can enhance the appearance of either the applied part or the background. Sometimes a double cord is used; in this case, the inner one is attached to the embroidery before it's cut out of the frame, and the second one is attached afterwards. The inner one often matches a predominant color in the embroidery, while the outer one matches the color of the background. Gold cord is commonly used; if a colored silk cord is used, it must match perfectly. The standard twisted cord looks best when attached invisibly; to achieve this, slightly untwist it while stitching and insert the needle into the opening formed. Some types of flat braids look good when the fixing stitches are done deliberately over them and become part of the decoration. Bunches of silk are sometimes secured with a buttonhole stitch or another stitch, but regardless of the outline, it should form a firm, bold line.
The work must be perfectly flat when completed. Puckering may occur through want of care in the preliminary straining or in the fixing on of the applied parts. Some materials are more easy to manage than others. The difficult ones can if necessary have a preliminary backing applied, which is useful also if the material is inclined to fray. The backing may consist of a thin coating of embroidery paste, or of tissue paper or fine holland pasted over the part to be applied. The more all this kind of thing can be avoided, the better the work, for pasting of any kind is apt to give a stiff mechanical look; also, if the work is intended to hang in folds any stiffness would be most impracticable.
The finished work needs to be completely flat. Puckering can happen if there’s not enough care during the initial stretching or when attaching the applied parts. Some materials are easier to work with than others. For the tricky ones, you can apply a preliminary backing if needed, which is also helpful if the material tends to fray. The backing can be a thin layer of embroidery paste, tissue paper, or fine holland glued over the area to be applied. The more you can avoid this kind of thing, the better the final result will be, since any kind of gluing tends to make the work look stiff and mechanical; plus, if the piece is meant to hang in folds, any stiffness would be really impractical.
Even more than simpler work applied embroidery needs the finish of some light work upon the ground. Gold threads and spangles, arranged in fashion similar to the sprays in fig. 112, are[Pg 180] very often used. Sometimes, instead of this, some small pattern in outline is run all over the ground in order to enrich it.
Even more than simpler work, applied embroidery requires some light finishing touches on the background. Gold threads and sequins, arranged similarly to the sprays in fig. 112, are[Pg 180] very commonly used. Sometimes, instead of this, a small outline pattern is stitched all over the background to enhance it.
INLAID WORK
Inlaid work is in effect similar to the applied, and it is used for the same purposes. The difference with this is that both background and pattern are cut out and fitted into each other, instead of only one of them being cut out and laid on an entire ground. The method of work is economical, for there need be very little waste of material. What is left from cutting out the pattern and background for one piece can be used as ground and pattern for another and possibly companion piece. There is in Perugia a church which possesses a complete set of draperies of this description, that were made at a good period for this work, early XVIth century, and evidently were designed for the position they occupy. On festivals, the piers, pulpit, and parts of the wall are hung with these rose and gold-coloured hangings of inlaid work. The design is a conventional scroll-work pattern, and the various hangings have[Pg 181] alternately the rose ground with gold pattern, and gold ground with rose pattern, the whole forming a rich and harmonious interchange of colour.
Inlaid work is essentially similar to applied work and serves the same purposes. The difference is that both the background and the pattern are cut out and fit together, rather than just one being cut out and placed on a full background. This method is efficient, as it produces very little waste of material. What remains from cutting out the pattern and background for one piece can be used as the background and pattern for another, possibly a complementary piece. In Perugia, there’s a church that has a complete set of draperies made in this style during a high point for this work in the early 16th century, clearly designed for their specific locations. During festivals, the piers, pulpit, and parts of the wall are adorned with these rose and gold-colored inlaid hangings. The design features a conventional scroll-work pattern, and the various hangings alternate between a rose background with a gold pattern and a gold background with a rose pattern, creating a rich and harmonious interplay of colors.
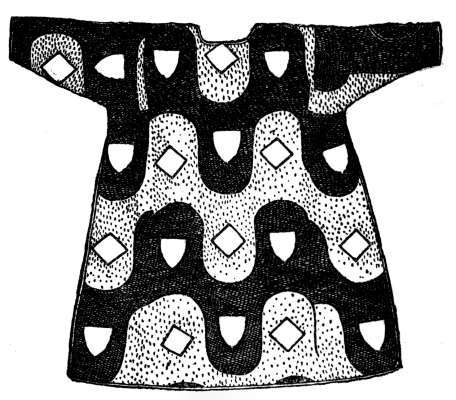
A very ancient piece of the same kind of inlaid work is the funeral tent of Queen Isi-em-Keb, dated about 980 B.C., which is in the Boulak Museum, Cairo. It is composed of thousands of pieces of gazelle hide dyed in various colours and stitched together so as to form a wonderful design.[4]
A very old example of this kind of inlaid work is the funeral tent of Queen Isi-em-Keb, dated around 980 BCE, which is located in the Boulak Museum in Cairo. It consists of thousands of pieces of gazelle hide dyed in different colors and stitched together to create a stunning design.[4]
To carry out the work—Stitch in a frame some holland to use as a background; this may be only temporary, being removed when the work is completed, or it may be left for additional strength. The materials for both background and pattern must first be carefully cut out. It is a good plan, where possible, to cut the two together so as to ensure exact similarity, for they have to fit together afterwards like the parts of a puzzle. The cut edges cannot be allowed to fray, so if there is any danger of this, precautions must be taken to prevent it, though the better way is to choose in the first place more suitable material. Leather is a particularly good example of one. Any pasting or backing which might be used for prevention of[Pg 183] fraying would prevent also that possibility of exposing both sides of the work, which in inlay is sometimes a valuable quality; also, the stiffening which unavoidably results from pasting is rarely an improvement. When materials of different thicknesses are used together, the thinner one can be lined with fine holland so as to make it nearer equal in strength. After the materials are cut out the next process is to lay them in position on the prepared holland and tack them to it. Then, with an overcast stitch that must not be allowed to pierce the under surface, join all the edges together, and cover the stitches with a finishing cord or braid. The backing can now be removed if need be.
To start the project, stitch some holland into a frame to serve as a background; this can be temporary and taken out when the work is done, or it can stay in place for extra durability. First, carefully cut out the materials for both the background and the pattern. It's a good idea, whenever possible, to cut both together to ensure they match perfectly, as they need to fit together later like pieces of a puzzle. The cut edges should not fray, so if there's any risk of that happening, take precautions to avoid it; however, it's better to choose materials that won't fray in the first place. Leather is a great example of a suitable material. Any pasting or backing used to prevent fraying will also block the ability to expose both sides of the work, which can be a valuable feature in inlay. Plus, the stiffness that comes from pasting rarely improves the outcome. When using materials of different thicknesses together, the thinner one can be lined with fine holland to make it closer in strength. After the materials are cut out, the next step is to lay them out on the prepared holland and tack them down. Then, using an overcast stitch that doesn’t pierce the back surface, join all the edges together and cover the stitches with a finishing cord or braid. The backing can now be removed if needed.
PATCHWORK
Patchwork can hardly attain to a high position amongst the various branches of embroidery. The main object of doing patchwork frequently is to make good use of valuable scraps of waste material. Unless, however, the product shows evidence of well thought out colour and arrangement, it cannot come under the heading[Pg 184] of embroidery. Interesting results, however, of many kinds can be produced from this paint-box of brightly coloured scraps of material by ingenious mixing and shaping of them. Patchwork infers a rather more mosaic-like design than inlaid work, to which it is in some respects similar. The geometrically planned mosaic and inlay pavements that are to be seen so commonly in Italy and the East suggest great variety of patterns that could be applied to patchwork. The illustration at fig. 97 is a simple example taken from this source. Too often the results are only "alarming," as the Countess of Wilton expressively puts it, thinking, probably, of the patterns frequently seen upon cushions, patterns more resembling bright-coloured bricks set in cornerwise than anything else. They are the most unrestful looking things imaginable. The important elements of the work lie in the colour, shape, and texture of the pieces used, for upon the right selection the result wholly depends. The shapes chosen must be simple owing to the necessity of fitting and stitching them together, but there is plenty of variety obtainable with simplicity. The design[Pg 185] may consist of one shape repeated or several. If only one, it is limited to a few geometrical figures, such as the square, hexagon, or shell shape; if more[Pg 186] than one, there can be greater variety of pattern. Fig. 98 is an example in which four shapes are made use of, a large and small circle, an octagon, and an S-like twist. Four of these twists together make the figure that interlaces over the surface. Embroidery stitching can be added to patchwork; for instance, this example might have a neat border pattern worked on all the S-shapes, as suggested in the diagram, which would probably considerably increase its interest. Fig. 99 shows flowers springing from the base of the shell-form in use upon it. The embroidery could be simply carried out in one colour, or if a more gorgeous result were required, variety could be introduced in this way as well as in the ground, and a marvellous combination of intricate colour could be thus produced.
Patchwork doesn't really rank high among the different types of embroidery. The main goal of patchwork is often to make good use of valuable scraps of leftover material. However, unless the final product shows careful consideration of color and arrangement, it can't truly be categorized as embroidery. On the other hand, a lot of interesting results can come from creatively mixing and shaping these brightly colored scraps. Patchwork tends to have a more mosaic-like design compared to inlaid work, which it resembles in some ways. The geometrically planned mosaics and inlaid floors commonly found in Italy and the East suggest a variety of patterns that could be applied to patchwork. The illustration at fig. 97 is a simple example drawn from this idea. Unfortunately, the results are often just "alarming," as the Countess of Wilton puts it, likely referring to patterns commonly seen on cushions that look more like bright-colored bricks arranged diagonally than anything else. They can be quite unappealing. The essential elements of the work are the color, shape, and texture of the pieces used, as the final outcome heavily relies on the right selection. The chosen shapes must be simple since they need to fit together well, but there is still a lot of variety to be found within simplicity. The design[Pg 185] can consist of one shape repeated or multiple shapes. If it's just one shape, it’s limited to a few geometric figures like squares, hexagons, or shell shapes; if there are multiple shapes[Pg 186], there’s more potential for varied patterns. Fig. 98 shows an example using four shapes: a large circle, a small circle, an octagon, and a twist in the shape of an S. Four of these twists together create the design that intertwines across the surface. You can add embroidery stitching to patchwork; for instance, the example could have a neat border pattern stitched onto all the S-shapes, as suggested in the diagram, which would likely enhance its visual appeal. Fig. 99 features flowers emerging from the base of the shell shape used in it. The embroidery could be done in a single color, or for a more stunning effect, a mix of colors could be introduced both in the embroidery and the background, resulting in a fantastic combination of intricate colors.


For the work to be made up satisfactorily it is necessary that the shapes be accurately cut out. To ensure this, a metal plate is cut and all the shapes are taken from it; sometimes, in lieu of this, a pattern is cut out in stiff cardboard. Lay this pattern-shape on the wrong side of the material and pencil it round, then carefully cut out the stuff, leaving[Pg 188][Pg 187] about a quarter of an inch for turning in. Next lay the pattern-shape upon a piece of stiff paper or thin card-board and again trace off the shape, this time cutting it out exactly to the pattern, tack the material to the paper, and stitch down the raw edges at the back. Lay the prepared patches on a table and put them in place by referring to the design, and then commence sewing the edges together with an overcast stitch on the wrong side. When all are sewn, remove the papers and flatten the seams with[Pg 189] an iron. Any braid or stitch that may be required to mask the join is next put on; this may be made ornamental by interlacing knots at the corners, or by any other device that happens to suit the work. The last thing to be done is to put a neat lining upon the back to cover and protect the numerous raw edges.
For the work to turn out well, it's essential that the shapes are cut out accurately. To make this happen, a metal plate is cut, and all the shapes are derived from it; sometimes, instead of that, a pattern is cut from stiff cardboard. Place this pattern shape on the back side of the material and trace around it with a pencil, then carefully cut out the fabric, leaving about a quarter of an inch for folding in. Next, lay the pattern shape on a piece of stiff paper or thin cardboard and trace the shape again, cutting it out exactly to the pattern. Then, attach the material to the paper and stitch down the raw edges at the back. Arrange the prepared patches on a table and position them according to the design, and begin sewing the edges together with an overcast stitch on the back side. Once everything is sewn, remove the papers and flatten the seams with an iron. Apply any braid or stitch needed to cover the joint; this can be decorative by adding interlacing knots at the corners or using any other method that fits the project. The final step is to add a neat lining on the back to cover and protect the many raw edges.

CHAPTER IX
WORK METHODS—(continued)
Quilting—Raised Work—Darning—Open Fillings—Darned Netting.
Quilting—Raised Work—Darning—Open Fillings—Darned Netting.
Quilting is a method of working by which three materials are fixed together by more or less all-over stitching. It probably developed through the necessity of keeping the three layers in place. For practical purposes only, the sewing machine does the work excellently, but by making the stitching follow out some prearranged design, it is raised to the level of art. Plate III. is an interesting example showing what can be done in the way of design with the stitching over the surface. Embroidery may be added to the quilting,[Pg 190] and this is often an improvement. The Eastern nations carry out marvellously intricate designs in quilting, and English XVIIIth century work of this kind shows Eastern influence strongly. A good example of this is a very interesting piece in the Victoria and Albert Museum.[5]
Quilting is a technique where three layers are stitched together using mostly continuous stitching. It likely originated from the need to keep the three layers secure. For practical purposes, the sewing machine does this job very well, but when the stitching follows a specific design, it becomes a form of art. Plate III. is a fascinating example of what can be achieved with design through surface stitching. Embroidery can enhance the quilting,[Pg 190] and this often makes it even better. Eastern cultures create marvelously intricate quilting designs, and 18th-century English pieces show a strong Eastern influence. A notable example of this is a very intriguing item in the Victoria and Albert Museum.[5]
The first aim in quilting was evidently warmth, and the name denotes one of the chief uses to which it is put. It is made use of also for curtains, infants' caps or gloves (see fig. 100), all these things requiring the three layers for warmth. The materials usually consist of a surface one, which can be silk, fine linen or anything else; an interlining of some softer material having a certain amount of spring in it, such as flannel, cotton wadding, or wool; and for the third, an underneath lining of some kind. A cord is sometimes inserted instead of the inner layer of stuff, the lines of stitching running along either side to keep it in place. Occasionally there are only the top and the under layer, with no intervening material. The stitch usually employed is a running, back, or chain stitch, and[Pg 192][Pg 191] it can be of the colour of the surface, or a contrast to it. Gold silk is often seen upon a white linen ground. The chief interest in the work lies in the choice of pattern, such things as colour, variety of stitching, interest in material, are not made much of. In planning the pattern, use is made of the knowledge that the closely stitched parts will lie more flatly, so it frequently happens that the ground has a small diaper running over it, and the pattern part, being less worked upon, perhaps only outlined, stands out more and forms an effective contrast.
The main goal of quilting was clearly to provide warmth, and the name reflects one of its primary purposes. It’s also used for things like curtains, baby hats, or gloves (see fig. 100), all of which need three layers for insulation. The materials typically include a top layer, which can be silk, fine linen, or something similar; a middle layer made of something softer and bouncy, like flannel, cotton batting, or wool; and a bottom lining of some kind. Sometimes, a cord is used instead of the inner layer, with stitching lines running along either side to hold it in place. Occasionally, only the top and bottom layers are used, without any middle material. The stitches commonly used are running, back, or chain stitches, and[Pg 192][Pg 191] they can match the color of the top layer or contrast with it. Gold silk is often seen on a white linen background. The main focus in the craft is on the choice of pattern; aspects like color, variety of stitching, and interest in the material aren't emphasized as much. When designing the pattern, there's an understanding that closely stitched areas will lie flatter, so it often happens that the background features a small pattern, while the patterned areas, being less stitched or perhaps just outlined, stand out more and create an appealing contrast.

RAISED WORK
In the XIVth century raised work was commonly done, but few examples are known of date earlier than this. The raised effect is obtained by an interposed layer of padding, which is a good method of getting a certain kind of effect. It is perhaps wise to err on the side of too little rather than too much relief. An example of too much and also of a wrong kind is the English stump work that was popular in the XVIIth century, when figures were stuffed like[Pg 193] dolls, the clothes made separately and attached, even to the shoes and stockings. Germain de St. Aubin, writing in 1769, describes with much admiration a kind of broderie en ronde bosse, apparently much the same thing and in equally doubtful taste, though the skill required to carry it out must have been considerable.
In the 14th century, raised work was commonly done, but few examples from before this time are known. The raised effect is achieved by adding a layer of padding, which is a good way to create a specific kind of effect. It's probably better to have too little relief than too much. An example of excessive and inappropriate relief is the English stump work that was popular in the 17th century, where figures were stuffed like dolls, with clothes made separately and attached, even down to the shoes and stockings. Germain de St. Aubin, writing in 1769, praises a type of broderie en ronde bosse, which seems to be quite similar and in equally questionable taste, although the skill needed to create it must have been considerable.
The work, usually done in a frame, must be well carried out technically; the padding should be quite perfect in the form required before the final surface layer is worked over it, for this one will not make any deficiency right, but will only serve to show it up the more. Another point to be careful about is to make the padding stop well within the traced line of the pattern, otherwise the finished design will turn out much larger than was originally intended. The outline is sometimes worked round at the commencement, whereby its correctness is ensured.
The work, often done in a frame, needs to be executed well technically; the padding should be just right in the shape needed before the final surface layer is applied, as this layer won’t fix any mistakes but will only highlight them. Another important thing to watch is that the padding stays well inside the drawn line of the pattern; otherwise, the finished design will end up much larger than originally planned. Sometimes, the outline is worked around at the beginning to ensure its accuracy.


Many different materials are brought into use for padding purposes. One of the simplest and most durable is a running of thread as illustrated in fig. 101. The thread can be arranged so[Pg 194] as to be thicker in the centre than at the edges by laying some extra stitches over that part. If a quite flat padding is required, the shape, cut out in cloth, felt, or parchment, is attached by stitches to the material as shown in fig. 102; the surface stitching would be taken across it. Cardboard, sometimes pasted on to the ground, is used for this purpose, but it is unsatisfactory in several ways; for instance, cardboard letters are procurable for embroidering initials upon linen, but they are not at all practical for anything that goes through the wash; moreover, the letters are sometimes of bad design. Cotton wool is used as a stuffing, its surface being usually covered over with muslin, but this again[Pg 195] would not stand much wear of any kind, and so could only be used under certain conditions.
Many different materials are used for padding. One of the simplest and most durable is a row of thread, as shown in fig. 101. The thread can be arranged to be thicker in the center than at the edges by adding some extra stitches in that area. If you need a completely flat padding, a shape cut out of cloth, felt, or parchment is stitched to the material as illustrated in fig. 102; the surface stitching would be done across it. Cardboard, sometimes glued to the base, is also used for this, but it has several drawbacks. For example, cardboard letters can be found for embroidering initials on linen, but they aren't very practical for anything that will be washed; also, the letters often have a poor design. Cotton wool is used as stuffing, with its surface usually covered in muslin, but again, this wouldn't hold up well over time and can only be used under certain conditions.

Another good method is to couch down a hank of threads of fine cotton or perhaps wool as illustrated in fig. 103. For raised lines there is a special kind of string procurable that can be couched to the ground material at the required places. The padding, whatever it may be composed of, should be as nearly as possible of the same colour as the surface layer, in view of any after wear and tear misplacing the threads.
Another effective method is to lay down a bundle of fine cotton or maybe wool threads as shown in fig. 103. For raised lines, there’s a specific type of string available that can be attached to the base material at the needed spots. The padding, no matter what it’s made of, should closely match the color of the surface layer to avoid any wear and tear that might shift the threads over time.

The top layer of underlay must lie in direction contrary to the surface embroidery stitching, which is very often some form of satin stitch taken from side to side over the padding. Instead of going through the material it can[Pg 196] be fixed on each side with a couching stitch, as in fig. 104. A stronger way than these would be that shown in fig. 129. Buttonhole is a good stitch for working over a padding; it would be worked solidly in the manner described and illustrated on page 117, but taken, as there shown, over a padding instead of over a flat surface.
The top layer of underlay should be placed in the opposite direction to the surface embroidery stitching, which is often some type of satin stitch going side to side over the padding. Instead of going through the material, it can[Pg 196] be secured on each side with a couching stitch, as shown in fig. 104. A stronger option than these would be the method shown in fig. 129. Buttonhole stitch is great for working over padding; it should be done solidly as described and illustrated on page 117, but taken, as indicated, over padding instead of a flat surface.
DARNING
There is a most practical sound about darning; it can, however, be made good use of in embroidery as well as in plain needlework. There are two rather different kinds in use; in both the stitch is a running one and done in much the same way that a thin place would be darned in mending.
There’s a really practical aspect to darning; it can also be effectively used in embroidery as well as in basic sewing. There are two quite different types in use; in both, the stitch is a running stitch and is done in a similar way to how you would darn a thin spot when mending.
One kind of darning is rather popular at the present moment, and examples of it may be familiar; it is a large, bold kind of work, often carried out with a coarse twisted silk. Upon the background, the lines of stitching usually run straight across or up and down, in the pattern, they radiate according to the shape of the form to be filled. The entire material[Pg 197] is covered one way or another by the running stitches, and just one thread of the ground fabric is picked up where necessary at irregular intervals; a loosely woven linen is often chosen for working upon, one in which it is easy to pick up the single thread. Gradation of colour can easily be introduced; the design chosen is most frequently some kind of conventional flower and leafy scroll. This method of embroidery is seen to best advantage when used upon large surfaces.
One popular type of darning right now is quite bold, and you might recognize it; it’s a large, striking style often done with thick twisted silk. The stitching lines usually go straight across or up and down, forming a pattern that radiates to fit the shape being filled in. The whole material[Pg 197] is covered by running stitches, and just one thread from the underlying fabric is pulled up as needed at random spots; a loosely woven linen is often chosen for this, making it easy to grab a single thread. You can easily add a gradient of color, and the most common design features some kind of traditional flower and leafy scroll. This embroidery technique looks best when used on larger surfaces.
The second kind is called pattern darning; in it the stitches are picked up in some regular order, so that they form various geometrical patterns over the surface. It is worked by counting the threads of the fine linen ground and picking up a single thread or more in some regular sequence. The threads are run in parallel lines close together, either horizontally or vertically, so as to take advantage of the web of the fabric. The work is particularly pretty and not difficult, requiring only patience and good eyesight. Fig. 105 gives some simple examples of the work—The first is a chevron pattern, formed by picking up one thread and leaving about five each[Pg 199][Pg 198] time; each succeeding row moves a step forward or backward as required to carry out the pattern. In the second example the darning is taken two ways of the material; in the centre, where it meets and crosses, it entirely covers the ground. A different colour might be used for each direction, which would look very well at the crossing in the centre. The four corners are filled up with a chequer darn; this each time picks up as much material as it leaves. The third example shows the darning stitch forming a diamond pattern. Samplers, dated early XIXth century, may be seen entirely filled with these pattern darns; they are covered with most intricate and beautiful sample squares showing various patterns in darning, and were possibly done in order to learn how to repair damask table linen. In a collection of early Egyptian work in the Victoria and Albert Museum, there is some pattern darning, dated VIth to IXth century, A.D., which proves it to be a very early method of embroidering.
The second type is called pattern darning; in this technique, the stitches are picked up in a regular order to create various geometric patterns across the surface. It's done by counting the threads of the fine linen background and picking up one or more threads in a consistent sequence. The threads are run in parallel lines that are closely spaced, either horizontally or vertically, to make the most of the fabric’s weave. The work is especially pretty and not too challenging, needing just patience and good eyesight. Fig. 105 provides some simple examples of the work—The first is a chevron pattern, created by picking up one thread and leaving about five each time; each subsequent row shifts forward or backward as needed to follow the pattern. In the second example, the darning is done in two directions across the material; in the center, where they intersect, it completely covers the ground. Using a different color for each direction would look stunning at the center intersection. The four corners are filled with a checkerboard darn, which picks up as much material as it leaves each time. The third example illustrates the darning stitch forming a diamond pattern. Samplers from the early 19th century often display these pattern darns; they are filled with intricate and beautiful squares showcasing various darning patterns, likely made to learn how to repair damask table linen. In a collection of early Egyptian work at the Victoria and Albert Museum, there's some pattern darning dated from the 6th to 9th century A.D., proving that this method of embroidery is quite ancient.

This pattern darning, however, is so pretty that it is often possible to make use of it in embroidery work for all kinds of purposes. It makes a very good back[Pg 200]ground if there is sufficient space to show the pattern, if there is not, the irregular darning might be used instead, for it would in that case be just as good and much quicker to work. To pattern-darn the ground with the ornament upon it left in the plain material, perhaps not worked upon at all, is a very effective method of carrying out a design, see fig. 106 for example. Again it might very well be used for the conventional carrying out of draperies in the same way as in point couché rentré ou retiré.[6] The draperies on the[Pg 201] figure in the frontispiece could easily be carried out with silk thread in the darning stitch, in fact this method of decoration more closely resembles the early couching than any other; it is not quite as satisfactory because the single threads of the background that are picked up prevent the ground showing nothing but silk. Bands of this work may be seen ornamenting needle books or work cases; it shows to best advantage when worked finely with floss or filosel silk, the coarse twisted silks are too thick for the purpose.
This pattern darning is so beautiful that it's often used in embroidery for all sorts of projects. It makes a great background if there's enough space to showcase the pattern. If there's not enough space, the irregular darning is a good alternative since it's just as effective and much faster to do. Pattern-darning the background while leaving the decoration in the plain material, perhaps untouched, is a very striking way to execute a design; see fig. 106 for example. It could also be effectively used to represent draperies, similar to how it's done in point couché rentré ou retiré.[6] The draperies on the[Pg 201] figure in the frontispiece could easily be done with silk thread in the darning stitch. In fact, this decoration method resembles early couching more than any others; however, it's not quite as satisfactory since the single threads of the background that are picked up prevent it from showing only silk. Bands of this technique can often be seen decorating needle books or work cases, and it looks best when done finely with floss or filosel silk, as thick twisted silks are not suitable for this purpose.

OPEN WORK FILLINGS
Patterns can be carried out in line, they can be worked quite solidly, and there is a method that lies between these two known as open filling. The open and solid fillings are often used together in the same piece of work; examples of this can be seen on the XVIIth century wool-work curtains, the large scrolling leaves are sometimes partly worked openly and a portion, possibly reflexed, filled in with solid stitches in gradating colour; see for an example Plate VIII. This has a very good effect, it[Pg 202] prevents the work looking too heavy, shows up the form more clearly, and allows of more variety in the stitching. With open fillings the outline surrounding them must always be some firm decided line, such as is made by a band of satin or long and short stitch, or, in the case of larger forms, by several rows of different line stitches worked closely together, one inside the other, most likely in different shades of colour. A filling of open work can be carried out in a variety of ways; it may be a decorated trellis, a regular dotting of some kind, or some geometrical pattern in outline, or some light stitch such as an open buttonhole (see[Pg 203] fig. 107), which would be treated each as a diapering over the form to be filled. It does not much matter what the filling is as long as it is dispersed pretty regularly over the space, giving the effect at a little distance of a light pervading tone, and when examined closely exhibiting an in[Pg 204]teresting small pattern. The open filling method can be used entirely throughout a design with very pretty effect; an example of this may be seen on an embroidered coverlet and pillow case in the Victoria and Albert Museum.[7] The pattern, composed of vine leaves and grapes, is carried out in dark brown silk on a linen ground, the leaves being all outlined with satin stitch. There is wonderful variety in the patterns, no two alike, which form the open fillings of the leaves; this makes them most interesting to examine, and is evidence of enthusiasm in their designing. Fig. 108, a leaf taken from this specimen, shows one method of filling a form with open work.[8] Fig. 109 shows a collection of patterns taken from the same piece of embroidery. It will be observed that small stitches of the same length compose the pattern, which can be designed upon squared paper and easily copied on to the linen ground by always picking up the same number of threads. To look well these little forms must be accurately worked,[Pg 206][Pg 205] and they or similar kinds can be used upon flowers, leaves, beasts, draperies, or anything else quite indiscriminately. Fig. 110, from a cap in the Victoria and Albert Museum, is a drawing showing the same kind of open filling in use upon a bird.[9]
Patterns can be done in a line, worked solidly, or with a technique in between called open filling. Open and solid fillings are often combined in the same piece of work; for example, in the 17th-century wool-work curtains, large scrolling leaves are sometimes partially worked openly, while other parts, perhaps in a reflective style, are filled with solid stitches in gradating colors; see for an example Plate VIII.. This creates a very nice effect, prevents the work from looking too heavy, clearly shows the form, and allows for more variety in the stitching. With open fillings, the surrounding outline must always be a firm, definite line, created by a band of satin or long and short stitches, or for larger shapes, by several rows of different line stitches worked closely together, most likely in different shades of color. Open work can be done in various ways; it could be a decorated trellis, an even dotting of some kind, a geometric outline, or a light stitch like an open buttonhole (see[Pg 203] fig. 107), all serving as a decorative overlay for the filled form. The type of filling doesn’t matter much as long as it is evenly distributed across the space, creating a light, pervasive tone from a distance, and revealing an interesting small pattern up close. The open filling method can be used throughout a design for a lovely effect; for example, there’s an embroidered coverlet and pillowcase in the Victoria and Albert Museum.[7] The pattern, made of vine leaves and grapes, is done in dark brown silk on a linen background, with the leaves outlined in satin stitch. There’s a wonderful variety in the patterns, no two the same, which create the open fillings of the leaves; this makes them fascinating to look at and shows the enthusiasm in their design. Fig. 108, a leaf from this specimen, demonstrates one method of filling a form with open work.[8] Fig. 109 shows a collection of patterns from the same embroidery piece. Notice that small stitches of the same length create the pattern, which can be designed on squared paper and easily transferred to the linen by consistently picking up the same number of threads. To look good, these little forms must be accurately worked,[Pg 206][Pg 205] and they or similar kinds can be applied to flowers, leaves, animals, drapery, or anything else quite randomly. Fig. 110, from a cap in the Victoria and Albert Museum, illustrates the same type of open filling being used on a bird.[9]


A quicker way of carrying out these geometrical fillings is by using such forms[Pg 208][Pg 207] as a lattice and throwing the lines from side to side across the shape to be filled, fixing them down, where they cross each other, with couching stitches; the interstices left between the threads can be filled in with little stars, crosses, or dots (see fig. 111). Buttonhole stitch, if made use of as an open filling, would be taken in lines straight across a form, the stitches being worked possibly two or three closely together and then a space, and so on.
A faster way to do these geometric fills is by using shapes like a lattice and drawing lines across the area to be filled, securing them at the intersections with couching stitches. The gaps left between the threads can be filled with small stars, crosses, or dots (see fig. 111). If you use buttonhole stitch as an open fill, it would be applied in straight lines across the shape, with the stitches possibly worked two or three close together and then a gap, and so on.

Fig. 112 suggests another method of lightly filling a leaf with a conventional veining and dotting. There is no limit to the variety which can be obtained in this method of working.
Fig. 112 suggests another way to lightly fill a leaf with traditional veining and dotting. There’s no limit to the variety that can be achieved using this technique.

Open fillings are effective for use upon any work that is intended to be seen with a light at the back; they make very decorative the various forms they fill, in such things as muslin window blinds, curtains, fire screens, whether hand screens or the larger type. For articles of this kind the patterns should be rather more solid and less lined in character; fig. 113, taken from a window blind exhibited in the Victoria and Albert Museum, exemplifies what is meant; most of the patterns illustrated in fig. 100 could be treated in a[Pg 210][Pg 209] more solid manner if necessary, and would look equally well that way. When working upon transparent grounds special care must be taken with the reverse side as well as with the surface, for the work to be practically alike upon both sides; there must be no threads running from one form to another nor any visible fastening off of ends.
Open fillings are great for anything that's supposed to be backlit; they really enhance the shapes they fill, like muslin window blinds, curtains, and fire screens, whether they’re hand-held or the larger versions. For these kinds of items, the patterns should be a bit more solid and less lined. fig. 113, taken from a window blind displayed in the Victoria and Albert Museum, shows what this means; most of the patterns shown in fig. 100 could be made to look more solid if needed, and they would look great that way. When working on transparent backgrounds, it's important to pay special attention to the back side as well as the front, so that both sides look practically the same; there shouldn't be any threads connecting one shape to another or any visible knotting of ends.

DARNED NETTING
Darned netting, or lacis, as it is sometimes called, might almost come under[Pg 211] the heading of either lace or embroidery. It is used effectively with other kinds of white linen work, bands or squares of it being let into the linen; the contrast of the solid with the more open work gives a pretty effect. Fig. 114 is an example of this work. The darning is done on a plain netted ground which can be[Pg 212] prepared by the worker if acquainted with netting, if not, the squares can be obtained ready for working upon. The pattern must be designed upon squared paper as for cross stitch work, then it is simply a question of following out the pattern upon the square net ground. Every square of the patterned part must be crossed in each direction by two lines of darning, which should about fill it up. The various lines are run in and out as continuously as possible, so as to avoid unnecessary fastening off or passing from one part to another. When a fresh thread is required, join it with a knot to the end of the last one (see figs. 165 and 166), and darn the ends in neatly with the other threads. These knots are often used in embroidery, for they are both strong and small. Detached stitches and parts must be worked by themselves; the thread should not be carried from one to the other. The work must be done in a frame and carried out with a blunt-pointed needle. The same thread is used for the netted ground and for the darned pattern. A method of work that the French call dessein réservé is, in result, rather similar to this, but it is worked[Pg 213] in just the reverse way. The pattern, whatever it may be, is left in the plain linen, and the background has certain threads in each direction withdrawn at regular intervals, whereby the effect of the squared net ground is obtained.
Darned netting, or lacis, as it’s sometimes called, could almost be classified as either lace or embroidery. It works well with other types of white linen work, where bands or squares of it are inserted into the linen; the contrast between the solid areas and the more open work creates a lovely effect. Fig. 114 is an example of this technique. The darning is done on a plain netted base that can be[Pg 211] prepared by the worker if they know how to net; if not, the squares can be purchased ready for stitching. The design must be drawn on squared paper like for cross stitch, and then it’s just a matter of following the pattern on the square net base. Every square of the patterned area needs to be crossed in each direction by two lines of darning, which should nearly fill it up. The various lines should be run in and out as continuously as possible to avoid unnecessary tie-offs or moving between sections. When a new thread is needed, tie it to the end of the previous one with a knot (see figs. 165 and 166), and tuck the ends in neatly with the other threads. These knots are often used in embroidery because they are both strong and small. Detached stitches and parts should be worked individually; the thread shouldn’t be carried from one to the other. The work must be done in a frame and executed with a blunt-pointed needle. The same thread is used for both the netted background and the darned pattern. A technique that the French call dessein réservé results in a similar effect, but it’s done[Pg 213] in the opposite way. The pattern, whatever it might be, is left in the plain linen, while certain threads from the background are withdrawn at regular intervals to achieve the look of a squared net ground.

CHAPTER X
METHODS OF WORK—(continued)
Drawn Thread Work—Hem Stitching—Simple Border Patterns—Darned Thread Patterns—Corners—Cut or Open Work—Various Methods of Refilling the Open Spaces.
Drawn Thread Work—Hem Stitching—Simple Border Patterns—Darned Thread Patterns—Corners—Cut or Open Work—Different Ways to Refill the Open Spaces.
This method of work is the acknowledged link between embroidery and lace, and was possibly the origin of the latter. Drawn work is that in which the threads of either the warp or the weft of the material are withdrawn and those remaining worked into a pattern, by either clustering together or working over them in some fashion. The cut or open work, as it is sometimes called, is that in which both warp and weft are in places cut away, and the open spaces thus formed are partly[Pg 214] refilled with a device of one kind or another.
This method of working is the recognized connection between embroidery and lace, and it may have actually been the source of lace. Drawn work involves removing threads from either the warp or the weft of the fabric, leaving the remaining threads to be arranged into a pattern, either by clustering them together or manipulating them in some way. The cut or open work, as it’s sometimes referred to, involves cutting away parts of both the warp and weft, and the resulting open spaces are partly[Pg 214] filled with a design of some kind.
The work is most often carried out in white thread on white linen, but coloured threads may occasionally be introduced with advantage. It is a durable method of work, and particularly suitable for the decoration of various house-linens, things that must undergo daily wear and wash; its rather unobtrusive character too makes it the more suitable for this purpose. The work is used in conjunction with other kinds of embroidery, perhaps making a neat finish to an edge, or lightening what would otherwise be too heavy in appearance.
The work is usually done with white thread on white linen, but colored threads can sometimes be added for a nice touch. It’s a durable technique, especially great for decorating house linens that get daily use and washing. Its subtle look also makes it perfect for this purpose. This technique is often combined with other types of embroidery, maybe to create a clean edge or to lighten up what would otherwise feel too heavy visually.
Drawn thread and cut work can be carried out with such detail and fineness as to really become most delicate lace. In this chapter, however, it is intended to be treated rather as an adjunct to other embroidery, therefore only elementary work will be discussed. More attention might with advantage be paid to the design of this kind of work, for more might be done with it than sometimes is. For one thing, there is very little variety in the patterns, and the result often seems a spidery mass of[Pg 215] incomprehensible threads with no very perceivable plan; perhaps if more attention were paid to the proportion and massing of the solid and open parts, a better result might be attained. Neatness and simplicity are good qualities in the pattern, the method of work not being suited to the expression of the various larger and bolder types of design.
Drawn thread and cut work can be done with such detail and finesse that they truly resemble delicate lace. In this chapter, however, we'll focus on it more as a supplement to other types of embroidery, so we'll only cover basic techniques. It would be beneficial to pay more attention to the design of this work because there is actually a lot more potential than is often realized. For one thing, the patterns tend to lack variety, and the end result often looks like a tangled mess of[Pg 215] incomprehensible threads without a clear design; if we focused more on the balance and arrangement of solid and open areas, we might achieve better results. Neatness and simplicity are important qualities in the pattern, as the technique isn’t suited for expressing larger and bolder types of designs.
DRAWN THREAD WORK
In drawn work the question is how to treat the remaining warp threads after the weft has been withdrawn. They can be clustered in bunches in different ways with ornamental stitches added, or be entirely covered over with darning or overcast stitches in such a way as to form a pattern.
In drawn work, the issue is how to handle the leftover warp threads after the weft has been removed. They can be grouped together in various ways with decorative stitches added, or completely covered with darning or overcast stitches to create a pattern.
The beginning of most drawn thread work is hem stitching, the two edges marking the limit of the withdrawn threads have usually to be hem stitched before any pattern can be carried out. One method of doing this is in progress in fig. 115. In order to work it, draw out three or four threads of the warp and tack the hem down to the top edge[Pg 216] of the line thus made. The diagram explains the remainder of the working.
The start of most drawn thread work involves hem stitching. The two edges that define where the threads are pulled out usually need to be hem stitched before any design can be created. One way to do this is in fig. 115. To work on it, pull out three or four threads from the warp and secure the hem to the top edge[Pg 216] of the line created. The diagram illustrates the rest of the process.

Fig. 116 shows in the first example clusters of four threads drawn together at each edge by hem stitching in such a way as to form a ladder-like pattern. This and the one below are the ornamentations of a plain hem that are most commonly seen. The variation in pattern in the lower one is obtained by drawing together on the lower edge two threads from two consecutive bunches in the upper row instead of just repeating over again the same divisioning as before. These two examples are drawn to show the reverse, not the working side.[Pg 217]
Fig. 116 shows in the first example clusters of four threads pulled together at each edge with hem stitching to create a ladder-like pattern. This one and the one below are the most common decorative elements on a plain hem. The variation in the pattern of the lower one is created by pulling together two threads from two consecutive bunches in the upper row on the lower edge, instead of just repeating the same division as before. These two examples are shown from the reverse side, not the working side.[Pg 217]

Another way of disposing of the undrawn threads is to cover them with a kind of darning stitch, as illustrated in fig. 117. This kind of work is more solid than the other, and is for that reason very durable. This example is commenced at the right-hand corner, where the threads are drawn loosely in order to explain the working. The needle, which should have a blunt point, takes the thread to and fro alternately over and under two clusters of warp thread, drawing them together a[Pg 218] little during the process; half-way down, the needle leaves the first set of threads and continues working with the second and a new set (see needle in diagram). When this is worked down to the base the needle takes the thread invisibly up the centre of the worked part to the point where it is required for the continuation of the pattern. The working of this simple pattern explains the principle upon which all kinds of pretty and more complicated designs can be carried out. The darning thread may be coloured; in a more intricate design two or three different colours might be introduced.
Another way to deal with the unused threads is to cover them with a type of darning stitch, as shown in fig. 117. This method is more solid than the other and, for that reason, very durable. This example starts at the bottom right corner, where the threads are drawn loosely to illustrate the technique. The needle, which should have a blunt tip, alternately moves the thread over and under two clusters of warp threads, pulling them together a[Pg 218] bit during the process; halfway down, the needle leaves the first group of threads and continues working with the second group and a new set (see needle in diagram). When this is completed down to the base, the needle takes the thread invisibly up the center of the worked part to the point where it’s needed for the continuation of the pattern. Working this simple pattern illustrates the principle behind all sorts of pretty and more intricate designs. The darning thread can be colored; in a more complex design, two or three different colors might be used.


Fig. 118 shows another pattern in the[Pg 219] same kind of work. The darning stitch begins by working to and fro over and under four clusters of warp threads, part way down it continues over the two central ones only, leaving the outside clusters alone for the present. It finishes up, as at the beginning, to and fro over the four. The threads that were left are next covered with an overcast stitch, the adjoining ones in each case are caught together in the centre in order to form the X shape that recurs along the pattern. This darning kind of work is very closely allied to weaving, and especially the kind often seen in Coptic work, in which bands of the woof threads are purposely omitted in places, whilst the fabric is being made,[Pg 220] in order that a pattern may be hand-woven in afterwards to take their place. Many beautiful examples of this work are on view in the Victoria and Albert Museum.
Fig. 118 shows another pattern in the[Pg 219] same type of work. The darning stitch starts by moving back and forth over and under four clusters of warp threads. Halfway through, it continues over just the two central ones, leaving the outside clusters alone for now. It finishes up, like at the beginning, by going back and forth over all four. The threads that were left are then covered with an overcast stitch, and the adjoining ones are caught together in the center to create the X shape that appears throughout the pattern. This darning technique is closely related to weaving, especially the type often found in Coptic work, where bands of the woof threads are intentionally left out in certain areas while the fabric is being made,[Pg 220] so that a pattern can be hand-woven in later to fill those gaps. Many beautiful examples of this work are on display in the Victoria and Albert Museum.

In working a drawn thread border round a square shape, at each corner there comes an open space that requires a filling. Fig. 119 shows two wheels that are commonly used to ornament such places. The square in the first one has a preliminary groundwork of threads thrown across from corner to corner and from side to side, all meeting and crossing in the centre. The working thread is brought through at this point and the wheel commenced by taking a kind of back stitch over a bar and bringing[Pg 221] the needle up beyond the next bar. It then takes the thread a step back and over the same bar and brings it up beyond the next; this goes on until the circle is of sufficient size, the stitches growing a little longer in each succeeding row. In the diagram the thread is loosened at the end to explain the working. The lower example is a commonly used wheel, which is made by the thread running round alternately over and under a bar until the wheel is completed. It should be as solid as the upper one, but is purposely left loose in the diagram. Either of the wheels could have a line of buttonhole stitching worked round the edge as a finish. This figure shows also the two usual ways of making firm the raw edges in cut work—the square shape is bound by an overcast stitch, and the round one by buttonholing.
In creating a drawn thread border around a square shape, each corner has an open space that needs filling. Fig. 119 shows two wheels that are often used to decorate these areas. The square in the first design has a base of threads crossed from corner to corner and from side to side, all meeting in the center. The working thread is brought through at this point, and the wheel is started by taking a back stitch over a bar and bringing the needle up beyond the next bar. Then it goes back a step and over the same bar, bringing it up beyond the next one; this continues until the circle is large enough, with the stitches getting slightly longer in each row. In the diagram, the thread is loosened at the end to demonstrate the technique. The lower example is a commonly used wheel, created by the thread looping alternately over and under a bar until the wheel is finished. It should be as solid as the upper one, but it's intentionally left loose in the diagram. Either wheel could have a line of buttonhole stitching along the edge for a finish. This figure also shows the two typical ways to secure the raw edges in cut work—the square shape is finished with an overcast stitch, and the round one with buttonholing.
CUT OR OPEN WORK
Cut work can be most interesting both to look at and to carry out. In the XVIIth century Italy was famous for its punto tagliato or cut work. John Taylor mentions "rare Italian cutworke" in "The[Pg 222] Praise of the Needle." This poem may perhaps be of interest to some; it was prefixed to a book of embroidery patterns of cut work named "The Needle's Excellency." It ran through twelve editions, the first of which was printed in 1621, and sold at "the signe of the Marigold in Paules Churchyard." Copies may be seen in the British Museum Library; in the Bodleian, Oxford, in the Ryland's Library, Manchester, and occasionally elsewhere. Fig. 120 shows a pattern taken from this book.
Cut work can be really interesting to look at and to do. In the 17th century, Italy was known for its punto tagliato or cut work. John Taylor refers to "rare Italian cutworke" in "The[Pg 222] Praise of the Needle." This poem might interest some; it was included in a book of embroidery patterns for cut work titled "The Needle's Excellency." It went through twelve editions, the first of which was printed in 1621 and sold at "the sign of the Marigold in Paul's Churchyard." Copies can be found in the British Museum Library, the Bodleian in Oxford, the Ryland's Library in Manchester, and occasionally in other places. Fig. 120 shows a pattern taken from this book.
There are several distinct varieties of cut work, for instance, that known as renaissance embroidery, which is usually composed of an arabesque design from which the background is cut away, leaving the pattern in the linen; the cut edges are outlined and protected by an overcast stitch. The pattern has to be specially planned with the idea of holding strongly together, but, if necessary, buttonholed bars can be added to form strengthening ties in any weak part.
There are several different types of cut work, such as renaissance embroidery, which typically features an arabesque design with the background cut away, leaving the pattern in the fabric. The cut edges are outlined and secured with an overcast stitch. The pattern needs to be carefully designed to hold together well, but if needed, buttonhole bars can be added to create reinforcement in any weak areas.
Another kind of cut work is that known as broderie anglaise, and sometimes as Madeira work, over which our grandmothers spent much time, perhaps with[Pg 223]out adequate result. The pattern is followed out by round holes pierced in the linen with a stiletto and then overcast round the edges. At the present day the work is done mostly by machinery, though hand work also is procurable.
Another type of cut work is called broderie anglaise, and sometimes it's referred to as Madeira work, which our grandmothers spent a lot of time on, maybe with[Pg 223]limited success. The pattern is created by making round holes in the linen with a stiletto and then stitching around the edges. Nowadays, this work is mostly done by machines, although hand work is still available.

Perhaps the prettiest kind of cut work is that in which various-shaped spaces are cut out of the linen, and these filled in, in[Pg 224] part, with some design built up with stitches. There are various methods of refilling the spaces cut out, one of the simplest is a diapering formed by some lace stitch, such as an open buttonhole. As a rule, the decoration of the open spaces is based upon bars of thread that are either composed of warp or woof threads left, instead of being cut away, or else upon fresh threads thrown across in various directions. The pattern is planned on and about these strengthening ties, and where necessary receiving support from them. An ingenious worker will soon devise ways of refilling the spaces by all kinds of interesting patterns, which can be geometrical or floral, or any kinds of objects that can be attractively represented in conventional fashion, such as figures, birds, insects, ships in full sail, or anything else. It must, however, be remembered that the various forms filling the spaces are for use in the way of strength as well as for ornament, and that the work is often put upon objects that have to endure daily wear.
Perhaps the most beautiful type of cut work is when different-shaped spaces are cut out of the linen and filled in, in[Pg 224] part, with some design created with stitches. There are various methods for refilling the cut-out spaces; one of the simplest is a pattern formed by a lace stitch, like an open buttonhole. Generally, the decoration of the open spaces relies on thread bars that are either made from warp or weft threads left in place instead of being cut away, or by new threads woven across in different directions. The pattern is designed around these supportive threads, gaining stability from them where needed. A skilled worker will quickly come up with different ways to refill the spaces using all kinds of interesting patterns, which can be geometric or floral, or any objects that can be represented in an attractive conventional style, such as figures, birds, insects, ships under full sail, or anything else. However, it's important to remember that the different designs filling the spaces are meant for both strength and decoration, and that the work is often applied to items that need to withstand daily use.
Open work is frequently mixed with other, and especially with white embroidery, and such things as counterpanes may be[Pg 225] seen arranged with a chequering of alternate squares of embroidered linen and open work.
Openwork is often combined with other techniques, especially white embroidery. Items like counterpanes can be seen arranged with a pattern of alternating squares of embroidered linen and openwork.
Fig. 121 shows in progress a simple method of filling a space, mainly making use of the strengthening threads that have been left at regular intervals over the cut part. The threads are covered with an overcast stitch, and alternate squares of those that recur over the space are decorated with a cross. This is made by the working thread, after reaching the right point at the centre of an overcast line, being thrown across the space and then twisted back over itself to the starting-point, where it is in the right position for continuing the overcast line. The crosses being put in at the same time as the overcasting of the bars renders some forethought necessary to get each in at just the right time and place.
Fig. 121 illustrates a simple method for filling a space, primarily using the strengthening threads that have been left at regular intervals over the cut area. The threads are covered with an overcast stitch, and alternate squares within the area are decorated with a cross. This cross is formed by taking the working thread, reaching the center of an overcast line, throwing it across the space, and then twisting it back to the starting point, where it is positioned correctly to continue the overcast line. Since the crosses are added at the same time as the overcasting of the bars, some planning is needed to ensure each one is placed at just the right moment and location.

Another kind of filling can be seen in progress in fig. 122. The stitches used in it are overcast and buttonhole. With the help of this last-mentioned stitch patterns of all kinds can be carried out, for each succeeding row of the stitch can be worked into the heading of the last row, and in this way it is possible to build up any required shape. This figure is a working[Pg 227][Pg 226] diagram of a piece of cut work of which the completed square with its surrounding decoration can be seen in fig. 34. After overcasting the raw edges a diagonal thread is thrown across (E D on plan), upon which the pattern shall be built up; the thread is taken once to and fro and[Pg 228] then twisted back again for a third crossing. Commence by overcasting the threads from point D, and upon reaching the part where the pattern is widened out, change the stitch to an open buttonholing (as shown on line B). It is worked openly in this way in order to leave space for another row of the same kind of stitching to be fitted in from the opposite side, which is the next thing to be done. Then an outer row of buttonhole stitch is worked on each side of the central bar and into the heading of the first row of stitching; this is shown in progress where the needle is at work. The entire pattern is carried out in this way, first laying down foundation threads in the necessary places and then covering them up with either overcasting or buttonhole stitch as required. It is easily possible to carry out flowers and all kinds of other things sufficiently well to make them pleasantly recognisable.[Pg 229]
Another type of filling is currently being demonstrated in fig. 122. The stitches used here are overcast and buttonhole. With the help of the buttonhole stitch, all kinds of patterns can be created, as each new row of stitches can be integrated into the heading of the previous row, allowing for the construction of any desired shape. This figure is a working[Pg 227][Pg 226] diagram of a piece of cut work, and the completed square with its surrounding decoration can be seen in fig. 34. After overcasting the raw edges, a diagonal thread is laid across (E D on the plan), which will serve as the foundation for the pattern; the thread is passed back and forth once and[Pg 228] then twisted back for a third crossing. Start by overcasting the threads from point D, and when you reach the area where the pattern expands, switch to an open buttonholing stitch (as shown on line B). It is worked this way to leave space for another row of the same stitching type to be added from the opposite side, which is the next step. Then, an outer row of buttonhole stitch is worked on each side of the central bar and into the heading of the first row of stitching; this is shown in progress where the needle is currently at work. The entire pattern is completed in this manner, first laying down the foundation threads in the necessary locations and then covering them with either overcasting or buttonhole stitch as required. It's quite simple to create flowers and various other designs well enough for them to be easily recognizable.[Pg 229]

CHAPTER XI
EMBROIDERY WITH GOLD AND SILVER THREADS
Introduction—Materials—Precautions for the Prevention of Tarnish—Ancient Method of Couching—Its various Good Points—Description of Working Diagram—Working a Raised Bar—Examples of Patterns Employed in Old Work—Illustrations upon Draped Figures—Usual Method of Couching—Couching Patterns—Outline Work—Raised Work—The Use of Purls, Bullions, &c.
Introduction—Materials—Precautions for Preventing Tarnish—Ancient Couching Methods—Their Various Benefits—Description of Working Diagram—Creating a Raised Bar—Examples of Patterns Used in Old Work—Illustrations on Draped Figures—Common Couching Technique—Couching Patterns—Outline Work—Raised Work—Using Purls, Bullions, &c.
Gold and silver threads have always played an important part in embroidered work, and are a most valuable addition to the worker's stock of materials, for they give a splendour and richness that is not obtainable in any other way. They have been utilised from the earliest times in both embroidery and weaving; in scripture and other ancient historical writings there is abundant proof of this fact.
Gold and silver threads have always been key in embroidery, and they are a valuable addition to a crafter's supplies, as they add a brilliance and richness that can't be achieved any other way. These materials have been used since ancient times in both embroidery and weaving; there is plenty of evidence in religious texts and other historical writings to support this.
The earliest form of gold thread in use was the pure metal beaten into thin plates and then cut into long narrow strips; that[Pg 230] it was sometimes rounded into wire form is very probable. The first wire-drawing machine is said to have been invented by a workman at Nuremberg, but it was not until two centuries later that the drawing-mills were introduced into England.
The earliest form of gold thread was pure metal hammered into thin plates and then cut into long narrow strips; it's likely that it was also sometimes made into wire. The first wire-drawing machine is believed to have been invented by a craftsman in Nuremberg, but it wasn't until two centuries later that drawing mills were brought to England.
Gold thread, similar to that we now use, entwined about a silk one, is mentioned in a XIVth century Latin poem; also, it is known that in the XIIIth century our English ladies prepared their own gold thread before working it in, and it was of the same type as ours, the gold being spirally twisted round a thread of silk or flax.[10]
Gold thread, like the kind we use today, was wrapped around a silk thread, and this is mentioned in a 14th-century Latin poem. It's also known that in the 13th century, English women made their own gold thread before incorporating it, and it was the same type as ours, with the gold twisted spirally around a thread of silk or flax.[10]
To be a skilled worker with gold thread needs considerable application and practice. There is much variety in the work, some branches of it being more simple to manipulate than others. It is desirable for all workers to understand something of gold work, for it is frequently employed in conjunction with other embroidery, as well as alone. Fig. 123 shows a couched line of gold thread outlining some silk embroidery, which gives a pretty jewel-like effect of something precious in a setting of gold.[Pg 231]
To be a skilled worker with gold thread requires significant effort and practice. The work has a lot of variety, with some techniques being easier to handle than others. It's beneficial for all workers to have some knowledge of gold work, as it's often used alongside other embroidery techniques, as well as on its own. Fig. 123 shows a couching technique using gold thread to outline some silk embroidery, creating a beautiful jewel-like effect that looks precious against a gold backdrop.[Pg 231]

Gold embroidery may be divided roughly into three main classes, outline work, solid flat work, and raised work. Outline work is, as far as technique is concerned, one of the simplest forms of gold embroidery. The pattern is followed round with a gold cord or double thread of passing, fixed either visibly or invisibly with a couching stitch; the work needs but an interesting design and suitable background to be most successful. Fig. 124 illustrates a portion of a design, carried out with gold cord upon a velvet ground, which has been further enriched by the addition of little applied white flowers. The raised work, and that which introduces the use of purls and bullions, is at once more complicated, and perhaps hardly as pleasing as the simpler flat work.[Pg 232]
Gold embroidery can be roughly categorized into three main types: outline work, solid flat work, and raised work. Outline work is, in terms of technique, one of the simplest forms of gold embroidery. The design is outlined with a gold cord or double thread, secured either visibly or invisibly using a couching stitch; all it needs is an interesting design and an appropriate background to be highly effective. Fig. 124 shows part of a design executed with gold cord on a velvet backdrop, further enhanced by the addition of small applied white flowers. Raised work, which involves using purls and bullions, is more complex and may not be as visually appealing as the simpler flat work.[Pg 232]

The method of applying the gold to the material is usually by couching of[Pg 233] one form or another, for most of the threads are too inflexible to be stitched through. The ground, if it shows at all, is usually a rich stuff, such as velvet, satin, or silk, in order to be in keeping with the valuable thread. If the ground chosen is difficult to work upon, the embroidery is carried out upon linen, and the finished work afterwards applied to the ground. If both background and pattern are solidly embroidered, linen can be used as the permanent ground. It is usual to have two layers of material for working upon, for gold threads are heavy and require the support of the double ground. There are several advantages in this double material, as the old workers knew, for we find they commonly used two. The under-layer can be a strong linen, and the surface one silk, satin, or a fine linen, as required.
The method of applying gold to the material is usually done through couching[Pg 233], since most threads are too stiff to be stitched through. The base, if visible, is typically a luxurious fabric like velvet, satin, or silk, to match the expensive thread. If the chosen base is tricky to work with, the embroidery is done on linen, which is then attached to the base afterward. If both the background and the design are heavily embroidered, linen can serve as the permanent base. It’s common to have two layers of fabric for the work because gold threads are heavy and need the support of a doubled base. There are several benefits to using this double material, as the old artisans knew, so they often utilized two layers. The bottom layer can be sturdy linen, while the top layer can be silk, satin, or a fine linen, depending on what’s needed.
MATERIALS
A variety of metal threads are manufactured for embroidery purposes, and they are all obtainable in gold, silver, or imitations of these; aluminium thread has been made lately, and has the advantage[Pg 234] of being untarnishable, but its colour and quality do not seem quite satisfactory, and it is not popular. The imitation threads are never worth the using; they tarnish to a worse colour, and are more difficult in manipulation; what goes by the name of real gold, is silver or copper, plated with the more valuable metal. The pure gold thread is said not to be so practical as this, being too brittle; but somehow or other it was more successfully manufactured in the past than nowadays, for some gold work six centuries old exhibits beautifully bright threads.
Various metal threads are made for embroidery, and you can find them in gold, silver, or their imitations. Recently, aluminum thread has been produced, which has the advantage[Pg 234] of being tarnish-resistant, but its color and quality are not very satisfying, so it’s not popular. Imitation threads are usually not worth using; they tarnish to an even worse color and are harder to work with. What is referred to as real gold is often silver or copper coated with the more valuable metal. Pure gold thread is said to be less practical because it’s too brittle; however, it seems that it was produced more successfully in the past than it is today, as some gold work from six centuries ago showcases beautifully bright threads.
The following list comprises the chief threads used in this work:—
The following list includes the main threads used in this work:—
Passing.—This is a bright smooth thread, resembling in appearance a gold wire; it consists of a narrow flat strip of gold spirally twisted round a silken thread. It can be obtained in different sizes, the finest qualities going by the name of tambour. Most passing has to be couched on to the material, but it is possible to stitch in the tambour like ordinary thread.
Passing.—This is a shiny, smooth thread that looks like a gold wire; it’s made of a narrow flat strip of gold twisted spirally around a silk thread. It comes in various sizes, with the finest qualities known as tambour. Most passing threads need to be couched onto the fabric, but you can stitch the tambour like regular thread.
Purl.—This resembles a smooth round hollow tube of metal, very pliable and elastic; when pulled lengthways it is[Pg 235] found to be constructed like a closely coiled spiral spring. It is manufactured in lengths of about one yard, and for use it is cut into small sections of any required size with scissors or a knife. There are several varieties of purl, namely, the smooth, rough, check, and wire check. The smooth has a bright polished appearance, which is obtained by a flat gold wire being spun spirally round; the rough has a duller and more yellow appearance, which is owing to the wire having been rounded; the check is bright and sparkling, and consists of the flattened wire spun in a different way, so that parts of it catch the light and sparkle; the wire check is the same thing, but duller and of a deeper yellow, owing again to its being made of the round wire.
Purl.—This looks like a smooth, round, hollow tube made of metal, very flexible and stretchy; when pulled lengthwise, it is[Pg 235] found to have a structure similar to a tightly coiled spiral spring. It's made in lengths of about one yard, and for use, it is cut into small pieces of any needed size with scissors or a knife. There are several types of purl, including smooth, rough, check, and wire check. The smooth type has a shiny polished look, which is achieved by spirally wrapping a flat gold wire around it; the rough type has a duller and more yellow look, due to the wire being rounded; the check type is bright and sparkling and consists of the flattened wire spun in a different way so that parts of it catch the light and twinkle; the wire check is similar but duller and a deeper yellow, again due to it being made of the round wire.
Bullion.—This is the name given to the larger sizes of purl.
Bullion.—This is the term used for the larger sizes of purl.
Pearl Purl.—This is manufactured in the same spiral tube-like fashion
as the other purl, but the gold wire is previously hollowed out in this
![]() shape, the convex side being the one exposed.
This, when spun round, has the appearance of a string of tiny gold
beads. It is frequently used as an outlining thread.[Pg 236]
shape, the convex side being the one exposed.
This, when spun round, has the appearance of a string of tiny gold
beads. It is frequently used as an outlining thread.[Pg 236]
Pearl Purl.—This is made in the same spiral tube-like way as the other purl, but the gold wire is first hollowed out in this
![]() shape, with the convex side being the exposed one. When spun around, it looks like a string of tiny gold beads. It’s often used as an outlining thread.[Pg 236]
shape, with the convex side being the exposed one. When spun around, it looks like a string of tiny gold beads. It’s often used as an outlining thread.[Pg 236]
Various gold twists and cords can be obtained; they are composed of several threads twisted up in the usual cord fashion, each ply consisting of gold spun round a silk thread.
Various gold twists and cords can be obtained; they are made of several threads twisted together in the usual cord style, with each strand consisting of gold spun around a silk thread.
Plate is a flat strip of metal commonly about one-sixteenth of an inch wide; it can be obtained in different widths.
Plate is a flat strip of metal usually about one-sixteenth of an inch wide; it comes in various widths.
Spangles.—These are small variously shaped pieces of thin metal, usually pierced with a hole in the centre for fixing on to the material. They are frequently circular in shape, and either flat or slightly concave; the latter are the prettier. Many fancy shapes also are obtainable, but they are inclined to look tawdry, and suggestive of the pantomime.
Spangles.—These are small, differently shaped pieces of thin metal, usually with a hole in the center for attaching to fabric. They're often circular, and can be flat or slightly concave; the latter is more attractive. Many decorative shapes are available, but they tend to look cheap and reminiscent of a pantomime.
Cloth of Gold and Silver.—This is a fabric manufactured of silk, with gold or silver thread inwoven in the making. It is not now so much used as formerly, when it was in great request for robes of kings and other high dignitaries of church or state.
Cloth of Gold and Silver.—This is a fabric made of silk, with gold or silver threads woven into it. It's not commonly used now as it used to be, when it was highly sought after for the robes of kings and other high-ranking officials in the church or government.
A special make of silk for couching down gold thread is obtainable in various colours. It is called horsetail or sewings, and is both fine and strong.[Pg 237]
A special type of silk for laying down gold thread is available in different colors. It’s called horsetail or sewings and is both delicate and durable.[Pg 237]
Padding for use in raised gold work is usually yellow, and for silver, white or grey. Yellow soft cotton, linen thread, or silk, are all used for the purpose.
Padding for raised gold work is typically yellow, while for silver, it's white or gray. Soft yellow cotton, linen thread, or silk are all used for this purpose.
Various precautions can and must be taken to keep the gold thread bright, for under unfavourable circumstances it rapidly assumes a bad colour; the silver thread is even more liable to tarnish than the gold, and it turns a worse colour, going black. There is a special paper manufactured to wrap threads in, and the stock supply should be kept in a tin or air-tight bottle; this is in order to protect the metal from damp, which is most injurious; to do this is a difficult matter in the English climate. Linen used for working upon, or as backing, is best unbleached, for sometimes the chemicals used in the bleaching process have a deleterious effect upon the gold; a piece of gold embroidery wrapped up in cotton wool for preservation has been found completely spoiled by some chemical in this wool, which proved more disastrous than exposure to air would have been. Gas, strong scents, handling (especially with hot hands), all have an evil effect, and so should be[Pg 238] avoided as much as possible. Work even whilst in progress should be kept covered as much as is practicable, and should not be allowed to hang about; the quicker it is done the better. A piece of finished work can be polished up with a leather pad or a brush, similar to a housemaid's brush for silver-cleaning purposes; this of course, must be used with care.
Various precautions should and must be taken to keep the gold thread shining because, under unfavorable conditions, it quickly loses its luster; the silver thread is even more prone to tarnish than the gold, turning a much worse color and going black. There’s a special paper made for wrapping threads, and the stock should be kept in a tin or airtight container; this is to protect the metal from moisture, which is very harmful. This is particularly challenging in the English climate. Linen used for working on, or as backing, is best when unbleached, as the chemicals in the bleaching process can negatively affect the gold. A piece of gold embroidery wrapped in cotton wool for preservation has been found completely ruined by some chemical in the wool, which turned out to be more damaging than exposure to air. Gas, strong scents, and handling (especially with hot hands) all have a negative effect and should be avoided as much as possible. Work in progress should be kept covered as much as possible and shouldn’t be left lying around; the quicker it’s finished, the better. A piece of completed work can be polished with a leather pad or a brush, like a housemaid’s brush for cleaning silver; this should, of course, be used carefully.
ANCIENT METHOD OF COUCHING
Gold thread can be couched on to the material in two distinct ways, one of them in use at the present day, the other one that was commonly practised in the XIIIth and XIVth centuries. About the second half of the last-named century the earlier method was supplanted by the present one. Almost every example of early gold thread work exhibits this obsolete and ingenious method of couching. The Syon cope and the Jesse cope in the Victoria and Albert Museum may be mentioned as famous examples. M. Louis de Farcy[11] draws especial attention[Pg 239] to this beautiful method of working, to which he gives the name point couché rentré ou retiré, and strongly urges its revival; he points out many distinct advantages it has over the method now in use.
Gold thread can be sewn onto the fabric in two different ways: one is used today, and the other was commonly practiced in the 13th and 14th centuries. By the second half of the 14th century, the earlier method was replaced by the current one. Almost every example of early gold thread work showcases this outdated yet clever method of sewing. The Syon cope and the Jesse cope in the Victoria and Albert Museum are well-known examples. M. Louis de Farcy[11] highlights this beautiful technique, which he refers to as point couché rentré ou retiré, and strongly advocates for its revival; he points out many clear advantages it has over the method currently in use.
The durability is very great, owing to the couching thread being upon the reverse side, where it is protected from wear and tear, and being out of sight can be made strong and durable. If a thread is accidentally broken it does not necessarily give way along an entire line, as may easily happen in the present method. A proof of this point can be seen upon the beautiful Ascoli cope lately in the Victoria and Albert Museum, about which there has been so much discussion of late as to in what country it originated, and who was the rightful owner. The early couching worked entirely over the background of the cope is in a state of perfect preservation; portions of the gold thread drapery have here and there been couched by the other method, the tying down threads have, in those parts, mostly disappeared, and the gold hangs loose and ragged upon the surface.
The durability is quite impressive because the couching thread is on the backside, where it’s protected from wear and tear, and being out of sight allows it to be made strong and long-lasting. If a thread happens to break, it doesn’t necessarily mean that the entire line will give way, unlike what can easily happen with the current method. A clear example of this can be seen in the beautiful Ascoli cope recently displayed at the Victoria and Albert Museum, which has sparked a lot of debate about its country of origin and rightful ownership. The early couching that’s done over the background of the cope is in perfect condition; however, areas where the gold thread drapery has been couched using the other method, the tying down threads in those sections have mostly vanished, leaving the gold hanging loose and ragged on the surface.
By the way in which it is worked, there results a particularly pleasing and even[Pg 240] surface, agreeably varied by play of light and shade. Another advantage of the ancient method is that the completed work is very flexible; this point will appeal to those who have experienced the extreme stiffness of a large surface of ordinarily couched metal threads. Flexibility is an invaluable quality for any work destined, like copes and curtains, to hang in folds.
By the way it's crafted, it results in a particularly nice and smooth[Pg 240] surface, nicely varied by the play of light and shadow. Another benefit of the traditional method is that the finished piece is quite flexible; this will resonate with anyone who has dealt with the extreme stiffness of a large area covered with standard metal threads. Flexibility is an essential quality for any piece intended, like copes and curtains, to drape in folds.
Representations of draperies upon figures are well expressed, for by the way in which they are worked there comes an indentation along the lines marking the folds; this emphasises them rather happily, and also breaks up the surface in a satisfactory manner.
Representations of draperies on figures are clearly depicted, as the way they are detailed creates indentations along the lines that define the folds; this highlights them nicely and also gives a satisfying texture to the surface.
Fig. 125 is a diagram that will aid in explaining the working, it gives both the front and the reverse side. This has been found to be the simplest and the most practical method of obtaining a result similar to the early examples; there is, however, no means other than examination of result whereby to get at this obsolete method. To all appearance there is upon the surface a kind of satin stitch worked in gold passing, the stitches carrying out some geometrical pattern, such as a chevron or lattice; but at[Pg 241] the back a linen thread is seen running to and fro in close parallel lines in the same direction as the surface thread, and at regular intervals encircled by the gold passing, just as if this was intended to couch down the linen thread.
Fig. 125 is a diagram that will help explain how it works, showing both the front and the back. This has been found to be the easiest and most practical way to achieve a result similar to the earlier examples; however, the only way to understand this outdated method is through examining the result. At first glance, there appears to be a kind of satin stitch done in gold thread, following some geometric patterns like a chevron or lattice; but at[Pg 241] the back, a linen thread is visible running back and forth in parallel lines in the same direction as the surface thread, and at regular intervals, it is surrounded by the gold thread, as if it was meant to secure the linen thread in place.

The ingenuity and satisfactoriness of the method must be admitted by all who give it a trial, and it is interesting to conjecture how it may have arisen. Possibly weaving suggested it to the embroiderers, for, take away the intervening material, and it is not unlike[Pg 242] woven work, and these two arts would very likely be the accomplishment of the same person. Perhaps the commonly used method of taking a coarse thread through to the back (see fig. 167) suggested it, for this is briefly the whole process.
The creativity and effectiveness of the method is something everyone will recognize once they give it a try, and it's fascinating to think about how it might have come about. It's possible that weaving inspired the embroiderers, because if you remove the material in between, it's quite similar to woven work, and these two crafts were likely mastered by the same individual. Maybe the usual technique of pulling a thick thread to the back (see fig. 167) led to this idea, as that essentially describes the entire process.
In order to try the couching, a two-fold ground material must be firmly stretched in an embroidery frame, a strong linen underneath and a thinner closely woven one upon the upper side. Some fine gold passing and some strong linen thread, well waxed, are required to work with, also an embroidery needle with long eye and sharp point, the size, which is important, depending upon the threads in use; the needle has to pierce the two-fold ground material, making a hole only just large enough for the passage of a double gold thread.
To try the couching technique, you need to firmly stretch a two-layer ground material in an embroidery frame—strong linen underneath and a thinner, closely woven fabric on top. You'll need some fine gold thread and a sturdy, well-waxed linen thread to work with, along with an embroidery needle that has a long eye and sharp point. The size of the needle is important and depends on the threads you’re using; it should be able to pierce through the two-layer ground material, creating a hole just big enough for the double gold thread to pass through.
If the linen has a regular even thread the drawn pattern shown in the diagram can be worked by counting the threads of the ground fabric, but if this is difficult or impossible, as in the case say of a twilled surface, a careful tracing must be made upon the linen; a beginner may find this the easier way in any case.
If the linen has an even thread, you can create the drawn pattern shown in the diagram by counting the threads of the base fabric. But if that’s tough or impossible, like with a twilled surface, you’ll need to make a careful tracing on the linen. A beginner might find this to be an easier method anyway.
The end of the gold thread, which by[Pg 243] now, in readiness for working, will be wound upon the bobbin or spindle, must be passed through to the back at the starting-point, the top left-hand corner in the diagram. The linen thread secures it at the back and then comes through to the front upon the traced line exactly beneath (see arrow on plan). It now encircles the gold thread which the left hand draws out rather tautly, and then returns by the same hole to the back, pulling the metal thread through with it. There is knack in taking the gold thread only just through and leaving the completed stitch straight and flat upon the surface. The process is now repeated, the linen thread coming through to the front again upon the next traced line, and so on. When the base of the pattern is reached the gold thread is taken through once upon that line, and then commences a like journey upwards.
The end of the gold thread, which by[Pg 243] now, ready for use, will be wound onto the bobbin or spindle, needs to be passed through to the back at the starting point, which is the top left corner in the diagram. The linen thread secures it at the back and then comes through to the front along the traced line directly beneath (see arrow on plan). It now wraps around the gold thread, which the left hand pulls out a bit taut, and then it goes back through the same hole to the back, pulling the metal thread through with it. There’s a trick to taking the gold thread just through and keeping the completed stitch straight and flat on the surface. The process is then repeated, with the linen thread coming back to the front on the next traced line, and so on. When the base of the pattern is reached, the gold thread is pulled through once on that line, and then it begins a similar journey upward.


The difficulties in technique are easily overcome; an important aid in this matter[Pg 245][Pg 244] is the use of materials exactly right; this means needles and threads of the correct size, the ground composed of suitable fabrics, and properly strained in a frame. The aim in the working is to get each stitch perfectly flat and straight in its correct place in spite of the obstinacy of the metal thread; to avoid making the perforation larger than necessary, for this makes the work clumsy; to make each succeeding line lie closely beside the last one, for the surface must be of solid gold, and if the ground showed through in places it would impoverish the effect.
The technical challenges are straightforward to tackle; a crucial factor in this is using the right materials[Pg 245][Pg 244]. This means choosing the appropriate needles and threads, using fabrics that are suitable for the base, and ensuring everything is properly tensioned in a frame. The goal while working is to make each stitch perfectly flat and straight in its designated spot, despite the stubbornness of the metal thread. It’s important to avoid making the holes larger than necessary, as this can make the work look clumsy. Each new line should be placed closely next to the previous one because the surface needs to appear solid gold; if the base fabric shows through in any areas, it diminishes the overall look.

The direction of the couched thread is usually either vertical or horizontal, and it may be both of these in the same piece of work. The reason of this may be because it is worked by counting the threads of the fabric, or because the pattern is always treated as a diaper and placed upon the surface without regard to contour. The exception to this rule of direction is when the couching is taken along a stem or the narrow hem of a robe to form the border, or along a girdle, it then follows the direction of the band, this being evidently the most straightforward and satisfactory method to use for the purpose.
The direction of the couched thread is usually vertical or horizontal, and it can be both in the same piece. This might happen because it's worked by counting the threads of the fabric, or because the pattern is often treated like a diaper and placed on the surface without considering the shape. The exception to this direction rule occurs when the couching runs along a stem or the narrow hem of a robe to create the border, or along a girdle; in these cases, it follows the direction of the band, which is clearly the simplest and most effective method to use for this purpose.

The point couché rentré ou retiré is an excellent[Pg 247] method to use for working a raised bar. Fig. 129 shows the front and reverse sides of a bar worked by it. The gold thread comes cleanly through from the back of the material instead of being clumsily doubled upon the surface, and the durability is evidently great. The linen thread, it will be seen, runs to and fro at the back, at each turn securing the gold thread.
The point couché rentré ou retiré is an excellent[Pg 247] method for working a raised bar. Fig. 129 shows the front and back of a bar created using this technique. The gold thread comes through neatly from the back of the material instead of being awkwardly doubled on the surface, and it clearly has great durability. The linen thread, as you can see, moves back and forth at the back, securing the gold thread with each turn.

In fig. 130 this couching is to be seen in use upon drapery. It is taken entirely over the exterior surface of the cloak, and upon the crown, sceptre, and model of the church. The lines expressing the folds of drapery are in this case shown by the couching at these places being taken in a different direction. Fine gold passing is used for the couched thread, much finer than can possibly be shown in the drawing, and the pattern chosen for the couching down is a chevron. The other parts of the work are done with silk thread in a fine chain or split stitch. The play of light upon the varied surface of the golden cloak is very beautiful; the drawing of the figure is perhaps primitive, and, regarded from the draughtsman's point of view, somewhat ludicrous; it is however sufficiently good to express all[Pg 249][Pg 248] that its author intended, and there is something very human in this dignified little king who would not have you forget that he founded a church. The king who is personified here is Edward the Confessor, so the church is Westminster Abbey, of which he was the founder.
In fig. 130 this couching can be seen on the drapery. It covers the entire outer surface of the cloak, as well as the crown, scepter, and model of the church. The lines representing the folds of the drapery are shown by varying the direction of the couching in those areas. Fine gold passing is used for the couched thread, which is much finer than can be depicted in the drawing, and the chosen pattern for the couching is a chevron. The other parts of the work are done with silk thread in a fine chain or split stitch. The way light plays on the varied surface of the golden cloak is really beautiful; the figure's drawing is perhaps somewhat primitive and, from a draughtsman's perspective, a bit comical; however, it's good enough to convey everything its creator intended, and there’s something very human about this dignified little king who wants you to remember that he founded a church. The king being depicted here is Edward the Confessor, so the church is Westminster Abbey, which he founded.
The Madonna and child forming the frontispiece of the work is another example of this couching. The method of expressing the folds of drapery is slightly different from that employed upon the king's robes. All drapery carried out in this stitch is worked in somewhat the same fashion, that is, the couching running to and fro between the lines marks each fold as roughly shown at fig. 131. This method leaves an indented line to express the drapery, which is a more satisfactory way than a simple line of dark colour worked over the gold, as in more modern work. The indented line is often further emphasised by a line of dark silk stitched[Pg 250] along it, which is done in this case. The figures are taken from the Jesse cope in the Victoria and Albert Museum;[12] this vestment, with its red silk background and its finely coloured and drawn ancestors of Christ posed amongst encircling vine branches, is a most beautiful, though sadly mutilated, example of XIIIth century design and workmanship.
The Madonna and child forming the frontispiece of the work is another example of this technique. The way the folds of drapery are expressed is slightly different from that used on the king's robes. All drapery done in this stitch is worked in a similar way; the couching runs back and forth between the lines, marking each fold as shown at fig. 131. This technique creates an indented line to depict the drapery, which is a more effective method than just a simple line of dark color over the gold, like in more modern work. The indented line is often further highlighted by a line of dark silk stitched[Pg 250] along it, and this is done in this case. The figures are taken from the Jesse cope in the Victoria and Albert Museum; [12] this vestment, with its red silk background and its beautifully colored and drawn ancestors of Christ posed among encircling vine branches, is a very beautiful, though sadly damaged, example of 13th-century design and craftsmanship.

MODERN METHOD OF COUCHING
In the usual form of couching the gold thread is attached to the material by fine strong silk. The thread is fastened down as a rule two-fold, sometimes even three-fold; this method is both quicker and more effective than couching each thread separately. As the couching thread is necessarily in evidence, decorative use is often made of it as well as practical; the stitches, for instance, may be planned so as to carry out some pattern (see fig. 132) instead of being put down at random. There is no limit to the variety of the patterns that can be devised in this way.
In the typical method of couching, the gold thread is secured to the fabric using fine, strong silk. Usually, the thread is attached in a two-fold manner, and sometimes even three-fold; this technique is both faster and more efficient than couching each thread individually. Since the couching thread is visible, it’s often used decoratively as well as practically; for example, the stitches can be arranged to create a specific pattern (see fig. 132) instead of being placed haphazardly. There’s no limit to the variety of patterns that can be created this way.
Decorative use can be made of the colour[Pg 251] of the couching thread; a hot colour warms the tone of the gold and a cool one does the reverse; and the more contrasting the colour the more it is in evidence.
Decorative use can be made of the color[Pg 251] of the couching thread; a warm color enhances the tone of the gold, while a cool one does the opposite; and the more contrasting the color, the more noticeable it becomes.


The gold thread may be couched solidly in straight lines, as the above figure shows, or it may be arranged in wavy lines either close or open, as in fig. 133. The thread is waved by bending it round the pointed end of a piercer just before fixing down. This waving line is particularly suitable for the gold thread, since the slight change in direction allows the light to play upon the metal very prettily. For this reason gold is often[Pg 252] couched solidly in circular or shell form over a ground. In gold embroidery, therefore, the direction of the thread is a specially important matter.
The gold thread can be stitched down in straight lines, as shown in the figure above, or it can be arranged in wavy lines, either closely or loosely, as seen in fig. 133. The thread is waved by bending it around the pointed end of a piercer right before securing it. This wavy line is especially suitable for gold thread, as the slight change in direction makes the light reflect off the metal beautifully. For this reason, gold is often[Pg 252] stitched solidly in circular or shell shapes over a background. In gold embroidery, the direction of the thread is therefore a particularly important consideration.

At the end of a line a technical difficulty sometimes arises in the turning of the thread, which is apt to be clumsy. This difficulty is overcome in various ways; the most usual is to return the doubled thread as neatly as possible and continue the next line; another is to cut the thread sharp off, secure it close to the end with a double stitch, and recommence in like fashion; the thread can sometimes be passed through to the back and brought up in position for working the next line. The fine point of a leaf may present difficulties in the same way; sometimes one of the two threads is temporarily let slip and the point completed with the single one, the left thread being picked up upon the return (see fig. 134). For such occasions as this it is more practical[Pg 253] to wind the two threads of passing upon separate bobbins, and bring them together at the working. Another way of overcoming the point difficulty is shown at fig. 135.
At the end of a line, a technical issue can sometimes come up when twisting the thread, which can be awkward. This problem can be resolved in a few different ways; the most common method is to neatly return the doubled thread and continue to the next line. Another option is to cut the thread cleanly, secure it close to the end with a double stitch, and start again in the same way. Sometimes, the thread can be passed through to the back and repositioned for the next line. The fine point of a leaf may also cause similar issues; occasionally, one of the two threads is temporarily let go, and the point is finished with just one thread, with the left thread picked up on the return (see fig. 134). For situations like this, it's more practical[Pg 253] to wind the two passing threads on separate bobbins and then bring them together for working. Another solution for addressing the point difficulty is demonstrated at fig. 135.

RAISED WORK
The couched gold threads may be raised in parts by means of some kind of padding interposed between it and the ground. They are very effective so treated, since the raised metal catches and reflects the light in a pleasing manner. This raising of the thread, however, has been carried to such extremes as to resemble goldsmith's work rather than embroidery, and it is then hardly in good taste.
The gold threads can be lifted in certain areas by using some padding placed between them and the base. This technique is quite effective because the elevated metal catches and reflects light attractively. However, this lifting of the thread has been taken to such extremes that it starts to look more like metalwork than embroidery, which is then not very tasteful.
A simple method of raising the gold is to lay down lines of string at stated intervals over the ground. The well-known form called basket stitch is done in this way; fig. 136 illustrates this stitch, a part of the square is left unworked in order to expose the under-layer of string. To carry out the diagram—First couch[Pg 254] down the lines of string at regular intervals over the surface, then commence laying on the gold by carrying a doubled thread of passing over two bars of string, and there fixing it down to the material, then over two more and fixing it down again, and so on to the end of the line. This is exactly repeated for a second line of passing, then, for the next two lines, commence by carrying the passing for the first stitch over one bar only, and for the remainder of the line over the two as before. This process repeated makes the wicker-like pattern so frequently seen in gold work. It can be used as a filling or as a border. It is evident that with the same arrangement of strings many other patterns could be carried out by varying the points of couching down.
A straightforward way to lay down gold is to place lines of string at regular intervals on the ground. The well-known technique called basket stitch is done this way; fig. 136 shows this stitch, leaving a part of the square unworked to reveal the underlying string. To follow the diagram—First, couch[Pg 254] the lines of string evenly across the surface, then start applying the gold by using a doubled thread, passing over two string bars, and securing it to the material, then over two more and securing it again, and so on until the line is complete. This is exactly repeated for a second passing line, then for the next two lines, start by carrying the passing for the first stitch over just one bar, and for the rest of the line, over the two as before. Repeating this process creates the wicker-like pattern often seen in gold work. It can be used as a filling or a border. Clearly, with the same arrangement of strings, many other patterns could also be created by changing the couching points.

Another way in which string is used for padding the gold is illustrated in fig. 137. The pattern, which in the first part[Pg 255] is two diamond shapes and a border line, is laid down in string. The doubled gold thread is then taken horizontally to and fro in close parallel lines over the part to be worked, and fixed by couching stitches at necessary intervals; wherever else these stitches may be put, one must always be placed upon each side of a raised line to make it sharp and clear. Other kinds of padding are used in this method of work; for instance, a lozenge shape may be stuffed with layers of soft cotton, as shown in the second part of this same diagram. Sometimes most complicated patterns are laid down in string and covered with gold thread in this way, e.g.:—fig. 138 shows an interlacing pattern taken from the border of an orphrey upon a XVth century chasuble.
Another way string is used to pad the gold is shown in fig. 137. The pattern, which in the first part[Pg 255] consists of two diamond shapes and a border line, is outlined in string. The doubled gold thread is then taken back and forth in close parallel lines over the area to be worked on and secured with couching stitches at necessary intervals; no matter where else these stitches are placed, one must always be put on each side of a raised line to make it sharp and clear. Other types of padding are used in this method; for example, a lozenge shape can be filled with layers of soft cotton, as shown in the second part of this same diagram. Sometimes very complex patterns are drawn in string and covered with gold thread in this way, e.g.:—fig. 138 shows an interlacing pattern taken from the border of an orphrey on a 15th-century chasuble.
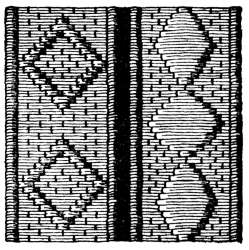
THE USE OF FANCY GOLD THREADS
A cursory glance must be given to the use of purls and other fancy threads, but these are mostly used nowadays for badges on uniforms, or for masonic purposes, and are carried out by the trade. These threads, when tarnished, are very difficult to clean, they easily turn a bad colour and catch the dust, and for real embroidery purposes are not as satisfactory as the plainer threads.
A quick look should be taken at the use of purls and other decorative threads, but these are mostly used today for badges on uniforms or for masonic purposes, and are handled by the industry. These threads, when tarnished, are very hard to clean, they easily turn a bad color and attract dust, and for actual embroidery purposes are not as effective as the simpler threads.

Purl and bullion must be cut very accurately into pieces of the required size, and attached to the material as a bead would be. The metal must be as little[Pg 257] as possible touched with the fingers; the cut pieces can be placed upon a tray lined with some soft springy substance, such as felt, in order to be easily picked up with the point of the needle, and they can be adjusted to their right position upon the work by the aid of the flat end of the piercer; unnecessary handling may be avoided in this way.
Purl and bullion need to be cut very precisely into pieces of the required size and attached to the fabric like a bead. The metal should be handled as little[Pg 257] as possible; the cut pieces can be placed on a tray lined with a soft, springy material like felt, making them easy to pick up with the needle's point. The flat end of the piercer can help adjust them into the right position on the work, minimizing unnecessary handling.
These threads, laid over padding either straight across or at an angle, may be used for the stems or petals of conventional flowers. The various kinds, dull, bright, and check, may perhaps be used in succession.
These threads, placed over padding either straight across or at an angle, can be used for the stems or petals of traditional flowers. The different types, including dull, bright, and checked, might be used one after another.
Plate is frequently taken to and fro over the same kind of forms over a prepared padding, being caught down by a stitch on each side by a method the French call le guipé. It needs skill and practice to do this well. Crinkled plate used to be couched on to work, but now is not much used in this way.
Plate is often moved back and forth over the same type of forms on a prepared padding, secured by a stitch on each side using a method the French call le guipé. It requires skill and practice to do this effectively. Crinkled plate used to be applied to work, but it's not commonly used this way anymore.

Spangles are usually sewn down separately; they may be attached by stitches from the centre outwards or by the thread being passed through a piece of purl and then returning to the back through the hole in the centre of the spangle. Fig. 139 illustrates another way of using these spangles to form a long tail shape. Here again they are attached with the help of pieces of purl. In the same figure are given some illustrations of the use of the fancy threads;[Pg 259] to learn more about them the student should examine XVIth to XVIIIth century gold work during which period they were in popular use.
Spangles are typically sewn on individually; they can be attached by stitching from the center outwards or by threading a piece of purl and then coming back through the hole in the center of the spangle. Fig. 139 shows another method of using these spangles to create a long tail shape. Again, they are attached with pieces of purl. The same figure includes some illustrations of how to use fancy threads; [Pg 259] to learn more about them, the student should look at gold work from the 16th to 18th centuries, when they were widely used.
CHAPTER XII
Lettering, Heraldry, and Emblems
The Uses of Lettering—Marking—Monograms—Heraldry—Emblems.
The Uses of Lettering—Marking—Monograms—Heraldry—Emblems.
Lettering of one kind or another is frequently in request. It is useful for inscriptions, verses, names attached to figures, the signing and dating of work, and for the more ordinary purposes of marking linen and so forth. Signed and dated work has peculiar attractiveness: it can be placed amidst definite historical associations: an authenticated piece of embroidery, say of the reign of King Richard Cœur de Lion, Queen Anne, or George III., would be an historical document and a standard to gauge the period of any uninscribed examples. Although few of us are likely to possess treasures of the XIIIth century, signed and dated[Pg 260] pieces of our great-grandmothers' embroideries are interesting personal landmarks in family history, so for this reason, amongst others, unostentatious marks of identification are by no means out of place. Descriptive names or verses are also a means of amplifying the story and so enlivening our curiosity.
Lettering in various forms is often in demand. It's useful for inscriptions, poems, names attached to figures, signing and dating work, and for everyday tasks like marking linen, and so on. Signed and dated work has a unique appeal: it can be linked to specific historical contexts. An authenticated piece of embroidery from the time of King Richard the Lionheart, Queen Anne, or George III would be a historical document and a reference point for dating any similar pieces without inscriptions. While few of us may own treasures from the 13th century, signed and dated pieces from our great-grandmothers' embroideries are interesting markers in family history. For this reason and others, subtle marks of identification are definitely appropriate. Descriptive names or verses also help enrich the story and pique our curiosity.

Lettering can answer a further purpose still; it can enrich the design, for, if rightly chosen and employed, letters are very decorative. They may be seen forming a border to a piece of work. The three letters in fig. 140 were taken from an XIth century embroidered cope, which has a fine inscription running round the entire lower margin.[13] The names of the[Pg 261] saints and martyrs standing in rows in the columned arcades, affected at certain periods, are sometimes inscribed in the mouldings of the arches above them or along the base; kneeling donors can be seen naïvely presenting a little scroll inscribed with prayers, and many other[Pg 262] interesting uses of lettering might be recalled. The names St. Luke and St. John, shown in fig. 141, are taken from a beautiful embroidered example of Gothic lettering.
Lettering serves another purpose as well; it can enhance the design, because when chosen and used correctly, letters can be very decorative. They can be arranged to create a border around a piece of work. The three letters in fig. 140 were sourced from an 11th century embroidered cope, which features a beautiful inscription running around the entire lower margin.[13] The names of the[Pg 261] saints and martyrs, arranged in rows within the columned arcades, are sometimes engraved in the mouldings of the arches above them or along the base; kneeling donors can be seen simply presenting a small scroll inscribed with prayers, and there are many other[Pg 262] interesting applications of lettering that could be mentioned. The names St. Luke and St. John, displayed in fig. 141, are taken from a stunning example of Gothic lettering.

Illuminated manuscripts supply fine examples of initial letters and writing. A visit to the show-cases in the King's Library at the British Museum will be of great interest to the student; the illustrations also to be seen there, the beautifully composed and coloured figure-subjects, would be equally suitable for carrying out in embroidery; indeed it is very probable that many of the figure compositions on the old copes and chasubles were derived from such a source. Fig. 142 gives as an example of an alphabet one taken from a Benedictionale of late XVth century date.
Illuminated manuscripts are great examples of decorative initials and writing styles. A visit to the displays in the King's Library at the British Museum would be very interesting for students; the illustrations there, with their beautiful designs and colors, would also be perfect for embroidery. In fact, it's likely that many of the figures on old copes and chasubles came from sources like these. Fig. 142 provides an example of an alphabet taken from a Benedictionale dated to the late 15th century.

A practical purpose to which lettering is often put is the marking of linen. To learn how to do this used to be a recognised part of a girl's education, and was one of the objects of the sampler. Marking can be anything from a simple cross-stitch initial to an elaborately worked monogram. For simple work the corner to be marked can be tacked upon toile[Pg 264][Pg 263] cirée, a material not unlike American cloth. Tambour frames also are useful for this purpose.
A practical use for lettering is labeling linen. Learning how to do this was once a standard part of a girl's education and was a key goal of the sampler. Labeling can range from a basic cross-stitch initial to an intricately designed monogram. For straightforward tasks, the corner to be labeled can be tacked onto toile[Pg 264][Pg 263] cirée, a fabric similar to American cloth. Tambour frames are also helpful for this.
Fig. 143 shows the stitches most used for working simple letters such as those seen upon the old samplers. The first is cross stitch, which for marking purposes should be worked so as to be alike on both sides. To do this requires some forethought whilst the work progresses, and necessitates an occasional doubling of one of the crossed stitches, in order to reach the point for commencing the next one and at the same time preserving a cross on each side.
Fig. 143 shows the most common stitches used for creating simple letters like those on old samplers. The first is cross stitch, which should be done in a way that looks the same on both sides for marking purposes. Achieving this takes some planning as you work, and sometimes you’ll need to double one of the crossed stitches to ensure you start the next one correctly while keeping a cross on each side.

The second stitch in the diagram shows a square on one side and is a cross upon the reverse. This makes a good stitch for the purpose, is quite simple to manipulate, and is easier to manage than the cross on both sides.
The second stitch in the diagram shows a square on one side and a cross on the other. This is a great stitch for the purpose, is pretty easy to work with, and is simpler to handle than having a cross on both sides.
The third example is made use of when a larger letter is required. It is known as blanket stitch, and is used for the[Pg 265] marking of such things. It may be further completed by a neat back stitch just fitting along the outside edges of the other stitches.
The third example is used when a bigger letter is needed. It's called blanket stitch, and it's used for the[Pg 265] marking of various items. It can also be finished off with a tidy back stitch that perfectly aligns with the outer edges of the other stitches.
Many embroidery stitches are suitable for marking purposes, such as satin, chain, stem, back, rope, basket, and others. The Oriental stitch which carries out the letter in fig. 144 is a good one when both sides can be seen, for though these are quite different, it is presentable upon either. The diagram shows the appearance of the stitch on the front and on the back.
Many embroidery stitches work well for marking, like satin, chain, stem, back, rope, basket, and more. The Oriental stitch that represents the letter in fig. 144 is a great choice when both sides are visible, because although they look different, it looks good on both sides. The diagram shows how the stitch appears on the front and back.

A simple initial letter may be made interesting by enriching the ground behind it with some form of diaper patterning. An example of this is shown in fig. 145. The letter could be worked in a plain satin stitch over a padding of threads, and the pattern on the ground[Pg 266] in a darning stitch and French knots, or in any other suitable way.
A basic initial letter can be made more appealing by adding an interesting background with a diaper pattern. An example of this is shown in fig. 145. The letter can be created using a simple satin stitch over some padding, while the background[Pg 266] can feature a darning stitch and French knots, or any other appropriate method.

A monogram carried out in embroidery can be a very pretty thing; there is scope in it for ingenuity both of design and of stitching. The letters may be decorated and tied up with a floral spray, strap work or a combination of several motifs. Fig. 146 shows a monogram composed of the letters I. G. ornamented and bound together by a ribbon-like interlacing band. The letters are worked in a raised satin stitch, and a running stitch in another colour threads in and out down the centre of each letter. The outline is stem stitch in a darker colour. The band is outlined on both sides with an overcast stitch, which always makes a particularly neat edging for anything of this sort. The centre is filled with a row of French knots, the tassels are worked in close lines of stem stitch,[Pg 267] and the petals of the small flowers in satin stitch, finished off with a French knot at the centre.
A monogram done in embroidery can look really beautiful; it allows for creativity in both design and stitching. The letters can be embellished and combined with floral designs, ribbon work, or various motifs. Fig. 146 displays a monogram made up of the letters I. G., decorated and tied together with a ribbon-like interlacing band. The letters are stitched using a raised satin stitch, with a contrasting colored running stitch weaving in and out through the center of each letter. The outline is done in stem stitch in a darker color. The band has an overcast stitch outlining both sides, which creates a particularly neat edge for this type of work. The center is filled with a row of French knots, the tassels are stitched in close lines of stem stitch,[Pg 267] and the petals of the small flowers are done in satin stitch, finished off with a French knot in the center.

Another mark of proprietorship and origin was the shield of arms of the owner, which introduces the subject of heraldry. A shield executed with the needle is often seen, and looks particularly rich. Heraldry is an intricate science, full of pitfalls for the unwary, and demands an earnest study of its complex rules and regulations. Every one should know at least some fine examples of great national shields such as the Lions of England, the Fleur de Lys of France, and the Imperial Eagle. Examples of shields surmounted by helmets and crests with quaint and flowing mantling are to be seen in all kinds of art work.
Another sign of ownership and origin was the owner's coat of arms, which brings us to the topic of heraldry. A needlework shield is often seen and looks especially luxurious. Heraldry is a complex field, full of traps for the unwary, and requires serious study of its intricate rules and regulations. Everyone should be familiar with some fine examples of prominent national coats of arms, such as the Lions of England, the Fleur de Lys of France, and the Imperial Eagle. You'll find examples of shields topped with helmets and crests adorned with elaborate, flowing mantling in various works of art.
Various stitches and methods specially lend themselves to the expression of heraldry. Those which, like cross stitch, impose a certain simplicity, are very good. Another suitable medium is applied work, of which an illustration can be seen on page 95. Gold and silver thread are very useful here, and look exceptionally rich when couched in the XIIIth century method. Fig. 147 is an embroidered coat of arms dated the first half of the XIVth century. It is executed almost entirely in the point couché[Pg 269] rentré ou retiré. The arms are those of the Clinton and Leyburne families—argent, 6 cross crosslets fitchée 3, 2 and 1 on a chief azure, two mullets or.
Various stitches and methods are particularly suited for expressing heraldry. Techniques like cross stitch, which have a certain simplicity, work very well. Another good approach is applied work, an example of which can be seen on page 95. Gold and silver thread are very effective here and appear exceptionally luxurious when laid down using the XIIIth century method. Fig. 147 is an embroidered coat of arms from the first half of the XIVth century. It is made almost entirely in the point couché[Pg 269] rentré ou retiré. The arms represent the Clinton and Leyburne families—argent, 6 cross crosslets fitchée 3, 2 and 1 on a chief azure, two mullets or.

In designing heraldic work care must be taken to introduce no debased forms such as were current after the XVth[Pg 270] century. The XIIIth and XIVth centuries are the periods considered best for the study of this subject. Heraldry sometimes adds historic interest to embroideries; owners or donors may be traced by their coat of arms appearing upon some part of the work.
In creating heraldic designs, it's important to avoid any outdated styles that became popular after the 15th century. The 13th and 14th centuries are considered the best times to study this topic. Heraldry can add historical significance to embroidery; you can often identify the owners or donors through their coat of arms displayed on the piece.
Allied to heraldry and marking are a number of decorative objects that have acquired peculiar traditional significance of an emblematic or symbolical nature, hard[Pg 271] to define. The Cross of Christianity may be instanced, the olive branch of peace, the mirror of truth, and the snake of eternity. The name of a saint is frequently declared by an emblem accompanying the figure. In appropriate surroundings emblems may often be used effectively. For knowledge about these things the student must go to various books that deal with the special subject. Fig. 148 is an illustration of the well-known emblem, the Pelican in her piety.
Linked to heraldry and markings are various decorative items that have taken on unique traditional meanings of an emblematic or symbolic nature, difficult to define. The Cross of Christianity, the olive branch of peace, the mirror of truth, and the snake of eternity are a few examples. A saint's name is often represented by an emblem accompanying their figure. When used in the right context, emblems can be quite impactful. To learn more about these topics, students should refer to different books that focus on this specific area. Fig. 148 is an illustration of the well-known emblem, the Pelican in her piety.

CHAPTER XIII
THE GEAR OF WORK
Finishing off—Making up—Edges—Use of Cord-making Appliance—Cord Twisted by Hand—Knotted Cord—Fringes—Tassels—Knots.
Finishing up—Creating—Edges—Using a Cord-making Tool—Cord Twisted by Hand—Knotted Cord—Fringes—Tassels—Knots.
When the embroidery is completed, the making up, the addition of tasteful finishing touches, and such things as fringes, tassels, and linings, must all be considered. These will, if judiciously made use of, give a distinction and character to the work that might be missed if due care and thought were not expended upon such details.[Pg 272] This part of the work might be compared to the garnishing of a boiled fowl with lemon and parsley, a minor detail, but a very effective one.
Once the embroidery is finished, you need to think about putting it all together and adding stylish finishing touches like fringes, tassels, and linings. If used wisely, these details can add a unique touch and character to the piece that would be overlooked without careful attention. [Pg 272] This aspect of the work is similar to garnishing a boiled chicken with lemon and parsley—it's a small detail, but it makes a big impact.
It is possible, by the help of such expedients, to emphasise certain colours and bring out points of the design, as well as to give completeness and finish. Such things as fringes, cords, and tassels are often more satisfactory when made by the worker and with materials like those used in the embroidery, for such will be more likely to be in keeping with the character of the rest, and to be more interesting in detail. In the finishing off the same taste and neatness of execution is required as in the embroidery. Good work can be very much marred in the making up; on the other hand, a little extra interest added on a part not often seen renders it doubly valuable.
It’s possible, with the help of these techniques, to highlight specific colors and enhance parts of the design, while also adding completeness and polish. Items like fringes, cords, and tassels are often more satisfying when made by the craftsman using materials similar to those used in the embroidery, as they are more likely to match the overall character and be more engaging in detail. The same level of taste and neatness in execution is necessary during finishing as it is in the embroidery. Quality work can be significantly ruined during assembly; however, adding a little extra interest to a part that isn’t often seen makes it even more valuable.
The mounting of certain things should not be attempted at home; boxes should be handed over to the cabinetmaker, books to the bookbinder, and so on, for it is not possible for any one not an expert to do these things properly, and even good work can look poor if badly set.
The installation of certain items shouldn't be done at home; boxes should be taken to the cabinetmaker, books to the bookbinder, and so on, because it's unlikely that someone without expertise can do these tasks correctly, and even quality work can appear subpar if not executed well.
The question how to appropriately[Pg 273] finish off an edge often arises; let it be hem stitched rather than plain hemmed; or a narrow line of drawn thread work may be inserted, for an open-work border is frequently a set-off to the rest of the embroidery. If a binding is placed over the edge this can be fixed with a pretty stitch, or the stitch alone can bind the edge, one such as buttonhole, overcast, or that shown in fig. 76. With some stitches the edge of the material can be rolled over a piping cord and the stitch worked over the thus emphasised margin.
The question of how to properly finish off an edge often comes up; it’s better to hem it with a hem stitch rather than just a plain hem. You could also add a narrow line of drawn thread work, as an open-work border often enhances the rest of the embroidery. If a binding is used to cover the edge, it can be attached with a decorative stitch, or the stitch itself can bind the edge, such as buttonhole, overcast, or the one shown in fig. 76. With some stitches, you can roll the edge of the fabric over a piping cord and stitch over the emphasized margin.
The difficulty of procuring cord suitable for use with embroidered work makes the appliance illustrated at fig. 149 a useful possession.[14] The cords made upon this wheel can be of any thickness, according to the number of plies and the substance in each. Different colours and materials can be twisted up together, such as a gold and silk thread.
The challenge of finding cord that's good for embroidery makes the tool shown at fig. 149 a handy item to have.[14] The cords produced on this wheel can be any thickness, depending on the number of strands and the material used. You can also twist together different colors and materials, like a gold thread mixed with silk.

To make a three-plied cord, cut three equal lengths of thread rather longer than the required cord is to be, as it shortens[Pg 275][Pg 274] in the twisting. Make a loop at each end of the thread, or, better still, attach tiny metal rings at the ends. Hook the threads in position as shown in the diagram, and place the instrument far enough from the clamped block of wood to make the threads that are stretched between quite taut. Now commence the twisting by turning the large wheel quickly with an even motion in the direction that continues to twist up the threads, keeping the left hand on the instrument to steady it, for it gradually slides towards the block as the twisting continues. When corkscrew-like knots begin to come in the threads, stop revolving the wheel, unhook the two outer threads and place them both on the central hooks together with the third thread, keeping them taut during the process. Revolve the large wheel again, in the direction opposite to that in which it has been working, and continue turning until the cord is tightly twisted up. It is now made, and can be removed from the machine. The second twisting had better be over-done rather than not sufficiently, since if over-twisted the cord rights itself upon being removed from the machine.[Pg 276] A two-ply cord is made in like manner, by using first the two outer hooks only, and then placing both threads together on the central hooks.
To make a three-strand cord, cut three equal lengths of thread that are a bit longer than the length you need, as they will shorten while twisting[Pg 275][Pg 274]. Make a loop at each end of the thread, or even better, attach small metal rings at the ends. Hook the threads into place as shown in the diagram, and position the tool far enough from the clamped wooden block to ensure the threads stretched between are taut. Start the twisting by quickly turning the large wheel smoothly in the direction that keeps twisting the threads, using your left hand to steady the tool, as it will gradually slide towards the block as twisting continues. When corkscrew-like knots start forming in the threads, stop turning the wheel, unhook the two outer threads, and place both on the central hooks along with the third thread, keeping them taut during this process. Turn the large wheel again in the opposite direction from the previous twisting, and keep turning until the cord is tightly twisted. It’s now made and can be removed from the machine. It's better to twist a little too much than not enough, as the cord will straighten itself out when removed from the machine.[Pg 276] A two-strand cord is made in a similar way, first using only the two outer hooks, and then placing both threads together on the central hooks.
There is a simple way of making this cord without the help of any instrument, but it is not possible to get the perfect result that the machine gives. It is most easily carried out by two persons, though one can do it. In order to make a two-plied cord, by hand, take a thread rather more than twice the length of the required cord. Let each worker take an end of the thread in the right hand and commence to twist it between the thumb and finger, each working in direction opposite to the other and keeping the thread at tension. When twisted as much as possible without getting corkscrew-like knots in the thread, the cord must be doubled in half by holding it at the centre and bringing together the two ends, which are then knotted. During the entire process the thread must be kept under tension. If one end of the cord is now let go it should immediately twist itself up tight, and remain in that position. If any small knots form during the process run the cord sharply[Pg 277] through the fingers once or twice to straighten it out.
There’s an easy way to make this cord without any tools, but you won’t get the perfect result that a machine produces. It’s easiest done by two people, though one person can manage it. To create a two-plied cord by hand, take a thread that’s a little more than twice the length of the desired cord. Each person should hold an end of the thread in their right hand and start twisting it between their thumb and finger, with each person working in the opposite direction and keeping the thread taut. When it’s twisted as much as possible without creating corkscrew knots, fold the cord in half by holding it at the center and bringing the two ends together, which are then tied together. Throughout the entire process, the thread needs to remain taut. If one end of the cord is released, it should immediately twist up tightly and hold that position. If any small knots form during the process, run the cord sharply[Pg 277] through your fingers once or twice to straighten it out.


Another pretty kind of cord is a knotted one. It is made in the hand in most primitive fashion by using the two first fingers as crochet hooks. The thread used for making it should be stout and firm. To commence making the cord, knot two pieces of thread together and place the threads in position as shown in fig. 150. The next step is shown in fig. 151, which is the index finger of the left hand bringing the darker thread through the loop. Fig. 152 shows this thread looped on the finger, the cord held in the left hand instead of the right,[Pg 278] and the right hand in process of drawing the lighter thread, which was the last loop, tight. The next move, fig. 153, shows the right-hand first finger making the new loop with the lighter thread, and[Pg 279] fig. 154 shows the loop on the finger, the cord passed over to be held in the right hand again, and the left hand this time pulling the last loop tight. Continue making the cord by following out the last four positions consecutively.
Another attractive type of cord is a knotted one. It's made by hand in a very basic way, using the index fingers as crochet hooks. The thread used should be thick and sturdy. To start making the cord, tie two pieces of thread together and position the threads as shown in fig. 150. The next step is shown in fig. 151, where the index finger of the left hand pulls the darker thread through the loop. Fig. 152 illustrates this thread looped on the finger, with the cord held in the left hand instead of the right, [Pg 278] and the right hand is drawing the lighter thread, which was the last loop, tight. The next move, fig. 153, shows the right index finger creating the new loop with the lighter thread, and [Pg 279] fig. 154 shows the loop on the finger, with the cord passed back to be held in the right hand again, and this time, the left hand is pulling the last loop tight. Keep making the cord by repeating the last four positions in order.


A very usual finish to an edge is a fringe. This can be made either by fraying out the material or by adding a detached fringe, either knotting it in or attaching it in some other way. If the fringe is to be a frayed-out one, the best way to do it is to first draw out a few warp threads where the head of the fringe is to come, then hem stitch the upper edge of this, see the right-hand end of fig. 155; this makes the heading of the fringe secure, after which the remainder of the warp threads can be withdrawn. When fringing a square in this fashion, it is well to save some of the frayings out to knot in at the four corners where otherwise there would be gaps.
A common way to finish an edge is with a fringe. This can be created by either fraying the material or adding a separate fringe, which can be knotted in or attached in another way. If you want a frayed fringe, the best method is to first pull out a few warp threads where the top of the fringe will be, then hem stitch the upper edge, as shown at the right-hand end of fig. 155; this secures the top of the fringe, after which you can pull out the rest of the warp threads. When fringing a square like this, it's a good idea to keep some of the frayed threads to knot at the four corners, where there would otherwise be gaps.

To knot an added fringe into the[Pg 281] border is a very simple matter. Begin by cutting the threads that are to compose it all to one length, about double that of the required fringe. Take a few together to form a bunch and double it in half. With a stiletto make a hole near the edge of the material; then bring from the back a crochet hook through this hole, and draw the loop formed by the doubling of the bunch a little way through, then take the ends of the bunch through the loop and draw them tight in order to make the knotting firm.
To add a fringe to the[Pg 281] border is really easy. Start by cutting the threads you’ll use to the same length, about twice the length of the fringe you want. Gather a few threads together to make a bunch and fold it in half. Use a stiletto to make a hole near the edge of the material; then take a crochet hook from the back through this hole and pull the loop made by folding the bunch a little through. Next, take the ends of the bunch and pull them through the loop, tightening them to secure the knot.

There are many ways of patterning a plain fringe, sometimes a change of colour in the knotted-in threads is sufficient, as shown in fig. 156. Another very usual way is to divide the bunches and refasten them together in some way to form a pattern. Fig. 157 is an example of this; they may be either knotted together, as[Pg 282] in the first half of the diagram, or bound with thread as in the second half, the needle reaching the required places by running in zigzag fashion up the thread and down again.
There are many ways to create a patterned plain fringe. Sometimes, just changing the color of the knotted-in threads is enough, as shown in fig. 156. Another common method is to separate the bunches and regroup them in some way to create a pattern. Fig. 157 is an example of this; they can either be knotted together, as[Pg 282] shown in the first half of the diagram, or tied with thread, as seen in the second half, with the needle moving in a zigzag motion up the thread and then down again.

A simple fringe can be made of strands twisted together, as in the first half of fig. 158. This is made upon the same principle as the twisted cord already described. About three threads of the fringe are twisted up tight, and an adjoining three treated in the same fashion. These threes are then twisted together in the direction opposite to that which has just been used, and thus are securely locked together. The ends of the completed fringe may require a little trimming[Pg 283] off to make all of an equal length. The second half of the diagram shows a durable and simple fringe made by a close series of knots down the thread.
A simple fringe can be made by twisting strands together, like in the first half of fig. 158. This follows the same principle as the twisted cord described earlier. Three threads of the fringe are twisted tightly, and three more are treated the same way. These two sets of three are then twisted together in the opposite direction, securely locking them together. The ends of the finished fringe might need a little trimming[Pg 283] to make them all the same length. The second half of the diagram shows a durable and simple fringe created by a series of tight knots down the thread.

Fig. 159 suggests two methods by which a stitching of coloured thread near the margin can help to decorate a plain fringed edge.
Fig. 159 suggests two ways that using colored thread near the edge can enhance the look of a simple fringed border.

A row of tassels makes a pretty finish to various things. Complicated tassel-making requires a professional hand; even a simple tassel requires making properly. The first proceeding is to wind some thread round a piece of card[Pg 284]board, which should be a little wider than the tassel is to be long; then double a piece of the same thread and thread the two ends into a needle, thus leaving a loop at the usual knot end. Slip the needle through the centre of the wound thread close to the cardboard, then through the loop and draw the thread tight; this will bind the threads securely at that point. They can then be cut exactly opposite this on the other side, which will release the cardboard. Give the binding thread another tightening pull, and then take the needle and thread[Pg 285] straight through the centre, as shown in fig. 160, and fasten it off with a good knot. This knot will be in the ball part of the tassel and will help to make it round. Next, double the tassel into shape ready for the collar. Thread the needle as before and make the thread encircle the tassel, as shown in the second figure in the diagram, drawing the thread quite tight, and, if necessary, winding it several times round the neck of the tassel until the collar is of sufficient width, then take the needle and thread straight through the centre, bringing it out at the top, where it can be made use of to fix the tassel in its place upon the work.[Pg 286] With sharp scissors trim the edge of the tassel which now is complete. The ball part can be further decorated by covering it with an open network of stitches in some contrasting colour; buttonhole and various lace stitches can be used for the purpose.
A row of tassels adds a nice finishing touch to various items. Creating intricate tassels requires skill; even a basic tassel needs to be made correctly. The first step is to wind some thread around a piece of cardboard that should be slightly wider than the desired length of the tassel. Then, double a length of the same thread and insert both ends into a needle, leaving a loop at the knot end. Slip the needle through the center of the wound thread, close to the cardboard, then through the loop, and pull the thread tight; this will securely bind the threads at that point. You can then cut the threads right across from where you made the binding on the other side, which will release the cardboard. Give the binding thread another tight pull, then take the needle and thread straight through the center, as shown in fig. 160, and tie it off with a strong knot. This knot will be in the ball part of the tassel and will help shape it round. Next, fold the tassel into shape for the collar. Thread the needle as before and wrap the thread around the tassel, as indicated in the second figure of the diagram, pulling the thread tight, and if necessary, wrapping it several times around the neck of the tassel until the collar reaches the desired width. Then take the needle and thread straight through the center, coming out at the top, where it can be used to secure the tassel in place on your project.[Pg 286] Use sharp scissors to trim the edges of the completed tassel. You can further decorate the ball part by covering it with an open stitch design in a contrasting color; buttonhole and various lace stitches can be used for this embellishment.

KNOTS
Knots, which can be very pretty, are at times required in embroidery; anything that requires a fastening may give an opportunity for some pretty interlacing strap work or knotting. Also knots may be practically useful in both weaving and embroidery, for sometimes a finishing thread must be knotted on to a new one, since there may be no opportunity of making a firm commencement with the aid of the material.
Knots, which can be quite beautiful, are sometimes needed in embroidery; anything that needs securing can provide a chance for some attractive interlacing strap work or knotting. Additionally, knots can be practically useful in both weaving and embroidery because sometimes a finishing thread has to be tied onto a new one, as there may be no way to make a solid start with the available material.
The knot shown in fig. 161 is called the girdle knot; it might be made use of in many other ways. To carry it out, make a loop with one end of the cord and hold it between the left finger and thumb, the looped part being towards the right, and the end that points downwards to the left passing over the other end. Take up the other piece of cord, pass it diagonally across the surface of[Pg 287] the loop, commencing from the right-hand lower side, then round under one end and over the other, then up into the loop from underneath, over its own end that crosses the loop there, and then out under the loop at the top right-hand corner.
The knot shown in fig. 161 is called the girdle knot; it can be used in many other ways. To tie it, make a loop with one end of the cord and hold it between your left finger and thumb, with the loop facing right and the end that points down to the left crossing over the other end. Take the other piece of cord, pass it diagonally across the surface of[Pg 287] the loop, starting from the lower right side, then around under one end and over the other, then up into the loop from underneath, over its own end that crosses the loop, and then out under the loop at the top right corner.

The Chinese knot, which is used for a sailor's collar, is shown in fig. 162. The looped end can be left as large as necessary. To work it the first part of the knot is laid in position on the table, commencing at point A; for the latter part (from point C) the thread is interlaced through to the finish. It can then be pulled tight, taking care in the drawing-together process that the various loops are adjusted in right position.[Pg 288]
The Chinese knot, used for a sailor's collar, is shown in fig. 162. The looped end can be as large as needed. To make it, start by laying the first part of the knot on the table, beginning at point A; for the second part (starting from point C), weave the thread through to complete it. Then, pull it tight, making sure to adjust the different loops into the correct position as you tighten them.[Pg 288]


Another ornamental knot is shown at fig. 163. To make it—Form a loop and hold it between the left thumb and finger, the loop pointing to the right, the longer end pointing upwards and passing over the end that points downwards. Take hold of the end pointing upwards, pass it perpendicularly downwards across the surface of the loop, then round under the other end, up over its own end, under the side of the loop, over its own end that lies across the loop, and out under the loop at the right-hand end. Pull as tight as required. All these knots may be made of double cord by running a second through, following the lead of the first, just before tightening up the knot. The one last described may be[Pg 290] made of doubled cord from the commencement, the looped end being used as the working end: the knot will then finish off with a loop at one end, which can be used as a loop or cut if required.
Another decorative knot is shown at fig. 163. To make it—Create a loop and hold it between your left thumb and finger, with the loop pointing to the right and the longer end pointing up, passing over the end that points down. Grab the end that’s pointing up, then pass it straight down across the surface of the loop, around under the other end, up over its own end, under the side of the loop, over its own end that lies across the loop, and out under the loop at the right end. Pull as tight as needed. All these knots can also be made with double cord by threading a second cord through, following the first one just before tightening the knot. The last one described may be[Pg 290] made with doubled cord from the start, using the looped end as the working end: the knot will then finish with a loop at one end, which can be used as a loop or cut if needed.

Fig. 164 is an example of a pretty piece of interlacing strap work attached to a fastening.
Fig. 164 is a great example of beautiful intertwined strap work connected to a clasp.
The weavers' knot (fig. 165) is useful for practical purposes in both weaving[Pg 291] and embroidery; this knot is universally employed by the cotton weavers when the warp breaks. It is made as follows—Place the two ends that are to be knotted together between the thumb and first finger of the left hand in such a way that they cross each other at right angles, the end that points towards the left passing under the one pointing towards the right. Pass the long end of thread that hangs down towards the right, and which is the newly attaching piece, over the thumb, round the back of the end pointing to the left in front of the other end, and let it hang down again towards the right, holding the loop thus made between the thumb and finger; then pass the end pointing towards the right down through this loop and out on the opposite side. To draw the knot tight, pull the end which hangs down towards the right, which will tighten the loop and so complete the knot.
The weavers' knot (fig. 165) is handy for practical uses in both weaving[Pg 291] and embroidery; this knot is commonly used by cotton weavers when the warp breaks. Here’s how to make it—hold the two ends you want to tie together between the thumb and index finger of your left hand so that they cross each other at right angles, with the end pointing to the left going under the one pointing to the right. Take the long end of the thread that hangs down to the right, which is the piece you're adding, and pass it over your thumb, around the back of the left end, in front of the other end, and let it hang down again to the right, keeping the loop you just made between your thumb and finger; then slide the end pointing to the right down through this loop and out the other side. To tighten the knot, pull the end that hangs down to the right, which will pull the loop tight and finish the knot.

The reef knot (fig. 166) is another useful one, and it has this advantage over the weaver's knot, that both short ends return parallel to the long ones instead of going off at an angle; this makes it neater for some purposes.
The reef knot (fig. 166) is another handy knot, and it has the advantage over the weaver's knot because both short ends run parallel to the long ones instead of going off at an angle; this makes it tidier for some uses.

CHAPTER XIV
PRACTICAL DIRECTIONS
Transferring Patterns—Paste for Embroidery Purposes—Protection and Preservation of Work—Washing Embroidery—Prevention and Cure of Puckered Work—Points about the Thread—Dressing the Frame.
Transferring Patterns—Pasting for Embroidery—Protecting and Preserving Your Work—Washing Embroidery—Preventing and Fixing Puckered Work—Thread Tips—Setting Up the Frame.
The best method of getting the pattern on to the material is to draw it on directly with a brush; since this, however, is not always possible, other ways of doing it can be employed.
The best way to get the pattern onto the material is to paint it on directly with a brush; however, since this isn't always possible, other methods can be used.
The pattern can be transferred to the background by a process called pouncing. To do this fix some tracing-paper over[Pg 293] the design and carefully take the outline; a good margin of plain paper should be left round the outside in order to prevent any of the pounce getting accidentally rubbed on to the embroidery. The next process is the perforation of the pattern. Lay the tracing upon some substance of the nature of thick felt, then with a pricker or a needle, held in an upright position, pierce tiny holes all round the outline of the pattern, very close together. This completed, attach the perforated tracing securely to the material, the smooth side of the perforations towards the stuff. Both material and tracing paper may be fixed to a board with drawing pins. Next, rub the pounce, which consists of finely powdered charcoal or of white chalk, lightly over the perforated parts with a soft pad, keeping the rubbing always in the same direction; once or twice at the most over the surface is quite sufficient, often too much is rubbed through, which afterwards is only in the way. The pad, first dipped into the pounce, is rubbed preparatorily upon some paper to remove the superfluous powder, and then upon the actual work. Carefully remove the tracing-paper; there[Pg 294] should now be visible upon the surface of the material, in charcoal dust, a perfectly clear reproduction of the pattern. Should, however, the impression be blurred, it is quite easy to flick everything away with a duster and repeat the process. The causes of failure would most probably be that the perforations were too large or too far apart, or that there was some movement of either paper or material during the process. It is necessary for the pattern to be permanently fixed upon the ground material; blow lightly to remove any superfluous powder, then, with a brush dipped in light red oil-paint moistened with turpentine, trace a fine clear line over the powdered pattern. When this is dry, what is left of the charcoal can be lightly dusted away. Red is in most cases a good colour to use for tracing purposes, for if by chance any tracing should show or come off on the thread it will be a clean-looking colour, and one comparatively easily removed in any after cleaning.
The pattern can be transferred to the background using a method called pouncing. To do this, place tracing paper over[Pg 293] the design and carefully trace the outline; leave a good margin of plain paper around the outside to prevent any pounce from accidentally smudging the embroidery. The next step is to perforate the pattern. Lay the tracing on some thick felt, then use a pricker or needle held upright to make tiny holes all around the outline of the pattern, keeping the holes very close together. Once that’s done, secure the perforated tracing to the material with the smooth side of the perforations facing the fabric. Both the material and tracing paper can be pinned to a board with drawing pins. Next, lightly rub pounce, which consists of finely powdered charcoal or white chalk, over the perforated areas with a soft pad, always moving in the same direction; rubbing once or twice is usually enough, as too much can be applied, making a mess later. The pad should first be dipped in the pounce and rubbed on some paper to remove excess powder before applying it to the actual work. Carefully lift off the tracing paper; there[Pg 294] should now be a clear reproduction of the pattern visible on the material in charcoal dust. If the impression is blurred, you can easily wipe it away with a duster and repeat the process. Most likely causes of failure would be that the perforations were too large or too far apart, or that there was some movement of either the paper or material during the process. It’s important to make the pattern permanent on the base material; gently blow off any excess powder, then use a brush dipped in light red oil paint mixed with turpentine to trace a fine, clear line over the powdered pattern. Once this dries, you can lightly dust away any remaining charcoal. Red is usually a good color for tracing purposes because if any tracing shows or comes off on the thread, it will be a clean-looking color that's relatively easy to remove during cleaning.
Red or blue carbonised paper is used for tracing patterns; it is not a good medium though it may be an expeditious one. If it is used, an after painting over the outline will make the marking permanent.[Pg 295]
Red or blue carbon paper is used for tracing patterns; it's not the best option, but it can be quick. If you use it, going over the outline with paint afterward will make the markings permanent.[Pg 295]
When pouncing or painting is difficult, a method of indicating the pattern upon the stuff is to trace the design on tissue paper, and tack it to the ground material with cotton, the stitching of which should follow the outline of the design, and be kept as much as possible upon the front. The thin paper is then torn away, and there will be some suggestion of pattern left upon the material.
When jumping or painting is challenging, a way to show the pattern on the fabric is to outline the design on tissue paper and pin it to the base material with cotton, stitching along the design's outline and keeping it as much as possible on the front. The thin paper can then be torn away, leaving a hint of the pattern on the material.
Transparent ground stuffs need only be laid upon the pattern; then the tracing can be taken directly on the stuff.
Transparent ground materials just need to be placed on the pattern; then the tracing can be done directly on the material.
Paste is sometimes in request for embroidery purposes; the following is a good recipe—Pour rather less than half a pint of cold water into a saucepan, add to this a piece of carpenter's glue about the size of a small filbert and place it on the fire to heat. Put three teaspoonfuls of flour into a basin, and with cold water mix to a smooth paste; when the water in the saucepan boils add it to the paste, stirring well all the time; then place the mixture in the saucepan and boil for about two minutes. When cold it is ready for use. It may be required as a preservative; for instance, canvas work when finished can have a thin coating of[Pg 296] paste rubbed over the back in order to preserve the stitches from giving or running; when the work is to be used for such things as furniture coverings this may be a good thing to do. Applied work is sometimes pasted on to its new ground, and a backing may be fixed to the surface material by paste. The more all this can be avoided the better, for its tendency is to give a stiff mechanical look to work; professional people, however, are rather fond of the paste pot. Paste, if used, must be of the right kind, or it will do more harm than good. It should be very fresh, and have no acid in its ingredients, of which gum arabic must not be one if any after stitching has to take place through the stuff, for gum makes it hard and less penetrable. The paste must be applied and allowed to dry thoroughly before the work is removed from the frame. A finger makes a good brush for the purpose. The paste should be put on as thinly and evenly as possible, care being taken not to rub on the cross of the material, since this might stretch it unevenly.
Paste is sometimes needed for embroidery; here’s a good recipe—Pour just under half a pint of cold water into a saucepan, add a piece of carpenter's glue about the size of a small hazelnut, and heat it up. Put three teaspoons of flour in a bowl and mix it with cold water to make a smooth paste. When the water in the saucepan is boiling, add it to the paste while stirring continuously. Then put the mixture back in the saucepan and boil for about two minutes. Once it cools, it’s ready to use. It can serve as a preservative; for example, finished canvas work can have a thin layer of [Pg 296] paste applied to the back to keep the stitches from loosening or running. If you’re using it for things like furniture coverings, this can be beneficial. Sometimes, applied work is pasted onto a new surface, and a backing can be attached to the main material with paste. It's better to avoid this when possible, as it can make the work look stiff and mechanical; however, professionals often favor using paste. If you do use paste, it has to be the right kind, or it will do more harm than good. It should be very fresh and have no acidic ingredients, and gum arabic should not be included if any stitching will be done afterward, as it makes the material hard and less penetrable. The paste needs to be applied and allowed to dry completely before removing the work from the frame. A finger works well as a brush for this purpose. The paste should be spread as thinly and evenly as possible, taking care not to rub against the fabric’s grain, as this can stretch it unevenly.
Shoemakers' paste is easily procured, and can be used for embroidery purposes. This is made from rye flour, and[Pg 297] is very strong. It is harmless if perfectly fresh.
Shoemakers' paste is easy to get and can be used for embroidery. It's made from rye flour, and[Pg 297] is quite strong. It's safe to use if it's fresh.
A good many things go to the keeping of work fresh and orderly, which is a very important matter. The work must be kept carefully covered up when not in use; finished parts can sometimes be covered whilst the work is going on, for the covering is easily raised when comparison with the part in progress is necessary. The work should have some protection if the hand rests on it; the worker should wear a white apron with sleeves. The worker's hand should be cool, dry, and smooth; hot hands should frequently be washed. The use of pumice stone cures slight roughness, but fine work cannot be attempted if the fingers are for any reason constantly rough. Wools and silks need a case to keep them orderly and clean. The best way to preserve valuable embroidery is to frame it, which, of course, is not always practicable, but it is a sure safeguard against moth and dust.
A lot of things are important to keep work fresh and organized, which is really crucial. The work should be kept covered when not in use; finished parts can sometimes be covered while other work is ongoing because it’s easy to lift the cover when a comparison with the ongoing part is needed. The work should have some protection if hands are resting on it; the worker should wear a white apron with sleeves. The worker's hands should be cool, dry, and smooth; hot hands should be washed often. Using pumice stone can fix slight roughness, but fine work isn't possible if the fingers are constantly rough for any reason. Wools and silks need a case to keep them organized and clean. The best way to preserve valuable embroidery is to frame it, which isn’t always feasible, but it definitely protects against moths and dust.
For washing embroidery special soap should be procured. It is not well to use any ordinary soap, for this may contain alkali, which would injure the colours in the work. Dissolve the soap in boiling water,[Pg 298] and add cold to make it just warm and of the required strength. Immerse the embroidery in the lather thus made, and work it about gently, avoiding any friction. When clean, rinse first in warm water, afterwards in cold, to which a little salt may be added. The water must be squeezed out carefully and the material quickly dried. If ironing is necessary it must be done on the wrong side, but if the work can be pinned out on a board to dry, and in this way stretched and smoothed without any ironing, so much the better, for the embroidery will not be flattened at all. Another way of ironing embroidery that is not harmful is to do it from underneath while some one holds out the material.
For washing embroidery, you should get special soap. It's not a good idea to use regular soap, as it may contain alkali that could damage the colors in your work. Dissolve the soap in boiling water,[Pg 298] and then add cold water to make it warm and of the right strength. Soak the embroidery in the lather you created, and gently agitate it, avoiding any friction. Once clean, rinse it first in warm water, then in cold, possibly adding a little salt. Carefully squeeze out the water and dry the material quickly. If you need to iron it, do so on the back side. However, if you can pin it out on a board to dry, stretching and smoothing it without ironing, that’s even better since it will keep the embroidery from flattening. Another safe method for ironing embroidery is to do it from underneath while someone holds the material.
It is easy to prevent the puckering of work when it is carried out in the frame; there is, however, no necessity for it to occur in hand work. Certain stitches are more inclined to draw up the material than others, and extra care has to be taken in working upon the cross of the fabric. The work should be held in convex fashion over the fingers of the left hand. Weights are occasionally attached to the corners of the work to prevent any unconscious drawing of it up.[Pg 299]
It’s simple to avoid puckering when work is done in a frame; however, it’s not necessary for it to happen with hand stitching. Some stitches tend to pull the fabric more than others, so you need to be extra careful when working on the bias of the fabric. The work should be held in a curved shape over the fingers of your left hand. Sometimes, weights are attached to the corners of the work to stop any unintended pulling.[Pg 299]
There are remedies for the cure of slightly puckered work. Place on a drawing-board some clean blotting-paper, damp it evenly over with a wet handkerchief, and then lay the work, right side up, upon it. Fix the work down to the board with drawing-pins, inserted at regular short intervals round the edge, endeavouring during the process to stretch the material to its original shape. This needs doing carefully, for it is quite possible to stretch it to a wrong shape, and it will remain as now pinned out. Next, lay some white paper or a handkerchief upon the surface of the work, and then place upon it a flat weight that presses equally on every part of the embroidery. Leave it undisturbed for a night, and the puckering will probably be cured. Work, if not puckered, may be improved by going through this process, which practically amounts to a mild ironing, but without any injurious effects.
There are ways to fix slightly puckered work. Start by placing some clean blotting paper on a drawing board, then dampen it evenly with a wet handkerchief. Next, lay the work down, right side up, on top of it. Secure the work to the board using drawing pins, spaced out evenly around the edge, making sure to stretch the material back to its original shape as you do this. Be careful, as it’s easy to stretch it into the wrong shape, and it will stay that way once pinned down. After that, put some white paper or a handkerchief over the work and place a flat weight on top that presses down evenly on every part of the embroidery. Leave it undisturbed overnight, and the puckering should likely be fixed. Even work that isn’t puckered can benefit from this process, which is essentially a gentle ironing without any damaging effects.
There are various points about the thread that should be known. To commence a new thread run a few stitches in the material upon the right side upon a part that will afterwards be covered by the working. This is a better way than a[Pg 300] fastening on the wrong side, for it is both neater and more secure. A knot made at the beginning is fairly safe, but it is undesirable for several reasons. The needleful should not be lengthy lest it gets worn before it is all worked in. With some threads it is important to thread only the proper end into the eye of the needle, since one way they will work in roughly and the other way smoothly. An end of a coarse thread can be taken through to the back of the material by the help of a fine one; the fine thread is brought through from the back by the needle, it then encircles the coarse one, and returns to the back by the same hole, pulling the coarse thread with it, as in process in fig. 167. Taking it through by the aid of a thick needle would make too large a hole. Thread can be knotted into the eye of the needle if for any reason it is required to be quite safe from accidental unthreading. The neatest way of doing this is to pass the[Pg 301] needle through the centre of the thread and draw it tight; this is a useful trick for any unskilled worker with needles and thread, for re-threading also may be a difficulty. When work has to be unpicked it is better to cut the threads rather than do any drawing out, for they are in any case unfit for further use, and this method wears the material less; a beginner must not shirk unpicking if first-rate results are to be obtained.
There are several important things to know about starting a new thread. To begin, run a few stitches on the right side of the fabric in an area that will later be covered by your work. This method is neater and more secure than tying off on the wrong side. A knot at the start is reasonably secure, but it's not ideal for several reasons. The length of thread should be manageable so it doesn't get worn out before you finish using it. With certain threads, it's crucial to use the correct end in the needle's eye, as one direction can snag and the other can run smoothly. You can pull a coarse thread through to the back of the fabric using a fine thread; bring the fine thread through from the back with the needle, loop it around the coarse thread, and then bring it back through the same hole, pulling the coarse thread along, as shown in fig. 167. Using a thick needle for this will create too large a hole. If you need to ensure the thread stays secure in the needle, you can knot it in place; the best way to do this is to thread the needle through the center of the thread and pull it tight. This is a handy trick for anyone who isn’t very experienced with needles and thread, since re-threading can also be a challenge. When you need to undo stitching, it’s better to cut the threads rather than try to pull them out, as they won’t be usable afterward anyway, and this method is less damaging to the fabric; a beginner should not avoid unpicking if they want to achieve excellent results.

FRAME WORK
Certain stitches and methods of work cannot be carried out except with the help of a frame, others are hand stitches, and some few can be worked either way. Work done in a frame takes longer than that done by hand, and is rather more fatiguing. Each method has its advantages; in the frame it is perhaps easier to get good technique, for difficulties such as puckering the material, irregular stitching, and so on, are more easily avoided, also it is more possible to see the effect of the whole whilst the part progresses. In frame work a thimble is required for each hand, for one pushes the needle through from above and one from below. It is a rest to[Pg 302] be able to reverse the hands, so both should be equally dexterous in either position.
Certain stitches and methods can only be done with the help of a frame, while others are hand stitches, and a small number can be done either way. Working with a frame takes longer than hand stitching and can be somewhat more tiring. Each method has its benefits; using a frame makes it easier to achieve good technique, as issues like puckering and uneven stitching are easier to avoid. Plus, it’s more possible to see the overall effect while working on a part. When using a frame, you need a thimble for each hand, since one hand pushes the needle from above and the other from below. It’s beneficial to be able to switch hands, so both should be equally skilled in either position.
To dress the frame correctly is an important preliminary, for unless done well the effect of much after labour may be spoiled. In the chapter upon tools and appliances in fig. 9 is shown a piece of linen stretched in the frame ready for commencing work.
To properly dress the frame is an important first step, because if it's not done right, all the effort you put in later might be wasted. In the chapter on tools and appliances in fig. 9, a piece of linen is shown stretched in the frame, ready to start work.
The square of material that is seen to be inserted in the centre of the stretched linen is to show how a very small piece or a portion of a large surface could be stretched in the same sized frame. A corner may require marking or a small detail of embroidery carrying out upon it. A portion is cut out of the centre of the stretched linen, and the piece or part of the material to be worked stitched securely to it, as illustrated in the diagram. The remainder of the material, if there is any, can be folded up and pinned out of the way over the rollers.
The square of material placed in the center of the stretched linen demonstrates how a small piece of a larger surface can fit into the same sized frame. You might need to mark a corner or add a small detail of embroidery to it. A section is cut out of the center of the stretched linen, and the piece of material to be worked on is stitched securely to it, as shown in the diagram. Any leftover material can be folded up and pinned out of the way over the rollers.
To return to the dressing of the frame—the linen to be stretched, before being fixed in place, must be hemmed or herring-boned down at the top and base and then sewn with overcast stitches to the webbings, inclining during the process to[Pg 303] pucker the webbing rather than the material. The side pieces can now be put through the holes at the ends of the rollers and the metal pins inserted, or nuts adjusted, as the case may be, in order to stretch the material to the right tension. The raw edges at the sides must now be turned in or bound with tape, and a string securely attached at intervals along the edge; this is for lacing the string through that now braces the material to the sides of the frame (see fig. 1). The screw-sided frame has an advantage over the side pieces shown in fig. 9, in that in the former an extra turn can, at this point, be given to the nuts to still further stretch the material; on the other hand, some workers prefer the flat side pieces, thinking that they make the frame more rigid.
To go back to finishing the frame—the linen that needs to be stretched, before it’s secured, must be hemmed or herring-boned at the top and bottom, and then sewn with overcast stitches to the webbing, making sure to cause the webbing to pucker instead of the fabric during this process. The side pieces can now be threaded through the holes at the ends of the rollers, and the metal pins can be inserted or nuts adjusted, depending on the situation, to stretch the fabric to the right tension. The raw edges on the sides should be folded in or bound with tape, and string should be securely attached at intervals along the edge; this is for lacing the string that will brace the fabric to the sides of the frame (see fig. 1). The screw-sided frame is better than the side pieces shown in fig. 9 because you can give the nuts an extra turn at this point to stretch the fabric even more; however, some workers prefer the flat side pieces, believing they make the frame more stable.
If the material, when fixed to the two webbings, is too long for the frame, it must be wound round one of the rollers until of the correct size. This must be done carefully, for a delicate fabric might get damaged in the process; the roller can be padded with soft paper, and an interlining of tissue paper can be inserted and wound up with the material. It may not always be desirable to do this wind[Pg 304]ing round the rollers; in that case fine glazed holland can be stretched in the frame, and the part to be first embroidered fixed to it. When the first part of the work is completed, the holland is cut out of the frame and fresh pieces substituted as the work goes on. If it is not wished that the stitches should be taken through both surfaces, as would here be the case, it would be possible to cut the linen partly away underneath, and use it only as a kind of inner frame for stretching the material on, in a way somewhat like that already described (see fig. 9).
If the material attached to the two webbings is too long for the frame, it should be wrapped around one of the rollers until it's the right size. This needs to be done carefully, as a delicate fabric could get damaged in the process; the roller can be padded with soft paper, and a layer of tissue paper can be inserted and rolled up with the material. Sometimes, winding the material around the rollers isn’t the best option; in that case, fine glazed holland can be stretched in the frame, and the part to be embroidered first can be attached to it. Once the first part of the work is finished, the holland is cut out of the frame, and new pieces are added as the work continues. If you don't want the stitches to go through both surfaces, as would happen here, you can cut away some of the linen underneath and use it just as a sort of inner frame to stretch the material, similar to what was already explained (see fig. 9).
A backing to the material, however, is often a necessity—perhaps heavy work may be put on it or the stuff itself is fragile; in such cases there must be a backing of some kind. This usually consists of fine holland or linen, which is first stretched in the frame and then has the surface material securely stitched to it with overcast stitches, care being taken that both materials are equally strained.
A backing for the material, however, is often necessary—maybe heavy work will be placed on it or the fabric itself is delicate; in these situations, there needs to be some sort of backing. This usually consists of fine holland or linen, which is first stretched in the frame and then the surface material is securely stitched to it with overcast stitches, ensuring that both materials are evenly tensioned.
To frame velvet, sew it to the webbing by the selvedges or that way of the material, since the pile with that arrangement is more manageable when the embroidery is in progress.[Pg 305]
To frame velvet, attach it to the webbing along the selvedges or the edges of the material, as this arrangement makes the pile easier to handle while you're doing the embroidery.[Pg 305]

PART II
Tapestry weaving
CHAPTER XV
Introduction
Weaving, a most ancient art, naturally precedes embroidery, for this necessitates an already existing ground stuff, which is generally some kind of woven material. All varieties of weaving are done by one little-varied method, that of the weft passing to and fro in and out of the warp, and thus binding the whole into a fabric or web.
Weaving, one of the oldest arts, obviously comes before embroidery because embroidery requires a fabric that is typically woven. All types of weaving are done using a mostly uniform method, where the weft threads go back and forth, weaving in and out of the warp threads, thereby creating a fabric or web.
The kind of weaving which demands from the worker the greatest artistic skill is that which produced the great masterpieces of Flanders, once known as Arras, from the town of that name, and now commonly called Gobelins tapestry, so[Pg 308] named from the Manufacture des Gobelins in Paris, at which establishment, founded over three hundred years ago, it is still produced.
The type of weaving that requires the highest artistic skill is what created the incredible masterpieces of Flanders, once known as Arras from the town of that name, and now commonly referred to as Gobelins tapestry, named after the Manufacture des Gobelins in Paris, where it has been produced for over three hundred years and continues to be made today. [Pg 308]
It is this kind of weaving that is now to be discussed, but without the least suggestion that the pupil should work upon a scale so large as is usually followed, though there is no reason against doing so if it is practicable. Tapestry weaving is so constantly associated with objects of large size, such as wall hangings, that it is scarcely realised as an art in this smaller way and as an alternative to embroidery. Yet it can be work of a most interesting kind even when produced in pieces only six inches square, as is well shown by existing specimens of the work of the weavers in Egypt who flourished in the early centuries of the Christian era. Examples of this work can be seen in many museums; they consist frequently of decorative panels of tapestry work inlaid in linen tunics and stuffs that have been used as grave clothes. These early Coptic examples are, like all tapestry, built up by interweaving various threads upon warp-strings stretched in close parallel lines. By varying the colour of the threads that are[Pg 309] thus manipulated upon the warp, patterns of any degree of complexity can be built up directly by hand, and without the assistance of any further mechanical contrivance. The peculiarity of this ancient weaving is that the patterns are frequently woven upon the warp-threads of some fabric, from which the weft either has been removed, or, what is perhaps more probable, been purposely left out when the material was made, to leave space for this decorative pattern weaving to be added to it.
It is this type of weaving that will be discussed now, but without suggesting that the student should work on a scale as large as is usually done, although there’s no reason not to if it’s feasible. Tapestry weaving is often linked with large items like wall hangings, making it hard to see it as an art form in smaller versions or as an alternative to embroidery. However, it can be incredibly interesting even when made in pieces as small as six inches square, as shown by existing examples from the weavers in Egypt who thrived in the early centuries of the Christian era. You can find examples of this work in many museums; they often include decorative tapestry panels integrated into linen tunics and fabrics used as burial shrouds. These early Coptic pieces, like all tapestries, are created by interweaving different threads on warp strings that are stretched in parallel lines. By changing the colors of the threads that are[Pg 309] manipulated on the warp, complex patterns can be crafted directly by hand, without needing any additional mechanical tools. The uniqueness of this ancient weaving lies in the fact that patterns are often woven into the warp threads of some fabric, with the weft either removed or, more likely, intentionally left out during production to create space for the decorative pattern weaving.
The Latin name for the workman who in this way wove in the ornamental patterns was Plumarius, which is a name known to be applied to an embroiderer also. This weaving of small subjects is certainly very little removed from embroidery; it may fairly be called needlework, for it is as often carried out with needles as with bobbins, the former being frequently better suited to the size of the work.
The Latin term for the craftsman who wove the decorative patterns in this way was Plumarius, a name also associated with embroiderers. This kind of weaving of small designs is quite similar to embroidery; it can reasonably be referred to as needlework, as it is often done with needles rather than bobbins, with the former often being more suitable for the size of the project.
In execution weaving is not more difficult than embroidered work; it can be done in an ordinary room and upon a simple loom that is not more cumbersome than an embroidery frame; in fact[Pg 310] an embroidery frame can sometimes be used in the place of a loom.
In practice, weaving isn't any more complicated than embroidery; it can be done in a regular room on a basic loom that isn’t heavier than an embroidery frame. In fact[Pg 310], an embroidery frame can sometimes be used instead of a loom.
Weaving takes about as long in doing as finely stitched solid needlework, for in weaving the entire fabric is made, both pattern and ground. The speed with which the work can be done of course varies considerably, being mainly dependent upon the design that is being carried out. Also the quality of the materials used affects the rate of working; for instance, the thickness of the warp-strings and the placing of them nearer together or further apart. Moreover the weft may be composed of one strand or of several strands together.
Weaving takes about the same amount of time as finely stitched solid needlework, since in weaving the whole fabric is created, including both the pattern and the background. The speed of the process can vary a lot, mainly depending on the design being used. The quality of the materials also influences how quickly the work can be done; for example, the thickness of the warp strings and how closely or far apart they are placed. Additionally, the weft can be made with a single strand or multiple strands together.
In weaving, unless the materials used are very fine, it is impossible to get minute detail in drawing; fortunately it is seldom necessary to attempt much of this. The simpler and more direct work is as good as, and sometimes better than, that with finely gradated colour, shading, and form. On the other hand, work, small in scale, even though simply treated, does not look well when carried out with very coarse materials, for they seem out of proportion to the size of it.
In weaving, unless the materials are really high quality, it's tough to achieve fine details in design; luckily, it's rarely needed. The simpler and more straightforward work is just as good as, and sometimes even better than, that which uses finely gradated color, shading, and form. On the flip side, small-scale work, even if it's basic, doesn’t look great when done with very coarse materials because they seem out of proportion to its size.
The main difficulty in the technique of[Pg 311] the work lies in the attainment of good draughtsmanship, which of course includes light and shade as well as outline. It is naturally more difficult to draw by means of bobbin and thread, in horizontal lines, than to work unrestrictedly with a pencil, or even with an embroidery needle.
The main challenge in the technique of[Pg 311] the work is achieving good drawing skills, which obviously involves light and shade as well as outlines. It’s naturally harder to draw using a bobbin and thread in straight lines than to work freely with a pencil or even with an embroidery needle.
There is a great deal in the preparation of the design; as in all other crafts this must be suited to the method of work; otherwise the difficulties of execution will be greatly increased and the result will be less satisfactory. This is even more important in weaving than in embroidery, for in the latter the stitch and method may possibly be chosen to suit the design, but in weaving no variation of stitch is possible; all must be carried out in the same way.
There’s a lot involved in preparing the design; like in any other craft, it needs to match the way of working; otherwise, the challenges of execution will increase significantly and the outcome will be less satisfying. This is even more crucial in weaving than in embroidery because, with embroidery, you might choose stitches and methods that fit the design, but in weaving, you can’t change the stitches; everything has to be done the same way.
Tapestry weaving, whether for wall hangings or for small objects, has the same technical difficulties, and certain restrictions govern all work of the kind. One point to be observed is, the main lines of the design should go as little as possible in the same direction as the warp threads. This is because with each change of colour in the weft that occurs in the direction of the warp, there comes an[Pg 312] inevitable separation in the woven material, which, oft repeated, would materially impair the strength of the fabric. The less frequently this occurs, of course, the better, since it entails additional labour, either a joining-together stitch at the time of working or an after-sewing up from the back. Long lines made by change of colour going straight or at a slight angle across the warp-threads, are perfectly simple to manage, and the hatching lines of shading, as well as the outline, should be taken as much as possible in this direction.
Tapestry weaving, whether for wall hangings or smaller items, has the same technical challenges, and there are certain rules that apply to all such work. One important thing to note is that the main lines of the design should not align too closely with the warp threads. This is because when the weft changes color in line with the warp, it creates an[Pg 312] unavoidable separation in the woven fabric, which, if repeated often, would significantly weaken the strength of the material. Naturally, the less frequently this happens, the better, since it adds more work, either a joining-stitch while weaving or a later sewing from the back. Long lines created by color changes running straight or at a slight angle across the warp threads are quite easy to manage, and the hatching lines of shading, along with the outline, should be aimed to go in this direction as much as possible.
It will be noticed that most tapestries have the ribbed lines of warp going horizontally across; in the loom these lines are perpendicular, so this means that the design has been placed and carried out sideways upon it. This is for the reason just under discussion, for the long lines of a design are most frequently perpendicular, take, for instance, lines of figures, draperies, or architecture, and so by placing the design sideways in the loom, most of the important lines will come in the direction most easy for the working of them.
It can be observed that most tapestries feature ribbed warp lines running horizontally; on the loom, these lines are vertical, which means the design has been set and worked on sideways. This is due to the reason just mentioned, as the long lines of a design are usually vertical, like the lines of figures, drapery, or architecture. By placing the design sideways on the loom, most of the key lines are oriented in a way that makes them easier to work with.
With small pieces it frequently does[Pg 313] not matter which way it is carried out, but it is useful to know when making the design that there is the alternative of placing it either way upon the warp-threads. If this matter were not considered and arranged, there might come a good deal of twisting round one or two warp-threads which would be most unsatisfactory in working and in appearance. A band of plain colour framing a square piece of work will be found to be completely detached from the centre part upon each side of the square, although working in very straightforwardly at the top and base; if, instead of being a straight band, the inner edge was vandyked, the work would be well knitted together upon all sides (see fig. 169). In such ways as this the technical pitfalls can be somewhat avoided by a designer who understands the method of the work.
With smaller pieces, it often doesn't matter how they are constructed, but it's helpful to know while designing that you can place it either way on the warp threads. If this isn't taken into account and planned, you might end up with some twisting around one or two warp threads, which would be quite frustrating both to work with and in terms of appearance. A solid color band framing a square piece will be entirely separate from the center on each side, even though it works in quite straightforwardly at the top and bottom; however, if the inner edge were scalloped instead of being a straight band, the work would be nicely connected on all sides (see fig. 169). By considering these details, designers who understand the technique can avoid some of the common mistakes.

To lay down definite rules for designing is practically impossible; right and wrong depend upon so many circumstances. The study of fine tapestries of the best[Pg 314] periods is one of the most satisfactory ways of learning what one may or may not attempt; the beautifully flowered grounds in many of these show what excellent motives flowers make, and how they should be treated. It is not usually a good plan to introduce in any part of the work much plain ground, for it is inclined to look poor; this is very likely the reason why the grass in tapestry-land is often covered with such profusion of flowers. Tapestry calls for beautiful colour, richness, and plenty of interesting detail; it is essentially decorative work, and must be treated as such. The arrangement of colours and tones need to be sharply defined; if by chance a dark leaf comes against another dark one, a line of light colour is sometimes deliberately run between, perhaps shading or outlining one of the forms; a flower may even change its colour as it passes over different backgrounds; what is more remarkable is that this change, unless sought for, is imperceptible.
It’s almost impossible to set strict rules for design; what’s right or wrong depends on so many factors. Studying the finest tapestries from the best[Pg 314] periods is one of the best ways to learn about what works and what doesn’t. The beautifully floral patterns in many of these pieces show how effective flowers can be and how they should be handled. Generally, it’s not a good idea to include too much plain background in any part of the work, as it tends to look bland; this is likely why the grass in tapestry designs is often covered with an abundance of flowers. Tapestry demands beautiful colors, richness, and lots of interesting details; it’s essentially decorative art and should be treated as such. The arrangement of colors and tones needs to be clearly defined; if a dark leaf happens to touch another dark one, a line of light color is often intentionally placed between them, perhaps shading or outlining one of the features; a flower might even change its color as it moves across different backgrounds, and what’s even more impressive is that this change is often subtle unless specifically intended.
The work may be applied to all kinds of uses, such as coverings for furniture, mats, curtains, bell-pulls, book-covers, bags, boxes, and so forth. Anything[Pg 315] that hangs upon a wall is particularly suitable for working in tapestry, for at a little distance this kind of work shows up more effectively than embroidered work does. A great many articles, such as alms-bags, frontals of all kinds, stoles and book-markers, for use in churches could most excellently be carried out in tapestry.
The work can be used for a variety of purposes, including furniture covers, mats, curtains, bell pulls, book covers, bags, boxes, and more. Anything[Pg 315] that hangs on a wall is especially suitable for tapestry, as it tends to be more eye-catching from a distance than embroidered work. Many items, like alms bags, frontals of all kinds, stoles, and bookmarks for use in churches, could be beautifully crafted in tapestry.
CHAPTER XVI
Essential Appliances and Materials
The Loom—Mirror—Bobbins and Needles—The Comb—Embroidery Frame treated as a Loom—Warp—Wools—Silk—Gold and Silver Thread.
The Loom—Mirror—Bobbins and Needles—The Comb—Embroidery Frame treated as a Loom—Warp—Wools—Silk—Gold and Silver Thread.
TOOLS AND APPLIANCES
The chief requisite for weaving is the loom; this can be made by a carpenter from a working drawing. In the Victoria and Albert Museum there is a model of a small tapestry loom, presented by William Morris, which a novice will do well to examine. It is quite possible to carry out a small piece of weaving upon an embroidery frame, but to work in a loom which has all the proper appliances is[Pg 316] always quicker, better, and absolutely necessary with work of any size.
The main requirement for weaving is a loom, which a carpenter can create from a working drawing. At the Victoria and Albert Museum, there's a model of a small tapestry loom gifted by William Morris that beginners should definitely check out. You can do some small weaving on an embroidery frame, but using a loom that has all the right tools is[Pg 316] always faster, better, and totally essential for any sizable project.
There are two main varieties of tapestry loom, one in which the warp-threads are horizontal, and another in which they are vertical. The latter kind is considered to give the best results, mainly owing to the possibility of the worker's seeing the right side of the work whilst it is in progress. This is a great advantage, for tapestry is woven with the reverse side towards the worker, and progresses by such gradual steps that the weaver is prone to lose sight of the whole whilst paying attention to the part in progress, and it will be easily understood that to be able to go round and view the entire piece is of immense help. A detail may perhaps be corrected during the progress of the work, but afterwards this would be an awkward matter. It is one of the difficulties of weaving to have to finish completely each step as it comes up. Working from the wrong side is not so hard as it might seem, for both sides are practically alike; the side towards the worker, however, shows ends of thread and thread passing from one place to another, which make it somewhat unpresentable.[Pg 317]
There are two main types of tapestry looms: one with horizontal warp threads and another with vertical ones. The vertical loom is considered to yield the best results, primarily because the worker can see the front side of the piece while working on it. This is a big advantage since tapestry is woven with the back side facing the worker, and it progresses in such gradual stages that the weaver often loses sight of the overall design while focusing on the section currently being created. It’s easy to see how being able to walk around and view the whole piece would be incredibly helpful. A detail might be fixed while working, but doing so afterward could be tricky. One of the challenges of weaving is completing each step thoroughly as it comes along. Working from the back isn’t as difficult as it might seem because both sides look almost the same; however, the side facing the worker shows loose threads and movement from one area to another, making it somewhat unappealing.[Pg 317]


Fig. 170 shows a drawing of a small loom with some warp stretched upon it in readiness for commencing work. It stands upon the ground, and is about 4 feet high by 2½ feet wide. It is made of beechwood; a hard wood like this is best, for there must be no possibility of the rollers bending with the strain of the warp. The loom consists of two uprights standing upon heavy feet; these uprights are joined together at the top and base by strengthening cross bars. Two wooden rollers are fixed into the uprights (see A and B in fig. 170) and in the surface of each of these a narrow groove is hollowed out lengthwise (see fig. 171); this is for the purpose of holding a long metal pin, by means of which the warp-threads are kept in place. The rollers are fitted at one extremity with a handle for turning them round, and at the other with a ratchet and toothed wheel to prevent unwinding. The pur[Pg 319]pose of the upper roller is to hold the supply of warp-thread and unwind it as required; the lower one is for winding up the web as the work progresses, so that upon a loom of this size a piece of work of considerable length can easily be carried out.
Fig. 170 shows a drawing of a small loom with some warp stretched on it, ready to begin work. It stands on the ground, about 4 feet high and 2½ feet wide. It's made of beechwood; this sturdy wood is ideal because there can't be any chance of the rollers bending under the strain of the warp. The loom features two upright beams supported by heavy feet; these uprights are connected at the top and bottom with reinforcing crossbars. Two wooden rollers are fixed into the uprights (see A and B in fig. 170), and each has a narrow groove carved lengthwise (see fig. 171); this groove holds a long metal pin that secures the warp threads in place. The rollers have a handle on one end to turn them, and at the other end, there's a ratchet and gear to prevent unwinding. The top roller is for holding the supply of warp thread and unwinding it as needed, while the bottom one winds up the web as the work progresses, allowing for a significant piece of work to be completed on a loom of this size.

The warp soon after it passes from the top roller is divided into two leaves by a cylindrical wooden bar about one inch in diameter, called the cross stave (see fig. 172). The cross stave may be oval or round in section; if it is oval the warp-threads may be moved more widely apart when required by turning the stave round, but this is not often necessary. The upper part of the cross stave can be seen in position in the loom diagram, which shows also how the stave divides the threads, which pass alternately one in front and one behind the bar. After this the threads are passed through a comb-like instru[Pg 320]ment, having about fourteen divisions to the inch (see fig. 173). This extends from side to side of the loom, and lies in a groove made in the bar that fixes the coat-stave (C in fig. 170) in position at either extremity. It can be taken out and exchanged for another with a different divisioning, if necessary; without doing this, however, it is quite possible to put at intervals two threads through one division, or to pass over one occasionally if need be. The threads are next fixed in the lower roller.
The warp, shortly after it leaves the top roller, is split into two sections by a cylindrical wooden rod about one inch in diameter, known as the cross stave (see fig. 172). The cross stave can be either oval or round in shape; when it's oval, the warp threads can be spaced apart more widely by rotating the stave, but this isn't usually needed. The upper part of the cross stave is shown in the loom diagram, which also illustrates how the stave separates the threads, which pass alternately in front of and behind the rod. Next, the threads go through a comb-like tool with about fourteen divisions per inch (see fig. 173). This tool spans the entire width of the loom and sits in a groove made in the bar that secures the coat-stave (C in fig. 170) at both ends. It can be removed and replaced with another that has a different division, if necessary; however, it's quite possible to run two threads through one division at intervals, or to skip one occasionally if needed. The threads are then secured in the lower roller.

The coat-stave can be seen projecting from near the top of the loom. A number of looped threads called coats are fixed to it, and each one of these encircles a thread of the warp. They are attached only to those threads that were passed behind the cross stave and form the back[Pg 321] leaf of the warp, and they are for the purpose of pulling these forward when required.
The coat-stave can be seen extending from near the top of the loom. A number of looped threads known as coats are fastened to it, and each one of these wraps around a thread of the warp. They are connected only to those threads that were passed behind the cross stave and make up the back[Pg 321] leaf of the warp, and they serve to pull these forward when necessary.
Underneath the lower roller is fixed a wooden tray, which is useful for holding bobbins, comb, or scissors.
Under the lower roller, there’s a wooden tray attached that’s handy for holding bobbins, a comb, or scissors.
On the loom is hung a small mirror facing the right side of the work (see fig. 170). This enables the weaver to glance now and then through the warp-strings at any detail that is in progress.
On the loom, there's a small mirror facing the right side of the work (see fig. 170). This allows the weaver to occasionally check through the warp strings at any detail that is being created.
Smaller looms can be made, suitable for placing upon a table; these, standing about two feet in height, must in some way be firmly fixed to the table, in order to be properly rigid for work.
Smaller looms can be made that are suitable for placing on a table; these, standing about two feet tall, need to be securely attached to the table to be stable enough for work.

The thread composing the woof is wound upon a wooden bobbin or shuttle, such as that shown in fig. 174. The chief point about this is, that it may not have sharp angles that might catch in the warp whilst passing to and fro. The pointed end is sometimes made use of to poke between the warp-threads and[Pg 322] press down the weft. A fresh bobbin is employed for each colour, and the wool is wound upon it two or three strands together, just as may happen to be required for the work. Large blunt-pointed needles about three inches long (fig. 175) are often used in place of bobbins, for with small pieces of work sometimes so little of a colour is required as to make it unnecessary to wind a quantity on a bobbin, which is, after all, only a needle with an extra long thread.
The thread that makes up the woof is wrapped around a wooden bobbin or shuttle, like the one shown in fig. 174. The key point is that it should not have sharp angles that might get caught in the warp while moving back and forth. The pointed end is sometimes used to poke between the warp threads and[Pg 322] press down the weft. A new bobbin is used for each color, and the wool is wrapped around it in two or three strands together, depending on what the work requires. Large, blunt-pointed needles about three inches long (fig. 175) are often used instead of bobbins, especially for small projects where only a little bit of color is needed, making it unnecessary to wind a lot on a bobbin, which is really just a needle with an extra long thread.


A comb is necessary for pressing down the weft whilst the work is in progress. Combs vary in size and shape; fig. 176 shows one suitable for this type of work; it is 1½ inches square, slightly wedge-shaped, and about one-eighth of an inch thick. Boxwood is the most suitable wood to make them from, since it is[Pg 323] particularly hard and fine in the grain. They are sometimes made of metal, ivory, or bone; for large work, metal combs of a heavier type are used.
A comb is essential for pressing down the weft while you’re working. Combs come in different sizes and shapes; fig. 176 shows one that’s suitable for this kind of work; it measures 1½ inches square, has a slightly wedge shape, and is about one-eighth of an inch thick. Boxwood is the best type of wood for making these, as it is[Pg 323] particularly hard and has a fine grain. They can also be made from metal, ivory, or bone; for larger projects, heavier metal combs are used.

An embroidery frame, which has been[Pg 324] already mentioned as a possible substitute for the loom, is oftentimes an article more easily procured. Fig. 177 illustrates how a frame of this kind may be prepared with warp-threads for weaving. One with the screw side pieces is the best, for these enable the tension of the warp to be slightly adjusted if the working shows any tendency to slacken the thread.
An embroidery frame, which has been[Pg 324] mentioned as a potential substitute for the loom, is often easier to find. Fig. 177 shows how to set up a frame like this with warp threads for weaving. The version with screw side pieces is the best because it allows you to slightly adjust the tension of the warp if the work starts to loosen the thread.
To prepare the frame for weaving—Place the parts together at the required distance from each other; secure the end of some warp-thread to some part of the frame, and then commence to wind it round and round over the two rollers, placing the threads at approximately the right distance apart, taking into account when doing this that the two leaves thus formed will eventually be brought into the same plane. When the required width of warp-thread is wound upon the rollers, secure the end of the string and proceed to bring the front and back leaves together by darning a knitting-needle or some similar article in and out of the threads at the centre. Then slide it up close to the top roller and secure it by tying it with string at each end[Pg 325] (see diagram). The same process is gone through with a second pin, which is tied to the lower roller.
To set up the frame for weaving—Place the pieces together at the desired distance from each other; attach the end of a warp thread to one part of the frame, and then start wrapping it around the two rollers, spacing the threads approximately right, keeping in mind that the two layers formed will eventually align in the same plane. Once you’ve wrapped the desired width of warp thread around the rollers, secure the end of the string and proceed to bring the front and back layers together by weaving a knitting needle or a similar object in and out of the threads at the center. Then slide it up close to the top roller and secure it by tying string at each end[Pg 325] (see diagram). Repeat the same process with a second pin, which is tied to the lower roller.
The warp-threads can now be adjusted to their proper distance apart, as they will probably be a little irregularly spaced. The next process is to weave two or three courses of warp-thread close to the knitting-pins at either end; this brings the warp still nearer to being in the one plane, and enables the threads to be arranged in perfect order by the aid of the point of the bobbin or a needle, and they will remain as now placed.
The warp threads can now be spaced properly since they might be a bit uneven. The next step is to weave two or three rows of warp threads close to the knitting pins at each end. This gets the warp closer to being in a single plane and allows for the threads to be organized perfectly using the point of the bobbin or a needle, and they will stay in place as they are arranged now.
The frame is now ready for work. A piece of plain web, about half an inch in width, is usually woven before the actual design is begun; this serves as a selvedge for turning in when the completed work is mounted, and also gets the warp into condition much better for working upon.
The frame is now set for use. A strip of plain web, about half an inch wide, is typically woven before starting the actual design; this acts as a selvedge for folding in when the finished work is mounted, and also prepares the warp better for working on.
A thick knitting-needle can be passed between the alternate threads of the warp and placed towards the top of the frame, as shown in the diagram. This takes the place of the cross-stave in the loom, and, by thus dividing the warp into two leaves, is of assistance when the[Pg 326] shuttle goes in one direction. Coats cannot easily be applied to an embroidery frame.
A thick knitting needle can be woven between the alternating threads of the warp and positioned at the top of the frame, as illustrated in the diagram. This replaces the cross-stave in the loom and, by splitting the warp into two sections, helps when the[Pg 326] shuttle moves in one direction. Coats are not easily added to an embroidery frame.
It is quite possible upon a frame of this kind to weave a long narrow band of any kind. The warp must be wound on and arranged in position at the necessary length by separating the rollers and temporarily fixing them apart at the distance required for the band. The surplus warp is then wound up on the upper roller until the side pieces will fit into the ends. As it gets worked upon, the completed part is wound upon the lower roller. A piece both long and wide would be impracticable, especially if any winding on and off the rollers were necessary.
It’s definitely possible on this type of frame to weave a long, narrow strip of any kind. The warp needs to be set up and positioned at the right length by separating the rollers and temporarily fixing them at the distance needed for the strip. The extra warp is then wound onto the upper roller until the side pieces fit into the ends. As it’s worked on, the finished part is rolled onto the lower roller. A piece that’s both long and wide would be unworkable, especially if winding on and off the rollers is involved.
MATERIALS
There are very few materials required for tapestry weaving; they consist of, string for warp, wools, silks, and maybe gold and silver thread for the weft.
There are only a few materials needed for tapestry weaving; they include string for the warp, wool, silk, and possibly gold and silver thread for the weft.
The warp is usually composed of a smooth, strong, evenly twisted thread, specially made for the purpose. It can be procured of various thicknesses. It happens sometimes that in parts the warp shows, as a fringe or in some other[Pg 327] way; in this case it could be made of a strong silk thread, such as purse silk, though for edges of mats, the ordinary string warp fringed out is quite suitable. Occasionally weaving is carried out in such a way as to expose the warp in various parts of the work, the pattern being woven, but the ground left altogether unworked. In a case of this kind the colour and composition of the warp is naturally important, and must be considered. In a show-case in the British Museum there can be seen a small book with an interesting woven binding carried out after this manner. The warp is composed of gold passing, and the effect of this with a pattern carried out in brightly coloured silks is very pretty indeed, the gold adding a rich glow to the whole.
The warp is typically made up of a smooth, strong, evenly twisted thread, specifically designed for this purpose. It comes in various thicknesses. Sometimes, the warp is visible as a fringe or in some other way; in this case, it could be made from a durable silk thread, like purse silk, although for the edges of mats, regular string warp that fringes out works just fine. Occasionally, weaving is done in a way that reveals the warp in different areas of the piece, with the pattern woven but the background left completely unworked. In such cases, the color and material of the warp become important and need to be taken into account. In a display case at the British Museum, there is a small book with an interesting woven binding done in this style. The warp is made of gold thread, and the combination with a pattern woven in bright colored silks creates a really beautiful effect, with the gold adding a rich glow to the whole piece.
Wool and silk are the chief materials used for the woof. It is well to choose those of fine texture, for several strands can then be wound together upon one bobbin, which, with coarse materials, would be too clumsy a method. When working in this way there is more opportunity of varying colour and texture, for three shades may be wound upon the bobbin together to get a required colour,[Pg 328] and this has often a prettier effect than the use of an unblended colour; also, silk and wool are very satisfactory wound and worked in together, each texture showing the other to advantage.
Wool and silk are the main materials used for the weft. It's best to choose those with a fine texture, as several strands can then be wound together on one bobbin, which would be too awkward with coarser materials. Working this way allows for more variation in color and texture, as three shades can be wound onto the bobbin together to achieve a desired color,[Pg 328] and this often looks prettier than using a single, unblended color. Additionally, silk and wool pair well together, with each texture enhancing the other.
Fine gold or silver threads are frequently used in tapestry weaving. They can be woven in alone, which gives a metallic look, or they may be mixed with strands of silk. Both ways are very good, and the use of the metal thread adds great richness to the work. These threads make fine backgrounds, and they can be used in many ways upon the design; it is a common practice to carry out the lighting of draperies and of other parts in real gold, just as they are treated in illuminated manuscripts.
Fine gold or silver threads are often used in tapestry weaving. They can be woven in on their own, which gives a metallic look, or mixed with strands of silk. Both methods are excellent, and using the metal thread adds great richness to the work. These threads create beautiful backgrounds and can be used in various ways within the design; it's common practice to use real gold for the highlights on draperies and other elements, just like in illuminated manuscripts.
CHAPTER XVII
Getting Ready for Work
Warping the Loom—Dressing the Coat-Stave—Tracing the Pattern upon the Threads.
Warping the Loom—Getting the Coat-Stave Ready—Outlining the Pattern on the Threads.
Upon commencing the warping of the loom the first matter to be decided is the length of the threads. Some extra length must be measured off besides that[Pg 329] actually used for weaving, to allow for what is taken up in fixing the threads and winding them round the rollers, and as it is not convenient to work more than about half-way up the loom, this also has to be allowed for in the length. The threads must all be cut to one size, and since they have to be doubled in halves when placed on the loom, this should be twice the required length.
Upon starting the process of warping the loom, the first thing to determine is the length of the threads. You need to measure out some extra length beyond what[Pg 329] will actually be used for weaving, to account for what’s taken up in securing the threads and wrapping them around the rollers. Since it's not practical to work much more than halfway up the loom, this also has to be considered in the length. All the threads should be cut to the same size, and since they need to be folded in half when placed on the loom, this should be double the required length.
Another question for early decision is the number of warp-threads that may be allowed per inch. This varies with the coarseness of the strings and the thickness of the weft that will have to pass to and fro between them; what governs both of these points is the design, whether there is much detail or not, for if the drawing is complicated the warp-strings must be fine in order to be able to carry it out; this point will be better understood after some experience of working. Fourteen to sixteen threads to the inch is a very usual number.
Another question for early decisions is how many warp threads can be allowed per inch. This varies depending on the thickness of the threads and the density of the weft that needs to move back and forth between them; what influences both of these factors is the design, whether it's simple or intricate. If the design is complex, the warp threads need to be finer to accurately reproduce it. This will be clearer after gaining some experience with the work. A common range is fourteen to sixteen threads per inch.
The fixing of the threads in the upper roller is a very simple matter. It is done by doubling each in halves and placing the loop thus formed over the metal pin, which for this purpose may be temporarily suspended by string to the frame of the top[Pg 330] of the loom just above the roller. It can be dropped into its place in the groove when all the threads are looped upon it, and made secure there for the moment by tying some string round the extremities of the roller.
Fixing the threads in the upper roller is really straightforward. Just double each thread in half and place the loop that forms over the metal pin, which can be temporarily attached with string to the top[Pg 330] of the loom just above the roller. It can be dropped into the groove once all the threads are looped onto it, and you can secure it for the moment by tying some string around the ends of the roller.
Each thread is now taken separately through the comb-like instrument. The cross-stave is laid upon this, so it is well to put it in place now, and carry the threads alternately in front and behind it, whilst passing them through the comb. The threading of the strings through the comb decides the number there will be to the inch, so they must be put through at the required distance apart.
Each thread is now taken individually through the comb-like tool. The cross-stave is placed on top of this, so it's a good idea to position it now and alternate carrying the threads in front and behind it while passing them through the comb. The way the strings are threaded through the comb determines how many there will be per inch, so they need to be spaced at the correct distance apart.
The upper roller is next given a complete turn, which will make the metal pin and the threads that are round it secure in the groove. The winding up must be continued until only about three inches of the warp-string hang below the lower roller. Some kind of tension must be applied to the threads whilst this winding is going on, or it will be done irregularly; a hand, or several hands, holding it, answers the purpose well enough.
The upper roller is then given a full turn, which will secure the metal pin and the threads around it in the groove. The winding must continue until only about three inches of the warp string hang below the lower roller. Some tension needs to be applied to the threads while winding, or it will be done unevenly; one person, or several people, holding it works well for this.
The next process is to fix the threads securely in the lower roller. The diffi[Pg 331]culty here lies in getting the placing and tension of the threads between the two rollers exactly regular and even. If some were slack and others tight it would be very awkward to correct afterwards, and impossible to weave upon properly if incorrect.
The next step is to firmly secure the threads in the lower roller. The challenge here is to ensure that the placement and tension of the threads between the two rollers are perfectly consistent and even. If some threads are loose while others are tight, it would be very difficult to adjust later, and weaving would not be possible if it's not done correctly.

Fig. 178 shows a practical method by[Pg 332] which the warp may be fixed in the lower roller, but any contrivance will do that gains the required result. To carry out the fixing as in the diagram, the roller must be turned so that the groove comes just at the centre in the front. Four lines of warp-thread are then fixed from end to end of the roller, two above and two below the groove. Each warp-string in turn is now threaded in and out of these cross lines, as shown in the diagram. This places them in regular order, at the correct distance apart, and keeps them at very nearly the same tension throughout. The metal pin is now placed in the groove and pushes the threads before it. It must be temporarily made firm there by string tied round the roller at intervals.
Fig. 178 shows a practical way to secure the warp in the lower roller, but any method that achieves the desired result will work. To set it up as shown in the diagram, turn the roller until the groove is centered at the front. Next, fix four strands of warp thread across the roller from one end to the other, with two above and two below the groove. Now, take each warp string and weave it in and out of the cross lines, as illustrated in the diagram. This arrangement keeps the threads evenly spaced and maintains a consistent tension. Finally, insert the metal pin into the groove to push the threads forward. It should be temporarily secured by tying string around the roller at various intervals.
The next process is to tie the warp-threads in knots, either two or four together, just where they emerge below the pin. This prevents any giving way, and if the threads are pulled just equally tight immediately before the knotting, the tension of the entire warp will be the same. The lower roller is next turned round until the metal pin is made quite firm in its place by the warp-threads passing across the face of the groove. The[Pg 333] warp will now be fixed in the loom as shown in the drawing in fig. 170.
The next step is to tie the warp threads in knots, either two or four together, right where they come out below the pin. This keeps everything from slipping, and if you pull the threads just tight enough before knotting, the tension in the entire warp will be balanced. Then, rotate the lower roller until the metal pin is securely in place with the warp threads crossing over the groove. The[Pg 333] warp will now be secured in the loom as shown in the drawing in fig. 170.
The placing of the coats upon the coat-stave is the next part of the preparatory work. Commence by fixing a line of warp-thread along the exterior side of the coat-stave, making it secure to the bar at both ends. The coats, encircling the stave and a thread of warp, are fixed to this string by a kind of buttonhole stitch (see fig. 179). It is important that each loop should be of exactly the same size; this can be ensured by temporarily fixing a rod across the loom at the point where the loops will encircle the warp-thread, and then taking the loop round this bar as well as round the thread.
The next step in the preparation process is to hang the coats on the coat-stave. Start by attaching a line of warp thread along the outside of the coat-stave, securing it to the bar at both ends. The coats, wrapping around the stave and a thread of warp, are attached to this line with a sort of buttonhole stitch (see fig. 179). It's essential that each loop is exactly the same size; you can make sure of this by temporarily attaching a rod across the loom where the loops will wrap around the warp thread and then looping around this bar as well as the thread.

To commence making the coats, take a long needleful of warp-thread and secure the end of it to the string at the right-hand end, and then make about three small looped stitches upon it (see needle in progress in the diagram); next, instead of making another of the same stitches, take the thread down below the stave, let it encircle the first thread of the back leaf and then be brought up over the coat-stave and string and be[Pg 334] looped under the thread to complete the stitch (see B). Usually a long and a[Pg 335] short stitch are taken alternately, but the number of short ones may be varied. This process is continued until all the threads of the back leaf are encircled each by a loop.
To start making the coats, take a long needleful of warp-thread and tie the end to the string on the right side. Then, make about three small looped stitches on it (see needle in progress in the diagram); next, instead of making another stitch the same way, bring the thread down under the stave, wrap it around the first thread of the back leaf, and then pull it up over the coat-stave and string, looping it under the thread to complete the stitch (see B). Generally, a long stitch and a short stitch are alternated, but you can vary the number of short stitches. Keep repeating this process until all the threads of the back leaf are encircled by a loop.
A new length of thread must be knotted on to the last one as it gets used up. The weavers' knot, which is shown on p. 291, might be used for the purpose. It would be made use of also if by chance the warp-thread were broken, for it is a knot specially good for the purpose.
A new piece of thread needs to be tied onto the last one as it gets used up. The weaver's knot, which is shown on p. 291, can be used for this. It would also be used if the warp thread happens to break, since it's a knot that works particularly well for that.
When the coats are completed there are still one or two preparations to be made before actually commencing to weave. Either a metal rod or a long narrow piece of wood must now be threaded in and out of the warp-strings and placed in position at the base. This rod can be seen properly placed in position in fig. 179 in front of the lower cylinder. This is put there to keep the lines of the woof horizontal when they are being beaten down by the comb.
When the coats are finished, there are still a couple of things to prepare before starting to weave. A metal rod or a long, narrow piece of wood needs to be threaded through the warp strings and positioned at the base. This rod can be seen properly positioned in fig. 179 in front of the lower cylinder. It's there to keep the lines of the weft horizontal while they are being pressed down by the comb.
Next wind on a bobbin some warp-thread similar to that already on the loom, or, if that happens to be very coarse, let this be a little finer. Now weave two courses with this warp-thread and beat it down with the comb, leaving the woof during the process rather loose. The technique of weaving with all its[Pg 336] difficulties is discussed in Chapter XVIII. When two of the warp-thread courses are complete, insert either the pointed end of the bobbin or a blunt needle between the warp-threads below the woven portion, and if necessary move the warp-strings a little to or fro until they are equally separated each from the other all along the line. Next weave about four more courses of the woof; these will serve to keep the arranged warp-threads still more firmly in place. Then with a red pencil rule a horizontal line straight across the warp-strings about one-third of an inch above the woven portion. Wind on another bobbin some wool and weave it to and fro until the space between the woven portion and the red line is filled in. Between each course the comb must beat the woof-threads firmly down. It is often necessary to weave over some portions of the surface more than over others as the threads pack down tighter in some parts. The loom should be now in perfect order for commencing work. The preparatory weaving that has been done is often useful afterwards as a selvedge.
Next, wind some warp thread onto a bobbin that's similar to what’s already on the loom, or if that one is very thick, use something a bit finer. Now weave two rows with this warp thread and use the comb to pack it down, leaving the weft fairly loose in the process. The technique of weaving with all its[Pg 336] challenges is discussed in Chapter XVIII. Once you finish two courses of the warp thread, insert either the pointed end of the bobbin or a blunt needle between the warp threads just below the woven part, and if needed, move the warp strings back and forth a little until they’re evenly spaced along the line. Next, weave about four more rows of the weft; these will help keep the arranged warp threads more securely in place. Then, using a red pencil, draw a horizontal line straight across the warp strings about one-third of an inch above the woven part. Wind some wool onto another bobbin and weave it back and forth until the area between the woven part and the red line is filled in. Between each row, the comb must firmly beat the weft threads down. It’s often necessary to weave over some areas of the surface more than others, as the threads pack tighter in some spots. The loom should now be in perfect condition to start working. The initial weaving that has been done is often useful later as a selvedge.
It is necessary to have a coloured drawing of the design for frequent reference whilst the work is in progress; also[Pg 337] a tracing of the outline must be marked upon the warp-threads for the worker's further guidance. The tracing upon the threads must be a reflection of the pattern owing to the fact that the work is done from the back. It does not affect the matter if the design is a symmetrical one, but to find the lions of England facing the wrong way in some completed piece of heraldic work would be most annoying. In order to get a tracing of the design upon the threads, a sheet of paper, with a distinct outline of the pattern upon it, must be attached, possibly by pinning, to the further side of the warp-threads, exactly where the weaving is to take place. The outline will be clearly perceivable through the threads, and the next process is to take pen and Indian ink and make a dot upon each warp-thread in sequence round the outline of the pattern. When this is completed, the tracing-paper can be removed, and the dots upon the warp must be taken all round each thread instead of marking one side only. The marking round is done by holding a warp-thread between the finger and thumb, placing the side of the nib against one of the dots, and then twisting the thread to and fro against it. All the marks upon the first[Pg 338] thread are treated in succession in this way, then the next thread is taken up and treated in similar fashion, and so on until all are done. Fig. 180 shows a leaf marked[Pg 339] upon the warp-threads in readiness for working. This marking should be clear, sharp, and decided, all the lines being taken horizontally round, as in fig. 180; if the pattern seems to run up a thread, a mark just half-way up is sufficient guide. In a piece of work of any size the tracing must be done, a part at a time, for the threads moving slightly when the warp is unwound and the web wound up may displace the marks and make the guiding lines incorrect.
It’s essential to have a colored drawing of the design for quick reference while the work is underway; also, a tracing of the outline needs to be marked on the warp threads for the worker's further guidance. The tracing on the threads must reflect the pattern since the work is done from the back. It doesn’t matter if the design is symmetrical, but it would be very frustrating to find the lions of England facing the wrong way in a finished piece of heraldic work. To trace the design onto the threads, a sheet of paper with a clear outline of the pattern should be attached—perhaps with pins—to the back side of the warp threads, exactly where the weaving will occur. The outline will be visible through the threads, and the next step is to take a pen and Indian ink and dot each warp thread in sequence around the outline of the pattern. Once that’s done, the tracing paper can be removed, and the dots on the warp must be marked all the way around each thread instead of just one side. This is done by holding a warp thread between your fingers, placing the side of the nib against one of the dots, and then twisting the thread back and forth against it. All the markings on the first thread are done this way, then the next thread is handled in the same manner, and so on until everything is marked. Fig. 180 shows a leaf marked[Pg 339] on the warp threads in preparation for working. This marking should be clear, sharp, and distinct, with all lines taken horizontally around, as in fig. 180; if the pattern appears to run up a thread, a mark halfway up is a sufficient guide. In a project of any size, the tracing must be done a section at a time, since the threads may shift slightly when the warp is unwound and the web rolled up, potentially misplacing the marks and making the guiding lines inaccurate.

CHAPTER XVIII
Weaving Technique
Weaving—Commencing and Fastening Off—The Interlocking Stitch—Fine Drawing—Shading—Added After-stitches.
Weaving—Starting and Finishing Off—The Interlocking Stitch—Detailed Drawing—Shading—Additional Stitches Added.
The way in which the woof threading in and out of the warp makes the web is shown at C, fig. 179. Here the woof has been taken once to and fro; a movement called a weft or a course, one way only, goes by the name of a half pass or a shoot. By the use of the cross stave for one direction, and of the coats for the other, the tediousness of the process of[Pg 340] darning in and out and so picking up the right threads is avoided. It is not always practical to make use of these appliances; for instance, in working over only two or three threads it may not be worth while, but when they can be made use of the work is done twice as rapidly by their help.
The way the woof weaves in and out of the warp to create the fabric is illustrated at C, fig. 179. Here, the woof has been passed back and forth once; this movement is called a weft or a course, while moving in just one direction is referred to as a half pass or a shoot. Using the cross stave for one direction and the coats for the other makes the tedious process of threading in and out and picking up the correct threads much easier. However, it's not always practical to use these tools; for example, when dealing with just two or three threads, it might not be worth the effort. But when they can be used, the work gets done twice as fast with their assistance.
The bobbin enters the loom rather high up, for there the division of threads is greatest. One hand starts the bobbin upon its journey, the other hand, entering between the divided warp-threads, takes it on and out as required. Sometimes the bobbin has to go the entire way between the leaves, and at others it may be only over two or three threads, this depending upon the pattern. To enable the bobbin to make the return passage, the warp must be redivided, the threads that are at the back must be brought to the front; this is managed by the help of the coats—a bunch of them is taken in the hand in order to pull forward the threads to which they are attached. This can be done by sections all along the line, or just in one part of it if it be so required.
The bobbin enters the loom from a high position since that’s where the threads are most spread apart. One hand starts the bobbin on its path, while the other hand moves in between the separated warp threads to guide it as needed. Sometimes the bobbin has to travel all the way through the leaves, and other times it only needs to go over two or three threads, depending on the pattern. To allow the bobbin to return, the warp must be re-divided, bringing the threads at the back to the front. This is done by using the coats—a handful of them is taken to pull forward the threads they are attached to. This can be done in sections all along the line or just in one specific area if needed.
The weft is almost always taken in horizontal lines to and fro. The exceptions to this rule occur when it is very[Pg 341] evident that to run up and down a narrow slanting line from end to end is far simpler than to work up in a horizontal zigzag fashion along it.
The weft is usually taken in horizontal lines back and forth. The exceptions to this rule happen when it's clear that going up and down a narrow slanting line from one end to the other is much easier than working in a horizontal zigzag pattern along it.
About an inch of thread is left at the end and at the commencement of each length of weft; these are secured by the tight packing down of the threads above them, so there is as a rule no need for any knot or fastening off, which would be necessary only in the case of commencing or ending off round a single thread, but it is important for the future durability of the work to see that the ends are secured. Sometimes a commencement or a finish is made just where a natural division of the fabric occurs; in this case, the end of thread would not be secure, for it might work loose or appear upon the right side. This can usually be avoided by commencing a little further along the line. The few times that fastening off or on is necessary, the thread can be run into the part already woven with a smaller needle, or else be knotted on to a loose end of wool.
About an inch of thread is left at the beginning and end of each length of weft; these are secured by tightly packing down the threads above them, so usually there’s no need for a knot or loose end unless you’re starting or finishing with a single thread. However, it is important for the durability of the work to make sure the ends are secured. Sometimes you might start or finish right at a natural division in the fabric; in this case, the end of the thread wouldn’t be secure, and it could come loose or show on the right side. You can typically avoid this by starting a little further along the line. When fastening off or on is necessary, you can weave the thread into the already woven part with a smaller needle, or tie it to a loose end of wool.
The bobbins not actually in use hang down fixed as in lace work by a half-hitch. Fig. 181 shows this in process of making; the loop is passed from the[Pg 342] finger on to the bobbin; it will unwind as wanted and yet hold firm whilst hanging down. The thread is always carried, if practicable, from one place to where it is next required, in order to avoid unnecessary breaking off. Tapestry is sometimes woven with both sides alike, which means only that all the ends must be cut close off. It is said that work so treated is quite durable.
The unused bobbins hang down, secured like in lace-making by a half-hitch. Fig. 181 shows this process; the loop is moved from the[Pg 342] finger onto the bobbin. It will unwind when needed but stay secure while hanging. The thread is always carried, if possible, from one spot to where it’s next needed to avoid unnecessary breaks. Tapestry can sometimes be woven with both sides looking the same, which just means that all the ends must be trimmed close. It's said that work treated this way is quite durable.

Special care must be taken that the weft is turned neatly round at the margins, because if it is at all loose there the work has a ragged, untidy appearance. This applies also to any turnings that may occur in other parts due to the carrying out of the pattern;[Pg 343] if in these places the thread is too loose upon the warp, the fabric will be uneven and pushed out of place; if on the other hand the thread there is too tight, the slits will gape, and if these are afterwards closed by stitching, the entire material will be drawn in. A new thread is never commenced actually at the margin, for it would then be seen upon the right side; it is quite easy to avoid this happening by commencing an inch further in. This may entail beginning in a direction which is apparently wrong for picking up the proper threads, that is, those not picked up in the row below; but this must happen at times, and the work packs down and quite prevents the warp showing, as it might be inclined to do in such a case. It is sometimes at the margin a good plan to pick up two warp-threads together, for this emphasises the edge rather pleasantly; this might be advisable in carrying out a long ribbon-like border of any kind.
Special care must be taken to ensure that the weft is neatly turned around the edges, because if it’s loose there, the work will look ragged and messy. This also applies to any turns that occur in other parts due to following the pattern;[Pg 343] if the thread is too loose on the warp in these areas, the fabric will become uneven and shift out of place; on the other hand, if the thread is too tight, the slits will gape, and if these are later closed with stitching, the entire material will pucker. A new thread should never be started right at the edge, as it would be visible on the front side; it’s easy to avoid this by starting an inch further in. This may mean starting in a direction that seems incorrect for picking up the right threads, meaning those not picked up in the row below; but this is sometimes necessary, and the work settles in nicely, preventing the warp from showing as it might in that situation. It can also be a good idea to pick up two warp-threads together at the edge, as this enhances the edge in a nice way; this could be useful when creating a long ribbon-like border of any type.
After each shoot, the point of the bobbin, the comb, or maybe the fingers, should press down the woof to make it lie close upon the row before, and so entirely cover up the warp. Fig. 182 shows the comb in action, and also the[Pg 344] bobbins hanging. The weft must be left a little slack along the line for this purpose, and some experience is required in order to leave just the right slackness. The turn at the edge is arranged first, and then the thread eased evenly along its length in readiness for being pressed down; it must have the appearance not of running straight across the warp-strings, but of lying loosely round them. For packing down a long line, much more play of weft is required than for a short one.
After each weave, the point of the bobbin, the comb, or maybe even your fingers should press down the weft to make it sit closely on the row before it, completely covering the warp. Fig. 182 shows the comb in action, along with the[Pg 344] bobbins hanging. The weft should be left a little loose along the line for this purpose, and you need some practice to find the right amount of looseness. First, arrange the turn at the edge, then ease the thread evenly along its length in preparation for being pressed down; it should look like it’s lying loosely around the warp threads, not running straight across them. To pack down a long line, you need much more slack in the weft than for a short one.

The usual fault with beginners is to draw the web too tight here and there. This is a fault to be specially avoided, for it causes the fabric to be drawn in, and to vary in width, spoiling its appearance and making the threads difficult to work upon; also the packing down of the weft could not be properly done, which would cause the warp-threads to be exposed in parts.
The common mistake beginners make is pulling the web too tight in certain areas. This is a mistake to avoid, as it makes the fabric draw in and change width, ruining its look and making it hard to work with. Additionally, the weft won’t be packed down correctly, which can leave some parts of the warp threads exposed.
The thoroughness of this packing down of the weft is for several reasons very important. The durability of the work is much affected by it, both for the securing of the ends of wool already mentioned, and for the making of a strong, well-knit piece of fabric. Another reason is, that the drawing of the various forms in the design may be made incorrect, in this way: suppose an apple were woven in, apparently correctly, but the wefts were not pressed down thoroughly, the weaving and packing down of the wefts above it would be sure to press the part underneath closer together, and the effect of this would be to make the round apple assume a flattened oval shape, and cause similar changes throughout the work.
The thoroughness of packing down the weft is really important for a few reasons. It significantly affects the durability of the work, both in securing the ends of the wool mentioned earlier and in creating a strong, well-knit piece of fabric. Another reason is that the drawing of the various shapes in the design can become incorrect this way. For instance, if an apple is woven in seemingly correctly but the wefts aren’t pressed down well, the weaving and packing of the wefts above it will compress the part underneath, causing the round apple to take on a flattened oval shape, leading to similar changes throughout the work.
It has already been mentioned that wher[Pg 346]ever a change of colour occurs vertically, that is, in the direction of the warp-threads, there results of necessity a division or slit in the web; the slit, which may be of any length, if noticeable, must be closed. This can be done whilst the weaving is in progress by a method of interlocking the two wefts as they meet, or else by stitching up at the back when the work is finished. The latter way is called fine drawing, and must be very carefully done, especially with large tapestries.
It has already been mentioned that whenever a color change happens vertically, meaning in the direction of the warp threads, it inevitably creates a division or slit in the fabric. The slit, no matter how long, needs to be closed if it’s noticeable. This can be done while weaving by interlocking the two wefts as they meet, or by stitching it up at the back once the work is finished. The latter method is called fine drawing, and it needs to be done very carefully, especially with larger tapestries.
Both methods are used; the first takes longer, but is the most durable. Old and worn tapestries will usually be seen to have given way where this stitching up at the back has taken place. In small pieces of work, however, there is not much likelihood of strain, so the oversewing at the back answers fairly well. The two ways can be used in conjunction. Supposing a border, owing to its being of a different colour, had to be joined the entire length of the work, the interlocking stitches might be made at intervals of about half an inch, and when the work was finished the oversewing at the back might be taken the entire length.
Both methods are used; the first one takes longer, but it’s the most durable. Old and worn tapestries often show signs of wear where this stitching at the back has occurred. However, in smaller pieces of work, there’s not much chance of strain, so the oversewing at the back works pretty well. The two methods can be combined. If a border needs to be joined along the entire length of the work because it’s a different color, interlocking stitches could be made at intervals of about half an inch, and when the work is finished, oversewing at the back could cover the entire length.

Fig. 183 is a diagram illustrating the[Pg 347] way in which the wefts may be interlocked whilst the weaving goes on. Examination of the drawing will probably be sufficient explanation; however, interlocking is effected thus: Commencing at the base, run a weft of the darker wool to and fro, leaving it slack at the turning point. A half pass of the lighter-coloured woof is then run through, it is threaded in an upward direction through the slack loop of the darker wool, waits there whilst another weft of the darker colour is worked, and then is threaded down through the second loop that has been formed, and returns to the starting-point. It then comes back again and is threaded upwards through this same loop, and waits, as before, for another to be formed, and[Pg 348] returns back through it—and so on. If this is done properly, no change is visible on the right side. The joined weft will last as long as any other part of the weaving.
Fig. 183 is a diagram showing how the wefts can be interlocked while weaving. Looking at the drawing should provide enough explanation; however, interlocking works like this: Starting at the base, run a weft of the darker wool back and forth, leaving it loose at the turning point. Then, a half pass of the lighter-colored yarn is threaded through, going upward through the loose loop of the darker wool, and waits there while another dark weft is worked. After that, it goes down through the second loop that has formed and returns to the starting point. It then comes back and is threaded upward through the same loop, waiting again for another loop to form, and goes back through it—and so on. If done correctly, there's no visible change on the right side. The joined weft will last as long as any other part of the weaving.
The process of stitching up at the back is simply an oversewing with silk or other strong thread. The stitches must be rather close, drawing the edges just sufficiently together, and they must not show through to the right side. The stitching together should be done while the work is on the loom, since the web would then be in less danger of pulling out of shape.
The process of sewing up the back is just oversewing with silk or other strong thread. The stitches need to be fairly close, pulling the edges together just enough, and they shouldn't be visible on the front side. The sewing should be done while the work is on the loom, as this minimizes the risk of the fabric getting out of shape.

Shading in tapestry weaving is carried out by a hatching process which is most simply explained by a diagram (fig. 184). The difficulty is not in the working, but in getting the form of the shadow or light correctly expressed. There is no need for fine gradation of colour and tone,[Pg 349] for the shading looks best when carried out simply and boldly, but the drawing of it should be decided and good. The above figure gives but one intermediary tone in shading from one colour to another, which is the ancient method of working; at the present day the weavers in the Manufacture des Gobelins employ several other intermediary tones, thus allowing of finer gradation; possibly however these fine gradations are not of such great importance, and so need not have an unnecessary amount of attention and time devoted to their accomplishment.
Shading in tapestry weaving is done through a hatching process that's best explained with a diagram (fig. 184). The challenge isn't in the technique, but in accurately representing the form of the shadow or light. There's no need for delicate gradations of color and tone,[Pg 349] because shading looks best when it's done simply and boldly, though the drawing should be clear and well-executed. The figure above shows just one intermediary tone for shading from one color to another, which is the traditional method; nowadays, the weavers at the Manufacture des Gobelins use several other intermediary tones, allowing for finer gradation. However, these subtle gradations may not be that important and shouldn't require an excessive amount of attention and time to achieve.
The student will do well to examine fine examples and make careful drawings from them, since this will teach the right way of going to work better than anything else can. Fig. 185 is simply a shaded leaf taken at random from a piece of weaving; the same leaf was shown in outline in fig. 180, so the two show the commencement and completion of the same piece. It will be noticed upon studying tapestry that usually all the light parts of a work are hatched with the same colour, often a buff shade, those of rich tapestries with gold thread. This sameness of colour throughout gives unity to the work.[Pg 350]
The student will benefit from looking at great examples and making careful drawings from them, as this will teach them the best approach better than anything else can. Fig. 185 is simply a shaded leaf randomly taken from a piece of weaving; the same leaf was shown in outline in fig. 180, so the two illustrate the beginning and end of the same piece. When studying tapestry, it’s noticeable that typically all the light areas are shaded with the same color, often a buff shade, while rich tapestries might use gold thread. This consistency of color throughout creates unity in the work.[Pg 350]

Sometimes after the weaving is completed a few finishing touches can be satisfactorily put in by means of single stitches taken through the fabric with a sharp-pointed embroidery needle. The dots representing the seeds upon a strawberry could be stitched in afterwards in this way, for to insert them while the work is going on would be very tedious. This[Pg 351] kind of thing must not be overdone, however, for the stitches are apt, unless very deftly treated, to have a laid-on look, and care must be taken not to mar the evenly ribbed effect, which is one of the characteristics of tapestry.
Sometimes, after finishing the weaving, you can add a few final touches using single stitches through the fabric with a sharp embroidery needle. The dots that represent the seeds on a strawberry can be stitched in afterward like this, since doing it while working can be really tedious. However, you shouldn't overdo this, because the stitches can easily look out of place unless they're done very carefully, and you need to make sure not to ruin the even ribbed effect, which is a key feature of tapestry.
This weaving is a most fascinating kind of work, as will be found upon a trial. The simplest patterns look very interesting when woven, and, on the other hand, the work can be carried to any degree of complexity that the worker desires. For a first trial a piece might[Pg 352] be done with no attempt at shading; even one such as that illustrated at fig. 186 would be suitable. This example happens to be a form particularly easy for carrying out in weaving. The worker should begin at the lower right-hand corner and work the successive flights of steps diagonally, as shown by the unfinished portion of the diagram.
This weaving is a really interesting type of work, as you’ll find out when you try it. Even the simplest patterns look great when woven, and, on the flip side, the work can be made as complex as the worker wants. For a first try, you might do a piece without any shading; even one like the example shown at fig. 186 would be a good choice. This example is particularly easy to weave. The worker should start at the lower right-hand corner and work the steps diagonally, as indicated by the unfinished section of the diagram.

In the way of actual technique there is in the art of tapestry weaving not nearly as much to be learnt as there is in embroidery, for there are no varieties of methods and of stitch to be acquired; still for a person to become a skilled weaver, capable of carrying out large wall hangings, is a thing very difficult of attainment—indeed it is said that it takes as long as fifteen years of constant application to acquire the necessary knowledge and skill. To carry out designs of less magnitude and intricacy is a very different matter; success in this smaller way is far more easily attained, and is well within the reach of unprofessional people.[Pg 355][Pg 354][Pg 353]
In terms of actual technique, there's a lot less to learn in tapestry weaving compared to embroidery, as there aren’t many different methods or stitches to master. However, becoming a skilled weaver who can create large wall hangings is quite challenging—it’s said that it can take up to fifteen years of consistent practice to gain the needed knowledge and skill. Working on smaller, simpler designs is a completely different story; success in this area is much easier to achieve and is well within the reach of non-professionals.[Pg 355][Pg 354][Pg 353]
NOTES ON THE COLLOTYPE PLATES
Plate I.—A Detail from a XIVth Century English Cope.—The figure of Christ which is shown in this plate is taken from a central group, representing the coronation of the Virgin, in a famous cope in the possession of Colonel J. E. Butler-Bowdon. The ground is of rich red silk velvet; the face, hands, and linings of the draperies are worked in silk in split stitch; the drapery, crown, and surrounding architectural decoration are in gold thread couched by the early method. The twisted column with oak leaves and the five lobed arch are both characteristic of English work of this period. Note the use of pearls in the lion's head and in the acorns, also the charmingly drawn bird. An interesting technical point displayed in this example[Pg 356] is that the work is done directly on to the velvet ground, instead of being first worked upon linen and afterwards as a completed piece of embroidery applied to the velvet. The method in use here, if at all possible, is always the most satisfactory.
Plate I.—A Detail from a 14th Century English Cope.—The image of Christ shown in this plate is taken from a central group that depicts the coronation of the Virgin, found in a well-known cope owned by Colonel J. E. Butler-Bowdon. The background is made of luxurious red silk velvet; the face, hands, and linings of the garments are executed in silk using split stitch; the drapery, crown, and surrounding architectural details are crafted from gold thread using the early technique. The twisted column adorned with oak leaves and the five-lobed arch are typical features of English craftsmanship from this time. Notice the use of pearls in the lion's head and the acorns, as well as the beautifully drawn bird. An intriguing technical aspect shown in this example[Pg 356] is that the work is done directly on the velvet base, rather than being initially worked on linen and then attached as a finished piece of embroidery. The method used here, if possible, is always the most effective.
Size of detail, about eleven inches by six.
Size of detail, approximately eleven inches by six.
Plate II.—Two Heads from a XIVth Century English Cope preserved at Steeple Aston, Oxfordshire.—The cope is not now in its original state, for it has been divided into two parts and used for the decoration of the altar. The background is composed of a thin greyish white silk backed with a stronger material. The white may have been originally some other colour; it is, however, in its present state, very beautiful and harmonious. The drawing of the features in this cope is remarkably refined and true to nature (the reproduction does not do full justice to the original). The ancient method, of working the faces in split stitch commencing with the middle of the cheek and continuing spirally round, then afterwards pressing the centre down by some mechanical means, is plainly to be observed here.[Pg 357] The effective drawing of the tresses of hair in alternate lines of two colours is well seen in the left-hand example. The gold thread which is freely made use of all over the cope, upon the draperies, nimbi, and surrounding foliage, is marvellously bright and sparkling, although nearly six hundred years old. The manufacture of untarnishable gold for embroidery purposes seems beyond present day enterprise.
Plate II.—Two Heads from a 14th Century English Cope preserved at Steeple Aston, Oxfordshire.—The cope is not in its original form anymore, as it has been split into two sections and used to decorate the altar. The background is made of a thin grayish-white silk backed with a sturdier material. The white might have originally been another color, but in its current state, it is very beautiful and harmonious. The depiction of the features in this cope is remarkably refined and realistic (the reproduction doesn't fully capture the original). The ancient technique of working the faces in split stitch, starting from the center of the cheek and continuing in a spiral, and then pressing the center down with some mechanical means, is clearly visible here.[Pg 357] The detailed drawing of the hair in alternating lines of two colors is well illustrated in the left-hand example. The gold thread that is extensively used throughout the cope, on the draperies, nimbi, and surrounding foliage, is incredibly bright and sparkling, despite being nearly six hundred years old. The creation of tarnish-proof gold for embroidery purposes seems to be beyond modern capabilities.
Width of nimbus, two and a half inches.
Width of nimbus is two and a half inches.
Plate III.—A small portion of a Quilted Coverlet, probably of Sicilian work. Date about 1400.—In this interesting example of quilting, which is exhibited in the Victoria and Albert Museum, the ground is composed of a buff-coloured linen. The raised effect is obtained by an interpadding of wool. The background is run over irregularly with white thread, in order to keep it more or less flat, and the design, which is in fairly high relief, is outlined with brown thread. The entire coverlet is embroidered with scenes from the life of Tristan. Tristan frequently engaged in battle against King Languis, the oppressor of his country.[Pg 358] This detail represents "How King Languis (of Ireland) sent to Cornwall for the tribute."
Plate III.—A small piece of a Quilted Coverlet, likely made in Sicily around 1400.—This fascinating example of quilting is on display at the Victoria and Albert Museum. The base fabric is a buff-colored linen. The raised effect is created using wool padding. The background is stitched irregularly with white thread to keep it relatively flat, while the design, which stands out prominently, is outlined in brown thread. The entire coverlet features scenes from the life of Tristan. Tristan often fought against King Languis, who was a tyrant in his country.[Pg 358] This detail shows "How King Languis (of Ireland) sent to Cornwall for the tribute."
Size of detail, two feet by three.
Size of detail: 2 feet by 3 feet.
Plate IV.—A portion of an Altar Cloth Band, embroidered in coloured silk threads upon a white linen ground.—This is a piece of German XVth century work exhibited in the Victoria and Albert Museum. It is embroidered almost entirely in one stitch, which might be described as a variety of herring-bone. The design is made up of two motives which repeat alternately along the band—a square shaped tree and a circle, the latter decorated with floral sprays and, in the centre of it, a group of emblems. Down the middle of the design runs a series of names in fine Gothic lettering—"Ursula" and "Augustinus" being the two that occur in this plate.
Plate IV.—A section of an altar cloth band, embroidered with colored silk threads on a white linen background.—This is a piece of German work from the 15th century displayed at the Victoria and Albert Museum. It's embroidered almost entirely using one stitch that could be described as a type of herringbone. The design features two alternating motifs along the band—a square-shaped tree and a circle, with the circle adorned with floral patterns and a group of symbols in the center. Running down the middle of the design is a series of names in elegant Gothic lettering—"Ursula" and "Augustinus" are the two that appear in this plate.
Width of embroidered band, four and a half inches.
Width of embroidered band: 4.5 inches.
Plate V.—A portion of a late XVth century Orphrey, embroidered with the arms of Henry Stafford, Duke of Buckingham.—The[Pg 359] ground is of red velvet, and is embroidered with gold thread and coloured silks. The two shields here represented bear the arms of the families of de Bohun and Fitzwalter. Each shield has for supporters two swans, and is surrounded by floral sprays. The Stafford knot unites the sprays between the shields. The chasuble upon which this orphrey is placed is made of a lovely brocaded silk decorated with falcons, peahens, and roses.
Plate V.—A section of a late 15th-century orphrey, embroidered with the arms of Henry Stafford, Duke of Buckingham.—The[Pg 359] background is made of red velvet, embroidered with gold thread and colorful silks. The two shields shown here display the arms of the de Bohun and Fitzwalter families. Each shield is supported by two swans and surrounded by floral designs. The Stafford knot connects the floral sprays between the shields. The chasuble that this orphrey is attached to is crafted from beautiful brocaded silk featuring falcons, peahens, and roses.
Width of embroidered orphrey, about eight inches.
Width of embroidered orphrey, roughly eight inches.
Plate VI.—A detail of Foliage taken from a late XVIth century Embroidered Picture representing the story of Daphne.—The picture is worked in coloured wools and silks in cross stitch upon canvas, and is an admirable example of this kind of work, and this particular detail is a good illustration of a very satisfactory treatment of foliage. The whole panel measures about seven feet by two, and is exhibited in the Victoria and Albert Museum.
Plate VI.—A detail of foliage from a late 16th-century embroidered picture that tells the story of Daphne.—The artwork is made with colored wools and silks in cross stitch on canvas, and it is an excellent example of this type of work. This specific detail showcases a very effective way of treating foliage. The entire panel measures about seven feet by two feet and is displayed at the Victoria and Albert Museum.
Plate VII.—An Embroidered XVIIth or XVIIIth century Wool-work Curtain.—This curtain, the property of Miss Killick, is a pretty example of a small crewel-work hanging. The design is of a type that was often used upon hangings of that period. It is embroidered with brightly coloured wools upon a white linen ground, and is in a good state of preservation. Much ingenuity as well as variety of stitching are shown in the execution of the work.
Plate VII.—An Embroidered 17th or 18th Century Wool-work Curtain.—This curtain, owned by Miss Killick, is a lovely example of a small crewel-work hanging. The design is typical of the hangings from that time period. It features brightly colored wools stitched onto a white linen background and is in excellent condition. The work showcases a lot of creativity and a variety of stitching techniques.
Size of curtain, about five feet by three.
Size of curtain is about five feet by three.
Plate VIII.—A portion of a large XVIIth century Linen Hanging embroidered with coloured wools.—In both design and execution this curtain is remarkably fine. The entire hanging is about eighteen feet in width by seven in height. It is embroidered with a conventional representation of a forest; in the branches of the trees lodge all kinds of birds and beasts. The type of design shown in this plate and in the last is derived from Eastern work; its introduction into England was due to the increase of trade with oriental nations, which developed about this time.
Plate VIII.—A section of a large 17th-century linen hanging embroidered with colorful wools.—This curtain is exceptionally fine in both design and craftsmanship. The entire piece measures about eighteen feet wide and seven feet tall. It's embroidered with a traditional depiction of a forest, where various birds and animals reside in the tree branches. The design shown in this plate and the previous one is inspired by Eastern art; its introduction to England was a result of increased trade with Eastern nations that developed around this time.
Plate IX.—Cutwork Lettering taken from a XVIIth century English Sampler.—The letters and surrounding decoration shown in this example of cut or open work are built up on a square network of warp and weft threads that were left at regular intervals throughout the space, when the unnecessary threads were withdrawn, and then covered with a kind of darning stitch. The letters are worked in buttonhole stitch, each fresh line being taken into the heading of the last one. The other parts of the work are carried out in either buttonhole or overcast stitch. The complete sampler is a long narrow strip of linen, across which run specimen bands of various kinds of work. It is exhibited in the Victoria and Albert Museum.
Plate IX.—Cutwork Lettering taken from a 17th-century English Sampler.—The letters and surrounding decorations in this example of cut or open work are created on a square pattern of warp and weft threads that were left at regular intervals in the areas where unnecessary threads were removed, and then covered with a type of darning stitch. The letters are made using buttonhole stitch, with each new line starting at the end of the previous one. The rest of the work is done in either buttonhole or overcast stitch. The entire sampler is a long, narrow strip of linen, featuring specimen bands of different types of work. It is displayed in the Victoria and Albert Museum.
Width of cutwork detail, six inches.
Width of cutwork detail: six inches.
Plate X.—An Embroidered Sampler.—The work is carried out in coloured silks in minute cross-stitch and occasional rows of satin stitch, upon a ground of fine single-thread canvas. It is dated 1798, and was worked by Alice Knight, the author's great-grandmother. The birds,[Pg 362] trees, and flowers, the charming little border patterns, and the comical cats standing on either hillocks or housetops, are all characteristic of sampler work. Working the sampler was once the regular introduction to mending, marking, and embroidery, and one was done by almost every XVIIIth century child as a part of education, indeed the practice of working samplers was continued some decades into the XIXth century.
Plate X.—An Embroidered Sampler.—This piece is made with colorful silks using tiny cross-stitch and some rows of satin stitch, all on a fine single-thread canvas. It’s dated 1798 and was created by Alice Knight, the author's great-grandmother. The birds,[Pg 362] trees, and flowers, along with the charming little border patterns and the playful cats standing on hillocks or rooftops, are typical of sampler work. Making a sampler used to be a standard part of learning to sew, mark, and embroider, and it was done by almost every child in the 18th century as part of their education; in fact, the practice continued for several decades into the 19th century.
Actual size of original, eighteen inches by twelve.
Actual size of original, eighteen inches by twelve.
Plate XI.—An Example of Persian Embroidery.—Formerly in the collection of Lord Leighton, and now in that of the London County Council's Central School of Arts and Crafts. The embroidery is carried out almost entirely in chain stitch with brilliantly coloured silks, upon a fine semi-transparent ground. The flowers that appear dark in the reproduction are worked in a bright rosy red, others are yellow and orange, and the leaves are in pale grey green outlined with a dark myrtle shade of the same.
Plate XI.—An Example of Persian Embroidery.—Previously part of Lord Leighton's collection, it is now held by the London County Council's Central School of Arts and Crafts. The embroidery is mainly done in chain stitch with vibrant colored silks, set against a fine semi-transparent background. The flowers that look dark in the image are actually done in a bright rosy red, while others are yellow and orange, and the leaves are in a light grey-green, outlined with a dark myrtle shade.
Size of panel, about five feet by four.[Pg 363]
Size of the panel is approximately five feet by four. [Pg 363]
Plate XII.—A Detail from an Embroidered Tablecloth.—The entire surface of this fine white linen cloth is strewn with a profusion of beautiful flowers, worked in floss silk in bright colours. The flowers were all drawn directly from nature by the worker, Mrs. W. R. Lethaby.
Plate XII.—A Detail from an Embroidered Tablecloth.—The whole surface of this fine white linen cloth is covered with a variety of beautiful flowers, created with bright-colored floss silk. The flowers were all inspired by nature and crafted by the artist, Mrs. W. R. Lethaby.
Plate XIII.—An Embroidered Altar Frontal, executed by Miss May Morris, designed by Mr. Philip Webb.—The work is carried out with floss silk in bright colours and gold thread, both background and pattern being embroidered. The five crosses, that are placed at regular intervals between the vine leaves, are couched in gold passing upon a silvery silk ground.
Plate XIII.—An Embroidered Altar Frontal, created by Miss May Morris, designed by Mr. Philip Webb.—The work is done with bright colored floss silk and gold thread, with both the background and the pattern embroidered. The five crosses, placed at regular intervals among the vine leaves, are stitched in gold thread on a silvery silk background.
Plate XIV.—Two Pieces of Ancient Weaving taken from Tombs in Egypt.—These are exhibited in the Victoria and Albert Museum. The upper example is about five inches square, dated IIIrd to VIIth century, Egypto-Roman work, and is said to have decorated a child's tunic. It is woven in coloured silks upon a green ground; the colours are still wonderfully[Pg 364] fresh and bright. Weavers may see various interesting technical as well as other points in this early work. For instance, how the difficulty of the narrow detached vertical lines, necessitated by change of colour in the weft, has been overcome by using surface stitching instead, the easier horizontal lines being woven in the usual way. A good deal of this surface stitching can be seen in the ancient weaving; sometimes an entire pattern is picked out by this method, the ground having been first woven all over in some plain colour.
Plate XIV.—Two Pieces of Ancient Weaving taken from Tombs in Egypt.—These are displayed at the Victoria and Albert Museum. The upper piece measures about five inches square, dating back to the 3rd to 7th century, and is a work of Egypto-Roman origin. It is believed to have adorned a child's tunic. The weaving is done in colored silks on a green background; the colors remain incredibly[Pg 364] fresh and vibrant. Weavers can observe several interesting technical details in this early piece. For example, the challenge of the narrow detached vertical lines, required for color changes in the weft, has been addressed by using surface stitching instead, while the easier horizontal lines are woven in the usual manner. A significant amount of this surface stitching is visible in the ancient weaving; sometimes an entire design is highlighted using this technique, with the background first woven completely in a solid color.
The lower border pattern is a band of weaving about two inches in width, Saracenic work. It is woven in coloured silks and linen thread upon the actual warp threads of the garment that it decorates. The weft threads were probably omitted for the space of one and a half inches when the fabric was being made in order that some ornamentation might be put in, in this way. Some of the weft threads have perished, leaving the warp exposed to sight; this enables the student to understand better the manner in which it was carried out.[Pg 365]
The lower border pattern is a band of weaving about two inches wide, featuring Saracenic design. It's made using colored silks and linen thread on the actual warp threads of the garment it adorns. The weft threads were likely left out for about an inch and a half during the fabric's creation to allow for some decoration to be added in this way. Some of the weft threads have deteriorated, exposing the warp, which helps the viewer understand better how it was made.[Pg 365]
Plate XV.—An Example of a Tapestry Field strewn with Flowers.—This kind of decoration is characteristic of many tapestry grounds, for the style is particularly suited to the method of work, and very happy in result. The detail shown in this plate is taken from a piece of late XVIth century Flemish work; it carries on, however, a much earlier tradition. The ground is of a dark blue colour, and the flowers varied as in nature.
Plate XV.—An Example of a Tapestry Field Covered in Flowers.—This type of decoration is typical of many tapestry backgrounds because the style works well with the technique and leads to very pleasing results. The detail shown in this plate is from a late 16th-century Flemish piece; however, it continues a much older tradition. The background is a dark blue color, and the flowers are diverse, as they are in nature.
Plate XVI.—A Tapestry Bag, woven in coloured silk and gold thread by the Author.—The ground is woven with black silk, decorated with gold at the top and base. The centre panel is carried out in brightly coloured silks and gold thread. The various compartments are filled with representations of flowers, birds, and fishes, upon an alternating purple and blue background. The dividing lines are of gold thread.
Plate XVI.—A Tapestry Bag, woven in colorful silk and gold thread by the Author.—The background is made of black silk, adorned with gold at the top and bottom. The center panel features vibrant silks and gold thread. The different sections are filled with images of flowers, birds, and fish, set against a backdrop of alternating purple and blue. The dividing lines are made of gold thread.
THE COLLOTYPE PLATES

 Plate II.—Two Heads from a 14th Century English Cope preserved at Steeple Aston, Oxfordshire.
__A_TAG_PLACEHOLDER_0__
 Plate III.—A small section of a Quilted Coverlet, likely made in Sicily. Date around 1400.
__A_TAG_PLACEHOLDER_0__
 Plate IV.—A section of an Altar Cloth Band, embroidered with colorful silk threads on a white linen background.
__A_TAG_PLACEHOLDER_0__
 Plate V.—A section of a late 15th-century orphrey, embroidered with the heraldic arms of Henry Stafford, Duke of Buckingham.
__A_TAG_PLACEHOLDER_0__
 Plate VI.—A close-up of foliage from a late 16th-century embroidered artwork depicting the story of Daphne.
__A_TAG_PLACEHOLDER_0__

 Plate VIII.—A section of a large 17th Century linen hanging, embroidered with colored wools.
__A_TAG_PLACEHOLDER_0__


 Plate XII.—A detail from an Embroidered Tablecloth. Designed and created by Mrs. W. R. Lethaby.
__A_TAG_PLACEHOLDER_0__
 Plate XIII.—An Embroidered Altar Frontal made by Miss May Morris, designed by Mr. Philip Webb.
__A_TAG_PLACEHOLDER_0__


 Plate XVI.—A Tapestry Bag, crafted from colored silk and gold thread by the Author.
__A_TAG_PLACEHOLDER_0__
FOOTNOTES:
[1] No. 184, 1898.
__A_TAG_PLACEHOLDER_0__ No. 184, 1898.
[2] No. 879, 1904.
__A_TAG_PLACEHOLDER_0__ No. 879, 1904.
[3] No. 517-522, 1896.
__A_TAG_PLACEHOLDER_0__ No. 517-522, 1896.
[5] No. 1564, 1902.
__A_TAG_PLACEHOLDER_0__ No. 1564, 1902.
[9] No. 308, 1902.
__A_TAG_PLACEHOLDER_0__ No. 308, 1902.
[12] No. 175, 1889.
__A_TAG_PLACEHOLDER_0__ No. 175, 1889.
[14] This will be found described in detail in Chapter II. There is an interesting drawing of a neat little machine, similar to this, but worked by cogwheels, in L'Art du Brodeur, by Germain de St. Aubin (1770).
[14] This will be explained in detail in Chapter II. There's a fascinating illustration of a tidy little machine, similar to this one, but powered by gears, in L'Art du Brodeur, by Germain de St. Aubin (1770).
INDEX
- Altar-cloth band (Plate IV.)
- Altar frontal (Plate XIII.)
- Appliances, 34
- Appliances and materials for tapestry weaving, 315
- Applied embroidery, 174
- Applied work, 172
- Background, the, 46
- Bag, tapestry (Plate XVI.)
- Beads, 50
- Bobbins, 321
- Braid work, 166
- Broderie anglaise, 222
- Bullions, 235, 256
- Canvas work, 147
- Coat-stave, 333
- Collotypes, descriptive notes on, 356
- Colour, 72
- Comb, 322, 344
- Cope at Steeple Aston (Plate II.), 357
- Cope, detail from XIVth century English (Plate I.), 356
- Cord, 40, 271
- Cord-making appliance, 39, 273
- Cotton, 49
- Couching, 164
- Couching gold, ancient method of, 238
- Couching gold, usual method, 250
- Coverlet, quilted Sicilian (Plate III.), 358
- Crewel work, 103
- Curtain, XVIIth century (Plate VIII.), 361
- Curtain, XVIIth century wool-work (Plate VII.), 361
- Cutwork, 213, 221
- Darned netting, 210
- Darning, 196
- Darning, pattern, 197
- Design, 30, 51
- Design for tapestry, 311
- Designing, pattern, 51
- Directions, practical, 292
- Drawn thread work, 213
- Dressing the coat-stave, 333
- Egyptian weaving (Plate XIV.), 364
- Emblems, 270
- Embroidery frame used as a loom, 323
- Embroidery, washing, 297
- Embroidery with gold and silver threads, 229
- Figure work, 69
- Fine drawing, 346
- Flax threads, 49
- Foliage, detail of (Plate VI.), 360
- Frames, embroidery, 35
- Frame work, 301
- Fringes, 280
- Garniture of work, the, 271
- Gold and silver threads, embroidery with, 229
- Gold thread embroidery, 229
- Heraldry, 268
- Inlaid work, 180
- Interlocking stitch, 347
- Knife, 43
- Knots, 118, 286
- Knotted cord, 277
- Knotted thread, 119
- Laid work, 168
- Lettering, 259
- Lettering, cutwork, XVIIth century (Plate IX.), 362
- Linen, 47
- Loom, 315
- Madeira work, 222
- Marking, 262
- Materials, 44
- Materials and appliances for tapestry weaving, 315
- Materials for gold work, 233
- Methods of work, 164
- Monograms, 259
- Needles, 35, 322
- Objects to work, 31, 314
- Open-work fillings, 201
- Opus plumarium, 101
- Orphrey, XVth century (Plate V.), 359
- Past work, study of, 28, 53
- Paste, embroidery, 295
- Patch work, 183
- Pattern darning, 197
- Pattern designing, 51
- Pattern tracing, 328
- Patterns, transference of, 42, 292
- Persian embroidery (Plate XI.), 363
- Petit point pictures, 149
- Picots, 143
- Piercer, 43
- Practical directions, 292
- Precious stones, 50
- Pricker, 42
- Puckered work, cure of, 298
- Purls, 256
- Quilting, 189
- Raised gold work, 253
- Raised work, 192
- Sampler, embroidered (Plate X.), 362
- Samplers, 148
- Satin, 48
- Scissors, 35
- Shading, 68, 348
- Silk, 48, 327
- Silk threads, 49
- Silver and gold threads, embroidery with, 229
- Spindle, 43
- Stands, embroidery frame, 37
- Stitches, 75
- Stitch, back, 107
- Stitch, basket, 131
- Stitch, braid, 88
- Stitch, bullion, 121
- Stitch, buttonhole, 107
- Stitch, cable chain, 90
- Stitch, chain, 77
- Stitch, chequered chain, 84
- Stitch, Cretan, 134
- Stitch, cross, 152
- Stitch, double back stitch, 127
- Stitch, feather stitch, 129
- Stitch, fishbone, 131
- Stitch, French knot, 120
- Stitch, Gobelin, 154
- Stitch, herring-bone, 126
- Stitch, Holbein, 159
- Stitch, insertion, various, 139
- Stitch, interlocking, 347
- Stitch, Irish, 155
- Stitch, knot, 124
- Stitch, knotted chain, 92
- Stitch, long and short, 99
- Stitch, open chain, 86
- Stitch, overcast, 106
- Stitch, plait, 156
- Stitch, rococo, 162
- Stitch, rope, 86
- Stitch, Roumanian, 136
- Stitch, satin, 95
- Stitch, split, 94
- Stitch, stem, 101
- Stitch, stroke, 159
- Stitch, tailor's buttonhole, 109
- Stitch, tambour, 77
- Stitch, tent, 153
- Stitch, twisted chain, 85
- Stitch, two-sided Italian, 156
- Stitch, zigzag chain, 83
- Tablecloth, embroidered (Plate XII.), 364
- Tambour frame, 39
- Tapestry bag (Plate XVI.), 365
- Tapestry, example (Plate XV.), 366
- Tapestry weaving, introduction to, 307
- Tassels, 283
- Tarnish of gold and silver threads, 237
- Thimbles, 35
- Threads, 49, 299, 327
- Threads, gold and silver, 229
- Tools, 34
- Tools for tapestry weaving, 315
- Tracing patterns, 42, 328
- Tracing patterns on warp, 336
- Transferring patterns, methods of, 292
- Transferring patterns, requisites for, 42
- Velvet, 48
- Warp, 326
- Warping the loom, 328
- Washing embroidery, 297
- Weaving, 339
- Weaving, Egyptian (Plate XIV.), 364
- Weaving, tapestry, 305
- Work, garniture of, 271
- Work, methods of, 164
- Work, preparations for, 328
- Work, protection and preservation of, 292
- Wools, 49, 327
Printed by Ballantyne, Hanson & Co.
Edinburgh & London
[Pg 405]
Printed by Ballantyne, Hanson & Co.
Edinburgh & London
[Pg 405]
EMBROIDERY MATERIALS
GEORGE KENNING & SON, Goldsmiths, Gold Lacemen, and Embroiderers, are the actual manufacturers of all materials that are best for Embroidery of any and every description.
GEORGE KENNING & SON, Goldsmiths, Goldsmith artisans, and Embroiderers, are the actual makers of all the best materials for embroidery of any kind.

The following are a few articles from the great variety they manufacture: Threads, Tambours, Braids, Laces, and Cords in Gold, Silver, Tinsel, and Aluminium; also Spangles, Sequins, Ornaments, and Beads of every possible variety.
The following are a few items from the wide range they produce: Threads, Tambours, Braids, Laces, and Cords in Gold, Silver, Tinsel, and Aluminum; also Spangles, Sequins, Ornaments, and Beads of every possible kind.
Please insist on your Draper or Fancy Warehouseman supplying only materials manufactured by George Kenning & Son.
Please make sure your Draper or Fancy Warehouseman only supplies materials made by George Kenning & Son.
Manufactory: 1/4 LITTLE BRITAIN, E.C.
Factory: 1/4 LITTLE BRITAIN, E.C.
And at Liverpool, Glasgow, and Manchester.
And at Liverpool, Glasgow, and Manchester.
RIBBON WEAVING FACTORY, COVENTRY
Ribbon Weaving Factory, Coventry
J. MAYGROVE & CO. Ltd.
| MILLS— | WAREHOUSE— |
| ST. ALBANS. | 51 ALDERSGATE STREET, LONDON, E.C. |
Manufacturers of Silks for Weaving and Embroidery.
Manufacturers of Silks for Weaving and Embroidery.
For REALLY RELIABLE BOILING and UNFADING DYES.
For truly dependable boiling and long-lasting dyes.
Maygrove's DUCHESSE FLOSS.
Maygrove's TWISTED EMBROIDERY.
Maygrove's FILOSELLE, &c.
Maygrove's DUCHESSE FLOSS.
Maygrove's TWISTED EMBROIDERY.
Maygrove's FILOSELLE, etc.
UNEQUALLED FOR LUSTRE, PERMANENCE, AND ARTISTIC GRADUATIONS OF COLOUR.
UNMATCHED FOR BRIGHTNESS, DURABILITY, AND ARTISTIC SHADES OF COLOR.
READY FOR USE.
READY TO GO.
| CHINA TRAM | 1000 Shades. | |
| FOR | TUSSAH TRAM AND ORGANZINE | 500 Shades. |
| WEAVING. | ORIENTAL FLOCHE | 500 Shades. |
| WORSTED YARNS—COTTON YARNS. |
STOCKED READY FOR DYEING.
Stocked and ready to dye.
Organzines, Sewings, Flosses, Twists, and SPUN SILKS.
WORSTED Cords, Genappes, Mohairs, &c. &c.
Organzines, Sewings, Flosses, Twists, and Spun Silks.
Worsted cords, genappes, mohair, etc.
PLASTER CASTS
LETTERING FOR LETTER CUTTERS BY A. E. R. GILL
LETTERING FOR LETTER CUTTERS BY A. E. R. GILL
Plaster Casts of the Stones shown on the Collotype Plates, numbers 13, 14, and 15, in the Portfolio, "Manuscript and Inscription Letters," by Edward Johnston, price 3s. 6d. net, are obtainable from the Publisher, or direct from Messrs. C. Smith & Sons, Moulders, 15 Kentish Town Road, London, N.W., at the following prices:—
Plaster casts of the stones shown in the collotype plates, numbers 13, 14, and 15, in the portfolio "Manuscript and Inscription Letters" by Edward Johnston, priced at 3s. 6d. net, can be purchased from the publisher or directly from Messrs. C. Smith & Sons, Moulders, 15 Kentish Town Road, London, N.W., at the following prices:—
| Roman Capital Letters (Incised). | } | |
| "Lower-case" Italics, &c. (Incised). | } | 12s. net per set of three. |
| "Raised" Letters, Capitals, &c. | } |
PACKED—DELIVERED FREE IN LONDON—CARRIAGE FORWARD FOR COUNTRY
PACKED—DELIVERED FREE IN LONDON—CARRIAGE PAID FOR COUNTRY
These Casts being facsimiles of the actual stones make the best kind of models for Letter Cutters and Sculptors, and all who have to do with Inscriptions. Being small, they are easily handled.
These casts are exact copies of the actual stones, making them the best models for letter cutters, sculptors, and anyone involved with inscriptions. Since they are small, they are easy to handle.
The Portfolio, "Manuscript and Inscription Letters," by Edward Johnston, is intended as a working supplement to his handbook, "Writing and Illuminating, and Lettering," price 6s. 6d. net. It contains 16 plates in all, measuring 9-7/8 × 12-3/8 inches, with full descriptions and notes.
The Portfolio, "Manuscript and Inscription Letters," by Edward Johnston, is designed as a practical supplement to his handbook, "Writing and Illuminating, and Lettering," priced at 6s. 6d. net. It includes 16 plates in total, measuring 9-7/8 × 12-3/8 inches, with complete descriptions and notes.
JOHN HOGG, Publisher, 13 Paternoster Row, London, E.C.
JOHN HOGG, Publisher, 13 Paternoster Row, London, E.C.
ROBERT S. RONALD
Decorator and Upholsterer
Decorator and Upholsterer

Loom Maker to the Royal School of Art, South Kensington
Loom Maker to the Royal School of Art, South Kensington
Table or Pedestal Looms to Order
Prices on Application
Table or Pedestal Looms Available for Order
Contact Us for Pricing
Office and Works—
ST. ANN'S HILL, WANDSWORTH,
LONDON, S.W.
Office and Works—
St. Ann's Hill, Wandsworth,
London, SW.
THE ARTISTIC CRAFTS SERIES
BOOKBINDING AND THE CARE OF BOOKS. By DOUGLAS COCKERELL. Third Edition. 122 Drawings by NOEL ROOKE. 8 Pages Collotype Reproductions. 352 pp. 5s. net.
BOOKBINDING AND THE CARE OF BOOKS. By DOUGLAS COCKERELL. Third Edition. 122 Drawings by NOEL ROOKE. 8 Pages Collotype Reproductions. 352 pp. 5s. net.
Extract from The Times.
Extract from The Times.
"... A capital proof of the reasoned thoroughness in workmanship, which is the first article in the creed of those who ... are attempting to carry into practice the industrial teaching of Ruskin and William Morris."
"... A prime example of the careful attention to detail in craftsmanship, which is the first principle for those who ... are trying to put into practice the industrial teachings of Ruskin and William Morris."
SILVERWORK AND JEWELLERY. By H. WILSON. Second Edition. 280 Diagrams by the Author. 32 Pages of Collotype Reproductions. 500 pp. 6s. 6d. net.
SILVERWORK AND JEWELLERY. By H. WILSON. Second Edition. 280 Diagrams by the Author. 32 Pages of Collotype Reproductions. 500 pp. 6s. 6d. net.
Containing special chapters, fully illustrated, based on demonstrations and with notes by Professor Unno Bisei and Professor T. Kobayashi, of the Imperial Fine Art College at Tokyo, giving the traditional method of Casting, Damascening, Incrustation, Inlaying, Engraving, and Metal Colouring still practised in Japan, also on Niello, the Making of Boxes and Card Cases, with chapters on Egyptian and Oriental methods of work.
Containing special chapters, fully illustrated, based on demonstrations and with notes by Professor Unno Bisei and Professor T. Kobayashi of the Imperial Fine Art College in Tokyo, presenting the traditional techniques of Casting, Damascening, Incrustation, Inlaying, Engraving, and Metal Colouring still used in Japan, as well as insights on Niello, the creation of Boxes and Card Cases, along with chapters on Egyptian and Oriental crafting methods.
WOODCARVING: DESIGN AND WORKMANSHIP. By GEORGE JACK. 79 Drawings by the Author. 16 Pages of Collotype Reproductions. 320 pp. 5s. net.
WOODCARVING: DESIGN AND WORKMANSHIP. By GEORGE JACK. 79 Drawings by the Author. 16 Pages of Collotype Reproductions. 320 pp. 5s. net.
Extract from The Builders' Journal.
Extract from *The Builders' Journal*.
"Undoubtedly the best guide to Woodcarving extant.... A practical work, written with clearness and literary power by a practical man ... of great artistic talent.... The illustrations are excellent."
"Without a doubt, the best guide to woodcarving available.... It's a practical work, clearly written with literary skill by someone experienced in the field ... with impressive artistic talent.... The illustrations are outstanding."
STAINED GLASS WORK. By C. W. WHALL. 73 Diagrams by Two of His Apprentices. 16 Pages of Collotype Reproductions. 392 pp. 5s. net.
STAINED GLASS WORK. By C. W. WHALL. 73 Diagrams by Two of His Apprentices. 16 Pages of Collotype Reproductions. 392 pp. £5.00 net.
Extract from The Scotsman.
Extract from The Scotsman.
"It provides an exposition at once instructive and interesting of the workshop practice of the craft ... of Stained Glass, animated throughout by an encouraging and cheerful sense of the dignity and the elevating influence of such an occupation."
"It offers a clear and engaging overview of the workshop practices involved in the craft of stained glass, consistently highlighted by an uplifting and positive sense of the importance and inspiring nature of this work."
EMBROIDERY AND TAPESTRY WEAVING. By Mrs. A. H. CHRISTIE. 178 Diagrams and Illustrations by the Author. 16 Pages of Collotype Reproductions. 320 pp. 6s. net. (Third Edition.)
EMBROIDERY AND TAPESTRY WEAVING. By Mrs. A. H. CHRISTIE. 178 Diagrams and Illustrations by the Author. 16 Pages of Collotype Reproductions. 320 pp. 6s. net. (Third Edition.)
Extract from The Pall Mall Gazette.
Extract from The Pall Mall Gazette.
"Mrs. Christie has performed her task to admiration, ... and her lucid explanations of various kinds of stitches ... should be of value to all workers at embroidery or tapestry weaving and to novices anxious to learn."
"Mrs. Christie has done an impressive job, ... and her clear explanations of different types of stitches ... will be valuable to all those working in embroidery or tapestry weaving, as well as beginners eager to learn."
WRITING AND ILLUMINATING, AND LETTERING. By EDWARD JOHNSTON. 227 Illustrations and Diagrams by the Author and NOEL ROOKE. 8 Pages of Examples in Red and Black. 24 Pages of Collotype Reproductions. 512 pp. (Fifth Edition.)
WRITING, ILLUMINATING, AND LETTERING by EDWARD JOHNSTON. 227 Illustrations and Diagrams by the Author and NOEL ROOKE. 8 Pages of Examples in Red and Black. 24 Pages of Collotype Reproductions. 512 pp. (Fifth Edition.)
Extract from The Athenæum.
Extract from The Athenæum.
"... This book belongs to that extremely rare class in which every line bears the impress of complete mastery of the subject. We congratulate Mr. Johnston on having produced a work at once original and complete."
"... This book is one of those very rare ones where every line shows a complete mastery of the topic. We congratulate Mr. Johnston on creating a work that is both original and comprehensive."
HAND-LOOM WEAVING. By LUTHER HOOPER. 125 Drawings by the Author and NOEL ROOKE. Coloured and Collotype Reproductions. 368 pp. 6s. net.
HAND-LOOM WEAVING. By LUTHER HOOPER. 125 Illustrations by the Author and NOEL ROOKE. Colored and Collotype Reproductions. 368 pages. £6.00 net.
Extract from The Morning Post.
Extract from The Morning Post.
"... Every phase and process in weaving is described with so clear and careful an exactitude, that, helped as the text is by the Author's sketches and diagrams, the reader should have no difficulty in conquering with its aid the rudiments of the craft."
"... Every stage and process in weaving is described with such clear and precise detail that, along with the Author's sketches and diagrams, the reader should have no trouble mastering the fundamentals of the craft with its help."
PORTFOLIOS (in the Series) already issued.
PORTFOLIOS (in the Series) that have already been issued.
SCHOOL COPIES AND EXAMPLES. Selected by W. R. LETHABY and A. H. CHRISTIE. 12 Drawing Copies (1 in colours), with Descriptive Letterpress. 3s. 6d. net.
SCHOOL COPIES AND EXAMPLES. Chosen by W. R. LETHABY and A. H. CHRISTIE. 12 Drawing Copies (1 in color), with Descriptive Text. 3s. 6d. net.
MANUSCRIPT AND INSCRIPTION LETTERS. For Schools and Classes and the Use of Craftsmen. By EDWARD JOHNSTON. With 5 Plates by A. E. R. GILL, 16 Plates in all. Full Notes and Descriptions by the Author. 3s. 6d. net. (Second Edition.)
MANUSCRIPT AND INSCRIPTION LETTERS. For Schools and Classes and the Use of Craftsmen. By EDWARD JOHNSTON. With 5 Plates by A. E. R. GILL, 16 Plates in total. Full Notes and Descriptions by the Author. £3.60 net. (Second Edition.)
NEW VOLUME IN THE PRESS
NEW RELEASE COMING SOON
HERALDRY FOR CRAFTSMEN
AND DESIGNERS
BY
W. H. ST. JOHN HOPE, M.A.
HERALDRY FOR CRAFTSMEN AND DESIGNERS
BY
W. H. ST. JOHN HOPE, M.A.
Further Volumes and Portfolios in preparation.
More volumes and portfolios are in the works.
ON WORKMANSHIP
A LECTURE BY H. WILSON
AUTHOR OF "SILVERWORK AND JEWELLERY"
1s. 6d. net
ON WORKMANSHIP
A LECTURE BY H. WILSON
AUTHOR OF "SILVERWORK AND JEWELRY"
1s. 6d. net
JOHN HOGG,
13 Paternoster Row, London
JOHN HOGG,
13 Paternoster Row, London
Download ePUB
If you like this ebook, consider a donation!