This is a modern-English version of Encyclopedia of Needlework, originally written by Dillmont, Thérèse de.
It has been thoroughly updated, including changes to sentence structure, words, spelling,
and grammar—to ensure clarity for contemporary readers, while preserving the original spirit and nuance. If
you click on a paragraph, you will see the original text that we modified, and you can toggle between the two versions.
Scroll to the bottom of this page and you will find a free ePUB download link for this book.
ENCYCLOPEDIAWIKIPEDIA
OFOF
NEEDLEWORK

ENGLISH EDITION
English Edition
ALL RIGHTS RESERVED
All rights reserved
To be had:
Up for grabs:
of TH. DE DILLMONT, DORNACH, Alsace,
and at all booksellers, and embroidery shops.
of TH. DE DILLMONT, DORNACH, Alsace,
and at all bookstores and embroidery shops.
Price, English bound with gilt edges:
Price, English edition with gilded edges:
| English edition | Sh. | 3.— |
| French edition | Fr. | 5.75 |
| German edition | Mk. | 3.— |
Preface.
The absolute want of any comprehensive book on needlework—such an one as contains both verbal and pictorial descriptions of everything included under the name of needlework—has led me to put into the serviceable form of an Encyclopedia, all the knowledge and experience, which years of unceasing study and practice have enabled me to accumulate on the subject, with the hope that diligent female workers of all ages, may be able, by its means to instruct themselves in every branch of plain and fancy needlework.
The complete lack of any comprehensive book on needlework—one that includes both written and visual descriptions of everything related to needlework—has motivated me to compile all the knowledge and experience I’ve gained through years of continuous study and practice into an Encyclopedia. I hope that hardworking women of all ages will be able to use it to teach themselves in every area of basic and decorative needlework.
All the patterns given, even the most insignificant, were worked afresh for the purpose, and thus, not merely faithful representations, but also lucid and intelligible explanations of the same, are secured.
All the patterns provided, even the smallest ones, were created anew for this purpose, ensuring that they are not only accurate representations but also clear and understandable explanations of the same.
In order that my readers may have something besides the dull theory, the work is enlivened by a number of useful patterns, some new, some derived from the artistic productions of such countries and epochs as have become famous by special excellence in the domain of needlework.
To give my readers something more engaging than just theory, this work includes a variety of useful patterns, some new and others inspired by the artistic creations from countries and times known for their exceptional needlework.
Many of these interesting designs are drawn from private collections, whose owners, with great kindness, placed their treasures at my disposal, to copy and borrow from at discretion, for which I desire to take the present opportunity, of tendering them my warmest thanks.
Many of these fascinating designs come from private collections, and I am very grateful to the owners who generously allowed me to use their treasures for inspiration and reference. I want to take this opportunity to express my heartfelt thanks to them.
The choice of colours and material—a difficult matter to many—my readers will find rendered comparatively easy to them by the notes affixed to the illustrations; and I may point out, that most of the patterns were worked with D.M.C cottons, which enjoy the well-earned reputation of being, the very best of their kind, in the market of the world.
The choice of colors and materials—a tough decision for many—will be made easier for my readers by the notes attached to the illustrations. I should mention that most of the patterns were created using D.M.C cottons, which are well-known for being the best of their kind in the global market.
Experience has convinced me that, in many instances, these cottons may with advantage take the place of wool, linen thread, and even silk.
Experience has shown me that, in many cases, these cottons can successfully replace wool, linen thread, and even silk.
If this work meet with indulgent judges, and prove really useful, I shall find ample reward in that fact for the trouble and difficulties that have unavoidably attended its completion.
If this work is received kindly by its readers and proves to be genuinely helpful, I will find great satisfaction in that alone for all the effort and challenges that have inevitably come with finishing it.
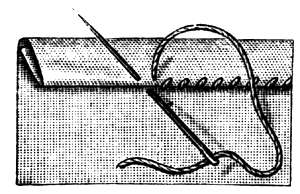
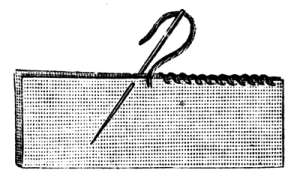
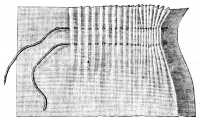
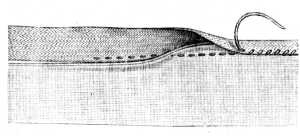
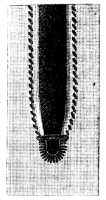
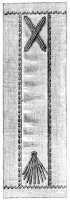
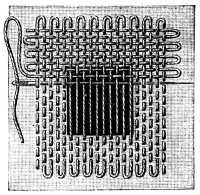
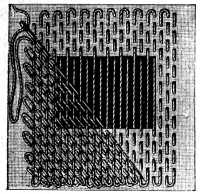
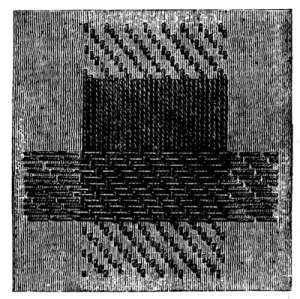
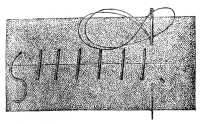
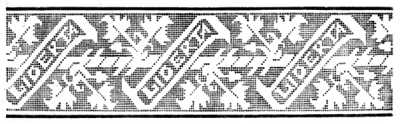
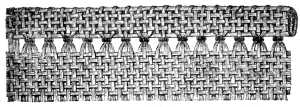
Stripe showing running, stitching, button-holing, and herring-boning.
Stripe showing running, stitching, buttonholing, and herringbone.
Plain Sewing.
Many, on opening the Encyclopedia of needlework will be disposed to exclaim as they read the heading of this first section: What is the use of describing all the old well-known stitches, when machines have so nearly superseded the slower process of hand-sewing? To this our reply is that, of all kinds of needlework, Plain Sewing needs to be most thoroughly learned, as being the foundation of all. Those who are able to employ others to work for them, should at least know how to distinguish good work from bad, and those who are in less fortunate circumstances, have to be taught how to work for themselves.
Many people, upon opening the Encyclopedia of Needlework, might feel the urge to exclaim as they read the title of this first section: What’s the point of describing all the old, familiar stitches when machines have almost completely replaced the slower process of hand-sewing? Our response is that out of all types of needlework, plain sewing is the one that needs to be learned most thoroughly, as it’s the foundation of everything else. Those who can hire others to work for them should at least know how to tell good work from bad, and those who are in less fortunate situations need to be taught how to work for themselves.
Position of the body and hands.—Before describing different kinds of stitches, a word should be said as to the position of the body and hands when at work. Long experience has convinced me that no kind of needlework necessitates a stooping or cramped attitude. To obviate which, see that your chair and table suit each other in height, and that you so hold your work as hardly to need to bend your head at all. The practice of fastening the work to the knee, besides being ungraceful, is injurious to the health.
Position of the body and hands.—Before discussing the different types of stitches, it’s important to talk about how to sit and hold your hands while working. From long experience, I've learned that no type of needlework requires you to slouch or contort your body. To avoid this, make sure your chair and table are at the right height for each other, and hold your work in a way that allows you to keep your head up. Fastening your work to your knee may not only look awkward but can also be bad for your health.
Needles.—These should be of the best quality. To test a needle, try to break it; if it resist, and then break clean in two, the steel is good; if it bend without breaking, or break without any resistance, it is bad. Never use a bent needle, it makes ugly and irregular stitches, and see that the eye, whether round or egg-shaped, be well-drilled, that it may not fray or cut the thread. Long or half-long needles are the best for white work, long ones for dress-making, and longer ones still, with long eyes, for darning. A stock of each, from No 5 to 12, is advised. The needle should always be a little thicker than the thread, to make an easy passage for it through the stuff.
Needles.—These should be of the highest quality. To test a needle, try to break it; if it resists and then breaks cleanly in two, the steel is good; if it bends without breaking, or breaks easily, it’s not good. Never use a bent needle, as it creates ugly and uneven stitches, and make sure the eye, whether round or egg-shaped, is well-drilled so it doesn’t fray or cut the thread. Long or medium-long needles are best for white work, long ones for dress-making, and even longer ones with long eyes for darning. It’s recommended to have a supply of each, from No 5 to 12. The needle should always be slightly thicker than the thread to allow it to pass easily through the fabric.
To keep needles from rusting, strew a little stone alum in the packets, and workers whose hands are apt to get damp, should have a small box of it handy, to powder their fingers with. Blackened needles can be made quite bright again by drawing them through an emery cushion.
To prevent needles from rusting, sprinkle a little stone alum in the packets, and workers whose hands tend to get damp should keep a small box of it nearby to powder their fingers with. Blackened needles can be made shiny again by pulling them through an emery cushion.
Scissors.—Scissors are a very important accessory of the work-table, and two varieties are indispensable; a pair of large ones for cutting-out, with one point blunt and the other sharp, the latter to be always held downwards; and a pair of smaller ones with two sharp points. The handles should be large and round; if at all tight, they tire and disfigure the hand.
Scissors.—Scissors are an essential tool for the work table, and you need two types; a large pair for cutting fabric, with one blunt point and one sharp point, the sharp point always facing downwards; and a smaller pair with two sharp points. The handles should be big and round; if they're too tight, they can be uncomfortable and ugly for your hands.
Thimble.—Steel thimbles are the best; bone are very liable to break, and silver ones are not deeply enough pitted, to hold the needle. A thimble should be light, with a rounded top and flat rim.
Thimble.—Steel thimbles are the best; bone ones are likely to break, and silver ones aren’t textured enough to grip the needle. A thimble should be lightweight, with a rounded top and a flat rim.
The thread.—Except for tacking, your thread should never be more than from 40 to 50 c/m. long.[1] If the thread is in skeins, it does not matter which end you begin with, but if you use reeled cotton, thread your needle with the end that points to the reel, when you cut it; as the other end will split, and unravel, when twisted from left to right, which is generally done, to facilitate the process of threading. The cotton should always be cut, as it is weakened by breaking.
The thread.—Aside from tacking, your thread should never be more than 40 to 50 cm long.[1] If the thread comes in skeins, it doesn’t matter which end you start with, but if you’re using reeled cotton, thread your needle with the end that’s pointing toward the reel when you cut it; the other end will split and unravel when twisted from left to right, which is usually how it’s done to make threading easier. Always cut the cotton because it gets weakened if you break it.
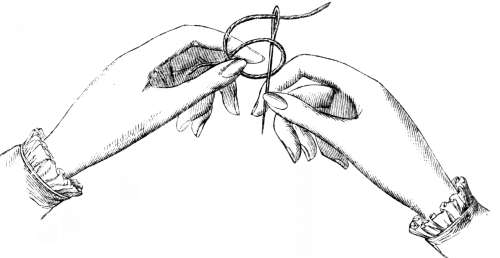
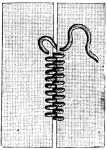
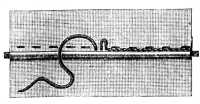
Knotting the thread into the needle (fig. 1).—When the thread becomes inconveniently short, and you do not want take a fresh one, it may be knotted into the needle, thus: bring it round the forefinger close to the needle, cross it on the inside next to the finger, hold the crossed threads fast, with the thumb draw the needle out through the loop thus formed, and tighten the loop round both ends.
Knotting the thread into the needle (fig. 1).—When the thread gets too short and you don't want to grab a new one, you can knot it into the needle like this: wrap it around your forefinger near the needle, cross it on the inside next to your finger, hold the crossed threads securely, and with your thumb, pull the needle through the loop that forms, then tighten the loop around both ends.
Materials.—For tacking, use Coton à coudre D.M.C qualité supérieure (black and gold stamp) Nos. 2 to 6.[A] For hand-sewing, Fil d’Alsace D.M.C Nos. 30 to 700,[A] and Fil à dentelle D.M.C, balls or reels, Nos. 25 to 100[A] will be found most useful. For machine-work: Câblé 6 fils pour machines D.M.C, Nos. 30 to 300,[A] black and white, or white and blue stamp. These can also be used for hand-work. Both these and the lace-thread (Fil à dentelle) on reels, are superfine in quality. The medium sizes are the most useful; but the only suitable ones for very fine and delicate fabrics are the Fil à dentelle D.M.C, and Fil d’Alsace, and the latter only is manufactured in the higher numbers.
Materials.—For tacking, use D.M.C quality superior sewing thread (black and gold stamp) Nos. 2 to 6.[A] For hand-sewing, the D.M.C Alsace thread Nos. 30 to 700,[A] and D.M.C lace thread, balls or reels, Nos. 25 to 100[A] will be very useful. For machine work: D.M.C 6-ply thread for machines, Nos. 30 to 300,[A] black and white, or white and blue stamp. These can also be used for hand work. Both these and the lace thread (Fil à dentelle) on reels are superfine in quality. The medium sizes are the most useful; but the only ones suitable for very fine and delicate fabrics are the D.M.C lace thread and Alsace thread, and the latter is only made in the higher numbers.
All these threads are to be had, wound in balls, or on reels, the buyer may make his own choice; balls are apt to get tangled, but the cotton preserves its roundness better than when it is wound on reels. Linen is generally sewn with linen-thread, but Fil à dentelle and the Fil d’Alsace are very good substitutes.
All these threads are available, either wound in balls or on reels, so the buyer can choose whatever they prefer. Balls tend to get tangled, but the cotton holds its shape better than when it's on reels. People usually sew with linen thread, but Fil à dentelle and Fil d’Alsace are excellent alternatives.
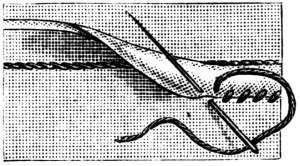
Position of the hands (fig. 2).—The stuff, fastened to a cushion, must be held with the left hand, which should neither rest on the table, nor on the cushion, the needle must be held between the thumb and forefinger, of the right hand, and the middle finger, armed with the thimble, pushes the needle far enough through the stuff, for the other fingers to take hold of it and draw it out; the thread then comes to lie between the fourth and fifth fingers in the form of a loop, which must be tightened gradually to avoid its knotting.
Position of the hands (fig. 2).—The fabric, secured to a cushion, should be held with the left hand, which shouldn't rest on the table or the cushion. The needle is to be held between the thumb and forefinger of the right hand, while the middle finger, covered with a thimble, pushes the needle through the fabric just enough for the other fingers to grab it and pull it out. The thread then rests between the fourth and fifth fingers in the shape of a loop, which should be tightened gradually to prevent it from knotting.
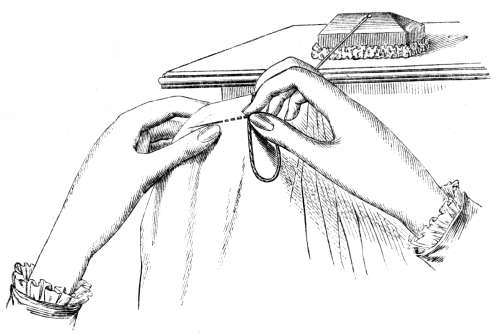
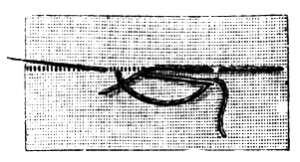
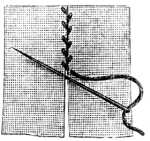
Position of the hands without cushion (fig. 3).—When the work cannot be fastened to a cushion it should be held between the forefinger and the thumb, and left hanging down, over the other fingers. If it need to be more firmly held, draw it between the fourth and fifth fingers, which will prevent it from getting puckered or dragged.
Position of the hands without cushion (fig. 3).—When the work can't be secured to a cushion, it should be held between the forefinger and thumb, letting it hang over the other fingers. If it needs to be held more securely, slide it between the fourth and fifth fingers to keep it from getting puckered or pulled.
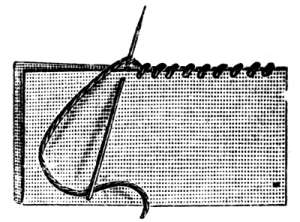
(1) Running-stitch (fig. 4).—This is the simplest and easiest of all. Pass the needle in and out of the material, at regular intervals, in a horizontal direction, taking up three or four threads at a time. If the stuff allow, several stitches may be taken on the needle at once, before the thread is drawn out. Running-stitch is used for plain seams, for joining light materials, for making gathers and for hems.
(1) Running-stitch (fig. 4).—This is the simplest and easiest of all. Pass the needle in and out of the fabric at regular intervals in a horizontal direction, catching three or four threads at a time. If the material allows, you can take several stitches on the needle at once before pulling the thread through. Running-stitch is used for plain seams, joining light fabrics, creating gathers, and for hems.
(2) Back-stitch (fig. 5).—Insert the needle, and draw it out six threads further on, carry your thread back, from left to right, and insert the needle three threads back from the point at which it was last drawn out, and bring it out six threads beyond. Stitching and back-stitching are better and more quickly done by machine than by hand.
(2) Back-stitch (fig. 5).—Insert the needle, pull it out six threads further along, then pull your thread back from left to right, and insert the needle three threads back from where it was last pulled out, bringing it out six threads beyond. Stitching and back-stitching are easier and quicker to do by machine than by hand.
Stitching (fig. 6).—The production of a row of back-stitches, that exactly meet one another, constitutes what is called stitching. Only one stitch can be made at a time, and the needle must be put in, exactly at the point where it was drawn out to form the preceding back-stitch, and brought out as many threads further on as were covered by the last back-stitch. The beauty of stitching depends on the uniform length of the stitches, and the straightness of the line formed, to ensure which it is necessary to count the threads for each stitch, and to draw a thread to mark the line. If you have to stitch in a slanting line across the stuff, or the stuff be such as to render the drawing of a thread impossible, a coloured tacking thread should be run in first, to as a guide.
Stitching (fig. 6).—Creating a row of back-stitches that connect perfectly is known as stitching. You can only make one stitch at a time, and the needle must go in exactly where it came out to make the previous back-stitch, pulling it through as many threads ahead as were covered by the last back-stitch. The elegance of stitching relies on the consistent length of the stitches and the straightness of the line formed. To achieve this, it’s essential to count the threads for each stitch and use a thread to mark the line. If you need to stitch in a diagonal line across the fabric, or if the fabric makes it impossible to draw a thread, a colored tacking thread should be used as a guide first.
Stitched hem (fig. 7).—Make a double turning, as for a hem, draw a thread two or three threads above the edge of the first turning, and do your stitching through all three layers of stuff; the right side will be that on which you form your stitches.
Stitched hem (fig. 7).—Create a double fold like you would for a hem, pull a thread two or three threads above the edge of the first fold, and stitch through all three layers of fabric; the side where you make your stitches will be the front side.
(3) Hemming-stitch (fig. 8).—To make a good hem, your stuff must be cut in the line of the thread. Highly dressed stuffs, such as linen and calico; should be rubbed in the hand, to soften them, before the hem is laid. Your first turning should not be more than 2 m/m. wide; turn down the whole length of your hem, and then make the second turning of the same width, so that the raw edge is enclosed between two layers of stuff.
(3) Hemming-stitch (fig. 8).—To create a good hem, your fabric should be cut along the thread line. Smooth fabrics like linen and calico should be rubbed between your hands to soften them before you lay the hem. Your initial fold shouldn't exceed 2 mm in width; fold down the entire length of your hem, and then make a second fold of the same width, so that the raw edge is tucked between two layers of fabric.
Narrow hems do not need to be tacked, but wide ones, where the first turning should only be just wide enough to prevent the edge from fraying, ought always to be. In hemming you insert the needle and thread directed in a slanting position towards you, just below the edge of the hem, and push it out two threads above, and so on to the end, setting the stitches, two or three threads apart, in a continuous straight line. To ensure the hem being straight, a thread may be drawn to mark the line for the second turning, but it is not a good plan, especially in shirt-making, as the edge of the stuff, too apt in any case, to cut and fray, is, thereby, still further weakened. Hems in woollen materials, which will not take a bend, can only be laid and tacked, bit by bit. In making, what are called rolled hems, the needle must be slipped in, so as only to pierce the first turning, in order that the stitches may not be visible on the outside.
Narrow hems don’t need to be tacked, but wide ones, where the first fold should be just wide enough to stop the edge from fraying, should always be tacked. When hemming, you insert the needle and thread at a slant toward you, just below the edge of the hem, and push it out two threads above, and so on until you reach the end, spacing the stitches two or three threads apart in a straight line. To keep the hem straight, you can draw a thread to mark the line for the second fold, but this isn’t a good idea, especially in making shirts, as the edge of the fabric is already prone to cutting and fraying and will get even weaker. Hems in woolen fabrics, which won’t hold a bend, can only be laid and tacked bit by bit. When making what are called rolled hems, the needle should only pierce the first fold so that the stitches aren’t visible on the outside.
Flat seam (fig. 9).—Lay your two edges, whether straight or slanting, exactly even, tack them together with stitches 2 c/m. long, distant 1 to 2 c/m. from the edge, and then back-stitch them by machine or by hand, following the tacking-thread. Cut off half the inner edge, turn the outer one in, as for a hem and sew it down with hemming-stitches.
Flat seam (fig. 9).—Align your two edges, whether straight or at an angle, so they are perfectly even. Temporarily hold them together with stitches that are 2 cm long, spaced 1 to 2 cm from the edge. Then, backstitch them either by machine or by hand, following the temporary stitches. Trim half of the inner edge, fold the outer edge in like a hem, and secure it with hemming stitches.
Smooth the seam underneath with the forefinger as you go, to make it lie quite flat. Beginners should flatten down the seam with their thimbles, or with the handle of the scissors, before they begin to hem, as the outer and wider edge is very apt to get pushed up and bulge over, in the sewing, which hides the stitches.
Smooth the seam underneath with your forefinger as you go, so it lies completely flat. Beginners should flatten the seam with their thimbles or the handle of the scissors before they start to hem, because the outer and wider edge tends to get pushed up and bulge over while sewing, which can hide the stitches.
Rounded seam.—Back-stitch your two edges together, as above directed, then cut off the inner edge to a width of four threads, and roll the outer one in, with the left thumb, till the raw edge is quite hidden, hemming as you roll. This kind of seam, on the wrong side, looks like a fine cord, laid on, and is used in making the finer qualities of underclothing.
Rounded seam.—Sew your two edges together with a back stitch, as instructed above. Then, trim the inner edge to four threads wide, and roll the outer edge in with your left thumb until the raw edge is completely covered, hemming as you go. This type of seam, on the inside, resembles a fine cord laid down and is used for making higher-quality undergarments.
Fastening threads off, and on (fig. 10).—Knots should be avoided in white work. To fasten on, in hemming, turn the needle backwards with the point up, take one stitch, and stroke and work the end of the thread in, underneath the turning. To fasten on, in back-stitching or running, make one stitch with the new thread, then take both ends and lay them down together to the left, and work over them, so that they wind in, and out of the next few stitches.
Fastening threads off, and on (fig. 10).—Knots should be avoided in white work. To start fastening on while hemming, turn the needle backwards with the point facing up, take one stitch, and tuck the end of the thread in underneath the fold. To fasten on while back-stitching or running, make one stitch with the new thread, then take both ends and lay them down together to the left, and work over them so that they intertwine with the next few stitches.
(4) Top or over-sewing stitch (fig. 11).—This stitch is used for joining selvedges together. To keep the two pieces even, it is better, either to tack or pin them together first. Insert the needle, from right to left, under the first thread of the selvedge, and through both edges, and sew from right to left, setting your stitches not more than three threads apart. The thread must not be drawn too tightly, so that when the seam is finished and flattened with the thimble, the selvedges may lie, side by side.
(4) Top or over-sewing stitch (fig. 11).—This stitch is used to join selvedges together. To ensure the two pieces stay even, it's better to tack or pin them together first. Insert the needle from right to left, under the first thread of the selvedge, and through both edges. Sew from right to left, keeping your stitches no more than three threads apart. Don't pull the thread too tight, so that when the seam is finished and flattened with the thimble, the selvedges lie side by side.
Another kind of sewing-stitch (fig. 12)—For dress-seams and patching; sew left to right, tacking or pinning the edges together first, and holding them tightly with the thumb and finger, to keep perfectly even.
Another type of sewing stitch (fig. 12)—For dress seams and mending; sew from left to right, first tacking or pinning the edges together, and holding them tightly with your thumb and finger to keep them perfectly even.
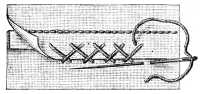
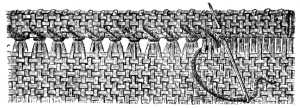
Antique or old-German seam (figs. 13 and 14).—Tack or pin the selvedges together as above, then, pointing your needle upwards from below, insert it, two threads from the selvedge, first on the wrong side, then on the right, first through one selvedge, then through the other, setting the stitches two threads apart. In this manner, the thread crosses itself, between the two selvedges, and a perfectly flat seam is produced. Seams of this kind occur in old embroidered linen articles, where the stuff was too narrow to allow for any other. A similar stitch, fig. 14, only slanting, instead of quite straight, as in fig. 13, is used in making sheets.
Antique or old-German seam (figs. 13 and 14).—Tack or pin the edges together as shown above, then, with your needle pointed upwards from underneath, insert it two threads in from the edge, first on the wrong side and then on the right, going through one edge and then the other, keeping the stitches two threads apart. This way, the thread crosses itself between the two edges, creating a perfectly flat seam. Seams like this can be found in old embroidered linen items, where the fabric was too narrow for any other type of seam. A similar stitch, fig. 14, is also used but slants instead of being straight, as seen in fig. 13, particularly in making sheets.
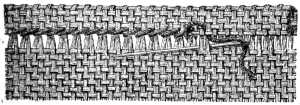
French double seam (fig. 15).—For joining such stuffs as fray, use the so-called French-seam.
French double seam (fig. 15).—To join fabrics that fray, use what’s known as a French seam.
Run your two pieces of stuff together, the wrong sides touching, and the edges perfectly even, then turn them round just at the seam, so that the right sides come together inside, and the two raw edges are enclosed between, and run them together again. See that no threads are visible on the outside. This seam is used chiefly in dress-making, for joining slight materials together which cannot be kept from fraying by any other means.
Sew your two pieces of fabric together, with the wrong sides facing each other and the edges perfectly aligned. Then, turn them at the seam so the right sides are together inside, and the raw edges are tucked in between. Sew them together again. Make sure no threads are visible on the outside. This seam is mainly used in dress-making for joining lightweight materials that can't be prevented from fraying by any other method.
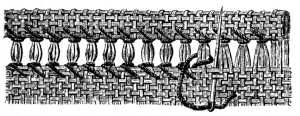
Hemmed double seam (figs. 16 and 17).—Turn in the two raw edges, and lay them one upon the other, so that the one next the forefinger, lies slightly higher than the one next the thumb. Insert the needle, not upwards from below but first into the upper edge, and then, slightly slanting, into the lower one. This seam is used in dress-making, for fastening down linings. Fig. 17 shows another kind of double seam, where the two edges are laid together, turned in twice, and hemmed in the ordinary manner, with the sole difference, that the needle has to pass through a sixfold layer of stuff.
Hemmed double seam (figs. 16 and 17).—Fold in the two raw edges and stack them so that the edge closest to your forefinger is slightly higher than the one next to your thumb. Insert the needle not from below but first into the upper edge, and then, at a slight angle, into the lower edge. This seam is used in dressmaking to secure linings. Fig. 17 shows another type of double seam, where the two edges are placed together, folded in twice, and hemmed in the usual way, with the only difference being that the needle has to go through a sixfold layer of fabric.
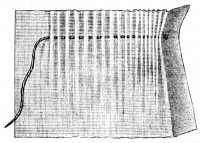
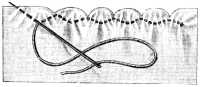
Gathering (fig. 18).—Gathers are made with running-stitches of perfectly equal length; take up and leave three or four threads, alternately, and instead of holding the stuff fast with your thumb, push it on to the needle as you go, and draw up your thread after every four or five stitches.
Gathering (fig. 18).—Gatherings are created with running stitches that are all the same length; take up and leave three or four threads alternately, and instead of holding the fabric in place with your thumb, slide it onto the needle as you stitch, and pull up your thread after every four or five stitches.
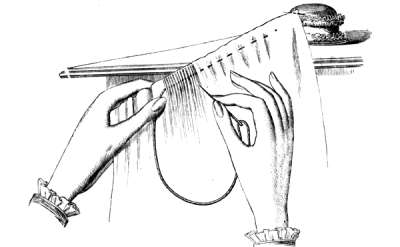
Stroking gathers (fig. 19).—When you have run in your gathering thread, draw it up tight, and make it fast round the finger of your left hand, and then stroke down the gathers with a strong needle, so that they lie evenly side by side, pushing each gather, in stroking it, under your left thumb, whilst you support the stuff at the back with your other fingers.
Stroking gathers (fig. 19).—Once you've run your gathering thread, pull it tight and secure it around the finger of your left hand. Next, use a sturdy needle to smooth down the gathers so they lie flat and evenly beside each other. As you smooth each gather, tuck it under your left thumb while supporting the fabric at the back with your other fingers.
Running in a second gathering thread (fig. 20).—This is to fix the gathers after they have been stroked, and should be run in 1 or 2 c/m. below the first thread, according to the kind of stuff, and the purpose it is intended for: take up five or six gathers at a time, and draw your two threads perfectly even, that the gathers may be straight to the line of the thread.
Running in a second gathering thread (fig. 20).—This is to secure the gathers after they've been smoothed out, and should be run in 1 or 2 cm below the first thread, depending on the type of fabric and its intended use: gather five or six sections at a time, and make sure your two threads are perfectly even so that the gathers align straight with the thread line.
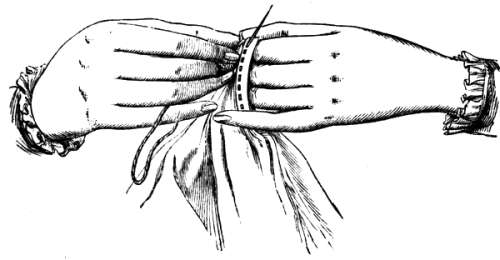
Sewing on gathers (fig. 21).—To distribute the fullness equally, divide the gathered portion of material, and the band, or plain piece, on to which it is to be sewn, into equal parts, and pin the two together at corresponding distances, the gathered portion under the plain, and hem each gather to the band or plain piece, sloping the needle to make the thread slant, and slipping it through the upper threads only of the gathers.
Sewing on gathers (fig. 21).—To evenly distribute the fullness, divide the gathered part of the material and the band or plain piece it will be sewn onto into equal sections. Pin the two together at matching intervals, with the gathered part underneath the plain section. Then, sew each gather to the band or plain piece, angling the needle to create a slant in the thread, and passing it through only the upper threads of the gathers.
Whipping (fig. 22).—Whipping is another form of gathering, used for fine materials. With the thumb and forefinger of the left hand, roll the edge over towards you, into a very tight thin roll, insert the needle on the inside of the roll next the thumb, and bring it out on the outside next the forefinger, at very regular distances, and draw up the thread slightly, from time to time, to form the gathers.
Whipping (fig. 22).—Whipping is another technique for gathering, typically used with delicate materials. With your left hand, use your thumb and forefinger to roll the edge towards you, creating a very tight, thin roll. Insert the needle on the inside of the roll next to your thumb, and bring it out on the outside next to your forefinger, making sure to space the stitches evenly. Occasionally, pull the thread slightly to create the gathers.

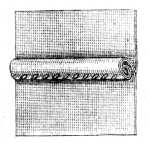
Sewing on cord (fig. 24).—For sewing on cord, use strong thread, either Fil d’Alsace D.M.C, Fil à dentelle D.M.C or Câblé 6 fils D.M.C No. 25, 30, 35 or 40.[A] Be careful not to stretch the cord, but to hold it in, as you sew it, as it invariably shrinks more than the stuff in the first washing. Fasten it with hemming stitches to the edge of the turning, taking care that it does not get twisted.
Sewing on cord (fig. 24).—To sew on cord, use strong thread like Fil d’Alsace D.M.C, Fil à dentelle D.M.C, or Câblé 6 fils D.M.C No. 25, 30, 35, or 40.[A] Be careful not to stretch the cord; instead, hold it in place while sewing since it usually shrinks more than the fabric during the first wash. Secure it with hemming stitches to the edge of the fold, making sure it doesn’t get twisted.
Sewing on flaps (fig. 25).—These should be back-stitched on to the right side of the article they are to be affixed to, quite close to the edge, then folded over in half, and hemmed down on the wrong side. Like the cord, the flap must, in the process, be held in very firmly with the left hand. Though the back-stitching could be more quickly done by machine, hand-work is here preferable, as the holding in cannot be done by machine.
Sewing on flaps (fig. 25).—These should be stitched backward onto the right side of the item they will be attached to, right up against the edge. Then, fold them over in half and hem them down on the wrong side. Like the cord, the flap needs to be held firmly in place with the left hand during this process. Although you could sew it faster by machine, hand-sewing is better here because the securing can't be done by machine.
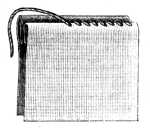
Sewing on tape-loops (figs. 26 and 27).—These, in the case of the coarser articles of household linen, are generally fastened to the corners. Lay the ends of your piece of tape, which should be from 15 to 17 c/m. long, side by side, turn in and hem them down, on three sides: the loop should be so folded as to form a three-cornered point, shewn in the illustration. Join the two edges of the tape together in the middle with a few cross-stitches, and stitch the edge of the hem of the article to the loop, on the right side.
Sewing on tape-loops (figs. 26 and 27).—For coarser household linens, these are usually attached to the corners. Take your piece of tape, which should be 15 to 17 cm long, and lay the ends side by side. Fold them in and hem them down on three sides: the loop should be folded to create a pointed triangle, as shown in the illustration. Join the two edges of the tape together in the middle with a few cross-stitches, and stitch the edge of the hem of the item to the loop on the right side.
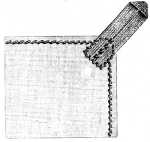
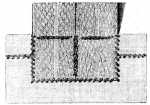
Fig. 27 shows how to sew on a loop in the middle of an article, the two ends separately, one on one side, the other on the other.
Fig. 27 shows how to attach a loop in the center of an item, with the two ends sewn separately, one on each side.
Strings and loops for fine under-linen (fig. 28).—Sew these on, likewise, on the wrong side of the article, hemming down the ends, and fastening them on the right side, with two rows of stitching crossing each other, and a third row along the edge.
Strings and loops for fine under-linen (fig. 28).—Sew these onto the underside of the item, hemming down the ends and securing them on the front with two rows of stitching that cross each other, plus a third row along the edge.
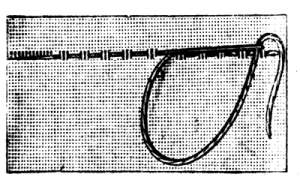
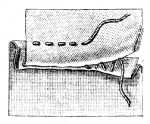
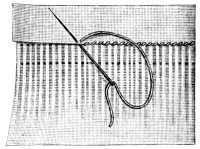
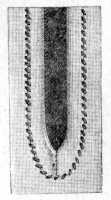
Button-holes in linen (fig. 29).—Cut your hole perfectly straight, and of exactly, the diameter of the button, having previously marked out the place for it, with two rows of running-stitches, two or three threads apart. Put in your needle at the back of the slit, and take up about three threads, bring the working thread round, from right to left under the point of the needle, and draw the needle out through the loop, so that the little knot comes at the edge of the slit, and so on to the end, working from the lower left-hand corner to the right. Then make a bar of button-hole stitching across each end, the knotted edge towards the slit.
Buttonholes in linen (fig. 29).—Cut your hole perfectly straight and exactly the size of the button, having previously marked the spot for it with two rows of running stitches, spaced two or three threads apart. Start your needle at the back of the slit, taking up about three threads, then bring the working thread around from right to left under the needle's point and pull the needle through the loop, so the little knot ends up at the edge of the slit. Continue this to the end, working from the lower left-hand corner to the right. Then create a bar of buttonhole stitching at each end, with the knotted edge facing the slit.
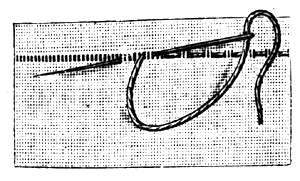
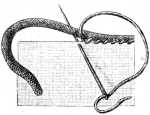
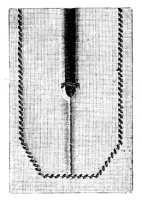
Button holes in dress materials (fig. 30).—Mark out and cut them as above described; if however, the material be liable to fray, wet the slit as soon as you have cut it, with liquid gum, and lay a strand of strong thread along the edge to make your stitches over; one end of dress button-holes must be round, the stitches diverging like rays from the centre, and when you have worked the second side, thread the needle with the loose strand, and pull it slightly, to straighten the edges; then fasten off, and close the button-hole with a straight bar of stitches across the other end, as in fig. 29.
Buttonholes in dress materials (fig. 30).—Mark and cut them as described above; however, if the material tends to fray, wet the slit with liquid gum as soon as you've cut it, and lay a strong thread along the edge to stitch over. One end of the buttonhole should be round, with the stitches spreading out from the center like rays. After you work on the second side, thread the needle with the loose strand and pull it slightly to straighten the edges. Then secure it and finish the buttonhole with a straight line of stitches across the other end, as shown in fig. 29.
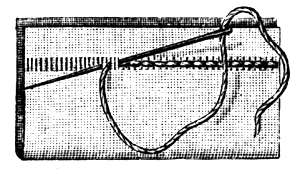
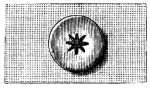
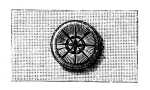
Sewing on buttons (figs. 31 and 32).—To sew linen, or webbed buttons on to underclothing, fasten in your thread with a stitch or two, at the place where the button is to be; bring the needle out through the middle of the button, and make eight stitches, diverging from the centre like a star, and if you like, encircle them by a row of stitching, as in fig. 32. This done, bring the needle out between the stuff and the button, and twist the cotton six or seven times round it, then push the needle through to the wrong side, and fasten off.
Sewing on buttons (figs. 31 and 32).—To attach linen or webbed buttons to underclothing, start by securing your thread with a stitch or two at the spot where the button will go; pull the needle through the center of the button and make eight stitches radiating from the center like a star. If you want, you can also add a row of stitches around them, as shown in fig. 32. Once that's done, bring the needle out between the fabric and the button, twist the cotton six or seven times around it, then push the needle through to the back side and tie it off.
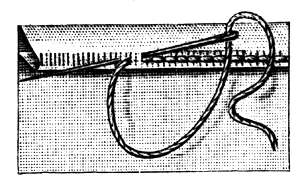
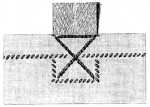
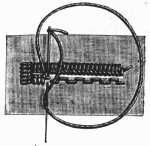
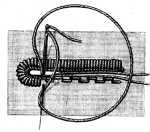
Binding slits (figs. 33, 34, 35, 36).—Nothing is more apt to tear than a slit whether it be hemmed or merely bound. To prevent this, make a semicircle of button-hole stitches at the bottom of the slit, and above that, to connect the two sides, a bridge of several threads, covered with button-hole stitches.
Binding slits (figs. 33, 34, 35, 36).—Nothing is more likely to tear than a slit, whether it’s hemmed or just bound. To prevent this, create a semicircle of buttonhole stitches at the bottom of the slit, and above that, connect the two sides with a bridge of several threads, covered with buttonhole stitches.

In under-linen, it often so happens that two selvedges meet at the slit, which renders binding unnecessary; in that case take a small square of stuff, turn in the raw edges, top-sew it into the slit on two sides, turn in the other two, fold over on the bias, and hem them down over the top-sewing, as shewn in fig. 36. Such little squares of material, inserted into a slit or seam, to prevent its tearing, are called gussets.
In under-linens, it often happens that two selvedges meet at the slit, making binding unnecessary. In that case, take a small square of fabric, fold in the raw edges, sew it into the slit on two sides, then fold in the other two edges, fold it over on the bias, and hem them down over the top-sewing, as shown in fig. 36. These small fabric squares, added into a slit or seam to prevent tearing, are called gussets.
Sewing on piping (fig. 37). Piping is a border, consisting of a cord or bobbin, folded into a stripe of material, cut on the cross, and affixed to the edge of an article to give it more strength and finish. It is a good substitute for a hem or binding on a bias edge, which by means of the cord, can be held in, and prevented from stretching. Cut your stripes diagonally, across the web of the stuff, and very even; run them together, lay the cord or bobbin along the stripe, on the wrong side, 5 m/m. from the edge, fold the edge over, and tack the cord lightly in. Then lay it on the raw edge of the article, with the cord towards you, and with all the raw edges turned away from you. Back-stitch the piping to the edge, keeping close to the cord. Then turn the article round, fold in the raw outside edge over the others, and hem it down like an ordinary hem.
Sewing on piping (fig. 37). Piping is a trim made of a cord or bobbin, wrapped in a strip of fabric, cut on the diagonal, and attached to the edge of an item to add strength and a finished look. It works well as a replacement for a hem or binding on a bias edge, as the cord helps hold it in place and prevents it from stretching. Cut your strips diagonally across the fabric, making sure they're very even; sew them together, position the cord or bobbin along the strip, on the back side, 5 mm from the edge, fold the edge over, and lightly tack the cord in place. Next, place it on the raw edge of the item, with the cord facing you, and the raw edges turned away. Back-stitch the piping to the edge, staying close to the cord. Then, turn the item around, fold the raw outer edge over the others, and hem it down like a standard hem.
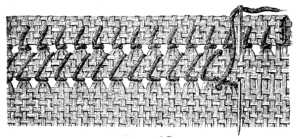
Herring-boning (fig. 39).—This stitch is chiefly used for seams in flannel, and for overcasting dress-seams, and takes the place of hemming, for fastening down the raw edges of a seam that has been run or stitched, without turning them in. Herring-boning is done from left to right, and forms two rows of stitches. Insert the needle from right to left, and make a stitch first above, and then below the edge, the threads crossing each other diagonally, as shewn in fig. 39.
Herring-boning (fig. 39).—This stitch is mainly used for seams in flannel and for overcasting dress seams. It serves as an alternative to hemming, securing the raw edges of a seam that has been sewn without folding them in. Herring-boning is done from left to right and creates two rows of stitches. Insert the needle from right to left, making a stitch first above, then below the edge, with the threads crossing diagonally, as shown in fig. 39.
FOOTNOTES:
Mending.
The mending of wearing-apparel and house-linen, though often an ungrateful task, is yet a very necessary one, to which every female hand ought to be carefully trained. How best to disguise and repair the wear and tear of use or accident is quite as valuable an art, as that of making new things.
The repair of clothing and household linens, while often a thankless job, is still a very important one that every woman should learn to do well. Knowing how to hide and fix the signs of use or damage is just as valuable a skill as making new items.
Under the head of mending, we include the strengthening and replacing of the worn and broken threads of a fabric, and fitting in of new stuff in the place of that which is torn or damaged. The former is called darning, the latter, patching.
Under the topic of mending, we include reinforcing and replacing the worn and broken threads of a fabric, and adding new material in place of what is torn or damaged. The first is called darning, and the second, patching.
Darning.—When only a few of the warp or woof threads are torn or missing, a darn will repair the mischief, provided the surrounding parts be sound. When the damage is more extensive, the piece must be cut out.
Darning.—When only a few of the warp or weft threads are torn or missing, darning can fix the damage, as long as the surrounding areas are intact. If the damage is more extensive, you'll need to cut out the affected piece.
In some cases the warp of the stuff itself can be used for darning, otherwise thread as much like the stuff as possible should be chosen.
In some cases, the fabric's own threads can be used for darning; otherwise, you should choose a thread that closely matches the fabric.
Materials suitable for mending.—Coton à repriser D.M.C is used for most kinds of darning. It can be had in 18 different sizes, from Nos. 8 to 100, white and unbleached, and in all the colours of the D.M.C colour-card in Nos. 12, 25 and 50.
Materials suitable for mending.—D.M.C mending cotton is used for most types of darning. It comes in 18 different sizes, from Nos. 8 to 100, white and unbleached, and in all the colors of the D.M.C color card in Nos. 12, 25, and 50.
It is but very slightly twisted and can be split or used double, if necessary, according to the material. For all the coarser articles of house-linen, unbleached cotton is the best, and for the finer white fabrics, Coton surfin D.M.C Nos. 110, 120 and 150[A]. This cotton, which is not the least twisted, and is to be had both white and unbleached, can be used, by subdividing it, for darning the finest cambric.
It’s just a little twisted and can be split or used double if needed, depending on the material. For all coarser household linens, unbleached cotton is the best choice, and for the finer white fabrics, use Coton surfin D.M.C Nos. 110, 120, and 150[A]. This cotton is minimally twisted and available in both white and unbleached options, which can be subdivided for mending the finest cambric.
Varieties of darning.—These are four, (1) Linen darning, (2) Damask darning, (3) Satin or Twill darning, and (4) Invisible darning, called also, Fine-drawing.
Varieties of darning.—There are four types: (1) Linen darning, (2) Damask darning, (3) Satin or Twill darning, and (4) Invisible darning, also known as Fine-drawing.
(1) Linen Darning (figs. 40 and 41).—All darns should be made on the wrong side of the stuff, excepting fig. 54, which it is sometimes better to make on the right side. The longitudinal running, to form the warp, must be made first. The thread must not be drawn tightly in running your stitches backwards and forwards, and be careful to leave loops at each turning, to allow for the shrinking of the thread in the washing, without its pulling the darn together.
(1) Linen Darning (figs. 40 and 41).—All repairs should be done on the back side of the fabric, except for fig. 54, which is sometimes better to do on the front side. Start by running the thread lengthwise to create the warp. Don’t pull the thread too tightly when stitching back and forth, and make sure to leave loops at each turn to accommodate the shrinking of the thread during washing, so it doesn’t pull the repair tight.
Run your needle in, about one c/m. above the damaged part, take up one or two threads of the stuff and miss the same number, working straight to a thread; on reaching the hole, carry your cotton straight across it, take up alternate threads beyond, and proceed as before. Continue the rows backwards and forwards, taking up in each row, the threads left in the preceding one. Turn the work round and do the same for the woof; alternately taking up and leaving the warp threads, where the cotton crosses the hole. The threads must lie so alone both ways, that the darn, when completed, replaces the original web. The threads are only drawn so far apart in the illustrations, for the sake of clearness.
Run your needle in about one centimeter above the damaged area, pick up one or two threads of the fabric, and skip the same number, working straight to a thread; when you reach the hole, pull your thread directly across it, pick up alternate threads beyond, and continue as before. Keep going back and forth, picking up the threads that were skipped in the previous row. Turn the piece around and do the same for the weft; alternately picking up and skipping the warp threads where the thread crosses the hole. The threads must lie flat in both directions so that once finished, the repair matches the original fabric. The threads in the illustrations are shown apart for clarity.
When the material to be darned does not admit of a fleecy thread, such as Coton à repriser D.M.C, one that as nearly as possible matches the material, should be chosen from the D.M.C cottons.[A]
When the fabric to be repaired doesn't allow for a fluffy thread, like D.M.C darned cotton, you should pick one that closely resembles the fabric from the D.M.C cotton range.[A]
Diagonal linen darning (fig. 42).—Darns are sometimes begun from the corner, so as to form a diagonal web, but they are then much more visible than when they are worked straight to a thread, and therefore not advisable.
Diagonal linen darning (fig. 42).—Darning sometimes starts from the corner to create a diagonal pattern, but this method is much more noticeable than when it's done straight along the thread, so it's generally not recommended.
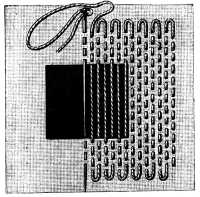
(2) Satin or twill darning (fig. 43).—By twill darning, the damaged web of any twilled or diagonal material can be restored. It would be impossible to enumerate all the varieties of twilled stuffs, but the illustrations and accompanying directions will enable the worker to imitate them all.
(2) Satin or twill darning (fig. 43).—With twill darning, you can repair the damaged fabric of any twilled or diagonal material. It's impossible to list all the different types of twilled fabrics, but the illustrations and instructions will help you replicate them all.
Begin, as in ordinary darning by running in the warp threads, then take up one thread, and miss three. In every succeeding row, advance one thread in the same direction. Or, miss one thread of the stuff and take up two, and as before, advance, one thread in the same direction, every succeeding row. The order in which threads should be missed and taken up, must depend on the web which the darn is intended to imitate.
Begin, like regular darning, by weaving in the warp threads, then pick up one thread and skip three. In each following row, move forward one thread in the same direction. Alternatively, skip one thread of the fabric and pick up two, and as before, move forward one thread in the same direction in each subsequent row. The pattern of threads that should be skipped and picked up will depend on the fabric that the darn is meant to replicate.
When the original is a coloured stuff, it is advisable to make a specimen darn first, on a larger scale, so that you may be more sure of obtaining a correct copy of the original web.
When the original is a colored material, it's a good idea to create a sample darn first, on a larger scale, so that you can be more confident in getting an accurate copy of the original fabric.
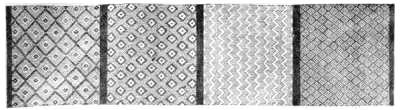
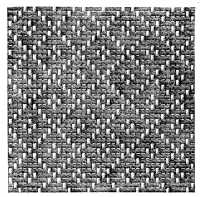
(3) Damask darning (figs. 44, 45, 46, 47, 48, 49).—A damask darn is begun in the same way as all other darns are; the pattern is formed by the cross-runnings and will vary with the number of warp threads taken up and missed, in each successive running. The woven design which you are to copy with your needle must therefore be carefully examined first.
(3) Damask darning (figs. 44, 45, 46, 47, 48, 49).—To start a damask darn, follow the same method as any other darning technique; the pattern is created by the crisscross threads and will change depending on how many warp threads you pick up and skip with each new line. So, make sure to carefully examine the woven design that you will replicate with your needle.
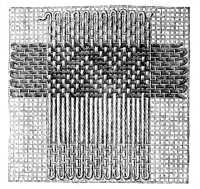
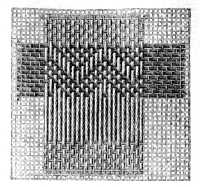
Fig. 46 represents a completed one. In the case of coloured webs, a light shade of cotton is generally used for the warp, one that matches the stuff, for the shot or woof.
Fig. 46 represents a finished one. For colored webs, a light cotton is usually used for the warp, one that matches the material for the weft.
Figs. 47 and 48, illustrate two specimens of darning, formerly done in the convents, from which it will be seen, that the warp and the woof were first drawn in with rather fine thread and the pattern then worked into this foundation with coarser, or else, coloured thread. When this kind of darn is in two colours, take, for the darker shade, Coton à broder D.M.C, or Coton à repriser D.M.C, which are both of them to be had in all the bright and faded shades, to match alike both old and new linen.
Figs. 47 and 48 show two examples of darning that used to be done in convents. From these, we can see that the warp and weft were first created with fine thread, and then the pattern was worked into this base with thicker or colored thread. When using this type of darning in two colors, for the darker shade, use D.M.C Coton à broder or D.M.C Coton à repriser, both of which come in a wide range of bright and faded colors to match both old and new linens.

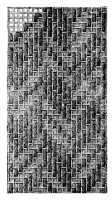
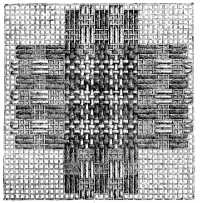
Fig. 49, which is executed in two colours, and is likewise copied from an old work on darning, shows you the manner in which a dice-pattern is to be reproduced.
Fig. 49, which is done in two colors, and is also taken from an old work on darning, shows you how to recreate a dice pattern.
(4) Darning, lost in the ground (fig. 50).—A kind of darn used for repairing rents, the edges of which fit exactly into one another. Neither the torn threads of the material nor the rough edges must be cut off; the torn part is to be tacked upon a piece of oil-cloth, wrong side uppermost, and the edges, drawn together by a thread, run in backwards, and forwards, across them. The stitches must be set as closely together as possible, and regularly inverted, as in every other darn. A much finer thread relatively than that of which the material is composed should, in all cases be used for darning. In this instance also, for the sake of greater distinctness, the size of the thread has been magnified in the illustration. Coton surfin D.M.C, will be found the best for darning both calico and linen.
(4) Darning, lost in the ground (fig. 50).—This is a type of darn used for mending tears, where the edges fit perfectly together. Neither the frayed threads of the fabric nor the rough edges should be trimmed; the torn area should be secured onto a piece of oilcloth, with the wrong side facing up, and the edges drawn together with a thread that runs back and forth across them. The stitches should be as close together as possible and consistently inverted, just like in any other darn. Always use a finer thread than the fabric is made of for darning. In this case, to enhance clarity, the size of the thread has been enlarged in the illustration. Coton surfin D.M.C. is recommended as the best option for darning both calico and linen.

Fine drawing (fig. 51).—The art of making invisible darns in cloth, though such a useful one, is all but unknown. It is a tedious process and one which, though easy enough to understand, requires great care in the execution.
Fine drawing (fig. 51).—The skill of creating invisible stitches in fabric, while incredibly useful, is nearly forgotten. It's a slow process and, although it's easy to grasp, demands a lot of attention to detail in its execution.
Use as fine a needle as possible and thread it with hair, instead of silk, or any other kind of fibre. Red and white hair is the strongest, and stronger than the ravellings of the stuff. Of course the hair has first to be carefully cleansed from grease. Pare the edges of the rent, on the right sides, quite clean and even, with a razor, so that both rent and stitches may be lost in the hairy surface of the cloth. Scissors do not cut so closely, and are liable moreover, to disturb the nap, and render the darn more visible. When this is done, fit the edges exactly together, and overcast them. Then thread a needle with a hair by the root, and slip it in, 2 or 3 m/m. from the one edge and back again pointed towards you, through the other, so that, neither needle nor hair, are visible on either side. The stitches should be set slightly slanting and must be quite lost in the thickness of the cloth. The needle must always be put in, exactly at the place where it came out, and the hair not be too tightly drawn.
Use the finest needle you can find and thread it with hair instead of silk or any other fiber. Red and white hair is the strongest, even stronger than the fabric's threads. First, make sure to clean the hair thoroughly to remove any grease. Trim the edges of the tear on the right sides so they're clean and even with a razor, ensuring both the tear and stitches blend into the fabric's texture. Scissors won't cut as closely and may disturb the nap, making the repair more noticeable. Once that's done, align the edges perfectly and overcast them. Then, thread a needle with a strand of hair from the root and insert it about 2 or 3 mm from one edge, pulling it back towards you through the other edge so that neither the needle nor the hair is visible on either side. The stitches should be slightly slanted and completely hidden within the thickness of the fabric. Always insert the needle back into the exact spot where it came out, and don't pull the hair too tightly.
When the darn is finished, lay the article on a bare table, or ironing-board, cover it with a damp cloth, and iron it. The sharpest eye will fail to detect a rent, when carefully darned in this manner.
When the darn is finished, lay the item on a clean table or ironing board, cover it with a damp cloth, and iron it. Even the keenest eye won't notice a tear when it's carefully darned this way.
Patching.—As we have already said, when the defective part is past darning, it must be cut out, and a new piece of stuff inserted in its place. If the garment be no longer new, it should be patched with a slighter material than that of which it was originally made. The patch should be of the same shape, and cut the same way of the stuff, as the piece it is to replace, it should also be, just so much larger, as to allow for the turnings in, and can either be top-sewn, or else, run and felled in.
Patching.—As we’ve mentioned before, when the damaged area is beyond repair with darning, it needs to be cut out and replaced with a new piece of fabric. If the garment isn’t new anymore, it should be patched with a lighter material than what it was originally made from. The patch should match the shape and cut of the original piece it’s replacing, and it should be slightly larger to allow for the folds, and can either be sewn on top or stitched and folded in.
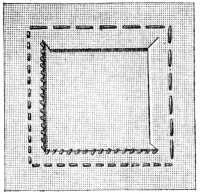
Back-stitching and felling in a patch (fig. 52).—Tack in the new piece, so that its edges overlap the edges of the hole. The back-stitching must be done on the article itself, as this renders it easier to do the corners neatly. The hem is turned down on to the patch. Make a little snip at the corners with your scissors to prevent puckering. The back-stitching should form a right angle at each corner.
Back-stitching and felling in a patch (fig. 52).—Pin the new piece in place so that its edges overlap the edges of the hole. The back-stitching should be done on the item itself, as this makes it easier to finish the corners neatly. Fold the hem down onto the patch. Make a small snip at the corners with your scissors to avoid puckering. The back-stitching should create a right angle at each corner.
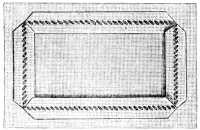
Top-sewing in a patch (fig. 53).—To do this, the edges of the hole and of the patch, must first be turned in, and either overcast or hemmed, to prevent their fraying, after which, sew the two edges together. The raw edges may also be turned in with herring-boning as in fig. 39, putting the needle, only through one layer of stuff.
Top-sewing in a patch (fig. 53).—To start, you need to fold in the edges of the hole and the patch, and either overcast or hem them to stop them from fraying. After that, sew the two edges together. You can also fold in the raw edges using a herringbone stitch, as shown in fig. 39, by putting the needle through just one layer of fabric.
Drawing in a patch (fig. 54).—Take a square piece of the original stuff, 5 or 6 c/m. larger each way, than the hole it is to fill, draw out threads on all the four sides, till the piece exactly matches the hole, and tack it into its place. Thread a very fine needle with the two ends of a thread of silk or Fil d’Alsace D.M.C No. 700, run it in at the corner of the stuff, and draw it out, leaving a loop behind. Into this loop, slip the first of the threads, which as it were, form a fringe to the patch, and tighten the loop round it, and so on with each thread, alternately taking up and leaving threads in the stuff, as in ordinary darning.
Making a patch (fig. 54).—Take a square piece of the original fabric, 5 or 6 cm larger on all sides than the hole it needs to cover. Pull threads from all four sides until the piece fits perfectly into the hole, and then pin it into place. Use a very fine needle and thread it with two ends of silk thread or D.M.C No. 700 Fil d’Alsace. Start at a corner of the fabric, pushing the needle in and pulling it out, leaving a loop behind. Slip the first thread into this loop, which acts as a kind of fringe for the patch, and tighten the loop around it. Keep doing this with each thread, alternately picking up and leaving threads in the fabric, just like in regular darning.
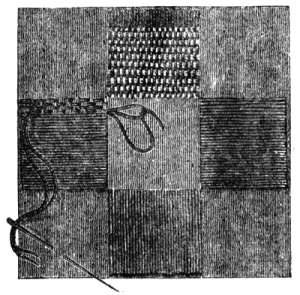
To put a patch into a thin material, in this manner, you must darn in the threads, a good long way, into the material, in order that the double layer of threads may be less visible.
To attach a patch to a thin material like this, you need to weave the threads deep into the fabric so that the double layer of threads is less noticeable.
FOOTNOTES:
Single and cut Open-work.
The above heading comprises every sort of needle-work, to which the drawing out of threads is a preliminary. By sewing over the single threads that remain, and drawing them together in different ways, an infinite variety of patterns can be produced. Many pretty combinations also, can be made of open-work, cross-stitch, and other kinds of embroidery.
The above heading includes all kinds of needlework, starting with pulling out threads. By sewing over the remaining single threads and gathering them in various ways, you can create endless patterns. You can also make many beautiful combinations using open-work, cross-stitch, and other types of embroidery.
Materials suitable for open-work.—For all the coarser stuffs, such as Holbein-linen, Java and linen-canvas and the like, now in such favour for the imitation of old needlework, it will be best to use: Fil à pointer D.M.C, No. 30[A] and Cordonnet 6 fils D.M.C, Nos. 10 to 20,[A] and for the finer stuffs, such as antique-linen and linen-gauze; Cordonnet 6 fils D.M.C Nos. 50 to 150,[A] Fil d’Alsace D.M.C, Nos. 20 to 100, and Fil à dentelle D.M.C, Nos. 25 to 80.
Materials suitable for open-work.—For all the coarser fabrics, like Holbein linen, Java, and linen canvas, which are currently popular for replicating old needlework, it's best to use: D.M.C Fil à pointer No. 30[A] and D.M.C Cordonnet 6 fils, Nos. 10 to 20,[A] and for the finer fabrics, like antique linen and linen gauze; D.M.C Cordonnet 6 fils Nos. 50 to 150,[A] D.M.C Fil d’Alsace, Nos. 20 to 100, and D.M.C Fil à dentelle, Nos. 25 to 80.
Coloured patterns can also be executed in open-work, with Coton à broder D.M.C Nos. 16 to 35, and Coton à repriser D.M.C, Nos. 25 to 50[A] .
Coloured patterns can also be done in open-work, using Coton à broder D.M.C Nos. 16 to 35, and Coton à repriser D.M.C, Nos. 25 to 50[A].
Single open-work (Punto tirato).—This, in its simplest form, is the ornamental latticed hem, in common use where something rather more decorative than an ordinary hem (fig. 8) is required, and consists in drawing out one layer of threads, either the warp or the woof.
Single open-work (Punto tirato).—This, in its simplest form, is the decorative latticed hem, commonly used where a more decorative finish than a regular hem (fig. 8) is needed, and involves pulling out one layer of threads, either from the warp or the weft.
Single hem-stitch (fig. 55).—Draw out, according to the coarseness of the stuff, two or four threads, below the edge of the turning, and tack your hem down to the line thus drawn. Fasten your thread in to the left, and work your hem from right to left, taking up three or four cross-threads at a time, and inserting your needle, immediately above, into the folded hem, three or four threads from the edge, and then drawing it out.
Single hem-stitch (fig. 55).—Pull out two or four threads, depending on the fabric thickness, just below the hem's edge, and secure your hem along the line you've drawn. Secure your thread on the left side, and stitch your hem from right to left, picking up three or four cross-threads at once. Insert your needle just above the folded hem, about three or four threads from the edge, and then pull it through.
The same stitch is used for preventing the fringes, that serve as a finish to so many articles of house-linen, from ravelling.
The same stitch is used to stop the fringes, which finish many items of household linen, from unraveling.
Second hem-stitch (fig. 56).—Prepare your hem as for fig. 55, and work from left to right; with this difference, that after drawing two or three cross-threads together, from right to left, you skip the same number of perpendicular threads you took up below, and insert your needle downwards from above, bringing it out at the bottom edge of the hem.
Second hem-stitch (fig. 56).—Prepare your hem as shown in fig. 55, and work from left to right; the difference is that after pulling together two or three cross-threads from right to left, you skip the same number of vertical threads you picked up below, and insert your needle downwards from above, bringing it out at the bottom edge of the hem.
These stitches, which can be used for the right side also, form a kind of little tress, along the edge of the hem.
These stitches, which can also be used on the right side, create a sort of small braid along the edge of the hem.
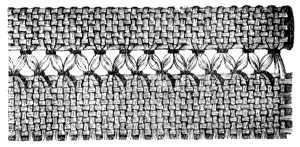
Antique hem-stitch (figs. 59, 60, 61 and 62). In the old, elaborate, linen needlework, we often meet two kinds of hem-stitching seldom found in modern books on needle-work. Figs. 59 to 62 are magnified representations of the same. At the necessary depth for forming a narrow hem, a thread is drawn, in the case of very fine textures where the edge is rolled, not laid; then fasten in the working thread at the left, and work the stitches from left to right. Passing your needle, from right to left, under three or four threads, draw the thread round the cluster and carry your needle on, through as many threads of the upper layer of stuff, as you took up below, so that the stitch may always emerge from the middle of the cluster.
Antique hem-stitch (figs. 59, 60, 61 and 62). In the intricate old linen needlework, we often encounter two types of hem-stitching that are rarely found in today’s needlework books. Figs. 59 to 62 are enlarged illustrations of the same techniques. At the appropriate depth for creating a narrow hem, a thread is pulled, especially in the case of very fine fabrics where the edge is rolled rather than laid flat; then secure the working thread on the left, and stitch from left to right. Pass your needle from right to left, under three or four threads, wrap the thread around the cluster, and continue your needle through the same number of threads in the upper layer of fabric as you picked up below, ensuring that the stitch always comes out from the center of the cluster.
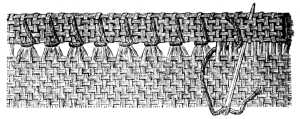

Antique hem-stitch (figs. 61 and 62).—These show, the right and wrong sides of the hem; here the rolled hem is prepared as above, but the stitches are worked from right to left, and the thread is carried round the little roll, so that, as shown in fig. 62, it is visible on both sides of the hem. The needle does not enter the stuff, but is carried back at once, from the outside, and put in again between two clusters of threads.
Antique hem-stitch (figs. 61 and 62).—These illustrate the right and wrong sides of the hem; here, the rolled hem is prepared as mentioned earlier, but the stitches are worked from right to left, and the thread is wrapped around the little roll, so that, as shown in fig. 62, it is visible on both sides of the hem. The needle does not go into the fabric but is pulled back immediately from the outside and inserted again between two clusters of threads.
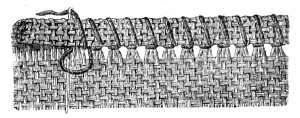

Slanting hem-stitch (figs. 63 and 64).—Bring out your needle and thread, two or three threads above the edge of the turning, between the first and second of the three cross-threads that compose the cluster, and then slip it under the cluster, from right to left. The loop must lie in front of the needle. When you have drawn up the stitch, put the needle in, one thread further on, and take up two threads. Fig. 64 shows the stitch on the right side.
Slanting hem-stitch (figs. 63 and 64).—Grab your needle and thread, then bring them up two or three threads above the edge of the hem, between the first and second of the three cross-threads that make up the cluster, and then pass it underneath the cluster, from right to left. The loop should be in front of the needle. Once you've pulled the stitch tight, insert the needle one thread further along and pick up two threads. Fig. 64 shows the stitch on the right side.
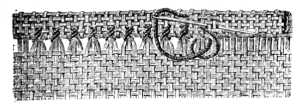
Double-rowed ornamental seam (figs. 65, 66, 67).—Begin with any one of the hems already described, then counting as many threads downwards, as are clustered together in the first row, draw out a second thread, and cluster the perpendicular threads in this second line together, as shown in figs. 65 and 66. On the right side the stitch is straight (fig. 67). Coloured cottons should be used for all the above patterns of hem-stitch, when they are to be introduced into coloured embroideries.
Double-rowed ornamental seam (figs. 65, 66, 67).—Start with any of the hems described earlier, then count down the same number of threads as those in the first row to pull out a second thread, and bunch the vertical threads in this second line together, as seen in figs. 65 and 66. On the right side, the stitch is straight (fig. 67). Use colored cottons for all the hem-stitch patterns above when incorporating them into colored embroideries.


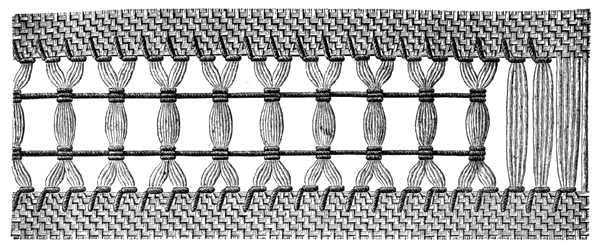
Single three-rowed open-work (fig. 68).—This, and the following patterns, are suitable for the headings of hems, and for connecting stripes of embroidery, and are also often used instead of lace, and lace insertion.
Single three-row open-work (fig. 68).—This pattern, along with the ones that follow, works well for the edges of hems and for joining stripes of embroidery. It's also frequently used as a substitute for lace and lace inserts.
The second and third, after drawing out six threads, the third and fourth after drawing out eight. The clusters must all consist of an even number of threads. The upper and the lower band of open-work is to be copied from fig. 58, the centre one, from fig. 57. Divide the threads of the perpendicular clusters in two; insert the needle, from left to right, underneath half the second cluster, turn the needle’s eye, by a second movement, from left to right, and take up the second part of the first cluster, drawing it under, and at the same time, in front of the first half of the second cluster. Be careful not to draw your thread too tightly.
The second and third clusters should have six threads each, while the third and fourth should have eight. All clusters need to consist of an even number of threads. The top and bottom open-work bands should be modeled after fig. 58, and the center band should follow fig. 57. Split the threads of the vertical clusters in half; insert the needle from left to right under half of the second cluster, then turn the needle’s eye in a second motion from left to right and pick up the second part of the first cluster, pulling it under and in front of the first half of the second cluster. Make sure not to pull your thread too tightly.
Open-work with two threads drawn through (fig. 69).—One such wide lane of open-work, between two finishing rows of stitches, may have two threads drawn through it.
Open-work with two threads drawn through (fig. 69).—One wide strip of open-work, positioned between two finishing rows of stitches, can have two threads passed through it.

Open-work with three threads drawn through (fig. 70). Overcast both edges with single stitches; draw the clusters together in the middle, as in fig. 68; then above and below the middle thread, draw in first one thread and then a second, straight above it, securing the latter with back-stitches to enclose the clusters between two threads.
Open-work with three threads drawn through (fig. 70). Sew both edges with single stitches; pull the clusters together in the middle, as shown in fig. 68; then above and below the middle thread, insert one thread first and then a second right above it, securing the latter with back-stitches to trap the clusters between the two threads.
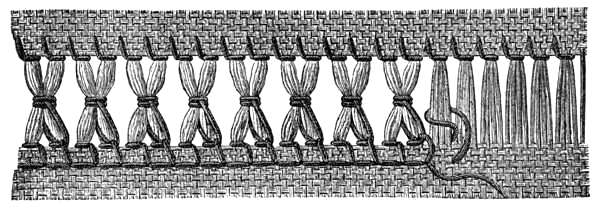
Clustered open-work (fig. 71).—Draw out from sixteen to eighteen threads, between two hem-stitched edges. Fasten your thread in, 3 m/m. above the seam-edge, and wind it three times round every two clusters, passing the needle, the third time, under the two first rounds, to fasten the thread. The thread, thus drawn through, must be left rather slack. A second row of stitches, similar to the first, and at the same distance from the bottom edge, completes this pattern. To give it greater strength, you may if you like, work back over the first thread, with a second, taking care to pass it under the knot, which was formed by the first.
Clustered open-work (fig. 71).—Pull out between sixteen and eighteen threads between two hem-stitched edges. Secure your thread 3 mm above the seam edge, and wrap it three times around every two clusters, threading the needle under the first two rounds the third time to secure the thread. The thread should be left a bit loose. A second row of stitches, identical to the first and at the same distance from the bottom edge, completes this pattern. To make it stronger, you can work back over the first thread with a second one, ensuring you pass it under the knot formed by the first.
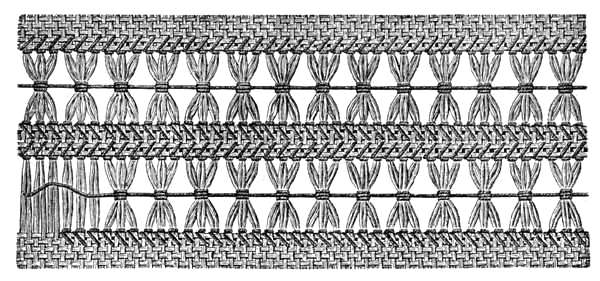
Double-rowed cluster-open-work (fig. 72).—A very good effect can be obtained by making the above stitch in such a manner, as to form groups of three clusters each, between hem-stitched bands of the stuff.
Double-rowed cluster-open-work (fig. 72).—You can achieve a really nice effect by creating the stitch in a way that forms groups of three clusters each, placed between hem-stitched strips of the fabric.
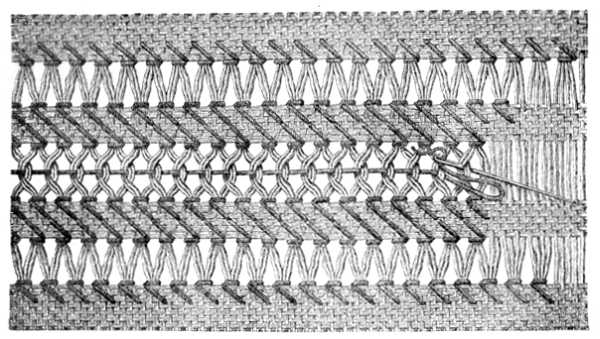
Turkish cluster open-work (fig. 73).—After portioning off, and sewing up the clusters on one side, draw out twelve or fourteen threads, and make your connecting-stitch and hem, all in one, as follows: bring out the thread before the cluster, and pass it round it, then from right to left, over three horizontal and under four perpendicular threads, again from left to right, over the four threads just passed over, and out at the second cluster; laying it over this, you bring it out behind the first cluster, wind it round the middle of them both, and pass it through, between the overcasting stitches back to the hem; encircle the second cluster with a loop-stitch, and carry your thread again over three horizontal and four perpendicular threads, and upwards, slanting underneath the stuff, out in front of the next cluster.
Turkish cluster open-work (fig. 73).—After dividing and sewing up the clusters on one side, pull out twelve or fourteen threads, and make your connecting stitch and hem all at once, as follows: bring the thread out in front of the cluster, wrap it around, then from right to left over three horizontal and under four vertical threads, then again from left to right over the four threads just mentioned, and out at the second cluster; laying it over this, pull it out behind the first cluster, wrap it around the middle of both clusters, and thread it back through between the overcasting stitches to the hem; wrap the second cluster with a loop stitch, and move your thread again over three horizontal and four vertical threads, upward, slanting beneath the fabric, and out in front of the next cluster.
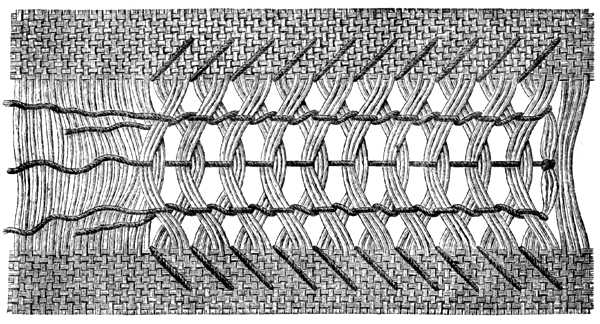
Open-work with darning stitch (fig. 74).—Draw out from eight to twelve threads, according to the quality of the stuff. Insert your needle and thread between two clusters, and pass it, as if you were darning, backwards and forwards over them, until they are encased half way down with stitches. In so doing, work with the eye of the needle forward, and the point towards your thimble. To pass to the next cluster, take one stitch back, under the one just darned, and bring your thread underneath the threads of the stuff, to the second cluster.
Open-work with darning stitch (fig. 74).—Pull out eight to twelve threads, depending on the fabric quality. Insert your needle and thread between two clusters, and then pass it back and forth over them, as if you were darning, until they are covered halfway down with stitches. While doing this, keep the eye of the needle facing forward and the point towards your thimble. To move to the next cluster, take one stitch back, underneath the one you just darned, and bring your thread underneath the fabric threads to the second cluster.
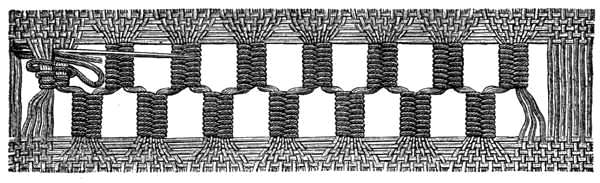
Open-work in three colours (fig. 75).—This pattern which is to be done in the same way as fig. 74, requires the drawing out of, at least, eighteen threads. Every cross-line of three clusters is to be worked in one colour. The colours may all be different, or you may if you prefer, take shades of the same colour.
Open-work in three colors (fig. 75).—This pattern, which should be completed in the same manner as fig. 74, involves pulling out at least eighteen threads. Each cross-line of three clusters should be worked in one color. The colors can all be different, or if you prefer, you can use shades of the same color.
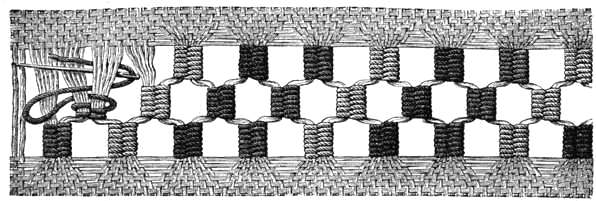
Colours: Bleu-Indigo 311, 322, 334, Brun-Caroubier 354, 303, 357, or Rouge-Géranium 349, 351, 352.[A]
Colors: Blue-Indigo 311, 322, 334, Brown-Carob 354, 303, 357, or Red-Geranium 349, 351, 352.__A_TAG_PLACEHOLDER_0__

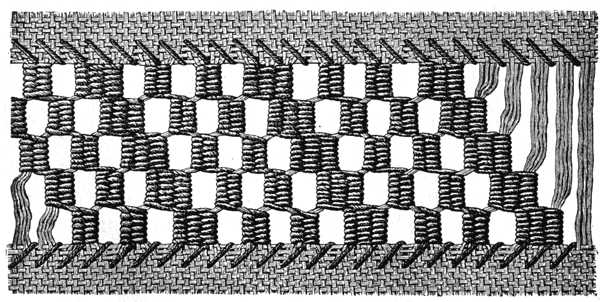
Open-work insertion (fig. 78).—After drawing out sixteen or eighteen threads, bind both sides with stitches made over four horizontal and four perpendicular threads, as follows; make one back-stitch over four disengaged threads, then bring up your thread from right to left, over four horizontal and under four perpendicular threads, back over the four last threads, and draw it out beside the next cluster. The clusters, as they now stand, are bound together in the middle, three by three, with darning-stitches. The thread must be fastened in and cut off, after each group is finished.
Open-work insertion (fig. 78).—After pulling out sixteen or eighteen threads, secure both sides with stitches across four horizontal and four vertical threads, like this: make one back-stitch over four loose threads, then bring your thread up from right to left, over four horizontal and under four vertical threads, back over the last four threads, and pull it out beside the next cluster. The clusters, as they currently are, are held together in the middle, three at a time, with darning stitches. The thread needs to be secured and cut off after each group is completed.
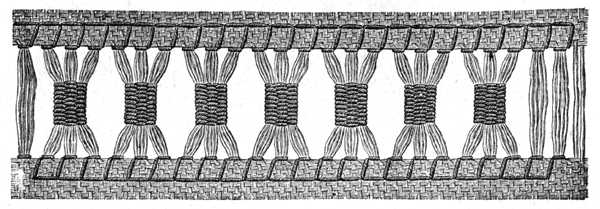
Open-work insertion (fig. 79).—First bind the two edges with stitches, in the ordinary way. At the last stitch introduce the thread slanting, according to the dotted line, pass it under four horizontal and three perpendicular threads of the stuff and draw it out; then over three threads from right to left, and back under the same, from left to right, and out again; over four horizontal threads, and, under and again over, three perpendicular ones; for the next stitch, you again follow the dotted slanting line.
Open-work insertion (fig. 79).—First, sew the two edges together with regular stitches. For the last stitch, thread it at an angle according to the dotted line, passing it under four horizontal and three vertical threads of the fabric, then pull it through; next, go over three threads from right to left, and back under the same threads from left to right, pulling it out again; then, go over four horizontal threads, and back under and over three vertical threads; for the next stitch, follow the dotted slanting line again.
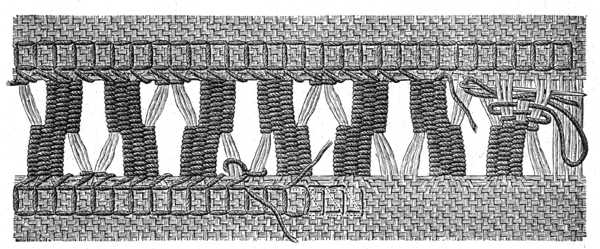
Then make the darning stitch over nine threads, or three clusters. At half their length, you leave out three threads, first on the right, then on the left, whilst in the other half, you, in a similar manner, take in three; so that you have two darned and two undarned clusters, standing opposite each other. Finally, you overcast the single clusters, and connect every two with a lock-stitch, as shown in the accompanying illustration.
Then make the darning stitch over nine threads, or three clusters. At half their length, leave out three threads, first on the right, then on the left, while in the other half, do the same by taking in three; so that you have two darned and two undarned clusters facing each other. Finally, overcast the single clusters and connect every two with a lock-stitch, as shown in the accompanying illustration.
Open-work insertion (fig. 80).—Draw out twenty threads, overcast both edges with stitches, made over three threads. Then, make slanting stitches, proceeding out from these, over three, six and nine threads respectively, all three terminating in a perpendicular line, one below the other.
Open-work insertion (fig. 80).—Pull out twenty threads, stitch both edges with overcast stitches made over three threads. Next, create slanting stitches extending from these, over three, six, and nine threads respectively, all three ending in a vertical line, one below the other.
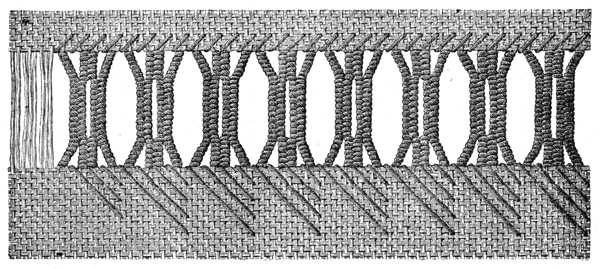
For the open-work, twist the thread five times, quite tightly round and round one cluster, bring it to the edge, between the second and third clusters, and connect these by means of six darning-stitches to and fro: join the first and second clusters in the same way by twelve stitches, and finish, by twisting the thread five times round the remaining length of the first cluster. The second half of the open-work figure is carried out in a similar manner over the third and fourth clusters.
For the open work, twist the thread five times tightly around one cluster, bring it to the edge between the second and third clusters, and connect these using six back-and-forth darning stitches. Join the first and second clusters in the same way with twelve stitches, and finish by twisting the thread five times around the remaining length of the first cluster. The second half of the open-work figure is done in a similar way over the third and fourth clusters.
Open-work insertion in four colours (fig. 81).—Draw out, from twenty-five to thirty threads. The outside figures are executed over six clusters, of three threads each, in a dark and light shade alternately of the same colour. Each of the middle figures combines three clusters of the two figures above it, and may be executed, either in a different colour altogether, or in a lighter shade of the one employed in the top row. The little star in the centre should be worked in dark red, or black.
Open-work insertion in four colors (fig. 81).—Pull out twenty-five to thirty threads. The outer figures are created over six clusters, each made up of three threads, using alternating dark and light shades of the same color. Each of the middle figures combines three clusters from the two figures above it and can be made in either a completely different color or in a lighter shade of the one used in the top row. The small star in the center should be done in dark red or black.
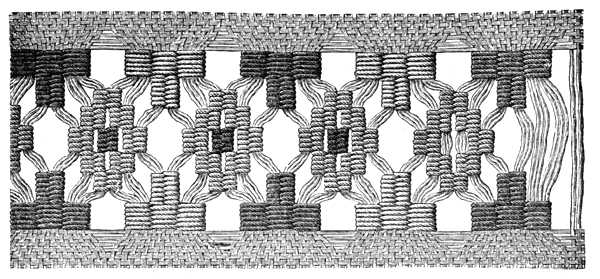
Materials: Coton à broder D.M.C No. 20, or Cordonnet 6 fils D.M.C Nos. 15 to 30.[A]
Colours: Rouge-Turc 321, Bleu-Indigo 312, 334, Noir grand Teint 310.[A]
Materials: D.M.C No. 20 embroidery cotton or D.M.C Cordonnet 6 threads Nos. 15 to 30.__A_TAG_PLACEHOLDER_0__
Colors: Turkish Red 321, Indigo Blue 312, 334, Black Deep Dye 310.__A_TAG_PLACEHOLDER_1__
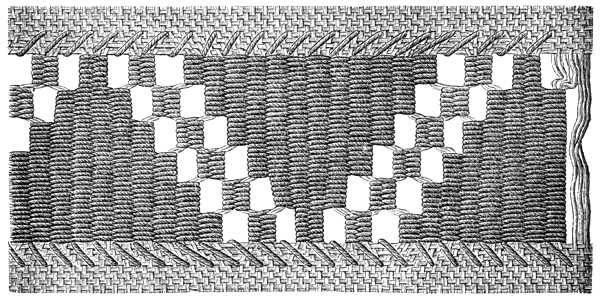
In fig. 83, the two rows of short clusters are worked in Gris-Tilleul moyen, and, Gris-Tilleul clair, 392 and 330; [A] the pyramid of steps, in Brun-Chamois moyen, 324;[A] the three inner clusters in Brim-Chamois très clair, 418. One figure consists of fourteen clusters, of three threads each.
In fig. 83, the two rows of short clusters are done in Medium Gray-Tilleul, and Light Gray-Tilleul, 392 and 330; [A] the pyramid of steps is in Medium Brown-Chamois, 324; [A] the three inner clusters are in Very Light Brown-Chamois, 418. One figure consists of fourteen clusters, each made of three threads.
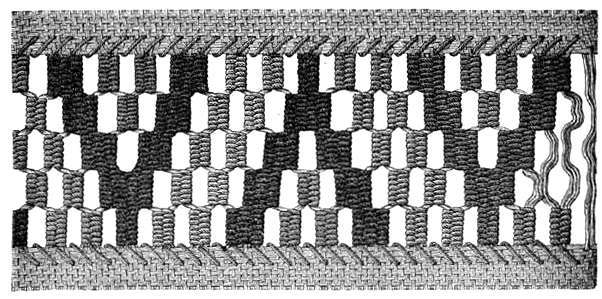
Fig. 84 also is to be worked in three colours; the light squares in unbleached cotton, the middle figure in Bleu-Indigo très clair, 334, the large squares on either side in Brun-Cuir clair 432. Each figure contains eighteen clusters, of three threads each.
Fig. 84 is also to be done in three colors; the light squares in unbleached cotton, the middle figure in very light Bleu-Indigo 334, and the large squares on either side in light Brown Leather 432. Each figure has eighteen clusters, with three threads each.
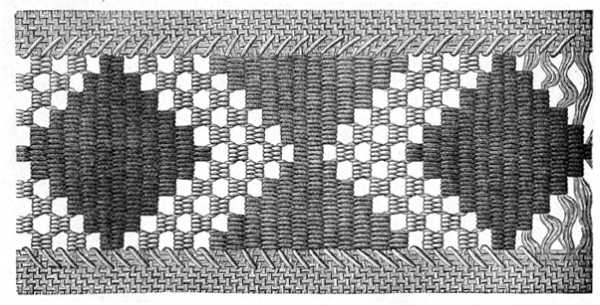
Open-work insertion with spiders (fig. 85).—The edges are to be herring-boned, as described in fig. 39. In the middle, the so-called spiders are made, over every group of four clusters. The thread that runs out from the spider, passes over two clusters and under one, and then three or four times, over and under the clusters, as in darning, and so back, under the spider, at the place at which it was drawn in, and then on, to the next four strands of thread.
Open-work insertion with spiders (fig. 85).—The edges should be herring-boned, as shown in fig. 39. In the center, the so-called spiders are created over each group of four clusters. The thread that emerges from the spider goes over two clusters and under one, and then three or four times, it alternates between over and under the clusters, similar to darning, and then goes back, under the spider, at the point where it was pulled through, and continues on to the next four threads.
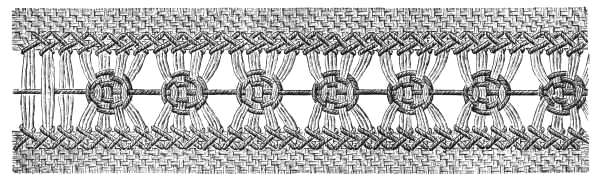
Three-rowed open-work (fig. 86).—Draw out five threads for the narrow stripe, and from fourteen to sixteen for the wide one. Each cluster should consist of four threads. The narrow bands between, are to be herring-boned on either side. The dotted line shows the course of the thread, on the wrong side. Then unite each separate cluster in the middle, with a back-stitch, as shown in the illustration, and finally, join every group of four clusters together, with three stitches, and make a spider in the middle of the open-work, at the point where the threads intersect each other.
Three-rowed open-work (fig. 86).—Pull out five threads for the narrow stripe, and from fourteen to sixteen for the wide stripe. Each cluster should be made up of four threads. The narrow bands in between should be herring-boned on both sides. The dotted line indicates the path of the thread on the back side. Then, connect each individual cluster in the center with a back-stitch, as shown in the illustration, and finally, link every group of four clusters together with three stitches, and create a spider in the center of the open-work, where the threads cross each other.
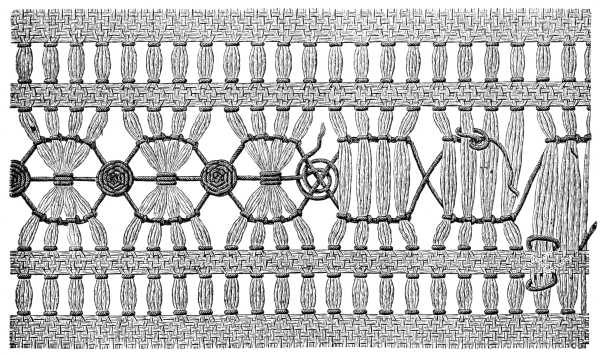
Open-work insertion with rings (fig. 87).—Bind the edges on both sides, with straight, two-sided, stitches. Take, for this, Coton à broder D.M.C, No. 30, (embroidery cotton), using it double. Draw out, from twenty-four to thirty threads. Wind your thread six or seven times round the middle of each cluster of nine threads, and then make darning-stitches, above and below, to a length of 3 m/m. When you have completed two clusters, join them together, by four interlocked stitches; wind your thread three times round the single thread, and sew it over with close stitches.
Open-work insertion with rings (fig. 87).—Sew the edges on both sides using straight, double-sided stitches. For this, use D.M.C embroidery cotton, No. 30, folded double. Pull out twenty-four to thirty threads. Wrap your thread six or seven times around the center of each cluster of nine threads, then make darning stitches above and below, to a length of 3 mm. Once you've finished two clusters, connect them with four interlocked stitches; wrap your thread three times around the single thread and sew it down with tight stitches.
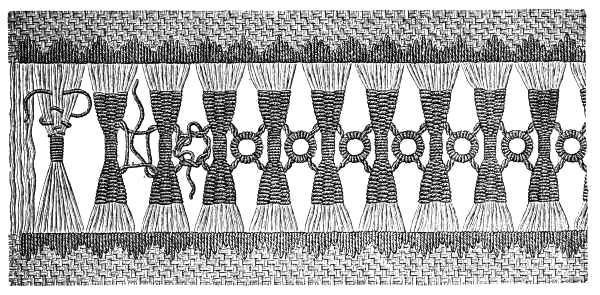
Open-work insertion with spiders (fig. 88).—Draw out twenty-four threads. Ornament the two edges with half-spiders. You begin these over two threads, and go on taking in others, to the number of eight. The whole spider in the middle, is made as above described.
Open-work insertion with spiders (fig. 88).—Pull out twenty-four threads. Decorate the two edges with half-spiders. Start these by using two threads, and continue adding others, up to eight in total. The complete spider in the center is made as previously described.
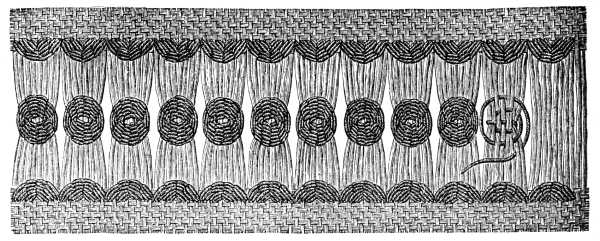
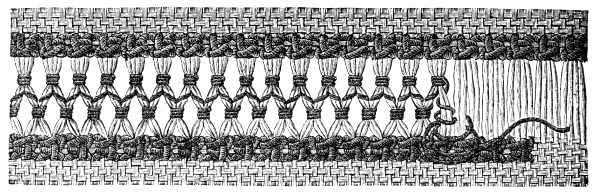
Carry the working thread, as shown in fig. 90, from right to left, (see the description of the right side) over and under four threads; then bring the needle back, under the thread which lies slanting, form a loop with the forefinger of the left hand, slip it on to the needle, and draw it up close to the first stitch; pull the needle through the knot, and proceed to the next stitch.
Carry the working thread, as shown in fig. 90, from right to left (refer to the description of the right side) over and under four threads. Then bring the needle back under the slanting thread, form a loop with your left index finger, slide it onto the needle, and pull it tight against the first stitch. Pull the needle through the knot and move on to the next stitch.
The illustration explains how the open-work in the middle should be carried out.
The illustration shows how the open-work in the center should be done.
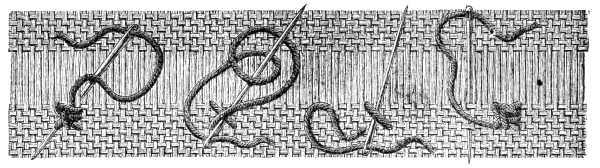
Open-work with winding stitch (fig. 91).—For this pattern, which is a very laborious one to work, draw out twenty-eight threads. Bind the edges with two-sided stitches, over two, three, four and five threads, respectively. For the middle figures, you must reckon four threads for the clusters, round which the working thread is tightly twisted, eight for the darned clusters, ornamented with picots (see fig. 165), and sixteen for the rectangular rosettes, in two colours.
Open-work with winding stitch (fig. 91).—For this design, which is quite detailed and time-consuming, pull out twenty-eight threads. Secure the edges using double-sided stitches, over two, three, four, and five threads, respectively. For the central figures, you need to use four threads for the clusters, around which the working thread is tightly wound, eight for the darned clusters, decorated with picots (see fig. 165), and sixteen for the rectangular rosettes, using two colors.
Make a loose spider over the threads, as a background for the rosette. Work the picots in a different colour from the cluster, and the rosettes, likewise, in two colours. The connecting loops between the figures should be made as you go along, the thread being always carried back into the loop just made.
Make a loose spider web over the threads, serving as a background for the rosette. Use a different color for the picots than the cluster, and create the rosettes in two colors as well. The connecting loops between the figures should be made as you go, with the thread consistently going back into the loop just created.
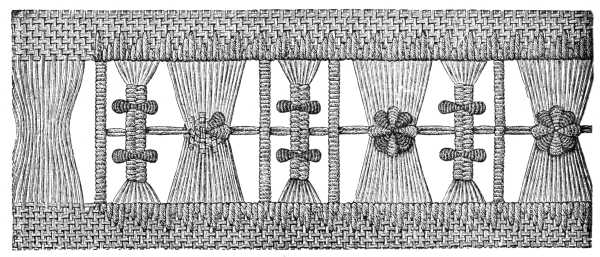
Cutting out threads at the corners (figs. 92, 93, 94, 95). If you want to carry a latticed-hem or a simple open-work pattern, round a corner, you must cut and loosen the threads, on both sides, about one c/m. from the edge of the hem, as seen in fig. 92. The loose threads can be pushed into the turning, and the edge button-holed, as in fig. 93.
Removing Threads at the Corners (figs. 92, 93, 94, 95). If you want to incorporate a latticed hem or a simple open-work pattern around a corner, you need to cut and loosen the threads on both sides, about one centimeter from the edge of the hem, as shown in fig. 92. The loose threads can be tucked into the fold, and the edge can be buttonholed, as illustrated in fig. 93.
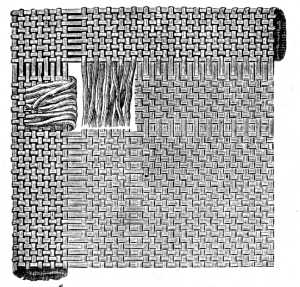
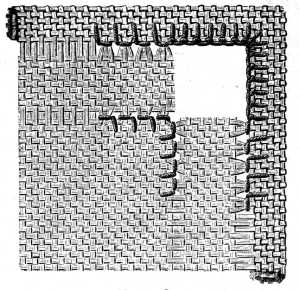
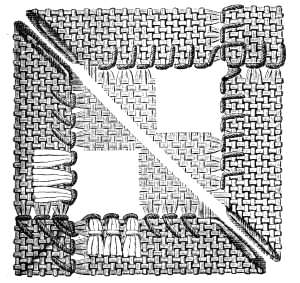
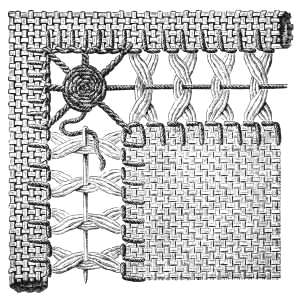
Cut open-work (Punto tagliato).—For cut open-work, threads have to be drawn out both ways, the number of course to depend on the pattern. Threads, left between others that have been cut out, serve as a foundation on which a great variety of stitches can be worked. Stuffs, equally coarse in the warp and woof, should be chosen for all cut open-work, for then the empty spaces that remain, where threads have been drawn out both ways, will be perfectly square.
Cut open-work (Punto tagliato).—For cut open-work, threads need to be pulled out in both directions, and the number of threads will depend on the pattern. The threads that are left among those that have been removed act as a base for various stitches. Fabrics that are evenly coarse in both the length and width should be used for all cut open-work, because this way, the empty spaces left where the threads have been pulled out will be perfectly square.
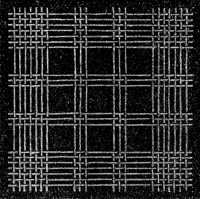
Cutting out threads (fig. 97).—We often meet with cut open-work patterns, set in another kind of embroidery. In such cases, the threads that are to be cut out, must be cut a few millimetres within the edge, and then drawn out, so that there may be a frame of the stuff left intact outside.
Cutting out threads (fig. 97).—We often encounter open-work patterns that are incorporated into other types of embroidery. In these situations, the threads that need to be cut should be cut a few millimeters inside the edge and then pulled out, leaving a border of the material intact outside.
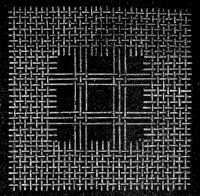
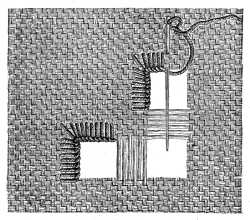
Overcasting the raw edges (fig. 99).—Cording the raw edges, is even better than button-holing them. Count the number of threads carefully that have to be cut out, run in a thread to mark the pattern, and then only, cut the threads through, at least two threads within the line.
Overcasting the raw edges (fig. 99).—Using cording on the raw edges is even better than button-holing them. Carefully count the number of threads you need to cut out, run a thread to mark the pattern, and only then cut through the threads, making sure to cut at least two threads within the line.
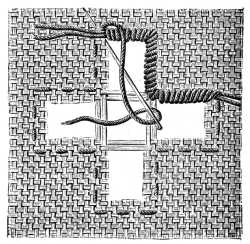
Overcasting the trellised ground (fig. 100).—If you only have a small surface to embroider, you can draw out all the threads at once. But in the case of a large piece of work it is better to begin by removing the threads in one direction only, and completing all the little bars, one way first; after which you draw out the threads the other way and embroider those you leave. In this way you will secure greater equality and finish in your work.
Overcasting the trellised ground (fig. 100).—If you only have a small area to embroider, you can pull all the threads out at once. However, for larger projects, it’s best to start by removing the threads in just one direction and finish all the small bars that way first; then you pull the threads out in the other direction and embroider the ones you left. This method will help you achieve a more even and polished finish in your work.
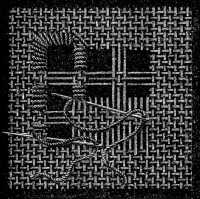
Ground for square, fig. 105 (figs. 101 and 102).—Finish the first row of bars along the edge completely, to begin with. In the second row, overcast the bar, down to half its length, then carry your thread over two empty spaces, see the letter a, come back to the bar, overcasting the thread which you threw across first, and passing the needle under the bars of the stuff. In the second rows that intersect the first, marked by letter b, the threads meet in the middle of the empty space.
Ground for square, fig. 105 (figs. 101 and 102).—Start by completely finishing the first row of bars along the edge. In the second row, overcast the bar for half its length, then move your thread over two empty spaces, as indicated by the letter a, and come back to the bar, overcasting the thread you just laid, and passing the needle under the bars of the material. In the second rows that cross the first, marked with the letter b, the threads converge in the center of the empty space.
In fig. 102, finish the bars, overcast both ways first, and then fill in the ground with interlaced threads, worked row by row, throwing the thread from one square to the other as you go, and doubling it, as you return. For the bars, see the chapters on net embroidery, and Irish lace.
In fig. 102, complete the bars by overcasting in both directions first, then fill in the ground with interlaced threads, working row by row. Throw the thread from one square to the next as you go, and double it when you return. For the bars, refer to the chapters on net embroidery and Irish lace.
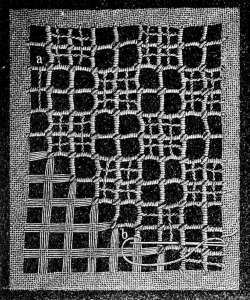
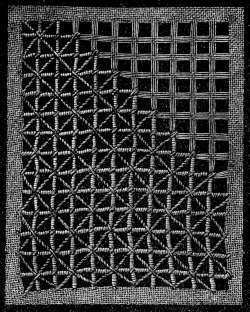
Lattice-ground and damask stitch for square, fig. 105 (fig. 103).—Our illustration shows a third kind of openwork ground with one corner in damask stitch, of the square represented in fig. 105. The little bars which intersect each square crossways, are made in two divisions, by carrying the thread to the opposite bar and back. In the same way, the second thread is carried over the first. The damask stitches are described in the next chapter, in figs. 143 and 144.
Lattice ground and damask stitch for square, fig. 105 (fig. 103).—Our illustration shows a different type of openwork ground with one corner in damask stitch, based on the square seen in fig. 105. The small bars that cross each square are created in two parts, by moving the thread to the opposite bar and back. Similarly, the second thread is placed over the first. The damask stitches will be detailed in the next chapter, in figs. 143 and 144.

Lattice-ground and damask stitches for square, fig. 105 (fig. 104).—Damask, or gobelin stitches, are given in figs. 152, 153, 154. The ground of this part of the square (fig. 104) is adorned with narrow bars, worked in darning stitch. From the centre of one bar, proceed three bars made on three foundation-threads, and a fourth made on two, on account of the passage to the next bar.
Lattice-ground and damask stitches for square, fig. 105 (fig. 104).—Damask, or gobelin stitches, are shown in figs. 152, 153, 154. The background of this part of the square (fig. 104) is decorated with narrow bars, created using darning stitch. From the center of one bar, create three bars made on three foundation-threads, and a fourth made on two, to allow for the transition to the next bar.
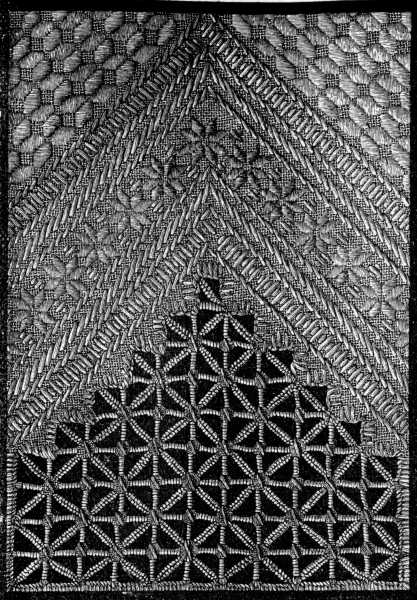
Quarter of the square in single and cut open-work, and damask-stitch (fig. 105).—Original size 48 c/m. square. This handsome square is worked in unbleached cotton on a white ground; it may also be worked in colours. A very good effect is produced by using Chiné d’or D.M.C[A] red, blue, or green for the gobelin stitch, and a uniform pale tint for the cut open-work.
Quarter of the square in single and cut open work, and damask stitch (fig. 105).—Original size 48 c/m. square. This attractive square is stitched in unbleached cotton on a white background; it can also be worked in colors. A great effect can be achieved by using D.M.C[A] red, blue, or green Chiné d’or for the gobelin stitch, and a consistent light shade for the cut open work.
Figs. 101, 102, 103, 104 illustrate in detail, one quarter of the square, which is represented here one third of the original size. The centre piece (fig. 104) is bordered by four stripes, two long and two short; the former containing two lozenge-shaped open-work figures separated and finished off by damask stitches; the latter, only one such figure. For the insertion in single open-work, that recurs three times, you will find a variety of designs in figs. 81, 82, 83, 84, 87, 88.
Figs. 101, 102, 103, 104 show in detail one quarter of the square, which is displayed here at one third of the original size. The centerpiece (fig. 104) is bordered by four stripes, two long and two short; the long ones feature two diamond-shaped open-work figures separated and finished off with damask stitches, while the short ones have just one such figure. For the insertion in single open-work that appears three times, you will find a variety of designs in figs. 81, 82, 83, 84, 87, 88.

Original size 48 c/m. square.
Materials suitable for Holbein linen: Fil à pointer D.M.C No. 15 or 20, and Coton à repriser D.M.C No. 25. [A]
For antique linen: Fil à dentelle D.M.C No. 25 or 30, or Cordonnet 6 fils D.M.C No. 50, 60, or 70, and Coton à repriser D.M.C No. 50 or, in place of the latter, Coton à broder surfin D.M.C No. 190.[A]
Original size 48 cm square.
Materials suitable for Holbein linen: D.M.C Fil à pointer No. 15 or 20, and D.M.C Coton à repriser No. 25. __A_TAG_PLACEHOLDER_0__
For antique linen: D.M.C Fil à dentelle No. 25 or 30, or D.M.C Cordonnet 6 fils No. 50, 60, or 70, and D.M.C Coton à repriser No. 50 or, as an alternative, D.M.C Coton à broder surfin No. 190. __A_TAG_PLACEHOLDER_1__
Drawing in the pattern (fig. 106).—Darning in the threads, as you do into a net foundation is a slower process and one that requires greater skill than drawing them in. The illustration shows the proper order and direction of stitches for Fig. 108. In this case likewise, the little bars must be finished, before the actual pattern is filled in.
Drawing in the pattern (fig. 106).—Darning in the threads, like you do with a net foundation, is a slower process that requires more skill than just drawing them in. The illustration shows the correct order and direction of stitches for Fig. 108. In this case, the little bars must also be finished before the actual pattern is filled in.
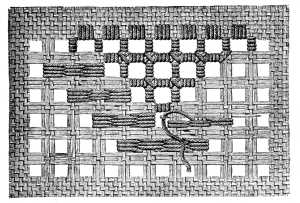
(Explanation of fig. 108)
(Description of fig. __A_TAG_PLACEHOLDER_0__)
Darning in the threads (fig. 107)—In old needle-work we often find the pattern reserved, that is, left blank and outlined by the grounding. As it is difficult, especially in executing minute, and delicate figures, to withdraw the threads partially, without injuring the linen foundation, they are withdrawn throughout, and new ones drawn in, to form the pattern. To explain this more clearly, the original threads of the material are represented in a lighter shade than the new ones that are drawn in; the course of the stitches is indicated in a darker shade.
Darning in the threads (fig. 107)—In traditional needlework, we often see patterns that are left blank and outlined by the background. Since it's challenging, especially when working on small and delicate designs, to pull threads partially without damaging the linen base, the threads are completely removed, and new ones are added to create the pattern. To make this clearer, the original threads of the material are shown in a lighter shade than the new ones that are added; the stitch paths are indicated in a darker shade.
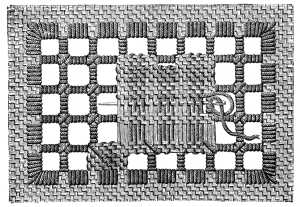
(Explanation of fig. 109).
(Explanation of fig. __A_TAG_PLACEHOLDER_0__.)
Broad insertion in cut open-work, with the pattern drawn in (fig. 108).—This insertion, suitable according to the foundation it is worked on, for the decoration either of curtains, table-covers, bed-linen or underclothing, is made as shown in fig. 106. If intended for the decoration of any article made of white linen, we recommend unbleached materials for the lattice-work, and bleached for the pattern, to bring it out in strong relief.
Broad insertion in cut open-work, with the pattern drawn in (fig. 108).—This insertion, suitable depending on the base it's worked on, can be used to decorate curtains, table covers, bed linens, or undergarments, as shown in fig. 106. If it's for decorating any item made of white linen, we recommend using unbleached materials for the lattice-work and bleached ones for the pattern to make it stand out more.

Insertion in cut open-work, with pattern darned in (fig. 109).—This insertion can be introduced into any kind of linen material, and used for ornamenting towels, aprons, bed-linen and table-linen. When it is used to connect bands of cross-stitch embroidery, the open-work should be of the same colour as the embroidery, and the pattern worked in white or unbleached cotton, to correspond with the foundation. In fig. 109, the pattern is half as large again as in the original.
Insertion in cut open-work, with pattern darned in (fig. 109).—This insertion can be added to any type of linen material and used to decorate towels, aprons, bed linens, and table linens. When it’s used to connect bands of cross-stitch embroidery, the open-work should match the color of the embroidery, and the pattern should be done in white or unbleached cotton to match the base fabric. In fig. 109, the pattern is one and a half times larger than in the original.
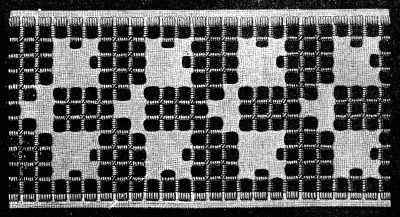
Materials—For Holbein linen: Fil à pointer D.M.C No. 15 or 20, Cordonnet 6 fils D.M.C No. 8, 10 or 15 for the bars.—Coton à tricoter D.M.C No. 16 or Coton à repriser D.M.C No. 12 or 25 for darning or drawing in the pattern.
For finer linens: Fil à dentelle D.M.C Nos. 25 to 30, or Cordonnet 6 fils D.M.C Nos. 25 to 40 for the bars and Coton à repriser D.M.C No. 50 for darning or drawing in the pattern.
Materials—For Holbein linen: D.M.C Fil à pointer No. 15 or 20, D.M.C Cordonnet 6 fils No. 8, 10, or 15 for the bars. D.M.C Coton à tricoter No. 16 or D.M.C Coton à repriser No. 12 or 25 for darning or adding the pattern.
For finer linens: D.M.C Fil à dentelle No. 25 to 30, or D.M.C Cordonnet 6 fils No. 25 to 40 for the bars and D.M.C Coton à repriser No. 50 for darning or adding the pattern.
Fig. 110, a magnified representation of the work in process of execution, shows alternately, ten threads withdrawn each way and six left, with open spaces between. The arcs are worked over three carefully laid threads, carried across from the middle of one bar to the middle of the bar at right angles to it, the wheels on the other hand are begun and finished at the same corner. Overcast the cut edges, and hem-stitch the outside layer of stuff (figs. 61 and 62).
Fig. 110, an enlarged view of the ongoing work, shows a pattern with ten threads pulled back on each side and six left in place, leaving gaps between them. The arcs are created over three neatly arranged threads, extending from the center of one bar to the center of the bar at a right angle to it, while the wheels are started and finished at the same corner. Overcast the cut edges and hem-stitch the outer layer of fabric (figs. 61 and 62).
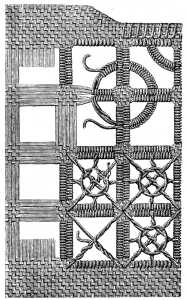
Fig. 111 in process of execution.
Fig. __A_TAG_PLACEHOLDER_0__ being created.
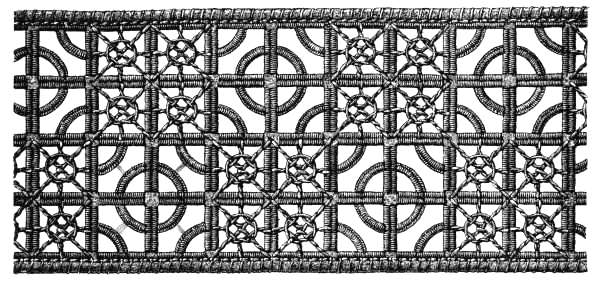
Materials: Fil à pointer D.M.C No. 20 or 30, Cordonnet 6 fils D.M.C Nos. 15 to 50 or Fil à dentelle D.M.C Nos. 25 to 50.
Materials: D.M.C No. 20 or 30 thread, Cordonnet 6 strands D.M.C Nos. 15 to 50, or D.M.C lace thread Nos. 25 to 50.
Greek cut open-work pattern (fig. 112).—After the foregoing explanations, no difficulty will be found in copying the beautiful Greek cut open-work pattern, illustrated in fig. 112. Here, we have in the original, 48 threads drawn out in the middle, both ways, from one straight bar to another, (these bars being darned) with open spaces between; and in the lower and narrower division, 21 threads drawn out each way. The cut edges, from bar to bar, are hem-stitched on both sides, leaving four threads of the stuff between.
Greek cut open-work pattern (fig. 112).—With the previous explanations, you should have no trouble replicating the beautiful Greek cut open-work pattern shown in fig. 112. In the original, there are 48 threads pulled out in the middle, extending from one straight bar to another (these bars are stitched), with gaps in between. In the lower and narrower section, 21 threads are pulled out in each direction. The cut edges, from bar to bar, are hem-stitched on both sides, leaving four threads of the material between.
The long bars, in the second figure, are button holed on both sides, those with the picots, on one side only.
The long bars in the second figure have buttonholes on both sides, while those with the picots have them on just one side.
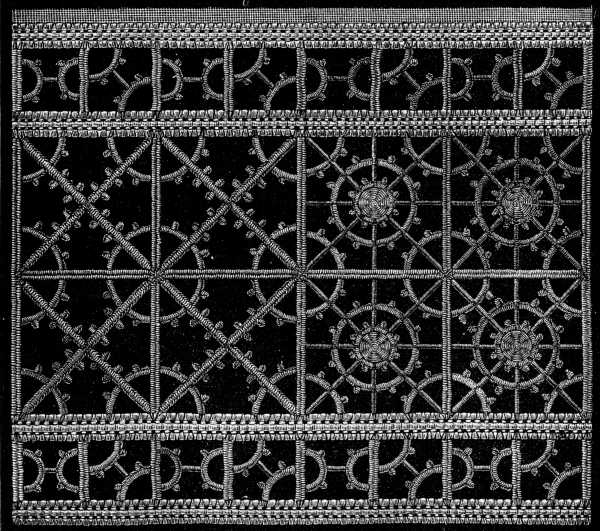
Materials: Cordonnet 6 fils D.M.C Nos. 25 to 50, Fil d’Alsace D.M.C Nos. 20 to 100 or Fil à dentelle D.M.C Nos. 25 to 50.
Materials: Cordonnet 6 threads D.M.C Nos. 25 to 50, Fil d’Alsace D.M.C Nos. 20 to 100 or Fil à dentelle D.M.C Nos. 25 to 50.
FOOTNOTES:
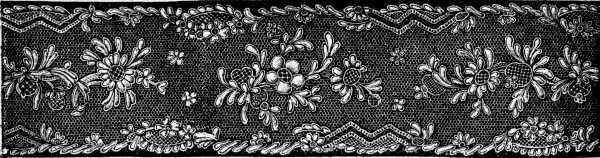
Net and damask stitches.
Many net embroidery patterns and damask stitches consist of a combination of ordinary running and darning, others of chain, stem and cross stitch.
Many net embroidery patterns and damask stitches are made up of a mix of regular running and darning stitches, while others use chain, stem, and cross stitches.
Stripes of net, finished off with button-hole edging, and ornamented with one or other of the following patterns, make very pretty washing laces and the like; net laid upon Irish point and converted by needlework into a lace ground, makes an excellent substitute for a hand-made ground, which demands much labour and time.
Strips of net, trimmed with buttonhole edging, and decorated with various patterns, create lovely washing laces and similar items; netting layered over Irish point and turned into a lace background through needlework serves as a great alternative to a handcrafted ground, which requires a lot of effort and time.
Materials suitable for net embroidery.—The choice of material must be determined by the quality of the net and the effect to be produced. For a coarse make of net and a very marked pattern, the lowest numbers of D.M.C cottons, or the narrowest braids, such as Soutache D.M.C Nos. 1, 2, 3 should be used; if the net be fine and the pattern a delicate one, then the higher numbers of the following are preferable: Coton à tricoter D.M.C Nos. 8 to 20, Coton à repriser D.M.C Nos. 25 to 70, Coton à broder D.M.C Nos. 16 to 50, Fil à dentelle D.M.C Nos. 25 to 50, Coton à broder surfin D.M.C Nos. 100, 120, 150. The latter must be adjusted to the required size before being used, that is to say as many strands of it removed, as is necessary in order to reduce it to the proper thickness.
Materials suitable for net embroidery.—The choice of material should depend on the quality of the net and the effect you want to achieve. For a coarse net and a bold pattern, use the lowest numbers of D.M.C cottons or the narrowest braids, like Soutache D.M.C Nos. 1, 2, 3; if the net is fine and the pattern is delicate, then it's better to use the higher numbers of the following: Coton à tricoter D.M.C Nos. 8 to 20, Coton à repriser D.M.C Nos. 25 to 70, Coton à broder D.M.C Nos. 16 to 50, Fil à dentelle D.M.C Nos. 25 to 50, Coton à broder surfin D.M.C Nos. 100, 120, 150. The latter needs to be adjusted to the required size before using, meaning that you should remove as many strands as necessary to achieve the correct thickness.
Tracing with running stitches (fig. 113).—Have your pattern traced on linen or paper; tack the net upon it, and copy it carefully on the net with running stitches. As in darning, the stitches must run first above and then beneath, alternating in each succeeding row. At the turn of the lines, the stitches cross each other, as shown in the illustration.
Tracing with running stitches (fig. 113).—Get your pattern printed on linen or paper; pin the net to it, and carefully copy it onto the net with running stitches. Just like in darning, the stitches should go above and then below, alternating with each row. At the turns of the lines, the stitches cross over each other, as shown in the illustration.
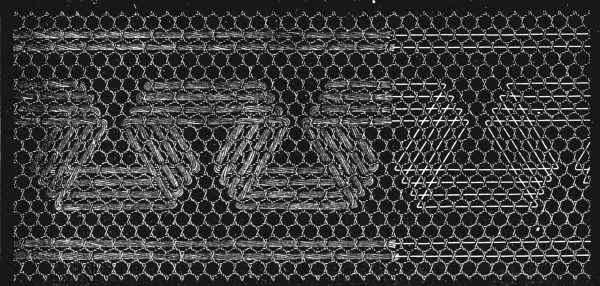
Net pattern (fig. 114).—Here too the pattern is traced with running stitches, which are run in on both sides of each row of meshes. The thread is carried first to the right, and then to the left, under every alternate bar of the net and out again. Between the first and second rows, one thread of the foundation must be left uncovered. In the next row, the thread is carried back again, so that it encircles each mesh. In the third row, the thread passes under the same bar of net as in the second, the threads touching each other. The fourth row is a repetition of the first.
Net pattern (fig. 114).—In this pattern, running stitches are used, running on both sides of each row of meshes. The thread goes to the right first, then to the left, going under every other bar of the net and coming out again. One thread of the foundation must be left uncovered between the first and second rows. In the next row, the thread comes back, wrapping around each mesh. In the third row, the thread goes under the same bar of the net as in the second, with the threads touching each other. The fourth row repeats the first.
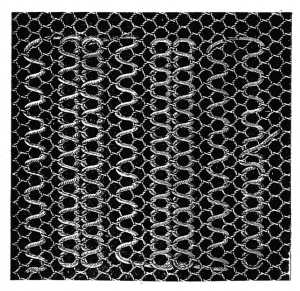
Net pattern (fig. 115).—This consists of two rows of stitches. In the first, the single stitches run diagonally from left to right, over and under a mesh; in the second row the triple stitches, also carried diagonally across a mesh, lie from right to left.
Net pattern (fig. 115).—This consists of two rows of stitches. In the first row, the single stitches run diagonally from left to right, going over and under a mesh; in the second row, the triple stitches, also placed diagonally across a mesh, run from right to left.
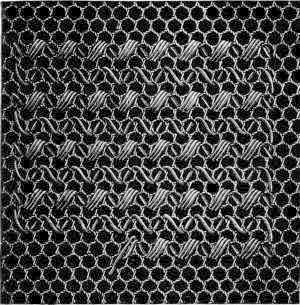
Net pattern (fig. 116).—Begin with a double row, as in fig. 114; this is followed by a row of cross-stitch, touching the others, for which the thread has to be carried, first under one of the straight bars of the mesh and then diagonally, across it. A second, similar row of stitches backwards, completes the crosses. This can be further varied by the introduction of a row of triple stitches, after the double row, as in fig. 115, and the repetition of the two first only.
Net pattern (fig. 116).—Start with a double row, like in fig. 114; then add a row of cross-stitch that touches the others, where the thread needs to go first under one of the straight bars of the mesh and then diagonally across it. A second, similar row of stitches backward completes the crosses. This can also be varied by adding a row of triple stitches after the double row, as shown in fig. 115, and then repeating just the first two.

These rows can also be worked in two colours, or in white thread and washing gold.
These rows can also be done in two colors, or in white thread and washing gold.
Net pattern (fig. 117).—Begin at the top, carrying the thread, first under and then over two bars and a mesh, and then underneath as before. In the second as in the first row, the threads must be drawn in, so that 4 threads always meet in one mesh, and two run parallel to each other through the same mesh.
Net pattern (fig. 117).—Start at the top, bringing the thread first under and then over two bars and a mesh, and then back underneath as before. In the second row, just like in the first, the threads need to be tightened, so that 4 threads always meet in one mesh, and two run parallel to each other through the same mesh.
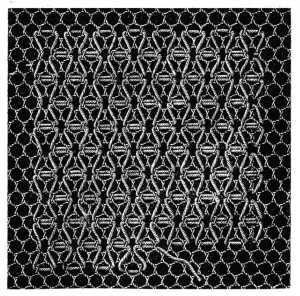
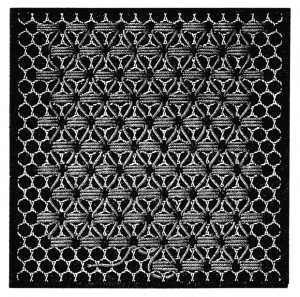
Very pretty varieties are to be obtained by the introduction of several colours. Take white, for instance, for the first row, and different shades of the same colour for the second, third, fourth and fifth rows; such as, Bleu-Lapis 345, 344, 343, 333, 342,[A] or Rouge-Cardinal 348, 305, 304, 347, 346,[A] or Rouge-Géranium, Brun-Caroubier or any other colour that is absolutely fast.
You can create beautiful varieties by using different colors. For the first row, use white, and for the second, third, fourth, and fifth rows, use various shades of the same color, like Bleu-Lapis 345, 344, 343, 333, 342,[A] or Rouge-Cardinal 348, 305, 304, 347, 346,[A] or Rouge-Géranium, Brun-Caroubier, or any other color that is completely fade-resistant.
Net pattern (fig. 119).—After one row of cross-stitch, such as was described in fig. 116, add a second, carrying the thread under the bar that lies between the first stitches, so that the two rows only cover three threads of the net. The close bands of cross-stitch must be divided from each other by one row of net bars.
Net pattern (fig. 119).—After completing one row of cross-stitch, as shown in fig. 116, add a second row by threading the needle under the bar between the first stitches, ensuring that the two rows only cover three threads of the net. The tightly packed cross-stitch bands should be separated by one row of net bars.

Net pattern (fig. 120).—Draw the thread twice backwards and forwards, as in darning, through one row of meshes. In the next, make four stitches over one mesh and two bars. After the fourth stitch, the thread is carried forward under two bars to the next group. The meshes filled in thus are divided from each other by two double rows of darning stitches. Here you may introduce a variety in the colour, using either white and unbleached, or unbleached and pale blue, or some other combination of the kind.
Net pattern (fig. 120).—Thread it back and forth twice, like you do in darning, through one row of loops. In the next row, make four stitches over one loop and two bars. After the fourth stitch, pull the thread forward under two bars to the next group. The loops filled in this way are separated by two double rows of darning stitches. Here, you can mix things up with color, using either white and unbleached, unbleached and pale blue, or some other similar combination.
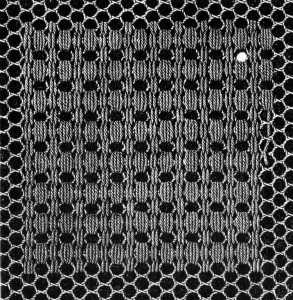
Net pattern (fig. 121).—Make three diagonal stitches over three bars and two meshes, then returning to the mesh out of which the first stitches come, make three more in the opposite direction. In the second row, the stitches meet in the same mesh as those of the first.
Net pattern (fig. 121).—Make three diagonal stitches over three bars and two meshes, then return to the mesh where the first stitches were made and create three more in the opposite direction. In the second row, the stitches should meet in the same mesh as those from the first row.
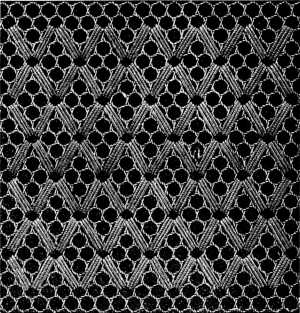
Net pattern (fig. 122).—Carry the thread upwards from below, over a bar of the net, then pass it horizontally under another bar and carrying it downwards, pass it under a diagonal bar and cover the other three. In the second row, your loops must be turned the opposite way. When the whole foundation is finished, run a thread over the whole surface and overcast it. A good effect is produced by using white and unbleached cottons, in alternate rows.
Net pattern (fig. 122).—Lift the thread up from below, over a bar of the net, then pass it horizontally underneath another bar. Carry it downwards, pass it under a diagonal bar, and cover the other three. In the second row, your loops should be turned the other way. When the whole foundation is done, run a thread over the entire surface and overcast it. A nice effect is created by alternating rows of white and unbleached cottons.
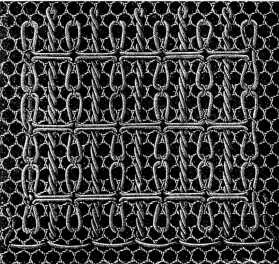
Net pattern (fig. 123).—This pattern consists of one row of overcasting, one of stitches like those described in fig. 114, and one of cross-stitch, as in fig. 39, running diagonally across the stuff. Besides the cottons already mentioned, washing gold thread (Or fin D.M.C pour la broderie), may be used for the overcasting. Dead gold introduced into simple needlework of this kind enlivens it extremely.
Net pattern (fig. 123).—This pattern includes one row of overcasting, one row of stitches similar to those shown in fig. 114, and one row of cross-stitch, as seen in fig. 39, running diagonally across the fabric. In addition to the cottons already mentioned, you can use washing gold thread (or fin D.M.C for embroidery) for the overcasting. Adding dead gold to simple needlework like this really uplifts it.
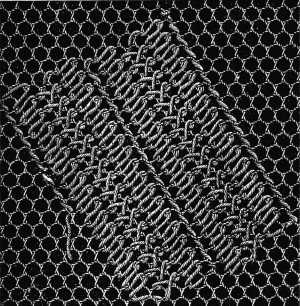
Net pattern (fig. 124).—Three kinds of stitches are required for this pattern. In the first row the stitch lies crossed underneath the net; in the second, 3 stitches are made over one mesh, the first and the last of which are carried across three meshes. In the third row, button-hole stitches are carried from right to left over two diagonal bars, in such a manner that the thread is drawn through the mesh facing the loops, and the next stitch comes out under the loop of the preceding one.
Net pattern (fig. 124).—This pattern needs three types of stitches. In the first row, the stitch crosses underneath the net; in the second row, make 3 stitches over one mesh, with the first and last stitches crossing over three meshes. In the third row, create button-hole stitches from right to left over two diagonal bars, making sure the thread goes through the mesh facing the loops, and the next stitch comes out under the loop of the one before it.
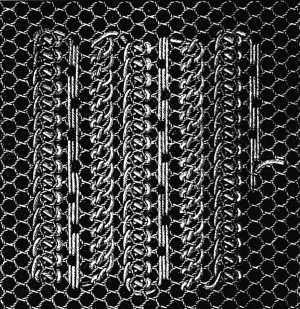
Net pattern (fig. 125).—Fill in every other diagonal row of meshes with chain stitch, inserting the needle into the same mesh it came out of, so that the thread lies in front of the needle, in a loop. The rows of chain stitch may be made with two or three rows of meshes between them. Even the diagonal lines by themselves, make a very pretty foundation for other stitches.
Net pattern (fig. 125).—Fill in every other diagonal row of mesh with chain stitch, inserting the needle into the same mesh it came out of so that the thread sits in front of the needle in a loop. The rows of chain stitch can be made with two or three rows of mesh in between. Even the diagonal lines alone create a beautiful base for other stitches.
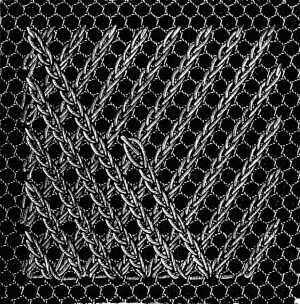
Net pattern (fig. 126).—The first row worked from left to right, consists of three loop stitches upwards and three downwards, each over one bar. In the second row, divided from the first by one row of stitches, the inner loops must be turned towards each other; in the third, the outer ones. Any of the stitches, already described, can be introduced into this pattern to enliven it.
Net pattern (fig. 126).—The first row worked from left to right has three loop stitches going up and three going down, each over one bar. In the second row, separated from the first by a row of stitches, the inner loops should face each other; in the third row, the outer ones should. Any of the stitches already described can be added to this pattern to make it more interesting.
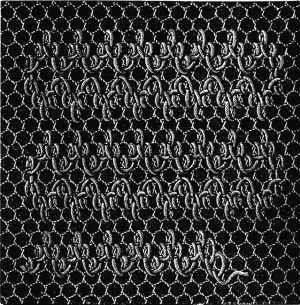
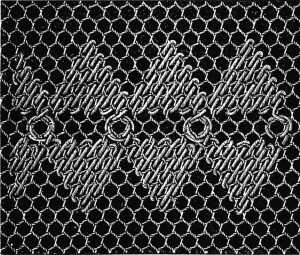
In repeating the pattern, the stitches forming the scallops, must be made to run in the opposite direction. Instead of the thread, simply drawn through the middle, little stars like those described in fig. 134, have a very pretty effect.
In repeating the pattern, the stitches that create the scallops must be made to run in the opposite direction. Instead of the thread just being pulled through the middle, little stars like the ones shown in fig. 134 create a very nice effect.
In fig. 128, the thread is first carried round one mesh and then on to the next scallop. In the second scallop, which turns the opposite way, the thread is carried once more round the last mesh after the pyramid is completed, and then on, to the next figure.
In fig. 128, the thread is first wrapped around one mesh and then moves on to the next scallop. In the second scallop, which curves in the opposite direction, the thread wraps around the last mesh again after the pyramid is finished, and then continues to the next figure.
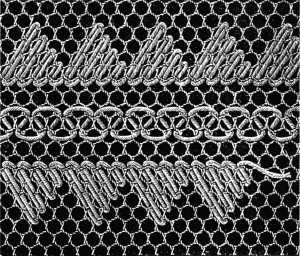
Net pattern (fig. 129).—This checked pattern is also worked in darning stitch. Carry the thread, as in fig. 125, through every second row of meshes. When the bottom rows are all finished, the upper ones are worked across them in the same way. Here the stitches may, if preferred, be distributed more sparingly. But if they are set wider apart, the spaces between should be filled up in some way. Little dots, made of Coton à repriser D.M.C, will answer the purpose best.
Net pattern (fig. 129).—This checked pattern is also done in darning stitch. Carry the thread, as shown in fig. 125, through every second row of meshes. Once the bottom rows are completed, work the upper ones across them in the same manner. In this case, the stitches can be spaced more loosely if you prefer. However, if they are placed further apart, the gaps in between should be filled in somehow. Small dots made from Coton à repriser D.M.C will work best for this purpose.
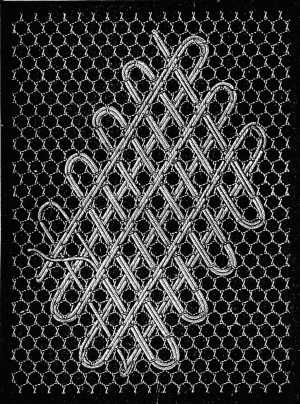
Net insertions (figs. 130, 131, 132).—These three patterns are specially suitable, for insertions, neck-tie lappets and the like, in the place of crochet, pillow, and other kinds of lace. Both design and stitch are clearly enough represented in the subjoined figure for further explanation to be unnecessary. All three should be worked with rather coarse cotton, and Soutache D.M.C[A] (braid) drawn in, produces an excellent effect.
Net insertions (figs. 130, 131, 132).—These three styles are particularly suitable for insertions, necktie lappets, and similar applications, instead of using crochet, pillow lace, or other types of lace. The design and stitch are clearly shown in the accompanying figure, so further explanation isn't needed. All three should be made with relatively thick cotton, and adding Soutache D.M.C[A] (braid) creates a great effect.
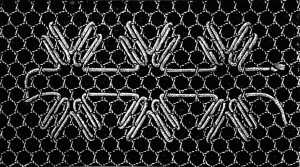
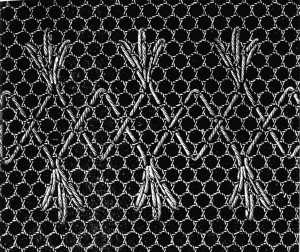
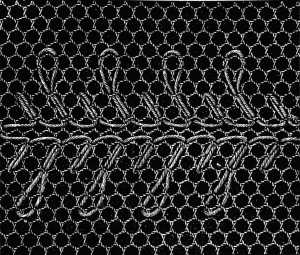
Net pattern (fig. 133).—These delicate little figures can be worked into a close pattern, or can be strewn singly over the surface. The closer you set the stitches, the more clear and distinct the stars will be. The thread must be drawn in to the centre mesh from without, so as to be invisible if possible, and then back again to the outside when the stitches are finished.
Net pattern (fig. 133).—These delicate little figures can be arranged in a close pattern or scattered individually across the surface. The closer you position the stitches, the clearer and more distinct the stars will appear. The thread should be brought in to the center mesh from the outside, making it as invisible as possible, and then pulled back out when the stitches are complete.
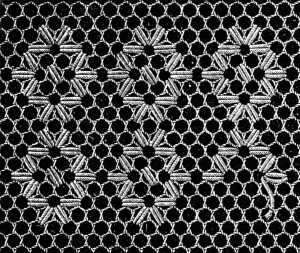
Net pattern (fig. 134).—These flowerets have a very pretty effect, set either singly, or in double or triple rows, and are very useful for filling up gaps or supplementing rows.
Net pattern (fig. 134).—These flower clusters look really nice, whether placed alone or in double or triple rows, and are great for filling in gaps or adding to rows.
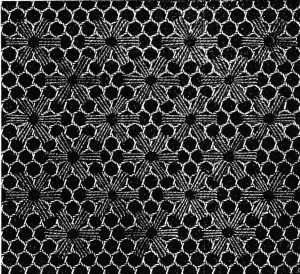
Net pattern (fig. 135).—These star-shaped figures, their longest stitch covering three straight bars and two meshes, the shortest, three diagonal bars and two meshes, may like the above flowerets, be ranged closely together in rows, so that four stitches, two horizontal and two vertical ones, meet in one mesh. Cotton of two colours should be used, in order that the figures may be distinct from each other: white and unbleached are the best, in cases where bright colours would be unsuitable.
Net pattern (fig. 135).—These star-shaped designs have their longest stitch covering three straight bars and two meshes, while the shortest covers three diagonal bars and two meshes. Like the flowerets mentioned earlier, they can be arranged closely together in rows, so that four stitches—two horizontal and two vertical—meet in one mesh. Use cotton in two colors to make the figures stand out from each other; white and unbleached are the best choices when bright colors wouldn’t be appropriate.

Net insertion (fig. 136).—These diamonds make a very pretty grounding either set separately, or in a continuous pattern. The design is slight, nevertheless, when it is worked in coarse cotton, the effect is exceedingly handsome, especially if the inside, in addition to the star here given, be enriched with ordinary darning-stitches, worked in fine gold thread, as we have already mentioned.
Net insertion (fig. 136).—These diamonds create a lovely foundation whether they're placed separately or in a continuous pattern. The design is subtle, but when it's done in coarse cotton, the result is very attractive, especially if the inner part, in addition to the star provided here, is enhanced with regular darning stitches worked in fine gold thread, as we've already mentioned.
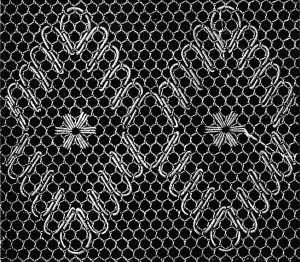
Net tracery with border (fig. 137).—In order to bring out the pattern and the colours, use instead of cotton, Soutache D.M.C, or Lacets surfins D.M.C. Both are to be had in all the colours, given in the list of colours of the D.M.C threads and cottons. The little border can be used in conjunction with any of the preceding patterns, but care must be taken not to let it get twisted in the working. To prevent this, slip a coarse needle under the last stitch, and draw the braid flat over it.
Net tracery with border (fig. 137).—To highlight the pattern and colors, use Soutache D.M.C or Lacets surfins D.M.C instead of cotton. Both are available in all the colors listed in the D.M.C threads and cottons color chart. The small border can be paired with any of the previous patterns, but be careful not to let it twist while you’re working. To avoid this, slip a coarse needle under the last stitch and pull the braid flat over it.
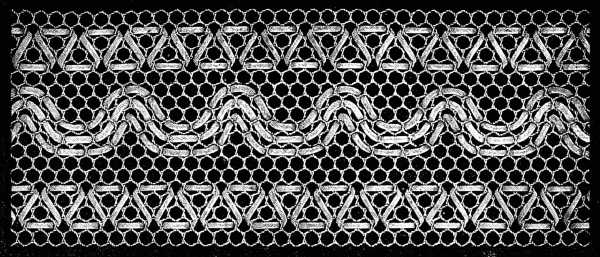
Materials: Soutache D.M.C No. 2 in Bleu-Indigo 334 and Rouge-Turc 321.
Materials: D.M.C No. 2 soutache in Bleu-Indigo 334 and Rouge-Turc 321.
Broad net lace tracery (fig. 138).—The pattern of this pretty lace must first be transferred to stout paper, or oil-cloth. All the leaves and stalks, and the button-holing round the open centres of the flowers, are worked in a pale green, the two bottom flowers in Turkey red, the star-shaped one in blue, the calyx in which the stalks unite, in dark red, and the little bells, in the lightest green.
Broad net lace tracery (fig. 138).—First, you'll need to transfer the pattern of this beautiful lace onto sturdy paper or oilcloth. All the leaves and stems, along with the buttonhole stitching around the open centers of the flowers, are created in a light green. The two bottom flowers are in Turkey red, the star-shaped flower is in blue, the calyx where the stems come together is in dark red, and the little bells are in the lightest green.
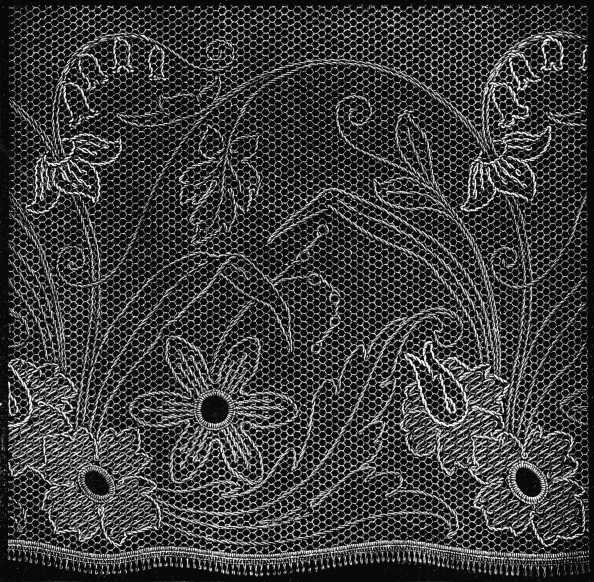
Materials: Coton à broder D.M.C No. 30, 35 or 40.—Colours: Rouge-Turc 321, Rouge-Cardinal 346, Bleu-Indigo 322, Gris-Tilleul 393 and Vert-Pistache 369.
Materials: D.M.C Embroidery Cotton No. 30, 35, or 40.—Colors: Turkish Red 321, Cardinal Red 346, Indigo Blue 322, Linden Grey 393, and Pistachio Green 369.
Laying the first thread (fig. 139).—Tack the net which is to be darned, closely to the defective part, upon either oil-cloth or coloured paper and cut the edges straight to the thread; Your thread must be of exactly the same size, as that of which the net is made. It takes three rows of stitches to imitate the net ground; in the first place, as shown in fig. 139, cross-threads must be laid from side to side, carried as in darning, a little beyond the edges of the hole and so as to surround each mesh with a slanting stitch.
Laying the first thread (fig. 139).—Secure the net that needs repairing tightly over the damaged area, using either oilcloth or colored paper, and trim the edges straight to the thread. Your thread must match the size of the original net exactly. It requires three rows of stitches to replicate the net pattern; first, as shown in fig. 139, lay cross-threads from side to side, extending slightly beyond the hole's edges and surrounding each mesh with a diagonal stitch.
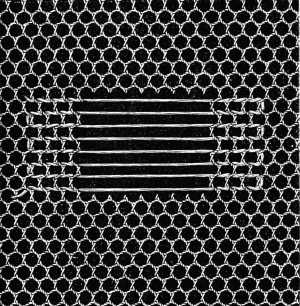
Laying the second thread (fig. 140).—Secondly, beginning from one corner, threads are laid diagonally across the first layer. The cross-threads of the foundation are encircled by a stitch, made from right to left, the needle is then carried under the next horizontal bar, and the first layer of threads is overcast with similar stitches.
Laying the second thread (fig. 140).—Next, starting from one corner, threads are laid diagonally across the first layer. The cross-threads of the foundation are wrapped by a stitch, made from right to left, then the needle is brought under the next horizontal bar, and the first layer of threads is covered with similar stitches.

Laying the third thread (fig. 141).—Thirdly, threads are carried across the second and first layers. They must start, far enough from the edge, for the second layer of threads to be overcast at the same time, so that there may be no loose threads left on the wrong side. In this third journey, every diagonal thread of the foundation is to be encircled with a stitch, taken upwards from below, the cut edges being strengthened in the same way. Then, to form the little cross in the fabric, the thread must be conducted by means of a second stitch, under the single horizontal thread, outwards, to the next-diagonal thread.
Laying the third thread (fig. 141).—Next, the threads are pulled across the second and first layers. They should begin far enough from the edge so that the second layer of threads can be overcast at the same time, ensuring there are no loose threads left on the back. During this third step, each diagonal thread of the foundation should be encircled with a stitch that goes up from below, and the cut edges should be reinforced in the same way. To create the small cross in the fabric, the thread should be guided with a second stitch, under the single horizontal thread, and outwards towards the next diagonal thread.
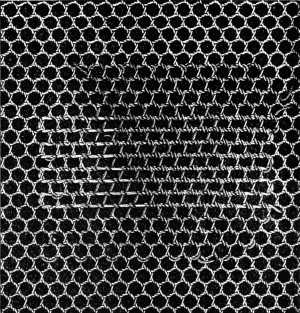
In places where the net is worn, it can be strengthened in the same manner, the stitches being made the way of the stuff.
In areas where the net is frayed, it can be reinforced in the same way, with the stitches following the pattern of the material.
Damask stitches.—As a rule the pattern is simply outlined with stem and cord stitch, and the inside spaces are left plain. In spite of the time this simple tracing takes to do, the effect is rather poor and scanty. If however, the inside of the leaves and flowers, be filled in with damask stitch, the result is very handsome.
Damask stitches.—Usually, the pattern is just outlined with stem and cord stitch, leaving the inside spaces empty. Even though this simple tracing takes a bit of time, the outcome looks quite basic and sparse. However, if you fill in the centers of the leaves and flowers with damask stitch, the result is really beautiful.
Not only can the following stitches, which are suitable for any linen coarse or fine, be used for this kind of embroidery, but most of the net and lace patterns too, and these combined with button-holing and flat stitch produce charming effects.
Not only can the following stitches, which work for any coarse or fine linen, be used for this type of embroidery, but most net and lace patterns can also be used. When these are combined with button-holing and flat stitch, they create beautiful effects.
Materials suitable for damask stitches.—All the threads and cottons used for net work can also be used for damask stitches, according to the material and the kind of work. We will enumerate them once more: Coton à tricoter D.M.C Nos. 8 to 20, Coton à repriser D.M.C Nos. 25 to 70, Coton à broder D.M.C Nos. 16 to 50, Fil à dentelle D.M.C Nos. 25 to 50, Coton à broder surfin D.M.C Nos. 100, 120, 150.[A]
Materials suitable for damask stitches.—All the threads and cottons used for net work can also be used for damask stitches, depending on the material and type of work. We'll list them again: Coton à tricoter D.M.C Nos. 8 to 20, Coton à repriser D.M.C Nos. 25 to 70, Coton à broder D.M.C Nos. 16 to 50, Fil à dentelle D.M.C Nos. 25 to 50, Coton à broder surfin D.M.C Nos. 100, 120, 150.[A]
This kind of embroidery is generally done with a very coarse needle, to press the threads of the stuff closely together and make the light spaces between, which appear in many of the following illustrations.
This type of embroidery is usually done with a very thick needle to push the threads of the fabric tightly together and create the light gaps that appear in many of the following illustrations.
First pattern (fig. 142).—Carry the needle in a slanting direction over three threads and bring it out, from right to left, under three perpendicular ones, then again slanting, over three threads, from left to right, and out again underneath three horizontal ones, downwards from above. Thus the first stitch lies across, from right to left, the second, lengthways. On the wrong side, the stitch forms a regular succession of steps.
First pattern (fig. 142).—Place the needle at an angle over three threads and bring it out, moving from right to left, under three vertical threads. Then, at an angle again, go over three threads from left to right and bring it out underneath three horizontal threads, going down from above. This way, the first stitch runs across from right to left, while the second goes lengthwise. On the back side, the stitch creates a neat series of steps.
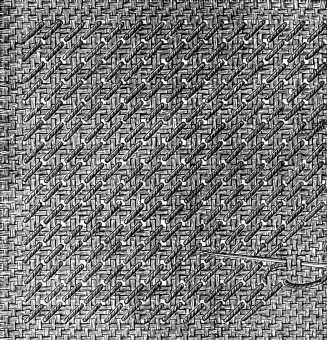
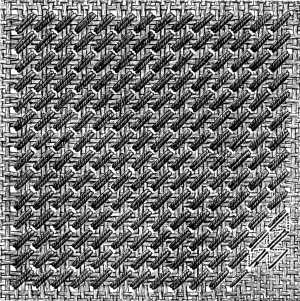
Third pattern (fig. 144).—Though at first sight, this stitch is very like the Holbein or stroke stitch, it is very different in the execution. It is worked in two rows, to and fro; in the first, you make all the vertical stitches side by side in the width of the stuff, drawing your thread very tightly, in the second, coming back, you make the horizontal stitches in a straight line, at right angles to the first stitches. On the wrong side the stitches are crossed; they in thin stuffs, show through, and quite alter the appearance of the right side.
Third pattern (fig. 144).—At first glance, this stitch looks a lot like the Holbein stitch, but it's quite different in how it's done. It's worked in two rows, back and forth; in the first row, you create all the vertical stitches next to each other across the width of the fabric, pulling your thread very tightly. In the second row, as you come back, you make the horizontal stitches in a straight line, crossing at right angles to the first stitches. On the reverse side, the stitches cross over each other; they show through in thin fabrics and noticeably change the look of the front side.
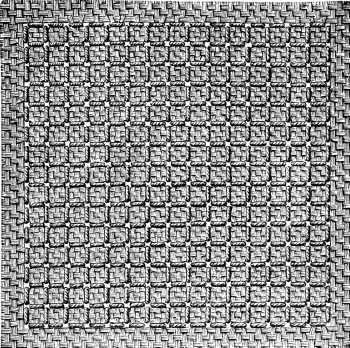
Fourth, pattern (fig. 145).—In the first row, the thread is carried slanting upwards from right to left, over two threads, then downwards under two. Coming back, the stitches must be set the opposite way, so that four threads meet in one hole.
Fourth, pattern (fig. 145).—In the first row, the thread is pulled at a diagonal from right to left, over two strands, and then underneath two. On the way back, the stitches need to go in the opposite direction, so that four strands come together in one hole.
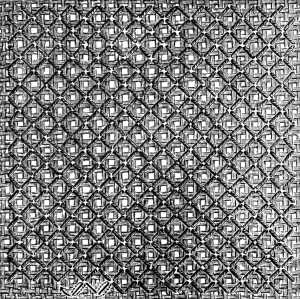
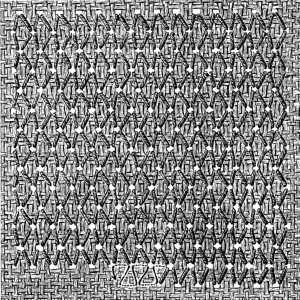
Sixth pattern (fig. 147).—Here, the stitches form a chess-board pattern. You begin with a diagonal stitch over two threads and bring your needle up again into the same line it started from. The second stitch covers three threads, the third six, the fourth eight; the next three decrease, successively in length, in the same proportion.
Sixth pattern (fig. 147).—In this pattern, the stitches create a chessboard design. Start with a diagonal stitch over two threads and bring your needle back up into the same line it started from. The second stitch covers three threads, the third covers six, the fourth covers eight; the next three decrease in length, following the same pattern.
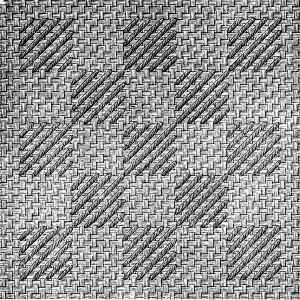
Seventh pattern (fig. 148).—Two kinds of cotton have to be used for this pattern, one of them soft and flat, like Colon à repriser D.M.C[A] (darning cotton) or Coton à tricoter D.M.C (knitting cotton)[A] for the flat stitches, and the other strongly twisted, like Cordonnet 6 fils D.M.C No. 8, 10, 12 or 15,[A] for the cross stitches.
Seventh pattern (fig. 148).—You need to use two types of cotton for this pattern. One should be soft and flat, like D.M.C Darn Cotton [A] (darning cotton) or D.M.C Knitting Cotton [A] for the flat stitches. The other should be strongly twisted, like D.M.C Cordonnet No. 6, available in sizes 8, 10, 12, or 15 [A] for the cross stitches.
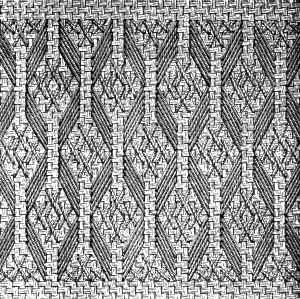
The five flat stitches cover three threads in width and six in height, and lie from right to left and from left to right. In the second row, which must be two threads distant from the first, the stitches must lie in the contrary direction. In the lozenge-shaped space between, make four cross stitches, over four threads in height and two in width.
The five flat stitches cover three threads in width and six in height, laying from right to left and then from left to right. In the second row, which should be two threads below the first, the stitches must go in the opposite direction. In the lozenge-shaped space in between, make four cross stitches, covering four threads in height and two in width.
Eighth pattern (figs. 149 and 150).—Make five stitches over 8 horizontal threads, miss 6 threads and make another 5 stitches. The groups of long stitches above and beneath the first row, encroach over two threads of the first group, so that a space of only four threads remains between two groups. The stitch between these groups is generally known as the rococo stitch.
Eighth pattern (figs. 149 and 150).—Make five stitches over 8 horizontal threads, skip 6 threads, and make another 5 stitches. The long stitch groups above and below the first row overlap two threads of the first group, leaving only a space of four threads between the two groups. The stitch between these groups is commonly called the rococo stitch.
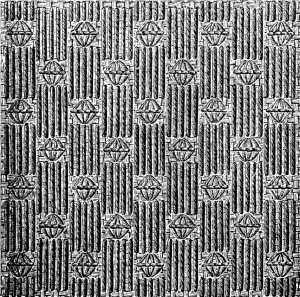
Bring out your needle between the third and fourth of these threads, and insert it again above, drawing it out afterwards between the second and third horizontal thread, and securing the first stitch with a back stitch. Make the three remaining stitches, as explained in fig. 150.
Bring your needle out between the third and fourth threads, and push it back in above. Pull it out afterwards between the second and third horizontal thread, securing the first stitch with a back stitch. Make the last three stitches as shown in fig. 150.
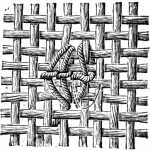
Ninth pattern (fig. 151).—This consists of straight bands of flat stitches, covering three threads each way, with spaces 8 threads wide between, ornamented with a small pattern in stroke stitch, (see chapter on Tapestry and Linen embroidery).
Ninth pattern (fig. 151).—This consists of straight bands of flat stitches that cover three threads in each direction, with 8 threads of space in between, decorated with a small design in stroke stitch (see chapter on Tapestry and Linen embroidery).
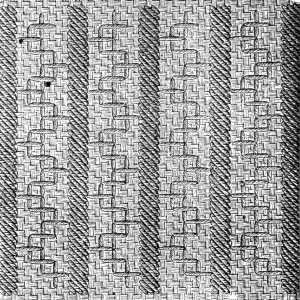
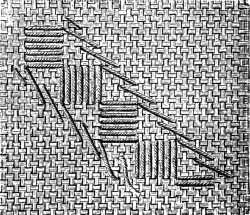
Tenth and eleventh patterns (figs. 153 and 154).—The former of these is used for filling in the short stripe in fig. 105, the second for the long inside one. Fig. 153 is clear enough to need no explanation; with reference to fig. 154, it is however as well to point out that the shortest stitch should cover 4 threads and the longest 12, the rest is easily learnt from the illustration. This is a very suitable design for the decoration of large surfaces and combines well with any running diagonal pattern, when it can be made to form a large star which can be worked as a separate figure.
Tenth and eleventh patterns (figs. 153 and 154).—The first one is used to fill in the short stripe in fig. 105, while the second is for the long inside stripe. Fig. 153 is clear enough to not need an explanation; however, regarding fig. 154, it's good to note that the shortest stitch should cover 4 threads and the longest should cover 12. The rest can be easily understood from the illustration. This design is great for decorating large surfaces and works well with any running diagonal pattern, where it can create a big star that can be done as a separate figure.
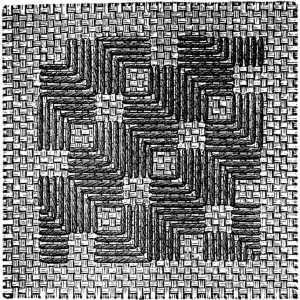
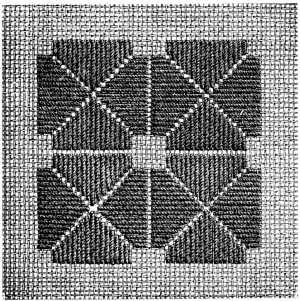
Twelfth pattern (fig. 155).—In cases where this and the following stitches are to be executed on a light, transparent stuff, it is best to use a very strongly twisted thread, such as Fil d’Alsace D.M.C[A] or, Fil à dentelle D.M.C[A] instead of a softer and looser material. A stiff thread compresses the threads of the stuff better and the open spaces, thus made in it, are rendered more visible.
Twelfth pattern (fig. 155).—When working with this and the next stitches on a light, transparent fabric, it's best to use a tightly twisted thread, like Fil d’Alsace D.M.C[A] or Fil à dentelle D.M.C[A], rather than a softer, looser material. A stiff thread holds the fabric threads together better, making the open spaces more noticeable.
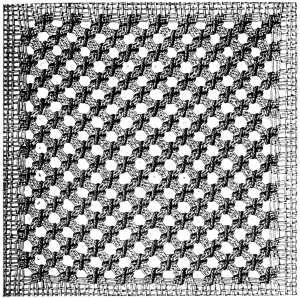
Count 6 threads vertically, put in the needle and draw it through from right to left, underneath 3 diagonal threads. For the next stitch, carry it upwards over 6 threads, and back under 3. The second row is worked back over the first in the same way. Leave 6 threads between each row.
Count 6 threads vertically, put the needle in, and pull it through from right to left, under 3 diagonal threads. For the next stitch, move it upwards over 6 threads, then back under 3. The second row is worked back over the first in the same way. Leave 6 threads between each row.
Thirteenth pattern (fig. 156).—Carry the thread, from right to left over four vertical threads, and under the same number of horizontal ones. The second row of stitches touches the first, so that the thread it is worked with seems to be drawn through under the same threads of the stuff, as the one the first row was worked with.
Thirteenth pattern (fig. 156).—Bring the thread from right to left over four vertical threads and under the same number of horizontal threads. The second row of stitches should touch the first, making it look like the thread being used is pulled through under the same threads of the fabric as the one used for the first row.
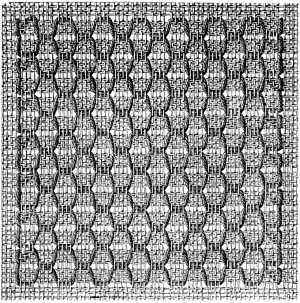
Fourteenth pattern (fig. 157).—Here, the stitches, contrary to those in fig. 147, are set vertically. The first stitch covers 2 threads, the second 6, the third 10, the fourth 14, the fifth 18. The longest stitches of two checks always meet in the same hole.
Fourteenth pattern (fig. 157).—In this pattern, the stitches are arranged vertically, unlike those in fig. 147. The first stitch covers 2 threads, the second covers 6, the third covers 10, the fourth covers 14, and the fifth covers 18. The longest stitches from the two checks always intersect in the same hole.
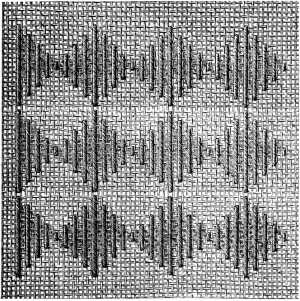
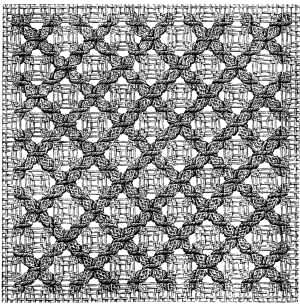
These rows are intersected by others, to which the thread is passed, from between the sixth and seventh of the 12 threads between the first rows. Where the stitches of the two rows meet, the working thread of the second row must be drawn through, under that of the first.
These rows are crossed by others, through which the thread is threaded, from between the sixth and seventh of the 12 threads between the first rows. Where the stitches of the two rows come together, the working thread of the second row should be pulled through, under that of the first.
Sixteenth pattern (fig. 159).—Between every two rows of cross-stitch, leave an interval of 6 threads, counting those on each side of the rows. Over these 6 threads work 2 rows, as shown in fig. 148, but so, that in the second, the lower stitch of the first row and the upper one of the second, cover the same threads.
Sixteenth pattern (fig. 159).—Between every two rows of cross-stitch, leave a gap of 6 threads, counting those on each side of the rows. Over these 6 threads, work 2 rows, as shown in fig. 148, making sure that in the second row, the lower stitch of the first row and the upper stitch of the second row cover the same threads.
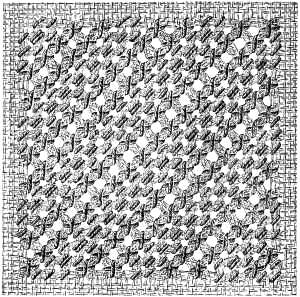
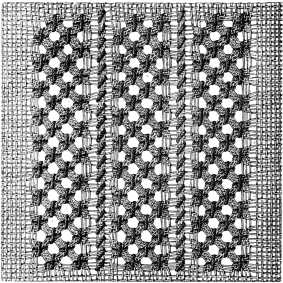
Eighteenth pattern (fig. 161).—Small squares of 7 stitches, inclined alternately, to the right and left, and so formed, that the longest stitch of one square is crossed by the first short stitch of the next, so that a space only 6 threads wide and 4 long, remains uncovered. The intervening stripes are filled with 3 rows of overcasting stitches, covering 2 threads each way.
Eighteenth pattern (fig. 161).—Small squares of 7 stitches, tilted alternately to the right and left, arranged so that the longest stitch of one square overlaps the first short stitch of the next, leaving an uncovered space that is only 6 threads wide and 4 long. The spaces in between are filled with 3 rows of overcasting stitches, covering 2 threads in each direction.
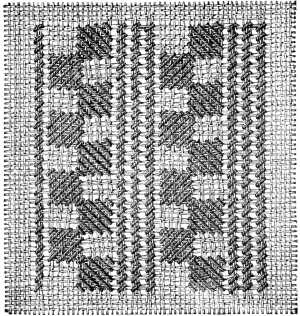
Nineteenth pattern (fig. 162).—The steps formed by this pattern are 11 stitches high, and 11 wide, and each stitch covers 4 threads.
Nineteenth pattern (fig. 162).—The steps created by this pattern are 11 stitches tall and 11 stitches wide, with each stitch covering 4 threads.
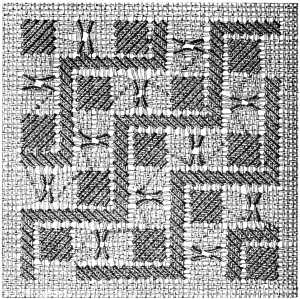
Eight threads intervene between each row of steps, which are covered at the bend, by a square of stitches, from the last of which, the thread is carried on at once, to the four single stitches.
Eight threads are placed between each row of steps, which are covered at the bend by a square of stitches. From the last of these stitches, the thread is directly taken on to the four single stitches.
Twentieth pattern (fig. 163).—The 4 squares set opposite to each other, with 2 threads between, are edged all round by 3 rows of overcasting.
Twentieth pattern (fig. 163).—The 4 squares positioned across from each other, with 2 threads in between, are bordered all around by 3 rows of overcasting.
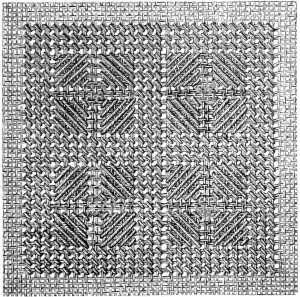
Twenty-first pattern (fig. 164).—Begin by rows of stitches, like those described in fig. 155, over 4 and 2 threads, with 4 threads between, not counting those covered with cross-stitch. Between the two rows of cross-stitch, join 6 threads together by a back-stitch, and carry your thread over the two last of the 6, to the 2 first of the next cluster. The narrow diagonal stripes are separated by 24 threads, exclusive of those covered by the cross-stitches. These spaces are filled in with squares, 10 threads wide and 10 long, formed by back-stitches crossed on the wrong side.
Twenty-first pattern (fig. 164).—Start by stitching rows as shown in fig. 155, using 4 and 2 threads, with 4 threads in between, not including those covered with cross-stitch. Between the two rows of cross-stitch, connect 6 threads together with a back-stitch, and then carry your thread over the last two of the 6, to the first two of the next group. The narrow diagonal stripes are spaced 24 threads apart, excluding those covered by the cross-stitches. Fill these spaces with squares that are 10 threads wide and 10 threads long, created by back-stitches crossed on the back side.
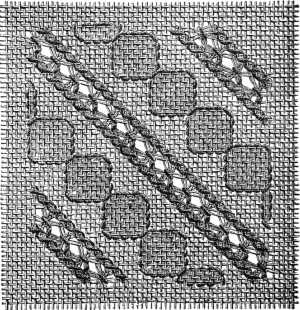
Twenty-second pattern (fig. 165).—In the closer stuffs, of a coarse texture, the threads of which do not admit of being drawn together, as you can those, of a loose thin stuff, where, by simply pulling your thread a little tighter you get open spaces, you must begin by cutting out every fourth or fifth thread. After which, you overcast all the rows, first one way, and then the other, with stitches covering 4 threads, each way. On this foundation with strong, loosely-twisted cotton, Coton à broder D.M.C or Coton à tricoter D.M.C No. 25, 30, 35, or 40, make long stitches, as indicated in the illustration.
Twenty-second pattern (fig. 165).—In thicker fabrics with a rough texture, where the threads can’t be pulled together like in lighter materials, you should start by cutting out every fourth or fifth thread. Then, overcast all the rows, first in one direction and then in the other, with stitches that cover 4 threads each way. Using strong, loosely-twisted cotton, like D.M.C Coton à broder or D.M.C Coton à tricoter No. 25, 30, 35, or 40, make long stitches as shown in the illustration.
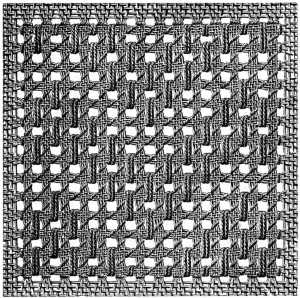
Twenty-third pattern (fig. 166.)—From the point where the thread comes out of the stuff, make 16 stitches, four times over, all coming out of the same hole, over 8, 6, 4 and 6 threads, thus forming a star. Leave an interval of four threads between the stars, and unite the intervening threads by cross-stitches one way, and whip-stitches, the other.
Twenty-third pattern (fig. 166.)—From the point where the thread emerges from the fabric, make 16 stitches, going around four times, all coming out of the same hole, over 8, 6, 4, and 6 threads, forming a star. Leave a gap of four threads between the stars, and connect the threads in between with cross-stitches in one direction and whip-stitches in the other.
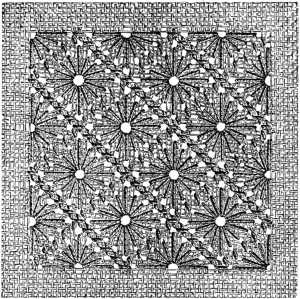
Twenty-fourth pattern (fig. 167).—Make a succession of diagonal stitches, increasing in length, and advancing one thread at a time, until the seventh stitch covers seven threads, and completes the triangle. Then begin a second triangle on the nearest, adjacent thread.
Twenty-fourth pattern (fig. 167).—Create a series of diagonal stitches, each one longer than the last, moving forward one thread at a time until the seventh stitch covers seven threads and finishes the triangle. Then start a second triangle on the nearest, next thread.
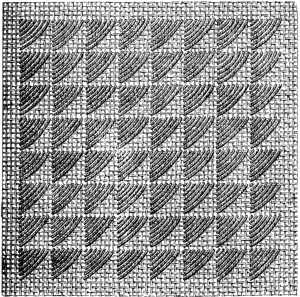
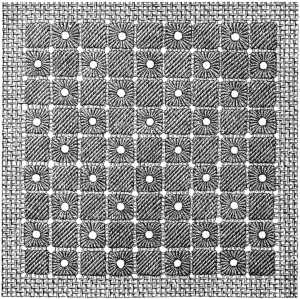
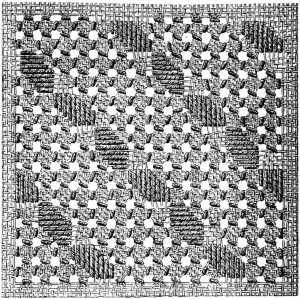
Twenty-seventh pattern (fig. 170).—We conclude our chapter with a circular design, which combines a variety of stitches, and introduces our workers to two new patterns, as well as to an advantageous way of hiding the junction of several kinds of stitches by semicircles of button-hole stitching.
Twenty-seventh pattern (fig. 170).—We finish our chapter with a circular design that features different stitches and introduces our workers to two new patterns, along with a clever method for concealing the junction of various types of stitches using semicircles of buttonhole stitching.
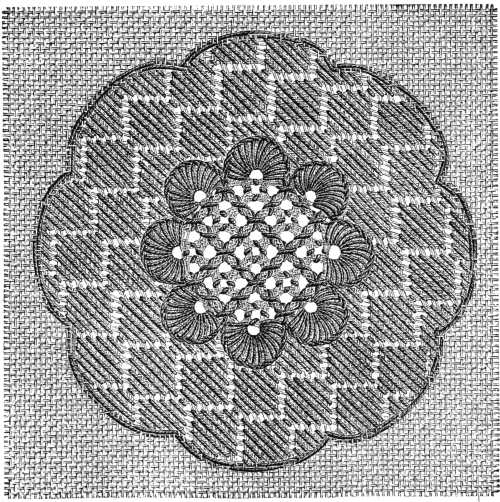
FOOTNOTES:
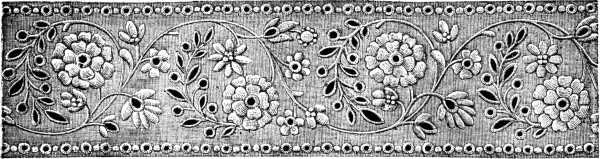
White Embroidery.
We have retained the familiar term, white embroidery, for this kind of needlework, for convenience sake, in spite of its inaccuracy, now that coloured materials are quite as much used for it as white.
We have kept the familiar term "white embroidery" for this type of needlework for the sake of convenience, even though it's not entirely accurate, since colored materials are now used just as much as white.
It is executed, either on a backing of oil-cloth, or in an embroidery frame, called «tambour-frame». Only skilful workers can dispense with these, for an untrained hand can hardly avoid puckering. If you work without a foundation, the material must be held, quite smoothly over the forefinger, so that the threads lie perfectly straight, otherwise, the pattern is very apt to get pulled out of shape in the working. With your three other fingers you hold the material fast, the thumb resting on the work itself, beyond the outline of the pattern, which must be turned towards the worker. It is always the outside line of a pattern that is drawn in double lines, that should be turned towards the palm of the hand.
It is done either on a backing of oilcloth or in an embroidery frame called a "tambour frame." Only skilled workers can forgo these tools, as an untrained hand can easily create puckering. If you’re working without a foundation, the material must be held smoothly over your forefinger so that the threads lie perfectly straight; otherwise, the pattern is likely to get distorted while you work. With your other three fingers, you hold the material securely, with your thumb resting on the work itself, beyond the outline of the pattern, which should face you. It's always the outer line of a pattern that's drawn in double lines that should be turned toward the palm of your hand.
Tracing patterns.—Patterns are generally to be had ready traced, but as it is often necessary to repeat, enlarge, or reduce them, descriptions of several modes of doing so, will be found at the end of the concluding chapter.
Tracing patterns.—Patterns are usually available pre-traced, but since it's often necessary to repeat, enlarge, or shrink them, descriptions of various methods for doing this can be found at the end of the final chapter.
Materials.—A loose, soft make of cotton, the looser the better, and very little twisted, is the best material for embroidery. We recommend for white embroidery in general, Coton à broder D.M.C Nos. 16 to 150; for monograms on cambric, Coton à broder surfin D.M.C Nos. 100, 120, 150;[A] and for English or Madeira embroidery, Coton Madeira D.M.C Nos. 40, 50, 60;[A] for padding, or raising the embroidery, all the different kinds of Coton à repriser D.M.C[A] can be used.
Materials.—A loose, soft cotton fabric works best for embroidery; the looser, the better, with very little twist. For general white embroidery, we recommend Coton à broder D.M.C Nos. 16 to 150; for monograms on cambric, use Coton à broder surfin D.M.C Nos. 100, 120, 150;[A] and for English or Madeira embroidery, choose Coton Madeira D.M.C Nos. 40, 50, 60;[A] for padding or raising the embroidery, you can use any of the different kinds of Coton à repriser D.M.C[A].
Outlining and padding.—The outlining of a pattern is a very important preliminary. A want of precision in the ultimate effect is often due, merely to careless outlining. This part of the work should be done with rather a coarser cotton than the embroidery itself. Fasten in the thread by a few running stitches, never with a knot, a rule to be observed also in embroidering, except in very rare cases. Finish off your thread by drawing it through the tracing stitches, or through some part of the pattern that is already finished. Fill in the spaces between the lines with a padding of run threads, run loosely, and so that they lie thickly and solidly in the centre, and shade off on both sides. The fullness, and roundness of embroidery, depends on the firmness of this sub-stratum of threads. The outlining and the padding of the different rounded and pointed scallops, as well as of other figures that occur in white embroidery, are illustrated in figs. 181, 182, 183, 184, 185, 187, 189, 190 and 191.
Outlining and padding.—Creating an outline for a pattern is a crucial first step. A lack of precision in the final effect is often just due to careless outlining. This part of the work should use a thicker cotton thread than the embroidery itself. Secure the thread with a few running stitches, never with a knot—a rule that should also apply when embroidering, except in very rare circumstances. To finish your thread, pull it through the tracing stitches or through an already completed part of the pattern. Fill in the spaces between the lines with loose padding of running threads, placing them thickly and solidly in the center while tapering off on both sides. The fullness and roundness of the embroidery rely on the strength of this underlying layer of threads. The outlining and padding of the various rounded and pointed scallops, as well as other shapes found in white embroidery, are shown in figs. 181, 182, 183, 184, 185, 187, 189, 190 and 191.
Blanket, or button-hole stitch (fig. 171).—Work from left to right; run in a foundation line, hold down the working thread below the run line with the right thumb; insert the needle above and bring it out below the run line but above the working thread; tighten the loop thus formed, without drawing up the stuff, and continue in this manner, setting your stitches closely and regularly, side by side.
Blanket, or button-hole stitch (fig. 171).—Start from the left and move to the right; create a foundation line, keeping the working thread held below the foundation line with your right thumb. Insert the needle from above and pull it out below the foundation line but above the working thread; tighten the loop that forms without pulling the fabric tight, and keep going this way, placing your stitches close together and evenly, side by side.

Straight stem stitch (fig. 172).—Work from left to right. The needle must always be inserted above the run thread, and brought out underneath it. In the case of a very delicate pattern, take up only just as much stuff as the run thread covers.
Straight stem stitch (fig. 172).—Sew from left to right. The needle should always go in above the running thread and come out below it. For very delicate patterns, only pick up as much fabric as the running thread covers.
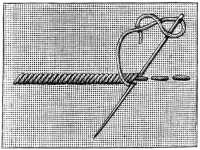
Sloping stem stitch (fig. 173).—Work without a run thread; insert the needle from right to left in a slanting direction, under 1 or 2 horizontal threads, and 5 or 6 perpendicular ones; so that each stitch reaches halfway back to the last.
Sloping stem stitch (fig. 173).—Work without a base thread; insert the needle from right to left at an angle, under 1 or 2 horizontal threads, and 5 or 6 vertical ones; so that each stitch goes halfway back to the last one.
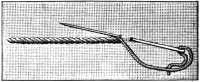
This kind of stem stitch is chiefly used for the fine upstrokes of letters and numbers, and for linen embroidery.
This type of stem stitch is mainly used for the delicate upward strokes of letters and numbers, as well as for linen embroidery.
Back-stitching (fig. 174).—Back-stitching, that is small, even stitches set closely together, is done from right to left, along a straight line, and is chiefly used for filling in the centres of letters, leaves and flowers.
Back-stitching (fig. 174).—Back-stitching, which consists of small, even stitches placed closely together, is done from right to left along a straight line and is mainly used for filling in the centers of letters, leaves, and flowers.
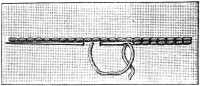
Crossed back-stitch (figs. 175 and 176).—Used, generally speaking, only for very transparent materials; it forms a close seam of cross-stitch, on the wrong side, and two straight rows of back-stitching on the right. To work, insert the needle as if for an ordinary back-stitch, pass it under the stuff, sloping it a little towards the second outline of the pattern, and draw it out almost in front of the first stitch. After making a back-stitch, pass the needle up again under the stuff and bring it out at the spot where the next stitch is to be.
Crossed back-stitch (figs. 175 and 176).—Typically used only for very sheer fabrics; it creates a close seam of cross-stitch on the back side, and two straight rows of back-stitching on the front. To do this, insert the needle as you would for a regular back-stitch, slide it under the fabric, angling it slightly towards the second outline of the pattern, and pull it out just in front of the first stitch. After making a back-stitch, push the needle back under the fabric and bring it out where the next stitch will go.
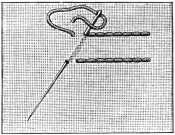

Fig. 176 shows the interlacing of the stitches on the wrong side, and the way in which this stitch, when it is used for filling in centres, can be worked on the right side.
Fig. 176 shows how the stitches are intertwined on the back side, and how this stitch, when used to fill in centers, can be worked on the front side.
Simple knot stitch (fig. 177). This consists of two back-stitches, side by side, covering the same threads; it is chiefly used for filling in leaves, embroidered on very thin materials, or in conjunction with flat stitch.
Simple knot stitch (fig. 177). This consists of two back-stitches side by side, covering the same threads. It’s mainly used for filling in leaves, embroidered on very thin fabrics or along with flat stitch.
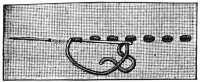
Twisted knot stitch (fig. 178). To work hold the working thread down with the thumb close to the spot where you first brought it out, twist it twice round the needle, turn the needle round from left to right, following the direction indicated by the arrow, pass it through the fabric at the place which is marked by a dot, and draw it out at the place where the next stitch is to be.
Twisted knot stitch (fig. 178). To create it, hold the working thread down with your thumb near where it first comes out. Twist it twice around the needle, turn the needle from left to right as shown by the arrow, push it through the fabric at the spot marked by a dot, and pull it out where the next stitch will go.
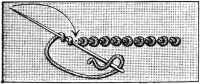
Post stitch (fig. 179).—Something like knot stitch and much used for patterns, composed of small flowers and leaves, where it often takes the place of raised satin stitch. The illustration represents five leaves finished, and the sixth in process of being worked.
Post stitch (fig. 179).—Similar to knot stitch and commonly used for patterns, it consists of small flowers and leaves, often replacing raised satin stitch. The illustration shows five completed leaves, with the sixth one currently being worked on.
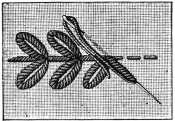
To work, bring the needle up from the back and twist the thread round it as many times as the length of the stitch requires, hold the left thumb on the species of curl thus formed, and passing the needle and thread through it, insert it at the end of the leaf where it first came out, and draw it out at the right place for the next stitch.
To get started, bring the needle up from the back and wrap the thread around it as many times as needed for the length of the stitch. Hold down the left thumb on the type of loop formed, then pass the needle and thread through it. Insert it back at the end of the leaf where it originally came out, and pull it through to the right spot for the next stitch.
Button-hole bars (fig. 180).—When a pattern is ornamented with open-work bars, begin by tracing the outside parallel lines. Then button-hole the whole lower line and the upper one, till you come to the place where the first bar is to be; then you carry your thread across and bring up the needle from below through one of the loops, as, shown in the figure; lay three threads in this manner, inserting your needle the third time one loop further on. Then cover the three threads thickly with button-holing.
Button-hole bars (fig. 180).—When a pattern is decorated with open-work bars, start by tracing the outside parallel lines. Then, create a button-hole stitch along the entire lower line and the upper line until you reach the spot for the first bar; at that point, take your thread across and bring up the needle from underneath through one of the loops, as shown in the figure. Lay three threads this way, inserting your needle one loop further along for the third stitch. Next, cover the three threads with button-holing.
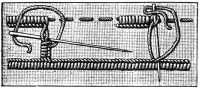
Different kinds of scallops (figs. 181, 182, 183).—The outlining, padding and button-holing of these scallops is executed in the manner already described. Be careful to adapt the length of the stitches to the shape and size of the scallops. If they are pointed (figs. 182, 183), the stitches will have to be set very closely together on the inner line, and a little play allowed them on the outer, to come exactly to the point, which should be very sharply defined.
Different kinds of scallops (figs. 181, 182, 183).—The outlining, padding, and button-holing of these scallops should be done as described earlier. Make sure to adjust the stitch length based on the shape and size of the scallops. If they are pointed (figs. 182, 183), the stitches will need to be placed very closely together on the inner edge, while allowing a little more space on the outer edge to reach the point, which should be sharply defined.
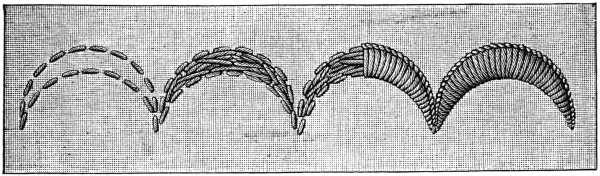
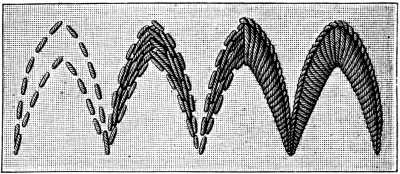
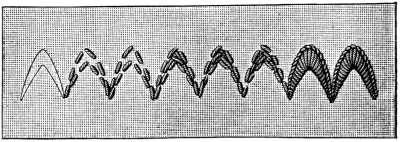
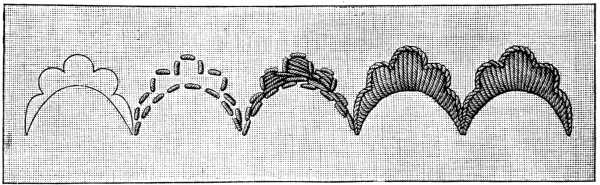
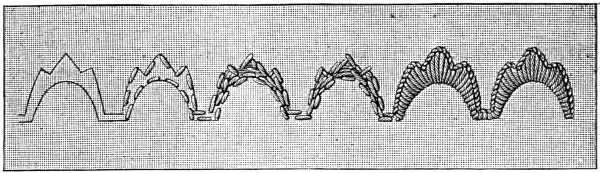
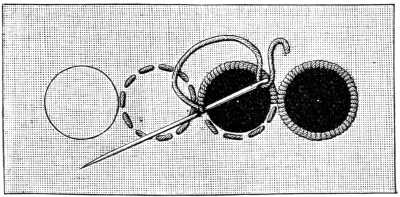
When you have a long row of eyelet holes to make, outline the upper and lower halves alternately, first on one side and then on the other, using two threads, and then overcast them in the same way. The double crossing of the working threads between the eyelet holes makes them much stronger, than if each hole were finished off separately, and the thread passed underneath from one to the other.
When you need to create a long line of eyelet holes, outline the top and bottom halves alternately, starting on one side and then switching to the other, using two threads. After that, overcast them the same way. The double crossing of the working threads between the eyelet holes makes them much stronger than if you finished each hole separately and passed the thread underneath from one to the other.
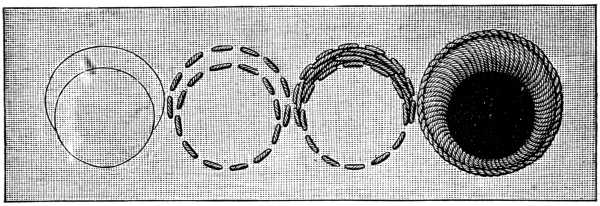

Six leaves in raised satin stitch (fig. 189).—Raised satin stitch is chiefly used for working flowers, leaves, petals, dots, initials and monograms. After tracing the outline of the design, fill in the centres with a padding of long, close stitches for which you can again take Coton à repriser D.M.C[A] and then, beginning always at the point of the leaf, see letter A, cover it with flat, perfectly even stitches, worked from right-to-left. B illustrates a leaf, divided through the middle by a line of overcasting; C, one with a corded vein; D, a divided leaf worked in sloping satin stitch; E, a leaf, with a corded vein and framed in sloping satin stitch; F, a leaf worked half in satin stitch, half in back-stitch and straight stem stitch.
Six leaves in raised satin stitch (fig. 189).—Raised satin stitch is mainly used for creating flowers, leaves, petals, dots, initials and monograms. After tracing the outline of the design, fill in the centers with a padding of long, close stitches for which you can again use Coton à repriser D.M.C[A] and then, always starting at the tip of the leaf, see letter A, cover it with flat, perfectly even stitches, worked from right to left. B shows a leaf divided in the middle by a line of overcasting; C shows one with a corded vein; D shows a divided leaf worked in sloping satin stitch; E shows a leaf with a corded vein framed in sloping satin stitch; F shows a leaf worked half in satin stitch, half in back-stitch and straight stem stitch.

Leaves and flowers of all descriptions, can be executed in any of these stitches, and in different combinations of the same.
Leaves and flowers of all kinds can be made using any of these stitches, and in various combinations of them.
Six ways of making dots (fig. 190).—Dots, when they are well made, are exceedingly effective in white embroidery, particularly if they are worked in a variety of stitches. Dot A is worked in raised satin stitch; B, in raised satin stitch, framed in back stitch; C, in raised satin stitch, framed in twisted knot stitch; D is composed of several post stitches of different lengths, set in a frame of stem stitches; E is worked in back-stitch, and F consists of a small eyelet hole, with a corded setting, which forms the centre.
Six ways of making dots (fig. 190).—Dots, when done well, are really effective in white embroidery, especially when created using a variety of stitches. Dot A is done in raised satin stitch; B is in raised satin stitch, outlined with back stitch; C is in raised satin stitch, outlined with twisted knot stitch; D consists of several post stitches of different lengths, surrounded by stem stitches; E is done in back-stitch, and F is made up of a small eyelet hole, with a corded setting that forms the center.
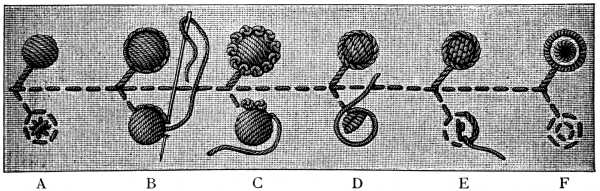
Venetian embroidery (fig. 191).—Scallops, worked in very high relief, called Venetian embroidery, are an imitation on stuff of Venetian lace.
Venetian embroidery (fig. 191).—Scallops, created in very high relief, known as Venetian embroidery, mimic the texture of Venetian lace on fabric.
Real Venetian point is entirely needle-made; in the embroidered imitations of it, the stuff takes the place of the needle-made lace foundation. To make it more like the original however, the ground is seldom left plain, but is covered with fancy stitches, such as are represented in the illustration, or with one or other of the damask stitches in figs. 146 to 170. The button-hole bars may be made with or without picots. A full description of the latter will be found in the chapters on net embroidery, and Irish lace. The space to be button-holed, must be well padded, for thereon depends the roundness of the embroidery. For this purpose take 6 or 8 threads of Coton à repriser D.M.C No. 25,[A] and fasten them down on to the pattern with loose stitches, laying on extra threads, and cutting them gradually away, according to the width the line is to be. The stuff underneath the bars should only be cut away when the embroidery is quite finished.
Real Venetian point is entirely made by hand with a needle; in the embroidered versions, the fabric replaces the needle-made lace base. To make it look more like the original, the background is rarely left plain, but is instead covered with decorative stitches, like those shown in the illustration, or with various damask stitches in figs. 146 to 170. The buttonhole bars can be created with or without picots. You can find a detailed description of the latter in the chapters on net embroidery and Irish lace. The area to be buttonholed must be well padded, as this affects the roundness of the embroidery. For this, use 6 or 8 threads of Coton à repriser D.M.C No. 25, [A], and secure them to the pattern with loose stitches, adding more threads as needed and trimming them gradually to match the desired width of the line. The fabric underneath the bars should only be cut away once the embroidery is completely finished.
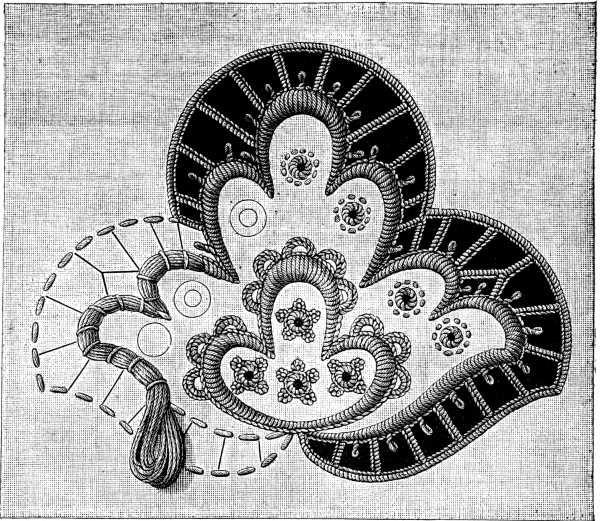
Renaissance embroidery (figs. 192 and 193).—This is the term applied, more especially in France, to embroidery patterns, which are worked entirely in button-holing, and connected by button-hole bars without picots, as shewn in the two accompanying figures. The outside edge in fig. 193, is embellished with picots, described in the chapters just referred to.
Renaissance embroidery (figs. 192 and 193).—This term is mainly used in France to refer to embroidery patterns that are entirely done in button-holing and linked by button-hole bars without picots, as shown in the two accompanying figures. The outer edge in fig. 193 is decorated with picots, as described in the chapters mentioned earlier.
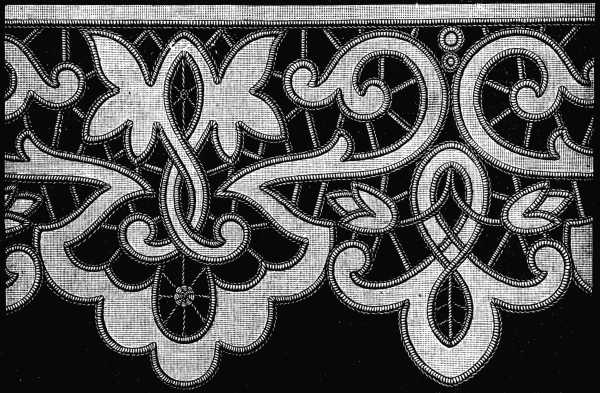
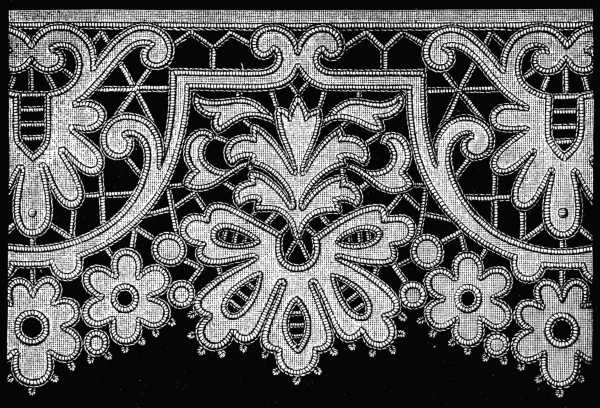
Richelieu embroidery (fig. 194).—The name given to embroidery of a similar kind to the former, but in which the connecting bars, instead of being left plain as they are in the Renaissance embroidery, are ornamented with picots.
Richelieu embroidery (fig. 194).—This is the term used for embroidery that resembles the previous style, but instead of leaving the connecting bars plain like in Renaissance embroidery, they are decorated with picots.
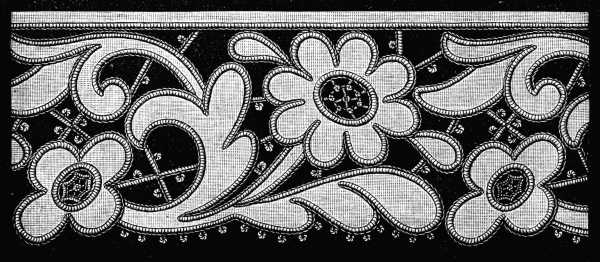
Madeira work (figs. 195, 196, 197).—This kind of embroidery, which consists chiefly of eyelet holes, and is distinguished for the excellence of its workmanship used to be known as English, but is now generally called Madeira work, from the island where it originated. The scallops in figs. 195 and 197, are bordered with shaded eyelet holes, worked half in button-hole stitch, half in overcasting; the finely scalloped edge, in fig. 196, is entirely button-holed. In working eyelet holes, the material must always be turned in, up to the inside line, and completely worked in, underneath the in order that no loose threads may be visible on the wrong side.
Madeira work (figs. 195, 196, 197).—This type of embroidery, which mainly features eyelet holes and is known for its high-quality craftsmanship, used to be referred to as English, but is now commonly called Madeira work, after the island where it originated. The scallops in figs. 195 and 197 are edged with shaded eyelet holes, created half with button-hole stitch and half with overcasting; the finely scalloped edge in fig. 196 is entirely finished with button-hole stitching. When making eyelet holes, the fabric should always be turned in, up to the inner line, and fully secured underneath, so that no loose threads are visible on the backside.
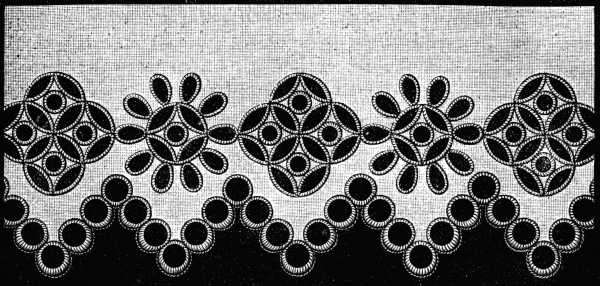
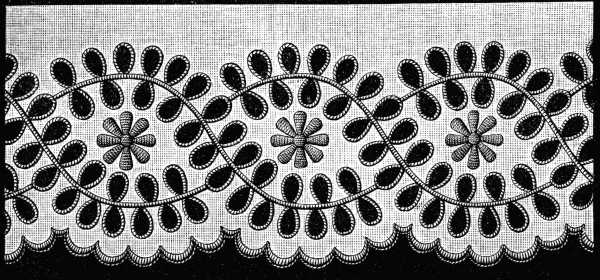
Materials: Coton Madeira D.M.C No. 40, 50 or 60. (Special cotton for Madeira work)[A]
Materials: Coton Madeira D.M.C No. 40, 50, or 60. (Special cotton for Madeira work) __A_TAG_PLACEHOLDER_0__

Materials: Coton Madeira D.M.C No. 40, 50 or 60. (Special cotton for Madeira-work).
Materials: Coton Madeira D.M.C No. 40, 50, or 60. (Special cotton for Madeira work).
Swiss embroidery frame (fig. 198).—Letters, monograms, coronets and the like, require extreme care in the working, and can only be really well done in a frame. The round Swiss frame, or tambour frame, is the one most commonly used. It consists of two wooden hoops, fitting loosely into each other; the inner one, fastened to a support with a wooden screw let into the lower part of it, with which to fasten the frame to the table. The outside hoop is loose.
Swiss embroidery frame (fig. 198).—Letters, monograms, crowns, and similar designs require a lot of attention while working on them, and can only be done really well using a frame. The round Swiss frame, or tambour frame, is the most commonly used type. It consists of two wooden hoops that fit loosely into each other; the inner one is attached to a support with a wooden screw that is built into its lower part, which helps secure the frame to the table. The outer hoop is loose.
Place the fabric to be embroidered over the smaller hoop, the pattern in the middle, and press the other down over it so that it is tightly stretched and fixed between the two hoops.
Place the fabric to be embroidered over the smaller hoop, position the pattern in the center, and press the other hoop down over it to ensure it's tightly stretched and secured between the two hoops.
A leathern strap with holes and a buckle, sometimes takes the place of the second hoop.
A leather strap with holes and a buckle sometimes replaces the second hoop.
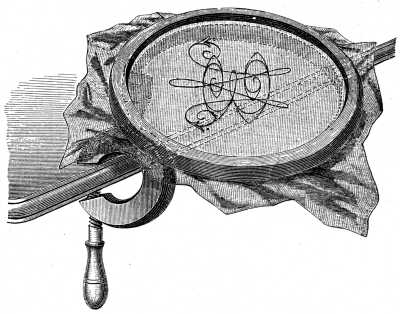
Ordinary embroidery frame (fig. 199).—Tambour frames can only be used for embroidering pocket-handkerchiefs and other small articles; all larger work has to be done in an ordinary frame. Sew a piece of strong stuff into the frame, stretch it as tightly and evenly as possible, and cut out a square in the middle to the size of the pattern. Then tack your work in underneath, straight to the thread, dividing it out carefully with pins first, to ensure its being set in perfectly evenly. Roll or fold up the rest of the stuff over the edges of the frame, and secure it with a few stitches or pins, to keep it out of the way of your hand as you work.
Ordinary embroidery frame (fig. 199).—Tambour frames can only be used for embroidering handkerchiefs and other small items; any larger projects need to be done in a standard frame. Sew a piece of sturdy fabric into the frame, stretching it as tightly and evenly as possible, and cut out a square in the middle to match the size of your pattern. Then, pin your work underneath, directly onto the thread, carefully dividing it with pins first to ensure it’s positioned perfectly evenly. Roll or fold the excess fabric over the edges of the frame, and secure it with a few stitches or pins to keep it out of your way while you work.
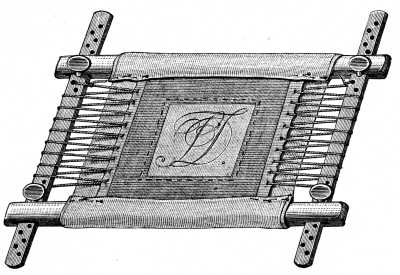
The letters are of a good medium size, which can be magnified or reduced according to the worker’s own taste.
The letters are a decent medium size, which can be enlarged or shrunk based on the worker’s preference.
The interlacing of the letters requires to be carefully done, and our workers should study the following specimens, so as to learn the stitches also, which are most suitable for this branch of embroidery.
The intertwining of the letters needs to be done carefully, and our workers should examine the following examples to learn the stitches that are best suited for this type of embroidery.
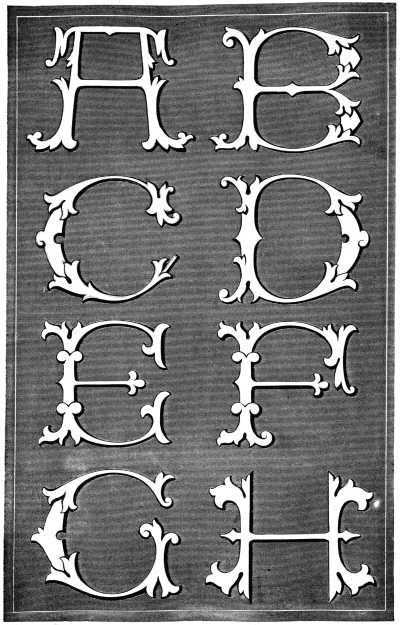
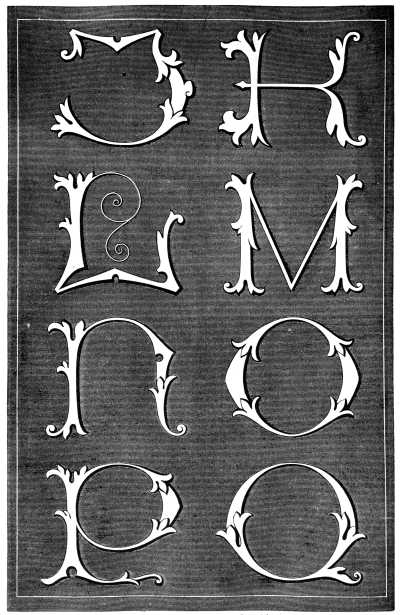

Monogram composed of letters A and D (fig. 206).—Here, letter A is worked in flat satin stitch, in Bleu-Indigo 312, and set in stem stitch, worked in Rouge-Turc 321. D as a contrast to A, is embroidered in transverse bars, the left part in pale blue and white, the right in pale blue and dark blue. The little ornaments may be worked according to fancy, either in white, or in one of the given colours.
Monogram made up of the letters A and D (fig. 206).—In this design, the letter A is created using flat satin stitch in Bleu-Indigo 312, outlined in stem stitch with Rouge-Turc 321. The letter D, contrasting with A, is stitched in transverse bars, with the left side in light blue and white, and the right side in light blue and dark blue. The small decorative elements can be designed according to preference, either in white or in one of the mentioned colors.
Materials: Coton à broder D.M.C Nos. 100 to 150.
Colours: Bleu-Indigo 334, Rouge-Turc 321 and white.[A]
Materials: D.M.C Embroidery Cotton Nos. 100 to 150.
Colors: Indigo Blue 334, Turkish Red 321, and white.__A_TAG_PLACEHOLDER_0__
Monogram composed of letters V and S (fig. 207).—The flat satin stitch in both letters is worked in white; the setting, is in red, in short stem stitch, or if preferred, in knotted back stitch.
Monogram made up of the letters V and S (fig. 207).—The flat satin stitch in both letters is done in white; the background is in red, using short stem stitch or, if you prefer, knotted back stitch.
Materials: Coton à broder D.M.C No. 120.
Colours: White and Rouge-Cardinal 305.[A]
Materials: D.M.C Embroidery Cotton No. 120.
Colors: White and Cardinal Red 305.__A_TAG_PLACEHOLDER_0__
Monogram composed of letters R and C (fig. 208).—These are worked in black and grey, for mourning; the way C is divided, admits of a variety in the stitch; for instance, the back-stitches, in the illustration, may be replaced by very small eyelet holes.
Monogram made up of the letters R and C (fig. 208).—These are done in black and grey for mourning; the way the C is shaped allows for different stitching options; for example, the back-stitches in the illustration can be swapped out for tiny eyelet holes.

Materials: Fil à dentelle D.M.C No. 150.
Colours: Gris-Cendre 318 and Noir grand Teint 310.
Materials: D.M.C No. 150 lace thread.
Colors: Ash Grey 318 and Deep Black 310.
Monogram composed of letters G and E (fig. 209).—The flat satin stitching and back-stitching in E, and the stem-stitched edges of G are worked in white Coton à broder D.M.C; the inside of G in ivory white Coton surfin D.M.C.
Monogram made up of the letters G and E (fig. 209).—The flat satin stitching and back-stitching in E, along with the stem-stitched edges of G, are done in white Coton à broder D.M.C; the inside of G is in ivory white Coton surfin D.M.C.
Border in Gobelin stitch (fig. 210).—Gobelin embroidery is merely raised satin stitch, worked directly upon the pattern, without any foundation, or padding. The effectiveness of this kind of embroidery, which appears so complicated and is really so easy, and the many ways in which it can be utilised, soon brought it into favour. It can be worked on the article itself, or on stripes, laid on afterwards, with a hem-stitch bordering. The original of fig. 210 was in blue and red; Bleu Indigo 312 for the grounding, Rouge-Turc 321, for the setting in stem-stitch. The herring-boning along the edges of the pattern, top and bottom, is also in red.
Border in Gobelin stitch (fig. 210).—Gobelin embroidery is simply raised satin stitch, done directly on the pattern, without any base or padding. The appeal of this type of embroidery, which looks complex but is actually quite simple, and the many ways it can be used, quickly made it popular. It can be done on the item itself or on stripes added later, finished with a hem-stitch border. The original of fig. 210 was in blue and red; Bleu Indigo 312 for the background, Rouge-Turc 321 for the details in stem-stitch. The herring-boning along the top and bottom edges of the pattern is also in red.
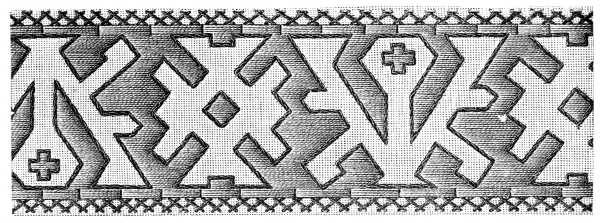
Materials: Coton à broder D.M.C No. 35 in two different colours such as: Bleu-Indigo 312 and Rouge-Cardinal 304, Rouge-Grenat 358 and 309 or, Gris-Tilleul 393 and Rouge-Cardinal 305.[A]
Materials: D.M.C No. 35 embroidery cotton in two different colors such as: Indigo Blue 312 and Cardinal Red 304, Garnet Red 358 and 309, or Linden Gray 393 and Cardinal Red 305.__A_TAG_PLACEHOLDER_0__
Should a different selection of colours be made, it is important to remember that in all cases a sharp contrast is desirable.
Should a different selection of colors be made, it is important to remember that in all cases a sharp contrast is desirable.
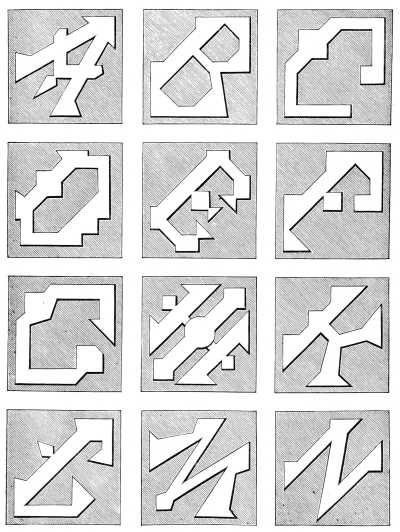
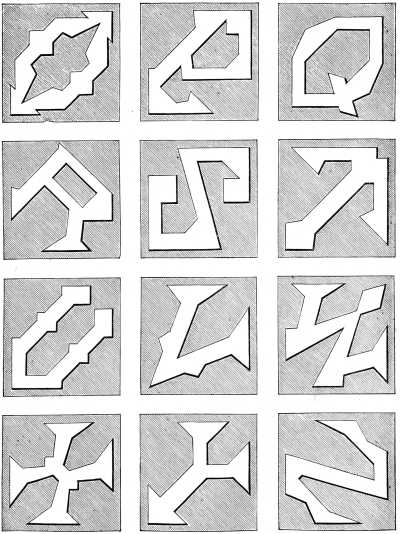
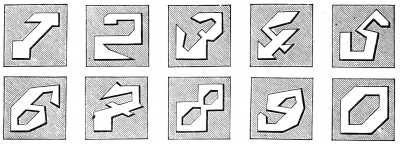
The border worked in Gobelin stitch, illustrated in fig. 210, suggested to us the idea of an alphabet and numerals, to be executed in a similar style, left blank, that is to say, and outlined by a grounding in Gobelin stitch, which are better suited to embroideries of the kind than those generally used. Our limited space prevents us from giving all the letters in the diagonal position they are intended to occupy on the article itself. O and W only, are represented in the right position. No difficulty will be found in copying the other letters, in giving them the proper direction.
The border designed in Gobelin stitch, shown in fig. 210, inspired us to create an alphabet and numerals in a similar style, left blank and outlined by a background in Gobelin stitch, which is more suitable for this type of embroidery than the ones generally used. Our limited space doesn't allow us to display all the letters in the diagonal positions they are meant to occupy on the item itself. Only O and W are shown in the correct positions. It shouldn’t be hard to replicate the other letters in the right orientation.
In order to economize room, J and H are represented in one square, but they are easily distinguishable from each other.
To save space, J and H are shown in one square, but they are easily recognizable as different from one another.
Fig. 214 represents the numerals, executed in the same way. We should like to draw our readers attention to a few other ways in which letters and numerals may be outlined by the background; for example, the solid parts can be worked either in plain or twisted knot stitch (figs. 177 and 178); in very fine chain stitch; in old German knot or bead stitch (fig. 873), or even in piqué embroidery (fig. 877).
Fig. 214 shows the numbers, created in the same way. We want to highlight a few other methods for outlining letters and numbers using the background; for instance, the solid sections can be done in either plain or twisted knot stitch (figs. 177 and 178); in very fine chain stitch; in old German knot or bead stitch (fig. 873), or even in piqué embroidery (fig. 877).
Border outlined by grounding, worked in Gobelin and stem stitch (fig. 216). The grounding of this pattern is worked on stiff white linen, and entirely in Rouge-Turc 321, and the outlining in Noir grand Teint 310. The same pattern can equally well be worked on gauzes and other transparent stuffs, but with Coton à repriser, instead of Coton à broder D.M.C, for the solid parts. Two shades of Rouge-Grenat, one dark and one very light, may be taken instead, or two of Jaune-Rouille, or of Violet-Mauve, employing always the lighter shade for the grounding and the darker for the setting.
Border outlined by grounding, worked in Gobelin and stem stitch (fig. 216). The background of this pattern is worked on stiff white linen, entirely in Rouge-Turc 321, and the outlining in Noir grand Teint 310. The same pattern can also be done on gauzes and other transparent fabrics, but using Coton à repriser instead of Coton à broder D.M.C for the solid parts. Two shades of Rouge-Grenat, one dark and one very light, can be used instead, or two shades of Jaune-Rouille, or Violet-Mauve, always using the lighter shade for the background and the darker for the details.
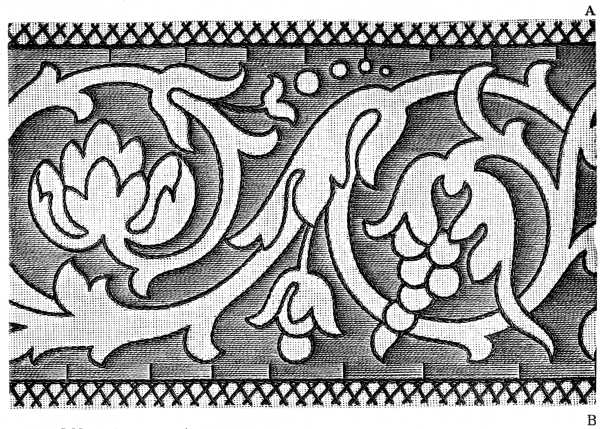
First part.
First part.
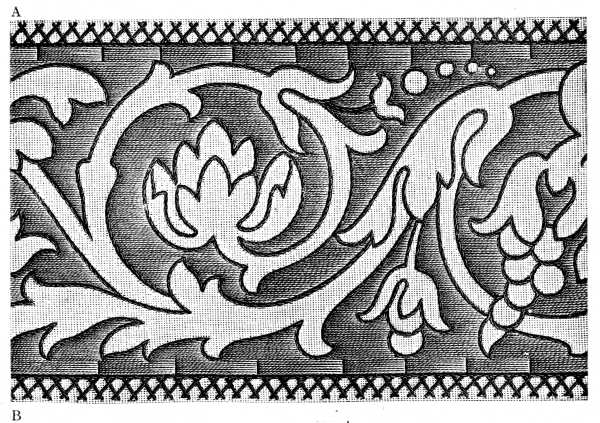
Materials: Coton à broder D.M.C No. 50.—Colours: Rouge-Turc 321 and Noir grand Teint 310.[A]
Materials: D.M.C No. 50 embroidery cotton.—Colors: Turkish Red 321 and Deep Black 310.__A_TAG_PLACEHOLDER_0__
Be careful, in the grounding, not to make the red stitches near the edge, longer than they are represented in the illustration and to set the black stem stitches as close as possible to the grounding.
Be careful with the grounding; don’t make the red stitches near the edge longer than they are shown in the illustration, and try to place the black stem stitches as close as possible to the grounding.
The pattern, which could only be reproduced in the original size, had to be divided in two, to fit the page. In copying it, join the A and B of the first part to the A and B of the second; the same in fig. 217, each time the pattern is repeated, the flowers are to droop from the + as seen from the position of the buds in the first part, at the beginning of the drawing.
The pattern, which could only be reproduced in its original size, had to be split in two to fit the page. When copying it, connect the A and B of the first part to the A and B of the second; the same goes for fig. 217. Each time the pattern repeats, the flowers should droop from the + based on the position of the buds in the first part at the beginning of the drawing.
Flower garland in different kinds of stitches (figs. 217 and 218).—Most of the stitches, described at the beginning of this chapter, will be found in this graceful garland, in the execution of which a considerable variety of colours can be introduced. The rose-buds may be worked in two shades of Vert-Pistache and of Rouge-Grenat, in the stitches described in figs. 173, 177, 189 A; the forget-me-nots, in two or even three shades of Bleu-Indigo, in raised satin stitch and knotted stitch; the slender green leaves in Vert-de-gris, or Gris-Tilleul, the stamens in Jaune-Citron, and the stalks of the roses in Brun-Acajou.
Flower garland in different types of stitches (figs. 217 and 218).—Most of the stitches described at the start of this chapter can be found in this elegant garland, where a wide range of colors can be used. The rose buds can be worked in two shades of Vert-Pistache and Rouge-Grenat, using the stitches shown in figs. 173, 177, 189 A; the forget-me-nots can be done in two or even three shades of Bleu-Indigo, using raised satin stitch and knotted stitch; the slender green leaves in Vert-de-gris or Gris-Tilleul, the stamens in Jaune-Citron, and the rose stalks in Brun-Acajou.
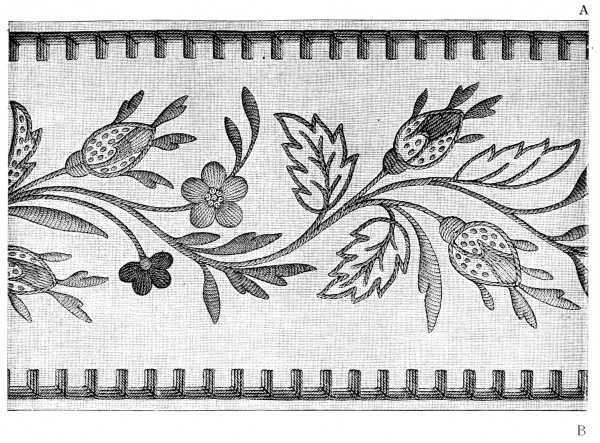
First part.
First part.
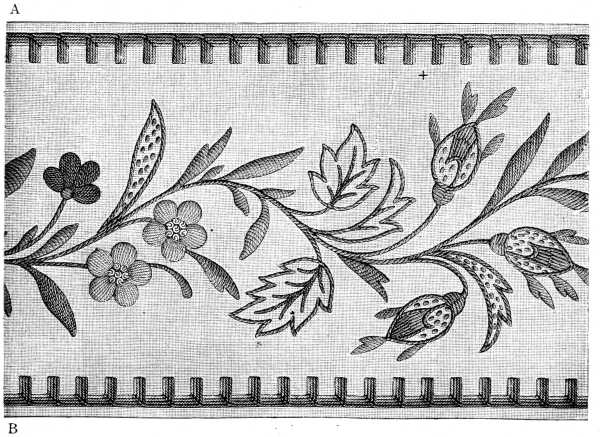
Materials: Coton à broder D.M.C No. 40.
Colours: Rouge-Grenat 326 and 335, Bleu-Indigo 312 and 334, Vert-Pistache 319 and 320, Vert-de-gris 474 and 475, Brun-Acajou 301, Jaune-citron 446.
Materials: D.M.C Embroidery Cotton No. 40.
Colors: Garnet Red 326 and 335, Indigo Blue 312 and 334, Pistachio Green 319 and 320, Gray Green 474 and 475, Mahogany Brown 301, Lemon Yellow 446.

The border that completes this charming pattern, consists of four rows of button holing, worked in four colours. The first row in our illustration is worked in pale pink, followed by three shades of green, the palest of which is used for the second row of stitches.
The border that finishes this lovely pattern is made up of four rows of buttonholing, done in four colors. The first row in our illustration is in light pink, followed by three shades of green, with the lightest shade used for the second row of stitches.
When these rows are worked upon a satine or cambric foundation, it is advisable to begin by making a small drawing, in which the height of the stitches and the distance between them is accurately marked out, then prick the pattern through and pounce it upon the material beneath.
When these rows are worked on a satin or cambric base, it's a good idea to start by creating a small sketch that accurately shows the height of the stitches and the space between them. Then, poke the pattern through and apply it onto the material below.
When they are worked on a material, the threads of which can be counted no such precaution is necessary.
When working with a material where the threads can be counted, no such precautions are needed.
Insertion in Gobelin and stem stitch (fig. 219).—Owing to the shortness of the stitches, this pattern is easier to work than the foregoing ones. The little flowers are embroidered alternately in dark and light red; the setting varies to correspond, the light red flower being set in dark red, and vice versa. The interior of the leaves is in light green and the setting, as well as the connecting bars, in dark green.
Insertion in Gobelin and stem stitch (fig. 219).—Because the stitches are short, this pattern is easier to work than the previous ones. The small flowers are embroidered alternately in dark and light red; the arrangement changes accordingly, with the light red flower positioned in dark red, and vice versa. The inside of the leaves is in light green, while the outline and connecting bars are in dark green.
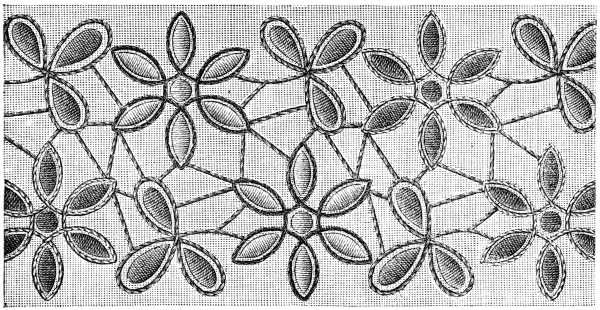
Materials: Coton à broder D.M.C No. 35—Colours: Rouge-Cardinal 347 and Rouge-Géranium 352 with Gris-Tilleul 392 and 331, or Bleu-Indigo 312 and 334 with Vert-Mousse 469 and 471, or Violet-Mauve 375 and 376 with Jaune-Rouille 364 365.[A]
Materials: D.M.C embroidery cotton No. 35—Colors: Cardinal Red 347 and Geranium Red 352 with Lichen Gray 392 and 331, or Indigo Blue 312 and 334 with Moss Green 469 and 471, or Mauve Violet 375 and 376 with Rust Yellow 364 365.__A_TAG_PLACEHOLDER_0__
Stripes of embroidery with lace insertion between (fig. 220).—We conclude this chapter, by showing how stripes of embroidery can be used alone, or in conjunction, either with bands of open-work, or lace, crochet, or net insertion. Such combinations are useful for ornamenting aprons, table-cloths, curtains etc., every description in short of household linen and of children’s garments. One great advantage, moreover, which stripes of this kind, have over larger pieces of embroidery is that they require neither frame nor pillow, nor wearisome counting of stitches, but can be worked in the hand, at all times and places.
Stripes of embroidery with lace insertion between (fig. 220).—We wrap up this chapter by demonstrating how stripes of embroidery can stand alone or be paired with bands of open-work, lace, crochet, or net insertion. These combinations are great for decorating aprons, tablecloths, curtains, and just about any type of household linen and children's clothing. One major advantage these stripes have over larger pieces of embroidery is that they don't need a frame or pillow, nor do they require tedious counting of stitches; they can be worked by hand anytime and anywhere.

FOOTNOTES:
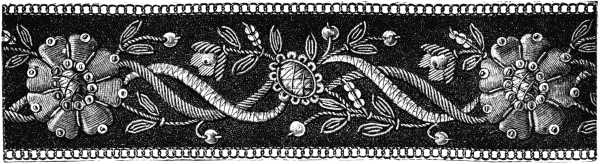
Flat stitch and Gold embroidery.
The terms, flat stitch and gold embroidery, suggest as a rule, needle-work upon rich materials, such as velvet, brocade, plush and the like.
The terms flat stitch and gold embroidery generally refer to needlework done on luxurious fabrics like velvet, brocade, plush, and similar materials.
Nevertheless, a great deal of beautiful embroidery is to be met with, in silk and gold thread upon quite common stuffs; Persian and Moorish embroidery for instance, both remarkable for their delicacy and minuteness, and executed upon ordinary linen, or cotton fabrics.
Nevertheless, you can find a lot of beautiful embroidery made with silk and gold thread on pretty ordinary materials. Persian and Moorish embroidery, for example, are both known for their delicacy and fine details, and they are crafted on regular linen or cotton fabrics.
As a fact, the material is quite a secondary matter; almost any will do equally well as a foundation, for the stitches described in these pages. Flat stitch, and some of the other stitches used in gold embroidery, can be worked with any kind of thread, but best of all with the D.M.C cottons.
As a matter of fact, the material is mostly a secondary consideration; nearly any will work just as well as a base for the stitches described on these pages. Flat stitch, along with some of the other stitches used in gold embroidery, can be done with any kind of thread, but the best choice is the D.M.C cottons.
Flat stitch embroidery.—Decorative designs, and conventional flowers, are the most suitable for flat stitch embroidery; a faithful representation of natural flowers should not be attempted, unless it be so well executed, as to produce the effect of a painting and thus possess real artistic merit.
Flat stitch embroidery.—Decorative designs and traditional flowers are best for flat stitch embroidery; try not to replicate natural flowers unless it’s done so well that it looks like a painting and has true artistic value.
Encroaching flat stitch (fig. 221).—Small delicate flowers, leaves, and arabesques, should in preference, be worked either in straight flat stitch (figs. 189 and 190) or in encroaching flat stitch. The stitches should all be of equal length, the length to be determined by the quality of the thread; a fine thread necessitating short, and a coarse one, long stitches. The stitches should run, one into the other, as shown in the illustration. They are worked in rows, those of the second row encroaching on those of the first, and fitting into one another.
Encroaching flat stitch (fig. 221).—Small delicate flowers, leaves, and decorative swirls should preferably be done using either straight flat stitch (figs. 189 and 190) or encroaching flat stitch. The stitches should all be the same length, which depends on the type of thread; a fine thread requires short stitches, while a coarse one needs longer stitches. The stitches should connect seamlessly, as illustrated. They are worked in rows, with the second row overlapping the first and fitting together.
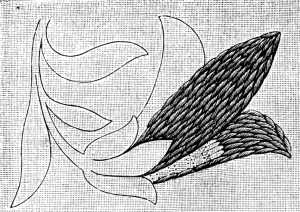
Work your flowers and leaves from the point, never from the calyx or stalk. If they are to be shaded, begin by choosing the right shade for the outside edge, varying the depth according to the light in which the object is supposed to be placed. The stitches should always follow the direction of the drawing.
Work on your flowers and leaves starting from the tip, not from the base or stem. If you're going to shade them, first pick the right color for the outer edge, and adjust the depth based on the light where the object will be displayed. The stitches should always align with the direction of the drawing.
Oriental stitch (figs. 222, 223, 224).—The three following stitches, which we have grouped under one heading, are known also, under the name of Renaissance or Arabic stitches. We have used the term Oriental, because they are to be met with in almost all Oriental needlework and probably derive their origin from Asia, whose inhabitants have, at all times, been renowned for the beauty of their embroideries.
Oriental stitch (figs. 222, 223, 224).—The next three stitches, which we’ve categorized together, are also referred to as Renaissance or Arabic stitches. We chose the term Oriental because they can be found in almost all Oriental needlework and likely originated in Asia, where people have always been celebrated for the beauty of their embroidery.
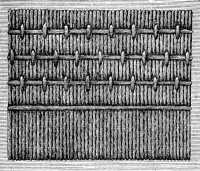
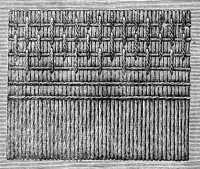
But if the thread be one that is liable to twist, take it back underneath the stuff and begin your next stitch in a line with the first, so that all the stitches of the first layer, which form the grounding, are carried from the top to the bottom. The same directions apply to figs. 223, 224 and 226.
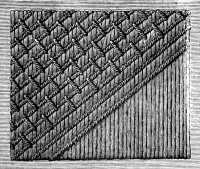
When you have laid your vertical threads, stretch threads horizontally across, and fasten them down with isolated stitches, set six vertical threads apart. The position of these fastening stitches on the transverse threads must alternate in each row, as indicated in fig. 222.
When you've set up your vertical threads, stretch the threads horizontally across and secure them with individual stitches, leaving a gap of six vertical threads in between. The placement of these fastening stitches on the horizontal threads should alternate in each row, as shown in fig. 222.
For fig. 223, make a similar grounding to the one above described, laying the horizontal threads a little closer together, and making the fastening stitches over two threads.
For fig. 223, create a grounding similar to the one described above, placing the horizontal threads a bit closer together and securing the stitches over two threads.
In fig. 224, the second threads are carried diagonally across the foundation-threads, and the fastening stitches are given a similar direction.
In fig. 224, the secondary threads run diagonally over the base threads, and the securing stitches follow the same angle.
Plaited stitch (fig. 225).—When the vertical stitches are laid, a kind of plait is formed in the following way. Pass the thread three times, alternately under and over three foundation threads. To do this very accurately, you must take the thread back, underneath, to its starting-point; and consequently, always make your stitch from right to left.
Plaited stitch (fig. 225).—To create plaited stitch, start by laying the vertical stitches. You'll form a kind of plait by passing the thread three times, alternating under and over three foundation threads. To get this just right, you need to take the thread back underneath to its starting point; therefore, always make your stitch from right to left.
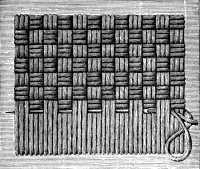
If you have chosen a washing material, and D.M.C cottons to work with, use one colour of cotton for the foundation, and Chiné d’or D.M.C No. 30, for the plaited stitch.
If you've picked a fabric to work with, and you're using D.M.C cottons, choose one color of cotton for the base, and use Chiné d’or D.M.C No. 30 for the braided stitch.
Mosaic stitch (fig. 226).—In old embroideries we often find this stitch, employed as a substitute for plush or other costly stuffs, appliquéd on to the foundation. It is executed in the same manner as the four preceding stitches, but can only be done in thick twist, such as Cordonnet 6 fils D.M.C or Ganse turque D.M.C.
Mosaic stitch (fig. 226).—In traditional embroidery, we often see this stitch used as a replacement for velvet or other expensive fabrics, sewn onto the base material. It’s done in the same way as the four previous stitches, but it can only be executed with thick thread, like Cordonnet 6 fils D.M.C or Ganse turque D.M.C.
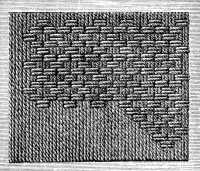
Each stitch should be made separately, and must pass underneath the foundation, so that the threads which form the pattern are not flat, as they are in the preceding examples, but slightly rounded.
Each stitch should be made individually, and must go under the foundation, so that the threads that create the pattern aren't flat, like in the previous examples, but are slightly rounded.
Border in Persian stitch (fig. 227).—This stitch, of Persian origin, resembles the one represented in fig. 175. Instead of bringing the needle out, however, as indicated in fig. 176, take it back as you see in the illustration, to the space between the outlines of the drawing, and behind the thread that forms the next stitch. Before filling in the pattern, outline it with short stem stitches, or a fine cord, laid on, and secured with invisible stitches.
Border in Persian stitch (fig. 227).—This stitch, which comes from Persia, looks similar to the one shown in fig. 175. Instead of pulling the needle out as shown in fig. 176, push it back into the space between the outlines of the drawing and behind the thread that makes the next stitch. Before filling in the pattern, outline it with short stem stitches or a fine cord, placed down and secured with invisible stitches.
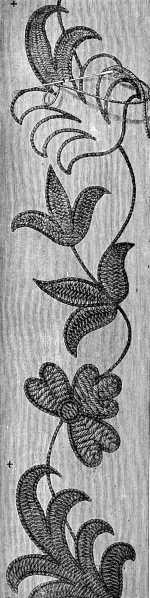
Materials: Cordonnet 6 fils D.M.C No. 14, 15, 20 or 25.
Colours: Noir grand Teint 310, Vert-Mousse 469 and 471, Rouge-Cardinal 346, Jaune-vieil-Or 680, Violet-Mauve 315 and 316.
Materials: Cordonnet 6 strands D.M.C No. 14, 15, 20, or 25.
Colors: Black deep dye 310, Moss Green 469 and 471, Cardinal Red 346, Old Gold Yellow 680, Purple Mauve 315 and 316.
This graceful design which can be utilised in various ways is formed of leaves of 7 lobes, worked alternately in dark and light green; of flowers of 3 petals, worked in red and the centres in yellow, and of small leaves in violet. The setting, throughout, is worked either in black or in dark brown.
This elegant design can be used in different ways and consists of 7-lobed leaves, alternating between dark and light green; 3-petaled flowers in red with yellow centers; and small leaves in violet. The background is either black or dark brown.
Stripe worked in flat stitch (fig. 228).—This pattern, simple as it is, will be found both useful and effective for the trimming of all kinds of articles of dress. The bottom edge should be finished off with rounded scallops or toothed vandykes worked in button-hole stitch. The flowers in flat stitch, are worked alternately, in Rouge-Géranium 351 and 352, and the leaves alternately, in Vert-de-gris 474 and 475; the centres of the flowers are worked in knot stitch, in Jaune-Rouille 308.
Stripe worked in flat stitch (fig. 228).—This pattern, simple as it is, will be both useful and effective for trimming all kinds of clothing. The bottom edge should be finished with rounded scallops or toothed vandykes done in button-hole stitch. The flowers in flat stitch, are worked alternately in Rouge-Géranium 351 and 352, while the leaves are done alternately in Vert-de-gris 474 and 475; the centers of the flowers are stitched in knot stitch, using Jaune-Rouille 308.
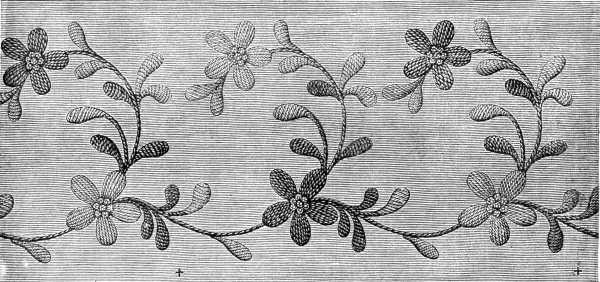
Materials—According to the stuff: Fil à dentelle D.M.C, Cordonnet 6 fils D.M.C or Coton à repriser D.M.C[A]
Colours—For the flowers: Rouge-Géranium 351 and 352.—For the knot stitch: Jaune-Rouille 308.—For the foliage: Vert-de-gris 474 and 475.[A]
Materials—Depending on the fabric: Fil à dentelle D.M.C, Cordonnet 6 fils D.M.C, or Coton à repriser D.M.C__A_TAG_PLACEHOLDER_0__
Colors—For the flowers: Rouge-Géranium 351 and 352.—For the knot stitch: Jaune-Rouille 308.—For the leaves: Vert-de-gris 474 and 475.__A_TAG_PLACEHOLDER_1__
Bouquet in straight and encroaching flat stitch (fig. 229). As we have already observed, it is by no means easy to arrange the colours in an embroidery of this kind, so as to obtain a really artistic effect. Whether the design be a conventional one or not, the great point is to put in the lights and shadows at the right place. If you want to make a faithful copy of a natural flower, take the flower itself, or a coloured botanical drawing of it, and if possible, a good black and white drawing of the same, match the colours in 6 or 7 shades, by the flower itself, keeping them all rather paler in tone, and take the black and white drawing as a guide for the lights and shadows. The colours for the leaves and petals, which should always be worked from the outside, should be chosen with a view to their blending well together. The stamens and the centres of the flowers should be left to the last, but the veins and ribs of the leaves, should always be put in before the grounding.
Bouquet in straight and encroaching flat stitch (fig. 229). As we’ve already noted, it’s not easy to arrange the colors in this type of embroidery to achieve an artistic effect. Whether the design is a traditional one or not, the key is to place the highlights and shadows correctly. If you want to create an accurate representation of a natural flower, use the actual flower or a colored botanical drawing, and if possible, a good black and white drawing of it. Match the colors in 6 or 7 shades by the flower itself, keeping them all rather lighter in tone, and use the black and white drawing as a reference for the highlights and shadows. The colors for the leaves and petals, which should always be worked from the outside in, should be selected to blend well together. The stamens and centers of the flowers should be done last, but the veins and ribs of the leaves should always be added before the background.
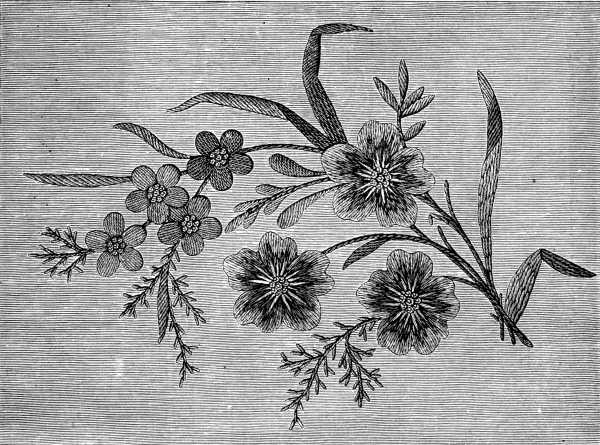
Materials: Coton à repriser D.M.C No. 50.
Colours—For the forget-me-nots: Bleu-Indigo 312, 322 and 334.—For the other flowers: Jaune-Rouille 365 and 366, Violet-Mauve 376, 316 and 377, Vert-Pistache 369.—For the foliage: Vert-de-Gris 474, Vert-Mousse 468, 469, 471 and 472.—For the stalks: Brun-Havane 455 and 457.[A]
Materials: D.M.C No. 50 Coton à repriser.
Colors—For the forget-me-nots: Bleu-Indigo 312, 322, and 334.—For the other flowers: Jaune-Rouille 365 and 366, Violet-Mauve 376, 316, and 377, Vert-Pistache 369.—For the foliage: Vert-de-Gris 474, Vert-Mousse 468, 469, 471, and 472.—For the stems: Brun-Havane 455 and 457.__A_TAG_PLACEHOLDER_0__
For embroideries of this kind, suitable materials must be selected; the more delicate and minute the design, and the more varied the colouring, the softer and finer should be the quality of the material employed. Specially to be recommended, as adapted to every form of stitch and as being each of them capable of being subdivided, are Filoselle, Marseille, open Chinese silk and Coton à repriser D.M.C.[A]
For these kinds of embroidery, you need to choose suitable materials; the more delicate and detailed the design, and the more varied the colors, the softer and finer the material should be. It's especially recommended to use Filoselle, Marseille, open Chinese silk, and Coton à repriser D.M.C., as each of these is perfect for any type of stitch and can be easily divided.
Flowers embroidered in the Chinese manner (fig. 230).—All Chinese embroidery displays undoubted originality and wonderful skill and judgment in the choice of material and colour. It excels particularly, in the representation of figures, flowers, and animals, but differs from European work in this, that instead of using flat stitch and making the colours blend together as we do, the Chinese put them, side by side, without intermediate tones, or they sometimes work the whole pattern in knot stitch. The little knots, formed by this stitch are generally set in gold thread.
Flowers embroidered in the Chinese manner (fig. 230).—All Chinese embroidery shows clear originality and impressive skill in selecting materials and colors. It particularly excels in depicting figures, flowers, and animals, but it's different from European embroidery because, instead of using flat stitches that blend colors together, the Chinese place them side by side without any intermediate shades, or they sometimes use knot stitches for the entire pattern. The small knots created by this stitch are generally embellished with gold thread.
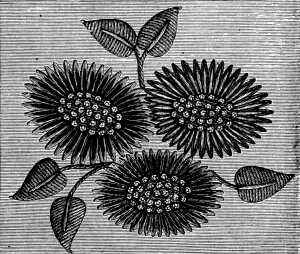
Often too, instead of combining a number of colours, as we do, the Chinese fill in the whole leaf with long stitches and upon this foundation, draw the veins in a different stitch and colour. Even the flowers, they embroider in the same way, in very fine thread, filling in the whole ground first, with stitches set very closely together and marking in the seed vessels afterwards, by very diminutive knots, wide apart.
Often, instead of mixing various colors like we do, the Chinese fill the entire leaf with long stitches and then outline the veins in a different stitch and color. They embroider the flowers in the same way, using very fine thread, first filling in the whole background with closely spaced stitches and then marking the seed vessels later with tiny, widely spaced knots.
Chinese encroaching flat stitch (fig. 231).—Another easy kind of embroidery, common in China, is done in encroaching flat stitch. The branch represented in our drawing, taken from a large design, is executed in three shades of yellow, resembling those of the Jaune-Rouille series on the D.M.C colour card.[A]
Chinese encroaching flat stitch (fig. 231).—Another easy type of embroidery, popular in China, is done using encroaching flat stitch. The branch shown in our drawing, taken from a large design, is done in three shades of yellow that are similar to those in the Jaune-Rouille series on the D.M.C color card.[A]

Materials: Cordonnet 6 fils D.M.C Nos. 20 to 50 or Chiné d’or D.M.C.
Colours—For the cotton: Jaune-Rouille 363, 308, 366.—For Chiné d’or: Red and gold, blue and gold, green and gold.[A]
Materials: Cordonnet 6 fils D.M.C Nos. 20 to 50 or Chiné d’or D.M.C.
Colors—For the cotton: Jaune-Rouille 363, 308, 366.—For Chiné d’or: Red and gold, blue and gold, green and gold.__A_TAG_PLACEHOLDER_0__
The stitches of the different rows encroach upon one another, as the working detail shows, and the three shades alternate in regular succession. Flowers, butterflies and birds are represented in Chinese embroidery, executed in this manner. It is a style, that is adapted to stuffs of all kinds, washing materials as well as others, and can be worked in the hand and with any of the D.M.C threads and cottons.[A]
The stitches from different rows overlap, as shown in the working detail, and the three colors alternate in a consistent pattern. Flowers, butterflies, and birds are depicted in Chinese embroidery done this way. This style works well on all types of fabrics, including washable materials, and can be done by hand using any of the D.M.C threads and cottons.[A]
Raised embroidery (figs. 232 and 233).—Raised embroidery worked in colours, must be stuffed or padded first, like the white embroidery in fig. 191. If you outline your design with a cord, secure it on the right side with invisible stitches, untwisting the cord slightly as you insert your needle and thread, that the stitch may be hidden between the strands. Use Coton à repriser D.M.C No. 25, for the padding. These cottons are to be had in all the colours, indicated in the D.M.C colour card, and are the most suitable for the kind of work.
Raised embroidery (figs. 232 and 233).—To create raised embroidery in colors, you need to stuff or pad it first, similar to the white embroidery shown in fig. 191. If you outline your design with a cord, attach it on the front side using hidden stitches, gently twisting the cord as you sew so that the stitch remains concealed between the strands. For padding, use Coton à repriser D.M.C No. 25. These cotton threads come in all the colors available on the D.M.C color card and are the best choice for this type of work.
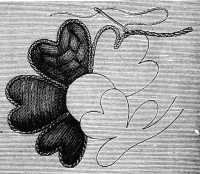
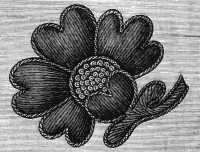
Use Coton à broder D.M.C for the transverse stitches and over the smooth surface which is thus formed, work close lines of satin stitch in silk or cotton; the effect produced, will bear more resemblance to appliqué work than to embroidery. The centres of the flowers are filled in with knot stitches, which are either set directly on the stuff or on an embroidered ground.
Use D.M.C embroidery cotton for the cross stitches and over the smooth surface formed, work close lines of satin stitch in silk or cotton; the effect created will look more like appliqué work than embroidery. The centers of the flowers are filled in with knot stitches, which are either placed directly on the fabric or on an embroidered background.
Contrary to what is noticeable in the real Turkish embroidery, the preparatory work here is very carefully done, with several threads of Coton à repriser D.M.C used as one. A rope of five threads is laid down, and carried from right to left and from left to right, across the width of the pattern. After laying it across to the right, as explained in fig. 234, bring the needle out a little beyond the space occupied by the threads, insert it behind them and passing it under the stuff, draw it out at the spot indicated by the arrow. The stitch that secures the threads, should be sufficiently long to give them a little play, so that they may lie perfectly parallel, side by side, over the whole width of the pattern.
Unlike what is typically seen in traditional Turkish embroidery, the prep work here is done with great care, using multiple threads of Coton à repriser D.M.C as a single unit. A bundle of five threads is laid down and moved from right to left and then from left to right across the width of the design. After laying it across to the right, as shown in fig. 234, pull the needle out just beyond where the threads are, insert it behind them, and passing it underneath the fabric, pull it out at the spot marked by the arrow. The stitch that holds the threads in place should be long enough to allow them slight movement, ensuring they lie perfectly parallel, side by side, across the entire width of the pattern.
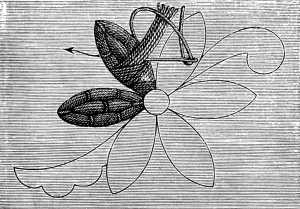
This kind of work can be done on woolen or cotton materials, and generally speaking, with D.M.C cottons, and gold thread shot with colour (Chiné d’or D.M.C.)
This kind of work can be done on wool or cotton fabrics, and generally speaking, with D.M.C. cottons and gold thread that has color accents (Chiné d’or D.M.C.).
Very pretty effects can be obtained, by a combination of three shades of Rouge-Cardinal 347, 346 and 304, with Chiné d’or gold and dark blue or with Chiné d’or, gold and light blue.[A]
Very beautiful effects can be achieved by combining three shades of Rouge-Cardinal 347, 346, and 304, with Chiné d’or gold and dark blue, or with Chiné d’or, gold, and light blue.[A]
This kind of embroidery may be regarded as the transition from satin stitch to gold embroidery.
This type of embroidery can be seen as a shift from satin stitch to gold embroidery.
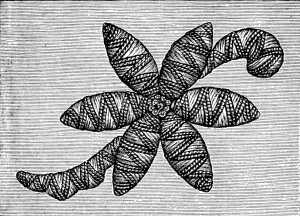
Gold embroidery.—Up to the present time, dating from the end of the eighteenth century, gold embroidery has been almost exclusively confined to those who made it a profession; amateurs have seldom attempted what, it was commonly supposed, required an apprenticeship of nine years to attain any proficiency in.
But now, when it is the fashion to decorate every kind of fancy article, whether of leather, plush, or velvet, with monograms and ingenious devices of all descriptions, the art of gold embroidery has revived and is being taken up and practised with success, even by those to whom needlework is nothing more than an agreeable recreation.
But now, when it's trendy to embellish all kinds of fancy items, whether they're made of leather, plush, or velvet, with monograms and creative designs of all sorts, the art of gold embroidery has made a comeback and is being embraced and practiced successfully, even by those for whom sewing is just a pleasant hobby.
We trust that the following directions and illustrations will enable our readers to dispense with the five years training, which even now, experts in the art consider necessary.
We believe that the following instructions and illustrations will help our readers skip the five years of training that experts in the field still think is essential.
Implements and materials.—The first and needful requisites for gold embroidery, are a strong frame, a spindle, two pressers, one flat and the other convex, a curved knife, a pricker or stiletto, and a tray, to contain the materials.
Tools and materials.—The essential items needed for gold embroidery are a sturdy frame, a spindle, two types of pressers—one flat and the other curved—a curved knife, a pricker or stiletto, and a tray to hold the materials.
Embroidery frame (fig. 236).—The frame, represented here, is only suitable for small pieces of embroidery, for larger ones, which have to be done piece by piece, round bars on which to roll up the stuff, are desirable, as sharp wooden edges are so apt to mark the stuff.
Embroidery frame (fig. 236).—The frame shown here is only suitable for small pieces of embroidery. For larger projects that need to be done in sections, round bars to roll up the fabric are better, as sharp wooden edges can easily leave marks on the material.
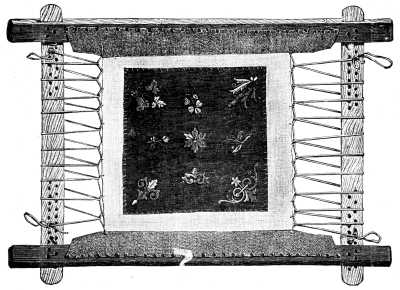
Every gold embroidery, on whatever material it may be executed, requires a stout foundation, which has to be sewn into the frame, in doing which, hold the webbing loosely, almost in folds, and stretch the stuff very tightly. Sew on a stout cord to the edges of the foundation, which are nearest the stretchers, setting the stitches, 3 or 4 c/m. apart. Then put the frame together and stretch the material laterally to its fullest extent, by passing a piece of twine, in and out through the cord at the edge and over the stretchers. Draw up the bracing until the foundation is strained evenly and tightly. Upon this firm foundation lay the stuff which you are going to embroider, and hem or herring-bone it down, taking care to keep it perfectly even with the thread of the foundation and, if possible, more tightly stretched to prevent it from being wrinkled or puckered when you come to take it off the backing. For directions how to transfer the pattern to your stuff, and prepare the paste with which the embroidery has to be stiffened before it is taken out of the frame, see the concluding chapter in the book.
Every gold embroidery, no matter what material it's on, needs a strong base that's sewn into the frame. When doing this, keep the webbing loose, almost in folds, while pulling the fabric very tight. Sew a sturdy cord along the edges of the base that are closest to the stretchers, spacing the stitches about 3 or 4 cm apart. Then, assemble the frame and stretch the material side to side as far as it can go by weaving a piece of twine in and out through the cord at the edge and over the stretchers. Tighten the bracing until the base is pulled evenly and tightly. On this solid base, lay the fabric you're going to embroider, and either hem or herringbone it down, making sure to keep it perfectly aligned with the thread of the base and, if possible, pulled even tighter to avoid any wrinkles or puckering when you remove it from the backing. For instructions on how to transfer the pattern to your fabric and prepare the paste needed to stiffen the embroidery before it comes out of the frame, see the final chapter in the book.
The spindle (fig. 237).—The spindle to wind the gold thread upon, should be 20 c/m. long and made of hard wood. Cover the round stalk and part of the prongs with a double thread of Coton à broder D.M.C No. 16, or pale yellow Cordonnet D.M.C No. 25, and terminate this covering with a loop, to which you fasten the gold thread that you wind round the stalk.
The spindle (fig. 237).—The spindle for winding the gold thread should be 20 cm long and made of hard wood. Wrap the round part of the stalk and part of the prongs with a double thread of D.M.C No. 16 embroidery cotton or pale yellow D.M.C No. 25 cord, and finish this wrapping with a loop, to which you attach the gold thread that you wind around the stalk.

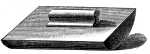
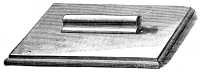
Having cut out your pattern in cartridge paper, lay it down, on the wrong side, upon a board thinly spread with embroidery paste. Let it get thoroughly impregnated with the paste and then transfer it carefully to its proper place on the stuff; press it closely down with the large presser, and with the little convex one rub the stuff firmly, from beneath, to make it adhere closely to the pasted pattern; small, pointed leaves and flowers will be found to need sewing down besides, as you will observe in fig. 242, where each point is secured by stitches. The embroidery should not be begun until the paste is perfectly dry, and the pattern adheres firmly to the stuff.
Having cut out your pattern from cartridge paper, place it upside down on a board lightly coated with embroidery paste. Allow it to soak in the paste thoroughly, then carefully transfer it to the correct position on the fabric; press it down firmly with a large presser, and use the smaller convex one to rub the fabric from underneath to ensure it sticks well to the pasted pattern. You'll notice that small, pointed leaves and flowers will also need to be sewn down, as shown in fig. 242, where each point is secured with stitches. Don't start the embroidery until the paste is completely dry and the pattern is securely attached to the fabric.
The knife (fig. 240).—Most gold embroideries require a foundation of stout cartridge paper, and, in the case of very delicate designs, the paper should further be covered with kid, pasted upon it.
The knife (fig. 240).—Most gold embroideries need a strong base of thick cartridge paper, and for very delicate designs, the paper should also be covered with kid leather, glued onto it.
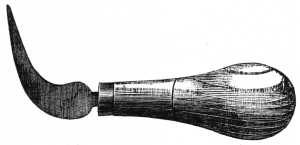
Transfer the design on to the paper or kid, in the manner described in the concluding chapter, and cut it out with the knife. You can only make very short incisions with this tool, which should be kept extremely sharp and held, in cutting, with the point outwards, and the rounded part towards you, as shown in the drawing.
Transfer the design onto the paper or cardboard as explained in the last chapter, and cut it out with the knife. You can only make very short cuts with this tool, which should be kept really sharp and held with the tip pointing away from you and the rounded part facing you, as shown in the drawing.
Tray to contain the materials (fig. 241).—Cut out as many divisions in a thin board, or sheet of stout cardboard, as you will require materials for your embroidery; these include not only gold thread of all kinds, but likewise beads and spangles of all sorts and sizes as well as bright and dead gold and silver purl, or bullion, as it is also called. For the pieces of purl alone, which should be cut ready to hand, you should have several divisions, in order that the different lengths may be kept separate.
Tray to contain the materials (fig. 241).—Cut out as many sections in a thin board or sturdy cardboard as you need for your embroidery materials. This includes not just various types of gold thread, but also beads and sequins of all kinds and sizes, along with shiny and matte gold and silver purl, or bullion, as it’s also known. For the pieces of purl alone, which should be cut and ready to use, you should have several sections so that the different lengths can be kept separate.
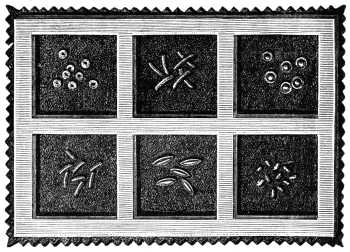
Use of the spindle (fig. 242).—Gold embroidery thread should be wound double upon the spindle. It is laid backwards and forwards and secured with two stitches at each turn, as described in fig. 234. Small holes where the stitches are to come, have first to be pierced in the material with the pricker, from the right side, for the needle to pass through. In soft stuffs, this is unnecessary, but in brocaded materials, and in plush and leather, where every prick shows and would often spoil the whole effect, it is indispensable.
Use of the spindle (fig. 242).—Gold embroidery thread should be wound double on the spindle. It is laid back and forth and secured with two stitches at each turn, as shown in fig. 234. Small holes where the stitches will go need to be pierced in the material with the pricker, from the right side, so the needle can pass through. In soft fabrics, this isn't necessary, but in brocaded materials, plush, and leather, where every pricking shows and could ruin the overall look, it's essential.
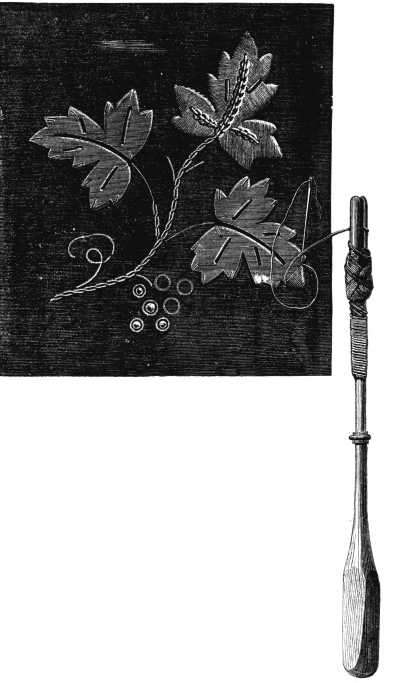
Gold thread which is stiff and difficult to work with, can be rendered soft and pliable by putting it into the oven, or any other warm place, for a short time.
Gold thread, which is stiff and hard to handle, can be made soft and flexible by placing it in the oven or any warm spot for a little while.
Embroidery with gold purl (fig. 243).—Embroidery is the easiest kind of gold embroidery; you have only to thread the little pieces of purl, cut into the required lengths beforehand, like beads on your needle, and fasten them down upon the foundation like the beads in bead-work. Smooth and crimped gold purl, or silver and gold purl used together, look exceedingly well, particularly where the pattern requires effects of light and shade to be reproduced.
Embroidery with gold purl (fig. 243).—Embroidery is the simplest type of gold embroidery; you just need to thread the small pieces of purl, pre-cut to the desired lengths, onto your needle like beads, and secure them onto the base like you would with beadwork. Smooth and crimped gold purl, or a mix of silver and gold purl, looks fantastic, especially where the design needs to show light and shadow effects.
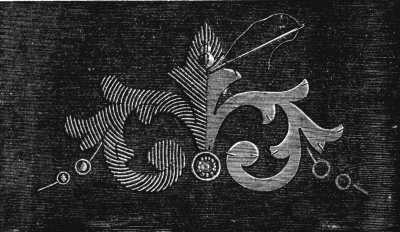
Embroidery in diamond stitch (fig. 244).—The diamond stitch is a charming novelty in gold embroidery. Short lengths of purl, not more than 1½ m/m. long, are threaded on the needle, and the needle is put in and drawn out at the same hole. These stitches which resemble knot stitches, form so many little glittering knots, turned alternately to the right and left, and look like seed-diamonds in appearance, more especially, when they are made in silver purl. The shorter the pieces are, and the more closely you set the knots together, the handsomer and richer the effect will be.
Embroidery in diamond stitch (fig. 244).—The diamond stitch is a delightful new trend in gold embroidery. Short lengths of purl, no more than 1½ mm long, are threaded onto the needle, which is then inserted and removed from the same hole. These stitches, resembling knot stitches, create a series of little shimmering knots that alternate direction to the right and left, resembling seed diamonds, especially when made with silver purl. The shorter the pieces and the closer you place the knots together, the more beautiful and luxurious the effect will be.
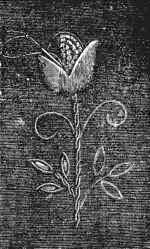
Chinese gold embroidery (figs. 245 and 246).—We recommend the imitation of Chinese gold embroidery to our readers as an easy and grateful recreation. It consists simply in laying down a gold thread, on a delicately outlined pattern and securing it by stitches. It can be done on any material, washing or other, the costliest as well as the most ordinary.
Chinese gold embroidery (figs. 245 and 246).—We suggest that our readers try replicating Chinese gold embroidery as a simple and enjoyable hobby. It involves laying down a gold thread on a delicately outlined pattern and securing it with stitches. This technique can be applied to various materials, whether they are expensive or everyday fabrics.
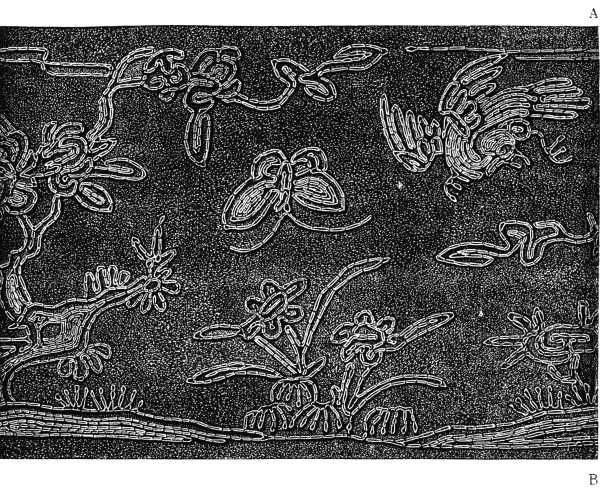
For a washing material use, Or fin D.M.C pour la broderie, No. 20, 30 or 40,[A] which, as it washes perfectly, is well adapted for the embroidery of wearing apparel, and household linen. Plain gold thread and gold thread with a thread of coloured silk twisted round it, are very effective used together.
For washing materials, use Or fin D.M.C for embroidery, No. 20, 30, or 40, [A] which washes perfectly and is well-suited for embroidering clothing and household linen. Plain gold thread and gold thread with a twist of colored silk around it work very well together.
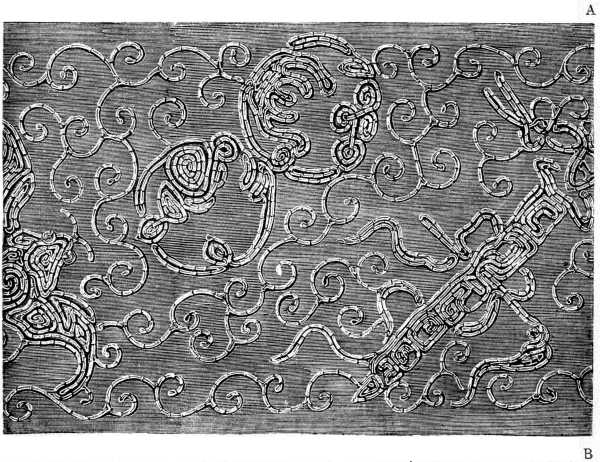
Thus in fig. 245, the trees, foliage and flowers, are worked in plain gold, the grasses, in gold shot with green, the butterflies in gold with red, the two birds in gold with dark blue, and gold with light blue.
Thus in fig. 245, the trees, leaves, and flowers are done in solid gold, the grasses in gold mixed with green, the butterflies in gold with red, the two birds in gold with dark blue, and gold with light blue.
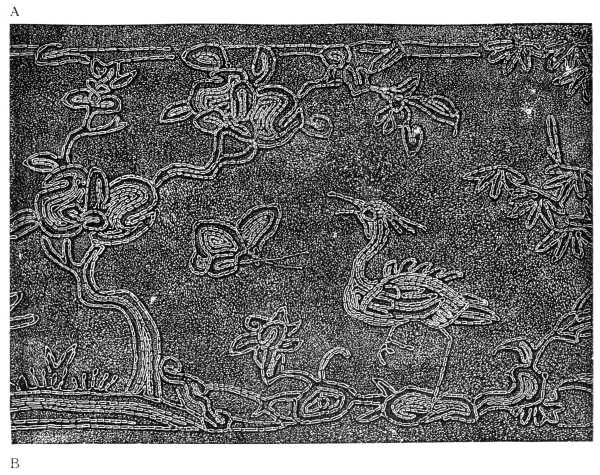
Two threads of gold should be laid down side by side and secured by small catching stitches, set at regular intervals from one another, and worked in Fil d’Alsace D.M.C No. 200,[A] of the same colour. Where the design requires it, you may separate the gold threads, and work with one alone.
Two gold threads should be laid down next to each other and secured with small catching stitches, spaced evenly apart, and worked in Fil d’Alsace D.M.C No. 200,[A] of the same color. Where the design calls for it, you can separate the gold threads and use just one.
The second specimen of Chinese embroidery, fig. 246, resembles the first, as far as materials and execution are concerned, but the design is different. The grotesque animals, flowers and shells it represents, can be worked separately, or connected together so as to form a running pattern.
The second example of Chinese embroidery, fig. 246, looks similar to the first in terms of materials and technique, but the design is different. The strange animals, flowers, and shells depicted can be made individually or linked together to create a continuous pattern.

Stripe worked in various stitches (fig. 247).—All the designs described thus far, are worked in the same way, but the stripe now presented to our readers introduces them to several kinds of gold thread, and a variety of stitches. The small, turned-back petals of the flowers are worked in plain gold thread, and outlined with crimped; the rest of the petals are worked in darning stitch, with plain gold thread. The latticed leaves are edged with picots, worked with bright purl. The other parts of the design are all worked with a double gold thread, the stalks in dead gold, the leaves in crimped. The gold thread is secured by overcasting stitches in gold-coloured thread, Jaune d’or 667, but it looks very well if you use black or red thread for fastening the crimped gold and dark or light green for the leaves and tendrils.
Stripe worked in various stitches (fig. 247).—All the designs described so far are worked the same way, but the stripe now introduced to our readers brings in several kinds of gold thread and a variety of stitches. The small, turned-back petals of the flowers are done in plain gold thread and outlined with crimped; the rest of the petals are done in darning stitch with plain gold thread. The latticed leaves are edged with picots, made with bright purl. The other parts of the design are all done with a double gold thread, the stalks in dead gold, and the leaves in crimped. The gold thread is secured with overcasting stitches in gold-colored thread, Jaune d’or 667, but it looks really nice if you use black or red thread to fasten the crimped gold and dark or light green for the leaves and tendrils.
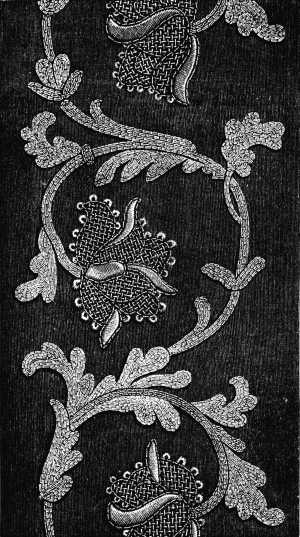
Gold embroidery on a foundation of cords (fig. 248).—In the old ecclesiastical embroideries, especially those representing the figures of saints, we often find thick whip cords used as a foundation, instead of cardboard, for the good reason that the stiff cardboard does not give such soft and rounded contours as a cord foundation, which will readily take every bend and turn that you give to it. In the following illustrations, we have adhered strictly to the originals, as far as the manner of working the surface is concerned, but have substituted for the cord, which in their case has been used for the foundation, Cordonnet 6 fils D.M.C No. 1, which is better for padding than the grey whip cord, as it can be had in white or yellow, according to whether it is intended to serve as a foundation to silver or gold work.
Gold embroidery on a foundation of cords (fig. 248).—In old ecclesiastical embroideries, especially those depicting saints, we often see thick whip cords used as a base instead of cardboard. This is because stiff cardboard doesn’t create the soft, rounded shapes that a cord foundation can easily adapt to with every bend and curve. In the following illustrations, we have closely followed the originals in terms of surface work but have replaced the cord used for the foundation with Cordonnet 6 fils D.M.C No. 1. This material is better for padding than the grey whip cord, as it is available in white or yellow, depending on whether it’s meant to support silver or gold work.
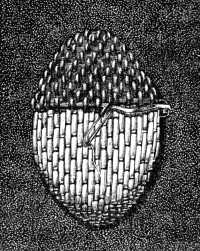
Lay down as many cords as are necessary to give the design the requisite thickness, in many cases up to 8 or 10 m/m. in height, taking care to lay them closely and solidly in the centre, and graduate them down at the sides and ends. When you have finished the foundation, edge it with a thick gold cord, such as Cordonnet d’or D.M.C No. 6 and then only begin the actual embroidery, all the directions just given, applying merely to the preparatory work.
Lay down as many cords as needed to give the design the right thickness, often up to 8 or 10 mm in height. Make sure to place them closely and firmly in the center, and taper them down at the sides and ends. Once you've finished the foundation, outline it with a thick gold cord, like Cordonnet d’or D.M.C No. 6, and only then start the actual embroidery. All the instructions provided apply only to the preparatory work.
Only four of the many stitches that are already in use and might be devised are described here. For the pattern, represented in fig. 248, flattened gold or silver wire is necessary, which should be cut into pieces, long enough to be turned in at the ends so as to form a little loop through which the thread that fastens them down is passed. Over each length of gold or silver wire small lengths of purl are laid at regular intervals, close enough just to leave room for the next stitch, the pieces of one row, alternating in position with those of the preceding one.
Only four of the many stitches that are already in use and could be created are described here. For the pattern shown in fig. 248, you'll need flattened gold or silver wire, cut into pieces long enough to turn the ends in to form a small loop that the thread can pass through to secure them. Small lengths of purl are laid over each piece of gold or silver wire at regular intervals, close enough to leave space for the next stitch, with the pieces of one row alternating positions with those of the previous row.
Plaited stitch in gold purl on a cord foundation (fig. 249).—Distribute the stitches as in the previous figure, substituting purl, for the flattened gold wire, and covering the purl with short lengths of gold thread of the same kind. All these stitches may be worked in gold and silver thread, mixed or in the one, or the other alone.
Plaited stitch in gold purl on a cord foundation (fig. 249).—Arrange the stitches as shown in the previous figure, replacing the flattened gold wire with purl, and cover the purl with short lengths of gold thread of the same type. All these stitches can be done in either gold or silver thread, mixed together or using just one color alone.
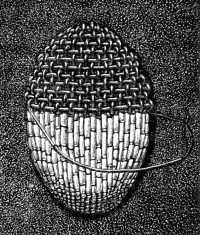
Scale stitch worked in gold thread and purl on a cord foundation (fig. 250).—Begin by covering the whole padded surface with gold or silver thread, then sew on short lengths of purl, long enough to cover six or eight threads, 2 or 3 m/m. apart, as shown in the engraving. These stitches in dead gold purl are then surrounded by shining or crimped purl.
Scale stitch done with gold thread and purl on a cord foundation (fig. 250).—Start by covering the entire padded surface with gold or silver thread, then attach short pieces of purl, long enough to cover six or eight threads, 2 or 3 mm apart, as illustrated in the image. These stitches in flat gold purl are then encircled by shiny or crimped purl.
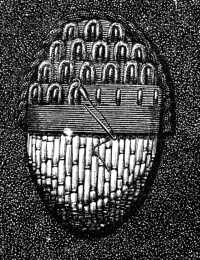
You bring out the working thread to the left of the purl stitch, which you take on your needle, put the needle in on the other side, draw it out above the little stroke, and secure the crimped purl with an invisible stitch.
You pull the working thread to the left of the purl stitch, which you put on your needle, insert the needle from the other side, pull it out above the small stitch, and fasten the crimped purl with a hidden stitch.
Conventional flower worked on a cord foundation (fig. 251).—The half finished flower, represented here, was copied from a handsome piece of ecclesiastical embroidery enriched with ornament of this kind. The three foregoing stitches and a fourth, are employed in its composition. The finished portions on the left hand side, are executed in silver and gold purl, whilst the egg-shaped heart of the flower is formed of transverse threads, carried over the first padding, and secured by a stitch between the two cords. In the subsequent row, the catching stitch is set between the cords, over which the first gold threads were carried.
Traditional flower created on a cord base (fig. 251).—The unfinished flower shown here was inspired by a beautiful piece of church embroidery featuring this type of decoration. The three previous stitches, along with a fourth stitch, are used in its design. The completed sections on the left side are done in silver and gold thread, while the oval part of the flower is made up of cross threads that go over the initial padding and are held in place with a stitch between the two cords. In the next row, the catching stitch is placed between the cords, over which the first gold threads were laid.
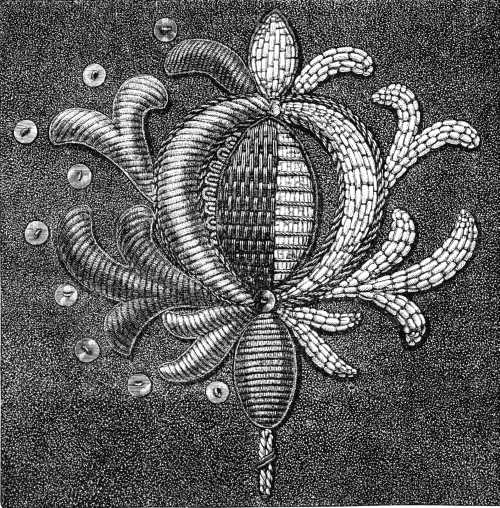
Materials.—For padding: Cordonnet 6 fils D.M.C Nos. 1 to 5 or Fil à pointer D.M.C No. 10.—For sewing on the gold thread and purl: Soie de coton D.M.C No. 50 or 70, Fil à dentelle D.M.C on reels Nos. 25 to 50.[A]
Materials.—For padding: Cordonnet 6 fils D.M.C Nos. 1 to 5 or Fil à pointer D.M.C No. 10.—For sewing on the gold thread and purl: Soie de coton D.M.C No. 50 or 70, Fil à dentelle D.M.C on reels Nos. 25 to 50.__A_TAG_PLACEHOLDER_0__
The heavier the design is, the thicker your padding should be, and cords a good deal thicker than those which are represented in the drawing should be used, as the more light and shade you can introduce into embroidery of this kind, the greater will be its beauty and value.
The heavier the design, the thicker your padding should be, and you should use cords that are significantly thicker than those shown in the drawing. The more light and shade you can add to this type of embroidery, the more beautiful and valuable it will be.
FOOTNOTES:
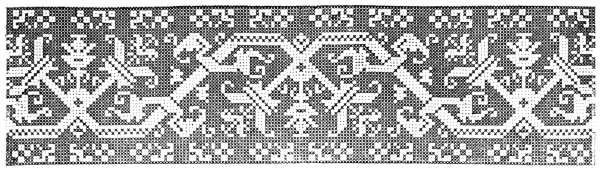
Tapestry and Linen Embroidery.
Tapestry is one of the oldest kinds of needlework and one which has always been popular every where.
Tapestry is one of the oldest forms of needlework and has always been popular everywhere.
There are two distinct sorts of canvas in use for tapestry, called respectively, ‘plain (single thread) canvas’, and ‘Penelope (double thread) canvas’. The latter is generally preferred, because it is easier to count the stitches upon it, but both make an equally good foundation for the embroidery, as the following examples will show.
There are two different types of canvas used for tapestry, known as ‘plain (single thread) canvas’ and ‘Penelope (double thread) canvas.’ The second one is usually the preferred choice because it's simpler to count the stitches on it, but both types provide a solid foundation for embroidery, as the examples below will demonstrate.
Besides canvas, other fabrics bearing a close resemblance to it, are often used, especially Java linen, the close texture of which renders grounding unnecessary.
Besides canvas, other fabrics that look similar are often used, especially Java linen, which has such a tight texture that grounding isn't needed.
Cloth, velvet or plush can also be overlaid with canvas, the threads of which are pulled away after the pattern is finished. For work of this kind, we however prefer a material with less dressing, such as a twisted tammy, or Colbert linen, because the pulling out of the harsh rough threads of the canvas is very apt to injure the material beneath.
Cloth, velvet, or plush can also be layered with canvas, with the threads being pulled away after the pattern is complete. For work like this, we prefer a material that's less finished, like twisted tammy or Colbert linen, because removing the rough threads of the canvas can easily damage the material underneath.
Stitches, worked upon two stuffs, must be drawn very tight, or they will look loose and untidy when the auxiliary fabric is taken away.
Stitches made on two pieces of fabric must be pulled tight, or they will appear loose and messy once the extra fabric is removed.
Tapestry can be done either in a frame, or in the hand; in the latter case, the ends of the piece of canvas should be weighted with stones or lead, to prevent its puckering.
Tapestry can be done either in a frame or by hand; in the latter case, the ends of the canvas should be weighed down with stones or lead to keep it from puckering.
The stitches, which ought completely to hide the canvas, should all lean one way and the underneath ones always from left to right, as the letters in writing.
The stitches should completely hide the canvas and should all lean in one direction, with the ones underneath always going from left to right, like writing letters.
Marking out the embroidery ground (fig. 252).—Before beginning a piece of canvas work and tacking on the auxiliary fabric, count how many stitches it will contain, and mark them out in tens, with a coloured thread, as shown in fig. 252, along two sides at least, in the length and breadth. Having ascertained the number of stitches both ways, divide them in two, and starting each time from the middle stitch, trace two lines, one horizontal, the other vertical, right across the canvas. The point of intersection will be the centre. This sort of ground-plan will be found most useful, and should not be pulled out until, at least, half the work be finished. If moreover, you have corners to work, or a pattern to reverse, in the angle of a piece of embroidery, trace a diagonal line besides, from the corner to the centre.
Marking out the embroidery ground (fig. 252).—Before starting your canvas work and attaching the extra fabric, count how many stitches you'll be using, and mark them in groups of ten with a colored thread, like shown in fig. 252, along at least two sides, both lengthwise and widthwise. Once you've determined the total number of stitches in both directions, divide that number by two and begin from the middle stitch to draw two lines—one horizontal and one vertical—across the canvas. The point where they intersect will be the center. This kind of groundwork will be very helpful and shouldn’t be removed until at least half of the work is completed. Additionally, if you have corners to work with or a pattern to flip in the corner of your embroidery, draw a diagonal line from the corner to the center.
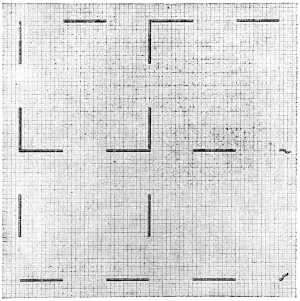
Materials suitable for tapestry.—Hitherto, wool and silk, were the materials chiefly used for canvas work; a very thick wool for carpets, as being warmer and more durable. Silk is too delicate a fibre to resist much wear and tear, and cannot therefore be recommended for articles that are intended for constant use, and wool, though stronger, is subject to the destructive agency of moths; whereas cotton, which is cheaper than both, and quite as brilliant, is free from all these disadvantages and is extremely easy to clean.
Materials suitable for tapestry.—Until now, wool and silk have been the main materials used for canvas work; very thick wool is preferred for carpets because it's warmer and more durable. Silk is too delicate to withstand much wear and tear, so it’s not ideal for items meant for regular use. Although wool is stronger, it can be damaged by moths. On the other hand, cotton, which is less expensive than both and just as vibrant, doesn't have these drawbacks and is incredibly easy to clean.
For most kinds of tapestry we can therefore with perfect confidence, recommend the use of Coton à tricoter D.M.C Nos. 6 to 20, Cordonnet 6 fils D.M.C Nos. 3 to 15, and even Coton à repriser D.M.C No. 25.[A]
For most types of tapestry, we can confidently recommend using Coton à tricoter D.M.C Nos. 6 to 20, Cordonnet 6 fils D.M.C Nos. 3 to 15, and even Coton à repriser D.M.C No. 25.[A]
Cross stitch (fig. 253).—Cross stitch is the foundation of every other stitch, and the one in most common use. It is also called marking-stitch, being used for marking linen. It is worked in two lines. In the first, the thread is carried diagonally from left to right across a square of threads, and then, downwards, underneath the two horizontal threads; in the second, the stitches are carried from the right-hand lower corner of the square to the upper left-hand corner, so that the four points of the two stitches form a perfect square.
Cross stitch (fig. 253).—Cross stitch is the basis of every other stitch and the one that's used most often. It's also known as marking-stitch, as it’s used for marking linen. It’s done in two lines. In the first line, the thread is pulled diagonally from left to right across a square of threads, and then downwards, beneath the two horizontal threads; in the second line, the stitches are made from the lower right corner of the square to the upper left corner, so that the four points of the two stitches create a perfect square.
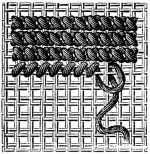
Half cross stitch (fig. 254).—If the cotton is too coarse, or the canvas too fine, to make the double stitch, carry the thread back along the whole line and make the half-stitches across it, from left to right; the same in the case of a piece of work, which you buy with a part of the pattern ready-worked.
Half cross stitch (fig. 254).—If the cotton is too thick, or the canvas too fine to create the double stitch, run the thread back along the entire line and make the half-stitches across it, from left to right; this also applies to a piece of work that you purchase with part of the pattern already stitched.
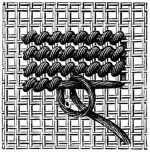
Gobelin stitch on plain canvas (fig. 255).—This is worked over two horizontal threads and one perpendicular. In a frame, you can work the second row, from right to left, otherwise, you must turn the work round, and bring out your needle behind the last-made stitch.
Gobelin stitch on plain canvas (fig. 255).—This is done over two horizontal threads and one vertical thread. If you're using a frame, you can work the second row from right to left; otherwise, you'll need to turn your work around and bring your needle out behind the last stitch you made.
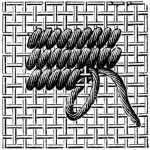
Gobelin stitch on Penelope canvas (fig. 256).—For the same stitch on Penelope canvas, you need rather a coarse needle, which will make its way easily between the threads of the canvas.
Gobelin stitch on Penelope canvas (fig. 256).—For the same stitch on Penelope canvas, you’ll need a fairly coarse needle that can easily glide between the threads of the canvas.
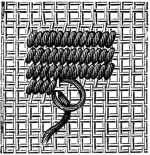
Reps stitch (fig. 257).—Contrary to Gobelin stitch, this stitch which is an imitation of reps, is worked in vertical lines, over two vertical threads and one horizontal one.
Reps stitch (fig. 257).—Unlike Gobelin stitch, this stitch, which mimics reps, is done in vertical lines, over two vertical threads and one horizontal thread.
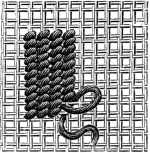
Tent stitch (fig. 258).—This stitch is simply the first half of a cross or marking stitch, worked over a single thread each way. The illustration shows the working of a row, from right to left, the thread being carried forward, underneath the vertical threads. Tent stitch is used for the most part, in conjunction with cross stitch, for the more delicate lines and the shaded parts of flowers and figures.
Tent stitch (fig. 258).—This stitch is just the first half of a cross stitch or marking stitch, made over a single thread each way. The illustration shows how to work a row, from right to left, with the thread moving forward under the vertical threads. Tent stitch is mainly used together with cross stitch for the finer lines and the shaded areas of flowers and figures.
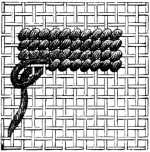
Wide Gobelin stitch (fig. 259).—This stitch covers two vertical and two horizontal threads, and advances one thread at a time.
Wide Gobelin stitch (fig. 259).—This stitch spans two vertical and two horizontal threads, moving forward one thread at a time.
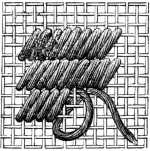
Broad cross stitch (fig. 260).—Worked over two vertical and four horizontal threads, and very useful for filling in large surfaces as it can be done twice as quickly as the ordinary cross stitch. It may be varied by turning the crosses first one way and then the other.
Broad cross stitch (fig. 260).—Done over two vertical and four horizontal threads, this stitch is great for covering large areas since it can be completed twice as fast as regular cross stitch. You can also mix it up by turning the crosses in one direction first and then the other.

Double stitch (fig. 261).—Begin with a simple cross stitch over every alternate intersection of the threads then make a second row of stitches between those of the first, but in this case, over two and six threads, so that they extend beyond the first each way. In the subsequent rows, a square stitch should be opposed to a long one and a long stitch to a square one.
Double stitch (fig. 261).—Start with a basic cross stitch over every other intersection of the threads. Then, create a second row of stitches in between the first set, but this time, make them cover two and six threads, extending beyond the first stitches on each side. In the following rows, alternate between square stitches and long stitches.
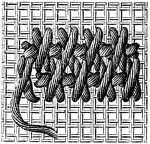
Rice stitch (fig. 262).—Fill in the whole ground first, with large cross stitches, over four threads each way, then upon these, make the so-called rice stitches. These cross the four points of the large cross stitches, and meet in the space between, where they form another cross. The large cross stitches should be worked in rather coarse cotton, the rice stitches in one of a finer quality.
Rice stitch (fig. 262).—Start by filling the entire area with large cross stitches, using four threads in each direction. Then, on top of these, create the rice stitches. These should cross over the points of the large cross stitches and meet in the space between, forming another cross. The large cross stitches should be made with fairly coarse cotton, while the rice stitches should be done in a finer quality thread.
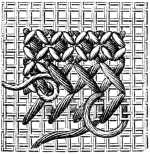
Double stitch, set two ways (fig. 263).—This consists of diagonal and upright cross stitches, alternately. Work from left to right, and carry the thread over four vertical threads and downwards, under two horizontal ones, then diagonally upwards, over four threads and downwards under two, then again over four vertical threads, and so on. Coming back, you cross the first threads, and pass the working thread each time in a straight line, underneath the two threads of the canvas. The stitches of the third and fourth rows are set, as the illustration shows, the opposite way to those of the two first, the thread being laid the contrary way. Gold thread is generally used for this second set of stitches; Or fin D.M.C pour la broderie, or Chiné d’or D.M.C will be found to be the most suitable for the purpose.[A]
Double stitch, set two ways (fig. 263).—This stitch uses diagonal and upright cross stitches alternately. Start from the left and carry the thread over four vertical threads and down under two horizontal threads, then diagonally up over four threads and down under two again, repeating the process. When you return, cross the first threads and pass the working thread each time in a straight line underneath the two threads of the canvas. The stitches in the third and fourth rows are set, as shown in the illustration, in the opposite direction to the first two, with the thread laid the other way. Gold thread is usually used for this second set of stitches; either fin D.M.C for embroidery or Chinéd’or D.M.C will be the most suitable for this purpose.[A]

Plait stitch (fig. 264).—It requires great attention to work this stitch, to and fro; the easier way is to carry the thread back each time, to the starting point.
Plait stitch (fig. 264).—This stitch takes a lot of focus to do back and forth; a simpler method is to return the thread each time to where you began.
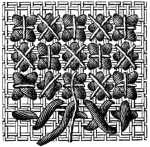
Carry the thread from left to right, over two horizontal threads, and downwards under four perpendicular ones, then under two threads, from right to left, as the figure indicates.
Carry the thread from left to right, over two horizontal threads, and then down under four vertical ones, followed by under two threads, from right to left, as shown in the figure.
Stem stitch (fig. 265).—Here, the stitches are worked in separate rows, over four threads each way. The working thread passes first under the two middle threads, from right to left, and then under the two upper ones.
Stem stitch (fig. 265).—In this technique, the stitches are created in separate rows, covering four threads in each direction. The working thread first goes under the two middle threads, from right to left, and then under the two upper threads.
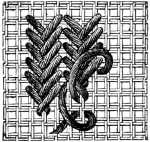
Leaf stitch (fig. 266).—Carry the thread diagonally over two double threads each way, and back under one double thread, to the row whence the stitch started. Make rows of back-stitches in a different colour between the rows of long ones.
Leaf stitch (fig. 266).—Hold the thread diagonally over two double threads in both directions, then go back under one double thread to the starting row of the stitch. Create rows of back-stitches in a different color between the rows of long stitches.
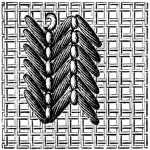
Fish-bone stitch (fig. 267).—The difference between this and the preceding stitch is, that the working thread after passing over three perpendicular and three horizontal threads, is secured by a back-stitch over the last intersection of the canvas threads. These back-stitches lean to the right or left, according to the direction of the long stitches.
Fish-bone stitch (fig. 267).—The difference between this and the previous stitch is that the working thread, after passing over three vertical and three horizontal threads, is secured by a back-stitch over the last intersection of the canvas threads. These back-stitches lean to the right or left, depending on the direction of the long stitches.
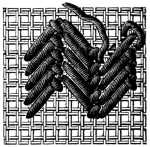
Diagonal web stitch (fig. 268).—Stretch diagonal threads across the whole surface you are going to embroider, and secure them with rows of overcasting stitches, set, if you are working on Penelope canvas, between the double threads of the canvas. In the next rows the stitches must be set the opposite way, which produces the effect of diagonal or twilled cloth.
Diagonal web stitch (fig. 268).—Stretch diagonal threads across the entire surface you’re going to embroider, and secure them with rows of overcasting stitches, placed, if you’re working on Penelope canvas, between the double threads of the canvas. In the following rows, the stitches should be set in the opposite direction, which creates the effect of diagonal or twilled fabric.
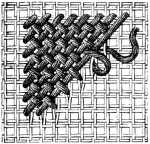
Cashmere stitch (fig. 269).—To imitate this texture in needlework first make one stitch over one crossing of the canvas threads, and then two stitches over two crossings.
Cashmere stitch (fig. 269).—To replicate this texture in needlework, first make one stitch over one crossing of the canvas threads, and then two stitches over two crossings.
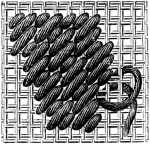
Florentine stitch (fig. 270).—Florentine stitch is worked in slanting lines, the thread being carried, diagonally first over one and then over two double threads of the canvas.
Florentine stitch (fig. 270).—Florentine stitch is done with slanting lines, where the thread is pulled diagonally first over one double thread of the canvas and then over two.
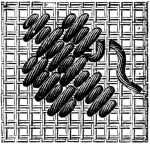
Mosaic stitch (fig. 271).—The first row consists of one short and one long stitch, alternately; the second, of short stitches only, set between the long stitches of the first row; the third row is a repetition of the first, and so on.
Mosaic stitch (fig. 271).—The first row has one short stitch and one long stitch, repeated alternately; the second row is made up of only short stitches placed between the long stitches of the first row; the third row repeats the first, and so on.
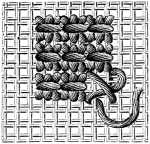
Knotted stitch (fig. 272).—Carry the working thread over two threads in width and six in height, bring the needle back, four threads lower down, in front of the double threads, and insert it behind the preceding stitch, and over the middle threads, and then carry it down to the line of the stitches. In the subsequent rows, the stitches extend over four threads and encroach on two of the previous row, so that the stitches of the second row lie between those of the first.
Knotted stitch (fig. 272).—Guide the working thread over two threads in width and six in height, then bring the needle back four threads lower, in front of the double threads, and insert it behind the previous stitch, over the middle threads, and then bring it down to the line of stitches. In the following rows, the stitches will cover four threads and overlap two threads from the previous row, so the stitches in the second row are positioned between those of the first.
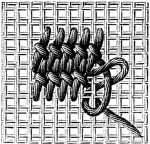
Star, or Smyrna stitch (fig. 273).—- Make a plain cross stitch over four threads, each way, and then over that, another cross stitch, standing upright. The same stitch can be made over six or seven threads; if you work over more than four threads, it follows that you increase the number of stitches accordingly.
Star, or Smyrna stitch (fig. 273).—- Create a basic cross stitch over four threads in both directions, and then add another upright cross stitch on top of that. You can also make this stitch over six or seven threads; if you use more than four threads, just increase the number of stitches accordingly.
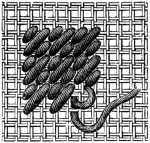
Rococo stitch (figs. 274, 275, 276).—After fastening in your thread, lay it over four single or two double threads, as the case may be, and carry the needle through to the left, under one double thread; then, as fig. 274 shows, bring it back over the first stitch, put it in by the side of it, and bring it out below, under half the horizontal threads covered by the first stitch. Then make a stitch to the right, similar to the one just made to the left.
Rococo stitch (figs. 274, 275, 276).—Once you’ve secured your thread, place it over four single threads or two double threads, depending on your project. Bring the needle through to the left, going under one double thread; then, as shown in fig. 274, pull it back over the first stitch, insert it next to that stitch, and bring it out below, under half of the horizontal threads covered by the first stitch. Next, make a stitch to the right, similar to the one just made to the left.
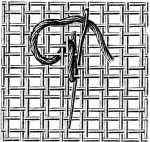
When you have finished one stitch, carry the needle under one thread, in an oblique line, to the next stitch, see fig. 273. The whole pattern is worked in diagonal lines.
When you finish one stitch, slide the needle under one thread, at an angle, to the next stitch, see fig. 273. The entire pattern is made with diagonal lines.
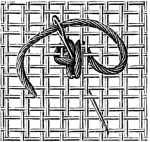
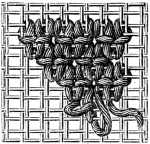
Parisian stitch (fig. 277).—This stitch, though it is generally worked on silk canvas, can also be worked on the different cotton and linen materials already referred to more than once in this Encyclopedia. It makes a very good grounding in cases where the material is not intended to be completely hidden. It consists of a long stitch over three threads, and a short stitch over one thread, alternately.
Parisian stitch (fig. 277).—This stitch is usually done on silk canvas, but it can also be used on various cotton and linen fabrics mentioned earlier in this Encyclopedia. It's great as a background when the material isn't meant to be fully covered. It involves making a long stitch over three threads and a short stitch over one thread, alternating between the two.
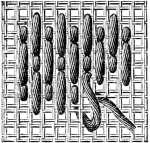
Greek stitch (fig. 278).—This differs from the ordinary cross stitch, in the oblique inclination given to the threads, and the manner in which it is begun. Instead of taking up the two threads that follow the first stitch, you bring your needle back from right to left, under the vertical threads of the first stitch, carry it downwards, and then from right to left, to a distance of four threads beyond the first stitch. The next stitch is made like the first. The rows may be joined together, either by the short or the long stitches, but you must follow one rule throughout. This stitch is much used in Slavonic countries, for the adornment of linen garments, and there we have observed that the short stitches are generally made to encounter the long ones. A coarse material that covers the ground well, such as, Coton à tricoter D.M.C Nos. 6 to 12, is the best one to use for this stitch.
Greek stitch (fig. 278).—This is different from regular cross stitch because of the angled way the threads are positioned and how you start it. Instead of picking up the two threads that follow the first stitch, you pull your needle back from right to left, underneath the vertical threads of the first stitch, then carry it downward and from right to left, reaching out four threads beyond the first stitch. The next stitch is worked just like the first one. The rows can be connected using either short or long stitches, but you need to stick to one method consistently. This stitch is commonly used in Slavic countries to decorate linen clothing, where we’ve noticed that the short stitches usually line up with the long ones. A sturdy material that provides good coverage, like Coton à tricoter D.M.C Nos. 6 to 12, is the best choice for this stitch.
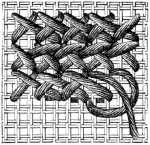
Scotch stitch (fig. 279).—Squares, composed of slanting stitches, made over one, three, five, three threads respectively, and then again over one thread, and separated from each other by rows of Gobelin stitches, constitute what is ordinarily known by the name of Scotch stitch.
Scotch stitch (fig. 279).—Squares made of diagonal stitches, worked over one, three, five, three threads in that order, and then again over one thread, are separated from each other by rows of Gobelin stitches. This is what is commonly referred to as Scotch stitch.
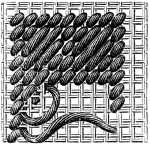
Moorish stitch (fig. 280).—For this stitch, instead of surrounding squares of stitches, made in the way we have just described, with Gobelin stitch, the squares are made to touch, rising like steps one above the other, and bordered only at the sides by Gobelin stitch.
Moorish stitch (fig. 280).—For this stitch, instead of surrounding the squares with Gobelin stitch as we just described, the squares are placed to touch each other, stacked like steps on top of one another, and bordered only on the sides with Gobelin stitch.
Oriental stitch (fig. 281).—Here, you make four diagonal stitches over one, two, three and four double threads respectively; which four stitches form so many triangles, one above the other. The empty spaces between are filled up with Gobelin stitches covering two threads.
Oriental stitch (fig. 281).—In this technique, you create four diagonal stitches over one, two, three, and four double threads respectively; these four stitches form triangles stacked on top of each other. The gaps in between are filled with Gobelin stitches that cover two threads.
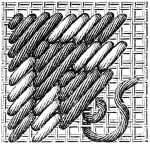
Shell stitch (fig. 282).—Carry your thread upwards over six horizontal threads, then from right to left, under one vertical thread and downwards over six horizontal ones. When you have made four vertical stitches in this way, bring the needle out behind the third double thread, counted lengthways, and between the third and fourth, counted across, and fasten the four long stitches together with a back-stitch, to the middle thread of the canvas. Draw a thread of a different colour twice through these back-stitches, so as to form small knots like shells, and then fill in the ground between the rows of long stitches, with back-stitches.
Shell stitch (fig. 282).—Bring your thread up over six horizontal threads, then go from right to left, under one vertical thread and down over six horizontal threads. After making four vertical stitches this way, bring the needle out behind the third double thread, counted lengthwise, and between the third and fourth, counted across. Secure the four long stitches together with a back-stitch to the middle thread of the canvas. Thread a different color through these back-stitches twice to create small knots like shells, and then fill in the area between the rows of long stitches with back-stitches.
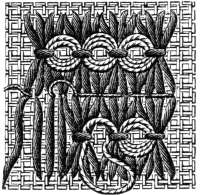
Jacquard stitch (fig. 283).—If you have a large plain surface to cover, you should choose a stitch that forms a pattern in itself. Jacquard stitch and others which we shall describe later on, will be found to produce the effect of brocaded stuff. To work Jacquard stitch, make six stitches underneath one another, over two double threads, and six by the side of one another, from left to right, over two double threads. The second row consists of the same number of stitches, similarly worked downwards and to the side, but over one double thread only.
Jacquard stitch (fig. 283).—If you have a large plain area to cover, you should pick a stitch that creates a pattern on its own. Jacquard stitch and others we’ll describe later will create the look of brocade fabric. To do Jacquard stitch, make six stitches stacked vertically over two double threads, and six stitches horizontally from left to right over two double threads. The second row consists of the same number of stitches, worked the same way but over just one double thread.
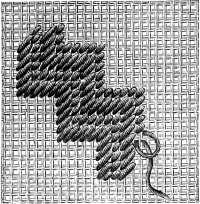
Byzantine stitch (fig. 284).—Here, you make the same number of stitches as in the preceding figure but with this difference, that the two rows of stitches are made either over two, or four threads.
Byzantine stitch (fig. 284).—In this stitch, you make the same number of stitches as shown in the previous figure, but the difference is that the two rows of stitches are made over either two or four threads.
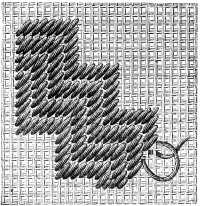
Milanese stitch (fig. 285).—In the first row, the back-stitch is made alternately, first over four diagonal crosses and then over one; in the second row, over three and two; in the third, over two and three, in the fourth, over one and four. The last long stitches should come under the last short ones and the short ones, in the middle of the last long ones.
Milanese stitch (fig. 285).—In the first row, alternate back-stitches are made, first over four diagonal crosses and then over one; in the second row, over three and two; in the third, over two and three; in the fourth, over one and four. The last long stitches should go under the last short ones, and the short ones should be placed in the middle of the last long ones.
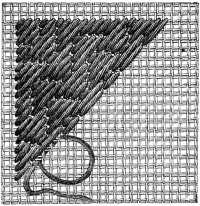
Plush stitch (fig. 286).—This stitch, also called Astrachan stitch, by means of which a very good imitation of an Oriental rug can be produced, consists of loops, each secured by a cross stitch; the best way to ensure these loops being even and regular is to make them over a narrow wooden ruler, or a piece of whalebone.
Plush stitch (fig. 286).—This stitch, also known as Astrachan stitch, allows you to create a close imitation of an Oriental rug. It is made up of loops, each secured with a cross stitch. The best way to keep these loops even and consistent is to create them using a narrow wooden ruler or a piece of whalebone.
The effect can be varied by cutting the loops, which gives the surface the appearance of velvet.
The effect can be changed by cutting the loops, which gives the surface a velvet-like appearance.

The illustration represents the middle loops only, as cut, for the cut and the uncut stitch can both be introduced into the same piece of embroidery. For example, the borders in figs. 290, and 291, are worked in open or cut plush stitch, whilst in the centres, the stitch is left uncut. Two stitches of a similar kind, called Smyrna and Malta stitch, suitable for making rugs or carpets, are described in the last chapter but one in the book.
The illustration shows just the middle loops as they've been cut, since both cut and uncut stitches can be used in the same piece of embroidery. For example, the borders in figs. 290, and 291, are created with open or cut plush stitch, while the centers use uncut stitch. Two similar stitches, known as Smyrna and Malta stitch, which are great for creating rugs or carpets, are described in the second-to-last chapter of the book.
Chain stitch (fig. 287).—Generally speaking, this stitch is only used for the adornment of under-linen or small articles of fancy-work but it can also be employed in copying cross stitch patterns. In old collections we often meet with very interesting pieces of needlework, which were used for hangings or screens, where the figure-subjects, are executed in chain stitch. Patterns in many colours, gain immensely by being worked in this stitch, the colours blend together better than in any other, and even the shape of the stitch contributes to soften the contrasts of colour.
Chain stitch (fig. 287).—In general, this stitch is mostly used for decorating undergarments or small craft items, but it can also be used to replicate cross stitch patterns. In old collections, we often find very interesting pieces of needlework that were used for hangings or screens, where the subjects are created using chain stitch. Patterns in multiple colors benefit greatly from being worked in this stitch; the colors blend together better than in any other method, and even the shape of the stitch helps to soften the color contrasts.
Chain stitch cannot, like other stitches, be worked to and fro, nor can all the stitches of one row be finished first, as is generally possible in cross stitch work, each row must be begun separately, and always from the same side, and a different needle should be used for each colour, as the material has often to be changed.
Chain stitch can't, like other stitches, be worked back and forth, nor can all the stitches in one row be finished first, as is usually possible in cross stitch. Each row must be started separately, always from the same side, and a different needle should be used for each color since the material often has to be changed.
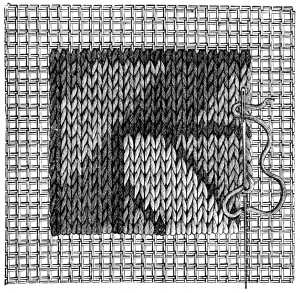
The stitch is worked as follows; after fastening in your thread, insert the needle at the same hole it came out of, and bring it out two threads lower down. Keep the loop, formed by the working thread, under the point of the needle. The thread should not be drawn up tightly but left to form a rather loose, round loop. For the next stitches, insert the needle close to the thread that issues from the last loop.
The stitch is made like this: after securing your thread, insert the needle back into the same hole it came out of, and pull it out two threads lower. Keep the loop created by the working thread under the tip of the needle. The thread shouldn't be pulled tight; instead, let it form a loose, round loop. For the next stitches, insert the needle close to the thread coming from the last loop.
Pattern for borders or grounding (fig. 288).—This simple but most effective design, copied from one of the most beautiful of Oriental carpets, can be executed in, either cross stitch, plush stitch, or chain stitch. To make a wider border still, the diagonal lines that divide the figures shaped like an S, have only to be prolonged, and the figures repeated.
Pattern for borders or grounding (fig. 288).—This straightforward yet highly effective design, inspired by one of the most beautiful Oriental carpets, can be created using cross stitch, plush stitch, or chain stitch. To create an even wider border, simply extend the diagonal lines that separate the S-shaped figures and repeat the figures.
The colours have been chosen with the view of reproducing as nearly as possible the subdued and faded tones, which time has imparted to the original.
The colors have been selected to closely match the muted and faded shades that time has given to the original.

Materials: Coton à broder D.M.C Nos. 6 to 12, Cordonnet 6 fils D.M.C Nos. 3 to 15, Fil à pointer D.M.C Nos. 10 to 30, or Coton à repriser D.M.C No. 25.
Explanation of the signs prefixed to the colours: (
 ) Rouge-Cardinal 346,
(
) Rouge-Cardinal 346,
( ) Rouge-Cornouille 449, (
 ) Bleu-Indigo 311, and (
 ) Bleu-Indigo 322,
(
) Bleu-Indigo 322,
( ) Gris-Cendre 414, (
 ) Bronze doré 585 and (
 ) Vert-Mousse 470.[A]
Materials: D.M.C Embroidery Cotton Nos. 6 to 12, D.M.C Cordonnet 6 strands Nos. 3 to 15, D.M.C Pointing Thread Nos. 10 to 30, or D.M.C Darning Cotton No. 25.
Meaning of the symbols next to the colors: (
) Cardinal Red 346, () Cornflower Red 449, () Indigo Blue 311, and () Indigo Blue 322, () Ash Gray 414, () Gold Bronze 585, and () Moss Green 470.__A_TAG_PLACEHOLDER_0__Pattern for grounding (fig. 289).—Diagonal lines, intersected by balls, serve here as a setting for quaintly shaped flowers and leaves. The outlines are all worked in cross stitch, and the solid parts, in either tent stitch or Gobelin stitch.
Pattern for grounding (fig. 289).—Diagonal lines, crossed by circles, create a backdrop for uniquely shaped flowers and leaves. The outlines are all done in cross stitch, while the filled areas are in either tent stitch or Gobelin stitch.

Materials: Coton à tricoter D.M.C Nos. 6 to 16, Cordonnet 6 fils D.M.C Nos. 5 to 15 or Coton à broder D.M.C No. 16. [A]
Explanation of the signs prefixed to the colours: (
 ) Noir grand Teint 310, () Jaune
d’Ocre 676, (
) Noir grand Teint 310, () Jaune
d’Ocre 676, ( ) Violet-Mauve 315, (
 ) Rouge-Géranium 349, (
 ) Rouge-Aurore 360,
() Bleu-Indigo 312, () Bleu pâle 668, () Rouge-Cornouille 449, () Vert-de-gris 474,
() Vert-de-gris 475, () Grounding.[A]
) Rouge-Aurore 360,
() Bleu-Indigo 312, () Bleu pâle 668, () Rouge-Cornouille 449, () Vert-de-gris 474,
() Vert-de-gris 475, () Grounding.[A]Materials: D.M.C knitting cotton No. 6 to 16, D.M.C 6-ply cordonnet No. 5 to 15, or D.M.C embroidery cotton No. 16. __A_TAG_PLACEHOLDER_0__
Explanation of the symbols before the colors: (
) Black (Grand Teint) 310, () Yellow Ochre 676, () Violet-Mauve 315, () Geranium Red 349, () Dawn Red 360,
() Indigo Blue 312, () Light Blue 668, () Corn Red 449, () Gray-Green 474,
() Gray-Green 475, () Grounding. __A_TAG_PLACEHOLDER_1__Part of a design, suitable for carpets (figs. 290 and 291). Our space will not admit of our reproducing more than a quarter of this design. Colours of the softest shades should be selected for it. A black line divides the pattern into four quarters. The upper quarter on the right, and the lower one, on the left, should be worked in blue, and the upper one on the left, copied from fig. 290.
Part of a design, suitable for carpets (figs. 290 and 291). Our space won’t allow us to reproduce more than a quarter of this design. We should choose colors in the softest shades. A black line divides the pattern into four quarters. The upper quarter on the right and the lower one on the left should be done in blue, while the upper one on the left should be a replica of fig. 290.

Materials: Fil à pointer D.M.C Nos. 10 to 30, Coton à tricoter D.M.C Nos. 6 to 12, Cordonnet 6 fils D.M.C Nos. 3 to 10, or Coton à repriser D.M.C No. 12.
Explanation of the signs prefixed to the colours: (
) Noir grand Teint 310,
() Rouge-Grenat 358, () Rouge-Cornouille 450,
() Bleu-Indigo 311, () Bleu-Indigo 322,
() Vert métallique 465, () Gris-Noisette 424.[A]Materials: D.M.C Fil à pointer Nos. 10 to 30, D.M.C Coton à tricoter Nos. 6 to 12, D.M.C Cordonnet 6 fils Nos. 3 to 10, or D.M.C Coton à repriser No. 12.
Explanation of the color codes: (
) Black 310,
() Garnet Red 358, () Cornflower Red 450,
() Indigo Blue 311, () Indigo Blue 322,
() Metallic Green 465, () Nutmeg Gray 424.__A_TAG_PLACEHOLDER_0__
Materials: Fil à pointer D.M.C Nos. 10 to 30, Coton à tricoter D.M.C Nos. 6 to 12, Cordonnet 6 fils D.M.C Nos. 3 to 15, or Coton à repriser D.M.C No. 12. [A]
Explanation of the signs prefixed to the colours: (
) Noir grand Teint 310,
() Rouge-Grenat 358, () Bleu-Indigo 311,
() Vert métallique 465, () Jaune-vieil-Or
679, () Gris-Noisette 424, () Rouge-Cornouille 450.[A]Materials: D.M.C Fil à pointer Nos. 10 to 30, D.M.C Knitting Cotton Nos. 6 to 12, D.M.C 6-Ply Cord Nos. 3 to 15, or D.M.C Darning Cotton No. 12. __A_TAG_PLACEHOLDER_1__
Explanation of the symbols associated with the colors: (
) Black 310,
() Garnet Red 358,
() Indigo Blue 311,
() Metallic Green 465,
() Old Gold Yellow 679,
() Nutmeg Gray 424,
() Corn Red 450.__A_TAG_PLACEHOLDER_2__Linen embroidery.—The stitches used in linen embroidery are very similar to those used in canvas work. The ordinary cross stitch, as represented in fig. 253, is the one most commonly used, but it is not so effective as the two-sided stitches, which in the beautiful old needlework of the 15th, 16th and 17th centuries, have always excited our wonder and admiration.
Linen embroidery.—The stitches used in linen embroidery are very similar to those used in canvas work. The regular cross stitch, as shown in fig. 253, is the most commonly used, but it's not as effective as the two-sided stitches, which in the beautiful old needlework of the 15th, 16th, and 17th centuries, have always amazed and impressed us.
Stuffs suitable for linen embroidery.—Most embroidery of this kind, and more especially the Italian, is done on very fine linen. Such fine work however, requires more time and patience than people, in these days, are as a rule disposed to bestow on work intended merely for pleasure and recreation. To meet the requirements of the day, therefore, in addition to the finer kinds of linen, a great variety of textures, are now manufactured, the threads of which, being thick and round, can be easily counted. The cross stitches that are worked on Cuba, Ceylon or Batavia linen, are large and coarse, those on linen-canvas, Russian linen, twisted tammy, and Rhodes linen, small and fine.
Materials Suitable for Linen Embroidery.—Most embroidery of this type, especially Italian, is done on very fine linen. However, such detailed work takes more time and patience than people generally want to spend on projects meant for fun and relaxation these days. To meet current demands, in addition to finer linens, a wide variety of textures are now produced, with thick, round threads that are easy to count. The cross stitches made on Cuba, Ceylon, or Batavia linen are large and coarse, while those on linen-canvas, Russian linen, twisted tammy, and Rhodes linen are small and fine.
Linen fabrics are either white, unbleached or cream-coloured. All three are used for embroidery, but the coloured cottons show up best on the cream ground; on the white, they look hard and crude, and on the unbleached, dull and faded.
Linen fabrics come in white, unbleached, or cream colors. All three are used for embroidery, but the colored cottons stand out best on the cream background; on the white, they appear harsh and crude, and on the unbleached, they look dull and faded.
Materials suitable for linen embroidery—As most linen embroidery is executed on articles that are subjected to frequent washing, the D.M.C cottons, which are to be had in every shade and colour, are the best for the purpose. For coarse stuffs, coarse cotton should be used, such as knitting cotton, Coton à tricoter D.M.C Nos. 6, 8, 10, 12 and 14,[A] which will be found a very good substitute for wool; or six-cord crochet cotton (Cordonnet 6 fils D.M.C) Nos. 3, 4, 5, 10 and 15,[A] which gives quite as full and brilliant a stitch, as silk-twist. Finer cottons should be used for the finer stuffs, such as embroidery cotton (Coton à broder D.M.C) Nos. 6 to 200,[A] and lace thread (Fil à dentelle D.M.C) Nos. 30 to 150.[A] In many cases, even darning cotton (Coton à repriser D.M.C) can be used, as like Algerian silk, it can be split or taken double, to suit the stuff.
Materials suitable for linen embroidery—Since most linen embroidery is done on items that get washed often, D.M.C cottons, available in every shade and color, are the best choice. For thicker fabrics, use thicker cotton like knitting cotton, Coton à tricoter D.M.C Nos. 6, 8, 10, 12, and 14,[A] which works well as a substitute for wool; or six-cord crochet cotton (Cordonnet 6 fils D.M.C) Nos. 3, 4, 5, 10, and 15,[A] which gives a stitch that's just as full and vibrant as silk-twist. For finer fabrics, opt for finer cottons like embroidery cotton (Coton à broder D.M.C) Nos. 6 to 200,[A] and lace thread (Fil à dentelle D.M.C) Nos. 30 to 150.[A] In many cases, you can even use darning cotton (Coton à repriser D.M.C), as it can be split or used doubled, similar to Algerian silk, to match the fabric.
Plain cross stitch on auxiliary canvas (fig. 292).—Plain cross stitch, commonly called marking stitch, has already been described in fig. 253. But it may be well to observe, that when an auxiliary material is used, it should be most carefully tacked upon the stuff following the thread of the same, and a sufficient margin left to allow of the drawing out of the canvas threads, when the work is finished.
Plain cross stitch on auxiliary canvas (fig. 292).—Plain cross stitch, often referred to as marking stitch, has already been explained in fig. 253. However, it’s important to note that when using an auxiliary material, it should be securely attached to the fabric by following the thread pattern, and enough margin should be left to remove the canvas threads once the work is completed.
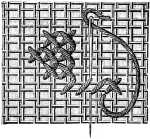
Two-sided cross stitch, worked in four rows of stitches (figs. 293, 294, 295).—Straight lines of cross stitch, alike on both sides, can be worked in two journeys to and fro. Working from left to right, begin by fastening in your thread, never with a knot, but by two or three little running stitches, which are hidden afterwards by your first cross stitch. Directing your needle to the right, pass it diagonally over a double cross of the warp and woof of the canvas, and so on to the end of the line.
Two-sided cross stitch, worked in four rows of stitches (figs. 293, 294, 295).—You can create straight lines of cross stitch that look the same on both sides by working back and forth twice. Start from the left and secure your thread without using a knot; instead, use two or three small running stitches that will be covered by your first cross stitch. Point your needle to the right and pass it diagonally over a double cross of the warp and weft of the canvas, and continue this until you reach the end of the line.
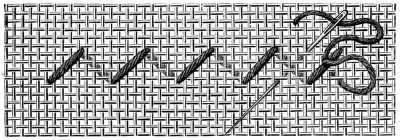
Having reached the last stitch, draw out your thread in the middle of it, make an auxiliary diagonal stitch downwards to the right, bring the needle up in the middle of the last stitch, take it thence, upwards to the left, across two threads, and begin the return journey, from right to left, crossing and thus completing the first row of stitches. In the auxiliary stitch with which you begin the backward journey, the thread lies double on both sides. Fig. 295 shows how to pass down to the next row.
Having reached the last stitch, pull your thread out in the middle of it, make a diagonal stitch downwards to the right, bring the needle up in the middle of the last stitch, and take it upwards to the left, across two threads. Then start the return journey from right to left, crossing and completing the first row of stitches. In the auxiliary stitch with which you start the backward journey, the thread is doubled on both sides. Fig. 295 shows how to move down to the next row.
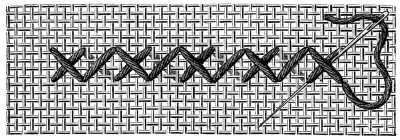
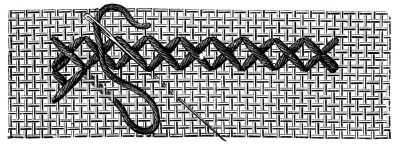
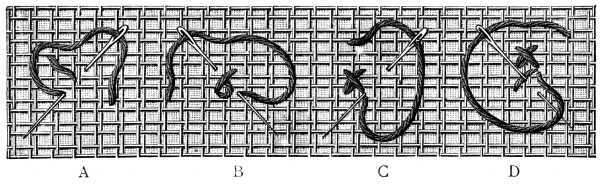
The working detail A, Fig. 296, indicates the spot for the thread to enter the stuff, and the position of the needle for the first and second stitches; B, the first two stitches completed, with an auxiliary stitch to the right, the thread drawn out on the right, and the position of the needle for the fifth stitch that completes the cross; G shows the completion of the stitch begun at B and the position of the needle for a second stitch to the right; D, one cross stitch completed and another begun, immediately beneath A. In fig. 297, E shows how to work stitches to the left; F, an auxiliary stitch to reach an isolated cross stitch on the right, G, auxiliary stitches between two isolated cross stitches, and H, a second and last auxiliary stitch to complete the cross.
The working detail A, Fig. 296, shows where the thread should enter the material and the position of the needle for the first and second stitches; B shows the first two stitches completed, with an extra stitch to the right, the thread pulled out on the right, and the position of the needle for the fifth stitch that finishes the cross; G shows the completion of the stitch started at B and the position of the needle for a second stitch to the right; D shows one cross stitch completed and another started, directly below A. In fig. 297, E demonstrates how to work stitches to the left; F shows an extra stitch to connect to an isolated cross stitch on the right, G shows extra stitches between two isolated cross stitches, and H shows a second and final extra stitch to complete the cross.
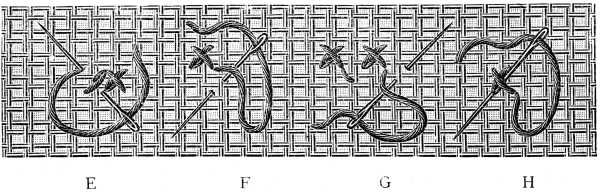
It requires both practice and care to do this two-sided marking stitch, so as not to disfigure the stuff by superfluous stitches.
It takes practice and attention to do this two-sided marking stitch without ruining the fabric with extra stitches.
Cross stitch forming a square at the back (figs. 298 and 299).—Many of the alphabets we so admire in old samplers are worked in cross stitch, that forms a square at the back. Each stitch has to be finished off before another is begun; if you carefully examine figs. 298 and 299, which show severally the right and the wrong sides of the stitch, you will find no difficulty in mastering it. Letter A, fig. 296, shows the entrance of the thread, the position of the needle for half the cross stitch on the right side, and the second side of the square at the back, as shown in fig. 299, A. Letter B, fig. 298, shows the cross stitch finished, and the position of the needle for the third side of the square on the wrong side, indicated by the same letter in fig. 299. C, in both figures, indicates a stitch which is double on the right side, and on the wrong side forms the fourth side of the square, whilst letter D, explains how to continue the stitches.
Cross stitch forming a square at the back (figs. 298 and 299).—Many of the alphabets we admire in old samplers are created using cross stitch, which forms a square at the back. Each stitch must be completed before starting another; if you take a close look at figs. 298 and 299, which show the front and back sides of the stitch, you'll find it easy to learn. Letter A, fig. 296, shows how the thread enters, the needle's position for half of the cross stitch on the front, and the second side of the square at the back, as demonstrated in fig. 299, A. Letter B, fig. 298, shows the completed cross stitch and the needle's position for the third side of the square on the back, marked by the same letter in fig. 299. C, in both figures, indicates a stitch that is doubled on the front side, and on the back forms the fourth side of the square, while letter D explains how to continue the stitches.
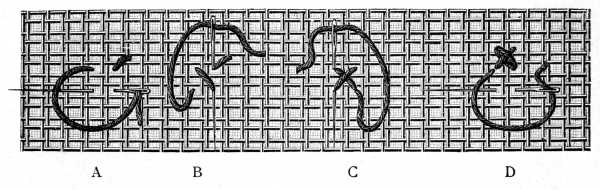
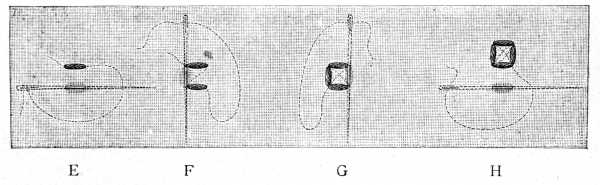
Italian stitch is worked in one journey, to and fro. Fig. 300 shows how to fasten in the thread, and place the needle for the first stitch, from right to left; fig. 301, the position of the needle from left to right, to form the cross at the back, and the vertical stitch to the left, on the right side; fig. 302, the position of the needle, for a two-sided horizontal stitch at the bottom of the cross, where upon you proceed as in fig. 300. Fig. 303 explains the return of the thread, which completes the double crosses and the lines between.
Italian stitch is done in one continuous movement, back and forth. Fig. 300 shows how to secure the thread and position the needle for the first stitch, from right to left; fig. 301 illustrates the needle's position from left to right, creating the cross on the back and the vertical stitch to the left on the front; fig. 302 depicts the needle's position for a two-sided horizontal stitch at the bottom of the cross, after which you proceed as in fig. 300. Fig. 303 details how to return the thread, completing the double crosses and the lines in between.
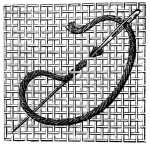
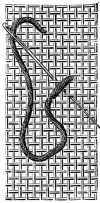
The horizontal lines, not made on the first journey, are added on the way back. In conclusion, pass the needle back, horizontally, from left to right, to make the final stitch over the cross, and then make the stitch between, as shown in fig. 303. On a thin stuff, this stitch produces an extremely pretty effect, resembling lattice-work, provided the thread be tightly drawn in the working.
The horizontal lines that weren't made on the first journey are added on the way back. In conclusion, pass the needle back, horizontally, from left to right, to make the final stitch over the cross, and then make the stitch in between, as shown in fig. 303. On a thin fabric, this stitch creates a really nice effect that looks like lattice-work, as long as the thread is pulled tight while working.
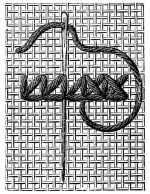
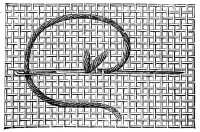
Montenegrin cross stitch (figs. 304, 305, 306).—The Slavonic tribes of the southern districts of E. Europe, especially the Montenegrins, have a great partiality for this stitch, which has been rarely noticed, hitherto, in books on needlework. The right side shows cross stitches with a double thread underneath, and divided by vertical stitches; the wrong side, regular cross stitches, also divided by vertical stitches. Coarse cotton should be used for this stitch; it produces a richer effect and not only covers the stuff better, but also the underneath stitch which in the Slavonic work, is entirely hidden by the cross stitches.
Montenegrin cross stitch (figs. 304, 305, 306).—The Slavic tribes from the southern regions of Eastern Europe, especially the Montenegrins, really favor this stitch, which has been rarely mentioned in books about needlework until now. The front side displays cross stitches with a double thread beneath, separated by vertical stitches; the back side shows regular cross stitches, also separated by vertical stitches. Coarse cotton should be used for this stitch; it creates a richer effect and not only covers the fabric better but also hides the underlying stitch, which in Slavic work, is completely concealed by the cross stitches.
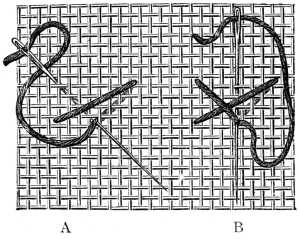
1st, 2nd, 3rd, 4th and 5th stitch and transversal stitch
1st, 2nd, 3rd, 4th, and 5th stitch and cross stitch
Begin, as letter A indicates, with a long, slanting stitch, across 4 and 8 threads, then, bringing your needle back from right to left, under four threads, draw it out, carry it over the first long stitch, and insert it again from left to right, under the first four threads of the canvas. These four stitches finished, proceed to the fifth and sixth, which as B shows, cross the first four, then repeat the first stitch.
Begin, as letter A indicates, with a long, slanting stitch across 4 and 8 threads. Then, bringing your needle back from right to left under four threads, pull it out, carry it over the first long stitch, and insert it again from left to right under the first four threads of the canvas. Once you've completed these four stitches, move on to the fifth and sixth, which, as B shows, cross the first four, and then repeat the first stitch.
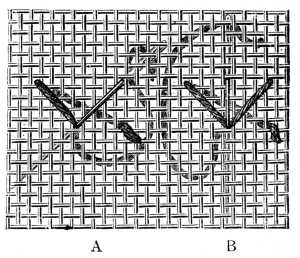
Position of the stitches on the wrong side.
Position of the stitches on the backside.
The threads that form the stitches on the wrong side, should always be opposed to each other, that is, one cross should lean to the right, the other to the left, as shown in fig. 305. This variation in the inclination of the stitches, which is regarded as a fault in plain cross stitch, is indispensable here, and produces a charming effect on the wrong side.
The threads that make the stitches on the back side should always be opposite each other. One cross should tilt to the right, and the other to the left, as seen in fig. 305. This difference in the angle of the stitches, which is considered a flaw in regular cross stitch, is essential here and creates a lovely effect on the back side.
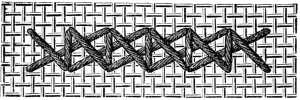
A row of stitches finished.
A completed row of stitches.
Plaited Algerian stitch (fig. 307).—The distinguishing feature of this stitch is, that it only advances one thread at a time. It should be begun on an uneven number of threads, and like the Montenegrin stitch, should be worked with coarse cotton. The rows may touch, either at the top or at the bottom of the stitch, so long as you keep to one plan throughout.
Plaited Algerian stitch (fig. 307).—The key characteristic of this stitch is that it only works with one thread at a time. You should start with an odd number of threads, and similar to the Montenegrin stitch, it should be made with thick cotton. The rows can touch at either the top or the bottom of the stitch, as long as you stick to one method consistently.
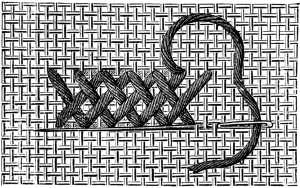
Two-sided Spanish plaited stitch (figs. 308 and 309).—This stitch has the advantage of being, not only very effective, but also very quickly executed. It is worked in two rows, forwards and backwards. All cross stitch patterns can be worked in Spanish stitch. The gaps, which are occasioned by the long stitches, have to be filled in with short ones. In itself, the stitch consists of slanting stitches, three threads a part, alike on both sides, and advances three threads at a time, as shown in figs. 308 and 309.
Two-sided Spanish plaited stitch (figs. 308 and 309).—This stitch is not only very effective but also super quick to do. It’s worked in two rows, moving forward and backward. You can use Spanish stitch for any cross stitch patterns. The gaps created by the long stitches need to be filled in with short ones. The stitch itself consists of slanting stitches, spaced three threads apart, which look the same on both sides and move ahead three threads at a time, as shown in figs. 308 and 309.

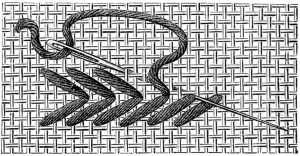
Two-sided line stitch (figs. 310 and 311).—Square stitch, Holbein stitch, line, or stroke stitch, as it is sometimes called, and setting stitch, are all worked on one principle. Though all these two-sided stitches are related to each other, and by no means difficult of execution, those new to the work will find a little practice necessary, to make the stitches follow in their proper order. Fig. 310 explains how the needle has to pass, alternately, step by step, over and under the threads of the stuff, and fig. 311, how the threads, left blank the first time, are covered on the way back. The great difficulty is how to place your first row of stitches so as to ensure an unbroken course back. It is as well before setting out, to ascertain clearly the most direct course back, so that you may not come to a stand-still, or be obliged to make unnecessary stitches on the wrong side. If you have to pass obliquely across the stuff, as in patterns figs. 326, 327, 328, 329, 331 and 333, proceed in the same way as though you were covering the straight threads of a fabric.
Two-sided line stitch (figs. 310 and 311).—Square stitch, Holbein stitch, line stitch, or stroke stitch, and setting stitch are all based on the same principle. While these two-sided stitches are related and not difficult to do, beginners will need some practice to make sure the stitches are in the right order. Fig. 310 shows how the needle should pass, alternating step by step, over and under the threads of the fabric, and fig. 311 shows how the threads left blank the first time are covered on the way back. The main challenge is getting your first row of stitches right so you can easily return without breaking the line. Before you start, it’s helpful to clearly determine the most direct path back to avoid getting stuck or having to make unnecessary stitches on the wrong side. If you need to go diagonally across the fabric, as in patterns figs. 326, 327, 328, 329, 331 and 333, follow the same method as if you were covering the straight threads of a fabric.
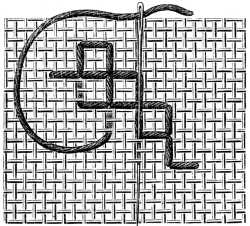
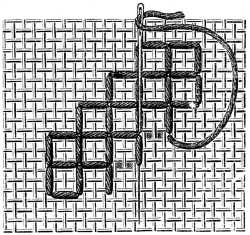
Two-sided insertion (figs. 312, 313, 314, 315, 316, 317, 318).—We conclude this series of stitches with a description of a pretty, two-sided insertion, suitable for joining stripes of work of different widths together. In pieces of old needlework, we often find handsome, coloured patterns, joined together by a piece of lace or some quite different kind of work. The insertion represented in fig. 317, is a very good substitute for either. Fig. 312 explains the first stitch and the course of the second, from left to right, under 3 vertical and 3 horizontal threads; the 3rd stitch to the left, over 6 vertical threads, and the beginning of the 4th stitch. Fig. 313 shows the 4th stitch completed, and the direction the 5th and 6th stitches have to take; fig. 314, the 6th completed, and the position of the needle for the 7th and 8th; fig. 315, the 9th lower, horizontal stitch, over 6 vertical threads, the 10th backward stitch, and the position of the needle for the 11th and last stitch. Fig. 317 represents a whole series of stitches, and fig. 318, the back of the work, which though quite a different pattern, will combine very well with any two-sided embroidery.
Two-sided insertion (figs. 312, 313, 314, 315, 316, 317, 318).—We wrap up this series of stitches by describing a charming two-sided insertion, perfect for connecting stripes of fabric that vary in width. In pieces of vintage needlework, we often see beautiful, colorful designs brought together by a piece of lace or a different type of stitching. The insertion shown in fig. 317 is a great alternative for either option. Fig. 312 illustrates the first stitch and the direction of the second stitch, going from left to right, under 3 vertical and 3 horizontal threads; the 3rd stitch goes to the left, over 6 vertical threads, and marks the start of the 4th stitch. Fig. 313 displays the completed 4th stitch and the directions for the 5th and 6th stitches; fig. 314 shows the completed 6th stitch, as well as the needle's position for the 7th and 8th stitches; fig. 315 depicts the 9th lower, horizontal stitch over 6 vertical threads, the 10th backward stitch, and the needle's position for the 11th and final stitch. Fig. 317 represents a complete set of stitches, and fig. 318 shows the back of the work, which, although it has a different pattern, will blend nicely with any two-sided embroidery.
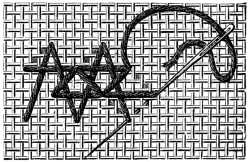
These insertions can be worked on any stuff, but the stitches, must be done, both ways, on a number of threads, divisible by 3. Thus, the first stitch may cover 6, 9, or 12 threads, but never 8, 10, 12 or 14. [Transcriber’s note: 12, here, appears to be an error in the original.]
These insertions can be applied to any material, but the stitches must be done in both directions on a number of threads that is divisible by 3. So, the first stitch can cover 6, 9, or 12 threads, but never 8, 10, or 14. [Transcriber’s note: 12, here, appears to be an error in the original.]
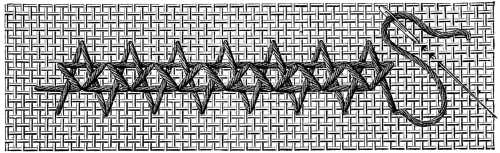
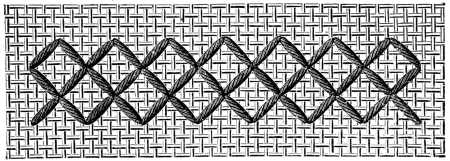
Gothic borders in Gobelin and cross stitch (figs. 319 and 320).—We are indebted for both these pretty patterns, which are quite Gothic in their character, to a visit we paid to the national museum at Munich, where we discovered them amongst a heap of other old valuables, lying un-heeded in a remote corner. Their simple graceful outlines render them peculiarly suitable for the decoration of table-cloths, counterpanes, curtains, etc. All embroideries of this kind should be finished off with a deep fringe, made in the stuff itself, or knotted on to it or may be trimmed with a heavy thread lace, of a wide width, corresponding with the work in character.
Gothic borders in Gobelin and cross stitch (figs. 319 and 320).—We owe both of these lovely patterns, which are distinctly Gothic in style, to a visit we took to the national museum in Munich, where we found them among a pile of other old treasures, left neglected in a hidden corner. Their simple, elegant lines make them particularly ideal for decorating tablecloths, bedspreads, curtains, and more. All embroideries of this type should be finished with a deep fringe, made from the same fabric, or knotted onto it, or can be edged with a wide, heavy-thread lace that matches the character of the design.

Materials: Coton à tricoter D.M.C Nos. 6 to 12, Coton à broder D.M.C Nos. 16 to 35, or Cordonnet 6 fils D.M.C Nos. 3 to 15.[A]
Colours: Rouge-Turc 321, or two shades of Bleu-Indigo, 311 and 334, or two shades of Rouge-Grenat, 358 and 359 or two shades of Brun-Acajou, 300 and 402.[A]
Materials: D.M.C knitting cotton Nos. 6 to 12, D.M.C embroidery cotton Nos. 16 to 35, or D.M.C 6-ply cord Nos. 3 to 15.__A_TAG_PLACEHOLDER_0__
Colors: Turkish Red 321, or two shades of Indigo Blue, 311 and 334, or two shades of Garnet Red, 358 and 359, or two shades of Mahogany Brown, 300 and 402.__A_TAG_PLACEHOLDER_1__

Materials: Coton à tricoter D.M.C Nos. 16 to 35.
Colours: Bleu-Indigo 311 and 344, or Rouge-Cardinal 346 and Rouge-Géranium 335, or Gris-Tilleul 391 and 331.[A]
Materials: D.M.C knitting cotton Nos. 16 to 35.
Colors: Indigo Blue 311 and 344, or Cardinal Red 346 and Geranium Red 335, or Linden Gray 391 and 331.__A_TAG_PLACEHOLDER_0__

Materials: Coton à tricoter D.M.C Nos. 6 to 12, Cordonnet 6 fils D.M.C Nos. 3 to 25 or Coton à repriser D.M.C No. 12, 25 or 50. [A]
Colours: Rouge-Cardinal 347, Bleu-Indigo 322, Vert métallique 465, Jaune-Orange 444, Gris-Brun 409.[A]
Materials: D.M.C Knitting Cotton Nos. 6 to 12, D.M.C 6-ply Cord No. 3 to 25, or D.M.C Darn Cotton No. 12, 25, or 50. __A_TAG_PLACEHOLDER_0__
Colors: Cardinal Red 347, Indigo Blue 322, Metallic Green 465, Orange Yellow 444, Brown Gray 409. __A_TAG_PLACEHOLDER_1__
In fig. 321, most of the stitches in every other diagonal row, are worked in red, the others in green or blue; in the intermediate rows the flowers are worked alternately, in green and red, or blue and red, and throughout, the centre of each figure should consist of 4 stitches in yellow.
In fig. 321, most of the stitches in every other diagonal row are done in red, while the others are in green or blue. In the intermediate rows, the flowers are worked alternately in green and red or blue and red, and throughout, the center of each figure should have 4 stitches in yellow.

Materials: Coton à tricoter D.M.C Nos. 6 to 12, Coton à broder D.M.C Nos. 16 to 35 or Cordonnet 6 fils D.M.C Nos. 3 to 25. [A]
Colours: Rouge-Cardinal 347, Bleu-Indigo 312, Jaune-Orange 444, Vert métallique 465, Gris-Brun 409.[A]
Materials: D.M.C Cotton for knitting in sizes 6 to 12, D.M.C Embroidery Cotton in sizes 16 to 35, or D.M.C 6-ply Cordonnet in sizes 3 to 25. __A_TAG_PLACEHOLDER_0__
Colors: Cardinal Red 347, Indigo Blue 312, Yellow-Orange 444, Metallic Green 465, Brown Gray 409. __A_TAG_PLACEHOLDER_1__
In fig. 321, which serves as a border to the above, only the stalks of the 4 conventional pinks, which, with the cross in their middle, form a square, are in brown.
In fig. 321, which acts as a border to the above, only the stems of the 4 traditional pink flowers, which, with the cross in their center, create a square, are in brown.
These squares are separated from the bottom border by an insertion, in Gobelin stitch, worked over 6 threads, in red, blue, green and yellow, from 20 to 25 stitches of each. This band is edged on both sides with a row of stem stitches, worked in yellow over 4 threads. The Holbein stitches that border the band, can be made in whichever colour the worker prefers, or else in red and gold thread.
These squares are separated from the bottom border by an insertion in Gobelin stitch, made over 6 threads, in red, blue, green, and yellow, with 20 to 25 stitches of each color. This band is bordered on both sides with a row of stem stitches, done in yellow over 4 threads. The Holbein stitches that outline the band can be made in any color the worker prefers, or in red and gold thread.
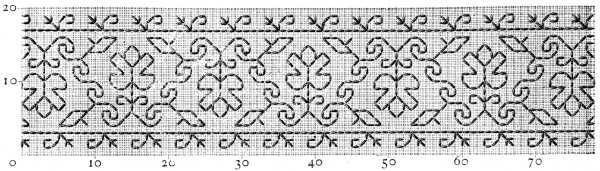
Materials: Coton à marquer D.M.C Nos. 5 to 200. [A]
Colours: Rouge-Turc 321 or Bleu-Indigo 312. [A]
Materials: D.M.C marking cotton Nos. 5 to 200. __A_TAG_PLACEHOLDER_0__
Colors: Turkish Red 321 or Indigo Blue 312. __A_TAG_PLACEHOLDER_1__
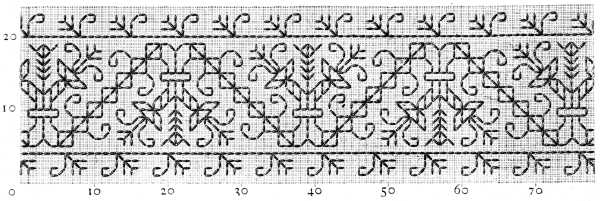
Materials: Coton à repriser D.M.C No. 50. [A]
Colours: Vert-Pistache 319, or Vert-Mousse 470. [A]
Materials: D.M.C No. 50 Reweaving Cotton. __A_TAG_PLACEHOLDER_0__
Colors: Pistachio Green 319, or Moss Green 470. __A_TAG_PLACEHOLDER_1__
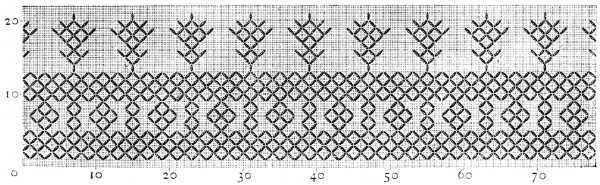
Materials: Coton à broder D.M.C Nos. 16 to 60. [A]
Colours: Rouge-Turc 321, or Rouge-Grenat 309, or Bleu-Indigo 311.[A]
Materials: D.M.C Embroidery Cotton No. 16 to 60. __A_TAG_PLACEHOLDER_0__
Colors: Turkish Red 321, or Garnet Red 309, or Indigo Blue 311.__A_TAG_PLACEHOLDER_1__
We again recommend our readers, to begin by ascertaining the course the stitches should take, in order to avoid all unnecessary stitches and be sure of finding their way back according to the prescribed rule.
We once more suggest that our readers start by figuring out the path the stitches should follow, to avoid any unnecessary stitches and ensure they can find their way back according to the established guideline.
Corners in stroke stitch (figs. 326 and 327).—These pretty little patterns are suitable for the decoration of ladies’ and children’s collars, fine pocket-handkerchiefs and finger napkins, and can be worked in one or two colours, as preferred. If two colours be used, the darker should be taken for the interior, the lighter for the narrow outside edge.
Corners in stroke stitch (figs. 326 and 327).—These cute patterns are perfect for decorating ladies’ and kids’ collars, nice handkerchiefs, and finger napkins, and can be done in one or two colors, depending on your preference. If you use two colors, the darker one should be for the inside, and the lighter one for the thin outer edge.
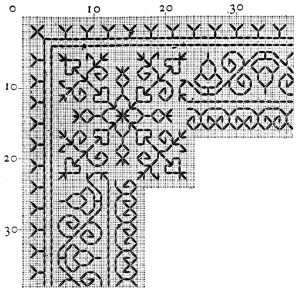
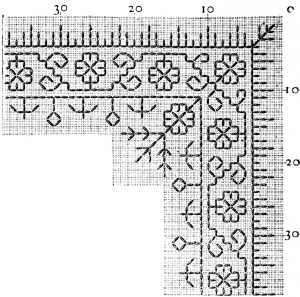
Materials: Coton à broder D.M.C Nos 35 to 200 or Fil à dentelle D.M.C Nos. 25 to 70. [A]
Colours: Bleu-Indigo, or Rouge-Cardinal, or Brun-Caroubier, or Violet-Lie-de-vin. [A]
Materials: D.M.C Embroidery Cotton Nos 35 to 200 or D.M.C Lace Thread Nos. 25 to 70. __A_TAG_PLACEHOLDER_0__
Colors: Indigo Blue, Cardinal Red, Carob Brown, or Wine Violet. __A_TAG_PLACEHOLDER_1__
Stripe in stroke stitch (fig. 328).—This is copied from a piece of Italian work, though from a resemblance in the different subjects to the rose, thistle and shamrock, if might have been supposed to be of English origin. The original work was executed in a most brilliant purple red which time has toned down to the colour of Jaune-Rouille 308, or Brun-Cuir 432, one or other of which we recommend, as being the only colours with which any thing approaching the refined distinguished look of the old embroidery, can be given to the new.
Stripe in stroke stitch (fig. 328).—This is taken from a piece of Italian work, though because of the similarity in the different designs to the rose, thistle, and shamrock, one might think it originated in England. The original piece was made in a vibrant purple red, which time has faded to the color of Jaune-Rouille 308 or Brun-Cuir 432. We recommend either of these colors, as they are the only ones that can give any new embroidery a refined, distinguished look similar to the old work.
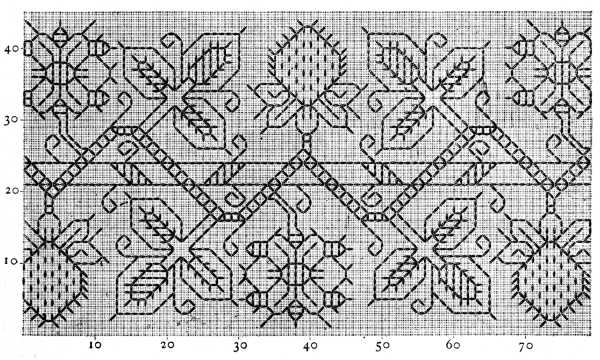
Materials: Cordonnet 6 fils D.M.C Nos. 15 to 50, Coton à broder D.M.C Nos. 16 to 35, or Coton à repriser D.M.C No. 12, 25 or 50. [A]
Colours: Jaune-Rouille 308, or Jaune-vieil-Or 680.[A]
Materials: Cordonnet 6 fils D.M.C Nos. 15 to 50, D.M.C Embroidery Cotton Nos. 16 to 35, or D.M.C Darning Cotton No. 12, 25 or 50. __A_TAG_PLACEHOLDER_0__
Colors: Yellow-Rust 308, or Old Yellow Gold 680.__A_TAG_PLACEHOLDER_1__
Grounding in diagonal lines (fig. 329).—This pattern can be worked, in any of the previous stitches, or in back-stitch. It is only suitable for large surfaces, on account of the diagonal lines, and should be worked, all in one colour. It can be varied by adding sprays to the upper sides of the slanting stalks, like those on the lower sides, turned either the same way, or upwards. Skilled workers will readily contrive the middles for themselves, by combining the different subjects and putting them together in various positions, either diagonally or at right angles to each other, with the help of the Penelope mirror.[2]
Grounding in diagonal lines (fig. 329).—You can create this pattern using any of the previous stitches or in back-stitch. It works best on large surfaces because of the diagonal lines and should be done in a single color. You can mix it up by adding elements to the upper sides of the angled stalks, similar to those on the lower sides, directed either the same way or upwards. Skilled artisans can easily come up with their own designs by combining different elements and arranging them in various ways, whether diagonally or at right angles to each other, using the Penelope mirror.[2]

Materials: Coton à tricoter D.M.C Nos. 6 to 16, or Coton à broder D.M.C Nos. 16 to 100.
Colours: Bleu-Indigo 322, or Rouge-Cardinal 347.
Materials: D.M.C knitting cotton Nos. 6 to 16, or D.M.C embroidery cotton Nos. 16 to 100.
Colors: Indigo Blue 322, or Cardinal Red 347.
Powdering in cross, stroke and star stitch (fig. 330).—This charming combination of cross, stroke and star stitches, can be made use of wherever embroidery is available as a means of decoration.
Powdering in cross, stroke and star stitch (fig. 330).—This delightful mix of cross, stroke, and star stitches can be used anywhere that embroidery serves as a way to add decoration.

Materials: Coton à repriser D.M.C No. 50 and Chiné d’or D.M.C. [A]
Colours—For the Cotton: Rouge-Grenat 326.—For the Chiné: Bleu-Indigo and gold.[A]
Materials: D.M.C. No. 50 Coton à repriser and Chiné d’or D.M.C. __A_TAG_PLACEHOLDER_0__
Colors—For the Cotton: Rouge-Grenat 326.—For the Chiné: Bleu-Indigo and gold.__A_TAG_PLACEHOLDER_1__
The cross stitches, in which the solid parts of the pattern are worked, should be in one colour only, the stroke and star stitches, in Chiné d’or D.M.C. [A]
The cross stitches, where the solid parts of the pattern are created, should be done in only one color, while the stroke and star stitches should be in Chiné d’or D.M.C. [A]
Border in Greek stitch (fig. 331).—All the darker lines here, should be worked in black, colour 473, the leaves in the form of steps, alternately in light and dark red up to the stalks, the line of demarcation being indicated by the different direction of the stitches, so that two light leaves, and two dark leaves, should always face each other.
Border in Greek stitch (fig. 331).—All the darker lines here should be stitched in black, color 473. The leaves should be done in a step pattern, alternating between light and dark red up to the stalks. The boundary should be shown by the different directions of the stitches, ensuring that two light leaves and two dark leaves always face each other.

Materials: Coton à broder D.M.C Nos. 16 to 25, or Coton à repriser D.M.C Nos. 12 to 50.
Colours: Rouge-Géranium 349 and 351, Jaune-Rouille 364, Bleu de France 341, Bleu pâle 668, Noir-Vert 473, Or fin D.M.C pour la broderie No. 30 and Chiné d’or D.M.C No. 30.
Materials: D.M.C embroidery cotton Nos. 16 to 25, or D.M.C mending cotton Nos. 12 to 50.
Colors: Geranium Red 349 and 351, Rust Yellow 364, French Blue 341, Light Blue 668, Black-Green 473, D.M.C fine gold embroidery No. 30, and D.M.C gold blend No. 30.
In the original, the cross bars that unite the leaves, are in yellow, whilst the detached figures that separate them, are worked, those that come between the light red leaves, in pale blue, and those between the dark red ones, in gold thread. The exterior part of the figure is filled in with the different colours, indicated above; with the exception of the small squares in Gobelin stitch, which should all be worked in plain gold, or Chiné d’or D.M.C, green and gold. The SS in the narrow outside border, should be worked in two shades of blue; the outside stitches in colour 341 and the solid parts in colour 668. The little figures with the transverse bars that unite the SS, should be set in black, and filled in, alternately, in light and dark red, and in yellow.
In the original, the crossbars that connect the leaves are yellow, while the separate figures between them are designed with those that are between the light red leaves in pale blue, and those between the dark red ones in gold thread. The outer part of the figure is filled in with the different colors mentioned above; except for the small squares in Gobelin stitch, which should all be done in plain gold, or Chiné d’or D.M.C, green and gold. The SS in the narrow outer border should be done in two shades of blue; the outer stitches in color 341 and the solid parts in color 668. The small figures with the horizontal bars that connect the SS should be done in black and filled in alternately in light and dark red and yellow.
Grounding (fig. 332).—This grounding was copied from a beautiful old cushion-cover and will be found particularly useful in the confection of small embroidered articles, because the pattern will always form a centre point in itself. A light, brilliant red, such as either of the two colours indicated beneath the figure, will best reproduce the tone of the original.
Grounding (fig. 332).—This grounding is based on a lovely old cushion cover and is especially handy for making small embroidered items, as the pattern stands out as a focal point on its own. A bright, vibrant red, like either of the two colors shown below the figure, will best capture the tone of the original.

Materials: Coton à tricoter D.M.C Nos. 6 to 10, or Coton à broder D.M.C Nos. 16 to 100.[A]
Colours: Rouge-Cardinal 804, or Rouge-Cornouille 450.[A]
Materials: D.M.C knitting cotton Nos. 6 to 10, or D.M.C embroidery cotton Nos. 16 to 100.__A_TAG_PLACEHOLDER_0__
Colors: Cardinal Red 804, or Frog Red 450.__A_TAG_PLACEHOLDER_1__
In making the little stars that connect the different squares, the mode we recommended for working stroke stitch should be adopted, that is, beginning, by bringing the needle out in the middle, making 7 stitches, and at the eighth, carrying the needle back under the first, to the spot whence you started. The stitches will then be alike on both sides.
In creating the small stars that connect the different squares, you should use the method we suggested for the working stroke stitch. Start by bringing the needle up in the center, make 7 stitches, and on the eighth stitch, pull the needle back under the first one to the point where you began. This way, the stitches will be uniform on both sides.
Wallachian border (fig. 333).—A piece of Wallachian needlework, executed on rough linen, and uncommon, both in colour and design, suggested the charming embroidery, here represented. In place of the somewhat violent colours, which indicate an undeveloped taste, we have substituted softer and more refined ones. All the stroke stitches of the middle stripe and of the two border stripes, top and bottom, as well as the darker portions of the small dice, subdivided into eight, in the bottom border, and of the small diagonal squares in the top border, worked in Gobelin stitch, are in red, colour 346. The setting of upright stroke stitches round the large centre figures, as well as the straight lines that divide these same figures into four, are worked in yellow, colour 680.
Wallachian border (fig. 333).—A piece of Wallachian needlework, crafted on coarse linen, and unique in both color and design, inspired the beautiful embroidery shown here. Instead of the somewhat harsh colors, which reflect a less developed taste, we have opted for softer and more refined hues. All the stroke stitches in the middle stripe and the two border stripes, top and bottom, as well as the darker parts of the small dice, divided into eight, in the bottom border, and the small diagonal squares in the top border, done in Gobelin stitch, are in red, color 346. The upright stroke stitches surrounding the large center figures, as well as the straight lines that divide these figures into four, are done in yellow, color 680.

Gobelin stitch, stroke stitch and spanish half-stitch.
Materials.—For Rhodes linen No. 1: Cordonnet 6 fils D.M.C No. 15, and Or fin D.M.C pour la broderie No. 30.—For other stuffs: Coton à tricoter D.M.C Nos. 6 to 16, or Coton à repriser D.M.C No. 12, 25 or 50 and Or fin D.M.C. [A]
Colours: Rouge-Cardinal 346, Rouge-Géranium 326, Vert-Pistache 319 and Jaune-vieil-Or 680.[A]
Gobelin stitch, stroke stitch, and Spanish half-stitch.
Materials.—For Rhodes linen No. 1: Cordonnet 6 fils D.M.C No. 15, and Or fin D.M.C for embroidery No. 30.—For other fabrics: D.M.C knitting cotton Nos. 6 to 16, or D.M.C darning cotton No. 12, 25, or 50, and Or fin D.M.C. __A_TAG_PLACEHOLDER_0__
Colors: Cardinal Red 346, Geranium Red 326, Pistachio Green 319, and Old Gold Yellow 680. __A_TAG_PLACEHOLDER_1__
The squares and the half-squares are worked in colour 326, green 319, and gold thread; colour 326 is indicated in the illustration by the darkest shade, green 319, by the medium shade, and the gold thread by the lightest shade.
The squares and half-squares are done in color 326, green 319, and gold thread; color 326 is shown in the illustration by the darkest shade, green 319 by the medium shade, and the gold thread by the lightest shade.
The stitches in the right bottom quarter and top left one, incline upwards from left to right, in the two other quarters they incline the contrary way. The Spanish half-stitch as shown in fig. 309, can only be done over 4 and 2 threads and worked one way, not to and fro.
The stitches in the bottom right and top left corners slant up from left to right, while in the other two corners, they slant the opposite way. The Spanish half-stitch, as shown in fig. 309, can only be done over 4 and 2 threads and has to be worked in one direction, not back and forth.
The general effect is very much heightened by the introduction of one or two rows of stitches, worked in gold thread, into the straight lines on either side of the stripes; all the light parts of the design moreover, should be worked in gold thread.
The overall impact is really enhanced by the addition of a couple of rows of stitches made with gold thread, placed along the straight lines on either side of the stripes; also, all the lighter sections of the design should be stitched in gold thread.
Borders in several shades of one colour (figs. 334 and 335). In some beautifully embroidered Chinese hangings, that latterly came under our notice, the principal subject was the figure of a mandarin, in a very richly decorated dress. The pretty pattern, given in fig. 334, was copied from the collar and cuffs of this dress. We should advise working it in several shades of pink or red, or in a single one of the colours indicated above.
Borders in several shades of one color (figs. 334 and 335). In some beautifully embroidered Chinese hangings that we recently came across, the main subject was the figure of a mandarin in a very elaborately decorated outfit. The lovely pattern shown in fig. 334 was taken from the collar and cuffs of this outfit. We suggest stitching it in several shades of pink or red, or in just one of the colors mentioned above.

Materials: Coton à tricoter D.M.C Nos. 12 to 20, Coton à broder D.M.C Nos. 16 to 35 or Coton à repriser No. 12, 25 or 50.
Colours: Three shades of either Bleu-Indigo, Rouge-Grenat, or Violet-Mauve etc. etc.
Materials: D.M.C knitting cotton Nos. 12 to 20, D.M.C embroidery cotton Nos. 16 to 35, or darning cotton No. 12, 25, or 50.
Colors: Three shades of either Blue-Indigo, Red-Garnet, or Purple-Mauve, etc. etc.
The border of these hangings furnished us with pattern 335, which will be found to look best, worked in three very distinct shades of blue.
The edge of these hangings gave us pattern 335, which looks best when done in three clearly different shades of blue.

The grotesque heads of animals, and the flowers and branches which break the running pattern, and are a Chinese speciality, distinguish this design from the more conventional patterns of the present day.
The bizarre animal heads, along with the flowers and branches that interrupt the flowing design—something unique to Chinese art—set this pattern apart from the more traditional styles of today.
We recommend these two pretty patterns, to our readers notice, as likewise adaptable by transposition, to centres, or by repetition, to broad stripes. With very little trouble they can be converted, into a variety of subjects, such as it is often difficult to find ready made, and exactly suited to the purpose in hand.
We suggest these two attractive patterns for our readers’ attention, as they can also be adapted by rearranging them for centers, or by repeating them for wide stripes. With just a little effort, they can be transformed into various designs, which are often hard to find pre-made and perfectly suited for the intended use.
Border in Greek stitch with a footing, composed of branches (fig. 336).—This design can be worked in Greek, Slavonic, Montenegrin, or plaited Algerian stitch. Our illustration worked in Greek stitch, shows how one stitch encroaches upon another, and how the thread is carried from one isolated stitch, to another.
Border in Greek stitch with a footing, made of branches (fig. 336).—This design can be created using Greek, Slavonic, Montenegrin, or plaited Algerian stitch. Our illustration, done in Greek stitch, demonstrates how one stitch overlaps with another and how the thread moves from one isolated stitch to the next.

It will be found to be an improvement if the stitches are so made as to follow the direction of the lines. The central subject may be repeated two or three times, according to the width of border required. The edging is the same throughout. The use of the ‘Penelope mirror’ for repeating patterns is described in the concluding chapter of the book.
It will be seen as an improvement if the stitches are made to follow the direction of the lines. The central design can be repeated two or three times, depending on the width of the border needed. The edging is consistent throughout. The use of the ‘Penelope mirror’ for repeating patterns is explained in the last chapter of the book.
Table-cover in Gobelin and stroke stitch (figs. 337, 338, 339, 340).—This tasteful little table-cover provides excellent practice in working two sided, square stitch. The square represented in fig. 339, forms the middle of the cloth. The Gobelin stitches, set very closely, unite and form a star in the centre of the principal subject. They begin in the corners, in red and continue in green, violet and blue, successively; the little branches in stroke stitch, on each side of the Gobelin stitches, correspond with them in colour, and the small figures, that form the border of the square, may be worked, indiscriminately, in any of the colours used for the Gobelin stitches of the centre. Four branches run inwards from the corners of the square, and four more advance to meet, and pass them, from the inner angles of the wide border. Four figures, copied from the outside border, fig. 339, and worked in yellow, and the little star, fig. 337, besides the little subjects, borrowed from the outside border, fig. 338, are strewn lightly over the foundation, interspersed between the branches. In fig. 340, nevertheless, which represents the whole table-cover, the edge is formed of the small subjects contained in the wide border and not of the little stars. The Gobelin stitches in the centre of fig. 337, are in dark green, the star stitches and the stroke stitches on the outside in red. The wide border consists of stars, every other row of which, is worked in red; the intermediate rows, successively, in blue, green, and yellow. The corners are composed of four detached stars, framed by a row of stroke stitches, one red and one blue, alternately. This line skirts both sides of the border, and forms the base to the quaint figures, that terminate the design and which can be worked in all the colours used for the inside.
Table cover in Gobelin and stroke stitch (figs. 337, 338, 339, 340).—This stylish little table cover is great practice for working two-sided, square stitch. The square shown in fig. 339 is the center of the cloth. The closely set Gobelin stitches create a star in the middle of the main design. They start from the corners in red and continue in green, violet, and blue, in that order; the small branches in stroke stitch on either side of the Gobelin stitches match these colors, and the small figures that make up the border of the square can be done in any of the colors used for the Gobelin stitches in the center. Four branches extend inward from the corners of the square, and four more meet and pass them from the inner angles of the wide border. Four figures, taken from the outside border, fig. 339, are worked in yellow, along with the little star, fig. 337, and the small subjects borrowed from the outside border, fig. 338, are lightly sprinkled across the foundation between the branches. In fig. 340, however, which shows the entire table cover, the edge is made up of the small subjects in the wide border and not the little stars. The Gobelin stitches in the center of fig. 337 are in dark green, while the star stitches and the stroke stitches on the outside are in red. The wide border is made of stars, with every other row done in red; the alternating rows are in blue, green, and yellow. The corners feature four separate stars, framed by a row of stroke stitches in alternating red and blue. This line runs along both sides of the border and serves as the base for the charming figures that complete the design, which can be worked in any of the colors used in the center.
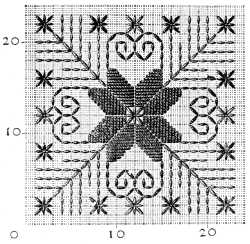


The original of our illustration, which is on fine Rhodes linen, in Coton à broder D.M.C No. 25, is only a small table-cover; for a larger one, if you wish strictly to adhere to the pattern, Java or Ceylon linen will be the best material to select, with Coton à tricoter D.M.C No. 12, for the stroke stitches and Coton à repriser No. 25 for the Gobelin stitches.
The original of our illustration, printed on high-quality Rhodes linen, uses Coton à broder D.M.C No. 25, and is just a small table cover; for a larger one, if you want to stick to the pattern, Java or Ceylon linen would be the best options, along with Coton à tricoter D.M.C No. 12 for the stroke stitches and Coton à repriser No. 25 for the Gobelin stitches.

Materials.—According to the stuff: Coton à tricoter D.M.C Nos. 6 to 16, Coton à broder D.M.C Nos. 16 to 35, Coton à repriser D.M.C Nos. 12, 25, 50, Fil à pointer D.M.C Nos. 10 to 30, or Cordonnet 6 fils D.M.C Nos. 3 to 20.[A]
Colours: Rouge-Cornouille 450, Vert-Pistache 319, Violet-Lie-de-vin 372, Jaune-Rouille 364, Bleu-Indigo 322.[A]
Materials:—Based on the fabric: D.M.C Cotton for knitting Nos. 6 to 16, D.M.C Embroidery Cotton Nos. 16 to 35, D.M.C Darning Cotton Nos. 12, 25, 50, D.M.C Tapestry Thread Nos. 10 to 30, or D.M.C 6-Ply Cord Nos. 3 to 20.__A_TAG_PLACEHOLDER_0__
Colors: Cornille Red 450, Pistachio Green 319, Wine Violet 372, Rust Yellow 364, Indigo Blue 322.__A_TAG_PLACEHOLDER_1__
FOOTNOTES:
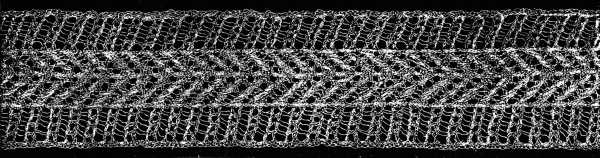
Knitting.
Knitting is one of the earliest forms of needlework, and one, which has been carried to the highest perfection. It would be difficult to invent new stitches or patterns and, we shall therefore confine ourselves to describing the stitches in general use, and reproducing those of the old patterns we consider the most useful, that our readers may make their own selection.
Knitting is one of the oldest forms of needlework and has reached a high level of perfection. It would be challenging to come up with new stitches or patterns, so we'll focus on describing the stitches that are commonly used and reproducing those from traditional patterns that we think are the most useful, allowing our readers to make their own choices.
In former days, knitting served mainly for the manufacture of stockings, and even now, in spite of machines, hand-knit stockings, and numberless other useful and ornamental articles, such as shawls, counterpanes, cradle-coverings, gloves, laces etc. are in great request.
In the past, knitting was primarily used to make stockings, and even today, despite the presence of machines, hand-knit stockings and countless other practical and decorative items, like shawls, bedspreads, cradle covers, gloves, lace, and more, are still in high demand.
Besides its practical use, knitting is an easy and pleasant pastime that can be taken up at odd minutes and even carried on, whilst talking, or reading.
Besides its practical use, knitting is an easy and enjoyable hobby that can be done during spare moments and even continued while chatting or reading.
Knitting consists of loops, or stitches, as they are generally called, formed by means of a thread and two needles.
Knitting involves creating loops, or stitches, as they are commonly known, using a thread and two needles.
In round knitting, four, or five needles are necessary for the better handling of the work.
In circular knitting, four or five needles are needed for better managing the work.
Through the loops formed in knitting, being connected together in unbroken continuity, a very elastic fabric is produced, which is specially suitable for making warm, and closely-fitting wearing-apparel.
Through the loops created in knitting, which are linked together in an unbroken flow, an extremely flexible fabric is made, making it especially suitable for crafting warm, form-fitting clothing.
Materials.—Threads with a slight twist, such as Coton à tricoter D.M.C, are the best. With regard to the thickness of the needles, whether they be of steel, wood, or bone, your choice must be determined by the quality of the thread used.
Materials.—Threads with a slight twist, like D.M.C. Cotton for knitting, are the best. When it comes to the thickness of the needles, whether they are made of steel, wood, or bone, your choice should depend on the quality of the thread you’re using.
The accompanying table is intended to help inexperienced knitters to match their needles and thread, we advisedly say, help, as it is impossible exactly to determine the numbers that will correspond, because every hand knits differently, and a loose knitter has to use finer needles than a tight knitter.
The table below is designed to assist beginner knitters in pairing their needles and yarn. We emphasize the word "assist" because it’s not possible to pinpoint exact numbers that will match up; every person knits uniquely, and a loose knitter needs to use thinner needles than a tight knitter.
Other materials are enumerated here, besides, what is properly speaking, called knitting-cotton, as for caps, lace edgings, insertions and so forth, finer kinds of thread and threads with a stronger twist which show up the pattern better, should be used.
Other materials are listed here, in addition to what is commonly referred to as knitting cotton. For items like caps, lace edgings, insertions, and so on, finer types of thread and those with a stronger twist should be used, as they enhance the appearance of the pattern.
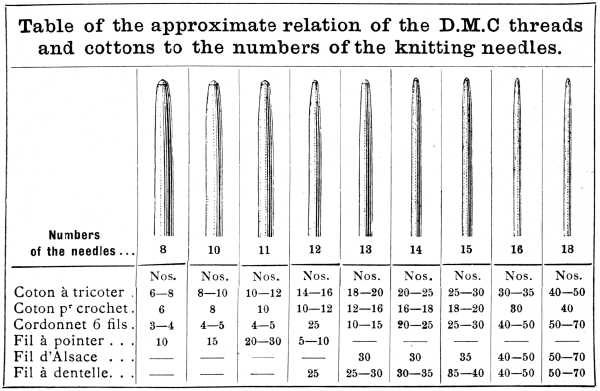
Position of the hands in knitting (fig. 341.)—Lay the thread over the fifth finger of the right hand, and twist it round it, then carry it over the forefinger, which should be kept close to the work, the work being held between the third finger and the thumb. The left hand remains more or less inactive, having merely, by a slight movement of the forefinger to pass the loops, in succession, on to the needle in the right hand, which forms the stitches. This position of the hands, which is the one usually adopted in England and France, is the one represented in our illustration. The Germans on the contrary, lay the thread over the left hand, and can move the hands much more quickly, in consequence. There are some ways of casting on, which can only be done in the German fashion.
Position of the hands in knitting (fig. 341.)—Place the thread over the fifth finger of your right hand and wrap it around. Then, bring it over the forefinger, which should stay close to the work, while you hold the work between your third finger and thumb. The left hand remains mostly inactive, using just a slight movement of the forefinger to slide the loops onto the needle in the right hand, creating the stitches. This hand position, commonly used in England and France, is shown in our illustration. In contrast, Germans place the thread over the left hand and can move their hands much faster as a result. Some methods of casting on can only be done using the German technique.
To prevent the irregularity in stitches, the needles should never be allowed to protrude more than 1 or 1½ c/m, from the work. All exaggerated movement of the arms, which renders knitting a very tiring occupation, should be avoided.
To avoid uneven stitches, the needles should never stick out more than 1 or 1½ cm from the work. Any excessive arm movement, which makes knitting really tiring, should be kept to a minimum.
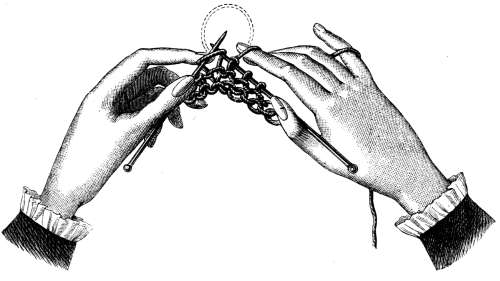
There are four methods of casting on: (1) crossed casting on, done in four different ways; (2) knitting on; (3) slipping on, also done in two ways; (4) casting on with picots.
There are four methods of casting on: (1) crossed casting on, done in four different ways; (2) knitting on; (3) slipping on, also done in two ways; (4) casting on with picots.
(1) Crossed casting on with a single thread (fig. 342). Lay the thread over your fingers as though you were beginning a chain of plain stitches, fig. 403, leaving a long end, sufficient to make the number of stitches required, lying within the palm of the hand. Put the needle in from below, into the loop on the thumb, and pass it from right to left under that part of the thread which lies between the forefinger and the thumb. Then bring the thread through the loop on the thumb, draw the thumb out, and lay the loop on the needle. In making the next stitches, lay the thread over the thumb, so that the end lies outside. Put in the needle under the front thread and complete the stitch as before. This method of casting on is generally done over two needles, one of them being drawn out before the knitting-off is begun, to ensure a loose edge.
(1) Crossed casting on with a single thread (fig. 342). Lay the thread over your fingers like you’re starting a chain of basic stitches, fig. 403, leaving a long end inside your palm that's enough to make the required number of stitches. Put the needle in from below, through the loop on your thumb, and pass it from right to left under the part of the thread that’s between your forefinger and thumb. Then pull the thread through the loop on your thumb, pull your thumb out, and place the loop on the needle. For the next stitches, lay the thread over your thumb so the end is on the outside. Insert the needle under the front thread and finish the stitch as you did before. This method of casting on is typically done over two needles, one of which is pulled out before you start knitting to create a loose edge.

Crossed casting on with a threefold thread.—This method is similar to the last, only that the thread is taken threefold and is drawn by the needle through the loop, which is formed at the bend of the thread. Then you pass the single thread over the left hand, and the triple one over the thumb, as shown in fig. 342, and make the same stitches, as above. The threefold thread makes a broad chain at the bottom of the loops.
Crossed casting on with a threefold thread.—This method is similar to the previous one, except that the thread is used three times and is pulled by the needle through the loop created at the bend of the thread. Then, you place the single thread over your left hand and the triple thread over your thumb, as shown in fig. 342, and make the same stitches as before. The threefold thread creates a wide chain at the bottom of the loops.
Double crossed casting on (fig. 343).—This can be done either with a single or a threefold thread. In our drawing it is done with the latter. The first stitch is made as we have already described, only that you have to keep the loop on your thumb, put the needle into it a second time, lay hold of the thread behind, cast on a second stitch, and then only, withdraw your thumb. In this manner two loops are made at once, close together.
Double crossed casting on (fig. 343).—You can do this with either a single thread or a threefold thread. In our example, we use the threefold thread. The first stitch is made as previously described, but you need to keep the loop on your thumb, insert the needle into it a second time, grab the thread from behind, cast on a second stitch, and only then pull your thumb out. This way, two loops are created at once, right next to each other.
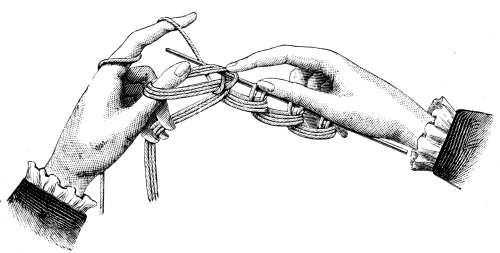
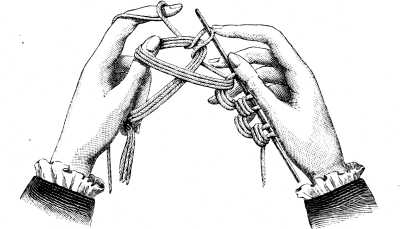
(2) Knitting on stitches (fig. 345).—Begin with a plain crossed stitch; then take the thread and the needle in the left hand, a second needle in the right, and catch it into the stitch on the left needle, lay the thread under the right needle and draw it through in a loop, through the loop on the left needle. Then transfer it as a fresh stitch to the left needle; catch the needle into this second stitch, and draw the thread through it, to form the third, and so on.
(2) Knitting on stitches (fig. 345).—Start with a basic crossed stitch; then hold the thread and the needle in your left hand, a second needle in your right, and insert it into the stitch on the left needle. Place the thread under the right needle and pull it through in a loop, going through the loop on the left needle. Next, move it as a new stitch to the left needle; insert the needle into this second stitch and pull the thread through it to create the third stitch, and continue this process.
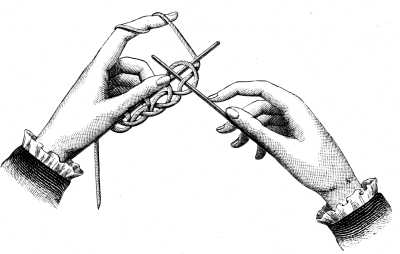
(3) Casting on with slip loops (fig. 346).—Begin by casting on one loop in the ordinary way, next, lay the thread, as in German knitting, over the left hand, twisting it once only round the forefinger, then put the needle in, upwards from below, under the thread that lies on the outside of the forefinger; draw out the finger from the loop, put the loop on the needle to the right, take the thread on the forefinger again, and so on.
(3) Casting on with slip loops (fig. 346).—Start by casting on one loop using the regular method. Next, place the thread over your left hand as you would in German knitting, twisting it only once around your forefinger. Then, insert the needle upwards from below, under the thread that’s resting on the outside of your forefinger. Pull your finger out of the loop, move the loop onto the needle to the right, take the thread on your forefinger again, and repeat.
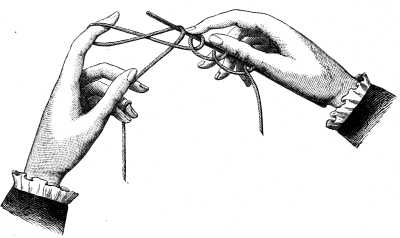
Casting on with double slip loops (fig. 347).—Begin by casting on a stitch in the ordinary way, then lay the thread over the forefinger, the reverse way, so that it crosses between, not outside the hand and the body of the knitter. Pass the needle upwards from below, under the inside thread, and slip this thread as a loop on to the needle. Continue to cast on, inserting the needle under the front and back threads alternately. This method is specially suitable for open patterns, where you have to increase several times, in succession.
Casting on with double slip loops (fig. 347).—Start by casting on a stitch using the usual method, then wrap the yarn over your forefinger in the opposite direction so it crosses between your hand and the body of the knitter. Bring the needle up from below, under the inside thread, and slide this thread onto the needle as a loop. Keep casting on by inserting the needle under the front and back threads alternately. This technique is especially useful for open patterns where you need to make several increases consecutively.
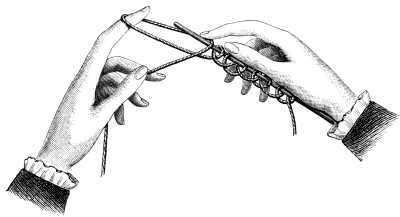
(4) Casting on with picots (fig. 348).—Cast on two stitches in the ordinary way and turn the work. Lay the thread over the needle, put the needle into the first stitch, from right to left, and slip it on to the right needle, knit off the second stitch plain, and draw the slipped one over it.
(4) Cast On with Picots (fig. 348).—Cast on two stitches normally and turn the work. Lay the thread over the needle, insert the needle into the first stitch from right to left, and slip it onto the right needle. Knit the second stitch normally and pull the slipped stitch over it.
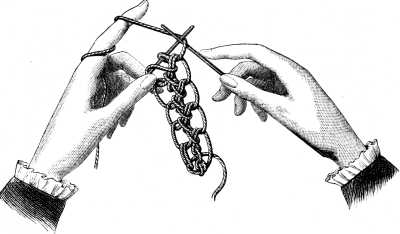
Cast on as many stitches as you want in this manner and then pick up the picots thus formed, with an auxiliary needle, and knit them off like ordinary stitches.
Cast on as many stitches as you like this way, then use a spare needle to pick up the picots that have formed and knit them off just like regular stitches.
This method of casting on may be varied thus in the following manner: having cast on the stitches as in fig. 348, throw the thread over the needle and knit two stitches together.
This way of casting on can be changed like this: after casting on the stitches as shown in fig. 348, wrap the thread over the needle and knit two stitches together.
Plain stitch (fig. 349).—This is the easiest stitch and the first which a knitter has to learn. It is executed as follows: Put the right-hand needle in, upwards from below, under the front part of the first stitch on the left-hand needle, lay the thread from right to left under the needle, draw it through the loop, and drop the loop off the left needle.
Plain stitch (fig. 349).—This is the simplest stitch and the first one a knitter needs to learn. Here's how to do it: Insert the right-hand needle from below, upwards, under the front section of the first stitch on the left-hand needle, place the thread from right to left under the needle, pull it through the loop, and drop the loop off the left needle.
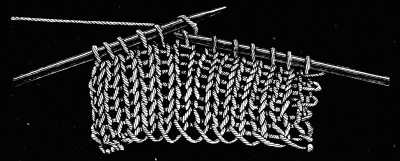
Plain knitting is employed wherever a perfectly smooth, even surface is required. It looks quite differently on the wrong side from what it does on the right where it presents the appearance of vertical rows of plaiting.
Plain knitting is used wherever a perfectly smooth, even surface is needed. It looks quite different on the wrong side compared to the right side, where it shows the appearance of vertical rows of weaving.
Back, or seam-stitch (fig. 350).—You may intentionally knit the wrong side of plain knitting. This is called purling and is done, in the following way: lay the thread over the left needle, and put the right one, downwards from above, behind the thread, into the loop on the left needle, lay the thread upwards from below, over the right needle, draw it through the loop, and drop the loop off the left needle. This stitch is used in knitting patterns, and for marking horizontal lines in smooth surfaces, such as the seam of a stocking, for instance.
Back, or seam-stitch (fig. 350).—You can intentionally knit the reverse side of regular knitting. This is known as purling and is done like this: place the thread over the left needle, then insert the right needle downwards from above, behind the thread, into the loop on the left needle. Bring the thread up from below, over the right needle, pull it through the loop, and let the loop fall off the left needle. This stitch is used in knitting patterns and for creating horizontal lines in smooth surfaces, like the seam of a stocking, for example.
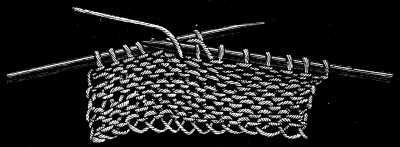
Plain stitch taken from behind (fig. 351).—Put the needle in from right to left, under the back part of the stitch; leave the thread behind the needle, then pass it from right to left over the needle and draw it through the stitch.
Plain stitch taken from behind (fig. 351).—Insert the needle from right to left, underneath the back of the stitch; keep the thread behind the needle, then loop it from right to left over the needle and pull it through the stitch.
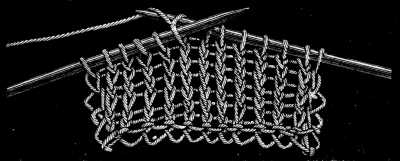
Back, or seam-stitch taken from behind (fig. 352).—Put the needle into the second part of the stitch, upwards from below, and knit it as a back or seam-stitch.
Back, or seam-stitch taken from behind (fig. 352).—Insert the needle into the second part of the stitch from below, and knit it as a back or seam-stitch.
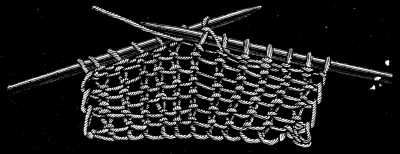
In plain stitch, taken from behind, the two threads of the loop are crossed, instead of lying side by side, as they do in plain knitting.
In plain stitch, viewed from behind, the two threads of the loop are crossed instead of lying next to each other like they do in plain knitting.
Back-stitch taken from behind, is only used for certain open-work patterns.
Back-stitch taken from behind is only used for specific open-work patterns.
Overs (fig. 353).—These form holes in plain knitting, and are used for open-work patterns and for increasing.
Overs (fig. 353).—These create gaps in basic knitting, and are used for open-work designs and for increasing stitches.
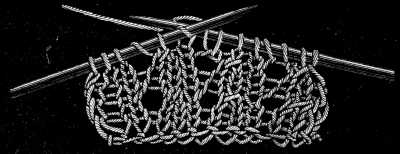
To make an over, lay the thread over the needle, and in the next row, knit this loop like any other stitch.
To create an over, place the thread over the needle, and in the next row, knit this loop just like any other stitch.
Each over adds one to the existing number of stitches. In cases, therefore, where the number is to remain the same, you have to make as many intakes as overs. Overs can only be used in conjunction with other stitches.
Each over adds one to the current number of stitches. So, in cases where the number needs to stay the same, you have to make as many intakes as overs. Overs can only be used along with other stitches.
Knot stitch (fig. 354).—This forms a raised spot in plain knitting and is executed as follows: knit 1, and leave it on the left-hand needle; put the stitch you have made with the right needle back on the left, and knit it off. Make 4 or 5 similar stitches, all issuing from the same stitch on the left needle, so that you have 4 or 5 loops on the right needle; then drop the stitch off the left needle, and pull the 4 first loops over the last one.
Knot stitch (fig. 354).—This creates a raised bump in regular knitting and is done like this: knit 1, and keep it on the left needle; take the stitch made with the right needle and place it back on the left, then knit it off. Make 4 or 5 similar stitches, all coming from the same stitch on the left needle, so you have 4 or 5 loops on the right needle; then drop the stitch off the left needle and pull the first 4 loops over the last one.
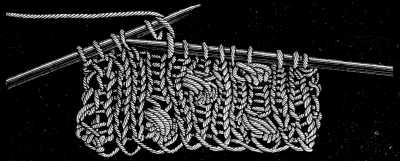
Cable or chain stitch.—Chain stitches are used for strengthening and equalizing the edges of articles that are made in stripes. They can be made in two ways; either, you knit off all the stitches on one needle, turn the work, put the needle into the first stitch, as if you were going to knit it from the back, and take it off the left needle without knitting it, the thread to lie behind the needle; or, you knit off all the stitches on one needle, turn the work, and knit off the first stitch.
Cable or chain stitch.—Chain stitches are used to reinforce and even out the edges of striped pieces. You can create them in two ways: first, knit all the stitches off one needle, turn the work, insert the needle into the first stitch as if you’re going to knit it from the back, and slide it off the left needle without knitting it, leaving the thread behind the needle; or, knit all the stitches off one needle, turn the work, and knit the first stitch.
The names of the stitches.—Out of the stitches that have been already described, other stitches are formed, which, as they are frequently alluded to in knitting directions, we shall here enumerate, explaining all the terms, usually employed in such directions.
The names of the stitches.—From the stitches that have already been described, other stitches are created, which are often mentioned in knitting instructions. We will list them here and explain all the terms commonly used in those instructions.
Over, or increase.—Explained in fig. 353. Throwing the thread once over the right needle.
Over, or increase.—Explained in fig. 353. Throw the thread once over the right needle.
Double over, or two increases.—Throwing the thread twice over the needle.
Double over, or two increases.—Wrapping the thread around the needle twice.
Plain intake.—Knitting two stitches together plain. This is done when the intake is to lie from left to right.
Plain intake.—Knit two stitches together plain. This is done when the intake is meant to lie from left to right.
Purled intake.—Purling two stitches together. This is done to make the stitches, that are knitted together, visible; or in the case of a piece of work composed of stripes, on the wrong side, when the intake is to lean to the right, on the right side.
Purled intake.—Purling two stitches together. This makes the stitches that are knitted together visible; or in a piece of work made up of stripes, on the wrong side, when the intake should lean to the right, on the right side.
Plain decrease, taken from behind.—Knitting off two stitches together, plain from behind. This is done when the intake is to lie to the left.
Plain decrease, taken from behind.—Knit two stitches together, plain from behind. This is done when the intake is meant to slope to the left.
Purled decrease, taken from behind.—Purling two stitches together, from behind. This is done when, in articles composed of stripes, the decrease has to be made on the wrong side, and is to lie to the left on the right side.
Purled decrease, taken from behind.—Purling two stitches together, from behind. This is done when, in projects made with stripes, the decrease needs to be done on the wrong side and should sit to the left on the right side.
Pulling over.—Slipping a stitch from the left needle to the right without knitting it, knitting the next plain, and pulling the slipped stitch over the knitted one. In this manner two or three stitches can be pulled over the knitted one.
Pulling over.—Transferring a stitch from the left needle to the right without knitting it, knitting the next plain stitch, and pulling the slipped stitch over the newly knitted one. This way, two or three stitches can be pulled over the knitted one.
Casting off.—To prevent the stitches from unravelling they are finished off in the following manner. Knit off two plain, pull the first over the second and drop it, so that only one remains on the needle. Knit the next stitch, and pull the one behind over it, and so on. This chain of stitches, must neither be too tight, nor too loose, but just as elastic as the rest of the work.
Casting off.—To stop the stitches from coming undone, finish them off like this. Knit two plain stitches, then pull the first one over the second and drop it, leaving only one on the needle. Knit the next stitch, and pull the one behind it over, and so on. This chain of stitches should be neither too tight nor too loose, but just as stretchy as the rest of your work.
Materials for stockings.—Stockings can be made of silk, wool or cotton, entirely according to fancy, but for coloured stockings, we cannot too highly recommend the D.M.C knitting cottons, as more durable, in all respects, than either silk or wool. They are manufactured in 360 different shades, whereas, wool and silk are only to be had in a very limited assortment of colours. For hand-knit stockings, Nos. 25, 30, 35[A] are the best, for machine-knit, Nos. 40 and 50.
Materials for stockings.—Stockings can be made of silk, wool, or cotton, depending on your preference, but for colorful stockings, we highly recommend D.M.C knitting cottons, as they are more durable than either silk or wool. They come in 360 different shades, while wool and silk are only available in a very limited range of colors. For hand-knitted stockings, sizes 25, 30, and 35 are the best, and for machine-knitted, sizes 40 and 50.
(1). The top may be either ribbed, or knitted in an openwork stitch of same kind or with a double-toothed edge, fig. 356.
(1). The top can be either ribbed or knitted with an openwork stitch of the same type or with a double-toothed edge, fig. 356.
(2) and (3). The knee, and the leg down to the heel, are generally plain knitted; it is only children’s stockings that are fancy knitted.
(2) and (3). The knee and the leg down to the heel are usually just plain knitted; only children's stockings have fancy knitting.
(4). The heel, is worked as straight knitting backwards and forwards; by knitting first one row plain and then turning back and knitting it purl. It is shaped to the foot by the intakes at the top.
(4). The heel is knitted straight back and forth; first, knit one row plain, then turn it around and knit it purl. It’s shaped to fit the foot with the increases at the top.
(5). The foot is knitted plain, with intakes from the heel onwards, to get rid of the superfluous stitches. Then knit a plain piece, without a seam-stitch, till you begin to decrease for the toe, which can be worked in several different ways.
(5). The foot is knitted in a simple pattern, with decreases starting from the heel to eliminate the extra stitches. After that, knit a straightforward piece without a seam stitch until you start to decrease for the toe, which can be done in several different methods.
To ensure the right proportions between the several parts of a stocking, the following directions should be attended to. An ornamental top must never be taken into account, in measuring the length of the leg. When the top part is finished, you make the seam, at the beginning of the first needle of the round, of one, or two purled stitches, or sometimes, a narrow pattern of purled stitches. This marks the middle of the stocking. For ordinary-sized stockings, knit plain from the top-band, till the knitted piece, forms a square.
To make sure the different parts of a stocking are shaped correctly, follow these guidelines. Don't include the decorative top when measuring the leg length. Once you finish the top part, make the seam at the start of the first needle in the round with one or two purl stitches, or sometimes a narrow pattern of purl stitches. This will indicate the center of the stocking. For standard-sized stockings, knit plain from the top band until the knitted piece forms a square.
For stockings that are to cover the knee, knit half as much again, that is one and a half times the width of the stocking. This brings you to the calf of the leg. Pull the third stitch after the seam, over the second, and knit together the two last but one before the seam. There should be 12 rounds between each of the first 3 or 4 intakes, and after that 8, until this part is one and a half times the width of the knee in length, and a quarter narrower.
For knee-high stockings, knit one and a half times the width of the stocking. This will take you to the calf of the leg. Pull the third stitch after the seam over the second, and knit together the two stitches just before the seam. There should be 12 rounds between each of the first 3 or 4 decreases, and then 8 rounds until this part is one and a half times the width of the knee in length and a quarter narrower.
For the ankle, knit a plain piece, half the width of the knee in length, without intakes.
For the ankle, knit a simple piece, half the width of the knee in length, without any increases.
For the heel, count the stitches on the four needles, exclusive of the seam, and put two stitches more than the quarter of the whole number on to the needles, to the right and left of the seam.
For the heel, count the stitches on the four needles, not including the seam, and add two more stitches than a quarter of the total number onto the needles, evenly divided to the right and left of the seam.
For a heel to fit well, it should be as long as it is wide. In order that they should wear better, the heel and the toe are often knitted with double thread. Coton à feutrer D.M.C[A] is made expressly for that purpose, and should be wound round the thread of which the whole stocking is made. For the instep, the part between the heel and toe, you must go on decreasing from the heel, until you have 2 stitches less on each needle, than you had at the ankle. Then knit the plain part of the foot, which should be as wide as the ankle, after which proceed to decrease for the toe, which should be a quarter the length of the whole foot. In spite of this careful subdivision, it is always well to count the stitches, to ensure perfect regularity. The number of stitches cast on, at the outset, for the same-sized stockings, must depend upon the size of the wool or cotton; we can only give the numbers approximately. Our calculation is based on the use of 5 needles; the given number has therefore to be cast on four times.
For a heel to fit well, it should be as long as it is wide. To make them last longer, the heel and the toe are often knitted with double thread. Coton à feutrer D.M.C[A] is made specifically for that purpose and should be wrapped around the yarn used for the entire stocking. For the instep, the section between the heel and toe, you need to keep reducing from the heel until you have 2 stitches fewer on each needle than you had at the ankle. Then knit the plain part of the foot, which should be as wide as the ankle, and after that, decrease for the toe, which should be a quarter of the length of the entire foot. Despite this careful breakdown, it’s always good to count the stitches to ensure everything is even. The number of stitches cast on at the beginning for the same-sized stockings will depend on the thickness of the wool or cotton; we can only give approximate numbers. Our calculation is based on using 5 needles; the specified number must be cast on four times.
| Coton à tricoter D.M.C Numbers to be used | Number of stitches to be cast on one needle for stocking ordinary-sized | Number of stitches to be cast on one needle for stockings that are to reach above the knee |
| 25 | 32 | 36 |
| 30 | 34 | 38 |
| 35 | 36 | 42 |
| 40 | 40 | 46 |
| 50 | 42 | 50 |
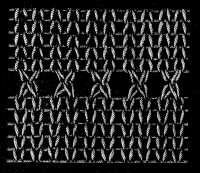
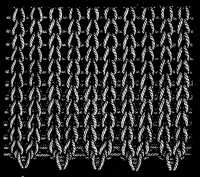
Having cast on the stitches, knit 6 to 10 rounds plain, according to the size of the cotton, then one round of alternate intakes and overs. Knit as many plain rounds as before, and with a sixth needle take up as many of the cast on stitches, as you have stitches on one of the upper needles. Turn this needle inwards, and place it against the outside needle and knit off both needles together. See that you knit the corresponding stitches off together, otherwise the scallops that form the edge will be crooked.
After casting on the stitches, knit 6 to 10 plain rounds depending on the size of the cotton. Then, do one round of alternating increases and decreases. Knit as many plain rounds as before, and with a sixth needle, pick up as many of the cast-on stitches as you have on one of the upper needles. Turn this needle inward and position it against the outside needle, then knit off both needles together. Make sure to knit the corresponding stitches together, or else the scallops at the edge will look crooked.
Common heel (fig. 357).—This is the simplest form of heel, and can be knitted either with or without an outside seam. Divide the stitches into four, and put two more on each of the heel needles than on the others, then make, according to the size of the cotton, from 15 to 20 seams; knit off all the stitches on the right needle and a third of those on the left. Supposing that you have 24 stitches, knit off 8, then slip 1, knit 1, and pull the slipped stitch over, knit 2 plain, turn the work, slip the first, and purl the next 8 stitches of the second needle; purl the 9th and 10th together, purl 2, turn the work to the right side, and slip the first stitch on to the right needle. By means of these successive intakes after the 8 stitches, the knitting forms a plait on both sides of the heel.
Common heel (fig. 357).—This is the simplest type of heel and can be knitted with or without an outside seam. Divide the stitches into four sections, adding two extra stitches on each of the heel needles compared to the others, then make from 15 to 20 seams depending on the thickness of the cotton. Knit off all the stitches on the right needle and a third of those on the left. If you have 24 stitches, knit off 8, then slip 1, knit 1, and pull the slipped stitch over, knit 2 plain, turn the work, slip the first stitch, and purl the next 8 stitches from the second needle; purl the 9th and 10th stitches together, purl 2, turn the work to the right side, and slip the first stitch onto the right needle. Through these successive decreases after the 8 stitches, the knitting forms a plait on both sides of the heel.
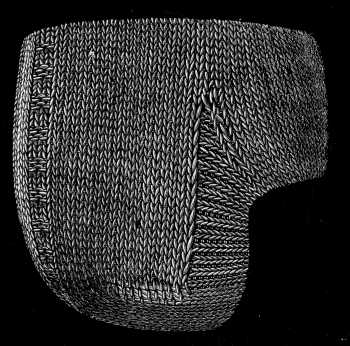
In all heels that are made after this pattern, the intakes must begin on the right side and the last one must be made on the wrong, so that once the heel is finished and the work turned, you can go on knitting plain.
In all heels designed like this, the intakes should start on the right side, and the final one should be done on the wrong side, so that once the heel is complete and the work is flipped, you can continue knitting straight.
When you have finished the stitches of the two heel needles up to the outside seams, take up the stitches on the sides of the heel with a spare needle and knit them on to the left heel needle, then knit the stitches reserved for the instep, take up the stitches on the right side of the heel again and knit them on to the fourth needle.
When you’ve finished the stitches on the two heel needles up to the outer seams, pick up the stitches on the sides of the heel using a spare needle and knit them onto the left heel needle. Then, knit the stitches set aside for the instep, pick up the stitches on the right side of the heel again, and knit them onto the fourth needle.
In the next round, knit all the stitches of the first needle plain, excepting the 4 last; knit the first and second of these together and the two last plain. Knit the two first stitches of the fourth needle plain, slip the third, knit the fourth and pull the slipped stitch over.
In the next round, knit all the stitches on the first needle normally, except for the last 4; knit the first and second of those together and knit the last two normally. Knit the first two stitches of the fourth needle normally, slip the third, knit the fourth, and pull the slipped stitch over.
Heel in steps (fig. 358).—After dividing the stitches, make from 12 to 14 seams. Then knit as many stitches of the first needle as you have seams at the side; turn the work, and begin the needle with the seam you made first. Knit off as many stitches from the second needle as from the first. Make the same number of seams, as for the first part of the heel. When the seams are finished, take up the chain stitches, on both sides, make a decrease by knitting the last stitch of the small part and the first of the large, together; knit two; turn the work; slip the first stitch, knit to the second side, and decrease as in the first part.
Heel in steps (fig. 358).—After splitting the stitches, make 12 to 14 seams. Then knit as many stitches on the first needle as you have seams at the side; turn the work, and start with the seam you made first. Knit off as many stitches from the second needle as from the first. Make the same number of seams as for the first part of the heel. Once the seams are done, pick up the chain stitches on both sides, make a decrease by knitting the last stitch of the small section and the first of the large one together; knit two; turn the work; slip the first stitch, knit to the second side, and decrease as in the first part.
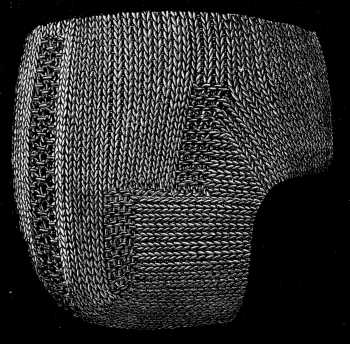
When you have decreased all the stitches up to the last, take up the slipped stitches of the first part, and begin the intakes for the instep in the ordinary way.
When you’ve decreased all the stitches down to the last one, pick up the slipped stitches from the first part and start the increases for the instep in the usual way.
There is not more work in this pattern of heel than in any other; it fits closely and consequently wears well.
There’s no more work in this type of heel than in any other; it fits snugly and therefore lasts longer.
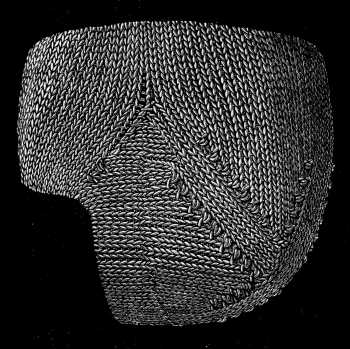
Knit off the stitches of the first needle after the seam; then on to two spare needles, cast on, 8 more stitches than you had on one needle after dividing the stitches; put the stitches of the third and fourth needles together and knit the first round plain.
Knit off the stitches from the first needle after the seam; then, onto two spare needles, cast on 8 more stitches than you had on one needle after dividing the stitches; join the stitches of the third and fourth needles together and knit the first round normally.
3rd round—plain.
3rd round—simple.
4th round—knit together the 1st and 2nd and the 7th and 8th of the first needle.
4th round—knit together the 1st and 2nd stitches and the 7th and 8th stitches on the first needle.
5th round—plain.
5th round—simple.
6th round—knit together the 1st and 2nd and the 5th and 6th of the first auxiliary needle; and the 6th and 7th and the last but one and the last, of the second.
6th round—combine the 1st and 2nd stitches and the 5th and 6th stitches of the first auxiliary needle; and the 6th and 7th stitches and the second to last and last stitches of the second needle.
7th, 10th, 11th, 13th, 14th, 16th, 17th, 19th, 20th rounds all plain.
7th, 10th, 11th, 13th, 14th, 16th, 17th, 19th, 20th rounds all plain.
8th round—knit together the 1st and 2nd, and the 3rd and 4th of the first auxiliary needle, and the 4th and 3rd, and the last stitch but one and the last, of the second.
8th round—knit together the 1st and 2nd stitches, and the 3rd and 4th stitches of the first auxiliary needle, and the 4th and 3rd stitches, and the second to last stitch and the last stitch of the second needle.
9th round—After the two last intakes, purl together the 4th and 3rd stitches before the end of the 1st and 3rd needle, and the 3rd and 4th at the beginning of the 2nd and 4th needles.
9th round—After the last two stitches, knit the 4th and 3rd stitches together before the end of the 1st and 3rd needle, and the 3rd and 4th stitches at the beginning of the 2nd and 4th needles.
12th, 15th, and 18th rounds—Decrease, the same as in the 9th round.
12th, 15th, and 18th rounds—Decrease, the same as in the 9th round.
21st round—knit 2 plain, at the beginning of the 1st and 3rd needles; knit the next 2 together; knit together the 4th and 3rd, before the end of the 2nd and 4th needles; knit the last stitches plain; go on decreasing in this way until the purled stitches meet. After the plain round over the intakes, add four plain rounds, divide the stitches that remain for the sole, on two needles and cast off on the wrong side.
21st round—knit 2 stitches plain at the beginning of the 1st and 3rd needles; knit the next 2 together; knit together the 4th and 3rd stitches before the end of the 2nd and 4th needles; knit the last stitches plain; continue decreasing like this until the purled stitches meet. After the plain round over the decreases, add four plain rounds, divide the remaining stitches for the sole onto two needles, and bind off on the wrong side.
Now take up the auxiliary stitches, and in the first 3 plain rounds, knit together the last and the first of the 1st and 2nd needles, and the last and the first of the 3rd and 4th.
Now take up the extra stitches, and in the first 3 plain rounds, knit together the last and the first stitches of the 1st and 2nd needles, and the last and the first stitches of the 3rd and 4th needles.
With the rest of the extra stitches make purled intakes, knitting two plain rounds after each round with an intake.
With the remaining extra stitches, create purl intakes, knitting two plain rounds after each round with an intake.
For the other kind of plain heel also (fig. 360), auxiliary stitches are required. Supposing that you have 20 stitches on each needle, you must cast on 28 stitches on to each auxiliary needle; knit together the 4th and 3rd stitches at the end of the 1st and 3rd needles, and the 3rd and 4th of the 2nd and 3rd needles, so that you may have 4 plain stitches between both intakes. Go on decreasing, knitting 2 plain rounds after each round with an intake, until you have 6 stitches left on each needle. Then knit together the first and last stitches of each needle, one plain round over it, and finish with a chain on the wrong side of the heel. Then take up the auxiliary stitches and knit the instep.
For the other type of plain heel also (fig. 360), you'll need auxiliary stitches. Let's say you have 20 stitches on each needle; you need to cast on 28 stitches on each auxiliary needle. Knit together the 4th and 3rd stitches at the end of the 1st and 3rd needles, and the 3rd and 4th of the 2nd and 3rd needles, so there are 4 plain stitches between both intakes. Keep decreasing, knitting 2 plain rounds after each round with an intake, until you have 6 stitches left on each needle. Then knit together the first and last stitches of each needle, do one plain round over it, and finish with a chain on the wrong side of the heel. After that, pick up the auxiliary stitches and knit the instep.
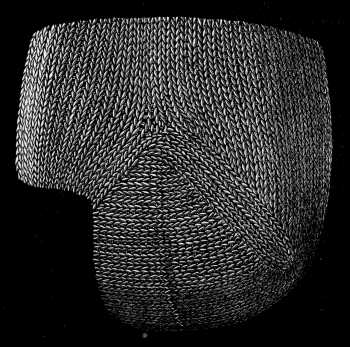
Italian stocking (fig. 361).—The heel, sole and toe of a stocking always wear out before the instep. The Italians and Greeks economise time and material and facilitate the renewal of those parts that wear out, by knitting the upper part of the foot in two pieces. After knitting the heel in on or other of the above ways, work the foot as straight knitting with the two upper needles only, until you have the necessary length. Then knit the underneath part separately, in the same way. You must keep a chain along all edges and a narrow seam of one or two stitches. In the sole, which you make after finishing the upper part, your intakes must come directly after and before the seam. When you have got the same number of rounds in each piece, join them together and begin the toe.
Italian stocking (fig. 361).—The heel, sole, and toe of a stocking always wear out before the instep. The Italians and Greeks save time and materials and make it easier to replace those worn areas by knitting the upper part of the foot in two pieces. After knitting the heel in one of the above methods, work the foot as straight knitting using only the two upper needles until you reach the desired length. Then knit the underside separately, in the same way. Make sure to keep a chain along all edges and a narrow seam of one or two stitches. In the sole, which you create after finishing the upper part, your decreases should be right after and right before the seam. Once you have the same number of rounds in each piece, join them together and start the toe.
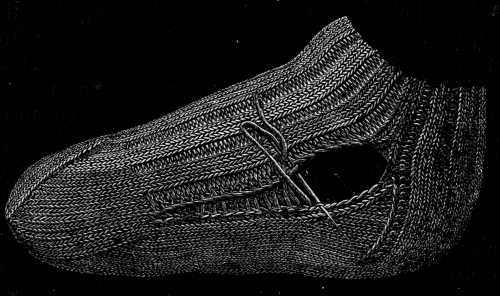
Sew up the slits left open on either side, with a needle and thread taking care to fit the corresponding stitches together.
Sew up the slits left open on both sides using a needle and thread, making sure to align the matching stitches.
Toe (fig. 362).—To begin as before, with the simplest and most ordinary way of making this part of the stocking, divide the stitches equally on to the 4 needles; knit together the 4th and 3rd stitches before the end of the 1st and 3rd needles, knit the 2 last and 2 first stitches of the 2nd and 4th needles plain, and make an intake by slipping the 3rd stitch, knitting the 4th, and pulling the slipped stitch over. Begin by knitting 2 plain rounds after each of the first 4 rounds with an intake, and afterwards only one. When you have only 4 stitches left on each needle, collect them on two, and knit them together, two and two, on the wrong side of the stocking.
Toe (fig. 362).—To start off just like before, with the simplest and most common way to make this part of the sock, split the stitches evenly across the 4 needles; knit together the 4th and 3rd stitches before the end of the 1st and 3rd needles, knit the last 2 and the first 2 stitches of the 2nd and 4th needles normally, and create a decrease by slipping the 3rd stitch, knitting the 4th, and pulling the slipped stitch over. Begin by knitting 2 regular rounds after each of the first 4 rounds with a decrease, and afterward only 1. When you have just 4 stitches left on each needle, gather them onto 2 needles, and knit them together, two at a time, on the inside of the sock.
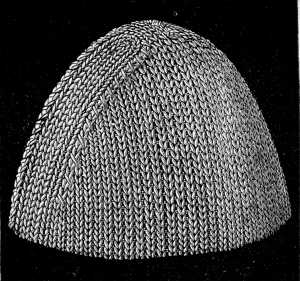
Toe (fig. 363).—Here, before beginning to decrease, divide the stitches by 8, 10, or 12. Supposing that they have been divided by 10, knit 8 plain; knit the 9th and 10th together, 8 plain, knit two together, and so on, the whole way round. Then knit as many plain rounds as there are plain stitches between 2 intakes. In the next rounds with intakes, you will have one stitch less between each intake, in the second therefore, there should be 7 plain stitches between each intake, and you knit 7 plain rounds; and so on to the 7th round, when 2 stitches will remain, followed by 2 plain rounds; when there are only 4 stitches left on the needles, turn them in to the wrong side of the stocking, and finish off with a chain.
Toe (fig. 363).—Before you start to decrease, divide the stitches into groups of 8, 10, or 12. If you divide them into 10, knit 8 stitches normally; then knit the 9th and 10th stitches together, followed by 8 more normal stitches, and continue this pattern all the way around. After that, knit as many normal rounds as there are plain stitches between each decrease. In the next rounds with decreases, you will have one less stitch between each decrease; so in the second round, there should be 7 normal stitches between each decrease, and you will knit 7 normal rounds; continue this through to the 7th round, when 2 stitches will remain, followed by 2 normal rounds. When there are only 4 stitches left on the needles, turn them to the wrong side of the stocking and finish off with a chain.

Toe (fig. 364).—Begin the intakes with the two first stitches of each needle, by the slip and pull over process, knit one plain round after each round with an intake. In the following rounds, make the intake in the 2nd round with the 3rd and 4th stitches, in the 3rd, with the 5th and 6th stitches, in the 4th, with the 7th and 8th stitches, so that when finished the intakes form a kind of spiral. Finish off in the ordinary way.
Toe (fig. 364).—Start the toe by making two initial stitches on each needle using the slip and pull over technique. After each round that includes an intake, knit one plain round. In the subsequent rounds, make the intake in the 2nd round with the 3rd and 4th stitches, in the 3rd round with the 5th and 6th stitches, and in the 4th round with the 7th and 8th stitches, so that the intakes create a spiral effect by the end. Finish off in the usual way.
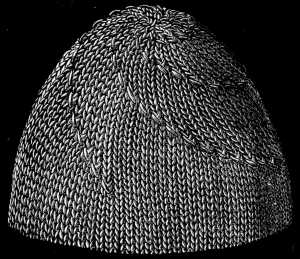
Toe (fig. 365).—We will describe one other kind of toe, quite as shapely and easy to make as the others.
Toe (fig. 365).—We will describe another type of toe, just as well-shaped and easy to create as the others.
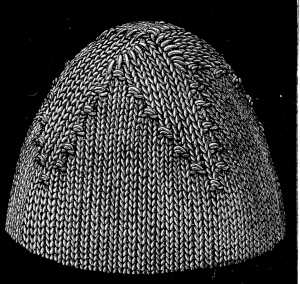
1st round—purl the first 2 stitches on each needle together.
1st round—purl the first 2 stitches on each needle together.
2nd and 3rd, 5th and 6th, 8th and 9th, 11th and 12th, 14th and 15th, 17th and 18th rounds—plain.
2nd and 3rd, 5th and 6th, 8th and 9th, 11th and 12th, 14th and 15th, 17th and 18th rounds—plain.
4th round—1 plain, 1 intake with the 2nd and 3rd stitches, and with the last 2 on each needle.
4th round—1 plain, 1 intake with the 2nd and 3rd stitches, and with the last 2 on each needle.
7th round—knit the 2 first plain, make 1 intake with the 3rd and 4th stitches, and 1 with the 2 last.
7th round—knit the first 2 stitches plain, make 1 increase with the 3rd and 4th stitches, and 1 with the last 2.
In each of the next rounds with intakes, knit 1 plain stitch more.
In each of the next rounds with intakes, knit 1 more plain stitch.
When the two seams meet, pull the last stitch on each needle over the first of the next; knit the stitches between the intakes plain. Continue to decrease in this manner until the last stitches are reached.
When the two seams come together, pull the last stitch on each needle over the first stitch of the next; knit the stitches between the intakes normally. Keep decreasing like this until you reach the last stitches.
Materials for darning stockings.—The thread used for darning a stocking should be a little finer than that of which it is made. Coton à repriser D.M.C[A] is the best, for as it consists of several strands it can be subdivided as occasion requires.
Materials for darning stockings.—The thread you use for darning a stocking should be slightly finer than the original material. Coton à repriser D.M.C[A] is the best choice since it consists of multiple strands that can be separated as needed.
Work the second row of stitches backwards; take up two threads on the left, pass downwards to the right, over one thread, take up the thread you passed over, and so on.
Work the second row of stitches in reverse; pick up two threads on the left, move down to the right, over one thread, pick up the thread you just went over, and keep going.
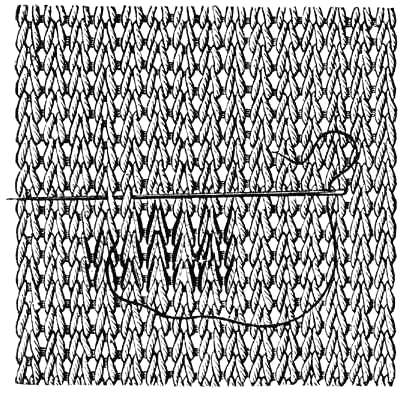
The other way, fig. 367, is, when you have brought out your needle, to carry it over one thread to the right and upwards over two, take up the next two threads on the left, pass downwards over two horizontal threads, and over one thread to the right, and put in the needle where it first came out; then working from right to left, take up two threads, pass over one to the right, and downwards over two horizontal ones, and so on. In the next row, hold your work, the finished part uppermost, carry the needle downwards over one horizontal thread, bring it out between two threads that lie separately and take it downwards again over two horizontal threads, pick up two threads, working from right to left, pass upwards over two threads and over one to the right, take up two to the left, and so on.
The other way, fig. 367, is when you’ve brought out your needle, carry it over one thread to the right and upwards over two, pick up the next two threads on the left, pass downwards over two horizontal threads, and over one thread to the right, then put the needle back where it first came out; then, working from right to left, take up two threads, pass over one to the right, and downwards over two horizontal ones, and so on. In the next row, hold your work with the finished part facing up, carry the needle downwards over one horizontal thread, bring it out between two threads that lie separately and take it downwards again over two horizontal threads, pick up two threads, working from right to left, pass upwards over two threads and over one to the right, take up two to the left, and so on.
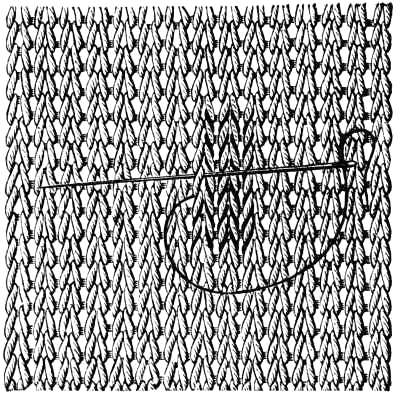
Repairing plain knitting (fig. 368).—When a broken piece of stocking web requires to be replaced by new, draw the new and the old pieces together with a needle and thread, using the same thread the stocking is made of.
Fixing plain knitting (fig. 368).—When a damaged section of a stocking needs to be replaced, use a needle and thread to sew the new and old pieces together, using the same thread the stocking is made from.
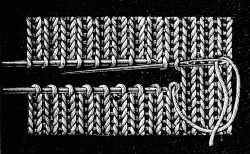
For this purpose, you must clear the loops, by ravelling them out top and bottom, and slip them on to knitting needles. The loops that are to be connected must lie exactly opposite to each other. Enter your threaded needle upwards from below through the first disengaged upper loop, and slip it off the knitting needle, then enter the needle, downwards from above through the first lower loop, and upwards from below through the next, and draw out just enough thread to make the new loop the same size as the old ones. Then enter the needle, downwards from above, through the same upper loop you took up before, taking up also the one next to it, and passing your needle through it from underneath; draw out the thread to form the new loop and descend again to the next, and so on.
For this, you need to clear the loops by unraveling them from the top and bottom and sliding them onto knitting needles. The loops that need to be joined must be directly opposite each other. Insert your threaded needle upward from below through the first loose upper loop and slip it off the knitting needle. Then, insert the needle downward from above through the first lower loop, and upward from below through the next one, pulling out just enough thread to make the new loop the same size as the old ones. Next, insert the needle downward from above through the same upper loop you took up earlier, also catching the one next to it by pushing your needle through from underneath. Pull out the thread to create the new loop and move down to the next one, and continue this process.
Repairing purled knitting (fig. 369).—To repair ribbed surfaces consisting of alternate rows of plain and purl, proceed as follows: hold the article so that the row of purled stitches is exactly opposite the upper part. Enter your needle upwards from below, through the first loop of the upper part; join the two lower loops together as in fig. 368; carry the needle upwards again, and enter it upwards from below through the first loop of the upper part and downwards from above, through the loop next it. Join the lower loops again, as in plain knitting.
Repairing purled knitting (fig. 369).—To fix ribbed surfaces made up of alternating rows of knit and purl stitches, follow these steps: hold the item so the row of purl stitches is right in front of you. Insert your needle from below, upwards through the first loop of the upper part; then, twist the two lower loops together as shown in fig. 368; push the needle upwards again and insert it from below through the first loop of the upper part, then downwards from above through the next loop. Twist the lower loops again, just as you would in regular knitting.
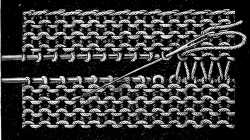
Disengaging the loops for darning (fig. 370).—Where the threads are broken, new loops have to be made, and the broken ones ravelled out and cut, so that the horizontal loops may stand out clear and distinct. Cut the threads on the vertical sides so that the loops form an edge and the hole is square, clear two or four loops in the corners of the hole, fold them in and fasten them off at the back by a stitch or two. The darns we are next going to describe should be made upon a ball to prevent drawing the threads too tightly.
Removing the loops for darning (fig. 370).—When the threads are broken, you need to create new loops, and carefully unravel and cut the broken ones so the horizontal loops stand out clearly. Cut the threads on the vertical sides so that the loops create an edge and the hole is square. Clear two or four loops in the corners of the hole, fold them in, and secure them at the back with a stitch or two. The darning techniques we will describe next should be done on a ball to avoid pulling the threads too tightly.
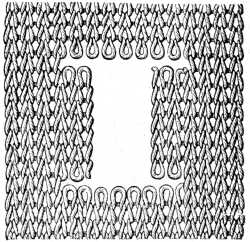
Darning on threads stretched horizontally (figs. 371 and 372).—Carry a horizontal thread across on the wrong side, in the place of each broken thread, securing it in the sound part of the stocking, about two threads from the edge of the hole. When you have made this foundation, put the needle in on the right side near the stitch that is nearest to the sound part on the left, fig. 371.
Darning on threads stretched horizontally (figs. 371 and 372).—Run a horizontal thread across on the back side, where each broken thread is, anchoring it in the solid part of the stocking, about two threads away from the edge of the hole. Once you've established this base, insert the needle on the front side close to the stitch that is nearest to the solid part on the left, fig. 371.
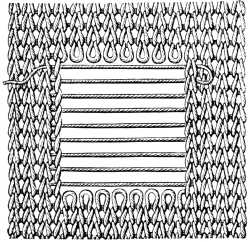
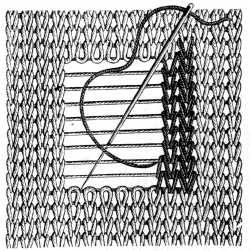
Then descending, pick up the nearest horizontal thread from below, so that the working thread lies to the right of the needle, and cover all the horizontal threads you have laid in this manner.
Then, moving down, grab the closest horizontal thread below, ensuring that the working thread is on the right side of the needle, and cover all the horizontal threads you've arranged this way.
When you have taken up the last thread, pass the needle downwards from above, through the nearest loop, and bring it back through the one at which you entered it.
When you’ve picked up the last thread, push the needle down from above through the closest loop, and then bring it back through the one where you first inserted it.
To make, in reascending, the second half of the loop, you must lay your thread to the right of the needle, fig. 372.
To create the second half of the loop while going back up, you need to place your thread to the right of the needle, fig. 372.
When you have reached the last thread, enter the needle at the loop, opposite the one it came out of.
When you get to the last thread, insert the needle into the loop, across from where it came out.
Darning on threads stretched obliquely across (figs. 373 and 374).—As the illustration shows, you have to pick up all the cleared loops, besides two or three on either side of the empty space. The number and length of the threads which you carry across, must correspond with those of the threads you have to replace.
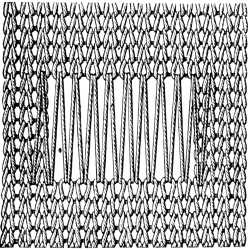
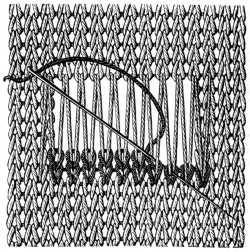
Fasten in, from the right side, a rather finer thread than the one the original web is made of, and make a few stitches over the existing ones, in the row you are about to complete.
Fasten in, from the right side, a slightly finer thread than the one the original web is made of, and make a few stitches over the existing ones in the row you're about to finish.
Enter the needle upwards from below, through the first disengaged loop, pass it under two threads issuing from one loop, and then bring it back again into the same loop between the two slanting threads, drawing it out again upwards from below, through the next loop, and so on. The new loop must be just equal to the old ones in size. Make in the same manner as at the beginning, two or three stitches at the end of the row, within the edge of the hole. Work back in a similar way, with this difference only, that you turn your work round.
Enter the needle from below and push it upwards through the first disengaged loop. Then, pass it under two threads coming from one loop, and bring it back into the same loop between the two slanting threads. Pull it back out again from below through the next loop, and continue this process. The new loop should be the same size as the old ones. Create two or three stitches at the end of the row, right at the edge of the hole, just like you did at the beginning. Then, work back the same way, with just one difference: turn your work around.
Piqué pattern (fig. 375).—The following patterns are suitable for making counterpanes, petticoats, vests and other articles of clothing. Select a suitable number of Coton à tricoter D.M.C. Cast on a number of stitches divisible by 7, and begin by 6 rows of 5 plain stitches and 1 purled, taken from behind.
Piqué pattern (fig. 375).—The following patterns are great for creating quilts, petticoats, vests, and other clothing items. Choose an appropriate amount of D.M.C. Coton à tricoter yarn. Cast on a number of stitches that can be divided by 7, and start with 6 rows of 5 knit stitches and 1 purled stitch taken from the back.
7th row—purl from behind the 3rd of the 5 plain, and knit 5 plain more and so on.
7th row—purl from behind the 3rd of the 5 knit stitches, and knit 5 more stitches plain, and keep going like that.
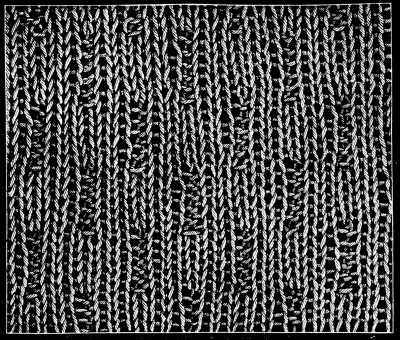
Materials: Coton à tricoter D.M.C Nos. 6 to 30.
Materials: D.M.C knitting cotton Nos. 6 to 30.
Piqué pattern (fig. 376).—Cast on a number of stitches divisible by 14.
Piqué pattern (fig. 376).—Cast on a number of stitches that can be divided by 14.
1st and 2nd row—* purl 7, knit 1, purl 1, knit 1, purl 1, knit 1, purl 1, knit 1; repeat from *.
1st and 2nd row—* purl 7, knit 1, purl 1, knit 1, purl 1, knit 1, purl 1, knit 1; repeat from *.
3rd and 4th row—* knit 7, purl 1, knit 1, purl 1, knit 1, purl 1, knit 1, purl 1; repeat from *.
3rd and 4th row—* knit 7, purl 1, knit 1, purl 1, knit 1, purl 1, knit 1, purl 1; repeat from *.
Repeat the whole from the 1st row.
Repeat the entire thing from the first row.
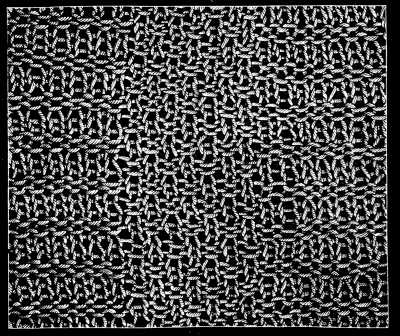
Materials: Coton à tricoter D.M.C Nos. 6 to 30, or Coton pour crochet 4 fils D.M.C Nos. 4 to 20.[A]
Materials: D.M.C Knitting Cotton No. 6 to 30, or D.M.C 4-ply Crochet Cotton No. 4 to 20.__A_TAG_PLACEHOLDER_0__
Piqué pattern (fig. 377).—Cast on a number of stitches divisible by 4.
Piqué pattern (fig. 377).—Cast on a number of stitches that can be divided by 4.
The 8 first rows—knit 2, purl 2.
The first 8 rows—knit 2, purl 2.
9th and 10th row—knit 2 over the 2 purled, purl 2 over the 2 knitted of the 8th row.
9th and 10th row—knit 2 over the 2 purled, purl 2 over the 2 knitted from the 8th row.
11th and 12th rows—the same as the first 8 rows.
11th and 12th rows—the same as the first 8 rows.
13th and 14th row—the same as the 9th and 10th row.
13th and 14th row—the same as the 9th and 10th row.
15th to the 23rd—the same as the first 8 rows.
15th to the 23rd—the same as the first 8 rows.
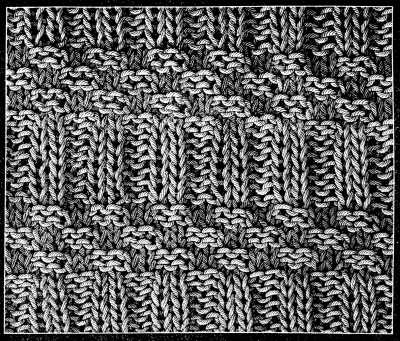
Materials: The same as for fig. 371.
Materials: The same as for fig. __A_TAG_PLACEHOLDER_0__.
Stripes for counterpanes (fig. 378).—This pattern is to be worked in stripes, of two colours; we may here take occasion to mention that in choosing two colours, one dark and one light, for a piece of work, the dark cotton should always be one or two numbers finer than the light, because the dark dyes thicken the cotton more than the light ones do. The blue, red and dark brown dyes sink into the cotton more and cause it to swell, whereas the lighter dyes do not affect its thickness.
Stripes for bedspreads (fig. 378).—This design should be created using stripes of two colors; it's worth noting that when selecting two colors, one dark and one light, for a project, the dark thread should always be one or two sizes finer than the light one. This is because dark dyes tend to make the cotton thicker than light dyes. The blue, red, and dark brown dyes penetrate the cotton more and cause it to expand, while lighter dyes do not impact its thickness.

Materials: Coton à tricoter D.M.C No. 6, 8, 10 or 12.
Colours: Rouge-Turc 321 and Gris-Tilleul 391.[A]
Materials: D.M.C Knitting Cotton No. 6, 8, 10, or 12.
Colors: Turkish Red 321 and Linden Gray 391.__A_TAG_PLACEHOLDER_0__
Hence it comes, that for the stripes, here described, we were obliged to take No. 8 of the red cotton and No. 6 of the green, in order that the same number of stitches should make the same length of stripe.
Therefore, for the stripes mentioned here, we had to use No. 8 of the red cotton and No. 6 of the green, so that the same number of stitches would produce the same length of stripe.
Cast on 28 stitches:
Cast on 28 stitches:
1st needle—slip 1, knit 2, over, knit 1, knit 1 from behind, purl 1 from behind, knit 1 from behind, purl 2, knit 5, purl 2, knit 1 from behind, purl 1 from behind, knit 1 from behind, purl 1 from behind, knit 1 from behind, purl 1 from behind, knit 1 from behind, purl 1 from behind, knit 1, over, knit 3, 1 chain stitch.
1st needle—slip 1, knit 2, yarn over, knit 1, knit 1 through the back, purl 1 through the back, knit 1 through the back, purl 2, knit 5, purl 2, knit 1 through the back, purl 1 through the back, knit 1 through the back, purl 1 through the back, knit 1 through the back, purl 1 through the back, knit 1 through the back, purl 1 through the back, knit 1, yarn over, knit 3, 1 chain stitch.
2nd needle—wrong side: slip 1, purl 2, purl 2 together, purl 1 from behind, knit 1 from behind, purl 1 from behind, knit 1 from behind, purl 1 from behind, knit 1 from behind, purl 1 from behind, knit 2, purl 5, knit 2, purl 1 from behind, knit 1 from behind, knit 2 together, purl 2, 1 chain stitch.
2nd needle—wrong side: slip 1, purl 2, purl 2 together, purl 1 from behind, knit 1 from behind, purl 1 from behind, knit 1 from behind, purl 1 from behind, knit 1 from behind, purl 1 from behind, knit 2, purl 5, knit 2, purl 1 from behind, knit 1 from behind, knit 2 together, purl 2, 1 chain stitch.
3rd needle—right side: slip 1, knit 2, over, knit 1, knit 1 from behind, purl 1 from behind, knit 1 from behind, purl 1 from behind, knit 1 from behind, purl 2, knit 5, purl 2, knit 1 from behind, purl 1 from behind, knit 1 from behind, purl 1 from behind, knit 1 from behind, purl 1 from behind, knit 1, over, knit 2, 1 chain stitch.
3rd needle—right side: slip 1, knit 2, yarn over, knit 1, knit 1 from the back, purl 1 from the back, knit 1 from the back, purl 1 from the back, knit 1 from the back, purl 2, knit 5, purl 2, knit 1 from the back, purl 1 from the back, knit 1 from the back, purl 1 from the back, knit 1 from the back, purl 1 from the back, knit 1, yarn over, knit 2, 1 chain stitch.
4th needle—wrong side: slip 1, purl 2, purl 2 together, purl 1 from behind, knit 1 from behind, purl 1 from behind, knit 1 from behind, purl 1 from behind, knit 2, purl 5, knit 2, purl 1 from behind, knit 1 from behind, purl 1 from behind, knit 1 from behind, purl 1 from behind, knit 1 from behind, purl 2 together, purl 2, 1 chain stitch.
4th needle—wrong side: slip 1, purl 2, purl 2 together, purl 1 from the back, knit 1 from the back, purl 1 from the back, knit 1 from the back, purl 1 from the back, knit 2, purl 5, knit 2, purl 1 from the back, knit 1 from the back, purl 1 from the back, knit 1 from the back, purl 1 from the back, knit 1 from the back, purl 2 together, purl 2, 1 chain stitch.
5th needle—on the right side: slip 1, knit 2, over, knit 1, knit 1 from behind, purl 1 from behind, knit 1 from behind, purl 1 from behind, knit 1 from behind, purl 1 from behind, knit 1 from behind, purl 2, knit 5, purl 2, knit 1 from behind, purl 1 from behind, knit 1 from behind, purl 1 from behind, knit 1, over, knit 2, 1 chain stitch.
5th needle—on the right side: slip 1, knit 2, yarn over, knit 1, knit 1 through the back, purl 1 through the back, knit 1 through the back, purl 1 through the back, knit 1 through the back, purl 1 through the back, knit 1 through the back, purl 2, knit 5, purl 2, knit 1 through the back, purl 1 through the back, knit 1 through the back, purl 1 through the back, knit 1, yarn over, knit 2, 1 chain stitch.
6th needle—on the wrong side: slip 1, purl 2, purl 2 together, purl 1 from behind, knit 1 from behind, purl 1 from behind, knit 2, purl 5, knit 2, purl 1 from behind, knit 1 from behind, purl 1 from behind, knit 1 from behind, purl 1 from behind, knit 1 from behind, purl 1 from behind, knit 1 from behind, purl 2 together, purl 2, 1 chain stitch.
6th needle—on the wrong side: slip 1, purl 2, purl 2 together, purl 1 from behind, knit 1 from behind, purl 1 from behind, knit 2, purl 5, knit 2, purl 1 from behind, knit 1 from behind, purl 1 from behind, knit 1 from behind, purl 1 from behind, knit 1 from behind, purl 1 from behind, knit 1 from behind, purl 2 together, purl 2, 1 chain stitch.
7th needle like the 5th, 8th needle like the 4th, 9th needle like the 3rd, 10th needle like the 2nd, 11th needle like the 1st. Five plain stitches form a zigzag in the middle of the stripe.
7th needle like the 5th, 8th needle like the 4th, 9th needle like the 3rd, 10th needle like the 2nd, 11th needle like the 1st. Five plain stitches create a zigzag in the center of the stripe.
Join the stripes with crochet stitches; of which several kinds are described in the next chapter.
Join the stripes using crochet stitches, which are described in various types in the next chapter.
Knitted square (fig. 379).—Cast on 2 stitches on to each of the 4 needles. Repeat always 3 times after the asterisk.
Knitted square (fig. 379).—Cast on 2 stitches onto each of the 4 needles. Always repeat 3 times after the asterisk.

Materials: Coton à tricoter D.M.C No. 8 or Fil à pointer D.M.C No. 20.
Materials: D.M.C No. 8 knitting cotton or D.M.C No. 20 needlework thread.
1st row—over, knit 1, over, knit 1 *.
1st row—yarn over, knit 1, yarn over, knit 1 *.
2nd row—knit 1, over, knit 1, over, knit 2 *.
2nd row—knit 1, yarn over, knit 1, yarn over, knit 2 *.
3rd row—knit 1, purl 1, over, knit 1, over, purl 1, knit 2 *.
3rd row—knit 1, purl 1, yarn over, knit 1, yarn over, purl 1, knit 2 *.
4th row—knit 1, purl 2, over, knit 1, over, purl 2, knit 2 *.
4th row—knit 1, purl 2, yarn over, knit 1, yarn over, purl 2, knit 2 *.
5th row—knit 1, purl 3, over, knit 1, over, purl 3, knit 2 *.
5th row—knit 1, purl 3, yarn over, knit 1, yarn over, purl 3, knit 2 *.
6th row—knit 1, purl 4, over, knit 1, over, purl 4, knit 2 *.
6th row—knit 1, purl 4, yarn over, knit 1, yarn over, purl 4, knit 2 *.
7th row—knit 1, purl 5, over, knit 1, over, purl 5, knit 2 *.
7th row—knit 1, purl 5, then knit 1, then purl 5, knit 2 *.
8th row—knit 1, purl 4, knit 2, over, knit 2, over, knit 1, purl 4, knit 2 *.
8th row—Knit 1, purl 4, knit 2, yarn over, knit 2, yarn over, knit 1, purl 4, knit 2 *.
9th row—knit 1, purl 3, knit 4, over, knit 1, over, knit 4, purl 3, knit 2 *.
9th row—knit 1, purl 3, knit 4, yarn over, knit 1, yarn over, knit 4, purl 3, knit 2 *.
10th row—knit 1, purl 2, knit 6, over, knit 1, over, knit 6, purl 2, knit 2 *.
10th row—knit 1, purl 2, knit 6, yarn over, knit 1, yarn over, knit 6, purl 2, knit 2 *.
11th row—knit 1, purl 1, knit 8, over, knit 1, over, knit 8, purl 1, knit 2 *.
11th row—knit 1, purl 1, knit 8, yarn over, knit 1, yarn over, knit 8, purl 1, knit 2 *.
12th row—knit 1, purl 2, knit 5, cross 2 stitches (that is, first knit off the second stitch plain and then the first), knit 1, over, knit 1, over, knit 1, cross 2, knit 5, purl 2, knit 2 *.
12th row—knit 1, purl 2, knit 5, cross 2 stitches (first knit the second stitch and then the first), knit 1, yarn over, knit 1, yarn over, knit 1, cross 2, knit 5, purl 2, knit 2 *.
13th row—knit 1, purl 3, knit 8, purl 1, over, knit 1, over, purl 1, knit 8, purl 3, knit 2 *.
13th row—knit 1, purl 3, knit 8, purl 1, yarn over, knit 1, yarn over, purl 1, knit 8, purl 3, knit 2 *.
14th row—knit 1, purl 4, knit 4, cross 2, knit 1, purl 2, over, knit 1, over, purl 2, knit 1, cross 2, knit 4, purl 4, knit 2 *.
14th row—knit 1, purl 4, knit 4, cross 2, knit 1, purl 2, over, knit 1, over, purl 2, knit 1, cross 2, knit 4, purl 4, knit 2 *.
15th row—knit 1, purl 5, knit 6, purl 3, over, knit 1, over, purl 3, knit 6, purl 5, knit 2 *.
15th row—knit 1, purl 5, knit 6, purl 3, over, knit 1, over, purl 3, knit 6, purl 5, knit 2 *.
16th row—knit 1, purl 4, knit 3, cross 2, knit 1, purl 4, over, knit 1, over, purl 4, knit 1, cross 2, knit 3, purl 4, knit 2 *.
16th row—knit 1, purl 4, knit 3, cross 2, knit 1, purl 4, over, knit 1, over, purl 4, knit 1, cross 2, knit 3, purl 4, knit 2 *.
17th row—knit 1, purl 3, knit 7, purl 5, over, knit 1, over, purl 5, knit 7, purl 3, knit 2 *.
17th row—knit 1, purl 3, knit 7, purl 5, over, knit 1, over, purl 5, knit 7, purl 3, knit 2 *.
18th row—knit 1, purl 2, knit 5, cross 2, knit 1, purl 4, knit 2, over, knit 1, over, knit 2, purl 4, knit 1, cross 2, knit 5, purl 2, knit 2 *.
18th row—knit 1, purl 2, knit 5, cross 2, knit 1, purl 4, knit 2, over, knit 1, over, knit 2, purl 4, knit 1, cross 2, knit 5, purl 2, knit 2 *.
19th row—knit 1, purl 1, knit 9, purl 3, knit 4, over, knit 1, over, knit 4, purl 3, knit 9, purl 1, knit 2 *.
19th row—knit 1, purl 1, knit 9, purl 3, knit 4, yarn over, knit 1, yarn over, knit 4, purl 3, knit 9, purl 1, knit 2 *.
20th row—knit 1, purl 2, knit 5, cross 2, knit 1, purl 2, knit 6, over, knit 1, over, knit 6, purl 2, knit 1, cross 2, knit 5, purl 2, knit 2 *.
20th row—knit 1, purl 2, knit 5, cross 2, knit 1, purl 2, knit 6, yarn over, knit 1, yarn over, knit 6, purl 2, knit 1, cross 2, knit 5, purl 2, knit 2 *.
21st row—knit 1, purl 3, knit 7, purl 1, knit 8, over, knit 1, over, knit 8, purl 1, knit 7, purl 3, knit 2 *.
21st row—knit 1, purl 3, knit 7, purl 1, knit 8, over, knit 1, over, knit 8, purl 1, knit 7, purl 3, knit 2 *.
22nd row—knit 1, purl 4, knit 3, cross 2, knit 1, purl 2, knit 6, cross 2, knit 1, purl 2, knit 5, cross 2, knit 1, over, knit 1, cross 2, knit 5, purl 2, knit 1, cross 2, knit 3, purl 4, knit 2 *.
22nd row—knit 1, purl 4, knit 3, cross 2, knit 1, purl 2, knit 6, cross 2, knit 1, purl 2, knit 5, cross 2, knit 1, over, knit 1, cross 2, knit 5, purl 2, knit 1, cross 2, knit 3, purl 4, knit 2 *.
23rd row—knit 1, purl 5, knit 3, purl 3, knit 7, purl 1, over, knit 1, over, purl 1, knit 7, purl 3, knit 5, purl 5, knit 2 *.
23rd row—knit 1, purl 5, knit 3, purl 3, knit 7, purl 1, over, knit 1, over, purl 1, knit 7, purl 3, knit 5, purl 5, knit 2 *.
24th row—knit 1, purl 4, knit 3, cross 2, knit 1, purl 4, knit 3, cross 2, knit 1, purl 2, over, knit 1, over, purl 2, knit 1, cross 2, knit 3, purl 4, knit 1, cross 2, knit 3, purl 4, knit 2 *.
24th row—knit 1, purl 4, knit 3, cross 2, knit 1, purl 4, knit 3, cross 2, knit 1, purl 2, over, knit 1, over, purl 2, knit 1, cross 2, knit 3, purl 4, knit 1, cross 2, knit 3, purl 4, knit 2 *.
25th row—knit 1, purl 3, knit 8, purl 5, knit 5, purl 3, over, knit 1, over, purl 3, knit 5, purl 5, knit 5, purl 3, knit 2 *.
25th row—knit 1, purl 3, knit 8, purl 5, knit 5, purl 3, over, knit 1, over, purl 3, knit 5, purl 5, knit 5, purl 3, knit 2 *.
26th row—knit 1, purl 2, knit 5, cross 2, knit 1, purl 4, knit 3, cross 2, knit 1, purl 4, over, knit 1, over, purl 4, knit 1, cross 2, knit 3, purl 4, knit 1, cross 2, knit 5, purl 2, knit 2 *.
26th row—knit 1, purl 2, knit 5, cross 2, knit 1, purl 4, knit 3, cross 2, knit 1, purl 4, over, knit 1, over, purl 4, knit 1, cross 2, knit 3, purl 4, knit 1, cross 2, knit 5, purl 2 *.
27th round—knit 1, purl 1, knit 9, purl 3, knit 7, purl 5, over, knit 1, over, purl 5, knit 7, purl 3, knit 9, purl 1, knit 2 *.
27th round—knit 1, purl 1, knit 9, purl 3, knit 7, purl 5, over, knit 1, over, purl 5, knit 7, purl 3, knit 9, purl 1, knit 2 *.
Finish the square with several rows of purl and a chain.
Finish the square with several rows of purl stitches and a chain.
Plain patent knitting, or brioche pattern (fig. 380).—This easy and extremely elastic stitch is used for all sorts of articles of clothing, and is worked in two rows.
Plain patent knitting, or brioche pattern (fig. 380).—This simple and highly flexible stitch is used for various types of clothing and is created in two rows.
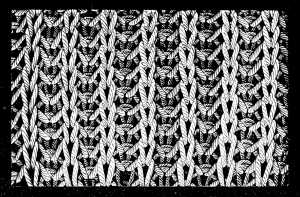
Cast on a number of stitches that divides by 3, with 4 extra for the edge.
Cast on a number of stitches that is a multiple of 3, plus 4 extra for the edge.
1st row—slip 1, knit 1, * over, put the needle into the next stitch, as if to purl it, slip the stitch from the left needle to the right, knit 1, repeat from *, and finish with 2 plain.
1st row—slip 1, knit 1, * yarn over, insert the needle into the next stitch, as if to purl it, slip the stitch from the left needle to the right, knit 1, repeat from *, and finish with 2 knit.
2nd row—begin with 1 chain, knit 1, knit the slipped stitch and the over together, over, slip the single stitch that remains, from the left needle to the right. When the knitting is round, you purl and knit the intake alternately.
2nd row—begin with 1 chain, knit 1, knit the slipped stitch and the yarn over together, yarn over, slip the single stitch that remains from the left needle to the right. When the knitting is round, alternate purling and knitting the intake.
Double patent knitting (fig. 381).—Begin on the wrong side.
Double patent knitting (fig. 381).—Start on the wrong side.
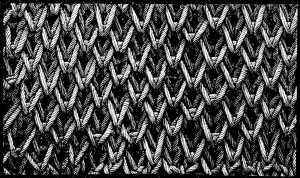
2nd row—knit all the stitches, pass the over by putting the needle into it from right to left.
2nd row—knit all the stitches, pass the yarn over by inserting the needle from right to left.
3rd row—like the second row of fig. 380. Now, it is only the second and third row that should alternate.
3rd row—like the second row of fig. 380. Now, only the second and third rows should alternate.
Patent knitting has a charming effect, done in two colours, by working them alternately backwards and forwards.
Patent knitting has a charming effect when done in two colors by alternating between them as you knit back and forth.
Plaited stitch (fig. 382).—This kind of stitch is worked in stripes, which, for scarves, counterpanes, etc., are generally joined together with stripes of plain knitting. For counterpanes, the lower numbers of D.M.C cottons are most suitable, for smaller articles the higher numbers. Plaited stitch is formed by crossing the stitches, that is, by knitting the second stitch on the left needle to begin with, and then the first stitch.
Plaited stitch (fig. 382).—This type of stitch is done in stripes, which, for scarves, bedspreads, etc., are usually combined with stripes of plain knitting. For bedspreads, the lower numbers of D.M.C cottons are the best to use, while for smaller items, the higher numbers are preferable. Plaited stitch is created by crossing the stitches, meaning you knit the second stitch on the left needle first, and then the first stitch.
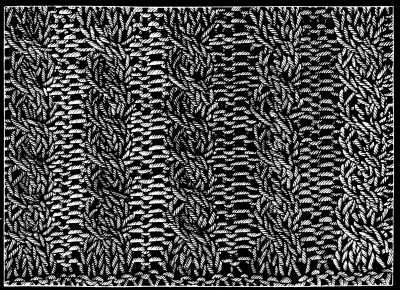
Materials: Coton à tricoter D.M.C Nos. 8 to 20, or Cordonnet 6 fils D.M.C Nos. 10 to 30.
Materials: D.M.C knitting cotton No. 8 to 20, or D.M.C 6-ply cord No. 10 to 30.
If you cross two or more stitches in a few successive rows without slipping them, the stitches will be seen by degrees, to form a plait, as shown in fig. 382.
If you cross two or more stitches in a few consecutive rows without slipping them, you will gradually see the stitches create a braid, as shown in fig. 382.
1st row—purl 4, cast on 3 stitches on to an auxiliary needle, and leave it hanging on the inside of the work; knit 3 and then knit the 3 stitches on the extra needle, purl 4.
1st row—purl 4, cast on 3 stitches onto an extra needle, and leave it hanging on the inside of the work; knit 3 and then knit the 3 stitches on the extra needle, purl 4.
Then follow 5 rows, in which you purl all the purled stitches and knit all the plain ones. After which 5 rows you repeat from the beginning.
Then follow 5 rows, in which you purl all the purled stitches and knit all the plain ones. After those 5 rows, you repeat from the beginning.
Turkish stitch (fig. 383).—1st row—slip 1, knit 1, over, knit 2 together, over, knit 2 together, and so on to the 2 last stitches, which you knit plain.
Turkish stitch (fig. 383).—1st row—slip 1, knit 1, yarn over, knit 2 together, yarn over, knit 2 together, and so on until you have 2 stitches left, which you knit normally.
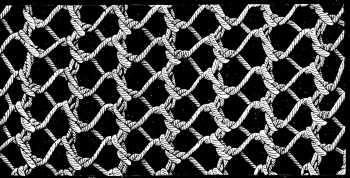
2nd row—slip the 1st, knit the 2nd and the 3rd plain, the latter having been formed by the last over on the 1st needle; 1 over, 1 intake with the stitch and the over, 1 over, 1 intake and so on.
2nd row—slip the 1st stitch, knit the 2nd, and knit the 3rd stitch plain. The 3rd stitch is formed from the last yarn-over on the 1st needle; yarn over, pull one stitch through with the stitch and over, yarn over, pull one stitch through, and continue this pattern.
Turkish stitch with beads (fig. 384).—String the beads on the thread before you begin to knit. When you only use one kind of bead, thread a needle with your knitting cotton and run it through the thread on which the beads are strung.
Turkish stitch with beads (fig. 384).—Before you start knitting, string the beads onto the thread. If you’re only using one type of bead, thread a needle with your knitting yarn and pass it through the thread that the beads are strung on.
When you use several kinds, you must count and thread them on in the required order. Beaded knitting is little in request now, excepting for tobacco pouches and purses; for which you should use Cordonnet 6 fils D.M.C Nos. 35, in any colour, and small beads.
When you use different types, you need to count and string them on in the correct order. Beaded knitting isn't very popular right now, except for tobacco pouches and wallets; for which you should use Cordonnet 6 fils D.M.C Nos. 35, in any color, along with small beads.
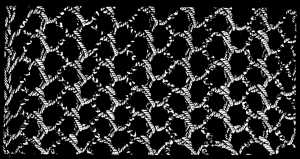
For close beaded knitting, plain stitch is the best. Run the beads down singly at each stitch. The beads will fall on the reverse side of the work so that in knitting with beads, remember that the reverse side will be the right side.
For close beaded knitting, plain stitch is the best. Run the beads down one at a time with each stitch. The beads will fall on the back side of the work, so when knitting with beads, remember that the back side will actually be the front side.
Knitting pattern with two kinds of cotton (fig. 385).—A variety of pretty things, such as open-work stockings, shawls, curtains etc. can be made in this pattern, worked with two sizes of thread. To give it its full effect it ought to be knitted with coarse needles, Nos. 10, 11, or 12.
Knitting pattern with two types of cotton (fig. 385).—You can create a range of beautiful items, like lace stockings, shawls, curtains, and more, using this pattern, knitted with two different sizes of thread. For the best results, it should be knitted with larger needles, sizes 10, 11, or 12.
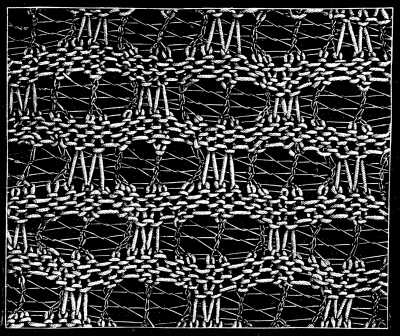
Materials: Fil à pointer D.M.C No. 20 or 30, and Cordonnet 6 fils D.M.C No. 60 or 80, écru.[A]
Materials: D.M.C Fil à pointer No. 20 or 30, and D.M.C Cordonnet 6 fils No. 60 or 80, ecru.__A_TAG_PLACEHOLDER_0__
Cast on a number of stitches that divides by 8. Take the coarse thread to begin with.
Cast on a number of stitches that's a multiple of 8. Start with the thicker yarn.
1st and 2nd row—purl.
1st and 2nd row—knit.
3rd row—purl 5, 2 overs, purl 5.
3rd row—purl 5, 2 wraps, purl 5.
4th row—with the fine thread: over, knit 2 together, slip the next stitch of the previous row, drop the double over, slip the next stitch, 1 over, knit 2 together.
4th row—with the fine thread: yarn over, knit 2 together, slip the next stitch from the previous row, drop the double yarn over, slip the next stitch, yarn over, knit 2 together.
5th row—over, knit 2 together, over, knit 2 together, and so on.
5th row—yarn over, knit 2 together, yarn over, knit 2 together, and so on.
6th row—like the last. See that the 2 slipped stitches, in the coarse thread, always come on the right side of the work.
6th row—same as the last. Make sure the 2 slipped stitches, in the thick thread, always appear on the right side of the work.
7th row—with the coarse thread: purl 4, purl the 2 slipped stitches of the 3rd row together, then repeat from the 1st row.
7th row—with the coarse thread: purl 4, purl the 2 slipped stitches of the 3rd row together, then repeat from the 1st row.
See that in the 3rd row the 2 overs come between the stitches formed by the 2 stitches that were formed by the 1st over, and the 2 stitches of the 6th row, that were knitted together.
See that in the 3rd row the 2 overs are placed between the stitches created by the 2 stitches from the 1st over, and the 2 stitches in the 6th row that were knitted together.
Knitting pattern with two kinds of thread (fig. 386).—Cast on a number of stitches that divides by 4.
Knitting pattern with two types of yarn (fig. 386).—Cast on a number of stitches that is a multiple of 4.
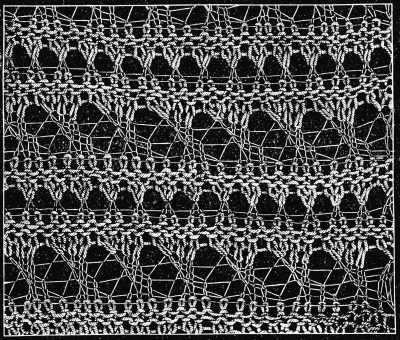
Materials: Fil à pointer D.M.C Nos. 25 to 30 and Cordonnet 6 fils D.M.C No. 60 or 80.
Materials: D.M.C Fil à pointer Nos. 25 to 30 and D.M.C Cordonnet 6 fils No. 60 or 80.
1st row—with coarse thread: purl.
1st row—with thick thread: purl.
2nd row—plain.
2nd row—simple.
3rd row—with fine thread: over, 1 intake, knit 2.
3rd row—with fine thread: knit over, 1 stitch, knit 2.
4th row—plain.
4th row—simple.
5th row—knit 1, over, 1 intake, knit 1.
5th row—knit 1, increase 1, knit 1.
6th row—plain.
Row 6—basic.
7th row—knit 2, over, 1 intake.
7th row—knit 2, yarn over, 1 increase.
8th row—plain.
8th row—basic.
9th and 10th row—with the coarse thread: purl.
9th and 10th row—with the thick thread: purl.
11th row—plain.
11th row—no decoration.
12th row—with the fine thread: over, knit 2 together.
12th row—with the fine thread: yarn over, knit 2 together.
13th row—plain.
Row 13—plain.
14th row—purl. Then repeat from the 1st row.
14th row—purl. Then repeat from the 1st row.
Knitting pattern with dropped stitches (fig. 387).—Cast on a number of stitches that divides by 9.
Knitting pattern with dropped stitches (fig. 387).—Cast on a number of stitches that is divisible by 9.
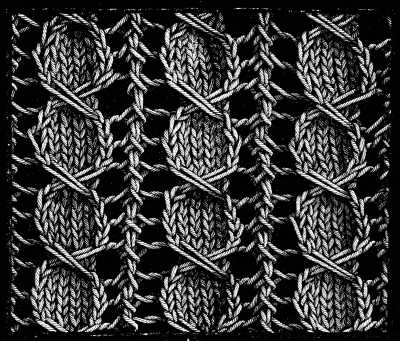
Materials: Coton à tricoter D.M.C Nos. 16 to 30, Coton pour crochet D.M.C Nos. 6 to 30, or Fil à pointer D.M.C Nos. 10 to 30.
Materials: D.M.C Knitting Cotton Nos. 16 to 30, D.M.C Crochet Cotton Nos. 6 to 30, or D.M.C Pointer Thread Nos. 10 to 30.
1st row—over, slip 3, knit 1, 2 overs, knit 3, 2 overs, knit 1.
1st row—over, slip 3, knit 1, 2 overs, knit 3, 2 overs, knit 1.
2nd row—knit 3, slip the next, drop the 2 overs, knit 4, turn the work, purl 4, turn the work, knit 4, drop the 2 overs, slip the next stitch.
2nd row—knit 3, slip the next, drop the 2 overs, knit 4, turn the work, purl 4, turn the work, knit 4, drop the 2 overs, slip the next stitch.
3rd row—over, slip 2, knit 1, pull slipped stitches over, drop the first of the 4 stitches, knit first the stitch that follows the second double over, then the 4 others plain, and lastly, take up the dropped stitch and knit it plain on the right side of the work.
3rd row—over, slip 2, knit 1, pull slipped stitches over, drop the first of the 4 stitches, knit first the stitch that comes after the second double over, then the 4 others plain, and finally, pick up the dropped stitch and knit it plain on the right side of the work.
4th row—knit plain.
4th row—knit stitch.
5th row—over, slip 3, over, knit 6.
5th row—over, slip 3, over, knit 6.
6th row—knit plain, and repeat from the 1st row.
6th row—knit plain, and repeat from the 1st row.

1st row—over, knit 2 together, over, knit 2 together, over, knit 2 together, over, knit 4, knit 2 together, over, slip 2, knit 1, pull slipped stitches over, over, knit 3.
1st row—yarn over, knit 2 together, yarn over, knit 2 together, yarn over, knit 2 together, yarn over, knit 4, knit 2 together, yarn over, slip 2, knit 1, pull slipped stitches over, yarn over, knit 3.
Each row marked by an even number is to be knitted plain throughout.
Each row with an even number should be knitted plain all the way through.
3rd row—knit 1, over, knit 2 together, over, knit 2 together, over, knit 2 together, over, slip 1, knit 1, pull slipped stitch over, knit 2, knit 2 together, over, knit 3, over, slip 1, knit 1, pull slipped stitch over, knit 1.
3rd row—knit 1, yarn over, knit 2 together, yarn over, knit 2 together, yarn over, knit 2 together, yarn over, slip 1, knit 1, pull slipped stitch over, knit 2, knit 2 together, yarn over, knit 3, yarn over, slip 1, knit 1, pull slipped stitch over, knit 1.
5th row—knit 2, over, knit 2 together, over, knit 2 together, over, knit 2 together, over, slip 1, knit 1, pull slipped stitch over, knit 2 together, over, knit 5, over, knit 2 together.
5th row—knit 2, yarn over, knit 2 together, yarn over, knit 2 together, yarn over, knit 2 together, yarn over, slip 1, knit 1, pull slipped stitch over, knit 2 together, yarn over, knit 5, yarn over, knit 2 together.
7th row—knit 3, over, knit 2 together, over, knit 2 together, over, knit 2 together, over, slip 1, knit 1, pull slipped stitch over, knit 1, over, slip 1, knit 1, pull slipped stitch over, knit 1, knit 2 together, over, knit 2.
7th row—knit 3, yarn over, knit 2 together, yarn over, knit 2 together, yarn over, knit 2 together, yarn over, slip 1, knit 1, pull the slipped stitch over, knit 1, yarn over, slip 1, knit 1, pull the slipped stitch over, knit 1, knit 2 together, yarn over, knit 2.
9th row—knit 4, over, knit 2 together, over, knit 2 together, over, knit 2 together, over, slip 1, knit 1, pull slipped stitch over, knit 1, over, slip 2, knit 1, pull slipped stitches over, over, knit 2.
9th row—knit 4, yarn over, knit 2 together, yarn over, knit 2 together, yarn over, knit 2 together, yarn over, slip 1, knit 1, pull slipped stitch over, knit 1, yarn over, slip 2, knit 1, pull slipped stitches over, yarn over, knit 2.
11th row—knit 5, over, knit 2 together, over, knit 2 together, over, knit 2 together, over, knit 2 together, over, slip 1, knit 1, pull slipped stitch over, knit 6.
11th row—knit 5, yarn over, knit 2 together, yarn over, knit 2 together, yarn over, knit 2 together, yarn over, knit 2 together, yarn over, slip 1, knit 1, pull the slipped stitch over, knit 6.
13th row—knit 7, over, knit 2 together, over, purl 2 together, over, slip 1, knit 1, pull slipped stitch over, knit 5.
13th row—knit 7, yarn over, knit 2 together, yarn over, purl 2 together, yarn over, slip 1, knit 1, pull slipped stitch over, knit 5.
Repeat from the beginning.
Repeat from the start.
Knitting pattern (fig. 389).—Cast on a number of stitches that divides by 9.
Knitting pattern (fig. 389).—Cast on a number of stitches that is a multiple of 9.
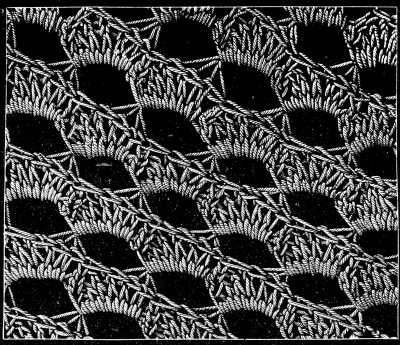
Materials: Cordonnet 6 fils D.M.C, or Fil à pointer D.M.C
Materials: Cordonnet 6 threads D.M.C, or Pointer thread D.M.C
1st row—2 overs, slip 1, knit 1, pull slipped stitch over, knit 5, knit 2 together.
1st row—2 overs, slip 1, knit 1, pull slipped stitch over, knit 5, knit 2 together.
2nd row—2 overs, slip the first over on to the right needle, knit the second over, slip 1, knit 1, pull slipped stitch over, knit 3, knit 2 together.
2nd row—2 stitches, slip the first stitch onto the right needle, knit the second stitch, slip 1, knit 1, pull the slipped stitch over, knit 3, knit 2 together.
3rd row—2 overs, slip the overs of the two first rows on to the right needle, slip 1, knit 1, pull slipped stitch over, knit 1, knit 2 together.
3rd row—2 stitches, transfer the stitches from the first two rows to the right needle, slip 1, knit 1, pull the slipped stitch over, knit 1, knit 2 together.
4th row—drop the overs of the 3 first rows and knit 8 double stitches, that is, knit 1 stitch on the over, slip it on to the left needle and knit it again.
4th row—drop the overs of the first 3 rows and knit 8 double stitches, which means knit 1 stitch on the over, slip it onto the left needle, and knit it again.
These 8 stitches finished, make 2 overs, and slip 3, knit 1, pull slipped stitches over. Repeat from the beginning.
These 8 stitches finished, make 2 yarn overs, and slip 3, knit 1, pull the slipped stitches over. Repeat from the beginning.
Each time you repeat the 4th row, make double stitches on 4 overs, that is, on 4 threads.
Each time you repeat the 4th row, make double stitches on 4 overs, that is, on 4 threads.
Knitting pattern (fig. 390).—This pattern is suitable for children’s braces. For Coton à repriser D.M.C Nos. 6 to 20, which is the best for the purpose, you will require fine bone needles.
Knitting pattern (fig. 390).—This pattern is perfect for kids' suspenders. For Coton à repriser D.M.C Nos. 6 to 20, which is the best choice for this, you'll need fine bone needles.
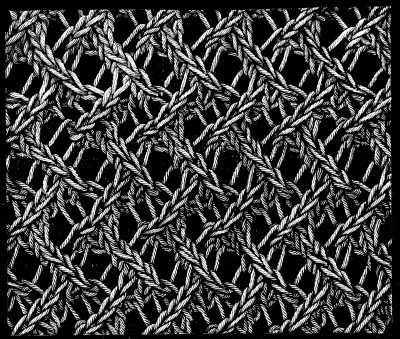
Materials: Coton à repriser D.M.C Nos. 5 to 20.
Materials: D.M.C Repair Cotton No. 5 to 20.
Cast on a number of stitches that divides by 4.
Cast on a number of stitches that is divisible by 4.
1st row—over, slip 1, knit 1, pull slipped stitch over, knit 2.
1st row—over, slip 1, knit 1, pull the slipped stitch over, knit 2.
2nd row—knit 1, over, slip 1, knit 1, pull slipped stitch over, knit 1.
2nd row—knit 1, yarn over, slip 1, knit 1, pull the slipped stitch over, knit 1.
3rd row—knit 2, over, slip 1, knit 1, pull slipped stitch over.
3rd row—knit 2, yarn over, slip 1, knit 1, pull the slipped stitch over.
4th row—slip 1, knit 1, pull slipped stitch over, knit 2, over.
4th row—slip 1, knit 1, pull slipped stitch over, knit 2, over.
5th row—knit 2 together, over, knit 2.
5th row—knit 2 together, over, knit 2.
6th row—knit 1, knit 2 together, over, knit 1.
6th row—knit 1, knit 2 together, over, knit 1.
7th row—knit 2 together, over, knit 2.
7th row—knit 2 together, over, knit 2.
8th row—knit 2, knit 2 together, over.
8th row—knit 2, knit 2 together, over.
Repeat from the beginning.
Start over.
Knitting pattern (fig. 391).—The patterns shown in figs. 391 and 392, are more particularly useful for comforters, shawls, hoods and the like. The needles, which may be either of bone or steel must match the cotton in size; steel needles are the best for any thing finer than No. 16, of D.M.C Coton à tricoter.
Knitting pattern (fig. 391).—The patterns shown in figs. 391 and 392 are especially helpful for comforters, shawls, hoods, and similar items. The needles, which can be made of bone or steel, need to match the cotton in size; steel needles are recommended for anything finer than No. 16 of D.M.C Coton à tricoter.
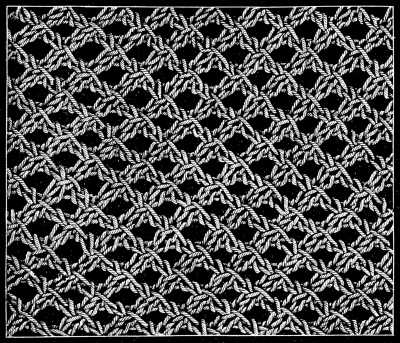
Cast on a number of stitches that divides by 3.
Cast on a number of stitches that is divisible by 3.
1st row—over, slip 1 stitch on to the right needle, knit the 2 next stitches, and draw the first stitch over them.
1st row—hold the yarn over, slip 1 stitch onto the right needle, knit the next 2 stitches, and pull the first stitch over them.
2nd row and 4th row—knit plain.
2nd row and 4th row—knit straight.
3rd row—like the first, but note, that the stitch that was the third in the first row, will be the first here.
3rd row—like the first, but note that the stitch that was third in the first row will be first here.
Repeat from the beginning.
Repeat from the start.
Knitting pattern (fig. 392).—Cast on a number of stitches that divides by 3.
Knitting pattern (fig. 392).—Cast on a number of stitches that is a multiple of 3.

1st row—over, knit the 2 first together, draw the 3rd stitch through the stitch formed by the intake and knit it off plain, then knit the stitch that was pulled over it.
1st row—over, knit the first 2 together, pull the 3rd stitch through the stitch made by the intake and knit it off plain, then knit the stitch that was pulled over it.
2nd and 4th row—knit plain.
2nd and 4th row—knit straight.
3rd row—like the first; the third stitch here is the same that was drawn through the third stitch in the first row.
3rd row—like the first; the third stitch here is the same as the one that was pulled through the third stitch in the first row.
Knitting pattern (fig. 393).—Cast on a number of stitches that divides by 14.
Knitting pattern (fig. 393).—Cast on a number of stitches that is divisible by 14.

1st row—over, knit 1, over, knit 2, purl 3, knit 3 together, purl 3, knit 2.
1st row—over, knit 1, over, knit 2, purl 3, knit 3 together, purl 3, knit 2.
2nd row—knit 5, purl 7, knit 2.
2nd row—knit 5, purl 7, knit 2.
3rd row—over, knit 3, over, knit 2, purl 2, knit 3 together, purl 2, knit 2.
3rd row—over, knit 3, over, knit 2, purl 2, knit 3 together, purl 2, knit 2.
4th row—knit 7, purl 5, knit 2.
4th row—knit 7, purl 5, knit 2.
5th row—over, knit 5, over, knit 2, purl 1, knit 3 together, purl 1, knit 2.
5th row—yarn over, knit 5, yarn over, knit 2, purl 1, knit 3 together, purl 1, knit 2.
6th row—knit 9, purl 3, knit 2.
6th row—knit 9, purl 3, knit 2.
7th row—over, knit 7, over, knit 2, knit 3 together, knit 2.
7th row—yarn over, knit 7, yarn over, knit 2, knit 3 together, knit 2.
8th row—knit 11, purl 1, knit 1.
8th row—knit 11, purl 1, knit 1.
Repeat from the beginning but in the reverse order, that is, purling the knitted stitches and knitting the purled.
Repeat from the beginning but in reverse order, meaning, purl the knitted stitches and knit the purled ones.
Knitted lace (fig. 394).—Knitted lace looks best, made of a smooth, silky thread which shows up the pattern better than any other material. As a knitted edging makes a very pretty finish to almost any kind of knitted article, we give a selection of some of the easiest and most effective patterns that we consider suitable for the purpose.
Knitted lace (fig. 394).—Knitted lace looks its best when made with a smooth, silky thread, which highlights the pattern better than any other material. Since a knitted edging adds a lovely finish to nearly any knitted piece, we present a selection of some of the easiest and most effective patterns that we believe are suitable for this purpose.
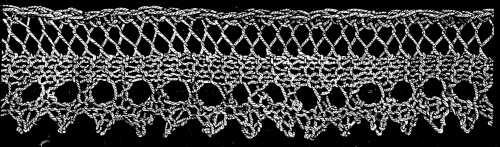
Materials: Cordonnet 6 fils D.M.C Nos. 25 to 60, Fil à dentelle D.M.C Nos. 25 to 70.[A]
Materials: Cordonnet 6 strands D.M.C Nos. 25 to 60, Lace thread D.M.C Nos. 25 to 70.__A_TAG_PLACEHOLDER_0__
Cast on 8 stitches.
Cast on 8 stitches.
1st needle—1 chain, knit 2, over, knit 2 together, knit 2, 2 overs, knit 2.
1st needle—1 chain, knit 2, yarn over, knit 2 together, knit 2, 2 yarn overs, knit 2.
2nd needle—knit 3, purl 1, knit 4, over, knit 2 together, 1 chain.
2nd needle—knit 3, purl 1, knit 4, yarn over, knit 2 together, 1 chain.
3rd needle—1 chain, knit 2, over, knit 2 together, knit 6.
3rd needle—1 chain, knit 2, yarn over, knit 2 together, knit 6.
4th needle—2 chain, knit 5, over, knit 2 together, 1 chain.
4th needle—2 chains, knit 5, yarn over, knit 2 together, 1 chain.
Repeat from the first needle.
Repeat from the first stitch.
Knitted lace (fig. 395).—Cast on 10 stitches.
Lace knitting (fig. __A_TAG_PLACEHOLDER_0__).—Cast on 10 stitches.
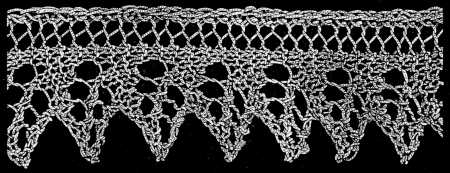
Materials: Coton à tricoter D.M.C Nos. 25 to 50, Fil à pointer D.M.C Nos. 10 to 30, Cordonnet 6 fils D.M.C Nos. 10 to 30.[A]
Materials: D.M.C cotton yarn in sizes 25 to 50, D.M.C thread in sizes 10 to 30, D.M.C 6-ply cord in sizes 10 to 30.__A_TAG_PLACEHOLDER_0__
1st needle—knit 2 together, 2 overs, knit 2 together, 2 overs, knit 3, over, knit 2 together, 1 chain.
1st needle—knit 2 together, 2 yarn overs, knit 2 together, 2 yarn overs, knit 3, yarn over, knit 2 together, 1 chain.
2nd needle—1 chain, knit 2, knit 2 together, knit 2, purl 1, knit 2, purl 1, knit 1.
2nd needle—1 chain, knit 2, knit 2 together, knit 2, purl 1, knit 2, purl 1, knit 1.
3rd needle—knit 2 together, 2 overs, knit 2 together, 2 overs, knit 4, over, knit 2 together, 1 chain.
3rd needle—knit 2 together, make 2 yarn overs, knit 2 together, make 2 yarn overs, knit 4, yarn over, knit 2 together, 1 chain.
4th needle—1 chain, knit 2, knit 2 together, knit 3, purl 1, knit 2, purl 1, knit 1.
4th needle—1 chain, knit 2, knit 2 together, knit 3, purl 1, knit 2, purl 1, knit 1.
5th needle—knit 2 together, 2 overs, knit 2 together, 2 overs, knit 5, over, knit 2 together, 1 chain.
5th needle—knit 2 together, yarn over 2 times, knit 2 together, yarn over 2 times, knit 5, yarn over, knit 2 together, 1 chain.
6th needle—1 chain, knit 2, knit 2 together, knit 4, purl 1, knit 2, purl 1, knit 1.
6th needle—1 chain, knit 2, knit 2 together, knit 4, purl 1, knit 2, purl 1, knit 1.
7th needle—knit 10, over, knit 2 together, 1 chain.
7th needle—knit 10, yarn over, knit 2 together, 1 chain.
8th needle—1 chain, knit 2, knit 2 together, knit 8.
8th needle—1 chain, knit 2, knit 2 together, knit 8.
9th needle—4 chain, 2 overs, knit 2 together, 2 overs, knit 3, over, knit 2 together, 1 chain.
9th needle—4 chains, 2 yarn overs, knit 2 together, 2 yarn overs, knit 3, yarn over, knit 2 together, 1 chain.
Repeat from the second needle.
Repeat from the second stitch.
Knitted lace (fig. 396).—Cast on 13 stitches.
Knitted lace (fig. __A_TAG_PLACEHOLDER_0__).—Cast on 13 sts.
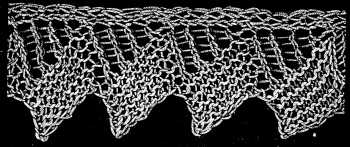
Materials: Fil d’Alsace D.M.C Nos. 30 to 70, Cordonnet 6 fils D.M.C Nos. 20 to 80, or Fil à dentelle D.M.C Nos. 25 to 60.[A]
Materials: Fil d’Alsace D.M.C Nos. 30 to 70, Cordonnet 6 fils D.M.C Nos. 20 to 80, or Fil à dentelle D.M.C Nos. 25 to 60.__A_TAG_PLACEHOLDER_0__
1st needle—1 chain, purl 1, purl 2 together, over, knit 8, 1 chain.
1st needle—1 chain, purl 1, purl 2 together, over, knit 8, 1 chain.
2nd needle—1 chain, knit 8, over, knit 2, knit 1 from behind, 1 chain.
2nd needle—1 chain, knit 8, yarn over, knit 2, knit 1 from behind, 1 chain.
3rd needle—1 chain, purl 2, over, purl 2 together, over, knit 8, 1 chain.
3rd needle—1 chain, purl 2, yarn over, purl 2 together, yarn over, knit 8, 1 chain.
4th needle—1 chain, knit 8, over, knit 2 together, over, knit 2, knit 1 from behind, 1 chain.
4th needle—1 chain, knit 8, yarn over, knit 2 together, yarn over, knit 2, knit 1 from behind, 1 chain.
5th needle—1 chain, purl 2, over, purl 2 together, over, purl 2 together, over, knit 8, 1 chain.
5th needle—1 chain, purl 2, yarn over, purl 2 together, yarn over, purl 2 together, yarn over, knit 8, 1 chain.
6th needle—1 chain, knit 8, over, knit 2 together, over, knit 2 together, over, knit 2, knit 1 from behind, 1 chain.
6th needle—1 chain, knit 8, yarn over, knit 2 together, yarn over, knit 2 together, yarn over, knit 2, knit 1 from behind, 1 chain.
7th needle—1 chain, purl 2, over, purl 2 together, over, purl 2 together, over, purl 2 together, over, knit 8, 1 chain.
7th needle—1 chain, purl 2, yarn over, purl 2 together, yarn over, purl 2 together, yarn over, purl 2 together, yarn over, knit 8, 1 chain.
8th needle—1 chain, knit 8, over, knit 2 together, over, knit 2 together, over, knit 2 together, over, knit 2, knit 1 from behind, 1 chain.
8th needle—1 chain, knit 8, yarn over, knit 2 together, yarn over, knit 2 together, yarn over, knit 2 together, yarn over, knit 2, knit 1 from behind, 1 chain.
9th needle—1 chain, purl 2, over, purl 2 together, over, purl 2 together, over, purl 2 together, over, purl 2 together, over, knit 8, 1 chain.
9th needle—1 chain, purl 2, over, purl 2 together, over, purl 2 together, over, purl 2 together, over, purl 2 together, over, knit 8, 1 chain.
10th needle—8 chain, knit 10, knit 1 from behind, 1 chain.
10th needle—8 chains, knit 10, knit 1 through the back, 1 chain.
Repeat from the first needle.
Repeat from the first stitch.
Knitted lace (fig. 397).—Cast on 11 stitches.
Knitted lace (fig. __A_TAG_PLACEHOLDER_0__).—Cast on 11 stitches.
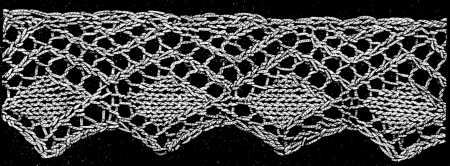
Materials: Fil d’Alsace D.M.C Nos. 30 to 70, Cordonnet 6 fils D.M.C Nos. 25 to 70, Fil à dentelle D.M.C Nos. 25 to 80.[A]
Materials: D.M.C Fil d’Alsace Numbers 30 to 70, D.M.C Cordonnet 6 fils Numbers 25 to 70, D.M.C Fil à dentelle Numbers 25 to 80.__A_TAG_PLACEHOLDER_0__
1st needle—1 chain, knit 1 from behind, over, knit 1, over, slip 1, knit 1, pull slipped stitch over, over, slip 1, knit 1, pull slipped stitch over, over, slip 1, knit 1, pull slipped stitch over, knit 1, 1 chain.
1st needle—1 chain, knit 1 from the back, yarn over, knit 1, yarn over, slip 1, knit 1, pull the slipped stitch over, yarn over, slip 1, knit 1, pull the slipped stitch over, yarn over, slip 1, knit 1, pull the slipped stitch over, knit 1, 1 chain.
The 2nd, 4th, 6th, 8th, 10th, 12th, 14th, and 16th needle, purled.
The 2nd, 4th, 6th, 8th, 10th, 12th, 14th, and 16th needle, purled.
3rd needle—1 chain, knit 1 from behind, over, knit 3, over, slip 1, knit 1, pull slipped stitch over, over, slip 1, knit 1, pull slipped stitch over, over, slip 1, knit 1, pull slipped stitch over, 1 chain.
3rd needle—1 chain, knit 1 from behind, yarn over, knit 3, yarn over, slip 1, knit 1, pull slipped stitch over, yarn over, slip 1, knit 1, pull slipped stitch over, yarn over, slip 1, knit 1, pull slipped stitch over, 1 chain.
5th needle—1 chain, knit 1 from behind, over, knit 5, over, slip 1, knit 1, pull slipped stitch over, over, slip 1, knit 1, pull slipped stitch over, knit 1, 1 chain.
5th needle—1 chain, knit 1 from behind, yarn over, knit 5, yarn over, slip 1, knit 1, pull the slipped stitch over, yarn over, slip 1, knit 1, pull the slipped stitch over, knit 1, 1 chain.
7th needle—1 chain, knit 1 from behind, over, knit 7, over, slip 1, knit 1, pull slipped stitch over, over, slip 1, knit 1, pull slipped stitch over, 1 chain.
7th needle—1 chain, knit 1 from behind, yarn over, knit 7, yarn over, slip 1, knit 1, pull slipped stitch over, yarn over, slip 1, knit 1, pull slipped stitch over, 1 chain.
9th needle—1 chain, slip 1, knit 1, pull slipped stitch over, over, slip 1, knit 1, pull slipped stitch over, knit 3, knit 2 together, over, knit 2 together, over, knit 2, 1 chain.
9th needle—1 chain, slip 1, knit 1, pull slipped stitch over, over, slip 1, knit 1, pull slipped stitch over, knit 3, knit 2 together, over, knit 2 together, over, knit 2, 1 chain.
11th needle—1 chain, slip 1, knit 1, pull slipped stitch over, over, slip 1, knit 1, pull slipped stitch over, knit 1, knit 2 together, over, knit 2 together, over, knit 2 together, over, knit 1, 1 chain.
11th needle—1 chain, slip 1, knit 1, pull slipped stitch over, over, slip 1, knit 1, pull slipped stitch over, knit 1, knit 2 together, over, knit 2 together, over, knit 2 together, over, knit 1, 1 chain.
13th needle—1 chain, slip 1, knit 1, pull slipped stitch over, over, knit 3 together, over, knit 2 together, over, knit 2 together, over, knit 2, 1 chain.
13th needle—1 chain, slip 1, knit 1, pull the slipped stitch over, over, knit 3 together, over, knit 2 together, over, knit 2 together, over, knit 2, 1 chain.
15th needle—1 chain, slip 1, knit 1, pull slipped stitch over, knit 1, knit 2 together, over, knit 2 together, over, knit 1, 1 chain.
15th needle—1 chain, slip 1, knit 1, pull slipped stitch over, knit 1, knit 2 together, over, knit 2 together, over, knit 1, 1 chain.
Repeat from the first needle.
Repeat from the first stitch.
Rose for knitting (fig. 398).—Repeat all the directions, 8 ending with the sign *, 7 times.
Rose for knitting (fig. 398).—Repeat all the instructions, 8 ending with the sign *, 7 times.
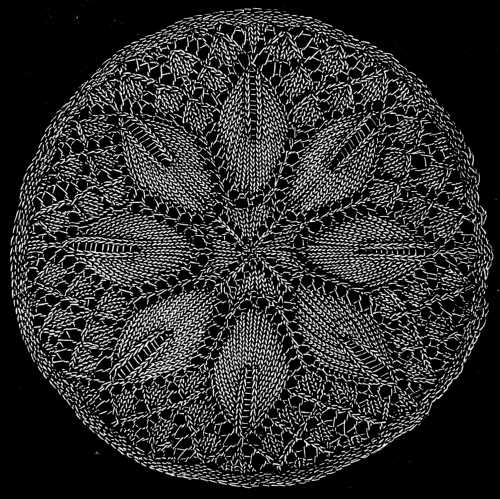
Materials: Fil d’Alsace D.M.C in balls, No. 60 or 70, Fil à dentelle D.M.C No. 40, 50 or 60.[A]
Materials: D.M.C Alsace thread in balls, No. 60 or 70, D.M.C lace thread No. 40, 50, or 60.__A_TAG_PLACEHOLDER_0__
Cast on 8 stitches, on to 4 needles, two on each; close the ring.
Cast on 8 stitches, using 4 needles with 2 stitches on each; close the ring.
2nd round—8 times: over, knit 1.
2nd round—8 times: repeat, knit 1.
The 3rd, 5th, 7th, 9th, 11th, 13th, 15th, 17th, 19th, 21st, 23rd, and 25th round, knit plain.
The 3rd, 5th, 7th, 9th, 11th, 13th, 15th, 17th, 19th, 21st, 23rd, and 25th rounds, knit normally.
4th round—over, knit 3, over, knit 1 from behind *.
4th round—over, knit 3, over, knit 1 from behind *.
6th round—over, knit 4, over, knit 1 from behind *.
6th round—knit 4, yarn over, knit 1 from behind *.
8th round—over, knit 7, over, knit 1 from behind *.
8th round—over, knit 7, over, knit 1 from behind *.
10th round—over, slip 1, knit 1, pull slipped stitch over, knit 2 together, over, knit 1 *.
10th round—over, slip 1, knit 1, pull slipped stitch over, knit 2 together, over, knit 1 *.
12th round—over, knit 2 together, over, knit 3 *.
12th round—over, knit 2 together, over, knit 3 *.
14th round—over, knit 1 from behind, over, knit 5 *.
14th round—over, knit 1 from behind, over, knit 5 *.
16th round—over, knit 1 from behind, over, knit 7 *.
16th round—over, knit 1 from behind, over, knit 7 *.
18th round—over, knit 1 from behind, over, knit 9 *.
18th round—over, knit 1 from the back, over, knit 9 *.
20th round—over, knit 1 from behind, over, knit 11 *.
20th round—over, knit 1 from behind, over, knit 11 *.
22nd round—over, knit 1 from behind, over, knit 13 *.
22nd round—over, knit 1 from behind, over, knit 13 *.
24th round—over, knit 1 from behind, over, knit 15 *.
24th round—over, knit 1 from behind, over, knit 15 *.
26th round—over, knit 3, over, knit 5, knit 2 together, purl 1, slip 1, knit 1, pull slipped stitch over, knit 5 *.
26th round—over, knit 3, over, knit 5, knit 2 together, purl 1, slip 1, knit 1, pull slipped stitch over, knit 5 *.
27th round—knit 11, purl 1, knit 6 *.
27th round—knit 11, purl 1, knit 6 *.
28th round—over, knit 5, over, knit 4, knit 2 together, purl 1, slip 1, knit 1, pull slipped stitch over, knit 4 *.
28th round—over, knit 5, over, knit 4, knit 2 together, purl 1, slip 1, knit 1, pull slipped stitch over, knit 4 *.
29th round—knit 12, purl 1, knit 5 *.
29th round—knit 12, purl 1, knit 5 *.
30th round—over, knit 1, over, slip 1, knit 1, pull slipped stitch over, knit 1, knit 2 together, over, knit 1, over, knit 3, knit 2 together, purl 1, slip 1, knit 1, pull slipped stitch over, knit 3 *.
30th round—over, knit 1, over, slip 1, knit 1, pull slipped stitch over, knit 1, knit 2 together, over, knit 1, over, knit 3, knit 2 together, purl 1, slip 1, knit 1, pull slipped stitch over, knit 3 *.
31st round—knit 13, purl 1, knit 4 *.
31st round—knit 13, purl 1, knit 4 *
32nd round—over, knit 3, over, slip 2, knit 1, pull slipped stitches over, over, knit 3, over, knit 2, knit 2 together, purl 1, slip 1, knit 1, pull slipped stitch over, knit 2 *.
32nd round—over, knit 3, over, slip 2, knit 1, pull slipped stitches over, over, knit 3, over, knit 2, knit 2 together, purl 1, slip 1, knit 1, pull slipped stitch over, knit 2 *.
33rd round—knit 14, purl 1, knit 3.
33rd round—knit 14, purl 1, knit 3.
34th round—over, knit 11, over, knit 1, knit 2 together, purl 1, slip 1, knit 1, pull slipped stitch over, knit 1 *.
34th round—over, knit 11, over, knit 1, knit 2 together, purl 1, slip 1, knit 1, pull slipped stitch over, knit 1 *.
35th round—knit 15, purl 1, knit 2.
35th round—knit 15, purl 1, knit 2.
36th round—over, knit 1, over, slip 1, knit 1, pull slipped stitch over, knit 1, knit 2 together, over, knit 1, over, slip 1, knit 1, pull slipped stitch over, knit 1, knit 2 together, over, knit 1, over, knit 2 together, purl 1, slip 1, knit 1, pull slipped stitch over *.
36th round—yarn over, knit 1, yarn over, slip 1, knit 1, pull slipped stitch over, knit 1, knit 2 together, yarn over, knit 1, yarn over, slip 1, knit 1, pull slipped stitch over, knit 1, knit 2 together, yarn over, knit 1, yarn over, knit 2 together, purl 1, slip 1, knit 1, pull slipped stitch over *.
37th round—knit 16, purl 1, knit 1.
37th round—knit 16, purl 1, knit 1.
38th round—over, knit 3, over, slip 2, knit 1, pull slipped stitches over, over, knit 3, over, slip 2, knit 1, pull slipped stitches over, over, knit 3, over, knit 2, over, slip 2, knit 1, pull slipped stitches over *.
38th round—over, knit 3, over, slip 2, knit 1, pull slipped stitches over, over, knit 3, over, slip 2, knit 1, pull slipped stitches over, over, knit 3, over, knit 2, over, slip 2, knit 1, pull slipped stitches over *.
39th, 41st and 43rd round—knit plain.
39th, 41st and 43rd round—knit straight.
40th round—over, knit 4, knit 2 together, over, knit 5, over, slip 1, knit 1, pull slipped stitch over, knit 4, over, knit 1.
40th round—yarn over, knit 4, knit 2 together, yarn over, knit 5, yarn over, slip 1, knit 1, pull slipped stitch over, knit 4, yarn over, knit 1.
42nd round—knit 1, over, slip 1, knit 1, pull slipped stitch over, knit 1, knit 2 together, over, knit 1, over, slip 1, knit 1, pull slipped stitch over, knit 1, knit 2 together, over, knit 1, over, slip 1, knit 1, pull slipped stitch over, knit 1, knit 2 together, over, knit 2 *.
42nd round—knit 1, yarn over, slip 1, knit 1, pull the slipped stitch over, knit 1, knit 2 together, yarn over, knit 1, yarn over, slip 1, knit 1, pull the slipped stitch over, knit 1, knit 2 together, yarn over, knit 1, yarn over, slip 1, knit 1, pull the slipped stitch over, knit 1, knit 2 together, yarn over, knit 2 *.
44th round—knit 2, over, slip 2, knit 1, pull slipped stitches over, over, knit 3, over, slip 2, knit 1, pull slipped stitches over, over, knit 3, over, slip 2, knit 1, pull slipped stitches over, over, knit 3 *.
44th round—knit 2, yarn over, slip 2, knit 1, pull slipped stitches over, yarn over, knit 3, yarn over, slip 2, knit 1, pull slipped stitches over, yarn over, knit 3, yarn over, slip 2, knit 1, pull slipped stitches over, yarn over, knit 3 *.
Finish with three purled rounds.
Finish with three purl rounds.
Knitted edging (fig. 399).—Cast on 43 stitches.
Knitted edging (fig. __A_TAG_PLACEHOLDER_0__).—Cast on 43 stitches.

Materials: Fil d’Alsace D.M.C Nos. 40 to 70 or Fil à dentelle D.M.C Nos. 25 to 50, or Cordonnet 6 fils D.M.C Nos. 25 to 60.[A]
Materials: D.M.C Fil d’Alsace Nos. 40 to 70 or D.M.C Fil à dentelle Nos. 25 to 50, or D.M.C Cordonnet 6 fils Nos. 25 to 60.__A_TAG_PLACEHOLDER_0__
1st needle, make a chain of 2 stitches, over, knit 1 from behind, over, knit 1 from behind, over, knit 1, over, slip 1, knit 1, pull slipped stitch over, knit 1, knit 2 together, over, knit 1, over, slip 1, knit 1, pull slipped stitch over, knit 1, knit 2 together, over, knit 1, knit 1 from behind, purl 1, knit 1 from behind, over, knit 1, knit 2 together, purl 1, slip 1, knit 1, pull slipped stitch over, knit 1, purl 1, knit 1, knit 2 together, knit 1 from behind, slip 1, knit 1, pull slipped stitch over, knit 1, over, knit 1 from behind, purl 1, knit 1 from behind, over, knit 2 together, knit 1, 1 chain.
1st needle, make a chain of 2 stitches, yarn over, knit 1 from behind, yarn over, knit 1 from behind, yarn over, knit 1, yarn over, slip 1, knit 1, pull slipped stitch over, knit 1, knit 2 together, yarn over, knit 1, yarn over, slip 1, knit 1, pull slipped stitch over, knit 1, knit 2 together, yarn over, knit 1, knit 1 from behind, purl 1, knit 1 from behind, yarn over, knit 1, knit 2 together, purl 1, slip 1, knit 1, pull slipped stitch over, knit 1, purl 1, knit 1, knit 2 together, knit 1 from behind, slip 1, knit 1, pull slipped stitch over, knit 1, yarn over, knit 1 from behind, purl 1, knit 1 from behind, yarn over, knit 2 together, knit 1, 1 chain.
2nd needle—1 chain, knit 2, purl 1, purl 1 from behind, knit 1, purl 1 from behind, purl 3, knit 1, purl 2, knit 1, purl 2, knit 1, purl 3, purl 1 from behind, knit 1, purl 1 from behind, purl 14, purl 1 from behind, purl 4.
2nd needle—1 chain, knit 2, purl 1, purl 1 from behind, knit 1, purl 1 from behind, purl 3, knit 1, purl 2, knit 1, purl 2, knit 1, purl 3, purl 1 from behind, knit 1, purl 1 from behind, purl 14, purl 1 from behind, purl 4.
3rd needle—slip 2 stitches over for a chain, over, knit 1 from behind, over, knit 1 from behind, over, knit 3, over, slip 2, knit 1, pull slipped stitches over, over, knit 3, over, slip 2, knit 1, pull slipped stitches over, over, knit 2 together, over, knit 1 from behind, purl 1, knit 1 from behind, over, knit 1, over knit 2 together, purl 1, slip 1, knit 1, pull slipped stitch over, purl 1, knit 2 together, purl 1, slip 1, knit 1, pull slipped stitch over, over, knit 1, over, knit 1 from behind, purl 1, knit 1 from behind, over, knit 2 together, knit 1, 1 chain.
3rd needle—slip 2 stitches over for a chain, over, knit 1 from behind, over, knit 1 from behind, over, knit 3, over, slip 2, knit 1, pull slipped stitches over, over, knit 3, over, slip 2, knit 1, pull slipped stitches over, over, knit 2 together, over, knit 1 from behind, purl 1, knit 1 from behind, over, knit 1, over knit 2 together, purl 1, slip 1, knit 1, pull slipped stitch over, purl 1, knit 2 together, purl 1, slip 1, knit 1, pull slipped stitch over, over, knit 1, over, knit 1 from behind, purl 1, knit 1 from behind, over, knit 2 together, knit 1, 1 chain.
5th needle—slip 2 stitches over for a chain, over, knit 1 from behind, over, knit 1 from behind, over, knit 2, over, slip 1, knit 1, pull slipped stitch over, knit 2 together, over, knit 2, over, slip 1, knit 1, pull slipped stitch over, knit 2 together, over, knit 2 together, over, knit 1, knit 1 from behind, purl 1, knit 1 from behind, over, knit 3, over, slip 2, knit 1, pull slipped stitches over, purl 1, slip 2, knit 1, pull slipped stitches over, over, knit 3, over, knit 1 from behind, purl 1, knit 1 from behind, over, knit 2 together, knit 1, 1 chain.
5th needle—slip 2 stitches for a chain, over, knit 1 from behind, over, knit 1 from behind, over, knit 2, over, slip 1, knit 1, pull the slipped stitch over, knit 2 together, over, knit 2, over, slip 1, knit 1, pull the slipped stitch over, knit 2 together, over, knit 2 together, over, knit 1, knit 1 from behind, purl 1, knit 1 from behind, over, knit 3, over, slip 2, knit 1, pull the slipped stitches over, purl 1, slip 2, knit 1, pull the slipped stitches over, over, knit 3, over, knit 1 from behind, purl 1, knit 1 from behind, over, knit 2 together, knit 1, 1 chain.
6th needle—slip 1, knit 2, purl 1, purl 1 from behind, knit 1, purl 1 from behind, purl 6, knit 1, purl 6, purl 1 from behind, knit 1, purl 1 from behind, purl 16, purl 1 from behind, purl 4.
6th needle—slip 1, knit 2, purl 1, purl 1 from behind, knit 1, purl 1 from behind, purl 6, knit 1, purl 6, purl 1 from behind, knit 1, purl 1 from behind, purl 16, purl 1 from behind, purl 4.
7th needle—slip 2 stitches over for a chain, over, knit 1 from behind, over, knit 1 from behind, over, knit 1, over, slip 1, knit 1, pull slipped stitch over, knit 1, knit 2 together, over, knit 1, over, slip 1, knit 1, pull slipped stitch over, knit 1, knit 2 together, over, knit 2 together, over, knit 2 together, over, knit 1 from behind, purl 1, knit 1 from behind, over, knit 5, over, slip 2, knit 1, pull slipped stitches over, over, knit 5, over, knit 1 from behind, purl 1, knit 1 from behind, over, knit 2 together, knit 1, 1 chain.
7th needle—slip 2 stitches for a chain, yarn over, knit 1 from behind, yarn over, knit 1 from behind, yarn over, knit 1, yarn over, slip 1, knit 1, pull the slipped stitch over, knit 1, knit 2 together, yarn over, knit 1, yarn over, slip 1, knit 1, pull the slipped stitch over, knit 1, knit 2 together, yarn over, knit 2 together, yarn over, knit 2 together, yarn over, knit 1 from behind, purl 1, knit 1 from behind, yarn over, knit 5, yarn over, slip 2, knit 1, pull the slipped stitches over, yarn over, knit 5, yarn over, knit 1 from behind, purl 1, knit 1 from behind, yarn over, knit 2 together, knit 1, 1 chain.
8th needle—slip 1, knit 2, purl 1, purl 1 from behind, knit 1, purl 1 from behind, purl 15, purl 1 from behind, knit 1, purl 1 from behind, purl 17, purl 1 from behind, purl 4.
8th needle—slip 1, knit 2, purl 1, purl 1 from the back, knit 1, purl 1 from the back, purl 15, purl 1 from the back, knit 1, purl 1 from the back, purl 17, purl 1 from the back, purl 4.
9th needle—slip 2 stitches over for a chain, over, knit 1 from behind, over, knit 1 from behind, over, knit 3, over, slip 2, knit 1, pull slipped stitches over, over, knit 3, over, slip 2, knit 1, pull slipped stitches over, over, knit 2 together, over, knit 2 together, over, knit 1, knit 1 from behind, purl 1, knit 1 from behind, over, knit 1, knit 2 together, purl 1, slip 1, knit 1, pull slipped stitch over, knit 1, purl 1, knit 1, knit 2 together, purl 1, slip 1, knit 1, pull slipped stitch over, knit 1, over, knit 1 from behind, purl 1, knit 1 from behind, over, knit 2 together, knit 1, 1 chain.
9th needle—slip 2 stitches for a chain, yarn over, knit 1 from the back, yarn over, knit 1 from the back, yarn over, knit 3, yarn over, slip 2, knit 1, pull the slipped stitches over, yarn over, knit 3, yarn over, slip 2, knit 1, pull the slipped stitches over, yarn over, knit 2 together, yarn over, knit 2 together, yarn over, knit 1, knit 1 from the back, purl 1, knit 1 from the back, yarn over, knit 1, knit 2 together, purl 1, slip 1, knit 1, pull the slipped stitch over, knit 1, purl 1, knit 1, knit 2 together, purl 1, slip 1, knit 1, pull the slipped stitch over, knit 1, yarn over, knit 1 from the back, purl 1, knit 1 from the back, yarn over, knit 2 together, knit 1, 1 chain.
11th needle—slip 2 stitches over for a chain, over, knit 1 from behind, over, knit 1 from behind, over, knit 2, over, slip 1, knit 1, pull slipped stitch over, knit 2 together, over, knit 2, over, slip 1, knit 1, pull slipped stitch over, knit 2 together, over, knit 2 together, over, knit 2 together, over, knit 2 together, over, knit 1 from behind, purl 1, knit 1 from behind, over, knit 1, over, knit 2 together, purl 1, slip 1, knit 1, pull slipped stitch over, purl 1, knit 2 together, purl 1, slip 1, knit 1, pull slipped stitch over, over, knit 1, over, knit 1 from behind, purl 1, knit 1 from behind, over, knit 2 together, knit 1, 1 chain.
11th needle—slip 2 stitches for a chain, yarn over, knit 1 from behind, yarn over, knit 1 from behind, yarn over, knit 2, yarn over, slip 1, knit 1, pull slipped stitch over, knit 2 together, yarn over, knit 2, yarn over, slip 1, knit 1, pull slipped stitch over, knit 2 together, yarn over, knit 2 together, yarn over, knit 2 together, yarn over, knit 2 together, yarn over, knit 1 from behind, purl 1, knit 1 from behind, yarn over, knit 1, yarn over, knit 2 together, purl 1, slip 1, knit 1, pull slipped stitch over, purl 1, knit 2 together, purl 1, slip 1, knit 1, pull slipped stitch over, yarn over, knit 1, yarn over, knit 1 from behind, purl 1, knit 1 from behind, yarn over, knit 2 together, knit 1, 1 chain.
12th needle—slip 1, knit 2, purl 1, purl 1 from behind, knit 1, purl 1 from behind, purl 4, knit 1, purl 1, knit 1, purl 1, knit 1, purl 4, purl 1 from behind, knit 1, purl 1 from behind, purl 19, purl 1 from behind, purl 4.
12th needle—slip 1, knit 2, purl 1, purl 1 from behind, knit 1, purl 1 from behind, purl 4, knit 1, purl 1, knit 1, purl 1, knit 1, purl 4, purl 1 from behind, knit 1, purl 1 from behind, purl 19, purl 1 from behind, purl 4.
13th needle—slip 2 stitches over for a chain, over, knit 1 from behind, over, slip 1, knit 1, pull slipped stitch over, over, slip 1, knit 1, pull slipped stitch over, knit 1, knit 2 together, over, knit 1, over, slip 1, knit 1, pull slipped stitch over, knit 1, knit 2 together, over, knit 1, over, slip 1, knit 1, pull slipped stitch over, over, slip 1, knit 1, pull slipped stitch over, over, slip 1, knit 1, pull slipped stitch over, knit 1 from behind, purl 1, knit 1, from behind, over, knit 3, over, slip 2, knit 1, pull slipped stitches over, purl 1, slip 2, knit 1, pull slipped stitches over, over, knit 3, over, knit 1 from behind, purl 1, knit 1 from behind, over, knit 2 together, knit 1, 1 chain.
13th needle—slip 2 stitches for a chain, yarn over, knit 1 from behind, yarn over, slip 1, knit 1, pull the slipped stitch over, yarn over, slip 1, knit 1, pull the slipped stitch over, knit 1, knit 2 together, yarn over, knit 1, yarn over, slip 1, knit 1, pull the slipped stitch over, knit 1, knit 2 together, yarn over, knit 1, yarn over, slip 1, knit 1, pull the slipped stitch over, yarn over, slip 1, knit 1, pull the slipped stitch over, yarn over, slip 1, knit 1, pull the slipped stitch over, knit 1 from behind, purl 1, knit 1 from behind, yarn over, knit 3, yarn over, slip 2, knit 1, pull the slipped stitches over, purl 1, slip 2, knit 1, pull the slipped stitches over, yarn over, knit 3, yarn over, knit 1 from behind, purl 1, knit 1 from behind, yarn over, knit 2 together, knit 1, 1 chain.
14th needle—slip 1, knit 2, purl 1, purl 1 from behind, knit 1, purl 1 from behind, purl 6, knit 1, purl 6, purl 1 from behind, knit 1, purl 1 from behind, purl 18, purl 1 from behind, purl 4.
14th needle—slip 1, knit 2, purl 1, purl 1 from the back, knit 1, purl 1 from the back, purl 6, knit 1, purl 6, purl 1 from the back, knit 1, purl 1 from the back, purl 18, purl 1 from the back, purl 4.
15th needle—slip 2 stitches over for a chain, over, knit 1 from behind, over, slip 1, knit 1, pull slipped stitch over, over, slip 2, knit 1, pull slipped stitches over, over, knit 3, over, slip 2, knit 1, pull slipped stitches over, over, knit 3, over, slip 1, knit 1, pull slipped stitch over, over, slip 1, knit 1, pull slipped stitch over, over, knit 2 together, purl 1, knit 1 from behind, over knit 5, over, slip 2, knit 1, pull slipped stitches over, over, knit 1 from behind, over, knit 2 together, knit 1, 1 chain.
15th needle—slip 2 stitches for a chain, over, knit 1 from behind, over, slip 1, knit 1, pull the slipped stitch over, over, slip 2, knit 1, pull the slipped stitches over, over, knit 3, over, slip 2, knit 1, pull the slipped stitches over, over, knit 3, over, slip 1, knit 1, pull the slipped stitch over, over, slip 1, knit 1, pull the slipped stitch over, over, knit 2 together, purl 1, knit 1 from behind, over knit 5, over, slip 2, knit 1, pull the slipped stitches over, over, knit 1 from behind, over, knit 2 together, knit 1, 1 chain.
16th needle—like the 8th.
16th needle—like the 8th.
17th needle—slip 2 stitches over for a chain, over, knit 1 from behind, over, slip 1, knit 1, pull slipped stitch over, over, slip 1, knit 1, pull slipped stitch over, knit 2 together, over, knit 2, over, slip 1, knit 1, pull slipped stitch over, knit 2 together, over, knit 2, over, slip 1, knit 1, pull slipped stitch over, over, slip 1, knit 1, pull slipped stitch over, knit 1 from behind, purl 1, knit 1 from behind, over, knit 1, knit 2 together, purl 1, slip 1, knit 1, pull slipped stitch over, knit 1, purl 1, knit 1, knit 2 together, purl 1, slip 1, knit 1, pull slipped stitch over, knit 1, over, knit 1 from behind, purl 1, knit 1 from behind, over, knit 2 together, knit 1, 1 chain.
17th needle—slip 2 stitches over for a chain, over, knit 1 from behind, over, slip 1, knit 1, pull the slipped stitch over, over, slip 1, knit 1, pull the slipped stitch over, knit 2 together, over, knit 2, over, slip 1, knit 1, pull the slipped stitch over, knit 2 together, over, knit 2, over, slip 1, knit 1, pull the slipped stitch over, over, slip 1, knit 1, pull the slipped stitch over, knit 1 from behind, purl 1, knit 1 from behind, over, knit 1, knit 2 together, purl 1, slip 1, knit 1, pull the slipped stitch over, knit 1, purl 1, knit 1, knit 2 together, purl 1, slip 1, knit 1, pull the slipped stitch over, knit 1, over, knit 1 from behind, purl 1, knit 1 from behind, over, knit 2 together, knit 1, 1 chain.
18th needle—slip 1, knit 2, purl 1, purl 1 from behind, knit 1, purl 1 from behind, purl 3, knit 1, purl 2, knit 1, purl 2, knit 1, purl 3, purl 1 from behind, knit 1, purl 1 from behind, purl 16, purl 1 from behind, purl 4.
18th needle—slip 1, knit 2, purl 1, purl 1 from the back, knit 1, purl 1 from the back, purl 3, knit 1, purl 2, knit 1, purl 2, knit 1, purl 3, purl 1 from the back, knit 1, purl 1 from the back, purl 16, purl 1 from the back, purl 4.
19th needle—slip 2 stitches over for a chain, over, knit 1 from behind, over, slip 1, knit 1, pull slipped stitch over, over, slip 1, knit 1, pull slipped stitch over, knit 1, knit 2 together, over, knit 1, over, slip 1, knit 1, pull slipped stitch over, knit 1, knit 2 together, over, knit 1, over, slip 1, knit 1, pull slipped stitch over, over, knit 2 together, purl 1, knit 1 from behind, over, knit 1, over, purl 1, slip 1, knit 1, pull slipped stitch over, purl 1, knit 2 together, purl 1, slip 1, knit 1, pull slipped stitch over, over, knit 1, over, knit 1 from behind, purl 1, knit 1 from behind, over, knit 2 together, knit 1, 1 chain.
19th needle—slip 2 stitches for a chain, over, knit 1 from behind, over, slip 1, knit 1, pull the slipped stitch over, over, slip 1, knit 1, pull the slipped stitch over, knit 1, knit 2 together, over, knit 1, over, slip 1, knit 1, pull the slipped stitch over, knit 1, knit 2 together, over, knit 1, over, slip 1, knit 1, pull the slipped stitch over, over, knit 2 together, purl 1, knit 1 from behind, over, knit 1, over, purl 1, slip 1, knit 1, pull the slipped stitch over, purl 1, knit 2 together, purl 1, slip 1, knit 1, pull the slipped stitch over, over, knit 1, over, knit 1 from behind, purl 1, knit 1 from behind, over, knit 2 together, knit 1, 1 chain.
20th needle—like the 4th.
20th needle—like the 4th.
21st needle—slip 2 stitches over for a chain, over, knit 1 from behind, over, slip 1, knit 1, pull slipped stitch over, over, slip 2, knit 1, pull slipped stitches over, over, knit 3, over, slip 2, knit 1, pull slipped stitches over, over, knit 3, over, slip 1, knit 1, pull slipped stitch over, knit 1 from behind, purl 1, knit 1 from behind, over, knit 3, over, slip 2, knit 1, pull slipped stitches over, purl 1, slip 2, knit 1, pull slipped stitches over, over, knit 3, over, knit 1 from behind, purl 1, knit 1 from behind, over, knit 2 together, knit 1, 1 chain.
21st needle—slip 2 stitches for a chain, over, knit 1 from behind, over, slip 1, knit 1, pull the slipped stitch over, over, slip 2, knit 1, pull the slipped stitches over, over, knit 3, over, slip 2, knit 1, pull the slipped stitches over, over, knit 3, over, slip 1, knit 1, pull the slipped stitch over, knit 1 from behind, purl 1, knit 1 from behind, over, knit 3, over, slip 2, knit 1, pull the slipped stitches over, purl 1, slip 2, knit 1, pull the slipped stitches over, over, knit 3, over, knit 1 from behind, purl 1, knit 1 from behind, over, knit 2 together, knit 1, 1 chain.
22nd needle—slip 1; knit 2, purl 1, purl 1 from behind, knit 1, purl 1 from behind, purl 6, knit 1, purl 6, purl 1 from behind, knit 1, purl 1 from behind, purl 14, purl 1 from behind, purl 4.
22nd needle—slip 1; knit 2, purl 1, purl 1 from behind, knit 1, purl 1 from behind, purl 6, knit 1, purl 6, purl 1 from behind, knit 1, purl 1 from behind, purl 14, purl 1 from behind, purl 4.
23rd needle—slip 2 stitches over for a chain, over, knit 1 from behind, over, slip 1, knit 1, pull slipped stitch over, over, slip 1, knit 1, pull slipped stitch over, knit 2 together, over, knit 2, over, slip 1, knit 1, pull slipped stitch over, knit 2 together, over, knit 2, over, knit 2 together, purl 1, knit 1 from behind, over, knit 5, over, slip 2, knit 1, pull slipped stitches over, over, knit 5, over, knit 1 from behind, purl 1, knit 1 from behind, over, knit 2 together, knit 1, 1 chain.
23rd needle—slip 2 stitches for a chain, over, knit 1 from behind, over, slip 1, knit 1, pull the slipped stitch over, over, slip 1, knit 1, pull the slipped stitch over, knit 2 together, over, knit 2, over, slip 1, knit 1, pull the slipped stitch over, knit 2 together, over, knit 2, over, knit 2 together, purl 1, knit 1 from behind, over, knit 5, over, slip 2, knit 1, pull the slipped stitches over, over, knit 5, over, knit 1 from behind, purl 1, knit 1 from behind, over, knit 2 together, knit 1, 1 chain.
24th needle—slip 1, knit 2, purl 1, purl 1 from behind, knit 4, purl 1 from behind, purl 15, purl 1 from behind, knit 1, purl 1 from behind, purl 13, purl 1 from behind, purl 4.
24th needle—slip 1, knit 2, purl 1, purl 1 from behind, knit 4, purl 1 from behind, purl 15, purl 1 from behind, knit 1, purl 1 from behind, purl 13, purl 1 from behind, purl 4.
Repeat from the first needle.
Repeat from the first stitch.
FOOTNOTES:

Crochet Work.
Crochet work, so called from the hook, French croche or croc, with which it is done, is not only one of the easiest but in comparison with the cost and labour, one of the most effective kinds of fancy-work. It is also one of the most useful, as it can be applied to the domestic requirements of every-day life, to wearing apparel, house-linen and upholstery; and we are sure that the patterns contained in this chapter, which have in addition to their other merits that of novelty, will meet with a favorable reception.
Crochet, named after the French words croche or croc, which refer to the hook used to create it, is not only one of the easiest crafts but also, in terms of cost and effort, one of the most effective forms of decorative work. It's incredibly useful too, as it can be used for everyday necessities, clothing, home linens, and upholstery. We believe that the patterns in this chapter, which also have the added benefit of being unique, will be well received.
Hooks, or needles, as they are generally called, made of wood, bone or tortoise-shell are used for all the heavier kinds of crochet work in thick wool or cotton, and steel ones for the finer kinds. The Tunisian crochet is done with a long straight hook, which is made all in one piece. The points should be well polished inside and not too sharp, the backs slightly curved, and the handles, whether of bone, steel or wood, so light as not to tire the hand. Those represented here, we consider the best, as regards shape. As it is most essential that the needle should be suited to the cotton in size, we subjoin a comparative table of the numbers of the D.M.C threads and cottons and of the different needles.
Hooks, commonly known as needles, made from wood, bone, or tortoise shell are used for heavier crochet projects in thick wool or cotton, while steel hooks are used for finer work. Tunisian crochet is done with a long, straight hook made from a single piece. The tips should be smooth on the inside and not too sharp, the backs should be slightly curved, and the handles, whether made of bone, steel, or wood, should be light enough not to strain the hand. The ones shown here are considered the best in terms of shape. Since it's crucial for the needle to match the size of the thread, we include a comparison chart of the D.M.C threads and cottons along with different needle sizes.

Explanation of the signs *.—In crochet, as in knitting, you frequently have to repeat the same series of stitches. Such repetitions will be indicated, by the signs *, **, ***, etc., as the case may be.
Explanation of the signs *.—In crochet, like in knitting, you often need to repeat the same sequence of stitches. These repetitions are shown using the signs *, **, ***, etc., depending on the situation.
Crochet stitches.—In point of fact, there is only one, because all crochet work consists of loops made by means of the hook or needle, and connected together by being drawn the one through the other.
Crochet stitches.—In reality, there’s only one type, because all crochet work consists of loops created with the hook or needle, linked together by pulling one through the other.
Crochet work may however, be divided into two kinds, German crochet, and Victoria or Tunisian crochet; the latter is known also under the name of tricot-crochet.
Crochet work can be divided into two types: German crochet and Victoria or Tunisian crochet; the latter is also known as tricot-crochet.
In German crochet there are eight different kinds of stitches: (1) chain stitch, (2) single stitch, (3) plain stitch, (4) treble stitch, (5) knot stitch, (6) bullion stitch, (7) cluster or scale stitch, (8) double stitch.
In German crochet, there are eight different types of stitches: (1) chain stitch, (2) single stitch, (3) plain stitch, (4) treble stitch, (5) knot stitch, (6) bullion stitch, (7) cluster or scale stitch, (8) double stitch.
The rows are worked, according to the kind of stitch, either to and fro, or all from one end. In the former case, the work has to be turned at the end of each row, and the subsequent row begun with 1, 2 or 3 chain stitches to prevent the contraction of the outside edge.
The rows are worked depending on the type of stitch, either back and forth or all from one end. In the first case, you need to turn the work at the end of each row and start the next row with 1, 2, or 3 chain stitches to avoid the edges from tightening.
When the rows are all worked one way, the thread must be fastened on afresh each time, which is done by putting the needle into the first chain stitch of the preceding row, drawing the thread through it so as to form a loop, and making one or more chain stitches according to the height required.
When all the rows are finished in one direction, you need to tie off the thread each time. This is done by inserting the needle into the first chain stitch of the previous row, pulling the thread through to create a loop, and then making one or more chain stitches depending on the height you need.
At the end of each row, cut the thread and draw the end through the last loop; in this manner all crochet work is finished off. Some crochet workers make a few extra chain stitches with the ends of the thread at the beginning and end of each row, or fasten them off with a few stitches on the wrong side.
At the end of each row, cut the thread and pull the end through the last loop; this is how all crochet work is finished. Some crocheters make a few extra chain stitches with the ends of the thread at the beginning and end of each row, or secure them with a few stitches on the wrong side.
They can also, when the occasion requires, be formed into a fringe or tassels as a finish to the work.
They can also, when needed, be shaped into a fringe or tassels to complete the work.
Position of the hands and explanation of (1) chain stitch (fig. 403).—Take the thread in the left hand between the finger and thumb, hold the needle between the thumb and first finger of the right hand, letting it rest on the second finger, in the same manner in which you hold your pen, and put it into the loop, which you hold between the finger and thumb of the left hand. Take up the thread, lying on your finger, with the needle and make your first stitch as you do in knitting, tightening the loop just enough to leave an easy passage through it for the needle. The end of the thread must be held by the thumb and forefinger. The next stitches are made by taking up the thread with the needle and drawing it through the loop. The throwing of the thread round the needle by a jerk of the wrist is called an ‘over’.
Position of the hands and explanation of (1) chain stitch (fig. 403).—Hold the thread in your left hand between your thumb and index finger. Grip the needle in your right hand between your thumb and index finger, resting it on your middle finger, just like you would hold a pen. Insert the needle into the loop that you’re holding with your left hand. Use the needle to pick up the thread that’s resting on your finger and make your first stitch as you do in knitting, tightening the loop just enough to allow the needle to pass through it easily. Keep the end of the thread secured with your thumb and index finger. For the next stitches, use the needle to pull the thread through the loop. The action of flicking the thread around the needle with a quick wrist motion is called an ‘over’.
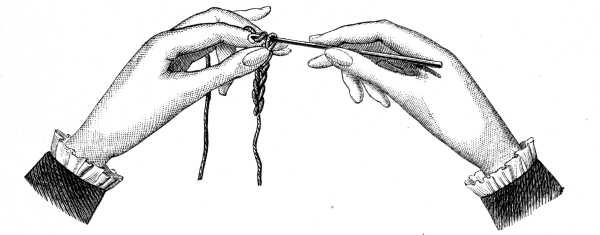
(2) Single stitch (fig. 404).—Put the needle in from the right side of the work, into the uppermost loop of the preceding row, take up the thread on the needle and draw it through both loops.
(2) Single stitch (fig. 404).—Insert the needle from the front of the work into the top loop of the previous row, pull the thread through the needle, and draw it through both loops.
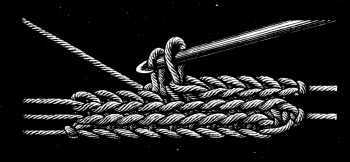
(3) Plain stitch (fig. 405).—Put the needle through, as in fig. 404, from the right side to the wrong, under the upper side, either of a chain, or of a stitch of the preceding row, draw the thread through it in a loop, turn the thread round the needle and draw it through both loops on the needle. By making the rows of plain stitches follow each other in different ways, a great variety of stitches can be produced, as the illustrations and written instructions here given will show.
(3) Plain stitch (fig. 405).—Insert the needle from the right side to the wrong side, under the top part of either a chain or a stitch from the previous row, pull the thread through in a loop, wrap the thread around the needle, and pull it through both loops on the needle. By arranging the rows of plain stitches in different patterns, you can create a wide range of stitches, as shown in the illustrations and instructions provided here.
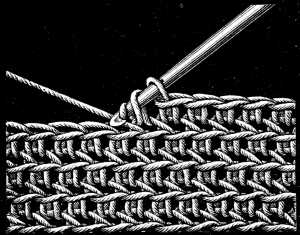
Rose stitch (fig. 406).—This consists of rows of plain stitches, worked backwards and forwards. Insert the needle from the right side, under both the horizontal loops of the preceding row.
Rose stitch (fig. 406).—This is made up of rows of regular stitches, worked back and forth. Insert the needle from the front side, under both the horizontal loops of the row before.
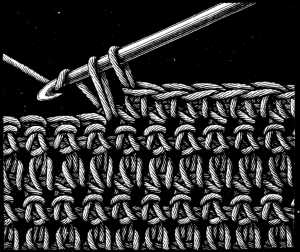
Russian stitch (fig. 407).—This is worked like the foregoing, only that all the rows have to be begun from the same end, and the thread has to be cut off at the end of each row.
Russian stitch (fig. 407).—This is done like the previous stitch, but all the rows need to start from the same end, and the thread must be cut off at the end of each row.
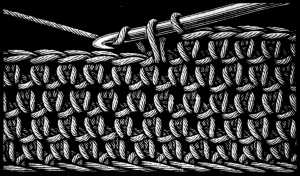
Ribbed stitch (fig. 408).—Worked backwards and forwards, the hook being passed through the back part only of the stitches of the preceding row.
Ribbed stitch (fig. 408).—Knit back and forth, the hook is inserted only into the back part of the stitches from the previous row.
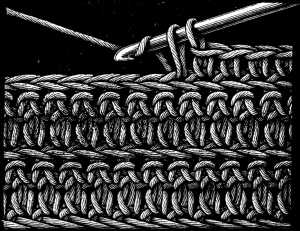
Chain stitch.—Worked like fig. 408, but on one side only.
Chain stitch.—Done like fig. 408, but on just one side.
Piqué stitch.—This stitch also is only worked on one side. Put the needle in under one of the vertical threads of a stitch and complete the plain stitch. This is a stitch that looks very well on the wrong side; the bars of the loop lie quite close together, which makes it particularly suitable for unlined articles of clothing. It requires a large-sized needle to do this stitch well, especially if the material be a heavy one.
Piqué stitch.—This stitch is also only worked on one side. Insert the needle under one of the vertical threads of a stitch and finish the plain stitch. This stitch looks great on the wrong side; the loops are close together, making it especially ideal for unlined clothing. It requires a larger needle to do this stitch properly, especially if the material is heavy.
Slanting stitch (fig. 409).—Worked entirely on the right side. Take up the back thread of a stitch in the preceding row, take hold of the crochet thread without turning it round the needle and draw it through in a loop, and then finish the stitch like a plain stitch.
Slanting stitch (fig. 409).—Worked completely on the front side. Pick up the back thread of a stitch from the previous row, grab the crochet thread without wrapping it around the needle, pull it through to make a loop, and then complete the stitch like a regular stitch.
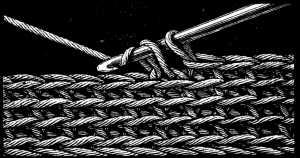
Crossed stitch.—The name which is given to the preceding stitch when both the threads of the stitches in the row before, are taken up together, instead of the back one only.
Crossed stitch.—This term is used for the previous stitch when both threads from the stitches in the row before are picked up together, rather than just the back one.
Russian crossed stitch (fig. 410).—To work this stitch which runs in slanting lines, put the needle in between the vertical threads of the stitches and underneath the two horizontal ones.
Russian crossed stitch (fig. 410).—To do this stitch, which creates diagonal lines, insert the needle between the vertical threads of the stitches and under the two horizontal ones.
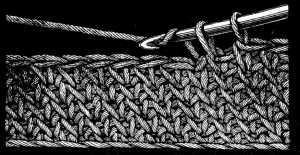
Counterpane stitch (fig. 411).—Counterpanes can be made in a less close stitch than those just described.
Counterpane stitch (fig. 411).—Counterpanes can be made with a looser stitch than the ones just described.
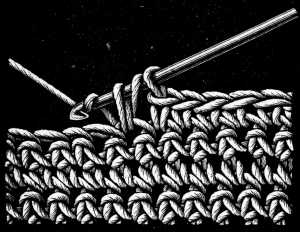
To produce a soft and elastic fabric turn the thread round the needle and insert it under both the horizontal threads of a loop, take up the thread without turning it round the needle, draw it through in a loop, make an over, and draw the thread through all the three loops, that you have on the needle.
To make a soft and stretchy fabric, wrap the thread around the needle and insert it under both horizontal threads of a loop. Pick up the thread without wrapping it around the needle, pull it through in a loop, make an over, and pull the thread through all three loops you have on the needle.
Knotted stitch (fig. 412).—This stitch likewise is composed of plain stitches, which, however differ in a slight degree from those we have described hitherto.
Knotted stitch (fig. 412).—This stitch is also made up of plain stitches, but they vary slightly from the ones we've talked about so far.
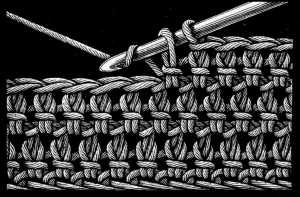
Make an over, put the needle through the two horizontal threads of the stitch below, make another over and draw it back through the two loops and the first over, make another over, and draw the thread through the last two loops.
Make an over, pull the needle through the two horizontal threads of the stitch below, make another over and pull it back through the two loops and the first over, make another over, and pull the thread through the last two loops.
Loop stitch (fig. 413).—Worked as follows: when you have put the needle into the loop of a stitch below, carry the thread, downwards from above, round a stripe of cardboard or a flat wooden ruler, then finish the stitch in the usual way. These long loops, each about 2 c/m. in length, can also be made over the forefinger and held fast by the thumb as you work, but it is more difficult to make them regular in this way.
Loop stitch (fig. 413).—To do this stitch, start by inserting the needle into the loop of a stitch below. Then, bring the thread down from above and wrap it around a piece of cardboard or a flat wooden ruler, before completing the stitch as you normally would. These long loops, each about 2 cm in length, can also be created over your forefinger and held in place with your thumb while you work, but it’s harder to keep them even this way.
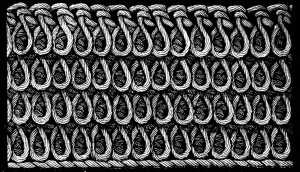
Each row of long stitches is followed by a row of plain stitches. The side, where the long loops lie, becomes the right side. If you wish this stitch to be very thick and handsome, wind the thread three times round the ruler, or finger, and secure it with a plain stitch; in this case, you should make one plain stitch between every two clusters. A loose, fleecy thread is generally used for this stitch, and for washing articles more especially, we recommend Coton à repriser D.M.C.
Each row of long stitches is followed by a row of basic stitches. The side with the long loops becomes the front side. If you'd like this stitch to be really thick and nice-looking, wrap the thread three times around a ruler or your finger, and secure it with a basic stitch; in this case, you should make one basic stitch between every two clusters. A loose, soft thread is usually used for this stitch, and for washing items, we especially recommend Coton à repriser D.M.C.
Plain stitches for a chain (fig. 414).—Begin with two chain stitches, put the needle in between the two threads of the first chain stitch, turn the thread round the needle and draw it through in a loop, turn it round again and draw it through the two loops; then, put the needle into the left part of the stitch that was just made, turn the thread round the needle, draw it through the two loops and so on, to the end.
Plain stitches for a chain (fig. 414).—Start with two chain stitches, insert the needle between the two threads of the first chain stitch, wrap the thread around the needle and pull it through to form a loop, wrap it around again and pull it through the two loops; then, insert the needle into the left side of the stitch you just made, wrap the thread around the needle, pull it through the two loops, and continue this process until you reach the end.
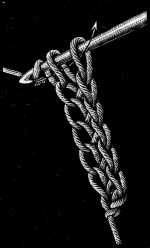
A chain of this kind makes a very good substitute for mignardise when that can not be got of the right size and colour for the required purpose.
A chain like this makes a great substitute for mignardise when you can't find one that fits the right size and color for what you need.
(4) Trebles.—Trebles are little columns, or bars made of loops or stitches. They can be worked, like all other crochet, either to and fro, or all one way. There are different kinds of trebles; half or short trebles, trebles, double trebles, called also ‘long stitch’, and quadruple and quintuple trebles, called ‘extra long stitch’, connected trebles and crossed trebles.
(4) Trebles.—Trebles are small columns or bars created by loops or stitches. They can be worked, like all other crochet, either back and forth or in one direction. There are different types of trebles: half or short trebles, trebles, double trebles (also called ‘long stitch’), quadruple and quintuple trebles (known as ‘extra long stitch’), connected trebles, and crossed trebles.
Half trebles (fig. 415).—Turn the cotton round the needle from behind, put the needle in between the trebles of the preceding row, or into one edge of a chain stitch; make an over, bring the needle forward again with the thread, make another over and draw the needle through all three loops.
Half trebles (fig. 415).—Wrap the cotton around the needle from behind, insert the needle between the trebles of the previous row, or into one edge of a chain stitch; yarn over, pull the needle forward again with the thread, yarn over again and pull the needle through all three loops.
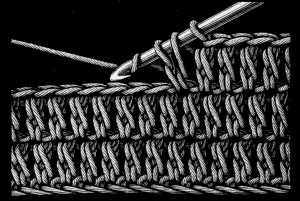

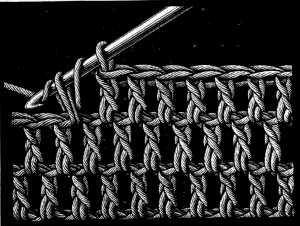
Double trebles or ‘long stitch’ (fig. 418).—Turn the thread twice round the needle, put it into a stitch of the work and bring the thread through in a loop, then take up the thread on the needle and bring it through two of the loops, three times in succession.
Double trebles or ‘long stitch’ (fig. 418).—Wrap the thread around the needle twice, insert it into a stitch of the work, and pull the thread through to form a loop. Then, take up the thread on the needle and pull it through two of the loops, repeating this three times in a row.
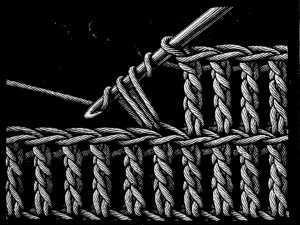
Triple and quadruple trebles or ‘extra long stitch’ (fig. 419).—For a triple treble, twist the cotton three times round the needle, for a quadruple one, four times, then form the treble in the usual way by bringing the needle through two of the loops at a time. To make a series of trebles, of gradually increasing length, bring the needle, at every other treble, through the last three loops, so that before making a triple treble you will have to make columns, respectively, 1 treble, 1½ treble, 2 trebles and 2½ trebles long. Columns like these, of different lengths, are often required in crochet work, for leaves and scalloped edgings.
Triple and quadruple trebles or ‘extra long stitch’ (fig. 419).—To make a triple treble, wrap the cotton three times around the needle; for a quadruple, wrap it four times. Then, create the treble as usual by pulling the needle through two loops at a time. To form a series of trebles that gradually increase in length, bring the needle, for every other treble, through the last three loops. This means that before you do a triple treble, you'll need to create columns that are 1 treble, 1½ treble, 2 trebles, and 2½ trebles long. Columns of varying lengths like these are often needed in crochet work for leaves and scalloped edges.
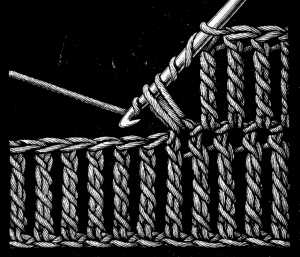
Connected trebles (fig. 420).—Trebles, connected together, can be worked to and fro, and take the place of plain stitches. Begin with a chain, then make a treble of the required height, form as many loops as you made overs for the treble, take up the upper thread of the stitch nearest the treble, turn the thread round the needle, bring it back to the right side and draw the needle through the trebles, two at a time.
Connected trebles (fig. 420).—Trebles that are linked together can be manipulated back and forth, acting in place of plain stitches. Start with a chain, then create a treble of the needed height, make as many loops as you created yarn overs for the treble, grab the upper thread of the stitch closest to the treble, wrap the thread around the needle, pull it back to the front, and draw the needle through the trebles, two at a time.
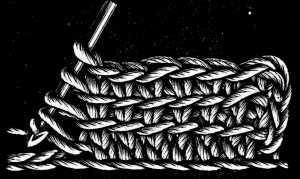
Crossed trebles (figs. 421 and 422).—Trebles of this sort produce an open stitch, which is often used for the footing of lace, or for an insertion. Make a foundation of chain, or other stitches, and proceed as follows: 3 chain, miss 2 stitches of the row beneath, make 1 treble in the third stitch, 5 chain, 1 over, put the needle in between the loops of the connected trebles and finish with a treble. Then make a double over, put the needle into the next loop of the preceding row, make another over, draw the needle through the loops, make another over and join the two next loops. This leaves 3 loops on the needle. Make an over, put the needle into the third stitch of the row beneath, make an over, and bring the needle back to the right side.
Crossed trebles (figs. 421 and 422).—Trebles like this create an open stitch, commonly used for lace edging or insertions. Start with a foundation of chain or other stitches, then follow these steps: make 3 chains, skip 2 stitches from the row below, and make 1 treble in the third stitch. Next, do 5 chains, skip 1, and insert the needle between the loops of the connected trebles to finish with a treble. Then do a double over, insert the needle into the next loop of the row before, do another over, pull the needle through the loops, do another over, and join the next two loops. This will leave 3 loops on the needle. Do an over, insert the needle into the third stitch of the row below, do an over, and bring the needle back to the front side.
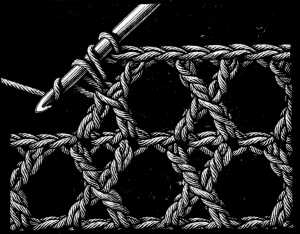
Join the 5 loops on the needle together, 2 and 2, make 2 chain, 1 over, put the needle into the upper parts of the connected trebles and finish with a treble, and so on.
Join the 5 loops on the needle together, 2 at a time, create 2 chains, 1 over, insert the needle into the top parts of the connected trebles and finish with a treble, and continue this way.
These trebles also can be lengthened if necessary, but in that case, the width of the crossed treble must correspond with the height. Generally speaking you make the trebles over the same number of stitches as you made overs on the needle, which should always be an even number.
These trebles can also be stretched if needed, but in that case, the width of the crossed treble must match the height. Generally, you create the trebles over the same number of stitches as you cast on the needle, which should always be an even number.
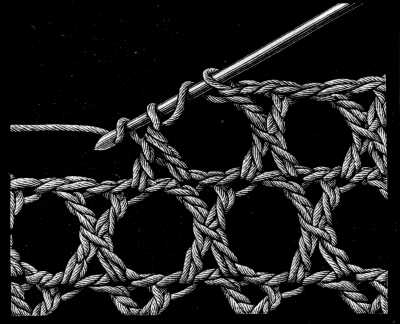
Trebles for a chain.—A quicker way of making a wide footing for a crochet lace is to make the trebles in the following manner.
Trebles for a chain.—A faster method for creating a wide base for crochet lace is to make the trebles like this.
Make 4 chain stitches, 2 overs, put the needle into the first of the 4 chain, 1 over, draw the thread through the stitch *, 1 over, draw the thread through the next 2 loops and repeat twice from * = ** 2 overs, put the needle into the left bottom part of the treble, close the treble as before and repeat from **.
Make 4 chain stitches, 2 yarn overs, insert the needle into the first of the 4 chains, 1 yarn over, pull the thread through the stitch *, 1 yarn over, pull the thread through the next 2 loops and repeat twice from * = ** 2 yarn overs, insert the needle into the left bottom part of the treble, close the treble as before and repeat from **.
(5) Knot stitch (fig. 423).—This stitch which is composed of several loops forming a tuft, can only be worked from one side, consequently all one way. It looks best in a coarse material to show the interlacing of the threads.
(5) Knot stitch (fig. 423).—This stitch, made up of several loops that create a tuft, can only be done from one side, so it goes all in the same direction. It looks best in a thick material to highlight the weaving of the threads.
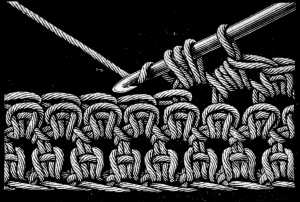
Enter the needle through the two loops of the stitches of the bottom row, turn the thread round the needle, but away from you towards the back; bring it forward to the right side, put the needle again through one of the bottom stitches, make another over like the first and draw the needle through all the bars at once.
Enter the needle through the two loops of the stitches in the bottom row, wrap the thread around the needle, but away from you towards the back; pull it forward to the right side, put the needle back through one of the bottom stitches, make another wrap like the first, and pull the needle through all the loops at once.
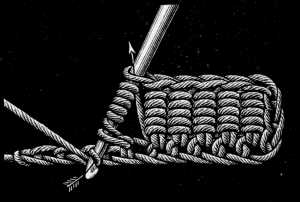
Begin by making a chain of very loose stitches, then wind the thread several times, very evenly, round the needle. Insert the needle into a loop of the chain, make a single over, and draw it with the last over upon it, through all the other overs.
Begin by creating a chain of very loose stitches, then wrap the thread several times, evenly, around the needle. Insert the needle into a loop of the chain, make a single over, and pull it with the last over through all the other overs.
Trebles in bullion stitch, fig. 425, are worked in just the same manner, only that you have to turn the thread, at least 10 or 12 times round the needle and draw it through all the overs at once. To facilitate the passage of the needle, keep the overs in their place with the thumb and forefinger of the left hand.
Trebles in bullion stitch, fig. 425, are done in the same way, except you need to wrap the thread around the needle at least 10 or 12 times and pull it through all the wraps at once. To make it easier to pass the needle through, hold the wraps in place with your thumb and index finger of your left hand.
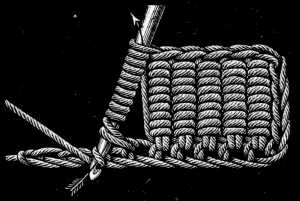
Bullion stitch can only be worked with wool or a very fleecy thread, such as Coton à repriser D.M.C,[A]but trebles in bullion stitch can be worked in any of the D.M.C threads and cottons.
Bullion stitch can only be done with wool or a very fluffy thread, like Coton à repriser D.M.C,[A]but you can use any of the D.M.C threads and cottons for trebles in bullion stitch.
(7) Cluster stitch (fig. 426).—Generally used as an insertion between rows of plain crochet.
(7) Cluster stitch (fig. 426).—Typically used as an addition between rows of basic crochet.
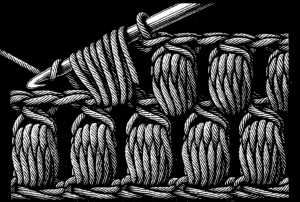
Put the needle under one stitch of the preceding row, make an over, draw the thread through in a loop, make another over, put the needle in again under the same stitch, bring it back, make a third over, and pass a third time under the same stitch; bring the needle back, make a fourth over and pass the needle through all the loops that are upon it.
Put the needle under one stitch from the previous row, make a yarn over, pull the thread through to create a loop, make another yarn over, insert the needle again under the same stitch, bring it back, make a third yarn over, and pass under the same stitch again; bring the needle back, make a fourth yarn over, and pull the needle through all the loops that are on it.
Then, after making a chain stitch, begin the same stitch over again, placing it in the second stitch of the lower row.
Then, after creating a chain stitch, start the same stitch again, positioning it in the second stitch of the row below.
Cluster stitch may also be finished off by retaining the two last loops on the needle, making an over, and ending with a plain stitch.
Cluster stitch can also be completed by keeping the last two loops on the needle, making an over, and finishing with a plain stitch.
(8) Double stitch (fig. 427).—A rather coarse thread, such as Coton à tricoter D.M.C Nos. 6 to 12, Cordonnet 6 fils D.M.C Nos. 3 to 10, or Fil à pointer D.M.C Nos. 10 to 30[A] is better for this stitch than a loose fleecy thread which is apt to render it indistinct. Take up a loop right and left of a stitch of the preceding row, so that counting the loop of the last stitch, you have 3 loops on the needle, make an over and draw it through the 3 loops. Then take up a loop again by the side of the one you made on the left, and which now lies on the right. Take 2 loops in the next stitch, make an over and draw it through all the loops.
(8) Double stitch (fig. 427).—A thicker thread, like Coton à tricoter D.M.C Nos. 6 to 12, Cordonnet 6 fils D.M.C Nos. 3 to 10, or Fil à pointer D.M.C Nos. 10 to 30[A] is better for this stitch than a loose, fluffy thread, which can make it hard to see. Pick up a loop on either side of a stitch from the previous row, so that when you count the loop from the last stitch, you have 3 loops on the needle. Make an over and pull it through the 3 loops. Then pick up a loop again next to the one you made on the left, which is now on the right. Take 2 loops from the next stitch, make an over, and pull it through all the loops.
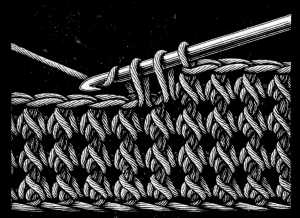
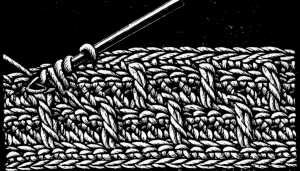
Miss the stitch of the preceding row, which is hidden under the treble, make 3 plain stitches, 1 double treble, and so on.
Miss the stitch from the previous row, which is hidden under the treble, make 3 plain stitches, 1 double treble, and continue like that.
Having finished this row, turn the work and make a plain row. In the next row begin with 4 plain stitches, then make 1 double treble between the 3 stitches that are between the first trebles, 3 plain stitches, 2 double trebles and so on.
Having finished this row, turn the work and make a plain row. In the next row, start with 4 plain stitches, then make 1 double treble between the 3 stitches that sit between the first trebles, followed by 3 plain stitches, 2 double trebles, and continue in this pattern.
In the 8th row of plain stitches, the trebles must be placed in the same order as in the 4th.
In the 8th row of plain stitches, the treble stitches should be arranged in the same order as they were in the 4th.
Raised stitch with crossed trebles (fig. 429).—Begin, as in fig. 428, by 3 rows of plain stitches. The 4th row begins with 2 plain stitches followed by: * 1 double treble joined to the upper part of the 1st stitch of the 1st row; keep the 2 last loops of this treble on the needle; make a double over for the next treble, pass the needle through the fourth stitch of the first row, make an over, turn the thread round the needle, bring it back, finish the treble all but the last 3 loops, which you crochet together. Miss the stitch behind the treble, make 3 plain stitches and repeat from *.
Raised stitch with crossed trebles (fig. 429).—Start, like in fig. 428, with 3 rows of plain stitches. The 4th row begins with 2 plain stitches followed by: * 1 double treble joined to the upper part of the 1st stitch in the 1st row; keep the last 2 loops of this treble on the needle; do a double over for the next treble, pass the needle through the fourth stitch of the first row, do an over, wrap the thread around the needle, bring it back, finish the treble except for the last 3 loops, which you crochet together. Skip the stitch behind the treble, make 3 plain stitches and repeat from *.
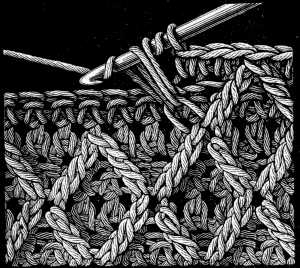
Then turn the work, make one plain row, and turn the work back to the right side.
Then flip the work, create one straight row, and flip the work back to the right side.
The second row of trebles begins with a plain stitch. The way in which the trebles are to be crossed is shewn in the illustration.
The second row of trebles starts with a regular stitch. The method for crossing the trebles is shown in the illustration.
Raised stitch with dots (fig. 430).—After making 3 plain rows, begin the 4th with 3 plain stitches, and proceed as follows: * 6 trebles into the 4th plain stitch of the preceding row, leaving the last loop of each treble on the needle, so that altogether you have 7 loops upon it; then you turn the thread once round the needle and draw it through the loops; miss the stitch that is underneath the dot, make 3 plain stitches and repeat from *.
Raised stitch with dots (fig. 430).—After completing 3 plain rows, start the 4th row with 3 plain stitches, and then do the following: * Make 6 trebles into the 4th plain stitch of the previous row, keeping the last loop of each treble on the needle, so that there are 7 loops in total on it; then wrap the thread once around the needle and pull it through all the loops; skip the stitch below the dot, make 3 plain stitches, and repeat from *.
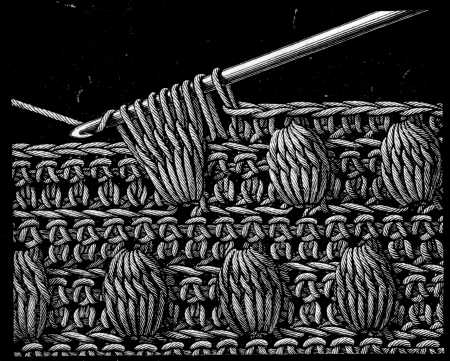
Then make 3 rows of plain stitches; in the 4th row, the 1st dot is made in the 4th stitch, so that the dots stand out in relief.
Then make 3 rows of plain stitches; in the 4th row, the 1st dot is made in the 4th stitch, so that the dots stand out in relief.
Raised dots with trebles (fig. 431).—Turn the work after making 3 rows of plain stitches, make 3 stitches more in the 4th stitch of the 1st row, * 6 trebles, drop the last stitch of the 6th treble, put the needle into the stitch between the last plain stitch and the 1st treble, take the dropped loop of the last treble and draw it through the one on the needle; miss the stitch under the dot, make 5 plain stitches and repeat from *.
Raised dots with trebles (fig. 431).—Turn the work after making 3 rows of plain stitches, then make 3 more stitches in the 4th stitch of the 1st row, * 6 trebles, drop the last stitch of the 6th treble, insert the needle into the stitch between the last plain stitch and the 1st treble, take the dropped loop from the last treble and pull it through the one on the needle; skip the stitch under the dot, make 5 plain stitches and repeat from *.
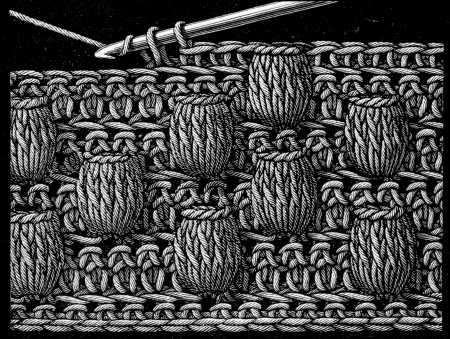
Raised dots in slanting lines (fig. 432).—On the rows of stitches that have been previously prepared, make, for the 4th stitch of the 4th row, a cluster stitch, as in fig. 426, with 1 quadruple over and then 4 plain stitches, 1 cluster stitch and so on. The next row is plain; in the second you have to make 1 plain stitch more, and fasten the cluster stitches into the loops to the left of the second of the 3 covered rows. In this way you have to make each raised stitch, one stitch, in advance and to the left of the last, so that they run in slanting lines over the surface.
Raised dots in slanting lines (fig. 432).—On the prepared rows of stitches, for the 4th stitch of the 4th row, create a cluster stitch, as shown in fig. 426, with 1 quadruple over and then 4 plain stitches, followed by 1 cluster stitch, and continue this pattern. The next row is plain; in the second row, you'll need to add 1 additional plain stitch, and secure the cluster stitches into the loops to the left of the second of the 3 covered rows. In this way, you need to make each raised stitch one stitch ahead and to the left of the last one, so that they form slanting lines across the surface.
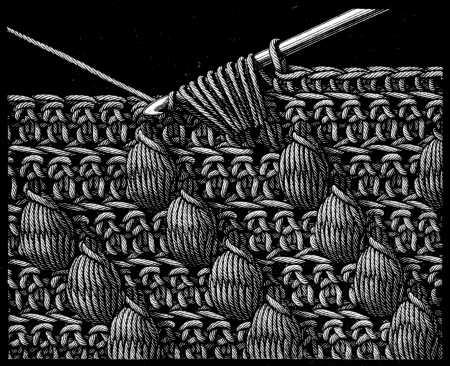
Close shell stitch (fig. 433).—This pretty stitch which can only be worked in rows, all one way, is more especially suitable for children’s jackets and petticoats; it is easy, and has the merit of being quickly done. On a foundation of chain, or other stitches, make: 2 chain, 7 trebles on the 4th stitch, * 1 chain, 7 trebles on the 5th stitch of the last row and repeat from *.
Close shell stitch (fig. 433).—This beautiful stitch, which can only be worked in rows all facing the same direction, is especially great for children's jackets and petticoats; it’s simple and quick to complete. Start with a foundation of chain or other stitches: make 2 chains, then 7 trebles on the 4th stitch, * 1 chain, and 7 trebles on the 5th stitch of the last row, and repeat from *.
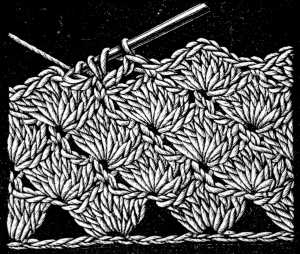
2nd row—** 7 trebles on the chain stitch of the last row which connects 7 bars, 1 plain stitch on the 4th of the 7 trebles of the first row and repeat from **.
2nd row—** 7 double crochets on the chain stitch of the last row which connects 7 bars, 1 single crochet on the 4th of the 7 double crochets of the first row and repeat from **.
Picots.—The edges of most crochet work are ornamented with picots, or small points of different shapes, called severally close picots, chain picots and lace picots.
Picots.—The edges of most crochet work are decorated with picots, which are small points in various shapes, known as close picots, chain picots, and lace picots.
Close picots may be subdivided into, large and small, pointed, and rounded, picots with rounded leaves and picots with pointed leaves.
Close picots can be divided into large and small, pointed and rounded, picots with rounded leaves, and picots with pointed leaves.
Small rounded picots.—These may either be made separately and then sewn on, or made at once, on to a crochet border. In the first case, begin with 3 chain, then coming back, make 1 plain stitch on the second and on the first chain stitch. In the second case make: 1 chain, take the needle out of the stitch and put it in from the right side, under both edges of the last stitch, take up the dropped stitch, bring it to the right side, * 3 chain; then returning: 1 plain stitch on each chain, draw the needle out, put it in from the right side into the second stitch of the row beneath, take up the loop, bring it back to the right side, and repeat from *.
Small rounded picots.—You can either make these separately and sew them on later or create them directly on a crochet border. If you're doing them separately, start with 3 chains, then come back and make 1 plain stitch on the second and first chain stitch. If you're making them on the border, start with 1 chain, take the needle out of the stitch, and insert it from the right side under both edges of the last stitch. Pick up the dropped stitch, bring it to the right side, * then make 3 chains; returning, make 1 plain stitch on each chain, pull the needle out, and put it into the second stitch of the row below from the right side. Take up the loop, bring it back to the right side, and repeat from *.
Large rounded picots.—5 chain, miss 3, 1 treble on the 2nd and 1 treble on the 1st chain stitch.
Large rounded picots.—5 chains, skip 3, 1 treble on the 2nd and 1 treble on the 1st chain stitch.
When you want to attach these picots at once to an existing piece of work, drop the last loop and bring it back again with the needle from the wrong side to the right and miss 2 stitches, instead of one, as in the case of the small picots.
When you want to attach these picots all at once to an existing piece of work, drop the last loop and pull it back through with the needle from the wrong side to the right, skipping 2 stitches instead of one, like you do with the small picots.
Pointed picots.—Cast on 6 chain, then returning, and missing the 6th stitch: 1 single stitch, 1 plain stitch, 1 half treble, 1 treble, 1 double treble.
Pointed picots.—Cast on 6 chains, then working back and skipping the 6th stitch: 1 single stitch, 1 plain stitch, 1 half treble, 1 treble, 1 double treble.
Picots with rounded leaves.—* 4 chain, and 3 trebles on the first stitch, and 1 single on the same stitch on which the trebles were, **, or 6 chain and repeat from * to **.
Picots with rounded leaves.—* 4 chains, and 3 trebles on the first stitch, and 1 single on the same stitch where the trebles were, **, or 6 chains and repeat from * to **.
When these picots serve as a finish to a straight edge, make 2 single stitches in the preceding row instead of 2 chain.
When these picots finish off a straight edge, make 2 single stitches in the previous row instead of 2 chain stitches.
Picots with pointed leaves.—6 chain, on the first chain stitch: 3 double trebles, of which you retain the two last loops on the hook, 1 over, draw the thread through the 4 loops, 5 chain, 1 single on the stitch on which the trebles are.
Picots with pointed leaves.—6 chains, on the first chain stitch: 3 double trebles, keeping the last two loops on the hook, yarn over, pull the thread through the 4 loops, 5 chains, 1 single crochet on the stitch where the trebles are.
Chain picots.—For the small chain picots, make: 5 chain and 1 plain stitch on the first of these 5 stitches. For the large ones: 5 chain and 1 treble on the first stitch.
Chain picots.—For the small chain picots, create: 5 chains and 1 single crochet in the first of these 5 stitches. For the large ones: 5 chains and 1 double crochet in the first stitch.
Drooping picots (fig. 434).—5 chain, drop the loop, put the needle into the first of the 5 chain, take up the dropped loop, and draw it through the stitch.
Drooping picots (fig. 434).—5 chains, drop the loop, insert the needle into the first of the 5 chains, pick up the dropped loop, and pull it through the stitch.
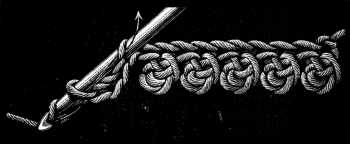
Lace picots (figs. 435 and 436).—Fig. 435 represents picots formed of chain stitches, as follows: 2 chain, put the needle into the first, 1 over, bring the thread back to the front, 2 chain: * put the needle into the two loops, and at the same time, into the second loop and the first chain, draw the thread through in a loop, make 2 chain and repeat from *.
Lace picots (figs. 435 and 436).—Fig. 435 shows picots made from chain stitches like this: 2 chains, insert the needle into the first, wrap it over, pull the thread back to the front, 2 chains: * insert the needle into the two loops and at the same time into the second loop and the first chain, pull the thread through to create a loop, make 2 chains and repeat from *.

In order to make the picots more even and regular, it is advisable to form them over a coarse knitting needle or mesh.
To make the picots more even and regular, it's recommended to form them over a thick knitting needle or mesh.
Fig. 436 represents picots attached by plain stitches to the edge of a finished piece of work; this is done as follows: 1 plain stitch, draw out the loop to the proper length for a picot, and slip it on a mesh: put the needle into the horizontal parts of the last stitches, turn the thread round the needle, draw it through in a loop, and make 1 plain stitch on the next stitch and so on.
Fig. 436 shows picots attached with plain stitches to the edge of a completed piece; here's how to do it: 1 make a plain stitch, pull the loop out to the right length for a picot, and slide it onto a mesh: insert the needle into the horizontal parts of the last stitches, wrap the thread around the needle, pull it through in a loop, and make a plain stitch on the next stitch, and continue like this.


The way in which such patterns are copied in crochet is by means of chain stitches and trebles, which, rising one above the other in rows, form little squares. For each square marked on the pattern, you must count, in the grounding, 1 treble and 2 chain stitches; in the solid parts, 3 trebles.
The way to replicate these patterns in crochet is through chain stitches and treble stitches, which stack on top of each other in rows to create small squares. For each square indicated on the pattern, you need to count 1 treble and 2 chain stitches for the background, and 3 trebles for the solid areas.
The squares formed by the chain stitches should always begin and end with a treble.
The squares created by the chain stitches should always start and end with a treble.
When, therefore, a solid square comes between empty or foundation squares, count 4 trebles for the solid square, because the last treble of the last empty square touches the third treble of the solid one.
When a solid square is placed between empty or foundation squares, count 4 trebles for the solid square because the last treble of the last empty square connects with the third treble of the solid square.
Thus for 2 solid squares, side by side, count 7 trebles, and for 3 squares, 10. Embroidery patterns worked in several colours can be reproduced in crochet either by trebles and rows worked one way only, cutting off the thread at the end of each row, or by plain stitches, worked in rows to and fro.
Thus for 2 solid squares, side by side, count 7 trebles, and for 3 squares, 10. Embroidery patterns made with several colors can be recreated in crochet either by using trebles and working one way only, cutting off the thread at the end of each row, or by plain stitches, worked in rows back and forth.

When only three colours are used, pass two threads under the stitches; when more than two, leave those which are not in use, at the back of the work and only bring them to the front as they are wanted. The thread, you lay aside, takes at the back the place of the one in use. Of course, the threads not in use can only can be disposed of in this way when the work has a wrong side, otherwise they must be passed underneath the stitches. The colours should alternate in the order the pattern prescribes; moreover, the last stitch before you take another colour cannot be finished with the same thread, you must pass the new thread through the last loop and draw it up with that.
When you’re using just three colors, pass two threads under the stitches. If you’re using more than two, keep the unused threads at the back of the work and only bring them to the front when you need them. The thread you set aside will take the place of the one you’re currently using at the back. Of course, the unused threads can only be managed this way if the work has a wrong side; otherwise, they need to be passed underneath the stitches. The colors should alternate according to the pattern's instructions. Also, you can't finish the last stitch before switching to a new color with the same thread; you must pass the new thread through the last loop and pull it up with that.
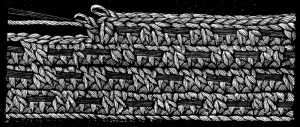
Both patterns are worked entirely with trebles; in fig. 439, the red braid passes over and under 2 trebles; in fig. 440, it is brought, it will be observed, from the wrong side to the right after every 2 trebles, and passed between them, in such a manner as to form a slanting stitch between the rows of stitches.
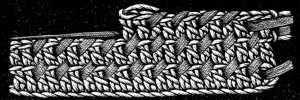
Materials: Coton à tricoter D.M.C Nos. 6 to 12 or Cordonnet 6 fil D.M.C Nos. 3 to 10. Soutache D.M.C No. 2 or 3 or Lacets superfins D.M.C Nos. 2 to 5.
Colours: The cotton, white or écru. The Soutache or Lacet: Rouge-Cardinal 347, or Rouge-Grenat 326, or Bleu-Indigo 312.[A]
Materials: D.M.C Cotton sizes 6 to 12 or D.M.C Cordonnet 6 thread sizes 3 to 10. D.M.C Soutache sizes 2 or 3 or D.M.C fine laces sizes 2 to 5.
Colors: The cotton can be white or ecru. The soutache or lace: Cardinal Red 347, Garnet Red 326, or Indigo Blue 312.__A_TAG_PLACEHOLDER_0__
Crochet square (fig. 441).—Begin with 4 chain stitches, and work 1 single on the 1st chain, to make a round. Work, 1 chain and 2 plain on the next chain, 3 plain on each of the next 3 chain, 1 plain on the stitch on which the two first plain are worked.
Crochet square (fig. 441).—Start with 4 chain stitches and do 1 single crochet into the 1st chain to form a circle. Then, do 1 chain and 2 double crochets into the next chain, followed by 3 double crochets into each of the next 3 chains. Finally, do 1 double crochet into the stitch where the first two double crochets are worked.
Slip the next stitch, that is, put the needle in between the horizontal bars of the 1st plain stitch of the previous row, and draw the thread out without making a stitch.
Slip the next stitch, which means to place the needle between the horizontal bars of the 1st plain stitch from the previous row, and pull the thread out without actually making a stitch.
Then make 1 chain and 2 plain on the slipped stitch.
Then make 1 chain and 2 plain stitches on the slipped stitch.
After which, you make 3 plain on the second of the 3 plain that form the corner, and 1 plain on all the other stitches of the last row. The beginning and end of each row, are worked as described above.
After that, you make 3 knits on the second of the 3 knits that form the corner, and 1 knit on all the other stitches of the last row. The beginning and end of each row are worked as described above.
Fig. 441 represents a square, worked in consecutive rows. In making a crochet square, the rows may end in the middle of a side.
Fig. 441 shows a square, created in consecutive rows. When making a crochet square, the rows can end in the middle of a side.
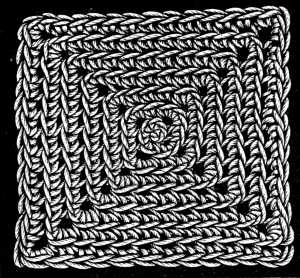
When you use a stitch that has to be worked to and fro, you turn your work at the end of every row and work back along the stitches you have just made.
When you use a stitch that you need to work back and forth, you turn your work at the end of each row and go back over the stitches you've just made.
Crochet hexagon (fig. 442).—Make a foundation chain of 6 stitches, join the round; 12 plain on the 6 chain; finish the row as indicated for the previous figure == turn the work == * 1 plain, 3 plain on the second plain of the last row; repeat 5 times from *. Finish the row with 1 single == turn the work == 2 plain, 3 plain on the second of the first 3 plain; 3 plain and so on. These hexagons can be made of any size.
Crochet hexagon (fig. 442).—Start with a foundation chain of 6 stitches and join to form a circle; work 12 single crochet into the 6-chain. Complete the row as shown in the previous figure == turn the work == * 1 single crochet, then 3 single crochet into the second single crochet from the last row; repeat from * a total of 5 times. Finish the row with 1 single crochet == turn the work == 2 single crochet, then 3 single crochet into the second of the first 3 single crochet; 3 single crochet, and continue in this manner. You can make these hexagons in any size.
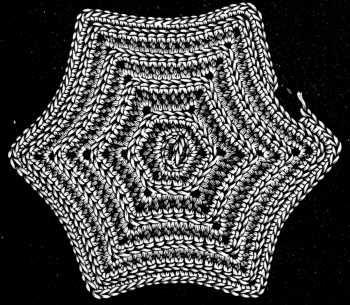
Coloured star worked into a light ground (fig. 443).—Begin with 3 chain, join the ring = 2 plain on each of the 3 chain; then for the foundation, 1 plain with the dark thread, and 1 with the light on each of the 6 plain.
Colored star worked into a light background (fig. 443).—Start with 3 chain, join to form a ring = 2 plain stitches on each of the 3 chain; then for the foundation, 1 plain stitch with the dark thread, and 1 with the light on each of the 6 plain stitches.
In each subsequent row, make one dark stitch more, increasing regularly, that is, making 2 stitches on the last light stitch that comes before the dark ones.
In each following row, add one more dark stitch, increasing steadily. That means making 2 stitches on the last light stitch that comes before the dark ones.
Proceed in this manner until you have 6 or 8 dark stitches, in all and then begin to decrease in every row by one, until there is at last only one dark stitch remaining.
Proceed this way until you have 6 or 8 dark stitches in total, then start to decrease by one stitch in every row until only one dark stitch is left.
These stars are used in the making of purses, cap-crowns and mats for lamps, etc.
These stars are used to make purses, cap crowns, and mats for lamps, etc.
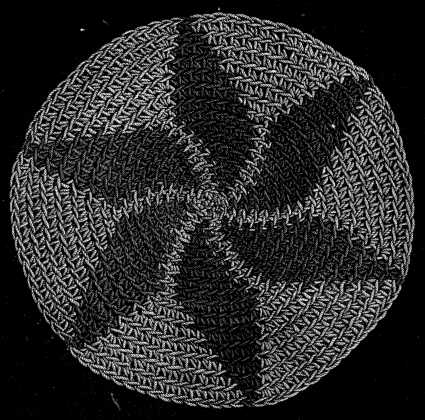
Materials—Every kind of cotton, as well as wool and silk, can be used for Tunisian crochet: the stitches look equally well in all these materials, but for things that require frequent washing or cleaning, a good washing material should be selected, such as Coton à tricoter D.M.C and Cordonnet 6 fils D.M.C[A], both strong and suitable in all ways.
Materials—You can use any type of cotton, along with wool and silk, for Tunisian crochet: the stitches look great in all these materials. However, for items that need to be washed or cleaned often, it’s best to choose a durable material like Coton à tricoter D.M.C and Cordonnet 6 fils D.M.C[A], both of which are strong and suitable in every way.
As we have already said, Tunisian crochet requires to be done with a long straight needle, with a knob at one end and it can only be worked on the right side.
As we've already mentioned, Tunisian crochet needs to be done with a long straight needle that has a knob at one end, and it can only be worked on the right side.
Plain Tunisian crochet (fig. 444).—After making a foundation chain of the required length, begin the first, or loop row as it is called. Put the needle into the 2nd chain stitch, draw a loop through and so on, until you have taken up all the chain stitches on the needle. After having made the last stitch of the loop row, make 1 chain stitch and then pass to the second row that completes the stitch. Turn the thread round the needle, draw it through two loops, turn the thread round again, and again draw it through two loops, and so on to the end.
Plain Tunisian crochet (fig. 444).—After making a foundation chain of the required length, start the first row, also known as the loop row. Insert the needle into the 2nd chain stitch, pull a loop through, and continue this process until all the chain stitches are on the needle. Once you've completed the last stitch of the loop row, make 1 chain stitch, then move on to the second row to finish the stitch. Wrap the thread around the needle, pull it through two loops, wrap the thread around again, and pull it through two loops once more, and keep going until the end.
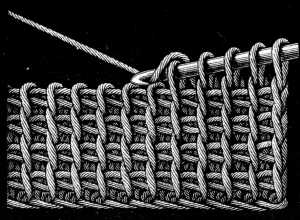
Straight plaited Tunisian stitch (fig. 445).—Worked thus: miss the first loop in the 1st row, take up the second, and come back to the first, so that the 2 loops are crossed. Work the second row in the same manner as the second row of the preceding figure.
Straight plaited Tunisian stitch (fig. 445).—Do it like this: skip the first loop in the 1st row, grab the second, and return to the first so that the 2 loops are crossed. Work the second row just like you did for the second row of the previous figure.
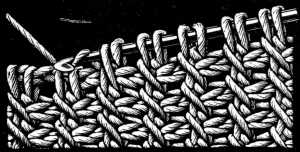
Diagonal plaited Tunisian stitch (fig. 446).—Worked like the preceding, taking up first the second loop and then the first: the second row also, in the same way as before. In the third row, take up the first stitch, and draw the third through the second, so as to produce diagonal lines across the surface of the work.
Diagonal plaited Tunisian stitch (fig. 446).—Worked the same way as the previous stitch, first picking up the second loop and then the first. The second row is also done the same way as before. In the third row, pick up the first stitch and draw the third through the second to create diagonal lines across the surface of the work.
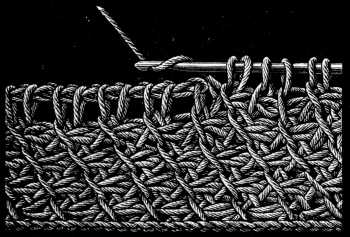
Open Tunisian stitch.—This is an easy kind of Tunisian crochet. The first row is worked as in fig. 444. In the row of plain stitches, you alternately join 2 and 3, or 3 and 4 loops of the preceding row together, and replace them by as many chain stitches.
Open Tunisian stitch.—This is a simple type of Tunisian crochet. The first row is done as shown in fig. 444. In the row of plain stitches, you alternately join 2 and 3, or 3 and 4 loops from the previous row together, and replace them with the same number of chain stitches.
Decreasing and increasing in Tunisian crochet (fig. 447). Our illustration shows how to decrease on both sides and by that means form scallops.
Decreasing and increasing in Tunisian crochet (fig. 447). Our illustration shows how to decrease on both sides to create scallops.
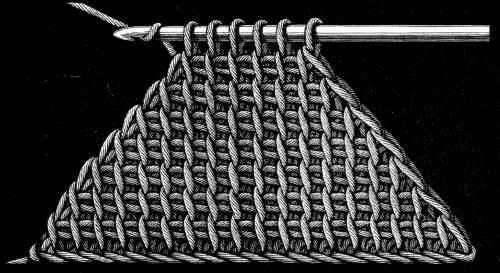
You miss a stitch alternately on the right and left. On the right you crochet the first two stitches together, and at the end of the row, the last two, and so on, to the end. You increase in the same order, first on the right and then on the left.
You skip a stitch alternately on the right and left. On the right, you crochet the first two stitches together, and at the end of the row, you do the same with the last two, and so on, until you finish. You increase in the same order, first on the right and then on the left.
Very pretty laces, fringes, gimp headings and the like can be made in this kind of crochet work. It is often used in combination with ordinary crochet and plain and scalloped braids and gimps, or as a heading for fringes made of tufts and pendant balls. There are a great many stitches which can be worked in hairpin-crochet. We shall only describe those here that will best teach our readers how the work is done.
You can create really beautiful lace, fringes, gimp headings, and similar designs with this type of crochet technique. It's often used alongside regular crochet, as well as plain and scalloped braids and gimps, or as a decorative edge for fringes made with tufts and hanging balls. There are plenty of stitches that can be done with hairpin crochet. We will only cover the ones here that will best help our readers understand how the process works.

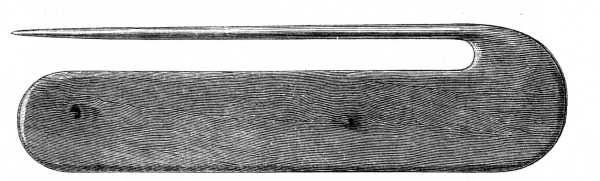
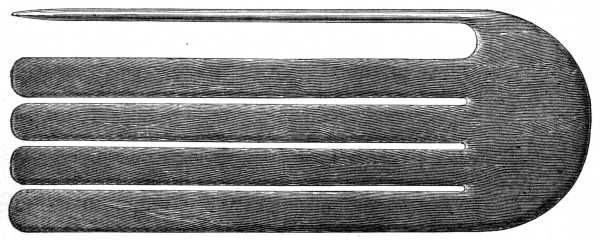
Materials.—For washing laces, Cordonnet 6 fils D.M.C is the best; for furniture fringes, the lower numbers of Coton à tricoter D.M.C, and for producing the appearance of filoselle, the lower numbers of Coton à repriser D.M.C are to be taken.
Materials.—For washing laces, Cordonnet 6 fils D.M.C is the best choice; for furniture fringes, use the lower numbers of Coton à tricoter D.M.C, and for creating the look of filoselle, go for the lower numbers of Coton à repriser D.M.C.
Stitches.—Begin by a chain stitch, made with an ordinary crochet needle, take the needle out of the loop, and insert the left prong of the fork upwards from below, holding the fork between the thumb and finger of the left hand. The thread should always be in front. Then put the thread over the right prong and the needle into the loop on the left prong, take up the thread, draw it through the loop, put the thread over the needle and draw it through the loop that is on the needle, twist the loop round the left prong, turn the needle round to the right (the thread will now be wound round the right prong); put the needle into the loop on the left prong, throw the thread over the needle, draw it through, tighten the loops and so on.
Stitches.—Start with a chain stitch using a regular crochet needle. Remove the needle from the loop and insert the left prong of the fork upward from underneath, holding the fork between your thumb and fingers of the left hand. Make sure the thread is always in front. Then, place the thread over the right prong and insert the needle into the loop on the left prong, grab the thread, pull it through the loop, put the thread over the needle, and pull it through the loop on the needle. Twist the loop around the left prong, turn the needle to the right (the thread will now wrap around the right prong); insert the needle into the loop on the left prong, throw the thread over the needle, pull it through, tighten the loops, and continue.
These stitches may be doubled, or you may make several trebles on each loop, or arrange the plain stitches in different ways.
These stitches can be doubled, or you can do several treble stitches on each loop, or arrange the plain stitches in various ways.
Hairpin insertion (fig. 451).—Begin by making stripes with the fork, covering each thread with two plain stitches. Then join the stripes together by the loops, drawing the left loop over the right one and the right one over the left. When you come to the end of the stripes fasten off the last loops by a few stitches. To strengthen the edges, join two loops together by 1 plain, 2 chain, 1 plain and so on.
Hairpin insertion (fig. 451).—Start by creating stripes with the fork, using two plain stitches to cover each thread. Next, connect the stripes by crossing the loops, pulling the left loop over the right one and the right one over the left. When you reach the end of the stripes, secure the last loops with a few stitches. To reinforce the edges, connect two loops by using 1 plain stitch, followed by 2 chain stitches, then 1 plain stitch, and continue this pattern.
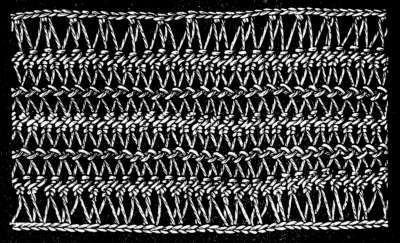
Materials: Fil à pointer D.M.C No. 20 or 30, or Cordonnet 6 fils D.M.C Nos. 4 to 15, white or écru.[A]
Materials: D.M.C No. 20 or 30 thread, or D.M.C Cordonnet 6 strands No. 4 to 15, in white or ecru. __A_TAG_PLACEHOLDER_0__
Hairpin lace (fig. 452).—When, by making two half trebles in each loop, you have got the necessary length of hairpin crochet, join the loops two and two, by means of a coloured thread which makes a good contrast with the thread of which the hairpin crochet is made. Work 1 plain stitch joining 2 loops on the right, 2 chain, 1 plain joining the 2 loops on the left; then 2 chain and come back to the right, and so on, until you have taken up all the loops. This forms the zigzag in the middle.
Hairpin lace (fig. 452).—After creating two half treble stitches in each loop and reaching the desired length of hairpin crochet, join the loops in pairs using a contrasting colored thread. Start by working 1 plain stitch to join 2 loops on the right, followed by 2 chain stitches, and then 1 plain stitch to join the 2 loops on the left. Next, work 2 chain stitches and return to the right, continuing this pattern until all the loops are joined. This will create the zigzag effect in the middle.
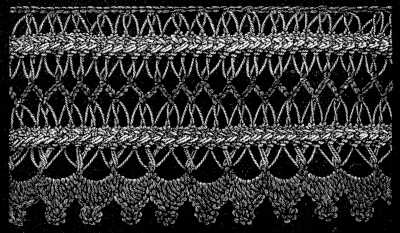
Materials—For the hairpin work: Fil à pointer D.M.C Nos. 20 to 30, or Cordonnet 6 fils D.M.C Nos. 3 to 10, white or écru. For the edge. Coton à tricoter D.M.C Nos. 16 to 30.
Colours: Rouge-Cardinal 347, or Jaune-Rouille 364, or Brun-Marron 406.[A]
Materials—For the hairpin work: Fil à pointer D.M.C Nos. 20 to 30, or Cordonnet 6 fils D.M.C Nos. 3 to 10, in white or ecru. For the edge: Coton à tricoter D.M.C Nos. 16 to 30.
Colors: Rouge-Cardinal 347, or Jaune-Rouille 364, or Brun-Marron 406.__A_TAG_PLACEHOLDER_0__
1st row—join 3 loops by: 1 plain, 5 chain.
1st row—join 3 loops by: 1 single crochet, 5 chain stitches.
2nd row—on the 5 chain stitches: 1 plain, 1 half-treble, 3 trebles, 1 picot, made with 5 chain (for the chain picots, see p. 237), 1 half-treble, 1 plain. The footing of this lace is made like the one in fig. 451.
2nd row—on the 5 chain stitches: 1 single crochet, 1 half-treble, 3 trebles, 1 picot, made with 5 chain (for the chain picots, see p. 237), 1 half-treble, 1 single crochet. The base of this lace is made like the one in fig. 451.
Hairpin fringes (figs. 453, 454, 455, 456).—Fig. 453 is made with a fork composed of one branch and 3 or 4 rulers, round which the thread is wound in succession, so as to form loops of different lengths. You may use for this, either a single very coarse thread, or else several fine ones, used together as one.
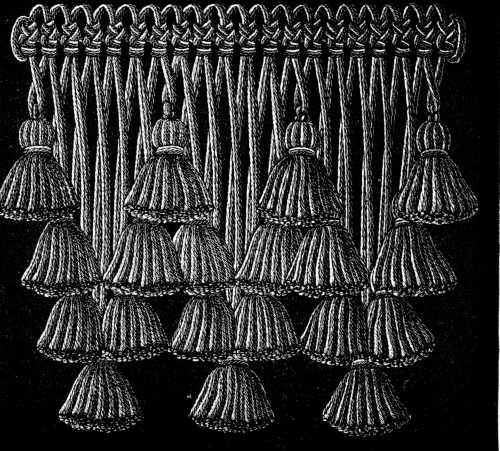
The heading of the fringe is plain, and heavy tassels are fastened into the loops. The tassels are made as follows: take a thick skein of the same thread the fringe is made of, pass it through the loop, leaving just the length required for the tassel, at one end, thread a needle with the same thread and twist it round the skein, the right distance from the top to form the head of the tassel and then cut the ends even, at the bottom. As the loops are of different lengths, the tassels will hang in steps and the fuller and heavier they are, the handsomer the fringe will be.
The fringe's heading is simple, and heavy tassels are attached to the loops. To make the tassels, take a thick skein of the same thread used for the fringe, pass it through the loop, leaving the length you need for the tassel at one end. Thread a needle with the same thread and wrap it around the skein, at the right distance from the top to create the head of the tassel, then cut the ends evenly at the bottom. Since the loops are different lengths, the tassels will hang at varying heights, and the fuller and heavier they are, the nicer the fringe will look.
Fig. 454 represents another pattern of fringe, the first part of which is made with the same fork as the preceding one. Instead however of winding the thread round the several prongs in succession, you pass it alternately round the two first and the fourth, thus making loops of two lengths only. Tassels of a length, suited to the purpose the fringe is intended for, depend from these loops and may be varied in the second row by balls made to issue from the middle, or by long meshes, which are made over the whole width of the fork and affixed to the loops.
Fig. 454 shows another type of fringe. The first part is made using the same fork as the previous one. Instead of wrapping the thread around each prong one after another, you alternate wrapping it around the first two prongs and the fourth one, creating loops of just two different lengths. Depending on the intended use of the fringe, tassels of appropriate length hang from these loops. In the second row, you can change things up by adding balls that come out from the middle or by creating long meshes that stretch across the entire width of the fork and are attached to the loops.
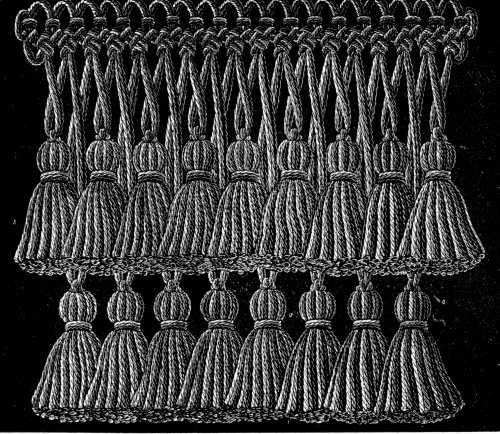
Materials: Coton à tricoter D.M.C Nos. 6 to 16.[A]
Colours: Écru and Jaune-Rouille 363, 368, or Gris-Tilleul 331 and Rouge-Cornouille 449 and 450, or three other shades.[A]
Materials: D.M.C knitting cotton No. 6 to 16.__A_TAG_PLACEHOLDER_0__
Colors: Ecru and Yellow-Rust 363, 368, or Sage Gray 331 and Red-Corn 449 and 450, or three other shades.__A_TAG_PLACEHOLDER_1__
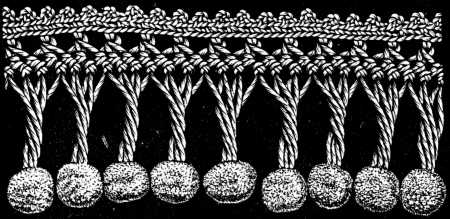
The loops in fig. 455 are all of one length and a ball hangs from every third. In the last chapter but one, a minute description is given of the way in which these balls are made. The heading of the loops is formed by a row of chain stitches, varying in number from four to six, according to the size of the cotton. The edge is ornamented with little picots. The fringe, in fig. 456, consists of three long and three short loops alternately, which causes, the balls that are made to depend from them, to form two parallel lines.
The loops in fig. 455 are all the same length, and a ball hangs from every third loop. In the second to last chapter, there’s a detailed description of how these balls are made. The tops of the loops are created with a row of chain stitches, ranging from four to six in number, depending on the size of the cotton. The edge is decorated with small picots. The fringe, in fig. 456, consists of three long loops and three short loops alternately, which causes the balls hanging from them to create two parallel lines.
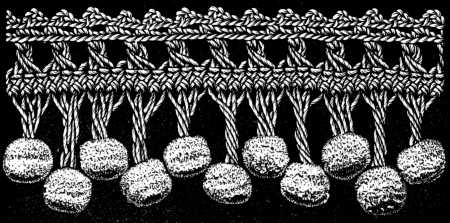
Materials—For the crochet-work: Cordonnet 6 fils D.M.C Nos. 3 to 10, or Fil à pointer D.M.C Nos. 10 to 30. For the balls: Coton à repriser D.M.C Nos. 8 to 16.
Materials—For the crochet work: Cordonnet 6 fils D.M.C Nos. 3 to 10, or Fil à pointer D.M.C Nos. 10 to 30. For the balls: Coton à repriser D.M.C Nos. 8 to 16.
If you join the loops of the heading together, three and three, you will have to make enough chain stitches to cover the space that is to be filled.
If you connect the loops of the heading together, three by three, you’ll need to create enough chain stitches to fill the space.
The picots are made with 6 chain stitches, you put the needle back into the fifth stitch after closing the picot, make 1 chain, 2 plain, in the preceding row, 1 picot and so on.
The picots are made with 6 chain stitches; you insert the needle back into the fifth stitch after closing the picot, make 1 chain, 2 plain in the previous row, 1 picot, and so on.
Fringe made with Lacet or braid (fig. 457).—This is an easy fringe to make and a very effective trimming for table-cloths, curtains etc., which are embroidered on coarse stuffs.
Fringe made with Lacet or braid (fig. 457).—This is a simple fringe to create and a really stylish trim for tablecloths, curtains, etc., especially when made with heavier fabrics.
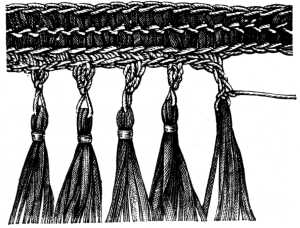
Materials: Lacet D.M.C No. 4 or Soutache D.M.C NO. 2½ in red. Cordonnet 6 fils D.M.C Nos. 3 to 10. Fil à pointer D.M.C Nos. 10 to 30, écru.[A]
Materials: Lacet D.M.C No. 4 or Soutache D.M.C NO. 2½ in red. Cordonnet 6 fils D.M.C Nos. 3 to 10. Fil à pointer D.M.C Nos. 10 to 30, off-white.__A_TAG_PLACEHOLDER_0__
In the next row, you use the twist and the braid together, as follows—with the twist = 1 chain stitch, put the needle into the first stitch of the foundation chain, take up the braid, draw it through, turn the twist round the needle, draw it through the braid and the chain stitch. To make the braid loops longer, they may be made over a wooden ruler. To the two rows of braid stitches, represented in the pattern, you may add as many other rows as you please. On the fringed side make: 4 plain, 3 chain, draw out one very long loop and fasten into it a cluster of lengths of braid from 10 to 12 c/m. long, and draw the loop tightly round it to secure the tassel; 3 plain on the chain stitches. Repeat from *.
In the next row, you combine the twist and the braid like this: with the twist = 1 chain stitch, insert the needle into the first stitch of the foundation chain, pull up the braid, draw it through, wrap the twist around the needle, and then pull it through the braid and the chain stitch. To make the braid loops longer, you can do it over a wooden ruler. You can add as many additional rows of braid stitches to the two rows shown in the pattern as you want. On the fringed side, do: 4 plain stitches, 3 chain stitches, pull out one very long loop, and secure a cluster of braid lengths that are 10 to 12 cm long into it, then pull the loop tightly around it to secure the tassel; 3 plain stitches on the chain stitches. Repeat from *.
Lace made on Point Lace braid (fig. 458).—For the rounds: 1 plain on the braid, 10 chain, then coming back, 1 single on the 4th chain.
Lace made on Point Lace braid (fig. 458).—For the rounds: 1 plain stitch on the braid, 10 chain stitches, then coming back, 1 single crochet on the 4th chain.
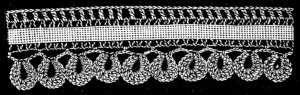
Materials: Fil d’Alsace D.M.C Nos. 30 to 50, or Cordonnet 6 fils D.M.C No. 80, white[A] and Point Lace braid.
Materials: Fil d’Alsace D.M.C Nos. 30 to 50, or Cordonnet 6 fils D.M.C No. 80, white__A_TAG_PLACEHOLDER_0__ and Point Lace braid.
In this first round you make: 1 chain, 1 half-treble, 12 trebles *, 1 half-treble, 1 chain, 1 single on the 4th chain; 3 chain, 1 single on the braid, far enough from the 1st chain for the rounds not to overlap each other. Then 10 chain, 1 single on the 4th chain, 1 single, 1 half-treble, 4 trebles, join to the first round between the 8th and 9th trebles, 8 trebles and repeat from *. For the footing: 1 treble, 1 chain, miss a few threads of the edge of the braid, 1 treble.
In this first round you make: 1 chain, 1 half-treble, 12 trebles *, 1 half-treble, 1 chain, 1 single on the 4th chain; 3 chain, 1 single on the braid, far enough from the 1st chain for the rounds not to overlap each other. Then 10 chain, 1 single on the 4th chain, 1 single, 1 half-treble, 4 trebles, join to the first round between the 8th and 9th trebles, 8 trebles and repeat from *. For the footing: 1 treble, 1 chain, miss a few threads of the edge of the braid, 1 treble.
Crochet guipure lace (fig. 459).—This charming little lace makes a very good substitute for real guipure. It can be made on a row of trebles, just as well as on point lace braid, or on a mignardise, after you have raised the picots of it by single and chain stitches.
Crochet guipure lace (fig. 459).—This lovely lace serves as a great alternative to real guipure. You can create it on a row of trebles, just like you would on point lace braid, or on a mignardise, after you've raised the picots using single and chain stitches.
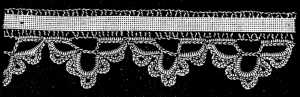
Materials: Fil d’Alsace D.M.C Nos. 70 to 90. Cordonnet 6 fils D.M.C Nos. 80 to 120, or Fil à dentelle D.M.C Nos. 40 to 70.
Materials: Fil d’Alsace D.M.C Nos. 70 to 90. Cordonnet 6 fils D.M.C Nos. 80 to 120, or Fil à dentelle D.M.C Nos. 40 to 70.
6 plain *, 9 chain, leave an interval equalling in length 6 bars of the point lace braid used in our pattern; in the braid: 6 plain stitches, very close together, 8 chain, 1 single on the 7th of the 9 chain, 10 chain, 1 single on the 3d of the 9 chain, 8 chain, 1 plain close to the first of the first 6 plain.
6 plain *, 9 chain, leave an interval equal in length to 6 bars of the point lace braid used in our pattern; in the braid: 6 plain stitches, very close together, 8 chain, 1 single on the 7th of the 9 chain, 10 chain, 1 single on the 3rd of the 9 chain, 8 chain, 1 plain close to the first of the first 6 plain.
1st scallop—7 plain, 5 chain, join to the 4th chain; on the 5th chain: 6 plain; on the 8th chain: 3 plain.
1st scallop—7 plain, 5 chain, join to the 4th chain; on the 5th chain: 6 plain; on the 8th chain: 3 plain.
2nd scallop—on the 10 chain: 7 plain, 5 chain, join to the 4th chain = on the 5 chain: 6 plain = on the 10 chain, 5 plain, 5 chain, join to the 4th chain, 6 plain, 5 chain, join to the 4th chain, 6 chain, 1 plain on the 10th chain.
2nd scallop—on the 10 chain: 7 plain, 5 chain, join to the 4th chain = on the 5 chain: 6 plain = on the 10 chain, 5 plain, 5 chain, join to the 4th chain, 6 plain, 5 chain, join to the 4th chain, 6 chain, 1 plain on the 10th chain.
3rd scallop—like the first, then repeat from *.
3rd scallop—just like the first, then repeat from *.
Lace made on Point Lace braid (fig. 460).—On the braid, work a row of trebles, 1 or 2 chain stitches apart, according to the size of the braid and on this row of trebles, make two other rows as follows:
Lace made on Point Lace braid (fig. 460).—On the braid, create a row of treble stitches, spaced 1 or 2 chain stitches apart, depending on the size of the braid. Then, on this row of trebles, make two additional rows as follows:
1st row—5 chain, 1 treble on the treble of the preceding row, 5 chain, 1 treble, on the same stitch to which the first treble is joined, 5 chain, miss 3 trebles, 1 treble on the 4th treble of the row beneath.
1st row—5 chains, 1 treble on the treble of the previous row, 5 chains, 1 treble, in the same stitch where the first treble is connected, 5 chains, skip 3 trebles, 1 treble in the 4th treble of the row below.
2nd row—1 plain on the 3rd of the 5 first chain, 3 plain, 1 treble on the 3rd of the chain stitches between the two trebles of the first row that come close together; 3 chain, 1 treble on the same stitch, 3 chain, 1 treble on the same stitch, 3 chain, 1 treble on the 3rd of the next 5 chain.
2nd row—1 single crochet in the 3rd chain of the first 5 chains, 3 single crochets, 1 double crochet in the 3rd chain stitch between the two double crochets of the first row that are close together; 3 chains, 1 double crochet in the same stitch, 3 chains, 1 double crochet in the same stitch, 3 chains, 1 double crochet in the 3rd chain of the next 5 chains.
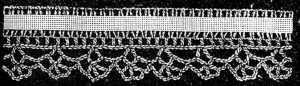
Materials: The same as for 458.
Materials: The same as for __A_TAG_PLACEHOLDER_0__.
Crochet lace (fig. 461).—1st row—3 plain close together, in the braid; * 13 chain, join to the 1st plain. On each of the first 6 chain; 1 plain; = on the 7th chain: 3 plain, then on the other chain stitches: 6 plain. In the braid: 7 plain and repeat from *.
Crochet lace (fig. 461).—1st row—3 doubles together in the braid; * 13 chains, join to the 1st double. On each of the first 6 chains; 1 double; = on the 7th chain: 3 doubles, then on the other chain stitches: 6 doubles. In the braid: 7 doubles and repeat from *.
2nd row—* miss 2 plain of the first row, 5 plain to reach the 2nd stitch added in the first row, 4 plain on the 2nd added stitch, 4 plain on the next stitches. Repeat from *.
2nd row—* knit 2 stitches from the first row, then 5 stitches to reach the 2nd stitch added in the first row, knit 4 stitches on the 2nd added stitch, and knit 4 stitches on the next stitches. Repeat from *.
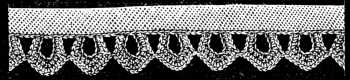
Materials: Lacet superfin D.M.C No. 14 and Fil d’Alsace D.M.C Nos. 30 to 70.[A]
Materials: D.M.C No. 14 superfine lace and D.M.C Nos. 30 to 70 Alsace thread.__A_TAG_PLACEHOLDER_0__
For an insertion, drop the thread after the 2nd of the 4 stitches that are to be made at the point, then put the needle into the stitch of the finished stripe, take up the thread again, draw it through the stitch and proceed to the second side of the scallop.
For an insertion, drop the thread after the 2nd of the 4 stitches that need to be made at the point, then insert the needle into the stitch of the finished stripe, pick up the thread again, pull it through the stitch and continue to the second side of the scallop.
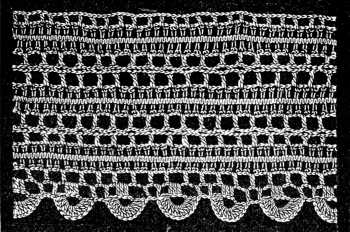
Materials—According to the mignardise used. Fil d’Alsace D.M.C Nos. 30 to 70, or Fil à dentelle D.M.C Nos. 25 to 70.[A]
Materials—Based on the mignardise used. Fil d’Alsace D.M.C Nos. 30 to 70, or Fil à dentelle D.M.C Nos. 25 to 70.__A_TAG_PLACEHOLDER_0__
The rows of crochet work between, consist of: 1 treble on 1 chain, 4 chain, miss 2 picots of the mignardise, 1 treble between the 3rd and 4th picot.
The rows of crochet work in between consist of: 1 treble on 1 chain, 4 chains, skip 2 picots of the mignardise, and 1 treble between the 3rd and 4th picot.
Work the edge in two rows.
Work the edge in two rows.
1st row—1 treble between 2 picots, 3 chain, miss 2 picots, 1 treble.
1st row—1 treble between 2 picots, 3 chains, skip 2 picots, 1 treble.
2nd row—1 treble on 3 chain, 3 chain, 1 treble, 3 chain, 3 trebles, 7 chain, turn back and join to the 1st of the 3 trebles, 2 chain, join them to the 2nd treble, 2 trebles on the 7 chain; keep the last loops of the last treble on the needle and join them to those of the next treble.
2nd row—1 triple crochet on 3 chains, 3 chains, 1 triple crochet, 3 chains, 3 triple crochets, 7 chains, turn back and join to the 1st of the 3 triple crochets, 2 chains, join them to the 2nd triple crochet, 2 triple crochets on the 7 chains; keep the last loops of the last triple crochet on the hook and join them to those of the next triple crochet.
Lace with two rows of leaves (fig. 463).—This is one of the pleasantest crochet patterns to work that we know. The leaves are made separately and fastened into a foundation with thread, at least two numbers finer than that of which the leaves are made.
Lace with two rows of leaves (fig. 463).—This is one of the most enjoyable crochet patterns we've come across. The leaves are created separately and attached to a base with thread that is at least two sizes finer than the yarn used for the leaves.
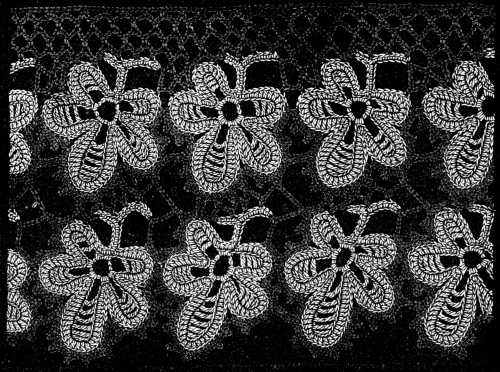
Materials: Fil d’Alsace D.M.C Nos. 20 to 100, Cordonnet 6 fils D.M.C Nos. 25 to 80 or Fil à dentelle D.M.C Nos. 25 to 100.
Materials: D.M.C Fil d’Alsace Nos. 20 to 100, D.M.C Cordonnet 6 fils Nos. 25 to 80 or D.M.C Fil à dentelle Nos. 25 to 100.
Leaf with 5 petals: 8 chain, make a ring = 2 plain on the ring = 1st petal * 11 chain, miss 3 chain, 1 half-treble on the 8th chain, 1 chain, miss the 7th chain, 1 treble on the 6th chain, 1 chain, 1 treble on the 4th chain, 1 chain, 1 treble on the 3rd chain, 2 chain, 2 plain on the ring.
Leaf with 5 petals: 8 chains, make a ring = 2 plain on the ring = 1st petal * 11 chains, skip 3 chains, 1 half-treble on the 8th chain, 1 chain, skip the 7th chain, 1 treble on the 6th chain, 1 chain, 1 treble on the 4th chain, 1 chain, 1 treble on the 3rd chain, 2 chains, 2 plain on the ring.
2nd petal: 15 chain, miss 3 chain, 1 half-treble *, 1 chain, miss 1 chain, 1 treble *. Repeat 4 times from * to *; add: 1 chain, 2 trebles on the ring.
2nd petal: 15 chains, skip 3 chains, 1 half-treble *, 1 chain, skip 1 chain, 1 treble *. Repeat 4 times from * to *; then add: 1 chain, 2 trebles on the ring.
3rd petal: 21 chain, miss 3 chain, 1 half-treble *, 1 chain, miss 1, 1 treble *. Repeat 7 times from * to *; add: 1 chain, miss 1, 2 trebles in the ring.
3rd petal: 21 chains, skip 3 chains, 1 half-treble *, 1 chain, skip 1, 1 treble *. Repeat 7 times from * to *; then add: 1 chain, skip 1, 2 trebles in the ring.
The 4th petal to be worked like the 3rd; the 5th like the 1st.
The 4th petal should be made like the 3rd; the 5th like the 1st.
When the 5 petals are finished, make 2 plain stitches on the ring; then on the chain stitches of the 1st petal: 2 plain, 7 trebles, 2 trebles on the 10th stitch; then descending again: 7 trebles, 2 plain and 3 single on the 3 plain stitches of the ring.
When the 5 petals are done, make 2 plain stitches on the ring; then for the chain stitches of the 1st petal: 2 plain, 7 trebles, 2 trebles on the 10th stitch; then going back down: 7 trebles, 2 plain and 3 single on the 3 plain stitches of the ring.
On the 2nd petal work: 3 plain, 10 trebles, 2 trebles on the 14th chain, 10 trebles, 3 plain, 2 single, on the 2 trebles on the ring.
On the 2nd petal work: 3 double crochets, 10 treble crochets, 2 treble crochets on the 14th chain, 10 treble crochets, 3 double crochets, 2 single crochets, on the 2 treble crochets on the ring.
3rd petal: 2 single, 3 plain, 14 trebles, 2 trebles on the 20th chain, 14 trebles, 3 plain, a single.
3rd petal: 2 singles, 3 plain, 14 trebles, 2 trebles on the 20th chain, 14 trebles, 3 plain, 1 single.
The 4th petal is worked like the 2nd; the 5th like the 1st, to be followed by 1 single on the 1st of the 3 chain stitches of the ring.
The 4th petal is made like the 2nd; the 5th like the 1st, followed by 1 single on the 1st of the 3 chain stitches of the ring.
For the stalk: 14 chain; miss 1, 9 plain on the 9 chain; 6 chain, miss 1, 5 plain on the 5 chain, 4 plain on the chain stitches that are still disengaged, 2 single on the ring and then fasten the thread off with a few stitches.
For the stalk: 14 chains; skip 1, 9 plain on the 9 chains; 6 chains, skip 1, 5 plain on the 5 chains, 4 plain on the chain stitches that are still free, 2 single on the ring and then finish off the thread with a few stitches.
When you have enough leaves, join them together by a row of picots, working from left to right as follows: * take the second petal on the right side of a leaf, put the thread into the 12th stitch; make 2 plain, 1 picot, 1 plain on the stitch on which the picot was made = in all the leaves, the 3rd plain before the picot and the first after, meet in the same stitch beneath = 2 plain, 1 picot, 3 plain, 2 chain = on the 8th stitch of the 3rd petal: 1 plain, 2 plain more on the next stitches **, 1 picot, 3 plain. Repeat 6 times from ** and finish with 2 chain.
When you have enough leaves, connect them together using a row of picots, working from left to right like this: * take the second petal on the right side of a leaf, place the thread into the 12th stitch; make 2 plain stitches, 1 picot, and then 1 plain on the stitch where the picot was made = in all the leaves, the 3rd plain stitch before the picot and the first after meet in the same stitch below = 2 plain stitches, 1 picot, 3 plain stitches, 2 chains = on the 8th stitch of the 3rd petal: 1 plain stitch, 2 more plain stitches on the next stitches **, 1 picot, 3 plain stitches. Repeat this 6 times from ** and finish with 2 chains.
On the 7th stitch of the 4th petal: 1 plain, 2 plain on the next stitches ***, 1 picot, 3 plain. Repeat 4 times from ***.
On the 7th stitch of the 4th petal: 1 knit, 2 knits on the next stitches ***, 1 picot, 3 knits. Repeat 4 times from ***.
On the 5th stitch of the 5th petal: 1 plain, and on the 4 next, 4 plain ****. Repeat from * to ** round each leaf, then instead of a picot, make 4 chain, join between the 1st and 2nd picot, 4 chain, close the picot. From this point the preceding series of stitches takes the place of the picot that immediately follows the sign **; proceed to ****.
On the 5th stitch of the 5th petal: 1 plain stitch, and on the next 4, 4 plain stitches ****. Repeat from * to ** around each leaf, then instead of a picot, make 4 chain stitches, join between the 1st and 2nd picot, make 4 chain stitches, and close the picot. From this point, the earlier series of stitches replaces the picot that immediately follows the sign **; proceed to ****.
Foundation for the footing of the lace, with a single row of leaves.—When all the leaves are joined together, take the finer number of cotton and fasten your thread to the last stitch of the small stalk; then make: * 2 chain, 1 plain on the 9th stitch of the 5th petal; 6 chain, miss 2, 1 plain on the 3rd stitch; 6 chain, 1 plain on the 3rd stitch, 1 chain, 1 plain on the 5th stitch of the 4th petal; 6 chain, 1 plain on the 3rd chain; 2 chain, 1 plain on the 4th stitch (counting from the bottom) of the 5th petal of the next leaf; 3 chain, 1 single on the last stitch of the long stalk; 3 chain, join to the 3rd chain stitch, 3 chain, draw the thread again in coming back through the 3rd of the second set of 6 chain stitches in the 1st petal; 1 single; turning back and from left to right: 1 single on the plain stitch between the chain stitches, 6 chain, 1 plain on the 2nd of the last 3 chain, 6 chain, 1 plain on the stalk, 6 chain, 1 plain on the 3rd stitch of the stalk; 6 chain, 1 plain on the 4th stitch of the stalk; 7 chain, 1 plain at the top of the little stalk, then repeat from *. The network in the next rows, which may be of any width, is composed of: 6 chain stitches and, 1 plain on the loop of the last row.
Foundation for the base of the lace, with a single row of leaves.—Once all the leaves are connected, take a finer cotton thread and secure it to the last stitch of the small stalk; then do the following: * 2 chains, 1 plain stitch on the 9th stitch of the 5th petal; 6 chains, skip 2, 1 plain stitch on the 3rd stitch; 6 chains, 1 plain stitch on the 3rd stitch, 1 chain, 1 plain stitch on the 5th stitch of the 4th petal; 6 chains, 1 plain stitch on the 3rd chain; 2 chains, 1 plain stitch on the 4th stitch (counting from the bottom) of the 5th petal of the next leaf; 3 chains, 1 single crochet on the last stitch of the long stalk; 3 chains, connect to the 3rd chain stitch, 3 chains, draw the thread again while coming back through the 3rd stitch of the second set of 6 chain stitches in the 1st petal; 1 single crochet; turning back from left to right: 1 single crochet on the plain stitch between the chain stitches, 6 chains, 1 plain stitch on the 2nd of the last 3 chains, 6 chains, 1 plain stitch on the stalk, 6 chains, 1 plain stitch on the 3rd stitch of the stalk; 6 chains, 1 plain stitch on the 4th stitch of the stalk; 7 chains, 1 plain stitch at the top of the little stalk, then repeat from *. The pattern in the next rows, which can be any width, consists of: 6 chain stitches and, 1 plain stitch on the loop of the last row.
For the last row but one of the network, make: 4 chain, 1 plain over each loop, and complete the lace by a row of plain stitches.
For the second to last row of the network, make: 4 chains, 1 plain stitch over each loop, and finish the lace with a row of plain stitches.
To make the leaves stand out from the foundation, use two shades of thread, white and écru, white and Jaune-Rouille 365, or white and Gris-Cendre 415.
To make the leaves pop against the background, use two shades of thread: white and light beige, white and Rust Yellow 365, or white and Ash Gray 415.
The following is the way to join two rows of leaves together, that have previously been edged with picots.
The following is how to connect two rows of leaves that have been previously trimmed with picots.
Fasten the thread on to the little stalk, * 3 chain, 1 plain on the 8th stitch of the leaf, 2 chain, join to the middle picot of the 3rd petal of the top leaf; 2 chain, 3 plain on the 5th petal of the bottom row, 1 picot, 3 plain.
Fasten the thread onto the little stalk, * 3 chains, 1 plain stitch on the 8th stitch of the leaf, 2 chains, join to the middle picot of the 3rd petal of the top leaf; 2 chains, 3 plain stitches on the 5th petal of the bottom row, 1 picot, 3 plain stitches.
For the 2nd petal of the bottom leaf: 3 plain, 1 picot, 3 plain.
For the 2nd petal of the bottom leaf: 3 plain, 1 picot, 3 plain.
For the 5th petal of the next leaf below: 3 plain, 4 chain, 1 single on the long stalk, 5 chain, 1 plain on the 2nd picot of the 1st petal of the preceding leaf, 5 chain, 1 single on the 2nd picot of the 4th petal of the top leaf, 4 chain, 1 plain on the 4th single of the stalk, 3 chain, 1 single on the 7th picot of the 3rd petal of the top leaf, 3 chain, miss 1 stitch of the stalk, 1 plain on the stalk, 3 chain, 1 plain on the 6th picot of the top leaf, 3 chain, 1 plain on the little stalk. Repeat from *.
For the 5th petal of the next leaf down: 3 plain, 4 chain, 1 single on the long stalk, 5 chain, 1 plain on the 2nd picot of the 1st petal of the previous leaf, 5 chain, 1 single on the 2nd picot of the 4th petal of the top leaf, 4 chain, 1 plain on the 4th single of the stalk, 3 chain, 1 single on the 7th picot of the 3rd petal of the top leaf, 3 chain, skip 1 stitch of the stalk, 1 plain on the stalk, 3 chain, 1 plain on the 6th picot of the top leaf, 3 chain, 1 plain on the little stalk. Repeat from *.
Three and even four rows of leaves may be joined together in this manner and make a very handsome lace, particularly suitable for church linen.
Three or even four rows of leaves can be combined like this to create a beautiful lace, especially ideal for church linens.
Insertion with waved braid (fig. 464).—1 plain stitch at the point of the braid, 7 chain, 1 single on the 2nd chain. On the next chain stitches: 1 half-treble, 1 treble, 1 double treble, 1 triple treble, 1 plain on the next point of the braid.
Insertion with waved braid (fig. 464).—1 plain stitch at the point of the braid, 7 chains, and 1 single crochet on the 2nd chain. For the next chain stitches: 1 half-treble, 1 treble, 1 double treble, 1 triple treble, and 1 plain stitch on the next point of the braid.
Repeat the same stitches on the second side, only that after the 6th chain stitch, you draw the thread through the 7th of the 1st finished row.
Repeat the same stitches on the second side, but after the 6th chain stitch, pull the thread through the 7th stitch of the 1st completed row.
Little wheels, set between the crochet pyramids, and described in the chapters on filet-guipure and Irish lace, complete the insertion.
Little wheels, placed between the crochet pyramids, and outlined in the chapters on filet-guipure and Irish lace, finish the insertion.
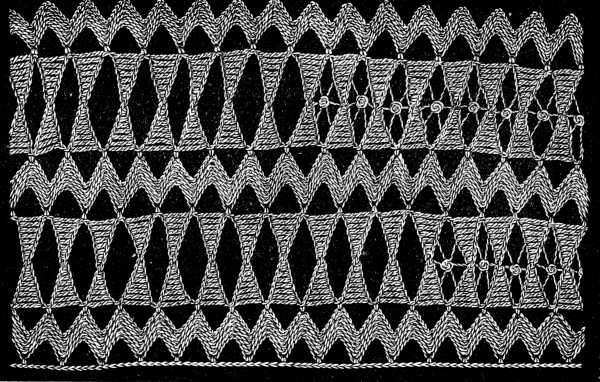
Materials.—According to the size of the braid: Fil d’Alsace D.M.C Nos. 20 to 70, or Cordonnet 6 fils D.M.C Nos. 40 to 70.[A]
Materials.—Depending on the size of the braid: Fil d’Alsace D.M.C Nos. 20 to 70, or Cordonnet 6 fils D.M.C Nos. 40 to 70.__A_TAG_PLACEHOLDER_0__
Crochet lace, made with leaf braid (fig. 465).—Introduce the thread into one of the leaves of the braid and working from right to left, make for the outer border: * 1 plain, 2 chain, 1 picot in bullion stitch, with 5 twists of the thread, 2 chain, 1 treble near the end of the leaf. Leave the last 2 loops of the treble on the needle **.
Crochet lace, made with leaf braid (fig. 465).—Insert the thread into one of the leaves of the braid and working from right to left, create the outer border: * 1 single crochet, 2 chain, 1 picot in bullion stitch, using 5 twists of the thread, 2 chain, 1 treble close to the end of the leaf. Keep the last 2 loops of the treble on the hook **.
Take 2 leaves of the braid, fold them one upon the other: 1 treble near the stalk of these folded leaves, tighten the loops of the 2 trebles; chain ***, 1 picot, 2 chain, 1 plain, 2 chain. Repeat 5 times from ***.
Take 2 leaves of the braid, fold them one on top of the other: 1 treble near the base of these folded leaves, tighten the loops of the 2 trebles; chain ***, 1 picot, 2 chains, 1 plain, 2 chains. Repeat 5 times from ***.
Proceed with 1 picot, 2 chain,—there will be 7 picots round the folded leaves—1 treble on the folded leaves and repeat from ** to *, therefore the inverse way, and begin again from *.
Proceed with 1 picot, 2 chains—there will be 7 picots around the folded leaves—1 treble on the folded leaves and repeat from ** to *, therefore the inverse way, and begin again from *.

Materials: Fil d’Alsace D.M.C Nos. 50 to 100 or Fil à dentelle D.M.C Nos. 50 to 80.[A]
Materials: D.M.C thread Nos. 50 to 100 or D.M.C lace thread Nos. 50 to 80.__A_TAG_PLACEHOLDER_0__
For the footing of the lace, 4 rows are required.
For the base of the lace, 4 rows are needed.
1st row—* 1 double treble close to the stalk of the leaf, 5 chain, 1 treble, at the third of the leaf, 1 double treble at the 2nd third of the leaf, 5 chain, 2 double trebles, one on the right leaf, one on the left, draw the last loops of the 2 trebles up together and repeat from *.
1st row—* 1 double treble close to the stem of the leaf, 5 chain, 1 treble, at the third of the leaf, 1 double treble at the 2nd third of the leaf, 5 chain, 2 double trebles, one on the right leaf, one on the left, pull the last loops of the 2 trebles up together and repeat from *.
2nd row—On each of the little loops formed by the 5 chain of the last row: 1 plain, 3 chain, 1 picot in bullion stitch, 7 chain, 1 picot, 3 chain; 1 plain on the next loop and so on.
2nd row—On each of the little loops formed by the 5 chains of the last row: 1 single crochet, 3 chains, 1 picot in bullion stitch, 7 chains, 1 picot, 3 chains; 1 single crochet on the next loop and so on.
3rd row—1 plain on the 4th of the 7 chain, 5 chain, 1 plain and so on.
3rd row—1 plain on the 4th of the 7 chain, 5 chain, 1 plain and so on.
4th row—1 plain on each loop of the last row.
4th row—1 plain stitch on each loop from the last row.
Crochet lace made with leaf braid (fig. 466).—Begin with the outside edge:
Crochet lace made with leaf braid (fig. 466).—Start with the outer edge:
1st row:—At the end of a leaf: 1 treble, 6 chain, 1 picot in bullion stitch, 6 chain, 1 treble = at the beginning of a 2nd leaf: 6 chain, 1 picot, 6 chain, 1 treble at the end of the leaf = 7 chain, 1 picot, 7 chain, 1 treble on the 3rd leaf = 6 chain, 1 picot, 6 chain, 1 treble at the end of the 3rd leaf = 6 chain, 1 treble, 6 chain, 1 treble on the 4th leaf = 1 double treble joined to the 4th and 1st leaf of the next scallop = 1 treble at the end of the 1st leaf, join and draw the last loops of these 3 trebles together.
1st row:—At the end of a leaf: 1 treble, 6 chain, 1 picot in bullion stitch, 6 chain, 1 treble = at the beginning of a 2nd leaf: 6 chain, 1 picot, 6 chain, 1 treble at the end of the leaf = 7 chain, 1 picot, 7 chain, 1 treble on the 3rd leaf = 6 chain, 1 picot, 6 chain, 1 treble at the end of the 3rd leaf = 6 chain, 1 treble, 6 chain, 1 treble on the 4th leaf = 1 double treble joined to the 4th and 1st leaf of the next scallop = 1 treble at the end of the 1st leaf, join and draw the last loops of these 3 trebles together.
2nd row—over each treble and picot: * 1 plain, 3 chain, 1 picot, 7 chain, 1 picot, 3 chain, 1 plain = repeat 6 times from *.
2nd row—over each treble and picot: * 1 single, 3 chains, 1 picot, 7 chains, 1 picot, 3 chains, 1 single = repeat 6 times from *.
At the indent and before the last picot: 2 chain, 1 picot, 2 chain = 1 plain before the 1st picot of the next scallop.
At the indent and before the last picot: 2 chains, 1 picot, 2 chains = 1 plain stitch before the 1st picot of the next scallop.
3rd row—1 treble, 8 chain, repeat 6 times. In the indent join the 4th of the 7 chain stitches right and left together by 1 treble.
3rd row—1 treble, 8 chain, repeat 6 times. In the indent, join the 4th of the 7 chain stitches on the right and left together with 1 treble.
4th row—15 single on each loop of 8 chain.
4th row—15 single crochets on each loop of 8 chain.
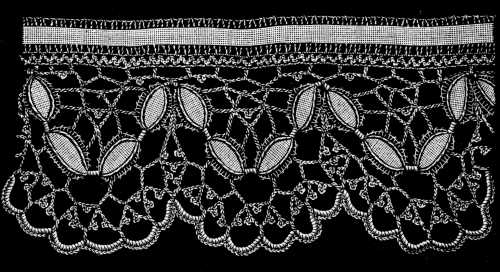
Materials: Cordonnet 6 fils D.M.C Nos. 40 to 80 or Fil à dentelle Nos. 50 to 80.[A]
Materials: Cordonnet 6 fils D.M.C Nos. 40 to 80 or Fil à dentelle Nos. 50 to 80.__A_TAG_PLACEHOLDER_0__
Inside junction.—Begin at the edge of the first leaf, fasten on the thread and make 10 chain and, 1 double treble at the end of the leaf, 1 triple treble, and draw up both together, 5 chain, 2 triple trebles on the leaves to the right and left = 5 chain, 2 triple trebles, one at the end and the other at the beginning of the 3rd and 4th leaf = 2 chain, 1 picot in bullion stitch, 2 chain, 1 plain on the last stitch of the first trebles, 10 chain, 1 plain on the last stitch of the last trebles; 5 chain, 1 triple treble at the end of the 4th leaf.
Inside junction.—Start at the edge of the first leaf, attach the thread and make 10 chains, then 1 double treble at the end of the leaf, followed by 1 triple treble, and pull both together, 5 chains, 2 triple trebles on the leaves to the right and left = 5 chains, 2 triple trebles, one at the end and the other at the beginning of the 3rd and 4th leaf = 2 chains, 1 picot in bullion stitch, 2 chains, 1 plain stitch on the last stitch of the first trebles, 10 chains, 1 plain stitch on the last stitch of the last trebles; 5 chains, 1 triple treble at the end of the 4th leaf.
Going back to the beginning: 5 chain, 1 single on the 10 chain above the picot = 5 chain, 1 single on the 5th of the first 10 chain = 12 chain, 1 plain on the loop of the last triple treble, 7 chain, 1 picot in bullion stitch, 6 chain = 1 plain on the stalk between the 2 leaves; 6 chain, 1 picot, 7 chain, 1 triple treble on the leaf, 5 chain, repeat from *.
Going back to the start: 5 chains, 1 single crochet on the 10 chains above the picot = 5 chains, 1 single crochet on the 5th of the first 10 chains = 12 chains, 1 double crochet on the loop of the last triple treble, 7 chains, 1 picot in bullion stitch, 6 chains = 1 double crochet on the stalk between the 2 leaves; 6 chains, 1 picot, 7 chains, 1 triple treble on the leaf, 5 chains, repeat from *.
2nd row—5 chain, 1 treble on the lower loops. Distribute the chain stitches equally.
2nd row—5 chain, 1 treble on the lower loops. Spread the chain stitches evenly.
3rd row—1 plain in the braid that forms the footing of the lace, 2 chain, 1 plain on the last chain stitches, 2 chain, 1 plain in the braid, continuing in this manner to join the crochet work and the braid together.
3rd row—1 plain in the braid that makes up the base of the lace, 2 chains, 1 plain on the last chain stitches, 2 chains, 1 plain in the braid, and keep going like this to connect the crochet work and the braid together.
Irish lace (fig. 467).—Begin with the semicircles in the middle of the pattern, which arch over two scallops, and cast on 117 chain. Then lay a double or threefold thread of Cordonnet 6 fils D.M.C No. 2, over the chain stitches, and make one plain stitch on each; then cut the padding thread short off.
Irish lace (fig. 467).—Start with the semicircles in the center of the pattern, which curve over two scallops, and cast on 117 chain stitches. Next, place a double or triple strand of Cordonnet 6 fils D.M.C No. 2 over the chain stitches, and make one plain stitch on each; then cut the padding thread short.

Materials: Cordonnet 6 fils D.M.C Nos. 25 to 100, Fil à pointer D.M.C No. 30 or Fil d’Alsace D.M.C Nos. 30 to 100.[A]
Materials: Cordonnet 6 threads D.M.C Nos. 25 to 100, D.M.C No. 30 pointing thread, or D.M.C Nos. 30 to 100 Alsace thread.__A_TAG_PLACEHOLDER_0__
On the other side of the chain make 2 plain, * 2 chain, 1 picot, 7 chain, 1 picot, 2 chain, miss 7; 1 plain on each of the 2 next stitches **.
On the other side of the chain, make 2 plain, * 2 chain, 1 picot, 7 chain, 1 picot, 2 chain, skip 7; 1 plain on each of the next 2 stitches **.
Repeat 11 times from * to **; the 11th time making only 6 chain.
Repeat 11 times from * to **; on the 11th time, make only 6 chains.
2nd and 3rd row—On the upper side, over a double thread of twist: 1 plain on each stitch of the last row; cut off the padding thread = 2 chain, 1 picot, 7 chain, 1 picot, 2 chain, 1 plain on the 4th of the 7 chain stitches after the first picot of the preceding row = 3 chain, 1 picot, 3 chain, 1 plain on the 4th of the next 7 chain stitches **. Repeat 11 times from * to ** and then make: 2 chain, 1 picot, 7 chain, 1 picot, 2 chain, 1 plain.
2nd and 3rd row—On the top side, over a double twisted thread: 1 plain stitch on each stitch of the last row; cut the padding thread = 2 chains, 1 picot, 7 chains, 1 picot, 2 chains, 1 plain stitch on the 4th of the 7 chain stitches after the first picot of the previous row = 3 chains, 1 picot, 3 chains, 1 plain stitch on the 4th of the next 7 chain stitches **. Repeat 11 times from * to ** and then make: 2 chains, 1 picot, 7 chains, 1 picot, 2 chains, 1 plain.
On the upper side and without a padding thread: 3 plain, 1 picot, * 5 plain, 1 picot, **. Repeat 20 times from * to **. Continue with: 3 plain, 10 chain, 1 picot, 2 chain, 2 plain on the 4th of the first 7 chain of the 2nd row on the inside of the semicircle = 2 chain, 1 picot, 7 chain, 1 picot, 2 chain, 1 plain on the plain stitch of the previous row = 1 plain on the 1st of the 3 chain = 2 chain, 1 picot, 7 chain, 1 picot, 2 chain, 2 plain as before, = 2 chain, 1 picot, 7 chain, 1 picot, 2 plain = 2 chain, 1 picot, 9 chain, 1 plain, return and make on the 9 chain: 7 plain, 2 chain, 1 picot, 2 chain, 2 plain = make 4 more scallops like the previous one = 2 chain, 1 picot, 9 chain, 1 plain = return and make on the 9 chain: 7 plain, 2 chain, 1 picot, 2 chain, 2 plain = make 2 more scallops, and then a 3rd joined to the scallop that terminates the semicircle on the right by the 2 plain stitches = 2 chain, 1 picot, 7 chain, 1 picot, 2 chain, 2 plain on the point of the crescent = 22 scallops consisting of: 2 chain, 1 picot, 7 chain, 1 picot, 2 chain, 2 plain.
On the top side and without a padding thread: 3 plain, 1 picot, * 5 plain, 1 picot, **. Repeat 20 times from * to **. Continue with: 3 plain, 10 chain, 1 picot, 2 chain, and 2 plain on the 4th of the first 7 chain of the 2nd row on the inside of the semicircle = 2 chain, 1 picot, 7 chain, 1 picot, 2 chain, 1 plain on the plain stitch of the previous row = 1 plain on the 1st of the 3 chain = 2 chain, 1 picot, 7 chain, 1 picot, 2 chain, 2 plain as before, = 2 chain, 1 picot, 7 chain, 1 picot, 2 plain = 2 chain, 1 picot, 9 chain, 1 plain, return and make on the 9 chain: 7 plain, 2 chain, 1 picot, 2 chain, 2 plain = make 4 more scallops like the previous one = 2 chain, 1 picot, 9 chain, 1 plain = return and make on the 9 chain: 7 plain, 2 chain, 1 picot, 2 chain, 2 plain = make 2 more scallops, and then a 3rd connected to the scallop that finishes the semicircle on the right by the 2 plain stitches = 2 chain, 1 picot, 7 chain, 1 picot, 2 chain, 2 plain on the point of the crescent = 22 scallops consisting of: 2 chain, 1 picot, 7 chain, 1 picot, 2 chain, 2 plain.
9 plain on the scallop that terminates the semicircle on the left, 7 chain, 2 plain on the next scallop, 2 chain, 1 picot, 2 chain, 2 plain on the next scallop = make 2 bars more of the same kind = 7 chain, 2 plain = 3 bars like the previous ones = 7 chain, 2 plain = 3 bars as before = 2 plain, 7 chain, 7 plain on the next scallop = 1 bar consisting of 3 chain, 1 picot, 3 chain, 2 plain over all the scallops of the preceding row (24 scallops in all).
9 plain on the scallop that ends the semicircle on the left, 7 chain, 2 plain on the next scallop, 2 chain, 1 picot, 2 chain, 2 plain on the next scallop = make 2 more bars of the same kind = 7 chain, 2 plain = 3 bars like the previous ones = 7 chain, 2 plain = 3 bars as before = 2 plain, 7 chain, 7 plain on the next scallop = 1 bar made of 3 chain, 1 picot, 3 chain, 2 plain over all the scallops of the previous row (24 scallops in total).
4th row—3 chain *, 8 trebles on the 7 chain that follow the 7 plain = turn the work = 1 single on the last treble, 3 chain, 1 treble on the 7th and 1 on the 6th of the 8 trebles, 2 chain, 1 treble on the 5th and 1 on the 4th of the 8 trebles, 2 chain, 1 treble on the 3rd and 1 on the 2nd of the 8 trebles, 3 chain, 1 single on the 1st of the 8 trebles = turn the work = ** on the 3 chain: 1 plain, 1 half-treble, 1 treble, 1 half-treble, 1 plain = 1 plain between the 2 trebles below = on the 2 chain, 1 plain, 1 half-treble, 1 treble, 1 half-treble, 1 plain *** = 1 plain between the 2 trebles beneath, repeat from *** to **, therefore the reverse way.
4th row—3 chains *, 8 trebles on the 7 chain that follows the 7 plain = turn the work = 1 single on the last treble, 3 chains, 1 treble on the 7th and 1 on the 6th of the 8 trebles, 2 chains, 1 treble on the 5th and 1 on the 4th of the 8 trebles, 2 chains, 1 treble on the 3rd and 1 on the 2nd of the 8 trebles, 3 chains, 1 single on the 1st of the 8 trebles = turn the work = ** on the 3 chains: 1 plain, 1 half-treble, 1 treble, 1 half-treble, 1 plain = 1 plain between the 2 trebles below = on the 2 chains, 1 plain, 1 half-treble, 1 treble, 1 half-treble, 1 plain *** = 1 plain between the 2 trebles beneath, repeat from *** to **, therefore in reverse.
Go on with 2 scallops consisting of 2 chain, 1 picot, 7 chain, 1 picot, 2 chain, 2 plain = after the 2nd scallop: 2 chain, 1 picot, 5 chain = 8 trebles on the 7 chain over the 7 plain and finish the little flowers consisting of 4 scallops each, like the first from * to *** and from *** to ** = 2 plain to get back to the scallop = 1 chain, 1 picot, 2 chain, 2 plain, 3 chain, 1 picot, 7 chain, 1 picot, 2 chain, 2 plain, 3 chain, 1 picot, 3 chain, and make a 3rd flower of 4 scallops like the 2 others = 2 single to come back to the scallop, 2 chain, 1 picot, 2 chain, 2 plain = 2 more scallops like the previous ones, then make the 4th flower of 4 scallops, which must come before the 7 plain stitches of the previous row = 20 scallops consisting of: 2 chain, 1 picot, 7 chain, 1 picot, 2 chain, 2 plain = the last scallop is to be joined to the 1st scallop of the 1st flower, under the left point of the semicircle = 3 single along the small scallop, 3 trebles, 2 chain, 1 picot, 2 chain, 2 plain on the point of the scallop = 3 bars like the previous ones to be joined to the 2 next scallops = 3 similar bars between the small scallops = 1 single on the scallop between the 2 flowers and 1 single on the 2nd set of chain stitches in the scallop that precedes the 3rd flower = 1 single on the point of the 1st scallop of the 3rd flower = continue the little bars along the 2nd side until past the 4th flower = after the 4th flower make 2 bars consisting of 2 chain, 1 picot, 2 chain, 2 plain = 3 chain, 1 picot, 3 chain, 2 plain on the next scallop **** 7 chain, 2 plain on the next scallop, 3 chain, 1 picot, 3 chain, 2 plain on the next scallop, 3 chain, 1 picot, 3 chain, 2 plain on the next scallop, 3 chain, 1 picot, 3 chain, 2 plain on the next scallop ***** repeat five times from **** to *****. At the 2nd repetition make 1 bar with 1 picot more, so that you have 4 bars instead of 3. At the 5th repetition you decrease by 1 bar, so that you have 2 instead of 3.
Continue with 2 scallops made of 2 chains, 1 picot, 7 chains, 1 picot, 2 chains, and then 2 plain stitches. After the 2nd scallop, do 2 chains, 1 picot, and 5 chains. Create 8 trebles over the 7 chains on the 7 plain stitches, and finish the little flowers with 4 scallops each, just like the first from * to *** and from *** to **. Do 2 plain stitches to get back to the scallop, then 1 chain, 1 picot, 2 chains, 2 plain stitches, 3 chains, 1 picot, 7 chains, 1 picot, 2 chains, 2 plain stitches, 3 chains, 1 picot, 3 chains, and make a 3rd flower of 4 scallops like the 2 others. Do 2 singles to return to the scallop, then 2 chains, 1 picot, 2 chains, 2 plain stitches. Make 2 more scallops like the previous ones, then create the 4th flower with 4 scallops, which should come before the 7 plain stitches from the previous row. You should have 20 scallops made up of: 2 chains, 1 picot, 7 chains, 1 picot, 2 chains, and 2 plain stitches. The last scallop should be joined to the 1st scallop of the 1st flower, under the left point of the semicircle. Do 3 singles along the small scallop, then 3 trebles, 2 chains, 1 picot, 2 chains, and 2 plain stitches at the point of the scallop. Create 3 bars like the previous ones to be joined to the next 2 scallops, and then 3 similar bars between the small scallops. Do 1 single on the scallop between the 2 flowers and 1 single on the 2nd set of chain stitches in the scallop before the 3rd flower. Do 1 single at the point of the 1st scallop of the 3rd flower, and continue the little bars along the 2nd side until past the 4th flower. After the 4th flower, make 2 bars consisting of 2 chains, 1 picot, 2 chains, and 2 plain stitches. Next, do 3 chains, 1 picot, 3 chains, and 2 plain stitches on the next scallop. Perform 7 chains, 2 plain stitches on the next scallop, then 3 chains, 1 picot, 3 chains, and 2 plain stitches on the next scallop. Repeat 3 chains, 1 picot, 3 chains, and 2 plain stitches on the next scallop, and again for the next scallop. Repeat five times from **** to *****. On the 2nd repetition, make 1 additional bar with 1 more picot, so you have 4 bars instead of 3. On the 5th repetition, decrease by 1 bar, ending up with 2 instead of 3.
1 plain on the point of the scallop of the flower, 3 chain, 1 picot, 7 chain, 1 picot, 3 chain, 3 plain, one of which is made on the 2nd plain of the previous row, and the 2nd on the bar of chain stitches = 3 plain, 1 picot, 7 chain, 1 picot, 3 chain, 2 plain = 2 more similar scallops = then 3 chain, 1 picot, 9 chain, 1 plain on the 2nd plain of the previous row = join and on the 9 chain make 7 plain = 3 chain, 1 picot, 3 chain, 2 plain.
1 plain on the tip of the flower's scallop, 3 chains, 1 picot, 7 chains, 1 picot, 3 chains, 3 plains, one of which is made on the 2nd plain of the previous row, and the 2nd on the bar of chain stitches = 3 plains, 1 picot, 7 chains, 1 picot, 3 chains, 2 plains = 2 more similar scallops = then 3 chains, 1 picot, 9 chains, 1 plain on the 2nd plain of the previous row = join and on the 9 chains make 7 plains = 3 chains, 1 picot, 3 chains, 2 plains.
Over the 1st little flower inside the semicircles, make 1 scallop like the previous ones = then 3 chain, 1 picot, 7 chain, 2 plain on the 3rd point of the first flower = 2 chain, 2 plain on the 2nd point of the second flower = 6 plain on the scallop and joined to the 3rd point of the first flower = 3 chain, 1 picot, 3 chain = 2 plain = 1 scallop like the previous ones, 2 plain on the 4th point of the small flower, 3 chain, 1 picot, 9 chain, 1 plain = 7 plain over the 9 chain = 3 chain, 1 picot, 3 chain, 2 plain.
Over the 1st small flower inside the semicircles, create 1 scallop like the previous ones, then 3 chains, 1 picot, 7 chains, and 2 single crochets on the 3rd stitch of the first flower. Next, 2 chains, 2 single crochets on the 2nd stitch of the second flower, then 6 single crochets on the scallop and join it to the 3rd stitch of the first flower. Follow with 3 chains, 1 picot, 3 chains, and 2 single crochets. Make 1 scallop like the previous ones, then 2 single crochets on the 4th stitch of the small flower, 3 chains, 1 picot, 9 chains, and 1 single crochet. Finally, do 7 single crochets over the 9 chains, then 3 chains, 1 picot, 3 chains, and 2 single crochets.
Make 7 scallops of: 3 chain, 1 picot, 7 chain, 1 picot, 3 chain, 2 plain, after the 7th scallop make 1 chain only, which must come just before the 7th chain to the left without a picot and above the point of the semicircle.
Make 7 scallops of: 3 chains, 1 picot, 7 chains, 1 picot, 3 chains, 2 plain stitches. After the 7th scallop, make just 1 chain, which should come right before the 7th chain to the left without a picot and above the point of the semicircle.
Over the 7 chain make a flower like the first with 4 scallops = then 3 scallops, 3 chain, 1 picot, 7 chain, 1 picot, 3 chain, 2 plain. Make one more flower with 4 scallops, 3 scallops like the previous ones = a third flower with 4 scallops, 2 chain, 2 plain, one of them above the point of the row beneath, 12 chain, 1 plain over the next scallop = turn the work and coming back over the row just made, make: 7 plain on the first 7 of the 12 chain, 1 plain on the point of the scallop, 4 chain, 1 picot, 4 chain, 1 plain on the next scallop, carry on the bars over the flowers and scallops, making 1 plain on the scallops of the flower and 2 plain on the other scallops, up to the 5 plain stitches between the 2 flowers underneath the semicircle.
Over 7 chains, create a flower like the first one with 4 scallops. Then, make 3 scallops, followed by 3 chains, 1 picot, 7 chains, 1 picot, 3 chains, and 2 plain stitches. Create another flower with 4 scallops and 3 scallops just like the previous ones, followed by a third flower with 4 scallops, 2 chains, and 2 plain stitches, placing one of them above the point of the previous row. Then, make 12 chains, and 1 plain stitch over the next scallop. Turn the work and come back over the row just made to do: 7 plain stitches on the first 7 of the 12 chains, 1 plain stitch on the point of the scallop, 4 chains, 1 picot, 4 chains, and 1 plain stitch on the next scallop. Continue adding stitches over the flowers and scallops, making 1 plain stitch on the scallops of the flower and 2 plain stitches on the other scallops, up to the 5 plain stitches between the 2 flowers underneath the semicircle.
After the plain stitch that joins the last bar, turn the work and make 23 scallops consisting of: 4 chain, 1 picot, 7 chain, 1 picot, 4 chain, 2 plain.
After the plain stitch that connects the last bar, turn the work and create 23 scallops made of: 4 chains, 1 picot, 7 chains, 1 picot, 4 chains, 2 plain.
Cut off the thread and fasten it on above the semicircle and at the plain stitch which precedes the 7 chain without picot and make the second side like the first = having reached the middle, close to the 5 plain, turn the work = make the half round of bars and fasten off at the 4th scallop of the flower above the semicircle.
Cut the thread and secure it above the semicircle and at the plain stitch that comes before the 7 chain without picot. Make the second side like the first. When you reach the middle, connect it to the 5 plain stitches, turn the work, and create the half round of bars, securing it at the 4th scallop of the flower above the semicircle.
Fasten on at the point under the flowers where the work was turned and on the wrong side, and from right to left, work: 21 scallops consisting of 4 chain, 1 picot, 7 chain, 1 picot, 4 chain, 2 plain = then add: 4 chain, 1 picot, 10 chain, 1 plain above the point of the scallop of the small flower = turn the work: 7 plain over the 10 chain.
Fasten at the spot under the flowers where the work was turned and on the wrong side, and from right to left, work: 21 scallops made up of 4 chains, 1 picot, 7 chains, 1 picot, 4 chains, 2 plain = then add: 4 chains, 1 picot, 10 chains, 1 plain above the tip of the scallop of the small flower = turn the work: 7 plain over the 10 chains.
22 bars of 3 chain, 1 picot, 3 chain, 2 plain = after the 22nd bar, 10 chain = come back and join to the picot of the 21st bar = 2 chain, 8 trebles over the 10 chain and complete the flower as before. After the 4th scallop of the flower: 2 chain, 1 single, quite close to the 8 trebles, 3 chain, 2 plain on the next bar, 3 chain, 1 picot, join to the 2nd stitch of the 4th scallop of the flower, 3 chain, carry on the bars the same distance as on the first side.
22 chains of 3, 1 picot, 3 chains, 2 single crochets = after the 22nd chain, make 10 chains = come back and slip stitch into the picot of the 21st chain = 2 chains, 8 double crochets over the 10 chains and finish the flower like before. After the 4th scallop of the flower: 2 chains, 1 single crochet, very close to the 8 double crochets, 3 chains, 2 single crochets on the next chain, 3 chains, 1 picot, join to the 2nd stitch of the 4th scallop of the flower, 3 chains, and continue making chains the same distance as on the first side.
Footing of the lace—On the chain stitches that follow the 3rd plain stitch and above the last little figure: 1 triple treble, 6 chain, join to the middle plain stitch = miss 1 scallop, 1 treble, 6 chain = miss 1 scallop, 1 double treble, 6 chain, = miss 1 scallop, 1 triple treble, 6 chain, = miss 1 scallop of the figure on the left, 1 double treble, 6 chain = miss 1 scallop, 1 treble, 6 chain = miss 1 scallop, 1 double treble, 6 chain = miss 1 scallop, 1 treble, 6 chain = miss 1 scallop, 1 treble, 6 chain = miss 1 scallop, 1 double treble, 6 chain, 1 triple treble, 6 chain, 1 quadruple treble on the next plain stitch. Repeat the whole, reversed, and finish off the footing with a row of plain stitches.
Footing of the lace—On the chain stitches that come after the 3rd plain stitch and before the last little figure: 1 triple treble, 6 chains, connect to the middle plain stitch = skip 1 scallop, 1 treble, 6 chains = skip 1 scallop, 1 double treble, 6 chains = skip 1 scallop, 1 triple treble, 6 chains = skip 1 scallop of the figure on the left, 1 double treble, 6 chains = skip 1 scallop, 1 treble, 6 chains = skip 1 scallop, 1 double treble, 6 chains = skip 1 scallop, 1 treble, 6 chains = skip 1 scallop, 1 treble, 6 chains = skip 1 scallop, 1 double treble, 6 chains, 1 triple treble, 6 chains, 1 quadruple treble on the next plain stitch. Repeat the entire pattern in reverse, and finish the footing with a row of plain stitches.
Edge of the lace.—Fasten on, where the semicircles join: 1 double treble on the first 3 chain stitches of the empty scallop, 5 chain, 1 double treble on the next disengaged chain stitches of the half scallop; continue the same on all the chain scallops and distribute the trebles so that there may be in all, 13 times 5 chain stitches.
Edge of the lace.—Attach at the point where the semicircles meet: 1 double treble on the first 3 chain stitches of the empty scallop, 5 chain, 1 double treble on the next free chain stitches of the half scallop; keep going the same way on all the chain scallops and space out the trebles so that there are a total of 13 sets of 5 chain stitches.
Add 2 triple trebles, the last loops of them, connected by a plain stitch; the 1st triple treble on the 3 last chain stitches of the last scallop, the 2nd on the plain stitch, that follows the 1st scallop of the middle figure = 4 chain, 1 treble on the plain stitch of the 2nd point. Repeat the same, reversed.
Add 2 triple trebles, the final loops of them, connected by a plain stitch; the 1st triple treble on the last 3 chain stitches of the last scallop, the 2nd on the plain stitch that follows the 1st scallop of the middle figure = 4 chain, 1 treble on the plain stitch of the 2nd point. Repeat the same, but in reverse.
2nd row—On the first 5 chain of the last row: 5 plain = on the next 5 chain: 5 plain = on the 3 chain, leave a space: 5 plain, 12 chain, come back and join to the 8th chain stitch by a single stitch = on the scallop: 4 plain, 1 picot, 3 plain, 1 picot, 4 plain = and so on, until you have 8 points altogether.
2nd row—On the first 5 chains of the last row: 5 single crochets = on the next 5 chains: 5 single crochets = on the 3 chains, leave a space: 5 single crochets, 12 chains, come back and join to the 8th chain stitch with a single crochet = on the scallop: 4 single crochets, 1 picot, 3 single crochets, 1 picot, 4 single crochets = and so on, until you have 8 points in total.
The plain stitches must be distributed as follows:
The regular stitches should be spread out like this:
For the 2nd point: in the 4th space 4 plain, in the 5th space 3 plain = for the 3rd point: in the 5th space, 2 plain, in the 6th space, 5 plain = for the 4th point: in the 6th space 1 plain, in the 7th space 6 plain = for the 5th point: in the 8th space 4 plain, in the 9th space 3 plain = for the 6th point: in the 9th space 3 plain, in the 10th space 4 plain = for the 7th point: in the 11th space 7 plain = for the 8th point: in the 12th space 7 plain = 5 plain in each of the 2 remaining spaces.
For the 2nd point: in the 4th space 4 plain, in the 5th space 3 plain = for the 3rd point: in the 5th space, 2 plain, in the 6th space, 5 plain = for the 4th point: in the 6th space 1 plain, in the 7th space 6 plain = for the 5th point: in the 8th space 4 plain, in the 9th space 3 plain = for the 6th point: in the 9th space 3 plain, in the 10th space 4 plain = for the 7th point: in the 11th space 7 plain = for the 8th point: in the 12th space 7 plain = 5 plain in each of the 2 remaining spaces.
Crochet lace (fig. 468).—This is always an effective pattern, in any number of thread. It is not new, however, and is probably already known to many of our readers as a pillow lace. Those who are not fond of making pillow lace, will be glad to learn how to reproduce it in crochet, as it makes a pretty trimming, both for wearing apparel and furniture. For furniture, it should be made in unbleached cotton, for articles of dress, in any of the of the finer numbers, referred to above.
Crochet lace (fig. 468).—This is always a striking pattern, suitable for any thread type. It's not new, though, and many of our readers might already recognize it as a pillow lace. For those who aren't keen on making pillow lace, you'll be pleased to know you can create it with crochet, making a lovely trim for both clothing and furniture. When making it for furniture, use unbleached cotton, and for clothing, choose any of the finer thread sizes mentioned earlier.

Materials.—For trimming curtains and coarse linen table covers: Fil à pointer D.M.C No. 25 or 30, or Cordonnet 6 fils D.M.C Nos. 10 to 25 écru. For articles of dress: Fil d’Alsace D.M.C Nos. 30 to 70, Cordonnet 6 fils D.M.C Nos. 25 to 70, or Fil à dentelle D.M.C Nos. 25 to 70 écru.[A]
Materials.—For trimming curtains and heavy linen table covers: Fil à pointer D.M.C No. 25 or 30, or Cordonnet 6 fils D.M.C Nos. 10 to 25 in ecru. For clothing: Fil d’Alsace D.M.C Nos. 30 to 70, Cordonnet 6 fils D.M.C Nos. 25 to 70, or Fil à dentelle D.M.C Nos. 25 to 70 in ecru.__A_TAG_PLACEHOLDER_0__
For the separate squares, cast on 10 chain stitches, and close the ring.
For the separate squares, chain 10 stitches and join to form a ring.
1st row—* 5 chain, 1 plain on the ring. Repeat 3 times from *.
1st row—* 5 chains, 1 plain stitch on the ring. Repeat 3 times from *.
2nd row—1 chain, 1 plain on the first 5 chain: * 5 chain, 1 plain = on the first 5 chain of the 1st row: 2 chain, 1 plain on the second 5 chain of the 1st row. Repeat 3 times from *.
2nd row—1 chain, 1 single crochet on the first 5 chains: * 5 chains, 1 single crochet = on the first 5 chains of the 1st row: 2 chains, 1 single crochet on the second 5 chains of the 1st row. Repeat 3 times from *.
3rd row—1 plain on the first 5 of the 2nd row: * 5 chain, 1 plain, 2 chain, 1 plain, 2 chain, 1 plain. Repeat 3 times from *.
3rd row—1 single crochet in the first 5 of the 2nd row: * 5 chain, 1 single crochet, 2 chain, 1 single crochet, 2 chain, 1 single crochet. Repeat 3 times from *.
In the 4th and following rows, go on increasing, as in the 3rd row, until, on all 4 sides, you have 11 plain stitches between every 5 chain.
In the 4th row and the ones that follow, keep increasing, just like in the 3rd row, until you have 11 plain stitches between every 5 chain on all 4 sides.
Crochet the squares together, as you finish them. After the 12th and last plain stitch, make: 2 chain, drop the loop, put the hook into the 3rd of the 5 chain stitches that form one corner of the square, draw the dropped loop through, 2 chain, close the picot, finish the square.
Crochet the squares together as you finish them. After the 12th and final plain stitch, make 2 chains, drop the loop, insert the hook into the 3rd of the 5 chain stitches that create one corner of the square, pull the dropped loop through, make 2 chains, close the picot, and finish the square.
For the star that connects the squares—10 chain, close the ring; * 4 chain, 1 picot, 4 chain, 1 over, join the 2 picots right and left of the squares that are to be joined together, by 1 treble; 4 chain, 1 picot, 3 chain, drop the loop, put the needle into the first of the first 4 chain stitches, draw the thread through, 2 plain on the ring, 8 chain, 1 treble on the 3rd picot and 1 treble on the 4th picot of the square = coming back: 1 plain on each of the 8 chain; 2 plain on the ring, and repeat 3 times from *.
For the star that connects the squares—10 chains, close the ring; * 4 chains, 1 picot, 4 chains, 1 over, join the 2 picots on the right and left of the squares that need to be connected with 1 treble; 4 chains, 1 picot, 3 chains, drop the loop, insert the needle into the first of the initial 4 chain stitches, pull the thread through, 2 plain on the ring, 8 chains, 1 treble on the 3rd picot and 1 treble on the 4th picot of the square = coming back: 1 plain on each of the 8 chains; 2 plain on the ring, and repeat 3 times from *.
For the half-star, that fills the space under the footing of the lace: 10 chain, close the ring = 9 chain, 1 treble on the 1st picot of the square; 4 chain, 1 picot, 3 chain; draw the thread through the 1st of the 9 chain = 2 plain, 8 chain, join the 3rd and 4th picots of the square by 1 treble bar on each picot = 8 single stitches on the 8 chain, 2 plain on the ring; 4 chain, 1 picot, 4 chain = on the 1st and last picot of the 2 opposite squares: 1 treble, 4 chain, 1 picot, 3 chain, drop the loop, draw it through the 1st of the 4 chain stitches = 2 plain, 8 chain, join 2 picots by 2 trebles = 8 single, 2 plain on the ring, 4 chain, 1 picot, 4 chain, 1 treble on the last picot = 8 chain, draw the thread through the 1st of the 4 chain.
For the half-star that fills the space under the lace: 10 chains, close the ring = 9 chains, 1 treble on the 1st picot of the square; 4 chains, 1 picot, 3 chains; pull the thread through the 1st of the 9 chains = 2 plain, 8 chains, connect the 3rd and 4th picots of the square with 1 treble bar on each picot = 8 single stitches on the 8 chains, 2 plain on the ring; 4 chains, 1 picot, 4 chains = on the 1st and last picot of the 2 opposite squares: 1 treble, 4 chains, 1 picot, 3 chains, drop the loop, pull it through the 1st of the 4 chain stitches = 2 plain, 8 chains, connect 2 picots with 2 trebles = 8 single, 2 plain on the ring, 4 chains, 1 picot, 4 chains, 1 treble on the last picot = 8 chains, pull the thread through the 1st of the 4 chains.
The footing is made as follows—* 1 plain on the 5 upper chain stitches of the square; 17 chain up to the ring, 3 plain, 17 chain and repeat from *. A row of plain stitches completes the footing.
The footing is made like this—* 1 plain on the 5 upper chain stitches of the square; 17 chains up to the ring, 3 plain, 17 chains, and repeat from *. A row of plain stitches finishes the footing.
Outer edge—* 2 treble on the 1st picot, 4 chain, and repeat 5 times from *.
Outer edge—* 2 treble on the 1st picot, 4 chain, and repeat 5 times from *.
On the 5 chain stitches, in the corner, make: 1 treble = 4 chain, 1 treble on the 5 chain and finish the second side of the square like the first. Omit the chain stitches, between the 1st and last trebles of the squares.
On the 5 chain stitches, in the corner, do: 1 treble = 4 chains, 1 treble on the 5 chain and complete the second side of the square just like the first. Skip the chain stitches between the 1st and last trebles of the squares.
The next and last row consists of: 2 plain, 1 picot, 2 plain every 4 chain. On the last 4 chain, at the point where 2 scallops join, make 4 plain stitches, without picots.
The next and final row is made up of: 2 plain, 1 picot, 2 plain for every 4 chains. On the last 4 chains, where 2 scallops meet, make 4 plain stitches, without picots.
Lace with stars (fig. 469).—Begin with the stars, make a chain of 18 stitches, close the ring, mount it on a mould, wind a soft thread, such as Coton à repriser D.M.C No 60, seven or eight times round it, and make 30 plain stitches upon it, joining the last to the first by a single stitch.
Lace with stars (fig. 469).—Start with the stars, create a chain of 18 stitches, close the loop, place it on a mold, wrap a soft thread like Coton à repriser D.M.C No 60 around it seven or eight times, and make 30 straight stitches on it, connecting the last one to the first with a single stitch.

Materials: Fil d’Alsace D.M.C Nos. 30 to 70, Fil à pointer D.M.C No. 25 or 30, Coton pour crochet D.M.C Nos. 8 to 12.[A]
Materials: D.M.C Fil d’Alsace No. 30 to 70, D.M.C Fil à pointer No. 25 or 30, D.M.C Coton pour crochet No. 8 to 12.__A_TAG_PLACEHOLDER_0__
Then: * 13 chain, and returning, miss the 1st chain = on the 12 chain: 1 single, 2 plain, 2 half-trebles, 2 trebles, 2 double trebles, 1 double treble and a half, 2 triple trebles; keep the two last loops of the last treble but one, on the needle, and join them, to those of the last treble. Repeat 5 times from *.
Then: * 13 chain, and returning, skip the 1st chain = on the 12 chain: 1 single, 2 plain, 2 half-trebles, 2 trebles, 2 double trebles, 1 double treble and a half, 2 triple trebles; keep the last two loops of the second-to-last treble on the needle, and join them to those of the last treble. Repeat 5 times from *.
2nd row—1 plain, on the upper stitch that was missed in the 1st row; * 17 chain, 1 plain on the next point. Repeat 5 times from *.
2nd row—1 single crochet in the upper stitch that was missed in the 1st row; * 17 chain stitches, 1 single crochet in the next stitch. Repeat 5 times from *.
3rd row—* 6 plain, 3 chain, miss 2 stitches of the lower row. Repeat from *.
3rd row—* 6 plain, 3 chain, skip 2 stitches from the row below. Repeat from *.
4th row—All round the last row, on each of the bottom stitches 1 plain; after every 6 stitches, 1 picot. This will give you 19 picots in all, separated from each other by 6 stitches.
4th row—All around the last row, on each of the bottom stitches 1 plain; after every 6 stitches, 1 picot. This will give you 19 picots in total, separated from each other by 6 stitches.
Inner connection—Fasten on the thread at the 5th treble, counting from the ring: 1 single, 8 chain. Draw out the thread, from the back, through the 9th of the 17 chain round the star = 8 chain * join with 1 chain to the 5th treble, passing the thread through to the back = work on the wrong side: 3 chain, bring the thread back between the 5th treble to the right side, and repeat 5 times from *. In joining the stars, place them so that 9 picots are turned to the edge, and 8 to the footing. The 10th and the 19th picots serve to join the stars.
Inner connection—Attach the thread to the 5th treble, counting from the ring: 1 single, 8 chains. Pull the thread from the back through the 9th of the 17 chains around the star = 8 chains * join with 1 chain to the 5th treble, pulling the thread through to the back = work on the wrong side: 3 chains, bring the thread back between the 5th treble to the right side, and repeat 5 times from *. When connecting the stars, position them so that 9 picots face the edge, and 8 face the base. The 10th and 19th picots are used to join the stars.
1st row—2 trebles between the 19th and the 9th of the * 9 picots, 7 chain, 1 treble; repeat 9 times from *.
1st row—2 double crochets between the 19th and the 9th of the * 9 picots, 7 chain stitches, 1 double crochet; repeat 9 times from *.
2nd row—On the 7 first chain stitches of the last row: 3 plain, 4 half-trebles, 3 trebles, 1 picot, 3 trebles, 1 picot, and so on, until in the semicircle over the picots, you have 7 times 7 chain stitches and 16 picots = on the ninth set of 7 chain: 3 trebles, 4 half trebles, 3 plain.
2nd row—On the 7 initial chain stitches of the last row: 3 plain, 4 half-trebles, 3 trebles, 1 picot, 3 trebles, 1 picot, and so on, until in the semicircle over the picots, you have 7 sets of 7 chain stitches and 16 picots = on the ninth set of 7 chain: 3 trebles, 4 half-trebles, 3 plain.
The scallops are joined by smaller ones, formed of: 3 plain, 4 half trebles, 3 trebles, 1 picot, 2 trebles, 7 chain, drop the loop, put the needle into the same treble of the last scallop; draw the loop through and make on the 7 chain: 1 plain, 1 half-treble, 5 trebles, 1 picot, 5 trebles, 1 half-treble, 1 plain; continue the large scallop, as described above.
The scallops are joined by smaller ones, made up of: 3 single crochets, 4 half double crochets, 3 double crochets, 1 picot, 2 double crochets, 7 chain stitches, drop the loop, insert the needle into the same double crochet of the last scallop; pull the loop through and on the 7 chain: 1 single crochet, 1 half double crochet, 5 double crochets, 1 picot, 5 double crochets, 1 half double crochet, 1 single crochet; continue the large scallop as described above.
The footing is composed of rings and trebles.—Begin with a ring, like those in the middle of the stars, worked as follows: 18 chain, with 28 plain upon them = miss 1 plain stitch of the ring, 3 plain, 10 chain = miss 1 plain, 3 plain, 10 chain = miss 1 plain, 3 plain, 5 chain, 1 single on the 7th picot of the 1st star, 5 chain = miss 1 plain, 3 plain, 5 chain, 1 single on the 8th picot, 5 chain = miss 1 plain, 3 plain, 5 chain, 1 single on the 2nd picot, 5 chain, finish off.
The base is made up of rings and trebles. Start with a ring, like those in the center of the stars, and work as follows: 18 chains, then 28 plain stitches on them = skip 1 plain stitch of the ring, 3 plain stitches, 10 chains = skip 1 plain stitch, 3 plain stitches, 10 chains = skip 1 plain stitch, 3 plain stitches, 5 chains, 1 single crochet on the 7th picot of the 1st star, 5 chains = skip 1 plain stitch, 3 plain stitches, 5 chains, 1 single crochet on the 8th picot, 5 chains = skip 1 plain stitch, 3 plain stitches, 5 chains, 1 single crochet on the 2nd picot, 5 chains, finish off.
Straight edge—Worked from right to left = 1 chain * turn the thread 7 times round the needle, join to the plain stitch between the 7th and 6th picot, complete the long treble, 7 chain, join 1 treble, consisting of six overs to the 1st treble; 1 quintuple treble between the 6th and the 5th picot; 7 chain, 1 quadruple treble joined to the previous treble = in all, 10 trebles, the 1st made with 7 overs, the 2nd with 6, the 3rd with 5, the 4th with 4, the 5th and 6th with 3, the 7th with 4, the 8th with 5, the 9th with 6, the 10th with 7; and between every 2 trebles, 7 chain.
Straight edge—Work from right to left = 1 chain * turn the thread 7 times around the needle, joining to the plain stitch between the 7th and 6th picot. Complete the long treble, 7 chain, join 1 treble made of six overs to the 1st treble; 1 quintuple treble between the 6th and the 5th picot; 7 chain, 1 quadruple treble joined to the previous treble = in total, 10 trebles. The 1st is made with 7 overs, the 2nd with 6, the 3rd with 5, the 4th with 4, the 5th and 6th with 3, the 7th with 4, the 8th with 5, the 9th with 6, and the 10th with 7; and between every 2 trebles, 7 chain.
The 3 long trebles of the ring are taken up with 1 plain and 7 chain between.
The 3 long trebles of the ring are worked with 1 plain stitch and 7 chains in between.
Guipure lace (fig. 470).—We advise our readers to work this charming pattern, in unbleached Fil à dentelle D.M.C No 50, because it imitates the appearance of old lace better than any other material.
Guipure lace (fig. 470).—We recommend that our readers create this lovely pattern using unbleached Fil à dentelle D.M.C No 50, as it resembles the look of vintage lace more than any other material.

Materials: Fil d’Alsace D.M.C Nos. 30 to 100, Cordonnet 6 fils D.M.C Nos. 25 to 100, or Fil à dentelle D.M.C Nos. 25 to 100.[A]
Materials: Fil d’Alsace D.M.C Numbers 30 to 100, Cordonnet 6 fils D.M.C Numbers 25 to 100, or Fil à dentelle D.M.C Numbers 25 to 100.__A_TAG_PLACEHOLDER_0__
Lozenge-shaped figures in the centre—5 chain, close the ring.
Lozenge-shaped figures in the center—5 chain, close the ring.
1st row—5 chain, 1 picot, 2 chain, 1 treble on the ring = 5 chain, 1 treble on the ring = 2 chain, 1 picot, 2 chain, 1 treble on the ring = 5 chain on the 3rd of the first 5 chain.
1st row—5 chains, 1 picot, 2 chains, 1 treble on the ring = 5 chains, 1 treble on the ring = 2 chains, 1 picot, 2 chains, 1 treble on the ring = 5 chains on the 3rd of the first 5 chains.
2nd row—12 chain, * 1 treble on the 1st treble of the 1st row = 4 chain, 1 treble on the 3rd of the next 5 chain = 5 chain, 1 treble on the same stitch as the last treble = 4 chain, ** 1 treble on the 2nd treble of the 1st row, 9 chain. Repeat from * to **; join the last 4 chain, to the 3rd of the first 12 chain, by a single stitch.
2nd row—12 chains, * 1 treble stitch on the 1st treble of the 1st row = 4 chains, 1 treble stitch on the 3rd chain of the next 5 chains = 5 chains, 1 treble stitch on the same stitch as the last treble = 4 chains, ** 1 treble stitch on the 2nd treble of the 1st row, 9 chains. Repeat from * to **; connect the last 4 chains to the 3rd of the first 12 chains with a single stitch.
3rd row—1 chain, 4 plain, 3 plain on the 5th of the 9 chain of the last row = 12 plain, 5 plain on the 3rd of the 5 chain, between the 2 trebles, 12 plain, 3 plain on the 5th of the lower 9 chain = 12 plain, 5 plain on the 3rd of the 5 chain, 7 plain; finish the row with a single stitch.
3rd row—1 chain, 4 stitches, 3 stitches on the 5th of the 9 stitches from the last row = 12 stitches, 5 stitches on the 3rd of the 5 chain, between the 2 treble stitches, 12 stitches, 3 stitches on the 5th of the lower 9 stitches = 12 stitches, 5 stitches on the 3rd of the 5 chain, 7 stitches; finish the row with a single stitch.
4th row—3 chain, 1 treble on each of the next 5 plain; 3 trebles on the 6th plain; 1 treble on each of the next 15 plain, 5 trebles on the 16th stitch; 15 trebles on the 2nd side; and again 3 trebles on the 16th stitch; 15 trebles on the 3rd side; 5 trebles on the 16th stitch, 9 trebles and join to the 3rd of the 3 chain.
4th row—3 chains, 1 treble on each of the next 5 plain stitches; 3 trebles on the 6th plain stitch; 1 treble on each of the next 15 plain stitches, 5 trebles on the 16th stitch; 15 trebles on the 2nd side; and again 3 trebles on the 16th stitch; 15 trebles on the 3rd side; 5 trebles on the 16th stitch, 9 trebles and join to the 3rd of the 3 chains.
5th row—1 chain, 6 plain, 3 plain on the 7th stitch beneath, * 18 plain, 3 plain on the 19th stitch. Repeat twice from *.
5th row—1 chain, 6 single crochet, 3 single crochet in the 7th stitch beneath, *18 single crochet, 3 single crochet in the 19th stitch. Repeat twice from *.
6th row—1 chain, 1 picot, 2 plain, 1 picot, 2 plain, 1 picot = towards the point: 3 plain, 1 picot = on the 2nd side of the square: 3 plain, 1 picot, and 5 times 2 plain, 1 picot = towards the point: 4 plain, 1 picot.
6th row—1 chain, 1 picot, 2 plain, 1 picot, 2 plain, 1 picot = towards the point: 3 plain, 1 picot = on the 2nd side of the square: 3 plain, 1 picot, and 5 times 2 plain, 1 picot = towards the point: 4 plain, 1 picot.
On the 3rd side as on the 2nd, only reversed, first 4 plain, and at the point 3 plain; on the 4th side as on the 2nd; on the 1st side must still be added 3 plain, 1 picot, 2 plain, 1 picot, 2 plain, 1 picot, 2 plain; draw the thread through the loop and fasten off.
On the 3rd side, just like on the 2nd but reversed, knit 4 plain stitches, and at that point, 3 plain stitches; for the 4th side, do the same as the 2nd. On the 1st side, you still need to add 3 plain stitches, 1 picot, 2 plain stitches, 1 picot, 2 plain stitches, and 1 picot, then 2 plain stitches; pull the thread through the loop and secure it.
The oblong squares, that connect the lozenges, take 7 rows of plain stitches. Make a chain of 14 = turn the work = 13 plain; add 5 rows of the same number of stitches. On the short side, and at the edge of the square: 1 picot, 3 plain, * 9 chain, miss 1 chain = returning: 1 plain on the 8th chain = on the next 7 chain: 1 half treble, 3 trebles, 1 half treble, 2 plain on the last chain stitches = on the 2nd half of the short side: 3 plain, 1 picot = on the long side: 3 plain **, 1 picot, 3 plain ***. Repeat the whole twice from * to ***, and then once from * to ** only.
The rectangular sections connecting the diamonds require 7 rows of simple stitches. Start with a chain of 14, then turn the work and crochet 13 simple stitches; add 5 more rows using the same stitch count. On the short side, at the edge of the square: 1 picot, 3 simple stitches, * then 9 chains, skip 1 chain = for the return, 1 simple stitch in the 8th chain = in the next 7 chains: 1 half treble, 3 trebles, 1 half treble, and 2 simple stitches in the last chain stitches = on the 2nd half of the short side: 3 simple stitches, 1 picot = on the long side: 3 simple stitches **, 1 picot, 3 simple stitches ***. Repeat the entire sequence twice from * to ***, and then once from * to ** only.
The row of bars, that encircles the small leaves, begins with 2 single stitches on the first picot, then add: **** 3 chain, 1 picot, 3 chain, 1 treble on the 9th chain of the small leaf; on the short side: 1 chain, 1 picot, 1 chain, 1 triple treble on the 9th chain of the leaf; drop the thread, bring it out from the back, by the side of the picot that forms the corner on the long side of the lozenge = 1 chain, 1 picot, 1 chain, 1 treble on the small leaf = 3 chain, 1 picot, 3 chain, 1 treble on the picot, forming the corner of the oblong square = 3 chain, 1 picot, 3 chain, 1 treble on the leaf on the long side of the square = 3 chain, 1 treble on the same stitch as the 1st treble is on = 3 chain, 1 treble on the same stitch as the 2 first trebles are on; 3 chain, 1 picot, 3 chain, 1 treble on the picot at the corner. Repeat once from ****.
The row of bars that surrounds the small leaves starts with 2 single stitches on the first picot, then add: **** 3 chains, 1 picot, 3 chains, 1 treble on the 9th chain of the small leaf; on the short side: 1 chain, 1 picot, 1 chain, 1 triple treble on the 9th chain of the leaf; drop the thread, pull it out from the back, next to the picot that forms the corner on the long side of the lozenge = 1 chain, 1 picot, 1 chain, 1 treble on the small leaf = 3 chains, 1 picot, 3 chains, 1 treble on the picot, forming the corner of the oblong square = 3 chains, 1 picot, 3 chains, 1 treble on the leaf on the long side of the square = 3 chains, 1 treble on the same stitch as the 1st treble is on = 3 chains, 1 treble on the same stitch as the 2 first trebles are on; 3 chains, 1 picot, 3 chains, 1 treble on the picot at the corner. Repeat once from ****.
Upper and lower edge—6 chain, 1 sextuple treble on the 2nd picot of the lozenge = 6 chain, 1 triple treble on the 4th picot of the lozenge. Coming back over the 2 trebles of 6 chain, work in 3 journeys to and fro, 13 plain stitches.
Upper and lower edge—6 chains, 1 sextuple treble on the 2nd picot of the diamond = 6 chains, 1 triple treble on the 4th picot of the diamond. Coming back over the 2 treble stitches of 6 chains, work in 3 back-and-forth movements, 13 plain stitches.
After the 2nd row of plain stitches, 1 quintuple treble on the 6th treble of the lozenge, and then 4 rows of plain stitches.
After the 2nd row of plain stitches, 1 quintuple treble on the 6th treble of the diamond shape, and then 4 rows of plain stitches.
After the 6th row, pass at once to the leaves above the lozenge: ***** 15 chain, 1 plain on the picot that forms the point of the lozenge = turn the work to the wrong side = on the chain stitches work: ****** 3 plain, 1 half treble, 4 trebles, 1 half treble, 3 plain = turn the work to the right side = returning and starting from the point of the leaf: 1 chain and 1 plain on each of the lower stitches.
After the 6th row, move directly to the leaves above the diamond shape: ***** 15 chain, 1 plain on the picot that makes the point of the diamond = turn the work to the wrong side = on the chain stitches work: ****** 3 plain, 1 half treble, 4 trebles, 1 half treble, 3 plain = turn the work to the right side = returning and starting from the point of the leaf: 1 chain and 1 plain on each of the lower stitches.
For the 2nd leaf: 12 chain = turn the work and repeat, as for the former leaf, from ***** to ******.
For the 2nd leaf: 12 chain = turn the work and repeat, as for the former leaf, from ***** to ******.
This leaf, being finished like the first, with this difference that it ends at the upper point, you pass to the 2nd little square: 6 chain, 1 sextuple treble on the picot next to the leaves; 3 chain, 1 triple treble on the 3rd picot, counted from the leaves = 6 chain, 1 sextuple treble on the 5th picot of the lozenge; keep the 2 last loops of the treble on the needle, 1 sextuple treble on the picot between every 3 chain of the small square with leaves; draw up the 2 last loops together with those already on the needle = 6 chain, 1 triple treble on the picot on the long side of the small square = 3 rows of 13 plain each.
This leaf, completed like the first one but with the difference that it ends at the top point, leads you to the 2nd small square: 6 chains, 1 sextuple treble on the picot next to the leaves; 3 chains, 1 triple treble on the 3rd picot, counted from the leaves = 6 chains, 1 sextuple treble on the 5th picot of the diamond; keep the last 2 loops of the treble on the needle, 1 sextuple treble on the picot between every 3 chains of the small square with leaves; pull up the last 2 loops together with those already on the needle = 6 chains, 1 triple treble on the picot on the long side of the small square = 3 rows of 13 plain each.
With the last stitch of each of these rows, take 1 of the chain stitches between the long trebles.
With the last stitch of each row, make 1 chain stitch between the long treble stitches.
After the 3rd row: 1 sextuple treble on the first treble on the small leaf of the small middle square = 3 rows of plain stitches to finish the square, and repeat from *****.
After the 3rd row: 1 sextuple treble on the first treble on the small leaf of the small middle square = 3 rows of plain stitches to finish the square, and repeat from *****.
The upper row is similar to this but should be worked from right to left.
The upper row is similar to this, but you should work on it from right to left.
Scalloped edge.—In the right corner of the 1st oblong figure of the outside corner: 1 double treble, 2 chain, 1 double treble on the 4th plain stitch = 2 chain, 1 double treble on the stitch that forms the corner stitch of the square = 2 chain, 1 plain at the extremity of the first long leaf, 9 chain = 1 quadruple treble on the stitch between the 2 leaves = 2 chain, 1 quadruple treble on the same stitch and on the 1st treble = 2 chain, 1 quadruple treble on the same stitch = 9 chain, 1 plain on the last stitch of the 2nd long leaf = turn the work: 1 chain, 1 plain on each of the chain stitches, and on each treble, 27 plain stitches in all = turn the work: 1 chain, 1 plain, 2 chain, 1 plain on the 2nd plain; repeat the last 12 times. Take in 1 stitch on each side in every row, turn the work after each row, and at the end of the last fasten off. Fasten on at the foot of the scallop, not at the point, and work plain stitches all round it; 20 plain to the upper point, 40 in all.
Scalloped edge.—In the right corner of the 1st oblong figure of the outside corner: 1 double treble, 2 chains, 1 double treble on the 4th plain stitch = 2 chains, 1 double treble on the stitch that forms the corner stitch of the square = 2 chains, 1 plain at the end of the first long leaf, 9 chains = 1 quadruple treble on the stitch between the 2 leaves = 2 chains, 1 quadruple treble on the same stitch and on the 1st treble = 2 chains, 1 quadruple treble on the same stitch = 9 chains, 1 plain on the last stitch of the 2nd long leaf = turn the work: 1 chain, 1 plain on each of the chain stitches, and on each treble, 27 plain stitches in total = turn the work: 1 chain, 1 plain, 2 chains, 1 plain on the 2nd plain; repeat the last 12 times. Decrease 1 stitch on each side in every row, turn the work after each row, and at the end of the last, fasten off. Attach at the base of the scallop, not at the tip, and work plain stitches all around it; 20 plain to the upper point, 40 in total.
The open-work edge of the scallops consists entirely of double trebles.—After the 40 plain stitches of the edge: 2 chain, 1 treble on the 1st plain stitch of the small square = turn the work: * 2 chain, 1 treble on the 2nd of the plain stitches, forming the edge of the scallop **; repeat 7 times from * to ** = *** 2 chain, 1 treble on the next plain stitch = 2 chain, 1 treble on the next plain = repeat 4 times from ***; and then 7 times from * to ** = 2 chain, 1 plain on the 4th treble of the square; 2 chain, 1 plain on the 3rd treble.
The open-work edge of the scallops is made up entirely of double trebles. After the 40 plain stitches of the edge: 2 chains, 1 treble into the 1st plain stitch of the small square = turn the work: * 2 chains, 1 treble into the 2nd plain stitch, forming the edge of the scallop **; repeat 7 times from * to ** = *** 2 chains, 1 treble into the next plain stitch = 2 chains, 1 treble into the next plain = repeat 4 times from ***; and then 7 times from * to ** = 2 chains, 1 plain stitch into the 4th treble of the square; 2 chains, 1 plain stitch into the 3rd treble.
Work on, on the right side = **** 2 chain and 1 treble on the preceding treble as far as the 8th treble; after the 8th: ***** 10 chain, back to the 7th, and returning, join to the 7th treble = on the 10 chain: 16 plain, after the 16th draw the loop through the upper loop of the 8th treble = ****** 2 chain, 1 treble, 2 chain, 1 treble, 10 chain, return, and fasten the chain stitches to the last treble but one = 6 plain, 1 picot, 2 plain, 1 picot, 6 plain and join as before ******* = Repeat once from ***** to *******, then twice, from ***** to ******, then from **** to *****, as on the first side, only 1 treble less = then 1 treble on the 4th plain stitch of the small square, 2 chain, 1 treble on the 7th plain stitch of the square, 2 chain, 1 treble on the 10th plain stitch, 1 treble on the outside stitch, at the corner of the square, 2 chain, 1 plain on the last stitch of the leaf; 9 chain and so on, as above described.
Work on the right side = **** 2 chain and 1 treble on the previous treble up to the 8th treble; after the 8th: ***** 10 chain, go back to the 7th, and returning, join to the 7th treble = on the 10 chain: 16 plain, after the 16th pull the loop through the upper loop of the 8th treble = ****** 2 chain, 1 treble, 2 chain, 1 treble, 10 chain, return, and attach the chain stitches to the second to last treble = 6 plain, 1 picot, 2 plain, 1 picot, 6 plain and join as before ******* = Repeat once from ***** to *******, then twice from ***** to ******, then from **** to *****, like on the first side, just 1 treble less = then 1 treble on the 4th plain stitch of the small square, 2 chain, 1 treble on the 7th plain stitch of the square, 2 chain, 1 treble on the 10th plain stitch, 1 treble on the outside stitch, at the corner of the square, 2 chain, 1 plain on the last stitch of the leaf; 9 chain and so on, as previously described.
Having reached the second scallop, on the 2nd row of trebles, at the sign ***, work: 2 chain, 1 treble to the left on the scallop just finished, keeping the last loops of the treble on the needle, 1 double treble to the right of the scallop and join it to the 2nd treble; draw the 4 loops together = 2 chain, 1 treble to the left, 1 quadruple treble to the right = 11 chain, drop the loop, bring it to the right side through the 4th treble of the right scallop = on these 11 chain stitches: 1 single, 1 plain, 1 half treble, 2 trebles, 1 half treble, 1 plain, 1 single = 1 double treble on the open-work edge, then 2 chain, 1 treble, 2 chain, 1 treble, 12 chain; join to the 6th treble of the right scallop = working back: 4 plain, 1 picot, 4 plain, 1 picot, 4 plain, 1 picot, 4 plain, join to the treble, thrice 2 chain, 1 treble. Go back to ***** and repeat twice to *******.
Having reached the second scallop on the 2nd row of trebles, at the mark ***, work: 2 chains, 1 treble to the left on the scallop just finished, keeping the last loops of the treble on the needle, 1 double treble to the right of the scallop and join it to the 2nd treble; pull the 4 loops together = 2 chains, 1 treble to the left, 1 quadruple treble to the right = 11 chains, drop the loop, bring it to the right side through the 4th treble of the right scallop = on these 11 chain stitches: 1 single, 1 plain, 1 half treble, 2 trebles, 1 half treble, 1 plain, 1 single = 1 double treble on the open-work edge, then 2 chains, 1 treble, 2 chains, 1 treble, 12 chains; join to the 6th treble of the right scallop = working back: 4 plain, 1 picot, 4 plain, 1 picot, 4 plain, 1 picot, 4 plain, join to the treble, three times 2 chains, 1 treble. Go back to ***** and repeat twice to *******.
The footing of the lace is worked in 5 rows from right to left.
The base of the lace is done in 5 rows from right to left.
1st row—1 single, * 1 double treble on the 6th plain stitch of the square = 1 chain, 1 double treble on the 2nd plain stitch of the square = 3 chain, 1 picot downwards, 3 chain, 1 plain on the stitch at the extremity of the long leaf = 3 chain, 1 picot downwards, 3 chain, 2 quadruple trebles between the two leaves = 3 chain, 1 picot downwards, 3 chain, 1 plain on the last stitch of the 2nd leaf, 3 chain; repeat from *.
1st row—1 single, * 1 double treble on the 6th plain stitch of the square = 1 chain, 1 double treble on the 2nd plain stitch of the square = 3 chain, 1 picot downwards, 3 chain, 1 plain on the stitch at the end of the long leaf = 3 chain, 1 picot downwards, 3 chain, 2 quadruple trebles between the two leaves = 3 chain, 1 picot downwards, 3 chain, 1 plain on the last stitch of the 2nd leaf, 3 chain; repeat from *.
2nd row—1 plain on each stitch of the previous row.
2nd row—1 knit stitch on each stitch of the previous row.
3rd row—count 2 stitches before and above the 2 trebles on the squares and make: * 1 treble, miss 1 stitch, 1 treble, miss 1 stitch, 1 treble, miss 1 stitch, 1 treble = turn the work: 1 plain on each of the 4 trebles = turn the work, come back and make 4 plain on the first 4 = 5 chain, miss 2 stitches of the 2nd row, 1 treble on the 3rd plain, and continue from *.
3rd row—count 2 stitches before and above the 2 trebles on the squares and do the following: * 1 treble, skip 1 stitch, 1 treble, skip 1 stitch, 1 treble, skip 1 stitch, 1 treble = turn the work: 1 plain stitch on each of the 4 trebles = turn the work, come back and make 4 plain on the first 4 = 5 chain, skip 2 stitches of the 2nd row, 1 treble on the 3rd plain, and continue from *.
4th row—1 treble on each of the 4 plain, 1 chain between each treble, 2 chain and so on.
4th row—1 treble on each of the 4 plain, 1 chain between each treble, 2 chain, and so on.
5th row—1 plain stitch on each of the stitches of the 4th row.
5th row—1 knit stitch on each of the stitches from the 4th row.
Crochet Reticella lace (fig. 471).—This pattern, copied in crochet from an old piece of Reticella lace, only looks well, worked in very fine cotton, as indicated in our illustration, namely, in unbleached Fil à dentelle D.M.C No 150. To make it resemble the original more closely, the method adopted in Venetian point, of making all the stitches over a padding thread, has, in the case of the outside edge, been followed here.
Crochet Reticella lace (fig. 471).—This design, created in crochet from a vintage piece of Reticella lace, looks best when worked with very fine cotton, as shown in our illustration, specifically in unbleached Fil à dentelle D.M.C No 150. To make it look more like the original, we've used the Venetian point technique of stitching over a padding thread at the outer edge.

Materials: Fil d’Alsace D.M.C Nos. 30 to 100, or Fil à dentelle D.M.C Nos. 25 to 150.
Materials: Fil d’Alsace D.M.C Nos. 30 to 100, or Fil à dentelle D.M.C Nos. 25 to 150.
At the end of each row of plain stitches, draw out a sufficiently long loop to lay it back over the stitches just made, and to work the next row of stitches over this double foundation. These loops must be long enough, not to pucker or tighten the scallops.
At the end of each row of simple stitches, pull out a long enough loop to lay it back over the stitches you just made, and to work the next row of stitches over this double foundation. These loops should be long enough so they don’t pucker or tighten the scallops.
For the inner squares = 4 chain, close the ring.
For the inner squares = 4 chain, close the loop.
1st row—8 chain, 1 treble, 3 chain, 1 double treble, 3 chain, 1 treble, 3 chain, 1 double treble, 3 chain, 1 treble, 3 chain, 1 double treble, 3 chain, 1 treble, 3 chain, 1 single stitch on the 5th of the 8 chain.
1st row—8 chains, 1 treble, 3 chains, 1 double treble, 3 chains, 1 treble, 3 chains, 1 double treble, 3 chains, 1 treble, 3 chains, 1 double treble, 3 chains, 1 treble, 3 chains, 1 single stitch in the 5th chain of the 8 chains.
2nd row—* 1 chain, 5 plain on the first 3 chain, 5 plain on the next 3 chain. On these 10 plain stitches, working to and fro, 9 rows of plain stitches, decreasing by 1 in each row; after the last stitch, come back along the side of the little triangle, and make 1 single stitch in every row, 1 plain on the treble of the 1st row **; repeat 3 times from * to **.
2nd row—* 1 chain, 5 single crochet in the first 3 chains, 5 single crochet in the next 3 chains. On these 10 single crochet stitches, working back and forth, make 9 rows of single crochet, decreasing by 1 in each row; after the last stitch, come back along the side of the little triangle, and make 1 single crochet in every row, 1 single crochet on the treble of the 1st row **; repeat 3 times from * to **.
These small triangles must be worked over 1 single treble and between 2 double trebles.
These small triangles should be worked over 1 single treble and between 2 double trebles.
When the 4th triangle is finished, make directly, starting from the last stitch at the point, and along the side: 3 plain, 1 picot, 3 plain, 1 picot, 3 plain; 1 single stitch on the treble; all the triangles must be edged, in this same manner on both sides; on the stitch that forms the point: 3 plain stitches.
When the 4th triangle is finished, continue directly from the last stitch at the point, along the side: 3 plain stitches, 1 picot, 3 plain stitches, 1 picot, 3 plain stitches; 1 single stitch on the treble; all the triangles must be edged this same way on both sides; on the stitch that creates the point: 3 plain stitches.
3rd row—* 17 chain, drop the loop = bring it to the front, through the plain stitch that lies between 2 triangles; returning, make 10 single stitches backwards on the 10 chain. You make stitches like this, backwards, in all the trebles that follow, that is, the loop is dropped after each stitch, and brought forward from the wrong side to the right = 13 chain, join to the 5th single, counting upwards from below = 7 single on the chain stitches; 13 chain, join to the other trebles; 6 chain, 1 single on the stitch at the point of the triangle **; repeat 3 times from * to **. = The chain stitches for the trebles, must be drawn up very tight.
3rd row—* 17 chains, drop the loop = bring it to the front, through the plain stitch that lies between 2 triangles; returning, make 10 single stitches backward on the 10 chains. You make stitches like this, backward, in all the trebles that follow, meaning the loop is dropped after each stitch and brought forward from the wrong side to the right = 13 chains, join to the 5th single, counting upward from below = 7 singles on the chain stitches; 13 chains, join to the other trebles; 6 chains, 1 single on the stitch at the point of the triangle **; repeat 3 times from * to **. = The chain stitches for the trebles must be pulled very tight.
4th row—1 plain on each of the stitches of the preceding row, 3 plain on the corner stitch. On each side there must be 29 plain stitches, not counting the corner ones.
4th row—1 plain stitch on each of the stitches from the previous row, 3 plain stitches on the corner stitch. Each side should have 29 plain stitches, not including the corner ones.
5th row = 6 chain, miss 2 stitches of the row beneath, * 1 double treble, 2 chain; repeat 3 times from * = 2 chain, 1 double treble, 2 chain, 1 double treble on the same stitch as the 1st treble = 2 chain, 1 double treble on the same stitch as the 1st treble = 2 chain, 1 double treble on the same stitch as the two first trebles = 10 times to the next corner: 2 chain, 1 double treble, 3 double trebles, each of them with 2 chain stitches at the corner; repeat the same on each of the 4 sides.
5th row = 6 chains, skip 2 stitches from the row below, * 1 double treble, 2 chains; repeat 3 times from * = 2 chains, 1 double treble, 2 chains, 1 double treble in the same stitch as the 1st treble = 2 chains, 1 double treble in the same stitch as the 1st treble = 2 chains, 1 double treble in the same stitch as the two first trebles = 10 times to the next corner: 2 chains, 1 double treble, 3 double trebles, each with 2 chains at the corner; repeat the same on each of the 4 sides.
6th row—1 plain on each of the stitches of the last row, 3 plain on the corner stitch = cut off the thread. Join the next squares together at once by the last corner stitch.
6th row—1 knit on each of the stitches of the last row, 3 knit on the corner stitch = cut the thread. Join the next squares together immediately by the last corner stitch.
Lower edge—You begin by making the large scallop at the point of the square, and pass the double thread over the 3rd treble that comes before the 3 trebles at the point of the square and make: 1 plain stitch on each stitch of the square, up to the 3rd treble on the opposite side; then draw out a long loop which you carry back to the beginning. In the 2nd row increase by 2 stitches, right and left of the middle stitches, for the rounding of the scallop, and decrease by 1 on each side. Make 10 rows in all, and in each row, decrease by 4 stitches and increase by 2. Fasten off after the 10th row.
Lower edge—Start by creating the large scallop at the point of the square. Pass the double thread over the 3rd treble before the 3 trebles at the point of the square, and make: 1 plain stitch on each stitch of the square, up to the 3rd treble on the opposite side. Then draw out a long loop and carry it back to the beginning. In the 2nd row, increase by 2 stitches on both sides of the middle stitches to round out the scallop, and decrease by 1 on each side. Make a total of 10 rows, decreasing by 4 stitches and increasing by 2 in each row. Fasten off after the 10th row.
The two little scallops, right and left of the big one, are worked in 5 rows, over 5 trebles and 4 intervals of chain stitches, taking off 2 stitches in every row. For the small triangle between, worked in 4 rows, you must increase on both sides by 2 stitches.
The two small scallops, one on each side of the big one, are made with 5 rows, over 5 treble stitches and 4 sections of chain stitches, decreasing by 2 stitches in each row. For the small triangle in between, which is done in 4 rows, you need to increase by 2 stitches on both sides.
When all the scallops are finished, edge them with 3 plain stitches, 1 picot and 3 plain and work in all the ends of thread from the preceding rows at the same time.
When you've finished all the scallops, finish them off with 3 straight stitches, 1 picot, and 3 straight stitches, and weave in all the thread ends from the previous rows at the same time.
For the footing and the small triangles, that fill up the spaces between the squares: 22 chain, miss 1, 10 rows of plain stitches, worked to and fro, decreasing by 1 in every row.
For the base and the small triangles that fill the gaps between the squares: 22 chains, skip 1, 10 rows of plain stitches, worked back and forth, decreasing by 1 in each row.
When the triangle is finished, make on one side, 1 single in every row; then, on the 11 remaining chain stitches, a second triangle, like the first, which you then join to the plain stitches, above the 5th treble; then returning along the side of the triangle, add 3 plain, 1 picot, 3 plain, 1 picot, 3 plain; 1 single on each of the 22 chain stitches.
When the triangle is completed, make 1 single crochet on one side for every row; then, on the 11 remaining chain stitches, create a second triangle, just like the first, which you’ll then attach to the plain stitches above the 5th treble; then going back along the side of the triangle, add 3 plain crochets, 1 picot, 3 plain crochets, 1 picot, 3 plain crochets; and 1 single crochet on each of the 22 chain stitches.
Edge the next side of the 2nd triangle like the first, join the corner stitch to the 5th treble; edge the two inner sides 3 times with 3 plain stitches and 2 picots.
Edge the next side of the 2nd triangle like the first, connect the corner stitch to the 5th treble; edge the two inner sides 3 times with 3 plain stitches and 2 picots.
Then from right to left on the plain stitches: 6 plain, 15 chain, join them to the middle of the 2 triangles = 1 single on each chain, 5 plain on the square; 11 chain, 1 single on the 9th of the first 15 chain; 1 single stitch on each of the chain stitches; 1 plain on each stitch of the square, to the point where the squares join, 8 chain, 1 single on the 6th of the 11 chain, 1 single on each of the 8 chain.
Then from right to left on the plain stitches: 6 plain, 15 chain, connect them to the center of the 2 triangles = 1 single on each chain, 5 plain on the square; 11 chain, 1 single on the 9th of the first 15 chain; 1 single stitch on each of the chain stitches; 1 plain on each stitch of the square, up to the point where the squares connect, 8 chain, 1 single on the 6th of the 11 chain, 1 single on each of the 8 chain.
On the 2nd side: 7 plain, 5 chain, 1 single on the 6th of the 11 chain, 1 single on each of the 5 chain, 5 plain, 9 chain, 1 single on the 9th of the 15 chain, 1 single on each of the 9 chain, 6 plain on the square; fasten off.
On the 2nd side: 7 plain stitches, 5 chain stitches, 1 single on the 6th of the 11 chain, 1 single on each of the 5 chain stitches, 5 plain stitches, 9 chain stitches, 1 single on the 9th of the 15 chain, 1 single on each of the 9 chain stitches, 6 plain stitches on the square; fasten off.
Fasten on, at the 2nd of the 3 corner stitches = 17 chain, 1 plain on the corner stitch of the triangle; 8 chain, 1 plain on the next corner stitch, 17 chain, and so on.
Fasten on at the 2nd of the 3 corner stitches = 17 chain, 1 single crochet in the corner stitch of the triangle; 8 chain, 1 single crochet in the next corner stitch, 17 chain, and repeat.
A row of plain stitches, or trebles, completes the lace.
A row of simple stitches, or trebles, finishes the lace.
Lace with corner, formed by increasing on the outside (fig. 472).—1st row—On a row of chain stitches or trebles, work alternately: 1 chain, 1 treble = on the corner: 1 chain, 1 treble, 2 chain, so that the last 3 trebles come on one stitch.
Lace with corner, formed by increasing on the outside (fig. 472).—1st row—On a row of chain stitches or trebles, work alternately: 1 chain, 1 treble = on the corner: 1 chain, 1 treble, 2 chains, so that the last 3 trebles are on one stitch.

Materials: Fil d’Alsace D.M.C No. 30, Fil à pointer D.M.C Nos. 20 to 30, Cordonnet 6 fils D.M.C Nos. 15 to 30, or Fil à dentelle D.M.C Nos. 25 to 50.[A]
Materials: Fil d’Alsace D.M.C No. 30, Fil à pointer D.M.C Nos. 20 to 30, Cordonnet 6 fils D.M.C Nos. 15 to 30, or Fil à dentelle D.M.C Nos. 25 to 50.__A_TAG_PLACEHOLDER_0__
2nd row—1 plain on each stitch of the 1st row, 3 plain on the 2nd of the 3 corner trebles.
2nd row—1 single crochet on each stitch of the 1st row, 3 single crochet on the 2nd of the 3 corner double crochets.
3rd row—Counting from the 2nd of the 3 corner stitches, and towards the left, make 1 plain on the 53rd, 52nd, 51st and 50th plain stitches; 8 chain, miss 1 chain, 1 plain on each of the 7 chain stitches = on the other side of the 8 chain, also 1 plain on each stitch, 3 plain on the 8th chain, 1 plain on each of the first 7 plain.
3rd row—Counting from the 2nd of the 3 corner stitches, and moving to the left, make 1 plain stitch on the 53rd, 52nd, 51st, and 50th plain stitches; then 8 chains, skip 1 chain, and make 1 plain stitch on each of the 7 chain stitches = on the other side of the 8 chains, also make 1 plain stitch on each stitch, 3 plain stitches on the 8th chain, and 1 plain stitch on each of the first 7 plain stitches.
On the next 11 stitches of the 2nd row: 1 plain = 4 chain, miss 4, 1 triple treble on the 5th of the 2nd row, 4 chain, 1 triple treble on the same stitch, 4 chain, 1 triple treble on the same stitch, 4 chain, miss 4, 1 single on the 5th = turn the work = on each treble of 4 chain: 7 plain; 28 in all; 1 single on the 10th of the 11 plain = turn the work = miss the 28th plain, and on the 27 others make: 3 plain, 1 picot, 3 plain = 11 chain, miss the 11th, 10 plain on the others = on the 2nd side of the chain: 4 plain, 10 chain, join them to the 6th of the first 11 plain of this row = on the 10 chain: 5 plain, 3 chain, join them to the 5th plain of the 1st leaf, made in this row = on the 3 chain: 3 plain = on those of the 10 remaining chain stitches: 6 plain = along the leaf: 3 plain, 1 picot, 3 plain = on the stitch at the point of the leaf: 3 plain = then down the 2nd side: 3 plain, 1 picot, 7 plain = over the next of the 28 plain: 3 plain, 1 picot, 4 plain = * 11 chain, miss the 11th, 10 plain = on the second side of the chain: 4 plain, 6 chain, join them to the 4th of the last 7 plain of the 2nd leaf = on the 6 chain: 9 plain. Continue on the 3rd leaf of this row: 3 plain, 1 picot, 3 plain and 3 plain on the stitch at the point of the leaf = on each of the next 3 stitches: 1 plain, then 1 picot, 7 plain = on the 28 stitches: 4 plain, 1 picot, 3 plain **. Repeat from * to **, and here follow: 3 plain, 1 picot, 3 plain.
On the next 11 stitches of the 2nd row: 1 plain = 4 chain, skip 4, 1 triple treble on the 5th of the 2nd row, 4 chain, 1 triple treble on the same stitch, 4 chain, 1 triple treble on the same stitch, 4 chain, skip 4, 1 single on the 5th = turn the work = on each treble of 4 chain: 7 plain; 28 in total; 1 single on the 10th of the 11 plain = turn the work = skip the 28th plain, and on the other 27 make: 3 plain, 1 picot, 3 plain = 11 chain, skip the 11th, 10 plain on the others = on the 2nd side of the chain: 4 plain, 10 chain, join them to the 6th of the first 11 plain of this row = on the 10 chain: 5 plain, 3 chain, join them to the 5th plain of the 1st leaf, made in this row = on the 3 chain: 3 plain = on those of the 10 remaining chain stitches: 6 plain = along the leaf: 3 plain, 1 picot, 3 plain = on the stitch at the point of the leaf: 3 plain = then down the 2nd side: 3 plain, 1 picot, 7 plain = over the next of the 28 plain: 3 plain, 1 picot, 4 plain = * 11 chain, skip the 11th, 10 plain = on the second side of the chain: 4 plain, 6 chain, join them to the 4th of the last 7 plain of the 2nd leaf = on the 6 chain: 9 plain. Continue on the 3rd leaf of this row: 3 plain, 1 picot, 3 plain and 3 plain on the stitch at the point of the leaf = on each of the next 3 stitches: 1 plain, then 1 picot, 7 plain = on the 28 stitches: 4 plain, 1 picot, 3 plain **. Repeat from * to **, and here follow: 3 plain, 1 picot, 3 plain.
On the 2nd row: *** 5 plain, 10 chain, join them to the 4th of the last 7 plain of the 3rd leaf; 11 plain over the 10 chain = on the 2nd row: 5 plain, 8 chain, miss 1 chain, 1 plain on each chain = on the second side: 4 plain, 3 chain, join them to the 6th of the last 11 plain = 3 plain on the leaf, 3 plain on the stitch at the point, 7 plain, and repeat from *.
On the 2nd row: *** 5 knit, 10 chain, connect them to the 4th of the last 7 knit from the 3rd leaf; 11 knit over the 10 chain = on the 2nd row: 5 knit, 8 chain, skip 1 chain, 1 knit on each chain = on the second side: 4 knit, 3 chain, connect them to the 6th of the last 11 knit = 3 knit on the leaf, 3 knit on the stitch at the point, 7 knit, and repeat from *.
On the 2nd row and for the corner: 9 plain, **** 4 chain, 1 triple treble on the 2nd of the 3 corner stitches and repeat 4 times from **** = 4 chain, miss 4 of the preceding row, 1 plain on the 5th = turn the work, on each bar of 4 chain, 6 plain, 36 in all, join the last to the 8th of the 9 plain = going back over the 36 plain: 3 plain, 1 picot, 3 plain, 11 chain, miss the 11th, 1 plain on each of the 10 chain = on the 2nd side of the chain: 4 plain, 10 chain, join them to the 4th of the 9 plain = over the 10 chain: 5 plain, 3 chain, join them to the 4th plain of the last leaf, 3 plain = on the remainder of the 10 chain: 6 plain.
On the 2nd row and for the corner: 9 single crochet, **** 4 chain, 1 triple treble on the 2nd of the 3 corner stitches and repeat 4 times from **** = 4 chain, skip 4 from the previous row, 1 single crochet on the 5th = turn the work, on each bar of 4 chain, 6 single crochet, 36 in total, join the last to the 8th of the 9 single crochet = going back over the 36 single crochet: 3 single crochet, 1 picot, 3 single crochet, 11 chain, skip the 11th, 1 single crochet on each of the 10 chain = on the 2nd side of the chain: 4 single crochet, 10 chain, join them to the 4th of the 9 single crochet = over the 10 chain: 5 single crochet, 3 chain, join them to the 4th single crochet of the last leaf, 3 single crochet = on the remainder of the 10 chain: 6 single crochet.
Proceeding along the leaf: 3 plain, 1 picot, 3 plain, 3 plain on the stitch at the point, 3 plain, 1 picot, 7 plain *****. Again on the 36 plain, make: 3 plain, 1 picot, 3 plain, 11 chain, miss the 11th, 10 plain = on the 2nd side of the chain: 4 plain, 6 chain, join them to the 4th of the last 7 plain of the last leaf, 9 plain over the chain stitches = on the leaf: 3 plain, 1 picot, 3 plain, 3 plain on the stitch at the point, 3 plain, 1 picot, 7 plain ******. Repeat 3 times from ***** to ****** and add 3 plain, 1 picot, 3 plain. Continue along the 2nd row: 4 plain, 10 chain and on these 11 plain = 4 plain, 8 chain, returning, miss the 8th, 7 plain on the others = on the 2nd side of the chain: 4 plain, 3 chain, join them to the 6th of the last 11 plain = on the 3 chain: 3 plain = on the leaf: 3 plain, 3 plain on the stitch at the point of the leaf, 7 plain.
Proceeding along the leaf: 3 plain, 1 picot, 3 plain, 3 plain at the point, 3 plain, 1 picot, 7 plain *****. Again on the 36 plain, do: 3 plain, 1 picot, 3 plain, 11 chain, skip the 11th, 10 plain = on the 2nd side of the chain: 4 plain, 6 chain, connect them to the 4th of the last 7 plain from the last leaf, 9 plain over the chain stitches = on the leaf: 3 plain, 1 picot, 3 plain, 3 plain at the point of the leaf, 3 plain, 1 picot, 7 plain ******. Repeat 3 times from ***** to ****** and add 3 plain, 1 picot, 3 plain. Continue along the 2nd row: 4 plain, 10 chain and on these 11 plain = 4 plain, 8 chain, returning, skip the 8th, 7 plain on the others = on the 2nd side of the chain: 4 plain, 3 chain, connect them to the 6th of the last 11 plain = on the 3 chain: 3 plain = on the leaf: 3 plain, 3 plain at the point of the leaf, 7 plain.
4th row—1 plain on the 1st leaf of the 3rd row: * 7 chain, 1 plain on the 2nd leaf = 7 chain, 1 triple treble on the 5th of the 9 plain between 2 leaves = 7 chain, 1 plain on the 3rd leaf = 7 chain, 1 triple treble, 7 chain, 1 plain on the 4th leaf = 7 chain, 1 plain on the 5th leaf; 5 chain, 1 plain on the 1st leaf of the corner scallop. Repeat from *, with this difference, that, in the corner scallop you must have 4 triple trebles.
4th row—1 single crochet on the 1st stitch of the 3rd row: * 7 chains, 1 single crochet on the 2nd stitch = 7 chains, 1 triple treble on the 5th of the 9 single crochets between 2 stitches = 7 chains, 1 single crochet on the 3rd stitch = 7 chains, 1 triple treble, 7 chains, 1 single crochet on the 4th stitch = 7 chains, 1 single crochet on the 5th stitch; 5 chains, 1 single crochet on the 1st stitch of the corner scallop. Repeat from *, with this change: in the corner scallop, you need to have 4 triple trebles.
5th row—on the first 7 chain of the 4th row: 7 plain, * on the next chain stitches: 12 plain = turn the work, and crochet to and fro, decreasing by 1 stitch in each row, until you have only 2 stitches left = along the leaf: 10 plain and repeat 3 times from * = 7 plain on the next 7 chain, 6 plain on the 5 chain, 7 plain on the 7 chain.
5th row—on the first 7 chain of the 4th row: 7 single crochets, * on the next chain stitches: 12 single crochets = turn the work, and crochet back and forth, decreasing by 1 stitch in each row, until you have only 2 stitches left = along the leaf: 10 single crochets and repeat 3 times from * = 7 single crochets on the next 7 chain, 6 single crochets on the 5 chain, 7 single crochets on the 7 chain.
The corner scallop has 7 points = the 12 first stitches must be divided as follows: * 1st point: 12 plain in the first interval = 2nd point: 10 plain in the 2nd interval and 2 plain in the 3rd interval = 3rd point: 7 plain in the 3rd interval and 5 plain in the 4th **. Repeat once from ** to *.
The corner scallop has 7 points = the first 12 stitches should be divided like this: * 1st point: 12 plain stitches in the first interval = 2nd point: 10 plain stitches in the 2nd interval and 2 plain stitches in the 3rd interval = 3rd point: 7 plain stitches in the 3rd interval and 5 plain stitches in the 4th **. Repeat once from ** to *.
6th row—* 1 plain in the 1st leaf, 5 chain, 1 crossed quadruple treble, the branches of which are joined by 5 chain; repeat twice from * = 1 plain, 4 chain, 1 plain in the 1st leaf of the next scallop = 5 chain, 1 crossed quadruple treble, the branches of which are joined by 5 chain and joined to the 6th stitch of the 2 next points = 5 chain and so on.
6th row—* 1 plain in the 1st leaf, 5 chains, 1 crossed quadruple treble, the branches of which are connected by 5 chains; repeat twice from * = 1 plain, 4 chains, 1 plain in the 1st leaf of the next scallop = 5 chains, 1 crossed quadruple treble, the branches of which are connected by 5 chains and attached to the 6th stitch of the next 2 points = 5 chains and so on.
7th row—6 plain on the first 5 chain of the 6th row, 6 plain on the next chain = 8 chain; carry the chain back to the right, and join it on, between the 6th and 7th plain = 4 plain on the 8 chain, then 8 chain, take it back, and join to the 1st plain = 12 plain on the 8 chain = continue on the small scallop: 3 plain, 1 picot, 8 plain = on the other 5 chain: 6 plain = 8 chain, join them again to the 4th of the 8 plain on the scallop = on the last 8 chain: 3 plain, 1 picot, 8 plain = on the 2 next bars of 5 chain: 12 plain = 8 chain, join them to the 7th of the last 12 plain = on the 8 chain: 5 plain = 8 chain, join them to the 1st of the last 12 plain = on the 8 chain: 5 plain, 3 chain, join them to the 4th plain of the 3rd finished scallop = over the 3 chain: 2 plain, 1 picot, 2 plain = on the next scallop: 3 plain, 1 picot, 3 plain = in the half finished scallop: 6 plain = 8 chain, take it back and join it to the 1st of the last 6 plain = on the 8 chain: 5 plain, 1 picot, 3 plain, 1 picot, 5 plain to finish the scallop below: 5 plain = on the 6th row: 6 plain, 8 chain, join them to the first of the last 5 plain of the last scallop = on the 8 chain: 3 plain, 1 picot, 8 plain.
7th row—6 plain on the first 5 chain of the 6th row, 6 plain on the next chain = 8 chain; carry the chain back to the right and join it on between the 6th and 7th plain = 4 plain on the 8 chain, then 8 chain, take it back and join to the 1st plain = 12 plain on the 8 chain = continue on the small scallop: 3 plain, 1 picot, 8 plain = on the other 5 chain: 6 plain = 8 chain, join them again to the 4th of the 8 plain on the scallop = on the last 8 chain: 3 plain, 1 picot, 8 plain = on the 2 next bars of 5 chain: 12 plain = 8 chain, join them to the 7th of the last 12 plain = on the 8 chain: 5 plain = 8 chain, join them to the 1st of the last 12 plain = on the 8 chain: 5 plain, 3 chain, join them to the 4th plain of the 3rd finished scallop = over the 3 chain: 2 plain, 1 picot, 2 plain = on the next scallop: 3 plain, 1 picot, 3 plain = in the half finished scallop: 6 plain = 8 chain, take it back and join it to the 1st of the last 6 plain = on the 8 chain: 5 plain, 1 picot, 3 plain, 1 picot, 5 plain to finish the scallop below: 5 plain = on the 6th row: 6 plain, 8 chain, join them to the first of the last 5 plain of the last scallop = on the 8 chain: 3 plain, 1 picot, 8 plain.
The little scallops must be carried on round the corner point, as they were on the 3rd, 4th and 5th trebles of the other points.
The small scallops need to be moved around the corner point, just like they were on the 3rd, 4th, and 5th trebles of the other points.
Lace with corner, formed by decreasing on the inside (fig. 473).—For the stars—8 chain, close the ring; 3 chain, 15 trebles in the ring; close = 3 chain, miss 1 treble of the last row, 1 treble, 5 chain, 1 treble on the upper part of the last treble = alternate 7 times: 1 chain, 1 crossed treble divided by 2 chain, lastly 1 chain, close the ring, fasten off.
Lace with a corner, created by decreasing on the inside (fig. 473).—For the stars—8 chains, close the ring; 3 chains, 15 trebles in the ring; close = 3 chains, skip 1 treble from the last row, 1 treble, 5 chains, 1 treble on top of the last treble = repeat 7 times: 1 chain, 1 crossed treble separated by 2 chains, finally 1 chain, close the ring, and fasten off.

Materials: Fil d’Alsace D.M.C Nos. 30 to 70, Fil à pointer D.M.C No. 20 or 30, Coton pour crochet D.M.C Nos. 10 to 18, or Cordonnet 6 fils D.M.C Nos. 4 to 60.[A]
Colours: White, Écru naturel or any other colour of the 450 shades of the D.M.C colour card.
Materials: Fil d’Alsace D.M.C Nos. 30 to 70, Fil à pointer D.M.C No. 20 or 30, Coton pour crochet D.M.C Nos. 10 to 18, or Cordonnet 6 fils D.M.C Nos. 4 to 60.__A_TAG_PLACEHOLDER_0__
Colors: White, Natural Écru, or any other color from the 450 shades available on the D.M.C color card.
Make 11 stars, and join them together as follows, counting the third from the left, in the engraving, as the first.—When you have joined the 1st star to the 2nd by the 6th and 7th cross trebles, join the next stars so that when the 3rd is fastened on, there should be 2 crossed trebles on the inside and outside of the 2nd star. The 3rd star will have: 1 crossed treble on the outside, 3 on the inside = the 4th: 2 crossed trebles inside, 2 outside = the 5th, the 6th, and the 7th: 1 inside, 3 outside = the 8th: 2 on the inside and outside = the 9th: 3 inside, 1 outside = the 10th: 2 outside, 2 inside = the 11th: 3 outside, 1 inside. For the next scallops, repeat from the 2nd to the 5th star.
Make 11 stars and connect them as follows, counting the third star from the left in the engraving as the first. Once you connect the 1st star to the 2nd using the 6th and 7th crossed treble stitches, continue linking the stars so that when you fasten on the 3rd star, there should be 2 crossed treble stitches on both the inside and outside of the 2nd star. The 3rd star will have 1 crossed treble stitch on the outside and 3 on the inside; the 4th star will have 2 crossed treble stitches inside and 2 outside; the 5th, 6th, and 7th stars will have 1 inside and 3 outside; the 8th will have 2 on both the inside and outside; the 9th will have 3 inside and 1 outside; the 10th will have 2 outside and 2 inside; the 11th will have 3 outside and 1 inside. For the next scallops, repeat the process from the 2nd to the 5th star.
2nd row—* over the 2 chain stitches of the 3rd crossed treble of the 11th star: 1 treble, 3 chain = over the 1st chain stitch between the 3rd and 4th crossed trebles: 1 treble, 3 chain = over the next 2 chain stitches: 1 double treble, 3 chain = 3 overs, in the next space: 1 double treble and 1 double treble in the 1st space of the 10th star; connect the two trebles together, 3 chain, 1 double treble, 3 chain, 1 treble, 3 chain, 1 treble, 3 chain, 1 connected treble as before, 3 chain ** 1 plain over the 2 chain stitches of the last crossed treble of the 9th star. Repeat from ** to *, therefore backwards.
2nd row—* over the 2 chain stitches of the 3rd crossed treble of the 11th star: 1 treble, 3 chain = over the 1st chain stitch between the 3rd and 4th crossed trebles: 1 treble, 3 chain = over the next 2 chain stitches: 1 double treble, 3 chain = 3 overs, in the next space: 1 double treble and 1 double treble in the 1st space of the 10th star; connect the two trebles together, 3 chain, 1 double treble, 3 chain, 1 treble, 3 chain, 1 treble, 3 chain, 1 connected treble as before, 3 chain ** 1 plain over the 2 chain stitches of the last crossed treble of the 9th star. Repeat from ** to *, therefore backwards.
Each of the next trebles comes, either over 2 chain stitches of the crossed treble, or over the chain stitch between the crossed trebles *** 3 chain, 1 treble, 3 chain, 1 double treble, 3 chain, 1 triple connected treble, 3 chain, 1 double treble, 3 chain, 1 treble, 3 chain **** 1 single; repeat, in the reverse order, therefore, from **** to ***.
Each of the following trebles is worked either over 2 chain stitches of the crossed treble or over the chain stitch between the crossed trebles **3 chain, 1 treble, 3 chain, 1 double treble, 3 chain, 1 triple connected treble, 3 chain, 1 double treble, 3 chain, 1 treble, 3 chain** 1 single; repeat in reverse order, from ** to **.
When the outside row is finished, make a similar row on the inside of the stars; at the corner 3 trebles are to be made 3 times over each of the middle stars.
When the outside row is done, create a similar row inside the stars; in the corners, make 3 trebles over each of the middle stars 3 times.
3rd row—1 treble above and below, on each stitch of the second row.
3rd row—1 treble stitch above and below, on each stitch of the second row.
4th row—consists entirely of crossed trebles = * miss on the upper edge: 3 times 1 treble, and 5 times 2 trebles = on the next trebles of the preceding row: 1 double treble, miss 2 stitches, 1 double treble, miss 2 stitches, 1 double treble = draw up the last loops of the 3 trebles together = repeat the same thing backwards = here follow: 8 crossed trebles separated each by 1 treble of the preceding row **; the 8th and the 9th crossed trebles are together in the corner treble of the preceding row. Repeat from ** to * = here follows 1 row with 1 treble on every stitch below.
4th row—made up entirely of crossed trebles = * skip the upper edge: 3 times 1 treble, and 5 times 2 trebles = on the next trebles of the row before: 1 double treble, skip 2 stitches, 1 double treble, skip 2 stitches, 1 double treble = draw up the last loops of the 3 trebles together = repeat the same thing backwards = here comes: 8 crossed trebles, each separated by 1 treble from the previous row **; the 8th and 9th crossed trebles are together in the corner treble of the previous row. Repeat from ** to * = here comes 1 row with 1 treble on every stitch below.
The row on the side of the footing is worked as above described = at the corner, and after having made the 3rd connected treble, * miss 5 times 2 stitches, 6 times 1 stitch, 3 times 2 stitches, 3 times 3 stitches, ** 3 triple trebles connected together above, miss 3 stitches underneath; repeat from ** to *, followed on both sides by a row of trebles.
The row next to the base is done as described above at the corner. After completing the 3rd connected treble, * skip 5 times 2 stitches, 6 times 1 stitch, 3 times 2 stitches, 3 times 3 stitches, ** 3 triple trebles connected together above, skip 3 stitches below; repeat from ** to *, followed on both sides by a row of trebles.
In the corner of the inside row of trebles connect the loops of 5 pairs of trebles, in the centre connect the loops of 3 trebles, and again the loops of 5 pairs of trebles.
In the corner of the inner row of triples, connect the loops of 5 pairs of triples, in the center connect the loops of 3 triples, and then connect the loops of 5 pairs of triples again.
For the 1st star of the footing: 8 chain, close the ring; 3 chain in the ring, 15 trebles, close = 3 chain, miss 1 treble, 1 treble, * 3 chain, 1 treble on the stitch of the 1st treble, miss 1, 1 treble in the 2nd stitch, draw the loops of the 2 trebles together **. Repeat 6 times from * to **; add 3 chain and close = 5 chain, join them to the 15th treble of the last row; 5 chain, 1 plain on the first chain stitches between 2 trebles; 4 chain, join them to the 7th treble; 4 chain, 1 plain on the next chain stitches, 3 chain, join to the treble over the 3 connected triple trebles, 3 chain, 1 plain on the next chain stitches, 4 chain, join them to the 8th treble, 5 chain, 1 plain on the 5th treble, cut off the thread.
For the 1st star of the footing: 8 chains, close the ring; 3 chains in the ring, 15 trebles, close = 3 chains, skip 1 treble, 1 treble, * 3 chains, 1 treble on the stitch of the 1st treble, skip 1, 1 treble in the 2nd stitch, draw the loops of the 2 trebles together **. Repeat 6 times from * to **; add 3 chains and close = 5 chains, join them to the 15th treble of the last row; 5 chains, 1 single crochet on the first chain stitches between 2 trebles; 4 chains, join them to the 7th treble; 4 chains, 1 single crochet on the next chain stitches, 3 chains, join to the treble over the 3 connected triple trebles, 3 chains, 1 single crochet on the next chain stitches, 4 chains, join them to the 8th treble, 5 chains, 1 single crochet on the 5th treble, cut the thread.
The corner star is made like the one just described, and is joined on, as follows: 3 chain, join them to the 17th treble on the left of the last row (counting from the triple treble) = 3 chain, 1 plain on the first chain stitches between 2 trebles = 3 chain, miss 4 trebles, join them to the 5th = 3 chain, 1 plain on the 2nd set of chain stitches between = 6 chain, miss 5 trebles, join them to the 6th = 3 chain, 1 plain on the 3rd of the 6 last chain = 3 chain, join them to the corner stitch, 3 chain, 1 plain on the last 3 chain = towards the right: 3 chain, join to the 5th treble = 3 chain, 1 plain on the preceding, 3 chain, 1 plain on the 3rd set of stitches between, 3 chain, miss 4 trebles, join to the 5th treble = 3 chain, 1 plain on the 4th set of stitches between, 3 chain, miss 4 stitches and join = 3 chain, 1 plain on the 5th double treble, fasten off.
The corner star is made like the one just described and is attached as follows: 3 chains, attach them to the 17th treble on the left of the last row (counting from the triple treble) = 3 chains, 1 plain stitch on the first chain stitches between 2 trebles = 3 chains, skip 4 trebles, attach them to the 5th = 3 chains, 1 plain stitch on the 2nd set of chain stitches between = 6 chains, skip 5 trebles, attach them to the 6th = 3 chains, 1 plain stitch on the 3rd of the last 6 chains = 3 chains, attach them to the corner stitch, 3 chains, 1 plain stitch on the last 3 chains = towards the right: 3 chains, attach to the 5th treble = 3 chains, 1 plain stitch on the preceding, 3 chains, 1 plain stitch on the 3rd set of stitches between, 3 chains, skip 4 trebles, attach to the 5th treble = 3 chains, 1 plain stitch on the 4th set of stitches between, 3 chains, skip 4 stitches and attach = 3 chains, 1 plain stitch on the 5th double treble, fasten off.
On the 3 first trebles of the preceding row of the inside edge, counting from the outermost stitches which are to be seen to the right in the illustration, 1 plain, 3 chain, miss 4 trebles, 1 treble = 3 chain, miss 3 trebles, 1 double treble, 3 chain, 3 overs, pass the needle over the double treble, crochet off one over = miss 3 stitches, 1 double treble, crochet off the 2 remaining loops = 3 chain, 4 overs, crochet off 2 loops, 1 double treble over the chain treble of the star, crochet off the remaining loops = 3 chain, 3 overs over the treble made on the 5 chain, crochet off 2 loops = 1 treble on the 5th set of stitches between, crochet off the remaining loops = 3 chain, 1 treble on the 6th set of stitches between = 3 chain, 1 treble on the 7th set of stitches between = 3 chain, 3 overs, 1 treble on the 8th set of stitches between; crochet off 1 over, 1 double treble on the 5 first chain stitches of the star, crochet off the remaining loops = 3 chain, 3 overs, 1 treble over the 2nd double treble, 1 double treble, miss 2 trebles of the preceding row, complete the treble = 3 chain, 3 overs, crochet off 1 over, joining it to the last double treble; crochet off the overs = 1 treble on the 5th treble of the preceding row, crochet off the loops = 3 chain, 1 treble on the 4th treble = 3 chain, miss 4 stitches = on each of the 6 following trebles: 1 plain = 3 chain, miss 3 trebles, 1 treble, 3 chain, miss 3 trebles, 1 double treble; 3 chain, 3 overs, over the double treble crochet off 1 loop, 1 double treble on the 4th treble after the plain stitches, crochet off the last overs = 3 chain, 3 overs, over the last double treble crochet off 1 loop, 1 double treble on the 5th intervening space of the corner star, crochet off the loops = 3 chain, 1 plain on the 7th double treble of the star = 3 chain, 1 double treble on the 8th intervening space = 3 chain, 3 overs, over the last double treble crochet off 2 loops, 1 double treble on the 3rd treble of the preceding row, complete the treble = 3 chain, 3 overs, over the double treble crochet off 2 loops, 1 treble on the 4th treble, complete the treble = 3 chain, 1 treble on the 4th treble, 3 chain, miss 3, 3 plain.
On the first 3 trebles of the previous row along the inner edge, starting from the outermost stitches visible to the right in the illustration, do 1 plain stitch, then 3 chains, skip 4 trebles, do 1 treble (which equals 3 chains), skip 3 trebles, do 1 double treble, 3 chains, 3 overs, pass the needle over the double treble, crochet off one over (skip 3 stitches), do 1 double treble, crochet off the 2 remaining loops, then do 3 chains, 4 overs, crochet off 2 loops, do 1 double treble over the chain treble of the star, crochet off the remaining loops, do 3 chains, 3 overs over the treble made on the 5 chains, crochet off 2 loops, do 1 treble on the 5th set of stitches in between, crochet off the remaining loops, do 3 chains, 1 treble on the 6th set of stitches in between, do 3 chains, 1 treble on the 7th set of stitches in between, do 3 chains, 3 overs, and do 1 treble on the 8th set of stitches in between. Crochet off 1 over, do 1 double treble on the first 5 chain stitches of the star, crochet off the remaining loops, do 3 chains, 3 overs, do 1 treble over the 2nd double treble, do 1 double treble, skip 2 trebles from the previous row, complete the treble with 3 chains, 3 overs, crochet off 1 over, joining it to the last double treble; crochet off the overs, do 1 treble on the 5th treble of the previous row, crochet off the loops with 3 chains, do 1 treble on the 4th treble, do 3 chains, skip 4 stitches. On each of the next 6 trebles, do 1 plain stitch, do 3 chains, skip 3 trebles, do 1 treble, 3 chains, skip 3 trebles, do 1 double treble; 3 chains, 3 overs over the double treble, crochet off 1 loop, do 1 double treble on the 4th treble after the plain stitches, crochet off the last overs with 3 chains, 3 overs, over the last double treble, crochet off 1 loop, do 1 double treble on the 5th space of the corner star, crochet off the loops with 3 chains, do 1 plain stitch on the 7th double treble of the star, do 3 chains, do 1 double treble in the 8th space, do 3 chains, 3 overs over the last double treble, crochet off 2 loops, do 1 double treble on the 3rd treble of the previous row, complete the treble with 3 chains, 3 overs over the double treble, crochet off 2 loops, do 1 treble on the 4th treble, complete the treble with 3 chains, do 1 treble on the 4th treble, do 3 chains, skip 3 stitches, and do 3 plain stitches.
One row of trebles to finish with; draw the 5 corner trebles together and add: 1 row of crossed trebles and 1 row of plain trebles, each time drawing the 5 corner loops together into one.
One row of treble stitches to finish with; bring the 5 corner treble stitches together and add: 1 row of crossed treble stitches and 1 row of regular treble stitches, each time pulling the 5 corner loops together into one.
1st row of the outside border—1 plain on every one of the 7 next trebles of the row beneath, 5 chain; turn back, join them to the 7th plain and so on.
1st row of the outside border—1 plain on every one of the 7 next trebles of the row beneath, 5 chain; turn back, join them to the 7th plain and so on.
2nd row—1 plain on the 4th of the 7 plain, 9 trebles on the 5 chain.
2nd row—1 plain on the 4th of the 7 plaine, 9 trebles on the 5 chain.
3rd row—1 plain on each of the first 2 trebles of the 2nd row, 1 picot, 2 plain, 1 picot, miss 1 stitch, 2 plain, 1 picot, 2 plain and so on.
3rd row—1 plain on each of the first 2 trebles of the 2nd row, 1 picot, 2 plain, 1 picot, skip 1 stitch, 2 plain, 1 picot, 2 plain, and continue like this.
Square with coloured tufts (fig. 474).—The following are different counterpane patterns which should be worked in coarse cotton; our engraving represents a single square, worked in two colours, in raised crochet. By joining a number of such squares together, 4 or 6 colours can be introduced into one covering with very good effect.
Square with coloured tufts (fig. 474).—Here are various counterpane patterns that should be made with coarse cotton; our illustration depicts a single square, created in two colors, using raised crochet. By connecting several of these squares, you can introduce 4 to 6 colors into one blanket with great effect.
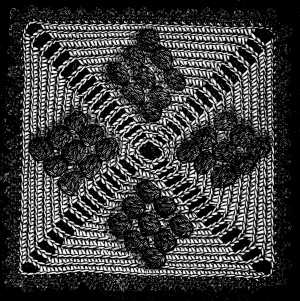
Materials: Coton pour crochet D.M.C Nos. 6 to 10, or Coton à tricoter D.M.C Nos. 6 to 12.[A]
Colours. White and Rouge-Turc 321, or écru and Bleu-Indigo 321, Rouge-Géranium 353 and Brun-Caroubier 356, Bleu d’Azur 3325 and Brun-Rouille 3312, Vert-Bouteille 494 and Bleu-Prunelle 489.[A]
Materials: D.M.C Crochet Cotton No. 6 to 10, or D.M.C Knitting Cotton No. 6 to 12.__A_TAG_PLACEHOLDER_0__
Colors: White and Turkish Red 321, or Ecru and Indigo Blue 321, Geranium Red 353 and Carob Brown 356, Azure Blue 3325 and Rust Brown 3312, Bottle Green 494 and Plum Blue 489.__A_TAG_PLACEHOLDER_1__
Cast on 13 chain and close the ring.
Cast on 13 chains and close the ring.
1st row—1 plain on the 1st of the 13 chain, 5 chain, 1 plain on the 4th chain, 5 chain, 1 plain on the 7th chain, 5 chain, 1 plain on the 10th chain, 5 chain, 1 plain on the 13th chain.
1st row—1 single crochet on the 1st of the 13 chain, 5 chain, 1 single crochet on the 4th chain, 5 chain, 1 single crochet on the 7th chain, 5 chain, 1 single crochet on the 10th chain, 5 chain, 1 single crochet on the 13th chain.
2nd row—1 plain on the 1st plain of the 1st row * 1 plain on the 1st of the 5 chain; 5 chain, 1 plain on the 5th chain. Repeat 3 times from *.
2nd row—1 knit stitch on the 1st knit stitch of the 1st row * 1 knit stitch on the 1st of the 5 chain; 5 chain, 1 knit stitch on the 5th chain. Repeat 3 times from *.
3rd row—5 plain on the 5 chain, 5 chain, 5 plain and so on.
3rd row—5 plain on the 5 chain, 5 chain, 5 plain, and so on.
4th and 5th rows—continue to increase, as in the 3rd row.
4th and 5th rows—keep increasing, just like in the 3rd row.
6th row—after the 3rd plain, 1 tuft in the contrasting colour (see fig. 431).
6th row—after the 3rd plain, 1 tuft in the contrasting color (see fig. 431).
The contrasting colour is to be introduced into the work at the first tuft, and cut off when the last is finished.
The contrasting color should be added to the work at the first tuft and removed when the last one is done.
The ends of the coloured threads must be worked in under the stitches of the next row. The square may be of any size; it is bordered by small picot scallops by means of which the different squares are joined together.
The ends of the colored threads should be tucked under the stitches of the next row. The square can be any size; it is bordered by small picot scallops that connect the different squares together.
Stripes for counterpanes (fig. 475).—We recommend the use of Soutache D.M.C or Lacets superfins D.M.C (braids) for the coloured stitches, in the place of cotton. The dark stitches standing, so to speak, on another ground of stitches the pattern will look brighter, if it be worked in a flat material that will spread out more than cotton does.
Stripes for bedspreads (fig. 475).—We suggest using Soutache D.M.C or Lacets superfins D.M.C (braids) for the colored stitches instead of cotton. The dark stitches will stand out more, creating a better contrast with the background stitches. The pattern will look brighter if it’s made with a flat material that spreads out more than cotton does.
The stripe, worked in its entire length and always on the right side, must be begun by a chain of stitches of the length the stripe is to be.
The stripe, created over its full length and always on the right side, should start with a chain of stitches that matches the length of the stripe.
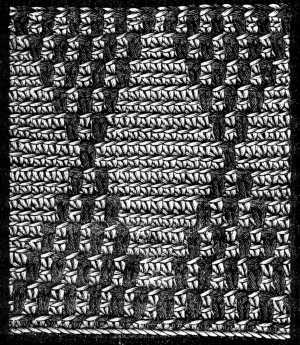
Materials: Coton pour crochet D.M.C Nos. 6 to 8, or Coton à tricoter D.M.C Nos. 6 to 12 and Lacets surfins D.M.C No. 4, or Soutache D.M.C No. 2½.[A]
Colours: Gris-Lin 716 and Rouge-Bordeaux 497, Gris-Tilleul 393 and Bleu-Faience 484 or Brun-Caroubier 356 and Jaune-Rouille 308 etc.[A]
Materials: D.M.C Crochet Cotton Nos. 6 to 8, or D.M.C Knitting Cotton Nos. 6 to 12 and D.M.C Surfing Lace No. 4, or D.M.C Soutache No. 2½.__A_TAG_PLACEHOLDER_0__
Colors: Linen Gray 716 and Bordeaux Red 497, Lark Gray 393 and Faience Blue 484 or Carob Brown 356 and Rust Yellow 308, etc.__A_TAG_PLACEHOLDER_1__
1st row—1 plain stitch on each chain stitch.
1st row—1 single crochet on each chain stitch.
2nd row—1 plain stitch with white or unbleached cotton, on each second stitch of the preceding row; 1 long plain stitch with the coloured cotton or the braid, in each second loop of the chain stitch.
2nd row—1 plain stitch with white or unbleached cotton, on every second stitch of the previous row; 1 long plain stitch with the colored cotton or the braid, in every second loop of the chain stitch.
When red and white cotton are used, only one thread must be drawn through the 1st loop, and the other through the two last loops.
When using red and white cotton, you should only pull one thread through the 1st loop and the other thread through the last two loops.
3rd, 5th, 7th, 9th, 11th rows—plain stitches of the colour of the grounding = 4th row—between every 5 coloured stitches 3 white = 6th row—between every 4 red, 5 white = 8th row—between every 3 red, 7 white = 10th row—between every 2 red, 9 white = 12th row—between the single red stitches, 11 white plain.
3rd, 5th, 7th, 9th, 11th rows—plain stitches in the color of the background = 4th row—between every 5 colored stitches, 3 white = 6th row—between every 4 red, 5 white = 8th row—between every 3 red, 7 white = 10th row—between every 2 red, 9 white = 12th row—between the single red stitches, 11 plain white.
In the second half of the pattern the red stitches must increase in the same proportion as that in which they decreased before.
In the second half of the pattern, the red stitches need to increase by the same amount that they decreased earlier.
Pattern of a counterpane in Tunisian crochet (fig. 476). This pattern, on a reduced scale, of a counterpane in Tunisian crochet, though it is worked here in several colours, can be done all in one. The numbers of the stitches, as they are here given, refer of course to the pattern represented in our figure; if worked on a larger scale, the number of stitches would have to be increased every way in the proper proportion.
Pattern of a counterpane in Tunisian crochet (fig. 476). This pattern, shown on a smaller scale, can be made in Tunisian crochet using multiple colors, but it can also be done in a single color. The stitch counts provided here correspond to the pattern depicted in our figure; if you’re working on a larger scale, you’ll need to increase the number of stitches in all directions proportionally.
For the inner square, which is worked in a light material, make 20 chain stitches, on which you make 17 rows of plaited Tunisian crochet, fig. 445, then fasten off.
For the inner square, which is made with a light material, make 20 chain stitches, and then work 17 rows of plaited Tunisian crochet, fig. 445, and then fasten off.
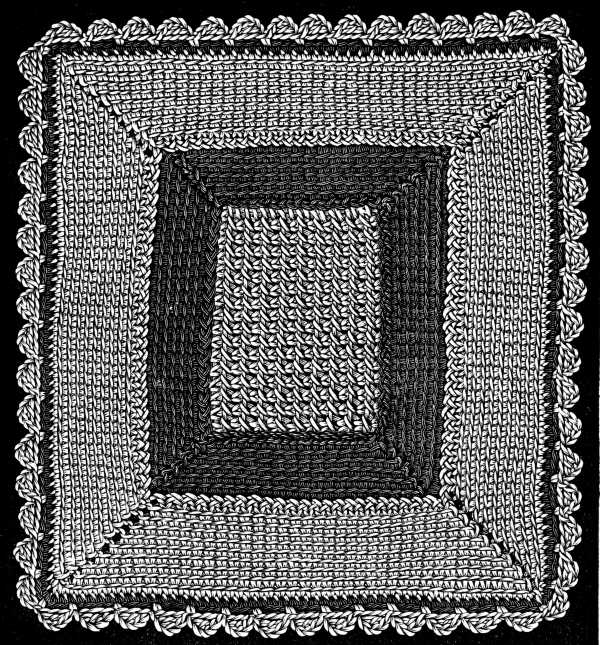
Materials: Coton pour crochet D.M.C Nos. 6 to 8, or Coton à tricoter D.M.C Nos. 6 to 12.[A]
Colours: Gris-Amadou 385 and Rouge-Cardinal 346, Vert-Bouteille 492 and Violet-Mauve 316, or Bleu-Gentiane 479 and Gris-Écru 706.
Materials: D.M.C Crochet Cotton Nos. 6 to 8, or D.M.C Knitting Cotton Nos. 6 to 12.__A_TAG_PLACEHOLDER_0__
Colors: Gray-Amadou 385 and Red-Cardinal 346, Bottle Green 492 and Violet-Mauve 316, or Gentian Blue 479 and Gray-Ecru 706.
For the first coloured border, which immediately surrounds the centre square, take a coloured thread and make 2 chain stitches and upon these the common Tunisian stitch, fig. 444. Increase to the right in every row by one stitch, to the number of 6 = then put the needle into the first stitch on one side of the square, turn the thread round and draw it through. Here you must be careful to observe, in the first instance, that the second part which is now to be joined to the square, should always remain on the left side of the square and secondly, that the thread with which you join the two parts together, should lie to the left and be drawn through, from the wrong side to the right. Having now got 7 Tunisian stitches on the needle, make 18 double rows, and join the last stitch of each row to a stitch of the square.
For the first colored border that goes around the center square, take a colored thread and make 2 chain stitches, and on these, use the common Tunisian stitch, fig. 444. Increase to the right by one stitch each row until you reach a total of 6 stitches. Then, insert the needle into the first stitch on one side of the square, turn the thread around, and pull it through. You need to be careful to make sure that the second part you’re joining to the square always stays on the left side of it, and that the thread used to connect both parts lies on the left side and is pulled through from the wrong side to the right. Now that you have 7 Tunisian stitches on the needle, make 18 double rows, and join the last stitch of each row to a stitch of the square.
When these rows are finished, you proceed to decrease on the right till you have only 2 stitches left; and then again to increase as at the beginning of the stripe. At each increase, after each double row you must pass the thread through the corresponding stitch opposite of the same row. When you have again got 7 stitches on the needle, join them as before to the square. Work round the 4 sides of the square in this manner and when you come to the last decrease, join the stitches to those of the first increase, and fasten off. The next stripes are to be worked in the same way; they may be made either wider or narrower, plain, or ornamented with a cross stitch pattern which you work upon them.
When these rows are done, you move to decrease on the right until you have only 2 stitches left; then, increase again like you did at the start of the stripe. With each increase, after every double row, you need to pass the thread through the corresponding stitch opposite in that same row. Once you have 7 stitches back on the needle, join them to the square like before. Work around the 4 sides of the square this way, and when you reach the last decrease, connect the stitches to the first increase, and fasten off. The next stripes will be worked the same way; they can be made either wider or narrower, plain, or decorated with a cross-stitch pattern that you work onto them.
Pattern of counterpane worked in stripes (fig. 477).—This is intended for a child’s coverlet and is worked in pale blue, Bleu-Indigo 334, and white; the stripes and the lace border, in white, the setting, partly in white, partly in blue.
Pattern of counterpane worked in stripes (fig. 477).—This is designed for a child's coverlet and is made with light blue, Bleu-Indigo 334, and white; the stripes and the lace border are in white, with the background partly in white and partly in blue.
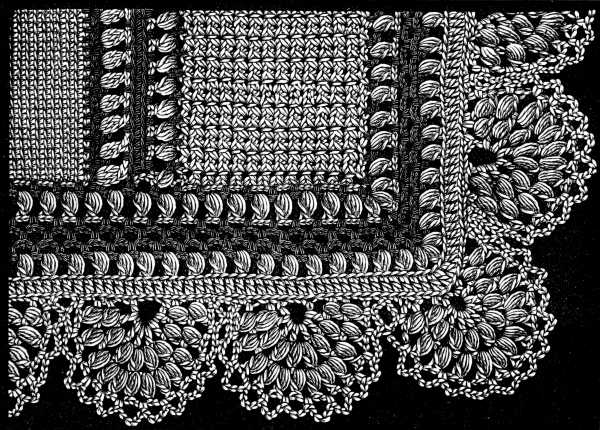
Materials: Coton pour crochet D.M.C Nos. 6 to 12, Coton à tricoter D.M.C Nos. 6 to 14, or Cordonnet 6 fils D.M.C No. 15.[A]
Materials: D.M.C Cotton for crochet Nos. 6 to 12, D.M.C Knitting cotton Nos. 6 to 14, or D.M.C 6-ply cord No. 15.__A_TAG_PLACEHOLDER_0__
For the first stripe, make a foundation chain of 26 stitches; then counting back, draw the needle through the 6th and 7th chain stitches, drawing up all the three loops together = 2 chain, then put the needle again through 2 chain stitches, draw up the 3 loops together = 2 chain and so on.
For the first stripe, create a foundation chain of 26 stitches; then, counting back, insert the needle through the 6th and 7th chain stitches, pulling up all three loops together = 2 chain, then insert the needle again through 2 chain stitches, pull up the 3 loops together = 2 chain, and so on.
Coming back, make the loop of the first stitch and that of the second on the chain stitches of the preceding row = begin every row with 3 chain, which form picots along the edge of the stripe; when the stripes are finished, take a blue thread and make 1 plain stitch on each picot and 3 chain.
Coming back, create the loop of the first stitch and that of the second on the chain stitches of the previous row = start every row with 3 chain, which make picots along the edge of the stripe; once the stripes are done, take a blue thread and make 1 plain stitch on each picot and 3 chain.
This blue row is followed by a white one, worked in cluster stitch, fig. 426, with 2 chain stitches between every 2 clusters.
This blue row is followed by a white one, made with cluster stitch, fig. 426, with 2 chain stitches between every 2 clusters.
Then follows another blue row of one plain stitch on each chain stitch of the previous row. The second blue row consists entirely of plain stitches worked along the long sides of the stripes, which are joined together afterwards, but not along the short sides until the counterpane is finished; then the stitches should border all the 4 sides. The second stripe, which should be of the same width as the first, is worked in Tunisian crochet; for the edge make one row of plain stitches in blue, one of cluster stitches in white, and then again a row of plain in blue.
Next, there's another blue row with one plain stitch on each chain stitch of the previous row. The second blue row is made up entirely of plain stitches along the long sides of the stripes, which are joined together later, but not along the short sides until the counterpane is completed; then the stitches should border all four sides. The second stripe, which should be the same width as the first, is worked in Tunisian crochet; for the edge, make one row of plain stitches in blue, one row of cluster stitches in white, and then another row of plain stitches in blue.
Join the stripes together on the wrong side with plain stitches, taking up one loop on the right and one on the left, alternately.
Join the stripes together on the back side with simple stitches, picking up one loop on the right and one on the left, alternately.
When you have joined the stripes, make the outer border, which consists of 7 straight rows and a scalloped lace edging.
When you've joined the stripes, create the outer border, which has 7 straight rows and a scalloped lace edge.
1st row—in blue: 3 chain and 1 plain on each picot, 1 plain, and so on, down the long sides of the stripes = along the short sides, the side of the chain stitches or that of the previous row: 1 plain, 3 chain, miss 2, 1 plain.
1st row—in blue: 3 chains and 1 single crochet on each picot, 1 single crochet, and so on, down the long sides of the stripes = along the short sides, the side of the chain stitches or that of the previous row: 1 single crochet, 3 chains, skip 2, 1 single crochet.
2nd row—in white or unbleached: 1 cluster stitch, fig. 426, on each picot formed by the 3 chain stitches of the 1st row; on the corner picots, you must make 3 cluster stitches.
2nd row—in white or unbleached: 1 cluster stitch, fig. 426, on each picot made by the 3 chain stitches of the 1st row; for the corner picots, make 3 cluster stitches.
3rd, 4th, 5th rows—in blue: similar to the first. Increase at the corners by making: 1 plain, 3 chain, 1 plain on the same stitch.
3rd, 4th, 5th rows—in blue: similar to the first. Increase at the corners by doing: 1 plain, 3 chain, 1 plain in the same stitch.
6th row—in white or unbleached: similar to the 2nd row.
6th row—in white or natural: similar to the 2nd row.
7th row—in blue: 1 treble on each of the stitches of the previous row.
7th row—in blue: 1 treble stitch on each of the stitches from the previous row.
Lace edging.—The scallops extend over 22 stitches of the previous row and on that account it is better to make the corners first, to count the stitches both ways so as to distribute the stitches that are left over, between the scallops.
Lace edging.—The scallops cover 22 stitches from the previous row, so it’s best to create the corners first. This way, you can count the stitches in both directions to evenly distribute any leftover stitches between the scallops.
Corner scallop.—Fasten on the thread to the left of the second of the stitches that were added to make the turn, make 6 chain, 1 single on the 4th treble to the right = 1 single on the next treble = turn the work = * 2 chain, 1 treble on the 6th chain, repeat 7 times from *, in all therefore 8 trebles = after the 8th treble: 2 chain, miss 1 treble, 1 single on the 2 next trebles = turn the work = 2 chain, 1 cluster stitch between each treble, in all 9 cluster stitches, then 2 chain, miss 2 trebles, 1 single stitch on the next 2 trebles = turn the work = 2 chain, 1 cluster stitch over the 1st, 2nd, 3rd and 4th pairs of chain stitches in the preceding row, and 2 cluster stitches and 2 chain over the 5th, 6th and 7th chain stitches; over the other chain stitches again: 1 cluster stitch; then 2 chain, miss 2 trebles, join to the 3rd treble = fasten off.
Corner scallop.—Attach the thread to the left of the second stitch added to make the turn, make 6 chains, then do 1 single crochet in the 4th treble to the right = 1 single crochet in the next treble = turn the work = * 2 chains, 1 treble in the 6th chain, repeat 7 times from *, which totals 8 trebles = after the 8th treble: 2 chains, skip 1 treble, 1 single crochet in the next 2 trebles = turn the work = 2 chains, 1 cluster stitch between each treble, for a total of 9 cluster stitches, then 2 chains, skip 2 trebles, 1 single crochet in the next 2 trebles = turn the work = 2 chains, 1 cluster stitch over the 1st, 2nd, 3rd, and 4th pairs of chain stitches in the previous row, and 2 cluster stitches and 2 chains over the 5th, 6th, and 7th chain stitches; for the other chain stitches again: 1 cluster stitch; then 2 chains, skip 2 trebles, join to the 3rd treble = fasten off.
For the scallops on the right side, divide the stitches between the corner scallops into equal portions. Supposing that they are divisible by 22, count 9 stitches to the right, fasten on the thread at the 9th; * 7 chain, miss 2 trebles of the row beneath, 1 plain on the 3rd, 1 single stitch on the next = turn the work = 2 chain, 1 treble on the 7 chain, repeat 5 times from * and finish with 2 chain, 1 single on the 2nd lower treble, 1 single on the next treble = turn the work = 2 chain and 1 cluster stitch between each treble of the preceding row, 2 cluster stitches between the 3rd and 2nd trebles = after the 8th stitch: 2 chain, miss 1 treble, 1 single on each of the 2 next stitches = repeat 3 times over 2 chain stitches of the previous row: 2 chain, 1 cluster stitch = on the 4th, 5th and 6th chain stitches: 2 cluster and 2 chain; on the 3 last chain the same stitches as on the 3 first = then 1 single over each of the next 18 and repeat from *.
For the scallops on the right side, divide the stitches between the corner scallops into equal portions. Assuming they can be divided by 22, count 9 stitches to the right, attach the thread at the 9th; * 7 chains, skip 2 trebles from the row below, 1 plain on the 3rd, 1 single stitch on the next = turn the work = 2 chains, 1 treble on the 7 chains, repeat 5 times from * and finish with 2 chains, 1 single on the 2nd lower treble, 1 single on the next treble = turn the work = 2 chains and 1 cluster stitch between each treble from the previous row, 2 cluster stitches between the 3rd and 2nd trebles = after the 8th stitch: 2 chains, skip 1 treble, 1 single on each of the next 2 stitches = repeat 3 times over 2 chain stitches from the previous row: 2 chains, 1 cluster stitch = on the 4th, 5th, and 6th chain stitches: 2 clusters and 2 chains; on the last 3 chains the same stitches as on the first 3 = then 1 single over each of the next 18 and repeat from *.
The final row consists of open picots, formed of 5 chain stitches and 1 plain, between each cluster stitch; after the last of these stitches and in the indent of the scallops on the straight line, only 2 chain stitches and 1 plain on the 3rd stitch.
The last row is made up of open picots, created with 5 chain stitches and 1 plain stitch between each cluster stitch; after the last of these stitches and in the dip of the scallops along the straight edge, there are just 2 chain stitches and 1 plain stitch on the 3rd stitch.
Pattern in squares for counterpanes (fig. 478).—This pattern may be worked in the same stitch as the previous one, either in Tunisian crochet or in any other of the stitches already described.
Pattern in squares for counterpanes (fig. 478).—You can create this pattern using the same stitch as the previous one, whether in Tunisian crochet or any other stitches previously mentioned.
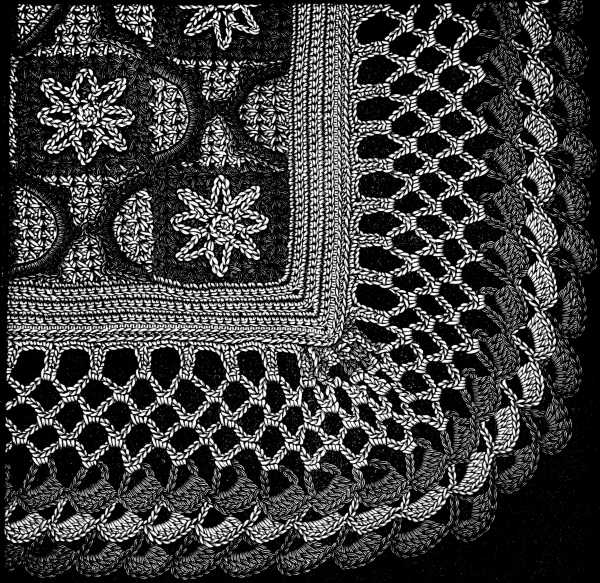
Materials: Coton à tricoter D.M.C Nos. 6 to 12, Cordonnet 6 fils D.M.C Nos. 1 to 5, or Coton pour crochet D.M.C Nos. 6 to 12.
Colours: Gris-Coutil 323 and Brun-Caroubier 303 or Bleu-cendré 448 and Rouge-Cornouille 449, Vert-Mousse 470 and Bleu d’Azur 3325.[A]
Materials: D.M.C Knitting Cotton Nos. 6 to 12, D.M.C 6-Ply Cord Nos. 1 to 5, or D.M.C Crochet Cotton Nos. 6 to 12.
Colors: Gray-Twill 323 and Brown-Carob 303 or Ash-Blue 448 and Red-Cornouille 449, Moss-Green 470 and Azure Blue 3325.__A_TAG_PLACEHOLDER_0__
The 2nd stripe is begun in the light colour, and the stitches, made at the beginning of each row, are joined to those of the first stripe, as the stitches of the 3rd are to those of the 2nd and so on.
The 2nd stripe starts with the light color, and the stitches made at the beginning of each row are connected to those of the first stripe, just as the stitches of the 3rd stripe are connected to those of the 2nd, and so on.
When you have made sufficient big squares, each consisting of 9 small ones, border them with seven rows of plain stitches, worked to and fro.
When you've created enough large squares, each made up of 9 smaller ones, outline them with seven rows of simple stitches, sewing back and forth.
The 4 squares that form the corners are only to be bordered in this manner on two sides; the squares along the straight edges, on 3 sides, and only those that are intended for the centre of the counterpane, on all 4 sides. The separate parts are then either sewn or crocheted together on the wrong side. The dark squares are ornamented with small stars worked in the light colour, the light ones with scallops in the dark colour.
The 4 squares at the corners should be bordered on just two sides; the squares along the straight edges should be bordered on three sides, and only the ones meant for the center of the counterpane should be bordered on all four sides. The separate pieces are then either sewn or crocheted together on the back side. The dark squares are decorated with small stars in the light color, while the light squares have scallops in the dark color.
For the small stars—4 chain, close the ring; 2 plain on each stitch of the chain; 8 plain in all = after the 8th stitch: 8 chain, 1 plain on the 1st plain of the 8 plain stitches. Repeat the 8 chain 7 times and fasten off, then sew the star on in the centre of the dark square, taking care to spread out the little points formed of chain stitches at regular distances from each other. The scallops are worked from left to right; fasten the thread on at the point where 4 squares touch, then make a chain of 18 stitches and secure it at the opposite point. On the chain stitches: 6 plain, 1 picot, 7 plain, 1 picot, 7 plain, 1 picot, 6 plain = fasten off.
For the small stars—4 chains to close the ring; 2 single crochet in each chain stitch; 8 single crochet in total. After the 8th stitch: chain 8, then 1 single crochet in the 1st single crochet from the 8. Repeat the chain 8 process 7 times and fasten off. Sew the star onto the center of the dark square, making sure to spread the little points made of chain stitches evenly apart. The scallops are worked from left to right; start by fastening the thread at the point where 4 squares meet, then make a chain of 18 stitches and secure it at the opposite point. On the chain stitches: 6 single crochet, 1 picot, 7 single crochet, 1 picot, 7 single crochet, 1 picot, 6 single crochet = fasten off.
Repeat the same scallop over the second half of the square; when you come to the 2nd picot of the first scallop join the two picots. When both scallops are completed, fasten them on to the foundation by a few stitches on the wrong side.
Repeat the same scallop over the second half of the square; when you reach the 2nd picot of the first scallop, connect the two picots. Once both scallops are finished, secure them to the foundation with a few stitches on the back side.
The outside border of the counterpane is made separately, and is worked inwards from without and from left to right.
The outer edge of the comforter is made separately and is worked in from the outside, moving from left to right.
1st row—begin with the dark colour and make * 10 chain stitches, drop the loop, put the needle into the 1st of the 10 chain, take up the loop and draw it through the stitch; 2 chain and on the 10 stitches: 6 trebles quite close together. Repeat from * and go on repeating the sequence until the lace is long enough to trim the counterpane handsomely.
1st row—start with the dark color and make * 10 chain stitches, drop the loop, insert the needle into the 1st of the 10 chain stitches, grab the loop and pull it through the stitch; 2 chain and on the 10 stitches: 6 trebles very close together. Repeat from * and keep repeating the sequence until the lace is long enough to nicely trim the bedspread.
2nd row—in the light colour and similar to the 1st = only that in joining the chain stitches together, you make the single stitch on the chain stitches of the 1st row.
2nd row—in the light color and similar to the 1st = only that when joining the chain stitches together, you create a single stitch on the chain stitches of the 1st row.
3rd row—in the dark colour and similar to the 2nd.
3rd row—in the dark color and similar to the 2nd.
4th, 5th and 6th rows—in the light colour and from right to left: 7 chain, 2 plain on each loop of chain stitches of the previous row.
4th, 5th and 6th rows—in the light color and from right to left: 7 chains, 2 plain stitches on each loop of the chain stitches from the previous row.
7th row—in the light colour and from left to right: * 2 plain on the treble of the lace, 11 chain, 2 plain on the next loop of chain stitches = these 2 stitches are made on the wrong side of the work = drop the loop, turn the work to the right, 3 plain on the last 3 chain, 8 chain **, and repeat always from * to **.
7th row—in the light color and from left to right: * 2 plain on the treble of the lace, 11 chain, 2 plain on the next loop of chain stitches = these 2 stitches are made on the wrong side of the work = drop the loop, turn the work to the right, 3 plain on the last 3 chain, 8 chain **, and always repeat from * to **.
One row of plain made on each chain stitch and a 2nd row of trebles on the plain stitches completes the lace edging, which is afterwards sewn on to the counterpane.
One row of simple stitches made on each chain stitch and a 2nd row of treble stitches on the simple stitches finishes the lace edging, which is then sewn onto the bedspread.
Counterpane with fringed border (fig. 479).—This pattern requires three colours; we suggest the following as making a very effective combination: Rouge-Turc 321, Bleu-Indigo 311 and white.
Counterpane with fringed border (fig. 479).—This pattern needs three colors; we recommend the following as a great combination: Rouge-Turc 321, Bleu-Indigo 311, and white.

Materials: Coton pour crochet D.M.C Nos. 6 to 10, or Coton à tricoter D.M.C Nos. 6 to 14.
Colours: White, Gris-Tilleul 331 and Rouge-Cornouille 449.[A]
Materials: D.M.C Crochet Cotton No. 6 to 10, or D.M.C Knitting Cotton No. 6 to 14.
Colors: White, Gray-Linden 331, and Red-Cornouille 449.__A_TAG_PLACEHOLDER_0__
The stripes, one red, the other blue, may be worked in any stitch. They are edged with 8 plain stitches of 3 different lengths worked in red. * The first stitch passes only under the loops of the stitches; the 2nd over 2 stitches; the 3rd over 1, the 4th inwards, over 3. Repeat from *.
The stripes, one red and the other blue, can be done in any stitch. They’re bordered with 8 plain stitches of 3 different lengths done in red. * The first stitch goes under the loops of the stitches; the 2nd goes over 2 stitches; the 3rd over 1, and the 4th inward, over 3. Repeat from *.
These stitches must be worked parallel to each other along the two edges that are to be joined together.
These stitches need to be done parallel to each other along the two edges that will be joined together.
The stripes are fastened together on the wrong side by single or plain stitches.
The stripes are sewn together on the back with simple stitches.
The outside edge consists of 15 rows: 1st row—in red: 1 row of plain stitches on the right side of the work.
The outer edge has 15 rows: 1st row—in red: 1 row of regular stitches on the front side of the work.
2nd row—in red, and on the wrong side of the work: plain stitches.
2nd row—in red, and on the back side of the work: plain stitches.
3rd and 4th rows—in red, and on the right side of the work: plain stitches.
3rd and 4th rows—in red, and on the right side of the work: simple stitches.
5th row—in dark blue and on the right side: 1 treble, 1 chain, miss 1 plain of the row beneath, 1 treble and so on.
5th row—in dark blue and on the right side: 1 treble, 1 chain, skip 1 plain from the row below, 1 treble, and so on.
6th row—in white, and similar to the 5th.
6th row—in white, and like the 5th.
7th row—in blue, and similar to the 5th.
7th row—in blue, and similar to the 5th.
8th row—in red: 1 plain on each stitch of the preceding row.
8th row—in red: 1 plain stitch on each stitch of the previous row.
9th row—in red and on the wrong side: 1 plain on each stitch of the preceding row.
9th row—in red and on the back side: 1 knit stitch for each stitch of the previous row.
10th and 11th rows—in red: and both on the right side, 2 rows of plain stitches.
10th and 11th rows—in red: and both on the right side, 2 rows of plain stitches.
12th row—in white: 5 chain, miss 3, 1 plain on the 4th stitch.
12th row—in white: 5 chain, skip 3, 1 plain on the 4th stitch.
13th row—in dark blue and similar to the 12th.
13th row—in dark blue and like the 12th.
15th row—in white: 1 plain on the picot formed by the chain stitches; 5 chain, 1 plain.
15th row—in white: 1 single crochet in the picot created by the chain stitches; 5 chains, 1 single crochet.
Into this last row you draw clusters of lengths of red cotton to form the fringe, and knot them together with blue, or if you prefer it, you may finish off the coverlet with a hairpin fringe.
Into this last row, you add bunches of red cotton strands to create the fringe and tie them together with blue. Or, if you prefer, you can finish the coverlet with a hairpin fringe.
Counterpane composed of squares and olive shaped figures (fig. 480).—There are many who shrink from undertaking a large piece of work because it becomes inconvenient to handle and carry about. The counterpane here represented has the advantage of being made up of a number of quite little pieces, which are worked separately and joined together afterwards.
Counterpane made up of squares and olive-shaped figures (fig. 480).—Many people hesitate to take on a large project because it can be cumbersome to manage and transport. The counterpane shown here has the benefit of being created from several small pieces, which are sewn individually and then put together afterwards.

Materials: Coton pour crochet D.M.C Nos. 6 to 10, or Coton à tricoter D.M.C Nos. 6 to 10.
Colours: White and Rouge-Turc 321, or Écru and Rouge-Cerise 3318, Gris-Coutil 323 and Bleu-Gentiane 478.[A]
Materials: D.M.C Crochet Cotton No. 6 to 10, or D.M.C Knitting Cotton No. 6 to 10.
Colors: White and Turkish Red 321, or Ecru and Cherry Red 3318, Cotton Gray 323 and Gentian Blue 478.__A_TAG_PLACEHOLDER_0__
Two colours, which can be clearly distinguished from each other in the engraving, should be chosen from among the various combinations suggested; one of them should be very light, say, cream or white for the olive shaped figures and squares, and the other of some soft shade only darker, for the connecting rows and the knotted fringe, described in the chapter on Macramé.
Two colors, which can be easily distinguished in the engraving, should be chosen from the different combinations suggested; one of them should be very light, like cream or white for the olive-shaped figures and squares, and the other should be a soft shade that’s just a bit darker, for the connecting rows and the knotted fringe, as described in the chapter on Macramé.
The olive shaped figures begin with 9 chain stitches, on which you make 8 plain stitches and on the 9th: 3 plain for the corner.
The olive-shaped figures start with 9 chain stitches, followed by 8 plain stitches, and on the 9th stitch, make 3 plain stitches for the corner.
On the second side of the chain: 8 plain and 3 besides on the corner stitch, and so on for 3 rows; in the last row there should be 28 stitches.
On the second side of the chain: 8 plain and 3 additional on the corner stitch, and continue like this for 3 rows; in the last row there should be 28 stitches.
These 3 rows are to be considered as one only.
These 3 rows should be regarded as a single unit.
2nd row—3 chain, 1 treble on the plain stitch that follows * 1 chain, 1 treble and repeat 11 times from *; 1 chain, 3 trebles with 1 chain between them on the corner stitch, ** 1 chain, 1 treble, repeat 12 times from **.
2nd row—3 chains, 1 treble on the plain stitch that follows * 1 chain, 1 treble and repeat 11 times from *; 1 chain, 3 trebles with 1 chain in between them on the corner stitch, ** 1 chain, 1 treble, repeat 12 times from **.
On the last stitch at the corner, again 3 trebles with 1 chain; close the round with 1 single stitch.
On the last stitch at the corner, make 3 treble crochets with 1 chain; finish the round with 1 single crochet.
4th row—here you can change the colour: 1 plain on each of the stitches of the last row; 3 plain at the corners.
4th row—here you can change the color: 1 solid on each of the stitches of the last row; 3 solid at the corners.
5th row—similar to the 4th.
5th row—like the 4th.
6th row—2 plain, 1 cluster of 2 double trebles on the same stitch of the 4th row as the 5th stitch of the last row is on; miss 1 plain.
6th row—2 plain, 1 cluster of 2 double trebles on the same stitch of the 4th row as the 5th stitch of the last row is on; skip 1 plain.
Continue in this manner along the whole row, taking care that the 9th and 22nd cluster come just at the corner.
Continue this way down the whole row, making sure that the 9th and 22nd clusters are positioned right at the corner.
7th and 8th rows—these two last rows should be worked in the same colour as the inside of the figure.
7th and 8th rows—these last two rows should be done in the same color as the inside of the figure.
Be careful always to make the increase at the point; a 9th row in the dark colour may further be added, to connect the figures, by passing the thread from the wrong side to the right, between the 13 last stitches of two of the points of the figures. The space between these olive shaped figures is filled by a pointed square of chain stitches.
Be sure to always make the increase at the tip; a 9th row in the dark color can be added to connect the shapes by threading from the back to the front, between the last 13 stitches of two points of the shapes. The area between these olive-shaped figures is filled with a pointed square of chain stitches.
In the 1st and following rows you miss 5 stitches at the point where the figures meet, and continue to decrease in this manner until the space is filled up. The fringe is made in the dark colour, either directly on to the plain crochet, or after a few rows of open-work.
In the 1st and following rows, you skip 5 stitches where the shapes connect, and keep decreasing this way until the area is filled in. The fringe is made in the darker color, either directly onto the plain crochet or after a few rows of open work.
Squares for chair-backs (fig. 481).—This is a design for cut-work, out of an old collection by Sibmacher, which we have adapted to crochet. It will be found most effective, worked in any of the given materials; we have worked it with admirable result, both in Cordonnet 6 fils D.M.C No. 15 and Fil à dentelle D.M.C No. 150.
Squares for chair-backs (fig. 481).—This is a design for cut-work from an old collection by Sibmacher, which we have adapted for crochet. It looks great in any of the materials listed; we have achieved excellent results using both Cordonnet 6 fils D.M.C No. 15 and Fil à dentelle D.M.C No. 150.

Materials: Fil d’Alsace D.M.C Nos. 30 to 100, Cordonnet 6 fils D.M.C Nos. 20 to 50, or Fil à dentelle D.M.C Nos. 25 to 70 in white or écru.[A]
Materials: Fil d’Alsace D.M.C Nos. 30 to 100, Cordonnet 6 fils D.M.C Nos. 20 to 50, or Fil à dentelle D.M.C Nos. 25 to 70 in white or ecru. __A_TAG_PLACEHOLDER_0__
1st row—4 chain, close the ring.
1st row—4 chains, join to form a ring.
2nd row—1 chain, 2 plain on each chain, 8 in all; draw the loop of the last stitch through the 1st chain.
2nd row—1 chain, 2 plain on each chain, 8 in total; pull the loop of the last stitch through the 1st chain.
3rd row—6 chain, 1 treble *, 3 chain, 1 treble, repeat 6 times from *. In all, with the 3 chain, 8 trebles.
3rd row—6 chains, 1 treble *, 3 chains, 1 treble, repeat 6 times from *. In total, with the 3 chains, 8 trebles.
4th row—4 plain, over each treble of 3 chain.
4th row—4 single crochets over each treble of 3 chains.
5th row—6 chain, 1 plain on the 2nd of the plain stitches beneath, * 3 chain, 1 treble, over the treble beneath, 3 chain, 1 plain on the 2nd stitch of the row beneath. Repeat 6 times from *, then add 3 chain, 1 plain on the 3rd of the 6 chain.
5th row—6 chains, 1 plain stitch on the 2nd of the plain stitches below, * 3 chains, 1 treble stitch, over the treble stitch below, 3 chains, 1 plain stitch on the 2nd stitch of the row below. Repeat 6 times from *, then add 3 chains, 1 plain stitch on the 3rd of the 6 chains.
6th row—7 chain, 1 plain over the treble of the last row; repeat the same series 7 times.
6th row—7 chains, 1 single crochet over the treble of the last row; repeat the same series 7 times.
7th row—3 chain, 1 treble over the treble beneath; 1 treble on each chain stitch, 2 trebles on each plain stitch of the row beneath; in all, 72 trebles, including the 3 chain.
7th row—3 chains, 1 treble over the treble below; 1 treble on each chain stitch, 2 trebles on each plain stitch of the row below; in total, 72 trebles, including the 3 chains.
8th row—* 8 chain, 1 plain between the 2 trebles that were added, therefore between the 8th and the 9th = turn the work = make 12 plain on the wrong side = turn the work back to the right side = take up 1 loop of each of the 12 stitches for the Tunisian stitch that is made on 10 rows, and decreasing by one stitch in each row, alternately on the right and left = draw up the 3 last loops together and make, descending on the right side: 1 single stitch on each row of the pyramid you have just made, finish with 1 plain on the stitch that follows the 8 chain. Repeat 7 times from *.
8th row—* 8 chains, 1 plain stitch between the 2 trebles that were added, so between the 8th and the 9th = turn the work = make 12 plain stitches on the wrong side = turn the work back to the right side = pick up 1 loop of each of the 12 stitches for the Tunisian stitch that is done over 10 rows, decreasing by one stitch in each row, alternating on the right and left = pull up the last 3 loops together and create, descending on the right side: 1 single stitch on each row of the pyramid you just made, finish with 1 plain stitch on the stitch that follows the 8 chains. Repeat 7 times from *.
10th row—fasten on the thread at a stitch at the point of a pyramid, * 7 chain, 5 overs, join the loop to the 2nd picot on the side of the pyramid where you are working, draw the needle back through 2 overs, make 2 overs more, and put the needle into the middle picot opposite and draw the needle twice through 2 loops, thirdly through 3 and each time after that, through 2 loops = 6 chain, 1 double treble, join to the 3rd over, 7 chain, 1 plain = on the next pyramid 7 chain, 1 septuple treble, join it to the next middle picot = draw the needle thrice through 2 loops, 1 triple treble to join to the middle picot opposite, draw the needle back through the loops, and at the 4th over, through 3 loops, and each time after that, through 2 loops, 7 chain, 1 quadruple treble, join it to the 4th over, 7 chain, 1 triple treble, 7 chain, 1 plain on the next pyramid. Repeat 3 times from *.
10th row—start by attaching the thread at a stitch at the tip of a pyramid, * 7 chains, 5 overs, connect the loop to the 2nd picot on the side of the pyramid you’re working on, pull the needle back through 2 overs, make 2 more overs, and insert the needle into the middle picot opposite and draw the needle twice through 2 loops, then through 3 loops, and after that, through 2 loops = 6 chains, 1 double treble, connect to the 3rd over, 7 chains, 1 plain = on the next pyramid 7 chains, 1 septuple treble, connect it to the next middle picot = pull the needle through 2 loops three times, 1 triple treble to join to the opposite middle picot, pull the needle back through the loops, and at the 4th over, through 3 loops, and each time after that, through 2 loops, 7 chains, 1 quadruple treble, connect it to the 4th over, 7 chains, 1 triple treble, 7 chains, 1 plain on the next pyramid. Repeat 3 times from *.
11th row—1 chain, 1 plain on each of the stitches of the previous row and 2 plain on those forming the corner; fasten off.
11th row—1 chain, 1 single crochet in each stitch of the previous row and 2 single crochets in the stitches forming the corner; fasten off.
12th row—1 single on the first plain, 5 chain, 1 treble on the 3rd plain, 2 chain, 1 treble on the 3rd plain and so on to the corner and until you have 14 trebles = on the corner stitch: 2 chain and 1 treble more; then proceed as you did on the first side. There should be 18 trebles and 19 times 2 chain between the corner trebles; all four sides should be alike.
12th row—1 single on the first plain, 5 chains, 1 treble on the 3rd plain, 2 chains, 1 treble on the 3rd plain, and continue that way to the corner until you have 14 trebles. For the corner stitch: 2 chains and 1 more treble; then continue as you did on the first side. There should be 18 trebles and 19 sets of 2 chains between the corner trebles; all four sides should be the same.
13th row—1 plain on each stitch of the last row, not counting the 3 which are to be made at the corner.
13th row—1 stitch in each stitch of the last row, not including the 3 stitches to be made at the corner.
14th row—14 single over the preceding stitches *, 1 chain, 24 plain; miss 4 plain of the last row, not counting the 2 increased stitches which must be left empty = after the 24th stitch turn the work, miss 2, 21 plain, passing the needle under the 2 loops of the row beneath = turn the work = 1 chain, 20 plain = turn the work = 19 plain = continue to decrease in the same proportion, until you have 3 stitches left and fasten off. In all the intakes miss the last stitch but one, coming back, and the 1st going, and always begin on the right side with 1 chain.
14th row—14 single crochet over the previous stitches, 1 chain, 24 plain; skip 4 plain from the last row, not counting the 2 increased stitches that should be left empty = after the 24th stitch, turn the work, skip 2, 21 plain, passing the needle under the 2 loops of the row underneath = turn the work = 1 chain, 20 plain = turn the work = 19 plain = continue to decrease in the same way until you have 3 stitches left and fasten off. In all decreases, skip the last stitch but one on the way back, and the 1st on the way there, and always start on the right side with 1 chain.
For the second half of these triangular figures which are worked from right to left, fasten on the thread to the 5th stitch after the increase and make 24 plain = 7 plain should remain between the two triangular figures formed of plain stitches = turn the work = 21 plain, miss the 2 last stitches, 1 plain on the stitch the thread is fastened to = turn the work = miss 1 stitch, 19 plain, 5 overs, put the needle through the 4th of the 7 stitches between, bring it back twice, each time through 2 loops, make 2 overs more, put the needle through the last stitch of the 3rd row opposite, bring it back twice through 2 loops, then once through 3 loops and twice through 2 loops = turn the work = 18 plain and so on, until you have made 10 transverse trebles = fasten off, then repeat the same series of rows on the other sides.
For the second half of these triangular shapes that are worked from right to left, attach the thread to the 5th stitch after the increase and make 24 plain stitches, leaving 7 plain stitches between the two triangular shapes made of plain stitches. Turn the work, make 21 plain stitches, skip the last 2 stitches, and make 1 plain stitch on the stitch where the thread is attached. Turn the work, skip 1 stitch, make 19 plain stitches, and 5 over stitches. Insert the needle through the 4th of the 7 stitches in between, pull it back twice, each time through 2 loops, make 2 more over stitches, insert the needle through the last stitch of the 3rd row opposite, pull it back twice through 2 loops, then once through 3 loops and twice through 2 loops. Turn the work, make 18 plain stitches, and continue like this until you've completed 10 transverse trebles. Fasten off, then repeat the same series of rows on the other side.
15th row—do not cut off the thread on the 4th side but work backwards: 3 single over the chain, 5 chain * 1 treble on the stitch whence the 5 chain proceeded, 2 chain, 1 treble on the last plain of the first half of the close parts of the pattern; 2 chain, 1 treble in the middle of the first part of the 10th transverse treble; 2 chain, 1 treble on the second half of the preceding treble, 2 chain, 1 treble on the 1st plain of the second half of the close parts; 2 chain, 1 treble on the 3rd and last upper stitch of the close part; 2 chain, 1 treble on the same stitch as the last treble. Then along the edge, 10 trebles, joined by 2 chain, one of which trebles should always be on a row of plain stitches = after the 10th treble: 3 chain, 1 plain on the 5th plain of the 13th row, 3 chain, again 11 trebles connected by 2 chain = after the 11 trebles: 2 chain ** and repeat 3 times from * to **.
15th row—do not cut off the thread on the 4th side but work backwards: 3 single stitches over the chain, 5 chains * 1 treble on the stitch where the 5 chains started, 2 chains, 1 treble on the last plain of the first half of the closing parts of the pattern; 2 chains, 1 treble in the middle of the first part of the 10th transverse treble; 2 chains, 1 treble on the second half of the previous treble, 2 chains, 1 treble on the 1st plain of the second half of the closing parts; 2 chains, 1 treble on the 3rd and last upper stitch of the closing part; 2 chains, 1 treble on the same stitch as the last treble. Then along the edge, 10 trebles, joined by 2 chains, one of which trebles should always be on a row of plain stitches = after the 10th treble: 3 chains, 1 plain stitch on the 5th plain of the 13th row, 3 chains, again 11 trebles connected by 2 chains = after the 11 trebles: 2 chains ** and repeat 3 times from * to **.
16th row—on every 2 chain stitches: 3 plain.
16th row—on every 2 chain stitches: 3 plain.
17th row—7 chain, 1 plain on the 6th plain of the last row; repeat 7 times = for the 9th and 10th scallops only: * 5 chain. The plain stitch that follows the 9th scallop should come exactly over the corner stitch of the 13th row = after the 10th scallop: 1 plain; then 13 scallops with 7 chain, 1 plain on the 6th 5 stitch of the row beneath. Repeat twice from * = after the 4th scallop 2 smaller scallops, and up to the end of the row, 5 scallops more of 7 chain each.
17th row—7 chains, 1 plain stitch on the 6th plain stitch of the last row; repeat 7 times = for the 9th and 10th scallops only: * 5 chains. The plain stitch that comes after the 9th scallop should be placed exactly over the corner stitch of the 13th row = after the 10th scallop: 1 plain; then 13 scallops with 7 chains, 1 plain stitch on the 6th 5-stitch of the row below. Repeat twice from * = after the 4th scallop 2 smaller scallops, and continue to the end of the row with 5 more scallops of 7 chains each.
18th row—make 7 plain over 7 chain, 5 chain, drop the treble, bring the needle back with the loop through the 3rd plain = on the 5 chain: 3 plain, 1 picot, 3 plain = on the 7 remaining stitches: 2 plain—on the 9th scallop of 5 chain, only: 5 plain = on the 10th scallop of 5 chain, only: 3 plain = then 7 chain, bring them back and join them to the 3rd plain of the 9th scallop and finish the picot.
18th row—make 7 plain stitches over 7 chain stitches, then 5 chain stitches, drop the treble, and bring the needle back with the loop through the 3rd plain stitch = on the 5 chain: 3 plain, 1 picot, 3 plain = on the 7 remaining stitches: 2 plain—on the 9th scallop of 5 chain, only: 5 plain = on the 10th scallop of 5 chain, only: 3 plain = then 7 chain stitches, bring them back and join them to the 3rd plain stitch of the 9th scallop and finish the picot.
When these squares are made use of in any number and have to be joined together, you must join 13 picots and leave the 14th free. The four empty picots in the centre are connected by a small star.
When these squares are used in any quantity and need to be connected, you should connect 13 picots and leave the 14th free. The four empty picots in the center are linked by a small star.
Crochet star (fig. 482).—This is one of the most graceful and delicate crochet patterns we know. For the purpose of reproduction here, we have had it worked in all the different sizes of D.M.C cotton but it looks best in a fine material; in Fil à dentelle No. 150, it can bear comparison with the finest needle-made lace.
Crochet star (fig. 482).—This is one of the most elegant and delicate crochet patterns we know. For this reproduction, we had it made in all the different sizes of D.M.C cotton, but it looks best in a finer material; in Fil à dentelle No. 150, it can rival the best needle-made lace.

Materials: Fil d’Alsace D.M.C No. 30, Cordonnet 6 fils D.M.C Nos. 25 to 80, or Fil à dentelle D.M.C Nos. 25 to 150.[A]
Materials: D.M.C No. 30 Alsace thread, D.M.C Cordonnet 6 strands Nos. 25 to 80, or D.M.C lace thread Nos. 25 to 150.__A_TAG_PLACEHOLDER_0__
1st row—6 chain, close the ring.
1st row—6 chains, join to form a ring.
2nd row—9 chain, 1 double treble, * 4 chain, 1 double treble; repeat 6 times from * = after the 7th treble: 4 chain, 1 single on the 5th of the 9 chain.
2nd row—9 chains, 1 double treble, * 4 chains, 1 double treble; repeat 6 times from * = after the 7th treble: 4 chains, 1 single on the 5th of the 9 chains.
3rd row—1 chain, 4 plain, * 1 picot, 4 plain; repeat 7 times from * = carry the thread to the last stitch through the 1st plain.
3rd row—1 chain, 4 plain, * 1 picot, 4 plain; repeat 7 times from * = carry the thread to the last stitch through the 1st plain.
4th row—12 chain, 1 treble on the stitch over the treble beneath, * 9 chain, 1 treble; repeat 6 times from * = after the 7th treble and the 9 chain: 1 single on the 3rd of the 12 chain.
4th row—12 chains, 1 treble on the stitch over the treble below, * 9 chains, 1 treble; repeat 6 times from * = after the 7th treble and the 9 chains: 1 single on the 3rd of the 12 chains.
5th row—3 chain, 1 treble on each stitch of the row beneath; including the 3 chain, 80 trebles in the whole circumference = after the last treble: 1 single on the 3 chain.
5th row—3 chains, 1 treble on each stitch of the row below; including the 3 chains, 80 trebles in total around = after the last treble: 1 single on the 3 chains.
6th row—11 chain, 1 quadruple treble on the 2nd treble of the last row; 4 chain, 1 quadruple treble on the 3rd treble and so on, in all 32 trebles including the 7 chain.
6th row—11 chains, 1 quadruple treble on the 2nd treble of the last row; 4 chains, 1 quadruple treble on the 3rd treble and so on, making a total of 32 trebles including the 7 chains.
7th row—1 chain, 5 plain on 4 chain.
7th row—1 chain, 5 single crochets on 4 chains.
8th row—3 plain on the 3 first chain, * 16 chain, miss 1, ** 1 single, 1 plain, 1 half treble, 2 trebles, 1 treble 1½ long, 2 double trebles, 1 triple treble, 1 treble 3½ trebles long, 1 quadruple-treble ***, 3 chain, miss 4 plain of the 7th row, 5 plain, 16 chain, join them, counting upwards from below, to the 5th treble of the first pyramid = on 7 chain: 3 plain, 1 picot, 3 plain, 1 picot, 3 plain, 1 picot, 3 plain; join the last loop of the last plain and the loop of the 7th chain; 8 chain. Repeat from ** to *** = on the middle of the last quadruple treble: 1 double treble towards the bottom, finish the treble, 3 chain, miss 4, 5 plain ****. Repeat 7 times from * to ****.
8th row—3 plain on the first 3 chains, * 16 chains, skip 1, ** 1 single, 1 plain, 1 half treble, 2 trebles, 1 treble 1½ long, 2 double trebles, 1 triple treble, 1 treble 3½ trebles long, 1 quadruple-treble ***, 3 chains, skip 4 plain from the 7th row, 5 plain, 16 chains, join them, counting up from below, to the 5th treble of the first pyramid = on 7 chains: 3 plain, 1 picot, 3 plain, 1 picot, 3 plain, 1 picot, 3 plain; join the last loop of the last plain and the loop of the 7th chain; 8 chains. Repeat from ** to *** = on the middle of the last quadruple treble: 1 double treble towards the bottom, finish the treble, 3 chains, skip 4, 5 plain ****. Repeat 7 times from * to ****.
9th row—1 chain, 1 plain, * 15 chain, 1 plain at the top of the point and repeat 15 times from *.
9th row—1 chain, 1 plain, * 15 chain, 1 plain at the top of the point and repeat 15 times from *.
10th row—3 chain; 1 treble on each stitch of the 9th row; 256 trebles in all, including the 3 chain.
10th row—3 chain; 1 treble on each stitch of the 9th row; 256 trebles in total, including the 3 chain.
11th row—The star is bordered by small and large scallops, surmounted by points similar to those inside.
11th row—The star is surrounded by small and large scallops, topped with points similar to those inside.
You begin by the small scallop and make on the 10th row: 5 single, * 8 chain, bring them back and join them to the 1st of the 5 single; 1 plain, 8 chain, miss 4 trebles, join them to the 5th; 14 plain on the 8 chain, 6 plain on the first 8 chain = turn the work = 5 chain, 1 treble on the plain stitch between two scallops; 5 chain, 1 plain on the 7th plain of the 1st scallop; 2 plain in the 5th chain, 2 chain, 1 picot, 10 chain, miss 1, and make on the following ones: 1 single, 1 plain, 1 half treble, 2 trebles, 1 treble 1½ treble long, 1 picot, 2 chain, 2 plain on the 5 chain; 8 plain on the 8 chain.
You start with the small scallop and on the 10th row: 5 single crochet, * 8 chain, bring them back and connect to the 1st of the 5 single; 1 plain, 8 chain, skip 4 trebles, connect to the 5th; 14 plain on the 8 chain, 6 plain on the first 8 chain = turn the work = 5 chain, 1 treble on the plain stitch between two scallops; 5 chain, 1 plain on the 7th plain of the 1st scallop; 2 plain in the 5th chain, 2 chain, 1 picot, 10 chain, skip 1, and work on the following ones: 1 single, 1 plain, 1 half treble, 2 trebles, 1 treble 1½ treble long, 1 picot, 2 chain, 2 plain on the 5 chain; 8 plain on the 8 chain.
To pass to the large scallop make: 16 single, 8 chain, bring them back, 1 plain on the 5th single, 8 chain, bring them back again to the 5th = turn the work = on the second set of 8 chain: 6 plain, 1 picot, 9 plain = on the first 8: 6 plain, then 8 chain, bring them back and join them to the 4th plain behind the picot of the finished scallop = on the 8 chain: 5 plain, 1 picot, 5 plain, 1 picot, 5 plain = on the remaining chain below: 3 plain, 1 picot, 6 plain; add 4 single on the trebles and pass to the outer scallop = 18 chain, 1 plain on the 3rd of the 5 plain of the small upper scallop; 18 chain, 1 plain on the 4th of the 16 single = turn the work = 25 plain on the last chain stitches, and 25 on the first; 1 single on the 3rd single = turn the work = 1 plain on each of the preceding 50 plain stitches; join the last to the under row with a single stitch = turn the work = 10 plain, 1 picot, 3 plain, 1 picot, 3 plain, 1 picot, 4 plain, 2 chain, 1 picot, 10 chain, miss 1, 1 single, 1 plain, 1 half treble, 2 trebles, 1 treble 1½ treble long, 1 double treble, 1 treble 2½ trebles long, 1 triple treble, 1 picot, 2 chain and join them to the 6th plain stitch, counting from the middle.
To create the large scallop, start with: 16 single stitches, followed by 8 chain stitches, then bring them back. Do 1 plain stitch on the 5th single, then 8 chain stitches, and bring them back to the 5th = turn the work = for the second set of 8 chain: 6 plain, 1 picot, 9 plain = on the first 8: 6 plain, then 8 chain, bring them back and join them to the 4th plain stitch behind the picot of the finished scallop = on the 8 chain: 5 plain, 1 picot, 5 plain, 1 picot, 5 plain = on the remaining chain below: 3 plain, 1 picot, 6 plain; add 4 single stitches on the trebles and proceed to the outer scallop = 18 chain, 1 plain on the 3rd of the 5 plain stitches of the small upper scallop; 18 chain, 1 plain on the 4th of the 16 single stitches = turn the work = 25 plain stitches on the last chain stitches, and 25 on the first; 1 single stitch on the 3rd single = turn the work = 1 plain stitch on each of the preceding 50 plain stitches; join the last to the under row with a single stitch = turn the work = 10 plain, 1 picot, 3 plain, 1 picot, 3 plain, 1 picot, 4 plain, 2 chain, 1 picot, 10 chain, skip 1, 1 single, 1 plain, 1 half treble, 2 trebles, 1 treble 1½ treble long, 1 double treble, 1 treble 2½ trebles long, 1 triple treble, 1 picot, 2 chain and join them to the 6th plain stitch, counting from the middle.
Then 4 plain, 1 picot, 3 plain, 1 picot, 3 plain, 1 picot, 10 plain, 11 single on the trebles. Repeat 7 times from *.
Then 4 plain, 1 picot, 3 plain, 1 picot, 3 plain, 1 picot, 10 plain, 11 single on the trebles. Repeat 7 times from *.
Star with little squares (fig. 483).—Begin with 4 chain stitches, close the ring.
Star with little squares (fig. 483).—Start with 4 chain stitches, then join to form a ring.

Materials: The same as for fig. 482.
Materials: The same as for fig. __A_TAG_PLACEHOLDER_0__.
1st row—5 chain, * 1 treble, 2 chain. Repeat 6 times from *, to number altogether 8 trebles including the 5 chain; 1 single on the 3rd chain.
1st row—5 chains, * 1 treble, 2 chains. Repeat 6 times from *, to total 8 trebles including the 5 chains; 1 single crochet on the 3rd chain.
2nd row—6 chain, * 1 triple treble on the 1st chain stitch, 2 chain. Repeat 23 times from * and join to the 4th chain.
2nd row—6 chains, * 1 triple treble on the 1st chain stitch, 2 chains. Repeat 23 times from * and join to the 4th chain.
3rd row—6 chain, * 1 double treble on the treble beneath, 3 chain. Repeat from * through the row; join to the 4th chain.
3rd row—6 chains, * 1 double treble on the treble below, 3 chains. Repeat from * across the row; join to the 4th chain.
4th row—1 plain on the treble = on the 3 chain: 5 plain, 1 plain on the treble; work 5 times to and fro over these stitches, put the needle through the 2 threads of the last stitch = after the 5th row: 10 chain, then 5 plain on the 3 next chain.
4th row—1 single crochet on the treble = on the 3 chain: 5 single crochets, 1 single crochet on the treble; work back and forth 5 times over these stitches, insert the needle through the 2 threads of the last stitch = after the 5th row: 10 chain, then 5 single crochets on the next 3 chains.
In turning the work and going from the 2nd to the 3rd, from the 4th to the 5th row, carry the thread behind the chain stitches, so that they may blend with the plain stitches; make in all 12 little squares with 11 spaces between; after the 12th, square: 5 chain, 1 single on the 5th row of the first square.
In switching the work and moving from the 2nd to the 3rd, from the 4th to the 5th row, carry the thread behind the chain stitches so they blend in with the plain stitches; create a total of 12 small squares with 11 spaces in between; after the 12th square: 5 chains, then 1 single stitch in the 5th row of the first square.
5th row—on each of the 6 plain of the 1st square: 1 single = on the 7th: 1 plain = 7 plain on the 5 chain = 1 plain on the 1st stitch of the 2nd square = 6 rows of plain, 14 chain, 1 plain on the 5th stitch of the next square = then make 6 rows of plain and wind the thread round the chain stitches.
5th row—on each of the 6 plain stitches of the 1st square: 1 single = on the 7th: 1 plain = 7 plain on the 5 chains = 1 plain on the 1st stitch of the 2nd square = 6 rows of plain, 14 chains, 1 plain on the 5th stitch of the next square = then make 6 rows of plain and wrap the thread around the chain stitches.
6th row—1 single on every stitch of the last square, 1 plain on the last stitch above the 7 chain = on the 7 chain: 9 plain, 1 plain on the 1st stitch of the next square below = 9 rows to and fro.
6th row—1 single crochet in each stitch of the last square, 1 single crochet on the last stitch above the 7 chain = on the 7 chain: 9 single crochets, 1 single crochet on the 1st stitch of the next square below = 9 rows back and forth.
7th row—after the 12th square: 9 chain, 1 single on the 1st plain, * 14 chain, 1 plain on the last plain = on the 9 chain: ** 1 chain, 1 plain, 1 treble 1½ treble long, 2 double trebles 2½ trebles long ***, 5 triple trebles ****. Repeat from *** to **, then proceed from * to ****.
7th row—after the 12th square: 9 chains, 1 single on the 1st plain, * 14 chains, 1 plain on the last plain = on the 9 chains: ** 1 chain, 1 plain, 1 treble, 1½ treble long, 2 double trebles, 2½ trebles long *** , 5 triple trebles ****. Repeat from *** to **, then proceed from * to ****.
8th row—19 plain over the 14 chain, 1 single on each treble; stop them at the 12th square and at the 3rd triple treble.
8th row—19 plain over the 14 chain, 1 single on each treble; stop them at the 12th square and at the 3rd triple treble.
9th row—12 chain, 1 plain on the 10th of the 19 plain; 12 chain, 1 plain on the triple treble, and proceed in the same way throughout the whole length of the row.
9th row—12 chains, 1 plain stitch on the 10th of the 19 plain stitches; 12 chains, 1 plain stitch on the triple treble, and continue in the same way across the entire length of the row.
10th row—on the first 12 chain stitches: * 5 plain, 1 picot, 12 plain = on the second 12 chain: 7 plain, 10 chain, bring them back to the 5th of the 12 plain of the first scallop = on the 10 chain: 4 plain, 1 picot, 4 plain, 1 picot, 4 plain, 1 picot, 4 plain, = on the 12 chain: 5 plain, 1 picot, 7 plain. Repeat 12 times from *.
10th row—on the first 12 chain stitches: * 5 plain, 1 picot, 12 plain = on the second 12 chain: 7 plain, 10 chain, bring them back to the 5th of the 12 plain of the first scallop = on the 10 chain: 4 plain, 1 picot, 4 plain, 1 picot, 4 plain, 1 picot, 4 plain, = on the 12 chain: 5 plain, 1 picot, 7 plain. Repeat 12 times from *.
Crochet collar (fig. 484).—We have avoided as far as possible describing articles in this book that are subject to the changes of fashion, the present collar composed of squares, stars, lozenge-shaped figures and a lace edge, is of a shape that will never be out of date. Fine and delicate work like this can only be executed in a very fine material, and we recommend unbleached thread as being more effective than white. The soft tone and the gloss of unbleached thread give the work an antique look, unobtainable in a white material. Fil à dentelle D.M.C No. 120 is the best for the purpose.
Crochet collar (fig. 484).—We’ve tried to avoid describing items in this book that are influenced by changing fashion trends. The current collar, made of squares, stars, lozenge-shaped designs, and a lace edge, features a style that will always be in vogue. Such fine and delicate work can only be done with very fine materials, and we suggest using unbleached thread because it is more effective than white. The soft tone and sheen of unbleached thread give the work an antique look that you can't achieve with white materials. Fil à dentelle D.M.C No. 120 is the best choice for this purpose.

Materials: Fil d’Alsace D.M.C No. 100, Cordonnet 6 fils D.M.C No. 120 or Fil à dentelle D.M.C No. 120, écru.
Materials: Fil d’Alsace D.M.C No. 100, Cordonnet 6 fils D.M.C No. 120, or Fil à dentelle D.M.C No. 120, in ecru.
Begin with the straight-edged figures, and then make the connecting pieces between. The four squares with half stars at both ends of the collar and on the right and left of the centre square, have their four sides all alike, whereas the 3 figures within the scalloped edge are rather narrower on the outer than on the inner side where they join to the foundation.
Begin with the straight-edged shapes, and then create the connecting pieces in between. The four squares with half stars at both ends of the collar and on the right and left of the center square have all four sides the same, while the 3 figures within the scalloped edge are narrower on the outer side than on the inner side where they connect to the base.
Inner squares: 1st row—4 chain, close the ring; 5 chain, * 1 treble on the ring, 2 chain; repeat 6 times from * and fasten the thread to the 3rd chain stitch.
Inner squares: 1st row—4 chains, close the ring; 5 chains, * 1 treble on the ring, 2 chains; repeat 6 times from * and fasten the thread to the 3rd chain stitch.
2nd row—1 chain, 3 plain over 2 chain; 1 plain over each treble.
2nd row—1 chain, 3 basic stitches over 2 chains; 1 basic stitch over each treble.
3rd row—8 chain, * 1 treble on each treble of the 1st row, 6 chain. Repeat 6 times from * = 8 trebles in all, including the first chain stitches.
3rd row—8 chains, * 1 treble on each treble from the 1st row, 6 chains. Repeat 6 times from * = 8 trebles in total, including the first chain stitches.
4th row—* 10 chain; returning over the chain stitches: 1 plain, 1 half treble, 4 trebles, 1 half treble, 1 plain, join to the 1st chain stitch = on the 6 chain of the 3rd row: ** 1 plain, 1 half treble, 1 treble, 3 double trebles, 1 treble, 1 half treble, 1 plain ***. Repeat once more from ** to ***, then 3 times from * to *** = along the first leaf to the 10th stitch: 10 single.
4th row—* 10 chains; returning over the chain stitches: 1 single crochet, 1 half double crochet, 4 double crochets, 1 half double crochet, 1 single crochet, join to the 1st chain stitch = on the 6th chain of the 3rd row: ** 1 single crochet, 1 half double crochet, 1 double crochet, 3 triple crochets, 1 double crochet, 1 half double crochet, 1 single crochet ***. Repeat once more from ** to ***, then 3 times from * to *** = along the first leaf to the 10th stitch: 10 single crochets.
5th row—starting from the point: * 7 chain, 1 triple treble on the 5th stitch of the small scallop of the 4th row: 7 chain, 1 triple treble on the next scallop, 7 chain, 1 plain on the 10th stitch of the 2nd leaf. Repeat 3 times from *.
5th row—starting from the point: * 7 chains, 1 triple treble on the 5th stitch of the small scallop of the 4th row: 7 chains, 1 triple treble on the next scallop, 7 chains, 1 single crochet on the 10th stitch of the 2nd leaf. Repeat 3 times from *.
6th row—1 chain, * 3 plain on the stitch that forms the point of the leaf; 1 plain on each chain stitch and each treble of the last row = 16 stitches in all, up to the 2nd treble = turn the work = coming back: 1 chain, 1 double treble on the 4th plain, 1 chain, 1 double treble, 1 chain, 1 double treble, 1 chain, 1 double treble, 1 chain, 1 double treble, 1 chain, miss 3 plain, join to the 4th plain = turn the work = make on each chain stitch, 2 plain and on each treble 1 plain and 1 picot over the 1st, 2nd, 4th and 5th treble; 8 plain **. Repeat 3 times from * to **.
6th row—1 chain, * 3 plain on the stitch that creates the point of the leaf; 1 plain on each chain stitch and each treble from the last row = 16 stitches in total, up to the 2nd treble = turn the work = coming back: 1 chain, 1 double treble on the 4th plain, 1 chain, 1 double treble, 1 chain, 1 double treble, 1 chain, 1 double treble, 1 chain, 1 double treble, 1 chain, skip 3 plain, join to the 4th plain = turn the work = for each chain stitch, 2 plain and for each treble, 1 plain and 1 picot over the 1st, 2nd, 4th and 5th treble; 8 plain **. Repeat 3 times from * to **.
7th row—1 chain, 1 plain on the 2nd of the 3 stitches at the point, * 9 chain, 1 double treble between the two first picots of the semicircle formed in the last row; 8 chain, 1 triple treble on the 3rd treble of the semicircle, 8 chain, 1 double treble between the 3rd and 4th picots of the semicircle, 9 chain, 1 plain on the stitch at the corner.
7th row—1 chain, 1 plain on the 2nd of the 3 stitches at the point, * 9 chain, 1 double treble between the first two picots of the semicircle formed in the last row; 8 chain, 1 triple treble on the 3rd treble of the semicircle, 8 chain, 1 double treble between the 3rd and 4th picots of the semicircle, 9 chain, 1 plain on the stitch at the corner.
8th row—19 single on the chain stitches of the 7th row, 1 chain, 3 plain on the corner stitch, 24 plain on the chain stitches and trebles = turn the work = coming back: 2 chain, 1 double treble on the 20th plain; on the same stitch add: 2 double trebles with 2 chain; finish with: 2 chain, join them to the 5th plain = turn the work = on the chain stitches: 1 plain, 1 picot, 1 plain, 1 plain on the treble. Repeat this series 4 times = add: 4 plain on the chain stitches of the 7th row = turn the work = 5 chain, 1 double treble on the 1st treble of the small semicircle; then again 3 times, 3 chain, and twice 1 double treble on each of the trebles beneath = after the last 5 chain: join to the 4th plain.
8th row—19 single crochets on the chain stitches of the 7th row, 1 chain, 3 single crochets on the corner stitch, 24 single crochets on the chain stitches and trebles = turn the work = coming back: 2 chains, 1 double treble on the 20th single crochet; on the same stitch add: 2 double trebles with 2 chains; finish with: 2 chains, join them to the 5th single crochet = turn the work = on the chain stitches: 1 single crochet, 1 picot, 1 single crochet, 1 single crochet on the treble. Repeat this sequence 4 times = add: 4 single crochets on the chain stitches of the 7th row = turn the work = 5 chains, 1 double treble on the 1st treble of the small semicircle; then again 3 times, 3 chains, and twice 1 double treble on each of the trebles beneath = after the last 5 chains: join to the 4th single crochet.
The points in this row are made with: * 1 plain on the chain stitches, 8 chain, miss 1 stitch = coming back: 1 single, 1 plain, 1 half treble, 1 treble 1½ treble long, 3 double trebles, 1 plain on the 5 chain stitches. The 2nd point must be placed one half of it, before, and the other half behind the picot; make altogether 7 points = after the 7th: 8 plain on the chain stitches of the 7th row = then work backwards, without however turning the work: 7 chain, 1 chain on the stitch at the top of the point and repeat 7 times from * = after the 8th set of 7 chain stitches: 1 chain; 1 plain on the 9th plain, bringing the thread forwards from the right side to the wrong = 2 chain; take the thread back to the 3rd plain from the wrong side to the right = 1 treble on each chain stitch, 1 picot above each point, add 4 trebles and 14 chain, join them to the 4th treble that comes after the 1st picot.
The points in this row are made with: * 1 plain on the chain stitches, 8 chain, skip 1 stitch = coming back: 1 single, 1 plain, 1 half treble, 1 treble, 1½ treble long, 3 double trebles, 1 plain on the 5 chain stitches. The 2nd point should be placed half in front and half behind the picot; make a total of 7 points = after the 7th: 8 plain on the chain stitches of the 7th row = then work backwards, but don’t turn the work: 7 chain, 1 chain on the stitch at the top of the point and repeat 7 times from * = after the 8th set of 7 chain stitches: 1 chain; 1 plain on the 9th plain, pulling the thread from the right side to the wrong = 2 chain; take the thread back to the 3rd plain from the wrong side to the right = 1 treble on each chain stitch, 1 picot above each point, add 4 trebles and 14 chain, joining them to the 4th treble that comes after the 1st picot.
On the 14 chain: 5 plain, 1 picot, 4 plain, 1 picot, 4 plain, 1 picot, 5 plain, 4 trebles to the next picot, 1 picot, 4 trebles; 14 plain, join them to the treble nearest the 1st scallop and so on = make 7 scallops in all; after the 7th add 2 trebles on the 2 chain stitches = after the 2nd treble make 2 plain, followed by the 3 stitches at the corner = in the next scallop, you fasten by 1 single, the 1st picot of the 1st scallop to the 3rd picot of the last scallop. When you have finished the four sides of the figure above-described, fasten off your thread.
On the 14-chain: 5 plain, 1 picot, 4 plain, 1 picot, 4 plain, 1 picot, 5 plain, 4 trebles to the next picot, 1 picot, 4 trebles; 14 plain, attach them to the treble closest to the 1st scallop and so on = make a total of 7 scallops; after the 7th, add 2 trebles on the 2 chain stitches = after the 2nd treble, make 2 plain, followed by the 3 stitches at the corner = in the next scallop, secure by 1 single, connecting the 1st picot of the 1st scallop to the 3rd picot of the last scallop. When you've completed all four sides of the figure described above, cut off your thread.
The edging of these squares should be begun on the narrower of the inner sides and at the 3rd little scallop: * 1 plain on the middle picot of the 3rd little scallop, 7 chain, 1 double treble on the 1st picot of the 4th scallop; 7 chain, 1 triple treble on the 2nd picot of the same scallop, 6 chain, 1 double treble on the 3rd picot of the same scallop, 6 chain, 1 plain on the middle picot of the 5th scallop; 10 chain, 1 treble on the middle picot of the 6th scallop, 11 chain **, 1 quadruple treble on the middle picot of the 7th and 1 quadruple treble on the middle picot of the 1st scallop following and draw the last loops of the 2 trebles up together. Repeat once from * to **. Carry the trebles all round the figure on the picots just referred to.
The edging of these squares should start on the narrower inner sides and at the 3rd little scallop: * 1 single crochet on the middle picot of the 3rd little scallop, 7 chains, 1 double treble on the 1st picot of the 4th scallop; 7 chains, 1 triple treble on the 2nd picot of the same scallop, 6 chains, 1 double treble on the 3rd picot of the same scallop, 6 chains, 1 single crochet on the middle picot of the 5th scallop; 10 chains, 1 treble on the middle picot of the 6th scallop, 11 chains **, 1 quadruple treble on the middle picot of the 7th and 1 quadruple treble on the middle picot of the 1st scallop following, then pull the last loops of the 2 trebles up together. Repeat once from * to **. Carry the trebles all around the figure on the picots just mentioned.
For the second half of the edging which becomes a little wider: *** 10 chain, 1 treble on the 6th scallop, 11 chain, 2 quadruple trebles, the last loops of which you join to the middle picots of the 7th and 1st scallop; 11 chain, 1 treble in the next scallop; 10 chain, 1 treble in the 3rd scallop; 7 chain, 1 treble 2½ long, 8 chain, 1 treble 3½ long, 8 chain; 1 double treble, 8 chain, 1 plain, 12 chain, 1 treble, 14 chain, **** 2 quadruple trebles, the last loops of which are joined together. Repeat from **** to ***, that is the reverse way = finally add 1 more whole row of plain and 3 plain stitches at the corners = on the wider side you should have 99 stitches, not counting the increases at the corner.
For the second half of the edging, which gets a bit wider: *** 10 chains, 1 treble on the 6th scallop, 11 chains, 2 quadruple trebles, with the last loops attached to the middle picots of the 7th and 1st scallop; 11 chains, 1 treble in the next scallop; 10 chains, 1 treble in the 3rd scallop; 7 chains, 1 treble 2½ long, 8 chains, 1 treble 3½ long, 8 chains; 1 double treble, 8 chains, 1 plain stitch, 12 chains, 1 treble, 14 chains, **** 2 quadruple trebles, with the last loops joined together. Repeat from **** to ***, which is the reverse direction = finally add 1 more complete row of plain and 3 plain stitches at the corners = on the wider side you should have 99 stitches, not counting the increases at the corners.
To make the same figure, forming a part of the large outside scallops, repeat the same rows you have in the inner square up to the 7th row, the first half of which you make exactly the same as before. In the second half of the row of chain there should be 1 chain stitch less in each intervening space than there were in the first half.
To create the same shape as part of the large outer scallops, repeat the rows from the inner square up to the 7th row, making the first half exactly as before. In the second half of the chain row, there should be 1 chain stitch less in each space than there was in the first half.
8th row—make the first half of this row like the 8th row of the inner square = over the 2nd half, one quarter of which is 4 chain stitches narrower, the little wheels are made like the others with 7 picots. The number of chain stitches and the trebles of the setting are also the same, but instead of 7 points you have to make 5 and over these, 5 small scallops instead of 7.
8th row—make the first half of this row like the 8th row of the inner square = over the 2nd half, one quarter of which is 4 chain stitches narrower, the little wheels are made like the others with 7 picots. The number of chain stitches and the trebles of the setting are also the same, but instead of 7 points you have to make 5 and over these, 5 small scallops instead of 7.
The setting, towards the top is made exactly in the same manner as the wide part of the upper square, that is, as from the 3rd scallop of the first semicircle to the 5th scallop of the 2nd. From this point, the series of stitches changes, so as to form a rounded edge: * 7 chain, 1 plain on the 6th scallop; 15 chain, 2 triple trebles joined by the last loops to the 7th and 1st scallop; 14 chain, 1 plain on the 2nd of the 5 scallops; 15 chain, 1 plain on the 3rd scallop; 15 chain, 1 plain on the 4th scallop, 15 chain **, 2 triple trebles joined by the last loops in the 5th and 1st scallop. Repeat once again from ** to * = add 1 row of plain on each stitch of the preceding row; 3 plain on the two top corner stitches. You will thus have 3 figures with a rounded edge on one side.
The setup at the top is done exactly like the wide part of the upper square, meaning from the 3rd scallop of the first semicircle to the 5th scallop of the 2nd. From this point, the series of stitches changes to create a rounded edge: * 7 chains, 1 plain stitch on the 6th scallop; 15 chains, 2 triple trebles connected by the last loops to the 7th and 1st scallop; 14 chains, 1 plain stitch on the 2nd of the 5 scallops; 15 chains, 1 plain stitch on the 3rd scallop; 15 chains, 1 plain stitch on the 4th scallop, 15 chains **, 2 triple trebles connected by the last loops in the 5th and 1st scallop. Repeat once again from ** to * = add 1 row of plain stitches on each stitch of the previous row; 3 plain stitches on the two top corner stitches. This will give you 3 figures with a rounded edge on one side.
The second kind of square consists of 8 leaves inside and is begun in the same way by 6 chain formed into a ring.
The second type of square has 8 leaves inside and starts in the same way, using 6 chains arranged into a ring.
1st row—5 chain, 1 treble, 2 chain, * 1 treble, 2 chain. Repeat 6 times from * and join to the 3rd of the 5 chain.
1st row—5 chains, 1 treble, 2 chains, * 1 treble, 2 chains. Repeat 6 times from * and connect to the 3rd of the 5 chains.
2nd row—1 chain, 3 plain over 2 chain, 1 plain on each treble.
2nd row—1 chain, 3 plain stitches over 2 chains, 1 plain stitch on each treble.
3rd row—9 chain, * miss 1 stitch = coming back: 1 single, 1 plain, 1 half treble, 1 treble, 1 double treble, 1 triple treble, 1 treble over the treble of the 2nd row; 7 chain. Repeat 7 times from * = after the 8th point: 7 single along the 1st.
3rd row—9 chains, * skip 1 stitch = coming back: 1 single crochet, 1 plain stitch, 1 half treble, 1 treble, 1 double treble, 1 triple treble, 1 treble over the treble from the 2nd row; 7 chains. Repeat 7 times from * = after the 8th point: 7 single crochets along the 1st.
4th row—* 1 plain on the stitch you missed at the point, 5 chain, 1 triple treble on the treble of the 3rd row, 5 chain. Repeat 7 times from *.
4th row—* 1 plain on the stitch you missed at the point, 5 chains, 1 triple treble on the treble of the 3rd row, 5 chains. Repeat 7 times from *.
5th row—3 chain, 1 treble on each stitch of the 4th row; join to the 3rd of the 3 chain.
5th row—3 chain, 1 treble on each stitch of the 4th row; join to the 3rd of the 3 chain.
6th row—10 chain, 1 plain on the treble over the triple treble of the 4th row: 10 chain, 1 plain on the treble above the little point.
6th row—10 chains, 1 single crochet on the treble over the triple treble of the 4th row: 10 chains, 1 single crochet on the treble above the small point.
7th row—15 plain on the 10 chain = on the 3rd scallop only: * 7 plain, 10 chain, come back to the second scallop, bring the thread back from the wrong side to the right between the 7th and 8th plain stitches, 15 plain on the 3rd scallop, 8 plain on the next scallop, 15 plain and repeat 6 times from *.
7th row—15 plain on the 10 chain = on the 3rd scallop only: * 7 plain, 10 chain, go back to the second scallop, bring the thread back from the wrong side to the right between the 7th and 8th plain stitches, 15 plain on the 3rd scallop, 8 plain on the next scallop, 15 plain and repeat 6 times from *.
When the 16th scallop is finished, pass to the point of the 1st scallop by means of 7 single, then add the 10 chain to pass to the 8th scallop above; when that is finished, fasten off, and fasten on again to one of the 8 scallops.
When you finish the 16th scallop, connect to the first scallop with 7 single stitches, then add a chain of 10 to move to the 8th scallop above. Once that's done, secure your work and reattach to one of the 8 scallops.
8th row—* 21 chain, miss 1 stitch, 1 plain, 1 half treble, 1 treble, 1 treble 1½ treble long, 1 double treble, 1 treble 2½ trebles long, 1 triple treble, 1 treble 3½ trebles long, 1 quadruple treble, 1 treble 4½ trebles long, 1 quintuple treble. After passing through the 3rd loop, make 1 quadruple treble, between the 2 plain scallops; then finish the quintuple treble, 7 chain, 1 plain on the 2nd scallop and repeat 7 times from *.
8th row—* 21 chains, skip 1 stitch, 1 single crochet, 1 half double crochet, 1 double crochet, 1 double crochet and 1½ double crochets long, 1 triple crochet, 1 double crochet and 2½ double crochets long, 1 triple treble, 1 double crochet and 3½ double crochets long, 1 quadruple treble, 1 double crochet and 4½ double crochets long, 1 quintuple treble. After passing through the 3rd loop, make 1 quadruple treble between the 2 single scallops; then finish the quintuple treble, 7 chains, 1 single crochet on the 2nd scallop and repeat 7 times from *.
9th row—* 7 plain on the 7 chain; 1 plain on each stitch of the pyramid, 3 plain on the stitch at the point; 4 plain on the 7 chain on the opposite side = turn the work = ** 1 chain, miss 1 plain, 1 treble on the 2nd stitch = after the 5th treble, leave out no more stitches between the trebles ***; place the 8th, 9th and 10th trebles on the 2nd of the increased stitches. Repeat on the opposite side from *** to ** and join to the 4th of the plain stitches = make 17 trebles in all, then one plain over each chain, 1 plain on each treble and 1 picot after every 3rd plain = after the 4th and up to the 8th picot, leave only 2 plain between: 11 picots in all = in conclusion: 3 plain more on the 7 chain and repeat the whole 7 times from *.
9th row—* 7 plain stitches on the 7 chain; 1 plain stitch on each stitch of the pyramid, 3 plain stitches on the stitch at the point; 4 plain stitches on the 7 chain on the opposite side = turn the work = ** 1 chain, skip 1 plain stitch, 1 treble on the 2nd stitch = after the 5th treble, don't skip any more stitches between the trebles ***; put the 8th, 9th, and 10th trebles on the 2nd of the increased stitches. Repeat on the opposite side from *** to ** and join to the 4th of the plain stitches = make 17 trebles in total, then 1 plain stitch over each chain, 1 plain stitch on each treble, and 1 picot after every 3rd plain stitch = after the 4th and up to the 8th picot, leave only 2 plain stitches in between: 11 picots in total = finally: 3 more plain stitches on the 7 chain and repeat the whole thing 7 times from *.
The little wheel at the top of the square is begun with 10 chain for the ring = 16 plain on the ring, 4 chain, * 1 treble, 1 chain = repeat 14 times from *; 16 trebles in all, including the chain stitches = then on each treble and each chain stitch: 1 plain; after 4 plain: 1 picot; connect the wheel first on the right.
The small wheel at the top of the square starts with 10 chains for the ring = 16 single crochets on the ring, 4 chains, * 1 treble, 1 chain = repeat 14 times from *; 16 trebles in total, including the chain stitches = then on each treble and each chain stitch: 1 single crochet; after 4 single crochets: 1 picot; attach the wheel first on the right.
The 2nd picot is to be fastened to the 9th picot of the large scallop = proceed with: 3 times 4 plain with 1 picot = after the 3rd plain, fasten the picot to the 3rd picot of the next large scallop and complete the small wheel. The left wheel is made and inserted in the same manner as the right one. The wheels at the bottom of the square require for the foundation ring: 14 chain, on which you make 21 plain = on these: 4 chain, * 1 treble, 1 chain = repeat 19 times from *; 21 trebles in all, including the chain stitches = 3 plain, 1 picot, 3 plain, 1 picot, 3 plain, 1 picot, 3 plain, 4 chain, join to the 8th picot of the 2nd scallop; 4 chain, finish the picot, 3 plain, 1 picot, 3 plain, 8 chain, join to the 10th picot of the scallop, 8 chain, complete the picot; 3 plain, 1 picot, 3 plain, 8 chain, join to the 2nd picot of the 3rd scallop, 8 chain, close the picot, 3 chain, 1 picot, 3 plain, 4 chain, join to the 4th picot of the 3rd scallop; 4 chain, complete the picot, 3 plain, 1 picot and so on, until you have 14 picots round the wheel. Repeat the same wheel to the left between the 4th and 5th scallop.
The 2nd picot should be attached to the 9th picot of the large scallop = continue with: 3 times 4 plain followed by 1 picot = after the 3rd plain, attach the picot to the 3rd picot of the next large scallop and finish the small wheel. The left wheel is made and added in the same way as the right one. For the foundation ring of the wheels at the bottom of the square: 14 chain, followed by 21 plain = on these: 4 chain, * 1 treble, 1 chain = repeat 19 times from *; that makes 21 trebles in total, including the chain stitches = 3 plain, 1 picot, 3 plain, 1 picot, 3 plain, 1 picot, 3 plain, 4 chain, join to the 8th picot of the 2nd scallop; 4 chain, finish the picot, 3 plain, 1 picot, 3 plain, 8 chain, join to the 10th picot of the scallop, 8 chain, complete the picot; 3 plain, 1 picot, 3 plain, 8 chain, join to the 2nd picot of the 3rd scallop, 8 chain, close the picot, 3 chain, 1 picot, 3 plain, 4 chain, join to the 4th picot of the 3rd scallop; 4 chain, complete the picot, 3 plain, 1 picot, and continue like this until you have 14 picots around the wheel. Make the same wheel on the left side between the 4th and 5th scallop.
The edging of this second kind of square is also slightly different; fasten the thread to the 6th picot of the 1st scallop before the small wheel, then working from right to left, count: * 10 chain, 1 treble on the 2nd empty picot of the small wheel; 8 chain, 1 triple treble on the 4th picot of the wheel = upwards: 9 chain, 1 double treble on the 6th picot of the wheel; 9 chain, 1 plain on the 6th picot of the 8th scallop, 12 chain, 1 plain on the 7th picot of the scallop, 11 chain **, 1 quadruple treble on the 9th picot of the 8th scallop and on the 3rd picot of the 7th; draw the last loops of the two trebles up together. Repeat once more from ** to *, then: 1 plain on the 6th picot of the 6th scallop; *** 12 chain, 1 sextuple treble on the 9th picot of the 6th scallop, retain 2 loops of the treble on the needle, make 4 more overs, join the treble to the 3rd picot of the 5th scallop; finish the bars, 12 chain, 1 plain in the 6th picot of the next scallop = 12 chain, 1 double treble on the 2nd picot of the 7 empty picots of the bottom wheel; 9 chain, 1 quadruple treble on the 4th picot; 12 chain, 1 double treble on the 6th picot, 14 chain, 1 plain on the 6th picot of the 4th scallop, 14 chain ***, 1 septuple treble, in the 9th and 3rd picots of the 4th and 3rd scallops ****. For the preceding treble, you pass first through 4 loops only, then make 4 more overs for the other half of the treble, and finish the last loops one by one. Repeat from **** to ***. One row of plain stitches completes the square.
The edging of this second type of square is also slightly different; attach the thread to the 6th picot of the 1st scallop before the small wheel, then working from right to left, count: * 10 chains, 1 treble on the 2nd empty picot of the small wheel; 8 chains, 1 triple treble on the 4th picot of the wheel = upwards: 9 chains, 1 double treble on the 6th picot of the wheel; 9 chains, 1 plain stitch on the 6th picot of the 8th scallop, 12 chains, 1 plain stitch on the 7th picot of the scallop, 11 chains **, 1 quadruple treble on the 9th picot of the 8th scallop and on the 3rd picot of the 7th; pull the last loops of the two trebles up together. Repeat once more from ** to *, then: 1 plain stitch on the 6th picot of the 6th scallop; *** 12 chains, 1 sextuple treble on the 9th picot of the 6th scallop, keep 2 loops of the treble on the needle, make 4 more overs, attach the treble to the 3rd picot of the 5th scallop; finish the bars, 12 chains, 1 plain stitch in the 6th picot of the next scallop = 12 chains, 1 double treble on the 2nd picot of the 7 empty picots of the bottom wheel; 9 chains, 1 quadruple treble on the 4th picot; 12 chains, 1 double treble on the 6th picot, 14 chains, 1 plain on the 6th picot of the 4th scallop, 14 chains ***, 1 septuple treble, in the 9th and 3rd picots of the 4th and 3rd scallops ****. For the preceding treble, you start by going through 4 loops only, then make 4 more overs for the other half of the treble, and finish the last loops one by one. Repeat from **** to ***. One row of plain stitches completes the square.
After having made the square similar to that of the upper one, you have merely to add the large wheels at the top.
After creating the square to match the one above, all you need to do is attach the large wheels at the top.
The setting of chain stitches and trebles is begun at the first scallop between 2 wheels = 1 plain on the 6th picot of the 1st scallop; 14 chain, 2 quintuple trebles, of which the last loops only are joined together, on the 9th and 3rd picot of the 1st and 2nd scallop, = 14 chain, 1 plain on the 6th picot of the next scallop; * 14 chain, 1 treble on the 2nd empty picot of the wheel; 10 chain, 1 quadruple treble on the 4th picot, 10 chain, 1 treble on the 6th picot; 14 chain, 1 plain on the 6th picot of the 3rd scallop; 14 chain, 2 sextuple trebles on the 10th and 2nd picot of the 3rd and 4th scallop; 15 chain, 1 plain on the 6th picot of the 4th scallop; 16 chain, 2 sextuple trebles on the 10th and 2nd picot of the 4th and 5th scallop; 16 chain, 1 plain on the 6th picot of the 5th scallop; 15 chain ** 3 septuple trebles on the 10th and 2nd picot of the 5th and 6th scallop. Repeat from ** to *; and make 4 figures with rounded edges. When all the figures are finished, join them together by trebles of a suitable length.
The chain stitches and trebles start at the first scallop between 2 wheels = 1 plain on the 6th picot of the 1st scallop; 14 chain, 2 quintuple trebles, with only the last loops joined together, on the 9th and 3rd picot of the 1st and 2nd scallop, = 14 chain, 1 plain on the 6th picot of the next scallop; * 14 chain, 1 treble on the 2nd empty picot of the wheel; 10 chain, 1 quadruple treble on the 4th picot, 10 chain, 1 treble on the 6th picot; 14 chain, 1 plain on the 6th picot of the 3rd scallop; 14 chain, 2 sextuple trebles on the 10th and 2nd picot of the 3rd and 4th scallop; 15 chain, 1 plain on the 6th picot of the 4th scallop; 16 chain, 2 sextuple trebles on the 10th and 2nd picot of the 4th and 5th scallop; 16 chain, 1 plain on the 6th picot of the 5th scallop; 15 chain ** 3 septuple trebles on the 10th and 2nd picot of the 5th and 6th scallop. Repeat from ** to *; and make 4 figures with rounded edges. When all the figures are finished, connect them using suitably long trebles.
Introduce the thread at the corner stitch on the widest side of the 2nd 8 pointed star and make: 1 plain, 6 chain, miss 3 stitches, 1 plain on the 3 next stitches, 4 chain, miss 2, 1 plain on the next 3 plain stitches.
Introduce the thread at the corner stitch on the widest side of the 2nd 8-pointed star and do the following: 1 single crochet, 6 chain stitches, skip 3 stitches, 1 single crochet in the next 3 stitches, 4 chain stitches, skip 2 stitches, then 1 single crochet in the next 3 stitches.
Make 11 loops in this manner, each consisting of 4 chain and 3 plain, then 2 loops of 3 chain and 2 plain = then miss as many stitches of the square at the edge of the collar as were left empty in the second square; 2 plain and draw the loop each time through the 2 last stitches of the opposite square = 1 chain, 1 single on the 2nd chain stitch of the opposite side; 1 chain, 3 plain on the edge of the first square, 1 chain, 1 single, 1 chain, miss 3 stitches, 3 plain, 5 chain, bring the loop from the wrong side to the right = on the chain stitches: 4 plain, 2 chain, miss 3, 3 plain.
Make 11 loops like this, each with 4 chains and 3 plain stitches. Then, make 2 loops of 3 chains and 2 plain stitches. Skip as many stitches on the edge of the collar as were left empty in the second square; do 2 plain stitches and draw the loop through the last 2 stitches of the opposite square. Then, do 1 chain, and 1 single crochet in the 2nd chain stitch of the opposite side. Next, do 1 chain, then 3 plain stitches on the edge of the first square, followed by 1 chain, then 1 single crochet, 1 chain, skip 3 stitches, and do 3 plain stitches. After that, make 5 chains and pull the loop from the wrong side to the right on the chain stitches: do 4 plain stitches, 2 chains, skip 3 stitches, and do 3 plain stitches.
From this point onwards, fasten all the bars of chain stitches to the loops produced by the same stitches in the 2nd square. Thus, the 1st bar consisting of 5 chain, the 2nd will consist of 7 chain on which make 7 plain, and then add 2 more chain. Nowhere must the two first chain stitches be uncovered.
From this point on, attach all the chain stitch bars to the loops created by the same stitches in the 2nd square. So, the 1st bar will have 5 chains, the 2nd will have 7 chains on which you should make 7 plain stitches, then add 2 more chains. The first two chain stitches must always be covered.
The 3rd bar must consist of 9 chain, 9 plain and 2 chain = the 4th of 11 chain, 5 plain, 1 picot, 5 plain, 2 chain = the 5th of 13 chain, 4 plain, 1 picot, 4 plain, 1 picot, 4 plain, 2 chain = the 6th of 16 chain, 6 plain, 1 picot, 6 plain, 1 picot, 6 plain, 2 chain = the 7th of 18 chain, 5 plain, 1 picot, 4 plain, 1 picot, 4 plain, 1 picot, 5 plain, 2 chain = the 8th of 21 chain, 5 plain, 1 picot, 5 plain, 1 picot, 5 plain, 1 picot, 5 plain, 2 chain = the 9th of 24 chain, 5 plain, 1 picot, 5 plain, 1 picot, 5 plain, 1 picot, 5 plain, 1 picot, 5 plain, 2 chain = the 10th of 26 chain, 6 plain, 1 picot, 5 plain, 1 picot, 5 plain, 1 picot, 5 plain, 1 picot, 6 plain, 2 chain = the 11th and last of 28 chain, 32 plain, 2 chain, fasten off.
The 3rd bar must have 9 chains, 9 plain stitches, and 2 chains = the 4th has 11 chains, 5 plain stitches, 1 picot, 5 plain stitches, 2 chains = the 5th has 13 chains, 4 plain stitches, 1 picot, 4 plain stitches, 1 picot, 4 plain stitches, 2 chains = the 6th has 16 chains, 6 plain stitches, 1 picot, 6 plain stitches, 1 picot, 6 plain stitches, 2 chains = the 7th has 18 chains, 5 plain stitches, 1 picot, 4 plain stitches, 1 picot, 4 plain stitches, 1 picot, 5 plain stitches, 2 chains = the 8th has 21 chains, 5 plain stitches, 1 picot, 5 plain stitches, 1 picot, 5 plain stitches, 1 picot, 5 plain stitches, 2 chains = the 9th has 24 chains, 5 plain stitches, 1 picot, 5 plain stitches, 1 picot, 5 plain stitches, 1 picot, 5 plain stitches, 1 picot, 5 plain stitches, 2 chains = the 10th has 26 chains, 6 plain stitches, 1 picot, 5 plain stitches, 1 picot, 5 plain stitches, 1 picot, 5 plain stitches, 1 picot, 6 plain stitches, 2 chains = the 11th and last has 28 chains, 32 plain stitches, 2 chains, fasten off.
As the square with the semicircles in it, has more plain stitches in the edge than the one with the eight-pointed star in it, the stitches must be divided so that you miss 3 from time to time, instead of two. When the 7 top figures are finished, join the 7 bottom ones to them, each separately, by a row of plain stitches, made on the wrong side of the work. Below the first square with the semicircles, comes the eight-pointed star, below the next eight-pointed star, the square with the semicircles, and so on.
As the square with the semicircles has more plain stitches along the edge than the one with the eight-pointed star, the stitches should be divided so that you skip 3 every now and then, instead of just 2. Once the 7 top figures are finished, attach the 7 bottom figures to them, one by one, with a row of plain stitches made on the back side of the work. Below the first square with the semicircles, place the eight-pointed star; below the next eight-pointed star, put the square with the semicircles, and continue this pattern.
A narrow edging forms the outside border, the foundation of which is a row of plain stitches running all along the squares. At the middle of the square you decrease by 2 stitches, and at the point where two squares meet, by 3. When you reach the left side and the end of the row, make 3 plain on the corner stitch, then: * 5 plain, 1 picot, 5 plain, 14 chain, join them to the first of the 5 first plain (drop the thread at each scallop and bring it forward from the wrong side to the right) = on the 14 chain: 5 plain, 1 picot, 11 plain, 1 picot, 5 plain = along the square: 5 plain, 1 picot, 5 plain, then 14 chain, join them to the first plain = over the 14 chain: 5 plain, 1 picot, 5 plain, 14 chain, join them in turning back between the 5th and 6th of the 10 plain of the 1st scallop; 5 plain, 1 picot, 5 plain, 1 picot, 5 plain, 1 picot, 5 plain; on the half-finished scallop: 5 plain, 1 picot, 5 plain ** = on the plain stitches of the edge: 4 plain, 1 picot, 4 plain, 12 chain, come back, join to the 1st of the 4 plain = on the 12 chain: 4 plain, 1 picot, 4 plain, 1 picot, 4 plain, 1 picot, 4 plain *** = repeat on the same figure once from * to *** and once from * to **.
A narrow border forms the outside edge, with a row of simple stitches running all along the squares as its foundation. In the center of the square, you decrease by 2 stitches, and where two squares meet, decrease by 3. When you get to the left side and the end of the row, make 3 plain stitches on the corner stitch, then: * 5 plain, 1 picot, 5 plain, 14 chain, join them to the first of the 5 plain stitches (drop the thread at each scallop and pull it through from the wrong side to the right) = on the 14 chain: 5 plain, 1 picot, 11 plain, 1 picot, 5 plain = along the square: 5 plain, 1 picot, 5 plain, then 14 chain, join them to the first plain stitch = over the 14 chain: 5 plain, 1 picot, 5 plain, 14 chain, join them while turning back between the 5th and 6th of the 10 plain stitches of the 1st scallop; 5 plain, 1 picot, 5 plain, 1 picot, 5 plain, 1 picot, 5 plain; on the half-finished scallop: 5 plain, 1 picot, 5 plain ** = on the plain stitches of the edge: 4 plain, 1 picot, 4 plain, 12 chain, come back, join to the 1st of the 4 plain = on the 12 chain: 4 plain, 1 picot, 4 plain, 1 picot, 4 plain, 1 picot, 4 plain *** = repeat the same sequence once from * to *** and once from * to **.
This makes 77 stitches, the number there ought to be on the wide side of the straight-edged figures.
This makes 77 stitches, which is the correct number for the wide side of the straight-edged shapes.
The scallops vary a little on the rounded sides. There, you should have 110 stitches, counting from the corner to the treble that marks the middle at the bottom. The single scallops, between the triple scallops of the border, are also all made over 8 stitches; the first triple scallop is made over 20 stitches, the 2nd, 3rd and 4th triple scallop over 16 stitches.
The scallops are slightly different on the rounded sides. You should have 110 stitches, counting from the corner to the treble that indicates the middle at the bottom. The single scallops, which are between the triple scallops of the border, are all made over 8 stitches; the first triple scallop is created over 20 stitches, and the 2nd, 3rd, and 4th triple scallops are made over 16 stitches each.
Make no single scallop after the 4th triple one; which is immediately succeeded by the 5th triple scallop, over 16 stitches.
Make no single scallop after the 4th triple one; which is immediately followed by the 5th triple scallop, over 16 stitches.
Altogether, round each star, there are 9 triple and 8 single scallops. After the 8th single one, make 3 plain stitches on the 2 chain stitches of the connecting bar.
Altogether, around each star, there are 9 triple and 8 single scallops. After the 8th single one, make 3 plain stitches on the 2 chain stitches of the connecting bar.
On the 32 plain stitches of the last bar: 8 plain, 1 picot, 4 plain, 12 chain, bring them back and join to the 5th of the 8 plain = on the 12 chain: 5 plain, 2 chain, draw the loop through the picot in the middle of the last single scallop, 2 chain, close the picot, 8 plain, 1 picot, 5 plain = in the bar: 4 plain, 1 picot, 4 plain, 12 chain, bring them back and fasten them to the 1st plain = 5 plain, 1 picot, 4 plain, 12 chain, join them to the 4th plain of the 1st scallop; 5 plain, 1 picot, 8 plain, 1 picot, 5 plain = in the half-finished scallop: 4 plain, 1 picot, 4 plain = in the bar: 4 plain, 1 picot, 4 plain = 12 chain, bring them back and fasten them to the 1st plain. 4 plain, 1 picot, 4 plain, 12 chain, join them close to the scallop above = 5 plain, 1 picot, 4 plain, 12 chain, bring them back and join them to the 4th plain of the 2nd scallop; 5 plain, 1 picot, 5 plain, 1 picot, 5 plain, 1 picot, 5 plain = in each of the 2 half-finished scallops: 4 plain, 1 picot, 5 plain = finish with 4 plain, 3 plain on the 2 chain and repeat from * round all the rounded parts.
On the 32 plain stitches of the last bar: 8 plain, 1 picot, 4 plain, 12 chain, bring them back and join to the 5th of the 8 plain = on the 12 chain: 5 plain, 2 chain, pull the loop through the picot in the middle of the last single scallop, 2 chain, close the picot, 8 plain, 1 picot, 5 plain = in the bar: 4 plain, 1 picot, 4 plain, 12 chain, bring them back and attach them to the 1st plain = 5 plain, 1 picot, 4 plain, 12 chain, join them to the 4th plain of the 1st scallop; 5 plain, 1 picot, 8 plain, 1 picot, 5 plain = in the half-finished scallop: 4 plain, 1 picot, 4 plain = in the bar: 4 plain, 1 picot, 4 plain = 12 chain, bring them back and attach them to the 1st plain. 4 plain, 1 picot, 4 plain, 12 chain, join them close to the scallop above = 5 plain, 1 picot, 4 plain, 12 chain, bring them back and connect them to the 4th plain of the 2nd scallop; 5 plain, 1 picot, 5 plain, 1 picot, 5 plain, 1 picot, 5 plain = in each of the 2 half-finished scallops: 4 plain, 1 picot, 5 plain = finish with 4 plain, 3 plain on the 2 chain and repeat from * round all the rounded parts.
The lozenges that fill the empty spaces between the large figures are made in 7 rows, on a ring formed of 4 chain.
The shapes that fill the empty spaces between the large figures are arranged in 7 rows, on a ring made of 4 chains.
1st row—5 chain, 1 treble on the ring, 2 chain, 8 trebles in all, including the bar of chain stitches.
1st row—5 chains, 1 treble on the ring, 2 chains, 8 trebles in total, including the section of chain stitches.
2nd row—3 plain over 2 chain, 1 plain over each treble.
2nd row—3 single crochets over 2 chains, 1 single crochet over each treble.
3rd row—7 chain, 1 treble over the treble beneath, 5 chain, 1 treble; 8 trebles in all.
3rd row—7 chains, 1 treble stitch over the treble stitch below, 5 chains, 1 treble; 8 trebles in total.
4th row—* 1 plain, 1 half treble, 1 treble, 1 double treble, 1 treble 2½ trebles long; ** repeat the reverse way to * = 1 plain on the treble, 7 chain, miss 1 stitch, 1 plain, 1 treble, 1 double treble, 1 treble, 1 plain. Repeat twice from * to **, followed by: 9 chain, miss 1, 1 single, 1 plain, 1 half treble, 2 trebles, 1 half treble, 1 plain, 1 single ***. Repeat once from * to ***, then again from * to **, and add 5 single all along the scallop.
4th row—* 1 plain, 1 half treble, 1 treble, 1 double treble, 1 treble, 2½ trebles long; ** repeat the reverse way to * = 1 plain on the treble, 7 chains, skip 1 stitch, 1 plain, 1 treble, 1 double treble, 1 treble, 1 plain. Repeat twice from * to **, followed by: 9 chains, skip 1, 1 single, 1 plain, 1 half treble, 2 trebles, 1 half treble, 1 plain, 1 single ***. Repeat once from * to ***, then again from * to **, and add 5 singles all along the scallop.
5th row—9 chain * 1 plain on the top stitch of the small leaf, 7 chain, 1 treble on the middle stitch of the scallop, 7 chain, 1 treble on the next scallop = 9 chain, 1 plain on the leaf, 9 chain, 1 treble on the scallop, 7 chain, 1 treble on the next scallop, 7 chain and repeat once from *.
5th row—9 chains, 1 single crochet on the top stitch of the small leaf, 7 chains, 1 double crochet on the middle stitch of the scallop, 7 chains, 1 double crochet on the next scallop = 9 chains, 1 single crochet on the leaf, 9 chains, 1 double crochet on the scallop, 7 chains, 1 double crochet on the next scallop, 7 chains and repeat once from *.
6th row—1 plain on each stitch of the row before, 3 plain on the points.
6th row—1 knit stitch for each stitch from the row before, 3 knit stitches on the points.
7th row—on each side of the lozenge 3 little scallops on 8 chain, with 3 picots and 1 picot below the scallops and between every 4 plain; the scallops at the points extend over 4 stitches only, so that the picot below is left out.
7th row—on each side of the diamond shape, 3 small scallops on 8 chains, with 3 picots and 1 picot below the scallops, and between every 4 plain stitches; the scallops at the points cover only 4 stitches, so the picot below is excluded.
These lozenges are fastened on two sides to the middle picot of the triple scallop; then, starting from the 3rd scallop of the lozenge you make, 8 chain, join them to the middle picot of the 1st triple scallop; coming back over the 8 chain: 5 plain, 1 picot, 5 plain and finish the scallop. The next scallop, at the point of the lozenge, is fastened by a picot of 6 chain, to the middle picot of the 6th scallop underneath the connecting bar. Repeat the same on the 2nd side and make 6 lozenges in all.
These lozenges are attached on two sides to the middle picot of the triple scallop; then, starting from the 3rd scallop of the lozenge you create, make 8 chain stitches and join them to the middle picot of the 1st triple scallop. Coming back over the 8 chain: do 5 plain stitches, 1 picot, 5 plain stitches, and finish the scallop. The next scallop, at the point of the lozenge, is secured by a picot of 6 chain stitches to the middle picot of the 6th scallop below the connecting bar. Repeat the same process on the 2nd side and make a total of 6 lozenges.
The lace that finishes off the collar at the neck must be made to stand up, and is begun by a row of trebles on the plain stitches.
The lace that completes the collar at the neck needs to be made to stand up, and it starts with a row of triple stitches on the plain stitches.
From the corner as far as the 2nd treble of the 4th scallop, make triple trebles, from the 4th scallop to the 6th chain stitch after the 5th scallop, make double trebles, from this point to the 2nd scallop of the next semicircle, only single trebles, then again double trebles and finish with triple trebles as at the beginning. Decrease by 2 or 3 stitches in each square.
From the corner up to the 2nd treble of the 4th scallop, make triple trebles. From the 4th scallop to the 6th chain stitch after the 5th scallop, make double trebles. From here to the 2nd scallop of the next semicircle, use only single trebles. Then switch back to double trebles and finish with triple trebles like you did at the beginning. Decrease by 2 or 3 stitches in each square.
When this row of trebles is finished, fasten off, and fasten on again on the right and on the base of the 1st treble which you border with 4 chain, then follow: * 15 plain on the row of trebles, put the needle in under the 2 loops of the trebles = turn the work = 2 chain, 1 double treble, miss 4 plain, 1 double treble on the 5th stitch, 2 chain, 1 double treble, 2 chain, 1 double treble, 2 chain, miss 4 plain = turn the work = bring the loop to the front; ** 1 plain, 1 picot, 1 plain, 1 plain on the treble; repeat 3 times again from ** and add 4 plain on the trebles = turn the work = 6 chain, 1 double treble over the treble beneath; again 3 times 6 chain stitches and 1 double treble; join the 4th set of 6 chain to the 4th plain = bring the thread back to the front: 1 plain on the 6 chain = 8 chain, miss 1, and make on the others: 1 plain, 1 half treble, 2 trebles, 1 treble 1½ treble long, 2 double trebles, 1 plain stitch on the 6 chain. The next point comes above a treble; you make 7 points in all. After the 7th: 5 plain, then 7 chain, 1 plain on each point between the points and join.
When you finish this row of treble stitches, tie off, and then attach the yarn again on the right side and at the base of the 1st treble, which you border with 4 chains. Then do the following: * 15 plain stitches on the row of trebles, insert the needle under the 2 loops of the trebles = turn the work = 2 chains, 1 double treble, skip 4 plain stitches, 1 double treble on the 5th stitch, 2 chains, 1 double treble, 2 chains, 1 double treble, 2 chains, skip 4 plain stitches = turn the work = bring the loop to the front; ** 1 plain stitch, 1 picot, 1 plain stitch, 1 plain stitch on the treble; repeat this 3 times from ** and add 4 plain stitches on the trebles = turn the work = 6 chains, 1 double treble over the treble below; repeat 3 times with 6 chain stitches and 1 double treble; join the 4th set of 6 chains to the 4th plain stitch = bring the thread back to the front: 1 plain stitch on the 6 chains = 8 chains, skip 1, and make on the others: 1 plain stitch, 1 half treble, 2 trebles, 1 treble of 1½ treble long, 2 double trebles, 1 plain stitch on the 6 chains. The next point comes above a treble; you will make 7 points in total. After the 7th: 5 plain stitches, then 7 chains, 1 plain stitch on each point between the points and join.
Join the 8th set of 7 chain on to the 4th plain of the first treble = then add: 2 chain, draw the loop from the wrong side to the right through the 1st plain stitch; 8 trebles, 1 picot, 4 trebles, 12 chain, bring them back over the picot, join it between the 4th and 5th trebles; 5 plain, 1 picot, 5 plain, 1 picot, 5 plain, 1 picot, 5 plain.
Join the 8th chain of 7 to the 4th plain of the first treble = then add: 2 chains, pull the loop from the wrong side to the right through the 1st plain stitch; 8 trebles, 1 picot, 4 trebles, 12 chains, bring them back over the picot, and join it between the 4th and 5th trebles; 5 plain, 1 picot, 5 plain, 1 picot, 5 plain, 1 picot, 5 plain.
Over each point: 1 picot and over the picot 1 scallop, like the one made in the square. On the 7th point only 1 picot = after the last treble on the last chain: 2 chain; then go on with the plain stitches until you have 27 and repeat from *.
Over each point: 1 picot and over the picot 1 scallop, like the one made in the square. On the 7th point, only 1 picot = after the last treble on the last chain: 2 chain; then continue with the plain stitches until you have 27 and repeat from *.
In the semicircles that follow you leave out the first and last little scallops, the first and the last scallop must be joined together by the first and the last picot; in the last semicircle, make 6 little scallops, the same as you did in the first.
In the semicircles that follow, skip the first and last small scallops; the first and last scallops should be connected by the first and last picot. In the last semicircle, create 6 small scallops, just like you did in the first.
Crochet chair-back (fig. 485).—The close leaves in plain stitch of the large centre star, the 4 corner figures forming a cross and the diagonal figures, all have to be made separately and sewn on afterwards in their proper place. To join the separate parts neatly together, draw a square the size of the work on a piece of thick paper or waxcloth, divide it into 8 parts by means of straight and diagonal lines, sew the separate pieces of crochet upon it, face downwards, in their proper places and make the trebles on the wrong side of the work.
Crochet chair-back (fig. 485).—The dense leaves in plain stitch of the large center star, the 4 corner shapes forming a cross, and the diagonal shapes all need to be made separately and sewn on later in their correct positions. To join the separate parts neatly, draw a square the size of your work on a piece of thick paper or wax cloth, divide it into 8 sections using straight and diagonal lines, sew the individual crochet pieces onto it, face down, in their correct spots and make the trebles on the back side of the work.

Materials: Fil à dentelle D.M.C No. 50 for the close figures and No. 120 for the connecting bars.[A]
Materials: D.M.C Fil à dentelle No. 50 for the detailed figures and No. 120 for the connecting bars.__A_TAG_PLACEHOLDER_0__
Begin by the centre star and make: 12 chain, close the ring.
Begin at the center star and make: 12 chains, then close the ring.
1st row—23 plain on the 12 chain.
1st row—23 plain stitches on the 12 chain.
2nd row—9 chain, 1 double treble on the 2nd plain, 4 chain, 1 treble and so on until you have 12 trebles, including the 5 chain.
2nd row—9 chains, 1 double treble on the 2nd plain, 4 chains, 1 treble, and so on until you have 12 trebles, including the 5 chains.
3rd row—1 plain on each chain stitch and each treble; 60 plain in all.
3rd row—1 single crochet on each chain stitch and each treble; 60 single crochets in total.
4th row—3 plain, 1 picot, altogether 20 picots in the row, then fasten off.
4th row—3 plain, 1 picot, for a total of 20 picots in the row, then fasten off.
The leaves round the ring have 3 petals, 1 large and 2 small; you begin by the large one, and make the small ones afterwards. The petals should be begun from the point and not from the bottom as is generally done—30 chain; coming back: 4 single, 4 plain, 5 half trebles, 8 trebles, 4 half trebles, 4 plain stitches, 3 plain on the 1st chain = on the second side of the chain make the same number of stitches but in the reverse order.
The leaves around the ring have 3 petals: 1 large and 2 small. Start with the large one and then make the small ones afterwards. Begin the petals from the tip, not from the bottom like is usually done—30 chain; then coming back: 4 single, 4 plain, 5 half trebles, 8 trebles, 4 half trebles, 4 plain stitches, 3 plain on the 1st chain = on the second side of the chain, make the same number of stitches but in reverse order.
Small petal on the left—21 chain, miss 1, 5 plain, 3 half trebles, 5 trebles, 3 half trebles, 3 plain, 3 plain on the top. Repeat the same series of stitches in the reverse order on the second side = at the 10th stitch of the large petal and counting upwards from below, draw the thread through the 10th stitch of the small petal, and do the same through the 9 next stitches = for this purpose drop the loop each time and draw it back through the opposite stitch, from the wrong side to the right. After making the same petal on the right, fasten off; fasten on again at the outer edge and edge the 3 petals with 1 plain on each stitch and 3 plain on the stitch at the point; make 4 leaves with 3 petals each.
Small petal on the left—21 chains, skip 1, 5 plain stitches, 3 half trebles, 5 trebles, 3 half trebles, 3 plain stitches, and 3 plain stitches on top. Repeat the same series of stitches in reverse order on the second side = at the 10th stitch of the large petal and counting upwards from below, pull the thread through the 10th stitch of the small petal, and do the same through the next 9 stitches = for this, drop the loop each time and pull it back through the opposite stitch, from the wrong side to the right. After making the same petal on the right, fasten off; fasten on again at the outer edge and edge the 3 petals with 1 plain stitch on each stitch and 3 plain stitches on the stitch at the point; make 4 leaves with 3 petals each.
Between the pointed leaves, which are afterwards placed on the diagonal line of the square, come some very long leaves which are rounded towards the top—29 chain, miss 1, 5 plain, 2 chain, 1 treble on the 3rd of the chain stitches; carry on the trebles until you have, on coming to the last chain, 7 trebles = turn the work and make 1 plain on each stitch of the row = turn the work = 1 plain on every stitch all round = turn the work = * 9 plain, 4 half trebles, 3 trebles, 2 double trebles, join the last loops of the 2 last trebles together; set the 20th and 21st double treble on the same stitch = the 20th treble 2½ trebles long; the 21st a triple treble = on the next plain stitch; 1 treble 3½ trebles long and 1 quadruple treble = again on the next stitch: 2 trebles, the first of them 4½ trebles long, the 2nd a quintuple one = on the 3rd plain: 2 quintuple trebles, 4 chain, 1 plain on the plain stitch of the 2nd row and next to the last quintuple treble, 1 half treble, 1 treble, 2 double trebles on one stitch, 2 triple trebles on one stitch **, 1 quadruple treble on the 2 next stitches. Repeat from ** to *, therefore in the reverse order.
Between the pointed leaves, which are later placed on the diagonal line of the square, there are some very long leaves that are rounded at the top—29 chains, skip 1, 5 plain, 2 chains, 1 treble on the 3rd chain stitch; continue with the trebles until you reach the last chain, making 7 trebles = turn the work and make 1 plain in each stitch of the row = turn the work = 1 plain in every stitch all around = turn the work = * 9 plain, 4 half trebles, 3 trebles, 2 double trebles, join the last loops of the last 2 trebles together; put the 20th and 21st double treble on the same stitch = the 20th treble 2½ trebles long; the 21st a triple treble = on the next plain stitch; 1 treble 3½ trebles long and 1 quadruple treble = again on the next stitch: 2 trebles, the first 4½ trebles long, the 2nd a quintuple one = on the 3rd plain: 2 quintuple trebles, 4 chains, 1 plain on the plain stitch of the 2nd row and next to the last quintuple treble, 1 half treble, 1 treble, 2 double trebles on one stitch, 2 triple trebles on one stitch **, 1 quadruple treble on the next 2 stitches. Repeat from ** to *, then in reverse order.
To make the large star which is the first of the figures placed on the diagonal line, make: 4 chain, close the ring.
To create the large star, which is the first figure on the diagonal line, do the following: 4 chains, then close the ring.
1st row—10 chain,* 1 double treble on the 4 chain, 5 chain. Repeat 4 times from *, 6 trebles in all.
1st row—10 chains,* 1 double treble on the 4th chain, 5 chains. Repeat from * 4 times, for a total of 6 trebles.
3rd row—1 plain on each stitch of the 2nd row.
3rd row—1 knit stitch on each stitch of the 2nd row.
4th row—3 plain, 1 picot, 2 plain, * 2 chain, 1 picot, 5 chain, miss 1 = coming back: 4 plain, 1 picot, 2 plain = on the plain stitches of the 3rd row: 2 plain, 1 picot, 3 plain. Repeat from *, with this difference that the trebles that are placed over the half trebles of the 2nd row must begin with 3 chain. Make, altogether, 12 long bars, 6 of them beginning with 2 chain and 6 with 3; these bars remain empty; after the 12th you fasten off.
4th row—3 plain, 1 picot, 2 plain, * 2 chains, 1 picot, 5 chains, skip 1 = coming back: 4 plain, 1 picot, 2 plain = on the plain stitches of the 3rd row: 2 plain, 1 picot, 3 plain. Repeat from *, but start the trebles that go over the half trebles of the 2nd row with 3 chains. In total, make 12 long bars, 6 starting with 2 chains and 6 with 3; these bars should be left empty; after the 12th, fasten off.
5th row—fasten on the thread to the top stitch of a treble, 11 chain, 1 plain. Repeat this series 11 times.
5th row—attach the thread to the top stitch of a treble, chain 11, then make 1 plain stitch. Repeat this sequence 11 times.
6th and 7th row—1 plain on each stitch of the 5th row, then 1 plain on each stitch of the 6th row.
6th and 7th row—1 knit on each stitch of the 5th row, then 1 knit on each stitch of the 6th row.
8th row—over 9 bars and 8 spaces: 3 plain, 1 picot, 3 plain and so on. Add nothing further to the 2 rows of plain stitches of the 10th, 11th and 12th picots.
8th row—over 9 bars and 8 spaces: 3 plain, 1 picot, 3 plain, and so on. Don't add anything more to the 2 rows of plain stitches of the 10th, 11th, and 12th picots.
For the second star of the corner figure 4 chain, close.
For the second star of the corner figure 4 chain, close.
1st row—8 chain, 1 treble, * 5 chain, 1 treble. Repeat 3 times from *; 5 trebles in all, including the chain stitches.
1st row—8 chains, 1 treble, * 5 chains, 1 treble. Repeat 3 times from *; 5 trebles in total, including the chain stitches.
2nd row—* 1 chain, 1 half treble, 1 treble, 1 treble 1½ treble long, 1 double treble, 1 triple treble **. Repeat from ** to *, and the whole series 4 times.
2nd row—* 1 chain, 1 half treble, 1 treble, 1 treble 1½ treble long, 1 double treble, 1 triple treble **. Repeat from ** to *, and the whole series 4 times.
3rd row—* 1 chain, 3 plain, 1 picot, 2 plain, 2 chain, 1 picot, 4 chain = coming back, 4 plain on the 4 chain, 1 picot, 2 chain = on the stitches of the 2nd row: 2 plain, 1 picot, 2 plain, 3 chain, 1 picot, 5 chain, miss 1, 4 plain = coming back: 1 picot, 3 plain. Repeat 4 times from *, fasten off.
3rd row—* 1 chain, 3 plain, 1 picot, 2 plain, 2 chain, 1 picot, 4 chain = coming back, 4 plain on the 4 chain, 1 picot, 2 chain = on the stitches of the 2nd row: 2 plain, 1 picot, 2 plain, 3 chain, 1 picot, 5 chain, skip 1, 4 plain = coming back: 1 picot, 3 plain. Repeat 4 times from *, fasten off.
4th row—fasten on at the point of one of the bars and make from one bar to the other: 9 chain, 1 plain on each bar.
4th row—attach at one of the bars and create from one bar to the other: 9 chains, 1 plain on each bar.
5th row—1 plain on each stitch of the last row.
5th row—1 knit on each stitch of the last row.
6th row—1 plain on each stitch of the last row and join the 4 last stitches to the 4 that are under the 11th treble of the 1st star, taking care to put the trebles one above the other.
6th row—1 plain on each stitch of the last row and join the last 4 stitches to the 4 under the 11th treble of the 1st star, making sure to stack the trebles directly above each other.
The 3rd star also begins with 4 chain formed into a ring.
The 3rd star also starts with 4 chains arranged in a ring.
1st row—8 chain, 1 treble, 5 chain, 1 treble, 5 chain, 1 treble, 5 chain, join them to the 4th of the 8 chain.
1st row—8 chains, 1 treble stitch, 5 chains, 1 treble stitch, 5 chains, 1 treble stitch, 5 chains, join them to the 4th chain of the 8.
2nd row—2 chain, * 1 half treble, 1 treble, 1 treble, 1½ treble long, 1 double treble **. Repeat from ** to * and then, 3 times from * to **.
2nd row—2 chain, * 1 half treble, 1 treble, 1 treble, 1½ treble long, 1 double treble **. Repeat from ** to * and then, 3 times from * to **.
3rd row—1 plain on each stitch of the 2nd row.
3rd row—1 knit on each stitch of the 2nd row.
4th row—1 chain, 2 plain, * 1 picot, 3 chain, 1 picot, 5 chain. Repeat 3 times from *; after the 8th picot: 3 chain.
4th row—1 chain, 2 plain, * 1 picot, 3 chain, 1 picot, 5 chain. Repeat 3 times from *; after the 8th picot: 3 chain.
5th row—15 chain, 1 triple treble on the 5th and on the 2nd plain stitch between 2 picots, 9 chain, 1 triple treble and so on. Altogether, including the chain stitches, 8 trebles and 8 times 9 chain; join to the 7th chain.
5th row—15 chains, 1 triple treble on the 5th and on the 2nd plain stitch between 2 picots, 9 chains, 1 triple treble, and so on. In total, including the chain stitches, there are 8 trebles and 8 sets of 9 chains; join to the 7th chain.
6th and 7th row—1 plain on each stitch of the previous row; join the 4 last stitches again to the 4th stitch of the 2nd star and fasten off.
6th and 7th row—1 plain on each stitch of the previous row; join the last 4 stitches again to the 4th stitch of the 2nd star and fasten off.
The open work border is made from the 1st large star, beginning near the 9th treble at the point where the picots leave off. After fastening on the thread: 5 chain, miss 2 plain, 1 plain on the 3rd = at the point where the circles meet, miss 3 or 4 stitches on each side and carry the treble over the indent of the scallop.
The open work border starts with the 1st large star, beginning near the 9th treble where the picots end. After attaching the thread: 5 chains, skip 2 plain stitches, 1 plain on the 3rd = at the point where the circles connect, skip 3 or 4 stitches on each side and bring the treble over the dip of the scallop.
After finishing the picots of chain stitches on the two sides and as far as the 3rd treble of the large star, fasten off; fasten on again on the right of the large star: 4 chain, 1 plain on the 3rd chain; put the needle only through the 2 upper loops of the chain stitch; in the indent, connect 3 picots by 1 chain stitch; 2 chain and 1 plain between the next plain stitches. Fasten off. The 2 next rows both begin on the right and consist of plain stitches only; in the indent of the rings join 3 stitches of the preceding row together by 1 plain.
After finishing the picots of chain stitches on both sides and up to the 3rd treble of the large star, fasten off; then attach the yarn again to the right of the large star: 4 chains, then 1 single crochet in the 3rd chain; insert the hook only through the top 2 loops of the chain stitch; in the dip, connect 3 picots with 1 chain stitch; make 2 chains and 1 single crochet between the next single crochets. Fasten off. The next 2 rows both start on the right and consist of single crochets only; in the dip of the rings, join 3 stitches from the previous row with 1 single crochet.
The 5 leaves over the circles—Begin with the middle and largest one—25 chain, miss 1, 3 plain, 2 chain, miss 2, 1 treble, 2 chain and so on, 7 trebles in all = turn the work = 1 plain on each stitch, passing under only 1 loop of the stitches = on the stitch you missed: 3 plain; on the second side: 1 plain on each stitch = turn the work = do as in the last row = turn the work = do as in the 2 last rows, excepting as regards the 5 last stitches which you leave untouched = turn the work = 15 plain, * 1 chain = turn the work = 12 plain = turn the work = 12 plain on the 12 plain and on all those you missed **. Fasten off the thread. On the 2nd side of the leaf: draw the thread through the 6th stitch, counting upwards from below and on the side that is not indented, 15 plain and repeat from * to ** = then make: 1 row of plain, putting the needle through both the loops of the lower stitches = at the points of the leaves: 3 plain, in the indents of the leaves miss 1 stitch.
The 5 leaves over the circles—Start with the middle and largest one—25 chains, skip 1, 3 plain, 2 chains, skip 2, 1 treble, 2 chains, and so on, totaling 7 trebles = turn the work = 1 plain on each stitch, passing under only 1 loop of the stitches = on the stitch you skipped: 3 plain; on the second side: 1 plain on each stitch = turn the work = repeat as in the last row = turn the work = follow the same instructions as in the last 2 rows, except for the 5 last stitches which you leave untouched = turn the work = 15 plain, * 1 chain = turn the work = 12 plain = turn the work = 12 plain on the 12 plain and on all those you skipped **. Secure the thread. On the 2nd side of the leaf: pull the thread through the 6th stitch, counting upwards from below and on the side that isn’t indented, 15 plain and repeat from * to ** = then make: 1 row of plain, inserting the needle through both loops of the lower stitches = at the points of the leaves: 3 plain, in the dips of the leaves skip 1 stitch.
First leaf on the right of the large leaf—25 chain, miss 1, 3 plain, 1 chain, 1 treble on the 3rd chain; 7 trebles in all = turn the work = 1 plain on each stitch, 18 stitches altogether, to the corner stitch; 3 plain on the corner stitch. The 2nd side is worked like the 1st.
First leaf on the right of the large leaf—25 chains, skip 1, 3 plain, 1 chain, 1 treble on the 3rd chain; 7 trebles in total = turn the work = 1 plain stitch on each stitch, 18 stitches total, to the corner stitch; 3 plain on the corner stitch. The 2nd side is worked like the 1st.
Add 3 more rows of plain stitches and increase 3 plain on the stitch at the point = in the 3rd row leave the 5 last stitches empty = turn the work = 11 plain, 1 chain = turn the work = 11 plain and 5 plain on the 5 stitches that were passed over; fasten off.
Add 3 more rows of plain stitches and increase 3 plain on the stitch at the point. In the 3rd row, leave the last 5 stitches empty. Turn the work, then do 11 plain and 1 chain. Turn the work again, do 11 plain, and then do 5 plain on the 5 stitches that were skipped. Fasten off.
On the opposite side fasten on the thread on the wrong side at the 8th stitch counting from the point: 12 plain, 1 chain = turn the work = 12 plain = turn the work = make plain stitches up to the end of the leaf and border it, like the large leaf, with plain stitches = join the 8 first stitches to the corresponding ones in the large leaf = make 4 leaves all alike.
On the opposite side, secure the thread on the back side at the 8th stitch from the tip: 12 plain stitches, 1 chain = turn the work = 12 plain stitches = turn the work = make plain stitches until the end of the leaf and border it, like the large leaf, with plain stitches = join the first 8 stitches to the corresponding ones in the large leaf = make 4 identical leaves.
2nd leaf on the left—19 chain, miss 1, 3 plain, 2 chain, 1 treble on the 2nd chain; 7 trebles in all = turn the work = 1 plain on each of the preceding stitches, 3 plain on the stitch at the point = turn the work = 1 row of plain stitches = turn the work = 1 row of plain = turn the work = 1 row of plain, excepting on the last 7 stitches = turn the work = 14 plain, 1 chain = 3 more rows to and fro with 11 plain; fasten off, and fasten on again on the 2nd side at the 6th stitch counting from below: 2 rows of 11 plain and 1 row to the end of the leaf = then encircle this leaf, like the others with plain stitches, join the 8 last stitches to the last 8 of the large leaf = make 4 leaves all alike.
2nd leaf on the left—19 chains, skip 1, 3 plain stitches, 2 chains, 1 treble on the 2nd chain; 7 trebles in total = turn the work = 1 plain stitch on each of the previous stitches, 3 plain stitches on the stitch at the tip = turn the work = 1 row of plain stitches = turn the work = 1 row of plain = turn the work = 1 row of plain, except for the last 7 stitches = turn the work = 14 plain stitches, 1 chain = 3 more rows back and forth with 11 plain stitches; fasten off, and reattach on the 2nd side at the 6th stitch counting from below: 2 rows of 11 plain stitches and 1 row to the end of the leaf = then encircle this leaf, like the others, with plain stitches, join the last 8 stitches to the last 8 of the large leaf = make 4 leaves all the same.
3rd leaf on the right—18 chain, miss 1, 2 plain, 1 chain, 1 treble on the 3rd chain, 5 trebles in all = turn the work = 4 rows of plain worked to and fro; on the stitch at the point: 3 plain = after the 4th row: 4 trebles, 8 plain, 1 chain, 4 plain, 1 chain, 4 plain, 1 chain, then plain stitches to the end = fasten off. On the second side, fasten on to the 6th stitch counting downwards from the top: 9 plain = coming back: 3 plain, 1 chain, 7 plain = coming back: 7 plain, 1 chain = then to the end of the leaf, 1 plain on each stitch.
3rd leaf on the right—18 chains, skip 1, 2 plain stitches, 1 chain, 1 treble in the 3rd chain, 5 trebles in total = turn the work = 4 rows of plain stitches worked back and forth; on the stitch at the point: 3 plain = after the 4th row: 4 trebles, 8 plain stitches, 1 chain, 4 plain stitches, 1 chain, 4 plain stitches, 1 chain, then plain stitches to the end = fasten off. On the second side, attach yarn to the 6th stitch counting down from the top: 9 plain = coming back: 3 plain, 1 chain, 7 plain = coming back: 7 plain, 1 chain = then to the end of the leaf, 1 plain on each stitch.
3rd leaf on the left—14 chain, miss 1, 2 plain, 2 chain, 1 treble, 2 chain, 1 treble, 2 chain, 1 treble, 2 chain, 1 treble; 4 rows of plain all round, 3 plain on the stitch at the point, and 3 plain on the added stitch. After the 4th row: 14 plain = turn the work = 10 plain = turn the work = 3 single, 7 plain = coming back: 7 plain = coming back again: 7 plain; after the last plain, 1 single on each plain up to the top = fasten off.
3rd leaf on the left—14 chains, skip 1, 2 plain stitches, 2 chains, 1 treble, 2 chains, 1 treble, 2 chains, 1 treble, 2 chains, 1 treble; 4 rows of plain all around, 3 plain on the stitch at the point, and 3 plain on the added stitch. After the 4th row: 14 plain = turn the work = 10 plain = turn the work = 3 single stitches, 7 plain = coming back: 7 plain = coming back again: 7 plain; after the last plain, 1 single on each plain stitch up to the top = fasten off.
On the second side of the leaf: 9 plain = turn the work = 5 plain = turn the work = 5 plain, 1 single on each of the remaining stitches = turn the work = surround the whole leaf with plain stitches; 3 plain on each stitch at the point; join the 8 last stitches to the 8 last of the 2nd leaf.
On the second side of the leaf: 9 knit stitches = turn the work = 5 knit stitches = turn the work = 5 knit, 1 single crochet on each of the remaining stitches = turn the work = surround the entire leaf with knit stitches; 3 knit on each stitch at the tip; join the last 8 stitches to the last 8 of the 2nd leaf.
Branch on the right and 1st leaf—28 chain, miss 1, 4 plain, 1 chain, 1 treble on the 3rd chain, 1 chain, 1 treble on the 3rd chain, 1 chain, 1 treble 1½ treble long on the 3rd chain, 1 chain, 1 treble 1½ treble long on the 3rd chain, 1 chain, 1 treble on the 3rd chain, 1 chain, 1 half treble on the 3rd chain, 1 chain, miss 2 stitches, 5 plain = on the second side of the chain: * 1 plain on each stitch, 3 plain on the 2nd of the missed stitches. Repeat 3 times from *. After the 4th row of plain: 6 chain = turn the work = 1 row of plain on both sides and plain stitches on the 6 chain; fasten off the thread. Counting back the last stitches, fasten on the thread at the 18th stitch, make one more row of plain, fasten off.
Branch on the right and 1st leaf—28 chains, skip 1, 4 plain, 1 chain, 1 treble on the 3rd chain, 1 chain, 1 treble on the 3rd chain, 1 chain, 1 treble 1½ treble long on the 3rd chain, 1 chain, 1 treble 1½ treble long on the 3rd chain, 1 chain, 1 treble on the 3rd chain, 1 chain, 1 half treble on the 3rd chain, 1 chain, skip 2 stitches, 5 plain = on the second side of the chain: * 1 plain on each stitch, 3 plain on the 2nd of the skipped stitches. Repeat 3 times from *. After the 4th row of plain: 6 chains = turn the work = 1 row of plain on both sides and plain stitches on the 6 chains; fasten off the thread. Counting back the last stitches, fasten on the thread at the 18th stitch, make one more row of plain, fasten off.
2nd leaf of the branch—22 chain, miss 1, 3 plain, 1 chain, 1 half treble on the 3rd chain, 1 chain, 1 treble on the 3rd chain, 1 chain, 1 treble on the 3rd chain, 1 chain, 1 half treble on the 3rd chain, 1 chain, 1 plain on the 3rd chain, 1 plain on each of the remaining stitches; 4 rows of plain, to and fro, in each of the stitches of the last row. The rows touch, and therefore encircle the leaf.
2nd leaf of the branch—22 chains, skip 1, 3 plain, 1 chain, 1 half treble on the 3rd chain, 1 chain, 1 treble on the 3rd chain, 1 chain, 1 treble on the 3rd chain, 1 chain, 1 half treble on the 3rd chain, 1 chain, 1 plain on the 3rd chain, 1 plain on each of the remaining stitches; 4 rows of plain, back and forth, in each of the stitches of the last row. The rows connect and therefore wrap around the leaf.
3rd leaf—16 chain, miss 1, 2 plain, 1 chain, 1 treble on the 3rd chain, 1 chain, 1 treble on the 3rd chain, 1 chain, 1 treble on the 3rd chain, 1 plain on each of the remaining stitches, 4 rows of plain, to and fro round the leaf; 3 plain on the stitch at the top of the leaf and 3 on the one at the bottom.
3rd leaf—16 chain, skip 1, 2 plain, 1 chain, 1 treble on the 3rd chain, 1 chain, 1 treble on the 3rd chain, 1 chain, 1 treble on the 3rd chain, 1 plain on each of the remaining stitches, 4 rows of plain, back and forth around the leaf; 3 plain on the stitch at the top of the leaf and 3 on the one at the bottom.
When these 3 leaves are finished, join them together on the wrong side so that the end of the 2nd leaf is parallel with the last treble of the 1st leaf, and the end of the 3rd leaf parallel with the 1st of the last plain stitches of the 2nd leaf. Having sewn these 3 leaves together, carry on the plain stitches with the thread of the 3rd little leaf over the two others. Fasten off the thread, join it on again at the 10th plain stitch of the 3rd little leaf, counting the stitches downwards from the top = 40 chain, 1 single on the 34th chain = on the ring: 10 plain, 1 plain each chain and 1 plain on each stitch of the leaves = then, make 3 more rows of plain and 2 plain on every second stitch of the 10 stitches in the ring.
When you finish these 3 leaves, sew them together on the back side so that the end of the 2nd leaf lines up with the last treble of the 1st leaf, and the end of the 3rd leaf lines up with the 1st of the last plain stitches of the 2nd leaf. After stitching these 3 leaves together, continue the plain stitches using the thread from the 3rd little leaf over the other two. Cut the thread, then reattach it at the 10th plain stitch of the 3rd little leaf, counting the stitches downwards from the top = 40 chains, 1 single on the 34th chain = on the ring: 10 plain, 1 plain on each chain and 1 plain on each stitch of the leaves = then, make 3 more rows of plain stitches and 2 plain on every second stitch of the 10 stitches in the ring.
Having reached the chain stitches, fasten on the thread, turn the work and continue the other rows. When the rows of plain stitches are finished, draw a thread through the chain stitches and pull them gently together.
Having reached the chain stitches, secure the thread, turn the work, and continue with the other rows. Once the rows of plain stitches are complete, thread a string through the chain stitches and gently pull them together.
Branch on the left and 1st leaf—22 chain, miss 1, 3 plain, 2 chain, 1 treble on the 2nd chain, 2 chain, 1 treble 1½ treble long, 2 chain, miss 1, 1 treble, 1½ treble long, 2 chain, miss 1, 1 treble, 2 chain, miss 1, 1 treble, 2 chain, miss 1, 1 plain on each of the remaining stitches. The remainder the same as for the right leaf.
Branch on the left and 1st leaf—22 chains, skip 1, 3 plain stitches, 2 chains, 1 treble on the 2nd chain, 2 chains, 1 treble and 1½ treble long, 2 chains, skip 1, 1 treble, 1½ treble long, 2 chains, skip 1, 1 treble, 2 chains, skip 1, 1 treble, 2 chains, skip 1, 1 plain stitch on each of the remaining stitches. The rest is the same as for the right leaf.
2nd leaf—16 chain, miss 1, 2 plain, 2 chain, 1 treble, 2 chain, miss 1, 1 treble, 2 chain, miss 1, 1 treble, 2 chain, miss 1, 1 treble, 2 chain, miss 1, 1 plain on each of the remaining stitches. The rest the same as for the right leaf.
2nd leaf—16 chains, skip 1, 2 plain, 2 chains, 1 treble, 2 chains, skip 1, 1 treble, 2 chains, skip 1, 1 treble, 2 chains, skip 1, 1 treble, 2 chains, skip 1, 1 plain on each of the remaining stitches. The rest is the same as for the right leaf.
3rd leaf—12 chain, miss 1, 2 plain, 2 chain, miss 1, 1 treble, 2 chain, miss 1, 1 treble, 2 chain, miss 1, 1 treble, 2 chain, miss 1, 1 plain on each of the remaining stitches. The remainder, as well as the little ring, the same as for the right leaf. Make altogether 4 leaves for the right side and 4 for the left.
3rd leaf—12 chains, skip 1, 2 plain stitches, 2 chains, skip 1, 1 treble, 2 chains, skip 1, 1 treble, 2 chains, skip 1, 1 treble, 2 chains, skip 1, 1 plain stitch on each of the remaining stitches. The rest, as well as the little ring, is the same as for the right leaf. Make a total of 4 leaves for the right side and 4 for the left.
Calyx of the small flowers.—11 chain = turn the work = 1 plain on the first 5 chain, 3 plain on the 6th chain, 1 plain on the 5 other chain = turn the work = * 2 chain, 1 treble on the 1st plain, 1 chain, 1 treble, 1 chain, 1 treble, 1 chain, ** 3 trebles on the second of the 3 plain, on the 6th chain, repeat once from ** to * = turn the work = 1 plain on each of the preceding stitches, 3 single on the added stitch = turn the work = 1 single on the first 2 plain; plain stitches as far as the middle stitch; 13 chain, miss 1, 1 plain on each chain stitch, 6 plain, 2 single. Fasten off. Make 8 calices in all.
Calyx of the small flowers.—11 chain = turn the work = 1 single crochet in the first 5 chains, 3 single crochets in the 6th chain, 1 single crochet in the other 5 chains = turn the work = * 2 chains, 1 treble crochet in the 1st single crochet, 1 chain, 1 treble crochet, 1 chain, 1 treble crochet, 1 chain, ** 3 treble crochets in the second of the 3 single crochets, in the 6th chain, repeat once from ** to * = turn the work = 1 single crochet in each of the previous stitches, 3 single crochets in the added stitch = turn the work = 1 single crochet in the first 2 single crochets; single crochets as far as the middle stitch; 13 chains, skip 1, 1 single crochet in each chain stitch, 6 single crochets, 2 single crochets. Fasten off. Make 8 calices in total.
Small flowers of three different sizes—Make altogether, 24 large, 12 of medium size, and 16 small.
Small flowers of three different sizes—A total of 24 large, 12 medium, and 16 small.
For the large flowers—18 chain, close the ring, 24 plain on the 18 chain; 1 plain on every stitch of the preceding row and 1 picot after every second plain stitch. Join the first and the last picots of 2 large flowers to the calyx, the 2nd and the 3rd picots of one large flower to the 10th and 11th picots of the other. Join the 1st and 11th picots of the 3rd flower to the 8th picot of the first and to the 5th of the second flower.
For the large flowers—18 chain, close the ring, 24 plain on the 18 chain; 1 plain in every stitch of the previous row and 1 picot after every second plain stitch. Connect the first and last picots of 2 large flowers to the calyx, the 2nd and 3rd picots of one large flower to the 10th and 11th picots of the other. Connect the 1st and 11th picots of the 3rd flower to the 8th picot of the first and to the 5th of the second flower.
For the medium-sized flowers—14 chain, close the ring = 20 plain on the ring, then a second row of plain with 1 picot after every second plain stitch.
For the medium-sized flowers—14 chain, close the ring = 20 plain on the ring, then a second row of plain with 1 picot after every second plain stitch.
These flowers connect the centre figure with the corner one.
These flowers link the central figure with the one in the corner.
For the small flowers—10 chain, close the ring = 16 plain on the ring, then a second row of plain stitches with a picot after every second stitch. Sew the medium-sized flowers and the small ones to the big ones with overcasting stitches.
For the small flowers—10 chain, close the ring = 16 plain on the ring, then a second row of plain stitches with a picot after every second stitch. Sew the medium-sized flowers and the small ones to the big ones with overcasting stitches.
As regards the bars of chain stitches that complete the pattern they can easily be copied from the illustration.
The bars of chain stitches that finish the pattern can be easily copied from the illustration.
FOOTNOTES:
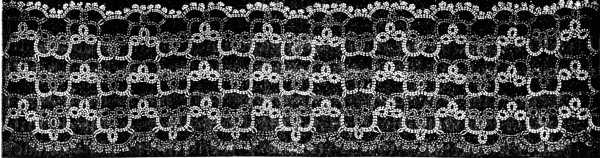
Tatting.
On account of a similarity in their construction, a chapter on tatting seems to form a natural sequence to the one on crochet and is in some ways a preparation for that on macramé which succeeds it.
Because of the similarities in their design, a chapter on tatting naturally follows the one on crochet and, in some ways, serves as a lead-in to the chapter on macramé that comes next.
The English name of tatting is said to be derived from «tatters» and to denote the frail disconnected character of the fabric. By the Italians it was formerly called «occhi», whilst in the East it still bears the name of «makouk», from the shuttle used in making it.
The English name for tatting is believed to come from "tatters," which reflects the delicate, unconnected nature of the fabric. The Italians used to call it "occhi," while in the East, it's still referred to as "makouk," named after the shuttle used to create it.
In the eighteenth century, when tatting was in great vogue, much larger shuttles than our present ones were used, because of the voluminous materials they had to carry, silk cord being one.
In the eighteenth century, when tatting was very popular, much larger shuttles than the ones we use today were used, because of the bulky materials they had to carry, including silk cord.
Shuttles.—The tatting shuttle consists of two oval blades of either bone, ivory, mother of pearl or tortoise-shell, pointed at both ends, and joined together in the middle. A good shuttle contributes materially to the rapid and perfect execution of the work and attention should be paid in its selection to the following particulars: that it be not more than 7 c/m. long and 2 or 3 c/m. wide: that the two ends be close enough to prevent the thread from protruding; this is more especially important in tatting with two shuttles and lastly, that the centre piece that joins the two oval blades together should have a hole bored in it, large enough for the thread to pass through.
Shuttles.—The tatting shuttle consists of two oval blades made of bone, ivory, mother of pearl, or tortoise-shell, pointed at both ends and connected in the middle. A quality shuttle is essential for quickly and accurately completing the work, so attention should be given to the following details when choosing one: it should be no longer than 7 cm and 2 or 3 cm wide; the two ends should be close enough to keep the thread from sticking out, which is especially important when using two shuttles; and finally, the center piece that joins the two oval blades should have a hole large enough for the thread to pass through.
Materials.—A strongly twisted thread such as Fil d’Alsace D.M.C, Fil à dentelle D.M.C, or Cordonnet 6 fils D.M.C, is best for tatting. We particularly recommend Fil d’Alsace, as forming the best shaped knots and picots. A soft material such as Coton à tricoter D.M.C, can also be used where it suits the purpose better.
Materials.—A tightly twisted thread like Fil d’Alsace D.M.C, Fil à dentelle D.M.C, or Cordonnet 6 fils D.M.C, is ideal for tatting. We especially recommend Fil d’Alsace for creating the best-shaped knots and picots. A softer material like Coton à tricoter D.M.C can also be used when it fits the purpose better.
First position of the hands (fig. 486).—The construction of the knots or stitches, appears at first sight to present great difficulties but will be easily mastered by attention to the indications here given. One thing, to be constantly borne in mind is, that when the right hand has passed the shuttle through the loop, it must stop with a sudden jerk and hold the thread tightly extended until the left hand has drawn up the knot. After filling the shuttle, take the end of the thread between the thumb and forefinger of the left hand, and the shuttle in the right, pass the thread over the third and fourth fingers of the left hand, bring it back towards the thumb and cross the two threads under the fingers, as indicated in fig. 486. Pass the thread that comes from the shuttle round the little finger of the right hand, and give the shuttle the direction shown in the engraving.
First position of the hands (fig. 486).—At first glance, the way to create knots or stitches might seem very challenging, but you can easily master it by paying attention to the instructions provided here. One important thing to remember is that after the right hand has passed the shuttle through the loop, it needs to stop suddenly and hold the thread tightly until the left hand has pulled up the knot. Once you’ve filled the shuttle, hold the end of the thread between the thumb and forefinger of your left hand, and hold the shuttle in your right hand. Pass the thread over the third and fourth fingers of your left hand, then bring it back towards your thumb and cross the two threads under your fingers, as shown in fig. 486. Wrap the thread coming from the shuttle around the little finger of your right hand, and position the shuttle as indicated in the engraving.
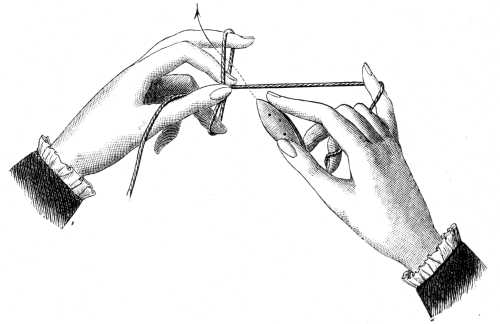
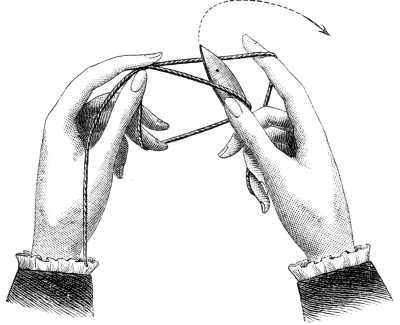
Here the first difficulties for beginners arise and until they have sufficiently mastered the movements of both hands not to confuse them, we advise them to pay careful attention to the following instructions. As soon as you have put the shuttle through the loop, place the right hand on the table with the thread tightly extended, leaving the left hand perfectly passive.
Here is where beginners start to face their first challenges, and until they've gotten a good grip on coordinating both hands without mixing them up, we recommend they closely follow the instructions below. Once you've threaded the shuttle through the loop, put your right hand on the table with the thread held tight, while keeping your left hand completely relaxed.
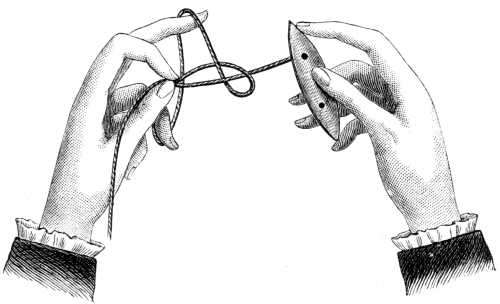
Then, raising the third and fourth fingers of the left hand with the loop upon them, pull up the loop, stretching the thread tightly in so doing by extending the fingers. By this movement a knot is formed, the first part of the «double knot», which is the most common one in tatting.
Then, raise the third and fourth fingers of your left hand with the loop on them, pull up the loop, and stretch the thread tightly by extending your fingers. This movement creates a knot, the first part of the "double knot," which is the most common one in tatting.
Remember that the right hand must be kept perfectly still as long as the left is in motion and that the knot must be formed of the loop thread that is in the left hand.
Remember that the right hand must stay completely still while the left is moving, and the knot should be made with the loop thread in the left hand.
Fourth position of the hands (fig. 489).—The second part of a knot is formed by the following movements: pass the shuttle, as indicated in fig. 489, from left to right, between the first and third fingers through the extended loop; the right hand seizes the shuttle in front of the empty loop and extends the thread; the left hand pulls up this second part of the knot as it did the first.
Fourth position of the hands (fig. 489).—The second part of a knot is made by the following steps: pass the shuttle, as shown in fig. 489, from left to right, between the first and third fingers through the extended loop; the right hand grabs the shuttle in front of the empty loop and stretches the thread; the left hand lifts this second part of the knot just like it did with the first.
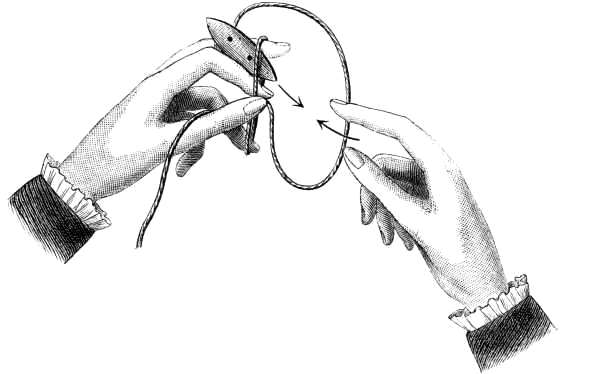
Single or half knots. Josephine picots (figs. 490 and 491).—The Josephine picot or purl, as it is also called in tatting, consists of a series of single or half knots formed of the first knot only. These picots may be made of 4 or 5 knots, as in fig. 490, or of 10 or 12 knots, as in fig. 491.
Single or half knots. Josephine picots (figs. 490 and 491).—The Josephine picot, also known as a purl in tatting, is made up of a series of single or half knots created from just the first knot. These picots can consist of 4 or 5 knots, as shown in fig. 490, or of 10 or 12 knots, as illustrated in fig. 491.


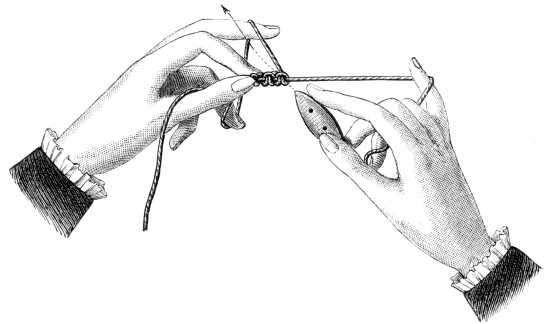
Position of the hands for making a picot (fig. 493).—Picots are introduced into tatting patterns as they are into knitting and crochet. They also serve to connect the different parts of a pattern together and render a great many pretty combinations feasible.
Position of the hands for making a picot (fig. 493).—Picots are added to tatting patterns just like they are in knitting and crochet. They also help to link different parts of a pattern and allow for many beautiful combinations.
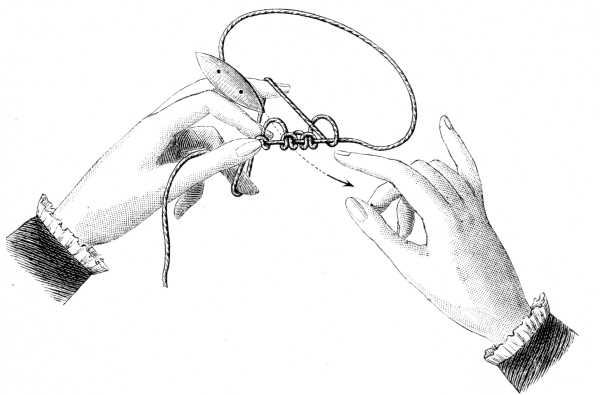
Open and close picot (figs. 494 and 495).—These are formed of single knots, leaving a loop on the extended thread, as shown in fig. 494, and a short length of thread between the knots; finish the second half knot and when you have pulled it up, join it to the preceding knot. In this manner the picot represented in fig. 495 is formed quite naturally.
Open and close picot (figs. 494 and 495).—These are made from single knots, leaving a loop on the extended thread, as shown in fig. 494, and a short length of thread between the knots; complete the second half knot and once you have tightened it, connect it to the previous knot. This way, the picot depicted in fig. 495 is created quite naturally.

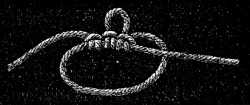
In every kind of tatting the knot that comes after the picot is independent of the loop.
In all types of tatting, the knot that follows the picot is separate from the loop.
Thus if the directions say: 2 knots, 1 picot, 3 knots, 1 picot, 2 knots, etc., you must count the knot that served to form the loop and not make: 2 knots, 1 picot, 4 knots, etc. To join the different rings, ovals, etc., together by means of picots, take up the thread that runs over the left hand with a crochet needle, inserting it into the picot downwards from above, draw the thread through and pull it up like any other knot.
So if the instructions say: 2 knots, 1 picot, 3 knots, 1 picot, 2 knots, etc., you need to count the knot that created the loop and not do: 2 knots, 1 picot, 4 knots, etc. To connect the different rings, ovals, etc., using picots, pick up the thread that goes over your left hand with a crochet hook, insert it into the picot from above, pull the thread through, and tighten it like you would with any other knot.
Tatting with two shuttles (fig. 496).—Two shuttles are used in tatting when the little rings are not to be connected together at the bottom by a thread, when you want to hide the passage of the thread to another group of knots and when threads of several colours are used.
Tatting with two shuttles (fig. 496).—Two shuttles are used in tatting when the small rings aren't meant to be linked at the bottom by a thread, when you want to conceal the transition of the thread to another set of knots, and when multiple colors of thread are being used.
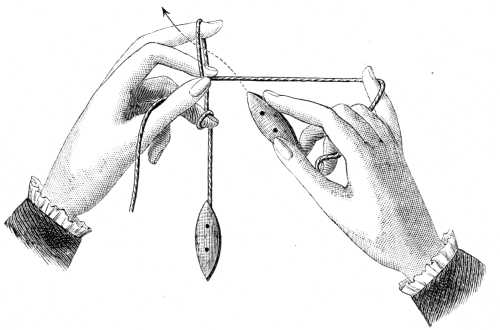
When you work with two shuttles, tie the two threads together. Pass one thread over the third finger of the left hand, wind it twice round the fourth finger and leave the shuttle hanging down.
When you’re using two shuttles, tie the two threads together. Pass one thread over the third finger of your left hand, wrap it twice around the fourth finger, and let the shuttle hang down.
Pass the second shuttle into the right hand and make the same movements with it as you do in working with one shuttle only.
Pass the second shuttle into your right hand and make the same movements with it as you do when working with just one shuttle.
Detached scallops (fig. 497).—Make 12 double knots with one shuttle, then tighten the thread so as to draw them together into a half ring; the next knot must touch the last knot of the scallop before it.
Detached scallops (fig. 497).—Create 12 double knots using one shuttle, then pull the thread to gather them into a half ring; the next knot should connect to the last knot of the previous scallop.

Materials: Fil d’Alsace D.M.C in balls Nos 30 to 70 or Cordonnet 6 fils D.M.C Nos. 25 to 50.[A]
Materials: Fil d’Alsace D.M.C in balls Nos 30 to 70 or Cordonnet 6 fils D.M.C Nos. 25 to 50.__A_TAG_PLACEHOLDER_0__
Scallops joined together at the top (fig. 498). With one shuttle make 4 double, 1 picot, * 8 double, 1 picot, 4 double, close the half ring, 4 double, draw the thread through the picot and repeat from *.
Scallops connected at the top (fig. 498). Using one shuttle, make 4 double stitches, 1 picot, * then 8 double stitches, 1 picot, 4 double stitches, close the half ring, make 4 double stitches, pull the thread through the picot, and repeat from *.
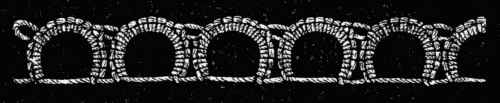
Materials: Fil d’Alsace D.M.C Nos. 30 to 70, Cordonnet 6 fils D.M.C Nos. 15 to 40, or Fil à dentelle D.M.C Nos. 25 to 60 [A]
Materials: Fil d’Alsace D.M.C Nos. 30 to 70, Cordonnet 6 fils D.M.C Nos. 15 to 40, or Fil à dentelle D.M.C Nos. 25 to 60 __A_TAG_PLACEHOLDER_0__
Scallops with picots (fig. 499).—Make with one shuttle: 4 double, 1 picot, * 3 double, 1 picot, 2 double, 1 picot, 2 double, 1 picot, 3 double, 1 picot, 4 double, close the ring.
Scallops with picots (fig. 499).—Use one shuttle to create: 4 double stitches, 1 picot, * 3 double stitches, 1 picot, 2 double stitches, 1 picot, 2 double stitches, 1 picot, 3 double stitches, 1 picot, 4 double stitches, and then close the ring.

Materials: Fil d’Alsace D.M.C in balls Nos. 30 to 70, écru or white.[A]
Materials: D.M.C Fil d’Alsace in balls, sizes 30 to 70, in ecru or white.__A_TAG_PLACEHOLDER_0__
Leave sufficient length of thread before beginning the next ring, for the rings not to overlap each other = make 4 double, draw the left hand thread through the 5th picot of the preceding ring and repeat from *.
Leave enough thread length before starting the next ring, so the rings don’t overlap each other = make 4 double stitches, pull the left thread through the 5th picot of the previous ring and repeat from *.
Tatted insertion (fig. 500).—Make with one shuttle a ring like the ones in fig. 499, then leaving a length of, from 5 to 10 m/m. of thread, make a second ring = turn the work = leave the same length of thread again, begin a third ring which you join after the 4th double, to the 5th picot of the 1st ring = turn the work after each ring is made, so that all the upper rings represent the right side of the work and all the lower ones the wrong.
Tatted insertion (fig. 500).—Using one shuttle, create a ring like the ones shown in fig. 499, then leave a length of thread from 5 to 10 mm. Make a second ring = turn the work = leave the same length of thread again, and start a third ring. Join it after the 4th double to the 5th picot of the 1st ring = turn the work after making each ring, so that all the upper rings show the right side of the work and all the lower ones show the wrong side.
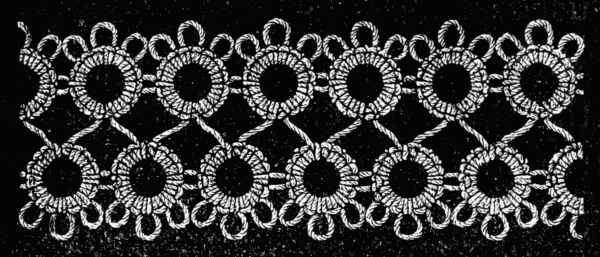
Materials: Fil d’Alsace D.M.C in balls Nos. 30 to 70, écru or white.
Materials: D.M.C Alsace thread in balls sizes 30 to 70, ecru or white.
Tatted insertion (fig. 501).—To be worked with two shuttles. Begin with one thread and one shuttle and make a ring, as in figs. 499 and 500; and a second close to it; then pass the thread over the left hand, take the second shuttle in the right hand and make 6 double on the 2nd thread, after which you again make a ring above and one below with one shuttle only.
Tatted insertion (fig. 501).—Work with two shuttles. Start with one thread and one shuttle to create a ring, similar to figs. 499 and 500; then create a second ring close to the first one. Next, lay the thread over your left hand, grab the second shuttle with your right hand, and make 6 double stitches on the second thread. After that, make another ring above and one below using only one shuttle.
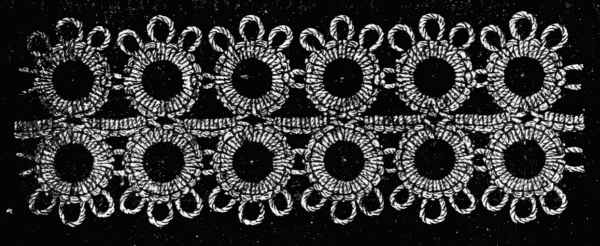
Materials: Fil d’Alsace D.M.C Nos. 30 to 70, or Cordonnet 6 fils D.M.C No. 20.
Materials: D.M.C Fil d’Alsace No. 30 to 70, or D.M.C Cordonnet 6 fils No. 20.
Edging of tatting and crochet (fig. 502).—Make with one shuttle: 1 double, 1 picot, 2 double, 1 picot, 2 double, 1 picot, 2 double, 1 picot twice as long as the others, 2 double, 1 picot, 2 double, 1 picot, 2 double, 1 picot, 2 double, 1 long picot, 1 double = close the ring = fasten off the two threads on the wrong side with two or three stitches.
Edging of tatting and crochet (fig. 502).—Use one shuttle to make: 1 double stitch, 1 picot, 2 double stitches, 1 picot, 2 double stitches, 1 picot, 2 double stitches, 1 picot that’s twice as long as the others, 2 double stitches, 1 picot, 2 double stitches, 1 picot, 2 double stitches, 1 picot, 2 double stitches, 1 long picot, and 1 double stitch = close the ring = secure the two threads on the back side with two or three stitches.
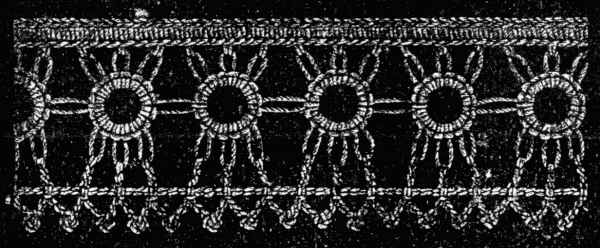
Materials—For the tatting: Fil d’Alsace D.M.C in balls No. 30. For the crochet: Cordonnet 6 fils D.M.C No. 60.
Materials—For tatting: Fil d’Alsace D.M.C in balls No. 30. For crochet: Cordonnet 6 fils D.M.C No. 60.
After the first knot join the next ring to the preceding one by the long picot, and work the remainder as has been already described.
After the first knot, connect the next ring to the previous one using the long picot, and continue working the rest as previously described.
When you have a sufficient number of rings, pick up the picots by crochet trebles with 3 chain stitches between them. On this first row, crochet a second, consisting of: 2 chain, 1 picot, 2 chain, 1 single in the treble of the 1st row. To finish the bottom part of the work, make 1 plain in the 1st picot, 3 chain; 1 plain in the 2nd picot, 3 chain, 1 plain in the 3rd picot, 1 chain, 1 plain in the 1st picot of the next ring.
When you have enough rings, use crochet trebles to pick up the picots with 3 chain stitches in between. On this first row, create a second row that consists of: 2 chain, 1 picot, 2 chain, 1 single in the treble of the 1st row. To finish the bottom part of the work, do 1 plain in the 1st picot, 3 chain; 1 plain in the 2nd picot, 3 chain; 1 plain in the 3rd picot, 1 chain, and 1 plain in the 1st picot of the next ring.
One row of single crochet serves as a footing to the edging.
One row of single crochet acts as the base for the edging.
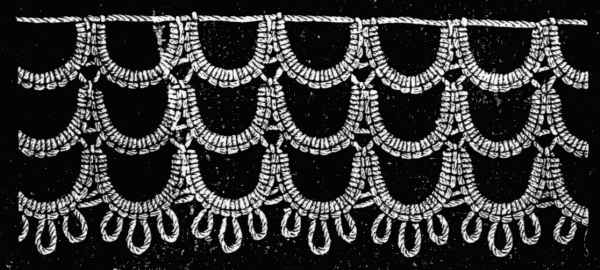
Materials: Fil d’Alsace D.M.C in balls Nos. 30 to 70, or Cordonnet 6 fils D.M.C Nos. 20 to 60.
Materials: Fil d’Alsace D.M.C in balls No. 30 to 70, or Cordonnet 6 fils D.M.C No. 20 to 60.
Fasten the thread of the right hand shuttle into the first picot; then work on this thread the same number of double knots and picots as in the 1st row and join each half ring to the picot of the row before. In the 3rd row, insert 3 picots between the 8 double knots of the row above. Here the Josephine picot may be substituted for the plain picot.
Fasten the thread of the right-hand shuttle into the first picot; then work the same number of double knots and picots on this thread as in the first row, joining each half ring to the picot of the previous row. In the third row, add 3 picots between the 8 double knots of the row above. Here, you can substitute the Josephine picot for the plain picot.
Tatted edging (fig. 504).—Worked with two shuttles and two colours. After making a string of rings like those in fig. 502, with Fil d’Alsace D.M.C No. 30 écru, fasten the blue and unbleached threads of the respective shuttles to the middle picot. Holding the light thread in the right hand, and the dark one laid over the left hand, work: 3 double, 1 picot, 3 double = then put the right hand thread separately through the 2 picots of the rings and continue to make: 3 double, 1 picot, 3 double.
Tatted edging (fig. 504).—Made using two shuttles and two colors. After creating a chain of rings like those shown in fig. 502, with Fil d’Alsace D.M.C No. 30 ecru, attach the blue and unbleached threads from the respective shuttles to the middle picot. Hold the light thread in your right hand and the dark one laid over your left hand, then work: 3 doubles, 1 picot, 3 doubles = then thread the right-hand thread separately through the 2 picots of the rings and continue making: 3 doubles, 1 picot, 3 doubles.
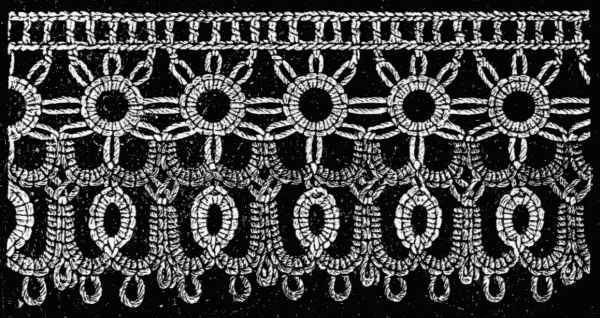
Materials: Fil d’Alsace D.M.C in balls Nos. 30 to 70, or Fil à dentelle D.M.C Nos. 25 to 50.
Colours: Écru and Bleu-Indigo 334, or Jaune d’Ocre 667 and Rouge-Cornouille 450, Gris-Tilleul 331 and Brun-Caroubier 356.
Materials: Fil d’Alsace D.M.C in balls No. 30 to 70, or Fil à dentelle D.M.C No. 25 to 50.
Colors: Écru and Bleu-Indigo 334, or Jaune d’Ocre 667 and Rouge-Cornouille 450, Gris-Tilleul 331 and Brun-Caroubier 356.
The next row also is made with two shuttles. Hold the light thread in the right hand; with the dark thread, laid across the left hand, make: * 4 double, 1 picot, 2 double, 1 picot, 2 double = turn the work = with the right hand shuttle make: 6 double, put the thread through the little picot formed above the middle picot of the rings, 6 double, close the ring = turn the work = make with two shuttles: 2 double, 1 picot, 2 double, 1 picot, 4 double, put the light thread through the 2 blue picots and repeat from *. The first row of crochet for the footing consists of chain and plain stitches only, the second, of chain stitches and trebles.
The next row is also made with two shuttles. Hold the light thread in your right hand; with the dark thread, laid across your left hand, make: * 4 double, 1 picot, 2 double, 1 picot, 2 double = turn the work = with the right hand shuttle make: 6 double, put the thread through the little picot formed above the middle picot of the rings, 6 double, close the ring = turn the work = make with two shuttles: 2 double, 1 picot, 2 double, 1 picot, 4 double, put the light thread through the 2 blue picots and repeat from *. The first row of crochet for the footing consists of chain and plain stitches only, the second consists of chain stitches and trebles.
Medallion (fig. 505).—Take two colours of thread and fill two shuttles with the light colour and two with the dark. Make with one shuttle: 24 double and 12 picots, 6 of them short and 6 long; close the ring, break off the thread and fasten off the ends by a stitch or two on the wrong side.—For the next 4 rows take two shuttles.
Medallion (fig. 505).—Take two different colors of thread and fill two shuttles with the light color and two with the dark. Using one shuttle, create 24 double stitches and 12 picots, with 6 short and 6 long. Close the ring, cut off the thread, and secure the ends with a stitch or two on the wrong side.—For the next 4 rows, use two shuttles.
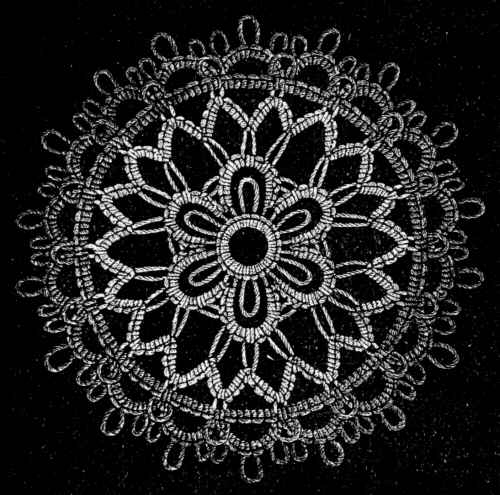
Materials: Fil d’Alsace D.M.C in balls Nos. 30 to 50.[A]
Colours: White and Rouge-Géranium 352, or écru and Vert-Mousse 471, Bleu pâle 668 and Jaune d’Or 676.
Materials: Fil d’Alsace D.M.C in balls Nos. 30 to 50.__A_TAG_PLACEHOLDER_0__
Colors: White and Geranium Red 352, or natural and Moss Green 471, Light Blue 668 and Golden Yellow 676.
1st row—with the shuttles containing the light colour = fasten the ends on to a short picot and make: * 3 double, 1 short picot, 2 double, 1 long picot, 2 double, 1 long picot, 2 double, 1 long picot, 2 double, 1 short picot, 3 double; pass the right hand thread through one of the short picots of the first ring, repeat the series 5 times from *.
1st row—with the shuttles containing the light color = fasten the ends onto a short picot and make: * 3 double, 1 short picot, 2 double, 1 long picot, 2 double, 1 long picot, 2 double, 1 long picot, 2 double, 1 short picot, 3 double; pass the right-hand thread through one of the short picots of the first ring, repeat the series 5 times from *.
When you reach the 6th half ring, instead of making the second picot, put the left hand thread through the short picot of the first half ring, then complete the last double knots, cut the threads off, pass them through the picot of the ring and fasten them off on the wrong side.
When you get to the 6th half ring, instead of making the second picot, thread the left-hand thread through the short picot of the first half ring, then finish the last double knots, cut the threads, pull them through the picot of the ring, and secure them on the wrong side.
2nd row—with the shuttles filled with the light colour = fasten the ends on to a long picot, then make: * 4 double, 1 picot, 4 double, pass the right hand thread through the picot of the first row and repeat the series 17 times from *.
2nd row—take the shuttles filled with the light color = secure the ends to a long picot, then do: * 4 doubles, 1 picot, 4 doubles, pass the right-hand thread through the picot of the first row and repeat the sequence 17 times from *.
3rd row—with the shuttles filled with the dark colour = fasten the ends on to one of the picots of the last row and make: * 4 double, pass the right hand thread through the picot of the 2nd row, make a long picot, 4 double and repeat this series all round the medallion, until you have 18 scallops.
3rd row—with the shuttles filled with the dark color = attach the ends to one of the picots of the last row and do: * 4 double, pass the right-hand thread through the picot of the 2nd row, create a long picot, 4 double and repeat this pattern all around the medallion, until you have 18 scallops.
4th row—with the shuttles filled with the dark colour = * 2 double, 1 picot, 2 double, 1 picot, 2 double, 1 picot, 2 double, pass the right hand thread, from the wrong side, through the picot of the 2nd row and begin again from *.
4th row—with the shuttles filled with the dark color = * 2 double, 1 picot, 2 double, 1 picot, 2 double, 1 picot, 2 double, pass the right-hand thread, from the wrong side, through the picot of the 2nd row and start again from *.
Insertion of tatting and crochet (fig. 506).—Fill two shuttles, one with a light colour, say, Bleu de France 344, the other with a darker, such as Jaune-Rouille 365, and two numbers coarser than the thread you intend to use for the crochet. Begin with the dark colour and make: * 4 double, 1 picot, 8 double, 1 picot, 4 double, close the ring. With both shuttles, the light colour in the left hand: 4 double, 1 picot, 2 double, 1 picot, 2 double, 1 picot, 4 double, put the right hand thread through the picot of the first circle; then add: 4 double, 1 picot, 2 double, 1 picot, 2 double, 1 picot, 4 double.
Insertion of tatting and crochet (fig. 506).—Prepare two shuttles, one with a light color, like Bleu de France 344, and the other with a darker shade, such as Jaune-Rouille 365, along with two threads that are coarser than the thread you plan to use for the crochet. Start with the dark color and create: * 4 double, 1 picot, 8 double, 1 picot, 4 double, then close the ring. With both shuttles, holding the light color in your left hand: 4 double, 1 picot, 2 double, 1 picot, 2 double, 1 picot, 4 double, then pass the right-hand thread through the picot of the first circle; then add: 4 double, 1 picot, 2 double, 1 picot, 2 double, 1 picot, 4 double.

Materials: Fil d’Alsace D.M.C in balls Nos. 30 to 70, or Fil à dentelle D.M.C Nos. 25 to 50.
Colours: Bleu de France 344 and Jaune-Rouille 365.
Materials: D.M.C Alsace thread in balls Nos. 30 to 70, or D.M.C lace thread Nos. 25 to 50.
Colors: French Blue 344 and Rust Yellow 365.
With the shuttle, filled with the dark colour: 5 double, pass the thread through the picot of the first ring, make 8 double, 1 picot, 5 double, close the ring. Then, leaving a short length of thread between, make: 4 double, put the thread through the picot of the preceding ring, 8 double, 1 picot, 4 double, close the ring **; then repeat from * to **.
With the shuttle, filled with the dark color: 5 double stitches, pass the thread through the picot of the first ring, make 8 double stitches, 1 picot, 5 double stitches, and close the ring. Then, leaving a short length of thread in between, make: 4 double stitches, pass the thread through the picot of the previous ring, 8 double stitches, 1 picot, 4 double stitches, and close the ring; then repeat from * to **.
When you have thus made two equal lengths, join them together with crochet, using a thread two numbers finer than the tatting thread; if the latter for instance was Fil d’Alsace No. 30, you would take No. 50 of the same material for the crochet—1 plain in the 1st picot, 5 chain, 1 plain in the middle picot, 5 chain, 1 plain in the 3rd and 1st picot = then, over 5 chain: 1 sextuple cluster stitch (fig. 426), 5 chain.
When you have made two equal lengths, connect them with crochet using a thread that’s two sizes smaller than the tatting thread; for example, if the tatting thread was Fil d’Alsace No. 30, you would use No. 50 of the same material for the crochet—1 plain stitch in the 1st picot, 5 chain stitches, 1 plain stitch in the middle picot, 5 chain stitches, 1 plain stitch in the 3rd and 1st picot = then, over 5 chain stitches: 1 sextuple cluster stitch (fig. 426), 5 chain stitches.
In the row on the opposite side of the tatting, take out the crochet needle at the 3rd chain stitch and put it in from beneath into the corresponding stitch of the opposite row; in this manner join the two insertions together so as to complete the pattern.
In the row on the other side of the tatting, pull out the crochet needle at the 3rd chain stitch and insert it from underneath into the matching stitch of the opposite row; this way, join the two sections together to finish the pattern.
Insertion of tatting and crochet (figs. 507 and 508).—Worked with one shuttle. The tatting thread should be two numbers coarser than the crochet thread. Begin with 2 strings of half rings consisting of: 4 short picots and 3 long. Leave a length of thread between, equal to the diameter of the ring.
Insertion of tatting and crochet (figs. 507 and 508).—Worked with one shuttle. The tatting thread should be two sizes thicker than the crochet thread. Start with 2 strands of half rings made up of: 4 short picots and 3 long. Leave a length of thread in between that’s equal to the diameter of the ring.

Materials—For the tatting: Fil d’Alsace D.M.C in balls Nos. 30 to 70, or Cordonnet 6 fils D.M.C Nos. 25 to 50, écru or white.[A]
For the crochet: The same materials, but two numbers finer.
Materials—For the tatting: D.M.C Fil d’Alsace in balls sizes 30 to 70, or D.M.C Cordonnet 6 fils in sizes 25 to 50, écru or white.__A_TAG_PLACEHOLDER_0__
For the crochet: Use the same materials, but two sizes smaller.
When the two strings of half rings are finished, crochet with the fine thread: 6 plain over each length of thread between, and at the base of the scallops.
When the two strings of half rings are done, crochet with the fine thread: 6 single crochets over each length of thread in between, and at the base of the scallops.

2nd row—5 chain, 1 plain in the 4th plain of the 1st row.
2nd row—5 chains, 1 plain stitch in the 4th plain stitch of the 1st row.
In the row that connects the two rows of tatting, put the 3rd chain stitch into the corresponding stitch of the opposite row.
In the row that connects the two rows of tatting, insert the 3rd chain stitch into the matching stitch of the other row.
For the outside edge make: 1 plain in the 1st short picot, 8 chain *, 1 treble in the 2nd short picot, 7 chain, 1 treble in the 3rd short picot, 8 chain, 1 plain in the 4th short picot, 1 plain in the short picot opposite, 3 chain, pass the thread through the 4th of the 8 chain stitches, 4 chain and repeat from *.
For the outer edge, do the following: 1 single crochet in the 1st short picot, 8 chains *, 1 double crochet in the 2nd short picot, 7 chains, 1 double crochet in the 3rd short picot, 8 chains, 1 single crochet in the 4th short picot, 1 single crochet in the corresponding short picot, 3 chains, pass the thread through the 4th of the 8 chain stitches, 4 chains, and repeat from *.
For the last row make: 3 plain in each of the 3 last of 8 chain, * 1 picot of 5 chain above the treble, 4 plain in the 4 next chain, 1 picot, 1 single in the same stitch as the plain before the picot, 3 plain, 1 picot, 3 plain, miss the 1st and the last stitch, then make 3 plain on the next scallop and repeat from *.
For the last row, make: 3 plain stitches in each of the last 3 of the 8 chains, * 1 picot of 5 chains above the treble, 4 plain stitches in the next 4 chains, 1 picot, 1 single stitch in the same stitch as the plain stitch before the picot, 3 plain stitches, 1 picot, 3 plain stitches, skip the 1st and last stitch, then make 3 plain stitches on the next scallop and repeat from *.
Edging of tatting and crochet (fig. 509).—Worked with two shuttles and in two shades. With the light shade: 2 double, 1 short picot, 2 double, 1 long picot, * 2 double, 1 picot of the ordinary size, 2 double, 1 picot, 2 double, 1 picot, 2 double, 1 long picot, 2 double, 1 short picot, 2 double, close the ring = with 2 shuttles: 3 double, pass the thread through the 1st picot, make 3 double, 1 long picot, 2 double = with the light shade: 4 double, pass the thread through the 9th picot of the 1st ring, make 3 double, 1 picot, 4 double, close the ring = with 2 shuttles: 2 double, 1 picot, 3 double, 1 short picot, 3 double = with one shuttle: 2 double, pass the thread through the empty picot of the small ring, make 2 double, pass the thread through the long picot of the big ring, then repeat from *.
Edging of tatting and crochet (fig. 509).—Made with two shuttles and two colors. Using the lighter color: 2 double stitches, 1 short picot, 2 double stitches, 1 long picot, * 2 double stitches, 1 regular picot, 2 double stitches, 1 picot, 2 double stitches, 1 picot, 2 double stitches, 1 long picot, 2 double stitches, 1 short picot, 2 double stitches, close the ring = with 2 shuttles: 3 double stitches, thread through the 1st picot, do 3 double stitches, 1 long picot, 2 double stitches = using the lighter color: 4 double stitches, thread through the 9th picot of the 1st ring, do 3 double stitches, 1 picot, 4 double stitches, close the ring = with 2 shuttles: 2 double stitches, 1 picot, 3 double stitches, 1 short picot, 3 double stitches = with one shuttle: 2 double stitches, thread through the empty picot of the small ring, do 2 double stitches, thread through the long picot of the big ring, then repeat from *.

Materials—For the tatting: Fil d’Alsace D.M.C in balls No. 30 in two shades of one colour.
For the crochet: Fil d’Alsace D.M.C in balls No. 50 in one colour only.
Materials—For tatting: Fil d’Alsace D.M.C in balls No. 30 in two shades of the same color.
For crochet: Fil d’Alsace D.M.C in balls No. 50 in just one color.
To complete the edge, crochet first one row, consisting of: * 1 plain in the 1st of the 5 picots of the big ring, 4 chain, 1 plain in the 2nd picot, 4 chain, 1 plain in the 3rd picot, 4 chain, 1 plain in the 4th picot, 4 chain, 1 plain in the 5th picot and repeat from *.
To finish the edge, start by crocheting one row, which includes: * 1 single crochet in the 1st of the 5 picots of the large ring, 4 chains, 1 single crochet in the 2nd picot, 4 chains, 1 single crochet in the 3rd picot, 4 chains, 1 single crochet in the 4th picot, 4 chains, 1 single crochet in the 5th picot and repeat from *.
2nd row—2 plain on the 3rd and 4th of the first chain stitches = over the 2nd and 3rd chain: 1 plain, 1 half treble, 2 trebles, 1 half treble, 1 plain; on the 4 last chain: 2 plain.
2nd row—2 single crochet on the 3rd and 4th of the first chain stitches = over the 2nd and 3rd chain: 1 single crochet, 1 half double crochet, 2 double crochets, 1 half double crochet, 1 single crochet; on the last 4 chain: 2 single crochet.
For the footing make: 1 plain in the long picot, 5 chain, 1 plain in the next picot, 5 chain, 1 double treble in the short picot, leave the 2 last loops of the treble on the needle = 3 trebles in the first lower loop of the double treble, keep the last loops of these 3 trebles on the needle, after the 4th treble, draw the needle through the 4 trebles. The last row consists of: 3 chain, 1 treble over 5 chain.
For the foundation, make: 1 single crochet in the long loop, 5 chain, 1 single crochet in the next loop, 5 chain, 1 double treble in the short loop, leave the last 2 loops of the treble on the hook = 3 trebles in the first lower loop of the double treble, keep the last loops of these 3 trebles on the hook, after the 4th treble, pull the hook through the 4 trebles. The last row consists of: 3 chain, 1 treble over 5 chain.
Tatted medallion (fig. 510).—Worked with two shuttles and two colours.
Tatted medallion (fig. 510).—Made with two shuttles and two colors.

1st row—with one shuttle: 12 double and 6 picots, close the ring.
1st row—with one shuttle: 12 doubles and 6 picots, close the ring.
2nd row—with two shuttles and the dark coloured thread laid across the left hand = knot the threads into one of the picots of the 1st ring: 1 double, 1 long picot, 2 double, pass the right hand thread through one of the picots of the ring, 1 picot, 2 double and so on. After the 12th picot fasten off the threads on the wrong side by two or three stitches.
2nd row—using two shuttles and the dark colored thread placed across the left hand = tie the threads into one of the picots of the 1st ring: 1 double, 1 long picot, 2 double, pass the right hand thread through one of the picots of the ring, 1 picot, 2 double, and keep going. After the 12th picot, secure the threads on the wrong side with two or three stitches.
3rd row—with one shuttle: * 3 double, pass the thread through one of the picots of the 2nd row, make 3 double, close the ring = leave 5 m/m. of thread = turn the work = 4 double, 1 picot, 4 double, close the ring = leave 5 m/m. of thread again and repeat 11 times from *.
3rd row—with one shuttle: * 3 double crochet, pass the thread through one of the picots from the 2nd row, make 3 double crochet, close the ring = leave 5 mm. of thread = turn the work = 4 double crochet, 1 picot, 4 double crochet, close the ring = leave 5 mm. of thread again and repeat 11 times from *.
4th row—with two shuttles; fasten the ends to one of the picots of one of the 12 rings of the 3rd row: * 3 double, 1 picot, 3 double = with one shuttle: 3 double, pass the thread through the picot, 3 double, 1 picot, 2 double, 1 picot, 3 double, close the ring = close to this: 3 double, pass the thread through the 2nd picot of the 1st ring, 3 double, 1 picot, 3 double, close the ring = again, close to the last ring: 3 double, pass the thread through the picot of the 2nd ring, 2 double, 1 picot, 3 double, close the ring = with 2 shuttles: 3 double, pass the thread through the 2nd picot of the 3rd ring, 3 double, fasten the thread to the picot of the ring of the 3rd row and repeat 11 times from *.
4th row—with two shuttles; attach the ends to one of the picots of one of the 12 rings in the 3rd row: * 3 double, 1 picot, 3 double = with one shuttle: 3 double, pull the thread through the picot, 3 double, 1 picot, 2 double, 1 picot, 3 double, close the ring = near this: 3 double, pull the thread through the 2nd picot of the 1st ring, 3 double, 1 picot, 3 double, close the ring = again, near the last ring: 3 double, pull the thread through the picot of the 2nd ring, 2 double, 1 picot, 3 double, close the ring = with 2 shuttles: 3 double, pull the thread through the 2nd picot of the 3rd ring, 3 double, attach the thread to the picot of the ring in the 3rd row and repeat 11 times from *.
5th row—with two shuttles and the dark colour across the left hand: 6 double and 2 picots over the lower rings and 10 double and 4 picots over the upper rings.
5th row—with two shuttles and the dark color on the left side: 6 double stitches and 2 picots over the lower rings and 10 double stitches and 4 picots over the upper rings.
Tatted edging (fig. 511).—With two shuttles and with the two colours indicated, or in any other combination of colours.
Tatted edging (fig. 511).—Using two shuttles and the two colors indicated, or in any other color combination.

Materials: Fil d’Alsace D.M.C in balls Nos. 30 to 70, Cordonnet 6 fils D.M.C Nos. 40 to 50, or Fil à dentelle D.M.C Nos. 25 to 40.
Colours: Gris-Tilleul 330 and Rouge-Grenat 326.
Materials: Fil d’Alsace D.M.C in balls Nos. 30 to 70, Cordonnet 6 fils D.M.C Nos. 40 to 50, or Fil à dentelle D.M.C Nos. 25 to 40.
Colors: Gris-Tilleul 330 and Rouge-Grenat 326.
Begin with two shuttles, the red thread across the left hand = 10 double, 1 picot, 6 double = with one shuttle: 6 double, 1 picot, 6 double, close the ring = turn the work = make a second ring like the first and close to it = turn the work = with two shuttles: 6 double, 1 picot, 6 double = with one shuttle: 6 double, pass the thread through the picot of the ring opposite, 6 double, close the ring = 6 double, 1 picot, 6 double, close the ring = turn the work to make the next half ring.
Begin with two shuttles, the red thread across the left hand = 10 double, 1 picot, 6 double = with one shuttle: 6 double, 1 picot, 6 double, close the ring = turn the work = make a second ring like the first and close to it = turn the work = with two shuttles: 6 double, 1 picot, 6 double = with one shuttle: 6 double, pass the thread through the picot of the ring opposite, 6 double, close the ring = 6 double, 1 picot, 6 double, close the ring = turn the work to make the next half ring.
For the outside scallops, make with one shuttle: * 5 double, pass the thread through the picot that connects 2 rings, 5 double, close the ring = with two shuttles: 4 double = with one shuttle: 2 double, 1 picot, 2 double, 1 picot, 2 double, pass the thread through the picot of the half ring of the 3rd row, 2 double; then 8 picots more with 2 double between each, close the ring = with two shuttles: 4 double, 1 long picot, 2 double, 1 short picot, 2 double, 1 short picot, 3 double = with one shuttle: 5 double, pass the thread through the 3rd picot of the big ring, 5 double, close the ring = with two shuttles: 2 double, 6 picots with 2 double after each picot = with one shuttle: 5 double, pass the thread through the 3rd picot of the big ring, 5 double, close the ring = with two shuttles: 3 double, 1 picot, 2 double, 1 picot, 2 double, 1 picot, 4 double, pass the right hand thread through the 6th picot of the big ring = with two shuttles: 4 double, then repeat from *.
For the outside scallops, make with one shuttle: * 5 double, pass the thread through the picot that connects 2 rings, 5 double, close the ring = with two shuttles: 4 double = with one shuttle: 2 double, 1 picot, 2 double, 1 picot, 2 double, pass the thread through the picot of the half ring of the 3rd row, 2 double; then 8 picots more with 2 double between each, close the ring = with two shuttles: 4 double, 1 long picot, 2 double, 1 short picot, 2 double, 1 short picot, 3 double = with one shuttle: 5 double, pass the thread through the 3rd picot of the big ring, 5 double, close the ring = with two shuttles: 2 double, 6 picots with 2 double after each picot = with one shuttle: 5 double, pass the thread through the 3rd picot of the big ring, 5 double, close the ring = with two shuttles: 3 double, 1 picot, 2 double, 1 picot, 2 double, 1 picot, 4 double, pass the right hand thread through the 6th picot of the big ring = with two shuttles: 4 double, then repeat from *.
The footing is worked in crochet and consists of one row of chain stitches and one of trebles.
The base is made using crochet and consists of one row of chain stitches followed by one row of treble stitches.
Square of tatting (fig. 512).—Worked with two shuttles and two colours. With the light colour: 2 double, 1 picot, 4 double, 1 picot, 4 double, 1 picot, 4 double, 1 picot, 2 double, close the ring.
Square of tatting (fig. 512).—Made with two shuttles and two colors. Using the light color: 2 double stitches, 1 picot, 4 double stitches, 1 picot, 4 double stitches, 1 picot, 4 double stitches, 1 picot, 2 double stitches, close the ring.

Materials: Fil d’Alsace D.M.C in balls Nos. 30 to 100, Cordonnet 6 fils D.M.C Nos. 10 to 60, or Fil à dentelle D.M.C Nos. 25 to 70. [A]
Colours: Jaune-Rouille 366 and Brun-Caroubier 359.[A]
Materials: D.M.C Fil d’Alsace in balls No. 30 to 100, D.M.C Cordonnet 6 fils No. 10 to 60, or D.M.C Fil à dentelle No. 25 to 70. __A_TAG_PLACEHOLDER_0__
Colours: Yellow-Rust 366 and Brown-Carob 359.__A_TAG_PLACEHOLDER_1__
1st row—with two shuttles, the dark coloured thread across the left hand = fasten the thread to a picot and make: * 2 double, 1 picot, 2 double, 1 picot, 2 double, 1 picot, 2 double, pass the right hand thread through the picot of the ring; 1 picot over the connecting thread, then repeat 3 times from *. The last picot over the picot of the small ring is made at the end.
1st row—with two shuttles, the dark colored thread across the left side = attach the thread to a picot and make: * 2 double stitches, 1 picot, 2 double stitches, 1 picot, 2 double stitches, 1 picot, 2 double stitches, pass the right-hand thread through the picot of the ring; 1 picot over the connecting thread, then repeat 3 times from *. The last picot over the picot of the small ring is made at the end.
2nd row—with two shuttles, the light thread over the left hand = fasten the thread to the picot over the light picot: * 2 double, pass the right hand thread through the picot of the 1st row, 1 long picot over the lower picot, 3 double, pass the thread through the next picot of the 1st row = in the corner, 1 rather longer picot than the one before, 3 double, pass the right hand thread through a picot, 1 long picot, 2 double, pass the thread through a picot; repeat 3 times from *. To form the last picot, fasten off the thread on the wrong side by two or three stitches.
2nd row—with two shuttles, the light thread over the left hand = attach the thread to the picot over the light picot: * 2 double, pass the right hand thread through the picot of the 1st row, 1 long picot over the lower picot, 3 double, pass the thread through the next picot of the 1st row = in the corner, 1 slightly longer picot than the one before, 3 double, pass the right hand thread through a picot, 1 long picot, 2 double, pass the thread through a picot; repeat 3 times from *. To finish the last picot, secure the thread on the wrong side with two or three stitches.
3rd row—with one shuttle and the dark colour: * 4 double, pass the thread through the picot above the picot of the small ring, 4 double, close the ring = leave 10 m/m. of thread, make a second ring like the 1st = leave 10 m/m. of thread, make 6 double, pass the thread through the long picot, 6 double, close the ring = leave 10 m/m. of thread, make another ring of 12 knots, fasten it to the same picot, the preceding knot is fastened to; then make a ring of 8 double knots and repeat 3 times from *.
3rd row—with one shuttle and the dark color: * 4 double, thread through the picot above the picot of the small ring, 4 double, close the ring = leave 10 mm. of thread, make a second ring like the 1st = leave 10 mm. of thread, make 6 double, thread through the long picot, 6 double, close the ring = leave 10 mm. of thread, make another ring of 12 knots, attach it to the same picot the previous knot is attached to; then make a ring of 8 double knots and repeat 3 times from *.
4th row—with one shuttle and the light colour and worked like the 3rd row, leaving a rather longer length of thread between; then make: 16 instead of 12 double for the corner rings.
4th row—using one shuttle and the light color, and worked like the 3rd row, leaving a slightly longer length of thread in between; then make: 16 instead of 12 double for the corner rings.
5th row—with one shuttle and the light colour = 8 double, fasten the thread to one of the corner loops and between 2 rings of the 4th ring: 8 double, close the ring = turn the work = leave a length of thread, 3 double, 1 picot, then 4 times 2 double knots and 1 picot, 3 double, close the ring. Make the second ring as close as possible to the first, beginning and finishing the second with 5 double knots = make a 3rd ring like the 1st, join it to the 2nd ring by the 4th picot = turn the work = make another ring of 16 knots and join it to the same loop of the 4th row, to which the two other rings are already joined = turn the work = 1 ring above, with 4 picots, like the first one we described, then a ring of 12 double knots below.
5th row—with one shuttle and the light color = 8 double, attach the thread to one of the corner loops and between 2 rings of the 4th ring: 8 double, close the ring = turn the work = leave a length of thread, 3 double, 1 picot, then 4 times 2 double knots and 1 picot, 3 double, close the ring. Create the second ring as close as possible to the first, starting and ending the second with 5 double knots = make a 3rd ring like the 1st, connect it to the 2nd ring by the 4th picot = turn the work = create another ring of 16 knots and attach it to the same loop of the 4th row, where the two other rings are already connected = turn the work = 1 ring above, with 4 picots, like the first one we described, then a ring of 12 double knots below.
At the top, 6 detached half rings, placed between 3 connected rings, which form the corners. The top rings are to be joined after the 3rd double knot, to the 4th picot of the preceding ring.
At the top, 6 separate half rings are positioned between 3 connected rings that make up the corners. The top rings need to be attached after the 3rd double knot to the 4th picot of the previous ring.
6th row—with two shuttles and the dark colour only = fasten the threads to a picot that serves as a connecting link, take the dark thread over the left hand and make: 3 double, 1 picot, 2 double, 1 picot, 2 double, 1 picot, 3 double = fasten the thread to the connecting picot and carry the half rings all round the square.
6th row—with two shuttles and the dark color only = secure the threads to a picot that acts as a connecting link, bring the dark thread over your left hand and do: 3 double, 1 picot, 2 double, 1 picot, 2 double, 1 picot, 3 double = secure the thread to the connecting picot and carry the half rings all around the square.
FOOTNOTES:

Macramé.
Macramé is an Arabic word, signifying an ornamental fringe or trimming, which has been adopted as the term for a certain kind of hand-work, known also as «knotted fringe» or «Mexican lace» and produced by the knotting, interweaving and tying together of threads.
Macramé is an Arabic word that means an ornamental fringe or trim. It has been used to refer to a type of handwork, also known as "knotted fringe" or "Mexican lace," created by knotting, interweaving, and tying threads together.
We have given the preference to the Arabic name because of its less definite meaning, seeing that not only fringe and lace, but trimmings of all kinds, in the shape of bands and stripes and headings, can be worked in macramé.
We chose to use the Arabic name because it has a less specific meaning, since not just fringe and lace, but all kinds of trimmings, like bands, stripes, and headings, can be made in macramé.
Until its revival about ten years ago, when it was regarded by many as a new invention, the art of macramé making had for centuries become almost extinct and save here and there in the convents, was quite unknown.
Until its revival about ten years ago, when many saw it as a new invention, the art of macramé had nearly disappeared for centuries and was mostly unknown, except for the occasional use in convents.
The multitude of uses to which it can be turned as a trimming, the infinite variety it admits of and its great durability and strength, make macramé well worth a study; the difficulties that repel many at first sight are only on the surface and any one who carefully follows the instructions given in the following pages, will soon overcome them and be able without pains to copy the charming designs that accompany them, which remind us of the wooden lattices in the windows of Eastern houses, doubtless familiar to many of our readers, under the name of moucharabieh.
The many ways it can be used as a decoration, the endless variety it allows, and its impressive durability and strength make macramé really worth learning. The challenges that might scare people off at first glance are only superficial, and anyone who carefully follows the instructions provided in the upcoming pages will quickly get the hang of it and be able to effortlessly replicate the lovely designs that come with it, which remind us of the wooden grilles in the windows of Eastern homes, likely familiar to many of our readers as moucharabieh.
Materials.—These may be of almost any kind; silk, gold thread, cord, wool or cotton, can all be employed with good effect. Almost any of the D.M.C cottons can be used for macramé; but the ones especially to be recommended are: Fil à dentelle D.M.C[A], Cordonnet 6 fils D.M.C[A] and Coton à broder D.M.C[A] for the finer kinds of work, and for the coarser, Fil à pointer D.M.C[A], Coton à tricoter D.M.C[A] and Ganse turque D.M.C[A]. The twist in all these is so regular as to admit of a high degree of perfection being attained with them: they are moreover very agreeable to the touch, a great recommendation considering how much they have to be handled by the worker.
Materials.—These can be made from almost anything; silk, gold thread, cord, wool, or cotton can all work well. Most of the D.M.C cottons are suitable for macramé, but the following are especially recommended: Fil à dentelle D.M.C[A], Cordonnet 6 fils D.M.C[A], and Coton à broder D.M.C[A] for finer projects, and for thicker work, Fil à pointer D.M.C[A], Coton à tricoter D.M.C[A], and Ganse turque D.M.C[A]. The twist in all of these is so consistent that a high level of perfection can be achieved with them; they are also very comfortable to handle, which is a big plus considering how much they need to be worked with.
Macramé cushion and other accessories (figs. 513 and 514).—The only really important requisite for macramé work is the cushion, which should be well stuffed, and weighted with lead (fig. 513). It is convenient to have it made to screw on to a table like the Swiss tambour frames. There are other kinds of macramé cushions but none, in our opinion, as practical as these because any pattern can be worked upon them and patterns that have a heading or a border of picots can not be worked on any others. The pegs at the ends of the cushion are for fixing and winding the long threads upon, which carry the knots, and which we shall in future call «cords».
Macramé cushion and other accessories (figs. 513 and 514).—The only really important requirement for macramé work is the cushion, which should be well-stuffed and weighted with lead (fig. 513). It’s convenient for it to be designed to screw onto a table like the Swiss tambour frames. There are other types of macramé cushions, but none, in our view, are as practical as these because any pattern can be created on them, and patterns that have a heading or a border of picots can’t be worked on any others. The pegs at the ends of the cushion are for securing and winding the long threads that carry the knots, which we’ll refer to as "cords" from now on.
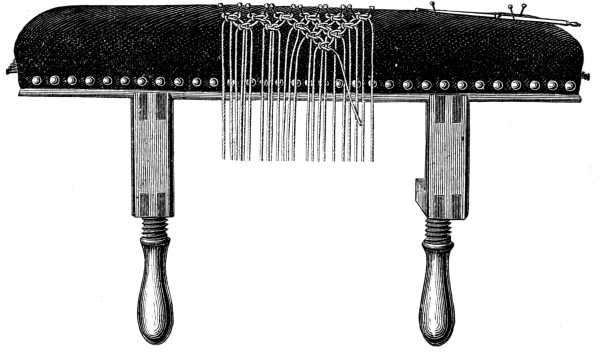
For making long lengths of macramé fringe, metal clamps, with round-headed pegs attached to them top and bottom, to fasten the cords to, as represented in fig. 514, will be found far better than a cushion, as any number of threads can be knotted on to them at a time by pushing them more or less closely together on the cord.
For creating long lengths of macramé fringe, metal clamps with round-headed pegs attached at both the top and bottom, for securing the cords to, as shown in fig. 514, are much better than using a cushion, as you can knot any number of threads onto them at once by adjusting their spacing on the cord.

Besides the cushion and clamps, you will require, some big glass-headed pins, made expressly for the purpose, a crochet needle for pulling the threads through the stuff when they have to be knotted on to an edge, and a French mètre or yard measure to measure the threads with; to these implements may further be added, scissors and a metal comb and ruler for cutting and straightening the ends of the threads.
Besides the cushion and clamps, you’ll need some large glass-headed pins specifically for this purpose, a crochet hook for pulling the threads through the fabric when they need to be knotted at the edge, and a French meter or yardstick to measure the threads. You can also include scissors and a metal comb and ruler for cutting and straightening the ends of the threads.
The length of the threads must depend on their substance and size; that is to say, that a knot will take up more of a coarse stiff thread than of a fine pliable one, on which account, to avoid the necessity of preliminary trials, the right length of thread, for the quality and size of material, is given with each pattern. If, for any reason, our workers should not follow the directions given, they must bear in mind that the thicker and stiffer the material, the more they will have to allow for the knots and vice versa.
The length of the threads should depend on their material and size. This means that a knot will take up more space with a thick, stiff thread than with a fine, flexible one. To avoid the need for trial and error, the correct thread length for the material's quality and size is provided with each pattern. If, for any reason, our workers do not follow the given instructions, they should remember that the thicker and stiffer the material, the more they need to account for the knots, and the opposite is true as well.
Formation of the knots.—Beginners must be careful, in macramé as in tatting, not to move or slacken the cord, or horizontal thread that carries the knots. The knots made by the «knotting-thread», as it will be called in future, consist of loops formed over the cord and then tightened. The knotting-thread and the cord are constantly changing places, as you work, loops having to be made now with the one and now with the other.
Formation of the knots.—Beginners need to be careful, in macramé as well as in tatting, not to move or loosen the cord or the horizontal thread that holds the knots. The knots made by the "knotting-thread," as it will be referred to from now on, consist of loops formed over the cord and then tightened. The knotting-thread and the cord are constantly switching places as you work, with loops needing to be made first with one and then with the other.
Knotting on the threads (fig. 515).—Excepting when you work with the threads of a material obtained by unravelling and drawing out the cross threads, you must knot on lengths of thread on to a cord; cut them double the length the fringe is to be and fold them in half, so as to form a loop by means of which you attach them to the cord, in the following manner. Put the loop over the cord from the front and bring it back underneath, put the ends down through the loop, detail a, and tighten it, detail b, as shown in the engraving.
Knotting on the threads (fig. 515).—Unless you're using threads made from unraveling and pulling out the cross threads, you need to knot lengths of thread onto a cord. Cut them to be double the length of the fringe you want, then fold them in half to create a loop for attaching them to the cord like this: Place the loop over the cord from the front and pull it back underneath, then pull the ends down through the loop, detail a, and tighten it, detail b, as shown in the engraving.
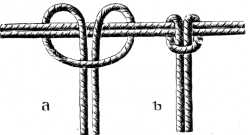
Knotting on the threads on to a stuff edge and formation of a flat double knot (fig. 516).—Push your crochet needle through the edge of the stuff from the right to the wrong side and catch hold of the loop, formed by the folding in half of the thread that is to be knotted on; pull it out to the right side, put the ends through, and tighten the loop, detail a. Detail b shows two double threads, knotted on near to each other in this way, and the first tying together of the two outer threads for the flat knot which is formed as follows: you take the two outer of the four threads hanging down and cross the right hand one under, and the left hand one over the two centre threads. Whilst doing this, hold the inner ones tightly stretched out on the 3rd and 4th fingers of the left hand, detail b. The manner in which the two threads are brought back and tied together again is shown in detail c; the drawing up of the threads completes the so-called flat double knot, detail d. Detail e, of the same figure, shows two flat double knots, side by side, and the first step towards the formation of a third, connecting together the two right threads of the one with the two left threads of the other.
Knotting the threads onto a fabric edge and creating a flat double knot (fig. 516).—Insert your crochet needle through the edge of the fabric from the right side to the wrong side and grab the loop formed by folding the thread you want to knot in half; pull it out to the right side, thread the ends through, and tighten the loop, detail a. Detail b shows two double threads knotted closely together in this way, along with the initial tying of the two outer threads for the flat knot, which is done as follows: take the two outer threads from the four hanging down, cross the right one underneath, and the left one over the two center threads. While doing this, keep the inner threads tightly stretched on the 3rd and 4th fingers of your left hand, detail b. The way the two threads are brought back together and tied again is illustrated in detail c; pulling up the threads completes the flat double knot, detail d. Detail e, from the same figure, shows two flat double knots side by side, and the first step towards creating a third by connecting the two right threads of one with the two left threads of the other.
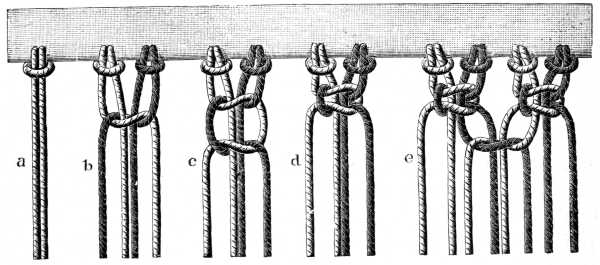
Knotting on threads on to a knotted heading (fig. 517).—Make flat double knots as in fig. 516, detail d, on a double cord and then knot on your threads on to the loops of the double knots, putting the loop through from the right side, so that it may lie at the back. Use double threads so that the work beneath the heading may not be too open.
Knotting on threads onto a knotted heading (fig. 517).—Create flat double knots like in fig. 516, detail d, on a double cord, and then knot your threads onto the loops of the double knots, threading the loop through from the right side, so it lies at the back. Use double threads to ensure that the work beneath the heading isn’t too loose.

Knotting on threads on to a picot heading (fig. 518) —First, crochet a row of chain stitches, then make flat double knots on the chain, far enough apart for the thread between to form picots on the chain, then a second chain of crochet drawn through the picots on one side, on to which tie triple or quadruple lengths of thread, as shown in the engraving.
Knotting threads onto a picot heading (fig. 518) —First, crochet a row of chain stitches, then make flat double knots on the chain, keeping enough space between them so the thread in between can create picots on the chain. Next, make a second chain of crochet that goes through the picots on one side, and tie triple or quadruple lengths of thread onto it, as shown in the engraving.
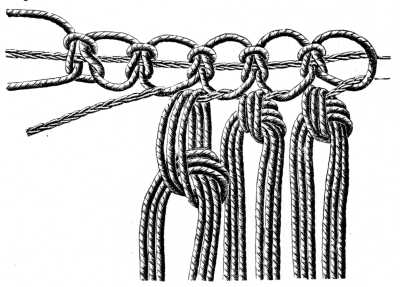
Knotting on threads with round picots (fig. 519).— Fasten the lengths of thread to the cushion with pins, about half a c/m. apart, fix the cord to one of the pegs at the left end of the cushion, hold it tightly extended in a horizontal line with the right hand. With the left hand knot the threads that are pinned down on to the cord, looping each end twice round it, upwards from below and then drawing it through between the two loops or knots thus formed, pulling each knot to the left as you tighten it round the cord. Make the second row of knots in the same way, taking care to lay the second cord as close to the first as possible that the vertical threads may not be visible between. One series of knots forms a bar; there are both horizontal and slanting bars as will be seen later on.
Knotting on threads with round picots (fig. 519).— Secure the lengths of thread to the cushion with pins, about half a cm apart, attach the cord to one of the pegs at the left end of the cushion, and hold it tightly stretched in a horizontal line with your right hand. With your left hand, knot the threads that are pinned down onto the cord, looping each end twice around it, upward from below, and then pulling it through the two loops or knots formed, pulling each knot to the left as you tighten it around the cord. Create the second row of knots in the same way, making sure to place the second cord as close to the first as possible so that the vertical threads are not visible in between. One series of knots creates a bar; there are both horizontal and diagonal bars, as will be shown later on.
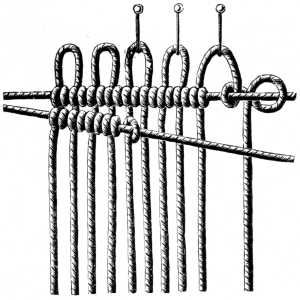
Knotting on threads with a fringe heading (fig. 520).—Knot the threads on with a picot heading, as explained in the preceding figure, then cut the picots through and unravel and comb out the threads.
Knotting on threads with a fringe heading (fig. 520).—Knot the threads on with a picot heading, as shown in the previous figure, then cut the picots and unravel and comb out the threads.
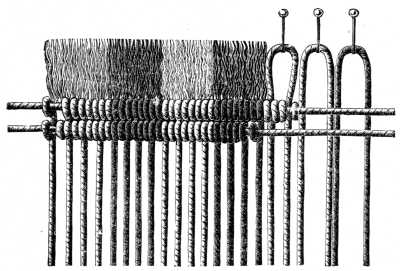
For this way of knotting on threads, a very strongly twisted material is better than a loose one, as when it is cut and untwisted, it makes a much richer and fuller fringe.
For this method of tying on threads, a tightly twisted material is better than a loose one, as when it’s cut and untwisted, it creates a much richer and fuller fringe.

Knotting on threads with picots and two flat double knots (figs. 522 and 523).—Pin the two threads on as before and make two flat double knots, one below the other; detail a shows the first knot begun, detail b the two knots completed. Fig. 523 shows the picots secured by a horizontal bar of knots beneath them.
Knotting on threads with picots and two flat double knots (figs. 522 and 523).—Pin the two threads in place as before and create two flat double knots, one underneath the other; detail a shows the beginning of the first knot, while detail b illustrates the completion of both knots. Fig. 523 displays the picots held in place by a horizontal bar of knots underneath them.
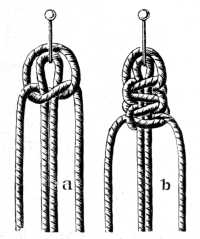
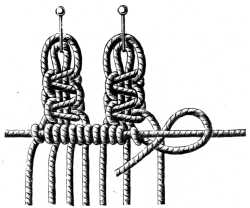
Knotting on threads with scallops (fig. 524).—The threads for the scallops must be cut much longer than those that are to be knotted on below them. The button-hole loops must be so made that they turn upwards; and there must be 12 of them, all made with the left hand thread over the right hand thread, detail a. Then, knot on two double threads underneath the scallop and besides, make knots with the threads that come from the scallops, detail b.
Knotting on threads with scallops (fig. 524).—The threads for the scallops should be cut significantly longer than the ones that will be knotted below them. The button-hole loops must be made so that they turn upwards, and there should be 12 of them, all made with the left-hand thread over the right-hand thread, detail a. Then, knot on two double threads underneath the scallop and also make knots with the threads that come from the scallops, detail b.
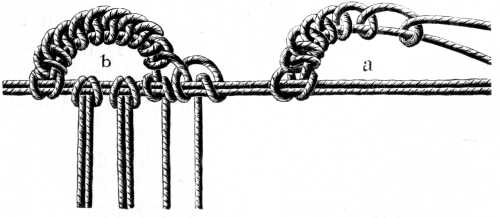
Knotting on threads with loops (fig. 525).—Pin on two threads folded in half, a little distance apart, detail a, and bind them together with a flat double knot. Pin on more lengths close to them, the inner threads of which are held by a “collecting knot”, as the flat double knot is called when it is made over more than two threads (see also fig. 530). The ends of the threads can then be looped over one or two cords, so as to form a single or double bar of knots, as required.
Knotting on threads with loops (fig. 525).—Pin two threads folded in half a little distance apart, detail a, and tie them together with a flat double knot. Pin additional lengths close to them, with the inner threads held by a “collecting knot,” which is what we call the flat double knot when made over more than two threads (see also fig. 530). Then, the ends of the threads can be looped over one or two cords to create a single or double bar of knots, as needed.
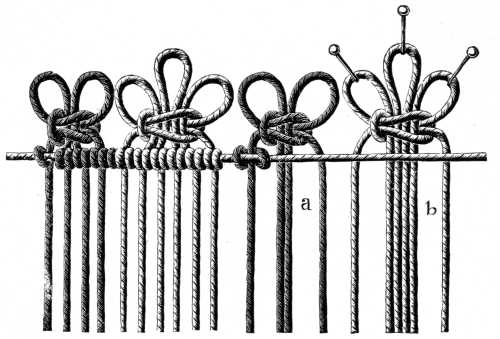
Knotting on threads with triple scallops (fig. 526).—Knot on three single threads in succession; first, the middle one, then the second, with the knot right and left and the loop long enough to form the scallop, then the third in the same manner.
Knotting on threads with triple scallops (fig. 526).—Knot three single threads one after the other; start with the middle one, then move to the second, making sure the knot is placed to the right and left with the loop long enough to create the scallop, and finally, do the same with the third thread.
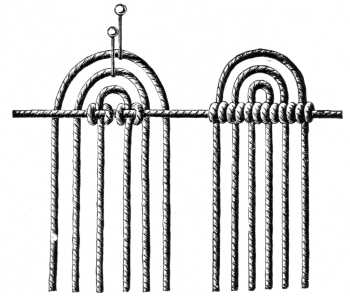
Knotting on threads for ribbed picots (fig. 527).—Take a double thread and make two slanting bars of knots, see details a and b, then secure them, like the preceding scallops by a horizontal bar of knots, see detail c.
Knotting on threads for ribbed picots (fig. 527).—Take a double thread and create two angled bars of knots, refer to details a and b, then secure them, similar to the previous scallops, with a horizontal bar of knots, see detail c.

Knotting on threads for a gimp heading (fig. 528).—This mode of knotting on forms a broad gimp, consisting of vertical bars of knots, made over a single cord. On the one side, that which is afterwards turned downwards, the cord, the ribs are made on, forms loops, held with pins, into which meshes of threads can be knotted when the gimp is finished, for making either a fringe or a grounding.
Knotting on threads for a gimp heading (fig. 528).—This method of knotting creates a wide gimp, made up of vertical bars of knots over a single cord. On one side, which will be turned downward later, the cord has ribs that create loops, secured with pins, into which thread meshes can be knotted once the gimp is complete, for either a fringe or a base.
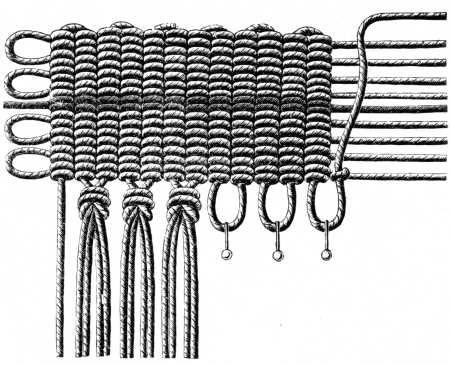
Patterns in several colours may likewise be knotted into gimp headings of this kind.
Patterns in several colors can also be knotted into gimp headings like this.
Flat double knots with half knots (fig. 529).—These are double knots followed by a third knot, or more correctly speaking, a half one of the first flat knots.
Flat double knots with half knots (fig. 529).—These are double knots followed by a third knot, or more accurately, a half knot of the first flat knots.
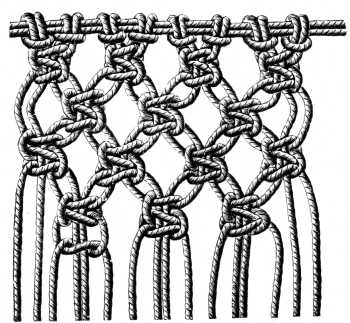
Collecting knots (fig. 530).—As explained in fig. 525, these are flat double knots, made over more than two threads. The engraving shows, in the first place on the left, a flat double knot made over two threads, completed, and the first crossing of the thread for the collecting knot; secondly, the second crossing of the threads; thirdly how the collecting knot can, if necessary, be continued over 4 threads, and fourthly, how the collecting knot should be made to finish with a flat double knot.
Collecting knots (fig. 530).—As shown in fig. 525, these are flat double knots made over more than two threads. The engraving illustrates, first on the left, a flat double knot made over two threads, completed, and the first crossing of the thread for the collecting knot; second, the second crossing of the threads; third, how the collecting knot can, if needed, be extended over 4 threads; and fourth, how to finish the collecting knot with a flat double knot.
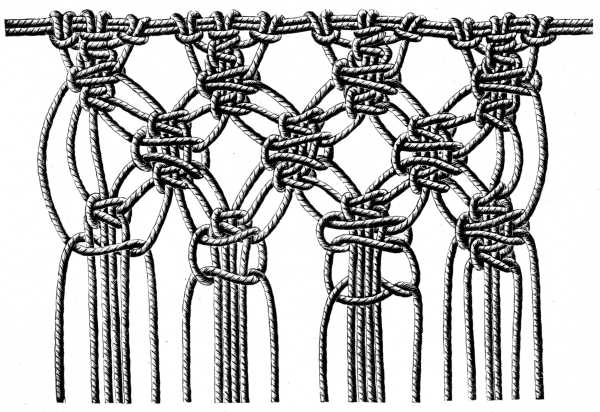
Plaited and waved knots (fig. 531).—Plaited knots are formed by a continuous repetition of the first crossing of the threads for making a flat knot, detail a; waved knots by a slight twist given to the plaited knots from left to right, detail b. These plaits of waved knots are secured by joining together the threads of opposite meshes, two and two, by a flat double knot.
Braided and twisted knots (fig. 531).—Braided knots are created by continuously repeating the initial crossing of the threads to form a flat knot, detail a; twisted knots are made by gently twisting the braided knots from left to right, detail b. These twisted knots are secured by tying together the threads of opposite weaves, two by two, using a flat double knot.

Single crossed knots and double crossed knots (figs. 532 and 533).—Two plain crossings of the threads, detail a, to begin with; after which you rapidly reverse the threads, turning the knot to the wrong side, drawing it up tightly at the same time; this forms the first knot, detail b. The second knot, fig. 533, is formed by 3 crossings, detail a; reverse the threads rapidly, to form the double crossed knot, detail b. For the following knots tie the threads together, as for the flat double knot, detail c.
Single crossed knots and double crossed knots (figs. 532 and 533).—Start with two plain crossings of the threads, detail a; then quickly reverse the threads, turning the knot to the back and pulling it tight at the same time; this creates the first knot, detail b. The second knot, fig. 533, is made with 3 crossings, detail a; rapidly reverse the threads to form the double crossed knot, detail b. For the next knots, tie the threads together like with the flat double knot, detail c.
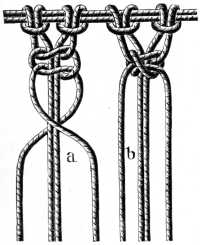
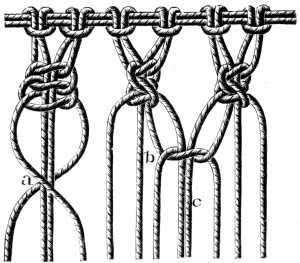
Looped picot and knotted picots (figs. 534 and 535).—Looped picots are made along a row of knots by setting the knots, far enough apart for the loop between, to form a picot when the knots are drawn up close together. In fig. 534, the detail a represents the picot, in its first open stage, detail b the same picot when it is finished.
Looped picot and knotted picots (figs. 534 and 535).—Looped picots are created along a row of knots by placing the knots far enough apart so that the space in between forms a picot when the knots are pulled close together. In fig. 534, detail a shows the picot in its first open stage, while detail b displays the same picot when it is completed.
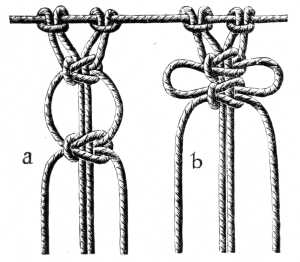
Knotted picots, fig. 535, are formed after one or more flat double knots, by a knot made in the outer thread; to get this knot into the right place, make it on a big pin and draw it up close to the flat knot before you take out the pin.
Knotted picots,
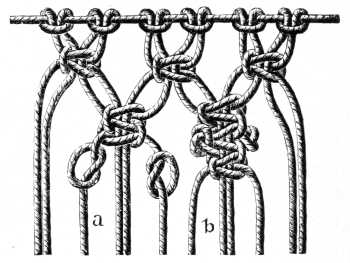
These picots are always made on both sides and can be repeated several times along a row of knots. Detail a shows the crossing of the threads for the picots, detail b the picots completed and followed by a flat knot.
These picots are always created on both sides and can be repeated multiple times along a row of knots. Detail a shows how the threads cross for the picots, while detail b shows the finished picots followed by a flat knot.
Bead knots (fig. 536).—A bead knot is made by turning back the threads after a row of flat double knots. Detail a shows three flat double knots finished, detail b the inner threads turned back over the flat double knots, detail c the two knotting threads, brought between the two threads coming from the left to the right, and detail d the bead knot finished and followed by a flat double knot.
Bead knots (fig. 536).—A bead knot is created by folding back the threads after completing a row of flat double knots. Detail a shows three finished flat double knots, detail b shows the inner threads folded back over the flat double knots, detail c displays the two knotting threads passing between the two threads moving from left to right, and detail d shows the finished bead knot followed by a flat double knot.
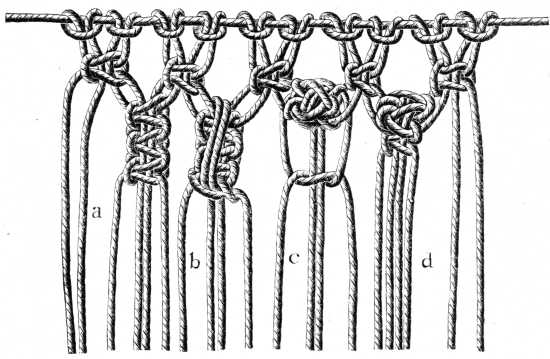
Bars of knots to the right and left (figs. 537, 538, 539, 540, 541, 542, 543, 544).—After knotting on the requisite number of threads on to a double cord, make two button-hole loops with the right thread round the left one, fig. 537, then knot each thread twice over the second cord, fig. 538. These knots must be as close together as possible. This done, begin to make the slanting bars, inclining from left to right, with 4 threads.
Bars of knots to the right and left (figs. 537, 538, 539, 540, 541, 542, 543, 544).—After tying the required number of threads onto a double cord, create two button-hole loops with the right thread around the left one, fig. 537, then tie each thread twice over the second cord, fig. 538. These knots should be packed as closely together as possible. Once that's done, start making the diagonal bars, slanting from left to right, with 4 threads.
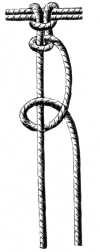
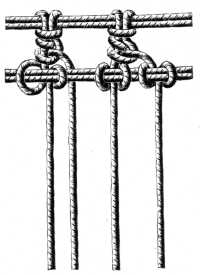
The first thread on the left, marked 1 in fig. 540, serves as cord to the threads 2, 3, 4, which are looped in succession over thread 1.
The first thread on the left, labeled 1 in fig. 540, acts as a cord for threads 2, 3, and 4, which are looped in order over thread 1.
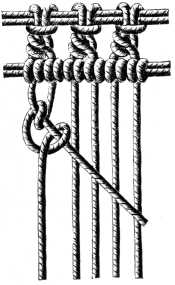
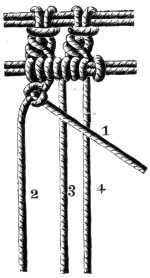
Fig. 541 represents threads 2, 3 and 4, knotted thread 1 and in the second bar, thread 2 becoming in its turn the cord, and having threads 3, 4 and 1 knotted over it, whilst it is being held, tightly stretched in the right hand. The knotting should be done with the left hand.
Fig. 541 shows threads 2, 3, and 4, which are knotted to thread 1, and in the second bar, thread 2 becomes the cord, with threads 3, 4, and 1 knotted over it, while being held tightly stretched in the right hand. The knotting should be done with the left hand.
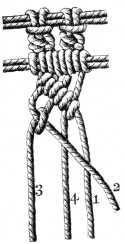
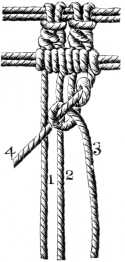
In fig. 542, which represents a bar inclining from right to left, threads 3, 2 and 1 are knotted over thread 4; and in fig. 543, in the second row, threads 2, 1, 4 over thread 3. Here, it has to be the left hand that holds the thread extended from right to left, whilst the right hand does the knotting.


Fig. 544 explains how the double bars are bound together by an ordinary double knot.
Fig. 544 explains how the double bars are tied together with a simple double knot.
Single chain (fig. 545).—This is made with two single threads, by knotting them alternately over each other, that is, each in turns serving as cord to the other.
Single chain (fig. 545).—This is created with two single threads, knotting them alternately over each other, meaning each one takes turns acting as the cord for the other.
Double chain (fig. 546).—The double chain is made in the same manner as the single, only with a double thread.
Double chain (fig. 546).—The double chain is created in the same way as the single chain, but using a double thread.
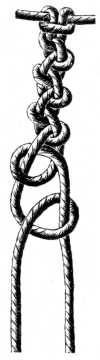
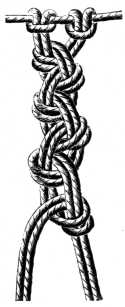
Both the double and single chain are generally used in macramé gimps and borders as a means of conducting threads of different colours, from one part of a pattern to another, which could be done in no other way; also, as a continuation to the Chinese knot, fig. 607, as described at the end of this chapter.
Both the double and single chain are commonly used in macramé trim and borders to carry threads of different colors from one part of a pattern to another, which can't be done any other way. They also serve as an extension of the Chinese knot, fig. 607, as described at the end of this chapter.
Ribbed border (fig. 547).—Here, the same cord runs to and fro; the 4 threads that hang down, form little ribbed bars running right and left. To distinguish from the knotting threads, the thread that runs to and fro it, is represented in a darker colour.
Ribbed border (fig. 547).—Here, the same cord moves back and forth; the 4 threads that hang down create small ribbed bars that run side to side. To differentiate from the knotting threads, the thread that goes back and forth is shown in a darker color.
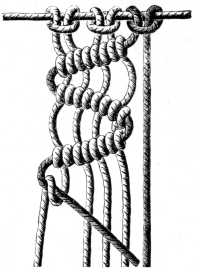

Materials: Coton à tricoter D.M.C Nos. 6 to 16, Cordonnet 6 fils D.M.C Nos. 5 to 25, or Fil à dentelle D.M.C Nos. 25 to 70.
Colours: Bleu-Indigo 311, Rouge-Turc 321 and white, or Bleu tendre 710, Rouge-Maroquin 3327 and Vert-Fauve 691.
Materials: D.M.C Cotton for knitting Nos. 6 to 16, D.M.C 6-ply Cord Nos. 5 to 25, or D.M.C Lace Thread Nos. 25 to 70.
Colors: Indigo Blue 311, Turkish Red 321 and white, or Soft Blue 710, Maroon Red 3327 and Fawn Green 691.
1st row—knot on the threads, as in fig. 515, and in the following order: 1 double white thread, 2 double red, 1 double blue and so on.
1st row—knot on the threads, as shown in fig. 515, and in the following order: 1 double white thread, 2 double red threads, 1 double blue thread, and so on.
3rd row—3 button-hole knots, fig. 524, each with 2 threads.
3rd row—3 button-hole knots, fig. 524, each with 2 threads.
4th row—like the 2nd.
4th row—same as the 2nd.
5th row—make slanting bars of double knots right and left, counting 6 threads for each bar, consequently 12 for 2. The 1st and 12th thread serving as the cords for the knots. In the 2nd series of knots which forms the double slanting bar, make another double knot over the cord with the thread that served as cord in the preceding row.
5th row—create slanting bars using double knots on the right and left, using 6 threads for each bar, which totals 12 for the 2. The 1st and 12th threads will act as the cords for the knots. In the 2nd series of knots that forms the double slanting bar, tie another double knot over the cord using the thread that served as the cord in the previous row.
When the slanting bars are finished, bring them as close together as possible, tighten the last thread on the right and make another double knot with the left thread; the position of all the threads is clearly described in fig. 549. Then continue the bars in the opposite direction, so that the 2nd thread on the left is stretched over the right hand group of threads, and the 11th thread on the right over the left hand group.
When the slanting bars are done, pull them as close together as you can, tighten the last thread on the right, and tie another double knot with the left thread; the arrangement of all the threads is clearly shown in fig. 549. Then, keep going with the bars in the opposite direction, so that the 2nd thread on the left goes over the right group of threads, and the 11th thread on the right goes over the left group.
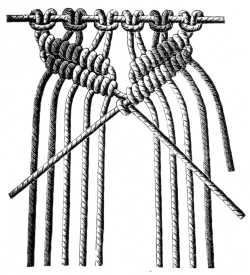
Make 3 rows of double bars and then take always 3 threads of a left hand group and 3 of a right hand one, tie them loosely together in a plain knot, put in, above the knot, a bunch of 8 threads, 15 c/m. long, fig. 550 detail a, draw up the knot close to the bars and wind thread of a different colour several times round it, detail b, to form the tassel.
Make 3 rows of double bars and then always take 3 threads from the left-hand group and 3 from the right-hand group, tie them loosely together in a simple knot, then place a bunch of 8 threads, 15 cm long, fig. 550 detail a, pull the knot tight against the bars and wrap a thread of a different color around it several times, detail b, to create the tassel.
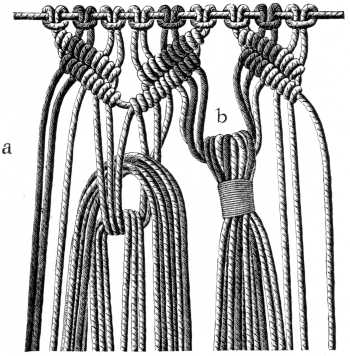
The other bunches of threads which are hung on between two bars of knots must be tied on the same level with the first, but do not, nevertheless, come into close contact with the bars.
The other groups of threads that are hung between two bars of knots must be tied at the same level as the first, but they should not come into close contact with the bars.
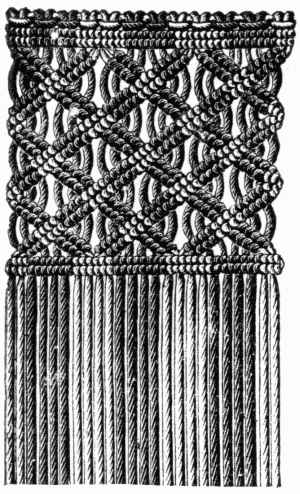
Materials: Coton à tricoter D.M.C Nos. 6 to 13, Cordonnet 6 fils D.M.C Nos. 1 to 20, Fil à pointer D.M.C Nos. 10 to 30, or Fil à dentelle D.M.C Nos. 25 to 50.
Colours: Bleu-indigo 311 and Brun-Chamois 418, or Brun-Rouille 3312 and Bleu-Gris 3303.
Materials: D.M.C Knitting Cotton No. 6 to 13, D.M.C 6-Ply Cordonnet No. 1 to 20, D.M.C Pointing Thread No. 10 to 30, or D.M.C Lace Thread No. 25 to 50.
Colors: Indigo Blue 311 and Chamois Brown 418, or Rust Brown 3312 and Gray-Blue 3303.
Begin by making all the knots over threads 1 and 2 of the left set, so that threads 3 and 4 on the left will be outside and threads 1 and 2 inside the group. Make the same knots over the 3rd and 4th thread on the right, then repeat the left group again and so on.
Begin by tying all the knots over threads 1 and 2 of the left group, so that threads 3 and 4 on the left will be outside, and threads 1 and 2 will be inside the group. Tie the same knots over the 3rd and 4th threads on the right, then repeat the left group again, and so on.
Repeat from the beginning, and make 2 double knots over thread 3 on the right, fig. 552, with threads 1 and 2 on the left, then again 2 knots over thread 4 on the right. When this series of knots is finished, make: 3 double knots over thread 1 (dark-coloured in the engraving) with the left thread 2 and the right threads 1 and 2; make on the left: 3 knots over thread 4 with the right thread 3 and the left threads 2 and 1, and so on.
Repeat from the beginning and tie 2 double knots over thread 3 on the right, fig. 552, using threads 1 and 2 on the left, then tie another 2 knots over thread 4 on the right. Once you've finished this series of knots, do the following: tie 3 double knots over thread 1 (the dark-colored one in the engraving) using the left thread 2 and the right threads 1 and 2; then on the left, tie 3 knots over thread 4 with the right thread 3 and the left threads 2 and 1, and so on.
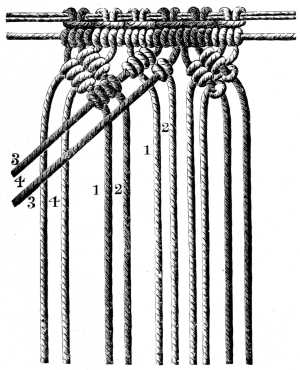
When this pattern is worked for a gimp and not a fringe, the threads are made to end in knots, as explained in fig. 558.
When this pattern is used for a gimp instead of a fringe, the threads are finished with knots, as shown in fig. 558.
In order not to have to add on threads in the middle of the work, or have long ends hanging down, which are very much in the way, we recommend the employment of a new macramé shuttle, a kind of spool, such as are used in the making of pillow lace. These shuttles simplify the work enormously and are made hollow so that they can be mounted and filled on the spindle of any sewing machine.
To avoid adding threads while you're working or having long ends hanging down that get in the way, we suggest using a new macramé shuttle, a type of spool similar to those used in making pillow lace. These shuttles make the job much easier and are designed to be hollow so they can be attached and filled on the spindle of any sewing machine.
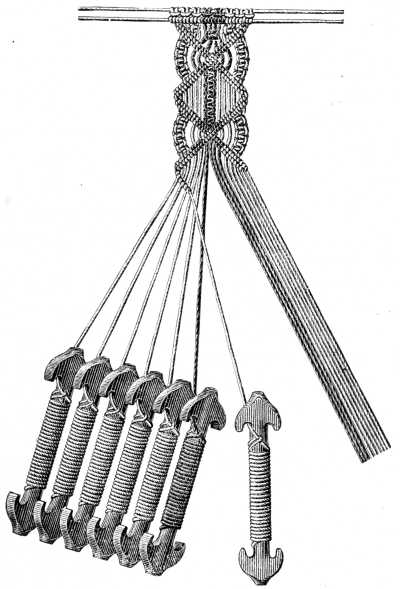
Materials: Coton à tricoter D.M.C Nos. 6 to 16, Cordonnet 6 fils D.M.C Nos. 1 to 10, Fil à pointer D.M.C Nos. 10 to 30, or Fil à dentelle D.M.C Nos. 25 to 50.[A]
Colours: Bleu-Indigo 311 and Brun-Marron 406.[A]
Materials: D.M.C Knitting Cotton Nos. 6 to 16, D.M.C 6-ply Cord No. 1 to 10, D.M.C Pointing Thread Nos. 10 to 30, or D.M.C Lace Thread Nos. 25 to 50.__A_TAG_PLACEHOLDER_0__
Colours: Indigo Blue 311 and Brown 406.__A_TAG_PLACEHOLDER_1__
Knot on the threads, as in fig. 515, and make a single bar of knots. Then leaving 2 threads on the right and 2 on the left disengaged, make 3 flat double knots with every set of 4 threads between. Make a slanting bar of double knots over the 16th right thread, with the 15th, 14th, 13th, 12th, 11th, 10th and 9th thread; then make knots with the same threads and with the 16th over the 15th thread. Make a similar bar on the left, over the 1st thread, with the 2nd, 3rd, 4th, 5th, 6th, 7th and 8th thread.
Knot the threads, as shown in fig. 515, and create a single row of knots. Then, leaving 2 threads on the right and 2 on the left free, make 3 flat double knots with each set of 4 threads in between. Create a diagonal row of double knots over the 16th right thread, using the 15th, 14th, 13th, 12th, 11th, 10th, and 9th threads; then tie knots with the same threads and the 16th over the 15th thread. Make a similar row on the left, over the 1st thread, using the 2nd, 3rd, 4th, 5th, 6th, 7th, and 8th threads.
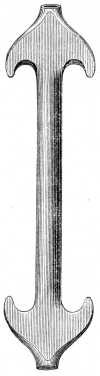
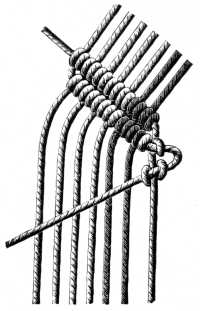
On both sides, and with the 4 outer threads: 4 flat double knots, fig. 516, detail d; 2 more bars on the right and left, but in the opposite direction, and knotting all the threads even to the last one, fig. 555. Take the 4 middle threads and make 6 flat double knots and then turn the bars of knots inwards; the return of the cord is indicated as before in fig. 555.
On both sides, with the 4 outer threads, tie 4 flat double knots, see fig. 516, detail d; then add 2 more bars on the right and left, but going in the opposite direction, and knot all the threads all the way to the last one, see fig. 555. Take the 4 middle threads and make 6 flat double knots, then fold the bars of knots inward; the return of the cord is shown as before in fig. 555.
Knot the threads on for both these borders in the ordinary way, followed by a single horizontal bar of knots. For fig. 556, make a triple slanting bar of knots, with 4 threads, slanting one from right to left and one from left to right; then make a single horizontal bar and add another series of triple bars slanting the opposite way; complete the pattern by a vertical bar, lay another cord and make a horizontal bar upon it on the wrong side of the work and finish by tying the threads together, two and two, as shown in fig. 558, detail a, cut them, detail b, and push the knot upwards, detail c.
Knot the threads onto both borders in the usual way, followed by a single horizontal row of knots. For fig. 556, create a triple slanting bar of knots using 4 threads, slanting one from right to left and the other from left to right; then make a single horizontal bar and add another series of triple bars slanting the other way; finish the pattern with a vertical bar, lay down another cord and create a horizontal bar on its wrong side and complete by tying the threads together in pairs, as shown in fig. 558, detail a, cut them, detail b, and push the knot upwards, detail c.

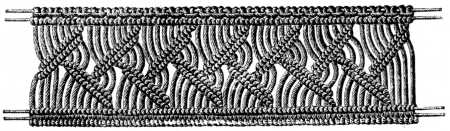
Materials: Coton à tricoter D.M.C Nos. 6 to 10, Fil à pointer D.M.C Nos. 10 to 30, or Fil à dentelle D.M.C Nos. 25 to 70.[A]
Colours—For fig. 556: Bleu-Lapis 342 or Bleu-Gentiane 480—For fig. 557: Rouge-Turc 321 or Rouge-Cerise 3318.[A]
Materials: D.M.C knitting cotton sizes 6 to 10, D.M.C embroidery thread sizes 10 to 30, or D.M.C lace thread sizes 25 to 70.__A_TAG_PLACEHOLDER_0__
Colors—For fig. __A_TAG_PLACEHOLDER_1__: Lapis Blue 342 or Gentian Blue 480—For fig. __A_TAG_PLACEHOLDER_2__: Turkish Red 321 or Cherry Red 3318.__A_TAG_PLACEHOLDER_3__
For fig. 557 take 8 threads for a group of knots. Make all the bars slanting from right to left first, fig. 559, then take the 5th thread, counting from left to right, for the cord, fig. 559 again, and begin the second series of bars of knots, slanting from left to right. Fasten off the threads as already explained in fig. 558.
For fig. 557, take 8 threads for a group of knots. First, make all the bars slanting from right to left, as shown in fig. 559. Then, take the 5th thread, counting from left to right, for the cord, as shown in fig. 559. Start the second series of bars of knots, slanting from left to right. Fasten off the threads as previously explained in fig. 558.
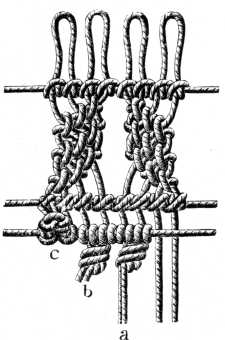
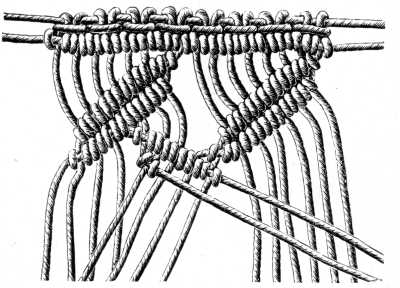
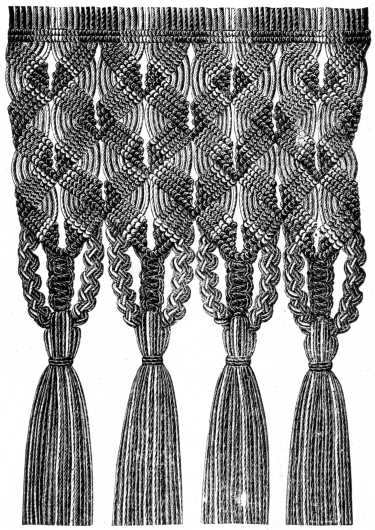
Materials: Cordonnet 6 fils D.M.C Nos. 3 to 25 or Fil à dentelle D.M.C Nos. 25 to 50.
Colours: Brun-Cuir 431 and 432, Bleu-Indigo 31
Materials: Cordonnet 6 fils D.M.C Nos. 3 to 25 or Fil à dentelle D.M.C Nos. 25 to 50.
Colors: Brown-Leather 431 and 432, Blue-Indigo 31
1st row—knot on the threads, as in fig. 520, in the following order: 4 double blue threads, 3 single dark brown, 1 double light brown, 3 single dark brown; then again 4 double blue, and so on.
1st row—knot on the threads, as shown in fig. 520, in the following order: 4 double blue threads, 3 single dark brown, 1 double light brown, 3 single dark brown; then repeat 4 double blue, and so on.
2nd row—divide the threads into groups, so that the brown threads come in the middle with 4 blue ones on either side. Begin on the left = cover the 4th blue thread, which comes nearest to the first brown one, with flat double knots, made over the 1st, 2nd and 3rd brown thread and the light brown one = cover the 3rd blue thread with the 4 brown threads and the 4th blue, which served as the cord in the 1st row of knots = cover the 2nd blue thread with the 4 brown and the 4th and 3rd blue = cover the 1st blue with the 4 brown and the 4th, 3rd and 2nd blue.
2nd row—split the threads into groups, so the brown threads are in the middle with 4 blue ones on each side. Start on the left = wrap the 4th blue thread, which is closest to the first brown one, with flat double knots, made over the 1st, 2nd, and 3rd brown threads and the light brown one = wrap the 3rd blue thread with the 4 brown threads and the 4th blue, which acted as the cord in the 1st row of knots = wrap the 2nd blue thread with the 4 brown and the 4th and 3rd blue = wrap the 1st blue with the 4 brown and the 4th, 3rd, and 2nd blue.

In the working detail, fig. 561, the dark lines represent the blue threads, the light ones, the brown.
In the working detail, fig. 561, the dark lines represent the blue threads, while the light lines represent the brown.
When the quadruple bar, slanting from left to right, is finished, make a similar one, from right to left, then connect the 1st and 16th thread by a double knot and pass the first blue thread on the left over to the right group.
When the quadruple bar, angled from left to right, is done, make a similar one from right to left. Then, tie the 1st and 16th thread together with a double knot and move the first blue thread on the left over to the right group.
2nd row—make similar groups, reversed, so that the brown knots come next to the last blue ones and the blue knots again terminate the groups of bars; the brown threads will be stretched flat between the preceding group and the next.
2nd row—create similar groups, reversed, so that the brown knots are next to the last blue ones and the blue knots again end the groups of bars; the brown threads will be stretched flat between the previous group and the next.
3rd and 5th row—like the first.
3rd and 5th row—just like the first.
4th row—like the 2nd.
4th row—same as the 2nd.
After the 5th row of groups, take 4 brown threads on either side of the blue knots, and make them into a double chain, fig. 546, consisting of 12 knots, and make 6 flat double knots with the last threads.
After the 5th row of groups, take 4 brown threads on each side of the blue knots, and create a double chain, fig. 546, which should have 12 knots, and tie 6 flat double knots with the last threads.
Lastly, unite all the threads of one group of bars, and make them into a handsome tassel by the addition of other threads.
Lastly, bring together all the strands of one set of bars, and create a beautiful tassel by adding more threads.
Macramé fringe (fig. 562).—Entire length of the threads for No. 3 of Cordonnet 6 fils D.M.C: 75 c/m.
Macramé fringe (fig. 562).—Total length of the threads for No. 3 of Cordonnet 6 fils D.M.C: 75 cm.
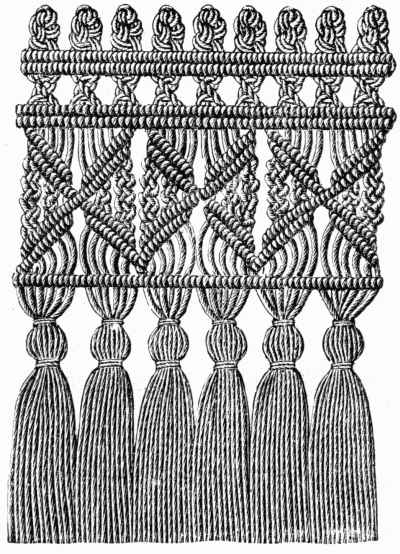
Materials: Cordonnet 6 fils D.M.C Nos. 3 to 15 or Fil à dentelle D.M.C Nos. 25 to 50.[A]
Colours: Écru, or any light shade mentioned in the D.M.C colour card.[A]
Materials: Cordonnet 6 fils D.M.C Nos. 3 to 15 or Fil à dentelle D.M.C Nos. 25 to 50.__A_TAG_PLACEHOLDER_0__
Colors: Ecru, or any light shade listed in the D.M.C color card.__A_TAG_PLACEHOLDER_1__
1st row—Knot on the threads as in fig. 527, succeeded by a double horizontal bar of knots.
1st row—Knot on the threads as seen in fig. 527, followed by a double horizontal bar of knots.
2nd row—twisted or waved knots with 4 knots, fig. 531.
2nd row—twisted or wavy knots with 4 knots, fig. 531.
3rd row—double horizontal bar of knots.
3rd row—double horizontal row of knots.
4th row—with 6 threads: 1 double bar, slanting from left to right, and 1 bar, from right to left, joined together by the last threads.
4th row—with 6 threads: 1 double bar, slanting from left to right, and 1 bar, from right to left, joined together by the last threads.
5th row—with the 4 threads coming from the groups of bars: 1 single chain, fig. 545, with 4 crossings of the threads, quite close to the point where the groups meet, and 1 single chain with 7 crossings, made with the outside threads.
5th row—with the 4 threads coming from the groups of bars: 1 single chain, fig. 545, with 4 crossings of the threads, pretty close to where the groups meet, and 1 single chain with 7 crossings, made with the outside threads.
6th row—similar groups of bars to those of the 4th row, but set the reverse way and terminating in a horizontal bar. For the tassels, add a thick bunch of threads to each group of 6 threads that issues from the work.
6th row—similar groups of bars to those of the 4th row, but arranged in the opposite direction and ending with a horizontal bar. For the tassels, add a thick bunch of threads to each group of 6 threads that comes out from the work.
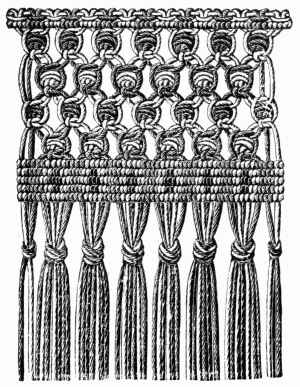
Materials: Cordonnet 6 fils D.M.C Nos. 8 to 30, or Fil à dentelle D.M.C Nos. 25 to 50.
Colours: Écru, Brun-Acajou 401 and Rouge-Cardinal 347.
Materials: Cordonnet 6 fils D.M.C Nos. 8 to 30, or Fil à dentelle D.M.C Nos. 25 to 50.
Colors: Écru, Brun-Acajou 401, and Rouge-Cardinal 347.
1st row—knot the threads on, as in fig. 515, one écru and one brown alternately, succeeded by a single horizontal bar of double knots.
1st row—tie the threads on, as shown in fig. 515, alternating one ecru and one brown, followed by a single horizontal bar of double knots.
2nd, 3rd, 4th and 5th row—4 rows of knots, such as are seen in fig. 564, in process of being made, and in fig. 565, finished, and succeeded by a flat knot. The colours alternate in the knots; in the 2nd and 4th row the knot is set in the light colour, in the 3rd and 5th, in the dark.
2nd, 3rd, 4th, and 5th row—4 rows of knots, like those shown in fig. 564, in the process of being made, and in fig. 565, completed, followed by a flat knot. The colors alternate in the knots; in the 2nd and 4th row, the knot is done in the light color, while in the 3rd and 5th, it’s done in the dark.
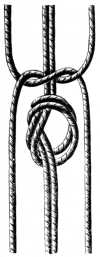
Working detail of fig. 563.
Working detail of fig. __A_TAG_PLACEHOLDER_0__.

Working detail of fig. 563.
Working detail of fig. __A_TAG_PLACEHOLDER_0__.
6th row—1 horizontal bar of double knots over a fresh cord.
6th row—1 horizontal bar of double knots over a new cord.
7th row—lay down another cord, make another horizontal bar of knots and between every second of the light double knots, loop on 1 red thread; the loop, that fastens it to the cord, taking the place of the knot.
7th row—lay down another cord, create another horizontal bar of knots, and between every second of the light double knots, loop on 1 red thread; the loop that attaches it to the cord takes the place of the knot.
8th row—lay down a third cord, and make 2 double knots with the red threads between the knots of écru thread.
8th row—lay down a third cord, and make 2 double knots with the red threads between the knots of beige thread.
9th row—lay down a fourth cord, make a half knot with every red thread.
9th row—lay down a fourth cord, tie a half knot with each red thread.
10th row—lay down a fifth cord, then make a horizontal bar of double knots, as in the 6th row; the red threads are taken to the wrong side and passed over. Knot the ends of the threads together in clusters of 6, about 15 m/m. below the last cord of knots.
10th row—lay down a fifth cord, then make a horizontal bar of double knots, like in the 6th row; the red threads go to the back side and are passed over. Tie the ends of the threads together in groups of 6, about 15 mm below the last knot cord.
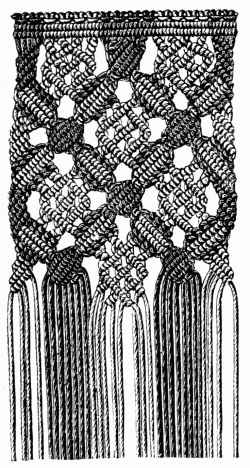
Materials: Cordonnet 6 fils D.M.C Nos. 15 to 30 or Fil à dentelle D.M.C Nos. 25 to 50.[A]
Colours: Écru and Bleu-Indigo 322, or Vert-Perroquet 697 and Rouge-Écarlate 498.[A]
Materials: Cordonnet 6 strands D.M.C Nos. 15 to 30 or Fil à dentelle D.M.C Nos. 25 to 50.__A_TAG_PLACEHOLDER_0__
Colors: Ecru and Indigo Blue 322, or Parrot Green 697 and Scarlet Red 498.__A_TAG_PLACEHOLDER_1__
1st row—knot the threads on, as in fig. 515, 4 blue and 4 écru alternately, and make a double horizontal bar.
1st row—tie the threads on, like in fig. 515, using 4 blue and 4 cream alternately, and create a double horizontal bar.
2nd row—beginning in the middle, make 2 flat double knots with 8 blue threads; with the 4 blue threads on the left, make a quadruple group of bars over the 4 blue threads on the right. These quadruple groups of bars, called «shell bars» are illustrated in detail in fig. 567. Unite the blue threads at the sides by flat double knots.
2nd row—starting in the middle, create 2 flat double knots with 8 blue threads; using the 4 blue threads on the left, form a quadruple group of bars over the 4 blue threads on the right. These quadruple groups of bars, known as "shell bars," are shown in detail in fig. 567. Secure the blue threads at the sides with flat double knots.
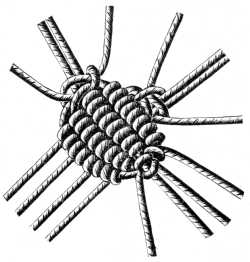
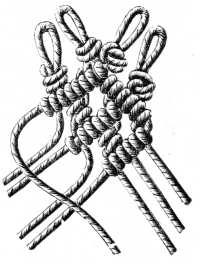
The beginning and continuation of the openwork parts of the pattern are explained in fig. 568.
The start and ongoing sections of the openwork parts of the pattern are detailed in fig. 568.
The threads that issue from the last group of knots are used for making the second shell bar, the two inner bars of which are made in écru cotton, and the two outer in blue. When this striped shell bar is finished, the blue threads are again united for the openwork figure.
The threads that come from the last set of knots are used to create the second shell bar. The two inner bars are made from off-white cotton, and the two outer bars are blue. Once this striped shell bar is completed, the blue threads are once again combined for the openwork design.
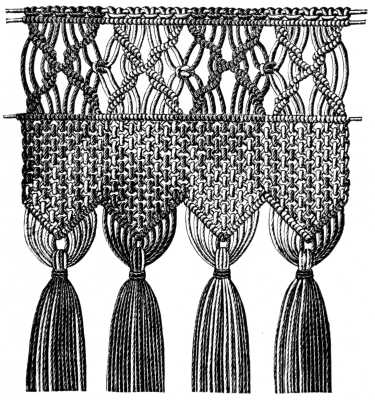
Materials: Coton à tricoter D.M.C Nos. 8 to 16, Cordonnet 6 fils D.M.C Nos. 5 to 25, Fil à pointer D.M.C Nos. 6 to 30, or Fil à dentelle D.M.C Nos. 25 to 50.[A]
Colours: White, Bleu-Indigo 311 and 312 or Gris-Amadou 385, Brun-Caroubier 356, 357.[A]
Materials: D.M.C Knitting Cotton Nos. 8 to 16, D.M.C 6-ply Cordonnet Nos. 5 to 25, D.M.C Tipping Thread Nos. 6 to 30, or D.M.C Lace Thread Nos. 25 to 50.__A_TAG_PLACEHOLDER_0__
Colors: White, Bleu-Indigo 311 and 312 or Gris-Amadou 385, Brun-Caroubier 356, 357.__A_TAG_PLACEHOLDER_1__
Knot the threads on, as in fig. 515 and after finishing the horizontal bar, make from left to right, over the 1st thread, 1 double knot made with the 2nd and with the 3rd thread.
Knot the threads as shown in fig. 515, and after finishing the horizontal bar, going from left to right, tie 1 double knot with the 2nd and 3rd threads over the 1st thread.
Then, over the 2nd thread, which has now become the 1st, make double knots with the 3rd, 1st, 4th and 5th thread; then, over the 3rd thread, counting now from right to left, which in the knotting on figured as the 4th: 1 double knot with the 5th and 2nd thread.
Then, over the 2nd thread, which is now the 1st, tie double knots with the 3rd, 1st, 4th, and 5th threads; next, over the 3rd thread, counting from right to left, which is the 4th in the knotting: 1 double knot with the 5th and 2nd threads.
Make the same group from right to left, only at the 3rd change of thread make 5 double knots instead of 2, and let the last knots count for the new group of bars, turned the opposite way.
Make the same group from right to left, but at the 3rd thread change, make 5 double knots instead of 2, and consider the last knots as part of the new group of bars, turned the other way.
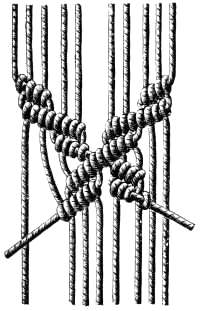
Working detail of fig. 569.
Detailed view of fig. __A_TAG_PLACEHOLDER_0__.
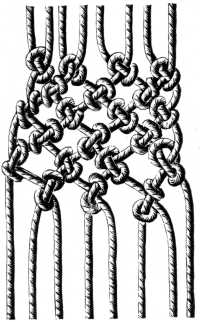
Working detail of fig. 569.
Working detail of fig. __A_TAG_PLACEHOLDER_0__.
In the middle of two opposing groups of bars, make a flat double knot with 2 of the right threads and 2 of the left.
In the middle of two opposing groups of bars, tie a flat double knot using 2 threads from the right and 2 threads from the left.
When the second horizontal bar is finished, turn the work round, and go on working on the wrong side, making plain double knots, as in fig. 571, turned in one row, all from right to left, and in the next, from left to right.
When you finish the second horizontal bar, turn the work around and continue working on the back side, making simple double knots, as shown in fig. 571, turning in one row from right to left, and in the next row from left to right.
When you have worked 10 such rows of knots, begin to make one knot less on either side of a group, so as to form pointed scallops of knots which you finish off with a plain bar.
When you’ve completed 10 rows of knots, start making one less knot on each side of a group to create pointed scallops of knots, which you finish with a plain bar.

Working detail of fig. 569.
Detailed work of fig. __A_TAG_PLACEHOLDER_0__.
Tassels are then made with the threads that issue from each scallop, and when these are sewn up, turn the work round to the right side, where the knots, made on the wrong side, will present the appearance indicated in fig. 572.
Tassels are then created with the threads that come from each scallop, and once these are sewn up, turn the work to the right side, where the knots made on the wrong side will look like what's shown in fig. 572.
Macramé fringe (fig. 573).—Entire length of the threads for No. 6 of Coton à tricoter D.M.C: 65 c/m.
Macramé fringe (fig. 573).—Total length of the threads for No. 6 of D.M.C Knitting Cotton: 65 cm.
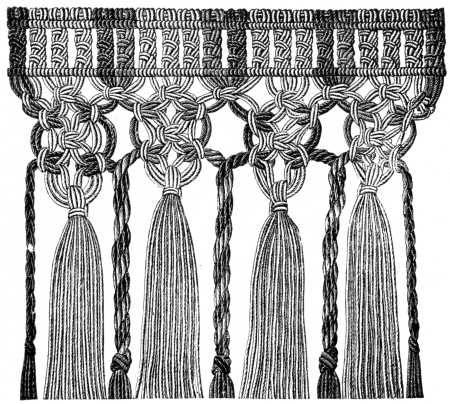
Materials: Coton à tricoter D.M.C No. 6, Cordonnet 6 fils D.M.C Nos. 3 to 25, or Fil à pointer D.M.C Nos. 10 to 30.[A]
Colours: Écru, Rouge-Turc 321 and Rouge-Grenat 358 or Violet-Mauve 315 and 316, and Vert-Bouteille 494.[A]
Materials: D.M.C No. 6 knitting cotton, D.M.C cordonnet 6 threads Nos. 3 to 25, or D.M.C pointed thread Nos. 10 to 30.__A_TAG_PLACEHOLDER_0__
Colors: Ecru, Turkish Red 321 and Garnet Red 358 or Purple-Mauve 315 and 316, and Bottle Green 494.__A_TAG_PLACEHOLDER_1__
1st row—6 chain knots made with every 4 threads.
1st row—6 chain knots made with every 4 threads.
2nd row—a single horizontal bar of knots.
2nd row—a single horizontal bar of knots.
3rd row—collecting knots, fig. 530, made with the écru threads over the 4 dark and the 4 light red ones, and flat double knots over the 4 écru threads.
3rd row—collecting knots, fig. 530, made with the beige threads over the 4 dark and the 4 light red ones, and flat double knots over the 4 beige threads.
4th row—collecting knots over 4 écru threads with 4 red and 2 écru threads.
4th row—tying knots over 4 cream threads with 4 red and 2 cream threads.
5th row—collecting knots in the centre of the groups, with the écru threads.
5th row—gathering knots in the center of the groups, using the beige threads.
6th row—similar to the 4th.
6th row—like the 4th.
7th row—similar to the 5th.
7th row—like the 5th.
Then take the red threads on the right and left and twist them, each cluster separately, from left to right between the thumb and forefinger, as you do in making a cord, then unite them together, twisting them from left to right. Fasten off the cord by a knot, beneath which the ends of thread form a little tassel. Collect all the écru threads together and make them into a heavy tassel with the aid of supplementary threads.
Then take the red threads on the right and left and twist them, each bunch separately, from left to right between your thumb and forefinger, just like you do when making a cord. Then bring them together, twisting them from left to right. Secure the cord with a knot, making sure the ends of the thread form a small tassel. Gather all the écru threads and create a heavy tassel using additional threads.

Materials: Cordonnet 6 fils D.M.C Nos. 5 to 25.[A]
Colours: Vert-Mousse 471 and Rouge-Cornouille 450, or Rouge-Framboise 686 and Gris-Coutil 323.[A]
Materials: Cordonnet 6 threads D.M.C Nos. 5 to 25.__A_TAG_PLACEHOLDER_0__
Colors: Moss Green 471 and Cornille Red 450, or Raspberry Red 686 and Coutil Gray 323.__A_TAG_PLACEHOLDER_1__
From left to right and over the 1st thread: 1 double knot with the 2nd thread; over the 4th thread of colour 450, and from right to left, double knots with the 3rd, 2nd and 1st thread of the same colour = from left to right: 1 double knot with the 6th thread of colour 450 over the 5th, and with the 3rd thread over the 2nd = from right to left: 5 double knots over the 8th thread of colour 450 = from left to right: 1 double knot over the 10th thread, 1 double knot over the 5th thread, 1 double knot over the 1st thread = from right to left: 7 double knots over the 12th thread = from left to right: 3 detached double knots.
From left to right and over the 1st thread: 1 double knot with the 2nd thread; over the 4th thread of color 450, and from right to left, double knots with the 3rd, 2nd, and 1st thread of the same color = from left to right: 1 double knot with the 6th thread of color 450 over the 5th, and with the 3rd thread over the 2nd = from right to left: 5 double knots over the 8th thread of color 450 = from left to right: 1 double knot over the 10th thread, 1 double knot over the 5th thread, 1 double knot over the 1st thread = from right to left: 7 double knots over the 12th thread = from left to right: 3 detached double knots.
Then, from left to right, and subsequently from right to left = with 6 green threads: 2 double bars slanting over the 2 red threads (see the top of fig. 577); unite the 4 red threads in the middle and make a shell knot with them, fig. 575, consisting of 6 flat knots, fig. 576; take 2 threads on the right and 2 on the left, turn them down to the left and right, and then from the wrong side to the right, over the threads that come from the bars and close with a flat knot. On the sides, make double bars and between each bar, 2 single chain knots.
Then, starting from the left and moving to the right, and then from the right back to the left, use 6 green threads: 2 double bars slanting over the 2 red threads (see the top of fig. 577). Bring the 4 red threads together in the middle and create a shell knot with them, fig. 575, which is made up of 6 flat knots, fig. 576. Take 2 threads on the right and 2 on the left, bend them down to the left and right, and then from the back side to the right, over the threads coming from the bars, and finish with a flat knot. On the sides, create double bars and in between each bar, make 2 single chain knots.
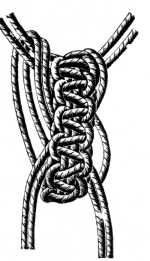
Working detail of fig. 574.
Close-up of fig. __A_TAG_PLACEHOLDER_0__.
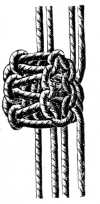
Working detail of fig. 574.
Working detail of fig. __A_TAG_PLACEHOLDER_0__.
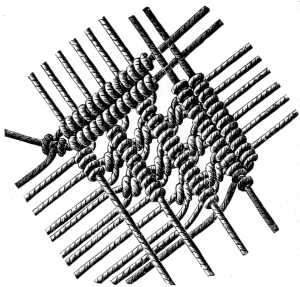
Fill the empty spaces under the outside shell knots, with 9 flat double knots; under the middle knot make bars of inter-crossed knots, of which a clear explanation will be found in fig. 577.
Fill the empty spaces beneath the outer shell knots with 9 flat double knots; underneath the middle knot, create bars of inter-crossed knots, which will be clearly explained in fig. 577.
To join two borders of the kind together, pass the thread of the second border over the thread on which the bar in the middle of the outer scallop is knotted.
To connect two borders of this type together, take the thread of the second border and place it over the thread where the bar in the middle of the outer scallop is tied.
Fringe with shell knots (fig. 578).—Entire length of the single threads for No. 12 of Coton à tricoter D.M.C: 90 c/m.
Fringe with shell knots (fig. 578).—Total length of the single threads for No. 12 of Coton à tricoter D.M.C: 90 cm.
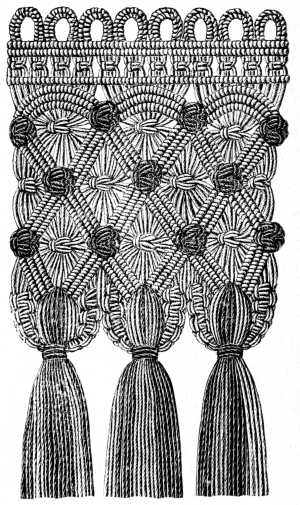
Materials: Coton à tricoter D.M.C Nos. 6 to 15.
Colours: Écru and Rouge-Turc 321.
Materials: D.M.C knitting cotton Sizes 6 to 15.
Colors: Écru and Rouge-Turc 321.
The threads must be taken double, counting as one. Knot them on, as in fig. 524. This exceedingly effective pattern is a very simple one to work and can easily be copied from the engraving by following, for the bars, figs. 537 to 544; for the collecting knots fig. 530, for the large shell knots figs. 575 and 576, and for the chain of flat double knots, fig. 536 detail a.
The threads should be taken double, counted as one. Knot them on, as shown in fig. 524. This very effective pattern is simple to work and can easily be replicated from the engraving by following, for the bars, figs. 537 to 544; for the collecting knots, fig. 530; for the large shell knots, figs. 575 and 576; and for the chain of flat double knots, fig. 536 detail a.
The tassels that complete the fringe must depend from the last collecting knot and hang between the triple bars of knots and beneath the collecting knot.
The tassels that finish the fringe should hang from the last knot and dangle between the three knots and below the collecting knot.
Macramé border or fringe (fig. 579).—Entire length of the threads for No. 10 of Cordonnet 6 fils D.M.C: 170 c/m.
Macramé border or fringe (fig. 579).—Total length of the threads for No. 10 of Cordonnet 6 fils D.M.C: 170 cm.
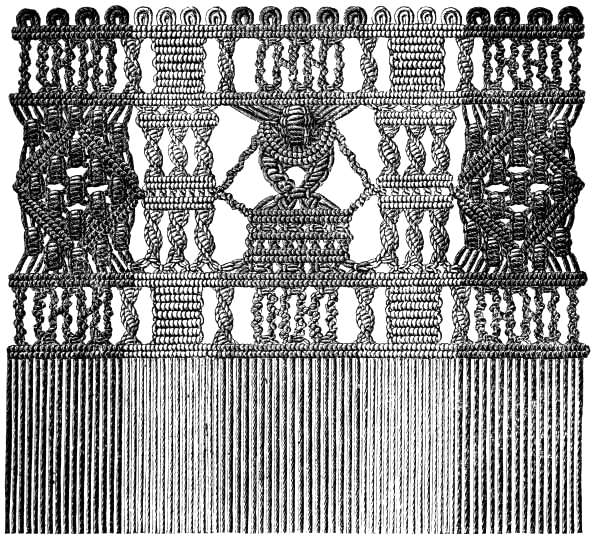
Materials: Cordonnet 6 fils D.M.C Nos. 10 to 20, Fil à dentelle D.M.C Nos. 25 to 50, or Fil à pointer D.M.C No. 30.[A]
Colours: Écru, Rouge-Turc 321 and Bleu-Indigo 312.[A]
Materials: Cordonnet 6 fils D.M.C Nos. 10 to 20, Fil à dentelle D.M.C Nos. 25 to 50, or Fil à pointer D.M.C No. 30.__A_TAG_PLACEHOLDER_0__
Colors: Ecru, Turkish Red 321 and Indigo Blue 312.__A_TAG_PLACEHOLDER_1__
1st row—knot on the threads with double round picots, and one horizontal double bar. The colours should succeed each other as follows: * 4 blue scallops, 4 écru, 5 red, 4 écru, repeat from *.
1st row—knot on the threads with double round picots, and one horizontal double bar. The colors should follow this order: * 4 blue scallops, 4 cream, 5 red, 4 cream, repeat from *.
2nd row—begin working from right to left: 1 single chain with 2 single threads, fig. 545, and 7 changes of the threads; after the 3rd change of the threads, connect the 2nd chain with the 3rd, the 4th with the 5th. Finish off every 2 chains with a flat double knot.
2nd row—start working from right to left: 1 single chain with 2 single threads, fig. 545, and 7 changes of the threads; after the 3rd change of the threads, connect the 2nd chain with the 3rd, the 4th with the 5th. Finish off every 2 chains with a flat double knot.
Make, over the first blue threads; 1 waved plait, fig. 531 detail b, = over the 14th écru thread: 1 bar of double knots, 3 going and 4 returning = over the last 2 red threads: waved knots, and repeat from * = then lay down 2 fresh cords, to make a double horizontal bar of knots.
Make, over the first blue threads; 1 waved braid, fig. 531 detail b, = over the 14th beige thread: 1 bar of double knots, 3 going and 4 returning = over the last 2 red threads: waved knots, and repeat from * = then lay down 2 new cords, to create a double horizontal bar of knots.
3rd row—with the blue threads: 5 large shell knots, fig. 576, 1 triple bar of double knots to the left and right = between the bars 9 large shell knots = 1 triple bar of double knots to the right and left and finish with 5 large shell knots, as above.
3rd row—with the blue threads: 5 large shell knots, fig. 576, 1 triple bar of double knots to the left and right = between the bars 9 large shell knots = 1 triple bar of double knots to the right and left and finish with 5 large shell knots, as above.
With the écru threads: 3 flat double knots, 1 double horizontal bar of knots = over the last écru thread: 3 waved knots with 12 changes of the threads = 1 more double bar of knots = join the cord to the outside thread of the blue triple bar. With the red threads: 1 shell knot, figs. 576 and 577, over 12 threads; 1 double bar on both sides of the shell knot with the outside threads, 1 single chain, consisting of 7 changes of the threads, made with the outside red threads; join the red thread and the light one that comes from the double bar together, on the left.
With the cream-colored threads: 3 flat double knots, 1 double horizontal bar of knots = over the last cream thread: 3 waved knots with 12 thread changes = 1 more double bar of knots = connect the cord to the outer thread of the blue triple bar. With the red threads: 1 shell knot, figs. 576 and 577, over 12 threads; 1 double bar on both sides of the shell knot with the outer threads, 1 single chain made up of 7 thread changes, created with the outer red threads; connect the red thread and the light one coming from the double bar together, on the left.
The light thread is afterwards looped into the blue thread on the right = 4 collecting knots over 6 red threads on the right and left, 1 collecting knot over all the red threads and one, on both sides, over 6 red threads.
The light thread is then looped into the blue thread on the right = 4 collecting knots over 6 red threads on the right and left, 1 collecting knot over all the red threads, and one on both sides over 6 red threads.
After joining the threads on both sides, carry on the single chain with 3 changes of the threads = over the first red thread of the left chain, make 1 double horizontal bar with all the disengaged threads = below the bar, 4 flat double knots = 1 single horizontal bar = 8 double knots, each over a single thread = 1 double bar of knots.
After joining the threads on both sides, continue the single chain with 3 changes of the threads: over the first red thread of the left chain, make 1 double horizontal bar with all the loose threads. Below the bar, create 4 flat double knots, then 1 single horizontal bar and finish with 8 double knots, each over a single thread, resulting in 1 double bar of knots.
The bottom border is like the top one with the exception of the picots.
The bottom border is like the top one, except for the picots.
When this pattern is to be used for an insertion or a gimp, the threads should be fastened off, as indicated in fig. 558.
When this pattern is used for an insertion or a gimp, the threads should be secured, as shown in fig. 558.
Macramé border (figs. 580, 581, 582).—Wind the threads on shuttles and knot them on, as in fig. 515, in the following order: 2 threads of, either colour 334 or Chiné d’or (blue and gold), 2 of colour 330, 2 of colour 392, 1 of colour 432, 1 of colour 310, 2 of colour 430, 1 of colour 310, 1 of colour 432, 2 of colour 392, 2 of colour 330, 2 of colour 334, or of Chiné d’or blue and gold.
Macramé border (figs. 580, 581, 582).—Wrap the threads on shuttles and tie them on, as shown in fig. 515, in the following order: 2 threads of either color 334 or Chiné d’or (blue and gold), 2 of color 330, 2 of color 392, 1 of color 432, 1 of color 310, 2 of color 430, 1 of color 310, 1 of color 432, 2 of color 392, 2 of color 330, 2 of color 334, or Chiné d’or blue and gold.
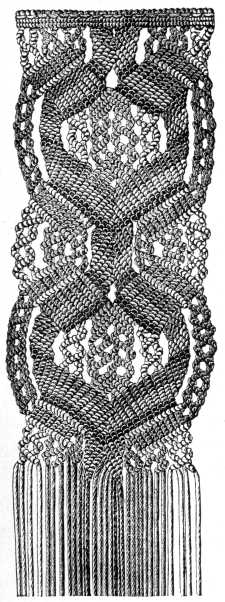
Materials: Coton à tricoter D.M.C Nos. 15 to 30, Cordonnet 6 fils D.M.C Nos. 10 to 30, or Fil à dentelle D.M.C Nos. 25 to 50 and Chiné d’or D.M.C[A]
Colours: Noir grand teint 310, Gris-Tilleul 392 and 330, Brun-Cuir 430 and 432, Bleu-Indigo 334 or Chiné d’or D.M.C, Bleu et Or.[A]
Materials: Knitting cotton D.M.C Nos. 15 to 30, 6-ply cord D.M.C Nos. 10 to 30, or Lace thread D.M.C Nos. 25 to 50 and Gold mélange D.M.C__A_TAG_PLACEHOLDER_0__
Colors: Deep black 310, Sage gray 392 and 330, Leather brown 430 and 432, Indigo blue 334 or Gold mélange D.M.C, Blue and Gold.__A_TAG_PLACEHOLDER_1__
Begin with the open work on either side of the crossed bars, figs. 581 and 582, with 4 blue threads and by 4 changes of the threads outwards and 3 inwards = the same with 4 light green threads with 3 changes outwards and 2 inwards = then with the dark green threads, with 2 changes outwards and 3 inwards = over the 4th dark green thread, 1 double knot with the 1st dark green thread with the 4th light green one and with the 4 blue.
Begin with the open work on either side of the crossed bars, figs. 581 and 582, using 4 blue threads and making 4 changes of the threads outward and 3 inward. Do the same with 4 light green threads, with 3 changes outward and 2 inward. Then use the dark green threads, making 2 changes outward and 3 inward. Over the 4th dark green thread, tie 1 double knot with the 1st dark green thread, the 4th light green one, and the 4 blue threads.
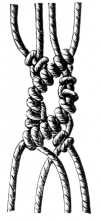
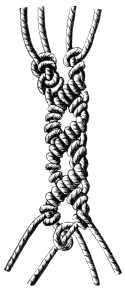
Over the 3 next, dark green threads, knot the 4 light green threads and the 4 blue, from right to left, and from left to right, thus forming altogether 8 bars across the first bar = then knot the 8 first threads over the last dark green one = add a crossed bar with 7 changes of the threads outwards and 5 inwards.
Over the next 3 dark green threads, tie the 4 light green threads and the 4 blue threads, going from right to left and then from left to right, creating a total of 8 bars across the first bar. Next, tie the first 8 threads over the last dark green one. Then, add a crossed bar with 7 outward thread changes and 5 inward.
Middle group, left side: 1 double knot with the first light brown thread over the second thread; 3 double knots with the black threads (the only ones that are to be taken double) and 2 light brown threads over the 1st and 2nd dark brown ones.
Middle group, left side: 1 double knot with the first light brown thread over the second thread; 3 double knots with the black threads (the only ones that need to be doubled) and 2 light brown threads over the 1st and 2nd dark brown ones.
In the 2nd bar, knot the 1st dark brown thread, and in the 3rd, the 4 dark brown ones, over the black thread. On the right, a similar group, slanting towards the one on the left.
In the 2nd bar, tie the 1st dark brown thread, and in the 3rd, tie the 4 dark brown ones over the black thread. On the right, create a similar group that slants towards the one on the left.
On the left—over the 1st light brown thread coming from the right, 1 double knot, made with 2 light and 2 dark brown threads, and the black one, all coming from the left.
On the left—over the first light brown thread coming from the right, there is one double knot made with 2 light brown threads, 2 dark brown threads, and the black one, all coming from the left.
On the right—over the 1st light brown thread coming from the left, 1 double knot with 1 light and 2 dark brown threads and the black one (used double).
On the right—over the first light brown thread coming from the left, one double knot with one light and two dark brown threads, and the black one (used double).
On the left—over the light brown thread coming from the right, 1 double knot with one light and 2 dark brown threads and the black one.
On the left—over the light brown thread coming from the right, 1 double knot with one light and 2 dark brown threads and the black one.
On the right—over the light brown thread, 1 double knot with 2 dark brown threads and the black one.
On the right—above the light brown thread, 1 double knot with 2 dark brown threads and the black one.
On the left—the same knots as on the right.
On the left—the same knots as on the right.
On the right—over the 1 dark brown thread 1 knot with 1 brown thread and the black one.
On the right—over the 1 dark brown thread, there’s 1 knot with 1 brown thread and the black one.
On the left—the same knots as on the right.
On the left—the same knots as on the right.
On the right—over the 1st dark brown thread, 1 knot with a brown thread and the black one.
On the right—over the first dark brown thread, one knot with a brown thread and the black one.
On the left—the same knots over the last thread.
On the left—the same knots over the last thread.
On the right—over the last brown thread one knot with the black one.
On the right—over the last brown thread, one knot with the black one.
On the left—over the 4 light green threads and the 4 blue ones, double knots with the 4 brown threads and the black one = 1 double knot with the 1st light brown thread over the 2nd, 3 double knots over the 2nd dark brown thread, with 2 light threads and 1 dark brown = 4 double knots with the 2 light and the 2 dark brown threads over the black one; after which you make 5 other bars, taking the last thread turned inwards for the cord. Make similar groups, slanting from right to left, then, beginning again on the left, make the knots with the 4 light green threads over the 1st thread of the same colour running from right to left.
On the left—over the 4 light green threads and the 4 blue ones, tie double knots with the 4 brown threads and the black one = 1 double knot with the 1st light brown thread over the 2nd, then 3 double knots over the 2nd dark brown thread, using 2 light threads and 1 dark brown = 4 double knots with the 2 light and the 2 dark brown threads over the black one; after that, make 5 other bars, taking the last thread turned inwards for the cord. Create similar groups, slanting from right to left, and then starting again on the left, make the knots with the 4 light green threads over the 1st thread of the same color running from right to left.
On the right—knot 3 light green threads over the 1st thread coming from the left and repeat the same group twice, on both sides.
On the right—knot 3 light green threads over the 1st thread coming from the left and repeat the same group twice, on both sides.
The third bar forms, at the same time, the first scallop of a triple crossed bar, which has also to be made on the right.
The third bar simultaneously creates the first scallop of a triple crossed bar, which also needs to be made on the right.
The two crossed bars finish with a triple group of bars; the last bar of which, on the right, consists of only one double knot.
The two crossed bars end with a group of three bars; the last bar on the right has just one double knot.
There remain to be made, on both sides, crossed bars with three whole scallops inside, one outside, and one half one, top and bottom.
There still need to be made, on both sides, crossed bars with three full scallops inside, one outside, and one half one, at the top and bottom.
Turn the group of bars, edged with blue and light green, inwards, and finish it off by a crossed bar, with 3 scallops inside.
Turn the group of bars, outlined in blue and light green, inward, and complete it with a crossed bar that has 3 scallops inside.
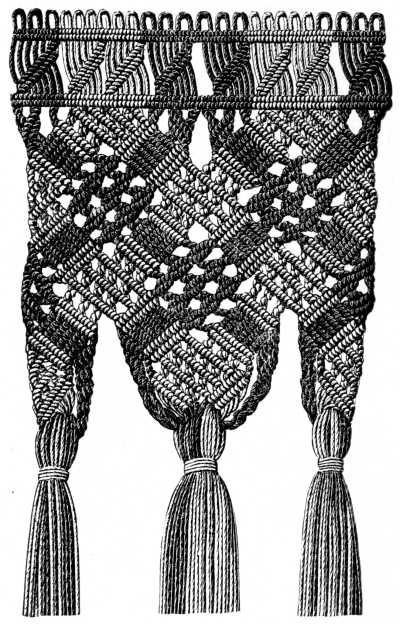
Materials: Cordonnet 6 fils D.M.C Nos. 15 to 30, Fil à pointer D.M.C Nos. 10 to 30, or Fil à dentelle Nos. 25 to 50.
Colours: Écru and Brun-Havane 455, or Gris-Tilleul 391 and 331.
Materials: Cordonnet 6 fils D.M.C Nos. 15 to 30, Fil à pointer D.M.C Nos. 10 to 30, or Fil à dentelle Nos. 25 to 50.
Colors: Ecru and Brun-Havane 455, or Gris-Tilleul 391 and 331.
1st row—knot the threads on with picots, fig. 519, 6 écru and 6 brown.
1st row—tie the threads on with picots, fig. 519, 6 beige and 6 brown.
2nd row—double and slanting bars made with 6 single threads, succeeded by a double horizontal bar.
2nd row—double and slanting bars made with 6 single threads, followed by a double horizontal bar.
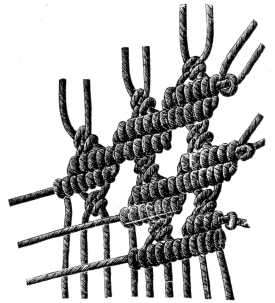
This pattern should always end in such a manner that the light openwork figure form the scallop and be framed with the brown knot.
This pattern should always end in a way that the light openwork design forms the scallop and is bordered with the brown knot.
Macramé fringe (fig. 585).—Entire length of the threads for No. 12 of Coton à tricoter D.M.C: 96 c/m.
Macramé fringe (fig. 585).—Total length of the threads for No. 12 of Coton à tricoter D.M.C: 96 cm.
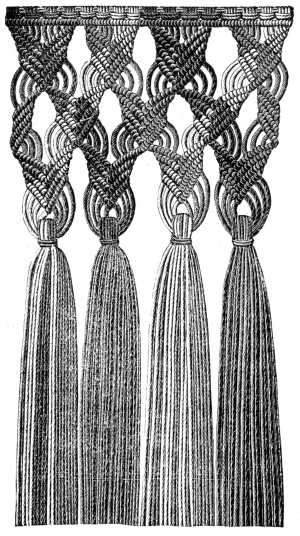
Materials: Coton à tricoter D.M.C Nos. 6 to 16, Cordonnet 6 fils D.M.C Nos. 8 to 20, or Fil à dentelle D.M.C Nos. 25 to 50.[A]
Colours: Brun-Cuir 325 and Brun-Marron 403, 405, 407.[A]
Materials: D.M.C knitting cotton Nos. 6 to 16, D.M.C 6-ply cord Nos. 8 to 20, or D.M.C lace thread Nos. 25 to 50.__A_TAG_PLACEHOLDER_0__
Colours: Brown-Leather 325 and Brown-Brown 403, 405, 407.__A_TAG_PLACEHOLDER_1__
This pattern is so easy that we refer our readers to figs. 544 and 561 for the working of it, merely remarking, that the bars are made alternately from right to left, and from left to right, and that 3 threads are knotted over the cord that runs from the left and 4, over the one from the right.
This pattern is so simple that we direct our readers to figs. 544 and 561 to see how it’s done. We just want to point out that the bars are made alternately from right to left and from left to right, and that 3 threads are knotted over the cord coming from the left and 4 over the one from the right.
This fringe will always be found most effective in appearance if it be made in four shades of one colour, knotted on in succession.
This fringe will always look best if it's made in four shades of the same color, tied on one after the other.
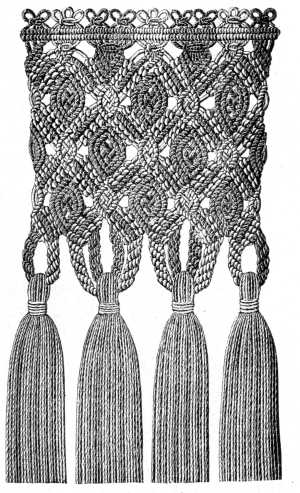
Materials: The same as for fig. 585.
Colours: Gris-Tilleul 331 and Violet-Mauve 315 or, Bleu cendré 448 and Rouge-Cornouille 450, Bleu-Canard 3309 and Rouge-Maroquin 3328, etc.
Materials: The same as for fig. __A_TAG_PLACEHOLDER_0__.
Colors: Gris-Tilleul 331 and Violet-Mauve 315 or Bleu cendré 448 and Rouge-Cornouille 450, Bleu-Canard 3309 and Rouge-Maroquin 3328, etc.
This effective pattern is not difficult, save in appearance, so that it is unnecessary to describe it in detail; for the knotting on, see fig. 525; for the plain bars, figs. 539 to 544; for the collecting knots, fig. 530. The only difficult point is where the threads cross each other inside the bars and form a check and by carefully following the course of the knots in fig. 587, that will be easily overcome.
This pattern is quite straightforward, despite how it looks, so there's no need to explain it in detail. For the knotting on, check out fig. 525; for the plain bars, see figs. 539 to 544; for the collecting knots, look at fig. 530. The only tricky part is where the threads cross each other inside the bars and create a check, but you can easily manage that by closely following the knots in fig. 587.
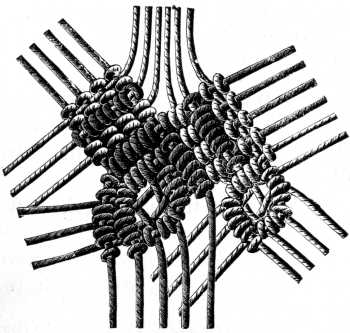
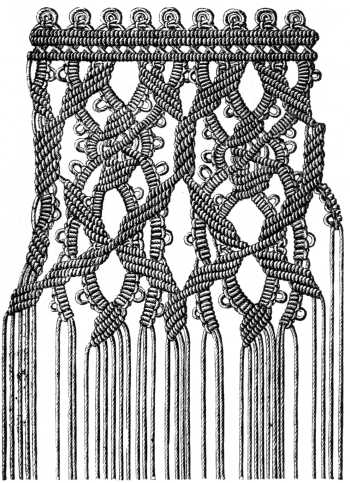
Materials: Cordonnet 6 fils D.M.C Nos. 10 to 40 or Fil à dentelle D.M.C Nos. 25 to 50.[A]
Colours: White, écru, or any light shade mentioned in the D.M.C colour card.[A]
Materials: Cordonnet 6 fils D.M.C Nos. 10 to 40 or Fil à dentelle D.M.C Nos. 25 to 50.__A_TAG_PLACEHOLDER_0__
Colors: White, cream, or any light shade listed in the D.M.C color chart.__A_TAG_PLACEHOLDER_1__
Leave a small space between the double bar and the 3rd bar, which is a single one, in which you cross the threads without knotting them.
Leave a small gap between the double bar and the third bar, which is a single one, where you cross the threads without tying them.
Beginning on the left—over the 2nd and 3rd thread: 2 button-hole knots, 1 picot, 2 button hole knots = over the 1st, 2nd and 3rd thread: 1 double knot with each of the 3 next threads = over the 6th and 7th with the 5th thread: 4 button-hole knots with 1 picot after the 2nd knot.
Beginning on the left—over the 2nd and 3rd thread: 2 buttonhole knots, 1 picot, 2 buttonhole knots = over the 1st, 2nd, and 3rd thread: 1 double knot with each of the 3 next threads = over the 6th and 7th with the 5th thread: 4 buttonhole knots with 1 picot after the 2nd knot.
With each of the 4 next threads, that is the 8th, 9th, 10th and 11th: 1 flat double knot followed by: 1 bar of double knots over the 12th thread as the cord, made with the 11th, 10th and 9th thread = add 1 bar with the 11th thread as the cord, and the 7 next ones as the knotting threads = add 1 bar with the 10th thread as the cord, and the 7 next ones as the knotting threads. Leave 3 threads free on the right = with the 8 threads on the left: 1 bar over the thread before these 3 threads = leave 3 free again on the right = 1 quintuple bar with the remaining threads.
With each of the next 4 threads—specifically, the 8th, 9th, 10th, and 11th—create 1 flat double knot followed by 1 bar of double knots over the 12th thread as the cord, which is made with the 11th, 10th, and 9th threads. Then, add 1 bar using the 11th thread as the cord and the next 7 threads as the knotting threads. Next, add 1 bar with the 10th thread as the cord and the next 7 threads as the knotting threads. Leave 3 threads free on the right, and with the 8 threads on the left, create 1 bar over the thread before these 3 free threads. Leave 3 threads free again on the right and complete with 1 quintuple bar using the remaining threads.
* 1 flat double knot with the 15th, 16th and 17th thread = with the 20th thread, over the 19th, 18th and 17th thread: 4 button-hole knots with 1 picot after 2 knots = knot 4 threads over the 13th thread and from left to right = from left to right, 2 bars with all the threads **.
* 1 flat double knot with the 15th, 16th, and 17th thread = with the 20th thread, over the 19th, 18th, and 17th thread: 4 button-hole knots with 1 picot after 2 knots = knot 4 threads over the 13th thread and from left to right = from left to right, 2 bars with all the threads **.
Over the 2 threads on the left and with the 3rd thread: 4 button-hole knots and 1 picot = with the 6 threads from the left: 2 bars consisting of button-hole knots and picots = a 3rd bar with 6 double knots = join it to the last bar.
Over the 2 threads on the left and with the 3rd thread: 4 buttonhole knots and 1 picot = with the 6 threads from the left: 2 bars made of buttonhole knots and picots = a 3rd bar with 6 double knots = attach it to the last bar.
Leave 2 threads of the bar of button-hole knots free = with the outer thread make: 4 button-hole knots and 1 picot over the 2nd thread and the cord of the bar.
Leave 2 threads of the bar of button-hole knots free. Using the outer thread, create: 4 button-hole knots and 1 picot over the 2nd thread and the cord of the bar.
Repeat from * to ** along the bar, also from right to left.
Repeat from * to ** along the bar, also from right to left.
Left group—knot the 3 last threads over the 4th thread and from left to right.
Left group—knot the last 3 threads over the 4th thread from left to right.
Right group—make, from right to left, 1 bar consisting of 6 double knots, over the 4th thread counting from right to left. After these last changes of the threads no difficulty will be found in copying the rest of the pattern.
Right group—make, from right to left, 1 bar consisting of 6 double knots, over the 4th thread counting from right to left. After these last changes of the threads, you shouldn’t have any trouble copying the rest of the pattern.
Double fringe (figs. 589, 590, 591, 592).—Entire length of the threads for No. 10 of Cordonnet 6 fils D.M.C: 100 c/m., and entire length for No. 16 of Coton à broder D.M.C: 40 c/m. Knot on, as in fig. 515, 1 thread of Cordonnet, 4 of Coton à broder (these are to be taken double) 2 of Cordonnet, 4 of Coton à broder, and so on.
Double fringe (figs. 589, 590, 591, 592).—Total length of the threads for No. 10 of Cordonnet 6 fils D.M.C: 100 cm, and total length for No. 16 of Coton à broder D.M.C: 40 cm. Knot on, as shown in fig. 515, 1 thread of Cordonnet, 4 of Coton à broder (these should be used double) 2 of Cordonnet, 4 of Coton à broder, and so on.

Materials: Cordonnet 6 fils D.M.C Nos. 10 to 30 and Coton à broder D.M.C Nos. 16 to 35.
Colours: White for the Cordonnet, Rouge-Grenat 335 for the Coton à broder.
Materials: Cordonnet 6 threads D.M.C Numbers 10 to 30 and Embroidery Cotton D.M.C Numbers 16 to 35.
Colors: White for the Cordonnet, Red-Garnet 335 for the Embroidery Cotton.
In the second horizontal bar, you only use the red threads of Coton à broder for knotting, not the white Cordonnet ones. To supply their place, knot on two threads of red Coton à broder under the white threads.
In the second horizontal bar, use only the red threads of Coton à broder for knotting, not the white Cordonnet ones. To fill their space, knot two threads of red Coton à broder underneath the white threads.
With the red threads (4 count as one) make 3 rows of collecting knots, followed by a single horizontal bar. Divide the white threads into twos and make single chains with them, the whole length of the fringe; the thread must be changed 8 times for each chain; then pass the right chain under the left one and join them by a flat double knot.
With the red threads (4 count as one), make 3 rows of gathering knots, followed by a single horizontal bar. Split the white threads into pairs and make single chains with them, the entire length of the fringe; the thread must be changed 8 times for each chain; then pass the right chain underneath the left one and connect them with a flat double knot.
You then, with the threads turned outwards, right and left, make the single chain with 5 changes of the threads and join them together again by a flat knot.
You then, with the threads facing outwards, to the right and left, create a single chain with 5 changes of the threads and tie them together again with a flat knot.
The other single chains are made with 6 and 8 changes of the threads and crossed under the double knots. The tassels, which the red threads serve as a foundation to, are begun by: 1 waved plait with two knots, then 4 single chains, again a waved plait and 1 berry composed of knots.
The other single chains are made with 6 and 8 changes of the threads and crossed under the double knots. The tassels, which the red threads serve as a foundation for, begin with: 1 waved plait with two knots, then 4 single chains, followed by another waved plait and 1 berry made up of knots.
This berry is made over the 8 threads that come from the chains, with a long auxiliary thread, knotted as shown in fig. 590.
This berry is created using the 8 threads that come from the chains, with a long auxiliary thread, knotted as shown in fig. 590.
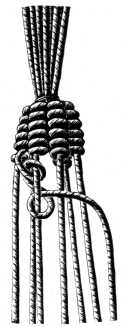
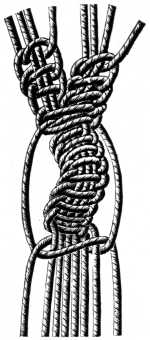
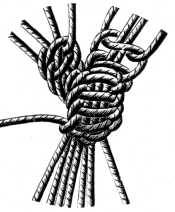
Macramé border (fig. 593).—Fill 24 shuttles, knotted together, that is, 2 and 2, and knot on 3 green threads, 6 gold and 3 green. The changing of the threads and the course of the knots can be so easily copied from the pattern that a description in detail is not necessary, it is sufficient to observe that all the dark parts in the engraving should be worked in green and the light ones in gold.
Macramé border (fig. 593).—Fill 24 shuttles, tying them together in pairs of two, and knot onto 3 green threads, 6 gold, and 3 green. The thread changes and the knotting process can be easily followed from the pattern, so a detailed description isn't needed. Just note that all the dark areas in the image should be done in green and the light areas in gold.

Materials: Cordonnet 6 fils D.M.C Nos. 10 to 20 and Or fin D.M.C No. 30.
COLOUR—For the cotton: Vert métallique 465[A]
Materials: Cordonnet 6 strands D.M.C Nos. 10 to 20 and Gold D.M.C No. 30.
COLOR—For the cotton: Metallic Green 465__A_TAG_PLACEHOLDER_0__
Beaded ground (fig. 594).—Knot on 4 threads for every group of knots, and secure them by a knot and a picot, as shown in the engraving. Work the groups of knots, as indicated in fig. 568, and after each group is finished, thread a gold bead on to every 2 threads. Our model is worked in écru thread and gold beads; the latter go very well with any colour and especially with the more subdued shades of green, such as the Vert-Mousse, Vert Bouteille and Gris-Tilleul of the D.M.C colour card.
Beaded ground (fig. 594).—Tie a knot with 4 threads for each group of knots, and secure them with a knot and a picot, as shown in the illustration. Create the groups of knots as indicated in fig. 568, and after finishing each group, thread a gold bead onto every 2 threads. Our example is made with écru thread and gold beads; the beads complement any color, especially the more muted shades of green, like Vert-Mousse, Vert Bouteille, and Gris-Tilleul from the D.M.C color chart.
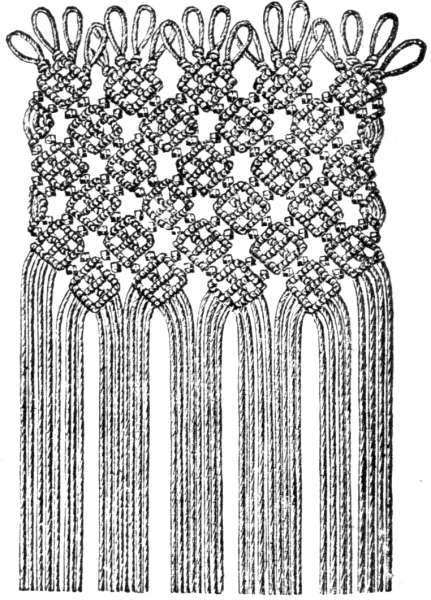
Materials: Cordonnet 6 fils D.M.C No. 25 or Fil à dentelle D.M.C Nos. 25 to 50 and gold beads.[A]
Materials: Cordonnet 6 threads D.M.C No. 25 or Lace thread D.M.C Nos. 25 to 50 and gold beads.__A_TAG_PLACEHOLDER_0__
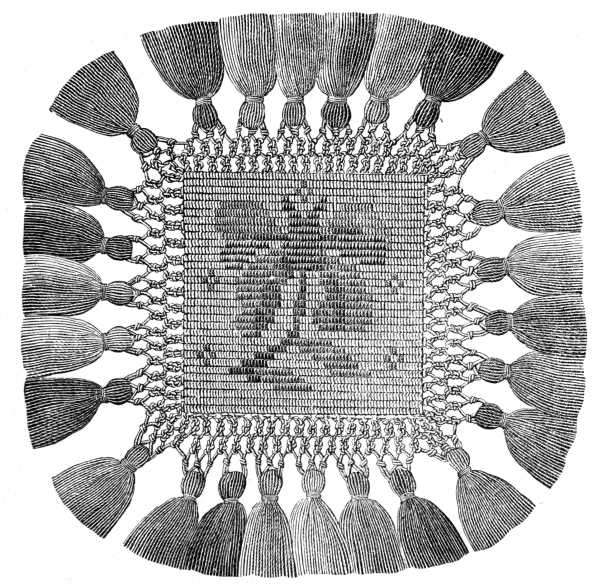
Materials: Fil à pointer D.M.C No. 30, Coton à broder D.M.C No. 16 and Or fin D.M.C pour la broderie No. 20[A]
Colours: Rouge-Cardinal 346, Rouge-Grenat 326 and 309, Bleu-Indigo 312 and 334, Gris-Tilleul 391 and 393[A]
Materials: D.M.C No. 30 Fil à pointer, D.M.C No. 16 Coton à broder, and D.M.C No. 20 Or fin for embroidery __A_TAG_PLACEHOLDER_0__
Colours: Cardinal Red 346, Garnet Red 326 and 309, Indigo Blue 312 and 334, Light Gray 391 and 393 __A_TAG_PLACEHOLDER_1__
All patterns that are drawn on checked paper can be copied in macramé and even in several colours. For every square, you count either one single or one double thread, according to the scale on which the work is to be.
All patterns that are created on graph paper can be replicated in macramé and even in multiple colors. For each square, you count either one single or one double thread, depending on the scale of the project.
In the case of a single thread, you count one double knot per square, in that of a double one, 4 double knots, two in the first and two in the second row.
In the case of a single thread, you count one double knot per square; for a double thread, you count 4 double knots, two in the first row and two in the second row.
After knotting the threads together, two and two, and pinning them to the cushion, see letter a, make 2 single chains with 2 changes of the thread, letters b and c, then take a very long cord, letter d, and knot on the threads. The cord forms picots along two sides of the square; into which you fasten threads, letters e and f, for the single chain formed, on the two other sides by the knotting threads.
After tying the threads together in pairs and pinning them to the cushion, see letter a, make 2 single chains with 2 changes of thread, letters b and c. Then, take a very long cord, letter d, and tie it to the threads. The cord creates picots along two sides of the square, where you attach the threads, letters e and f, for the single chain formed on the other two sides by the knotted threads.
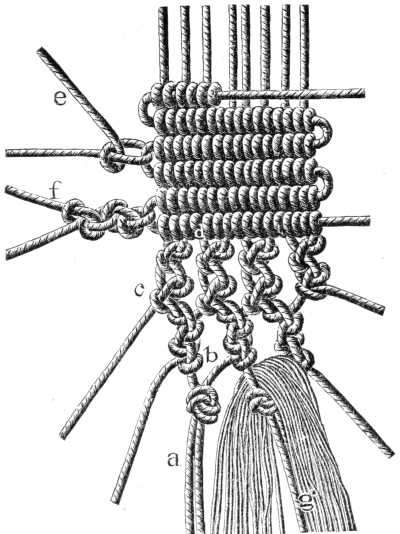
The coloured threads for the flowers are knotted on as the pattern requires it, taking the place for the time being, of those with which the foundation is made, which are left hanging on the wrong side until they are wanted again.
The colored threads for the flowers are tied on as the pattern needs, temporarily replacing the ones used for the foundation, which are left hanging on the back until they’re needed again.
The top leaves of the iris shaped flower, are worked in two shades of blue; the bottom ones, in three shades of red, the stalk and the leaves in green, and the little stars, with which the ground is powdered, in real gold thread.
The top leaves of the iris-shaped flower are done in two shades of blue; the bottom ones in three shades of red, the stalk and leaves in green, and the little stars sprinkled on the ground in actual gold thread.
When the ground is finished, you make the same openwork border at the sides and along the bottom, as at the top and finish off with very full tassels, hung on over 3 double threads and made of all the colours used in the square, tied up with gold thread, fig. 596 letter g.
When the foundation is complete, create the same openwork border on the sides and at the bottom, just like you did at the top, and finish off with very full tassels. Hang them using over 3 double threads and make them from all the colors used in the square, tied up with gold thread, fig. 596 letter g.
Fringe with three rows of tassels (fig. 597).—As this kind of fringe is chiefly used for trimming carpets, curtains and furniture, it is best to make it in the coarsest numbers of the materials indicated at the foot of the engraving.
Fringe with three rows of tassels (fig. 597).—Since this type of fringe is mainly used for decorating carpets, curtains, and furniture, it's best to create it using the coarsest versions of the materials mentioned at the bottom of the engraving.
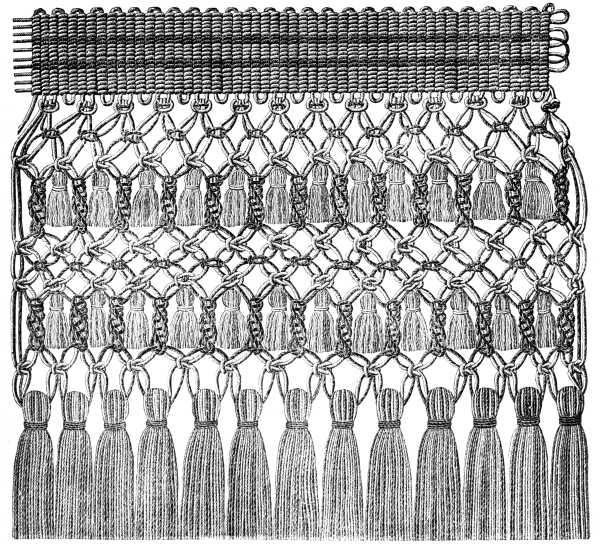
Materials: Cordonnet 6 fils D.M.C Nos. 3 to 30, or Fil à pointer D.M.C Nos. 10 to 30[A]
Colours: Bleu-Indigo 312 and écru.
Materials: Cordonnet 6 threads D.M.C Nos. 3 to 30, or Fil à pointer D.M.C Nos. 10 to 30 __A_TAG_PLACEHOLDER_0__
Colors: Blue-Indigo 312 and cream.
The little tassels between the knots, are made separately from the rest of the work and fastened on by the thread with which you sew them together at the top.
The small tassels between the knots are made separately from the rest of the work and attached with the thread that you use to sew them together at the top.
Macramé ground (fig. 598).—The work represented in the engraving was made for a purse and copied from a beautiful piece of Arabian stuff. Ganse turque D.M.C was used for the light background and Coton à broder D.M.C for the design. It is very easy to copy this pattern from the illustration by paying scrupulous attention to the number of knots; we do not therefore enter into any detailed description of the same, merely referring the worker to figs. 528 and 596 and the accompanying directions, for the adding on and the taking off of threads.
Macramé ground (fig. 598).—The work shown in the engraving was created for a purse and is based on a beautiful piece of Arabian fabric. Ganse turque D.M.C was used for the light background and Coton à broder D.M.C for the design. It's very easy to replicate this pattern from the illustration by carefully counting the knots; we won't provide a detailed description, so we just refer the crafter to figs. 528 and 596 and the accompanying instructions for adding and removing threads.

Materials: Ganse turque D.M.C No. 12 and Coton à broder D.M.C No. 16.
Colours: Rouge-Cardinal 347, or Rouge-Cerise 3318.
Materials: Ganse turque D.M.C No. 12 and Coton à broder D.M.C No. 16.
Colors: Cardinal Red 347, or Cherry Red 3318.
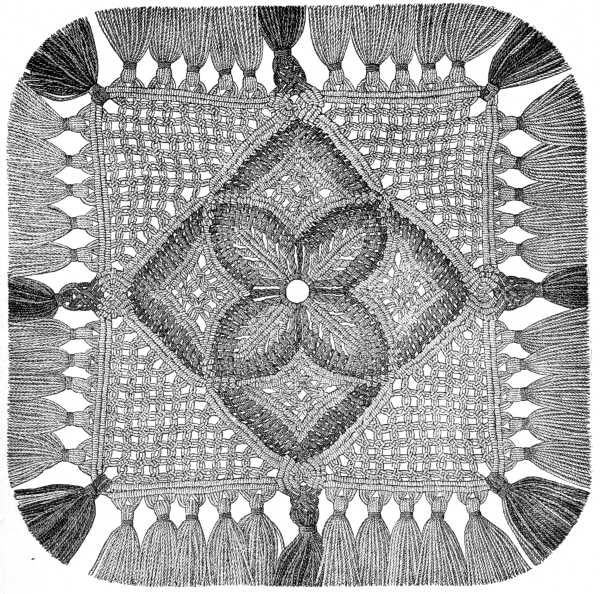
Materials: Cordonnet 6 fils D.M.C No. 15 and Coton à broder D.M.C No. 16 or Fil à dentelle D.M.C No. 25 and Coton à broder D.M.C No. 30.[A]
Colours: White, Rouge-Grenat 309 and 358, or Gris-Lin 716 and Rouge-Maroquin 3327 and 3329.[A]
Materials: Cordonnet 6 fils D.M.C No. 15 and Coton à broder D.M.C No. 16 or Fil à dentelle D.M.C No. 25 and Coton à broder D.M.C No. 30.__A_TAG_PLACEHOLDER_0__
Colours: White, Rouge-Grenat 309 and 358, or Gris-Lin 716 and Rouge-Maroquin 3327 and 3329.__A_TAG_PLACEHOLDER_1__
Knot upon a ring consisting of one thread: * 1 thread of white Cordonnet, 1 of Coton à broder colour 309, 1 of colour 358, 1 of colour 309 and repeat three times from *. (The embroidery cotton is to be taken double.)
Knot on a ring made from one thread: * 1 thread of white Cordonnet, 1 of embroidery cotton color 309, 1 of color 358, 1 of color 309 and repeat three times from *. (The embroidery cotton should be used double.)
Begin with the light red thread and make: 1 single chain with 3 changes of the threads, 1 single chain with the dark red thread with 4 changes of the threads. Add, or rather thread, 8 supplementary threads in succession on to the white thread, which in fig. 600, comes in the middle of the group of knots, and over each of these supplementary threads, make 2 double knots with the light red thread and 2 with the dark.
Begin with the light red thread and make: 1 single chain with 3 changes of the threads, 1 single chain with the dark red thread with 4 changes of the threads. Add, or rather thread, 8 extra threads in a row onto the white thread, which in fig. 600, is in the middle of the group of knots, and over each of these extra threads, make 2 double knots with the light red thread and 2 with the dark.
Then, over the first white thread coming from the right, knot all the white threads on the left of it and in the last place, the cord itself, over the 3 red threads.
Then, over the first white thread coming from the right, knot all the white threads on the left of it and lastly, the cord itself, over the 3 red threads.
Make the same series of threads on the left. This is succeeded by a second bar of white knots, the last thread of which is left unknotted. Make 4 double knots with the 8 white threads and close the square by a double bar. Add a supplementary thread to the first bar, so that you may have 10 threads coming from each side of the second bar and over these you knot the red threads, which form a dark setting to the leaves.
Make the same set of threads on the left. Follow this with a second row of white knots, leaving the last thread unknotted. Make 4 double knots with the 8 white threads and finish the square with a double bar. Add an extra thread to the first bar, so you have 10 threads coming from each side of the second bar, and knot the red threads over these, creating a darker backdrop for the leaves.
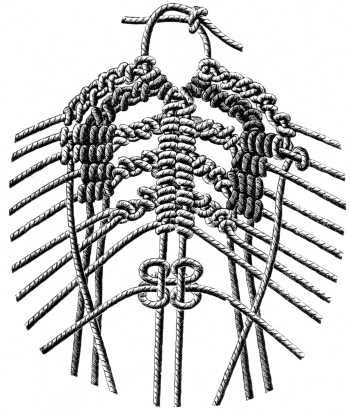
When this is done on both sides, make 10 flat double knots with a supplementary knot, taking 4 single threads for each knot, and decreasing the number of knots successively to 2. At the point of the inside square, knot the white threads over the red ones and turn back the second white thread to serve as a cord to the first of the outside bars. Join the first thread on the left and the first on the right, to form a flat knot with them in the middle, the threads of which are then passed over the red threads; the last white threads become the cords for the second outer bar. Make a group of bars with the red threads and cross them 3 times, then finish with a handsome tassel and join the white threads together all round the square with tassels. In the case of your wishing to use these squares for making a larger piece of work, through joining several of them together, you can knot the ends of the threads into short double chains, finishing off these again with ring knots, fig. 608, and loops; through these loops, when you come to join on the next square, the knotting thread is drawn, forming them thus into connecting picots, like those which you make in tatting.
When you've done this on both sides, make 10 flat double knots using a supplementary knot, taking 4 single threads for each knot, and gradually reduce the number of knots down to 2. At the center of the inside square, tie the white threads over the red ones and turn back the second white thread to act as a cord for the first of the outside bars. Connect the first thread on the left with the first thread on the right to create a flat knot in the middle, then pass those threads over the red threads; the last white threads will become the cords for the second outer bar. Create a group of bars with the red threads and cross them 3 times, then finish with a nice tassel and tie the white threads together all around the square with tassels. If you want to use these squares to make a larger piece by joining several of them together, you can knot the ends of the threads into short double chains, finishing them off with ring knots, fig. 608, and loops; through these loops, when you go to connect the next square, pull the knotting thread, creating connecting picots similar to those made in tatting.
Fringe with corner (figs. 601, 602, 603).—Macramé fringes are not capable of being drawn up, as knitted, crochet, and netted fringes are, on the inside, so as to turn the corners. Consequently, according to the pattern, a greater or less number of supplementary threads have to be knotted in so as to form the corners.
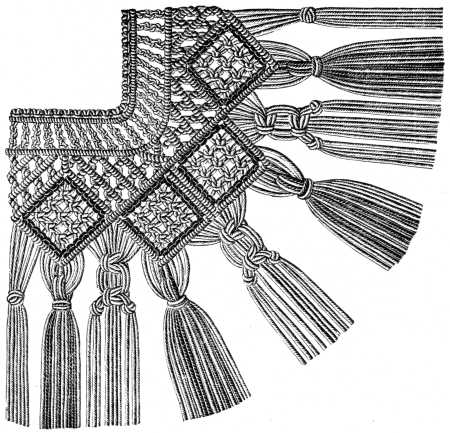
Materials: Cordonnet 6 fils D.M.C Nos. 10 to 30 or Fil à dentelle D.M.C Nos. 25 to 50.[A]
Colours: White and Rouge-Cardinal 348.[A]
Materials: Cordonnet 6 threads D.M.C Nos. 10 to 30 or Fil à dentelle D.M.C Nos. 25 to 50.__A_TAG_PLACEHOLDER_0__
Colors: White and Cardinal Red 348.__A_TAG_PLACEHOLDER_1__
The working detail, fig. 602, shows us how the 5 first supplementary threads, are looped on to the 4th row of knots. A group of crossed bars requires 16 threads, which answer to 4 groups of little squares, placed between the lozenges. The 6th supplementary thread is put into the double connecting knot at the corner, fig. 603, and on this, the bar of knots which runs right and left is subsequently made. (In order to make it clearer, the supplementary threads are represented in the engraving in a darker shade).
The working detail, fig. 602, shows us how the first 5 supplementary threads are looped onto the 4th row of knots. A group of crossed bars needs 16 threads, which correspond to 4 groups of small squares placed between the diamonds. The 6th supplementary thread is added to the double connecting knot at the corner, fig. 603, and on this, the bar of knots that extends left and right is created. (To make it clearer, the supplementary threads are shown in the engraving in a darker shade).
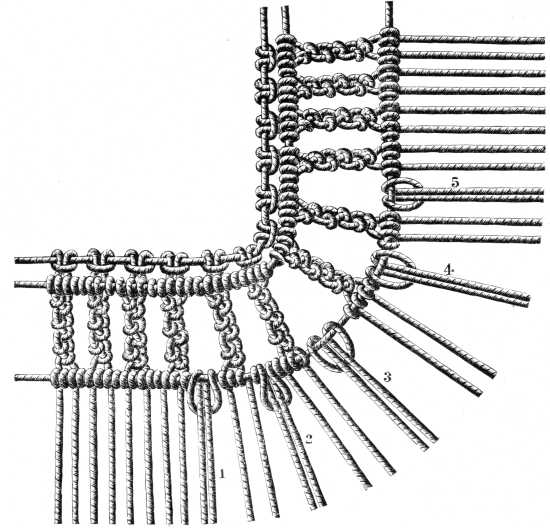
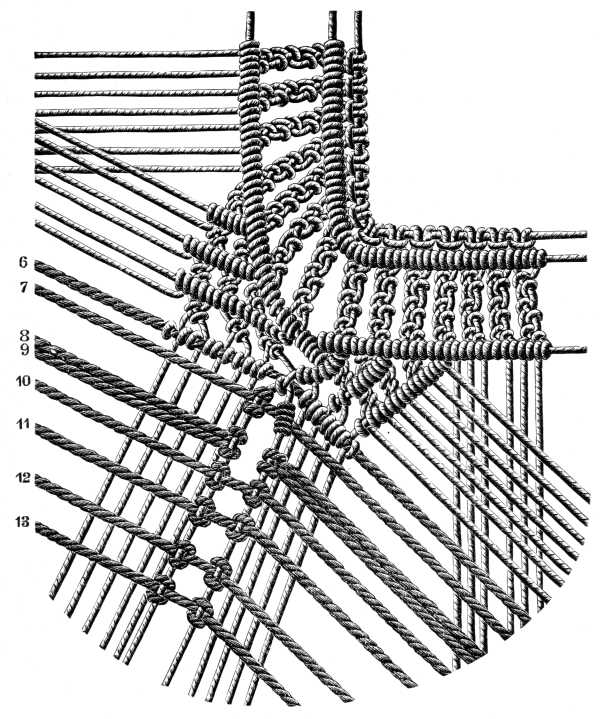
In this manner the supplementary threads 7, 10, 11, 12 and 13 connect the two cords, whilst threads 8 and 9 only, are mounted separately on both sides.
In this way, the additional threads 7, 10, 11, 12, and 13 link the two cords, while threads 8 and 9 are only attached separately on each side.
The bars, formed by the knots which are made with the supplementary threads, must be drawn tight, like any other double bar. The space left between the cords in the engraving is intentional, to distinguish the supplementary threads from the others.
The bars, created by the knots made with the extra threads, need to be pulled tight, just like any other double bar. The gap left between the cords in the engraving is intentional, meant to differentiate the extra threads from the others.
A long, coloured thread is looped on to the topmost thread, between the two bars, and with this, knots are made over all the 14 threads that come from the bars and run inwards.
A long, colored thread is looped onto the top thread, between the two bars, and with this, knots are tied over all 14 threads that come from the bars and run inward.
Knotted tassels, hanging from the points of the scallops, and others ornamented with flat double knots made of 10 threads, suspended between the scallops, form the outside finish to this fringe.
Knotted tassels hanging from the points of the scallops, and others decorated with flat double knots made of 10 threads, hanging between the scallops, complete the outer finish of this fringe.
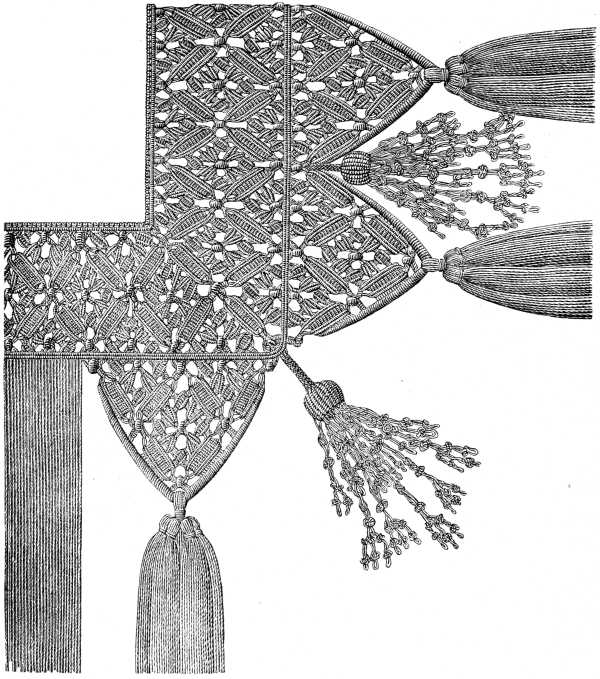
Materials: Fil à pointer D.M.C Nos. 10 to 30, Cordonnet 6 fils D.M.C Nos. 10 to 50, or Fil à dentelle D.M.C Nos. 25 to 50.[A]
Materials: D.M.C Fil à pointer Nos. 10 to 30, Cordonnet 6 fils D.M.C Nos. 10 to 50, or D.M.C Fil à dentelle Nos. 25 to 50.__A_TAG_PLACEHOLDER_0__
The present pattern, which concludes our chapter on macramé work, is one of the most difficult of all, requiring great accuracy in every particular, but more especially, extremely careful attention to the direction of the cords, that the groups of double knots and the bars may be drawn up very tightly together, so as to make the pattern very distinct and give each figure its proper value.
The current pattern, which wraps up our chapter on macramé, is one of the most challenging ones, requiring great precision in every detail, but especially careful attention to the direction of the cords. This ensures that the groups of double knots and the bars are pulled very tightly together, making the pattern clear and giving each figure its proper significance.
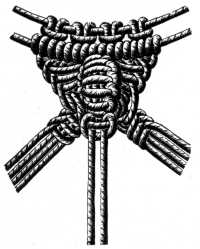
For each repetition of the subject 16 threads are wanted. You begin the half stars, on each side of the lozenges, with the 15th and 16th double thread of the first figure and make 3 double knots with 3 threads over a 4th thread, fig. 606.
For each repeat of the subject, 16 threads are needed. You start the half stars, on each side of the diamonds, using the 15th and 16th double thread from the first figure and make 3 double knots with 3 threads over a 4th thread, fig. 606.
Over 2 cords on the left and 2 on the right, consequently over 4 threads: 5 button-hole knots, with the 4 threads and the disengaged threads, 1 flat double knot over each of the 4 threads. This forms a shell knot, on either side of which, make 3 button-hole knots over 3 threads.
Over 2 cords on the left and 2 on the right, making a total of over 4 threads: 5 button-hole knots with the 4 threads and the loose threads, plus 1 flat double knot over each of the 4 threads. This creates a shell knot, on either side of which, make 3 button-hole knots over 3 threads.
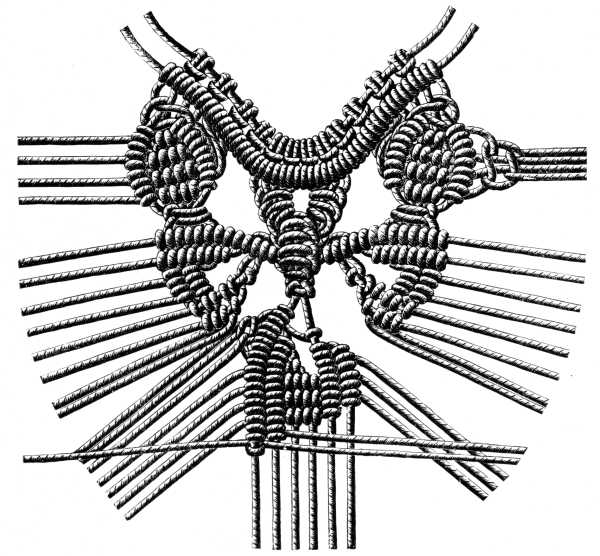
Knot the 4 threads of the left group over the cord on the right; and over them again the 2 next threads on the right; knot the 4 threads on the left over the 4th thread on the right; make 2 button-hole knots with the 4th thread over the 3 threads at the bottom and on the side.
Knot the 4 threads from the left group over the cord on the right; then do the same with the next 2 threads on the right; knot the 4 threads on the left over the 4th thread on the right; create 2 button-hole knots with the 4th thread over the 3 threads at the bottom and on the side.
Over the 4 threads, that come from the left and right, make quadruple bars; cross the upper threads after the second row of bars, make 2 button-hole bars with the next thread over the 4th thread, then finish the 3rd and 4th bar of knots.
Over the 4 threads that come from the left and right, create quadruple bars; cross the upper threads after the second row of bars, then form 2 button-hole bars with the next thread after the 4th thread, and finally finish the 3rd and 4th bar of knots.
To make the olive-shaped group of knots on both sides, take the threads, that come out from the shells, as cords. Fig. 605 shows the adding on of the first supplementary thread, fig. 606, that of 12 more which, knotted on to the first, form with it, the group of bars on the diagonal corner line. The knots, of which the next large shell is composed, are made with 2 more supplementary threads and one thread from the preceding figure. Add on 2 more supplementary threads to the disengaged threads, which 4 then serve as cords for the groups of bars, left and right.
To create the olive-shaped group of knots on both sides, use the threads that come out from the shells as cords. Fig. 605 shows how to attach the first additional thread, while fig. 606 illustrates the addition of 12 more threads that, when knotted onto the first, form the group of bars along the diagonal corner line. The knots that make up the next large shell are created using 2 more additional threads and one thread from the previous figure. Add 2 more supplementary threads to the loose threads, which then serve as cords for the groups of bars on the left and right.
The 4th group of bars which forms the corner of the fringe, is made on the 4 threads that come from the large shell, on to which the fourth set of 12 supplementary threads is knotted.
The fourth group of bars that makes up the corner of the fringe is created on the four threads coming from the large shell, onto which the fourth set of 12 extra threads is tied.
The pattern ends at the bottom with a half star, and a double bar; beneath these, large scallops are added, consisting of 2 half stars, 4 ovals, 1 whole star and 2 ovals.
The pattern concludes at the bottom with a half star and a double bar; below these, large scallops are added, made up of 2 half stars, 4 ovals, 1 whole star, and 2 ovals.
All the threads that come from the groups are then collected at the top of the scallops and overcast with strong thread, so as to form a thick round cord along the edges of the scallops, widening towards the point, as more and more threads are taken in. At the point, these threads are knotted into a big tassel with another bunch of supplementary threads added to them. The other small tassels, represented in fig. 604, are made separately and then fastened on.
All the threads from the groups are then gathered at the top of the scallops and sewn with strong thread, creating a thick round cord along the edges of the scallops, which widens toward the point as more and more threads are included. At the point, these threads are tied into a large tassel with another bunch of extra threads added to them. The other small tassels, shown in fig. 604, are made separately and then attached.
The fringe is further ornamented by large knotted tassels, introduced between the scallops, for which, a large knotted berry, fig. 590, over 21 cords, has first to be made.
The fringe is decorated with large knotted tassels, added between the scallops. For this, a large knotted berry, fig. 590, needs to be created first with over 21 cords.
Collect the 21 threads all together, to begin with; then make: 2 rows of knots over 12 threads, 1 over 15, 3 over 21, 1 over 15 and 2 over 12; then cut the ends of the 21 threads to the same length, and turn them inwards, to fill up the hollow space inside the berry, stuffing it besides, if necessary, with wadding to make it perfectly firm and hard and sewing it together at the ends.
Collect all 21 threads together to start; then make 2 rows of knots over 12 threads, 1 over 15, 3 over 21, 1 over 15, and 2 over 12. After that, cut the ends of the 21 threads to the same length and turn them inwards to fill the hollow space inside the berry, adding wadding if needed to make it completely firm and hard, and sew it together at the ends.
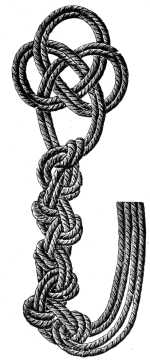
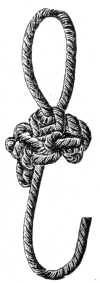
These ring knots take the place, in macramé, of bead drops, in gimp trimmings; when they are made of a double chain, you cut away 3 threads, when of a single, 1 thread, conceal the ends carefully inside the knot, make a loop with the 4th or 2nd thread, fig. 608, and lastly, fasten off all the ends with two or three invisible stitches.
These ring knots replace bead drops in macramé and gimp trimmings. When they’re made with a double chain, cut away 3 threads; when made with a single chain, cut away 1 thread. Hide the ends carefully inside the knot, make a loop with the 4th or 2nd thread, fig. 608, and finally, secure all the ends with two or three invisible stitches.
Into the loop formed by the 4th thread, you hang 3 small ring knots, made of a single chain, with a loop, top and bottom, formed of the ends of the thread.
Into the loop created by the 4th thread, you attach 3 small ring knots, made from a single chain, with a loop at the top and bottom formed from the ends of the thread.
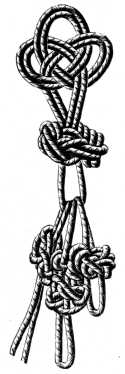
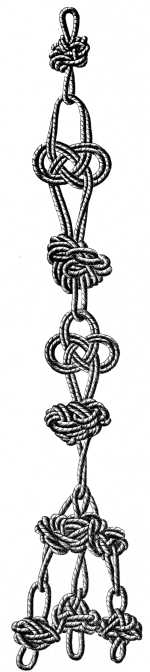
FOOTNOTES:
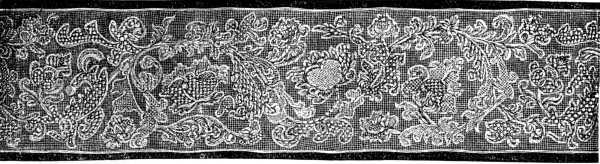
Netting.
Netting is a handicraft, so ancient that it would be difficult to trace it to its origin, or determine the date of its invention. There is evidence to show that the making of nets for fishing and game catching was as familiar to the earlier races of mankind as it is to us.
Netting is a craft that's so old that it's hard to pinpoint where it started or when it was first invented. There's evidence that creating nets for fishing and hunting was as common for early humans as it is for us today.
Practised in the first instance for the wants of life, it by degrees developed into an art, in conjunction with embroidery, to which it was made to serve as a foundation. The netting of every country, almost, has a distinctive character of its own: that of Persia is known by its fine silken meshes and rich gold and silver embroidery; that of Italy, by the varied size and shape of its meshes and a resemblance in the style of its embroidery to the Punto tagliato; whilst the netting of France, known by the name of Cluny guipure, consists of a groundwork of fine meshes with stiff close designs embroidered upon it, outlined in coarse glazed thread.
Originally created to meet basic needs, it gradually evolved into an art form, partnered with embroidery, which it served as a foundation for. The netting from almost every country has its own unique characteristics: Persian netting is recognized for its delicate silk threads and intricate gold and silver embroidery; Italian netting is distinguished by the varied sizes and shapes of its meshes, resembling the Punto tagliato embroidery style; while French netting, known as Cluny guipure, features a base of fine meshes with bold, detailed designs embroidered on top, outlined in a thick, shiny thread.
Netting, which divides itself under two headings, netting proper, or plain netting and net embroidery, has never yet gone out of fashion and places are still to be found where the entire population is engaged in this industry.
Netting, which breaks down into two categories: plain netting and net embroidery, has never gone out of style, and there are still places where the whole community is involved in this craft.
Plain netting and the implements used in netting (figs. 611, 612, 613).—Plain netting consists of loops, secured and rendered independent of one another by knots. For forming and tightening these loops and knots the following implements are necessary; in the first place, a netting needle; these are generally made of steel, split and flattened at both ends, with a hole bored through them below the fork at the one end, in which the thread, fig. 611, is secured, before it is wound on lengthwise between the forks. They are numbered as to size like knitting needles. There are netting needles likewise of bone, ivory, wood and tortoise-shell for twine and thick materials; these are without hole, fig. 612.
Plain netting and the tools used in netting (figs. 611, 612, 613).—Plain netting is made up of loops that are secured and kept separate by knots. To create and tighten these loops and knots, the following tools are needed; first, a netting needle, which is usually made of steel, split, and flattened at both ends, with a hole drilled through it below the fork at one end, where the thread, fig. 611, is secured before it is wrapped lengthwise between the forks. They are sized like knitting needles. There are also netting needles made from bone, ivory, wood, and tortoise-shell for twine and heavier materials; these do not have a hole, fig. 612.


The thread must be wound on very tightly, and not too much of it at a time, that the needle may slip easily through the loops. The mesh, or spool, fig. 613, whether of ivory, bone, steel or wood, should be smooth and round and of the same thickness throughout, so that the loops, made upon it, may be all of one size and easily slipped off.
The thread needs to be wound very tightly and not too much at once, so the needle can easily slip through the loops. The mesh, or spool, fig. 613, whether it's made of ivory, bone, steel, or wood, should be smooth, round, and consistently thick, allowing the loops created on it to be uniform in size and easy to remove.

For long loops a flat mesh is best, and in all cases, the needle and mesh should be selected with a view, both to the material employed, and the size of loop required.
For long loops, a flat mesh is best, and in all cases, the needle and mesh should be chosen based on the material used and the size of the loop needed.
In addition to these two implements, a cushion, weighted with lead will be required, to pin the foundation loop to, on which the first row of netting is worked.
In addition to these two tools, a cushion weighted with lead will be needed to secure the foundation loop where the first row of netting is created.
Materials suitable for netting.—These, of course depend on the purpose of the netting: silk, twine, wool and cotton, can all be used and each possesses its advantages and disadvantages. Silk has the finest gloss but when it is strongly twisted it is very apt to knot, and when loosely twisted, does not make firm knots. It is difficult to get linen thread with a smooth uniform twist and moreover it soon frays in the working; wool is too elastic a fibre and is unsuitable for washing purposes, cotton remains therefore, in every respect the most desirable material, being both smooth and uniformly twisted; as qualities, more especially adapted for netting we may mention the following: Fil à pointer D.M.C, Cordonnet 6 fils D.M.C (crochet cotton), Fil à dentelle D.M.C (lace thread), and even Coton à tricoter D.M.C[A] (knitting cotton).
Materials suitable for netting.—These depend on the purpose of the netting: silk, twine, wool, and cotton can all be used, and each has its pros and cons. Silk has the best shine, but when it's tightly twisted, it tends to knot easily, and when it's loosely twisted, it doesn't hold knots well. It's hard to find linen thread that has a smooth, even twist, and it frays quickly during use. Wool is too stretchy and isn't great for washing purposes. Therefore, cotton stands out as the most desirable material overall, being smooth and evenly twisted. As qualities specifically suited for netting, we can mention the following: Fil à pointer D.M.C, Cordonnet 6 fils D.M.C (crochet cotton), Fil à dentelle D.M.C (lace thread), and even Coton à tricoter D.M.C[A] (knitting cotton).
Netting stitches.—The loops are always the same—four-cornered whether they be square or oblong—and connected together, though secured and rendered independent of one another by knots. By different ways of passing the thread over the mesh and connecting the loops together, the following stitches are produced: 1º plain loop, 2º double loop, 3º oblong loop, 4º honeycomb loop, 5º twisted loop.
Netting stitches.—The loops are always the same—four-cornered whether they are square or rectangular—and connected together, though secured and made independent of each other by knots. By using different methods to pass the thread over the mesh and connect the loops, the following stitches are created: 1º plain loop, 2º double loop, 3º rectangular loop, 4º honeycomb loop, 5º twisted loop.
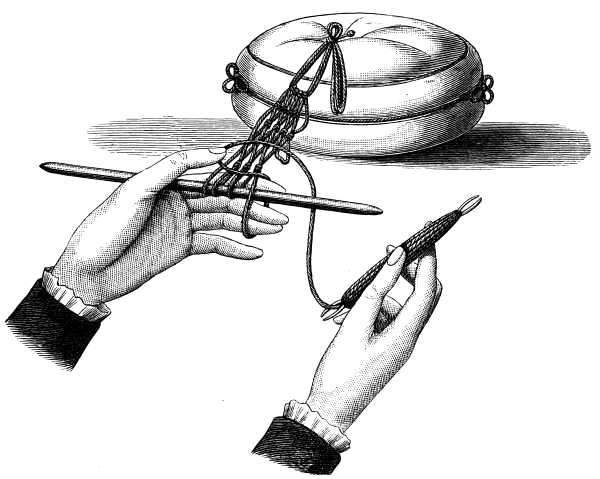
1º Plain loop. First position of the hands (fig. 614).—Every kind of netting requires a foundation loop, from 10 to 20 c/m. long, made either of Cordonnet 6 fils D.M.C Nos. 3 to 10, or Fil à pointer D.M.C No. 10[A], which is pinned to the cushion. Fasten the working thread to the foundation loop; then take the mesh in the left hand, holding it between the thumb and forefinger, with the other fingers extended beneath. Take the needle filled with thread in the right hand and pass the thread downwards over the mesh and over the second, third and fourth fingers, inside, carry it up behind the third finger and lay it to the left under the thumb by which it has to be held fast.
1st Plain loop. First position of the hands (fig. 614).—Every type of netting starts with a foundation loop, which should be between 10 to 20 cm long, made from either Cordonnet 6 fils D.M.C Nos. 3 to 10, or Fil à pointer D.M.C No. 10[A], which is secured to the cushion. Attach the working thread to the foundation loop; then hold the mesh in your left hand, pinching it between your thumb and forefinger, while your other fingers extend below. With your right hand, take the needle filled with thread and pass the thread downwards over the mesh and over your second, third, and fourth fingers inside, then carry it up behind your third finger and lay it to the left under your thumb, where it should be held securely.
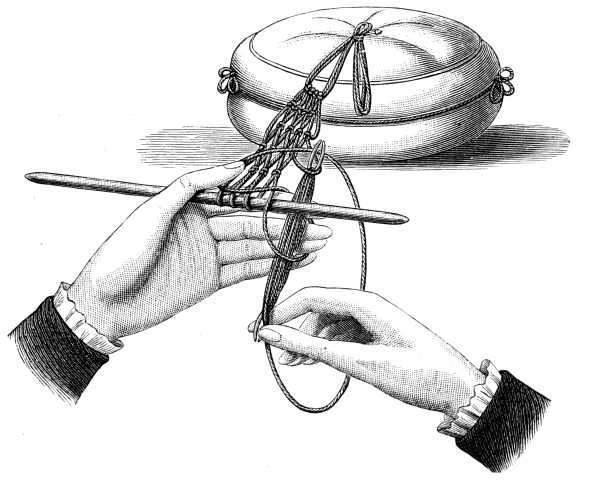
Second and third position of the hands (figs. 615 and 616).—Carry the thread down behind the second, third, fourth and fifth fingers, and put the needle through the loop on the fingers and behind the mesh, through the foundation loop, thus forming a second loop, which you hold back with the little finger of the left hand. Then gradually drawing up the thread that runs from the mesh, let go the loop held down by the thumb; then by degrees let go also, the loop which lies over the second, third and fourth fingers, still holding the last loop fast with the little finger; finally you release this too and pull up the knot thus formed close to the mesh with the right hand. This completes the stitch. The next stitches are made in the same way; whether they are to serve for casting on or for a netted foundation. The mesh is drawn out at the end of each row, the work turned and the mesh held beneath the last row, in readiness for the next, in making which you pass your needle through each loop. These diamond-shaped loops form a diagonal net.
Second and third position of the hands (figs. 615 and 616).—Hold the thread behind the second, third, fourth, and fifth fingers, and put the needle through the loop on the fingers and behind the mesh, through the foundation loop. This creates a second loop, which you secure with the little finger of your left hand. Gradually pull up the thread coming from the mesh, and release the loop held down by your thumb; then slowly let go of the loop resting on the second, third, and fourth fingers, while still holding the last loop with your little finger. Finally, release this as well and pull the knot formed up close to the mesh with your right hand. This completes the stitch. The next stitches are made in the same way, whether for casting on or for a netted foundation. At the end of each row, the mesh is pulled out, the work is turned, and the mesh is held below the last row, ready for the next one, where you pass your needle through each loop. These diamond-shaped loops create a diagonal net.

2º Double loop.—To make a double loop put the thread two or three times round the mesh.
2nd Double loop.—To create a double loop, wrap the thread around the mesh two or three times.
3º Oblong loop.—For oblong loops, the knots must be made a little distance from the mesh.
3rd Oblong loop.—For oblong loops, the knots should be tied a short distance away from the mesh.
4º Honeycomb loop.—Make an oblong loop, pass the thread round the fingers, but not over the mesh as in plain netting, put the needle, not into the loop of the previous row, but between the loop, just made. The knot which is made in the same way as in plain netting, must be drawn close up to the mesh; the two threads of the loop should lie side by side on the mesh. The loops in honeycomb netting are six-sided.
4º Honeycomb loop.—Create an oblong loop, wrap the thread around your fingers, but don't place it over the mesh like in regular netting. Insert the needle not into the loop of the previous row, but between the loop you just made. The knot, made the same way as in regular netting, should be pulled tight against the mesh; the two threads of the loop should lie next to each other on the mesh. The loops in honeycomb netting have six sides.
Although in netting the loops cannot be formed in as many different ways as in knitting or crochet, they admit of a certain variety, as the following explanations will show.
Although when netting the loops can't be made in as many different ways as in knitting or crocheting, they do allow for some variety, as the following explanations will show.
Patterns produced in netting by increasing and decreasing (fig. 617).—Patterns of this kind are made by netting the meshes together in regular sequence and taking up as many meshes as you have netted together, or vice versa. You may increase and decrease in the same rows, or at an interval of so many rows.
Patterns created in netting by increasing and decreasing (fig. 617).—Patterns like this are made by connecting the meshes together in a regular order and adding as many meshes as you’ve netted together, or the other way around. You can increase and decrease in the same rows, or after a certain number of rows.
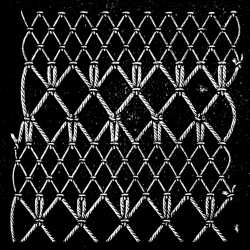
Two sizes of thread should be used for this patterns. To show the relation they should bear to one another, we instance: Fil à pointer D.M.C No. 30 with Fil à dentelle D.M.C No. 50[A], or Coton à tricoter D.M.C Nos. 14 and 30[A], with Coton à tricoter D.M.C No. 50[A], or Coton à repriser D.M.C No. 25 with No. 100.[A]
Two sizes of thread should be used for these patterns. To show the relationship they should have with each other, we provide the following examples: Fil à pointer D.M.C No. 30 with Fil à dentelle D.M.C No. 50[A], or Coton à tricoter D.M.C Nos. 14 and 30[A], with Coton à tricoter D.M.C No. 50[A], or Coton à repriser D.M.C No. 25 with No. 100.[A]
Begin by 3 rows of plain netting with the finer thread over the small mesh, followed by one row with the coarser thread over the large mesh; then, with the coarse thread over the large mesh, one row, in which you net every two loops together and one row, with two loops in every one, so that the number of loops remains the same. These are followed by 3 rows of plain netting with the fine thread on the small mesh.
Begin with 3 rows of plain netting using the finer thread over the small mesh, followed by one row with the coarser thread over the large mesh. Then, using the coarse thread over the large mesh, make one row where you net every two loops together and another row with two loops in each one to keep the number of loops the same. After that, add 3 rows of plain netting with the fine thread on the small mesh.
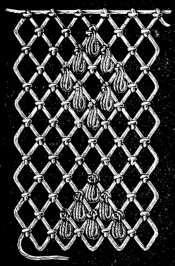
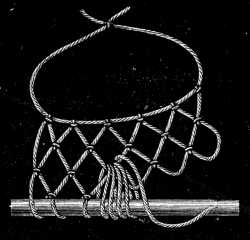
1st row—one loop, the knot of which must be a little distance from the mesh; put the thread over the mesh and the needle through the loop where the knot is; repeat this three or four times, making the loops all of the same length. Then unite all the loops with one knot, carrying the needle from right to left, round the loops, instead of putting it through the loop of the previous row.
1st row—create one loop, ensuring the knot is a bit away from the mesh; place the thread over the mesh and thread the needle through the loop where the knot is; repeat this three or four times, keeping the loops the same length. Then, tie all the loops together with one knot by moving the needle from right to left around the loops, instead of inserting it through the loop of the previous row.
2nd row—make one loop over each loop of the first row, leaving out the loops that form the cluster.
2nd row—create one loop for each loop in the first row, skipping the loops that make up the cluster.
As may be gathered from the drawing, many different patterns can be worked upon the netting in this manner.
As you can see from the drawing, many different patterns can be created on the netting this way.
Netting composed of plain, double and oblong loops (fig. 620).—Netting composed of large and small loops is the kind generally used as a groundwork for embroidery. The loops of it are straight; diamond netting will serve the same purpose, but as it is less commonly used we have given the preference to the straight.
Netting made of simple, double, and rectangular loops (fig. 620).—Netting made of big and small loops is the type usually used as a base for embroidery. The loops are straight; diamond netting can work too, but since it’s not as commonly used, we prefer the straight version.
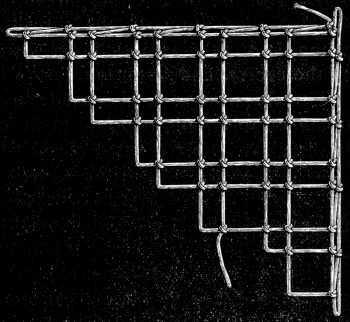
The whole first row consists of a double and a plain loop alternately; the second, entirely of oblong loops, which are made by passing the thread only once over the mesh, and so, that in netting on the double loop, the knot is brought close to the needle, where as, in netting the plain loop, it hangs free; so that, as shown in fig. 620, all the loops of the 2nd row are of the same length. In the 3rd row, which is like the first, the plain loops should come between the small holes and the double ones between the large holes.
The entire first row is made up of alternating double and plain loops; the second row is made entirely of oblong loops, which are created by passing the thread only once over the mesh. This means that when you net on the double loop, the knot is brought close to the needle, while in netting the plain loop, it hangs freely. As shown in fig. 620, all the loops in the second row are the same length. In the third row, which is similar to the first, the plain loops should go between the small holes and the double loops should be placed between the large holes.
Circular netting composed of long and short loops (fig. 621).—Make thirty or thirty one loops over a large mesh with a very stout material, such as Fil à pointer D.M.C No. 20, or a double thread of Cordonnet 6 fils D.M.C No. 30, then draw up the thread on which the loops are strung, as tightly as possible, so as to form quite a small ring for the centre, and fasten off.
Circular netting made of long and short loops (fig. 621).—Create thirty or thirty-one loops using a large mesh with a strong material, like Fil à pointer D.M.C No. 20, or a double thread of Cordonnet 6 fils D.M.C No. 30. Then pull the thread that the loops are on as tightly as you can to form a small ring for the center, and secure it.
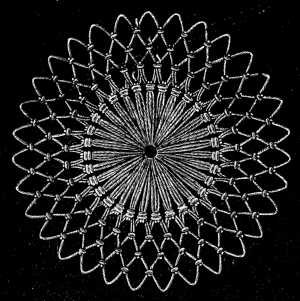
For the next row, also made in coarse thread, fasten the thread on to a long loop and make one loop into each loop of the first row, over a small mesh. Use the same mesh for all the subsequent rows, which should be worked in a finer thread, such as Cordonnet 6 fils D.M.C No. 50 or 60.
For the next row, also using thick thread, tie the thread to a long loop and make one loop into each loop of the first row, over a small mesh. Use the same mesh for all the following rows, which should be worked in a finer thread, like Cordonnet 6 fils D.M.C No. 50 or 60.
If you want to avoid fastening on the thread afresh for each row, make a loop over the thumb.
If you want to avoid re-threading for each row, make a loop around your thumb.
Making loops over the thumb.—Put the thread, as for a plain loop over the mesh and fingers, and put the needle through the loop, likewise as for a plain loop, but before tightening the knot, draw the mesh out of the loop just made and make it exactly as long as the loop above.
Making loops over the thumb.—Place the thread as if you’re making a regular loop over the mesh and fingers, then push the needle through the loop, just like with a regular loop. However, before you tighten the knot, pull the mesh out of the loop you just made and make it exactly as long as the loop above.
Circular netting formed by increases (fig. 622).—Make 10 loops on the foundation loop, close the ring, then go on, making a row with one knot in the first loop and two knots in the second, until the net attains the right circumference; in the subsequent rows, increase by one loop, that is to say, make two knots in each of the previous increases.
Circular netting formed by increases (fig. 622)—Create 10 loops on the foundation loop, close the ring, and then continue by making a row with one knot in the first loop and two knots in the second, until the net reaches the desired size; in the following rows, increase by one loop, meaning to make two knots in each of the previous increases.
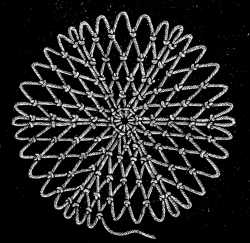
Square of netting (figs. 623 and 624).—To make squares of netting with straight loops, begin by making two loops or three knots. Make two knots in each of the following rows so that each row is increased by one loop. Continue to increase until you have one loop more than the square should number.
Square of netting (figs. 623 and 624).—To create squares of netting with straight loops, start by making two loops or three knots. In each subsequent row, make two knots so that each row has one more loop than the previous one. Keep increasing until you have one loop more than the desired total for the square.
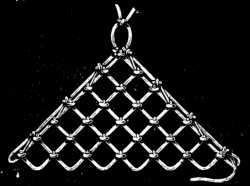
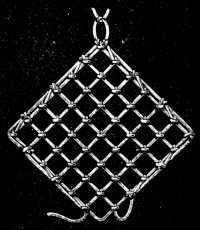
Following this row with the extra stitch, make a row without either increase or intake and begin the intakes in the next row, joining the two last loops of each row together by a knot. Finish the two last loops over the thumb.
Following this row with the extra stitch, make a row without any increases or decreases and start the decreases in the next row, joining the last two loops of each row together with a knot. Finish the last two loops over the thumb.

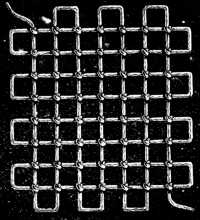
Cast on the required number of loops, make an intake in each row, by omitting to take up the last loop of a row. In coming back, your first knot will thus be made over the last loop but one of the previous row, fig. 625. To complete the square, fasten the thread on again, to the end of the thread of the last row, then make a similar to it, and repeat the same rows you made at the beginning (see fig. 626).
Cast on the required number of stitches, and create a decrease in each row by skipping the last stitch of a row. When you return, your first stitch will be made over the second-to-last stitch of the previous row, fig. 625. To finish the square, reattach the thread to the end of the last row, then make a stitch similar to the previous one, and repeat the same rows you started with (see fig. 626).
Stripes of straight netting (figs. 627 and 628).—These can be begun and finished in two ways. The simplest way, more especially when they are to be embroidered afterwards, is to cast on the necessary number of loops, to decrease on one side by dropping a loop, fig. 627, or by joining two loops together with a knot, fig. 628, and to increase on the other side, by making two knots over one loop.
Stripes of straight netting (figs. 627 and 628).—You can start and finish these in two ways. The easiest method, especially if you plan to embroider them later, is to cast on the required number of loops, then decrease on one side by dropping a loop, fig. 627, or by joining two loops together with a knot, fig. 628, and increase on the other side by making two knots over one loop.
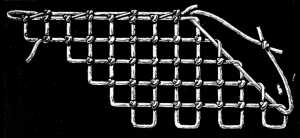
Great care must be taken not to change the order of the intakes and increases, as any mistake of the kind would break the lines of squares, and interfere with the subsequent embroidery, unless there happened to be more loops in the stripe than stitches in the pattern, in which case the superfluous loops might be cut away when the embroidery is finished.
Great care must be taken not to change the order of the intakes and increases, as any mistake like that would disrupt the lines of squares and interfere with the following embroidery, unless there happen to be more loops in the stripe than stitches in the pattern, in which case the extra loops might be cut away when the embroidery is done.
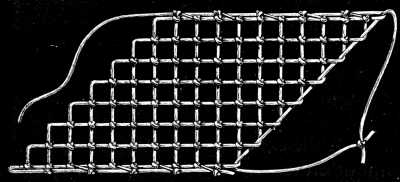
Straight netting with a scalloped edge (fig. 629).—The second way of making stripes of straight netting is to begin by a square. After making two loops on the foundation loop, make rows with increases, until you have the required number of loops. Then make an increase in every row to the left and leave the last loop empty in every row to the right. Continuing the increases on the left, you net 4 rows, without increasing or decreasing on the right, whilst in the next 4, you again leave the outside loop empty.
Straight netting with a scalloped edge (fig. 629).—The second method for creating stripes of straight netting starts with a square. After making two loops on the foundation loop, create rows with increases until you have the required number of loops. Then, make an increase in every row to the left and leave the last loop empty in every row to the right. Continuing the increases on the left, net 4 rows without any increases or decreases on the right, while in the next 4 rows, again leave the outside loop empty.
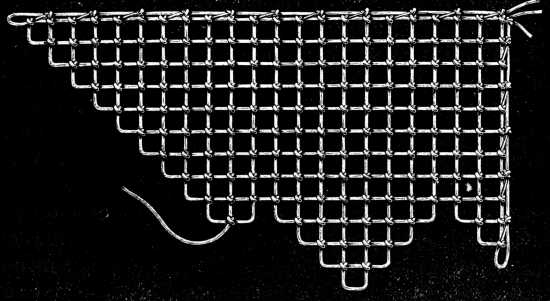
Square frame of netting (fig. 630).—Handkerchief, counterpane and chair-back borders can be netted in one piece, leaving an empty square in the centre. After casting on the loops as for an ordinary square of netting, letter a, increase them to double the number required for the border. Thus, for example, if the border is to consist of 3 squares, you make 6 loops, then leave 3 loops empty on the left and continue to work to the right and decrease to the left, up to the dotted line from c to c. After this you begin to decrease on the right and increase on the left, up to the dotted line from e to e.
Square frame of netting (fig. 630).—You can net a handkerchief, bedspread, and chair-back borders in one piece, leaving a blank square in the middle. After casting on the loops like you would for a standard square of netting, refer to letter a, and double the number needed for the border. For instance, if the border is supposed to have 3 squares, you would create 6 loops, then leave 3 loops empty on the left and keep working to the right while decreasing to the left, up to the dotted line from c to c. After that, start decreasing on the right and increasing on the left, up to the dotted line from e to e.
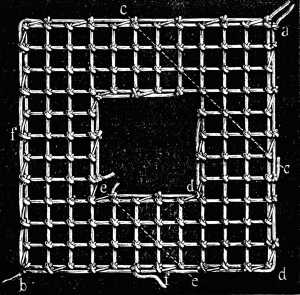
Leaving the right side of the net, you now fasten on the thread at c, where the 3 empty loops are, and here you make your increases on the right side and your intakes on the left, till you come to the corner, from whence you decrease on the right and increase on the left, up to letter g. Stop on the left side and then work from left to right, passing over the row that is marked e. The fourth corner, letter b, is worked like any other piece of straight netting, with an intake in each row, until there are only two loops left.
Leaving the right side of the net, you now attach the thread at c, where the 3 empty loops are, and here you make your increases on the right side and your intakes on the left, until you reach the corner, where you decrease on the right and increase on the left, up to letter g. Stop on the left side and then work from left to right, skipping over the row marked e. The fourth corner, letter b, is worked like any other piece of straight netting, with an intake in each row, until only two loops are left.
Diagonal netting with crossed loops (figs. 631 and 632). To work this simple and effective pattern, begin by making a stripe of plain netting, 14 loops in width, for the middle. When it is long enough for your purpose, take up all the loops on one side on a strong thread; fasten the work to the cushion again and work 3 rows, along the other edge in the following manner.
Diagonal netting with crossed loops (figs. 631 and 632). To create this simple and effective pattern, start by making a stripe of plain netting that is 14 loops wide for the center. Once it’s long enough for your needs, gather all the loops on one side onto a sturdy thread; secure the work to the cushion once more and work 3 rows along the other edge in the following way.
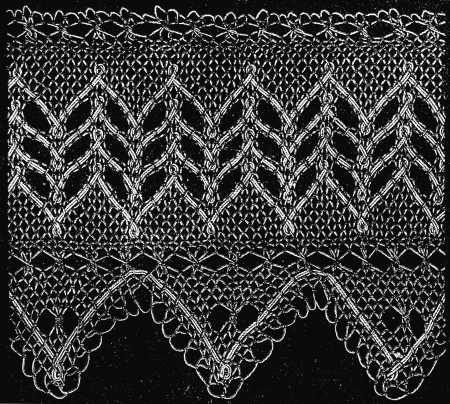
Original size.
Materials—For the netting: Cordonnet 6 fils D.M.C Nos. 10 to 30, or Fil à dentelle D.M.C Nos. 25 to 40.[A]
For the darning stitches: Coton à tricoter D.M.C Nos. 12 to 20, or Coton à repriser D.M.C Nos. 12 to 50.[A]
Original size.
Materials—For the netting: Cordonnet 6 fils D.M.C Nos. 10 to 30, or Fil à dentelle D.M.C Nos. 25 to 40.__A_TAG_PLACEHOLDER_0__
For the darning stitches: Coton à tricoter D.M.C Nos. 12 to 20, or Coton à repriser D.M.C Nos. 12 to 50.__A_TAG_PLACEHOLDER_1__
1st row—long loops, to be made by the thread being passed thrice over the mesh.
1st row—long loops, to be made by passing the thread three times over the mesh.
2nd row—here, 3 loops are so made as to cross each other, that is, you begin by putting your netting-needle at first into the 3rd loop, counting from left to right, then into the 1st, and lastly into the middle one of the three, so that the right loop leans to the left and the left one to the right.
2nd row—here, 3 loops are made to cross each other. You start by putting your netting needle into the 3rd loop, counting from left to right, then into the 1st, and finally into the middle one of the three, so that the right loop leans to the left and the left one leans to the right.
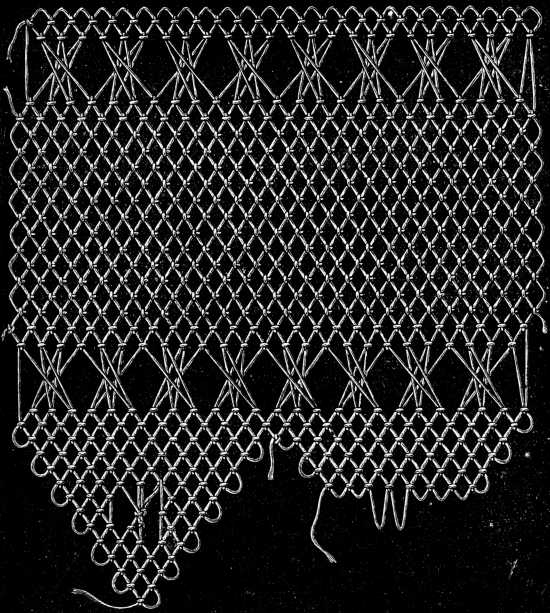
When this is done, you begin the scallops, composed of 12 knots or 11 loops, or 14 loops and 15 knots = net 5 rows, leaving the outside loops empty, fig. 632, stop on the left and proceed with: 6 knots or 5 plain loops, 2 or 3 long loops with 3 overs, 3 plain loops = turn the work = 3 plain loops, 3 knots = turn the work = 2 loops with 3 overs, 3 knots = turn the work = 2 plain loops, 2 knots = turn the work = cross 2 or 3 loops, according to the number you crossed in the middle, then carry the working thread to the middle of the long loops, and connect them by 2 knots = pass the needle under the knot of the last long loop, then, on the right side net: 3 plain loops = turn the work = 3 plain loops, 3 knots = turn the work = 2 plain loops, 2 knots = turn the work and continue the rows of plain netting until you have only 2 loops left.
When you've finished that, start the scallops, which are made of 12 knots, 11 loops, or 14 loops and 15 knots = a total of 5 rows, leaving the outer loops empty, fig. 632, stop on the left and continue with: 6 knots or 5 plain loops, 2 or 3 long loops with 3 overs, 3 plain loops = turn the work = 3 plain loops, 3 knots = turn the work = 2 loops with 3 overs, 3 knots = turn the work = 2 plain loops, 2 knots = turn the work = cross 2 or 3 loops, depending on how many you crossed in the middle, then bring the working thread to the center of the long loops, and connect them with 2 knots = pass the needle under the knot of the last long loop, then, on the right side net: 3 plain loops = turn the work = 3 plain loops, 3 knots = turn the work = 2 plain loops, 2 knots = turn the work and keep going with the plain netting until you have just 2 loops left.
To reach the next scallop, pass the netting-needle through each hole of the net and round each thread.
To get to the next scallop, thread the needle through each hole in the net and around each strand.
Finish off the scallops with a row of plain netting, made with a coarser thread than the foundation.
Finish off the scallops with a strip of plain netting, made with a thicker thread than the base.
These netted edgings are generally made in unbleached cotton, because the patterns afterwards embroidered upon them in coarse, white knitting or darning cotton, show best upon it. The thread for this purpose should be used double, and the pattern worked in darning stitches, made over 8 squares of the netting; the 8th knot is then encircled by a loop and the thread carried down over 8 squares and a loop again made round the 8th knot. After making 4 rows of stitches on the netting, cut 3 bars between the rows of white stitches.
These netted edges are usually made from unbleached cotton because the patterns stitched onto them with thick white knitting or darning cotton show up better that way. The thread for this should be used doubled, and the pattern should be created with darning stitches over 8 squares of the netting; the 8th knot is then looped and the thread is drawn down over 8 squares and another loop is made around the 8th knot. After making 4 rows of stitches on the netting, cut 3 bars between the rows of white stitches.
The row of openwork produced in this way has a very good effect and greatly improves the look of the lace.
The row of openwork created like this has a really great effect and significantly enhances the appearance of the lace.
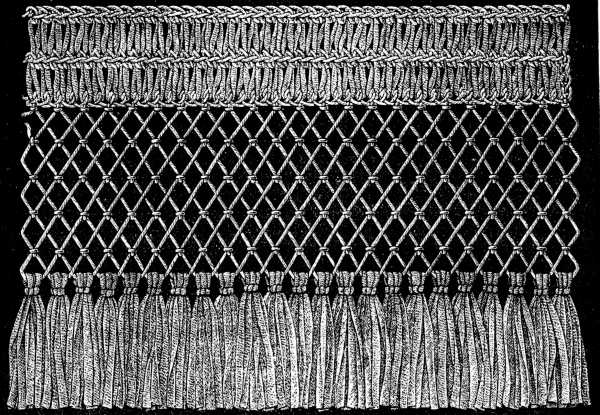
Materials—For the netting: Cordonnet 6 fils D.M.C Nos. 10 to 30 or Fil à pointer D.M.C No. 30.[A]
For the fringes: Soutache D.M.C No. 3 or Lacets superfins D.M.C No. 4.[A]
Materials—For the netting: Cordonnet 6 fils D.M.C Nos. 10 to 30 or Fil à pointer D.M.C No. 30.__A_TAG_PLACEHOLDER_0__
For the fringes: Soutache D.M.C No. 3 or Lacets superfins D.M.C No. 4.__A_TAG_PLACEHOLDER_1__
Into every fourth of these chain stitches, net one loop, missing the 3 between. At the end of the row, turn the work and make the knot in the middle of the 3 chain stitches, so that the 2 loops of netting cross each other.
Into every fourth of these chain stitches, make one loop, skipping the 3 in between. At the end of the row, turn the work and create the knot in the middle of the 3 chain stitches, so that the 2 loops of netting cross each other.
In the second, or rather the third row, the knots are again made first into the front loops, into those of the first row that is; in the fourth row, into those of the second row.
In the second, or actually the third, row, the knots are again made first into the front loops, specifically those of the first row; in the fourth row, they're made into those of the second row.
When the stripe is sufficiently wide, finish it off with tassels, made of Soutache D.M.C No. 3. Instead of tying up the lengths of braid with a thread, twisted round them and fastened off with a stitch, make 2 looped knots round them with an end of the braid, where the neck of the tassel should come.
When the stripe is wide enough, finish it off with tassels made of Soutache D.M.C No. 3. Instead of tying the lengths of braid with a thread twisted around them and secured with a stitch, make 2 looped knots around them with an end of the braid where the neck of the tassel should be.
Embroidered netting.—Embroidered netting, also known as Filet Guipure, Cluny Guipure, and Richelieu Guipure, is a netted ground, with patterns of one kind or another, worked upon it in a variety of stitches.
Embroidered netting.—Embroidered netting, also called Filet Guipure, Cluny Guipure, and Richelieu Guipure, is a netted fabric featuring different patterns created using various stitches.
Implements required for embroidered netting.—Besides scissors, needles and thread, a light steel frame is the only thing required, and this renders embroidered netting very popular.
Tools needed for embroidered netting.—Both sides need scissors, needles, and thread; a light steel frame is all that's required, which makes embroidered netting really popular.
The needles should be long, and blunt; those called saddlers needles are the best.
The needles should be long and blunt; the ones called saddlers' needles are the best.
Wire frame for embroidered netting (fig. 634).—The frame on which the net is stretched should be made of strong iron wire, that will not bend in the using. In shape, it may be square or oblong, according to whether squares or edgings are to be made upon it, but the sides must be straight, so that the net can be evenly stretched.
Wire frame for embroidered netting (fig. 634).—The frame used to stretch the net should be made of strong iron wire that won’t bend during use. It can be square or rectangular, depending on whether squares or edges are to be made on it, but the sides must be straight, so the net can be stretched evenly.
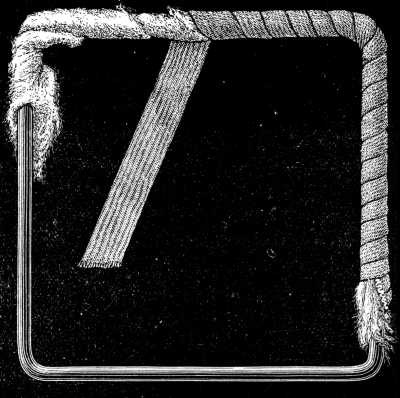
This wire frame must be covered, first with wadding or tow, as shown in fig. 634, and then with silk ribbon, which must be wound tightly round it, and more particularly at the corners, very closely, so that it may be quite firm and not twist about when the netting is sewn in. The ends of the ribbon should be secured by two or three stitches.
This wire frame must be covered first with padding or stuffing, as shown in fig. 634, and then with silk ribbon, which should be wrapped tightly around it, especially at the corners, so that it is firm and won’t twist when the netting is sewn in. The ends of the ribbon should be secured with two or three stitches.
Mounting the netting on the frame (fig. 635).—When the netting is exactly the size of the inside of the frame, it need only be secured to it with overcasting stitches, set very closely at the corners.
Mounting the netting on the frame (fig. 635).—When the netting fits perfectly inside the frame, it just needs to be attached with tight overcasting stitches at the corners.
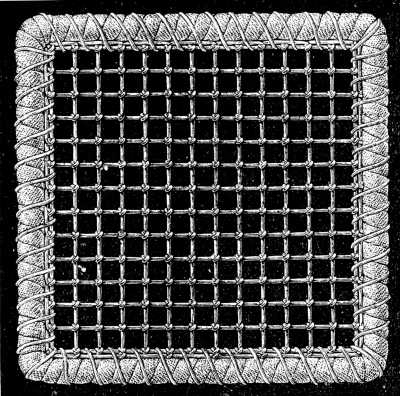
Mounting the netting on the frame with an auxiliary tape (fig. 636).—When the netting, is smaller, the space between it and the frame, must be filled up with strong very evenly woven, linen tape, sewn on all round the netting.
Attaching the netting to the frame with additional tape (fig. 636).—When the netting is smaller, the gap between it and the frame must be filled with strong, evenly woven linen tape, sewn all the way around the netting.
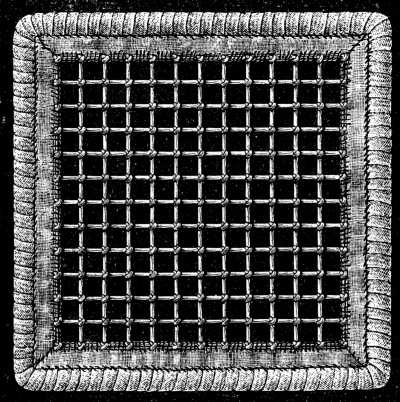
The tape must be very tightly held in the sewing, so that it even forms little gathers all round; this will help you to stretch the netting in mounting it without injuring it, and is especially necessary when the netting is not quite evenly made. Fig. 636 shows how the tape is sewn on, the fold that has to be made at the corners, and the way to fix the netting into the frame.
The tape should be held very tightly while sewing it on, so that it creates little gathers all around; this will make it easier to stretch the netting when you’re mounting it without damaging it, and it’s especially important when the netting isn’t perfectly even. Fig. 636 shows how to sew the tape on, how to fold it at the corners, and how to attach the netting to the frame.
Long stripes or large pieces of work, can be mounted on waxcloth, but we cannot recommend shortening the preparatory work in this manner, as the squares of netting are never so regular as when they are made in a frame.
Long strips or large sections of work can be attached to wax cloth, but we do not advise cutting corners on the preparatory work this way, as the squares of netting are never as even as when they are created in a frame.
There are however certain old kinds of embroidered netting made in soft loose silk, for imitating which it is best to use, Coton à repriser D.M.C[A] that being quite the best substitute for the original material.
There are, however, certain traditional types of embroidered netting made with soft, loose silk. To imitate this, it's best to use Coton à repriser D.M.C[A], as it is the closest substitute for the original material.
The stitches used for embroidered netting.—These are so multifarious and admit of so many different combinations, that not a few of them seeing that be quite new to our readers, willsome we have never yet come across in any book on the subject that has come under our notice.
The stitches used for embroidered netting.—There are so many different stitches and combinations that some of them will be completely new to our readers, and some we have never seen in any book on the subject that we've come across.
Ordinary darning stitch (fig. 637).—The simplest stitch of all for covering a netted ground is the ordinary darning stitch; drawing the thread, that is to say, in and out of the number of squares, prescribed by the pattern, and backwards and forwards as many times as is necessary to fill them up.
Ordinary darning stitch (fig. 637).—The easiest stitch to use for covering a mesh background is the ordinary darning stitch. This involves pulling the thread in and out of the specified number of squares according to the pattern and going back and forth as many times as needed to fill them in.
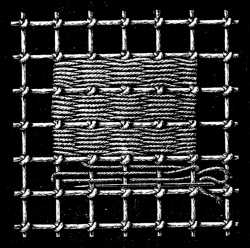
The number of stitches depends, to a certain extent, on the material employed; with Coton à broder D.M.C for example, you will have to make more stitches than with one of the coarser numbers of Coton à repriser D.M.C.
The number of stitches varies, to some degree, based on the material used; for instance, with Coton à broder D.M.C, you'll need to make more stitches than with one of the thicker types of Coton à repriser D.M.C.
This is the stitch generally used for reproducing a cross stitch pattern on a netted ground and is especially to be recommended for covering large surfaces, curtains, counterpanes and so forth, as it is quickly done and shows up the pattern well.
This is the stitch usually used to recreate a cross-stitch pattern on a netted background and is particularly recommended for covering large areas, like curtains, bedspreads, and so on, as it is quick to do and highlights the pattern nicely.
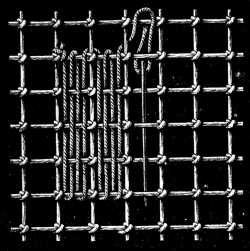

Fasten on the thread to a knot of the netting and carry it twice to and fro, over and under the threads of the netting, so that at the end of the row, every second thread passes under and over the thread of the netting, as it is carried upwards again.
Fasten the thread to a knot in the netting and move it back and forth twice, going over and under the threads of the netting, so that by the end of the row, every second thread goes under and over the thread of the netting as it moves upward again.
This constitutes the first layer of threads, the second completes the linen stitch and is made in the same way, only across the first, alternately taking up and missing a thread as is done, in darning. The thread may also be carried both ways over the threads of the squares. In this case you must draw an uneven number of threads through the squares, otherwise the crossing of the threads will be irregular in the last square.
This is the first layer of threads; the second one finishes the linen stitch and is made the same way, but it goes across the first layer, alternating between picking up and missing a thread like in darning. The thread can also be carried both ways over the threads of the squares. In this case, you need to pull an odd number of threads through the squares; otherwise, the crossing of the threads will be uneven in the last square.
Linen stitch. Formation of the corners (fig. 640).—When linen stitch is used for the border of a pattern, and a corner has to be formed, you begin by carrying the threads over a given number of squares. This first layer, especially in the case of long stripes, must be kept very slack, and to ensure the threads being all of the same length, lay a fine mesh or a thick knitting needle at one end and stretch the threads over it. After carrying the second layer across a few squares, take away the mesh or needle. The threads of the first layer become gradually shorter, from the passage of the cross threads in and out between them, and end by being just long enough to prevent the last embroidered squares from being too tightly stretched.
Linen stitch. Formation of the corners (fig. 640).—When using linen stitch for the border of a pattern and needing to form a corner, start by carrying the threads over a specified number of squares. The first layer, especially with long stripes, should be kept quite loose, and to ensure all the threads are the same length, place a fine mesh or a thick knitting needle at one end and stretch the threads over it. After you’ve carried the second layer across a few squares, remove the mesh or needle. The threads in the first layer will gradually shorten as the cross threads weave in and out between them, ultimately becoming just long enough to prevent the last embroidered squares from being pulled too tightly.
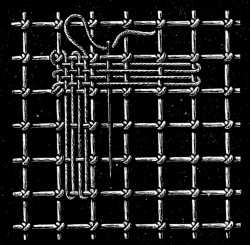
On reaching the corner, you cross the threads of the next row, as shown in fig. 640. The first threads of the second side form the foundation of the corner square; from the second corner square you pass to the third; from the third to the fourth, carrying your thread alternately over and under the threads that were stretched for the first corner.
On reaching the corner, you cross the threads of the next row, as shown in fig. 640. The first threads of the second side create the base of the corner square; from the second corner square, you move to the third; from the third to the fourth, alternating your thread over and under the threads that were stretched for the first corner.
Loop stitch (point d’esprit) (figs. 641 and 642).—This is a light open stitch, chiefly used for making a less transparent foundation than plain netting. Fasten the thread to the middle of one bar of the netting, then make a loose loop to the middle of the top bar of the same square, fig. 641, by carrying the thread, from left to right, over one vertical and one horizontal bar of the net and inserting the needle downwards from above under the bar and in front of the working thread. For the second row back, also represented in fig. 641, you draw the needle through, underneath the bar above the loop stitch and make the loop upwards from below; in doing this the working thread must lie to the left, in front of the needle. Fig. 642 shows how to join the rows and pass the needle through the stitches of the preceding row.
Loop stitch (point d’esprit) (figs. 641 and 642).—This is a lightweight open stitch, mainly used to create a less transparent base than plain netting. Attach the thread to the middle of one bar of the netting, then create a loose loop to the middle of the top bar of the same square, fig. 641, by moving the thread, from left to right, over one vertical and one horizontal bar of the net and inserting the needle downwards from above under the bar and in front of the working thread. For the second row back, also shown in fig. 641, pull the needle through, underneath the bar above the loop stitch and create the loop upwards from below; while doing this, the working thread should lie to the left, in front of the needle. Fig. 642 illustrates how to connect the rows and pass the needle through the stitches of the previous row.
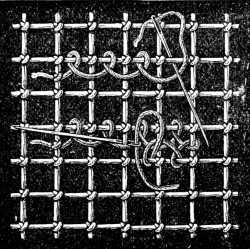
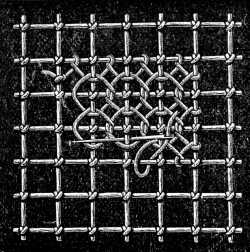
Star composed of loose threads (figs. 643, 644, 645).—This star covers 16 squares of netting. Fasten the thread to the middle knot of the 16 squares, then carry it diagonally over 4 squares, three times from left to right under a knot of the foundation and three times from right to left. In this way, the bottom rays of the star are formed. For the stitches that complete the figure, you start from the middle and following the direction of the little arrow in the illustration, you cover the netting with 3 horizontal and 3 vertical threads, carried over 4 squares. When you have laid the vertical threads, slip the needle 4 or 5 times round in a circle, under the diagonal and over the straight threads, but always over the bars of the netting. This completes the star, as it is represented in fig. 645. Care must be taken to make the stitches lie quite flat side by side, and not one on the top of the other.
Star composed of loose threads (figs. 643, 644, 645).—This star covers 16 squares of netting. Attach the thread to the middle knot of the 16 squares, then move it diagonally over 4 squares, three times from left to right under a knot of the foundation and three times from right to left. This is how the bottom rays of the star are created. For the stitches that finish the design, start from the middle and, following the direction of the little arrow in the illustration, cover the netting with 3 horizontal and 3 vertical threads, moving over 4 squares. Once you’ve laid down the vertical threads, wrap the needle around in a circle 4 or 5 times, underneath the diagonal and above the straight threads, but always over the bars of the netting. This completes the star, as shown in fig. 645. Be sure to make the stitches lie flat side by side, instead of stacking them on top of one another.

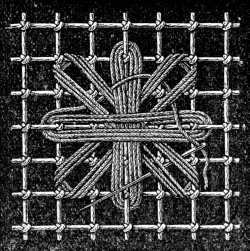
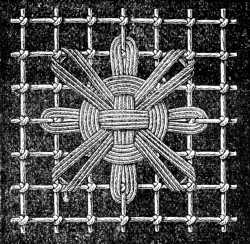
Darning stitch (point de reprise) (figs. 646 and 647).—Little flowers and leaves are generally executed in this stitch; the first course of the thread is shown in fig. 646. Leaves can be made with one, two or three veins. Carry the needle, invariably from the middle, first to the right and then to the left, under the threads of the foundation and push the stitches close together, as they are made, with the point of your needle. This you will be able to do most easily by holding the work so as to make the stitches towards you.
Darning stitch (point de reprise) (figs. 646 and 647).—You typically create little flowers and leaves using this stitch; the first row of thread is shown in fig. 646. You can make leaves with one, two, or three veins. Always carry the needle from the center, starting to the right and then to the left, underneath the threads of the foundation, and push the stitches close together as you go with the tip of your needle. You'll find it easiest to do this by positioning your work so that you're stitching toward yourself.
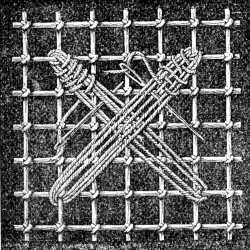
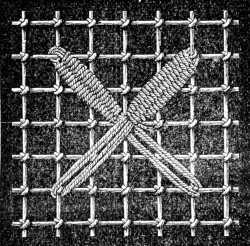
In working leaves of this kind in darning stitch, you must draw your stitches at the top and bottom of the leaf rather tighter than in the middle, so as to give them the proper shape. If you wish to make them very slender at the bottom, you can finish them off with a few overcasting stitches.
In working leaves like this in darning stitch, you need to pull your stitches at the top and bottom of the leaf tighter than in the middle to give them the right shape. If you want to make them really narrow at the bottom, you can finish them off with a few overcasting stitches.
Fig. 647 represents two leaves completed, one with one vein and the other, with two.
Fig. 647 shows two completed leaves, one with a single vein and the other with two veins.
Pointed scallops in darning stitch (fig. 648).—The simplest way to work these scallops is to carry a thread, as shown in the illustration, to and fro over the square, from the knot in one corner to the middle of the bar above and downwards to the opposite knot, round which the thread is carried and passed upwards again to the middle. As the scallop must always be begun from the top, you will have, two foundation threads on one side and three on the other. Here likewise, you must push the threads as closely together as possible with the needle.
Pointed scallops in darning stitch (fig. 648).—The easiest way to create these scallops is to thread a line back and forth over the square, starting from the knot in one corner to the middle of the bar above, then down to the opposite knot, around which the thread is looped and brought back up to the middle. Since you must always start the scallop from the top, there will be two foundation threads on one side and three on the other. Also, make sure to push the threads as close together as possible with the needle.
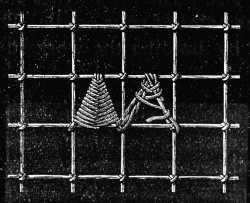
Pointed scallops in button-hole stitch (fig. 649).—Another quite as pretty and easy way of working pointed scallops on a netted foundation is by making two button-hole stitches before crossing to the opposite side. As shown in the foregoing illustration, you begin by stretching single or double foundation threads across; then beginning at the point, you make, alternately right and left, 2 button-hole stitches over the foundation threads, so that the working thread is only carried across to the opposite side after every second stitch.
Pointed scallops in button-hole stitch (fig. 649).—Another pretty and easy way to create pointed scallops on a netted base is by making two button-hole stitches before crossing to the other side. As shown in the illustration above, you start by stretching single or double foundation threads across. Then, starting at the point, you alternate to make 2 button-hole stitches over the foundation threads to the right and left, so that the working thread is only carried to the opposite side after every second stitch.
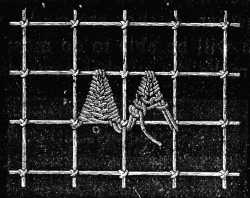
Veined pointed scallops (fig. 650).—A third way of making pointed scallops is by first stretching a thread to and fro across the middle of the square, after which you slip the needle from left to right under the middle thread, and underneath the left bar from above. Then you carry the needle, from right to left, over the foundation thread and under the right bar and so on. The one thread must be drawn tightly round the other, in order that the stitches may form close and evenly shaped veins, like small cords, on the wrong side of the scallop. There must be enough stitches to completely cover the foundation thread that crosses the middle of the square.
Veined pointed scallops (fig. 650).—Another method for creating pointed scallops involves first stretching a thread back and forth across the center of the square. After that, you insert the needle from left to right under the center thread and beneath the left bar from the top. Then, move the needle from right to left, over the foundation thread and under the right bar, and continue this pattern. One thread needs to be pulled tightly around the other to ensure that the stitches create closely spaced and evenly shaped veins, resembling small cords, on the back side of the scallop. You should have enough stitches to fully cover the foundation thread that runs through the center of the square.
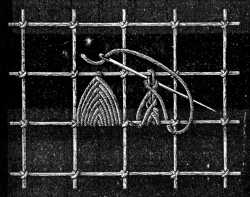
Pointed scallops in Venetian stitch (fig. 651).—The prettiest scallops of all are those worked in Venetian stitch. You begin, by making from 8 to 10 button-hole stitches over one bar of the netting, then you work on with the same stitch backwards and forwards, making one stitch less in each row, until you come to the one which forms the point of the scallop and is fastened to the bar above; you carry the working thread back on the wrong side to the lower bar, and then under the button-hole stitches to the next square of the netting. Scallops worked in this manner, can be overcast round the edges in the way described further on, in fig. 660.
Pointed scallops in Venetian stitch (fig. 651).—The most beautiful scallops are those made using Venetian stitch. Start by making 8 to 10 buttonhole stitches over one bar of the netting, then continue with the same stitch back and forth, decreasing one stitch in each row until you reach the one that forms the point of the scallop, which is attached to the bar above. Carry the working thread back on the back side to the lower bar, then under the buttonhole stitches to the next square of the netting. Scallops created this way can be overcast around the edges as described later in fig. 660.
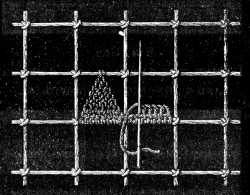
Wheels embroidered on netting (figs. 652 and 653).—To make wheels or spiders, as they are also called, you have first to fasten the thread to the middle knot of four squares, thence you carry it diagonally right and left, fig. 652, right detail, across the empty squares of netting and the knot, and return to the middle, overcasting your first thread by the way, so as to form a closely twisted cord. This is called cording a thread.
Wheels embroidered on netting (figs. 652 and 653).—To create wheels or spiders, as they're also known, you first need to secure the thread to the center knot of four squares. Then, you carry it diagonally to the right and left, as shown in fig. 652, right detail, moving across the empty squares of netting and the knot, and return to the center, overlapping your initial thread along the way to form a tightly twisted cord. This process is referred to as cording a thread.
Having reached the centre, carry the working thread round and round, under and over the corded threads and under the bars of the netting till the wheel covers half the bars.
Having reached the center, wrap the working thread around and around, under and over the corded threads and under the bars of the netting until the wheel covers half the bars.
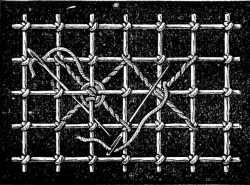
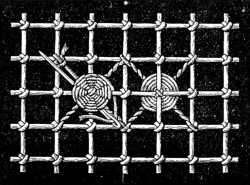
Fig. 653 shows, on the right, a finished wheel, and on the left, another way in which it can be made, and indicates the course of the thread over and under the lines, as in a darn. These details show also how, when the foundation thread of the wheel starts from a corner, it is left single in the first square until the wheel is finished; then the needle is slipped back along the little spoke, opposite to the single thread, and through the wheel, and the single thread is corded like the others.
Fig. 653 shows a completed wheel on the right and another way to make it on the left, demonstrating how the thread goes over and under the lines, similar to darning. These details also illustrate how the foundation thread of the wheel starts from a corner and remains single in the first square until the wheel is complete. After that, the needle is pulled back along the little spoke, opposite the single thread, and through the wheel, allowing the single thread to be corded like the others.
Ribbed wheels (fig. 654).—Make the foundation of the wheels as before, over 8 threads. To form the ribs at the back of the wheels, see fig. 654; make a back stitch, on the right side, over a bar of the netting, and carry on the needle under one bar, so that the thread that lies outside always crosses 2 bars of the netting.
Ribbed wheels (fig. 654).—Start by making the base of the wheels just like before, using over 8 threads. To create the ribs on the back of the wheels, refer to fig. 654; make a back stitch on the front side, over one of the netting bars, and thread the needle underneath one bar, ensuring that the thread on the outside crosses over 2 bars of the netting at all times.
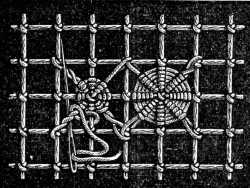
In this case you must make circles of thread enough, to cover the bars completely, not half, as before.
In this case, you need to make enough circles of thread to cover the bars completely, not just halfway like before.

Wheels set with button-holing (fig. 656).—A very pretty lace-like effect is produced by encircling the wheels in large squares of netting with a double setting of stitches. The left detail of fig. 656 shows how the thread, having been passed under the wheel and twisted once round the single thread, is carried all round the square and forms 8 loops.
Wheels set with button-holing (fig. 656).—A beautiful lace-like effect is created by wrapping the wheels in large squares of netting with a double layer of stitches. The left detail of fig. 656 illustrates how the thread, after being passed under the wheel and twisted once around the single thread, is wrapped all the way around the square and forms 8 loops.
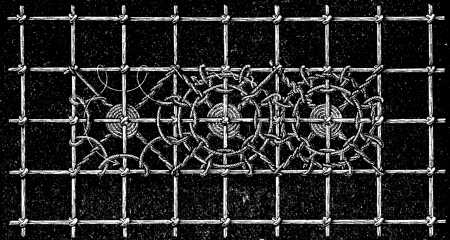
The arrow shows the way in which the loops are taken up, and the first ring of stitches round the wheel is finished.
The arrow indicates how the loops are taken, and the first ring of stitches around the wheel is complete.
The second detail of the same figure explains the course the thread, that forms the second ring, has to take through the loops and between the bars; whilst the white line shows the passage of the thread over the second ring. The third detail represents a wheel, completed.
The second detail of the same figure explains the path the thread, which forms the second ring, needs to take through the loops and between the bars; while the white line indicates the thread's journey over the second ring. The third detail shows a finished wheel.
Star with one-sided button-hole stitches (fig. 657).—The pattern represented in fig. 657, is the quickest to work that we know of. Two button-hole stitches made upon the outside bar of a square and a simple crossing of the thread at the bottom, produce elongated triangles which should always be begun from the knot. Two triangles stand exactly opposite to each other in one square, and the square that comes in the middle of the four thus filled, is ornamented with a small wheel.
Star with one-sided button-hole stitches (fig. 657).—The pattern shown in fig. 657 is the fastest to create that we know of. Two button-hole stitches made on the outside bar of a square and a simple thread crossing at the bottom form elongated triangles that should always start from the knot. Two triangles sit directly opposite each other in one square, and the square positioned in the center of the four filled squares is decorated with a small wheel.
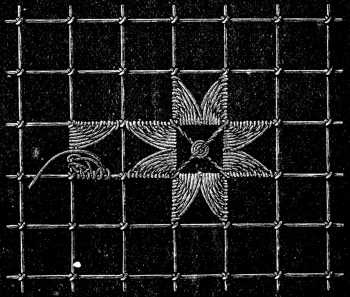
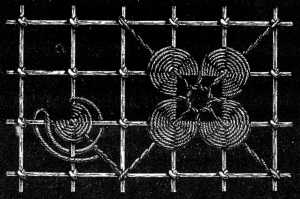
The number of stitches depends on the material you use; there should be no more than can lie quite flat, side by side, on the diagonal thread.
The number of stitches depends on the material you use; there shouldn’t be more than can lie flat, next to each other, on the diagonal thread.
Linen stitch, set with darning stitch (fig. 659).—There are some patterns it would hardly be possible to work on netting unless you could soften the outlines by darning stitches, as shown in the foregoing figure.
Linen stitch, set with darning stitch (fig. 659).—There are certain patterns that would be nearly impossible to create on netting unless you could smooth out the outlines with darning stitches, as depicted in the figure above.
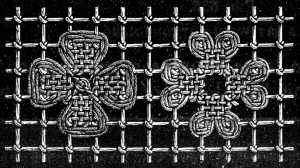
When employed as a setting to linen stitch, there should be fewer than in fig. 658; you may also, instead of interrupting them at every corner, carry them all round a square, (see the right detail of the figure).
When used as a background for linen stitch, there should be fewer than in fig. 658; you can also, instead of stopping them at each corner, take them all the way around a square (see the right detail of the figure).
Linen stitch set with cord stitch (fig. 660).—Many figures are also either corded or edged with twisted thread; both ways are represented in the illustration. In the latter case you can use the same thread as for the linen stitch, or if you wish the setting to be very pronounced, a thicker one. For instance, if the netting be made of Cordonnet 6 fils D.M.C No. 25[A] we recommend Fil à pointer D.M.C No. 15 or 20[A] for the setting. This difference of material is especially noticeable in the old Cluny Guipure, where the figures worked in linen stitch are edged with a thread like a cord. But if the linen stitch be bound with cord stitch, the same thread must be used for it, as for the foundation. A soft material, like Coton à repriser, makes the best padding for the overcasting stitches.
Linen stitch set with cord stitch (fig. 660).—Many figures are either corded or finished with twisted thread; both options are shown in the picture. If you're edging the design, you can use the same thread as the linen stitch, or go for a thicker one if you want it to stand out more. For example, if the netting is made with Cordonnet 6 fils D.M.C No. 25[A], we suggest using Fil à pointer D.M.C No. 15 or 20[A] for the edging. This difference in material is especially clear in the old Cluny Guipure, where the figures worked in linen stitch are finished with a cord-like thread. However, if the linen stitch is finished with cord stitch, you should use the same thread for both as for the base. A soft material, like Coton à repriser, is best for padding the overcasting stitches.

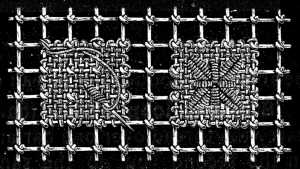
Bordering in button-hole stitch (fig. 662).—Scalloped edges in netting should be button-holed; 2 or 3 padding threads should be run in first, following the bars of the netting, over which the button-holing is done; the bars of the netting must not be cut away until the edge be finished.
Bordering in button-hole stitch (fig. 662).—Scalloped edges in netting should have button-hole stitching; run 2 or 3 padding threads first, following the bars of the netting, over which you will do the button-holing; the netting's bars must not be cut away until the edge is finished.
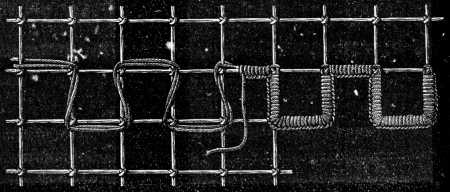
Cut work in embroidered netting (fig. 663).—Cut work here means half covering the bars of the netting with button-hole stitches and half cutting them away with scissors. The inner bars are frequently ornamented with a double button-hole edging and knotted picots, see figs. 698 and 699 in the next chapter. You slightly separate the stitches of the first row of button-holing so as to be able to introduce the thread of the second row between them.
Cut work in embroidered netting (fig. 663).—Cut work here involves partially covering the bars of the netting with buttonhole stitches while also cutting some of them away with scissors. The inner bars are often decorated with a double buttonhole edging and knotted picots; see figs. 698 and 699 in the next chapter. You slightly separate the stitches of the first row of buttonholing to introduce the thread of the second row between them.
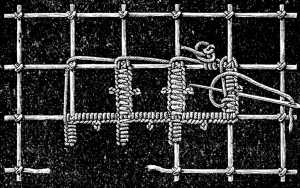
Straight loop stitch (fig. 664).—In the first row you carry the thread over one bar and slip it through behind a knot; in the second you do the same thing, only that above, your needle will pass under 3 threads, two of them the threads of the loop of the first row and the third a bar of the net. In every square 4 threads cross each other.
Straight loop stitch (fig. 664).—In the first row, you take the thread over one bar and pull it through behind a knot; in the second row, you do the same, but this time, your needle will go under 3 threads: two from the loop of the first row and the third being a bar of the net. In each square, 4 threads cross each other.
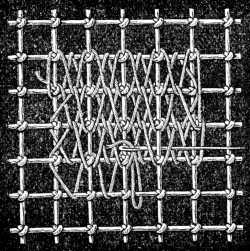
Waved stitch (fig. 665).—This stitch, which forms a close waved ground, is produced by passing the thread in each row of the netting over a square and behind a knot. When the pattern admits of it, as it mostly does, a considerably thicker thread is used for this stitch and for the stitches represented in figs. 667, 668, 669 and 670, than that in which the netting is made. When the netted ground is of Fil à dentelle D.M.C No. 50,[A] the embroidery upon it may very well be done in Cordonnet 6 fils. D.M.C No. 10[A], or Fil à pointer D.M.C No. 30.[A]
Waved stitch (fig. 665).—This stitch creates a close waved texture and is made by passing the thread in each row of the netting over a square and behind a knot. When the design allows it, which it usually does, a much thicker thread is used for this stitch and for the stitches shown in figs. 667, 668, 669 and 670, compared to the thread used for the netting. When the netted background is made with Fil à dentelle D.M.C No. 50, [A] the embroidery on it can be done nicely with Cordonnet 6 fils, D.M.C No. 10 [A], or Fil à pointer D.M.C No. 30. [A]
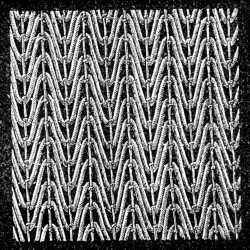
Intersected loop stitch (fig. 666).—Begin by covering the whole surface to be embroidered with plain loop stitches, then stretch threads diagonally across the squares of the netting and the loop stitches; one set of threads running over the stitches and under the knots of the netting, the other under the first and second threads of the loop stitches and over the first crossed threads and the knots.
Intersected loop stitch (fig. 666).—Start by filling the entire area you want to embroider with plain loop stitches. Then, stretch threads diagonally across the square sections of the netting and the loop stitches. One set of threads should go over the stitches and beneath the knots of the netting, while the other set goes under the first and second threads of the loop stitches and over the first crossed threads and the knots.
The laying and stretching of these threads must, it is hardly necessary to say, be systematically and regularly done.
The laying and stretching of these threads should, obviously, be done in a systematic and regular way.

Ground worked in horizontal lines (fig. 667).—Make half cross stitches over 4 squares of netting, by passing the thread alternately over and under 3 knots, and under 3 squares of the netting. In the second row, cross the threads over those of the first row, as is shown in our engraving.
Ground worked in horizontal lines (fig. 667).—Make half cross stitches over 4 squares of netting by passing the thread alternately over and under 3 knots and under 3 squares of the netting. In the second row, cross the threads over those of the first row, as shown in our illustration.

Ground worked in stitches placed one above the other (fig. 668).—Cover a whole row of squares with cross stitches and leave 3 rows of squares empty. When you have a sufficient number of rows of cross stitches, take a long needle and pass it upwards from below, and from right to left, under the two bars of the third upper square; then pass downwards to the first square of the 3 bottom rows and under the bars from right to left, so as again to leave 3 squares between the fresh stitches. The next row of stitches is made in the same manner, so that the stitches are not only set contrary ways but reciprocally cover each other.
Ground worked in stitches placed one above the other (fig. 668).—Cover an entire row of squares with cross stitches and leave 3 rows of squares empty. Once you have enough rows of cross stitches, take a long needle and push it upwards from below, and from right to left, under the two bars of the third upper square; then move downwards to the first square of the 3 bottom rows and under the bars from right to left, leaving 3 squares between the new stitches. The next row of stitches is done in the same way, so that the stitches are not only facing opposite directions but also overlap each other.
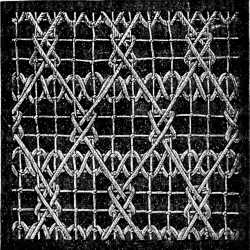
Latticed ground (fig. 669).—Begin by running the thread, to and fro, under two vertical bars and over three horizontal ones. When the ground is entirely covered, carry your thread from right to left, under the bars over which the first rows of threads are crossed; then take it over the long crosses, that correspond to 5 squares of netting, and pass it in the same line under the bars of the netting. In coming back, the long stitches cross each other over the stitches of the first rows.
Latticed ground (fig. 669).—Start by weaving the thread back and forth under two vertical bars and over three horizontal ones. Once the ground is fully covered, move your thread from right to left, under the bars where the first rows of threads intersect; then go over the long crosses that correspond to five squares of netting, and pass it in the same line under the bars of the netting. When returning, the long stitches will cross over the stitches of the first rows.
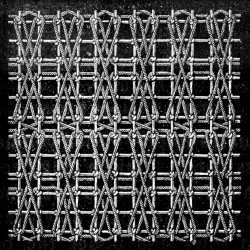
Ground worked in Russian stitch (fig. 670).—Pass the thread from left to right, under a bar of the netting, carry it downwards over 4 squares and pass it again, from left to right, under the bar, then upwards, again over 4 squares of netting and so on. The stitches of the next rows are made in the same manner; you have only to see that the loops formed by the stitches all come on the same line of knots.
Ground worked in Russian stitch (fig. 670).—Insert the thread from left to right, under a bar of the netting, then move it down over 4 squares and pass it again, from left to right, under the bar, then upwards, over 4 squares of netting, and repeat. The stitches in the following rows are done the same way; just make sure that the loops created by the stitches align along the same line of knots.
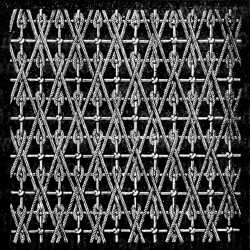
Ground worked in two sizes of thread (fig. 671).—Herewith begins the series of stitches, referred to at the beginning of the chapter, copied in part from one of the oldest and most curious pieces of embroidered netting we have ever met with. The copies were worked with Cordonnet 6 fils D.M.C No. 25 and écru Fil à dentelle D.M.C No. 70[A]; the former being used for the darning and the almond-shaped stitches between; the latter for the button-hole stitches. Wherever two sizes of thread are used for one pattern, all the stitches in the coarse thread should be put in first and those in the fine, last.
Ground worked in two sizes of thread (fig. 671).—This marks the start of the stitch series mentioned at the beginning of the chapter, which is partly adapted from one of the oldest and most interesting pieces of embroidered netting we've ever come across. The samples were stitched using Cordonnet 6 fils D.M.C No. 25 and écru Fil à dentelle D.M.C No. 70[A]; the former was used for the darning and the almond-shaped stitches in between, while the latter was used for the button-hole stitches. Whenever two sizes of thread are used for one pattern, all the stitches in the thicker thread should be done first, followed by those in the thinner thread.
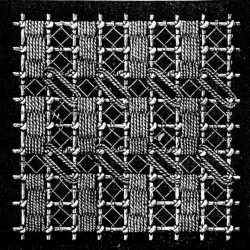
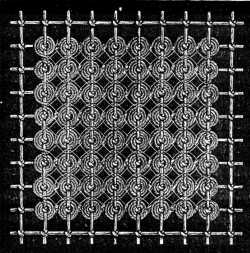
Ground worked in darning and loop stitch (fig. 673).—The darning stitches are made in the coarse thread, over 4 squares of the netting, in a horizontal direction, with loop stitches, in the fine thread, made between them, over the same number of squares.
Ground worked in darning and loop stitch (fig. 673).—The darning stitches are made with a thick thread, covering 4 squares of the netting, going horizontally, with loop stitches, using a fine thread, made in between, over the same number of squares.
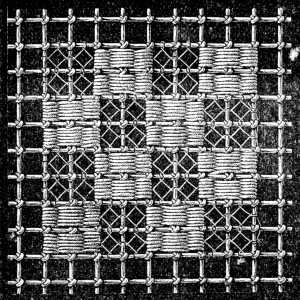
Ground worked in two sizes of thread (fig. 674).—Carry the coarse thread, from right to left, under the first knot of the netting, and then under the next, from left to right. This has to be done twice, to and fro, so that the squares of the netting are edged on both sides with a double layer of threads.
Ground worked in two sizes of thread (fig. 674).—Carry the coarse thread from right to left under the first knot of the netting, then under the next one from left to right. You need to do this twice, back and forth, so that the squares of the netting are bordered on both sides with a double layer of threads.
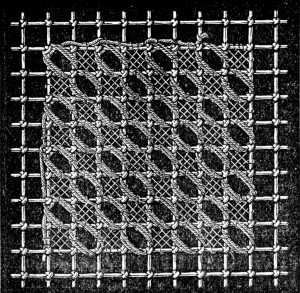
When the whole foundation has been thus covered, take the fine thread and make loop stitches in the squares between the other rows of stitches, passing the needle for that purpose over the double stitch. Lastly, intersect the loop stitches with straight threads and pass the needle each time through the knot of the netting.
When the entire foundation has been covered like that, take the fine thread and create loop stitches in the squares between the other rows of stitches, passing the needle over the double
Ground worked with cross stitches in one size of thread (fig. 675).—This pattern, very like the foregoing one, consists of 3 diagonal rows of stitches, worked to and fro, with cross stitches made over them.
Ground worked with cross stitches using one size of thread (fig. 675).—This pattern, similar to the previous one, consists of 3 diagonal rows of stitches, worked back and forth, with cross stitches made over them.
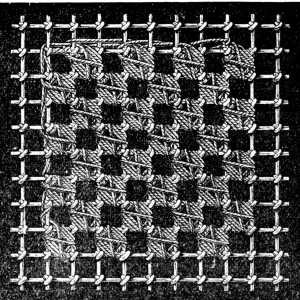
You may also begin with the cross stitches, in the fine thread, and work the triple stitches over them, in the coarse.
You can also start with the cross stitches using the fine thread, and then do the triple stitches over them with the coarse thread.
Ground worked with darning and cord stitches (fig. 676).—Patterns, executed chiefly in darning stitches, in a comparatively coarse thread, present a closer and heavier appearance than those we have been describing. Here, every other square of the netting is filled, as closely as possible, with stitches; the empty squares between are intersected diagonally with corded threads.
Ground worked with darning and cord stitches (fig. 676).—Patterns that are mainly created with darning stitches, using a relatively thick thread, look denser and heavier than those we've been discussing. In this method, every other square of the netting is filled tightly with stitches, while the empty squares in between are crossed diagonally with corded threads.
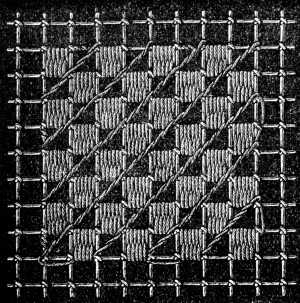
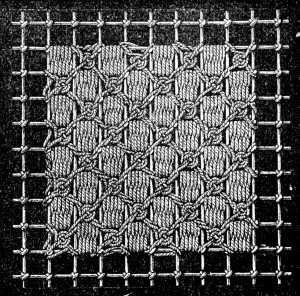
In fig. 678, the darning stitches, and the wheels, which are both worked with the same material, cover 4 squares of the netting.
In fig. 678, the darning stitches and the wheels, both made from the same material, cover 4 squares of the netting.

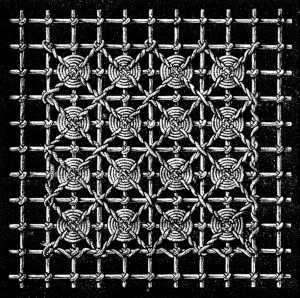
Larger expanses of netting may also be entirely filled with wheels, fig. 679. To make a really satisfactory grounding of this kind, you should be careful always to carry your thread over the bars of the netting and under the threads that are stretched diagonally across.
Larger areas of netting can also be completely filled with wheels, fig. 679. To create a truly satisfying grounding of this kind, you should always be sure to pass your thread over the bars of the netting and under the threads that are stretched diagonally across.
Ground worked in cross and darning stitch (fig. 680).—You begin, as before, by making the close darning stitches, and then proceed to the cross stitches. To give them the right shape, finish all the rows of stitches one way first; in the subsequent rows, that cross the first ones, you introduce the thread between the stitches that were first crossed.
Ground worked in cross and darning stitch (fig. 680).—Start by making the close darning stitches as before, then move on to the cross stitches. To get the correct shape, complete all the rows of stitches in one direction first; in the following rows that cross the initial ones, weave the thread between the already crossed stitches.

Ground of geometrical figures (fig. 681).—This pattern, quite different from all the others, consists of simple geometrical lines. Fasten the thread to a knot of the netting, then carry it, always diagonally, under 3 other knots and repeat this 3 times, after which, carry it once round the bar of the netting, to fasten it, and back again to the knot which it already encircles, and from thence begin a new square. Owing to your having always to bring the thread back to the knot whence the next square is to begin, you will have 4 threads on two of the sides and 6 on the two others.
Ground of geometrical figures (fig. 681).—This design, quite different from the others, consists of simple geometric lines. Secure the thread to a knot of the netting, then carry it diagonally under 3 other knots and repeat this 3 times. After that, wrap it around the bar of the netting to secure it, then back to the knot it already encircles, and from there start a new square. Because you always have to return the thread to the knot where the next square begins, you will have 4 threads on two of the sides and 6 on the other two.
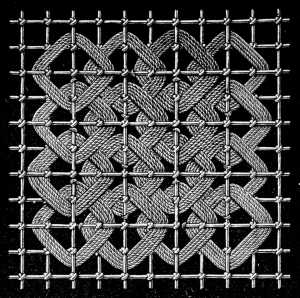
In the second and subsequent rows, the needle has to pass twice under the angles that were first formed, in order that, over the whole surface, all the corners may be equally covered and connected.
In the second and later rows, the needle has to go under the angles formed at first twice, so that all the corners are evenly covered and connected across the entire surface.
Netted insertion worked in plain darning stitch (fig. 682).—The taste for ornamenting not only curtains but bed and table linen also, with lace and insertion of all kinds, to break the monotony of the large white surfaces, is becoming more and more general and the insertion here described will be welcome to such of our readers as have neither time nor patience for work of a more elaborate nature.
Netted insertion worked in plain darning stitch (fig. 682).—The trend of decorating not just curtains but also bed and table linens with lace and various types of insertions to add some flair to the vast white surfaces is becoming increasingly popular. The insertion described here will be appreciated by readers who lack the time or patience for more complicated projects.

Materials—For the netting: Cordonnet 6 fils D.M.C No. 25.—For the darning stitch: Coton à broder D.M.C No. 25, or Coton à repriser D.M.C Nos. 12 to 50, white or écru.[A]
Materials—For the netting: Cordonnet 6 fils D.M.C No. 25.—For the darning stitch: Coton à broder D.M.C No. 25, or Coton à repriser D.M.C Nos. 12 to 50, in white or off-white.__A_TAG_PLACEHOLDER_0__
To those who wish to be saved the trouble of making the netting themselves, we can strongly recommend various fabrics, intended to take its place, more especially Filet Canevas, which is an exact imitation of the finest hand-made netting. The centre part of the pattern in fig. 682, is worked in rows of horizontal darning stitches, the narrow border in vertical ones.
To those who want to avoid the hassle of making the netting themselves, we highly recommend several fabrics as alternatives, especially Filet Canevas, which perfectly mimics the finest hand-made netting. The center part of the pattern in fig. 682 is done in rows of horizontal darning stitches, while the narrow border is made with vertical ones.
Ground of netting embroidered (fig. 683).—We have already had occasion, in the foregoing explanations, to point out the advantage of embroidering with two sizes of thread, but it is only in a piece of work of a certain size that it is possible really to judge of the excellent effect produced by the use of two threads of different sizes.
Ground of netting embroidered (fig. 683).—We've already mentioned, in the earlier explanations, the benefits of using two different sizes of thread for embroidery. However, it's only in a work of a certain size that you can truly appreciate the great effect achieved by using two threads of different sizes.
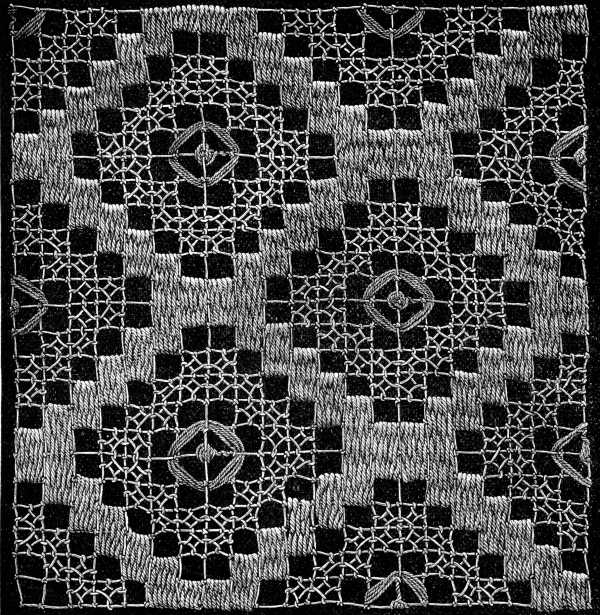
Materials—For the netting: Fil à dentelle D.M.C Nos. 25 to 50.
For the darning stitch: Cordonnet 6 fils D.M.C No. 15, or Fil à pointer D.M.C No. 30.—For the loop stitch: Fil à dentelle D.M.C or Cordonnet 6 fils D.M.C according to the size of the netting thread.
Materials—For the netting: D.M.C lace thread Nos. 25 to 50.
For the darning stitch: D.M.C cordonnet 6 strands No. 15, or D.M.C point thread No. 30.—For the loop stitch: D.M.C lace thread or D.M.C cordonnet 6 strands depending on the size of the netting thread.
The principal lines of the pattern, which are in darning stitch, are worked in a very coarse thread with a strong twist, Fil à pointer D.M.C, whilst the loop stitches are in Cordonnet 6 fils D.M.C.
The main lines of the pattern, which are in darning stitch, are made with a very thick thread that has a strong twist, Fil à pointer D.M.C, while the loop stitches are done in Cordonnet 6 fils D.M.C.
Our model was worked in écru thread but there is nothing to prevent several colours being introduced, for instance écru, black or Gris-Ficelle 462 for the netted foundation; Rouge-Cardinal 346, for the darning stitches, and Chiné d’or D.M.C green and gold or blue and gold, for the loop stitches and the threads that are carried across inside.
Our model was made with off-white thread, but there's nothing stopping you from using different colors. For example, you could use off-white, black, or Gris-Ficelle 462 for the netted base; Cardinal Red 346 for the darning stitches; and D.M.C green and gold or blue and gold for the loop stitches and the threads carried inside.
Embroidered square of netting with two kinds of lace suitable for the border (figs. 684, 685, 686).—Large pieces of embroidered netting are generally made up of squares and stripes, joined together with ribbon and fine linen insertions. It is easier and less cumbrous to make the netting in separate pieces. Squares of different patterns can also be combined with crochet and pillow lace, in this case of course the squares have to be arranged with some system.
Embroidered square of netting with two types of lace suitable for the border (figs. 684, 685, 686).—Large pieces of embroidered netting are usually made from squares and stripes, sewn together with ribbon and fine linen insertions. It’s easier and less cumbersome to create the netting in separate pieces. Squares with different patterns can also be combined with crochet and pillow lace, but in this case, the squares need to be arranged in a certain way.

Materials: Cordonnet 6 fils D.M.C Nos. 15 to 30, or Fil à dentelle D.M.C Nos. 15 to 40, white or écru.[A]
Materials: Cordonnet 6 fils D.M.C Nos. 15 to 30, or Fil à dentelle D.M.C Nos. 15 to 40, in white or cream.__A_TAG_PLACEHOLDER_0__
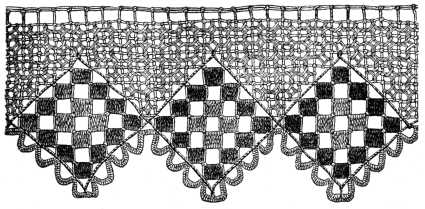
Materials: The same as for fig. 684, and Or fin D.M.C pour la broderie No. 30.
Colours—For the netting and the loop stitch: White or écru.—For the darning stitch: Brun-Caroubier 303 and Rouge-Grenat 335.[A]
Materials: The same as for fig. __A_TAG_PLACEHOLDER_1__, and Or fin D.M.C for embroidery No. 30.
Colors—For the netting and the loop stitch: White or cream.—For the darning stitch: Brun-Caroubier 303 and Rouge-Grenat 335.__A_TAG_PLACEHOLDER_2__
Fig. 686 is a handsomer and more elaborate pattern for the same kind of purpose. The loop stitches and the linen stitches should be worked in a very light shade; instead of the colour indicated at the foot of the engraving, Rouge-Géranium 353, Violet-Mauve 377 or Jaune-Rouille 365 may be used; for the netting and the loop stitches you may combine, with the first shade, two shades of Brun-Caroubier 303 and 357, with the second, two shades of Jaune-vieil Or 678 and 680 and with the third, two shades of Rouge-Cardinal 346 and 348.
Fig. 686 is a more attractive and detailed pattern for the same purpose. The loop stitches and the linen stitches should be done in a very light shade; instead of the color mentioned at the bottom of the engraving, you can use Rouge-Géranium 353, Violet-Mauve 377, or Jaune-Rouille 365; for the netting and loop stitches, you can combine with the first shade two shades of Brun-Caroubier 303 and 357, with the second two shades of Jaune-vieil Or 678 and 680, and with the third two shades of Rouge-Cardinal 346 and 348.
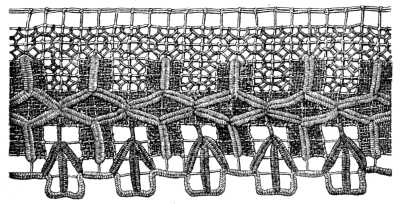
Materials: The same as for 684.
Colours—For the netting: écru.—For the ground in loop and linen stitch: Bleu pâle 668.—For the bars in darning stitch: Gris-Tilleul 391 and 393.[A]
Materials: The same as for __A_TAG_PLACEHOLDER_0__.
Colors—For the netting: ecru.—For the background in loop and linen stitch: Light Blue 668.—For the bars in darning stitch: Gray-Tilleul 391 and 393.__A_TAG_PLACEHOLDER_1__
Pattern for ground (fig. 687).—The peculiar charm of this most unpretending pattern is chiefly due to the variety of material and colour introduced into it. The netted ground is made of dark brown Cordonnet 6 fils D.M.C No. 25, worked over, in the first instance, with loop stitches in a pale grey, which are afterwards connected by darning stitches in Coton à repriser Gris-Tilleul 392.
Pattern for ground (fig. 687).—The unique appeal of this simple pattern comes mainly from the mix of materials and colors used in it. The netted ground is created with dark brown Cordonnet 6 fils D.M.C No. 25, initially worked with loop stitches in a light grey, which are then connected with darning stitches in Coton à repriser Gris-Tilleul 392.
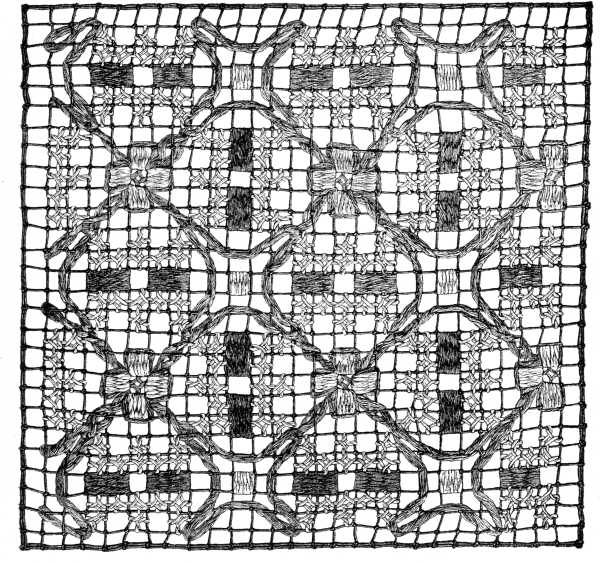
Materials—For the netting: Cordonnet 6 fils D.M.C Nos. 15 to 30. For the embroidery: Coton à repriser D.M.C No. 25.
Colours: Brun-Havane 455, Gris-Noisette 423, Jaune-vieil-Or 680, Gris-Tilleul 391 and Rouge-Géranium 352.[A]
Materials—For the netting: Cordonnet 6 fils D.M.C Nos. 15 to 30. For the embroidery: Coton à repriser D.M.C No. 25.
Colors: Brown-Havana 455, Gray-Hazelnut 423, Old Gold Yellow 680, Gray-Linden 391, and Geranium Red 352.__A_TAG_PLACEHOLDER_0__
The same material in Rouge-Géranium, is used for the little centre squares and the pink crosses, and isolated darned squares are framed with loose cord stitches in Coton à repriser colour Jaune-vieil-Or 680.
The same material in Rouge-Géranium is used for the small center squares and the pink crosses, and the isolated darned squares are outlined with loose cord stitches in Coton à repriser color Jaune-vieil-Or 680.
We can also recommend, for the same pattern, the following combination of colours, all to be found on the D.M.C colour card; namely, Bleu pâle 668 for the netting; Chiné d’or, gold with dark blue for the loop stitches; Ganse turque D.M.C No. 12 (Turkish gold cord) for the darning stitches, between the loop stitches; Coton à broder or Cordonnet 6 fils in Rouge-Cornouille 450, for the detached darned squares and Coton à repriser, in Jaune-d’Or 667 for the setting of all the different parts of the pattern.
We also recommend the following color combination, which you can find on the D.M.C color card, for the same pattern: Light Blue 668 for the netting; Golden Chinée, a gold with dark blue for the loop stitches; D.M.C No. 12 Turkish Gold cord for the darning stitches between the loop stitches; Six-strand embroidery cotton in Cornille Red 450 for the detached darned squares; and Darning cotton in Golden Yellow 667 for assembling all the different parts of the pattern.
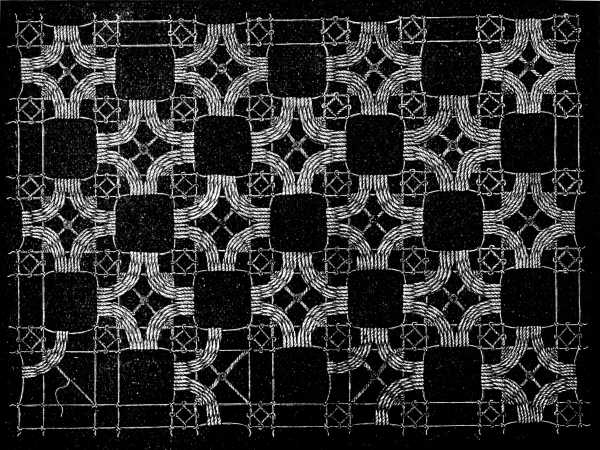
Materials—For the netting: Fil à dentelle D.M.C No. 40. For the embroidery: Coton à broder D.M.C No. 16, white or écru.[A]
Materials—For the netting: D.M.C No. 40 lace thread. For the embroidery: D.M.C No. 16 embroidery cotton, in white or ecru. __A_TAG_PLACEHOLDER_0__
In order to make the isolated loop stitches, the thread which forms the cross in the middle must be carried to the middle of the bar, the loops that form the stitches must be finished and the thread carried back to the knot whence it started. It must then be taken three times backwards and forwards over the foundation thread and the two bars of the netting, when the stitches, into and over 3 squares of the netting, should be made. The last row in the engraving shows the pattern in the successive stages of its development.
To create the isolated loop stitches, the thread that makes the cross in the middle needs to be brought to the middle of the bar. The loops that make up the stitches should be completed and the thread taken back to the starting knot. Then, it should be passed three times back and forth over the foundation thread and the two bars of the netting, where the stitches should be made into and over 3 squares of the netting. The last row in the engraving displays the pattern in its various stages of development.
Square and edging in cut netting (figs. 689 and 690).—Few patterns admit of such a successful application of all the stitches hitherto described, as the square and edging presented to our readers in the two subjoined figures. On a netted ground of rather fine thread, we have in the first place, linen stitch, in the border, worked in rather a coarser thread than the ground; then raised wheels, button-holed bars with picots in the centre, plain wheels very close together, and long ribbed bars worked in darning stitch.
Square and edging in cut netting (figs. 689 and 690).—Few patterns allow for such effective use of all the stitches we've discussed so far as the square and edging shown in the two figures below. On a netted background made from relatively fine thread, we start with linen stitch in the border, worked in a slightly thicker thread than the background; then we have raised wheels, button-holed bars with picots in the center, plain wheels placed very close together, and long ribbed bars worked in darning stitch.

The edging, to match the square, is worked in the original in pale shades, in contrast to the square which is executed entirely in écru thread. The squares in the netted footing of the lace are loosely overcast with pale Violet-Mauve 316, the same colour is also used for the wheels in the outside edge, each of which fills a square, and for the loop stitches round them; whilst the middle one of the three upper ribbed wheels and the star are worked in dark Violet-Mauve 315. The crosses in linen stitch, the three lower ribbed wheels and the long ribbed bars in darning stitch, are in Gris-Tilleul 392.
The edging, to match the square, is done in light shades, which contrasts with the square that's made entirely of écru thread. The squares in the netting of the lace are loosely stitched with light Violet-Mauve 316, and the same color is used for the wheels on the outer edge, each of which fills a square, as well as for the loop stitches around them. Meanwhile, the middle one of the three upper ribbed wheels and the star are made in dark Violet-Mauve 315. The crosses in linen stitch, the three lower ribbed wheels, and the long ribbed bars in darning stitch are in Gris-Tilleul 392.

Materials: Fil à dentelle D.M.C Nos. 25 to 50, in three shades of one colour.
Materials: D.M.C Lace Thread Nos. 25 to 50, in three shades of the same color.
Netted insertion (fig. 691).—This is a copy of a beautiful piece of embroidered netting, to all appearance, several centuries old, and in a state that rendered, even the most delicate handling almost impossible.
Netted insertion (fig. 691).—This is a replica of a stunning piece of embroidered netting that looks like it’s several centuries old and is in such a fragile state that even the gentlest handling is nearly impossible.

After several experiments, the best result has been arrived at, and the Turkish cord in which the original is made, has now been manufactured for netting purposes, as well as for other kinds of decorative work, already alluded to, and referred to again later on.
After several experiments, the best result has been achieved, and the Turkish cord that the original is made of has now been produced for netting purposes, as well as for other types of decorative work mentioned earlier and referenced again later on.
The first foundation, that is, the actual netting, for a thing of this kind, should be made in white or écru thread, with very small meshes; the pattern itself is embroidered on the netting with Ganse turque D.M.C No. 12; this material, écru and gold mixed, gives the work a glittering and peculiarly elegant appearance, unobtainable in any other.
The first foundation, that is, the actual netting, for something like this should be made in white or beige thread, with very small holes; the pattern itself is stitched onto the netting with Ganse turque D.M.C No. 12; this material, a blend of beige and gold, gives the piece a sparkling and uniquely elegant look that can't be achieved in any other way.
The execution is extremely easy, it being worked entirely in darning stitch; but the drawing should be copied with great accuracy and the wide braid very carefully sewn on with close stitches round the squares, which are filled in with darning stitches made in Ganse turque No. 12.
The execution is really simple, as it's done entirely in darning stitch; however, the design should be copied with great precision, and the wide braid should be sewn on carefully with tight stitches around the squares, which are filled in with darning stitches made in Ganse turque No. 12.
Any netting pattern can be copied in this braid, and the simplest piece of work of the kind is worth mounting on a rich foundation of silk, brocade, velvet or plush. To give a single example, the insertion here described and illustrated, was mounted on slate-blue plush and has been universally admired.
Any netting pattern can be replicated in this braid, and the simplest piece of work is worth showcasing on a luxurious foundation of silk, brocade, velvet, or plush. For example, the insertion described and illustrated here was mounted on slate-blue plush and has been widely appreciated.
FOOTNOTES:

Irish Lace.
Irish lace, also known under the name of Renaissance lace, from its having been first made in the sixteenth century, is an imitation of the earliest pillow laces; it ought, properly speaking, to be called French lace, having been invented in France and thence introduced into England and Ireland.
Irish lace, also known as Renaissance lace because it was first made in the sixteenth century, is a version of the earliest pillow laces. It should technically be called French lace, as it was invented in France and then introduced to England and Ireland.
It is composed of braid or tape, formed into figures, joined together by needle-made, corded or button-hole bars and fillings of different kinds, or by bars alone.
It’s made of braid or tape, shaped into designs, connected by needle-made corded or button-hole bars and various fillings, or just by the bars.
The lace stitches and bars are almost the same as those used in fine Venetian point, but they are executed in a coarser material so that this section of our work may be considered as a preparation for the different kinds of lace, to be described in the next chapter.
The lace stitches and bars are nearly identical to those used in fine Venetian point, but they're made with a thicker material, so this part of our work can be seen as a preparation for the various types of lace that will be discussed in the next chapter.
MaterialsMaterials (fig. 692).—The braids used for making Irish lace are an English speciality and manufactured exclusively in England; they are very various in shade, width and thickness, and are to be had white, unbleached, grey and pale yellow, narrow and wide, coarse and fine in texture, with and without holes, open edge and picots, with large medallions and small.
MaterialsMaterials (fig. 692).—The braids used to create Irish lace are a specialty from England and are made exclusively there; they come in a variety of shades, widths, and thicknesses, and are available in white, unbleached, grey, and pale yellow, as well as narrow and wide, coarse and fine textures, with and without holes, open edges and picots, featuring large medallions as well as small ones.

Fig. 692 represents the kinds most commonly used, in their original size, together with a specimen picot, or purl, as they are called in England, for the outside edge, also to be had ready made, for those who do not care for the trouble of making them themselves.
Fig. 692 shows the types most frequently used, in their original size, along with a sample picot, or purl, as they're known in England, for the outer edge. These can also be purchased pre-made for anyone who doesn't want to go through the effort of making them on their own.
For the stitches and bars by which the braids are joined together, the best material is Fil à dentelle D.M.C,[A] (lace thread) a smooth even thread, now made in every colour to match the braids.
For the stitches and bars that hold the braids together, the best material is Fil à dentelle D.M.C,[A] (lace thread), which is a smooth, even thread now available in every color to match the braids.
Transferring designs for Irish lace.—The best way is to trace them on oiled tracing linen with a watery ink, free from greasy matter. This tracing linen, which is of English make, is white, glazed on one side only; the unglazed surface should be turned uppermost, as it takes the ink better.
Transferring designs for Irish lace.—The best way is to trace them on oiled tracing linen with a watery ink that’s free from grease. This tracing linen, which is made in England, is white and has a glossy side and a matte side; the matte side should be facing up because it absorbs the ink better.
As this tracing linen is quite transparent, the pattern can be transferred to it at once without recourse to any other process.
As this tracing linen is very see-through, the pattern can be transferred to it right away without needing any other method.
It will be found less trying for the eyes to lay a piece of transparent coloured paper, or stuff, under the pattern whilst you are copying it. The Irish lace designs are almost all drawn with double lines, between which the braid is tacked on with small back stitches. We may mention at once that it is advisable to make the stitches longer on the right side than on the other, or at any rate to make them of the same length.
It will be easier on the eyes to place a piece of transparent colored paper or fabric under the pattern while you’re copying it. The Irish lace designs are mostly outlined with double lines, between which the braid is attached using small back stitches. It's worth noting that it's best to make the stitches longer on the right side than on the other, or at least make them the same length.
Tacking down and gathering in the braids (fig. 693).—Where the lines of the pattern describe a curve or a circle, the outside edge of the braid, as shown in fig. 693, must be sewn down firmly, so as to form little folds or gathers on the inside edge, which are first tacked down and then gathered in with small overcasting stitches in fine thread, so as to fit exactly to the pattern.
Tacking down and gathering in the braids (fig. 693).—Where the lines of the pattern create a curve or circle, the outer edge of the braid, as shown in fig. 693, needs to be sewn down securely, creating small folds or gathers on the inner edge. These are first tacked down and then gathered in with small overcasting stitches using fine thread, ensuring a precise fit to the pattern.

The stitches, made for the bars and the fillings, must never be drawn so tightly as to drag out the edges of the braids and thus spoil the outlines of the pattern. Nor should the stitches be caught into the tracing cloth, but only rest upon it.
The stitches used for the bars and fillings should never be pulled so tight that they distort the edges of the braids and ruin the pattern’s outline. They also shouldn’t be sewn into the tracing cloth, but should just rest on top of it.
When the embroidery is finished, turn the work the wrong side up, cut every second or third tacking stitch and pull the threads carefully out, from the wrong side, when the lace will separate itself from the backing without difficulty; it has then to be damped and ironed also on the wrong side. (See the concluding chapter on the different processes for finishing off needlework).
When the embroidery is done, flip the work over so the back is facing up, cut every second or third tacking stitch, and gently pull the threads out from the back. The lace will easily come away from the backing. Then, it needs to be dampened and ironed on the back side as well. (See the concluding chapter on the different processes for finishing off needlework).
It is of no consequence which are made first, the bars or the fillings; we however incline to the former, more especially in the case of button-hole bars, as they are easier to do than the fillings and once done, there is less risk of puckering or drawing the edges together, in making the fillings.
It doesn’t matter whether the bars or the fillings are made first; we tend to prefer the bars, especially with button-hole bars, since they’re easier to make. Once the bars are done, there’s less chance of puckering or pulling the edges together when making the fillings.
Without pretending to have exhausted the infinite variety of lace stitches that exists, we hope to have brought before our readers’ notice a sufficiently numerous selection to satisfy all tastes and capacities.
Without claiming to have covered every possible lace stitch out there, we hope to have presented our readers with a wide enough selection to satisfy all tastes and skill levels.
With regard to the names, the same stitches are known by so many different ones, that excepting in the case of those universally accepted, we have disregarded them altogether and merely numbered the stitches in their order.
With the names, the same stitches are known by so many different names that, aside from those that are widely recognized, we've completely ignored them and just numbered the stitches in their sequence.
Plain twisted bar (fig. 694).—Secure the thread to the braid and throw it across from one braid edge to the other, put the needle in downwards from above, and overcast the first thread, so as to form the two into a cord. If you do not make enough overcasting stitches to tighten the two threads, the bars will be loose and untidy and spoil the general appearance of the work.
Plain twisted bar (fig. 694).—Attach the thread to the braid and cross it over from one edge of the braid to the other. Insert the needle downwards from above and wrap it around the first thread to create a cord from the two. If you don’t make enough overcasting stitches to tighten the two threads, the bars will be loose and messy, ruining the overall look of the work.
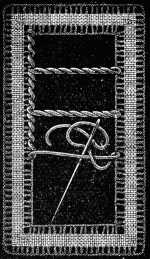
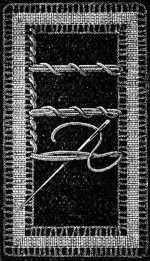
Double twisted bar (fig. 695).—Throw three foundation threads across the space to be filled and overcast them loosely, so that they remain visible between the stitches.
Double twisted bar (fig. 695).—Lay three foundation threads across the area you want to fill and loosely stitch over them, keeping them visible between the stitches.
Plain button-hole bar (fig. 696).—Throw three threads across and cover them with button-hole stitches, made from right to left.
Plain button-hole bar (fig. 696).—Lay three threads across and cover them with buttonhole stitches, made from right to left.
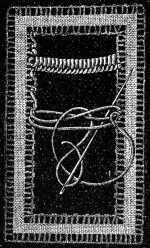
In making this and the subsequent bars, we recommend turning the needle round and holding it as it were the reverse way, so that the eye not the point passes first under the threads; strange as it may seem, it is easier in this manner to avoid splitting the threads. The working thread should always issue from the edge of the braid, one or two threads before the foundation threads of the bar, to prevent the bars being of unequal width, or getting twisted at the beginning.
In creating this and the following bars, we suggest turning the needle around and holding it in a reverse way, so that the eye, not the point, goes under the threads first; strange as it may sound, it's easier to avoid splitting the threads this way. The working thread should always come from the edge of the braid, one or two threads before the foundation threads of the bar, to ensure that the bars are of even width and don’t get twisted at the start.
Button-hole bars with pinned picots (figs. 697 and 698). After covering half, or a third of the bar with button-hole stitches, pass the thread without making a loop, under the foundation threads, and fasten the loop with a pin, fig. 697, then slip the needle, horizontally from right to left, under the 3 threads and tighten the knot close to the last button-hole stitch.
Button-hole bars with pinned picots (figs. 697 and 698). After covering half or a third of the bar with button-hole stitches, run the thread under the foundation threads without making a loop and secure the loop with a pin, fig. 697, then slide the needle horizontally from right to left under the 3 threads and tighten the knot close to the last button-hole stitch.
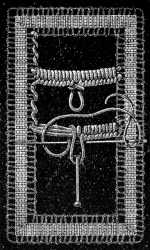
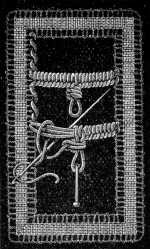
Fig. 698 shows a picot made in the same manner, but with several button-hole stitches inserted between the loop and the button-holed bar.
Fig. 698 shows a picot created in the same way, but with several buttonhole stitches added between the loop and the buttonholed bar.
Bar with lace picot (fig. 699).—Here the picot is made by bringing the thread out through the loop and beginning the button-hole stitches, 4 or 5 in number, according to the size of the thread, quite close to the pin, so that they entirely cover the loop. The pin must be stuck in the width of 4 stitches, distant from the bar, and the foundation threads should be completely hidden under the bar.
Bar with lace picot (fig. 699).—In this technique, the picot is created by pulling the thread through the loop and starting the button-hole stitches, using 4 or 5 stitches depending on the thread size, placed closely to the pin so they completely cover the loop. The pin should be inserted at a distance of the width of 4 stitches from the bar, and the foundation threads need to be completely concealed beneath the bar.
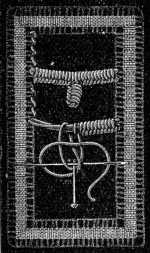
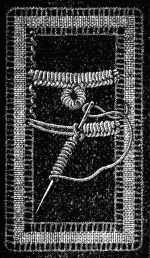
Bar with picot made in bullion stitch (fig. 700).—Put the needle halfway into the last button-hole stitch, twist the thread ten or twelve times round it from left to right, draw it through and tighten the thread, so that the spiral on the thread form a semicircle, then continue the bar (see also for the bullion stitch figs. 179 and 661).
Bar with picot made in bullion stitch (fig. 700).—Insert the needle halfway into the last button-hole stitch, twist the thread ten or twelve times around it from left to right, pull it through, and tighten the thread so that the spiral on the thread forms a semicircle. Then continue the bar (see also for the bullion stitch figs. 179 and 661).
Bar with button-hole picot (fig. 701).—Cover rather more than half the bar with button-hole stitches, carry the thread three times to the 6th stitch and back, then button-hole these threads that are attached to the bar in the same way as the bar itself and finish the bar in the usual way.
Bar with button-hole picot (fig. 701).—Cover just over half of the bar with button-hole stitches, pull the thread three times to the 6th stitch and back, then button-hole these threads that are attached to the bar in the same way as the bar itself and finish the bar as usual.
These button-hole picots are generally used for edging lace; they may in their turn be adorned with small pinned picots to produce a richer effect.
These button-hole picots are usually used for lace edges; they can also be decorated with small pinned picots to create a more elaborate look.
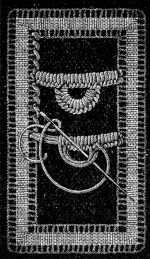
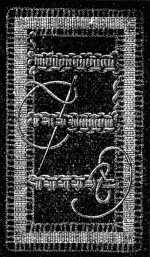
Bar with two rows of knots (fig. 702).—Over two foundation threads, make double knots, far enough apart to leave room for the knots of the next row between.
Bar with two rows of knots (fig. 702).—On top of two foundation threads, create double knots, spaced out enough to allow for the knots of the next row in between.
These double knots consist, in the first place, of one plain button-hole stitch and then one reversed, that is, made by bringing the needle out in front of the thread and passing it under the loop; the result being that the thread will lie behind the thread and not before it, as in an ordinary button-hole stitch.
These double knots start with one plain buttonhole stitch, followed by one reversed stitch, which is made by bringing the needle out in front of the thread and passing it under the loop. This technique causes the thread to lie behind instead of in front, like in a regular buttonhole stitch.
Branched bars (fig. 703).—Where you have a larger surface to cover with bars, you are generally obliged to make them with branches. For this purpose you prepare the threads as for an ordinary bar and cover them halfway with button-hole stitches; then you carry on the foundation thread to the next bar, button-hole it also halfway, lay the next foundation thread, and finally button-hole all the half-covered bars till you reach the dotted line, from whence you lay the last foundation threads.
Branched bars (fig. 703).—When you need to cover a larger area with bars, you typically have to make them with branches. To do this, prepare the threads like you would for a regular bar and cover them halfway with button-hole stitches. Then, take the foundation thread to the next bar, button-hole it halfway as well, lay down the next foundation thread, and continue button-holing all the halfway covered bars until you reach the dotted line, at which point you’ll lay the last foundation threads.
The last bar is worked over 2 or 4 threads, so that the working thread can be taken back to the edge of the braid by means of the last button-hole stitches.
The last bar is created using 2 or 4 threads, allowing the working thread to be brought back to the edge of the braid through the last button-hole stitches.
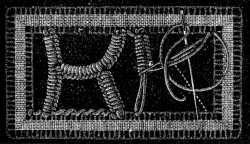

Plain Russian stitch (fig. 704).—Stitches of all kinds can be used, as well as bars, for joining braids together that run parallel to each other, and for filling up the spaces between. These stitches, which serve as an insertion, are some of them very elementary, whilst others require great skill and patience to execute.
Plain Russian stitch (fig. 704).—You can use various stitches and bars to join braids that run parallel to each other and to fill in the gaps between them. These stitches, which act as an insertion, vary in complexity; some are quite simple, while others need a lot of skill and patience to do well.
You pass the needle from left to right, under the edge of the braid, then again from right to left under the opposite edge, taking care always to leave the thread in front of the needle.
You move the needle from left to right, underneath the edge of the braid, then again from right to left under the opposite edge, making sure to keep the thread in front of the needle at all times.
Twisted Russian stitch (fig. 705).—Instead of passing the needle behind the thread, pass it before it and round it, so that the needle always comes out again beneath the thread, which will then be twice twisted.
Twisted Russian stitch (fig. 705).—Instead of threading the needle behind the thread, thread it in front of the thread and wrap it around, so that the needle always comes out underneath the thread, which will then be twisted twice.
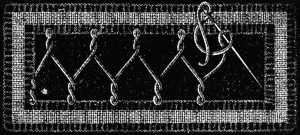
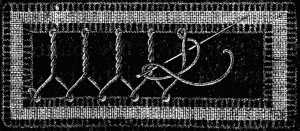
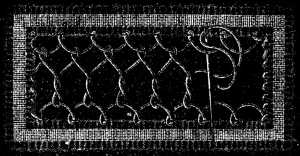
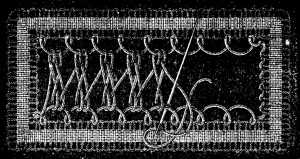
Insertion with bead stitches (fig. 709).—Join the opposite rows of loops together by four stitches. The threads of these stitches must lie quite flat, side by side, and not one on the top of the other. After the fourth stitch, you wind the thread round the bottom loop and then carry it on to the next, whence you repeat the four stitches as above.
Insertion with bead stitches (fig. 709).—Connect the opposite rows of loops using four stitches. The threads of these stitches should lie completely flat, side by side, without stacking on top of each other. After the fourth stitch, wrap the thread around the bottom loop and then pull it to the next stitch, where you repeat the four stitches as described.

Cluster insertion (fig. 710).—Over the middle of two finished plain bars and one half-finished one, a short distance apart, you make five button-hole stitches and overcast the remainder of the third bar. The first bar of the next cluster must be set quite close to the last.
Cluster insertion (fig. 710).—In the center of two completed plain bars and one half-finished bar, a short distance apart, you create five button-hole stitches and overcast the remaining part of the third bar. The first bar of the next cluster should be placed very close to the last one.
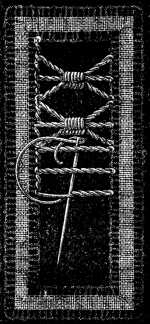
Insertion with branches (figs. 711 and 712).—Throw the thread across the middle of the space between two edges of braid, and lengthways, from one end to the other, pass the needle horizontally under four or five threads of the braid, across the insertion; then carry it in a similar manner, first to the left and then to the right, take up the same number of threads of the braid and connect the three loops together by a knot, as is clearly shown in fig. 711.
Insertion with branches (figs. 711 and 712).—Place the thread across the center of the space between the two edges of the braid, and then, lengthwise, from one end to the other, slide the needle horizontally under four or five strands of the braid across the insertion; then move it in the same way, first to the left and then to the right, picking up the same number of strands of the braid, and tie the three loops together with a knot, as shown in fig. 711.
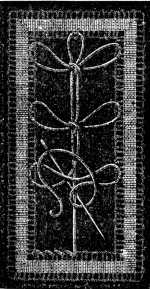
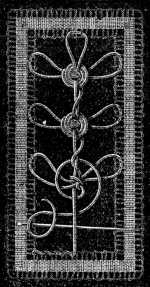
Fig. 712 represents a similar beginning, and a similar interlacing of the threads, but ornamented this time with a wheel, added after the knot has been made over the loops.
Fig. 712 shows a similar starting point and a similar intertwining of the threads, but this time it's decorated with a wheel, which was added after the knot was tied over the loops.
Insertion with leaves in darning stitch (fig. 713).—Fasten on the thread where, according to the illustration, the first leaf in the insertion ought to come, carry it across to the opposite side, draw it through the edge of the braid and bring it back to the point whence it started, lay threads across to both sides, like in figs. 711 and 712, unite them by a knot, such as described in fig. 711, lay the thread once more round the middle leaf, and finish the leaf in darning stitch, working downwards from the top, as described in the preceding chapter in figs. 646 and 647. As may be seen from the second middle leaf, your darning stitches have to be made over five threads, subdivided into two and three.
Insertion with leaves in darning stitch (fig. 713).—Start by attaching the thread where the first leaf in the insertion should be, then pull it to the opposite side, thread it through the edge of the braid, and bring it back to the starting point. Lay threads across to both sides, like in figs. 711 and 712, and tie them together in a knot, as shown in fig. 711. Wrap the thread around the middle leaf again and finish the leaf in darning stitch, working downwards from the top, as detailed in the previous chapter in figs. 646 and 647. As shown in the second middle leaf, your darning stitches should cover five threads, split into two and three.
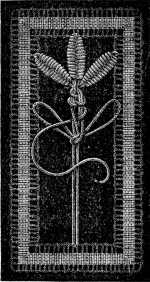
Insertion with small wheels (fig. 714).—Here, you have to make two rows of Russian stitches opposite each other and carry the thread to the point of intersection, then, you make a wheel over five threads and pass the needle under the completed wheel to reach the next point of intersection. Half wheels may also be added at the edge of the braid, as in figs. 658 and 659.
Insertion with small wheels (fig. 714).—Here, you need to create two rows of Russian stitches facing each other and bring the thread to the point where they intersect. Then, you create a wheel over five threads and pass the needle under the completed wheel to move to the next intersection. You can also add half wheels at the edge of the braid, as shown in figs. 658 and 659.
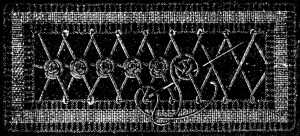
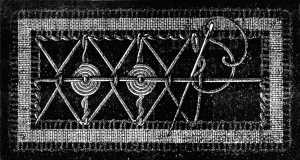
Insertion with big wheels (fig. 715).—Carry the thread horizontally across the middle of the space intended for the insertion, to the opposite side, and then conduct it by means of overcasting stitches into the corner; thence make a loose loop over to the opposite corner, pass the needle under six or eight threads of the braid edge, slip it under the horizontal thread first laid and behind the loop, and finish the stitch on the other side in the edge of the braid.
Insertion with big wheels (fig. 715).—Run the thread horizontally across the center of the area meant for the insertion, reaching the opposite side, and then use overcasting stitches to guide it into the corner; from there, create a loose loop over to the other corner, pass the needle under six or eight threads of the braid edge, slip it under the horizontal thread you just placed, and behind the loop, and finish the stitch on the other side at the edge of the braid.
Throw the thread again across the empty space and over the first thread, bring your needle back to the middle, make a big wheel over four threads, passing each time under the same threads, then overcast the single thread, come back to the edge of the braid and make the second loop, bringing out the thread at the same place where the other stitches came out.
Throw the thread again across the empty space and over the first thread, bring your needle back to the middle, make a big circle over four threads, going under the same threads each time, then overcast the single thread, return to the edge of the braid and make the second loop, pulling the thread out at the same spot where the other stitches came out.
To reach the point of the next cone you overcast the thread of the Russian stitch several times.
To get to the next cone, you wrap the thread of the Russian stitch several times.
You may also, as in fig. 717, double the Russian stitch and make the darning stitches in such a manner that the points of the cones touch each other and their bases meet the edge of the braid. The same thing, worked the reverse way, that is, with the points turned outwards to the edge, produces a not less pretty effect.
You can also, like in fig. 717, double the Russian stitch and create the darning stitches so that the tips of the cones touch each other and their bases meet the edge of the braid. Doing it the opposite way, with the tips facing outwards towards the edge, creates an equally beautiful effect.
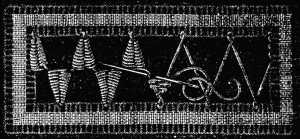
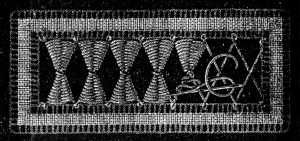
Insertion with embroidered squares (fig. 718).—After making rows of loose button-hole stitches along the braid edges, as in figs. 707, 708, 709, run a thread through the button-hole stitches; this thread serves as the foundation to the Russian stitches by which the two edges are joined together. The empty square space left between the Russian stitches is then filled up with button-hole stitches, like those in fig. 651, in the foregoing chapter.
Insertion with embroidered squares (fig. 718).—After creating rows of loose buttonhole stitches along the braid edges, as shown in figs. 707, 708, 709, thread a needle through the buttonhole stitches; this thread acts as the base for the Russian stitches that will stitch the two edges together. The empty square space between the Russian stitches is then filled with buttonhole stitches, similar to those in fig. 651, in the previous chapter.
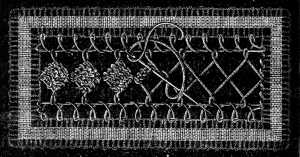
Insertion with half bars (fig. 719).—Fasten on the thread in one of the corners of the braid and conduct it by means of overcasting stitches to the middle of the insertion, draw it through the edge of the braid on the right and make button-hole stitches over it, to the middle of the space to be filled, then carry the thread to the left, draw it through the left edge, a little higher up than on the other side, and make the same number of stitches over it as over the first. You can vary this insertion with very good result by making more stitches on one side than on the other, but it should never be more than 10 or 12 stitches wide.
Insertion with half bars (fig. 719).—Attach the thread in one of the corners of the braid and lead it using overcasting stitches to the center of the insertion. Pull it through the edge of the braid on the right and make buttonhole stitches over it until you reach the middle of the space to be filled. Then, bring the thread to the left, pull it through the left edge, slightly higher than the other side, and make the same number of stitches over it as you did on the first side. You can also vary this insertion with great results by making more stitches on one side than the other, but it should never exceed 10 or 12 stitches wide.
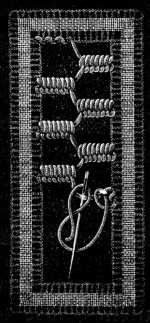
Plain net stitch. First lace stitch (fig. 720).—Make rows of button-hole stitches to and fro, loose enough to form loops into which the stitches of each subsequent row are set. You must be careful to make the same number of stitches in all the spaces that are of the same size, and also, when you begin a row with a whole stitch, to begin the return row with a half, and so on, in regular rotation.
Plain net stitch. First lace stitch (fig. 720).—Create rows of buttonhole stitches back and forth, making them loose enough to form loops for the stitches in each following row. Be sure to keep the same number of stitches in all spaces of equal size, and when starting a row with a full stitch, begin the return row with a half stitch, and continue this pattern in regular rotation.
The number of stitches should vary with the width of the pattern and the decreasing and increasing should always be done at the edge.
The number of stitches should change based on the width of the pattern, and decreases and increases should always be made at the edge.
The loops must be as many threads of the braid edge long, as they are wide.
The loops need to be as long as the number of threads in the braid edge, and as wide as they are long.

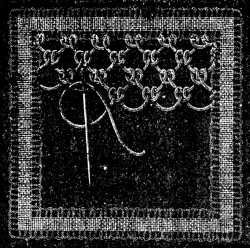
Double net stitch. Second lace stitch (fig. 721).—You leave the same distance between the stitches here as in the preceding figure, but in each of the loops of the first row, you must make two button-hole stitches close together. It is as well to round the loop a little less than is usually done in net stitch.
Double net stitch. Second lace stitch (fig. 721).—Keep the same distance between the stitches as in the previous figure, but in each of the loops of the first row, you need to make two buttonhole stitches close together. It’s better to round the loop a little less than you usually do in net stitch.
Third lace stitch (fig. 722).—Here, you make three button-hole stitches close together, joined to the next three by a loop of thread, just long enough to hold the three button-hole stitches of the subsequent row.
Third lace stitch (fig. 722).—In this stitch, you create three closely spaced button-hole stitches, connecting them to the next three with a loop of thread that's just the right length to secure the three button-hole stitches in the following row.
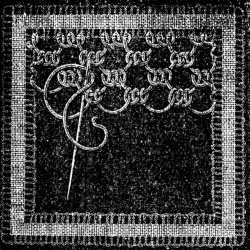
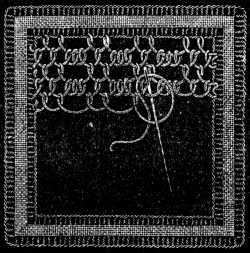
Fourth lace stitch (fig. 723).—Working from left to right, make two button-hole stitches rather near together, and leave twice as long a loop between them and the next two stitches as between the two first.
Fourth lace stitch (fig. 723).—Starting from the left and moving to the right, create two button-hole stitches fairly close together, and leave a loop between them and the next two stitches that is twice as long as the loop between the first two stitches.
In the next row, which is worked from right to left, make one stitch in the loop between the two stitches that are close together and three or four in the long loop.
In the next row, which is worked from right to left, make one stitch in the loop between the two stitches that are close together and three or four in the long loop.
In the second row, you make one button-hole stitch in each of the loops between the three stitches and six or eight in the long intermediate loop.
In the second row, make one buttonhole stitch in each of the loops between the three stitches and six or eight in the long intermediate loop.
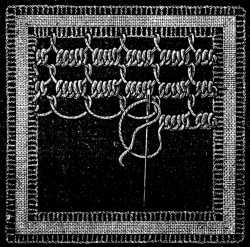
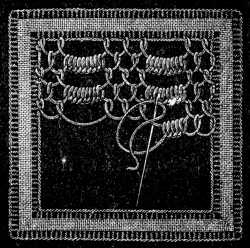
Sixth lace stitch (fig. 725).—Over wide loops, made from left to right in the first row, make in the second, enough button-hole stitches entirely to cover the thread.
Sixth lace stitch (fig. 725).—Over wide loops created from left to right in the first row, create enough button-hole stitches in the second row to completely cover the thread.
In the third row of stitches, put the needle into the small loop between two sets of button-hole stitches, so that the close stitches shall form vertical lines across the surface they cover.
In the third row of stitches, insert the needle into the small loop between two sets of button-hole stitches, ensuring that the close stitches create vertical lines across the surface they cover.
This stitch admits of every sort of modification, such as, for instance, making the third row of stitches on the button-hole stitches, in the middle of the ones on the small loop; or making one row of close stitches first, and then three open rows; in the former case you should always make an uneven number of button-hole stitches, so that you have the same number on both sides of the needle, which you must put in between the two threads that form the middle button-hole stitch.
This stitch allows for all kinds of changes, like, for example, creating the third row of stitches on the button-hole stitches in the center of the small loop stitches; or starting with one row of tight stitches, followed by three loose rows; in the first case, you should always use an odd number of button-hole stitches, so you have the same number on both sides of the needle, which you need to place between the two threads that make up the middle button-hole stitch.
Seventh lace stitch (fig. 726).—Begin, working from right to left, by making one row of pairs of button-hole stitches, a very short distance apart; in the second row you make one button-hole stitch between each of these pairs, and in the third row, two button-hole stitches in every long loop. Here, the stitches must not be crowded together but have a small gap left between them.
Seventh lace stitch (fig. 726).—Start by working from right to left and create one row of pairs of button-hole stitches, placing them a short distance apart. In the second row, add one button-hole stitch between each of these pairs, and in the third row, put two button-hole stitches in every long loop. Make sure the stitches aren’t too close together; leave a small gap between them.
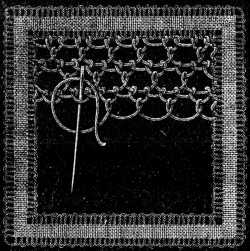
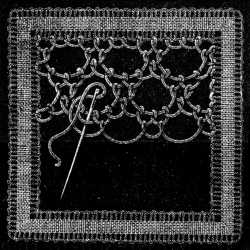
Eighth lace stitch (fig. 727).—This stitch is generally known as the “pea-stitch” on account of the holes occasioned by the different distribution of the stitches.
Eighth lace stitch (fig. 727).—This stitch is commonly referred to as the “pea-stitch” because of the holes created by the varying arrangement of the stitches.
The first row consists of stitches, set rather closely together, and all the same distance apart. In the second row, you make one button-hole stitch in the last stitch of the first row, then, missing two loops and three button-hole stitches, you make two stitches in the next loops and so on. In the third row, you make three stitches in the big loop, and one in the loop between the stitches of the second row.
The first row is made up of stitches that are placed fairly close together and evenly spaced. In the second row, you'll make one buttonhole stitch in the last stitch of the first row, then skip two loops and three buttonhole stitches before making two stitches in the next loops, and continue like that. In the third row, you'll make three stitches in the large loop and one in the loop between the stitches of the second row.
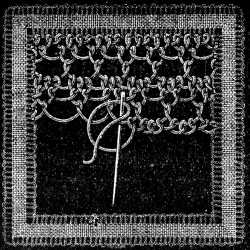
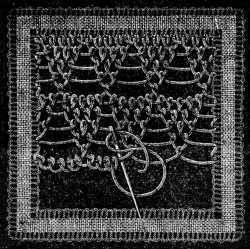
Fig. 728 requires three rows; in the second you miss two stitches and make two in the next loops; in the third, only one stitch is introduced between the two loops of the lower row.
Fig. 728 needs three rows; in the second, you skip two stitches and make two in the next loops; in the third, only one stitch is added between the two loops of the lower row.
Fig. 729 requires five rows. The stitches of the first must be set as closely together as possible; in the second row you make four stitches and miss two of the first row, in the third row you make three stitches, in the fourth, two and in the fifth, one only. The long loops of the last row must not be too slack so that the first stitches of the next scallop may quite cover them.
Fig. 729 requires five rows. The stitches of the first row should be placed as close together as possible. In the second row, make four stitches and skip two from the first row. In the third row, make three stitches; in the fourth row, make two; and in the fifth row, just one stitch. The long loops of the last row should not be too loose so that the first stitches of the next scallop can fully cover them.
Eleventh lace stitch (fig. 730).—This stitch is not really more difficult to work than those we have been describing, but requires rather more attention to learn.
Eleventh lace stitch (fig. 730).—This stitch isn't any harder to do than the ones we've been discussing, but it does need a bit more focus to master.
The first row consists of plain net stitches; in the second, you have three button-hole stitches in the middle net stitch; in the third, three button-hole stitches in the whole loops on either side of the three button-hole stitches of the second row, and one stitch in the half loops that precede and immediately follow them; the fourth row is similar to the second.
The first row is made up of regular net stitches; in the second row, there are three button-hole stitches positioned in the middle net stitch; in the third row, there are three button-hole stitches in the complete loops on either side of the three button-hole stitches from the second row, plus one stitch in the half loops right before and right after them; the fourth row is structured the same way as the second.
In the fifth row the close stitches are changed. The three button-hole stitches are made in the third whole loop, before and after those of the fourth row, so that between two groups of three stitches you have six single button-hole stitches and seven loops.
In the fifth row, the tight stitches are altered. The three buttonhole stitches are made in the third whole loop, both before and after the stitches from the fourth row, creating six single buttonhole stitches and seven loops between the two groups of three stitches.
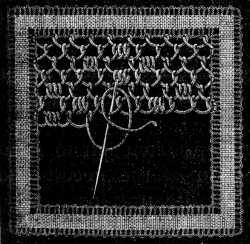
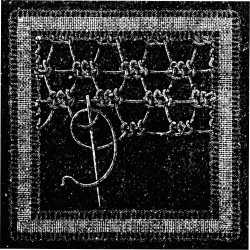
Twelfth lace stitch (fig. 731).—Fasten on your thread, take it by overcasting stitches over the braid edge, half a c/m. from the corner, and make three button-hole stitches downwards, quite close together. The next loops, over four or six threads of the braid, must be left long enough to be on a level with the first stitch reaching downwards from the edge.
Twelfth lace stitch (fig. 731).—Attach your thread by making overcasting stitches over the braid edge, half a cm from the corner, and then create three closely spaced button-hole stitches going downwards. The next loops, over four or six threads of the braid, should be left long enough to match the length of the first downward stitch from the edge.
In the second row, you cover the long loops with three button-hole stitches and draw the intervening thread quite tight.
In the second row, you cover the long loops with three buttonhole stitches and pull the thread in between tight.
The third row is like the first, with the difference, that you put the needle in between the two threads of the button-hole stitch, instead of through the loops.
The third row is similar to the first, except that you insert the needle between the two threads of the buttonhole stitch, rather than through the loops.
Thirteenth lace stitch (fig. 732).—The stitch here represented, as well as the two next ones are looped from left to right and then again from right to left.
Thirteenth lace stitch (fig. 732).—The stitch shown here, along with the next two, is looped from left to right and then again from right to left.
As it is more unusual to make the loops from left to right than the reverse way, the proper position of the needle and the course of the thread are shown in the illustrations.
Since it's more uncommon to create the loops from left to right than the other way around, the correct position of the needle and the path of the thread are illustrated in the images.
Fig. 732 requires, in the first place, two button-hole stitches very close together in the edge of the braid, then a third stitch covering the two first stitches and set quite close to them; the connecting thread between these stitches must be tightly stretched so as to lie almost vertically, that the stitches may form straight lines.
Fig. 732 starts with two closely spaced button-hole stitches at the edge of the braid, followed by a third stitch that covers the first two and is placed right next to them. The thread connecting these stitches needs to be pulled tight to lie almost vertically, ensuring that the stitches create straight lines.
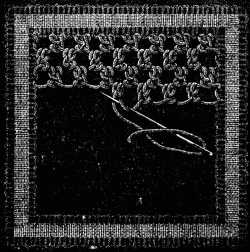
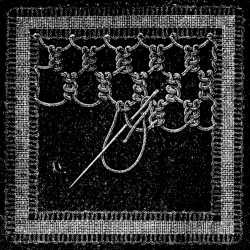
Fifteenth lace stitch (fig. 734).—This resembles the two foregoing stitches and consists of three button-hole stitches, made over the edge of the braid or the intermediate bars, and joined together afterwards under one transverse stitch.
Fifteenth lace stitch (fig. 734).—This is similar to the previous two stitches and is made up of three button-hole stitches, which are created over the edge of the braid or the intermediate bars, and then joined together under a single transverse stitch.
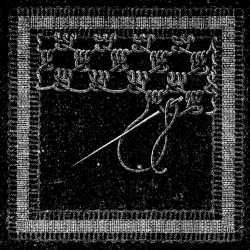
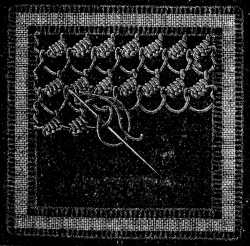
Sixteenth lace stitch (fig. 735).—You begin this by a row of net stitches worked from right to left, or as the engraving shows, by a row of stitches called «seed stitches».
Sixteenth lace stitch (fig. 735).—Start with a row of net stitches worked from right to left, or as the engraving illustrates, by a row of stitches called "seed stitches."
The second row, worked from left to right, consists of short bars, set slanting and shaped like a seed, and made the same way as the picot in fig. 699. The first stitch is carried through the loop of the row below, the second over both threads and far enough from the loop to leave room for three other stitches. The first of the four button-hole stitches of the next group must be set quite close to the last.
The second row, worked from left to right, is made up of short bars that are angled and shaped like a seed, created in the same way as the picot in fig. 699. The first stitch goes through the loop of the row below, the second over both threads and spaced far enough from the loop to allow room for three more stitches. The first of the four button-hole stitches in the next group should be positioned very close to the last one.
Seventeenth lace stitch (fig. 736).—Here we have the same pattern as the preceding one without the row of net stitches; the engraving shows us at the same time, the proper direction of the needle and thread for the row that is worked from right to left.
Seventeenth lace stitch (fig. 736).—This pattern is the same as the previous one, but without the row of net stitches. The engraving also illustrates the correct direction for the needle and thread for the row that is worked from right to left.
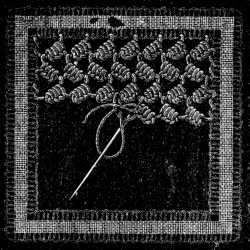

Eighteenth lace stitch (fig. 737).—This is the first of a series of lace stitches, often met with in old Venetian lace, and which can therefore with perfect right be called, Venetian stitches.
Eighteenth lace stitch (fig. 737).—This is the first in a series of lace stitches commonly found in old Venetian lace, and can rightly be referred to as Venetian stitches.
Owing to the manner and order in which the rows of stitches are connected and placed above one another, they form less transparent grounds than those we have hitherto described.
Due to the way the rows of stitches are connected and stacked on top of each other, they create less transparent backgrounds than those we've described so far.
In these grounds you begin by making the row of loops, then you throw a thread across on the same level and in coming back, pass the needle through the row of loops under the thread stretched across, and under the stitch of the previous row.
In this area, you start by creating a row of loops, then you stretch a thread across at the same level and, on your way back, guide the needle through the row of loops beneath the thread and under the stitch from the previous row.
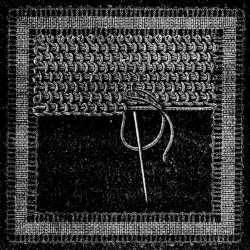
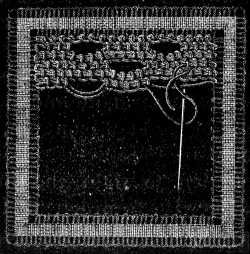
Twentieth lace stitch (fig. 739).—By missing some loops of the close ground in one row and replacing them by the same number in the next, small gaps are formed, and by a regular and systematic missing and taking up of stitches, in this way, extremely pretty grounds can be produced.
Twentieth lace stitch (fig. 739).—By skipping some loops of the tight pattern in one row and replacing them with the same number in the next, small gaps are created, and by consistently and systematically skipping and picking up stitches this way, you can produce really beautiful patterns.
Twenty-first lace stitch (fig. 740).—These close lace stitches, can be varied in all sorts of other ways by embroidering the needle-made grounds.
Twenty-first lace stitch (fig. 740).—These tight lace stitches can be modified in many different ways by embellishing the needle-made backgrounds.
In fig. 740, you have little tufts in darning stitch, and in a less twisted material than the close stitches of the ground, worked upon the ground.
In fig. 740, you see small tufts in darning stitch, made from a less twisted material than the tight stitches of the background, worked on the background.
If you use Fil à dentelle D.M.C (lace thread) for the ground, you should take either Coton à repriser D.M.C (darning cotton), or better still, Coton surfin D.M.C[A] for the tufts. The ground can also be ornamented with little rings of button-holing, stars or flowerets in bullion or some other fancy stitch.
If you're using D.M.C lace thread for the base, you should choose either D.M.C darning cotton, or even better, D.M.C surfin cotton for the tufts. You can also decorate the base with little rings of buttonhole stitching, stars, or small flowers in bullion, or some other decorative stitch.
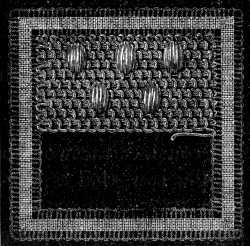
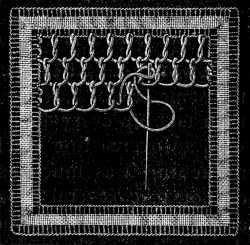
Twenty-second lace stitch (fig. 741).—For the above three stitches and the three that follow, the work has to be held, so that the finished rows are turned to the worker and the needle points to the outside of the hand. In the first row, from left to right, take hold of the thread near the end that is in the braid, lay it from left to right under the point of the needle, and bring it back again to the right, over the same. Whilst twisting the thread in this way round the needle with the right hand, you must hold the eye of the needle under the left thumb.
Twenty-second lace stitch (fig. 741).—For the three stitches mentioned above and the next three, the work should be positioned so that the finished rows face the worker and the needle points outward. In the first row, from left to right, grab the thread near the end that's in the braid, lay it from left to right under the tip of the needle, and then bring it back to the right, over the same. While twisting the thread around the needle with your right hand, you need to keep the eye of the needle supported under your left thumb.
When you have laid the thread round draw the needle through the loops; the bars must stand straight and be of uniform length. Were they to slant or be at all uneven, we should consider the work badly done.
When you’ve wrapped the thread around, pull the needle through the loops; the bars should be straight and the same length. If they slant or are uneven in any way, we would see the work as poorly done.
In the row that is worked from left to right, the thread must be twisted round the needle, likewise from left to right.
In the row being worked from left to right, the thread must be wrapped around the needle, also from left to right.
Twenty-third lace stitch (fig. 742).—This is begun with the same stitches as fig. 741, worked from right to left. You then take up every loop that comes between the vertical bars with an overcasting stitch, drawing the thread quite out, and tightening it as much as is necessary after each stitch. You cannot take several stitches on the needle at the same time and draw out the thread for them all at once, as this pulls the bars out of their place.
Twenty-third lace stitch (fig. 742).—Start this stitch the same way as in fig. 741, working from right to left. Then, pick up every loop that falls between the vertical bars using an overcasting stitch, pulling the thread all the way through and tightening it as needed after each stitch. You can’t take multiple stitches on the needle at once and pull the thread for them all at the same time, as that will displace the bars.
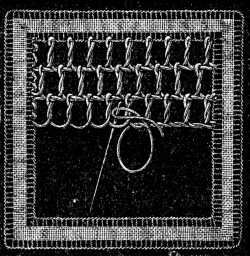

Twenty-fourth lace stitch (fig. 743).—This is often called the Sorrento stitch.
Twenty-fourth lace stitch (fig. 743).—This is commonly referred to as the Sorrento stitch.
Every group of three bars of stitches is separated from the next by a long loop, round which the thread is twisted in its backward course. In each of the succeeding rows you place the first bar between the first and second of the preceding row, and the third one in the long loop, so that the pattern advances, as it were in steps.
Every group of three bars of stitches is separated from the next by a long loop, around which the thread is twisted in its backward direction. In each of the following rows, you place the first bar between the first and second of the previous row, and the third one in the long loop, so that the pattern moves forward, like taking steps.
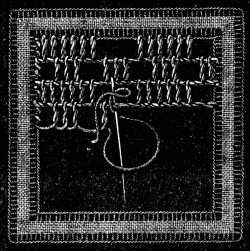
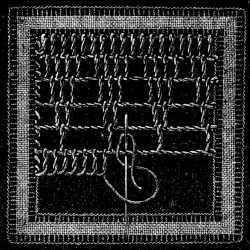
Both consist of the same stitches as those described in fig. 741. The thread that connects the groups should be tightly stretched, so that the rows may form straight horizontal lines.
Both consist of the same stitches as those described in fig. 741. The thread connecting the groups should be tightly stretched, so that the rows can form straight horizontal lines.
If you want to lengthen the bars, twist the thread once or twice more round the needle. You can also make one row of bars surmounted by wheels, as shown in fig. 765, then one more row of bars and continue with close stitches.
If you want to make the bars longer, twist the thread around the needle one or two more times. You can also create a row of bars topped with wheels, as shown in fig. 765, then add another row of bars and keep going with tight stitches.
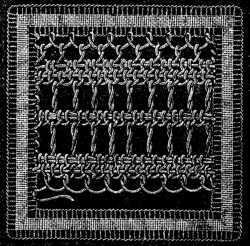
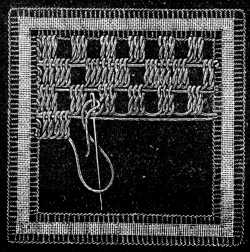
Twenty-eighth lace stitch (fig. 747).—Between every group of three bars, set close together, leave a space of a corresponding width; then bring the thread back over the bars, as in figs. 737, 738 and 739, without going through the loops. In the second row, you make three bars in the empty space, two over the three bars of the first row and again three in the next empty space. The third row is like the first.
Twenty-eighth lace stitch (fig. 747).—Between every group of three closely set bars, leave a gap that’s the same width; then bring the thread back over the bars, as shown in figs. 737, 738 and 739, without going through the loops. In the second row, create three bars in the empty space, two over the three bars of the first row, and then again three in the next empty space. The third row is the same as the first.
Twenty-ninth lace stitch (fig. 748).—This stitch, known as Greek net stitch, can be used instead of button-hole bars for filling in large surfaces.
Twenty-ninth lace stitch (fig. 748).—This stitch, called Greek net stitch, can be used instead of button-hole bars to fill in large areas.
Make bars from left to right, a little distance apart as in fig. 741, leaving the loops between rather slack, so that when they have been twice overcast by the returning thread, they may still be slightly rounded. In the next row, you make the bar in the middle of the loop and lift it up sufficiently with the needle, for the threads to form a hexagon like a net mesh.
Make bars from left to right, spacing them out a bit like in fig. 741, leaving the loops in between fairly loose, so that when they've been wrapped around twice by the returning thread, they still stay a bit rounded. In the next row, place the bar in the center of the loop and lift it up enough with the needle for the threads to create a hexagon like a net mesh.
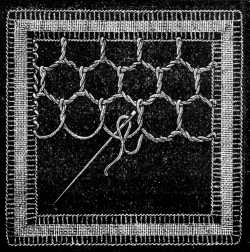
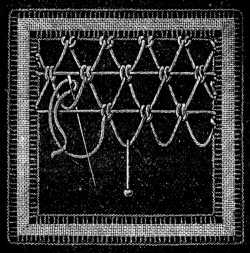
Thirtieth lace stitch (fig. 749). After a row of pairs of button-hole stitches set closely together, with long loops between, as long as the space between the pairs, throw the thread across in a line with the extremities of the loops, fasten it to the edge of the braid and make pairs of button-hole stitches, as in the first row above it.
Thirtieth lace stitch (fig. 749). After a row of button-hole stitches that are placed closely together, with long loops in between that are the same length as the space between the pairs, lay the thread across in a straight line with the ends of the loops, secure it to the edge of the braid, and create pairs of button-hole stitches just like in the row above it.
The loops must be perfectly regular, to facilitate which, guide lines may be traced across the pattern, and pins stuck in as shown in the figure, round which to carry the thread.
The loops need to be perfectly even, so to help with this, you can draw guide lines across the pattern and use pins, as shown in the figure, around which to wrap the thread.
Thirty-first lace stitch (fig. 750).—At first sight this stitch looks very much like the preceding one, but it differs entirely from it in the way in which the threads are knotted. You pass the needle under the loop and the laid thread, then stick in the pin at the right distance for making the long loop, bring the thread round behind the pin, make a loop round the point of the needle, as shows in the engraving, and pull up the knot.
Thirty-first lace stitch (fig. 750).—At first glance, this stitch looks quite similar to the one before it, but it’s completely different in how the threads are knotted. You insert the needle under the loop and the laid thread, then place the pin at the right distance to create the long loop. Bring the thread around behind the pin, make a loop around the needle’s point, as shown in the illustration, and pull up the knot.
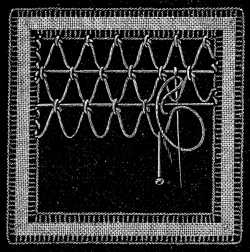
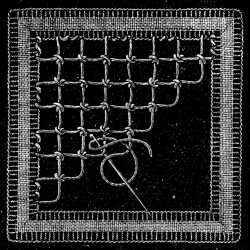
Thirty-second lace stitch (fig. 751).—To introduce a greater variety into lace stitches, netting can also be imitated with the needle. You begin with a loop in the corner of a square and work in diagonal lines. The loops are secured by means of the same stitch shown in fig. 750, and the regularity of the loops ensured, as it is there, by making them round a pin, stuck in at the proper distance. The squares or meshes must be made with the greatest accuracy; that being the case, most of the stitches described in the preceding chapter can be worked upon them, and the smallest spaces can be filled with delicate embroidery.
Thirty-second lace stitch (fig. 751).—To add more variety to lace stitches, you can also replicate netting using a needle. Start with a loop at one corner of a square and work in diagonal lines. Secure the loops using the same stitch shown in fig. 750, and keep the loops consistent, just like there, by wrapping them around a pin placed at the right distance. The squares or meshes need to be made with precision; since this is important, most of the stitches described in the previous chapter can be applied to them, and even the smallest gaps can be filled with fine embroidery.
Thirty-third lace stitch (fig. 752).—This stitch is frequently met with in the oldest Irish lace, especially in the kind where the braids are joined together by fillings not bars. At first sight, it looks merely like a close net stitch, the ground and filling all alike, so uniform is it in appearance, but on a closer observation it will be found to be quite a different stitch from any of those we have been describing.
Thirty-third lace stitch (fig. 752).—This stitch is commonly found in the oldest Irish lace, particularly in the style where the braids are connected by fillings instead of bars. At first glance, it seems simply like a tight net stitch, with the ground and filling looking so similar, but upon closer inspection, it reveals itself to be a completely different stitch than any we've discussed.
The first stitch is made like a plain net stitch, the second consists of a knot that ties up the loop of the first stitch. Fillings of this kind must be worked as compactly as possible, so that hardly any spaces are visible between the individual rows.
The first stitch is made like a simple net stitch, the second consists of a knot that secures the loop of the first stitch. Fillings like this must be done as tightly as possible, so that barely any gaps are visible between the individual rows.
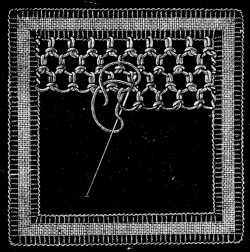
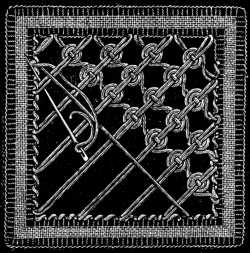
Thirty-fourth lace stitch (fig. 753).—To fill in a surface with this stitch, known as the wheel or spider stitch, begin by laying double diagonal threads to and fro, at regular distances apart, so that they lie side by side and are not twisted. When the whole surface is covered with these double threads, throw a second similar series across them, the opposite way. The return thread, in making this second layer, must be conducted under the double threads of the first layer and over the single thread just laid, and wound two or three times round them, thereby forming little wheels or spiders, like those already described in the preceding chapter in figs. 653 and 654.
Thirty-fourth lace stitch (fig. 753).—To fill a surface with this stitch, called the wheel or spider stitch, start by laying down double diagonal threads back and forth, spaced evenly apart, ensuring they are parallel and not twisted. Once the entire surface is covered with these double threads, add a second similar set across them, but in the opposite direction. As you create this second layer, guide the return thread underneath the double threads of the first layer and over the newly placed single thread, wrapping it around two or three times to form small wheels or spiders, like those shown in the previous chapter in figs. 653 and 654.
Thirty-fifth lace stitch (fig. 754).—Begin by making a very regular netted foundation, but without knots, where the two layers of threads intersect each other.
Thirty-fifth lace stitch (fig. 754).—Start by creating a neat netted foundation, but without any knots, where the two layers of threads cross each other.
Then, make a third layer of diagonal threads across the two first layers, so that all meet at the same points of intersection, thus forming six rays divergent from one centre. With the fourth and last thread, which forms the seventh and eighth ray, you make the wheel over seven threads, then slip the needle under it and carry it on to the point for the next wheel.
Then, create a third layer of diagonal threads over the first two layers, making sure all meet at the same intersection points, creating six rays radiating from a single center. With the fourth and final thread, which makes the seventh and eighth rays, you will create the wheel over seven threads, then slide the needle underneath it and move it to the spot for the next wheel.
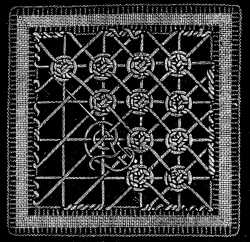
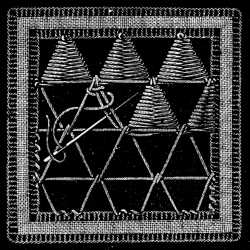
Thirty-sixth lace stitch (fig. 755).—After covering all the surface to be embroidered, with threads stretched in horizontal lines, you cover them with loops going from one to the other and joining themselves in the subsequent row to the preceding loops.
Thirty-sixth lace stitch (fig. 755).—After you’ve covered the entire area to be embroidered with threads laid out in horizontal lines, create loops that connect from one line to another, linking them together in the next row with the previous loops.
Thirty-seventh lace stitch (fig. 756).—Here, by means of the first threads that you lay, you make an imitation of the Penelope canvas used for tapestry work, covering the surface with double threads, a very little distance apart, stretched both ways. The second layer of threads must pass alternately under and over the first, where they cross each other, and the small squares thus left between, must be encircled several times with thread and then button-holed; the thicker the foundation and the more raised and compact the button-holing upon it is, the better the effect will be. Each of these little button-holed rings should be begun and finished off independently of the others.
Thirty-seventh lace stitch (fig. 756).—Here, by using the first threads you lay down, you create a look similar to the Penelope canvas used in tapestry work, covering the surface with double threads spaced closely together, stretched in both directions. The second layer of threads should go alternately under and over the first where they intersect, and the small squares created in between must be wrapped several times with thread and then button-holed; the thicker the base and the more pronounced and compact the button-holing is, the better the effect will be. Each of these little button-holed rings should be started and finished off individually from the others.
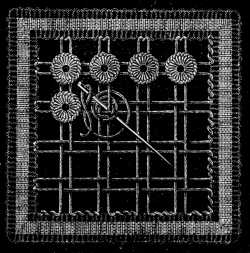
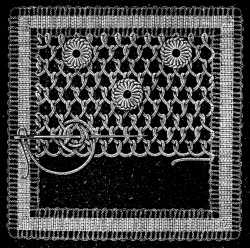
Thirty-eighth lace stitch (fig. 757).—Plain net stitch being quicker to do than any other, one is tempted to use it more frequently; but as it is a little monotonous some openwork ornament upon it is a great improvement; such for instance as small button-holed rings, worked all over the ground at regular intervals. Here again, as in the preceding figure the rings must be made independently of each other.
Thirty-eighth lace stitch (fig. 757).—Plain net stitch is quicker to make than any other, which makes it tempting to use it more often; however, since it can get a bit boring, adding some openwork decoration really enhances it. For example, you could use small button-holed rings spread evenly across the design. Once again, as in the previous figure, the rings need to be created independently from one another.
Thirty-ninth lace stitch (fig. 758).—Corded bars, branching out into other bars, worked in overcasting stitches, may also serve as a lace ground.
Thirty-ninth lace stitch (fig. 758).—Corded bars that spread into other bars, created with overcasting stitches, can also function as a lace base.
You lay five or six threads, according to the course the bars are to take; you overcast the branches up to the point of their junction with the principal line, thence you throw across the foundation threads for another branch, so that having reached a given point and coming back to finish the threads left uncovered in going, you will often have from six to eight short lengths of thread to overcast.
You lay down five or six threads, based on the direction the bars will take; you stitch the branches up to where they connect with the main line, then you cross over the foundation threads for another branch. That way, after reaching a certain point and returning to finish the threads that were left uncovered on the way, you will often have six to eight short lengths of thread to stitch.
Overcasting stitches are always worked from right to left.
Overcasting stitches are always done from right to left.
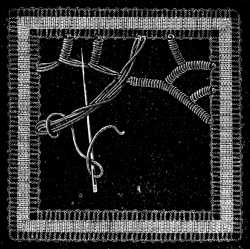
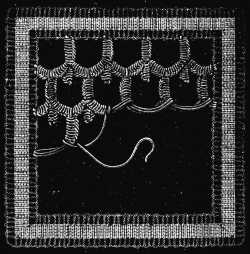
Fortieth lace stitch (fig. 759).—Of all the different kinds of stitches here given, this, which terminates the series, is perhaps the one requiring the most patience. It was copied from a piece of very old and valuable Brabant lace, of which it formed the entire ground. Our figure of course represents it on a very magnified scale, the original being worked in the finest imaginable material, over a single foundation thread.
Fortieth lace stitch (fig. 759).—Of all the different types of stitches provided here, this one, which concludes the series, likely requires the most patience. It was inspired by a piece of very old and valuable Brabant lace, of which it made up the entire base. Our illustration, of course, displays it on a much larger scale, as the original was made with the finest material imaginable, over a single foundation thread.
In the first row, after the three usual foundation threads are laid, you make the button-hole stitches to the number of eight or ten, up to the point from which the next branch issues, from the edge of the braid, that is, upwards.
In the first row, after laying the three usual foundation threads, you create eight or ten buttonhole stitches, stopping at the point where the next branch comes out from the edge of the braid, which is upwards.
Then you bring the needle down again and button-hole the second part of the bar, working from right to left.
Then you bring the needle down again and create a buttonhole for the second part of the bar, working from right to left.
A picot, like the one described in fig. 701, marks the point where the bars join. More picots of the same kind may be added at discretion.
A picot, similar to the one shown in fig. 701, indicates the spot where the bars connect. More picots of the same type can be added as needed.
Wheel composed of button-hole bars (figs. 760, 761, 762, 763).—As we have already more than once given directions for making wheels, not only in the present chapter, but also in the one on netting, there is no need to enlarge on the kind of stitches to be used here, but we will explain the course of the thread in making wheels, composed of button-hole bars in a square opening.
Wheel made with button-hole bars (figs. 760, 761, 762, 763).—Since we have already provided instructions on how to create wheels multiple times, both in this chapter and in the one about netting, there’s no need to go into detail about the types of stitches to use here. Instead, we will explain the threading process for making wheels that consist of button-hole bars in a square opening.
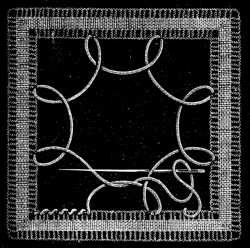
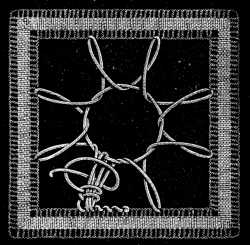
Fig. 760 shows how the first eight loops which form the foundation of the bars are made.
Fig. 760 illustrates how the initial eight loops that create the base of the bars are constructed.
In fig. 761 you will see that a thread has been passed through the loops, for the purpose of drawing them in and making a ring in addition to which, two threads added to the loop serve as padding for the button-hole stitches; the latter should always be begun on the braid side. Fig. 762 represents the bar begun in fig. 761 completed, and the passage of the thread to the next bar, and fig. 763 the ring button-holed after the completion of all the bars.
In fig. 761, you can see that a thread has been threaded through the loops to pull them tight and create a ring. Additionally, two threads added to the loop act as padding for the button-hole stitches; these should always start on the braid side. Fig. 762 shows the bar started in fig. 761 finished, along with the thread moving to the next bar, and fig. 763 displays the ring with button-holing completed after all the bars are done.


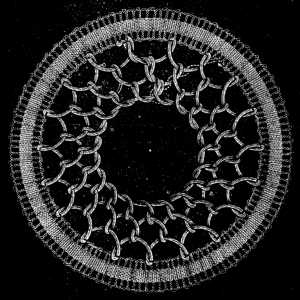
In tacking braids on to circular patterns, the inside edges, as we pointed out at the beginning of this chapter, have to be drawn in with overcasting stitches in very fine thread.
In attaching braids to circular patterns, the inner edges, as we mentioned at the start of this chapter, need to be stitched with overcasting stitches using very fine thread.
Fig. 764 shows how to fill in a round space with net stitches. It will be observed that the loop which begins the row, has the thread of the loop with which it terminates, wound round it, which thread then passes on to the second series of stitches. In the same manner you pass to the third row after which you pick up all the loops and fasten off the thread by working back to the braid edge over all the rows of loops, following the course indicated by the dotted line.
Fig. 764 illustrates how to fill a round space using net stitches. You'll notice that the loop that starts the row has the thread from the loop that finishes it wrapped around it, and this thread then continues to the second series of stitches. Similarly, you move on to the third row, and after that, you collect all the loops and secure the thread by working back to the braid edge across all the rows of loops, following the path shown by the dotted line.
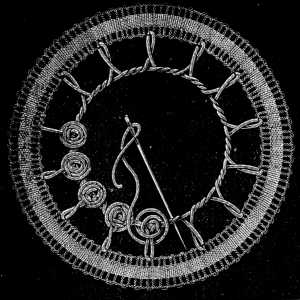
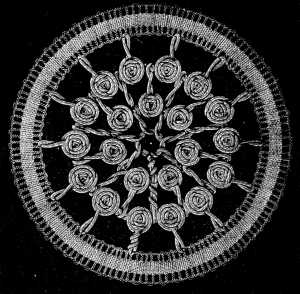
Fig. 765 shows how to finish a row of loops with wheels worked upon three threads only. In the first row, you make a wheel over each bar; in the second, you make a bar between every two wheels; in the third, the wheels are only made over every second bar; a fourth row of bars which you pick up with a thread completes the interior of the circle, then you work along the bars with overcasting stitches, fig. 766, to carry the thread back to the edge of the braid where you fasten it off.
Fig. 765 shows how to finish a row of loops with wheels worked on just three threads. In the first row, you create a wheel over each bar; in the second, you place a bar between every two wheels; in the third, the wheels are made only over every second bar. A fourth row of bars, which you pick up with a thread, completes the inside of the circle. Then, you work along the bars with overcasting stitches, fig. 766, to bring the thread back to the edge of the braid, where you secure it.
Needle-made picots (figs. 767, 768, 769).—The edges and outlines of Irish lace are generally bordered with picots, which as we have already said can be bought ready-made (see fig. 692). They are not however very strong and we cannot recommend them for lace that any one has taken the pains to make by hand.
Needle-made picots (figs. 767, 768, 769).—The edges and outlines of Irish lace are usually trimmed with picots, which, as mentioned earlier, can be purchased pre-made (see fig. 692). However, they aren't very sturdy, so we can't recommend them for lace that someone has painstakingly crafted by hand.
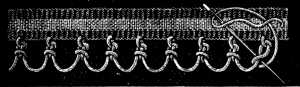
It is needless to repeat that the loops should all be knotted in a line, all be of the same length and all the same distance apart.
It’s unnecessary to say again that the loops should all be tied in a line, all be the same length, and all be the same distance apart.
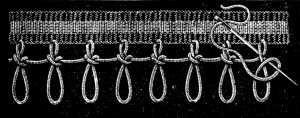
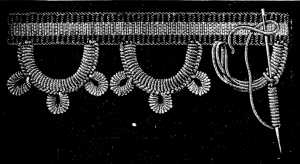
Irish lace (fig. 770).—English braids or those braids which are indicated at the foot of the engraving must be tacked down on to the pattern and gathered on the inside edge, wherever the lines are curved, as explained in fig. 693; in cases however where only Lacet superfin D.M.C[A] is used, the needle should be slipped in underneath the outside threads, so that the thread with which you draw in the braid be hidden.
Irish lace (fig. 770).—English braids or the braids shown at the bottom of the engraving need to be tacked down onto the pattern and gathered along the inner edge wherever the lines curve, as explained in fig. 693; however, when only Lacet superfin D.M.C[A] is used, you should slide the needle underneath the outer threads, so that the thread used to pull in the braid stays hidden.
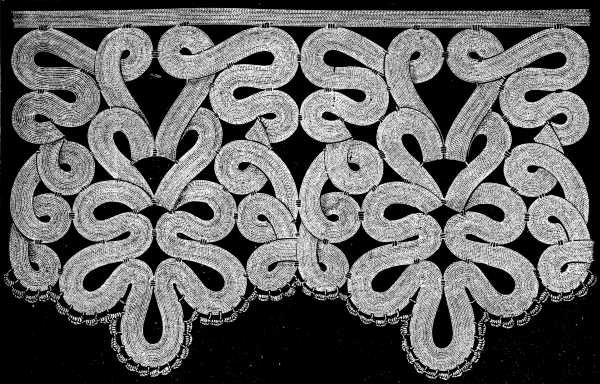
The braids are joined together where they meet with a few overcasting stitches, as shown in the illustration.
The braids are stitched together where they connect with a few overcasting stitches, as shown in the illustration.
Here, we find one of the lace stitches used instead of picots; the first row of fig. 736 always makes a nice border for Irish lace.
Here, we find one of the lace stitches used instead of picots; the first row of fig. 736 always creates a nice border for Irish lace.
Irish lace (fig. 771).—This pattern, which is more complicated and takes more time and stitches than the preceding one, can also be executed with one or other of the braids mentioned at the beginning of the chapter; but it looks best made with a close braid.
Irish lace (fig. 771).—This pattern is more complex and requires more time and stitches than the previous one. It can also be made using one of the braids mentioned at the start of the chapter, but it looks best when made with a tight braid.
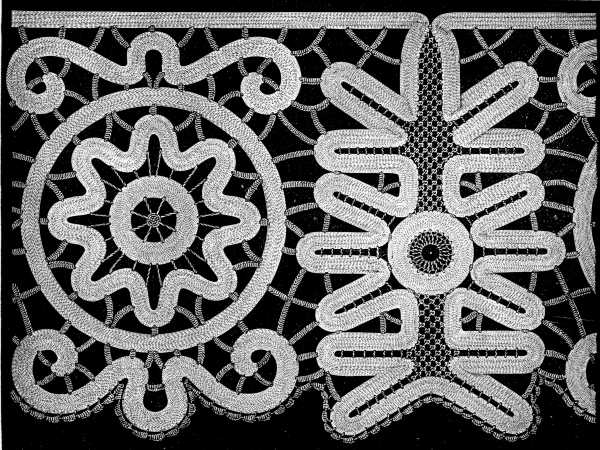
Materials: Lacet surfin D.M.C No. 5, white or écru and Fil d’Alsace D.M.C Nos. 40 to 150, or Fil à dentelle D.M.C Nos. 50 to 150.
Materials: Lacet surfin D.M.C No. 5, in white or écru, and Fil d’Alsace D.M.C Nos. 40 to 150, or Fil à dentelle D.M.C Nos. 50 to 150.
The bars, which in the illustration are simply button-holed may also be ornamented with picots of one kind or another; the interior spaces of the figure on the left can be filled, instead of with corded bars, with one of the lace stitches we have described, either fig. 720, 721, or 732, any one of which is suitable for filling in small spaces like these.
The bars, which in the illustration have buttonholes, can also be decorated with different kinds of picots. The interior areas of the figure on the left can be filled, instead of with corded bars, with one of the lace stitches we’ve mentioned, either fig. 720, 721, or 732, any of which work well for filling in small spaces like these.
In the figure on the right, the ring of braid may be replaced by close button-hole stitches, made over several foundation threads or over one thick thread, such as Fil à pointer D.M.C No. 10 or 20[A] to make them full and round.
In the figure on the right, the braid ring can be replaced by tight buttonhole stitches, made over several foundation threads or a single thick thread, like Fil à pointer D.M.C No. 10 or 20[A] to create a full and round shape.
You begin the ring on the inside and increase the number of stitches as the circumference increases.
You start the ring from the inside and add more stitches as the circumference gets bigger.
Irish lace (fig. 772).—Here we find one of the fillings above alluded to, fig. 751, used as a ground for the flowers and leaves. For the design itself some of the closer stitches described in this chapter, should be selected. When the actual lace, is finished you sew upon the braid a thin cord, made of écru Cordonnet 6 fils D.M.C, as described in the chapter on different kinds of fancy work. Cords of this kind can be had ready made, but the hand-made ones are much to be preferred, being far softer and more supple than the machine-made.
Irish lace (fig. 772).—Here we see one of the fillings mentioned earlier, fig. 751, used as a base for the flowers and leaves. For the actual design, you should choose some of the closer stitches described in this chapter. Once the lace is finished, sew a thin cord made of écru Cordonnet 6 fils D.M.C onto the braid, as explained in the chapter on different types of fancy work. You can buy ready-made cords like this, but handmade ones are definitely better, as they are much softer and more flexible than the machine-made versions.
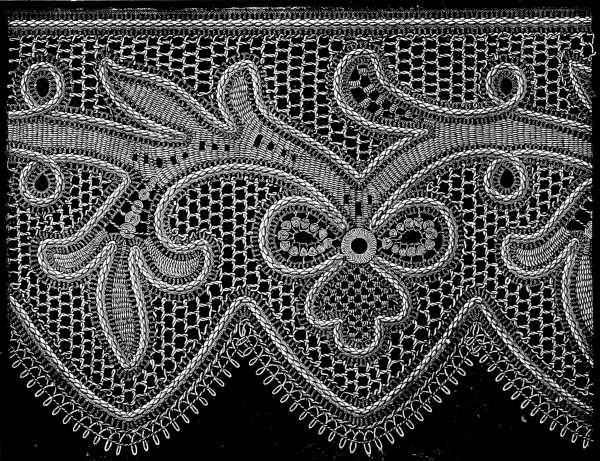
Materials: English braid with open edge.—For the lattice work: Fil d’Alsace D.M.C in balls Nos. 50 to 100 or Fil à dentelle D.M.C Nos. 50 to 100, white. For the cord: Cordonnet 6 fils D.M.C No. 15, écru.[A]
Materials: English braid with an open edge.—For the lattice work: Fil d’Alsace D.M.C in balls No. 50 to 100 or Fil à dentelle D.M.C No. 50 to 100, white. For the cord: Cordonnet 6 fils D.M.C No. 15, écru.__A_TAG_PLACEHOLDER_0__
Irish lace (fig. 773).—This lace, more troublesome than the preceding ones to make, is also much more valuable and effective. The ground is composed entirely of bars, like the ones described in fig. 761, the branches, true to the character of the work are worked in the close stitch represented in fig. 755, and the flowers in double net stitch, fig. 721.
Irish lace (fig. 773).—This lace, which is more challenging to create than the previous ones, is also much more valuable and effective. The foundation is made up entirely of bars, similar to those shown in fig. 761, while the branches, true to the style of the work, are done in the close stitch represented in fig. 755, and the flowers are crafted in double net stitch, fig. 721.
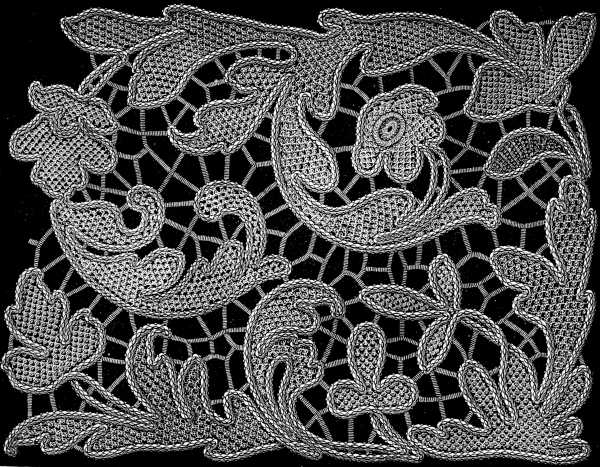
Materials—For the cord: Cordonnet 6 fils D.M.C Nos. 15 to 25. For the bars and lace stitches: Fil à dentelle D.M.C No. 200.[A]
Materials—For the cord: Cordonnet 6 fils D.M.C Nos. 15 to 25. For the bars and lace stitches: Fil à dentelle D.M.C No. 200.__A_TAG_PLACEHOLDER_0__
In working the above fillings, the thread must not, as in lace made with braid, be carried on from one point to the other by overcasting stitches along the braid edges, but should be drawn out horizontally through the cord and back again the same way, giving the needle in so doing a slightly slanting direction.
In using the fillings mentioned above, the thread shouldn't be passed from one point to another by stitching over the braid edges like in lace made with braid. Instead, it should be pulled horizontally through the cord and back the same way, with the needle held at a slight angle while doing this.
FOOTNOTES:
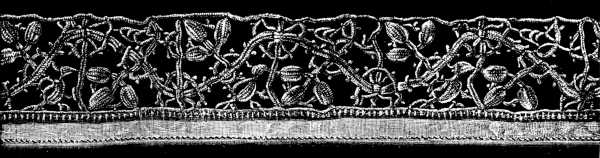
Laces of different kinds.
In general, to the uninitiated, the word «lace» signifies exclusively the delicate and elaborate fabrics that owe their origin to Venice and the Netherlands and were thence imported into other countries. But besides Venetian, French, English, Chantilly, Brussels, Sedan point, names familiar to every one, there are all kinds of other laces, likewise of great antiquity, and named as the above are, after the country they belong to.
In general, for those who aren’t familiar, the word "lace" refers specifically to the delicate and intricate fabrics that originated in Venice and the Netherlands and were then brought to other countries. But in addition to Venetian, French, English, Chantilly, and Brussels laces—names that are well-known—there are many other types of lace, also very old, named in the same way based on their country of origin.
As it would be impossible in these pages to give a comprehensive account of them all, we have restricted ourselves to such as seem more especially suited to the amateur, to whom needlework is a mere recreation and pastime.
Since it’s not possible to cover everything in this space, we’ve focused on those that seem most suitable for amateurs, for whom needlework is simply a hobby and a way to pass the time.
Worked like the above-named entirely with the needle, but much less elaborate and minute in character and workmanship, they are quicker and easier to make and we are sure that by the help of the directions that accompany the illustrations, any careful worker will be able to imitate them without difficulty.
Worked like the ones named above entirely with a needle, but much simpler and less detailed in character and craftsmanship, they are quicker and easier to make. We are confident that with the help of the instructions that come with the illustrations, any diligent worker will be able to replicate them with ease.
Materials.—It will be observed that we do not bind ourselves in the following directions to one size of cotton, that as in point of fact, one and the same piece of work can be executed in either fine or coarse cotton, we have only indicated the most suitable kind of material to use: as for instance for Armenian lace, Fil à pointer D.M.C[A] or Cordonnet 6 fils D.M.C[A], for Smyrna or knotted lace, Fil à pointer D.M.C, Cordonnet 6 fils D.M.C and Fil à dentelle D.M.C[A], for Reticella and Venetian lace, Fil d’Alsace D.M.C[A], for Brussels lace, the finest numbers of Fil à dentelle and for pillow lace, any one of those enumerated, excepting Coton à broder surfin.
Materials.—You’ll notice that we’re not restricting ourselves in the following directions to just one size of cotton. In fact, the same piece of work can be done with either fine or coarse cotton; we’ve simply indicated the most suitable type of material to use. For Armenian lace, use Fil à pointer D.M.C[A] or Cordonnet 6 fils D.M.C[A]; for Smyrna or knotted lace, use Fil à pointer D.M.C, Cordonnet 6 fils D.M.C, and Fil à dentelle D.M.C[A]; for Reticella and Venetian lace, use Fil d’Alsace D.M.C[A]; for Brussels lace, use the finest numbers of Fil à dentelle; and for pillow lace, you can use any of those listed, except for Coton à broder surfin.
Various articles are required for the making of pillow lace; in the first place a cushion or pillow, then bobbins and a winder, parchment patterns, pins and a pricker.
Various items are needed to make pillow lace: first, a cushion or pillow, then bobbins and a winder, parchment patterns, pins, and a pricker.
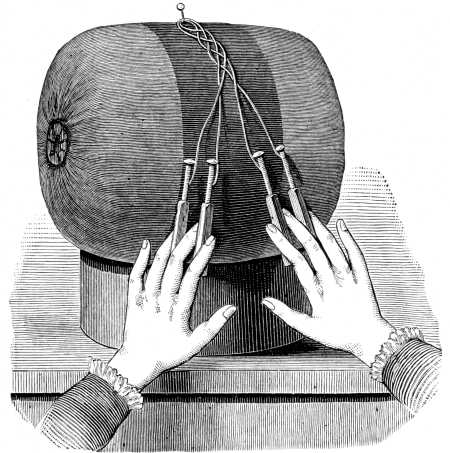
Fig. 774 represents the shape in use in the mountains of Bohemia and Saxony, where pillow lace has always been one of the chief industries of the inhabitants. Any one can make a cushion of this kind themselves with a piece of stuff, 60 c/m. long and 40 wide. The long sides are firmly sewn together and the short ones turned in with a narrow hem through which you run a cord to draw them up. A disc of stout cardboard is put inside the case after you have gathered up the one end; you then stuff the case as full as possible with bran, sawdust or horsehair, lay a second disc of cardboard in at the top and draw up the other end.
Fig. 774 shows the shape used in the mountains of Bohemia and Saxony, where pillow lace has always been one of the main industries for the locals. Anyone can make this type of cushion themselves with a piece of fabric that is 60 cm long and 40 cm wide. The long sides are stitched together securely, and the short sides are folded in with a narrow hem through which you thread a cord to cinch them closed. A strong cardboard disc is placed inside the case after you gather one end; then you fill the case as much as possible with bran, sawdust, or horsehair, lay a second cardboard disc on top, and pull the other end shut.
These pillows are then put into cardboard boxes with rather high sides, or into a kind of basket, weighted at the bottom, to keep it firm and steady. Pillows of this most primitive kind have the great advantage of being perfectly easy to make.
These pillows are then placed in cardboard boxes with fairly high sides, or in a type of basket that’s weighted at the bottom to keep it stable and secure. Pillows of this very basic kind have the major advantage of being super easy to make.
Fig. 775 represents a pillow of a more complicated kind, which can be stood upon the table or mounted on a stand. The cylinder is movable so that you can go on working without interruption.
Fig. 775 shows a more complex type of pillow, which can be placed on a table or set on a stand. The cylinder is adjustable so you can continue working without interruption.
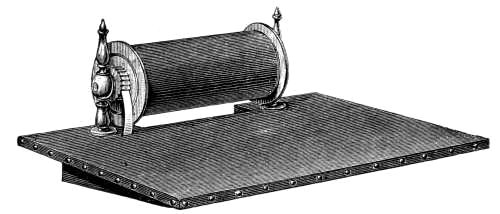
The whole apparatus consists of a board or stand, 50 c/m. long and 40 wide, resting upon two transverse pieces of wood, 3½ c/m. high behind and 1 c/m. in front.
The entire setup includes a board or stand that is 50 cm long and 40 cm wide, supported by two horizontal wooden pieces, 3.5 cm high at the back and 1 cm at the front.
The board should be covered, first with a very thick flannel or Bath coating and then with a fine dark green flannel or cloth.
The board should be covered first with a thick flannel or Bath coating, and then with a smooth dark green flannel or cloth.
Two small supports are fixed on to the outside edge of the stand to hold the cylinder, which consists of two discs that revolve on a rod about 22 c/m. long.
Two small supports are attached to the outside edge of the stand to hold the cylinder, which is made up of two discs that spin on a rod about 22 cm long.
This rod should be covered, in the first place with a thick layer of tow and then with flannel or cloth.
This rod should first be covered with a thick layer of tow and then with flannel or cloth.
On the left side of the cylinder is a cog-wheel and a metal spring is attached to the board, by means of which the wheel is prevented from turning the wrong way.
On the left side of the cylinder is a gear, and a metal spring is attached to the board, which keeps the wheel from turning the wrong way.
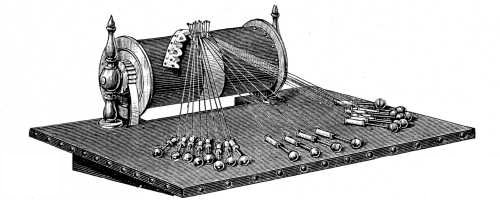
This cylinder scarcely projects above the stand, a second groove in the back edge receives the lace as it is worked off the cylinder.
This cylinder barely sticks up above the stand; a second groove along the back edge holds the lace as it's worked off the cylinder.
The pillows used for Valenciennes lace are of again a different construction, but as it is not our intention in the present work to describe the finer kinds of lace it appeared superfluous to give any illustration of the pillows on which they are made.
The pillows used for Valenciennes lace have a different design altogether, but since we don't aim to detail the finer types of lace in this work, it seems unnecessary to include any illustrations of the pillows used to make them.
The bobbins (fig. 777).—A bobbin is a sort of little wooden spool with a handle to it; there are several varieties of them but we have confined ourselves to a representation of the kind considered best for beginners.
The bobbins (fig. 777).—A bobbin is a small wooden spool with a handle. There are different types, but we have focused on showing the kind that is considered best for beginners.

As a considerable number are wanted for every pattern and they are apt to slip about and get entangled in inexperienced hands, they are now to be had with the handles weighted with lead to steady them and counteract any independent motion of their own. We cannot help again laying great stress on the importance of seeing that the size of the bobbins and the number of the cotton be well assorted to the kind of lace.
As many are needed for each pattern and they tend to slide around and get tangled in untrained hands, they are now available with handles that are weighted with lead to stabilize them and prevent any erratic movement. We must emphasize again how important it is to ensure that the size of the bobbins and the amount of cotton are well-matched to the type of lace.
The winder (fig. 778).—Every one who means to take the work seriously should provide themselves with a winder, as here represented, which is affixed to a polished wooden stand.
The winder (fig. 778).—Anyone who intends to take the work seriously should get a winder, like the one shown here, which is attached to a polished wooden stand.
This stand has to be firmly screwed to the table and the bobbin is squeezed in between the two little rods fitted into the supports at the left end of the stand; one of these rods serves as the axle to the little wheel, the other can be drawn in and out and fitted to the length of the bobbin.
This stand needs to be securely screwed onto the table, and the bobbin is held tightly between the two small rods attached to the supports at the left end of the stand; one of these rods acts as the axle for the small wheel, while the other can be adjusted in and out to match the length of the bobbin.
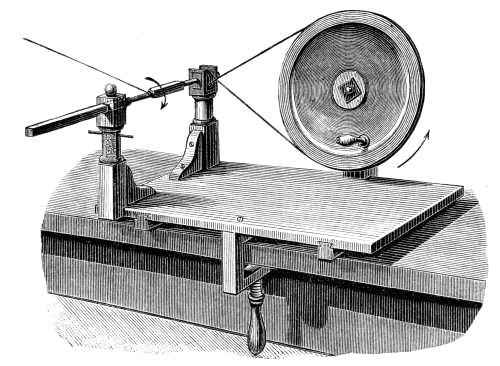
When the bobbin is fixed in its place, you take the thread in the left hand and wind it round it, turning the wheel with the right hand from right to left in the direction indicated by the arrow.
When the bobbin is secured in place, hold the thread in your left hand and wrap it around the bobbin, turning the wheel with your right hand from right to left, following the direction shown by the arrow.
The thread is wound round the handles of the bobbins that are used for making very fine lace, and a wooden shield that is so contrived that you can slip it over the handle prevents the thread from getting soiled.
The thread is wrapped around the handles of the bobbins used for making very fine lace, and a wooden shield designed to slip over the handle keeps the thread from getting dirty.
Stoppage of the thread at the end of the bobbin (fig. 779).—After cutting off the thread, you make a loop close to the top of the bobbin to prevent it from unwinding too easily. This loop is formed by taking the bobbin in the right hand, the thread between the fourth and fifth fingers of the left hand and laying it away from you round the left thumb; then lifting up the bottom thread with the second finger of the left hand you pass the bobbin upwards from below through the loop on the left hand.
Stopping the thread at the end of the bobbin (fig. 779).—After cutting the thread, make a loop near the top of the bobbin to stop it from unwinding too easily. Create this loop by holding the bobbin in your right hand and the thread between your fourth and fifth fingers of your left hand , then wrap it away from you around your left thumb. Next, lift the bottom thread with your left hand's second finger and pass the bobbin upwards from below through the loop made with your left hand.
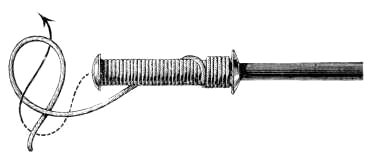
Machine for crossing the threads (fig. 780).—This ingenious little machine is of great assistance in making straight running patterns and Irish lace braids, and is particularly useful for Russian lace and braid lace of all kinds.
Machine for crossing the threads (fig. 780).—This clever little machine is very helpful for creating straight running patterns and Irish lace braids, and is especially useful for Russian lace and various types of braid lace.
It renders the even crossing of the threads in those parts of a pattern that imitate linen in texture comparatively easy.
It makes the uniform crossing of the threads in the areas of a pattern that mimic linen texture relatively easy.
Two implements like combs, fitting into one another, and movable, are mounted at two thirds of their length on a steel axle. The long teeth have holes bored through the ends, from the sides to the middle of the points and through these holes the threads from the bobbins are passed.
Two tools like combs, that fit into each other and can move, are mounted two-thirds of their length on a steel axle. The long teeth have holes drilled through the ends, from the sides to the middle of the points, and through these holes the threads from the bobbins are threaded.
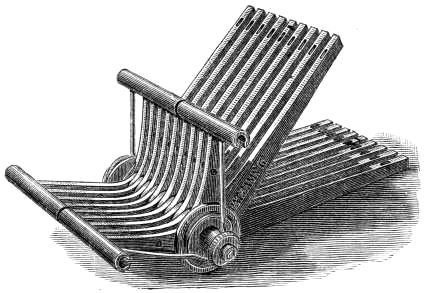
The short teeth also are pierced with transverse holes, through which a needle with the threads threaded in the long teeth resting upon it, is passed. The points of the short teeth are covered with a hollow metal cylinder, split through from end to end, which can be removed when new threads have to be added.
The short teeth are also drilled with horizontal holes, allowing a needle with threads threaded through the long teeth resting on it to be passed. The tips of the short teeth are covered with a hollow metal tube, split from end to end, which can be taken off when new threads need to be added.
When the threads are all on, a small spring is fixed to the two ends of the axle, which is independent of the machine, and the two ends of the spring are introduced into the hollow of the cylinder.
When all the threads are in place, a small spring is attached to both ends of the axle, which is separate from the machine, and the ends of the spring are inserted into the hollow of the cylinder.
By the pressure you exercise on the teeth in the cylinder, the long teeth change their position, the lower ones rise and the upper ones fall and the threads cross each other, as in a loom. After each movement of the machine, the bobbin that makes the woof must be passed between the crossed threads; the edges are made like those of any other kind of lace.
By the pressure you put on the teeth in the cylinder, the long teeth shift their position; the lower ones rise and the upper ones drop, causing the threads to intertwine, just like in a loom. After each movement of the machine, the bobbin that creates the woof must be threaded through the crossed threads; the edges are shaped like those of any other type of lace.
Fig. 781 explains how the bobbins are passed between the threads that are held between the teeth of the machine.
Fig. 781 shows how the bobbins are transferred between the threads that are held between the machine's teeth.
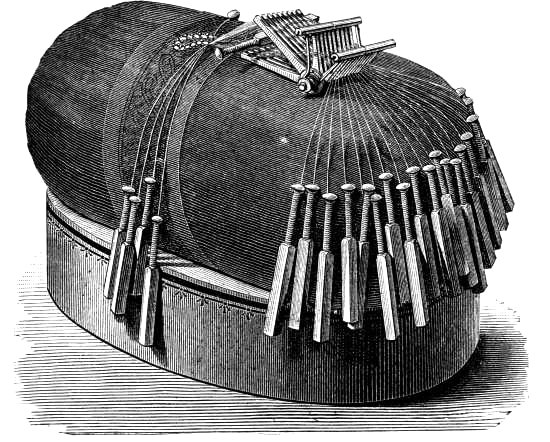
The pattern.—The pattern is one of the most important things in making pillow lace.
The pattern.—The pattern is one of the most crucial elements in creating pillow lace.
The outlines must be clear and exact, as upon that in great measure the perfection of the lace depends.
The outlines need to be clear and precise, as the quality of the lace largely depends on that.
The drawing transferred to parchment, paper or cardboard, usually of a yellowish tint, should be lined with a very thin stuff such as muslin to prevent its tearing.
The drawing should be transferred onto parchment, paper, or cardboard, which usually has a yellowish color, and lined with a very thin material like muslin to stop it from tearing.
A stripe of quadrille, or point paper as it is called, should be laid upon the pattern and then holes pricked with a medium-sized needle at every intersection of the lines.
A piece of graph paper, also known as point paper, should be placed over the pattern, and then holes should be pricked at every intersection of the lines using a medium-sized needle.
All the curved long lines of the pattern must first be traced upon the point paper with ink and then pricked.
All the curved long lines of the pattern should first be drawn on the graph paper with ink and then perforated.
The pattern should be adapted to the thickness of the thread the lace is to be made of; for a coarse lace large point paper should be used and small, for the finer kinds of lace. The pricking of the pattern beforehand is particularly important in the case of the common torchon lace, where the real beauty of the design consists in its regularity; in the case of fine close patterns the pricking can only be done as you proceed.
The pattern should be adjusted to match the thickness of the thread used for the lace. For thicker lace, you should use larger point paper, while for finer lace, smaller point paper is needed. Marking the pattern beforehand is especially important for common torchon lace, where the true beauty of the design lies in its consistency. For fine, close patterns, marking can only be done as you work.
Prickers and holders of the kind represented in fig. 782 or very much resembling it, are to be had at every stationer’s shop.
Prickers and holders like the one shown in fig. 782 or something very similar can be found at any stationery store.

The holes made by the prickers are to receive the pins, stuck in as you go along, round which you form and by which these are kept in their place.
The holes made by the prickers are meant for the pins, which you insert as you progress, around which you shape and by which these are held in position.
The pins must be long, with round heads and of a size suited to the thread. When your pattern is ready fasten it to the pillow or cylinder as the case may be, stretching it as smoothly as possible and being careful in so doing to fit the lines of the pattern together. If it be too long it must be cut to the required length or you may make the cylinder bigger by wrapping several folds of flannel round it.
The pins should be long, with round heads, and sized to match the thread. Once your pattern is ready, attach it to the pillow or cylinder, making sure to stretch it as smoothly as possible and carefully aligning the lines of the pattern. If it's too long, cut it to the right length, or you can make the cylinder larger by wrapping several layers of flannel around it.
Position and movements of the hands (fig. 783).—Pillow lace is always made with two pairs of bobbins at once and the «stitches» are formed by the different ways of passing, plaiting, crossing and twisting the threads.
Position and movements of the hands (fig. 783).—Pillow lace is always created using two pairs of bobbins at the same time, and the “stitches” are made by the various techniques of passing, plaiting, crossing, and twisting the threads.
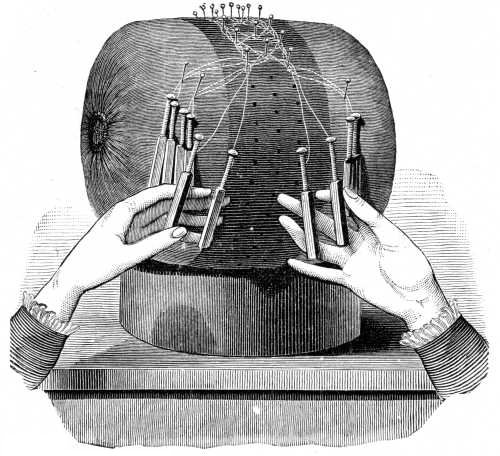
To begin with the simplest operation, making a plait, hang 2 pairs of bobbins to a pin, take 2 bobbins in each hand and lay the right bobbin of each pair over its left fellow and draw up the threads slightly. Then take the bobbins in the 2nd, 3rd and 4th fingers of the right hand and with the same fingers of the left, lay the 2nd bobbin over the 3rd with the 2nd and 3rd fingers of the left, so that the two middle bobbins are crossed, then take the 4th bobbin in the 2nd and 3rd fingers of the right hand and the bobbin that is now the 2nd, in the 3rd and 4th fingers of the left hand and lay the former over the 3rd, the latter over the 1st. This constitutes a «half passing».
To start with the simplest operation, making a braid, hang 2 pairs of bobbins on a pin, take 2 bobbins in each hand, and lay the right bobbin of each pair over its left counterpart, pulling the threads up slightly. Then take the bobbins with the 2nd, 3rd, and 4th fingers of your right hand and, using the same fingers of your left hand, lay the 2nd bobbin over the 3rd with your left fingers so that the two middle bobbins cross each other. Next, take the 4th bobbin with the 2nd and 3rd fingers of your right hand and the bobbin that is now the 2nd with the 3rd and 4th fingers of your left hand, and lay the former over the 3rd and the latter over the 1st. This is called a "half passing."
The plait, fig. 784, is formed by the repetition of the half passing. Two half passings make a whole or «double passing».
The braid, fig. 784, is made by repeating the half passing. Two half passings create a whole or “double passing.”
On the kind of lace you are making, depends how many pairs of bobbins you will have to use. But as one part of the lace is often made before the other, or you have to put on supernumerary bobbins, you fasten up those not in use on one side with pins, as shown in fig. 783.
On the type of lace you are creating, it depends on how many pairs of bobbins you will need to use. However, since one part of the lace is often made before another or you need to add extra bobbins, you pin the ones not in use to one side, as shown in fig. 783.
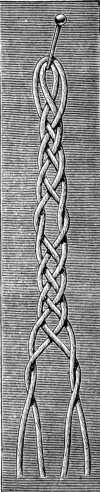
The pattern, fig. 785, is fastened upon the pillow and 6 pins are stuck in at the top, at regular intervals from each other; hang one pair of bobbins on every pin and lay the second bobbin of each pair over its fellow, so that the threads cross each other.
The pattern, fig. 785, is secured to the pillow and 6 pins are inserted at the top, evenly spaced apart; hang one pair of bobbins on each pin and place the second bobbin of each pair over its counterpart, so that the threads overlap.
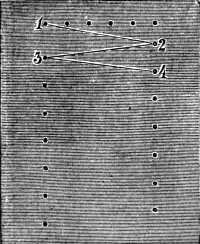
1 half passing with the 1st and 2nd pair = lay the 1st pair aside = 1 half passing with the 2nd and 3rd pair = lay the 2nd pair aside = 1 half passing with the 3rd and 4th pair = lay the 3rd pair aside = 1 half passing with the 4th and 5th pair = lay the 4th pair aside = 1 half passing with the 5th and 6th pair = stick in a pin at point 2, then work back from right to left = surround the pin with a half passing made with the 5th and 6th pair = lay the 6th pair aside = 1 half passing with the 5th and 4th pair = lay the 5th pair aside = 1 half passing with the 4th and 3rd pairs = lay the 4th pair aside = 1 half passing with the 3rd and 2nd pair = lay the 3rd pair aside = 1 half passing with the 2nd and 1st pair = stick in a pin at point 3 and repeat from the beginning.
1 half passing with the 1st and 2nd pair = lay the 1st pair aside = 1 half passing with the 2nd and 3rd pair = lay the 2nd pair aside = 1 half passing with the 3rd and 4th pair = lay the 3rd pair aside = 1 half passing with the 4th and 5th pair = lay the 4th pair aside = 1 half passing with the 5th and 6th pair = stick in a pin at point 2, then work back from right to left = surround the pin with a half passing made with the 5th and 6th pair = lay the 6th pair aside = 1 half passing with the 5th and 4th pair = lay the 5th pair aside = 1 half passing with the 4th and 3rd pairs = lay the 4th pair aside = 1 half passing with the 3rd and 2nd pair = lay the 3rd pair aside = 1 half passing with the 2nd and 1st pair = stick in a pin at point 3 and repeat from the beginning.
Fig. 786 shows the net ground completed; the thread that runs to and fro, to make it more clear, is represented in a darker shade than the others.
Fig. 786 shows the finished net ground; the thread that moves back and forth, for clarity, is shown in a darker shade than the rest.
Before proceeding further, it is as well to prepare our readers for the many trials they will have to make, even with the help of the most minute explanations, before they succeed in carrying out the directions; for the whole art of making pillow lace lies in a manual dexterity, only attainable by practice.
Before we go further, it's good to prepare our readers for the many challenges they'll face, even with the most detailed explanations, before they can successfully follow the instructions; because the entire skill of making pillow lace comes down to a manual dexterity that can only be achieved through practice.
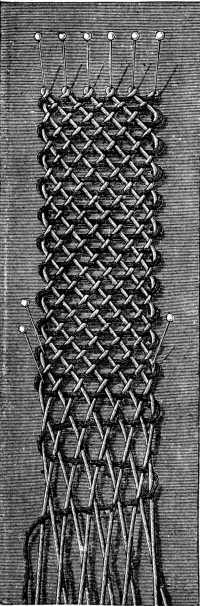
Even copying the patterns from description is only possible at first in a qualified sense; the surest way of attaining a satisfactory result is by constantly comparing the drawing and the work in progress and wherever the latter does not correspond with the former, trying at once to rectify the difference.
Even copying the patterns from the description is only possible at first in a qualified sense; the best way to achieve a satisfactory result is by constantly comparing the drawing with the work in progress and, wherever the latter doesn’t match the former, trying immediately to fix the difference.
Linen or cloth ground.—The pattern used for net passing can also be used for linen passing or ground but 7 pins, instead of 6, have to be stuck in at the top first. As in net passing, you work first from left to right, running 2 threads to and fro in perfectly horizontal lines, so as to produce a ground resembling linen in its texture.
Linen or cloth ground.—The pattern used for net passing can also be applied to linen passing or ground, but 7 pins, instead of 6, need to be set at the top first. Like in net passing, start by working from left to right, running 2 threads back and forth in perfectly horizontal lines to create a ground that resembles linen in texture.
The threads that run to and fro are held at the edge with pins and changed by a half passing, so that the one that was first in going, is first also in returning.
The threads that go back and forth are secured at the edges with pins and adjusted by a half twist, ensuring that the one that was first to go out is also the first to come back.
The use of the machine for crossing the threads is especially to be recommended in working linen ground; by pressing the short branches of the machine, the position of the threads is changed and the bobbin is pushed through; by a second pressure the second bobbin is driven through, the pin is stuck in for the picot or the cord, when the bobbins are taken back again, four movements being thus all that is required.
Using the machine to cross the threads is highly recommended for working on linen fabric. By pressing the short branches of the machine, the thread position shifts, and the bobbin gets pushed through. A second press drives the next bobbin through, and the pin is stuck in for the picot or the cord. When the bobbins are pulled back, only four movements are needed in total.
Plain hole ground (figs. 787 and 788).—Hole ground can be worked in various ways; we will begin by describing the plain hole ground, which as a rule forms the ground of all torchon laces. After fixing the pattern, as represented in fig. 787, upon the pillow, stick in 5 pins, hang 2 pairs of bobbins on to each and throw the 2nd bobbin of each pair over its fellow = 1 half passing with the 2nd and 3rd pairs = put up a pin at point 1 = 1 half passing with the same pair = this encloses the pin = lay the 3rd pair aside = 1 half passing with the 2nd and 1st pair = put up a pin at point 2 = enclose it with the same pairs = 1 half passing with the 5th and 4th pair = put up a pin at point 3 = enclose it with the same pairs = lay the 5th pair aside = 1 half passing the 4th and 3rd pair = put up the pin at point 4 = enclose the same = lay the 4th pair aside = work on in the same way over points 5 and 6 = 1 half passing with the 6th and 7th pair = put up the pin at point 7 = enclose the same = work on in the same way over points 8, 9, 10, 11 and 12 = 1 half passing with the 8th and 9th pair = put up the pin at point 31 = enclose the same = work on over points 14, 15, 16, 17, 18, 19 and 20 = 1 half passing with the 9th and 10th pair = put up the pin at point 21 = enclose the same and proceed as in the preceding rows, from point 22 to 29.
Plain hole ground (figs. 787 and 788).—Hole ground can be worked in various ways; we'll start by describing the plain hole ground, which typically serves as the base for all torchon laces. After securing the pattern, as shown in fig. 787, on the pillow, insert 5 pins, attach 2 pairs of bobbins to each pin, and throw the 2nd bobbin of each pair over the first = 1 half passing with the 2nd and 3rd pairs = place a pin at point 1 = 1 half passing with the same pair = this encloses the pin = set the 3rd pair aside = 1 half passing with the 2nd and 1st pair = place a pin at point 2 = enclose it with the same pairs = 1 half passing with the 5th and 4th pair = place a pin at point 3 = enclose it with the same pairs = set the 5th pair aside = 1 half passing the 4th and 3rd pair = place the pin at point 4 = enclose the same = set the 4th pair aside = continue in the same manner over points 5 and 6 = 1 half passing with the 6th and 7th pair = place the pin at point 7 = enclose the same = continue in the same way over points 8, 9, 10, 11, and 12 = 1 half passing with the 8th and 9th pair = place the pin at point 31 = enclose the same = continue over points 14, 15, 16, 17, 18, 19, and 20 = 1 half passing with the 9th and 10th pair = place the pin at point 21 = enclose the same and proceed as in the previous rows, from point 22 to 29.
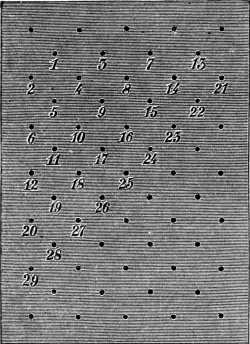
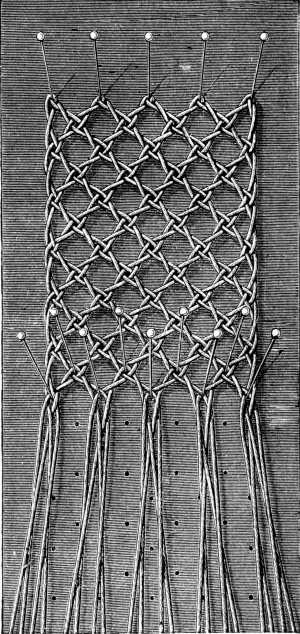
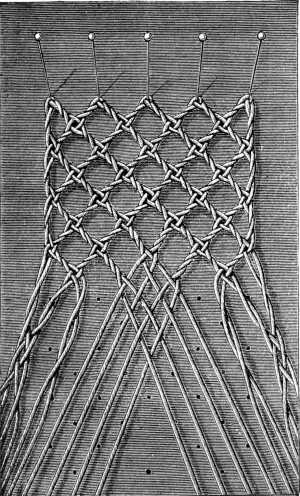
In fig. 789, the wheel is worked with the 4 middle pairs of bobbins. Each pair has first to be twisted once = 1 linen passing with the 3rd and 2nd pair = lay aside the 3rd pair = 1 linen passing with the 2nd and 4th pair = lay both pairs aside = 1 linen passing with the 4th and 3rd pair = lay aside the 4th pair = 1 linen passing with the 3rd and 2nd pair = put up the pin at the next point and between the 2nd and 3rd pair = 1 linen passing with the 3rd and 2nd pair = lay aside the 3rd pair = 1 linen passing with the 2nd and 1st pair = lay both pairs aside = 1 linen passing with the 4th and 3rd pair = lay the 4th pair aside = 1 linen passing with the 3rd and 2nd pair = the last passing completes the wheel, such as it is represented in fig. 790.
In fig. 789, the wheel is operated using the 4 middle pairs of bobbins. Each pair needs to be twisted once = 1 linen pass with the 3rd and 2nd pair = set aside the 3rd pair = 1 linen pass with the 2nd and 4th pair = set both pairs aside = 1 linen pass with the 4th and 3rd pair = set aside the 4th pair = 1 linen pass with the 3rd and 2nd pair = place the pin at the next point between the 2nd and 3rd pair = 1 linen pass with the 3rd and 2nd pair = set aside the 3rd pair = 1 linen pass with the 2nd and 1st pair = set both pairs aside = 1 linen pass with the 4th and 3rd pair = set the 4th pair aside = 1 linen pass with the 3rd and 2nd pair = the last passing completes the wheel, as shown in fig. 790.
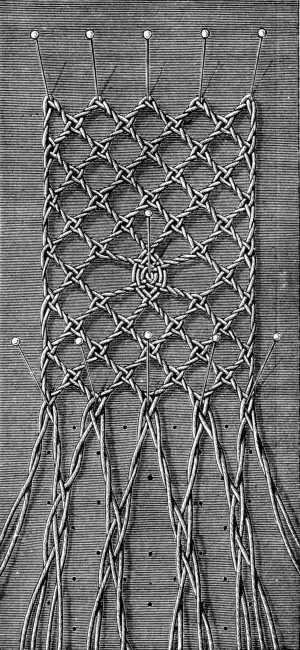
Twist the pairs of bobbins again as you did before beginning the wheel and then proceed with the plain ground.
Twist the pairs of bobbins again like you did before starting the wheel, and then continue with the plain ground.
Rose ground (figs. 791 and 792).—After preparing the pattern, as in fig. 791, put up pins at a, b, c, d, e, f, g, h and i and hang on 2 pairs of bobbins to the first pin, and one pair to each of the other 8 = 1 half passing with the 1st and 2nd pair = twist each pair once = take out the pin at point a and put it up again at the same point between the pairs = enclose the pin with 1 half passing = twist the pair once = lay the 1st pair aside = 1 half passing with the 2nd and 3rd pair = twist the pair again = take out the pin at b, put it in again at the same point between the pair = enclose the pin = twist the pairs again = lay the 2nd pair aside = 1 half passing with the 3rd and 4th pair = twist the pair again = take out the needle at c and put it in again at the same point between the pairs = enclose the pin = twist the pair again = 1 half passing with the 3rd and 2nd pair = twist the pair again = put up a pin at point 1 = enclose the pin = twist the pair again = 1 half passing with the 2nd and 1st pair = twist the pair again = put up a pin at point 2 = enclose the pin = work point 2 and 1 with the 3rd and 2nd pair = 1 half passing with the 4th and 5th pair = twist the pairs again = take out the pin at d and put it in again at the same point between the pair = work point e exactly like point d with the 5th and 6th pair = work point 4 like point 3 with the 4th and 5th pair = work points 5, 6 and 7 in a slanting direction from right to left = carry out point 8 with the 5th and 4th pair = lay both pairs aside = work point 9 with the 3rd and 2nd pair = work point f like point e with the 6th and 7th pair = work point g like point f with the 7th and 8th pair = then work points 10 to 15 with the 6th and 7th pair = point 16 with the 7th and 6th pair = point 17 with the 5th and 4th pair = point 18 with the 3rd and 2nd pair = point h like point g with the 8th and 9th pair = point i with the 9th and 10th pair = points 19 to 26 with the 9th and 10th pair = point 27 with the 9th and 8th pair = point 28 with the 7th and 6th pair = point 29 with the 5th and 4th pair = point 30 with the 3rd and 2nd pair. Proceed in this manner until the whole ground be finished.
Rose ground (figs. 791 and 792).—After setting up the pattern, as shown in fig. 791, place pins at a, b, c, d, e, f, g, h, and i and attach 2 pairs of bobbins to the first pin, and one pair to each of the other 8 = 1 half passing with the 1st and 2nd pair = twist each pair once = remove the pin at point a and place it back at the same point between the pairs = enclose the pin with 1 half passing = twist the pair once = set the 1st pair aside = 1 half passing with the 2nd and 3rd pair = twist the pair again = remove the pin at b, put it back in at the same point between the pair = enclose the pin = twist the pairs again = set the 2nd pair aside = 1 half passing with the 3rd and 4th pair = twist the pair again = remove the pin at c and place it back at the same point between the pairs = enclose the pin = twist the pair again = 1 half passing with the 3rd and 2nd pair = twist the pair again = put a pin at point 1 = enclose the pin = twist the pair again = 1 half passing with the 2nd and 1st pair = twist the pair again = put a pin at point 2 = enclose the pin = complete points 2 and 1 with the 3rd and 2nd pair = 1 half passing with the 4th and 5th pair = twist the pairs again = remove the pin at d and place it back at the same point between the pair = complete point e the same way as point d with the 5th and 6th pair = complete point 4 like point 3 with the 4th and 5th pair = complete points 5, 6 and 7 diagonally from right to left = complete point 8 with the 5th and 4th pair = set both pairs aside = complete point 9 with the 3rd and 2nd pair = complete point f the same way as point e with the 6th and 7th pair = complete point g like point f with the 7th and 8th pair = then complete points 10 to 15 with the 6th and 7th pair = point 16 with the 7th and 6th pair = point 17 with the 5th and 4th pair = point 18 with the 3rd and 2nd pair = point h like point g with the 8th and 9th pair = point i with the 9th and 10th pair = points 19 to 26 with the 9th and 10th pair = point 27 with the 9th and 8th pair = point 28 with the 7th and 6th pair = point 29 with the 5th and 4th pair = point 30 with the 3rd and 2nd pair. Continue this process until the entire ground is finished.

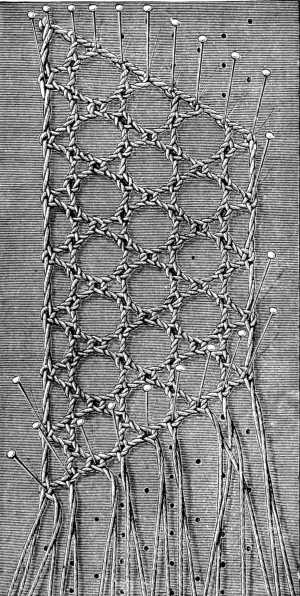
Double or ornamental ground (figs. 793 and 794).—This ground should be worked in a comparatively fine material; we should recommend Fil à dentelle D.M.C Nos. 30 to 100. Put up pins at points a and g in the pattern and hang on a pair of bobbins = put up pins likewise at b, c, d, e and f and hang on a pair of bobbins to each = 1 half passing with the 2nd and 3rd pair = take out the pin at point b and put it in again between the pair at the same place = enclose the pin with a half passing = 1 half passing with the 2nd and 1st pair = put up a pin at point 1 = enclose the pin = 1 half passing with the 4th and 5th pair = take out the pin at point l and put it in again between the pairs at the same place = enclose the needle = 1 half passing with the 4th and 3rd pair = put up a pin at point 2 = enclose the needle = 1 half passing with the 3rd and 2nd pair = put up a pin at point 3 = enclose the needle = 1 half passing with the 3rd and 4th pair = 1 half passing with the 2nd and 1st pair = put up a needle at point 4 = enclose the needle = work point d like point c with the 6th and 7th pair = 1 half passing with the 6th and 5th pair = put up a pin at point 5 = enclose the pin = work over point e like point d with the 7th and 8th pair = 1 half passing with the 7th and 6th pair = put up a pin at point 6 = enclose the pin = 1 half passing with the 6th and 5th pair = put up a pin at point 7 = enclose the pin = 1 half passing with the 6th and 7th pair = lay the 2 pairs aside = 1 half passing with the 5th and 4th pair, by which the threads are made to cross each other in the square = work over point f as over point e with the 10th and 11th pair = work over points 17 to 19 as over points 5 to 7 = when the square is finished 1 half passing with the 10th and 11th pair = half passings between all the squares.
Double or ornamental ground (figs. 793 and 794).—This ground should be worked in a relatively fine material; we recommend Fil à dentelle D.M.C Nos. 30 to 100. Place pins at points a and g in the pattern and attach a pair of bobbins. Also, place pins at b, c, d, e, and f and attach a pair of bobbins to each = 1 half passing with the 2nd and 3rd pair = remove the pin at point b and reinsert it between the pair at the same location = enclose the pin with a half passing = 1 half passing with the 2nd and 1st pair = place a pin at point 1 = enclose the pin = 1 half passing with the 4th and 5th pair = remove the pin at point l and reinsert it between the pairs at the same spot = enclose the needle = 1 half passing with the 4th and 3rd pair = place a pin at point 2 = enclose the needle = 1 half passing with the 3rd and 2nd pair = place a pin at point 3 = enclose the needle = 1 half passing with the 3rd and 4th pair = 1 half passing with the 2nd and 1st pair = place a needle at point 4 = enclose the needle = work point d like point c with the 6th and 7th pair = 1 half passing with the 6th and 5th pair = place a pin at point 5 = enclose the pin = work over point e like point d with the 7th and 8th pair = 1 half passing with the 7th and 6th pair = place a pin at point 6 = enclose the pin = 1 half passing with the 6th and 5th pair = place a pin at point 7 = enclose the pin = 1 half passing with the 6th and 7th pair = set the 2 pairs aside = 1 half passing with the 5th and 4th pair, causing the threads to cross each other in the square = work over point f as over point e with the 10th and 11th pair = work over points 17 to 19 as over points 5 to 7 = when the square is finished, 1 half passing with the 10th and 11th pair = half passings between all the squares.

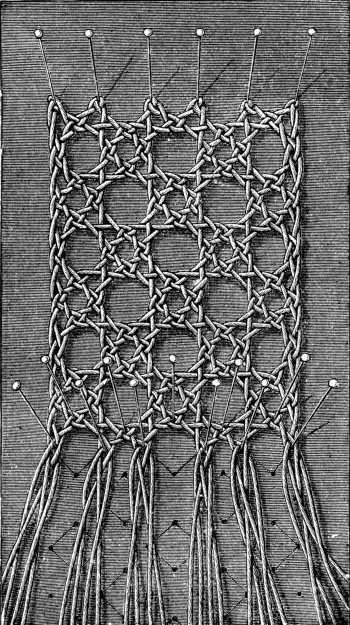
Tulle ground (fig. 795).—Prepare your pattern for the ground represented here on a magnified scale, by pricking holes at regular distances so as to form diagonal lines intersecting each other, as shown in the engraving, and set more or less closely together, according to the thickness of the thread you use.
Tulle ground (fig. 795).—Prepare your pattern for the ground shown here on a larger scale by making evenly spaced holes to create intersecting diagonal lines, as illustrated in the engraving, and space them more or less closely depending on the thickness of the thread you’re using.
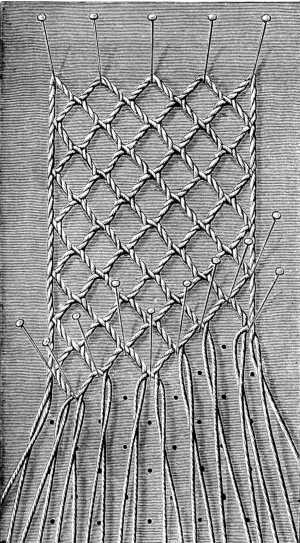
1 half passing = put up the pin at the next point, twist both pairs twice, but without enclosing the pin, and pass the inner left thread over the inner left one = twist the two pairs again = cross as before and so on.
1 half passing = put up the pin at the next point, twist both pairs twice, but without enclosing the pin, and pass the inner left thread over the inner left one = twist the two pairs again = cross as before and so on.
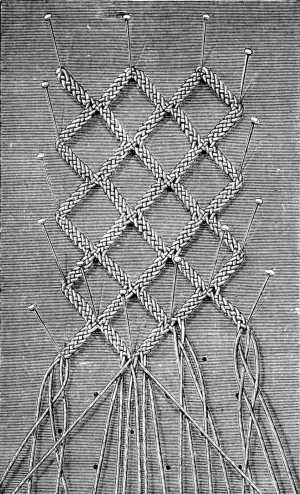
According to the size of the squares the plaits are made with either 4, 6 or 8 half passings, 2 pairs of bobbins being invariably used. The plaits are joined by a half passing, made with the last pair of the left plait and the first of the right = stick the pin into the hole = enclose the pin by a half passing and work the next plait on the left with the two left pairs and the next plait on the right with the two right pairs.
According to the size of the squares, the braids are made with either 4, 6, or 8 half passes, always using 2 pairs of bobbins. The braids are joined by a half pass, made with the last pair of the left braid and the first of the right = stick the pin into the hole = secure the pin with a half pass and work on the next braid on the left with the two left pairs and the next braid on the right with the two right pairs.
Brussels ground (fig. 797).—For the sake of greater clearness, this ground too has been worked and reproduced here on a magnified scale.
Brussels ground (fig. 797).—To make things clearer, this ground has also been created and shown here on a larger scale.
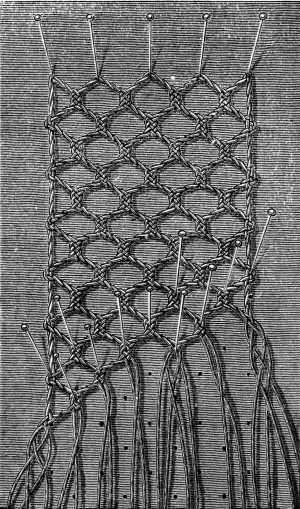
It is worked in diagonal lines, as follows: 1 double passing with 2 pairs of bobbins = put up a pin at the next point = enclose the pin with a double passing, twist both pairs each time once and so on. This ground, when it is worked by the hand in very fine thread, takes a long time to do and is therefore often made by machinery.
It is done in diagonal lines like this: 1 double pass with 2 pairs of bobbins = place a pin at the next point = surround the pin with a double pass, twisting both pairs each time once, and so on. This pattern, when done by hand with very fine thread, takes a long time to complete and is often made by machines instead.
Eternelle with two rows of holes (fig. 798).—The so-called «eternelle» laces have no definite pattern; they can be made of any width, in the form of insertions or edgings.
Eternelle with two rows of holes (fig. 798).—The so-called "eternelle" laces don't have a specific design; they can be made in any width, as either insertions or edgings.
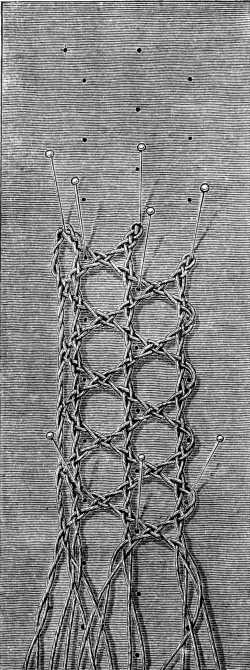
For a single row of holes, you want 6 pairs of bobbins; for two rows, 7; for three, 9, adding two pairs of bobbins for every additional row of holes. The upper part of fig. 798 shows how the points are distributed; here 7 pairs of bobbins are used.
For one row of holes, you need 6 pairs of bobbins; for two rows, you need 7; for three rows, you need 9, adding two pairs of bobbins for each extra row of holes. The upper part of fig. 798 illustrates how the points are distributed; in this case, 7 pairs of bobbins are used.
Put up a pin at the topmost point = hang on 2 pairs of bobbins = 1 double passing = take out the pin and put it in again between the two pairs = tighten the pair = hang on 1 pair of bobbins again on the left = 1 double passing with the 1st pair of the bobbins you hung on first and with the new pair = push the double passing close to the pin = twist the first pair once and then lay it aside = 1 double passing with the 2nd and 3rd pair that enclose the pin = hang on 2 pairs of bobbins in the middle = 1 double passing with both pairs = lay the 5th pair aside = 1 double passing with the 4th and 3rd pair = lay the 4th pair aside = 1 double passing with the 2nd and 1st pair = twist the 1st pair once and lay it aside = 1 double passing with the 2nd and 3rd pair that enclose the pin = put up 1 pin at the 3rd lower point, hang on 2 pairs of bobbins = 1 double passing with these bobbins = lay the 7th pair aside = * 1 double passing with the 6th and 5th pair = lay the 6th pair aside = 1 double passing with the 5th and 4th pair = lay the 5th pair aside = 1 double passing with the 4th and 3rd pair = lay the 4th pair aside = 1 double passing with the 3rd and 2nd pair = put up a pin at the next point = 1 double passing with the 2nd and 1st pair = twist the 1st pair once = 1 double passing with the 2nd and 3rd pair, to enclose the pin = lay the 3 first pairs aside = 1 double stitch with the 4th and 5th pair = lay the last two pairs aside = 1 double passing with the 6th and 7th pair = put up a pin at the next point = enclose the pin with the last pairs = repeat from *.
Put a pin at the highest point = attach 2 pairs of bobbins = 1 double pass = take out the pin and put it back in between the two pairs = tighten the pair = attach 1 pair of bobbins again on the left = 1 double pass with the 1st pair of the bobbins you attached first and the new pair = push the double pass close to the pin = twist the first pair once and set it aside = 1 double pass with the 2nd and 3rd pair that surround the pin = attach 2 pairs of bobbins in the middle = 1 double pass with both pairs = set the 5th pair aside = 1 double pass with the 4th and 3rd pair = set the 4th pair aside = 1 double pass with the 2nd and 1st pair = twist the 1st pair once and set it aside = 1 double pass with the 2nd and 3rd pair that surround the pin = place 1 pin at the 3rd lower point, attach 2 pairs of bobbins = 1 double pass with these bobbins = set the 7th pair aside = * 1 double pass with the 6th and 5th pair = set the 6th pair aside = 1 double pass with the 5th and 4th pair = set the 5th pair aside = 1 double pass with the 4th and 3rd pair = set the 4th pair aside = 1 double pass with the 3rd and 2nd pair = put a pin at the next point = 1 double pass with the 2nd and 1st pair = twist the 1st pair once = 1 double pass with the 2nd and 3rd pair, to surround the pin = set aside the 3 first pairs = 1 double stitch with the 4th and 5th pair = set the last two pairs aside = 1 double pass with the 6th and 7th pair = put a pin at the next point = surround the pin with the last pairs = repeat from *.
Lace with torchon ground and edge in net ground (fig. 799).—Worked with 10 pairs of bobbins.
Lace with a torchon background and an edge in netting (fig. 799).—Made using 10 pairs of bobbins.
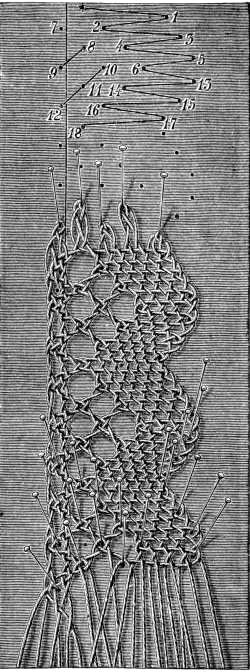
Lace with torchon ground and edge in net ground.
Materials: Fil à pointer D.M.C No. 30. Cordonnet 6 fils D.M.C Nos. 20 to 100, or Fil à dentelle D.M.C Nos. 25 to 150, white or écru.[A]
Lace with a torchon background and a net edge.
Materials: D.M.C Fil à pointer No. 30. D.M.C Cordonnet 6 fils Nos. 20 to 100, or D.M.C Fil à dentelle Nos. 25 to 150, white or natural.__A_TAG_PLACEHOLDER_0__
Put up a pin at * = make net passings, fig. 786, to point 1 = put up a pin at point 1 = enclose the pin with the two last pairs on the right = net passings to point 2 = put up a pin at point 2 = lay one pair of bobbins aside = net passings to point 3 = put up a pin at point 3 = enclose the pin = net passings to point 4 = put up a pin at point 4 = lay one pair of bobbins aside = net passings to point 5 = put up a pin at point 5 = net passings, back to point 6 = put up a pin at point 6 = take up the bobbins on the left again = 1 half passing with the 1st pair on the left = put up a pin at point 7 = work the torchon ground, at the top of the lace, as in fig. 788, with the 2nd and 3rd pair = 1 half passing with the 3rd and 4th pair = put up a pin at point 8 = twist the 1st and 2nd pair = 1 double passing with the 1st and 2nd pair = put up a pin at point 9 = 1 double passing with the 2nd and 3rd pair = lay the 2nd pair aside = make hole or torchon stitch, fig. 788, with the 3rd and 4th pair = put up a pin at point 10 = work on to point 11 in hole ground = put up a pin at point 11 = cross the 1st and 2nd pair on the left = put up a pin at point 12 = enclose the pin = lay 5 pairs of bobbins aside on the left = take up 5 pairs on the right = put up a pin at point 13 = net passings with the 5 pairs on the right = take up, in addition, the 6th pair on the left = hole ground with the 5th and 6th pair = put up a pin at point 14 = net passings to point 15 with 5 pairs of bobbins = put up a pin at point 15 = net passings with 6 pairs of bobbins = take up a 7th pair of bobbins in addition = hole ground with the 6th and 7th pair = put up a pin at point 16 = net passings with 6 pairs of bobbins = put up a pin at point 17 = net passings with 6 pairs of bobbins = put up a pin at point 18 and then repeat from the first point * on the left.
Put a pin at * = make net passings, fig. 786, to point 1 = put a pin at point 1 = enclose the pin with the last two pairs on the right = net passings to point 2 = put a pin at point 2 = set one pair of bobbins aside = net passings to point 3 = put a pin at point 3 = enclose the pin = net passings to point 4 = put a pin at point 4 = set one pair of bobbins aside = net passings to point 5 = put a pin at point 5 = net passings, back to point 6 = put a pin at point 6 = take up the bobbins on the left again = 1 half passing with the 1st pair on the left = put a pin at point 7 = work the torchon ground, at the top of the lace, as in fig. 788, with the 2nd and 3rd pair = 1 half passing with the 3rd and 4th pair = put a pin at point 8 = twist the 1st and 2nd pair = 1 double passing with the 1st and 2nd pair = put a pin at point 9 = 1 double passing with the 2nd and 3rd pair = set the 2nd pair aside = make hole or torchon stitch, fig. 788, with the 3rd and 4th pair = put a pin at point 10 = continue to point 11 in hole ground = put a pin at point 11 = cross the 1st and 2nd pair on the left = put a pin at point 12 = enclose the pin = lay 5 pairs of bobbins aside on the left = take up 5 pairs on the right = put a pin at point 13 = net passings with the 5 pairs on the right = take up, in addition, the 6th pair on the left = hole ground with the 5th and 6th pair = put a pin at point 14 = net passings to point 15 with 5 pairs of bobbins = put a pin at point 15 = net passings with 6 pairs of bobbins = take up a 7th pair of bobbins in addition = hole ground with the 6th and 7th pair = put a pin at point 16 = net passings with 6 pairs of bobbins = put a pin at point 17 = net passings with 6 pairs of bobbins = put a pin at point 18 and then repeat from the first point * on the left.
Pillow lace (figs. 800, 801, 802).—We here give as an example the same pattern of lace worked in two thicknesses of thread; fig. 801 in Cordonnet 6 fils D.M.C No. 25[A], fig. 802 in Fil à pointer D.M.C No. 30[A], which is of course much thicker. As this pattern is especially suitable for trimming household articles, made of unbleached linen, such for instance as table-covers, curtains and hangings of all kinds, we prefer it made in the thicker thread; even then it looks very well as a trimming for articles of dress.
Pillow lace (figs. 800, 801, 802).—Here, we provide an example of the same lace pattern created using two different thread thicknesses: fig. 801 in Cordonnet 6 fils D.M.C No. 25[A], and fig. 802 in Fil à pointer D.M.C No. 30[A], which is definitely thicker. This pattern is particularly well-suited for trimming household items made from unbleached linen, like table covers, curtains, and various hangings, so we recommend using the thicker thread; it also looks great as a trim for clothing.

It is worked with 40 pairs of bobbins = hang them on one after the other in a row = put up a pin at point 1 = twisted linen passing = work all the pairs to point 2 with linen passing = put up the pin at the last pair = go back through 3 pairs with linen passing = twist 2 pairs once = go back with linen passing through all the pairs to point 3 = twist each pair separately = at point 4 twist the 2 pairs and put up the pin = twist the last pair twice and so on and coming back to point 5 = put up the pin = come back again to point 6 = return to point 7 = put up the pins at the two points.
It uses 40 pairs of bobbins = hang them up in a row = place a pin at point 1 = passing the twisted linen = work all the pairs to point 2 with linen passing = place the pin at the last pair = go back through 3 pairs with linen passing = twist 2 pairs once = go back with linen passing through all the pairs to point 3 = twist each pair separately = at point 4 twist the 2 pairs and place a pin = twist the last pair twice and continue returning to point 5 = place a pin = go back to point 6 = return to point 7 = place the pins at both points.

Material: Cordonnet 6 fils D.M.C No. 30.[A]
Material: Cordonnet 6 fils D.M.C No. 30.__A_TAG_PLACEHOLDER_0__
Divide the 30 other pairs into twos = put up a pin between every set of two pairs = linen passing. The ground is all worked alike: twist the pairs twice = linen passing = put up the pins = linen passing to points 6 and 7 = twist the threads in taking them through = make a plait, fig. 796, for the scallop point 8 = put up a pin at the point marked for the picot = pass the thread of the outside bobbin from right to left, round the pin, to form the picot = continue the plait to the next picot = put up a pin = form the picot = continue the plait to point 9 = connect the plait with the bobbins of points 9 and 7 = make 4 linen passings with 3 pairs = continue the plait = carry the last pair to point 10 = twist the threads = make 1 linen passing = put up a pin and enclose it = go on in this manner to point 12 = make the wheel, as in figs. 789 and 790, with 6 pairs of bobbins, hanging on 4 new pairs at point 12 = work with twisted linen passing = twist the 4 pairs once and cross with linen passing = take the last pair out from the middle to point 13, join it to the first pair of the scallop = make all the wheels before continuing the ground = then go back from point 13 to 14 = cross the pairs again = at point 12 twist 4 pairs = 2 twisted linen passings right and left with the bobbins of points 14 and 15 = 1 twisted linen passing = put up the pins and work all the spiders alike.
Divide the 30 other pairs into groups of two = place a pin between each set of two pairs = linen passing. The background is all worked the same way: twist the pairs twice = linen passing = put up the pins = linen passing to points 6 and 7 = twist the threads as you pull them through = create a braid, fig. 796, for the scallop point 8 = place a pin at the point marked for the picot = bring the thread of the outer bobbin from right to left, around the pin, to form the picot = continue the braid to the next picot = place a pin = form the picot = continue the braid to point 9 = connect the braid with the bobbins of points 9 and 7 = make 4 linen passings with 3 pairs = continue the braid = take the last pair to point 10 = twist the threads = make 1 linen passing = place a pin and secure it = continue this way to point 12 = create the wheel, as shown in figs. 789 and 790, with 6 pairs of bobbins, hanging on 4 new pairs at point 12 = work with twisted linen passing = twist the 4 pairs once and cross with linen passing = take the last pair out from the middle to point 13, and attach it to the first pair of the scallop = make all the wheels before continuing the background = then go back from point 13 to 14 = cross the pairs again = at point 12 twist 4 pairs = 2 twisted linen passings right and left with the bobbins of points 14 and 15 = 1 twisted linen passing = place the pins and work all the spiders in the same way.

Material: Fil à pointer D.M.C No. 30.[A]
Material: D.M.C No. 30 Fil à pointer.__A_TAG_PLACEHOLDER_0__

Divide the bobbins and put 2 pairs at point 1 = put up a pin = twist once = 2 linen passings = from point 2 to point 8 = 5 twisted linen passings = add one pair of bobbins = put up a pin = add one pair of bobbins = put up a pin = lay one pair of bobbins aside = twist = 2 linen passings = 5 twisted linen passings to point 10 = 2 linen passings = twist the 2 last pairs = go back with linen passing through 2 pairs = join together with the two pairs and the first pair by means of a twisted stitch = put up the pin = lozenge stitch (for lozenge stitch in which the lozenges or close leaves are made, you take 4 or 6 threads; in the execution it resembles the darning stitch represented in figs. 646 and 647) to point 11 = twist at point 12 = take 2 pairs from point 10 = plait to point 13 = twist with the bobbins of point 1 = double passing = plait on the right, twist on the left = put up the pin = tie up as described.
Divide the bobbins and put 2 pairs at point 1. Put up a pin, twist once, then do 2 linen passings from point 2 to point 8. Do 5 twisted linen passings, add one pair of bobbins, put up a pin, add another pair of bobbins, put up a pin, lay one pair of bobbins aside, twist, do 2 linen passings, and do 5 twisted linen passings to point 10. Do 2 linen passings, twist the last 2 pairs, go back with linen passing through 2 pairs, join together with the two pairs and the first pair using a twisted stitch, put up the pin, and do a lozenge stitch (for the lozenge stitch where the lozenges or close leaves are made, use 4 or 6 threads; in execution, it looks like the darning stitch shown in figs. 646 and 647). Move to point 11, twist at point 12, take 2 pairs from point 10, plait to point 13, twist with the bobbins from point 1, do double passing, plait on the right, twist on the left, put up the pin, and tie up as described.
Take the second pair at points 13 and 15 = put up the pin = 2 twisted double passings on the right = 2 linen passings = twist the 2 latter = put up the pin = at point 16 lay one pair of bobbins aside = with simple passing go back through 2 linen passings = join the latter and the former with linen passing = put up the pin at point 17 = lozenge stitch with the bobbins of points 15 and 17 to point 18 = connect the same at point 11 = carry on the lozenge stitch to points 19, 20 and 21 = put up a pin at each number and enclose with a linen passing = with the first pair of bobbins of point 21, 2 linen passings to the left and 2 twisted linen passings, that is to say, crossing the threads = put up the pin at point 22.
Take the second pair at points 13 and 15 = put up the pin = 2 twisted double passings on the right = 2 linen passings = twist the 2 latter = put up the pin = at point 16, set one pair of bobbins aside = with a simple passing, go back through 2 linen passings = join the latter and the former with a linen passing = put up the pin at point 17 = lozenge stitch with the bobbins from points 15 and 17 to point 18 = connect the same at point 11 = continue the lozenge stitch to points 19, 20, and 21 = put up a pin at each number and enclose with a linen passing = with the first pair of bobbins from point 21, do 2 linen passings to the left and 2 twisted linen passings, meaning crossing the threads = put up the pin at point 22.
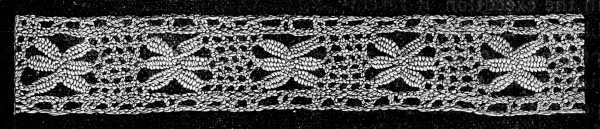
Materials: Cordonnet 6 fils D.M.C Nos. 25 to 50, or Fil à dentelle D.M.C Nos. 25 to 100.[A]
Materials: Cordonnet 6 fils D.M.C Nos. 25 to 50, or Fil à dentelle D.M.C Nos. 25 to 100.__A_TAG_PLACEHOLDER_0__
Twist the threads from point 16 to point 23 = make a plait from point 15 to point 23 = then join the two parts together by half passings = put up a pin = twist the threads and make plaits to point 24 = join the threads as at point 23.
Twist the threads from point 16 to point 23 to create a braid. From point 15 to point 23, join the two parts together with half passes. Put in a pin, twist the threads, and braid to point 24, then join the threads as you did at point 23.
On the left and with the first pair of point 19, 2 linen passings = with the 2 latter 1 twisted passing = put up the pin at point 25 = returning, 2 linen passings to point 26 = 2 linen passings to the left = with the 2 latter pairs 2 double passings and put up the pin.
On the left, with the first pair of point 19, 2 linen threads = with the 2 latter 1 twisted thread = place the pin at point 25 = returning, 2 linen threads to point 26 = 2 linen threads to the left = with the 2 latter pairs, do 2 double threads and place the pin.

These are divided into 3 groups = 3 pairs at point 1 = put up a pin = twisted linen passing = twist both pairs once = put up the pin at point 3 = add on 5 pairs at point 2 = put up the pin = go back through 3 pairs = twist the 2 last pairs = linen passing = put up the pin at point 3 = twist both pairs = linen passings, as seen in the illustration, to the right and left as far as point 11 = at point 13 intervert 6 pairs by a twisted linen passing = make a plait at point 14 = put up a pin in the middle of the same = pass through 2 pairs of bobbins with twisted linen passing = put 1 pair of bobbins aside at point 22 = put up a pin at the 2 first pairs at point 15 = work the leaf in lozenge stitch = put up a pin at point 16 near the first pair = twist both pairs once = linen passing = put up the pin at point 17 = go back in the same manner = work on in the same way to point 21 = put up the pin at point 22 = twisted linen passing to point 11 = tie up the first pair of the scallop with the bobbins of point 11 = bring the last pair back and work as at point 1 = then repeat and proceed in the same way to point 27 = twist the 2 pairs up to point 26 = put up the pin = make one lozenge stitch and join the plait, stitch to point 28 = continue the lozenge stitch to point 29 = join the bobbins of point 29 to those of point 21 by a plait = put up the pin = linen passing = twist the two last pairs once = put up the pin = linen passing = put up the pin at point 31 = twist both pairs once = 2 linen passings = put up the pin at point 82 = 2 linen passings = tie up the bobbins of point 33 with those of point 29 = plait stitch = put up the pin = join to point 34 with lozenge stitch = with the bobbins at point 28 make lozenge stitch to point 27 = put up a pin = twist 3 pairs once = make 2 linen passings = join with linen passing = continue the scallop according to the preceding description, from point 27 to point 35.
These are divided into 3 groups = 3 pairs at point 1 = put up a pin = twisted linen passing = twist both pairs once = put up the pin at point 3 = add on 5 pairs at point 2 = put up the pin = go back through 3 pairs = twist the last 2 pairs = linen passing = put up the pin at point 3 = twist both pairs = linen passings, as seen in the illustration, to the right and left as far as point 11 = at point 13, switch 6 pairs by a twisted linen passing = make a plait at point 14 = put up a pin in the middle of it = pass through 2 pairs of bobbins with twisted linen passing = put 1 pair of bobbins aside at point 22 = put up a pin at the first 2 pairs at point 15 = work the leaf in lozenge stitch = put up a pin at point 16 near the first pair = twist both pairs once = linen passing = put up the pin at point 17 = go back in the same way = continue working in the same manner to point 21 = put up the pin at point 22 = twisted linen passing to point 11 = tie up the first pair of the scallop with the bobbins from point 11 = bring the last pair back and work as at point 1 = then repeat and proceed in the same way to point 27 = twist the 2 pairs up to point 26 = put up the pin = make one lozenge stitch and join the plait, stitch to point 28 = continue the lozenge stitch to point 29 = join the bobbins of point 29 to those of point 21 by a plait = put up the pin = linen passing = twist the last 2 pairs once = put up the pin = linen passing = put up the pin at point 31 = twist both pairs once = 2 linen passings = put up the pin at point 82 = 2 linen passings = tie up the bobbins of point 33 with those of point 29 = plait stitch = put up the pin = join to point 34 with lozenge stitch = with the bobbins at point 28, make lozenge stitch to point 27 = put up a pin = twist 3 pairs once = make 2 linen passings = join with linen passing = continue the scallop according to the previous description, from point 27 to point 35.
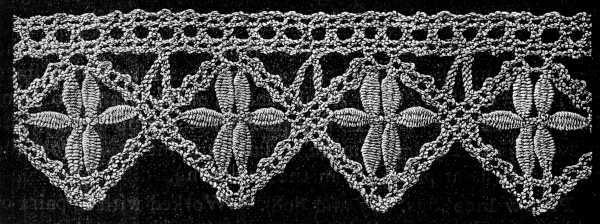
Material: Cordonnet 6 fils D.M.C No. 25.[A]
Material: Cordonnet 6 threads D.M.C No. 25.__A_TAG_PLACEHOLDER_0__
At point 34 make a leaf in lozenge stitch = put up the pin = continue from point 33 to point 36 with twisted linen passings = carry the first pair of bobbins of the lozenge to point 35 by means of 2 twisted linen passings = put up a pin in the middle of the 2 pairs = make a plait to point 37 = cross the pairs again as at point 13, in the beginning.
At point 34, create a leaf using lozenge stitch. Insert a pin and continue from point 33 to point 36 with twisted linen passings. Move the first pair of bobbins for the lozenge to point 35 using 2 twisted linen passings. Place a pin in the middle of the 2 pairs and create a plait to point 37. Cross the pairs again as you did at point 13 at the beginning.
Pillow lace (figs. 807 and 808).—Worked with 30 pairs of bobbins.—These are divided: 14 pairs at point 1 = put up a pin on the left and right = with the last pairs make plaits to point 12 = add 2 pairs = make a double passing as for a plait = put up a pin in the middle of the pairs = plait with 2 pairs of bobbins to point 3 = add 2 pairs of bobbins = make a double passing as for the plait = put up a pin in the middle of the pairs = then go on in the same manner to point 4 = add 4 pairs of bobbins = put up the pin = at point 5, add 2 pairs of bobbins = make a plait = put up a pin and join to point 4 by a double passing.
Pillow lace (figs. 807 and 808).—This technique uses 30 pairs of bobbins. First, divide them: 14 pairs at point 1. Place a pin on both the left and right sides. Use the last pairs to create plaits leading to point 12. Then, add 2 pairs and perform a double passing like you would for a plait. Insert a pin in the center of the pairs and plait using 2 pairs of bobbins up to point 3. Next, add 2 more pairs of bobbins and do another double passing similar to the plait and place a pin in the middle of the pairs. Continue in the same way to point 4, adding 4 pairs of bobbins and placing the pin. At point 5, add 2 pairs of bobbins, create a plait, place another pin, and connect back to point 4 with a double passing.


Material: Fil à dentelle D.M.C No. 50.[A]
Material: D.M.C Lace Thread No. 50.__A_TAG_PLACEHOLDER_0__
At point 1, lay the two last pairs to the right = put up a pin = make a plait to point 6 = add 2 pairs of bobbins = 1 double passing = put up a pin = make a plait to point 7 with a pairs of bobbins = add 2 pairs of bobbins = 1 double passing = put up the pin = make a plait to point 8 = add 4 pairs of bobbins = 5 linen passings = put up a pin at the last passing = at point 9 add 2 pairs of bobbins = make a plait = put up a pin = join to point 8 with linen passing = make plaits from point 9 to point 10 = put up a pin = leave the pairs hanging = 5 linen passings with the bobbins of point 10 = put up the pin at point 11 = go back to point 10 with 5 passings = put up the pin = make a plait and tie up the bobbins at point 6 = leave these bobbins hanging down.
At point 1, position the last two pairs to the right = place a pin = create a braid to point 6 = add 2 pairs of bobbins = 1 double passing = place a pin = create a braid to point 7 with a pairs of bobbins = add 2 pairs of bobbins = 1 double passing = place the pin = create a braid to point 8 = add 4 pairs of bobbins = 5 linen passings = place a pin at the last passing = at point 9 add 2 pairs of bobbins = create a braid = place a pin = connect to point 8 with linen passing = create braids from point 9 to point 10 = place a pin = leave the pairs hanging = 5 linen passings with the bobbins of point 10 = place a pin at point 11 = go back to point 10 with 5 passings = place the pin = create a braid and tie up the bobbins at point 6 = leave these bobbins hanging down.
With the two first pairs at point 11, make a plait to point 12 = 1 linen passing at point 7 and join to point 12 by a plait = plait stitch = put up a pin = then plait stitch to point 13 and make the same connection as at points 12 and 7 = continue to plait to point 14 = put up the pin at the first pair = 7 linen passings = leave these bobbins hanging down = tie up the plait of point 5 with the 1st pair of point 4 = make a plait on the left = put up a pin at point 15 = make 5 linen passings on the right and put up the pin at point 16 = make a plait to point 17 = make the same connection as at point 7 and 12 = the same connection also at point 18 = make a plait to point 19 = put up the pin = make a plaited lozenge with one pair = leave 2 pairs hanging at point 20, left and right = continue to point 21 = leave 2 pairs hanging, left and right = make a plait to point 22 = begin again at point 17 and make a leaf in lozenge stitch to point 23 = make a second leaf from point 16 to point 23 = join the leaves at point 23 = make a plait with the first pair of point 16 to point 24 = put up a pin = enclose it with a double passing and make a plait = tie up the bobbins at point 15 = continue the edge to point 26 = make a leaf in lozenge stitch from point 32 to point 26 = tie up the bobbins at point 26 and make linen passings with the united bobbins to point 27 = with the bobbins of point 18 and point 20, therefore with 4 pairs, make a square in lozenge stitch = join the 3 leaves at point 23 = from point 23 to point 28 make a plait with the two first pairs of bobbins = put up a pin at point 28 = make a plait with picots to point 29 = lozenge stitch from point 32 to point 22 and point 33 = join to point 30 by a plait = plait to point 22 = work from point 34 to 35 in the same way as from point 1 to point 33 = at point 22 and point 35 the pairs cross each other.
With the first two pairs at point 11, create a braid to point 12 = 1 strand passing at point 7 and connect to point 12 with a braid = braid stitch = place a pin = then braid stitch to point 13 and make the same connection as at points 12 and 7 = continue braiding to point 14 = place the pin at the first pair = 7 strand passes = let these bobbins hang down = tie the braid of point 5 with the 1st pair of point 4 = make a braid on the left = place a pin at point 15 = make 5 strand passes on the right and place the pin at point 16 = braid to point 17 = make the same connection as at points 7 and 12 = the same connection also at point 18 = braid to point 19 = place the pin = create a braided diamond with one pair = leave 2 pairs hanging at point 20, left and right = continue to point 21 = leave 2 pairs hanging, left and right = braid to point 22 = start again at point 17 and make a leaf in diamond stitch to point 23 = create a second leaf from point 16 to point 23 = join the leaves at point 23 = braid with the first pair from point 16 to point 24 = place a pin = enclose it with a double pass and braid = tie up the bobbins at point 15 = continue the edge to point 26 = make a leaf in diamond stitch from point 32 to point 26 = tie up the bobbins at point 26 and make strand passes with the combined bobbins to point 27 = with the bobbins from point 18 and point 20, using 4 pairs, create a square in diamond stitch = join the 3 leaves at point 23 = from point 23 to point 28 make a braid with the first two pairs of bobbins = place a pin at point 28 = braid with picots to point 29 = diamond stitch from point 32 to point 22 and point 33 = join to point 30 with a braid = braid to point 22 = work from point 34 to 35 in the same way as from point 1 to point 33 = at point 22 and point 35 the pairs cross each other.
Pillow lace (figs. 809 and 810).—Hang on 28 pairs of bobbins. Begin at point 1 with a plait, fig. 790 = put up a pin = * hang on 5 pairs at point 2 and put up a pin at the last pair = with the last pair make a plait to point 3 * = hang on a pair of bobbins = 1 linen passing = hang on a pair of bobbins = 1 linen passing = hang on 3 pairs of bobbins = 1 linen passing = 3 linen passings = put up a pin = 1 leaf in lozenge stitch to point 4 = hang on 2 pairs of bobbins = 2 plait stitches = put up a pin = make a leaf to point 5 = hang on 2 pairs of bobbins = 1 plait stitch = put up a pin = repeat in the reverse order to point 3.
Pillow lace (figs. 809 and 810).—Start by hanging 28 pairs of bobbins. Begin at point 1 with a braid, fig. 790 = attach a pin = * hang on 5 pairs at point 2 and secure a pin at the last pair = with the last pair, make a braid to point 3 * = hang on a pair of bobbins = 1 linen passing = hang on a pair of bobbins = 1 linen passing = hang on 3 pairs of bobbins = 1 linen passing = 3 linen passings = secure a pin = create 1 leaf in lozenge stitch to point 4 = hang on 2 pairs of bobbins = 2 braid stitches = secure a pin = create a leaf to point 5 = hang on 2 pairs of bobbins = 1 braid stitch = secure a pin = repeat in reverse order back to point 3.

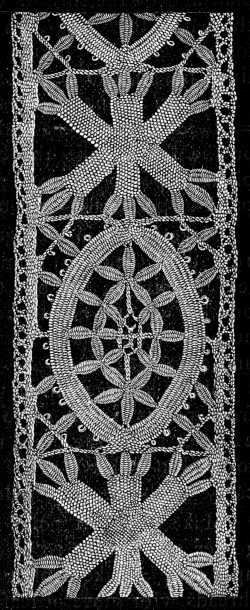
Material: Fil à dentelle D.M.C No. 50.[A]
Material: D.M.C Lace Thread No. 50.__A_TAG_PLACEHOLDER_0__
Put up a pin at point 9 = hang on a pair of bobbins = 1 linen passing = hang on a pair of bobbins = 1 linen passing = hang on a pair of bobbins = make a plait to point 11 = put up a pin = hang on 2 pairs of bobbins at point 12 = make a plait and tie the threads together with those of point 11 = on the left with 2 pairs, on the right with 3 pairs to point 13 for the edge = put up 2 pins and continue the edge with linen passings to point 14.
Put a pin at point 9 = hang a pair of bobbins = 1 linen passing = hang a pair of bobbins = 1 linen passing = hang a pair of bobbins = make a braid to point 11 = put up a pin = hang 2 pairs of bobbins at point 12 = make a braid and tie the threads together with those from point 11 = on the left with 2 pairs, on the right with 3 pairs to point 13 for the edge = put up 2 pins and continue the edge with linen passings to point 14.
Return to point 15 and make a plait = put up a pin = divide the bobbins and put one pair on the right, the other on the left = take the bobbins at point 5 and 7 and make plaits to points 16 and 17 = make linen passings with the two pairs to point 18 = put up a pin and make a plait to point 21.
Return to point 15 and create a braid = put in a pin = separate the bobbins and place one pair on the right and the other on the left = take the bobbins at points 5 and 7 and braid them to points 16 and 17 = make linen passes with the two pairs to point 18 = put in a pin and braid to point 21.
Make leaves in lozenge stitch from points 4 and 8 to points 19 and 20 = one leaf from point 16 to point 19 = make another leaf to point 22 and one to point 21 = make the same leaves on the left to points 20, 21 and 23 = cross the bobbins at point 21 = make leaves from point 21 to points 24, 26 and 26.
Make leaves in lozenge stitch from points 4 and 8 to points 19 and 20 = one leaf from point 16 to point 19 = make another leaf to point 22 and one to point 21 = make the same leaves on the left to points 20, 21, and 23 = cross the bobbins at point 21 = make leaves from point 21 to points 24, 26, and 26.
Make lozenge stitch with picots, with 3 pairs of bobbins from points 9 and 10 to point 22 = join the bobbins to leaf 22 = carry on the braid to point 26 = join 2 pairs of bobbins to the leaf = leave the 2 pairs at point 28 hanging down = carry on the braid to point 25.
Make lozenge stitch with picots using 3 pairs of bobbins from points 9 and 10 to point 22 = connect the bobbins to leaf 22 = continue the braid to point 26 = attach 2 pairs of bobbins to the leaf = let the 2 pairs at point 28 hang down = continue the braid to point 25.
Make a leaf at point 27 to point 14 = tie the threads together as at point 10 = carry on the edge to point 29 = put up a pin = make a plait with picots to point 30 = tie up the threads with those of leaf 28 = make a leaf to point 31 = introduce the threads into the edge = put up a pin = tie the threads together.
Make a leaf from point 27 to point 14 = tie the threads together like at point 10 = carry on the edge to point 29 = put in a pin = create a braid with picots to point 30 = tie up the threads with those from leaf 28 = make a leaf to point 31 = bring the threads into the edge = put in a pin = tie the threads together.
Make a plait on the left = leave 4 pairs of bobbins hanging down on the right, 2 pairs for the plait and 2 for the leaf = carry on the edge to point 32 = leave 2 pairs hanging for another leaf = continue the edge to point 33. Make a plait from point 21 to point 34.
Make a braid on the left = leave 4 pairs of threads hanging down on the right, 2 pairs for the braid and 2 for the leaf = continue the edge to point 32 = leave 2 pairs hanging for another leaf = keep going along the edge to point 33. Braid from point 21 to point 34.
Begin again on the left at points 1 and 2 and work, as on the right, to point 35 = cross the threads at point 25 = linen passing = distribute the pairs to point 36 = 2 pairs at point 37 = 2 at point 38 = 3 pairs at point 34 = plait to point 37 = join to point 38 = continue the plait and join to points 36, 35, 39 = at points 35, 36, 37 lozenge stitch with every 2 pairs of bobbins to point 40 = then join the next 6 pairs together = and work on with lozenge stitch to point 41 = work exactly in the same manner at points 31, 32, 34, 35, 39, 42 as at points 36, 37, 38, 40 to 41 = at point 41, all the threads are interwoven, and then divided into 3 sets = continue the leaves to points 45, 46 and 47. Then repeat in the reverse order from points 31, 38, 25, 32 and 39.
Begin again on the left at points 1 and 2 and work, like on the right, up to point 35 = cross the threads at point 25 = passing the linen = distribute the pairs to point 36 = 2 pairs at point 37 = 2 at point 38 = 3 pairs at point 34 = braid to point 37 = join to point 38 = continue the braid and join to points 36, 35, 39 = at points 35, 36, 37, use lozenge stitch with every 2 pairs of bobbins to point 40 = then join the next 6 pairs together = and continue with lozenge stitch to point 41 = do exactly the same at points 31, 32, 34, 35, 39, 42 as at points 36, 37, 38, 40 to 41 = at point 41, all the threads are intertwined, and then divided into 3 sets = continue the leaves to points 45, 46, and 47. Then repeat in reverse order from points 31, 38, 25, 32 and 39.
Armenian lace (figs. 811 and 812).—The dresses of the Turkish women are often ornamented with flowers and leaves, executed in needlework which take the place of fringe and braid trimmings and are often even employed as adornments for the neck and arms instead of necklets and bracelets in metal work; though, as such, they do not always accord with our Western notions of good taste, the Armenian work is in itself, both sufficiently interesting and easy of execution, to deserve description here amongst other kinds of needlework that are adaptable to use. It may be imitated with capital effect in strong stiff washing materials, such as those indicated in our illustration, either upon a linen or cotton foundation or upon plush or silk.
Armenian lace (figs. 811 and 812).—Turkish women's dresses are often decorated with flowers and leaves made with needlework, which replace fringe and braid trim and are sometimes used as decorations for the neck and arms instead of metal necklets and bracelets. While this style might not always align with our Western ideals of good taste, the Armenian work is interesting and simple enough to be worth describing here along with other types of needlework that can be used. It can be effectively imitated on sturdy, stiff fabrics like those shown in our illustration, either on a linen or cotton base or on plush or silk.
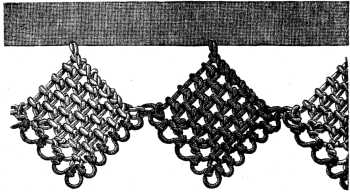
Materials: Fil à pointer D.M.C Nos. 10 to 30, Cordonnet 6 fils D.M.C Nos. 15 to 40 or Fil à dentelle D.M.C Nos. 25 to 70.
Colours: Écru and Brun-Caroubier 303.[A]
Materials: Fil à pointer D.M.C Nos. 10 to 30, Cordonnet 6 fils D.M.C Nos. 15 to 40 or Fil à dentelle D.M.C Nos. 25 to 70.
Colors: Écru and Brun-Caroubier 303.__A_TAG_PLACEHOLDER_0__
The thread is first drawn into the edge of the stuff; you then carry it from right to left, determine the length of the squares, and working from left to right make on this first thread as many knots as you have room for.
The thread is first pulled into the edge of the fabric; then you move it from right to left, decide the size of the squares, and working from left to right, make as many knots on this first thread as you can fit.
Fig. 812 shows the formation of the knot, the manner in which the thread, passing from left to right, forms a loop, and how to pass your needle under the straightly extended thread and through the loop. You leave a space of one or two m/m. between the knots, according to the thickness of the thread you are using. Having covered the first thread with knots, you return to the edge for the next row of knots, but passing your needle this time under three threads.
Fig. 812 shows how to create the knot, demonstrating how the thread moves from left to right to form a loop, and how to position your needle under the straight thread and through the loop. Leave a gap of one or two mm between the knots, depending on the thickness of the thread you're using. Once you've covered the first thread with knots, go back to the edge for the next row of knots, but this time, pass your needle under three threads.
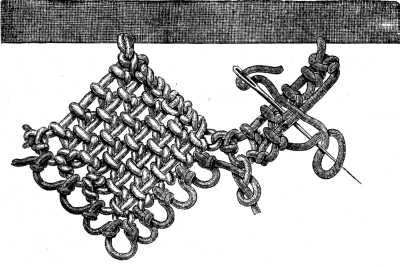
The number of knots should be the same in each row, and the four sides of the square should be all equal.
The number of knots should be the same in each row, and all four sides of the square should be equal.
When the squares are finished they are edged with picots on the two lower sides, as shown in fig. 812.
When the squares are done, they're finished with picots along the two lower sides, as shown in fig. 812.
Thread of two colours was used for fig. 811, the squares being worked alternately in Écru and Brun-Caroubier and the picots, all in the latter colour.
Thread in two colors was used for fig. 811, with the squares worked alternately in Écru and Brun-Caroubier, and the picots all in the latter color.
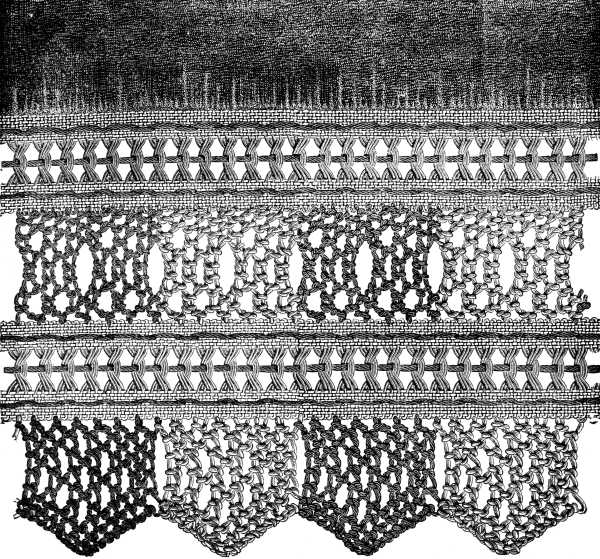
Materials: Fil à pointer D.M.C Nos. 10 to 30, Cordonnet 6 fils D.M.C Nos. 10 to 25, or Fil à dentelle D.M.C Nos. 25 to 50.
Colours: Écru and Rouge-Cardinal 46.[A]
Materials: D.M.C Fil à pointer sizes 10 to 30, D.M.C Cordonnet 6 fils sizes 10 to 25, or D.M.C Fil à dentelle sizes 25 to 50.
Colors: Écru and Rouge-Cardinal 46.__A_TAG_PLACEHOLDER_0__
The stitches that form the insertion are attached, on both sides, to an English braid, something of the nature of Rhodes linen, which is open-worked before the knotted work upon it is begun.
The stitches that make up the insertion are attached, on both sides, to an English braid, similar to Rhodes linen, which is open-worked before the knotted work on it starts.
As in the preceding figure, two colours are used alternately, the change from one to the other is distinctly marked in the engraving.
As in the previous figure, two colors are used alternately, and the switch from one to the other is clearly indicated in the engraving.
The outside edge consists of light scallops, formed by the regular increase and decrease of the stitches. The original piece of work from which our drawing was taken, forms the border of a dark blue plush carpet; the red and écru hues of the lace harmonize exceedingly well with the soft colour of the plush.
The outer edge has light scallops created by the regular rise and fall of the stitches. The original piece that inspired our drawing is the border of a dark blue plush carpet; the red and beige tones of the lace blend perfectly with the soft color of the plush.
Insertion in knotted stitch (figs. 814 and 815).—This kind of work, similarly composed of knotted stitches, can be used instead of crochet insertion or single and cut openwork in linen. It looks exceedingly well as a trimming for bed and table linen and is executed on foundation threads or cords, which connect the different figures together, with closely connected rows of knots between.
Insertion in knotted stitch (figs. 814 and 815).—This type of work, made up of knotted stitches, can be used instead of crochet insertion or single and cut openwork in linen. It looks great as a trim for bed and table linens and is done on foundation threads or cords that connect the different patterns, with closely spaced rows of knots in between.
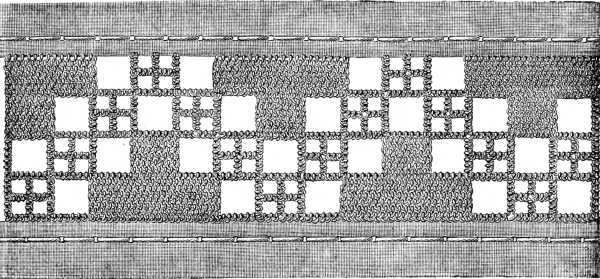
Materials: Fil à pointer D.M.C No. 30, Cordonnet 6 fils D.M.C Nos. 15 to 30, or Fil à dentelle D.M.C Nos. 25 to 50.[A]
Materials: D.M.C No. 30 Fil à pointer, D.M.C Nos. 15 to 30 Cordonnet 6 fils, or D.M.C Nos. 25 to 50 Fil à dentelle.__A_TAG_PLACEHOLDER_0__
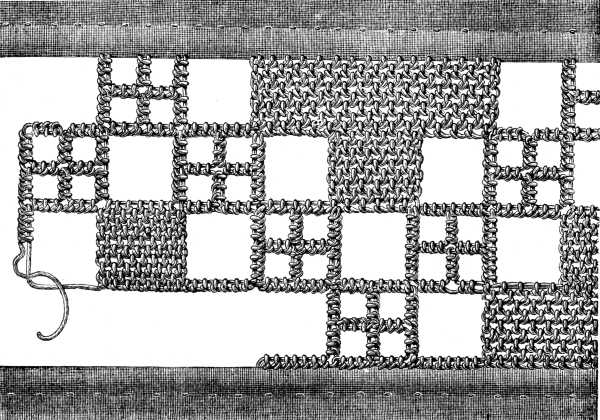
Insertion in knotted stitch (figs. 816 and 817).—The mode of making the insertion in knotted stitch, which is represented in the two accompanying engravings, is supposed to be of Italian origin, but we have met with quite as perfect specimens of work done in the same way, which were the products of Persia and Asia Minor. We have called it by the same name as the preceding patterns, for even the way in which the stitch is worked is almost the same. Through some slight difference however in the interlacing of the threads, shown by the open loops in fig. 817, the stitches lie closer together and are alike on both sides of the work.
Insertion in knotted stitch (figs. 816 and 817).—The technique for creating the insertion in knotted stitch, illustrated in the two accompanying engravings, is believed to have originated in Italy, but we've also encountered equally well-made examples from Persia and Asia Minor. We've used the same name as the earlier patterns because the stitching method is nearly identical. However, due to a slight variation in how the threads intertwine, as shown by the open loops in fig. 817, the stitches are closer together and look the same on both sides of the work.
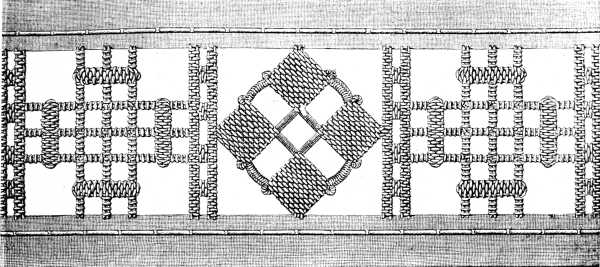
No difficulty will be found in making out the course of the rows; it is best to begin by the two rows of stitches that form the perpendicular bars and make the stitches, that compose the 4 staves between the bars next. For the little picots see fig. 700.
No difficulty will be found in figuring out the layout of the rows; it's best to start with the two rows of stitches that create the vertical bars and then make the stitches that form the 4 sections between the bars next. For the little picots, see fig. 700.
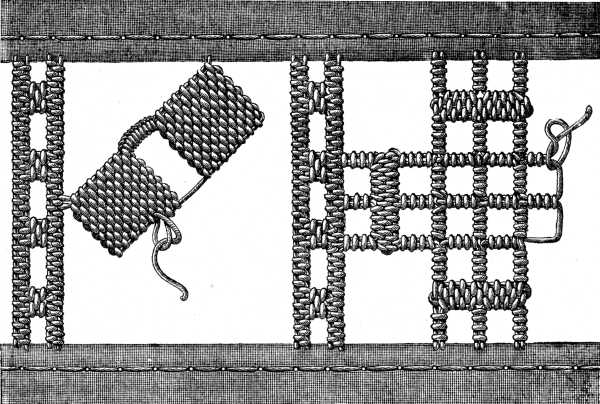
Lace in knotted stitch (figs. 818 and 819).—This charming little lace, which is of Italian origin, was taken from a cushion cover, used for church purposes. The stitches, made in the order indicated in the working detail, fig. 819, are overcast at the last with a fleecy thread, such as Coton à repriser D.M.C, of a rather sober colour, such for instance as Bleu-Indigo 334, Rouge-Géranium 352, or Jaune-Rouille 363.
Lace in knotted stitch (figs. 818 and 819).—This lovely little lace, which comes from Italy, was taken from a cushion cover used in churches. The stitches, made in the order shown in the working detail, fig. 819, are finished off with a fluffy thread, like Coton à repriser D.M.C, in a rather muted color, such as Bleu-Indigo 334, Rouge-Géranium 352, or Jaune-Rouille 363.
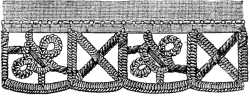
Materials: Cordonnet 6 fils D.M.C Nos. 10 to 25 or Fil à dentelle D.M.C Nos. 25 to 50.[A]
Materials: Cordonnet 6 fils D.M.C Nos. 10 to 25 or Fil à dentelle D.M.C Nos. 25 to 50.__A_TAG_PLACEHOLDER_0__

You overcast the slanting bars and pass over the stitches that connect the two picots.
You cover the angled bars and move over the stitches that link the two picots.
Reticella lace (figs. 820 and 821).—The Reticella laces are generally made on a design traced upon parchment, similar to those required for the laces described later on. But as the manner of working has been modified in the lace represented here, we thought it as well to adopt the same simplification, often used in beautiful pieces of old needlework, which consists in substituting a braid made upon a pillow, for the bars made with the needle.
Reticella lace (figs. 820 and 821).—Reticella laces are typically created based on a design drawn on parchment, similar to those needed for the laces described later. However, since the technique has changed for the lace shown here, we decided to use the same simplification often seen in beautiful pieces of vintage needlework, which involves replacing the bars made with a needle with a braid made on a pillow.
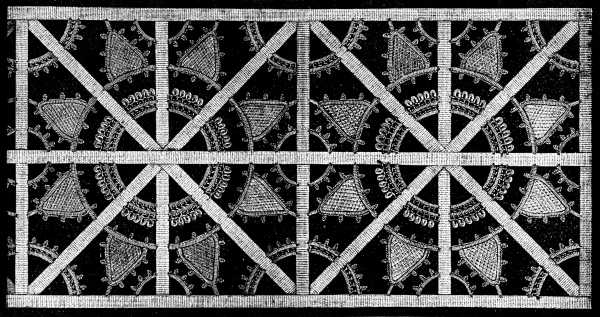
Materials—For the open-work: Cordonnet 6 fils D.M.C Nos. 10 to 100, or Fil à dentelle D.M.C Nos. 25 to 150, white or écru. For the bars: Lacets superfins D.M.C Nos. 3 to 8.[A]
Materials—For the open-work: Cordonnet 6 fils D.M.C Nos. 10 to 100, or Fil à dentelle D.M.C Nos. 25 to 150, in white or beige. For the bars: Lacets superfins D.M.C Nos. 3 to 8.__A_TAG_PLACEHOLDER_0__
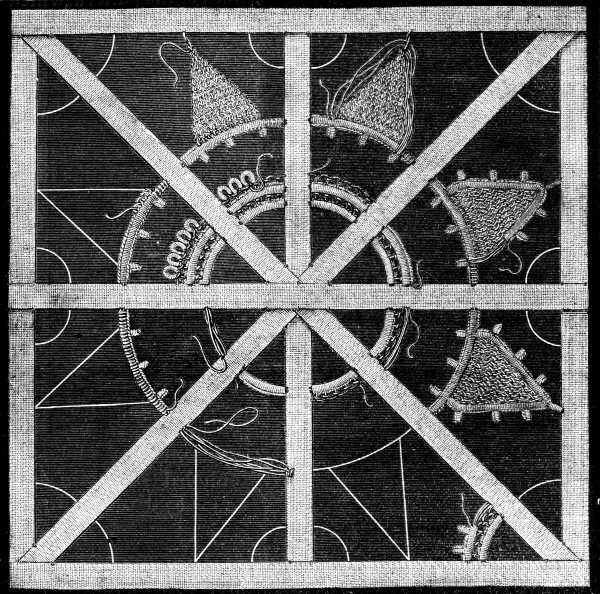
You begin by laying and fastening down the braid by means of very small stitches upon the lines of the pattern, which should be traced upon black paper; you next proceed to make the centre bars, covered with plain button-hole stitches, on which you mount a row of stitches, like those of fig. 755; these are followed by another bar, to make which, you pick up the loop of the stitches of the preceding row and by another row like the second, finished off with picots, like those illustrated in fig. 700. The bases of the pyramids likewise consist of bars, button-holed on both sides and edged on the inside with picots.
You start by laying down and securing the braid with very small stitches along the lines of the pattern, which should be outlined on black paper. Next, you create the center bars, which are covered with simple buttonhole stitches, and on those, you add a row of stitches like the ones shown in fig. 755; then you add another bar, for which you pick up the loop of the stitches from the previous row, and follow it with another row similar to the second, finishing with picots, like those shown in fig. 700. The bases of the pyramids also consist of bars, buttonholed on both sides and trimmed on the inside with picots.
The stitches of the first row should not be too close together, that there may be room for those of the second row between, as we have already explained in fig. 702, in the chapter on Irish lace.
The stitches in the first row shouldn't be too tight so that there's enough space for the stitches in the second row to fit in between, as we previously explained in fig. 702, in the chapter on Irish lace.
The lace, represented in fig. 820 in its original size, was worked in Fil à dentelle D.M.C No. 80, whilst the second engraving, representing the same subject, shows us how perfectly well it can also be made in heavier and coarser materials, these being in this instance, Lacets superfins D.M.C No. 4 and Cordonnet 6 fils D.M.C No. 20.
The lace, shown in fig. 820 at its original size, was made with Fil à dentelle D.M.C No. 80, while the second engraving, depicting the same subject, demonstrates how effortlessly it can also be created with thicker and coarser materials, which in this case are Lacets superfins D.M.C No. 4 and Cordonnet 6 fils D.M.C No. 20.
We shall confine our attention in the present instance to the needle-made Venetian lace as the other can be learnt without any great difficulty by following the instructions already given for the making of pillow lace.
We will focus on needle-made Venetian lace in this case, as the other type can be easily learned by following the instructions already provided for making pillow lace.
The preparation of the pattern, in most kinds of needlework, is a most important matter and one requiring the greatest care, but in the case of needle-made lace and pillow lace the processes are different.
The preparation of the pattern in most types of needlework is very important and requires a lot of care, but when it comes to needle-made lace and pillow lace, the processes are different.
The paper on which the design is traced must first be backed or lined with unglazed black paper (made specially for this purpose). Prick holes all along the lines of the pattern, at exactly the same distance from each other, remove the tracing and tack the black paper upon rather coarse linen.
The paper with the design needs to be backed or lined with unglazed black paper (made specifically for this purpose). Puncture holes along the lines of the pattern, keeping the distance between them consistent. Remove the tracing and attach the black paper to a coarse linen fabric.
This done, you take from three to five lengths of the thread of which the lace is to be made, lay them down together upon the lines marked by the prickings and secure them at each hole by a stitch made over the threads.
This done, you take from three to five lengths of the thread that the lace is made from, lay them down together on the lines marked by the pricks and secure them at each hole with a stitch made over the threads.
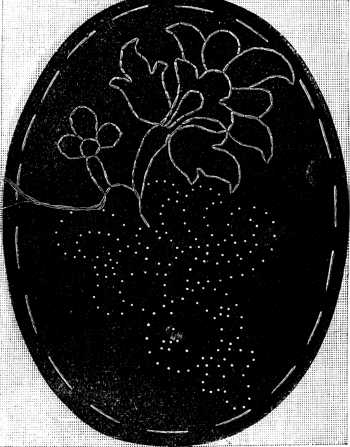
Fig. 822, with the others of the same series in their natural size, show the proper distance that should be left between the prickings, and the laying down of the threads begun; whilst in fig. 823, we have the threads laid down throughout, even for the little eyelet holes, which are to be open-worked afterwards.
Fig. 822, along with the others in the same series at their actual size, illustrates the correct spacing that should be maintained between the prickings, and the starting position of the threads has begun; whereas in fig. 823, we see the threads laid out completely, even for the small eyelet holes, which will be worked as open spaces later on.
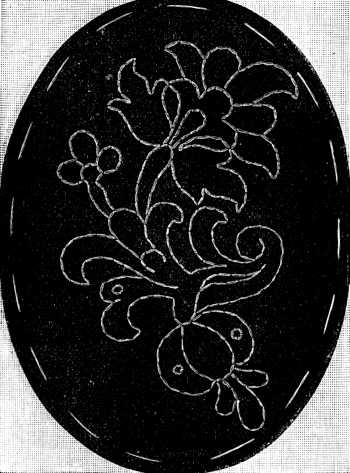
When all this preliminary work is finished, the pattern is ready for the lace stitches that are to form the filling in, between the raised outlines. In order to keep your work perfectly clean and preserve it from unnecessary contact with your fingers, cover all those parts of the pattern you are not immediately engaged on, with a piece of blue paper with a hole, about the size of a pea, cut in it. This you move along as you go, working only at the part of the pattern which is visible through the hole, keeping all the rest carefully covered up and sewing paper over each part as soon as it is finished; this should not be removed until you are ready to join all the separate parts together with bars or latticed ground and work the button-hole edges.
When all this initial work is done, the pattern is ready for the lace stitches that will fill in between the raised outlines. To keep your work clean and avoid unnecessary touching with your fingers, cover all parts of the pattern that you’re not currently working on with a piece of blue paper that has a hole about the size of a pea cut in it. Move this along as you go, working only on the part of the pattern that’s visible through the hole, keeping the rest carefully covered and placing paper over each section as soon as it’s finished. Don't remove this until you’re ready to join all the separate parts together with bars or a latticed ground and create the buttonhole edges.
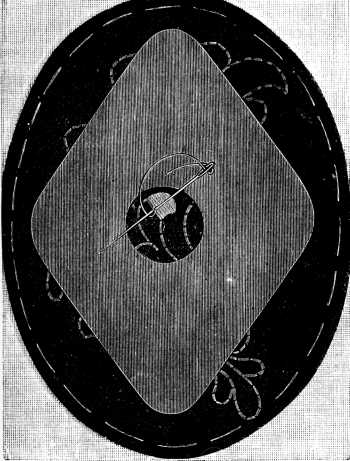
All the different lace stitches that are used as fillings must be begun and fastened off at the outline threads, which you must be careful not to drag out of their place.
All the various lace stitches used as fillings must start and end at the outline threads, which you need to be careful not to pull out of position.
We again remark, for the benefit of those of our readers who may not have read the preceding chapter attentively, that in working all the finer lace stitches, the needle should be held with the eye towards the worker and the point turned outwards. All the inside portions of the pattern have to be worked in separately; (for a choice of stitches to serve as fillings see figs. 720 to 762) until all the spaces are filled, as represented in figs. 825 and 826. The stitches should be selected as far as possible, to suit the style of the design. Flowers look best worked in an open or lattice stitch, leaves on the other hand in a thick close stitch.
We want to remind those readers who might not have paid close attention to the previous chapter that when working with all the finer lace stitches, the needle should be held with the eye facing the worker and the point pointing outwards. All the inner parts of the pattern need to be worked in separately; (for a selection of stitches to use as fillings, see figs. 720 to 762) until all the spaces are filled, as shown in figs. 825 and 826. The stitches should be chosen as much as possible to match the style of the design. Flowers look best when done in an open or lattice stitch, while leaves should be done in a thick close stitch.

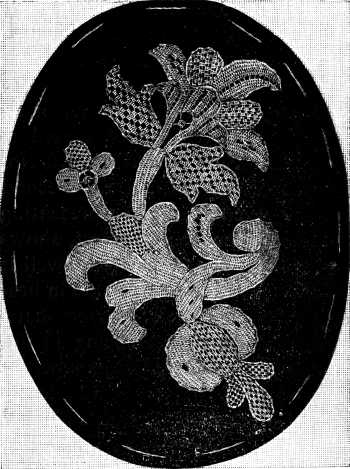
When all the insides are done, the edges and outlines have to be closely button-holed.
When everything inside is finished, the edges and outlines need to be carefully buttonholed.
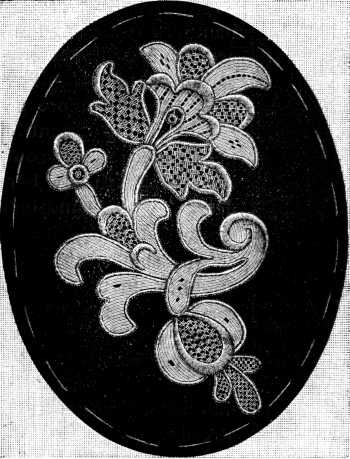
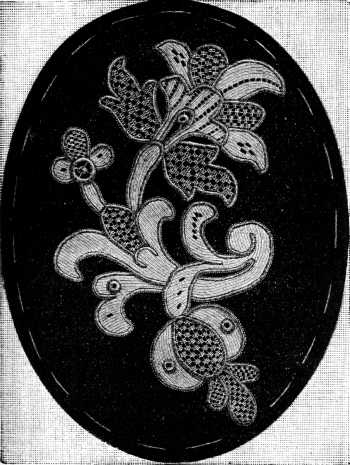
Materials—For the open stitches: Fil à dentelle D.M.C Nos. 100 to 200.
For the outlining and for the padding: Coton surfin D.M.C Nos. 120 to 150.[A]
Materials—For the open stitches: Fil à dentelle D.M.C Nos. 100 to 200.
For the outlining and padding: Coton surfin D.M.C Nos. 120 to 150.__A_TAG_PLACEHOLDER_0__
Venetian lace with net ground (fig. 829).—The outlining of the figures with several strands of Coton surfin D.M.C, should, in the case of detached pieces of lace, be done at once, but where the figures are connected by bars or by a net ground as in fig. 825, the button-holed outlines should be done last. Thus in making the lace, fig. 829, you should begin by working all the insides of the flowers and foliage, then the net ground which may be replaced by bars with picots and then only proceed to the outside button-holing and the scallops.
Venetian lace with net background (fig. 829).—When outlining the figures with several strands of Coton surfin D.M.C, it’s best to complete this for detached pieces of lace all at once. However, for figures connected by bars or by a net background as shown in fig. 825, the button-holed outlines should be done last. So, when making the lace in fig. 829, start by working on all the details inside the flowers and foliage, then the net background, which can be replaced by bars with picots, and only then proceed to the outer button-holing and the scallops.
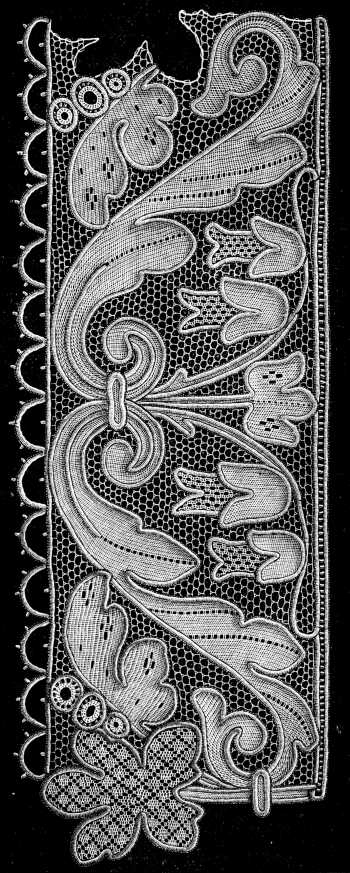
Materials—For the open stitches: Fil à dentelle D.M.C Nos. 100 to 200.—For the outlining: Coton surfin D.M.C Nos. 120 to 150.
Materials—For the open stitches: Fil à dentelle D.M.C Nos. 100 to 200.—For the outlining: Coton surfin D.M.C Nos. 120 to 150.
As all this kind of lace-work is very laborious and takes a long time to do, we advise our readers to use thread that is slightly tinted; in the first place it does not turn yellow as white thread is liable to do and secondly, being softer and less twisted it takes every bend and turn more readily than the stiffer white material does.
Since this type of lace-making is quite labor-intensive and time-consuming, we recommend that our readers use slightly colored thread. First, it doesn’t yellow like white thread tends to do. Second, it’s softer and less twisted, making it easier to maneuver around bends and turns than the stiffer white material.
Of all the different kinds of thread, so frequently alluded to in these pages, the higher numbers of Fil d’Alsace D.M.C and Fil à dentelle D.M.C are the best for the finer kinds of lace, and they all have the soft ivory tint, we so admire in the old needlework.
Of all the different types of thread mentioned in these pages, the higher numbers of Fil d’Alsace D.M.C and Fil à dentelle D.M.C are the best for finer lace, and they all have the soft ivory shade we admire in vintage needlework.
Spray in needle-point (fig. 830).—Needle-point lace, also called Brussels lace, requires the same preparatory work as Venetian lace; but it seldom contains such a variety of stitches and openwork as the latter.
Spray in needle-point (fig. 830).—Needle-point lace, also known as Brussels lace, requires the same prep work as Venetian lace; however, it usually doesn't have as many different stitches and openwork as the latter.
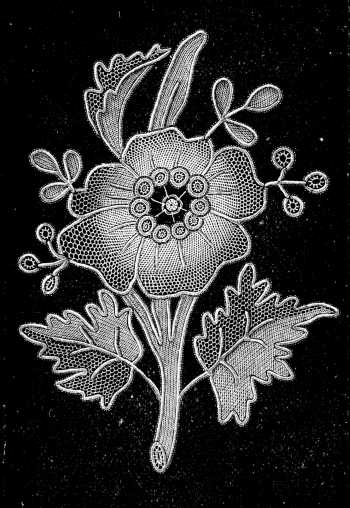
Materials—For the open stitches: Fil à dentelle D.M.C No. 200.—For the outlining: Coton surfin D.M.C Nos. 120 to 150.[A]
Materials—For the open stitches: D.M.C No. 200 lace thread.—For the outlining: D.M.C cotton numbers 120 to 150.__A_TAG_PLACEHOLDER_0__
Here also, the finished parts should be carefully covered with paper to keep them from getting soiled.
Here too, the finished parts should be carefully covered with paper to prevent them from getting dirty.
The needle-point lace designs are ordinarily speaking more realistic and as regards the composition, less artistic and severe than the Venetian point ones.
The needle-point lace designs are generally more realistic and, in terms of composition, less artistic and strict than the Venetian point ones.
The spray, represented in our engraving, is a specimen of an ordinary Brussels lace pattern and of the stitches it is worked in.
The spray shown in our engraving is an example of a typical Brussels lace pattern and the stitches used to create it.
FOOTNOTES:
Miscellaneous fancy work.
As the plan on which this book was constructed rendered a systematic classification of the different subjects it treats of necessary, a certain amount of miscellaneous fancy work, which does not come under any of the previous headings remains to be dealt with in the present chapter. In most cases the illustrations and the accompanying directions are but an application to a practical use of the different kinds of stitches already described in previous chapters and those who are familiar with all these various branches of needlework will have no difficulty in understanding what follows.
As the plan for this book required a systematic classification of the various subjects it covers, a bit of miscellaneous craftwork that doesn’t fit into any of the previous categories is addressed in this chapter. In most cases, the illustrations and the accompanying instructions are just practical applications of the different kinds of stitches already described in earlier chapters, and those who are familiar with these various areas of needlework will have no trouble understanding what comes next.
You tie two ends of thread or braid together, take one thread in the left hand fig. 831, and with the forefinger of the right, pull out a loop long enough for the left forefinger to pass through and hold the end of the thread tight with the little finger of the right hand.
You tie two ends of thread or braid together, take one thread in your left hand fig. 831, and with your right index finger, pull out a loop long enough for your left index finger to pass through and hold the end of the thread tight with your right pinky.
Then draw the left forefinger backwards through the loop and behind the thread that is round the loop and lies in the left hand, fig. 832. As you lay the thread round the left forefinger, you must pass the knot and the ends of thread as well, over into the left hand, and with the right hand pull the thread that lies on the right and draw up the loop, fig. 833.
Then move your left index finger back through the loop and behind the thread that's wrapped around the loop in your left hand, fig. 832. As you position the thread around your left index finger, make sure to also bring the knot and the ends of the thread over into your left hand, and with your right hand, pull the thread that's on the right to tighten the loop, fig. 833.
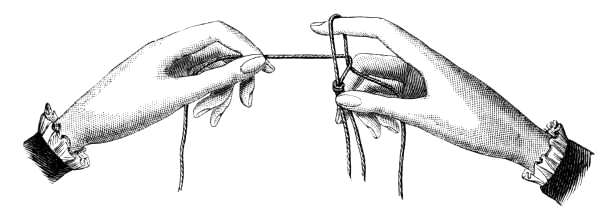
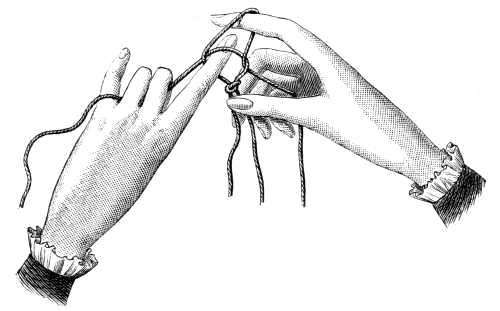

In fig. 834, representing the fourth position of the hands, you are shown how the forefinger of the right hand lifts up the thread and passes through the loop on the left hand; the end will consequently also pass immediately into the right hand and the left hand will tighten the knot.
In fig. 834, showing the fourth position of the hands, you can see how the forefinger of the right hand lifts the thread and threads it through the loop on the left hand; as a result, the end will also go straight into the right hand, and the left hand will tighten the knot.
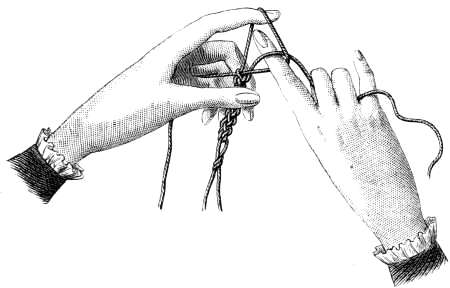
It is by thus drawing up first a loop on the right and then one on the left that this pretty cord is produced.
It’s by first making a loop on the right and then one on the left that this nice cord is created.
Skilful hands will soon learn to make a cord of the same kind with four threads, as follows: knot the four ends of thread together, make a few knots, using two threads as one, then dropping the loop on your forefinger, put the next one upon it and draw up the knot, passing however the threads over those that you dropped. Then drop the loop you have on your finger again and take up the first loops.
Skilled hands will quickly figure out how to make a cord of the same kind with four threads like this: tie the four ends of the thread together, make a few knots by using two threads as one, then drop the loop on your forefinger and place the next one on top of it and pull up the knot, making sure to pass the threads over those that you dropped. Then drop the loop on your finger again and pick up the first loops.
For the cord made with double threads, represented in fig. 835 on a magnified scale, use Cordonnet 6 fils D.M.C or one of the other materials mentioned at the foot of the illustration. Soutache D.M.C will always be found to be very suitable for this purpose.
For the cord made with double threads, represented in fig. 835 on a magnified scale, use Cordonnet 6 fils D.M.C or one of the other materials listed at the bottom of the illustration. Soutache D.M.C is always a great choice for this purpose.
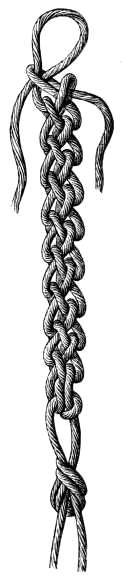
Materials: Fil à pointer D.M.C Nos. 10 to 30, Coton à tricoter D.M.C Nos. 6 to 12, Cordonnet 6 fils D.M.C Nos. 3 to 25 or Soutache D.M.C Nos. 1 to 3.[A]
Materials: D.M.C No. 10 to 30 embroidery thread, D.M.C No. 6 to 12 knitting cotton, D.M.C No. 3 to 25 six-strand cord, or D.M.C No. 1 to 3 soutache.__A_TAG_PLACEHOLDER_0__
If you have a great many balls to make it is well worth your while providing yourself with a metal die of the proper size, to cut the rounds with.
If you have a lot of balls to make, it’s definitely worth getting a metal die of the right size to cut the rounds with.
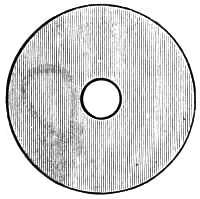
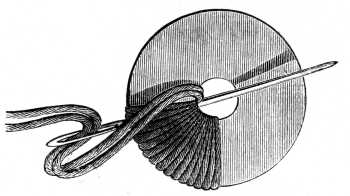
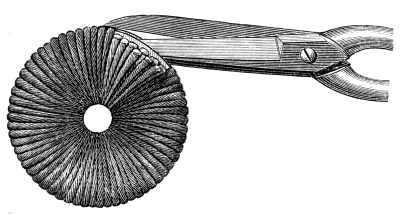
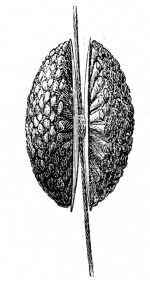
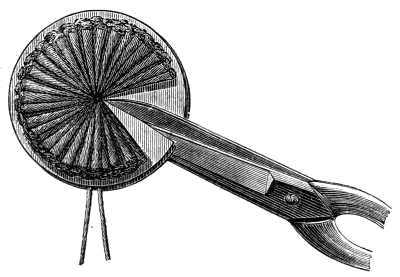
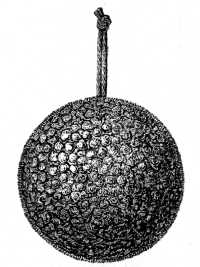
When the round is entirely covered, put the scissors in between the two circles of cardboard and cut open the stitches all round the outer edge, fig. 838; then draw a piece of thread between the two circles and knot it firmly round the stitches that meet in the centre hole, fig. 839; leave sufficiently long ends of thread hanging to form a loop by which the ball can afterwards be fastened to the heading of the fringe; when the stitches are knotted together you cut and pull out the cardboard, fig. 840, and snip the thread with your scissors until it becomes quite fluffy and the ball is perfectly round, as shown in fig. 841.
When the round is fully covered, place the scissors between the two circles of cardboard and cut open the stitches all around the outer edge, fig. 838; then thread a piece of string between the two circles and tie it securely around the stitches that meet in the center hole, fig. 839; leave long enough ends of thread hanging to create a loop that can later be used to attach the ball to the top of the fringe; once the stitches are tied together, you cut and remove the cardboard, fig. 840, and trim the thread with your scissors until it looks fluffy and the ball is perfectly round, as shown in fig. 841.
Tambour work (figs. 842, 843, 844, 845).—Since the introduction of the sewing machine, by means of which this charming kind of embroidery can be so quickly and easily executed, it has somewhat gone out of favour. As however, the fine patterns with a good deal of shading in them, can be far more accurately worked by hand than by machine, tambouring, which is in point of fact merely a form of crochet, has lately been revived. The piece of stuff on which the tambour work is to be done must be mounted on a frame.
Tambour work (figs. 842, 843, 844, 845).—Since the sewing machine was introduced, making this beautiful type of embroidery can be done quickly and easily, it has somewhat fallen out of favor. However, because intricate patterns with a lot of shading can be stitched much more precisely by hand than by machine, tambouring, which is essentially a form of crochet, has recently made a comeback. The fabric on which the tambour work will be done needs to be stretched on a frame.


The loops which are made with a small hook, called a tambour needle, form a fine chain stitch and must be regular and even; to facilitate this a sort of thimble, fig. 842, is worn on the forefinger of the right hand, formed of a small plate of sheet brass, rolled up but not joined, so as to fit any finger; it is open at the top like a tailor’s thimble and has a little notch on the side which is placed above the nail, and in which you lay the tambour needle whilst you work. From the thimble being cut slightly slanting at the top, it follows that the inside where the two ends meet is a little shorter than the outside.
The loops created with a small hook, known as a tambour needle, form a neat chain stitch and need to be consistent and even. To make this easier, a type of thimble, fig. 842, is worn on the forefinger of the right hand. It’s made from a small plate of sheet brass, rolled up but not sealed, so it can fit any finger. It's open at the top like a tailor’s thimble and has a small notch on the side that fits above the nail, where you rest the tambour needle while you work. Because the thimble is cut at a slight angle at the top, the inside where the two ends meet is a bit shorter than the outside.
The thread is drawn through in a loop to the front of the work by means of the hook, whilst it is held at the back in the left hand, and when the needle is put downwards through the stuff, laid round it. The needle in its downward and upward passage, should be kept in the notch in the thimble and the stuff pressed down with the thimble, as the needle is drawn up to the surface of the work, fig. 844.
The thread is pulled through in a loop to the front of the work using the hook, while it is held at the back in the left hand. When the needle goes down through the fabric, it’s wrapped around it. The needle should stay in the notch of the thimble during both the downward and upward motions, and the fabric should be pressed down with the thimble as the needle is pulled up to the surface of the work, fig. 844.
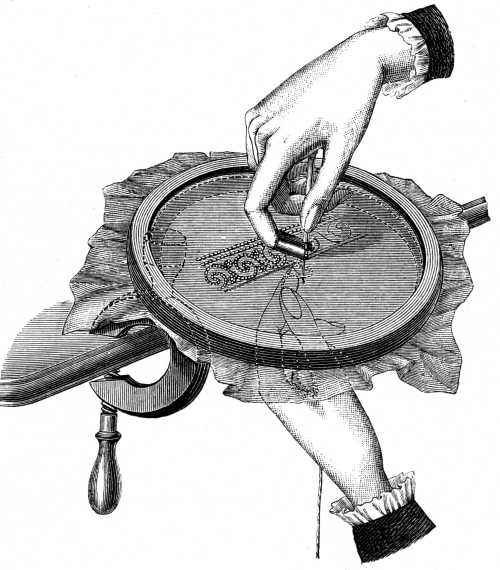
A little practice is necessary to acquire the right action of the hands, there being always a tendency, the same as in tatting and macramé, to confuse the movements of the two. As soon as you realize that the upward drawing of the needle and the downward pressure of the stuff with the thimble must be simultaneous, you will find that you can work with great rapidity and with admirable results. Thread with a very strong twist, which the hook will not split, is the only suitable kind for tambouring. Of the D.M.C materials, Fil d’Alsace[A] and Fil à dentelle[A] are the most to be recommended.
A little practice is needed to develop the right hand movements, as there’s always a tendency, like in tatting and macramé, to mix up the motions of the two. Once you understand that lifting the needle upward and pressing down on the fabric with the thimble must happen at the same time, you’ll find you can work quickly and achieve great results. The only suitable type of thread for tambouring is one with a very strong twist that won’t split when using the hook. Of the D.M.C materials, Fil d’Alsace[A] and Fil à dentelle[A] are the most highly recommended.
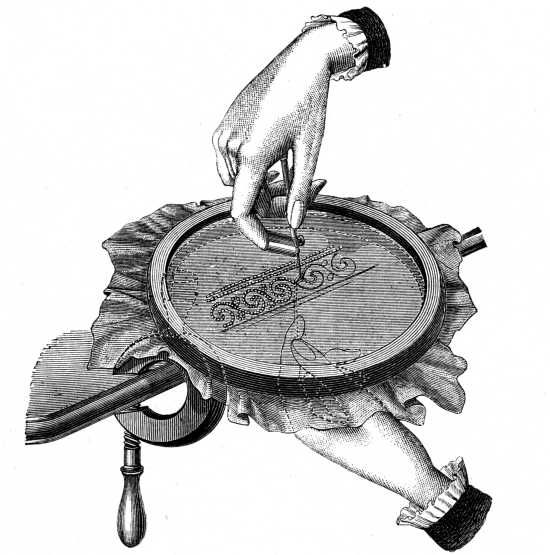
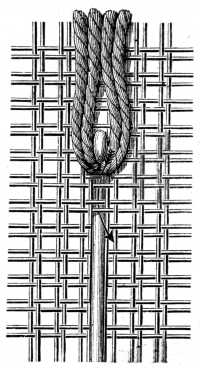
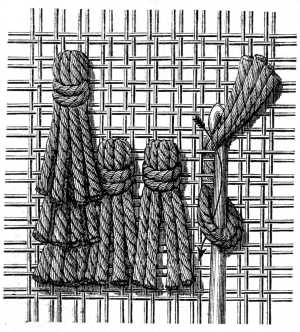
Smyrna stitch requires only a crochet needle and is worked on very coarse canvas or Java linen. You take a coarse mesh of cotton, such as Nos. 6, 8 or 10 of Colon à tricoter D.M.C (knitting cotton), cut it into lengths of 8 c/m., fold two lengths together in half, stick in the crochet needle from above, under two threads of the canvas, take hold of the loop with the hook, fig. 846, and draw it in; then push out the hook to seize the ends of the cotton and draw them through the loop which is on the needle, as indicated by the little arrow in fig. 847. The stitches or tassels should be two or three double threads of the canvas apart. As you finish each row, comb the ends of the tassels out carefully with a fine metal comb. When the whole piece of work is finished shear the entire surface, quite even, with a pair of sharp scissors. Fig. 849 shows a square of the work completed, presenting that warm velvety appearance which distinguishes the Smyrna carpets.
Smyrna stitch only needs a crochet hook and is done on very coarse canvas or Java linen. You take a coarse cotton mesh, like Nos. 6, 8, or 10 of Colon à tricoter D.M.C (knitting cotton), cut it into 8 cm lengths, fold two lengths in half, insert the crochet hook from above under two threads of the canvas, grab the loop with the hook, fig. 846, and pull it through; then push out the hook to grab the ends of the cotton and pull them through the loop on the needle, as shown by the little arrow in fig. 847. The stitches or tassels should be two or three double threads of the canvas apart. After you finish each row, carefully comb out the ends of the tassels with a fine metal comb. Once the entire piece is complete, shear the whole surface evenly with a pair of sharp scissors. Fig. 849 shows a square of the finished work, presenting the warm velvety look that defines Smyrna carpets.
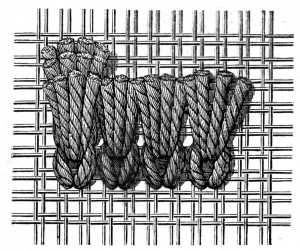
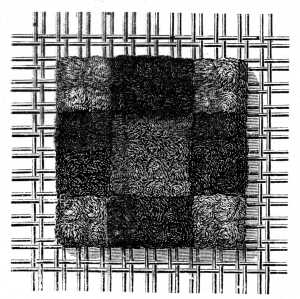
Malta stitch (figs. 850, 851, 852, 853, 854).—This stitch is much used by the Maltese; it is the same as the «point tricot» excepting that in the latter, the loops formed by the return of the thread are open and the stitches packed very closely together, whereas in the Maltese work there is always one close loop and two open tassels.
Malta stitch (figs. 850, 851, 852, 853, 854).—This stitch is commonly used by the Maltese; it’s similar to the “point tricot” except that in the latter, the loops created by the thread returning are open and packed very closely together, while in Maltese work, there’s always one tight loop and two open tassels.
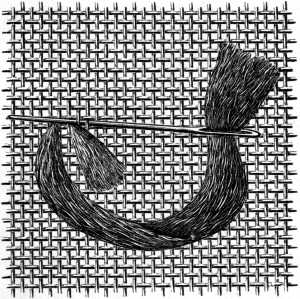
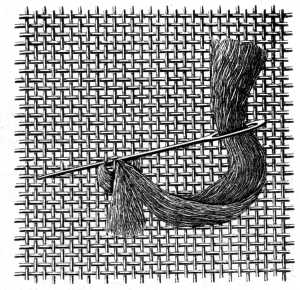
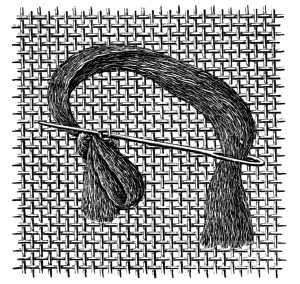
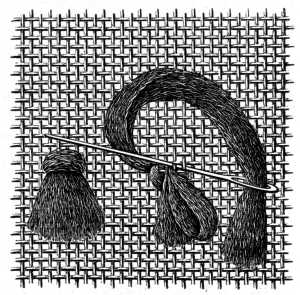
It is worked as follows: take a thick bunch of lengths of Coton à repriser D.M.C, pass it under two vertical threads of the stuff, from right to left, fig. 850, leaving an end, 1 or 2 c/m. long, lying on the surface of the work; put the needle in again under the two threads that are in front of the first stitch and leave the tassel, formed by the first stitch, above the one by which you bring the needle back between the two stitches.
It works like this: take a thick bunch of lengths of D.M.C Coton à repriser, pass it under two vertical threads of the fabric from right to left, as shown in fig. 850, leaving an end that's 1 or 2 cm long lying on the surface of the work. Then, insert the needle again under the two threads in front of the first stitch and let the tassel, made by the first stitch, sit above the one where you bring the needle back between the two stitches.
The needle must now follow the same course it took for the first stitch and the thread must be drawn out far enough to form a loop as long as the tassel; you then repeat the second stitch, carrying back the working thread however this time above the loop, after which you cut the two open ends the same length as the loop. In the Maltese work, three times as many threads have to be left between the tassels as are covered by the stitch.
The needle should now trace the same path it did for the first stitch, and the thread needs to be pulled out long enough to create a loop that matches the tassel's length. Next, repeat the second stitch, this time pulling the working thread above the loop. After that, trim the two loose ends to match the length of the loop. In Maltese work, you need to leave three times as many threads between the tassels as the amount covered by the stitch.
Thus if your stitch cover 4 threads of the foundation, you should leave 12 threads between the tassels, and if it cover 6, you should leave an interval of 18 threads, that the stuff may always be visible between the little tassels or balls.
Thus, if your stitch covers 4 threads of the foundation, you should leave 12 threads between the tassels, and if it covers 6, you should leave an interval of 18 threads, so that the fabric is always visible between the little tassels or balls.
Fig. 854 represents a portion of a curtain, embroidered on Flemish linen in the colours indicated at the foot of the engraving; these may be arranged according to the taste of the worker.
Fig. 854 shows part of a curtain, embroidered on Flemish linen in the colors listed at the bottom of the engraving; these can be arranged according to the worker's preference.
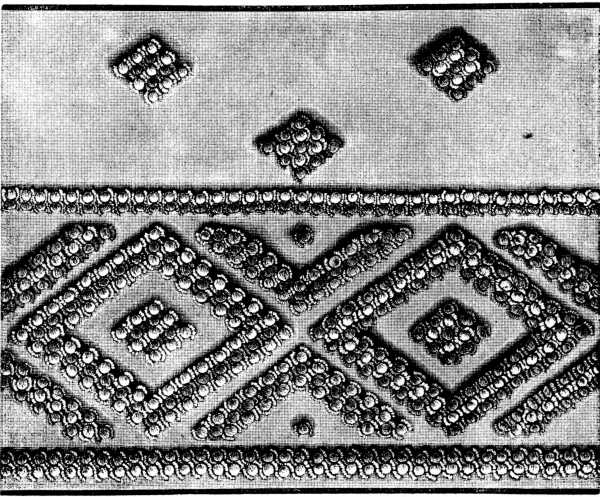
Materials: Coton à repriser D.M.C No. 25.[A]
Colours: Jaune-vieil-Or 680, Vert-Mousse 469, Bleu-Indigo 311 and Rouge-Cornouille 449.[A]
Materials: D.M.C No. 25 Coton à repriser __A_TAG_PLACEHOLDER_0__
Colors: Jaune-vieil-Or 680, Vert-Mousse 469, Bleu-Indigo 311, and Rouge-Cornouille 449.__A_TAG_PLACEHOLDER_1__
Malta embroidery is mostly done on coarse coloured linen fabrics or on single thread canvas.
Malta embroidery is primarily done on coarse colored linen fabrics or on single thread canvas.
Triangular Turkish stitch (figs. 855, 856, 857, 858, 859). Amongst the many pretty stitches for which Turkish embroideries are distinguished, there is one in particular, which though apparently very difficult, is in reality quite the reverse; it resembles line stitch upon straight threads, only that in the East it is generally worked in diagonal lines, each row requiring two journeys to and fro.
Triangular Turkish stitch (figs. 855, 856, 857, 858, 859). Among the many beautiful stitches that Turkish embroideries are known for, there’s one in particular which seems very difficult at first, but is actually quite the opposite; it looks like line stitch on straight threads, except in the East it is usually done in diagonal lines, with each row requiring two trips back and forth.
In the first, fig. 855, the needle must always be carried, first over, then under two threads in a diagonal line and so on to the end of the row.
In the first, fig. 855, the needle should always be moved, first over and then under two threads in a diagonal line, continuing this pattern until the end of the row.
Coming back, you pass the needle under the stuff and the stitch on the right side, and bring it out at the bottom of the stitch; then you make a back stitch over two horizontal and two vertical threads, pass the needle over two straight threads, put it in behind the same, bring it out again near the upper stitch and then insert it near the bottom vertical stitch; after this you carry it to the second stitch lower down and pass it over the same. Four threads should meet in every hole which the needle makes. The third and fourth row should be worked in a colour that forms a sharp contrast with the one in which the two first rows are worked and constitute with these one complete row of stitches, fig. 856.
Coming back, you pass the needle under the fabric and the stitch on the right side and bring it out at the bottom of the stitch; then you do a back stitch over two horizontal and two vertical threads, pass the needle over two straight threads, insert it behind the same, bring it out again near the upper stitch, and then insert it near the bottom vertical stitch; after this, you carry it to the second stitch lower down and pass it over the same. Four threads should meet in every hole that the needle makes. The third and fourth rows should be done in a color that sharply contrasts with the one used for the first two rows and make together one complete row of stitches, fig. 856.
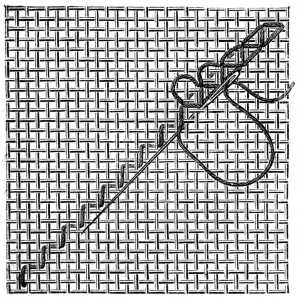
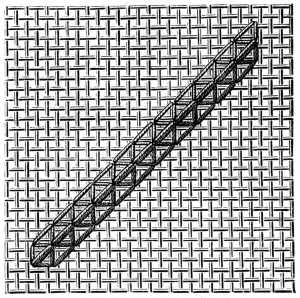
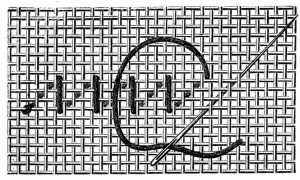
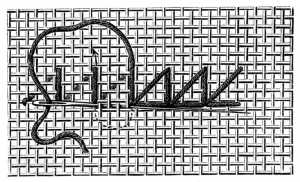
The dark shade in fig. 859 shows the first row of stitches, the light, the second, or rather the third and fourth, as four rows of stitches are required to make one complete row of triangular Turkish stitch.
The dark shade in fig. 859 shows the first row of stitches, the light shows the second, or more accurately, the third and fourth, since four rows of stitches are needed to create one complete row of triangular Turkish stitch.
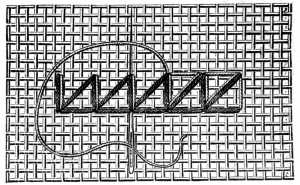
Pattern worked in triangular Turkish stitch and Gobelin stitch (fig. 860).—The diagonal lines are all worked with Chiné gold and blue, and gold and red. The stitch we have just described is most effective in conjunction with other kinds of embroidery, as illustrated in fig. 860, where it is combined with Gobelin stitch.
Pattern created using triangular Turkish stitch and Gobelin stitch (fig. 860).—The diagonal lines are stitched with Chiné gold and blue, as well as gold and red. The stitch we’ve just described looks really good when used alongside other types of embroidery, as shown in fig. 860, where it’s mixed with Gobelin stitch.
The running foundation is divided into slanting squares; the diagonal lines are all worked in gold and red. The squares number 9 stitches inside, these are followed by a tenth which is covered by the first stitch of the next square. Where two kinds of coloured gold thread are used, one square will be framed on all sides by one kind, say, gold and blue for instance, the next by the other, gold and red.
The running foundation is made up of slanted squares; the diagonal lines are all done in gold and red. Each square has 9 stitches inside, followed by a tenth stitch that is covered by the first stitch of the next square. When two types of colored gold thread are used, one square will be bordered on all sides by one type, like gold and blue, while the next one will use the other type, like gold and red.

Materials: Chiné d’or D.M.C.
Colours: Gold and red, gold and dark blue, gold and light blue, gold and green.
Materials: Chiné d’or D.M.C.
Colors: Gold and red, gold and dark blue, gold and light blue, gold and green.
The stalk that divides the two little leaves and has a small lozenge at the top, is begun above the fifth of the 9 stitches; you make 5 stitches, but in such a manner as to end at the top of these 5 with the stitch that runs in a diagonal direction over the threads, turned to the inside of the stalk, so that the last stitch of the first row may form with the first stitch of the second row, a triangle at the top of the stalk, which is surmounted by the aforesaid lozenge.
The stem that separates the two small leaves and has a small lozenge at the top begins just above the fifth of the 9 stitches; you make 5 stitches, but in a way that the last stitch of these 5 ends at the top and runs diagonally over the threads, turned to the inside of the stem, so that the last stitch of the first row forms a triangle with the first stitch of the second row at the top of the stem, which is topped by the mentioned lozenge.
The lozenges in Chiné gold and light blue, of which there are three in each of the half squares, besides those that terminate the stalk, consist of 9 stitches, the first, extending over 3 threads, the second over 5, the third over 7, the fourth over 9 and the fifth over 11; the four next decreasing in a similar manner. The leaves in Chiné gold and green, on either side of the stalk, also begin with a stitch over 3 threads of the stuff, followed by 8, each increasing in length by one thread on the side of the stalk, but all equal on the other, the last extending over 12 threads of the stuff. After these 9, the subsequent 8 must decrease in the same manner by one thread on the opposite side; then you make 4 more extending over only 3 threads and set the contrary way to the others.
The lozenges in Chiné gold and light blue, three in each half square along with those that end the stalk, are made up of 9 stitches. The first covers 3 threads, the second covers 5, the third covers 7, the fourth covers 9, and the fifth covers 11; the next four decrease in the same way. The leaves in Chiné gold and green on either side of the stalk also start with a stitch over 3 threads of the material, followed by 8, each increasing in length by one thread towards the stalk, but all equal on the other side, with the last covering 12 threads of the material. After these 9, the next 8 must decrease in the same manner by one thread on the opposite side; then make 4 more covering only 3 threads and facing the opposite way to the others.
The zigzag border and the small squares of 5 stitches within it are worked entirely in Chiné gold and red.
The zigzag border and the small squares of 5 stitches within it are made entirely in Chiné gold and red.
Turkish embroidery (fig. 861).—The powdering of flowers and also the border are worked like the preceding pattern in two-sided Gobelin stitch. Embroidery of this kind looks best on Algerian linen, which is exactly like the Turkish stuff. It is not absolutely necessary to count the threads for the little flowers and stalks, but it is as well to do so for the border, that you may be sure to get the zigzags perfectly regular.
Turkish embroidery (fig. 861).—The application of flowers and the border are done in the same way as the previous pattern using two-sided Gobelin stitch. This type of embroidery looks best on Algerian linen, which is just like the Turkish fabric. It's not absolutely necessary to count the threads for the small flowers and stems, but it’s a good idea to do so for the border to ensure the zigzags are perfectly regular.
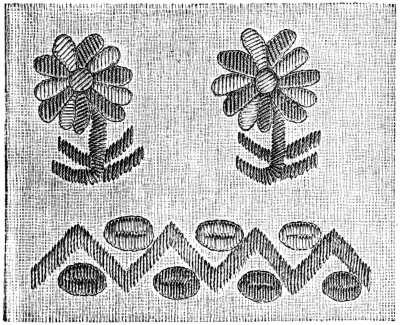
Materials: Chiné d’or D.M.C No. 30 and Coton à broder D.M.C No. 40.[A]
Colours—For the Chiné: Gold and red, gold and dark blue and gold and green. For the Coton à broder: Noir grand-teint 310.[A]
Materials: Chiné d’or D.M.C No. 30 and Coton à broder D.M.C No. 40.__A_TAG_PLACEHOLDER_0__
Colors—For the Chiné: Gold and red, gold and dark blue, and gold and green. For the Coton à broder: Noir grand-teint 310.__A_TAG_PLACEHOLDER_1__
The petals of the flowers are worked alternately in Chiné gold and red, and gold and blue, the centre in Or fin D.M.C pour la broderie and the leaves and stalks in Chiné gold and green. The petals are set with stem stitch in fine black Coton à broder and if the embroidery is to be the same on both sides this setting must be repeated at the back.
The flower petals are alternately done in Chiné gold and red, and gold and blue, with the center in Or fin D.M.C for embroidery, and the leaves and stems in Chiné gold and green. The petals are outlined with stem stitch in fine black embroidery thread, and if the embroidery is meant to look the same on both sides, this design needs to be replicated on the back.
The distribution of colours in the border is left to the taste of the worker, but we should recommend for the zigzags Chiné gold and red, as being the most effective.
The choice of colors in the border is up to the worker's preference, but we suggest using Chiné gold and red for the zigzags, as these are the most striking.
Appliqué work (fig. 862).—Appliqué work means the laying on of pieces of one kind of stuff on to a foundation of a different kind, so as to form a pattern—these pieces of stuff of various shapes and sizes, taking the place of solid needle-made embroidery.
Appliqué work (fig. 862).—Appliqué work refers to attaching pieces of one type of fabric onto a base of a different type to create a design—these fabric pieces, which come in various shapes and sizes, replace traditional needle embroidery.

Appliqué work may be done on linen, silk, velvet, plush and leather. The stuff out of which the pattern is cut has, in most cases, to be backed first with very fine tissue paper.
Appliqué work can be done on linen, silk, velvet, plush, and leather. The material used for the pattern usually needs to be backed first with very fine tissue paper.
This is done in the following manner with starch paste, which dries quicker than any other. Spread the paste on the paper with a brush, carefully removing all the little lumps; it should only be just liquid enough to make the stuff and the paper adhere perfectly together and above all must never penetrate to the right side of the stuff. When the paper has been evenly spread with the paste, lay your stuff upon it and smooth and press it down with a clean cloth, stroking it out carefully in the line of the thread to prevent its becoming in the least dragged or puckered, or any air remaining between it and the paper.
This is done as follows with starch paste, which dries faster than any other. Apply the paste to the paper with a brush, making sure to eliminate all the small lumps; it should be just liquid enough to make the material and the paper stick perfectly together and, most importantly, must never seep through to the front side of the material. Once the paper is evenly coated with the paste, place your material on it and smooth it down with a clean cloth, carefully stroking it out in the direction of the threads to ensure it doesn’t get pulled or wrinkled, and to prevent any air from getting trapped between it and the paper.
You next lay several sheets of paper without a mark or a fold in them, on a perfectly smooth flat board, and upon these, your paper-lined stuff, covered in its turn with several loose sheets of paper, all being kept in their place by another board with several stones or heavy weights laid upon it to act as a press. Leave the stuff in the press until it be quite dry. You will find that any kind of fabric, even the slightest, can be rendered available in this manner for appliqué work, not even plush or velvet being in the least injured by the process.
You should first lay several unmarked, uncreased sheets of paper on a perfectly flat board. On top of these, place your paper-lined material, which is also covered with more loose sheets of paper. Keep everything in place with another board and put some stones or heavy weights on top to act as a press. Leave the material in the press until it’s completely dry. You’ll find that any type of fabric, even the thinnest ones, can be used for appliqué work this way, with plush or velvet remaining unharmed by the process.
You then transfer the whole pattern on to the foundation, whatever it happen to be, but only the detached figures on to the paper-lined stuff, carefully cutting out the latter with a very sharp pair of scissors so as to avoid unravelling the threads along the edges.
You then transfer the entire pattern onto the foundation, whatever it may be, but only the separate figures onto the paper-lined material, carefully cutting out the latter with a very sharp pair of scissors to avoid fraying the threads along the edges.
Then cover the cut-out figures with paste on the wrong side and fit them into their proper places upon the foundation. In larger pieces of work especially, this should be done as quickly as possible so that a board with weights upon it, to serve as a press, may be laid over them all at once.
Then spread paste on the back of the cut-out figures and place them in their correct spots on the foundation. In larger projects, it's especially important to do this quickly so that a board with weights can be placed over everything at once to press them down.
The board must not be removed until the paste be dry; then you can begin the needlework, fastening down the appliqué figures and finishing them off round the edges by laying down a fine round, cord, or by flat stitches.
The board shouldn't be taken off until the paste is dry; then you can start the needlework, securing the appliqué shapes and finishing them around the edges by using a fine round cord or flat stitches.
You either sew on the cord with invisible stitches, opening it a little at each stitch so as to slip the needle and thread in between the twist, or else with ordinary overcasting stitches.
You can either sew the cord using invisible stitches, making a slight opening with each stitch to slip the needle and thread between the twist, or you can use regular overcasting stitches.
In either case it must be so laid on as completely to hide the cut edges and keep them from fraying.
In any case, it has to be applied in a way that completely hides the cut edges and prevents them from fraying.
Should you wish to frame the appliqué figures with flat embroidery, you must bring your needle out close to the cut edge and enter it, 1 or 2 m/m. within the edge from above.
Should you want to outline the appliqué shapes with flat embroidery, you need to bring your needle out near the cut edge and then insert it 1 or 2 mm inside the edge from above.
Both, cord and flat stitch setting, should be of a subdued shade and if possible, of a colour to match the foundation.
Both the cord and flat stitch settings should be in a muted color and, if possible, a shade that matches the base fabric.
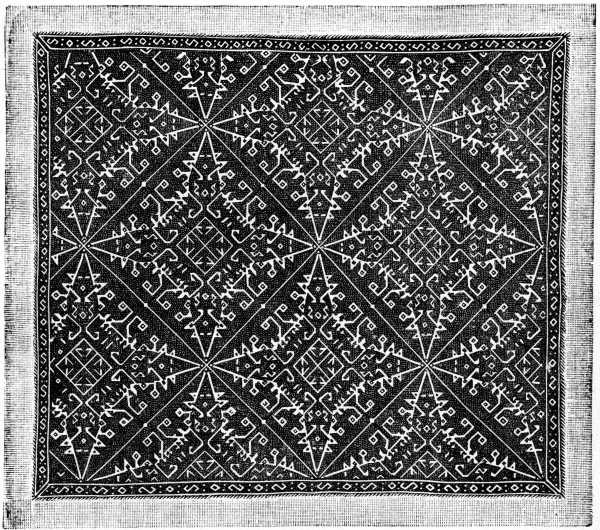
Materials—According to the stuff: Fil à pointer D.M.C, Cordonnet 6 fils D.M.C, Coton à broder D.M.C or Coton à repriser D.M.C.[A]
Colour: Rouge-Cardinal 346.[A]
Materials—Based on the material: Fil à pointer D.M.C, Cordonnet 6 fils D.M.C, Coton à broder D.M.C or Coton à repriser D.M.C.__A_TAG_PLACEHOLDER_0__
Color: Rouge-Cardinal 346.__A_TAG_PLACEHOLDER_1__
In fig. 864, the stitches are formed by passing over 5 threads and taking up the sixth. Coming back you take up the third of the 5 threads first missed and proceed in the same manner over the whole surface of the work, unless the lines of the pattern require you to depart from this rule; as, for instance, in certain parts of fig. 864, where you will notice stitches, carried over 7 or 8 threads; also in the borders, fig. 865 and 866, where the stitches are arranged in a rather arbitrary manner, in order to bring out the pattern more clearly.
In fig. 864, the stitches are made by going over 5 threads and picking up the sixth. When you come back, you pick up the third of the 5 threads that you missed first and continue in the same way across the entire surface of the work, unless the lines of the pattern require you to change this method; for example, in certain areas of fig. 864, where you will see stitches carried over 7 or 8 threads; also in the borders, fig. 865 and 866, where the stitches are arranged in a somewhat random way to make the pattern stand out more clearly.
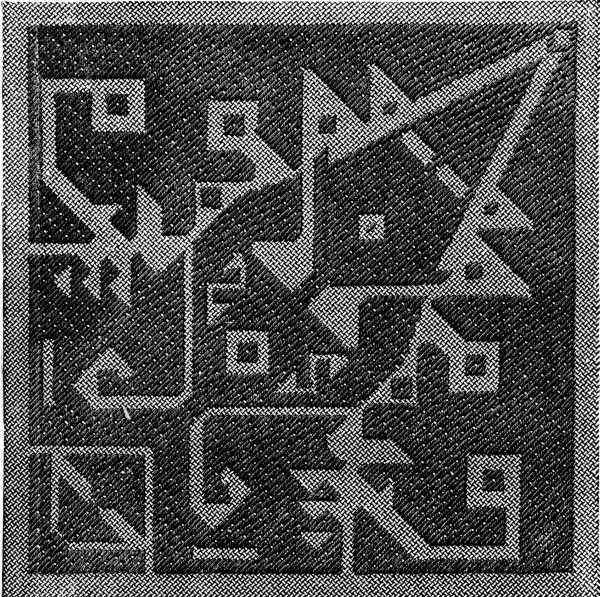
Quarter of the subjects of fig. 863.
Part of the subjects in fig. __A_TAG_PLACEHOLDER_0__.

Small outer border of fig. 863.
Small outer border of fig. __A_TAG_PLACEHOLDER_0__.
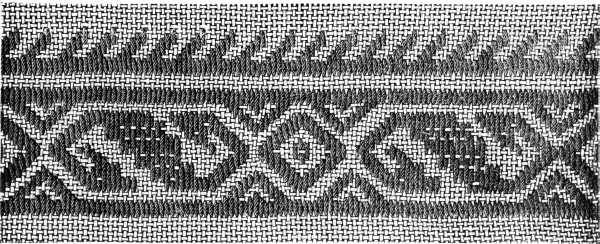
Border and insertion suitable for fig. 863.
Border and insert suitable for fig. __A_TAG_PLACEHOLDER_0__.
Most of the stuffs, already so frequently alluded to in this work, can be used as a foundation for this kind of embroidery, provided the right working materials to go with it are chosen; Coton à tricoter or Fil à pointer should only be used for the coarser stuffs, such as Rhodes linen No. 1, or Russian linen and the different kinds of tammy cloth, whereas the other kinds of D.M.C threads and cottons and especially the finer numbers, are best adapted for embroidery on fine stuffs, such as Rhodes linen No. 2, and Spanish or Algerian linen.
Most of the materials mentioned throughout this work can be used as a base for this type of embroidery, as long as you choose the right working materials to go with them. Coton à tricoter or Fil à pointer should only be used for coarser fabrics, like Rhodes linen No. 1, Russian linen, and various types of tammy cloth. On the other hand, the other types of D.M.C threads and cottons, especially the finer ones, are best suited for embroidery on finer fabrics, such as Rhodes linen No. 2, and Spanish or Algerian linen.

Materials: Or fin D.M.C pour la broderie No. 40, Coton à broder D.M.C Nos. 50 and 100, or Fil à dentelle D.M.C No. 80.[A]
Colours: Bleu-Indigo 312, 322, 334 and Bleu pâle 668.[A]
Materials: D.M.C Or thread for embroidery No. 40, D.M.C Cotton embroidery Nos. 50 and 100, or D.M.C lace thread No. 80.__A_TAG_PLACEHOLDER_0__
Colors: Indigo Blue 312, 322, 334 and Light Blue 668.__A_TAG_PLACEHOLDER_1__
The button-hole stitches, for which the more subdued shade of the colours indicated should always be taken, or else yellow, dark or pale, to match the gold thread, are made over two threads of gold and follow the outlines of the pattern, which should be more or less appropriate to this style of embroidery. One of the gold threads always keeps the inside of the line and follows it throughout in an unbroken course, whilst with the second, the outside one, you form picots, folding the gold thread over from right to left and catching down the loop by a button-hole stitch, which is introduced into the loop itself and carried over the combined gold threads, as shown in the left corner of fig. 868, representing one quarter of the whole design, where the position of the needle and the way in which the picot is secured are plainly indicated.
The button-hole stitches, for which you should always use a more muted color shade or else yellow, either dark or light, to match the gold thread, are made over two strands of gold and follow the outlines of the pattern, which should be generally suitable for this style of embroidery. One of the gold threads always stays on the inside of the line and follows it consistently, while the second, the outer one, is used to create picots by folding the gold thread from right to left and securing the loop with a button-hole stitch, which is inserted into the loop itself and carried over the combined gold threads, as shown in the left corner of fig. 868, representing one quarter of the whole design, where the needle's position and the method of securing the picot are clearly illustrated.
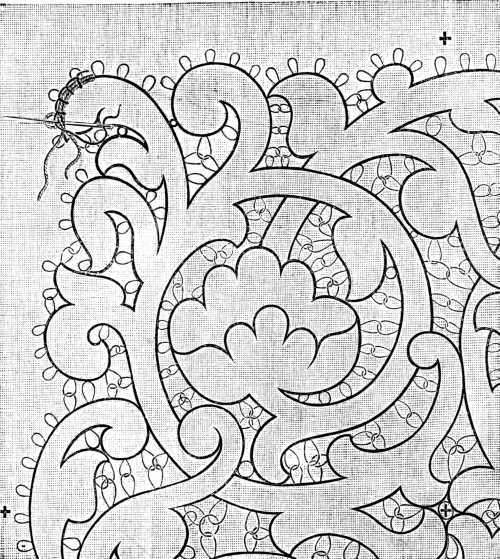
Where the picots have to fill up empty spaces of a larger size, you can join several together by connecting them each in turn with the first.
Where the picots need to fill in larger empty spaces, you can connect several of them together by linking each one to the first.
When you have bordered all the outlines with button-hole stitches and picots, fill up the spaces enclosed within the lines, which properly speaking form the pattern, with flat stitch embroidery, worked in Coton à broder or Coton à repriser; after which the whole surface is sewn over with fine little spangles which give the sparkling look that constitutes the peculiar charm of this kind of embroidery. The flowers are covered with a fancy stitch that forms regular little lozenges, and every second row of stitches is hidden under a spangle.
When you've bordered all the outlines with buttonhole stitches and picots, fill in the spaces enclosed by the lines, which actually create the pattern, with flat stitch embroidery, using Coton à broder or Coton à repriser. After that, cover the entire surface with little fine spangles that give the sparkling effect, which is the unique charm of this type of embroidery. The flowers are covered with a decorative stitch that creates even little diamonds, and every second row of stitches is concealed under a spangle.
With regard to the colours indicated at the foot of fig. 867, this is how they were distributed in the original, from which our engraving was taken; all the outlines in button-hole stitch, in Bleu pâle 668; the tops of the flowers in Bleu-Indigo 334; the bottom parts in Bleu-Indigo 332, and all three shades of blue so blended together in the solid parts of the design as to be undistinguishable from each other. It is not absolutely necessary to keep to the colours here indicated; there is no reason whatever why a greater variety should not be introduced, but in every case the more subdued shades should be selected; a pale red, for instance, for the flowers, a green and a brown for the arabesques, will always be found to produce a very pretty and harmonious effect.
With respect to the colors shown at the bottom of fig. 867, this is how they were arranged in the original from which our engraving was taken: all the outlines in buttonhole stitch, in light blue 668; the tops of the flowers in indigo blue 334; the bottom parts in indigo blue 332, with all three shades of blue blended together in the solid parts of the design to the point where they are indistinguishable from one another. It's not absolutely necessary to stick to the colors specified here; there’s no reason why a broader variety can’t be introduced. However, in every case, more muted shades should be chosen; for example, a pale red for the flowers and a green and brown for the arabesques will always create a very nice and harmonious effect.
When all the needlework is finished, you cut away the stuff underneath the network formed by the picots, with a pair of sharp scissors.
When all the sewing is done, you trim away the fabric underneath the design created by the picots with a pair of sharp scissors.
A word remains to be said with regard to the copying of fig. 868.
A word still needs to be mentioned about copying fig. 868.
Our readers will notice that in fig. 867 the flowers and arabesques succeed and grow out of each other; that whilst the four quarters are symmetrical, yet at the same time, the curves in each quarter take a different inclination.
Our readers will see that in fig. 867, the flowers and arabesques connect and expand from one another; while the four sections are symmetrical, the curves in each section tilt in a different direction.
You cannot therefore simply repeat the subject four times; when you have copied the one quarter, given in fig. 868, you must lay this first quarter on again at the cross + on the left side; when the second quarter is finished, you again turn the copy to the left and tack it on at the +; when you come to the fourth quarter the lines of the first quarter must exactly meet those of the last. We beg here to draw attention to the directions, relative to the copying of patterns, given in the subsequent chapter.
You can’t just repeat the subject four times; after you’ve copied the first quarter shown in fig. 868, you need to align this first quarter again at the cross + on the left side. Once the second quarter is done, turn the copy to the left and attach it at the +. When you reach the fourth quarter, the lines from the first quarter must perfectly align with those of the last. We would like to highlight the instructions related to copying patterns provided in the next chapter.
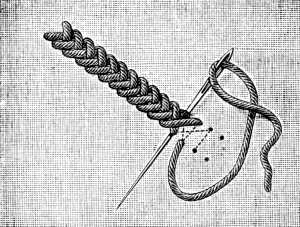
Basket stitch can be worked on all kinds of stuffs, on counted threads or on a wide or narrow tracing, with fine or coarse thread, and more or less closely, according to the taste of the worker.
Basket stitch can be done on all sorts of materials, on counted threads or on a wide or narrow pattern, with fine or thick thread, and more or less tightly, depending on the preference of the person working on it.
You insert the needle from right, and pass it under, from 3 to 6 threads of the foundation, according to the stuff and the material you are using, then downwards from left to right, and over, from 6 to 8 threads, into the stuff again from right to left; then you push it under the stuff in an upward direction and bring it out on the left in the middle of the space left between the last stitch and the top of the second. The dotted line in the engraving indicates the course of the stitches.
You insert the needle from the right and pass it under, through 3 to 6 threads of the foundation, depending on the fabric you’re using. Then, move it downwards from left to right, and over, through 6 to 8 threads, into the fabric again from right to left. Next, push it under the fabric in an upward direction and bring it out on the left, in the middle of the space between the last stitch and the top of the second. The dotted line in the illustration shows the path of the stitches.
Old German knotted stitch (fig. 870).—This is a stitch often met with in old church and house linen embroidery. A beautiful design worked in this way is given further on.
Old German knotted stitch (fig. 870).—This is a stitch commonly found in traditional church and household linen embroidery. A beautiful design created using this technique is shown later on.
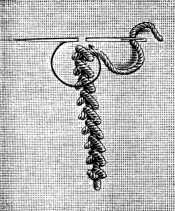
Contrary to most stitches, this is worked upwards; the needle is put in horizontally under the stuff, the thread tightly drawn, then laid from left to right and drawn through underneath the first stitch and a tight knot made. We find the same stitch, worked in a variety of ways, according to the taste and skill of the worker; for instance the knots may be set slanting, as in fig. 870, or else straight and very close together, as in fig. 873, where they present the appearance of a close string of beads, or again wide apart, as they are in fig. 876.
Unlike most stitches, this one is done upwards; you insert the needle horizontally under the fabric, pull the thread tight, then lay it from left to right and pull it through under the first stitch while making a tight knot. This stitch can be worked in different ways depending on the worker's taste and skill; for example, the knots can be angled, like in fig. 870, or arranged straight and very close together, as in fig. 873, where they look like a close string of beads, or spaced out, as shown in fig. 876.
All these ways are admissible but care should be taken in each case, to make the stitches perfectly regular; it is the direction which is given to the stitch and the number of threads taken up with the needle that changes the appearance of the stitch.
All these methods are acceptable, but it's important to ensure that the stitches are perfectly even in each case. It's the direction of the stitch and the number of threads captured by the needle that alters the look of the stitch.
Raised stem stitch (figs. 871, 872).—Take a very thick thread, such as Fil à pointer D.M.C No. 10 or 20, or one of the coarser numbers of Cordonnet 6 fils D.M.C, lay it as a foundation thread along the line of your pattern and work over it wide stem stitches, as represented in figs. 172 and 173, either in the same number of thread used for the foundation thread, or a finer, according to the stuff you are embroidering upon.
Raised stem stitch (figs. 871, 872).—Use a thick thread, like Fil à pointer D.M.C No. 10 or 20, or one of the thicker Cordonnet 6 fils D.M.C numbers. Lay it as a base thread along the pattern line and stitch wide stem stitches over it, as shown in figs. 172 and 173, either using the same thread thickness as the base thread or a thinner one, depending on the fabric you’re embroidering on.
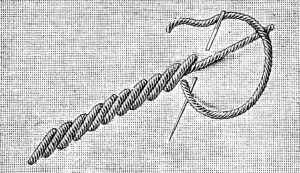
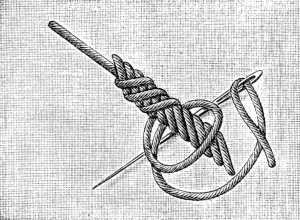
You may overcast the same stitch in the manner indicated in fig. 872, using a different colour for the second layer of stitches to produce an agreeable variety.
You can overlap the same stitch as shown in fig. 872, using a different color for the second layer of stitches to create a nice variation.
Border in different kinds of stitches (fig. 873).—The straight lines of this border are all worked in old German knotted stitch in écru thread, forming a thick round cord which stands out from the surface in high relief; the flatter outlining of the outside figures is done in basket stitch in soft blue knitting cotton. The little oblong figures within the two inner lines of the border are worked in Gobelin stitch, in red embroidery cotton, and the filling of the figures, outlined in basket stitch, in one or other of the Irish lace stitches, worked in white lace thread, either so that all the stitches enter the stuff, or form a network over it.
Border in different kinds of stitches (fig. 873).—The straight lines of this border are all created using an old German knotted stitch in off-white thread, forming a thick round cord that stands out prominently from the surface. The flatter outlines of the outer figures are done in basket stitch with soft blue knitting cotton. The small rectangular figures between the two inner lines of the border are made using Gobelin stitch in red embroidery cotton, and the filling of the figures, outlined in basket stitch, is done with one of the Irish lace stitches, using white lace thread, either so that all the stitches penetrate the fabric, or create a lace-like pattern over it.
The work may be simplified by sewing Soutache D.M.C or Lacet superfin D.M.C along the straight lines instead of embroidering them in basket stitch.
The task can be made easier by sewing Soutache D.M.C or Lacet superfin D.M.C along the straight lines instead of embroidering them in a basket stitch.
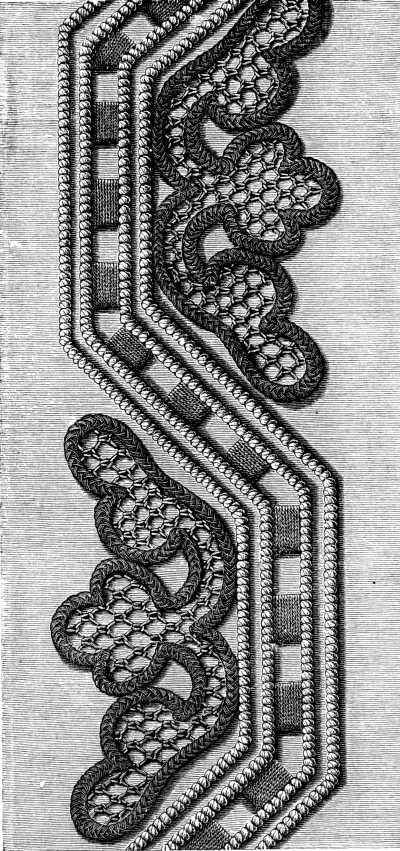
Materials—For the old German knotted stitch: Cordonnet 6 fils D.M.C No. 2, écru—For the basket stitch: Coton à tricoter D.M.C No. 16, Bleu-Indigo 312—For the Gobelin stitches: Coton à broder D.M.C No. 20, Rouge-Turc 321—For the lace stitches: Fil à dentelle D.M.C No. 40, white.
Materials—For the old German knotted stitch: Cordonnet 6 fils D.M.C No. 2, ecru—For the basket stitch: Coton à tricoter D.M.C No. 16, Indigo Blue 312—For the Gobelin stitches: Coton à broder D.M.C No. 20, Turkish Red 321—For the lace stitches: Lace thread D.M.C No. 40, white.
Though the engraving is so clear as to render it hardly necessary, we subjoin an exact description of the way the stitches run.
Though the engraving is so clear that it's almost unnecessary, we include a detailed description of how the stitches run.

Bring out the needle on the left, 2 or 6 threads beyond the line your embroidery is to follow; with regard to the number of threads you take up, you must be guided by the quality of the stuff and the material you have selected: put the needle in on the right, the same distance in advance of the line as before and bring it out in the middle of the stitch; then passing the needle over the first stitch, put it in again one or two threads in advance of the point where it came out, and draw it out close to where the first stitch began.
Bring out the needle on the left, 2 or 6 threads beyond the line your embroidery is meant to follow. When deciding how many threads to take up, consider the quality of the fabric and material you’ve chosen. Insert the needle on the right, at the same distance ahead of the line as before, and bring it out in the middle of the stitch. Then, passing the needle over the first stitch, insert it again one or two threads ahead of where it came out, and pull it out close to where the first stitch started.
The border, represented in fig. 875, is worked in great part in Roumanian stitch.
The border, shown in fig. 875, is mainly done in Romanian stitch.
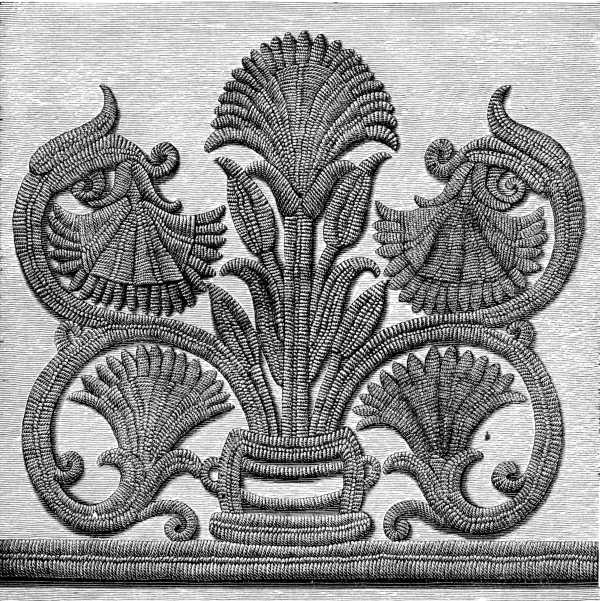
Materials: Coton à broder D.M.C No. 16, Coton à repriser D.M.C No. 50, or Cordonnet 6 fils D.M.C No. 20.[A]
Colours: Rouge-Cardinal 346, Rouge-Grenat 358, Brun-Caroubier 355, Rouge Maroquin 3327 et 3328, or Rouge-Cerise 3317 et 3318.[A]
Materials: D.M.C No. 16 embroidery cotton, D.M.C No. 50 darning cotton, or D.M.C No. 20 cordonnet, 6 strands.__A_TAG_PLACEHOLDER_0__
Colors: Cardinal Red 346, Garnet Red 358, Carob Brown 355, Maroon Red 3327 and 3328, or Cherry Red 3317 and 3318.__A_TAG_PLACEHOLDER_1__
The original, still very well preserved, notwithstanding its age, is worked in silk of a brilliant red on a stiff stuff which has been coloured by time and use.
The original, still very well preserved despite its age, is made of bright red silk on a firm fabric that has been changed by time and use.
Willems satin, Rhodes linen No. 2 and Algerian linen, make very suitable foundations for this kind of embroidery and have that soft tint which is almost indispensable to a satisfactory imitation of old needlework.
Willems satin, Rhodes linen No. 2, and Algerian linen are great options for this type of embroidery. They have that soft color that's almost essential for a good imitation of vintage needlework.
Any one of the shades of red named at the foot of the illustration, will be found to be a good match for the original colours.
Any of the shades of red listed at the bottom of the illustration will match the original colors well.
Roumanian stitch is used wherever the lines of the pattern are widest; there where they narrow, in the indentures of the leaves and the twists of the stalks, flat stitch is used instead.
Roumanian stitch is used where the pattern lines are widest; where they narrow, in the indentations of the leaves and the twists of the stems, flat stitch is used instead.
By the repetition of the detached subject, this pattern may be made to serve either for a stripe or for a grounding; if you use it for a stripe, the centre flower of the principal subject with the stalks lengthened, will look very well worked as a separate subject between the large bouquets. Worked in a double row, base to base, on any stuff and in any material, these large figures form a very handsome border which makes an effective trimming for furniture and curtains.
By repeating the separate subject, this pattern can be used for either a stripe or a background. If you choose to use it as a stripe, the central flower from the main subject with lengthened stems will look great as a distinct element placed between the large bouquets. When designed in a double row, base to base, on any fabric and in any material, these large patterns create a beautiful border that serves as an attractive trim for furniture and curtains.
Pattern for piqué embroidery (fig. 876).—The stuff, called piqué, such as it is now manufactured, is simply an imitation of an old kind of needlework, almost unknown in these days, but very popular in the fifteenth and sixteenth century in Italy, for making coverlets and more especially curtains and blinds; the latter being highly esteemed, because without intercepting the light altogether, they tempered it agreeably.
Pattern for piqué embroidery (fig. 876).—The material known as piqué, as it is currently produced, is just a modern version of an old type of needlework that is nearly forgotten today but was very popular in the 15th and 16th centuries in Italy for creating coverlets, particularly curtains and blinds. These were especially valued because they softened the light without blocking it completely.
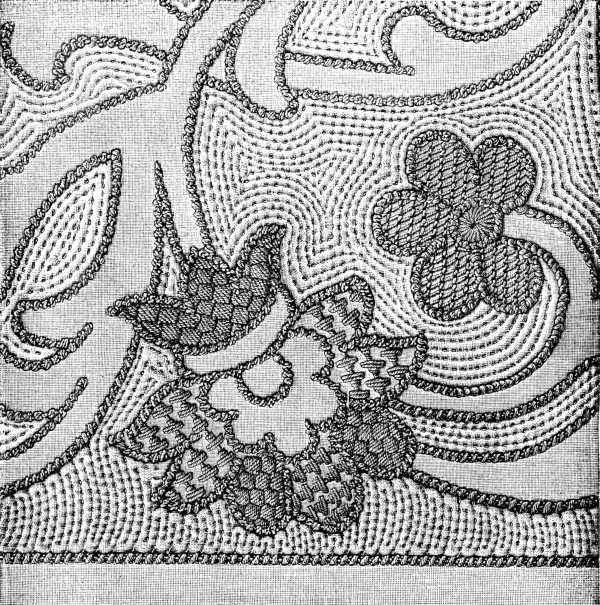
Materials: Cordonnet 6 fils D.M.C Nos. 1 and 25, Fil d’Alsace D.M.C No. 100, Fil à pointer D.M.C No. 30 and Fil à dentelle D.M.C No. 30.[A]
Materials: Cordonnet 6 fils D.M.C Nos. 1 and 25, Fil d’Alsace D.M.C No. 100, Fil à pointer D.M.C No. 30, and Fil à dentelle D.M.C No. 30.__A_TAG_PLACEHOLDER_0__
A similar kind of work was common in Bohemia until a recent date for the making of caps. It is done on two layers of stuff, of different kinds, the upper one fine and transparent, the lower, more substantial.
A similar type of work was common in Bohemia until recently for making caps. It is done with two layers of fabric, of different kinds; the top layer is fine and transparent, while the bottom layer is thicker and more durable.
The pattern is drawn upon the fine stuff, because on that side the different kinds of stitches are made.
The design is created on the fine material, as that’s where the various types of stitches are applied.
You then tack the two stuffs together and work all the outlines of the pattern in Old German knotted stitch with écru Fil à pointer D.M.C No. 20; that done, thread a tapestry needle with white Cordonnet 6 fils D.M.C No. 1 or 2, slip it in between the two layers of stuff and secure the end by two or three stitches; then push the twist quite close to the knotted stitch and fasten it in between the two layers of stuff, with small and very regular running stitches, in a fine pliable material, such as Fil d’Alsace D.M.C on reels.
You then stitch the two fabrics together and outline the pattern in Old German knotted stitch with écru D.M.C No. 20 thread; once that’s done, thread a tapestry needle with white Cordonnet 6 fils D.M.C No. 1 or 2, slip it between the two layers of fabric, and secure the end with two or three stitches; then push the twist close to the knotted stitch and secure it between the two layers of fabric with small, even running stitches using a fine, flexible material like Fil d’Alsace D.M.C on reels.
Fill up in this manner all the ground of the pattern, leaving the arabesques and the ornaments plain, or embellishing them with some kind of lace or embroidery stitch.
Fill in all the areas of the pattern like this, leaving the arabesques and ornaments simple, or decorating them with some type of lace or embroidery stitch.
When these stripes are intended for blinds, you can produce pretty transparent effects in them by cutting away the underneath stuff, in places.
When these stripes are meant for blinds, you can create some nice transparent effects by cutting away the material underneath in certain spots.
The letters lend themselves, better than any we know, to being executed in Soutache D.M.C.
The letters are more suited than any we know to be done in Soutache D.M.C.
The sewing on of the braid is done with very small running stitches and the interlacing with a tapestry needle, into which the braid is threaded; both operations are shown in figs. 877 and 880. The embroidery of the connecting bars, and the small leaves and tendrils that complete the letter are explained in fig. 881, whilst fig. 882 represents the letter A in its finished state.
The braid is sewn on with tiny running stitches, and the interlacing is done with a tapestry needle that the braid is threaded through; both processes are illustrated in figs. 877 and 880. The embroidery of the connecting bars, along with the small leaves and tendrils that finish the letter, is detailed in fig. 881, while fig. 882 shows the completed letter A.

Flowers executed in Soutache and embroidery (fig. 883). Flowers and sprays, such as here represented, make a charming trimming for summer dresses, sunshades, aprons etc. and can be executed with admirable effect in the D.M.C Soutache, now to be had in all the colours of the D.M.C colour card. A very pretty running pattern can be formed out of the spray, fig. 883, by turning the flowers first to the right and then to the left and making the stalks come out underneath the ears of corn. In order to reverse the position of the flowers thus, you will have to make two tracings of the spray, one negative and one positive.
Flowers made with Soutache and embroidery (fig. 883). Flowers and sprays like the ones shown here make a lovely trim for summer dresses, sunshades, aprons, etc. They can be created with stunning results using D.M.C Soutache, which is available in all the colors of the D.M.C color card. A very nice running pattern can be created from the spray, fig. 883, by turning the flowers first to the right and then to the left, letting the stalks come out from underneath the ears of corn. To switch the position of the flowers like this, you'll need to make two tracings of the spray, one negative and one positive.
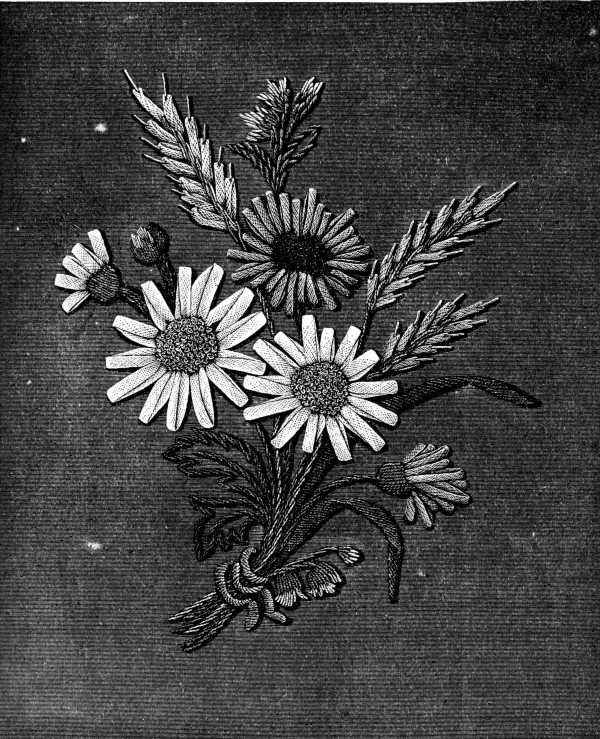
Materials: Soutache D.M.C Nos. 1 to 3 and Coton à broder D.M.C No. 35.[A]
Colours—For the Soutache: White, écru or Jaune d’Ocre 677, and Bleu-Indigo 322.—For the Coton à broder: Écru, Jaune-Orange 444, Bleu-Indigo 311, Gris-Tilleul 391 and 330, Vert-Pistache 319, 320 and 369, Rouge-Cardinal 348.[A]
Materials: Soutache D.M.C Nos. 1 to 3 and Coton à broder D.M.C No. 35.__A_TAG_PLACEHOLDER_0__
Colors—For the Soutache: White, ecru, or Yellow Ocher 677, and Indigo Blue 322.—For the Coton à broder: Ecru, Orange Yellow 444, Indigo Blue 311, Thistle Gray 391 and 330, Pistachio Green 319, 320, and 369, Cardinal Red 348.__A_TAG_PLACEHOLDER_1__
For the ears of corn in fig. 883, use either Soutache écru, or Jaune-d’Ocre 677 No. 2; for the marguerites, white Soutache No. 2½ and for the corn flowers, Soutache Bleu-Indigo 322 No. 2. Nothing could be simpler than the mode of working these flowers.
For the ears of corn in fig. 883, use either Soutache beige or Jaune-d’Ocre 677 No. 2; for the daisies, white Soutache No. 2½, and for the cornflowers, Soutache Bleu-Indigo 322 No. 2. It couldn't be easier to create these flowers.
Thread a tapestry needle with the Soutache and draw it into the stuff, and then pass it through from the right side to the wrong at the bottom of one of the petals of the flowers, secure it on the wrong side by two or three stitches and then bring the working thread, which should be of the same colour as the Soutache, out again at the point of the petal, then carry the Soutache back to the bottom of the petal and fasten it down, like the gold threads in fig. 242, by a stitch rather wider than the Soutache, fold the Soutache over again to the starting point, and secure it by a stitch, and so on. In order to give a different character to the flowers, use Soutache of different widths, fold it over more or less closely and lay it down in shorter or longer lengths, as required. The natural irregularity of the petals of a flower can be very faithfully imitated in this manner. Fig. 883 shows the way in which, for the ears of corn, the braid is folded back upon itself and fastened down, whilst in the white flowers the two layers of the braid that form each petal are separated at the bottom.
Thread a tapestry needle with the Soutache and pull it into the fabric, then pass it through from the right side to the wrong side at the bottom of one of the flower petals. Secure it on the wrong side with two or three stitches, then bring the working thread, which should match the color of the Soutache, back out at the tip of the petal. Next, bring the Soutache back to the bottom of the petal and secure it down with a stitch that is a bit wider than the Soutache. Fold the Soutache back to the starting point and secure it with a stitch, and repeat as needed. To create a different look for the flowers, use Soutache of varying widths, fold it over more or less tightly, and lay it down in shorter or longer lengths as needed. This technique can realistically mimic the natural irregularity of flower petals. Fig. 883 demonstrates how the braid is folded back on itself and secured for the ears of corn, while in the white flowers, the two layers of braid that make up each petal are separated at the bottom.
The stamens of the marguerites are worked in knot stitch with yellow cotton and those of the cornflowers with dark blue.
The stamens of the daisies are done in knot stitch with yellow cotton, and those of the cornflowers are done in dark blue.
We need only point out that Rouge-Cardinal 348 is intended for the little knot that connects the stalks of the flowers.
We just need to mention that Rouge-Cardinal 348 is meant for the small tie that connects the stems of the flowers.
Chinese subject (fig. 884).—This quaint and graceful composition, copied from an interesting piece of Chinese embroidery, gives our readers the opportunity of turning the different damask stitches, already described in these pages, to quite a new use.
Chinese subject (fig. 884).—This charming and elegant composition, inspired by a fascinating piece of Chinese embroidery, allows our readers to apply the various damask stitches discussed in these pages in a completely new way.
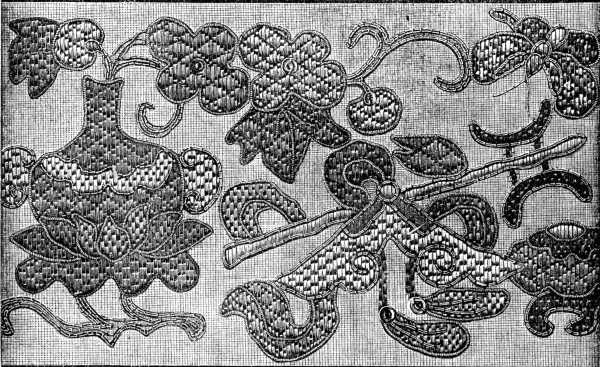
Materials: Coton à repriser D.M.C No. 50, Or fin D.M.C pour la broderie No. 40 and Chiné d’or D.M.C.[A]
Materials: D.M.C No. 50 mending cotton, D.M.C gold for embroidery No. 40, and D.M.C gold twist __A_TAG_PLACEHOLDER_0__
The kind of gauze which forms the foundation of the original work can be replaced either by Spanish or Rhodes linen No. 2, by any stuff, in fact, the threads of which can be counted.
The type of gauze that serves as the base of the original work can be replaced with either Spanish or Rhodes linen No. 2, or really any material, as long as the threads can be counted.
The drawing has to be transferred to the stuff, and the different parts are filled in with the stitches, clearly indicated in the illustration.
The drawing needs to be transferred onto the material, and the different sections are filled in with the stitches, clearly shown in the illustration.
By the introduction of several colours, this pattern is capable of being infinitely varied.
By introducing several colors, this pattern can be infinitely varied.
Thus, in the model before us, the neck and bulb of the flask, the leaves it stands upon and those attached to the flowers in it, are worked in Vert-Pistache 367, the handles, the ornament on the bottle, and the triangular figure in the centre are in white; the little flower on the left, the second on the right, the straight staff, the upper wings of the butterfly, as well as the three leaves underneath the triangle are in Bleu-Indigo 334; the first flower on the right of the flask, the knot above the triangle, the lower wings of the butterfly and the middle part of the bottom subject on the right of the engraving are in Gris-Amadou 383; and Violet-lie-de-vin and Brun-Caroubier 357 alternate in the pointed leaves that support the flask; the former colour recurs in the ornaments of the staff, and Rouge-Cardinal 347, black and Gris-Tilleul alternate in the other details of the drawing.
Thus, in the model before us, the neck and bulb of the flask, the leaves it stands on, and those attached to the flowers inside it, are done in Vert-Pistache 367. The handles, the decoration on the bottle, and the triangular shape in the center are in white. The little flower on the left, the second one on the right, the straight staff, the upper wings of the butterfly, and the three leaves underneath the triangle are in Bleu-Indigo 334. The first flower on the right of the flask, the knot above the triangle, the lower wings of the butterfly, and the middle part of the bottom subject on the right of the engraving are in Gris-Amadou 383. Violet-lie-de-vin and Brun-Caroubier 357 alternate in the pointed leaves that support the flask; the former color appears again in the decorations of the staff, while Rouge-Cardinal 347, black, and Gris-Tilleul alternate in the other details of the drawing.
For the setting it will be best to take Or fin D.M.C pour la broderie or else Chiné d’or D.M.C, used either double or single, according to whichever the drawing seems to require.
For the setting, it’s best to use Or fin D.M.C for the embroidery, or Chiné d’or D.M.C, using either double or single thread, depending on what the drawing needs.
FOOTNOTES:
Practical directions.
Hitherto we have been chiefly occupied with descriptions and explanations of the different kinds of needlework; to render these complete, it remains for us to give a few practical directions with regard to the copying, adjustment and transposition of the patterns, as well as to the different processes, often so essential to the ultimate success of a piece of needlework. For this success will soon be found not to depend on the stitches only but very largely on the proper adaptation of the design to the space it is intended to fill.
Up until now, we have mainly focused on describing and explaining the various types of needlework. To complete this, we need to provide some practical tips on how to copy, adjust, and transpose the patterns, as well as the different processes that are often crucial for the final success of a sewing project. It's important to understand that success doesn't just depend on the stitches, but also significantly on how well the design fits the area it's meant to fill.
Then, in the case of new lace, it is necessary to know the amount of dressing it will require to give it the right stiffness and when this dressing has worn off how to renew it; whilst in the case of appliqué work more especially, it is indispensable to know exactly what the ingredients are, of which the paste should be composed and how to make and lay it on in the proper manner.
Then, for new lace, it's important to understand how much dressing it needs to achieve the right stiffness and how to renew it once the dressing has worn off. Especially for appliqué work, it's essential to know the exact ingredients that the paste should be made of and how to properly mix and apply it.
Tracing patterns against a window pane.—In order to copy a pattern in this way, the first step is to tack or pin the piece of stuff or paper on which the copy is to be made upon the pattern. In the case of a small pattern, the tacking or pinning may be dispensed with and the two sheets held firmly pressed against the window pane with the left hand, whilst the right hand does the tracing, but even then it is safer to pin or gum the four corners of the two sheets together, in case of interruption, as it is difficult to fit them together again exactly.
Tracing patterns against a window pane.—To copy a pattern this way, the first step is to secure the piece of fabric or paper you’re using to make the copy onto the pattern. For a small pattern, you can skip the tacking or pinning and just hold both sheets pressed against the window pane with your left hand while tracing with your right hand. However, it’s still a good idea to pin or tape the four corners of the two sheets together in case you get interrupted, since it’s challenging to align them perfectly again.
The tracing may be done with a pencil, or better still, with a brush dipped in Indian ink or water-colour paint.
The tracing can be done with a pencil, or even better, with a brush dipped in Indian ink or watercolor paint.
The process of tracing is easy enough, so long as the hand does not get tired but as this generally comes to pass very soon it is best, if the pattern be a large and complicated one, to stick the sheets to the pane with strong gum or suspend them on a string, fastened across the pane by pins stuck into the window frame on either side.
The tracing process is pretty straightforward, as long as your hand doesn't get tired. However, since it usually gets tired quickly, it's a good idea, especially for large and complex patterns, to attach the sheets to the window with strong adhesive or hang them on a string secured across the pane by pins on either side of the window frame.
To take off a pattern by rubbing.—If you want to take a pattern of a piece of embroidery direct from the work itself, lay it, the right side up, flat upon a board or table and cover it with letter or tissue paper.
To take off a pattern by rubbing.—If you want to get a pattern from a piece of embroidery directly from the work itself, lay it, right side up, flat on a board or table and cover it with letter or tissue paper.
The paper should be of a good medium thickness, if it be too thick it will not take a clear impression of the pattern, and if very thin it is apt to tear.
The paper should be a good medium thickness; if it’s too thick, it won’t take a clear impression of the pattern, and if it’s very thin, it’s likely to tear.
Fasten the paper down upon the embroidery with drawing-pins and rub off the pattern with drawing-wax. In default of the right kind of wax, the bowl or handle of a spoon, or a large silver coin will serve the purpose equally well, as will also some powdered graphite or charcoal. The outlines will not of course, in any case, be very clearly defined upon the paper and will have to be gone over and carefully supplemented afterwards with a pencil.
Secure the paper onto the embroidery with drawing pins and transfer the pattern using drawing wax. If you don't have the right kind of wax, the bowl or handle of a spoon, or a large silver coin can work just as well, as can some powdered graphite or charcoal. The outlines won't be very clearly defined on the paper and will need to be refined and enhanced later with a pencil.
Taking off the pattern with charcoal or graphite is less injurious to the embroidery than rubbing it off with wax or metal, as the pressure required in the latter case flattens the needle-work very considerably. As soon as you have fixed the lines of the pattern by drawing them over with ink, it is ready for use.
Removing the pattern with charcoal or graphite is less damaging to the embroidery than wiping it away with wax or metal, since the pressure needed in the latter method flattens the stitching quite a bit. Once you've outlined the pattern with ink, it's good to go.
To transfer a pattern direct on to the stuff.—Patterns cannot be copied by either of the above methods direct on to the stuff and can only be used when the stuff on which the embroidery is to be executed is transparent; in the case of thick close fabrics the drawing must be made on the stuff itself. The following is the simplest way of transferring a pattern on to a transparent stuff; begin by going over all the lines of the drawing with Indian ink so as to make them quite thick and distinct, and tacking the paper with large stitches on to the back of the stuff. Then, mix some very dark powdered indigo diluted with water, in a glass with a small pinch of sugar and powdered gum arabic, and using this as ink and a fine pen very slightly split, trace the pattern that shines through on the stuff.
To transfer a pattern directly onto the fabric.—Patterns cannot be directly copied onto the fabric using either of the above methods and can only be applied when the fabric intended for the embroidery is transparent; in the case of thick, close-knit fabrics, the drawing must be made directly on the fabric itself. The following is the simplest way to transfer a pattern onto a transparent fabric: start by outlining all the lines of the drawing with Indian ink to make them bold and clear, then tack the paper with large stitches onto the back of the fabric. Next, mix some very dark powdered indigo diluted with water in a glass, adding a small pinch of sugar and powdered gum arabic, and using this as ink with a fine pen that’s slightly split, trace the pattern that shines through on the fabric.
The tracing must be very slight, for if the embroidery be not done till some time afterwards the lines get so firmly fixed in the stuff that one washing will not obliterate them; the tracing ink moreover makes the work unpleasantly sticky.
The tracing should be very light, because if the embroidery isn't done until a while later, the lines get so deeply set in the fabric that one wash won't remove them. Plus, the tracing ink can make the work uncomfortably sticky.
To copy with oiled paper.—Another rather expeditious mode of transferring patterns on to thin and more especially smooth glossy stuffs, is by means of a special kind of tinted paper, called autographic paper, which is impregnated with a coloured oily substance and is to be had at any stationer’s shop. This you place between the pattern and the stuff, having previously fastened the stuff, perfectly straight by the line of the thread, to a board, with drawing-pins. When you have fitted the two papers likewise exactly together, you go over all the lines of the pattern with a blunt pencil, or with, what is better still, the point of a bone crochet needle or the edge of a folder. You must be careful not to press so heavily upon the pattern paper as to tear it; by the pressure exercised on the two sheets of paper, the oily substance of the blue paper discharges itself on to the stuff, so that when it is removed all the lines you have traced are imprinted upon the stuff.
To copy with oiled paper.—Another fairly quick way to transfer patterns onto thin, especially smooth glossy fabrics, is by using a special type of tinted paper called autographic paper. This paper is coated with a colored oily substance and can be found at any stationery store. Place this paper between the pattern and the fabric, making sure to secure the fabric perfectly straight along the thread line to a board using drawing pins. Once you have aligned the two papers precisely, trace all the lines of the pattern with a blunt pencil, or even better, with the tip of a bone crochet needle or the edge of a folder. Be careful not to press too hard on the pattern paper to avoid tearing it; the pressure applied to the two sheets of paper will transfer the oily substance from the blue paper onto the fabric, so when you remove it, all the lines you traced will be imprinted on the fabric.
This blue tracing paper is however only available for the reproduction of patterns on washing stuffs, as satin and all other silky textures are discoloured by it.
This blue tracing paper is only suitable for reproducing patterns on washable materials, as satin and other silky fabrics get stained by it.
To pounce patterns upon stuffs.—The modes of copying, hitherto described, cannot be indiscriminately used for all kinds of stuff; for cloth, velvet and plush, for instance, they are not available and pouncing is the only way that answers.
To transfer patterns onto fabrics.—The methods of copying described so far cannot be used for every type of material; for example, they don't work for cloth, velvet, or plush, and pouncing is the only technique that works effectively.
The patterns, after having been transferred to straw or parchment paper, have to be pricked through. To do this you lay the paper upon cloth or felt and prick out all the lines of the drawing, making the holes, which should be clear and round, all exactly the same distance apart.
The patterns, after being transferred to straw or parchment paper, need to be pricked through. To do this, you place the paper on cloth or felt and prick out all the lines of the drawing, making the holes clear and round, with each one exactly the same distance apart.
The closer and more complicated the pattern is, the finer and closer the holes should be. Every line of the outline must be carefully pricked out.
The more intricate and detailed the pattern is, the smaller and more precise the holes need to be. Every line of the outline must be carefully marked out.
If the paper be sufficiently thin, several pouncings can be pricked at the same time, and a symmetrical design can be folded together into four and all pricked at once.
If the paper is thin enough, you can make several pouncings at the same time, and a symmetrical design can be folded into four and all pricked at once.
The pricked pattern has next to be tacked upon the material, the side from which the pricking was done next to the stuff and the little funnel-shaped holes uppermost. Paper and stuff must be firmly fastened down and kept in position by drawing pins, so that neither of them may move during the process, otherwise you will have double lines on the stuff which you will find very confusing afterwards.
The prick pattern needs to be tacked onto the fabric, with the side where the pricking was done facing the material and the small funnel-shaped holes on top. The paper and fabric must be securely fastened down and held in place with drawing pins, so that neither piece moves during the process. Otherwise, you'll end up with double lines on the fabric, which will be very confusing later on.
For the pouncing, use either powdered chalk or charcoal, according to whether the stuff be dark or light in colour. Dip the pouncing implement, a thing like a small drum-stick, stuffed and covered with cloth, into the powder and rub it lightly over the whole surface of the pricked pattern, so that the powder penetrates through the pin-holes to the stuff. In default of a proper pouncing implement take a small stripe of cloth, roll it up round a stick and wind a string round, and dip this into the powder.
For pouncing, use either powdered chalk or charcoal, depending on whether the material is dark or light in color. Dip the pouncing tool, which looks like a small drumstick covered with cloth, into the powder and lightly rub it over the entire surface of the pricked pattern so that the powder gets through the pinholes to the material. If you don’t have a proper pouncing tool, take a small strip of cloth, roll it around a stick, tie it up with string, and dip that into the powder.
When the powder has penetrated to the stuff, remove the paper and if the pattern is to be repeated, lay it on again further on, taking care to make the lines meet exactly so that the join may not be seen.
When the powder has soaked into the material, take off the paper, and if you need to repeat the pattern, place it down again further along, making sure to align the lines perfectly so that the seam isn't visible.
When you have finished the pouncing and taken off the paper, you proceed to draw or rather paint in the pattern with water-colour paints: Ackermann’s are the best for the purpose; no others, as far as our experience has proved, adhere so well to even the roughest fabrics or so little affect the brilliancy of the embroidery thread. Four paints, blue, black, yellow and white are sufficient for all purposes, whatever the colour of the stuff may be.
When you've finished the pouncing and removed the paper, you move on to drawing or rather painting in the pattern with watercolors: Ackermann's are the best for this; no other brands, based on our experience, stick as well to even the roughest fabrics or affect the brightness of the embroidery thread as little. Four colors—blue, black, yellow, and white—are enough for all needs, regardless of the fabric's color.
On a smooth surface the tracing may be done with a pen but a small sable-hair brush is preferable under all circumstances.
On a smooth surface, you can use a pen for tracing, but a small sable-hair brush is better in every situation.
The rougher and more hairy the surface, the finer the brush ought to be, in order that the colour may sink well in between the fibres.
The rougher and hairier the surface, the finer the brush should be, so that the color can really get into the fibers.
Before beginning to paint in the pattern, gently blow away all the superfluous powder from the surface. This process may be objected to as being an old one which has been superseded by new inventions; a resinous powder for instance, by the use of which patterns can be fixed, as soon as they have been pounced, by passing a hot iron over the stuff, a sheet of paper having first been laid upon it to protect it; or else a mixture of gum and powder which can be dissolved on the stuff itself by the steam of spirits-of-wine, and various other processes needless to mention here, as some are only useful in tracing patterns on a large scale, whilst others require a variety of appliances, not as a rule, within the reach of those to whom needle-work is a simple recreation.
Before you start painting the pattern, gently blow away any excess powder from the surface. Some might argue that this is an outdated method, replaced by newer tools; for example, there are resinous powders that allow patterns to be fixed right after they're applied by using a hot iron over it, with a sheet of paper laid down first for protection. Alternatively, there's a mixture of gum and powder that can be activated on the material itself using the steam from alcohol, among other techniques that aren't necessary to discuss here. Some of these methods are only useful for tracing large designs, while others need various tools that are typically not available to those who enjoy needlework as a simple hobby.
The preparation of the stuffs and the subdivision of the patterns.—Long years of experience and practice have brought us in contact with a good many designers, many of them artists in their way, so long as it was only a question of putting their own compositions on paper but who yet found themselves confronted by real difficulties the moment they were called upon to transfer them to stuff.
The preparation of the materials and the breakdown of the designs.—After years of experience and practice, we have worked with many designers, many of whom are talented artists when it comes to putting their own ideas on paper. However, they often faced real challenges when it came time to apply those ideas to fabric.
We shall, as far as possible, point out to our readers the precautions to be taken in tracing patterns and must for that purpose go back to one of the first operations, namely that of pricking.
We will, as much as we can, highlight for our readers the precautions to take when tracing patterns and for that reason, we need to revisit one of the initial steps, which is pricking.
To begin with, the paper on which the pattern is should always be large enough for there to be a clear margin of from 4 to 5 c/m. all round the pattern, so that the pouncing instrument may never come in contact with the stuff beneath.
To start, the paper the pattern is on should always be large enough to leave a clear margin of 4 to 5 cm all around the pattern, so that the pouncing tool never touches the material underneath.
In transferring patterns to stuff, no lines of division should ever be made directly upon it either with lead, chalk or charcoal, as it is hardly ever possible entirely to obliterate them and they often become very confusing afterwards.
In transferring patterns to materials, no dividing lines should ever be made directly on it with lead, chalk, or charcoal, as it’s almost impossible to completely erase them, and they often end up being very confusing later on.
Before beginning the tracing, divide your stuff into four, then decide what the width of the border outside the pattern is to be; it is quite an exceptional thing to carry a pattern right up to the edge. Stuffs that will take a bend, such as all linen and cotton textures, can be folded in four, like the paper, the folds ought then to be pinched and pressed down so that the lines may remain clear and distinct until the tracing be finished.
Before you start tracing, separate your materials into four sections. Next, determine the width of the border outside the pattern; it's quite unusual to have a pattern go all the way to the edge. Fabrics that can bend, like all linen and cotton types, can be folded into quarters, just like the paper. Make sure to pinch and press the folds down so that the lines stay clear and distinct until you finish the tracing.
After dividing it into four, mark out the diagonal lines; these are absolutely necessary in order to get the corner figures rightly placed.
After dividing it into four, draw the diagonal lines; these are essential for properly positioning the corner figures.
Though most of our readers know how to make these lines on paper with a pencil and ruler, few, easy as it is, know how to make them upon stuff. You have only to fold over the corner of your piece of stuff so that the outside thread of the warp or cut edge run parallel with the woof edge which marks the angle of the fold-over.
Though most of our readers know how to draw these lines on paper with a pencil and ruler, few, despite its simplicity, know how to create them on fabric. You just need to fold over the corner of your fabric so that the outer thread of the warp or the cut edge runs parallel to the weft edge that indicates the angle of the fold.
This double folding over divides the ground into 8 parts. To arrange for the outside border or margin, is easy enough if the stuff and the kind of work you are going to do upon it admit of the drawing out of threads, as then a thread drawn out each way serves as a guide for tracing the pattern, straight to the line of the stuff. It is often better however, not to draw out the threads for an open-work border till the pattern be traced. If you do not wish or are not able to draw out threads to mark the pattern and you are working on a stuff of which the threads can be counted, follow the directions given on page 128, and explained in fig. 252.
This double fold divides the fabric into 8 sections. Setting up the outer border or margin is pretty simple if the material and the type of work you're doing allow for pulling out threads. In that case, a thread pulled out in both directions acts as a guide for tracing the pattern straight along the edge of the material. However, it’s often better not to pull out the threads for an open-work border until the pattern is traced. If you don’t want to or can’t pull out threads to mark the pattern and you're working with a fabric where you can count the threads, follow the instructions given on page 128, and explained in fig. 252.
You cannot mark cloth, silk stuffs or plush by folding them in the above way, cloth and some kinds of silken textures will not take a bend and others that will would be spoiled by it.
You can't mark fabric, silk, or plush by folding them like that; some fabrics and certain types of silk won't hold a crease, and others that can will be damaged by it.
All such stuffs should be mounted in a frame, before the pattern be traced and the ground be then divided out in the following way: take a strong thread, make a knot at one end, stick a pin into it and tighten the knot round it; with a pair of compasses, divide one of the sides into two equal parts, stick the pin with the knot round it in at the middle and the same on the opposite side, putting in a second pin by means of which you stretch the thread; carry other threads across in a similar way, in the width of the stuff and from corner to corner and you will have your ground correctly marked out, in such a manner as to leave no marks when, after pouncing in the pattern, you remove the threads. Before finishing the pouncing of a pattern, see that it is the right size for the purpose it is intended for.
All these materials should be framed before tracing the pattern and dividing the ground as follows: take a strong thread, tie a knot at one end, stick a pin through it, and tighten the knot around the pin; using a pair of compasses, divide one side into two equal parts, insert the pin with the knot into the middle, and do the same on the opposite side, inserting a second pin to stretch the thread; place additional threads across in a similar manner, covering the width of the material and from corner to corner, and you will have your ground accurately marked out in a way that leaves no marks when you remove the threads after pouncing the pattern. Before finishing the pouncing of a pattern, ensure that it is the correct size for its intended purpose.
Supposing that you are tracing a border with a corner, you should measure the length it will occupy and then by a very light pouncing, you can mark the points from which the pattern will have to be repeated. It may be that a gap will be left in the middle, which, if not too large, can be got rid of without altering the pattern by pushing the whole thing a little further in and so shortening the distance between the two corners.
If you're outlining a border with a corner, you should first measure how long it will be. Then, with a light touch, you can mark the spots where you need to repeat the pattern. There might be a space left in the middle, which, if it's not too big, can be fixed without changing the pattern by just shifting everything a bit closer together and reducing the distance between the two corners.
Should the gap however be too large for this, you will have to make a supplementary design to fill up the place. The same thing would be necessary in the case of your having to shorten a pattern.
Should the gap be too large for this, you'll need to create an additional design to fill the space. The same would apply if you need to shorten a pattern.
To transpose and repeat patterns by means of looking-glasses (fig. 885).—We have referred to the necessity that often occurs of adapting patterns to certain given proportions; this can in most cases be done easily enough without the help of a draughtsman, especially in the case of cross stitch embroideries, by means of two unframed looking-glasses (Penelope mirrors, as they are called) used in the following manner.
To transpose and repeat patterns using mirrors (fig. 885).—We have mentioned the need to adjust patterns to specific proportions; this can usually be done quite easily without needing a draftsman, especially with cross stitch embroideries, by using two unframed mirrors (called Penelope mirrors) in the following way.
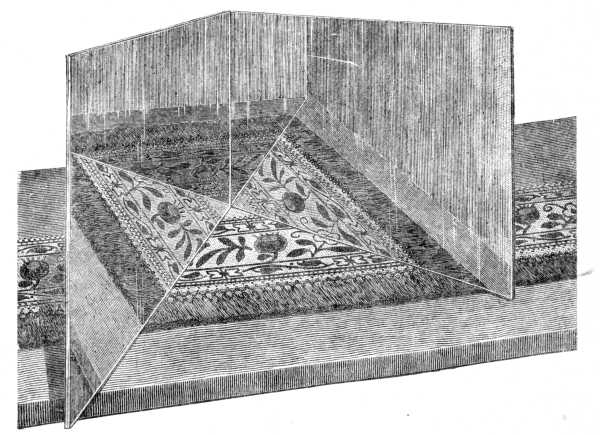
If you want to utilize a piece only of a straight border, or after repeating it several times, to form a corner with it, you place the mirror in the first instance across it at right angles, at the place from which the pattern is to be repeated, and then exactly diagonally inwards.
If you want to use just a part of a straight border or create a corner by repeating it several times, first set the mirror across it at a right angle, where you want the pattern to repeat, and then position it diagonally inwards.
To make a square out of a straight pattern, you take two mirrors and so place them that they touch at the point where the diagonal lines meet, as represented in fig. 885, and you have your square at once.
To create a square from a straight pattern, you take two mirrors and position them so that they touch at the point where the diagonal lines intersect, as shown in fig. 885, and you instantly have your square.
This is all easy enough, but before beginning any large piece of work it is necessary to consider carefully which parts of the drawing will best fill the centre and which are best suited to form the corners, as it is not every part of a straight pattern that is adapted for repetition.
This is all pretty straightforward, but before starting any big project, it's important to think carefully about which parts of the drawing will work best in the center and which are better for the corners, since not every part of a straight pattern is suitable for repetition.
A few preliminary trials with the help of the mirrors will better show the importance of these explanations than anything further we can say on the subject.
A few initial tests using the mirrors will demonstrate the significance of these explanations better than anything else we could say on the topic.
You want, for example, to embroider a rather large running ground pattern on a piece of stuff, that is relatively too small for the subject; or a small and rather minute pattern on a large surface on which it is likely to look, either too insignificant, or too crowded and confused and the chances are, if you do not know how to draw, you will either think it necessary to get a draughtsman to help you or you will give up the piece of work altogether, deterred by the difficulties that confront you. You need not do either if you will follow the directions here given.
You want to embroider a large running pattern on a piece of fabric that’s too small for it, or a small, intricate pattern on a large surface where it might look either too insignificant or too crowded. If you don’t know how to draw, you might think you need to hire a designer to help you, or you might give up on the project entirely because of the challenges. But you don’t need to do either if you follow the instructions provided here.
Take a sheet of large-sized quadrille paper which if necessary you can prepare for yourself; trace your pattern upon it, or rule the squares direct upon the drawing, as shown in fig. 886.
Take a large piece of graph paper, which you can make yourself if needed; trace your pattern onto it, or draw the squares directly on the sheet, as shown in fig. 886.
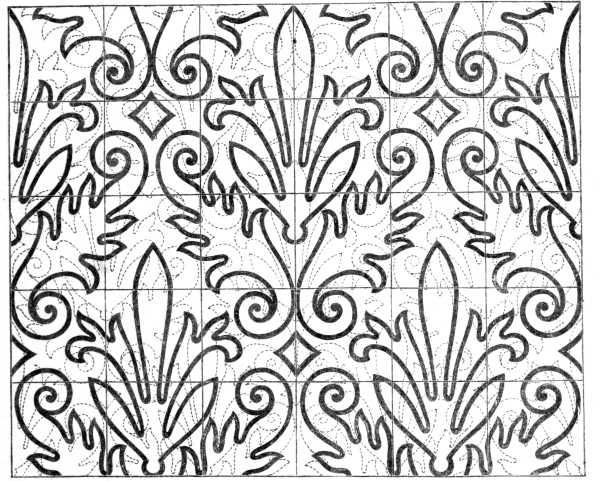
On a second sheet of vegetable paper, rule squares, a fourth, a third or half as small again as those on the first sheet. Thus, if the sides of the first squares be 15 m/m. long and you want to reduce your pattern by one fifth, the sides of your new squares should measure only 12 m/m.
On a second sheet of vegetable paper, draw squares that are a fourth, a third, or half the size of the squares on the first sheet. So, if the sides of the first squares are 15 mm long and you want to reduce your pattern by one fifth, the sides of your new squares should be only 12 mm.
If, on the contrary, you want to enlarge the pattern by one fifth, make the sides of your squares 18 m/m. long.
If you want to increase the pattern by one-fifth, make the sides of your squares 18 mm long.
To copy a pattern directly from a piece of embroidery and enlarge or diminish it at the same time, proceed as follows: fix the embroidery on a board, stretching it equally in every direction; then measure the length of the drawing, divide the centimetres by the number of units corresponding to whatever the proportions of your copy are to be, and if there be any fractions of centimetres over, subdivide them into millimetres, if necessary, into half millimetres and make your division by whatever measure you have adopted; take a pair of compasses with dry points, open them sufficiently for the opening to correspond to the number and the distance obtained by the division; plant a pin with a thread fastened to it, at the point indicated by the point of the compasses and repeat the last operation all along one side of the embroidery and, if possible a little beyond it, so that it may not be defaced by the marks of the pins. All you now have to do is to pull the threads in perfectly straight lines to the opposite side and carry other threads across them in a similar manner so that the whole surface be divided into squares.
To copy a pattern from a piece of embroidery and resize it at the same time, follow these steps: secure the embroidery to a board, stretching it evenly in all directions; then measure the length of the design, divide the centimeters by the number of units based on the proportions you want for your copy, and if there are any leftover centimeters, break them down into millimeters, and if necessary, into half millimeters, and make your division according to whatever measurement you’ve chosen; take a pair of compasses with sharp points, open them wide enough to match the number and distance from your division; place a pin with a thread attached at the point indicated by the compass point and repeat this process along one side of the embroidery and, if possible, a little beyond it, so the pin marks won’t ruin the design. Now, just pull the threads in perfectly straight lines to the opposite side and lay other threads across them in the same way, so the entire surface is divided into squares.
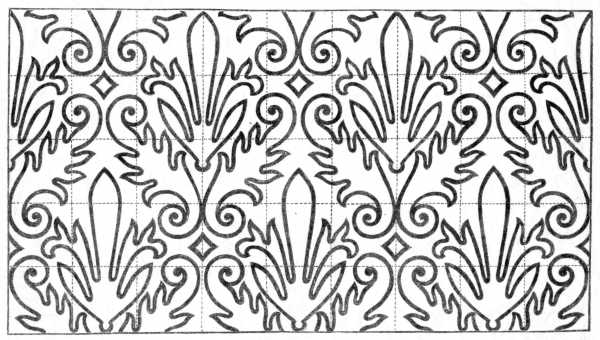
To alter the width of a pattern retaining the original height (figs. 888, 889, 890).—Sometimes it is necessary to lengthen out a pattern without however altering its height. In this case you modify the shape of the square and make long or narrow squares, according to the general shape of the design you wish to reproduce. Fig. 888 represents a pattern in Soutache D.M.C, marked out in squares; in fig. 889 the squares are lengthened out a third beyond their original size and the pattern is expanded; in fig. 890, the squares are compressed to a third less than their original size.
To change the width of a pattern while keeping the original height (figs. 888, 889, 890).—Sometimes you need to elongate a pattern without changing its height. In this case, adjust the shape of the square to create longer or narrower squares, depending on the overall shape of the design you want to replicate. Fig. 888 shows a pattern in Soutache D.M.C, outlined in squares; in fig. 889, the squares have been lengthened by a third beyond their original size and the pattern is expanded; in fig. 890, the squares have been compressed to a third less than their original size.
This method of subdividing patterns greatly facilitates the alterations they have so often to undergo and we are sure that there are few amongst those who have any real aptitude for needlework, who cannot draw enough to be able to copy the contents of a square.
This way of breaking down patterns makes it much easier to make the changes they often need, and we're confident that very few people with a genuine talent for sewing can't draw well enough to replicate what's in a square.
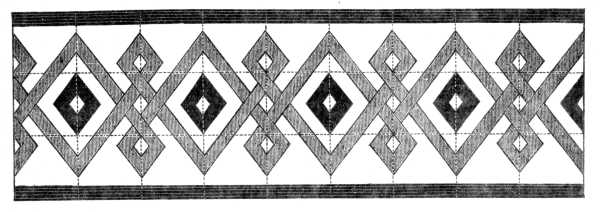
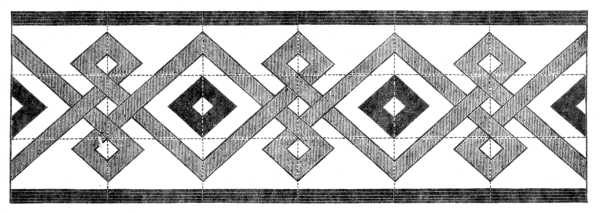
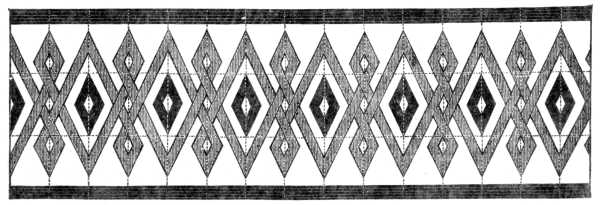
To prepare the paste for appliqué work.—It may seem strange to devote a separate paragraph to such an apparently simple operation; but in appliqué work it is a most important one, as not only the stuff on which the work is done but all the expensive accessories are liable to be spoilt by paste that has been badly prepared.
How to prepare the paste for appliqué work.—It might seem odd to dedicate a separate section to what seems like a simple task, but in appliqué work, it's really important. If the paste isn't prepared well, it can ruin not just the fabric you're working on but also all the pricey accessories involved.
Put some wheaten (not rice) starch into a vessel with a rounded bottom, pour on just enough water to dissolve the starch and stir it with a wooden spoon till it becomes perfectly smooth.
Put some wheat starch (not rice) into a bowl with a rounded bottom, pour in just enough water to dissolve the starch, and stir it with a wooden spoon until it’s completely smooth.
In the meantime put about ¼ of a pint of clean water on the fire to boil and when it boils add to it a little powdered pitch or carpenter’s glue, in quantity about the size of a pea and pour in the starch, stirring it the whole time. When the mixture has boiled up several times take it off the fire and go on stirring it till it gets cold, otherwise lumps will form in it, which as we specially pointed out in the preceding chapter, must never be allowed to get in between the stuff and the paper.
In the meantime, put about ¼ of a pint of clean water on the stove to boil. When it starts boiling, add a bit of powdered pitch or carpenter’s glue, about the size of a pea, and pour in the starch while continuously stirring. After the mixture has come to a boil several times, remove it from the heat and keep stirring until it cools down, or else lumps will form. As we specifically mentioned in the previous chapter, you should never let lumps get in between the adhesive and the paper.
This kind of paste makes no spots and does not injure even the most delicate colours as it contains no acid. In winter it will keep for several days, but in hot weather it very soon begins to ferment and should then on no account be used.
This type of paste leaves no marks and won’t damage even the most delicate colors since it has no acid. In winter, it can last for several days, but in hot weather, it quickly starts to ferment and should definitely not be used then.
Gum arabic ought never to be used for appliqué work, as it becomes so hard that it is impossible to get the needle through, whilst the saccharine it contains almost always causes ugly spots to appear in the stuff when it dries.
Gum arabic should never be used for appliqué work, as it hardens so much that it's impossible to get the needle through, and the sugar it contains almost always leaves ugly spots on the fabric when it dries.
When the work is finished it is a good plan to spread a very thin layer of paste over the entire back of it with a fine brush made of hog’s bristles, and not to take it out of the frame until it is perfectly dry.
When the work is done, it's a good idea to spread a very thin layer of glue over the entire back with a fine brush made of hog bristles, and not to remove it from the frame until it's completely dry.
To stiffen new needlework.—In the chapter on Irish lace, page 441, we said that new needlework of that kind had to be ironed; this should be done in the following manner: when the lace has been taken off its foundation, lay it, face downwards, on a piece of fine white flannel; then dip a piece of very stiff new organdie muslin into water, take it out again almost immediately and wring it slightly, so that no drops may fall from it, and then dab the wrong side of the lace all over with this pad of damp muslin and iron it with a hot iron which should be moved slowly forwards so that the moisture which the organdie has imparted to the lace may evaporate slowly. Not until you are quite sure that the lace is dry should it be taken off the board.
To stiffen new needlework.—In the chapter on Irish lace, page 441, we mentioned that new needlework of this type needs to be ironed; this should be done as follows: once the lace is removed from its foundation, place it face down on a piece of fine white flannel. Next, take a piece of very stiff new organdie muslin, dip it in water, remove it almost immediately, and wring it out slightly to prevent any drops from falling. Then, gently dab the wrong side of the lace with this damp muslin pad and iron it with a hot iron, moving it slowly forward so the moisture from the organdie evaporates gradually. Only once you’re completely sure that the lace is dry should you take it off the board.
There is no better way than this of giving new lace that almost imperceptible degree of stiffness by which alone it is often to be distinguished from old. Water only does not stiffen the thread sufficiently and it is difficult with starch to hit upon exactly the right consistency, whereas the organdie muslin supplies just the needful quantity.
There’s no better way to give new lace that barely noticeable stiffness that often sets it apart from old lace. Water alone doesn’t stiffen the thread enough, and it’s tough to get the starch to the perfect consistency, while organdie muslin provides just the right amount.
Embroidered network can be stiffened in the same manner and should be damped in the frame on the wrong side and not taken off until it is quite dry.
Embroidered fabric can be stiffened in the same way and should be dampened in the frame on the back side and not removed until it is completely dry.
We even recommend embroidery on linen being treated in the same way but when the linen is very creased, cover it with a damp cloth and iron upon that first, then take the cloth away and iron the embroidery itself so as to dry it completely.
We also suggest treating embroidered linen the same way, but if the linen is very wrinkled, cover it with a damp cloth and iron it like that first. Then, remove the cloth and iron the embroidery itself to fully dry it.
Immerse the bottle in a saucepan of cold water with a piece of soap the size of a nut in it, and if the lace be very dirty, a small pinch of salt, and let it boil for about an hour pouring off the water as it gets dirty and adding clean.
Immerse the bottle in a saucepan of cold water with a piece of soap about the size of a nut in it, and if the lace is really dirty, add a small pinch of salt. Let it boil for about an hour, pouring off the water as it gets dirty and adding fresh water.
When all the dirt has been boiled out of the lace, which you will know to be the case when the water remains perfectly clear, rinse out the soap before you take the lace off the bottle, by plunging it into cold water.
When all the dirt has been boiled out of the lace, which you’ll know is done when the water is completely clear, rinse out the soap before removing the lace from the bottle by submerging it in cold water.
If stained or greasy, it should be left to soak for some hours or even days, in good olive oil. This restores to the thread that softness and smoothness which use and bad washing had impaired. After the oil bath it should be washed on a bottle in the manner already described.
If it's stained or greasy, it should be soaked for a few hours or even days in good olive oil. This will bring back the softness and smoothness to the thread that use and bad washing had damaged. After the oil soak, it should be washed in a bottle as described earlier.
Take as much fine wheaten starch, as you think you will require, divide it into two portions and dissolve both in cold water. Boil the one portion and when it has so far cooled as to have ceased to steam, stir the cold starch into it and dilute the whole with cold water to the consistency of thick cream. If the lace is to be slightly coloured, add a few drops of black coffee, or dilute the starch with weak tea or guimauve water; the coffee will give it a dark cream colour, either of the latter a pale greenish hue.
Take as much fine wheat starch as you think you'll need, split it into two parts, and dissolve both in cold water. Boil one part, and when it has cooled down enough to stop steaming, stir the cold starch into it and thin it out with cold water until it reaches the consistency of thick cream. If you want the lace to be slightly colored, add a few drops of black coffee, or mix the starch with weak tea or marshmallow water; the coffee will give it a dark cream color, while the other options will provide a pale greenish tint.
Dip the lace in the mixture and squeeze it out gently without wringing it to get rid of all the superfluous liquid, then lay it flat on the left hand and beat it for a few minutes with the right to work the starch well in; repeat the whole process twice, then roll the lace in fine linen and leave it there till you are ready to iron or pin it out, as the case may be.
Dip the lace into the mixture and gently squeeze it out without wringing it to remove any excess liquid. Then, lay it flat on your left hand and beat it for a few minutes with your right hand to incorporate the starch properly. Repeat the whole process twice, then roll the lace in fine linen and leave it there until you are ready to iron or pin it out, depending on what you need to do.
Before you begin to iron, hold the lace tight in your left hand by the footing and with the right hand pull out all the picots, along the edge of the lace, to an equal length, then lay it out flat upon a board covered with white flannel and iron it with a moderately hot iron, passing the iron backwards and forwards over it until it be quite dry.
Before you start ironing, hold the lace tightly in your left hand by the base and use your right hand to pull out all the picots along the edge of the lace to make them even in length. Then, lay it flat on a board covered with white flannel and iron it with a moderately hot iron, moving the iron back and forth over it until it is completely dry.
If creases should come in the ironing where they ought not to be, dab them over lightly with a sponge moistened with water and a few drops of starch and pass the iron over them again.
If there are creases in the ironing where there shouldn't be, lightly dab them with a sponge dampened with water and a few drops of starch, then go over them with the iron again.
After ironing the whole length of lace, pull it out crossways from left to right, and from right to left and iron it all over once more. This does away with the artificial stiffness and gives it the agreeable softness and pliancy of new lace.
After ironing the entire length of lace, pull it out sideways from left to right and then from right to left, and iron it all over again. This removes the artificial stiffness and gives it the nice softness and flexibility of new lace.
The outside circumference of the wood should be padded and covered with grey or white ticking.
The outer edge of the wood should be padded and covered with gray or white fabric.
The pins must be exactly the size of the picots they are to pin down; you will require extremely fine ones for Valenciennes and coarser for other kinds of lace: steel pins are of no use whatever, because of their liability to rust. Cover the cylinder with blue paper (less trying for the eyes than any other) and take only just as much lace out of the damp cloth as you are likely to be able to pin out before it gets dry, keeping the remainder covered up.
The pins need to be the exact size of the picots they are meant to hold down; you'll need very fine ones for Valenciennes lace and coarser ones for other types of lace. Steel pins are useless because they tend to rust. Cover the cylinder with blue paper (it's easier on the eyes than any other color), and only take out as much lace from the damp cloth as you can pin down before it dries, keeping the rest covered.
Lay the lace upon the drum and pin the footing down first in a straight line, sticking the pins in pretty closely and at regular distances apart; then pin down each picot separately, taking care not to open them if they have kept their original shape and to shut them up by twisting them if they have got untwisted.
Lay the lace on the drum and pin the base down first in a straight line, placing the pins close together and evenly spaced; then pin down each picot individually, making sure not to open them if they’ve retained their original shape, and twist them shut if they’ve become untwisted.
If you find the pinning out troublesome and cannot get it all done before the lace dries, damp the picots with a sponge as you proceed.
If you’re having trouble pinning everything out and can’t finish before the lace dries, dampen the picots with a sponge as you go.
Lace should never be pinned out when it is dry as the threads of the picots are then very apt to break and torn picots destroy the value of even the choicest lace.
Lace should never be pinned out when it's dry, as the threads of the picots can easily break, and torn picots ruin the value of even the finest lace.
Raised lace has to be stamped out from the wrong side with a lace awl or kind of pricker of bone made for the purpose. Some professional lace-cleaners use this implement even for Valenciennes lace but we cannot recommend it, seeing that it is a lace that is by nature perfectly flat.
Raised lace needs to be punched out from the back side using a lace awl or a type of bone pricker designed for this task. Some professional lace cleaners use this tool even for Valenciennes lace, but we do not recommend it, as this lace is naturally perfectly flat.
Let the length of lace you have pinned out remain on the drum till it be quite dry; if you have several yards to pin out, wind it round and round the cylinder. Cover up the lace as you proceed and put each length away as soon as it is ready in a blue paper bag, so as to keep the whole perfectly clean.
Let the length of lace you've pinned out stay on the drum until it's completely dry; if you have several yards to pin out, wrap it around the cylinder. Cover the lace as you go, and put each piece away in a blue paper bag as soon as it's ready to keep everything perfectly clean.
In conclusion we may remark that the cleaning of lace should only be undertaken when you are fairly sure of not being interrupted, as more especially the pinning requires to be finished off as quickly as possible.
In conclusion, we should note that cleaning lace should only be done when you're reasonably sure you won't be interrupted, especially since the pinning needs to be completed as quickly as possible.
To wash coloured cottons and work done with the same.—In order to test the fastness of the dyes, untie the skeins and pour boiling water upon them, leave them to soak for about a quarter of an hour, soap and rub them lightly with the hand from end to end and rinse them out thoroughly in as many changes of cold water as may be found necessary, until the water remain perfectly colourless.
To wash colored cottons and work done with the same.—To check how well the dyes hold up, untie the skeins and pour boiling water over them. Let them soak for about 15 minutes, then gently soap and rub them by hand from one end to the other. Rinse them thoroughly in as many changes of cold water as needed until the water is completely clear.
Squeeze out all the water you can and let them dry quickly without exposing them to the sun.
Squeeze out as much water as you can and let them dry quickly without putting them in direct sunlight.
Coloured cottons are often washed in vinegar, because it is supposed to affect the colour less than water does. We have come to the conclusion after several trials that this is a delusion, for the good dyes keep their colour without the aid of vinegar and the bad ones wash out in spite of it.
Coloured cottons are often washed in vinegar because it’s thought to be less harsh on the color than water. After several tests, we've concluded that this is a myth; good dyes hold their color without vinegar, while the bad ones fade regardless.
The fast colours lose none of their beauty in the process nor does it affect the quality of the cotton; any excess of colouring matter which the fibres of the cotton may have absorbed in the process of dyeing is got rid of by this means.
The bright colors don’t lose any of their beauty in the process, and it doesn’t impact the quality of the cotton; any extra dye that the cotton fibers might have absorbed during dyeing is removed this way.
Materials.—It was stated in the preface that our readers would find the choice of colours and material rendered comparatively easy to them by the notes affixed to the illustrations, but these notes, in spite of all the care bestowed upon them must still have remained very incomplete had it not been for the following tables which we were fortunately enabled to append to our work and which will help every one to choose their own materials without having them actually before them. The strokes that are affixed to each number indicate the exact size of the thread, so that to find out the number you want to buy you have but to lay your pattern thread, stretching it slightly, on the strokes, in succession, till you come to the one that matches it in size.
Materials.—We mentioned in the preface that our readers would find it relatively easy to choose colors and materials thanks to the notes attached to the illustrations. However, despite the care put into these notes, they would still be quite incomplete without the following tables, which we’re lucky to include in our work. These tables will assist everyone in selecting their materials without having them physically present. The strokes next to each number indicate the exact size of the thread, so to find the number you need to buy, you just have to lay your reference thread, stretching it slightly, over the strokes in order until you find the one that matches in size.
With regard to the colours, the names and shades of which have been classed in the second table with the greatest care, and of which our workers have no less than 460 to choose from [3], all those referred to in connection with our illustrations are quite fast dyes [4], save in a few instances in which we were forced to make an exception in favour of a doubtful colour to secure a harmonious effect.
Regarding the colors, the names and shades of which have been carefully categorized in the second table, and from which our workers have a selection of no less than 460 to choose from [3], all the ones mentioned in relation to our illustrations are quite fast dyes [4], except for a few instances where we had to make an exception for a questionable color to achieve a harmonious effect.
A complete table of colours must of necessity include certain more or less staring shades, which though they may not be to every one’s taste cannot on that account be left out.
A complete color chart must include some bold shades that, while they may not appeal to everyone, cannot be excluded for that reason.
We conclude our work with the well-meant and by no means useless recommendation to our readers, never to begin a piece of work of any considerable size without first making sure that the colours they intend to use are fast and providing themselves with a larger supply of materials than even on a close calculation they think they are likely to require, lest they should find themselves under the disagreeable necessity of having either to leave their work unfinished or finish it with materials that do not match. There is generally a slight difference in tone between cottons that have been bought at different times, and there is also a reasonable likelihood, considering their great variety, of some mistake being made in the number by either buyer or seller in ordering a fresh supply.
We wrap up our work with a well-intentioned and definitely helpful tip for our readers: never start a project of any significant size without first confirming that the colors you plan to use are permanent. Also, make sure to stock up on more materials than you think you'll need, to avoid finding yourself in the unpleasant position of either leaving your project unfinished or having to complete it with mismatched materials. Generally, there’s a slight difference in shade between fabrics bought at different times, and given their wide variety, there’s also a good chance that either you or the seller could make a mistake when ordering more supplies.

| Alphabetical list of the names and the numbers of the 450 shades D.M.C Alsace Thread, Sewing and Embroidery Cottons, contained in the D.M.C colour-card, in any of which shades the knitting Cotton, Soutaches and Braids etc. are to be had. | |||||
| Couleurs Colours | Très-foncé Very dark | Foncé Dark | Moyen Medium | Clair Light | Très-clair Very light |
| Bleu d’Azur | ... | 3325 | ... | ... | ... |
| Bleu-Canard | 3395 | 3306 | 3307 | 3308 | 3309 |
| Bleu cendré | ... | ... | 448 | ... | ... |
| Bleu de Ciel | 515 | 516 | 517 | 518 | 519 |
| Bleu-Fayence | 481 | 482 | 483 | 484 | 485 |
| Bleu de France | 337 | 338 | 339 | 340 | 341 |
| Bleu-Gentiane | 476 | 477 | 478 | 479 | 480 |
| Bleu-Gris | 3300 | 3301 | 3302 | 3303 | 3304 |
| Bleu-Indigo | 336 | 311 | 312 | 322 | 334 |
| Bleu-Lapis | 342 | 333 | 343 | 344 | 345 |
| Bleu-Marin | 505 | 506 | 507 | 508 | 509 |
| Bleu-Outremer | ... | 682 | 683 | ... | ... |
| Bleu pâle | ... | ... | ... | 668 | ... |
| Bleu-Prunelle | 486 | 487 | 488 | 489 | 490 |
| Bleu tendre | ... | ... | ... | ... | 709 |
| Bleu vert | 525 | 526 | 527 | 528 | 529 |
| Bleu violacé | ... | 674 | 675 | ... | ... |
| —— | |||||
| Bronze doré | 585 | 586 | 587 | 588 | 589 |
| —— | |||||
| Brun-Acajou | 300 | 400 | 301 | 401 | 402 |
| Brun-Cachou | 433 | 434 | 435 | 436 | 437 |
| Brun-Cannelle | 660 | 661 | 662 | 663 | 664 |
| Brun-Caroubier | 354 | 355 | 303 | 356 | 357 |
| Brun-Chamois | 416 | 417 | 324 | 418 | 419 |
| Brun-Cuir | 430 | 431 | 302 | 432 | 325 |
| Brun-Feuille-morte | 615 | 616 | 617 | 618 | 619 |
| Brun-Havane | 454 | 455 | 456 | 457 | 458 |
| Brun-Loutre | 438 | 439 | 440 | 441 | 442 |
| Brun-Marron | 403 | 404 | 405 | 406 | 407 |
| Brun-Myrthe | ... | ... | 463 | ... | ... |
| Brun-Puce | 459 | ... | ... | ... | ... |
| Brun-Rouille | 3310 | 3311 | 3312 | 3313 | 3314 |
| —— | |||||
| Gris-Acier | 650 | 651 | 652 | 653 | 654 |
| Gris-Amadou | 329 | 383 | 384 | 385 | 386 |
| Gris d’Argent | ... | ... | 719 | ... | ... |
| Gris-Bleu | 590 | 591 | 592 | 593 | 594 |
| Gris-Bois | 610 | 611 | 612 | 613 | 614 |
| Gris-Brun | 408 | 409 | 410 | 411 | 412 |
| Gris-Castor | 645 | 646 | 647 | 648 | 649 |
| Gris-Cendre | 413 | 317 | 414 | 318 | 415 |
| Gris-Coutil | 387 | 388 | 323 | 389 | 390 |
| Gris-Deuil | 655 | 656 | 657 | 658 | 659 |
| Gris-Écru | ... | 704 | 705 | 706 | ... |
| Gris-Etoupe | ... | 707 | 708 | ... | ... |
| Gris de Fer | 600 | 601 | 602 | 603 | 604 |
| Gris-Feutre | 635 | 636 | 637 | 638 | 639 |
| Gris-Ficelle | ... | 460 | 461 | 462 | ... |
| Gris-Foin | 520 | 521 | 522 | 523 | 524 |
| Gris-Fumée | 640 | 641 | 642 | 643 | 644 |
| Gris-Lin | ... | ... | 716 | 717 | ... |
| Gris-Mastic | ... | ... | 718 | ... | ... |
| Gris neutre | 620 | 621 | 622 | 623 | 624 |
| Gris-Noisette | 420 | 421 | 422 | 423 | 424 |
| Gris-Perle | 625 | 626 | 627 | 628 | 629 |
| Gris de Plomb | 378 | 379 | 380 | 381 | 382 |
| Gris-Poussière | 630 | 631 | 632 | 633 | 634 |
| Gris-Souris | 425 | 426 | 427 | 428 | 429 |
| Gris-Tilleul | 391 | 392 | 393 | 330 | 331 |
| Gris verdâtre | 595 | 596 | 597 | 598 | 599 |
| —— | |||||
| Jaune-Citron | ... | 307 | 445 | 446 | ... |
| Jaune-Crême | ... | ... | 711 | 712 | ... |
| Jaune-Maïs | 575 | 576 | 577 | 678 | 579 |
| Jaune d’Ocre | ... | ... | 676 | 677 | ... |
| Jaune-Orange | ... | ... | 443 | 444 | ... |
| Jaune-Rouille | 363 | 364 | 308 | 365 | 366 |
| Jaune d’Or | ... | ... | 667 | ... | ... |
| Jaune-vieil-Or | 678 | 679 | 680 | ... | ... |
| —— | |||||
| Lilas gris | 313 | 398 | 314 | 328 | 399 |
| —— | |||||
| Noir grand-teint | 310 | ... | ... | ... | ... |
| Noir-Jais | 681 | ... | ... | ... | ... |
| Noir vert | 473 | ... | ... | ... | ... |
| —— | |||||
| Rose-Eglantine | 570 | 571 | 572 | 573 | 574 |
| Rose tendre | ... | ... | ... | ... | 3326 |
| Rose vif | 565 | 566 | 567 | 568 | 569 |
| —— | |||||
| Rouge-Aurore | 360 | 306 | 361 | 332 | 362 |
| Rouge-Bordeaux | 496 | 497 | ... | ... | ... |
| Rouge-Cardinal | 346 | 347 | 304 | 305 | 348 |
| Rouge-Cerise | 3315 | 3316 | 3317 | 3318 | 3319 |
| Rouge-Corinthe | ... | ... | 447 | ... | ... |
| Rouge-Cornouille | ... | 449 | 450 | ... | ... |
| Rouge-Ecarlate | ... | 498 | 464 | ... | ... |
| Rouge-Framboise | 684 | 685 | 686 | 687 | 688 |
| Rouge-Géranium | 349 | 350 | 351 | 352 | 353 |
| Rouge-Grenat | 358 | 359 | 326 | 309 | 335 |
| Rouge-Groseille | 605 | 606 | 607 | 608 | 609 |
| Rouge-Maroquin | ... | ... | 3327 | 3328 | 3329 |
| Rouge-Turc | ... | ... | 321 | ... | ... |
| Rouge-Vermillon | ... | ... | 666 | ... | ... |
| —— | |||||
| Vert-Bouteille | 491 | 492 | 493 | 494 | 495 |
| Vert-Bronze | 669 | 670 | 671 | 672 | 673 |
| Vert-Canard | 545 | 546 | 547 | 548 | 549 |
| Vert-Corbeau | 665 | ... | ... | ... | ... |
| Vert doré | 580 | 581 | 582 | 583 | 584 |
| Vert d’Eau | ... | ... | 713 | 714 | 715 |
| Vert-de-gris | ... | 474 | 475 | ... | ... |
| Vert-Emeraude | 555 | 556 | 557 | 558 | 559 |
| Vert-Fauve | 689 | 690 | 691 | 692 | 693 |
| Vert-Lierre | 500 | 501 | 502 | 503 | 504 |
| Vert-Madeira | ... | ... | ... | 710 | ... |
| Vert-Malachite | 560 | 561 | 562 | 563 | 564 |
| Vert métallique | 465 | 466 | 467 | ... | ... |
| Vert-Mousse | 468 | 469 | 470 | 471 | 472 |
| Vert-Myrthe | 535 | 536 | 537 | 538 | 539 |
| Vert-Olive | 510 | 511 | 512 | 513 | 514 |
| Vert-Perroquet | 694 | 695 | 696 | 697 | 698 |
| Vert-Pistache | 319 | 367 | 320 | 368 | 369 |
| Vert-Pré | 699 | 700 | 701 | 702 | 703 |
| Vert russe | ... | 499 | ... | ... | ... |
| —— | |||||
| Violet-Améthyste | 3320 | 3321 | 3322 | 3323 | 3324 |
| Violet-Evêque | 451 | 452 | 453 | ... | ... |
| Violet-Lie-de-vin | 370 | 371 | 372 | 373 | 374 |
| Violet-Mauve | 375 | 315 | 376 | 316 | 377 |
| Violet-de-Parme | 540 | 541 | 542 | 543 | 544 |
| Violet-Pensée | 530 | 531 | 532 | 533 | 534 |
| Violet-Prune | 550 | 551 | 552 | 553 | 554 |
| Violet-Scabieuse | 394 | 327 | 395 | 396 | 397 |
| Couleurs Colours | Très-foncé Very dark | Foncé Dark | Moyen Medium | Clair Light | Très-clair Very light |
To avoid mistakes the public is urgently requested to designate the colours by the number, never by name.
To avoid mistakes, the public is strongly urged to identify the colors by their number, not by name.
The colours whose numbers begin with 3 or 4 are the fastest.
The colors that start with the numbers 3 or 4 are the quickest.
TABLE OF CONTENTS.
Further information respecting mode of execution, materials and so forth may be had by applying to the firm of
Further information about the execution method, materials, and so on can be obtained by contacting the firm of
TH. de DILLMONT, DORNACH (Alsace).
TH. de DILLMONT, DORNACH (Alsace).
FOOTNOTES:
[4] By fast (bon-teint) colours are meant those which will bear ordinary and repeated washing. There are only very few which are really fast, or grand-teint, that is to say, which will resist the action of chemical agents, amongst of these, the black, Noir 310, is quite indestructible.
[4] By fast (colorfast) colors, we mean those that can withstand normal and repeated washing. There are only a very few that are truly fast or long-lasting, meaning they will hold up against chemical agents; among these, the black, Noir 310, is almost indestructible.
☞ By the same Author ☜
☞ By the same Author ☜
ALBUM DE BRODERIES
Embroidery Album
AU POINT DE CROIX.
Cross-stitch.
(Album of cross-stitch embroidery)
(Album of cross-stitch art)
BY TH. DE DILLMONT
BY TH. DE DILLMONT
32 Plates with 278 Designs, and a complete treatise on the embroidery itself.
32 plates with 278 designs, plus a complete guide on the embroidery itself.
Quarto; artistic boards, price 1s. 6d.
Quarto; art boards, price 1s. 6d.
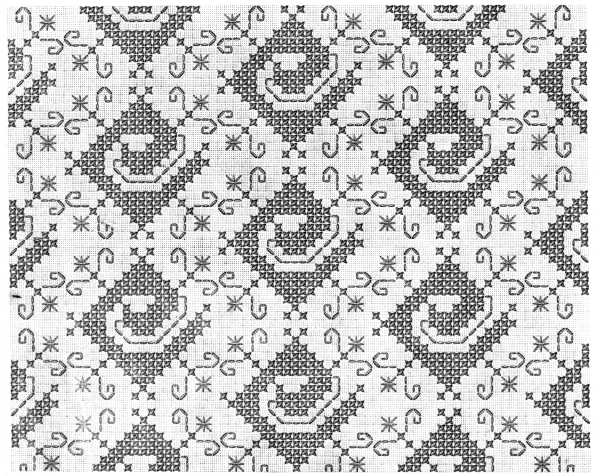
To be had by applying to the Author and Editor TH. DE DILLMONT, DORNACH, Alsace, and at all the leading booksellers and Embroidery shops.
Available by contacting the Author and Editor TH. DE DILLMONT, DORNACH, Alsace, and at all major bookstores and embroidery shops.

PRINTED BY BRUSTLEIN & Co.,
MULHOUSE (Alsace)
PRINTED BY BRUSTLEIN & Co.,
MULHOUSE (Alsace)
Download ePUB
If you like this ebook, consider a donation!