This is a modern-English version of The Art of Modern Lace Making, originally written by unknown author(s).
It has been thoroughly updated, including changes to sentence structure, words, spelling,
and grammar—to ensure clarity for contemporary readers, while preserving the original spirit and nuance. If
you click on a paragraph, you will see the original text that we modified, and you can toggle between the two versions.
Scroll to the bottom of this page and you will find a free ePUB download link for this book.
Transcriber's Note:
A number of typographical errors have been corrected. They are
shown in the text with mouse-hover popups.
Transcriber's Note:
A number of typos have been fixed. They are highlighted in the text with mouse-hover popups.
Beginning at page 22, all images have been provided as thumbnails. A larger version of those images is available by clicking on the image number.
Beginning at page 22, all images are shown as thumbnails. You can see a larger version of those images by clicking on the image number.
THE ART
OF
MODERN LACE-MAKING.
PRICE:
FIFTY CENTS OR TWO SHILLINGS.
PRICE:
FIFTY CENTS OR TWO DOLLARS.
PUBLISHED BY
The Butterick Publishing Co. (Limited).
London and New York.
1891
PRINTED IN NEW YORK.
PUBLISHED BY
The Butterick Publishing Co. (Limited).
London and New York.
1891
PRINTED IN NEW YORK.

INTRODUCTION.
Owing to the growing popularity of the fascinating art of lace-making and the appeals of our readers to place it within their reach, we have prepared this pamphlet. In making it a perfect instructor and a reliable exponent of the favorite varieties of lace, we have spared neither time nor expense, and are most happy to offer to our patrons what a celebrated maker of Modern Lace has pronounced as "the finest book upon lace-making to be found on either continent."
Because of the increasing popularity of the captivating art of lace-making and our readers' requests to make it accessible, we have put together this pamphlet. To ensure it serves as an excellent guide and a trustworthy resource on the favorite types of lace, we have invested considerable time and effort. We are excited to present our patrons with what a renowned Modern Lace creator has called “the best book on lace-making available on either continent.”
The illustrations, in the main, are direct reproductions from genuine, hand-made modern laces, such as any lady may make who masters the instructions found upon these pages.
The illustrations are primarily direct copies of authentic, handcrafted modern laces that any woman can create by following the instructions provided in these pages.
The beauty of these laces is beyond question, their durability all that can be desired, and their textures may be varied from an extreme delicacy to a sumptuous opposite. In introducing the art of modern lace-making into the realms of our readers, we feel all of the pleasure we are sure we thus convey.
The beauty of these laces is beyond doubt, their durability is exactly what one could want, and their textures can range from extremely delicate to richly luxurious. As we introduce the art of modern lace-making to our readers, we feel all the joy that we believe we are sharing.
The Butterick Publishing Co.,
Limited.
The Butterick Publishing Co., Limited.
CONTENTS.
Pages 5 to 9—
Lace-Making, Ancient and Modern Methods.
Pages 5 to 9—
__A_TAG_PLACEHOLDER_0__
Pages 9 to 19—
Stitches used in Modern Lace-Making.
Pages 9 to 19—
__A_TAG_PLACEHOLDER_0__
Pages 19 to 22—
Fancy Braids Cords, Rings and Buttons.
Pages 19 to 22—
__A_TAG_PLACEHOLDER_0__
Pages 22 to 96—
Designs, Lace Articles, Edgings, etc., etc., in Modern Lace.
Pages 22 to 96—
__A_TAG_PLACEHOLDER_0__
Pages 96 to 125—
Darned Net Samples, Kerchiefs, Tidies, Edgings, Insertions, etc.,
etc., with Designs for the same and other Articles.
Pages 96 to 125—
__A_TAG_PLACEHOLDER_0__
Lace-Making[Pg 5]
ANCIENT AND MODERN METHODS.

The art of making lace in one form or another has existed from the earliest ages. There are Scriptural references to various web-like fabrics, which were of rude construction, no doubt, but whose general characteristics were identical with those productions of modern skill which have for centuries been known as lace. Homer and other ancient writers constantly mention net-works of fancifully embroidered materials; gold thread-work was known to the Romans; and as Egyptian robes of state are depicted upon the tombs of the earlier dynasties as being fashioned from a looped net-work or crochet, it is probable that the Israelites learned the art from the Egyptians. Museums contain specimens of lace dating back to periods that to us of the present day seem mere dreams of reigns and eras, and history includes a scattered literature of lace which proves that the art must have been practised almost from the beginning.
The art of making lace has been around since the earliest ages. There are references in the Bible to various web-like fabrics that were probably simply made, but their general characteristics are the same as what we now know as lace. Homer and other ancient writers frequently mention networks of intricately embroidered materials; the Romans were familiar with gold thread work; and since Egyptian royal robes are depicted on tombs from earlier dynasties as being made from a looped network or crochet, it's likely that the Israelites learned this skill from the Egyptians. Museums hold examples of lace from times that seem like distant dreams to us today, and history includes a variety of writings about lace that show the art has likely been practiced almost since the beginning.
Up to the Sixteenth Century, however, open work embroidery was the favorite decoration, and from it the tangible origin of lace seems derived. During the Renaissance period the first book of embroidery patterns and lace-work appeared. The earliest volume bearing a date was printed at Cologne in 1527; and it was during the reign of Richard III. of England that the word lace was first used in the descriptions of the royal wardrobe.
Up until the 16th century, open work embroidery was the preferred decoration, and it seems to be the direct origin of lace. During the Renaissance, the first book of embroidery patterns and lace designs was published. The earliest dated volume was printed in Cologne in 1527; and it was during the reign of Richard III of England that the term lace was first mentioned in descriptions of the royal wardrobe.
At first the best known laces were those of Venice, Milan and Genoa. The Italians claim the invention of point or needle-made lace; but the Venetian point is now a product of the past, and England and France supply most of the fine laces of the present time.
At first, the most famous laces were those from Venice, Milan, and Genoa. The Italians say they invented point or needle-made lace, but Venetian point is now a thing of the past, and England and France provide most of the fine laces today.
Lace-makers in the various European countries are trained to the work from childhood; but it is said that the makers of Honiton lace, the fabric of which Queen Victoria's wedding gown was made, are rapidly decreasing in numbers, so that there are few persons now living who understand the construction of this exquisite "pillow" lace. The costly point and Honiton and the dainty Mechlin and Valenciennes of bygone days can only be produced by trained lace-workers, whose skilful fingers weave bobbins of cobweb-like thread to and fro over the "pillow" necessary to antique methods; and for this reason fine lace-making is practically beyond the skill of the amateur. Besides, some of the threads in the very filmy laces are so fine that they cannot be successfully manipulated except in a[Pg 6] moist atmosphere, such as that of Great Britain; and even there some of the more exquisite specimens must perforce be made in underground rooms, since it is only there that the proper degree of moisture can be obtained. In dry climates these gossamer-like threads would roughen and break at almost the slightest touch.
Lace-makers in various European countries start training for this work as children; however, the number of Honiton lace makers—famous for creating the fabric used in Queen Victoria's wedding gown—is rapidly declining. Now, very few people know how to make this beautiful "pillow" lace. The expensive lace types like point, Honiton, and the delicate Mechlin and Valenciennes from the past can only be crafted by skilled lace-workers, whose dexterous fingers move cobweb-like threads back and forth over the "pillow" used in traditional techniques. For this reason, fine lace-making is nearly impossible for amateurs. Additionally, some of the threads in these very delicate laces are so thin that they can only be handled successfully in a[Pg 6] humid environment, like that of Great Britain. Even there, some of the more intricate pieces must be made in underground rooms, where the correct moisture level can be maintained. In dry climates, these delicate threads would become rough and break with even the slightest touch.
Referring to the known origin of some of the earlier laces, a writer upon the subject says:
Referring to the known origin of some of the earlier laces, a writer on the subject says:
"They say it was a woman, Barbara Uttmann, who invented pillow lace in the 16th century. Women have ever been patrons of lace-making. Victoria has kept the Honiton laces in fashion, and it was the Duchess of Argyle who introduced lace-making in Scotland. The Countess of Erne and Lady Denny and Lady Bingham began it in Ireland, and Lady De Vere gave her own Brussels point for patterns when the first Irish point was made at Curragh. It was Elizabeth of Denmark who introduced lace-making in that country, and the Archduchess Sophia who started lace schools in Bohemia. "Now at least I can have laces," said Anne of Austria, when Louis XIII., her husband died, and her court was famous for its cleanliness and its Spanish point. Colbert had three women as coadjutors when he started lace-making in France. It was because Josephine loved point d'Alençon that Napoleon revived it. Eugenie spent $5,000 for a single dress flounce, and had $1,000,000 in fine laces."
"They say a woman named Barbara Uttmann invented pillow lace in the 16th century. Women have always been supporters of lace-making. Victoria kept Honiton lace in style, and it was the Duchess of Argyle who brought lace-making to Scotland. The Countess of Erne, Lady Denny, and Lady Bingham started it in Ireland, and Lady De Vere contributed her own Brussels pattern when the first Irish lace was created at Curragh. Elizabeth of Denmark introduced lace-making in her country, while Archduchess Sophia initiated lace schools in Bohemia. 'Now at least I can have lace,' said Anne of Austria when her husband Louis XIII. died, and her court was known for its cleanliness and Spanish lace. Colbert had three women as collaborators when he began lace-making in France. It was because Josephine adored point d'Alençon that Napoleon revitalized it. Eugenie spent $5,000 on a single dress trim and had $1,000,000 worth of exquisite lace."
Victoria's favorite, Honiton, is not considered a particularly beautiful lace, although its weaving is so tedious and difficult. "Real Honiton laces," so says an authority, "are made up of bits and bits fashioned by many different women in their own little cottages—here a leaf, there a flower, slowly woven through the long, weary days, only to be united afterward in the precious web by other workers who never saw its beginning. There is a pretty lesson in the thought that to the perfection of each of these little pieces the beauty of the whole is due—that the rose or leaf some humble peasant woman wrought carefully, helps to make the fabric worthy the adorning of a queen or the decoration of an altar, even as the sweetness and patient perfection in any life makes all living more worthy and noble. A single flower upon which taste and fancy were lavished, and which sustained and deft labor brought to perfection, represents the lives of many diligent women workers.
Victoria's favorite, Honiton, isn’t seen as a particularly beautiful lace, even though its weaving is incredibly tedious and challenging. "Real Honiton laces," as an expert says, "are made up of pieces crafted by many different women in their little cottages—here a leaf, there a flower, slowly woven through long, exhausting days, only to be brought together later in the precious web by other workers who never saw its beginning. There’s a lovely lesson in the idea that the beauty of the whole comes from the perfection of each of these tiny pieces—that the rose or leaf carefully made by some humble peasant woman contributes to making the fabric worthy of adorning a queen or decorating an altar, just as the sweetness and diligent perfection in any life elevates all living to be more worthy and noble. A single flower, on which taste and creativity were lavished and which skilled labor perfected, represents the lives of many hardworking women."
It has become so much the fashion to worship all things ancient that most lovers of fine lace would prefer to have it a century old; and yet there never was a time when laces were more beautiful, more artistic and more unique in design than just at the present day; for modern laces preserve the best features of the laces that have gone before them, and have added so many new inspirations that except for the sentiment, the romance or the history connecting this scrap with a title, that with a famous beauty, and another with some cathedral's sacred treasure, the palm would certainly be given to the gauze-like production of the poor flax thread spinner of the present day."
It has become so trendy to admire all things ancient that most lace enthusiasts would rather have lace that's a century old; yet there has never been a time when lace was more beautiful, more artistic, and more unique in design than it is today. Modern laces retain the best features of their predecessors and incorporate numerous new inspirations. If it weren't for the sentiment, romance, or history that connects a piece to a title, a famous beauty, or a cathedral's sacred treasure, the top prize would definitely go to the delicate creations made by today's flax thread spinners.
Not all people know the difference between point lace which is made with the needle, and pillow lace which is made with the bobbins—but much of the beautiful point lace of the present day is made with the needle, and its beauty stands a favorable comparison with the more costly pillow lace.
Not everyone knows the difference between point lace, which is made with a needle, and pillow lace, which is made with bobbins—but a lot of the beautiful point lace today is made with a needle, and its beauty can compete well with the more expensive pillow lace.
Strictly modern lace-making is a result of American ingenuity, and it has so simple a basis and is so easy to learn that any woman of average skill may, with little difficulty, pro[Pg 7]duce by its different processes, laces that are really magnificent and quite as substantial and useful as they are exquisitely beautiful. In America modern lace-making has been developed to a high degree of perfection by its pioneer, Mrs. Grace B. McCormick, in whose designing rooms at No. 923 Broadway, New York, may be seen specimens of modern laces of every variety, from dainty needle-point to a very elaborate kind known as the Royal Battenburg. This English name for an American production was selected in honor of the Battenburg nuptials, which occurred about the time a patent for making the lace was applied for at Washington. Only a few years have elapsed since this plucky little woman made a single piece of lace edging from common braid as an experiment, and sold it for a trifling sum. Love for the work and perseverance have enabled her to overcome obstacles that would have discouraged a woman of ordinary energy, and she has gradually improved upon her earlier methods until modern lace occupies a front rank among the numerous dainty forms of needle-work of the day.
Strictly modern lace-making is a product of American creativity, and it's so simple and easy to learn that any woman with basic skills can, with a little effort, produce truly stunning laces that are as practical and durable as they are beautifully intricate. In America, modern lace-making has been refined to a high level of excellence by its pioneer, Mrs. Grace B. McCormick, whose design studio at 923 Broadway, New York, features examples of modern laces in every style, from delicate needlepoint to the more intricate Royal Battenburg. This English name for an American product was chosen in honor of the Battenburg wedding, which coincided with the time a patent for the lace-making process was filed in Washington. Only a few years have passed since this determined woman created a single piece of lace trim from ordinary braid as a trial and sold it for a small amount. Her passion for the craft and determination have helped her overcome challenges that would have discouraged someone with less drive, and she has gradually refined her techniques until modern lace has secured a prominent place among the many elegant forms of needlework today.
One of the finest specimens lately placed on exhibition is a table-cloth intended for use at elaborate dinners. It is made of the finest table linen and Royal Battenburg lace. The cloth is, of course, very large, and the lace, in the form of wide insertion, is let in above the border and is also arranged to divide the center into three squares. An outside border of edging to match completes this exquisite production, which has been two years in course of construction, and is valued at four hundred and seventy-five dollars. The same style of lace may be made by any one who studies the art and in any width or form, and it may be produced in many textures, although really intended for heavy effects. The making of such lace possesses a great charm for womankind in general, and will undoubtedly retain favor as long as needlecraft remains a pastime and employment with the gentler sex.
One of the finest pieces recently displayed is a tablecloth designed for fancy dinners. It’s made of top-quality table linen and Royal Battenburg lace. The cloth is quite large, and the lace, featuring wide insertions, is placed above the border and also arranged to divide the center into three squares. An outer border of matching edging completes this beautiful piece, which took two years to create and is valued at four hundred seventy-five dollars. Anyone who studies the craft can make this style of lace in various widths and forms, and it can be produced in many textures, even though it’s really meant for bold effects. The craft of making such lace has a strong appeal for women in general and will likely remain popular as long as needlework remains a hobby and job for women.
MATERIALS.
The requirements of modern lace-making are few. The products are classed as Honiton, Point, Duchesse, Princesse, Royal Battenburg or Old English Point, etc., etc.; but all are made with various braids arranged in different patterns and connected by numerous kinds of stitches, many different stitches often appearing in one variety of lace.
The requirements for modern lace-making are minimal. The products are categorized as Honiton, Point, Duchesse, Princesse, Royal Battenburg, or Old English Point, among others; but all are created using various braids arranged in different patterns and joined by several types of stitches, with many different stitches often found in a single type of lace.
The materials required are neither numerous nor expensive. The following is a complete list: Tracing cloth, leather or toile cirée, lace braids of various kinds, linen thread, two or three sizes of needles, a good thimble and a pair of fine sharp scissors.
The materials needed aren't many or costly. Here's the full list: tracing cloth, leather or toile cirée, lace braids of different kinds, linen thread, two or three needle sizes, a good thimble, and a pair of sharp, fine scissors.
For each kind of lace there is a special sort of braid in various patterns, and the selection of the thread depends entirely upon the variety and quality of lace to be made. This selection should be left to the decision of the teacher or the skilled maker of laces, as she knows from experience the proper combinations of materials. Thus, in making Honiton and point lace, thread in twelve different degrees of fineness is used; and as the braids also vary in size, the thread must always be adapted to the braid. For Battenburg lace the thread is in eight sizes, the finest being used only for "whipping curves" or drawing edges into the outlines required. The "Ideal Honiton" is a new lace made with fancy Honiton braid and wash-silk floss in dainty colors, and is exquisite for doilies, mats, table scarfs and center-pieces.
For each type of lace, there's a specific kind of braid in different patterns, and the choice of thread totally depends on the type and quality of lace being made. This choice should be made by the teacher or the experienced lace maker since she knows from experience the best combinations of materials. So, for making Honiton and point lace, thread in twelve different thicknesses is used; and since the braids also come in various sizes, the thread must always match the braid. For Battenburg lace, the thread comes in eight sizes, with the finest used only for "whipping curves" or shaping edges into the required outlines. The "Ideal Honiton" is a new lace made with fancy Honiton braid and wash-silk floss in beautiful colors, perfect for doilies, mats, table scarves, and centerpieces.
Designs sold by lace-makers are usually drawn upon tracing cloth, as this is flexible[Pg 8] and much more agreeable to work upon than any other material. The tracing cloth, when the braid is arranged, is basted to a foundation of leather or toile cirée; or smooth wrapping-paper may be basted under the design and will furnish all the support that is necessary, while being lighter than the toile cirée.
Designs created by lace-makers are typically outlined on tracing cloth because it's flexible[Pg 8] and much easier to work with than other materials. Once the braid is set up, the tracing cloth is stitched onto a leather base or coated fabric; alternatively, smooth wrapping paper can be stitched underneath the design, providing all the support needed while being lighter than the coated fabric.
It must be remembered that the work is really wrong side out while in progress, so that it will not show its true beauty until finished and removed from the foundation or pattern. According to the braid and thread selected, these laces may be made of fairy-like fineness or of massive elegance—general results being dainty enough for the gown of a bride or sumptuous enough for the adornment of an altar.
It should be noted that the piece is actually inside out while it's being made, so it won't reveal its real beauty until it's finished and taken off the base or pattern. Depending on the braid and thread chosen, these laces can be incredibly delicate or richly elegant—suitable enough for a bride's gown or lavish enough for decorating an altar.
Lace-making establishments will furnish designs of any width or shape desired, and will also originate designs for special articles for which there are only occasional calls. Regular edging designs are ordinarily made in four widths—from quite narrow to very wide; and not infrequently a handkerchief design is enlarged sufficiently to form a square for a table or a fancy stand.
Lace-making shops can provide designs of any width or shape you want and can create custom designs for special items that are only needed occasionally. Common edging designs usually come in four widths—ranging from narrow to very wide; and sometimes, a handkerchief design is enlarged enough to make a square for a table or a decorative stand.
In filling in the spaces of any design or pattern, the worker may choose the stitches that please her best, if she does not like those accompanying the design that she has selected or that has been sent her.
In filling in the spaces of any design or pattern, the worker can choose the stitches that she likes best, if she doesn’t like those that come with the design she selected or that were sent to her.
STITCHES USED IN MODERN LACE-MAKING.[Pg 9]
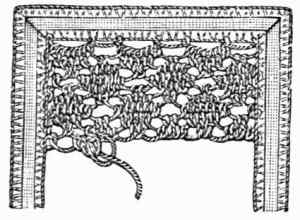
As in all fancy work which has a set of foundation stitches peculiar to it that may be varied according to the proficiency and ingenuity of the maker, so has Modern Lace a series of primary stitches from which may be evolved many others. A large number of illustrations of stitches, some of which are primary or foundation stitches, while others are combinations, are here presented, with full instructions for making; and the entire series given will make perfectly plain to the student the ease with which she may combine or invent stitches, when those of the design she is to work are not to her liking. The first stitch given is the main foundation stitch.
As with all decorative crafts that have a unique set of foundational stitches which can be adapted based on the skill and creativity of the person making it, Modern Lace also has a range of basic stitches from which many others can be created. Here, you'll find a variety of stitch illustrations, some being foundational or primary stitches and others being combinations, along with complete instructions for creating them. This comprehensive collection will clearly show the learner how easily she can mix or invent stitches when the ones in her chosen design don't appeal to her. The first stitch presented is the primary foundation stitch.
PLAIN POINT STITCHES.
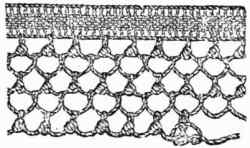
Nos. 1 and 2.—Point de Bruxelles or Brussels Point.—Among the stitches most used in lace-making is Point de Bruxelles or Brussels point. It is simply a button-hole stitch worked loosely, and it must be done with regularity, as the beauty of the work depends almost wholly upon the evenness of the stitches. Brussels point is occasionally used as an edge, but is more frequently seen in rows worked back and forth to fill in spaces, or as a ground work. The illustrations clearly represent the method of making this stitch.
Nos. 1 and 2.—Brussels Point.—One of the most common stitches used in lace-making is Point de Bruxelles or Brussels point. It's essentially a button-hole stitch done loosely, and it needs to be done consistently, as the beauty of the work relies heavily on the uniformity of the stitches. Brussels point is sometimes used as an edge but is more often found in rows worked back and forth to fill in gaps or as a base. The illustrations clearly show how to make this stitch.

No. 1.—Point de Bruxelles (Brussels Point).
No. 1.—Brussels Spot.

No. 2.—Point de Bruxelles Worked in Rows.
No. 2.—Brussels Point Worked in Rows.
No. 3.—Point de Venise, or Venice Point.—This stitch is worked from left to right, like Brussels point. Work 1 loose button-hole stitch, and in this stitch work 4 button-hole stitches tightly drawn up, then work another loose button-hole stitch, then 4 more tight button-hole stitches in the loose one; repeat to the end of the row, and fasten off.
No. 3.—Point de Venise, or Venice Point.—This stitch is done from left to right, just like Brussels point. Start with 1 loose buttonhole stitch, and then create 4 tightly drawn buttonhole stitches in this stitch. Next, make another loose buttonhole stitch, followed by another 4 tight buttonhole stitches in the loose one. Repeat this pattern until the end of the row, and then fasten off.
No. 3.—Point de Venise (Venice Point).
No. 3—Venice Point.
No. 4.—Petit Point de Venise (Little Venice Point).
No. 4.—Little Venice.
No. 4.—Petit Point de Venise, or Little Venice Point.—This stitch is worked in the same manner as point de Venise, but one tight stitch only is worked in each loose button-hole stitch. This is a most useful stitch for filling in small spaces.
No. 4.—Petit Point de Venise, or Little Venice Point.—This stitch is done the same way as point de Venise, but only one tight stitch is made in each loose button-hole stitch. This stitch is very useful for filling small spaces.
No. 5.—Italian Lace Stitch.—Commence at the right side and pass the thread to the left.
No. 5.—Italian Lace Stitch.—Start on the right side and move the thread to the left.
First row.—Make a loose button-hole stitch into the braid to form a loop, then pass the needle under the line of thread, making the loops an eighth of an inch apart.
First row.—Create a loose buttonhole stitch into the braid to make a loop, then pass the needle under the thread line, spacing the loops an eighth of an inch apart.
Second row.—Pass the thread back to the left, make a button-hole stitch in every loop, and pass the needle under the line of thread after each button-hole stitch.[Pg 10]
Second row.—Bring the thread back to the left, create a button-hole stitch in each loop, and slide the needle under the thread line after each button-hole stitch.[Pg 10]
No. 5.—Italian Lace Stitch.
No. 5.—Italian Lace Stitch.
No. 6.—Cobweb Lace Stitch.
No. 6.—Cobweb Lace Stitch.
No. 6.—Cobweb Lace Stitch.—Commence at the right side, pass the thread to the left, work 3 button-hole stitches, miss the space of 3, which will leave a small loop, and continue these details to the end.
No. 6.—Cobweb Lace Stitch.—Start on the right side, thread to the left, make 3 button-hole stitches, skip 3 spaces to create a small loop, and keep repeating these steps until the end.
Second row.—Pass the thread back to the left side, work 3 button-hole stitches in each loop, taking up the line of thread with the loop, as seen in the engraving.
Second row.—Pass the thread back to the left side, make 3 buttonhole stitches in each loop, incorporating the line of thread with the loop, as shown in the illustration.
No. 7.—Point Brabançon.—This stitch is worked as follows from left to right:
No. 7—Point Brabançon.—This stitch is done like this from left to right:
First row.—Make 1 long, loose point de Bruxelles, and 1 short loose one alternately, to end of row.
First row.—Make 1 long, loose Brussels stitch, and 1 short loose one alternately, until the end of the row.
Second row.—Make 7 tight point de Bruxelles in the 1 long, loose stitch, and 2 short, loose point de Bruxelles in the short, loose stitch on previous row, and repeat across the row.
Second row.—Make 7 tight Brussels stitches in the 1 long, loose stitch, and 2 short, loose Brussels stitches in the short, loose stitch from the previous row, and repeat across the row.
Third row.—Same as first.
Third row.—Identical to first.

No. 7.—Point Brabançon.
No. 7 — Point Brabançon.
No. 8.—Point de Valenciennes (Valenciennes Stitch).
No. 8 — Valenciennes Stitch.
No. 8.—Point de Valenciennes, or Valenciennes Stitch.—This stitch appears complicated, but is really easy to work. Begin at the left hand and work 6 point de Bruxelles stitches at unequal distances, every alternate stitch being the larger.
No. 8—Valenciennes Lace Stitch.—This stitch looks complicated, but it’s actually easy to do. Start on the left side and make 6 point de Bruxelles stitches at different distances, with every other stitch being larger.
Second row.—Upon the first large or long stitch, work 9 close button-hole stitches, then 1 short point de Bruxelles stitch under the one above, then 9 close stitches, and so on to the end of the row (right to left).
Second row.—For the first large or long stitch, make 9 tight buttonhole stitches, then 1 short point de Bruxelles stitch under the one above it, then 9 tight stitches, and repeat this pattern until you reach the end of the row (from right to left).
Third row.—Make 5 close button-hole stitches in the 9 of previous row, 1 short point de Bruxelles, 2 close, in the Bruxelles stitch, 1 short point de Bruxelles, 5 close, 1 short point de Bruxelles, 2 close, 1 short, 5 close, 1 short and repeat.
Third row.—Create 5 tight button-hole stitches in the 9 from the previous row, 1 short Brussels stitch, 2 tight stitches in the Brussels stitch, 1 short Brussels stitch, 5 tight, 1 short Brussels stitch, 2 tight, 1 short, 5 tight, 1 short, and repeat.
Fourth row.—Make 5 close, 1 short point de Bruxelles, 2 close, 1 short, 5 close, 1 short, 2 close, 1 short, and repeat. Continue the rows until sufficient of the pattern is worked.
Fourth row.—Make 5 tight point de Bruxelles, 1 short, 2 tight, 1 short, 5 tight, 1 short, 2 tight, 1 short, and repeat. Keep going until you have enough of the pattern.
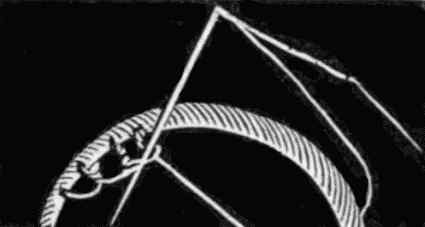
No. 9.—Point d'Espagne, or Spanish Point.—This variety of stitch is worked from left to right as follows: Insert the needle in the edge of the braid, keeping the thread turned to the right, and bringing it out inside the loop formed by the thread (see illustration No. 9); the needle must pass from the back of the loop through it. Pass the needle under the stitch and bring it out in front, thus twice twisting the thread, which produces the cord-like appearance of this stitch. At the end of each row fasten to the braid and sew back, inserting the needle once in every open stitch.
No. 9.—Spanish Point.—This stitch is worked from left to right like this: Insert the needle into the edge of the braid with the thread turned to the right, and pull it out through the loop formed by the thread (see illustration No. 9); the needle should go from the back of the loop through it. Then, pass the needle under the stitch and bring it out in front, twisting the thread twice to create the cord-like look of this stitch. At the end of each row, secure it to the braid and sew back, inserting the needle into every open stitch.
No. 9.—Point d'Espagne (Spanish Point).
No. 9.—Spanish Point.
No. 10.—Genoa Lace Stitch.—Commence at the right side, and work as follows:[Pg 11]
No. 10.—Genoa Lace Stitch.—Start on the right side and proceed as follows:[Pg 11]
First row.—Work 4 button-hole stitches, miss the space of 3, work 3, miss the space of 3, work 4. Continue to the end.
First row.—Sew 4 button-hole stitches, skip 3 spaces, sew 3, skip 3 spaces, sew 4. Repeat until the end.
Second row.—Work 9 stitches close together, 3 into the spaces of the 4, and 3 more into the loop at each side of it. Miss the 3 stitches, and make 9 as before.
Second row.—Knit 9 stitches tightly together, then 3 into the spaces of the 4, and 3 more into the loop on each side. Skip the 3 stitches, and make 9 as before.
Third row.—Make 9 close stitches, 3 into the last 3 spaces of the 9, 3 into the loop, and 3 into the first spaces of the 9 next, and so on to the end.
Third row.—Make 9 close stitches, 3 into the last 3 spaces of the 9, 3 into the loop, and 3 into the first spaces of the next 9, and continue this pattern to the end.
Fourth row.—Repeat the first, making the 3 stitches into the loop, and the 4 into the center spaces of the nine.
Fourth row.—Repeat the first, making 3 stitches into the loop and 4 into the center spaces of the nine.

No. 10.—Genoa Lace Stitch.
No. 10 — Genoa Lace Stitch.
No. 11.—Flemish Lace Stitch.
No. 11.—Flemish Lace Stitch.
No. 11.—Flemish Lace Stitch.—Commence at the right side, and work as follows:
No. 11.—Flemish Lace Stitch.—Start on the right side and proceed as follows:
First row.—Work 2 button-hole stitches close together, miss the space of 2, work 2, miss the space of 8; this will leave a large loop and a small one alternately.
First row.—Make 2 button-hole stitches close together, skip the space of 2, make 2, skip the space of 8; this will create a large loop and a small one alternately.
Second row.—Make 8 button-hole stitches in the larger loops and 2 in the small ones.
Second row.—Make 8 buttonhole stitches in the larger loops and 2 in the smaller ones.
Third row.—Repeat the first row, making 2 stitches in each loop of the second row.
Third row.—Repeat the first row, making 2 stitches in each loop of the second row.
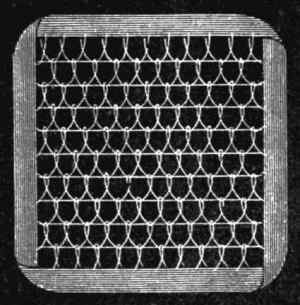
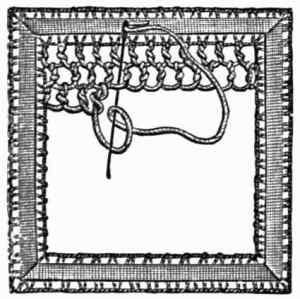
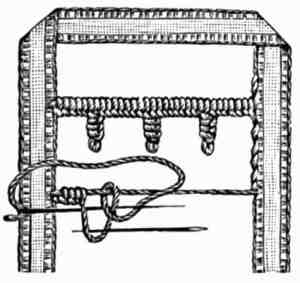
No. 12.—Point de Fillet, or Net Groundwork Stitch.—This stitch is also represented at No. 21, on page 13, but the method of making the knot is here illustrated. It is used for ground-work where Brussels net is not imitated, and is very effective wherever it is used. It is begun in the corner or crosswise of the space to be filled. A loose point de Bruxelles stitch is first taken and fastened to the braid, then passed twice through the braid as shown in the illustration, and worked in rows backward and forward as follows: 1 point de Bruxelles stitch, then before proceeding to the next stitch, pass the needle under the knot, over the thread, and again under it, as shown in the illustration. This stitch is very quickly worked.
No. 12.—Point de Fillet, or Net Groundwork Stitch.—This stitch is also shown at No. 21, on page 13, but the method for creating the knot is illustrated here. It’s used for groundwork where Brussels net isn’t mimicked and is very effective wherever applied. Start in the corner or crosswise of the area to be filled. Begin with a loose point de Bruxelles stitch, attach it to the braid, then pass it through the braid twice as illustrated, and work in rows back and forth as follows: 1 point de Bruxelles stitch, then before moving to the next stitch, pass the needle under the knot, over the thread, and then under it again, as shown in the illustration. This stitch can be completed quickly.
No. 12. Point de Fillet (Net Groundwork Stitch).
No. 12. Point de Fillet (Net Groundwork Stitch).
No. 13.—Point de Reprise.
No. 13.—Restart Point.
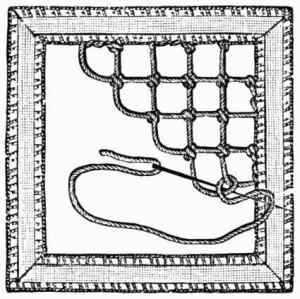
No. 13.—Point de Reprise.—This stitch is worked by darning over and under two threads forming a triangle. The space is filled by parallel and crosswise bars placed at equal distances, and on the triangles thus produced point de reprise is worked.
No. 13.—Check-in Point.—This stitch is done by darning over and under two threads that create a triangle. The space is filled with parallel and crosswise bars placed at equal intervals, and on the triangles created, point de reprise is worked.
No. 14.—Point Turque, or Turkish Point.—This easy and effective stitch is very appropriate for filling either large or small spaces; the thread employed should be varied in thickness according to the size of the space to be filled.
No. 14.—Point Turque, or Turkish Point.—This simple and efficient stitch works well for filling both large and small areas; the thread used should vary in thickness depending on the size of the area being filled.
First row.—Work a loop into the braid, bringing the thread from right to left, passing the needle through the twist and through the loop (see engraving), draw up tight and repeat.
First row.—Create a loop in the braid by moving the thread from right to left, threading the needle through the twist and the loop (see engraving), pull it tight, and repeat.
Second row.—1 straight thread from right to left.
Second row.—1 straight line from right to left.
Third row.—Work the same as first, using the straight thread in place of the braid, and passing the needle through the loop of the previous row, as shown in the illustration.[Pg 12]
Third row.—Work the same as the first, using the straight thread instead of the braid, and passing the needle through the loop of the previous row, as shown in the illustration.[Pg 12]
No. 14.—Point Turque (Turkish Stitch).
No. 14.—Point Turque (Turkish Stitch).
No. 15.—Treble Point d'Espagne.—This stitch is worked in exactly the same way as the open and close varieties just mentioned, as follows: 3 close stitches, 1 open, 3 close to the end of each row. Sew back, and in the next row make 1 open, 3 close, 1 open, 3 close to the end; repeat the rows as far as necessary, taking care that the close and open stitches follow in regular order. Diamonds, stars, squares, blocks and various other pretty patterns may be formed with this stitch.
No. 15.—Treble Point of Spain.—This stitch is done in the same way as the open and close varieties mentioned earlier, as follows: 3 close stitches, 1 open, 3 close until the end of each row. Sew back, and in the next row make 1 open, 3 close, 1 open, 3 close until the end; repeat the rows as needed, making sure the close and open stitches follow a regular pattern. You can create diamonds, stars, squares, blocks, and various other beautiful designs with this stitch.
No. 15.—Treble Point d'Espagne.
No. 15.—Treble Point of Spain.

No. 16.—Point d'Espagne. (Close.)
No. 16.—Point d'Espagne. (Nearby.)
No. 16.—Point d'Espagne (Close).—This stitch is worked like open point d'Espagne (see No. 9, page 10) but so closely as to only allow the needle to pass through in the next row. It is also worked from left to right, and is fastened to the braid at the end of each row.
No. 16.—Point d'Espagne (Nearby).—This stitch is done like open point d'Espagne (see No. 9, page 10) but so tightly that the needle only goes through in the next row. It is also worked from left to right and is secured to the braid at the end of each row.
No. 17.—Point de Grecque or Grecian Point.—Point de Grecque is made from left to right, and is worked backward and forward. It is begun by 1 stitch in loose point de Bruxelles and followed by 3 of close point d'Espagne; then 1 Bruxelles, 3 point d'Espagne, to the end of the row; in returning work in the same manner.
No. 17.—Grecian Point or Point de Grecque.—Point de Grecque is created from left to right, and is worked back and forth. Start with 1 stitch in loose point de Bruxelles, followed by 3 stitches of close point d'Espagne; then 1 stitch of Bruxelles and 3 stitches of point d'Espagne, continuing to the end of the row; when returning, work in the same way.

No. 17.—Point de Grecque (Grecian Point).
No. 17.—Grecian Point (Point de Grecque).

No. 18.—Point de Cordova.
No. 18.—Cordova Point.
No. 18.—Point de Cordova.—This stitch is useful as a variation, and resembles the point de reprise of Guipure lace making. It is worked in a similar manner, over and under the sides of squares formed by intersecting straight lines of the thread.
No. 18.—Cordova Point.—This stitch is a good alternative and looks like the point de reprise found in Guipure lace making. It is done in a similar way, weaving over and under the edges of squares created by crossing straight threads.
No. 19.—Point d'Alençon, with Twisted Stitch.—This stitch is used to fill in narrow spaces where great lightness of effect is desired, and is usually seen along the sides of insertions and the tops of edgings. Plain point d'Alençon is worked over and under in bars in a sort of herring-bone pattern, and a twisted stitch is made as seen in the engraving, by twisting the thread three times around each bar and knotting it at the angles as pictured. The effect is similar to one of the drawn-work hem-stitches.
No. 19.—Point d'Alençon, featuring Twisted Stitch.—This stitch is used to fill in narrow spaces where a light effect is desired and is typically seen along the sides of insertions and the tops of edgings. Plain point d'Alençon is created by weaving over and under in bars in a herringbone pattern, and a twisted stitch is made, as shown in the engraving, by twisting the thread three times around each bar and knotting it at the corners as illustrated. The result is similar to that of drawn-work hem-stitches.
No. 19.—Point d'Alençon, with Twisted Thread.
No. 19.—Point d'Alençon, with Twisted Thread.

No. 20.—Point d'Angleterre.
No. 20.—Angleterre Point.
No. 20.—Point d'Angleterre.—This lace is worked as follows: Cover the space to be filled in with lines of thread about an eighth of an inch apart, then form cross-lines, intersecting those already made and passing alternately under and over them; work a rosette on every spot where two lines cross by working over and under the two lines about 16 times round; then twist the thread twice round the ground-work thread, and begin to form another rosette at the crossing threads.
No. 20.—Point of England.—This lace is created like this: Fill the area with threads laid out about an eighth of an inch apart, then make cross threads that intersect those already laid, going alternately under and over them; create a rosette at every intersection where two threads meet by weaving over and under the two lines about 16 times around; then twist the thread twice around the foundation thread, and start making another rosette at the crossing threads.
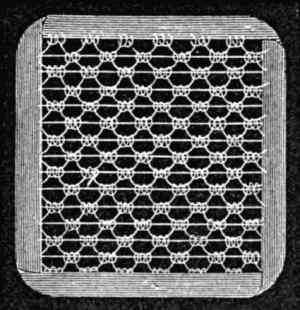
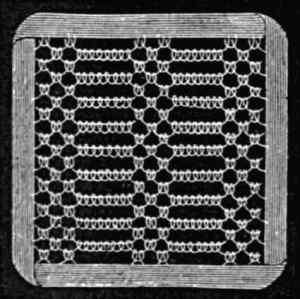
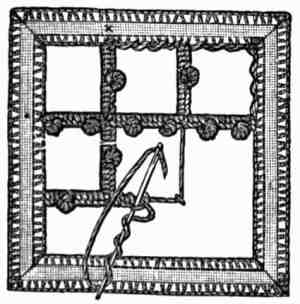
No. 21.—Point de Fillet and Point de Reprise.—The net-work seen in this engraving is the first stitch mentioned, while the block-work is the second. Both are clearly illustrated and need no written explanation of the methods employed in making them.
No. 21.—Point de Fillet and Point de Reprise.—The netting shown in this engraving is the first stitch mentioned, while the block pattern represents the second. Both are clearly illustrated and don't require any written explanation of the techniques used to create them.

No. 21.—Point de Fillet And Point de Reprise.
No. 21.—Point de Fillet and Point de Reprise.

No. 22.—Point de Tulle.
No. 22.—Tulle Point.
No. 22.—Point de Tulle.—This stitch is used as a ground-work for very fine work, and is worked in rows backward and forward in the same[Pg 13] stitch as open point d' Espagne. When this is completed the work is gone over a second time by inserting the needle under one twisted bar, bringing it out and inserting it at + and bringing it out again at the dot. This produces a close double twist which is very effective.
No. 22.—Tulle Lace.—This stitch serves as a foundation for delicate work and is done in rows, moving back and forth using the same[Pg 13] stitch as open point d'Espagne. Once that’s completed, the work is revisited by inserting the needle under one twisted bar, pulling it out and inserting it at +, then bringing it out again at the dot. This creates a tight double twist that looks fantastic.
No. 23. Fan Lace Stitch.—Commence at the right side, and work as follows:
No. 23. Fan Lace Stitch.—Start on the right side and proceed as follows:
First row.—Make 1 button-hole stitch and miss the space of 8, which will leave a long loop.
First row.—Make 1 buttonhole stitch and skip 8 spaces, which will create a long loop.
Second row.—Make 8 button-hole stitches in each loop.
Second row.—Make 8 buttonhole stitches in each loop.
Third row.—Make 7 stitches into the spaces between the 8, and so decrease one in every row until only one remains, as may be seen by referring to the illustration.
Third row.—Make 7 stitches into the spaces between the 8, and then decrease one in every row until only one remains, as shown in the illustration.

No. 23.—Fan Lace Stitch.
No. 23.—Fan Lace Stitch.

No. 24.—Rose Point Lace Stitch.
No. 24.—Rose Point Lace Stitch.
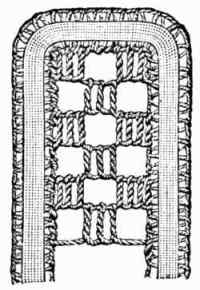
No. 24.—Rose Point Lace Stitch.—Make a foundation of single threads, crossing them to form the large squares. Work a button-hole stitch at each crossing to make it firm. Now begin at the top, at the right side and fill the first square with Brussels net stitches, finishing at the lower left corner. Fill every alternate square in the same way as seen in the picture.
No. 24.—Rose Point Lace Pattern.—Create a base using single threads, crossing them to form large squares. Use a buttonhole stitch at each crossing to secure it. Start from the top on the right side and fill the first square with Brussels net stitches, finishing at the bottom left corner. Fill every other square in the same manner as shown in the picture.
Now cross the open squares diagonally with two threads, twisting each thread around the adjoining one as represented. (Carry one thread across all the squares from corner to corner first, then twist back, fastening at the corner started from; cross these threads in the same way from the opposite direction). When twisting the thread back from the last set of crossings, make a rosette at each center crossing as follows: Keep the space open with a pin and trace round it with a darning movement five or six times; commence at the single thread and work a close button-hole stitch over the tracing entirely around, and then twist along the single thread to the center of the next square. This is a very effective design for spaces.
Now stretch two threads diagonally across the open squares, twisting each thread around the other as shown. (Start by carrying one thread diagonally across all the squares from one corner to the opposite corner, then twist it back, securing it at the starting corner; cross these threads in the same manner from the other direction). When twisting the thread back from the last set of crossings, create a rosette at each center crossing like this: Keep the space open with a pin and trace around it with a darning movement five or six times; start at the single thread and work a tight buttonhole stitch over the tracing completely around, then twist along the single thread to the center of the next square. This design works great for filling spaces.
WHEELS AND ROSETTES.
Wheels and rosettes are used to fill up spaces, or in combination, to form lace.
Wheels and rosettes are used to fill spaces or, when combined, to create lace.
No. 25.—Rosette in Raised Point d'Angleterre.—This rosette is worked in a manner similar to the English wheel, the difference being that after each stitch is passed round and under the bars, the thread is passed loosely around in the reverse direction, as shown in the illustration, before proceeding to make the next stitch.
No. 25.—Rosette in Raised Point d'Angleterre.—This rosette is created in a way that’s like the English wheel, but the key difference is that after each stitch goes around and under the bars, the thread is loosely wrapped in the opposite direction, as shown in the illustration, before moving on to the next stitch.

No. 25.—Rosette in Raised Point d'Angleterre.
No. 25.—Rosette in Raised Point d'Angleterre.
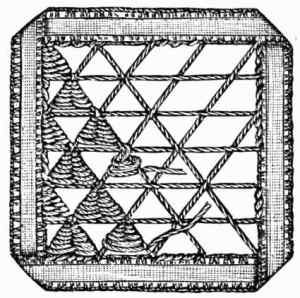
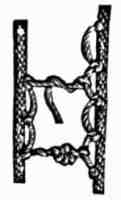
No. 26.—Mechlin Lace Wheels.—This is one of the prettiest stitches in point lace, but also one of the most difficult to work correctly. It is made thus: Work a number of diagonal bars in button-hole stitch on a single thread in one direction, then begin at the opposite side in the same way, and work 5 or 6 stitches past the spot where the two lines cross; pass the thread round the cross twice, under and over the thread to form a circle. Work in button-hole stitch half of one-quarter, make a dot by putting a fine pin in the loop instead of drawing the thread tight, and work 3 button-hole stitches in the loop held open by the pin, then take the pin out and continue as before. Beginners will do well to omit the[Pg 14] dot, leaving the loop only on the wheel. Mechlin wheels are also worked in rows upon horizontal and parallel lines of thread.
No. 26.—Mechlin Lace Spindles.—This is one of the prettiest stitches in point lace, but also one of the hardest to do correctly. Here's how to make it: Create several diagonal bars in buttonhole stitch on a single thread in one direction, then start from the opposite side in the same way and work 5 or 6 stitches beyond where the two lines intersect; wrap the thread around the intersection twice, going under and over the thread to form a circle. Work in buttonhole stitch for half of a quarter, create a dot by inserting a fine pin in the loop instead of tightening the thread, and then work 3 buttonhole stitches in the loop that’s held open by the pin. After that, remove the pin and continue as before. Beginners should skip the[Pg 14] dot and just leave the loop on the wheel. Mechlin wheels can also be done in rows on horizontal and parallel lines of thread.
No. 26.—Mechlin Lace Wheels.
No. 26.—Mechlin Lace Spindles.
No. 27.—English Wheel.
No. 27.—English Wheel.
No. 27.—English Wheel.—This is worked in the same manner as Sorrento wheels, but instead of winding the thread over and under the bars, the needle is inserted under each bar, and brought out again between the thread and the last stitch; this produces a kind of button-hole stitch, and gives the square, firm appearance possessed by this wheel.
No. 27.—English Wheel.—This is operated in the same way as Sorrento wheels, but instead of winding the thread over and under the bars, the needle is inserted under each bar and pulled back out between the thread and the last stitch; this creates a kind of button-hole stitch and gives the square, firm look that this wheel is known for.
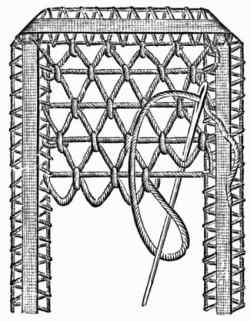
Nos. 28 and 30.—Sorrento Wheel.—This is worked by fastening the thread in the pattern to be filled up, as indicated by the letters. Fasten it first to the place a, then at place b, carrying it back to the middle of the first formed bar by winding it round; fasten again at c, carrying it back again to the center by winding it around the bar, and so on to all the letters; then work over and under the bars thus formed.
Nos. 28 and 30.—Sorrento Wheel.—This is done by attaching the thread to the pattern that needs to be filled in, as shown by the letters. First, secure it at point a, then at point b, bringing it back to the middle of the first bar by wrapping it around; secure it again at c, bringing it back to the center by wrapping it around the bar again, and continue this to all the letters; then weave over and under the bars created in this way.
No. 28.—Sorrento Wheel.
No. 28.—Sorrento Ferris Wheel.

No. 30.—Sorrento Wheel.
No. 30.—Sorrento Ferris Wheel.
No. 29.—Close English Wheels.—These wheels may be used in open spaces and may be very easily made from the engraving. They are much like the wheels used in drawn work—indeed, many of the stitches used in lace are identical with those used in drawn-work.
No. 29.—Close English Wheels.—These wheels can be used in open areas and can be easily created from the engraving. They are very similar to the wheels used in drawn work—actually, many of the stitches used in lace are the same as those used in drawn work.

No. 29.—Close English Wheels.
No. 29.—Close English Wheels.
BARS AND PICOTS.[Pg 15]
The word "Bar" is applied to the many stitches used to connect the various parts of point lace, and the beauty of the work depends greatly upon the class of bar selected and its suitability to the lace stitches used.
The term "Bar" refers to the various stitches used to join different parts of point lace, and the overall beauty of the work heavily relies on the type of bar chosen and how well it matches the lace stitches used.
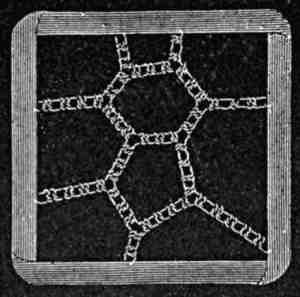
Nos. 31 and 32.—Raleigh Bars.—These bars are much used in making Battenburg lace and are very effective. They are worked over a foundation or net-work of coarse thread, and are twisted in places so that they will more easily fall into the desired form.
Nos. 31 and 32.—Raleigh Bars.—These bars are widely used in creating Battenburg lace and are quite effective. They are worked over a foundation or net of coarse thread, and are twisted in spots so they can easily take on the desired shape.
By following the numbering from 1 to 21, in No. 31, a square place may be easily filled, and portions of this arrangement applied to form ground-work of any shape desired. Upon this ground-work tight point de Bruxelles stitches are made, and the dot worked upon these in one of the following ways:
By following the numbers from 1 to 21, in No. 31, you can easily fill a square area, and parts of this layout can be used to create a base of any shape you want. On this base, tight point de Bruxelles stitches are made, and the dots are worked on these in one of the following ways:

No. 31.—Net-work for Working Raleigh Bars.
No. 31.—Network for Working Raleigh Bars.
Dot or Picot.—First Method.—Make 5 tight point de Bruxelles stitches, 1 loose point de Bruxelles; pass the needle under the loop and over the thread, as shown in point de Venise bars at No. 47, on page 18, and draw up, leaving a small, open loop as in tatting. Work 5 tight point de Bruxelles stitches, and repeat.
Dot or Picot.—First Method.—Make 5 tight Brussels stitches, 1 loose Brussels stitch; pass the needle under the loop and over the thread, as shown in the Venice bars at No. 47 on page 18, and pull it tight, leaving a small open loop like in tatting. Make 5 tight Brussels stitches again, and repeat.
Second Method.—Proceed as above directed, but instead of continuing the tight stitches, work two or three tight stitches in the loop thus formed and repeat.
Second Method.—Follow the instructions given above, but instead of keeping the stitches tight, make two or three tight stitches in the loop created and repeat.

No. 32.—Raleigh Bars.
No. 32.—Raleigh Bars.
Third Method.—Work 4 tight point de Bruxelles stitches; 1 loose, through which pass the needle point, wind the thread three or four times round the point (see No. 48, page 18), press the thumb tightly on this, and draw the needle and thread through the twists. This is a quick mode of making the picot, and imitates most closely the real Spanish lace.
Third Method.—Make 4 tight point de Bruxelles stitches; then 1 loose stitch, through which pass the needle point. Wrap the thread around the point three or four times (see No. 48, page 18), press your thumb tightly on this, and pull the needle and thread through the twists. This is a quick way to create the picot and closely resembles real Spanish lace.
Illustration No. 48 shows how this stitch may also be applied as a regular ground-work, but the beauty of old point ground-work bars consists of variety in form.[Pg 16]
Illustration No. 48 shows how this stitch can also be used as a regular groundwork, but the beauty of old point groundwork bars comes from the variety in their shapes.[Pg 16]
No. 33.—Italian Ground Stitch.—Commence at the left side, and work as follows:
No. 33.—Italian Ground Stitch.—Start on the left side and proceed as follows:
First row.—Make a loose button-hole stitch to form a loop a quarter of an inch wide, and then make a plain stitch into the loop to twist it, and continue to the end.
First row.—Create a loose buttonhole stitch to make a loop that's a quarter of an inch wide, then insert a plain stitch into the loop to twist it, and keep going until the end.
Second row.—Make two plain stitches into each loop, working back to the left.
Second row.—Make two basic stitches into each loop, working back to the left.
Third row.—Repeat first row.
Third row.—Repeat the first row.
No. 33.—Italian Ground Stitch.
No. 33.—Italian Ground Stitch.
No. 34.—Open Lace Bars.
No. 34.—Open Lace Straps.
No. 34.—Open Lace Bars.—Pass a thread from right to left. Make it firm by working a second stitch into the braid; work 2 button-hole stitches on this line of thread, close together. Then work 1 button-hole stitch on the lower thread at the left hand side, and draw it close to the 2 stitches on the line of thread. Miss the space of 2 and repeat.
No. 34.—Open Lace Strips.—Pass a thread from right to left. Secure it by adding a second stitch into the braid; then make 2 buttonhole stitches close together on this line of thread. Next, work 1 buttonhole stitch on the lower thread on the left side, and pull it tight against the 2 stitches on the line of thread. Skip a space of 2 and repeat.
Nos. 35 and 36.—Sorrento Bars.—Each of the bars is worked from right to left, a straight thread being carried across and fastened securely with a stitch. The return consists of a simple twist under and over the straight thread; three of these bars are usually placed close together at equal distances between the groups. The thread is sewn carefully over the braid in passing from one spot to another.
Nos. 35 and 36.—Sorrento Bars.—Each bar is worked from right to left, with a straight thread run across and securely fastened with a stitch. The return consists of a simple twist under and over the straight thread; three of these bars are typically placed close together at equal distances between the groups. The thread is sewn carefully over the braid when moving from one spot to another.
No. 35.—Sorrento Bars.
No. 35.—Sorrento Snacks.
No. 36.—Sorrento Bars.
No. 36.—Sorrento Snacks.
Nos. 37 and 38.—Venetian Bars.—The bar at No. 37 is so simple that it really needs no description. It is worked over two straight threads in reverse button-hole stitch. No. 38 shows the Venetian bar used as the veining of a leaf and worked upon Sorrento bars.
Nos. 37 and 38.—Venetian Blinds.—The bar at No. 37 is so straightforward that it doesn't really require a description. It’s created over two straight threads using a reverse button-hole stitch. No. 38 illustrates the Venetian bar used as the veining of a leaf and is worked on Sorrento bars.
No. 37.—Venetian Bars.
No. 37.—Venetian Bars.

No. 38.—Venetian Bars.
No. 38.—Venetian Bar.
[Pg 17]No. 39.—Point d'Anvers Bars.—Two upright bars form the foundation. The thread is carried over and under them as seen in the engraving, the side loops being added by the method depicted at the top of the point.
[Pg 17]No. 39.—Antwerp Bar Points.—Two vertical bars create the base. The thread is woven over and under them as shown in the illustration, with the side loops added using the technique illustrated at the top of the point.
The over and under work in point d'Anvers bars, without the side loops, is often used for plain bars for filling in odd spaces or wheels in heavy lace.
The over and under technique used in point d'Anvers bars, without the side loops, is often applied to plain bars for filling in gaps or wheels in heavy lace.

No. 39.—Point d'Anvers Bars.
No. 39.—Antwerp Point Bars.

No. 40.—Point Grecque Bars.
No. 40.—Greek Point Bars.
No. 40.—Point Grecque Bars.—These bars are so simply made that they are great favorites with beginners. They are begun at the top of the point, one straight thread being carried to the bottom; then the cross bars are worked after the method seen in the illustration.
No. 40.—Greek Bar Points.—These bars are so easy to make that they are very popular with beginners. You start at the top of the point, running a straight thread down to the bottom; then, the cross bars are created using the method shown in the illustration.
No. 41.—Bars of Point d'Angleterre.—These bars may be worked singly or to fill up a space, as in the illustration. Work rosettes as in point d'Angleterre; when each rosette is finished twist the thread up the foundation thread to the top, fasten with one stitch, then pass it under the parallel line running through the center and over into the opposite braid; repeat on each side of each rosette, inserting the threads as seen in the illustration.
No. 41.—Point d'Angleterre Bars.—These bars can be used individually or to fill a space, as shown in the illustration. Create rosettes as you would in point d'Angleterre; once each rosette is completed, twist the thread up around the foundation thread to the top, secure it with one stitch, then pass it under the parallel line running through the center and over into the opposite braid. Repeat this on each side of each rosette, inserting the threads as shown in the illustration.

No. 41.—Bars of Point d'Angleterre.
No. 41.—Angleterre Point Bars.
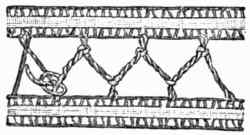
No. 42.—Point de Venise Bars (Edged).—Begin at the right hand and stretch a line of thread to the left side of the braid, fastening it with one tight stitch of point de Bruxelles. Upon this line work a succession of tight point de Bruxelles stitches. Then in every third stitch work one point de Venise stitch.
No. 42.—Point de Venise Bars (Edged).—Start on the right side and run a line of thread over to the left side of the braid, securing it with a tight stitch of point de Bruxelles. On this line, create a series of tight point de Bruxelles stitches. Then, for every third stitch, work in one point de Venise stitch.

No. 42.—Point de Venise Bars (Edged).
No. 42.—Point de Venise Bars (Edged).

No. 43.—d'Alençon And Sorrento Bars.
No. 43.—d'Alençon and Sorrento Bars.
No. 43.—d'Alençon and Sorrento Bars.—At Nos. 35 and 36 (page 16), a description of the method of making Sorrento bars is given, while at No. 19 (page 12), is a description of plain and fancy d'Alençon stitches. The two methods are combined in the work seen at No. 43 where the process is so clearly illustrated that a mere novice in lace-work could not fail to produce it perfectly. The combined stitch is used in filling in spaces, etc., etc.
No. 43.—d'Alençon and Sorrento Bars.—At Nos. 35 and 36 (page 16), there's a description of how to make Sorrento bars, while at No. 19 (page 12), there's an explanation of plain and decorative d'Alençon stitches. The two methods are combined in the work shown at No. 43, where the process is so clearly illustrated that a complete beginner in lace-making could easily create it perfectly. The combined stitch is used to fill in spaces, and so on.
[Pg 18]No. 44.—Picot Or Dot on Sorrento Bar.—This dot is worked between rows of point de Bruxelles, 3 twisted stitches being worked into the loop left by the twisted thread; this forms a picot resembling satin stitch in appearance.
[Pg 18]No. 44.—Picot or Dot on Sorrento Bar.—This dot is created between rows of point de Bruxelles, with 3 twisted stitches worked into the loop left by the twisted thread; this gives it a picot look that resembles satin stitch.
No. 44.—Picot or Dot on Sorrento Bar.
No. 44.—Picot or Dot on Sorrento Bar.
No. 45.—d'Alençon Bars.—These bars are worked upon point de Bruxelles edging, and are only applied to the inner part of a pattern, never being used as ground-work bars. The thread is merely passed three times over and under the point de Bruxelles stitches, the length of these bars being regulated by the space to be filled; when the third bar is completed a tight point de Bruxelles stitch fastens off the bars, and the thread is passed through the next point de Bruxelles stitch.
No. 45.—d'Alençon Bar.—These bars are created using point de Bruxelles edging and are only added to the inner part of a design, never serving as background bars. The thread is simply passed three times over and under the point de Bruxelles stitches, with the length of these bars determined by the area that needs to be filled; once the third bar is finished, a tight point de Bruxelles stitch secures the bars, and the thread is moved through the next point de Bruxelles stitch.

No. 45.—d'Alençon Bars.
No. 45 — d'Alençon Bars.

No. 46.—Plain Venetian Bars.
No. 46.—Simple Venetian Bars.
No. 46.—Plain Venetian Bars.—These bars are worked so as to form squares, triangles, etc., in button-hole stitch upon a straight thread.
No. 46.—Simple Venetian Bars.—These bars are designed to create squares, triangles, etc., using a button-hole stitch on a straight thread.
The arrow in the illustration points to the direction for working the next stitch.
The arrow in the illustration shows the direction for making the next stitch.
No. 47.—Dotted Point de Venise Bars.—These pretty bars are worked as follows: Stretch the thread from right to left; on this work 5 tight stitches of point de Bruxelles, then insert a pin in this last stitch to hold it open and loose, pass the needle under the loose stitch and over the thread, as clearly shown in the illustration, and in this loop work 3 tight point de Bruxelles stitches. Then work 5 more stitches and repeat to end of row.
No. 47.—Dotted Point de Venise Strips.—These lovely bars are made like this: Stretch the thread from right to left; then make 5 tight stitches of point de Bruxelles. Insert a pin in the last stitch to keep it open and loose, pass the needle under the loose stitch and over the thread, as clearly shown in the illustration, and in this loop work 3 tight point de Bruxelles stitches. After that, make 5 more stitches and repeat until the row is complete.
No. 47.—Dotted Point de Venise Bars.
No. 47.—Dotted Point de Venise Bars.
No. 48.—Third Method of Making Picots or Dots.
No. 48.—Third Way to Make Picots or Dots.
The making of the dots or purls before mentioned as picots, is an important feature in bar work. All three names are employed for the same class of stitch.
The creation of the dots or purls mentioned earlier as picots is an important aspect of bar work. All three names are used for the same type of stitch.
No. 48.—Third Method of Making Picots Or Dots.—This method has been fully described in connection with the making of Raleigh Bars at Nos. 31 and 32 (page 15), and requires no further description at this point. All dots and picots render work much more effective, and may be introduced at will by the worker.
No. 48.—Third Method for Creating Picots or Dots.—This method has been fully explained along with the creation of Raleigh Bars in Nos. 31 and 32 (page 15), so there's no need to go into further detail here. All dots and picots make the work more impactful, and the worker can add them whenever they like.
In making modern lace, the various kinds require appropriate braids. There are three classes of these braids—those for Battenburg lace, those for plain Honiton and point, and those for the newest kind of lace, which is called the "Ideal Honiton." Each class of braids contains many designs and widths, and a large number of them, together with various cords, buttons and rings also used are illustrated on following pages.
In creating modern lace, different types need specific braids. There are three categories of these braids: those for Battenburg lace, those for plain Honiton and point, and those for the latest type of lace called "Ideal Honiton." Each category of braids features many designs and widths, and a wide range of them, along with various cords, buttons, and rings, are illustrated on the following pages.
FANCY BRAIDS, CORDS, RINGS AND BUTTONS.[Pg 19]
BRAIDS.
The braids, cords, rings and buttons illustrated upon the following two pages are all used in modern lace-making. They are all made of pure linen thread, and according to the fancy, the lace including them may be heavy or light. Royal Battenburg lace, as originated, was heavy—in some cases massive; but at present many lighter varieties are made, as will be surmised upon an inspection of the braids for its manufacture which are represented on the pages mentioned. As shown by No. 1, these braids are about a third narrower than their actual width, and the picot edges numbered 16 and 17 are plain tatting made for the purpose, as the picot edges woven for lighter laces are not heavy enough for Battenburg lace. The numbers opposite the specimens are simply for convenience in ordering, if the order is sent the lady mentioned in another part of the book as the Pioneer of Lace-Making in America; but in ordering from other lace-makers or manufacturers of braids, these numbers will be of little use, as every lace-maker or manufacturer has his or her own individual identifications for materials. Almost any of the braids, or those very similar, may be found at large fancy stores, but in buying them at such stores, be careful to get linen braids, as cotton braids do not make pretty lace, neither do they wear or launder well. In ordering these braids from other lace-makers or from fancy stores, it will be necessary to forward the illustration of the kind wanted, as the braids cannot be described with sufficient accuracy to obtain the desired varieties. Some are sold by the yard, some by the dozen yards and others by the piece, according to the position to be occupied in the work.
The braids, cords, rings, and buttons shown on the following two pages are all used in modern lace-making. They are made of pure linen thread, and depending on the design, the lace featuring them can be heavy or light. The original Royal Battenburg lace was heavy — sometimes even massive; however, many lighter versions are now made, as you can see in the braids for its production depicted on the mentioned pages. As shown in No. 1, these braids are about one-third narrower than their actual width, and the picot edges numbered 16 and 17 are plain tatting made specifically for this purpose, since the picot edges used for lighter laces aren’t sturdy enough for Battenburg lace. The numbers next to the samples are for convenience in ordering, if the order is sent to the lady referred to elsewhere in the book as the Pioneer of Lace-Making in America; however, when ordering from other lace-makers or braid manufacturers, these numbers won’t be very helpful, as each lace-maker or manufacturer has their own unique identifiers for materials. You can find many of the braids, or ones very similar, in large specialty stores, but when buying from such stores, make sure to get linen braids because cotton braids don’t make pretty lace and they don’t hold up well when washed. When ordering these braids from other lace-makers or specialty stores, it’s necessary to send the illustration of the kind you want, as the braids can’t be described accurately enough to ensure you get the right varieties. Some are sold by the yard, some by the dozen yards, and others by the piece, depending on their intended use in the work.
The point, Honiton and Princess braids are represented full size, and are much daintier in texture than the Battenburg braids. Of this class of braids (see No. 2) are made the plain Honiton and point laces, and the braids for these two laces combined produce the Princess lace—a creation whose beauty fully entitles it to its royal name.
The point, Honiton, and Princess braids are shown at full size and are noticeably more delicate in texture than the Battenburg braids. This category of braids (see No. 2) is used to make the plain Honiton and point laces, and the combination of these two braids results in the Princess lace—a creation whose beauty truly deserves its royal name.
The braids seen at No. 3, page 21, are those which are used in making the new "Ideal Honiton" lace represented in another portion of the book. As illustrated, these braids are three-quarters of their proper widths, the top braid, No. 38, being just one inch wide in the fabric itself. The "Ideal Honiton" is one of the prettiest laces made, and is very appropriate for tidies, doilies, squares and scarfs. It is daintily secured to the finest of lawn in charming designs, and then the lawn is cut out from beneath it. (See doily, page 33).
The braids shown on page 21, No. 3, are the ones used to create the new "Ideal Honiton" lace featured elsewhere in the book. As shown, these braids are three-quarters of their actual widths, with the top braid, No. 38, measuring just one inch wide in the fabric itself. The "Ideal Honiton" is one of the prettiest laces available and is perfect for tidies, doilies, squares, and scarves. It is delicately attached to the finest lawn in beautiful designs, and then the lawn is cut away from underneath. (See doily, page 33).
The cords seen at No. 4 are used in making Battenburg laces, and greatly increase the beauty of the work in addition to forming a distinctive species of lace. After the ordinary Battenburg is worked with quite thick braid, the cord, in any size desired, is used to follow one edge of the design, as will be seen from illustrations upon other following pages.
The cords shown at No. 4 are used to create Battenburg lace, enhancing the beauty of the piece while also making it a unique type of lace. After the regular Battenburg is made with fairly thick braid, the cord, in any size you want, is used to outline one edge of the design, as you can see in the illustrations on the following pages.
RINGS AND BUTTONS.
The rings and buttons illustrated, are made throughout of linen thread in layers of button-hole stitches, and are sold by the dozen or gross. Buttons arranged as grapes (see No. 50, page 21), add greatly to the sumptuous effect of a heavy lace, and may be purchased already arranged as illustrated, or they may be arranged by the purchaser of a quantity of them. The latter method is a good plan if spaces are to be filled with clusters which must be of a certain shape.
The rings and buttons shown are made entirely from linen thread in layers of buttonhole stitches and are sold by the dozen or gross. Buttons arranged like grapes (see No. 50, page 21) greatly enhance the luxurious look of heavy lace, and can be bought pre-arranged as shown, or the buyer can arrange them after purchasing a quantity. The second option is a good approach if spaces need to be filled with clusters that must match a specific shape.


No. 2.—Braids used in Making Honiton, Point and Princess Lace.
No. 2.—Braids Used in Making Honiton, Point, and Princess Lace.
No. 3.—Braids used in Making "Ideal Honiton" Lace.
No. 3.—Braid Techniques for Making "Ideal Honiton" Lace.

No. 4.—Cords, Rings and Buttons used in Making Battenburg Lace.
No. 4.—Cords, Rings, and Buttons Used in Making Battenburg Lace.
DESIGNS, LACE ARTICLES, EDGINGS, INSERTIONS, ETC., IN MODERN LACE.[Pg 22]
Of necessity, most of the designs and specimens given on this and the following pages are smaller than the articles they represent, but they afford a correct idea of the method of making and the beauty of Modern Lace, and also its adaptability to dainty accessories of the toilet and the household. As before mentioned any design desired can be obtained from any lace-making establishment in any size, width or shape, according to the requirements of the article or lace to be made, and individual taste. Ingenious students will no doubt be able to adapt for themselves the designs offered, but it is not advisable for those who have no talent in the matter of drawing or designing to undertake an elaborate adaptation, though they may easily accomplish a simple one. Besides, a professional designer will furnish the design for a moderate sum, perfectly outlined upon tracing cloth, with ink, and with the proper filling-in stitches perfectly delineated; and if the student wishes it, will select the thread and braid appropriate for the design; or the student may select the braid she fancies, and the designer will then select the thread suitable for the braid.
Out of necessity, most of the designs and samples shown on this and the following pages are smaller than the items they represent, but they provide a clear idea of how to create and the beauty of Modern Lace, along with its versatility for delicate accessories in both fashion and home. As mentioned earlier, any design can be acquired from any lace-making shop in any size, width, or shape, depending on the needs of the item or lace being made, as well as personal preference. Creative students will likely be able to adapt the designs provided, but it's not recommended for those who lack skills in drawing or design to attempt an intricate modification, though they can easily manage a simple one. Additionally, a professional designer will supply the design for a reasonable fee, clearly outlined on tracing fabric, with ink, and with the appropriate filling stitches clearly marked; if the student wishes, the designer will also choose the thread and braid that match the design; alternatively, the student can pick the braid they prefer, and the designer will then choose the suitable thread for that braid.
No. 1.
DESIGN FOR A LACE HANDKERCHIEF.
This design is suitable for point lace braid, but is of course very much reduced in size, in order to show the effect and arrangement of a design ready for working, as sent out from the lace-maker's. By a reference to the various stitches illustrated on preceding pages, the stitches shown in one corner of the design may be readily identified. The following engraving shows how braid is applied to a design before the stitches are begun.
This design works well for point lace braid, but it's scaled down significantly to display the effect and layout of a design that is ready to be worked on, as sent out by the lace-maker. By looking back at the various stitches shown on earlier pages, you can easily identify the stitches illustrated in one corner of the design. The following engraving demonstrates how braid is incorporated into a design before the stitches begin.
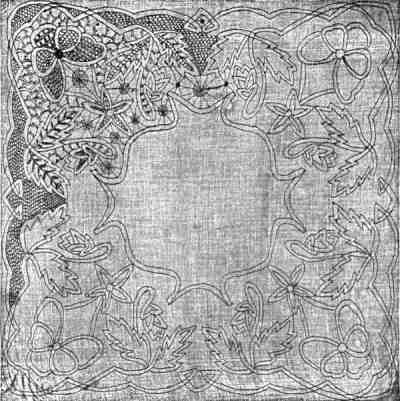
No. 1.—Design for a Lace Handkerchief.
__A_TAG_PLACEHOLDER_0__—Lace Handkerchief Design.
No. 2.
METHOD OF PLACING BRAID UPON DESIGNS.
This illustration shows the method of arranging braid upon designs for modern lace, and how, after the braid is basted along the pattern, the tracing cloth is basted to toile cirée or to smooth, light brown wrapping paper to provide sufficient firmness for working.
This illustration shows how to arrange braid for modern lace designs. After the braid is pinned along the pattern, the tracing cloth is pinned to toile cirée or to smooth, light brown wrapping paper to ensure enough firmness for working.
The following instructions apply particularly to engraving No. 2, but their principle should be observed and applied to any design decided upon, as good results in lace-making largely depend upon the arrangement of the braid.
The following instructions apply specifically to engraving No. 2, but the principle should be followed and applied to any design chosen, as successful lace-making greatly depends on how the braid is arranged.
Run on a straight line of braid for the lower edge, with fine stitches, working as shown, from left to right. Take another piece of braid, or the other end of the same piece, and begin to lay the braid by "running" stitches in its center, keeping it as smooth and even as possible. The outer edge presents no difficulty, but the inner edge will not lie evenly without being drawn in by a needle and thread, as follows: Fasten whipping thread securely, and insert the needle in and out of the edge of the braid, as if for fine gathering; this thread when drawn up will keep the braid in its place. Two or three fastening-off stitches should be worked when each circle, half circle, or rounded curve of a pattern is finished, as the drawing or gathering thread remains in the work, and forms an important, though unseen, part of its structure.
Run a straight line of braid along the lower edge with fine stitches, working from left to right as shown. Take another piece of braid, or the other end of the same piece, and start to lay the braid down by making "running" stitches in its center, keeping it as smooth and even as you can. The outer edge should be easy, but the inner edge won't lie flat without being pulled in with a needle and thread, like this: Securely fasten the whipping thread and insert the needle in and out of the edge of the braid, as if you're gathering it finely; pulling this thread will keep the braid in place. You should make two or three fastening-off stitches at the end of each circle, half circle, or rounded curve of a pattern, since the gathering thread stays in the work and plays an important, although hidden, role in its structure.
Before cutting off the braid run a few stitches across it to prevent it from widening. Joins should be avoided, but when a join is indispensable, stitch the braid together, open and turn back the ends, and stitch each portion down separately. When passing the thread from one part to another, run it along the center of the braid, allowing the stitches to show as little as possible. In commencing, make a few stitches, leaving the end of the thread on the wrong side and cutting it off afterwards. In fastening off, make a tight button-hole stitch, run in three stitches, bring the needle out at the back, and cut off.[Pg 23]
Before cutting off the braid, sew a few stitches across it to keep it from fraying. Try to avoid joins, but if you really need to make one, stitch the braid together, open it up, and fold the ends back, then stitch each part down separately. When moving the thread from one section to another, run it along the center of the braid, so the stitches are as inconspicuous as possible. To start, make a few stitches, leaving the thread end on the inside, and cut it off later. To finish off, make a tight buttonhole stitch, add three more stitches, bring the needle out at the back, and then cut it off.[Pg 23]
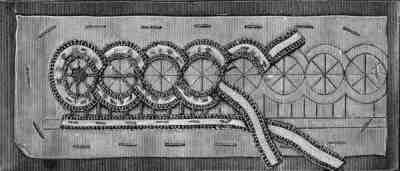
No. 3.[Pg 24]
ROYAL BATTENBURG LACE BUREAU-SCARF.
The engraving on the opposite page represents the article above mentioned, and shows the effectiveness of this magnificent and durable lace. In actual size the scarf is about a yard and one-half long and one-half yard wide, and is made of a heavy Battenburg braid, having a fancy edge (See Nos. 5 or 7, on page 20) and cord, rings and buttons. The main part of the design is outlined with the braid, cord is used as a veining for the leaves, and the rings and buttons are introduced here and there over the surface, as seen in the picture. Raleigh bars with picots connect the border and center designs, while the palms along the border as well as other small spaces are filled in with point Turque and point de Grecque stitches. Sorrento bars are also used in some of the long leaf-like spaces, while in a few of the circular spaces point d'Angleterre rosettes are introduced. These rosettes are also frequently called "spiders," and are made, according to the space, large or small; and according to the requirements of the braid selected, heavy or light.
The engraving on the opposite page represents the previously mentioned article and demonstrates the beauty and durability of this stunning lace. The scarf is approximately one and a half yards long and half a yard wide, made from a thick Battenburg braid with a decorative edge (See Nos. 5 or 7, on page 20), along with cord, rings, and buttons. The main part of the design is outlined with the braid, with cord used to create veining for the leaves, and the rings and buttons are scattered throughout the surface, as shown in the picture. Raleigh bars with picots connect the border and center designs, while the palms along the border and other small areas are filled with point Turque and point de Grecque stitches. Sorrento bars are also used in some of the long, leaf-like spaces, and in a few of the circular areas, point d'Angleterre rosettes are included. These rosettes are often referred to as "spiders," and are made in sizes that vary based on the space, as well as the selected braid's weight, whether heavy or light.
For convenience in giving the name of this lace, the full title is rarely used—"Battenburg Lace" being considered sufficient to identify the fabric from the other and lighter laces.
For convenience in naming this lace, the full title is rarely used—"Battenburg Lace" is seen as enough to differentiate the fabric from the other, lighter laces.
Battenburg lace is made both heavy and light, according to personal taste or the object for which the lace is intended, but it was originally designed for heavy work only.[Pg 25]
Battenburg lace can be made heavy or light, depending on personal preference or the purpose of the lace, but it was originally created solely for heavier applications.[Pg 25]

No. 3.—Royal Battenburg Lace Bureau-scarf.
__A_TAG_PLACEHOLDER_0__—Royal Battenburg Lace Scarf.
No. 4.[Pg 26]
POINT LACE DOILY FOR A TOILET CUSHION.
This dainty doily may be made of the point lace braids illustrated at Nos. 30 and 31, together with the picot edging No. 36, seen on page 20. In filling in the spaces, thread suitable for the braid is used, and the stitches are point de Valenciennes, point d'Espagne, Sorrento bars, point de Bruxelles, open rings and "spiders." As all of these stitches, with many others are illustrated in that section of this book devoted to stitches, it will be unnecessary to repeat the details for making, as they are fully given in the department mentioned. It will also be understood that most of the articles illustrated are not of full size, but in some instances are nearly so. The doily just described is illustrated about three-quarters of its actual size; but by using a fine braid a doily of fairy-like texture, and just the size of the engraving may be produced. Any one accustomed to drawing may enlarge this or any of the designs given, but only clever fingers should try this experiment.[Pg 27]
This delicate doily can be made using the point lace braids shown at Nos. 30 and 31, along with the picot edging No. 36, found on page 20. To fill in the spaces, use thread suitable for the braid, and the stitches include point de Valenciennes, point d'Espagne, Sorrento bars, point de Bruxelles, open rings, and "spiders." Since all of these stitches, along with many others, are illustrated in the stitches section of this book, there's no need to repeat the details for making them, as they are fully covered in that part. It’s also important to note that most of the items illustrated are not full size, though some are nearly so. The doily described here is shown at about three-quarters of its actual size, but by using a fine braid, you can create a doily with a delicate texture that matches the size of the engraving. Anyone familiar with drawing can enlarge this or any of the designs provided, but only skilled hands should attempt this experiment.[Pg 27]

No. 5.[Pg 28]
BATTENBURG EDGING, WITH CORD.
This is a very elegant looking lace, though simply made after the regular Battenburg method. A plain braid (No. 10, page 20) is chosen to form the outlines, and after the stitches are filled in, cord of a suitable size is carried around the petals and foliage of the design, and rows of it are also used to indicate the vine, though the latter may be outlined with the tape and then with the cord. The petals of the blossoms are filled in in point de Bruxelles and point de Venise stitches, while point d'Espagne and point Brabançon are used for the foliage and vine. Point Grecque and d'Alençon bars are also used at the very heart of the blossom, and Raleigh net-work bars connect the design to the edge and are dotted here and there with "spiders."
This is a very elegant-looking lace, made simply using the regular Battenburg method. A plain braid (No. 10, page 20) is used to create the outlines, and once the stitches are filled in, cord of an appropriate size is wrapped around the petals and leaves of the design. Rows of cord are also used to represent the vine, though the vine can be outlined with tape and then with cord. The petals of the flowers are filled in with point de Bruxelles and point de Venise stitches, while point d'Espagne and point Brabançon are used for the leaves and vine. Point Grecque and d'Alençon bars are also used at the very center of the flower, and Raleigh net-work bars connect the design to the edge, dotted here and there with "spiders."
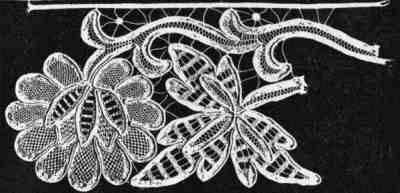
No. 5.—Battenburg Lace, with Cord.
__A_TAG_PLACEHOLDER_0__—Battenburg Lace with Cord.
No. 6.
BATTENBURG INSERTION, WITH CORD.
This insertion matches the edging or lace above described, and is, therefore, made in exactly the same way, except that the design is double. Both the edging and insertion may be made of any width desired; and the design will be found very pretty for fancy-edge or plain braids without the cord. Buttons or rings may be used in place of the "spiders" seen in the engravings if preferred.[Pg 29]
This insertion matches the trim or lace mentioned earlier and is made in exactly the same way, except that the design is doubled. Both the trim and insertion can be made in any width you want, and the design looks really nice for decorative or plain braids without the cord. You can use buttons or rings instead of the "spiders" shown in the illustrations if you'd like.[Pg 29]

No. 6.—Battenburg Insertion, with Cord.
__A_TAG_PLACEHOLDER_0__—Battenburg Insertion, with Cord.
No. 7.[Pg 30]
DESIGN FOR A HONITON LACE CAP.
The design illustrated is, of necessity, much smaller than the cap it is intended for; but the clever student may easily enlarge it to, or design one for herself of the size required. Lace-makers will duplicate designs in any size desired for a moderate sum, thus saving the amateur much work and at the same time putting her to little expense.
The design shown is, by necessity, much smaller than the cap it's meant for; however, a savvy student can easily enlarge it or create one of the required size. Lace-makers will replicate designs in any desired size for a reasonable fee, saving the amateur a lot of effort while keeping costs low.
The design here illustrated might also be used for handkerchief corners, scarf-ends, etc., etc.; and any of the stitches illustrated on preceding pages may be selected for filling-in purposes.
The design shown here can also be used for handkerchief corners, scarf ends, and so on; and any of the stitches shown on the previous pages can be chosen for filling in.

No. 8.
DESIGN FOR A CORNER IN BATTENBURG, POINT, OR HONITON LACE.
According to the article to be decorated, this design will be found appropriate for either of the braids used for the laces above mentioned.
According to the article to be decorated, this design will be suitable for either of the braids used for the laces mentioned above.
For table scarfs, tidies, heavy borders, etc., etc., the Battenburg braids should be selected; but for handkerchiefs or doilies, the point or Honiton braids are the proper ones to choose for this design.
For table scarves, tidies, heavy borders, etc., the Battenburg braids should be chosen; but for handkerchiefs or doilies, the point or Honiton braids are the right options for this design.
Raleigh bars, Brussels point and any other stitches preferred, may be used in filling in the spaces. When a design is procured from a lace-maker a portion of it is always marked with the stitches to be used; but this is not an arbitrary matter, since the one who is to make the lace, may desire to and may insert other stitches in preference to those indicated.[Pg 31]
Raleigh bars, Brussels points, and any other preferred stitches can be used to fill in the gaps. When a design is obtained from a lace-maker, part of it is always marked with the stitches to use. However, this isn't fixed, as the person making the lace might want to use different stitches instead of the ones shown.[Pg 31]

No. 9.[Pg 32]
DOILY IN "IDEAL HONITON" LACE-WORK AND LINEN LAWN.
One of the prettiest and the very newest of the modern laces is here illustrated. It is made of two of the many varieties of Honiton braids, wash-silk floss and linen lawn. The braid is basted smoothly upon a square of lawn in the design illustrated (though individual taste will no doubt suggest many other equally pretty designs), after which the inner edges of the braid are permanently secured by a "short and long stitch." This is merely a short and long button-hole stitch reversed so that the cross loops are on the edge of the braid, while the stitches them selves extend beyond the braid, into the lawn, as seen in the engraving. Two short stitches alternate with single long ones throughout this part of the work. The outer edges are then fastened to the square by tiny button-hole scollops. Then the lawn is cut from under the squares formed by the braid, and the openings are button-holed through the lawn and braid so that the edges of the lawn will not fray. When this is done the spaces are filled in with fancy stitches, and when they are completed the lawn is cut away from the edge-scollops with a pair of fine sharp, scissors. In the doily illustrated "spiders" and point de Venise stitches are used for filling in the spaces. The floss used may be white or tinted, the latter washing as well as the white; but as a rule, white or yellow flosses are selected in preference to other colors. "Ideal Honiton" scarfs, tidies, doilies, pillow shams, tray cloths, etc., etc., may be purchased with the braid already basted on in a pretty design and with the necessary threads or floss, or they may be designed at home, and by either method will result in a beautiful variety of modern lace.[Pg 33]
One of the prettiest and newest modern laces is shown here. It's made from two of the various types of Honiton braids, wash-silk floss, and linen lawn. The braid is smoothly basted onto a square of lawn in the illustrated design (although individual preferences might suggest many other equally lovely designs). The inner edges of the braid are then permanently secured using a "short and long stitch." This is essentially a short and long button-hole stitch reversed so that the cross loops are on the edge of the braid, while the stitches themselves extend beyond the braid into the lawn, as seen in the engraving. Two short stitches alternate with single long ones throughout this part of the work. The outer edges are then attached to the square with tiny button-hole scallops. After that, the lawn is cut away from the squares formed by the braid, and the openings are button-holed through the lawn and braid to prevent fraying. Once this is done, the spaces are filled in with decorative stitches, and when they're finished, the lawn is trimmed away from the edge scallops using fine, sharp scissors. In the doily illustrated, "spiders" and point de Venise stitches are used to fill the spaces. The floss can be white or tinted, with the latter washing just as well as the white; however, white or yellow flosses are generally preferred over other colors. "Ideal Honiton" scarves, tidies, doilies, pillow shams, tray cloths, etc., can be purchased with the braid already basted on in an attractive design along with the necessary threads or floss, or they can be designed at home, resulting in a beautiful variety of modern lace.[Pg 33]

No. 10.[Pg 34]
DESIGN FOR A CORNER IN BATTENBURG LACE.
Although this design is intended for Battenburg lace, and may be made up of any of the braids used for that kind of lace, it will also be found suitable for the finer point or Honiton braids for handkerchiefs, doilies, mats, etc., etc. As illustrated it would be suitable for a handkerchief. Enlarged and followed in Battenburg braid it would make a very handsome border for a table-scarf, curtains or draperies, or a substantial decoration for a gown of wash fabric or other goods. Raleigh bars, "spiders" and point de Bruxelles stitches are used for filling in, and a dainty picot edge is sewed to the outer line of the braid. Plain or fancy braid may be used for this design. If fancy loop-edge braid is selected, the picot edge will not be needed, the loops taking its place.[Pg 35]
Although this design is meant for Battenburg lace and can incorporate any of the braids used for that type of lace, it can also work well with finer point or Honiton braids for handkerchiefs, doilies, mats, and so on. As shown, it would be suitable for a handkerchief. When enlarged and made with Battenburg braid, it would create a beautiful border for a table scarf, curtains, or drapes, or serve as a lovely decoration for a wash fabric gown or other materials. Raleigh bars, "spiders," and point de Bruxelles stitches are used for filling in, and a delicate picot edge is sewn to the outer line of the braid. You can use plain or fancy braid for this design. If you use a fancy loop-edge braid, you won't need the picot edge because the loops will take its place.[Pg 35]

No. 11.[Pg 36]
BATTENBURG EDGING.
The edging here illustrated is represented about one-third less than its actual width, but the design is so distinctly brought out that its beauty in any width may be readily conceived. It is formed of fancy Battenburg braid, but may be made from a plain variety if preferred. The design is known as the fern leaf and is easy to follow. Sorrento bars are used to connect the work, and "spiders" are made here and there to add variety to the work. Point de Bruxelles stitches are used to fill in the spaces at the sides of the leaves, and, with the fancy braid, produce a very dainty, delicate effect.
The edging shown here is about one-third smaller than its actual width, but the design stands out so clearly that its beauty in any size is easy to imagine. It's made from decorative Battenburg braid, but you can use a plain version if you prefer. The design is called the fern leaf and is simple to create. Sorrento bars connect the pieces, and "spiders" are added here and there for variety. Point de Bruxelles stitches fill in the spaces beside the leaves, and together with the decorative braid, they create a very pretty, delicate effect.

No. 11.—Battenburg Edging.
__A_TAG_PLACEHOLDER_0__—Battenburg Lace.
No. 12.
BATTENBURG INSERTION.
This insertion is made to match the edging seen above it, but is much wider than the edging, though formed of the same braid. Either design could be varied so as to result in an edging and insertion of equal width, or the edging could be arranged for an insertion, and the insertion illustrated changed into an edging.[Pg 37]
This addition is made to match the trim above, but it’s much wider than the trim, even though it’s made from the same braid. Either design could be modified to create a trim and addition of the same width, or the trim could be adapted for an addition, and the addition shown could be changed into a trim.[Pg 37]
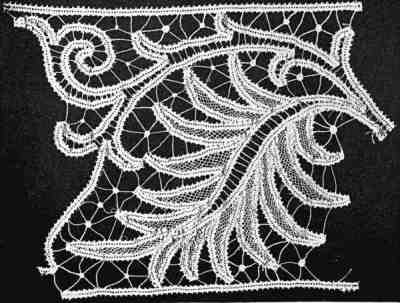
No. 12.—Battenburg Insertion.
__A_TAG_PLACEHOLDER_0__—Battenburg Insertion.
No. 13.[Pg 38]
FINGER-BOWL DOILY OF PRINCESS LACE AND LINEN LAWN.
Princess lace, (also known as Duchesse lace) as elsewhere mentioned, results from combining Honiton and point lace braids in one design; and a charming specimen of this lovely lace is here illustrated.
Princess lace, also known as Duchesse lace, as mentioned elsewhere, comes from merging Honiton and point lace braids into a single design; a beautiful example of this lovely lace is illustrated here.
The doily is pictured only a trifle smaller than its actual size, and even in its full size is a very dainty affair. After the braids are basted along the design, they are then connected by twisted bars that are an adaptation from the point d'Alençon bars with the twisted stitch; and the spaces are filled in in small d'Angleterre rosettes or "spiders." As few bars as possible are employed for the spiders, in order to produce a very delicate effect. The lawn center is added last.[Pg 39]
The doily is shown to be just a bit smaller than its actual size, and even when it's at full size, it's quite delicate. After the braids are sewn along the design, they're then linked by twisted bars that are adapted from point d'Alençon bars with a twisted stitch; the gaps are filled with small d'Angleterre rosettes or "spiders." As few bars as possible are used for the spiders to create a very light effect. The lawn center is added last.[Pg 39]

No. 14.[Pg 40]
DESIGN FOR INSERTION, OR A CENTER-PIECE, IN BATTENBURG LACE.
As suggested by the title, the design here presented may be used for insertion, or for a center to a table cloth or scarf, or a handsome spread. As represented it is intended for a center-piece, and the lace from which the engraving was made is about half-a-yard long and one-fourth of a yard wide. The ground-work is formed of Raleigh bars made with picots, and the loops of braid are filled in with twisted point d'Alençon bars.
As the title suggests, the design presented here can be used for an insert, as the centerpiece of a tablecloth or scarf, or as a beautiful spread. As shown, it's meant to be a centerpiece, and the lace used for the engraving is about half a yard long and a quarter of a yard wide. The background is made of Raleigh bars decorated with picots, and the loops of braid are filled in with twisted point d'Alençon bars.
This center-piece is very pretty made of ribbon with silk thread for the bars, and in this event it may be made of any color desired, and added to a spread or scarf of Surah silk or fine cloth, for which a border to match may be made.
This centerpiece is beautiful, made of ribbon with silk thread for the bars. For this event, it can be made in any color you want and added to a spread or scarf of Surah silk or fine fabric, for which a matching border can be made.
No. 15.
QUEEN ANNE TRAY-CLOTH OF BATTENBURG LACE AND LINEN.
This pretty cloth is intended for a Queen Anne tray, and its lace edges curve upward and just over the rim of the tray when it is laid upon it. The center is of fine table-linen, while the edge is formed of Battenburg braid, buttons and fancy stitches. As will be seen, the corner spaces are filled in with point d'Angleterre rosettes or "spiders," the large border spaces and corresponding corner ones are filled in with picot bars, while the very fine work seen in the triangles and square spaces are point de Venise stitches, and half-spiders are made in the other triangles. The narrow, straight inner border is composed of bars and tiny buttons arranged as represented. The cloth is hem-stitched before the braid is laid on, and the corners are cut out from underneath after the work is otherwise completed.[Pg 41]
This beautiful cloth is designed for a Queen Anne tray, and its lace edges curve upward just over the tray's rim when it's placed on it. The center is made of fine table linen, while the edge features Battenburg braid, buttons, and decorative stitches. As you can see, the corner spaces are filled with point d'Angleterre rosettes or "spiders," the larger border spaces and matching corners are filled with picot bars, and the delicate work in the triangles and square spaces consists of point de Venise stitches, with half-spiders in the other triangles. The narrow, straight inner border is made up of bars and tiny buttons arranged as shown. The cloth is hem-stitched before the braid is applied, and the corners are cut out from underneath once the work is finished.[Pg 41]

No. 16.[Pg 42]
DESIGN FOR A BUTTERFLY IN POINT LACE. (FULL SIZE).
Butterflies for the corners of handkerchiefs, scarf-ends and the points of caps or coiffures are favorite designs in point and Honiton laces. The one illustrated is very dainty and exceedingly simple to execute. The upper portion of each wing has a point de reprise ground-work, but the solid sections are tiny spiders instead of point de reprise triangles. The outer tips of the wings are filled in with Raleigh bars, while similar bars, point de Bruxelles stitches and a point d'Angleterre rosette complete the lower wings. Any of the fine point or Honiton braids may be chosen for the outlining of the butterfly, and a fine over-and-over stitch or fine cord may be used to mark the lines extending from the head.
Butterflies are popular designs for the corners of handkerchiefs, ends of scarves, and the tips of caps or hairstyles in point and Honiton laces. The one shown here is very delicate and quite simple to create. The upper part of each wing has a point de reprise background, but the solid parts are small spider shapes instead of point de reprise triangles. The outer ends of the wings are filled with Raleigh bars, while similar bars, point de Bruxelles stitches, and a point d'Angleterre rosette finish off the lower wings. You can choose any of the fine point or Honiton braids to outline the butterfly, and a fine over-and-over stitch or thin cord can be used to define the lines extending from the head.

No. 17.
DESIGN FOR A DOILY OR HANDKERCHIEF OF POINT OR HONITON LACE.
This design, as illustrated, is of course too small for either a doily or handkerchief, but an expert lace-maker can enlarge it to any size desired; and the clever amateur will find no difficulty in doing the same thing, as the outlines are not at all intricate, and may be easily followed. In sending for the braid for this, or similar designs, it is advisable to permit the lace-maker addressed to select them, and of course, the thread, since her long experience enables her at once to correctly judge what materials are appropriate for the articles you wish to make, especially if she knows the size the article is desired to be. The stitches, as here indicated, are point d'Angleterre rosettes, and point de fillet, with small "spiders" on the latter. A dainty picot-braid edges the design.[Pg 43]
This design, as shown, is obviously too small for either a doily or a handkerchief, but an expert lace-maker can easily enlarge it to any size you want; and a skilled amateur will have no trouble doing the same since the outlines are quite simple and can be easily followed. When ordering the braid for this or similar designs, it's a good idea to let the lace-maker you contact choose it, as well as the thread, since her extensive experience allows her to accurately judge what materials are appropriate for the items you want to create, especially if she knows the desired size. The stitches, as indicated here, are point d'Angleterre rosettes and point de fillet, with small "spiders" on the latter. A delicate picot-braid edges the design.[Pg 43]

No. 18.[Pg 44]
"CARDINAL'S POINT" LACE.
This engraving represents a modern adaptation of an ancient lace which may be made of fancy Battenburg braid and plain Raleigh bars. The design is not especially definite in its outlines, and may be imitated with any variations which may seem pleasing to the copyist. The picots are made after the method directed at the illustration of point de Venise bars in the department devoted to stitches. "Cardinal's point" of genuine make is of Italian origin, and in the earlier eras, was largely used for the decoration of church vestments and draperies.[Pg 45]
This engraving shows a modern version of an ancient lace that can be made with decorative Battenburg braid and simple Raleigh bars. The design isn't particularly clear in its outlines and can be adjusted with any variations that the creator finds appealing. The picots are made using the method shown for point de Venise bars in the section dedicated to stitches. "Cardinal's point," which is authentically made, originates from Italy and was widely used in earlier times to decorate church garments and draperies.[Pg 45]

No. 18.—"Cardinal's Point" Lace.
__A_TAG_PLACEHOLDER_0__—"Cardinal's Point" Lace.
Nos. 19 and 20.[Pg 46]
BATTENBURG EDGING AND INSERTION, WITH CORD.
These two engravings show a very pretty design for Battenburg lace made with a cord finish. The application of the cord has been fully described elsewhere, where a different design of the same kind of work is given. In the present instance the spaces are filled in with twisted bars, "spiders" and rosettes in point d'Angleterre. The specimens from which the engravings were made are a trifle wider than seen in the pictures; but the width is a matter of individual taste, and also a result of the braid selected. A professional lace-maker will enlarge or adapt the design to accord with personal requirements.[Pg 47]
These two engravings showcase a beautiful design for Battenburg lace featuring a cord finish. The application of the cord has been discussed in detail elsewhere, where a different design of the same type is presented. In this case, the spaces are filled with twisted bars, "spiders," and rosettes in point d'Angleterre. The examples used for these engravings are slightly wider than shown in the pictures; however, the width is a matter of personal preference and also depends on the type of braid chosen. A professional lace-maker can enlarge or adapt the design to meet individual needs.[Pg 47]

No. 19.—Battenburg Edging, with Cord.
__A_TAG_PLACEHOLDER_0__—Battenburg Edging with Cord.

No. 20.—Battenburg Insertion, with Cord.
__A_TAG_PLACEHOLDER_0__—Battenburg Insertion, with Cord.
No. 21.[Pg 48]
TAPE-GUIPURE DESIGN, FOUND IN AN OLD CHURCH.
The design here illustrated was found in the old church of Santa Margherita, in Italy. It was drawn on parchment, and was undoubtedly intended as a design for altar lace. It was mentioned in a book of accounts for the year 1592, found in the archives of the church designated and is therefore of antique origin; but it may be easily adapted to modern methods of lace-making, and could be appropriately filled in with either Italian or Genoa lace stitches or with a combination of both, and twisted bars. Done with fancy Battenburg braid, it would be quite similar in effect to the "Cardinal's Point" illustrated on another page.[Pg 49]
The design shown here was discovered in the old church of Santa Margherita in Italy. It was drawn on parchment and was clearly meant as a design for altar lace. It appeared in a book of accounts from 1592, found in the church's archives, and is therefore of historical origin. However, it can easily be adapted to modern lace-making techniques and could be nicely filled in with either Italian or Genoese lace stitches, or a mix of both, along with twisted bars. If done with decorative Battenburg braid, it would look quite similar to the "Cardinal's Point" shown on another page.[Pg 49]

No. 22.[Pg 50]
BATTENBURG CHURCH LACE.
The engraving opposite illustrates a magnificent specimen of Modern Church Lace made of Battenburg braid with a limited introduction of Honiton braid. The specimen itself is considerably wider than represented, but as the width is a matter of individual taste, the engraving will serve as a design for a narrow church lace.
The engraving on the opposite page shows a stunning example of Modern Church Lace made with Battenburg braid and a little bit of Honiton braid. The piece itself is much wider than what’s shown, but since width is a personal choice, the engraving will work as a design for a narrow church lace.
Sorrento bars are used to connect the braids and to form foundations for the spiders or rosettes here and there inserted, and the lace is delicately bordered with a dainty picot-braid. The fancy stitches in the main portions of the cross are point de Valenciennes, while those in the minor sections are point de Bruxelles.
Sorrento bars are used to link the braids and create the bases for the spiders or rosettes placed throughout, and the lace is softly edged with a delicate picot braid. The decorative stitches in the main parts of the cross are point de Valenciennes, while those in the smaller sections are point de Bruxelles.
Point de fillet is used for the central portion of the large T-shaped symbol, while the stitch forming the other symbol is one never used except for church lace, and consists of two or three sets of fine stitches so interlaced as to seem to form one solid stitch.
Point de fillet is used for the center part of the large T-shaped symbol, while the stitch that creates the other symbol is one that is only used for church lace, consisting of two or three sets of fine stitches interwoven to create the appearance of a single solid stitch.
In making church lace any insignia desired can be introduced by a professional designer—an accomplishment that is usually beyond the inventive powers of the novice in lace-making.[Pg 51]
In creating church lace, any desired insignia can be added by a professional designer—something that is typically beyond the creative abilities of a beginner in lace-making.[Pg 51]

No. 22.—Battenburg Church Lace.
__A_TAG_PLACEHOLDER_0__—Battenburg Lace.
No. 23.[Pg 52]
ENGLISH NEEDLE-POINT.
This is a very handsome design combining the lily and the rose. The foundation work is made with unbleached linen braid having an ornamental edge, and the filling-in is done with fine and coarse linen thread in various stitches. Raleigh bars with picots define the upper edge of the edging, and Sorrento bars on which buttons are worked form the ground work.
This is a really beautiful design that combines the lily and the rose. The base is made with unbleached linen braid featuring a decorative edge, and the filling is completed with fine and coarse linen thread in different stitches. Raleigh bars with picots outline the top edge of the trim, and Sorrento bars, onto which buttons are sewn, create the foundation.
Point de Grecque, point d'Angleterre, d'Alençon bars plain and twisted, point de Bruxelles and "spiders" are also used in making this lace, as will be seen from a close inspection of the engraving.
Point de Grecque, point d'Angleterre, Alençon bars plain and twisted, point de Bruxelles and "spiders" are also used in making this lace, as you can see from a close look at the engraving.
This specimen of lace is very handsome when developed in black silk braids and silk thread, for black costumes.[Pg 53]
This piece of lace looks really nice when made with black silk braids and silk thread, perfect for black outfits.[Pg 53]

No. 23.—English Needle Point.
__A_TAG_PLACEHOLDER_0__—English Needlepoint.
No. 24.[Pg 54]
PUNCH-GLASS DOILY OF POINT LACE AND LAWN.
As represented this doily is about three-fourths of its actual size. It is made of fine linen lawn, and a set generally comprises a dozen. Fine point lace braid is used to outline the design, and then rosettes in point d'Angleterre, and "spiders" or small rosettes are made in the openings as represented. The alternate outer scallops are filled in with point de Bruxelles stitches, and a dainty picot-braid is added to the edge by the usual over-and-over stitch.
As shown, this doily is about three-fourths of its actual size. It’s made of fine linen lawn, and a set usually includes a dozen. Fine point lace braid outlines the design, with rosettes in point d'Angleterre and small rosettes or "spiders" placed in the openings as shown. The alternate outer scallops are filled in with point de Bruxelles stitches, and a delicate picot braid is added to the edge with the usual over-and-over stitch.

No. 25.
POINT LACE COLLAR AND CUFF.
A very handsome point lace set is here illustrated, and may be easily followed by an expert lace-maker; but it will be wiser for the novice to obtain a pattern or design of the shape and size desired, from a professional lace-maker. Point de Grecque, point de Bruxelles, point de Venise, Sorrento bars, and rosettes and rings are all employed in carrying out this design. As elsewhere mentioned, any fine stitch preferred may be used for filling-in purposes when those suggested or marked out upon a design are not admired.[Pg 55]
A very beautiful point lace set is illustrated here and can be easily followed by an experienced lace-maker; however, it's better for beginners to get a pattern or design of the desired shape and size from a professional lace-maker. Point de Grecque, point de Bruxelles, point de Venise, Sorrento bars, and rosettes and rings are all used in creating this design. As mentioned elsewhere, any fine stitch that you prefer can be used for filling in when the ones suggested or shown on a design aren't preferred.[Pg 55]

No. 25.—Point Lace Collar and Cuff.
__A_TAG_PLACEHOLDER_0__—Point Lace Collar & Cuffs.
No. 26.[Pg 56]
DESIGN FOR TABLE SCARF IN BATTENBURG LACE.
The scarf-end from which this design was copied is about ten inches deep, and it is about fourteen or fifteen inches wide. It will be seen from these dimensions, that it is impossible to produce a full-size design of it on these pages, but one of any size desired may be obtained at any lace-makers; or, a clever student of lace-making may enlarge the design to suit her own requirements. According to the size of the scarf-end, wide or narrow braid must be selected, with thread to correspond. The stitches used in filling in are point de fillet, point de Bruxelles and point d'Angleterre, and Raleigh, Sorrento and d'Alençon bars, and rosettes and "spiders."
The scarf-end that this design is based on is about ten inches deep and around fourteen to fifteen inches wide. Given these dimensions, it's clear that it’s not possible to create a full-size design on these pages. However, you can find one in any lace-making shop, or a skilled lace-making student can enlarge the design to fit her own needs. Depending on the size of the scarf-end, you should choose either wide or narrow braid, along with matching thread. The stitches used for filling in include point de fillet, point de Bruxelles, and point d'Angleterre, along with Raleigh, Sorrento, and d'Alençon bars, plus rosettes and "spiders."
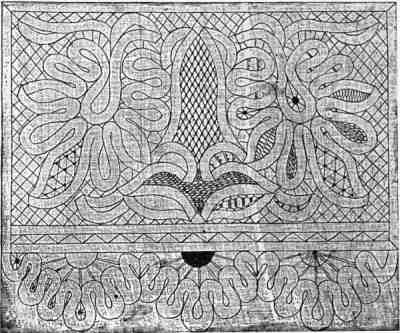
No. 27.
APPLE DESIGN FOR A CORNER IN BATTENBURG LACE.
This design is for the corner of a scarf, spread, tidy or pillow-sham and is very popular, as it is effective though simply made. The fine stitches are point de Bruxelles, while the others are Raleigh, Sorrento and point Grecque bars. Plain or fancy braid, or a combination of both may be used in this design with a charming effect.[Pg 57]
This design is for the corner of a scarf, spread, tidy, or pillow sham and is very popular because it's effective yet simple to make. The fine stitches use point de Bruxelles, while the others incorporate Raleigh, Sorrento, and point Grecque bars. You can choose plain or fancy braid, or a mix of both, for a lovely effect.[Pg 57]
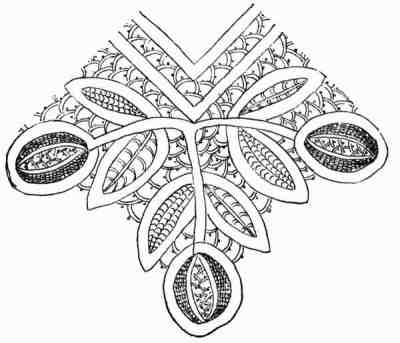
No. 28.[Pg 58]
ROMAN PUNCH-GLASS DOILY IN POINT LACE.
Doilies of this description are generally made about four inches square. The engraving opposite pictures the doily mentioned as somewhat smaller, but the design is sufficiently large to enable the student to make her doilies as large as she desires them to be, as it is easy to follow. The corner spaces are filled in with twisted bars and rings worked at the same time; but rosettes or spiders may be worked in place of the rings if preferred. The corner spaces are filled in in point Brabançon, and for those at each side point de Bruxelles is used. The doily is edged with a fine picot-braid that finishes it daintily, and very sheer linen lawn is used for the center.
Doilies like this are typically about four inches square. The engraving on the opposite page shows the doily in question as slightly smaller, but the design is large enough for the student to make her doilies as big as she wants, as it's easy to follow. The corner spaces are filled with twisted bars and rings worked at the same time, but rosettes or spiders can be used instead of rings if preferred. The corner spaces are filled in with point Brabançon, and point de Bruxelles is used for the sides. The doily is finished with a delicate picot braid along the edge, and very sheer linen lawn is used for the center.
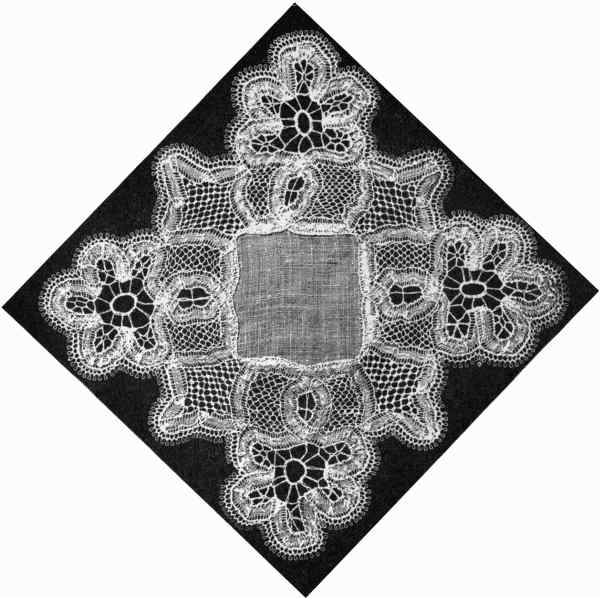
No. 29.
MODERN RUSSIAN LACE.
The design illustrated may be followed in Battenburg braid or plain lace tape, and any of the fancy stitches mentioned and described among the rosettes, bars and picots may be employed for filling-in purposes. Cream white or unbleached braids or tapes are prettier for Russian lace than pure white. Russian lace is a very durable as well as effective trimming for household draperies, and also for gowns of wash fabrics or those of cotton fabrics which will not need renovating.[Pg 59]
The design shown can be made using Battenburg braid or plain lace tape, and any of the decorative stitches described in the rosettes, bars, and picots can be used for filling in. Cream white or unbleached braids or tapes look nicer for Russian lace than pure white. Russian lace is both durable and stylish for household draperies, and it works well for washable gowns or cotton fabrics that won't require refreshing.[Pg 59]

No. 29.—Modern Russian Lace.
__A_TAG_PLACEHOLDER_0__—Contemporary Russian Lace.
No. 30.[Pg 60]
RUSSIAN LACE.
This engraving represents a specimen of genuine Russian lace made of fine braid, and wrought with bars similar to Raleigh bars, except that they have no picots. The Russians have always been noted for their exquisite needle-work, but as a nation they have never had any established lace manufactory. The workers of the small amount of lace produced are scattered about at their own houses, and many of them are poor ladies of gentle birth. Most of the laces, however, are made by the peasantry, who bring them to St. Petersburg where sale for them is found.[Pg 61]
This engraving shows a piece of genuine Russian lace made of fine braid, crafted with bars similar to Raleigh bars, but without the picots. Russians have always been recognized for their beautiful needlework, but as a nation, they haven’t established a lace industry. The few lace makers work from their own homes, many of whom are ladies from noble families. However, most of the lace is made by peasants, who take their work to St. Petersburg to sell it.[Pg 61]

No. 30.—Russian Lace.
__A_TAG_PLACEHOLDER_0__—Russian Lace.
No. 31.[Pg 62]
BOW-KNOT DESIGN FOR MODERN LACE.
This fashionable design may be developed in various widths and braids as an insertion, or as an appliqué on lawn. The ground-work may be formed of Raleigh bars, or of twisted bars made like the net-work for Raleigh bars. The loops of the bows may be filled in with point de Bruxelles or any fine stitch preferred. The design is pretty for bordering table scarfs, tidies, valances and curtains when heavy braids are selected. The finer braids render the design appropriate for handkerchiefs and dainty trimming laces.
This trendy design can be created in different widths and braids as an insertion or as an appliqué on lawn fabric. The base can be made from Raleigh bars or twisted bars similar to the network used for Raleigh bars. The loops of the bows can be filled in with point de Bruxelles or any preferred fine stitch. The design looks great for edging table scarves, tidies, valances, and curtains when heavier braids are chosen. Finer braids make the design suitable for handkerchiefs and delicate trimming laces.

No. 31.—Bow-Knot Design for Modern Lace.
__A_TAG_PLACEHOLDER_0__—Bow-Knot Design for Contemporary Lace.
No. 32.
PRINCESS LACE DOILY DESIGN.
The design here illustrated may be enlarged or simplified to please individual taste, and it may be made of Honiton braid as well as point. The connecting stitches may be point de Bruxelles, Raleigh and Sorrento bars, "spiders" or any of the fine stitches described and illustrated in the department devoted to stitches. A dainty picot braid follows the outer edge of the doily. This design, enlarged sufficiently, would form an elegant pattern for a lace handkerchief.[Pg 63]
The design shown here can be made larger or simpler to match personal preferences, and it can be crafted from Honiton braid or point lace. The connecting stitches can be point de Bruxelles, Raleigh and Sorrento bars, "spiders," or any of the fine stitches described and illustrated in the stitching section. A delicate picot braid follows the outer edge of the doily. If this design is enlarged enough, it could create a stylish pattern for a lace handkerchief.[Pg 63]

No. 32.—Princess Lace Doily Design.
__A_TAG_PLACEHOLDER_0__—Princess Lace Doily Style.
No. 33.[Pg 64]
ALTAR LACE (BATTENBURG).
This very elegant specimen of altar lace is, in reality, about nine or ten inches deep; but, for want of space the engraving represents it as only about half as wide. The design, however, is perfect in detail, and the illustration fully displays its effectiveness, and discloses the variety of connecting and filling-in stitches used. A delicate Battenburg braid is chosen for the foundation, and in addition to regular lace stitches, those from drawn work are here and there interspersed. The cross is filled in in point de Venise, (or side stitch as it is sometimes called), and the same stitch is seen in the central design at each side of the cross. Drawn-work effects are seen also in these central figures and along the borders. Sorrento bars are here made and knotted at the center like drawn strands, or are connected by rosettes or "spiders" made in drawn-work style. At the center of the cross is a large drawn-work wheel, while small Maltese crosses and half-crosses are made elsewhere in the work by the drawn-work method, Sorrento bars taking the place of the usual strands. The central section of the border at the right of the cross is done in point de Bruxelles which is afterward button-holed as in bar-work, and a button-hole picot edge follows the lower outlines of the pattern. Raleigh bars with picots form the connecting ground-work throughout the work. This beautiful specimen shows two distinct methods of filling in the sections between the crosses. Either may be used alone, or the two may be used alternately with the crosses.[Pg 65]
This beautiful piece of altar lace is about nine or ten inches deep; however, due to limited space, the engraving shows it as only about half that width. The design is exquisite in detail, and the illustration effectively showcases its beauty while revealing the variety of connecting and filling stitches used. A delicate Battenburg braid serves as the foundation, and besides regular lace stitches, some drawn work stitches are interspersed throughout. The cross is filled in with point de Venise (also known as side stitch), and the same stitch is found in the central design on either side of the cross. Drawn work effects appear in these central figures and along the borders as well. Sorrento bars are made and knotted at the center like drawn strands, or they are connected by rosettes or "spiders" in drawn-work style. At the center of the cross is a large drawn-work wheel, while small Maltese crosses and half-crosses are created elsewhere in the piece using the drawn-work method, with Sorrento bars replacing the usual strands. The central section of the border to the right of the cross is done in point de Bruxelles, which is then button-holed as in bar work, and a button-hole picot edge follows the lower outlines of the pattern. Raleigh bars with picots form the connecting groundwork throughout the piece. This lovely specimen demonstrates two distinct methods for filling in the sections between the crosses. You can use either method alone, or alternate between the two with the crosses.[Pg 65]

No. 33.—Altar Lace (Battenburg.)
__A_TAG_PLACEHOLDER_0__—Altar Lace (Battenburg).
No. 34.[Pg 66]
BATTENBURG OR POINT LACE COLLAR AND CUFF.
These engravings represent a very graceful design for a lace collar and cuffs. As suggested in the title, the set may be made of point or Battenburg braid. The leaf-points are all filled in with d'Alençon bars in the twisted stitch, while the centers are completed with rosettes or small open "spiders," and the latter are distributed elsewhere as will be seen by inspecting the engraving. Point de Grecque is also introduced into some of the spaces, and Raleigh bars are used for the ground-work. Any of the stitches previously described may be used in making such a collar if those mentioned are not admired; and the addition of buttons or rings will improve the work greatly.[Pg 67]
These engravings show a really elegant design for a lace collar and cuffs. As the title suggests, the set can be made from point or Battenburg braid. The leaf points are all filled in with d'Alençon bars in a twisted stitch, while the centers are finished with rosettes or small open "spiders," which are also spread throughout, as you can see by looking at the engraving. Point de Grecque is also included in some of the spaces, and Raleigh bars are used for the background. Any of the stitches described earlier can be used to make this collar if the ones mentioned aren’t preferred; adding buttons or rings will greatly enhance the piece.[Pg 67]

No. 35.[Pg 68]
FLOUNCE IN BATTENBURG LACE.
A very elegant flounce of Battenburg lace may be made after the design represented on the opposite page. The picture shows the flounce just one-half its actual width; but even this width would be very handsome as a band for the bottom of a dress. By a close inspection of the stitches seen and a reference to these illustrated in the department devoted to stitches, the various kinds here used may be easily identified. They consist of point de Venise, point de Bruxelles, Sorrento and d'Alençon bars and "spiders." A fine picot braid edges each side of the flounce. The design can be obtained in any width desired from a reliable lace-maker.[Pg 69]
A very elegant flounce made of Battenburg lace can be crafted based on the design shown on the opposite page. The picture displays the flounce at half its actual width, but even this width would make a beautiful band for the bottom of a dress. By closely examining the visible stitches and referring to those illustrated in the section dedicated to stitches, you can easily identify the various types used here. They include point de Venise, point de Bruxelles, Sorrento, and d'Alençon bars and "spiders." A fine picot braid trims each side of the flounce. The design can be produced in any desired width by a trustworthy lace-maker.[Pg 69]

No. 36.[Pg 70]
BUTTERFLY DESIGN FOR POINT LACE.
This design is for point lace braid, and is very easily made. Fancy bars made after an adaptation from the d'Alençon bars, and point de Venise stitches are used for filling in. The butterfly may be used as a portion of an edging design, or as a corner or center for any small article to be decorated. The lines extending from the head are made with a fine over-and-over stitch, or a fine cord.
This design is for point lace braid and is very easy to make. Fancy bars adapted from the d'Alençon bars, along with point de Venise stitches, are used for filling in. The butterfly can be part of an edging design or serve as a corner or center for any small item that needs decoration. The lines extending from the head are made with a fine over-and-over stitch or a fine cord.

No. 36.—Butterfly Design for Point Lace.
__A_TAG_PLACEHOLDER_0__—Butterfly Design for Point Lace.
No. 37.
VENETIAN POINT LACE.
This is a design containing many of the features of antique lace patterns, and is made of narrow tape and fine cord combined with fancy stitches. The lace from which the engraving is made is about twice as wide as the picture represents it, but as the pattern differs in its sections for several inches at a time, the design could not be given full size. It will be seen that in the section illustrated no two figures are alike. The filling-in stitches consist of combinations and groupings of many of the stitches previously illustrated and described.
This design features many elements of vintage lace patterns and is made from narrow tape and fine cord, combined with decorative stitches. The lace used for the engraving is about twice as wide as shown in the picture, but because the pattern varies in sections over several inches, the design couldn't be displayed at full size. In the illustrated section, no two figures are identical. The filling stitches include various combinations and groupings of the stitches that have been shown and described earlier.

No. 37.—Venetian Point Lace.
__A_TAG_PLACEHOLDER_0__—Venetian Point Lace.
No. 38.
BUTTERFLY DESIGN FOR FINE BATTENBURG LACE.
This design, developed in Battenburg lace with d'Alençon and Sorrento bars and small "spiders" or dots, makes a pretty ornament for centers or corners, or is effective when introduced as a part of an edging design. Point or Honiton braids may also be made up by this design.[Pg 71]
This design, created in Battenburg lace with d'Alençon and Sorrento bars and small "spiders" or dots, makes a lovely decoration for centers or corners, or looks great as part of an edging design. Point or Honiton braids can also be made using this design.[Pg 71]

No. 39.[Pg 72]
DESIGN FOR INSERTION.
A very pretty design for insertion is here given. The braid may be basted as seen in the picture, and then the bars may be made of single threads, and of single threads over-wrought with button-hole stitches. Or, any of the bars or other stitches described, may be used to connect the braid and fill in the spaces. Tiny "spiders" are already used to fill in the circles.
A really nice design for insertion is provided here. The braid can be tacked down as shown in the picture, and then the bars can be created using single threads, and with single threads embellishing them with buttonhole stitches. Alternatively, any of the bars or other stitches mentioned can be used to link the braid and fill in the gaps. Small "spiders" are already used to fill in the circles.

No. 39.—Design for Insertion.
__A_TAG_PLACEHOLDER_0__—Design for Insertion.
No. 40.
DESIGN FOR A LACE BORDER AND CORNER.
A great deal must be left to the ingenuity of the worker in filling in this design, which is not of the orthodox modern variety but may be readily transformed into that class by an adaptation of modern stitches. With the methods of the latter well mastered, the worker will have no trouble in bringing out the design just as it is illustrated; but she may also by the exercise of a little judgment and taste substitute many other pretty filling-in stitches for those here pictured.[Pg 73]
A lot will depend on the creativity of the worker in completing this design, which isn’t the typical modern style but can be easily adapted using contemporary stitches. Once the worker has mastered the modern methods, she won’t have any trouble creating the design as shown; however, with a bit of judgment and creativity, she can also replace many of the filling stitches shown here with other attractive options.[Pg 73]

No. 41.[Pg 74]
DESIGN FOR A BUTTERFLY IN POINT LACE.
Another butterfly design is here given for point lace, though it may also be developed in a larger size in Battenburg braid for decorative purposes. The filling-in stitches are d'Alençon and Raleigh bars, point de Venise and point de Bruxelles, and point d'Angleterre rosettes.
Another butterfly design is provided here for point lace, though it can also be created in a larger size using Battenburg braid for decorative purposes. The filling stitches include d'Alençon and Raleigh bars, point de Venise and point de Bruxelles, and point d'Angleterre rosettes.
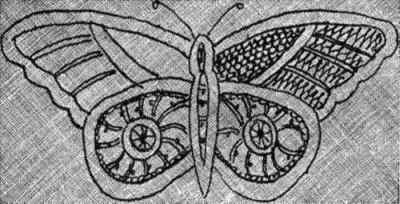
No. 42.
ITALIAN LACE.
This lace is of a conventional Italian pattern, and is filled in with the Italian lace and ground-stitches, and Sorrento bars. The lower edge is very daintily completed with a button-hole effect. The design is simple, elegant, and popular, and may be wrought in Battenburg or the finer braids, and in any width desired, the braid selected and the width decided upon determining the use to which the lace shall be put.[Pg 75]
This lace features a traditional Italian design, filled with Italian lace and ground stitches, along with Sorrento bars. The lower edge is delicately finished with a buttonhole effect. The design is straightforward, elegant, and widely liked, and can be made in Battenburg or finer braids, in any width you want. The choice of braid and width will determine the lace's intended use.[Pg 75]

No. 42.—Italian Lace (Half Size).
__A_TAG_PLACEHOLDER_0__—Italian Lace (Medium).
No. 43.[Pg 76]
MODERN VENETIAN POINT.
The engraving shows a reduced representation of a very elegant specimen of modern lace—the reduction in size being necessary in order to present the whole design. In making the lace, narrow braid and cord are used for the foundation of the design, and then the filling-in stitches are made and at the same time rings and buttons and bars and picots are introduced. Some of the filling-in stitches are combinations—as in the figures with very open bars where point d'Espagne and point Brabançon are combined, and at the middle section of the central figure where point de Valenciennes and point Brabançon are combined. Other stitches used are d'Alençon bars, Raleigh bars, church stitch, point de Bruxelles, "spiders," Sorrento bars, and picots. The greater the variety in the filling-in stitches, the more beautiful the lace. A picot edge finishes the lace in a very dainty manner along its lower outline, while a cord forms the upper edge.[Pg 77]
The engraving shows a smaller version of a very elegant piece of modern lace—the size reduction is necessary to display the entire design. To create the lace, narrow braid and cord are used as the base, and then filling stitches are added along with rings, buttons, bars, and picots. Some of the filling stitches are combinations—like in the sections with very open bars where point d'Espagne and point Brabançon are mixed, and in the middle part of the central figure where point de Valenciennes and point Brabançon are combined. Other stitches used include d'Alençon bars, Raleigh bars, church stitch, point de Bruxelles, "spiders," Sorrento bars, and picots. The more variety in the filling stitches, the more beautiful the lace becomes. A picot edge delicately finishes the lace along its lower edge, while a cord shapes the upper edge.[Pg 77]

No. 43.—Modern Venetian Point.
__A_TAG_PLACEHOLDER_0__—Modern Venice Point.
No. 44.[Pg 78]
DESIGN FOR MODERN LACE.
This design may be made up in Battenburg braid, or of point or Honiton braid according to the texture of the lace desired. In making it for garments or articles that are to be renovated occasionally, the Battenburg braids are advisable; but for daintier uses, point or Honiton may be chosen. The Raleigh-bar stitch, point de Bruxelles, and "spiders" may be used in following the outlines given for stitches.
This design can be made using Battenburg braid, or point or Honiton braid depending on the type of lace you want. If you’re making it for clothes or items that will be refurbished now and then, Battenburg braids are the best choice. For more delicate purposes, you can go with point or Honiton. The Raleigh-bar stitch, point de Bruxelles, and "spiders" can be used to follow the outlines provided for the stitches.

No. 44.—Design for Modern Lace.
__A_TAG_PLACEHOLDER_0__—Design for Contemporary Lace.
45.
CORNER IN MODERN LACE.
The suggestions given above will also apply to this design, which may be used for a table spread, or a handkerchief, according to the braid selected. As illustrated, the design is of pretty dimensions for a doily or a toilet-cushion cover, or for a handkerchief. All of the bar work seen may be done with single threads instead of the complete Raleigh method, and the rosettes or "spiders" may be larger or smaller as preferred.[Pg 79]
The suggestions above will also apply to this design, which can be used for a table spread or a handkerchief, depending on the braid chosen. As shown, the design is a nice size for a doily, a toilet cushion cover, or a handkerchief. All of the bar work can be done with single threads instead of the full Raleigh method, and the rosettes or "spiders" can be larger or smaller based on preference.[Pg 79]

No. 45.—Corner in Modern Lace.
__A_TAG_PLACEHOLDER_0__—Corner in Modern Lace.
No. 46.[Pg 80]
PILLOW-SHAM OF BATTENBURG LACE AND LINEN.
A very elaborate pillow-sham is here illustrated. It is made of Battenburg braid and appropriate thread, together with an intermingling of rings, and forms one of the most elegant appointments of a handsomely furnished bed-room. The pattern is very distinct and is called the "rose and leaf" design. The ground-work is formed of rings and Raleigh bars, while the centers of the roses and their leaves are filled in in various fancy stitches which include the crosses and rosettes used in drawn-work, Sorrento bars, points de Venise and Bruxelles, d'Alençon bars, etc., etc. If desired the linen square may be made larger, and the lace but one row of blossoms in width. The square is made of the finest household linen and is completed with a broad hem-stitched hem before the lace is added. The lace design may be obtained in any width desired by sending to a professional lace-maker; or, a clever student may be able to enlarge the design herself.[Pg 81]
A very detailed pillow sham is shown here. It’s made of Battenburg braid and matching thread, combined with interlocking rings, and is one of the most stylish features of a beautifully decorated bedroom. The pattern is quite clear and is called the "rose and leaf" design. The background consists of rings and Raleigh bars, while the centers of the roses and their leaves are filled with various decorative stitches including crosses and rosettes found in drawn-work, Sorrento bars, points de Venise and Bruxelles, d'Alençon bars, and more. If you want, the linen square can be made larger, and the lace can have just one row of blossoms in width. The square is made of the finest household linen and is finished with a wide hem-stitched hem before the lace is added. The lace design can be ordered in any width you want by contacting a professional lace-maker; or, a skilled student may be able to enlarge the design herself.[Pg 81]
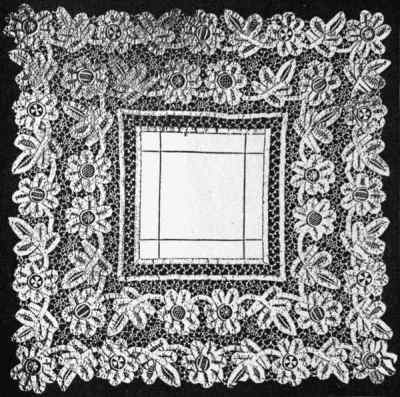
No. 47.[Pg 82]
DESIGN FOR PRINCESS OR DUCHESSE LACE COLLAR AND CUFFS.
Although this design is represented very small, it is sufficiently clear to convey a good idea of its outlines, and enable a student of average ability to adapt it to collar and cuffs of any size desired. Raleigh bars are used in connecting the various portions of the braids, while any of the fine stitches preferred may be chosen to fill in around the loops of the blossoms and foliage. A fine picot braid finishes the edge.
Although this design is shown very small, it's clear enough to give a good idea of its shape and help a student with average skills adapt it for collars and cuffs of any size. Raleigh bars connect the different parts of the braids, and any fine stitch you prefer can be used to fill in around the loops of the flowers and leaves. A delicate picot braid finishes the edge.

No. 48.
ENGLISH NEEDLE-POINT LACE.
This engraving illustrates a very beautiful specimen of modern-point lace in a design combining the lily and the rose. Raleigh bars and buttons render the heavy part of the work effective, while the daintier point stitches and bars are used to fill in the floral sections—coarse and fine thread being used in the work.
This engraving shows a stunning example of modern point lace, featuring a design that combines the lily and the rose. Raleigh bars and buttons highlight the heavier parts of the work, while more delicate point stitches and bars fill in the floral sections—both coarse and fine threads are used in the piece.
This lace, like any of the varieties now fashionable may be made wide or narrow, or fine or coarse by designs furnished as required by lace-makers in general; and the patterns may also be developed in silk or ribbon needle-point, which is a style of ornamentation appearing extensively as a decoration for scarfs, piano and table covers, mantel valences, etc., etc.[Pg 83]
This lace, like the various trendy types today, can be made wide or narrow, or delicate or thick based on designs provided by lace makers. The patterns can also be created in silk or ribbon needlepoint, which is a popular decoration style for scarves, piano covers, tablecloths, mantel valances, and more.[Pg 83]

No. 48.—English Needle-Point Lace.
__A_TAG_PLACEHOLDER_0__—English Needlepoint Lace.
No. 49.[Pg 84]
ROYAL BATTENBURG LACE.
This design was among the first ones of this lace to appear, and is fully entitled to its royal name. Fancy Battenburg braid was selected for the foundation, and various stitches chosen for filling-in purposes. Among the stitches are point de Bruxelles, made similarly to the Italian lace stitch, point de fillet, plain Raleigh bars, point d'Alençon, rosettes, rings and point de Grecque. The central figure conveys a hint of the outlines of the royal crown, and the lace is really sumptuous in design and texture. In 1883, Mrs. Grace McCormick, the originator of the design and lace was awarded a diploma for her work which was forwarded from Washington, where she applied for a patent for her specimens of Royal Battenburg lace, of which this is one.[Pg 85]
This design was one of the first of this lace to appear and truly deserves its royal name. Fancy Battenburg braid was used for the foundation, with various stitches selected for filling in. The stitches include point de Bruxelles, which is made similarly to the Italian lace stitch, point de fillet, plain Raleigh bars, point d'Alençon, rosettes, rings, and point de Grecque. The central figure suggests the outlines of a royal crown, and the lace is really luxurious in design and texture. In 1883, Mrs. Grace McCormick, the creator of the design and lace, was awarded a diploma for her work, which she submitted from Washington when she applied for a patent for her samples of Royal Battenburg lace, of which this is one.[Pg 85]

No. 49.—Royal Battenburg Lace.
__A_TAG_PLACEHOLDER_0__—Royal Battenburg Lace.
No. 50.[Pg 86]
ROMAN LACE (CORAL PATTERN).
The design here given is for a lappet or scarf-end, and will afford a suggestion for the making of larger articles or edging in similar arrangements of braid. It will be observed that the braid forms irregular lines that recall the branchings of coral, and it will be a very easy matter for an amateur lace-maker to similarly arrange her braid for any purpose she desires. Fine Raleigh bars form the connecting work, and a button-hole picot-finish is made along the edge of the braid which forms the border. In making an edging, a definite outline could be kept for the lower edge, and above this an irregular or indefinite outline arranged.[Pg 87]
The design presented here is for a lappet or scarf-end and offers inspiration for creating larger items or similar braid edgings. You'll notice that the braid creates irregular lines that resemble the branches of coral, making it easy for a beginner lace-maker to arrange her braid for any desired purpose. Delicate Raleigh bars connect the pieces, and a buttonhole picot finish is added along the edge of the braid that forms the border. When making an edging, you can maintain a clear outline for the lower edge while arranging an irregular or undefined outline above it.[Pg 87]

No. 50.—Roman Lace (Coral Pattern).
__A_TAG_PLACEHOLDER_0__—Roman Lace (Coral Design).
No. 51.[Pg 88]
TIDY OF BATTENBURG LACE.
The tidy here illustrated is made entirely of Battenburg lace, and is a beautiful specimen of this kind of work. The border design is the same as the one previously described for a pillow-sham, except that but one row of the blossoms and foliage is used. The center is composed of rows of braid crossed to form squares or open spaces that are filled in with rosettes in point d'Angleterre. This center is attached to the braid at the inner edge of the border by a series of bars arranged in d'Alençon style and then wrought with the thread after the method used in d'Anvers bars. This tidy, enlarged, forms an elegant design for a pillow-sham. When laid over a tinted silk spread or pillow, a sham of this design shows its full beauty. When the braid is basted on in the outlines desired, the remainder of the work will be a pleasing pastime, as none of it is so fine as to require very close attention.[Pg 89]
The tidy shown here is made entirely of Battenburg lace and is a beautiful example of this type of work. The border design is the same as the one previously described for a pillow sham, except there's only one row of blossoms and foliage used. The center consists of rows of braid crossed to create squares or open spaces filled in with rosettes in point d'Angleterre. This center is connected to the braid at the inner edge of the border by a series of bars arranged in the d'Alençon style and then worked with thread using the method for d'Anvers bars. This tidy, when enlarged, creates an elegant design for a pillow sham. When placed over a tinted silk spread or pillow, a sham of this design reveals its full beauty. Once the braid is basted on in the desired outlines, the rest of the work will be an enjoyable pastime since none of it is so intricate that it requires intense focus.[Pg 89]

No. 51.—Tidy of Battenburg Lace.
__A_TAG_PLACEHOLDER_0__—Battenburg Lace Coaster.
No. 52.[Pg 90]
MODERN LACE.
A handsome specimen of lace is here illustrated. It will be observed that the braid from which it is made is woven like fine binding braid, and in this respect differs from any of the lace-braids herein illustrated. It will also be seen that no two figures of the design are alike, and that various stitches are used in completing them, many being combinations of or adaptations from the stitches illustrated at the beginning of this pamphlet. The engraving is sufficiently plain to enable the worker to decide which stitches are used alone or in combination, and to guide her correctly in their application. The picot-edge is done in point de Venise stitch.
A beautiful piece of lace is shown here. You’ll notice that the braid it's made from is woven like fine binding braid, which sets it apart from any of the lace-braids shown in this collection. It’s also clear that no two designs are identical, and various stitches are used to create them, many being combinations or adaptations of the stitches presented at the beginning of this pamphlet. The engraving is clear enough for the crafter to determine which stitches are used alone or in combination, and it will help her apply them correctly. The picot edge is created with point de Venise stitch.

No. 52.—Modern Lace.
__A_TAG_PLACEHOLDER_0__—Modern Lace.
No. 53.
MODERN-POINT LACE EDGING.
This is an easy design to follow and is simply made. Heavy Sorrento bars with picot loops form the ground-work, while the filling-in stitches are of the same class done in fine thread in regular squares and also a combination of point de fillet and point de Grecque. A dainty picot-finish is added at the lower edge. This edging is pretty for bordering draperies or decorating dresses, and may be made as fine or as coarse as desired.[Pg 91]
This design is easy to follow and simple to make. Thick Sorrento bars with picot loops create the base, while the filling stitches use fine thread in regular squares, plus a mix of point de fillet and point de Grecque. A delicate picot finish is added at the bottom edge. This edging looks lovely for draperies or dress decoration and can be made as fine or as coarse as you like.[Pg 91]

No. 53.—Modern-Point Lace Edging.
__A_TAG_PLACEHOLDER_0__—Modern Point Lace Trim.
No. 54.[Pg 92]
SQUARE IN MODERN-POINT LACE.
In this design will be observed a favorite combination—the rose and the butterfly. Close inspection will also disclose that the filling-in stitches are of a diverse character, and that to this diversification much of the beauty of the work is due. As most of the stitches are easily recognized, and as the copyist can easily adapt methods for the combinations seen, it will not be necessary to definitely describe them.
In this design, you'll see a popular combination—the rose and the butterfly. A closer look will also reveal that the filling stitches are quite varied, and this diversity contributes greatly to the beauty of the piece. Since most of the stitches are easily identifiable, and the copyist can easily adjust techniques for the combinations displayed, there's no need to describe them in detail.
The square may be used for a scarf-end in connection with the edging No. 53 seen on page 91, if the braid selected is sufficiently fine. When coarser braid is chosen, the square will be pretty for doilies, tidies or the center of a table spread. The design may be daintily made up of ribbon, with silk for the stitches. In this event it may be set into a scarf or drapery of China or Surah silk with charming results.[Pg 93]
The square can be used as a scarf-end along with the edging No. 53 shown on page 91 if the chosen braid is fine enough. If a coarser braid is used, the square will look great as doilies, tidies, or the center of a table spread. The design can be delicately made with ribbon and silk for the stitches. In that case, it can be incorporated into a scarf or drapery made of China or Surah silk for beautiful results.[Pg 93]

No. 54.—Square in Modern-Point Lace.
__A_TAG_PLACEHOLDER_0__—Square in Modern Point Lace.
No. 55.[Pg 94]
LOUIS XIV. CURTAIN-LACE.
This is a very popular decoration for curtains and vestibule doors and is made of heavy écru or white net and braid. The design selected is generally a border with a corner piece, and sometimes a center piece. The specimen here given is simply a square of the net decorated as illustrated to convey an idea of this at present fashionable curtain lace. The design is first traced on tracing cloth that is then underlaid with brown paper to hold it stiffly in place. The net is then laid over this and smoothly basted down so that the tracing shows through plainly. Then écru or white Battenburg braid is used to follow the design, and is shaped into the leaves and flowers seen, rings being used for the centers of the blossoms and écru or white cord for the stems. The net is cut from under the rings at the centers of the large roses, and each opening is filled in with point de fillet and English wheels. The effect is very rich and the work is not difficult to do.
This is a really popular decoration for curtains and entry doors, made from heavy off-white or white netting and braid. The chosen design usually features a border with a corner piece, and sometimes a center piece. The example given here is just a square of the net decorated as shown to give an idea of this currently trendy curtain lace. The design is first traced onto tracing paper, which is then placed on brown paper to keep it stiff. The net is laid over this and smoothly basted down so the design is clearly visible. Then, off-white or white Battenburg braid is used to follow the design, shaped into the leaves and flowers, with rings used for the centers of the blossoms and off-white or white cord for the stems. The net is cut out from under the rings at the centers of the large roses, and each opening is filled in with point de fillet and English wheels. The overall effect is very rich, and the work isn't difficult to do.
When a curtain is thus embroidered or decorated with braid, it is bordered the same as the square illustrated, or upon that principle, with rows and points of Battenburg braid. Ribbon is often used in this way for tidies, bureau scarfs and various other little household decorations, and in this event the flower and foliage tints may be carried out in the design.[Pg 95]
When a curtain is embroidered or decorated with braid, it is edged the same way as the square shown, or based on that idea, with rows and points of Battenburg braid. Ribbon is often used this way for tidy items, dresser scarves, and various other small home decorations, and in this case, the colors of flowers and leaves can be incorporated into the design.[Pg 95]

No. 55.—Louis XIV. Curtain-Lace.
__A_TAG_PLACEHOLDER_0__—Louis XIV. Lace Curtains.
DARNED-NET SCARFS, KERCHIEFS, TIDIES, EDGINGS, INSERTIONS, ETC., ETC., WITH DESIGNS FOR THE SAME AND OTHER ARTICLES.[Pg 96]
Bobbin net, or "bobbinet," or "net" as it is now commonly called, was first made by machinery in 1809, and was so called because the threads from which it was made were wound upon bobbins, and twisted into meshes instead of being looped in knitting style as they were previous to the invention of the machine. The latter was invented by John Heathcoat, the son of an English farmer; but to France must be given the credit of introducing the "darned work" by which some of its costliest net laces were first made. From these laces originated the industry of darning net by machinery and by hand, and in all grades from fine silk-blonde and Brussels net to the coarsest wash net, such as is used for curtains and draperies.
Bobbin net, commonly known today as "bobbinet" or simply "net," was first produced by machines in 1809. It got its name because the threads used to make it were wound onto bobbins and twisted into meshes, rather than being looped like in traditional knitting before the invention of the machine. This machine was created by John Heathcoat, the son of an English farmer. However, France deserves credit for introducing the "darned work," which led to the production of some of the most expensive net laces. These laces gave rise to the industry of darning net both by machine and by hand, ranging from fine silk-blonde and Brussels net to the coarsest wash net, which is used for curtains and draperies.
In the earlier days the pattern was stamped on the net by means of wooden blocks, and the net was then placed in a frame, and the darner with her left hand under the lace followed the design with her needle and cotton, linen or silk floss held over the work in the right hand. This method may be employed at the present time; or, the design may be drawn on thick paper and the net basted over it; or, if the net is coarse the design may be followed by counting the meshes and inserting the needle and floss accordingly; or the design may be transferred to the net itself by black or colored pencils, or stamping. The darner must decide for herself which method for holding the work she will use. Some of the most expert darners simply hold the net loosely in their hands and copy the design by eye alone. Wash-silk floss, India floss which is of linen but looks like silk, and ordinary darning flosses are all used for this work. Darned net is liked for many purposes, as will be observed by the variety of designs and illustrations given on these pages.
In the past, the pattern was stamped on the net using wooden blocks, and then the net was put in a frame. The darner, holding her needle and cotton, linen, or silk floss in her right hand, would follow the design with her left hand under the lace. This method can still be used today; alternatively, the design can be drawn on thick paper and the net basted over it. If the net is coarse, the design can be followed by counting the meshes and inserting the needle and floss accordingly. Another option is to transfer the design onto the net using black or colored pencils or stamping. The darner must decide for herself which method of holding the work to use. Some of the most skilled darners simply hold the net loosely in their hands and replicate the design by sight alone. Wash-silk floss, India floss—which is linen but resembles silk—and regular darning floss are all used for this work. Darned net is favored for many purposes, as demonstrated by the variety of designs and illustrations found on these pages.
No. 1.
SCARF-END OF DARNED NET.
This illustration pictures a very pretty scarf-end, but presents it only half of its actual width. The scarf is about a yard in length and is darned with linen floss and edged with the finest feather-edge braid. The center portions of the flowers and foliage are cut out after the solid darning is made, and the spaces are then filled in with a fancy mesh done with fine cotton in point de Bruxelles stitch.[Pg 97]
This illustration shows a really beautiful scarf end, but it only displays half of its true width. The scarf is about a yard long and is stitched with linen floss, featuring the finest feather-edge braid. The center parts of the flowers and leaves are cut out after the solid stitching is completed, and the empty spaces are filled in with a decorative mesh created with fine cotton using point de Bruxelles stitch.[Pg 97]
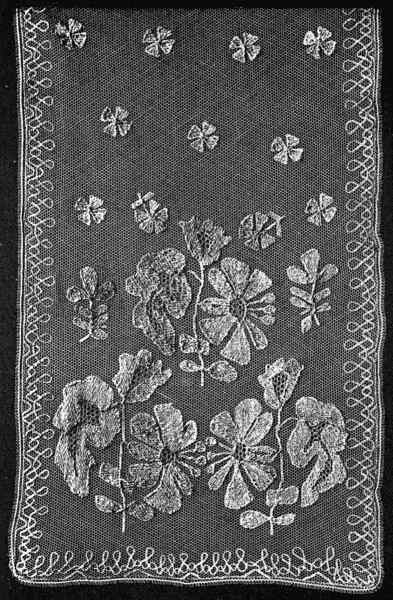
No. 2.[Pg 98]
NARROW CUFF OF DARNED NET.
This engraving presents a cuff of darned net in its actual width. The design is also suitable for an edging and may be easily changed into an insertion. Feather-edge braid is used to complete the cuff. A collar may be made to match if desired.
This engraving shows a cuff of patched net at its actual width. The design also works well as an edging and can be easily adapted into an insertion. Feather-edge braid is used to finish the cuff. A matching collar can be made if you want.

No. 2.—Narrow Cuff of Darned Net.
__A_TAG_PLACEHOLDER_0__—Skinny Cuff of Mended Net.
No. 3.
CORNER OF KERCHIEF OF DARNED NET.
This kerchief is made similarly to the scarf-end illustrated on page 97, and as represented, the corner is only one-half its actual size. The kerchief itself is about twenty-two inches square and is very dainty in effect. The stars which fill in the central portion are very simple to make, and the eyelets in each are punched with a bodkin and then worked once around in point de Bruxelles or button-hole stitch. The kerchief is made of fine Brussels net and the darning is done with India floss.[Pg 99]
This kerchief is made in a similar way to the scarf-end shown on page 97, and as depicted, the corner is only half its actual size. The kerchief itself is about twenty-two inches square and has a very delicate look. The stars that fill the center are easy to make, and the eyelets in each are punched with a bodkin and then finished off with a point de Bruxelles or buttonhole stitch. The kerchief is crafted from fine Brussels net, and the darning is done with India floss.[Pg 99]
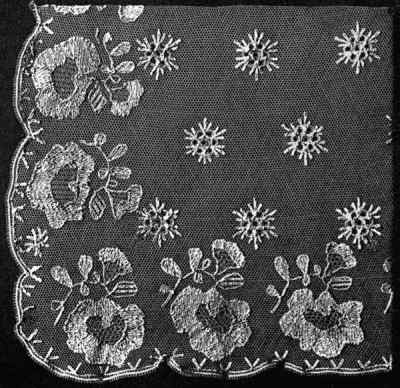
No. 4.[Pg 100]
TIDY OF DARNED NET.
This engraving represents a charming little tidy made of coarse wash-net darned with wash-silk floss in Oriental colorings. The tidy has an inch wide hem and is about eleven inches wide and twelve long. The hem is fastened down by three rows of darning stitches, the outer row being deep garnet, the middle row bright old-rose and the inner row deep orange. One small fan is made of the orange and pale-blue, another of the old-rose with sulphur-yellow, and the third peacock-blue and crimson. One large fan is made of pale-pink and silver-gray (darned together), and wood-brown; another is made of the garnet and the sulphur-yellow, while the third is made of orange and pale-blue. The scrolls meeting at the center are made, one of wood-brown, one of sulphur-yellow and one of garnet, and the rest of the design is made in different shades of dull green. Laid over white, this tidy is very effective. It may be darned in one color on white, black or écru net if preferred, and with linen floss.[Pg 101]
This engraving shows a cute little tidy made of coarse wash-net, adorned with wash-silk floss in vibrant colors inspired by Eastern designs. The tidy features a one-inch wide hem and measures about eleven inches across and twelve inches long. The hem is secured with three rows of darning stitches: the outer row is a deep garnet, the middle row is a bright old-rose, and the inner row is a deep orange. One small fan is crafted from orange and pale blue, another from old-rose and sulfur yellow, and the third from peacock blue and crimson. One large fan combines pale pink and silver gray (stitched together) and wood brown; another fan is made from garnet and sulfur yellow, while the third is orange and pale blue. The scrolls that meet in the center are made of wood brown, sulfur yellow, and garnet, with the rest of the design featuring various shades of muted green. When placed over white, this tidy looks very striking. If desired, it can be stitched in one color on white, black, or off-white net, using linen floss.[Pg 101]

No. 4.—Tidy of Darned Net.
__A_TAG_PLACEHOLDER_0__—Tidy of Damned Net.
No. 5.[Pg 102]
TIE-END OF DARNED NET.
A tie-end in its actual width is here illustrated. The tie is about three-quarters of a yard long, and is darned in all-over style in the design seen in the engraving, with linen floss. A line of fine feather-edge braid finishes the tie in a dainty manner. This design may be used for any other article preferred, and its details will also suggest other designs of a similar character which may be invented by the worker. This scarf as well as the others just described, may be made up in black if preferred; and in this event it will be easier for the darner to follow the meshes if she bastes her net over a white background. The design may or not be traced on this background.[Pg 103]
A tie-end in its actual width is illustrated here. The tie is about three-quarters of a yard long and is fully darned in the design shown in the engraving, using linen floss. A line of fine feather-edge braid adds a delicate touch to finish the tie. This design can be applied to any other item you prefer, and its details may also inspire similar designs that the creator can come up with. This scarf, along with the others described, can also be made in black if desired; in this case, it will be easier for the person doing the darning to follow the stitches if she bastes her net over a white background. The design may or may not be traced on this background.[Pg 103]

No. 6.[Pg 104]
DARNED-NET EDGING, WITH OVER-WROUGHT STITCH.
This handsome edging is darned upon a wide strip of net with coarse and fine embroidery cotton, and after the pattern is completed the lower edge of the net is cut away. The coarse cotton is used to outline the design and fill in some of the central portions, while the fine is darned in between the outer and center portions, and is used for the over-wrought portions. These portions are "run" back and forth loosely to form a raised foundation for the buds and rose-centers before the over-wrought work is done. The edging is given full-size and no difficulty will be experienced in following the design or making the lace; and the design may be adapted to any article of wear that can be made of darned net. A scarf or kerchief, dotted with rosebuds made like those of this design would be a very dainty article of personal adornment; and the buds might be made of pale-pink or yellow floss with a charming effect. The floral idea might be further carried out by using shaded green floss for the foliage.[Pg 105]
This beautiful edging is created on a wide strip of net using both coarse and fine embroidery cotton. Once the pattern is finished, the lower edge of the net is trimmed off. The coarse cotton is used to outline the design and fill in some central areas, while the fine cotton is stitched between the outer and center parts, and is used for the more detailed sections. These detailed parts are loosely sewn back and forth to create a raised base for the buds and rose centers before the finer details are added. The edging is presented in full size, making it easy to follow the design and create the lace. The design can be adapted for any item that can be made from darned net. A scarf or handkerchief decorated with rosebuds in this style would make a lovely accessory, and the buds could be crafted from pale pink or yellow floss for a charming look. The floral theme could be enhanced further with shaded green floss for the leaves.[Pg 105]

Nos. 7 and 8.[Pg 106]
DARNED-NET EDGINGS.
It will not be necessary to give special instructions for either of the edgings here illustrated, as both are given full size and the designs are perfectly distinct. No. 7 is finished with a button-holed scallop from which the net is cut away when the work is completed. Either edging may be made of white, écru or black net as preferred, and the floss may be white or tinted, or of cotton, linen or silk.
It won't be necessary to provide special instructions for either of the edgings shown here, as both are shown at full size and the designs are completely clear. No. 7 is finished with a button-holed scallop, and the net is cut away once the work is done. Either edging can be made from white, ecru, or black net, depending on your preference, and the floss can be white, tinted, or made of cotton, linen, or silk.
In making No. 8 upon black net, silver or gilt thread or colored flosses will be found very effective. Black net thus darned is very pretty for ruching and jabots for dress-waists.
In creating No. 8 on black net, silver or gold thread or colored embroidery floss can be very effective. Black net that’s been embellished this way looks really nice for ruffles and jabots on dress tops.
In making darned edgings, net may be purchased in various edging widths, and in this style is often called "footing." When bobbin net (or bobbinet as it is now called) was first invented, it was made only one inch wide but now it may be purchased three and one-half yards wide if desired.[Pg 107]
In making darned edges, netting can be bought in different widths, often referred to as "footing." When bobbin net (or bobbinet as it’s now known) was first created, it was only one inch wide, but now it can be purchased in widths of up to three and a half yards if needed.[Pg 107]

No. 7.—Darned-Net Edging.
__A_TAG_PLACEHOLDER_0__—Darned-Net Edging.
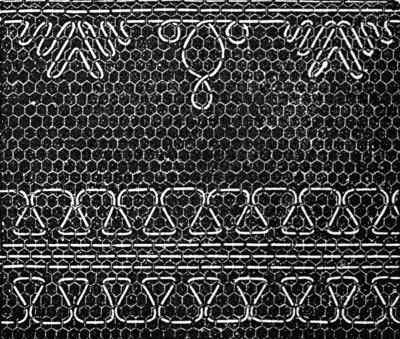
No. 8.—Darned-Net Edging.
__A_TAG_PLACEHOLDER_0__—Darned-Net Edging.
No. 9.[Pg 108]
PILLOW-SHAM OF DARNED NET.
This engraving represents one of the many uses to which darned net is put. Moderately coarse net was selected, and the darning was done with linen floss in the various patterns seen, and which are repeated in a larger form on the following pages. The sham was hemmed after the darning was finished, and a frill of darned-net edging was then added. Tinted silk or sateen should be laid under such a sham in order to bring out the beauty of the work. The ambitious darner may make a bed-spread to correspond with her shams, if she has the time to devote to the task and the patience to complete it; and in making such a set, she need not confine herself to the designs here given, but may select any others she admires, or may originate a design herself. Individual ideas as to decoration so widely differ, that clever workers are sure to evolve designs of various characters and a generally uniform beauty. Blossoms, leaves, carvings, Oriental figures, brocades, etc., etc., all afford dainty ideas for designs for darned net.[Pg 109]
This engraving shows one of the many ways darned net can be used. A moderately coarse net was chosen, and the darning was done with linen floss in the various patterns you see, which are repeated in a larger form on the following pages. The sham was hemmed after the darning was completed, and a frill of darned-net edging was added. Use tinted silk or sateen underneath such a sham to highlight the beauty of the work. If she has the time and patience, an ambitious darner may make a bedspread to match her shams; and while making a set, she doesn’t have to stick to the designs provided here but can choose any others she likes or create her own design. Since personal ideas about decoration vary widely, skilled workers are sure to come up with designs that differ in style but share a general beauty. Blossoms, leaves, carvings, Oriental figures, brocades, and so on all offer delicate ideas for designs for darned net.[Pg 109]

No. 9.—Pillow-Sham of Darned Net.
__A_TAG_PLACEHOLDER_0__—Pillow Sham of Darned Net.
No. 10.[Pg 110]
CENTER OF PILLOW-SHAM.
This engraving presents an enlarged representation of the center of the pillow-sham seen on page 109, and also shows its suitability for the center of a tidy. The inner design is very easy to follow, as will be seen by referring to No. 12 on page 113, where a large illustration of it is seen supplemented by a vine-border at each side. The outer border of this center-piece is very simple, and may be darned in diamonds as large or as small as desired.
This engraving shows a larger version of the center of the pillow sham seen on page 109 and also illustrates how it can work as the center of a tidy. The inner design is straightforward to follow, as you can see by looking at No. 12 on page 113, which has a large illustration of it, enhanced by a vine border on each side. The outer border of this centerpiece is quite simple and can be filled in with diamonds of any size you prefer.

No. 10.—Center of Pillow-Sham.
__A_TAG_PLACEHOLDER_0__—Pillow Sham Center.
No. 11.
SECTION OF PILLOW-SHAM.
In looking at the sham illustrated on page 109, the design illustrated at No. 11 will be seen at either side of the middle-stripe design. As here represented it will be easy to copy either for a pillow-sham or for any article of decoration or personal use desired. The ingenious worker will find many methods of combining it with other designs or applying it as an insertion, a border or an edging; and she may also use her own taste as to darning with white or colored floss, or using white, écru, fancy-colored or black net.[Pg 111]
In looking at the sham shown on page 109, the design at No. 11 can be seen on either side of the middle-stripe design. As presented here, it will be easy to replicate for a pillow sham or for any decorative or personal item you want to create. The creative crafter will discover various ways to combine it with other designs or use it as an insertion, a border, or an edging; and she can also use her own style for darning with white or colored thread, or using white, cream, colorful, or black net.[Pg 111]

No. 11.—Section of Pillow-Sham.
__A_TAG_PLACEHOLDER_0__—Part of Pillow Sham.
No. 12.[Pg 112]
SECTION OF PILLOW-SHAM.
This design has been mentioned in connection with the pillow-sham seen upon page 109, and the engraving represents it perfectly. It may be employed for the purpose mentioned or adapted to any other use required, and may be copied exactly or varied to suit individual taste. Black net darned with gold thread in this design would be pretty for decorating a black silk gown or trimming a black hat.
This design has been referenced in relation to the pillow sham shown on page 109, and the illustration captures it perfectly. It can be used for the intended purpose or modified for any other needs, and it can be replicated exactly or adjusted to fit personal preferences. Black net embellished with gold thread in this design would look beautiful for decorating a black silk dress or trimming a black hat.

No. 12.—Section of Pillow-Sham.
__A_TAG_PLACEHOLDER_0__—Pillow Sham Section.
No. 13.
SECTION OF PILLOW-SHAM.
Another portion of the pillow-sham mentioned is here illustrated, but the design is quite as appropriate for any other decorative purpose. Yokes for night-dresses may be darned in this pattern, or in any of the ones previously given, with a very pretty effect; and when tinted ribbon, mull or lawn is laid under the darned stripes, the effect is very dainty indeed. Yokes to children's dresses may also be darned in this pattern or the others, and little caps or hoods may be made to match and lined with a tinted or white fabric.[Pg 113]
Another part of the pillow sham mentioned is shown here, but the design is just as suitable for any other decorative use. Yokes for nightgowns can be embroidered with this pattern or any of the ones listed before, creating a lovely effect; and when you place colored ribbon, mull, or lawn underneath the embroidered stripes, the result is quite delicate. Yokes for children's dresses can also be done in this pattern or the others, and matching little caps or hoods can be made and lined with a colored or white fabric.[Pg 113]
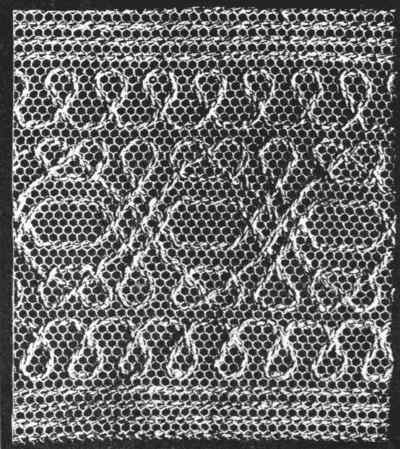
No. 13.—Section of Pillow-Sham.
__A_TAG_PLACEHOLDER_0__—Part of Pillow-Sham.
No. 14.[Pg 114]
END OF DRAPERY-SCARF OF DARNED NET.
The end of the drapery-scarf from which this engraving was made is about fourteen inches square, and the sides are turned under for about a quarter of an inch, or a little more, and darned down closely to represent a selvedge. The design is Oriental in outline and is easy to follow. As represented the scarf is made of white net and darned with white linen floss; but the Oriental effect may be carried out more perfectly if the darning is done with colored flosses with an intermingling of silver or gilt thread. White, black, écru or colored net may be used. Two ends are made and then gathered to a smaller square of net. This small square is then drawn together through the center under a bow of wide satin ribbon, and the scarf is then fastened to the article of furniture it is to decorate. To its ends may be added tassels, rings or any edge-finish that is in accord with the materials of the scarf. Black net darned with gold, crimson, peacock-blue, and pale-yellow and pale-olive, results in a charmingly Eastern or Oriental effect.[Pg 115]
The end of the drapery scarf that this engraving is based on measures about fourteen inches square, with the sides folded under about a quarter of an inch or a bit more and neatly darned to mimic a selvedge. The design has an Oriental outline and is straightforward to follow. As shown, the scarf is made from white net and darned with white linen floss; however, the Oriental look can be enhanced by using colored flosses combined with silver or gold thread for the darning. White, black, écru, or colored net can be used. Two ends are created and then gathered to form a smaller square of net. This small square is then pulled together at the center under a bow of wide satin ribbon, and the scarf is attached to the piece of furniture it is meant to adorn. You can add tassels, rings, or any edge finish that complements the materials of the scarf at its ends. A black net scarf darned with gold, crimson, peacock blue, pale yellow, and pale olive creates a beautifully Eastern or Oriental effect.[Pg 115]
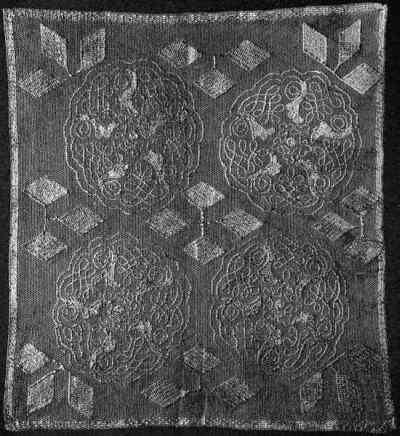
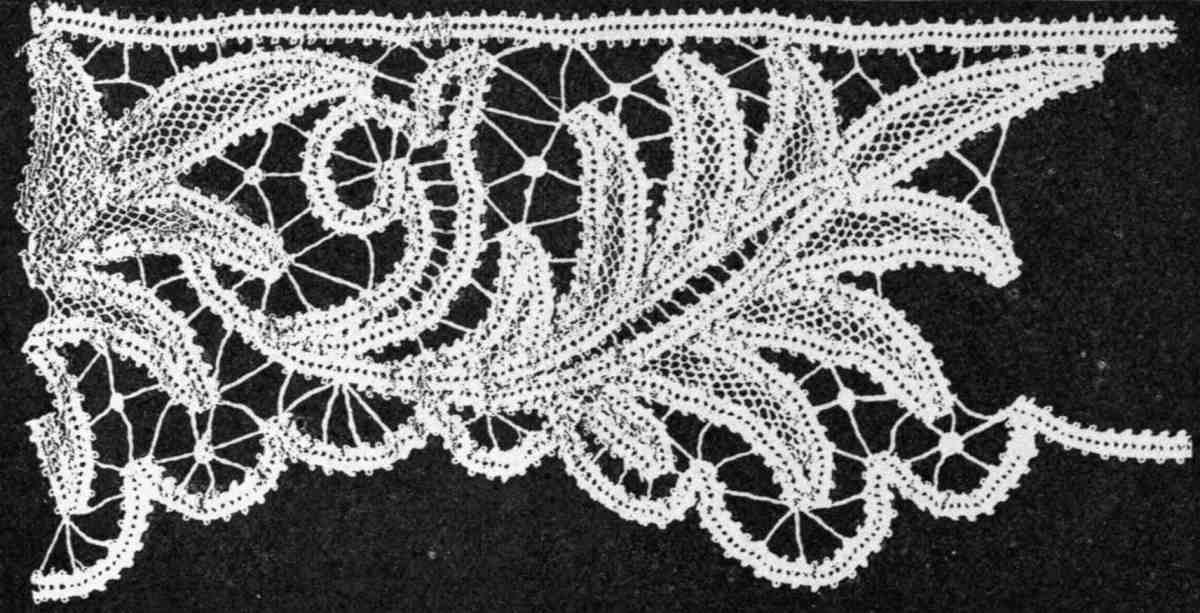
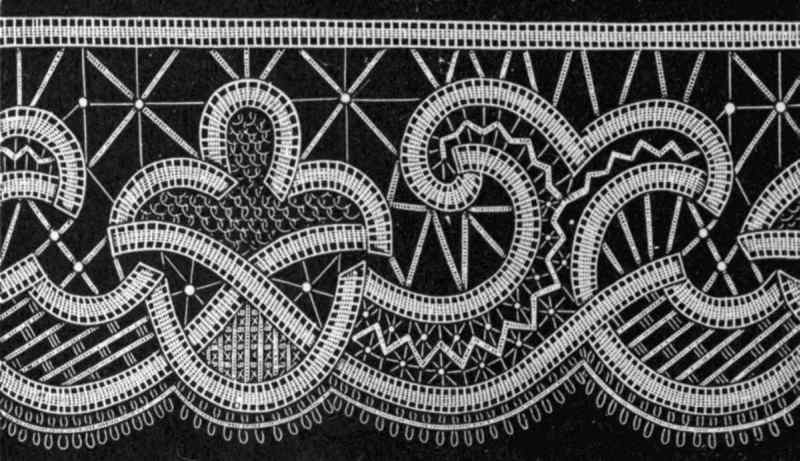
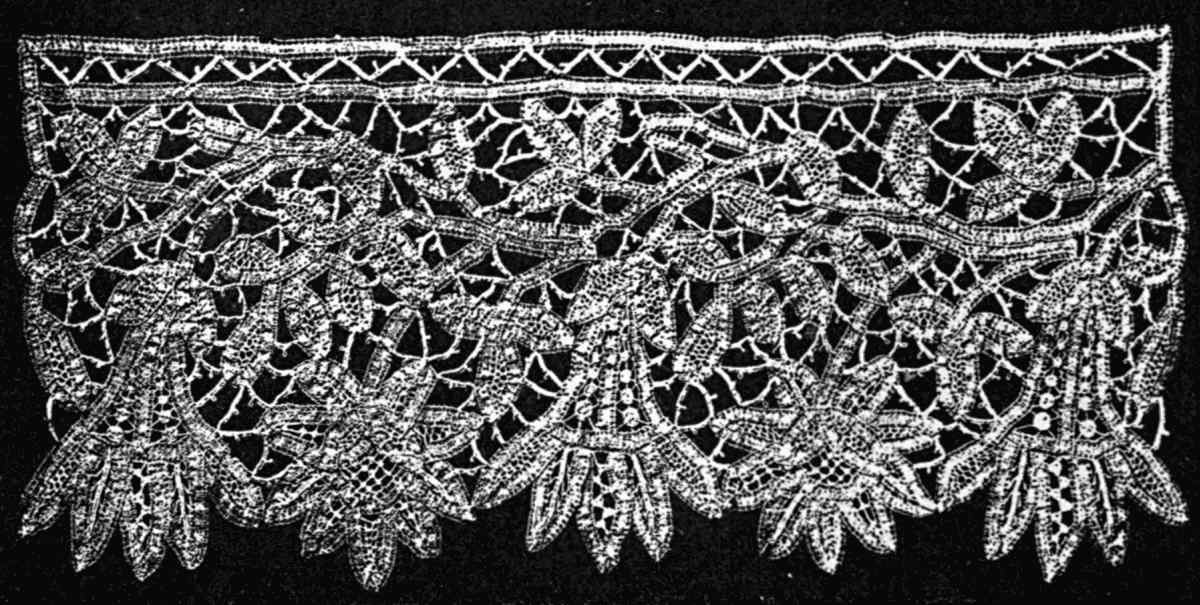
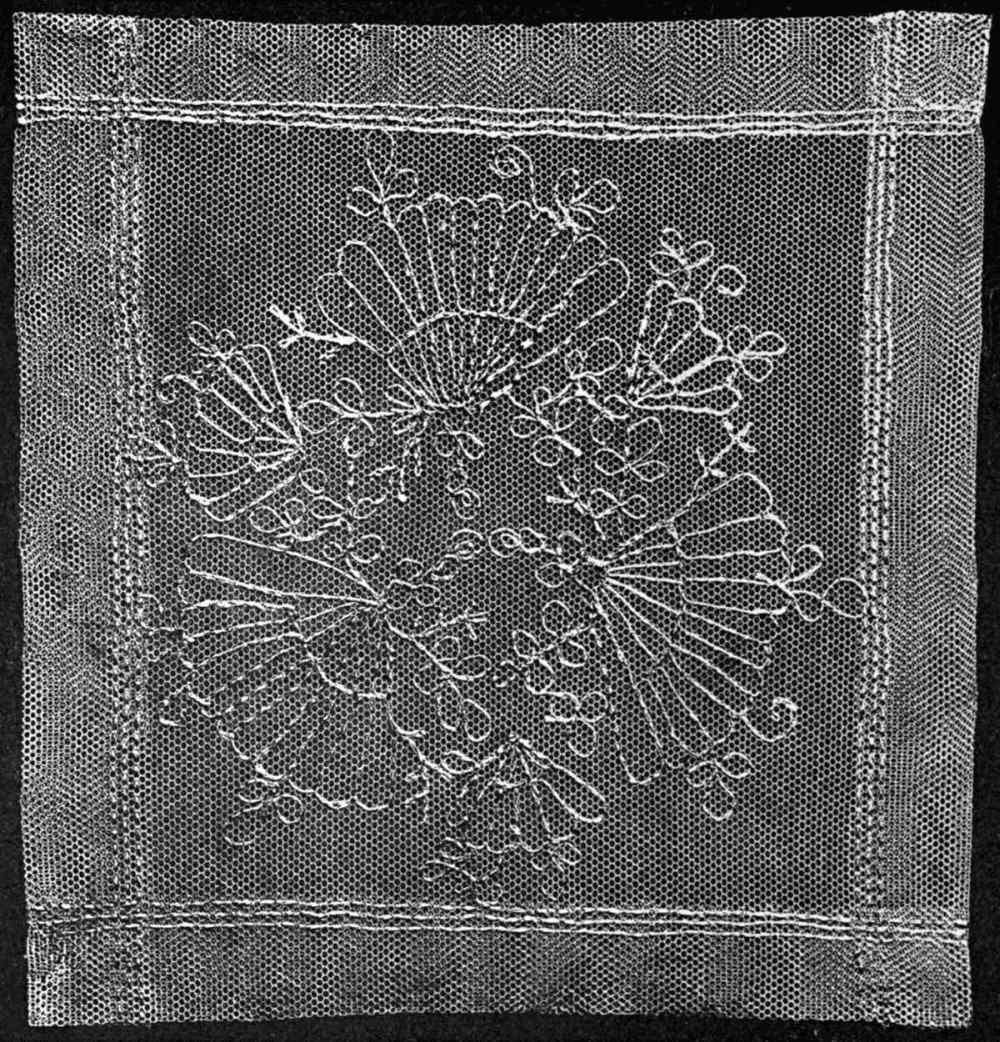
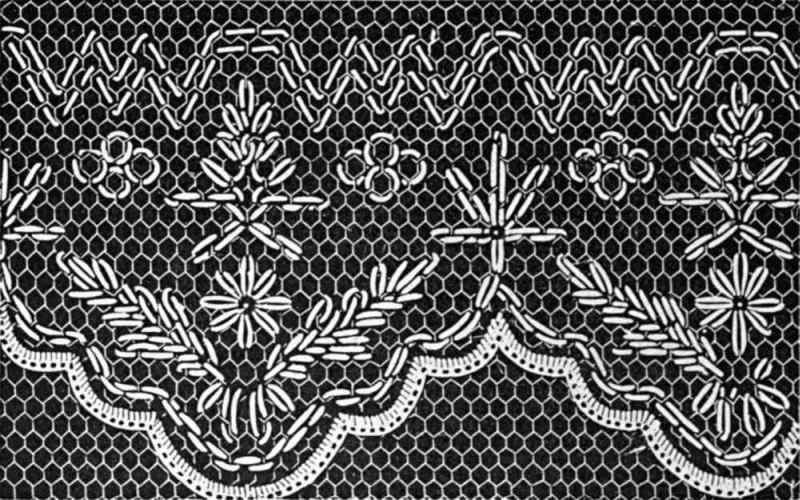
No. 15.[Pg 116]
DESIGN FOR A CORNER OR SQUARE OF DARNED NET.
A very pretty design, as simple as it is effective, is here represented. According to the purpose for which the work is intended, and the color of the net selected, the darning may be done in cotton, linen or silk, and in white, black, écru or colors. The pattern may be modified in any way pleasing to the taste, or diversified by the introduction of portions of other designs or individual ideas.
A really nice design, as simple as it is effective, is shown here. Depending on the purpose of the project and the color of the net chosen, you can use cotton, linen, or silk for the darning, in white, black, natural, or various colors. You can change the pattern in any way you like, or mix in parts of other designs or personal ideas.

No. 16.
BORDER FOR DARNED NET.
A pretty border for tidies, draperies, flounces, yokes, collars or any article requiring a border is here illustrated. Any of the suggestions given above may be adopted in making this border, which may be used separately or in combination with other borders, according to individual taste. Gold thread upon black or white net would, in this design, result in a very effective dress decoration.[Pg 117]
A stylish border for finishing touches, curtains, ruffles, yokes, collars, or any item needing a border is shown here. You can use any of the ideas mentioned above to create this border, which can be used alone or combined with other borders, depending on your personal style. Gold thread on black or white net would make a striking decoration for a dress in this design.[Pg 117]

No. 16.—Border for Darned Net.
__A_TAG_PLACEHOLDER_0__—Border for Damned Net.
No. 17.[Pg 118]
DESIGN FOR DARNED NET.
This pretty pattern may be used as a border, insertion or stripe for personal or household articles, and is one of the most popular designs in use. It is very easy to follow and is illustrated full size. It might be used to border the lower edge of a wide flounce for a petticoat, or, with equal propriety, applied to a tidy or a window drapery, providing the worker regulates the size of the design appropriately for the work in hand. For window draperies it would need to be much broader and larger in other ways than as represented.
This nice pattern can be used as a border, insert, or stripe for personal or household items, and it's one of the most popular designs around. It’s really easy to follow and shown in full size. You could use it to edge the lower part of a wide flounce for a petticoat, or just as suitably on a tidy or window drapery, as long as you adjust the size of the design to fit the project. For window drapes, it would need to be much wider and larger in other respects than what’s shown.
No. 18.
EDGING OF DARNED NET.
The design here presented is of full size, and very easy to work. A dainty edge in button-hole stitch is worked for the border, and the net is afterward cut out to form the tiny scallops. This is a pretty pattern for neck and wrist frills, jabots or ruffles, or for the adornment of kerchiefs for the neck or pockets, or for any purpose for which lace edging is selected.[Pg 119]
The design shown here is full size and very easy to work with. A delicate edge in buttonhole stitch is created for the border, and then the net is cut out to form the little scallops. This is a lovely pattern for neck and wrist frills, jabots or ruffles, or for decorating kerchiefs for the neck or pockets, or for any purpose where lace edging is used.[Pg 119]

No. 17.—Design for Darned Net.
__A_TAG_PLACEHOLDER_0__—Design for the Darned Net.
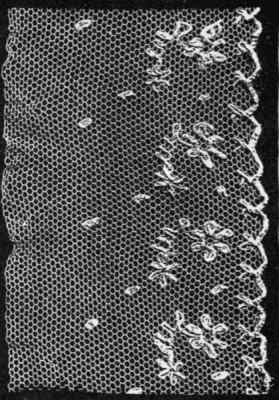
No. 18.—Edging of Darned Net.
__A_TAG_PLACEHOLDER_0__—Frayed Edge of Damned Net.
No. 19.[Pg 120]
DESIGN FOR DARNED NET.
This engraving represents a flounce of darned-net in its actual size or width. It will be seen that the design is simple, but at the same time very effective. The flounce is for a child's dress made of net darned all over in the pattern seen in the picture, and worn over a tinted silk slip. The all-over work is very pretty indeed, and the design may be put to any of the many uses for which darned net is suitable. It is pretty for yokes, pillow-shams, counterpanes, infants' dresses and carriage-robes, parasol-covers, sofa-pillow covers, and in fact for any article that may be made of lace.
This engraving displays a flounce of darned-net in its actual size and width. You'll notice that the design is simple yet very effective. The flounce is intended for a child's dress made of net with the pattern shown in the image, and it's worn over a colored silk slip. The all-over design is quite beautiful, and it can be used for many applications suitable for darned net. It's great for yokes, pillow shams, bedspreads, baby dresses and carriage robes, parasol covers, sofa pillow covers, and really for any item that can be made with lace.
The points of the flounce are darned back and forth in selvedge effect; but they may be worked in button-hole stitch if preferred. A touch of color may be given the work by using a little tinted or colored floss with the white, though the latter is most generally selected for darning net. In using tints, more delicate shades will be found in silk darning-flosses.[Pg 121]
The points of the flounce are sewn back and forth in a selvedge effect; however, you can use button-hole stitch if you prefer. You can add a bit of color to the work by using some tinted or colored floss alongside the white, though white is typically the most common choice for darning net. When using colors, you'll find that more delicate shades are available in silk darning flosses.[Pg 121]

No. 19.—Design for Darned Net.
__A_TAG_PLACEHOLDER_0__—Design for Darned Internet.
No. 20.[Pg 122]
DESIGN IN DARNED NET.
This design is extremely simple, and it may be used separately as a border or insertion, or in combination with parts of other designs in making up a large or elaborately-worked article. It is dainty enough for the decoration of an infant's garment if desired for such ornamentation, or heavy enough for elaborating an adult's attire.
This design is very simple and can be used on its own as a border or insert, or combined with elements from other designs to create a larger or more intricate piece. It's delicate enough for decorating a baby's outfit if such embellishment is desired, yet substantial enough for enhancing an adult's clothing.

No. 20.—Design in Darned Net.
__A_TAG_PLACEHOLDER_0__—Design in Darned Net.
No. 21.
DESIGN FOR A YOKE OR SECTION OF A GARMENT IN DARNED NET.
The yoke, sleeves, collar, cuffs and flounce of a child's dress were beautifully darned in the design illustrated by this engraving, and the effect was far more charming than can be conveyed by a picture. The little gown was airy enough for a sprite, and its greatest cost was in the outlay of the time devoted to its construction; and even this could not be counted a real outlay, as only odd moments of leisure were employed in making the pretty garment. White net, white floss and white India lawn were the composing materials.[Pg 123]
The yoke, sleeves, collar, cuffs, and flounce of a child's dress were beautifully stitched in the design shown in this engraving, and the effect was much more charming than what a picture could show. The little gown was light enough for a fairy, and its biggest expense was the time spent making it; but even that couldn't be seen as a real cost since only spare moments were used to create the lovely garment. White net, white floss, and white India lawn were the materials used.[Pg 123]

Nos. 22 and 23.[Pg 124]
DESIGNS FOR DARNED NET.
Both of these designs are very pretty for diverse purposes, and also very easy to follow. Either may be used as a heading, an insertion or a border, separately or in conjunction with other designs. Many of the suggestions given concerning other designs upon previous pages will apply to these two designs, which fact leaves little to suggest for them individually. Each darner will think out for herself many uses to which to put designs, many combinations in which they will prove effective, and many colorings suggested by the tints which govern her room or her wardrobe; all of which would be an impossible task for any one person, unacquainted with the surroundings of all our students to accomplish. One idea from one person will suggest another idea to a second person, and thus, in the lace-work at the beginning and after part of this book, as in all fancy work, upon an evolution of ideas must rest the great responsibility of an endless variety of designs.[Pg 125]
Both of these designs are really pretty for various uses, and they’re also very easy to follow. Either one can be used as a heading, an insertion, or a border, either on its own or alongside other designs. Many of the suggestions from previous pages about other designs will apply to these two as well, which means there’s not much to add for them individually. Each crafter will come up with many ways to use these designs, lots of combinations where they’ll look great, and color schemes inspired by the colors in their room or wardrobe; this would be nearly impossible for any one person who isn’t familiar with the environments of all our students to do. One person’s idea will spark another’s, and so, like the lace-work at the beginning and end of this book, the endless variety of designs relies on an evolution of ideas.[Pg 125]

No. 22.—Design for Darned Net.
__A_TAG_PLACEHOLDER_0__—Design for the Darned Net.

No. 23.—Design for Darned Net.
__A_TAG_PLACEHOLDER_0__—Design for Darned Internet.
Mrs. Grace B. McCormick,
Mrs. Grace B. McCormick,
Lace-Maker for the Best Families of New York and Other Cities,
Designer and Manufacturer of Modern Hand-Made Laces,
~~~~and~~~~
Lace-Maker for the Finest Families in New York and Other Cities,
Designer and Manufacturer of Modern Hand-Made Laces,
~~~~and~~~~
Importer of Materials for Laces, Needle-Work and General Household Decorative Work, and also of Fine Linens and Linen Lawn.
Importer of materials for lace, needlework, and general household decorative items, as well as fine linens and linen lawn.

Designs for Borders, Pillow-Shams, Edgings, Insertions, Tray-Cloths,
Center-Pieces, Buffet and Bureau Scarfs, Tidies, Pin-Cushion Covers,
Doilies, Collars and Cuffs, Coiffures, Dress Sets, Panels,
Handkerchiefs, Flounces, Vestibule and Window Curtains,
And All Household Garnitures; also Exceptionally Rich
Designs for Church and Altar Laces, etc., etc.
Designs for borders, pillow shams, edging, insertions, tray cloths,
centerpieces, buffet and bureau scarves, tidies, pin cushion covers,
doilies, collars and cuffs, hairstyles, dress sets, panels,
handkerchiefs, flounces, vestibule and window curtains,
and all household decorations; also exceptionally rich
designs for church and altar laces, etc., etc.
THESE DESIGNS WILL BE FURNISHED FOR
THESE DESIGNS WILL BE PROVIDED FOR
Royal Battenburg, Honiton, English Needle-Point, Princess, Russian and "Ideal
Honiton" Laces, in ANY SIZE or SHAPE REQUIRED.
Royal Battenburg, Honiton, English Needle-Point, Princess, Russian, and "Ideal
Honiton" Laces, in ANY SIZE or SHAPE NEEDED.
ALSO DESIGNS FOR DARNED NET.
ALSO DESIGNS FOR DAMNED NET.
Particular attention paid to Making Estimates, and Drafting Special Designs and Selecting the Proper Braids, Threads, Needles, Etc., Etc., for the same.
Particular attention given to Estimating, and Drafting Custom Designs and Choosing the Right Braids, Threads, Needles, and More., for the same.
also, always on hand a fine assortment of
Imported and American Samples of CROCHETED LACES; also CROCHETED MATS,
DOILIES, TIDIES, SCARF-ENDS, Etc., Etc.
also, always available is a great selection of
Imported and American samples of crocheted laces; also crocheted mats,
doilies, tidies, scarf-ends, etc., etc.
Curtains and Fine Laces Skilfully Cleaned and Repaired.
Curtains and Fine Laces Expertly Cleaned and Repaired.
ALL INFORMATION DESIRED CONCERNING
Modern or Antique Laces, Materials, Quantities and Prices, cheerfully Supplied upon
Receipt of Inquiry, Full Address and Return Postage.
ALL INFORMATION DESIRED CONCERNING
Modern or Antique Laces, Materials, Quantities and Prices, gladly provided upon
Receipt of Inquiry, Full Address and Return Postage.
Address,
Location,
MRS. GRACE B. McCORMICK,
Mrs. Grace B. McCormick,
923 BROADWAY, NEW YORK.
923 Broadway, New York.
Download ePUB
If you like this ebook, consider a donation!