This is a modern-English version of Practical taxidermy : a manual of instruction to the amateur in collecting, preserving, and setting up natural history specimens of all kinds. To which is added a chapter upon the pictorial arrangement of museums. With additional instructions in modelling and artistic taxidermy., originally written by Browne, Montagu.
It has been thoroughly updated, including changes to sentence structure, words, spelling,
and grammar—to ensure clarity for contemporary readers, while preserving the original spirit and nuance. If
you click on a paragraph, you will see the original text that we modified, and you can toggle between the two versions.
Scroll to the bottom of this page and you will find a free ePUB download link for this book.
PRACTICAL TAXIDERMY
Practical Taxidermy
A
A
MANUAL OF INSTRUCTION TO THE AMATEUR
MANUAL OF INSTRUCTION FOR THE AMATEUR
IN COLLECTING, PRESERVING, AND
In collecting, preserving, and
SETTING UP NATURAL HISTORY SPECIMENS OF ALL KINDS.
SETTING UP NATURAL HISTORY SPECIMENS OF ALL KINDS.
TO WHICH IS ADDED A CHAPTER UPON
TO WHICH IS ADDED A CHAPTER UPON
THE PICTORIAL ARRANGEMENT OF MUSEUMS.
MUSEUM LAYOUT DESIGN.
ILLUSTRATED.
ILLUSTRATED.
BY
BY
MONTAGU BROWNE, F.Z.S., etc..,
MONTAGU BROWNE, F.Z.S.
Curator, Town Museum, Leicester.
Curator, Leicester Town Museum.
-------------
Sure! Please provide the text you would like me to modernize.
SECOND EDITION,
SECOND EDITION,
Revised and considerably Enlarged,
Revised and significantly Expanded,
With additional Instructions in Modelling and Artistic Taxidermy.
With extra guidance in modeling and artistic taxidermy.
--------------
--------------
LONDON:
LONDON:
L. UPCOTT GILL, BAZAAR BUILDINGS, DRURY LANE, W.C.
L. UPCOTT GILL, BAZAAR BUILDINGS, DRURY LANE, W.C.
(FORMERLY OF 170, STRAND).
(FORMERLY OF 170, STRAND).
NEW YORK:
NEW YORK:
CHARLES SCRIBNER'S SONS, 153-157, FIFTH AVENUE.
CHARLES SCRIBNER'S SONS, 153-157, FIFTH AVENUE.

Showing Method of Binding etc..
Binding Method Demonstration etc.
Frontispiece — see chapter V
Frontispiece — see chapter 5
LONDON:
LONDON:
L. UPCOTT GILL, LONDON AND COUNTY PRINTING WORKS,
L. UPCOTT GILL, LONDON AND COUNTY PRINTING WORKS,
BAZAAR BUILDINGS. W.C.
BAZAAR BUILDINGS. RESTROOM.
CONTENTS.
TABLE OF CONTENTS.
PRACTICAL TAXIDERMY *
PRACTICAL TAXIDERMY __A_TAG_PLACEHOLDER_0__
PREFACE TO SECOND EDITION. *
PREFACE TO SECOND EDITION. __A_TAG_PLACEHOLDER_0__
CHAPTER III. NECESSARY TOOLS. *
CHAPTER III. ESSENTIAL TOOLS. __A_TAG_PLACEHOLDER_0__
Fig. 16. — Bell-hangers' Pliers. *
Fig. 16. — Wire Cutters. __A_TAG_PLACEHOLDER_0__
Fig. 17 — Cutting nippers. *
Fig. 17 — Wire cutters. __A_TAG_PLACEHOLDER_0__
Fig. 19 — Feather Pliers *
Fig. 19 — Feather Pliers __A_TAG_PLACEHOLDER_0__
Fig. 20 — Tow Forceps *
Fig. 20 — Tow Forceps __A_TAG_PLACEHOLDER_0__
Fig. 21 — Stuffing Iron *
Stuffing Iron
Fig. 22 — Starling — Showing Position of First Incision and the Commencement of the Removal of the Skin *
Fig. 22 — Starling — Indicating the Location of the First Cut and the Beginning of Skin Removal *
Fig. 23 — Skin of Bird Turned Ready for Severance from Body *
Fig. 23 — Bird Skin Ready for Removal from Body *
Plate III Skeleton of Otter *
Plate III Skeleton of Otter __A_TAG_PLACEHOLDER_0__
CHAPTER VII. MODELLING OF ANIMALS BY SUBSTITUTION OF CLAY, COMPOSITION, PLASTER CASTS, OR WAX FOR LOOSE STUFFING. *
CHAPTER VII. MODELING ANIMALS USING CLAY, COMPOSITION, PLASTER CASTS, OR WAX IN PLACE OF LOOSE STUFFING. *
Fig. 28 — Stag's head in plaster from clay model. *
Fig. 28 — Stag's head made of plaster from a clay model. *
Fig. 31 — Back view of model with neck block inserted. *
Fig. 31 — Back view of the model with the neck block added. *
CHAPTER VIII. SKINNING, PRESERVING, AND MOUNTING FISH, AND CASTING FISHES IN PLASTER, etc.. *
CHAPTER VIII. SKINNING, PRESERVING, AND MOUNTING FISH, AND CASTING FISH IN PLASTER, etc.. *
CHAPTER IX. SKINNING, PRESERVING, AND MOUNTING REPTILES. *
CHAPTER IX. SKINNING, PRESERVING, AND MOUNTING REPTILES. *
CHAPTER X. DRESSING AND SOFTENING SKINS OR FURS AS LEATHER. *
CHAPTER X. DRESSING AND SOFTENING SKINS OR FURS AS LEATHER. *
CHAPTER XI RELAXING AND CLEANING SKINS — "MAKING-UP" FROM PIECES. *
CHAPTER XI RELAXING AND CLEANING SKINS — "MAKING-UP" FROM PIECES. *
CHAPTER XII Colouring Bills And Feet Of Birds, Bare Skin Of Mammals, Fishes, Etc. — Restoring Shrunken Parts By A Wax Process — Drying And Colouring Ferns Grasses, Seaweeds, Etc. — "Piece Moulds," And Modelling Fruit In Plaster — Preserving Spiders — Making Skeletons Of Animals, Skeleton Leaves Etc. — Polishing Horns, Shells, Etc. — Egg Collecting And Preserving — Additional Formulae, Etc. *
CHAPTER XII Coloring Bills and Feet of Birds, Bare Skin of Mammals, Fishes, Etc. — Restoring Shrunken Parts Using a Wax Process — Drying and Coloring Ferns, Grasses, Seaweeds, Etc. — "Piece Molds," and Modeling Fruit in Plaster — Preserving Spiders — Making Skeletons of Animals, Skeleton Leaves, Etc. — Polishing Horns, Shells, Etc. — Egg Collecting and Preserving — Additional Formulas, Etc. *
Fig. 37 — Climbing iron *
Fig. 37 — Climbing gear __A_TAG_PLACEHOLDER_0__
CHAPTER XIII. CASES, MOUNTS, SHIELDS, EGG CABINETS, ROCKWORK, FERNS, GRASSES, SEA-WEEDS, ETC., FOR "FITTING UP." *
CHAPTER XIII. CASES, MOUNTS, SHIELDS, EGG CABINETS, ROCKWORK, FERNS, GRASSES, SEA-WEEDS, ETC., FOR "FITTING UP." *
Fig. 39 — Section of "uprights" or pillars of square case. *
Fig. 39 — Section of "uprights" or square case pillars. *
Fig. 40 — Mitre block. *
Fig. 40 — Miter block. __A_TAG_PLACEHOLDER_0__
CHAPTER XIV. GENERAL REMARKS ON ARTISTIC "MOUNTING," MODELLED FOLIAGE, SCREENS, LAMPS, NATURAL HISTORY JEWELLERY, ETC. *
CHAPTER XIV. GENERAL REMARKS ON ARTISTIC "MOUNTING," MODELLED FOLIAGE, SCREENS, LAMPS, NATURAL HISTORY JEWELLERY, ETC. *
Fig. 45 — The "Hill sliding net" ready for use. *
Fig. 45 — The "Hill sliding net" is ready for use. *
Fig. 46 — "Sugaring" net. *
Fig. 46 — "Sugaring" net. __A_TAG_PLACEHOLDER_0__
Fig. 50 — Front of setting-board box, with flaps open. *
Fig. 50 — Front of the setting-board box, with the flaps opened. *
Fig. 51 — Sugaring can. *
Fig. 51 — Sugaring can. __A_TAG_PLACEHOLDER_0__
Fig. 52 — Impaler. *
Fig. 52 — Impaler. __A_TAG_PLACEHOLDER_0__
Fig. 53 — Diaphragm bottle. *
Fig. 53 — Diaphragm bottle. __A_TAG_PLACEHOLDER_0__
Fig. 54 — Sugaring drum. *
Fig. 54 — Sugaring drum. __A_TAG_PLACEHOLDER_0__
Fig. 55 — Assembling cage. *
Fig. 55 — Assembling cage. __A_TAG_PLACEHOLDER_0__
CHAPTER XVI. ON NATURAL HISTORY MUSEUMS, WITH SPECIAL REFERENCE TO A NEW SYSTEM OF PICTORIAL ARRANGEMENT OF VERTEBRATES. *
CHAPTER XVI. ON NATURAL HISTORY MUSEUMS, WITH SPECIAL REFERENCE TO A NEW SYSTEM OF PICTORIAL ARRANGEMENT OF VERTEBRATES. *
Scanner's remarks. *
Scanner's comments. __A_TAG_PLACEHOLDER_0__
THE First Edition of "Practical Taxidermy" having now run through the press — with, I venture to hope, some profit to students of the art, if I may judge from the many hundreds of letters I have from time to time received — the publishers have invited me to revise such parts of the work as may be expedient, and also to add many technical methods of modelling animals an artistic manner.
The first edition of "Practical Taxidermy" is now printed — and I hope it has helped students of the art, based on the hundreds of letters I've received over time. The publishers have asked me to update parts of the work where needed and to add more technical methods for artistically modeling animals.
I do this the more readily because of the narrow way in which most professional Taxidermists bolster up their art in a secret and entirely unnecessary manner — unnecessary because amateur can, but by the severest application, possibly compete with the experience of the technical or professional worker. No pictorial artist ever pretends he has a special brush or colours with which he can paint landscapes or sea pieces at will; he knows that only thorough mastery of the technicalities of his art - supplemented by wide experience and close application - enables him to succeed as he does, and to delight people who, seeing his facility of handling, may imagine that picture painting is very easy and could be readily acquired — perhaps from books. So it is with the Taxidermist. Those, therefore, who procure this book, thinking to do all attempted to be explained therein without long study and without a knowledge of anatomy, form, arrangement, and colour, may put it on one side as useless. These pages are merely an introduction to a delightful art, which must be wooed with patient determination and loving pains until technical skill invests it with beauty.
I’m more than happy to do this because most professional taxidermists keep their craft a secret in a way that isn't really necessary — unnecessary because an amateur can, with a lot of hard work, maybe compete with the experience of a skilled professional. No visual artist claims to have a special brush or colors to paint landscapes or seascapes whenever they want; they understand that only a thorough understanding of the techniques of their craft—along with extensive experience and dedication—allows them to achieve their success and impress those who might think painting is easy and could be learned from books. The same goes for taxidermy. So, anyone who buys this book hoping to understand everything explained here without extensive study and without knowledge of anatomy, form, arrangement, and color should set it aside as pointless. These pages are just an introduction to a rewarding art that needs to be pursued with patient determination and care until technical skill brings it to life.
If I can be of any assistance to my readers, I invite them to write to me if at any time they are puzzled or temporarily disheartened; merely asking them to remember
If I can help my readers in any way, I encourage them to reach out to me if they ever feel confused or a bit down; I just ask them to keep in mind
(1) — That, not being in business, I cannot of course answer purely business communications; and (2) — Not being a man of infinite leisure, it must also be remembered that a properly directed envelope for return to the inquirer is of consequence when minutes are precious. Unlike the Prime Minister, I do not like post-cards, and never answer them if from unknown correspondents.
(1) — Since I'm not in business, I can't respond to purely business communications; and (2) — Since I don't have endless free time, it's important to include a properly addressed envelope for replies when time is valuable. Unlike the Prime Minister, I don't like postcards and never respond to them if they're from unknown senders.
I may here mention that this edition is not only considerably enlarged, but has several woodcuts and four plates added, three of which latter have been engraved from photographs specially taken for this work.
I should mention that this edition is not only significantly expanded but also includes several illustrations and four plates, three of which have been engraved from photographs taken specifically for this work.
I say now, in conclusion, work hard, study hard, and look to good modellers and painters — and not to bird-stuffers — for conceptions of form, arrangement, and colour, and in the end, believe me, you will achieve a better success than attends the labours of those who follow in the old paths of careless or inartistic Taxidermy.
I’m saying this now, as we wrap up: work hard, study hard, and look to skilled modelers and painters — not just bird taxidermists — for ideas on form, layout, and color. Trust me, in the end, you’ll find more success than those who stick to the old ways of careless or unartistic taxidermy.
MONTAGU BROWNE.
MONTAGU BROWNE.
LEICESTER.
LEICESTER.
PRACTICAL TAXIDERMY.
PRACTICAL TAXIDERMY.
TAXIDERMY, which is derived from two Greek words, a literal translation of which would signify the "arrangement of skins," appears to have been practised in a limited degree ages ago, for may we not say without doubt that the first taxidermists were the ancient Egyptians, who, despite the fact that they seldom or never appear to have removed the skin as a whole, as in our modern methods, yet, taking into consideration the excellent manner in which they preserved their human or other bodies for thousands of years by the aid of injections, spices, essential oils, or what not, they may, I think, be fairly placed in the front rank as the first taxidermists the world has known. For an account, of the arts used in embalming see Herodotus, who says:
TAXIDERMY, which comes from two Greek words meaning "arrangement of skins," appears to have been practiced to some degree a long time ago. It's reasonable to say that the first taxidermists were the ancient Egyptians. Although they rarely, if ever, completely removed the skin like we do today, their techniques for preserving human and animal bodies for thousands of years using injections, spices, essential oils, and other methods certainly qualify them as some of the earliest taxidermists in history. For more details on the methods used in embalming, take a look at Herodotus, who mentions:
In Egypt certain persons are appointed by law to exercise this art (embalming) as their peculiar business; and when a dead body is brought them they produce patterns of mummies in wood imitated in painting, the most elaborate of which are said to be of him (Osiris) whose name I do not think it right to mention on this occasion. The second which they show is simpler and less costly; the third is the cheapest. Having exhibited them all, they inquire of the persons who have applied to them which method they wish to be adopted, and this being settled, and the price agreed upon, the parties return, leaving the body with the embalmers.
In Egypt, certain people are officially allowed to practice embalming as their profession. When a deceased person is brought to them, they showcase models of mummies made of wood and painted to look realistic, with the most detailed one representing him (Osiris), whose name I’d rather not mention right now. The second model they present is simpler and cheaper, while the third is the most affordable. After showing all the options, they ask the clients which method they want to choose. Once that’s decided and the price is agreed upon, the clients leave the body with the embalmers.
In preparing it according to the first method, they commence by extracting the brain from the nostrils with a curved iron probe, partly clearing the head by this means, and partly by pouring in certain drugs; then, making an incision in the side with a sharp Ethiopian stone, they draw out the intestines through the aperture. Having cleansed and washed them with palm wine they cover them with pounded aromatics, and afterwards filling the cavity with powder of pure, myrrh, cassia, and other fragrant substances, frankincense excepted, they sew it up again. This being done, they salt the body, keeping it in natron seventy days, to which period they are strictly confined. When the seventy days are over they wash the body and wrap it up entirely in bands of fine linen smeared on their inner side with gum, which the Egyptians generally use instead of glue. The relatives then take away the body, and have a wooden ease made in the form of a man, in which they deposit it, and, when fastened up, they keep it in a room in their house, placing it upright against the wall. This is the most costly method of embalming.
In preparing it according to the first method, they start by removing the brain through the nostrils using a curved iron probe, partly clearing the head this way and partly by pouring in certain chemicals. Then, they make an incision in the side with a sharp Ethiopian stone and pull out the intestines through the opening. After cleaning and washing them with palm wine, they cover them with powdered aromatics, and then they fill the cavity with a mixture of pure myrrh, cassia, and other fragrant substances, excluding frankincense, and sew it up again. Once that’s done, they salt the body, keeping it in natron for seventy days, which is a strict requirement. After the seventy days are completed, they wash the body and wrap it entirely in strips of fine linen coated on the inside with gum, which the Egyptians commonly use instead of glue. The relatives then take the body and have a wooden case made in the shape of a man, where they place it, and when it’s sealed, they keep it in a room in their house, propped upright against the wall. This is the most expensive method of embalming.
For those who choose the middle-kind, on account of the expense, they prepare the body as follows: They fill syringes with oil of cedar, and inject this into the abdomen, without making any incision or removing the bowels, and, taking care that the liquid shall not escape, they keep it in salt during the specified number of days. The cedar oil is then taken out, and such is its strength, that it brings with it the bowels and all the inside in a state of dissolution. The natron also dissolves the flesh, so that nothing remains but the skin and bones. This process being over, they restore the body without any further operation.
For those who pick the middle option because of the cost, here's how they prepare the body: They fill syringes with cedar oil and inject it into the abdomen, without making any cuts or removing the organs. They ensure that the liquid doesn’t leak out and keep it salted for the required number of days. After that time, they remove the cedar oil, and its potency causes the organs and everything inside to break down. The natron also dissolves the flesh, leaving only the skin and bones. Once this process is done, they put the body back together without any more procedures.
The third kind of embalming is only adopted for the poor. In this they merely cleanse the body, by an injection of syrmoea, and salt it during seventy days, after which it is returned to the friends who brought it.
The third type of embalming is only used for the poor. In this process, they simply clean the body with an injection of syrmoea and salt it for seventy days, after which it is returned to the friends who brought it.
The account given by Diodorus is similar, if we except the cost and time of embalming. The most expensive way of embalming costs a talent of silver (about 250 pounds sterling); the second, twenty-two minae (60 pounds); and the third is extremely cheap. The persons who embalm the bodies are artists who have learnt this secret from their ancestors. They present to the friends of the deceased who apply to them an estimate of the funeral expenses, and ask them in what manner they wish it to be performed, which being agreed upon, they deliver the body to the proper persona appointed to that office. First, one who is denominated the scribe, marks upon the left side of the body, as it lies on the ground, the extent of the incision which is to be made; then another, who is called the dissector, cuts open as much of the flesh as the law permits with a sharp Ethiopian stone, and immediately runs away, pursued by those who are present throwing stones at him, amidst bitter execrations, as if to cast upon him all the odium of this necessary act, for they look upon everyone who has offered violence to, or inflicted b wound or any other injury upon a human body to be hateful; but the embalmers, on the contrary, are held in the greatest consideration and respect, being the associates of the priests, and permitted free access to e temples as sacred persons.
The account from Diodorus is similar, except for the cost and time of embalming. The most expensive embalming method costs a talent of silver (about £250); the second costs twenty-two minae (£60); and the third is very cheap. The people who embalm the bodies are skilled artists who learned this technique from their ancestors. They provide the deceased's friends with an estimate of the funeral costs and ask how they want it to be done. Once that's agreed upon, they hand over the body to the appropriate person for that job. First, someone called the scribe marks the left side of the body, as it lies on the ground, indicating where the incision will be made. Then, another person, known as the dissector, cuts open as much flesh as the law allows with a sharp Ethiopian stone and quickly runs away, while those present throw stones at him, cursing him as if to blame him for this necessary act. They see anyone who has harmed or injured a human body as loathsome; meanwhile, the embalmers are highly respected and valued, being associates of the priests and allowed free access to the temples as sacred individuals.
As soon as they have met together to embalm the body thus prepared them, one introduces his band through the aperture into the abdomen, and takes everything out except the kidneys and heart, another cleanses each of the viscera with palm wine and aromatic substances; lastly, having applied oil of cedar and other things to the whole body for wards of thirty days, they add myrrh, cinnamon, and those drugs which have not only the power of preserving the body for a length of time, but of imparting to it a fragrant odour. It is then restored to the friends of the deceased; and so perfectly are all the members preserved even the hair of the eyelids and eyebrows remains undisturbed, and the whole appearance of the person is so unaltered that every feature may be recognised.
As soon as they gather to embalm the body, one person inserts a tool through the opening in the abdomen and removes everything except the kidneys and heart. Another person cleans each organ with palm wine and fragrant substances. Finally, after applying cedar oil and other treatments to the entire body for about thirty days, they add myrrh, cinnamon, and other ingredients that not only help preserve the body for a long time but also give it a pleasant scent. The body is then returned to the deceased's friends, and so well are all the body parts preserved that even the hair on the eyelids and eyebrows remains intact, and the person's overall appearance is so unchanged that every feature can be recognized.
Sir J. Gardener Wilkinson ("Manners and Customs of the Ancient Egyptians") from whom I have quoted, says that —
Sir J. Gardener Wilkinson ("Manners and Customs of the Ancient Egyptians") from whom I've quoted, states that —
"The extraction of the brain by the nostrils is proved by the appearance of the mummies found in the tombs; and some of the crooked instruments (always of bronze) supposed to have been used for this purpose have been discovered at Thebes."
"The extraction of the brain through the nostrils is shown by the state of the mummies discovered in the tombs, and some of the bent tools (always made of bronze) believed to have been used for this purpose have been found in Thebes."
The preservatives appear to have been of two classes, bituminous and saline, consisting, in the first class, of gums, resins, asphaltum, and pure bitumen, with, doubtless, some astringent barks powders, etc.., rubbed in. Mummies prepared in this is way are known by their dry, yet flexible skins, retracted and adherent to the bones; features, and hair, well preserved and life-like. Those mummies filled with bitumen, have black skins, hard and shining as if varnished, but with the features perfect, having been prepared with great care, and even after ages have elapsed, are but little susceptible to exposure.
The preservatives appear to come from two main types: bituminous and saline. The first type includes gums, resins, asphalt, and pure bitumen, probably mixed with some astringent powders from barks. Mummies prepared in this way have dry yet flexible skins that adhere to the bones, with well-preserved and lifelike features and hair. Mummies filled with bitumen have black skins that are hard and shiny like they’ve been varnished, but their features are flawless and carefully prepared. Even after many years, they still resist exposure relatively well.
Of the mummies of the second class (also filled with resins and asphaltum), we must assume that their skins and flesh have been subjected to sodaic or saline products; for Boitard, in a work published at Paris in 1825, says that an injection is made with oil of cedar and common salt, also, that they wash the corpse with nitre and leave it to steep for seventy days, at the end of which time they remove the intestines, which the injection has corroded, and replace their loss by filling the cavity of the abdomen with nitre. This is also borne out by Wilkinson, who says:
Of the second-class mummies (also filled with resins and asphalt), we should assume that their skin and flesh have been treated with sodium or saline products; because Boitard, in a book published in Paris in 1825, states that an injection is done with cedar oil and common salt. He also mentions that they wash the body with saltpeter and let it soak for seventy days. After that period, they take out the intestines, which the injection has deteriorated, and compensate for this by filling the abdominal cavity with saltpeter. Wilkinson supports this as well, who says:
"On exposure to air they (the mummies) become covered with efflorescence of sulphate of soda, and also readily absorb moisture from the atmosphere."
"When exposed to air, the mummies get covered with a layer of sodium sulfate and readily absorb moisture from the atmosphere."
It appears, also, that after the period of preparation (thirty, forty, or seventy days, as fixed by various authors), the corpse was relieved, in the first-class ones, of all the old saline, nitrous, or resinous products, and re-filled with costly resins, aromatic spices, and bitumen; which, says Monsieur Rouyer -
It also appears that after the preparation period (thirty, forty, or seventy days, depending on the author), the body was rid of all the old salty, nitrogenous, or resinous materials, and filled with costly resins, fragrant spices, and bitumen; which, according to Monsieur Rouyer -
"Having styptic, absorbent, and balsamic qualities, would produce a kind of tanning operation on the body, which would also, no doubt, be heightened by the washing with palm wine."
"With properties that are astringent, absorbent, and soothing, it would create a tanning effect on the body, which would definitely be enhanced by washing with palm wine."
He here broaches the ingenious and highly probable theory, that the corpse, during its mummification, was placed in stoves of a certain temperature, where the heat gradually and closely united the various preservative agents before mentioned. They were then swathed in linen bandages of great length, and enclosed in beautifully painted and gilded cartonages; the faces were heavily gilded and the eyes imitated in enamel; they were then inclosed in three or four cases, also richly gilded and painted, and finally "mounted" in a sarcophagus.
He proposes an interesting and likely theory that during mummification, the body was put in stoves set to a certain temperature, where the heat gradually melted the different preservative substances mentioned earlier. The body was then wrapped in long linen bandages and enclosed in beautifully painted and gilded coverings; the faces were heavily gilded, and the eyes were recreated with enamel. They were placed in three or four additional cases, which were also richly gilded and painted, and finally "mounted" in a sarcophagus.
Common people appear in some cases to have been merely salted and plunged in liquid pitch, others were simply salted and dried. Mummies prepared by these methods freely attract moisture — are ill preserved, and, therefore, as a matter of course, fall to pieces easily on contact with external air.
Common people seem to have been either salted and soaked in tar, or just salted and dried. Mummies made this way absorb moisture easily — they don't preserve well, and as a result, they break apart easily when exposed to air.
In summing up the process of embalming, as described by the authors just quoted, we find a few problems of more or less difficulty, and which none of them appear inclined to solve; and I do not wonder at this, as the attempt, in my own case, in one or two instances, has involved days of study and references to dozens of medical and other works with but a meagre result. However, to take them seriatim, we can assume, I think, with some show of evidence, that the Ethiopian stone, mentioned as being used to make the first incision in the corpse, might have been a piece of obsidian or basalt, but most probably was merely an ordinary sharp flint of a dark colour.
In summarizing the embalming process described by the authors mentioned, we encounter a few issues of varying difficulty that none of them seem willing to address; I can’t blame them, since my own attempts in one or two cases have required days of research and consulting dozens of medical and other texts, leading to only minimal results. However, to take them seriatim, I think we can reasonably assume, based on some evidence, that the Ethiopian stone referred to as being used for the first incision in the body could have been a piece of obsidian or basalt, but it was most likely just a regular sharp dark flint.
The first chemical used in embalming is the hardest nut of all to crack, and on which I have most exercised my intellectual teeth — and that is natron. Now, what is natron? [Footnote: Natrium is the old Latin term for the metal or base we now call sodium. The old names for some of its salts were: Natron Carbonicum--or Bicarbonate of Soda; Natron Vitriolatum — or Sulphate of Soda; discovered or re-discovered about 1670. Nitrum =Carbonate of soda.] Ordinary dictionaries and authors tell us, as a matter of course — carbonate of soda. In support of this theory M. Rouyer writes:
The first chemical used in embalming is the toughest one to figure out, and I've really worked hard on it — that’s natron. So, what exactly is natron? [Footnote: Natrium is the old Latin term for the metal or base we now call sodium. The old names for some of its salts were: Natron Carbonicum— or Bicarbonate of Soda; Natron Vitriolatum— or Sulphate of Soda; discovered or re-discovered around 1670. Nitrum = Carbonate of soda.] Regular dictionaries and authors usually define it as carbonate of soda. To support this idea, M. Rouyer writes:
"The natron would be used just as it was got from many of the lakes of Egypt, where it is found abundantly in the form of carbonate of soda."
"The natron would be used just as it was collected from many lakes in Egypt, where it's found in large quantities as soda ash."
Pereira, in "Materia Medica," though intimating that natron is not to be confounded with nitre, says, in speaking of carbonate of soda:
Pereira, in "Materia Medica," while advising that natron should not be mistaken for nitre, notes, when talking about sodium carbonate:
"This salt was probably known to the ancients under the term of Nitron." (Nitron)
"The ancients probably called this salt Nitron." (Nitron)
Now, as ( Nitron) is more likely, from its etymology, to be translated "nitre," we are landed into another difficulty, if by nitre we mean saltpetre, for that will, as we all know, preserve animal tissue for a certain time; however, I do not think we can translate natron as being nitre (saltpetre), for in former days many salts were included under the general term nitre; for instance, our common soda and potash, the chemical composition of which was unknown until Davy, in 1807, extracted the metals sodium and potassium from those salts. Boitard expressly states:
Now, as (Nitron) is more likely, based on its origin, to be translated as "nitre." We face another problem if we mean saltpetre, because, as we all know, it can preserve animal tissue for a certain time. However, I don’t think we can translate natron as nitre (saltpetre), since in earlier times many salts were generally called nitre. For instance, our common soda and potash were referred to as such, and their chemical makeup was unknown until Davy, in 1807, extracted the metals sodium and potassium from those salts. Boitard explicitly states:
"Il parait que ce natrum était un alkali fixe, et pas du tout du nitre comme quelques auteurs l'ont pensé; ce qui semblerait appuyer cette opinion, c'est que lea femmes egyptiennes se servaient de natrum pour faire leur lessive, comme on as sert aujourd'hui de la soude."
"It appears that this natrum was a stable alkali and not a nitrate as some writers have suggested; what backs up this idea is that Egyptian women used natrum for laundry, similar to how we use soda today."
In Peru the soil may be said to be impregnated with nitre, but that is nitrate of soda, and not really saltpetre (nitrate of potassium), as many people imagine who hear it called simply nitre.
In Peru, the soil is rich in nitrates, but this means sodium nitrate, not potassium nitrate, which is what most people associate with the term nitre.
Mr. Thos. W. Baker, who has most obligingly unearthed several old works for me, says:
Mr. Thos. W. Baker, who has kindly dug up several old works for me, says:
"Now I think of it, natron is perfectly familiar to me as apparently a mixture of broken soda crystals and a brown earth which is sold in the bazaars of India, under the name of 'sootjee moogee,' for domestic purposes; and I know, from experience, that unless it is washed off paint work directly it is passed over it with a cloth all the paint comes off bare, sometimes to the wood."
Now that I think about it, natron is really familiar to me. It’s basically a blend of crushed soda crystals and a brown soil sold in Indian markets under the name 'sootjee moogee' for home use. From experience, I know that if it’s not cleaned off painted surfaces immediately, wiping it with a cloth will strip all the paint off, sometimes revealing the wood underneath.
Again, he says:
He says again:
"In Bayley's Dictionary, circa 1730, I find the following: 'Natron; or, a Natron, from Gr. Natron (?) ( Natron), a kind of black greyish salt, taken out of a lake of stagnant water in the territory of Terrana, in Egypt."
In Bayley's Dictionary, around 1730, I found this entry: 'Natron; or, a Natron, from Gr. Natron (? (Natron), a type of blackish-gray salt, extracted from a lake of stagnant water in the Terrana region of Egypt."
Also see "Penny Cyclopaedia," vol. xvi., p. 105, "Natron, native sesquicarbonate of soda (see 'Sodium'):"
Also see "Penny Cyclopaedia," vol. 16, p. 105, "Natron, natural sesquicarbonate of soda (see 'Sodium'):"
"The Natron Lakes, which are six in number, are situated in a valley bordering upon Lower Egypt, and are remarkable for the great quantity of salt which they produce. The crystallisations are both of muriate of soda (or common salt) and of carbonate of soda. ... The "Natron" is collected once a year, and is used both in Egypt and Syria, as also in Europe, for manufacturing glass and soap, and for bleaching linen."
The six Natron Lakes are situated in a valley close to Lower Egypt and are famous for their high salt production. The lakes contain both sodium chloride (table salt) and sodium carbonate. The "Natron" is collected once a year and is utilized in Egypt, Syria, and Europe for making glass and soap, as well as for bleaching linen.
Turning to "Sodium" for the sesquicarbonate, which is found native in Hungary, and also near Fezzan, in Africa:
Looking at "Sodium" for the sesquicarbonate, which occurs naturally in Hungary and also near Fezzan in Africa:
'By the natives it is called "Trona." It is found in hard striated crystalline masses, and is not altered by exposure to the air, but is readily soluble in water. This salt appears to be formed when a solution of the carbonate of soda is heated with carbonate of ammonia, and probably also when a solution of the bicarbonate is heated. Its taste is less alkaline than that of the carbonate, into which it is converted when strongly heated by losing one-third of its carbonic acid.'
The locals refer to it as "Trona." It appears in solid, striated crystalline forms and doesn’t alter when exposed to air, but it dissolves easily in water. This salt seems to form when a sodium carbonate solution is heated with ammonium carbonate, and probably also when a sodium bicarbonate solution is heated. Its taste is less alkaline than sodium carbonate, which it becomes when heated strongly by losing a third of its carbonic acid.
That it was one of the products of soda cannot reasonably be doubted. Biborate of soda (with which I have been experimenting lately) has certainly wonderfully preservative powers, especially in conjunction with common salt, or saltpetre; but then it has not the caustic properties of natron. May not natron have been a fixed alkali, or has the native carbonate of soda more caustic and antiseptic properties than the usual carbonate of soda of commerce, which plainly cannot be intended?
It's obvious that this was one of the products of soda. Biborate of soda (which I've been working with recently) definitely has strong preserving abilities, especially when paired with regular salt or saltpeter; however, it lacks the caustic properties of natron. Could natron have been a fixed alkali, or does the natural carbonate of soda have more caustic and antiseptic qualities than the regular commercial carbonate of soda, which is clearly not intended?
We have here a most interesting subject to solve as to the component parts of the ancient natron; my suspicion is that natron, as used by the Egyptians, was a mixture of biborate of soda, caustic soda, and muriate of soda. [Footnote: The following report appeared in the California Alta, 24th June. 1874:
We have a really interesting topic to tackle regarding the components of ancient natron; I suspect that the natron used by the Egyptians was a blend of sodium borate, caustic soda, and sodium chloride. [Footnote: The following report appeared in the California Alta, 24th June. 1874:
"AN INTERESTING DISCOVERY. — Several weeks ago we mentioned the departure of Mr. Arthur Robottom, Birmingham, England, on a search for borax in the southern part of California. He has now returned, bringing news of an interesting and valuable discovery. Beyond the Sierra Nevada, in the Enclosed Basin of North America, about 140 miles in a north-eastward direction from Bakersfield, there is the bed of a dry lake filled over an area of fifteen miles long by six wide with saline crystals to a depth of about six or eight feet. The appearance of the surrounding country clearly indicates that water once stood sixty feet deep here over a large area, the ancient beach being distinctly traceable. The most remarkable fact about this-saline deposit is that in its middle there is a tract, five miles long and two wide, of common salt, while on the outside there is a deposit of borate of soda, three feet thick, and under this a lower stratum composed of sulphate of soda and tincal mixed together, from one to three feet thick. These minerals are all in crystals, the sulphate of soda and tincal forming a solid mass, almost like stone in its hardness. The borate of soda is of a dirty hue, but the salt, which lies above the level of the entire deposit, in some places to a depth of seven feet, is white as snow. The report of natural deposits thus situated will appear very improbable to scientific men, for there is nothing to account for the separation of the salt from the borates, or for the accumulation of salt above the level of other crystalline deposits. We have Mr. Robottom for authority, and the country is open for those who wish to examine for themselves. The place can easily be found. It is known as the Borax Fields in the Slate Range, and will be examined carefully by many competent men, since the tincal — a crude borate of soda — is a valuable mineral, and can be separated, at little expense, from the sulphate of soda."]
AN INTERESTING DISCOVERY. — A few weeks ago, we shared news about Mr. Arthur Robottom from Birmingham, England, who went to southern California in search of borax. He has now returned with exciting information about a major discovery. Beyond the Sierra Nevada, in North America's Enclosed Basin, about 140 miles northeast of Bakersfield, lies the bed of a dry lake that stretches fifteen miles long and six miles wide, with saline crystals reaching a depth of around six to eight feet. The surrounding landscape clearly indicates that water once covered this area to a depth of sixty feet, leaving an ancient beach distinctly visible. The most astonishing part of this saline deposit is a five-mile-long and two-mile-wide patch of common salt in the center, while the outer edges have a three-foot-thick layer of borate of soda. Below that, there’s a lower layer of mixed sulphate of soda and tincal, ranging from one to three feet thick. All these minerals are crystalline; the sulphate of soda and tincal create a solid mass that's nearly as hard as stone. Although the borate of soda has a dirty color, the salt, which stands above the overall deposit and reaches depths of up to seven feet in some spots, is as white as snow. The natural arrangement of these deposits may seem unlikely to scientists, as there's no clear explanation for how the salt separated from the borates or why it accumulated above the other crystalline deposits. We are depending on Mr. Robottom's findings, and the area is available for those interested in exploring it. It's called the Borax Fields in the Slate Range, and many qualified individuals will study it closely, as tincal—a crude borate of soda—is a valuable mineral that can be extracted cheaply from the sulphate of soda.I'm sorry, but I don't see any text to modernize. Please provide a short phrase, and I'll be happy to assist you.
The next chemical agent we have to notice (which should, however, have appeared prior to natron), is palm wine, used in the first process of cleansing the intestines; this would doubtless act as an astringent, and would, of course, tend to coagulate the liquid albumen contained in the body (in a similar manner to our ordinary spirits of wine), which, if followed by a caustic alkali (such as natron may have been), to dissolve the solid albumen, fibrin and gelatine, ought certainly to have exercised a decidedly tanning influence.
The next chemical agent we should mention (which should have come before natron) is palm wine, used in the initial process of cleansing the intestines; this would likely act as an astringent and would naturally help to coagulate the liquid albumen found in the body (similar to how common spirits of wine work). If this is followed by a caustic alkali (like natron may have been), to dissolve the solid albumen, fibrin, and gelatin, it would definitely have had a significant tanning effect.
Following this is oil of cedar. The present oil of cedar (ol cedrat of commerce) cannot be intended, as that is made from the citron, and being merely an essential oil can have little of the antiseptic or corrosive qualities imputed to the ancient oil of cedars. May it not have been a product distilled from the actual cedar tree (one of the coniferae) similar to our oil or spirit of turpentine? I have, however, been unable to discover any writings in certain support of this theory; "Encyclopaedia Britannica" merely mentions it as "a certain oily liquor extracted from the cedar;" while Boitard boldly says, "... Sans doute l'essence de terebenthine." [Footnote: The Detroit Review of Medicine and Pharmacy for July, 1876. gives a report of a case of poisoning through an overdose of oil of red cedar (oleum juniper virginianae) which supports my theory as to there being extracted an oil from the Lebanon (or other) cedars partaking of the nature of turpentine and totally distinct from ol cedrat.]
Following this is cedar oil. The current cedar oil (ol cedrat in commerce) can't be what is intended, as it's made from the citron, and being just an essential oil, it has little of the antiseptic or corrosive properties attributed to the ancient cedar oil. Could it be that it was a product distilled from the actual cedar tree (one of the conifers), similar to our turpentine oil or spirit? However, I haven't found any writings that definitively support this theory; the "Encyclopaedia Britannica" only mentions it as "a certain oily liquor extracted from the cedar," while Boitard boldly states, "... Sans doute l'essence de terebenthine." [Footnote: The Detroit Review of Medicine and Pharmacy for July, 1876, gives a report of a case of poisoning due to an overdose of oil of red cedar (oleum juniper virginianae) that supports my theory that there is an oil extracted from the Lebanon (or other) cedars that is similar to turpentine and completely different from ol cedrat.]
Whatever may have been the composition of — and manner of applying — the foregoing agents, it is certain that they had the effect intended, for Diodorus writes fully within bounds when mentioning the life-like appearance of the features in mummies, as we know by later discoveries, for there are some well-known specimens still in existence of which the eyelids, lashes, eyebrows, and hair are still in their natural state, and this after an interval of thousands of years. In some mummies, for instance, the contour of the features is plainly discernible, and surely this is scientific "preparation of specimens" not to be excelled in the present day.
Whatever the composition and method of applying the previous substances were, it's clear that they achieved their intended effect. Diodorus accurately notes the lifelike appearance of features in mummies, as we see from later discoveries. There are still well-known examples where the eyelids, lashes, eyebrows, and hair remain in their natural state even after thousands of years. In some mummies, for instance, the shape of the features is clearly visible, and this is a scientific "preparation of specimens" that couldn't be surpassed today.
The Egyptian mode of embalming was imitated occasionally by the Jews, Greeks, Romans, and other nations, and has sometimes been adopted in modern times, but never to the same extent or perfection as they attained. The only other method which is known to have been adopted as a national custom was that practised by the Guanches, the ancient inhabitants of the Canary Isles. Their mummies are particularly described by M. Bortj de St. Vincent, in his 'Essai sur les Isles Fortunées.' Numerous and vast catacombs are filled with them in each of the thirteen islands, but the best known is one in Teneriffe, which contained upwards of a thousand bodies. The mummies are sewn up in goat or sheep skins, and five or six are commonly found together, the skin over the head of one being stitched to that over the feet of another; but those of the great are contained in cases hollowed out of a piece of savin wood. The bodies are not bandaged, and are dry, light tan-coloured, and slightly aromatic. Several of them are completely preserved with distinct, though distorted, features.
The ancient Egyptian embalming process was sometimes imitated by the Jews, Greeks, Romans, and other cultures, and it has even been used in modern times, but never with the same level of skill or effectiveness as they achieved. The only other method recognized as a national tradition was that of the Guanches, the early inhabitants of the Canary Islands. Their mummies are notably described by M. Bortj de St. Vincent in his 'Essai sur les Isles Fortunées.' There are numerous large catacombs filled with them across all thirteen islands, but the most famous is in Tenerife, which contained over a thousand bodies. The mummies are wrapped in goat or sheep skins, and you often find five or six together, with the skin over the head of one sewn to the skin over the feet of another; however, those of the elite are placed in cases carved from a single piece of savin wood. The bodies are not wrapped in bandages and are dry, light tan in color, and slightly aromatic. Several of them are well-preserved with recognizable, although misshapen, features.
The method of embalming adopted by the Guanches consisted in removing the viscera in either of the same ways as the Egyptians practised, then filling the cavities with aromatic powders, frequently washing and anointing the surface, and, lastly, drying the body very carefully for fifteen or sixteen days in the sun or by a stove.
The embalming method used by the Guanches involved removing the internal organs just like the Egyptians did, then packing the cavities with aromatic powders, regularly washing and applying oils to the surface, and finally, carefully drying the body for fifteen or sixteen days in the sun or using a stove.
[Footnote: My friend, the late Thos. Baker, wrote me, some time before his sad death by shipwreck: "In an old work which I have, 'A General Collection of Voyages,' I find the following relating to the 'Guanches' in vol. i., book ii., chap. i., page 184, 'The Voyage of Juan Rejon to the Canary Islands, AD. 1491': 'When any person died, they preserved the body in this manner: First, they carried it to a cave and stretched it on a fiat stone, where they opened it and took out the bowels; then, twice a day, they washed the porous parts of the body, viz., the arm-pits, behind the ears, the groin, between the fingers, and the neck, with cold water. After washing it sufficiently they anointed those parts with sheep's butter (?), and sprinkled them with a powder made of the dust of decayed pine trees, and a sort of brushwood which the Spaniards call Brefsos, together with the powder of pumice stone. Then they let the body remain till it was perfectly dry, when the relatives of the deceased came and swaddled it in sheep or goat skins dressed. Girding all tight with long leather thongs, they put it in the cave which had been set apart by the deceased for his burying place, without any covering. There were particular persons set apart for this office of embalming, each sex performing it for those of their own. During the process they watched the bodies very carefully to prevent the ravens from devouring them, the relations of the deceased bringing them victuals and waiting on them during the time of their watching.'"]
[Footnote: My friend, the late Thos. Baker, wrote to me some time before his tragic death in a shipwreck: "In an old book I have, 'A General Collection of Voyages,' I found the following about the 'Guanches' in vol. i., book ii., chap. i., page 184, 'The Voyage of Juan Rejon to the Canary Islands, A.D. 1491': 'When someone died, they preserved the body like this: First, they carried it to a cave and laid it on a flat stone, where they opened it up and removed the organs. Then, twice a day, they washed the porous areas of the body—like the armpits, behind the ears, the groin, between the fingers, and the neck—with cold water. After washing sufficiently, they anointed those areas with sheep's butter (?) and sprinkled them with a powder made from the dust of decayed pine trees and a type of brushwood that the Spaniards call Brefsos, along with pumice stone powder. Then they let the body dry completely, after which the deceased's relatives came and wrapped it in dressed sheep or goat skins. They tightened everything with long leather thongs and placed it in the cave the deceased had chosen as their burial place, without any cover. There were specific people designated for the embalming process, with each sex handling the bodies of their own. During the process, they took great care to watch over the bodies to keep the ravens from eating them, with relatives bringing food and attending to them while they kept watch.'"]
So complete is the desiccation of these mummies, that a whole body, which Blumenbach possessed, weighed only 7.5 lb., though the dried skeleton of a body of the same size, as usually prepared, weighs at least 9 lb.
The drying process of these mummies is so complete that a whole body, which Blumenbach examined, weighed only 7.5 lbs, whereas the dried skeleton of a similarly sized body, when usually prepared, weighs at least 9 lbs.
In some situations the conditions of the soil and atmosphere, by the rapidity with which they permit the drying of the animal tissues to be effected, are alone sufficient for the preservation of the body in the form of a mummy; this is the case in some parts of Peru, especially at Arica, where considerable numbers of bodies have been found quite dry in pits dug in a saline dry soil. There is an excellent specimen of a mummy of this kind in the Museum of the College of Surgeons, which was brought from Caxamarca by General Paroissien -- like most of them, it is in a sitting posture, with the knees almost touching the chin, and the hands by the sides of the face. It is quite dry and hard; the features are distorted, but nearly perfect, and the hair has fallen off. The Peruvian mummies do not appear to have been subjected to any particular preparation, the dry and absorbent earth in which they are placed being sufficient to prevent them from putrefying. M. Humboldt found the bodies of many Spaniards and Peruvians lying on former fields of battle dried and preserved in the open air. In the deserts of Africa the preservation of the body is secured by burying it in the hot sand; and even in Europe soils are sometimes met with in which the bodies undergo a slow process of drying, and then remain almost unalterable even on exposure to the air and moisture. There is a vault at Toulouse in which a vast number of bodies that have been buried were found, after many years, dry and without a trace of the effects of putrefaction; and in the vaults of St. Michael's Church, Dublin, the bodies are similarly preserved. In both cases putrefaction is prevented by the constant absorption of the moisture from the atmosphere, and through its medium from the body by the calcareous soil in which the vaults are dug. — Penny Cyclopaedia, vol. xv., p. 477."
In some situations, the soil and atmospheric conditions, by how quickly they allow animal tissues to dry out, are enough on their own to preserve the body as a mummy. This is true in some parts of Peru, especially at Arica, where numerous bodies have been found completely dry in pits dug in saline dry soil. There is an impressive example of this type of mummy in the Museum of the College of Surgeons, which was brought from Caxamarca by General Paroissien. Like most mummies, it is in a sitting position, with the knees nearly touching the chin and the hands beside the face. It is very dry and hard; the features are distorted but almost intact, and the hair has fallen out. The Peruvian mummies don't seem to have undergone any special preparation; the dry and absorbent earth they are placed in is enough to stop them from decaying. M. Humboldt found many Spaniards and Peruvians' bodies lying on former battlefields, dried and preserved in the open air. In the deserts of Africa, bodies are preserved by being buried in hot sand. Even in Europe, there are soils where bodies slowly dry out and remain almost unchanged even when exposed to air and moisture. There is a vault in Toulouse where a large number of buried bodies were found, after many years, dry and without any signs of decay. Similarly, in the vaults of St. Michael's Church in Dublin, the bodies are preserved in the same way. In both cases, decay is prevented by the continuous absorption of moisture from the atmosphere and, through it, from the body by the calcareous soil in which the vaults are dug. — Penny Cyclopaedia, vol. xv., p. 477.
Having now given a brief sketch of the best-known methods of preserving Nature's greatest handiwork — Man — I may mention that the Egyptians also devoted their energies to the preservation of those things more intimately connected with our theme, namely, mammals, birds, etc.. A people who knew how to preserve and arrest from decay the carcase of so immense an animal as the hippopotamus (a mummy of which was discovered at Thebes), or the various bulls, cows, dogs, cats, mice, ichneumons, hawks, ibises, fishes, serpents, crocodiles, and other sacred animals (mummies of which have been and are constantly found), must have had some glimmerings of taxidermy; many of the subjects are preserved in so beautiful a manner that mummied ibises, hawks, etc.., are occasionally discovered even in a good state of preservation, and Cuvier actually found in the intestines of a mummied ibis (Ibis religiosa, a species still found, though rarely, in Egypt) the partly-digested skin and scales of a snake!
Now that I’ve provided a brief overview of the most recognized methods for preserving Nature's greatest creation — humanity — I should also mention that the Egyptians focused their efforts on preserving things more relevant to our discussion, specifically mammals, birds, and so on. A civilization that succeeded in preserving a large creature like the hippopotamus (a mummy of which was found at Thebes), along with various bulls, cows, dogs, cats, mice, ichneumons, hawks, ibises, fish, snakes, crocodiles, and other sacred animals (mummies of which have been and continue to be discovered), must have had some knowledge of taxidermy. Many of these specimens are preserved in such an impressive way that mummified ibises, hawks, and others are sometimes found in very good condition. Cuvier even discovered partially-digested skin and scales of a snake in the intestines of a mummified ibis (Ibis religiosa, a species that still exists, though rarely, in Egypt)!
From this period of the world's history I can discover but few links to the chain of Practical Taxidermy.
From this time in history, I can find only a few connections to the chain of Practical Taxidermy.
True it is that the Greeks, Romans, and the tribes which inhabited ancient Britain must have had some knowledge of preserving Skins of animals slaughtered by them in the chase, for we everywhere read of the skins of lions, tigers, wolves, etc.., being used for purposes of necessity, as in the case of those barbarians who clothed themselves with skins as a protection from the inclemency of the weather, and also in the case of the luxurious Greeks and Romans, who used skins in the adornment of their persons or homes. In fact, the conversion of skins into leather must be of the highest antiquity, for, in the Leeds mummy described in 1828, there was found on the bandages of the head and face a thong composed of three straps of leather, and many of the Egyptian divinities are represented with a lion or leopard skin as a covering for the throne, etc..; and do we not read in many places in Holy Writ of leather and of tanners? — a notable instance, to wit, in Simon, the tanner — in fact, the ancient history of all nations teems with the records of leather and of furs; but of the actual setting up of animals as specimens I can find no trace.
It's true that the Greeks, Romans, and the tribes living in ancient Britain must have had some understanding of how to preserve the skins of animals they hunted, as we often read about lion, tiger, and wolf skins being used out of necessity. For instance, those barbarians used skins to protect themselves from harsh weather, while the more extravagant Greeks and Romans adorned themselves and their homes with them. In fact, turning skins into leather must date back extremely far, as evidenced by the Leeds mummy described in 1828, which had a thong made of three leather straps found on its head and face bandages. Many Egyptian gods are depicted with a lion or leopard skin covering their thrones, and we also find mentions of leather and tanners in various parts of the Bible—like the notable example of Simon, the tanner. The ancient history of all nations is full of references to leather and furs; however, I can't find any evidence of animals being set up as specimens.
I doubt, however, if we can carry taxidermy proper farther back than to about 150 years ago, at which date naturalists appear to have had some idea of the proper preservation and mounting of natural history specimens; but Réaumur, more than a century and a quarter ago, published a treatise on the preservation of skins of birds; however, as his plan was simply setting up with wires birds which had previously been steeped in spirits of wine, his method did not find much favour. It appears that, just after that time, the system was tried of skinning birds in their fresh state, and also of cutting the skins longitudinally in two halves, and filling the one half with plaster; then the skin was fixed to a backboard, an eye was inserted, and the beak and legs were imitated by painting: and this was then fixed in a sort of framework of glass. This system is still followed to a certain extent; for, fifteen years ago, when I was in one of the Greek islands, a German came round the town selling birds mounted in the same way, and also mounted feather by feather.
I doubt we can trace proper taxidermy back more than about 150 years. Around that time, naturalists seemed to have some understanding of how to preserve and mount natural history specimens. However, Réaumur, over a century and a quarter ago, published a guide on preserving bird skins; his method, which involved setting up birds with wires after soaking them in alcohol, didn’t gain much popularity. It seems that shortly after, a new technique emerged where birds were skinned while fresh, and their skins were cut open along the length and filled with plaster. The skins were then attached to a backboard, with an eye added, and the beak and legs painted on. This was placed in a glass frame. This method is still used to some extent; about fifteen years ago, when I was in one of the Greek islands, I saw a German selling birds mounted this way, as well as feather by feather.
To quote now from the translation of a French work, published by Longman, Rees, and Co., in London, in 1820, we find that "A work appeared at Lyons in 1758, entitled 'Instructions on the Manner of Collecting and Preparing the Different Curiosities of Natural History.'" [Footnote: The sixth edition, twenty-three years later, has this title, "Taxidermy, or the Art of Preparing and Mounting Objects of Natural History for the use of Museums and Travellers, by Mrs. R. Lee, formerly Mrs. J. Edward Bowdich. Sixth edition, 1843. Longman, Brown, Green, and Longman."]
To quote now from the translation of a French work, published by Longman, Rees, and Co., in London, in 1820, we find that "A work appeared in Lyons in 1758, titled 'Instructions on the Manner of Collecting and Preparing the Different Curiosities of Natural History.'" [Footnote: The sixth edition, twenty-three years later, has this title, "Taxidermy, or the Art of Preparing and Mounting Objects of Natural History for the Use of Museums and Travelers, by Mrs. R. Lee, formerly Mrs. J. Edward Bowdich. Sixth edition, 1843. Longman, Brown, Green, and Longman."]
The author was the first who submitted some useful principles for taxidermy. He ornamented his book with many plates, more than half of which are in all respects foreign to his subject, as they simply represent shells, and other marine productions, with their descriptions.
The author was the first to share some practical principles for taxidermy. He filled his book with many illustrations, more than half of which aren’t relevant to the subject, as they just display shells and other marine life, along with their descriptions.
In 1786, the Abbé Manesse published a volume under the title of "Treatise on the Manner of Stuffing and Preserving Animals and Skins." He presented his work to the Academy, who made a favourable report of it.
In 1786, Abbé Manesse published a book called "Treatise on the Manner of Stuffing and Preserving Animals and Skins." He presented his work to the Academy, which gave it a positive review.
Mauduyt has given a memoir on the manner of preparing dead birds for forming collections. (See la 5ème "Livraison de L'Encyclopédie, Méthodique, Histoire Naturelle des Oiseaux," t. i., deuxième partie, p. 435.) By studying his method we may, with perseverance, be able to mount birds well, although he had never prepared them himself, for he has composed his memoir from the notes which Lerot furnished him, who mounted them very well, and who merited the confidence which Mauduyt had accorded him in all the preparations which his fine collection required.
Mauduyt has shared a guide on how to prepare dead birds for creating collections. (See la 5ème "Livraison de L'Encyclopédie, Méthodique, Histoire Naturelle des Oiseaux," t. i., deuxième partie, p. 435.) By following his method and with some dedication, we could learn to mount birds effectively, even though he never prepared them himself. He wrote his guide based on notes from Lerot, who mounted the birds very well and earned the trust that Mauduyt placed in him for all the preparations needed for his impressive collection.
An old sculptor, living at Lahaye, devoted himself to the practice of taxidermy, and in a short time surpassed all those who had employed themselves in mounting animals, especially large mammalia.
An old sculptor living in Lahaye focused on taxidermy, and in a short time, he outperformed everyone who had been working on mounting animals, especially large mammals.
It seems that neither the English nor the Dutch have published any work which treats of the method of mounting animals according to system.
It looks like neither the English nor the Dutch have published any work that discusses the method of mounting animals systematically.
In 1801 we were not more advanced than they were. What we possessed of this kind appeared insufficient to amateurs. Notwithstanding, many derived advantage from the memoir of Mauduyt, but being inserted in the "Encyclopédie Méthodique," it was not always easy to procure it. There was, besides, only the work of Abbé Manesse, and the tediousness of the means which he pointed out frightened all those who desired to learn taxidermy. The professors of natural history to the central schools of the departments felt more than ever the want of a work which furnished the method of preserving and augmenting their zoological collections. In 1802 their wishes were nearly accomplished, for there appeared almost at the same time two works on taxidermy, the one by M. Nicholas, a chemist, the other by M. Henon. M. Nicholas makes an analysis of all that had been said before on the preparation of animals. This view comprehends nearly half the volume.
In 1801, we weren’t any more advanced than they were. What we had in this area seemed inadequate to enthusiasts. Still, many people found value in Mauduyt’s memoir, but since it was published in the "Encyclopédie Méthodique," it wasn’t always easy to obtain. Additionally, there was only the work of Abbé Manesse, and the complexity of his methods intimidated those who wanted to learn taxidermy. The professors of natural history at the central schools in the departments increasingly felt the need for a resource that provided methods for preserving and enhancing their zoological collections. By 1802, their wishes were almost fulfilled, as two books on taxidermy were released nearly simultaneously: one by M. Nicholas, a chemist, and the other by M. Henon. M. Nicholas offers an analysis of everything that had been previously discussed regarding animal preparation, which makes up nearly half of the volume.
Bécoeur, of Metz, was the best apothecary in that city. He mounted fresh birds in the greatest perfection, and by a little practice one is sure to succeed with his method. He opened his birds in the usual manner, that is to say, by the middle of the belly. He easily took out the body by this opening without cutting any of the extremities; he then removed the flesh by the aid of a scalpel, taking the precaution to preserve all the ligaments; he anointed the skin, and put the skeleton in its place, carefully dispersing the feathers on each side. He ran the head through with an iron wire, in which he had formed a little ring at nearly the third of its length; the smallest side passed into the rump in such a manner that 'the ring of the iron wire was under the sternum. He then passed a wire into each claw, so that the extremities of the wire united to pass into the little ring; he bent these extremities within, and fixed them with a string to the iron in the middle of the vertebral column. He replaced the flesh by flax, or chopped cotton, sewed up the bird, placed it on a foot or support of wood, and gave it a suitable attitude, of which he was always sure — for a bird thus mounted could only bend in its natural posture (?). He prepared quadrupeds in the same manner.
Bécoeur, from Metz, was the best pharmacist in that city. He expertly mounted fresh birds with great precision, and with a bit of practice, anyone could succeed using his technique. He would open the birds in the usual way, cutting through the middle of the belly. He effortlessly removed the body through this opening without disturbing any of the extremities; then he used a scalpel to take out the flesh, making sure to keep all the ligaments intact. He applied an ointment to the skin and replaced the skeleton, carefully spreading the feathers on both sides. He threaded an iron wire through the head, forming a small ring about a third of the way down; the smaller end was inserted into the rump so that the ring of wire was positioned beneath the breastbone. He then inserted a wire into each claw, connecting the ends of the wire to fit into the small ring; he bent these ends inward and secured them with a string attached to the iron wire in the center of the vertebral column. He stuffed the body with flax or shredded cotton, sewed up the bird, placed it on a wooden stand, and positioned it in a natural pose, which was always accurate—since a bird mounted this way could only bend in its natural posture. He prepared four-legged animals in the same way.
It remains for us to speak of a little work published by Henon and Mouton Fontenelle. They had at first no other object than to read their manuscript to the Athenaeum at Lyons, of which they were members. They were earnestly solicited to print it, and published it in 1802. The authors speak of birds only. They describe an infinity of methods practised by others, and compare them to their own, which, without doubt, are preferable, but too slow to satisfy the impatience of ornithologists.
We need to mention a small work published by Henon and Mouton Fontenelle. Their initial goal was simply to read their manuscript to the Athenaeum in Lyons, where they were members. They were strongly encouraged to publish it, which they did in 1802. The authors focus solely on birds. They explain numerous techniques used by others and compare them to their own, which are certainly better, but too slow to satisfy the impatience of bird enthusiasts.
The book from which I have just quoted seems to have been the only reliable text book known at that period, and with the exception of certain modern improvements in modelling and mounting, contains a mass of — for that day — valuable elementary information. In fact, the French and German taxidermists were then far in advance of us, a stigma which we did not succeed in wiping off until after the Great Exhibition of 1851.
The book I just quoted seems to have been the only reliable textbook available at that time, and apart from some modern updates in modeling and mounting, it has a lot of valuable basic information for its day. In fact, the French and German taxidermists were ahead of us, a drawback we didn’t manage to overcome until after the Great Exhibition of 1851.
Although, as I have just said, the French and Germans excelled us in the setting up of specimens, yet their collections did not, in all cases, exceed ours in point of interest or magnitude, for the old taxidermists had been at work prior to 1725, at which date it is recorded that the museum of Sir Hans Sloane (the nucleus of our British Museum collection) contained the following number of specimens: Mammals, 1194; birds, 753; reptiles, 345; fishes, 1007. A gradual increase appeared by 1753, when the figures stood: Mammals, 1886; birds, 1172; reptiles, 521; fishes, 1555. A great proportion of these were, however, not stuffed specimens, but simply bones and preparations of fleshy parts in spirits. Nothing shows the gradual rise and progress of taxidermy better than the history of the British Museum, which, under the then name of Montagu House, was opened to the public by special ticket on Jan. 15, 1759.
Although, as I mentioned earlier, the French and Germans were better than us at setting up specimens, their collections didn’t always surpass ours in interest or size. The old taxidermists had been working before 1725, and records show that the museum of Sir Hans Sloane (the foundation of our British Museum collection) had the following number of specimens: Mammals, 1194; birds, 753; reptiles, 345; fishes, 1007. By 1753, there was a gradual increase, with the numbers at: Mammals, 1886; birds, 1172; reptiles, 521; fishes, 1555. However, a significant portion of these were not stuffed specimens but just bones and preserved fleshy parts in spirits. Nothing illustrates the gradual rise and progress of taxidermy better than the history of the British Museum, which, under the name Montagu House, was opened to the public by special ticket on Jan. 15, 1759.
Soon after its opening the natural history collections appear to have claimed more interest from the public, for in 1765 we had a very good collection of butterflies, and in 1769 the trustees acquired, by purchase, a considerable collection of stuffed birds from Holland. The restrictions on visitors were, however, vexatious, people of all classes being hurried through the rooms at a tremendous speed — vide Hutton, the Birmingham historian, who visited it in 1784, and relates how he would fain have spent hours looking at things for which only minutes were allowed. From this period up to 1816 (at which date the valuable ornithological collection of Col. Montagu was purchased for the nation at a cost of £11,000) the additions to the natural history galleries were not many, probably owing to the troublous times; however, when we had succeeded in breaking the power of Napoleon and restored peace to Europe, naturalists and taxidermists found that the public had then time and inclination to devote themselves to their collections or works.
Soon after it opened, the natural history collections started to attract more public interest. By 1765, there was a great collection of butterflies, and in 1769, the trustees bought a significant collection of stuffed birds from Holland. However, the restrictions on visitors were annoying; people from all backgrounds were rushed through the rooms at a rapid pace — see Hutton, the Birmingham historian, who visited in 1784 and mentioned how he wished he could spend hours admiring things that were only shown for minutes. From this time until 1816 (when the valuable ornithological collection of Col. Montagu was purchased for the nation at a cost of £11,000), there weren't many additions to the natural history galleries, likely due to the turbulent times. However, once we succeeded in defeating Napoleon and brought peace back to Europe, naturalists and taxidermists discovered that the public then had both the time and interest to engage with their collections or work.
Accordingly, during the next twenty years many works (including those before noted) were written on taxidermy, the most notable being by Swainson, Brown, and that eccentric genius Waterton, whom we may call the pioneer of our present system of mounting, and who, in his usual caustic style, pointed out the very inferior way in which specimens were then mounted.
Accordingly, over the next twenty years, many works (including those mentioned earlier) were written on taxidermy, with the most notable being by Swainson, Brown, and the eccentric genius Waterton, whom we can consider the pioneer of our current mounting techniques. He, in his typical sharp style, criticized the poor quality of how specimens were mounted at that time.
At the end of his "Wanderings in South America" appeared a treatise on Taxidermy, but, as he decried the use of arsenical preparations, and mounted his birds without wires in a fashion peculiar to himself, his system did not find favour in the eyes of the school of rigid stuffing, who had not then worked out the present happy compromise between his style and theirs. His patience must have been inexhaustible; indeed, the Rev. J. G. Wood, who knew him well, has told me of many instances in which he spent days in scraping out the hands and feet of the larger apes until he got them as thin as paper, and also of his delight when he invented the kid-glove substitute for a peacock's face much to the astonishment of the reverend gentleman. Of course; all these works on the preservation of natural history objects and the labours of collectors directed the public mind to the contemplation of natural history.
At the end of his "Wanderings in South America," there was a treatise on Taxidermy. However, since he criticized the use of arsenical preparations and mounted his birds without wires in a unique way, his methods didn't gain popularity among the traditional stuffing school, which had not yet developed the current happy compromise between his style and theirs. His patience must have been endless; in fact, the Rev. J. G. Wood, who knew him well, recounted many instances where he spent days scraping out the hands and feet of larger apes until they were as thin as paper. He also shared his excitement when he created a substitute for a peacock's face out of kid-glove material, which greatly surprised the reverend gentleman. Naturally, all these works on preserving natural history objects and the efforts of collectors got the public thinking about natural history.
The British Museum at this time also — relieved of a few of the restrictions on admission — became more popular, and in 1836 we find the natural history collections were as follow: Mammals, species 405; birds, species 2400; constituting altogether in specimens the sum total of 4659. Of reptiles we could boast — species 600, specimens 1300; fish 1000 specimens. These figures did not contrast favourably with the Paris Museum as in the days of old for now Paris stood: Mammals, species 500; birds, species 2300; grand total of specimens 6000. Of fish the French had four times as many as we (and beat us, proportionately, in other sections), while we were far in advance in this class of the Vienna and Berlin Museums. In shells (not fossils), London and Paris were equal and much superior to Berlin and Leyden. In 1848 an extraordinary increase (marking the great interest taken in taxidermical science) had taken place; we now had added to the British Museum since 1836, 29,595 specimens, comprising 5797 mammals, 13,414 birds, 4112 reptiles, 6272 fish.
The British Museum at this time, having lifted some admission restrictions, became more popular. In 1836, the natural history collections were as follows: 405 species of mammals; 2,400 species of birds, totaling 4,659 specimens. We had 600 species of reptiles, totaling 1,300 specimens; and 1,000 specimens of fish. These numbers didn’t compare well with the Paris Museum as in the past, as Paris had: 500 species of mammals; 2,300 species of birds; with a total of 6,000 specimens. The French had four times as many fish as we did (and outperformed us in other areas), while we were far ahead in this category compared to the Vienna and Berlin Museums. In shells (not fossils), London and Paris were equal and much better than Berlin and Leyden. By 1848, an extraordinary increase (reflecting the growing interest in taxidermy) had occurred; since 1836, the British Museum had added 29,595 specimens, including 5,797 mammals, 13,414 birds, 4,112 reptiles, and 6,272 fish.
In mammals and birds we held the proud position of having the finest and most extensive collection in the world, while in reptiles and fish we were again beaten by Paris. In proof of the growing interest taken in natural history, we find that in 1860 the number of visitors to the natural history department was greatly in excess of all the other departments; and at the present time the attendance has greatly increased, as also the objects exhibited, a fact patent to all who will take the trouble to visit the British Museum, or to inspect the official catalogues published from time to time, a synopsis of which cannot at present be given owing to their extent and variety; but we can assume, I think, that we have as complete a natural history collection as is to be found in any of the museums of the world. [Footnote: Some idea of the extent of the National Natural History Collections may be gathered from the pages of the recently-published British Museum "Catalogues" 1874-82, where, in many instances, the number of specimens of a certain order of birds contained in the Museum falls very little short of the ascertained number of species for the whole of the world.]
In mammals and birds, we proudly held the best and most extensive collection in the world, while in reptiles and fish, we were once again outdone by Paris. To show the increasing interest in natural history, we note that in 1860, the number of visitors to the natural history department far exceeded that of all the other departments; and now, attendance has risen significantly, along with the number of exhibits. This is evident to anyone who takes the time to visit the British Museum or check the official catalogues published periodically. A summary of these catalogues can't be provided right now due to their size and variety, but we can reasonably assume that we possess as complete a natural history collection as any museum in the world. [Footnote: You can get an idea of the extent of the National Natural History Collections from the recently published British Museum "Catalogues" 1874-82, where, in many cases, the number of specimens of certain types of birds in the Museum is very close to the total number of species found worldwide.]
Though taxidermy flourished, as we see, for some years previous to the Great Exhibition of 1851, yet that decidedly gave a considerable impetus to the more correct and artistic delineation of animals, especially in what may be called the grotesque school instituted by the Germans, which, though it may perhaps be decried on the score of misrepresenting nature in the most natural way possible, yet teaches a special lesson by the increased care necessary to more perfectly render the fine points required in giving animals that serio-comic and half-human expression which was so intensely ridiculous and yet admirable in the studies of the groups illustrating the fable of "Reinecke the Fox," which were in the Wurtemburgh Court, class XXX., and were executed by H. Ploucquet, of Stuttgart. These groups, or similar ones, are now to be seen in the Crystal Palace at Sydenham.
Although taxidermy was thriving for several years before the Great Exhibition of 1851, that event definitely gave a significant boost to the more accurate and artistic representation of animals, especially in what's known as the grotesque style developed by the Germans. While some may criticize this style for misrepresenting nature in a very realistic way, it offers an important lesson in the heightened attention to detail needed to accurately capture the subtle features that give animals that strange yet captivating half-human expression, which was both hilarious and commendable in the groups illustrating the fable of "Reinecke the Fox," displayed in the Wurtemburgh Court, class XXX., and created by H. Ploucquet from Stuttgart. These groups, or similar ones, can now be seen in the Crystal Palace at Sydenham.
In nearly all of these groups the modelling and the varied expressions of hope, fear, love, and rage, were an immense step in advance of the old wooden school of taxidermy; specimens of which are still to be found in museums — stiff, gaunt, erect, and angular. Copies of those early outrages on nature may still be seen in the dreary plates of the anything but "animated" work of "poor Goldie," who, as Boswell said, "loved to shine" in what was least understood.
In almost all of these groups, the modeling and the different expressions of hope, fear, love, and anger were a huge improvement over the old, rigid style of taxidermy. You can still find examples of that in museums—stiff, lifeless, upright, and sharp-edged. Copies of those early assaults on nature can still be seen in the dull images of the anything but "animated" work of "poor Goldie," who, as Boswell noted, "loved to shine" in what was least understood.
16 PRACTICAL TAXIDERMY.
16 Practical Taxidermy.
From this era the English artists, having had their eyes opened by the teachings of the foreign exhibits of 1851, steadily gained ground, and the Wards having the sense to employ, in the first instance, foreign artistic workmen, rapidly pushed to the front, until the finest animal study of ancient or modern times was achieved by one of them — the "Lion and Tiger Struggle," exhibited at Paris, and afterwards at the Sydenham Crystal Palace. This, and one or two analogous works, carried the English to the foremost ranks of zoological artists; and now that we embellish our taxidermic studies with natural grasses, ferns, etc.., and with representations of scenery and rockwork, in the endeavour to carry the eye and mind to the actual localities in which the various species of animals are found — an advance in art not dreamed of fifty years ago — and also correctly model the heads and limbs of animals, we still hold our own, and are as far advanced in taxidermy as any other nation.
From this era, English artists, inspired by the foreign exhibits of 1851, steadily made progress. The Wards wisely chose to hire foreign artistic workers, quickly moving to the forefront until one of them created the finest animal study of any time— the "Lion and Tiger Struggle," displayed in Paris and later at the Sydenham Crystal Palace. This piece, along with a few similar works, propelled the English to the top ranks of zoological artists. Now, as we enhance our taxidermy studies with natural grasses, ferns, and scenes with rockwork to bring the viewer’s eye and mind to the actual habitats of various animal species— an artistic advancement unimaginable fifty years ago— and as we also accurately model the heads and limbs of animals, we continue to compete and stand as advanced in taxidermy as any other nation.
THE decoying and trapping of birds, etc.., is a somewhat delicate subject to handle, lest we degenerate into giving instruction in amateur poaching; but the application of my direction I must leave to the reader's own sense of fitness of time and scene, and object to be snared. And now, before launching into my subject, one word in season. Observe as a golden rule — never to be broken — this: Do not snare, shoot, nor kill any more birds or animals than you absolutely want — in fine, do not kill for killing's sake, or snare in wantonness. Let all you do have reference to some object to be attained, either to procure specimens wanted for a collection, or, in cases of necessity, for food. Bear this in mind, for, without sympathy with creatures fashioned in as complex and beautiful a manner as ourselves, we can never hope to be true naturalists, or to feel a thrill of exquisite pleasure run through us when a new specimen falls to our prowess. How can we admire its beauty when alive, or feel a mournful satisfaction at its death, if we are constantly killing the same species of bird for sport alone?
Deceiving and trapping birds and other animals is a delicate topic, as it's easy to unintentionally promote amateur poaching. However, I'll let you decide when and how to use my advice based on what you're trying to catch. Before we get into the details, here’s an important rule to remember—one you should never disregard: Don't trap, shoot, or kill any more birds or animals than you truly need—in other words, don’t kill just for the sake of killing or trap without justification. Make sure that everything you do has a purpose, whether it’s to collect specimens you want or, if necessary, to gather food. Keep this in mind: without empathy for creatures that are as complex and beautiful as we are, we can never truly be naturalists or feel joy when we catch a new specimen. How can we appreciate their beauty when they’re alive, or feel a bittersweet satisfaction at their death, if we constantly kill the same species of bird just for sport?
Another thing: kill a wounded bird as quickly and humanely as possible, which you may always do by pressing its breast just under the wings with your finger and thumb, bearing the whole weight of the palm of the hand on the sternum or breast-bone, and gradually increasing the pressure until life is extinct. This plan suffices for even the larger birds, provided you can find a means of holding them firmly while you employ both hands in the manner previously indicated.
Another thing: quickly and humanely put down a wounded bird. You can do this by pressing down on its chest just below the wings with your finger and thumb, using the full weight of your palm on the breastbone. Gradually increase the pressure until it’s no longer alive. This method works for larger birds too, as long as you can hold them securely while using both hands as described.
Again: if collecting eggs, be content with half the sitting of a nest, and if you know of a very rare nest of eggs, do not take them all in your acquisitive greed. If you see a rare bird, on common land, you may as well secure him as let "Jack Smith" make him up in a sparrow pie; but if the bird is on preserved land, or in a retired spot where no one is likely to harry it, do think a minute before pulling trigger, and ask yourself three questions:
Again: if you're collecting eggs, be satisfied with taking half from a nest, and if you come across a very rare nest of eggs, don't take them all out of greed. If you see a rare bird on public land, you might as well catch it instead of letting "Jack Smith" turn it into a sparrow pie; but if the bird is on protected land or in a secluded area where it's unlikely to be disturbed, take a moment to think before you pull the trigger, and ask yourself three questions:
1. Will this bird be likely to stay if unmolested?
1. Will this bird probably stick around if it's not disturbed?
2. Is it likely to have a mate?
2. Is it likely to have a partner?
3. Will it nest here?
Will it make a nest here?
If you can answer any of these questions in the affirmative, why, "don't shoot, colonel;" for think of the aid to science, and your own satisfaction, if you can discover anything new in its habits, or verify any doubtful point. Many rare birds would nest here if undisturbed, and come again with additions. The Hoopoe, or golden oriole, for instance, and many other rare birds, would nest, and, indeed, do nest here when allowed.
If you can answer any of these questions yes, then "don't shoot, colonel;" because think about how much it could help science, and your own satisfaction, if you could uncover something new about their habits or confirm any uncertain details. Many rare birds would nest here if not disturbed, and they would return with new individuals. The Hoopoe, or golden oriole, for example, and many other rare birds would nest here, and in fact, do nest here when they have the chance.
An interesting account of the appearance of the great bustard in Norfolk, and the pains taken through the kindness of Lord Lilford to provide it with a mate, appeared in the Field of April 8, 1876. But alas! everyone is not so considerate, and we have but a select few of such self-sacrificing people.
An intriguing story about the sighting of the great bustard in Norfolk, and the efforts made by Lord Lilford to find it a mate, was published in the Field on April 8, 1876. But unfortunately, not everyone is so thoughtful, and we only have a select few individuals who are willing to make such selfless sacrifices.
I presume no notice is required how to set the first trap on our list — I mean our boyhood's old favourite, the brick trap, or the sieve and string, both very well in their way in hard weather; but a notice may be required as to the uses to which the next simplest trap, or springe (the horsehair noose), may be applied. For the very few people who do not know how to set it, I will, in the manner of Col. Hawker, who did everything at the time which he wished to explain in writing, proceed to make one.
I don’t think I need to explain how to set the first trap on our list — our childhood favorite, the brick trap, or the sieve and string, both of which work really well in tough weather. However, I should provide some guidance on how to use the next simplest trap, the springe (the horsehair noose). For the very few who aren’t familiar with how to set it, I’ll follow the approach of Col. Hawker, who explained everything he wanted to write about at the time, and I’ll show you how to make one.

Here, then, I have a black horsehair about two feet long; I double it, holding it between the right-hand finger and thumb, leaving a little loose loop of about half an inch long; from this point I proceed by an overhand motion of the thumb to twist it up; on reaching the bottom I make a small knot to prevent its unrolling; then, pushing the knotted end through the eye of the loop, I thus form a loose noose. I then attach a piece of wire to the free end by a twisted loop (see Fig. 1).
Here, I have a black horsehair that's about two feet long. I double it, holding it between my right thumb and finger, leaving a small loose loop about half an inch long. From this point, I twist it up with an overhand motion of my thumb. When I reach the bottom, I make a small knot to keep it from unrolling. Then, I push the knotted end through the eye of the loop to form a loose noose. Next, I attach a piece of wire to the free end with a twisted loop (see Fig. 1).
With about half a dozen of these springes coiled in an oval tin box I am ready to snare any small bird whose haunt I may discover. Birds which are nesting can easily be caught by placing one noose in the nest and others round the edge or mouth, making fast the end wires to any contiguous branch or twigs. Moorhens or water-rails, which swim or run through the constantly frequented tracks which they have made in dense undergrowth or rushes in bogs, may be captured by attaching these nooses to a string stretched across — indeed, a writer in the Field, of July 8, 1876, says, speaking of Turkestan:
With about half a dozen of these traps coiled in an oval tin box, I'm ready to catch any small bird I might come across. Birds that are nesting can easily be caught by placing one noose in the nest and putting others around the edge or opening, fastening the end wires to any nearby branch or twigs. Moorhens or water-rails, which swim or run along the well-trodden paths they've made through thick brush or reeds in swamps, can be captured by attaching these nooses to a string stretched across — in fact, a writer in the Field, on July 8, 1876, mentions, talking about Turkestan:
"Ducks are caught by rather a clever arrangement with horsehair nooses attached to a string, which is stretched over the ditches and canals used for irrigation, and so close to the water that the ducks are compelled when swimming under the string to stretch out their necks, when they are easily caught in the hanging nooses."
Ducks are caught using a smart setup with horsehair nooses tied to a string stretched over the ditches and canals used for irrigation. It’s positioned so close to the water that when the ducks swim underneath the string, they have to stretch out their necks, making it easy for them to get caught in the hanging nooses.
Also a useful plan for catching plovers or snipes, which haunt the edges of streams having a narrow margin between the bank and the water, is described by him as used for catching quails:
He also explains a useful method for catching plovers or snipes, which are located along the edges of streams where there's a narrow strip of land between the bank and the water, similar to the technique for catching quails:
"One method is simplicity itself: a hair noose is fastened to a lump of clay well worked together; a number of these appliances are scattered about the lucerne fields, which the quails are fond of frequenting; the bird caught in the noose is prevented from flying away owing to the weight of the lump of clay and its getting easily entangled in the grass."
"One method is really simple: a noose made of hair is tied to a well-shaped lump of clay; several of these traps are placed around the alfalfa fields, where quails often gather; the bird caught in the noose can't escape because the weight of the clay keeps it down, and it easily gets tangled in the grass."
Wheatears and ortolans are caught by suspending a hair noose between two turves placed on end and touching each other in the form of the roof of a house; to this shelter the birds constantly run on the approach of danger, or even, apparently, through timidity, on the gathering of storm clouds.
Wheatears and ortolans are trapped by placing a hair noose between two grass tufts that are standing upright and touching each other like a roof. The birds often run to this shelter when they sense danger, or even out of fear when storm clouds begin to form.
With this springe, also, thrushes and similar birds are described as being snared by Mr. Gould (in his "Birds of Great Britain"), who, giving Mr. Box as his authority, says:
With this trap, thrushes and similar birds are noted to be caught by Mr. Gould (in his "Birds of Great Britain"), who cites Mr. Box as his source, stating:
"The thrush is a great source of amusement to the middle, and of profit to the lower, classes during its autumnal migration. Many families of Liege, Luxemburg, Luneburg, Namur, parts of Hainault, and Brabant choose this season for their period of relaxation from business, and devote themselves to the taking of this bird with horsehair springes. The shopkeeper of Liege and Verviers, whose house in the town is the model of comfort and cleanliness, resorts with his wife and children to one or two rooms in a miserable country village to enjoy the sport he has been preparing with their help during the long evenings of the preceding winter, in the course of which he has made as many as from 5000 to 10,000 horsehair springes and prepared as many pieces of flexible wood, rather thicker than a swan-quill, in and on which to hang the birds. He hires what he calls his 'tenderie,' being from four to five acres of underwood about three to five years old, pays some thirty shillings for permission to place his springes, and his greatest ambition is to retain for several years the same tenderie and the same lodgings, which he improves in comfort from year to year.
The thrush offers a lot of entertainment for the middle class and a source of income for the lower class during its autumn migration. Many families from Liege, Luxembourg, Luneburg, Namur, parts of Hainault, and Brabant take time off work to focus on catching this bird using horsehair springes. The shopkeeper from Liege and Verviers, known for his comfortable and clean home in town, heads to a small country village with his wife and kids to enjoy the sport he has been preparing for with their help during the long winter nights. He makes between 5,000 and 10,000 horsehair springes and prepares flexible pieces of wood, slightly thicker than a swan quill, to hang the birds on. He rents what he calls his 'tenderie,' which is about four to five acres of underbrush that's around three to five years old, and pays about thirty shillings for the right to set his springes. His main goal is to keep the same tenderie and accommodations for several years, improving their comfort each year.
The springes being made and the season of migration near, he goes for a day to his intended place of sojourn, and cuts as many twigs, about 18 in. in length, as he intends hanging springes. There are two methods of hanging them — in one the twig is bent into the form of the figure six, the tail end running through a slit out in the upper part of the twig. The other method is to sharpen a twig at both ends, and insert the points into a grower or stem of underwood, thus forming a bow, of which the stem forms the string below the springe; and hanging from the lower part of the bow is placed a small branch, with three or four berries of the mountain ash (there called "sorbier "); this is fixed to the bow by inserting the stalk into a slit in the wood. The hirer of a new tenderie three or four acres in extent is obliged to make zigzag footpaths through it, to out away the boughs which obstruct them, and even to hoe and keep them clean. Having thus prepared himself, he purchases one or two bushels of mountain ash berries, with the stalks to which they grow, picked for the purpose after they are red, but before they are ripe, to prevent falling off: these he lays out on a table in the loft or attic. The collection of these berries is a regular trade, and the demand for them is so great that, although planted expressly by the side of the roads in the Ardennes, they have been sold as high as 2 pounds the bushel; but the general price is 5 francs.
The traps are made and migration season is approaching, so he goes to his intended spot for the day and cuts as many twigs, about 18 inches long, as he plans to use for traps. There are two ways to set them up — one method involves bending the twig into a shape that looks like the number six, with the tail end going through a slit cut in the upper part of the twig. The other method is to sharpen both ends of a twig and insert the tips into a growth or stem of underbrush, creating a bow where the stem acts as the string below the trap. Hanging from the lower part of the bow is a small branch with three or four berries of the mountain ash (locally called "sorbier"); this is secured to the bow by pushing the stalk into a slit in the wood. Anyone renting a new plot of land that’s three or four acres has to make zigzag paths through it, cut back the branches that get in the way, and even hoe the paths to keep them tidy. After preparing like this, he buys one or two bushels of mountain ash berries, still on their stalks, picked when they are red but not fully ripe to avoid them dropping off. He lays these out on a table in the attic. Collecting these berries is a regular trade, and they are in such high demand that, although they’re purposely planted along the roads in the Ardennes, they can sell for as much as 2 pounds a bushel; however, the usual price is 5 francs.
We will now suppose our thrush-catcher arrived at his lodgings in the country — that he has had his footpath cleared by the aid of a labourer, and that he is off for his first day's sport. He is provided with a basket, one compartment of which holds his twigs bent or straight, another his berries; his springes being already attached to the twigs, he very rapidly drives his knife into a lateral branch, and fixes them, taking care that the springe hangs neatly in the middle of the bow, and that the lower part of the springe is about three fingers' breadth from the bottom. By this arrangement the bird alighting on the lower side of the bow, and bending his neck to reach the berries below, places his head in the noose. Finding himself obstructed in his movements, he attempts to fly away; but the treacherous noose tightens round his throat, and he is found by the sportsman hanging by the neck, a victim of misplaced confidence.
We now imagine that our thrush-catcher has arrived at his country lodgings—he's had a worker clear his path, and he’s ready for his first day of hunting. He’s equipped with a basket, one section of which holds his bent or straight twigs, and another for his berries. His springes are already attached to the twigs, and he quickly drives his knife into a lateral branch to secure them, making sure that the springe hangs neatly in the middle of the bow and that the lower part of the springe is about three fingers’ width from the bottom. With this setup, when a bird lands on the lower side of the bow and bends its neck down to reach the berries below, it puts its head in the noose. When it tries to fly away, the deceptive noose tightens around its throat, and the sportsman finds it hanging by the neck, a victim of misplaced trust.
The workman, who at this season earns a second harvest by this pursuit, carries on his industry in wilder districts, or he frequently obtains permission from his employer to set springes in his master's woods. In this case he supplies the family with birds, which are highly appreciated as a delicacy, especially when almost covered with butter, with a few juniper berries, and some bacon cut into small dice and baked in a pan. The rest of his take he sells at from 5d. to 10d. per dozen.
The worker, who during this time makes a second income from this activity, operates in more remote areas or often gets his boss's permission to set traps in his employer's woods. In this case, he provides the family with birds, which are highly valued as a treat, especially when nearly drowned in butter, with a few juniper berries and some bacon diced small and cooked in a pan. He sells the rest of what he catches for between 5d. and 10d. per dozen.
No person who has not lived in the country can imagine the excitement among all classes when the "grives" arrive. If the morning be foggy, it is a good day for "grives"; if bright, bad "tenderie"! The reason is obvious. When the birds arrive in a fog they settle at once in the woods; if bright, they fly about, seeking the most propitious place for food.
No one who hasn’t lived in the countryside can understand the excitement among everyone when the “grives” arrive. If it’s a foggy morning, it’s a good day for “grives”; if it’s bright, bad “tenderie”! The reason is clear. When the birds show up in a fog, they land immediately in the woods; if it’s bright, they fly around looking for the best spot for food.
It appears that redwings and fieldfares are caught by this method also, as well as a few ring-ousels and blackbirds.
It looks like redwings and fieldfares are also caught using this method, along with some ring-ousels and blackbirds.
"Stonehenge" says that the springe just described was used for snaring woodcocks, in the following mariner:
"Stonehenge" states that the spring described earlier was used for catching woodcocks in the following manner:
"It used to be the constant practice on all the hill downs in these parts to place out underwood or furze, about a foot in height, to a very great extent along the ground, in the shape of a letter V, at the apex of which an opening would be left, where a hair noose or springe would be set, which seldom failed to yield the pot-hunter a nightly supply, as the cock would run along the side of the brushwood feeding, not taking the trouble to top over it, until he was led into the snare; but this plan is now, owing to the scarcity of cocks, when compared with former years, very seldom practised."
In the hills around here, it used to be common to lay out underbrush or gorse about a foot high in a V shape on the ground, leaving an opening at the top for a noose or spring trap. This method usually allowed hunters to make a nightly catch, as roosters would run along the side of the brush, pecking at the ground without jumping over it, until they got caught in the trap. However, this technique is rarely used today because rooster populations have declined compared to previous years.
Ptarmigan are said by Daniels, in his "Rural Sports," to be led up to springes in nearly the same manner, stones being substituted for furze.
In "Rural Sports," Daniels states that ptarmigans are lured to spring traps in a similar manner, using stones instead of gorse.
Another mode of making a springe, which is a capital plan for catching almost any bird, whether it be a percher or a runner, is this: Procure an elastic wand (hazel or osier makes the best) of about 3 ft. 6 in. long, to the top of which tie a piece of twisted horsehair about 3 in. in length; to the free end attach a little piece of wood of 2 in. in length, by the middle, cutting one end to an obtuse point, flattened on the top and underneath. Just underneath this little crosspiece attach two horsehair springes, at right angles; next cut a little fork, or rather angle piece, from a tree, one end of which is to be quite 4 in. long (to drive in the ground), the other end about 0.5 in., measuring from underneath.
Another way to make a springe, which is a great method for catching almost any bird, whether it perches or runs, is this: Get an elastic stick (hazel or osier works best) that’s about 3 ft. 6 in. long. Tie a piece of twisted horsehair about 3 in. long to the top of it; then attach a small piece of wood about 2 in. long to the free end, securing it in the middle and shaping one end to a blunt point that’s flattened on the top and bottom. Just below this small crosspiece, attach two horsehair springes at right angles. Then, cut a small fork, or angle piece, from a tree, with one end being about 4 in. long (to stick into the ground) and the other end around 0.5 in., measuring from underneath.
To set this trap, push the long wand into the ground until about 3 ft. of it is out; then, at a distance of 2 ft., drive in the fork piece, until only 0.5 in. clears the ground; next bend the wand down in the form of a bow, and bring the pointed end of the crosspiece under the peg, or fork, planted in the ground at the other end. The free end is now a little elevated, while the middle is held very lightly on the point of the catch, and its opposite end rests lightly on the ground. On the "ticklish" setting of this everything depends.
To set this trap, push the long stick into the ground until about 3 feet is sticking out; then, 2 feet away, drive in the fork piece so that only half an inch is above the ground. Next, bend the stick down into a bow shape and bring the pointed end of the crosspiece under the peg or fork that’s planted in the ground at the other end. The free end should be slightly raised while the middle is barely resting on the catch point, and the other end should lightly touch the ground. The success of this setup relies heavily on how delicately it's balanced.
Next place some blades of grass or light moss so as to hide the fork piece at the back and sides, taking care that no small sticks interfere with the proper working of the trap; strew some suitable seed or bait on the grass or moss, and then carefully place one horsehair noose in such a manner as to trap a bird should it merely hop on the crosspiece, and the other noose arrange so as to catch it by the neck should it attempt to seize the bait or to pass. In either case it dislodges the crosspiece, which instantly flies up, suspending the bird by the neck or legs in one or both of the nooses. The appearance of the set trap before the grass or moss is arranged is as represented in Fig. 2, which I have drawn from a trap set for that purpose.
Next, place some blades of grass or light moss to cover the fork piece at the back and sides, making sure that no small sticks get in the way of the trap's proper functioning; sprinkle some suitable seed or bait onto the grass or moss, and then carefully position one horsehair noose in such a way that it will trap a bird if it simply hops onto the crosspiece, and arrange the other noose to catch it by the neck if it tries to grab the bait or pass by. In either case, it dislodges the crosspiece, which immediately flies up, suspending the bird by its neck or legs in one or both of the nooses. The appearance of the set trap before the grass or moss is arranged is as shown in Fig. 2, which I have drawn from a trap set for that purpose.
Sometimes this trap (or properly springe) is set with another fork placed at right angles to the other, and sufficiently distant from it to just catch the opposite end of the crosspiece, and though, perhaps, this plan allows it to be set a little finer, it has many disadvantages.
Sometimes this trap (or properly springe) is set with another fork placed at a right angle to the first one, spaced far enough apart to catch the opposite end of the crosspiece. While this method might allow for a more precise setup, it comes with several downsides.

Yet another modification of the same springe. The wand or spring-stick, crosspiece, and nooses as before, but instead of the simple catch, use a complete bow, with both ends stuck in the ground. At some little distance from this drive in a straight piece of stick; next procure a piece of stick with a complete fork or crutch at one end. To set it, draw down the spring-stick and pull the crosspiece under the bow by the top side farthest from the spring-stick. Now hold it firmly with one hand while you place the forked stick with its crutch pressing against the opposite upright stick, and bring its free end against the lower end of the crosspiece, and adjust both as finely as you can. Finally, arrange the nooses in such a manner that if either of them or the crutched stick is touched the latter falls, and releasing the crosspiece, the spring-stick flies up, and the bird with it.
Another version of the same trap. The wand or spring-stick, crosspiece, and nooses are all the same, but instead of the simple catch, use a complete bow, with both ends anchored in the ground. A short distance away, drive in a straight piece of stick; then get a stick with a complete fork or notch at one end. To set it up, pull down the spring-stick and pull the crosspiece under the bow by the top side that’s farthest from the spring-stick. Hold it firmly with one hand while you position the forked stick so its notch presses against the opposite upright stick, and bring its free end against the lower end of the crosspiece, adjusting both as precisely as you can. Finally, arrange the nooses so that if either one or the forked stick is disturbed, the latter falls, releasing the crosspiece, causing the spring-stick to shoot up, and the bird goes with it.
To see the setting of this at a glance, vide Fig. 3 (showing only one noose, however), which I have "cribbed" from a tail piece of Bewick's, putting it a little out of drawing to show it up.
To get a quick view of the setting, see Fig. 3 (showing only one noose, though), which I’ve "borrowed" from a tail piece of Bewick's, adjusting it slightly to highlight it.
 Fig. 3 —
"Springe" for Snipe.
Fig. 3 —
"Springe" for Snipe.The next simple trap to be considered is evidently the pit-fall, used only, however, for large and fierce animals, and varying in construction in different countries. For descriptions of methods of baiting for and catching such animals as lions, leopards, tigers, elephants, etc.., consult almost any book on African or Indian field sports.
The next straightforward trap to consider is clearly the pitfall, which is only used for large and aggressive animals and varies in design across different countries. For descriptions of how to bait and catch animals like lions, leopards, tigers, elephants, and others, check out almost any book on African or Indian hunting.
Of poisons or intoxicants for capturing birds or animals, I do not intend to treat, as they are better left to gamekeepers and poachers.
Of poisons or drugs used to catch birds or animals, I don't plan to discuss them, as they are better handled by gamekeepers and poachers.
Dead-falls, such as the "Figure of 4 trap," are easy to make, and useful for killing small animals. The materials required are simply three ordinary pieces of wood, a small piece of string, or, better still, wire, and a large, heavy, flat paving stone, or slate. Having procured three pieces of wood of half an inch square by one foot long, we call one the "upright," which is simply brought to a point at one end, somewhat like a chisel. The second is the "slanting stick," which should be cut to about 8 in. long, having a nick in it about half an inch from one end, about half way through its depth; the other end is brought to a chisel point on its upper surface; the third, which is the "foot" or "bait stick," has a square notch, the thickness of the upright, cut in it, about three inches from one end; the inner end of this notch is relieved a little, so as not to bind on the upright too much. Within half an inch of the other end another notch is cut, but at right angles to the last, that is to say, this last notch is cut on the top, while the other is cut at the side; the outer or top notch also slopes inward. At the inner or side notch end drill a little hole, through which place a piece of pointed wire to receive the bait.
Dead-falls, like the "Figure of 4 trap," are simple to create and effective for catching small animals. You only need three regular pieces of wood, a small piece of string, or, ideally, wire, and a large, heavy, flat stone or slate. To start, you need three pieces of wood around half an inch square and one foot long. Call one the "upright," which should be pointed at one end, similar to a chisel. The second piece is the "slanting stick," which should be about 8 inches long, with a notch cut halfway through about half an inch from one end; the other end should also be pointed. The third piece, known as the "foot" or "bait stick," has a square notch the thickness of the upright cut into it, around three inches from one end; the inner part of this notch should be slightly relieved so it doesn't bind on the upright. About half an inch from the other end, cut another notch at a right angle to the first, meaning this one is cut on the top, while the first one is on the side; the outer notch also slopes inward. Near the inner side notch end, drill a small hole to insert a piece of pointed wire for the bait.
The appearance of the three sticks when set is best explained by Fig 4; A. is the upright, B the slanting stick, and C bait or bottom stick. To set it, take the upright in the left hand, chisel point up, pick up B with the right hand, place it with its notch fitting on the top of A, and keeping the slanting stick pressed down firmly, you hold the two in proper position. This has relieved the left hand entirely, which now is used to pick up c; place the side notch of this on the upright A, slide it up until its end nick is caught by the point of B; a sufficient leverage, as it were, being attained on this, we can hold the whole of the trap now with the right hand. By grasping B with the fingers of the hand in opposition to the palm, while the thumb presses it down on the top, the left hand, being at liberty, is used to drag the stone and to raise one end to fall on the top of B; the weight of the stone now sets the three parts in opposition to each other. An animal touching the bait in the slightest manner is sufficient to destroy the nice balance of the whole affair, and down it comes with a run. The sizes given — from a trap I have just set — are, of course, for small animals only, but it may be enlarged or decreased to any extent, at the pleasure of the operator.
The setup of the three sticks is best illustrated in Fig 4. A is the upright stick, B is the slanting stick, and C is the bait or bottom stick. To set it up, hold the upright stick in your left hand, pointy end up. With your right hand, pick up B and place its notch on top of A. Keeping the slanting stick pressed down firmly, hold both sticks in position. This frees up your left hand to pick up C; place the side notch of C on the upright A, slide it up until its end fits into the notch of B. Now that you have enough leverage, you can hold the entire trap with your right hand. Grab B with your fingers opposing your palm while pressing it down with your thumb. With your left hand free, pull the stone and lift one end to place it on top of B; the weight of the stone will set the three parts against each other. If an animal touches the bait even slightly, it will tip the balance and the trap will spring shut. The sizes given — based on a trap I just set — are for small animals only, but you can adjust the size up or down as needed.
 Fig. 4 —
"FIGURE of 4" TRAP.
Fig. 4 —
"FIGURE of 4" TRAP.As "Stonehenge" and "High Elms" have introduced some improvements, I may as well quote the former:
As "Stonehenge" and "High Elms" have made some updates, I might as well mention the former:
The Figure of 4 trap is composed of a large square piece of stone or slate propped up in a peculiar manner with three pieces of wood, which are arranged in the shape of a 4.
The Figure of 4 trap consists of a large square stone or slate slab that is oddly held up by three wooden pieces arranged to resemble a 4.
In examining this figure it will be seen to consist of a perpendicular limb or upright, of a horizontal one or stretcher, and of a short slanting stick, as the third is called. The upright is usually cut about half an inch wide, shaved to a thin edge at top, but "High Elms" recommends it to have a forked foot to keep it from twisting, and a notch in it to prevent the stretcher slipping down. The slanting stick has a notch cut in it half an inch from its upper end to receive the top of the upright, while its lower end is shaved off to fit in a notch in the upper surface of the front of the stretcher. Lastly, the stretcher has this notch in front, and another notch cut in its side by which it is caught by the upright and held in its place.
In looking at this figure, you'll notice it has a vertical piece or upright, a horizontal one or stretcher, and a short angled stick, known as the third piece. The upright is typically about half an inch wide, tapered to a thin edge at the top, but "High Elms" suggests it should have a forked base to prevent it from twisting, along with a notch to stop the stretcher from sliding down. The angled stick has a notch cut into it half an inch from the top to fit the top of the upright, while the bottom is trimmed to fit snugly into a notch on the front surface of the stretcher. Finally, the stretcher features this notch in front, and another notch on its side that secures it with the upright to keep it in place.
A bait being tied to the external end of the stretcher, and a stone placed so that it will lie flat on the ground, the whole is ready for setting, which is effected as follows: Raise the stone, and support it by the notched end of the slanting stick held in the left hand, the notch itself looking downwards, then place the upright with one end on the ground and the other in this notch, and let it carry the weight of the stone, which will have a tendency to tilt up the slanting stick still held down by the left hand; finally, hitch the middle notch of the stretcher in the upright, with its front notch facing upwards, then bring the lower end of the slanting stick down to this front notch, drop it in, and the trap is set. Of course, it requires that each part shall be carefully adapted to the others, but when the trap is seen set it will be readily understood, practice being, however, required to set it properly.
A bait is tied to the outer end of the stretcher, and a stone is placed so it lies flat on the ground. The whole setup is ready for use, and here’s how it works: Lift the stone and hold it up with the notched end of the slanting stick in your left hand, the notch facing down. Then, place the upright so one end is on the ground and the other sits in this notch, allowing it to bear the weight of the stone, which will tend to lift the slanting stick that you’re still holding down. Finally, hook the middle notch of the stretcher onto the upright with its front notch facing up, then lower the ends of the slanting stick down to this front notch, drop it in, and your trap is set. Each piece needs to be carefully adjusted to fit the others, but once you see the trap set, it’ll make sense; however, it does take some practice to set it up correctly.
I quite agree with "High Elms" that the footed upright is an improvement; but I am inclined to doubt the advantage of the double notch between the upright and the stretcher. I have tried both, and I cannot find that there is any great superiority in his plan; but, perhaps, though I have exactly followed his directions as given in the Field, I may have omitted some point of practical importance. In setting the Figure of 4 trap, the height of the upright and the size and weight of the stone will be proportioned to the animal for which it is set. I do not like the trap myself, as it cannot be concealed so well as the steel trap, and, indeed, has no advantage except in cheapness. Dozens of them may be set in the woods, and if stolen little harm is done, as the cost is barely a penny apiece if made in large numbers. I have also known pheasants caught by the head and killed in them, the flesh with which they are baited being often attractive to tame-bred birds, which usually are fed with more or less of it in their rearing.
I completely agree with "High Elms" that the footed upright is an improvement; however, I'm not sure about the usefulness of the double notch between the upright and the stretcher. I've tried both, and I don't see any significant advantage in his design. But maybe, even though I followed his instructions as listed in the Field, I missed some practical detail. When setting the Figure of 4 trap, the height of the upright and the size and weight of the stone should match the animal it’s intended for. Personally, I don't like the trap because it can't be hidden as well as the steel trap, and honestly, it only has the benefit of being cheap. You can set dozens of them in the woods, and if they get stolen, it’s not a big deal since they cost just about a penny each when made in bulk. I've also seen pheasants caught by the head and killed in them, as the bait typically used can often attract domesticated birds, which usually get fed with some of it while they're being raised.
Mr. G. S. Purden has informed me that he has succeeded in capturing birds alive with this trap by hollowing out the ground where the stone falls.
Mr. G. S. Purden told me that he has successfully caught birds alive using this trap by digging out the ground where the stone lands.
Another "deadfall" for taking capercailzie in Norway is described by Mr. Yarnell in his "British Birds":
Another "deadfall" for capturing capercaillie in Norway is described by Mr. Yarnell in his "British Birds":
"Where the trees grow thickly on either side of a footpath, two long pieces of wood are placed across it; one end of these rests on the ground, the other being raised a foot and a half, or somewhat more, from the surface, and supported by a piece communicating with a triangular twig, placed in the centre of the path, and so contrived that on being slightly touched the whole fabric falls; a few stones are usually placed upon the long pieces of wood to increase the rapidity of the drop by the additional weight. Birds running along the footpath attempt to pass beneath the barrier, strike the twig, and are killed by the fall of the trap."
Where the trees grow densely on both sides of a trail, two long pieces of wood are laid across it; one end rests on the ground while the other is raised about a foot and a half or a bit more above the ground, supported by a piece connected to a triangular twig in the center of the path. This arrangement is designed so that when it's nudged, the entire setup collapses. A few stones are usually placed on the long pieces of wood to increase the drop speed by adding extra weight. Birds walking along the path attempt to pass under the barrier, hit the twig, and get caught by the trap that falls down.
Taking birds by means of bird-lime is my next consideration. Bird-lime is made either from boiled oil or from holly-bark, but the making of it is not "worth the candle," it being so easily bought from any professional bird-catcher.
Catching birds with bird-lime is my next topic. Bird-lime is made from either boiled oil or holly bark, but it's not worth the trouble to make it yourself since you can easily buy it from any professional bird catcher.
To those who wish to make their own, I commend the following: Take half a pint of linseed oil and put it into an old pot, or any vessel that will stand the fire without breaking. The vessel should not be more than one-third full. Place it over a slow fire and stir it until it thickens as much as required. This can be ascertained by cooling the stick in water and trying if it will stick to the fingers. When sufficiently boiled, pour into cold water, and it will be found ready for use.
To anyone looking to make their own, I recommend the following: Take half a pint of linseed oil and put it into an old pot or any container that can handle heat without breaking. The container should be no more than one-third full. Place it over a low flame and stir it until it thickens to your liking. You can check if it's thick enough by cooling a stick in water and seeing if it will stick to your fingers. Once it's boiled to the right consistency, pour it into cold water, and it will be ready to use.
I have submitted the foregoing to a practical birdcatcher and maker of bird-lime, and he has "passed" it as correct, only adding that the oil takes somewhere about four hours to slowly boil before it becomes sufficiently tenacious for use. Holly-bark he does not believe in, as he says it takes too long to make; but that is no reason why we should pass over bird-lime made from this substance. The "Encyclopaedia Britannica" says:
I’ve shared the above with a seasoned birdcatcher and bird-lime maker, and he has confirmed it’s accurate, only mentioning that the oil needs to slowly boil for about four hours before it’s sticky enough to use. He doesn’t believe in using holly bark, saying it takes too long to prepare; however, that doesn’t mean we should disregard bird-lime made from this material. The "Encyclopaedia Britannica" states:
"It is usually prepared by boiling holly-bark ten or twelve hours, and when-the green coat is separated from the other it is covered up for a fortnight in a moist place; then pounded into a rough paste, and washed in a running stream till no motes appear. It is next put up to ferment for four or five days, and repeatedly skimmed. To prepare it for use, a third part of nut oil or thin grease must be incorporated with it over the fire."
"It's typically made by boiling holly bark for ten to twelve hours. When the green layer separates from the rest, it’s kept covered in a damp place for two weeks. Then, it’s pounded into a rough paste and washed in running water until there are no visible particles. Next, it’s set aside to ferment for four or five days, with regular skimming. To prepare it for use, you need to mix in one-third nut oil or thin grease while heating it."
Bird-lime can also be made from many other plants, but the best quality is made by either of the two methods mentioned above.
Bird-lime can also be made from different plants, but the best quality comes from either of the two methods mentioned above.
The "Edinburgh Encyclopaedia" says further that —
The "Edinburgh Encyclopaedia" also says that —
When bird-lime is about to be applied to use, it should be made hot, and the rods or twigs should be warmed a little before they be dipped in it. Where straws and cords are to be limed it should be very hot, and after they are prepared they should be kept in a leather bag till used. In order to prevent bird-lime from being congealed by cold, it should be mixed with a little oil of petroleum; and, indeed, before the common kind can be used at all, it must be melted over the fire with a third part of nut oil or any thin grease, if that has not been added in the preparation.
When you're ready to use bird-lime, you should heat it up and warm the rods or twigs a bit before dipping them in. If you're using straws or cords, the bird-lime needs to be really hot, and after preparing them, keep them in a leather bag until you're ready to use them. To prevent the bird-lime from hardening in the cold, mix in a little petroleum oil. In fact, before you can use the regular kind, it needs to be melted over the fire with one-third nut oil or any light grease, if that hasn't been mixed in during preparation.
The smaller kinds of birds are frequently taken with bird-lime, which is one of the most eligible modes in frost or snow, when all sorts of small birds assemble in flocks, and which may be used in various ways. Put the bird-lime into an earthen dish, with the addition of one ounce of fresh lard to every quarter-pound of bird-lime, and melt the whole gently over the fire. Take a quantity of wheat ears, with a foot of the straw attached to thorn, and, having warmed the lime, that it may spread the thinner, lime about six inches of the straw from the bottom of the ears. Scatter a little chaff and thrashed ears over a compass of twenty yards; stick the limed straws into the ground, with the ears inclining downwards, or even touching the surface; traverse the adjoining places in order to disturb the birds, and make them fly towards the snare, and, by pecking at the ears of corn, they will become so entangled with the limed straw as to be easily taken by the hand.
The smaller types of birds are often caught with bird-lime, which is one of the best methods in frost or snow, when all kinds of small birds gather in flocks. It can be used in different ways. Put the bird-lime in a clay dish, adding one ounce of fresh lard for every quarter-pound of bird-lime, and gently melt the mixture over the fire. Take some wheat ears with a foot of straw attached, and after warming the lime to make it easier to spread, coat about six inches of the straw from the bottom of the ears with the lime. Scatter a little chaff and thrashed ears over a twenty-yard area; stick the limed straws into the ground with the ears leaning downwards or even touching the surface. Move around the nearby areas to disturb the birds and encourage them to fly towards the trap, and as they peck at the ears of corn, they will get stuck in the limed straw, making them easy to catch by hand.
The lime may also be applied to cords, rods, and twigs, especially when it is intended to entangle the larger birds, such as snipes and fieldfares, and for this purpose the following mode may be adopted: Take the main branch of any bushy tree, with long, straight, and smooth twigs, such as the willow or birch, clear the twigs from every notch and prickle, lime the branches to within four fingers of the bottom, leaving the main bough from which the others rise untouched by the composition, and then place the bush where the birds resort. For small birds two to three hundred single twigs, about the thickness of a rush and three inches in length, may be stuck in sheaves of flag and corn.
The lime can also be used on cords, rods, and twigs, especially if the goal is to catch larger birds like snipes and fieldfares. For this, you can follow this method: Take the main branch of any bushy tree with long, straight, and smooth twigs, like a willow or birch. Remove any notches and prickles from the twigs, apply lime to the branches up to about four fingers from the bottom, leaving the main bough untouched, and then place the bush where the birds gather. For small birds, you can use two to three hundred single twigs, around the thickness of a rush and three inches long, sticking them in bundles of flag and corn.
In hot and dry weather the twigs may be placed around the rivulets, ditches, and pools to which the birds come for drink, covering the waters at the same time with brushwood, so that they can have no access to quench their thirst, except at the spot where the twigs are fixed. For this purpose the rods or twigs should be about a foot in length, limed to within two inches of the thickest end, which is stuck into the bank in such a manner that they may lie within two fingers' breadth of the ground, and as the birds do not alight at once upon the place where they are to drink, but gradually descend from the higher trees to the lower, thence to the bushes, and lastly to the bank, it is useful to fix a few branches about a fathom from the water in a sloping direction, with a few lime twigs fastened upon them on which the birds will as frequently be caught as on those which are placed nearer to the water. The best time for this sport is from ten to eleven in the forenoon, from two to three in the afternoon, and about an hour before sunset, when the birds come to the watering places in flocks before they retire to roost.
In hot, dry weather, you can place twigs around the streams, ditches, and pools where birds come to drink, covering the water with brushwood so they can only access it where the twigs are placed. For this, the sticks should be about a foot long, coated with lime up to two inches from the thicker end, which should be stuck into the bank so they lie within two fingers' width of the ground. Since birds don’t land directly at their drinking spot but gradually come down from higher trees to lower ones, then to bushes, and finally to the bank, it's helpful to place a few branches about a fathom from the water in a sloping position, with some lime-coated twigs attached to them. Birds will often be caught on these as well as on those closer to the water. The best times for this are from ten to eleven in the morning, from two to three in the afternoon, and about an hour before sunset, when birds come in flocks to drink before heading to their roosts.
The application of bird-lime is of ancient origin, and is practised in many countries. Pennant gives an account of how to take Small birds by liming twigs around a stuffed or tethered live owl. I have heard of this plan being adopted, but have not tried it myself. From the curious manner in which small birds usually mob an owl, I should fancy it would succeed.
Using bird-lime is an age-old practice and is found in many countries. Pennant describes how to catch small birds by covering twigs with bird-lime near a stuffed or secured live owl. I’ve heard of people using this technique, but I haven't attempted it myself. Considering how small birds usually flock around an owl, I believe it would be effective.
According to Folkard's "Wildfowler:"
According to Folkard's "Wildfowler":
"There was also a method much in vogue previously to the invention and discovery of decoys, of taking wild fowl with lime strings made of packthread or string, knotted in various ways and besmeared with birdlime; these were set in rows about fens, moors, and other feeding haunts of the birds, an hour or two before morning or evening twilight. This plan was to procure a number of small stakes, about 2 ft. in length, sharpened to a point at the nether end, and forked at the upper. These were pricked out in rows about a yard or two apart, some being placed in a slanting direction, and each stake siding one with another, within convenient distances of 4 yds. or 5 yds., so as to bear up the strings, which were laid upon the crutches, and placed loosely about 18 in. above the ground. The lime strings were thus drawn from stake to stake in various directions, and lightly placed between the forks at the top of the stakes, some rows being higher than others; and in this manner the whole space occupied by the stakes was covered with lime strings, as if carefully laid in wave-like coils, or placed in different directions, the ends being secured to the stakes with slip-knots, so that upon a light strain the whole of any string which might be touched by the bird became instantly loose, and, sticking to the feathers, the more it struggled to free itself, so much the more the string twisted about it, and thus the bird was quickly entangled, and became an easy prey. In this manner numbers of wild fowl of the largest species were taken at night at the moment of sweeping over the ground at very slow flight, just before alighting; and it would appear that this method of fowling was particularly successful in taking plovers, which generally alight on the ground thickly congregated together.
Before decoys were invented, a common way to catch wild birds involved using lime strings made from thread or string, tied in different ways and coated with birdlime. These were set up in rows around wetlands, moors, and other feeding areas for birds, an hour or two before dawn or dusk. The plan required several small stakes, about 2 feet long, sharpened at one end and forked at the top. They were arranged in rows about a yard or two apart, with some set at an angle, ensuring each stake was spaced about 4 to 5 yards apart to hold the strings, which were positioned roughly 18 inches above the ground. The lime strings were stretched from stake to stake in various directions, lightly resting between the forks at the top of each stake, with some rows higher than others. This setup covered the entire area occupied by the stakes with lime strings, arranged in wave-like coils or different directions, with the ends secured to the stakes using slip-knots. When a bird touched any of these strings, a light tug would cause the string to loosen, and as the bird struggled to escape, the string would wrap more tightly around its feathers, quickly entangling it and making it an easy target. This method effectively captured many large wild birds at night as they slowly descended just before landing. It seemed especially successful for catching plovers, which typically land in groups close together.
A similar method was employed for taking wild fowl with lime strings placed over the surface of rivers and ponds frequented by those birds, and apparently with remarkable success. For this purpose it was necessary to procure a waterproof bird-lime wherewith to dress the strings, which were knotted in a similar manner to those employed for taking birds on land. The strings so prepared were in serpentine coils from stake to stake, the stakes being forked at the top, and of similar form to those last described, but of sufficient length to reach the bottom of the water and obtain a firm fixing in the mud. Some of the stakes were placed on the banks of the water or in any manner so that the lime strings could be drawn across and about the surface in different directions, resting here and there on some or other of the stakes or any boughs or overhanging trees, in such a way that the birds, when in the act of alighting on the water at night, might strike against the lime strings and become therein entangled.
A similar method was used to catch wild birds using lime strings set over the surface of rivers and ponds that those birds often visited, apparently with great success. To do this, it was necessary to get a waterproof bird lime to coat the strings, which were tied in the same way as those used to catch birds on land. The prepared strings were set in serpentine loops from stake to stake, with the stakes forked at the top and shaped similarly to those previously mentioned, but long enough to reach the bottom of the water for a firm grip in the mud. Some stakes were placed on the banks of the water or arranged so that the lime strings could be pulled across the surface in different directions, resting on various stakes or branches of overhanging trees, so that when the birds landed on the water at night, they would hit the lime strings and get caught in them.
The principal secret of success in this and the preceding device was that of placing the lime strings in shaded places over the most assured haunts of the birds; and it was only obtainable on dark nights, or in good shade, for whenever there was sufficient light for the birds to see the least sign of the snare spread for them the fowler had no chance of making any captives. (And be sure to take this caution not to use these strings in moonshine nights, for the shadow of the line will create a jealousy in the fowl, and so frustrate your sport.) And as wildfowl in their descent, just before alighting on the water, diverge from their accustomed angular figure, and spread themselves more in a broad front line, a whole flight sometimes comes swooping into the fowler's snare all at once."
The key to success in this method and the earlier one was placing the lime strings in shaded areas where birds would typically gather. This technique was only effective on dark nights or in good shade because if there was enough light for the birds to see even the slightest indication of the trap, the hunter had no chance of catching any. (And remember, don’t use these strings on moonlit nights, as the shadow of the line will make the birds suspicious and ruin your efforts.) As wildfowl approach the water to land, they often change their usual arrangement, spreading out into a wider formation, which means a whole flock can sometimes end up caught in the hunter's trap all at once.
A method of trapping, with the assistance of bird-lime, might, I think, be tried with some chance of success. It is to insert a piece of fish in a cone of paper well smeared with bird-lime, and to throw down a few of these prepared cones in places accessible to gulls, herons, and such birds, who, in attempting to seize the fish, would be effectually hoodwinked, and thus easily secured.
I think we could try trapping using bird-lime, which might be effective. The plan is to place a piece of fish in a paper cone that’s heavily coated with bird-lime, and then drop a few of these prepared cones in areas accessible to gulls, herons, and similar birds. When they go for the fish, they'll get fooled and can be easily captured.
Hawking, by which birds are captured by trained falcons, is of the highest antiquity. Pennant mentions that the Saxon King Ethelbert (who died in 760) sent to Germany for a cast of falcons to fly at cranes (herons?). As this sport has now fallen into disuse, I must refer my readers for particulars to Blaine, Daniel, Freeman, Harting, Captain Dugmore, and to occasional articles by one or two modern falconers in the columns of the Field.
Hawking, where trained falcons catch birds, is an ancient practice. Pennant notes that the Saxon King Ethelbert (who died in 760) sent to Germany for a group of falcons to hunt cranes (or herons?). Since this sport has mostly fallen out of favor now, I recommend my readers check out the details in the works of Blaine, Daniel, Freeman, Harting, Captain Dugmore, and some occasional articles by a couple of modern falconers in the columns of the Field.
The infinite variety of nets used in the capture of various birds requires almost a chapter by itself; but it will suffice for the present one if we mention those most generally used, or the most striking varieties. First, then, comes the ordinary "clap-net" of the London and provincial bird-catchers. The "Edinburgh Encyclopaedia" says, with regard to clap-nets:
The endless range of nets used to catch different birds deserves almost a whole chapter on its own; however, for now, it’s enough to highlight the most commonly used ones or the most notable types. First, we have the standard "clap-net" used by bird catchers in London and the countryside. The "Edinburgh Encyclopaedia" states the following about clap-nets:
"Birds are also taken with nets during the day, and especially in those seasons of the year when they change their situation; in the month of October, for instance, when the wild birds begin to fly, and in March, when the smaller kinds assemble for pairing. They are chiefly on the wing from daybreak to noon, and always fly against the wind. The birdcatchers, therefore, lay their nets towards that point to which the wind blows. The nets employed in this way are generally 12.5 yds. long and 2.5 yds. wide, and are spread on the ground parallel to each other, in such a manner as to meet when turned over. They are provided with lines, fastened in such a way that, by a sudden pull, the birdcatcher is able to draw them over the birds that may have alighted in the space between those parallel sides. In order to entice the wild birds to alight amongst the nets, call birds are employed, of which there must be one or two of each of the different kinds which are expected to be caught, such as linnets, goldfinches, greenfinches, etc.. Besides the call birds there are others denominated flur birds, which are placed upon a moveable perch within the net, called a flur, and which can be raised or depressed at pleasure, and these are secured to the flur by means of a brace or bandage of slender silk strongly fastened round the body of the bird. The call birds are deposited in cages at a little distance from the nets, and as soon as they see or hear the approach of the wild birds, which they perceive long before it can be observed by the birdcatcher, they announce the intelligence from cage to cage with the greatest appearance of joy, and they proceed to invite them to alight by a succession of notes or short jerks, as they are termed by the birdcatcher, which may often be heard at a considerable distance. The moment that the call is heard by the wild birds they stop their flight and descend towards the net, and so great is the ascendancy and fascination of the call birds that they can induce the others to return repeatedly to the nets till every bird in the flock be caught."
Birds are also caught with nets during the day, especially during certain times of the year when they move to new locations. For example, in October, when wild birds start migrating, and in March, when smaller species gather to mate. They typically fly from dawn until noon and always against the wind. Because of this, birdcatchers set their nets in the direction the wind is blowing. The nets used this way are usually 12.5 yards long and 2.5 yards wide, arranged on the ground parallel to each other so they can meet when flipped over. They are fitted with lines that allow the birdcatcher to quickly pull them over the birds that land in the space between the parallel sides. To lure the wild birds to land among the nets, call birds are used, with one or two from each type expected to be caught, like linnets, goldfinches, greenfinches, etc. In addition to the call birds, there are flur birds, which are placed on a movable perch inside the net called a flur, allowing them to be raised or lowered at will. These birds are secured to the flur with a thin silk band tightly fastened around their bodies. The call birds are kept in cages a bit away from the nets, and as soon as they see or hear the wild birds approaching—something they can sense well before the birdcatcher—they share the news from cage to cage with great excitement, inviting the others to land with a series of notes or quick movements, as the birdcatcher refers to them, which can often be heard from far away. The moment the wild birds hear the call, they stop flying and head toward the net, and the appeal of the call birds is so strong that they can make the others return to the nets repeatedly until every bird in the flock is caught.
Being somewhat afraid that this description would not meet all the practical requirements of the case, and knowing myself but little or nothing of this mode of birdcatching, I thought it advisable to interview a practical man. Having at last succeeded in capturing a specimen of the genus homo, species birdcatcher, I prevailed upon him (through the medium of a tip) to impart his stock of birdcatching lore, and to cut me patterns of play-sticks and pegs, and also to correct my rough sketches when necessary.
Feeling a bit unsure that this description would cover all the practical aspects of the situation, and knowing very little about this method of birdcatching, I thought it would be best to talk to someone with real experience. After finally managing to find a birdcatcher, I persuaded him (with a little encouragement) to share his knowledge of birdcatching and to show me designs for play-sticks and pegs, as well as to help me improve my rough sketches when needed.
The sum and substance of my interview is as follows: The nets, which are of two pieces, are each about twelve yards long by two-and-a-half yards wide, and are made with a three-quarter mesh of what is technically called two-thread. The staves at each end, to which the nets are permanently attached, are made of red deal, ferruled and jointed at the middle, in the manner of a fishing rod, for the convenience of carriage. The length of each when put together is about five feet six inches, being thus shorter than the width of the net. This, it will be readily observed, allows for the bagging of the net — an important particular, as, if the nets were strained tight with no allowance made for bagging, the birds would flutter along the ground until they got out at one end or the other. As it is, they roll themselves up in the meshes, and effectually entangle themselves while attempting to escape.
The main points of my interview are as follows: The nets, which come in two pieces, are each about twelve yards long and two-and-a-half yards wide, made with a three-quarter mesh of a material known as two-thread. The poles at each end, to which the nets are permanently attached, are made of red deal wood, connected and jointed at the middle like a fishing rod for easy transport. When assembled, each pole is about five feet six inches long, making them shorter than the width of the net. This design allows for the net to bunch up, which is crucial because if the nets were stretched tight without room for bagging, the birds would just flutter along the ground until they managed to escape at one end or the other. As it stands, they get tangled up in the mesh and end up ensnared while trying to break free.
A strong line, called the top line, made of clock line, passes the whole length of each net, and is protracted some feet past the staves at either end. A similar line runs along the bottom made of three-thread or whip thread. This is called the bottom line. There are then two unattached cords of some strength, called the pull line and the forked line, which latter is attached, when required for use, to the two staves nearest the birdcatcher, at the intersection of the top line.
A strong line, called the top line, made of clock line, runs the entire length of each net and extends a few feet beyond the ends of the staves. A similar line runs along the bottom made of three-thread or whip thread. This is called the bottom line. There are also two separate cords of some strength, known as the pull line and the forked line, with the latter being attached when needed to the two staves closest to the birdcatcher at the point where the top line intersects.
Eight pegs are used, made of hard wood, generally ash, four of which are called the "chief pegs." The whole of the pegs are notched, for the convenience of attaching a line.
Eight pegs are used, made of hardwood, usually ash, four of which are referred to as the "chief pegs." All of the pegs are notched for easy line attachment.
The method of laying the clap-net is best described with the aid of a drawing (vide Fig. 5).
The method of laying the clap-net is best explained with the help of a drawing (see Fig. 5).
The first thing to be done is to lay down the right-hand net, and to drive in the two chief pegs where shown, namely, at the bottom of the staves, to which they are attached by a loop of strong cord, acting as a hinge. The two end pegs are then driven in the ground at some little distance from and in an exact line to the chief pegs. The bottom line is then made fast at each end, as also the continuation of the top line. The two pegs, lines, and staff thus forma triangle at each end. The other net is then laid in such a manner that when both are pulled over, one net shall overlap the other to the extent of six inches. It is then turned back and pegged down in the same way as the right-hand net. The next operation is to tie the forked line to each top end of the staves, a nick being cut in each for this purpose.
The first step is to set up the right-hand net and drive in the two main pegs as indicated, at the bottom of the staves, where they are secured with a loop of strong cord that serves as a hinge. The two end pegs are then placed in the ground at a slight distance from and in a straight line with the main pegs. The bottom line is secured at each end, as is the continuation of the top line. The two pegs, lines, and staves together form a triangle at each end. The other net is then laid out so that when both nets are pulled over, one overlaps the other by six inches. It is then folded back and secured in the same way as the right-hand net. The next step is to tie the forked line to the top ends of the staves, with a notch cut in each for this purpose.
Exactly in the centre of the forked line the pull line is knotted, at the other end of which the birdcatcher stands at varying distances, according to the bird he wishes to catch; for instance, for linnets or goldfinches, thirty to forty yards; for starlings a greater distance is required; or to capture these wary birds a better plan is to place the nets in one field while you retire into another, bringing the pull line through an intervening hedge.
Exactly in the center of the split line, the pull line is tied, at the other end of which the birdcatcher stands at different distances, depending on the bird he wants to catch; for example, for linnets or goldfinches, it’s thirty to forty yards; for starlings, a greater distance is needed; or to catch these cautious birds, a better strategy is to set the nets in one field while you move back into another, bringing the pull line through a nearby hedge.
Cages containing birds are dispersed about on the outer edges of the nets, the best, or call birds, being placed farther away; in fact, my informant thinks that if all the cages were placed a moderate distance away from the nets it would be better, as he has found that the usual red or green cages have been the means of "bashing "--i.e., frightening — the wild birds away from the nets.
Cages with birds are spread out on the outskirts of the nets, with the best or call birds placed farther away. In fact, my source believes that if all the cages were positioned at a reasonable distance from the nets, it would be more effective. He has observed that the typical red or green cages have been causing the wild birds to get scared and fly away from the nets.
 Fig. 5 —
PLAN AND METHOD OF SETTING CLAP-NET.
Fig. 5 —
PLAN AND METHOD OF SETTING CLAP-NET."When doctors differ, who shall decide?"
"When doctors disagree, who will make the final call?"
On mentioning the above to another birdcatcher he gave a huge snort of dissatisfaction, and roundly swore that my man knew "nought about it," for he always set his cages as near the nets as possible; "for don't it stand to reason," quoth he, "that if you set your cages fur away, your 'call birds' will 'tice the wild 'uns down round 'em? an' they won't come near your nets."
On bringing this up to another birdcatcher, he let out a loud snort of dissatisfaction and firmly declared that my guy didn't know "anything about it," because he always placed his cages as close to the nets as possible. "Doesn't it make sense," he said, "that if you set your cages too far away, your 'call birds' will attract the wild ones around them? And they won't come close to your nets."
An important actor in the performance is the "play-bird," which is a bird braced by a peculiar knot or "brace," as shown in Fig. 6, on an arrangement called the play-stick.
An important part of the performance is the "play-bird," which is a bird secured by a unique knot or "brace," as shown in Fig. 6, on a setup called the play-stick.
The "play-stick" is resolvable into three parts, Fig. 7 being the ground peg, formed of a piece of hard wood about six inches long, having a round hole bored through close to the top, through which the "play-line" passes. Immediately underneath is a square slot for the reception of a piece of brass tube beaten flat at one end (Fig. 8), while the other end is left open for the reception of the "play-stick" (C, Fig. 9), simply a rough twig or piece of hard wood, upon which the bird is tied by the "brace" (Fig. 6) — which is constructed, as shown in drawing, by doubling a piece of string, tying a knot in the centre and then joining the ends. The head and body of the bird is thrust through, so that a loop catches it on each side and in front of the wings, the legs and tail being thrust through the other, one loop coming on each side of the body behind the wings. A swivel is attached at one of the knots, and, by another piece of string, is made fast to the play-stick near its end. The bird is thus perfectly free so far as the wings and legs are concerned.
The "play-stick" can be broken down into three parts. Fig. 7 shows the ground peg, which is made from a piece of hard wood about six inches long and has a round hole drilled close to the top for the "play-line" to pass through. Right underneath it is a square slot that holds a piece of brass tube flattened at one end (Fig. 8), while the other end remains open to fit the "play-stick" (C, Fig. 9), which is just a rough twig or piece of hard wood where the bird is attached using the "brace" (Fig. 6). The brace is made by folding a piece of string, tying a knot in the center, and then connecting the ends. The head and body of the bird are passed through so that a loop catches it on each side and in front of the wings, while its legs and tail go through the other loop, which comes around each side of the body behind the wings. A swivel is attached to one of the knots and is secured to the play-stick near its end with another piece of string. This setup allows the bird to move freely with its wings and legs.
 Fig. 6, 7 &
8 — "Play-stick" parts
Fig. 6, 7 &
8 — "Play-stick" partsThe "play-stick," as a whole, is represented in Fig. 9, which shows the bird in repose, with the end of the stick (C) resting on the ground, the play-line passing through a hole in the ground peg (A), while the part marked B works in the slot in the same.
The "play-stick," as a whole, is shown in Fig. 9, which depicts the bird at rest, with the end of the stick (C) touching the ground, the play-line going through a hole in the ground peg (A), while the section marked B moves in the slot of the same.
A little food and water are put down by the play-bird's side, to which it addresses itself in its intervals of rest. Directly birds appear, the play-line is smartly pulled, which has the effect of jerking the play-bird upwards, while at the same time it flutters its wings to regain its perch. This motion is mistaken by the wild birds as a natural proceeding; they accordingly alight around the play-bird, to assist it in feeding. The pull-line of the net is then smartly jerked, which causes the forked-line to fly inwards, and, acting on the hinged pegs and top and bottom lines as by a lever, the staves rise from the outside, become perpendicular, and finally fall over, inclosing all within the open space in the nets.
A little food and water are placed beside the play-bird, which it uses during its
 Fig. 9 —
"FLUR" OR "PLAY-STICK."
Fig. 9 —
"FLUR" OR "PLAY-STICK."The "Play-bird" is always placed on the left hand of the birdcatcher, about two yards into the net. Sometimes more than one play-stick and bird are used; all are, however, played by the same string. The best birds are, however, contrary to my expectations, not used, as the constant pulling up and down, to say nothing of the worry of the falling nets, very soon kills the poor little "play-bird." From Michaelmas to Christmas would appear to be the best times for catching.
The "Play-bird" is always positioned on the left side of the birdcatcher, about two yards into the net. Sometimes more than one play-stick and bird are used; however, they are all controlled by the same string. The best birds, contrary to what I expected, are not used because the constant pulling up and down, not to mention the stress from the falling nets, quickly wears out the poor little "play-bird." From Michaelmas to Christmas seems to be the best times for catching.
Many rare birds not calculated on by the operator, are procured in this way. I allude to hawks, which constantly dash at the call, or play-birds, of the netsman. I remember seeing, taken in a lark net on the racecourse of Corfu — one of the Ionian Isles — a most beautiful male specimen of the hen harrier (Circus cyaneus, Macg.); and here in England I have received, within the last few years, one great grey shrike (Lanus excubitor, L.), four or five hobby hawks (Falco subbuteo, L.), a dozen or more merlins (Falco oesalon, Tunstall), and a great number of sparrowhawks, and kestrels, all captured by this method.
Many rare birds not accounted for by the operator are captured this way. I'm talking about hawks that constantly respond to the call, or play-birds, of the netsman. I remember seeing a stunning male specimen of the hen harrier (Circus cyaneus, Macg.) caught in a lark net on the racecourse in Corfu — one of the Ionian Isles. Here in England, in the last few years, I've received one great grey shrike (Lanus excubitor, L.), four or five hobby hawks (Falco subbuteo, L.), a dozen or more merlins (Falco aesalon, Tunstall), and many sparrowhawks and kestrels, all captured using this method.
Draw-nets are those used by fen-men and others at night for taking lark, snipe, plover, etc.., by dragging a long net of a certain construction over the fields and swamps. The actual originator of this method of capture as applied to snipe and such birds, appears to have been Mr. Daniel himself (vide "Rural Sports," vol. 3, p. 179).
Draw-nets are the ones used by fen-men and others at night to catch larks, snipe, plover, etc., by dragging a long net designed for this purpose over fields and swamps. It seems that the original creator of this technique for capturing snipe and similar birds was Mr. Daniel himself (see "Rural Sports," vol. 3, p. 179).
Glade nets, which are nets stretched in narrow glades or ridings in woods from tree to tree, are used chiefly for taking night-flying birds, such as woodcocks, or wild ducks. Folkard thus describes their use:
Glade nets, which are nets stretched in narrow clearings or paths in forests from tree to tree, are mainly used for catching night-flying birds, like woodcocks or wild ducks. Folkard describes how they are used this way:
"The proceedings connected with the use of glade nets appear to be very simple. These nets are of lengths and breadths proportioned to the places in which they are suspended. They are simply pieces of fine thread netting, edged with cords adapted to the extent of the lint. The glade net so formed is suspended between two trees, directly in the track of the woodcock's flight. Both the upper and lower corners have each a rope attached to them which, as regards the upper part of the net, is rove through sheaves, iron rings, or thimbles fastened to the trees on either side at the top of the glade at a moderate height, varying from ten to twelve or fifteen feet. The falls of the two upper ropes are joined or so adjusted that they form a bridge, to the central part of which a rope is attached of several yards in length, which the fowler holds in his hand in a place of concealment, and thus commands full power over the net, being able to drop it down suddenly and intercept the flight of any birds which may attempt to escape through the glade; or he can draw it up as suddenly from the ground to a perpendicular position. A stone, of about 5 lb. weight, is attached to each of the lower cords of the net, so that when the fowler lets go his controlling rope the weight of the stones forces the lower part of the net down in an instant with a strong fall, and, at the same time, they draw up the upper part of the net. The fowler having stationed himself in such a position as to command a full view of the glade in which his net is placed, beaters are employed to flush the cocks from their retreats; immediately on one or more flying in the direction of the fowler a signal is given, and just as the bird approaches the net it is suddenly let down or drawn up, when the woodcock, flying forcibly against it, is immediately ensnared. The instant the birds have struck the net the fowler lets go another rope, which is generally looped to a stake within reach of his arm, and the whole net, with the birds entangled, then drops to the ground. In forcing themselves forward in their endeavour to escape they form the net into a sort of bag, which makes their capture more certain."
Using glade nets is a pretty simple process. These nets are made to fit the areas where they’re placed. They consist of fine thread netting, with edges made from cords that are the same width as the lint. The glade net is hung between two trees, right in the path of the woodcock's flight. Both the top and bottom corners are attached to ropes; for the upper part, these ropes pass through pulleys, iron rings, or thimbles fixed to the trees at the top of the glade, usually about ten to fifteen feet high. The ends of the two upper ropes are connected to form a bridge, to which a long rope is attached. The fowler holds this rope from a hidden spot, giving him complete control over the net—he can quickly drop it to catch any birds flying through the glade or pull it up just as quickly into a vertical position. Each of the lower net cords has a stone weighing around 5 lbs. tied to it, so when the fowler releases his control rope, the stones cause the lower part of the net to drop rapidly, pulling up the upper part at the same time. The fowler positions himself to see the entire glade where the net is set up, and beaters are used to drive the woodcocks out of their hiding spots; as soon as one or more birds fly toward him, he signals, and just as they approach the net, it’s suddenly lowered or raised. This causes the woodcock to hit the net hard, getting caught instantly. When the birds strike the net, the fowler releases another rope, typically looped to a stake within arm’s reach, and the whole net, along with the trapped birds, falls to the ground. In their attempt to escape, the birds create a bag-like shape with the net, making capture even more likely.
Nets are in some parts of the world set under water to procure wild fowl. I remember, when in Norfolk, a gannet being brought in by one of the fishing boats; the bird had become accidentally entangled in one of the nets whilst attempting to rob-it of some fish.
In some parts of the world, nets are set underwater to capture wild birds. I remember a time in Norfolk when a gannet was brought in by one of the fishing boats; the bird had inadvertently gotten caught in one of the nets while trying to snatch some fish from it.
Small nets of a few yards long, made of fine black silk, with a small mesh, are used in some parts of the country for taking kingfishers. These nets are stretched across a small watercourse or the arch of a bridge in such a manner that, a little "slack" being allowed, the bird is taken to a certainty in attempting to pass. So fatal is this net when skilfully set, that I know one man who adds several pounds to his income in the course of a year by taking kingfishers in this manner.
Small nets a few yards long, made of fine black silk with tiny mesh, are used in some areas of the country to catch kingfishers. These nets are stretched across a small waterway or the arch of a bridge in such a way that, allowing a little "slack," the bird is definitely caught when it tries to pass. This net is so deadly when set skillfully that I know one guy who adds several pounds to his income each year by catching kingfishers this way.
For the netting of hawks by a contrivance called the bow net, which was formerly used in England, see Blaine's "Encyclopaedia of Rural Sports."
For catching hawks using a device known as the bow net, which was once used in England, check out Blaine's "Encyclopaedia of Rural Sports."
Many birds (notably sea and rock birds) are to be procured by descending the rocks attached to a stout line. But this highly dangerous work had better not be attempted by the tyro. For an ancient but interesting account of rock fowling in the Orkneys, see Pennant's "Arctic Zoology," page 29. The same system is still adopted on many parts of the coast. In fact, I recollect (when some years ago I visited the Isle of Wight on a collecting expedition) seeing two men with ropes and an iron bar going to the top of the "Bench" (a famous place for sea fowl), and while one man was let down over the edge of the cliff his fellow remained at the top to answer the pull of the "bird-line" and look after the safety of the "man-rope" and iron bar. So fascinating did this appear to me that, having been "between heaven and earth" once or twice before, I volunteered to "go below;" but I found that the fowlers did not care for the risk, or the loss of time, and booty, involved in letting an amateur down.
Many birds, especially sea and rock birds, can be caught by descending the cliffs with a strong line. However, this very dangerous activity is not something beginners should try. For an old but interesting account of rock bird hunting in the Orkneys, check out Pennant's "Arctic Zoology," page 29. The same method is still used in many coastal areas. In fact, I remember when I visited the Isle of Wight a few years ago for a collecting trip, I saw two men with ropes and an iron bar going to the top of the "Bench" (a well-known spot for sea birds). One man was lowered over the edge of the cliff while the other stayed at the top to manage the "bird-line" and ensure the "man-rope" and iron bar were secure. I found this so fascinating that, having been "between heaven and earth" a couple of times before, I volunteered to "go below." But the bird catchers weren't interested in the risks or the time and effort it would take to let a novice down.
It was, indeed, a wonderful sight. I crept as closely as I dared, and lying on my breast looked over the cliff. Hundreds of feet down, the sea, lashed into breakers by the breeze, crept up the steep black rock walls, or tumbled over the half-hidden crags; and yet, though you could see the white war of waters, but the faintest murmur of this battle between land and sea could be heard — below and halfway up, the puffins and guillemots were sitting in rows, or flying off in droves as little black specks on the white foam.
It was truly an amazing sight. I crept as close as I could and lay on my stomach to look over the cliff. Hundreds of feet below, the sea, whipped into waves by the wind, rolled up the steep black rock walls or crashed over the partially hidden cliffs; yet, even though you could see the white fury of the water, you could hardly hear a sound from this battle between land and sea — down below and halfway up, the puffins and guillemots were sitting in rows or flying off in flocks like little black dots on the white foam.
Here I learned that they often baited fish-hooks with offal or pieces of fish, for the purpose of catching the gulls, and this brought to my mind the quantities of robins, thrushes, and such birds I had seen caught by fish-hooks baited with worms and pegged down in the olive groves of the Ionian Sea.
Here, I learned that they often used scraps or pieces of fish to bait hooks in order to catch gulls, which reminded me of the many robins, thrushes, and other birds I had seen caught by hooks baited with worms and secured in the olive groves by the Ionian Sea.
I notice that Pennant mentions that the lapwing is decoyed into nets by the twirling of looking glass. I have seen exactly the same thing myself on the Continent applied to the taking of larks. A cylinder of wood, inlaid with pieces of looking-glass, is fixed 'between two uprights, and made to revolve by means of a small crank and wheel, to which a line is attached. The netsman, retiring to some little distance, keeps the cylinder in constant motion by pulling the line, at the same time keeping up a soft whistling noise with his mouth. The larks flutter over the twirler, and seemingly dazzled, descend on the ground between the nets which are then pulled over in the usual manner.
I see that Pennant talks about how lapwings are trapped in nets by spinning a mirror. I've actually seen the same method used on the Continent to catch larks. A wooden cylinder, decorated with pieces of mirror, is set up between two posts and made to spin using a small crank and wheel attached to a line. The netsman steps back a bit and keeps the cylinder moving by pulling the line while softly whistling. The larks flutter above the spinning mirror and, seemingly captivated, land on the ground between the nets, which are then pulled over in the usual way.
Steel traps are of many shapes and sizes, and are best procured ready made from a good firm, though I have known a few country blacksmiths who could turn them out decently. As everyone knows this, the ordinary "gin," or tooth trap, used for capturing rats or other animals and birds, no description is, I think necessary, further than to say that the springs should be highly tempered, and that the teeth should not be too long. These traps can be set in various places with or without baits — in the water, on the ground, up a tree, or on a post; but post-traps proper, which are chiefly useful, when set unbaited, for catching hawks, are made with an arm and spring at right angles to the plate, so that they may be fastened to the post which supports them. In setting these traps great care and skill are necessary; and in giving directions how to do this properly, I cannot do better than quote "Stonehenge," who says:
Steel traps come in various shapes and sizes, and it’s best to buy them pre-made from a reputable company, although I’ve known a few local blacksmiths who can make them well. Since this is common knowledge, I won’t go into detail about the standard "gin," or tooth trap, used for catching rats or other animals and birds, except to mention that the springs should be well-tempered and the teeth shouldn’t be too long. These traps can be placed in different locations with or without bait—be it in water, on the ground, up a tree, or on a post. However, the specific post traps are particularly effective when set without bait for catching hawks; they’re designed with an arm and spring positioned at right angles to the plate so they can be attached to the post that holds them. Setting these traps requires a lot of care and skill, and to explain how to do this correctly, I can’t do any better than to quote "Stonehenge," who says:
"First lay the trap on the ground, then mark the outline of it, allowing half an inch clear all round; out away the turf to this pattern, and in the centre dig a hole deep enough to receive a strong peg and the chain which fastens the trap to it, which will thus be entirely concealed; drive in the peg, arrange the chain neatly upon this and in the channel for the spring, and then set the trap in its place, temporarily propping up the plate by a piece of twig, which can finally be withdrawn by a string; take care so to out away the turf that the jaws are only just below the level of the ground. Having done this, cut a very thin slice of the turf which was removed to make way for the trap, leaving little more than the grass itself with a ragged edge, and lay this gently on the plate, and withdraw the prop. Then cover the spring in the same way; and, lastly, put some more shreds of grass or leaves over the jaws themselves, but in such a way that the former will not be caught between the teeth when the trap is sprung. When the keeper can do all this so neatly that the trap cannot be discovered by the eye at two or three yards distance, and yet will be sprung by half an ounce weight being placed upon the plate over and above what it has already, and without leaving anything between the jaws, he may be considered a master of his craft. All this should be done with strong leather gloves on the hands, and with as little breathing over the trap as possible. The object of these precautions is to avoid leaving any scent behind, which might alarm the vermin, who are always suspicions of any place where they have reason to believe man has been at work."
First, set the trap on the ground and trace its outline, leaving half an inch of space all around. Cut away the grass to follow this shape, and in the center, dig a hole deep enough to hold a sturdy peg and the chain that secures the trap to it, keeping everything completely hidden. Drive in the peg, neatly arrange the chain on it and in the slot for the spring, and then position the trap, using a twig to temporarily support the plate, which can be pulled out with a string. Be careful to cut the grass so the jaws sit just below ground level. After that, slice off a very thin piece of grass from the area where you removed it, making sure it’s mostly just grass with a ragged edge, and gently place this on the plate before taking out the support. Next, cover the spring in the same way, and finally, add some more bits of grass or leaves over the jaws, ensuring nothing gets caught between them when the trap is triggered. When the trap is set up so well that it can’t be seen from two or three yards away, yet will spring with just half an ounce of weight on the plate, without anything left between the jaws, the keeper can be seen as a master of the trade. All this should be done while wearing strong leather gloves and with minimal breath over the trap. The purpose of these precautions is to avoid leaving any scent behind that might alert the vermin, who are always suspicious of any area where they think a human has been working.
Daniel, in his "Rural Sports," says:
Daniel, in his "Rural Sports," states:
"Otters are taken in an unbaited trap, for they reject every kind of bait, This trap must be placed near his landing place, which will be found by carefully examining the edges of rivers or ponds, either by his spraints, his seal, or the remains of fish (for in whatever place he eats his plunder he always leaves the tail or hinder parts of the fish undevoured). The trap must be set in and covered with mud to prevent his seeing it; the instant the trap "strikes," the otter plunges into the water with it, when its weight, preventing his rising to the surface, soon destroys him. The trap will seldom be drawn more than twenty yards from the spot, and with a grappling iron is soon recovered. If the place where he comes out of the water cannot be discovered, upon the ground where the remains of fish are left, out a hole near the edge of the water, and place a trap or two upon a level with the ground and cover it over carefully with moss."
You can catch otters using an unbaited trap since they won’t go for any kind of bait. Place this trap near their exit point, which you can find by closely inspecting the edges of rivers or ponds for their droppings, tracks, or leftover fish parts (they always leave behind the tails or pieces of fish they don’t eat). The trap needs to be set in and covered with mud so they won’t notice it; once the trap "strikes," the otter dives into the water with it, and its weight keeps it submerged, causing it to drown. The trap usually won’t drift more than twenty yards from the spot and can be quickly retrieved using a grappling iron. If you can’t find where they come out of the water, look for the area where fish remains are left, dig a hole near the water’s edge, and set one or two traps flush with the ground, carefully covering them with moss.
This aqueous method of trapping, is also recommended for taking all birds of the crow tribe. The bait in this case is an egg, so secured that on the bird walking along a prepared pathway to seize the delicacy he springs a concealed trap, and fluttering into deep water drowns by the weight of the attachment.
This water-based trapping method is also recommended for catching all kinds of crows. The bait used is an egg, arranged so that when the bird walks along a specific path to get the treat, it activates a concealed trap, making it fall into deep water and drown because of the weight of the device.
Another method of setting the trap on land for the taking of some animals, which, says Daniel, speaking of the marten (now a rare animal in most parts of England), is a sure way of catching this destructive little animal in a park or covert which is railed in, is to cut a groove in some of the posts or gate posts, in which set an unbaited steel trap, and as they constantly run along the posts and pales early in the morning to dry themselves, in leaping up from the ground upon the place where the trap is set, they are sure to be captured.
Another way to set a trap on land to catch certain animals, which Daniel mentions when talking about the marten (now a rare animal in most parts of England), is an effective method for capturing this destructive little creature in a fenced park or wooded area. You can cut a groove in some of the posts or gate posts and place an unbaited steel trap there. Since they frequently run along the posts early in the morning to dry off, when they jump up from the ground where the trap is set, they are guaranteed to be caught.
Fish is recommended as bait for weasels, polecats, etc.., although I think the best way of trapping such animals is to form an enclosure of brushwood, etc.., in which peg down some live bird, leading two narrow pathways from it from each end and exactly opposite each other, in each of which place an ordinary steel trap, unbaited, concealed in as skilful a manner as possible. The animal running along one of these pathways, to seize his prey, is inevitably trapped. Be sure and have two openings, or this plan will not succeed. Cats may be trapped in this manner.
Fish is suggested as bait for weasels, polecats, and similar animals, but I believe the best way to catch them is to create an enclosure with brushwood, where you can set up a live bird as bait. You should lead two narrow paths from the bird, one at each end and directly opposite each other, and place a standard steel trap in each path, without bait, and hidden as well as possible. When the animal runs along one of these paths to get the bird, it will be caught in the trap. Make sure to have two openings, or this method won't work. You can also catch cats this way.
St. John, in his "Highland Sports," mentions that if a wild cat, or fox, can be killed, and the body placed in the usual haunts of its kind, well surrounded with traps, curiosity or some such feeling will impel them to visit the "dear departed," and in walking round they often succeed in springing the traps, and remaining as mourners in a fashion they did not intend.
St. John, in his "Highland Sports," mentions that if a wild cat or fox is killed and its body is placed in its usual spots, well surrounded by traps, curiosity or some similar instinct will prompt others of its kind to visit the "dear departed." While they wander around, they often end up triggering the traps, unintentionally becoming mourners.
Hawks may be trapped by first capturing their young, and pegging one or more to the ground, and surrounding it or them by concealed traps. This cruel but highly effective way succeeds by reason of the old birds seeing or hearing their young, and attempting to release them.
Hawks can be captured by first catching their chicks and tying one or more to the ground, then surrounding them with hidden traps. This harsh but very effective method works because the adult birds see or hear their chicks and try to free them.
If part of a bird or animal killed by a hawk can be found, a good plan is to allow it to remain, surrounding it also with concealed traps, as they usually return to finish their meal, and that sometimes after the lapse of days.
If you find a part of a bird or animal killed by a hawk, a smart move is to leave it there and set up hidden traps around it, since hawks often come back to finish their meal, sometimes even after several days.
The "box trap" is used for catching many animals for which the ordinary gin is used; but the advantage which it possesses over the latter is that it captures all animals alive, which, in the case of a hare or a rabbit accidentally getting in, is of consequence, as it may be released unhurt, whereas the ordinary steel trap, if accidentally sprung by them, would have killed or maimed them to a certainty. These box traps can be bought ready-made at many places; but, for those who wish to make one themselves, I must refer them for plans and description to Col. Hawker, or "Stonehenge." Almost anything does to bait a gin or box trap with — bits of flesh, fish, offal, half-cooked red herrings, etc.. — and it is a generally understood thing that if half-putrid flesh or entrails of any animal are rubbed over traps or the thorns or bushes placed as entrances to traps, hares and the like will seldom go near.
The "box trap" is used to catch many animals that the regular gin trap is also designed for, but it has the advantage of capturing all animals alive. This is important if a hare or rabbit accidentally enters, as it can be released unharmed. In contrast, a regular steel trap, if triggered by them, would definitely kill or injure them. You can buy box traps ready-made from various places, but for those who want to make one themselves, I recommend checking the plans and description by Col. Hawker or "Stonehenge." You can use almost anything as bait for a gin or box trap—pieces of meat, fish, scraps, half-cooked red herrings, etc. It's commonly understood that if you rub half-rotten meat or animal entrails on the traps or on the thorns and bushes leading to them, hares and similar animals will usually avoid the area.
Of course, a very small trap must be used for small birds, and baited either with seeds, bread, worms, or a small piece of fat meat, which latter is a most tempting bait for the birds of the genus Parus (titmice).
Of course, a tiny trap should be used for small birds, and it should be baited with seeds, bread, worms, or a small piece of fatty meat, which is particularly irresistible for birds of the genus Parus (titmice).
There are several other made traps, such as the trap cage; the best of which has a bird as a decoy partitioned off from the actual trap. This is a useful little trap in some seasons, and is well known, being easily procurable at any of the bird fanciers'.
There are several other traps available, like the trap cage; the best one uses a bird as a decoy, separated from the actual trap. This trap is handy during certain seasons and is well-known, easily found at any bird fancier's shop.
Mr. James Hiam, well known in Worcestershire for his "Notes on Natural History," sends me the following description of his method of trapping bullfinches:
Mr. James Hiam, well known in Worcestershire for his "Notes on Natural History," sends me the following description of his method for trapping bullfinches:
"I find the best way to trap bullfinches is to procure a caged bird, also what is known as a trap-cage, putting the tame bird in the lower part, placing a bunch of blackberries or privet berries in the top part; and hanging the cage against a wall or tree out of the reach of cats. I have reserved a stook of bunches of blackberries by inserting their stems in water, grape-fashion, for a succession of food for bait. I have also caught scores, if not hundreds, on bird-lime, but this injures their plumage and is somewhat troublesome, especially to anyone not accustomed to handle it. I have also caught them in a bat fowling net at night out of thick hedges. I find a trap cage or cages best, for bullfinches generally go in small parties, and I have taken two out at once from two separate cages, while others waited round and were caught afterwards.
I've found that the best way to catch bullfinches is by using a caged bird, also known as a trap cage. You place the tame bird in the bottom part and put a bunch of blackberries or privet berries in the top part. Then, you hang the cage against a wall or tree out of reach of cats. I keep a stash of blackberries by placing their stems in water, like grapes, to ensure I always have bait on hand. I've also caught many, if not hundreds, using bird-lime, but that can damage their feathers and is a bit tricky, especially for someone who isn’t experienced with it. I've also caught them at night in a bat fowling net from dense hedges. I think trap cages are the best method because bullfinches usually come in small groups, and I've managed to catch two at once from separate cages while others waited around and got caught later.
The well-known and easily imitated call of the bullfinch at this season of the year (autumn) appears to have a greater attraction — for what reason I cannot say — than at any other period; there is also a great difference in individual call birds. The best should be selected. When fresh caught, bullfinches are best placed in a low kind of box cage about six inches deep, with wires only on one side. Such cage may be easily made out of a soap box from the grocer's, giving them a good supply of canary and hemp seed and water. If they refuse to eat the seed, which sometimes happens, give a few blackberries or such other food as they feed on at the time; the seed of the dock is always a favourite dish in the winter, and the probability is in a day or two they will take to the seed, which should be strewed over the bottom of the cage."
The well-known and easily imitated call of the bullfinch during this time of year (autumn) seems to be more appealing—I'm not sure why—than at any other time. There's also a significant variation in individual call birds. You should choose the best ones. When freshly caught, bullfinches do best in a low cage about six inches deep, with wires on just one side. You can easily make such a cage from a soap box from the grocery store, providing them with plenty of canary and hemp seed along with water. If they refuse to eat the seed, which can happen sometimes, offer a few blackberries or whatever other food they might be eating at the moment; dock seed is always a favorite during winter, and likely within a day or two they will start eating the seed, which should be scattered across the bottom of the cage.
The nightingale trap (perhaps not quite so well known) is a compromise between the bow net and the spring trap; it is useful for taking most insectivorous birds, is easily made by anyone possessing a little mechanical ability, and is to be bought cheaply at most of the bird shops. As I have been asked, however, by many correspondents in the country, where such things are to be procured, they are informed that in the classic retreat of the Seven Dials — that is to say, in the street running through from Charing Cross to Bloomsbury — are to be found many bird fanciers' shops where the nightingale trap can be procured for something under a couple of shillings.
The nightingale trap (which might not be very familiar) is a combination of the bow net and the spring trap; it works well for catching most insect-eating birds, is easy to make for anyone with some mechanical skill, and can be bought cheaply at most bird shops. Many people in the countryside have asked me where to find one, and they should know that in the well-known area of the Seven Dials — specifically, the street linking Charing Cross to Bloomsbury — there are several shops for bird lovers where the nightingale trap can be purchased for just under a couple of shillings.
In setting all of these traps be sure to touch them with the hands as little as possible, especially if setting a baited trap. Gloves are recommended to be worn, scented with musk when baiting for stoats, weasels, etc.., and with vervain or valerian if baiting for cats.
In setting all of these traps, make sure to handle them as little as possible, especially when baiting a trap. It's recommended to wear gloves, scented with musk when baiting for stoats, weasels, etc., and with vervain or valerian if baiting for cats.
I will proceed now to the consideration of decoys. Decoys are of two classes, fixed and mechanical, or those easily removable and natural. Of the former the most important is what is called a decoy for wild fowl, viz., a large tract of land and water specially fitted up with nets of the sorts most suitable for taking ducks and similar birds, and near which it is unlawful to fire a gun. For a thoroughly exhaustive and interesting article on decoy ponds, see Folkard's "Wild Fowler," pp. 44-94.
I will now talk about decoys. There are two types: fixed and mechanical, or those that are easy to move and natural. The most important fixed decoy is a decoy for wildfowl, which is a large area of land and water specifically set up with nets designed for capturing ducks and similar birds, where it's illegal to shoot a gun. For a detailed and interesting article on decoy ponds, check out Folkard's "Wild Fowler," pp. 44-94.
Some singular and highly original methods of catching birds are described by ancient and modern authors. Pennant, in his "Arctic Zoology," vol. ii, page 550, describes a quaint but doubtful method of decoying wild geese in Siberia; he also, at page 311, records how immense numbers of willow grouse are taken by a curious mode of netting.
Some unique and highly original ways of catching birds are described by both ancient and modern writers. Pennant, in his "Arctic Zoology," vol. ii, page 550, talks about a strange but questionable method of luring wild geese in Siberia; he also, on page 311, notes how large numbers of willow grouse are caught using an interesting netting technique.
Folkard also mentions an ingenious way of capturing wild fowl in their own element by the aid of calabashes. This, however, I think, "must be seen to be believed," though I am bound to confess that it is partly corroborated by other writers.
Folkard also talks about a clever method of catching wild birds in their natural habitat using calabashes. However, I believe this "must be seen to be believed," although I must admit that other writers partially support it.
Of the lasso or the "bolas," used in South America for capturing certain animals and birds, no description need be given, as this method of trapping is only to be performed by a person trained from childhood to ride and throw the lasso. The same remark applies to the use of the blowpipe (see Bates's "Amazons"), and the Australian "boomerang" and "throwstick."
Of the lasso or the "bolas," used in South America for catching specific animals and birds, no description is needed because this trapping method can only be performed by someone trained from childhood to ride and throw the lasso. The same goes for the blowpipe (see Bates's "Amazons") and the Australian "boomerang" and "throwstick."
Regarding the use of the blowpipe, I see that an American author on Taxidermy, who has written a very good book on the subject — albeit he has, perhaps unwittingly, cribbed my title of "Practical Taxidermy" — appears to have attained remarkable proficiency in the use of this weapon, and describes also his method of making it, thus:
Regarding the use of the blowpipe, I notice that an American author on taxidermy, who has written a really good book on the subject — although he may have unintentionally borrowed my title "Practical Taxidermy" — seems to have achieved remarkable skill with this tool and also describes his method for making it, as follows:
"The blowpipe is of great service for collecting warblers and other small birds. It should be made by encasing a long glass tube in wood, to prevent breaking. The ordinary glass tubes used by glass-blowers make good blowpipes, which should have a diameter of 0.5 in. and be not less than 6 ft. long.
The blowpipe is really effective for catching warblers and other small birds. It should be made by wrapping a long glass tube in wood to prevent it from breaking. Standard glass tubes made by glass-blowers are suitable for blowpipes and should have a diameter of 0.5 inches and be at least 6 feet long.
To encase a pipe with wood, take two strips of straight-grained pine, and plane or "gouge" out a half-round groove the full length of each, glue them together, and wire firmly over the glass pipe. When the glue is dry, remove the wires, and plane the wood round until it has a diameter of 1.5 in.; if smaller it will sag, and not do good shooting. Putty balls should be used, and blown with a quick puff, which is easily acquired by practice. The putty is thickened with whiting until the pellets will roll hard, but they should not be dry enough to crumble.
To wrap a pipe with wood, take two strips of straight-grained pine and carve out a half-round groove along the full length of each. Glue them together and secure them tightly around the glass pipe with wire. Once the glue has dried, take off the wires and round the wood until it has a diameter of 1.5 inches; if it's smaller, it will sag and won’t shoot well. Use putty balls and blow them out with a quick puff, which you'll get better at through practice. The putty should be thickened with whiting until the pellets are hard enough to roll, but not so dry that they crumble.
With this novel gun I have killed as many as fifty-six warblers in less than a day, and spoiled but few specimens in killing."
With this new gun, I've killed as many as fifty-six warblers in less than a day and ruined very few specimens in the process.
Rowland Ward, also, in his "Sportsman's Handbook," appears to favour the use of the blowpipe, and very correctly says at page 9:
Rowland Ward, in his "Sportsman's Handbook," also appears to endorse the use of the blowpipe and wisely mentions on page 9:
"The implement is so simple and so easily constructed that the price of it is inappreciable. About 3 ft. length of any straight metal or wooden tubing, 0.75 in. diameter, through which a pellet the size of a marble may be thrown, will serve well, but an even longer tube may be chosen. The pellet should be of clay or any putty, rolled in the hand to easily pass through the barrel without too much windage. It should not touch the mouth, but be lightly placed just in the orifice, by stopping which with the thumb the tube can be conveniently carried loaded, muzzle up, ready for the most rapid use. To propel the pellet the puff must be sudden and powerful. There is a proper way of effecting this. When a practitioner first begins to use the blow-pipe, it is a common error to eject the breath only direct from the lungs; he should acquire the habit of inflating his cheeks, so as to make a storage of wind, as it were, for each shot; that, added to the breath from the lungs, gives a force which will sometimes astonish him. The hand follows the eye in aim, and practice will often develop unthought-of proficiency."
"The tool is so simple and inexpensive to make that it barely costs anything. A piece of straight metal or wooden tubing about 3 feet long and 0.75 inches in diameter, through which you can shoot a marble-sized pellet, works well, but you could also use a longer tube. The pellet should be made of clay or any kind of putty, shaped by hand so it fits easily through the barrel without much movement. It shouldn't touch the opening; instead, it should be gently placed right at the tip, where you can block it with your thumb to carry the tube loaded, pointing up, ready for quick use. To launch the pellet, you need a quick and strong puff of air. There's a proper way to do this. When someone first starts using the blowpipe, it's common to blow straight from the lungs; they should learn to puff out their cheeks to store air, creating a reserve for each shot. That, along with breath from the lungs, produces a force that can really surprise them. The hand follows the eye for aiming, and practice will often lead to unexpected skill."
The catapult is also a first-rate weapon in a skilful hand for procuring small birds. I must confess I cannot use it as well as some young friends of mine, who knock over nearly every sitting bird they aim at, and even now and then are successful with such difficult shots as at swallows on the wing; a novice, on the contrary, nearly always succeeds in stinging his fingers and missing the object aimed at.
The catapult is an excellent weapon for someone who knows how to catch small birds. I have to admit I'm not as skilled as some of my younger friends, who hit almost every bird they aim at, and occasionally, they even pull off tricky shots at swallows in flight. A beginner, on the other hand, usually just ends up with sore fingers and misses the target completely.
I remember also, when a boy, using a very effective weapon, which I should describe as a catapult gun. It was, if I recollect aright, fashioned similarly to a cross bow, the bolt, however, from which was ejected from a little wash-leather bag by means of very powerful India-rubber springs, which being released by a trigger delivered a bullet or small shot from a tube with amazing force and precision. I do not know if such guns are made now, but I should imagine that anyone with a little ingenuity could construct one for himself.
I also remember, when I was a kid, using a really effective weapon that I would describe as a catapult gun. If I remember correctly, it was shaped a bit like a crossbow, but instead of a traditional bolt, it shot a projectile from a small leather pouch using some really strong rubber springs. When triggered, it would launch a bullet or small shot from a tube with incredible force and accuracy. I’m not sure if such guns are still made today, but I think anyone with a bit of creativity could build one for themselves.
All these appliances, with the well-known air-gun, are chiefly of use for collecting the smaller birds with a minimum of noise. There are several small collecting guns made which do the work required in a much more thorough manner. Messrs. Bland, gun-makers, of Birmingham, some time since showed me an elegant little double-barrelled central fire gun, which seems to be just the thing for the purpose. Messrs. Clarke, of Leicester, also make a small single-barrelled central fire .410-bore collector's gun, but as before observed, they are only fit for small birds at short ranges.
All these tools, including the well-known air gun, are mainly useful for quietly collecting smaller birds. There are several compact collecting guns designed to do the job much more effectively. A while back, the gun-makers at Bland in Birmingham showed me a stylish little double-barrel central fire gun, which seems perfect for this purpose. Clarke in Leicester also makes a small single-barrel central fire .410-bore collector's gun, but, as mentioned before, they are only suitable for small birds at close range.
I have lately procured a small walking-stick gun .410-bore, central fire, with a removeable stock, which I have found of great service in collecting small birds — bringing down swifts and swallows flying, at moderate ranges.
I recently got a small walking-stick gun that’s a .410-bore, central fire, with a removable stock. I've found it very useful for collecting small birds, successfully shooting swifts and swallows while they’re flying at moderate distances.
Many birds, especially males, in the breeding season, are taken by decoying them into nets or snares by tame or wild birds of the opposite sex; in fact, advantage was wont to be taken of the pugnacity or devotion of the Ruffes when "hilling," by previously setting springes or nets on their battle-ground, into which said snares they danced, when courting or fighting (see Daniel, vol. U, p. 212).
Many birds, especially males, during breeding season, are caught by luring them into nets or traps using tame or wild birds of the opposite sex. In fact, it was common to take advantage of the aggression or devotion of the Ruffes when "hilling" by setting up snares or nets in their battle areas, into which they would dance while courting or fighting (see Daniel, vol. U, p. 212).
Poachers also sometimes take cock pheasants by bringing an armed gamecock into the woods and hiding themselves, while the domesticated bird challenges and gives battle to the unarmed wild one. The boldness of cock pheasants during their breeding time is wonderful; many instances having come under my notice of wild pheasants coming from the woods to do battle with aviary ones, and also with farm-yard "roosters."
Poachers sometimes catch cock pheasants by bringing in an armed gamecock and hiding while the domesticated bird confronts and fights the unarmed wild one. The bravery of cock pheasants during their breeding season is impressive; I've seen many cases of wild pheasants leaving the woods to battle with those from aviaries and even with farmyard roosters.
A highly interesting account of the ludicrous actions and insensibility to fear of the capercailzie, and blackgame, when courting (and through which they are easily shot), is given by a writer on Norway in the Field of March 27, 1875; and this brings us to the greatest of all aids for the procuring of specimens — I mean the shot-gun and rifle. So much of success depends upon being a clever marksman, and also upon having a good general knowledge of woodcraft, that although for instructions in guns and shooting I refer the reader to Col. Hawker, Daniel, Blaine, "Stonehenge," Folkard, Greener, "Wildfowler," and many others, yet a few words on some peculiar, and in some cases well-known, methods of decoying birds within gunshot, may not be out of place.
A very interesting account of the ridiculous behavior and lack of fear shown by capercaillies and black grouse during mating season (which makes them easy targets) is provided by a writer about Norway in the Field from March 27, 1875. This leads us to the most important tool for acquiring specimens—I'm talking about shotguns and rifles. Success relies heavily on being a skilled shooter and having a solid understanding of woodcraft. While I recommend Col. Hawker, Daniel, Blaine, "Stonehenge," Folkard, Greener, "Wildfowler," and many others for detailed information on guns and shooting, I think it’s worthwhile to mention a few unique and sometimes well-known techniques for luring birds into shooting range.
The stalking-horse was, no doubt, the earliest decoy or shield under which the ancient fowler got near his birds with the crossbow or gun. It was sometimes a mere framework of wood, covered with painted canvas to represent a horse or cow, or was a real animal trained to feed and move in a natural manner in the midst of the fowl. In the first instance, the fowler carried the framework in front of him, and made his shot through an opening; in the second case he gently urged the animal on, hiding behind, and making his shot under the belly, or over the back. For ancient methods of stalking, see Gervase Markham; for a modern method, see "Bustard Shooting in Spain," in the Country of Jan. 21, 1875, and current pages of the Field.
The stalking-horse was definitely the earliest decoy or shield that ancient hunters used to get close to their birds with a crossbow or gun. Sometimes it was just a wooden frame covered with painted canvas to look like a horse or cow, or it was a real animal trained to feed and move naturally among the birds. In the first case, the hunter carried the frame in front of him and shot through an opening; in the second case, he gently moved the animal forward while hiding behind it, shooting under its belly or over its back. For ancient stalking methods, check out Gervase Markham; for a modern method, see "Bustard Shooting in Spain," in the Country of Jan. 21, 1875, and the current issues of the Field.
Decoying birds by imitating their notes or cries is an art which the collector must acquire. Many mechanical calls for wood pigeons, curfews, and other birds are made. One call, which I do not think is made or used in England, is a Greek idea for decoying thrashes. It is a whistle formed from two discs of thin silver or silvered copper, each the size of, or a little smaller than, a "graceless" florin, or say an inch across; those discs are — one fully concave, and the other slightly convex, both have a hole in the centre and are soldered together by their edges in the manner shown in Fig. 10. [Footnote: Since writing this I find there are now sold to boys, for the large sum of one-halfpenny, whistles formed in tin, of almost similar construction to those described. I never yet found anyone to make them "speak" properly; boys not knowing how to modulate or inspire the breath. I have now tried one of them against my silver whistle, and I cannot say which has the better tone.]
Decoying birds by mimicking their sounds is a skill that every collector should master. There are many mechanical calls available for wood pigeons, curfews, and other birds. One call, which I don’t think is made or used in England, is a Greek concept for attracting thrushes. It’s a whistle made from two thin discs of silver or silver-plated copper, each about the size of, or slightly smaller than, a "graceless" florin, or roughly an inch across. One disc is fully concave, and the other is slightly convex; both have a hole in the center and are soldered together at the edges as shown in Fig. 10. [Footnote: Since writing this, I've found that they now sell whistles made of tin, similar in design to the ones described, to kids for the price of half a penny. I’ve never met anyone who can make them "speak" properly, as kids don’t know how to modulate or inspire their breath. I’ve tried one of those against my silver whistle, and I can't say which one sounds better.]
 Fig. 10 —
DECOY WHISTLE FOR THRUSHES, etc..
Fig. 10 —
DECOY WHISTLE FOR THRUSHES, etc..The concave part is placed in the mouth, pressing against the teeth, and by inspiring the breath and modulating the tones with the closed or open hands, as the case may be, a very perfect imitation of the song-thrush's note is the result. This, the arriving or newly-arrived birds hear, and, imagining it proceeds from the throat of one of their species, who, entirely at his ease, is letting the ornithological world know how excessively overjoyed he is at his safe arrival, alight in the trees which surround and conceal the treacherous imitator, and quickly fall a prey to the ready gun. So infatuated are they, that enormous quantities are killed by this method early in the season; in fact, I knew one person who shot one hundred and four, besides other birds, to his own gun in one day.
The curved part is held in the mouth, pressing against the teeth, and by taking a breath and adjusting the sounds with your closed or open hands, you can perfectly imitate the song of a thrush. Newly arrived birds hear this and, thinking it comes from one of their own, who is relaxed and joyfully announcing his safe arrival, they land in the trees that surround and hide the tricky imitator, quickly becoming easy targets for the ready gun. They are so naive that a huge number are killed this way early in the season; in fact, I knew someone who shot one hundred and four, along with other birds, in just one day.
Quails may be called from a distance if the sportsman hides himself and imitates with his mouth their peculiar cry, "More wet, more wet."
Quails can be summoned from afar if the hunter conceals himself and mimics their distinctive call with his mouth, "More wet, more wet."
There are many other birds which come to call in addition to quail. Woodpigeons and doves will sometimes be attracted to an ambush by making a soft cooing noise with the mouth and the hollows of both hands, but the most successful way of procuring both of these birds is to build a hut with boughs in the hedge of a field to which they resort, in which hut the shooter hides himself, keeping perfectly quiet, and not attempting to shoot until the birds have begun feeding, as woodpigeons, or doves, when they first alight "have their eyes all about them," the slight rustle even of the gun being brought to the present, is enough to scare them, and a snap shot at a flying dove is rarely successful when you are penned and cramped up in a little bough hut. Pea, tare, and barley fields, when they are first sown in the spring, and pea and corn fields, after getting in the crops in the autumn, are their especial haunts, though they do not despise turnip leaves and acorns.
There are many other birds that also visit besides quail. Woodpigeons and doves can sometimes be drawn to a hidden spot by making a soft cooing noise with their mouths and cupped hands. However, the best way to attract both of these birds is to build a hut with branches in the hedge of a field where they gather. In this hut, the shooter hides, staying completely still and waiting to shoot until the birds start feeding. Woodpigeons and doves are very alert when they first land, so even the slightest rustle from raising the gun can scare them away. A quick shot at a flying dove is usually unsuccessful when you’re cramped in a small branch hut. Fields of peas, tares, and barley, especially when newly sown in the spring, as well as pea and corn fields once the crops are harvested in the autumn, are their favorite spots, although they also enjoy turnip leaves and acorns.
Salt marshes are also especially favoured by all the pigeon family in quest of salt, of which they seem to be inordinately fond. Fresh water rivers in hot weather are also sure spots to find them; and a stuffed pigeon is a good decoy in some seasons, if placed in front of a place of concealment.
Salt marshes are especially liked by all types of pigeons looking for salt, which they seem to love. Freshwater rivers in hot weather are also reliable places to spot them; a stuffed pigeon can be a good decoy in some seasons if it's positioned in front of a hiding spot.
Perhaps it may be as well to mention that often, while lying in wait for wild pigeons, you will observe the advent of one or two tame ones, or even a flock from some neighbouring farmyard, and, as some of these pigeons are almost certain to closely resemble the wild stock dove (Columba oenas, L.), some little discrimination is required to distinguish the two species.
Perhaps it’s worth mentioning that when you’re waiting for wild pigeons, you might notice one or two tame ones showing up, or even a whole flock from a nearby farmyard. Since some of these pigeons can closely resemble the wild stock dove (Columba oenas, L.), you’ll need to pay attention to tell the two species apart.
The Gannet or Solon goose (Sula bassana, Hewitson) is said to be taken by the strange device of floating a plank out at sea, to which a fish is attached, in such a manner that, on the bird dashing down on the half-submerged plank, it strikes itself with such violence as not unfrequently to break its neck or breastbone. On mentioning this to Mr. Frederick Ryland, he assured me that he has in some instances observed the marks of the bird's bill, which had indented the plank — a pretty conclusive evidence of the extraordinary force of its descent.
The Gannet or Solon goose (Sula bassana, Hewitson) is said to be caught using a peculiar method of floating a plank out at sea with a fish attached. When the bird dives down onto the partially submerged plank, it often hits it with such force that it can break its neck or breastbone. When I mentioned this to Mr. Frederick Ryland, he confirmed that he has sometimes seen the indentations from the bird's bill on the plank — pretty strong evidence of the impressive force of its dive.
Many other birds besides pigeons are attracted by "stales," which was the ancient name for a representation of the living bird by stuffed specimens or wooden images; knots and godwits, says Daniel (vol. iii., p. 214), were attracted into nets by this mode. Gulls and terns I have often found attracted by a stuffed bird, or, when one can be shot, should it be left to lie on the water, or propped up on land, as if alive, the others almost always hover around it. Sheep's lights thrown on the water is another good decoy for gulls.
Many other birds besides pigeons are drawn to "stales," which was the old term for representations of live birds using stuffed specimens or wooden figures. Daniel (vol. iii., p. 214) mentions that knots and godwits were lured into nets using this method. I've often noticed that gulls and terns are attracted to a stuffed bird, or if one can be shot and left floating on the water or propped up on land as if it were alive, the others usually gather around it. Using sheep's lights on the water is another effective way to attract gulls.
Ducks are sometimes attracted by dummies of indiarubber sold at some of the shops for that purpose, but the best modification of this is the French "hut system," described at length, in his usual amusing style, by the once-renowned Col. Hawker.
Ducks are sometimes drawn to rubber decoys sold at shops for that purpose, but the best version of this is the French "hut system," explained in detail, in his usual entertaining style, by the once-famous Col. Hawker.
A more singular way still, of decoying these birds to the gun is by the American fashion of "toling," a lucid description of which I append, culled from the pages of Folkard's "Wildfowler:"
A more unique way to lure these birds to the gun is by the American style of "toling," a clear explanation of which I've included from Folkard's "Wildfowler:"
"There is one system of fowling practised in America which is as curious in performance as it is interesting. It is probably one of the most remarkable methods ever invented, and approaches the nearest to the system of decoy as practised in England of any of the arts employed by the people of a foreign country for the capture of wildfowl. The method alluded to is termed "toling." I am unable to trace the origin of the term, unless it simply implies a death knell, for such it assuredly assumes to those birds which approach within range of the secreted sportsman.* This singular proceeding is said to have been first introduced upwards of fifty years ago near Havre-de-Grace, in Maryland; and, according to traditional testimony, the art was accidentally discovered by a sportsman whilst patiently lying in ambush watching a paddling of wild ducks, which were a little beyond the range of his gun. Whilst in a state of doubt and anxiety as to whether they would approach near enough to be shot, he suddenly observed them raise their heads and swim towards the shore apart from his ambuscade; and, whilst wondering at the cause of so strange a proceeding, his attention was directed to a fox which was skipping about on the shore, and evidently enticing the ducks to approach. This accidental discovery of so weak a point in the nature of the feathered tribe led the sportsman to turn it to advantage, and thence arose the curious art of "toling." To practise it successfully the sportsman requires simply the services of a dog, which he uses in a similar way to that of a "piper," employed at an English decoy. [Footnote: The word "toling" may be explained as a corruption of "tolling," i.e., enticing.]
There's a unique method of bird hunting in America that's as fascinating in practice as it is intriguing. It's likely one of the most extraordinary techniques ever developed and is closest to the decoy system used in England compared to other methods used by people in other countries to catch wildfowl. This method is called "toling." I can't track down the origin of the term, unless it simply means a death knell, as that’s definitely what it signifies for the birds that come within range of the hidden hunter.* This unusual practice is believed to have been first introduced over fifty years ago near Havre-de-Grace, Maryland, and, according to tradition, it was discovered by a hunter who was lying in wait, watching a group of wild ducks that were just out of shooting range. While he was anxiously hoping they would come close enough to shoot, he suddenly saw them raise their heads and swim towards the shore, moving away from his hiding spot; and as he wondered about this strange behavior, he noticed a fox nearby, skipping along the shore and clearly tempting the ducks to get closer. This accidental discovery of such a vulnerability in bird behavior led the hunter to exploit it, resulting in the intriguing skill of "toling." To practice it successfully, the hunter simply needs the help of a dog, which he uses much like a "piper" in an English decoy. [Footnote: The word "toling" can be explained as a variation of "tolling," i.e. enticing.]
For the purpose of "toling," the American sportsman erects blinds or screens on the margin of some lake, the resort of wildfowl; when any birds are in sight upon the water, he, with his dog, takes up a position behind the screens, and by throwing small bits of wood or pebbles up and down the shore, he keeps the dog in active motion so as to attract the attention of the birds, and induce them to swim towards the shore within a few yards of the screens, when, if they do, the sportsman immediately discharges his fowling piece at them, and sometimes kills large numbers at a shot. The principal things to be observed are, a strict silence, and to keep the dog constantly in motion, and all the time in sight of the ducks. The little animal should be encouraged to skip and bound over the rocks and stones in front of the screens, and to flourish his tail about with playful vivacity. He must never bark, for that would alarm the fowl and cause them to fly away immediately.
For the purpose of "toling," the American hunter sets up blinds or screens along the edge of a lake where wildfowl gather. When birds are seen on the water, he and his dog take a position behind the screens. By tossing small pieces of wood or pebbles along the shore, he keeps the dog moving actively to capture the birds' attention and lure them to swim toward the shore, just a few yards from the screens. If they do, the hunter immediately fires his shotgun at them and can sometimes take down several birds with one shot. The key points to remember are to stay completely silent and keep the dog constantly moving and always in view of the ducks. The little dog should be encouraged to jump and leap over the rocks and stones in front of the screens while wagging its tail with playful energy. It must never bark, as that would scare the birds away instantly.
Red or chestnut coloured dogs with long bushy tails are best for the purpose of "toling"; the nearer they approach a fox in colour and appearance the better."
Red or chestnut-colored dogs with long, bushy tails are best for "toling"; the closer they resemble a fox in color and appearance, the better.
Tubs may be sunk on the seashore into which the shooter gets at the approach of night (or even a "skip" or basket may be used to sit on) to wait till flight time to procure specimens; but having myself sat in a marsh at night between a river and the sea in Norfolk more than once for several hours during a very severe winter, I cannot recommend this as a torrid amusement — indeed, the melancholy "sough" of the sea, and the pale glitter of the stars in the half-frozen pools, whose dead and dry sedges rustle in unison to the icy blasts rushing from the dead white north, make even the most hardy long for the old armchair by the cozy fireside.
You can set up tubs on the beach where someone can sit as night falls (or even use a "skip" or a basket) to wait for the right moment to collect specimens; however, having spent several hours sitting in a marsh at night between a river and the sea in Norfolk during a harsh winter more than once, I can't say this is a pleasant activity — in fact, the mournful sound of the sea and the faint sparkle of the stars in the half-frozen puddles, where the dead and dry reeds rustle with the icy winds from the desolate north, make even the toughest individuals long for the comfort of an old armchair by a warm fire.
A writer in the Zoologist some years ago appeared to think that iodine was a species of enchanter's wand in rendering your presence unknown to wildfowl. I have never tried it, having but little faith in cunning nostrums concocted for the taking of either birds or fish; but as he is a gentleman of standing and great experience, I will quote his words from which I drew my inference:
A writer in the Zoologist years ago seemed to believe that iodine acted like a magical wand, making you invisible to wild birds. I’ve never tried it myself, as I don’t have much faith in clever potions designed for catching either birds or fish; however, since he is a respected gentleman with significant experience, I will quote his words that led me to this conclusion:
"A cormorant once perched himself on my back as I lay concealed on a rock enveloped in a drab driving coat, which so closely resembled the rock in colour that even he was deceived, and, taking my back as the highest pinnacle, accommodated himself accordingly; neither did he discover his error till my hand grasped him by the legs. I have frequently had cormorants and shags perched around me within a few feet; but their suspicions seemed generally to be aroused by human smell, unless I had rubbed iodine on some part of my clothes."
A cormorant once landed on my back while I was hiding on a rock, wrapped in a dull coat that blended in so well with the rock's color that even he was tricked. He thought my back was the highest point and settled down without realizing his error until I grabbed his legs. I've often had cormorants and shags perched nearby, just a few feet away, but they usually got suspicious from the smell of humans, unless I had rubbed some iodine on my clothes.
The landrail or corncrake, whose peculiar rasping cry we hear in the grass or young corn in the spring of the year, is easily called to the gun by rubbing one notched bone over another, or, better still, using that peculiar instrument of torture worked at fairs, and called a "scratchback" — the same which, in the palmy days of Greenwich or Charlton fairs, was retailed to the cry of "All the fun of the fair for one penny".
The landrail, or corncrake, known for its distinctive rasping call that we hear in the grass or young corn in spring, can be easily attracted by rubbing one notched bone against another. Even better is using that unique device sold at fairs called a "scratchback" — the same one that was popular during the peak of Greenwich or Charlton fairs, promoted with the chant "All the fun of the fair for one penny."
In bringing this chapter to a close, let me not omit to mention that all shot birds should immediately have the mouth, palatal slit, and nostrils, stopped with tow or cotton wool, to prevent the blood from running out and soiling the feathers; then, if possible, always wrap each specimen separately in paper, smoothing the feathers in their proper places before doing so. Also, never carry a shot bird by its neck, as the weight of the bird's body depending from the neck must stretch the latter beyond its fair proportions.
In wrapping up this chapter, I want to emphasize that all shot birds should have their mouths, palatal slits, and nostrils plugged with tow or cotton wool right away to stop the blood from drenching the feathers. Then, if you can, always wrap each specimen individually in paper, making sure to smooth the feathers back into place first. Also, never carry a shot bird by its neck because the weight of its body hanging from the neck will stretch it out of shape.
I have here briefly glanced at a few of the many ways of taking birds and beasts; to have described them all would have required a special volume double the size of the present one. I think, however, I have said enough for all practical needs; but in case any reader should require fuller information, I must refer him to such articles as he will find week by week in The Field, Land and Water, or the American publication, Forest and Stream.
I have briefly looked at a few of the many ways to catch birds and animals; describing them all would need a whole separate book, twice the size of this one. I believe I've provided enough information for practical purposes, but if any reader wants more details, I recommend checking out the articles published weekly in The Field, Land and Water, or the American magazine Forest and Stream.
Good text books, also, on Trapping, etc.., are W. B. Lord's "Shifts and Expedients of Camp Life," Captain Darwin's ("High Elms") "Game Preservers' Manual," Jefferries' "Amateur Poacher," "Gamekeeper at Home," etc.. For details as to the hunting and scientific shooting of foreign large game, with directions as to the vulnerable spots to be aimed at, I must again refer the reader to articles from the pen of such men as Sir Samuel Baker, G. P. Sanderson, "Smoothbore," "The Old Shekarry," Gordon Cumming, Jules Gerard, C. J. Andersson, Emil Holub, F. C. Selous, etc.., all of whom have either written books on sporting, or whose articles are still to be met with in late numbers of The Field.
Good textbooks on trapping and similar topics include W. B. Lord's "Shifts and Expedients of Camp Life," Captain Darwin's ("High Elms") "Game Preservers' Manual," Jeffries' "Amateur Poacher," and "Gamekeeper at Home." For more details on hunting and the scientific shooting of large game abroad, along with instructions on where to aim for a clean shot, I recommend reading articles by writers like Sir Samuel Baker, G. P. Sanderson, "Smoothbore," "The Old Shekarry," Gordon Cumming, Jules Gerard, C. J. Andersson, Emil Holub, and F. C. Selous. Many of them have published books on hunting, and their articles can still be found in recent issues of The Field.
A BAD workman, it is said, always quarrels with his tools. If this be so, it is equally certain that a good workman, though he may make shift with indifferent implements of his craft, yet always prefers the best and most labour-saving tools he can procure. The chief point of difference, however, between the skilled and unskilled workman is, that the former may and often does get the best results with the fewest possible tools, while the other must surround himself with dozens of unnecessary things before he can "do a stroke." This being so, I propose to point out to my readers in a few words, and by means of drawings, how very few tools are required to skin and set up a bird or small animal. My remarks will, therefore, be addressed as much to the amateur as to the tyro desirous of becoming a professional; in fact, I wish it to be understood that I write as much to educate the one as the other.
They say a bad worker always blames their tools. If that's true, then it's also clear that a good worker, even if they have to work with subpar equipment, always prefers the best and most efficient tools available. The main difference between a skilled worker and an unskilled one is that the skilled worker can often achieve great results with just a few essential tools, while the unskilled worker feels they need to gather a lot of unnecessary items before they can get anything done. With that in mind, I plan to show my readers, in just a few words and some illustrations, how few tools are really needed to skin and prepare a bird or small animal. My insights are aimed at both hobbyists and beginners who want to become professionals; I want it to be clear that I'm writing to educate both groups equally.
The first and almost indispensable tool is the knife (I say almost, because I have known a person begin and finish a small bird with a pair of scissors); nearly any small knife will do to make the first incision, but experience has shown the most useful shape to be as in Fig. 11, which is the skinning knife; the blade, it will be observed, is long and narrow, 3 in. to 4 in. along the cutting edge, and half an inch across; the handle, which should be of box, lignum vitae, or any hard wood susceptible, of a high polish, is 3.5 in. in length, exclusive of a half-inch brass ferrule; the shape shown is the most comfortable and handiest to work with. Fig. 12 shows a broader and stronger knife, five-eighths of an inch across, having a somewhat differently shaped hard wood handle, as the knife is intended for heavier work. Fig. 13 shows a broad strong blade, one inch across, and of an entirely different character; this, which is useful for the rough, large work, to be hereafter mentioned, has a perforated tang, to which two half rounded pieces of hard wood should be bolted. Length of blade and handle, 4 in. each.
The first and nearly essential tool is the knife (I say nearly because I've seen someone start and finish a small bird using scissors); almost any small knife will work for the initial cut, but experience has shown that the most effective shape is depicted in Fig. 11, which is the skinning knife. The blade is long and narrow, measuring 3 to 4 inches along the cutting edge and half an inch wide; the handle, made from boxwood, lignum vitae, or any hard wood that can be polished, is 3.5 inches long, not including a half-inch brass ferrule. The shape shown is the most comfortable and convenient to use. Fig. 12 displays a broader and stronger knife, five-eighths of an inch wide, with a differently shaped hard wood handle since this knife is meant for heavier tasks. Fig. 13 shows a wide, strong blade that is one inch across and has a completely different design; this knife, useful for the rough, larger jobs that will be discussed later, features a perforated tang where two half-rounded pieces of hard wood should be bolted. The length of the blade and handle is 4 inches each.
My reason for having all of these handles of polished hard wood is, that blood and dirt will the more easily wash off. All of these knives are best procured at the leather sellers', for the reasons that, first, the shapes drawn are always in stock; secondly, they are manufactured of the finest and toughest steel; and thirdly, their expense is trifling. The handles, however, are usually of softwood, unpolished, and had better be replaced at the turner's. The knives when first purchased are about 4 in. long in the blade; for skinning I think them pleasantest to use when ground or worn down to 3 in. or 3.5 in.; this, however, is a matter of individual taste.
My reason for having all these polished hardwood handles is that blood and dirt wash off more easily. These knives are best sourced from leather sellers for a few reasons: first, they always have the shapes you need in stock; second, they’re made from the finest and toughest steel; and third, they’re pretty inexpensive. However, the handles are usually made of unpolished softwood and should ideally be replaced at a turning shop. The knives, when first bought, have blades that are about 4 inches long; I find them most comfortable for skinning when ground down to about 3 or 3.5 inches, but that’s really a matter of personal preference.
I have, since the above was written, found that some dealers in leather and shoemakers' "grindery" sell knives of varied and serviceable patterns — other than those described — all of which have hard wood handles. Dissecting knives and scalpels, to be procured at any Surgical instrument maker's, are also very useful for fine work. "Transfixion" knives are of service when engaged upon very large animals, and here also come in the post-mortem hooks.
I have, since the above was written, found that some leather dealers and shoemakers sell knives in different and useful styles—besides the ones mentioned—all of which have sturdy wooden handles. Dissecting knives and scalpels, available from any surgical instrument supplier, are also great for detailed work. "Transfixion" knives are helpful when working with very large animals, and you can also use the post-mortem hooks.

 Fig. 11, 12, 13
— SKINNING KNIVES.
Fig. 11, 12, 13
— SKINNING KNIVES.The next most important tool is the scissors, two pairs of which should be procured, one pair long and fine, 5.5 in. or 6 in. long (see Fig. 14), for use in small and delicate work connected with birds; the other about 4 in. long, of a different shape and much stouter and stronger (see Fig. 15). These are used for general work upon larger birds or small mammals.
The next most important tool is scissors, and you should get two pairs: one long and fine pair that’s about 5.5 or 6 inches long (see Fig. 14) for small, delicate tasks related to birds; and another pair that’s about 4 inches long, with a different shape that’s sturdier and stronger (see Fig. 15). These are used for general work on larger birds or small mammals.
 Fig. 14 —
SCISSORS, No 1. pattern.
Fig. 14 —
SCISSORS, No 1. pattern.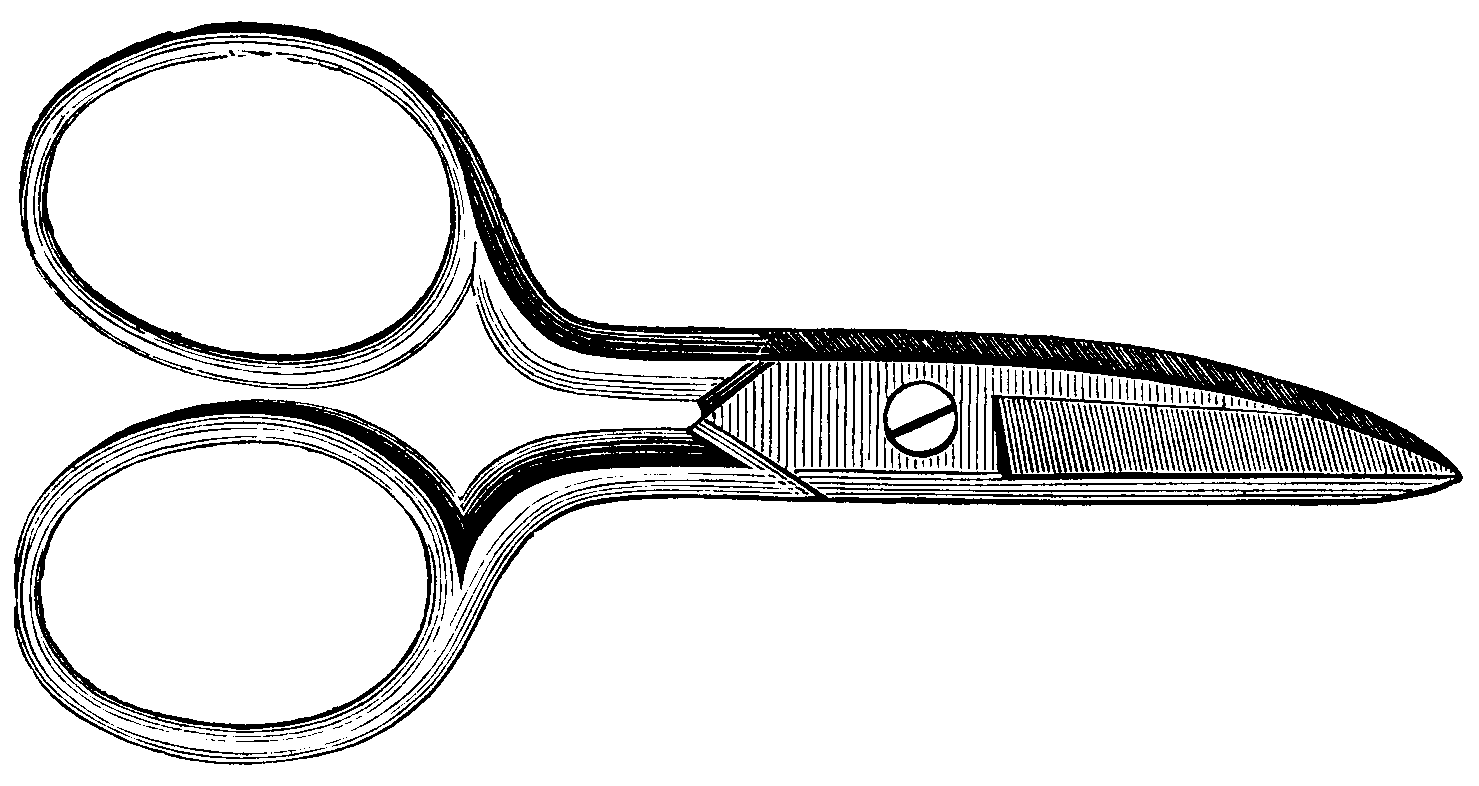
For still heavier work connected with mammals, and especially with fish, I prefer a pair of small spring shears, 6 in, to 7 in. long, similar to those used by gardeners for grape-pruning.
For heavier tasks involving mammals, and especially fish, I prefer a pair of small spring shears, 6 inches long, rather than 7 inches, similar to those used by gardeners for pruning grapes.
 Fig. 16.
— Bell-hangers' Pliers.
Fig. 16.
— Bell-hangers' Pliers.Fig. 16 brings us to a really indispensable adjunct to the taxidermist's kit — the compound or bell-hangers' pliers; these pliers are as the ordinary holding ones at the top, but have a cutting plane fixed lower down (those with flat, not raised, cutters, are to be preferred)*; the figure gives a good idea, but the grip should not be quite so broad as they are usually made; from 8 in. to 10 in. is the most useful size. The 10 in. is rather large, but is, perhaps, the best for professional needs. [Footnote: These pliers are sometimes made with a nick at the intersection of the joint to form a cutting plane for thick wires.]
Fig. 16 shows an essential tool for the taxidermist's kit — the compound or bell-hangers' pliers. These pliers are similar to standard holding pliers at the top but have a cutting edge further down (flat cutters are preferred over raised ones)*. The illustration provides a decent representation, but the grip shouldn't be as wide as it's typically manufactured; a size between 8 in. and 10 in. is most practical. The 10 in. size is a bit large but might be the best fit for professional use. [Footnote: These pliers are sometimes designed with a notch at the joint to create a cutting edge for thick wires.]
Fig. 17 shows the ordinary cutting nippers, 4 in. to 5 in. long, useful for cutting fine wires or pins, in situations where the use of the other pliers is impracticable. Remarks as to grip as before.
Fig. 17 shows the standard cutting nippers, 4 in. to 5 in. long, useful for cutting thin wires or pins in situations where using other pliers isn't practical. Remarks about grip are the same as before.
 Fig. 17 —
Cutting nippers.
Fig. 17 —
Cutting nippers.Both of these articles should be of the best workmanship and materials. Buck, of London, and Stubbs, of Warrington, may be recommended as good makers.
Both of these articles should be made with top-quality craftsmanship and materials. Buck from London and Stubbs from Warrington are recommended as reliable manufacturers.
I lately procured a very handy little pair of cutting nippers of elegant workmanship, used chiefly by watchmakers, and made in Paris. These are excellent for delicate work or for cutting very fine wire or entomological pins (see Fig. 18).
I recently got a really handy little pair of cutting nippers with elegant craftsmanship, mainly used by watchmakers, and made in Paris. They're great for fine work or for cutting very thin wire or entomological pins (see Fig. 18).
 Fig. 18 —
French Cutting Nippers
Fig. 18 —
French Cutting NippersI now figure a most necessary little pair of pliers for dressing the feathers of birds. These are also used by watchmakers, are of neat construction and differ from most pliers in having an obtusely rounded point (see Fig. 19, A and B). These, which I call "feather pliers," are in conjunction with a small, thick, round, camel-hair brush (used by artists for "washing in"), indispensable for "feathering up" birds, a process to be described later on.
I now think a really essential little pair of pliers is needed for grooming the feathers of birds. These are also used by watchmakers, have a nice design, and are different from most pliers because they have a bluntly rounded tip (see Fig. 19, A and B). These, which I call "feather pliers," along with a small, thick, round camel-hair brush (used by artists for "washing in"), are crucial for "feathering up" birds, a process I'll explain later.
Fig. 20 is the next, and I fancy I hear some reader exclaim, "What on earth has a goffering-iron to do with taxidermy?" I reply: This shaped tool is wanted for artfully conveying small morsels of tow, etc.., into the necks and hollow places of birds' skins. It may be easily made in this wise: Procure as small and fine a pair of goffering-irons as you possibly can, and have them drawn out and brought to a fine yet obtuse point by some smith, and you thus get a finished tool for about half what it would cost to make outright. Length, when finished, should be somewhere about 10 in.
Fig. 20 is next, and I can almost hear some reader asking, "What on earth does a goffering iron have to do with taxidermy?" I respond: This shaped tool is needed to carefully push small pieces of tow, etc., into the necks and hollow parts of birds' skins. It can be easily made this way: Get the smallest and finest pair of goffering irons you can find, and have them shaped into a fine yet blunt point by a blacksmith, which will give you a finished tool for about half the cost of making one from scratch. The finished length should be around 10 inches.
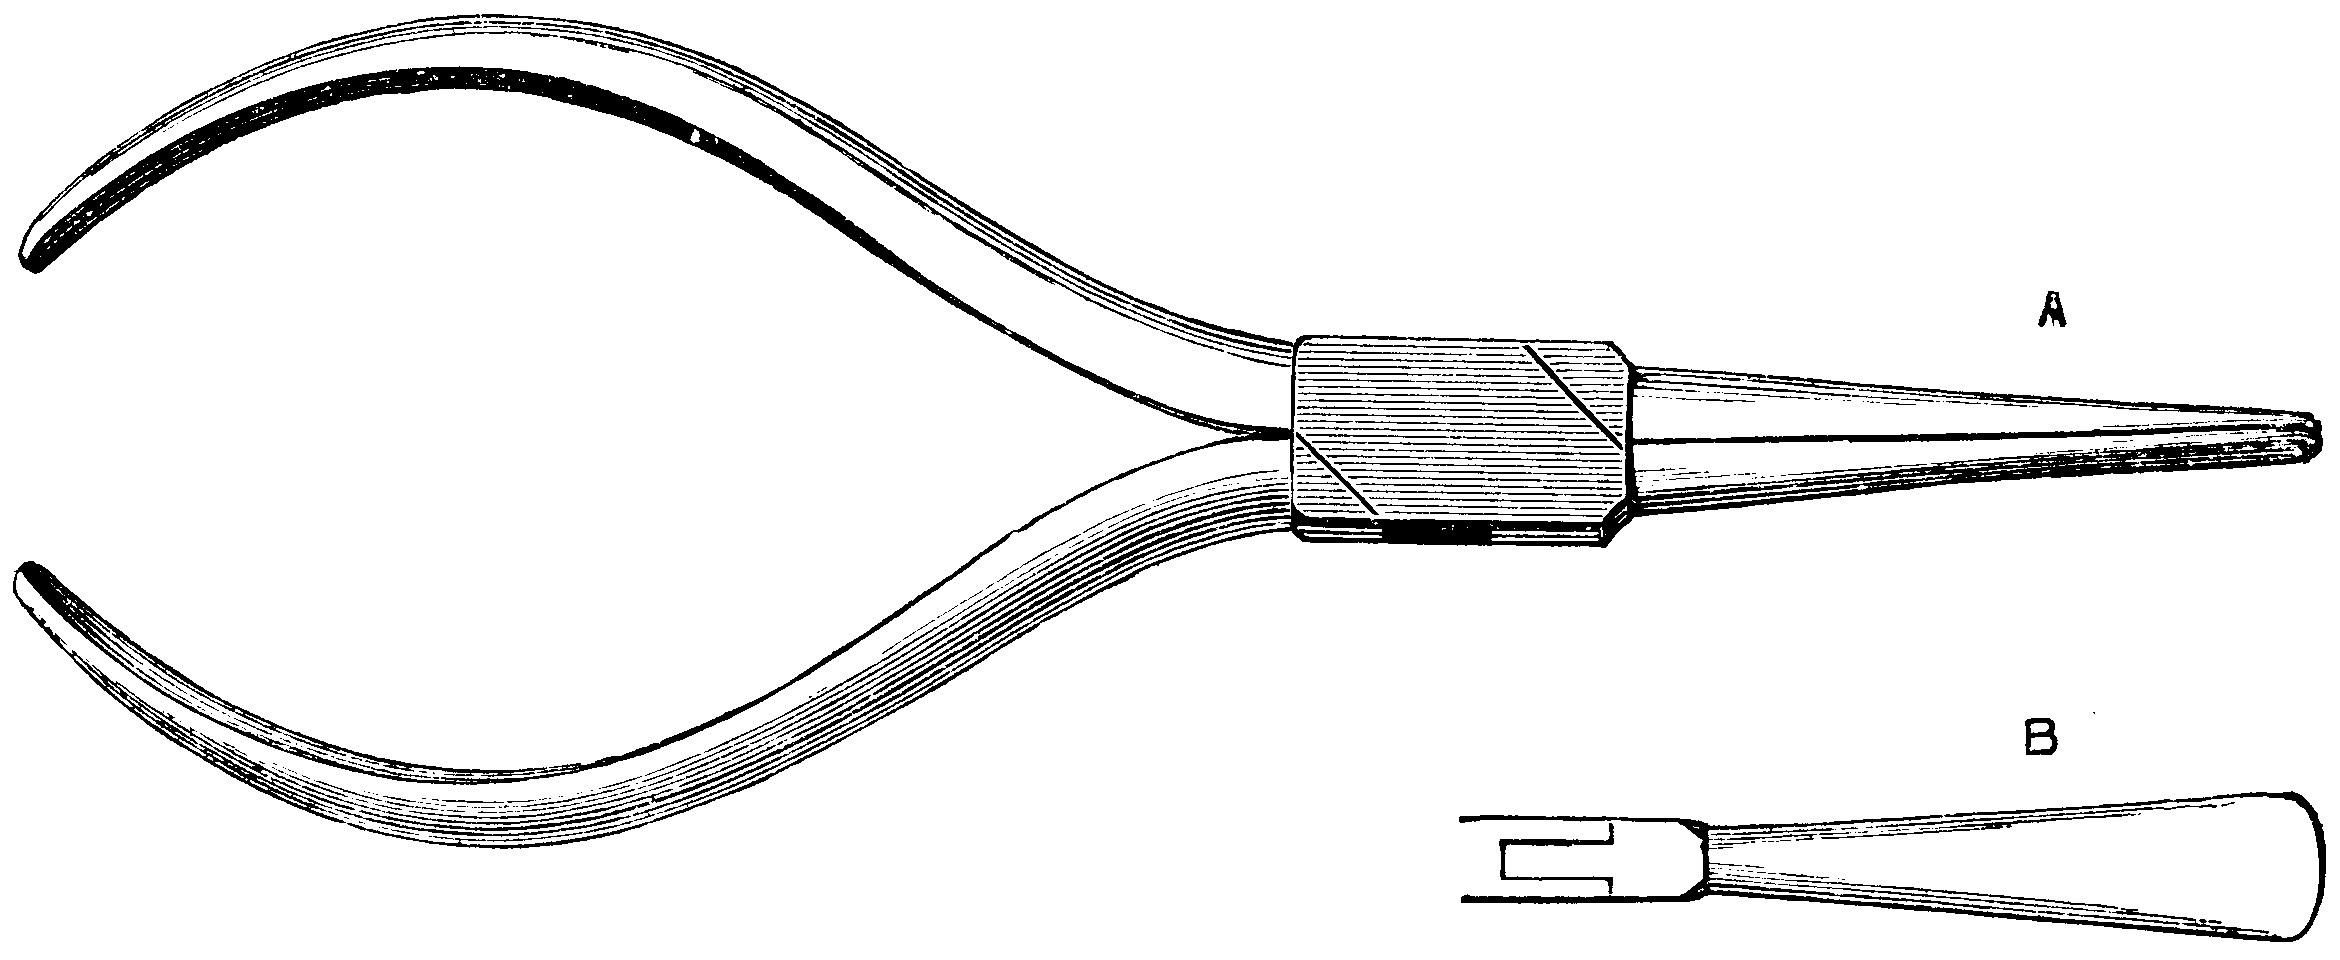 Fig. 19 —
Feather Pliers
Fig. 19 —
Feather PliersA large and a fine crooked awl with handles, a file, and a rough stone from the leatherseller's, are other things to procure, and these, with the ten tools previously particularised, some tow, wool, wire, eyes, and a needle and thread, a pot of preservative paste, and a piece of wood or a wire for a stuffing iron, are all that the amateur or the professional requires to skin and stuff a small or medium-sized bird or mammal. Cost of the stone and tools (which, with ordinary care, will last for years) should be within the reach of all.
A large and sturdy crooked awl with handles, a file, and a rough stone from the leather shop are other items to get. Along with the ten tools mentioned before, some tow, wool, wire, eyes, a needle and thread, a jar of preservative paste, and a piece of wood or wire for a stuffing iron, these are all that both amateurs and professionals need to skin and stuff a small to medium-sized bird or mammal. The cost of the stone and tools (which, with regular care, will last for years) should be affordable for everyone.
 Fig. 20 —
Tow Forceps
Fig. 20 —
Tow ForcepsThe "stuffing iron" mentioned above is best made, if wanted for small birds, from the broken steel of a wool comber's "devil," about nine inches long, fixed in a bradawl handle of about four inches, or, if for large birds or mammals, the iron may be made from a broken fencing foil, to any size between twelve and thirty inches, with suitable handle. In either case the smallest end is driven into the handle, and the top is filed across with a smooth nick, to push in, but not to retain the tow. See Fig. 21.
The "stuffing iron" mentioned above is best made, if you need it for small birds, from the broken steel of a wool comber's "devil," about nine inches long, fixed in a bradawl handle that's about four inches. For larger birds or mammals, you can make the iron from a broken fencing foil, anywhere from twelve to thirty inches, with a suitable handle. In either case, the smallest end is inserted into the handle, and the top is filed with a smooth notch to help push in the stuffing, but not to hold onto the tow. See Fig. 21.
This, I would point out to the non-professional reader, is a much more satisfactory way of getting thoroughly efficient tools than going to the expense of ordering a box of "bird-stuffing implements," at a cost of many pounds and finding one half of them unnecessary, and the other half worthless.
This, I would like to highlight for the casual reader, is a much better way to get really effective tools than spending a lot of money on a set of "bird-stuffing tools," costing several pounds, only to discover that half of them are unnecessary and the other half are useless.
HAVING skinned a zoological specimen, we require, as a matter of course, to anoint the inside of the skin with some preservative, for the purpose of arresting decomposition and general decay, and also defending it from the ravages of insects for an indefinite period. Many things will partially cure a skin; for instance, rubbing it with dry earth and exposing it to the sun, as I have done with some success when hunting abroad; chalk also will do, if nothing else can be procured. I have at the present moment a raven's head cut off by a rifle ball, cured only with chalk, and which is now, after a lapse of twenty years, in as good a state of preservation as need be. Still we require other aids than sun and chalk to properly preserve our specimens, especially in our usually cold, damp climate; and if we ask what is the sine qua non, a chorus of professional and amateur taxidermists shout out, "Arsenic, of course."
After skinning a zoological specimen, we need to apply some preservative to the inside of the skin to stop decomposition and decay, as well as to protect it from insects for a long time. There are several methods that can help preserve a skin; for instance, rubbing it with dry dirt and exposing it to sunlight, which I've had some success with while hunting abroad. Chalk can also work if nothing else is available. Right now, I have a raven's head that was shot off by a rifle bullet, preserved only with chalk, and after twenty years, it’s still in great condition. However, we need more than just sunlight and chalk to properly preserve our specimens, especially in our usually cold, damp climate. And if we ask what the key ingredient is, a chorus of professional and amateur taxidermists will yell, "Arsenic, of course."
I propose to show the fallacy of this, being quite of the way of thinking of Waterton, who says, "It (arsenic) is dangerous to the operator and inefficient as a preservative." I will, however, give everyone a chance of doing exactly as he pleases by jotting down three different recipes for arsenical soaps. The inventor of the first of these appears to have been one Bécoeur, of the now world-renowned Metz. Bécoeur appears to have flourished about the year 1770, and his formula is still commonly used. It is compounded as follows:
I propose to demonstrate the error in this, following the mindset of Waterton, who states, "It (arsenic) is harmful to the user and ineffective as a preservative." However, I will give everyone the opportunity to do as they wish by outlining three different recipes for arsenical soaps. The creator of the first recipe seems to have been a man named Bécoeur, from the now-famous Metz. Bécoeur appears to have been active around 1770, and his formula is still widely used. It is made up as follows:
No. 1. — Bécoeur's Arsenical Soap.
No. 1. — Bécoeur's Arsenic Soap.
Camphor, 5 oz.
Camphor, 5 oz.
Salt of tartar, 12 oz.
Cream of tartar, 12 oz.
Powdered arsenic, 2 lb.
2 lb. powdered arsenic
Lime in powder (or powdered chalk), 4 oz.
Lime powder (or powdered chalk), 4 oz.
White soap, 2 lb.
White soap, 2 lbs.
Cut the soap into small slices as thin as possible, put them into a pot over a gentle fire with very little water, stirring it often with a wooden spoon; when dissolved, add the salts of tartar and powdered chalk; take it off the fire, add the arsenic, and stir the whole gently; lastly, put in the camphor, which must first be pounded in a mortar with a little spirits of wine. When the whole is properly mixed together it will have the consistence of paste. It may be preserved in tin or earthenware pots, well closed and cautiously labelled. When wanted for use it must be diluted with a little cold water to the consistence of clear broth; the pot may be covered with a lid of pasteboard, having a hole for the passage of the brush, by which the liquor is applied. (There appears in this formula to be an error in giving 12 oz. of Salts of tartar, which should, I think, be reduced to 2 oz.; also the proportion, of arsenic and soap is clearly excessive with regard to the quantity of the lime or chalk.)
Cut the soap into thin slices as small as possible, place them in a pot over a low flame with a little water, stirring often with a wooden spoon. Once dissolved, add the cream of tartar and powdered chalk; take it off the heat, add the arsenic, and mix everything gently. Finally, add the camphor, which should first be ground in a mortar with a little spirits of wine. When everything is well combined, it should have a paste-like consistency. It can be stored in tin or ceramic pots, sealed tightly and labeled carefully. When you need to use it, dilute it with a little cold water until it reaches the consistency of clear broth; the pot can be covered with a pasteboard lid that has a hole for the brush to apply the mixture. (There seems to be a mistake in this recipe regarding the amount of cream of tartar, which should be 2 oz. instead of 12 oz.; also, the ratio of arsenic and soap is clearly too much compared to the amount of lime or chalk.)
Swainson appears to have used a composition somewhat different from the preceding. He describes it as follows:
Swainson seems to have used a composition that’s a bit different from the one before. He describes it like this:
No. 2. — Swainson's Arsenical Soap.
No. 2. — Swainson's Arsenic Soap.
Arsenic, 1 oz.
Arsenic, 1 oz.
Distilled water, 6 drms.
Distilled water, 6 drops.
White soap, 1 oz
White soap, 1 oz
Camphor, 2 drms.
Camphor, 2 drams.
Carbonate of potash, 1 drm.
Potassium carbonate, 1 dram.
This mixture should be kept in small tin boxes; when it is to be used moisten a camel-hair pencil with any kind of spirituous liquor, and with it make a lather from the soap, which is to be applied to the inner surface of all parts of the skin, and also to such bones as may not be removed.
This mixture should be stored in small tin boxes; when you're ready to use it, wet a camel-hair brush with any kind of alcoholic beverage, and use it to create a lather from the soap. This lather should be applied to the inner surface of all areas of the skin, as well as to any bones that can't be removed.
The next formula is of my own arrangement; I have used it, and have found it quite equal to any of the other arsenical preparations, which is not saying much for any of them.
The next formula is my own creation; I've used it and found it just as effective as any of the other arsenic-based preparations, which doesn’t say much for any of them.
No. 3. — Browne's Arsenical Soap.
No. 3. — Browne's Arsenic Soap.
Arsenic, 1 lb
Arsenic, 1 lb
Distilled water 6 drms
Distilled water 6 drops
Soft soap, 2 lb.
Liquid soap, 2 lb.
Whiting (or powdered chalk), 3 lb.
Whiting (or powdered chalk), 3 lbs.
Camphor or tincture of musk, 2 oz.
Camphor or musk tincture, 2 oz.
Place the arsenic in an old saucepan (which is not to be used for any other purpose whatever); put the whiting over it, next pour sufficient water over it to make it into a thick paste, then add the soft soap, stir the whole well together, add a little water, and place on the fire to boil, adding from time to time water sufficient to render the whole mass of the consistence of gruel. When it boils up it is sufficiently well done; take it off the fire, and place outside in the open air to cool, as the fumes, if given off in a close room, are highly prejudicial to health. When nearly cold, stir in the camphor, previously pounded to a fine powder by the addition of a few drops of any spirit — spirits of wine, gin, rum, turpentine, etc.. If musk is used it is sufficient to stir it in the mass, or 1 oz. of pure carbolic acid (previously melted) may be substituted for either the camphor or musk.
Place the arsenic in an old saucepan (which should not be used for anything else); add the whiting on top, then pour in enough water to make a thick paste. Next, stir in the soft soap and mix everything well. Add a bit more water and put it on the stove to boil, adding water as needed to keep the mixture at a gruel-like consistency. Once it starts boiling, it's done; take it off the heat and set it outside to cool, as the fumes can be harmful in a closed space. Once it's almost cool, stir in the camphor, which should be finely powdered with a few drops of any type of spirit—like alcohol, gin, rum, turpentine, etc. If you're using musk, just mix it into the mixture, or you can replace the camphor or musk with 1 oz. of pure melted carbolic acid.
The reason for stirring in the camphor, musk, or carbolic acid, when the arsenical paste is nearly cold, is twofold — first, to prevent the inhaling of the metallic fumes, which readily attack the lungs; and secondly, to prevent the said fumes or heated air carrying off with it the volatile essences of those drugs. The quantities given are sufficient to fill two six-pound Australian meat tins, which form capital receptacles for arsenical paste, and should be soldered up, only to be opened as required for use. As this quantity is, however, perhaps too much for the amateur, the proportions may be decreased, and what is not in actual use had better be soldered up in the tins just referred to, and which may be found very useful, besides, for such purposes as paint pots, etc.. Carefully label this preparation "Poison," and place it out of the reach of children.
The reason for mixing in the camphor, musk, or carbolic acid when the arsenic paste is almost cool is twofold — first, to avoid inhaling the metallic fumes that can harm the lungs; and second, to stop the fumes or heated air from carrying away the essential properties of those substances. The amounts mentioned are enough to fill two six-pound Australian meat tins, which make great containers for arsenic paste and should be sealed shut, only to be opened when needed. However, since this amount might be too much for beginners, the proportions can be reduced, and the excess should be sealed in the tins mentioned earlier, which can also be helpful for other uses like paint pots. Make sure to carefully label this preparation "Poison" and keep it out of children’s reach.
I have given the foregoing formulae, not because I have the slightest faith in any of them, but simply for the benefit, or otherwise, of those persons who elect to use arsenical preparations in defiance of the teachings of common sense, and in deference to the prevailing notion that arsenic is the only poison extant which has extraordinary preservative powers. This I flatly deny, after an experience of more than five and twenty years. Let us dissect the evidence as to the claim of arsenic to be considered as the antiseptic and preservative agent par excellence.
I’ve shared the formulas above, not because I believe in any of them, but simply for the sake of those who choose to use arsenic-based products despite common sense, and because of the widespread belief that arsenic is the only poison with remarkable preservative abilities. I completely reject this idea after more than twenty-five years of experience. Let’s break down the evidence regarding arsenic's claim to be the ultimate antiseptic and preservative agent par excellence.
Its advocates claim for it — First, that it dries and preserves all flesh from decay better than anything else known; secondly, that if the skin is well painted with arsenical soap no moth or maggot will be found to touch it. This, then, is all is wanted — immunity from decay and protection from insects. Now I maintain that arsenical mixtures are not only most dangerous, but quite useless also for the purpose.
Its supporters argue that it — First, dries and preserves all flesh from decay better than anything else known; second, that if the skin is well coated with arsenical soap, no moth or maggot will come near it. This is all that is needed — protection from decay and insects. However, I assert that arsenical mixtures are not only very dangerous but also entirely ineffective for this purpose.
Arsenic is simply a drier of animal tissue to a certain extent, but so are hundreds of other agents not so dangerous. It is also perfectly useless as a scarecrow or poison to those bêtes noire of the taxidermist, the larvae of the various clothes and fur eating moths of the genus Tinea, or the larvae of Dermestes lardarius, murinus, and other museum beetles. They simply laugh arsenic to scorn; indeed, I believe, like the Styrian arsenic eaters, they fatten on it. I could give many instances. Of course, when you point out to a brother taxidermist — rival, I mean; there are no brothers in art — the fact that somehow this arsenical paste does not work the wonders claimed for it, he replies, "Oh! ah! yes! that specimen, I now recollect, was done by a very careless man I employed; he never half painted the skin."
Arsenic is really just a way to dry animal tissue to some extent, but there are hundreds of other agents that aren’t as dangerous. It’s also completely ineffective as a scare tactic or poison against those pesky critters that taxidermists deal with, like the larvae of various clothes and fur-eating moths from the genus Tinea, or the larvae of Dermestes lardarius, murinus, and other museum beetles. They just ignore arsenic; in fact, I believe, like the Styrian arsenic eaters, they thrive on it. I could share many examples. Of course, when you point out to a fellow taxidermist—rival, I mean; there are no siblings in art—that this arsenical paste doesn’t deliver the amazing results it claims, he responds, "Oh! ah! yes! that specimen, I remember now, was done by a very careless person I hired; he didn’t even paint the skin properly."
All nonsense! Men, as well as masters, lay the "preservative" on as thickly as they can. Verbum sap.! A great outcry is being made at the present day as to arsenical wall papers and ladies' dresses — very properly so; but did it never strike any taxidermist — they must read the papers some times, even if not scientific men — that if it was dangerous to live in a room, the paper of which contains a barely appreciable quantity of arsenic, it was also dangerous to work all day in a shop amid hundreds of specimens actually reeking with arsenic, and giving it off when dry, and when handled, in the form of dust? Painted on the skin while wet is bad enough; but what shall we say to those — well, we will not use harsh terms — who calmly tell you that they always use dry arsenic. Incredible as the statement may appear to the scientist, yet it is true that I have seen a man plunge his hand in the most matter-of-fact way into a box containing dry arsenic, and coolly proceed to dust it on a skin. What is the consequence of this to the user of wet or dry arsenical preparations? Coughs, colds, chronic bronchitis, soreness of the lips and nose, ugly ulcers, brittleness of nails, and partial or complete paralysis. I knew a man who formerly used dry arsenic, whose constitution was thoroughly broken up by it. Again, an amateur of long standing called on me some time since, paralyzed in one hand — the doctors could make nothing of him. I said at once, "You have been using quantities of arsenic, and probably dry?"
All nonsense! Men and their masters apply the "preservative" as thickly as they can. Verbum sap! There's a big fuss these days about arsenic in wallpapers and women's clothing — which is totally justified; but hasn't it occurred to any taxidermist — they must read the news sometimes, even if they aren't scientists — that if living in a room with wallpaper containing a tiny amount of arsenic is dangerous, then working all day in a shop surrounded by hundreds of specimens that are full of arsenic and releasing it as dust when dry or handled is just as risky? Having it painted on your skin while wet is bad enough; but what can we say about those — well, let’s not be too harsh — who casually claim they always use dry arsenic? As unbelievable as it may sound to a scientist, I've seen a man casually dip his hand into a box of dry arsenic and then go on to dust it on a skin without a second thought. What does this mean for someone using either wet or dry arsenic treatments? Coughs, colds, chronic bronchitis, sore lips and nose, ugly ulcers, brittle nails, and partial or complete paralysis. I knew a man who used to work with dry arsenic, and it seriously ruined his health. Also, an experienced amateur came to see me a while ago, paralyzed in one hand — and the doctors couldn't find anything wrong. I immediately said, "You've been using a lot of arsenic, probably dry?"
Much astonished, he said "Yes;" and he had never mentioned this fact to his numerous doctors, who worked, of course, in the dark, when, by a course of antidotes taken at first, he might have been saved.
Much to his surprise, he said "Yes;" and he had never brought this up with any of his many doctors, who were, of course, unaware, when he could have been saved by initially taking a series of antidotes.
Used alone, arsenical paste is worse than useless for animals, causing them to "sweat" at once in certain places, and preventing your pulling them about, as you must do if modelling; again, if used for fur, you seldom or never can relax by that crucial test of a good preservative, i.e., — plunging in water.
Used alone, arsenical paste is more harmful than helpful for animals, causing them to "sweat" immediately in certain areas, and making it difficult to move them around, which you need to do if you're modeling; furthermore, if it's used for fur, you can rarely or never test its effectiveness as a good preservative by the crucial method of soaking in water.
Yet one question to the advocates of arsenic. If it possesses the chief advantage claimed for it, why use camphor in museums under the idea that it drives away moths?
Yet one question for the proponents of arsenic. If it has the main benefit that's been claimed, why use camphor in museums thinking it drives away moths?
Perhaps it will be as well to point out secundum artem the pros and cons for the use of arsenic.
Perhaps it will be helpful to outline the pros and cons for the use of arsenic.
|
ARSENICAL PASTE. ARSOXIC PASTE. |
|
|
Advantages claimed. Claimed advantages. |
Disadvantages. Disadvantages. |
|
A perfect dryer of animal tissue. A perfect device for drying animal tissue. |
Will often "sweat" skins, especially those of mammals, for which it is useless. Often, they'll "sweat" skins, especially mammal skins, which is unnecessary. |
|
Keeps all things free from attack of insects. Protects against insect infestations. |
Is not of the slightest use for this purpose. Isn't even a little helpful for this purpose. |
|
Easier to make and use than any other preparation. It's easier to create and use than any other option. |
Denied. Denied. |
|
Gives off poisonous fumes when hot. Releases toxic fumes when heated. |
|
|
Deposits metallic arsenic when drying. Deposits metallic arsenic when dried. |
|
|
Gives off poisonous dust when thoroughly dry. Releases harmful dust when fully dry. |
|
|
Causes colds, coughs, etc.., which turn to bronchitis, paralysis, etc.. Can cause colds, coughs, and other issues, which can lead to bronchitis, paralysis, and more. |
|
Having now summed up in the case of Common Sense versus Arsenic, I challenge contradiction to any of my statements, and ask, Why use a dangerous and inefficient preservative agent, when a harmless preservative, and that quite as good worker and dryer as arsenic, will suffice? I have invented a soap for which I claim those advantages, and as to its deterrent principle re insects, I am convinced that it is quite as good as the other, for is there any one thing known — compatible with clean-looking work — that will prevent the ravages of the maggots in birds' skins? I answer, No! — if we except one thing, too dangerous to handle — bichloride of mercury, of which anon. Let me whisper a little fact, and blow the poison theory to the winds: The real secret of success is to case your specimens up as soon as practicable, or to keep them always in full light, not poking them away in obscure corners, which the Tineidae and other pests love--hating light as the Father of Evil is said to hate holy water.
Having summed up the case of Common Sense versus Arsenic, I dare anyone to disagree with my statements and ask: Why use a dangerous and ineffective preservative when a safe one that works just as well as arsenic will do? I’ve invented a soap that I claim has those advantages, and as for its ability to deter insects, I believe it is just as effective as the other option. Is there anything known—compatible with a clean appearance—that will stop maggots from damaging bird skins? I say no!—except for one thing, which is too dangerous to handle—bichloride of mercury, but more on that later. Let me share a little secret and dismiss the poison theory: The real key to success is to encase your specimens as soon as possible or keep them in bright light, not tucked away in dark corners where pests like Tineidae thrive—because they hate light just like the Father of Evil is said to hate holy water.
My Preservative formula is as follows:
My preservative formula is as follows:
No. 4. — Brown's (Non poisonous) Preservative Soap.
No. 4. — Brown's (Non-toxic) Preservative Soap.
Whiting or chalk, 2.5 lb.
Whiting or chalk, 2.5 lbs.
Chloride of lime, 2 oz.
Chlorinated lime, 2 oz.
Soft soap, 1 lb.
Liquid soap, 1 lb.
Tincture of musk, 1 oz.
Musk tincture, 1 oz.
Boil together the whiting and the soap with about a pint of water; then stir in the chloride of lime (previously finely pounded) while the mixture is hot; if this point is not attended to, the mixture will not work smoothly; when nearly cool, stir in the tincture of musk. This will about fill a 6 lb. Australian meat tin. Caution: It is not necessary to hold the mouth over the mixture while hot, as chlorine is then rapidly evolved. This mixture has stood the test of work and time, and I therefore confidently bring it to the notice of the public as completely superseding the arsenical paste or soap for small mammals and all birds; indeed, numbers of persons, totally unknown to me, have written to me about its advantages.
Boil the whiting and soap together with about a pint of water. Then, while the mixture is hot, stir in the finely crushed chloride of lime. If you miss this step, the mixture won’t combine properly. Once it’s almost cool, mix in the tincture of musk. This will fill a 6 lb. Australian meat tin. Caution: Don’t hold your face over the hot mixture, as chlorine will be released quickly. This mixture has proven effective over time, so I confidently present it to the public as a complete replacement for arsenical paste or soap for small mammals and all birds. In fact, many people I don’t even know have contacted me about its benefits.
One says: "I have followed the bird-stuffing now for several years in connection with another trade, but I have never seen anything to touch it before. I have quite given up arsenic, and can get on fine without it, and only wish that I had known the grand secret before."
One says: "I've been into taxidermy for several years alongside another job, but I've never seen anything like this before. I've completely stopped using arsenic and I'm doing just fine without it; I just wish I had learned this great secret earlier."
Another: "Your recipe for preservative unction (non-poisonous) is simply invaluable to taxidermists. I have been trying for a long time to make a non-poisonous unction, but never fairly succeeded; always had a doubt as to their efficacy, prejudice had something to do with it."
Another: "Your formula for a non-toxic preservative is incredibly valuable to taxidermists. I've been trying for a long time to create a non-toxic preservative, but I never really succeeded; I always had doubts about their effectiveness, and some of that was due to my biases."
A third says: "I have tried your recipe, and am well satisfied of its qualities for preserving skins, having tried Swainson's, and Bécoeur's, and yours, and after a twelvemonth have relaxed the skins, and give my favour to yours as a toughener of the skin."
A third says: "I have tried your recipe, and I'm really happy with how well it preserves skins. I've also tried Swainson's and Bécoeur's, and after a year, their recipes loosened the skins. I prefer yours as a way to toughen the skin."
None of the above correspondents are known tome, and their opinion was sent unasked. Those people I do know who are using it are perfectly satisfied, as I myself am after a constant use of it for the past seven years. I find that skins dressed by it are not "burned," as some people may think, but relax most perfectly after a lapse of years by any method, even by the water process spoken of hereafter. I do not think it any better or worse than the arsenical preparations for preventing the attacks of insects, but the addition of tincture of musk (a lasting perfume) has seemed to me to be a great gain. One person wrote to me stating his opinion that the lime unduly corroded the wires used in setting up. I believe this might happen in cases where the mixture was used in a more fluid state than directed, namely, as a paste of a creamy consistence. I know of no evil effects produced.
None of the correspondents mentioned above are known to me, and their opinions were given without being asked for. The people I do know who are using it are completely satisfied, just like I am after using it constantly for the past seven years. I find that skins treated with it are not “burned,” as some might think, but actually relax perfectly over time, even with methods like the water process mentioned later. I don't think it's better or worse than arsenic-based preparations for preventing insect attacks, but the addition of musk tincture (a lasting fragrance) seems like a significant benefit. One person wrote to me expressing concern that the lime might corrode the wires used for setup. I believe this could happen if the mixture was used too fluidly, like a creamy paste, instead of as directed. I haven’t seen any harmful effects.
Of course the mixture, if kept exposed, dries up in time, and is then best wetted with a little warm water, into which a few drops of tincture of musk have been stirred. Where there is more fat or flesh than usual, say, on the inside of the wings, or on the leg bones, or inside the mouth, a small quantity of carbolic acid wash (Formula No. 16) will be found useful to dilute the preservative paste. Carbolic acid, however weak, must not be used on the thin parts of the skin of small mammals or birds, as it dries and shrivels them up so quickly as to seriously interfere with subsequent modelling.
Of course, the mixture will eventually dry out if left exposed, and it’s best to rehydrate it with a bit of warm water that has a few drops of musk tincture mixed in. If there is more fat or flesh than usual, like on the inside of the wings, the leg bones, or inside the mouth, a small amount of carbolic acid wash (Formula No. 16) can help to thin out the preservative paste. However, even weak carbolic acid shouldn’t be used on the delicate skin of small mammals or birds because it dries and shrinks them too quickly, which can seriously mess up any further modeling.
Though many insects eat the skin itself, yet how is it possible to guard against insects which attack the feathers only of birds (as the most minute species of the little pests do) by an agent which professedly cures the skin only? I remember once seeing the most comical sight possible, a stuffed cock and hen entirely denuded of feathers by thousands of a minute tines, their dry skins only left; they were as parchment effigies of their former selves. Difficult as the matter is, I yet hope to show both amateurs and professionals how to considerably increase the chances of preservation. It is this: After using the soap, and having the mammal arranged or bird stuffed ready for "cottoning," brush over the whole of the feathers, legs, toes, and beak, with the following preparation:
Though many insects eat the skin itself, how can we protect against insects that only attack the feathers of birds (like the tiniest species of these pests) with a remedy that supposedly works only on the skin? I once saw the most ridiculous sight: a stuffed rooster and hen completely stripped of their feathers by thousands of tiny pests, leaving just their dry skins that looked like parchment versions of their former selves. As challenging as this issue is, I still hope to show both hobbyists and professionals how to significantly improve their chances of preservation. Here’s how: After using the soap and arranging the mammal or prepping the bird for "cottoning," brush the entire surface of the feathers, legs, toes, and beak with the following mixture:
No. 5. — Waterton's Solution of Corrosive Sublimate.
No. 5. — Waterton's Solution of Corrosive Sublimate.
To a wine-bottleful of spirits of wine add a large teaspoonful of corrosive sublimate; in twelve hours draw it off into a clean bottle, dip a black feather into the solution, and if, on drying, a whiteness is left on the feather, add a little more alcohol.
To a bottle full of alcohol, add a large teaspoon of corrosive sublimate; in twelve hours, pour it into a clean bottle, dip a black feather into the solution, and if, after drying, the feather has a white residue on it, add a little more alcohol.
Care must be taken not to handle the bird more than absolutely necessary after this operation, for reasons which I will give below when speaking of the following recipe, which I have extracted from a little book professedly written by a well-known taxidermist, though I believe he knew nothing at all about it until it was published.
Care should be taken not to handle the bird more than absolutely necessary after this procedure, for reasons I'll explain later when discussing the next recipe. This recipe comes from a little book supposedly written by a well-known taxidermist, though I believe he didn't actually know anything about it until it was published.
The preparation referred to, which should be labelled "Dangerous! Not to be used!" is as follows:
The preparation mentioned, which should be labeled "Dangerous! Not to be used!" is as follows:
No. 6. — Gardner's Preservative.
No. 6. — Gardner's Preservative.
Arsenic, 6 oz.
Arsenic, 6 oz.
Camphor, 1 oz.
Camphor, 1 oz.
Corrosive sublimate, 3 oz.
Corrosive sublimate, 3 oz.
Spirits of wine, 0.5 pint.
Wine, 0.5 pint.
Yellow soap, 2 oz.
Yellow soap, 2 oz.
"Put all these ingredients in a pipkin, which place over a slow fire, stirring the mixture briskly till the several parts are dissolved and form one homogeneous mass. This may then be poured into a wide-mouthed bottle and allowed to stand till quite cold, when it will be ready for use. Of course, these quantities may be increased or decreased according to the size of the animal to be operated on; but the proportions here given must be preserved."
"Put all these ingredients in a small pot and place it over a low heat, stirring the mixture quickly until everything is dissolved and combined into one smooth mass. You can then pour it into a wide bottle and let it sit until it cools completely, when it will be ready to use. Of course, you can adjust the amounts based on the size of the animal being treated, but make sure to keep the same proportions."
Did it ever occur to the gifted author of this that stirring camphor and spirits of wine briskly over a slow fire would be as quick a way as could be invented of summoning the fire brigade; also, that nine ounces of poison to eleven ounces of other ingredients, well worked into the hands at different times, as it must be, when handling, or returning skins painted with it, would not tend to lengthen the life of the learner? Corrosive sublimate being a mercurial preparation — i.e., bichloride of mercury — I ask any chemist amongst my readers what effect three ounces of that dangerous preparation, six ounces of arsenic, yellow soap, and spirits of wine would have upon the constitution? Would it not be readily absorbed through the hands into the system? and next comes salivation, and then — the last scene of all!
Did it ever cross the mind of the talented author that quickly mixing camphor and alcohol over a low flame would be one of the fastest ways to call the fire department? Also, that using nine ounces of poison with eleven ounces of other ingredients, properly mixed into the hands at different times — as you must when handling or returning painted skins — wouldn’t help the learner live any longer? Since corrosive sublimate is a mercurial preparation — that is, bichloride of mercury — I ask any chemist among my readers what effect three ounces of that hazardous substance, six ounces of arsenic, yellow soap, and alcohol would have on the body. Wouldn't it be easily absorbed through the skin into the system? And then comes salivation, followed by — the final act!
Yet another little treat for the amateur desirous of committing suicide under the transparent pretence of studying taxidermy. This, which I have culled from the pages of "Maunders' Treasury of Natural History," is, by a fine irony, entitled Bullock's "Preservative" Powder:
Yet another little treat for the amateur wanting to commit suicide while pretending to study taxidermy. This, which I pulled from the pages of "Maunders' Treasury of Natural History," is, in a fine irony, titled Bullock's "Preservative" Powder:
No. 7. — Bullock's Preservative Powder.
No. 7. — Bullock's Preservative Powder.
Arsenic, 1 lb.
Arsenic, 1 lb.
Camphor, 0.5 lb.
Camphor, 0.5 lbs.
Burnt alum, 1 lb.
Burnt alum, 1 lb.
Tincture of musk, 12 oz.
Musk tincture, 12 oz.
Tanners' bark 2 lb.
Tannery bark 2 lb.
"Mix the whole thoroughly, and after reducing it to a powder pass it through a sieve. Keep in close tin canisters. This powder is more particularly adapted to fill up incisions made in the naked parts of quadrupeds and the skulls of large birds. It has been strongly recommended to us, but, being perfectly satisfied with our own, we have never tried it."
"Thoroughly mix everything, and after grinding it into a powder, sift it through a sieve. Store it in airtight tin canisters. This powder is especially suitable for filling incisions in the exposed areas of four-legged animals and the skulls of large birds. We’ve been strongly advised to try it, but since we are completely satisfied with our own, we have never tested it."
With regard to the foregoing composition I have a few words to say, which are these, that the reason I have copied it is that I have met with it in more books than one, and I wish therefore to call special attention to it, that it may be labelled "Dangerous," and that anyone using it will do so at his peril. Fancy shaking arsenic up in a sieve, and afterwards dusting it in con amore! Really, if people will use poisons, and others put themselves to considerable pains to invent the most deadly compounds for them, is it not criminal carelessness that such things should be published without a word of warning as to their character or effects?
Regarding the previous composition, I have a few things to say: the reason I copied it is that I’ve seen it in more than one book, and I want to draw special attention to it so it can be labeled "Dangerous," warning anyone who uses it that they’re taking a risk. Just imagine shaking arsenic in a sieve and then sprinkling it on with love! Honestly, if people are going to use poisons, and others are going to go to great lengths to create the most lethal compounds for them, isn’t it a serious oversight that such information is published without any warning about its nature or effects?
Powders, as a rule, being made of astringents, dry the skin too quickly (especially if a bird is being operated on) to perfectly shape the specimen. As they are useful, however, to fill up and quickly dry cavities in the wings, and such like, of large birds, etc.., and in some cases even to prepare a skin for future stuffing, I will give a powder of my own composition, the chief point of merit of which consists in its being harmless to the user, and also that it has been tried on a large bird's skin, which it so effectually preserved and toughened that, eighteen months afterwards, it was relaxed and stuffed up better than the usual run of made skins:
Powders, in general, are made from astringents that dry out the skin too quickly (especially when operating on a bird), making it hard to shape the specimen properly. However, they are helpful for filling and quickly drying out cavities in the wings and similar areas of large birds, and in some situations, they can even prepare a skin for future stuffing. I’m going to share a powder I’ve created that is particularly noteworthy because it’s safe for the user and has been tested on a large bird's skin. It preserved and toughened the skin so effectively that eighteen months later, it was easier to relax and stuff than most commonly made skins.
No. 8. — Browne's Preservative Powder.
No. 8. — Browne's Preservative Powder.
Pure tannin, 1 oz.
1 oz. pure tannin
Red pepper, 1 oz.
Red bell pepper, 1 oz.
Camphor, 1 oz.
Camphor, 1 oz.
Burnt alum, 8 oz.
Burnt alum, 8 oz.
Pound and thoroughly mix, and keep in stoppered bottles or canisters.
Pound and mix completely, then store in sealed bottles or containers.
The foregoing preparation, though perfectly efficient for small mammals (say up to squirrel size) and for birds, is not sufficiently strong to penetrate the skin and thoroughly fix the hair of the larger mammals. For this purpose the older taxidermists used a wash or powder, composed of equal parts of alum and nitre (saltpetre). This had the double disadvantage of rendering the specimen cured by its aid almost dripping with humidity in damp weather, and efflorescing with the double salts around the eyes and mouth in dry weather. Alum alone was frequently used by those unaware of its peculiar property of deliquescing in heat as well as in humidity.
The preparation mentioned earlier works well for small mammals (like squirrels) and birds, but it isn't strong enough to fully penetrate the skin and secure the fur of larger mammals. To address this issue, older taxidermists used a wash or powder made of equal parts alum and nitre (saltpetre). This approach had two main downsides: specimens treated with it tended to be overly moist in damp weather and developed crystallized salts around the eyes and mouth in dry conditions. Many people often relied on alum alone, not realizing that it has a unique property of dissolving in heat as well as humidity.
I have, I believe, at last succeeded in arranging the proper proportions, and in substituting, for the worse than useless crude alum, the alum ustum or burnt alum, which is not affected by moisture (at least to any appreciable extent). The proportions are:
I think I've finally managed to get the right proportions and replaced the completely useless raw alum with burnt alum, which isn’t affected by moisture (at least not in a significant way). The proportions are:
No. 9. — Browne's Preservative Powder for Skins of Mammals.
No. 9. — Browne's Preservative Powder for Mammal Skins.
Burnt alum, 1 lb.
Burnt alum, 1 lb.
Saltpetre, 0.25 lb.
Saltpeter, 0.25 lb.
Pound and thoroughly mix.
Mash and mix well.
This, well rubbed into the skin and fleshy parts of mammals, is a certain and thoroughly trustworthy cure, and will penetrate through skin a quarter of an inch or more thick, fixing the hair or fur in a most admirable manner, and has the double advantage of being harmless to the person using it, and beneficial even if it gets on the outside of the skin of the specimen; indeed, it should be rubbed in on the fur side if the specimen is at all "high" when brought in. In all cases it is a good plan to thoroughly rub the outside of the ears, eyelids, nose, and lips, with this composition before skinning. I consider this the greatest boon to the animal preserver ever invented, and those to whom I have imparted the formula are loud in its praise, as witness the dozens of letters I have received from all parts during the last seven years.
This, when well rubbed into the skin and fleshy parts of mammals, is a reliable and completely trustworthy remedy that can penetrate through skin that is a quarter of an inch or more thick, effectively fixing the hair or fur in a remarkable way. It has the added benefits of being harmless to the person applying it and beneficial even if it comes into contact with the exterior of the specimen's skin; in fact, it should be applied on the fur side if the specimen is at all in good condition when brought in. In all instances, it's a good idea to thoroughly rub the outside of the ears, eyelids, nose, and lips with this mixture before skinning. I believe this is the best advantage to animal preservation ever created, and those to whom I've shared the formula have praised it highly, as evidenced by the dozens of letters I've received from all over in the past seven years.
If the proportions given are adhered to, no crystallisation of salts will take place around the eyes and mouth. Should this, however, happen from any cause, a stiff brush dipped in olive oil may be used to remove it and prevent its reappearance.
If the specified proportions are followed, there won't be any crystallization of salts around the eyes and mouth. If it does occur for any reason, a stiff brush dipped in olive oil can be used to remove it and prevent it from coming back.
After the mammal is stuffed and mounted, it may be washed over with Waterton's Solution (previously given) or the following, which ought to preserve the specimen from the attacks of insects:
After the mammal is stuffed and mounted, it can be washed with Waterton's Solution (as mentioned earlier) or the following, which should protect the specimen from insect damage:
No. 10. — Preservative Wash.
No. 10. — Preservative Wash.
Corrosive sublimate, 1 oz.
Corrosive sublimate, 1 oz.
Tincture of camphor (or musk), 1 oz.
Tincture of camphor (or musk), 1 oz.
Methylated spirits, 1 quart. 1 oz.
Methylated spirits, 1 quart. 1 oz.
This solution must be kept in a bottle, carefully labelled "Poison," and when used is not to be touched with the hands, but laid on with a brush.
This solution should be stored in a bottle and clearly labeled "Poison." When applying it, do not touch it with your hands; use a brush instead.
It constantly happens that parts of the bodies of animals — notably their fore and hind limbs, and their heads even — are required to be preserved for some considerable time for purposes of modelling their contour or muscles; it then becomes necessary to find some preparation which will keep large pieces of flesh sufficiently sweet and firm to model from. For the first edition, I had written to a scientific friend as to the preparations now in use at the various hospitals for the preservation of subjects, etc.., to which he answered:
It often happens that parts of animal bodies—especially their front and back legs, and even their heads—need to be preserved for a significant amount of time to model their shape or muscles. It then becomes important to find a method to keep large pieces of flesh fresh and firm enough to work with. For the first edition, I asked a scientific friend about the preservation methods currently being used at various hospitals for specimens, to which he responded:
"As far as I can glean from various sources, the medical profession has only within the last few years attempted to preserve whole bodies. Parts have, of course, been preserved in alcohol of some kind until they have literally crumbled away. At St. George's Hospital they use a preservative fluid, invented by the hospital porter (dissecting-room porter). The subjects are kept in a slate tank filled with the fluid. To show the efficiency of this fluid, I might mention that the first subject arrived much decomposed some months since, but is now quite fresh and sweet. The muscles inevitably lose a little of their colour in the preparation, which is all the change as yet observed. At Guy's is used a preparation of glycerine and arsenic, but at the present moment I do not recollect the exact proportions. At King's College, the method invented by Sterling, of Edinburgh, is used. All other hospitals have the old methods in vogue, such as preparations of arsenic."
From what I've gathered from various sources, the medical field has only recently started to preserve entire bodies. Parts have definitely been kept in some kind of alcohol until they essentially disintegrated. At St. George's Hospital, they use a preservative fluid developed by the hospital porter who works in the dissecting room. The bodies are stored in a slate tank filled with this fluid. To illustrate how effective this fluid is, I can mention that the first body that came in several months ago was already pretty decomposed, but now it looks completely fresh and pleasant. The muscles might lose a little of their color during the process, which is the only change we've noticed so far. At Guy's, they use a mix of glycerin and arsenic, but I can’t remember the exact proportions right now. At King's College, they use the method created by Sterling from Edinburgh. All the other hospitals are still using the old methods, like arsenic preparations.
Since then, I have had occasion to go more deeply into the subject and have used some of the formulae which follow, viz., rectified spirits, Moeller's Solution, and various preparations of lime.
Since then, I've had the opportunity to explore the topic more thoroughly and have utilized some of the formulas mentioned below, like distilled spirits, Moeller's Solution, and various lime preparations.
Messrs. Medlock and Bailey's bisulphite of lime (calcium) is most highly recommended by analytical experts for preserving large joints of meat and fish; and, indeed, the experiments conducted under scientific and Government supervision have abundantly proved its value. Its price is not great. For large joints the following is the formula:
Messrs. Medlock and Bailey's bisulphite of lime (calcium) is highly recommended by experts for preserving large cuts of meat and fish; indeed, the experiments conducted under scientific and government supervision have clearly demonstrated its effectiveness. It's not very expensive. For large cuts, here is the formula:
No. 11. — Messrs. Medlock and Bailey's Formula.
No. 11. — Medlock and Bailey's Formula.
Bisulphite of lime, 1 gall.
Lime bisulfite, 1 gallon.
Common salt, 0.25 pint.
Table salt, 0.25 pint.
Water, 2 to 4 galls.
Water, 2 to 4 gallons.
The following, taken from the "Year Book of Pharmacy for 1880," appears to be a very efficient formula; like all the rest of such formulae, it contains a certain percentage of arsenious acid:
The following, taken from the "Year Book of Pharmacy for 1880," seems to be a really effective formula; like all the other similar formulas, it includes a certain percentage of arsenious acid:
A new Preserving Fluid. — The Prussian Secretary of State for Education has caused the publication of the following compound and method of its application, discovered by Wickersheimer, the Preparator of the Anatomical Museum of the University of Berlin, who had at first patented the compound, but was induced to renounce his patent claims.
A new preservation fluid. — The Prussian Secretary of State for Education has announced a new compound and its method of use, discovered by Wickersheimer, the preparator of the Anatomical Museum at the University of Berlin. He initially patented the compound but later decided to forfeit his patent rights.
No. 12. — Wickersheimer's Preserving Liquid, No. 1.
No. 12. — Wickersheimer's Preserving Liquid, No. 1.
In 3000 parts of boiling water dissolve 100 of alum, 25 of sodium chloride, 12 of potassium nitrate, 60 of potassa, and 10 of arsenious acid, let cool and filter. To every 10 litres of the filtrate add 4 litres of glycerine and 1 litre of methylic alcohol. [Footnote: A gram = 15.444 grains troy; a litre = a little more than 11 pints.]
In 3000 parts of boiling water, dissolve 100 grams of alum, 25 grams of salt (sodium chloride), 12 grams of potassium nitrate, 60 grams of potash, and 10 grams of arsenious acid. Allow it to cool and then filter it. For every 10 liters of the filtered solution, add 4 liters of glycerin and 1 liter of methanol. [Footnote: A gram = 15.444 grains troy; a liter = just over 11 pints.]
Its application differs with the special objects to be preserved. In general, the objects must be impregnated with it. If the objects are to be preserved dry, they are soaked in the liquid from six to twelve days, and afterwards dried in the air.
Its application varies depending on the specific items being preserved. Generally, the items need to be soaked in it. If the items are to be preserved in a dry state, they are immersed in the liquid for six to twelve days and then air-dried.
Ligaments, muscles, and other animal objects remain perfectly soft and movable. Hollow organs, as lungs and intestines, should be filled with the liquid previous to immersion in it; after being taken out, and before drying, it is advisable to inflate them with air. Injecting the liquid into a corpse will preserve the latter completely, and the muscular tissue will always retain the natural colour of fresh corpses. To preserve the outward appearance of the latter, they should be well impregnated externally and enclosed in air-tight oases; this is only necessary to preserve the exact original appearance; if it is not done, the body will keep equally well if thoroughly injected, but the exterior will gradually become somewhat dry and dark coloured. Plants may likewise be preserved by this liquid. [Footnote: So expensive a preparation is, I think, sufficiently well replaced by salt, corrosive sublimate, and distilled water (see Formula No. 27). M. Decandolle exhibited, some years since, a branch of a coffee tree which had been perfectly preserved for fifty years. It was then pointed out that the efficacy of such solutions (saline) depended on their being boiled and applied to the plants hot (not boiling).]
Ligaments, muscles, and other animal tissues stay soft and flexible. Hollow organs, like lungs and intestines, should be filled with liquid before being submerged. After they are removed and before drying, it’s a good idea to inflate them with air. Injecting liquid into a body will preserve it completely, and the muscle tissue will always maintain the natural color of fresh bodies. To keep the exterior looking the same, they should be thoroughly treated on the outside and placed in airtight containers; this is only necessary to maintain the exact original look. If this is not done, the body will still preserve well if it is fully injected, but the outside will gradually become a bit dry and darker. Plants can also be preserved using this liquid. [Footnote: This costly preparation can be effectively replaced with salt, corrosive sublimate, and distilled water (see Formula No. 27). M. Decandolle demonstrated, several years ago, a branch of a coffee tree that had been perfectly preserved for fifty years. It was noted that the effectiveness of such saline solutions relied on them being boiled and applied to the plants while hot (not boiling).]
The following is a modification of the above, useful for comparison as to relative strengths for injection and immersion:
The following is a revised version of the above, helpful for comparing the relative strengths for injection and immersion:
No. 13. — Wickersheimer's Preserving Liquids, Nos. 2 and 3.
No. 13. — Wickersheimer's Preserving Liquids, Nos. 2 and 3.
|
For Injecting. For injecting. |
For Immersing. For Immersion. |
|
|
Arsenious acid Arsenic acid |
16 grams 16 grams |
12 grams 12 grams |
|
Sodium chloride Salt |
80 grams 80 grams |
60 grams 60 grams |
|
Potassium sulphate Potassium sulfate |
200 grams 200 grams |
150 grams 150 grams |
|
Potassium nitrate ... Potassium nitrate |
25 grams 25 grams |
18 grams 18g |
|
Potassium carbonate... Potassium carbonate... |
20 grams 20 grams |
15 grams 15 grams |
|
Water Water |
10 litres 10 liters |
10 litres 10 liters |
|
Glycerine Glycerin |
4 litres 4 liters |
4 litres 4 liters |
|
Wood naphtha Wood naphtha |
0.75 litres 0.75 liters |
0.75 litres 0.75 liters |
My friend, Dr. Priestley Smith, surgeon to the Birmingham Eye Hospital, has kindly given me his formula for a process which most admirably preserves delicate parts of animals. Having been enabled to give him some eyes of rare animals and fishes (whales and sharks), he showed me the process which is now fully explained in the following extract from the British Medical Journal of Jan. 10th, 1880:
My friend, Dr. Priestley Smith, a surgeon at the Birmingham Eye Hospital, has generously shared his formula for a process that wonderfully preserves delicate parts of animals. After I provided him with some eyes from rare animals and fish (like whales and sharks), he demonstrated the procedure, which is now fully detailed in the following excerpt from the British Medical Journal dated January 10, 1880:
PRESERVATION OF OPHTHALMIC SPECIMENS.
STORING EYE SPECIMENS.
Several friends and correspondents have asked me to refer them to a description of the method which I employ for the preservation of ophthalmic specimens, examples of which were exhibited in the annual museum of the Association in Cork last summer. I published an account of it in the Birmingham Medical Review for July, 1878; but, as several improvements have been effected since that time, I shall be greatly obliged by being allowed space in this journal for a brief description of my present method.
Several friends and colleagues have asked me to point them to a description of the method I use to preserve eye specimens, examples of which were shown in the annual museum of the Association in Cork last summer. I published an account of it in the Birmingham Medical Review for July 1878; however, since several improvements have been made since then, I would greatly appreciate space in this journal for a brief description of my current method.
No. 14. — Priestley Smith's Formula.
The following are the solutions, etc., employed:
1. Mueller's Fluid — viz.,
Bichromate of potash 1 part,
Sulphate of soda 1 part,
Water 100 parts;
2. Hydrate of chloral and water, 1 in 20;
3. Glycerine and water, 1 in 4,
4. Glycerine and water, 1 in 2 — i.e.,
equal parts;
5. Glycerine-jelly — viz.,
No. 14. — Priestley Smith's Formula.
The following are the solutions, etc., used:
1. Mueller's Fluid — that is,
Bichromate of potash 1 part,
Sulphate of soda 1 part,
Water 100 parts;
2. Hydrate of chloral and water, 1 in 20;
3. Glycerine and water, 1 in 4,
4. Glycerine and water, 1 in 2 — i.e.,
equal parts;
5. Glycerine-jelly — that is,
Best French gelatine 1 part,
Glycerine 6 parts,
Water 6 parts,
Best French gelatin 1 part,
Glycerin 6 parts,
Water 6 parts,
Soak the gelatine in the water until swollen,
then heat and add the glycerine,
add a few drops of a saturated solution of carbolic acid,
and
filter hot through white blotting-paper;
Soak the gelatin in the water until it’s expanded,
then heat it and add the glycerin,
add a few drops of a saturated solution of carbolic acid,
and
filter it hot through white blotting paper;
6. A thick white varnish made by mixing oxide of zinc with copal varnish in a mortar.
6. A thick white varnish made by mixing zinc oxide with copal varnish in a mortar.
The eyeball is placed, immediately after excision, unopened, in Mueller's Fluid for about three weeks, light being carefully excluded. It is then frozen solid by immersion for a few minutes in a mixture of finely powdered ice and salt, and immediately divided into lateral halves by means of a sharp-edged table-knife. The portion to be mounted is then placed in chloral solution for some weeks, in order to remove the yellow colour; light being still excluded, and the fluid being changed until it is no longer discoloured by the bichromate. The specimen next lies for twenty-four hours or longer in the weaker glycerine solution, and is then transferred for a similar period to the stronger glycerine solution, after which it may be mounted in the jelly without danger of shrinking. A specimen-jar being two-thirds filled with melted jelly, the half-eye is placed in it, the concavity upwards. When every interstice is filled, it is turned over (care being taken to avoid the inclusion of an air-bubble), and held in a central position in contact with the bottom of the jar. When cold and firmly coagulated, the jelly is coated over with white varnish. A few days later, when the surface of the varnish is firm, this again is thinly coated with a film of jelly, and thereby preserved from the ultimate danger of cracking. The jar is fixed with glue into a suitable wooden stand. The gelatine which yields the strongest and most colourless jelly is that manufactured by Coignet and Co., of Paris, obtainable in packets, and known as the "gold-label" variety. The specimen-jars, admirable both as to material and workmanship, have been made expressly for me by Messrs. F. and C. Osler, of Broad Street, Birmingham, from whom they may be obtained in any number. — PRIESTLEY SMITH, Birmingham.
The eyeball is placed, right after removal, without being opened, in Mueller's Fluid for about three weeks, with light carefully kept out. It is then frozen solid by immersing it for a few minutes in a mix of finely powdered ice and salt, and immediately cut into two halves using a sharp table knife. The part to be mounted is then put in chloral solution for several weeks to remove the yellow color; light is still excluded, and the fluid is replaced until it no longer has a discoloration from the bichromate. The specimen is then left for twenty-four hours or longer in a weaker glycerine solution and then moved to a stronger glycerine solution for a similar period, after which it can be mounted in jelly without the risk of shrinking. A specimen jar is filled two-thirds with melted jelly, and the half-eye is placed in it with the concave side facing up. Once every gap is filled, it is turned over (with care taken to prevent air bubbles) and held in a central position against the bottom of the jar. Once it has cooled and solidified, the jelly is coated with white varnish. A few days later, when the varnish surface is firm, it's thinly coated again with a layer of jelly to protect it from future cracking. The jar is secured with glue in a suitable wooden stand. The gelatin that produces the strongest and most colorless jelly is made by Coignet and Co., in Paris, available in packets, known as the "gold-label" variety. The specimen jars, excellent in terms of material and craftsmanship, have been specially made for me by Messrs. F. and C. Osler, of Broad Street, Birmingham, from whom they can be purchased in any quantity. — PRIESTLEY SMITH, Birmingham.
Glycerine retards fermentation and decomposition to a remarkable degree. It combines readily with alcohol or water.
Glycerin greatly slows down fermentation and decomposition. It blends easily with alcohol or water.
Boracic acid in small quantities mixed with a solution of saltpetre, i.e., 1 to 50, is stated to be of service in the preservation of flesh.
Boracic acid in small amounts mixed with a solution of saltpeter, i.e., 1 to 50, is said to be helpful in preserving meat.
Previously salted meat cannot be preserved this way; salting evidently removes the phosphates. Action of boracic acid would, no doubt, set up acid phosphates, which are the prime causes of the preservation.
Previously salted meat can't be preserved like this; salting clearly removes the phosphates. The action of boric acid would likely create acid phosphates, which are the main factors for preservation.
A preparation of borax has been brought out by Mr. Robottom, of Birmingham, who claims for it that it preserves all animal and vegetable tissue, as well as being useful for tanning skins. I shall refer to this preparation further on. Carbolic acid (pure) will be found a valuable ally of the taxidermist. Calvert was the chief if not the only maker of the pure preparation, which is sold in 0.5 lb. or 1 lb. bottles in a solid crystalline state, as if it were frozen. The bottle, with the stopper temporarily removed, must be plunged in boiling water to melt out as much as is required, to which must be added many times its weight or quantity of water. This diluted preparation will be found of infinite service in the hot summer months for pouring in the "gentle" infested throats or wounds of mammals and birds preparatory to skinning. Diluted and poured on a little burnt alum or pure tannin, and the mixture well shaken together, it forms an exceedingly strong preparation, as well as a valuable one, for painting the noses or pickling the tongues of animals before or after skinning. Two strengths of this will be found very useful. Thus:
A borax preparation has been developed by Mr. Robottom from Birmingham, who claims it can preserve all animal and vegetable tissue and is also useful for tanning hides. I'll discuss this preparation more later. Pure carbolic acid will be an invaluable tool for taxidermists. Calvert was the main, if not the only, producer of the pure form, which comes in 0.5 lb. or 1 lb. bottles in a solid crystalline state, resembling something frozen. The bottle, with the stopper temporarily removed, needs to be immersed in boiling water to melt out the required amount, which should then be mixed with many times its weight in water. This diluted solution will be extremely helpful during hot summer months for treating the "gentle" infested throats or wounds of mammals and birds before skinning. If diluted and combined with a bit of burnt alum or pure tannin, and then shaken well, it creates a very strong and valuable mixture for coating the noses or pickling the tongues of animals before or after skinning. Two strengths of this will be quite useful. Thus:
No. 15 — Carbolic Wash, No. 1 (for Mammals).
No. 15 — Carbolic Wash, No. 1 (for Mammals).
Glacial carbolic acid, 2 oz.
Carbolic acid, 2 oz.
Burnt alum or pure tannin, 1 oz.
Burnt alum or pure tannin, 1 oz.
Water, 1 pint.
1 pint of water.
Keep in stoppered bottle labelled "Poison," and shake up before using.
Keep in a sealed bottle labeled "Poison," and shake well before using.
No. 16. — Carbolic Wash, No. 2 (for Birds).
No. 16. — Carbolic Wash, No. 2 (for Birds).
Glacial carbolic acid, 1 oz.
Carbolic acid, 1 oz.
Water, 1 pint.
1 pint of water.
Keep in stoppered bottle labelled "Poison," and shake before using. Carbolic acid is a caustic poison, and therefore must be handled carefully.
Keep in a sealed bottle labeled "Poison," and shake before use. Carbolic acid is a corrosive poison, so it must be handled with caution.
It sometimes happens that the taxidermist, if in a large way of business, is called upon to destroy the insects infesting, it may be, the entire collection of heads or skins hanging in some gentleman's hall. No better or more effective way of doing this is to be found than plunging them entirely in a bath composed of:
It sometimes happens that the taxidermist, especially if running a large operation, is asked to eliminate the insects infesting, perhaps, the entire collection of heads or skins displayed in some gentleman's hall. There is no better or more effective method for doing this than fully submerging them in a bath made of:
No. 17. — Carbolic Acid Wash, No. 3 ("Poison").
No. 17. — Carbolic Acid Wash, No. 3 ("Poison").
Carbolic acid, 1 lb.
Carbolic acid, 1 lb.
Sal ammoniac, 0.5 oz.
Sal ammoniac, 0.5 oz.
Corrosive sublimate, 3 oz.
Corrosive sublimate, 3 oz.
Pure tannin, 4 oz.
4 oz. pure tannin
Hot water, 4 galls.
Hot water, 4 gallons.
Mix this up in some out-house, or in the open air away from the house, if a fine day; and when the mixture is cold plunge the heads or skins in, holding the former by the horns, and stirring the latter about with a stick; in fact, allowing the mixture to touch the hands as little as possible.
Mix this in an outdoor shed or outside in the fresh air on a nice day. Once the mixture is cold, dip the heads or skins into it, holding the heads by the horns and stirring the skins around with a stick. In fact, try to keep your hands out of the mixture as much as possible.
It is, I believe, more efficacious if laid on hot than cold, but the danger to health is greater. I venture to say that if there is anything which will preserve objects for an indefinite period it is corrosive sublimate. Deadly though it be, and dangerous to work with, it has the advantage of being used as a finishing preparation, and therefore need not, except in extreme cases, be handled.
I think it's more effective when applied hot rather than cold, but it poses a greater health risk. I’d say that if there’s anything that can preserve things for a long time, it’s corrosive sublimate. Although it's deadly and risky to handle, it has the benefit of being used as a final treatment, so it doesn’t usually need to be dealt with directly, except in rare situations.
Instead of rectified spirits of wine, I have used with much success as an exterior wash for valuable bird skins, the following:
Instead of using rectified spirits of wine, I have successfully used the following as an exterior wash for valuable bird skins:
No. 18. — Preservative Wash.
No. 18. — Preservative Wash.
Pure sulphuric ether, 1 pint.
Pure sulfuric ether, 1 pint.
Corrosive sublimate, 6 grs.
Corrosive sublimate, 6 grams.
Keep in a stoppered bottle, labelled "Poison," and when used apply with a brush. This is more rapid in its evaporation than spirits of wine, but is very expensive. Of course, the more rapidly any spirit evaporates, and deposits poison previously held in solution, the better chance you have of not spoiling your specimens.
Keep in a sealed bottle, labeled "Poison," and when using it, apply with a brush. This evaporates faster than alcohol but is very costly. Naturally, the quicker any spirit evaporates and leaves behind the poison that was dissolved, the better your chances are of not ruining your specimens.
PRESERVATIVE FLUIDS FOR FISHES AND REPTILES.
PRESERVATIVE FLUIDS FOR FISH AND REPTILES.
I have lately given a great deal of attention to the preservation of fishes — and especially large ones — in some fluid which should have four advantages:
I’ve recently been focusing a lot on how to preserve fish—especially the larger ones—in a liquid that offers four key benefits:
1. Perfect preservation of the specimen — and which also, if a foreign one, is consequently a long time in transit.
1. Perfect preservation of the specimen — and which also, if it's from abroad, takes a long time to arrive.
2. Its freedom from causing great shrinking or shrivelling of the integument.
2. Its ability to avoid causing significant shrinking or wrinkling of the skin.
3. The points 1 and 2 being so well balanced that the specimen is in a fit state--after many months — either to be treated as a specimen shown in fluid, or to be mounted by the process of taxidermy.
3. The points 1 and 2 are so well balanced that the specimen is ready—after many months—to either be displayed in fluid or to be mounted using taxidermy.
4. The comparative cheapness and facility of carriage of the preservative medium.
4. The relative affordability and ease of transporting the preservative medium.
In trying to obtain all these advantages there seem almost insuperable difficulties in the reconcilement of these diverse conditions.
In trying to gain all these benefits, there seem to be nearly insurmountable challenges in reconciling these different conditions.
Dr. A. Guenther, F.R.S., the eminent, ichthyologist and Chief of the British Museum, recommends, in his new book, that pure or rectified spirits of wine (56 per cent. over-proof) be the only thing used for fishes, for permanent preservation in glass jars or tanks, and this even for ordinary fishes 3 ft. to 4 ft. in length, or even up to 6 ft. in length, if eel-like. "Proof" spirit (containing only 49 per cent. by weight of pure alcohol as against 84 per cent. contained in rectified spirit) is, says Dr. Guenther, the lowest strength which can be used.
Dr. A. Guenther, F.R.S., the distinguished ichthyologist and Head of the British Museum, suggests in his new book that only pure or rectified spirits of wine (56% over-proof) should be used for preserving fish in glass jars or tanks. This applies to ordinary fish that are 3 to 4 feet long, or even up to 6 feet long if they resemble eels. Dr. Guenther states that "proof" spirit (which has only 49% pure alcohol by weight compared to 84% in rectified spirit) is the minimum strength that can be used.
These will then stand as
These will then serve as
No. 19. — Rectified Spirits of Wine (56 per cent. over-proof),
No. 19. — Rectified Spirits of Wine (56 percent over-proof),
and
and
No. 20. — Proof Spirits of Wine.
No. 20. — Proof Spirits of Wine.
If a spirituous solution is absolutely required, I would substitute for pure spirits of wine methylated spirit (alcohol containing a certain percentage of impure gum or undrinkable wood spirit) as being cheap and sufficiently good for some purposes. It will not, however, bear any diluting with water; it must stand, therefore, as
If you absolutely need an alcoholic solution, I would recommend using methylated spirits instead of pure wine spirits (this is alcohol mixed with some impure gum or undrinkable wood alcohol) since it's cheaper and good enough for certain uses. However, it can't be diluted with water; it needs to remain as
No. 21. — Methylated Spirit (undiluted),
No. 21. — Methylated Spirit (undiluted)
or as
or like
No. 22. — Alcoholic Solution, No. 1.
No. 22. — Alcoholic Solution, No. 1.
Methylated spirit, 1.5 pints.
Methylated spirit, 1.5 liters.
Burnt alum (pounded), 2 oz.
Burnt alum (ground), 2 oz.
Distilled water, 0.5 pint.
Distilled water, 0.5 pint.
Saltpetre, 4 oz.
Saltpeter, 4 oz.
This, which is to be well shaken together, becomes milky at first, but will soon fine down, and may then be decanted.
This should be shaken well; it starts off milky but will quickly settle down and can then be poured off.
No. 23. — Alcoholic Solution, No. 2.
No. 23. — Alcoholic Solution, No. 2.
Methylated spirit, 3 parts.
Methylated spirits, 3 parts.
Glycerine, 1 part.
Glycerin, 1 part.
Distilled water, 1 part.
1 part distilled water.
Although turpentine will not preserve reptiles or fishes, yet, struck with the perfect manner with which I was enabled to preserve soft-bodied beetles for nearly a year in benzol or benzoline, I lately tried if this cheap and colourless liquid would be of service for other subjects, with the result that I have now some frogs (six or seven) in a glass jar containing benzoline which have been immersed for over three months, and have apparently undergone less change than if in spirits for the same length of time. Whether they are likely to be permanently preserved by this method I cannot, of course, yet determine, but if so, it would be a great gain, owing to the brilliancy of the liquid, its cheapness, and its advantages over all alcoholic spirit in its less powerful action on the sealing wax or coating used over the corks or stoppers of the glass preparation jars.
Although turpentine won't preserve reptiles or fish, I was impressed with how well I could preserve soft-bodied beetles for almost a year in benzol or benzoline. Recently, I decided to see if this inexpensive, colorless liquid would work for other specimens. As a result, I now have several frogs (about six or seven) in a glass jar filled with benzoline that have been soaked for over three months, and they seem to have changed less than if they were in alcohol for the same time. I can't say for sure yet whether they'll be permanently preserved this way, but if they are, it would be a significant improvement due to the clarity of the liquid, its affordability, and its advantages over any alcoholic spirits, particularly its milder effect on the sealing wax or coating used on the corks or stoppers of the glass jars.
There is no doubt that pure spirits of wine will preserve objects for a great length of time, but the cost is very serious to most persons, or even to institutions of less importance than the British Museum — added to which the strong spirit unquestionably shrivels and distorts such objects as fishes and reptiles, whilst, diluted to any appreciable extent, spirit will not preserve anything for any great period. To obviate these inconveniences chemists have invented more or less perfect preservative fluids, the oldest perhaps of which is
There’s no doubt that high-proof alcohol can keep objects preserved for a long time, but the cost is significant for most people, or even for institutions less important than the British Museum. Plus, the strong alcohol definitely causes objects like fish and reptiles to shrivel and warp. If diluted to any noticeable degree, alcohol won’t preserve anything for an extended period. To avoid these issues, chemists have created various preservative fluids, the oldest of which is
No. 24. — Goadby's Solution, No. 1.
No. 24. — Goadby's Solution, No. 1.
Bay salt, 4 oz.
Sea salt, 4 oz.
Corrosive sublimate, 4 grs.
Corrosive sublimate, 4 grams.
Alum, 2 oz.
Alum, 2 oz.
Boiling water, 2 quarts.
2 quarts of boiling water.
Keep in stoppered bottle labelled "Poison."
Keep in a sealed bottle labeled "Poison."
[Footnote: "Bay salt" is salt formed by evaporation of sea-water in shallow lagoons or "salt-pans" exposed to the rays of the sun.]
[Footnote: "Bay salt" is salt produced by evaporating seawater in shallow lagoons or "salt pans" that are exposed to sunlight.]
No. 25. — Goadby's Solution, No. 2.
No. 25. — Goadby's Solution, No. 2.
Bay salt, 0.5 lb.
Sea salt, 0.5 lb.
Corrosive sublimate, 2 grs.
Corrosive sublimate, 2 grams.
Arsenious acid, 20 grs.
Arsenic acid, 20 grams.
Boiling rain water, 1 quart.
Boil 1 quart of rainwater.
Keep in stoppered bottle labelled "Poison."
Keep in a sealed bottle labeled "Poison."
Note that, corrosive sublimate being a remarkably difficult thing to dissolve, even in pure spirits of wine, it may not be generally known that the addition of a saturated solution of sal ammoniac, in weight about half an ounce, is sufficient to dissolve many ounces of corrosive sublimate. Thus a solution useful for some purposes is easily made as follows:
Note that corrosive sublimate is notoriously hard to dissolve, even in pure alcohol, and it may not be widely known that adding about half an ounce of a saturated solution of sal ammoniac is enough to dissolve many ounces of corrosive sublimate. Therefore, a solution that is useful for some purposes can be easily made as follows:
No. 26. — Browne's Preservative Solution.
No. 26. — Browne's Preservative Solution.
Saltpetre, 4 oz.
Saltpeter, 4 oz.
Corrosive sublimate, 0.25 oz.
Corrosive sublimate, 0.25 oz.
Alum, 2 oz.
Alum, 2 oz.
Sal ammoniac, 0.125 oz.
Sal ammoniac, 0.125 oz.
Boiling water, half gallon.
Half a gallon of water.
Keep in stoppered bottle labelled "Poison."
Keep in a sealed bottle labeled "Poison."
This, it will be seen, is a modification of Goadby's Solution.
This is a modified version of Goadby's Solution.
In the three preceding formulae the corrosive sublimate must be dissolved in a small quantity of spirits of some kind, or, as explained above, by the addition of a strong solution of sal ammoniac.
In the three formulas mentioned above, the corrosive sublimate needs to be dissolved in a small amount of spirits of some type, or, as explained earlier, by adding a strong solution of sal ammoniac.
No. 27. — Saline Solution for bottling Fish and Reptiles.
No. 27. — Saline Solution for Bottling Fish and Reptiles.
Bichloride of mercury (corrosive sublimate), 1 grain.
Bichloride of mercury (corrosive sublimate), 1 grain.
Chloride of sodium (common salt), 90 grains.
Chloride of sodium (table salt), 90 grains.
Distilled water, 1 pint.
1 pint of distilled water.
Intimately mix, set aside, let settle, and when clear, decant and preserve in stoppered bottles. The following might also be tried:
Intimately mix, set aside, let settle, and when clear, decant and store in capped bottles. You might also try the following:
No. 28. — Camphorated Fluid for Preserving Fishes, etc..
No. 28. — Camphorated Fluid for Preserving Fish, etc.
To distilled water, sixteen parts, add one part of rectified spirits of wine and a few drops of creosote, sufficient to saturate it; stir in a small quantity of best prepared chalk, and then filter. With this fluid mix an equal quantity of camphor water (water saturated with camphor), and before using, strain off through very fine muslin.
To distilled water, add sixteen parts, one part of purified spirits of wine, and a few drops of creosote to fully saturate it; stir in a small amount of well-prepared chalk, then filter. Mix this fluid with an equal amount of camphor water (water that’s saturated with camphor), and before using, strain it through very fine muslin.
The bisulphite of lime (see formula No. 11, ante) would also, no doubt, be excellent as a preservative for fishes if not quite so much diluted. Chloride of zinc, much diluted, is recommended as a good preservative.
The bisulphite of lime (see formula No. 11, ante) would definitely be a great preservative for fish if it weren't so diluted. Chloride of zinc, when diluted a lot, is suggested as an effective preservative.
Dr. Priestley Smith's formula (see No. 14, ante) would do exceedingly well for small specimens to be subsequently arranged in glass-topped tanks, as at the British Museum.
Dr. Priestley Smith's formula (see No. 14, ante) would work very well for small specimens that are later organized in glass-topped tanks, like those at the British Museum.
Another formula, sometimes used in the medical schools for preserving parts of subjects, and useful as a pickle for fish and reptiles, is a preparation called Moeller's Solution:
Another formula, sometimes used in medical schools for preserving body parts, and effective as a pickling solution for fish and reptiles, is a preparation known as Moeller's Solution:
No. 29 — Moeller's Solution.
No. 29 — Moeller's Solution.
Bichromate of potash, 2 oz.
Potassium bichromate, 2 oz.
Sulphate of soda, 1 oz.
Sodium sulfate, 1 oz.
Distilled water, 3 pints.
Distilled water, 3 pints.
A saturated solution of chromic acid is also used for the same purposes. The chief disadvantage which both this and Moeller's Solution possess in common is their colour — a rich golden one — which, of course, stains everything with which they come in contact. This, however, is easily removable by the Hydrate of Chloral formula (see Priestley Smith's formula, No. 14, Section 2, ante).
A saturated solution of chromic acid is also used for the same purposes. The main disadvantage that both this and Moeller's Solution share is their color — a deep golden hue — which, of course, stains everything it touches. However, this is easily removed using the Hydrate of Chloral formula (see Priestley Smith's formula, No. 14, Section 2, ante).
This last (Moeller's Solution) I have kept purposely until the end, as it is the formula which, in my opinion, fulfils all the four requirements stated in the opening paragraph, as desirable in the preservation of the lower vertebrates. On my appointment to the curatorship of the Leicester Museum I had occasion to overhaul the "pickles" and prepare some fresh specimens, and was very loth to use expensive spirits, or even methylated, for large fish, and therefore tried many things with varying results. At last I was driven back on Moeller's Solution, and by its aid saved some specimens which were slowly rotting in other fluids, and successfully "pickled" such flabby things as sharks' eggs, sea anemones, and large-sized "lump fish." It was then tried on common "dog-fish," one of which came out limp, yet perfectly tough, and was skinned as an experiment after a month's immersion.
This last solution (Moeller's Solution) I've intentionally saved for the end because, in my view, it meets all four requirements mentioned in the opening paragraph for effectively preserving lower vertebrates. When I started my role as the curator of the Leicester Museum, I had to review the "pickles" and prepare some new specimens. I was reluctant to use expensive spirits or even methylated spirits for larger fish, so I experimented with various options that yielded mixed results. Eventually, I returned to Moeller's Solution, which helped me save some specimens that were slowly deteriorating in other fluids, and I successfully preserved difficult specimens like sharks' eggs, sea anemones, and large lump fish. I then tested it on common dogfish; one of them came out limp but surprisingly tough, and I skinned it as an experiment after a month of immersion.
One day two large "topers" (a small species of shark), about six feet long, were sent from Scarboro'. My taxidermist being very busy at the time, I decided to give Moeller a severe test and pickle them. Accordingly — their viscera only being removed — they were tumbled into a large tub containing 2 lb. of bichromate of potassa to 20 galls. of spring water. This was on 13th Sept., 1882; I looked at them on 17th July, 1883, and they were perfectly fresh, quite limp, unshrivelled, and yet so tough as to be capable of any treatment, even to being cast as models, or "set up" by the taxidermic art; and this after the lapse of ten calendar months — a time more than sufficient for even a sailing vessel to come from any part of the world.
One day, two large "topers" (a small species of shark), about six feet long, were sent from Scarborough. Since my taxidermist was really busy at the time, I decided to give Moeller a tough challenge and pickle them. So, after removing their insides, I put them into a large tub with 2 lbs. of potassium bichromate mixed into 20 gallons of spring water. This was on September 13, 1882; I checked on them again on July 17, 1883, and they were still perfectly fresh, completely limp, unshrivelled, and tough enough to withstand any treatment, even being cast as models or "set up" using taxidermy, and this was after ten whole months—a time long enough for even a sailing vessel to travel from anywhere in the world.
I changed the solution once, the total cost from first to last being one shilling and fourpence. Had pure spirit been used, the expense would have been many pounds, to say nothing of the great shrivelling which would have taken place by now. I must therefore think that Moeller's solution is, for the purpose, one of the best things ever invented.
I changed the solution once, and the total cost from beginning to end was one shilling and fourpence. If pure spirit had been used, the cost would have been several pounds, not to mention the significant shrinkage that would have happened by now. I must therefore believe that Moeller's solution is one of the best inventions for this purpose.
PRESERVATIVE FLUIDS FOR MOLLUSCA.
PRESERVATIVE SOLUTIONS FOR MOLLUSKS.
Generally speaking, pure alcohol is the best for this purpose. Chloride of zinc would doubtless be of considerable service, and I notice that Woodward, in his "Manual of the Molluscs," says that chloride of calcium, made by dissolving chalk, or the purer carbonate — white marble, — in hydro-chloric acid until effervescence ceases and a saturated solution is obtained, is most useful as a preservative, as it "keeps the specimen previously steeped in it permanently moist without injuring its colour or texture; while its antiseptic properties will aid in the preservation of matters liable to decay."
Generally speaking, pure alcohol is the best for this purpose. Zinc chloride would definitely be very useful, and I noticed that Woodward, in his "Manual of the Molluscs," mentions that calcium chloride, made by dissolving chalk or the purer carbonate—white marble—in hydrochloric acid until the fizzing stops and a saturated solution is created, is very effective as a preservative. It "keeps the specimen previously soaked in it permanently moist without damaging its color or texture, while its antiseptic properties help preserve materials that are prone to decay."
Possibly some of the beautiful preparations in the Fisheries Exhibition of 1883 were prepared in this manner, and such objects as the sea-anemones, with tentacles expanded as in life, may have been instantaneously killed by osmic acid.
Possibly some of the beautiful displays at the Fisheries Exhibition of 1883 were made this way, and objects like the sea anemones, with their tentacles spread out like when they’re alive, may have been quickly preserved using osmic acid.
LUTING FOR STOPPERS.
SEALING FOR STOPPERS.
No doubt, every one notices how the ordinary wax, which is used as a protective coating for bottles or "preparation" jars, is attacked by the contained spirit in such a manner as to be useless as a preventive of evaporation. Ordinary sealing wax, "bottle wax," beeswax, or paraffin wax, being useless, we are driven back on a very old recipe of the French naturalist M. Peron, who claimed for it advantages which it certainly possesses.
No doubt, everyone notices how the regular wax used as a protective coating for bottles or jars gets damaged by the spirits inside, making it ineffective at preventing evaporation. Since common sealing wax, "bottle wax," beeswax, and paraffin wax don’t work, we have to rely on a very old recipe from the French naturalist M. Peron, who claimed it has benefits that it indeed does have.
No. 30. — "Lithocolle" for Sealing Bottles.
No. 30. — "Lithocolle" for Sealing Bottles.
Common resin.
Regular resin.
Yellow beeswax (or paraffin wax).
Beeswax (or paraffin wax).
Red ochre (in powder).
Red ochre powder.
Oil of turpentine (turps).
Turpentine oil (turps).
The proportions of this luting are determined by putting more or less resin and red ochre, or turpentine and wax, as the "lithocolle" is to be more or less brittle or elastic. Melt the wax in the resin, then add the ochre in small quantities, and at each addition of this stir the whole briskly round. When the mixture has boiled seven or eight minutes, pour in the turpentine, stir it round, and set it near the fire to keep it warm some little time. To ascertain the quality, and if it requires more or less wax, put a little out on a cold plate, and note its degree of tenacity.
The proportions of this adhesive are determined by adjusting the amounts of resin and red ochre, or turpentine and wax, depending on whether the "lithocolle" needs to be more or less brittle or flexible. Melt the wax in the resin, then gradually mix in the ochre, stirring the entire mixture vigorously after each addition. Once the mixture has boiled for seven or eight minutes, pour in the turpentine, mix it well, and then keep it warm by placing it near the fire for a short time. To check the quality and see if it needs more or less wax, scoop a small amount onto a cold plate and observe its stickiness.
It is rather dangerous to prepare, and is best managed over a gas jet or stove, so arranged that the flame does not rise above the edge of the iron pot containing the composition; if this is attended to, not much danger can arise, especially if, in case of the composition firing, the lid of the pot be immediately clapped on.
It’s pretty risky to prepare this, and it’s best done over a gas burner or stove, set up so that the flame doesn’t go above the rim of the iron pot holding the mixture; if this is taken care of, there shouldn't be much risk, especially if the lid of the pot is quickly put on in case the mixture catches fire.
Apply with an old brush, or by repeatedly plunging the neck of the bottle in the luting before the latter becomes cold. I have used an application of glue with great success on corks over spirits, by procuring the best glue, making it rather thin, and applying it whilst hot in successive coats. It will not do, however, for non-alcoholic solutions, nor for glass stoppers, from which it scales off when cold.
Apply with an old brush or by repeatedly dipping the neck of the bottle into the adhesive before it cools down. I’ve had great success using glue on corks for spirits by getting the best glue, making it a bit thinner, and applying it hot in several layers. However, it doesn’t work for non-alcoholic solutions or glass stoppers, from which it flakes off when cold.
GENERAL REMARKS.
GENERAL COMMENTS.
In all cases when "pickling" animals it must be remembered that the first pickle, whether alcoholic or not, is essentially deteriorated by the bloody mucus and water which exudes from the specimens, especially if large and "flabby;" this, of course, reduces the strength of the preservative medium. It is well, therefore, to have from three to four different vessels, in which the objects shall be successively immersed for several days, or even weeks, until, coming to the final preparation jar, they shall not stain the liquid in which they are ultimately to rest.
In all cases when "pickling" animals, it’s important to remember that the first pickle, whether alcoholic or not, becomes contaminated by the bloody mucus and water that comes from the specimens, especially if they're large and "flabby." This reduces the effectiveness of the preservative solution. Therefore, it's a good idea to have three to four different containers, where the specimens can be immersed successively for several days, or even weeks, until they reach the final jar where they won't stain the liquid they'll ultimately be kept in.
By using the various strengths of each preservative fluid one under the other, in which to steep the specimens, proper results will be obtained, by the exercise of a little forethought and judgment. Filtration through blotting paper or charcoal is necessary from time to time, and expensive spirits may be re-distilled when becoming too weak by constant use.
By using the different strengths of each preservative fluid in a layered approach to soak the specimens, you can achieve good results with some planning and insight. It's important to filter through blotting paper or charcoal periodically, and costly spirits can be re-distilled when they get too weak from continuous use.
Large fishes must have small cuts made in the walls of the abdomen to allow the fluid to properly penetrate. In cases where the specimen is not required for dissection, the removal of the viscera facilitates the ultimate preservation.
Large fish need small cuts in the walls of their abdomen to let the fluid properly seep in. If the specimen isn't needed for dissection, taking out the insides helps with long-term preservation.
If at 'any time it is necessary to throw away a quantity of inexpensive spent liquor which may smell offensively, a small quantity of the crystals of permanganate of potassa will instantly deodorise a large quantity of fluid, and this without adding to it any offensive scent of its own, as in the case of chloride of lime or carbolic acid. The vessel must be afterwards well rinsed out in clean water, as 'the potassa temporarily stains everything in contact a rich purplish red.
If at any time you need to dispose of a large amount of cheap, used liquor that might have a bad smell, a small amount of potassium permanganate crystals will quickly deodorize a big quantity of liquid without adding any unpleasant scent of its own, unlike lime chloride or carbolic acid. You should rinse the container thoroughly with clean water afterward, as the potassium can temporarily stain everything it touches a deep purplish red.
Some experiments which I conducted with benzoline incontestably proved to me its valuable properties. I experimented on a Cornish chough — an old specimen, infested with maggots or larvae of the "clothes" moth. I immediately plunged it in benzoline, took it out, drained the superfluous spirit off, and rapidly dried it by suspending it in a strong current of air.
Some experiments I did with benzoline clearly showed me its valuable properties. I tested it on a Cornish chough — an old specimen that was infested with maggots or larvae of the "clothes" moth. I quickly dipped it in benzoline, took it out, drained the excess liquid, and quickly dried it by hanging it in a strong airflow.
It took but a short time to dry, and, though the feathers were very slightly clotted after the operation, yet, by a little manipulation, explained hereafter, they soon arrived at their pristine freshness, and all the insects which previously infested it were effectually killed. I afterwards found on another specimen — a short-eared owl — two or three larvae feeding on the feathers. I poured a little benzoline over them in situ, and they fell off, apparently dead. I kept them for a day, and by that time they were shrivelled and undeniably dead.
It only took a short time to dry, and even though the feathers were a bit clumped after the process, with a little bit of handling, explained later, they quickly returned to their original freshness, and all the insects that had been living in them were effectively eliminated. Later, I found on another specimen—a short-eared owl—two or three larvae feeding on the feathers. I poured a little benzene over them while they were still in place, and they fell off, seemingly dead. I kept them for a day, and by then, they were shriveled and definitely dead.
Here, then, we have the two elements of success — a perfect destroyer of insects, and an agent not damaging, but positively beneficial, to the feathers of birds when applied; added to which, is the remarkable cheapness of benzoline. Caution — do not use it near a candle, lamp, nor fire, as it gives off a highly inflammable vapour at a low temperature; it also fills a house with a peculiarly disagreeable odour, finding its way upstairs, as all volatile gases do; so it had better always be used in the workshop or outhouse.
Here, then, we have the two key components of success — a perfect insect killer and a substance that is not harmful but actually beneficial to bird feathers when used; plus, benzoline is remarkably inexpensive. Caution — do not use it near a candle, lamp, or fire, as it emits a highly flammable vapor at low temperatures; it also fills a house with a particularly unpleasant smell, traveling upstairs like all volatile gases do; so it’s best to always use it in the workshop or shed.
I have just discovered — and feel very "small" that I did not do so before — that benzoline perfectly preserves birds "in the flesh" for a considerable time. I tried it on a razorbill (Alta torda, L.), which I placed in a "preparation" jar, filled with common benzoline at l s. per gallon. The bird was simply cut under the wing to allow the benzoline to penetrate, and was left for three weeks; at the end of which time it and taken out, cleaned in plaster (as described in Chapter XI.), and made a most excellent taxidermic object! The advantages of this to the overworked professional are obvious.
I just found out — and feel quite embarrassed that I didn’t realize it sooner — that benzoline perfectly preserves birds "in the flesh" for a long time. I tested it on a razorbill (Alta torda, L.), which I placed in a "preparation" jar filled with regular benzoline at 1 shilling per gallon. I only made a small cut under the wing to let the benzoline soak in, and I left it for three weeks. After that time, I took it out, cleaned it with plaster (as explained in Chapter XI), and it turned out to be an excellent taxidermy specimen! The benefits of this for the busy professional are clear.
In very severe cases I have used turpentine ("turps") with excellent effect; in fact, as a destructive agent for insects, I prefer it to benzoline, having now mastered the hitherto fatal objections to its use on birds' skins. For the skins of mammals there is nothing to beat it. This will be enlarged on in the chapter on "Relaxing and Cleaning Skins."
In very intense cases, I've used turpentine ("turps") with great success; in fact, as an insect killer, I prefer it to benzoline, having now addressed the previously serious concerns about its use on bird skins. For mammal skins, nothing works better. This will be discussed further in the chapter on "Relaxing and Cleaning Skins."
In thus speaking of benzoline and turpentine as agents in the destruction of insect plagues, I mean, of course, that the specimens should be plunged into, or have poured over them either benzoline or turpentine. This seems to have been lost sight of by some former correspondents of mine, one of whom writes —
In talking about benzoline and turpentine as methods for getting rid of insect infestations, I mean that the specimens should be either immersed in or have benzoline or turpentine poured over them. It seems that some of my previous correspondents have overlooked this point, as one of them writes—
"In your toxicological section, I do not find any opinion on atmospheric poisoning of acari, etc..
"In your toxicology section, I don’t see any opinion on atmospheric poisoning from mites, etc."
"If not giving you too much trouble, I should be glad to know whether you think spirits of turpentine would be efficacious if allowed to evaporate in a case of birds in which moths have lately shown themselves.
"If it’s not too much trouble, I’d like to know if you think turpentine spirits would be effective if allowed to evaporate in a case of birds where moths have recently appeared."
"I am unwilling to have them taken out, in fact they have not been cased twelve months, and I thought of boring a hole in an obscure corner with bit and brace, and inserting a saturated sponge, and then closing it again.
"I don't want them removed; in fact, they haven't been cased for twelve months, and I thought about drilling a hole in a hidden corner with a bit and brace, inserting a soaked sponge, and then sealing it up again."
"Waterton says — 'The atmosphere of spirit of turpentine will allow neither acarus nor any insect to live in it.' Do you believe this?"
"Waterton says — 'The spirit of turpentine will not allow any mites or insects to survive in it.' Do you believe that?"
My answer to him, and to all such correspondents, was that I had repeatedly proved that all such little vermin did not care a bit for the fumes of benzoline, nor of any spirits whatever, as I had caused gallons of turpentine, etc.., to be poured into large cases containing specimens without producing the smallest effect, unless it absolutely touched them, but that I had partly succeeded by introducing cyanide of potassium (deadly poison) into small cases containing birds, through a hole bored for the purpose; but it was objectionable —
My response to him, and to anyone else asking similar questions, was that I had repeatedly demonstrated that these tiny pests were completely unaffected by the fumes of benzene or any other spirits. I had poured gallons of turpentine, among other things, into large containers with specimens without any noticeable effect, unless it actually came into direct contact with them. However, I had somewhat succeeded by introducing potassium cyanide (a deadly poison) into small containers with birds through a hole that was drilled for that purpose; but it was objectionable —
(I) on the score of its danger to health, should the poisonous vapour escape; and
(I) because of the health risks, should the toxic vapor leak; and
(2) because it deliquesced rapidly in any but the driest atmosphere, by its affinity for damp, and, consequently, often caused mildew in cases of birds, etc.., into which it had been introduced. The fumes of sulphur during combustion are, on the contrary, really of service in destroying insect life, as evidenced in the fumigation of hospital wards, etc.., but I cannot tell how anyone may burn sulphur in specimen cases without half choking himself, and probably setting on fire the fittings and spoiling the work altogether. It is also objectionable because it readily discharges certain colours from fabrics, flowers, and birds' feathers. My advice is, therefore, to pull to pieces any case infested with insects, to burn all fittings not absolutely valuable, and to drench with turpentine all specimens, together with all the rockwork and fittings desired to be retained. [Footnote: I would indeed advise the destruction by burning of the birds themselves even, should they be common specimens, or easily replaced.]
(2) because it dissolved quickly in any atmosphere that wasn't extremely dry, due to its attraction to moisture, and often caused mildew in birds and other specimens it was introduced to. The fumes from burning sulfur, on the other hand, are actually useful in killing insect life, as seen in the fumigation of hospital wards. However, I can't understand how anyone could burn sulfur in display cases without nearly choking themselves and likely setting the fixtures on fire, ruining everything. It's also problematic because it can easily fade certain colors in fabrics, flowers, and bird feathers. My advice is to take apart any case infested with insects, burn all the fittings that aren't absolutely necessary, and soak all specimens, along with any rockwork and fixtures you want to keep, in turpentine. [Footnote: I would actually recommend the destruction by burning of the birds themselves too, if they are common specimens or easily replaceable.]
Crude creosote, in little pots or saucers, is a great deterrent to the visits of insect plagues; it cannot, however, be exposed openly, as its scent is overpowering and decidedly unhealthy for use in private houses. In museums it does very well if cased up.
Crude creosote, in small pots or saucers, is very effective at keeping insect infestations away; however, it shouldn't be left out in the open since its smell is strong and not safe for use in homes. In museums, it works well if kept inside a case.
With regard to camphor in museums, although it is so constantly used, I consider it of no use as a deterrent. A small piece of tallow candle is equally efficacious, and of late I have had much more faith in insect powders, the best of which is, I believe, compounded of the petals of the Russian tansy (Pyrethrum roseum). This has certainly some principle contained in it not obvious to our senses. It is perfectly harmless to man, and to domestic animals, but on insects its action is entirely different. I cannot as yet discover whether insects eat it, or if its smell overcomes them, whether it repels, or attracts them to their doom. A series of experiments has left me just as much in the dark as ever. Certain it is that I have never found insects among skins over which it has been strewn.
Regarding camphor in museums, even though it's used all the time, I think it's not effective as a deterrent. A small piece of tallow candle works just as well, and recently, I've placed much more trust in insect powders, the best of which is, I believe, made from the petals of Russian tansy (Pyrethrum roseum). It definitely contains some principle that we can't easily detect. It's completely harmless to humans and pets, but its effects on insects are totally different. I still can’t figure out whether insects eat it or if its smell repels or attracts them to their end. A series of tests has left me just as confused as before. One thing is certain: I've never found insects on skins that have been dusted with it.
There is, however, one slight objection to its use, which is that it stains light-coloured skins, if at all greasy, with its fine, brownish-yellow dust. This is, however, but a trifle, easily avoided, in face of its unquestionable value. I have used it now for many years, and have never had cause to alter my opinion as to its efficacy. The best only must be procured, from some well-known wholesale house, price about 3s. per lb. That sold made up in small quantities is generally adulterated and useless. No curator should ever be without it, and a small quantity should always be placed inside a newly-made skin. It can also be worked up in many of the preservative pastes, or macerated in spirit as a wash, for the inside of skins.
There is, however, one minor drawback to its use, which is that it can stain light-colored skin, especially if it's a bit oily, with its fine, brownish-yellow dust. This is a small issue, easily avoided, considering its undeniable value. I've been using it for many years and have never felt the need to change my opinion about its effectiveness. Only the best should be purchased from a reputable wholesale supplier, costing about 3s. per lb. What’s sold in small quantities is usually adulterated and ineffective. No curator should ever be without it, and a small amount should always be placed inside a newly-prepared skin. It can also be mixed into many preservative pastes or soaked in alcohol as a wash for the inside of skins.
Baking or stowing maggot-infected specimens is recommended by some authors, but I strongly object to it in the case of old or valuable skins, firstly, because the heat can seldom be properly regulated, unless in an apparatus specially constructed; secondly, because heat sufficient to kill the larvae is also sufficient to crimp or twist some part of the plumage or render the skin, if an old specimen, too crisp or tender for ultimate handling; thirdly, because even a moderate degree of heat is sufficient to set free the fat contained in the skin, and thus spoil the feathers.
Baking or storing specimens infected with maggots is suggested by some writers, but I strongly disagree when it comes to old or valuable skins. First, the heat is rarely well-controlled unless it's in a specially designed device. Second, the heat that's enough to kill the larvae can also crimp or twist parts of the feathers or make an old specimen too brittle or soft for proper handling. Third, even a moderate amount of heat can release the fat in the skin, which can ruin the feathers.
Perhaps the tyro may remark, "But in a preserved and stuffed skin there ought to be no fat to ooze out." Quite true, there ought not to be, but as skins are usually dressed with arsenical soap, the fat, instead of being dried up, is beautifully conserved, ready to run out at the slightest provocation, or be drawn out by the capillary attraction of the threads used in sewing up — another hard knock for arsenical pastes!
Perhaps the novice might say, "But in a preserved and stuffed skin, there shouldn't be any fat oozing out." That's true, it shouldn't be there, but since skins are typically treated with arsenical soap, the fat, instead of being dried up, is effectively preserved, ready to seep out at the slightest provocation or be drawn out by the capillary action of the threads used in stitching — another blow for arsenical pastes!
Writing about pastes reminds me that no taxidermist should be without a pot of flour paste, which is far better and more cleanly than gum or glue for sticking in loose feathers, etc.. For a small quantity, sufficient to fill a jam-pot, take
Writing about pastes makes me think that every taxidermist should always have a pot of flour paste. It's much better and cleaner than gum or glue for sticking in loose feathers and so on. For a small amount, enough to fill a jam jar, take
No. 31. — Flour Paste.
No. 31. — Flour Glue.
Good wheat flour, 2 oz.
Quality wheat flour, 2 oz.
Essence of cloves, 0.5 a teaspoonful.
0.5 teaspoon clove essential oil.
Water, 0.5 pint.
Water, 8 oz.
Mix the flour with part of the water in a basin, being careful to crush out all the lumps, and work it up smoothly to the consistence of thick cream; add the remainder of the water, and boil for a few minutes in a saucepan. Turn out into a jam-pot, and when nearly cold stir in the essence of cloves; this latter gives an agreeable odour to the paste, is not poisonous, and preserves the paste indefinitely from turning mouldy. A few drops of carbolic acid may be used instead of the cloves; but in this case the pot must be labelled "Poison."
Mix the flour with some of the water in a bowl, making sure to eliminate all the lumps, and blend it until it has a smooth, thick cream-like consistency. Add the rest of the water and boil for a few minutes in a saucepan. Pour it into a jar, and when it’s almost cool, stir in the clove essence; this gives the paste a nice smell, is safe to use, and keeps the paste from getting moldy for a long time. If you want, you can use a few drops of carbolic acid instead of the cloves, but in that case, be sure to label the jar "Poison."
Strong gum water may be made from gum arabic, into which a little powdered white sugar is stirred. Essence of cloves prevents mould in this also, unless there be an excess of water.
Strong gum water can be made from gum arabic by stirring in a bit of powdered white sugar. Clove essence prevents mold from forming in this mixture, unless there's too much water.
A fine paste, useful for paper or photographic work, is made from rice-flour.
A good paste, suitable for paper or photo work, is made from rice flour.
"Dextrine," in powder, is cheap and strong, easily soluble in cold water, but as a paste shows up on feathers, etc.., much more than wheat-flour paste.
"Dextrine," in powder form, is inexpensive and powerful, easily dissolves in cold water, but as a paste, it's much more noticeable on feathers, etc., than wheat-flour paste.
Cement, for uniting broken bones or fossils, or to fix shells, etc.., on tablets, is, says the late Frank Buckland, made thus
Cement, used for joining broken bones or fossils, or for attaching shells, etc., on tablets, is, according to the late Frank Buckland, made this way:
No. 32. — White Cement.
No. 32. — White Cement.
Beeswax, 1 part.
1 part beeswax.
Powdered plaster of Paris (best fine), 5 parts.
Powdered plaster of Paris (finest quality), 5 parts.
Resin, 4 parts.
Resin, 4 parts.
Warm the edges (when possible) and use the cement warm.
Warm the edges (whenever you can) and use the cement warm.
I would advise the plaster being stirred into the other two ingredients as wanted. The great objection to this and to all the "coagulines" is that the edges of the specimen require warming, which cannot always be done.
I recommend mixing the plaster with the other two ingredients as needed. The main issue with this and all the "coagulines" is that the edges of the specimen need to be warmed, which isn't always possible.
Another good colourless cement is
Another good clear cement is
No. 33. — White Cement, No. 2.
No. 33. — White Cement, No. 2.
Gum tragacanth in powder, 1 part.
Gum tragacanth powder, 1 part.
Gum arabic (acacia) in powder, 1 part.
Gum arabic (acacia) powder, 1 part.
Glacial acetic acid, a few drops.
Glacial acetic acid, just a few drops.
When used, moisten the gums with a little of the acetic acid diluted.
When using it, wet the gums with a bit of diluted acetic acid.
Gum mastic dissolved in alcohol, and white shellac dissolved in naphtha, are two other white cements.
Gum mastic dissolved in alcohol and white shellac dissolved in naphtha are two other types of white cements.
Where, however, colour does not matter, take
Where color doesn't matter, take
No. 34 — Brown Cement.
No. 34 — *Brown Cement*.
Common shellac, 0.25 lb.
Common shellac, 0.25 lbs.
Spirits of naphtha, 0.5 pint.
Naphtha spirits, 0.5 pint.
Place them in a bottle in a warm situation on a closed stove, or in a vessel containing hot water. Be careful of fire. The edges of bones or undersides of fossils are smeared with this, tied with string, and left for a day or so to unite.
Place them in a bottle in a warm spot on a closed stove, or in a container with hot water. Be careful with fire. The edges of bones or the undersides of fossils are coated with this, secured with string, and left for a day or so to bond.
The reader has now a repertoire of poisonous and harmless preparations from which he may choose. As for myself, for the preservation of birds, I pin my faith to formula No. 4, viz., my Preservative Soap for the inside of the skin, and a wash of benzoline or turpentine liberally applied from time to time — say twice a year — to the outside of all uncased or exposed specimens. This, it will be seen, entirely does away with the use of any poison, and yet is proved to be of the highest efficacy.
The reader now has a selection of toxic and safe preparations to choose from. Personally, for preserving birds, I trust formula No. 4, which is my Preservative Soap for the inside of the skin, along with a wash of benzoline or turpentine applied generously from time to time—about twice a year—to the outside of all uncased or exposed specimens. This method completely eliminates the need for any poison and has been shown to be highly effective.
For those who do not object to expense nor to the use of a poisonous preparation, a wash of Waterton's Solution (No. 5), or the sulphuric ether preparation (No. 18), can be substituted for benzoline or turpentine. I mention the expense, because only rectified spirits of wine, or pure sulphuric ether, will do for birds; the methylated spirit, though of service for washing over most subjects, is not so good when applied to the delicate feathers of birds, as it leaves on drying a certain impure residuum behind it.
For those who aren't concerned about the cost or the use of a toxic solution, a wash of Waterton's Solution (No. 5) or the sulfuric ether preparation (No. 18) can replace benzoline or turpentine. I bring up the cost because only rectified spirits of wine or pure sulfuric ether are suitable for birds; methylated spirits, while useful for cleaning most items, aren’t ideal for the delicate feathers of birds since they leave behind an impure residue as they dry.
For mammals I recommend my formula of burnt alum and saltpetre (No. 9), followed by a wash of benzoline or turpentine twice a year, or by any one of the mercurial preparations given.
For mammals, I suggest my formula of burnt alum and saltpeter (No. 9), followed by a wash of benzene or turpentine twice a year, or by any of the mercurial treatments mentioned.
On a retrospect of this chapter it will, I think, be admitted that, if I am adverse to the use of any poisonous preparations in taxidermy, I at least point out the why and wherefore, as also an alternative course, showing at the same time the benefits and defects of both systems. I now, therefore, leave the amateur to choose for himself — bearing in mind the time-honoured aphorism, chacun à son goût.
Looking back at this chapter, I believe it can be agreed that while I am against using any toxic substances in taxidermy, I at least explain the reasons for my stance and provide an alternative approach, highlighting the advantages and disadvantages of both methods. I now leave it up to the amateur to make their own choice—keeping in mind the age-old saying, chacun à son goût.
 Plate II Skeleton
of Peregrine Falcon
Plate II Skeleton
of Peregrine FalconSHOWING THE PROPER POSITION OF THE VARIOUS BOXES.
SHOWING THE CORRECT PLACEMENT OF THE VARIOUS BOXES.
Explanation: follows:
Explanation: follows:
SKELETON OF PEREGRINE FALCON (above.)
Peregrine Falcon Skeleton (above.)
SHOWING THE PROPER POSITION OF THE VARIOUS BOXES.
SHOWING THE CORRECT POSITION OF THE DIFFERENT BOXES.
Explanation:
Explanation:
A, skull; B, upper mandible; C, lower mandible;
A, skull; B, upper jaw; C, lower jaw;
D, cervical vertebrae (9);
D, cervical vertebrae (9);
E, humeri (sing. humerus); F, radius; G, Ulna;
E, humerus (sing. humerus); F, radius; G, ulna;
H, carpus, or wrist I and J, metacarpal bones (8); i, "knuckle" joint;
H, carpus, or wrist I and J, metacarpal bones (8); i, "knuckle" joint;
K, pollex (first digit, or "'thumb"); K2 and K3 second or "index" digit, and next or third digit;
K, pollex (first digit, or "thumb"); K2 and K3 second or "index" digit, and next or third digit;
L, pelvis or "ossa innominata" ilium, ischium, and pubes anchylosed;
L, pelvis or "ossa innominata" ilium, ischium, and pubes are fused;
M, femur; N, tibia; O O, fibula;
M, femur; N, tibia; O O, fibula;
P, metatarse, or "tarso-metarsus" (3, sometimes 4 bones);
P, metatarsal, or "tarso-metatarsus" (3, sometimes 4 bones);
p, actual "knee" joint; q, "heel," or tibiotarsal joint;
p, actual "knee" joint; q, "ankle," or tibiotarsal joint;
Q, hallux (first or "big" toe), called in ornithology the "hind" toe
Q, hallux (first or "big" toe), referred to in ornithology as the "hind" toe
R, fourth (or outermost) toe; S S sternum, or breast bone.
R, fourth (or outermost) toe; S S sternum, or breastbone.
IN order that this shall be a thoroughly practical chapter, I will, in my method of working, copy the admirable plan of my old sporting favourite, Col. Hawker, who, when wishing to note down some difficult point, was in the habit of doing with his own hands all things pertaining to the matter at issue, because, as he said, he might not make mistakes when subsequently writing upon knotty subjects intended for his readers' consideration.
To make this a truly practical chapter, I will follow the great method of my former sports mentor, Col. Hawker. When he needed to address a difficult issue, he took care of everything himself. He believed that this way, he wouldn't make mistakes when writing about complex subjects for his readers to consider.
I have, therefore, specially procured a starling, as I consider this bird the very best for the amateur's purpose, not only on account of the toughness of the skin, but also because, being a medium-sized bird, it presents no difficult points in skinning, and with this bird before me I shall minutely instruct my pupil, pointing out each step that has to be taken and each difficulty that is likely to arise.
I have, therefore, specifically gotten a starling because I think this bird is the best for beginners. Not only is its skin tough, but since it’s a medium-sized bird, it doesn’t have any tricky areas when it comes to skinning. With this bird in front of me, I will thoroughly teach my student, highlighting every step that needs to be taken and any challenges that might come up.
As I shall have occasion constantly to refer to the various parts of the skeleton, I now give an engraving of that of the Peregrine Falcon, in order to help my explanations in the future (see Plate II.).
As I will frequently refer to the different parts of the skeleton, I'm providing an illustration of the Peregrine Falcon's skeleton to assist with my explanations later on (see Plate II.).
Having placed ready for use the skinning knife (see Fig. 11), the scissors (Fig. 14), and the cobbler's crooked awl in handle, a pot of preservative mixture, some cotton wool or wadding, some tow, and a needle and thread; lay the starling on its back on a piece of clean paper, the head of the bird pointing from the operator; then seize the bird by the sides of the head with the first two fingers and thumb of the left hand in opposition, the awl held in the palm of the right hand, and a piece of wool between the right-hand finger and thumb; then insert the point of the awl between the upper and lower mandibles, and, having opened them, keep them open with the first finger of the right hand, removing the piece of wool which should have been previously placed there by the sportsman (see instructions re shot birds, at end of Chapter II.). Replacing it with the fresh piece of wool held in readiness, plug the nostrils in the same manner.
Having set out the skinning knife (see Fig. 11), scissors (Fig. 14), and the cobbler's crooked awl with the handle, along with a pot of preservative mixture, some cotton wool or wadding, some tow, and a needle and thread; lay the starling on its back on a piece of clean paper, with the bird's head pointing away from you. Then, hold the sides of the bird's head with the first two fingers and thumb of your left hand while holding the awl in your right hand, palm up, and have a piece of wool between your right thumb and finger. Next, gently insert the point of the awl between the upper and lower beaks, and while keeping them open with your right index finger, remove the piece of wool that should have been previously placed there by the hunter (see instructions re shot birds, at end of Chapter II.). Replace it with the fresh piece of wool that you have ready, and plug the nostrils in the same way.
As even this simple operation will have somewhat disarranged the feathers of the head and neck, smooth them down with the fingers, taking care, however, not to stretch the neck in doing so. The next operation is to hold the left-hand wing with the left hand, and with the fingers of the right hand break or disjoint the bone of the wing as close to the body as possible, i.e., across the "humerus" (E) (in the case of large birds, or for some special purpose, this bone is often left intact, but the amateur will be puzzled how to subsequently arrange it in the skin if unbroken). Repeat this on the other wing. For those whose fingers are not strong enough to do this effectually, I recommend a small pair of flat-nosed pliers, some sizes larger than the "feather pliers" (Fig. 19).
As this simple task might have slightly messed up the feathers on the head and neck, smooth them down with your fingers, making sure not to stretch the neck while you do it. The next step is to hold the left wing with your left hand, and with the fingers of your right hand, break or disjoint the wing bone as close to the body as you can, specifically across the "humerus" (E). For larger birds, or for certain purposes, this bone is often left unbroken, but if you're an amateur, you might be confused about how to arrange it in the skin later if it isn't broken. Do the same with the other wing. If your fingers aren't strong enough to do this effectively, I suggest using a small pair of flat-nosed pliers, a size larger than the "feather pliers" (Fig. 19).
Large birds may have their wings broken at the humeri (E) by striking them with a stick or hammer in such a manner as not to break nor seriously disarrange the feathers; the largest-sized pliers (Fig. 16) may also be used for this purpose, but in that case a piece of clean rag should be folded in the jaws of the pliers so as to envelope the upper and under surface of the wing, in order to protect the feathers from injury. Practice will, however, point out the best method of doing this. Next take hold of the legs with the fingers and gently twist them out of joint at the junction of the tibia and femur.
Large birds may have their wings broken at the humeri (E) by hitting them with a stick or hammer in a way that doesn't break or seriously mess up the feathers; the largest pliers (Fig. 16) can also be used for this, but in that case, a piece of clean rag should be folded in the jaws of the pliers to cover the top and bottom surfaces of the wing, protecting the feathers from harm. With practice, you'll find the best way to do this. Next, grab the legs with your fingers and gently twist them out of joint at the connection of the tibia and femur.
Now, keeping the head of the bird toward you, part the feathers away from each side of the sternum or breast-bone; then with the knife held short in the hand, the point placed exactly in the centre of the bird (calculating from the bill to the tip of the tail), make the first incision just on the right side of the breast bone down to the vent, taking care not to cut so deeply as to expose the intestines. Now turn the bill towards your right, and gently lay hold of the cut edge of the skin, which you see shining whitely in front of you; then with the point of the knife — the cutting edge kept on the flesh — gently loosen the skin above, below, and downwards. Completely reverse the bird, and repeat this for the other side.
Now, with the bird’s head facing you, push the feathers away from each side of the breastbone. Then, hold the knife short in your hand, place the tip exactly in the center of the bird (measuring from the bill to the tip of the tail), and make the first cut just to the right of the breastbone down to the vent, being careful not to cut too deeply and expose the intestines. Next, turn the bird’s bill to your right, and gently grasp the cut edge of the skin that you can see shining white in front of you; then, using the point of the knife—keeping the cutting edge on the flesh—carefully loosen the skin above, below, and downward. Completely flip the bird over and do the same on the other side.
At this stage the body may be held down, with the knife pressed on the side of the breast bone, and thus the two first fingers of the left hand may be advantageously employed — but in a very gentle manner — to loosen the skin around the upper part of the breast-bone from the inside, while the thumb regulates the pull from the outside. All must be done with the feathers kept as much away from the flesh as possible.
At this stage, the body can be held down, with the knife pressed against the side of the breastbone. The first two fingers of the left hand can be used carefully to loosen the skin around the upper part of the breastbone from the inside, while the thumb controls the pull from the outside. Everything should be done while keeping the feathers as far from the flesh as possible.

Fig. 22 shows the appearance which the specimen should now present.
Fig. 22 shows what the specimen should look like now.
The skin being, as it were, nicely "persuaded" from the flesh (more being done by pushing than by pulling), the legs begin to appear. Take hold of the one nearest to you with the right hand, at the same time inserting the fingers of the left inside the skin; then, by gently pushing up with the right hand, free the legs sufficiently to show the second joint, where it has been previously twisted or broken.
The skin, so to speak, is gently "nudged" away from the flesh (more pushing than pulling involved), and the legs start to show. Grab the leg closest to you with your right hand while using your left fingers to get inside the skin; then, by softly pushing up with your right hand, release the legs enough to reveal the second joint, where it was previously twisted or broken.
Laying down the knife, and picking up the scissors, force their point underneath the joint, marked P in Plate II., and cut it completely off; it should then be clear of the flesh, showing the skin on either side as if it were a stocking turned inside out. Pull it gently by the claw back into its proper position, and there leave it, and do the same by the other leg, turning the bird again for that purpose.
Laying down the knife and picking up the scissors, push the point underneath the joint marked P in Plate II, and cut it completely off. It should then be free of flesh, showing the skin on either side as if it were a stocking turned inside out. Gently pull it back into its proper position by the claw and leave it there, then do the same with the other leg, turning the bird again for that purpose.
Both the legs should now be entirely free, not holding to the body at any point. Taking up the knife again, carefully work with it down toward the tail, and as far round the back as you can get with safety. Now let the bird rest on its head, as it were, with the beak from you, and, placing the fingers with the thumb on the back (which is now underneath), the middle finger on the root of the tail inside, flanked by the first and third fingers keeping down the skin on either side, cautiously insert the knife through the skin of the vent, and cut that free, cutting upward in a slanting direction; having done this, carefully cut away on the root of the tail, at the same time freeing it wherever it sticks; then, when nothing but one bone, that is to say, the last caudal vertebra, holds it, slip the knife underneath and cut with a drawing motion upward. The tail is now entirely separated from the body.
Both legs should now be completely free, not attached to the body at any point. Take up the knife again and carefully work it down toward the tail, as far around the back as you can safely go. Now let the bird rest on its head, with the beak facing away from you. Place your fingers, with your thumb on the back (which is now underneath), your middle finger at the base of the tail inside, and your first and third fingers pulling down the skin on either side. Gently insert the knife through the skin of the vent and cut it free, angling upward as you do. Once that's done, carefully cut away at the base of the tail, freeing it wherever it is stuck. When there's only one bone left, specifically the last caudal vertebra, slip the knife underneath and cut with a drawing motion upward. The tail is now completely separated from the body.
Now advance the fingers of the left hand and seize the bottom part of the loosened body with the right hand, and by pushing with the finger-nails, and occasionally using the knife where the tendons hold the skin, gradually work up the back, turning it round and round, and working very carefully until the place where the wings have been previously broken is arrived at. Again lay down the knife, and taking up the scissors, cut the wing nearest to you away from the skin; do the same with the other side; and now the only thing which holds skin and body together is the neck. Taking the whole of the body in the hand, proceed with the fingers of the other (using no knife) to gradually cause the skin to leave its attachment at the neck. With care work over the head by the same means, and here progress is stopped by the skin being held on either side of the face by a little membrane; this is the inner skin of the ears.
Now move the fingers of your left hand to grasp the lower part of the loosened body with your right hand, and by pushing with your fingernails, and occasionally using a knife where the tendons hold the skin, carefully work your way up the back, rotating it as you go, until you reach the spot where the wings have been previously broken. Put down the knife and pick up the scissors to cut the wing closest to you away from the skin; do the same on the other side. At this point, the only thing connecting the skin and body is the neck. Holding the entire body with one hand, use the fingers of your other hand (without a knife) to gradually separate the skin from its attachment at the neck. Carefully work around the head using the same method, but you'll find progress stops here because the skin is held on both sides of the face by a small membrane; this is the inner skin of the ears.
Regaining the knife, slip the point underneath, and gradually lift them out, cutting towards the flesh and not towards the skin. This done, the skin will appear darker, immediately above this point. These are the eyes; carefully cut on top of them with a very gentle motion, until they are skinned to where only a very thin membrane hides them from view; arrived at this, the knife-point must be pushed gently underneath, and an upward cut made, which, if carefully done, entirely severs the eyelids from the retaining membrane. The exact point shown in Fig. 23 is now reached.
Regain the knife, slide the tip underneath, and slowly lift them out, cutting toward the flesh and not the skin. Once that's done, the skin will look darker right above this point. These are the eyes; carefully cut on top of them with a very gentle motion, until they are skinned down to just a thin membrane that covers them. Once you get to this point, gently push the knife tip underneath, and make an upward cut, which, if done carefully, will completely separate the eyelids from the membrane holding them in place. You now reach the exact point shown in Fig. 23.
 Fig. 23 —
Skin of Bird Turned Ready for Severance from Body
Fig. 23 —
Skin of Bird Turned Ready for Severance from BodyAfter this sever the skull from the neck at the point where the dotted lines A — B are shown in the drawing. This exposes the brain without cutting off too much at the base of the cranium, the shape of which is wanted for subsequent operations. After the body is completely severed, proceed to pull the tongue out (unless wanted for show) by placing the knife on the other aside of it in opposition to the thumb, give a smart pull, keeping an even pressure on, and the tongue will come out with little or no difficulty.
After this, cut the skull from the neck at the point where the dotted lines A — B are shown in the drawing. This reveals the brain without removing too much from the base of the cranium, which is needed for the next steps. Once the body is fully severed, pull the tongue out (unless it’s needed for display) by positioning the knife on the opposite side of it against your thumb, giving a quick pull while maintaining steady pressure, and the tongue will come out with little to no trouble.
Next enlarge the orifice at the back of the head by cutting a triangular piece out towards the palate or roof of the mouth, scooping the brains out with the point of the knife, having a small piece of paper in readiness to receive them. During this operation hold the beak of the bird through the skin of the neck by the two first fingers, and thumb, the latter being uppermost, the other fingers being employed in keeping the remainder of the skin with the feathers out of harm's way.
Next, make the opening at the back of the head bigger by cutting out a triangular piece toward the palate or roof of the mouth, and scoop out the brains with the tip of the knife, having a small piece of paper ready to catch them. While you do this, hold the bird's beak through the skin of the neck with your first two fingers and thumb, with the thumb on top, and use the other fingers to keep the rest of the skin and feathers out of the way.
Inserting the point of the knife at the back of the eye, place the thumb on the eyeball and gently pull it out, taking care not to let the point of the knife cut upward so as to burst the eye, or the effect will be to liberate the dark-coloured pigment or the vitreous humour, and thus wet or stain the feathers. Having done all this, there will still remain some little flesh at the back of the eye and the junction of the mandibles, and this must be carefully cut away so as not to dis-articulate the latter. The Preservative Paste now comes into requisition, and with this the skull and orbits are well painted inside and out. A little tow, previously chopped by the medium of a sharp pair of scissors, is now pushed into the empty skull, with the "stuffing iron," which is a small piece of thick wire (see Fig. 21). For large birds the tow forceps (see Fig. 20) may be conveniently used.
Inserting the tip of the knife at the back of the eye, place your thumb on the eyeball and gently pull it out, being careful not to let the knife's point cut upward, as this could burst the eye and release the dark pigment or vitreous fluid, staining the feathers. After doing this, there will still be some small flesh remaining at the back of the eye and where the mandibles meet, and this should be carefully cut away to avoid disarticulating them. Now, the Preservative Paste is needed, and with this, the inside and outside of the skull and eye sockets are thoroughly coated. A little tow, previously chopped with sharp scissors, is then pushed into the empty skull using the "stuffing iron," which is a small piece of thick wire (see Fig. 21). For larger birds, the tow forceps (see Fig. 20) can be conveniently used.
Having neatly filled the head with the tow, proceed to put a small piece of cotton wadding in each orbit. (Note, be careful that tow only is pushed into the head, as if never so small a piece of wadding gets into the cavity of the head it will effectually prevent any subsequent mounting of the specimen, as, singular though it may appear, a small piece of wadding is more than a match for a pointed wire.)
Having neatly packed the head with the tow, go ahead and place a small piece of cotton wadding in each eye socket. (Note, be careful that only tow is pushed into the head, as even a tiny piece of wadding getting into the cavity will completely prevent any future mounting of the specimen, since, oddly enough, a small piece of wadding is more than enough to thwart a pointed wire.)
During all this time the neck must be kept as short and as little stretched as possible. In some birds a line of fat will be observed extending from the neck to the back or even to the breast, which must be as carefully as possible scraped off the skin by using the edge of the knife, guided by the thumb. Having done this, paint the neck only with the preservative, and lay the skin on the paper, back upward and tail from you; the under part of the head in this position points upward.
During this time, you should keep the neck as short and unstretched as possible. In some birds, you’ll notice a line of fat stretching from the neck to the back or even to the breast, which should be carefully scraped off the skin using the edge of a knife, guided by your thumb. Once you've done this, apply only the preservative to the neck and lay the skin on the paper, back facing up and tail toward you; the underside of the head in this position will point upward.
Place the thumbs of both hands, their nails touching each other, at the back of the head with the first two fingers of each hand placed in this wise: forefingers along the side of the face, second fingers underneath on the top of the skin of the head; then, by gently pushing with the thumbs and pulling or scratching, as it were, with the other fingers, gradually force the head through until the mandibles appear, as also the eyelids. Let go with the right hand, still keeping the thumb of the left pressing against the head; and, by gently working with the two first fingers of the left hand outside the feathers, and by pulling the beak upward and toward you with the right, the bird is returned to the position shown in Fig. 22.
Place the thumbs of both hands, with their nails touching, at the back of the head, and position the first two fingers of each hand like this: forefingers along the side of the face and second fingers underneath on the top of the head. Then, by gently pushing with the thumbs and pulling or scratching with the other fingers, gradually move the head until the jaws and eyelids appear. Release the right hand while keeping the thumb of the left hand pressed against the head. By gently working with the first two fingers of the left hand outside the feathers and pulling the beak upward and toward you with the right hand, return the bird to the position shown in Fig. 22.
As the bird now lies, it is optional whether the flesh is cleaned away from the root of the tail first or from the legs and wings. I will, however, in this case take the wing on my right. Place the right hand underneath, lift the wing as far up into the skin as possible, and by holding it tightly in that position with the finger and thumb of the left hand, a ridge of skin becomes visible, running down each side, and framing in, as it were, a little oval-shaped piece of flesh, i.e., that lying between the "radius" and "ulna" The broken bone and flesh of the wing is now toward you. Clean the flesh away from this and then devote the attention to the before-named oval-shaped piece of flesh. Putting the point of the knife down on the right, lift and scoop away (using the greatest care meanwhile) some small pieces of flesh. This by degrees reveals the top of another little bone, from under which all the flesh to be seen must be scraped away; anoint this freely with the preservative, and return it to its normal position after tying a small piece of strong thread through the loop of the bone (in large birds a little tow should be placed in the cavity).
As the bird lies now, it doesn't matter whether you clean the flesh off the tail first or the legs and wings. However, in this case, I will choose the wing on my right. Place your right hand underneath, lift the wing as far up into the skin as you can, and by holding it tightly in that position with your left thumb and finger, a ridge of skin becomes visible that runs down each side, framing a little oval-shaped piece of flesh, which lies between the "radius" and "ulna." The broken bone and flesh of the wing will now be facing you. Clean the flesh away from this, and then focus on the previously mentioned oval-shaped piece of flesh. Place the point of the knife down on the right, then lift and scoop away some small pieces of flesh with great care. This will gradually reveal the top of another small bone, from which all the visible flesh must be scraped away; apply preservative generously, and then return it to its normal position after threading a small piece of strong thread through the loop of the bone (for larger birds, a little tow should be placed in the cavity).
If this process is too tedious, or not quite comprehended by the amateur — i.e. the clearing out of the flesh between the radius and ulna — the smaller bone of the two — the radius (F, Plate II) may be twisted or cut out entirely, leaving only the larger bone of the two to clear of flesh. Sometimes — but this with large birds only — the wing may be advantageously cut from the outside along its entire length underneath, the flesh removed, skin dressed, and the cut carefully sewn up.
If this process is too tedious or not fully understood by beginners—the removal of the flesh between the radius and ulna—the smaller of the two bones, the radius (F, Plate II) can be twisted or completely cut away, leaving only the larger bone to be cleared of flesh. Sometimes—with larger birds only—the wing can be effectively cut from the outside along its entire length underneath, the flesh removed, the skin prepared, and the cut carefully stitched up.
Do the same by the other wing, and then push the leg on the same side up through the skin, pushing the skin down with the fingers and thumb of the left hand, and pulling with the right, until you have stripped the skin nearly down to the so-called "knee," q (not the proper knee, however, that being situated higher up — Plate II), or tibio-tarsal joint. At this joint a bundle of little "leaders," or muscles, assemble; cut them away from around the bone (without interfering with the joint, however), and they will roll up with the flesh to the head of the bone previously cut off at the proper knee joint, and can there be easily pulled off. (In practice, it will be found that retaining the full length of this bone — the tibia — is not desirable for subsequent operations; it may therefore be advantageously shortened by one-half.)
Do the same on the other wing, then push the leg on the same side up through the skin, using your left hand's fingers and thumb to push down the skin while pulling with your right hand, until you've stripped the skin nearly down to the so-called "knee," q (which isn’t the actual knee since that's higher up — see Plate II), or tibio-tarsal joint. At this joint, a bunch of small "leaders," or muscles, come together; cut them away from around the bone (without interfering with the joint), and they will roll up with the flesh to the head of the bone you previously cut off at the correct knee joint, and can be easily pulled off there. (In practice, it's usually not a good idea to keep the full length of this bone — the tibia — for future operations; it can be beneficially shortened by half.)
Anoint with the preservative and neatly wrap a piece of tow around the leg-bone (or tibia) to the supposed shape of the flesh previously removed. Return the leg to its natural position; and repeat the same on the other side.
Anoint with the preservative and neatly wrap a piece of tow around the leg bone (or tibia) to match the shape of the flesh that was removed. Put the leg back in its natural position, and do the same on the other side.
The tail is now the only thing left which requires to be freed from flesh. Keeping the beak still from you, push the tail, with the left hand, as far up into the body as possible, then clear it of every particle of flesh by scraping and cutting, taking care to cut away the oil ducts or glands — usually full of a thick fat — and being careful also not to cut away the attachment of the roots of the feathers to the skin; anoint with the preservative, and return. Several little streaks of fat in various parts of the skin may now be seen, which must be carefully scraped away.
The tail is now the only thing left that needs to be freed from flesh. Keeping the beak away from you, push the tail, with your left hand, as far up into the body as possible, then remove every bit of flesh by scraping and cutting, making sure to cut away the oil ducts or glands — usually filled with thick fat — and be careful not to cut the roots of the feathers connecting to the skin; apply the preservative, and put it back. You may now see several small streaks of fat in different areas of the skin, which must be carefully scraped away.
The wing bones must now be tied nearly together by the pieces of thread previously attached; the distance between them varies with the size of the bird's body previously removed (this knowledge is, of course, gained by experience, but amateurs are recommended to take careful measurements of this and other analogous points). The whole of the skin of the back, body, and throat is to be well anointed. Now take the forceps (see Fig. 20), and form a little neck of tow on it, introduce it into the skin, leaving the end of the tow resting against the back of the head. Then insert some larger pieces of tow with the fingers or tongs into the body, and when you have shaped it as nearly as possible to the original body of the bird — taking care to nicely observe the adjustment of the several parts — neatly sew up the skin with a fine needle and thread by an under stitch on the edges of the skin, drawing it tight after two or three stitches; and thus proceed until the bottom is reached, avoiding the common fault of sewing the feathers in with the stitches.
The wing bones should now be tied close together using the pieces of thread that were attached earlier; the space between them depends on the size of the bird's body that was removed (this is something you learn through experience, but beginners are advised to take careful measurements of this and similar points). The entire skin of the back, body, and throat should be well-oiled. Now take the forceps (see Fig. 20) and form a small neck of tow on it, inserting it into the skin, with the end of the tow resting against the back of the head. Then, use your fingers or tongs to insert larger pieces of tow into the body, shaping it as closely as possible to the bird's original body — being careful to properly align the different parts — and then neatly sew up the skin with a fine needle and thread using an under stitch along the edges of the skin, pulling it tight after every two or three stitches; continue this way until you reach the bottom, avoiding the common mistake of sewing the feathers into the stitches.
Some few ends of tow will possibly be protruding from the lower part, which must be cut off before the final stitch. The bird's legs are tied one across the other, and the wings pressed close to the body in the proper position; the neck is also shortened, and a little narrow band of paper is cut, and placed underneath the bird, brought round the butts of the wings or shoulders, and pinned together on the top of the breast; a needle and thread are inserted through the nostrils, the thread is brought round underneath the bird's lower mandible, and is tied in a knot to keep the beak closed.
Some ends of tow might be sticking out from the bottom, which should be trimmed off before the final stitch. The bird's legs are tied together, one over the other, and the wings are pressed tightly against the body in the right position; the neck is also shortened. A narrow strip of paper is cut and placed underneath the bird, wrapped around the bases of the wings or shoulders, and pinned together on top of the chest. A needle and thread are inserted through the nostrils, the thread is brought around underneath the bird's lower jaw, and tied in a knot to keep the beak closed.
In the course of a week or so, when sufficiently dry, the bandage is removed, and thus we have what is technically called a "skin."
In about a week, once it's dry enough, the bandage is taken off, and that's what we refer to as a "skin."
This is the loose body method of making skins; perhaps a better plan is making a body — see farther on — on wire, which should not come through the top of the head, or on a piece of stick (a lucifer match with the top broken off will do for small skins) coming into the base of the skull; this gives a great support to the neck, and prevents the common fault of the skin breaking away just above the shoulders.
This is the loose body method for creating skins; perhaps a better approach is to make a body—see further on—using wire, which shouldn’t extend through the top of the head, or on a stick (like a matchstick with the top snapped off, which works for small skins) that goes into the base of the skull; this provides great support to the neck and prevents the common issue of the skin breaking away just above the shoulders.
If great nicety is desired — and neatness in making a skin is everything — remember particularly not to overstuff it; it will really require just about half as much packing as you would at first imagine sufficient to fill it. Be careful as to the set of the wings, at the shoulders especially; and after having coaxed every feather with loving care into its proper position, wrap the whole skin in a sheet of wadding, leaving the ends open, and put away in a secure place to dry.
If you want to achieve great precision—and neatness is key when preparing a skin—make sure not to overstuff it; you actually need only about half as much packing as you might initially think would be enough. Pay attention to how the wings are positioned, especially at the shoulders; after gently adjusting each feather into its correct spot, wrap the entire skin in a sheet of wadding, leaving the ends open, and store it in a safe place to dry.
Another method of shaping skins whilst drying is described by Mr. Batty, the well-known American taxidermist, who makes a drying board for small skins in the following manner (see Fig. 24): Procure a piece of board of the length and width you require, on which nail on edge 0.75-inch slips of wood two inches high at intervals required; between these supports stretch stout cardboard in the form of "gutters." In these, padded in wadding, the skins rest until dry.
Another method of shaping skins while drying is described by Mr. Batty, the famous American taxidermist. He makes a drying board for small skins like this (see Fig. 24): Get a piece of board of the length and width you need, then nail 0.75-inch wide slips of wood, two inches high, at intervals as required. Between these supports, stretch sturdy cardboard to create "gutters." In these gutters, padded with wadding, the skins rest until they dry.
 Fig. 24 —
"Set" or Drying Board for Birds' Skins.
Fig. 24 —
"Set" or Drying Board for Birds' Skins.Often blood and other substances clog and spoil the feathers of a bird; how to remove these will be found explained in the chapter on Cleaning Birds' Skins.
Often, blood and other substances get stuck and ruin a bird's feathers; you can find the instructions for removing these in the chapter on Cleaning Birds' Skins.
 Fig. 25 —
Starling Properly Made Into a Skin With Label
Attached.
Fig. 25 —
Starling Properly Made Into a Skin With Label
Attached.In noting the sex of a bird an important matter, only managed in most cases by the aid of a little dissection — it will be necessary to cut the body, after it is out of the skin, through the ribs along the side close to the back, open it, and look upon the kidneys (dark coloured masses apparently let into the hollow of the back-bone at the narrowest part of the body) for the sexual organs.
In determining the sex of a bird, an important task often requires some dissection. First, you’ll need to cut the body, once it’s out of the skin, along the ribs near the back. Then, open it up and examine the kidneys (dark masses that seem to fit into the hollow of the backbone at the narrowest part of the body) for the sexual organs.
If a male, there will appear just upon the upper end of the kidneys, one on each side of the back bone, two little oval-shaped bodies, usually of a dull white or light yellow tint (do not mistake the supra-renal capsules — quite yellow, small, and a little higher up — for these).
If it's a male, you’ll notice two small oval-shaped bodies at the top of the kidneys, one on each side of the spine. They’re usually a dull white or light yellow color (don’t confuse them with the adrenal glands — which are yellow, smaller, and positioned a bit higher up).
If a female, these two small oval bodies will be replaced a little lower clown by a string or bundle of eggs, very minute in some seasons, but strongly marked and large in the breeding season. It is sometimes difficult to tell the sex — in young birds especially; but a good plan is to get a bird, known by its plumage to be a male - say a cock sparrow — and a female bird, and dissect out these organs, putting them in spirits in separate bottles, the organs of each sex attached to its part of the bone and kidneys, and keep them for reference until experience teaches the way to readily decide sexes.
If it's a female, these two small oval shapes will be replaced a little lower down by a string or bundle of eggs, which can be very tiny in some seasons but are clearly defined and larger during the breeding season. It can sometimes be tricky to determine the sex, especially in young birds; however, a good method is to obtain a bird that is clearly a male, like a male sparrow, alongside a female, and carefully dissect these organs. Store them in separate bottles with spirits, keeping each sex's organs attached to its respective bones and kidneys, so you can refer to them until you gain enough experience to easily identify the sexes.
A label is attached to the legs, giving scientific and common name of bird, sex, locality, and date, and name or initials of collector. Thus:
A label is attached to the legs that gives the scientific and common name of the bird, its sex, location, date, and the name or initials of the collector. So:
|
No. 1. STURNUS VULGARIS, L. (Starling). No. 1. STURNUS VULGARIS, L. (Starling). Sex. — Male Juv. Sex: Male Juvenile Colour of irides — Dark brown. Colour of irides — Dark brown. Colour of beak — Dark slate. Colour of beak — Dark gray. Colour of legs & toes — Reddish-brown. Colour of legs & toes — Reddish-brown. Leicester, 21/9/83. Collector, MB. Leicester, 9/21/83. Collector, MB. |
In the cases of such birds as the hawks, which have bare spaces around the eyes (sub, and super-ciliary patches) and around the base of the beak (cere), note down the colours of these parts also. In the cases of rare birds the measurements of the extreme length from tip of beak to tail — again from inner edge of gape to vent, the bill and tail being measured separately from those points — should be carefully taken, as also the length of culmen, carpus, and tarsus, and set down in inches and tenths, on the label, or in the note book, when the matter becomes too voluminous. The reference number and name, in the latter case, will be sufficient for the label, thus keeping it very small. In ordinary cases, all information, excepting name, date, and collector's name, may be written on the back. Part of the label may be printed ready for filling in.
In the case of birds like hawks, which have bare areas around their eyes (sub- and superciliary patches) and at the base of their beak (cere), also make a note of the colors of these areas. For rare birds, take careful measurements of the total length from the tip of the beak to the tail — also measure from the inner edge of the gape to the vent, with the bill and tail measured separately from those points. Measure the length of the culmen, carpus, and tarsus, and record these in inches and tenths on the label or in a notebook when the information becomes too extensive. In the latter case, the reference number and name will be enough for the label, keeping it small. In typical cases, all information except the name, date, and collector's name can be written on the back. Part of the label can be pre-printed for easy filling in.
Another plan of skinning a bird is to work upward instead of downward, and by raising the skin on top of the breast and throat to approach the neck, which is then cut off by slipping the point of the scissors underneath. This gives room for one wing to be loosened, and ultimately cut off, the other one then easily follows as a matter of course, and by alternately skinning away the back and the breast, the legs and the tail are arrived at, which are treated as before described. This method is useful in cases where the lower extremities are badly shot or "high," but is otherwise objectionable, as, in any other but the most careful hands, it is apt to stretch or split any delicate skin, in the attempt to get the shoulders out, but for which I should have nothing to say against it. Curiously enough, however, it is more practised by amateurs than by professionals.
Another way to skin a bird is to start from the top instead of the bottom. By pulling back the skin on the breast and throat, you can get to the neck, which you then cut off by sliding the scissors underneath. This creates space to loosen one wing and cut it off, making it easy to remove the other one as well. By alternating between skinning the back and the breast, you can access the legs and tail, which are treated as mentioned before. This method is helpful if the legs are badly damaged or shot high, but it can be problematic because it risks stretching or tearing delicate skin when trying to remove the shoulders, unless done very carefully. Interestingly, amateurs tend to use this method more than professionals do.
One of the most important, however, of all methods of skinning ever invented, is that known as skinning from under the wing; it is perhaps more difficult to a beginner than the other way of skinning, but its advantages are enormous. Supposing you have a bird very badly shot, or one with its wing half torn off or ripped underneath, as sometimes happens, you then, instead of complicating matters by making an incision in another place, take advantage of the ripped side and cut it open there.
One of the most important methods of skinning ever invented is known as skinning from under the wing. It's probably more challenging for beginners than the other method, but its benefits are huge. If you have a bird that's been shot badly or has its wing half torn off or ripped underneath, instead of complicating things by cutting in a different spot, you can use the ripped side and make your incision there.
The birds, however, for which this system is invaluable are sea birds, or all birds having white or very light coloured breasts. To cut such birds on the breast practically ruins them, for however well a sea bird's skin may be cleaned, there still remains some little greasiness between the roots of the feathers; and in spite of the most careful sewing, the capillary action of the thread used in stitching up (aided, of course, by the position of the mounted bird — breast downward) is sufficient to draw to the surface whatever oily fat or grease remains in the skin; and though it may not show for a few months, yet, sooner or later, a rust coloured line of grease appears, and in spite of all cleaning will reappear, and gradually spread over the breast, destroying the beauty of perhaps a unique specimen.
The birds that this system is especially useful for are seabirds or any birds with white or very light-colored breasts. Cutting such birds on the breast basically ruins them because, no matter how well you clean a seabird's skin, there's always some greasiness left between the feather roots. Despite careful sewing, the capillary action of the stitching thread (along with the position of the mounted bird — breast down) is enough to pull any remaining oil or grease to the surface. Even if it doesn't show for a few months, eventually a rust-colored line of grease will appear, and no amount of cleaning will prevent it from returning and gradually spreading over the breast, ruining the look of what could be a unique specimen.
To skin a bird from under the wing, select the worst side, or that injured the most by shot, etc.., and laying the bird with that side uppermost, make an incision from just above the leg to just under the wing. Push the leg-bone up, and cut it off with a pair of scissors; then work the skin away a little from the back, and as much as possible from the breast, gradually working your way until you see the wing-bone, which cut off. Careful skinning brings you to the neck and windpipe, which also cut off. The whole of one side of the bird is now skinned out with the exception of the tail; come downward on the opposite side to your incision, and across the breast until you can cut off the remaining wing; having done this, keep skinning downward until the leg is arrived at, and cut off. Nothing now holds the skin to the body but the tail-bone, which separate. Clean and finish the bird in the ordinary way.
To skin a bird from under the wing, choose the worst side, or the one that's most injured by shot, etc., and lay the bird with that side facing up. Make a cut from just above the leg to just below the wing. Push the leg bone up and cut it off with scissors; then work the skin away a bit from the back and as much as you can from the breast, gradually moving until you reach the wing bone, which you should cut off. Careful skinning takes you to the neck and windpipe, which you also need to cut off. One side of the bird is now skinned out except for the tail; move down on the opposite side of your incision and across the breast until you can cut off the remaining wing; after doing this, keep skinning down until you reach the leg and cut it off. At this point, the only thing holding the skin to the body is the tail bone, which you should separate. Clean and finish the bird in the usual way.
I shall now suppose that, instead of making a skin (as previously described), you desire to stuff the specimen with the ultimate idea of its forming part of a collection mounted in the same manner as the birds are mounted in the British Museum — namely, on turned stands as perches; or, as is usual now, to form a unit of a characteristic group mounted in a more artistic manner in a shade or a case.
I will now assume that, instead of creating a skin (as described earlier), you want to stuff the specimen with the intention of it being part of a collection displayed similarly to how the birds are showcased in the British Museum—specifically, on turned stands used as perches; or, as is more common today, to be included in a distinctive group displayed in a more artistic way within a shade or case.
For the purpose of this lesson I have "relaxed" the original starling we before made into a skin, and shall now mount it, keeping to one bird, so as not to confuse the learner.
For this lesson, I've "relaxed" the original starling we turned into a skin, and now I will mount it, focusing on just one bird to avoid confusing the learner.
In "setting up" a bird we require to use wires. The sizes of wires are determined by gauges. Thus the smallest sized wire made is that known as Gauge 28. This and the two following numbers, 26 and 27, are only required for the humming birds; 28 is, however, a good size for the least. 24 will be found a good size for the smaller kinds of warblers and finches up to canaries. 21 is a useful general size for a great number of small birds, and will do for such a bird as the hawfinch. 19 is a good size for thrushes and starlings, and will also do very well for squirrels. 16 is a good useful size for many things — will do for such birds as the landrail or pigeons. 13 is a good size for such birds as parrots, and that or the next largest size will do for owls. 12 will do for the larger hawks, such as the peregrine falcon, etc.., and for small dogs. 9 is more suitable for foxes and larger dogs. 7 will do for eagles. 5, 3, and 1 approach so nearly to bars as to be fit only for the larger animals.
In "setting up" a bird, we need to use wires. The sizes of the wires are determined by gauges. The smallest wire size is known as Gauge 28. This and the next two sizes, 26 and 27, are only needed for hummingbirds; 28 is, however, a good size for the smallest ones. 24 is a good size for the smaller types of warblers and finches, up to canaries. 21 is a useful general size for many small birds and will work for a bird like the hawfinch. 19 is a good size for thrushes and starlings and will also work well for squirrels. 16 is a versatile size for many things—it will do for birds like the landrail or pigeons. 13 is a good size for birds like parrots, and that or the next largest size will work for owls. 12 will be fine for larger hawks, such as the peregrine falcon, and for small dogs. 9 is more suitable for foxes and larger dogs. 7 will work for eagles. 5, 3, and 1 are so close to bars that they're only suitable for larger animals.
As a rule, however, practice enables a person to use smaller sized wires than appears possible to him at first. I would here also recommend that "galvanised" be used instead of the common "annealed" wire (never use "hard" wire) for all purposes, excepting for large animals. Its advantages are very great, as I can personally testify.
As a general rule, though, practice helps a person use smaller wires than they think is possible at first. I would also suggest using "galvanized" wire instead of the usual "annealed" wire (never use "hard" wire) for all purposes, except for larger animals. Its benefits are significant, and I can personally attest to that.
If you decide on mounting your bird on a turned stand, you will, if not possessing a lathe yourself, have to call in the assistance of a turner, who will, for a small sum, turn the requisite stands, which may be either in mahogany, boxwood, ebony, or ivory, according to your taste and the length of your pocket. If, on the contrary, you decide to ultimately mount your specimen in a case or a shade, you had better provide yourself with some wire of a suitable strength, and some tow, which latter you will proceed to wrap round the wire to within a couple of inches of one end — forming, in fact, an artificial twig, which you may bend to any shape, riveting the unbound end through a piece of wood of sufficient weight to balance the bird when set up.
If you choose to mount your bird on a turned stand and don’t have a lathe, you’ll need to hire a turner, who can create the stands for you at a reasonable price. You can choose materials like mahogany, boxwood, ebony, or ivory, depending on your preferences and budget. On the other hand, if you decide to mount your specimen in a display case or under a shade, it's best to get some strong wire and some tow. You’ll wrap the tow around the wire, leaving a couple of inches at one end — basically creating an artificial twig that you can shape as needed. Then, use the unwrapped end to secure it to a piece of wood that’s heavy enough to balance the bird once it’s set up.
Having, then, before you, as the first indispensable adjunct, the turned stand or artificial twig (a natural one does in some cases), the stuffing irons, file, crooked awl, pliers, scissors, wire, tow, needle and thread, pins, and some fine darning cotton, which is called "wrapping cotton," you proceed to business thus: The bird being skinned, all the flesh cleaned out, and well dressed with the preservative up to the point previously described — leg bones being wrapped and wings being tied — lay the bird down on a clean piece of paper.
Having the essential tools in front of you, including a turned stand or artificial twig (a natural one works in some cases), stuffing irons, a file, a crooked awl, pliers, scissors, wire, tow, a needle and thread, pins, and some fine darning cotton known as "wrapping cotton," you can begin the process as follows: Once the bird is skinned, all the flesh has been removed, and it has been properly treated with the preservative as previously mentioned — with the leg bones wrapped and the wings secured — lay the bird down on a clean piece of paper.
Having selected the wire of two sizes, of a suitable thickness, the thinner for the body wire and the other for the leg wires, cut the three, with the aid of the pliers, a little longer than the body and legs respectively, pointing each wire at one end with a file — not rounding the points, but leaving them with cutting edges.
Having chosen two sizes of wire with suitable thickness, use the thinner for the body wire and the thicker for the leg wires. Cut all three pieces a bit longer than the body and legs, respectively, using pliers. Sharpen one end of each wire with a file — don't round the points, but leave them with cutting edges.
Taking up the thicker or body wire in the right hand and some tow in the left, commence at about an inch from the point to tightly and neatly bind on the tow in the shape of the neck, and of nearly the same length that the neck was before being cut off — that is to say, making the artificial neck somewhat longer than the neck of the skin (if properly taken off and not abnormally lengthened) appears to be. The reason for this is that the natural neck, being carried between the clavicles forming the furculum or "merry-thought," is bent downward and forward between them when perching (see Fig. 22); hence the artificial neck must imitate nature so far as that, when inserted in the skin, it may be also bent forward and downward, and afterwards thrown back on the body in a natural position.
Taking the thicker or body wire in your right hand and some tow in your left, start about an inch from the tip to tightly and neatly bind the tow in the shape of the neck, making it nearly the same length that the neck was before it was cut off. This means that the artificial neck should be somewhat longer than the natural neck of the skin (if it was removed properly and not excessively elongated) appears to be. The reason for this is that the natural neck, which is carried between the collarbones forming the furculum or "merry-thought," bends downward and forward between them when the bird is perching (see Fig. 22). Therefore, the artificial neck must imitate this so that when it's inserted into the skin, it can also bend forward and downward, and later be positioned back on the body in a natural way.
Of course, if a bird's neck is to be represented very short, as it will be in certain attitudes, the artificial neck must be almost, if not quite, done away with; indeed, the shortening of the neck of the mounted specimen depends almost entirely on the absence of stuffing above the shoulders. Be sure, also, not to stuff the skin too wide about the shoulders; if so, the "butts" of the wings will never come into place, nor allow the feathers of the breast to be brought over them in a natural manner.
Of course, if you want to show a bird's neck as very short, like in certain positions, the fake neck should be almost completely removed; in fact, making the neck of the mounted bird look shorter relies mainly on not adding too much stuffing above the shoulders. Also, make sure not to stuff the skin too wide around the shoulders; if you do, the wing joints won’t fit properly, and the breast feathers won't be able to lay over them naturally.
It is exceedingly difficult to instruct in these niceties of detail; close observation — note a canary or any song bird at rest — added to experience, will alone teach the amateur these points. To excel in mounting animals the arts of drawing and modelling from living examples must be cultivated; the amateur taxidermist thus gains the requisite knowledge to help him in his art. [Footnote: It may perhaps, be necessary to warn the non-scientific that whenever I speak of animals I include fishes, reptiles, and birds with the mammals.]
It’s really challenging to teach these finer details; careful observation—like watching a canary or any songbird at rest—combined with experience, will ultimately teach the aspiring taxidermist these important points. To become skilled at mounting animals, one must develop the abilities to draw and model from live examples; this way, budding taxidermists acquire the necessary knowledge to enhance their craft. [Footnote: It's worth noting for those not in the scientific field that when I refer to animals, I’m also including fish, reptiles, and birds along with mammals.]
Having shaped the neck to your own satisfaction, proceed thence to form the body, by continuously wrapping the tow round and round the wire, keeping the shape, however, somewhat flat on the sides, full on the breast and back, and narrowest at the lower extremity of the body, where it comes in between the legs to the tail. About an inch of the wire should now be left unbound, which turn up on the back of the false body to prevent the tow slipping off; next take some cotton, which wind all over the false body to keep the tow in its place, adding, as you go on, small pieces of tow, and binding them on where depressions or faults appear.
Once you're happy with the neck shape, move on to creating the body by continuously wrapping the tow around the wire. Keep the sides a bit flat, the front and back full, and the bottom narrow, where it connects between the legs to the tail. Leave about an inch of wire unwrapped, which should be bent up on the back of the fake body to stop the tow from slipping off. Next, take some cotton and wrap it around the fake body to hold the tow in place, adding small pieces of tow as needed and securing them where there are any dips or imperfections.
This being finished secundum artem, insert the pointed end of the wire or false neck up the neck of the specimen, pushing the point of the wire right through the skull until it comes out at the crown of the head. Now gradually, by persuasive means, pull the skin over the false body; and lift the starling up and observe what faults are apparent — possibly a little difficulty exists at the shoulders, if so, press them in with the thumbs, and then note if there are any apparently hollow places; if so, fill them out with a little more tow. See that the back is nicely sloped, that the breast is full enough, and especially if it be even and narrow between the legs. Having observed all these points with great exactness, proceed to nicely sew up the skin with the stitch previously mentioned.
Once this is finished secundum artem, insert the pointed end of the wire or false neck into the neck of the specimen, pushing the wire's tip all the way through the skull until it exits at the top of the head. Now, carefully pull the skin over the false body; lift the starling up and check for any visible flaws — there might be a slight issue at the shoulders; if so, press them in with your thumbs, and then check for any hollow spots; if there are, fill them in with a bit more tow. Ensure that the back has a nice slope, that the breast is sufficiently full, and especially that it is even and narrow between the legs. After assessing all these details carefully, proceed to sew up the skin neatly using the stitch mentioned earlier.
Then select two other pieces of wire of the right size, and point them each at one end. (Note. — The wires are generally a size or so stronger for the legs than for the body.) Taking a wire in the right hand, open the claws of the bird with the other, so as to expose the sole of the foot, into which push the point of the wire, forcing it up the leg on its under side between the skin and the bone — be careful how you pass under the so-called "knee" joint. Pulling the leg now downward and upward, that is to say, toward the breast, push the wire right through the false body to the other side, until it comes out under the wing on the side farthest from the leg. With a small pair of pliers turn the point downward, pull the wire at the foot, and it is thus clenched and firmly fixed; do the same with the other leg.
Then grab two other pieces of wire that are the right size, and sharpen one end of each. (Note: The wires are usually a size or so thicker for the legs than for the body.) Holding a wire in your right hand, use the other hand to open the bird's claws, exposing the sole of the foot. Push the pointed end of the wire into the foot, driving it up the leg on the underside, between the skin and the bone — be careful as you go under the so-called "knee" joint. While pulling the leg both downward and upward, meaning toward the breast, push the wire all the way through the false body to the other side until it comes out under the wing on the side farthest from the leg. Using a small pair of pliers, bend the point downward, pull the wire at the foot, and it will be clenched and securely fixed; do the same with the other leg.
Remember that if the leg wires are not firmly clenched in the made body, and are not perfectly stiff and tight, all your labour goes for nothing. Now bring together the skin at the lower part with your fingers, and push a small wire through the root of the tail up into the made body.
Remember that if the leg wires aren't securely fastened in the constructed body and aren't completely stiff and tight, all your efforts are in vain. Now gather the skin at the lower part with your fingers and insert a small wire through the base of the tail into the constructed body.
Picking the bird up with one hand, bend the legs into their proper position, bend the neck a little downward and backward on the front, then forward and downward from the back of the head. Place the leg wires through two holes bored in the crosspiece of the stand, or through the natural twig, or wind them round on the false twig and make them secure. Run a fine pin (entomological pin, No. 2) through the shafts of the feathers of the tail to cause them to dry in proper shape, then neatly insert the eyes (putting a small piece of putty in the orbit previously), bringing the eyelids over with a fine needle, being exceedingly careful not to rip them, and not to have them too staring, a very common fault with the amateur. See that the wings are fixed in their right places with one or more pins or wires.
Picking up the bird with one hand, bend the legs into the right position, tilt the neck slightly downward and backward from the front, then forward and downward from the back of the head. Thread the leg wires through two holes drilled in the crosspiece of the stand or through the natural twig, or wrap them around the false twig and secure them. Insert a fine pin (entomological pin, No. 2) through the shafts of the tail feathers to help them dry in the correct shape, then carefully insert the eyes (placing a small piece of putty in the orbit first), bringing the eyelids down with a fine needle, being extremely cautious not to tear them and avoiding making them too wide-open, which is a common mistake among beginners. Ensure the wings are securely positioned with one or more pins or wires.
Place one pin in the centre of the breast and in the middle of the back (all of these pins must be left half-way out), proceed to nicely arrange the feathers in their proper places by the aid of the crooked awl and feather pliers (see Fig. 19). Having done this till it appears as nearly like the living bird as possible (which constant practice and close attention alone will enable you to do), take the "wrapping cotton," and, having made a loop on one end, fix it to the pin on the back. Bring it across to the pin on one of the wings, and across in a zig-zag manner to the other pins in the wings, binding down the back first. Then attend to the breast and under tail coverts, taking care to bind down more securely than the others those feathers which will start up (usually the upper wing coverts). A careful binder working properly will shape his bird by binding. Tie the mandibles if they are wanted closed, and cut the wire off the head, as it permanently raffles the feathers if left until the specimen is dry.
Place a pin in the center of the chest and in the middle of the back (all these pins should be left half-way out). Next, arrange the feathers in their proper places using the crooked awl and feather pliers (see Fig. 19). Keep adjusting until it looks as much like a live bird as you can manage (which takes constant practice and careful attention). After that, take the "wrapping cotton," make a loop at one end, and attach it to the pin on the back. Bring it over to the pin on one wing, and then zig-zag it across to the other pins in the wings, securing the back first. Then focus on the chest and under tail feathers, ensuring you secure those feathers that tend to lift up (usually the upper wing feathers) more firmly than the others. A skilled binder will shape the bird by binding. If you want the beak closed, tie the mandibles together, and cut the wire off the head, as leaving it on until the specimen is dry will mess up the feathers.
This is binding for a closed-winged bird; but for one whose wings are to be thrown up, say a hawk on flight, the modus operandi is slightly different; wire stays and card braces now supplement "wrapping" cotton. The bird being opened on its worst side is stuffed in the usual manner as far as getting the neck up into the skull, the attached body is now bolted through near the top of the cut by the wing, by a long wire sufficiently strong to keep the bird suspended; this wire, being firmly clenched on the opposite side of the body to the cut, has its free end, of course, depending from the incision under the wing.
This is binding for a closed-winged bird; but for one whose wings are going to be spread out, like a hawk in flight, the method is slightly different; wire stays and card braces now add to "wrapping" cotton. The bird is opened on its worst side and stuffed in the usual way, ensuring that the neck goes up into the skull. The attached body is then secured near the top of the cut by a long wire strong enough to keep the bird hanging; this wire, being firmly clenched on the opposite side of the body from the cut, has its free end, of course, hanging from the incision under the wing.
The next thing to do is to support the wings in the position necessary to represent flight. For this purpose, point four wires sufficiently long to extend the wings, and to come through the body to be clenched. Two of these wires should be of a size thinner than the other two. Select the wing on the side of the body farthest from the cut, and enter the point of one of the thickest wires in the wing at the end of the part called the "metacarpus" (i, Plate II); push it gently along between the bone and the skin — meanwhile holding the wing with the left-hand fingers — along the side of or between the "radius and ulna," finally pushing it into the body at the shoulder, and clenching it when it comes through, which it should do under the opposite wing at the cut. It is often very difficult or impossible to get the wire to go through the "carpus;" it will suffice, therefore, if, after coming along the metacarpus, it just misses the carpus and enters the skin again at the junction of the radius and ulna. If properly managed, the wire will be snugly hidden in the skin of the wing by the feathers of the parts along which it has travelled.
The next step is to support the wings in the position needed to show flight. For this, take four wires that are long enough to extend the wings and come through the body to be secured. Two of these wires should be thinner than the other two. Choose the wing on the side of the body that's farthest from the cut, and insert the tip of one of the thick wires into the wing at the end of the part called the "metacarpus" (i, Plate II); gently push it along between the bone and the skin—while holding the wing with your left fingers—along the side of or between the "radius and ulna," and finally push it into the body at the shoulder, and secure it when it comes through, which should happen under the opposite wing at the cut. It’s often very challenging or impossible to get the wire through the "carpus;" so, it will be sufficient if, after moving along the metacarpus, it just bypasses the carpus and enters the skin again at the junction of the radius and ulna. If done correctly, the wire will be neatly hidden in the skin of the wing beneath the feathers along its path.
Do likewise with the other wing, but this wire often cannot be carried right through to the opposite side, and must therefore be firmly secured in the body on its own side; next fix the legs in the manner before detailed, or, as the bird is to be represented on flight, the wires need only be entered at the tibia-tarsal joint (q, Plate II). Push a wire in the tail, and sew up the incision under the wing.
Do the same with the other wing, but this wire often can’t go all the way to the opposite side, so it needs to be securely fixed on its own side. Next, attach the legs as previously described, or if the bird is going to be shown in flight, just insert the wires at the tibia-tarsal joint (q, Plate II). Insert a wire into the tail and sew up the incision underneath the wing.
The bird has now its wings, legs, and tail fixed, and the free end of the supporting wire is sticking out from under the wing. Fix this wire firmly through the top of a narrow strip of board at such a distance as to miss the outspread wing; let this board also be long enough to allow of one end being fixed in a vice or screwed to the edge of a table, whilst the hawk or other bird clears its surface. The bird being now "shaped up" a little, take the two thinnest wires and enter the point of one in each wing at the end of the fleshy part of the wing (really the bird's middle finger), or through the base of the first quill, an inch or so from the other wire. This last wire travels along the outside of the feathers under the wing, and is consequently not hidden at all when pushed into the body: its use is to curve the wing upon it into a graceful shape, and when the bird is sufficiently dry it is pulled out, the first wire at the shoulder being quite sufficient to bear up the wing when set.
The bird now has its wings, legs, and tail secured, and the free end of the supporting wire is sticking out from under the wing. Secure this wire firmly through the top of a narrow strip of board, keeping it at a distance to avoid hitting the outspread wing. Make sure this board is also long enough to allow one end to be clamped in a vice or screwed to the edge of a table while the hawk or other bird clears the surface. Now that the bird is somewhat "shaped up," take the two thinnest wires and insert the tip of one into each wing at the end of the fleshy part (essentially the bird's middle finger) or through the base of the first quill, about an inch away from the other wire. This second wire runs along the outside of the feathers under the wing, so it isn’t hidden when inserted into the body. Its purpose is to curve the wing into a graceful shape, and when the bird is dry enough, it is removed, with the first wire at the shoulder being more than enough to support the wing when set.
As, however, the wing feathers start up here and there, and do not readily conform to all the curves of the wires, the wiring and binding must be supplemented by "braces," which are narrow strips of cardboard pinned in pairs at intervals below and above the wing, and held in position by pins running through both braces from the under to the upper surface. For explanation of this see Plate I (Frontispiece), a hawk properly "set up" and "bound" to represent it swooping on its prey.
As the wing feathers begin to appear here and there, and don’t easily fit all the curves of the wires, the wiring and binding need to be supported by "braces." These are narrow strips of cardboard pinned in pairs at intervals above and below the wing, secured in place by pins going through both braces from the bottom to the top surface. For an explanation of this, see Plate I (Frontispiece), which shows a hawk properly "set up" and "bound" to depict it swooping down on its prey.
Putty sometimes greases light-coloured skins around the eyes; it will be well, therefore, to insert in its stead a little "pipe" or modelling clay worked up stiff. (Clay will be treated of in a subsequent chapter. It will be found useful for the faces of some sea-birds and hawks, and indeed for the greater part of the body and legs of large birds. The Cassowary in the Leicester Museum has been worked up largely in this manner.)
Putty can sometimes smudge light-colored skin around the eyes; so, it's a good idea to use a bit of "pipe" or modeling clay that's been worked until it's firm instead. (Clay will be discussed in a later chapter. It can be really helpful for the faces of some sea birds and hawks, and actually for most of the body and legs of large birds. The Cassowary in the Leicester Museum has been mostly done this way.)
Steel pins with black bead heads are first-rate helps to binding. They are sold in various lengths, and being long, sharp, and fine, quite supersede ordinary pins.
Steel pins with black bead heads are excellent tools for binding. They come in different lengths, and because they are long, sharp, and fine, they far exceed ordinary pins.
Audi alteram partem! Let us now take the evidence of Waterton:
Audi alteram partem! Now, let's consider the evidence from Waterton:
"You will observe how beautifully the feathers of a bird are arranged; one falling over the other in nicest order, and that, where this charming harmony is interrupted, the defeat, though not noticed by an ordinary spectator, will appear immediately to the eye of a naturalist. Thus, a bird not wounded, and in perfect feather, must be procured, if possible, for the loss of feathers can seldom be made good; and where the deficiency is great all the skill of the artist will avail him little in his attempt to conceal the defect; because, in order to hide it, he must contract the skin, bring down the upper feathers and shove in the lower ones, which would throw all the surrounding parts into contortion.
You'll see how beautifully a bird's feathers are arranged; each one overlaps perfectly, creating a lovely order. When this harmony is disrupted, it might go unnoticed by an average observer, but it will be immediately obvious to a naturalist. That's why it's important to find a bird that isn't injured and has perfect feathers, if possible, because lost feathers are hard to replace. If there's a significant deficiency, no amount of skill from the artist can hide the flaw; to conceal it, they would need to tighten the skin, pull down the upper feathers, and push in the lower ones, which would distort all the surrounding areas.
You will also observe that the whole of the skin does not produce feathers, and that it is very tender where the feathers do not grow. The bare parts are admirably formed for expansion about the throat and stomach, and they fit into the different cavities of the body at the wings, shoulder, rump, and thighs, with wonderful exactness, so that in stuffing the bird, if you make an even rotund surface of the skin, where the cavities existed, in lieu of re-forming them, all symmetry, order, and proportion are lost for ever.
You will also notice that the entire skin doesn't grow feathers, and it's very sensitive in the areas without feathers. The bare spots are perfectly shaped to expand around the throat and stomach, fitting into the various cavities of the body at the wings, shoulders, back, and thighs with remarkable precision. So, when you stuff the bird, if you create a smooth, rounded surface of the skin, instead of reshaping the cavities, you will lose all symmetry, order, and proportion permanently.
You must lay it down as an absolute rule that the bird is to be entirely skinned, otherwise you can never succeed in forming a true and pleasing specimen.
You have to establish as a strict rule that the bird must be completely skinned; otherwise, you'll never be able to create an authentic and attractive specimen.
You will allow this to be just, after reflecting a moment on the nature of the fleshy parts and tendons, which are often left in. First, they require to be well seasoned with aromatic spices; secondly, they must be put into the oven to dry; thirdly, the heat of the fire, and the natural tendency all cured flesh has to shrink and become hard, render the specimen withered, distorted, and too small; fourthly, the inside then becomes like a ham or any other dried meat. Ere long the insects claim it as their own, the feathers begin to drop off, and you have the hideous spectacle of death in ragged plumage.
You will find this to be fair after considering the nature of the flesh and tendons that are often left in. First, they need to be well-seasoned with aromatic spices; secondly, they should be put into the oven to dry; thirdly, the heat from the fire, combined with the natural tendency of all cured meat to shrink and harden, makes the specimen shriveled, misshapen, and too small; fourthly, the inside then becomes like ham or any other dried meat. Before long, the insects take over, the feathers start to fall out, and you are left with the awful sight of death in ragged plumage.
Wire is of no manner of use, but, on the contrary, a great nuisance, for, when it is introduced, a disagreeable stiffness and disarrangement of symmetry follow.
Wire is completely useless and, on the contrary, a major hassle because when it’s introduced, it creates an uncomfortable stiffness and messes up the symmetry.
The head and neck can be placed in any attitude; the body supported, the wings closed, extended, or elevated; the tail depressed, raised, or expanded; the thighs set horizontal, or oblique, without any aid from wire. Cotton will effect all this.
The head and neck can be positioned in any way; the body can be supported, and the wings can be closed, extended, or lifted; the tail can be lowered, raised, or spread out; the thighs can be placed horizontally or at an angle, all without any support from wire. Cotton will accomplish all this.
A very small proportion of the skull bone — say from the fore part of the eyes to the bill — is to be left in, though even this is not absolutely necessary. Part of the wing bones, the jaw bones, and half the thigh bones remain. Everything else — flesh, fat, eyes, bones, brain and tendons — are all to be taken away.
A very small part of the skull bone — from just in front of the eyes to the beak — should be left in, although this isn't strictly necessary. Some of the wing bones, jaw bones, and half of the thigh bones will stay. Everything else — flesh, fat, eyes, bones, brain, and tendons — should all be removed.
While dissecting, it will be of use to keep in mind that, in taking off the skin from the body, by means of your fingers and a little knife, you must try to shove it, in lieu of pulling it, lest you stretch it.
While dissecting, it's helpful to remember that when removing the skin from the body using your fingers and a small knife, you should try to push it instead of pulling it, to avoid stretching it.
That you must press as lightly as possible on the bird, and every now and then take a view of it, to see that the feathers are all right.
That you should press as lightly as you can on the bird, and every now and then check on it to make sure the feathers are okay.
That, when you come to the head, you must take care that the body of the skin rests on your knee; for, if you allow it to dangle from your hand, its own weight will stretch it too much.
That, when you get to the head, you need to make sure that the body of the skin is resting on your knee; because if you let it hang from your hand, its own weight will stretch it out too much.
That throughout the whole operation, as fast as you detach the skin from the body you must put cotton immediately between the body and it, and this will effectually prevent any fat, blood, or moisture from coming in contact with the plumage. Here it may be observed that on the belly you find an inner skin which keeps the bowels in their place.
That throughout the entire procedure, as soon as you separate the skin from the body, you need to immediately place cotton in between the body and the skin. This will effectively prevent any fat, blood, or moisture from touching the feathers. It's important to note that on the belly, there's an inner skin that holds the intestines in place.
By a nice operation with the knife you can cut through the outer skin, and leave the inner skin whole. Attention to this will render your work very clean, so that, with a little care in other parts, you may skin a bird without even soiling your finger ends.
By making a careful cut with a knife, you can slice through the outer skin while keeping the inner skin intact. Paying attention to this will make your work very neat, so that with a bit of care in other areas, you can skin a bird without even getting your fingers dirty.
As you can seldom get a bird without shooting it, a line or two on this head will be necessary. If the bird be still alive, press it hard with your finger and thumb just behind the wings, and it will soon expire. Carry it by the legs, and then, the body being reversed, blood cannot escape down the plumage through the shot holes.
As you can rarely catch a bird without shooting it, a few words on this topic will be necessary. If the bird is still alive, squeeze it firmly with your fingers just behind the wings, and it will quickly die. Carry it by the legs so that the body is upside down; this way, blood won’t leak through the feathers from the shot holes.
As blood will often have issued out before you have laid hold of the bird, find out the shot holes by dividing the feathers with your fingers and blowing on them, and then, with your penknife or the leaf of a tree, carefully remove the clotted blood, and put a little cotton in the hole. If, after all, the plumage has not escaped the marks of blood, or if it has imbibed slime from the ground, wash the part in water without soap, and keep gently agitating the feathers with your fingers till they are quite dry. Were you to wash them and leave them to dry by themselves they would have a very mean and shrivelled appearance.
As blood often comes out before you catch the bird, find the shot holes by gently parting the feathers with your fingers and blowing on them. Then, with your penknife or a leaf, carefully remove the clotted blood and place a little cotton in the hole. If, despite your efforts, the feathers still bear blood stains or have picked up dirt from the ground, rinse the area in water without soap, and keep gently moving the feathers with your fingers until they are completely dry. If you just wash them and leave them to dry on their own, they will look very rough and shriveled.
In the act of skinning a bird you must either have it upon a table or upon your knee. Probably you will prefer your knee, because, when you cross one knee over the other, and have the bird upon the uppermost, you can raise it to your eye, or lower it at pleasure, by means of the foot on the ground, and then your knee will always move in unison with your body, by which much stooping will be avoided and lassitude prevented.
In the process of skinning a bird, you should either have it on a table or on your knee. You’ll probably prefer your knee because, when you cross one knee over the other and place the bird on top, you can easily lift it to your eye or lower it as needed using the foot on the ground. This way, your knee moves with your body, which helps you avoid bending over too much and keeps you from getting tired.
With these precautionary hints in mind, we will now proceed to dissect a bird. Supposing we take a hawk. The little birds will thank us with a song for his death, for he has oppressed them sorely; and in size he is just the thing. His skin is also pretty tough and the feathers adhere to it.
With these precautionary tips in mind, let's go ahead and dissect a bird. Let's say we choose a hawk. The little birds will sing in gratitude for his death because he has troubled them greatly; plus, he's the right size for our needs. His skin is pretty tough, and the feathers stick to it well.
We will put close by us a little bottle of the solution of corrosive sublimate in alcohol, also a stick like a common knitting needle, and a handful or two of cotton.
We will keep a small bottle of the corrosive sublimate solution in alcohol nearby, along with a stick like a regular knitting needle, and a handful or two of cotton.
Now fill the mouth and nostrils of the bird with cotton, and place it upon your knee on its back with its head pointing to your left shoulder. Take hold of the knife with your two first fingers and thumb, the edge upwards. You must not keep the point of the knife perpendicular to the body of the bird, because, were you to hold it so, you would cut the inner skin of the belly and thus let the bowels out. To avoid this, let your knife be parallel to the body, and then you will divide the outer skin with great ease.
Now stuff the bird's mouth and nostrils with cotton, and rest it on your knee on its back with its head facing your left shoulder. Grip the knife with your first two fingers and thumb, with the blade facing up. Don't hold the knife straight up against the bird's body, because if you do, you'll cut through the inner skin of the belly and spill the insides. To prevent this, keep your knife parallel to the body, and you'll easily slice through the outer skin.
Begin on the belly below the breastbone, and cut down the middle quite to the vent. This done, put the bird in any convenient position, and separate the skin from the body till you get at the middle joint of the thigh. Cut it through, and do no more there at present, except introducing cotton all the way on that side from the vent to the breastbone. Do exactly the same on the opposite side.
Begin at the belly below the breastbone, and cut straight down the center to the vent. Once that's done, place the bird in a comfortable position and separate the skin from the body until you reach the middle joint of the thigh. Cut through it, and don’t do anything else right now except insert cotton all the way along that side from the vent to the breastbone. Do the exact same thing on the other side.
Now place the bird perpendicular, the breast resting on your knee, with its back towards you. Separate the skin from the body on each side at the vent, and never mind at present the part from the vent to the root of the tail. Bend the tail gently down to the back, and while your fingers and thumb are keeping down the detached parts of the skin on each side of the vent, cut quite across and deep till you see the backbone near the oil gland at the root of the tail. Sever the backbone at the joint, and then all the root of the tail together, with the oil gland dissected from the body. Apply plenty of cotton.
Now place the bird upright, with its chest resting on your knee and its back facing you. Carefully pull the skin away from the body on both sides at the vent, and don’t worry about the area from the vent to the base of the tail for now. Gently bend the tail down towards the back, and while holding down the loose skin on each side of the vent with your fingers and thumb, cut across deeply until you can see the backbone near the oil gland at the base of the tail. Cut through the backbone at the joint, and then remove the entire base of the tail along with the oil gland still attached to the body. Use plenty of cotton.
After this seize the end of the backbone with the finger and thumb, and now you can hold up the bird clear of your knee and turn it round and round as occasion requires.
After this, grab the end of the backbone with your finger and thumb, and now you can hold the bird up away from your knee and turn it around as needed.
While you are holding it thus, contrive, with the help of your other hand and knife, by cutting and shoving, to get the skin pushed up till you come to where the wings join on the body.
While you're holding it like this, use your other hand and knife to cut and push the skin up until you reach where the wings connect to the body.
Forget not to apply cotton; cut these joints through, add cotton, and gently push the skin over the head, cut out the roots of the ears, which lie very deep in the head, and continue skinning till you reach the middle of the eye; cut the nictating membrane quite through, otherwise you would tear the orbit of the eye; and after this nothing difficult intervenes to prevent your arriving at the root of the bill.
Forget to apply cotton; cut these joints, add cotton, and gently push the skin over the head, cut out the roots of the ears, which are very deep in the head, and keep skinning until you reach the middle of the eye; cut the nictitating membrane all the way through, or else you might tear the eye socket; after this, nothing else gets in the way of reaching the root of the beak.
When this is effected cut away the body, leaving a little bit of skull, just as much as will reach to the fore-part of the eye, clean well the jaw bones, fasten a little cotton at the end of your stick, dip it into the solution, and touch the skull and corresponding parts of the skin, as you cannot well get at these places afterwards.
When this is done, cut away the body, leaving just enough skull to reach the front part of the eye. Clean the jaw bones thoroughly, attach a small piece of cotton to the end of your stick, dip it into the solution, and apply it to the skull and matching areas of the skin, since it will be difficult to reach these spots later.
From the time of pushing the skin over the head you are supposed to have had the bird resting upon your knee. Keep it there still, and with great caution and tenderness return the head through the inverted skin, and when you see the beak appearing pull it very gently till the head comes out unruffled and unstained.
From the moment you start to push the skin over the head, you should have the bird resting on your knee. Keep it there, and with care and gentleness, pull the head back through the turned-in skin. When you see the beak coming out, pull it very gently until the head comes out smoothly and without any stains.
You may now take the cotton out of the mouth. Cut away all the remaining flesh from the palate, and whatever may have remained at the under jaw.
You can now remove the cotton from the mouth. Cut away all the leftover tissue from the roof of the mouth and anything that might be left on the lower jaw.
Here is now before you the skin without loss of any feathers, and all the flesh, fat, and unclean bones out of it, except the middle joint of the wings, one bone of the thighs, and the fleshy root of the tail. The extreme point of the wing is very small, and has no flesh on it, comparatively speaking, so that it requires no attention except touching it with the solution from the outside. Take all the flesh from the remaining joint of the wing, and tie a thread about four inches long to the end of it, touch all with the solution, and put the wing bone back into its place. In baring this bone you must by no means pull the skin. You would have it to pieces beyond all doubt, for the ends of the long feathers are attached to the bone itself. You must push off the skin with your thumb and forefinger. Now skin the thigh, quite to the bone, cut away all flesh and tendons, and bare the bone, form an artificial thigh round it with cotton, apply the solution, and draw back the skin over the artificial thigh; the same to the other thigh.
Here is the skin with all its feathers intact, and all the flesh, fat, and unwanted bones removed, except for the middle wing joint, one thigh bone, and the fleshy base of the tail. The very tip of the wing is quite small and has little flesh, so it only needs to be touched with the solution from the outside. Remove all the flesh from the other wing joint, tie a thread about four inches long to its end, apply the solution to everything, and put the wing bone back in place. While exposing this bone, be careful not to pull the skin, or else it will tear since the ends of the long feathers are directly attached to the bone. Use your thumb and forefinger to push the skin off. Next, skin the thigh all the way to the bone, remove all flesh and tendons, and expose the bone. Wrap cotton around the bone to create an artificial thigh, apply the solution, and pull the skin back over the artificial thigh; do the same for the other thigh.
Lastly, proceed to the tail, take out the inside of the oil gland, remove all the remaining flesh from the root till you see the ends of the tail feathers, give it the solution and replace it. Now take out all the cotton which you have been putting into the body from time to time to preserve the feathers from grease and stain.
Lastly, move on to the tail, remove the inside of the oil gland, and clean off any leftover flesh from the base until you can see the ends of the tail feathers. Apply the solution and put it back. Now, take out all the cotton you've been using to keep the feathers free from grease and stains.
Place the bird upon your knee, on its back, tie together the two threads which you had fastened to the ends of the wing joints, leaving exactly the same space betwixt them as your knowledge of anatomy informs you existed there when the bird was entire, hold the skin open with your finger and thumb, and apply the solution to every part of the inside. Neglect the head and neck at present; they are to receive it afterwards.
Place the bird on your knee, on its back, and tie the two threads you attached to the ends of the wing joints, leaving the same space between them as your understanding of anatomy tells you existed when the bird was whole. Hold the skin open with your finger and thumb, and apply the solution to every part inside. Leave the head and neck for now; they'll get treated later.
Fill the body moderately with cotton lest the feathers on the belly should be injured. Whilst you are about the following operation you must recollect that half of the thigh — or, in other words, one joint of the thigh bone — has been out away. Now, as this bone never moved perpendicular to the body, but, on the contrary, in an oblique direction, of course, as soon as it is cut off, the remaining part of the thigh and leg, having nothing to support them obliquely, must naturally fall to their perpendicular; hence the reason why the legs appear too long. To correct this, take your needle and thread, fasten the end round the bone inside, and then push the needle through the skin just opposite to it; look on the outside, and after finding the needle amongst the feathers, tack up the thigh under the wing with several strong stitches. This will shorten the thigh and render it quite capable of supporting the weight of the body without the help of wire.
Fill the body moderately with cotton to avoid damaging the feathers on the belly. While you carry out the next steps, keep in mind that half of the thigh—specifically, one joint of the thigh bone—has been removed. Since this bone never moved straight up and down but rather at an angle, once it’s cut off, the remaining part of the thigh and leg, lacking support, will naturally fall down vertically. That’s why the legs look too long. To fix this, take your needle and thread, secure the end around the bone inside, and then push the needle through the skin directly across from it. Check on the outside, and once you find the needle among the feathers, stitch up the thigh under the wing with several strong stitches. This will shorten the thigh and make it able to support the body without needing any wire.
This done take out every bit of cotton except the artificial thighs, and adjust the wing bones (which are connected by the thread) in the most even manner possible, so that one joint does not appear to be lower than the other, for unless they are quite equal the wings themselves will be unequal when you come to put them in their proper attitude. Here, then, rests the shell of the poor hawk ready to receive from your skill and judgment, the size, the shape, the features, and expression it bad ere death and your dissecting hand brought it to its present still and formless state. The cold hand of death stamps deep its mark upon the prostrate victim. When the heart ceases to beat and the blood no longer courses through the veins, the features collapse, and the whole frame seems to shrink within itself. If, then, you have formed your idea of the real appearance of the bird from a dead specimen you will be in error. With this in mind, and at the same time forming your specimen a trifle larger than life to make up for what it will lose in drying, you will reproduce a bird that will please you.
Once you've done that, remove all the cotton except for the artificial thighs, and adjust the wing bones (which are connected by thread) as evenly as possible, so that neither joint looks lower than the other. If they aren’t perfectly equal, the wings will be uneven when you position them correctly. Here lies the shell of the unfortunate hawk, ready to receive from your skill and judgment the size, shape, features, and expression it had before death and your dissection left it in this still and lifeless state. The cold hand of death leaves a deep impression on the fallen victim. When the heart stops beating and the blood no longer flows through the veins, the features sag, and the entire body seems to shrink in on itself. Therefore, if you've formed your idea of what the bird looks like based on a dead specimen, you might be mistaken. Keeping this in mind, and simultaneously making your specimen a bit larger than life to compensate for shrinkage during drying, you'll create a bird that will satisfy you.
It is now time to introduce the cotton for an artificial body by means of the little stick like a knitting needle; and without any other aid or substance than that of this little stick and cotton your own genius must produce those swellings and cavities, that just proportion, that elegance and harmony of the whole, so much admired in animated nature, so little attended to in preserved specimens. After you have introduced the cotton, sew up the orifice you originally made in the belly, beginning at the vent. And from time to time, till you arrive at the last stitch, keep adding a little cotton in order that there may be no deficiency there. Lastly, dip your stick into the solution and put it down the throat three or four times in order that every part may receive it.
It’s now time to use the cotton for an artificial body with the help of the small stick that resembles a knitting needle. Using just this stick and the cotton, your creativity needs to create those shapes and indentations, achieving the right proportions, elegance, and overall harmony that we admire in living beings but often overlook in preserved samples. After you’ve added the cotton, sew up the opening you made in the belly, starting at the vent. Periodically, until you finish the last stitch, add a bit of cotton to ensure there are no gaps. Finally, dip your stick in the solution and insert it down the throat three or four times so that every part gets coated.
When the head and neck are filled with cotton quite to your liking, close the bill as in nature. A little bit of beeswax at the end of it will keep the mandibles in their proper place. A needle must be stuck into the lower mandible perpendicularly.
When the head and neck are stuffed with cotton to your satisfaction, close the beak as it appears in nature. A small piece of beeswax at the tip will hold the jaws in the right position. You need to insert a needle into the lower jaw vertically.
You will shortly see the use of it. Bring also the feet together by a pin, and then run a thread through the knees, by which you may draw them to each other as near as you judge proper. Nothing now remains to be added but the eyes. With your little stick make a hollow in the cotton within the orbit, and introduce the glass eyes through the orbit; adjust the orbit to them as in nature, and that requires no other fastener.
You will soon see how to use it. Also, bring the feet together with a pin, then thread a piece of string through the knees so you can pull them closer together to your liking. The only thing left to add is the eyes. Use your small stick to create a hollow in the cotton inside the eye socket, and insert the glass eyes through the socket; adjust the socket to them like in nature, and no other fastener is needed.
Your close inspection of the eyes of animals will already have informed you that the orbit is capable of receiving a much larger body than that part of the eye which appears within it when in life, so that were you to proportion your eye to the size the orbit is capable of receiving it would be far too large. Inattention to this has caused the eyes of every specimen in the best cabinets of natural history to be out of all proportion. To prevent this, contract the orbit, by means of a very small delicate needle and thread, at that part of it farthest from the beak. This may be done with such nicety that the stitch cannot be observed, and thus you have the artificial eye in true proportion.
Your careful examination of animal eyes will have already shown you that the eye socket can hold a much larger eye than the part that shows when the animal is alive. If you sized your eye based on how big the socket can be, it would end up being way too big. Ignoring this has led to the eyes of every specimen in the best natural history collections being completely out of proportion. To fix this, reduce the eye socket using a very small, fine needle and thread at the part farthest from the beak. You can do this so precisely that the stitch isn't noticeable, giving you an artificial eye that's in true proportion.
After this touch the bill, orbits, feet, and former oil-gland at the root of the tail with the solution, and then you have given to the hawk everything necessary, except attitude and a proper degree of elasticity — two qualities very essential.
After this, touch the bill, orbits, feet, and former oil gland at the base of the tail with the solution, and then you’ve provided the hawk with everything it needs, except for attitude and the right amount of flexibility—two qualities that are really important.
Procure any common ordinary box, fill one end of it about three-fourths up to the top with cotton, forming a sloping plane. Make a moderate hollow in it to receive the bird. Now take the hawk in your hands, and after putting the wings in order, place it in the cotton with its legs in a sitting posture. The head will fall down; never mind. Get a cork and run three pins into the end, just like a three-legged stool. Place it under the bird's bill, and run the needle, which you formerly fixed there, into the head of the cork. This will support the bird's head admirably. If you wish to lengthen the neck, raise the cork by putting more cotton under it. If the head is to be brought forward, bring the cork nearer to the end of the box. If it requires to be set backwards on the shoulders, move back the cork.
Get any ordinary box and fill one end about three-quarters full with cotton, creating a sloped surface. Make a small indentation in it to hold the bird. Now take the hawk in your hands, arrange the wings, and place it in the cotton with its legs in a sitting position. The head will droop; that’s okay. Take a cork and insert three pins into one end, like a three-legged stool. Place it under the bird’s beak, and push the needle you previously fixed there into the cork's head. This will support the bird’s head perfectly. If you want to lengthen the neck, lift the cork by adding more cotton underneath. To bring the head forward, move the cork closer to the box's end. If you need it to tilt back on the shoulders, position the cork further back.
As in drying the back part of the neck will shrink more than the fore part, and thus throw the beak higher than you wish it to be — putting you in mind of a star-gazing horse — prevent this fault by tying a thread to the beak and fastening it to the end of the box with a pin or needle. If you choose to elevate the wings, do so, and support them with cotton; and should you wish to have them particularly high, apply a little stick under each wing, and fasten the ends of them to the side of the box with a little beeswax.
As the back part of the neck dries, it will shrink more than the front part, causing the beak to rise higher than you want — kind of like a horse looking at the stars. To avoid this issue, tie a thread to the beak and secure it to the end of the box with a pin or needle. If you want to raise the wings, go ahead and support them with cotton; if you want them to be especially high, place a small stick under each wing and secure the ends to the side of the box with a bit of beeswax.
If you would have the tail expanded, reverse the order of the feathers, beginning from the two middle ones. When dry, replace them in their true order, and the tail will preserve for ever the expansion you have given it. Is the crest to be erect? Move the feathers in a contrary direction to that in which they lie for a day or two, and it will never fall down after.
If you want the tail to be expanded, change the order of the feathers, starting from the two in the middle. Once they're dry, put them back in their original order, and the tail will keep the expansion you've given it forever. Should the crest be standing up? Adjust the feathers in the opposite direction to how they are for a day or two, and it will stay up after that.
Place the box anywhere in your room out of the influence of the sun, wind, and fire, for the specimen must dry very slowly if you wish to reproduce every feature. On this account the solution of corrosive sublimate is uncommonly serviceable, for, at the same time that it totally prevents putrefaction, it renders the skin moist and flexible for many days. While the bird is drying, take it out and replace it in its position once every day. Then, if you see that any part begins to shrink into disproportion, you can easily remedy ft.
Place the box anywhere in your room that's away from the sun, wind, and fire, since the specimen needs to dry very slowly if you want to capture every detail. For this reason, the solution of corrosive sublimate is really useful, because it not only completely stops decay but also keeps the skin moist and flexible for several days. While the bird is drying, take it out and put it back in its spot once every day. Then, if you notice any part starting to shrink disproportionately, you can easily fix it.
The small covert feathers of the wings are apt to rise a little, because the skin will come in contact with the bone which remains in the wing. Pull gently the part that rises with your finger and thumb for a day or two; press the feathers down; the skin will adhere no more to the bone, and they will cease to rise.
The small hidden feathers on the wings tend to lift a bit because the skin touches the bone underneath. Gently pull the part that's lifted with your fingers for a day or two; press the feathers down, and the skin will stop sticking to the bone, and they won't lift anymore.
Every now and then, touch and re-touch all the different parts of the feathers, in order to render them distinct and visible, correcting at the same time any harshness or unnatural risings or sinkings, flatness, or rotundity. This is putting the last finishing touch to it.
Every now and then, touch and retouch all the different parts of the feathers to make them distinct and visible, fixing any harshness or unnatural rises or dips, flatness, or roundness. This is the final finishing touch.
In three or four days the feet lose their natural elasticity, and the knees begin to stiffen. When you observe this, it is time to give the legs any angle you wish, and arrange the toes for a standing position, or curve them to your finger. If you wish to set the bird on a branch, bore a little hole under each foot a little way up the leg, and, having fixed two proportional spikes on the branch, you can in a moment transfer the bird from your finger to it, and from it to your finger, at pleasure.
In three or four days, the feet lose their natural flexibility, and the knees start to stiffen. When you notice this, it’s time to position the legs at any angle you like and arrange the toes for a standing position or curve them to your finger. If you want to place the bird on a branch, drill a small hole under each foot a little way up the leg, and once you’ve attached two proportionate spikes on the branch, you can quickly move the bird from your finger to the branch and back as you wish.
When the bird is quite dry, pull the thread out of the knees, take away the needle, etc.., from under the bill, and all is done.
When the bird is completely dry, pull the thread out of the knees, take away the needle, etc., from under the bill, and that’s it.
In lieu of being stiff with wires, the cotton will have given a considerable elasticity to every part of your bird, so that when perching on your finger, if you press it down with the other hand, it will rise again. You need not fear that your hawk will alter, or its colours fade.
In place of being rigid with wires, the cotton will have provided a good amount of flexibility to every part of your bird, so that when it’s sitting on your finger, if you press it down with your other hand, it will bounce back up. You don’t need to worry about your hawk changing or its colors fading.
The alcohol has introduced the sublimate into every part and pore of the skin, quite to the roots of the feathers. Its use is twofold: First, it, has totally prevented all tendency to putrefaction, and thus a sound skin has attached itself to the roots of the feathers. You may take hold of a single one, and from it suspend five times the weight of the bird; you may jerk it, it will still adhere to the akin, and, after repeated trials, often break short. Secondly, as no part of the skin has escaped receiving particles of sublimate contained in the alcohol, there is not a spot exposed to the depredation of insects; for they will never venture to attack any substance which has received corrosive sublimate.
The alcohol has infused the sublimate into every part and pore of the skin, right down to the roots of the feathers. Its use serves two purposes: First, it has completely stopped any chance of decay, so a healthy skin has formed around the roots of the feathers. You can grab a single feather and suspend five times the bird's weight from it; if you yank it, it will still stick to the skin, and after repeated tests, it often breaks off. Secondly, since no part of the skin has escaped the particles of sublimate carried in the alcohol, there isn’t a spot vulnerable to insect damage; they will never attempt to attack any material that has been treated with corrosive sublimate.
You are aware that corrosive sublimate is the most fatal poison to insects that is known. It is anti-putrescent, so is alcohol, and they are both colourless. Of course, they cannot leave a stain behind them. The spirit penetrates the pores of the skin with wonderful velocity, deposits invisible parts of the sublimate, and flies off. The sublimate will not injure the skin, and nothing can detach it from the part where the alcohol has left it.
You know that corrosive sublimate is the deadliest poison known for insects. Both it and alcohol are anti-putrescent and colorless, so they won't leave any stains behind. The spirit quickly seeps into the skin's pores, leaving behind invisible traces of the sublimate before evaporating. The sublimate won't harm the skin, and nothing can remove it from where the alcohol has deposited it.
* * * * * * * * * * * * * * * *
* * * * * * * * * * * * * * * *
All the feathers require to be touched with the solution in order that they may be preserved from the depredation of the moth. The surest way of proceeding is to immerse the bird in the solution of corrosive sublimate, and then dry it before you begin to dissect it." — (Waterton's "Wanderings in South America.")
All the feathers need to be treated with the solution to protect them from moth damage. The best method is to soak the bird in a solution of corrosive sublimate, and then let it dry before you start to dissect it." — (Waterton's "Wanderings in South America.")
On reference to the instructions given previously, and those last quoted, it will be seen that the two systems are diametrically opposed to each other. I will, therefore, now point out the objections to a general use of Waterton's plan.
Based on the instructions given earlier and the most recent ones mentioned, it's obvious that the two systems are completely opposite. Therefore, I will now point out the problems with using Waterton's method overall.
First, let me premise that I entirely agree with him in his opening paragraph as to selecting, when practicable, a bird as little damaged as possible; but I need not remind professionals, or amateurs of some practice, how seldom these conditions exist, especially in the instance of birds sent to them for mounting, by people totally ignorant of the first principles of taxidermy. Where a great number of feathers are missing, the loss must be repaired by the insertion of similar feathers placed one by one in position by the aid of strong paste, in which a little of the corrosive sublimate preparation (see chapter on Preservatives, ante) or carbolic acid has previously been stirred. He is also quite right when he insists upon the specimen not being stuffed as a round ball of feathers, as some tyros are in the habit of doing, and also when he says that the bird must be well skinned.
First, let me say that I completely agree with him in his opening paragraph about choosing a bird that is as undamaged as possible whenever it's feasible. However, I don’t need to remind professionals or experienced amateurs how rarely these conditions actually occur, especially in cases where birds are sent to them for mounting by people who know nothing about the basic principles of taxidermy. When a lot of feathers are missing, the gap has to be filled by carefully inserting similar feathers one by one using strong glue, in which a bit of the corrosive sublimate preparation (see chapter on Preservatives, ante) or carbolic acid has already been mixed. He’s also absolutely correct when he insists that the specimen shouldn’t be stuffed into a round ball of feathers, as some beginners tend to do, and when he emphasizes that the bird must be properly skinned.
With the next paragraph, as to the uselessness of wire, I totally disagree, and for this reason, that, although I have myself proved it possible — having many years ago followed Waterton's instructions — to mount a bird entirely without wire, still it is at the best but an amateur's "dodge;" and I can fearlessly assert that it will not stand the test of work and expediency. It is, in fact, impossible to dispense with wire, if taxidermy is to be followed as a profession.
With the next paragraph about the uselessness of wire, I completely disagree. Although I have personally proven it possible—having followed Waterton's instructions many years ago—to mount a bird entirely without wire, it’s really just a trick that amateur taxidermists use. I can confidently say that it won't hold up under practical use and necessity. In fact, it's impossible to do without wire if you want to pursue taxidermy professionally.
As to putting cotton wool between the flesh and the skin, practice will enable one to do without this. To me it would be a great nuisance, unless in the case of much grease, of persistent bleeding, or clots of extravasated blood occurring. All the rest of the instructions on skinning are sound and practical, except where he advises the knee to be used instead of a table. A little reflection, or, better still, a trial, will convince anyone that nothing can compare in practice with a table or bench for comfortable working.
As for putting cotton wool between the flesh and the skin, you can learn to manage without it over time. To me, it would be a real hassle, except in cases of a lot of grease, ongoing bleeding, or clumps of pooled blood. The rest of the tips on skinning are practical and sensible, except for the advice to use your knee instead of a table. A little thought, or better yet, a tryout, will show anyone that nothing beats a table or bench for comfortable work.
I do not hold, either, with the total removal of the skull. For instance, how are you to exhibit the superciliary ridge which gives so distinctive a character to the very bird Waterton selects — the hawk — if you cut it away? I have tried both plans, and I unhesitatingly say that you cannot give character to the heads of the larger birds if you remove the skull (unless, of course, you choose to model it up in clay, etc.., as in the heads of mammals), though I agree that you must free the skin from all its surroundings. I have at the present moment several birds (set up by a man in the West of England), in which the skulls have been removed; the skin has shrunk in at the back of the head and at the mandibles; and in one instance — an osprey — the bird has entirely lost its nobility and eagle-like appearance by the removal of the ridge above the eye.
I don't agree with completely removing the skull either. For example, how can you show the brow ridge that gives such a unique look to the very bird Waterton chooses — the hawk — if you take it out? I've tried both methods, and I can confidently say that you can't capture the character of larger birds' heads if you remove the skull (unless, of course, you decide to mold it in clay, etc., like with mammal heads), though I do agree that you need to detach the skin from everything around it. Right now, I have several birds (mounted by a guy in the West of England) where they've removed the skulls; the skin has shrunk at the back of the head and around the mandibles, and in one case — an osprey — the bird has completely lost its majesty and eagle-like look because the ridge above the eye was taken away.
I cannot urge the advisability of making the body larger to allow for shrinking, inasmuch as in the case of certain birds — notably gulls — which should present an even' surface on the breast, the opposite effect will be produced if the false body is unduly large, as then, in place of the evenness so desirable, a division will appear in the centre of the body, which entirely mars the beautiful symmetry of the sea-bird's breast. No perceptible shrinkage can, however, occur if the body is properly made and packed; and here is shown the vast superiority of the made body of well-wrapped tow over that made of loose cotton inserted in the skin, bit by bit.
I can't stress enough how unwise it is to make the body bigger to allow for shrinkage. In the case of certain birds—especially gulls—which should have a smooth surface on their chest, an oversized body will actually create the opposite effect. Instead of achieving that desirable smoothness, you'll end up with a noticeable divide in the center, ruining the beautiful symmetry of the sea bird's chest. However, no noticeable shrinkage will happen if the body is made and packed properly. This highlights the significant advantage of a well-formed body made of carefully wrapped tow compared to one made from loose cotton stuffed into the skin piece by piece.
The eyes I prefer to insert in the larger birds after the specimen is dry, as then any little fault in the shape of the head is easily rectified through the orbit, the eyelid, of course, being previously relaxed (with cotton wool dipped in warm water) to do this and to receive the artificial eye.
The eyes I like to put into the larger birds after the specimen has dried because any small issue with the shape of the head can be easily fixed through the eye socket. The eyelid needs to be relaxed first (using cotton wool soaked in warm water) to allow for this and to place the artificial eye.
Waterton's method of setting up birds may be dismissed in a few words; it is impracticable for anyone but an amateur who has unlimited time at his disposal, and who does not object to spend about a couple of days over one specimen, and who has also ample room for the large collection of different-sized boxes he must accumulate.
Waterton's way of preparing birds can be summed up quickly; it's unrealistic for anyone except a hobbyist with unlimited free time, who doesn't mind spending a couple of days on one specimen, and who also has plenty of space for the large collection of various-sized boxes he'll need to gather.
In using the corrosive sublimate the student will do well to carefully read the chapter on Preservatives, and then make up his mind. I may here mention, however, that I should not advise anyone to work on a bird previously saturated with a solution of corrosive sublimate.
In using the corrosive sublimate, the student should carefully read the chapter on Preservatives, and then decide. However, I should mention that I wouldn’t recommend anyone to work on a bird that has been soaked in a solution of corrosive sublimate.
It has been said, De mortuis nil nisi bonum; but, while fully acknowledging the force of the remark, as also the great scientific attainments and love for natural history which distinguished the illustrious traveller, I cannot allow anyone who reads his entertaining works to be misled into wasting time in an unprofitable manner.
It’s often said, De mortuis nil nisi bonum; but, while I completely recognize the truth in that statement, along with the incredible scientific achievements and passion for natural history that set apart the famous traveler, I can’t let anyone who reads his engaging works be misled into wasting their time in an unproductive way.
Another way of setting up a bird may be described as follows: Provide yourself with four wires — two of which are for the legs, a long one for the body, and a shorter one for the wings; let us suppose we have another starling in front of us. For this bird take a suitable piece of wire about three inches long (pointed at both ends), and bend it down at each end for the distance of an inch, which of course leaves one inch in the middle at a right angle to each end; this is called the wing-bearer. Then place a little piece of tow inside the skin to fit along the back, and on to the top of this lay the wing-bearer, pushing the pointed ends down and into the hollows of the wing-bones (which must be left nearly their full length to admit of this).
Another way to set up a bird can be described like this: Get four pieces of wire—two for the legs, a long one for the body, and a shorter one for the wings. Let's say we have another starling in front of us. For this bird, take a suitable piece of wire about three inches long (pointed at both ends), and bend it down at each end for about an inch, which leaves one inch in the middle at a right angle to each end; this is called the wing-bearer. Then place a small piece of tow inside the skin to fit along the back, and on top of this lay the wing-bearer, pushing the pointed ends down into the hollows of the wing bones (which should be left nearly their full length to allow for this).
Next take the body wire, also sharpened at both ends, and a little longer than you require, and at a sufficient distance from one end form with the pliers a loop similar to Fig. 1, so that it comes about the centre of the projected body; one end will thus be much longer from the loop than the other. Run one end (the longest) right up the body to come out at the crown of the head (the head itself being previously stuffed), push it through a sufficient distance, so that the looped end falls within the incision of the skin; so soon as it is passed inside pull the looped end down, and push its point through the root of the tail; the loop should now, if accurately calculated, come just in the centre of the body incision.
Next, take the body wire, which should also be sharpened at both ends and slightly longer than you need. At a good distance from one end, use the pliers to form a loop like in Fig. 1, positioning it around the center of the projected body; one end will be much longer than the other from the loop. Run the longer end all the way up the body so it exits at the crown of the head (with the head having been stuffed beforehand). Push it through enough so that the looped end falls within the incision of the skin; as soon as it's inside, pull the looped end down and push its point through the base of the tail. The loop should now, if calculated correctly, sit right in the center of the body incision.
Pack underneath the wire at all points with little pieces of finely cut tow, not forgetting the neck. The wire should now be protected from touching the bird on its underside. Now take the leg wires, point them and pass them up the legs as before described; when they appear within the skin by the side of the legs, push the ends of each one through the little loop on the body wire, and by the aid of the small pliers and your finger and thumb twist them tightly up or down the main wire. If properly done, the bird should be capable of being lifted by one leg wire and should feel perfectly stiff and firm. Proceed by the addition of cut tow to gradually form the body, which, when arranged to your liking, sew up.
Pack underneath the wire at all points with small pieces of finely cut tow, making sure not to forget the neck. The wire should now be protected from touching the bird's underside. Next, take the leg wires, point them, and thread them up the legs as previously described. When they come through the skin beside the legs, push the ends of each one through the little loop on the body wire. Using small pliers, along with your fingers and thumb, twist them tightly down the main wire. If done correctly, the bird should be able to be lifted by one leg wire and should feel completely stiff and firm. Continue by adding cut tow to gradually shape the body, which you can sew up once you’re satisfied with its arrangement.
This, in contradistinction to the other method, is called the soft body, and is not a plan which I at all recommend. Sometimes a cork is pushed on at the main or body wire to act in the place of the loop; the leg wires are then pushed through and clenched on the other side, and the skin is filled with cut tow as before.
This, unlike the other method, is known as the soft body, and I don't recommend it at all. Sometimes, a cork is pushed onto the main or body wire to replace the loop; the leg wires are then pushed through and secured on the other side, and the skin is filled with cut tow as before.
Another system of forming an artificial body for a bird is by means of "peat." [Footnote: "Peat" is compressed vegetable fibre cut from old bogs, and is sold by the dealers, in dried cakes about 1 foot long by 6 inches by 2 inches.] Having provided yourself with one of these bricks of peat, you cut it with a sharp knife to as near the shape required as possible, having the natural body before you as a guide, finally inserting it in the bird.
Another way to create an artificial body for a bird is by using "peat." [Footnote: "Peat" is compressed plant material taken from old bogs, and it's sold by retailers in dried blocks approximately 1 foot long, 6 inches wide, and 2 inches thick.] Once you have one of these peat blocks, use a sharp knife to cut it into a shape that's as close as possible to what you need, using the natural body as a reference, and then place it inside the bird.
My objection to the use of peat for this purpose is, first, the dust and dirt caused by the waste pieces; and, secondly, the fact that birds mounted on this system have a tendency to look "wooden," as, unlike a body formed of tow, that made of peat is stiff and unyielding, and, therefore, after it is once in the skin, it cannot be pressed into shape where defects appear, and is of course not so easily altered. After a long and patient trial of the peat body, I have become convinced of its many disadvantages, and have of late years returned to my first plan — the body made of well wrapped tow — nor do I think anything will compare with it, for the reasons above stated. Peat in the case of very large birds (ostriches, etc..) and mammals is useful, but for the ordinary run of birds I decidedly veto its application.
My issue with using peat for this purpose is, first, the dust and mess created by the leftover pieces; and, second, the fact that birds made with this system tend to look "wooden." Unlike a body made of tow, which is flexible, the peat is stiff and doesn’t conform easily. Once it’s in the skin, it can't be reshaped to fix any flaws, and it’s not as easy to modify. After a long and careful trial with the peat body, I’ve come to realize its many drawbacks, and in recent years, I’ve gone back to my original method—the body made of well-wrapped tow. I don’t think anything can compare to it for the reasons mentioned above. Peat can be useful in the case of very large birds (like ostriches) and mammals, but for regular birds, I strongly oppose its use.
Birds with larger heads than necks, such as ducks, etc.., must be treated in one of three ways. First, after skinning out the body, and cutting off the neck from the inside, cut with the strong scissors a triangular piece away from the base of the skull, from which extract the brain, and then compress the sides of the face (mandibles) between your finger and thumb from the outside, at the same time endeavouring to "slip" the head (now somewhat elastic by the removal of the base of the skull) through the neck.
Birds with larger heads than necks, like ducks, etc., must be handled in one of three ways. First, after removing the skin from the body and cutting off the neck from the inside, use strong scissors to cut a triangular piece from the base of the skull, then take out the brain. Next, squeeze the sides of the face (the mandibles) between your fingers and thumb from the outside, while trying to "slip" the head (which is now a bit flexible due to the removal of the base of the skull) through the neck.
Do this whenever possible; but for those birds whose mandibles resist any amount of moderate pressure, of which the larger ducks, woodpeckers, etc.., are examples, the second plan must be adopted, which is to cut (after the removal of the body) on the crest of the head of a specimen — if a crested bird — or along the sides of the face if failing in this particular; the head may then be carefully skinned, leaving it attached as much as before directed, brains cleared out, eyes extracted, etc.., then painted with the preservative, head nicely stuffed with chopped tow, and returned in the skin, and finally very neatly sewn up. If this latter operation be well performed, and especially if the stitches are drawn tight, the seam ought not to show.
Do this whenever possible; but for those birds whose beaks resist any amount of moderate pressure, like larger ducks, woodpeckers, etc., the second plan must be used. This involves cutting (after removing the body) on the crest of a crested bird's head, or along the sides of the face if it doesn’t have a crest. The head can then be carefully skinned, leaving it attached as previously directed, with the brains cleared out, eyes removed, etc. After that, it should be painted with preservative, stuffed with chopped tow, and returned into the skin, and finally sewn up very neatly. If this last step is done well, especially with the stitches pulled tight, the seam shouldn't be visible.
A more tedious method is to extract the brain and eyes through the roof of the mouth, or from the back of the head (after the neck has been cut off), but neither of these plans will bear comparison with "slipping," or with cutting on the crest, or by the side of the head, as by these latter methods you do not miss any flesh by the sides of the face in skinning out.
A more tedious method is to remove the brain and eyes through the roof of the mouth or from the back of the head (after cutting off the neck), but neither of these methods compares to "slipping," or cutting along the crest or the side of the head, as these latter methods allow you to avoid missing any flesh along the sides of the face while skinning.
Let me give an instance. In the eider duck, the flesh of the face is protracted along the sides of the bill; if, therefore, you fail to open on the crown, or by the side of the face, you must of necessity miss these, or have ten times more trouble in feeling your way to it. If the processes by the side of the face are entirely missed, the consequences are an unsightly and inartistic shrivelling; it is as well, therefore, to make a note of all birds having such a peculiarity.
Let me give you an example. In the eider duck, the skin on the face extends along the sides of the bill; so, if you don’t open at the crown or the side of the face, you will definitely miss this area or face a lot more difficulty trying to access it. If you completely overlook the areas by the side of the face, the result is an ugly and unappealing shriveling; therefore, it's a good idea to keep track of all birds that have this feature.
Amongst the birds which may be instanced as having heads too large to pass the neck in the usual manner, we may place the whole of the ducks, geese, and swans, though the heads of the herons and divers, which appear to be as large and yet have as small necks as the former birds, pass easily. Again, the head of the great or crested grebe passes, while that of the little grebe sticks. Of the three woodpeckers found in Britain, the heads of the great-spotted and lesser-spotted will not pass the neck, but the head of the other, the green woodpecker, the largest looking of the three, will pass if care be taken. These things being noted and borne in mind will save the tyro a considerable amount of trouble.
Among the birds that have heads too large to pass through the neck normally, we can include all ducks, geese, and swans. In contrast, the heads of herons and divers, which seem just as big but have smaller necks, pass through easily. Additionally, the head of the great or crested grebe can pass, while that of the little grebe gets stuck. Of the three woodpecker species found in Britain, the heads of the great-spotted and lesser-spotted woodpeckers can’t pass through the neck, but the head of the green woodpecker, the largest of the three, can pass if done carefully. Keeping these points in mind can save beginners a lot of hassle.
In concluding this chapter, let it be noted as an unalterable doctrine, that no white-breasted birds, sea birds especially, are, under any pretence whatever, to be cut on their breasts. How many birds pass through the hands of the professional, spoiled by a neglect or ignorance of this rule, it would be impossible to say, nor are amateurs the only offenders in this particular. Grebes, etc.., which have wings hardly sufficient to hide the cut beneath, can be cut on the back, between the wings, and skinned out that way; and if the breast is, as it should be, fronted for the "showpiece," the effect, if skilfully done, is very fine.
In wrapping up this chapter, it's important to emphasize that no white-breasted birds, especially seabirds, should ever be cut on their breasts for any reason. It's hard to say how many birds have been ruined by professionals who neglect or are unaware of this rule, and amateurs are not the only ones at fault here. Grebes, for example, have wings that barely cover the cut underneath; they can be cut on the back, between the wings, and skinned that way. If the breast is presented, as it should be, for the "showpiece," it can create a very impressive effect if done skillfully.
I have lately given a great deal of attention to this method of skinning from the back, having found it necessary in mounting young birds which otherwise showed an unsightly cut on their naked breasts. I found that the modelling was much truer and more effective by this method, and therefore extended it to mature specimens with the result that I now think no birds, excepting the very largest, perhaps, should ever be opened on the breast. I am quite convinced that if a person of any experience makes up his mind never to skin a bird by any other way than by the side or back, he will have no reason to ever regret his decision. Should a bird be required for flight, undoubtedly the proper place to cut it is under the side; the suspending wire then comes along the off side and is hidden by the wing. If the wings are to be raised and the breast or side shown, cut it on the back; if closed wings, the same; in either case the cut is perfectly hidden, and is where it should be, out of the way of grease.
I've recently focused a lot on this method of skinning from the back because I've found it necessary when mounting young birds that would otherwise have an unsightly cut on their bare breasts. I noticed that the modeling looked much better and more effective using this method, so I started applying it to mature specimens. As a result, I now believe that no birds, except maybe the very largest ones, should be opened on the breast. I'm convinced that if someone with experience decides never to skin a bird except from the side or back, they won't regret that choice. If a bird needs to be posed for flight, the best place to make the cut is underneath the side, allowing the suspending wire to run along the opposite side and be concealed by the wing. If the wings are to be raised and the breast or side on display, cut it on the back; if the wings are closed, do the same. In either case, the cut is completely hidden and is positioned where it should be, out of the way of grease.
Perhaps it may be as well to state here that — contrary to my usual custom of working from the lowest to the highest animal form — I have written upon birds out of their proper natural order; the reason being that birds are always selected because of easiness of treatment for the student's first lessons in taxidermy, before his teacher allows him to "try his 'prentice hand" on the more difficult branches of the art.
Perhaps it's worth mentioning here that — unlike my usual habit of starting from the simplest to the most complex animal forms — I have written about birds out of their usual natural order; the reason being that birds are often chosen because they are easier to handle for a student's initial lessons in taxidermy, before the instructor lets them "try their hand" at the more challenging aspects of the craft.
 Explanation:
Explanation:
A, skull;
A skull;
B, lower maxillary (or jaw) at point of articulation with upper;
B, lower jaw at the point where it connects with the upper jaw;
C, cervical vertebrae (7); D, dorsal Vertebrae;
C, cervical vertebrae (7); D, dorsal vertebrae;
E, lumbar vertebrae; F, sacral vertebrae ;
E, lumbar vertebrae; F, sacral vertebrae;
G, caudal vertebrae ;
G, tail vertebrae;
H pelvic girdle, or "ossa innominata" (ilium, ischium, and pubes anchylosed);
H pelvic girdle, or "ossa innominata" (ilium, ischium, and pubis fused);
I, femur; i, patella, or "knee pan";
I, femur; I, patella, or "knee cap";
J, tibia ; K, fibula;
J, shin bone; K, calf bone;
L, tarsal, and meta-tarsal bones, and phalanges of digits, of pes or hind foot ;
L, tarsal and metatarsal bones, and phalanges of the toes, of the foot or hind foot;
M, scapula; N, humerus ; O, radius ; P, ulna ;
M, shoulder blade; N, upper arm bone; O, forearm bone on the thumb side; P, forearm bone on the pinky side;
Q, carpal and meta-carpal bones, and phalanges, of digits, of manes or fore-foot;
Q, carpal and metacarpal bones, and phalanges, of fingers, of manes or front foot;
R, dorsal and sternal ribs.
R, back and chest ribs.
=========================
Understood. Please provide the text you'd like me to modernize.
THE art of setting up quadrupeds in a natural and life-like manner is of so recent a date that few, if any, of the manuals on taxidermy do more than glance at it. True, they nearly all give directions, in an off-hand way, as to the skinning of mammals; but their instructions are so vague and meagre that, though confessing that the subject is no easy one to write upon, I yet feel that we may, perhaps, improve, in point of detail, on what has gone before.
THE art of positioning four-legged animals in a natural and lifelike way is so recent that very few, if any, taxidermy manuals take a deep look at it. True, most provide casual instructions for skinning mammals, but their guidance is so unclear and limited that, while I acknowledge that this is a challenging topic to write about, I believe we can improve in terms of detail compared to what has been done before.
In accordance with my usual custom, I have procured an animal — a fox — to illustrate my instructions, and, the learner having got out the whole of the knives (previously figured) and the whetstone, may proceed to work in the following manner:
In line with my normal practice, I've obtained an animal—a fox—to demonstrate my instructions, and once the learner has taken out all the knives (as shown earlier) and the whetstone, they can start working as follows:
Measure the fox, as a preliminary, taking note of his length, breadth, and fineness of limb; length and thickness of muzzle and side of face; and, having aided the recollection by the use of the callipers, and made all necessary notes, lay him on the skinning table, back downwards, and, separating the fur on the stomach at about two inches from the root of the tail, gently insert the point of the skinning knife (keeping the handle well down) under the skin, and continue the cut to within about ten inches of the chest, between the fore limbs--that is to say, up to the first rib, which may be felt with the finger and thumb. If an ordinary-sized fox, this will allow the cut to be of about the same length, viz., ten inches. Be very careful, in making this incision, to cut the top skin only, and not that which retains the bowels.
Measure the fox first by noting his length, width, and the slenderness of his limbs; the length and thickness of his muzzle and the sides of his face. After you’ve helped your memory with some calipers and taken all the necessary notes, place him on the skinning table with his back facing down. Then, separate the fur on his stomach about two inches from the root of the tail and gently insert the point of the skinning knife (keeping the handle down) under the skin. Continue the cut until you’re about ten inches away from the chest, between the front legs—specifically, up to the first rib, which you can feel with your fingers. For an average-sized fox, this cut will be about ten inches long. Be very careful to only cut the top layer of skin and not into the layer that holds the intestines.
Having done this, commence to clear away the skin from the flesh on one side by using the point of the knife in a slanting manner between skin and flesh. The fox being with its head from you and directly to your front, the side which you naturally begin on first would be the one on your left; turn the fox now so that its head comes to your left hand instead of directly to your front, and skin in the same manner on the other side, which is now from you. The skin of a fox being very thin about this part, as indeed, nearly all over its body, you must be careful while making your cuts to release the skin, not to push the point of your knife through. As you get along the side of the fox, use your knife, point downward, cutting edge toward you, on the inner side, and from you on the outer, with a scraping motion to separate the skin from the body at the sides.
Having done this, start to remove the skin from the flesh on one side by using the tip of the knife at an angle between the skin and the flesh. With the fox facing away from you and directly in front of you, the side you'll start on first is the one on your left. Now, turn the fox so that its head is on your left hand instead of directly in front of you, and skin in the same way on the other side, which is now away from you. Since the skin of a fox is very thin in this area, as it is nearly all over its body, be careful not to push the tip of your knife through while making your cuts to free the skin. As you work along the side of the fox, hold your knife with the point down, the cutting edge facing you on the inner side, and away from you on the outer side, using a scraping motion to separate the skin from the body at the sides.
No doubt, by this time you will be somewhat troubled with a discharge of blood; if so, use sawdust or silver sand, either of which will not dirty the skin, but yet affords a good grip. (Plaster is very commonly used instead of either, but, though a capital absorbent of blood and grease, I object to it, except in the instances of white or very light coloured furs.) Silver sand is, I think, the best of all, as sawdust is apt to get into some furs, and it requires a great deal of pains to get it out again.
No doubt, by now you might be a bit worried about bleeding; if that’s the case, use sawdust or silver sand, as either will keep your skin clean while providing a good grip. (Plaster is commonly used instead, but while it's great at absorbing blood and grease, I wouldn't recommend it except for white or very light-colored furs.) I believe silver sand is the best option overall, since sawdust can get stuck in some furs, and it takes a lot of effort to clean it out.
By a little management of the point of the knife, and by undercutting slightly, you expose the thighs of the hind limbs. The fox lies still in front of you with its head to your left. Changing your position, go to the tail, and, seizing the foot nearest to you with your right hand, and the skin with your left, push and pull at one and the same time until you expose the knee-joint, or rather — to speak more correctly — the articulation of the "femur" or thigh bone (i, Plate III.) with the two smaller bones ("fibula" and "tibia") which form the shank (K and J).
By carefully moving the knife and making a slight undercut, you can reveal the thighs of the back legs. The fox remains still in front of you, its head on your left. Change your position and approach the tail. Grip the nearest foot with your right hand and the skin with your left, then push and pull simultaneously until you uncover the knee joint, or more accurately, the connection of the "femur" or thigh bone (i, Plate III.) with the two smaller bones ("fibula" and "tibia") that make up the lower leg (K and J).
Let go with your right hand, and by an arrangement of the fingers of the left — difficult to describe — retain your hold of both the skin and flesh of the leg, and re-commence skinning with the knife on each side of the leg until you arrive at the hollow which lies behind, just above the shank; this exposes daylight between skin and flesh, and thus you may get your fingers between the two skins, and, finding the articulation, or joint of the thigh (just mentioned), you push the point of your knife in, and sever the ligaments, and then return the loose shank to its skin.
Let go with your right hand, and with a tricky arrangement of your left fingers, keep a hold on both the skin and flesh of the leg. Start skinning again with the knife on each side of the leg until you reach the hollow just above the shank; this will create a gap between the skin and flesh, allowing you to get your fingers in between them. Once you locate the thigh joint, you push the tip of your knife in to cut the ligaments, and then put the loose shank back into its skin.
Holding the fingers of your left hand underneath the skin — thumb and bottom of the palm of the hand opposing — skin out the rest of the thigh, which brings you just on top of the root of the tail. Turn the fox in an exactly opposite direction, and repeat the process; you will before doing this find yourself, perhaps, restrained by the skin of the ventral orifice, which carefully cut out; this frees the limb considerably. (I may mention that the animal skinner must not be afraid of handling his subject; it is not so pleasant nor so delicate an operation as skinning a bird, and, consequently, does not require so fine a touch.)
Holding the fingers of your left hand under the skin — thumb and the bottom of the palm opposing — gently pull the skin off the rest of the thigh, which brings you right at the base of the tail. Turn the fox in the opposite direction and repeat the process; before doing this, you might find yourself limited by the skin of the ventral opening, which you should carefully cut out. This will free the limb significantly. (It's worth mentioning that the animal skinner shouldn’t be afraid to handle their subject; it’s not as pleasant or delicate as skinning a bird, and therefore doesn’t require such a fine touch.)
You will now have exposed the tail at its back and front. Now double up the fox, supporting it with your left hand, and get the whole of the tail free at the root. Letting it rest on the table again, you skin as far up the tail as you can go. The two thighs and part of the back are entirely freed from the skin, but the tail still holds at about three inches up.
You will now have exposed the tail from both the back and the front. Next, double up the fox and support it with your left hand, freeing the entire tail at the root. Once it's resting on the table again, skin as far up the tail as possible. The two thighs and part of the back are completely free from the skin, but the tail is still attached about three inches up.
Now get a pair of common pincers, such as are used for pulling nails out, and place them so that the tail comes between their hollows; push this against the part still unskinned; hold this firmly down on the table with the left hand, and pull from the root of the tail with the right. Very often the tail will not move past this point; in that case there is nothing left but to cut it off at the root, and place the latter firmly in a vice (after the animal is skinned out), and taking both hands to the skin, cross the thumbs and two first fingers, so as to obtain a good grip and yet prevent the skin of the tail from turning inside out, and pull with all your might (jerking it at the same time) until it slides.
Now grab a pair of common pliers, like the ones used for pulling out nails, and position them so that the tail fits between their grips; press this against the part that’s still unskinned. Hold it down firmly on the table with your left hand, and pull from the base of the tail with your right. Often, the tail won’t move past this point; if that happens, your only option is to cut it off at the base and secure that part in a vise (after the animal is skinned), then using both hands to hold the skin, cross your thumbs and index fingers to get a good grip while preventing the skin of the tail from turning inside out, and pull with all your strength (giving it a quick jerk at the same time) until it comes off easily.
Now free the skin from the back, working round to the front. During this operation the fox must be frequently turned to get round the sides and back. The knife being held short in the hand and guided near the tip by the fore-finger considerably facilitates this. Endeavour as much as possible to keep all the flesh and fat (if any) on the body, and not on the skin.
Now, start by peeling the skin away from the back, moving around to the front. While doing this, you’ll need to frequently turn the fox to reach the sides and back. Hold the knife close to the handle and use your index finger near the tip for better control, which makes this easier. Try to keep as much of the meat and fat (if there is any) on the body and not on the skin.
Coming up now to the fore limbs you will find the skin hold considerably between them at the chest. This is the place where an amateur generally runs his knife through, which, I need hardly say, is one of the worst places in which this accident could happen. Having released the chest, skin all away from the back and shoulder; the fore-arm now appears, showing the articulation of the humerus with the radius and ulna. Skin all round it until you come to the return of the fore-arm in precisely the same manner as you have done with the hind limbs. This point is not so easy to find as is that of the hind legs, but if you will twist the leg you will at once see the point of junction, where slip the knife in and cut off as before. Turn the fox, and treat the other leg in the same manner.
Coming up to the front legs, you'll notice that the skin holds quite a bit of tension at the chest. This is usually where someone inexperienced makes a cut, which, I don't need to mention, is one of the worst places for such an accident to occur. Once you've freed the chest, skin all around the back and shoulder; now you can see the forearm, showing the joint where the humerus connects with the radius and ulna. Skin all around it until you reach the bend of the forearm, just like you did with the hind legs. This point can be harder to find than the hind legs, but if you twist the leg, you’ll easily see the connection point. Slip the knife in there and cut it off as you did before. Flip the fox over and treat the other leg the same way.
Arrived at the neck, skin all round until you arrive at the base of the skull; you will then become aware of two cartilaginous bodies standing up one on each side — these are the ears. Having skinned a little on top of these, with your finger and thumb raise them slightly and cut them away from their attachment at their bases.
Arrive at the neck, skin all around until you reach the base of the skull; you'll then notice two cartilaginous bodies standing out on each side — these are the ears. After removing a bit of skin on top of them, use your fingers to lift them slightly and cut them away from their attachments at the bases.
Having freed both ears carefully, skin on the top of the head and the side of the face, until, at about two and a half inches from the ear, and in a line with it, you find the eye, which holds by a thin membrane at this point; carefully skin on the top until the eyeball shows through, and very carefully free it from its attachment all round, except at its lower angle, i.e., that nearest the nose; do the same with the other. Now skin a little more by the side of the jaw until you find it firmly held by a return angle of skin; there leave it attached. Turning the under jaw exactly uppermost, skin along the bone toward the lip as far as you can get, not, however, entirely relieving it from the jawbone at the side, but only until a thin blue membrane appears, which take care not to cut through; this is inside of the skin which comes between the lower lip and the teeth.
Having carefully removed the skin around both ears, and along the top of the head and the sides of the face, you will find the eye about two and a half inches from the ear, aligned with it. The eye is held by a thin membrane at this point; carefully skin the top until the eyeball is visible and gently free it from all attachments around the edges, except for the lower angle, meaning the part closest to the nose; do the same for the other eye. Next, remove a bit more skin along the side of the jaw until you find it firmly held by a returning angle of skin; leave that attached. Turning the lower jaw upwards, skin along the bone towards the lip as far as you can go, but do not completely detach it from the jawbone on the side—stop when a thin blue membrane appears, and be careful not to cut through it; this membrane is the inside of the skin between the lower lip and the teeth.
The fox's skin is now held to the body at five points, viz., the lower corners of each eye, two; at each return of the jaw just underneath, two more; and at the point of the junction of the two lower jawbones close to the under lip. Procure a saw and saw the head off, so as to expose the brain. On reaching the flesh under the jaw, slip the knife up between on each side of the jaw, which will have the effect of pulling out the tongue attached to the body; preserve the tongue for further operations. With a small chopper, or a mallet and chisel, cut away part of the bone by the palate, between which and the skull bones the brains are included. This considerably assists the removal of the brain.
The fox's skin is now attached to the body at five points: the lower corners of each eye (two points), at the jawline just below (two more points), and at the joining of the two lower jawbones near the under lip. Get a saw and cut off the head to expose the brain. Once you reach the flesh under the jaw, slide the knife up on each side of the jaw, which will pull the tongue attached to the body; set aside the tongue for later use. With a small chopper or a mallet and chisel, remove part of the bone by the palate, which is between the palate and the skull bones that hold the brains. This makes it much easier to take out the brain.
A large quantity of flesh still remains at the top of the head, which must be cleanly removed, and the eyeballs taken out. You will then find just underneath the eye a bony ridge, running backward to the base of the skull. Surrounding this is a pad of flesh, which hides the attachment of the lower jaw with the upper. By digging underneath with the point of the knife you remove all this flesh, taking care, however, not to cut the attachments of the skin close by, which you previously left, nor the ligaments which hold the upper to the lower jaw. Both sides being served in the same manner, the skull presents a tolerably clean appearance.
A large amount of flesh still remains on the top of the head, which needs to be carefully removed, along with the eyeballs. Right below the eye, you'll notice a bony ridge that extends back to the base of the skull. Surrounding this ridge is a chunk of flesh that covers where the lower jaw connects to the upper jaw. By using the tip of your knife to dig underneath, you can take out all this flesh, being careful not to cut the nearby skin attachments that you left earlier, or the ligaments that connect the upper and lower jaws. After both sides are treated the same way, the skull should look relatively clean.
The ears are now nearest to the operator. (You will recollect they have been cut off inside). All you can see of them, however, are two shapeless masses of gristle surrounding a small hole. On the sides of each — farthest from the head — you must begin cautiously skinning, and by pushing your left hand through the aperture of the skin of the body, assist this with your finger and thumb, pushed into the ear from the outside, until by skilfully working with the knife and left-hand fingers you turn the inside skin of each ear to its very edge and tip, until, in fact, each stands up inside the skin, completely reversed.
The ears are now closest to the operator. (You’ll remember they were cut off inside.) However, all you can see are two shapeless pieces of cartilage surrounding a small hole. On the sides of each—farthest from the head—you need to start carefully skinning, and by pushing your left hand through the opening in the body’s skin, help this with your finger and thumb pushed into the ear from the outside, until by skillfully using the knife and your left-hand fingers you turn the inside skin of each ear to its very edge and tip, until, in fact, each stands up inside the skin, completely reversed.
The next thing which engages your attention is the near fore leg, which you skin as far as you can go, in this instance to the next joint, the one above the carpus or wrist joint. Repeat this with all the limbs, in each case removing all the flesh from the two bones (the radius and ulna of the fore limbs and the tibia and fibula of the hind), which together form those parts of the bones you leave in. If not done previously, now is the time to remove the tail bone. Finally, rub every part of the skin on its inside, as also all the bones left in, with the preservative recommended for mammals (No. 9), not forgetting to push some up the hollow of the brush where the tail bone has been.
The next thing to focus on is the front leg, which you skin as far as possible, in this case to the next joint, just above the carpus or wrist joint. Do this for all the limbs, making sure to remove all the flesh from the two bones (the radius and ulna of the front limbs and the tibia and fibula of the back), which together form the parts of the bones that you leave in. If you haven't done it already, now is the time to remove the tailbone. Finally, rub every part of the skin on the inside, as well as all the bones left in, with the preservative recommended for mammals (No. 9), remembering to push some into the hollow of the brush where the tailbone has been.
Turn your fox's skin completely inside out, skull, leg bones and all, until it comes to its normal position. Commence now from the pad of each foot, and make an incision from near the toes to the point where you left off. Skin round carefully and as much underneath as possible, so as to expose all the flesh and sinews, which clear from off the bone. Be sure to push your knife well round on the top of the bones, which you may do by feeling with the knife and keeping the pad uppermost. This is for the purpose of freeing the attachment of skin around, to prevent ultimate shrivelling.
Turn your fox's skin completely inside out, including the skull and leg bones, until it returns to its normal position. Start from the pad of each foot and make a cut from near the toes to where you left off. Carefully skin around and as much underneath as you can to expose all the flesh and sinews, removing them from the bone. Be sure to guide your knife around the top of the bones by feeling with the knife while keeping the pad facing up. This is to ensure you detach the skin properly to prevent it from shriveling later.
You may get nearly to the points of the toes in this manner, the only places it should hold to the bone being the top of the last joint and at the tips of the toes; the actual pad, which you will find loaded with a thick fat, must be trimmed as well as possible.
You can get almost to the tips of the toes this way, with the only areas that should touch the bone being the top of the last joint and the tips of the toes; the actual pad, which you’ll find packed with thick fat, needs to be trimmed as closely as possible.
Whilst doing all this take notice of the points of attachment and shapes of sinews, etc.., which you remove, especially those of the hind legs.
While doing all this, pay attention to the points of attachment and shapes of tendons, etc., that you remove, especially those of the hind legs.
It will be recollected that although we have returned the head, nothing has been done to the upper lip or nose from the outside. Accordingly the knife must be slipped the whole way round, beginning at the nose and keeping as close to the teeth as possible, in fact, on the very edges of the gums. This is important. Skin away now from the bone of the upper jaw on each side; having bared this, come back to the nose, the cartilage of which skin until you arrive at the extreme tip; in point of fact, skin it entirely out, which is best done by cutting a portion off inside, and then carefully skinning the little bit which is left until the extreme tip of the nostrils is arrived at. This requires great care, as the black skin on the top of the nose is extremely thin. This is the very worst place in which a cut could be made; and, although the cutting out of the nose could be done in five minutes, the tyro will do well if he completes it in half an hour.
It should be remembered that even though we've reattached the head, nothing has been done to the upper lip or nose from the outside. So, the knife needs to be carefully run all the way around, starting at the nose and staying as close to the teeth as possible, right along the edges of the gums. This is crucial. Now, remove the skin from the bone of the upper jaw on both sides; once that’s done, go back to the nose and remove the skin from the cartilage until you reach the very tip. In fact, skin it completely, which is easiest to do by cutting a piece from the inside and then carefully removing the remaining bit until you get to the very tips of the nostrils. This requires a lot of care, as the thin skin on top of the nose is very delicate. This is the worst area to make a cut; while a skilled person could remove the nose in five minutes, a beginner should aim to finish it in half an hour.
This being satisfactorily ended, free the flesh from the bone, except at the attachment previously left at the corner of the eye. There is now a smooth and shiny skin between the upper lip and the cut you made to free it from the gums; this is the inner skin of the lips; the knife must, therefore, be slipped between this skin and the outer skin, and it must then be carefully separated the whole of the way round, to the extreme edge of the upper lip; this requires nice manipulation and great care. This inner skin now hangs down from the inner lip, and forms a bag, the uses of which will be seen hereafter.
This part done, detach the flesh from the bone, except at the connection left at the corner of the eye. There’s now a smooth and shiny layer of skin between the upper lip and the cut made to release it from the gums; this is the inner skin of the lips. Therefore, you need to slide the knife between this inner skin and the outer skin, and then carefully separate it all the way around, to the very edge of the upper lip; this takes precise handling and great care. This inner skin now hangs down from the inner lip and forms a pouch, the purpose of which will be explained later.
There still remains the inside of the bone of the nose to be cleaned out with a pointed knife. The lower lip is now attached only at the extreme tip; this must be cut away from the gum at that place and the knife pushed underneath, by the side of the canine teeth, to still further free the skin.
There’s still the inside of the nasal bone that needs to be cleaned out with a pointed knife. The lower lip is now only attached at the very tip; this needs to be cut away from the gum there, and the knife should be pushed underneath, next to the canine teeth, to further free the skin.
The skin is now ready for stuffing, when you have thoroughly rubbed the preservative into the cut of the pads, and around the eyelids, outside the ears, mouth, nose, and vent, or any damaged parts. If the skin is allowed to remain for a night as it is, it will be all the better, as it allows time for the preservative to penetrate. Throw the tongue into a pickle of tannin and carbolic acid (see chapter IV, No. 15), and there leave it until wanted.
The skin is now ready for stuffing once you've thoroughly rubbed the preservative into the cuts of the pads and around the eyelids, outside the ears, mouth, nose, and vent, or any damaged areas. If you let the skin sit overnight as it is, it will be even better, as this gives the preservative time to soak in. Put the tongue in a mixture of tannin and carbolic acid (see chapter IV, No. 15), and leave it there until needed.
It will no doubt have been observed that I have used several tools not previously mentioned as necessaries; my reason is that I assume no one who aspires to become an amateur workman fails to provide himself with such everyday implements as saw, chisel, chopper, hammer, pincers, rule, etc.., the only tool not in ordinary use being the "callipers," which are made of various patterns, and are used to take measurements of breadths and depths in situations where the foot rule is useless, such as spherical and cylindrical bodies. The price of a pair of callipers need not exceed 1s.
It’s probably been noticed that I’ve included several tools that I didn’t mention before as essentials; the reason is that I assume anyone wanting to be a DIY enthusiast will definitely have everyday tools like a saw, chisel, cutter, hammer, pliers, ruler, etc. The only tool that isn’t commonly used is the “calipers,” which come in different designs and are used to measure widths and depths in places where a ruler isn’t practical, such as on round or cylindrical objects. A pair of calipers shouldn’t cost more than 1 shilling.
When the skin is sufficiently penetrated with the preservative, lay it on its back ready for stuffing. First take hold of the bone of the nose and push the skull into the skin, so that it comes through the orifice of the skin of the body. The back of the skull being now toward you, proceed to push tow into the cavity whence the brains were removed, also in the cavity of each orbit, between the articulations of the jaws at the sides of the face, and the lower jaw — in fact, everywhere where the flesh has been removed, forming it as well as you possibly can to the shape which existed previously.
When the skin is thoroughly treated with the preservative, place it on its back, ready for stuffing. First, grasp the nose bone and push the skull into the skin so that it comes through the opening in the body skin. With the back of the skull facing you, proceed to pack tow into the cavity where the brain was taken out, as well as into each eye socket, between the joints of the jaws on the sides of the face, and in the lower jaw—in fact, everywhere the flesh has been removed, shaping it as closely as possible to its original form.
When you have modelled this as well as the nature of the tow will allow, return the head through the skin to its first position. Next cut four strong wires of suitable size, one a little stronger than the others and somewhat longer than the whole of your skin, including brush. Point this wire at one end and make two loops in it (each similar to that in Fig. 1); one loop to occur about 4 in. from the tail, and the other up in the chest, near the junction of the fore limbs. Spread a sufficient quantity of tow inside the skin to run all the way along the back and up the neck to join the head. Enter the point of the wire through the orifice of the skin, push it up the lower jaw into the hollow part of the skull, and holding the head in the left hand, calculate so that the wire may come through the skin at about the centre of the head, about 1.5 in. from, and above each eye.
When you have shaped this as much as the material allows, bring the head back through the skin to its original position. Then cut four strong wires of appropriate size, one slightly stronger and longer than the entire skin, including the brush. Sharpen one end of this wire and create two loops in it (similar to the one in Fig. 1); one loop should be about 4 inches from the tail, and the other should be near the top of the chest, close to where the front limbs meet. Fill the inside of the skin with enough tow to run along the back and up the neck to connect with the head. Insert the sharpened end of the wire through the opening in the skin, pushing it up through the lower jaw into the hollow of the skull. While holding the head in your left hand, adjust so that the wire comes through the skin roughly at the center of the head, about 1.5 inches from and above each eye.
Bear in mind that the skull being somewhat thick, it is the more necessary for your wire to have cutting edges, as before explained. Having pushed the wire through three or four inches, cut off the point with your large pliers (Fig. 16) to prevent injuring yourself, turning down the remainder to prevent the wire pulling through again. Push the other end of the wire right up the brush, to do which you must bend it back on itself about halfway up, straightening up as you proceed.
Bear in mind that the skull is a bit thick, so it's even more important for your wire to have cutting edges, as mentioned earlier. After pushing the wire through about three or four inches, cut off the tip with your large pliers (Fig. 16) to avoid hurting yourself, and bend the remaining part down to stop the wire from pulling through again. Push the other end of the wire all the way up the brush; to do this, you'll need to bend it back on itself about halfway up, straightening it out as you go.
Next take four wires, somewhat longer than the legs, and pointed at each end. Push one of these right up the foot in at the pad, along the back of the leg, and up into the body, pushing it through its proper loop on the body wire, and twisting it round and round the same with your pliers until it is firmly attached. Fill the cut pad with chopped tow, and nicely sew it up to its normal shape. Do the same with the three remaining limbs. You should be able now to lift the fox by any one of the leg wires, and find it support the remainder.
Next, take four wires that are a bit longer than the legs, with pointed ends. Push one of these all the way up the foot through the pad, along the back of the leg, and into the body, pushing it through its proper loop on the body wire and twisting it tightly with your pliers until it’s securely attached. Fill the cut pad with chopped tow, and sew it up nicely to its normal shape. Do the same with the three remaining limbs. You should now be able to lift the fox by any of the leg wires and have it support the rest of the body.
Having by this time determined the shape which the fox shall assume — that is to say, if standing, running, or springing on its prey — commence by gradually filling up the neck with suitable pieces of tow, bending the head and neck as you wish; in point of fact, shaping as you go on. Next work down the chest, and then fill up the skin of the limbs with smaller pieces of tow, endeavouring to keep to the characteristic shapes of the thin and thick parts (various stuffing irons of different degrees of thickness will have to be used during the process). Having filled up the fore limbs, bend them to their required position and go to the hind, disregarding the body for the present.
Having decided on the pose for the fox—whether it will be standing, running, or leaping at its prey—start by gradually filling the neck with appropriate pieces of tow, adjusting the head and neck as needed; in fact, shaping as you go. Next, work on the chest, and then fill the skin of the limbs with smaller pieces of tow, trying to maintain the distinctive shapes of the thin and thick parts (you'll need to use different sizes of stuffing tools throughout the process). Once the forelimbs are stuffed, bend them into position and move on to the hind limbs, leaving the body for now.
The hind limbs have more character in them than the fore, and are, in consequence, harder to model; be the more careful, therefore, to pay particular attention to the proper development of these limbs, bending them into shape during work, and keeping the thighs nice and thin, and distinct from the body. All the limbs being shaped, model up the various parts of the body, not getting it like a sack, as is too frequently the case, but producing those fine flowing lines which are so necessary to ensure the perfect model of a zoological specimen. Lift your work up from time to time, noting where inequalities appear.
The back legs have more character than the front ones, so they're harder to shape. Be especially careful to focus on developing these limbs properly, bending them into shape as you work, and keeping the thighs nice and slim, distinct from the body. Once all the limbs are shaped, work on the different parts of the body, avoiding making it look like a sack, which happens too often. Instead, aim for those smooth, flowing lines that are essential for creating a perfect zoological model. Occasionally lift your work to check for any unevenness.
The fox being now fairly well shaped, sew it up with a three-cornered skin (or glover's) needle and string. A board is now to be procured, of the necessary length and thickness, in which holes are to be bored to receive the leg wires, which are then clenched underneath. This operation, no doubt, will knock the specimen somewhat out of shape, which, of course, is easily remedied, and having brought up the limbs to their proper position, you will now address yourself to the formation of the head and face.
The fox is now properly shaped, so sew it up using a triangular skin needle and string. Next, you need to get a board of the right length and thickness, and drill holes to hold the leg wires, which are then secured underneath. This step will likely slightly distort the specimen, but that's easy to fix. Once you've adjusted the limbs to their correct position, you can start working on shaping the head and face.
This latter will possess but little expression, owing to the nose, etc.., being cut out. To remedy this procure a cork, which push into the cavity whence the cartilage of the nose has been removed, roughly shaping it, and covering it over with a pad of putty, pushing some also into the skin of the nostrils at the same time. The inner skin of the lips is still hanging down as a bag. Fill this up with sufficient putty to allow for shrinking, sewing it to the outer skin.
This latter will have little expression since the nose and other parts are cut out. To fix this, get a cork and push it into the space where the cartilage of the nose has been taken out, roughly shaping it and covering it with a pad of putty. Also, push some putty into the skin of the nostrils at the same time. The inner skin of the lips is still hanging down like a bag. Fill this with enough putty to account for shrinkage and sew it to the outer skin.
The lips may now be adjusted in position by sewing the upper to the under, if the fox is to be shown with a closed mouth, or by driving in "needle points" in various positions, if the mouth is to be open, until these parts set. Fill in the orbits with putty, attending to the eyebrows, reproducing the various muscles underneath, and insert the artificial eyes. All that now remains to be done is to push two pointed wires down the back of the ears, and run them along each edge, finally pushing them in the skin of the head, where required; the two loose ends being twisted together at the top keep the ears in position.
The lips can now be adjusted by sewing the upper lips to the lower ones if the fox is meant to be displayed with a closed mouth, or by driving in "needle points" in different positions if the mouth is to be open, until these parts set. Fill the eye sockets with putty, paying attention to the eyebrows and recreating the underlying muscles, then insert the artificial eyes. The last step is to push two pointed wires down the back of the ears and run them along the edges, finally pushing them into the skin of the head as needed; twisting the two loose ends together at the top will keep the ears in place.
The tongue, if intended to be shown, must be removed from the pickle, cut on its under side, and skinned completely out to the tips and to each edge. All the included flesh must then be cut away, and replaced with putty, the cut sewn up, and it is then ready to be inserted in the mouth in the required position, when modelled into shape.
The tongue, when meant to be displayed, should be taken out of the brine, sliced underneath, and completely skinned down to the tips and edges. All the excess flesh has to be trimmed off, filled with putty, sewn up, and it's then ready to be placed in the mouth in the desired position, when molded into shape.
The animal being stuffed and mounted to your satisfaction, you must bear in mind, that although you have perfectly cured the skin — turning it, in fact, into a species of leather — you have not rendered it proof against the attacks of insects; it must, therefore, be washed over with one of the preparations given in Chapter IV.
The animal being stuffed and mounted to your satisfaction, you must remember that although you have successfully cured the skin—essentially turning it into a type of leather—you haven't made it insect-proof; it must, therefore, be treated with one of the preparations mentioned in Chapter IV.
The preceding method of skinning and stuffing an animal is given, not because it is the most scientific, but because it is the most satisfactory to the learner, and is, indeed, the method which obtains with the majority of taxidermists. Though perfectly efficient as far as it goes, it yet possesses the disadvantage of allowing a certain percentage of shrinkage, and that caused solely by the yielding nature of the tow used to fill out the places where the muscles formerly rested. To an educated eye this defect is at once recognised by the uneven contour of the cheeks, superciliary muscles, and various parts of the limbs, and also by the generally "wooden" appearance of the specimen.
The previous method of skinning and stuffing an animal is provided, not because it’s the most scientific, but because it’s the most satisfying for the learner, and it’s also the method most commonly used by taxidermists. While it’s quite effective for its purpose, it has the downside of allowing a certain amount of shrinkage, which is primarily due to the soft material used to fill in the areas where the muscles used to be. To a trained eye, this flaw is immediately noticeable because of the uneven shape of the cheeks, forehead muscles, and different parts of the limbs, as well as the overall "wooden" look of the specimen.
The system on which I will now give a lesson is far more tedious in its application, but certain in its effects, being, in fact, substituting hard for loose stuffing, and differing from the foregoing in one essential particular, viz., the modelling of the head and limbs with a medium of an unyielding nature. To illustrate this, we will take another fox or similar animal. After skinning it, as in the foregoing lesson, you will, instead of leaving the leg bones in the skin, cut them completely out down to the claws, which may best be done by skinning down as far as you can, cutting the bones off at the last joint, then making an incision above the pads, and slipping the bones completely out; this allows you to work right down to the last joint of the phalanges or toes, at which point you cut the bones free.
The method I'm about to teach is a bit more complicated to apply, but the results are reliable. It effectively replaces soft stuffing with something more rigid and differs from the previous method in one key way: the shaping of the head and limbs using a stiff material. To illustrate this, let's use another fox or a similar animal. After skinning it, as in the previous lesson, you'll want to remove the leg bones entirely instead of leaving them in the skin. Do this by skinning down as far as you can, cutting the bones off at the last joint, then making a cut above the pads and easing the bones out completely. This way, you can reach all the way down to the last joint of the toes, where you will cut the bones free.
The head is now to be considered. When it has been cut off as before, skin down to the eyelids, and instead of leaving them attached at the lower angles, cut them completely away. Now take the skin off all round the skull, until the return of the skin of the side of the mouth is arrived at. Skin well under the jaw to the very tip, and now begin under-cutting at the sides, coming up to the return angle — keeping, however, well to the side of the skin. By cautious working you can skin in between the inner and outer skins until you can touch the tips of the lower teeth at the point of the jaw with your fingers.
The head is now to be addressed. Once it’s been removed as before, peel the skin down to the eyelids, and instead of leaving them connected at the lower corners, cut them off completely. Next, remove the skin all around the skull until you reach the point where the skin returns to the sides of the mouth. Ensure to skin well under the jaw all the way to the tip, and then start under-cutting at the sides, working your way up to the return angle—making sure to stay close to the side of the skin. With careful handling, you can work between the inner and outer skins until you can reach the tips of the lower teeth at the jaw's point with your fingers.
Coming along from here by the side of the lower jaw, you skin by undercutting almost to the inside of the mouth, taking care not to cut the thin membrane which holds at the extreme edge. Still working along the lower jaw, come right up until you can cut out, just under the eye, the top end of the return. Leaving it attached by a thin membrane 'to the upper jaw, skin downward toward the nose, and, by undercutting and using great care, completely skin up to the nostril, which sever. Do precisely the same with the other side. The nostrils being completely skinned out, the skin holds just below them.
Coming from here along the side of the lower jaw, carefully skin by undercutting almost to the inside of the mouth, making sure not to cut the thin membrane at the very edge. Continuing along the lower jaw, go right up until you can cut out, just under the eye, the top end of the return. Leave it attached to the upper jaw by a thin membrane, then skin downward toward the nose, and with careful undercutting, completely skin up to the nostril, which you should sever. Do the exact same thing on the other side. With the nostrils fully skinned out, the skin remains just below them.
Place the head on the table, standing on the base of its skull, the ears toward you. Take the nostrils with the finger and thumb of the left hand, and with the knife (the broad knife will be found most useful here) very carefully work all round until you arrive at the extreme tip of the inner skin of the upper jaw, which is now turned inside out, and actually rests below the under jaw. Your cuts must be made a hair's breadth at a time to get to the extreme edge. By this time the severed nostrils will have fallen some little distance underneath the under jaw. See, now, that the lips, both upper and lower, as well as the inner angles of the mouth, are skinned inside to the extreme edge at every point, or all your labour will be thrown away. This operation is one of the most nice and difficult in the whole range of skinning operations, and is equally difficult to describe. Cut out the cartilage of the nose, slip out the tongue, and generally trim the head in the usual manner, and well rub in the preservative. If you should find too much of the inner angle left far up in the mouth it may be cut off.
Place the head on the table, with the base of the skull facing down and the ears toward you. Use the fingers and thumb of your left hand to hold the nostrils, and with a knife (a broad knife works best here), carefully cut all around until you reach the very tip of the inner skin of the upper jaw, which will now be turned inside out and resting below the lower jaw. Make your cuts as thin as possible to reach the edge. By this point, the severed nostrils will have dropped a bit below the lower jaw. Ensure that the lips—both upper and lower—as well as the inner corners of the mouth, are skinned right up to the edge at every point, or all your work will be wasted. This step is one of the trickiest and most challenging in the entire skinning process, and it's equally hard to explain. Remove the cartilage from the nose, take out the tongue, and generally trim the head as you normally would, thoroughly rubbing in the preservative. If you notice too much of the inner corner left high up in the mouth, you can trim it away.
If the head were returned now it would be seen that the lower edges of the inside skin of the mouth were the only points of attachment, and even there only to the edge of the teeth all around them.
If the head were returned now, it would be clear that the only points of attachment were the lower edges of the inner skin of the mouth, and even there, only to the edge of the teeth all around.
The skull bone being now only attached to the subject, literally by the "skin of its teeth," you have the whole bone exposed to work on.
The skull bone is now only connected to the person, literally by the "skin of its teeth," so you have the entire bone exposed to work on.
Fill up the orbits and hollow bone of the nose with any loose pieces of peat, to give solidity to the next operation, which is, to cut pieces of peat in an artistic manner to represent the flesh of the cheeks, the chin, the top of the head, and the cartilage of the nose. When the whole of these pieces are shaped to their required measurements, attach them by string or wire to their neighbouring bones in the manner which occurs to you as being the best. Having well secured them, go over the whole with plaster of Paris, mixed with water to the consistence of a stiff paste, merely smoothing it as it sets, up to the required shape with a broad knife. The plaster will soon set, and may be further rasped or trimmed into shape. Plaster alone may be used, but my reason for making a substratum of peat is, that if the former only is used it renders the head unpleasantly heavy.
Fill the orbits and hollow spaces of the nose with any loose pieces of peat to give stability for the next step, which is to cut pieces of peat artistically to represent the flesh of the cheeks, the chin, the top of the head, and the cartilage of the nose. Once all these pieces are shaped to the necessary measurements, attach them by string or wire to the neighboring bones in whatever way you think works best. After securing them well, cover the entire structure with plaster of Paris mixed with water to the consistency of a thick paste, smoothing it as it sets to achieve the desired shape with a broad knife. The plaster will set quickly and can be further rasped or trimmed into shape. You can use plaster alone, but my reason for using a base of peat is that if only plaster is used, it makes the head uncomfortably heavy.
The great advantage which this system has over the former is that, by the unyielding nature of the medium, nothing can possibly shrink or shift, and though this plan is, perhaps, more tedious, and certainly requires more skill in its execution, yet it is, as a matter of course, far preferable than trusting to tow alone for the formation of the head.
The major benefit of this system compared to the previous one is that, because the medium is rigid, nothing can shrink or move around. While this method may be more tedious and definitely demands more skill to carry out, it's generally much better than relying solely on tow to shape the head.
Finally, place some putty or clay in the ears, nose, and around the skin of the lips, and pull the mask over the model.
Finally, put some putty or clay in the ears, nose, and around the lips, then pull the mask over the model.
Pad the body, and put in the central body wire as before, also the leg wires, but in this system you add another, but thinner, wire to come up the back of each of the fore legs and the front of the hind, not attaching these wires, however, to any point, but letting them come up into the body, and merely wrapping them with tow to the large leg wires in the necessary manner. This second wire partly supplies the place of the small bone and muscles of each leg, and its natural appearance is considerably enhanced by the application of putty or clay to pad parts of the animal's legs and feet. Being of a yielding nature, until dry, putty or clay may be squeezed and moulded into proper shape to give character to the various parts. In the return of the sinews of the legs, make their peculiar, hollow appearance by stitching through from side to side. Wrinkles of the neck, etc.., may be treated in the same manner. Finish as before directed.
Pad the body and insert the central body wire as before, along with the leg wires. In this system, you also add another thinner wire that rises up the back of each foreleg and the front of each hind leg. However, don't attach these wires to any point; instead, let them extend into the body and simply wrap them with tow around the large leg wires as needed. This second wire partially replaces the small bones and muscles of each leg, and its natural appearance is greatly improved by applying putty or clay to pad parts of the animal's legs and feet. Since putty or clay is pliable until dry, it can be squeezed and shaped to give character to the various parts. To create the distinct hollow appearance of the sinews in the legs, stitch from side to side. You can treat wrinkles in the neck and other areas in the same way. Finish as previously instructed.
No shrinking can possibly take place in the most important parts; hence the manifest advantages of this system; but as in practice it requires some knowledge and experience, I have not ventured to insist upon it previously, as it is too much to expect a tyro to take it up until he is thoroughly grounded in the first system. An amateur, however, who can skin and stuff fairly may try this, and I am positive that he will succeed, and never again return to the "good old style" of loose stuffing.
No shrinking can happen in the most important areas; that's why this system has clear advantages. However, since it requires some knowledge and experience in practice, I haven't pushed it before, as it's unrealistic to expect a beginner to adopt it until they're fully familiar with the first system. That said, an amateur who can skin and stuff reasonably well can give this a try, and I'm confident they will succeed and never want to go back to the "good old style" of loose stuffing.
In cases where the animal (especially if small) is merely to be lying down, three wires will sometimes be found sufficient, namely, one long and strong body wire (with no loops) and two wires for the legs, one of which will be run in at the right fore leg and cross the body, and be pushed down the left hind leg and come out at the sole of the foot, the other wire then crosses it reversely. The body wire (having no loops) can be pushed in at the head through a hole previously made with a bradawl. Ears may be filled in with brown paper, cut to shape, instead of putty. Pieces of wood, peat, or clips of tin may be cut to the form of the ears, and used to block them to shape, from the outside.
In situations where the animal (especially if it's small) just needs to be lying down, three wires are often enough: one long and strong body wire (with no loops) and two wires for the legs. One of these will be inserted in the right foreleg, cross the body, and be pushed down the left hind leg, coming out at the sole of the foot; the other wire crosses in the opposite direction. The body wire (with no loops) can be inserted at the head through a hole made beforehand with a bradawl. Ears can be filled in with brown paper, cut to shape, instead of putty. Pieces of wood, peat, or tin clips can be cut to the shape of the ears and used to block them from the outside.
A third system is for the smaller horned heads, such as deer, goats, etc.., which are begun somewhat differently, but are afterwards treated in a similar manner. The usual way in which horned heads are skinned is to cut them under the throat right up to the jaw, turning the skin back, and then to skin upward to the horns. This, though perpetrated by people who ought to know better, is based on entirely false principles, for a head when finished being hung usually at some height, you have constantly before your eyes the hideous spectacle of a chain of stitches (which no art can successfully hide) running up the throat and under the chin.
A third system is for smaller horned heads, like those of deer, goats, etc., which start off a bit differently but are then handled in a similar way. The usual technique for skinning horned heads involves cutting under the throat all the way up to the jaw, pulling the skin back, and then skinning upward toward the horns. This method, used by people who should know better, is based on completely incorrect principles, because when the head is finished and hung at some height, you’re left with the unpleasant sight of a row of stitches (which no skill can effectively hide) running up the throat and under the chin.
The buck's or goat's head, being, perhaps, the most easily obtained, I will take one as an example. Make an incision exactly on the top of the head, running from the back of the neck to just behind the horns; then make two cross cuts up to their seats or "burrs," and, pushing your knife down at the side of the nearest horn, cut the skin entirely away, keeping as close to the horn as possible — in fact, shaving its edge. When you arrive just above the eye, while doing this, you will find the ear hold back the skin considerably. Skin it as much as possible on the top, and, putting your finger underneath, cut it out as usual. Now you can work all round the horn to join the cut at the back. Do the same with the other horn and side, skinning away round the neck to the under jaw and sides of the face until you find the skin of each eyelid holds. Skin this completely off, not leaving it attached anywhere, as also the skin on the forehead where it holds. Continue and finish in the same manner as the fox's head.
The head of the buck or goat, being probably the easiest to get, will serve as an example. Start by making an incision right on top of the head, extending from the back of the neck to just behind the horns; then make two cross cuts up to their bases, or "burrs," and, pushing your knife down beside the nearest horn, cut the skin away entirely, staying as close to the horn as possible — basically, shaving its edge. When you get just above the eye while doing this, you'll notice the ear pulls back the skin quite a bit. Skin it as much as you can on top, and then, putting your finger underneath, cut it out as usual. Now you can work all around the horn to connect the cut at the back. Do the same for the other horn and side, skinning around the neck to the jaw and sides of the face until you find the skin of each eyelid is still attached. Remove this completely, ensuring it’s not left attached anywhere, as well as the skin on the forehead where it connects. Keep going and finish in the same way as the fox's head.
The skins of the heads of bulls, large stags, tigers, etc.., are best taken completely off the bone, and the inside of the lips, nostrils, eyelids, etc.., afterwards skinned out and well cured; the skull-bone may then be plunged in a copper full of water and boiled out; this saves considerable labour, and also gets the skulls nicely cleaned and free from grease.
The skins of bull, deer, tiger, and similar heads should be completely removed from the bone, and then the insides of the lips, nostrils, eyelids, etc., should be carefully skinned and properly cured. The skull can then be submerged in a pot of water and boiled; this saves a lot of work and results in clean, grease-free skulls.
The plan of taking the skin entirely off the head will be found of the utmost advantage to explorers or collectors in foreign countries, as the skulls may be numbered and a corresponding number scratched on a tin, or written on a parchment label, which may be tied through the eyehole of the skin. The skulls being left loose, their skins may be packed in barrels, and if well rubbed in with my preservative (No. 9), and looked at occasionally to prevent mildew, they will, after the lapse of many years, only need relaxing to make perfect specimens. The usual way of sending horned heads home from abroad is to leave the skins attached to the skull, and the consequence is, that at the various points of attachment the skin is improperly cured (often with the — worse than — useless arsenic), and if they escape the inevitable knocking about they receive in travelling, and get to England in fair condition, the hair, when the skin is relaxed, sweats off, particularly at the very places it should not, around the eyes, lips, nose, and ears, and the labour of, perhaps, years of anxious collecting and dangerous hunting is nullified.
The method of completely removing the skin from the head will be extremely beneficial for explorers or collectors in foreign countries because the skulls can be numbered and a matching number can be scratched onto a tin or written on a parchment label that can be tied through the eyehole of the skin. With the skulls left loose, their skins can be packed in barrels, and if they are well treated with my preservative (No. 9) and checked occasionally to prevent mildew, they will only need to be relaxed to become perfect specimens after many years. The usual way of sending horned heads home from abroad is to leave the skins attached to the skull, which leads to the skin being improperly cured at the various attachment points (often with worse-than-useless arsenic), and if they avoid the inevitable rough handling they encounter during travel and arrive in England in decent condition, the hair tends to sweat off when the skin is relaxed, especially in the critical areas like the eyes, lips, nose, and ears. This ruins the hard work of possibly years spent collecting and hunting in dangerous situations.
 Fig. 26
I will now take a bull's head as our subject, to illustrate the method of mounting such heads. I will assume that a fair piece of neck is attached to the head, and having skinned the head completely off the skull and preserved it, proceed as follows: When the bone is sufficiently trimmed, should the meat have been cut off, or dry, if the head has been previously boiled, tie together the upper and the lower jaws at their points of articulation behind the eye, by the aid of wire or string; tie also the tip of the lower jaw to the nose in any manner that allows the teeth to come in their proper position as in nature.
I will now use a bull's head as our example to show how to mount such heads. I’ll assume there's a decent piece of neck attached to the head, and after completely skinning the head from the skull and preserving it, I’ll proceed as follows: Once the bone is trimmed enough, if the meat has been removed or is dry from the head being boiled earlier, tie the upper and lower jaws together at their hinges behind the eye using wire or string. Also, tie the tip of the lower jaw to the nose in a way that positions the teeth naturally.
Attention to this point will give you a guide as to the length of the model. The jaws being now rigidly fixed, lay the head down for a while, and getting a piece of inch deal of suitable length, saw it to the shape shown in Fig. 26, which also shows the method of attachment.
Attention to this point will give you a guide for the length of the model. With the jaws now firmly fixed, lay the head down for a moment, and take a piece of inch board of suitable length, cutting it to the shape shown in Fig. 26, which also demonstrates the method of attachment.
Insert the part marked A inside the head up to the return B; this being inserted exactly in the middle of the skull, bore two or more holes through the latter at the forehead, and make fast the bone to the wood by strong screws. Block on each side of this board and inside the jaws with pieces of peat nailed on with "French nails" (Points-de-Paris) or pieces of pointed wire. At the place marked B (A to B being now hidden) make up with wet plaster of Paris, which, while filling up, serves also to steady the prop. Fill up the orbits with any pieces of loose peat, paper, etc.. Now carve a large piece of peat for each side, cut to the shape of the cheeks, and attach them to the jaw bones in their proper positions with wires driven right through into the board, fill also the bone of the nose with peat roughly cut to shape. Cut another piece of peat for the swelling of the under jaw, and entirely model up with peat the front and sides of the neck.
Insert the part marked A inside the head up to the return B; this should be placed exactly in the middle of the skull, creating two or more holes through it at the forehead, and securely fastening the bone to the wood with strong screws. Block on each side of this board and inside the jaws with pieces of peat nailed on with "French nails" (Points-de-Paris) or pieces of pointed wire. At the spot marked B (with A to B now concealed), use wet plaster of Paris to fill in, which will also help stabilize the support. Fill the eye sockets with any loose peat, paper, etc. Now carve a large piece of peat for each side, shaped like the cheeks, and attach them to the jaw bones in their proper positions with wires driven directly through into the board, also fill the nasal bone with roughly shaped peat. Cut another piece of peat for the bulge of the lower jaw and completely shape the front and sides of the neck with peat.
Next mix some plaster of Paris, and go over the whole of the peat with it, bringing it up level to the bones, nicely smoothing it over with a knife, and, as it sets, adding more where required, or shaving it off if in excess — in short, replacing the flesh, where it has been removed, with peat and plaster. The front view should now present a somewhat even appearance; the nice swelling of the cheeks being well rounded off, as also under the jaws and on the top of the nose, etc..
Next, mix some plaster of Paris and spread it evenly over the entire area of peat, bringing it up to the level of the bones, smoothing it out nicely with a knife, and as it sets, add more where needed or shave it off if there's too much—in short, replacing the flesh that's been removed with peat and plaster. The front view should now look somewhat even, with the nice curves of the cheeks rounded off as well as underneath the jaw and on top of the nose, etc.
Now draw the skin nicely over the model, taking care especially to get the eye holes in their proper places around the orbits. This being a guide for the truth of that part of the head, drive two wires through the skin, into the bone above the orbits, to keep it in its place. Sew the hair in position round the horns. Being now qualified to judge as to the size of the neck-block, you will cut an oval, or rather egg-shaped, piece of wood, out of inch stuff, to the required size; this determines the breadth and length of the neck at the back. The head-block of Fig 26 being cut off along the dotted line D, it of course stands to reason that if the neck-board (Fig. 27) is screwed on to it along its centre, the head, if the board is placed against a wall, will now look downwards at the angle determined by the cutting of D.
Now stretch the skin neatly over the model, making sure to position the eye holes correctly around the eye sockets. As a guide for the accuracy of that part of the head, push two wires through the skin into the bone above the eye sockets to hold it in place. Sew the hair around the horns. Now that you can determine the size of the neck block, you'll cut out an oval, or rather egg-shaped, piece of wood from one-inch material to the required size; this will set the width and length of the neck at the back. With the head block of Fig 26 trimmed along the dotted line D, it’s clear that if the neck board (Fig. 27) is attached to it along its center, the head will look downward at an angle based on the cut at D when the board is placed against a wall.
Having firmly screwed the oval neck-block to the prop, or head-block, in such a manner that the top of the oval does not come above nor interfere with the modelling of the back of the head, fill the inside of the ears with putty, and also make up the back of the head and neck, with peat and plaster of Paris between the wood and the skull. Having previously cut the board somewhere near the dotted line E, the throat and neck will now claim your attention, and will require the nicest skill to show the various wrinkles, depressions, etc.., where they should occur. Putty or clay as a finish will be found of great service at this stage.
Having securely attached the oval neck-block to the prop, or head-block, in such a way that the top of the oval doesn’t extend above or interfere with the shaping of the back of the head, fill the inside of the ears with putty, and also fill in the back of the head and neck with peat and plaster of Paris between the wood and the skull. After cutting the board close to the dotted line E, the throat and neck will now need your focus, and will require careful skill to demonstrate the various wrinkles, indentations, etc., where they should appear. Putty or clay as a finishing touch will be very helpful at this stage.
 Fig. 27 —
Neck-board for skin of head.
Fig. 27 —
Neck-board for skin of head.Constantly turn the head to the light, to see how you are going on. If a horned head and heavy, many plans will occur to you for easily supporting it, such as ropes attached to the horns, and to a beam, etc.. When all the head and back of the neck is adjusted to your measurements, bring the skin over and around the edge of the oval to its back, attaching it firmly there with strong tacks.
Constantly turn your head towards the light to see how you're doing. If you have a horned head and it's heavy, you'll come up with many ideas for supporting it easily, like using ropes attached to the horns and to a beam, etc. Once the head and the back of the neck are adjusted to fit you, bring the skin over and around the edge of the oval to its back, attaching it securely there with strong tacks.
Nothing has as yet been done to the eyes, lips, or nose. Turn, therefore, the bags of the skin of the eyelids inside out, and, filling them with putty or clay, shape them and return. Fill up the orbits also with putty or clay to receive the eyes, packing up above and below them to show the various depressions and ridges. Turning the nose up, fill the nostrils and bag of the lips with putty or clay, being careful to show up all the wrinkles (the division in the chin, if one exists), and, in fine, generally modelling and filling out with putty or clay, of which you will use several pounds if you are working on a large head.
Nothing has been done yet to the eyes, lips, or nose. So, turn the bags of skin on the eyelids inside out, and fill them with putty or clay to shape them before putting them back. Also, fill the eye sockets with putty or clay to hold the eyes, packing above and below to highlight the different dips and ridges. Tilt the nose up and fill the nostrils and the lips with putty or clay, making sure to highlight all the wrinkles (including the line in the chin, if there is one), and generally mold and fill with putty or clay, which you’ll need several pounds of if you’re working on a large head.
Sew up the lips, or perhaps a better plan is to enter a skin needle, charged with strong string, in at the lower lip, and bring the string around wires driven in at the front and sides of the nose inside, pulling your string over from side to side, and making a final stitch in the most convenient situation. Nicely insert the eyes, bringing the upper lids over, so as not to give too staring an appearance to the animal, and hang the head up to dry by firmly attaching a very strong hook of wire to the oval block, or by a small rope tied round the horns at their base.
Sew up the lips, or maybe a better idea is to use a skin needle with strong thread to pierce the lower lip, then loop the thread around wires inserted at the front and sides of the nose, pulling the thread from side to side and making a final stitch in the best spot. Properly place the eyes by adjusting the upper lids to avoid making the animal look too wide-eyed, and then hang the head up to dry by securely attaching a strong wire hook to the oval block or by tying a small rope around the base of the horns.
Note that the horns of goats, antelopes, etc.., and bulls and cows are set on a bony core, and must come off to prevent an offensive effluvium. Placing the skull in a hot bed has been recommended, boiling will sometimes fetch the horns off, but it very often happens that nothing but time will loosen them. When this occurs wash the cores and horns with carbolic wash (No. 15).
Note that the horns of goats, antelopes, bulls, and cows are attached to a bony core and need to be removed to avoid an unpleasant smell. It's been suggested to place the skull in a hot bed, and boiling can sometimes get the horns off, but often, only time will loosen them. When this happens, wash the cores and horns with carbolic wash (No. 15).
The student may, if he likes, fill in the eyelids, bags of the upper and lower lips, and nostrils with putty or clay before drawing the skin on the head; but in this case he will have to sew the inner to the upper skins, in addition to which he will find many things occur in drawing on and shaping the skin to render most of his labour useless if these parts are modelled first instead of last.
The student can choose to fill in the eyelids, bags under the upper and lower lips, and nostrils with putty or clay before drawing the skin on the head; however, in this case, he will need to sew the inner skin to the upper skin. Additionally, he will discover that many issues arise when drawing and shaping the skin, making most of his work pointless if these areas are modeled first rather than last.
The following system, the fourth, differs from all the preceding in there being erected a sort of framework on which to mount the skin, and hence is in use only for large animals. As an illustration let us take the bear (which was the last large animal I caused to be set up by this method).
The fourth system is different from all the previous ones because it involves building a kind of framework to attach the skin, which is why it's only used for large animals. For example, let's consider the bear (which was the last large animal I had mounted using this method).
Skin as before, subsequently removing the leg bones and head, and modelling as in the second system, or working by the first method, according to your degree of proficiency. To do such an animal as a bear, however, you should remove all the bones of the legs, and skin to the toes, as directed in the second system, also removing the skull, and treating it and the skin of the head as before.
Skin as before, then take out the leg bones and head, and shape it using the second method, or follow the first method based on your skill level. To work on an animal like a bear, though, you need to remove all the leg bones and skin down to the toes, as specified in the second method. Also, take out the skull and handle it and the skin of the head as you did previously.
Procure now a piece of deal 2 in. square, and of the length which you wish your animal to assume when finished, calculating from the centre of the chest to the tail. In this wood fix a strong iron rod, or wire, at one end, by boring two holes through it at some distance apart, and pushing the end of the wire in at one hole, then beating it down and clenching it through the other.
Procure a piece of 2-inch square wood, cut to the length you want your animal to be when finished, measuring from the center of the chest to the tail. In this wood, secure a strong iron rod or wire at one end by drilling two holes through it a short distance apart. Push the end of the wire into one hole, then beat it down and secure it through the other hole.
The bar of wood now represents the backbone, and the wire the neck of the animal. Point the wire and push it up into the skull, which model up as before, binding tow round the wire underneath to roughly form a neck somewhat smaller than you intend it to be when finished. Pull the skin over this, and adjust it so that you may see the places on the wooden backbone where the fore and hind limbs will come. Having marked the position of these, pull back the skin up to the neck, and bore holes through the wood, at right angles to the other holes made for the neck wire.
The piece of wood now represents the backbone, and the wire represents the neck of the animal. Shape the wire into a point and insert it into the skull, just as you did before, tying some twine around the wire underneath to create a neck that's slightly smaller than what you want it to be when it's finished. Pull the skin over it and adjust it so you can see where the fore and hind limbs will go on the wooden backbone. Once you’ve marked those positions, pull the skin back up to the neck and drill holes through the wood at right angles to the other holes made for the neck wire.
Taking now four rods or wires for the legs, point each at one end, and screw the other with "nuts" to fit the screws, bend each rod for 7 in. or more, at a sharp angle, at its screwed end, and push the pointed end down the fore legs from the inside, so that the points come through the ball of each foot, and having stuffed and bent the fore-legs into shape, push the screwed part into, and through, the corresponding holes in the artificial backbone; screwing on the "nuts" on the opposite aides, which will of course prevent the rods from pulling through again.
Take four rods or wires for the legs, point one end of each, and attach the other end with "nuts" that fit the screws. Bend each rod at a sharp angle for 7 inches or more at the screwed end, and push the pointed end down the front legs from the inside, so the points come through the ball of each foot. After stuffing and shaping the front legs, insert the screwed part into and through the corresponding holes in the artificial backbone, then screw on the "nuts" on the opposite sides to keep the rods from pulling through again.
Finish the stuffing of the neck and chest, and coming along the body repeat the same process with the hind limbs as with the fore. Greater steadiness can be attained if required, by using two "nuts" instead of one to each rod, that is to say, one on each side of the wood, No. 1 being screwed on first, the arm of the rod then pushed through the hole, and "nut" No. 2 screwed up to its bearing.
Finish stuffing the neck and chest, then continue down the body and repeat the same process for the hind limbs as you did for the forelimbs. You can achieve more stability if needed by using two "nuts" instead of one on each rod; that is, one on each side of the wood. First, screw on "nut" No. 1, then push the arm of the rod through the hole, and finally screw up "nut" No. 2 to its position.
For a nearly tail-less animal, such as the bear, it will be sufficient to drive a strong wire through the stump of the tail from the outside, to hold in the end of the "backbone," but a long-tailed animal will require to have the tail-bearer inserted in the wood, in the same manner as the neck wire, and the artificial tail run up the skin before the legs are attached.
For an animal with a nearly non-existent tail, like a bear, it’s enough to run a strong wire through the tail stump from the outside to secure the end of the "backbone." However, for a long-tailed animal, you'll need to insert the tail wire into the wood, just like you would with the neck wire, and the artificial tail should be positioned along the skin before attaching the legs.
The extreme stability of the foregoing system is obvious, as the "backbone" completely supports the weight of the skin and head, while the leg rods support this in their turn.
The extreme stability of the system described above is clear, as the "backbone" fully supports the weight of the skin and head, while the leg rods support it in turn.
Wood of suitable thickness must be used to mount the animal on while drying, and the leg rods, if too strong to clench through on the under side, may be screwed and "nuts" attached.
Wood of the right thickness should be used to mount the animal while it's drying, and if the leg rods are too strong to clamp through on the underside, they can be screwed in with "nuts" attached.
For the very largest animals, such as the elephant, a somewhat different system would be adopted; a model in parts would be made, fitted together, and the skin stretched over. A very interesting account of the method adopted many years ago in the French capital is here appended:
For the largest animals, like elephants, a different approach would be used; a model would be created in sections, assembled, and the skin placed over it. An intriguing description of the technique used many years ago in Paris is included here:
"The corpse of the elephant having been extended upon the ground facilitated our taking and writing all its dimensions; the thickness was taken by a sort of rule, which M. Lassaigne, cabinet maker of the museum of Paris, invented at the time. This instrument is the rule used by shoemakers on a large scale. The curves of the back, the belly, etc.., were taken by bars of lead, 0.75 in. thick. This metal, not having any elasticity, accommodated or bent itself to the curves we wished to measure and preserved the measurements until wanted. M. Desmoulins drew the animal on one of the sides of the wall according to all these measurements, in the workshop where the model was to be constructed, in its natural size. This done, we proceeded to the skinning of the elephant, which we were only able to place upon its back by four corded pulleys fastened to the platform. In this position we made an incision in the form of a double cross; the middle line went from the mouth to the anus, the two others were directed from each left foot to the opposite right foot; the tail and trunk were opened underneath longitudinally. We scooped out the soles of the feet within an inch of their edge, that the nails might remain in the skin; to effect this we were obliged to employ the chisel and mallet. This operation was very difficult.
The elephant's body, laid out on the ground, made it easier for us to measure and document all its dimensions. We used a special tool designed by M. Lassaigne, a cabinet maker from the Paris museum, to measure the thickness. This tool is similar to what shoemakers use, but it's larger. We applied lead bars, 0.75 inches thick, to capture the curves of the back, belly, and so on. Because lead has no flexibility, it adapted to the curves we needed to measure and held the measurements until we required them. M. Desmoulins sketched the animal on one side of the wall using all these measurements to create a life-sized model. Afterward, we started the process of skinning the elephant, which we could only flip onto its back using four corded pulleys attached to a platform. Once it was in that position, we made an incision shaped like a double cross; the main line ran from the mouth to the anus, while the other two lines extended from each left foot to the opposite right foot. We also cut open the tail and trunk lengthwise from underneath. To preserve the nails in the skin, we scooped out the soles of the feet, staying within an inch of their edges, which required using a chisel and mallet. This task was very challenging.
After four days' labour of several persons we separated the skin from the body; it then weighed 576 lb. We extended it on the ground to take away the cutaneous muscles which adhered to its interior — particularly to the head. In this state the skin was placed in a large tub; we spread a considerable quantity of pounded alum in all its folds. We then boiled some water with such quantities of alum that some pieces still remained at the bottom of the boiler — that is, more than saturated the water. This water was poured upon the skin, and we continued to do so until the skin was covered with it 6 in. deep.
After four days of work by several people, we removed the skin from the body; it weighed 576 lbs. We spread it out on the ground to remove the muscles that were stuck to the inside, especially around the head. At this point, the skin was placed in a large tub; we spread a good amount of crushed alum in all its folds. Next, we boiled some water with enough alum so that some pieces were still sinking to the bottom of the pot — in other words, the water was more than saturated. We poured this water over the skin and kept doing so until it was covered with it six inches deep.
To render the dimensions of the model or shape which was to receive the skin more exact, we modelled one-half of the skinned head in plaster, as well as one of the hind and one of the fore legs.
To make the dimensions of the model or shape that would be covered with the skin more precise, we created a plaster model of one half of the skinned head, along with one hind leg and one foreleg.
All these measures being taken, Lassaigne constructed a factitious body in linden wood. The reader would find the detail too long and too minute if we were to describe the ingenious methods invented by Lassaigne, either to cut the wood or to preserve the form he had given to this great mass. But to avoid all prolixity, it will be sufficient to observe that he composed this wooden elephant in such a manner that all the parts could be separated. He opened a panel (it is immaterial on which side of the body) and introduced himself into the interior by means of this opening, either to diminish the thickness of the wood or for any other purpose during its construction; the head, the trunk, all was hollow; so that the body, alarming at first from its supposed weight, might be easily transported from one place to another.
All these measures taken, Lassaigne built a fake body out of linden wood. The details would be too long and too intricate if we were to describe all the clever techniques he came up with, whether to cut the wood or maintain the shape he had given to this massive piece. But to keep it brief, it’s enough to note that he designed this wooden elephant so that all the parts could be taken apart. He opened a panel (it doesn't matter which side of the body) and entered through this opening, either to reduce the thickness of the wood or for some other reason during its construction; the head and trunk were all hollow, so the body, initially daunting because of its supposed weight, could be easily moved from one place to another.
After taking the alum water from the tub where the skin was placed, we heated it, and poured it, boiling, on the skin; we left it an hour and a half in this state, after which we drew the skin out to place it, quite warm, upon the shape. This was not an easy thing, but it was rendered still more difficult by our finding the false body a little too large — the skin would not entirely cover it. There was but one thing which could be done; we could not diminish the wood without destroying the proportions; besides, the iron pins, the screws which fastened the work, would have lost their hold, and we should have run the risk of overturning the edifice. We then took down the skin, placed it on trestles, and diminished the thickness of it by the help of large knives, cutting it away in thick and long shreds from the whole of the inside. This work occupied five persons for four days. We weighed these shreds and they amounted to 194 lb. During this operation the skin had dried, and consequently lost its suppleness. We put it back into a tub and covered it with soft cold water. The next day we placed it afresh on the shape, and fixed it with wire nails and large brads; those which fixed the edge of the skin were driven in deeply, the others only half way, to accommodate the skin to all the sinuosities of the model. We drew out a great many of them when the skin was sufficiently dry.
After taking the alum water from the tub where the skin was placed, we heated it and poured it, boiling, over the skin. We left it like that for an hour and a half, after which we pulled the skin out to place it, still warm, onto the mold. This wasn't easy, and it became even more challenging because we found the false body was a bit too large — the skin wouldn't fully cover it. There was only one thing we could do; we couldn’t reduce the wood without messing up the proportions. Plus, the iron pins and screws holding it all together would lose their grip, and we risked toppling the whole structure. So, we took down the skin, set it on trestles, and reduced its thickness using large knives, cutting it away in thick, long strips from the entire inside. This task required five people working for four days. We weighed the strips, and they totaled 194 lbs. During this process, the skin dried out and lost its flexibility. We then put it back into a tub and covered it with soft cold water. The next day, we placed it back on the mold and secured it with wire nails and large brads; the ones securing the edge of the skin were driven in deep, while the others were only halfway in to fit the skin to all the curves of the model. We removed many of them once the skin was dry enough.
This paring of the skin answered our purpose in two essential points:
This way of trimming the skin served our needs in two important ways:
first, by facilitating the means of enveloping the model entirely, the form of which had not been altered; and, secondly, by ensuring its speedy desiccation. This last had not been the least alarming, for we feared that the humidity secreted in the skin might concentrate in such a manner (notwithstanding we had taken the precaution to give the wooden model a coat of oil paint) as to occasion mouldiness in the parts exposed to the air. The alum with which it was saturated soon crystallised on the interior, which at first gave it a very ugly grey colour; but we entirely got rid of it by rubbing the surface of the skin, first with spirits of turpentine, and then with oil of olives."
first, by making it easier to completely wrap the model, which had not been changed; and, secondly, by making sure it dried quickly. This last point was quite concerning because we worried that the moisture trapped in the skin might concentrate in such a way (even though we took the precaution of giving the wooden model a coat of oil paint) that it could cause mold in the areas exposed to the air. The alum it was soaked in soon crystallized inside, which at first made it look a very unappealing grey color; however, we completely removed it by rubbing the surface of the skin, first with turpentine, and then with olive oil.
Some little hints which occurred to me as being useful to the animal mounter I will now jot down: I have been frequently asked, "Supposing I get a fat dog, or animal of any kind, to set up, how can I manage such a subject satisfactorily? If I leave the fat on the skin I am doing wrong in every way, and if I trim it cleanly off, as it should be done, I stretch the skin to such an extent that my dog is completely out of shape, and though formerly a 'pug' he speedily becomes a 'greyhound.' In fact, I am in a quandary, and do not know what to do."
Here are some tips that I think would be helpful for anyone mounting an animal, which I'll list now: I've often been asked, "If I have a fat dog or any other animal to mount, how can I handle it properly? If I leave too much fat on the skin, I'm making a mistake, and if I trim it all off like I should, I stretch the skin so much that my dog looks completely weird. What was once a 'pug' suddenly turns into a 'greyhound.' Honestly, I'm stuck and I don’t know what to do."
My reply is: Try what a hot knife will do passed over the skin, with sand or sawdust thrown on to absorb the fat as it melts off. Candidly speaking, however, it is purely a matter of experience to trim fat off a skin without stretching it to any alarming degree, and in very fine-skinned animals, if we find them stretch in spite of all care, we take advantage of wrinkles to sew up here and tuck in there, resorting even, in extreme cases, to cutting away portions of the skin, notably in those parts underneath, hidden by the subsequent operation of mounting.
My response is: Try what a hot knife does when it slides over the skin, with sand or sawdust sprinkled on to soak up the fat as it drips off. Honestly, it's really all about experience when it comes to trimming fat off a skin without stretching it too much, and with very thin-skinned animals, if we notice any stretching despite our efforts, we take advantage of wrinkles to sew up here and tuck in there, sometimes even cutting away parts of the skin, especially in areas underneath that will be concealed by the later process of mounting.
The skin of the soles of the feet of some animals requires paring down. The bear is an instance of this. The hands of monkeys also must be carefully skinned out to the extreme tips of the fingers. These latter animals are best skinned out from the back, as a great many of our "relatives" have but little hair on the abdomen to hide the stitches, added to which their usually upright position tends still more to show up any defect in sewing.
The skin on the soles of some animals' feet needs to be trimmed. Bears are one example. The hands of monkeys also need to be skinned carefully all the way to the tips of their fingers. It's best to skin these animals from the back because many of our "relatives" have very little hair on their bellies to cover the stitches, plus their upright posture makes any sewing flaws more noticeable.
Peat and straw may sometimes be used with advantage in the bodies of large animals.
Peat and straw can sometimes be beneficial when used in the bodies of large animals.
Moles may be very well mounted by being cut across from one hind limb to the other, just under the tail, skinned out, preserved, and the skin then filled with sand or dry plaster.
Moles can be mounted effectively by cutting across from one hind leg to the other, just below the tail, skinning them, preserving the skin, and then filling it with sand or dry plaster.
Hedgehogs, if required to be curled up, may be also filled with sand, then tied up in a cloth, and hung up to dry.
Hedgehogs, when needing to be curled up, can also be filled with sand, then wrapped in a cloth and hung up to dry.
Bats are skinned out from the back or front according to the position it is required to show them in. A thin piece of wire is doubled; each end is then pulled out at right angles for a certain distance up its length, and pushed into the hollows of the bones of the "wings." The animal is then stuffed with chopped tow, sand, or sawdust, sewn up, leaving the doubled wire outside; a hole is then made in a board (of the length and breadth suited to the specimen), through which the wire passes, and the "wings" are kept in place, until dry, by fine needle-points, or entomological pins passed through the joints, or by braces of cardboard. The ears, if long, are best blocked with cork cut to fit the inside, and then bound round with "wrapping cotton." The shrivelled ears of these and much larger animals may be got into proper shape by careful ironing.
Bats are skinned from the back or front, depending on how they need to be displayed. A thin piece of wire is doubled, with each end pulled out at right angles for a certain distance along its length, and inserted into the hollows of the wing bones. The animal is then stuffed with chopped tow, sand, or sawdust and sewn up, leaving the doubled wire outside. A hole is made in a board (sized to fit the specimen), through which the wire passes, and the wings are held in place until dry with fine needle points or entomological pins inserted through the joints, or by braces made of cardboard. If the ears are long, it's best to fill them with cork cut to fit the inside, then wrapped with cotton. The wrinkled ears of these and larger animals can be shaped properly by careful ironing.
Mice, small leverets, or rabbits, will be found very useful, if roughly stuffed, to place in the mouth or under the feet of birds or small beasts of prey. These animals, if very young, had better be placed for an hour or so in benzoline or in one of the hardening solutions (Nos. 15 or 16). This remark applies with especial force to animals as yet unborn, which the naturalist will sometimes find during work, and will wish to preserve. These foetal specimens, however, let it be remembered, are of the greatest consequence in the study of embryology, and should always be preserved intact in a fluid medium of some kind. Sometimes the operator comes across a foetus of some rarity, which, if not large, can be preserved in a small "preparation" jar, filled with best rectified spirits of wine, as being not too expensive for such subjects.
Mice, small leverets, or rabbits can be very useful if roughly stuffed to put in the mouths or under the feet of birds or small predators. If these animals are very young, it’s better to place them in benzoline or one of the hardening solutions (Nos. 15 or 16) for about an hour. This is especially important for unborn animals that naturalists might find while working and want to preserve. However, it’s important to remember that these fetal specimens are crucial for the study of embryology and should always be preserved intact in some type of fluid medium. Sometimes the operator finds a rare fetus, which, if not too large, can be preserved in a small “preparation” jar filled with the best rectified spirits of wine, as this is not too costly for such specimens.
THE subject to be now treated of is of so varied a nature, requiring so great a knowledge of anatomy, and so much experience and aptitude, that I have deemed it advisable to reserve for a separate chapter the explanations of the processes to be learned, to avoid, at the outset, confusing the learner by asking him to attempt too much. This chapter may therefore be considered a finishing one, and, perhaps, it will be best to be candid, and say at once, that no one should attempt the mounting of animals by this method until he has fully mastered the principles laid down in the foregoing chapter, and has learned the characteristic attitudes and expression of some hundreds of animal forms.
The topic we’re about to discuss is quite complex and demands a solid understanding of anatomy, as well as a lot of experience and skill. For this reason, I believe it’s best to dedicate a separate chapter to explain the processes involved, so learners won’t feel overwhelmed from the beginning. This chapter can be viewed as an advanced one, and I’ll be straightforward: no one should attempt to mount animals using this method until they have fully mastered the principles covered in the previous chapter and have studied the unique postures and expressions of several hundred animal forms.
It is quite true that this art — which has for its end and aim the better delineation of character as exhibited by the lower animals — is not teachable unless the pupil is well grounded in anatomy, and is also a clever draughtsman and modeller — in fine, an artist! — with all an artist's perception of beauty of line and of form. I will here indicate what I take to be the basis upon which a competent taxidermist must proceed to become a zoological artist. First, then, let him take lessons in drawing, pinning himself steadily to copying pictures by the best masters of zoological subjects; as he advances, let him draw from the casts of animals, when procurable.
It’s definitely true that this craft—which aims to better depict character as shown by animals—can’t be taught unless the student has a solid understanding of anatomy and is also a skilled drawer and sculptor—in short, an artist! They need to possess an artist's keen sense of beauty in line and form. Here, I’ll outline what I believe are the foundations a competent taxidermist should follow to become a zoological artist. First, they should take drawing lessons, focusing on replicating works by the best masters of zoological subjects; as they progress, they should draw from animal casts whenever possible.
Let him beware, however, of the conventional lion, and lion's head, which are about as much like the real things as the donkey is like the horse — just a family resemblance, nothing more. Having done all this, let him copy animals from nature; and if he lives in or near London, so much the better, there is the "Zoo" for him to study in. Indeed, it is a marvel to me that, with the museums and the Zoological Gardens surrounding them, so few London taxidermists attain even a respectable proficiency in the correct delineation of animal forms. The pupil being well grounded in drawing, will have observed many points in animal anatomy not hitherto suspected by him, and will naturally wish to know the why and wherefore of the swellings and depressions occurring in his subjects. To this end he must study a little simple anatomy of bones and muscles — their objects and meanings in different animals.
Let him be careful, though, of the typical lion and lion's head, which are about as similar to the real deal as a donkey is to a horse — just a family resemblance, nothing more. After that, he should draw animals from nature; and if he lives in or near London, that's even better, as there's the “Zoo” for him to study. Honestly, it's amazing to me that, with the museums and the Zoological Gardens around them, so few taxidermists in London reach even a decent level of skill in accurately representing animal forms. Given that the student is well-versed in drawing, he will have noticed many aspects of animal anatomy he hadn't suspected before, and will naturally want to understand the reasons behind the bumps and dips on the creatures he studies. For that, he needs to learn some basic anatomy of bones and muscles — their purposes and meanings in different animals.
The last stage is the reproduction, by modelling in clay, etc.., of the various parts of animals, the head, of course, in the instance of large mammals, being looked upon as the chief motif in composition. To do all this requires time and considerable perseverance, but, with the facilities for study now offered by the various schools of art, he should not despair of success in a few years' time after mastering the first principles of his art.
The final step is to create reproductions by shaping various parts of animals in clay, with the head being the main focus for large mammals. This process takes time and a lot of determination, but thanks to the study resources available at different art schools today, he shouldn't lose hope of achieving success in a few years after learning the basics of his craft.
I will now proceed to demonstrate how the learner may work himself up to a respectable proficiency in modelling animals, should he possess the necessary aptitude.
I will now show how a learner can achieve a good level of skill in modeling animals, assuming they have the right talent.
Let us divide our theme into three parts — First, mounting the skin of the specimen, by using the skeleton as a foundation.
Let’s break down our topic into three sections — First, preparing the skin of the specimen, using the skeleton as a base.
Secondly, mounting by means of a rough framework of wood and iron, more completely than as instanced in the example of the bear mentioned in the last chapter.
Secondly, climbing using a rough structure made of wood and iron, more thoroughly than the example of the bear mentioned in the last chapter.
Thirdly, mounting on a model skeleton of carved wood and iron, to represent, and to take the place of, the bones; somewhat in the manner described for the elephant.
Thirdly, getting onto a model skeleton made of carved wood and iron, to symbolize and replace the bones; a bit like what was described for the elephant.
In each of these systems there is one point of resemblance, namely, that the bones, or their semblances, are to be covered with hard composition, of some kind or another, to replace the flesh and muscles, and that the heads of mammals being often of great beauty, and possessing certain characters of their own, are to be copied first of all by one of two methods. Either they must be
In each of these systems, there’s one common feature: the bones or their representations need to be covered with some kind of hard material to substitute for the flesh and muscles. Also, since the heads of mammals are usually very beautiful and have distinct characteristics, they should be replicated primarily through one of two methods. Either they must be
(1) cast as a "mould" from the dead head, and the "return," or model, again cast from that; or
(1) cast as a "mold" from the dead head, and the "return," or model, again cast from that; or
(2) modelled from the dead head in clay, by the eye and by measurements, and a mould taken from that, to be again cast into for the model.
(2) modeled from the dead head in clay, by the eye and by measurements, and a mold taken from that, to be recast into the model.
This latter, though entailing three processes, is the more correct, and gives the best result when the modeller is experienced; but as the former is the easier, and leads up to better things, I must describe it first.
This latter approach, although it involves three steps, is more accurate and produces the best outcome when the modeler is skilled. However, since the former is simpler and paves the way for better results, I will explain it first.
We will take as an example the most difficult head to cast — a horned head — considering that, if we do this correctly, all others will be easy enough. Here, then, is a stag's head, some modelling or pipe-clay, some soft-soap, a hundredweight or so of common plaster of Paris at about 4s. per cwt., two pails, or rather zinc or galvanised iron buckets, one of them containing water. [Footnote: Pipe-clay quite good enough for this purpose is sold by the pipe makers in dry blocks or pieces, at about 6s. or 7s. per cwt. The clay must be soaked as wanted in a bucket of water and beaten up with a stick or "bat" until it is smooth, free from lumps, and of the consistence of very stiff putty. It should then be formed into a square mass, and kept damp by wet cloths.]
We will use the most challenging head to cast as our example — a horned head — because if we get this right, the others will be much easier. So, here’s what you’ll need: a stag's head, some modeling or pipe clay, some soft soap, about a hundredweight of standard plaster of Paris at around 4s. per cwt., and two buckets, preferably zinc or galvanized iron, with one filled with water. [Footnote: Good quality pipe clay for this purpose is available from pipe makers in dry blocks or pieces, costing about 6s. or 7s. per cwt. The clay needs to be soaked in a bucket of water as needed and mixed with a stick or "bat" until it’s smooth, lump-free, and has the consistency of very stiff putty. Then it should be shaped into a square mass and kept moist with wet cloths.]
The first operation, after beating up the clay, is getting the head into position; this will be easy enough should it be cut off from the body, otherwise the head must be propped up on the table, whilst the greater part of the body rests on boxes, or trestles, somewhat lower than the table. A very little "gumption" will enable the learner to cope with these small difficulties, always remembering, however, that both body and head must be immovably fixed during the process of casting.
The first step, after kneading the clay, is to get the head in position; this will be pretty easy if it’s separated from the body. Otherwise, you need to support the head on the table while the larger part of the body sits on boxes or trestles that are a bit lower than the table. A little bit of common sense will help the beginner handle these minor challenges, always keeping in mind that both the body and head must be securely fixed during the casting process.
Let us assume, therefore, the body arranged so that the head — face uppermost — and part of the neck, rests on the table, firmly fixed; supports, or stays of wood, fastened at one end to the horns by wires or cords, and at the other end by nails to the table, will effect this. The chin should be propped up a little from the surface of the table, by means of a pad of clay which has been previously prepared; next cut more slices of clay from the mass, and build in the front and sides of the face in a straight line, to just under the nostrils, but above the line of the mouth; smooth the clay — which should extend outwards some two or three inches from the head — with water and a broad knife. The lower half of the head is now hidden, mouth and all, up to just above the upper lip.
Let’s say the body is positioned so that the head—face up—and part of the neck is resting on the table, securely fixed. Wooden supports or stays, attached at one end to the horns with wires or cords and at the other end with nails to the table, will achieve this. The chin should be slightly elevated from the table’s surface using a prepared clay pad. Next, cut more slices of clay from the bulk and build up the front and sides of the face in a straight line, just below the nostrils and above the mouth. Smooth the clay—extending about two to three inches out from the head—with water and a wide knife. The lower half of the head, including the mouth, is now concealed, extending just above the upper lip.
Next fill in the nostrils and the lachrymal sinuses (the orifices below the eyes) with clay, but in a careful manner, so that, although they shall be filled up sufficiently to prevent the plaster from running in to make "undercuts," they shall still preserve a certain shallow imprint of their original form. Now mix your soft soap with a brush until it becomes a stiff lather, and paint it all over the face and hair of the head; build up a wall of thin board around the clay — in the manner described in Chapter VIII. on Fish Casting — and when practicable tie a thin board just in front of the horns, so that the model may end there.
Next, fill the nostrils and the tear ducts (the openings below the eyes) with clay, but do so carefully. They should be filled enough to stop the plaster from leaking in and causing "undercuts," but still retain a slight impression of their original shape. Now mix your soft soap with a brush until it forms a thick lather, and apply it all over the face and hair of the head. Construct a barrier of thin board around the clay — as explained in Chapter VIII on Fish Casting — and, when possible, secure a thin board just in front of the horns, so that the model finishes there.
If, however, the back of the head down to the neck is required — which it seldom is, for reasons explained hereafter — it must be managed by "piece-casting." (See Chapter XII.) The head being nicely soaped, lay a thin piece of string or strong hemp along the top of the face and head, exactly in the centre, and extending from the clay under the nostrils up to the back of the head in a straight line. Be sure that the string is perfectly straight, and that it presses closely to the nose before coming on to the clay.
If, however, the area from the back of the head down to the neck is needed — which is rarely the case, for reasons that will be explained later — it should be done by "piece-casting." (See Chapter XII.) Once the head is nicely soaped, place a thin piece of string or strong hemp along the top of the face and head, exactly in the center, extending from the clay under the nostrils to the back of the head in a straight line. Make sure that the string is perfectly straight and is pressed closely against the nose before reaching the clay.
Next mix the plaster, not in the usual manner, by adding water to it, but by half filling a vessel with water, to which the plaster is added, a little at a time, until enough is mixed to serve the purpose, i.e., in sufficient quantity to cover the head with a layer some inches thick. After it is well worked up and moderately thick, carefully pour it over the specimen, taking it up as it runs down, and piling it up a little thicker in the centre, to give stability to the mass. Just as the plaster is setting — which a very little experience will teach — lift the ends of the string upward through the plaster, which has the effect of cutting it in two, but these halves will not fall off of their own accord if care be taken.
Next, mix the plaster in a different way than usual. Instead of adding water to the plaster, fill a container halfway with water and gradually add the plaster until you have enough to meet your needs, meaning enough to create a layer several inches thick to cover the head. Once it's well mixed and moderately thick, carefully pour it over the specimen, picking it up as it flows down and building it up slightly thicker in the center for stability. Just as the plaster is beginning to set—something you'll learn quickly with a bit of experience—lift the ends of the string upward through the plaster. This will effectively split it in two, but the halves won't fall off by themselves if you're careful.
The mould being allowed to set for about half an hour or an hour, according to the quality of the plaster, is then ready for the next operation, which is the turning of the carcase, so that the head may also be turned upside down. Previously to this, should the mould show the least sign of coming off, it will be as well to tie it on.
The mold should be left to set for about half an hour to an hour, depending on the quality of the plaster. Once it’s ready for the next step, you’ll turn the structure so that the head can be flipped upside down. Before doing this, if the mold shows any sign of coming loose, it’s a good idea to tie it on.
Supposing, however, that the wall of boards being removed, the head is successfully turned until it rests with its centre on the table, it may happen that the horns, being in the way, may require to hang over the edge of the table to effect this properly, and that the head, being rounded by the superior thickness of the mould, may require propping. To describe the means for overcoming such self-evident little difficulties as these, would only insult my reader's judgment.
Suppose, however, that the wall of boards is removed and the head is successfully turned until it rests with its center on the table. It may happen that the horns, being in the way, need to hang over the edge of the table to do this properly, and the head, being rounded by the greater thickness of the mold, might need some support. Describing the ways to handle such obvious little challenges would only insult my reader's judgment.
The head, then, being now securely fixed face downwards, the clay which hides the lower half must be picked off. This exposes the inner edge of the mould, together with the lower jaw. Scrape the plaster to a level surface, and cut two moderately large V-shaped nicks, one on each edge of the mould, build up around as before with wood, and fill in all interstices leading to the table below with clay. See that the mouth is properly shut, introducing a little clay if needed. Brush over with soft soap, not forgetting the top of the plaster mould, and mix some more plaster and pour over the lower jaw, on to the edges of the plaster mould, until stopped by the wall; build up thicker in the centre, as before, and suffer all to dry for about an hour. After this, pull away the walls, and all retaining clay, and the mould will easily come away from the head in three pieces, i.e., two for the upper surface, and one for the under.
The head is now securely positioned face down, so the clay covering the lower half needs to be removed. This reveals the inner edge of the mold, along with the lower jaw. Scrape the plaster to create a flat surface and make two reasonably sized V-shaped nicks, one on each edge of the mold. Build up the sides with wood as before, and fill in any gaps leading to the table below with clay. Ensure the mouth is properly closed, adding a little clay if necessary. Brush the surface with soft soap, don’t forget the top of the plaster mold, and mix more plaster to pour over the lower jaw, onto the edges of the plaster mold, until it reaches the wall. Build it up thicker in the center as you did before and let everything dry for about an hour. After that, remove the walls and any clay holding everything together, and the mold will easily come away from the head in three pieces, that is, two for the upper surface and one for the bottom.
The chief thing to guard against is not to get the plaster behind the horns, so that it locks the front up. As, however, you may require to cast more, in length, of the under surface than of the upper, you may easily do this by lengthening the upper surface, when turned over, with clay, and casting on to that. It is this system which gives the diagonally-cut appearance to the model (see Fig. 28).
The main thing to watch out for is to avoid getting the plaster behind the horns so that it doesn't lock the front in place. However, if you need to cast more of the underside than the top, you can easily do this by adding some clay to the upper surface when it's flipped over and casting onto that. This approach gives the model its diagonally-cut look (see Fig. 28).
You have now three pieces, forming, when trimmed and put together, a concavity representing the place whence the stag's head has been extracted; bake these pieces in an oven for a day or so until sufficiently dried, then examine them for flaws or air-bubble holes, which fill up with clay, brush over inside with linseed oil or soft soap, tie together, and fix the mould, nose downward, in a bucket or pail, pack with wedges, and run in sand outside the mould to make all secure.
You now have three pieces that, when trimmed and assembled, create a hollow shape where the stag's head was removed. Bake these pieces in the oven for about a day until they're thoroughly dried. Then, check for any defects or air bubbles and fill those with clay. Brush the inside with linseed oil or soft soap, tie the pieces together, and position the mold with the nose facing down in a bucket or pail. Pack it with wedges and pour sand around the outside of the mold to stabilize everything.
Prepare some plaster and pour into the mould at the opening and before it is quite set, scoop out some to make it hollow at the neck; allow it to remain undisturbed for from two to four hours,* then take it out, undo the string, and gently tap the mould in every part with a small mallet, rolling it every now and then upon the table; in a short time you will hear something rattle, and perhaps a little loosening of one edge or piece will take place; tap now very cautiously, lest you should break anything; soon one piece will come off, which will materially assist your labour; take time and have patience, and you will be rewarded by seeing a perfect model of the stag's head come out of the mould in due course. [Footnote: Baking, when practicable, will often assist the parting of the mould from the model.]
Prepare some plaster and pour it into the mold at the opening. Before it completely sets, scoop out some plaster to create a hollow space at the neck; let it sit undisturbed for two to four hours,* then take it out, remove the string, and gently tap the mold all over with a small mallet, rolling it occasionally on the table. Soon, you’ll hear something rattling, and you might notice a piece loosening at one edge; tap carefully now to avoid breaking anything. Eventually, one piece will come off, which will really help your progress. Take your time and be patient, and you'll be rewarded with a perfect model of the stag's head emerging from the mold in due course. [Footnote: Baking, when possible, can often help separate the mold from the model.]
I have said perfect, but I mean perfect so far as this system allows of perfection. If you hold the model up to the light, or look down upon it from above, you will see, if your eye is sufficiently educated, that, although it correctly represents the hair even, and all prominent features, yet that the weight of the plaster has perhaps caused one eye to drop lower than the other, or twisted the mouth aside, and given a different expression altogether to that needed.
I’ve said it's perfect, but I mean perfect as far as this system allows for perfection. If you hold the model up to the light or look down at it from above, you’ll see, if you have a trained eye, that while it accurately represents the hair and all the prominent features, the weight of the plaster might have caused one eye to sit lower than the other or distorted the mouth and given it a completely different expression than intended.
What is to be done then? Nothing but altering the model, by cutting and scraping it, until both sides are even, casting again from the corrected model when necessary, that is to say, when it is desired to get or to keep a very good one for reference. Remember that the model is a little larger than you require it, so that the hair marks, etc.., must be trimmed away to lessen it. Shaving the hair all away from the head, leaving only the naked skin, has been recommended as a preliminary to casting; but this, of course, destroys one specimen entirely, that others of the same size may be mounted from the model made from the shaved head. Skinning the head first, and casting from the flesh, does not help the amateur, as so many muscles and other characteristic parts are cut away, that a model taken in this manner is often worse than useless.
What should you do then? Just modify the model by trimming and scraping it until both sides are even, and recast from the corrected model when needed, especially if you want to have a really good one for reference. Keep in mind that the model is slightly larger than you need, so the hair marks and other details must be trimmed down. It’s been suggested to shave all the hair off the head, leaving just the bare skin, as a first step before casting; however, this completely ruins one specimen so that others of the same size can be created from the model made from the shaved head. Skinning the head first and casting from the flesh doesn’t help beginners, since so many muscles and other key features are removed, resulting in a model that’s often more trouble than it’s worth.
What, then, is our way out of this difficulty? Nothing but educating the hand and eye to the point of being able to take a dead head, and, by knowledge of its living anatomy, to model it in clay so truthfully as to far surpass any other process whatever. I can, unfortunately, give no directions for doing this. I can merely say, in the words of many unpractical "guide books" to art: "Take a board, some tools, a well-kneaded lump of clay; place the head before you in strong light, and turn out a lifelike representation of it; wrinkles, muscles, and all — in clay." To me, this is now far the easiest thing to do, but I do not forget the time when I used perhaps a ton of plaster in experiments, and wasted lots more, and learned many little arts before I could model correctly.
What, then, is our way out of this challenge? The only solution is to train our hands and eyes to the point where we can take a lifeless head and, using our knowledge of its living anatomy, model it in clay so accurately that it surpasses any other method. Unfortunately, I can't provide any specific instructions for this. I can only echo the advice found in many impractical "guidebooks" to art: "Grab a board, some tools, a well-kneaded lump of clay; set the head in front of you in good lighting, and create a lifelike representation of it — wrinkles, muscles, and all — in clay." For me, this has become the easiest task, but I remember the time when I probably used a ton of plaster experimenting, wasted even more, and learned countless little techniques before I could model correctly.
Let this be a grain of comfort to the learner, that, although he must waste a deal of good plaster ere he sees the "points," and before he can model straight away, yet that he has an advantage which I, as a self-taught man, did not possess — the advantage of some little practical advice, such as is given in the pages of this work.
Let this be a bit of comfort to the learner: even though they have to go through a lot of material before they really grasp the "points," and before they can start modeling directly, they have an advantage that I, as a self-taught person, didn’t have—the benefit of some practical advice found in the pages of this book.
Now, "returning to our muttons," it must not be supposed that our omega is gained when the tyro has modelled by eye, and by measurements, his first head in clay; this has to be cast from, as if from the dead head, and the resultant model touched up, where incorrect, by cutting and scraping when too large, or by addition of clay when too small. Sometimes it will be necessary to cast from this again and again, but in all cases the mould and model should be managed as before described.
Now, "getting back to our main topic," it shouldn't be assumed that we’ve reached our goal just because the beginner has shaped their first head in clay by eye and measurement; this has to be cast as if from the actual head, and the resulting model needs to be refined, correcting any mistakes by cutting and scraping if it’s too large, or adding clay if it’s too small. Sometimes it will be necessary to cast from this over and over again, but in all cases, the mold and model should be handled as described earlier.
 Fig. 28 —
Stag's head in plaster from clay model.
Fig. 28 —
Stag's head in plaster from clay model.Assuming that the student has managed a cast to his satisfaction, he will see, by looking at the accompanying cut, Fig. 28, that the orbits of the eyes are shallow, that only the upper line of the sinus shows, that the lips and nostrils are also shallow depressions; all of these parts must be hollowed out or undercut. To do this we require a knife such as that figured No. 12 in Chapter III., and three other tools, one a large crooked awl (sharpened at one edge), in handle, and steel "undercutting" and "relieving tools" (see Figs. 29 and 30). [Footnote: Messrs. Lechertier, Barbs, et Cie., of 60, Regent-street, London, have many patterns of these for plaster work, at a low figure.]
Assuming the student has successfully crafted a cast to their satisfaction, they will notice by looking at the accompanying image, Fig. 28, that the eye sockets are shallow, that only the upper edge of the sinus is visible, and that the lips and nostrils form shallow depressions; all of these areas need to be hollowed out or undercut. To achieve this, we need a knife like the one shown as No. 12 in Chapter III, along with three other tools: a large curved awl (sharpened on one side), and steel "undercutting" and "relieving tools" (see Figs. 29 and 30). [Footnote: Messrs. Lechertier, Barbs, et Cie., at 60 Regent Street, London, offer many designs of these tools for plaster work at a reasonable price.]
 Fig. 29 —
Steel "undercutting" tool.
Fig. 29 —
Steel "undercutting" tool. Fig. 30 —
Steel "relieving" tool.
Fig. 30 —
Steel "relieving" tool.With these the eyes, nostrils, lips, etc.., of the model, are relieved and undercut, in order to take in the folds of the inner surfaces of the skin of those parts. Be sure to hollow out the mouth upward toward the nostrils, keeping it fine, however, at the lips, and not opening it outward too much; the same with the nostrils, looking to the dead head to note the beautiful curves which can be treated so as to express, at will, rest, alarm, or defiance, according as the under-cutting is managed; the eyes of the model must be hollowed out and deeply undercut to receive the hollow glass globes (see Chapter XII), and the eye pits (lachrymal sinuses) relieved.
With these, the eyes, nostrils, lips, etc., of the model are shaped and carved out to capture the folds of the inner skin surfaces in those areas. Make sure to contour the mouth upward toward the nostrils, keeping it delicate at the lips and not opening it too much outward; do the same with the nostrils, referring to the deceased head to observe the lovely curves that can be sculpted to convey, if desired, calm, anxiety, or defiance, depending on how the carving is done; the model's eyes should be hollowed out and deeply carved to accommodate the hollow glass spheres (see Chapter XII), and the eye sockets (lachrymal sinuses) should be shaped.
Although we have cast the head whilst attached to the body in order to get our difficulties increased, yet we will now imagine the stag's head, with a long piece of neck-skin attached, severed from the body, in the manner in which heads usually arrive from Scotland to be mounted as trophies of the chase. The model being ready, the dead head is now skinned, the skin being taken entirely off the head, and being "double-skinned" as described, washed and cured, is now ready for mounting.
Although we have cast the head while it's still attached to the body to make our challenges greater, we will now visualize the stag's head, with a long piece of neck skin still attached, cut off from the body, like heads typically arrive from Scotland to be mounted as trophies of the hunt. With the model prepared, the dead head is now skinned; the skin is completely removed from the head and is "double-skinned" as described, then washed and cured, making it ready for mounting.
First, however, the horns must be sawn from the skull by cutting away a triangular piece of the bone to which they are attached; drill this bone for two long screws, by means of an American "twist-drill," fitted into an ordinary brace. Next, the prepared model requires blocking; this may be done as shown at Fig. 26. A slot to receive the board should have been previously cut in the plaster under-jaw of the model, or, in a more simple and efficient manner (see Fig. 31), by procuring a piece of "quartering," 3 in. x 2 in., about 2 ft. in length, cutting a channel in the under-jaw and the back of the head to fit it, wedging up, and pouring in wet plaster to make all secure. The head of the model should be cut to receive the horns, leaving about half-an-inch or more of plaster before coming to the wood.
First, though, you need to saw the horns off the skull by cutting away a triangular piece of the bone they're attached to; drill this bone for two long screws using an American "twist-drill" fitted into a regular brace. Next, the prepared model needs to be blocked; this can be done as shown in Fig. 26. A slot for the board should have been cut beforehand in the plaster under-jaw of the model, or, more simply and efficiently (see Fig. 31), by getting a piece of "quartering," 3 in. x 2 in., about 2 ft. long, cutting a channel in the under-jaw and the back of the head to fit it, wedging it up, and pouring in wet plaster to secure everything. The head of the model should be cut to fit the horns, leaving about half an inch or more of plaster before reaching the wood.
The quartering protruding below the neck must now be fixed in a vice, and the horns screwed in. seats, the screws coming through the plaster and into the wood, which they should "bite" for an inch or so of their length; wet plaster is then poured on the top, and the back of the head made up by the addition of more. When dry the quartering should support the model with horns attached, and all parts should be immovably rigid.
The quartering extending below the neck must now be secured in a vice, and the horns should be screwed in. The screws should go through the plaster and into the wood, so they grip for about an inch. Wet plaster is then poured on top, and more is added to form the back of the head. Once dry, the quartering should support the model with the horns attached, and all parts should be completely rigid.
Nothing remains now but to thin the skin all over the inside in a careful manner, remembering., the thinner the skin the better the points of the model will show up. When finished, simply draw the skin over the model like a glove upon the hand, put a little clay in the "bags" of the eyelids, perhaps a little about the nostrils, and fix the various parts in the under-cuttings made to receive them, being sure that the lips go in naturally, not leaving a thick edge outside. The ears now require blocking; to do this many taxidermists run a wire all around each ear from the inside, or put cardboard inside, sewing another piece outside by the edges to give shape.
Nothing is left now but to carefully thin the skin all over the inside, keeping in mind that the thinner the skin, the better the details of the model will show. Once you’re done, just pull the skin over the model like a glove on a hand, add a little clay in the "bags" of the eyelids, maybe a bit around the nostrils, and secure the various parts in the undercut areas made for them, making sure the lips fit naturally without a thick edge sticking out. The ears now need to be shaped; many taxidermists run a wire around each ear from the inside or place cardboard inside, sewing another piece on the outside edges to give them shape.
Neither of these plans is, I am sure, equal to my method of cutting a zinc plate to the full size of the ear — when flattened out — and inserting it between the skin, pushing it well up to the tip; afterwards it may be elevated or depressed, and moulded to any shape, or to any degree of convexity; a little clay placed at the base of each ear improves its shape, and assists to fix it in position.
Neither of these plans is, I'm sure, as effective as my method of cutting a zinc plate to the full size of the ear—when flattened out—and inserting it between the skin, pushing it all the way up to the tip. After that, it can be raised or lowered and shaped to any contour or degree of curve. A bit of clay at the base of each ear enhances its shape and helps keep it in place.
The last thing to be done is to cut the "quartering" to the length and angle required, to determine upon the shape and size of the neck, and to fix the neck block (see Fig. 27) to the "quartering" by screws.
The final step is to trim the "quartering" to the necessary length and angle, decide on the shape and size of the neck, and secure the neck block (see Fig. 27) to the "quartering" with screws.
 Fig. 31 —
Back view of model with neck block inserted.
Fig. 31 —
Back view of model with neck block inserted.A A, the Horns attached to piece of Skull; B B, the Model; C, Quartering on which the Model is mounted.
A A, the horns attached to a piece of skull; B B, the model; C, the quartering on which the model is mounted.
Try the skin of the neck for length and shape, and then fill up each side of the block with peat nailed on, over which pour wet plaster, making up the back of the head as you go on, keeping the neck in front narrow, and of an elegant shape, using clay afterwards over all to do this. During all this time you will no doubt have had the skin off and on several times to get the shape to suit, and you will have taken precautions not to break away the thinly carved parts around the mouth, nose and eyes.
Try the neck skin for length and shape, then fill each side of the block with nailed-on peat, over which you’ll pour wet plaster, shaping the back of the head as you work. Keep the neck narrow in front and give it an elegant shape, using clay to finish everything later. Throughout this process, you’ve likely put the skin on and taken it off several times to get the shape just right, making sure not to damage the delicate areas around the mouth, nose, and eyes.
The very last operation is sewing up; this is done with a "skin" needle (glover's needle) and strong hemp, double and waxed; commence your stitches at the skin in front of one of the horns, bring it around to the back, and enter your needle in the edge of the skin at the side, lace across and across, including the other horn, in the manner most convenient, being careful, however, to make every stitch "tell," otherwise, as the skin dries, the horns will be left bare around the "burrs," and ugly gaps appear. The neck being sewn up, is to be nailed around its circumference to the neckblock by strong tacks.
The final step is stitching it up; this is done with a "skin" needle (glover's needle) and strong, double-waxed hemp. Start your stitches at the skin in front of one of the horns, pull it around to the back, and insert your needle at the edge of the skin on the side. Lace back and forth, including the other horn, in the most convenient way, making sure that every stitch is secure. If you don't, as the skin dries, the horns will be exposed around the "burrs," creating unsightly gaps. Once the neck is sewn up, it should be secured around its circumference to the neck block with strong tacks.
The skin of the face is, perhaps, a little out of position; it must be properly arranged on the model, and wire points of suitable size, filed up from galvanized wire, must be driven into the eye-pits, inside the corners of the mouth, the nostrils and ears, and also on various parts of the face and the head, to prevent the skin rising whilst drying. The eyes should now be inserted, and the skin of the eyelids filled slightly, and drawn naturally around them. Hang the head up as high as possible out of the way, and also because the room is always warmest near the ceiling; two centre-bit holes of different sizes, forming a kind of keyhole, may be drilled in the centre of the neck-block, or strong wire bolted in the form of a loop near the top to hang it up by.
The skin of the face might be slightly misaligned; it needs to be positioned correctly on the model. To secure it, you should use appropriately sized wire points, made from galvanized wire, which need to be inserted into the eye sockets, the inner corners of the mouth, the nostrils, ears, and other areas of the face and head to keep the skin from lifting while it dries. Next, place the eyes in, and slightly fill in the skin of the eyelids, making sure they fit naturally around the eyes. Hang the head as high as you can, out of the way, since the warmest spot in the room is usually near the ceiling. You can drill two holes of different sizes in the center of the neck block, creating a sort of keyhole, or use a strong wire bolted into a loop near the top to hang it up.
Be sure all is sound and firm, as also the nail on which the specimen hangs, otherwise your own, or your stag's, head may come to grief. Plaster heads being very heavy at first, before drying, it is as well to get them dried, if possible, in advance of the mounting, to obviate great weight, and also a tendency to cause mildew inside the skin. It is really astounding, however, to observe how very light plaster becomes when thoroughly dry; clay of the same sized model is, on the contrary, exceedingly heavy — more than twice the weight of plaster.
Make sure everything is secure and stable, including the nail that holds the specimen, or else you might risk damaging your own head or your stag's. Plaster heads can be quite heavy before they dry, so it's a good idea to let them dry out before you mount them to avoid excessive weight and the risk of mold forming inside the skin. It's really amazing to see how light plaster can get when it's completely dry; clay models of the same size, on the other hand, are really heavy—more than twice as heavy as plaster.
Sometimes it may be necessary, if wanting a frill of hair, or what not, to be conspicuous, to keep it in position until dry, by brushing on paste, or thick clay water, to stiffen the hair in the desired manner. This can afterwards be brushed off, when the head is ultimately cleansed, before screwing it on its shield. Foxes' and other similar heads may be blocked best by the process sketched out as relating to Figs. 26 and 27: and finally attached to suitable shields (see Chapter XIII.)
Sometimes, if you want a fancy hairstyle or something similar, you might need to keep it in place until it dries by applying a paste or thick clay water to stiffen the hair in the way you want. This can be brushed out later when the head is finally cleaned, before attaching it to its shield. Fox and other similar heads can be shaped best using the method described in Figs. 26 and 27, and then finally attached to suitable shields (see Chapter XIII.)
Looking at the skeleton of the otter, Plate III., we at once observe that it is placed in the position it assumed when the animal was alive and walking with a stealthy, cat-like, movement. This skeleton is not very unlike that of the fox, nor, if we except its smaller size, that of the lion. Hence we shall be enabled to refer to it, from time to time, as being sufficiently our guide to the mounting of these animals.
Looking at the otter's skeleton, Plate III., we can immediately see that it's positioned as it was when the animal was alive, moving silently like a cat. This skeleton is somewhat similar to that of a fox and, except for its smaller size, isn't too different from that of a lion. Therefore, we will be able to refer to it occasionally as a useful reference for understanding the anatomy of these animals.
We will not be too ambitious to begin with, and will, therefore, take our old friend the fox for our first lesson. This is the animal sure to be selected by all learners, and the reason is not far to seek — it being of a manageable size, not too large nor too small; an animal, moreover, of a picturesque habit of body, and about whose death more or less of mystery hangs — this mystery so dear to the imagination of the youthful amateur! In some places the death of the vulpine robber of hen roosts is hailed with delight, and people are to be found even — oh, horror! — willing to grasp in friendship the hand of the slayer.
We won’t aim too high at first, so let’s start with our old friend the fox for our first lesson. This is the animal that every learner is likely to choose, and the reason is obvious — it’s the right size, not too big or too small; plus, it has a unique shape, and there’s a bit of mystery surrounding its death — a mystery that captivates the imagination of young enthusiasts! In some places, the death of this sly thief of chickens is celebrated, and there are even people — oh, the horror! — who are willing to shake hands with the hunter.
In such a county as Leicestershire, foxes are not "accidentally" killed, but when so, what bewailings over the "late lamented!" what anathemas upon the villain's head who is suspected of "vulpicide"! If it were not so serious a matter, one would be inclined to laugh over Anthony Trollope's description, in the "American Senator," of the old hunting farmer who moved himself and his dinner to the other side of the table, in speechless indignation, lest he should be contaminated by the presence of a sympathiser with a man who wantonly killed a far too sacred fox, which gobbled up the aforesaid man's ducks and fowls. Let this sad relation be a warning to all who look with acquisitive eyes on the scented jacket of our "Reynard."
In a place like Leicestershire, foxes aren't "accidentally" killed, but when they are, there are so many cries of mourning over the "recently lost!" and curses thrown at anyone suspected of "killing a fox!" If it weren't such a serious issue, it would be amusing to recall Anthony Trollope's depiction in the "American Senator" of the old hunting farmer who moved himself and his meal to the other side of the table in silent rage, worried that he might be tainted by the presence of someone who sympathized with a guy who senselessly killed a fox that had been eating his ducks and chickens. Let this unfortunate situation serve as a warning to anyone who looks greedily at the prized coat of our "Reynard."
Moral, procure your specimens from the Highlands, where they are not worshipped, nor protected, with a view to being hunted to death afterwards.
Moral, get your specimens from the Highlands, where they aren't revered or protected, just to be hunted to death later.
Having procured our specimen, we lay it in state on the modelling table, and, having decided to mount it by the first process mentioned at the beginning of this chapter, viz., by using the skeleton as a foundation, we have further to decide if the animal is to be open-mouthed or not. In the first case, we shall require the skull, in order to show the teeth and palate; in the latter case, we may discard the skull if we choose, making a model of the head in a similar manner to that of the stag, but with the difference that now, our specimen not being horned, will make a mould and model much more easily.
After getting our specimen, we placed it on the modeling table and decided to mount it using the first method mentioned at the beginning of this chapter, which is using the skeleton as a base. Now, we need to decide whether the animal will have its mouth open or closed. If it’s open, we’ll need the skull to display the teeth and palate; if it’s closed, we can skip the skull if we want and create a model of the head similar to that of the stag. The difference is that since our specimen doesn't have horns, making a mold and model will be much easier.
We decide, then, to keep the skull as part of the skeletal foundation. Skin out the animal in the usual manner, as described in the last chapter, with these differences, that the skin must be split on the underneath, from the vent to above the shoulder (in some cases, and for some attitudes, this cut must extend up the throat); cross cuts from this must extend all the way down the limbs, on their inside surfaces. By these five cuts the body is released entirely from the skin, the head being cut off at the nose, and the feet at the claws; nothing, therefore, of the skeleton remains in the skin but the cores supporting the claws.
We decide to keep the skull as part of the skeletal structure. Skin the animal in the usual way, as described in the last chapter, with these differences: the skin must be split underneath, from the vent to above the shoulder (in some cases, and for certain positions, this cut should extend up the throat); make cross cuts from this down the inside surfaces of the limbs. With these five cuts, the body is completely released from the skin, with the head cut off at the nose and the feet at the claws; thus, nothing of the skeleton remains in the skin except for the cores supporting the claws.
Measure the body now carefully for size, etc.., and treat the skin in the manner indicated, and turning to the body, disjoint the hind limbs at the junction of the femur with the pelvic girdle, and the fore limbs at the junction of the humerus with the scapular arch (see Plate III). Cut off the head (A, B), and trim it. If you cannot make a rough representation in wood of the pelvic girdle (H) and scapular arch (M), you had better cut these bones out and trim them, as they, or their representatives, give a natural set to the limbs. Throw away the remainder of the body. You now possess the complete skin, and also the bones I, J, K, L, and N, O, P, Q, together with the skull and the four other bones, or their semblances. Having properly cured all these parts, we will for this lesson take the skeleton of the otter and its attitude as our guide.
Measure the body carefully for size and other details, and treat the skin as instructed. Next, dislocate the hind limbs where the femur connects to the pelvic girdle, and the fore limbs at the junction where the humerus meets the scapular arch (see Plate III). Remove the head (A, B) and clean it up. If you can't create a rough model in wood of the pelvic girdle (H) and scapular arch (M), it's better to cut these bones out and shape them since they help give the limbs a natural positioning. Discard the rest of the body. You now have the complete skin as well as the bones I, J, K, L, and N, O, P, Q, along with the skull and the four other bones or their equivalents. Once all these parts are properly cured, we will use the skeleton of the otter and its posture as our reference for this lesson.
Our first care, then, is to provide a block of wood, similar to that in the illustration, for the animal to stand on; the length and width of this are, of course, determined by the measurements which should have been previously taken — its thickness should not be less than one inch. The next thing to be done is to cut a piece of 0.5 in. or 0.75 in. deal to represent the body — now thrown away — figured in the plate as D, E, F, and R; the shape as shown in Fig. 32 will be found the most convenient.
Our first priority, then, is to provide a block of wood, like the one in the illustration, for the animal to stand on; the length and width of this should be based on the measurements that should have been taken beforehand—its thickness should be at least one inch. The next step is to cut a piece of 0.5 in. or 0.75 in. deal to represent the body—now discarded—shown in the plate as D, E, F, and R; the shape shown in Fig. 32 will be the most practical.
To this attach, by bolting, a thick wire, to represent the neck (C), and of sufficient strength to carry the weight of the head, also another thinner one to take the place of the tail (G). At the point M nail two small blocks of wood on each side of the body-board, in order to slightly raise from its surface, and also attach thereto, the scapulars; do the same at H, remembering that the thickness of the blocks with bones attached determines the width of the chest, etc.. Bore holes along D, through which thrust stout wires to represent the ribs, bending them into position, and bringing them over the edge of R, and bolting each end into one or the other of the holes along its lower surface. The wires must, of course, be cut of sufficient length to go right through the holes at D, to form both sides of the ribs, ere being finally bolted in the holes at R.
To this, attach a thick wire by bolting it on to represent the neck (C), making sure it's strong enough to support the weight of the head. Also, use a thinner wire for the tail (G). At point M, nail two small blocks of wood on each side of the body-board to slightly lift it off the surface, and attach the scapulars to these blocks. Repeat this at H, keeping in mind that the thickness of the blocks with the attached bones sets the width of the chest, etc. Drill holes along D, and insert stout wires to represent the ribs, bending them into shape and bringing them over the edge of R, then bolting each end into the holes along its lower surface. The wires, of course, need to be cut to the right length to go right through the holes at D to form both sides of the ribs before finally being bolted into the holes at R.
 Fig. 32 —
False body of wood, with neck and tail wires
attached.
Fig. 32 —
False body of wood, with neck and tail wires
attached.We now have a cage, as it were, of wood and wire, terminating in two long wires, in which state we leave it for the present. The next process is to drill the leg bones (I and J, and N and P) with an American twist-drill and brace, in order to push up a wire rod of sufficient stoutness to carry the weight of the body; leave plenty of length of wire above and below. [Footnote: In cases where drilling is impracticable, it will be sufficient to firmly lash the bones to the rod in the position which they should occupy during the subsequent modelling.]
We now have a wooden and wire cage, which ends in two long wires, and we’ll leave it like this for now. The next step is to drill into the leg bones (I and J, and N and P) using an American twist-drill and brace, so we can push a sturdy wire rod up that will support the body weight; make sure to leave plenty of wire length above and below. [Footnote: If drilling isn’t possible, it will be enough to securely tie the bones to the rod in the position they should be in during the next modeling.]
Next drill the bottom board to receive the wires under the feet, where shown at L and Q; when firmly bolted underneath bend the rod with attached bones into the positions shown on Plate III. Bend the upper portion of the rods now at right angles, in order to go through the scapulars and pelvis. Next take the cage (Fig. 32) representing the body, with pelvic girdle and scapular arch attached, and ready drilled, lift between the limbs, pushing the top wires — now at right angles — through the holes drilled to receive them, bending these down on each side. We have now a rough but fairly correct image of the skeleton without a head.
Next, drill the bottom board to accommodate the wires under the feet, as indicated at L and Q. Once it's securely bolted underneath, bend the rod with the attached bones into the positions shown on Plate III. Now, bend the upper part of the rods at right angles so they can pass through the shoulder blades and pelvis. Then, take the cage (Fig. 32) that represents the body, with the pelvic girdle and shoulder arch already attached and drilled. Lift it between the limbs, pushing the top wires—now at right angles—through the drilled holes, bending them down on each side. We now have a rough but fairly accurate representation of the skeleton without a head.
Taking now the natural skull (A B), we open the jaws as much as desired, and filling in the cavities with paper and tow, perfect the shape by modelling with clay to replace the flesh. Fixing this on the wire, C, we make up the neck with tow and clay, binding the former on very tightly, and adding clay to give character, especially where it approaches the chest. The cage must now be tightly packed with old newspapers, brown paper, or clean straw, but with neither hay nor "flocks." [Footnote: "Flocks" and sacking are the harbouring places of Tinea Tapetzella, L., a destructive little moth, the ravages of whose larvae once cost me all the "soft" parts of a sofa, besides filling the house before discovery with the perfect insect — eager to perpetuate its race at my expense.]
Taking the natural skull (A B), we open the jaws as much as we want, filling the cavities with paper and tow, and perfecting the shape by molding clay to replace the flesh. We then attach this to the wire, C, and create the neck with tow and clay, binding the former tightly and adding clay to give it character, especially near the chest. The cage now needs to be tightly packed with old newspapers, brown paper, or clean straw, but not hay or "flocks." [Footnote: "Flocks" and sacking can harbor Tinea Tapetzella, L., a destructive little moth whose larvae once cost me all the "soft" parts of a sofa, and filled my house with the insect before I discovered it — eager to reproduce at my expense.]
Before this is done, however, it will be as well to interlace the wires with tow, laid on as a thin sheet, and glued; be sure of the shape now — if ever; let the cage be widest in the middle, tapering off above and below and toward each end, being careful to make it a little smaller, if anything, than the actual body; make up with straw and tow at E, keeping this part narrow underneath; bind the tail, G, thinly with tow, gradually thickening it as it approaches F; cover all these parts with clay where required.
Before this is done, it's a good idea to layer the wires with tow, applied as a thin sheet and glued down; double-check the shape now — if there's ever a time to do it, it’s now; the cage should be widest in the middle, narrowing at the top, bottom, and toward each end, making sure it's slightly smaller, if anything, than the actual body; fill in with straw and tow at E, keeping this area narrow underneath; wrap the tail, G, lightly with tow, gradually making it thicker as it gets closer to F; cover all these parts with clay where needed.
The fore and hind limbs, especially the latter, require very careful modelling. To do this properly measurements and tracings of the shapes should have been taken. Bind tow around all, to roughly represent the form, and then artistically adjust clay to represent the muscles and flesh. The appearance presented now should be as a clay model — without hair--of the specimen taken in hand.
The front and back limbs, particularly the back ones, need to be modeled with great care. To do this correctly, you should have taken measurements and tracings of the shapes. Wrap tow around everything to roughly show the form, and then artistically mold clay to represent the muscles and flesh. What you have now should look like a clay model—hairless—of the specimen you are working on.
Nothing now remains but to take the skin, properly thinned down and prepared, and try it over the model, altering the latter where it is too large or too small. Perhaps it may be necessary to pull it over — commencing at the head — several times before getting it quite right. When fairly satisfied with your progress, commence stitching the skin up from the neck, adding clay where wanted, noticing that, in the position you are now working to, the neck will hang low, and rather fine in front, between the fore limbs, and that the flanks will be tucked up.
Nothing is left to do but take the skin, properly thinned and prepared, and try it on the model, adjusting it where it's too big or too small. You might need to pull it on — starting at the head — several times before it’s just right. Once you're happy with your progress, start stitching the skin up from the neck, adding clay where needed, and keep in mind that in the position you’re working on, the neck will hang low and look nice in front, between the front legs, and the flanks will be tucked up.
Go on sewing up until you are at the point behind the shoulders, including the fore limbs in this; pad the skin at the toes with clay, to replace the flesh previously cut away. Leave this now, and go to the tail end; bend the wire down, and insert it in the hollow of the skin of the tail, and work on the hind limbs, finishing as you go on, and sewing up to the point between F and E. This leaves you the remainder of the body to finish, and also gives you a chance to dispose of any loose skin about that part. The clay and wire, being both amenable to any alteration, can be beaten into shape where required. Finally, sew up, and if your modelling is correct all the remainder must of necessity be correct also.
Continue sewing until you reach the area behind the shoulders, making sure to include the front legs in this process; use clay to pad the skin on the toes, replacing the flesh that was cut away. Now, set this aside and move to the tail; bend the wire down and insert it into the hollow of the tail skin, then work on the back legs, finishing as you go and sewing up to the point between F and E. This will leave the rest of the body to complete and give you a chance to manage any excess skin in that area. Both the clay and wire can be easily reshaped as needed. Finally, sew everything up, and if your modeling is done correctly, the remaining parts will also be correct.
To keep the skin in position on the model, tack it down with galvanised wire points, or by stitching it through in places, such as occur in the neck and various parts of the limbs. These wires can, of course, be removed, and all stitches cut and drawn away when the specimen is dry, at which time the eyes can be inserted, if not previously done. In all cases, however, the specimen must be thoroughly dried before it can be finished off by modelling the inside of the lips and palate with wax or cement (described in Chapter XII), or before the model tongue is inserted.
To keep the skin in place on the model, secure it with galvanized wire points or by stitching it in certain areas, like the neck and various parts of the limbs. These wires can be taken out later, and all stitches can be cut and removed once the specimen is dry, at which point the eyes can be added if they haven't been inserted already. In any case, the specimen must be completely dried before you can finish it by shaping the inside of the lips and palate with wax or cement (as described in Chapter XII), or before inserting the model tongue.
The foregoing thus describes the method which may be adopted to educate the tyro to a correct idea of the osteology of his subject, and, by analogy, to the osteology and relation of parts of many others. It is practicable only in the case of mammals done from the flesh, and whose skeleton is not valuable. In this system, as in all the following, the model head of any animal, cast as described for the stag, may be substituted for the natural skull, unless the teeth, etc.., are required to be shown. Model teeth carved from bone, or from wood, subsequently coloured, are sometimes inserted in model heads, but this is not recommended.
The above explains the method that can be used to help beginners get a clear understanding of the skeletal structure of their subject, and by extension, the anatomy and relationships of many others. This method is only suitable for mammals that have been prepared from the flesh and whose skeletons are not particularly valuable. In this approach, as in all the following ones, a model head of any animal, cast as described for the stag, can be used in place of the natural skull, unless the teeth, etc., need to be shown. Model teeth carved from bone or wood, and later colored, are sometimes placed in model heads, but this practice is not recommended.
The next part of our theme deals with mounting skins from the "flat," when no body or skeleton is forthcoming, and is practised by masters of the art, who know by experience the various positions assumed by their subjects when in a state of Nature. By this means large animals, such as tigers, lions, bears, etc.., may be mounted from skins sent home from abroad.
The next part of our theme focuses on mounting skins from the "flat," when no body or skeleton is available, and is practiced by skilled professionals who understand through experience the different positions their subjects take in a natural state. This technique allows for large animals, like tigers, lions, bears, etc., to be mounted using skins sent from overseas.
The skin having been relaxed and thinned (see Chapter X.), is put over the model in exactly the same manner as described for the otter. The model is, however, now determined by the size of the skin, which, when perfectly soft, is folded together, legs and all, and shaped on the floor of the studio, in somewhat the position required; from this a rough tracing is made with red chalk on boards kept for that purpose, or on sheets of brown paper. These are afterwards corrected by eye, or by the aid of smaller drawings or good prints.
The skin, having been relaxed and thinned (see Chapter X.), is placed over the model just like how it was done for the otter. However, the model's size is now determined by the skin, which, when fully softened, is folded together, including the legs, and shaped on the studio floor in a position that is somewhat required. From this, a rough outline is created with red chalk on boards kept for that purpose or on sheets of brown paper. These are later adjusted by eye or with the help of smaller drawings or good prints.
Inside this large finished tracing trace an irregularly-shaped long oval, quite two inches smaller all the way round than the tracing of the skin itself. Cut this out in stiff paper, and from it shape up one or two boards of 1 in. to 1.5 in. deal, jointed together on edge; to this "body-board" bolt by staples the four strong rods representing the fore and hind limb bones. Let each have a right-angled crook where they first spring from the board, to represent the scapular and pelvic arches, then bend each one (more or less) at each joint (see Plates III. and IV.) according to the attitude desired.
Inside this large finished tracing, create an irregularly-shaped long oval that is about two inches smaller all around than the tracing of the skin itself. Cut this out of stiff paper, and from it, shape one or two boards of 1 to 1.5 inch deal, joined together on the edge. To this "body board," bolt the four strong rods representing the bones of the fore and hind limbs using staples. Each rod should have a right-angled bend where it first comes off the board to represent the shoulder and hip arches. Then, bend each one (more or less) at each joint (see Plates III and IV) according to the desired pose.
Insert these rods at the feet through a strong base made of 1 in. or 1.5 in. boards, remembering that, if the projected attitude of your model demands the fore-feet raised, you must nail "quartering" on end, to which attach a platform of board of the requisite height. Fix two medium sized or one very strong rod for the neck, and one moderately strong for the tail. In a large animal — and I am assuming that we are now engaged on a lion — the wire ribs may be replaced by sections of 0.5 in. board, cut as in Fig. 33, and nailed vertically on each side of the body-board. On the half-rounded surfaces of these, laths are tacked, and afterwards covered with straw, or plastered over, just as a plasterer would finish a partition; let this be kept somewhat smaller than you wish it, in order to allow for its subsequent covering with clay. From this proceed to model the limbs as before, using plaster over the tow, and clay over all; next arrange the tail, and, lastly, fix on the skull, if you possess it, or the plaster head, which has been modelled and cast in the same manner as the stag's head.
Insert these rods at the feet through a sturdy base made of 1 in. or 1.5 in. boards. Keep in mind that if your model's intended pose requires the front feet to be raised, you need to nail "quartering" on end, to which you’ll attach a platform of wood at the necessary height. Use two medium-sized rods or one very strong rod for the neck, and one moderately strong rod for the tail. For a large animal — and I'm assuming we're working on a lion — you can replace the wire ribs with sections of 0.5 in. board, cut as shown in Fig. 33, and nailed vertically on each side of the body board. On the half-rounded surfaces of these, attach laths, and then cover them with straw or plaster, just as a plasterer would finish a wall; make sure this is slightly smaller than you want it to allow for later covering with clay. From here, continue to model the limbs as before, using plaster over the tow and clay over all; then arrange the tail, and finally attach the skull if you have it, or the plaster head, which should be modeled and cast in the same way as the stag's head.
The skin is then fitted on as before, with the difference that the head part, which, perhaps, is split right through the chin, and the tail, split up its whole length, will come on more easily, but will of course require more sewing up. When finished, adjust the claws, the mane, the ears (blocked with zinc as in the stag), and the mouth. Should it be wished to open the mouth to express rage or what not, the edges of the skin of the mouth, being no doubt destitute (in a "flat" skin) of their inner lining (the mucous membrane), must have this replaced by wash leather sewn all around to form the "bags" of each side of the lips, previously mentioned.
The skin is then put on as before, but now the head part, which might be split all the way through the chin, and the tail, split along its entire length, will be easier to put on, though it will obviously need more stitching. Once it’s done, adjust the claws, the mane, the ears (blocked with zinc like in the stag), and the mouth. If you want to open the mouth to show anger or something similar, the edges of the mouth skin, which likely lacks their inner lining (the mucous membrane) in a "flat" skin, will need to be replaced with wash leather sewn all around to create the "bags" on each side of the lips that were mentioned earlier.
These "bags" are then filled with clay or modeling wax, and when the skin is put on over the skull, are pinched into proper shape and attached by their inner edges to where the gums should be, or around convenient teeth by stitches, or by strong wire points driven into the bone, in the manner which will best commend itself to the learner. Suffer it to dry, looking at it from time to time, and when perfectly dried model the palate, etc.. (should the animal be represented open-mouthed), in the manner described in Chapter XII. So great a mass of damp clay used on these large animals is apt to crack; paper may advantageously be pasted over the whole surface before the skin is put on, which will stick well and not interfere with the modelling.
These "bags" are filled with clay or modeling wax, and when the skin is placed over the skull, they're shaped and attached by pinching their inner edges to where the gums should be or around suitable teeth using stitches or sturdy wire points driven into the bone, in a way that seems best to the learner. Allow it to dry, checking on it occasionally, and when it's completely dry, model the palate, etc. (if the animal is shown with its mouth open), as described in Chapter XII. Using such a large mass of damp clay on these big animals can cause cracks; it’s helpful to paste paper over the entire surface before putting on the skin, as this will adhere nicely and won’t interfere with the modeling.

The last process of all is mounting, by means of a model skeleton of carved wood, supplemented by iron rods. This is a system which requires a slight knowledge of wood carving, and would be practised in the case of having the skeleton of the large animal to model from, or in cases where, having both skeleton and flesh, it is desirable to retain the former as an osteological preparation, and to treat the skin as a taxidermic object.
The final step is mounting, using a model skeleton made of carved wood and supported by iron rods. This method requires some knowledge of wood carving and is used when you have the skeleton of a large animal to work from, or when you want to keep the skeleton as an osteological specimen while treating the skin as a taxidermy project.
Supposing, then, we have a lion in the flesh, our first care must be to determine upon the position and attitude it is to ultimately assume. Not to perplex the student too much, we determine that it shall take the attitude of our last example (Plate IV), or else that shown in Plate III. Accordingly, we arrange it on a platform just raised from the floor of the studio, when by propping and judicious management we make it, although lying on its side, assume the position we require.
Supposing we have an actual lion, our first task is to decide the position and pose it will ultimately take. To avoid confusing the student, we choose the pose from our last example (Plate IV) or the one shown in Plate III. We then place it on a platform slightly elevated from the studio floor, and by propping and carefully adjusting it, we make it take the desired position, even while lying on its side.
We carefully measure and take a rough tracing of the whole. The muscles are now worked up into position, and moulds taken from them, or from such parts of the limbs as we require. By careful arrangement of clay, wooden walls, and other packing, it is quite possible to take a complete cast of the whole carcase. Piece-casting, however (described in Chapter XII), assists us here. From these moulds we cast reproductions of parts of the lion, which will be patterns for, and greatly assist us when, ultimately modelling up.
We carefully measure and make a rough outline of the entire figure. The muscles are now positioned, and molds are created from them or from specific parts of the limbs that we need. With careful arrangement of clay, wooden walls, and other materials, we can make a complete cast of the whole body. However, piece-casting (explained in Chapter XII) helps us in this process. From these molds, we cast reproductions of parts of the lion, which will serve as patterns and will greatly assist us when we eventually model the final piece.
The animal is now skinned, and the skin prepared in the usual manner, i.e., stripped entirely from the body, cured, and thinned down. The bowels are taken out, the flesh is cut off the bones, and the parts H, I, J, K, and M, N, O, P (see Plate III.), are copied by carving in lime-tree or beech wood. [Footnote: Bones can be cast in plaster quite as easily as anything else, and often take the place of carved wood.]
The animal is now skinned, and the skin is prepared like usual, meaning it’s completely stripped from the body, cured, and thinned out. The organs are removed, the meat is cut off the bones, and the parts H, I, J, K, and M, N, O, P (see Plate III.) are replicated by carving in lime or beech wood. [Footnote: Bones can be cast in plaster just as easily as anything else and often replace carved wood.]
These models are then sawn longitudinally in halves, and each half hollowed out to receive, and to be either tied, or wired on to, the rods-1, 2, 3 and 4 of Plate IV. By this it will be seen that the model is made up precisely as in that, the only addition being the substitution of carved limb-bones in place of tow previously used to bind over the rods. Clay or other substances is worked over these "wooden bones," and the finishing processes are the same as the last.
These models are then cut in half lengthwise, and each half is hollowed out to fit onto, and either tied or wired to, the rods 1, 2, 3, and 4 of Plate IV. This shows that the model is constructed exactly like that one, with the only change being that carved limb bones replace the tow that was used to cover the rods before. Clay or other materials are applied over these "wooden bones," and the finishing processes are the same as before.
The skeleton must be carefully mounted and articulated, as described in Chapter XII. Be careful to get the ultimate phalanges of each limb out of the skin, and by careful management we shall also be enabled to get the bony core from the claw, and thus reap the advantage of having two specimens instead of one only.
The skeleton needs to be put together and articulated with care, as outlined in Chapter XII. Make sure to extract the final phalanges from each limb without damaging the skin, and with careful handling, we can also retrieve the bony core from the claw, giving us the benefit of having two specimens instead of just one.
Large fishes — such as sharks; or reptiles, such as very large alligators and crocodiles — may be mounted by slight modifications of any of the foregoing processes.
Large fish — like sharks — or reptiles, such as very large alligators and crocodiles — can be mounted with minor adjustments to any of the previous methods.
Often hardened wax, linseed oil and plaster, plaster composition, modelling wax, cobbler's wax, shellac, or what not, is used to represent the muscles and "flabby" parts. Wax is also used to paint over the mucous membrane, where shown or exposed. All this will be found fully explained in Chapter XII, thus exploding all the rubbish talked, and written, about "secret" or "patent" compositions, which, when put on soft, will ultimately dry as hard as marble. These wonderful "secrets" may be summed up under three heads — Clay, Plaster, and Wax!
Often hardened wax, linseed oil, plaster, plaster mix, modeling wax, cobbler's wax, shellac, or similar materials are used to mimic muscles and "flabby" areas. Wax is also used to cover the mucous membrane, when it's visible or exposed. All of this will be thoroughly explained in Chapter XII, debunking all the nonsense spoken and written about "secret" or "patent" mixtures, which, when applied soft, will eventually harden like marble. These amazing "secrets" can be summarized in three categories — Clay, Plaster, and Wax!
FISH being, perhaps, the most difficult things in the range of taxidermical science to set up in a satisfactory manner, I would impress upon the amateur to take particular note of their peculiarities of shape and colour, and to practise upon any easily-obtained and tough-skinned fish, such as the perch, which is, indeed, one of the best of all subjects for the purpose.
Fish are likely the most challenging specimens to mount in taxidermy, so I strongly recommend that beginners pay close attention to their distinct shapes and colors. It's a great idea to practice on any easily accessible and durable fish, like the perch, which is one of the best choices for this.
However, as I have now before me a pike of over 11 lb., I will take it to illustrate this lesson.
However, since I now have a pike weighing over 11 lbs. in front of me, I'll use it to illustrate this lesson.
Provide yourself first with skinning knives (see Figs. 11-13) and a tool previously figured, which I call the undercutting knife or scraper (see Fig. 29). It is best made by an artisan, but may be roughly fashioned by beating out a square piece of steel (a worn-out, narrow, flat or square file will furnish this), while hot, to a flat surface at one end, turning it at right angles for about an inch, and filing each side of this return, as also the point (the latter previously rounded) to a cutting edge, and afterwards giving it the requisite hardness by "tempering" it in oil. Many tools used by the gun stockers are to be bought ready made, which will fulfil all the requirements of this tool, but it is so easily made that I consider anyone with the least mechanical ability should be able to make one. The object of this tool is to run in under bones and to cut and drag out pieces of flesh through small openings.
Provide yourself first with skinning knives (see Figs. 11-13) and a tool previously shown, which I call the undercutting knife or scraper (see Fig. 29). It’s best made by a craftsman, but you can also make a rough version by pounding out a square piece of steel (a worn-out narrow flat or square file works well), while hot, to create a flat surface at one end, then bending it at a right angle for about an inch, and filing each side of this bend, as well as the point (which should be rounded first) into a cutting edge, and finally hardening it by “tempering” it in oil. Many tools used by gun stockers can be purchased ready-made that will meet all the needs of this tool, but it’s so simple to make that I think anyone with a bit of mechanical skill should be able to create one. The purpose of this tool is to slide in under bones and to cut and pull out pieces of flesh through small openings.
Measurements being taken and a board provided on which to trace the outline, select the best side of the fish — by which I mean the side most free from bruises or "gaff" marks. Cover this with thin paper (cap paper) or muslin, which readily adheres by the natural mucus peculiar to fish. This process, it will be seen, keeps the scales fast in their seats during the operation of skinning, and gives also a "set," as it were, to the skin. The fins and tail must not, however, be allowed to dry until the fish is finished. To avoid this and the consequent splitting of these members, keep them constantly damped by wet cloths or tow wrapped around them.
Measurements are taken and a board is provided to trace the outline. Choose the best side of the fish—the side that's least bruised or has no "gaff" marks. Cover this side with thin paper (cap paper) or muslin, which sticks well due to the fish's natural mucus. This process helps keep the scales in place during skinning and gives the skin a certain firmness. However, the fins and tail shouldn't be allowed to dry out until the fish is completely prepared. To prevent this and avoid splitting, keep them constantly damp with wet cloths or tow wrapped around them.
Lay the worst side uppermost, and then cut the skin from head to tail in a straight line. A mark called the subdorsal or lateral line is an excellent guide for this. With a strong pair of scissors, — or rather shears, cut through the scapular arch (the large bone beneath the gills — see Fig. 34, A). Slip the knife under the edges of the cut skin, and lift the skin the whole of the way up at about an inch in on both sides of the cut. Having carefully separated this from the flesh, take the broad knife in your hand, and, holding the skin lightly in the middle, with a scraping motion of the knife on the skin free it from the flesh. If the knife is held in a proper manner, slanting inward towards you, this will be done very easily. Take care, however, when approaching the fins not to cut outward too much, or you will rip them out of the skin. Fig. 34 shows the point where we have arrived, B being the loosened skin and C the flesh denuded of that skin.
Lay the worst side facing up, and then make a straight cut from head to tail along the skin. A line known as the subdorsal or lateral line serves as a great guide for this. Using a strong pair of scissors—or preferably shears—cut through the scapular arch (the large bone underneath the gills—see Fig. 34, A). Slip the knife under the edges of the cut skin and lift it up about an inch on both sides of the cut. After carefully separating the skin from the flesh, take the broad knife in your hand, and while holding the skin lightly in the middle, use a scraping motion with the knife to detach it from the flesh. If you hold the knife correctly, angled inward towards you, this should be quite easy. However, be careful not to cut too much outward when you’re near the fins, or you could tear them out of the skin. Fig. 34 shows the point we've reached, with B being the loosened skin and C the flesh without that skin.

Fig. 34 — Diagram of pike, showing skin removed on one side from lower half of body.
Fig. 34 — Diagram of pike, showing skin taken off one side of the lower half of the body.
Skin out the remaining part up to the back, holding the knife in the same manner; the fish is now half way skinned, and holding only by the fins. Slip the scissors carefully underneath the bones of each fin and cut them away from the inside. Do not be afraid of leaving a little flesh attached, as this can be easily cut away from the inter-spinous bones afterwards, it being better to have too much flesh attached to them than to find you have cut the skin through on the other side. It is a matter of little importance as to which fin you cut away first; but let me assume that you begin at the under anal fin, and, having cut this away carefully, you now find that it is still held at a little distance above it by. the orifice of the vent. A great deal of care is required here to cut the attachment away so as not to pierce through to the outside; a piece of wool comes in very handily to push in, to stop the flow of blood, etc..
Skin the remaining part up to the back, holding the knife the same way; the fish is now halfway skinned and only held by the fins. Carefully slide the scissors under the bones of each fin and cut them away from the inside. Don’t worry about leaving a bit of flesh attached, as you can easily cut that away from the inter-spinous bones later. It’s better to have too much flesh attached than to accidentally cut the skin through on the other side. It doesn’t really matter which fin you cut away first; let’s say you start with the lower anal fin. After carefully cutting this away, you’ll notice it’s still held a little above by the vent. You need to be very careful here to cut the attachment without piercing through to the outside; a piece of wool is very useful to push in to stop the flow of blood, etc.
Now turn your attention to the only fin on a pike's back, the second or lower dorsal one, which cut away in the same careful manner as before. Working down toward the tail, get the broad knife as much underneath as you can, and then push the fingers underneath until they meet, and thus gradually free the flesh from the skin almost up to the extreme end of the caudal fin (or tail). Insert the point of the large shears underneath, and cut the bone and flesh completely through at a distance of about 1 in. from the last joint of the vertebrae at the tail; this leaves a little flesh attached to be subsequently cleared out.
Now focus on the only fin on the pike's back, the second or lower dorsal fin, and carefully cut it away just like before. As you work down toward the tail, try to get the broad knife as far underneath as possible, then use your fingers to push underneath until they meet, gradually freeing the flesh from the skin almost up to the very end of the caudal fin (or tail). Insert the point of the large shears under the fin and cut through the bone and flesh about 1 inch from the last joint of the vertebrae at the tail; this will leave a bit of flesh attached that you'll need to clean out later.
Leaving this, go now to the head of the fish, and, holding down the skin of the back, which is now flat on the table, run the fingers of the right hand, especially the thumb, right down the whole length of the fish to the tail, in order to loosen all from the underneath to the front of the fish, when the whole will be free up to the two ventral fins, which you may cut away, as it were, with your finger nails, leaving the attached flesh to be trimmed away afterwards. The only part which now holds to the skin is that near the head, as also the under one of the pectoral fins; this latter must be carefully cut away, as the skin is very thin about here, and is rather awkward to get at.
Leaving this, now go to the head of the fish, and while holding down the skin of the back, which is flat on the table, run your fingers of your right hand, especially your thumb, all the way down the length of the fish to the tail to loosen everything from the underneath to the front of the fish. The entire piece should come free up to the two ventral fins, which you can cut away with your fingernails, leaving the attached flesh to be trimmed later. The only part still attached to the skin is near the head, as well as the underside of the pectoral fins; this latter part must be carefully cut away since the skin is very thin here and can be a bit tricky to access.
Now let the fingers of both hands come into requisition, and let them meet under the head. Regaining the large knife, with it sever the bone of the head cutting toward you. If this is properly performed, the cutting edge of the knife will touch the gills; be careful in this, that your knife does not slip and go too far into the underneath skin. Various internal organs will now appear, holding fast to the skin; these must be cut through with the knife, and the effect should be that the whole of the body comes out in a piece. [Footnote: The beginner may, however, for greater facility of handling, cut the body of a large fish into sections, and remove them piece by piece as he progresses.] For larger fish, say one of 20 lb. or more, I recommend splitting the flesh longitudinally or vertically, and getting out each section separately.
Now use the fingers of both hands and bring them together under the head. Take the large knife again and carefully cut through the bone of the head, cutting towards yourself. If you do this right, the blade of the knife will touch the gills; just be careful not to let the knife slip and go too deep into the bottom skin. You’ll see various internal organs now, still attached to the skin; you need to cut through these with the knife, aiming for the whole body to come out in one piece. [Footnote: However, for beginners, it might be easier to cut the body of a large fish into sections and remove them piece by piece as you go.] For larger fish, like those weighing 20 lb. or more, I suggest cutting the flesh lengthwise or vertically and removing each section separately.
The skin now being free from the body, scrape away all the small pieces of flesh that are still adhering inside the skin, down the centre, and around the fins and tail. Those fin-bones (inter-spinous bones) which protrude inside may be cut fairly short with the scissors, and the flesh nicely scraped off from each side. What flesh is left on the tail must be carefully cut away with the aid of the knife, scissors, and shears, care being taken also to free the bone to the very end, and yet not to disturb the scales underneath. A considerable amount of scraping, coaxing, and undercutting will have to be done here.
The skin is now detached from the body, so scrape off all the small bits of flesh that are still stuck inside the skin, along the center, and around the fins and tail. The fin bones (interspinous bones) that stick out inside can be trimmed down with scissors, and the flesh should be scraped off nicely from both sides. Any flesh left on the tail needs to be carefully cut away using the knife, scissors, and shears, making sure to free the bone all the way to the end without disturbing the scales underneath. This process will require a lot of scraping, coaxing, and undercutting.
Having well freed the fins of flesh, turn your attention to the head: make a cut along the side of the under jaw, then cut away the gills at their top and bottom attachments and pull them out, if you do not wish them ultimately to show. When this is done you will become aware that there is still remaining a piece of the vertebra leading up into the head; take the large knife and chop it to the underneath; it will then lift up, exposing what little brain the fish has. Cut this piece off before it enters the palate; and then, by clearing away a little flesh, you come to the eye, which take hold of with your finger and pull out. You will now see several small cavities filled with flesh running up to the sides of the face, cheeks, etc..
Having properly removed the fins, turn your focus to the head: make a cut along the underside of the jaw, then cut away the gills at both the top and bottom attachments and pull them out if you don’t want them to be visible later. Once this is done, you’ll notice there’s still a piece of the vertebra extending into the head; take the large knife and chop it underneath. It will then lift up, revealing what little brain the fish has. Cut this piece off before it reaches the palate; then, by clearing away a bit of flesh, you’ll come to the eye, which you should grab with your finger and pull out. You’ll now see several small cavities filled with flesh along the sides of the face, cheeks, etc.
The scraper or undercutting knife will now come into use, and small pieces of flesh must be laboriously cleared out. After this tool has well loosened and partly cut away the intervening flesh, the fingers may be advantageously used to work with, by being pushed in at the orbits of the eyes, to pull out the loose pieces of flesh. (Note that, in doing this, it is as well to be careful not to cut your fingers with the edges of the small bones of the head, nor with the palatal or lingual teeth.)
The scraper or undercutting knife will now be used, and small bits of flesh need to be carefully removed. Once this tool has loosened and partially cut away the flesh in between, fingers can be effectively used by inserting them into the eye sockets to pull out the loose flesh. (Keep in mind that while doing this, it's important to be cautious not to cut your fingers on the sharp edges of the small bones in the head or on the palatal or lingual teeth.)
The operator must not forget during work to keep the fins well damped, otherwise they rapidly dry and split, as I have before observed.
The operator must remember while working to keep the fins well dampened; otherwise, they quickly dry out and crack, as I have noticed before.
Running between and from the pectoral fins a thick, fleshy process continues right up underneath the jaw. As the included flesh is contained in a remarkably thin silvery skin, extraordinary care is necessary in freeing this from the flesh, so the knife, the scraper, and the fingers will all have to come into play. It is held at the extreme end under the jaw by a thin bone, which, though skinned to its under part, must not be cut away, but left slightly attached.
Running between and from the pectoral fins, a thick, fleshy structure extends right up underneath the jaw. Since the included flesh is surrounded by a very thin silvery skin, extraordinary care is needed to separate this from the flesh, so the knife, scraper, and fingers will all need to be used. It is held at the far end under the jaw by a thin bone, which, while skinned on its underside, must not be completely cut away but left slightly attached.
A little sand at this stage is useful to rub the fingers in, to prevent them slipping, when pulling out small pieces of flesh. The pectoral fins are, of all, the most awkwardly situated to skin out, coming, as they do, at the bottom of the pectoral process, and they must be left with their bones attached, and the flesh be scraped away from between the two fins, and underneath each one, until nothing remains. Carefully attend to the latter part of these instructions, or the final result will be anything but creditable.
A little sand at this point is helpful to rub your fingers in to keep them from slipping while you pull out small pieces of flesh. The pectoral fins are the hardest to skin because they’re located at the bottom of the pectoral process. You need to leave their bones attached and scrape away the flesh between the two fins and underneath each one until there’s nothing left. Pay close attention to this last part, or the end result won’t look good at all.
Some flesh now lies between two skins along the sides of the fish's gums, between the tongue and the teeth; a hole must be cut inside at the back part of the head below the eye, the crooked scraper inserted, and all the flesh dragged out bit by bit. Remember, this is merely a thin membrane, and the slightest awkwardness ruptures it; in large fish, however, the finger may be introduced with advantage, to pull out pieces of flesh. Many taxidermists cut the whole of this away, and replace it with plaster; but if the fish's mouth is to be left open it never looks so well as if done by this method.
Some flesh now sits between two layers along the sides of the fish's gums, between the tongue and the teeth; a hole has to be cut at the back part of the head below the eye, the crooked scraper inserted, and all the flesh pulled out piece by piece. Remember, this is just a thin membrane, and the slightest awkwardness can tear it; in larger fish, though, you can use your finger to help pull out chunks of flesh. Many taxidermists remove all of this and replace it with plaster; but if the fish's mouth is going to be left open, it never looks as good as if done this way.
Cut under the tongue from the outside, and scrape out the flesh, fill up with putty, and sew up neatly.
Cut under the tongue from the outside, scrape out the flesh, fill it with putty, and stitch it up neatly.
To stuff the fish, procure a thick piece of wire somewhat longer than the body, bending one end, to form a large oval- shaped loop, to be afterwards pushed up as a bearer into the head. At some little distance from this (which will be determined by the size of the fish), form a smaller loop, to which, by twisting, attach a short piece of wire a size smaller than the main bearer. At some distance from this — near the tail — form another small loop, to which attach in the same manner another piece of wire. Cut off the end of the main wire, so that when pointed and pushed through it will fall just outside the bone of the tail. It will no doubt be obvious to the reader that this forms an artificial backbone.
To prepare the fish, get a thick piece of wire that’s a bit longer than the fish’s body. Bend one end to create a large oval loop, which will later be pushed into the head as a support. A little further down (the distance will depend on the fish’s size), make a smaller loop and attach a shorter piece of wire that’s smaller in size than the main support by twisting. A bit closer to the tail, make another small loop and attach another piece of wire in the same way. Trim the end of the main wire so that when it’s pointed and pushed through, it will come out just beyond the bone in the tail. It should be clear to the reader that this creates an artificial backbone.
The large oval or pear-shaped loop at the one end is intended to be pushed in to support the head, and, in the present method, also to help the formation of the model. The loops and attached wires are to support the body, and also to bolt it to the back of the case when finished. The pointed end is to push into and support the tail.
The big oval or pear-shaped loop at one end is meant to be pushed in to support the head, and, in this method, also to help shape the model. The loops and connected wires are there to support the body, and also to secure it to the back of the case when it's done. The pointed end is for pushing into and supporting the tail.
I should have previously mentioned that this wire backbone should be made before the fish is skinned, as you then have a correct guide to position of bearing wire, and, more important still, a guide to the extreme length of the fish.
I should have mentioned earlier that this wire backbone should be made before the fish is skinned, as it provides you with a proper guide for the placement of the bearing wire and, more importantly, a guide for the maximum length of the fish.
Round this wire, wrap paper, glued, or tied with string, until it is a little less than the body of the fish previously taken out; when this is done, cover over with tow well tied on with hemp, until it has arrived at almost the shape and size of the body — being, in fact, the shape of the fish without head or tail — lay this down and thoroughly anoint all parts of the fish. Stuff out the now hollow sides of the face, gums, and the underneath of the throat with putty, of which push some thick pads underneath the root of the tail and all about the fins; next lay a thin skin of putty over the whole of the skin on the inside.
Wrap paper around this wire, using glue or string to secure it, until it’s slightly smaller than the body of the fish you took out earlier. Once that’s done, cover it with tightly bound tow made from hemp, shaping it to closely resemble the body of the fish without the head or tail. Lay this down and thoroughly coat all parts of the fish. Fill the hollow areas of the face, gums, and underneath the throat with putty, placing some thick pads under the base of the tail and around the fins. Then, spread a thin layer of putty over the entire inside of the skin.
Wet plaster is commonly used for this, but I prefer putty, as not being quite so heavy, and as affording also a more agreeable agent to work with. Another objection to plaster, used in quantities, is that the heat it evolves in drying has a tendency to make the scales rise.
Wet plaster is often used for this, but I prefer putty because it's lighter and easier to work with. Another downside of using a lot of plaster is that the heat it gives off while drying can make the scales lift.
The next thing to be done is to insert the body. Pushing the sharpened end of the tail wire through the bone of the tail, bring it up on the inside. Now drill a little hole with a straight awl through the bone of the scapular arch, and with a strong needle and thread join that part together. The next hole should be drilled through the uppermost gill-cover, through which pass the needle; then commence, travelling downward, to sew the skin together, taking care to go inward a sufficient distance from the cut edges with the needle and thread, and yet not allowing the edges of the skin to overlap.
The next step is to insert the body. Push the sharpened end of the tail wire through the bone of the tail and bring it up inside. Now, use a straight awl to drill a small hole through the bone of the shoulder area, and with a strong needle and thread, connect that part. The next hole should be drilled through the top gill cover, and then pass the needle through; start sewing the skin together from that point downwards, making sure to keep the needle and thread a good distance in from the cut edges, and be careful not to let the edges of the skin overlap.
This requires patience, and a little coaxing together of the edges of the skin. As you go on, see where your fish appears out of shape on the upper side, which is a pretty good guide but not always so — for the under, or show side. If the defect is serious, insert a little more putty, followed by a judicious application of tow, which will push the putty to the under side where you most require it.
This takes patience and a bit of gently bringing the edges of the skin together. As you continue, check where your fish looks uneven on the top side, which is a decent guide but not always accurate for the bottom or show side. If the issue is significant, add a bit more putty, followed by careful use of tow, which will push the putty to the underside where you need it most.
It is sometimes expedient, after having sewn half-way down, to begin to sew up from the tail end, so as to meet the other stitches. A fine "skin" needle must be used.
It can be helpful, after sewing halfway down, to start sewing up from the end, so the stitches meet. A sharp "skin" needle should be used.
After it is entirely stitched up there will still be little places which will require deepening and filling up. A little tow, pushed in any interstices which maybe left between the stitches, will soon rectify this, and also help to shorten the fish, which, in a first attempt, is almost sure to be made too long. This is important, as a well-fed pike should be of some considerable depth, and not a lanky monster like a snake. A little gentle tapping with the handle of the stuffer on the upper surface is sometimes advisable. Get the back almost straight, and, having brought it nearly to your measurements, you may lift the fish by the two wires, but in a very careful manner, to examine the show side, and there note any little defect. Of course, you must constantly alter your position.
After it’s completely stitched up, there will still be small gaps that need to be deepened and filled in. A bit of tow pushed into any spaces left between the stitches will fix this quickly and also help to shorten the fish, which, on the first try, is almost guaranteed to be too long. This is important because a well-fed pike should have some decent depth, not be a skinny creature like a snake. A little gentle tapping with the handle of the stuffer on the upper surface can be helpful at times. Get the back almost straight, and once you’ve brought it close to your measurements, you can carefully lift the fish by the two wires to check the show side and spot any small defects. Obviously, you should constantly change your position.
Carefully lift the fish off the board, still keeping the sewn side uppermost, and measure the distance between the two upright wires, and make corresponding holes in the board, which push down on the top of the fish, bringing the wires through, and bending their ends down upon the board, so that the specimen may be temporarily rivetted thereto. Place your hand carefully underneath the head of the fish, and turn the board over. You have now the fish right side uppermost. About the head some little extra stuffing will doubtless be required, and, as the putty will have got a little out of place in the process, it must be replaced, and the head and neck made up nice and square; also look to the tail, and put that in proper shape.
Carefully lift the fish off the board, keeping the sewn side facing up, and measure the distance between the two upright wires. Make corresponding holes in the board, then push down on the top of the fish to bring the wires through, bending their ends down onto the board so the specimen can be temporarily secured. Place your hand gently under the head of the fish and turn the board over. Now, the fish is right side up. You may need a little extra stuffing around the head, and since the putty may have shifted during the process, it needs to be adjusted. Make sure the head and neck are shaped nicely and also check the tail to ensure it’s properly formed.
Gently press the skin all over with the hands, deftly patting it with a small piece of smooth flat board to reduce any lumps, and to get the putty to work evenly over the surface. Get some short wires and set the head, with the mouth open as much as you require. One wire may be pushed through the nostril, another may go under the tongue, and a third parallel to it beneath the under-jaw. Arrange the teeth, some of which you will find loose, and, with "needle points," fix into position the gill-covers, which tie over with a little wrapping cotton to keep them from springing up out of place. Next look to the fins, under which put some pieces of peat, covered by stiff card-board, and nicely display them, pinning them down and binding the wrapping cotton over them.
Gently press the skin all over with your hands, skillfully patting it with a small flat board to smooth out any lumps and ensure the putty spreads evenly across the surface. Grab some short wires and position the head, with the mouth open as wide as you need. One wire can be inserted through the nostril, another can go under the tongue, and a third can run parallel beneath the lower jaw. Arrange the teeth, some of which may be loose, and use needle points to secure the gill covers in place, tying them down with a bit of wrapping cotton to prevent them from shifting. Next, check the fins, placing some pieces of peat underneath, covered with stiff cardboard, and display them neatly by pinning them down and securing them with wrapping cotton.
As a last operation, go over the whole of the outside skin with the carbolic formula, No. 15. When this dries, which it will do in the course of an hour or so, varnish the whole upper surface with best clear "paper" varnish, which will have the effect of keeping the skin and scales in position. Let the fish be now put by in a moderately warm situation to thoroughly dry, which will, in the case of a large specimen, take about a month. The skin is then like leather, with no colour in it at all, and must, of course, be subsequently coloured up according to nature, the eyes put in, and mounted in a case with appropriate water-weed; notes on all of which will be found in Chapters XII., XIII., and XIV.
As a final step, apply the carbolic solution, No. 15, over the entire outer skin. Once it dries, which should take about an hour, coat the whole top surface with the best clear "paper" varnish. This will help keep the skin and scales in place. Then, place the fish in a moderately warm spot to dry thoroughly; for a large specimen, this could take about a month. The skin will then be like leather and completely colorless and will need to be painted according to its natural colors, with the eyes added and mounted in a display case with suitable water plants. More details on all of this can be found in Chapters XII., XIII., and XIV.
Sawdust or bran may be used for stuffing the fish, which, with the addition of putty and tow to certain parts, will shape it up very fairly. Some taxidermists use tow alone, but this I do not think advisable.
Sawdust or bran can be used to stuff the fish, and when you add putty and some tow to specific areas, it will take shape quite well. Some taxidermists only use tow, but I don't think that's a good idea.
Small fish, up to 2 lb., may, after skinning, have a bent wire inserted as before, and be filled entirely with plaster of Paris, which must be mixed in readiness, and poured in the skin to fill out every part. The cut edges of the skin are now brought together, and the whole fish turned over to show its proper side and rapidly patted into shape, before the plaster has time to set.
Small fish, weighing up to 2 lb., can have a bent wire inserted after being skinned, just like before, and be completely filled with plaster of Paris, which should be mixed beforehand and poured into the skin to fill every part. The cut edges of the skin are then brought together, and the whole fish is turned over to display its proper side and quickly patted into shape before the plaster has time to set.
Beautiful models of the thicker-skinned fishes maybe made by this method, but rapidity of execution is a sine quâ non.
Beautiful models of thicker-skinned fish can be made using this method, but speed is essential.
As the student progresses he will find that it will not be necessary in all cases to cut through the scapular arch of the under side to clear out the head. As a proof, I may mention that I have just finished an 18 lb. fish, the head of which was skinned out by this process.
As the student progresses, they will realize that it won't always be necessary to cut through the scapular arch on the underside to remove the head. For example, I just finished working on an 18 lb. fish, and the head was skinned out using this method.
Small pieces of cabinet cork (about one-eighth inch thick) will be found very useful for spreading the fins of small fishes. [Footnote: Notes on repairing fins will be found in Chapter XII.]
Small pieces of cabinet cork (about one-eighth inch thick) are very handy for spreading the fins of small fish. [Footnote: Notes on repairing fins can be found in Chapter XII.]
In the event of the scales rising from the use of wet plaster or any other cause, "wrapping" cotton, i.e., "darning" cotton, or shoemakers' hemp, must be bound over them to keep them in place.
In case the scales move due to wet plaster or any other reason, "wrapping" cotton, i.e., "darning" cotton, or shoemaker's hemp should be tied over them to hold them steady.
Since the foregoing was written I have considerably modified and improved on my former method. Having tried wet "pipe" or modelling clay, with which to stuff the skin, I found that although at first the working and general shape were excellent, yet that, after a few days, the skin shrank and puckered in so abominable a fashion as to render all the labour bestowed upon it of no avail. This was most unfortunately tried upon a twenty pound pike, and so utterly misshapen did it become as to necessitate the relaxing of the specimen — the removal of the clay — and the ultimate shaping up again, by the dry plaster process. [Footnote: Several correspondents have written as to the relaxing of fish skins. This is a very easy process, nothing more being done to the skin than plunging it in water until sufficiently softened.]
Since I wrote the previous section, I've significantly updated and improved my earlier technique. I experimented with wet "pipe" or modeling clay to fill the skin, and while the initial shape and texture were great, after a few days, the skin shrank and wrinkled in such an awful way that all the effort put into it was wasted. Unfortunately, I tested this on a twenty-pound pike, and it became so distorted that I had to loosen the specimen — remove the clay — and reshape it again using the dry plaster method. [Footnote: Several people have asked about relaxing fish skins. This is a very simple process, which only involves soaking the skin in water until it's soft enough.]
This substitution of dry plaster of Paris (price about 4s. per cwt.) for sand is one of the very best things ever tried. Having skinned your fish in the manner before directed, crowd the head with peat and the face, and parts of the skin inside, and around the fins and tail, with putty. Lay the fish-skin, cut uppermost as before, and ladle in dry plaster, beginning at the tail end; as this fills in, sew up, being careful to shorten the skin, making it deep, and not long and narrow at that part; being particular also to well ram in with a short stick the plaster to fill all out, and to remove ugly creases or depressions. When about a third of the fish is done, fasten your stitches and go on filling in at the head; as you work toward the middle, lift head or tail very gently to peep underneath at the progress you are making.
This replacement of dry plaster of Paris (costing about 4s. per cwt.) for sand is one of the best methods ever tried. After skinning your fish as previously instructed, pack the head with peat and fill the face and parts of the inside skin, along with the areas around the fins and tail, with putty. Position the fish skin, cut side up as before, and pour in dry plaster, starting from the tail. As you fill it up, sew it closed, making sure to shorten the skin so that it's deep rather than long and narrow at that part. Also, be careful to firmly press the plaster in with a short stick to eliminate any ugly creases or dents. Once you’ve completed about a third of the fish, secure your stitches and continue filling at the head. As you work towards the middle, gently lift the head or tail to check on your progress underneath.
As the stuffing progresses, deepen the body toward the middle, being careful at the same time to well ram in the plaster. Finally sew up.
As you continue stuffing, make sure to pack the middle more tightly, while also pressing the plaster in well. Finally, sew it up.
Now take another board, a little more than the length and breadth of the specimen, lay it upon the top of the skin and tie it to the board on which the fish is resting; by this means you will be enabled to reverse the fish without cracking the skin or destroying the "set" of it. Untie your boards and the object is before you right side uppermost. It will now be seen if your modelling is true or not; in the latter case, note where all imperfections occur, reverse the fish once more, and ram more dry plaster in between the stitches, or if the latter be sewn up too tightly, cut them where needed, sewing up again when all is satisfactorily accomplished.
Now take another board, slightly larger than the size of the specimen, place it on top of the skin, and tie it to the board where the fish is lying. This way, you can flip the fish without tearing the skin or ruining its shape. Untie your boards, and the object will be facing the right way up. You’ll be able to see if your modeling is accurate; if not, make a note of any imperfections, flip the fish again, and pack more dry plaster between the stitches. If the stitches are too tight, cut them as needed, and sew them up again once everything looks good.
The specimen being once again right side uppermost, will appear somewhat flat along the centre, this arises from the plaster accommodating itself to the flat surface of the board. You must now, therefore, pass a wet cloth several times over the surface of the skin, and proceed to pat it in a light and dexterous manner into a more rounded shape with your hand, or by the aid of a piece of board shaped in the manner of a small flat bat.
The specimen, once again with the right side facing up, will look a bit flat in the center because the plaster adjusts to the flat surface of the board. You should now wipe the surface of the skin several times with a wet cloth and gently pat it into a more rounded shape with your hand or using a piece of board shaped like a small flat bat.
The head will require a great deal of attention; it is now flat and, perhaps, drops down upon the board, causing the upper gill cover to open more widely than it should; to obviate this, prop the nose from the underneath by a piece of peat, or by a wedge-shaped piece of wood; the tail may be twisted or thrown up by the same means if required. The mouth may be kept open as much as desired by pointed wires, one driven through the "nostrils" of the upper jaw, the other wire resting against the teeth inside the lower jaw. The fins being kept damp during the preceding operations, must now be "braced out" by the process heretofore described, and the fish washed, varnished, and dried in the usual manner.
The head will need a lot of attention; it’s now flat and may droop down onto the board, which causes the upper gill cover to open wider than it should. To fix this, prop the nose up from underneath with a piece of peat or a wedge-shaped piece of wood. The tail can also be twisted or lifted in the same way if needed. You can keep the mouth open as much as you want using pointed wires—one pushed through the “nostrils” of the upper jaw, and the other wire resting against the teeth inside the lower jaw. The fins, which should have been kept damp during the previous steps, now need to be "braced out" using the method described earlier. Finally, wash, varnish, and dry the fish in the usual way.
Nothing, you will observe, has been said as to the oval-shaped piece of board previously used inside the pike mounted by the first process. This is wanted when the fish is thoroughly set and dried; when this takes place, cut the stitches and carefully shake out the plaster. If a large fish, replace this by tow, moderately packed; on this lay an irregularly oval-shaped piece of three-quarter inch board, edges rounded and cut to the shape, and almost the length of the fish.
Nothing, as you’ll notice, has been mentioned about the oval-shaped piece of board that was used inside the pike during the first process. This is needed when the fish is fully set and dried; when that happens, cut the stitches and gently shake out the plaster. For a large fish, replace it with tow, packed moderately; on top of this, place an irregularly oval-shaped piece of three-quarter inch board, with rounded edges cut to shape, and nearly the length of the fish.
No wires are needed at the head and the tail (one end of the board running into the head), but only those required to support the specimen in its case. When this board is properly in position inside the fish, nail the edges of the skin on it with tacks of a suitable length. Nothing is now needed to complete the fish but the fixing of the eyes and the colouring of the skin. The eyes are hollow, and fixed by wax (see Chapter XII).
No wires are needed at the front and the back (one end of the board going into the front), but only those needed to hold the specimen in its case. Once this board is securely placed inside the fish, nail the edges of the skin onto it with appropriately sized tacks. The only things left to finish the fish are attaching the eyes and coloring the skin. The eyes are hollow and secured with wax (see Chapter XII).
In cases where it is undesirable or inconvenient to mount a fish as a whole, the head only may be treated as a taxidermic object. In this case cut off the head behind the scapular arch, leaving sufficient of the skin of the "neck" for nailing on the block. The head being skinned and preserved, as above directed, is then nailed by the skin of the neck on to a similar block to that shown in Fig. 27. The mouth is set open when required, and the gullet and underneath the tongue filled up and modelled with either clay, cement, or wax, the tongue remodelled or substituted by a copy in wax or cement, the composition and application of which is fully explained in Chapter XII.
In situations where it's not practical or convenient to mount a fish whole, just the head can be treated as a taxidermy piece. To do this, cut off the head just behind the shoulder area, leaving enough skin on the "neck" to attach it to the mounting block. After skinning and preserving the head as mentioned earlier, it is then nailed by the neck skin onto a block similar to the one shown in Fig. 27. When necessary, the mouth is set open, and the throat and under the tongue are filled and shaped using clay, cement, or wax. The tongue can either be reshaped or replaced with a wax or cement copy, the details of which are fully explained in Chapter XII.
Notes of the colour of the various parts of your specimen should have been taken previously; in some cases, it is a good plan to make a water-colour drawing of the whole or certain parts of your subject when fresh.
Notes on the color of the different parts of your specimen should have been taken beforehand; in some cases, it's a good idea to make a watercolor drawing of the whole or specific parts of your subject while it’s still fresh.
FISH CASTING . — Casting fishes by the plaster of Paris method deserves description, as by this means you are enabled to get correct copies of the shapes and peculiarities of any specimen, from the smallest to the largest. Procure some plaster of Paris of a finer quality — known as "S.F." — than that you have been using previously in modelling mammals, or to fill out the skins of fishes; also some tempered clay — described in Chapter VII. — and some strips of board calculated to the depth, width, and length of the fish you wish to "cast." The specimen having had all the mucus washed from its most perfect side, is laid upon one or two sheets of brown paper or common card-board ("straw-board")covering the work-table. [Footnote: I see that Rowland Ward advises the fish being washed with dilute vitriol (sulphuric acid and water) to remove this mucus.]
FISH CASTING . — Casting fish using the plaster of Paris method is worth describing, as it allows you to create accurate copies of the shapes and features of any specimen, from the smallest to the largest. Get some higher-quality plaster of Paris — known as "S.F." — than what you’ve been using for modeling mammals or filling out fish skins; also, you'll need some tempered clay — explained in Chapter VII. — and some strips of board that match the depth, width, and length of the fish you want to "cast." After washing all the mucus off the best side of the specimen, place it on one or two sheets of brown paper or regular cardboard ("straw-board") covering your work table. [Footnote: I see that Rowland Ward recommends washing the fish with a dilute solution of vitriol (sulphuric acid and water) to remove this mucus.]
Decide now as to the attitude you wish it to finally assume, and taking some of the tempered clay, cut it into thin slices, build it on, as it were, until only the upper half of the fish is exposed, build under the fins — including the caudal one — and spread them out as you wish; the clay will usually stick to their under surfaces, and hold them in position. Should they "run back," stick fine pins in them here and there, being sure, however, to cut of the heads of the latter close to the upper surface of the fins.
Decide now what attitude you want it to finally have, and taking some of the tempered clay, cut it into thin slices, and build it up until only the upper half of the fish is exposed. Add to the fins — including the tail fin — and spread them out however you like; the clay will usually stick to their undersides and hold them in place. If they start to "run back," stick fine pins in them here and there, making sure to cut the heads of the pins close to the upper surface of the fins.
It is often advisable to lay thin card-board or strong paper under the fins, if the clay is so soft as to come up over the edges. Having now nicely built in the fish — the upper surface of the clay being carefully smoothed over with a knife-blade and a stiff brush ("Artist's hog-hair, No. 8") dipped in water, surround the clay with pieces of board, set up on edge, so as to form a wooden wall around all; the height of this wall should exceed the greatest depth or thickness of the fish by some inches. Tie these four walls — planed on their inside surface — around with strong string, finally nailing outside all with long "French" nails, driven into the table as a support against pressure from within. Look all over carefully, and if any open spaces appear between the clay tablet and the boards, fill in with more clay.
It’s often a good idea to place thin cardboard or sturdy paper under the fins if the clay is soft enough to spill over the edges. Once you’ve nicely shaped the fish—carefully smoothing the top surface of the clay with a knife blade and a stiff brush ("Artist's hog-hair, No. 8") dipped in water—surround the clay with pieces of board set on edge to create a wooden wall all around. This wall should be taller than the deepest part of the fish by a few inches. Secure these four walls—planed on the inside—with strong string, and finally nail everything together using long "French" nails driven into the table for support against pressure from the inside. Check carefully for any gaps between the clay tablet and the boards, and fill those in with more clay.
The fish being now ready for casting, take a bowl, which half fill with clean water, into this "dust in" the fine plaster of Paris, in small quantities at a time, stirring each portion until all is ultimately mixed smoothly and without lumps; when enough is mixed — and the knowledge of quantity only comes with experience — pour it quickly, yet gently, over the whole surface of the fish; jarring the table with your fist causes the plaster to settle down more evenly, without leaving "blowholes." The plaster should now be an inch or more in thickness over the highest portion of the fish, in order to give sufficient strength for the "return" cast. Should this not be so, mix some more plaster and strengthen the cast, endeavouring to get a flat surface on the top.
The fish is now ready for casting. Take a bowl and fill it halfway with clean water. Gradually add fine plaster of Paris, mixing it in small amounts each time until everything is blended smoothly without lumps. Once you have enough mixed — and you'll learn the right amount with experience — pour it quickly and gently over the entire surface of the fish. Hitting the table with your fist will help the plaster settle evenly and avoid "blowholes." The plaster should be at least an inch thick over the highest point of the fish to ensure enough strength for the "return" cast. If it's not thick enough, mix more plaster and reinforce the cast, trying to achieve a flat surface on top.
After ten minutes, take away the nails and boards, thus allowing more air to get to the mass of plaster. In half an hour — should the plaster be of good quality — the mould may be raised, turned over, and the fish will tumble out, or may be pulled carefully out without the least trouble. Remove the clay, and on looking into the mould it will, if properly made, show every scale and every line, be free from "blow-holes" or blemishes of casting, besides having a fairly even and square surface surrounding the cavity from whence the fish has been extracted.
After ten minutes, take off the nails and boards to let more air circulate around the plaster. In half an hour—if the plaster is good quality—you can lift the mold, flip it over, and the fish will fall out, or you can gently pull it out without any hassle. Remove the clay, and when you look inside the mold, it should, if made correctly, show every scale and detail, be free from air bubbles or casting flaws, and have a fairly even and straight surface around the cavity where the fish was taken out.
This first mould can be cast into again by plaster of Paris, and will, in the case of most fishes, turn out a satisfactory reproduction of the original. Some fishes there are, however, so curiously shaped as to make the first or "female" mould so "undercut" as to render it impossible to get a return cast. In this case, nothing avails but the destruction of the first to release the copy. There are several ways of doing this; one of the most simple is sawing with many cuts the edges of the first, or, as it now becomes, the "waste" mould as near to the cavity as you dare, before casting into it; having done which, and allowed several hours, or a day even, to elapse, you proceed to break it away, piece by piece, by gentle blows with a hammer, leaving the enclosed fish to make its appearance little by little. When this plan is adopted, the last cast or copy must be run double the thickness to that you wish to destroy, otherwise you may break the copy instead of the "waste" mould. Another way is to make the first mould very thin, or to put thin successive coats of plaster over the fish, with brown paper between each coat, and subsequently breaking them away, layer by layer, after the fish is extracted and the mould is filled in by plaster.
This first mold can be recast using plaster of Paris, and for most fish, it will create a satisfactory reproduction of the original. However, some fish have such unique shapes that the first or "female" mold becomes so "undercut" that it's impossible to get a return cast. In this case, the only option is to destroy the first mold to release the copy. There are several ways to do this; one of the simplest is to saw multiple cuts along the edges of the first mold, which now becomes the "waste" mold, as close to the cavity as you can before recasting. After doing this and allowing several hours, or even a day, to pass, you can break it away piece by piece with gentle hammer blows, revealing the enclosed fish gradually. When using this method, the last cast or copy must be twice as thick as what you want to destroy; otherwise, you might break the copy instead of the "waste" mold. Another method is to make the first mold very thin or to apply thin, successive layers of plaster over the fish, with brown paper between each layer, and then break them away layer by layer after extracting the fish and filling the mold with plaster.
In casting into the first mould for the "copy" or perfect cast, it will, of course, be necessary to lay it concavity uppermost, and to surround it with a wall of board like the last, brushing over the concavity, and indeed the whole of the tablet surrounding it, with soft soap and water, or oil, or thin pipe-clay and water; or, if the mould has been baked dry, soaking it in water alone will be sufficient to prevent the copy sticking. Recollect that the flatter the tablet — surrounding the cavity left by the fish — is made, the better will be that of the model.
In casting the first mold for the "copy" or perfect cast, you will need to position it with the concave side facing up and build a wall of board around it, just like the last one. Brush the concave area and the entire tablet surrounding it with soft soap and water, or oil, or a mixture of thin pipe clay and water. If the mold is baked dry, soaking it in water alone will be enough to stop the copy from sticking. Remember, the flatter you make the tablet surrounding the cavity left by the fish, the better the model will turn out.
Supposing that your cast, or model fish, has been turned out in good condition, you will see that there are still certain inequalities of the tablet, and certain roughnesses around the fins, mouth, etc..; these latter must be "relieved" and undercut by the aid of the "undercutting" and "relieving" tools (see Figs. 29 and 30), the tablet must be pared flat by a long broad flat chisel called a "firmer," and the edges also nicely squared.
Supposing your cast, or model fish, has come out well, you'll notice some uneven spots on the tablet and some rough areas around the fins, mouth, etc. These rough areas need to be smoothed out and undercut using the "undercutting" and "relieving" tools (see Figs. 29 and 30). The tablet should be flattened with a long, broad flat chisel called a "firmer," and the edges should also be squared nicely.
Your fish is now in high relief on a flat background, but, though having correct form, it still lacks colour. How to colour plaster satisfactorily is a puzzle which has perplexed more persons than taxidermists. Speaking for myself, I say that, having coloured the cast, when wet and when dry, with water-colours, used paper varnish when dry, with water-colours and varnished and painted, and painted and varnished the cast in oils, having used "mediums," tempera painting, "secco" — yet I am not satisfied; there appears a want of softness and brilliancy; probably the electro-type or wax process I am now trying may give the desired effect.
Your fish is now clearly visible against a simple background, but even though it looks right, it still lacks color. Figuring out how to color plaster effectively is a challenge that has confused more people than just taxidermists. Personally, I've tried coloring the cast when it was wet and dry with watercolors, using paper varnish when dry, and I've painted it and then varnished it, as well as used oils with different mediums, tempera painting, and "secco" techniques — yet I'm still not happy with the results; it feels like there's a lack of softness and brightness. I'm currently experimenting with the electrotype or wax process, which I hope will achieve the effect I'm looking for.
So disgusted was I at the seeming impossibility of getting "tone" on plaster, that I determined to try paper for the last cast or model; to this end I took lessons at a theatre in the art of "making (paper) faces," with the result that I now employ paper whenever practicable, and find it answer, from a 2 lb. perch to a 2 cwt. skate. Two or three most valuable results accrue from the substitution of paper for plaster. First, extreme lightness combined with strength; and secondly, of course, excellence of detail and facility of colouring in either water or oil. For remarks upon the artistic mounting of fishes, see Chapters XII., XIII., and XIV.
I was so frustrated by the seeming impossibility of getting "tone" on plaster that I decided to try using paper for the last cast or model. To do this, I took lessons at a theater on the art of "making paper faces," and now I use paper whenever possible. I find it works well, whether I'm working on a 2 lb. perch or a 2 cwt. skate. There are two or three very valuable benefits from using paper instead of plaster. First, it’s extremely lightweight yet strong; and secondly, it allows for excellent detail and easy coloring in either water or oil. For comments on the artistic mounting of fish, see Chapters XII., XIII., and XIV.
There are, I find, two excellent articles on fish-casting in "Science Gossip for 1878," to which I must refer my readers for further details. They agree to differ, however, in one important particular. One writer says that plaster-work is as "cleanly as any cooking operation, and there is no reason why ladies should not engage in it"! The other writer speaks of it as "filthy," and, really, I feel inclined to back his opinion; for having now used some tons of plaster, ranging in quantities from a few pounds to 3 cwt. at a time, I must say that, of all the diabolical messes for getting into the hair or on the boots, and about a house or workshop, plaster is the worst. "Matter in the wrong place," ma foi! you can't keep it in the right.
I’ve found two great articles on fish-casting in "Science Gossip for 1878," which I recommend to my readers for more details. However, they disagree on one key point. One writer argues that plaster work is as “clean as any cooking task, and there’s no reason why women shouldn’t do it!” The other writer describes it as “filthy,” and honestly, I’m inclined to agree with him; having used several tons of plaster, from just a few pounds up to 3 cwt. at a time, I can say that, of all the messy materials that get stuck in your hair or on your shoes, plaster is the worst. “Matter in the wrong place,” ma foi! you just can't keep it where it’s supposed to be.
I see that Mr. Taylor, amongst other suggestions, advises the use of half glue and treacle (see Chapter XII.) to cast the first mould for groups of small fishes. If these glue-moulds were backed with plaster "piece-moulds," they might be useful for larger "undercut" specimens.
I see that Mr. Taylor, among other suggestions, recommends using half glue and treacle (see Chapter XII.) to create the first mold for groups of small fish. If these glue molds were supported by plaster "piece molds," they could be useful for larger "undercut" specimens.
Plaster moulds and casts, it must be remembered, are, when dried, about a quarter of their weight when wet, and the same bulk of dried (not dry) plaster is not half the weight of dried clay.
Plaster molds and casts, it’s important to remember, weigh about a quarter of their wet weight when dried, and the same amount of dried (not completely dry) plaster does not weigh half as much as dried clay.
A very scientific way of getting the correct shape of a fish for mounting by taxidermy is to take a cast of the specimen and to then adjust the skin, stuffed by the dry-plaster process, into the cavity of the mould, suffering all to dry therein.
A scientific method for achieving the right shape of a fish for taxidermy is to create a cast of the specimen and then fit the skin, which has been stuffed using the dry-plaster technique, into the mold, allowing everything to dry inside.
Fishes are now and then mounted in halves, should one side be very badly mangled; the effect is not very good, however, and should not be resorted to but in extreme cases.
Fishes are sometimes mounted in halves if one side is badly damaged; however, the result isn't very appealing and should only be done in extreme cases.
Large fishes, such as sharks, rays, and sturgeons of great size and weight, must be cast by the "piece-mould" process — described in Chapter XII. The mounting of such as these, by processes of taxidermy, differs from all previously described in this chapter. When of excessive size and weight, they may be "set up" with wood and iron (see Chapter VII.), or if smaller — say, up to 5 cwt. — may be managed by being cut underneath along the stomach, from head to tail, and mounted by two short iron rods being screwed into a beam of wood, or bar of iron fitted into the body, now filled out with hay, straw, or, better still, clean shavings, supplemented by tow here and there.
Large fish, like sharks, rays, and large sturgeons, need to be created using the "piece-mould" method described in Chapter XII. The way these are mounted through taxidermy is different from what has been mentioned earlier in this chapter. If they are extremely large and heavy, they can be supported with wood and iron (see Chapter VII). For smaller fish—up to around 5 hundredweight—they can be handled by making a cut along the stomach from head to tail and then mounted using two short iron rods screwed into a wooden beam or an iron bar placed inside the body, which is then filled with hay, straw, or preferably clean shavings, with some tow added here and there.
When all is sewn up, and the mouth — if open — modelled by any of the methods described in Chapter XII., the short iron rods protruding from each end of the fish must be let into metal sockets (iron gas pipes will often do) screwed into iron feet, supporting all clear from the floor of the museum or room they are to be exhibited in.
When everything is finished, and the mouth — if open — shaped by any of the methods described in Chapter XII., the short iron rods sticking out from each end of the fish need to be fitted into metal sockets (iron gas pipes often work) that are screwed into iron feet, keeping everything elevated off the floor of the museum or room where they will be displayed.
============================================
Understood! Please provide the text you'd like me to modernize.
THE chief requirement in preserving reptiles is a fine and delicate hand, in order to deal successfully with these mostly thin-skinned objects. I will now take one of the easiest reptiles as our first study, viz., the common snake.
The main requirement for taking care of reptiles is a gentle and careful touch, as you need to successfully handle these mostly delicate creatures. I will now select one of the simplest reptiles for our first study, specifically, the common snake.
Formerly, by the old method of skinning, the bodies of all snakes were removed through an incision made along the skin of the stomach. This was a mistake, for the smaller snakes may be skinned through the mouth, in this wise: Open the jaws of the snake to their fullest extent, taking care, if a venomous one, not to scratch the fingers with the fangs, which, in the adder or viper, lie folded backward along the roof of the mouth. If the fangs are not required to be shown, the safest plan will be to cut them away with a pointed pair of scissors.
Previously, with the old method of skinning, the bodies of all snakes were taken out through a cut made along the belly. This was a mistake, because smaller snakes can be skinned through the mouth instead. Here's how: Open the snake's jaws as wide as possible, making sure not to scratch your fingers with the fangs if it's a venomous one, since the fangs in an adder or viper are folded back along the roof of the mouth. If you don't need to display the fangs, the safest approach is to cut them out with a sharp pair of scissors.
Holding the snake by the back of the neck with the left hand, push the pointed knife or scissors into the mouth towards the back of the head, feeling at the same time with the point of the knife for the first joint of the cervical vertebrae, having found which proceed to dislocate it with the point of the knife, gently feeling your way, and cutting downward toward the right hand, the thumb of which presses against the snake's head at the under jaw. Feel round with the point of the knife or scissors up toward the outer skin, gradually working the flesh away. Cut away the under jaw, inside the skin, from its attachment to the flesh, pushing the point of your scissors or knife at the same time as far as you can get it down inside the skin.
Holding the snake by the back of its neck with your left hand, push the sharp knife or scissors into its mouth towards the back of its head, while using the tip of the knife to locate the first joint of the cervical vertebrae. Once you've found it, dislocate it carefully with the knife's point, cutting downwards toward your right hand, which should be pressing against the snake's head at the underside of its jaw. Use the tip of the knife or scissors to feel around towards the outer skin, gradually working the flesh away. Cut away the underside of the jaw, inside the skin, from where it attaches to the flesh, while trying to push the scissors or knife as far down inside the skin as you can.
This all requires time and patience, lest you push the point of the knife or scissors through the skin, and also as you will not at the first trial succeed in detaching the head from the body.
This all takes time and patience, or else you might push the blade of the knife or scissors too hard against the skin, and you probably won’t succeed in separating the head from the body on your first try.
The knife or scissors must then be run a little way down the back, to detach the skin. The neck being now entirely free, lay the knife down, and endeavour to push the broken or cut part of the neck up through the mouth; seize the end with your right-hand fingers and gradually slide the skin down with your left hand, turning it inside out until the vent is reached, which carefully cut away; beyond this the skin, instead of coming off easily, holds most tenaciously to the flesh, and the knife again comes into play to free it all around.
The knife or scissors should then be used to make a small cut down the back to separate the skin. With the neck now completely free, set the knife aside and try to push the broken or cut part of the neck up through the mouth. Grab the end with your right hand and slowly pull the skin down with your left hand, turning it inside out until you reach the vent, which you should carefully cut away. After that, the skin doesn’t come off easily; it clings tightly to the flesh, so you’ll need the knife again to loosen it all around.
Near the extreme tip of the tail it will be almost impossible to get the flesh out, you must therefore skin as far as you can, and then make a small incision underneath, lay back the skin on each side, and cut the flesh away. This operation will bring the outside of that part inside. Return, it, and neatly sew up the cut from the inside, trim away all flesh from the skull bone, take out the eyes, put a stitch in the vent, and anoint the whole of the skin with the preservative.
Near the very tip of the tail, it will be nearly impossible to remove the flesh. You should skin as much as you can, then make a small cut underneath, pull back the skin on either side, and cut the flesh away. This will turn the outer part inside out. Flip it back, and neatly sew up the cut from the inside. Trim away any flesh from the skull bone, take out the eyes, stitch up the vent, and coat the entire skin with the preservative.
To return the skin, push a small round stick down and pull the skin back on it; when nearing the tail, the stick may be removed and the fingers used to gradually work this end through, or tie a small piece of wool to form a knot on the end of a piece of doubled thread, and push it through by a long fine needle from the inside to the out, at the same time allowing the needle to come through, by doubling up the skin. You may reach the needle with your fingers, or by long pliers, or even shake it down by its own weight, then by pulling gently you return the skin effectually.
To put the skin back, push a small round stick down and pull the skin over it; as you get close to the tail, you can remove the stick and use your fingers to carefully work this end through. Alternatively, tie a small piece of wool to make a knot at the end of a doubled thread and push it through with a long, thin needle from the inside to the outside, while also folding the skin over to let the needle come through. You can reach the needle with your fingers, long pliers, or by letting it drop down by its own weight, then gently pull to effectively return the skin.
To stuff the snake insert a funnel in the mouth, and fill the skin through this with fine dry sand, or dry plaster of Paris, taking great care to shake the sand well down, and fill in every part in a regular and natural manner. On nearing the head, push a piece of wool in the mouth to prevent the sand from running back, and then adjust the snake to the position you require, leaving the head to be modelled last with clay, putty, or plaster, then remove the wool and make up the throat and inside of the mouth. The natural tongue should be left in, and displayed with fine entomological pins pushed in the hollow underneath, and, if shown open-mouthed, the fangs must be dropped, and the head raised, as in the attitude of striking.
To stuff the snake, insert a funnel into its mouth and fill the skin with fine dry sand or dry plaster of Paris through the funnel. Make sure to shake the sand down well and fill every part evenly and naturally. As you approach the head, place a piece of wool in the mouth to keep the sand from falling back. Then, position the snake how you want it, leaving the head to be shaped last with clay, putty, or plaster. After that, remove the wool and finish the throat and inside of the mouth. The natural tongue should be left in place, displayed with fine entomological pins pushed into the hollow underneath. If the snake is shown with its mouth open, the fangs need to be lowered, and the head should be raised as if it's about to strike.
Large snakes, such as rock snakes or boas, must be cut on the old system, viz., under the belly and skinned out, working up and down, as the muscles have so firm an attachment that the slipping-out process cannot be resorted to, but each inch will have to be laboriously cut away from the skin.
Large snakes, like rock snakes or boas, need to be butchered using the old method, which means cutting under the belly and skinning them out, going up and down, because their muscles are so strongly attached that you can't just slip the skin off. Instead, you'll have to painstakingly cut each inch away from the skin.
Sawdust, mixed with a little sand, will be found very useful for stuffing the larger snakes, as the weight of so large a quantity of sand, or plaster, is too great to successfully manipulate.
Sawdust, combined with a bit of sand, is really useful for filling the larger snakes, since the heaviness of a large amount of sand or plaster is too much to handle effectively.
A few hints as to snakes and snake bites may not be out of place here. To distinguish the only venomous snake found in the British Isles is an easy matter, if you have the opportunity of examination. In the first place, the viper appears to have a more spade-like and flatter head than the common snake, and has a black cross from near the neck running up to the centre of the head, where it terminates in a black, oval-shaped spot. But the greatest distinction, perhaps, is that a decided pattern runs down the centre of the back, appearing as a chain of obtusely-shaped diamond markings, joined together, and somewhat confused in places.
A few tips about snakes and snake bites might be useful here. It's easy to identify the only venomous snake in the British Isles if you get a chance to examine it. First, the viper has a more spade-shaped and flatter head compared to the common snake, and it features a black cross from just below the neck that extends to the center of the head, ending in a black, oval-shaped spot. However, the most noticeable difference is likely the distinct pattern that runs down the center of its back, which looks like a chain of bluntly-shaped diamond markings that are connected and somewhat jumbled in places.
Again, it has in the upper jaw two fangs or poison teeth, which in rest lie folded back; on pulling them down with a needle, or by the crooked awl, they appear as fleshy lobes, out of the apex of which is thrust a little glittering point like a small fish bone. This small bone or fang is hollow, and through it the poison is ejected by a process too complex to describe in the pages of this work.
Again, it has two fangs or poison teeth in the upper jaw that are folded back when at rest. When you pull them down with a needle or by using a curved awl, they look like fleshy lobes, with a tiny shiny tip that resembles a small fish bone sticking out. This small bone or fang is hollow, and the poison is released through it using a process that's too complicated to explain in this text.
The slow-worm, common snake, and the one other rarer species found in Britain, have merely the ordinary holding teeth, and are all perfectly harmless. Should anyone be so unfortunate as to be bitten or scratched by a viper's fang, a speedy application of liquor ammoniae fort (strong ammonia) to the wound, with the further application of a ligature above the bitten part will be found of benefit, and perhaps avert serious consequences until surgical aid is obtained. Ipecacuanha has been recommended, powdered and applied as a poultice, with an internal administration at the time also, of the same drug, but that requires medical knowledge as to the extent and frequency of the doses.
The slow-worm, common snake, and the one other rarer species found in Britain have only ordinary holding teeth and are completely harmless. If someone is unfortunate enough to be bitten or scratched by a viper, quickly applying strong ammonia to the wound and tying a ligature above the bitten area can help and might prevent serious issues until medical help arrives. Ipecacuanha has been suggested, powdered and used as a poultice, with the same drug given internally as well, but that needs medical expertise to determine the right amount and frequency of doses.
To skin frogs, they must be plunged for an hour or so into the hardening solution, No. 15, and then skinned out from the mouth. This requires a finer hand and greater patience even than skinning a snake, as they must be carefully cut all around the mouth, and the body drawn out to the tips of the toes. They may then be filled with sand or plaster. Various comic scenes may be made by skilfully grouping frogs, but if required to stand on their hind legs, etc.., they will have to be wired, by pushing fine wires or stout "needle points" through a small piece of board into the sole of the foot, to run a little distance up the legs. A drop or two of strong glue, or shellac, may then be placed under each foot, which should be tied down until the glue sets hard.
To skin frogs, you need to immerse them in the hardening solution, No. 15, for about an hour, and then skin them from the mouth. This takes a steadier hand and more patience than skinning a snake, as you have to carefully cut around the mouth and pull the body out to the tips of the toes. After that, you can fill them with sand or plaster. You can create various funny scenes by skillfully arranging the frogs, but if you want them to stand on their hind legs and such, you'll need to use wires. This involves pushing fine wires or sturdy "needle points" through a small piece of board into the sole of the foot, extending them a little ways up the legs. Finally, place a drop or two of strong glue or shellac under each foot and tie them down until the glue hardens.
Tortoises and turtles may be skinned out, by having the skin of the legs, tail, and head, cut away all round from their attachments to the under shell or plastron. The joints of the limbs should then be cut away from the inside, and the tortoise or turtle laid on its back, in which position the separated limbs hang down, remaining only attached by their top skin (now underneath), to the upper part of the shell or carapace. This exposes the whole of the remaining skin and flesh, which must be cut and scraped out with knives, or with the under-cutting tool. The limbs are then skinned out, preserved and stuffed, and their proper bottom edges, when in position, pushed back and attached by needle points to the plastron.
Tortoises and turtles can be skinned by cutting around the skin of the legs, tail, and head, severing it from their attachment to the underside of the shell or plastron. The joints of the limbs should then be cut from the inside, and the tortoise or turtle should be laid on its back, allowing the detached limbs to hang down, still connected by their top skin (now underneath) to the upper shell or carapace. This position reveals all the remaining skin and flesh, which must be cut and scraped out with knives or an under-cutting tool. The limbs are then skinned, preserved, and stuffed, and their proper bottom edges, once in place, are pushed back and attached to the plastron with needle points.
Lizards, "horned toads," and chameleons may be cut underneath and filled out with sand or plaster.
Lizards, "horned toads," and chameleons can be cut open and filled with sand or plaster.
In all cases where sand is used it may, after the animal is thoroughly dry, be shaken out if desired; but if the reptile is not very large, it is better to leave it in.
In all situations where sand is used, it can be shaken out once the animal is completely dry, if you prefer; however, if the reptile isn't very large, it's better to leave it in.
Dry plaster will, in nearly all cases, be found the best medium for filling out the skins of reptiles; with this I have succeeded in giving characteristic and life-like attitudes to moderately-sized alligators, etc..
Dry plaster will, in almost all cases, be the best material for filling out the skins of reptiles; with this, I have successfully created characteristic and lifelike poses for moderately-sized alligators, etc.
Very large saurians may be mounted by either of the methods referred to in the closing sentences of the last two chapters.
Very large reptiles can be ridden using either of the methods mentioned in the last two chapters' closing sentences.
THE art of tanning is, as I before observed (vide Chapter I.), of the highest antiquity, as systems which are now in vogue must have been known — if even in a modified form — to the ancients. We may roughly divide the operation of tanning into two distinct classes: One which deals with skins without the preservation of the fur, and which turns the skin so operated upon into the material known as leather; and the other in which we seek to preserve the fur or hair in its normal position, at the same time dressing or rendering soft the actual skin itself. [Footnote: Some time during 1874, Mr. Joseph Tussaud read a paper before the Society of Arts, in which he described an ingenious method of removing the fur of any animal to an artificial "backing" of india-rubber or flannel, whilst the original skin was utilised as leather.]
The art of tanning is, as I mentioned earlier (see Chapter I), very old, as the techniques we commonly use today must have been known — even if in a different form — to people in ancient times. We can generally break down the tanning process into two main categories: one that involves treating skins without preserving the fur, turning the treated skin into what we call leather; and the other that aims to keep the fur or hair in its natural position while also softening the skin itself. [Footnote: At some point in 1874, Mr. Joseph Tussaud presented a paper to the Society of Arts, where he explained a clever technique for removing the fur from any animal and attaching it to an artificial "backing" made of rubber or flannel, while the original skin was turned into leather.]
The first process — the making of leather — does not lie within the scope of this work; suffice it to say, that the hair or fur is first removed by lime, etc.., and that after the skin is scraped it is treated variously with oak bark, valonia, sumach, divi-divi, etc..; it is a long and tedious process, and certainly does not lie within the province of a taxidermist to attempt; and though it is possible for a tanner to preserve the fur with the skin, yet the attempt is undesirable, by reason of the false or unnatural colour it permanently gives the fur — totally destroying the character of a light one, and heightening or lowering, as the case may be, the tint of a dark fur. [Footnote: Technical works on Tanning are "Tanning, Currying, and Leather-dressing," by F. Dussance: "The Arts of Tanning, Currying, and Leather-dressing," from the French of J. de Fontenelle and F. Malepeyre.]
The first process—making leather—falls outside the scope of this work; it’s enough to say that the hair or fur is first removed using lime, and after the skin is scraped, it’s treated variously with oak bark, valonia, sumach, divi-divi, and others. It’s a long and tedious process, certainly not something a taxidermist should try. While a tanner can preserve the fur with the skin, it’s not recommended because it gives the fur an unnatural color, ruining the character of light fur and altering the tone of dark fur. [Footnote: Technical works on Tanning are "Tanning, Currying, and Leather-dressing," by F. Dussance: "The Arts of Tanning, Currying, and Leather-dressing," from the French of J. de Fontenelle and F. Malepeyre.]
To obviate all these difficulties and disagreeable effects, a totally distinct method of dressing skins has been devised, which is called "white leather dressing." Before I describe this, however, it may be as well to say that no liquid, powder, or combination of liquids or powders, is known into which a skin can be plunged, and — without the aid of manual labour — come out as leather. I mention this to correct a popular error, many people supposing that labour has no part in the preparation of "white leather." To those who are not prepared to work hard, and very hard indeed, I say, Do not waste your time in reading this chapter.
To solve all these problems and unpleasant effects, a completely new method for treating hides has been created, known as "white leather dressing." Before I explain this, it’s worth mentioning that there’s no liquid, powder, or mix of liquids or powders that can soak a hide and — without any manual effort — turn it into leather. I bring this up to clear up a common misconception, as many people think that labor plays no role in making "white leather." For those not ready to work hard, and I mean really hard, I suggest you don’t waste your time reading this chapter.
The usual and time-honoured method of dressing skins, say a rabbit's skin, is — directly it is removed from the animal — to nail it on a board, and rub it in with alum four parts, and common salt one part, or plunge it in a warm solution of the same for a day or so, taking it out, nailing it on a board, letting it dry, rubbing it down with pumice stone, and plunging it again and again, and repeating the drying and pumice-stoning process until the skin becomes pliable. This is rather an uncertain process, for if well steeped the hair or fur is constantly damp, or dripping even, in humid weather, and if alum alone is used, though killing much of the dampness, it renders a fine thin skin of a parchment-like texture.
The traditional and well-established way of preparing animal skins, like a rabbit's skin, is to immediately nail it to a board after it's taken from the animal. Then, rub it with a mixture of four parts alum and one part common salt, or soak it in a warm solution of the same for about a day. After that, take it out, nail it to a board, let it dry, rub it down with pumice stone, and repeat the soaking and drying process multiple times until the skin is flexible. This method can be a bit unreliable because if it's soaked too long, the hair or fur can stay wet or even drip in humid weather. On the other hand, if only alum is used, it reduces dampness but leaves the skin with a thin, parchment-like texture.
However, as anything is better than a damp skin, I have used a mixture of four parts of burnt alum to one part of saltpetre (see Formula No. 9) for small skins, finally rubbing down and dressing the skin with lard, into which a little essence of musk has been stirred, and kneading the skin with the hands in bran to remove the superflous grease.
However, anything is better than damp skin, so I've used a mixture of four parts burnt alum to one part saltpeter (see Formula No. 9) for small skins. Finally, I rub down and treat the skin with lard, into which I've mixed a bit of musk essence, and then knead the skin by hand in bran to remove the excess grease.
This, and all other such processes where alum is used, must, however, give way to the following, which I have used for certain skins for years, and for which I was originally indebted to a correspondent in the English Mechanic; his formula was: "Mix bran and soft water sufficient to cover the skins, let this stand four hours covered, before being used, then immerse the skins, keeping them well covered for twenty-four hours (less in India), then take out, wash clean, and carefully scrape off all the flesh. To one gallon of water (hot) add one pound of alum and a quarter of a pound of salt. When dissolved and the mixture is cool enough to bear the hand, immerse the skins for twenty-four hours, take out and dry in the shade, and well rub with the hand.
This process, as well as all others that involve alum, should give way to the following method, which I've used for certain types of skins for years and which I initially learned from a correspondent in the English Mechanic. His formula was: "Mix bran with enough soft water to cover the skins, let it sit for four hours while covered before using it, then immerse the skins, keeping them well covered for twenty-four hours (or less in India). After that, take them out, wash them thoroughly, and carefully scrape off all the flesh. To one gallon of hot water, add one pound of alum and a quarter pound of salt. Once dissolved and the mixture is cool enough to touch, immerse the skins for twenty-four hours, then take them out, dry them in the shade, and rub them well with your hands."
Stir the liquor, and again immerse for twenty-four hours; dry, and hand-rub as before, and then put the skins for twenty-four hours into warm oatmeal and water, stirring occasionally. Dry in the shade, and when the skin is nearly dry, hand-rub till quite dry."
Stir the liquid, then soak for another twenty-four hours; dry it, and hand-rub as before. After that, place the skins in warm oatmeal and water for twenty-four hours, stirring from time to time. Dry them in the shade, and when the skins are almost dry, hand-rub until completely dry.
The only thing I have found necessary to guard against in this is, that the skins must be perfectly fresh before being put in the bran and water, otherwise it will be necessary to rub them in with the salt and alum first. Another improvement is, to tear up the fibre with a little instrument I have invented, or rather adapted (see Fig. 35), which is simply a "hog scraper," ground up sharp all round, and then filed up into short rounded teeth where shown; this will be found of incalculable service in tearing off the hard upper skin or dried flesh and blood, which locks up as it were the true skin, and which must be got at before the pelt will become at all flexible.
The only thing I've found necessary to watch out for here is that the skins need to be perfectly fresh before they're soaked in the bran and water. Otherwise, you'll have to rub them with salt and alum first. Another improvement is to shred the fiber using a little tool I invented, or rather adapted (see Fig. 35). It’s basically a "hog scraper," sharpened all around, with short rounded teeth filed in as shown. This tool is incredibly useful for removing the tough outer skin or dried flesh and blood that traps the true skin, which needs to be accessed before the pelt can become flexible.

Often a thorough wetting of the skin will considerably facilitate this operation. Constant scraping and hard hand-rubbing, similar to a washerwoman's "rubbing" of clothes, is necessary. In the cases of some skins which are obstinate, thick, or have been simply sun-dried, as are many tigers' and leopards' skins sent from India, it will be found necessary to fix them over a sloping board or on the edge of a table, and to use a spokeshave, or currier's thinning knife, to thin them down — perhaps an eighth of an inch all over — then tear the fibre up with the scraper, grease them with lard, to which has been added essence of musk, and punch them for several hours or several days with a "dolly" in a tub half full of bran or hard-wood sawdust; finally covering them with plaster of Paris, or powdered whiting, to absorb the grease; scraping off the old plaster or whiting, and adding fresh from time to time, until the skin is freed of fat and perfectly pliant. [Footnote: Professional workmen often knead the lard into skins by the medium of their feet and hands — not too clean an operation!]
Often, thoroughly wetting the skin will make this process much easier. Continuous scraping and hard hand-rubbing, similar to how a washerwoman scrubs clothes, are necessary. For stubborn, thick skins or those that have just been sun-dried, like many tiger and leopard skins sent from India, it may be necessary to fix them over a sloping board or on the edge of a table and use a spokeshave or a currier's thinning knife to thin them down—perhaps an eighth of an inch all over—then tear the fibers up with the scraper, grease them with lard mixed with essence of musk, and pound them for several hours or days with a "dolly" in a tub half full of bran or hardwood sawdust; finally, cover them with plaster of Paris or powdered whiting to absorb the grease, scraping off the old plaster or whiting and adding fresh from time to time until the skin is free of fat and perfectly pliable. [Footnote: Professional workers often knead the lard into the skins using their feet and hands—not the cleanest operation!]
To afterwards clean the fur, dress it down with a "scratch-card" (to be procured of any ironmonger) — steel wire woven on cloth in such a manner that short ends protrude like a wire brush.
To clean the fur afterward, use a "scratch card" (which you can get from any hardware store) — it's made of steel wire woven onto cloth so that the short ends stick out like a wire brush.
Very fat skins, such as dogs' skins, may, if perfectly fresh, be nailed out and gone over with a saturated solution of borax, or a solution of one part borax to one-eighth part saltpetre, and left to dry in the shade for three months, after which they may be scraped, and their natural fat will, after all superfluity has been removed with plaster, etc.., be found to have sufficiently imbued the under or proper skin to render the final greasing unnecessary.
Very thick skins, like those of dogs, can be nailed out and treated with a saturated solution of borax, or a mixture of one part borax to one-eighth part saltpeter, as long as they are perfectly fresh. They should be left to dry in the shade for three months, after which they can be scraped. The natural fat will, after clearing away any excess with plaster and other materials, be found to have soaked into the underlying skin enough to make any final greasing unnecessary.
The two foregoing processes seem to have been modified with some success by Mr. R. Backhouse, of Stockton-on-Tees, whose process is spoken of in the Field of June 3rd, 1882, as follows:
The two processes mentioned earlier appear to have been successfully adapted by Mr. R. Backhouse from Stockton-on-Tees, whose method is discussed in the Field on June 3rd, 1882, as follows:
"The skin, which should be removed from the animal as soon as possible after it has been killed, is stretched and tacked on to a board, the flesh side being outwards. This is at once covered with lard carefully spread over the entire surface, no portion being allowed to escape. As the moisture dries out of the skin, the lard enters the pores and supplies its place, and in about a week's time (the lard being carefully renewed when requisite) the skin will have altered its character, in consequence of being penetrated by the grease. It is then removed and washed thoroughly in warm water and soap until the external grease is removed.
The skin, which should be taken off the animal as soon as possible after it’s been killed, is stretched and secured onto a board with the flesh side facing out. It’s then covered completely with lard, making sure that every part is coated. As the moisture evaporates from the skin, the lard fills the pores and takes its place. After about a week (with the lard being replaced as needed), the skin will have changed due to being saturated with the grease. It is then taken off and thoroughly washed in warm water and soap until all the external grease is gone.
During the drying it is necessary to pull and stretch the skin in all directions, so that its texture opens, and it becomes white, owing to the admission of air into the pores; this stretching is accompanied, or rather preceded, by careful scraping or currying with a sharp knife or razor, to remove the fleshy matters and render the skin thinner. With the larger number of skins the process is successful; but some few go bad, apparently from not absorbing the lard with sufficient rapidity."..
During the drying process, it's important to pull and stretch the skin in all directions so that its texture opens up and it turns white because air gets into the pores. This stretching is usually preceded by careful scraping or currying with a sharp knife or razor to remove any flesh and thin out the skin. Most skins turn out successfully; however, a few go bad, seemingly because they don't absorb the lard quickly enough.
Possibly the species of mammals treated may have something to do with this, the skins of carnivorous animals bearing exposure better than those of the rodentia — hares, rabbits, squirrels, etc.., and insectivora — bats, shrew-mice, and moles — indeed, the latter animals must be skinned almost as soon as they are dead, or the skin turns "green" and goes bad in a very short time. No doubt the vegetable and insect food consumed by these cause fermentation after death, with the resultant putrefaction of the bowels and the thin coverings of the latter.
Possibly the types of mammals discussed have something to do with this, as the skins of carnivorous animals hold up better when exposed than those of rodents—hares, rabbits, squirrels, etc.—and insectivores—bats, shrew-mice, and moles. In fact, the latter animals need to be skinned almost right after they die, or their skin can turn "green" and spoil very quickly. It's likely that the plant-based and insect diets these animals consume cause fermentation after death, leading to the decay of their intestines and the fragile layers around them.
I would here point out, however, that small skins — cats', rabbits', etc.. — will be perfectly preserved if stretched out whilst fresh, cured with the chloride of lime preservative (No. 4), and then finally treated with lard and essence of musk, and finished off by either of the preceding methods to render them clean and supple. A correspondent who had treated some cats' skins by this method writes to say he has "succeeded in curing some cats' skins in an admirable manner" by following these instructions.
I want to point out that small skins — like those of cats, rabbits, etc. — can be perfectly preserved if they are stretched out while fresh, cured with the chloride of lime preservative (No. 4), and then treated with lard and musk essence. Finally, use either of the previous methods to make them clean and supple. A correspondent who used this method on some cat skins wrote to say he has "succeeded in curing some cat skins in an admirable manner" by following these instructions.
A very convenient mixture of borax and another natural salt has been brought out by Mr. Robottom, of Birmingham (see Chapter I). I have given his preparation a long and patient investigation, and can recommend it for small skins, while its convenient form, cleanliness, and low price, place it within the reach of all amateurs.
A very handy mix of borax and another natural salt has been developed by Mr. Robottom from Birmingham (see Chapter I). I have thoroughly examined his product and can recommend it for small skins. Its easy-to-use form, cleanliness, and affordability make it accessible for all hobbyists.
Equal parts of salt, alum, and Glauber's salts, mixed with half a part of saltpetre, the whole rubbed in several times a day, has been recommended, but I have not tried it.
Equal parts of salt, alum, and Glauber's salts, mixed with half a part of saltpeter, all rubbed in several times a day, has been suggested, but I haven't tried it.
A mixture of sulphur and arsenic with soft soap is sometimes used to dress skins with, and if left on for about a year certainly renders them very pliant, after the removal of the grease.
A mix of sulfur and arsenic with soft soap is sometimes used to treat skins, and if it's left on for about a year, it definitely makes them very flexible after the grease is removed.
The North American Indians, I believe, smoke their deer skins, etc.., and after working them, use brains to dress them with.
The North American Indians, I think, smoke their deer hides and after preparing them, use brains to tan them.
The skins of mammals in the flesh may, if bloody, be washed, should the blood be new, or combed with the scratch card (see ante) if it has dried on the hair or fur. In old skins washing is effective when the animal is relaxed. Freshly skinned deer and bulls' heads should always be washed and combed, and wrung out before having the preservative applied.
The skins of mammals in the flesh can be washed if they're bloody, especially if the blood is fresh. If the blood has dried on the hair or fur, use a scratch card (see ante) to comb it out. For old skins, washing works best when the animal is relaxed. Always wash and comb freshly skinned deer and bull heads, and wring them out before applying the preservative.
Mammals' fur is also considerably improved in tone by being well brushed with stiff horse or carriage brushes, and afterwards wiped down with turpentine, followed by benzoline.
Mammals' fur is also significantly enhanced in appearance by being thoroughly brushed with stiff horse or carriage brushes, and then wiped down with turpentine, followed by benzene.
When a skin is properly cleaned and finished, it may be lined with red or black cloth, or baize, and a "pounced" border of cloth attached. The tools for "pouncing" are to be bought at most saddlers' or ironmongers'.
When a skin is properly cleaned and finished, it can be lined with red or black cloth or baize, and a "pounced" border of cloth can be added. You can find the tools for "pouncing" at most saddlers' or hardware stores.
I have been asked many times what to do, if camping out abroad, supposing you shot a tiger or a bear, and wished to preserve the skin as a "flat." Simply lay it on the ground and slit the skin underneath, in a straight line through the under lip to the tip of the tail, then make four cross cuts from the median line along the inside of the limbs down to the toes, and skin out the body by stripping it in a careful manner, not allowing any pieces to be cut away, in case you might change your mind and wish it mounted as a specimen.
I’ve been asked many times what to do if you’re camping abroad and you shoot a tiger or a bear and want to preserve the skin as a flat. Just lay it on the ground and make a cut on the underside, running in a straight line from the lower lip to the tip of the tail. Then make four cross cuts from the center line along the inside of the legs down to the toes. Skin the body by carefully stripping it, making sure not to cut away any pieces in case you decide you want it mounted as a specimen later.
Take out the skull, clean and preserve it, and though skinning out the toes completely, be careful to retain the claws in their seats. When the body is removed, "flesh" the skin, which means scraping and cutting away all superfluous flesh and fat, then lay it out flat and rub it well in with the burnt alum and saltpetre (Formula No. 9). In dressing thick skins, it will be advisable to make a paste of the alum and saltpetre by mixing it with a little water, and repeatedly rub this mixture into those parts where the skin is thickest, such as around the lips, eyes, ears, etc.., taking care that not a wrinkle in any part escapes a thorough dressing, otherwise it will assuredly "sweat," and the hair come off in such places.
Take out the skull, clean and preserve it, and while skinning the toes completely, be careful to keep the claws intact. Once the body is removed, "flesh" the skin, which means scraping and cutting away all excess flesh and fat. Then lay it out flat and rub it well with the burnt alum and saltpeter (Formula No. 9). When dressing thick skins, it’s helpful to make a paste of the alum and saltpeter by mixing it with a little water, and repeatedly rub this mixture into the areas where the skin is thickest, such as around the lips, eyes, ears, etc., making sure that not a single wrinkle is missed during the dressing. Otherwise, it will surely "sweat," and the hair will come off in those areas.
The skin may now be rolled or folded together for travelling, but the next day, when settled in camp, it must be dressed again — twice will be quite sufficient for any but the thickest or most greasy skins; after that it must be exposed day by day to the sun and air, taking care meanwhile to guard it against all possible enemies. Treated in this manner, it has no "nature" in it, but is "as stiff as a board;" before this happens, however, it will be advisable to roll it, unless you have plenty of space at disposal on the floor of a travelling waggon, etc.., in which case it may be folded to fit. A folded skin is, however, worse to treat, subsequently, than a rolled one.
The skin can now be rolled or folded together for travel, but the next day, once you’re settled in camp, it needs to be treated again—twice will be enough for all but the thickest or greasiest skins. After that, it should be exposed to the sun and air daily, while also being protected from any potential threats. When treated this way, it loses its natural flexibility and becomes "as stiff as a board." However, before that happens, it's better to roll it up, unless you have a lot of space available on the floor of a traveling wagon, in which case it can be folded to fit. That said, a folded skin is generally more difficult to treat later on than a rolled one.
Valuable skins should be, when practicable, sprinkled with insect powder, turpentine, or pepper, and sewn up in sacking until they can be tanned, or made into soft leather, by any one of the processes previously described. If time is no object the skin may, after the first rubbing-in of the preservative, be stretched by the old-fashioned method of "pegging out," or by the more efficient professional "frame," made of four bars of wood, to which the specimen is "laced," or sometimes made of bars of wood and stout sacking, adjustable by means of wood screws, which open the bars and stretch the attached skin in a proper manner to the required size.
Valuable skins should, when possible, be treated with insect powder, turpentine, or pepper, and then sealed in sacking until they can be tanned or made into soft leather using any of the methods mentioned earlier. If time isn’t a constraint, the skin can be stretched using the traditional "pegging out" method or a more efficient professional "frame" made of four wooden bars, to which the specimen is "laced." Sometimes, these frames are constructed with wooden bars and sturdy sacking, adjustable with wood screws to open the bars and stretch the skin properly to the desired size.
When alum, etc.., cannot be obtained, recourse must be had to common salt, which is generally procurable in any part of the world; a strong — almost a saturated — solution with water must be made of this in a tub, and the skin placed in it. If possible, change the liquor after a few days and add fresh; head the tub up tightly and the skin will keep many years. I received the skin of a polar bear, sent from the Arctic Regions to Leicester for the Town Museum, simply flayed and pickled in this manner, and after a lapse of two years it was examined, and found to be perfectly sweet and firm — quite fit for mounting when opportunity served.
When alum and similar substances can’t be found, you should use common salt, which is usually available everywhere. Mix a strong — almost saturated — solution of this in a tub with water and soak the skin in it. If you can, change the solution after a few days and add fresh salt. Seal the tub tightly, and the skin will last for many years. I received the skin of a polar bear, sent from the Arctic Regions to Leicester for the Town Museum, simply skinned and preserved in this way, and after two years it was checked and found to be perfectly clean and firm — totally ready for mounting when the chance came.
Of course, these salted subjects are terrible nuisances either to mount or to treat as flat skins, having to go through many processes to rid them of the salt which pervades them. The first process is thorough washing and steeping in water, constantly changed; after that experience alone determines the treatment to be pursued. If alum were mixed with rough salt in the proportion of two parts of the former to one of the latter, the solution would become more astringent in its operation. A pickle made of oatmeal, saltpetre, and boiling vinegar has been recommended, but I have not yet tried it.
Of course, these salted items are a real hassle to prepare or to treat as flat skins, requiring several processes to remove the salt that saturates them. The first step is to wash and soak them in water, changing it frequently. After that, experience dictates the treatment to follow. If alum were mixed with coarse salt in a ratio of two parts alum to one part salt, the solution would work more effectively as an astringent. A brine made from oatmeal, saltpeter, and boiling vinegar has been suggested, but I haven't tried it yet.
I think I have now put the would-be tanner and currier in a fair way to do some of the dirtiest work imaginable, and if after a fair trial he does not cry, "Hold, enough!" and hand all future leather-dressing over to the professionals, I shall indeed think him "hard to kill."
I think I’ve now set up the aspiring tanner and leatherworker to tackle some of the dirtiest jobs you can imagine, and if after giving it a good shot he doesn’t say, “That’s enough!” and leave all future leather processing to the pros, I’ll really consider him “hard to kill.”
In conclusion, I can only reiterate to those who wish to do skins well by any of the foregoing methods, that nothing can be done without hard work.
In conclusion, I can only repeat to those who want to do skins well by any of the methods mentioned above that nothing can be achieved without hard work.
RELAXING SKINS. — In many instances, especially when collecting abroad, it may be found incompatible with the time and storage space at the disposal of the collector to set up birds and animals in their natural positions. To obviate these difficulties we make a skin as previously described, and by this means pack many in the space which would otherwise be occupied by one. The time comes, however, when we wish to "set up" the skins procured by ourselves, or by others, and for this purpose we "relax" them.
RELAXING SKINS. — In many situations, especially when collecting from other countries, it can be impractical due to time constraints and limited storage space to display birds and animals in their natural poses. To address these issues, we create a skin as described earlier, which enables us to fit many into the space that would normally be occupied by just one. However, there comes a time when we want to "set up" the skins we've collected ourselves or received from others, and for this, we "relax" them.
"Relaxing" is performed in various ways, but probably the oldest plan is that of simply unstuffing the skin, laying it down on a board, wrapping the feet and legs round with wet cloths or tow, and applying the same to the insides of the butts of the wings, allowing the skin to remain from one to four or five days in this position, according to its size; then, when the legs, feet, and wings are sufficiently damped, warm water is poured into the orifices of the skin, and suffered to run out at the eyes and beak. It is then ready for stuffing in the ordinary way.
"Relaxing" is done in different ways, but probably the oldest method involves simply removing the skin, laying it flat on a board, wrapping the feet and legs with wet cloths or tow, and applying the same to the inside of the wing tips. The skin is kept in this position for one to five days, depending on its size. Once the legs, feet, and wings are adequately damp, warm water is poured into the openings of the skin, allowing it to run out through the eyes and beak. It is then ready to be stuffed in the usual manner.
Another "rough and ready" method is simply pouring hot water through the bird's skin; this relaxes just sufficiently to bend the head, which many workmen of slovenly habits consider quite sufficient!
Another "rough and ready" method is simply pouring hot water through the bird's skin; this relaxes it just enough to bend the head, which many workers with careless habits think is good enough!
The next most ancient method is relaxing by the plaster box, which is a rough box, with a lid made to fit over all tightly, and having the whole of its inside lined with a coating of plaster of Paris mixed with water, and laid on two or three inches thick. 'When a bird is to be "relaxed," the inside of the box is saturated with water, which the plaster readily absorbs up to a certain point. Then the surplus water is poured off, the skin or skins are placed within the box, the lid is fastened down, and the whole placed in the cellar for so long a time as is required to thoroughly soften the included skins.
The next oldest method is relaxing in a plaster box, which is a rough container with a lid that fits tightly over it. The inside is completely lined with a thick layer of plaster of Paris mixed with water, about two or three inches deep. When a bird is to be "relaxed," the inside of the box is soaked with water, which the plaster easily absorbs up to a certain point. Then, any extra water is poured out, the skin or skins are placed inside the box, the lid is secured, and the whole thing is put in the cellar for as long as needed to properly soften the skins inside.
This plan, though fairly efficient for the smaller skins, must give place to that which I have ever adopted, and which is almost as effective for a large as for a small skin. It is this: Procure a box of suitable size, which, for greater efficiency, may be lined with zinc. Into this put several quarts of clean silver sand well damped with water, but not up to the point of actual wetness. Wrap each skin separately in a clean rag or in a piece of unprinted paper ("cap paper" will do for the smaller birds), pull back the sand to one end of the box, leaving a thin layer, however, all over the remaining part of the bottom, on which place the skins, covering them up as you go on with the sand from the other end. When covered with the proper depth of sand, lay a damp cloth over the top, and put the box away in the cellar or in the shade.
This plan, while pretty effective for smaller skins, needs to be replaced by the method I've always used, which works almost as well for larger skins as it does for smaller ones. Here it is: Get a box of the right size, and for better results, you can line it with zinc. Fill it with several quarts of clean silver sand that's slightly damp but not soaking wet. Wrap each skin individually in a clean rag or in a piece of unprinted paper (using "cap paper" is fine for smaller birds). Shift the sand to one end of the box, leaving a thin layer all over the rest of the bottom where you'll place the skins, covering them as you add sand from the other end. Once you've covered them with the right depth of sand, lay a damp cloth on top and store the box in the cellar or in a shaded area.
In from three days to a week, according to the size of the skins, they will be found more thoroughly relaxed by this than by any other method, and will be kept — by their covering paper or linen rag — from having their feathers soiled or disturbed by the sand.
In three days to a week, depending on the size of the skins, they will be more thoroughly relaxed by this method than by any other, and will be protected from getting their feathers soiled or disturbed by the sand by their covering paper or cloth.
In the first edition, I decried the practice of plunging birds' skins into water in the manner pursued by Waterton and his followers, but I had not at that time found anyone to please me in the subsequent manipulation of skins after being taken out of water. I have now, however, changed my views on the subject, and will proceed to describe a plan, which, though entailing some little trouble, is yet so simple, and so complete in its effects, as almost to supersede the previous methods, when the operator has attained any degree of proficiency in this.
In the first edition, I criticized the practice of soaking bird skins in water like Waterton and his followers did, but back then, I hadn’t found anyone who managed the handling of skins after they were taken out of the water to my satisfaction. However, I’ve since changed my opinion on the matter and will now describe a method that, while requiring a bit of effort, is so straightforward and effective that it nearly replaces the earlier techniques once the operator becomes reasonably skilled in it.
The skin to be operated upon is, if small, simply placed in a pan or bucket partly filled with water, and weighted own in such a manner that it shall always be beneath the surface. If the taxidermist is in a fair way of business, he will find a wooden tank, about 36 in. by 24 in. by 12 in. deep (inside measurement), sufficiently large for his needs. This tank should be "tongued" and dressed with red lead, or lined with zinc, to render it waterproof. Of course, the professional will not find it large enough for anything but medium-sized skins; for the larger ones, and for mammals, he will require other and larger tanks. A petroleum cask (procurable from any oilman for a few shillings), cut unequally in two parts, will be found of service when one large skin only is soaked at a time.
The skin that needs to be worked on, if small, should be placed in a pan or bucket filled with water, weighted down to keep it submerged. If the taxidermist is doing well, they'll have a wooden tank, around 36 inches by 24 inches by 12 inches deep (inside measurement), that’s large enough for their needs. This tank should be sealed and treated with red lead or lined with zinc to make it waterproof. Naturally, a professional will find this size only suitable for medium-sized skins; for larger ones and mammals, they'll need additional, bigger tanks. A petroleum barrel (available from any oil supplier for a few shillings), cut unevenly in half, can be useful when soaking just one large skin at a time.
When the skin is in the water, a board may be placed upon it, weighted so as not to flatten against the bottom of the vessel, or it may be kept in position under the water by pressing thin slips of wood over from side to side. The skin being well saturated — which, according to the size of the bird, will take place in from twelve to twenty-four hours — must have the stuffing removed from it, and then be allowed to soak for so long a time as experience will dictate. [Footnote: This should not be attempted before the skin is properly soaked, otherwise the cotton wool, or whatever it maybe stuffed with, will "stick" and frequently pull the head, etc.. off with it.] As a rule, however, when the wings and tail will spread out with gentle handling, the bird is fit to mount.
When the skin is in the water, you can place a board on it, weighted enough to prevent it from sinking to the bottom of the container, or you can keep it submerged by pressing thin pieces of wood across from side to side. The skin should be fully saturated — this process usually takes between twelve and twenty-four hours, depending on the size of the bird. Once it's well soaked, the stuffing needs to be removed, and then it should be left to soak for as long as experience suggests. [Footnote: Don't try this until the skin is properly soaked; otherwise, the cotton wool or whatever material it’s stuffed with will get stuck and often pull off the head, etc., along with it.] Generally, however, when the wings and tail can spread out with gentle handling, the bird is ready to mount.
Sometimes the legs, if thick, and even the wings and tail, if large, will require a longer time to soak than is conducive to the well-being of the remainder of the skin; in this case, nothing remains but to skilfully pull off the wings, legs, and tail, and let them soak a few hours longer. [Footnote: This would seem to an amateur very rough treatment, but often it is the only method to pursue especially if the skin be "tender," although in them latter case vinegar is recommended to be added to the water in which it is steeped.]
Sometimes, if the legs are thick, and even the wings and tail are large, they'll need a longer soaking time than is good for the rest of the skin. In this situation, the only option is to carefully remove the wings, legs, and tail, and let them soak for a few more hours. [Footnote: This might seem very rough to an amateur, but often it's the only method to use, especially if the skin is "tender." However, in that case, it's recommended to add vinegar to the water in which it's soaking.]
Supposing, however, that the skin is properly relaxed without recourse to this, it must then be hung up by a wire secured through the nostrils, in order to drain the water out of it. After hanging a few hours (or many, if large) it is, when all the water has drained away from it, but while yet damp, carefully wiped down in every part with benzoline, applied liberally, but from head to tail, the way of the feathers; this is important. The skin may now be placed in a long shallow box, called the dry plaster box, and all the feathers well covered above and below with common dry plaster of Paris, and the skin allowed to be buried in it for three or four hours, then the damp caked plaster may be shaken off and fresh dry plaster added, allowing it to remain for several more hours.
Supposing, however, that the skin is properly relaxed without this method, it should be hung up by a wire secured through the nostrils to drain the water out of it. After hanging for a few hours (or longer, if it's large), once all the water has drained away and it's still damp, carefully wipe down every part with benzoline, applied generously from head to tail, following the direction of the feathers; this is important. The skin can now be placed in a long, shallow box, known as the dry plaster box, and all the feathers should be well covered above and below with regular dry plaster of Paris. Let the skin be buried in it for three or four hours, then the damp caked plaster can be shaken off and fresh dry plaster added, allowing it to sit for several more hours.
This should be repeated until the feathers are fairly dry — which, if the bird be large, will take from twelve to twenty-four hours. The feathers of the skin must now be beaten with a bundle of stiff feathers, or the wing of a goose, or other large bird, until nearly dry, then dry plaster added from time to time, and the skin twirled about in the open air if possible. Very soon the feathers will cease to remain clogged with plaster, and will come out ready for mounting, nicely dried, fresh, and so beautifully clean as to surprise any person ignorant of the process.
This process should be repeated until the feathers are mostly dry — which, if the bird is large, will take about twelve to twenty-four hours. The feathers on the skin should then be beaten with a bunch of stiff feathers, or the wing of a goose, or another large bird, until they're nearly dry. After that, add dry plaster from time to time and turn the skin in the open air if possible. Before long, the feathers will stop being stuck together with plaster and will be ready for mounting, nicely dried, fresh, and so clean that it would surprise anyone who doesn't know the process.
Carefully managed, this is one of the most valuable aids to artistic taxidermy, as by its means birds' skins are rendered as limp and supple, and much tougher, than if just removed from the body. In proof of my assertion, I may mention that I have caused skins from ten to fifteen years old, and ranging in size from a cassowary to a humming bird, to be prepared by this method, all of which subsequently mounted up in a first-rate manner. [Footnote: A humming bird, after relaxing by water, is, when drained sufficiently, best treated by plunging in benzoline and then carefully dried in plaster. A night in water, and half-an-hour's treatment with benzoline and plaster, is sufficient for these small creatures.]
When managed carefully, this is one of the most valuable tools for artistic taxidermy because it makes bird skins soft, flexible, and much more durable than if they were simply taken from the body. To support my claim, I can mention that I've had skins ranging from ten to fifteen years old, from a cassowary to a hummingbird, prepared using this method, and all of them were mounted in a top-quality manner. [Footnote: A hummingbird, after being relaxed in water, is best treated by plunging it in benzoline and then carefully drying it in plaster once it's sufficiently drained. A night in water and half an hour with benzoline and plaster is enough for these small creatures.]
The points to observe are — first, perfect relaxing; secondly, wiping down thoroughly with benzoline; thirdly, drying the feathers of the skin well, by dusting in plaster and beating and agitating them in a current of air. Should the skin be greasy, covered with fat, or imperfectly freed of flesh (as many of the foreign birds' skins are), it will be necessary to scrape and trim when the specimen comes out of the plaster, before it is finally cleaned. In any case, it is always advisable to turn the skin of the head inside out, stretch the face, scrape the neck, and stuff the head in the ordinary manner before returning the skin.
The key points to keep in mind are — first, make sure to relax completely; second, clean thoroughly with benzine; third, dry the feathers of the skin well by dusting with plaster and shaking them in a current of air. If the skin is greasy, has fat, or hasn't been properly cleaned of flesh (as is often the case with many foreign bird skins), you'll need to scrape and trim it once it comes out of the plaster, before final cleaning. In any situation, it's always a good idea to turn the skin of the head inside out, stretch the face, scrape the neck, and stuff the head in the usual way before putting the skin back.
The great advantage in the water process is, that a "Past master" in the method can mount a skin in as artistic and natural a manner as if done from the flesh. Usually, specimens done from the "skin" are at once recognisable by their uneasy and "wooden" appearance, but I defy anyone to pick out the skins in the Leicester Museum — unless by their neater appearance — from those anciently mounted from the flesh.
The big benefit of the water process is that a skilled expert can mount a skin in a way that looks just as artistic and natural as if it were done from the flesh. Usually, specimens done from the "skin" are easily recognizable because they look stiff and unnatural, but I challenge anyone to identify the skins in the Leicester Museum—unless it's by their cleaner look—from those that were mounted from the flesh a long time ago.
Skins of mammals, if cured by the formula (No. 9) given in Chapter IV., need only to be plunged in water for a night or so to relax them, wrung out, thinned down where required, and mounted straight away; a wet skin being an advantage when modelling mammals, wet cloths even being necessary to cover over certain parts, should the mounting occupy more than a day or so. This, if the skin is properly cured, does not injure the fur or any part in the slightest degree, while, at the same time, it thoroughly relaxes.
Skins of mammals, if treated with the formula (No. 9) in Chapter IV, only need to be soaked in water overnight to relax them. After that, you can wring them out, thin them down where needed, and mount them right away. A wet skin is actually helpful when modeling mammals, and wet cloths might be necessary to cover some areas if the mounting takes more than a day. When the skin is properly treated, this process doesn’t damage the fur or any other part at all, while effectively relaxing it.
As newly relaxed skins (especially those of birds) dry rapidly it will be advisable to have everything ready, and shape them up as quickly as possible.
As newly relaxed skins (especially those of birds) dry quickly, it's best to have everything prepared and to shape them up as fast as you can.
The colours of the bills and feet of most birds recover their pristine hues whilst being relaxed — a matter of great importance as assisting the naturalist to the subsequent natural rendering of those parts.
The colors of the bills and feet of most birds regain their vibrant hues while they're calm — this is really important as it helps naturalists accurately depict those features later on.
CLEANING BIRDS' SKINS, etc.. — Formerly, it appears, the orthodox method of cleaning birds' skins was by the application of water and plaster of Paris. When it was wished to remove blood, or other stains, from a white or a light-coloured bird, this was effected by means of a soft piece of wadding saturated with warm water, and then rapidly and lightly applied to the stained part, followed by plaster of Paris dusted on the way of the "grain," and allowed to remain on the specimen until perfectly dry, when it easily came off in cake-like pieces, leaving the feathers thoroughly cleansed of all impurities. If the wadding became overcharged with blood, it was, of course, changed from time to time before the plaster was thrown on.
CLEANING BIRDS' SKINS, etc.. — It seems that in the past, the traditional way to clean birds' skins involved using water and plaster of Paris. To remove blood or other stains from a white or light-colored bird, a soft piece of wadding soaked in warm water was gently pressed onto the stained area. After that, plaster of Paris was sprinkled along the direction of the feathers and left on the specimen to dry. Once it was completely dry, it would come off in large chunks, leaving the feathers clean and free of any impurities. If the wadding became too soaked with blood, it was of course replaced periodically before applying the plaster.
Though this method does very well for blood stains of a recent date, it will not remove grease or the stains from old skins. This was always a weak point with the taxidermists of yore, who used, with very meagre results, turpentine and plaster of Paris to clean their skins. This went on for many years, and, though an unsatisfactory state of things, had to be endured, as nothing better was known.
Though this method works well for fresh blood stains, it won't get rid of grease or stains from old skins. This has always been a weakness for taxidermists in the past, who used turpentine and plaster of Paris to clean their skins with very little success. This approach continued for many years, and, while it was an unsatisfactory situation, it had to be accepted since nothing better was known.
Some few years ago "benzine collas" was introduced, and the taxidermists were not long in finding out its valuable properties for feather cleaning. "Benzoline" (Benzol, or Benzine C6H6), then came into more general use, and was, of course, found to have all the properties of the so-called "benzine collas." This discovery, we may say, completely revolutionised the art of feather cleaning. It served equally as well as the other preparation, and its superior cheapness placed it within the reach of everybody. The cleansing property of benzoline is still somewhat a secret out of the profession, and is really worth, as a matter of business, all the money which is sometimes asked for divulging it to an amateur.
A few years ago, "benzine collas" was introduced, and taxidermists quickly discovered its valuable properties for cleaning feathers. Then, "benzoline" (Benzol, or Benzine C6H6) became more widely used and was found to have all the properties of the so-called "benzine collas." This discovery completely changed the way feather cleaning was done. It worked just as well as the other preparation, and its lower cost made it accessible to everyone. The cleaning ability of benzoline is still somewhat of a secret outside the profession, and it's really worth the money that is sometimes asked for sharing it with amateurs.
When, therefore, you have a bird which is greased, or stained with greasy dirt, etc.., wipe it down the way of the feathers with a piece of wool saturated with common (or French) benzoline, using from time to time fresh wool as the other becomes soiled. When the feathers are well damped, cover the newly-cleaned part with dry plaster of Paris, allowing the bird to remain from one to two or three hours, at the expiration of which time take it out, dusting the waste plaster off with a soft bundle of feathers, Do not be alarmed if the bird looks somewhat miserable at the outset, but be sure that, if the plaster is dusted on the way of the feathers, all will come out right.
When you have a bird that's greasy or dirty, wipe it down in the direction of the feathers with a piece of wool soaked in regular (or French) benzine, changing to fresh wool every so often as it gets dirty. Once the feathers are well dampened, cover the cleaned area with dry plaster of Paris and let the bird sit for one to three hours. After that, take it out and gently brush off the excess plaster with a soft bunch of feathers. Don’t worry if the bird looks a bit miserable at first; just make sure to dust the plaster on in the direction of the feathers, and everything will turn out fine.
Blood, whether fresh or old, is best removed by warm water as just described, and the feathers then carefully wiped down with benzoline, before putting, on the plaster; this obviates the roughness often observable in water-cleaned birds. [Footnote: The American publication, "Science," points out that the addition of salt to the water cleanses blood from feathers, by preventing the solution of the blood-globules, and diffusion to the colouring matter, or red haemoglobin. I have found this "wrinkle" of great benefit in cleansing white-plumaged birds.] Sometimes, in very old skins, successive applications of water, turpentine, benzoline, and plaster, carefully managed, will work wonders.
Blood, whether fresh or old, is best removed with warm water as mentioned earlier, and the feathers should then be gently wiped down with benzoline, before applying the plaster; this prevents the roughness often seen in birds cleaned with water. [Footnote: The American publication, "Science," notes that adding salt to the water helps cleanse blood from feathers by stopping the blood cells from dissolving and spreading to the coloring matter, or red hemoglobin. I’ve found this "trick" very helpful when cleaning birds with white feathers.] Sometimes, with very old specimens, using water, turpentine, benzoline, and plaster in careful succession can make a big difference.
I have mentioned the fact that birds may be plunged into turpentine to rid them of insects. After this process they do not readily dry in, proper form, remaining greasy and streaked with, dirt — in fact, in a generally deplorable condition (as I know to my cost, teste, the Leicester Museum collection, ignorantly treated in this manner before my advent). Birds treated with turpentine must be well washed down afterwards with benzoline and then dried in plaster of Paris, as before described. In cleansing old specimens, do not forget to dust them, or to beat them thoroughly with feathers, before applying the benzoline, etc..
I’ve pointed out that birds can be soaked in turpentine to get rid of insects. After this process, they don’t dry properly and end up greasy and dirty—in short, in a pretty bad state (as I know from my experience with the Leicester Museum collection, which was mishandled this way before I got there). Birds that have been treated with turpentine need to be thoroughly washed with benzoline afterward and then dried with plaster of Paris, as mentioned earlier. When cleaning old specimens, remember to dust them and give them a good beat with feathers before applying the benzoline, etc.
In a fresh specimen it would be a person's own fault if he should fail to clean a bird, even were it dipped in blood and grease. Patience and several cleanings are all that are necessary.
In a fresh specimen, it would be a person's own fault if they failed to clean a bird, even if it were covered in blood and grease. All that's needed is patience and a few cleanings.
Dark plumaged birds — which may have light or white parts — will require care in cleaning, in order that their darker feathers may not be dulled by contact with the white plaster. Should this happen, however, in spite of all pains, it will be found that beating with feathers, and a light touching over with wadding, on which a very little benzoline has been poured, will brighten them up wonderfully. Ostrich and other feathers may be effectually cleaned by any of the foregoing methods, and, by management, re-curled with a blunt knife and the fingers.
Dark-colored birds — which may have light or white parts — need careful cleaning so their darker feathers don't get dull from touching the white plaster. If this does happen despite your best efforts, using feathers to gently beat them and lightly rubbing them with wadding that has a little benzoline on it will really help brighten them up. Ostrich and other feathers can also be effectively cleaned using any of these methods, and with some care, they can be re-curled using a blunt knife and your fingers.
"MAKING UP" From Pieces. — I have before mentioned that birds are sometimes made up feather by feather, and also when pulled to pieces for "relaxing." The first is simply pretty pastime, which any person possessed of patience, some little ability, and a stock of feathers, paste, and paper, may indulge in as a recreation.
"MAKING UP" From Pieces. — I've previously mentioned that birds are sometimes assembled feather by feather, and also taken apart for "relaxing." The first is just a lovely hobby that anyone with patience, a bit of skill, and some feathers, glue, and paper can enjoy as a way to pass the time.
The latter, however, is a different matter, and is practised in cases where a bird's skin is accidentally torn in several parts, or drops to pieces when "relaxed" through imperfect curing, or by old age. When this happens, the amateur need not feel as if the world would be the next thing to tumble to pieces, but simply get to work thus: Make a body of tow, with neck attached, as described; next, pull the legs off (if they have not previously fallen off), wire them, and attach them firmly to the body by clenching their free ends; bend these legs into the position you wish the specimen ultimately to assume and attach the wires at the feet to a block or perch. A T, formed of two pieces of wood, the bottom end attached to a block, is, perhaps, the best support, as you can get all round to adjust everything, even to the tail.
The latter, however, is a different story and is done in situations where a bird's skin accidentally tears in several places, or falls apart when "relaxed" due to poor preservation or old age. When this occurs, the amateur doesn't need to feel like the world is about to fall apart, but should simply get to work like this: Make a body of tow with the neck attached, as described; next, remove the legs (if they haven't already fallen off), wire them, and attach them securely to the body by twisting their free ends. Bend these legs into the position you want the specimen to ultimately take and attach the wires at the feet to a block or perch. A T, made of two pieces of wood, with the bottom piece connected to a block, is probably the best support, as it allows you to adjust everything from all angles, even the tail.
Your progress up to this point is simply a headless neck attached to a tow body, supported by natural legs fixed to a perch. I assume that your fragments are sufficiently relaxed, and the feathers cleaned and nearly dried. All the fat must, of course, have been scraped off the inside of each piece of skin. Arrange these pieces in the order they should come upon the model, to get the "fit," as a dressmaker would arrange the patterns of a dress upon a lady. Notice where your model is too small or misshapen, and bind on pieces of tow; or paste and bind on wadding, excepting near the wings, where wires would fail to pierce wool or wadding.
Your progress up to this point is just like a headless neck connected to a body, sitting on natural legs fixed to a stand. I assume your pieces are relaxed enough, and the feathers are cleaned and almost dry. All the fat should definitely be scraped off the inside of each skin piece. Arrange these pieces in the order they should appear on the model, just like a dressmaker arranges the patterns of a dress on a woman. Notice where your model is too small or misshapen, and add pieces of stuffing; or glue and attach batting, except near the wings, where wires wouldn’t be able to penetrate wool or batting.
When properly-shaped, give the whole of the model a good dressing with flour paste (see No. 31), into which a little carbolic acid has been stirred. Paste the inside of each piece of skin with this, and commence to finally rearrange them. As a rule, the under and breast pieces are fixed first, then the wings are wired* and firmly clenched on the body; adjust the wings into proper position, bringing the breast feathers over at the shoulders; next, put on the wing coverts, the back, the tail (firmly wired), and the upper and under tail coverts; lastly, the head and neck pieces, shaping the made neck into position, etc.., as you proceed. [Footnote: Note that even in close-winged birds, which a pieced specimen such as this one described must be of necessity, it is always advisable to wire the wings as for flight, running them on these wires close to the body, and giving them by this means the necessary curvature; entirely different, and much more natural, than if simply bolted on by straight wires running through the shoulders into the body.]
When shaped correctly, coat the entire model with flour paste (see No. 31) that has a bit of carbolic acid mixed in. Apply this paste to the inside of each piece of skin and start rearranging them. Generally, the under and breast pieces are attached first. Then, wire the wings and secure them tightly to the body; position the wings properly, overlapping the breast feathers at the shoulders. Next, add the wing coverts, the back, the tail (which should be firmly wired), and the upper and lower tail coverts. Finally, attach the head and neck pieces, shaping the neck as you go. [Footnote: Keep in mind that even for close-winged birds, which this pieced specimen must necessarily represent, it's always better to wire the wings as if in flight, running the wires close to the body to create the necessary curvature; this looks much more natural than simply bolting them on with straight wires that run through the shoulders into the body.]
Sometimes it is necessary to slip a piece of wadding underneath to swell out a certain set of feathers; in this case, lift up the surrounding parts with a crooked awl or with the feather-pliers, and carefully insert the wadding in such a manner that the paste shall not clog the other feathers in juxtaposition.
Sometimes you need to put a piece of padding underneath to puff up a specific group of feathers. In this case, lift up the surrounding areas with a bent awl or with the feather pliers, and carefully insert the padding in a way that the glue doesn’t mess up the other feathers nearby.
When finished to your satisfaction, lightly sponge off any excess of paste with warm water; wipe down with benzoline, and dust plaster thickly over all the specimen; this assists the drying and cleans it. In an hour or so dust off the plaster with a bunch of feathers, and bind the skin with "wrapping cotton" in the usual manner. Set it in a warm place, or in a current of air, for a week or so, to dry, and, lastly, put in the eyes and finish off. The foregoing, though apparently a Caesarian operation, is not difficult to a practised hand. I may, perhaps, here mention, in order to encourage my readers, that I myself once successfully mounted a large snowy owl from thirteen pieces of skin, and that had there been twenty-three it would have come out just as well.
When you're done to your liking, gently wipe off any extra paste with warm water; clean it with benzoline, and cover the entire specimen with a thick layer of plaster; this helps it dry and keeps it clean. After about an hour, brush off the plaster with a bunch of feathers, and secure the skin with "wrapping cotton" as usual. Place it in a warm spot or in a airflow for about a week to dry, and finally, insert the eyes and finish it up. Although it may seem like a complicated procedure, it’s not hard for someone experienced. To motivate my readers, I’d like to share that I once successfully mounted a large snowy owl from thirteen pieces of skin, and I believe that if I had twenty-three pieces, it would have turned out just as well.
In "relaxing" it is often better, especially in such specimens as Birds of Paradise, to pull off the legs and wings; by this means the skin is more easily stretched, and always, in the hands of a master, makes up more satisfactorily than by any other means.
In "relaxing," it's often better, especially with specimens like Birds of Paradise, to remove the legs and wings. This way, the skin is easier to stretch, and always, in the hands of an expert, turns out better than any other method.
COLOURING BILLS AND FEET OF BIRDS. — Birds which, when alive, have either legs, bills, or faces of various bright colours, lose these tints when dead, and after lapse of time, the colouring matter in some cases totally disappears, and nothing can restore the loss of pigment but artificial treatment of the faded parts. To do this satisfactorily is not one of the easiest matters in the world, inasmuch as two things are to be strictly guarded against. One — thick painting, which hides all the characteristics of the scutellae, or plates of the legs and toes, or fills up the minute papillae of the face; the other — imparting a too shining or varnished appearance to the parts coloured. So little colour is required for this purpose that I have found the oil-colour tubes used by artists to be the handiest and cheapest. The colour, when squeezed out, is to be thinned with turpentine only, until it readily flows off the brush on to the beak or legs of the specimen; if properly done it is very transparent, and of just sufficient quality to give the necessary brightness without undesirable shininess.
COLORING BILLS AND FEET OF BIRDS. — Birds with brightly colored legs, bills, or faces lose these colors after they die. Over time, the colors can completely fade, and the only way to bring back the lost pigment is through artificial treatment of the faded areas. This process can be tricky due to two main issues to consider. First — using too much paint can cover up the details of the leg and toe plates or fill in the tiny bumps on the face. Second — the colored areas should not appear too shiny or varnished. Only a small amount of color is needed, so I’ve found that artist's oil color tubes are the easiest and most affordable choice. When you squeeze out the color, thin it with turpentine until it flows easily from the brush onto the beak or legs of the specimen; if done correctly, it will be very transparent and just right to provide the necessary brightness without any unwanted shine.
The colours that are most useful are chrome yellow, yellow ochre, Prussian blue, permanent blue, light red, burnt umber, flake white, and vermilion. With these every shade of grey, blue, green, red, or pink can be obtained; they are all cheap, but if a quantity of vermilion is desired, it is cheapest bought as a powder at the oilman's, and mixed as required. When colour tubes are not procurable, the same colours are to be obtained at the oilman's in powder, or ready mixed, which latter must be thinned with one part transparent paper varnish to two parts turpentine (turps), the varnish being added or decreased as dry or mixed colours are used.
The most useful colors are chrome yellow, yellow ochre, Prussian blue, permanent blue, light red, burnt umber, flake white, and vermilion. With these, you can create every shade of gray, blue, green, red, or pink; they're all affordable, but if you need a lot of vermilion, the cheapest way is to buy it as a powder from the paint store and mix it as needed. When color tubes aren't available, you can get the same colors at the paint store in powder form or already mixed. The pre-mixed option should be thinned with one part transparent paper varnish to two parts turpentine (turps), adjusting the varnish as needed based on whether you're using dry or mixed colors.
"Brunswick black," a cheap and durable brown, if laid on thinly, i.e., thinned with turps, is sometimes used for colouring the noses of mammals. It must be recollected, however, that greys predominate in some noses over browns, and that the surface is seldom of one tint, hence "Brunswick black" is seldom used by artists, who prefer to make tints from some of the colours mentioned.
"Brunswick black," an inexpensive and sturdy brown, when applied lightly, meaning thinned with turpentine, is occasionally used to color the noses of mammals. It's important to remember, though, that some noses have more grey than brown, and that the surface usually isn't just one color. Because of this, artists rarely use "Brunswick black," preferring to create shades from some of the colors listed.
Faces of parrots must be whitened with dry "flake white" applied with a piece of cotton wool.
Faces of parrots should be whitened with dry "flake white" applied using a cotton ball.
The bills of toucans, and similar birds, require some nice colouring to blend the various tints one within the other. If the reader requires a more scientific method of doing this, I must refer him to "Waterton's Wanderings in South America," in which work he will find an account of the manner in which that eccentric naturalist cut out the insides of his toucans' bills, paring them down to the outer layer, through which the subsequent artificially-introduced colour was revealed.
The beaks of toucans and similar birds need some nice coloring to blend the different shades together. If you're looking for a more scientific way to do this, I recommend checking out "Waterton's Wanderings in South America," where you'll find a description of how that quirky naturalist carved out the insides of his toucans' beaks, scraping them down to the outer layer, which then revealed the artificial colors added later.
It would, no doubt, be possible to introduce colour into combs and wattles, and also into the bills of some species of birds by subcutaneous injections of various dyes when the specimen was fresh, but as all taxidermists are not skilled anatomists, and have not too much time to spare in doing what is — at best — but an unsatisfactory and unpractical method, I may relieve their anxiety by saying at once that the difficulty attendant on shrinkage of the integument may be avoided by using wax, with which to thinly paint the large bills of some birds, and the legs of all, restoring also the fleshy appearance of wattles, etc..
It would definitely be possible to add color to combs and wattles, as well as the bills of some bird species, using subcutaneous injections of various dyes when the specimen is fresh. However, since not all taxidermists are skilled anatomists and often don't have much time to spend on what is ultimately an unsatisfactory and impractical method, I can ease their concerns by saying that the issues caused by shrinkage of the skin can be avoided by using wax to lightly paint the large bills of some birds and the legs of all, also restoring the fleshy appearance of wattles, etc.
Let us take one or two representative birds -- first, an eagle, to work upon, Premising that your bird is finished and dry, and that you have previously accurately copied into your note-book the colours of the soft parts, you will begin by brushing over the parts to be coloured with a very little turpentine. Next, heat in a pipkin, or "patty-pan," some beeswax, into which a little common resin has been powdered, just sufficient to harden the wax under the point of brittleness; apply this with camel-hair brushes of different sizes to the eyelids (the eye being in and fixed), the superciliary ridge, the cere, the gape, and all over the bill, and legs, and feet, regulating the thickness of the wax thus — very thin over the bill and eyelids, a little thicker upon the cere, ridge, and gape, and quite thick upon the legs and feet; so much so, indeed, in places on the latter, as to necessitate carving up with tools to reproduce the underlying shrunken scutes, etc.. This, of course, is a delicate operation, involving practice and artistic perception of form.
Let’s take a couple of representative birds—first, an eagle—to work on. Assuming your bird is finished and dry, and that you've accurately recorded the colors of the soft parts in your notebook, start by lightly brushing the areas to be colored with a small amount of turpentine. Next, heat some beeswax in a small pot or "patty-pan," adding a bit of common resin powder to harden the wax just to the point of brittleness. Use camel-hair brushes of various sizes to apply this mixture to the eyelids (with the eye in and fixed), the brow ridge, the cere, the gape, and all over the bill, legs, and feet. Adjust the thickness of the wax, using it very thin over the bill and eyelids, a bit thicker on the cere, ridge, and gape, and quite thick on the legs and feet. In fact, in some areas on the feet, it may need to be carved with tools to recreate the underlying shrunken scales, etc. This is, of course, a delicate task that requires practice and a keen artistic sense of form.
Remove all superfluous wax by paring with curved awls of various sizes, and rubbing down with rag wetted in turpentine. Some parts of the legs may be treated with hot irons (large wires, old awls, knives, etc..). When the wax is sufficiently cold, which it will be in a quarter of an hour after finishing, commence colouring, by using the colours direct from the tubes, with as little admixture of "turps" as possible. [Footnote: Winsor and Newton, Rowney, or Roberson, are some of the best makers of these.] Note the different tints — quite three shades of yellow upon the cere, four or five upon the bill itself, and perhaps half-a-dozen upon the legs and feet, and carefully put them on. Properly finished, your eagle will — if correctly shaped — be quite life-like; all the soft parts now look full and fleshy, having lost that hard appearance inseparable from direct painting on the shrivelled integument without the intervention of wax.
Remove all excess wax by scraping with curved awls of different sizes and wiping down with a rag soaked in turpentine. Some areas of the legs can be treated with hot tools (like large wires, old awls, knives, etc.). Once the wax has cooled sufficiently, which should take about fifteen minutes after you're done, start applying color directly from the tubes, using as little turpentine as possible. [Footnote: Winsor and Newton, Rowney, or Roberson are some of the best brands.] Note the various shades — at least three shades of yellow on the cere, four or five on the bill itself, and maybe half a dozen on the legs and feet, and apply them carefully. If done correctly, your eagle will — if shaped properly — look quite lifelike; all the soft parts will appear full and fleshy, having lost that hard look that comes from painting directly on the shriveled skin without the use of wax.
The wattles and combs of gallinaceous birds, after being washed with preservative (Formula No. 15), or, when practicable, skinned out and filled, together with analogous processes on the vultures, and also the pouches of pelicans, etc.., may be treated in like manner, the wax being thinly or thickly painted as required.
The wattles and combs of chickens and related birds, after being cleaned with preservative (Formula No. 15), or, when possible, skinned and filled, along with similar methods used for vultures and the pouches of pelicans, can be treated in the same way, with the wax applied either thinly or thickly as needed.
The inside of the mouths of mammals, their tongues, eyelids, and noses, should be treated in a similar manner.
The insides of mammals' mouths, their tongues, eyelids, and noses should be handled in a similar way.
The skin of fishes also, which, when dry, shrinks away above the eye and around the mouth and lips, should have these parts replaced by wax before colouring, in the manner practised on the new specimens in the Leicester Museum. So little, however, is the want of this understood, that, of the thousands of stuffed fishes exhibited in the Fisheries Exhibition, I looked in vain for one with unshrivelled lips or orbital ridges. For the credit of artistic taxidermy, let us hope I overlooked some, finished as they should be.
The skin of fish, which shrinks around the eyes and lips when it dries, should have those areas filled with wax before being colored, similar to what is done with new specimens at the Leicester Museum. However, the need for this is so poorly understood that of the thousands of stuffed fish displayed at the Fisheries Exhibition, I couldn’t find a single one with unshriveled lips or smooth eye ridges. For the sake of artistic taxidermy, I hope I just missed a few that were done properly.
The fins of fishes may be repaired with thin tissue paper, or, if finless by accident — "ware cat!" — may be replaced by wax. White wax may be coloured in some instances before using. Paraffin wax does in some situations, but is not a very tractable medium. Dry colours may sometimes be rubbed into the wax with advantage. The colouring of a fish's skin, which, when set up and dried, is colourless, as noted, is a nice operation involving some artistic ability; the same remarks apply as those upon the colouring of the bills and feet of birds (see ante), but with this difference, that although the colour should be thinly applied as directed, yet in this instance the appearance of wetness has to be represented. In ordinary taxidermic work this is managed by adding clear "paper" varnish, or "Roberson's medium," to the colours, thinned by turpentine, floating the tints on the skin of the specimen, and nicely blending them, in order to obviate unnatural streaks or bands of colour.
The fins of fish can be fixed with thin tissue paper, or if they’re missing due to an accident — "careful!" — they can be replaced with wax. In some cases, white wax can be colored before use. Paraffin wax works in certain situations, but it isn’t very easy to work with. Dry colors can sometimes be rubbed into the wax for better results. Coloring a fish's skin, which is colorless once it’s set and dried, is a delicate task that requires some artistic skill; similar comments apply to coloring the bills and feet of birds (see ante), with the difference that in this case, the effect of wetness needs to be depicted. In typical taxidermy work, this is achieved by adding clear "paper" varnish or "Roberson's medium" to the colors, thinned with turpentine, applying the tints on the specimen's skin, and carefully blending them to avoid unnatural streaks or bands of color.
Speaking of the duck-billed platypus, the Rev. J. G. Wood, in "Homes without Hands," has some pertinent remarks upon the manner in which nearly all taxidermists allow the cuticle to dry and shrivel, to the ultimate distortion of the surrounding parts:
Speaking of the duck-billed platypus, Rev. J. G. Wood, in "Homes without Hands," has some relevant comments on how almost all taxidermists let the skin dry and shrink, leading to the eventual distortion of the surrounding areas:
"The wonderful duck-like mandibles into which the head is prolonged are sadly misrepresented in the stuffed specimens which we generally see, and are black, flat, stiff, and shrivelled, as if cut from shoe leather. The dark colour is unavoidable, at all events in the present state of taxidermy. Bare skin invariably becomes blackish-brown by lapse of time, no matter what the previous colour may have been, so that the delicate tints of an English maiden's cheek and the sable hue of the blackest negro would in a few years assume the same dingy colour, and become quite undistinguishable from each other.
"The amazing duck-like beaks that extend from the head are unfortunately poorly represented in the stuffed specimens we usually see. They appear black, flat, stiff, and wrinkled, as if made from shoe leather. The dark color is unavoidable, especially given the current state of taxidermy. Bare skin always turns a blackish-brown over time, regardless of its original color, so the delicate shades of an English maiden's cheek and the deep hue of the darkest skin would, after a few years, take on the same dull color and become indistinguishable from one another."
But there is no excuse now-a-days for allowing the bare skin to become shrivelled. The colours we cannot preserve, the form we can and ought to reproduce. No one would conceive, after inspecting a dried specimen, how round, full, and pouting were once those black and wrinkled mandibles, and how delicately they had been coloured while the animal retained life. Their natural hue is rather curious, the outer surface of the upper mandible being very dark grey, spotted profusely with black, and its lower surface pale flesh-colour. In the lower mandible the inner surface is flesh-coloured, and the outer surface pinky white, sometimes nearly pure white."
But there's no excuse these days for letting bare skin get shriveled. We can't preserve the colors, but we can and should reproduce the shape. No one would imagine, after looking at a dried specimen, how round, full, and pouting those black and wrinkled mandibles once were, and how delicately they were colored while the animal was alive. Their natural color is quite interesting; the outer surface of the upper mandible is very dark gray, heavily spotted with black, while its lower surface is a pale flesh color. In the lower mandible, the inner surface is flesh-colored, and the outer surface is a pinkish white, sometimes nearly pure white.
All this could easily be avoided by the taxidermist first skinning the beak and lips to their farthest extent, and then filling them with clay or composition, and afterwards waxing and colouring the parts in question.
All of this could easily be avoided if the taxidermist first skinned the beak and lips as far as possible, then filled them with clay or a similar material, and finally waxed and painted the relevant areas.
Small birds having black feet or bills, which permanently retain their colour, need only to have them slightly brushed with oil, before casing up, to give them proper freshness.
Small birds with black feet or bills, which keep their color all the time, just need to be lightly brushed with oil before being stored, to look fresh.
HOLLOW EYES. — I have for a great number of years discarded the conventional glass eyes — glass buttons I have heard them irreverently termed! — for all fishes, reptiles, birds, and mammals, excepting the smallest, using, in their stead, hollow half-globes rather more oval than round; these are hand-painted on the inside with either water or oil-colours, and when dry are varnished, filled in with wadding and putty, or modelling-wax, not clay, and fixed in the orbits with wax, see ante. These, properly coloured, and, in the instance of fishes, gilded inside, are wonderful representations of the natural eye, and when properly inserted, the cornea in mammals reproduced by wax, and the eyelids properly managed, give a most life-like and natural appearance to any specimen. [Footnote: Glass eyes have of late been much improved in shape and colour by the Germans, and also by some English eyemakers, who have had the sense to listen to the suggestions of artistic taxidermists. I have by me now a really beautiful pair of glass lynx eyes, veined and streaked, and "cornered" in porcelain, in almost as perfect a manner as could be managed by hand-painting.]
HOLLOW EYES. — For many years now, I’ve stopped using conventional glass eyes — which I’ve heard referred to disrespectfully as glass buttons! — for all fish, reptiles, birds, and mammals, except the smallest ones. Instead, I use hollow half-globes that are slightly more oval than round. These are hand-painted on the inside with either water or oil colors, then varnished, filled with wadding and putty, or modeling wax (not clay), and secured in the eye sockets with wax, as mentioned earlier. When properly colored, and in the case of fish, gilded inside, they create wonderful representations of a natural eye. When inserted correctly, with the cornea in mammals recreated using wax and the eyelids properly positioned, they give any specimen a strikingly lifelike and realistic appearance. [Footnote: Recently, glass eyes have been significantly improved in shape and color by Germans and some English eyemakers who have wisely considered the input of artistic taxidermists. I currently have a truly beautiful pair of glass lynx eyes, veined and streaked, and "cornered" in porcelain, crafted almost as perfectly as could be achieved through hand-painting.]
"PIECE MOULDS" AND MODELLING TONGUES, MUSCLES, etc.., IN COMPOSITION. — As I stated at the end of Chapter VII., "composition" has for its base one of three things — clay, plaster, or wax. The uses of the first I have fully explained — glue-water and plaster will stiffen or toughen it. There is also "terra-cotta" clay, which, if moulded into shape, can be "fired," and is lighter, and retains its shape without cracking. Its service to the taxidermist is limited to the reproduction of certain bones and some few natural objects, such as fungi, etc..
"PIECE MOULDS" AND MODELLING TONGUES, MUSCLES, etc., IN COMPOSITION. — As I mentioned at the end of Chapter VII, "composition" is based on one of three materials — clay, plaster, or wax. I've thoroughly explained the uses of the first one — glue-water and plaster can stiffen or toughen it. There's also "terra-cotta" clay, which can be shaped and then "fired," making it lighter and able to hold its shape without cracking. Its usefulness for the taxidermist is limited to recreating certain bones and a few natural objects, like fungi, etc.
Plaster casts of almost anything may be made by "piece-casting," which is casting arranged to take moulds from anything "undercut" or complicated; such, let us say, as a lion's head with open jaws, or the human face, surrounded by a wreath of leaves and flowers, as in the antique sculptures. Assuming you had such a model as this to cast from, you would commence by oiling or soaping the whole in the ordinary manner. The plaster being prepared, is poured on the neck or chin, being prevented from spreading to other parts by clay placed across as a barrier. The first section, being cast, is trimmed, and its edges cut diagonally toward the chin, in such a manner that the next piece ultimately unlocks from it, without being wedged by undercasting.
Plaster casts of just about anything can be made using "piece-casting," which involves creating molds from complex or detailed objects—like a lion's head with its jaws open, or a human face surrounded by a wreath of leaves and flowers, similar to ancient sculptures. If you had a model like this to cast from, you would start by applying oil or soap to the entire surface as usual. Once the plaster is prepared, it is poured onto the neck or chin, while clay is used as a barrier to prevent it from spreading to other areas. After the first section is cast, it's trimmed, and its edges are cut diagonally toward the chin to ensure that the next piece can be removed without getting stuck in the undercuts.
So you may proceed, trimming each piece, cutting its edges to prevent locking, and casting bit by bit until you reach the hair and forehead, with wreath. Here the pieces will be numerous, and your ingenuity will be exercised to keep out of trouble from getting some piece or another to lock the others. The face will often mould into three or four pieces; but it is on the forehead, chin, and throat — and, if a lion's head, in the open mouth — where the multiplicity of parts may perplex.
So you can go ahead, trimming each section, cutting the edges to avoid locking them together, and shaping it gradually until you get to the hair and forehead, with a wreath. At this point, there will be many pieces, and you'll need to be clever to avoid getting any piece stuck and locking the others. The face will usually be molded into three or four sections; however, it's the forehead, chin, and throat — and, if it's a lion's head, especially around the open mouth — where the large number of parts can be confusing.
These small pieces are, when taken from off the model, very difficult to put together again without a core; hence, when the mould is complete, each little piece must have a shallow hole cut on its top, be replaced on the model, and a "jacket-mould" cut into two or more pieces by string (as described at chapter VII) made over the whole. This jacket keeps all together for the ultimate casting by the pegs in its surface made by the holes of the pieces underneath.
These small pieces are really hard to put back together without a core once they're taken off the model; therefore, when the mold is finished, each piece needs to have a shallow hole cut into its top, be placed back on the model, and a "jacket-mold" created by cutting it into two or more pieces with string (as described in chapter VII) made over it all. This jacket holds everything together for the final casting with the pegs on its surface created by the holes from the pieces underneath.
The ultimate cast is made by plaster being poured into a hole left at one end of the mould for that purpose. Should this ultimate casting be wanted hollow, it will be necessary to shake the plaster, when poured in, around the mould in the manner described for making wax fruit.
The final cast is made by pouring plaster into a hole left at one end of the mold for this purpose. If a hollow casting is desired, you'll need to shake the plaster around the mold as described in the process for making wax fruit.
Small undercut articles may be cast from, by making a mould of best glue — "gelatine glue" — which readily stretches enough to "clear" undercuts and come off the model. To get a model from this glue mould, cover the original model you wish to cast from with as thick a covering of clay as you wish your gelatine mould to be when run; upon this pour plaster to form a "jacket," letting its top and bottom rest on the top and bottom of the original model. When the clay is removed, and the "jacket" fitted on again, it will, of course, only touch at top and bottom, leaving an interspace all over the remainder of the model. A hole being now cut in the "jacket," the glue [Footnote: Made by steeping for a night, and allowing it to absorb all the water it will, throwing away the surplus, and boiling the remainder in the usual manner in a glue-kettle. Pour on when hot, not boiling.] is poured in over the original oiled model, and fills up the interspace left by the removal of the clay. When cold, it, of course, forms a mould into which plaster can be run, in the usual manner, to form the ultimate model.
Small undercut parts can be made by creating a mold from high-quality glue—"gelatin glue"—which stretches enough to clear undercuts and come off the model. To get a model from this glue mold, cover the original model you want to cast with a thick layer of clay, as thick as you’d like your gelatin mold to be. Then, pour plaster over it to create a "jacket," ensuring its top and bottom are aligned with the top and bottom of the original model. Once you remove the clay, and fit the "jacket" back on, it will only touch at the top and bottom, leaving a gap around the rest of the model. Next, cut a hole in the "jacket," and pour in the glue [Footnote: Made by soaking overnight, allowing it to absorb as much water as it can, discarding the excess, and then boiling the remaining mixture in a glue kettle. Pour it in while hot, but not boiling.], which fills the gap left by the clay. When it cools, it will form a mold into which plaster can be poured to create the final model.
Piece-casting of large subjects, where the various parts are cast and then fitted together afterwards, is best understood by learning a little from some Italian modeller, or looking over the seams (representing the "piece-casting" joints) in some one or other of Brucciani's reproductions, which may be seen in almost any art gallery or museum.
Piece-casting of large subjects, where different parts are cast separately and then assembled later, is best understood by getting some insights from an Italian modeler or examining the seams (representing the "piece-casting" joints) in one of Brucciani's reproductions, which can be found in almost any art gallery or museum.
One great advantage of this system is, that by its means large models, if built up in ordinary field clay, or by any other means, may be cast from in plaster or in metal by the intervention of piece moulds, failing which it would be impossible to do so. The resultant model, if in plaster, is not cast solid, but is hollowed out in the casting — to prevent weight — by "cores" being inserted in the moulds. "Casting sand" is, however, necessary when casting in metal, together with all sorts of technical appliances and knowledge beyond the scope of the taxidermist, and although I have found it necessary to cast in metal for some purposes, it is so seldom needed that I do not purpose describing what any friendly brass founder will tell the amateur in a few minutes. The casting by amateurs at an ordinary fire is limited to three metals — lead, tin, and zinc — or a mixture of two.
One major advantage of this system is that it allows for large models, whether made from regular field clay or other materials, to be cast in plaster or metal using piece molds; without this method, it would be impossible. A model made of plaster isn’t cast solid but instead is hollowed out during the casting process to reduce weight by inserting "cores" in the molds. However, when casting in metal, "casting sand" is required, along with various technical tools and expertise that go beyond what a taxidermist usually knows. Although I've found it necessary to cast in metal for some purposes, it's rarely needed, so I won't go into detail about what any friendly brass founder can explain to a beginner in just a few minutes. Amateur casting with a regular fire is limited to three metals: lead, tin, and zinc, or a combination of two.
How large models in clay, etc.., can be made is described by Mr. Waterhouse Hawkins, F.G.S., etc.., in his paper on the reproductions he made of the extinct animals exhibited at the Crystal Palace, Sydenham:
How large models in clay, etc., can be made is described by Mr. Waterhouse Hawkins, F.G.S., etc., in his paper on the reproductions he created of the extinct animals displayed at the Crystal Palace, Sydenham:
"By careful study of their works I qualified myself to make preliminary drawings, with careful measurements of the fossil bones in our Museum of the College of Surgeons, British Museum and Geological Society. Thus prepared, I made my sketch-models to scale, either a sixth or twelfth of the natural size, designing such attitudes as my long acquaintance with the recent and living forms of the animal kingdom enabled me to adapt to the extinct species I was endeavouring to restore.
"By thoroughly studying their works, I equipped myself to create initial drawings with precise measurements of the fossil bones in our Museum of the College of Surgeons, the British Museum, and the Geological Society. With this preparation, I made my scale models, either one-sixth or one-twelfth of the natural size, designing poses that my extensive knowledge of current and living forms of the animal kingdom allowed me to adapt for the extinct species I was trying to recreate."
"I caused the clay model to be built of the natural size by measurements from the sketch model, and when it approximated to the form, I, with my own hand in all instances, secured the anatomical details and the characteristics of its nature.
"I had the clay model created to actual size based on measurements from the sketch model, and when it resembled the form, I personally made sure to capture all the anatomical details and the specific features of its nature."
"Some of these models contained thirty tons of clay, which had to be supported on four legs, as their natural history characteristics would not allow of my having recourse to any of the expedients for support allowed to sculptors in an ordinary case. I could have no trees, nor rocks, nor foliage to support these great bodies, which, to be natural, must be built fairly on their four legs. In the instance of the iguanodon, it is not less than building a house upon four columns, as the quantities of material of which the standing iguanodon is composed, consist of 4 iron columns, 9 ft. long by 7 in. diameter, 600 bricks, 650 5 in. half-round drain-tiles, 900 plain tiles, 38 casks of cement, 90 casks of broken stone; making a total of 640 bushels of artificial stone. These, with 100 ft. of iron hooping and 20 ft. of cube inch bar constitute the bones, sinews, and muscles of this large model, the largest of which there is any record of a casting being made."
Some of these models had thirty tons of clay that needed to be supported on four legs, as their natural characteristics wouldn't allow me to use any of the typical support methods available to sculptors. I couldn't use trees, rocks, or foliage to support these massive figures, which needed to be realistically built on their four legs. In the case of the iguanodon, it’s like building a house on four columns, as the materials used for the standing iguanodon include 4 iron columns, each 9 ft. long and 7 in. in diameter, 600 bricks, 650 half-round drain tiles, 900 plain tiles, 38 barrels of cement, and 90 barrels of crushed stone; totaling 640 bushels of artificial stone. Along with 100 ft. of iron hooping and 20 ft. of cube inch bar, these make up the bones, sinews, and muscles of this large model, which is the biggest one on record for casting.
Other uses of plaster are also described in Chapters VI. and VII. One of the uses of plaster in modelling is, however, to reproduce flesh, etc.. For this purpose mix plaster of Paris (best S.F.) with boiled oil until it forms a smooth, thick putty, which, though at first capable of much finger-and-thumb manipulation, dries as hard as stone, and is fairly light and impervious to damp. Plaster will also make a putty if mixed with glue-water.
Other uses of plaster are also described in Chapters VI and VII. One of the ways plaster is used in modeling is to replicate flesh, etc. For this, mix plaster of Paris (preferably S.F.) with boiled oil until it turns into a smooth, thick putty. Although it can be easily manipulated at first, it dries as hard as stone and is fairly lightweight and resistant to dampness. Plaster can also be turned into a putty if mixed with glue-water.
The composition used by the picture-frame makers is also a first-rate medium, being susceptible to the softening influences of hot water when newly made, but ultimately dries as hard as the preceding. It is made variously, but perhaps the best is made thus:
The mix used by the picture-frame makers is also a top-notch medium, easily softened by hot water when it's fresh, but eventually dries as hard as the one before it. It's made in different ways, but the best way is probably like this:
Cement for Modelling.
Cement for Modeling.
Three parts best glue.
Three parts best adhesive.
One part linseed oil.
One part flaxseed oil.
One part powdered resin.
One part powdered resin.
Whiting.
Whiting fish.
Tallow candle.
Beeswax candle.
Melt the glue with water until it is moderately thin. Boil up the resin and oil together (be careful of fire). Mix up this with the glue by thorough stirring and boiling together, turn it all out into a bucket (unless you are boiling it in one), and add half a tallow candle. Stir in enough powdered whiting to make a thick putty. Pour some out on a plate, and let it get cold; you will then be able to determine whether the mixture requires more or less glue, whiting or oil. It should dry tough, but not too brittle, and should, when cut into strips and warmed by hot water or steam, be tough and yet pliable. Properly made, this cement is invaluable to the taxidermist, as it works well by the hand or by tools, drying slowly until it sets. It can be worked over real or modelled bones to show sinews or muscles as previously mentioned. The tongues of mammals or fishes may be cast either in plaster, glue, or wax, and subsequently modelled in this cement, plaster, or wax, as required.
Melt the glue with water until it's somewhat thin. Boil the resin and oil together (be careful with the fire). Thoroughly mix this with the glue by stirring and boiling it together, then pour everything into a bucket (unless you're already boiling it in one), and add half a tallow candle. Stir in enough powdered whiting to create a thick putty. Pour some onto a plate and let it cool; then you can determine if the mixture needs more glue, whiting, or oil. It should dry strong but not too brittle, and when cut into strips and warmed in hot water or steam, it should be tough yet flexible. When made correctly, this cement is invaluable for taxidermists as it works well by hand or with tools, drying slowly until it sets. It can be applied over real or molded bones to represent sinews or muscles as mentioned before. The tongues of mammals or fish can be cast in plaster, glue, or wax, and then further modeled with this cement, plaster, or wax as needed.
Wax is the last, and, as I have before pointed out, is, whether used melted or softened by warm water, of the highest service to the artist. Beeswax, when melted, will mix well with either plaster or whiting, or with both, and will make a useful modelling composition, its brittleness being determined by its containing more or less plaster. Wax will also mix with red ochre, and makes a modelling composition. Modelling wax is sold, however, ready prepared, and is useful to pack under the skin for delicate muscles or "flabby" folds of skin.
Wax is the last, and as I mentioned earlier, it is, whether used melted or softened with warm water, extremely valuable to the artist. When melted, beeswax mixes well with either plaster or whiting, or both, creating a useful modeling material, with its brittleness depending on the amount of plaster it contains. Wax can also mix with red ochre, producing a modeling composition. However, ready-prepared modeling wax is available for purchase and is useful for packing under the skin to enhance delicate muscles or "flabby" folds of skin.
Paraffin wax melted, and modelled when half cold, is also sometimes of service; it has, however, so little affinity for "sticking" as to come away from almost anything smooth, on the slightest provocation.
Paraffin wax, when melted and shaped while it's still warm, can also be useful; however, it has such a low tendency to stick that it will easily come off almost any smooth surface with just a light touch.
White lead stiffened with whiting is sometimes useful in taking the place of putty, and is a trifle more durable.
White lead mixed with whiting can sometimes replace putty, and it's slightly more durable.
Perhaps, at the end of this section, it may not be amiss to point out to the modeller that it is of the highest importance that all his tools should be freed from dirt and plaster at the conclusion of his day's work; scarcely anything rusts and spoils tools more quickly than damp plaster left on them.
Perhaps, at the end of this section, it’s worth mentioning to the modeler that it’s really important to make sure all their tools are cleaned of dirt and plaster at the end of the workday; almost nothing rusts and ruins tools faster than damp plaster left on them.
TO IMITATE BLOOD. — Frequently blood is required to be shown, as in instances where some animal may be represented tearing its prey. Usually this is done by thickly painting on vermilion and red lead mixed with varnish, or brushing on red lead mixed with thick glue, as a base on which to subsequently lay the vermilion. I may point out, however, that blood differs in tint, and that the appearance of torn flesh, fresh blood, and coagulated blood is best got by painting the parts with wax, and tinting, with a little vermilion, some madder brown, or madder lake (a rather expensive colour), and light red, arranged and blended one with the other as in nature.
TO IMITATE BLOOD. — Often, there's a need to show blood, like in scenes where an animal is depicted tearing into its prey. This is typically achieved by applying a thick layer of vermilion mixed with red lead and varnish, or by brushing on red lead mixed with a heavy glue as a base for the vermilion. However, it's important to note that blood varies in color, and the appearance of torn flesh, fresh blood, and dried blood can be best created by painting the areas with wax, then tinting with a bit of vermilion, some madder brown, or madder lake (which is quite an expensive color), and light red, blending them together naturally.
Should you be setting up a large group, such as a tiger tearing open a deer, or a vulture at a sheep, you may represent the liver and other organs in modelling clay or plaster, dried, waxed, and coloured, or by coloured wax alone if the part to be modelled is not large.
Should you be arranging a large group, like a tiger ripping apart a deer, or a vulture feasting on a sheep, you can create the liver and other organs using modeling clay or plaster, dried, waxed, and painted, or just with colored wax if the part to be modeled isn't too big.
SNOW, FROST, AND ICE. — The appearances of snow and frost are imitated in a variety of ways. Pounded white sugar; alum powdered, or put on boiling, and suffered to crystallize; borax, two parts, alum, four parts, burnt in a shovel over the fire; and various other crystalline preparations. Nothing, however, is half so good as using best S.F. plaster of Paris mixed with powdered "glass frosting" — bought from the glass-blower's or artificial eyemaker's — to imitate snow, the powdered glass frosting being thrown upon the foliage and rocks — the latter being gummed or varnished with paper varnish — to imitate ice. Blocks of ice require special treatment with glass and thin paper strained over a framework and varnished to get a good and natural effect. Icicles are best modelled in glass.
SNOW, FROST, AND ICE. — The looks of snow and frost can be replicated in several ways. You can use crushed white sugar; powdered alum, either sprinkled on boiling surfaces or allowed to crystallize; a mix of two parts borax and four parts alum, burned in a shovel over a fire; and various other crystalline materials. However, nothing works as well as using high-quality S.F. plaster of Paris mixed with powdered "glass frosting," which you can buy from a glass blower or artificial eye maker. This mixture is sprinkled on foliage and rocks, which should be coated with gum or varnish to mimic ice. Blocks of ice need special attention, using glass and thin paper stretched over a framework and varnished to achieve a natural look. Icicles are best created with glass.
WATER AND WAVES. — Water is best represented by "hammered glass" coloured, and streaked and varnished, to the tint required. Birds may be represented swimming by being cut in halves, their upper and under surfaces fixed to the corresponding sides of the glass, or the glass may be cut to receive the body,* which is the most satisfactory, although the most difficult to manage without smashing the glass. [Footnote: There is a black-necked swan (Cygnus nigricollis), from Chili, treated in this manner, in the Leicester Museum.] Holes may be drilled in the glass to allow water plants to come through, or to allow long-legged birds, such as herons, to stand mid-leg in water.
WATER AND WAVES. — Water is best depicted using "hammered glass" that is colored, streaked, and varnished to achieve the desired shade. Birds can be shown swimming by being cut in half, with their top and bottom surfaces attached to the corresponding sides of the glass, or the glass can be shaped to fit the body,* which is more effective, though harder to handle without breaking the glass. [Footnote: There is a black-necked swan (Cygnus nigricollis), from Chile, done this way, in the Leicester Museum.] Holes can be drilled in the glass to let water plants grow through or to allow long-legged birds like herons to stand partially submerged in water.
Waves are moderately well imitated by thin paper creased, varnished and coloured, on which white wool "foam" is arranged.
Waves are fairly well represented by thin paper that’s folded, coated, and colored, with white wool used to create the "foam."
MODELLING FRUIT, etc.., IN PLASTER. — You may, perhaps, wish to model an apple, peach, or plum, to place in the hands of some mounted object, such as a monkey. To do this, you take a natural fruit, which oil, and push it half way (on its longest axis) into a bed of damped and hard-pressed sand banked up all round. At some little distance from the edges of the fruit stick two or three small pegs of wood (points downwards) about half-an-inch long, leaving a quarter-of-an-inch out of the sand. Over all this pour some plaster of Paris mixed with water to the thickness of a paste; when set, lift it up carefully — the plaster now appears with the fruit half set in it, and the two or three little pegs of wood sticking up, their other half firmly fixed in the plaster — oil their points, the face of the plaster, and also the fruit, and laying the half-cast fruit uppermost, pour over it some more plaster.
MODELING FRUIT, etc., IN PLASTER. — You might want to model an apple, peach, or plum to place in the hands of a mounted figure, like a monkey. To do this, take a real piece of fruit, oil it, and push it halfway (along its longest side) into a bed of damp, tightly packed sand that is built up all around it. About half an inch from the edges of the fruit, stick two or three small wooden pegs (pointing downward) into the sand, leaving a quarter of an inch exposed. Pour plaster of Paris mixed with water over this setup to create a paste-like thickness; once it hardens, carefully lift it up — the plaster will now have the fruit half embedded in it, with the pegs sticking up, their other halves securely set in the plaster. Oil the tips of the pegs, the face of the plaster, and the fruit, and then, with the half-set fruit facing up, pour more plaster over it.
When set, trim the edges, the complete mould will then part in halves, and the fruit will shake out. Oil the mould inside, and when dry procure some wax — beeswax from the oilman's will do for this purpose — and after heating it carefully, for fear of fire, pour it while hot into the mould through a hole cut for that purpose. When about a quarter full, put your thumb or finger over the hole, and rotate the mould rapidly. Allow it to cool, and on opening the mould the artificial fruit will drop out, and may then be coloured by powder or varnish colours to the tints required.
When ready, trim the edges; the complete mold will then split in half, and the fruit will shake out. Grease the inside of the mold, and when it's dry, get some wax—beeswax from the oil shop works well for this. After carefully heating it to avoid fire, pour the hot wax into the mold through a hole made for that purpose. When it’s about a quarter full, cover the hole with your thumb or finger and quickly spin the mold. Let it cool, and when you open the mold, the artificial fruit will come out, which can then be colored with powder or varnish in the desired shades.
My friend, Wright Wilson, F.L.S., etc.., surgeon to the Birmingham Ear and Throat Hospital, has very kindly written me a short description of the plan he adopts, which, it will be seen, is a complete reversal of the foregoing:
My friend, Wright Wilson, F.L.S., etc., a surgeon at the Birmingham Ear and Throat Hospital, has kindly written me a brief description of the approach he uses, which, as you'll notice, is a complete reversal of the previous one:
"With regard to plaster casts of fruit, etc.., a much neater and readier method of making the mould is to mix a sufficient quantity of beeswax with resin in a pipkin over a slow fire. It must be used whilst just lukewarm by either dipping the fruit — say, an apple — until sufficient adheres to form a good strong coating. When cold (dipping in cold water will readily make it so), the whole can be cut through with a sharp knife, the halves of the fruit come out easily, and a perfect mould in two halves is thus obtained. Fasten the halves of the mould together with string, and smear a little of the warm material over the joint to hold it together, and cast your model (into this, through a small hole made for the purpose) in the usual way with plaster of Paris made rather thin with water. When set, place in a little warm water, when the mould easily strips off, leaving a model of the most perfect kind and at a small expense, for the mould can be melted up and used over and over again."
"To make plaster casts of fruit and similar items, a much cleaner and easier method to create the mold is to mix a good amount of beeswax with resin in a small pot over low heat. It should be used while it's still warm by either dipping the fruit—like an apple—until enough sticks to form a strong coating. When it cools down (dipping it in cold water will help it cool quickly), you can easily cut through the whole thing with a sharp knife, and the two halves of the fruit will come out without any trouble, giving you a perfect mold in two pieces. Secure the mold halves together with string and apply a little of the warm mixture over the seam to hold it in place. Then, pour your casting material (through a small hole made for this purpose) like plaster of Paris mixed a bit thin with water. Once it’s set, place it in warm water, and the mold will come off easily, leaving you with a perfect model at a low cost, as the mold can be melted down and reused multiple times."
Glue may sometimes be substituted for the wax.
Glue can sometimes be used instead of wax.
The advantage of being able to fall back on this system is obvious, especially if the modelled fruit is to be placed in a position exposed to considerable heat. Of course, the plaster model must be coloured to nature, and, as I have before pointed out, this is not one of the easiest things to do. I would suggest dipping the model (when dry) in melted wax to give a surface for colouring, or modelling it in paper.
The benefit of relying on this system is clear, especially if the modeled fruit will be put in a location where it will be exposed to significant heat. Naturally, the plaster model needs to be painted realistically, and as I've mentioned before, this isn't the simplest task. I would recommend dipping the model (once it's dry) in melted wax to create a surface for painting, or you could model it using paper.
PRESERVING SPIDERS, etc.. — Spiders, which from their rarity or the beauty of their markings it may be desirable to preserve, require the contents of the abdomen to be pressed out, or their bodies to be cut underneath. A first-rate article on preserving these crustaceans appeared in Science Gossip for January, 1868, in which the author points out what is just as well to bear in mind, which is "that the colouring matter or pigment is placed between the outer or abdominal covering and the pulpy contents within, upon a very delicate membrane, which adheres very loosely to both, but more firmly to the contents within; so that when the viscera or contents are rudely removed, and without much tearing, the whole mass will be found more or less coloured, while the outer skin will be left entirely transparent. To preserve, therefore, the beauty of spiders, this must be untouched."
PRESERVING SPIDERS, etc.. — Spiders, whether due to their rarity or the beauty of their markings, may be worth preserving. To do this, you need to press out the contents of the abdomen or cut the body from underneath. A great article on preserving these creatures was published in Science Gossip in January 1868, where the author highlights an important point: "the coloring matter or pigment is located between the outer abdominal covering and the soft interior, on a very delicate membrane that is loosely attached to both, but more firmly to the internal contents. So, when the insides are removed without much tearing, the entire mass will show some color, while the outer skin will remain completely transparent. Therefore, to keep the beauty of spiders intact, this should be left undisturbed."
He further says: "Make an incision along the ventral aspect of the abdomen, nearly its whole length, or as long as will enable the pulpy contents to be easily removed; then pinch up the pulpy mass with a small forceps, carefully avoiding any dragging; then, with sharp-pointed scissors, cut away the contents bit by bit until the whole is nearly removed, or until you can see the brilliant colour shining through what remains in the cavity — better leave a little too much than be too nice in clearing all away; then, with a blowpipe, distend the empty abdomen; it will very soon become firm, and retain its original form, but until it is so the blowing must be frequently repeated."
He further says: "Make a cut along the lower part of the abdomen, almost its entire length, or as long as needed to easily remove the soft contents; then pinch up the soft mass with small forceps, being careful not to pull on it; next, use sharp scissors to cut away the contents bit by bit until most of it is gone, or until you can see the bright color shining through what’s left in the cavity — it's better to leave a little too much than to be overly meticulous about clearing everything away; then, using a blowpipe, inflate the empty abdomen; it will quickly become firm and hold its original shape, but until it does, you'll need to blow into it frequently."
A correspondent to Science Gossip, page 21, 1868, says: "I found the best way to preserve spiders was to suspend them by a loop round their waist in a solution of glycerine 2/3, water 1/3. The solution may want changing once or twice at first, after that it will keep unchanged for years."
A writer for Science Gossip, page 21, 1868, says: "I discovered the best way to preserve spiders was to hang them by a loop around their waist in a mixture of 2/3 glycerine and 1/3 water. The solution might need to be changed once or twice at first, but after that, it will remain stable for years."
 Fig. 36 —
Blow-pipe for inflating larvae
Fig. 36 —
Blow-pipe for inflating larvaePRESERVING CATERPILLARS. — The larvae of moths and butterflies may be preserved by pressing out the contents of their bodies, and by working from the head to the tail in a gentle manner, and assisting the removal of the mass by a careful dragging with a crochet needle. When empty, a little corrosive sublimate solution may be injected with a metal or glass blow-pipe, and the empty skin then distended by blowing into it through a very fine blowpipe, made by drawing out in a clear flame a small glass tube until it is attenuated to a fine point. This being inserted in the orifice at the last segment of the caterpillar, is kept in place by being tied round with a piece of darning cotton, or, better still, by a contrivance shown in Fig. 36 (the invention of Mr. Auld, in Science Gossip for 1872). A A are pieces of watch spring tied on the thick part of the blowpipe, and holding the caterpillar by pressure on the last segments when the point B is inserted.
PRESERVING CATERPILLARS. — You can preserve the larvae of moths and butterflies by carefully squeezing out their insides while working from the head to the tail. Use a gentle technique and help pull out the contents by carefully dragging with a crochet needle. Once empty, you can inject a little corrosive sublimate solution using a metal or glass blowpipe, and then inflate the empty skin by blowing into it through a very fine blowpipe. This can be made by heating a small glass tube in a clear flame until it tapers to a fine point. Insert this into the opening at the last segment of the caterpillar and secure it in place by tying it with a piece of darning cotton, or even better, use a device shown in Fig. 36 (invented by Mr. Auld, in Science Gossip for 1872). A A are pieces of watch spring attached to the thicker part of the blowpipe, which hold the caterpillar by applying pressure to the last segments when point B is inserted.
Mr. Auld, I see by his article, used a spirit lamp under a glass jar to form a drying chamber while blowing; but I have myself found a "box iron" a most convenient arrangement. The inner iron, being heated in the fire, is placed in the chamber or "box," which it thoroughly heats; then removed, and the larvae introduced and blown out in the hot air, but not so full as to unnaturally distend the segments.
Mr. Auld, I noticed in his article that he used a spirit lamp under a glass jar to create a drying chamber while blowing; however, I've personally found a "box iron" to be a much more convenient setup. The inner iron, heated in the fire, is placed in the chamber or "box," which heats it thoroughly; then it's removed, and the larvae are introduced and blown out in the hot air, but not so much that the segments become unnaturally stretched.
A certain loss of colour inevitably takes place in preserved larvae, which in the larger ones may be restored by colouring inside them with powder colours mixed in turps. Coloured wax is sometimes injected, and makes the skin very firm, but it is a delicate operation, requiring great skill in application. When finished, they may be "mounted" on green silk-covered wire, or, more naturally, on nicely modelled leaves of their various food-plants, by gum attached to their claspers.
A certain loss of color inevitably occurs in preserved larvae, which in the larger ones can be restored by coloring inside them with powdered colors mixed with turpentine. Colored wax is sometimes injected, making the skin very firm, but it’s a delicate procedure that requires great skill to apply. When finished, they can be "mounted" on green silk-covered wire or, more naturally, on well-shaped leaves from their various food plants using glue attached to their claspers.
It is often necessary to plunge the more delicate larvae into a weak solution of carbolic acid, or alum and water, to harden them before preservation.
It’s often necessary to dip the more delicate larvae into a weak solution of carbolic acid or alum and water to toughen them up before preservation.
SKELETONS OF ANIMALS. — Many people being under the impression that it is only necessary to remove the flesh of any mammal or bird in order to get a perfect skeleton, it may be as well to point out that as the flesh rots, so do the ligaments which hold the bones, and consequently the skeleton falls to pieces. When, therefore, you have made your skeleton by the means recommended by various authors, such as exposing it in an ant-hill, a wasp's nest, or to the attacks of the "blow-flies" or "mealworm" (the larvae of a beetle), to "tadpoles," or — as is the usual way with the bone preservers — by maceration in water for a lengthened period (after removal of a great deal of the flesh, the skin, and entrails), you will, after the careful removal of the flesh still remaining, and subsequent drying of the bones in the sun and air, find that nearly every bone will have to be attached to its fellow by fine brass wire, and in the case of the bones of large animals, each bone will have to be neatly drilled and coupled with brass wire of greater strength.
SKELETONS OF ANIMALS. — Many people think that it’s just enough to take the flesh off any mammal or bird to get a perfect skeleton. However, it's important to note that as the flesh decays, so do the ligaments that hold the bones together, which causes the skeleton to come apart. Therefore, once you've prepared your skeleton using methods suggested by various authors—such as placing it in an ant hill, a wasp nest, or exposing it to the activity of "blow-flies" or "mealworms" (the larvae of a beetle), tadpoles, or, as is commonly done by bone preservers, by soaking it in water for an extended period (after removing most of the flesh, skin, and internal organs)—you will find that after carefully cleaning off the remaining flesh and drying the bones in the sun and air, nearly every bone will need to be connected to its counterparts with fine brass wire. For larger animal bones, each bone will need to be neatly drilled and joined with stronger brass wire.
Skeleton-making by maceration in cold water is, perhaps, one of the most sickening operations. I have been somewhat successful by trimming off all the flesh possible, wiring some parts together, tying others in cloths and boiling them gently for several hours in water changed from time to time, afterwards taking them out and picking off, with fingers and blunt tools, all the flesh remaining — whilst hot — then drilling and wiring all together with galvanised or copper fastenings in a proper manner, boiling again in plenty of water, and then allowing the bones to remain in cold water — constantly changed — for a week or so; finally laying out in the sun and air to bleach.
Skeleton-making by soaking in cold water is probably one of the most disgusting tasks. I've had some success by cutting off as much flesh as possible, wiring certain parts together, tying others in cloth, and gently boiling them for several hours in water that I change from time to time. After that, I take them out and pick off all the remaining flesh—while hot—using my fingers and blunt tools, then drilling and wiring everything together with galvanized or copper fasteners in a proper way, boiling again in a lot of water, and finally letting the bones sit in cold water—constantly changed—for about a week; then I lay them out in the sun and air to whiten.
By this system I have lately "skeletonized" part of a horse, and the bones are free from grease and fairly white. Experience, however, in this as in everything else, will tell you what to do and how to piece one system into another to best advantage. Washing the bones with Hudson's "dry" soap, or soda and water, will often remove a great deal of the grease. Chloride of lime and water will assist the bleaching, but must be managed cautiously, or in careless hands it is likely to do more harm than good. The making of good and nicely bleached osteological preparations really depends on carefulness and neatness, supplemented by water, air, and sun; by the three latter aids, I have repeatedly improved in a wonderful manner "old bones" which were greasy and discoloured.
By this system, I have recently "skeletonized" part of a horse, and the bones are clean and fairly white. However, experience—just like with everything else—will teach you what to do and how to combine different methods for the best results. Washing the bones with Hudson's "dry" soap or a solution of soda and water can often remove a lot of the grease. Chloride of lime mixed with water can help with bleaching, but it needs to be handled carefully, or it might do more harm than good in careless hands. Creating good, nicely bleached osteological preparations really comes down to being careful and neat, combined with water, air, and sunlight; using these three aids, I have significantly improved "old bones" that were greasy and discolored.
Should the sea be close at hand, the skeleton, shut in a box with holes, may be sunk, and exposed to the attacks of various "small deer," especially "bees" (Aega tridens), which swarm in some shallow waters to such an extent as to clear the flesh from a large animal in a few hours.
Should the sea be nearby, the skeleton, contained in a box with holes, can be submerged and subjected to the assaults of various "small deer," particularly "bees" (Aega tridens), which swarm in some shallow waters so densely that they can strip the flesh from a large animal in just a few hours.
SKELETON LEAVES. -- Very beautiful objects may be made by placing the leaves of trees and shrubs, or such as are of a strong or woody texture, in a pan, pouring boiling soft or rain water over them, then exposing them to the atmosphere for a time varying from one to three or four months. They are then gently lifted out and held on a board, or on a plate, under running water, and the pulpy part, or epidermis, removed by gentle brushing with a camel-hair pencil or fine needle, to split the skin away from the mid-rib.
SKELETON LEAVES. -- You can create beautiful objects by taking leaves from trees and shrubs, especially those with a strong or woody texture. Place the leaves in a pan and pour boiling soft or rainwater over them. Then, leave them out in the atmosphere for anywhere from one to three or four months. Once that time has passed, gently lift them out and hold them over a board or plate under running water. Carefully remove the pulpy part, or epidermis, by gently brushing with a camel-hair pencil or fine needle to separate the skin from the mid-rib.
When nothing but the ligneous skeleton or woody fibre remains, it may be placed in a weak solution of chloride of lime, and exposed to the sun under glass to dry and bleach. To prevent them sticking to the paper on which you may wish to dry them, use either blotting-paper or oiled paper, after well washing the leaves. If skeletonizing in summer time, trust to sun alone, as chloride of lime has a tendency to make the leaves go brittle. The seed vessels of various plants, such as the poppies, thorn apples (Daturae), and campions, as also the leaves of laurel, holly, ivy, lime, sycamore, poplar, and a host of others, may be treated in this manner. When finished, they may be mounted on wires whipped with white silk, and placed on black velvet under a shade.
When only the wooden skeleton or fibrous material is left, you can soak it in a weak solution of calcium hypochlorite and let it dry and bleach in the sun under glass. To avoid them sticking to the paper while drying, use either blotting paper or oiled paper after thoroughly washing the leaves. If you're skeletonizing in the summer, rely on the sun alone, as calcium hypochlorite can make the leaves brittle. The seed pods of various plants, like poppies, thorn apples (Daturae), and campions, as well as the leaves of laurel, holly, ivy, lime, sycamore, poplar, and many others, can be treated this way. Once finished, they can be mounted on wires wrapped with white silk and displayed on black velvet under a shade.
Some writers have advised the boiling of the leaves in a solution of caustic soda, or steeping them in a strong mixture of chloride of lime and water, but I have hitherto considered these plans not so practical as the foregoing, though, perhaps, quicker; as, however, I find two writers, in Science Gossip for 1867, very positive on the subject, I will give the following extracts:
Some writers have suggested boiling the leaves in a solution of caustic soda or soaking them in a strong mix of bleach and water, but I’ve always thought these methods aren’t as practical as the ones mentioned earlier, though they might be faster. However, since I found two writers in Science Gossip from 1867 to be very adamant about this topic, I’ll provide the following excerpts:
"A solution of caustic soda is made by dissolving 3 oz. of washing soda in two pints of boiling water, and adding 1.5 oz. of quicklime, previously slacked; boil for ten minutes, decant the clear solution, and bring it to the boil. During ebullition add the leaves; boil briskly for some time — say, an hour — occasionally adding hot water to supply the place of that lost by evaporation. Take out a leaf and put into a vessel of water, rub it between the fingers under the water. If the epidermis and parenchyma separate easily, the rest of the leaves may be removed from the solution, and treated in the same way; but if not, then the boiling must be continued for some time longer.
A solution of caustic soda is made by dissolving 3 oz. of washing soda in two pints of boiling water, and adding 1.5 oz. of quicklime, which has been slaked beforehand; boil for ten minutes, then decant the clear solution and bring it to a boil again. While it’s boiling, add the leaves; let it boil vigorously for about an hour, occasionally adding hot water to replace what’s lost due to evaporation. Take out a leaf and place it in a container of water, rubbing it between your fingers under the water. If the outer layer and inner tissue separate easily, you can take the rest of the leaves out of the solution and treat them the same way; if not, continue boiling for a bit longer.
To bleach the skeletons, mix about a drachm of chloride of lime with a pint of water, adding sufficient acetic acid to liberate the chlorine. Steep the leaves in this till they are whitened (about ten minutes), taking care not to let them stay in too long, otherwise they are apt to become brittle. Put them into clean water, and float them out on pieces of paper. Lastly, remove them from the paper before they are quite dry, and place them in a book or botanical press." — Dr. G. Dickson, Science Gossip, January, 1867.
To bleach the skeletons, mix about a teaspoon of chlorine powder with a pint of water, adding enough vinegar to release the chlorine. Soak the leaves in this solution until they are white (about ten minutes), being careful not to leave them in too long, or they'll become fragile. Rinse them in clean water and lay them out on pieces of paper. Finally, take them off the paper before they're completely dry, and put them in a book or botanical press." — Dr. G. Dickson, Science Gossip, January, 1867.
"I once saw another way of managing skeleton leaves that interested me greatly. The leaves were boiled for two minutes, and then transferred to a strong solution of permanganate of potash and gently heated. In an hour or two the laxer tissues were easily removed by means of a brush. Sulphurous acid was used for bleaching them, and this liquid was also employed with much facility for the removing of the stains on the fingers caused by the permanganate of potash." — George Newlyn, Science Gossip, November, 1867.
"I once saw a different method for managing skeleton leaves that really caught my interest. The leaves were boiled for two minutes and then moved to a strong solution of potassium permanganate and gently heated. After an hour or two, the softer tissues were easily brushed away. Sulfurous acid was used for bleaching, and this liquid was also very effective at removing the stains on fingers caused by the potassium permanganate." — George Newlyn, Science Gossip, November, 1867.
The last-named gentleman appears to bleach his leaves by fastening them across a hat-box by means of strings, inserting a pan or tin cup containing sulphur, setting it on fire, and shutting down the lid (of course, out of doors). The whole article is very interesting, but too long for insertion here.
The last-mentioned guy seems to lighten his leaves by tying them across a hat box with strings, placing a pan or tin cup filled with sulfur inside, lighting it on fire, and closing the lid (obviously outdoors). The whole thing is pretty fascinating, but it's too lengthy to include here.
CRUSTACEANS. — Lobsters, crawfish, and crabs must have the cephalo-thorax (the upper part) disjointed from the body or "tail" part, the limbs taken off at their attachment to the body, and the whole of the flesh removed by means of the "undercutting tool" (see Fig. 29), and crooked wires; afterwards wash the inside with carbolic wash (No. 15), and fill the limbs and body with dry plaster and wadding, neatly fixing on the legs where disjointed, and putting the remainder of the body together with any of the cements mentioned in Chapter IV.
CRUSTACEANS. — Lobsters, crayfish, and crabs need to have the cephalothorax (the upper part) separated from the body or "tail" section, the limbs removed at their attachment to the body, and all the flesh extracted using the "undercutting tool" (see Fig. 29) and bent wires; next, wash the inside with carbolic wash (No. 15), and fill the limbs and body with dry plaster and wadding, neatly attaching the legs where they were separated and assembling the rest of the body with any of the adhesives mentioned in Chapter IV.
POLISHING HORNS. — As a commencement it will be requisite to remove all the rough shell-like layers of horn which stand up as knots and gnarls, and mar the symmetry of the horns. In some horns, old ones especially, you will find their inner sides covered with several thicknesses of this waste or dead stuff. Do not be afraid, but boldly pare this down level with the surrounding horn, for which purpose nothing is so good as a spokeshave. Blood stains usually lie in the soft upper layers; shave these down carefully until they end, which will be underneath where the horn becomes white and of a more ivory-like texture. When nearing this it will be as well to give up the use of the spokeshave, and use some instrument in a scraping manner; the side of a chisel (not the cutting edge) or a knife is best for this purpose. The handle being held in the right hand and the point in the left, scrape the horn until you get to the white part, which will be somewhat harder than the remainder.
POLISHING HORNS. — First, you need to remove all the rough, shell-like layers of horn that create knots and gnarls, disrupting the horns' symmetry. In some older horns, especially, you'll notice their inner sides are covered with several layers of this dead material. Don’t hesitate; confidently shave this down to be level with the surrounding horn, and the best tool for this is a spokeshave. Blood stains usually sit in the softer upper layers; carefully shave these away until they disappear, which will be underneath where the horn turns white and takes on a more ivory-like texture. As you approach this layer, it’s best to stop using the spokeshave and switch to a scraping tool. The side of a chisel (not the cutting edge) or a knife works well for this. Hold the handle in your right hand and the point in your left, and scrape the horn until you reach the white part, which will be somewhat harder than the rest.
In colourless horns you must get down to this white part, or your polish will not be high; besides this, blood stains will show up, and the surface will look of a soapy, greasy nature, instead of the ivory-like texture it should assume. Be careful when working to the largest part, or base of the horn, not to run your tool through, as it is much thinner there than at the tips.
In colorless horns, you need to reach this white area, or your polish won't shine; also, blood stains will become visible, and the surface will appear soapy and greasy instead of the ivory-like texture it should have. Be careful when working on the largest part, or base of the horn, not to push your tool through, as it's much thinner there than at the tips.
Whilst thinning rough places in certain horns you will find a half round and flat fine rasp of great assistance. When you have obtained a nice even surface all over, use glass paper of different degrees of fineness, and pumice-stone. Collect the dust which falls off, with a rag dipped in linseed oil and well rub the horn with this. Next get some "putty powder" (oxide of tin), which rub violently on all parts of the horn with a rag and linseed oil, finally finishing off with brown paper, a soft rag, and the palm of the hand, using plenty of "elbow grease."
While sanding down rough areas on certain horns, you'll find that a half-round and flat fine rasp is really helpful. Once you’ve achieved a nice, even surface all over, use sandpaper with different grits and pumice stone. Collect any dust that falls off with a rag soaked in linseed oil and rub the horn down well with it. Next, grab some "putty powder" (oxide of tin) and vigorously rub it on all parts of the horn with a rag and linseed oil. Finally, finish off with brown paper, a soft cloth, and the palm of your hand, putting in plenty of "elbow grease."
Remember, horn polishing is all hard work, unless managed by "bobbing" on a lathe, so let no one attempt it who is not prepared to work very hard, as plenty of quick and violent friction is indispensable in the latter stages to give the high polish requisite. Horn may be softened, and ultimately dissolved in caustic soda.
Remember, polishing horn is all about hard work unless you do it by "bobbing" on a lathe, so don’t let anyone try it unless they’re ready to put in a lot of effort, as a lot of quick and intense friction is necessary in the later stages to achieve the high polish needed. Horn can be softened, and eventually dissolved, in caustic soda.
POLISHING TORTOISE-SHELL, etc.. — To polish tortoise-shell (which is in many cases turtle-shell) it is necessary to scrape the shell very carefully with a broad knife, taking care not to cut through to the under shell or "bone." When properly smoothed rub it over with pumice-stone and water, then with bath-brick and water, finally polishing off, when you have a nice fine surface, with putty-powder and oil, or rotten-stone and oil, with plenty of hard work and hand-polishing towards the last. A little tallow rubbed in with the hand, as the very last finishing touch, will be found of benefit. A paste made of sal volatile and rouge has been recommended to be applied to the shell after scraping, then suffered to remain until dry, and finally polished off.
POLISHING TORTOISE-SHELL, etc.. — To polish tortoise-shell (which is often turtle-shell), you need to carefully scrape the shell with a broad knife, being careful not to cut through to the under shell or "bone." Once it's properly smoothed, rub it with pumice stone and water, then with bath brick and water. Finally, polish it off with putty powder and oil, or rotten stone and oil, spending plenty of time on hard work and hand polishing. A little tallow rubbed in with your hand as a final touch will be beneficial. A paste made of sal volatile and rouge has been suggested to apply to the shell after scraping, letting it dry, and then polishing it off.
Bad places in the shell, where it has peeled or been broken off, should be made up with coloured shellac, or hardened wax, put in with a warmed knife after polishing, and finished off separately. Tortoise-shell may be welded by heat.
Bad spots in the shell, where it has chipped or broken off, should be fixed with colored shellac or hard wax, applied with a warmed knife after polishing, and finished separately. Tortoiseshell can be fused with heat.
Sea shells may be polished by being plunged for a little time in dilute nitric acid, then rubbed down with sand paper or fine emery and oil, finished with "Water-Ayr" or "Snake-stone," and finally polished with putty-powder and oil. A mussel-shell treated in this manner makes a most beautiful object, coming out purple, with streaks of lighter blue and pearl.
Sea shells can be polished by briefly soaking them in diluted nitric acid, then sanding them with sandpaper or fine emery and oil. Finish with "Water-Ayr" or "Snake-stone," and finally polish with putty powder and oil. A mussel shell treated this way turns into a stunning object, emerging with a purple hue and streaks of lighter blue and pearl.
Stones, such as agates, which are found on the sea beach, or any stone which is required to be polished, is to be first ground down to a rough surface, then polished by successive rubbings of first, second, and third grit-stones of different degrees of fineness, lastly "Water-Ayr" or "Snake-stone," and finished with "putty powder" applied with oil. All of the stones or grits mentioned are to be procured at the marble mason's at a low rate. Serpentine treated in this manner makes a very beautiful object.
Stones like agates, found on the beach, or any stone that needs polishing should first be ground down to a rough surface. Then, polish it by progressively rubbing it with first, second, and third grit stones of different fineness levels, finishing off with "Water-Ayr" or "Snake-stone," and complete the process using "putty powder" mixed with oil. All the stones or grits mentioned can be bought at a marble mason’s for a low price. Serpentine treated this way turns into a really beautiful object.
EGGS, COLLECTING AND PRESERVING. — Eggs of various birds may be sought for in their seasons in the localities best suited to the several species. But so much depends upon special training or aptitude in the collecting of birds' eggs, that a detailed description of localities where to seek and how to find, eggs, is hardly necessary, in the pages of this work, further than to remark that a pair of "climbing irons" are requisite for those individuals who do not possess the agility of a cat or of a schoolboy.
EGGS, COLLECTING AND PRESERVING. — You can look for eggs from different birds during their respective seasons in places that are ideal for those species. However, since successfully collecting bird eggs often requires specific training or natural skill, it’s difficult to provide a comprehensive guide on where to search and how to find eggs in this text. It's worth mentioning that a pair of "climbing irons" is necessary for those who aren't as agile as a cat or a schoolboy.
Climbing Irons (see Fig. 37), to fit the foot and leg, are best made of wrought iron with a welding of finely-tempered steel from C to DE, to form the claw used when climbing. To affix them to the leg, the foot is placed as in a stirrup from C to B, the claw ED pointing inward. A strap should now be passed through a slot or square hole punched in the metal between C and D (not shown in the figure), and laced under and across the foot to and through the loop shown between B and A at a, thus keeping the foot itself tightly fixed. Another strap passes through the loop at the top where marked A, and is strapped round the calf of the leg, keeping all below the knee rigid and secure. When climbing, the hands clasp the tree in the usual manner, and the side of the foot is struck smartly against the trunk, to cause the claw to penetrate. The climber now rests on this, and strikes the claw of the other iron in, on the other side, higher up, and so on alternately.
Climbing Irons (see Fig. 37), designed to fit the foot and leg, are ideally made from wrought iron with a weld of finely-tempered steel from C to DE to form the claw used while climbing. To attach them to the leg, place the foot as if in a stirrup from C to B, with the claw ED facing inward. Now, a strap should be threaded through a slot or square hole punched in the metal between C and D (not shown in the figure), laced under the foot, and then looped through the opening shown between B and A at a, securing the foot tightly. Another strap goes through the loop at the top marked A and wraps around the calf of the leg, keeping everything below the knee firm and secure. While climbing, the hands grip the tree as usual, and the side of the foot is hit firmly against the trunk to make the claw dig in. The climber then supports their weight on this claw and drives the claw of the other iron into the tree higher up, alternating the process.
 Fig. 37 —
Climbing iron
Fig. 37 —
Climbing ironEggs, when procured, must have their contents removed. To do this they must first be drilled with little steel instruments called egg-drills, which are made of various degrees of fineness according to the size of the egg to be operated upon. Drills are to be procured from the various dealers, but can be made from steel wire softened in the fire and filed to a sharp three-cornered point--afterwards tempered to hardness — for the smaller eggs, or filed up for the larger eggs to the pattern of a "countersink" used for wood; indeed, the smallest-sized "countersink" made — to be procured at any ironmonger's — will do very well for eggs the size of a hen's. Capital egg-drills are to be made from "pinion wire" used by watchmakers. Simply file to a point, and "relieve" with a small "three-square" file the channels of the wire, giving them a cutting edge up to their point. With such a drill as this — cost, about 2d. — I have blown, without any breakage, eggs varying in size, from swallows' to hens'. A drill costing 2s. 6d., which was the price I paid for my first — purchased from a surgical-instrument maker in London, since deceased — could not do the work better.
Eggs, once obtained, need to have their insides taken out. To do this, they must first be drilled with small steel tools called egg-drills, which come in different sizes to match the eggs being worked on. You can buy drills from various suppliers, but you can also make them from soft steel wire that’s heated in the fire and sharpened to a point—then hardened for smaller eggs, or shaped for larger eggs like a “countersink” used for wood; in fact, the smallest “countersink” you can find at any hardware store works well for eggs the size of a hen's. Good egg-drills can be made from "pinion wire" used by watchmakers. Just sharpen it to a point and use a small "three-square" file to create cutting edges along the wire up to the tip. With a drill like this—costing about 2d.—I've successfully opened eggs varying in size from swallows’ to hens’ without breaking them. A drill I bought for 2s. 6d., which was the price of my first one—purchased from a surgical-instrument maker in London, who has since passed away—couldn't perform any better.
To use these drills, rotate the point by "twiddling" the drill between the finger and thumb, making only one hole, and that in the centre of the egg. When a nicely-rounded hole is cut, the egg must be emptied by means of an "egg-blower," or blowpipe; the point being introduced into the hole, the contents are blown out or sucked up into the bulb, which, when full, is emptied out at the other end. It sometimes happens that the egg is "hard set." The embryo must, in that case, be cut out with small curved scissors specially made. If hard set, putrid, or stale, an egg often bursts when touched. To obviate this, drill and blow it under water.
To use these drills, twist the point by "twiddling" the drill between your finger and thumb, making just one hole right in the center of the egg. Once you’ve cut a nice, rounded hole, you need to empty the egg using an "egg-blower" or blowpipe; insert the point into the hole, and either blow the contents out or suck them up into the bulb, which you can then empty from the other end. Sometimes, the egg is "hard set." In that case, you have to cut out the embryo with small curved scissors made for this purpose. If the egg is hard set, spoiled, or old, it can often burst when touched. To prevent this, drill and blow it underwater.
Young birds can often be extracted, with a little care, uninjured from their egg-shells, and yet — as happened to me lately in the instance of a hawk — the shell may make a presentable museum object, after such extraction.
Young birds can often be carefully removed from their eggshells without any harm, and yet — as I recently experienced with a hawk — the shell can still serve as an impressive museum display after the bird is extracted.
In all cases eggs should be thoroughly rinsed out with a solution of six grains of corrosive sublimate to an ounce of rectified spirits of wine. This may be sucked up into the bulb of the "egg-blower," and thence ejected into the egg, which is to be rotated, and what solution is left may then be sucked back and thrown away, or returned to the bottle. Great care must be taken, however, that the mixture shall not pass the bulb and be drawn up into the mouth, as it is, of course, a deadly poison; the egg, being placed (hole downwards) on blotting paper, is to be left until dry.
In all cases, eggs should be thoroughly rinsed with a solution made of six grains of corrosive sublimate per ounce of rectified spirits of wine. This solution can be drawn up into the bulb of the "egg-blower" and then pushed into the egg, which should be rotated. Any leftover solution can then be drawn back and disposed of or returned to the bottle. It's crucial to ensure that the mixture doesn’t pass the bulb and get sucked into the mouth, as it is a deadly poison. The egg, placed hole down on blotting paper, should be left until dry.
Those who object to poison may rinse their eggs out with water to which has been added a few drops of strong essence of cloves. This is agreeable to use, and appears to cleanse away all impurities.
Those who are against poison can rinse their eggs with water mixed with a few drops of strong clove oil. This is pleasant to use and seems to remove all impurities.
A little label may finally be gummed over the orifice, and the specimen is then ready for the cabinet; or, as labels will in time fall off, however well they may have been previously gummed, it is better to write a distinguishing number, and as much of the history of its collection as is possible on the egg itself, the full history, of course, being posted up in the note book. Labels may, however, be used with great advantage on the divisions of the cabinet drawer which separate one species of egg from the other.
A small label can finally be stuck over the opening, and the specimen is then ready for the cabinet. But since labels tend to fall off eventually, no matter how securely they were attached, it’s better to write a unique number and as much of the collection history as possible directly on the egg itself, while the complete history should be recorded in a notebook. Labels can still be very useful on the dividers of the cabinet drawer to separate different species of eggs from one another.
Loose labels are not to be used on any account, as they often get reversed and create confusion, and a collection thus treated is brought into grave discredit. Eggs, when being sent any distance, should be separately wrapped in cotton wool, and packed in a strong box, any interstices being lightly filled with wool also. Sawdust or bran should never be used as a packing medium, as the eggs shake together and break each other in travelling.
Loose labels should never be used because they can get mixed up and cause confusion, leading to serious problems for the collection. When shipping eggs over any distance, they should be individually wrapped in cotton wool and packed in a sturdy box, with any gaps lightly filled with wool too. Never use sawdust or bran as packing material since the eggs can bump against each other and break during transit.
For those who require coloured figures of eggs I must refer them to Hewitson's "Eggs of British Birds," or Atkinson's "British Birds' Eggs and Nests," a much cheaper, but very good little work; also to a new work by Mr. H. Seebohm (the celebrated traveller in Siberia, etc..), entitled, "A History of British Birds," with coloured illustrations of their eggs.
For those who need colored images of eggs, I recommend Hewitson's "Eggs of British Birds," or Atkinson's "British Birds' Eggs and Nests," which is a more affordable but still very good resource. Also, check out a new book by Mr. H. Seebohm (the famous traveler in Siberia, etc.), called "A History of British Birds," which has colored illustrations of their eggs.
PREPARATION OF MICROSCOPIC OBJECTS. — The same remark applies to this as to aquaria (see Chapter XIII.). The treatment is so varied, the objects so numerous, that books upon books have been written on it. Every naturalist and curator, however, has to work sometimes with the microscope; but taking into consideration the vastness of the subject, I must refer them to text-books, such as Beale's "How to Work with the Microscope;" Lankester's "Half-hours with the Microscope;" Hon. Mrs. Ward's "The Microscope;" Davies' "On the Preparation and Mounting of Microscopic Objects;" G. E. Davis' "Practical Microscopy;" Gosse's "Half-hours with the Microscope;" Wood's "Common Objects of the Microscope;" any of Quekett's works, and to late numbers of the Monthly Microscopical Journal, Nature, Science Gossip (the latter teeming with practical hints on all matters connected with natural history), and hosts of other works.
PREPARATION OF MICROSCOPIC OBJECTS. — The same observation applies here as it does to aquariums (see Chapter XIII.). The techniques are so diverse, and the objects so numerous, that entire books have been dedicated to it. Every naturalist and curator needs to use a microscope from time to time; however, given the vastness of the topic, I need to refer them to textbooks like Beale's "How to Work with the Microscope," Lankester's "Half-hours with the Microscope," Hon. Mrs. Ward's "The Microscope," Davies' "On the Preparation and Mounting of Microscopic Objects," G. E. Davis' "Practical Microscopy," Gosse's "Half-hours with the Microscope," Wood's "Common Objects of the Microscope," any of Quekett's works, and to recent issues of the Monthly Microscopical Journal, Nature, Science Gossip (the latter full of practical tips on all topics related to natural history), along with many other resources.
This chapter, dealing as it does with details and hints upon many subjects, may fittingly be closed with scraps forgotten in the body of this work, but which now occur to me as being useful knowledge.
This chapter, which covers various details and tips on many topics, can appropriately be wrapped up with bits of information that were overlooked in the main text, but now come to mind as valuable insights.
STARCH AS PASTE: (see chapter IV). — Procure some common starch (that which is white looking is perhaps the best), mix it up with a little cold water, just sufficient to dissolve it, stirring it thoroughly to prevent lumps. Pour upon this sufficient boiling water to make it into a stiff paste. This will be found most useful for clean paper or photographic work, as it enables paper to be pasted on cardboard, etc.., without creasing. The paper should be first wetted on the face side, the back pasted with the starch-paste, fixed on the cardboard, and the whole dried off by blotting paper. For common taxidermic work, paste containing resin (sold at leather merchants') is strong and cheap.
STARCH AS PASTE: (see chapter IV). — Get some plain starch (the white kind is probably the best), mix it with a bit of cold water, just enough to dissolve it, stirring thoroughly to avoid lumps. Then, pour in enough boiling water to create a thick paste. This is really useful for clean paper or photography work, as it lets you attach paper to cardboard without creasing. First, wet the front side of the paper, then paste the back with the starch paste, attach it to the cardboard, and blot it dry with some blotting paper. For regular taxidermy work, a paste with resin (available at leather shops) is strong and affordable.
BEST GLUE, made in the ordinary manner, but rather thicker than usual, then poured into a bottle containing enough methylated spirit to thin it, is recommended as being a strong medium to stick paper on wood or cardboard, with the advantage claimed for it that it does not cause the thin wood or cardboard to "cast" or "buckle."
BEST GLUE, made in the usual way but slightly thicker than normal, then poured into a bottle with enough methylated spirit to thin it, is recommended as a strong adhesive for sticking paper to wood or cardboard. It’s claimed to have the added benefit of not causing the thin wood or cardboard to "warp" or "bend."
MARINE GLUE dissolved in diluted acetic acid makes a strong cement for certain things, such as mending shells. This, as also the preparation of Formula No. 33, should be kept in bottles, or small stoppered jars, and melted for use by surrounding with hot water.
MARINE GLUE dissolved in diluted acetic acid creates a strong cement for specific purposes, like repairing shells. This, along with the preparation of Formula No. 33, should be stored in bottles or small stoppered jars and melted for use by placing in hot water.
LEATHER is (so says a bookbinder) to be pasted, after it is damped on the outside. Cloth is to be glued. This is useful to know if making up cloth-covered boxes with leather backs, to imitate books (see Chapter XV., on Entomology).
LEATHER is (as a bookbinder states) to be glued after it’s dampened on the outside. Cloth is to be glued as well. This is helpful information if you're making cloth-covered boxes with leather backs to resemble books (see Chapter XV., on Entomology).
ANTI-INSECT NOSTRUMS (see chapter IV). — Russian tallow in saucers, oil of birch, flowers of sulphur, hellebore, pepper, tobacco, are said to be "bogies," the last especially, to the Dermestes beetles and their cousin, Anthrenus museorum. Try them, but don't rely too much upon them, is my advice; nor, indeed, upon anything — not excepting even corrosive sublimate. Trust only to exposure to light and constant supervision, zinc or wire drying cases, and to "casing up" as soon as possible.
ANTI-INSECT REMEDIES (see chapter IV). — Russian tallow in saucers, birch oil, sulfur flowers, hellebore, pepper, and tobacco are said to be "boogeymen," especially the last one, for the Dermestes beetles and their relative, Anthrenus museorum. Give them a try, but my advice is not to depend on them too much; nor should you trust anything completely—not even corrosive sublimate. Rely solely on exposure to light and constant supervision, zinc or wire drying cases, and on sealing things up as soon as you can.
If sending specimens long distances, it is well to pepper the shot parts, enclosing also in the parcel some pieces of charcoal wrapped in paper. Of course, if the specimens are not for the table, dilute glacial carbolic acid, poured on the wounds and down the throat, is the best thing to do, but it should always be noted in an accompanying letter, for fear of accidents. Smearing the hands and face with paraffin is said to keep forest flies and midges from biting.
If you're sending specimens over long distances, it's a good idea to pack the damaged parts carefully and include some pieces of charcoal wrapped in paper in the package. Naturally, if the specimens aren’t for eating, you should pour diluted glacial carbolic acid on the wounds and down the throat, but this should always be mentioned in an accompanying letter to avoid any accidents. It's said that applying paraffin to your hands and face helps keep forest flies and midges from biting.
PRESERVATION OF ANIMAL TISSUE (see chapter IV).
PRESERVATION OF ANIMAL TISSUE (see chapter IV).
Chloride of zinc, 1 part.
Zinc chloride, 1 part.
Water, 20 parts.
Water, 20 units.
This formula appears to be one of the non-alcoholic preservatives most suited for fishes in preparation jars. I have so lately tried it that I cannot at present state if it is the very best.
This formula seems to be one of the non-alcoholic preservatives best suited for fish in preparation jars. I've only recently tried it, so I can't say for sure if it is the absolute best.
PICRIC ACID, formed by a certain chemical fusion of carbolic acid with nitric acid, is recommended (when diluted) for the preservation of soft-bodied animals, such as zoophytes, etc..
PICRIC ACID, created by a specific chemical reaction between carbolic acid and nitric acid, is suggested (when diluted) for preserving soft-bodied animals, like zoophytes, and others.
BICHROMATE OF POTASH (see chapter IV), though so useful for pickling fishes, mollusca, worms, and even "jelly fish" and sea-anemones, is, I have found, liable to be attacked by mildew; to prevent this add a few drops of phenic (carbolic acid). [Footnote: Phenol, Phenic Acid, Phenic Alcohol, Hydrate of Phenyl (C6H5HO)=Carbolic add.] This salt is also used in microscopy to assist in fixing glass covers on glass slides. The cement in question appears so admirably adapted to many purposes, that I think it worth quoting (see Science Gossip, 1879, p. 136):
BICHROMATE OF POTASH (see chapter IV), though so useful for pickling fish, mollusks, worms, and even "jellyfish" and sea anemones, is, I’ve found, prone to mildew; to prevent this, just add a few drops of phenic acid (carbolic acid). [Footnote: Phenol, Phenic Acid, Phenic Alcohol, Hydrate of Phenyl (C6H5HO) = Carbolic acid.] This salt is also used in microscopy to help fix glass covers on glass slides. The cement in question seems so well-suited for many purposes that I believe it’s worth quoting (see Science Gossip, 1879, p. 136):
Cox's gelatine, 2 oz.
Cox's gelatin, 2 oz.
Acetic acid, fluid, 1 drachm.
Acetic acid, liquid, 1 drachm.
Gum ammoniac, 10 grains.
Ammoniac gum, 10 grains.
"Dissolve in a water bath, and filter through cotton while warm. This cement remains fluid when cold, and dries quickly. After the ring has become set, or stiff, the whole slide is immersed for a minute or so in a 10-grain solution of bichromate of potash, and is then allowed to dry, exposed to the light, which makes the bichromated gelatine perfectly insoluble, even in boiling water, and thoroughly prevents the escape of any glycerine."
"Dissolve in a water bath and filter through cotton while warm. This cement stays liquid when cold and dries quickly. Once the ring has set or hardened, the entire slide is immersed for about a minute in a 10-grain solution of potassium bichromate, then left to dry in the light, which makes the bichromated gelatin completely insoluble, even in boiling water, and effectively prevents any glycerin from escaping."
PERMANGANATE OF POTASH (see chapter IV) is recommended at p. 49, Science Gossip, 1879, by a French scientist, for "preserving delicate organisms." "It is especially good in histological researches, as it acts like osmic acid, burning up the protoplasm, bringing out the minutiae, and showing the nuclei, outlines of cells, etc.. It is used as a saturated solution in distilled or very pure spring water; sea-water also dissolves it. The concentrated solution, of a lovely violet colour, kills small organisms at once, and then burns them. They are left in it from thirty minutes to an hour, then withdrawn, and placed in alcohol, after which they can be made transparent with essence of terebinth and mounted in Canada balsam. Beautiful results are thus obtained with echinoderms, zoophytes, worms and marine arthropoda. For delicate researches, especially in the ciliated infusoria, it is better than osmic acid, without its great cost, and is everywhere easily obtained." — G. du Plessis.
PERMANGANATE OF POTASH (see chapter IV) is recommended on p. 49 of Science Gossip, 1879, by a French scientist, for "preserving delicate organisms." "It works particularly well in histological research, acting like osmic acid by destroying protoplasm, highlighting details, and showing cell nuclei, outlines, etc. It's used as a saturated solution in distilled or very pure spring water; seawater also dissolves it. The concentrated solution, which has a beautiful violet color, instantly kills small organisms and then breaks them down. They are left in it for thirty minutes to an hour, then taken out and placed in alcohol, after which they can be made transparent using essence of terebinth and mounted in Canada balsam. This leads to stunning results with echinoderms, zoophytes, worms, and marine arthropods. For delicate studies, especially in ciliated infusoria, it’s preferable to osmic acid, without the high cost, and it's readily available everywhere." — G. du Plessis.
GLYCERINE (see Chapter IV). — Glycerine will be found useful for rubbing on the eyes or noses of animals to keep them moist and prevent their drying up when modelling, as well as for many other purposes, which will readily occur to the practical worker.
GLYCERINE (see Chapter IV). — Glycerine is helpful for applying to the eyes or noses of animals to keep them moist and prevent drying out during modeling, as well as for many other uses that will easily come to mind for the practical worker.
CORALS, etc.., may be cleaned by first soaking in warm water, to remove surface dust, etc.., then allowing the tap to run on them for some hours, and afterwards soaking them in a weak solution of chloride of lime for a short time, until fairly bleached.
CORALS, etc., can be cleaned by first soaking them in warm water to remove surface dust, then letting the tap run on them for a few hours, and after that soaking them in a weak solution of bleach for a short time, until they are reasonably bleached.
BIRDS may be roughly preserved from immediate decay by pouring down their throats, or into their bodies by an incision under the wing, crude creosote or carbolic acid. I remember once having a collection of birds from India prepared in this way, which after a lapse of years were successfully skinned and made up — "as well as could be expected."
BIRDS can be somewhat preserved from quick decay by pouring crude creosote or carbolic acid down their throats, or into their bodies through an incision under the wing. I recall once having a collection of birds from India prepared this way, which after several years were successfully skinned and put together — "as well as could be expected."
Sometimes I have been written to by correspondents to say that they had cured some mammals' skins by Formula No. 9, and that there was an efflorescence about the mouth, or that mildew had appeared. My answer has ever been:
Sometimes I've received messages from people saying they cured some animal skins with Formula No. 9, and that there was a rash around the mouth, or that mold had shown up. My response has always been:
Firstly, that possibly the specimen had been cased up too soon. At least two months should elapse after stuffing before mammals should be mounted in a case.
Firstly, it's possible that the specimen was cased up too soon. At least two months should pass after stuffing before mammals are mounted in a case.
Secondly, that common alum had been used instead of burnt alum.
Secondly, common alum had been used instead of burnt alum.
Thirdly, that an undue proportion of saltpetre had been mixed with the alum.
Thirdly, that an excessive amount of saltpeter had been mixed with the alum.
Should mildew make its appearance, it would point to improper mounting — i.e., not trimming off enough flesh or fat, or to the specimen being mounted in a case before it was sufficiently dry. If it be mildew, the specimen must come out of the case and be properly dried. If it be merely crystallisation of impure alum, the crystals must be washed off with warm water from time to time as they form, until no more appear. It must be remembered, however, that a damp house, or juxtaposition to a wet wall, will ruin the most carefully mounted specimens.
If mildew shows up, it means the specimen wasn't mounted correctly — for example, not trimming enough flesh or fat, or putting it in a case before it was completely dry. If it is mildew, you'll need to take the specimen out of the case and dry it properly. If it's just the crystallization of impure alum, you should wash off the crystals with warm water as they form, until none are left. Keep in mind, though, that a damp house or being next to a wet wall can ruin even the best-mounted specimens.
Correspondents may be quite sure that neither the method nor the formula are to blame in the matter. The great point is to wipe off the mildew or crystals as fast as they appear until no more form, which will determine when the specimen is thoroughly dry.
Correspondents can be confident that neither the method nor the formula is at fault here. The key is to remove the mildew or crystals as quickly as they show up until none are left, which will indicate when the specimen is completely dry.
How to solder, either by the blowpipe or by the "bit," is now and then useful knowledge. Any mechanic will impart this for a consideration.
How to solder, either with a blowtorch or a soldering iron, is sometimes useful information. Any mechanic will teach you this for a fee.
CASES can be made in all styles. The oldest is the "box," which needs no description. Next in age is the "canted-corner case," a most odious abomination beloved of the amateur; the shape of the ground plan being as Fig. 38. A to A the front, B to B the back, C C C is glass, the points A A are wooden or metal uprights, pinning together top and bottom; B B B B is wood; hence it follows that all the space outside the dotted lines is useless, or if used at all, the uprights (A A) cross perhaps the most important part of the work, so that this shaped case resolves itself into the following difficulty: either the case is too large for the object, or two lines cross it.
CASES can be created in various styles. The oldest is the "box," which doesn't need any explanation. The next oldest is the "canted-corner case," a design that's generally disliked and often used by beginners; the layout resembles Fig. 38. A to A shows the front, B to B shows the back, C C C represents glass, and points A A are wooden or metal supports that connect the top and bottom; B B B B is made of wood. As a result, all the space outside the dotted lines is unnecessary, or if it's used at all, the supports (A A) might block the most important part of the display, causing problems: either the case is too large for the object, or two lines cut through it.
 Fig. 38
The usual glass-ended square case is easily made by any amateur joiner in this wise: Take two pieces of wood for top and bottom to size required, plane and square them up together to ensure their being exactly alike; then, with a "plough" plane, set to 0.375 in., "plough out" all around the front and sides of each to half its thickness. Take the back and nail it to the top and bottom with brads; having done which, next take two pieces of wood for the uprights of sufficient thickness to suit the case — too great thickness being guarded against.
The typical glass-ended square case is easy to make for any amateur woodworker like this: Take two pieces of wood for the top and bottom, cut them to the required size, and plane them to make sure they are exactly the same. Then, using a "plough" plane set to 0.375 inches, groove all the way around the front and sides of each piece to half its thickness. Take the back and nail it to the top and bottom using small nails; once that's done, take two pieces of wood for the sides that are thick enough for the case—just make sure they aren't too thick.
 Fig. 39
Let us, however, assume that each of these pieces is 0.75 in. square, the height immaterial, "plough" these out on two sides, the "plough" still set at 0.375 in. for depth. For the front, "plough" out 0.375 in. from the edge, and 0.375 in. deep, this still leaves 0.375 in. out of the 0.75 in. untouched; turn the upright now on its side and repeat the "ploughing," allowing for just missing the point of intersection. Fig. 39 shows a section; the dark part is the wood left, the dotted squares show where the wood has been removed; the corner A, outside the dotted line, is afterwards rounded off. Each upright is "ploughed" alike; they are then glued and nailed to the top and bottom by brads running through; the rounded edges falling outside.
Let’s assume that each of these pieces is 0.75 inches square, with the height not being important. We’ll groove out two sides, keeping the depth at 0.375 inches. For the front, groove out 0.375 inches from the edge and to a depth of 0.375 inches. This leaves 0.375 inches of the 0.75 inches untouched. Now, turn the upright on its side and repeat the grooving, making sure to just miss the point of intersection. Fig. 39 shows a section; the dark area represents the wood that remains, and the dotted squares indicate where the wood has been removed. The corner A, outside the dotted line, will be rounded off later. Each upright is grooved the same way; they are then glued and nailed to the top and bottom with brads going through, and the rounded edges will extend outward.
The case is now finished, as will be seen, for the reception of glass at its front and sides. First, however, it will have to be blacked or ebonised. Mix, therefore, some "lamp" or "drop" black in powder with thin glue-water, boil, and lay the mixture on with a stiff brush over the case whilst warm. When quite dry, rub it down with fine sand paper.
The case is now complete, as you will see, for the installation of glass at the front and sides. However, first, it needs to be painted black or stained dark. So, mix some "lamp" or "drop" black powder with thin glue-water, heat it, and apply the mixture with a stiff brush over the case while it's warm. Once fully dry, smooth it out with fine sandpaper.
The subjects being mounted in the case, paper the glass in with brown paper and strong paste, and then go over the previously blackened case with a very thin coat of Brunswick black. When this is dry put a slip of 0.5 in. or 0.75 in. gilt moulding (procured at the picture frame maker's) all around the front of the case on top of the prepared glass, and just within the edges of the wood "ploughed" out to receive it, nicely mitring the comers with a mitre and shooting block.
The subjects being displayed in the case, cover the glass with brown paper and strong glue, then apply a very thin layer of Brunswick black over the previously blackened case. Once this is dry, attach a 0.5 in. or 0.75 in. gilt molding (sourced from the picture frame shop) all around the front of the case, placing it on top of the prepared glass and just inside the edges of the wood that's been cut to fit it, making sure to neatly mitre the corners using a mitre and shooting block.
The foundation of this latter is a sound 1 in. board, 2 ft. 6 in. long by 18 in. wide, or of any other convenient dimensions. Upon this is screwed another piece an inch or more thick (Fig. 40), so as to make a step (C C). Both pieces must be dry, so as not to be liable to warp; upon the higher part are screwed two strips of hard wood (B B) about 1.5 in. or 2 in. wide, forming a right angle where they meet. The whole must be very accurately made, and although deal will answer the purpose, hard wood of some kind will be more satisfactory. Beech or oak will do very well.
The base of this is a solid 1-inch thick board, 2 feet 6 inches long by 18 inches wide, or any other suitable size. On top of this, another piece that is an inch or more thick (Fig. 40) is attached, creating a step (C C). Both pieces need to be dry to prevent warping; on the upper section, two strips of hardwood (B B) about 1.5 inches or 2 inches wide are fastened at a right angle where they meet. Everything should be made very precisely, and while softwood will work, a type of hardwood will provide better results. Beech or oak are both good options.
 Fig. 40 —
Mitre block.
Fig. 40 —
Mitre block.Suppose a piece of moulding to require mitring; it has only to be laid as shown against the guide bar (B), and sawn off on the line (CC), or laid on the other side against the second guide bar, and similarly cut off. It will be necessary to use both sides in this way, because, although the piece cut off has also an angle of 45 deg., it would need to be turned over and applied to the other, which could not be done without reversing the moulding. In a plain unmoulded strip this, of course, would not signify.
Suppose a piece of molding needs to be cut at an angle; it just needs to be placed against the guide bar (B) and cut along the line (CC), or placed on the other side against the second guide bar and cut in the same way. You’ll need to use both sides this way because, even though the piece being cut off also has a 45-degree angle, it would need to be flipped over to fit on the other side, which isn’t possible without turning the molding around. In a plain strip without any molding, this wouldn’t be an issue, of course.
Gilt moulding may be put at each end or not, according to the fancy and pocket of the workman. The case is now finished, and shows the front and two sides of glass framed in by gilt, outside of which is the narrow black line of the wood. If it be desired to get up the wood of the case in a superior manner, it must first be blacked with the glue and lamp-black, sand-papered down, blacked and sand-papered again, and finally French polished.
Gilt molding can be added at each end or left off, depending on the preference and budget of the craftsman. The case is now complete and features the front and two sides made of glass, framed in gilt, with a thin black line of wood around the edge. If you want to finish the wood of the case to a higher standard, it should first be coated with a mixture of glue and lampblack, sanded down, coated again, sanded again, and finally polished with French polish.
The most substantial and effective case is the "stop-chamfered" one, made either in deal ebonized, or fancy woods polished. In this the glass is put in from the back with putty, or papered in, and finally held in place by "beads" of wood, the top is lined with linen and coloured in oil, and after the work is put in (from the back) the back-board (previously lined and coloured) is screwed up, and thus you have a case perfectly impervious to dust or to the changes of the atmosphere. Unless the amateur is a good workman, it will be better for him to get such a case turned out by a professional joiner, to ensure clean-cut work.
The best and most effective case is the "stop-chamfered" one, made from either ebonized deal or polished fancy woods. In this design, the glass is installed from the back using putty or paper, and it's securely held in place by wooden "beads." The top is lined with linen and painted with oil, and once the work is placed in from the back, the backboard (which has been lined and painted beforehand) is screwed in. This results in a case that is completely sealed against dust and changes in the atmosphere. Unless the amateur is skilled in woodworking, it’s better for them to have a professional carpenter create such a case to ensure clean, precise work.
These are very handsome and neat cases, especially if the back be "ploughed" out deeply to receive a canvas on a stretcher, on which a characteristic scene is painted. In this event the included work must be good, and the fitting-up as plain as possible.
These are really nice and tidy cases, especially if the back is cut out deeply to hold a canvas on a stretcher, featuring a distinctive scene painted on it. If that’s the case, the artwork needs to be good, and the setup should be as simple as possible.
Cases for fishes are best glazed by "sprung" or semi-convex glass for the fronts, which often does away with the necessity for glass ends, and gives also a more artistic and finished appearance.
Cases for fish are best fitted with "sprung" or semi-convex glass for the fronts, which often eliminates the need for glass ends and also provides a more artistic and polished look.
Glass shades, especially those of an oval shape, suit many birds well, but for large work are more expensive than cases. Stands in black or gilt are usually supplied with them; but those in mahogany, oak, and other fancy woods must be ordered, unless the amateur possesses a lathe, and the requisite knowledge to use it. In fitting up these with rockwork, etc.., it is best to arrange the work on a "false bottom," or at least to cover up with paper the polished stand, lest it be spoiled.
Glass shades, especially those that are oval-shaped, are ideal for many birds, but for larger setups, they cost more than cases. They usually come with black or gold stands; however, if you want stands made from mahogany, oak, or other fancy woods, you'll need to order those unless you have a lathe and know how to use it. When setting these up with rockwork and other decorations, it's best to create a "false bottom" or at least cover the polished stand with paper to prevent it from getting damaged.
MOUNTS. — "Mounts," which are simply tops of round or oval shades fitted into corresponding stands or frames of wood, or are open cylinders of glass with a flat piece cemented on one end, were, I believe, first invented by Mr. George Ashmead, of Bishopsgate-street, London. They are very effective, and also occupy but little space, as they hang up on the wall in positions where shades or cases will not go.
MOUNTS. — "Mounts," which are just tops of round or oval shades attached to matching stands or frames made of wood, or open glass cylinders with a flat piece fixed on one end, were, I think, first created by Mr. George Ashmead, from Bishopsgate Street in London. They look great and take up very little space since they can be hung on the wall in places where shades or cases won't fit.
The method of making up a "mount" is as follows: Procure from a glass merchant the top of a shade, let us say 12 in. in diameter by 7 in. high. To this have a stand or rim turned out of thoroughly dry wood of sufficient size to overlap the shade 1 in. all round — 14 in. in diameter, therefore, for a 12 in. shade. A groove should be turned in them stand of sufficient width to allow the glass to play freely.
The process of creating a "mount" is as follows: Get a glass shade top, let's say 12 inches in diameter and 7 inches high, from a glass store. Then, have a base or rim made from completely dry wood that’s big enough to extend 1 inch beyond the shade all around — so it should be 14 inches in diameter for a 12-inch shade. A groove should be carved into the base that's wide enough to let the glass move freely.
The groove, however, should be so arranged that the excess in width should fall outside the glass. The centre of the stand inside the groove being tinted for a sky, as desired, the objects, whether small birds or butterflies, are introduced in the usual manner, and the glass is then cemented, in the groove, over them.
The groove should be set up so that the extra width is on the outside of the glass. The center of the stand inside the groove is tinted to look like a sky, as needed. The objects, whether they are small birds or butterflies, are added in the usual way, and then the glass is cemented in the groove over them.
Waste cylinders of glass may be economised for making mounts. It will then, however, be necessary to have a circular plate for the top cut by a glazier's turn-table. These are really better for showing up anything than the round-topped mounts, as they cast no reflection; but the top plates are harder to put on and to keep on when finished. Strongly pasted black tape will do to fix the very small ones, but for larger the tops should be cemented with thick white-lead, left to dry, and then further cemented with narrow tape smeared with white-lead, or any of the cements given in chapter IV. If it be desired to give a rounded edge to this taping, plaster or whiting mixed with glue and lamp-black may be laid on thickly, rubbed down with fine sand-paper, and polished, or if the black is left out, the cement may be gilded, after the manner of picture frames.
Waste glass cylinders can be reused to make mounts. However, it's necessary to have a circular plate cut for the top using a glazier's turn-table. These are actually better for showcasing items than the round-topped mounts, as they don’t create any glare; but the top plates are trickier to attach and keep secure once finished. Strongly glued black tape works for the very small ones, but for larger ones, the tops should be secured with thick white lead, left to dry, and then reinforced with narrow tape coated in white lead, or any of the adhesives mentioned in chapter IV. If you want to give a rounded edge to this taping, you can apply a thick layer of plaster or whiting mixed with glue and lamp-black, sand it down with fine sandpaper, and polish it. Alternatively, if you skip the black, the cement can be gilded like picture frames.
The stand itself may be "dished" out in the centre, in concave form, and thus more room allowed for the enclosed specimens; but in this case the stand must be of some thickness.
The stand itself can be shaped in a "dished" way in the center, making it concave, which allows for more space for the enclosed specimens; however, in this case, the stand needs to be of some thickness.
At one time the glasses were put in the stands with glue and cork, or glue and paper, until it was found, in nine cases out of ten, that glue, under atmospheric changes, sooner or later broke the glass, or else entirely released it. Putty was then used, but that failed to hold with the tenacity required, as there was a constant tendency of the shade to fall out by its natural weight when hanging up. I have accordingly mixed white-lead with putty with better results, in the proportion of two parts putty; one ditto white-lead (thick, such as gasfitters use); one-eighth ditto gold size — or I have used red-lead, mixed with common putty and boiled oil; and, again, simply plaster of Paris mixed with water. These last two are the best holdfasts of glass within my experience.
At one time, the glasses were secured in the stands using glue and cork, or glue and paper, until it became clear that in nine out of ten cases, glue would eventually break the glass or completely let it go due to changes in the atmosphere. Putty was then tried, but it didn’t hold tight enough since the shade had a constant tendency to fall out due to its natural weight when hung up. I then mixed white lead with putty, which worked better, using a ratio of two parts putty to one part thick white lead (like what gas fitters use), and an eighth part gold size — or I’ve used red lead mixed with regular putty and boiled oil; and again, simply plaster of Paris mixed with water. In my experience, these last two mixtures are the best for holding glass securely.
Supposing the stand to be ebonized, or of mahogany or any other fancy wood, the putty or plaster can be coloured to any required tint, or if the stand is gilt the cement can be gilded over. Failing to make a very neat job, it will be necessary to wind a piece of chenille around the shade in order to hide the junction.
Supposing the stand is blackened wood, mahogany, or any other decorative wood, the putty or plaster can be dyed to any needed color, or if the stand is gold-plated, the glue can be covered in gold. If it doesn’t turn out very tidy, you’ll need to wrap a piece of chenille around the shade to cover the joint.
As it is very difficult to prevent a small percentage of the cement from working inside, and thus spoiling the neatness of the sky effect, I have devised the following plan, which I do not think is generally known: Instead of using a solid stand with groove for the back of the mount, I turn a rim of wood to form a ring, in such a manner that it shall just pass over the shade without allowing the latter to fall through at its bottom edge. Underneath this rim, or ring, I turn it out to within a quarter of an inch of its edge to receive the back, turned out of a piece of thinner wood.
As it's really hard to keep a small amount of cement from getting inside and ruining the clean look of the sky effect, I've come up with a plan that I don't think many people know about: instead of using a solid stand with a groove for the back of the mount, I create a wooden ring that just fits over the shade without letting it fall through at the bottom. Underneath this ring, I carve it out to within a quarter of an inch of its edge to hold the back, which is made from a piece of thinner wood.
The rim of wood is best turned by being nearly cut through on its upper or pattern side, the wood then reversed on the lathe, turned out to receive the back, then altered again, and the rim cut entirely through. To fix this, the rim is fitted on over the glass, and kept in place with cement. The work is made up on the back, which is then screwed, or pasted, or glued, in the hollow turned out at the back of the rim. By this method there is no cement showing inside on the sky-line of the work when finished, nor can the glass possibly tumble out, being, of course, held by the rim, which is of necessity smaller than the bottom of the glass. Such rims may, of course, be ebonized, of fancy woods, or gilded, according to the taste of the workman. A small screw-plate with ring should be attached to hang it up by.
The wooden rim is best shaped by cutting almost all the way through on its top side, then flipping it on the lathe, carving out the back, modifying it again, and cutting the rim completely through. To secure this, the rim is placed over the glass and held in place with adhesive. The backside is then finished, which is either screwed, pasted, or glued into the hollow section created on the back of the rim. This technique ensures that no adhesive is visible from the front when the piece is completed, and the glass cannot fall out, as it is securely held by the rim, which is intentionally smaller than the base of the glass. These rims can be stained black, made from unique woods, or gilded, depending on the craftsman's preference. A small screw plate with a ring should be added for hanging.
A modification of the "mount" is made by securing five pieces of glass together in the usual manner, by tape pasted on each edge to make a square glass cover, making up the work on a piece of board of the required size, rebated or grooved all around, or by nailing on strips of wood to receive the glass cover, which is then pasted or cemented to the edges of the board, and finally finished off by dropping over all picture-frame moulding, cut and joined to size, to which the back is screwed. This style does either for fishes or dead game to stand upon a hall table, or easily becomes a "mount" by the simple process of screwing on "plate-rings," and hanging it up on a wall.
A modification of the "mount" involves securing five pieces of glass together in the usual way, using tape on each edge to create a square glass cover. This is assembled on a board of the required size, which is either rebated or grooved all around, or by nailing on strips of wood to hold the glass cover. The glass cover is then pasted or cemented to the edges of the board, and finally, it's finished off with picture-frame molding that is cut and joined to size, with the back screwed in place. This style works for displaying fish or taxidermied game on a hall table, or it can easily be turned into a "mount" by simply adding "plate-rings" and hanging it on a wall.
The colouring of the backs of cases and mounts is of two kinds — distemper and oil; that is to say, supposing paper, calico or sheeting is used for the back of the cases or mounts. Colour the paper or other material — if you wish to show a toned sky — with whiting in which a little glue-water or paste is dissolved, or with common flake-white and size (note that there must be a good body of white to give a luminous appearance), tinting at the same time with blue, shading off into pink, etc.. The colours most useful are ultramarine, vermilion, and chrome yellow in powder. This colouring will not do if putty is used to put the glass in with, as the oil flies over the tinted sky. For oil painting place a thin calico or canvas on the backs, and colour with the tints you desire, mixed in oil and turps. Putty can be used in any part with this colouring. One coat of colour is sufficient, as if another is added an unpleasant glaze is the result.
The coloring of the backs of cases and mounts comes in two types — distemper and oil. This applies when using paper, calico, or sheeting for the back of the cases or mounts. To create a toned sky effect, color the paper or material with whiting mixed with a little glue-water or paste, or use common flake-white and size (be sure to use a good amount of white to achieve a luminous look), while also tinting with blue and blending into pink, etc. The most useful colors are ultramarine, vermilion, and chrome yellow in powder form. This method won’t work if putty is used to set the glass, as the oil will smudge the tinted sky. For oil painting, apply a thin layer of calico or canvas on the backs, and paint with the colors you want, mixed with oil and turpentine. Putty can be used anywhere with this coloring. One coat of color is enough; adding another coat will create an unpleasant glaze.
SHIELDS. — Heads of mammals, etc.., when set up and finished, should be mounted on "shields" of fancy wood; oak or mahogany being the best, unless ebonized and gilded pine is preferred. The shapes are usually a modification of the conventional "heart," such as will be found in a pack of cards. This being purely a matter of individual taste, the taxidermist may easily make as many patterns as he chooses by doubling a piece of brown or stiff paper and cutting his shapes out therefrom. One of these paper patterns may be traced around upon a piece of planed wood of the suitable size, and cut out by a "bow "-saw, the edges trimmed and bevelled, and the surface finally polished. A key-hole (protected by metal screwed across in the instances of large or weighty heads), is bored or cut, by which to hang it up, and the neck-block of the specimen is screwed thereto by three screws of sufficient length placed in the form of a triangle. Horns alone are attached to shields by screws running through the frontal bone, or, if without this, are attached - to a model of the frontal bone in wood, by nuts and screws.
SHIELDS. — The heads of mammals, etc., when prepared and finished, should be mounted on "shields" made from decorative wood; oak or mahogany are the best options, unless you prefer ebonized and gilded pine. The shapes are usually adaptations of the classic "heart" design, similar to what you’d find in a deck of cards. Since this is purely a matter of personal preference, the taxidermist can easily create various patterns by folding a piece of brown or stiff paper and cutting out shapes from it. One of these paper patterns can be traced onto a piece of smooth wood of the appropriate size, then cut out using a "bow" saw. The edges should be trimmed and beveled, and the surface polished. A keyhole (protected by metal screws in the case of larger or heavier heads) is drilled or cut for hanging it up, and the neck-block of the specimen is attached with three screws of appropriate length, arranged in a triangular formation. Horns are secured to shields using screws that go through the frontal bone or, if that's not available, are attached to a wooden model of the frontal bone with nuts and screws.
CABINETS FOR EGGS AND SKINS. — I have lately seen many cabinets for eggs, skins, etc.., constructed on a capital system, the invention, I believe, of Mr. Salvin, the eminent ornithologist. The drawers are made of varying depths, from 1 in. to 6 in., and the bottoms are fitted with tongues overlapping each side, which fit into grooves cut in the carcase of the cabinet, and so arranged by a little calculation that a shallow drawer can immediately be inserted in the place previously occupied by a deep one, or vice versa — i.e., a deep 6 in. drawer, which may be No. 30, at the bottom, can be pushed upwards at any intermediate point between that and No. 1.
CABINETS FOR EGGS AND SKINS. — I've recently seen a lot of cabinets for eggs, skins, etc., designed using a brilliant system, which I believe was invented by Mr. Salvin, the renowned ornithologist. The drawers come in different depths, ranging from 1 inch to 6 inches, and the bottoms are designed with overlapping tongues on each side that fit into grooves carved into the cabinet's structure. With a bit of planning, a shallow drawer can easily replace a deeper one, or vice versa — for example, a deep 6-inch drawer, which might be No. 30 at the bottom, can be moved up to any spot in between that and No. 1.
The modus operandi is as follows: Whatever the depth decided on of the drawers, the carcase is grooved all the way down to half the depth of the shallowest drawer, if in even inches, or to a multiple of each drawer if otherwise. Example: Take a foot rule and mark off 10 in on a piece of paper, dividing it into alternate half inches making, of course, twenty half inches; this represents the carcase. Then take some strips of paper or cardboard, which cut to 1 in., 1.5 in., 2 in., 2.5 in. and 3 in. respectively, total 10 in. These represent the drawers; putting them in their order, they will, of course, fit in the 10 in. Now change them about, top to bottom, or bottom in the middle, or in any way that you like, and you will find that they will always fall in a groove, leaving room for the others, when pushed down, without any open space between.
The way it works is this: No matter how deep the drawers are set, the frame is grooved all the way down to half the depth of the shallowest drawer, or to a multiple of each drawer if they're not in even inches. For example, take a ruler and measure out 10 inches on a piece of paper, dividing it into alternate half-inch sections, making a total of twenty half-inches; this represents the frame. Then, cut some strips of paper or cardboard to sizes of 1 inch, 1.5 inches, 2 inches, 2.5 inches, and 3 inches, adding up to 10 inches. These represent the drawers; when placed in order, they will fit perfectly into the 10 inches. Now mix them up, placing one on top of another or rearranging them however you like, and you’ll find that they will always slide into a groove, allowing space for the others without any gaps in between when you push them down.
The same method is adopted in the cabinets under the invertebrate show cases in the Liverpool Museum, which I recently visited under the able guidance of the clever and genial curator, Mr. Moore, so well known, together with his family, in connection with many unique and beautiful osteological preparations.
The same method is used in the cabinets beneath the invertebrate display cases at the Liverpool Museum, which I recently visited under the expert guidance of the knowledgeable and friendly curator, Mr. Moore, who, along with his family, is well known for their many unique and beautiful osteological collections.
CASING UP WITH ROCKWORK, ETC. — Brown paper was formerly the pièce de rèsistance of those who aspired to imitate rocks on which to place or to surround their animals. It was used by being first soaked in water and drawn over pieces of wood, boxes, or large cinders even, to give shape. It was then glued, and small stones and sand thrown on. Usually uncoloured, it revealed itself in its naked ugliness, and looked what it was — paper. Later, it was more artistically arranged, and when divested of folds by the application of more paper, plenty of glue, and well coloured, it certainly looked decent. Then came peat, a glorious innovation for quick, if not artistic, work. This dried earth, dug from bogs, admits of being carved and shaped to almost any form. Sandstone and some other rocks may be represented by it, as also trunks of trees. Well glued and sanded, it takes colour readily, or it may be gone over with a mixture of whiting and plaster of Paris with glue-water, and finally coloured; or dry plaster may be mixed with thick oil paint as a "priming" medium.
CASING UP WITH ROCKWORK, ETC. — Brown paper used to be the go-to material for those wanting to create rock-like structures to place or surround their animals. It was first soaked in water and then stretched over pieces of wood, boxes, or even large cinders to give it shape. It was then glued, and small stones and sand were scattered on top. Typically uncolored, it showed its raw ugly side and looked like what it was—paper. Eventually, it was arranged more artistically, and when smoothened out with more paper, plenty of glue, and painted well, it looked decent. Then came peat, an amazing innovation for quick, if not artistic, work. This dried earth, taken from bogs, can be carved and shaped into almost any form. It can represent sandstone and other rocks, as well as tree trunks. When well glued and sanded, it absorbs color easily or can be covered with a mix of whiting and plaster of Paris combined with glue-water, and finally painted; or dry plaster can be mixed with thick oil paint as a "priming" medium.
"Virgin" cork is the latest rockwork model. Its shape being irregular, it is well suited to imitate craggy rocks, added to which it takes thick colour or whiting well, glued or unglued.
"Virgin" cork is the newest rockwork model. Its irregular shape makes it perfect for mimicking jagged rocks, and it holds onto paint or whitewash nicely, whether it's glued or not.
Nothing, however, beats a mixture of all methods — paper, peat, and cork, their lines broken up or blended with wadding. The whole of this, well glued, sanded, and properly coloured, will defy the most critical unprofessional judgment to declare it anything but what it seems — hard rock.
Nothing, however, beats a combination of all methods — paper, peat, and cork, with their lines interrupted or mixed with padding. When all of this is well glued, sanded, and properly colored, it will challenge even the most critical untrained eye to say it's anything but what it appears to be — solid rock.
I am speaking, of course, of small cases; large work requires consideration. Peat will not do for anything but the illustration of small subjects. It is too heavy, and does not readily adapt itself to imitate large masses of overhanging rock; added to which, its expense in large quantities is very great. It is also dirty to work with, and is often a harbour for larvae of various moths — inimical to the taxidermist. I so recognised all these facts in the treatment of the rockwork in the Leicester Museum, that I determined to use paper only, treating it by an old method, artistically elaborated.
I'm talking about small projects here; larger work needs careful thought. Peat isn't suitable for anything but small subjects. It's too heavy and doesn’t easily mimic large sections of overhanging rock; plus, it gets really expensive in large amounts. It's also messy to handle and often attracts larvae from different moths, which is a problem for taxidermists. I understood all these issues when working on the rockwork at the Leicester Museum, so I decided to use only paper, applying an old technique that I refined artistically.
This method was, after making a rough drawing and calculation as to the positions the specimens would occupy in the case, to nail strips of "quartering" across the backs of the cases, to which again were nailed strips of 0.75 in. wood, crossing in all directions, but especially where the drawings indicated a mass of rock. On these, and to these, small shelves of wood were nailed in the positions to be subsequently occupied by the specimens. To these shelves cardboard was tacked, and bent upward and downward to the pointed or square shapes assumed by the rocks modelled from. [Footnote: It is quite necessary in artistic modelling not only to have coloured drawings of the rocks you are imitating, but to have an actual piece by you as a little guide to form and colour.] Where the edges were too sharp they were beaten in by a mallet, or altered by glueing on wadding.
This method involved first making a rough drawing and calculating the positions the specimens would occupy in the case. Next, strips of "quartering" were nailed across the backs of the cases, to which were also nailed strips of 0.75 in. wood, crossing in all directions, especially where the drawings indicated a mass of rock. On these, small wood shelves were nailed in the positions where the specimens would eventually be placed. Cardboard was tacked to these shelves and bent upward and downward to match the pointed or square shapes of the rocks being modeled. [Footnote: It's essential in artistic modeling to have colored drawings of the rocks you're imitating, as well as an actual piece to use as a guide for form and color.] When the edges were too sharp, they were softened with a mallet or modified by gluing on padding.
The mass of rock being joined here and there to break up the appearance of shelves, and to give a certain homogeneity, was then treated by having brown paper well glued on both sides, stuck all over the edges, joins, or accidental fissures; this, suffered to dry, was then well painted with a mixture of whiting and glue-water, again allowed to dry, and again painted. When this last was dry it was gone over with a thin wash of glue-water, and sharp "silver" sand thrown on; when dry, coloured by staining it with various oil colours (not tube), and some few powder colours — blue-black, yellow ochre, Vandyke brown, celestial blue (cheap), burnt sienna, etc.., thinned with turps, afterwards touched up, when dry, with touches of tube colours, smartly and cleanly put on. This would be the treatment and colouring for greyish-brown or yellowish-grey smooth, dry-looking rocks, sandstones, etc..; and by a little alteration of tint and treatment in places, would imitate the various slates.
The chunks of rock were joined here and there to break up the look of the shelves and to create a certain uniformity. They were then covered with brown paper that was well glued on both sides, sticking it all over the edges, seams, or any cracks. After it dried, it was painted with a mix of whiting and glue-water, allowed to dry again, and painted once more. When this last layer was dry, it was coated with a thin wash of glue-water, and fine "silver" sand was sprinkled on top. Once dry, it was colored using various oil paints (not from tubes) and some powdered colors—blue-black, yellow ochre, Vandyke brown, celestial blue (cheap), burnt sienna, etc.—thinned with turpentine, and then touched up with tube colors when dry for a clean finish. This would be the method and coloring for smooth, dry-looking rocks in greyish-brown or yellowish-grey, such as sandstones, and with a few adjustments in color and technique, could replicate different types of slate.
For chalk and limestone, mix plaster and sand with the whiting and lay it on thickly, not throwing on sand, as a final operation. Colours, of course, are different here, more bright and light green predominating; but the colouring of the rockwork, etc.., to imitate the various kinds of rocks required, is only to be learned by experience; in point of fact, to colour rocks in an effective manner is really the work of an artist, for it is requisite to know the properties of colours, and to "scumble" and "stipple" or "glaze" one colour over another to get "depth." A few hints may, however, help out the tyro.
For chalk and limestone, mix plaster and sand with the whiting and apply it thickly, without throwing sand on as a final step. The colors are different here, with brighter and lighter greens dominating; however, coloring the rockwork to mimic different types of rocks is something you learn from experience. In fact, effectively coloring rocks is truly an artist's job because you need to understand color properties and know how to "scumble," "stipple," or "glaze" one color over another to achieve "depth." A few tips may, however, help out the beginner.
For rough sea rocks, after sanding and glueing, go over the rockwork with a mixture of chrome yellow and Prussian blue, mixed with oil and turps, the blue predominating; touch up the points with white, and allow it to dry. The next day deepen the shadows with Brunswick black, "stippling" lightly the remainder of the rock with the same. Arrange sea-shells and sea-weed, here and there, where the mounted subject allows of this treatment. This is a shining dark bluish-green and brown rock, suitable for sea-gulls, divers, etc..
For rough sea rocks, after sanding and gluing, paint the rockwork with a mix of chrome yellow and Prussian blue, combined with oil and turpentine, with the blue being more dominant; touch up the spots with white and let it dry. The next day, enhance the shadows with Brunswick black, lightly stippling the rest of the rock with the same color. Place seashells and seaweed here and there, where the mounted subject allows for this kind of treatment. This is a shiny dark bluish-green and brown rock, perfect for seagulls, divers, etc.
For rough grey land rock, paint over all with lamp-black in powder, mixed with plaster of Paris, and touch up the points with oil white. When the work is quite dry, go over all with a glaze of Prussian blue mixed with Brunswick black. Fit up with ferns, grass, and golden lichens on the points, or in the hollows. This makes a greyish rock with no gloss, and is suitable for owls and similar birds.
For rough gray land rock, cover everything with a mix of black lamp paint in powder form and plaster of Paris, and add touches of white oil paint. Once everything is completely dry, apply a glaze of Prussian blue mixed with Brunswick black. Decorate with ferns, grass, and golden lichens on the highlights or in the crevices. This creates a matte gray rock that’s perfect for owls and similar birds.
For rough sandstone rock, paint over with chrome yellow and a very little blue mixed with oil white, the latter predominating; dust over on the points with red sand, touch up the hollows with Brunswick black, suffer to dry, and then go over all with a very little rose pink or vermilion, worked up in turps with a little varnish. Fit up with ferns, grasses, and mosses. This is a reddish-yellow rock, suitable for anything not having red or yellow fur or feathers.
For rough sandstone rock, paint it with chrome yellow and just a tiny bit of blue mixed with oil white, with the oil white being the dominant color. Sprinkle red sand on the high points, touch up the recesses with Brunswick black, let it dry, and then cover everything lightly with a bit of rose pink or vermilion mixed in turpentine with a little varnish. Decorate with ferns, grasses, and mosses. This creates a reddish-yellow rock that works well for anything that doesn't have red or yellow fur or feathers.
The predominating colour may be mixed with the whiting, etc.., to paint over the artificial rock; but there is a certain loss of brilliancy in the colours which follow, unless a white ground has been previously laid on.
The main color can be mixed with white and so on to paint over the fake rock; however, there is a noticeable loss of brightness in the colors that come after unless a white base has been applied first.
For certain objects a great advantage is obtained by making up the rockwork on a false bottom and slipping it, ready finished, into the case.
For certain items, a significant benefit comes from building the rockwork on a false bottom and then sliding it, fully completed, into the display case.
There are hundreds of other varieties, but they must be worked out by each person according to his proclivities. It might as well be expected that a picture could be painted from printed directions as to imagine that one person could make a rockwork precisely similar to another without seeing it done, or without working it out by his own experience.
There are hundreds of other varieties, but each person needs to figure them out based on their own preferences. It’s just as unrealistic to expect that a picture could be created from written instructions as to think one person could create rockwork that is exactly like another's without seeing it done or without figuring it out through their own experience.
Trees for large groups may be carved out of successive layers of peat, or modelled up with brown paper and virgin cork; better still by arranging brown paper over rods or a wire framework, covered previously by tow, and afterwards coloured to nature. The leaves of some trees dry and colour up well, and can be introduced on the natural or artificial twigs.
Trees for large groups can be made from layers of peat, or shaped using brown paper and new cork; even better by draping brown paper over rods or a wire frame covered in tow and then painted to look natural. The leaves of some trees dry and take on color nicely, and can be added to either natural or artificial branches.
TWIGS. — Artificial twigs can be made by twisting tow round wire, glueing, and throwing on sawdust, peat-dust, etc.., and afterwards colouring. The most natural way, however, is to rub up the gold and grey lichens, and throw them on the glued tow, filling up afterwards with larger pieces to break the lines. Natural and artificial twigs mix well together; the latter, from their flexibility, allowing of any treatment.
TWIGS. — You can make artificial twigs by twisting tow around wire, gluing it, and then adding sawdust, peat dust, and so on, followed by coloring. However, the most realistic method is to grind up gold and gray lichens and sprinkle them onto the glued tow, then fill in with larger pieces to break up the lines. Natural and artificial twigs blend together well; the latter, due to their flexibility, can be shaped however you'd like.
FERNS, GRASSES, ETC., FOR "FITTING up." — Time was when our ancestors were content to stick their preserved specimens in boxes with nothing to break the blank of white paper which backed them up. Nowadays we have arrived at such a pitch of decorative art in taxidermy, as in all things, that this stiffness of outline does not suffice; accordingly, we break our background by flowing lines of beauty, produced by the graceful aids of dried ferns and grasses, twigs of trees, etc..
FERNS, GRASSES, ETC., FOR "FITTING up." — There was a time when our ancestors were satisfied to keep their preserved specimens in boxes with just plain white paper behind them. Today, we've advanced so much in decorative art, including taxidermy, that this rigid look isn't enough anymore; instead, we enhance our backgrounds with elegant, flowing designs created by beautiful dried ferns, grasses, twigs, and more.
Many ferns are not suitable for decoration; for instance, the male fern (Filix-mas) is of too tender a texture to stand upright when weighted with colour. The very best fern is the common brake (Pteris aquilina), as also the common polypody (Polypodium vulgare). The fronds of the brake should be gathered in August or September, when they are fully matured and hard, and also when the weather, is hot and dry. If gathered in continuous wet weather, hardly any amount of drying will prevent the fronds from ultimately becoming mouldy, when no amount of after-drying prevents them going brittle and dropping to pieces. Ferns which have lost their green colouring matter, and are going red and yellow, dry well, and retain their colours nicely if quickly dried.
Many ferns aren’t great for decoration; for example, the male fern (Filix-mas) is too delicate to stand upright when weighted down with color. The best fern is the common brake (Pteris aquilina), along with the common polypody (Polypodium vulgare). You should gather the fronds of the brake in August or September, when they are fully matured and sturdy, and when the weather is hot and dry. If you collect them during prolonged wet weather, no amount of drying will stop the fronds from eventually getting moldy, and even after drying, they will crumble and fall apart. Ferns that have lost their green color and are turning red and yellow dry well and keep their colors nicely if dried quickly.
Foreign ferns, such as the various adiantums, the "gold" and "silver" ferns, and many others, dry well, and retain their colour if care be used; nothing suits foreign birds better as a background than the ferns and grasses of the various countries they inhabit.
Foreign ferns, like the different types of adiantums, the "gold" and "silver" ferns, and many others, dry nicely and keep their color if handled carefully; nothing makes a better background for foreign birds than the ferns and grasses from the various countries they come from.
Paper used in the drying of botanical specimens is sold, but being too expensive for this particular purpose, a supply of large sheets of common grey paper used by ironmongers or grocers, or even brown paper, will suffice — the ferns should, directly they are gathered, be laid out straight on a board, or on a floor, and covered with paper, then more ferns, again a layer of paper, and so on — a board weighted with bricks should be placed over all, and suffered to remain for a few days; the ferns are then to be turned, the paper dried, and the process repeated.
Paper for drying botanical specimens is available for purchase, but it's too pricey for this specific use. Instead, large sheets of basic gray paper used by hardware stores or grocery stores, or even brown paper, will work just fine. As soon as you gather the ferns, lay them flat on a board or the floor, and cover them with paper. Then add another layer of ferns, followed by another layer of paper, and keep repeating this. Place a board weighted down with bricks on top of everything and leave it for a few days. After that, turn the ferns, dry the paper, and repeat the process.
When thoroughly dry, the ferns may be coloured with oil paint thinned with turps and varnish, sufficient to give lustre without shininess. Here and there break the green colour with white, red, blue, and yellow, in a manner which will occur to anyone having artistic ability. Ferns treated in this manner soon dry, and retain their colour for an indefinite period, the only thing to be said against them being their rather unnatural flatness — due to pressure; this, however, may be counteracted by a little judgment during the drying, one plan being the regulation of pressure at certain points, aided also by clean dry sand.
When completely dry, you can color the ferns with oil paint mixed with turpentine and varnish, just enough to give them a shine without being glossy. Here and there, add white, red, blue, and yellow to break up the green, in a way that anyone with artistic skills would figure out. Ferns treated this way dry quickly and keep their color for a long time; the only downside is their somewhat unnatural flatness from being pressed. However, you can counter this by being careful during the drying process, like regulating pressure at certain spots and using clean dry sand.
Several hard-leaved plants (mostly foreign) found in our conservatories are also excellent driers, many taking colour readily.
Several hard-leaved plants (mostly from other countries) found in our conservatories are also great at drying, with many taking on color easily.
Many grasses (not the flowers, but the leaves or blades) dry well. Amongst the best of these is the "wiregrass," found in woods, growing especially over runnels in those localities. The flower also of this plant is most eligible as a decorative agent. The wood melick is another elegant and suitable plant.
Many grasses (not the flowers, but the leaves or blades) dry well. Among the best of these is the "wiregrass," which grows in woods, especially over streams in those areas. The flower of this plant is also great for decoration. The wood melick is another lovely and suitable plant.
The sedges (Carex) dry and colour well, as also several of the water-rushes, reeds, and flags. The "toad-rush" (Juncus bufonius), and its allies, found in damp places, by roads, by canals, and in pasture or corn-fields, dry and colour excellently.
The sedges (Carex) dry and take on color nicely, as do several types of water-rushes, reeds, and flags. The "toad-rush" (Juncus bufonius) and its related species, commonly found in damp areas, along roads, by canals, and in pastures or cornfields, dry and color beautifully.
Sphagnum, or bog moss, especially when having pink tips, is a most beautiful object; the only thing to be said against it is the difficulty of getting it free from water, and the length of time it takes afterwards to dry.
Sphagnum, or bog moss, particularly with pink tips, is a stunning sight; the only downside is the challenge of getting it out of the water, and the long time it takes to dry afterward.
Mosses of various sorts growing in woods on trees — lichens, gold and grey, mosses or lichen-covered twigs, sprigs of heather, furze, sea-lavender — all dry well, and come in usefully.
Mosses of different types growing in forests on trees — lichens, gold and grey, moss-covered twigs, sprigs of heather, furze, sea-lavender — all dry nicely and are quite useful.
Many persons like their moss and grasses dyed: this is perhaps allowable in some cases for common work; but if a bird or a mammal is nicely mounted, the plainer the fitting, and nearer nature, the better. To those, however, who desire to dye their grasses, I recommend Judson's powder dyes as the readiest medium, the directions for manipulating which are given with them. Any rough grass in flower does for dyeing, and a visit to the fields just before haymaking will supply the amateur with all he wants for this.
Many people like to dye their moss and grasses: this might be acceptable in some common projects; however, when a bird or mammal is beautifully mounted, the simpler the presentation and the closer to nature, the better. For those who want to dye their grasses, I suggest Judson's powder dyes as the easiest option, with instructions provided. Any coarse grass in bloom works for dyeing, and a trip to the fields just before haymaking will give the enthusiast everything they need for this.
Teazles, thistles, and the umbels (seed-heads) of various plants, chiefly compositae, will be found of service; but everything must be thoroughly dried before being coloured, or before being introduced into shades or cases. Nothing must be coloured with water colours or gums, as some writers contend, or mould will inevitably follow. A few drops of creosote, or the black carbolic acid of commerce, poured into the case or shade just before closing up, is a very good thing to prevent mildew, though if everything is thoroughly dried, and only oil colours are used, no danger from this cause need be apprehended.
Teazles, thistles, and the seed-heads of various plants, mainly from the composite family, can be quite useful; however, everything must be completely dried before being colored or placed into shades or cases. You shouldn't use watercolors or gums for coloring, as some suggest, because that will definitely lead to mold. A few drops of creosote, or the commercial black carbolic acid, added to the case or shade right before sealing it up, is a great way to prevent mildew. However, if everything is thoroughly dried and only oil paints are used, there should be no risk from this issue.
SEA-WEEDS, SHELLS, ETC. — Sea-weeds, which are constantly used in fitting up cases of sea birds, need no description as to their collection, further than to say that all sea-weeds, whether sea-weeds proper, corallines, and zoophytes, must be well washed in spring water, many times changed, to thoroughly remove the salt, and must be well dried before being introduced into cases or shades. Those who require full descriptions of British sea-weeds, their collection and preservation, I must refer to "British Marine Algae," by W. H. Grattan, published at the office of The Bazaar, 170, Strand, London.
SEA-WEEDS, SHELLS, ETC. — Seaweeds, which are commonly used to decorate cases for seabirds, don’t need much explanation about how to collect them. It’s important to note that all seaweeds, whether they’re true seaweeds, corallines, or zoophytes, must be thoroughly washed in spring water multiple times to effectively remove the salt and should be properly dried before being placed in cases or displays. For those who want detailed descriptions of British seaweeds, their collection, and preservation, I recommend checking out "British Marine Algae" by W. H. Grattan, published at the office of The Bazaar, 170, Strand, London.
Few sea-weeds proper are applicable to the purpose of the taxidermist, though some of the oar-weeds can be used, and many of the red sea-weeds (Rhodosperms) can be floated out in water and carelessly arranged on paper, if wanted for fitting-up purposes, or more carefully arranged if for a collection. After washing, these small plants adhere by their natural mucilage to the paper on which they may be floated out.
Few types of seaweed are useful for taxidermy, although some of the oar-weeds can be utilized, and many red seaweeds (Rhodosperms) can be floated in water and casually arranged on paper if they’re needed for decoration, or more neatly arranged if they’re for a collection. After being washed, these small plants stick to the paper by their natural mucilage.
Of all the sea-weeds proper the Carrageen mosses (Chondrus crispus and mamillosus) are the most eligible, and if dried and arranged in cases are very elegant. The common coralline (Corallina officinalis) — a sea-weed which so rapidly attracts carbonate of lime as to be almost of a stony or coral-like texture — is another invaluable plant for fitting up. When wet it is usually purple or pink, but on exposure to the sun becomes white.
Of all the proper seaweeds, the Carrageen mosses (Chondrus crispus and mamillosus) are the best choice, and when dried and displayed in cases, they look very elegant. The common coralline (Corallina officinalis)—a seaweed that quickly attracts carbonate of lime and has a texture that’s almost stony or coral-like—is another valuable plant for decoration. When wet, it usually appears purple or pink, but it turns white when exposed to sunlight.
Amongst the zoophytes which, though looking like the sea-weeds, are not of vegetable origin, there are many which are most useful, not to say indispensable to the taxidermist. Leaving out the foreign corals, sea-fans, sponges, etc.., we shall certainly find the most useful English species to be first: the broad leaved horn-wrack (Flustra foliacia), that mass of thin hand-like leaves, of the colour of brown paper, which is cast up on some shores, often in great quantities. Other useful sorts are those like little trees, such as the common sea fir (Sertularia, abietina and operculata); these last are found especially attached to stones, shells and sea-weeds. The lobster's horn coralline (Antennularia antennina) and the various sponges are also most useful things, the branched sponge (Halichondria oculata) and others being amongst the best for use. Several of the bladder-wracks or "sea-grapes" will dry nicely, as also will the egg cases of the whelk and the "sea purses" and "skate barrows," really the egg bags of the dogfish and skate.
Among the zoophytes that, while resembling seaweeds, aren’t plant-based, there are many that are incredibly useful, if not essential, for taxidermists. Setting aside foreign corals, sea-fans, sponges, and so on, we can definitely highlight the most beneficial English species first: the broad-leaved horn-wrack (Flustra foliacia), a cluster of thin, hand-like leaves that are brown and often found in large amounts on some shores. Other helpful varieties resemble small trees, like the common sea fir (Sertularia abietina and operculata); these are particularly found attached to stones, shells, and seaweeds. The lobster's horn coralline (Antennularia antennina) and various sponges are also extremely useful, with the branched sponge (Halichondria oculata) among the best options. Several types of bladder-wrack or "sea grapes" dry well, as do the egg cases of the whelk and the "sea purses" and "skate barrows," which are actually the egg bags of the dogfish and skate.
The starfish, or "five fingers," will, after washing, dry well, or can be plunged in any one of the hardening solutions mentioned in Chapter IV. The various sea urchins (Echinii), if emptied of their contents, make pretty objects, either with or without their spines. The beautiful sea anemones are, however, impossible to preserve as dried objects, but must be modelled in glass or wax, as imitations. Various shells come in handily also; amongst those may be mentioned the common razor shells (Solen ensis and siliqua), several of the Venus shells, the common limpets, the chitons, several of the trochi, and last, but not least, the shells of the speckled scallop (Pecten varius).
The starfish, also known as "five fingers," will dry out nicely after washing or can be soaked in any of the hardening solutions described in Chapter IV. Various sea urchins (Echinii,) when emptied of their insides, make attractive decorations, with or without their spines. However, the beautiful sea anemones cannot be preserved as dried specimens and should instead be modeled in glass or wax as replicas. A variety of shells are also useful; among them are the common razor shells (Solen ensis and siliqua), several Venus shells, common limpets, chitons, some of the trochi, and last but not least, the shells of the speckled scallop (Pecten varius).
Many freshwater, as also land shells, come in for decorating cases of littoral birds. Amongst those of the first we may instance Limnoea stagnalis, palustris, peregra, etc.., Dreissena polymorpha, Planorbis corneus, etc..; the various Unios, anodons, and many others.
Many freshwater and land shells are used to decorate cases of shoreline birds. Among the freshwater shells, we can mention Limnoea stagnalis, palustris, peregra, etc., Dreissena polymorpha, Planorbis corneus, etc.; the various Unios, anodons, and many others.
Amongst the land shells very many of the Helices, such as the gaily-coloured nemoralis, or its variety hortensis, caperata, arbustorum, cantiana, etc.., as well as many other specimens.
Among the land snails, there are many types of Helices, like the brightly colored nemoralis, or its varieties hortensis, caperata, arbustorum, cantiana, and others.
The preservation of most freshwater and land shells is exceedingly easy, the greater number of specimens requiring only to be plunged into boiling water, and the contents removed — an easy operation in the case of the bivalves, and the contents of univalves or snail-like shells being also easily wormed out with a pin or crooked awl. [Footnote: Mr. R. B. Woodward, F.G.S., etc.. in one of the very best and most practical of those wonderful little penny "Handbooks" for young collectors, advises a large spoonful of salt being added to the boiling water, for two reasons, one, because it puts them out of pain at once, and also makes their subsequent extraction more easy. "It is a good plan (says he) to soak the smaller shells in cold water (without salt), before killing them, as they swell out with the water, and do not when dead retreat so far into their shells."]
Preserving most freshwater and land shells is really simple; most specimens just need to be boiled, and then you can remove their insides. This is easy for bivalves, and for univalves or snail-like shells, you can easily pull out the insides with a pin or a bent awl. [Footnote: Mr. R. B. Woodward, F.G.S., etc., in one of the best and most practical of those great little penny "Handbooks" for young collectors, suggests adding a large spoonful of salt to the boiling water for two reasons: first, it alleviates their suffering immediately, and second, it makes it easier to extract them afterward. "It's a good idea (he says) to soak the smaller shells in cold water (without salt) before killing them, as they swell with the water and won’t retreat as far into their shells when they're dead."]
For works on shells see "Manual of the Mollusca," by Dr. S. P. Woodward, J. Gywn-Jeffreys' "British Conchology," Lovell Reeve's "British Land and Freshwater Mollusks," and several clever articles in Science Gossip and the Conchological Journal, by Mr. G. Sherriff Tye and others.
For information on shells, check out "Manual of the Mollusca" by Dr. S. P. Woodward, J. Gwyn-Jeffreys' "British Conchology," Lovell Reeve's "British Land and Freshwater Mollusks," and a number of insightful articles in Science Gossip and the Conchological Journal, by Mr. G. Sherriff Tye and others.
Glue is sufficient to fix all these objects in their places on rockwork, in cases; resins, such as mastic or shellac, or any of the cements mentioned in Chapter IV., are, however, the best mediums to fix such objects upon tablets for scientific purposes. For fixing shells on labelled cards, Mr. Woodward recommends gum arabic, with one-sixth of its bulk of pure glycerine added to it, which makes a semi-elastic cement, with the advantage also of allowing the shells to be taken from their tablets, at any time, by the intervention of hot water.
Glue is enough to hold all these items in place on rockwork, but resins like mastic or shellac, or any of the cements mentioned in Chapter IV., are the best options for securing objects on tablets for scientific use. For attaching shells to labeled cards, Mr. Woodward suggests using gum arabic with one-sixth of its volume in pure glycerin added. This creates a semi-elastic cement that also allows for the shells to be removed from their tablets anytime using hot water.
DRYING AND STORAGE OF SPECIMENS. — It is always a vexed question how to keep newly-mounted specimens free from moths, and flies, and dust, whilst drying. The difficulty is, that you cannot put them away at once in boxes, cases, or shades, for if you do they do not dry at all, but "sweat" and slowly rot, or else become mildewed. If you expose them fully without any covering, they are soon covered with dust, and liable at any moment to — first, the attacks of meat flies, and next of moths and beetles.
DRYING AND STORAGE OF SPECIMENS. — It’s always a tricky issue how to keep newly-mounted specimens safe from moths, flies, and dust while they’re drying. The problem is that you can’t just store them right away in boxes, cases, or shades, because if you do, they won’t dry at all; instead, they’ll "sweat" and gradually rot or become moldy. If you leave them out uncovered, they quickly gather dust and are vulnerable to attacks from meat flies, followed by moths and beetles.
Good insect powder is, as I have before pointed out, a deterrent; still, to make assurance doubly sure, I would always, in the case of valuable specimens, enclose them in square cages, made one side of glass, and the three other sides and top of fine meshed muslin, wirework, or perforated zinc, the latter sufficiently fine not to allow small moths and flies to creep in. These can be made of various sizes, can be varied by having a top and back of wood, can have the front to open like a meat safe with shelves, or be simply cases to lift over the specimens like shades; in any case, however, the front glass allows you to see how all is going on, and the wire sides permit a free current of air to pass through to dry the specimens.
Good insect powder is, as I've mentioned before, a deterrent; still, to be extra sure, I would always enclose valuable specimens in square cages, with one side made of glass and the other three sides and top made of fine mesh muslin, wirework, or perforated zinc, the latter being fine enough to prevent small moths and flies from getting in. These cages can be made in various sizes, can have a wooden top and back, can feature a front that opens like a meat safe with shelves, or simply be cases that can be lifted over the specimens like shades. In any case, the glass front lets you see how everything is doing, and the wire sides allow for a free flow of air to dry the specimens.
In this manner I have been enabled to laugh at the little wretches of insects buzzing around, and flattening their noses against the zinc, in vain endeavours to interview some charming specimens of young birds, whose "fluffy" plumage they delight in. Like the cats, they are "so fond of noticing those dear little birds!"
In this way, I've been able to laugh at the tiny insects buzzing around, pressing their noses against the metal, trying in vain to get a look at some lovely young birds with the "fluffy" feathers they adore. Just like the cats, they are "so fond of watching those cute little birds!"
Skins not in constant use for reference should, when dried, be wrapped in soft paper amidst insect powder, and put away in closely fitting drawers. "Paper fasteners" are very useful to clip the ends of the paper — folded over — which encloses them.
Skins that aren't regularly used for reference should, once dried, be wrapped in soft paper with insect powder and stored in snug drawers. "Paper fasteners" are really handy for clipping the ends of the paper that folds over and encloses them.
AQUARIA. — This being a subject a little outside my province, I do not purpose dwelling on it, further than to say that all information will be found in "The Aquarium, its History, Structure, and Management," by Dr. J. E. Taylor, F.L.S., etc..; Gosse's "Handbook of the Marine Aquarium," and many others. Two recipes, culled from the Scientific American, 1879, may be of service, however: "Cheap tanks can be made of wood and glass, the frame and bottom being of wood, and sides of glass. In order to make the joints watertight, care must be taken to get a proper aquarium putty or cement. The following is a good recipe: Put an egg-cupful of oil and 4 oz. tar to 1 lb. resin, melt over a gentle fire, test it to see if it has the proper consistency when cooled; if it has not, heat longer, or add more resin or tar. Pour the cement into the angles in a heated state, but not boiling hot, as it would crack the glass. The cement will be firm in a few minutes. Then tip the aquarium in a different position, and treat a second angle likewise, and so on. The cement does not poison the water."
AQUARIA. — This is a topic a bit outside my expertise, so I won't go into it in depth, except to mention that you can find all the details in "The Aquarium, its History, Structure, and Management" by Dr. J. E. Taylor, F.L.S., etc.; Gosse's "Handbook of the Marine Aquarium," and many others. However, two recipes from Scientific American, 1879, might be helpful: "You can make cheap tanks from wood and glass, with a wooden frame and bottom and glass sides. To ensure the joints are watertight, it's important to use a good aquarium putty or cement. Here's a solid recipe: Mix an egg-cup full of oil and 4 oz. of tar with 1 lb. of resin, and melt it over a low flame. Check its consistency when it cools; if it’s not right, heat it longer or add more resin or tar. Pour the cement into the corners while it's warm, but not boiling hot, as it could crack the glass. The cement will set in a few minutes. Then turn the aquarium to a different angle and apply it to another corner, and so on. This cement won't harm the water."
"To mend the broken glass of an aquarium, fasten a strip of glass over the crack, inside the aquarium, using for a cement white shellac dissolved in one-eighth its weight of Venice turpentine."
"To fix the broken glass of an aquarium, attach a strip of glass over the crack, on the inside of the aquarium, using a mixture of white shellac dissolved in one-eighth its weight of Venice turpentine as glue."
ARTISTIC MOUNTING. — GENERAL REMARKS. — By the time the student has slowly worked his way to this chapter, he will no doubt — should he be apt, and have an artistic mind — have achieved things beyond the mere drudgery of the profession. I take it that, being interested in his work, he will not have rested content with mounting — even in a perfect manner — his animals at rest, but will have "had a shy" at animals in action, or engaged in some characteristic occupation. The days of birds on "hat-pegs," stiff-legged, long-necked and staring, round-eyed, at nothing — of mammals, whose length and stiffness are their greatest merit — has passed away for ever; and only in dreary museums, far behind the age, where funereal silence obtains, and where the dust of mummied animals arises to awe and half poison the adventurous explorer, are these "specimens" to be found.
ARTISTIC MOUNTING — GENERAL REMARKS. — By the time the student reaches this chapter, they will likely—if they are skilled and possess an artistic mindset—have achieved more than just the basic tasks of the profession. I assume that, being engaged in their work, they will not be content with only mounting—no matter how perfectly—their animals at rest, but will have tried to capture animals in action or engaged in some unique activity. The time of birds on "hat-pegs," with stiff legs, long necks, and wide, unblinking eyes staring into space—of mammals whose only characteristics are their length and rigidity—is over. These "specimens" can now only be found in dull museums, stuck in the past, where a funereal silence reigns, and the dust of mummified animals rises to intimidate and subtly poison the curious explorer.
Public museums are, unfortunately, in nine cases out of ten, not good schools for delineating the natural attitudes or characteristics of animals. This arises partly from the fact that all, save the more modern ones, retain their original specimens mounted in the old style. The newer work of the museums of London, Paris, Madrid, etc.., is, however generally of quite a different stamp. [Footnote: Since this was written, the new South Kensington Natural History Museum has been built and I lately had the pleasure of a private view - through the courtesy of Mr. R. Bowdler Sharpe F.L.S. - of the new style of mounting of the future, i.e. pairs of birds their nests and young, surrounded with carefully-modelled foliage and accessories. I there saw a bunch of "willow-herb" magnificently modelled. I was pleased, however, from an artist's point of view, to discover that we in Leicester could give them a "Roland for an Oliver" in our white-throats, together with their nest and young, surrounded by a modelled bramble-bush in blossom; and with our swallows in section of a cow-house — neither of which groups have yet been attempted for the national collection. I am trembling with apprehension, however, that ere long Mr. Sharpe and his "merry men" - one of them, a German, the cleverest bird-mounter I ever saw — will leave us in the lurch. Nevertheless, healthy emulation of the best features of our national collection will do us no harm. ]
Public museums are, sadly, in nine out of ten cases, not great places for showing the natural behaviors or traits of animals. This is partly because most of them, except for the newer ones, still have their original specimens displayed in the old-fashioned way. However, the recent exhibitions in museums in London, Paris, Madrid, etc., are usually very different. [Footnote: Since this was written, the new South Kensington Natural History Museum has been completed, and I recently had the pleasure of a private viewing—thanks to Mr. R. Bowdler Sharpe F.L.S.—of the new style of mounting for the future, i.e. pairs of birds with their nests and young, surrounded by carefully crafted foliage and other elements. I saw a beautifully modeled bunch of "willow-herb." From an artist's perspective, I was glad to realize that we in Leicester could compete with them by showcasing our white-throats, along with their nest and young, surrounded by a modeled blooming bramble-bush; plus our swallows depicted in a section of a cow-house—neither of which groups have yet been attempted for the national collection. However, I am quite anxious that soon Mr. Sharpe and his talented team—one of whom, a German, is the most skilled bird-mounter I've ever seen—will leave us behind. Still, trying to incorporate the best aspects of our national collection will be beneficial for us. ]
This struck me most forcibly with regard to that of Madrid, which I visited some years ago. The vertebrate specimens were old and wretchedly mounted, the lepidoptera nowhere; but the recently acquired animals were splendidly rendered. The youthful and painstaking amateur will, no doubt, however, do as I did when a boy — viz., pitch upon some professional taxidermist, to whose window he will repair at all available opportunities to learn his style, now and then venturing on some small purchase (usually a pair of eyes), to gain admittance to the glories within, and have speech with the great man himself. Exploring in this manner, I have had occasion to thank many of the leading London taxidermists for little "tips" ungrudgingly given.
This hit me hard when I visited Madrid a few years ago. The vertebrate specimens were old and poorly displayed, the butterflies were missing completely; but the newly acquired animals were beautifully arranged. The eager and dedicated young hobbyist will, no doubt, do what I did when I was a kid — that is, find a professional taxidermist whose shop window he will visit at every opportunity to learn his style, occasionally making a small purchase (usually a pair of eyes) to gain entry to the treasures inside and have a chat with the master himself. Through this exploration, I’ve had the chance to thank many leading taxidermists in London for the little “tips” they generously shared.
A few hints may suffice to help the reader. The most important canon is: Do not mix your orders of birds; that is to say, abstain from surrounding a hawk tearing its prey, with various birds in all attitudes, placidly ignoring the existence of their enemy. A scene of this kind irresistibly reminds me of the stage "aside," when the villain of the piece audibly proclaims vengeance against the unconscious hero but two yards away on his right or left.
A few tips might be enough to assist the reader. The main rule is: Don't mix up your orders of birds; in other words, avoid showing a hawk tearing into its prey surrounded by different birds that are totally oblivious to their enemy. This kind of scene always makes me think of the theatrical "aside," where the villain loudly declares revenge against the unaware hero just a short distance away on either side.
Birds not of the same kind, and from different parts of the world, are often cased together, but this is open to criticism, unless you avowedly wish to illustrate the whole order for purposes of reference, as in the instance of, say, the Columbae (pigeons). Pairs of birds are the most effective, if the idea of the surroundings is nicely carried out.
Birds that are different species and from various parts of the world are often displayed together, but this practice is questionable unless you clearly intend to showcase the entire group for reference purposes, as seen with, for example, the Columbae (pigeons). Pairing birds is most effective when the concept of their environment is well executed.
I have seen one or two very funny effects in the "Black Country." In one example, a scarlet ibis, mounted in a case on a broken piece of highly gorgeous china gaselier; in another, two puppies facing each other on velvet, a piece of rock salt in the middle, on which stood a lapwing, surrounded by foreign birds in all attitudes. Need I warn the reader against such flights of fancy and works of art?
I have seen one or two really funny things in the "Black Country." For example, there was a scarlet ibis displayed in a case on a broken piece of beautiful china chandelier; and in another, two puppies facing each other on velvet, with a piece of rock salt in the middle, where a lapwing stood, surrounded by exotic birds in various poses. Do I need to caution the reader against such wild imagination and works of art?
It is, I would remark, quite impossible to give directions as to attitudes, but on one point I might advise, in order to save the many inquiries addressed to me, from time to time, upon the subject of the straightness or otherwise of gulls' legs. The fact is — gulls, when standing, tuck the tibia quite close to the abdomen, apparently under the wing, and reveal only a very little portion of the tibio-tarsal joint, keeping the metatarse perfectly straight, or, as someone wrote to me once, "like two arrows or sticks." (For explanation of these parts named, see Plate II., (N, q, P.))
It’s important to note that it’s quite impossible to give guidance on attitudes. However, I can offer one piece of advice to help reduce the numerous questions I receive about the straightness of gulls' legs. The truth is, when gulls are standing, they tuck their tibia in close to their bodies, seemingly under their wings, and only show a tiny bit of the tibio-tarsal joint. They keep the metatarsus perfectly straight, or as someone once described it to me, "like two arrows or sticks." (For definitions of these parts mentioned, see Plate II., (N, q, P.))
Although most works on taxidermy profess to give descriptions of the attitudes of animals, I cannot do so for the simple reason that I consider the acquirement a speciality and purely a matter of experience. Nature must be closely studied; failing this, reference must be made to illustrated works on natural history. All of Gould's works are grand guides to attitudes of specimens and accessories, as also that beautiful work of my friend H. E. Dresser, F.L.S., etc.., on the "Birds of Europe;" but as the price of these magnificent works places them beyond the reach of any but rich people, the amateur may fall back on Morris's "British Birds" and Bree's "Birds of Europe" for coloured plates, and Routledge's "Wood's Natural History" for uncoloured plates of many mammals, birds, and fishes; those signed by Coleman being especially artistic and natural. Add to these Cassell's new "Natural History," edited by Dr. Duncan, F.R.S. — really the best book on popular natural history we have.
Although most taxidermy books claim to describe animal postures, I can't do that because I believe it's a specialty that comes purely from experience. You need to closely observe nature; if that’s not possible, you should refer to illustrated natural history books. All of Gould's works are excellent resources for understanding specimen postures and accessories, as is the beautiful book by my friend H. E. Dresser, F.L.S., etc., on the "Birds of Europe." However, since the cost of these outstanding works is too high for anyone but wealthy individuals, amateurs can rely on Morris's "British Birds" and Bree's "Birds of Europe" for color plates, and Routledge's "Wood's Natural History" for black-and-white plates of various mammals, birds, and fish, especially those illustrated by Coleman, which are particularly artistic and lifelike. Additionally, there's Cassell's new "Natural History," edited by Dr. Duncan, F.R.S.—truly the best book on popular natural history we have.
Other works, perhaps not so easily accessible, are the "Proceedings of the Zoological Society," and the "Ibis," for coloured illustrations of animals — often in characteristic attitudes, and which, with the above-named works, fitly replace the more ancient "pictures" of animals, arranged on the "fore and aft" system, and from which instead of nature, our taxidermists took their original ideas; indeed, the English school, with true British insularity, would, I presume, have continued the mounting of animals by this "fore and aft" method,* had not the Germans and French broken rudely in on our slumbering taxidermists at the Great Exhibition of 1851. [Footnote: Is it not singular that even now anything stiff, inartistic, "solidly" (i.e. clumsily) made, or behind the age, is cherished with the utmost veneration, as being a proof of the solidity of our "Old English Methods" (and skulls)!]
Other works, which might be less accessible, are the "Proceedings of the Zoological Society" and the "Ibis," known for their colored illustrations of animals—often showing them in typical poses. These publications, along with the previously mentioned works, effectively replace the older "pictures" of animals arranged in a "fore and aft" style, which our taxidermists originally used for inspiration instead of nature. In fact, the English school, with its typical British insularity, would probably have kept using this "fore and aft" method for mounting animals if the Germans and French hadn't jolted our complacent taxidermists at the Great Exhibition of 1851. [Footnote: Isn’t it odd that even now anything stiff, unartistic, or made in a clumsy, outdated way is revered as proof of the strength of our "Old English Methods" (and skulls)!]
I propose now to give a few hints on groups, etc.., not describing their management, but merely giving a list of subjects. First, let me say that in order of merit, in all arts connected with the preservation of natural history objects, I must, after many years study, give the palm to the Germans, not only in all matters connected with artistic taxidermy, but in their elegant and truthful setting of beetles, their sensible setting of lepidoptera, and their really beautiful method of making skins of birds etc..
I would like to share some tips on groups, etc., not about how to manage them, but just a list of topics. First, I want to say that based on my many years of study, I have to give the top spot to the Germans when it comes to the arts related to preserving natural history items. They excel not only in artistic taxidermy but also in their elegant and accurate display of beetles, their practical approach to arranging butterflies, and their truly beautiful techniques for preparing bird skins, etc.
Next come the French, then the English, and lastly, the Americans. The Americans are the worst simply because they adopt the crudest English methods of taxidermy, with other bad habits of ours. I may say that I never saw an artistic piece of work, nor a well made skin, coming from America, unless done by a German or a Frenchman. I believe, however, the European element is working wonders amongst them, and reading Mr. Batty's book (if he be a true American), I was very favourably impressed with the signs of progress contained therein, and I should not at all wonder if soon our American friends "go ahead" and quickly leave us behind.
Next come the French, then the English, and finally, the Americans. The Americans are the worst simply because they use the most basic English methods of taxidermy, along with other bad habits of ours. I can honestly say that I've never seen an artistic piece of work or a well-made skin come from America unless it was done by a German or a Frenchman. However, I believe the European influence is making a big difference among them, and after reading Mr. Batty's book (if he is indeed a true American), I was quite impressed with the signs of progress in it. I wouldn’t be surprised at all if our American friends soon "go ahead" and quickly leave us behind.
Professor Henry a. Ward, of Rochester, New York, U.S.A., in a well-written article in one of his "Bulletins" sent to me, has, since I wrote the above, confessed the great superiority of European over American taxidermists, but says that within the last few (very few) years, their native taxidermists have greatly improved, owing to the importation of clever foreign artists, who are gradually educating the American workmen.
Professor Henry A. Ward from Rochester, New York, U.S.A., in a well-written article in one of his "Bulletins" sent to me, has, since I wrote the above, admitted the significant superiority of European taxidermists over American ones. However, he notes that in the last few (very few) years, native American taxidermists have improved a lot, thanks to the inflow of skilled foreign artists who are gradually teaching the American workers.
Just before this there was an entertaining article in the "Century" magazine, and illustrations were given showing the best work of the American taxidermic artists. I must say, however, that, unless the draughtsman failed to copy what an educated eye looks for, none of this work struck me as being of a high order — one or two "pieces," indeed, being decidedly capable of improvement. Possibly this improvement has taken place by now; anyway, I heartily wish Brother Jonathan good luck in his taxidermic studies.
Just before this, there was an interesting article in "Century" magazine, featuring illustrations of the best work by American taxidermists. I have to say, though, that unless the illustrator didn’t capture what an educated eye looks for, none of this work impressed me as being top-notch — one or two "pieces," in fact, could definitely use some improvement. It's possible that these improvements have happened since then; either way, I sincerely wish Brother Jonathan good luck in his taxidermy studies.
At present, however, I say to all rising taxidermists, follow the lead of the Germans — they are true artists; and with the Italian modelling and French neatness of workmanship to fall back on, success is certain.
At this point, though, I tell all aspiring taxidermists to follow the example of the Germans — they are real artists; and with Italian modeling and French attention to detail to lean on, success is guaranteed.
Looking back to '51, let us see what one of these foreigners (mentioned in chapter I) could teach us. Among over fifty groups of animals shown in the Great Exhibition were —
Looking back to '51, let’s see what one of these foreigners (mentioned in chapter I) could teach us. Among more than fifty groups of animals displayed in the Great Exhibition were —
A stag caught by five hounds (price 180 pounds).
A stag caught by five hounds (cost 180 pounds).
A wild boar set on by three hounds.
A wild boar attacked by three dogs.
A couple of old and young foxes in front of their "earth" (60 pounds).
A couple of old and young foxes in front of their burrow (60 pounds).
Trophy of 25 heads of animals of the chase.
Trophy of 25 heads of game animals.
Nest of a horned owl. Two old birds and five young defending themselves against two polecats (30 pounds).
Nest of a horned owl. Two adult birds and five juveniles defending themselves against two polecats (30 pounds).
Goshawk attacking an eagle owl.
Goshawk attacking an eagle owl.
These were followed by comic groups, six of which illustrated Goethe's fable of "Reinecke the Fox," and were skilfully managed as well as amusing. Some others were--
These were followed by comedy troupes, six of which brought to life Goethe's fable of "Reinecke the Fox," and were skillfully executed as well as entertaining. Some others were--
A duel between two dormice, with moles as gravediggers.
A duel between two dormice, with moles as the grave diggers.
"A Declaration of Love." Two weasels.
"A Declaration of Love." Two weasels.
"A Nursery Maid." One old and four young weasels.
"A Nursery Maid." One old weasel and four young weasels.
"Shaving a Luxury." One frog shaving another.
"Shaving a Luxury." One frog shaving another.
Apropos of the above, frogs lend themselves better to comic scenes than almost any other animal, from their ridiculous likeness, when erect on their hind legs, to mighty man. Hence advantage is often taken of this; and amongst mirth-provoking caricatures I have seen "A Steeplechase," frogs mounted on puppies as horses, some tumbling at the water-jump, others riding to win, some unhorsed, scrambling after their steeds, and so on; "The Battle of the Nile," frogs on rafts of leaves of water plants, attacking one another with small bulrushes; duel scenes; "Courtship" and "Matrimony"; "Fortiter in Re," a young frog soundly smacked (in the most approved fashion) by the irate paternal frog; the companion picture, "Suaviter in Modo," a young frog soothed by maternal affection.
Speaking of the above, frogs are often funnier than almost any other animal, from their silly resemblance to tall humans when standing on their hind legs. Because of this, they are frequently used in funny caricatures. I've seen one called "A Steeplechase," featuring frogs riding on puppies as horses, some tumbling during the water jump, others racing to win, and some falling off and scrambling after their mounts. There’s also "The Battle of the Nile," with frogs on leaf rafts from water plants, attacking each other with small bulrushes, along with duel scenes; "Courtship" and "Matrimony"; "Fortiter in Re," showing a young frog getting a good smack (in the most acceptable way) from an angry father frog; and the accompanying picture, "Suaviter in Modo," featuring a young frog comforted by its mother's affection.
Monkeys are the next best for comic scenes, but are more awkward to handle, and not half so funny, unless very carefully modelled to caricature the manners and customs of the human subject. Pourtrayed as shoemakers, acrobats, as "You dirty boy!" or, as in the Fisheries Exhibition of 1883, as "The Enthusiast" (a gouty monkey fishing in a tub placed in his sick chamber), they are, perhaps, the most successful. The addition of miniature furniture to assist the delusion is permissible; but, after all, these caricatures are not artistic taxidermy, and they are only allowable now and then as a relaxation.
Monkeys are great for comedic scenes, but they’re trickier to handle and not nearly as funny unless they're carefully crafted to exaggerate the habits and customs of humans. When depicted as shoemakers, acrobats, or with phrases like "You dirty boy!"—or, like in the Fisheries Exhibition of 1883, as "The Enthusiast" (a gouty monkey fishing in a tub in his sick room)—they can be really effective. Adding tiny furniture to enhance the illusion is fine, but ultimately, these caricatures aren’t artistic taxidermy, and they're only worth doing occasionally as a way to unwind.
Perhaps that which most exercises the skill and judgment of the taxidermic artist is reproducing large groups of some of Landseer's pictures, such as, "The Combat" (two stags fighting); the "Stag at Bay," and others in connection with hunting. Lion and tiger fighting over prey; two tigers fighting for possession of a deer; head and paws of lion or tiger peeping over a rock; tiger crouching for a spring on some feeding animal; lion and zebra; panther or jaguar crouching on an overhanging tree-trunk; leopard killed by a gemsbok antelope; polar bear killing seal on ice; lynx creeping over snow upon grouse; wolf leaping with fore-legs in air on receiving his death-shot; fox in "full cry;" fox just missing a pheasant or duck by only securing the tail feathers; two foxes fighting; fox and playing cubs; fox and trapped rabbit (after Ansdell); "Heads and Tails," fox coming over bank as rabbit disappears; dogs and puppies; cats and kittens (see Landseer's, Ansdell's, Couldery's, and Frank Paton's pictures for treatment of these); otters and young; otters with fish (see Landseer's and Rolfe's pictures for these); otters diving after fish, both seen in mid-water, are some of the studies which have been, or can be, executed.
Perhaps what challenges the skill and judgment of the taxidermy artist the most is recreating large groups from some of Landseer's paintings, such as "The Combat" (two stags fighting), "The Stag at Bay," and others related to hunting. Scenes like a lion and tiger fighting over prey, two tigers battling for a deer, the head and paws of a lion or tiger peeking over a rock, a tiger crouching to pounce on a grazing animal, a lion with a zebra, a panther or jaguar resting on a tree branch, a leopard taken down by a gemsbok antelope, a polar bear hunting a seal on ice, a lynx sneaking over snow towards grouse, a wolf leaping in the air after being shot, a fox in "full cry," a fox just missing a pheasant or duck by catching only its tail feathers, two foxes fighting, a fox with its playful cubs, a fox and a trapped rabbit (after Ansdell), "Heads and Tails" with a fox coming over a bank as a rabbit disappears, dogs and puppies, cats and kittens (see the works of Landseer, Ansdell, Couldery, and Frank Paton for treatments of these), otters with their young, otters with fish (see Landseer's and Rolfe's pictures for these), and otters diving for fish, both visible in mid-water, are some of the studies that have been or can be executed.
Among birds, eagles and falcons at rest or in action are the most capable of artistic treatment, such as "The Eagle's Throne" (after Wolf); laemmergeyer carrying off lamb; hawks fighting over a small bird, allowing the latter to escape; peregrine falcon striking a bittern; eagle and wild cat; sea-eagle and gulls; osprey and fish. In connection with the last, one of the very best things I ever saw done with these specimens was in the Fisheries Exhibition, 1883, a piece of work — a study it might be called — executed by a German residing in London. It represented an osprey tugging a fish from some sea rocks.
Among birds, eagles and falcons, whether resting or in action, are the most suitable for artistic representation, such as "The Eagle's Throne" (after Wolf); a lammergeyer carrying off a lamb; hawks fighting over a small bird, which allows the latter to escape; a peregrine falcon striking a bittern; an eagle with a wild cat; a sea eagle and gulls; an osprey and fish. Related to the last, one of the best pieces I ever saw using these subjects was at the Fisheries Exhibition in 1883 — a work, or perhaps a study, created by a German living in London. It depicted an osprey pulling a fish from some sea rocks.
Both fish and bird were excellently rendered; the latter, with wings expanded, had gripped the fish with both feet, and had raised it in the air some distance off the rocks; the fish was, however, entangled by a line and hook it had swallowed; and the action of the fish-hawk in attempting to tear the fish away was wonderfully fine, the feathers were raised about the head, the eye was fierce, and the sidelong waft of the wings was most natural. The study was all the more interesting from the fact that both bird and fish were poised in air without any visible means of support, the case enclosing them being of glass all around. How it was managed was easy for the professional eye to discover, but I do not think I should be doing justice to the inventor to describe the method.
Both the fish and the bird were portrayed beautifully; the bird, with its wings spread wide, had grabbed the fish with both feet and lifted it into the air some distance from the rocks. However, the fish was tangled up in a line and hook that it had swallowed. The fish-hawk's struggle to pull the fish away was incredibly well done, with its feathers ruffled around its head, a fierce look in its eye, and the sideways flapping of its wings looking very realistic. The scene was even more captivating because both the bird and fish were suspended in mid-air with no visible support, as the whole display was enclosed in glass. A professional could easily figure out how it was done, but I believe it wouldn't be fair to the inventor to reveal the method.
Amongst the water birds, which are the next best, perhaps, for artistic treatment, come the swans, in the attitude of swimming (see Chapter XII.), ducks swimming, diving, and flying. "The Widowed Duck" — after the celebrated picture — was one of the things very nicely rendered in the "Fisheries Exhibition;" the painting of an artistic scene at the back of this case helped the effect wonderfully, as it usually does in good work. "Hooded Crows Tracking a Widgeon," and "Wounded Tern," fallen by its eggs, were two other clever groups — said to be "copyright," though how on earth such things can be copyright I do not know, especially as not one of the things exhibited could be called original; indeed, everything I saw at the "Fisheries," with the exception of the osprey mentioned above, had been done over and over again by German, French, and English artists.
Among the water birds, which might be the next best for artistic representation, are the swans, swimming (see Chapter XII.), along with ducks swimming, diving, and flying. "The Widowed Duck" — inspired by the famous painting — was one of the pieces beautifully displayed at the "Fisheries Exhibition;" the artwork in the background of this display enhanced the effect significantly, as it typically does in quality work. "Hooded Crows Tracking a Widgeon" and "Wounded Tern," which fell from its nest, were two other impressive groups — claimed to be "copyrighted," though I really don't understand how such things can be copyrighted, especially since none of the pieces displayed could be considered original; in fact, everything I saw at the "Fisheries," except for the osprey mentioned earlier, had been redone numerous times by German, French, and English artists.
The work of these "copyright" groups — excepting the foliage, which was rather "stiff" — was, however, very clean and nice, and favourably compared with work by other taxidermists, many of whose "pieces" — as the Americans say — should have been refused on the score of pretentious incompetence.
The work of these "copyright" groups — except for the foliage, which was a bit "stiff" — was, however, very clean and nice, and it compared well to the work of other taxidermists, many of whose "pieces" — as the Americans say — should have been rejected due to their obvious incompetence.
There was one detestable exhibit, all the more grievous as being professional. No wonder that people, seeing this sort of thing, should laugh at fish and bird "stuffing." As I looked and wondered, I felt that a first-class assortment of injurious epithets applied to such "work" would have relieved my perturbed spirit.
There was one awful exhibit, even more upsetting because it was done by a professional. It's no surprise that people laugh at taxidermy of fish and birds when they see something like this. As I looked and thought about it, I felt that a top-notch collection of harsh insults aimed at such "work" would have eased my troubled mind.
This digression puts me in mind of another, and that is to warn the amateur not to "know too much," and think he has nothing to learn directly he can set up a bird or mammal, or anything else, in a fairly respectable manner. The people who know everything, and imagine they cannot be taught, are just the people who know very little and who will never learn more. "Duffers" they are, and "duffers" they will be, to the end of their days. Every sensible man, even should he rival Methusaleh — which heaven forfend! — must be learning Art (even should he teach) all his life.
This digression reminds me of another point I want to make: a warning to beginners not to "know too much" and think they have nothing left to learn just because they can create a decent representation of a bird, mammal, or anything else. Those who believe they know everything and think they can't be taught are often the ones who know very little and will never learn more. They're "losers," and they'll remain "losers" for the rest of their lives. Every sensible person, even if he were to live as long as Methuselah—which I hope never happens!—must continue to learn about Art (even if he teaches) throughout his life.
Make haste to learn, therefore, from anyone who can give you a hint, and don't set yourself up (or down) in some obscure country town and fancy you are great. Come out into the world, measure yourself against the best, criticise your own work as if it were a stranger's. Be honest, and say, "That man's work knocks mine into a cocked hat," and then go home miserable, but determined to beat that man's work or perish in the attempt. Never sneak! If you see first-class work by anyone, go boldly and say, "Sir, I am an amateur," or, "I am a young professional," as the case may be. "Your work interests and delights me. May I look around?" Doubtless, the person addressed will be flattered by your appreciation, and, unless narrow-minded, will exchange views with you to your benefit.
Hurry to learn from anyone who can give you advice, and don’t lock yourself away in some small town thinking you’re amazing. Step into the world, compare yourself to the best, and critique your own work as if it belonged to someone else. Be honest and admit, “That person’s work blows mine away,” and then go home feeling down but determined to either improve your work or fail trying. Never be sneaky! If you see outstanding work by anyone, go up confidently and say, “Hi, I’m an amateur,” or, “I’m a young professional,” depending on your situation. “Your work fascinates and inspires me. May I take a look around?” The person you approach will likely be pleased by your admiration and, unless they’re narrow-minded, will be happy to exchange ideas with you for your benefit.
Let us return to our theme. Amongst the water birds, then, we may instance herons with young as making a nice group, moorhens leading out their young on water under a mossy bank and so on; and this brings us to the question of mounting pairs of birds, with their nests and eggs, or nests and young.
Let’s get back to our topic. Among the water birds, we can point out herons with their chicks as a pleasant sight, moorhens taking their young onto the water near a mossy bank, and so on; this leads us to the topic of displaying pairs of birds, along with their nests and eggs, or nests and their young.
GROUPS OF BIRDS AND YOUNG, WITH MODELLED FOLIAGE — Nothing in taxidermy requires more correct mounting and taste, and nothing is more charming, if properly done, than illustrating the life-history of, say, a pair of birds with their nest and young. Take any birds you like — sparrows or robins — and, if you know anything, you may "invest with artistic merit" even such common specimens as these. There is a certain fascination in young things which, I suppose, calls up all the kindly feelings of our nature, and so it is that young birds tended by their parents are groups which appeal the most to the finer senses, besides being really educative if worked out properly.
GROUPS OF BIRDS AND YOUNG, WITH MODELED FOLIAGE — Nothing in taxidermy requires more precise mounting and taste, and nothing is more charming, if done right, than showcasing the life story of, say, a pair of birds with their nest and chicks. Pick any birds you like — sparrows or robins — and if you know what you're doing, you can add "artistic merit" to even these common examples. There’s a certain allure in young creatures that, I suppose, brings out all the gentle feelings in us, which is why scenes of young birds being cared for by their parents are the ones that resonate most with our sensibilities, while also being genuinely educational if executed well.
I remember, quite twenty years ago, when a boy, seeing a collection of nearly all the "British" birds, their nests and eggs, for sale, so that the idea is not a new one, nor is that of surrounding such groups, with proper accessories and modelled leaves and flowers, as will shortly be exhibited to the public in the new "British" Natural History Room at South Kensington, and as is now exhibited in the Leicester Museum. I remember getting foliage done for me many years ago for such groups, and I believe Mr. Shaw, of Shrewsbury, did it long before I copied his lead. Who was the original inventor of this system I know not, but I shrewdly suspect we have to thank French artists for this. Let it be thoroughly understood that I do not intend to disparage the beautiful work done for South Kensington by the various gentlemen and artists interested, but I merely point the adage, "Nothing new under the sun."
I remember, almost twenty years ago, when I was a boy, seeing a collection of nearly all the "British" birds, their nests, and eggs for sale. So, this idea isn’t new, nor is the concept of surrounding such displays with appropriate accessories, modeled leaves, and flowers. These will soon be showcased to the public in the new "British" Natural History Room at South Kensington, and are currently displayed in the Leicester Museum. I recall getting foliage made for me many years ago for similar displays, and I believe Mr. Shaw from Shrewsbury did it long before I followed his example. I don’t know who originally invented this system, but I strongly suspect we have French artists to thank for it. Let it be clear that I don’t intend to undermine the beautiful work done for South Kensington by the various gentlemen and artists involved; I simply point out the saying, "Nothing new under the sun."
Of course, when I say "modelled foliage" I do not allude to stamped leaves in various materials, sold at so much (or so little) a gross, and used to "decorate" "boxes of birds" in the "Black Country" quite fifty or sixty years ago, but that which has arisen on its ashes in response to the cry for "more art," and because of the impossibility of getting any other natural flowers than "everlasting," or any other leaves than those of grasses and ferns (mentioned in the last chapter), to dry for decorative, or, as we say, "fitting up" purposes.
Of course, when I say "modeled foliage," I’m not talking about stamped leaves made from various materials, sold by the gross for a low price, and used to "decorate" "bird boxes" in the "Black Country" around fifty or sixty years ago. Instead, I’m referring to what has emerged from that practice in response to the demand for "more art." This development is largely due to the difficulty of finding any natural flowers other than "everlasting" ones or any leaves other than those from grasses and ferns (mentioned in the last chapter) to dry for decorative, or what we now call "furnishing," purposes.
To describe the processes involved in copying leaves and flowers of any plant from nature, so that all will appear perfectly life-like and yet be durable, and stand exposure to moderate heat and cold, would take up too much space, added to which, my personal knowledge of all is required in this is of such recent acquirement, that, although I have fairly succeeded in teaching myself modelling of this kind, and have executed a few groups, yet I would like a little more time to elapse ere I pose as a teacher; but, no doubt, when the time comes, someone — perhaps the publisher of "Practical Taxidermy" — may be induced to give the results of my labours to the class most interested.
To explain the methods for copying leaves and flowers from any plant in nature, so they look completely realistic while being durable and able to withstand moderate heat and cold, would take up too much space. Plus, my personal knowledge in this area is so recent that, although I've managed to teach myself this type of modeling and have completed a few pieces, I'd prefer to wait a bit longer before I consider teaching others. However, when the time comes, I’m sure someone—maybe the publisher of "Practical Taxidermy"—will be encouraged to share the results of my work with those most interested.
I may instance some groups: Robin's nest, in bank covered with ivy, and primroses in flower, the old female bird feeding the young, the male searching for more food, or singing on branch near nest; long-tailed titmice, in furze-bush (South Kensington); chiff-chaff, in long grass, surrounded by willow-herb; chaffinches in blossoming hawthorn; white-throat's nest, with young, surrounded by leaves and flowers of the bramble (Leicester Museum); blue-tits, in apple-tree with modelled foliage and flowers; moorhens swimming, with young just leaving nest, surrounded with water-lilies, flowering rush, and other plants; grouse and young; swallows, in section of cow-house, with plants, etc.., growing on roof (Leicester Museum); grebes and nest, amid marsh plants and marsh marigold in flower, etc.. (South Kensington).
I can mention a few groups: Robin's nest on a bank covered with ivy and blooming primroses, the female bird feeding the young, the male searching for more food or singing on a branch nearby; long-tailed titmice in a furze bush (South Kensington); chiff-chaffs in tall grass surrounded by willow-herb; chaffinches in flowering hawthorn; a white-throat's nest with young ones surrounded by bramble leaves and flowers (Leicester Museum); blue-tits in an apple tree with lush foliage and flowers; moorhens swimming with young just leaving the nest, surrounded by water lilies, flowering rush, and other plants; grouse and their chicks; swallows in a corner of a cow shed, with plants growing on the roof (Leicester Museum); grebes and their nest among marsh plants and blooming marsh marigolds, etc. (South Kensington).
To give a tenth of the phases of the studies which can be worked out would fill pages of this book; suffice it to say that nature, being the guide in this, must be rigidly adhered to. There is, of course, no need to copy any accidental awkwardness; but don't invent too much, as the greatest charm of all is taking Nature as your guide. At the back of these groups may be placed the eggs, and birds of the same species in change of plumage or winter dress, thus making the life history complete. For museums, and similar educational institutions, the food and the skeleton should be exhibited, with explanatory label attached.
To list even a tenth of the study phases that can be developed would fill pages of this book; it's enough to say that we must strictly follow nature as our guide. There's no need to replicate any random awkwardness, but don’t invent too much either, since the greatest appeal comes from taking nature as your guide. At the back of these displays, you can place the eggs and birds of the same species in different plumage or winter attire, completing their life history. For museums and similar educational institutions, food samples and skeletons should be shown, with explanatory labels attached.
Reptiles and fishes are most unsatisfactory things to treat artistically. When set up and dried they shrivel, and are seldom modelled nicely. (To counteract such shrivelling, see Chapter XII.) I have almost made up my mind that, taking into consideration the stiffness of outline usually present in mounting by the ordinary methods, all fish should be cast in plaster or paper, although even then stiffness may be present unless the fish is posed properly. Fish lying in a mass on a bank, or in a dish, as were some at the "Fisheries," look the most natural and easy.
Reptiles and fish are really difficult to represent in an artistic way. When they are set up and dried, they tend to shrink and are rarely shaped well. (To address this shrinking issue, see Chapter XII.) I've almost convinced myself that given the stiffness of the outline that usually comes with traditional mounting methods, all fish should be cast in plaster or paper, although even then stiffness can occur if the fish isn't posed correctly. Fish that are lying in a heap on a bank or in a dish, like some were at the "Fisheries," look the most natural and relaxed.
One plan, new to me, however, was adopted in such subjects as large pike, etc.., which were cast, coloured, and placed in a long basket upon straw, the whole covered with glass. This method is especially nice for the hall table as a souvenir of piscatorial success. I was rather disappointed in the colouring of these casts. Many of the artists had entirely missed the subtle colours of the pike, trout, and other fish — one salmon only, and one dishful of grayling, magnificently managed, excepted. [Footnote: One of the very best books I know to help teach the colouring of fish is "British Freshwater Fishes," by the Rev. W. Houghton, M.A. Two vols., quarto, each fish beautifully drawn and coloured.]
One new method I came across involved creating life-like casts of large pike and similar fish. These were painted, placed in a long basket on straw, and then covered with glass. This approach looks especially nice on a hall table as a memento of fishing triumphs. I was a bit let down by the coloring of these casts. Many of the artists completely overlooked the subtle hues of the pike, trout, and other fish—except for one salmon and one dish of grayling, which were beautifully done. [Footnote: One of the best resources I know for learning how to color fish is "British Freshwater Fishes," by the Rev. W. Houghton, M.A. Two vols., quarto, each fish beautifully drawn and colored.]
Perhaps, the best treatment of fish, when modelled in plaster, was exhibited in the Indian section; here the tints of the fish were beautifully managed, the skins appeared wet, but not varnished, and all the colours were nicely blended in. As for the stuffed fish, their name was legion, and they were there in all degrees of merit. One thing, however, struck me with painful surprise; among the thousands of freshwater fish I saw mounted by taxidermy, not one was without those ridiculous little spears (cut from large rushes, or from paper) growing from the bottom of the case, each one, or each bunch of them, erect as possible, and almost always arranged at equal distances apart, with maddening precision.
Maybe the best way fish were treated, when shaped in plaster, was shown in the Indian section; here the colors of the fish were beautifully handled, the skins looked wet but not shiny, and all the colors were blended nicely. As for the stuffed fish, they were in great numbers and came in all levels of quality. One thing, though, caught me off guard; among the thousands of freshwater fish I saw preserved by taxidermy, not a single one lacked those silly little spears (made from large reeds or paper) sticking up from the bottom of the display, each one, or each group of them, standing straight up and almost always spaced out with irritating precision.
Some of the sea-fish admitted of more elastic treatment, and I saw one very good exhibit of these. The artist had, however, rather detracted from their undeniably good treatment by modelling small stones. These were so natural as to require a label explaining this; but I would remind all workers in taxidermy that there is no useful end gained by modelling small stones; a great amount of labour is wasted, and the intention of modelling — which is to replace the great weight of large stones by extraordinary lightness — is completely overlooked.
Some of the sea fish could be treated with more flexibility, and I saw one really impressive display of these. However, the artist somewhat diminished their undeniably good treatment by modeling small stones. These were so realistic that they needed a label to explain what they were; but I want to remind all taxidermy workers that there's no useful purpose in modeling small stones. A lot of effort is wasted, and the main goal of modeling — which is to replace the heavy weight of large stones with something much lighter — is completely ignored.
"SCREENS." — The ordinary screen intended for use is made of two sheets of thick plate-glass, between which are pressed ferns, butterflies, etc.., the whole set in an oak or other wood frame, with castors.
"SCREENS." — The typical screen designed for use is made up of two sheets of thick glass, with ferns, butterflies, and similar items pressed between them, all set in a wooden frame made of oak or another type of wood, complete with wheels.
Those intended for ornament are more lightly made. Thus: A square frame, about 30 in. by 24 in. by 4.5 in. deep, is made in thin fancy wood, or in pine veneered; no front nor back is fitted, merely a groove ploughed all around, with "beads," to receive and to retain the glass, on each face. This frame is then fixed by screws, with buttons fitting over the screw holes, between two turned and carved uprights (like small bedstead posts), supported by carved feet on castors; a handle of carved wood is fixed on top of the box, which completes the joiner's work. The inside of the frame is papered and coloured; the birds — usually brightly-coloured foreign birds, or humming birds and butterflies — are inserted, properly mounted on light twigs, etc.., and the glass beaded in, to complete all.
Those meant for decoration are made lighter. So, a square frame, about 30 inches by 24 inches by 4.5 inches deep, is crafted from thin decorative wood or pine veneer; it has no front or back, just a groove cut all around, with “beads” to hold the glass in place on each side. This frame is then secured with screws, and buttons cover the screw holes, positioned between two turned and carved upright posts (similar to small bed posts), supported by carved feet on casters. A handle made of carved wood is attached to the top of the box, finishing the carpenter's work. The inside of the frame is lined with paper and colored; the birds — typically brightly-colored exotic birds, or hummingbirds and butterflies — are placed inside, properly mounted on light twigs, and the glass is beaded in to complete everything.
One very nice "screen" was exhibited at the "Fisheries," almost a reproduction of the woodcut illustrating the outside of Science Gossip, with the addition of a hawk striking the kingfisher. There were also two large and capital trophies, called "The Rod". and "The Gun," remarkably cheap, mounted as screens in framed bamboo. The first represented a string of large fresh-water fish depending from a branch of a tree, a creel, a rod, a landing-net, and other angling gear. "The Gun" showed a fine bittern and heron, and, I think, some other birds, also depending from a branch, with a gun and some old-fashioned tools (powder-flask, etc..) included.
One really nice "screen" was displayed at the "Fisheries," almost identical to the woodcut showing the cover of Science Gossip, but with the addition of a hawk attacking a kingfisher. There were also two large and impressive trophies called "The Rod" and "The Gun," which were surprisingly affordable, mounted as screens in framed bamboo. "The Rod" featured a string of big freshwater fish hanging from a tree branch, along with a creel, a rod, a landing net, and other fishing gear. "The Gun" displayed a beautiful bittern and heron, and, if I remember correctly, some other birds, also hanging from a branch, along with a gun and some old-fashioned tools (like a powder flask, etc.).
"Screens" filled with corals and sponges (Euplectellae, etc..) would be very handsome and useful. I am not sure whether I have seen any managed in this manner.
"Screens" filled with corals and sponges (Euplectellae, etc.) would be really attractive and practical. I’m not sure if I’ve seen any set up like this before.
Very handsome "screens" for the mantelpiece may be made up from owls, hawks, seagulls, and a variety of other birds. The birds being skinned out through an opening in the back, the wings and tail are cut off and spread out on a board, with fine needle points driven through their webs until the pair of wings — the butts or shoulders placed inward — assume the shape of a long oval; the tail is fully spread by the same means, and wings and tail are "wrapped" with cotton and left to dry. The head and breast are stuffed independently of these and sewn up.
Very stylish "screens" for the mantelpiece can be made from owls, hawks, seagulls, and various other birds. After skinning the birds through an opening in the back, the wings and tail are cut off and spread out on a board, with fine needle points pushed through their webs until the wings—shoulders facing inward—take on a long oval shape. The tail is fully spread using the same method, and both the wings and tail are "wrapped" in cotton and left to dry. The head and breast are separately stuffed and then sewn up.
When all is ready, a handle of about 8 in. to 10 in. long by 0.5 in. square must be turned out of ivory, ebony, or any wood desired. One end of this should be turned the full thickness of the wood for about 1.25 in. from the top, then drilled with two holes through its diameter, and a slot cut of 0.25 in. in width longitudinally for the full length of the 1.25 in. to receive a thin piece of oval shaped deal about 4 in. long by 2.5 in. broad by 0.25 in. thick, which should have a silken loop attached, and a piece of blue or other coloured silk stretched over it, and the edges of the silk tucked under the wood and attached by paste; this latter is then fixed to the handle by rivets running through the two holes previously drilled.
When everything is ready, you need to shape a handle that's about 8 to 10 inches long and 0.5 inches square out of ivory, ebony, or any wood you prefer. One end should be shaped to the full thickness of the wood for about 1.25 inches from the top, then drilled with two holes through its diameter, and a slot cut 0.25 inches wide running the entire length of the 1.25 inches to hold a thin, oval-shaped piece of wood measuring about 4 inches long, 2.5 inches wide, and 0.25 inches thick. This piece should have a silk loop attached, and a piece of blue or other colored silk stretched over it, with the edges of the silk tucked under the wood and glued down; this piece is then attached to the handle using rivets that go through the two holes you drilled earlier.
The wings and tail are now glued and pinned to the uncovered part of the thin wood, the shoulders of the wing inward, the tail radiating from the bottom. On top of these comes the body (also wired and glued) fitting in the small space left between the wings. The silk during the fixing of the wings, tail, and head, should be protected by paper pasted over all, and which can be removed when the screen is finished.
The wings and tail are now glued and pinned to the exposed part of the thin wood, with the wings angled inward and the tail extending from the bottom. On top of these, the body (also wired and glued) fits into the small space left between the wings. While securing the wings, tail, and head, the silk should be protected by a layer of paper pasted over everything, which can be removed once the screen is complete.
Screens are also made of single large birds, such as the peacock, or swan and heron; these are stuffed in the same manner as above, but instead of being attached to handles should be fixed on a shield of some fancy wood, the back of which must be polished, and made to slide up and down on an upright standard, springing from carved legs.
Screens are also made from large birds like peacocks, swans, or herons. These are stuffed in the same way as mentioned before, but instead of being attached to handles, they should be fixed to a decorative wooden shield. The back of the shield must be polished and designed to slide up and down on an upright stand that comes from carved legs.
Still more handsome screens are those intended to flank the fireplace. These are, however, ovals of glass, set in carved or gilded frames, which are made to slide up or down on a standard or upright, supported by a carved tripod. Humming birds or insects are included between the glasses of the carved oval. These screens are made of all sizes, the standard of some standing 5 ft. to 6 ft. high, the ovals being often 3 ft. by 2 ft.; but smaller ones are constantly made.
Still more attractive are the screens designed to go beside the fireplace. These are oval pieces of glass, framed in carved or gilded designs, that can slide up or down on a stand supported by a carved tripod. Hummingbirds or insects are featured between the panes of glass in the carved oval. These screens come in various sizes, with some standing between 5 and 6 feet tall, and the ovals often measuring 3 feet by 2 feet; however, smaller versions are regularly made.
JEWELLERY. — Following the example of the ladies who indirectly send expeditions to "frosty Caucasus or glowing Ind" to take tithe of animals for the sake of their skins, of birds for their plumes, and of insects for their silk, to be used in adornment, society demands that objects of natural history should not be all relegated to the forgotten shelves of dusty museums, but live as "things of beauty and joys forever." Hence the new alliance between the goldsmith and the taxidermist, resulting in a thousand ingenious combinations of nature and art — a list of a few of which may not be unacceptable as hints.
JEWELRY. — Following the example of women who indirectly send expeditions to the "frosty Caucasus or glowing India" to collect animals for their skins, birds for their feathers, and insects for their silk, all for decorative purposes, society insists that specimens of natural history shouldn’t just gather dust on shelves in forgotten museums, but should exist as "things of beauty and joys forever." Thus, the new partnership between the goldsmith and the taxidermist has led to countless creative combinations of nature and art — a list of a few of which may serve as useful suggestions.
For earrings, two leopard's claws are mounted as miniature Robin Hood bugles, the mouth and bell of each being of gold, attached to which is a chain depending by its centre from the ear-wire. Two tiger's claws placed base to base, their hooks pointing inwards, are strung and clasped with gold, thus forming the lyre of the Tragic Muse, as a brooch or ornament for the breast. Beetles, usually of the genus chrysochroa, also, are set as earrings. Humming birds' heads, their throats surrounded with a fillet of gold, form also handsome brooches. The feet of the various species of grouse and owls are capped with silver or gold (in which is set a cairngorm), the toes tipped, or the tarsus banded with silver or gold, to form clasps or brooches.
For earrings, two leopard claws are designed as tiny Robin Hood bugles, with the mouth and bell of each made of gold, and attached by a chain that hangs from the center of the ear wire. Two tiger claws placed base to base, with their hooks facing inward, are strung and fastened with gold, creating the lyre of the Tragic Muse as a brooch or ornamental piece for the chest. Beetles, usually from the chrysochroa genus, are also used as earrings. Hummingbird heads, with their throats wrapped in a band of gold, also make beautiful brooches. The feet of various grouse and owls are adorned with silver or gold (set with a cairngorm), and the toes tipped or the tarsus banded with silver or gold to create clasps or brooches.
Pins for the sterner sex are mounted up from the teeth of foxes or dogs, or more curiously of their noses even. Hares' ears are also mounted for both sexes, especially for the Scotch markets. To turn from the adornment of the person to that of the house, we find horses' hoofs mounted in silver or electro for snuff boxes, inkstands, paper weights, etc..; rams' or buffaloes' horns as Scotch "mulls" or as flower stands. Sometimes the whole head of a ram or buffalo is mounted, the horns polished, sawn in two, hinged and mounted in silver, and set with Scotch stones. Deers' heads are mounted as gas chandeliers; foxes' heads as gas brackets or as supports for Duplex lamps; monkeys, bears, ibises, owls, eagles, etc.., as "dumb-waiters" or lamp bearers.
Pins for men are made from the teeth of foxes or dogs, or even more uniquely from their noses. Hares' ears are also used for both genders, especially in the Scottish markets. Shifting from personal decoration to home embellishments, we see horses' hooves crafted in silver or electro for snuff boxes, ink stands, paperweights, etc.; rams' or buffaloes' horns used as Scottish "mulls" or flower holders. Sometimes the entire head of a ram or buffalo is mounted, with polished horns sawed in half, hinged, and set in silver, adorned with Scottish stones. Deer heads are turned into gas chandeliers; fox heads serve as gas brackets or supports for duplex lamps; monkeys, bears, ibises, owls, eagles, etc., are made into "dumb-waiters" or lamp holders.
These are a few of the uses to which mammals and birds can be put.
These are a few ways mammals and birds can be used.
Emu's eggs form also handsome goblets when sawn through and mounted in silver, or when mounted as vases for the chimney-piece, or formed into an inkstand group.
Emu eggs also make beautiful goblets when cut and set in silver, or when used as vases on the mantelpiece, or crafted into a group of inkstands.
Foxes' pads mount up as whip handles, bell pulls, and paper knives, as also do the feet of the various deer. The only satisfactory way, however, to prepare these is to slit them carefully up the back, and pull the skin away from the bone all around, leaving the skin attached to the lowest point you can skin to. Clean out all the flesh and sinews, and dress the skin with the No. 9, and the bone with No. 15, preservatives. Stuff with a little chopped tow where needed, and sew up neatly, sewing also the skin at top over the end of the bone; if done neatly, the stitches will never show. Use waxed hemp, and pull each stitch tight.
Foxes' pads can be used for things like whip handles, bell pulls, and paper knives, just like the feet of different deer. The best way to prepare them is to carefully slit them up the back and peel the skin off the bones, making sure to keep the skin attached as low as possible. Remove all the flesh and sinews, and treat the skin with No. 9 and the bone with No. 15 preservatives. Stuff a little chopped tow into areas that need it, and sew everything up neatly, making sure to stitch the skin at the top over the end of the bone; if done well, the stitches won’t be visible. Use waxed hemp and pull each stitch tight.
Game birds stuffed as "dead game" and hung in oval medallions form suitable ornaments for the billiard-room or hall if treated in an aesthetic manner. Not, however, in the manner I lately saw perpetrated by a leading London taxidermist--a game bird hanging in a prominent position, as if dead, from a nail, enclosed in an elaborate mount, the bird so beautifully sleek and smooth that, although it was hanging head downwards, not a feather was out of place! All was plastered down, and gravity and nature were utterly set at defiance. A little consideration, and a visit to the nearest poulterer's shop, would have prevented such a palpable error.
Game birds stuffed as "dead game" and hung in oval medallions make great decorations for the billiard room or hallway if done tastefully. However, not in the way I recently saw done by a well-known London taxidermist—a game bird hanging visibly from a nail, appearing dead, in a fancy display, the bird so perfectly sleek and smooth that even though it was hanging upside down, not a feather was out of place! Everything was glued down, completely ignoring gravity and nature. A little thought and a trip to the nearest butcher shop would have avoided such an obvious mistake.
Kittens or puppies of a few days old, if nicely marked, can be stuffed and mounted on a piece of marble for paper weights, or on red cloth for penwipers.
Kittens or puppies just a few days old, if they're well-marked, can be preserved and mounted on a piece of marble to be used as paperweights, or on red cloth for penwipers.
The shells of small tortoises make tobacco pouches if lined with silk, as do also the skins of the feet of albatrosses (the long bones of the wings of these birds make pipe-stems) or squirrels mounted as a whole.
The shells of small tortoises can be used to make tobacco pouches if they're lined with silk, just like the skins from the feet of albatrosses (the long bones of these birds' wings can be used for pipe stems) or whole mounted squirrels.
The shells of large tortoises make fancy baskets if the lower shell or plastron is sawn away, with the exception of the centre piece, which is left to form a handle. The shell may be lined with metal or with any other material or fabric desired.
The shells of large tortoises can be used to create decorative baskets if the lower shell or plastron is cut away, leaving the center piece intact to serve as a handle. The shell can be lined with metal or any other preferred material or fabric.
Lobster claws make up as Punchinellos, or as old men and women, or — as exhibited at the Fisheries — handles of fish-knives and forks, tops of inkstands, paper weights, etc.. The uses of ivory, either in the rough, or sawn and polished, are too manifold to notice here.
Lobster claws are used as Punchinellos, or as old men and women, or — as shown at the Fisheries — handles for fish knives and forks, tops for inkstands, paperweights, etc. The uses of ivory, whether raw or cut and polished, are too numerous to mention here.
FEATHER FLOWERS. — I have seen some splendid specimens of flowers (made from waste feathers of birds) brought from China, the Island of Ascension, and Brazil, but can give no directions for making them, further than to say that I should suppose anyone skilled in the making of such artificial flowers as are sold by the best milliners, or makers of wax flowers, would have but little difficulty in making up these beautiful objects.
FEATHER FLOWERS. — I've seen some amazing examples of flowers (made from leftover feathers from birds) brought from China, the Island of Ascension, and Brazil, but I can't provide any instructions on how to make them. I would assume that anyone who is good at making the artificial flowers sold by top milliners or wax flower creators would find it fairly easy to create these beautiful items.
This is, of course, but a précis of the various uses to which objects of natural history can be applied as means of ornament; and, indeed, so many branches are represented by this department of art that it would require a book double the size of the present, and written by experts of the various professions and trades concerned, to give a full history of the practical working of what is known as "Ornamental Taxidermy."
This is just a summary of the different ways natural history objects can be used for decoration. In fact, there are so many fields involved in this art that it would take a book twice the length of this one, written by specialists from various professions and trades, to provide a complete history of what is known as "Ornamental Taxidermy."
=======================================
Understood! Please provide the text you'd like me to modernize.
THE taxidermist will, in the course of his avocation, require to know something of various insects, their methods of capture, and how to preserve and utilise them in his profession.
The taxidermist will need to understand different insects, how to catch them, and how to preserve and use them in their work.
Of the various orders of insects, Hemiptera (earwigs, field-bugs, etc..), Orthoptera (cockroaches, grasshoppers, locusts, etc..), Diptera (flies, etc..), Neuroptera (dragon flies, May flies, Ac.), Lepidoptera (butterflies and moths), Coleoptera (beetles), and Hymenoptera (bees, wasps, and Ichneumon-flies, etc..), the Lepidoptera and Coleoptera will find most favour in his eyes, owing to their brilliancy of colouring, variety of shape and size, and easiness of manipulation.
Of the different groups of insects, Hemiptera (earwigs, field bugs, etc.), Orthoptera (cockroaches, grasshoppers, locusts, etc.), Diptera (flies, etc.), Neuroptera (dragonflies, mayflies, etc.), Lepidoptera (butterflies and moths), Coleoptera (beetles), and Hymenoptera (bees, wasps, Ichneumon flies, etc.), the Lepidoptera and Coleoptera will be the most favored due to their vibrant colors, variety of shapes and sizes, and ease of handling.
It must be remembered, however, that insects should be collected with a definite purpose by the taxidermist, and not merely for pastime, or he will degenerate into that most Odious of all created beings — a collector for the sake of collecting, or what used to be called an "exterminator." Indeed, I have known of a case in which over 1600 of the males of a certain species were caught in one day, "assembled" by the attractions of seven or eight females. These figures seem incredible, but for the fact that I myself saw part of the spoil displayed on a 12 ft. board.
It’s important to remember that insects should be collected by the taxidermist for a specific purpose, not just for fun, or else they risk becoming the most detestable of all beings — a collector for the sake of collecting, or what used to be called an "exterminator." In fact, I know of a case where over 1600 males of a certain species were caught in one day, "attracted" by seven or eight females. These numbers seem unbelievable, but I personally saw part of the catch displayed on a 12 ft. board.
Need I say that such slaughter as this is far beyond the bounds of fair collecting, and that such courses, persevered in, give the odious title of "exterminators" to all those who practise it. In this particular instance the moths were made up into "pictures," which, though ornamental perhaps for a workman's home, hardly justify the slaughter of any but the very commonest or harmful species.
Need I even mention that this kind of killing is way beyond what can be considered fair collecting, and that continuing down this path earns everyone who does it the nasty label of "exterminators"? In this case, the moths were turned into "pictures," which might look nice in a worker's home, but that doesn't justify the killing of anything other than the most common or harmful species.
The tortoiseshell, peacock, and admiral butterflies are often bred in hundreds for the purpose of making a "picture" of a snake strangling a tiger, or a crown, or the wings are cut by punches to form the petals of flowers, to be afterwards grouped under shades. All these things, though very curious, and really striking if well done, are steps in the wrong direction, and on a par with the use of humming and other birds for ladies' hats — all of which adaptations of natural history objects to commerce inexpressibly "worry" anyone with the slightest taste or feeling.
The tortoiseshell, peacock, and admiral butterflies are often bred in large numbers to create a "picture" of a snake strangling a tiger, or a crown, or their wings are cut with punches to make flower petals, which are then arranged under shades. While these creations are quite fascinating and can be really impressive if done well, they are a step in the wrong direction, similar to using hummingbirds and other birds for women's hats—these uses of natural history items for commercial purposes deeply unsettle anyone with even a hint of taste or feeling.
If a really beautiful object is wanted, in order to show a group of exotic or other insects as specimens, out of a cabinet, you may mount them in as natural a manner as possible on grasses or fine twigs, made as directed, setting them off with a few foreign ferns, and inclosing the whole in a "mount," to hang up, or in a narrow oval shade with carved oak or other stand; or they may be scientifically and artistically mounted, to show the life-history of any one species, by arranging the larvae feeding on a properly modelled representation of its natural food-plant, the imagines, male and female, with some few striking varieties, shown at rest or flying, as also the eggs and the pupa-case, with a description of their economy affixed. A few specimens of families or genera of insects shown thus is, to my mind, of far greater importance, especially to museums, than mere "collectors" are aware of.
If you want to display a really beautiful object featuring a group of exotic or other insects as specimens outside of a cabinet, you can arrange them as naturally as possible on grasses or fine twigs, as directed. Enhance the display with a few foreign ferns and enclose the entire arrangement in a "mount" for hanging or in a narrow oval frame with a carved oak or other stand. Alternatively, you can create a scientific and artistic display that illustrates the life cycle of a specific species by arranging the larvae feeding on a well-modeled representation of their natural food plant, alongside the adult males and females, with some striking varieties shown either at rest or in flight, as well as the eggs and pupa case, accompanied by a description of their life cycle. In my opinion, displaying a few specimens from various families or genera of insects in this way holds much greater importance, especially for museums, than mere "collectors" realize.
Many works have been written on the collecting and preserving of these orders, and especially of the Lepidoptera, vide Dr. Guard Knagg's work on "Collecting Lepidoptera," Rev. Joseph Greene's "Insect Hunter's Companion," and many others, including a little work on "Collecting Butterflies and Moths" by myself.
Many books have been written about collecting and preserving these orders, especially Lepidoptera. See Dr. Guard Knagg's work on "Collecting Lepidoptera," Rev. Joseph Greene's "Insect Hunter's Companion," and several others, including a short book on "Collecting Butterflies and Moths" by me.
Cruelty has been advanced as a crime specially to be laid to the charge of the student in entomology; but some of the greatest workers in that science have been ladies and clergymen, as also laymen of the most humane and advanced scientific principles. A vast amount of ignorant ideas, carefully nursed, are used as weapons against the entomologist — the pet one of which is, that impalement of a living insect through the head constitutes the sole aim and end of the collector.
Cruelty has been claimed as a crime specifically attributed to students of entomology; however, some of the most prominent figures in this field have been women and clergymen, as well as laypeople with the most compassionate and progressive scientific beliefs. A lot of misguided ideas, carefully perpetuated, are used as arguments against entomologists — with the favorite being that impaling a live insect through the head is the only goal of the collector.
The fact is curiously inverse of this, for not only are insects captured for purposes of study, but they are never impaled alive but by a very ignorant or careless person. The lepidoptera (butterflies especially) are very easy to kill, the simplest plan being to press the thorax underneath the wing with the finger and thumb, which instantly causes death. This is now superseded by the cyanide bottle, of which anon.
The reality is quite the opposite, as not only are insects collected for study, but they are never tortured alive except by someone very ignorant or careless. Butterflies, in particular, are very easy to kill; the simplest method is to press down on the thorax under the wing with your fingers, which causes instant death. This method has now been replaced by the use of a cyanide bottle, which will be discussed later.
It is singular how many people there are, even in the middle class, who fail to recognise the fact that the egg (ovum) produces the caterpillar or "grub" (larva), which, after a due season of preparation, produces the chrysalis (pupa), which latter, lying quiescent for a variable period, either in the ground or in other situations favourable for its development, changes the last time to the perfect insect (imago). This latter, if a butterfly or moth, does not, as some people imagine, grow, but after it has unfolded its wings on emergence to their full extent, it never becomes either larger or smaller.
It's interesting how many people, even in the middle class, fail to recognize that the egg (ovum) creates the caterpillar or "grub" (larva), which, after a period of preparation, becomes the chrysalis (pupa). This chrysalis, lying dormant for a varying amount of time, either in the ground or in other favorable places for its development, eventually transforms into the perfect insect (imago). This insect, whether a butterfly or moth, does not grow, as some believe; once it has spread its wings fully after emerging, it never becomes larger or smaller.
An insect, especially a butterfly, when seen by a youngster, is usually chased in the most reckless fashion — jacket and cap, and even sticks and stones, are pressed into the service, and the unfortunate insect is usually a wreck before its fortunate (?) captor falls on top of it.
An insect, especially a butterfly, when spotted by a child, is often pursued in a wildly reckless way — jackets and caps, even sticks and stones, are put to use, and the poor insect is usually destroyed before its lucky (?) catcher lands on top of it.
I shall endeavour in the following pages to show the proper way in which to collect and preserve insects, especially the lepidoptera and coleoptera.
I will try in the following pages to show the right way to collect and preserve insects, especially butterflies and beetles.
NETS. — The first thing to be considered is, how to catch your game. This is managed by a "net," not of the construction of those mentioned in Chapter II., but made of a lighter material. They are of various shapes, the professional, or old English pattern, being something of the construction of a "bat-folding" net. It is, in my opinion, a most unsportsmanlike weapon, rapidly going out of date — if not deceased already — and is fitly replaced by the Continental, or "ring"-net, which is now generally used. However, it may, perhaps, be necessary to describe how to make this machine or clap-net — fit only for dealers or exterminators.
NETS. — The first thing to consider is how to catch your game. This is done with a "net," but not the kind mentioned in Chapter II; it's made of a lighter material. They come in various shapes, with the professional or old English style resembling a "bat-folding" net. In my opinion, it’s a very unsportsmanlike tool, quickly becoming outdated — if it hasn't already vanished — and it's justly being replaced by the Continental, or "ring"-net, which is now commonly used. However, it might still be necessary to explain how to make this contraption or clap-net — suitable only for dealers or pest controllers.
Procure two pieces of ash (or beech, as being the lighter wood), each of about 5 ft. in length. With a plane or spokeshave round these up until they taper from 1 in. diameter at bottom to little less than 0.5 in. at top. Now saw each rod into four pieces of 15 in. long, or, for greater strength, but less portability, into three 20 in. pieces. Ferrule these in the manner of fishing-rods, so that each rod joins up to its normal length of 5 ft. At the top of each rod fix a specially-made ferrule, bent or brazed to about the angle of 45 deg.
Get two pieces of ash (or beech, since it's lighter wood), each about 5 feet long. Use a plane or spokeshave to shape them until they taper from 1 inch in diameter at the bottom to just under 0.5 inches at the top. Now cut each rod into four pieces that are 15 inches long, or for better strength but less portability, into three pieces that are 20 inches long. Ferrule these like fishing rods, so each rod can join up to its normal length of 5 feet. At the top of each rod, attach a specially made ferrule, bent or brazed to about a 45-degree angle.
Next get two pieces of cane, each 15 in. in length, and of sufficient diameter to fit tightly into the bent angle of the top piece; bore the top ends of these canes and tie them loosely together. If the rods with canes attached are now laid down, with the ends of the canes pointing inwards, it will be seen that they assume somewhat the shape of the gable-end of a house, which would fold in on itself by means of the cord acting as a hinge.
Next, take two pieces of cane, each 15 inches long, and thick enough to fit snugly into the bent angle of the top piece; drill holes at the top ends of these canes and loosely tie them together. If you lay the rods with the canes attached down, with the ends of the canes pointing inward, you'll notice that they take on a shape similar to the gable end of a house, which can fold in on itself with the cord acting as a hinge.
Now get some stout black holland, which sew all round the rods to within 6 in. of the ends of the bottom joints, so as to fit loosely to allow them to be inserted or withdrawn at pleasure. When the cane ends are tied together, cut a hole on the top of the holland, so that you may be enabled to untie them when required. This hole, for greater neatness and strength, should be "button-holed" around. To this framework of holland attach at the bottom some strong black tape, which pass through the holes previously bored in the last joints of the rods within 6 in. of their ends. This prevents the net slipping either up or off when in use.
Now get some sturdy black fabric and sew it all around the rods, leaving about 6 inches from the ends of the bottom joints, so it fits loosely enough to be inserted or removed easily. Once you tie the cane ends together, cut a hole in the top of the fabric so you can untie them when needed. To keep it neat and strong, you should "buttonhole" the edges of this hole. Attach some strong black tape to the bottom of this fabric framework, threading it through the holes you previously drilled in the last joints of the rods, leaving about 6 inches from their ends. This will stop the net from slipping up or coming off while in use.
The material of the net itself is the next consideration. This is of "leno," a cheap kind of strong gauze. Procure as many yards of this as will make a loose bag when sewn on and around the framework of holland, when the net-rods are folded together; bagging especially at the bottom part, so as to fall down some inches when the net is held up.
The next thing to think about is the material of the net itself. It’s made of “leno,” an inexpensive, strong gauze. Get as many yards of this as you need to create a loose bag when it’s sewn on and around the frame of holland, especially when the net rods are folded together; make sure the bag hangs a bit at the bottom so that it drops down several inches when the net is lifted.
You have now a portable bag, or "clap-net," of over 5 ft. high by 2 ft. 6 in. or more wide. To use this machine, you simply stretch it to its full extent and run out in front of any insect you wish to stop, clapping it smartly together and securing your captive in the bag formed when the net is shut. Some little practice is needed to do this neatly, especially with such dashing, fast-flying moths as the "Emperor," or "Bee Hawks." Laying down the net, and confining the insect to one part, is the best way to get it out uninjured. To take this net to pieces, the tapes at the bottom and the cords at the top require only to be loosened, when the rods can be drawn out, unjointed, and slipped into a bag or a pocket specially sewn in the breast of the coat to receive them.
You now have a portable bag, or "clap-net," that’s over 5 feet tall and 2 feet 6 inches wide or more. To use this device, just stretch it out to its full length and run in front of any insect you want to catch, clapping it quickly together to trap your catch in the bag formed when the net is closed. It takes a little practice to do this neatly, especially with quick, fast-flying moths like the "Emperor" or "Bee Hawks." Laying down the net and keeping the insect in one area is the best way to get it out without harming it. To take this net apart, just loosen the tapes at the bottom and the cords at the top, and then you can pull out the rods, disassemble them, and slip them into a bag or a specially sewn pocket in the breast of your coat designed for this purpose.
When portability is not a desideratum, the rods may be easily made of green hazel (or nut tree) wands, bent and secured into shape and dried in the sun, or up a chimney, or otherwise a strong cane may be steamed (or boiled) and dried in like manner; few people, I opine, however, care to carry out from a town two long roughly-shaped rods of 5 ft. or 6 ft. long in this clumsy fashion.
When portability isn’t a priority, you can easily make the rods from green hazel (or nut tree) branches, bending and securing them into shape, then drying them in the sun, up a chimney, or using similar methods. Alternatively, a sturdy cane can be steamed (or boiled) and dried the same way. However, I believe few people want to leave a town carrying two long, roughly-shaped rods that are 5 to 6 feet long in such a cumbersome way.
I did not wish to describe this net at all, as it is, in my opinion, a most unsportsmanlike or un-entomological weapon, as nothing can escape it. Indeed, a friend of mine not inaptly describes it as the "gobbler; " and it does really "gobble" up any insect it is used against.
I did not want to describe this net at all, since I think it's a really unsportsmanlike or anti-entomological tool, as nothing can get away from it. In fact, a friend of mine aptly calls it the "gobbler," and it really does "gobble" up any insect it’s used on.
The continental or ring net is now generally used. For one variety a tin or brass Y is made, into the bottom arm of which a stick fits. The spreading arms serve to hold a cane, which is bent round, and each end thrust in. A net of gauze or leno, is attached. My objection to this net is that the cane often slips out of the arms of the Y, which latter also breaks at the junction; added to which it takes up a great deal of room, not being very easily doubled without the risk of breaking. The points which a net should possess in perfection are — first, strength; secondly, portability; and, thirdly, adaptability to more than one use. I shall endeavour to show by the next two figures my ideas of a perfect net.
The continental or ring net is now commonly used. For one version, a tin or brass Y is made, into which a stick fits at the bottom arm. The spreading arms hold a cane, which is bent around, with each end pushed in. A net made of gauze or leno is attached. My issue with this net is that the cane often slips out of the Y's arms, which also tends to break at the joint; plus, it takes up a lot of space and isn't very easy to fold without the risk of breaking. The qualities a net should ideally have are—first, strength; second, portability; and third, adaptability for multiple uses. I will try to illustrate my ideas of a perfect net in the next two figures.
 Fig. 41
Fig. 41 shows a strong and easily made net. To make this, procure some brass wire, gauge No. 8 or 9. Cut from the ring of wire sufficient to form a net a foot in diameter, allowing enough in addition for two short arms. Cut off about 3 ft. 8 in., which will allow for joints; divide this so that one half is about an inch and a half longer than the other; make one end of the longest piece into a small loop, cranking it at the bottom, as shown at C; one end of the other piece is then thrust through the loop at A, turned round, and beaten down, forming as it were two links of a chain; this acts as a hinge, and allows the net to be doubled. The other end is then cranked, as shown at B, but shorter than the arm C.
Fig. 41 shows a strong and easy-to-make net. To create this, get some brass wire, gauge No. 8 or 9. Cut enough wire from the roll to form a net that’s a foot in diameter, adding extra for two short arms. Cut about 3 ft. 8 in., which will account for joints; split this so that one half is about an inch and a half longer than the other. Make a small loop at one end of the longer piece, cranking it at the bottom, as shown at C; then take one end of the other piece, push it through the loop at A, turn it around, and flatten it down, creating what looks like two links of a chain. This acts as a hinge, making it possible for the net to be folded. The other end is then cranked, as shown at B, but shorter than the arm C.
Next procure sufficient of the material known as black "holland," which sew all round the ring of the net in such a manner that it does not interfere with the working of the hinge. For this purpose a strip of about 2 in. wide will be enough, which, doubled over and hemmed at the bottom, allows sufficient for the net — a bag made of the material called "leno" — to be subsequently affixed. About a yard of "leno" suffices for the bag, and the pieces which come off the bottom during the operation of rounding it, form "gussets" to fill the net in up to the point where the arms B and C first spring.
Next, get enough of the material called black "holland" to sew all around the ring of the net in a way that doesn't interfere with how the hinge works. For this, a strip about 2 inches wide will be enough. If you fold it over and hem the bottom, it will be sufficient for the net—a bag made from the material called "leno"—to be attached later. About a yard of "leno" is enough for the bag, and the pieces that come off the bottom while rounding it will form "gussets" to fill the net up to where the arms B and C first extend.
To fit this net ready for use, get an ordinary walking-stick, a portion of which is shown at A (Fig. 42), in which bore two holes, one on each side, to receive the little returns shown at B and C (Fig. 41), and at such a distance from the top of the stick as is determined by the length of the arms. With a 0.125 in. gouge or chisel, groove out the wood from these holes to the end of the stick, until the arms of the net just, "bed" up level with the surface.
To prepare this net for use, take a regular walking stick, a part of which is shown at A (Fig. 42), and make two holes, one on each side, to hold the small returns shown at B and C (Fig. 41). Position these holes based on how long the arms are. Using a 0.125 in. gouge or chisel, carve out the wood from these holes to the end of the stick until the arms of the net are just even with the surface.
The arms being nicely adjusted, remove the net temporarily from the stick. Next procure a piece of brass tube from 2 in. to 2.5 in. long, and of sufficient diameter to slip from the point of the stick until it passes the last hole (a 0.625 or 0.75 in. diameter will be found a generally suitable size). On the extreme point of the stick affix an ordinary walking-stick ferrule of such a size and thickness as not to allow the tube to slip off. To fix the net, slip the tube up the stick past the last hole, and placing the little cranks, B and Q in their proper holes, the remainder of the arms properly "bedded" in the grooves, slide the tube D (Fig. 41) up to the point of the stick, as shown in Fig. 42, and the net is thus effectually locked and ready for use.
The arms being nicely adjusted, temporarily remove the net from the stick. Next, get a piece of brass tube about 2 to 2.5 inches long, with a diameter that fits over the point of the stick until it goes past the last hole (a diameter of 0.625 or 0.75 inches is generally a suitable size). At the very end of the stick, attach a standard walking-stick ferrule that’s sized and thick enough to keep the tube from slipping off. To attach the net, slide the tube up the stick past the last hole, insert the small cranks, B and Q, in their correct holes, making sure the rest of the arms are properly "bedded" in the grooves. Then, slide the tube D (Fig. 41) up to the tip of the stick, as shown in Fig. 42, and the net will be securely locked and ready for use.
 Fig. 42
I claim for this net the following advantages: That it is the most easily made, the strongest, and the most easily taken down of any net known; added to which its joint A, which does not in the least weaken the frame, allows it to be folded in half the space taken up by the "ring net" or the ordinary "landing net" arrangement. (Note for fishermen: Landing nets, formed as Fig. 41, I have found very useful, as they take up less room in the fishing basket, and are quite as quickly put together as by the screw and socket arrangement.)
I claim the following advantages for this net: it's the easiest to make, the strongest, and the easiest to take down compared to any other net out there. Plus, its joint A, which doesn’t weaken the frame at all, allows it to be folded up to half the space that the "ring net" or the standard "landing net" setup uses. (Note for fishermen: I’ve found that landing nets shaped like Fig. 41 are very useful because they take up less space in the fishing basket and can be put together just as quickly as the screw and socket setup.)
Larger nets than are generally used in this country will of course be necessary when collecting such insects as form the genus Ornithoptera or Morpho. For collecting abroad no net will be found more serviceable than a large and strong one, made as Fig. 41; and really when you have five large papilios in your net at one time, as I once had, you require one a little out of the common. A short handle to the net will be found more useful than a long one for collecting some insects, but a brass telescopic handle can be easily made by any gasfitter, and used either long or short as expediency directs.
Larger nets than what are typically used in this country will definitely be necessary when collecting insects from the genus Ornithoptera or Morpho. When collecting abroad, you won’t find a net more useful than a large and sturdy one, like the one shown in Fig. 41; and really, when you have five large papilios in your net at once, as I once did, you need something a bit more special. A short handle for the net is more practical than a long one for catching certain insects, but a brass telescopic handle can easily be made by any gasfitter, allowing you to use it either long or short based on what you need.
The next figure shows apparently a more elaborate looking net. The only other one known to me which folds in four, folds by means of the rule joint, and is somewhat objectionable, inasmuch as it must either be made of unnecessarily thick and cumbersome wire, to stand the strain, or if made, as it should be, of the proper sized wire and of light construction, it is sure to break out at one or the other of the joints. Experience having proved this, I devised the net shown in Fig. 43, which, in compliment to a gentleman who gave me a hint with regard to the slide, I have called the "Hill Sliding Net." This slide allows the net to be folded to just half the size of the preceding one, making it, therefore, highly convenient to carry.
The next figure presents what appears to be a more complex net. The only other one I'm aware of that folds in four does so using a rule joint, which is somewhat problematic because it has to be made from either unnecessarily thick and heavy wire to handle the strain or, if made from the right size wire and designed to be lightweight, it’s likely to break at one of the joints. Based on this experience, I created the net shown in Fig. 43, which I've named the "Hill Sliding Net" in honor of a gentleman who suggested the slide to me. This slide allows the net to fold to just half the size of the previous one, making it much more convenient to carry.
 Fig. 43 —
The "Hill sliding net," open.
Fig. 43 —
The "Hill sliding net," open. Fig. 44 —
The "Hill sliding net," closed.
Fig. 44 —
The "Hill sliding net," closed.This net frame is, I fear, beyond the power of the amateur to make for himself, being really a brazier's job. A A A A are four pieces of wire of the same thickness as used for the preceding net. The two top pieces are flattened out at the top and each one drilled with a hole, b b. At e e e e are little brass tubes, brazed to the arms, which allow each arm to slide down on the other. When these are brazed and fitted to slide they are fixed to the tube D by smaller tubes, one on each side, in this manner. At f the arm is brought across the tube and permanently fixed in the smaller tube. At g the other arm is brought across in the same manner, but allowed to revolve in the small tube brazed to the side of D; the end of this am (on the right of Fig. 43) coming through the tube is coiled round and brazed to a screw, H, fixed in such a manner that, though screwing freely through a burr fixed on D, it cannot come out.
This net frame is, I fear, beyond what an amateur can make for himself; it's really a job for a brazier. A A A A consists of four pieces of wire that are the same thickness as the previous net. The two top pieces are flattened at the ends and each one is drilled with a hole, b b. At e e e e, there are small brass tubes brazed to the arms, allowing each arm to slide over the other. Once these are brazed and set up to slide, they are attached to the tube D with smaller tubes, one on each side, like this. At f, the arm is brought across the tube and securely fixed in the smaller tube. At g, the other arm is brought across in the same way, but is allowed to rotate in the small tube brazed to the side of D; the end of this arm (on the right of Fig. 43) goes through the tube and is coiled around and brazed to a screw, H, which is set up so that while it can screw freely through a burr fixed on D, it cannot be removed.
There are then no loose pieces to this net, which, from the nature of the slides, is remarkably strong, and is easily opened and shut. (Fig. 44 shows the net folded, and with the arms slid down one on the other.) To finish, tie a piece of whipcord in the holes from b to b, and sew the holland all around the net as before, leaving plenty of room for the playing of the slides; the "leno" is then sewn to this in the usual manner, and thus becomes a fixture, as in the preceding net.
There are no loose parts in this net, which, due to the design of the slides, is really strong and is easy to open and close. (Fig. 44 shows the net folded, with the arms slid down one on top of the other.) To finish, tie a piece of whipcord in the holes from b to b, and sew the fabric all around the net as before, leaving enough space for the slides to work; the "leno" is then sewn to this in the usual way, making it a permanent part like in the previous net.
To open and fix the net from the position shown in Fig. 44 (which for the sake of clearness is shown without the "leno "), pull the whipcord C (now hidden, of course, by the holland) and ease up the slides; bend over the revolving arm until the screw H comes over the hole in the burr on D. Push the walking stick A (Fig. 45) into the tube D, and screw up H, the point of which enters the stick, and firmly fixes and locks the net. Fig. 45 shows the net ready for use.
To open and fix the net from the position shown in Fig. 44 (which is shown without the "leno" for clarity), pull the whipcord C (which is currently hidden by the holland) and loosen the slides; bend over the revolving arm until the screw H lines up with the hole in the burr on D. Insert the walking stick A (Fig. 45) into the tube D, then tighten H, which will pierce the stick and securely lock the net in place. Fig. 45 shows the net ready for use.
The arrangement of the whipcord at C is to enable the net to be used as a "sugaring" net in addition to its ordinary use for catching; C being pressed against a tree, the corner of a wall, a fence, or a gas lamp, etc.., readily accommodates itself to any angle required.
The setup of the whipcord at C allows the net to function as a "sugaring" net alongside its regular purpose for catching; when C is pressed against a tree, a wall corner, a fence, or a gas lamp, etc., it easily adjusts to any angle needed.
A useful net for sugaring purposes, if Fig. 45 is not used, is one recommended by Dr. Guard Knaggs. It is of triangular shape, the frame of it being formed by socketing two pieces of paragon wire into a metal Y piece, and connecting their diverging extremities by means of catgut, which, when pressed against a tree or other object, will adapt itself to the outline of it, as shown below by the dotted line (Fig. 46).
A helpful net for sugaring, if Fig. 45 isn't used, is one suggested by Dr. Guard Knaggs. It's triangular in shape, with the frame made by socketing two pieces of paragon wire into a metal Y piece and connecting their diverging ends with catgut. When pressed against a tree or other object, it will adjust to its outline, as shown by the dotted line below (Fig. 46).
Killing Insects. — Having caught your butterfly, you will wish to kill it in the most painless and least troublesome manner. For this purpose you will require a "cyanide bottle." Purchase, therefore, at the druggist's a wide-mouthed bottle (a 4 oz. bottle is a handy size for the pocket, but you will require larger sizes for certain uses). Into this bottle put from an ounce to an ounce and a half of pure cyanide of potassium, in lumps, not pounded (a deadly poison), which you will completely cover with a layer of plaster of Paris, mixed to the consistence of paste. The bottle may be corked, have a screw top, or glass stopper, according to your fancy. A glass stopper is, of course, the safest to confine the deadly vapour given off, but in point of convenience, and especially for outdoor work, nothing can surpass a well-fitting cork — rising sufficiently high above the mouth of the bottle to afford a good grip. As the plaster is setting it should be well shaken down to insure an even surface, and afterwards a piece of wool or blotting-paper should be put into the bottle to absorb any superfluous moisture. In the course of a day, the plaster will be dry and ready for use. [Footnote: A piece or pieces of blotting-paper cut to fit will be found very handy to introduce into the bottle from time to time to absorb all moisture, and to keep the specimens themselves mean and dry.]
Killing Insects. — Once you've caught your butterfly, you'll want to kill it in the most painless and least stressful way possible. For this, you'll need a "cyanide bottle." So, head over to the drugstore and buy a wide-mouthed bottle (a 4 oz. bottle is a good size for your pocket, but you might need larger ones for certain situations). Into this bottle, put from one ounce to one and a half ounces of pure potassium cyanide, in lumps, not powdered (this is a deadly poison), and completely cover it with a layer of plaster of Paris mixed to a paste-like consistency. You can cork the bottle, use a screw top, or a glass stopper, depending on your preference. A glass stopper is definitely the safest option to contain the toxic fumes, but for convenience—especially when outdoors—nothing beats a well-fitting cork that extends high enough above the bottle's mouth for a good grip. While the plaster sets, make sure to shake it down well to create an even surface, and afterwards, add a piece of wool or blotting paper into the bottle to absorb any excess moisture. After a day, the plaster will be dry and ready for use. [Footnote: Cut pieces of blotting paper to fit inside the bottle; they'll be really useful to soak up moisture from time to time and keep your specimens mean and dry.]
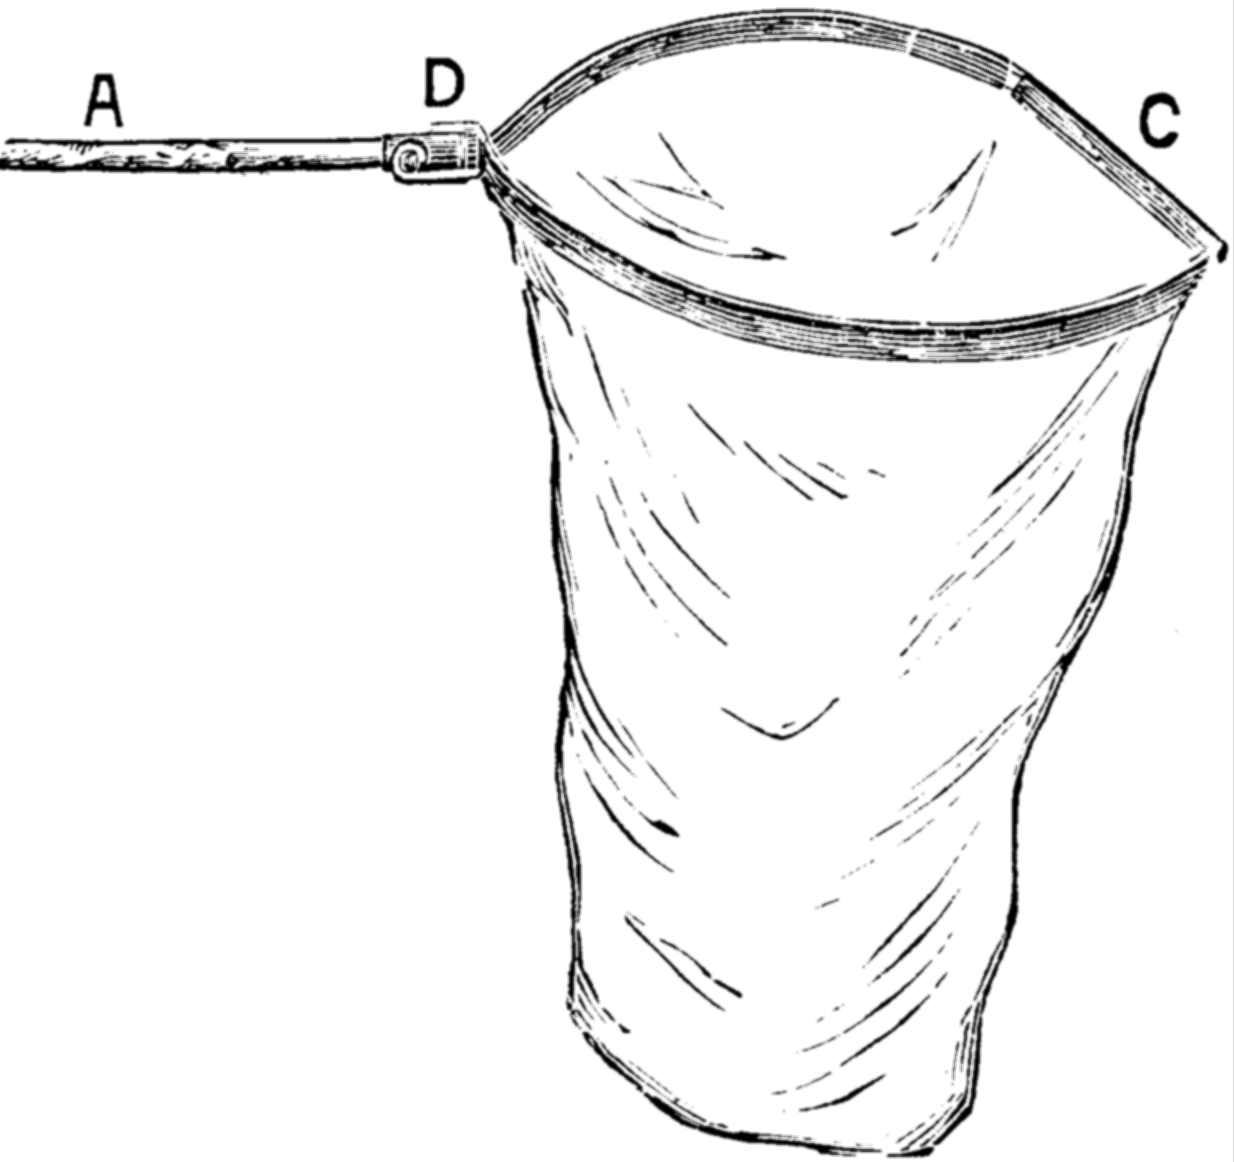 Fig. 45

The insect being captured, you twist your net rapidly over to get it as near to the bottom as possible — a very necessary precaution in the case of a swift-flying or excitable insect. Holding the net now in the left hand, take the bottle, previously uncorked, in your right hand and slip it into the net and over the insect. In case of refractory insects, blowing from the outside will sometimes make them go to the bottom of the bottle. When this happens, you can slip your hand from the outside over the mouth of the bottle, and hold it there until the insect is corked up. In less than a minute it is stupefied and motionless. If taken out, however, it will revive; it must be left in, therefore, from ten to fifteen minutes. In the case of female insects which have not yet deposited their eggs, and are consequently exceedingly tenacious of life, a longer time will be found necessary.
When you catch the insect, quickly twist your net to get it as close to the bottom as possible—this is really important for fast-flying or jumpy insects. Now, holding the net in your left hand, take the already uncorked bottle in your right hand and slide it into the net over the insect. For stubborn insects, blowing from the outside can sometimes make them move to the bottom of the bottle. When that happens, you can place your hand over the mouth of the bottle from the outside and hold it there until the insect is corked inside. In less than a minute, it will be dazed and still. However, if you take it out, it will wake up; so, you have to leave it in for about ten to fifteen minutes. For female insects that haven't laid their eggs yet and are therefore very resistant to dying, you'll need to wait even longer.
Bruised laurel leaves, chloroform, benzol, etc.., are recommended by some authors. The first is, I think, uncertain in its effects, and has, perhaps, a tendency to make the insects go ultimately mouldy. The second stiffens the wing rays of some insects to such an extent as to render them difficult to set. It has been recommended in the case of large insects, such as the hawk moths, to pierce them underneath the thorax at the insertion of the first and second pairs of wings with a steel pen dipped in a saturated solution of oxalic acid. I have frequently done this myself with good results in the days when cyanide bottles were unknown, but for the largest hawk moths -- "Death's heads" even — I find nothing to beat a large bottle (a glass jar, such as the French bottle plums in, does admirably), in which is placed about 0.25 lb. of cyanide. With a killing jar of this kind, which I call the "home" bottle, I have frequently instantaneously killed mice and even rats. In fact, the volume of poisonous vapour evolved from one of these bottles is such, that I advise my readers not to take "sniffs" therefrom, lest severe headaches, or worse results, should follow.
Bruised laurel leaves, chloroform, benzene, etc., are suggested by some authors. I think the effects of the first are uncertain, and it might make the insects go moldy in the end. The second stiffens some insects' wing rays to the point that it's hard to set them. For larger insects, like hawk moths, it’s recommended to pierce them underneath the thorax at the point where the first and second pairs of wings attach with a steel pen dipped in a saturated solution of oxalic acid. I’ve done this myself with good results back when cyanide bottles weren’t available, but for the biggest hawk moths—even “Death’s heads”—nothing beats a large bottle (a glass jar, such as the ones French plums come in, works perfectly), with about 0.25 lb. of cyanide inside. With this type of killing jar, which I refer to as the “home” bottle, I've often killed mice and even rats instantly. In fact, the amount of poisonous vapor released from one of these bottles is so strong that I recommend my readers not to take "sniffs" from it, or they might end up with severe headaches or worse.
As it is nearly all but impossible to pin an insect so correctly as you would wish during the hurry and excitement of butterfly hunting, I recommend that all insects captured when the collector is from home be laid on their sides, and the pin passed through the body whilst in that position. This saves the unnecessary marking of the thorax by more than one pin hole, as the pin can be removed without detriment to the formation of the body, and the insect pinned in its proper position when the collector reaches home.
As it’s almost impossible to pin an insect perfectly while you’re in the rush and excitement of butterfly hunting, I suggest that all insects collected away from home be placed on their sides, and the pin should go through the body in that position. This prevents unnecessary damage to the thorax from multiple pin holes since the pin can be taken out without hurting the body’s shape, allowing the insect to be pinned correctly when you get back home.
SETTING. — Having brought the entomologist to this point, I may discuss what to do to preserve the trophies of the day's chase. First, then, the insects must be "set." To do this properly is the vexata quaestio of the day. As a nation we anciently practised the "setting" of lepidoptera with four or eight braces, two or one underneath and two or one on top of the wings. The wings were then not so fully extended as now, but the body was pressed as close to the setting board as it was possible to get it. The next step was the cork setting board, cut to show in section nearly a half oval, the bodies were a little raised from the set, and the rounded points of the fore and hind wings invariably touched the paper of the cabinet when placed therein, curling up wherever they touched.
SETTING. — Having brought the entomologist to this point, I can discuss how to preserve the trophies from the day's hunt. First, the insects must be "set." Doing this properly is the vexata quaestio of the day. Historically, we practiced the "setting" of butterflies with four or eight supports, two or one underneath and two or one on top of the wings. The wings were not as fully extended as they are now, but the body was pressed as close to the setting board as possible. The next step was using a cork setting board, cut to show a nearly half oval shape in section. The bodies were slightly raised from the set, and the rounded points of the fore and hind wings always touched the paper in the cabinet when placed inside, curling up wherever they made contact.
 Fig. 47 —
Section of "Setting Board"
Fig. 47 —
Section of "Setting Board"Fig. 47 shows a section of a "setting board" designed to remedy this evil. The block A is formed of a piece of 0.75 in. deal, 12 in. to 14 in. long, and of varying widths according to the insects required to be set. Exactly in the centre a groove is "ploughed" to the depth of 0.5 in.; from the outer edges of this groove B the board should be "pitched" or "bevelled" 0.125 in. on each side to its outer edge. On top of each half, a piece of 0.125 in. cabinet cork C C is glued, and also in the groove B, where shown at C.
Fig. 47 shows a section of a "setting board" created to address this issue. The block A is made from a piece of 0.75 in. wood, 12 in. to 14 in. long, and its width varies based on the insects that need to be set. Right in the center, a groove is cut to a depth of 0.5 in.; from the outer edges of this groove B, the board should be angled or sloped by 0.125 in. on each side to its outer edge. On the top of each half, a piece of 0.125 in. cabinet cork C C is glued, and also in the groove B, where it is indicated at C.
Presuming that you have a "Red Admiral" to set with l.125 in. or a No. 13 pin, you will find, if allowing 0.125 in. for the body, that after setting an insect in a board of this kind the matter will be pretty evenly adjusted — that is to say, about 0.5 in. of pin above and below the butterfly. This allows the insect when placed in the cabinet to be well clear of the paper, and is the mode now generally adopted by those entomologists who effect a compromise between the ridiculous English low setting and the Continental "high-set." What the real objections are to this latter setting it has always puzzled me to discover, unless it is the true British objection to anything foreign or "French."
Assuming you have a "Red Admiral" to set with a 1.25-inch pin or a No. 13 pin, you'll find that if you allow for 0.125 inches for the body, after setting an insect in a board like this, it will be fairly well balanced — specifically, about 0.5 inches of pin above and below the butterfly. This ensures that when the insect is placed in the cabinet, it is well above the paper, which is the method that most entomologists now use to balance the overly low English setting with the Continental "high-set." I've always been puzzled by the real objections to this latter setting, unless it's just the typical British aversion to anything foreign or "French."
In a foreign Camberwell Beauty (Vanessa Antiopa) which I have just measured, the relative proportions are as follow: The whole length of the pin is 1.5 in., it comes through the body on the underside 0.875 in., whilst above the body it shows but a little more than 0.25 in. Its advantages are manifest. First, it brings the insects much nearer the eye when placed in the cabinet. Secondly, by its position the body is prevented from greasing the paper of the cabinet (a not unimportant item when the reader is told that the white velvet of a newly-lined cabinet drawer has been utterly ruined by the grease from the bodies of low-set insects). Thirdly, the almost total immunity from "mites" which high-set insects enjoy.
In a foreign Camberwell Beauty (Vanessa Antiopa) that I just measured, the proportions are as follows: The total length of the pin is 1.5 inches; it goes through the body on the underside at 0.875 inches, while above the body it shows just a bit over 0.25 inches. Its benefits are clear. First, it brings the insects much closer to the eye when displayed in the cabinet. Second, its position prevents the body from staining the cabinet's paper, which is important to note since the white velvet of a newly-lined cabinet drawer has been completely ruined by grease from low-set insects. Third, high-set insects have almost complete immunity from "mites."
This last consideration ought to induce our entomologists to adopt the Continental set nem. con. For what entomologist dare tell me that he has no mites in his cabinet? Is it the user of camphor, of creosote, of phenic acid, or of corrosive sublimate? Why, then, this foolish prejudice against the high-set? I have tried both plans, low setting for fifteen, and high setting for ten years. I have, as an experiment, mixed high-set insects in with low-set "exchanges." The brown dust underneath the latter tells their tale too well. In a box of foreign high-set insects which I have had by themselves for four or five years little or no trace of the destroyer is to be seen.
This last point should encourage our entomologists to adopt the Continental set nem. con. What entomologist would claim he has no mites in his collection? Is it the person who uses camphor, creosote, phenic acid, or corrosive sublimate? Then why the silly bias against the high-set? I've tried both methods: low setting for fifteen years and high setting for ten years. As an experiment, I've mixed high-set insects with low-set "exchanges." The brown dust under the latter tells the story all too clearly. In a box of foreign high-set insects that I've kept separate for four or five years, there's barely any sign of the pest.
Reform your "setting boards," then, say I; plough your grooves deeper, and if you object to the flat appearance of the foreign set insects, there is no earthly reason why you should not "pitch" your boards to the angle I show in Fig. 47, or to any other angle you desire. The objection to this "high-set" lies in a nutshell: it looks "odd" to one accustomed to the English method, and that is really all to be advanced against its general use.
Rearrange your "setting boards," I suggest; make your grooves deeper, and if you don’t like how the foreign insects appear flat, there’s no reason you can’t position your boards at the angle I show in Fig. 47, or any other angle you want. The only downside to this "high-set" is simple: it looks "odd" to someone used to the English method, and that’s really all there is against its widespread use.
Let me, therefore, ask my brother entomologists to give the "high-set" a fair trial, and not to be deterred by the sneers of any novice. It may strengthen my pleading and terminate the hesitation of the young entomologist if I mention here that the officer in charge of the collection of lepidoptera in the British Museum — the well-known authority, A. G. Butler, F.L.S., etc.. — is not only setting all newly-received butterflies and moths in precisely the fashion advocated above, but is actually re-setting all the old "low-set" insects in the same manner!
Let me, therefore, ask my fellow entomologists to give the "high-set" approach a fair chance and not be discouraged by the mockery of any beginner. It might reinforce my argument and help the young entomologists feel more confident if I mention that the person responsible for the lepidoptera collection at the British Museum — the well-known expert, A. G. Butler, F.L.S., etc. — is not only arranging all newly received butterflies and moths exactly as recommended above, but is also re-arranging all the old "low-set" specimens in the same way!
Whilst on the subject of foreign insects I should like to impress upon the young beginner not too greedily to rush after "real British" specimens of rarities, or he may find that he has purchased, at the expense of some pounds, perhaps, a reset continental type worth as many pence. I fancy I see our would-be entomologist shaking his head and very sagely saying, "Oh no! I intend to collect all my insects myself." My young friend, let me tell you that you will have to collect far beyond the prescribed threescore years and ten if you would yourself collect all the British lepidoptera. Work, therefore, in collecting as hard as you can, and when you want a rarity to fill up a void in your cabinet, go at once to some respectable dealer and ask for a continental type of the insect you want, place it in your cabinet, label it "Foreign," and when you can replace it with an undoubted "Britisher" think yourself lucky.
While we're talking about foreign insects, I want to advise young enthusiasts not to rush too eagerly after "real British" rare specimens, or they might end up spending quite a bit of money on a repurposed continental type that's worth only pennies. I can almost picture our aspiring entomologist shaking his head and wisely declaring, "Oh no! I plan to collect all my insects myself." My young friend, let me tell you that you'll need to collect for far more than the typical lifespan if you want to gather all the British lepidoptera yourself. So, work hard at collecting, and when you need a rarity to fill a gap in your display, just go to a reputable dealer and ask for a continental version of the insect you need. Put it in your collection, label it "Foreign," and when you can find a true "Britisher" to replace it, consider yourself lucky.
 Fig. 48 —
Butterfly "braced" on board.
Fig. 48 —
Butterfly "braced" on board.To make my meaning plain, we will take the Bath White butterfly (Pieris Daplidice) as an example. An undoubted British specimen of this, caught, say, at Dover, is certainly worth a sovereign — the price of a continental one precisely similar, but captured on the other side of the "silver streak," 5d. Difference in cost for a mere fancy, 19s. 7d!
To make my point clear, let's use the Bath White butterfly (Pieris Daplidice) as an example. An authentic British specimen of this butterfly, caught, for instance, at Dover, is definitely worth a pound — while the price for a similar continental one captured on the other side of the "silver streak" is just 5 pence. That's a difference of 19 shillings and 7 pence for just a preference!
Again, what would be the price of an English captured Oleander Hawk (Choerocampa Nerii) — shall we say from 12 to 20 pounds, according to the conscience of the vendor and the pocket of the purchaser? A fine foreign specimen, beautifully set and precisely similar, can be bought for about 5s.
Again, what would be the price of an English captured Oleander Hawk (Choerocampa Nerii) — shall we say between £12 and £20, depending on the vendor's conscience and the buyer's budget? A nice foreign specimen, beautifully presented and exactly the same, can be purchased for around 5 shillings.
To set your butterflies, see Fig. 48, which shows a common white butterfly braced on the setting board. To do this your insect must be truly pinned as before directed, and placed in the centre of the groove A B (which is also shown in section at B, Fig. 47); four pieces of thin cardboard, each about 1 in. long, are cut to the shape shown at C C C C. An ordinary pin is pushed a little way through them at their bases.
To set your butterflies, see Fig. 48, which shows a common white butterfly secured on the setting board. To do this, your insect must be properly pinned as previously instructed and placed in the center of the groove A B (which is also shown in section at B, Fig. 47); four pieces of thin cardboard, each about 1 inch long, should be cut to the shape shown at C C C C. An ordinary pin is pushed a little way through them at their bases.
With a fine needle now lift up from underneath the left hand upper wing of the insect to about the angle shown in Fig. 48; picking up a brace with the left hand, push the pin in the cork in such a manner that the brace lightly holds down the wing. Do the same with the underwing. Repeat with the other side. [Footnote: The braces shown in Fig. 48 should be a little nearer the tips of the fore wings, or supplemented by stiff papa pinned across, otherwise the tips are likely to curl up when drying.]
With a fine needle, gently lift the upper left wing of the insect to about the angle shown in Fig. 48. Using your left hand, pick up a brace and push the pin into the cork in such a way that the brace holds the wing down lightly. Do the same for the underwing. Repeat this process on the other side. [Footnote: The braces shown in Fig. 48 should be positioned a little closer to the tips of the forewings, or supplemented by a stiff paper pinned across; otherwise, the tips may curl up while drying.]
I have been assuming that the wings of the insect previously lay flat. If they are folded up above the back they had better be pushed down with the braces instead of with the needle, and pinned to any position they will readily fall to, and from that gradually worked up by means of another brace to the angle required. The fore pair of legs should be braced to the front, and hind pair of legs, especially of moths, are to be braced out to fall neatly between the body and the wings. Sometimes very fine cambric needles are thrust through, just underneath one of the wing rays, to lift up and keep it in position, -until the braces can be brought to bear. This ought not to be resorted to except in extreme cases, or for other than cabinet specimens.
I’ve been thinking that the insect's wings used to lie flat. If they’re folded over the back, it's better to push them down with braces instead of a needle and pin them to whatever position they naturally want to settle in. From there, you can gradually adjust them to the required angle using another brace. The front pair of legs should be secured to the front, while the hind legs, especially on moths, should be braced out so they sit neatly between the body and the wings. Sometimes very fine cambric needles are inserted just under one of the wing rays to lift it up and keep it in place until the braces can take effect. This shouldn’t be done unless absolutely necessary, or when dealing with specimens that aren’t meant for display.
A correspondent (Mr. G. H. Bryan) writing in Science Gossip for December, 1883, says: — "The grooved cork, instead of being glued to one wooden board, is fastened on to the two boards, the groove between them corresponding exactly with the groove in the cork. These in turn are held together by three slips of wood, to which they are firmly nailed. In setting insects, the pin should not be run into the groove just above the slips. If run into the cork anywhere else, the pin can be pushed through to any depth required, and, as a rule, the slips are so high that, when the board is laid down on a table, none of the pins touch the table."
A writer (Mr. G. H. Bryan) contributing to Science Gossip in December 1883 states: — "The grooved cork is attached to two wooden boards instead of being glued to just one, with the groove between them perfectly aligning with the groove in the cork. These boards are then secured together by three wooden strips that are firmly nailed. When setting insects, the pin should not be inserted into the groove just above the strips. If the pin is inserted into the cork anywhere else, it can be pushed through to any desired depth, and typically, the strips are tall enough that when the board is placed on a table, none of the pins touch the surface."
I some time ago saw, at the house of a well-known naturalist and traveller, residing near Cirencester, an ingenious arrangement applied to setting-boards, by which the groove of each board could be altered so as to take in the body of the smallest or the largest butterfly or moth at will. It was managed by one half of the board being movable from its fellow, and capable of being adjusted to any size, by simply turning a screw working in a slot in a brass plate at top and bottom.
I saw some time ago at the home of a well-known naturalist and traveler near Cirencester a clever setup for setting boards. This arrangement allowed the groove of each board to be adjusted to accommodate the body of both the smallest and the largest butterfly or moth as needed. It worked by having one half of the board movable, enabling it to be adjusted to any size by simply turning a screw that operated in a slot in a brass plate at the top and bottom.
Another method of setting insects is by means of "blocks," sections of varying widths cut from the uncorked setting-board, the grooves only being corked. The insect being pinned in the groove is extended with the setting needle, and the wings lightly wrapped, when in position, with silk coming over and over, from side to side. To do this nicely requires practice, to avoid marking the wings with the silk.
Another way to mount insects is by using "blocks," which are pieces of different widths cut from the uncorked setting board, with only the grooves corked. The insect is pinned in the groove and positioned using a setting needle, and the wings are gently wrapped in silk, going back and forth from side to side. Doing this well takes practice to prevent the silk from leaving marks on the wings.
The "block" system of setting is more used by collectors in the Midlands and the North than about London or in the South. Insects should be left on the setting-boards or blocks from two or three days to a week, or even more, according to their size; and during this time should be kept out of the dust, but allowed air to dry them thoroughly.
The "block" system of setting is used more by collectors in the Midlands and the North than in London or the South. Insects should stay on the setting boards or blocks for two to three days to a week, or even longer, depending on their size; during this time, they should be kept free from dust but given enough air to dry them completely.
The German system of setting by means of pieces of glass dropped over the wings when in position is a clean neat method of "flat" setting, allowing the insect to be clearly seen if it be truly "set" or not.
The German method of setting insects using pieces of glass placed over the wings is a clean and tidy way to achieve a "flat" setting, making it easy to see if the insect is truly "set" or not.
When insects are from any cause too stiff to set without first relaxing them — placing them in the cyanide bottle for a day or night will often do this effectually, or placing them in a wet corked zinc box, or in a box with damp sand, or in a small "plaster box" will do equally as well. This is made by lining the whole of the inside of a wooden box with plaster of Paris mixed with water, and laid on from one to two inches thick. The plaster is, of course, thoroughly damped, and the insects enclosed in the box. The same pins with which they are pinned whilst relaxing should not be permanently left in, if it be possible to remove them without injuring the aspect of the thorax. Pins so left in, being more corroded than usual, frequently break after being in use a short time.
When insects are too rigid to position without first relaxing them, placing them in a cyanide bottle for a day or night often works well. Alternatively, you can put them in a wet corked zinc box, a box with damp sand, or a small "plaster box." To make a plaster box, line the inside of a wooden box with plaster of Paris mixed with water, applying it one to two inches thick. The plaster should be thoroughly dampened before enclosing the insects in the box. The same pins used to pin the insects while they relax should not be left in permanently if they can be removed without damaging the appearance of the thorax. Pins left in tend to corrode more quickly and often break after a short period of use.
Old insects, which it may be dangerous to relax, or large foreign unset lepidoptera, may sometimes be set by a skilful hand by having their wings carefully pinched off by forceps, and replaced in the required position by using a strong paste or cement (see Formula No. 33): Repairs may be "executed with promptness and despatch" by cementing on parts of other wings to replace torn or missing pieces, or tissue paper may be used, providing the repairer is a skilful artist. I once saw a very poor specimen of Urania rhipheus — a splendid moth from Madagascar — so cleverly pieced by tissue paper and coloured, that it would deceive any but an expert.
Old insects, which can be risky to handle, or large foreign unset lepidoptera, can sometimes be set by a skilled hand by carefully pinching off their wings with forceps and reattaching them in the correct position using a strong paste or cement (see Formula No. 33): Repairs can be done "quickly and efficiently" by gluing on parts from other wings to replace torn or missing sections, or tissue paper can be used, as long as the repairer is a talented artist. I once saw a very poor specimen of Urania rhipheus — a stunning moth from Madagascar — so cleverly pieced together with tissue paper and colored that it could fool all but an expert.
Beetles (in science — Coleoptera) may be sought for everywhere — in woods, fields, ponds, rivers, underneath stones and exuviae of cattle; in decaying leaves, trees, and fungi; in and underneath dead animals; in cellars, outhouses, and even in what would be supposed the most unlikely place to find them — ant hills, bees' and wasps' nests — and in the rubbish collected at the sides of streams, especially if after a flood. They may be taken by sweeping, beating, sugaring, or by carefully prospecting tufts of grass, moss, leaves, and flowers. Bags of moss or ant-hills may be brought home and looked over at leisure for minute beetles — throwing rubbish into water, or sifting it over white paper, being the handiest way to reveal them.
Beetles (scientifically known as Coleoptera) can be found just about anywhere — in forests, fields, ponds, rivers, under stones and animal remains; in decaying leaves, trees, and fungi; among and under dead animals; in basements, outdoor toilets, and even in the most unexpected places like ant hills, and nests of bees and wasps — as well as in the debris collected along streams, especially after a flood. You can collect them by sweeping, beating, sugaring, or by carefully examining clumps of grass, moss, leaves, and flowers. You can take bags of moss or ant hills home and sort through them at your convenience for tiny beetles — tossing debris into water or sifting it over white paper is the easiest way to uncover them.
For those which inhabit water, a net made of any strong material, which allows water, but nothing else, to run through quickly (a net fashioned as in Fig. 41 or 46 will do for this), should be used as well as for collecting other water insects. Beetles may be brought home in small test tubes, corked at the open end, or in quills stopped at one end with sealing wax, and at the other with wadding, or a quill may be inserted in the cork of a larger bottle, into and through which they may be dropped, or they may be killed at once in the cyanide bottle, or otherwise thrown into a bottle containing alcohol, in which corrosive sublimate (in the proportion of 6 gr. to the ounce of spirit) has been previously placed, which effectually kills and ultimately tends to preserve them.
For those that live in water, you should use a net made of any strong material that lets water flow through quickly, but nothing else (a net like the one shown in Fig. 41 or 46 will work for this). This net should also be used to collect other water insects. You can bring beetles home in small test tubes sealed at one end with a cork, or in quills sealed at one end with sealing wax and stuffed with wadding at the other end. Alternatively, a quill can be inserted into the cork of a larger bottle, allowing you to drop the beetles in. They can be killed immediately in a cyanide bottle, or you can put them in a bottle with alcohol that already contains corrosive sublimate (at a ratio of 6 grams to an ounce of alcohol), which will effectively kill them and help preserve them in the long run.
On reaching home, the contents of this bottle may be turned out into any shallow dish kept specially for that purpose (a photographer's "print" pan) and fished for with small pieces of paper or cardboard, and the spirit afterwards returned to the bottle. The larger beetles are to be pinned through the right wing case, and never in the centre, their legs being nicely arranged in the proper positions, and in some cases the wings may be displayed. The more minute beetles may be gummed on a small slip of card through which the pin passes, their legs arranged by the aid of fine patience, a crooked pin, a camel-hair pencil, and a pair of small forceps, the latter being also very handy for picking up any other small objects.
Upon arriving home, the contents of this bottle can be poured into any shallow dish designated for that purpose (like a photographer's "print" pan) and can be fished out using small pieces of paper or cardboard, with the liquid then returned to the bottle. The larger beetles should be pinned through the right wing case, avoiding the center, while their legs are neatly arranged in proper positions, and in some cases, the wings can be displayed. The smaller beetles can be glued onto a small slip of card that the pin passes through, with their legs positioned using fine patience, a bent pin, a camel-hair brush, and a pair of small tweezers, which are also very useful for picking up other tiny objects.
In setting the larger beetles, as well as the various thick-bodied insects, belonging to the orders Orthoptera, Neuroptera, Diptera, and Hymenoptera, double braces instead of "setting"-boards may be used in the following manner: The insect being pinned high on a board or piece of cork, with legs extended, two large pieces of card, one for each side, are brought up underneath the wings and close to the body by pins stuck through the corners. This forms a rest for the wings when extended, which are then braced on top of the cards by smaller braces in the usual manner, the pins, however, of the braces falling outside the supporting cards and fixing in the wood or flat cork underneath.
In preparing larger beetles and various thick-bodied insects from the orders Orthoptera, Neuroptera, Diptera, and Hymenoptera, you can use double braces instead of "setting" boards like this: Pin the insect high on a board or piece of cork, with its legs extended. Then, take two large pieces of card—one for each side—and position them under the wings, close to the body, using pins pushed through the corners. This creates a support for the extended wings, which are then held on top of the cards with smaller braces as usual. The pins for the braces, however, should go outside the supporting cards and be secured in the wood or flat cork beneath.
Many exotic insects — butterflies and moths — are set in this manner, which is really "flat setting." If the braces are at any time too limp and do not seem to clip the wings properly, a little piece of cork just sufficient for the pin to slip through may be added on top of the brace.
Many exotic insects — butterflies and moths — are set up this way, which is actually "flat setting." If the braces ever feel too loose and don’t seem to hold the wings properly, you can add a small piece of cork just big enough for the pin to slip through on top of the brace.
The larger beetles and other insects, such as the dragon-flies, cicadas, grasshoppers, and "walking leaf" insects, should always have the contents of the abdomen removed either by pressure, or by being cut underneath, and, when empty, injected with a little of the corrosive sublimate preparation, and afterwards filled out with wool or blown out with a small blowpipe until the abdomen is again distended and dry. Some insects which are narrow at the "waist" may be advantageously snipped through at that part to remove the contents therefrom, the body being afterwards fixed with gum or cement to its normal position.
The larger beetles and other insects, like dragonflies, cicadas, grasshoppers, and "walking leaf" insects, should always have their abdomen contents removed either by applying pressure or by cutting them underneath. Once empty, inject a little of the corrosive sublimate solution into them, and then fill them with wool or use a small blowpipe to puff them up until the abdomen is distended and dry again. For some insects that are narrow at the "waist," it can be helpful to snip through that area to remove the contents. The body can then be fixed back to its normal position using gum or cement.
In the setting of beetles — as in other things — the ubiquitous Germans and the Frenchmen beat us. Compare the beautifully foreign set coleoptera, with our wretchedly lame and uneven-sided attempts. It is impossible to mistake the ordinary English for foreign setting, and of this I was curiously convinced on my arrival at Leicester, in the Museum of which town I found some exquisitely-set specimens of coleoptera. I said at once, "These are German-set." "No, indeed," I was told, "they are set by a local man." I could not believe it; and after great difficulty, the man himself even persisting in this assertion, I discovered that they were all procured from Germany or were set by a German friend.
In the world of beetles — just like with other things — the ever-present Germans and French outshine us. Just compare the beautifully arranged foreign beetles with our clumsy and poorly presented versions. It's easy to tell ordinary English specimens from their foreign counterparts, and I was clearly reminded of this when I arrived in Leicester, where I found some stunningly arranged beetles in the town's museum. I immediately said, "These are German-made." "Not at all," I was told, "they're set by a local person." I couldn't believe it; after much difficulty, with the person even insisting on this, I found out that all of them were either sourced from Germany or arranged by a German acquaintance.
This gentleman having subsequently shown me his method, I now give it for the benefit of coleopterists: The beetles, after being killed, are plunged into benzoline (benzol) for two or three days, to cleanse them from grease and impurities. Indeed, it considerably simplifies matters to carry a bottle of benzol, as I do when collecting beetles, to plunge them into when first taken. It instantly kills, and the cleansing operation goes on at once. On reaching home the beetles are, after a day or two, pinned, or gummed unset on to any pieces of card in any manner most suitable at the time to economise space; the cards can then be pinned into a store-box.
This gentleman later showed me his method, and I’m now sharing it for the benefit of beetle enthusiasts: After killing the beetles, you should soak them in benzoline (benzol) for two or three days to remove grease and impurities. It really simplifies things to carry a bottle of benzol, like I do when collecting beetles, to dip them in right after capturing them. It kills them instantly, and the cleansing starts right away. Once home, after a day or two, the beetles are pinned or stuck onto pieces of card in whatever way works best at the time to save space; the cards can then be pinned into a storage box.
During the winter months, or at any time when required, the beetles may be set, thus: first, plunge them into water for a day or so until quite limp, then take them out and place them one by one on separate pieces of card, well gummed in the centre to retain them firmly by the abdomen whilst being set. A very little time will suffice to do this should the gum be strong.
During the winter months, or whenever necessary, the beetles can be prepared like this: first, soak them in water for a day or so until they’re completely limp, then remove them and place them one by one on separate pieces of card, making sure to glue the center well to hold them securely by the abdomen while setting them. If the glue is strong, this will only take a little time.
After twenty or so are fixed, the first one gummed down can be finished off. The card is smeared with gum where the legs, or rather "tarsi," will come into place, and arranged with a setting needle. Now carefully place the limbs into a natural and even position, their feet resting on the gummed surface; adjust the antennae, etc.., and leave the insect to dry by pinning the card in any suitable receptacle. When perfectly set and dry, the final operations are once more plunging the beetle into benzoline, then wetting its abdomen and feet to release it from the dirty card, and lastly slightly re-gumming the underneath and tips of the feet with cement (see Formula 33) and finally adjusting it on a clean card, which may be labelled or numbered, and secured by a small pin at each end in the cabinet or store-box.
After about twenty are fixed, the first one that’s been glued down can be finished. The card is coated with glue where the legs, or more specifically “tarsi,” will be attached, and positioned using a setting needle. Now carefully place the limbs in a natural and even position, with their feet resting on the glued surface; adjust the antennae, etc., and leave the insect to dry by pinning the card in any suitable container. Once it’s fully set and dry, the final steps involve dipping the beetle in benzoline, then wetting its abdomen and feet to detach it from the dirty card, and finally lightly re-gluing the underside and tips of the feet with adhesive (see Formula 33) and then adjusting it on a clean card, which can be labeled or numbered, and secured with a small pin at each end in the cabinet or storage box.
COLLECTING AND OTHER BOXES. — The collecting box is a small box made to fit the pocket, corked top and bottom, opening in the middle, and made of sufficient depth to allow the heads of the pins on one side to well clear the insects, which may be pinned on the other. Collecting boxes may be made of various woods and of various sizes to suit the pleasure and pocket of the collector. They should be made light but strong, and a little fillet of thin wood should be inserted along one side on the front edge, to ensure the close fitting of the box. Another sort of collecting box is that corked at the bottom, having a flat lid, on which a piece of cork is glued, and cut to fit the box tightly when closed, thus forming the top lid. This style is also used for postal boxes.
COLLECTING AND OTHER BOXES. — The collecting box is a small container designed to fit in your pocket, with corked tops and bottoms, opening in the middle, and deep enough for the heads of the pins on one side to avoid touching the insects pinned on the other side. Collecting boxes can be made from different types of wood and come in various sizes to match the preferences and budget of the collector. They should be lightweight yet sturdy, and a thin strip of wood should be added along one side of the front edge to ensure the box closes tightly. Another type of collecting box has a corked bottom and a flat lid, topped with a piece of cork that is glued on and cut to fit snugly when the box is closed, effectively serving as the top lid. This design is also used for postal boxes.
In very hot weather, or if the collector roves far afield, he will find that many of his butterflies, if placed in the ordinary wooden collecting box, will have become stiff before he can reach home to set them. The remedy for this is a zinc box lined with cork, which latter is soaked in water before commencing the day's collecting. These boxes are made in various shapes and sizes. A handy one for the pocket is a 7 in. by 4 in., 2.5 in. deep, made of an oval shape if desired, corked on top and bottom, the cork held by clips of zinc soldered to top and bottom. For more extended operations a larger box will be required, say, 13 in. by 9 in., 2.5 in. deep, with loops soldered to the back, through which a strap passes to suspend it from the shoulders. These boxes are lighter if made in tin, and the water does not corrode them so rapidly if they are japanned inside as well as out.
In really hot weather, or if the collector goes far from home, they'll notice that many of their butterflies, if kept in a regular wooden collecting box, will have stiffened by the time they get home to set them. The solution is to use a zinc box lined with cork, with the cork soaked in water before starting the day's collecting. These boxes come in different shapes and sizes. A convenient one for your pocket is 7 inches by 4 inches, 2.5 inches deep, and can be oval if preferred, with cork on the top and bottom, held in place by zinc clips soldered to both ends. For longer collecting trips, a larger box is needed, such as 13 inches by 9 inches, 2.5 inches deep, with loops soldered to the back for a strap to hang it from your shoulders. These boxes are lighter if made of tin, and the water doesn't rust them as quickly if they are coated inside and out.
"Postal boxes," by which entomologists transmit their captures to one another, should be made of strong white pine, the tops and bottoms nailed on, on the cross. They may open in the middle or at top, as before mentioned, and further have a strengthening piece of thick cork glued all over them outside and rasped down to the shape of a rough oval.
"Postal boxes," which entomologists use to send their collections to each other, should be made of sturdy white pine, with the tops and bottoms nailed securely. They can open in the middle or at the top, as previously mentioned, and should also have a reinforcement made of thick cork glued on the outside and smoothed down to a rough oval shape.
Inside, the cork should be glued down on top and bottom; on this a few small strips of the same cork running across with interstices left between them. On top of this another sheet of cork, thus forming three thicknesses, in which the pin is pushed as far as it will go. In the case of large-bodied moths, or any valuable insects, it is as well to support the abdomen with a layer of wool, cross-pinning the body on either side to prevent it jarring or shifting. The box may then, for greater security, be wrapped in a sheet of wool and tied up. The address should not be written on the box, or the stamps affixed thereto, but on a direction label, otherwise some vigorous post-office sorter, or stamper, will convince you to your sorrow that he scorns such paltry protection as is afforded by the triple alliance of wood, cork, and wool.
Inside, the cork should be glued down on the top and bottom; on this, a few small strips of the same cork should run across with gaps left between them. On top of this, add another sheet of cork, creating three layers in which the pin is pushed as far as it will go. For larger moths or any valuable insects, it's a good idea to support the abdomen with a layer of wool, pinning the body on either side to keep it from moving or shifting. The box can then be wrapped in a sheet of wool and securely tied up. The address shouldn’t be written directly on the box or on the stamps attached to it, but on a separate label. Otherwise, some overzealous post-office worker will show you that they don’t care about the flimsy protection provided by the three layers of wood, cork, and wool.
The Germans cover the bottoms of a great many of their entomological boxes with peat, and this certainly holds the long pins firmly in transit; and it is also much less expensive than cork.
The Germans line the bottoms of many of their bug collection boxes with peat, which definitely keeps the long pins secure during transport; plus, it's also way cheaper than cork.
Foreign insects, when space is limited, may be sent home unpinned and unset, their wings folded over their backs, and each specimen wrapped in silver or tissue paper. It is astonishing what a number of them will pack in this manner in the compass of an ordinary cigar box.
Foreign insects, when there's limited space, can be sent back home without being pinned or set, with their wings folded over their backs, and each specimen wrapped in silver or tissue paper. It's amazing how many of them can fit this way in a regular cigar box.
"Drying houses" are sold by most of the dealers, but are expensive and cumbersome, and are really only of service when travelling, or collecting away from home. For this reason I suggest the following — which is a store box and receptacle for setting boards combined.
"Drying houses" are available from most dealers, but they're pricey and bulky, and they're really only useful when you're traveling or collecting away from home. For this reason, I recommend the following — a storage box and holder for setting boards combined.
Make of 0.5 in. deal a box 20 in. long and 15 in. wide by 0.5 in. deep (all inside measurements), glue up all but the front piece (4 in. wide by 20 in. long), which merely tie in its place whilst glueing up the others. Cut the box when dry through the 4 in. back piece to exactly halve it. Hinge each half with strong hinges. It now resembles an open backgammon board box, without its two fronts.
Make a box out of 0.5 in. material that measures 20 in. long, 15 in. wide, and 0.5 in. deep (all internal measurements). Glue all the pieces together except for the front piece, which should be 4 in. wide and 20 in. long; just hold it in place while you glue the others. Once dry, cut the box through the 4 in. back piece to split it in half. Attach strong hinges to each half. It will now look like an open backgammon board box, minus its two fronts.
Take now a strip of 1 in. deal, 15 in. long, and form it with a plough plane to the shape shown in Fig. 49. The part marked A will be 0.375 in. thick, the parts marked B B overhang 0.25 in., and rise from A to B B to the height which the thickness of your setting boards determine.
Take a 1-inch wide, 15-inch long piece of wood, and shape it with a plane to match the design shown in Fig. 49. The section labeled A should be 0.375 inches thick, the parts labeled B B should extend 0.25 inches beyond A, and the height from A to B B should be determined by the thickness of your setting boards.
Divide this down the whole length with a cutting gauge where shown by the dotted lines; glue one of these halves to the side of one of the bottoms of the box, and from here measure off 5 in., which will be the size of your largest setting board for hawk moths. At this point glue down a whole strip, as shown in Fig. 49, which (supposing you have commenced from your left) clips the right-hand side of the first or 5 in. setting board, and the left-hand side of the second. Proceed in this manner until the bottom of the box is covered with setting boards, which will now slide in and out between the 0.375 in. divisions. Turn the box round and do precisely the same with the other half.
Divide this along the entire length using a cutting gauge at the dotted lines; glue one half to the side of one of the bottoms of the box, and from there, measure 5 inches, which will be the size of your largest setting board for hawk moths. At this point, glue down a whole strip, as shown in Fig. 49, which (assuming you started from your left) fits against the right-hand side of the first 5-inch setting board and the left-hand side of the second. Continue like this until the bottom of the box is filled with setting boards, which will now slide in and out between the 0.375-inch divisions. Turn the box around and do exactly the same with the other half.
As many more insects under, than above, 4 in. in expanse of wing will be captured, the most useful sizes for setting boards, as also the proper proportions of boards and divisions to fill up the bottom of each half of the box, are as follow:
As many more insects measure under 4 inches in wing span than those that exceed it, the best sizes for setting boards, along with the right proportions of boards and sections to fill the bottom of each half of the box, are as follows:
First half. — 0.25 in. strip, 5 in. board; 0.375 in. strip, 4 in. board; 0.375 in. strip, 3.5 in. board; 0.375 in. strip, 3 in board; 0.375 in. strip, 2.5 in. board; 0.25 in. strip = 20 in. total.
First half. — 0.25 in. strip, 5 in. board; 0.375 in. strip, 4 in. board; 0.375 in. strip, 3.5 in. board; 0.375 in. strip, 3 in. board; 0.375 in. strip, 2.5 in. board; 0.25 in. strip = 20 in. total.
Second half. — 0.25 in. strip, 3.5 in. board; 0.375 in. strip, 3 in. board; 0.375 in. strip, 2.5 in. board; 0.375 in. strip, 2.5 in. board; 0.375 in. strip, 2.25 in. board; 0.375 in. strip, 2 in. board; 0.375 in. strip, 1.5 in. board; 0.25 in. strip = 20 in. total.
Second half. — 0.25 in. strip, 3.5 in. board; 0.375 in. strip, 3 in. board; 0.375 in. strip, 2.5 in. board; 0.375 in. strip, 2.5 in. board; 0.375 in. strip, 2.25 in. board; 0.375 in. strip, 2 in. board; 0.375 in. strip, 1.5 in. board; 0.25 in. strip = 20 in. total.
 Fig. 49 —
Section of division strips.
Fig. 49 —
Section of division strips.There are thus twelve setting boards 15 in. long, of the most useful sizes, contained in this box. The front is still as it was, open. The loose piece of wood, 20 in. by 4 in., must now be cut down the length, and each half must (making 20 in. by 2 in.) be hinged to the top and bottom of the box; a lock can then be fixed to bolt together the two halves, hooks also being fixed at each end of the box to further secure the front flaps. Fig. 50 shows the arrangement of the box at this stage — shut, but with the front flaps lifted up and down, showing the "sliding" setting boards snugly fixed within. Insects may by this method be left on the boards whilst travelling without the slightest risk, as nothing can come loose, and the pins of one side miss those of the other when the box is shut and locked.
There are twelve setting boards that are each 15 inches long, made in the most practical sizes, included in this box. The front remains open, just like it was before. The loose piece of wood, measuring 20 inches by 4 inches, now needs to be cut down the length, and each half should be hinged to the top and bottom of the box, making them 20 inches by 2 inches. A lock can then be added to hold the two halves together, with hooks fixed at each end of the box to further secure the front flaps. Fig. 50 illustrates the arrangement of the box at this stage — closed, but with the front flaps lifted up and down, showing the "sliding" setting boards snugly secured inside. Insects can be left on the boards while traveling without any risk, as nothing can come loose, and the pins on one side miss those on the other when the box is closed and locked.
 Fig. 50 —
Front of setting-board box, with flaps open.
Fig. 50 —
Front of setting-board box, with flaps open.A more simple plan, serving equally as well perhaps, and having the advantage of dispensing with the intervening slips, therefore giving more space for setting boards, is simply fixing a slip of wood at each inner end of the box, and another on each flap, so arranged as to hold all the setting boards down when shut. This is managed by allowing the wood of each setting board to protrude beyond its cork to the thickness of the slip — say half an inch. [Footnote: This box should be made in oak or mahogany; put together with brass screws, if for "foreign service."]
A simpler plan, which might work just as well and has the benefit of eliminating the extra slips, thereby providing more space for the setting boards, is to just attach a piece of wood at each inner end of the box and another on each flap. These should be arranged to keep all the setting boards in place when closed. This is done by letting the wood of each setting board stick out beyond its cork by the thickness of the slip—about half an inch. [Footnote: This box should be made of oak or mahogany and assembled with brass screws if it's for "foreign service."]
Insects, after removal from their "sets," require to be stored in glazed cases or cabinets for greater security and protection against evils previously glanced at. Some collectors content themselves with using for this purpose the ordinary store-box, made in the same manner as the collecting box, but of greater capacity. One 15 in. by 10 in. by 4 in. deep will be found a useful size; this — opening in the same manner as a backgammon board — is corked with cabinet cork, each sheet of which is usually 11 in. by 3.5 in. or (double size) 12 in. by 7.5 in.
Insects, after being taken out of their "sets," need to be stored in glass cases or cabinets for better security and protection against the issues mentioned earlier. Some collectors are fine using a regular storage box for this, which is made like the collecting box but is larger. A useful size would be 15 inches by 10 inches by 4 inches deep; this opens like a backgammon board and is lined with cabinet cork, with each sheet typically measuring 11 inches by 3.5 inches or (double size) 12 inches by 7.5 inches.
The cork being glued evenly over each half of the box, is rubbed down with pumice-stone, and afterwards with sand-paper, to get an even surface and reconcile the joints one with the other. It is then papered with white blotting-paper, toned, or black paper, pasted down over the cork with paste, in which has been previously stirred a little carbolic acid or corrosive sublimate (both poisons).
The cork is glued evenly over each half of the box, then rubbed down with pumice stone and sandpaper to create a smooth surface and blend the joints together. Next, it's covered with white blotting paper, toned, or black paper, which is glued over the cork using paste that has a bit of carbolic acid or corrosive sublimate mixed in (both are toxic).
It has also been recommended to previously steep the cork, especially if for "foreign service," in a solution of —
It has also been suggested to soak the cork beforehand, especially if it's for "foreign service," in a solution of —
Corrosive sublimate, 0.5 oz.
Corrosive sublimate, 0.5 oz.
Camphor, 1 oz.
Camphor, 1 oz.
Spirits of wine, 1 pint.
Wine, 1 pint.
Some little care is, of course, required in the handling of poisoned cork, etc.., but I do not write expecting that infants will be allowed to handle the various lethal agents with which these chapters necessarily abound.
Some care is, of course, needed when handling poisoned cork, etc., but I'm not writing with the expectation that infants will be allowed to handle the various deadly substances that these chapters inevitably contain.
Another sort of store box is the book box, hinged at the back and opening along the front, representing two distinct volumes of a book. This is either covered in cloth, labelled with gilt letters, or is made in mahogany, the bands let in in ebony, or white wood, and strips of lettered leather pasted in between them. [Footnote: see remarks on leather in chapter XII.] All around the box inside runs a little ledge of wood for the reception of glass, which, as each half is filled with insects, is pasted in with ornamental paper.
Another type of storage box is the book box, which has a hinge at the back and opens at the front, resembling two separate volumes of a book. This box is usually covered in cloth with gilded letters, or made of mahogany with ebony or white wood inlays, and strips of labeled leather glued in between. [Footnote: see remarks on leather in chapter XII.] Inside the box, there’s a small wooden ledge all around for holding glass, which is glued in with decorative paper as each half is filled with insects.
For those who delight in camphor, a piece of perforated cardboard or cork should be placed in the corners, forming angle pieces, and enclosing within the triangle thus formed, the (un)necessary morsels of the drug. When filled, it should be pasted over on the top, and the glass then fits close on top of it. Book boxes have one or two advantages: they look well in a library and take up but little room, and are easily handled when showing them to friends. As exhibition boxes they are nearly perfect.
For those who enjoy camphor, you should place a piece of perforated cardboard or cork in the corners, creating angle pieces, and enclosing any unnecessary bits of the substance within the triangle formed. Once filled, it should be sealed on top, and the glass will fit snugly over it. Book boxes have a couple of advantages: they look nice in a library, take up very little space, and are easy to handle when showing to friends. As display boxes, they're nearly perfect.
CABINETS. — The entomological cabinet is a much more serious matter; there is no limit to its size, from the modest one of six drawers to the "working" one of thirty. The size of the drawers varies with individual taste. A nice size, however, is 18.5 in. long by 16.5 in. by 2.5 in., or the 20 in. by 18 in. by 2.5 in., or deeper if for large insects.
CABINETS. — The insect collection cabinet is a much more important topic; its size can range widely, from a simple six-drawer model to a more extensive thirty-drawer version for active use. The dimensions of the drawers can vary based on personal preference. A good size, though, is 18.5 inches long by 16.5 inches wide by 2.5 inches deep, or 20 inches by 18 inches by 2.5 inches, or even deeper if it's meant for larger insects.
No amateur, unless he is a past master at joinery, can hope to construct a thoroughly well-made cabinet; indeed, few cabinet makers know how to turn out one to suit a veteran entomologist. Briefly: the drawers of a first class cabinet should be made of the best Spanish mahogany, or oak, in every part; no "baywood," "cedar," or any such spurious stuff should enter into its composition (good white pine being preferable to such). Cedar is totally unfit for store boxes or cabinets, owing to its tendency to throw out in time a gummy exudation, which settles on the wings of the insects and utterly ruins them. This remark applies also to cabinets for eggs.
No amateur, unless they are an expert in woodworking, can expect to build a truly well-made cabinet; in fact, few cabinet makers are skilled enough to create one that meets a seasoned entomologist's standards. Simply put: the drawers of a top-quality cabinet should be made entirely of the best Spanish mahogany or oak; no "baywood," "cedar," or any other inferior material should be included (good white pine is better than such options). Cedar is completely unsuitable for storage boxes or cabinets because it tends to release a sticky substance over time, which settles on the wings of the insects and completely destroys them. This also applies to cabinets for eggs.
The frames which hold the covering glass should preferably fit by a tongue resting in a groove, ploughed with a "filister" in the substance of the drawer itself. A fillet should rest inside, fitting against the inner edge of the frame, which should also be lined with velvet, to further exclude the dust. Drawer and frame should be made so true that the latter should fit back to front, if required, equally with its normal position. The carcase, or part into which the drawers fit, either by runners or in grooves by tongues attached to the drawers, should be made so truly that No. 1 drawer should fit in the place of Nos. 15 or 30, and vice versa, and all should "suck" back when pulled out half way. The drawers should be looked by "pilasters," or have glazed and framed doors.
The frames that hold the glass cover should ideally fit with a tongue that rests in a groove cut into the drawer itself. A small strip should sit inside, pressing against the inner edge of the frame, which should also be lined with velvet to keep out dust. The drawer and frame should be made so precisely that the frame can fit in either direction if needed, just as well as it does in its normal position. The carcass, or the part where the drawers go, whether by runners or grooves with tongues attached to the drawers, should be made so accurately that Drawer No. 1 can fit where Drawers Nos. 15 or 30 would go, and vice versa, with all of them smoothly sliding back when pulled out halfway. The drawers should be secured with pilasters or have glazed, framed doors.
There are but few makers of such cabinets as I have just described, and prices are proportionately high, a sovereign a drawer being about the figure. Fair cabinets in mahogany or walnut, quite good enough. ordinary purposes, can be made, however, for half this sum, and deal ones a little less. The corking of these best cabinets is generally done before the bottoms are fixed, as thus an open surface is obtained for rubbing down, by leaving out the bottom until corked. White or black velvet, instead of paper, is often used to cover the cork.
There are only a few makers of the cabinets I just described, and the prices are correspondingly high, around a pound per drawer. You can get decent cabinets in mahogany or walnut, which are perfectly fine for regular use, for about half that price, and cheaper ones for a bit less. The corking of these top-notch cabinets is usually done before the bottoms are attached, allowing for a flat surface to be sanded down by leaving out the bottom until the corking is done. White or black velvet is often used to cover the cork instead of paper.
Some little skill is requisite to do this without soiling the delicate material; the best way is, perhaps, to glue the cork on cardboard, cut to the size of the drawer, less the thickness of the velvet all round; on this glue the cork, rub it down as before directed, and strain the velvet over it, bringing its edges underneath the cardboard; glue the bottom of the cabinet drawer, and drop the prepared velvet-covered cork and cardboard into it, place clean paper over the velvet, and weight it down for a day or two. This plan ensures the cleanliness of your covering medium — a highly necessary precaution if using white velvet.
Some skill is needed to do this without getting the delicate material dirty; the best way is probably to glue the cork onto cardboard cut to the size of the drawer, minus the thickness of the velvet all around. Then glue the cork onto this, smooth it down as previously instructed, and stretch the velvet over it, tucking the edges underneath the cardboard. Glue the bottom of the cabinet drawer and place the prepared velvet-covered cork and cardboard inside. Put clean paper over the velvet and weigh it down for a day or two. This method ensures the cleanliness of your covering material — a very important step if you’re using white velvet.
There are many other ways of fitting glass to drawers than that recommended. For instance, a hinged frame may be used, dropping in a "rabbet," ploughed around the front, back, and sides of the drawers; or the top frame may have a tongue fitting inside the whole substance of the drawer, or the glass may be a fixture, beaded or puttied in on top, the whole of the bottom unscrewing from the drawer frame. This latter is very well for a collection when fully made up and complete, but if required for an incomplete collection, the risk and annoyance of unscrewing and screwing up, to constantly remove or insert a specimen, are great.
There are several other ways to fit glass to drawers besides the recommended method. For example, you can use a hinged frame that drops into a "rabbet" cut around the front, back, and sides of the drawers. Alternatively, the top frame can have a tongue that fits inside the entire drawer, or the glass can be fixed in place with a bead or putty on top, with the bottom of the glass frame unscrewing from the drawer frame. This last option is great for a fully assembled collection, but if you need it for a collection that's still being put together, constantly unscrewing and re-screwing to take out or put in a specimen can be quite annoying and risky.
In view of the almost impossibility of keeping dust out of even the best-made cabinet drawers, if made on the top-lifting system, and also to do away with the screws, I have devised what I call the "dust-proof cabinet drawer." The glass is "beaded" and puttied in as a fixture on the top of the drawer, either from the inside or out. At the usual distance from the glass, to clear the pins, a strip is fixed all around the frame of the drawer. Below this, at a depth settled by the thickness of the bottom, a groove runs all around, except at the back, which is cut out up to the bottom edge of the groove. The bottom, when corked and papered, fits inside the frame, "butting" up to the strip which clips it all around to about the width of 0.25 in. A false bottom now slides in the groove below, and fastens with a catch, making all perfectly secure and altogether dust proof.
Given how nearly impossible it is to keep dust out of even the best-made cabinet drawers, especially with a top-lifting design, and to eliminate the need for screws, I’ve created what I call the "dust-proof cabinet drawer." The glass is "beaded" and secured with putty as a fixture on the top of the drawer, either from the inside or outside. At the usual distance from the glass, to allow for the pins, a strip is installed all around the frame of the drawer. Below this, at a depth determined by the thickness of the bottom, a groove runs all the way around, except at the back, which is cut out up to the bottom edge of the groove. The bottom, when lined with cork and paper, fits inside the frame, "butting" up against the strip, which secures it all around to about 0.25 inches. A false bottom then slides into the groove below and secures with a catch, making everything perfectly safe and completely dust-proof.
If well made, this drawer is easy to open, as, directly the false bottom is removed the inner one slips down and is found on the table when the upper part is lifted off. The only thing to be said against this drawer is that the fronts show a little deeper than usual to allow for the extra bottom.
If made well, this drawer is easy to open; as soon as the false bottom is removed, the inner one drops down and can be found on the table when the top part is lifted off. The only downside to this drawer is that the fronts appear slightly deeper than normal to accommodate the extra bottom.
A modification of this is a closely glazed cabinet drawer, with a false corked bottom, loosely held down by a slip affixed to each side of the drawer, and sliding out from the back; managed by hinging the back piece or fixing it by brass eyes and hooks. Note, that all loose flaps to drawers or door-frames, in best cabinet-work, should be worked and fitted by "Dust-joint" planes. This reduces risk and dust to a minimum.
A modified version of this is a drawer with a glass front, featuring a false corked bottom that's loosely secured with a slip on each side, allowing it to slide out from the back. This is achieved by either hinging the back piece or securing it with brass eyes and hooks. Keep in mind that in high-quality cabinetry, all loose flaps on drawers or door frames should be crafted and fitted using "Dust-joint" planes. This minimizes dust and risk effectively.
PINS. — The pins used are those called entomological, and are made in various sizes to suit various insects. An insect should be pinned with one of these exactly in the centre of the back, running through truly to the underneath, slanting, however, a little downward toward the body, thus throwing the pin's head a little forward, but exactly in a line with the longest axis of the body. These are specially made by one or two firms only. Messrs. D. F. Tayler and Co., of Birmingham, issue a sample card, the most useful sizes of which are No. 11 (at 6d. per oz.) for the hawk moths, No. 13 (at 6d. per oz.) for smaller moths and butterflies, and No. 7 (at 2s. 6d. per oz.) for small moths, and such butterflies as the "Blues." I have, of late, almost confined myself to No. 2 (at 2s. per oz.), a long fine pin, useful for many purposes (see chapter V).
PINS. — The pins used are called entomological pins and come in different sizes to fit various insects. An insect should be pinned right in the center of its back, going through to the bottom, but slanted slightly downward toward the body, which positions the pin's head a bit forward while aligning it with the longest axis of the body. These pins are made by only a couple of companies. Messrs. D. F. Tayler and Co. in Birmingham provides a sample card, with the most useful sizes being No. 11 (at 6d. per oz.) for hawk moths, No. 13 (at 6d. per oz.) for smaller moths and butterflies, and No. 7 (at 2s. 6d. per oz.) for small moths and butterflies like the "Blues." Recently, I have mostly used No. 2 (at 2s. per oz.), which is a long, fine pin that is handy for many purposes (see chapter V).
There are many other sizes, but these will be found quite sufficient for the beginner. These pins are also gilt, under the impression that gilding tends to prevent the corrosion of verdigris which the juices from the bodies of some moths, the Hepialidae especially, induce. This is not so; the Continental black varnished pins are better safeguards, but prejudice forbids their use. Messrs. Tayler now make all their sizes in "enamelled black" to order, at the same prices as their gilded ones.
There are plenty of other sizes, but these will be more than enough for beginners. These pins are also gold-plated, based on the belief that gilding helps prevent the corrosion from verdigris caused by the juices from certain moths, especially the Hepialidae. However, that’s not true; the black varnished pins from the Continent offer better protection, but bias prevents their use. Messrs. Tayler now makes all their sizes in "enamelled black" on request, at the same prices as their gold-plated ones.
Varnishing the common entomological pins with a hard and nearly colourless varnish has been tried with good effect, though it is a trial of patience to do this to pins one by one. Really the only thing to stop grease appearing in the bodies of moths, to the subsequent breaking of your pins and soiling of your cabinet paper or velvet, is to open all the insects underneath, take out all their internal organs, carefully paint the inside with a little of the corrosive sublimate preparation (see Chapter IV), and fill up the void with cotton wool. Unfortunately the evil of greasy exudations from the bodies of unstuffed or low-set insects does not stop at the corrosion of the pins or greasing of the paper, but in many cases extends to the underlying cork, which is sometimes so badly greased as to necessitate the cutting out of the damaged patch to prevent the grease reappearing when the drawer is newly papered.
Varnishing standard entomological pins with a hard, almost colorless varnish has been effective, although it requires a lot of patience to coat each pin individually. The only solution to prevent grease from forming in moth bodies, which leads to broken pins and stained cabinet paper or velvet, is to carefully open all the insects, remove their internal organs, paint the insides with a little of the corrosive sublimate preparation (see Chapter IV), and fill the cavities with cotton wool. Unfortunately, the problem of greasy excretions from unstuffed or poorly mounted insects doesn’t just lead to pin corrosion or paper staining; it often affects the underlying cork as well, which can become so badly greased that you'll need to cut out the damaged area to stop the grease from reappearing when the drawer is repapered.
GREASE AND MITES. — "Grease" and "mites" are in fact the bêtes noires of the entomological collector. When you have an insect, therefore, old and greasy, but yet "too fondly dear" to throw in the fire, place the offender on a piece of cork weighted at the bottom with lead and sink it bodily in a wide-mouthed bottle, partly full of benzoline; leave it there from a day to a week, according to its state. When it comes out it will look even worse than before, but after being covered up with a layer of powdered chalk, magnesia, or plaster of Paris, it will often come out as good as new.
GREASE AND MITES. — "Grease" and "mites" are really the bêtes noires of the bug collector. So, if you have an old and greasy insect that you’re too attached to throw away, put it on a piece of cork that’s weighted down with lead and fully submerge it in a wide-mouthed bottle that’s partly filled with benzoline; let it soak for a day to a week, depending on its condition. When you take it out, it might look even worse than before, but after covering it with a layer of powdered chalk, magnesia, or plaster of Paris, it can often look as good as new.
I say often, for cases occur now and then in which no amount of pains restores the insect to its pristine freshness; but these exceptions are few and far between. "Mitey" insects are cured in a similar manner; in fact, I would advise that all exchanges be submitted to the benzoline test. I have also used Waterton's solution (see chapter IV) to plunge them in, though 6 gr. of corrosive sublimate to the ounce of alcohol are about the proportions of the bath for most insects; but the spirit may be increased, if, on trial with a common insect or black feather, it should be found that the mercury is deposited as a white stain on the evaporation of the spirit.
I say often, because there are times when no amount of effort can bring the insect back to its original freshness; however, these cases are rare. "Mitey" insects are treated in a similar way; in fact, I recommend that all exchanges undergo the benzoline test. I've also used Waterton's solution (see chapter IV) to immerse them in, although 6 grams of corrosive sublimate per ounce of alcohol is roughly the right ratio for most insects; however, the alcohol content can be increased if, when testing with a common insect or black feather, it turns out that mercury leaves a white stain when the alcohol evaporates.
Rectified aether (pure) is a better medium than alcohol for rapidity of drying (especially in a draught), but is more expensive. Nothing, I believe, prevents mites (psocidae) appearing now and then even in poisoned insects. Constant care, stuffed bodies, and soaking in benzoline, are the deterrent agents; camphor is a pleasant fiction, so is wool soaked in creosote, phenic acid, cajeput oil, crystals of napthelin, etc.. — in fact, it may be laid down as an indisputable doctrine that no atmospheric poison is of the slightest avail against mites. [Footnote: See remarks on this in chapter IV.] Get them to eat poison, or drown them and shrivel them up in spirit and you may settle them, but not otherwise.
Rectified ether (pure) is a better drying agent than alcohol (especially in a draft), but it costs more. I don't think anything really prevents mites (psocidae) from showing up now and then, even in poisoned insects. Regular care, stuffed specimens, and soaking in benzene are the effective solutions; camphor is just a nice story, and so is wool treated with creosote, phenol, cajeput oil, naphthalene crystals, and so on. In fact, it’s a proven fact that no atmospheric poison works against mites at all. [Footnote: See remarks on this in chapter IV.] Get them to eat poison, or drown them and dry them out in alcohol, and you might get rid of them, but nothing else will do.
I have heard of cabinet drawers suffered to remain upside down to prevent mites getting to the insects; but I very much fear that such a plan as this, is on all fours with that of a man whom I knew, who, being abroad in a "Norfolk-Howard" infested country, turned the head of his bed every other night to puzzle the enemy!
I’ve heard of cabinet drawers being left upside down to stop mites from getting to the insects; but I really worry that this kind of approach is just as silly as a guy I knew who, while traveling in a “Norfolk-Howard” infested area, rotated the head of his bed every other night to confuse the pests!
The late Mr. Doubleday, the father of English entomology, never admitted camphor in his cabinet (thinking, as I do, that it conduces to grease), but used the corrosive sublimate preparation instead, to touch the underneath of the bodies of doubtful strangers. Loose quicksilver or insect powder is by some strewn amongst their insects; but the danger of the first to the pins, and the untidy appearance of the second, militate against their general use. [Footnote: It is quite true that, although camphor evaporates rapidly, and settles on anything, so as to be perceptible even to the naked eye, yet that it re-evaporates and ultimately disappears. This, to my mind, is the most fatal objection to its use: its ready evaporation leaving the insects etc.., ultimately without any protection.]
The late Mr. Doubleday, the father of English entomology, never allowed camphor in his collection (thinking, like I do, that it leads to grease), but instead used a corrosive sublimate solution to treat the undersides of questionable specimens. Some people sprinkle loose mercury or insect powder among their insects, but the risk of mercury damaging the pins and the messy appearance of the powder work against their widespread use. [Footnote: It's true that while camphor evaporates quickly and settles on surfaces, making it noticeable even to the naked eye, it also re-evaporates and eventually disappears. This, in my opinion, is the most serious drawback to using it: its rapid evaporation ultimately leaves the insects, etc., unprotected.]
HAUNTS. — Having given a brief outline of the capture, setting and storing of an ordinary insect, I will, in as few words as possible, give a short history of any peculiarities attending the capture of extraordinary insects.
HAUNTS. — Having provided a brief overview of the capture, setting, and storing of a typical insect, I will, in as few words as possible, share a brief history of the unique characteristics associated with the capture of extraordinary insects.
Some butterflies and moths (the autumnal appearing species) live through all the winter hid up in hollow trees, outhouses, etc.., appearing at the first rays of the spring sun to lay their eggs and die. Others pass through the frost and snow as pupae, bursting their cerements in the sunshine, to live their brief life and perpetuate their race; others eke out a half dormant existence as minute larvae, others pass the winter in the egg state. In fact, each species has its idiosyncrasy. [Footnote: Here, perhaps, I may explode that myth and "enormous gooseberry" of the mild winter or early spring, headed in the newspaper every year as "Extraordinary Mildness of the Season": "We are credibly informed that, owing to the mildness of the past week, Mr. William Smith, of Dulltown, Blankshire, captured a splendid specimen of a butterfly, which a scientific gentleman to whom it was sent pronounced to be the small tortoiseshell Vanessa, etc.." Now the fact is, that Urticae merely came out for an airing, awakened from its winter sleep by the extraordinary warmth of the day, and it might just as likely have been "shook up" on the preceding Guy Faux or Christmas-day; all the Vanessidae, and many others, being hybernators. Far different, however, is it when any of the "Whites" — Pieridae — are seen or caught. They indeed do herald the coming spring, as, lying in the chrysalis state throughout the autumn and following winter, some degree of continuous warmth must take place 'ere they can emerge.]
Some butterflies and moths (the ones that appear in autumn) survive the entire winter hidden in hollow trees, sheds, and similar places, and then come out with the first rays of the spring sun to lay their eggs and die. Others make it through the frost and snow as pupae, breaking out of their cocoons in the sunshine to live their short lives and continue their species; some get by in a semi-dormant state as tiny larvae, while others spend the winter in the egg stage. In fact, each species has its own quirks. [Footnote: Here, I might as well bust that myth and exaggerated claim of the mild winter or early spring, headlined in the newspapers every year as "Extraordinary Mildness of the Season": "We have reliable information that, due to the mildness of the past week, Mr. William Smith of Dulltown, Blankshire, captured a beautiful butterfly specimen, which a scientific expert confirmed to be the small tortoiseshell Vanessa, etc.." The truth is, that Urticae just came out for some fresh air, roused from its winter slumber by the unusual warmth of the day, and it could just as easily have been "woken up" on the previous Guy Fawkes night or Christmas day; all the Vanessidae, along with many others, hibernate. However, it's a whole different story when any of the "Whites" — Pieridae — are spotted or caught. They truly signal the arrival of spring, as they remain in the chrysalis stage throughout the autumn and following winter, needing some degree of continuous warmth before they can emerge.]
The swallow-tail butterfly, first on some British lists, must be sought for in the fens of Norfolk, and Cambridgeshire, and Northamptonshire. It is a strong flyer, and requires running down, unless when settled on the head of one of the various umbelliferous plants it delights in. The clouded yellow is usually a lover of the sea-coast during the months of August and September — though in that year of strange climatic changes (1877) it appeared in considerable numbers from the beginning of June, whether hybernated, or an early brood evolved from pupae lying dormant throughout the last summer, is an open question.
The swallow-tail butterfly, first recorded on some British lists, can be found in the fens of Norfolk, Cambridgeshire, and Northamptonshire. It flies powerfully and needs to be chased down, unless it's resting on the heads of the various umbelliferous plants it enjoys. The clouded yellow typically prefers coastal areas during August and September, but in the unusual climatic year of 1877, it appeared in large numbers starting in early June. Whether this was due to hibernation or an early generation emerging from pupae that lay dormant throughout the previous summer remains uncertain.
The Purple Emperor, now one of our rarest insects (I have not seen it alive since the time when I was a boy, and saw it around the oaks of Darenth Wood), was formerly captured by the aid of a net fixed to a pole 30 ft. or 40 ft. long. But accident or science discovered, however, that this wearer of Imperial purple possessed a very degraded taste, descending, in fact, from the tops of the highest oaks to sip the juices from any decaying or excremental matter. Now, therefore, the recognised bait is a dead dog or cat in a severe state of "highness." The "gamekeeper's museum" in the few places where Iris now resorts may be searched with advantage, yielding also a plentiful supply of beetles of various sorts. The "Holly Blue" I have noticed to have a similar degraded taste.
The Purple Emperor, now one of our rarest insects (I haven't seen it alive since I was a kid, when I spotted it around the oaks of Darenth Wood), used to be captured with a net attached to a pole that was 30 to 40 feet long. But either by chance or through research, it was found out that this insect with its imperial purple coloration has surprisingly poor taste, as it drops down from the tallest oaks to feed on rotting or fecal matter. So now, the preferred bait is a dead dog or cat in a state of serious decomposition. The "gamekeeper's museum" in the few locations where the Iris still appears can be searched for these insects, and it also has a good supply of various beetles. I've also noticed that the "Holly Blue" shows a similar poor taste.
Mud holes also in hot weather attract many butterflies, as do the sweet exudations from various trees, or from fallen or over-ripe fruit.
Mud holes, even in hot weather, attract a lot of butterflies, just like the sweet sap from different trees or from fallen or overripe fruit.
Occasionally a high-flying insect may be induced to follow to the ground a stone or piece of turf thrown up in front of it. The persistent manner in which some species will return again and again to the very same spot is something wonderful. The same flower head, the same muddy puddle or patch of road, is selected. The collector, if foiled in his first attempt, will do well, therefore, to wait for the probable return of his prize. Certain species frequent the chalk district only, others woods and sandy lanes; some are found only high up in the mountains of the north, others but in the low-lying valleys of the south.
Sometimes, a high-flying insect can be prompted to follow a stone or a clump of grass tossed in front of it to the ground. It's amazing how some species will repeatedly return to the exact same spot. They choose the same flower head, the same muddy puddle, or stretch of road each time. If a collector fails in their first attempt, it's wise to wait for the insect to return. Certain species are found only in chalk areas, while others prefer wooded or sandy paths; some are located only high in the northern mountains, and others are found only in the low-lying valleys of the south.
The sea coast has its specialities, some insects even flying well out to seaward, in crossing from land to land. I remember a "crimson-speckled footman" moth, Deiopeia pulchella, flying on board a steamship whilst we were fully a hundred miles from the nearest land. No place, in fact, should be disregarded in which to search for insects, for some are so exceedingly local that a district of perhaps twenty miles in extent may be searched in vain for a desired species, until the collector suddenly comes upon one or two fields swarming with them.
The sea coast has its own unique features, with some insects even flying far out to sea while traveling from one land to another. I remember a "crimson-speckled footman" moth, Deiopeia pulchella, flying onto a steamship when we were already a hundred miles from the nearest land. No location should be overlooked when searching for insects, as some species are so rare that you might look through an entire area of about twenty miles without success, only to suddenly find one or two fields filled with them.
Nor is this all, for in the case of two or three extremely local species, but one or two spots in the British Isles are their favoured haunts. Bean fields in flower, clover and lucerne fields in sunshine, are first-class hunting grounds, whilst on cloudy or very windy days many butterflies, such as the Blues, may be found resting on grasses or on tree trunks in woods; or, as in the case of the Hairstreaks, higher up under the leaves. Beating the boughs with a long stick will often force insects to fly, when their presence is unknown to us.
Nor is this all, because for a couple of very localized species, only one or two places in the British Isles are their preferred habitats. Flowering bean fields, as well as clover and lucerne fields in the sun, are excellent spots for hunting. On cloudy or very windy days, many butterflies, like the Blues, can be found resting on grasses or tree trunks in the woods; or, like the Hairstreaks, higher up under the leaves. Tapping the branches with a long stick will often make insects fly out when we weren't even aware of their presence.
I have hitherto spoken of the collecting of insects by day only, but as there are many insects — moths — which appear but at night, we must follow them to their haunts, prepared with lantern and net. In the dusk of the evening, just as the sun sets and twilight comes on, we must take our stand near the flowers frequented by certain moths. In spring the blue bell, cherry, and apple blossom may be watched.
I have only talked about collecting insects during the day so far, but since many insects—like moths—come out at night, we need to track them down to their hiding spots, armed with a lantern and net. As evening falls, right when the sun sets and twilight begins, we should position ourselves close to the flowers that certain moths are drawn to. In spring, you can observe the bluebell, cherry, and apple blossoms.
Later on, the blossoms of lime trees, flowers of the honeysuckle, bramble, petunias, scabious, and a host of others. Nettle beds also are great hunting localities at this time of the evening for many moths. Dark and sheltered hedgerows of lanes, fields of mowing grass, willows near water, heather, the seashore, all add their quota to the persevering entomologist. The sallow blooms (commonly called "palm"), both male and female, must be searched early in spring time for the whole of the genus Taeniocampa and many other newly-emerged or hybernated species. As they usually drop at the first contact of the light from the lantern, the net must be held under them, or a sheet may be spread under the bush, and those which do not fall at first may be shaken off the blooms with a smart stroke or two of a stick. If the bushes are not high, "hand-picking" with the net held in readiness is really the best.
Later on, the blooms of lime trees, honeysuckle flowers, brambles, petunias, scabious, and many others. Nettle patches are also great spots for hunting moths at this time of evening. Dark, sheltered hedgerows along lanes, fields of cut grass, willows by the water, heather, and the seashore all contribute to the dedicated entomologist's findings. The sallow blooms (commonly called "palm"), both male and female, should be searched early in spring for the entire genus Taeniocampa and many other newly-emerged or hibernated species. Since they usually drop at the first contact with the lantern light, the net should be held underneath them, or a sheet can be spread under the bush; those that don’t fall immediately may be shaken off the blooms with a quick stroke or two of a stick. If the bushes aren't too tall, "hand-picking" with the net ready is actually the best method.
Ivy blooms in the autumn are also sure finds, several species — many of great rarity — being taken off this plant at night. Owing to the usual localities in which ivy is found, the spread sheet and subsequent "beating" come in more often than the safer method of "netting" and "bottling."
Ivy flowers in the fall are also great discoveries, with several species—many of which are quite rare—being collected from this plant at night. Because of the typical places where ivy grows, using a spread sheet and then "beating" is more common than the safer methods of "netting" and "bottling."
Light is also a great attraction to many moths, some of our greatest rarities being captured frequently, inside or outside street lamps, and the spectacle is by no means rare to see a "grave and reverend signor" climbing up the lamp-posts at a most unseemly hour of the night in search of specimens. Lighthouses have also yielded important captures, and there are worse things than being on friendly terms with the cleaner of street lamps, or the keeper of a lighthouse. True, you will get some awful rubbish, but the day will come when Alniaria or Celerio (which latter I once received alive), or some other rarity, will reward your faith. Light surfaces, such as white cloths or sheets left out all night, sometimes attract moths.
Light also attracts many moths, and we often catch some of our rarest species around street lamps, both inside and outside. It’s not uncommon to see a “serious and respected gentleman” climbing lamp-posts at odd hours of the night looking for specimens. Lighthouses have also produced significant finds, and having a good relationship with the street lamp cleaner or the lighthouse keeper isn’t the worst thing. Sure, you’ll come across some awful stuff, but eventually, a day will come when Alniaria or Celerio (which I once received alive) or some other rarity will reward your efforts. Light-colored surfaces, like white cloths or sheets left out overnight, can also attract moths.
SUGARING. — The great nostrum for capturing moths is — "Sugar!" A legend tells that many years ago someone discovered (or imagined) that moths came to an empty sugar cask, situate somewhere in a now-unknown land; and acting as the Chinaman is said to have done, in re the roast pork — thought perhaps that the virtue resided in the barrel, and accordingly carted it off into the woods, and was rewarded by rarities previously unknown. A sage subsequently conceived the grand idea that the virtue resided in the sugar and not in the cask, and afterwards came the idea of an improved "sugar," made as follows:
SUGARING. — The ultimate trick for catching moths is — "Sugar!" There's a legend that a long time ago, someone discovered (or imagined) that moths were drawn to an empty sugar barrel, located somewhere in a now-forgotten place; and just like the story about the Chinaman and his roast pork, they thought the value was in the barrel itself, so they took it off into the woods and were rewarded with rare finds that were previously unknown. Later, a wise person realized that the real attraction was in the sugar, not the barrel, leading to the development of an improved "sugar," made as follows:
Coarse brown sugar (foots), 1 lb.
Coarse brown sugar (foots), 1 lb.
Porter (or ale), 1 gill.
Porter (or ale), 1 gill.
Treacle (common), 0.25 lb.
Molasses (common), 0.25 lb.
Rum, a wineglassful or 0.5 quartern.
Rum, a glassful or 0.5 quart.
Mix together the sugar, treacle, and beer in a saucepan, and bring the mixture to the boiling point, stirring it meanwhile. Put it in corked bottles, and just before you wish to use it add the rum. Aniseed is sometimes used as the flavouring medium. Honey is also substituted for sugar, and sometimes the whole is mixed unboiled; but if the collector will try the foregoing recipe, the result of many years' experience, he will, I am sure, be thoroughly satisfied.
Mix the sugar, molasses, and beer in a saucepan, and bring the mixture to a boil while stirring. Pour it into corked bottles, and right before you want to use it, add the rum. Aniseed is sometimes used for flavor. Honey can also replace the sugar, and sometimes everything is mixed without boiling; but if you try the previous recipe, based on many years of experience, I’m sure you’ll be very satisfied.
The entomologist having provided himself with a bottle of the foregoing mixture, a tin pot to pour it into, and a brush to lay it on with, the net figured at Fig. 46, the cyanide bottle, a collecting box, and a lantern, is equipped for sugaring.
The entomologist, having gathered a bottle of the mixture mentioned earlier, a tin pot to pour it into, and a brush to apply it with, along with the net shown in Fig. 46, the cyanide bottle, a collecting box, and a lantern, is ready for sugaring.
A special sugaring can may be made from a tin canister, to the rim of which a sort of funnel has been soldered in such a manner as to prevent any spilling of the contents, and to the lid of which a brush has been affixed. The wood-cut (Fig. 51), will explain.
A special sugaring can can be made from a tin canister, to the rim of which a kind of funnel has been soldered in a way that prevents any spilling of the contents, and to the lid of which a brush has been attached. The wood-cut (Fig. 51) will explain.
This is, however, but a "fad," intended to do what it never does — viz., keep your fingers from sticking, and "your tongue from evil speaking" about the "messiness" of the sugar.
This is, however, just a "fad," meant to do what it never actually does — that is, keep your fingers from getting sticky, and "your tongue from badmouthing" the "messiness" of the sugar.
 Fig. 51 —
Sugaring can.
Fig. 51 —
Sugaring can.All seasons of the year (except when too great an abundance of a favourite flower abounds) yield a certain percentage of moths attracted by sugar. Mild nights in the depth of winter, or in very early spring, sometimes afford rarities, and certainly many hybernated common species. Warm, cloudy nights, with a little wind stirring, are generally the most favourable; but one of the best nights I ever had amongst the "Peach Blossoms" and "Buff Arches" (Thyatira batis and derasa) was in a wood in Warwickshire, when the rain fell in torrents, accompanied with fierce lightning and thunder, from about 11 p.m. until 6 the next morning. On this night everything swarmed, a hundred or more common things on one patch of sugar being of frequent occurrence.
All seasons of the year (except when there's too much of a favorite flower) attract a certain number of moths drawn to sugar. Mild nights in the middle of winter, or very early in spring, can bring out rarities, and definitely many common species that hibernate. Warm, cloudy nights with a bit of wind are usually the best; however, one of the best nights I ever experienced among the "Peach Blossoms" and "Buff Arches" (Thyatira batis and derasa) was in a forest in Warwickshire when it poured rain, along with fierce lightning and thunder, from about 11 p.m. until 6 the next morning. That night, everything was everywhere, often with a hundred or more common species found on just one patch of sugar.
Moonlight nights are, as a rule, blank ones for the "sugarer" — (Do the moths fly high to the light?) — but I once had a grand capture of many specimens of the "sword-grass" (C. exoleta) on a bright moonlight and very windy night in February; and Dr. Knaggs says that on one occasion he met with night-flying moths literally swarming on a sugared fence in a field once in his possession, whither, in the small hours, he had taken a stroll with a friend on the brightest moonlight morning it was ever his lot to behold.
Moonlit nights are usually quiet for the "sugarer" — (Do moths fly up to the light?) — but I once had an amazing night catching many specimens of the "sword-grass" (C. exoleta) on a bright, windy night in February. Dr. Knaggs mentions that one time he encountered night-flying moths literally swarming on a sugared fence in a field he used to own, where he strolled with a friend in the early hours of the brightest moonlit morning he had ever seen.
Many nights which appear the most favourable will, on the contrary, be unaccountably disappointing; not a single moth will make its appearance. The presence of ground-fog, "honeydew," more attractive flowers, or a coming change of wind or temperature (nothing caring to stir in an east, north, or northeast wind) will sometimes account for this.
Many nights that seem the best can surprisingly turn out to be really disappointing; not a single moth will show up. Factors like ground fog, "honeydew," more appealing flowers, or an approaching shift in wind or temperature (nothing likes to move in an east, north, or northeast wind) can sometimes explain this.
"Showers, rain, thunderstorms, provided they are accompanied by warmth, are," says Dr. Knaggs, "very favourable, and the catch during these conditions of the atmosphere will generally repay the inconvenience of a wet jacket. On one terrible night, when the lightning was perfectly terrific, almost blinding even, though my companion's eyes and mine were kept upon our work, an incredible profusion of moths of various kinds were hustling one another for a seat at the festive board, and continued thus to employ themselves until a deluge of rain swept both sweets and moths away from their positions. On another stormy night, I well remember having counted no less than a hundred and fifty moths of several sorts and sizes struggling for the possession of two small patches of sugar. Perhaps the best condition of the air may be described as cloudy overhead, but clear and free from ground-fog near the earth; and when this state of things has been preceded by sultry weather, and a steady west, south, or south-west wind is blowing at the time, the collector need not fear the result, for he can hardly fail to be successful."
"Showers, rain, and thunderstorms, as long as they come with warmth, are," says Dr. Knaggs, "very beneficial, and the catch during these weather conditions will usually make up for the hassle of getting wet. One stormy night, when the lightning was absolutely intense, nearly blinding even, my companion and I stayed focused on our work while an incredible number of moths of different types jostled for a spot at the feast, continuing to do so until a downpour washed both the sweets and the moths away. I vividly remember another stormy night when I counted at least one hundred and fifty moths of various kinds and sizes fighting over two small patches of sugar. The ideal weather condition might be described as cloudy above, but clear and free of ground fog near the surface; and if this follows sultry weather, with a steady west, south, or south-west wind blowing, the collector can expect a successful outing."
July is usually one of the very best months for sugaring, and, if warm, what can be more charming than to select a fine night at this season of the year and to spend it in the woods?
July is typically one of the best months for sugaring, and if it's warm, what could be more delightful than choosing a lovely night during this time of year to spend in the woods?
Just before dusk get your sugar painted on the trees, at about the height of your chest, in long narrow strips, taking care not to let any fall at the foot of the tree or amongst the adjacent bushes (though I have sometimes done very well by sugaring low down near the foot of the tree). Just as the nightjars and bats begin to fly you will have finished the last tree of your round, and rapidly retracing your steps to the first you will perhaps see a small moth, with wings raised, rapidly flitting up and down your patch of sugar. This is most probably the "Buff Arches," usually first to come; in fact, during the summer months, it is perhaps as well to get the sugar on at eight o'clock, as I have known this species, the "Peach Blossom" and the "Crimson Underwings" (Catocala promissa and sponsa), to come on the sugar in bright light while yet the last rays of the sun were lighting the westward side of the tree-trunk, when all the rest lay in shadow.
Just before dusk, apply your sugar to the trees at about chest height, in long, narrow strips, making sure not to let any fall at the base of the tree or in the nearby bushes (though I've had success sugaring low down near the bottom of the tree). As the nightjars and bats start to fly, you'll finish the last tree on your route and quickly head back to the first tree. You might spot a small moth with its wings raised, flitting up and down your patch of sugar. This is likely the "Buff Arches," usually the first to show up; in fact, during the summer months, it's often best to apply the sugar by eight o'clock, as I've seen this species, along with the "Peach Blossom" and the "Crimson Underwings" (Catocala promissa and sponsa), come to the sugar while there’s still bright light, with the last rays of the sun hitting the west side of the tree trunk while everything else is in shadow.
 Fig. 52
If you are not facile princeps at "bottling," do not attempt it with the three or four species named above, but strike them with the net at once, for they are the most skittish of noctuae, especially in the early part of the evening. Striking down such insects with a parchment-covered battledore, which Dr. Guard Knaggs considers inflicts the least injury, or impaling them with a triangle of needles stuck in cork, in the manner shown in Fig. 52, or even with a single darning needle, has been recommended, but after a trial I have come to the conclusion that such plans are clumsy in the extreme.
If you're not skilled at "bottling," don’t try it with the three or four species mentioned above. Instead, catch them with a net right away, because they are the most jumpy of nocturnal insects, especially early in the evening. Using a parchment-covered battledore to knock down these insects, which Dr. Guard Knaggs thinks causes the least harm, or impaling them with a triangle of needles stuck in cork, as shown in Fig. 52, or even using a single darning needle, has been suggested. However, after trying it myself, I've concluded that these methods are incredibly awkward.
A little practice will enable the beginner to dispense even with the net, which tends to "rub" such dashing or unquiet insects, and to rapidly cover them with a large cyanide bottle, or, failing this, with the instrument shown in Fig. 53, which is a combination of the "drum" and cyanide bottle, and will be found very useful for skittish insects. A, represents a cyanide bottle with no neck — a wine or ginger-beer bottle cut down, by filing it around, and then tapping it smartly, does very well on an emergency.
A little practice will allow beginners to even forgo the net, which tends to "brush off" quick-moving or restless insects, and quickly cover them with a large cyanide bottle, or, if that’s not available, with the device shown in Fig. 53, which combines the "drum" and cyanide bottle, making it very useful for skittish insects. A represents a neckless cyanide bottle—cut down a wine or ginger beer bottle by filing it around the top, then tapping it smartly works well in a pinch.
 Fig. 53
On this is fixed a tin cylinder, B, having a slot cut in at D, in which a diaphragm, C, works, and is prevented from falling out by a stud fixed to its inside, and from falling inside by the stud above C. To use this, the bottom must be stopped with a cork, through which a piece of stout wire is bolted, the wire to come up to, but just underneath, the slot D, allowing the diaphragm to close. In action this machine is worked thus: Supposing an insect is seen resting on a flat surface, such as palings, a wall, or the trunk of a tree, you having previously removed the cork and pulled the diaphragm out of the slot to its full extent, take aim, as it were, at the insect with the open mouth of B, and rapidly cover him with it. The moth, or what not, as a matter of course, flies toward the light which is at the bottom of the bottle, A; directly it has done so you push in the diaphragm, which of course effectually bottles him up. Now enter the cork in the mouth, B, and pull out the diaphragm again to allow the cork to pass to its place in the mouth of the cyanide bottle, which stopping is of course fatal to the insect.
On this, there’s a tin cylinder, B, with a slot cut in at D, where a diaphragm, C, operates. It’s kept from falling out by a stud fixed inside and from falling in by the stud above C. To use this, you need to seal the bottom with a cork, through which a sturdy wire is bolted. The wire should reach up to, but just below, the slot D, allowing the diaphragm to close. To use this machine, follow these steps: If you spot an insect resting on a flat surface, like a fence, wall, or tree trunk, first remove the cork and pull the diaphragm out of the slot all the way. Aim the open mouth of B at the insect and quickly cover it. The insect will naturally fly toward the light at the bottom of the bottle, A. Once it does, push in the diaphragm, which will effectively trap it inside. Now place the cork in the mouth of B, and pull the diaphragm out again to let the cork settle in the mouth of the cyanide bottle, which will be fatal to the insect.
 Fig. 54
The "sugaring drum" referred to is thus described and figured by Dr. -Knaggs; and it will be seen that in its main principle it is similar to my diaphragm bottle, sans cyanide:
The "sugaring drum" mentioned is described and illustrated by Dr. -Knaggs; and it will be noted that in its basic principle it is similar to my diaphragm bottle, sans cyanide:
"This is a hollow metal tube of two or three inches diameter, over one end of which a piece of gauze has been strained, while at the other end a valve, to open and shut the mouth, works in a transverse slit (shown in Fig. 54). To use it we open the valve and deftly place the mouth of the drum over the insect which, in nineteen cases out of twenty, flies towards the gauze. We then seize the opportunity to close the valve, and pushing the corked piston represented at the right side of the figure against it, once more open the valve, and force the capture up to the gauze, through which it may be pinned, and the piston should then be withdrawn with the insect stuck upon it."
"This is a hollow metal tube about two or three inches in diameter, with a piece of gauze stretched over one end. At the other end, there’s a valve that opens and closes the mouth, working through a horizontal slit (shown in Fig. 54). To use it, we open the valve and carefully place the mouth of the drum over the insect, which in nineteen out of twenty cases flies toward the gauze. We then take the chance to close the valve, and by pushing the corked piston shown on the right side of the figure against it, we open the valve again and force the insect up to the gauze, where it can then be pinned. After that, the piston should be withdrawn with the insect stuck to it."
After all, I like nothing so well as working two or three large cyanide bottles in this manner: Get some 6 oz. or 8 oz. bottles, with as large mouths as possible--a confectioner's small and strong glass jar is about as good a thing as you can get. To this have a cork, cut as tightly as possible, sloping outwards above the bottle some little distance, to afford a good grip. Fill with cyanide as before directed, putting in enough to make the bottles work quickly. When you see one of the restless hovering kind of insects at your sugar, aim at him stealthily, as it were, with the mouth of your bottle, and when near enough rapidly close the mouth over him — ten to one he flies to the light, and with a little management you can contrive to get the bottle recorked. Let him remain in the bottle until stupefied, meanwhile using another bottle. When this is tenanted and the insect drops, gently shake him into the first bottle, using the last to capture the next insect, and so on. By using three bottles you can always have one disengaged, and the bottled insects can thus be allowed to remain a sufficient time to go dead before pinning.
After all, I enjoy nothing more than working with two or three large cyanide bottles like this: Get some 6 oz. or 8 oz. bottles with as wide a mouth as possible—a small, strong glass jar from a candy shop is about the best option you can find. To this, have a cork that’s cut as tightly as possible, sloping outward above the bottle a little way to give a good grip. Fill it with cyanide as previously directed, adding enough to make the bottles work quickly. When you spot one of those restless insects hovering around your sugar, aim at it quietly with the mouth of your bottle, and when you're close enough, quickly close the mouth over it—chances are it will fly toward the light, and with a bit of management, you can manage to recork the bottle. Let it stay in the bottle until it's stupefied, while using another bottle. When the second one is occupied and the insect drops, gently shake it into the first bottle, using the last bottle to catch the next insect, and so on. By using three bottles, you can always keep one free, allowing the captured insects to remain long enough to die before pinning.
Many insects sit very quietly at the sugar, but some few have a nasty trick of "dropping" at the least alarm; to prevent this, the whipcord of the net (Fig. 43 or Fig. 46), should be always pressed close to the tree to receive them. The cyanide bottle should be held with the left hand, and the insect gently "flicked" in with a disengaged finger, the cork held in the right hand to close the bottle as quickly as possible.
Many insects stay very still at the sugar, but a few have the bad habit of "dropping" at the slightest disturbance; to avoid this, the string of the net (Fig. 43 or Fig. 46) should always be held close to the tree to catch them. You should hold the cyanide bottle with your left hand, and gently "flick" the insect inside with a free finger, using your right hand to quickly close the bottle with the cork.
My readers will say, How is the necessary lantern held all this time? Between the teeth by a piece of wood, or leather, fixed round the top or swinging handle; or by being strapped on the chest at the height of the sugar patch. This is, of course, on the assumption that you work solus — not too pleasant if in a lonely wood for three or four days and nights. Unless you are greedy, therefore, and wish to make a regular trade of your loneliness, you will find that a friend, holding the lantern or net while you "bottle," is not by any means prohibitory to enjoyable collecting. Two working together can get over more ground than one, and what one friend misses, the other stops.
My readers might wonder, how is the necessary lantern held all this time? Between the teeth with a piece of wood or leather, attached to the top or a swinging handle; or strapped to the chest at the height of the sugar patch. This assumes, of course, that you're working solus — not too pleasant if you're in a quiet woods for three or four days and nights. Unless you're really keen and want to make a business out of your solitude, you'll find that having a friend hold the lantern or net while you "bottle" doesn't take away from the fun of collecting. Two people working together can cover more ground than one, and what one friend misses, the other catches.
From dusk to eleven on a favourable night in the summer months the fun is fast and furious; thousands of moths of the common sorts come and go; now and then a "good thing" to sweeten the toil. The "Peach Blossoms" and "Buff Arches" slacken at about half-past nine, and do not reappear until exactly the same light reappears in the morning, going on well into the daylight. In fact, I have taken them still coming to the sugar as late as a quarter past three, when the first rays of the sun were just appearing.
From dusk until eleven on a good night during the summer months, the action is intense; thousands of common moths come and go, with occasional highlights to make the effort worth it. The "Peach Blossoms" and "Buff Arches" slow down around half-past nine and don’t come back until the same light returns in the morning, sticking around well into daylight. In fact, I've seen them still coming to the sugar as late as a quarter past three, when the first rays of the sun were just starting to show.
This is one of the most curious things about sugaring. The swarming of one species at a certain hour of the night, their almost total disappearance, and their replacement by moths of quite a different genus, giving way again to others; then comes a lull — remarked by everyone — between half-past eleven and one or half-past, then a rush again up to daylight, when they all disappear, save one or two, who remain until they tumble dead drunk off the tree--a shocking example to the wood fairies, who are popularly supposed to draw the line at rum!
This is one of the most interesting things about sugaring. One species swarms at a certain time during the night, then almost completely disappears, only to be replaced by moths from a different genus, which are then replaced by others; after that, there's a noticeable lull—something everyone notices—between 11:30 and 1:30, followed by another surge until dawn, when most of them vanish, except for one or two, who stay on the tree until they fall off, dead drunk—a shocking sight for the wood fairies, who are thought to avoid rum!
Another curious thing is that you may sugar in a wood for years and will always find certain trees unprofitable. I remember one tree in a favourite wood, which tree I sugared for years without taking a single moth from it. You can assign no reason for this, as the unproductive tree may be precisely similar to others on which insects swarm. As a rule, however, rough-barked trees are the best; and smooth, or dead or rotten ones, the worst. Still there is no hard-and-fast line in this.
Another interesting thing is that you can tap trees for sap for years and still find some trees just aren’t worth it. I remember one tree in a favorite spot that I tapped for years without getting a single moth from it. There's no clear reason for this, since that unproductive tree might be exactly like others where insects thrive. Generally, though, rough-barked trees are the best, while smooth, dead, or rotten ones are the worst. Still, there are no strict rules about this.
Failing trees on which to put your sugar, paint palings, walls, bushes, leaves of plants, and even flower heads: or, if working on the seashore, on which several rare and local species are found, "sugar" flat stones, rocks, or even make bundles of the mat weed, as you will have to do on the "denes" of Norfolk or similar places, and sugar them. If you are entirely at a loss for bushes or grasses, soak some pieces of cloth or calico, before leaving home, in the sugar, and peg them down on the ground, or stick them in the crevices of the rocks, if the latter are, from any cause, too wet to hold the sugar.
Failing trees where you can put your sugar, painted fences, walls, bushes, plant leaves, and even flower heads: or, if you’re working by the seaside, where you can find several rare and local species, "sugar" flat stones, rocks, or even bundle up the mat weed, as you need to do on the "denes" of Norfolk or similar areas, and sugar them. If you can’t find any bushes or grasses, soak some pieces of cloth or calico in sugar before you leave home, and then pin them down to the ground, or stick them in the cracks of the rocks, if they’re too wet to hold the sugar.
It often happens that moths will come to sugar, even when not freshly painted on the trees. I remember once taking several Crimson Underwings (C. promissa), and several other things, on sugar which was painted on the trees by a collector four nights before I arrived at the spot. Butterflies and several other things are often attracted by sugared trees, whether old or fresh; and Dr. Knaggs says that by day several butterflies, chiefly Vanessidae, a group comprising the "Peacock," the "Tortoiseshell," the "Red Admiral," the "Painted Lady," and the "Camberwell Beauty," have a penchant for the sugar, and may, by this means, be enticed within our reach; and the "Purple Emperor" has thus been frequently entrapped.
It often happens that moths are drawn to sugar, even if it’s not freshly applied to the trees. I remember once catching several Crimson Underwings (C. promissa) along with a few other species on sugar that had been painted on the trees by a collector four nights before I got there. Butterflies and other insects are often attracted to sugared trees, whether the sugar is old or new. Dr. Knaggs mentions that during the day, several butterflies, mainly from the Vanessidae family—which includes the "Peacock," the "Tortoiseshell," the "Red Admiral," the "Painted Lady," and the "Camberwell Beauty"—are drawn to the sugar and can be tempted to come within our reach; the "Purple Emperor" has been frequently caught this way.
Sugaring constantly in the same tract of woodland is certain ultimately to yield something out of the common, for moths have been proved to fly many miles in search of natural or artificial sweets, and even a barren locality may be made exceedingly productive by perseveringly sugaring it.
Sugaring continuously in the same area of the woods is sure to eventually produce something unusual, as it's been shown that moths can travel long distances in search of natural or artificial sweets. Even a seemingly unproductive spot can become very fruitful with consistent sugaring efforts.
Some very curious things come to sugar now and then. Such insects as beetles, woodlice, slugs, etc.., are expected as a matter of course, but toads, dormice, and bats — all attracted, however, I suspect, as much by the insects as the sugar — you do not expect, nor the sundry caterpillars which you occasionally can catch sipping at the sweet juice. The Hawk moths and Bombyces are popularly supposed not to come, but I have a distinct recollection of catching, near Woolwich, many years ago, a "goat moth" certainly "inspecting" the sugar, and analogous but isolated instances now and then occur.
Some really interesting things come to sugar from time to time. Insects like beetles, woodlice, and slugs are expected, but you wouldn’t anticipate toads, dormice, and bats—though I suspect they’re drawn to the insects as much as the sugar. You also don't expect the various caterpillars you might occasionally find sipping the sweet juice. People generally think that Hawk moths and Bombyces don’t show up, but I clearly remember catching a "goat moth" near Woolwich many years ago, definitely "checking out" the sugar, and similar but rare instances happen now and then.
In the grey of the morning, when sugaring is finished, it will be as well to keep your eye on the hedgerows or heaths you may pass, as occasionally certain insects swarm at an early hour, and now and then important captures may be made.
In the early morning, after sugaring is done, it’s a good idea to pay attention to the hedgerows or heaths you pass by since sometimes certain insects gather in swarms at this time, and you might make some significant finds.
Before dismissing the subject of sugaring, it may be as well to say a few words on lanterns and chip boxes. With regard to the first, bull's eyes are generally recommended. Possibly, I may be prejudiced against them when I say that I think they concentrate the glare of light too suddenly and in too narrow a focus, causing thereby many insects to drop, which the broader stream of light from an ordinary lantern does not appear to do to such an extent.
Before dismissing the topic of sugaring, it might be worth mentioning a few things about lanterns and chip boxes. When it comes to the first, bull's-eye lanterns are usually recommended. I might be biased, but I believe they focus the light too sharply and narrowly, causing more insects to fall, which doesn’t seem to happen as much with the wider beam of light from a regular lantern.
I recommend, therefore, a medium-sized ordinary lantern, about 7 in. high by 4.5 in. by 3.5 in back to front, fitted with a double-wicked reservoir, holding sufficient oil to burn seven or eight hours. A screw cap should be fitted over the burners to prevent the oil running out and spoiling everything with which the lantern may be packed when travelling. The usual plate glass door should be made to open from the front, the glass sides, however, being replaced with bright metal, converging the rays from a strong reflector at the back; a swing handle should be fixed at the top and two at the back, all folding close to the lantern when not in use.
I recommend a medium-sized standard lantern, about 7 inches high, 4.5 inches wide, and 3.5 inches deep, equipped with a double-wicked reservoir that can hold enough oil to last seven or eight hours. A screw cap should cover the burners to stop the oil from spilling and ruining anything packed with the lantern while traveling. The usual plate glass door should open from the front, while the glass sides should be replaced with shiny metal to reflect light from a strong reflector at the back; a swing handle should be attached at the top and two at the back, all folding neatly against the lantern when not in use.
Plenty of ventilation, without allowing actual wind to penetrate, should be provided, and only the best colza oil be used. If made to order, a great advantage will be found in having the right-hand side to open outwards (from the back) instead of opening on the front, as the lantern can then be more easily trimmed when strapped on the body without the necessity of its removal for that purpose.
Enough ventilation should be provided without letting actual wind come in, and only the best colza oil should be used. If custom-made, it's much better to have the right-hand side open outwards (from the back) instead of opening at the front, as this makes it easier to trim the lantern while it's strapped onto the body without having to remove it for that purpose.
The chip boxes, which some entomologists use instead of the cyanide bottle to take the moths off the trees, are simply the various sized ointment boxes of the druggist, strengthened by papering, or by pieces of glued linen crossing them. Many use them, chiefly those of the old school, in preference to anything else — De gustibus, etc..
The chip boxes, which some entomologists use instead of cyanide bottles to collect moths from the trees, are just various-sized ointment containers from the drugstore, reinforced with paper or glued pieces of fabric crisscrossing them. Many of the old-school researchers prefer these over anything else—De gustibus, etc.
The objections to a general use of these boxes are many. First, you must provide yourself with a large bagful or pocketful of these boxes on starting out, as one moth only goes in each box, leaving one pocket empty on the reverse side of your coat to receive the boxes when filled, in order not to mix the empty with the full ones. Second, you are not quite sure at night as to "rubbed" or "chipped" specimens, and may find in the morning your boxes filled with worthless things, which a brief introduction to the cyanide bottle would long before have revealed.
The objections to widely using these boxes are numerous. First, you need to have a big bag or pocket full of these boxes when you start, since only one moth goes in each box. This means you’ll have one pocket on the other side of your coat empty to keep the filled boxes separate from the empty ones. Second, at night, it can be difficult to tell if specimens are "rubbed" or "chipped," and you might discover in the morning that your boxes are filled with useless items, which a quick check with the cyanide bottle would have easily revealed.
Third, the most important fact, that though there are many insects which rest quietly when boxed, there is a large percentage which pass the time of their captivity in madly dashing themselves against the walls of their prison, and a boxed insect of this turn of mind presents a sorry sight in the morning, many stages, in fact, on the wrong side of "shabby-genteel." Then when, after a night's severe work, you are limping home in the morning, thinking how cold it is — until roused to action by the appearance of some unexpected insect — then, indeed, how much more cold and hollow seems the world, when, suddenly catching your tired foot in a stump or tangle of grass, you roll over on the full pocket side and hear (and feel) the boxes burst up on the unhappy moths within. I have gone through it all, and I don't like it!
Third, the most important fact is that while many insects remain calm when boxed, a large number spend their time in captivity frantically banging against the walls of their container. A boxed insect like this looks pretty sad in the morning, often way past just being "a bit worn out." Then, when you’re limping home after a night of hard work, thinking about how cold it is—until you’re jolted back to reality by the sight of some random insect—how much colder and emptier the world feels. Suddenly, when you trip over a stump or a patch of grass, you fall over onto your pocket, and you hear (and feel) the boxes burst open, releasing the poor moths inside. I’ve experienced it all, and I really don’t like it!
ASSEMBLING - I had almost forgotten to mention another extraordinary way of catching moths (chiefly Bombyces), by what is called "assembling," which is exposing in a gauze-covered box a virgin female, who, by some mysterious power "calls" the males of the same species around her in so infatuated a manner that they will even creep into the collector's pocket in their quest of the hidden charmer.
ASSEMBLING - I had nearly forgotten to mention another incredible method of catching moths (mainly Bombyces), known as "assembling." This involves placing a virgin female in a gauze-covered box, who, through some mysterious ability, "calls" the males of the same species to her in such an obsessive way that they will even crawl into the collector's pocket in their search for the hidden charmer.
In a highly interesting paper in the "Country," of 2nd Oct., 1873, Dr. Guard Knaggs gave a very full account of the theory and practice of "assembling," so interesting, indeed, that I venture to reproduce it in extenso. He says:
In a very interesting article in the "Country," from October 2nd, 1873, Dr. Guard Knaggs provided a detailed account of the theory and practice of "assembling." It was so engaging that I feel compelled to reproduce it in extenso. He states:
"The generally accepted theory is that each female should, at one or other period of her existence, captivate at least one of the opposite sex, though it will be found by experience that some species possess a far more potent influence for this purpose than others.
"The widely accepted theory is that every female should, at some point in her life, attract at least one male, although experience shows that some species have a much stronger ability to do this than others."
"It may be set down as a rule that females which are captured at rest during the time of day or night at which they should naturally be upon the wing are unimpregnated, and may be used for attracting with fair chances of success. There may be exceptions to this rule; my opinion inclines to the belief that the butterflies take wing before impregnation; but of this I am certain, namely, that the females of butterflies — at any rate of certain species — have considerable influence over the males. Doubtless, too, there are many skittish Geometrae or slender-bodied moths, and Pyrales, or Pearls, which are easily frightened, the females of which will rush from their places of concealment even before they are prepared to start on the mission of ovipositing. The converse of this rule, that female insects captured on the wing are almost invariably impregnated, may be taken as an axiom, at least so far as the moth tribe is concerned. Of course females which have made their appearance in our breeding cages are the most eligible for the purpose of attraction; but whenever we breed these with the intention of using them for attracting, we must bear well in mind that the rearing process, whether from the chrysalis, the caterpillar, or the egg, must be conducted under surrounding conditions of temperature, etc.., as nearly as possible resembling those to which they would be subjected in their natural state. Otherwise, if we retard their appearance by keeping our breeding-cages in too cool a situation, we shall be too late for our sport, or at best capture only worn specimens; while, if we force them by an unnatural state of warmth, the males will not have made their appearance at large by the time we are ready to arrive upon the hunting-ground. Having furnished ourselves with a bred female, the next procedure will be to construct a cage for her reception in such a manner that the males will be compelled to keep within a respectful distance, and formed of such material as will permit the air to readily permeate the sides of the prison.
"It can be established as a rule that females caught resting during the time of day or night when they should naturally be flying are not fertilized and can be used for attracting with good chances of success. There may be exceptions to this rule; I believe that butterflies take flight before mating, but I am certain of one thing: the females of butterflies — at least certain species — have a significant influence over the males. There are also many skittish Geometrae or slender-bodied moths, and Pyrales, or Pearls, that are easily startled, and their females may flee from hiding spots even before they are ready to start laying eggs. The opposite of this rule, that female insects caught in flight are almost always fertilized, can be accepted as a principle, particularly for moths. Naturally, females that appear in our breeding cages are the best candidates for attracting; however, whenever we breed them with the goal of using them for this purpose, we must keep in mind that the rearing process, whether from the chrysalis, caterpillar, or egg, should be conducted under conditions of temperature, etc., as closely as possible resembling their natural environment. Otherwise, if we delay their emergence by keeping our breeding cages too cool, we will miss our opportunity for catching them or at best get only worn specimens; while if we push them by keeping them too warm, the males won't have emerged by the time we’re ready to hunt. Once we have a bred female, the next step is to create a cage for her that ensures the males will have to stay at a respectful distance and is made of material that allows air to easily flow through the sides of the cage."
 Fig. 55 —
Assembling cage.
Fig. 55 —
Assembling cage."The cage (Fig. 55) adapted to our requirements is a very simple affair; it is formed by bending our three strips of cane of about equal lengths each into the form of a circle, and fixing them in that form by means of twine; these three circular pieces are then placed in such a manner that they cross one another at right angles (Fig. 55), thereby forming the rudimentary outline of a hollow sphere, over which it is an easy matter to stretch and tie a piece of leno. When required for use the female may be put in, either loose or clinging to a twig of the length of the diameter of the globe, and the leno tied afterwards.
"The cage (Fig. 55) we created is quite simple; it's made by bending three strips of cane, all about the same length, into a circle and securing them with twine. These three circular pieces are arranged to cross each other at right angles (Fig. 55), creating the basic shape of a hollow sphere, which makes it easy to stretch and tie a piece of leno over it. When needed, the female can be placed inside, either loose or clinging to a twig the same length as the diameter of the globe, and then the leno can be tied shut."
"The theory of the peculiar action of the female upon the senses of the males is usually considered to be due to a subtle scent which emanates from her, and is wafted on the breeze to distant parts; and it is believed that by means of this scented track the males are enabled to discover the whereabouts of the object of their search. And that this would appear to be the true solution, no one who has witnessed the grand spectacle of the 'Kentish Glories' or the 'Emperor' moths coming up against the wind can, I should say, for a moment doubt.
"The idea that females have a unique effect on males' senses is usually thought to be linked to a subtle scent that they give off, which is carried by the wind to faraway places. It's believed that this scented trail helps males locate what they are searching for. Anyone who has seen the amazing sight of the 'Kentish Glories' or 'Emperor' moths flying against the wind can't seriously doubt that this is the actual explanation."
"To be attractive the female must be in that condition which is known by the fraternity as 'calling,' that is, she should be slightly convulsed with tremor, and the last segment of the body should be denuded of fur. Then, if the weather be propitious — bright for such males as fly in the sunshine, warm at dusk for those whose hour of flight commences with the shades of evening — and if also the wind be blowing steadily from a favourable quarter, such as west, south, or a gentle south-west, we may reasonably hope for success.
"To be attractive, the female must be in a state known as 'calling,' meaning she should show slight tremors, and the last part of her body should be bare of fur. Then, if the weather is favorable—sunny for those males that fly in the daytime, warm at dusk for those whose flying begins as evening falls—and if the wind is blowing steadily from a good direction, like west, south, or a gentle south-west, we can reasonably expect success."
"But the young collector must remember that it does not by any means follow that because he captures a female, say an 'Oak eggar,' on the wing in the evening, he has detected the time of flight of the males. In fact, it very frequently happens that the males fly in the daytime and the females in the evening.
"But the young collector must remember that just because he catches a female, like an 'Oak eggar,' in the evening, it doesn't mean he has figured out when the males are flying. In fact, it often happens that the males fly during the day while the females fly in the evening."
"In the case of species which inhabit open parts of the country, such as moors, mosses, commons, chases, fens, and fields, we should take care that no obstacle is in the way to prevent the current of air from carrying the scent freely over the locality. On the other hand, if it be the inmates of a wood or copse which we are desirous of attracting, we must either select a ride down which the wind finds its way, or else we shall have to allow the breeze to convey the scent from some part of the surrounding country to the outskirts of the wood.
"In the case of species that live in open parts of the country, like moors, mosses, commons, chases, fens, and fields, we should make sure there are no obstacles blocking the airflow that would carry the scent freely across the area. On the other hand, if we want to attract animals from a wood or thicket, we need to either choose a path where the wind can reach, or we’ll have to let the breeze carry the scent from some nearby area to the edge of the wood."
"As a rule, it is quite sufficient for our ends to lay the baited cage upon the ground, and then to lie down at a little distance off and keep watch. But in some cases it is advisable to tie the cage to the trunk or branch of a tree, or to fix it in a bush. I have found the latter very effective with the red-belted apple clearwing (Sesia myopiformis), and no doubt it would also prove so with other species of the class.
"As a general rule, it's usually enough for our purposes to set the baited trap on the ground and then lie down a short distance away to keep watch. However, in some situations, it's a good idea to tie the trap to the trunk or branch of a tree, or to secure it in a bush. I've found that the latter technique works really well with the red-belted apple clearwing (Sesia myopiformis), and I’m sure it would also be effective with other species in that group."
"Any Londoner who would like to judge for himself can easily manage it. He has only, in the first place, to hunt about in his own or some one else's garden for a handsome little caterpillar, of a blackish colour, spotted with pink, with four rows of thick tufts of yellowish hairs resembling brushes upon its back, with two long tufts of blackish hairs pointing forwards in front, almost like horns, and a similar one behind pointing backwards, something like a tail. It eats almost anything, and is easily reared.
"Any Londoner who wants to check for themselves can do so easily. They just need to search in their own or someone else's garden for a cute little caterpillar, which is dark-colored with pink spots, featuring four rows of thick tufts of yellowish hairs that look like brushes on its back. It has two long tufted strands of dark hairs pointing forward at the front, almost resembling horns, and a similar tuft at the back that looks a bit like a tail. It eats nearly anything and is easy to take care of."
When full fed it spins a web, in which it changes to a chrysalis; and, in time, from some of the cocoons thus formed, spider-like creatures will emerge and attach themselves to the outer part of the web. These should at once be removed (web and all), and placed securely in the cage already mentioned, when, if there be any males about, I will warrant it will not be long before the proprietor has a very tolerable idea of what is meant by attracting by the bred female."
When well-fed, it spins a web, where it transforms into a chrysalis; eventually, some spider-like creatures will come out from the cocoons formed and attach themselves to the outer part of the web. These should be removed immediately (web and all) and securely placed in the cage mentioned earlier. If there are any males present, I guarantee it won't be long before the owner has a good understanding of what is meant by attracting the bred female.
COLLECTING AND REARING LARVAE. — Very many insects are more easily collected in the larval or caterpillar stage than in the perfect one. Every tree, bush, or plant, the grass, and even the lichens growing on trees or walls, produce some larvae feeding on it. It would, I feel, be a work of supererogation to attempt to give detailed descriptions of food-plants and the insects feeding on them, when we have a book so good and cheap to fall back on as "Merrin's Lepidopterist's Calendar," which gives the times of appearance of butterflies and moths in all their stages, with localities and the food-plants of the larvae, and this for every month of the year.
COLLECTING AND RAISING LARVAE. — Many insects are much easier to collect in their larval or caterpillar stage than in their adult form. Every tree, bush, or plant, along with grass and even the lichens growing on trees or walls, hosts larvae that are feeding on them. I believe it would be unnecessary to provide detailed descriptions of food plants and the insects that feed on them when we have a book as excellent and affordable as "Merrin's Lepidopterist's Calendar," which outlines the appearance times of butterflies and moths in all their stages, along with their localities and the food plants for the larvae, for every month of the year.
For bringing caterpillars home, a larvae box is necessary; this should, if possible, be made of a cylinder of wire gauze or perforated zinc (see Fig. 56), capped top and bottom with zinc, the bottom a fixture, the top to lift off, dished inward towards an orifice with a tube soldered in it, which is kept corked until it is wanted to drop larvae down it. The tube coming well through into the cylinder, and narrowing inside to half its diameter at the top, prevents anything escaping, even if the cork should be left out, and also prevents the swarming out of the enclosed larvae, which would take place if the top were lifted off bodily.
To bring caterpillars home, you need a larvae box; this should ideally be made from a cylinder of wire mesh or perforated zinc (see Fig. 56), with a zinc cap on both the top and bottom. The bottom should be fixed, while the top should be removable and shaped inward towards an opening with a tube soldered into it, which is kept corked until you're ready to drop larvae down it. The tube should extend well into the cylinder and narrow to half its diameter at the top to prevent anything from escaping, even if the cork is missing, and to stop the larvae enclosed inside from swarming out if the top is completely removed.
Wooden canisters, such as tobacco is often stored in, make very good substitutes if small holes are bored in the side. Tin canisters, or, indeed, anything made entirely of metal, unless plenty of ventilation is afforded, as in Fig. 56, have a tendency to cause the enclosed larvae to sweat.
Wooden canisters, like those used for storing tobacco, are great alternatives if small holes are drilled into the side. Tin canisters, or anything made completely of metal, can cause the larvae inside to sweat unless there's enough ventilation, as shown in Fig. 56.
Some few hints as to collecting larvae may not be unacceptable. In the spring, just as the buds of various low plants and bushes break forth, they should be searched by night, by the aid of a lantern, for the larvae of various noctuae and geometrae then feeding. The best plants to search will be the mountain ash, bilberry, honeysuckle, and bramble, given in their order of merit. Many other plants may be advantageously searched, in fact, all low plants and bushes ought to be well looked over by the persevering collector.
A few tips on collecting larvae might be useful. In spring, just as the buds of various low plants and bushes start to bloom, they should be searched at night with a lantern for the larvae of different noctuae and geometrae that are feeding. The best plants to check are mountain ash, bilberry, honeysuckle, and bramble, in that order. Many other plants can also be worth searching; in fact, all low plants and bushes should be thoroughly examined by dedicated collectors.
Later on, sweeping, i.e., pushing a strong ring net through the grass, may be resorted to. The net for this should be made of strong wire in the shape of the net at Fig. 46, or 43, if without the joints, a bag of strong dowlas and a stick are attached, and the front square-ended part is pushed by the collector through the grass, in order to trap any low feeding or invisible insects. When the leaves are fully out on the trees, beating will shake many larvae, pupae, certain moths, beetles, etc.., into the net or sheet spread to receive them, Both sweeping and beating may be practised by night as by day.
Later on, sweeping, meaning using a sturdy ring net to push through the grass, can be used. The net should be made of strong wire, similar to the nets shown in Fig. 46 or 43, if it doesn’t have joints. A bag of strong fabric and a stick are attached, and the flat, square-ended part is pushed by the collector through the grass to capture any low-flying or hidden insects. When the leaves are fully out on the trees, beating will dislodge many larvae, pupae, certain moths, beetles, etc., into the net or sheet laid out to catch them. Both sweeping and beating can be done at night as well as during the day.
The situations in which larvae are found are many, some rolling themselves in nettle, oak, or other leaves; others boring into the substance of the wood itself, and some feeding in the stems of various bushes, plants, reeds, etc.. For life histories of such consult the pages of the Entomologist's Monthly Magazine, or Entomologist, both published every month at 6d. each; or Newman's "British Butterflies" and "British Moths," published as complete volumes at. 7s. 6d. and 20s. respectively. These latter are the finest works at the price in any language whatever, giving figures — perfect specimens of the wood engraver's art — of the whole of the Macro-Lepidoptera, backed up by exhaustive descriptions.
There are many situations where larvae can be found: some roll themselves in nettles, oak leaves, or other types of foliage; others burrow into the wood itself, and some feed on the stems of various bushes, plants, reeds, and more. For the life histories of these, check out the pages of the Entomologist's Monthly Magazine or Entomologist, both published monthly at 6d. each; or Newman's "British Butterflies" and "British Moths," available as complete volumes for 7s. 6d. and 20s., respectively. These latter works are the best available for the price in any language, featuring illustrations — perfect examples of wood engraving — of all the Macro-Lepidoptera, along with detailed descriptions.
 Fig. 56 —
Cage for collecting larvae.
Fig. 56 —
Cage for collecting larvae."Digging" in the dead months of the year, when the weather is mild, for pupae, is another method of getting insects. Corners where roots meet or spring from the trunks of trees, are good "harbours of refuge" for pupae; so are inner angles of walls, underneath sheltered hedgerows, or under isolated trees in parks or meadows, and a host of other spots.
"Digging" during the slow months of the year, when the weather is mild, is another way to find insects. Places where roots connect or grow from tree trunks are great "hiding spots" for pupae; so are the inner corners of walls, beneath protected hedgerows, or under lone trees in parks or meadows, along with many other locations.
The best places for "digging" are not always, as you would suppose, in the thickest parts of woods or shrubberies, but under skirting trees or in avenues. The best times for pupae are from October to January. Many people attain great proficiency in finding — the Rev. Joseph Greene, to wit. For my own part I must confess that I have never "earned my salt" at it, but that is possibly due to want of skill or perseverance.
The best spots for "digging" aren't always, as you might think, in the densest parts of woods or bushes, but under edge trees or in pathways. The best time for pupae is from October to January. Many people become very skilled at finding them — like the Rev. Joseph Greene, for example. Personally, I have to admit that I've never really "earned my salt" at it, though that might be due to a lack of skill or persistence.
The tools required are simply a trowel, a curved piece of steel fitted in a handle, or a three-cornered instrument similar to, but smaller than, the scraper used by shipwrights; anything, in fact, handy to carry, and efficacious in scratching up the sod at the roots of trees, or tearing off the pseudo-knots of bark which veil the pupae of various moths.
The tools you need are just a trowel, a curved piece of steel attached to a handle, or a smaller three-cornered tool similar to the scraper used by shipbuilders; basically, anything that's easy to carry and effective for scraping up the grass at the roots of trees or removing the fake knots of bark that cover the pupae of different moths.
When larvae or pupae are brought home, it will be necessary to place them in something which, though retaining them in captivity, yet allows them as natural conditions of living as is possible in a circumscribed space. Pupae, may be kept in a flower pot covered with earth, or in moss damped from time to time with water of not too cold a temperature. Over the flower pot may be strained two pieces of wire or cane, crossing each other in the form of arches, the whole covered with muslin; or a handier plan to get to the insects quickly when emerged, or to damp the pupae, is to procure from the glass merchant the waste cylinders of glass cut from shades, pasting over one end with "leno" or muslin, and placing the other in the flower pot on top of the earth or moss.
When you bring larvae or pupae home, you'll need to put them in a container that keeps them captive but also mimics their natural living conditions as much as possible in a limited space. Pupae can be kept in a flower pot filled with soil or in damp moss, which you should occasionally moisten with water that's not too cold. You can set up two pieces of wire or cane over the flower pot, arranging them in an arch shape and covering the whole setup with muslin. Alternatively, a more convenient way to quickly access the insects once they emerge or to moisten the pupae is to get some glass waste cylinders from a glass shop, which are leftover from shades. Just cover one end with "leno" or muslin and place the other end on the flower pot on top of the soil or moss.
This also makes a cheap substitute for the breeding cage for larvae, if a little earth only is put in the flower pot in which a bottle of water is placed containing the food plant. Wire gauze cylinders are handy as affording plenty of air to delicate larvae. Bandboxes with a square piece cut out from the top lid, the hole thus made covered with muslin, will do very well for breeding a quantity of a hardy common sort.
This also works as a cost-effective substitute for a breeding cage for larvae, as long as a bit of soil is added to the flower pot that contains a bottle of water with the food plant. Wire gauze cylinders are useful because they provide ample air for delicate larvae. Bandboxes with a square cut out of the top lid, covered with muslin, are great for breeding a large number of hardy common types.
 Fig. 57 —
Insect breeding cage
Fig. 57 —
Insect breeding cageThe usual wooden breeding cage is shown at Fig. 57. This requires hardly any explanation: A is a glass door, B B B are sides and top of perforated zinc, C is a tray fitting inside, where dotted lines are shown, to hold the earth in which the bottle of water holding food is placed, or where the larvae bury themselves to change to pupae. Properly, the inner tray of box C should be constructed of zinc perforated with a few holes at the bottom, in order that it may be lifted out to allow the pupae to be well damped when "forcing." [Footnote: For those larvae of butterflies and moths which do not require earth, it will be sufficient to have a zinc pan, with covered top perforated with holes, in which the stalks of the food plants be inserted in the water which fills the pan, whose covering prevents the insects from drowning themselves therein.]
The typical wooden breeding cage is shown in Fig. 57. It doesn't need much explanation: A is a glass door, B B B are the sides and top made of perforated zinc, and C is a tray that fits inside, indicated by the dotted lines, to hold the soil where the water bottle with food is placed, or where the larvae bury themselves to transform into pupae. Ideally, the inner tray of box C should be made of zinc with a few holes at the bottom so it can be lifted out to ensure the pupae get enough moisture when "forcing." [Footnote: For those larvae of butterflies and moths that don’t need soil, a zinc pan with a covered top that has holes will suffice. The stalks of the food plants can be inserted in the water that fills the pan, and the cover prevents the insects from drowning.]
"Forcing" is a method adopted to cause any moth to emerge at the collector's will, and several months before its proper time, it having been proved that certain moths more than others die in the chrysalis or pupa state if left to go their full time, notably the "Death's Head," the "Spurge," and other hawks. The best time for forcing is about Christmas, and the conditions are simply heat and moisture, the pupae being placed over a spirit lamp, in a hothouse, on the kitchen mantelpiece, or by the fire grate even, kept for a week or so at a temperature of 85 deg. or thereabout, and constantly damped with moss wrung out in warm water. Bear in mind that heat without moisture will not do by any means.
"Forcing" is a method used to make a moth emerge at the collector's timing, often a few months earlier than usual. It's been shown that certain moths, like the "Death's Head," the "Spurge," and other hawks, tend to die in the chrysalis or pupa stage if left to develop fully. The best time for forcing is around Christmas, and the key conditions are heat and moisture. You can place the pupae over a spirit lamp, in a hothouse, on the kitchen mantelpiece, or even by the fireplace, maintaining a temperature of about 85 degrees for a week or so, while keeping them damp with moss that's been soaked in warm water. Remember, heat alone without moisture is not effective at all.
The breeding cage itself need not be used, but only the tray, provided that gauze is stretched over in such a manner as to allow room for the moth to dry its wings on emergence. But if the whole of the breeding cage were made of framed zinc (such as aquaria are made of), and the glass and perforated zinc fixed in, the cost, though greater at first, would be more than counterbalanced by its greater strength, with lightness and capability of resisting wear and tear, added to which is the advantage of being used as a whole during the operation of "forcing," wood not standing, of course, the heat and moisture necessary. Breeding cages should not be painted.
The breeding cage itself doesn’t have to be used, just the tray, as long as gauze is stretched over it in a way that gives the moth enough space to dry its wings after it emerges. However, if the entire breeding cage were made from framed zinc (like what aquariums are made from), and the glass and perforated zinc were fixed in, the initial cost, although higher, would be more than offset by its enhanced strength, lightness, and ability to withstand wear and tear. Plus, it would have the added benefit of being usable as a whole during the "forcing" process, since wood obviously can’t handle the heat and moisture required. Breeding cages shouldn’t be painted.
Fresh food, and plenty of it, should, if possible, be supplied to the larvae. Dry food is, as a rule, the best, though the larvae of one or two of the foreign Saturnidae require their food to be sprinkled with water, and sometimes even with the addition of salt, to make them thrive. Moths on emergence should not be killed at once, as they are then too flaccid, and have not sufficiently purged themselves. Yet they should not be left too long or over night, as they often fly at that time, and knock themselves about in the cage, to the detriment of their beauty; destroying, in fact, the whole aim and end of breeding, which is of course, instituted to procure specimens for the cabinet as fine as it is possible to get them.
Fresh food, and lots of it, should be provided to the larvae whenever possible. Generally, dry food is the best option, although the larvae of a few foreign Saturnidae species need their food to be moistened with water and sometimes even sprinkled with salt to thrive. When moths emerge, they shouldn't be killed immediately, as they're too limp and haven't fully purged themselves. However, they shouldn't be left for too long or overnight, as they tend to fly around during that time and can injure themselves in the cage, damaging their appearance. This ultimately defeats the purpose of breeding, which is to produce specimens for display that are as perfect as possible.
In collecting insects it is always as well to bear in mind that a "worn" female, though not of the slightest use to the entomologist, unless she can be induced to lay in confinement, may become the progenitor of many, and may thus afford you during the next season great pleasure in collecting. This being so, I should like to impress upon my readers (the young especially) the propriety of giving all insects, not actually noxious, heir liberty, if on examination they prove to be useless as specimens. These remarks apply also to the case of hybernated females. Many female insects, though unwilling to lay in confinement, may be watched at large, and the flowers and plants on which they have from time to time rested, searched for their eggs.
When collecting insects, it’s important to remember that a "worn" female, while not very useful to an entomologist unless she can be encouraged to lay eggs in captivity, can become the ancestor of many and might provide you with great enjoyment in your collection next season. With this in mind, I want to emphasize to my readers, especially the younger ones, the importance of giving all insects that are not actually harmful their freedom if they turn out to be useless as specimens upon examination. This advice also applies to hybernated females. Many female insects, even if they won’t lay eggs in captivity, can be observed in the wild, and you can search the flowers and plants they rest on for their eggs.
In concluding this chapter, I feel that I might have said much more upon nearly every section — have explained many new "dodges," and so forth, were it not that the limit of space has been reached. One thing, however, may be noted as an omission, and that is the recommendation as to what books should be procured by the young entomologist. This is so difficult a matter — depending entirely upon the aim of the individual — that I prefer to leave it an open question, merely making the general statement that nearly all our advanced systems are founded upon the labours of German and French entomologists. [Footnote: Mr. Wm. Wesley. Essex Street Strand, London, publishes monthly a "Natural History Book Circular," which he will send to naturalists if asked.]
In wrapping up this chapter, I feel like I could have elaborated much more on almost every section — discussed many new "tricks," and so on, if it weren't for the space limitations. However, one thing I should mention as missing is a recommendation on what books young entomologists should get. This is a tricky issue — entirely depending on the person's goals — so I'd rather leave it open-ended, just stating that most of our advanced systems are based on the work of German and French entomologists. [Footnote: Mr. Wm. Wesley. Essex Street Strand, London, publishes a monthly "Natural History Book Circular," which he will send to naturalists upon request.]
I MUST confess that, at one time, the consideration of the best method of dealing to advantage with the limited space usually existing in the older provincial museums would have dismayed me. Even at that time, however, I had glimmerings of the brighter light which has since illumined the way, and I was, perhaps, aided by the persistent manner in which I haunted museums both abroad and at home, until at last I never went on a journey without managing to break it, or to make it end at the then summum bonum of my happiness — a museum.
I have to admit that at one point, the thought of figuring out how to make the best use of the limited space usually found in older provincial museums felt overwhelming. However, even then, I caught glimpses of the clearer path that has since guided me. My constant visits to museums, both abroad and at home, probably played a role in this. Eventually, I made it a point to include a museum in every trip I took or to end my journey at the place that brought me the most joy—a museum.
Like Diogenes, I went about with my lamp to find, not an honest man, but an honest museum — a museum with some originality, and with some definite idea as to its sphere of work. Leaving out, of course, such complete and technical institutions as the Museum of Geology, the Museum of the College of Surgeons, and such institutions which really have a motive in view — steadfastly adhered to — I saw, then as now, that every provincial museum was nothing if left to its own devices, and, if "inspired," was, at the best, but a sorry and servile imitator of the worst points of our national museum.
Like Diogenes, I walked around with my lamp to find not just an honest person, but an honest museum — a museum with some creativity and a clear purpose regarding its work. Excluding, of course, fully specialized institutions like the Museum of Geology, the Museum of the College of Surgeons, and similar places that truly have a specific goal in mind — pursued with determination — I noticed then, as I do now, that every regional museum was essentially helpless if left to its own devices, and, if it was “inspired,” it was, at best, just a poor and unoriginal copy of the worst aspects of our national museum.
Everyone must have observed, no doubt, in any provincial museum which dates back thirty or forty years, that the great curse of the collection, so to speak, is sketchy versatility. In walking through the usually "dry-as-dust" collections you find numbers of very atrociously-rendered mammals, a greater sprinkling of funereal and highly-disreputable birds, some extremely-protracted fishes, some chipped insects, and a lot of shells, chiefly marine, which suggest association with the word "stores." I allude to those odds and ends which people do not want themselves, and which are, therefore, so kindly brought as an offering — would I might say a "burnt" one — to any institution so reckless of consequences as to admit them.
Everyone has probably noticed, without a doubt, in any small museum that’s been around for thirty or forty years, that the main issue with the collection is a lack of focus. While walking through the usually boring collections, you come across a bunch of poorly made mammals, a handful of dreary and questionable birds, some overly elongated fish, a few damaged insects, and tons of shells, mainly marine, that evoke the idea of “leftovers.” I’m referring to those random bits and pieces that people don’t want for themselves, and so they generously donate them — I wish I could call it a “burnt” offering — to any institution foolish enough to accept them.
Nearly all museums of early days were imitators of the British Museum, whilst those of later days affect the newer treatment of South Kensington. Hence, in walking through any museum, a technical observer can easily detect the sources of inspiration and the lines of demarcation between the old and the new. Really it amounts to this, that hardly any institution in England thinks for itself. Museum authorities, like sheep, follow the lead of the most ancient bell-wether; and the reason of this is not far to seek. Curators, as a rule, are men with one hobby — "one-horse" men, as the Americans so aptly put it- "sometimes wise, sometimes otherwise," but in many cases totally devoid of that technical education so much needed in reconciling the divergent atoms of the institutions they represent; in fact, head and hand seldom work together.
Almost all museums in the past were copies of the British Museum, while more recent ones tend to follow the newer style of South Kensington. So, when walking through any museum, a trained observer can easily spot the sources of inspiration and the differences between the old and the new. It really comes down to the fact that very few institutions in England think independently. Museum authorities, like sheep, follow the example of the oldest leader; and the reason for this is pretty clear. Curators, as a rule, are individuals with a single focus—“one-horse” men, as the Americans put it—“sometimes wise, sometimes not,” but often completely lacking the technical training that is crucial for managing the diverse elements of the institutions they represent; in fact, the head and hand seldom work together.
Often, owing to the want of technical advice, money is wasted in more than one department, cases are too highly paid for, and have not been thought out sufficiently as to their fitness for their future contents, or the position in which they are to be placed, or the more fatal error has been perpetrated of considering them as merely units of a certain department instead of parts of a whole. I contend that if it be necessary for a civil engineer or other professional man to have mastered the various technicalities of his profession, it is also incumbent on curators to have done or to do likewise, in order that they may grasp the treatment of their museum as a whole, and not fall into the grave fault of working up one department whilst ignoring the others.
Often, due to a lack of technical advice, money is wasted in multiple areas, cases are overpaid for, and they haven't been thoroughly considered in terms of their suitability for future content, or the position they are meant to occupy, or the more serious mistake of viewing them merely as units of a specific department rather than as parts of a larger whole. I believe that just as it is necessary for a civil engineer or other professional to master their field's various technical details, it is also essential for curators to do the same so they can manage their museum as a cohesive entity, rather than focusing on one department while neglecting the others.
Nothing is more distasteful to my mind than that a man in the position of a curator should impertinently ride one single hobby to death, to the utter exclusion and detriment of all other branches of knowledge entrusted to his care. What is the sum total of this? In looking around any museum of old standing we see twenty different styles and colours of cases, which may be briefly summarized as representing the eocene, miocene, and pliocene formation of cases; space has been wasted, or not utilized as it might be, and the result is a confused jumble of odds and ends, consequent on some persons considering that the end and aim of a museum should be the preservation of "bullets" collected by "Handy-Andy" from the field of "Arrah-na-Pogue," "My Grandfather's Clock," and so on.
Nothing irritates me more than when someone in the role of a curator stubbornly focuses on just one interest to the complete neglect and harm of all the other areas of knowledge they're supposed to oversee. What’s the outcome of this? When we look around any well-established museum, we see a variety of display cases in different styles and colors, which can be summed up as representing the eocene, miocene, and pliocene periods of case design; space has been wasted or not used as effectively as it could be, resulting in a disorganized mix of random items. This has occurred because some people believe that the main purpose of a museum should be to preserve "bullets" collected by "Handy-Andy" from the site of "Arrah-na-Pogue," "My Grandfather's Clock," and similar items.
This is certainly not the mission of any museum, nor should it lay itself out with avidity to collect disjointed scraps of savage life, such as portraits of the "ladies" who ate cold savage and who — horresco referens! — "drank his blood." [Footnote: A fact!]
This is definitely not the purpose of any museum, nor should it eagerly aim to gather random pieces of primitive life, like portraits of the "ladies" who ate cold flesh and who — horresco referens! — "drank his blood." [Footnote: A fact!]
Such a museum object as this, awfully, yet ludicrously, reminds me of that showman who enticed his audience in with — "Here you'll see the Duke of Vellington at the battle of Vauterloo, with the blood all a-runnen down his fut,"' or of poor little "Totty" (in "Helen's Babies"), who loved to hear about "B'liaff" and his headlessness, and the sword that was all "bluggy." This is, I think, one of the mistakes which most museums fall into. They collect a vast quantity of rubbish utterly useless to anyone but a schoolboy or a showman, and in consequence they find valuable space wasted to make way for tops of teapots, bits of leather, Kaffirs' or Zulus' knives made in Sheffield, native ornaments, in beads and brass, made in Birmingham, and such-like members of the great family of "curios." All such as these should be firmly and respectfully declined without thanks. [Footnote: When I first came to the Leicester Museum I was requested to present to the Museum and enclose in a suitable receptacle — No. 1, a piece of thick leather, which the donor thought "just the right thickness for the heel of a boot;" and No. 2 a teapot lid with no particular history, only that — as the dame who brought it phrased it — "maybe it's summat old."]
Such a museum object as this, both terrible and absurd, reminds me of that showman who drew in his audience with — "Here you'll see the Duke of Wellington at the Battle of Waterloo, with blood all running down his foot," or of little "Totty" (from "Helen's Babies"), who loved to hear about "B'liaff" and his headlessness, and the sword that was all "bloody." I think this is one of the common mistakes many museums make. They gather a huge amount of junk that’s completely useless to anyone except schoolboys or showmen, and as a result, they waste valuable space making room for tops of teapots, scraps of leather, knives from Kaffirs or Zulus that were made in Sheffield, native ornaments made of beads and brass from Birmingham, and similar items from the vast collection of "curios." All of these should be firmly and politely declined without thanks. [Footnote: When I first came to the Leicester Museum, I was asked to donate to the Museum and provide a suitable container — No. 1, a piece of thick leather, which the donor thought was "just the right thickness for the heel of a boot;" and No. 2 a teapot lid with no particular history, just that — as the lady who brought it put it — "maybe it's something old."]
I have spoken, in somewhat sacrilegious terms, of imitation of the worst points of the old British Museum and of South Kensington (I don't mean the new Natural History Galleries, but artistic South Kensington); but perhaps I may be forgiven when I state that I consider, and always considered, the weakest part of our old natural history galleries at Bloomsbury was the arrangement of all the mammals, birds, etc.., in that provokingly "fore-and-aft" manner (spoken of before), on uninteresting stands or perches (hat-pegs) such as the skeletons in Plates II. and III. are represented on.
I’ve talked, maybe in a cheeky way, about copying the worst things from the old British Museum and South Kensington (I’m not talking about the new Natural History Galleries, but the artistic side of South Kensington); however, I hope it’s understandable when I say that I’ve always thought the weakest part of our old natural history galleries at Bloomsbury was how all the mammals, birds, and so on were arranged in that annoyingly “front-and-center” style (which I mentioned before), on boring stands or perches (like hat pegs), similar to how the skeletons are shown in Plates II and III.
This, which was, perhaps, inevitable in a national collection professedly showing to the public every species of bird and mammal in the least possible space, is unpardonable in a provincial museum, which has not the task imposed upon it of attempting to vie with the national collection in point of numbers. Provincial museums, then, if electing to show only animals collected in their immediate vicinity or county (which some authorities--of whom anon — say is the only raison d'être of a provincial museum), or, if electing to supplement these by showing a few foreign forms of striking appearance, fall into grievous error by mounting the necessarily few specimens they can get together on "hat-pegs," simply because the national collection, with which they are not on "all fours," sets them the bad example in this.
This situation, which was probably unavoidable in a national collection that aims to display every type of bird and mammal in a limited space, is unacceptable in a provincial museum that isn't required to compete with the national collection in terms of numbers. Provincial museums should, if they choose to display only animals found in their local area or county (which some experts—more on that later—argue is the only valid purpose for a provincial museum), or if they decide to add a few impressive foreign species, make a serious mistake by displaying the few specimens they can gather on "hat-pegs," simply because the national collection, which is not on the same level, sets this poor example.
Now for South Kensington: the imitation I decry is that of black, or black-and-gold cases, suitable the exhibition of art treasures, but objectionable for natural history objects, which, usually dreary enough in their abject condition on pegs, are rendered more funereal by their black, or black-and-gold surroundings; yet, with these obvious disadvantages, what do we see in some provincial museums? — a servile adoption of South Kensington "ebonized" cases, without any reference to fitness. It is positively painful to see elaborately carved and gilded cases, costing, perhaps, a hundred guineas a-piece, entombing a few wretchedly-mounted specimens worth, perhaps, less than £5 the lot.
Now for South Kensington: the imitation I criticize is that of black, or black-and-gold display cases, which are great for showing off art treasures but totally inappropriate for natural history items. These items, usually rather dull in their sad state on pegs, look even more gloomy surrounded by black or black-and-gold cases. Yet, despite these clear downsides, what do we see in some provincial museums? A slavish copying of South Kensington's "ebonized" cases, with no thought to what actually fits. It’s honestly painful to watch expensive, intricately carved and gilded cases, costing maybe a hundred guineas each, displaying a few poorly mounted specimens worth maybe less than £5 altogether.
I have technical objections to "ebonized" cases, which I am sure have been lost sight of by all but the makers of such articles. These are — first, that if deal, or pine, or common cedar is used to make the cases with, they will shrink, lose colour, or be easily chipped or dinted, becoming in a short time useless and shabby; and, on the other hand, if made by first-class makers out of good mahogany, afterwards blacked or "ebonized," their price is enormous, and out of all proportion to their appearance, added to which they get worn on their edges in a short time and show the mahogany underneath in reddish, rust-coloured streaks on their most prominent parts.
I have some technical issues with "ebonized" cases, which I’m sure most people, except for the manufacturers, overlook. First, if they’re made from deal, pine, or regular cedar, they tend to shrink, lose color, or get easily chipped or dented, making them useless and shabby in no time. On the other hand, if they’re crafted by top-quality makers from good mahogany and then blackened or "ebonized," they come with a huge price tag that doesn’t match their appearance. Plus, they wear down quickly at the edges, revealing the mahogany underneath in reddish, rust-colored streaks on their most noticeable parts.
How ridiculous, then, does it seem to cover up serviceable and handsome (and expensive) mahogany with a coat of black simply for the sake of getting an effect which is, to say the least, depressing!
How ridiculous does it seem to cover up useful and attractive (and expensive) mahogany with a layer of black just to create an effect that is, to put it mildly, depressing!
Well, you will say, you have fallen foul of the fundamental principles of nearly all museums — black cases, and animals on "hat-pegs." What do you propose?
Well, you might say that you've run into the basic principles of almost all museums — black cases and animals on "hat pegs." So, what do you suggest?
I propose, in the first place, mahogany, walnut, or oak cases; and, in the second place, the pictorial mounting of all specimens, and not only do I propose it, but I claim in the Leicester Museum to have done on a large scale what has hitherto been applied to small matters only. First, as to the wood; I delight in oak, and, although I know how much more liable it is to "twist" than first-class mahogany, yet if of good picked quality, dry and sound, and properly tongued and framed, there is not much to fear, and its light and elegant appearance is a great gain in a large room, added to this it improves by age and is practically indestructible.
I suggest starting with cases made from mahogany, walnut, or oak; and secondly, I advocate for the decorative display of all specimens. Not only do I propose this, but I also assert that at the Leicester Museum, I have implemented on a large scale what has only been done on a smaller scale until now. First, regarding the wood; I have a preference for oak, and while I understand that it is much more prone to warping than high-quality mahogany, if it is chosen well—dry, sound, and properly constructed—there's not much to worry about. Its light and elegant appearance is a significant advantage in a large room, and it actually improves with age, making it practically indestructible.
Now for the pictorial mounting of specimens; and here let me say that, for any person to lay down a hard-and-fast line as to what natural history specimens should be, or should not be, collected by provincial natural history museums as a whole, is about as sensible a plan as saying that a nation as a whole must drink nothing but beer or nothing but water. It is apparently forgotten that general principles cannot apply to museums ranging in size from 20 ft. by 12 ft. to that of Liverpool with its several large rooms, each one larger than the entire "museum" of small towns.
Now for the display of specimens; and let me point out that it's pretty unreasonable for anyone to insist on strict guidelines about what natural history specimens should or shouldn’t be collected by provincial natural history museums overall. It's like claiming a nation should only drink beer or only drink water. It's clearly forgotten that general rules can't be applied to museums that vary in size from 20 ft. by 12 ft. to the size of Liverpool, which has several large rooms, each one bigger than the entire "museum" in small towns.
I think it may be laid down as a common-sense proceeding that, if a provincial museum consists of only one or two rooms of the size above given, the managers should strictly confine themselves to collecting only the fossils, animals, and plants of their own district. If, however, like Leicester, they possess a zoological room 80 ft. in length by 40 ft. in width, and of great height, together with smaller rooms, then the proposition to strictly confine themselves to local forms is unwise in the extreme. How would it be possible to fill so much cubic space with the few specimens — even if extended unwarrantably, and elaborately mounted — which many years of arduous collecting might obtain? Taking the list of vertebrates of any midland county, how many of them do we find could be collected if we left out of count the "accidentals?" Here is a list: Fishes, 26; reptiles, 10; birds, 110; * mammals, 26 (the fox being the largest of these). [Footnote: About 80 only, of the 110, breed in any given midland district.]
I think it’s common sense to say that if a regional museum has only one or two rooms the size mentioned, the managers should focus on collecting only the fossils, animals, and plants from their area. However, if they have a large zoological room like Leicester's, which is 80 feet long and 40 feet wide, along with smaller rooms, then it’s extremely unwise to limit themselves only to local specimens. How could they possibly fill such a large space with the few specimens they might collect over many years, even if they were overextended and well-displayed? Looking at the list of vertebrates in any midland county, how many could we collect if we ignore the "accidentals?" Here’s the breakdown: Fishes, 26; reptiles, 10; birds, 110; * mammals, 26 (with the fox being the largest). [Footnote: About 80 of the 110 breed in any midland district.]
It would be impossible to fill the wall-cases, if properly proportioned, with these few, even given all the favourable conditions of procuring the "accidentals" and varieties, under ten years. It is quite true, also, that the contemplation of purely local fauna, though giving interest to, and holding undue importance in the eyes of a few men, who narrow their views to their own county (which, perhaps, they believe in to such an extent as to seldom pass its boundaries), is misleading and even possibly damaging to the student of biology, who must be shown, in the clearest possible manner, the affinities — say, of such a well-known bird as the heron, which a local collection will tell him, by means of a huge and unblushing label, is a "Blankshire bird," shot somewhere in the vicinity; not a word is said as to its being also a "British" bird and also a "Foreign" bird, the heron ranging throughout every county in Britain, throughout Europe, the greater part of Africa and Asia, and even penetrating into Australia.
It would be impossible to fill the display cases, if properly sized, with just these few items, even considering all the favorable conditions for obtaining the "accidentals" and varieties, in under ten years. It's also true that focusing solely on local wildlife, while interesting to a few individuals who narrow their views to their own county (which they might believe in so much that they rarely leave its borders), can be misleading and potentially harmful to biology students. They need to be clearly shown the connections — for instance, take the well-known heron. A local collection will label it boldly as a "Blankshire bird," shot somewhere nearby, but it fails to mention that it's also a "British" bird and a "Foreign" bird, as herons can be found across every county in Britain, throughout Europe, most of Africa and Asia, and even into Australia.
The remedy for this is a typical "general" collection — running around the room, let us say — and a "local" collection entirely distinct and separate.
The solution for this is a standard "general" collection — running around the room, for example — and a "local" collection completely different and separate.
First, in the structural necessities of a museum, I place well-lighted rooms — preferably from the top. Of course, side windows, though giving an increase of light, yet by that very increase become objectionable by making cross lights, which the sheets of glass enclosing the various objects tend to multiply; next, the colour of the walls — this is very important. Some museums have blue or Pompeian-red* walls, under the impression that it suits certain objects; in the instances of pictures or statuary, etc.., it may be right, but, for natural history objects, nothing suits them and shows them up better than a light neutral tint - one of the tertiaries — lightened considerably, until it arrives at a light stone, very light sage, or pale slate colour. [Footnote: The Leicester Museum, when I first came to it, had the walls of its chief room, the then "Curiosity shop," painted dull dark red, cut up by twenty-four pilasters of ad deep green in imitation of marble; the ceiling bad not been whitened for twenty years, and the birds and animals on "hat-pegs," in cases with small panes of glass, etc.., were frightfully contrasted by a backing of crude, deep ultramarine-blue! Three primary colours. Could human perversity and bad taste go much further?]
First, in the essential structure of a museum, I prioritize well-lit rooms—preferably with light coming from above. Of course, side windows can increase light, but they also create unwanted cross-lighting, which the glass surrounding the various objects tends to amplify. Next, the color of the walls is very important. Some museums have blue or Pompeian-red walls, thinking it complements certain objects; that might be fitting for paintings or sculptures, but for natural history specimens, nothing showcases them better than a light neutral color—one of the tertiary shades—lightened enough to achieve a very light stone, very light sage, or pale slate color. [Footnote: When I first arrived at the Leicester Museum, the walls of its main room, then known as the "Curiosity Shop," were painted a dull dark red, interrupted by twenty-four pilasters of deep green imitating marble; the ceiling hadn't been painted white for twenty years, and the birds and animals on "hat-pegs" in cases with small glass panes were shockingly contrasted against a crude, deep ultramarine-blue background! Three primary colors. Could human stubbornness and bad taste go any further?]
The pilasters, if any, must be ignored, and blended into the walls by being painted of the same colour as the remainder; otherwise, the first things which strike the observer on entering are the walls and pilasters, and not the objects; whereas the impression to be secured on the mind should be exactly the reverse of this, for be sure that, if the colour of the walls be noticed at all by the casual visitor, something is radically wrong. This is one of the reasons why I prefer light oak wall-cases to anything else, by their being so unobtrusive, and not dividing the room so sharply into squares as the black and gold. I venture to say that the first thing noticeable on entering the zoological-room at Leicester is the form and colour of the objects, and this is as it should be.
The pilasters, if they exist, should be ignored and blended in with the walls by painting them the same color as the rest; otherwise, the first things that catch the visitor's eye when they enter are the walls and pilasters, not the actual objects. The impression we want to create should be the exact opposite of this. If a casual visitor notices the wall color at all, that means something is seriously off. This is one reason I prefer light oak wall cases over anything else; they are so unobtrusive and don't split the room into sharp squares like black and gold do. I would say that the first thing you notice when entering the zoological room in Leicester is the shape and color of the objects, and that’s exactly how it should be.
Having now got light in the rooms from the top and, possibly, from the north, supplemented by, and radiating from, the light walls and ceiling, we, having our oak cases in position, must glaze them with as large sheets of plate glass as are manageable or as we can afford; a very handy size is-say, 8 ft. in height by 5 ft. 4 in. in breadth, this prevents cutting up the enclosed specimens by many bars, enclosing small panes, so prevalent in the older museums, also, of course, adding greatly to the general effect. The backs of the wall cases should be, if the specimens are mounted on pegs, of some light tint slightly contrasting with that of the walls, or, if the specimens are to be pictorially treated, with softly graduated skies applicable to each group.
Now that we have light coming into the rooms from above and possibly from the north, enhanced by the light-colored walls and ceiling, we need to set up our oak display cases and cover them with the largest sheets of plate glass that we can handle or afford. A practical size would be around 8 feet high by 5 feet 4 inches wide. This choice helps avoid breaking up the displayed specimens with too many bars or small panes, which were common in older museums, and it significantly improves the overall look. The backs of the display cases should be painted in a light shade that slightly contrasts with the walls if the specimens are mounted on pegs. If the specimens are going to be treated pictorially, the backs should feature softly graduated skies that fit each group.
Perhaps a sketch of the treatment of the zoological-room of Leicester Museum would help the reader to grasp the facts of the case better. In the first place, the walls were cut for more windows, at a height of 12 ft. above the floor, the top light not being sufficient nor properly available, nor end lights obtainable, owing to the structural defects of the existing building; the ceiling was then whitewashed, and walls painted of a nice warm stone colour, quite unobtrusive in itself; the artificial light was provided for by twelve gas pendants* of twenty-four lights each, i.e., eight arms, each holding three burners. The heating — a most important matter, not only for the comfort of visitors, but for the proper preservation of the specimens — was managed by hot-water coils running around the walls under the cases. [Footnote: I am not at all sure if the artificial lighting of wall cases is not best managed by gas arms shaded from the eye of the spectator, and throwing their light into the cases by a hi similar arrangement to that adopted for lighting jewellers' and other shops from the outside.]
Perhaps a description of how the zoological room in Leicester Museum was set up would help the reader understand the situation better. First, the walls were modified for additional windows, positioned 12 feet above the floor, as the existing top lighting was inadequate and side lighting wasn't an option due to the building's structural issues. The ceiling was then whitewashed, and the walls were painted a nice warm stone color, which was quite subtle. The artificial lighting came from twelve gas pendants, each with twenty-four lights, meaning eight arms, each supporting three burners. Heating, which was crucial for both visitor comfort and the preservation of the specimens, was achieved through hot-water coils running around the walls beneath the display cases. [Footnote: I'm not entirely convinced that artificial lighting for wall cases isn't better handled by gas arms that are shielded from the viewer's line of sight, directing their light into the cases in a way that's similar to how jewelry shops and others are lighted from the outside.]
The cases themselves were framed in oak, rising 10 ft. from the floor, thus — 1 ft. 3.5 in. of plinth and frames, enclosing panelled gratings to allow the hot air to escape; on this the wooden bottoms of the range was built; then 3.5 in. and 3 in. frame at bottom and top, enclosing 7 ft. 6 in. space for glass, and 8 in. frieze moulding; the divisions of each were arranged to suit the space at disposal to represent all orders of vertebrates.
The cases were made of oak, standing 10 ft. tall from the floor, which included a 1 ft. 3.5 in. base and frames that had panelled grates to let the hot air out. On this base, the wooden bottoms of the range were built, then there were 3.5 in. and 3 in. frames at the bottom and top, creating a 7 ft. 6 in. space for glass, along with an 8 in. frieze moulding. The sections of each case were arranged according to the available space to display all kinds of vertebrates.
The doors or sashes were round-headed and glazed with plate glass, three plates of which were 7 ft. 6 in. by 4 ft. 4.5 in.; eight, 7 ft. 6 in. by 4 ft. 6 in.; eleven, 7 ft. 6 in. by 5 ft. 1 in.; eleven, 7 ft. 6 in. by 5 ft. 2.5 in.; one, 7 ft. 6 in. by 4 ft. 7.5 in.; and three, 7 ft. 6 in. by 4 ft. 1 in.; thirty-seven plates in all. All but twelve of the cases were 2 ft. 6 in. from back to front, these twelve being 3 ft. from back to front, all glazed at the top, to admit light, by glass fixed in iron T-pieces at intervals of 2 ft. 6 in., making two divisions.
The doors and windows were rounded at the top and fitted with plate glass. Three pieces measured 7 ft. 6 in. by 4 ft. 4.5 in.; eight pieces were 7 ft. 6 in. by 4 ft. 6 in.; eleven pieces were 7 ft. 6 in. by 5 ft. 1 in.; another eleven pieces were 7 ft. 6 in. by 5 ft. 2.5 in.; one piece measured 7 ft. 6 in. by 4 ft. 7.5 in.; and three pieces were 7 ft. 6 in. by 4 ft. 1 in., totaling thirty-seven pieces overall. All but twelve of the cabinets were 2 ft. 6 in. deep, while those twelve were 3 ft. deep, all fitted with glass at the top to let in light, secured in iron T-pieces spaced 2 ft. 6 in. apart, creating two sections.
To these, two cases were subsequently added; one, 7 ft. 6 in. by 2 ft. 6 in.; the other, 7 ft. 6 in. by 6 ft. The division frames, being rebated and lined with "moleskin," had the sashes, previously glazed from the inside, lifted in and screwed to them, the screw heads being hidden by turned "buttons" of oak. I objected to these doors or sashes being hung in the ordinary manner, it being so difficult to hinge large and weighty frames without danger of "twisting" or of straining the surrounding parts, to say nothing of the almost impossibility of keeping dust from getting in through hinged doors; accordingly it was felt that, although there might be a little inconvenience in unscrewing the eight or ten screws which held them in their places, yet that the trouble of their removal, not being an every-day occurrence, in any instance, would be more than compensated by the increased strength, and air and dust-proof advantages.
To these, two cases were added later; one measuring 7 ft. 6 in. by 2 ft. 6 in., and the other 7 ft. 6 in. by 6 ft. The division frames, which were rebated and lined with "moleskin," had the sashes, previously glazed from the inside, lifted in and screwed to them, with the screw heads concealed by turned "buttons" of oak. I opposed hanging these doors or sashes in the usual way, since it was so challenging to hinge large and heavy frames without the risk of "twisting" or straining the surrounding areas, not to mention the nearly impossible task of preventing dust from entering through hinged doors. Therefore, it was agreed that, although there might be a bit of inconvenience in unscrewing the eight or ten screws that held them in place, the hassle of their removal, which wouldn’t happen very often, would be more than offset by the added strength and benefits of being air and dust-proof.
(That these predictions were justified is proved by the fact that the cases, being filled, were opened at the end of 1883 to allow of their contents being photographed-without the intervention of glass-and the air which then issued from them was strongly charged with turpentine and other agents used about the birds, and the rockwork, nearly two years before, whilst not a particle of dust was observable anywhere.)
(That these predictions were justified is proven by the fact that the cases, being filled, were opened at the end of 1883 to allow their contents to be photographed—without the use of glass—and the air that came out of them was heavily charged with turpentine and other substances used around the birds, and the rockwork, nearly two years earlier, while there wasn't a speck of dust visible anywhere.)
These cases were, as regards workmanship, strongly and well made by a local man, working under my direction, and although, of course, lacking the minute finish of such champions of case-making as Sage, yet, taking into consideration that quite 300 pounds was saved in the construction, we may be fairly proud of our success.
These cases were well-made by a local craftsman under my guidance, and while they don’t have the precise finish of top case-makers like Sage, considering we saved around 300 pounds in construction, we can be quite proud of what we achieved.
Regarding the classification of the vertebrates, it was admitted on all hands that we might take Huxley as our standpoint; but I felt that, in this age of specialists, we ought to be guided by those who, taking the labours of the leading physiologists and men of science for their groundwork, compiled, so to speak, from these results, and being anatomists and men of great learning themselves, were generally accepted throughout the world as the leading exponents of the branch of biology they represented.
Regarding the classification of vertebrates, everyone agreed that we could use Huxley as our reference point; however, I thought that in this era of specialists, we should rely on those who, building on the work of leading physiologists and scientists, synthesized these findings. Being anatomists and highly knowledgeable themselves, they were widely recognized around the world as the foremost authorities in their specific area of biology.
Accordingly the plan was sketched out, and, selecting Professor W. H. Flower, F.R.S., the president of the College of Surgeons, for the mammals; Dr. P. L. Sclater, F.R.S., secretary of the Zoological Society, for the birds; and Dr. a. C. Guenther, F.R.S., chief of the British Museum, for the reptiles and fishes, I submitted my plans to each gentleman, who did me the honour to return them corrected where necessary. Since then I have slightly modified where the latest views of these great men have undergone some slight change; and now the scheme of our zoological room is as in the accompanying plan (see Plate).
The plan was laid out, and I chose Professor W. H. Flower, F.R.S., the president of the College of Surgeons, for the mammals; Dr. P. L. Sclater, F.R.S., secretary of the Zoological Society, for the birds; and Dr. A. C. Guenther, F.R.S., head of the British Museum, for the reptiles and fish. I presented my plans to each of these gentlemen, who graciously returned them with corrections where needed. Since then, I’ve made some minor adjustments based on the latest opinions from these esteemed experts, and now the layout of our zoological room is as shown in the accompanying plan (see Plate).
Of course, for purposes of convenience and reference, a linear arrangement has been adopted, but it will not be necessary to point out that no actual linear arrangement can exist in nature, the chain being broken, not only in links, but by large portions being twisted off. Rather may we liken biology to a tree whose branches ramify in many directions from the main trunk of life.
Of course, for convenience and reference, a linear arrangement has been used, but it's important to note that no true linear arrangement exists in nature, as the chain is disrupted not only in its links but also by large portions being twisted off. Instead, we can compare biology to a tree whose branches spread out in many directions from the main trunk of life.
The classification — superseding the old, unscientific Vigorsian and other systems, founded on external characteristics — being decided on, the style of mounting of the specimens had to be settled. The "peg" system was to be discarded; but here occurred the most serious hitch of all. In accordance with the plan now being pursued in many provincial museums, it was wished by one party to elevate the local exhibits into undue importance, at the expense of general zoology, by taking up much more of the room at disposal than was practicable or necessary.
The classification — replacing outdated, unscientific systems like the Vigorsian based on external traits — was settled. Next, the way to mount the specimens needed to be decided. The "peg" system was to be eliminated; however, this led to the biggest issue. In line with the approach now taken by many local museums, one group wanted to give the local exhibits excessive importance, taking up much more space than was practical or needed, to the detriment of general zoology.

The suggestion was to furnish cases of a certain size, one or more of which was to be devoted to each order of animals. Taking birds (for convenience) as the standpoint, we were to place on the ground line "local" birds, male and female, with nest and young, and eggs, mounted with appropriate accessories, in the most complete and artistic manner. This division taking up 3 ft. 6 in. in height out of a possible 8 ft., leaving 4 ft. 6 in. to be disposed of thus — another division for "British" birds which have never been found in the locality.
The idea was to create display cases of a specific size, with one or more designated for each group of animals. Starting with birds for simplicity, we planned to arrange "local" birds, both male and female, along the ground line, including their nests, young, and eggs, all set up with suitable accessories in a complete and artistic way. This section would take up 3 ft. 6 in. of the total 8 ft. height, leaving 4 ft. 6 in. for another section dedicated to "British" birds that have never been spotted in the area.
These "British" were to be in pairs, but not very well mounted, and without nests and young. Above these, again, another line, exhibiting a few of the most striking typical foreign birds. These "Foreign" birds were not to be well mounted, but plain "stuffed." It was claimed for this that "each order would be distinct, and that there would be the best opportunity of comparing the local birds with those of Britain generally and of the whole world, while a real notion of the life of birds would be conveyed by the full portraiture of those forms with which the local visitors would be most familiar, making them distinct items of knowledge in a manner scarcely ever attempted, and, in fact, almost impossible with the usual methods of arrangement.
These "British" birds were meant to be displayed in pairs, but they weren't very well mounted and didn't include nests or young ones. Above them, there was another line showing a few of the most notable foreign birds. These "Foreign" birds weren't very well mounted either; they were just simply "stuffed." The claim was that "each category would be distinct, providing the best chance to compare local birds with those from Britain and around the world, while giving a real sense of the life of birds through the complete depiction of those forms that local visitors would be most familiar with. This would make them clear items of knowledge in a way that's rarely attempted and, in fact, almost impossible with traditional methods of arrangement.
It is an elastic system, admitting of many variations, while retaining the fundamental principle; and of all really effective systems it is the least expensive, because it depends mainly upon objects procurable in the locality. The Leicestershire species should occupy the ground line, and come up to the front. The British species should be set back 8 in. to 12 in., and the Foreign 15 in. to 18 in.; but these limits might be occasionally infringed where it seems necessary."
It’s a flexible system that allows for various changes while keeping the core principle intact; and out of all truly effective systems, it’s the most cost-effective since it mostly relies on items that can be found locally. The Leicestershire species should be planted at ground level and positioned towards the front. The British species should be placed 8 to 12 inches back, and the Foreign species 15 to 18 inches back; however, these distances might be adjusted occasionally if needed.
To give the reader an idea of how disproportionate these divisions would be when comparing "local" with "foreign," see the diagram (Fig. 58), representing one division or "bay" marked on Plan.
To give the reader an idea of how unequal these divisions would be when comparing "local" with "foreign," see the diagram (Fig. 58), which represents one division or "bay" marked on the Plan.
 Fig. 58 —
Projected arrangement of a biological collection by "Scheme
A."
Fig. 58 —
Projected arrangement of a biological collection by "Scheme
A."Again, it was urged that "The three sections should be divided horizontally, but the lines of division need not be straight. They may be broken so as to preserve the pictorial effect, but not to destroy the division."
Again, it was suggested that "The three sections should be divided horizontally, but the lines of division don't have to be straight. They can be broken to maintain the visual effect, but not to ruin the separation."
Regarding this part of the contention, it is only necessary to point out that no "pictorial effects" were possible under such a system, which is really a lucus a non lucendo.
Regarding this part of the argument, it's important to note that no "visual effects" were possible under such a system, which is really a lucus a non lucendo.
By this scheme, we have "local" birds at bottom (very well arranged), "British" next (not so well arranged), and "foreign" at top (not well arranged at all), and these arbitrary and totally unnatural divisions were supposed to "drive home the truths of natural history into the minds of casual visitors," to be "applicable to all the departments of a museum, so that, if it were adopted, a uniform plan might be carried through the collections from end to end, giving a systematic completeness which is rarely found in museums at the present time. It utilises the breaks and blank spaces in every series."
By this system, we have "local" birds at the bottom (very well organized), "British" birds in the middle (not as well organized), and "foreign" birds at the top (not organized at all). These arbitrary and completely unnatural categories were meant to "instill the truths of natural history in the minds of casual visitors," to be "applicable to all areas of a museum, so that if it were implemented, a consistent plan could be carried throughout the collections from start to finish, providing a systematic completeness that is rarely seen in museums today. It takes advantage of the gaps and empty spaces in every series."
Never was there a more impracticable theory broached. The whole arrangement was based on an utter disregard of the requirements of science, leaving out art altogether, and, worse still, upon an utter ignorance of first principles of zoology. May I ask if anyone can define a "local" bird from a "British" bird, or a "British" bird from a "foreign" bird? Lastly, every one should know that every bird found in Leicestershire is a "British" bird, and that every "British" bird is a "foreign" one; and that each of these imaginary divisions is being constantly recruited from the division immediately above it. [Footnote: There are but two birds belonging to the Paridae (Titmice), which are claimed as being peculiar to Britain; and these merely on the ground of being climatic varieties — hardly sufficient to warrant the founding of new "species."]
Never was there a more impractical theory proposed. The whole setup was based on a complete disregard for the requirements of science, completely ignoring art, and, even worse, showing total ignorance of the basic principles of zoology. Can anyone explain the difference between a "local" bird and a "British" bird, or between a "British" bird and a "foreign" bird? Lastly, everyone should know that every bird found in Leicestershire is a "British" bird, and that every "British" bird is a "foreign" one; and that each of these made-up categories is constantly being filled from the group just above it. [Footnote: There are only two birds in the Paridae (Titmice) family that are claimed to be unique to Britain; and these are only considered as climatic varieties—hardly enough to justify the creation of new "species."]
For instance, the golden eagle is not a "local" bird, but it may be so to-morrow, should one stray from North Britain, as they sometimes do, and be shot by some person within the boundary of the county. It then becomes "local"! This bird, which is as distinctly "foreign" — being found in Europe, North Africa, America, etc.. — as it is "British"! Put this in, or leave it out of the "local" division, and what does it teach?
For example, the golden eagle isn't a "local" bird, but it could be tomorrow if one wanders down from North Britain, as they occasionally do, and gets shot by someone in the county. Then it becomes "local"! This bird, which is just as clearly "foreign"—found in Europe, North Africa, America, and so on—as it is "British"! Whether you include it or exclude it from the "local" category, what does it really teach us?
Arguing per contra, the osprey has been killed in our own county more than once; it is thus "local;" it is also "British," nesting in North Britain; it is also distinctly "foreign," being found positively in every quarter of the globe — in Australia even — sharing with the common barn owl the distinction of being actually cosmopolitan.
Arguing the opposite, the osprey has been killed in our own county more than once; it is therefore "local;" it is also "British," nesting in North Britain; it is also clearly "foreign," found in every corner of the globe — even in Australia — sharing with the common barn owl the distinction of being genuinely cosmopolitan.
In which division are we to place this? It is "local," and yet cannot be mounted in that division, with its nest and young, because it has never bred in the Midlands; but it has bred in North Britain, and might be shown in the "British" division fully displayed; but, says this contention, which I have called "Scheme A," no "British" specimens shall be mounted with nest and young!
In which category should we put this? It’s “local,” yet it can’t be classified there with its nest and young since it has never bred in the Midlands. However, it has bred in North Britain and could be displayed in the “British” category fully shown. But, according to this argument, which I’ve labeled “Scheme A,” no “British” specimens are allowed to be displayed with their nest and young!
Being "foreign," it should also come in the "Foreign" division. What, then, can this teach? Either the bird must be repeated in all three divisions, or it must, according to the foregoing, appear only in the "local" division, thus acting an ornithological lie, and leading the unlearned to believe that it is a very rare bird, peculiar only to Leicestershire. These examples might be repeated ad nauseam. The sparrow, the swallow, the kingfisher, the heron, the wild duck, the wood-pigeon, the pheasant, the coot, the woodcock, the terns, the gulls, etc.., are some common forms which occur to me.
Being "foreign," it should also be included in the "Foreign" category. So, what can we learn from this? Either the bird has to be listed in all three categories, or, as mentioned earlier, it should only appear in the "local" category, creating an ornithological misconception and leading those who aren't knowledgeable to think that it is a very rare bird, unique to Leicestershire. These examples could go on indefinitely. The sparrow, the swallow, the kingfisher, the heron, the wild duck, the wood-pigeon, the pheasant, the coot, the woodcock, the terns, the gulls, etc., are some common birds that come to mind.
Again, there are five orders of birds not represented in Leicestershire, nor in England even. These contain nearly five hundred species. Are these to be entirely eliminated from the collection? or does it teach anything to put cards in the "Local" or "British" divisions of the parrot cases to say that no parrots occur (out of cages) in either Leicestershire or Britain? Again, what can this teach?
Again, there are five groups of birds that aren’t found in Leicestershire or anywhere in England. These include nearly five hundred species. Should we completely remove them from the collection? Or does it serve any purpose to place cards in the "Local" or "British" sections of the parrot displays stating that no parrots occur (outside of cages) in either Leicestershire or Britain? Once more, what can we learn from this?
Well, we will take a representative group — say, the order Gallinae, or game-birds, and, taking our own county of Leicestershire as an example, we shall find that, although there are nearly four hundred species of this order known, but eleven at the very outside are claimed as having occurred in Britain, whilst but three of these are commonly found in the county. I give their names and values under each heading:
Well, let’s take a representative group — like the Gallinae, or game birds. Using our own county of Leicestershire as an example, we’ll see that although there are nearly four hundred species known in this group, only eleven at most are recorded as having appeared in Britain, and just three of these are commonly found in the county. I’ll list their names and values under each heading:
|
LOCAL. LOCAL. |
BRITISH. BRITISH. |
FOREIGN. FOREIGN. |
|
|
Ptarmigan Ptarmigan |
No. No. |
Yes. Yes. |
Yes. Yes. |
|
Red Grouse Red Grouse |
Has occurred. Has happened. |
Yes. Yes. |
Yes.[Footnote: Formerly indigenous to Britain, but now found in Sweden, etc..] Yes.[Footnote: Originally from Britain, but now found in Sweden, etc..] |
|
Capercaillie Capercaillie |
No. No. |
Yes. Yes. |
Yes. Yes. |
|
Black Grouse Black Grouse |
Has occurred. Occurred. |
Yes. Yes. |
Yes. Yes. |
|
Pheasant Pheasant |
Yes. Yes. |
Yes. Yes. |
Yes. Yes. |
|
Red-legged Partridge Red-legged Partridge |
Yes. Yes. |
Yes. Yes. |
Yes. Yes. |
|
Barbary Partridge Barbary Partridge |
Said to have once occurred Said to have happened before |
Doubtful. Skeptical. |
Yes. Yes. |
|
Partridge Partridge |
Yes. Yes. |
Yes. Yes. |
Yes. Yes. |
|
Virginian Colin Virginian Colin |
No. No. |
Doubtful. Uncertain. |
Yes. Yes. |
|
Quail Quail |
Has occurred. Has happened. |
Yes. Yes. |
Yes. Yes. |
|
Andalusian Hemipode Andalusian Hemipode |
No. No. |
Doubtful. Unsure. |
Yes. Yes. |
Or, putting it into a tabular form, as if supposing that the whole four hundred known species could be shown, we should have it presented thus:
Or, putting it in a table, if we assume that all four hundred known species could be displayed, it would look like this:
ORDER — GALLINAE.
ORDER — BIRDS.
(400 SPECIES.)
(400 species.)
|
389 389 |
. . . . . . . .400 . . . . . . . .400 |
FOREIGN. FOREIGN. |
|
|
8 . . . . 8 . . . . |
. . . . 11 . . . . 11 |
. . . . . . . . . . . . Sure, please provide the text you would like me to modernize. |
BRITISH. BRITISH. |
|
3 . . . . 3 . . . . |
. . . . . . . . I'm sorry, but I need the text you'd like me to modernize. Please provide that, and I'll be happy to help! |
. . . . . . . . . . . . I'm sorry, but it appears that the text you wanted me to modernize is missing. Please provide the text you would like me to work on. |
LOCAL. LOCAL. |
That is to say, that, although it was wished to claim the 3 ft. 6 in. division in height, of indefinite length (really ten feet when worked out) for the three "local" birds, yet it will be seen by the foregoing tables that those three "locals" would do equally as well if placed in the "British" division, and the sum total of the "local" and "British" might be placed correctly with all the rest in the "foreign." Why, then, should valuable space be wasted for three birds, simply to perpetuate an error in working out a crotchet?
In other words, although there was a wish to classify the height range of 3 ft. 6 in. as indefinite (which actually totals ten feet when calculated) for the three "local" birds, the previous tables indicate that those three "locals" would perform equally well if placed in the "British" division. Furthermore, the total of the "local" and "British" birds could be accurately combined with all the others in the "foreign" category. So, why waste valuable space for three birds just to keep a mistake in calculating a detail?
The question again arose, What could such a "model" system as this teach? This was effectually answered by a specimen case, representing the above, being fitted up, when the glaring errors of the proposed system were at once evident, there being fully a space of 10 ft. x 3 ft. 6 in. x 2 ft. 6 in. = 87.5 ft. cube, devoted to five birds only — three of which were not now found in the county. These represented the "locals." In the "British" division, of 10 ft. in length x 2 ft. 6 in. in height x 1 ft. 6 in. back to front, viz., a cube of 37.5 ft. there appeared but six others — three of which were doubtful. Furthermore, as if to point to the crowning absurdity of the whole scheme, but 10 ft. x 2 ft. x 1 ft. = 20 ft. cube, was provided for the great remainder of the "foreign" specimens, nearly thirty-seven times as numerous as both "local" and "British" combined.
The question came up again: what could this "model" system really teach? This was clearly demonstrated by setting up a sample case that exposed the glaring flaws of the proposed system. There was a total space of 10 ft. x 3 ft. 6 in. x 2 ft. 6 in. = 87.5 ft. cube, allocated for just five birds—three of which weren't even found in the county anymore. These represented the "locals." In the "British" section, measuring 10 ft. long x 2 ft. 6 in. high x 1 ft. 6 in. deep, or a cube totaling 37.5 ft., there were only six others—three of which were questionable. Moreover, to highlight the absurdity of the entire plan, only 10 ft. x 2 ft. x 1 ft. = 20 ft. cube was allocated for the vast majority of the "foreign" specimens, which were nearly thirty-seven times more than the combined "local" and "British" birds.
Now for the cheapness of the system advocated. In the first place, local specimens of rare birds are not cheap. For instance, anyone can get a foreign specimen of — say, the honey buzzard — for about 8s., but a locally-killed specimen would be very likely to cost several pounds. As for the "elasticity" of such a system, if it is meant that it will stretch any way but the right, I agree, but if meant to be applied to any department of natural history it is distinctly wrong.
Now let's talk about how inexpensive the system proposed really is. First of all, local examples of rare birds aren't cheap. For example, anyone can get a foreign example of—let's say, the honey buzzard—for about 8 shillings, but a locally sourced specimen would likely cost several pounds. As for the "flexibility" of such a system, if it means it can bend in any direction except the right one, I agree; but if it's supposed to apply to any area of natural history, that's definitely incorrect.
Let us take the case of the invertebrates, nearly all of which, as the birds, have a wide range. Many instances occur to me, but one will be sufficient, Vanessa Antiopa, the "Camberwell Beauty" butterfly. Now this insect has been taken three times (perhaps more?) in the county, and I suppose it has occurred in nearly every county in England, but as it is found also commonly throughout the greater part of Europe, parts of Africa, Asia, and America, we are confronted by the unpleasant reminder, "what shall we do with it" under the system proposed?
Let’s consider invertebrates, most of which, like birds, have a wide distribution. Many examples come to mind, but one is enough: Vanessa Antiopa, the "Camberwell Beauty" butterfly. This insect has been spotted three times (maybe more?) in the county, and I think it’s been found in nearly every county in England. However, since it’s also common throughout much of Europe, parts of Africa, Asia, and America, we face the unsettling question, "what do we do with it" under the proposed system?
It is, according to that theory, "local," "British," and "foreign;" it is rarest as "local," being, of course, of accidental occurrence; yet it is proposed to show it only in that division, to the extent of ignoring the two other divisions which have manifestly a greater claim on it. If this, then, were adhered to, the student would at once have presented to him an incorrect view of the distribution of species.
It is, according to that theory, "local," "British," and "foreign;" it's rarest as "local," since it happens only by chance; yet it's suggested to show it only in that category, ignoring the two other categories which clearly deserve more attention. If this approach were followed, the student would immediately be given an inaccurate view of the distribution of species.
One other way only is there out of the difficulty, which is to show a specimen of the same insect in all three divisions; but this would, though more correct, be as embarrassing to understand, to say nothing of the loss of space involved, because the same thing would have to be repeated with nearly every invertebrate possessed by a museum arranged on these lines.
One other way out of the problem is to display a sample of the same insect in all three categories; however, while this would be more accurate, it would also be confusing to understand, not to mention the space it would take up, since the same approach would need to be repeated with almost every invertebrate in a museum organized like this.
The proper way, I contend, to give real information is to shake off all insular prejudice and not call things by their wrong names, i.e., claim as "British," things which are not essentially so. To this end I have labelled the butterfly in question:
The right way, I believe, to provide accurate information is to let go of all narrow-minded bias and not mislabel things, i.e., to claim things that aren’t truly "British" as if they are. To achieve this, I have named the butterfly in question:
VANESSA. ANTIOPA, L.
VANESSA. ANTIOPA, L.
(Camberwell Beauty.)
(Camberwell Beauty.)
Range: Asia, Africa, America,
Europe generally, including Britain (rarely),
and has occurred in Leicestershire three times.
Range: Asia, Africa, America,
Europe in general, including Britain (rarely),
and has happened in Leicestershire three times.
This, I am quite sure, is the proper method to educate the public, who cannot understand, or are misled by, such crudities as placing specimens in arbitrary divisions such as "Local," "British," and "Foreign."
This, I'm pretty sure, is the right way to educate the public, who either can’t understand or are confused by things like sorting specimens into random categories like "Local," "British," and "Foreign."
The same rule applies to the plants; and I remember a case occurring, but a short time since when a young botanist, wishing to name a few plants collected abroad (in Europe), came to our herbarium, modelled on these misleading lines, and at once turned to the "Foreign" division to find specimens by which to compare his own. An hour was wasted in trying to puzzle some of them out, and he then came to me saying, "You hav'n't got them."
The same rule applies to the plants; and I remember a recent case when a young botanist, wanting to name a few plants he collected in Europe, came to our herbarium, which was set up in a confusing way, and immediately went to the "Foreign" section to find samples to compare with his own. He spent an hour trying to figure some of them out and then came to me saying, "You don't have them."
At once I saw he had things of world-wide distribution, and turning, much to his amazement, to the "Local" division, found them for him. All this comparison, and waste of time and temper, might have been saved had the plants been arranged in their proper orders and families, irrespective of imaginary divisions, with a label attached stating their range and if occurring locally.
At that moment, I realized he had items that were available all over the world, and turning, much to his surprise, to the "Local" section, I found them for him. All this comparing and wasting time and patience could have been avoided if the plants had been organized in their correct orders and families, without any made-up divisions, along with a label that indicated their distribution and whether they were found locally.
Leaving biology now, we shall see how this "elastic system" can "be carried through the collections from end to end." Take the rocks as an example. Is it real science — or what is it — which would label syenite a "Leicestershire" rock? Such queries and replies could be multiplied ad infinitum, for it will be observed that I have said nothing about the mammals, where the loss of space and want of cohesion in such a group as the carnivora — best represented of all in "local"--are patent. The fishes — fancy a "local" salmon! yet they occasionally run up the rivers.
Leaving biology for now, let’s see how this "elastic system" can "be carried through the collections from end to end." Take rocks, for example. Is it really science — or what is it — that would label syenite as a "Leicestershire" rock? Such questions and answers could go on forever because, as you can see, I haven’t even mentioned mammals, where the lack of space and cohesion in a group like carnivores — best represented in "local" forms — is obvious. As for fish — imagine a "local" salmon! Yet they sometimes swim up the rivers.
But I need not enlarge on this, further than to say that under this "elastic" system it was gravely proposed to pictorially mount the "local" freshwater fishes under the sea fishes, not because it was a direct violation of the physics of salt and fresh water, but because the "local" division must come in its place at the bottom of the range of cases! I had almost forgotten to say that these precious divisions were to be made self-evident to the bucolic intellect even, by means of colour — thus, "Local" was to be brownish-red rock; "British," green; and "Foreign," blue; and these colours were, without reference to any artistic considerations such as the laws of contrast in colour, or light and shade, to be rigidly adhered to, and to be carried in distinct, if "wavy" bands, all around the room.
But I don’t need to elaborate on this, other than to say that under this "flexible" system, it was seriously suggested to display the "local" freshwater fish alongside the saltwater fish, not because it violated the physics of salt and freshwater, but because the "local" category had to be placed at the bottom of the range of cases! I almost forgot to mention that these precious categories were to be made obvious even to the rural mind through color — so, "Local" was to be a brownish-red rock; "British," green; and "Foreign," blue; and these colors were, regardless of any artistic considerations like the rules of color contrast or light and shade, to be strictly followed, and presented in distinct, if "wavy" bands, all around the room.
Fortunately, it was pointed out that shelves of wood would carry out that idea more effectually than playing with science and art in such a manner, therefore these absurd propositions were promptly discarded. And now, having described what I take to be the evils to be guarded against in plain or "pictorial" mounting, if founded on such lines as those in the scheme I have called "A," I will briefly sketch out what I take to be the lines of the museum of the future.
Fortunately, it was pointed out that wooden shelves would accomplish this idea more effectively than messing around with science and art in such a way, so these ridiculous suggestions were quickly dismissed. Now, having outlined what I believe are the issues to avoid in plain or "pictorial" mounting, based on the principles of the scheme I've labeled "A," I will briefly outline what I envision as the future of museums.
I must confess I had thought a great deal of arranging the vertebrata in zoo-geographical order, in a manner founded on a. R. Wallace's great and concise work on the "Geographical Distribution of Animals." It seemed to me a fairly comprehensive and scientific, certainly a novel, method of treatment, and I had gone so far as to sketch out several of my groups, when I was confronted by difficulties, and saw that it was not a system which was thoroughly coherent throughout the whole of the collections, and I finally abandoned it, on the advice of Dr. Sclater, the originator, I believe, of the "zoo-geographical divisions."
I have to admit I had spent a lot of time thinking about organizing the vertebrates by their geographical distribution, based on A. R. Wallace's important and concise work on the "Geographical Distribution of Animals." It seemed like a pretty comprehensive and scientific, definitely a fresh, way to approach it, and I even sketched out several of my categories. But then I ran into some challenges and realized it wasn't a completely consistent system across the entire collection, so I eventually dropped the idea, following Dr. Sclater's advice, who I believe is the creator of the "zoo-geographical divisions."
I wanted a system which might be carried out throughout the whole biological collections, and this end was best gained by arranging them in zoological order, so far as is possible in these days, when the microscope tells us that a plant may be an animal, or vice versa, or that an organism may be a plant now and something very like an animal a short time after (see Saville Kent on the "myxomycetes").
I wanted a system that could be applied to all the biological collections, and the best way to achieve this was to organize them in zoological order, as much as possible today, when the microscope reveals that a plant can be an animal, or the other way around, or that an organism might be a plant now and something very similar to an animal shortly after (see Saville Kent on the "myxomycetes").
With the plants and invertebrates this was comparatively easy, for though, as I have before pointed out, no linear arrangement is correct, yet in a small museum the "table cases" for invertebrates must run on in lines, and the mounting, owing to their enormous numbers and usually small size, must be tabular, and not pictorial (except, of course, in rare instances).
With the plants and invertebrates, this was relatively simple, because although, as I mentioned earlier, no linear arrangement is accurate, in a small museum the "table cases" for invertebrates need to be lined up, and the display, due to their vast numbers and typically small size, has to be tabular and not pictorial (except, of course, in rare cases).
I was aware that several naturalists had "laid down the law" as to the position to be taken by local museums, and that notably Mr. John Hopkinson, of the Watford Natural History Society, had written his views upon the subject; but these views are, I think, probably somewhat narrowed by the small size of the museum he had in mind whilst writing. Though agreeing with him in the main, I considered that very few provincial museums, excepting Liverpool, could boast of having anything like so large a space for the exhibition of specimens as we possessed in our zoological room.
I knew that several naturalists had "laid down the law" about the role of local museums, and that especially Mr. John Hopkinson from the Watford Natural History Society had shared his thoughts on the topic; however, I believe his opinions are probably influenced by the small size of the museum he was thinking about when he wrote them. While I mostly agree with him, I think very few regional museums, aside from Liverpool, can claim to have as much space for displaying specimens as we had in our zoological room.
It may be taken, therefore, for granted, that what was written specially to suit the requirements of Watford is not of the slightest use when sought to be applied to larger museums. When, however, Mr. Hopkinson quotes the opinions of such well-known scientists as Professors Flower, Rudler, Dr. Sclater, and other practical workers, his compilation becomes of some value.
It can be assumed that what was written specifically for the needs of Watford is not at all useful when applied to larger museums. However, when Mr. Hopkinson references the views of well-known scientists like Professors Flower, Rudler, Dr. Sclater, and other hands-on professionals, his collection starts to hold some value.
Professor Rudler, it will be seen, points out that, however full and perfect a local collection may be, it would teach nothing if narrowed down to purely local limits, and that, therefore, it must be broadened for the sake of comparison; and he very properly says: "Whilst we should patriotically aspire to render the local collection as perfect as possible, I would not by any means have the usefulness of museums stop here. Comparing any local collection with a general collection, it will, of course, be found that many important groups of 'animals, vegetables, and minerals, are but imperfectly represented, whilst others are altogether blank. There is, consequently, great danger of very limited and inadequate notions of the great system of Nature being formed by the student who confines his attention to local natural history. To counteract such a tendency, it is eminently desirable to form, under proper conditions, a general collection, which will give the visitor some notion of, at any rate, the larger groups in which natural bodies are classified. There should, consequently, be two departments to our central museum---one local and the other general--each with distinct aims, and each appealing to a distinct class of visitors."
Professor Rudler points out that, no matter how complete a local collection may be, it won’t provide much insight if it’s limited to just local items. Therefore, it needs to be expanded for the sake of comparison. He wisely states: "While we should strive to make the local collection as perfect as possible, I don’t think we should limit the usefulness of museums to just that. When you compare any local collection to a general one, you’ll find that many important groups of animals, plants, and minerals are either poorly represented or completely missing. As a result, students focusing only on local natural history may develop a very limited and inadequate understanding of the broader system of Nature. To address this issue, it’s crucial to create a general collection under the right conditions, which can give visitors an idea of at least the larger groups into which natural items are categorized. We should, therefore, have two sections in our central museum—one local and one general—each with different purposes and appealing to different types of visitors."
These being exactly my views, but with the radical change of wishing to mount both collections pictorially, I considered that, although the newly-erected wall-cases in oak, with single sheets of plate-glass, 7 ft. 6 in. by 5 ft., were, when filled as I projected, admirably suited to interest the general public, who comprise, perhaps, nine-tenths of museum visitors, yet that the claims of the respectable minority of students, artists, and quasi-scientific people should not be neglected, and for these the local fauna, etc.., should be perseveringly collected and mounted with all the appliances which science and art can suggest. To do this properly, and to preserve groups for an indefinite time, it is necessary, and indeed indispensable, that each group of male, female, nest and eggs, or young, should be mounted in a separate case, or in separate divisions of a row of cases quite distinct from the general collection.
These are exactly my views, but with the significant shift of wanting to display both collections visually. I thought that while the newly-built oak wall cases, with single sheets of plate glass measuring 7 ft. 6 in. by 5 ft., would be very appealing to the general public—who make up about ninety percent of museum visitors—it's important not to overlook the needs of the respected minority of students, artists, and quasi-scientific individuals. For these people, local fauna, etc., should be carefully collected and displayed using all the methods that science and art can offer. To do this properly and to preserve groups over an indefinite period, it's essential that each group of male, female, nest and eggs, or young be mounted in a separate case or in distinct sections of a row of cases, separate from the general collection.
Although I had assumed, and, indeed, had the courage of my opinions, that the pictorial method of displaying natural history specimens was a great improvement upon the old peg system, I recognised the difficulties attendant upon this and also that many excellent authorities were adverse to any pictorial arrangement whatever. And, indeed, if we come to the consideration of "true science," I unhesitatingly assert that end is best served by a collection of properly authenticated birds' skins scientifically arranged in cabinets, and not mounted in any way whatever; but although this method might satisfy a few workers, I very much fear that the general bulk of the ratepayers would be hardly satisfied with a museum arranged on so severely scientific principles.
Although I thought, and was confident in my beliefs, that using images to display natural history specimens was a major improvement over the old peg system, I recognized the challenges this method presented and that many respected experts opposed any pictorial arrangement. In fact, when we consider "true science," I firmly believe that the best approach is a collection of properly authenticated bird skins organized scientifically in cabinets, without any mounting. However, while this method might please a few researchers, I worry that the majority of the taxpayers would not be satisfied with a museum organized so strictly based on scientific principles.
It must be considered that a public museum differs from a private one in a very material point. In the former there is a diversity of tastes to please, and it is often difficult to know the exact point where the line should be drawn; in a private museum, on the contrary, there is but one person to please, and that the owner, consequently he may indulge his crotchets without fear of doing damage to anyone but himself. I considered that public museums must always be affected by matters of expediency and local feeling, and that the will of the majority must always be studied, when it has common sense for its basis.
It’s important to note that a public museum is different from a private one in a significant way. In a public museum, there are many different tastes to satisfy, and it can be hard to determine where to draw the line; on the other hand, in a private museum, there is only one person to please—the owner—so they can follow their unique preferences without worrying about negatively impacting anyone else. I believe that public museums are always influenced by practical considerations and local sentiments, and that the needs of the majority should always be taken into account, as long as they are based on common sense.
To this end I worked, and not wishing to be so much in love with my own system as to be blind to advice, I wrote to ten of the most eminent men of science — men of European reputation, and whose dictum on museum matters cannot be questioned — setting forth, under the heading "Scheme A" and "Scheme B," the pros and cons of both, not favouring one or the other in the slightest, giving no clue whatever to my leaning to either, and resolving to be guided entirely by the opinion of the majority, or, should it be a close tie, to refer it to an umpire.
To achieve this goal, I worked diligently, and not wanting to be so in love with my own ideas that I ignored outside opinions, I reached out to ten of the leading scientists—well-respected figures in Europe, whose views on museum issues are beyond dispute. I outlined the advantages and disadvantages of both "Scheme A" and "Scheme B," without showing any preference for one over the other. I didn’t give any hints about my bias toward either option and decided to follow the majority opinion. If the results were close, I would turn to an impartial judge for a final decision.
Of these ten, eight returned unqualified approval of having a general collection for Leicester, and also of that plan which kept the "general" and "local" collections entirely distinct; one gave no opinion, and one eminent man suggested an alternative scheme of a typical collection somewhat like Professor Owen's "Index Museum" at South Kensington, and which could be carried out afterwards without reference to the question at issue.
Of these ten, eight agreed without hesitation on having a general collection for Leicester, as well as on the plan that kept the "general" and "local" collections completely separate; one didn't give an opinion, and one respected individual proposed an alternative idea for a typical collection similar to Professor Owen's "Index Museum" at South Kensington, which could be implemented later without relating to the matter at hand.
As regards the pictorial mounting of the specimens in zoological order — the thing I was most doubtful about — both for the "general" and the "local" collections, five out of the ten unhesitatingly favoured pictorial mounting — if well done — of both collections, and four more said nothing for or against it.
As for the visual presentation of the specimens in zoological order — the aspect I was most unsure about — both for the "general" and the "local" collections, five out of the ten confidently supported visual presentation — if done well — for both collections, and four others didn’t express any opinion either way.
Nearly every one of these gentlemen wrote me a lengthy letter, giving most valuable advice — advice which has in all cases been acted on where practicable.
Nearly every one of these guys wrote me a long letter, giving really helpful advice — advice that has been followed in all cases where it was possible.
Dr. a. C. Guenther, F.R.S., etc.., at one time the Keeper of Zoology, British Museum, has kindly allowed me to quote his views embodied in a letter to me. He says:
Dr. A. C. Guenther, F.R.S., etc., formerly the Keeper of Zoology at the British Museum, has generously permitted me to quote his thoughts from a letter he sent me. He says:
"I should recommend you to adopt the following plan: Arranging the general and British collections together, strictly systematically, receiving, of the foreign animals, typical forms only, but making the British series as complete as possible, and choosing in preference Leicestershire animals when practicable.
I recommend you follow this plan: Organize the general and British collections together in a clear system, include only typical examples of foreign animals, but try to make the British collection as comprehensive as possible, and select Leicestershire animals whenever you can.
Excluding from the general series specially mounted objects, such as groups of birds showing nidification, change of plumage, or illustrating the habits of animals — such groups to be mounted on separate stands in the middle of the room.
Excluding from the general series specially displayed items, like groups of birds demonstrating nesting, changes in feathers, or showcasing animal behaviors — these groups should be displayed on separate stands in the center of the room.
I believe this plan would best meet the requirements in your museum."
I believe this plan would best meet the needs of your museum.
Having now something to work upon, the Museum Committee rejected "Scheme A." whose weak points have been detailed at length, and sanctioned "Scheme B" being carried out, which not only separated "local" from "general," but provided for the pictorial mounting of both.
Now that they had a basis to work from, the Museum Committee rejected "Scheme A," which had been thoroughly criticized, and approved "Scheme B" for implementation. This scheme not only distinguished "local" from "general," but also enabled the visual presentation of both.
Taking, therefore, any of the orders marked on the plan (see Plate) as an example, the best known, and therefore "local" or "British" species of the first family (or genera) of that order is selected, then the least known or most striking "foreign" species of the same family (or genera) to compare with it, and so on throughout. Space being limited, however, species closely allied are not always represented, but are collected as skins to fill up the unavoidable blanks. In all cases, however, typical specimens of the families and genera of animals are attempted to be shown, and as many species as possible are collected as skins.
Taking any of the orders shown on the plan (see Plate) as an example, the most well-known, or "local" or "British," species of the first family (or genera) of that order is chosen, followed by the least known or most striking "foreign" species of the same family (or genera) for comparison, and this continues throughout. However, since space is limited, closely related species aren’t always included but are collected as skins to fill the unavoidable gaps. In all cases, typical specimens of the families and genera of animals are aimed to be displayed, and as many species as possible are collected as skins.
The highest form of each order is placed at the top, the next underneath, until the bottom of the case is arrived at, then ascends again, forming a serpentine line, which, taking the first order, Passeres, as an example, begins at the top of the first case, and takes the song thrush — one of the "locals" — as being of the first genera of the first family; this is contrasted by a "foreign" form of the same family (and genus), the "American Robin," and thus runs on throughout the whole of the wall-cases on that side of the room devoted to birds (see Plan), until it ends at the ostrich, as being the last.
The highest form of each category is located at the top, with the next one underneath it, continuing down to the bottom of the display case, and then going back up, creating a winding line. For example, starting with the first category, Passeres, it begins at the top of the first case, showcasing the song thrush — one of the "locals" — as the first genus of the first family; this is compared to a "foreign" version of the same family (and genus), the "American Robin," and this pattern continues along the entire row of cases on that side of the room dedicated to birds (see Plan), concluding with the ostrich as the last entry.
It win be seen by this that, although the so-called "local" birds are often, nay nearly always, represented, they have no fictitious value given to them, but simply take their place in the great scheme of Nature in a proper manner, being often close to so-called "foreign" forms, with which they are easily compared. The whole arrangement of accessories is "pictorial," birds being represented on trees or on "rockwork," many of them swimming, or flying, or eating, surrounded by mosses and the few dried plants available for such purposes — in fact, represented in as natural a manner as is possible under the circumstances.
It can be seen that, although the so-called "local" birds are often, almost always, included, they aren't given any made-up value. They simply fit into the larger scheme of Nature appropriately, often being close to so-called "foreign" species, which makes easy comparisons possible. The entire arrangement of elements is "pictorial," with birds depicted on trees or "rockwork," many of them swimming, flying, or eating, surrounded by mosses and the few dried plants available for such purposes — in fact, represented as naturally as possible given the circumstances.
Exception may be taken to the close contiguity of an American or Indian form with an European, sometimes "British" form, which, though scientifically correct, is artistically and topographically wrong; and this certainly was a crux of mine until I reflected that, under the old peg system, the same state of affairs existed. I have endeavoured to isolate as much as possible such incongruities one from the other, often by partially surrounding them with ferns, etc.., of their native habitat, and by leaving little blanks here and there. Apart from this, the general opinion of both scientific [Footnote: In this category I may place Sir Philip Cunliffe Owen, C.B., etc..; Mr. R. Bowdler Sharpe, F.L.S., etc..; Mr. Smith Woodward, all of South Kensington; Sir J. A. Picton, F.S.A., etc. of Liverpool; Professor St. George Mivart, F.R.S., etc..; Professor L. O. Miall; Professor Wm. Knight; Professor A. Schuster, etc..; Mr. Jas. Orrock, Member of the Royal Institute of Water-colour Painters; and several other gentlemen who have done me the honour to speak in most flattering terms of the new arrangement.] and unscientific people is that the scheme is a success, and that such trifling and inevitable irreconcilements are amply condoned and compensated for by the increased beauty of the groups, and by the pleasure it affords, not only to artistic people, but to the general public; indeed, if vox populi be vox Dei, there is no doubt upon the subject whatever.
Exception can be raised about the close proximity of an American or Indian form to a European, sometimes "British" form, which, while scientifically correct, is artistically and topographically incorrect; and this was definitely a problem for me until I realized that, under the old peg system, the same situation existed. I’ve tried to separate these incongruities as much as possible, often by partially surrounding them with ferns and other elements from their native habitats, and by leaving small gaps here and there. Aside from this, both the general scientific [Footnote: In this category I may place Sir Philip Cunliffe Owen, C.B., etc.; Mr. R. Bowdler Sharpe, F.L.S., etc.; Mr. Smith Woodward, all of South Kensington; Sir J. A. Picton, F.S.A., etc. of Liverpool; Professor St. George Mivart, F.R.S., etc.; Professor L. O. Miall; Professor Wm. Knight; Professor A. Schuster, etc.; Mr. Jas. Orrock, Member of the Royal Institute of Water-colour Painters; and several other gentlemen who have honored me by speaking in very flattering terms about the new arrangement.] and non-scientific people generally agree that the scheme is successful, and that such minor and unavoidable inconsistencies are more than made up for by the increased beauty of the groupings, and by the enjoyment it brings, not only to artists, but to the public as a whole; in fact, if vox populi is vox Dei, there’s no doubt about it at all.
Other defects there are; for instance, repetitions of grasses in "fitting-up," which proves how little can be done with dried things, and how much better it would be to replace them by modelled foliage (mentioned in Chapter XIV). [Footnote: One would-be critic wrote to the papers condemning the whole arrangement, because, in one of the cases, one plant was about a foot nearer the water or a yard nearer to another plant than it should be! The same wiseacre, or his friend, wrote quite an article upon some supposed "fir twigs" which, much to his confusion, were nothing of the sort, but a plant quite proper to its place in the case.]
Other issues exist; for example, the repetitions of grasses in "fitting-up," which show how little can be achieved with dried materials, and how much better it would be to replace them with modeled foliage (mentioned in Chapter XIV). [Footnote: One would-be critic wrote to the papers criticizing the entire arrangement because, in one of the cases, one plant was about a foot closer to the water or a yard nearer to another plant than it should have been! The same know-it-all, or his friend, also wrote an article about some supposed "fir twigs," which, much to his embarrassment, were nothing of the sort, but a plant that was completely appropriate for its place in the display.]
I would now wish to point out why I object so much to carefully-managed groups of so-called "local" birds, their nests and eggs, being introduced in a general collection, especially if the latter be arranged in a pictorial manner.
I want to highlight why I strongly oppose the inclusion of carefully curated groups of so-called "local" birds, along with their nests and eggs, in a general collection, especially if that collection is displayed in a visual format.
First, because small groups, such as of necessity the greater number of pairs of local birds would cut up into, would be lost amidst their larger surroundings, and be really as if an artist were to paint a small, highly finished picture in the corner of some large, "broad" subject; secondly, the great difficulty there is in protecting such choice groups from moth if exposed in, say, a cubic space of 100 ft. filled with other specimens, some of them old and doubtful as regards freedom from insects. A general collection, even should great care be taken, requires constant watching to seize upon any specimen showing signs of damage; but why a choice group of young birds in their nest, with parents — birds in change of plumage, surrounded by accessories which perhaps have cost hundreds of hours to execute — should be exposed to all the evils imaginable when isolation is so much more practicable and practical, passes comprehension.
First, because small groups, like the majority of pairs of local birds, would get lost in their larger surroundings, it’s as if an artist were to create a small, highly detailed picture in the corner of a large, broad scene; second, there’s the significant challenge of protecting such valuable groups from moths if they are placed in a 100 ft³ space filled with other specimens, some of which might be old and questionable in terms of being insect-free. A general collection, even with careful attention, needs constant monitoring to catch any specimen that shows signs of damage; but the idea that a special group of young birds in their nest, with their parents—birds in transition of plumage—surrounded by accessories that may have taken hundreds of hours to create, should be exposed to every possible threat when it would be so much easier and more practical to isolate them, is beyond understanding.
No; I am convinced that the only way to manage, in a museum of sufficient size to have a general collection, is to arrange it as I have sketched out, and to make a separate collection close at hand, if need be, for comparison of the animals collected in the district.
No; I'm convinced that the only way to manage a museum large enough to have a general collection is to organize it the way I've outlined, and to create a separate collection nearby, if necessary, for comparing the animals collected in the area.
Now for labelling. It was proposed originally in Scheme A in this form:
Now for labeling. It was originally proposed in Scheme A like this:
"It will be essential to have labels in the cases. These maybe made simple, however, with references to a descriptive catalogue. The labels should bear the English name, with 'Resident,' Summer Visitant,' or 'Winter Visitant' on all British species. Nothing more.
"It will be essential to have labels in the cases. These may be made simple, however, with references to a descriptive catalog. The labels should include the English name, with 'Resident,' 'Summer Visitor,' or 'Winter Visitor' for all British species. Nothing more."
"The three sections should have labels of distinct colours — say, yellow for local, pink for British, white for foreign. The labels will probably be best glued on to some part of the stand or setting. They should be as small as possible, so as to be legible,
"The three sections should have labels in different colors — like yellow for local, pink for British, and white for foreign. The labels will probably work best if they're glued onto some part of the stand or display. They should be kept as small as possible while still being readable."
"Local species maybe distinguished as 'Native' and 'Casual, or Accidental.
"Local species can be categorized as 'Native' and 'Casual,' or 'Accidental.'
"The latter might have a dark line above, and below the name on the label — thus, Stork, or be marked 'Casual — Spring,' or 'Casual — Autumn.'"
"The latter might have a dark line above and below the name on the label — so, Stork, or be marked 'Casual — Spring,' or 'Casual — Autumn.'"
To this I objected that if the arrangement was to be "pictorial," the "spotty" appearance of labels, especially if of light tints, was destructive to the effect sought to be gained; that yellow is not distinct from white by gaslight; and that pink often fades to yellow; also that to colour-blind people these labels would have no significance whatever.
To this, I argued that if the design was meant to be "visual," the "spotty" look of the labels, particularly in lighter colors, would ruin the desired effect. I pointed out that yellow isn't much different from white under gaslight, and that pink can often fade to yellow. Additionally, I noted that these labels would be meaningless to color-blind individuals.
In addition, I submitted that there are educated people as well as people of the other class, and that the system of labels written with common names inside the cases is not only unscientific but ugly in the extreme, for these reasons — that there are many birds whose "English" names are just as puzzling as their scientific to the uneducated; whereas, for those who care to learn, the scientific name is a factor of knowledge.
Additionally, I argued that there are educated individuals as well as those from other backgrounds, and that using generic labels inside the cases is not only unscientific but also visually unappealing. This is because many birds have "English" names that are just as confusing as their scientific names to those who aren’t educated; however, for those willing to learn, the scientific name represents a valuable source of knowledge.
Regarding their inexpedience and ugliness, such a word as the "Lesser - spotted -Woodpecker" with the marking underneath it of "Resident," would fill up a large label if it were to be read at any height or distance. Taking it as a whole, the proposition was behind the age, and was commonplace also.
Regarding their impracticality and unattractiveness, a term like "Lesser-Spotted Woodpecker" marked with "Resident" would take up a large label if it were to be read from any height or distance. Overall, the idea was outdated and quite ordinary as well.
To dispense altogether with the necessity for labels, I proposed that a chart might be made for every group--a picture, in fact, of the contents of each case, every bird numbered, and a list prepared, whose corresponding number would give the whole history of each specimen; but, in any case, the adoption of a mass of printed matter clumsily introduced amidst pictorial effects must be condemned.
To completely eliminate the need for labels, I suggested creating a chart for every group—a visual representation of the contents of each case, with every bird assigned a number, and a list prepared so that the corresponding number would provide the entire history of each specimen. However, in any situation, using a lot of printed material awkwardly mixed in with the visuals should be avoided.
That all this was practicable is now proved by the present state of the Leicester Museum, provisionally finished in its general zoological collections so far as the birds and fishes are concerned. [Footnote: That is to say, that many of the ill-mounted and old specimens will ultimately be replaced by better ones of the same species, and that some modelled foliage will take the place of many of the dried grasses, rushes, etc.., which are not quite truthfully arranged.]
That all this is doable is now shown by the current state of the Leicester Museum, which is mainly finished in its general zoological collections regarding birds and fish. [Footnote: That is to say, many of the poorly displayed and old specimens will eventually be replaced with better ones of the same species, and some modeled foliage will replace many of the dried grasses, rushes, etc., which are not arranged very accurately.]
The reference to species in the general collection is now managed as I proposed. (See list, on p. 337, of part of the Order Anseres, printed on sage-green cards.) This is, I contend, a great advance on the old system of labelling, which has this defect, that the labels, even if small, are "spotty" and obtrusive near the eye, and if placed 10 ft. from the floor, as they must be in many instances, it is impossible to read them unless both label and type be very large, which is an absurdity in a pictorially-mounted collection. [Footnote: When I first came to Leicester the birds, mounted on stands and perches 9 ft. from the floor, were labelled by slips of yellow paper pasted on the stands, the type being that known as Pica and Bourgeois!]
The way species are referenced in the general collection is now managed as I suggested. (See the list on p. 337, which includes part of the Order Anseres, printed on sage-green cards.) I believe this is a significant improvement over the old labeling system, which has the drawback that the labels, even when small, are noticeable and distracting at eye level. Additionally, when placed 10 ft. above the ground, as they often must be, it becomes impossible to read them unless both the label and the text are very large, which is ridiculous in a collection that is visually presented. [Footnote: When I first arrived in Leicester, the birds, mounted on stands and perches 9 ft. high, were labeled with slips of yellow paper stuck to the stands, using a typeface known as Pica and Bourgeois!]
Fancy Ramiphomicron microrhynchum, Boiss. (one of the humming-birds), peeping over a label long enough to take his name — say, 3 in. x 1 in.!
Fancy Ramiphomicron microrhynchum, Boiss. (one of the hummingbirds), glancing over a label just long enough to catch his name—about 3 inches by 1 inch!
Multiply this by fifty, and fancy a typical collection of pictorially-mounted humming-birds labelled in this manner! A well-known naturalist and scientific zoologist, personally unknown to me, to whom I wrote, advised, as usual, the labels to be of different colours as distinguishing marks. I sent him one of my lists and charts, and he wrote: "I return the printed description which seems to me admirably calculated to convey instruction in a becoming and sightly way. It is undoubtedly an advance upon labelling."
Multiply this by fifty, and just imagine a typical collection of framed hummingbirds labeled like this! A well-known naturalist and zoologist, who I don't know personally, advised me, as usual, to use different colored labels as distinguishing marks. I sent him one of my lists and charts, and he replied: "I'm returning the printed description which I think is excellently designed to provide instruction in an attractive and appealing way. It is certainly a step forward from traditional labeling."
Again, a scientific gentleman of local celebrity wrote an article on the museum, and did me the honour to especially note the substitute for labels. He says: "Affixed to the front of each group case, and on a level with the eye, is a neatly-printed explanatory tablet, suitably framed, comprising a list of the specimens (numbered), class, sub-class, order, family, etc.., with their scientific terms. The literal interpretation of these several terms is then given. Then follow the scientific names, with sex (where determined); and, lastly, the known range of each species — a matter of acknowledged importance. This is supplemented by an artistically-coloured chart, representing each example (also numbered), in the corresponding position which it occupies in any given group case. Thus is conveyed, in a concise and intelligible form, all the information which can fairly be embodied in the limited space at command.
Again, a well-known local scientist wrote an article about the museum and took the time to highlight the substitutes for labels. He says: "Attached to the front of each display case, at eye level, is a neatly printed explanatory tablet, properly framed, which includes a list of the specimens (numbered), their class, subclass, order, family, etc., along with their scientific terms. A straightforward explanation of these terms is provided. Following that are the scientific names, along with the sex (where determined); and finally, the known distribution of each species — which is recognized as important. This is complemented by a beautifully colored chart, depicting each example (also numbered) in the corresponding position it occupies within each display case. This conveys, in a clear and concise manner, all the information that can reasonably fit in the limited space available."
Another redeeming feature, consequent upon this instructive and unique method, is the dispensing with the formidable array of labels mounted on unsightly coils of wire dotted about, reminding one of the labels displayed in the shop window of a hatter or haberdasher — 'The Latest Novelty,' 'New this Season,' etc.. They are not only obtrusive to the eye, but have a decided tendency to mar the neat effect and appropriate mounting of the general collection, and materially interfere with the surroundings, outline, and beauty of the objects to which they are appended, and their multiplied form only enhances this confusion. Beside which, these labels are of necessity frequently placed at such a height that, in order to decipher them, the head of the observer needs to be perched on a neck somewhat like the giraffe. So forcibly impressed am I with the soundness and value of this newly-devised plan, that I am led to predict that its adoption will sooner or later find favour among other kindred institutions even of a larger growth."
Another great aspect of this unique and educational method is that it eliminates the overwhelming number of labels mounted on ugly coils of wire scattered around, which remind one of the labels seen in a hat shop window — 'The Latest Novelty,' 'New this Season,' etc. These labels are not only an eyesore but also tend to disrupt the neat appearance and appropriate presentation of the entire collection, significantly affecting the surroundings, outline, and beauty of the items they’re attached to, and their many forms only add to this chaos. Additionally, these labels are often placed at such a height that you have to stretch your neck like a giraffe to read them. I’m so convinced of the effectiveness and value of this new approach that I believe it will eventually be embraced by other similar institutions, even larger ones.
LIST OF THE SPECIMENS CONTAINED IN THIS GROUP.
LIST OF THE SPECIMENS INCLUDED IN THIS GROUP.
(Arranged from the most highly specialized to lowest form.)
(Arranged from the most specialized to the least specialized.)
For Reference see coloured CHART below.
For reference, see the colored chart below.
ORDER — ANSERES. From the Latin Anser--a Goose,
ORDER — ANSERES. From the Latin Anser—a Goose,
INCLUDING GEESE, SWANS, TREE-DUCKS, DUCKS, MERGANSERS, etc.
INCLUDING GEESE, SWANS, TREE-DUCKS, DUCKS, MERGANSERS, etc.
Total number of Species of this Order known to inhabit the World 185
Total number of species in this order known to inhabit the world: 185
Of this number there are as visitants to, and residents in Britain, but 44, 19 only of which remain to breed.
Of this number, there are visitors to and residents in Britain, but 44, and only 19 of them remain to breed.
Of these 44 for Britain, there are as visitants to, and residents in Leicestershire 13
Of these 44 for Britain, there are 13 who are visitors to and residents in Leicestershire.
3 only of which breed in the County.
3 only of which breed in the county.
Family — ANATIDAE.
Family — Waterfowl.
From the Latin Anas — a Duck.
From the Latin Anas — a duck.
(Ducks, Geese, etc..)
(Ducks, Geese, etc.)
No. — EGYPTIAN GOOSE
No. — Egyptian Goose
Chenalopex aegyptiaca (L). RANGE — Africa.
Chenalopex aegyptiaca (L). RANGE — Africa.
Domesticated in many parts of Europe, including Britain and Leicestershire.
Domesticated in various regions of Europe, including Britain and Leicestershire.
Shot at Withcote Hall, near Oakham (probably escaped from confinement), and presented by F. PALMER, Esq.
Shot at Withcote Hall, near Oakham (likely escaped from captivity), and given by F. PALMER, Esq.
No. — BLACK-NECKED SWAN.
No. — Black-necked Swan.
Cygnus nigricollis (Gm.). RANGE — Antarctic America.
Cygnus nigricollis (Gm.). RANGE — Antarctic America.
From River Plate, S. America.
From River Plate, South America.
Presented (in the skin) by C. J. MUSSON, Esq., 1876.
Presented (in the skin) by C. J. MUSSON, Esq., 1876.
No. — BLACK SWAN.
No. — BLACK SWAN.
Cygnus atratus (Lath.) (Immature) RANGE — Australia
Cygnus atratus (Lath.) (Immature) RANGE — Australia
From Sydney, New South Wales.
From Sydney, NSW.
Presented by W. M. SQUIRES, Esq., 1875.
Presented by W. M. SQUIRES, Esq., 1875.
No — SHELDRAKE. Tadorna cornuta (Gm.). RANGE — N. Africa, Asia, as far east as Japan, Europe including Britain, and has occurred as a rare straggler in Leicestershire.
No — SHELDRAKE. Tadorna cornuta (Gm.). RANGE — N. Africa, Asia, as far east as Japan, Europe including Britain, and has been spotted as a rare visitor in Leicestershire.
From Scotland, by purchase, 1881.
Purchased from Scotland, 1881.
No. — WILD DUCK OR MALLARD.
No. — WILD DUCK OR MALLARD.
Anas boscas (L.). Range — North Africa, Asia from the far North to China and Japan, N. America to Mexico, Europe generally, including Britain, and commonly occurring in Leicestershire.
Anas boscas (L.). Range — North Africa, Asia from the far North to China and Japan, North America to Mexico, Europe generally, including Britain, and commonly found in Leicestershire.
From Barston, Warwickshire. Presented by the Curator (M.B.), 1882.
From Barston, Warwickshire. Presented by the Curator (M.B.), 1882.
The animals collected in the district are now being placed in the middle of the room in oak cases, with plate-glass all around, on the tops of table-cases holding at present the invertebrates, and will show the male and female, young in nest, the eggs, birds in change of plumage, all surrounded as in nature by carefully-modelled plants and other accessories, the food, and the skeleton. The labelling of these latter groups requiring a mass of information, as being of local interest, is in this wise (on light sage-green coloured cards):
The animals collected in the area are now being displayed in the center of the room in oak cases, completely surrounded by plate glass. These cases are currently on the tables that hold the invertebrates and will showcase males and females, young ones in nests, eggs, birds in the process of changing plumage, all set in a natural environment with carefully designed plants and other props, food, and skeletons. The labeling of these groups, which needs a lot of information because they are of local interest, is done like this (on light sage-green cards):
TOWN MUSEUM, LEICESTER.
Leicester Town Museum.
Studies illustrating the Habits, etc.., of Animals collected in the County.
Studies illustrating the habits, etc., of animals collected in the county.
CLASS — Aves ORDER — Passeres FAMILY — Turdidae
CLASS — Birds ORDER — Songbirds FAMILY — Thrushes
GROUP No. . — Illustrative of the Life-History of the Whitethroat (SYLVIA CINEREA, Bechst), a Bird of Passage, or Spring Migrant to Britain (winters in Africa).
GROUP No. . — Illustrative of the Life-History of the Whitethroat (SYLVIA CINEREA, Bechst), a Bird that Migrates to Britain in Spring (spends winter in Africa).
|
No. C1A — Male Whitethroat No. C1A — Male Whitethroat No C1B — Female Whitethroat No C1B — Female Whitethroat No C1— Nest Of Whitethroat No C1— Whitethroat Nest Nos. C1.50 to C1.53 — Four Young Of Whitethroat Nos. C1.50 to C1.53 — Four Young Whitethroats |
The whole collected by the Curator at Aylestone, August, 1883. The complete collection assembled by the Curator at Aylestone, August 1883. The Male and Female are the actual builders of the nest, and parents of the young birds here shown. The male and female are the actual builders of the nest and the parents of the young birds shown here. |
No. A Male, and No. Female, in Spring plumage. To be procured
No. Male, and No. Female, in spring plumage. To be obtained.
RANGE. — N. Africa, Western Asia, Europe generally, common in Britain (except in the North), and also in Leicestershire.
RANGE. — N. Africa, Western Asia, Europe generally, common in Britain (except in the North), and also in Leicestershire.
FOOD. — Caterpillars, various small insects, and occasionally small fruits.
FOOD. — Caterpillars, different small insects, and sometimes small fruits.
EGGS. — Four or five. Builds its nest amongst nettles or brambles, in low bushes near to the ground. (N.B. — Eggs shown at back of group.) Duplicate Skin and Skeleton.
EGGS. — Four or five. It builds its nest among nettles or brambles in low bushes close to the ground. (N.B. — Eggs shown at the back of the group.) Duplicate Skin and Skeleton.
|
PLANT EXHIBITED. PLANT DISPLAYED. |
BRAMBLE (Rubus fruticosus, L.). VAR.: discolor BRAMBLE (Rubus fruticosus, L.). VARIETY: discolor RANGE. — Whole of Europe except extreme North, Russian and Central Asia and Northern Africa (Not high Alpine). Common in Leicestershire. RANGE. — All of Europe except for the extreme North, including Russia, Central Asia, and Northern Africa (Not high Alpine areas). Common in Leicestershire. |
Flowers and leaves modelled from Nature by the curator Flowers and leaves made by Nature through the curator. |
Now for the invertebrates. Not having a special room at present for these, they are best displayed in the centre of the vertebrate-room, if possible, in table-cases, which are — for convenience, though, incorrectly in science — arranged in linear order, beginning at the Protozoa and running on to the Cephalopoda. As I before pointed out, a tabular arrangement is inevitable except in some rare cases, where a group might be taken to be pictorially displayed to give an idea of the creature's mode of life.
Now for the invertebrates. Since there isn’t a dedicated room for them right now, they are best shown in the middle of the vertebrate room, if possible, in display cases, which are — for convenience, though not scientifically accurate — arranged in a straight line, starting with the Protozoa and moving on to the Cephalopoda. As I mentioned earlier, a tabular layout is unavoidable except in a few rare instances, where a group might be visually displayed to illustrate the creature's way of life.
By far the best arrangement of invertebrates I have ever seen is that adopted at the Liverpool Museum under the auspices of the Rev. H. H. Higgins, M.A., whose views on the invertebrates are very clearly defined in his Introduction to a "Synopsis of an Arrangement of Invertebrate Animals" contained in the Liverpool Museum. He says therein:
By far the best way I've seen invertebrates organized is at the Liverpool Museum, thanks to Rev. H. H. Higgins, M.A. His perspectives on invertebrates are clearly outlined in his Introduction to a "Synopsis of an Arrangement of Invertebrate Animals" featured at the Liverpool Museum. He states:
"The series had to be conformed to a linear arrangement. In some respects this was a serious disadvantage. The classes of invertebrate animals cannot well be represented in a single ascending or descending series. Probably it would not be possible on any symmetrical plan to assign to them their proper positions relatively to each other; but some palpable incongruities might be avoided by the use of table-cases on a ground plan resembling a genealogical tree, one proposed form of which is represented by a diagram in a work published by Professor Rolleston.
"The series had to be arranged in a linear format. In some ways, this was a significant disadvantage. The different classes of invertebrate animals can't be properly represented in a single ascending or descending order. It's likely that there’s no symmetrical way to assign their correct positions relative to one another; however, some obvious mismatches could be avoided by using display cases based on a layout resembling a family tree, one suggested design of which is illustrated in a diagram in a publication by Professor Rolleston."
"The importance of a suitable ground plan for cases in museums seems to be much underrated. When a class of students visit a museum frequently, the localities of cases containing special groups become indelibly impressed upon the memory. This might be turned to good account.
"The importance of a good layout for display cases in museums seems to be significantly overlooked. When a group of students visits a museum regularly, the locations of cases containing specific collections become deeply embedded in their memory. This could be utilized effectively."
"In preparing the first scheme of the collection, it seemed essential that plain and moderately-simple printed descriptions of the life-history of the animals should accompany the specimens; therefore, as it was clearly impossible to describe every genus, it became necessary to fix on some mode of associating in groups a number of examples to which the descriptions might apply. Such divisions as 'classes' and 'orders' were manifestly too large, whilst 'families' varied from a single genus, including a solitary species, to an army of more than a thousand genera — e.g., the Linnaean families Cerambycidae and Curculionidae in the Coleoptera. It was with some regret that the idea of attaching a readable sketch to each division of a given rank in recent systems of classification was relinquished; but it was found to be impracticable, and the life-history sketch thus became the foundation of the arrangement eventually adopted.
"In preparing the initial plan for the collection, it was crucial to include straightforward and fairly simple printed descriptions of the animals' life histories alongside the specimens. Since it was obviously impossible to describe every genus, it became necessary to determine a way to group together several examples to which the descriptions could apply. Divisions like 'classes' and 'orders' were clearly too broad, while 'families' ranged from a single genus with just one species to a massive group of over a thousand genera — e.g., the Linnaean families Cerambycidae and Curculionidae in the Coleoptera. It was somewhat disappointing to give up the idea of attaching a readable summary to each division of a specific rank in current classification systems; however, it was found to be impractical, and the life-history sketch thus became the basis for the arrangement that was ultimately adopted."
"Whether it might be a few species, or a genus, or a family, or an order, that seemed to afford suitable scope for a page of readable and instructive matter, it was decided that, throughout the entire collection, such a group should be segregated, so as to form the unit of the series. Eventually, in order that the sketches, which it was proposed to print for that purpose on tablets, might all be in positions where they could conveniently be read, it was found to be expedient that each group or unit should occupy an equal space; and as the blocks on which the table-cases rested were to be fitted up with trays or drawers, twelve of which would occupy the table-case without loss of room, these trays or drawers were adopted as the receptacles and boundaries of the groups.
"Whether it was a few species, a genus, a family, or an order that seemed suitable for a page of engaging and informative content, it was decided that, throughout the entire collection, such a group should be set apart to form the unit of the series. Ultimately, to ensure that the sketches, intended to be printed for this purpose on tablets, could all be positioned for easy reading, it was deemed practical for each group or unit to take up an equal space. Since the blocks supporting the table-cases were to be fitted with trays or drawers, with twelve of these fitting into the table-case without wasting space, these trays or drawers were chosen as the containers and boundaries of the groups."
"The entire plan of the table-cases, and the limits of many of the groups, were committed to writing before any considerable advance had been made in procuring specimens. In one respect this circumstance was found to be very advantageous — our desiderata were at once well defined. It was an object that each of the groups should be illustrated by carefully-selected specimens, and, until this could be attained, other acquisitions need not be sought for. In making purchases, such an object, steadily kept in view, exercises a powerful influence against the seductive attractions of 'great bargains,' which often turn out to be great misfortunes to a museum. Moreover, in accepting donations, it is sometimes convenient to be able to refer to a fixed plan. Where room is scanty, as in most museums, nothing is more subversive of order, or more fatal to an instructive arrangement, than the gift of a collection, coupled with a stipulation that it must be displayed in some special way. [Footnote: We possess in the Leicester Museum a very fine collection of the whole of the "British" Birds (totally devoid, however of a history of the specimens) called the "Bickley Collection" — bequeathed to the town under these conditions — which, could we have used it to embellish our present arrangement, would have saved money, and, what is still more important, the entire wall space of a small room now devoted to them.] It is far better to forego the possession even of a valuable series of specimens than to sacrifice order for their sake . . . .
"The complete plan for the display cases, along with the boundaries of many groups, was documented before we made significant progress in acquiring specimens. This turned out to be very beneficial in one way—our desiderata were clearly defined from the start. The goal was for each group to be represented by carefully chosen specimens, and until that was achieved, we didn’t need to seek out other acquisitions. Keeping this goal in mind while making purchases helps resist the tempting allure of 'great bargains,' which often lead to unfortunate outcomes for a museum. Additionally, having a fixed plan to refer to can be handy when accepting donations. In tight spaces, like most museums, nothing disrupts order or undermines an informative arrangement more than receiving a collection with the requirement that it must be displayed in a specific manner. [Footnote: We have a very fine collection of all the "British" Birds (although it lacks any history of the specimens) known as the "Bickley Collection" — given to the town under these conditions — which, had we been able to integrate it into our current setup, would have saved money and, more importantly, all the wall space of a small room now dedicated to it.] It's much better to forgo possessing even a valuable series of specimens than to compromise order for their benefit . . . .
The following is the plan of arrangement adopted in connection with each group: Wherever circumstances permit, the plan for each group includes (1) A printed schedule, (2) Exotic species, (3) British representatives, (4) The printed tablet, (5) Earliest fossils, (6) Diagrams and other illustrations, (7) Species and varieties on a more extended scale."
The following is the plan for organizing each group: Whenever possible, the plan for each group includes (1) A printed schedule, (2) Exotic species, (3) British representatives, (4) The printed tablet, (5) Earliest fossils, (6) Diagrams and other illustrations, (7) Species and varieties on a larger scale.
The schedule, of which an example follows, is printed in large type, and is attached conspicuously to the drawer:
The schedule, as shown in the example below, is printed in large font and is clearly attached to the drawer:
|
GROUP 222. GROUP 222. |
||
|
SUB-KINGDOM SUB-KINGDOM PROVINCE STATE CLASS CLASS SUB-CLASS Subcategory ORDER ORDER SUB-ORDER Suborder FAMILY FAMILY |
Annulosa Annulosa Arthropoda Arthropods Insecta Insects Metabola Metabola Lepidoptera Butterflies and moths Rhopalocera Butterflies Papilionidae Butterflies |
Skeleton external, ringed. Skeleton external, ringed. Limbs jointed. Movable limbs. Legs, six. Six legs. Transformations complete. Transformations complete. Wings with scales. Scaled wings. Horns clubbed at the apex. Horns struck at the top. Middle nerve of fore-wing 4-branched. Middle nerve of fore-wing branched 4 ways. |
The whole "Synopsis," published at a shilling, by the authorities of the Liverpool Museum, is well worth reading. It contains a store of information, not the least interesting being the Greek and Latin derivations of the scientific names. I am especially glad to see that the Greek characters are not barbarously replaced by English "equivalents," which nearly always fail to give the key to the roots. [Footnote: I noticed "Ocnai gunaike" written in a scientific work lately, and I thought I never saw a sentence so ugly and so unlike what it would be if written in Greek characters or properly pronounced.]
The whole "Synopsis," available for a shilling from the Liverpool Museum authorities, is definitely worth checking out. It has a lot of information, including the Greek and Latin roots of the scientific names, which I find particularly fascinating. I'm really glad to see that the Greek characters aren’t clumsily replaced with English "equivalents," which typically fail to capture the real origins. [Footnote: I recently saw "Ocnai gunaike" written in a scientific publication, and I thought it was the ugliest sentence I've ever encountered, completely lacking the beauty it would have if written in Greek characters or pronounced correctly.]
The cases themselves are excellently adapted to show the specimens, and the plan — if we except the division labelled "British," which might be advantageously altered, I think, to "Animals belonging to the above group (etc..), found also in Britain" — is admirable. Not only are objects dried, mounted, or shown in spirits, but first-class coloured drawings of such creatures as Medusae, etc.., are provided. This is, I am sure, a step in the right direction, and I so recognise the importance of this, that I am preparing charts of parts, etc.., of animals as keys to their structure, and also enlarging minute forms under the microscope, to be placed in position in the invertebrate cases for the Leicester Museum.
The display cases are really well designed to showcase the specimens, and the layout—except for the section labeled "British," which I think should be changed to "Animals belonging to the above group (etc.), found also in Britain"—is excellent. Not only are the objects dried, mounted, or preserved in fluids, but there are also high-quality color drawings of creatures like Medusae, etc. This is definitely a positive development, and I recognize how important it is that I'm creating charts of different animal parts, etc., as guides to their structure, and also enlarging tiny forms observed under the microscope to be included in the invertebrate cases for the Leicester Museum.
Another very fine feature of the Liverpool Museum, and worthy of imitation, is the manner in which the osteological preparations are managed. Not only are complete skeletons of mammals shown, but parts for comparison — that is to say, there is a large series of skulls of various mammals, birds, reptiles, and fishes, and, again, leg and arm bones, and their parts, arranged side by side; hence you may compare the fore-limb of the human subject with that of a monkey, a lion, a whale, a marsupial, a bird, a reptile, or a fish. [Footnote: Of course, all this may be seen in the Museum of the College of Surgeons, or at Oxford or Cambridge, etc.., but these are special institutions, and I am merely taking provincial general museums as my standpoint.]
Another great feature of the Liverpool Museum, and one that should be copied, is how they handle the osteological displays. They not only showcase complete mammal skeletons but also provide parts for comparison—there's a large collection of skulls from various mammals, birds, reptiles, and fish, along with leg and arm bones and their parts, all arranged side by side. This way, you can compare the forelimb of a human with that of a monkey, a lion, a whale, a marsupial, a bird, a reptile, or a fish. [Footnote: Of course, you can see all this at the Museum of the College of Surgeons, or in Oxford or Cambridge, etc., but those are specialized institutions, and I’m just looking at regional general museums as my focus.]
It is needless to say — taking into consideration the fact that these are prepared under the direction of the curator, Mr. Moore, and his accomplished family — that all are beautifully arranged and classified. In short, Liverpool is to be congratulated on its collections of bones and invertebrates. Turning, however, to the vertebrates, we see that, although the management begins to recognise the importance of "pictorial" mounting, it is done in a half-hearted manner — isolated groups here and there, on square boards, placed in the general collection amongst the birds, on pegs, serving only to render the latter more conspicuous in their shortcomings. This system of Liverpool is being copied at Nottingham, Derby, and other places, and was being copied also at Leicester, but not being, to my mind, half thorough enough, has been discarded for the more ambitious — certainly more effective — and quite as scientific method of arranging the vertebrates pictorially, and in their proper sequence in orders and families, endeavour being made to represent specimens of each genus also, where practicable, in this manner.
It goes without saying—considering that these are organized under the guidance of the curator, Mr. Moore, and his skilled family—that everything is beautifully arranged and classified. In short, Liverpool deserves praise for its collections of bones and invertebrates. However, when we look at the vertebrates, we see that while the management is starting to recognize the value of "pictorial" displays, it’s being done half-heartedly—isolated groups scattered on square boards, placed among the birds on pegs, only making the birds' shortcomings more noticeable. This Liverpool approach is being emulated in Nottingham, Derby, and other places, and was also being adopted at Leicester, but it wasn’t thorough enough in my opinion, so they switched to a more ambitious—definitely more effective— and equally scientific method of displaying the vertebrates pictorially, in their correct order by family and order, with efforts made to include specimens of each genus wherever possible.
As will be seen, in making a brief résumé of what has gone before, I am in favour of large, top-lighted rooms, painted in a light neutral tint, well warmed; cases built in oak, with single sheets of plate-glass not less than 7 ft. 6 in. by 5 ft. or 8 ft. by 5 ft. 4 in., artificially lighted by pendants shaded from the eye; the vertebrates to be pictorially mounted both in the "general" and "local" collections, but, of course, zoological sequence and science not to suffer in consequence; I think that the "local" and "general" typical collections should be entirely distinct though close to each other in the same room for comparison; that extreme care should be taken in the collection and mounting of the animals inhabiting the district, and that no opportunity be lost of making this latter as complete as possible; that anything for which the locality is famed, be it fossils or antiquities, be the chief motif of any provincial museum; that, failing this, some groups or forms be collected to establish a monograph, such as Norwich is doing with its Accipitres; that, where practicable, bones and complete skeletons of animals should be collected, as being, of the greatest service to all students, be they medical or biological.
As we'll see, in summarizing what has been discussed, I support large, well-lit rooms painted in a light neutral color and kept warm. The display cases should be made of oak, with single sheets of plate glass measuring no less than 7 ft. 6 in. by 5 ft. or 8 ft. by 5 ft. 4 in., and there should be artificial lighting provided by pendants that are shaded to avoid glare. The vertebrates should be displayed in both the "general" and "local" collections pictorially, but zoological order and scientific accuracy shouldn’t be compromised. I believe that the "local" and "general" typical collections should be completely separate while still being close to each other in the same room to allow for comparison. Extreme care should be taken in collecting and mounting animals from the area, and every opportunity should be seized to make this collection as comprehensive as possible. Anything that the locality is known for, whether fossils or antiquities, should be a primary focus of any provincial museum. If that’s not feasible, then groups or species should be collected to create a monograph, like what Norwich is doing with its Accipitres. Wherever possible, bones and complete skeletons of animals should be gathered, as these are extremely valuable for all students, whether they are studying medicine or biology.
Also that explanatory charts and lists take the place of labels for the vertebrates, and that all information as to range and distribution of species be given. Further, that anatomical diagrams and figures explanatory of the structure and form of animals be provided, together with all facilities for the study of biology from a scientific stand-point. I have also laid down the axiom that a very small museum must and should confine itself to objects collected in its immediate vicinity, but that a fairly large museum would ever be in a disjointed and unfurnished state if it relied solely on such specimens. It must, therefore, have a general collection; and care should be taken in the selection of specimens so that they may fill up the blanks occurring in the "local."
Also, explanatory charts and lists will replace labels for the vertebrates, and all information about the range and distribution of species will be provided. Furthermore, anatomical diagrams and figures explaining the structure and form of animals will be included, along with all the resources for studying biology from a scientific perspective. I've also established that a very small museum must and should focus on objects collected in its immediate area, but a reasonably large museum would always be disjointed and poorly equipped if it relied only on such specimens. Therefore, it must have a general collection, and care should be taken in selecting specimens to fill the gaps in the "local."
Another thing I am quite assured of; it is that the management should exercise a wise discretion in refusing unsuitable objects (chiefly of ethnology) or duplicates of common forms, and never receive a collection if fettered with the condition that "it must be kept separate." Order, method, neatness, and careful cataloguing I say nothing about, for I assume that all principals must practise these virtues to do any good whatever with the collections entrusted to their care.
Another thing I’m certain of is that management should wisely decide against accepting unsuitable items (mainly ethnological ones) or duplicates of common forms, and should never accept a collection if it comes with the condition that “it must be kept separate.” I won’t mention order, organization, cleanliness, and careful cataloging, because I assume that all those in charge must practice these qualities to effectively manage the collections entrusted to them.
============================
Understood! Please provide the text for me to modernize.
This book seems to have been printed about 1885. I got my copy when I was still a teenager (nth-hand; I am not really as old as all that!) and have greatly enjoyed the enlightened, yet practical and down-to-earth attitude of the writer. It seems to me a fine example of late Victorian instructional material of the unpretentious persuasion. Some of Browne's views were ahead of his time in terms of compassion and conservation, so I urge modern readers not to sneer at what they see as his out-of-date interest in "stuffed animals". Nor should they take too patronising an attitude to Browne's long paragraphs and occasionally strained concordances; he was not a professional writer and he produced a fine, readable, and useful work. Both to the biologist and historian of science, the book remains useful to this day, and, as books of that period disappear for good, I hope, in scanning it, to prevent a sorry loss to our generation and to those who follow us. Though I nowhere edited his wording or punctuation in any other way, no matter how much self-control this occasionally demanded, I did split a lot of paragraphs, especially when they spanned pages and confused lines of thought.
This book seems to have been printed around 1885. I got my copy when I was still a teenager (used; I'm not that old!) and have really enjoyed the author's insightful but practical and straightforward approach. I believe it’s a great example of late Victorian educational material that isn’t pretentious. Some of Browne's ideas were ahead of his time regarding empathy and conservation, so I encourage modern readers not to dismiss what they see as his outdated interest in "stuffed animals." They also shouldn't be overly critical of Browne's long paragraphs and sometimes awkward grammar; he wasn’t a professional writer, but he created a clear, engaging, and useful work. For both biologists and historians of science, the book is still relevant today, and as older books from that era fade away, I hope that by digitizing it, I can help preserve it for our generation and those that follow. While I didn’t alter his wording or punctuation in any way, despite the restraint that required, I did break up a lot of paragraphs, especially when they spanned pages and disrupted the flow of ideas.
In transcribing this book I have generally kept as truly to the original as I could, including when Browne's (or possibly his editors') conventions for the use of quotes and parentheses set my teeth on edge. However, for lack of convenient font characters and sophistication of scanning software, I have converted most of the vulgar fractions to decimals. The others I have represented with slashes, so that say, a value of one third might appear as 1/3. Similarly, I have split ligatured characters such as the ligatured "ae" and "oe" frequent in late Latin in particular. Also, following a practical and common convention, I have replaced the umlaut with a following letter "e". Thus "Möller" becomes "Moeller".
In transcribing this book, I have generally tried to stay as true to the original as possible, even when Browne's (or possibly his editors') conventions for using quotes and parentheses were a bit irritating. However, due to the limitations of font characters and the scanning software, I have converted most of the vulgar fractions to decimals. The others I have represented with slashes, so a value like one-third might show up as 1/3. Likewise, I have separated ligatured characters, like the combined "ae" and "oe," which are common in late Latin. Also, following a practical and common convention, I have replaced the umlaut with a following "e." So, "Möller" becomes "Moeller."
Browne frequently cross-referred readers to pages in the book. As pages got changed in scanning and editing, I have changed such page references mainly to chapters or similar references.
Browne often referred readers to specific pages in the book. As pages were modified during scanning and editing, I have adjusted those page references primarily to chapters or similar references.
There were several places where changes (generally advances, I hope!) in technical biology, or possibly slips that Browne made in matters outside his speciality, led to errors. I have not corrected these in the text of course, nor do I discuss many of them. After all, most readers who can recognise the errors in modern terms do not need my assistance in correcting them, and to the other readers they would hardly matter. Here however are comments on a few arbitrarily chosen points, in no particular sequence:
There were several instances where changes (hopefully improvements!) in technical biology, or possibly mistakes that Browne made regarding topics outside his expertise, resulted in errors. I haven’t corrected these in the text, nor do I delve into many of them. After all, most readers who can identify these errors using modern terminology won’t need my help to fix them, and for other readers, they probably wouldn’t be significant. Here, though, are comments on a few randomly selected points, in no specific order:
- Browne seems to have worked before hydrogen peroxide became
generally available, or possibly before its bleachng powers were
recognised. For bleaching most biological specimens, especially bones
and the like, hydrogen peroxide is in every way better, less offensive,
less corrosive, and less damaging to tissues, than hypochlorite.
Soaking even badly yellowed teeth in say, a "five volumes"
concentration (about 1 to 2%) of peroxide for a few days or weeks,
whitens them beautifully without damage or rotting of tissues.
You might find that other peroxide compounds, such as perborates,
work better still, but I have not yet had occasion to use them.
Other methods of bleaching only are worth trying when the specimens
happen to contain a particular pigment that does not respond well
to peroxide bleaching. Some such pigments are better bleached with
other chemicals, such as sulphites or hypochlorites.
- It takes some trawling through the book to discover that by
"mites" in insect collections, Browne probably means "booklice",
i.e. Psocoptera.
- Earwigs (Dermaptera) are not Hemiptera, as Browne
classed them. Dermaptera and Hemiptera are not even closely
related. The error is an interesting one however. It presumably
arose from a nineteenth-century confusion of the hemelytra of the
Hemiptera, with the short tegmina, the covering fore-wings of the
Dermaptera, that protect their hind wings when they are not in
flight. Hemelytra of Hemiptera are not really half-wings anyway, but
protective fore-wings armoured for only about half their length.
The two orders do not even resemble each other in appearance,
anatomy, habits or ecological significance.
- Browne uses a few terms not easily to be found in every
dictionary nowadays. Dowlas is (was) a coarse kind of linen, but
probably Browne referred to a strong calico in imitation of such
linen. For "filister" read "fillister"; according to more or less
contemporary dictionaries, it is a misspelling. It turns out to
be a type of rabbet plane used in making window frames and
similar structures.
- For setting insects on a setting board, I was slightly surprised at
Browne's use of "braces" and the like. Nowadays everyone I know uses
strips of smooth, non-sticky, translucent paper or similar material for
the purpose, and I had not realised that any other methods had been
used in the past. The use of such strips is easy, fast and effective.
It permits one to set large numbers of insects almost in an assembly
line fashion, working from the far end of the board towards oneself,
laying the tape over the wings, blowing or gently dragging the wings
into position, pinning down the tape, and proceeding to the next insect.
- If you get a small fish alive, then there is absolutely no
way to set it more perfectly than by dropping it alive
into rather strong acetic acid. This is not generally practical
for say, a large salmon, but for anything of manageable size, it
leaves the gills, jaws, and fins fully and stiffly extended.
Strong formaldehyde has a similar effect, but not as good.
Immediately the specimen is stiff and dead (a few seconds at
most) remove it from the acid and rinse it gently with clean,
cold water, then transfer it to a solution of ammonium carbonate,
lime water, or similarly gentle alkaline material, to neutralise
the acid before proceeding with whatever means of preparation you
intended. See also the means I describe for preventing acid
damage.
- If you happen to use hypochlorite or any other compound that
releases chlorine, and you then wish to remove the residues,
first rinse your specimens clean as well as is convenient, then
soak them in very weak peroxide for a while. Hypochlorite and
peroxide react with each other to produce free oxygen (harmless)
and chloride (also harmless in any plausible concentrations).
The effect is to neutralise any harmful or irritating residues or
smell of chlorine.
- In at least one place I was surprised to see that Browne
speaks of pinning insects exactly through the middle. Nowadays
this is not widely done because one risks damaging structures on
the median line of the specimen. Instead the common convention is
to pin specimens somewhat to the right of the median, so that
anything damaged on the right can generally be seen undamaged on
the left. When setting beetles or the like, this usually means
pinning them through the right elytron. Commonly one then may set
the specimen with the left elytron and wing spread. Not all
beetles will permit this of course, as many flightless species
have their elytra fastened down, and some, such as many
Scarabaeidae, flip their flying wings out pen-knife-like without
noticeably raising the elytra.
- No doubt the non-toxic soaps and so on that Browne describes
do work as advertised, but for keeping pests of dried material at
bay, for protecting hides, preserved insects and so on, do not
copy the recipes from this book. Though many of Browne's
observations are in every way practical and intelligent, our
current knowledge of safe, persistent, effective insecticides
would not emerge for some fifty or sixty years after his death.
And, please, please! Though Browne was realistic in his
assessment of the dangers of the chemicals he describes, bear in
mind that even his precautions were insufficient for modern
purposes. Above all, be very wary of the mercurial recipes he
mentions!!! It is true that mercuric chloride is very effective,
but I cannot think of a single modern reason to use it. Today we
have much safer, more appropriate, materials at our disposal,
including some very effective fumigants that Browne would have
coveted.
- Note that among the substances that Browne fails to warn us
against, are those that certainly are of low acute
toxicity, but present serious risks of chronic medical conditions
or cancer, unrecognised in his day. His much beloved "benzoline"
seems to have been largely benzene, which nowadays is regarded as
a carcinogen, and for many purposes too dangerous to handle.
Before this became generally known I personally handled benzene
in totally unacceptable ways, but so far I seem to have been
lucky, and I seem to have given up tempting fate before I
incurred dangerous symptoms.
- Browne seems to me a bit too cheerful about high-pinned insects
being protected from some museum pests. High pinning might help a
little, but it most certainly is nowhere near adequate. I have
seen entire cases reduced to labelled pins standing among Dermestid
beetle frass. Use modern insecticides and carefully sealed drawers
or cases. I like the new pyrethroids, but keep in touch with museums
to be sure you know the best current means of protection. Grease
from pinned insects has caused me less of a problem than Browne
describes, but possibly that is because I always have used the
high-pinning techniques, never having known any other.
- When it comes
to setting insects Browne was no doubt very artistic and very
competent at producing a presentable specimen no matter what, but
some of his procedures for cheerfully snipping insects and
re-assembling them should be avoided. Such expedients could ruin
specimens intended for the use of professional entomologists.
For the requirements of biological studies, it is far more important to have
a fully genuine specimen, no matter how badly disfigured, than a
hopefully reconstructed mosaic, no matter how artistic.
For some purposes one could use more radical "relaxing" procedures instead.
Browne seems to have used only cool water vapour or sometimes water
itself. Careful application of hot steam can relax most specimens
that otherwise could not be re-set. One good trick (Beware of the
risks of cuts and scalding if your apparatus should burst!) is to boil
water in a closed vessel, leading the
steam out into a tube, preferably of silicone rubber, tipped with
a drawn glass tube or the blunted needle of a syringe. Direct
steam at the parts of the specimen that need relaxing. With practice you often
can relax legs or wings one at a time, stopping as soon as they
reach the desired position.
- Note too, that Browne is cheerful about mounting some insects
by gumming their feet (tarsi) to card. For entomological purposes
this has severe disadvantages. Nowadays professionals hardly ever
use any means of setting that prevent one from examining a
specimen from all sides. Even mounting them on a transparent
material tends to interfere with proper examination. For most
purposes pin the insects using what Browne called "flat" setting,
high on the pin, with the label beneath. Where this is not
practical, such as for tiny specimens, there are other methods,
which you may see described in manuals or used in museums.
- Note: Browne wrote in pre-decimal days, using largely the
so-called Imperial units. This might raise difficulties in
understanding his quantities. E.g. his dram or drachm (drm)
probably was 0.125 ounce (roughly 3.5 grams). His pound would be
sixteen ounces (oz.) of 28.35 grams, but his pint would be
twenty fluid ounces (not 16 as in American pints!)
Correspondingly his gallon would be ten pounds, not
eight. A grain would be about 65 mg. Of other units and utensils
apparently common in Browne's day, such as "six-pound Australian
meat tins", or "goffering-irons", make what sense you may. A
"wine-bottleful" was probably about 700 cc.
- Note: I have had little use for hexavalent chrome compounds but
one thing I did notice in experimenting with a few of Browne's
recommendations ("bichromates", "chromic acid" etc), is that the
merest few drops of such compounds (typically as a solution of potassium
dichromate or chromate) added to water containing soft creatures such
as molluscs, generally will kill them gently by paralysis and
leave them relaxed. Usually almost anything else one uses, short of
illegal or expensive drugs, causes such specimens to distort or
contract into useless lumps. Once the chromate has thoroughly killed
and relaxed them, say after an hour or two, the specimens can be fixed,
preserved, or manipulated as required. You may wish to compare this
method with the method that I describe for killing molluscs with
boiled water.
- One effective way of killing molluscs, particularly
gastropods, snails and the like, whether terrestrial, freshwater
or marine, in fully extended form, is to put them into cool
or barely lukewarm, freshly-boiled water that has been
kept closely covered in airtight containers for
cooling without permitting a lot of oxygen to re-dissolve in the
water. First rinse the live specimens in fresh water to clean
away superficial dirt and slime, then submerge them in the
de-oxygenated water. Place some sort of grid or other barrier to
ensure that they cannot get near the surface, and re-seal the
container to keep air out. Leave them for at least
twenty-four hours before transferring them to a preservative
fluid or otherwise proceeding to deal with them. This method
leaves them fully extended and firm, ready for dissection or for
preservation for display. If you remove them too soon, they at
first seem dead, but contract say, when a scalpel stimulates a
still-living nerve.
- The cyanide bottle for killing insects certainly could be
very useful, though I am not certain how widely such a dangerous
substance would be available nowadays. Many forms of killing
bottle have been used in the last century or so, and several are
described in many handbooks. An old favourite handbook of mine is
the British Museum Instructions to Collectors (Insects). Most
killing bottles depend on some volatile liquid soaked into
plaster, rubber or cotton wool. My
own favourite was ethyl acetate, which is safe, inoffensive, and has
several advantages, as long as the bottle and fluid are kept free from
moisture. Dry ethyl acetate anaesthetises most insects very quickly, even
if the paralysed insects take some time to die.
For some reason the presence of water
seems to reduce the effectiveness of ethyl acetate at quickly
immobilising specimens.
For example, unlike many popular components of
killing bottles, ethyl acetate leaves dead specimens relaxed.
- When you have treated wet specimens with anything acid, do
remember to neutralise the acid residues as soon as possible. The
same applies if you have preserved them with anything that
gradually produces acid; For example, formaldehyde gradually
reacts with oxygen to produce formic acid. In due course it
destroys shells, and even fine bones and teeth. As a buffer,
ammonia is cheap, effective and safe in reasonable circumstances.
However, it is too volatile to be a reliable buffer against long
term acidity. Specimens preserved in formaldehyde can be
protected in the long term by adding hexamethylenetetramine
(otherwise known as hexamine, the product of ammonia and
formaldehyde) to the liquid. A practical proportion is to add 100
grams of hexamine to a litre of concentrated formaldehyde
solution (formalin). This one dilutes before use, according the
particular application. If you cannot get hexamine, you can use
strong ammonia (about 36%) solution, about 150 ml to 1 litre of
formalin. In preparing
to use such formalin, allow for the fact that in adding the ammonia you
diluted the formalin by about one sixth. Alternatively, though usually
less effectively, you could add some ammonium carbonate or sodium
bicarbonate to the container. Sometimes a little oyster-shell grit
or chalk will do for long-term buffering; it can be used together
with the hexamine and can go on working after the hexamine is exhausted
if the collection is poorly maintained. Use your good sense in adapting
your measures to your needs.
Jon Richfield
Jon Richfield
Download ePUB
If you like this ebook, consider a donation!