This is a modern-English version of Soil Culture: Containing a Comprehensive View of Agriculture, Horticulture, Pomology, Domestic Animals, Rural Economy, and Agricultural Literature, originally written by Walden, J. H..
It has been thoroughly updated, including changes to sentence structure, words, spelling,
and grammar—to ensure clarity for contemporary readers, while preserving the original spirit and nuance. If
you click on a paragraph, you will see the original text that we modified, and you can toggle between the two versions.
Scroll to the bottom of this page and you will find a free ePUB download link for this book.

SOIL CULTURE;
CONTAINING
A COMPREHENSIVE VIEW
OF
AGRICULTURE, HORTICULTURE, POMOLOGY,
DOMESTIC ANIMALS, RURAL ECONOMY,
AND AGRICULTURAL LITERATURE.
BY
J. H. WALDEN, A. M.
ILLUSTRATED BY NUMEROUS ENGRAVINGS
NEW YORK:
PUBLISHED BY ROBERT SEARS,
181 WILLIAM STREET.
[Pg 3]1858.
NEW YORK:
PUBLISHED BY ROBERT SEARS,
181 WILLIAM STREET.
[Pg 3]1858.
Entered, according to Act of Congress, in the year 1857, By J. H. WALDEN, in the Clerk's Office of the District Court of the United States, in and for the Northern District of Illinois.
Recorded, under the Act of Congress, in the year 1857, By J. H. WALDEN, in the Clerk's Office of the District Court of the United States for the Northern District of Illinois.
SAVAGE & McCREA, STEREOTYPERS, C. A. ALVORD, Printer,
13 Chambers Street, N.Y. No. 15 Vandewater Street, N.Y.
SAVAGE & McCREA, STEREOTYPERS, C. A. ALVORD, Printer,
13 Chambers Street, New York, NY 15 Vandewater Street, New York, NY
TO
THE PRACTICAL CULTIVATORS OF THE SOIL,
The True Lords of the Manor,
THIS VOLUME IS DEDICATED,
BY THEIR SINCERE FRIEND,
The Author.
PREFATORY NOTE TO THE READER.
If "he who causes two blades of grass to grow where but one grew before, is a benefactor of his race," he is not less so who imparts to millions a knowledge of the methods by which it is done.
If "he who causes two blades of grass to grow where only one grew before is a benefactor of his race," then the same goes for anyone who teaches millions the ways to achieve that.
The last half century has been the era of experiments and writing on the cultivation of the soil. The result has been the acquisition of more knowledge on the subjects embraced, than the world had attained in all its previous history. That knowledge is scattered through many volumes of numerous periodicals and books, and interspersed with many theories, and much speculation, that can never be valuable in practice. In the form in which it is presented, it confuses, rather than aids, the great mass of cultivators. Hence the prejudice against "book-farming." Provided established facts only are presented, they are none the worse for being printed.
The last fifty years have been a time of experimentation and writing about soil cultivation. As a result, we’ve gained more knowledge on these topics than the world has gathered throughout its entire history. However, this knowledge is spread out across many volumes of various magazines and books, mixed in with numerous theories and a lot of speculation that aren't particularly useful in practice. The way it's presented often confuses rather than helps the majority of farmers. That's why there's a bias against "book-farming." If only established facts are presented, they’re not any less valuable just because they’re printed.
The object of this volume is to condense, and present in an intelligible form, all important established facts in the science of soil-culture. The author claims originality, as to the discovery of facts and [Pg 6]principles, in but few cases. During ten years of preparatory study for this work, he has sought the rewards of industry, in sifting out the certain and the useful from the hypothetical and the fanciful, and the results of judicious discrimination between fallacy and just reasoning, in support of theories. This volume is designed to be a complete manual for all but amateur cultivators. While it is believed that he who follows its directions will be certain of success, it is not intended to disparage the merits of other works, but to encourage and extend their perusal. We can not too strongly recommend to young culturists to keep themselves well posted in this kind of literature, and give to every discovery and invention in this science a fair trial; not on a large scale, so as to sink money in fruitless experiments, but sufficient to afford a sure test of their real value. To no class of men is study more important than to soil-culturists.
The goal of this book is to summarize and present all the important established facts in soil-cultivation in a way that's easy to understand. The author claims to have original insights regarding a few discoveries of facts and principles. Over ten years of preparation for this work, he has worked hard to differentiate between what is certain and useful versus what is hypothetical and fanciful. He aims to provide clear reasoning to support various theories. This book is intended to serve as a thorough guide for all but casual cultivators. It's believed that those who follow its guidance will find success, but it doesn't aim to undermine the value of other works; instead, it encourages readers to explore them as well. We strongly recommend that aspiring cultivators stay informed about this type of literature and give every new discovery and invention in this field a fair trial—not on a large scale, which could lead to wasting money on unproductive experiments, but enough to properly assess their real value. No group of people values study more than soil-cultivators.
It is believed that the directions here given, if followed, will save millions of dollars annually to that class of cultivators who can least afford to waste time and money in experimenting. With beginners it is important to be successful at first; which is impossible without availing themselves of the experience of others. While we thus aim to give our volume this exclusively practical form, and utilitarian character, we do not undervalue the labors of amateur cultivators. A meed of praise is due to those who are willing to spend time and money in experiments, by which great truths are evolved for the benefit of mankind.[Pg 7]
It’s believed that the instructions provided here, if followed, will save millions of dollars each year for those farmers who can’t afford to waste time and money on trial and error. For beginners, it’s crucial to succeed right from the start, which is impossible without learning from others’ experiences. While our goal is to make this book entirely practical and useful, we also appreciate the efforts of amateur growers. They deserve recognition for investing their time and money into experiments that lead to valuable insights for everyone.[Pg 7]
Perfection is not claimed for this volume. But the author hopes nothing will be found here that is untrue. A fear of inserting errors may have induced us to omit some things that may yet prove valuable. If anything seems to be at variance with a cultivator's observation, in a given locality, he will discover in our general principles on climate, soil, and location, that it is a natural result.
Perfection isn't guaranteed in this book. However, the author hopes that nothing here is false. The concern about making mistakes might have led us to leave out some information that could be useful. If anything appears to contradict what a grower notices in a specific area, they will find in our general guidelines regarding climate, soil, and location that it makes sense.
Accurate as far as we go has been our motto. It is hoped the form is most convenient. All is arranged under one alphabet, with a complete index. The author has consulted many intelligent cultivators and writers, who, without exception, approve his plan. All agree in saying that it is designed to fill a place not occupied by any other single volume in the language. It is impossible, without cumbering the volume, to give suitable credit to the authors and persons consulted. Suffice it to say, the author has carefully studied all the works mentioned in this volume, and availed himself of a great variety of verbal suggestions, by scientific and practical men. If this work shall, in any good degree, serve the purpose for which it is intended, it will amply reward the author for an amount of labor, experiment, observation, and study, appreciable only by few.
As accurate as we can be has been our motto. We hope this format is the most convenient. Everything is organized alphabetically, along with a complete index. The author has talked to many knowledgeable growers and writers, all of whom fully support his approach. They all agree that it aims to fill a gap not covered by any other single book in the language. It's impossible to give proper credit to all the authors and individuals consulted without cluttering the book. It's enough to say that the author has thoroughly reviewed all the works referenced in this volume and has taken advantage of a wide range of suggestions from scientific and practical experts. If this work serves its intended purpose in any meaningful way, it will more than reward the author for the considerable amount of effort, experimentation, observation, and study—things only a few can truly appreciate.
ILLUSTRATIONS.
| PAGE | |
| Apple-Worms | 22 |
| Apple-Tree Borer | 24 |
| Caterpillar Eggs | 25 |
| Canker-Worm Moths | 25 |
| Baldwin Apple | 34 |
| Bellflower Apple | 35 |
| Early Harvest Apple | 36 |
| Spitzbergen Apple | 37 |
| Rhode Island Greening | 38 |
| Fall Pippin | 39 |
| Newtown Pippin | 40 |
| Rambo Apple | 41 |
| Rome Beauty | 42 |
| Westfield Seek-no-further | 43 |
| Northern Spy | 44 |
| Roxbury Russet | 45 |
| Swaar Apple | 46 |
| Maiden's Blush | 47 |
| Barberries | 56 |
| Working Bee, Queen and Drone | 69 |
| High-Bush Blackberry | 83 |
| Budding (Six Illustrations) | 91 |
| Cherries (Six Illustrations) | 122 |
| Milking Qualities of Cows Illustrated | |
| The Flanders Cattle | 145 |
| The Selvage Cow | 147 |
| The Curveline Cow | 148 |
| The Bicorn Cow | 149 |
| The Demijohn Cow | 150 |
| The Square Shield Cow | 151 |
| The Limousine Cow | 151 |
| The Horizontal Slice Beef | 152 |
| Jerks | 152 |
| Cranberries | 156 |
| Fig | 181 |
| Cleft and Tongue Grafting | 210 |
| Isabella Grapes | 223 |
| Catawba Grapes | 223 |
| Rebecca Grapes | 224 |
| Delaware Grapes | 225 |
| Hedge-Pruning (4 engravings) | 238 |
| Ground Plan of Farm Buildings | 252 |
| Ground Plan of Piggery | 253 |
| Ground Plan of Country Residence, Farm Buildings, Fruit Garden, and Grounds | 254 |
| Laying out Curves Illustrated | 255 |
| Ground Plan of Farm-House | 255 |
| Summer-House | 256 |
| Laborer's Cottage | 257 |
| Ground Plan of Laborer's Cottage | 257 |
| Italian Farm-House | 258 |
| Ground Plan of Italian Farm-House | 258 |
| Neglected Peach-Tree | 324 |
| Properly-Trimmed Peach-Tree | 324 |
| Plan of a Pear-Orchard | 338 |
| Bartlett Pear | 340 |
| Beurré Diel Pear | 341 |
| White Doyenne Pear | 342 |
| Flemish Beauty | 343 |
| Seckel | 345 |
| Gray Doyenne Pear | 346 |
| The Curculio | 355 |
| Lawrence's Favorite Plum | 356 |
| Imperial Gage | 357 |
| Egg-Plum | 357 |
| Green Gage | 358 |
| Jefferson Plum | 358 |
| Washington Plum | 359 |
| French Merino Ram | 386 |
| Shepherdia, or Buffalo Berry | 390 |
| Strawberry Blossoms | 397 |
| Fan Training (Four Illustrations) | 417, 418 |
| Horizontal Training (Two Illustrations) | 419 |
| Conical Training (Four Illustrations) | 420 |
SOIL CULTURE.
ACCLIMATION.
This is the art of successfully changing fruits or plants from one climate to another. Removal to a colder climate should be effected in the spring, and to a warmer one in the fall. This may be done by scions or seeds. By seeds is better, in all cases in which they will produce the same varieties. Very few imported apple or pear trees are valuable in this country; while our finest varieties, perfectly adapted to our climate, were raised from seeds of foreign fruits and their descendants. The same is true of the extremes of this country. Baldwin apple-trees, forty or fifty years old, are perfectly hardy in the colder parts of New England; while the same imported from warmer sections of the Union fail in severe winters. This fact has given many new localities the reputation of being poor fruit-regions. When we remove fruit-trees to a similar climate in a new country, they flourish well, and we call it a good fruit-country. Remove trees from the same nursery to a different climate and soil, and they are not hardy and vigorous, and we call it a poor fruit-country. These two localities may be equally good for fruit, with suit[Pg 10]able care in acclimating the tree and preparing the soil. Thus the rich prairies of central Illinois are often said not to be adapted to fruit. Give time to raise fruits from the seed, and to apply the principles of acclimation, and those rich prairies will be among the great fruit-growing regions of the world. Two things are essential to successful fruit-culture, on all the alluvial soils of the Northwest: raise from seed, and prune closely and head-in short, and thus put back and strengthen the trees for the first ten years, and no more complaints will be heard.
This is the process of successfully transferring fruits or plants from one climate to another. Moving to a colder climate should happen in the spring, while moving to a warmer one should occur in the fall. This can be done using scions or seeds, but using seeds is better in cases where they will produce the same varieties. Very few imported apple or pear trees are valuable in this country, while our finest varieties, which are perfectly suited to our climate, were grown from seeds of foreign fruits and their offspring. The same applies to the extreme climates in this country. Baldwin apple trees that are forty or fifty years old thrive in the colder parts of New England; however, those imported from warmer areas of the country do not survive harsh winters. This has led to many new regions being seen as poor for fruit production. When we move fruit trees to a similar climate in a new country, they grow well, and we label it as a good fruit region. On the other hand, if we take trees from the same nursery to a different climate and soil, they are not hardy or vigorous, and we call it a poor fruit region. These two locations might be equally suitable for fruit, given proper care in acclimating the trees and preparing the soil. Therefore, the rich prairies of central Illinois are often considered unsuitable for fruit. If we take the time to grow fruits from seeds and apply the principles of acclimation, those rich prairies can become some of the great fruit-growing areas in the world. Successful fruit cultivation in all the alluvial soils of the Northwest relies on two key factors: grow from seed and prune closely while keeping the trees short for the first ten years, and complaints will cease.
The peach has been gradually acclimated, until, transplanted from perpetual summer, it successfully endures a temperature of thirty-five degrees below zero. This prince of fruits will yet be successfully grown even beyond the northern limits of Minnesota. Many vegetables may also be grown in very different climates, by annually importing the seed from localities where they naturally flourish. Sweet potatoes are thus grown abundantly in Massachusetts. We wonder this subject has received so little attention. We commend these brief hints to the earnest consideration of all practical cultivators, hoping they may be of great value in the results to which they may lead.
The peach has gradually adapted, and now, when moved from a constant summer environment, it can withstand temperatures as low as thirty-five degrees below zero. This amazing fruit can even be successfully cultivated beyond the northern reaches of Minnesota. Many vegetables can also thrive in very different climates by importing seeds each year from places where they grow naturally. For example, sweet potatoes are widely grown in Massachusetts. It's surprising that this topic hasn’t received more attention. We offer these quick tips for serious growers, hoping they will lead to valuable results.
ALMONDS.
Almonds are natives of several parts of Asia and Africa. They perfectly resemble the peach in all but the fruit. The peach and almond grow well, budded into each other. In France, almond-stocks are pre[Pg 11]ferred for the peach. Their cultivation and propagation are in all respects the same as the peach.
Almonds originate from various regions in Asia and Africa. They closely resemble peaches, except for their fruit. The peach and almond can grow well when grafted onto each other. In France, almond trees are preferred for peach cultivation. Their growing and propagation methods are identical to those of peaches.
Varieties.—1. Long, hard shell. This is the best for cultivation in western and middle states, and in all cold regions. Very ornamental.
Varieties.—1. Long, hard shell. This is the best for growing in the western and midwestern states, as well as in all colder areas. It’s also very decorative.
2. Common sweet. Productive in middle states, but not so good as the first.
2. Common sweet. Grows well in the central states, but not as well as the first.
3. Ladies' thin shell. Fruit large, long, and sweet; the very best variety, but not so hardy as the first two. Grows well in warm locations, with slight protection in winter.
3. Women's thin shell. The fruit is large, long, and sweet; it's the best variety, but not as resilient as the first two. It thrives in warm spots, with some winter protection needed.
4. The bitter. Large, with very ornamental leaves and blossoms. Fruit bitter, and yielding that deadly poison, prussic acid.
4. The bitter. Large, with very decorative leaves and flowers. The fruit is bitter and contains that deadly poison, prussic acid.
5. Peach almond. So called from having a pulp equal to a poor peach. Not hardy in northern climates. Other varieties are named, but are of no consequence to the practical cultivator.
5. Peach almond. Named for having a flesh similar to a subpar peach. It isn’t hardy in northern climates. Other varieties exist, but they don’t matter much to the practical grower.
6. Two varieties of ornamental almonds are very beautiful in spring—the large, double flowering, and the well-known dwarf flowering. But we regard peach-blossoms quite as ornamental, and the ripe peaches much more so, and so prefer to cultivate them.
6. Two types of ornamental almonds are really beautiful in the spring—the large, double flowering and the popular dwarf flowering. However, we consider peach blossoms to be just as decorative, and ripe peaches even more so, which is why we prefer to grow them.
Almonds are extensively cultivated in the south of Europe, especially in Portugal, as an article of commerce. They will grow equally well in this country; but labor is so cheap in Europe, that American cultivators can not compete with it in the almond market. But every one owning land should cultivate a few as a family luxury.[Pg 12]
Almonds are widely grown in southern Europe, particularly in Portugal, as a commercial crop. They can thrive just as well in this country; however, labor is so inexpensive in Europe that American farmers can’t compete in the almond market. Still, anyone who owns land should grow a few for family enjoyment.[Pg 12]
APPLES.
The original of all our apples was the wild European crab. We have in this country several native crabs larger and better than the European; but they have not yet, as we are aware, been developed into fine apples. Apple-trees are hardy and long-lived, doing well for one hundred and fifty years. Highly-cultivated trees, however, are thought to last only about fifty years. An apple-tree, imported from England, produced fruit in Connecticut at the age of two hundred and eight years. The apple is the most valuable of all fruits. The peach, the best pears, the strawberries, and others, are all delicious in their day; but apples are adapted to a greater variety of uses, and are in perfection all the year; the earliest may be used in June, and the latest may be kept until that time next year. As an article of food, they are very valuable on account of both their nutritive and medicinal qualities. As a gentle laxative, they are invaluable for children, who should always be allowed to eat ripe apples as they please, when they can be afforded. Children will not long be inclined to eat ripe fruit to their injury.
The original source of all our apples was the wild European crab apple. We have several native crab apples in this country that are larger and better than the European ones; however, they haven't yet, as far as we know, been developed into high-quality apples. Apple trees are tough and can live a long time, thriving for up to one hundred fifty years. However, well-cultivated trees are believed to last only about fifty years. An apple tree brought over from England produced fruit in Connecticut at the age of two hundred eight years. The apple is the most valuable of all fruits. The peach, the best pears, strawberries, and others are all delicious in their season; but apples can be used in a wider variety of ways and are in their prime all year round. The earliest apples can be enjoyed in June, while the latest can be stored until the same time the following year. Nutritionally, they are very valuable due to their nourishing and medicinal properties. As a gentle laxative, they are especially useful for children, who should always be allowed to eat ripe apples as they like, whenever they are available. Kids won't be inclined to overeat ripe fruit to their detriment.
An almost exclusive diet of baked sweet apples and milk is recorded as having cured chronic cases of consumption, and other diseases caused by too rich food. Let dyspeptics vary the mode of preparing and using an apple diet, until it agrees with them, and many aggravated cases may be cured without medicine. It is strange how the idea has gained so much currency that apples, although a pleasant luxury, are not suffi[Pg 13]ciently nutritious for a valuable article of diet. There is no other fruit or vegetable in general use that contains such a proportion of nutriment. It has been ascertained in Germany, by a long course of experiments, that men will perform more labor, endure more fatigue, and be more healthy, on an apple diet, than on that universal indispensable for the poor, the potato. Apples are more valuable than potatoes for food. They are equally valuable as food for fowls, swine, sheep, cattle, and horses. Hogs have been well fattened on apples alone. Cooked with other vegetables, and mixed with a little ground grain or bran, they are an economical food for fattening pork or beef. Sweet or slightly-acid apples, fed to neat stock or horses, will prevent disease, and keep the animals in fine condition. For human food they may be cooked in a greater variety of ways than almost any other article. Apple-cider is valuable for some uses. It makes the best vinegar in general use, and, when well made and bottled, is better than most of our wines for invalids. Apple-molasses, or boiled cider, which is sweet-apple cider boiled down until it will not ferment, is excellent in cookery. Apple-butter is highly esteemed in many families. Dried apples are an important article of commerce. Green apples are also exported to most parts of the world. Notwithstanding the increased attention to their cultivation during the last half-century, their market value is steadily increasing, and doubtless will be, for the best varieties, for the next five hundred years.
An almost exclusive diet of baked sweet apples and milk has been noted to cure chronic cases of tuberculosis and other diseases caused by too rich food. Those with indigestion should try different ways of preparing and using an apple diet until it suits them, and many severe cases may be treated without medicine. It’s odd how the idea has spread that apples, while a nice treat, aren’t nutritious enough to be a valuable part of our diets. No other commonly used fruit or vegetable contains as much nutrition. Research in Germany has shown through extensive trials that people can work harder, withstand more fatigue, and be healthier on an apple diet compared to the staple food for the poor, the potato. Apples are more valuable than potatoes for food. They are equally beneficial as food for poultry, pigs, sheep, cattle, and horses. Pigs have been successfully fattened on apples alone. When cooked with other vegetables and mixed with a bit of ground grain or bran, they are an economical way to fatten pork or beef. Sweet or slightly tart apples given to livestock or horses can prevent disease and keep the animals in great condition. For human consumption, they can be cooked in more ways than almost any other food. Apple cider is useful for various purposes. It produces the best vinegar available, and when made well and bottled, is better than most of our wines for people recovering from illness. Apple molasses, or boiled cider, which is sweet apple cider reduced until it won’t ferment, is excellent for cooking. Apple butter is highly valued in many households. Dried apples are an important commercial product. Green apples are also exported worldwide. Despite the increased focus on their cultivation over the last fifty years, their market value continues to rise and will likely keep increasing, especially for the best varieties, for the next five hundred years.
It does not cost more than five or six cents per bushel to raise apples; hence they are one of the most profitable crops a farmer can raise. No farm, there[Pg 14]fore, is complete without a good orchard. The man who owns but five acres of land should have at least two acres in fruit-trees.
It costs no more than five or six cents per bushel to grow apples; therefore, they are one of the most profitable crops a farmer can grow. No farm, there[Pg 14]fore, is complete without a good orchard. A person who owns just five acres of land should have at least two acres of fruit trees.
Soil.—Apples will succeed well on any soil that will produce good cabbages, potatoes, or Indian corn. Land needs as much manure and care for apple-trees as for potatoes. Rough hillsides and broken lands, unsuitable for general cultivation, may be made very valuable in orchards. It must be enriched, if not originally so, and kept clean about the trees. On no crop does good culture pay better. Many suppose that an apple-tree, being a great grower, will take care of itself after having attained a moderate size. Whoever observes the great and rapid growth of apple-trees must see, that, when the ground is nearly covered with them, they must make a great draft on the soil. To secure health and increased value, the deficiency must be supplied in manure and cultivation. The quantity and quality of the fruit depend mainly on the condition of the land. The kinds and proportions of manures best for an apple-orchard are important practical questions. We give a chemical analysis of the ashes of the apple-tree, which will indicate, even to the unlearned, the manure that will probably be needed:—
Soil.—Apples will do well in any soil that can grow good cabbages, potatoes, or corn. The land needs as much fertilizer and care for apple trees as it does for potatoes. Rough hillsides and uneven ground, which aren’t ideal for general farming, can become very valuable orchards. It will need to be enriched, if it isn’t already, and kept clear around the trees. No other crop benefits more from proper care. Many people think that an apple tree, being a fast grower, can take care of itself after it reaches a decent size. Anyone who observes the rapid growth of apple trees must realize that, once they nearly fill the ground, they will draw significantly from the soil. To ensure health and enhance value, the lack must be compensated with fertilizer and proper care. The amount and quality of the fruit mainly depend on the condition of the land. Understanding the types and amounts of fertilizer best for an apple orchard is a crucial practical issue. We provide a chemical analysis of apple tree ashes, which will help even those without much knowledge understand what fertilizer may be needed:—
Analysis of the ash of the apple-tree.
Analysis of the ash from the apple tree.
| Sap-wood. | Heart-wood. | Bark of trunk. | |
| Potash | 16.19 | 6.620 | 4.930 |
| Soda | 3.11 | 7.935 | 3.285 |
| Chloride of sodium | 0.42 | 0.210 | 0.540 |
| Sulphate of lime | 0.05 | 0.526 | 0.637 |
| Phosphate of peroxyde of iron | 0.80 | 0.500 | 0.375 |
| Phosphate of lime | 17.50 | 5.210 | 2.425 |
| Phosphate of magnesia | 0.20 | 0.190 | |
| Carbonic acid | 29.10 | 36.275 | 44.830 |
| Lime | 18.63 | 37.019 | 51.578 |
| Magnesia | 8.40 | 6.900 | 0.150 |
| Silicia | 0.85 | 0.400 | 0.200 |
| Soluble silicia | 0.80 | 0.300 | 0.400 |
| Organic matter | 4.60 | 2.450 | 2.100 |
| —— | —— | —— | |
| 100.65 | 104.535 | 111.450 |
This table will indicate the application of plenty of wood-ashes and charcoal; lime in hair, bones, horn-shavings, old plaster, common lime, and a little common salt. Lime and ashes, or dissolved potash, are indispensable on an old orchard; they will improve the fruit one half, both in quantity and quality.
This table will show the use of a lot of wood ashes and charcoal; lime mixed with hair, bones, horn shavings, old plaster, regular lime, and a bit of regular salt. Lime and ashes, or dissolved potash, are essential for an old orchard; they will enhance the fruit by fifty percent, both in amount and quality.
Propagation.—This is done mainly by seeds, budding and grafting. The best method is by common cleft-grafting on all stocks large enough, and by whip or tongue grafting on all others. (See under article, Grafting.)
Propagation.—This is mainly done by seeds, budding, and grafting. The best method is common cleft-grafting for all stocks that are large enough, and whip or tongue grafting for all others. (See under article, Grafting.)
Grafting into the sycamore is recommended by some. The scions are said to grow profusely, and to bear early and abundantly; but they are apt to be killed by cold winters. We do not recommend it. Almost everything does best budded or grafted into vigorous stocks of its own nature. Root-grafting, as it is termed,—that is, cutting up roots into pieces three or four inches long, and putting a scion into each—has been a matter of much discussion and diversity of opinion. It is certainly a means of most rapidly multiplying a given variety, and is therefore profitable to the nurseryman. For ourselves, we should prefer trees grafted[Pg 16] just above, or at the ground, using the whole stock for one tree. We do not, however, undertake to settle this controverted point. Our minds are fixed against it. Others must do as they please. Propagation by seed is thought to be entirely uncertain, because, as is supposed, the seeds will not reproduce their own varieties. We consider this far from being an established fact.
Some people recommend grafting into the sycamore. The scions are said to grow vigorously and produce early and abundantly, but they are prone to dying in cold winters. We don't recommend it. Almost everything performs better when budded or grafted into strong stocks of its own type. Root-grafting, which involves cutting roots into pieces about three or four inches long and inserting a scion into each, has sparked a lot of discussion and differing opinions. It definitely offers a fast way to multiply a specific variety, making it profitable for nurserymen. Personally, we would prefer trees grafted[Pg 16] just above or at the ground, using the entire stock for one tree. However, we don’t claim to settle this debated issue. We are set against it, and others can do as they wish. Propagation by seed is seen as unreliable because it’s believed that the seeds won't reproduce their own varieties. We think this is far from a proven fact.
When grafts are put into large trees, high up from the ground, their fruit may be somewhat modified by the stock. There is also a slight tendency in the seeds of all grafts to return to the varieties from which they descended. But we believe the general rule to be, that the seeds of grafts, put in at the ground and standing alone, will generally produce the same varieties of fruit. The most prominent obstacle in the way of this reproduction is the presence of other varieties, which mix in the blossom. The planting of seeds from any mixed orchard can never settle this question, because they are never pure. Propagation by seeds, then, is an inconvenient method, only to be resorted to for purposes of acclimation. But it is so seldom we have a good bearing apple-tree so far removed from others as not to be affected by the blossoms, that we generally get from seeds a modification of varieties. Raising suitable stocks for grafting is done by planting seeds in drills thirty inches apart, and keeping clear of weeds until they are large enough to graft. The soil should be made very rich, to save time in their growth. Land where root-crops grew the previous year is the best. If kept clear of weeds, on rich, deep soil, from one to two thirds of them will be large enough for whip-grafting after the first year's growth. The pomice from the[Pg 17] cider-mill is often planted. It is better to separate the seeds, and plant them with a seed-drill. They will then be in straight, narrow rows, allowing the cultivator and hoe to pass close by them, and thus save two thirds of the cost of cultivation. The question of keeping seeds dry or moist until planting is one of some importance. Most seeds are better for being kept slightly moist until planted; but with the apple it makes no difference. Keep apple-seeds dry and spread, as they are apt to heat. Freezing them is not of the slightest importance. If you plant pomice, put in a little lime or ashes to counteract the acid. For winter-grafting, pull the seedlings that are of suitable size, cut off the tops eight inches from the root, and pack in moist sand in a cellar that will not freeze. After grafting, tie them up in bunches, and pack in tight boxes of moist sand or sawdust.
When grafts are inserted into tall trees, their fruit might be slightly affected by the rootstock. There's also a small chance that the seeds from all grafts will revert to the original varieties they came from. However, we believe the general rule is that seeds from grafts planted at ground level and left alone will typically produce the same types of fruit. The main challenge to this reproduction is the presence of other varieties that can mix in the blossoms. Planting seeds from any mixed orchard will never definitively solve this issue because they'll never be pure. Therefore, growing plants from seeds is an inconvenient method, only used for acclimatization purposes. Since it's rare to find a good apple tree far enough away from others not to be affected by their blossoms, we usually get a mix of varieties from the seeds. To grow suitable rootstocks for grafting, seeds should be planted in rows 30 inches apart and kept weed-free until they are big enough to graft. The soil should be enriched to speed up their growth. The best land is one where root crops were grown the previous year. If kept free of weeds in rich, deep soil, one to two-thirds of them will be large enough for whip-grafting after the first year. The pomace from the [Pg 17] cider mill is often planted. It’s better to separate the seeds and plant them using a seed-drill. This way, they’ll be in straight, narrow rows, allowing better access for cultivators and hoes, thus saving about two-thirds of the cultivation cost. The issue of whether to keep seeds dry or moist until planting is quite important. Most seeds prefer to be kept slightly moist until planting, but with apple seeds, it doesn't matter. Keep apple seeds dry and spread, as they can heat up. Freezing them is entirely irrelevant. If you plant pomace, add a bit of lime or ashes to neutralize the acidity. For winter grafting, pull out the seedlings that are the right size, cut the tops off about eight inches from the roots, and pack them in moist sand in a cellar that won’t freeze. After grafting, tie them in bunches and pack them tightly in boxes of moist sand or sawdust.
Transplanting.—This is fully treated elsewhere in this work. We give under each fruit only what is peculiar to that species. In mild climates transplant in the fall, and in cold in the spring. Spring-planting must never be done until the soil has become dry enough to be made fine. A thoroughly-pulverized soil is the great essential of successful transplanting. Trees for spring-planting should always be taken up before the commencement of vegetation. But in very wet springs, this occurs before the ground becomes sufficiently dry; it is then best to take up the trees and heel them in, and keep them until the soil is suitable. The place for an apple-tree should be made larger than for any other tree, because its roots are wide-spreading, like its branches. The earth should be thrown out to the depth of twenty inches, and four or five feet square,[Pg 18] for an ordinary-sized tree. This, however, will not do on a heavy clay subsoil, for it would form a basin to hold water and injure the tree. A ditch, as low as the bottom of the holes, should extend from tree to tree, and running out of the orchard, constructed in the usual method of drains, and, whatever be the subsoil, the trees will flourish. The usual compost to manure the trees in transplanting will be found elsewhere. In the bottom of these places for apple-trees should be thrown a plenty of cobblestones, with a few sods, and a little decaying wood and coarse manure. We know of nothing so good under an apple-tree as small stones; the tree will always be the larger and thriftier for it. This is, in a degree, beneficial to other fruits, but peculiarly so to the apple.
Transplanting.—This is covered in detail elsewhere in this work. We provide only the specific information relevant to each fruit. In mild climates, transplant in the fall, and in colder areas, transplant in the spring. Spring planting should never happen until the soil is dry enough to work. Having well-loosened soil is crucial for successful transplanting. Trees meant for spring planting should always be dug up before new growth begins. However, if springs are very wet, this may happen before the soil is dry enough; in that case, it's best to dig up the trees, heel them in, and keep them until the soil conditions improve. The hole for an apple tree should be larger than for other trees because its roots spread wide, just like its branches. The soil should be removed to a depth of twenty inches and a size of four or five feet square,[Pg 18] for a tree of average size. However, this won't work well in heavy clay subsoil, as it would create a basin that holds water and harms the tree. A ditch should run between the trees, reaching out of the orchard, constructed in the usual way for drains, and regardless of the subsoil, the trees will thrive. The typical compost for fertilizing trees during transplanting can be found elsewhere. At the bottom of the holes for apple trees, a good amount of cobblestones should be placed along with some sod, decaying wood, and coarse manure. We have found that having small stones under an apple tree is extremely beneficial; the tree will always grow larger and healthier because of it. This is somewhat helpful for other fruits as well, but especially for apples.
Size for transplanting.—Small trees usually do best. Large trees are often transplanted with the hope of having an abundance of fruit earlier. This usually defeats the object. The large trees will bear a little fruit earlier than the small ones; but the injury by removal is so much greater, that the small stocky trees come into full, regular bearing much the soonest. From five to eight feet high is often most convenient for field-orchard culture. But, wherever we can take care of them, it is better to set out smaller trees; they will do better for years. A suitable drain, extending through the orchard, under each row of trees, will make a good orchard on low, wet land.
Size for transplanting.—Smaller trees usually do better. Larger trees are often transplanted in hopes of getting a lot of fruit sooner. However, this usually backfires. Larger trees might produce a few fruits earlier than the smaller ones, but the damage from taking them out is much greater, so the smaller, sturdier trees start producing fruit regularly much sooner. Trees that are five to eight feet tall are often the most convenient for field-orchard setups. However, wherever possible, it's better to plant smaller trees; they’ll thrive better for years. A proper drain running through the orchard, under each row of trees, will create a good orchard on low, wet land.
Trimming at the time of transplanting.—Injured roots should be removed as in the general directions under Transplanting. But the idea of cutting off most of the top is a very serious error. When large trees are transplanted, which must necessarily lose many of their[Pg 19] roots in removal, a corresponding portion of the top must be separated; but in no other case. The leaves are the lungs of the tree. How shall it have vitality if most of them are removed? It is like destroying one lung and half of the other, and then expect a man to be in vigorous health. We have often seen the most of two years' growth of trees lost by such reckless pruning. If the roots are tolerably whole and sound, leave the top so. A peach-tree needs to be trimmed much closer when transplanted, because it has so many more buds to throw out leaves.
Trimming at the time of transplanting.—Injured roots should be removed as described in the general instructions under Transplanting. However, the idea of cutting off most of the top is a serious mistake. When large trees are transplanted and lose a significant number of their[Pg 19] roots during the process, a corresponding amount of the top must be removed; but in no other situation. The leaves are the tree's lungs. How can it survive if most of them are taken away? It's like destroying one lung and half of the other and then expecting a person to be in good health. We've often seen two years' worth of growth from trees lost due to such careless pruning. If the roots are mostly intact and healthy, keep the top intact as well. A peach tree needs to be trimmed more closely when transplanted because it has many more buds that will produce leaves.
Mulching.—This is quite as beneficial to apple-trees as to all transplanted trees. Well done, it preserves a regularity of moisture that almost insures the life of the tree.
Mulching.—This is just as beneficial to apple trees as it is to all transplanted trees. When done correctly, it helps maintain consistent moisture, which nearly guarantees the survival of the tree.
Pruning.—The tops should be kept open and exposed to the sun, the cross limbs cut out, and everything removed that shows decided symptoms of decay. The productiveness of apple-trees depends very much upon pruning very sparingly and judiciously. There are two ways to keep an open top: one is, to allow many large limbs to grow, and cut out most of the small ones, thus leaving a large collection of bare poles without anything on which the fruit can grow;—the other method is to allow few limbs to grow large, and keep them well covered with small twigs, which always bear the fruit. The latter method will produce two or three times as much fruit as the former.
Pruning.—The tops should stay open and exposed to sunlight, remove any crossing limbs, and get rid of anything that shows clear signs of decay. The productivity of apple trees relies heavily on careful and limited pruning. There are two ways to maintain an open top: one is to let many large limbs grow and cut out most of the small ones, resulting in a bunch of bare branches with nothing for the fruit to grow on; the other method is to allow a few limbs to grow large while keeping them covered with small twigs, which always produce fruit. The second method will yield two or three times more fruit than the first.
The head of an apple-tree should be formed at a height that will allow a team to pass around under its branches.
The top of an apple tree should be shaped at a height that lets a team pass underneath its branches.
Distance apart.—In a full-grown orchard, that is designed to cover the ground, the trees should be two[Pg 20] rods (thirty-three feet) apart. When it is designed always to cultivate the ground, and land is plenty, set them fifty or sixty feet apart. You will be likely always to have fine fruit, and a crop on the land beside. Our recommendation to every one is to set out all orchards, of whatever fruit, so as to have them cover the whole ground when in maturity. Among apple-trees, dwarf pears, peaches, or quinces, may be set, which will be profitable before the apples need all the ground.
Spacing.—In a fully grown orchard that’s meant to fill the space, the trees should be two[Pg 20] rods (thirty-three feet) apart. If the plan is to cultivate the ground regularly and there's plenty of land, plant them fifty or sixty feet apart. This way, you'll likely always have great fruit and a good crop alongside. We recommend that everyone plant all orchards, regardless of the type of fruit, so that they cover the entire area when fully grown. In among apple trees, you can also plant dwarf pears, peaches, or quinces, which will be productive before the apples take up all the space.
Bearing years.—A cultivator may have a part of his orchard bear one year, and the remainder the next, or he may have them all bear every year. There are two reasons why a tree bears full this year and will not bear the next. One is, it is allowed to have such a superabundance of fruit to mature this year, that it has no strength to mature fruit-buds for the next, and hence a barren year; the other reason is, a want of proper culture and the specific manures for the apple. Manure highly, keep off the insects, cultivate well, and do not allow too much to remain on the trees one season, and you will have a good crop every year. But if one would let his trees take the natural course, but wishes to change the bearing year of half of his orchard, he can accomplish it by removing the blossoms or young fruit from a part of his trees on the bearing year, and those trees having no fruit to mature will put forth an abundance of buds for fruit the following season; thus the fruit-season will be changed without lessening the productiveness. Go through a fruit-region in what is called the non-bearing seasons, and you will find some orchards and some trees very full of fruit. Trees of the same variety in another orchard near by will have very little fruit. This shows that the bearing season[Pg 21] is a matter of mere habit, in all except what is determined by late frosts. This fact may be turned to great pecuniary value, by producing an abundance of apples every year.
Bearing years.—A grower might have part of their orchard produce fruit one year, and the rest the next, or they can have all the trees bear fruit every year. There are two reasons why a tree might produce a lot of fruit one year and not the next. One reason is that it’s allowed to produce such a surplus of fruit this year that it doesn’t have the energy to develop flower buds for the following year, resulting in a barren year. The other reason is a lack of proper care and the right fertilizers for the apple trees. Fertilize properly, keep pests away, maintain good cultivation, and avoid leaving too much fruit on the trees in one season, and you’ll have a good crop every year. However, if someone wants to let their trees follow a natural cycle but wishes to alter the bearing year of half their orchard, they can do this by removing blossoms or young fruit from a portion of their trees during the bearing year; those trees without fruit will then produce a lot of fruit buds for the next season, effectively changing the fruiting season without reducing productivity. If you visit a fruit-growing area during what are considered non-bearing seasons, you’ll see some orchards and trees loaded with fruit. Trees of the same variety in another nearby orchard may have very little fruit. This shows that the bearing season[Pg 21] is largely a matter of habit, aside from factors affected by late frosts. This knowledge can be highly valuable financially by enabling the production of a large amount of apples every year.
Plowing and pasturing.—An apple-orchard should be often plowed, but not too deep among the roots. When not actually under the plow, it should be pastured, with fowls, calves, or sheep. Swine are recommended, as they will eat all the apples that fall prematurely, and with them the worms that made them fall. But we have often seen hogs, by their rooting and rubbing, kill the trees. Better to pick up the apples that fall too early, and give them to the swine. Turkeys and hens in an orchard will do much to destroy the various insects. They may be removed for a short time when they begin to peck the ripening fruit.
Plowing and pasturing.—An apple orchard should be plowed frequently, but not too deeply around the roots. When it’s not being plowed, it should be grazed by birds, calves, or sheep. Pigs are a good option because they eat all the apples that fall prematurely, along with the worms that caused them to fall. However, we have often seen pigs damage the trees by rooting and rubbing against them. It’s better to gather the apples that fall too early and feed them to the pigs. Turkeys and hens in an orchard will help reduce various insects. They can be temporarily removed when they start pecking at the ripening fruit.
Orchards pastured by sheep are said not to be infested with caterpillars. Sheep pastured and salted under apple-trees greatly enrich the soil, and in those elements peculiarly beneficial.
Orchards where sheep graze are said not to have caterpillar problems. Sheep grazing and being salted under apple trees significantly enrich the soil, especially in the nutrients that are particularly beneficial.
Enemies.—There are several of these that are quite destructive, when not properly guarded against. Two things are necessary, and, united and thoroughly performed, they afford a remedy or a preventive for most of the depredations of all insects: 1. Keep the trees well cleared of all rough, loose bark, which affords so many hiding-places for insects.
Enemies.—There are several of these that can be really harmful if we don’t protect against them properly. Two things are essential, and when combined and done thoroughly, they provide a solution or prevention for most insect damage: 1. Keep the trees free of all rough, loose bark, which gives insects numerous hiding spots.
2. Wash the trunks and large limbs of the trees, twice between the 25th of May and the 15th of August, with a ley of wood-ashes or dissolved potash. Apple-trees will bear it strong enough to kill some of the finest cherries. We add another very effectual wash. Let cultivators choose between the two. Into two gal[Pg 22]lons of water put two quarts of soft-soap and one fourth pound of sulphur. If you add tobacco-juice, or any other very offensive article, it will be still better.
2. Wash the trunks and big limbs of the trees twice between May 25 and August 15 using a solution of wood ashes or dissolved potash. Apple trees can handle it enough to eliminate some of the best cherries. We have another very effective wash. Let growers decide between the two options. Mix two gallons of water with two quarts of soft soap and a quarter pound of sulfur. Adding tobacco juice, or any other very strong-smelling ingredient, will make it even more effective.
Apple-worm.—The insect that produces this worm lays its egg in the blossom-end of the young apple. That egg makes a worm that passes down about the core and ruins the fruit. Apples so affected will fall prematurely, and should be picked up and fed to swine. This done every day during their falling, which does not last a great while, will remedy the evil in two seasons. The worm that crawls from the fallen apple gets into crevices in rough bark, and spins his cocoon, in which he remains till the following spring.
Apple-worm.—The insect that creates this worm lays its egg in the blossom end of the young apple. That egg hatches into a worm that burrows down through the core and damages the fruit. Apples affected by this will drop prematurely and should be collected and given to pigs. Doing this every day during the dropping period, which doesn't last long, will solve the problem in two seasons. The worm that emerges from the fallen apple finds its way into crevices in rough bark and spins a cocoon, where it stays until the following spring.
Bonfires, for a few evenings in the fore part of June, in an orchard infested with moths, will destroy vast numbers of them, before they have deposited their eggs. This can not be too strongly insisted upon.
Bonfires, for a few evenings in early June, in an orchard filled with moths, will eliminate a large number of them before they lay their eggs. This cannot be emphasized enough.
 Apple-Worms.
a The young worm. b The adult worm. c The same magnified. d Cocoon. e Chrysalis.
Apple-Worms.
a The young worm. b The adult worm. c The same magnified. d Cocoon. e Chrysalis.f Mature insect. g The same magnified. h Passage of the worm in the fruit. j Worm inside the fruit. k Exit point.
Bark-louse.—Dull white, oval scales, one tenth of an inch long, which sometimes appear on the stems of trees in vast numbers, may be destroyed by the wash recommended above.
Bark-louse.—Dull white, oval scales, about a tenth of an inch long, which can sometimes appear in large quantities on tree stems, can be eliminated by the wash advised above.
Woolly aphis—called in Europe by the misnomer, American blight—is very destructive across the water, but does not exist extensively on this side. It is supposed to exist, in this country, only where it has been introduced with imported trees. It appears as a white downy substance in the small forks of trees. This is composed of a large number of very minute woolly lice, which increase with wonderful rapidity. They are easily destroyed by washing with diluted sulphuric acid—three fourths of an ounce, by measure, from the druggist's—and seven and a half ounces of water, applied by a rag tied to the end of a stick. The operator must keep it from his clothes. After the first rain this is perfectly effectual.
Woolly aphis—mistakenly called American blight in Europe—is quite harmful overseas, but it's not widespread here. It’s believed to only exist in this country where it has been brought in with imported trees. It shows up as a white, fuzzy substance in the small forks of trees. This is made up of many tiny woolly lice that reproduce very quickly. They can be easily eliminated by washing with diluted sulfuric acid—three-quarters of an ounce, measured from the drugstore—and seven and a half ounces of water, applied using a rag tied to the end of a stick. The person doing this should avoid getting it on their clothes. After the first rain, this method works perfectly.
Apple-tree borer.—This is a fleshy-white grub, found in the trunks of the trees. It enters at the surface of the ground where the bark is tender, and either girdles or thoroughly perforates the tree, causing its death. This is produced by a brown and white striped beetle about half an inch long. It does not go through its different stages annually, but remains a grub two or three years. It finally comes out in its winged state, early in June, flying in the night and laying its eggs. If the borers are already in the tree, they may be killed by cutting out, or by a steel wire thrust into their holes. But better prevent them. This can be done effectually by placing a small mound of ashes or lime around each tree early in the spring.
Apple-tree borer.—This is a fleshy-white larva found in the trunks of trees. It enters at the ground level where the bark is soft and either strips away the bark or makes holes in the tree, leading to its death. This is caused by a brown and white striped beetle that's about half an inch long. It doesn't go through its life cycle every year but stays in the larval stage for two or three years. It finally emerges as a beetle in early June, flying at night and laying its eggs. If borers are already in the tree, they can be removed by cutting them out or by inserting a steel wire into their holes. But it’s better to prevent them. You can effectively do this by placing a small mound of ash or lime around each tree early in the spring.
On nursery-trees their attacks may be prevented by[Pg 24] washing with a solution of potash—two pounds in eight quarts of water. As this is a good manure, as well as a great remedy for insects, it had better be used every season.
On nursery trees, their attacks can be prevented by[Pg 24] washing with a solution of potash—two pounds in eight quarts of water. Since this is not only a good fertilizer but also a great insect remedy, it’s best to use it every season.

| Borer, | Eggs. | Beetle. |
Caterpillars are the product of a miller of a reddish-brown color, measuring about an inch and a half when flying. They deposit many eggs about the forks and near the extremities of young branches. These hatch in spring, in season for the young foliage, on which they feed voraciously. When neglected for two or three years, they often defoliate large trees. The habits of the caterpillar are favorable to their destruction. They weave their webs in forks of trees, and are always at home in rainy weather, and in the morning till nine o'clock. The remedy is to kill them. This is most effectually done by a sponge on the end of a pole, dipped in strong spirits of ammonia. Each one touched by it is instantly killed, and it is not difficult to reach them all. They may also be rubbed off with a brush or swab on the end of a pole, and burned. The principle is to get them off, web and all, and destroy them. This can always be effectually done, if attended to early in the season, and early in the morning. If any have been missed, and come out in insects to deposite more[Pg 25] eggs, bonfires are most effectual. These should be made of shavings, in different parts of the orchard, and about the middle of June, earlier or later, according to latitude and season. The ends of twigs on which the eggs are laid in bunches of hundreds (see figure), may be cut off in the fall and destroyed. As this can be done with pruning-shears, it may be an economical method of destroying them.
Caterpillars come from a reddish-brown moth, measuring about an inch and a half when flying. They lay many eggs at the forks and near the tips of young branches. These eggs hatch in the spring, right when the young leaves appear, which they eat voraciously. If left alone for two or three years, they can totally strip large trees of their leaves. Their habits make them vulnerable to being killed. They spin webs in tree forks and tend to stay there during rainy weather and in the mornings until around nine o'clock. The best solution is to kill them. The most effective way to do this is by using a sponge on the end of a pole dipped in strong ammonia. Each caterpillar touched by it is killed instantly, and it’s not hard to reach them all. You can also brush them off with a swab on a pole and burn them. The key is to remove them, webs and all, and destroy them. This can always be done effectively if you act early in the season and in the early morning. If any are missed and turn into moths to lay more[Pg 25] eggs, bonfires work well. These should be made from shavings in different spots of the orchard, around mid-June, adjusting for latitude and season. The ends of the twigs where the eggs are laid in clusters of hundreds (see figure) can be cut off in the fall and destroyed. Since this can be done with pruning shears, it can be a cost-effective way to get rid of them.
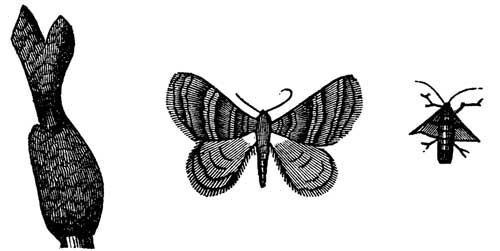 Caterpillar Eggs. Canker-worm Moths, Male and Female.
Canker-worm.—The male moth has pale-ash colored wings, with a black dot, and is about an inch across. The female has no wings, is oval in form, dark-ash colored above, and gray underneath. These rise from the ground as early in spring as the frost is out. Some few rise in the fall. The females travel slowly up the body of the tree, while the winged males fly about to pair with them. Soon you may discover the eggs laid, always in rows, in forks of branches and among the young twigs. Every female lays nearly a hundred, and covers them over carefully with a transparent, waterproof glue. The eggs hatch from May 1st to June 1st, according to the latitude and season, and come out an ash-colored worm with a yellow stripe. They are very voracious, sometimes entirely stripping an orchard of[Pg 26] its foliage. At the end of about four weeks they descend to the ground, to remain in a chrysalis state, about four inches below the surface, until the following spring. These worms are very destructive in some parts of New England, and have been already very annoying, as far west as Iowa. They will be likely to be transported all over the country on young trees. Many remedies are proposed, but to present them all is only to confuse. The best of anything is sufficient. We present two, for the benefit of two classes of persons. For all who have care enough to attend to it, the best remedy is to bind a handful of straw around the tree, two feet from the ground, tied on with one band, and the ends allowed to stand out from the tree. The females, who can not fly, but only ascend the trunk by crawling, will get up under the straw, and may easily be killed, by striking a covered mallet on the straw, and against the tree below the band. This should be attended to every day during the short season of their ascent, and all will be destroyed. Burn the straw about the last of May. But those who are too indolent or busy to do this often till their season is past, may melt India-rubber over a hot fire, and smear bandages of cloth or leather previously put tight around the tree. This will prevent the female moth from crossing and reaching the limbs. Tar is used, but India-rubber is better, as weather will not injure it as it will tar, so as to allow the moth to pass over. Put this on early and well, and let it remain till the last of May. But the first, the process of killing them, is far the best.
Canker-worm.—The male moth has light ash-colored wings with a black dot and is about an inch wide. The female has no wings, is oval-shaped, dark ash-colored on top, and gray underneath. They emerge from the ground as soon as the frost is gone in spring. A few appear in the fall. The females crawl slowly up the tree trunk while the winged males fly around looking to mate with them. Soon, you'll find the eggs laid in rows, in the forks of branches and among the young twigs. Each female lays nearly a hundred eggs and carefully covers them with a transparent, waterproof glue. The eggs hatch between May 1st and June 1st, depending on the location and season, and the larvae that emerge are ash-colored with a yellow stripe. They are very greedy, sometimes stripping an orchard of[Pg 26] all its leaves. After about four weeks, they drop to the ground to pupate about four inches below the surface until the next spring. These worms are very destructive in some parts of New England and have already been quite troublesome as far west as Iowa. They are likely to be spread all over the country on young trees. Many remedies have been suggested, but listing them all only creates confusion. The best solution is generally sufficient. We present two options for two types of people. For those who are willing to take care of it, the best method is to wrap a handful of straw around the tree, two feet off the ground, secured with a single band, and let the ends stick out from the tree. The females, which cannot fly and only crawl up the trunk, will get under the straw and can easily be killed by hitting a mallet against the straw and the tree below the band. This should be done daily throughout the short time they are climbing, and all will be eradicated. Burn the straw by the end of May. However, for those who are too lazy or busy to do this until their season has passed, melting rubber over a hot fire and applying tight bands of cloth or leather around the tree will prevent the female moth from crossing over and reaching the branches. Tar can be used, but rubber is better because the weather won’t damage it like it can tar, allowing the moth to pass. Apply this early and thoroughly and leave it on until the end of May. But the first method of killing them is definitely the best.
Gathering-and preserving.—All fruit, designed to be kept even for a few weeks, should be picked, and not shaken off, and laid, not dropped into a basket, and[Pg 27] with equal care put into the barrels in which it is to be kept or transported. The barrel should be slightly shaken and filled entirely full. Let it stand open two days, to allow the fruit to sweat and throw off the excessive moisture. Then head up tight, and keep in a cool open shed until freezing weather; then keep where they can occasionally have good air, and in as cool a place as possible, without danger of freezing. Of all the methods of keeping apples on shelves, buried as potatoes, in various other articles, as chaff, sawdust, &c., this is, on the whole, the best and cheapest. Wrapping the apples in paper before putting them into the barrels, may be an improvement. Apples gathered just before hard frosts, or as they are beginning to ripen, but before many have fallen from the trees, and packed as above, and the barrels laid on their sides in a good dry, dark cellar, where air can occasionally be admitted, can be kept in perfection from six to eight weeks, after the ordinary time for their decay. Apples for cider, or other immediate use, may be shaken off upon mats or blankets spread under the tree for that purpose. They are not quite so valuable, but it saves times in gathering.
Gathering and preserving.—All fruit that is meant to be stored for even a few weeks should be picked, not shaken off, and placed gently, not tossed into a basket, and[Pg 27] handled with the same care when being put into the barrels for storage or transport. The barrel should be slightly shaken and filled completely. Let it remain open for two days to allow the fruit to breathe and release excess moisture. Then seal it tightly and store it in a cool, ventilated shed until freezing weather. After that, keep it in a place where it can get some fresh air, while being as cool as possible without the risk of freezing. Among all the ways to store apples on shelves, burying them like potatoes or using other materials like chaff, sawdust, etc., is generally the best and most cost-effective method. Wrapping the apples in paper before placing them in the barrels could be an improvement. Apples picked just before hard frosts or while they’re starting to ripen, but before many have fallen from the trees, packed as described above, and stored with the barrels laid on their sides in a dry, dark cellar where air can occasionally circulate, can be kept perfectly for six to eight weeks beyond their usual decay period. Apples meant for cider or immediate use can be shaken off onto mats or blankets spread underneath the tree for that purpose. They may not be as valuable, but it saves time in gathering.
Varieties are exceedingly numerous and uncertain. Cole estimates that two millions of varieties have been produced in the single state of Maine, and that thousands of kinds may there be found superior to those generally recommended in the fruit-books. The minute description of fruits is not of the least use to one out of ten thousand cultivators. The best pomologists differ in the names and descriptions of the various fruits. Some varieties have as many as twenty-five synonyms. Of what use, then, is the minute description of the hundred[Pg 28] and seventy-seven varieties of Cole's American fruit-book, or of the vast numbers described by Downing, Elliott, Barry, and Hooper? The best pear we saw in Illinois could not be identified in Elliott's fruit-book by a practical fruit-grower. We had in our orchard in Ohio a single apple-tree, producing a large yield of one of the very best apples we ever saw; it was called Natural Beauty. We could not learn from the fruit-books what it was. We took it to an amateur cultivator of thirty years' experience, and he could not identify it. This is a fair view of the condition of the nomenclature of fruits. The London experimental gardens are doing much to systemize it, and the most scientific growers are congratulating them on their success. But it never can be any better than it is now. Varieties will increase more and more rapidly, and synonyms will be multiplied annually, and the modification of varieties by stocks, manures, climates, and location, will render it more and more confused.
Varieties are extremely numerous and uncertain. Cole estimates that around two million varieties have been produced in the state of Maine alone, and that there are thousands of types there that are better than the ones usually recommended in fruit books. The detailed descriptions of fruits are of little use to one out of ten thousand growers. The best fruit experts disagree on the names and descriptions of different fruits. Some varieties have as many as twenty-five different names. So, what’s the point of the detailed descriptions of the hundred[Pg 28] seventy-seven varieties in Cole's American fruit-book, or the countless numbers listed by Downing, Elliott, Barry, and Hooper? The best pear we saw in Illinois could not be identified in Elliott's fruit book by a practical grower. We had an apple tree in our Ohio orchard that produced an excellent yield of one of the best apples we’ve ever seen; it was called Natural Beauty. We couldn’t find out what it was in the fruit books. We showed it to an amateur grower with thirty years of experience, and he couldn’t identify it either. This reflects the state of fruit naming right now. The experimental gardens in London are doing a lot to organize it, and the most knowledgeable growers are praising their success. But it likely won’t get any better than it is now. Varieties will continue to multiply rapidly, and the number of names will increase every year, while the variation in types caused by rootstocks, fertilizers, climates, and locations will make it even more confusing.
We can depend only upon our nurserymen to collect all improved varieties, and where we do not see the bearing-trees for ourselves, trust the nurseryman's description of the general qualities of fruit. Seldom, indeed, will a cultivator buy fruit-trees, and set out his orchard, and master the descriptions in the fruit-books, and after his trees come into bearing, minutely try them by all the marks to see whether he has been cheated, and, if so, take up the trees and put out others, to go the same round again, perhaps with no better success. Hence, if possible, let planters get trees from a nursery so near at hand that they may know the quality of the fruit of the trees from which the grafts are taken, get the most popular in their vicinity, and always[Pg 29] secure a few scions from any extraordinary apple they may chance to taste. It is well, also, to deal only with the most honorable nurserymen. Remember that varieties will not do alike well in all localities. Many need acclimation. Every extensive cultivator should keep seedlings growing, with a view to new varieties, or modifications of old ones, adapted to his locality.
We can only rely on our nurserymen to gather all the improved varieties, and when we can't see the bearing trees ourselves, we should trust the nurseryman's description of the general qualities of the fruit. It’s rare for a grower to buy fruit trees, plant an orchard, master the descriptions in the fruit books, and then, once the trees start bearing fruit, meticulously check them against all the characteristics to see if he’s been misled. If he finds he has, he might dig up the trees and replace them, only to go through the same process again, possibly with no better outcome. Therefore, if possible, planters should get trees from a nursery close enough to know the quality of the fruit from which the grafts are taken. They should choose the most popular varieties in their area and always [Pg 29] secure a few scions from any exceptional apple they might happen to try. It’s also wise to work only with reputable nurserymen. Keep in mind that varieties won’t perform equally well in all locations. Many need to be acclimated. Every large grower should keep seedlings growing with the aim of developing new varieties or modifying old ones to suit his area.
We did think of describing minutely a few of the best varieties, adapted to the different seasons of the year. But we can see no advantage it would be to the great mass of cultivators, for whom this book is designed. Those who wish to acquaint themselves with those descriptions will purchase some of the best fruit-books. We shall content ourselves with giving the lists, recommended by the best authority, for different sections, followed by a general description of the qualities of a few of the best. Downing's lists are the following:—
We considered providing detailed descriptions of some of the best varieties suited for different seasons. However, we don't see how this would benefit the majority of cultivators for whom this book is intended. Those interested in detailed descriptions will likely buy some of the best fruit books. Instead, we'll share the recommended lists from trusted sources for various sections, followed by a general overview of the qualities of a few top varieties. Here are Downing's lists:—
APPLES FOR MIDDLE AND SOUTHERN PORTIONS OF THE EASTERN STATES, RIPENING IN SUCCESSION.
| Early Harvest. | Vandevere of New York. |
| Red Astrachan. | Jonathan. |
| Early Strawberry. | Melon. |
| Summer Rose. | Yellow Bellflower. |
| William's Favorite. | Domine. |
| Primate. | American Golden Russet. |
| American Summer Pearmain. | Cogswell. |
| Garden Royal. | Peck's Pleasant. |
| Jefferis. | Wagener. |
| Porter. | Rhode Island Greening. |
| Jersey Sweet. | King of Tompkins County. |
| Large Yellow Bough. | Swaar. |
| Gravenstein. | Lady Apple. |
| Maiden's Blush. | Ladies' Sweet. |
| Autumn Sweet Bough. | Red Canada. |
| Fall Pippin. | Newtown Pippin. |
| Mother. | Boston Russet. |
| Smokehouse. | Northern Spy. |
| Rambo. | Wine Sap. |
| Esopus Spitzenburg. | Baldwin. |
APPLES FOR THE NORTH.
| Red Astrachan. | Fameuse. |
| Early Sweet Bough. | Pomme Gris. |
| Saps of Wine or Bell's Early. | Canada Reinette. |
| Golden Sweet. | Golden Ball. |
| William's Favorite. | St. Lawrence. |
| Porter. | Jewett's Fine Red. |
| Dutchess of Oldenburgh. | Rhode Island Greening. |
| Keswick Codlin. | Baldwin. |
| Hawthornden. | Winthrop Greening. |
| Gravenstein. | Danvers Winter-Sweet. |
| Mother. | Ribston Pippin. |
| Tolman Sweet. | Roxberry Russet. |
| Yellow Bellflower. |
APPLES FOR THE WESTERN STATES,
Made up from the contributions of twenty different cultivators, from five Western states.[Pg 31]
Made up of contributions from twenty different growers in five Western states.[Pg 31]
| Early Harvest. | Domine. |
| Carolina Red June. | Swaar. |
| Red Astrachan. | Westfield Seek-no-further. |
| American Summer Pearmain. | Broadwell. |
| Sweet June. | Vandevere of New York, or Newtown Spitzenburg. |
| Large Sweet Bough. | Ortly, or White Bellflower. |
| Summer Queen. | Yellow Bellflower. |
| Maiden's Blush. | White Pippin. |
| Keswick Codlin. | American Golden Russet. |
| Fall Wine. | Herfordshire Pearmain. |
| Rambo. | White Pearmain. |
| Belmont. | Wine Sap. |
| Fall Pippin. | Rawle's Janet. |
| Fameuse. | Red Canada. |
| Jonathan. | Willow Twig. |
| Tolman Sweet. |
APPLES FOR THE SOUTH AND SOUTHWEST.
| Early Harvest. | Nickajack. |
| Carolina Juice. | Maverack's Sweet. |
| Red Astrachan. | Batchelor or King. |
| Gravenstein. | Buff. |
| American Summer Pearmain. | Shockley. |
| Julian. | Ben Davis. |
| Mangum. | Hall. |
| Fall Pippin. | Mallecarle. |
| Maiden's Blush. | Horse. |
| Summer Rose. | Bonum. |
| Porter. | Large Striped Pearmain. |
| Rambo. | Rawle's Janet. |
| Large Early Bough. | Disharoon. |
| Fall Queen, or Ladies' Favorite. | Meigs. |
| Oconee Greening. | Camack's Sweet. |
| Cullasaga. |
Some varieties are included in all these lists, showing that the best cultivators regard some of our finest[Pg 32] apples as adapted to all parts of the country. A careful comparison of Hooper's lists, as recommended by the best Western cultivators, whose names are there mentioned, will show that they name the same best varieties, with a few additions.
Some varieties appear on all these lists, indicating that top cultivators believe some of our finest[Pg 32] apples are suitable for every region of the country. A thorough comparison of Hooper's lists, as suggested by the leading Western cultivators whose names are included, will reveal that they highlight the same top varieties, along with a few extra ones.
We have carefully examined the varieties recommended by Ernst, by Kirtland and Elliott, by Barry, and by the national convention of fruit-growers, and find a general agreement on the main varieties. There are some differences of opinion, but they are minor. They have left out some of Downing's list, and added some, as a matter of course. All this only goes to show the established character of our main varieties. Out of all these, select a dozen of those named, in most of the lists, and you will have all that ever need be cultivated for profit. The best six might be still better. Yet, in your localities, you will find good ones not named in the books, and new ones will be constantly rising.
We have carefully looked over the varieties suggested by Ernst, Kirtland and Elliott, Barry, and the national convention of fruit-growers, and we see a general agreement on the main varieties. There are a few differing opinions, but they are minor. Some of Downing's varieties are missing from the lists, and new ones have been added, which is expected. All this just shows the established nature of our main varieties. From all these, choose a dozen that appear in most of the lists, and you'll have everything you ever need to grow for profit. The best six could be even better. However, in your area, you might find great options that aren't in the books, and new varieties will keep emerging.
Downing adds that "Newtown Pippin does not succeed generally at the West, yet in some locations they are very fine. Rhode Island Greening and Baldwin generally fail in many sections, while in others they are excellent."
Downing adds that "Newtown Pippin doesn't generally do well in the West, yet in some places they are really great. Rhode Island Greening and Baldwin usually don't thrive in many areas, while in others they are outstanding."
Now, it is contrary to all laws of vegetation and climate, that a given fruit should be good in one county and useless in the next, if they have an equal chance in each place. A suitable preparation of the soil, in supplying, in the specific manures, what it may lack, getting scions from equally healthy trees, and grafting upon healthy apple-seedling stocks—observing our principles of acclimation—and not one of our best apples will fail, in any part of North America.[Pg 33]
Now, it goes against all the principles of growing plants and weather that a particular fruit would thrive in one region and be useless in another, assuming both have the same conditions. Proper soil preparation, providing the right fertilizers for what it needs, using scions from equally healthy trees, and grafting onto healthy apple-seedling stocks—while following our acclimation guidelines—and not one of our best apples will fail, in any part of North America.[Pg 33]
On a given parallel of latitude, a man may happen to plant a tree upon a fine calcareous soil, and it does well. Another chances to plant one upon a soil of a different character, and it does not succeed. It is then proclaimed that fruit succeeds well in one locality, and is useless in another near by and in the same latitude. The truth is, had the latter supplied calcareous substances to his deficient soil, as he might easily have done, in bones, plaster, lime, &c., the fruit would have done equally well in both cases. We should like to see this subject discussed, as it never has been in any work that has come under our observation. It would redeem many a section from a bad reputation for fruit-growing, and add much to the luxuries of thousands of our citizens. Apples can be successfully and profitably grown on every farm of arable land in North America. We present, in the following cuts, a few of our best apples, in their usual size and form. Some are contracted for the want of room on the page. We shall describe a few varieties, in our opinion the best of any grown in this country. These are all that need be cultivated, and may be adapted to all localities. We lay aside all technical terms in our description, which we give, not for purposes of identification, but to show their true value for profitable culture. The quality of fruit, habits of the tree, and time of maturity, are all that are necessary, for any practical purpose.
On a certain latitude, someone might plant a tree in nice, rich soil, and it thrives. Another person plants a tree in a different type of soil, and it doesn’t do well. People then claim that fruit grows well in one area but is useless just a short distance away, even though it’s in the same latitude. The reality is, if the second person had added calcareous materials to improve their soil, like bones, plaster, or lime, the fruit would have thrived in both situations. We’d like to see this topic explored more, as it hasn’t been adequately covered in any work we’ve seen. It could clear up the bad reputation of many regions for fruit-growing and significantly enhance the lifestyle of countless citizens. Apples can be successfully and profitably grown on every farm with arable land in North America. Below, we present a few of our best apples, shown in their typical size and shape. Some may look smaller because of the space on the page. We will describe a few varieties that we think are the best grown in this country. These are the only ones that need to be cultivated and can be suitable for all areas. We’re avoiding technical jargon in our descriptions, which we provide not for identification purposes but to highlight their true value for profitable cultivation. The quality of the fruit, the habits of the tree, and the timing of maturity are all that’s necessary for practical purposes.
Nickajack.—Synonyms—Wonder, Summerour.
Nickajack.—Synonyms—Wonder, Summerour.
Origin, North Carolina. Tree vigorous, and a constant prolific bearer. Fruit large, skin yellowish, shaded land striped with crimson, and sprinkled with lightish dots. Yellowish flesh, fine subacid flavor. Tender, crisp, and juicy. Season, November to April.[Pg 34]
Origin, North Carolina. The tree is strong and consistently produces a lot of fruit. The fruit is large, with yellowish skin marked with crimson stripes and sprinkled with light dots. The flesh is yellowish, with a fine tangy flavor. It's tender, crisp, and juicy. The season is from November to April.[Pg 34]
Baldwin.—Synonyms—Late Baldwin, Woodpecker, Pecker, Steele's Red Winter.
Baldwin.—Synonyms—Late Baldwin, Woodpecker, Pecker, Steele's Red Winter.

Stands at the head of all apples, in the Boston market. Fruit large and handsome. Tree hardy, and an abundant bearer. It is of the family of Esopus Spitzenburg. Yellowish white flesh, crisp and beautiful flavor, from a mingling of the acid and saccharine. Season, from November to March. On some rich western soils, it is disposed to bitter rot, which may be easily prevented, by application to the soil of lime and potash.
Stands out as the best apple in the Boston market. The fruit is large and attractive. The tree is resilient and produces a lot of fruit. It's part of the Esopus Spitzenburg family. The flesh is yellowish-white, crisp, and has a wonderful flavor that combines both tartness and sweetness. The season runs from November to March. In certain rich western soils, it can sometimes develop bitter rot, but this can be easily prevented by adding lime and potash to the soil.
Canada Red.—Synonyms—Old Nonsuch, Richfield Nonsuch, Steele's Red Winter.
Canada Red.—Synonyms—Old Nonsuch, Richfield Nonsuch, Steele's Red Winter.
An old fruit in Massachusetts and Connecticut. Tree[Pg 35] not a great grower, but a profuse bearer. Good in Ohio, Michigan, and other Western states. Retains its fine flavor to the last. January to May.
An old fruit in Massachusetts and Connecticut. Tree[Pg 35] isn't a great grower, but it produces a lot of fruit. It’s good in Ohio, Michigan, and other western states. It keeps its delicious flavor until the very end. Available from January to May.
Bellflower.—Synonyms—Yellow Bellflower, Lady Washington, Yellow Belle-fleur.
Bellflower—Synonyms—Yellow Bellflower, Lady Washington, Yellow Belle-flower.

Fruit very large, pale lemon yellow, with a blush in the sun. Subacid, juicy, crisp flesh. Tree vigorous, regular and excellent bearer. Season, November to March. Highly valuable.[Pg 36]
Fruit is very large, pale lemon yellow with a slight blush in the sun. It has a tangy, juicy, and crisp texture. The tree is vigorous, consistently produces well, and is an excellent bearer. Season: November to March. Highly valuable.[Pg 36]
Early Harvest.—Synonyms—Early French Reinette, Prince's Harvest, July Pippin, Yellow Harvest, Large White Juneating, Tart Bough.
Early Harvest.—Synonyms—Early French Reinette, Prince's Harvest, July Pippin, Yellow Harvest, Large White Juneating, Tart Bough.

The best early apple. Bright straw color. Subacid, white, tender, juicy, and crisp. Equally good for cooking and the dessert. Season, the whole month of July in central New York; earlier south, and later north, as of all other varieties.
The best early apple. Bright straw color. Slightly tangy, white, tender, juicy, and crisp. Great for both cooking and dessert. Season, the whole month of July in central New York; earlier to the south and later to the north, like all other varieties.
Red Astrachan.—Brought to England from Sweden in 1816. One of the most beautiful apples in the whole list. Fruit very large, and very smooth and fair. Color deep crimson, with a little greenish yellow in the shade and occasionally a little russet near the stalk. Flesh white and crisp, rich acid flavor. Gather as soon as nearly ripe, or it will become mealy. Abundant bearer. July and August.[Pg 37]
Red Astrachan apple.—Brought to England from Sweden in 1816. It's one of the most beautiful apples on the list. The fruit is very large, smooth, and attractive. Its color is deep crimson, with a hint of greenish-yellow in the shade and occasionally a bit of russet near the stem. The flesh is white and crisp, with a rich, tangy flavor. Harvest as soon as it's nearly ripe, or it will become mealy. Produces abundantly. July and August.[Pg 37]
Esopus Spitzenburg.—Synonym—True Spitzenburg.
Esopus Spitzenburg.—Also known as—True Spitzenburg.

Large, fine flavored, lively red fruit. It is everywhere well known, as one of the very best apples ever cultivated, both for cooking and the desert. December to February, and often good even into April. A very great bearer.
Large, flavorful, vibrant red fruit. It's widely recognized as one of the best apples ever grown, perfect for both cooking and dessert. Available from December to February, and often still good into April. A very prolific producer.
King of Tompkins County.—Synonym—King Apple.
King of Tompkins County.—Synonym—King Apple.
This is an abundant annual bearer. Skin rather yellowish, shaded with red and striped with crimson. Flesh rather coarse, but juicy and tender, with a very agreeable vinous aromatic flavor. One of the best. December and March.[Pg 38]
This is a prolific annual producer. The skin is somewhat yellow, tinged with red and striped with crimson. The flesh is a bit coarse, but it's juicy and tender, with a pleasant wine-like aromatic flavor. One of the best. December and March.[Pg 38]
Rhode Island Greening.—Synonyms—Burlington Greening, Jersey Greening, Hampshire Greening.
Rhode Island Sustainability.—Other Names—Burlington Greening, Jersey Greening, Hampshire Greening.

A universal favorite, everywhere known. Acid, lively, aromatic, excellent alike for the dessert and kitchen. Great bearer. November to March. It is said to fail on some rich alluvial soils at the West. Avoid root grafting, and apply the specific manures, and we will warrant it everywhere.
A universal favorite, known everywhere. Tart, vibrant, fragrant, great for both desserts and cooking. Produces well. November to March. It's said to struggle in some rich alluvial soils in the West. Avoid root grafting, and use the right fertilizers, and we guarantee success everywhere.
Bonum.—Synonym—Magnum Bonum.
Good.—Synonym—Great Good.
From North Carolina. Fruit large, from light to dark red. Flesh yellow, subacid, rich, and delicious. Tree hardy, vigorous, and an early and abundant bearer.
From North Carolina. Fruit is large, ranging from light to dark red. The flesh is yellow, slightly tangy, rich, and delicious. The tree is hardy, vigorous, and produces early and abundant yields.
American Golden Russet.—Synonyms—Sheep Nose, Golden Russet, Bullock's Pippin, Little Pearmain.
American Golden Russet.—Synonyms—Sheep Nose, Golden Russet, Bullock's Pippin, Little Pearmain.
The English Golden Russet is a variety cultivated in this country, but much inferior to the above. The[Pg 39] fruit is small, but melting juicy, with a very pleasant flavor. It is one of the most regular and abundant bearers known. Tree hardy and thrifty. October to January. We know from raising and using it at the West, that it is one of the very best.
The English Golden Russet is a variety grown in this country, but it is much inferior to the one mentioned earlier. The[Pg 39] fruit is small, but super juicy and has a really nice flavor. It’s one of the most consistent and plentiful producers known. The tree is sturdy and healthy. It’s available from October to January. Based on our experience growing and using it in the West, we know it is one of the best.
Pippin, Fall.—Confounded with Holland Pippin and several other varieties.
Pippin, Autumn.—Mixed up with Holland Pippin and a few other types.

A noble fruit, unsurpassed by any other autumn apple. Very large, equally adapted to table and kitchen. Fine yellow, when fully ripe, with a few dots. Flesh is white, mellow, and richly aromatic. October and December. A fair bearer, though not so great as many others.[Pg 40]
A great fruit, unmatched by any other autumn apple. Very large, perfect for both eating fresh and cooking. It’s a nice yellow when fully ripe, with a few specks. The flesh is white, tender, and very fragrant. Available from October to December. It produces a decent amount, though not as much as some others.[Pg 40]
Newtown Pippin.—Synonyms—Green Newtown Pippin, Green Winter Pippin, American Newtown Pippin, Petersburg Pippin.
Newtown Pippin apple.—Synonyms—Green Newtown Pippin, Green Winter Pippin, American Newtown Pippin, Petersburg Pippin.

This is put down as the first of all apples. It commands the highest price, in the London market. It keeps long without the least shriveling or loss of flavor. Fruit medium size, olive green, with small gray specks. Flesh greenish white, juicy, crisp, and of an exceedingly delicious flavor. The best keeping apple, good for eating from December to May.
This is noted as the top apple of all. It fetches the highest price in the London market. It lasts a long time without any shriveling or loss of flavor. The fruit is medium-sized, olive green, with small gray specks. The flesh is greenish-white, juicy, crisp, and has an incredibly delicious flavor. The best keeping apple, great for eating from December to May.
The yellow pippin, is another variety nearly as good.
The yellow pippin is another variety that's almost as good.
Porter.—A Massachusetts fruit, very fair; a very great bearer. Is a favorite in Boston. Deserves general cultivation. September and into October.
Delivery person.—A Massachusetts fruit, very attractive; known for its high yield. It's a popular choice in Boston. Worth growing widely. Available from September into October.
Smokehouse.—Synonyms—Mill Creek Vandevere, English Vandevere.
Smokehouse.—Synonyms—Mill Creek Vandevere, English Vandevere.
An old variety from Pennsylvania, where the original[Pg 41] tree grew by a gentleman's smoke-house; hence its name. Skin yellow, shaded with crimson, sprinkled with large gray or brown dots. September to February. One of the very best for cooking.
An old variety from Pennsylvania, where the original[Pg 41] tree grew near a gentleman's smokehouse; that's where it got its name. The skin is yellow, with a splash of crimson, and dotted with large gray or brown spots. Available from September to February. It’s one of the best for cooking.
Rambo.—Synonyms—Romanite, Bread and cheese apple, Seek-no-further.
Rambo.—Synonyms—Romanite, Bread and cheese apple, Seek-no-further.

This is a great fall apple. Medium size, flat, yellowish white in the shade, and marbled with pale yellow and red in the sun, and speckled with large rough dots. Flesh greenish white, rich, subacid. October to December.
This is a fantastic fall apple. It's medium-sized, flat, yellowish-white in the shade, marbled with pale yellow and red in the sunlight, and dotted with large rough spots. The flesh is greenish-white, rich, and slightly tart. Available from October to December.
Canada Reinette.—This has ten synonyms in Europe, which indicates its popularity. In this country it is known only under the above name. Fruit of the very largest size. A good bearer. The quality is in all respects good. Lively, subacid flavor. December to April, unless allowed to hang on the tree too long. Pick early in the fall.[Pg 42]
Canada Reinette.—This apple has ten different names in Europe, showing how popular it is. Here, it is known only by this name. The fruit is very large. It produces a good yield. The quality is excellent in every way. It has a lively, slightly tart flavor. Best from December to April, unless left on the tree too long. Pick it early in the fall.[Pg 42]
Rome Beauty.—Synonyms—Roman Beauty, Gillett's Seedling.
Rome Beauty.—Synonyms—Roman Beauty, Gillett's Seedling.

Fruit large, yellow, ground shaded, and striped with red, and sprinkled with little dots. Flesh yellowish, juicy, tender, subacid. Bears every year a great crop of very large showy apples. It is not superior in flesh or flavor, but keeps and sells very well. Always must be very profitable, and hence very popular.
Fruit is large, yellow, shaded on the ground, and striped with red, sprinkled with little dots. The flesh is yellowish, juicy, tender, and slightly tart. It produces a big crop of very large, attractive apples every year. While it may not be the best in flesh or flavor, it stores and sells very well. It’s always been profitable, making it quite popular.
Autumn Sweet Bough.—Synonyms—Late Bough, Fall Bough, Summer Bell Flower, Philadelphia Sweet.
Autumn Sweet Bough.—Synonyms—Late Bough, Fall Bough, Summer Bell Flower, Philadelphia Sweet.
Tree very vigorous and productive. Fruit medium. Skin smooth, pale yellow with a few brown dots. Flesh white, tender, sweet vinous flavor. One of the best dessert sweet apples. August and October.[Pg 43]
Tree is very strong and fruitful. Fruit is medium-sized. Skin is smooth, light yellow with some brown specks. Flesh is white, tender, and has a sweet, wine-like flavor. It’s one of the best dessert apples. Available from August to October.[Pg 43]
Westfield Seek-no-further.—Synonyms—Seek-no-further, Red Winter Pearmain, Connecticut Seek-no-further.
Westfield No-Longer-Looking.—Synonyms—Seek-no-further, Red Winter Pearmain, Connecticut Seek-no-further.

Fruit large, pale dull red, sprinkled with obscure russety yellow dots. Flesh white, tender and fine-grained. On all accounts good. October to February according to Downing. Elliott says from December to February. But the doctors often disagree. So you had better eat your apples when they are good, whether it be October or December, or according to Downing, Elliott, or Hooper.
Fruit is large, a pale dull red, dotted with small yellow specks. The flesh is white, tender, and finely textured. Overall, it’s quite good. According to Downing, it's available from October to February. Elliott states it's from December to February. But doctors often have different opinions. So it's best to eat your apples when they're good, whether that's in October, December, or based on Downing, Elliott, or Hooper.
Ribston Pippin.—Synonyms—Glory of York, Travers', Formosa Pippin, Rock hill's Russet.
Ribston Pippin apple.—Synonyms—Glory of York, Travers', Formosa Pippin, Rock Hill's Russet.
This occupies as high a place in England, as any other apple. In this country, two or three others, as Baldwin and Newtown Pippin, are more highly es[Pg 44]teemed. This is most successfully grown in the colder parts of the United States and Canada. Fruit medium, deep yellow, firm, crisp; flavor sharp aromatic. November to April.
This ranks among the top apples in England, just like any other. In this country, a few others, like Baldwin and Newtown Pippin, are more highly valued. This apple is best grown in the colder regions of the United States and Canada. The fruit is medium-sized, deep yellow, firm, and crisp; it has a sharp, aromatic flavor. Available from November to April.
Northern Spy.—This is a new American variety, with no synonyms. It originated near Rochester, N. Y.
Northern Spy.—This is a new American variety, with no other names. It started near Rochester, N.Y.

There is not a better dessert apple known. It retains its exceedingly pleasant juiciness, and excellent flavor from January to June. In western New York, they have been carried to the harvest field, in July in excellent condition. A fair bearer of beautiful fruit. Subacid with a peculiar freshness of flavor. Dark stripes of purplish red in the sun, but a greenish pale yellow in the shade. High culture and an open top for admission of the sun, affects the fruit more favorably than any other.[Pg 45]
There’s no better dessert apple out there. It keeps its incredibly pleasant juiciness and great flavor from January to June. In western New York, they’ve made it to the harvest field in July in excellent condition. It produces a good amount of beautiful fruit. It has a slightly tart taste with a unique freshness. It shows dark stripes of purplish-red when in the sun but appears a greenish-pale yellow in the shade. Careful cultivation and an open canopy for sunlight benefit the fruit more than anything else.[Pg 45]
Roxbury Russet.—Synonyms—Boston Russet, Putnam Russet.
Roxbury Russet. — Synonyms — Boston Russet, Putnam Russet.

An excellent fruit, and prodigious bearer. Medium size, flesh greenish white, rather juicy, and subacid. Good in January, and one of the best in market in June.
An excellent fruit that produces abundantly. Medium size, with greenish-white flesh that is quite juicy and slightly tart. Good in January and one of the best on the market in June.
There are other russets of larger size, but much inferior. This should be in every collection. It is not first in richness and flavor, but it is superior to most in productiveness, and is one of the best keepers.
There are other larger russets, but they are much worse. This one should be in every collection. It's not the richest or most flavorful, but it’s better than most in terms of productivity, and it’s one of the best for keeping.
Large Yellow Bough.—Synonyms—Early Sweet Bough, Sweet Harvest, Bough.
Large Yellow Branch.—Synonyms—Early Sweet Bough, Sweet Harvest, Bough.
No harvest-apple equals this, except the Early Harvest. Excellent for the dessert, but rather sweet for pies and sauce. Fruit above medium. Tree a moderate grower, but a profuse bearer. Flesh white and very tender. Very sweet and sprightly. July and August. Should have a place, even in a small collection.[Pg 46]
No harvest apple compares to this one, except for the Early Harvest. It’s great for desserts, but a bit too sweet for pies and sauces. The fruit is above average in size. The tree grows at a moderate rate but produces a lot of fruit. The flesh is white and super tender. It’s really sweet and has a lively flavor. Available in July and August. It deserves a spot, even in a small collection.[Pg 46]
Swaar.—One of the best American fruits. Its name in Dutch, where it originated on the Hudson River, means heavy.
Swaar.—One of the best American fruits. Its name in Dutch, where it originated on the Hudson River, means heavy.

Fruit is large, and when fully ripe, of a dead gold color, dotted with many brown specks. Flesh yellowish, fine grained, and tender. Flavor aromatic and exceedingly rich. Bears good crops. December to March.
Fruit is large, and when fully ripe, it turns a dull gold color, dotted with many brown spots. The flesh is yellowish, fine-grained, and tender. The flavor is aromatic and very rich. It produces good crops. Available from December to March.
Winesap.—This is one of the best apples for cider, and good also for the table and kitchen. Fruit hangs long on the tree without injury. It is very productive, and does well on a variety of soils. Very fine in the West. Yellow flesh, very firm, and high flavored. November to May. Deservedly, a very popular orchard variety.[Pg 47]
Winesap apple.—This is one of the best apples for cider, and it's also great for eating and cooking. The fruit stays on the tree for a long time without getting damaged. It's very productive and thrives in different types of soil. It's especially excellent in the West. The flesh is yellow, very firm, and has a strong flavor. Available from November to May. It's truly a popular choice for orchards.[Pg 47]
Maiden's Blush.—A comparatively new variety from New Jersey. Remarkably beautiful. Admired as a dessert fruit, and equally good for the kitchen and for drying. Clear lemon yellow, with a blush cheek, sometimes a brilliant red cheek. Rapid growing tree, with a fine spreading head, bearing most abundantly. August and October.
Maiden's Blush.—A relatively new variety from New Jersey. Extremely beautiful. Praised as a dessert fruit, and also great for cooking and drying. Bright lemon yellow with a blush, sometimes a striking red blush. Fast-growing tree with a nice spreading shape, producing a lot of fruit. August and October.

Ladies' Sweeting.—The finest sweet apple, for dessert in winter, that has yet been produced. Skin smooth and nearly covered with red, in the sun. Flesh is greenish white, very tender, juicy, and crisp. Without any shriveling or loss of flavor, it keeps till May. So good a winter and spring sweet apple is a desideratum in any orchard or garden.[Pg 48]
Ladies' Sweeting.—The best sweet apple for winter desserts that has ever been produced. The skin is smooth and almost completely red in the sun. The flesh is greenish-white, very tender, juicy, and crisp. It stays fresh and maintains its flavor without shriveling until May. A great winter and spring sweet apple is a must-have in any orchard or garden.[Pg 48]
The foregoing are all that any practical cultivator will need. Most will select from our list, perhaps half a dozen, which will be all they wish to cultivate. From our descriptions, which are not designed to enable planters to identify the varieties, but to ascertain their qualities, any one can select such as he prefers. And they are so generally known, that there will be but little danger of getting varieties, different from those ordered.
The above is all any practical grower will need. Most will choose about half a dozen from our list, which will be all they want to grow. From our descriptions, which are meant to help planters understand the qualities rather than identify the varieties, anyone can pick what they like. And they are so widely recognized that there's little chance of receiving varieties different from what was ordered.
We subjoin, from Hooker's excellent Western Fruit-Book, the following—
We include the following from Hooker's excellent Western Fruit-Book—
LIST OF APPLES FOR THE WESTERN STATES.
"The following list," says Hooker, "contains a catalogue of the most popular varieties of apples, recommended by various pomological societies of the United States for the Western states." These varieties can be obtained of all respectable nurserymen. The list may be of use to some cultivators in the different states mentioned. The general qualities of the best of these will be found in our descriptions under the cuts:—
"The following list," says Hooker, "contains a catalog of the most popular types of apples, recommended by various fruit-growing societies in the United States for the Western states." These varieties can be obtained from all reputable nurseries. The list may be helpful for some growers in the different states mentioned. You can find the general qualities of the best of these in our descriptions under the images:—
- Baldwin.—Ohio, Missouri, Illinois.
- Roxbury Russet.—Michigan, Ohio, Missouri, Indiana, Illinois.
- Rhode Island Greening.—Michigan, Iowa, Ohio, Missouri, Illinois.
- Swaar.—Ohio, Illinois, Michigan.
- Esopus Spitzenburg.—Missouri, Illinois, Michigan, Ohio.
- Early Harvest.—Virginia, Ohio, Missouri, Indiana, Illinois, Michigan, Iowa.
- Sweet Bough.—Illinois, Virginia, Missouri, Indiana, Ohio.[Pg 49]
- Summer Rose.—Ohio, Missouri, Illinois.
- Fall Pippin.—Michigan, Virginia, Ohio, Missouri, Illinois.
- Belmont.—Michigan, Ohio.
- Golden Sweet.—Missouri.
- Red Astrachan.—Iowa, Ohio, Missouri, Illinois.
- Jonathan.—Ohio, Missouri.
- Early Strawberry.—Ohio.
- Danvers Winter Sweet.—Ohio.
- American Summer Pearmain.—Illinois.
- Maiden Blush.—Ohio, Missouri, Indiana, Illinois.
- Porter.—Ohio, Missouri.
- Gravenstein.—Ohio.
- Vandevere.—Missouri, Indiana, Illinois.
- Yellow Bellflower.—Michigan, Iowa, Virginia, Ohio, Missouri, Illinois.
- Fameuse.—Illinois.
- Newtown Pippin.—Michigan, Iowa, Ohio, Missouri, Indiana, Illinois.
- Rambo.—Michigan, Iowa, Ohio, Missouri, Indiana, Illinois.
- Smokehouse.—Virginia, Indiana.
- Fallawalden.—Ohio.
- Golden Russet.—Ohio, Illinois.
- Wine Sap.—Ohio, Illinois.
- White Bellflower.—Missouri, Illinois.
- Holland Pippin.—Michigan, Missouri, Indiana.
- Raule's Janet.—Iowa, Virginia, Illinois.
- Lady Apple.—Ohio, Missouri.
For the value of these varieties, in the states mentioned, you have the authority of the best pomological societies. The several states are mentioned so fre[Pg 50]quently, that it will be seen that most of them are adapted to all the states. Attend to acclimation and manure, and guard against insects, and they will all flourish, in all parts of the West and of the Union.
For the value of these varieties in the mentioned states, you have the backing of the top pomological societies. The various states are referenced so often that it will be clear that most of them are suitable for all states. Pay attention to acclimation and fertilizer, and protect against insects, and they will all thrive in all areas of the West and the Union.
APRICOT.
This is a fruit about half-way between a peach and a plum. The stone is like the plum, and the flesh rather more like the peach. It is esteemed, principally, because it comes earlier in the season than anything else of the kind.
This is a fruit that’s sort of in between a peach and a plum. The pit is similar to a plum’s, while the flesh is a bit more like a peach’s. It’s valued mainly because it arrives earlier in the season than any other fruit of its kind.
It is used as a dessert-fruit, for preserving, drying, and various purposes in cookery. It does well on plum-stock, and best in good deep, moist loam, manured as the peach and plum. The best varieties produce their like from the seed. Seedlings are more hardy than any grafted trees. Grafts on plums are much better than on the peach. The latter seldom produce good hardy, thrifty trees, although many persist in trying them. The apricot is a favorite tree for espalier training against walls and fences, in small yards, where it bears luxuriantly. It also makes a good handsome standard tree for open cultivation.
It’s used as a dessert fruit, for preserving, drying, and various cooking purposes. It thrives on plum rootstock and grows best in rich, deep, moist loam, treated with the same fertilizers as peaches and plums. The best varieties can produce more of their kind from seeds. Seedlings are hardier than any grafted trees. Grafts on plums are significantly better than those on peaches. The latter rarely results in strong, healthy trees, yet many continue to attempt it. The apricot is a popular choice for espalier training against walls and fences in small yards, where it produces abundantly. It also makes an attractive standard tree for open gardens.
It is as much exposed to depredations from curculio as the plum, and must be treated in the same way. Cultivation same as peach. It produces its fruit, like the peach, only on wood of the previous year's growth; hence it must be pruned like the peach. Especially must it be headed in well, to secure the best crop.
It’s just as vulnerable to damage from curculio as the plum, so it needs to be treated the same way. The care is the same as for a peach. It produces its fruit, like the peach, only on wood that grew the previous year; therefore, it should be pruned like a peach. It especially needs to be trimmed properly to ensure the best yield.
Varieties are quite numerous, a few of which only[Pg 51] deserve cultivation. Any of the nine following varieties are good:—
Varieties are quite numerous, but only a few of them[Pg 51] are worth cultivating. Any of the nine varieties listed below are good:—
Brown's Early.—Yellow, with red cheek. A very productive, great grower.
Brown's Early.—Yellow with a red blush. Highly productive and a vigorous grower.
Newhall's Early.—Bright-orange color, with deep-red cheek. A good cling-stone variety, every way worthy of cultivation.
Newhall's beginnings.—Vibrant orange color with deep red blush. A strong clingstone variety, definitely worth growing.
Moorpark.—Yellow, with ruddy cheek. An enormous bearer, though of slow growth. It is a freestone variety of English origin, and needing a little protection in our colder latitudes.
Moorpark.—Yellow, with a red cheek. A large fruit, although it grows slowly. This is a freestone variety from England that requires some protection in our colder climates.
Dubois' Early Golden.—Color, pale-orange. Very hardy and productive. In 1846, the original tree at Fishkill, N. Y., bore ninety dollars' worth of fruit.
Dubois' Early Success.—Color: light orange. Very resilient and fruitful. In 1846, the original tree in Fishkill, NY, produced fruit worth ninety dollars.
Large Early.—Orange, but red in the sun. An excellent, early, productive variety.
Large Early.—Orange, turning red in the sun. A great, early, and productive variety.
Hemskirke.—Bright-orange, with red cheek. An English variety, vigorous tree, and good bearer.
Hemskirke.—Bright orange with a red cheek. An English variety, it’s a strong tree and produces well.
Peach.—Yellow, with deep-brown on the sun-side. An excellent French variety.
Peach.—Yellow, with rich brown on the sun-facing side. A great French variety.
Breda.—Deep-orange, with blush spots in the sun. A vigorous, productive, African variety.
Breda.—Bright orange, with pink spots in the sunlight. A strong, fruitful variety from Africa.
Roman.—Pale-yellow, with occasionally red dots. Good for northern latitudes.
Roman.—Pale yellow, sometimes with red dots. Suitable for northern latitudes.
From these, planters may select those that best suit their localities and fancy. They are a little liable to be frost-bitten in the blossoms, as they bloom very early. Otherwise they are always very productive. They are ornamental, both in the leaf and in the blossom. Eaten plain, before thoroughly ripe, they are not healthy; otherwise, harmless and delicious. Every garden should have half a dozen.[Pg 52]
From these, gardeners can choose the ones that fit their local area and preferences best. They might be slightly prone to frost damage in the flowers since they bloom quite early. Other than that, they're always very fruitful. They look great, both in their leaves and flowers. Eating them raw before they’re fully ripe isn't healthy; otherwise, they’re safe and tasty. Every garden should have at least six.[Pg 52]
ARTICHOKE.
There are two plants known by this name. The Jerusalem artichoke, so called, not from Jerusalem in Palestine, but a corruption of the Italian name which signifies the tuber-rooted sunflower. The tubers are only used for pickling. They make a very indigestible pickle, and the plant is injurious to the garden, so they had better not be raised.
There are two plants known by this name. The Jerusalem artichoke, named not after Jerusalem in Palestine but as a mispronunciation of the Italian name that refers to the tuber-rooted sunflower. The tubers are only used for pickling. They create a very hard-to-digest pickle, and the plant is harmful to gardens, so it’s best not to grow them.
The artichoke proper grows something like a thistle, bearing certain heads, that, at a particular stage of their growth, are fine for food.
The artichoke grows like a thistle, producing heads that are great to eat at a specific point in their growth.
The soil should be prepared as for asparagus, only fifteen inches deep will do well. The plot of ground should be where the water will not stand on it at any time in the winter, as it will on most level gardens. This will kill the roots. When a new bed is made with slips from old plants, carefully separate vigorous shoots, remove superfluous leaves, plant five inches deep in rows five feet apart, and two feet apart in the rows. Keep very clean of weeds. The first year, some pretty good, though not full-sized heads will be produced. Plant fresh beds each year, and you will have good heads from July to November. Small heads will grow out along the stalk like the sunflower. Remove most of these small ones when they are about the size of hens' eggs, and the others will grow large. When the scales begin to diverge, but before the blossoms come out, is the time to cut them for use. Lay brush over them to prevent suffocation, and cover with straw in winter, to protect from severest cold. Too much warmth, however, is more injurious than frost.[Pg 53]
The soil should be prepared like you would for asparagus, but just fifteen inches deep will work well. Choose a plot where water won't pool in the winter, as it often does in most flat gardens. Standing water will kill the roots. When creating a new bed using slips from older plants, carefully separate strong shoots, remove extra leaves, and plant them five inches deep in rows that are five feet apart, with two feet between the plants in each row. Keep the area very clean of weeds. In the first year, you’ll get some decent heads, although they won't be full-sized. Plant new beds each year, and you’ll have good heads from July to November. Small heads will grow along the stalk like sunflowers. Remove most of these smaller ones when they're about the size of a large egg, and the remaining heads will grow bigger. Cut them for use when the scales start to open up, but before the blossoms form. Lay brush over them to prevent suffocation, and cover with straw in the winter to protect against extreme cold. However, too much warmth is more harmful than frost.[Pg 53]
Spring-dress much like asparagus. Remove from each plant all the stocks but two or three of the best. Those removed are good for a new bed. A bed, properly made, will last four or five years.
Spring-dress similar to asparagus. Take away all the stalks from each plant except for two or three of the best ones. The ones you remove can be used for a new bed. A properly made bed will last four to five years.
To save seed, bend down a few good heads, so as to prevent water from standing in them; tie them to a stake, until the seed is matured. But, like Early York cabbage, imported seed is better. The usual way of serving them is, the full heads boiled. In Italy the small heads are cut up, with oil, salt, and pepper. This vegetable would be a valuable accession to American kitchen gardens.
To save seeds, bend down a few good heads to keep water from pooling in them; tie them to a stake until the seeds are mature. However, like Early York cabbage, imported seeds are better. The typical way to serve them is by boiling the whole heads. In Italy, the small heads are chopped up with oil, salt, and pepper. This vegetable would be a great addition to American kitchen gardens.
ASHES.
Are one of the best applications to the soil, for almost all plants. Leeched ashes are a valuable manure, but not equal to unleached. Few articles about a house or farm should be saved with greater care. Be as choice of them as of your small change. They are worth three times as much on the land as they can be sold for other purposes. On corn, at first hoeing, they are nearly equal to plaster. On onions and vines, they promote the growth and keep off the insects. Sprinkle on dry, when plants are damp, but not too wet. Do not put wet ashes on plants, or water while the ashes are on. It will kill them. Mix ashes and plaster with other manures, and their power will be greatly increased. Mixed in manure of hot-beds, they accelerate the heat. On sour land they are equal to lime for correcting the acidity.[Pg 54]
Are one of the best things you can add to the soil for almost any plant. Leached ashes are a great fertilizer, but not as good as unleached ones. A few items around the house or farm should be saved with more care. Treat them like your spare change. They're worth three times as much in the ground as you could sell them for otherwise. For corn, at the first hoeing, they're almost as good as plaster. For onions and vines, they boost growth and fend off insects. Sprinkle them on dry when the plants are damp, but not overly wet. Don’t put wet ashes on the plants or water them while the ashes are applied. It will harm them. Combining ashes and plaster with other fertilizers will enhance their effectiveness. When mixed into hot-bed manure, they speed up the heat. On acidic soil, they work just like lime to neutralize the acidity.[Pg 54]
ASPARAGUS.
This is a universal favorite in the vegetable garden. By the application of sand and compost, the soil should be kept loose, to allow the sprouts to spring easily from the crowns. Propagation is best effected by seed, transplanting after one year's growth. Older roots divided and transplanted are of some value, but not equal to young roots, nor will they last as long.
This is a universal favorite in the vegetable garden. By adding sand and compost, the soil should be kept loose so that the sprouts can easily emerge from the crowns. The best way to propagate is through seeds, transplanting after one year of growth. Older roots that are divided and transplanted have some value, but they are not as good as young roots and won't last as long.
Preparation of the soil for an asparagus-bed is most important to success. Dig a trench on one edge of the plat designed for the bed, and the length of it, eighteen inches wide and two feet deep. Put in the bottom one foot of good barn-yard manure, and tread down. Then spade eighteen inches more, by the side of and as deep as the other, throwing the soil upon the manure in the trench. Fill with manure and proceed as before, and so until the whole plat has been trenched; then wheel the earth from the first ditch to the other side and fill into the last trench, thus making all level. If there is danger that water will stand in the bottom, drain by a blind ditch. If this is objected to as too expensive, let it be remembered that such a bed, with a little annual top-dressing, will be good for twenty years, which is the age at which asparagus-plants begin to deteriorate; then a new bed should be ready to take its place.
Preparing the soil for an asparagus bed is crucial for success. Dig a trench along one edge of the area meant for the bed, measuring eighteen inches wide and two feet deep. Add one foot of good barnyard manure at the bottom and pack it down. Next, spade an additional eighteen inches alongside it, at the same depth, placing the soil on top of the manure in the trench. Continue to fill with manure and repeat the process until the entire area has been trenched; then move the earth from the first ditch to the other side and fill the last trench to create a level surface. If there's a risk of water pooling at the bottom, install a blind drain. If that seems too costly, keep in mind that such a bed, with some annual top-dressing, will last for twenty years, which is when asparagus plants start to decline; then, a new bed should be ready to replace it.
Planting.—Mark the plat into beds five feet wide, leaving paths two feet wide between them. In each bed put four rows lengthwise, which will be just fifteen inches apart, and set plants fifteen inches apart in the row. Dig a trench six inches wide and six inches deep[Pg 55] for each row; put an inch of rich mould in the bottom; set the plants on the mould, with the roots spread naturally, with the ends pointing a little downward. Be very particular about the position of the roots. Fill the trench, and round it up a little with well-mixed soil and fine manure. The bed is then perfect, and will improve for many years.
Planting.—Divide the area into beds that are five feet wide, leaving two-foot-wide paths between them. In each bed, create four rows running lengthwise, spaced fifteen inches apart, and plant the plants fifteen inches apart within the rows. Dig a trench that is six inches wide and six inches deep[Pg 55] for each row; add an inch of rich soil at the bottom; place the plants on the soil, ensuring the roots are spread out naturally, with the tips angled slightly downward. Pay close attention to how the roots are positioned. Fill the trench and mound it slightly with well-mixed soil and fine manure. The bed will then be perfect and will continue to improve for many years.
After-Culture.—In the fall, after the frost has killed the stalks, cut them down and burn them on the bed. Cover the bed with fine rotted manure, to the depth of two inches, and one half-bushel salt to each square rod. As soon as frost is out in spring, with a fork work the top-dressing into the soil to the depth of four inches, and stir the soil to the depth of eight inches between the rows, using care not to touch the crowns of the roots with the fork.
After-Culture.—In the fall, after the frost has killed the stalks, cut them down and burn them on the bed. Cover the bed with fine, well-rotted manure, about two inches deep, and add half a bushel of salt for each square rod. As soon as the frost is gone in spring, use a fork to mix the top-dressing into the soil to a depth of four inches, and loosen the soil to a depth of eight inches between the rows, being careful not to damage the crowns of the roots with the fork.
Cutting should never be performed until the third year. Set out the plants when one year old, let them grow one year in the bed, and the next year they will be fit to cut. Cut all the shoots at a suitable age, up to the last days of June. The shoots should be regularly cut just below the surface, when they are four or six inches high. If you are tempted to cut after the 25th of June, leave two or three thrifty shoots to each root, to grow up for seed, or you will weaken the plants, and they will die in winter. This is the reason why so many vacancies are seen in many asparagus beds. This plant may be forced in hotbeds, so as to yield an abundance of good shoots long before they will start in the open air, affording an early luxury to those who can afford it.
Cutting should never happen until the third year. Plant the seedlings when they're one year old, let them grow for a year in the bed, and by the next year, they will be ready to cut. Trim all the shoots at the right age, up until the end of June. The shoots should be cut just below the surface when they are four to six inches tall. If you feel the urge to cut after June 25th, leave two or three healthy shoots on each root to grow for seed, or you will weaken the plants, and they might die in the winter. This is why there are so many empty spots in many asparagus beds. You can force this plant in hotbeds, which allows for a lot of good shoots to develop long before they come up in open air, providing an early treat for those who can afford it.
This vegetable is equal or superior to green peas, and by taking all the pains recommended above, in[Pg 56] the beginning, an abundance can be raised for twenty years, on the same bed, at a very trifling cost. Early radishes and other vegetables can be raised, between the rows, without any harm to the asparagus.
This vegetable is just as good or even better than green peas, and by following all the tips mentioned earlier, in[Pg 56] the beginning, you can produce a lot for twenty years in the same spot, at a very low cost. You can grow early radishes and other vegetables between the rows without hurting the asparagus.
BALM.
This is a medicinal plant, very useful, and easily raised. A strong infusion of the leaves, drank freely for some time by a nervous, hypochondriacal person, is, perhaps, better than any other medicine. It is also good in flatulency and fevers.
This is a medicinal plant that is very useful and easy to grow. A strong infusion of the leaves, consumed regularly by someone who is anxious or hypochondriacal, is probably better than any other medicine. It's also effective for gas and fevers.
Its propagation is by slips or roots. It is perennial, affording a supply for many years. Gather just as the blossoms are appearing, and dry quickly in a slow oven, or in the shade. Press and do up in white papers, and keep in a tight, dry drawer, until needed for use.
Its propagation is through cuttings or roots. It lasts for many years. Harvest just as the flowers start to bloom, and dry them quickly in a low oven or in the shade. Press them and wrap them in white paper, then store them in a tight, dry drawer until you need them.
BARBERRY.
 Barberries.
A prickly shrub, from five to ten feet high, growing wild in this
country and in Europe, on poor, hard soils, or in moist situations, by
walls, stones, or fences.
A thorny bush, between five to ten feet tall, growing wild in this country and in Europe, in poor, hard soil, or in damp areas, near walls, rocks, or fences.
Its propagation is by seeds, suckers, or offshoots.
Its propagation is through seeds, suckers, or offshoots.
This shrub is used for jellies, tarts, pickles, &c. Preserves made of equal parts of barberry and sweet apples, or outer-part of fine water-melons, are very superior. It is also one of the best shrubs for hedge.
This shrub is used for jellies, tarts, pickles, etc. Preserves made from equal parts of barberry and sweet apples or the outer part of fine watermelons are really good. It's also one of the best shrubs for hedges.
The bark has much of the tannin principle, and with[Pg 57] the wood, is used for coloring yellow. Shrub, blossoms, and fruit, are quite ornamental, forming a beautiful hedge, but rather inclined to spread. Will do well on any land and in any situation. The discussion in New England about its blasting contiguous fields of grain, is about as sensible as the old witchcraft mania. Every garden should have two or three.
The bark contains a lot of tannin, and along with the wood, it's used for coloring things yellow. The shrubs, flowers, and fruit are very decorative, making a lovely hedge, but they tend to spread quite a bit. They thrive in any type of soil and location. The talk in New England about it damaging nearby fields of grain is as reasonable as the old witchcraft craze. Every garden should have two or three of them.
BARLEY.
Does best on land which was hoed the previous year. If properly tilled, such land is rich, free from weeds, and easily pulverized. Sod, plowed deep in the fall, rolled early in the spring, well harrowed, the seed sown and harrowed in, and all rolled level, will produce a good crop. Two bushels of seed should be sowed on an acre, unless the land be very rich; in that case, one half-bushel less. Essential to a good crop is rain about the time of heading and filling. Hence early sowing is always surest. In many parts of the country it is of little use to sow barley, unless it be gotten in VERY EARLY. In not more than one season in twelve can you get a good crop of barley from late sowing in all the middle and western states. Barley is more favorably affected than any other grain, by soaking twenty-four hours before sowing, and mixing with dry ashes. A weak solution of nitre is best for soaking the seed.
Does best on land that was tilled the previous year. If properly prepared, such land is fertile, free of weeds, and easy to break up. Sod, plowed deep in the fall, rolled early in the spring, well-cultivated, with the seed sown and rolled in, will yield a good crop. You should sow two bushels of seed per acre, unless the land is very fertile; in that case, use half a bushel less. Rain around the time of heading and filling is vital for a good crop. That's why early sowing is usually the most reliable. In many regions, it’s not very effective to sow barley unless it’s done Very early. In no more than one season out of twelve can you expect a good barley crop from late sowing in all the middle and western states. Barley benefits more than any other grain from being soaked for twenty-four hours before sowing, especially when mixed with dry ashes. A weak solution of nitre works best for soaking the seed.
Varieties are two, four, and six rowed. The two-rowed grows the tallest, and is most conveniently harvested. It is controverted whether the six-rowed variety yields the largest crop to the acre. If the weather[Pg 58] be dry, and the worms attack the young plants, rolling when two or three inches high, with a heavy roller, will save and increase the crop. Rolling is a great help to the harvesting, as it levels the surface.
Varieties come in two, four, and six rows. The two-rowed variety grows the tallest and is easiest to harvest. It's debated whether the six-rowed variety produces the largest yield per acre. If the weather[Pg 58] is dry and worms start attacking the young plants, using a heavy roller when they are two or three inches high will help save and boost the yield. Rolling really helps with harvesting because it levels the ground.
Harvesting should always be attended to just as it turns, but by all means before the straw becomes dry. If it stands up, cut with cradle or reaper, and bind. If lodged, cut with a scythe, and cure in small cocks like clover. Standing until very ripe, or lying scattered until quite dry, is very wasteful.
Harvesting should always be done as soon as it turns, but definitely before the straw gets dry. If it’s standing up, cut it with a cradle or reaper, and bind it. If it's fallen over, use a scythe to cut it, and cure it in small bundles like clover. Leaving it standing until it’s very ripe or letting it lie around until it’s fully dry is a big waste.
Products are all the way from fifteen to seventy bushels to the acre, according to season and cultivation. Reasonable care will secure an average annual crop of forty-five or fifty bushels per acre, which makes it a profitable crop while the demand continues. It is a good crop for ground feed for all animals, the beards being a little troublesome when fed whole. The straw is one of the very best for animals. Barley requires the use of the land only ninety days, leaving it in good condition for fall-grain.
Products range from fifteen to seventy bushels per acre, depending on the season and farming methods. With proper care, you can expect an average annual yield of forty-five to fifty bushels per acre, making it a profitable crop as long as there's demand. It's a great source of ground feed for all animals, although the beards can be a bit annoying when fed whole. The straw is among the best for feeding animals. Barley only needs the land for ninety days, which keeps it in good shape for fall planting.
Used for malting, and for food for men and beasts. It makes handsome flour and good bread. Hulled, it is a better article of food than rice.
Used for malting and as food for people and animals. It produces nice flour and good bread. When hulled, it's a better food option than rice.
It succeeds well on land not stiff and tenacious enough for wheat, or moist and cool enough for oats. If farmers should raise only for malt, the nation would become drunk and poor on beer, and the market would be ruined. But raised as food, it is one of the most profitable agricultural products.[Pg 59]
It does well in land that isn't tough and sticky enough for wheat, or wet and cool enough for oats. If farmers only grew it for malt, the country would end up drunk and poor from beer, and the market would collapse. But when it's grown as food, it’s one of the most profitable crops.[Pg 59]
BARNS.
A barn should always front the north. The yard for stock should be on the south side, with tight fences for protection on the east and west. As this is designed for winter use, it is a great saving of comfort to the creatures. The barn-yard should be hollowed out by excavation, until four or five feet lower in the centre than on the edges. The border should be nearly level, inclining slightly toward the centre, to allow the liquid in the yard to run into it for purposes of manure. The front of a barn should be on the summit of a small rise of ground, to allow water to run away from the door, to prevent mud. In hilly countries it is very convenient to build barns by hills, so as to allow hay and grain to be drawn in near the top, and be thrown down, instead of being pitched up. These general principles are sufficient for all ordinary barns. Those who are able to build expensive barns had better build them circular, eight or sixteen square, and one hundred feet in diameter—the lower part, to top of stable, of stone. Let the stable extend all around next to the wall, and a floor over the stable, that teams may be driven all around to pitch into the bays, and upon the mows and scaffolds, at every point. Thus teams may go round and out the door at which they entered. Such a floor will accommodate several teams at the same time. The cellar should be in the centre, surrounded by the stable. Such a cellar would never freeze, and would hold roots enough for one hundred head of cattle, which the stable would easily accommodate. Let the mangers be around next the cellar, for[Pg 60] convenience of feeding. Such a barn would be more convenient for a dairy of one hundred cows, or for winter-fattening of cattle, than any other form. It would cost no more than many barns in western New York that are not half as convenient.
A barn should always face north. The yard for livestock should be on the south side, with sturdy fences for protection on the east and west. Since this is meant for winter use, it significantly enhances the animals' comfort. The barnyard should be excavated so that the center is four or five feet lower than the edges. The border should be almost level, slightly sloping toward the center to allow liquids to drain for manure purposes. The front of a barn should be at the top of a small rise in the ground, so that water can drain away from the door, preventing mud. In hilly areas, it's very practical to build barns near hills, allowing hay and grain to be brought in from the top and dropped down, rather than having to lift them up. These basic guidelines are enough for all standard barns. Those who can afford to build more elaborate barns should consider a circular design or octagonal shapes, eight or sixteen sides, and about one hundred feet in diameter—the base, up to the stable, made of stone. The stable should extend all around next to the wall, with a floor above the stable so that teams can drive all the way around to unload into the bays, mows, and scaffolds at every point. This way, teams can circle around and exit through the same door they came in. Such a floor can accommodate several teams at the same time. The cellar should be in the center, surrounded by the stable. This type of cellar would never freeze and would have enough space for roots to feed one hundred cattle, which the stable could easily hold. The mangers should be around the cellar for[Pg 60] easy feeding. This barn design would be more practical for a dairy with one hundred cows or for winter-feeding cattle than any other structure. It wouldn't cost more than many barns in western New York that aren't nearly as convenient.
BEANS.
These are divided into two classes—pole and bush beans. They are subdivided into many varieties. We omit the English, or horse-bean, as being less valuable, for any purpose, than our well-known beans or peas. Pole beans are troublesome to raise, and are only grown on account of excellence of quality, and to have successive gatherings from the same vines. Pole beans are only used for horticultural purposes.
These are divided into two types—pole and bush beans. They are further divided into many varieties. We exclude the English or horse bean as it is less valuable for any purpose compared to our well-known beans or peas. Pole beans are difficult to grow and are only cultivated for their excellent quality and to have multiple harvests from the same vines. Pole beans are only used for gardening purposes.
Field-Beans.—For general culture there are three varieties of white—small, medium, and large. Of all known beans, we prefer the medium white. The China bean, white with a red face, is an early variety. All ripen nearly at the same time. It cooks almost as soon as a potato, and is good for the table; but it is less productive, and less saleable because not wholly white. For planting among corn, as for a very late crop, this bean is valuable, because it matures in so short a time. Good beans may be raised among corn, without injury to the corn-crop. This can only be done when it is designed to cultivate the corn but one way. Many fail in attempts to grow beans among corn, by planting them at first hoeing. The corn, having so much the start, will shade the beans and nearly destroy them.[Pg 61] But plant at the same time of the corn, and they will mature before the corn will shade them much, and not be in the way even of the ordinary crop of pumpkins. But double-cropping land in this way, at any time, is of very doubtful utility. A separate plat of ground for each crop, in nearly all cases, is the most economical. To raise a good crop of beans, prepare the soil as thoroughly as for any other crop. Beans will mature on land so poor and hard as to be almost worthless for other crops. But a rich, mellow soil is as good for beans as anything else, though not so indispensable. Drill in with a planter as near together as possible, and allow a cultivator to pass between them. One bushel to the acre on ordinary land, and three fourths of a bushel on very rich land, is about the quantity of seed requisite. Hoe and cultivate them while young. Late cultivation is useless—more so than on most other crops. Beans should not be much hilled in hoeing, and should never be worked when wet. All plants with a rough stalk, like the bean, potato, and vine, are greatly injured, sometimes ruined, by having the earth stirred around them when they are wet, or even damp. Beans are usually pulled; this should be done when the latest pods are full-grown, but not dry. Place them in small bunches on the ground with the roots up. If the weather be dry, they need not be moved until time to draw them in. If the weather be damp, they should be stacked loosely in small stacks around poles, and covered with straw on the top, to shed rain. Always haul in when very dry. Avoid stacking if possible, for they are always wasted rapidly by moving. In drawing in, keep the rack under them covered with blankets to save those that shell.[Pg 62]
Field-Beans.—For general cultivation, there are three varieties of white beans—small, medium, and large. Of all the known beans, we prefer the medium white. The China bean, which is white with a red face, is an early variety. They all ripen around the same time. It cooks almost as quickly as a potato and is good for the table; however, its lower productivity and marketability are due to it not being completely white. This bean is valuable for late planting among corn because it matures in such a short time. Good beans can be grown among corn without harming the corn crop. This is only feasible when the corn is meant to be cultivated in just one direction. Many people struggle to grow beans among corn by planting them at the first hoeing. The corn, having a head start, will shade the beans and nearly destroy them.[Pg 61] However, if you plant them at the same time as the corn, they will mature before the corn shades them too much and won’t interfere with the typical pumpkin crop. But double-cropping land in this way is generally of questionable value. A separate plot of land for each crop is usually the most economical choice. To raise a good crop of beans, prepare the soil as thoroughly as you would for any other crop. Beans can mature in land that is too poor and hard for other crops to thrive. However, rich, mellow soil works well for beans too, though it’s not strictly necessary. Drill in with a planter as closely as possible and leave space for a cultivator to pass between them. About one bushel per acre on regular land and three-quarters of a bushel on very rich land is the typical seed requirement. Hoe and cultivate them while they’re young. Late cultivation is ineffective—more so than with most other crops. Beans should not be hilled too much when hoeing, and avoid working on them when they are wet. Plants with rough stalks, like beans, potatoes, and vines, can be greatly damaged, sometimes ruined, by stirring the earth around them when they are wet, or even damp. Beans are usually harvested by pulling; this should be done when the latest pods are fully grown but not dry. Place them in small bunches on the ground with the roots up. If the weather is dry, there’s no need to move them until it’s time to bring them in. If it’s damp, they should be loosely stacked in small piles around poles and covered with straw to keep off the rain. Always bring them in when they are very dry. Try to avoid stacking them if possible, as moving them causes waste. When bringing them in, keep the rack underneath covered with blankets to protect those that might shell.[Pg 62]
In pulling beans, be sure and take hold below the pods, otherwise the pods will crack; and although no harm appears then to be done, yet, when they dry, every pod that has been squeezed by pulling, will turn wrong side out, and the contents be wasted. If your beans are part ripe and the remainder green, and it is necessary to pull them to save the early ones, or guard against frost, when the ripe ones are dry, thrash them lightly. This will shell all the ripe ones, and none of the green ones. Put the straw upon a scaffold and thrash again in winter. Thus you will save all, and have beautiful beans. Bean-straw should always be kept dry for sheep in winter; it is equal to hay.
When picking beans, make sure to grab them below the pods; otherwise, the pods might crack. Even if it doesn’t seem like a problem at first, when they dry, every pod that gets squeezed while pulling will turn inside out, wasting the contents. If some of your beans are ripe and others are still green, and you need to pull them to harvest the ripe ones or protect against frost, when the ripe ones are dry, lightly thrash them. This will shell all the ripe ones without affecting the green ones. Store the straw on a scaffold and thrash it again in winter. This way, you can save them all and end up with beautiful beans. Always keep bean straw dry for sheep in winter; it’s just as good as hay.
Garden-Beans.—There are many varieties, a few of which only should be cultivated. Having the best, there is no object in raising an inferior quality.
Garden Beans.—There are many varieties, but only a few should actually be grown. If you have the best, there's no point in growing lower quality.
The best early string-bean is the Early Mohawk; it will stand a pretty smart spring-frost without injury; comes early, and is good. Early Yellow, Early Black, and Quaker, or dun-colored, are also early and good.
The best early string bean is the Early Mohawk; it can handle a pretty significant spring frost without damage; it grows early and tastes great. Early Yellow, Early Black, and Quaker, or brownish, are also early and tasty.
Refugee, or Thousand-to-one, are the best string-beans known; have a round, crisp, full, succulent pod; come as soon as the Mohawks are out of the way; and are very productive. Planted in August, they are excellent until frost; the very best for pickling. For an early shell-bean we recommend the China red-face; the white kidney and numerous other varieties are less certain and productive.
Refugee, or Thousand-to-one, are the best string beans around; they have a round, crisp, full, juicy pod; they arrive as soon as the Mohawks are out of the way; and they are very productive. If you plant them in August, they stay great until frost; they’re the best for pickling. For an early shell bean, we recommend the China red-face; the white kidney and many other varieties are less reliable and productive.
Running Beans are numerous. The true Lima, very large, greenish, when ripe and dry, is the richest bean known; is nearly as good in winter, cooked in the same way, as when shelled green. They are very productive, continuing in blossom till killed by frost.[Pg 63] In warm countries they grow for years, making a tree, or growing like a large grapevine.
Running Beans are abundant. The real Lima bean, which is very large and greenish, is the richest bean known; it's nearly as good in winter, cooked the same way, as when it's shelled green. They produce a lot, continuing to bloom until frost kills them.[Pg 63] In warm climates, they can grow for years, forming a tree or growing like a large grapevine.
The London Horticultural—called also Speckled Cranberry, and Wild Goose—is a very rich variety. The only objection is the difficulty of shelling; one only can be removed at once, because of the tenderness of the pod. The Carolina or butter bean often passes for the Lima. It has similar pods, the bean is of similar shape, but always white, instead of greenish like the Lima, and smaller, earlier, and of inferior quality. The Scarlet Runner, formerly only grown as an ornament on account of its great profusion of scarlet blossoms continuing until frost, is a very productive variety; pods very large and very succulent, making an excellent string-bean; a rich variety when dry, but objectionable on account of their dark color. The Red and the White Cranberries, Dutch Caseknife, and many other varieties, have good qualities, but are inferior to those mentioned above. Beans may be forwarded in hotbeds, by planting on sods six inches square, put bottom-up on the hotbed, and covered with fine mould; plant four beans on each sod; when frost is gone, remove the sod in the hill beside the pole, previously set, leave only two pole-beans to grow in a hill; they will always produce more than a greater number. A shrub six feet high, with the branches on, is better than a pole for any running bean; nearly twice as many will grow on a bush as on a pole. Use a crowbar for setting poles, or drive a stake down first, and set poles very deep, or they will blow down and destroy the beans.[Pg 64]
The London Horticultural—also known as Speckled Cranberry and Wild Goose—is a very rich variety. The only drawback is the difficulty of shelling; only one can be removed at a time due to the tenderness of the pod. The Carolina or butter bean is often mistaken for the Lima. It has similar pods, the bean is similar in shape, but it’s always white instead of greenish like the Lima, and is smaller, earlier, and of lower quality. The Scarlet Runner, which was previously only grown for its ornamental value because of its abundance of bright red flowers that last until frost, is actually a very productive variety; its pods are large and juicy, making it an excellent string bean. It’s a rich variety when dried but is typically considered undesirable because of its dark color. The Red and White Cranberries, Dutch Caseknife, and many other varieties have good qualities, but they are not as good as those mentioned above. Beans can be started in hotbeds by planting on sods that are six inches square, placed bottom-up in the hotbed and covered with fine soil; plant four beans on each sod. Once the frost is gone, remove the sod and place it in the hill next to the pole that has been set up, leaving only two pole beans to grow in the hill; this will always produce more than having a greater number. A six-foot-high shrub with branches is better than a pole for any climbing bean; you can grow nearly twice as many on a bush as on a pole. Use a crowbar for setting poles or drive a stake down first, and set the poles very deep, or they might blow down and damage the beans.[Pg 64]
BEES AND BEEHIVES.
The study of the honey-bee has been pursued with interest from remote ages. A work on bees, by De Montfort, published at Antwerp in 1649, estimates the number of treatises on this subject, before his time, at between five and six hundred. As that was two hundred and eight years ago, the number has probably increased to two thousand or more. We have some knowledge of the character of these early works, as far back as Democritus, four hundred and sixty years before the Christian era. The great men of antiquity gave particular attention to study and writing on the honey-bee.—Among them we notice Aristotle, Plato, Columella, Pliny, and Virgil. At a later period, we have Huber, Swammerdam, Warder, Wildman, &c. In our own day, we have Huish, Miner, Quinby, Weeks, Richardson, Langstroth, and a host of others. For the first two thousand years from the date of these works, the bee was treated mainly as a curious insect, rather than as a source of profit and luxury to man. And although Palestine was eulogized as a land flowing with milk and honey, before the Hebrews took possession of it, yet the science of bee-culture was wholly unknown.
The study of honeybees has intrigued people for a long time. A book on bees by De Montfort, published in Antwerp in 1649, estimates that there were between five and six hundred treatises on the topic before his time. Since that was two hundred and eight years ago, the number has likely increased to two thousand or more. We know a bit about these early works, dating back to Democritus, who lived four hundred and sixty years before Christ. The great thinkers of ancient times paid special attention to studying and writing about honeybees, including Aristotle, Plato, Columella, Pliny, and Virgil. Later on, we have authors like Huber, Swammerdam, Warder, Wildman, &c. In our time, we have Huish, Miner, Quinby, Weeks, Richardson, Langstroth, and many more. For the first two thousand years from the time of these works, bees were mainly seen as a curious insect rather than a source of profit and luxury for humans. While Palestine was praised as a land flowing with milk and honey before the Hebrews settled there, the science of bee-culture was completely unknown.
In the earliest attention to bees, they were supposed to originate in the concentrated aroma of the sweetest and most beautiful flowers. Virgil, and others of his time, supposed them to come from the carcasses of dead animals. But the remarkable experiments of Huber, sixty years ago, developed many facts respecting their origin and economy. Subsequent observers have added still more to the stock of our knowledge respecting[Pg 65] these wonderful creatures. The different stages of growth, from the minute egg of the queen to a full grown bee, and the precise time occupied by each, are well established. The three classes of bees, in every perfect colony, and the offices of each; their mechanical skill in constructing the different sized and shaped cells, for honey, for raising drones, workers, and queens, all differing according to the purposes for which they are intended; the wars of the queens, and their sovereignty over their respective colonies; the methods by which working-bees will raise a young queen, when the old one is destroyed, out of the larvae of common bees; the peculiar construction and situation of the queen cells; and, above all, the royal jelly (differing from everything else in the hive) which they manufacture for the food of young queens; the manner in which they ventilate their hives by a swift motion of their wings, causing the buzzing noise they make in a summer evening; their method of repairing broken comb, and building fortifications, before their entrances, at certain times, to keep out the sphinx—all these curious matters are treated fully in many of our works on bees. But we must forego the pleasure of presenting these at length, it being our sole object to enable all who follow our directions, so to manage bees as to render them profitable. In preparing the brief directions that follow, we have most carefully studied all the works, American and foreign, to which we could get access. Between this article and the best of those works there will be found a general agreement, except as it respects beehives. We present views of hives, that we are not aware have ever been written. The original idea, or new principle (which consists in constructing the hive[Pg 66] with the entrance near the top), was suggested to us by Samuel Pierce, Esq., of Troy, N. Y., who is the great American inventor of cooking-ranges and stoves. We have carefully considered the principle in its various relations to the habits of the bee, and believe it correct. To most of our late works on honey-bees we have one serious objection: it is, that they bear on their face the evidence of having been written to make money, by promoting the sale of some patent hive. These works all have a little in common that is interesting; the remainder seems designed to oppose some former patent and commend a new one. They thus swell their volumes to a troublesome and expensive size, with that which is of no use to practical men. A work made to fight a patent, or to sell one, can not be reliable. The requisites to successful bee-management are the following:—
In the earliest studies of bees, people believed they came from the strong scent of the sweetest and most beautiful flowers. Virgil and others of his time thought they originated from the bodies of dead animals. However, remarkable experiments conducted by Huber sixty years ago revealed many facts about their origin and behavior. Subsequent observers have added even more to our understanding of these amazing creatures. The different stages of growth, from the tiny egg of the queen to a fully grown bee, and the specific time each stage takes, are well established. The three classes of bees in every healthy colony and the roles of each; their skill in building different sized and shaped cells for honey, raising drones, workers, and queens—all tailored to their intended purposes; the conflicts between queens and their dominance over their colonies; the ways worker bees can raise a new queen from the larvae of regular bees when the old one is lost; the unique design and position of queen cells; and, most importantly, the royal jelly (which is different from everything else in the hive) that they produce for the nourishment of young queens; how they ventilate their hives with rapid wing beats, causing the buzzing sound heard on summer evenings; their method of repairing damaged comb and building defenses at their entrances to keep out the sphinx—these fascinating topics are thoroughly covered in many of our books on bees. However, we must skip the pleasure of discussing them at length, as our main goal is to help everyone who follows our guidelines manage bees in a way that makes them profitable. In preparing the brief instructions that follow, we have carefully studied all the resources, both American and foreign, that we could access. Between this article and the best of those resources, you will find a general agreement, except regarding beehives. We present hive designs that we believe have not been documented before. The original idea, or new principle (which involves constructing the hive with the entrance near the top), was suggested to us by Samuel Pierce, Esq., of Troy, N.Y., a notable American inventor of cooking ranges and stoves. We have thoroughly considered this principle in relation to the habits of bees and believe it to be correct. One serious criticism we have about most of the recent books on honey bees is that they seem to be written primarily to make money by promoting the sale of some patent hive. These books contain a bit of interesting information, but the rest appears to be aimed at discrediting some earlier patent while praising a new one. As a result, they inflate their volumes with unnecessary content that is of no use to practical beekeepers. A book designed to criticize or sell a patent cannot be reliable. The requirements for successful bee management are as follows:—
1. Always have large, strong swarms. Such only are able successfully to contend with their enemies. This is done by uniting weak swarms, or sending back a young, feeble swarm when it comes out (as herein after directed).
1. Always have large, strong swarms. Only they can effectively fight against their enemies. This can be achieved by combining weak swarms or sending back a young, weak swarm when it emerges (as directed later on).
2. Use medium-sized hives. In too large hives, bees find it difficult to guard their territories. They also store up more honey than they need, and yield less to the cultivator. The main box should be one foot square by fifteen inches high. Make hives of new boards; plane smooth and paint white on the outside. The usual direction is to leave the inside rough, to aid in holding up the honey, but to plane the inside edges so as to make close joints. We counsel to plane the inside of the hive smooth, and draw a fine saw lightly length wise of the boards, to make the comb adhere. This[Pg 67] will be a great saving of the time of bees, when it is worth the most in gathering honey. They always carry out all the sawdust from the inside of their hives. Better save their time by planing it off.
2. Use medium-sized hives. In hives that are too big, bees struggle to defend their territory. They also tend to store more honey than they need, resulting in less yield for the beekeeper. The main box should be one foot square and fifteen inches high. Build hives from new boards; make them smooth and paint the outside white. Typically, the inside is left rough to help hold the honey, but the inner edges should be planed to ensure tight joints. We recommend planing the inside of the hive smooth and lightly running a fine saw lengthwise along the boards to help the comb stick. This[Pg 67] will save bees time when it's most valuable for gathering honey. They always remove all the sawdust from inside their hives, so it’s better to save their time by planing it off.
3. To prevent robberies among bees, when a weak colony is attacked, close their entrances so that but one bee can pass at once, and they will then take care of themselves. To prevent a disposition to pillage, place all your hives in actual contact, on the sides, and make a communication between them, but not large enough to allow bees to pass. This will give the same scent to the whole, and make them feel like one family. Bees distinguish strangers only by the smell: hence, so connected, they will not quarrel or pillage.
3. To prevent robberies among bees, when a weak colony is attacked, close their entrances so that only one bee can pass at a time, and they will manage. To avoid a tendency to steal from each other, place all your hives right next to each other, on the sides, and create a connection between them, but not big enough for bees to pass through. This will give the same scent to all of them and make them feel like one family. Bees recognize strangers only by smell: therefore, being connected like this, they won’t fight or steal from each other.
4. Comb is usually regarded better for not being more than two or three years old. The usual theory is, that cells fill up by repeated use, and, becoming smaller, render the bees raised in them diminutive. This is not probable, as a known habit of the bee is to clean out the cells before reusing them. Huber demonstrated that bees raised in drone-cells (which are always larger than for workers) grew no larger than in their own natural cells. And as bees build their cells the right size at first, it is probable they keep them so. Quinby assures us that bees have been grown twenty years in the same comb, and that the last were as large as the first. But for other reasons, it is better to change the comb. In all ordinary cases, it is better to transfer the swarm to a new hive every third year. Many think it best to use hives composed of three sections, seven and a half inches deep each, screwed together with strips of wood on the sides, and the top screwed on that it may easily be removed; thick paper or muslin should be pasted[Pg 68] around, on the places of intersection, to guard against enemies; the two lower sections only allowed to contain bees—the upper one being designed for the honey-boxes, to be removed. Each spring, after two years old, the lower section is taken out and a new one put on the top, the cover of the old one having been first removed. This is the old "pyramidal beehive," which is the title of a treatise on bees, by P. Ducouedic, translated from the French and abridged by Silas Dinsmore in 1829. This has recently been revived and patented as a new thing. We think with Quinby, that these hives are too expensive and too complicated, and that the great mass of cultivators will succeed best with hives of simple construction.
4. Combs are usually considered better if they're no more than two or three years old. The common belief is that cells fill up with repeated use, and as they get smaller, the bees raised in them become smaller too. This isn't likely, though, since bees have a known habit of cleaning out the cells before reusing them. Huber showed that bees raised in drone cells (which are always larger than those for workers) did not grow any larger than those raised in their own natural cells. And since bees build their cells the right size from the start, it's likely they maintain that size. Quinby tells us that bees have lived for twenty years in the same comb, and the last ones were just as large as the first. However, for other reasons, it’s best to change the comb. In general, it’s preferable to transfer the swarm to a new hive every three years. Many believe it's best to use hives made of three sections, each seven and a half inches deep, screwed together with wooden strips on the sides, and the top screwed on to be easily removed; thick paper or muslin should be pasted[Pg 68] around the intersections to protect against intruders; only the two lower sections should contain bees—the upper section is meant for honey boxes, which can be taken out. Each spring, after they’re two years old, the lower section is removed and a new one is placed on top, after first taking off the cover of the old one. This is the old "pyramidal beehive," the title of a treatise on bees by P. Ducouedic, translated from French and shortened by Silas Dinsmore in 1829. This has recently been revived and patented as something new. We agree with Quinby that these hives are too costly and too complicated, and that most bee keepers will do better with hives of simpler design.
5. Allowing bees to swarm in their own time and way is better than all artificial multiplication of colonies. If there are no small trees near the apiary, place bushes, upon which the bees will usually light, when they come out. If they seem determined to go away without lighting, throw sand or dust among them; this produces confusion, and causes them to settle near. The practice of ringing bells and drumming on tin, &c., is usually ridiculed; but we believe it to be useful, and that on philosophic principles. The object to be secured is to confuse the swarm and drown the voice of the queen. The bees move only with their queen; hence, if anything prevents them from hearing her, confusion follows, and the swarm lights: therefore, any noise among them may answer the purpose, and save the swarm.
5. Letting bees swarm in their own time and way is better than trying to create new colonies artificially. If there aren’t any small trees close to the apiary, put down some bushes where the bees can typically land when they take off. If they look like they’re set on leaving without landing, throw some sand or dust among them; this creates confusion and makes them settle nearby. People often make fun of ringing bells and drumming on tin, etc., but we think it’s actually helpful, and there’s a solid reasoning behind it. The goal is to confuse the swarm and muffle the queen’s voice. Bees only move with their queen; so if anything stops them from hearing her, it causes confusion and encourages the swarm to land: therefore, making any noise around them can achieve this and save the swarm.
To hive bees, place them on a clean white cloth, and set the hive over them, raised an inch or two by blocks under the corners. It is said that a little sweetened[Pg 69] water or honey, applied to the inside of the hive, will incline the bees to remain. The best preparation is to fasten a piece of new white comb on the top of the inside of the hive. This is done by dipping the end of a piece of comb in melted beeswax, and sticking it to the top. Bees should never be allowed to send off more than two colonies in one season. To restrict them to one is still better. Excessive swarming is a precursor of destruction, rather than an evidence (as usually regarded) of prosperity. A given number of bees will make far less honey in two hives than in one, unless they are so numerous as greatly to crowd the hive. When a late swarm comes out, take away the queen, and they will immediately return. Any one may easily find the queen: she is always in the centre of the bunch into which the swarm collects on lighting. If they form two or three clusters, it is because they have that number of queens. Then all the queens should be destroyed. The following cuts of the three classes of bees will enable one to distinguish the queen.
To catch bees, place them on a clean white cloth and set the hive on top, propped up an inch or two with blocks under the corners. It's said that a bit of sweetened[Pg 69] water or honey inside the hive will encourage the bees to stay. The best preparation is to attach a piece of fresh white comb to the top inside of the hive. You can do this by dipping the end of a piece of comb in melted beeswax and sticking it to the top. Bees should never be allowed to establish more than two colonies in a single season. Keeping them to just one is even better. Excessive swarming is a sign of trouble instead of what is usually seen as success. A certain number of bees will produce far less honey in two hives than in one, unless they are overcrowded. When a late swarm emerges, remove the queen, and they will immediately return. Anyone can easily spot the queen; she’s always at the center of the cluster formed when the swarm settles. If they create two or three clusters, it’s because they have that many queens. In that case, all the queens should be removed. The following images of the three types of bees will help you identify the queen.

| Work Party. | Queen. | Drone. |
The queen is sometimes, but not always, larger than the common bee; but her body is always longer, and blackish above and yellowish underneath.
The queen bee is occasionally, but not consistently, bigger than the worker bee; however, her body is always longer, with a blackish top and yellowish underside.
To unite any two swarms together, turn the hive you wish to empty bottom-up, and place the one into which you would have them go on the top of the other, with their mouths together; then tie a cloth around, at the place of intersection, to prevent the egress of the bees. Gently rap the lower hive on all sides, near the bottom, gradually rising until you reach the top of the lower hive, and all the bees will go into the upper one.
To combine two swarms, turn the hive you want to empty upside down and place the hive you want them to move into on top of it, aligning the openings. Then, tie a cloth around the point where they connect to keep the bees from escaping. Gently tap the lower hive all around, starting from the bottom and moving up to the top, and all the bees will move into the upper hive.
In the same way, it is easy to remove a colony into a new hive, whenever you think they need changing. This should be performed in the dusk of the evening, and need occupy no more than half an hour. The hive should then be put in its place. Uniting weak new swarms, may be done whenever they come out; but changing a swarm from an old hive to a new one should be performed as early as the middle of June. If moths get in, change hives at any time when it is warm enough for bees to work, and give them all the honey in their old hive. If you discover moths too late for the bees to build comb in a new hive, take the queen from the hive infested with moths, and place it where the bees will unite with another colony, and feed them all the honey from the deserted hive. This, or the destruction of the bees and saving the honey, is always necessary, when moth-worms are in possession, unless they are so near the bottom, that all the comb around them may be cut out. Bees are fond of salt. Always keep some on a board near them.
In the same way, it's easy to move a colony to a new hive whenever you think they need it. This should be done at dusk and should take no more than half an hour. The hive should then be placed back where it belongs. You can unite weak new swarms whenever they emerge; however, moving a swarm from an old hive to a new one should happen no later than mid-June. If moths get in, change hives whenever it's warm enough for the bees to work and give them all the honey from their old hive. If you notice moths too late for the bees to build comb in a new hive, take the queen from the hive with moths and place her where the bees can join another colony, feeding them all the honey from the abandoned hive. This, or eliminating the bees and saving the honey, is always necessary when moth worms are present, unless they're so close to the bottom that all the comb around them can be cut out. Bees love salt, so always keep some on a board near them.
They also need water. If a rivulet runs near the[Pg 71] apiary, it is well. If not, place water in shallow pans, with pebbles in them, on which the bees can stand to drink. Change the water daily. It is too late to speak of the improvidence of killing bees, to get their honey. Use boxes of any size or construction you choose. In common hives, boxes should be attached to the sides, and not placed on the top. It is a wasteful tax upon the time and strength of loaded bees, to make them travel through the whole length of the hive, into boxes on the top. Place boxes as near as possible to their entrance or below that entrance. Bees should be kept out of the boxes until they have pretty well filled the hive, or they may begin to raise young bees in the boxes.
They also need water. If there's a stream nearby the[Pg 71] apiary, that’s great. If not, put water in shallow pans with pebbles in them so the bees can land and drink. Change the water daily. It's too late to talk about the foolishness of killing bees just to get their honey. Use boxes of any size or design you prefer. In standard hives, boxes should be attached to the sides, not placed on top. It wastes the time and energy of busy bees to make them travel the entire length of the hive to reach boxes on top. Put the boxes as close as possible to their entrance or below it. Keep bees out of the boxes until the hive is fairly full, or they might start raising young bees in the boxes.
Wintering bees successfully, is one of the most difficult matters in bee-culture. Two evils are to be guarded against, dampness and suffocation. Excessive dampness, sometimes causes frost about the entrance that fills it up and suffocation ensues. Sometimes snow falls, or is blown over the entrance, and the bees die in a few hours for the want of air. Many large colonies, with plenty of honey, are thus destroyed. Dampness is very injurious to bees on other accounts. In a good bee-house there is no danger from snow, and little from dampness. Bees, not having honey enough for winter, should be fed in pleasant fall weather, after they have nearly completed the labors of the season. Weighing hives is unnecessary. A moderate degree of judgment will determine whether a swarm has a sufficient store for winter. If not, feed them. Never give bees dry sugar. They take up their food, as an elephant does water in his trunk; it, therefore, should be in a liquid form. Boil good sugar for ten minutes in ale or beer,[Pg 72] leaving it about as thick as honey. Put it in a feed trough; which should be flat-bottomed.
Wintering bees successfully is one of the toughest challenges in beekeeping. You need to watch out for two main problems: dampness and suffocation. Excessive moisture can sometimes lead to frost at the entrance, which can block it and cause suffocation. Snow can also fall or be blown over the entrance, leading to the bees dying within hours due to lack of air. Many large colonies with plenty of honey can be wiped out this way. Dampness is harmful to bees for other reasons too. In a good beehouse, there’s little risk from snow and minimal from dampness. If bees don't have enough honey for winter, they should be fed during mild fall weather after they’ve finished most of their work for the season. Weighing hives isn't necessary. A reasonable amount of judgment will help you figure out if a swarm has enough food for winter. If not, feed them. Never give bees dry sugar. They take in their food like an elephant does water with its trunk, so it should be in a liquid form. Boil good sugar for ten minutes in ale or beer,[Pg 72] until it’s about as thick as honey. Then place it in a feed trough with a flat bottom.
Fasten together thin slats, one fourth of an inch apart, so as to fit the inside of the feed trough and lie on the surface of the liquid, so as to rise and fall with it. Put this in a box and attach it to the hive, as for taking box-honey, and the bees will work it all up. Put out-door, it tempts other bees, and may lead to quarrels, and robbery.
Fasten thin slats together, spaced a quarter of an inch apart, so they fit inside the feed trough and float on the surface of the liquid, rising and falling with it. Place this in a box and attach it to the hive, like you would for harvesting box honey, and the bees will work it all in. If placed outdoors, it can attract other bees and may result in fights and theft.
It is not generally known, that a good swarm of bees may be destroyed, by feeding them plenty of honey, early in the spring. They carry it in and fill up their empty cells and leave no room for raising young bees; hence the whole is ruined for want of inhabitants, to take the places of those that get destroyed, or die of age.
It’s not widely recognized that a healthy bee swarm can be harmed by giving them too much honey early in the spring. They bring it in and fill their empty cells, leaving no space for raising new bees; as a result, the entire colony suffers because there aren’t enough bees to replace those that die or age out.
To winter bees well, utterly exclude the light during all the cold weather, until it becomes so warm, that they will not get so chilled when out that they can not return. Intense cold is not injurious to bees, provided they are kept in the hive and are dry. A large swarm, will not eat two pounds of honey during the whole cold winter, if kept from the light. When tempted out, every warm day they come into the sunshine and empty themselves, and return to consume large quantities of honey. Kept in the dark, they are nearly torpid, eat but a mere trifle, and winter well. Whatever your hive or house, then, keep your bees entirely from the light, in cold weather. This is the only reason why bees keep so well in a dark dry cellar, or buried in the ground, with something around them, to preserve them from moisture, and a conductor through the surface, to admit fresh air. It is not because it keeps out the cold, but because it excludes the light, and renders the bees inactive. Gil[Pg 73]more's patent bee-house, is a great improvement on this account.
To winter bees properly, completely block out the light during the cold months until it’s warm enough that they won’t get too chilled to return when they go outside. Extreme cold isn’t harmful to bees as long as they stay in the hive and stay dry. A large colony will hardly eat two pounds of honey throughout the entire cold winter if kept from the light. When they’re tempted outside on warm days, they bask in the sunshine, relieve themselves, and then go back inside to eat a lot of honey. When kept in the dark, they become nearly inactive, eat very little, and survive the winter well. So, regardless of your hive or space, make sure to keep your bees completely out of light during the cold weather. This is why bees do so well in a dark, dry cellar or buried in the ground, surrounded by something to keep moisture out, and with a pathway through the surface to let fresh air in. It’s not because it blocks the cold, but because it keeps out the light and makes the bees inactive. Gil[Pg 73]more's patent bee-house is a significant improvement for this reason.
Of the diseases of bees, such as dysentery, &c., we shall not treat. All that can profitably be done, to remedy these evils, is secured by salt, water, and properly-prepared food, as given above.
Of the diseases of bees, like dysentery, etc., we won’t discuss. The only effective ways to address these issues are through salt, water, and properly prepared food, as mentioned above.
But the great question in bee-culture is, How to prevent the depredation of the wax-moth? To this subject, much study has been given, and respecting it many theories have been advanced. The following suggestions are, to us, the most satisfactory. The miller, that deposites the egg, which soon changes to the worm, so destructive in the beehive, commences to fly about, at dark. In almost every country-house, they are seen about the lights in the evening. They are still during all the day. They are remarkably attracted by lights in the evening. Hence our first rule:—
But the big question in beekeeping is, how can we stop the wax moth from causing damage? A lot of research has gone into this topic, and many theories have been proposed. The following suggestions seem to be the most effective to us. The moth that lays the egg, which quickly turns into the harmful worm in the beehive, starts flying around at night. They can be seen near lights in the evening at almost every country house. During the day, they remain inactive. They are especially drawn to lights at night. So, our first rule is:—
1. Place a teasaucer of melted lard or oil, with a piece of cotton flannel for a wick, in or near the apiary at dusk; light it and allow it to burn till near morning, expiring before daylight. This done every night during the month of June, will be very effectual.
1. Put a small dish of melted lard or oil, with a piece of cotton flannel for a wick, in or near the bee yard at dusk; light it and let it burn until close to morning, going out before daylight. Doing this every night in June will be very effective.
2. Keep grass and weeds away from the immediate vicinity of your apiary. Let the ground be kept clean and smooth. This destroys many of the hiding-places of the miller, and forces him away to spend the day. This precaution has many other advantages.
2. Keep grass and weeds away from around your beehive. Keep the ground clean and level. This removes many hiding spots for the moth and forces it to leave during the day. This measure has several other benefits.
3. Keep large strong colonies. They will be able to guard their territories, and contend with this and all other enemies.
3. Maintain large, strong colonies. They will be able to defend their territories and fight against this and all other enemies.
4. Never have any opening in a beehive near the bottom, during the season of millers (see Beehive). Let the openings be so small, that only one or two bees[Pg 74] can pass at once. To accommodate the bees, increase the number of openings. Millers will seldom enter among a strong swarm, with such openings. All around the bottom, it should be so tight, that no crevice can be found, in which a miller can deposite an egg. Better plaster around, closely, with some substance, the place of contact between the hive and the board on which it stands, and keep it entirely tight during the time in which the millers are active.
4. Never have any openings in a beehive near the bottom during the miller season (see Beehive). Make the openings so small that only one or two bees[Pg 74] can go through at a time. To help the bees, increase the number of openings. Millers will rarely enter a strong swarm with such small openings. The area around the bottom should be so tight that there’s no crevice for a miller to lay an egg. It's better to seal the contact area between the hive and the board it’s sitting on with some material to keep it completely tight while the millers are active.
5. If, through negligence, worms have got into a hive, examine it at once; and if they are near the bottom only, within sight and reach, cut out the comb around them, and remove them from the hive. If this is not practicable, transfer the swarm to a new hive, or unite it with another, without delay.
5. If worms have entered a hive due to carelessness, check it right away; if they're only located near the bottom and are visible and accessible, cut out the comb around them and take them out of the hive. If that's not possible, move the swarm to a new hive or combine it with another one immediately.
6. The great remedy for the moth is in the right construction of a BEEHIVE.
6. The best solution for the moth problem lies in the proper design of a BEEHIVE.
Whatever the form of the hive you use, have the entrance within three or four inches of the top. Millers are afraid of bees; they will not go among them, unless they are in a weak, dispirited condition. They steal into the hive when the bees are quiet, up among the comb, or when they hang out in warm weather, but are still and quiet. If the hive be open on all sides (as is so often recommended), the miller enters on some side where the bees are not. Now bees are apt to go to the upper part of the hive and comb, and leave the lower part and entrance exposed. If the entrance be at the upper part, the bees will fill it and be all about it. A bee can easily pass through a cluster of bees, and enter or leave a hive; but a miller will never undertake it: this, then, will be a perfect safeguard against the depredations of the moth. This hive is better on every[Pg 75] account. Moisture rises: in a hive open only at the bottom, it is likely to rise to the top of the hive and injure the bees; with the opening near the top it easily escapes. The objection that would be soonest raised to this suggestion is, that bees need a good circulation of fresh air, and such a hive would not favor it. To this we reply, a hive open near the top secures the best possible air to the swarm; any foul air has opportunity freely to escape. That peculiar humming heard in a hive in hot weather is produced by a certain motion of the wings of the bees, designed to expel vitiated air, and admit the pure, by keeping up a current. In the daytime, when the weather is hot, you will see a few bees near the entrance on the outside, and hear others within, performing this service, and, when fatigued, others take their place. This is one of the most wonderful things in all the habits and instincts of bees. They thus keep a pure atmosphere in a crowded hive in hot weather. Now, it would require much less fanning to expel bad air from a hive open at the top, than from one where all that air had to be forced down, through an opening at the bottom. This theory is sustained by the natural habits of bees in their wild state. Wild bees, that select their own abodes, are found in trees and crevices of rocks. They usually build their combs downward from their entrance, and their abode is air-tight at the bottom; they have no air only what is admitted at their entrance, near the top of their dwelling, and with no current of air only what they choose to produce by fanning. The purest atmosphere in any room is where it enters and passes out at the top; in such a room only does the external atmosphere circulate naturally. It is on the same principle that bees[Pg 76] keep better buried than in any other way, provided only they are kept dry. Yet they are in a place air-tight, except the small conductor to the atmosphere above them. The old "pyramidal beehive" of Ducouedic, with three sections, one above the other, allowing the removal of the lower one each spring, and the placing of a new one on the top—thus changing the comb, so that none shall ever be more than two years old, with the opening always within three or four inches of the top, is the best of the patent hives. We prefer plain, simple hives. The general adoption of this principle, whatever hives are used, would be a new era in the science of bee-culture. No beehive should ever be exposed to the direct rays of the sun in a beehouse. A hive standing alone, with a free circulation of air on every side, will not be seriously injured by the sun. But when the rays are intercepted by walls or boards, in the rear and on the sides, they are very disastrous. Other hints, such as clearing off occasionally, in all seasons except in the cold of winter, the bottom board, &c., are matters upon which we need not dwell. No cultivator would think of neglecting them. Let no one be alarmed at finding dead bees on the bottom when clearing out a hive; bees live only from five to seven months, and their places are then supplied with young ones. The above suggestions followed, and a little care taken in cultivating the fruits, grains, and grasses, that yield the best flowers for bees, would secure uniform success in raising honey. This is one of the finest luxuries; and, what is a great desideratum, it is within the easy reach of every poor family, even, in all the rural districts of the land.
Whatever type of hive you choose, make sure the entrance is three or four inches from the top. Moths are scared of bees; they won’t come near unless the bees are weak or dispirited. They sneak into the hive when the bees are calm, either resting among the comb or hanging out during warm weather. If the hive is open on all sides (as often suggested), the moth will enter from a side without bees. Bees tend to gather at the top of the hive and comb, leaving the lower part and entrance exposed. If the entrance is at the top, the bees will occupy it and swarm around it. A bee can easily move through a group of bees to enter or exit a hive; however, a moth won't attempt this, making it an effective defense against moth damage. This design is advantageous for multiple reasons. Moisture rises: in a hive open only at the bottom, moisture can accumulate at the top and harm the bees, whereas with an opening near the top, it can escape easily. The most common objection to this idea is that bees need good airflow, and such a hive wouldn’t encourage it. However, we argue that a hive open at the top provides optimal air circulation for the swarm; any stale air can exit freely. The unique humming sound you hear in a hive during hot weather is caused by the motion of the bees' wings, which works to expel stale air while bringing in fresh air, creating a current. During the day, when it’s hot, you’ll notice a few bees at the entrance outside while others are inside doing this task, and when they need to rest, others take over. This is one of the most remarkable aspects of bees’ habits and instincts. They maintain a clean atmosphere in a crowded hive even in hot weather. It would take much less fanning to remove bad air from a hive open at the top than one where air must be forced downward through a lower opening. This concept is supported by the natural behaviors of bees in the wild. Wild bees that choose their own homes are often found in trees and rock crevices. They typically build their combs downward from their entrance and have an airtight bottom; they only have air from what comes in through their entrance near the top and create airflow solely by fanning. The freshest air in any room comes in from the top and exits at the top; it’s in this situation that outside air circulates naturally. It’s on the same principle that bees do best when they’re "buried" as long as they stay dry. They are in an airtight spot except for a small opening to the air above. The old "pyramidal beehive" by Ducouedic, with three sections stacked one above the other, allows for the removal of the lower section each spring and the addition of a new one on top—ensuring that no comb is ever older than two years, with the entrance always three or four inches from the top—is the best of the patented hives. We prefer simple, straightforward hives. Widespread adoption of this principle, regardless of the hive type, could mark a new era in beekeeping. No hive should be exposed to direct sunlight within a beehouse. A hive standing alone with air circulation from all sides won’t be severely impacted by the sun. However, if sunlight is blocked by walls or boards on the sides and back, it can be very harmful. Other tips, like occasionally clearing the bottom board during all seasons except the cold of winter, are essential but don’t require elaboration. No beekeeper would think to ignore these. Don’t be alarmed if you find dead bees at the bottom when cleaning out a hive; bees live for only five to seven months, and their spots are then filled by younger ones. If you follow the above suggestions and take a little care in cultivating the fruits, grains, and grasses that provide the best flowers for bees, it would ensure consistent success in honey production. Honey is one of life’s greatest luxuries and, importantly, it’s easily attainable for even the poorest families in all rural areas.
Good honey, good vegetables, and good fruit, like[Pg 77] rain and sunshine, may be the property of all. The design of this volume is to enable the poor and the unlearned to enjoy these things in abundance, with only that amount of care and labor necessary to give them a zest.
Good honey, fresh vegetables, and delicious fruit, like[Pg 77] rain and sunshine, should be accessible to everyone. This book aims to help the less fortunate and those who aren’t well-educated enjoy these things in plenty, with just enough effort and attention to make them enjoyable.
BEETS.
Of this excellent root there are quite a number of varieties. Mangel-Wurtzel yields most for field-culture, and is the great beet for feeding to domestic animals; not generally used for the table. French Sugar or Amber Beet is good for field-culture, both in quality and yield; but it is not equal to the Wurtzel. Yellow-Turnip-rooted, Early Blood-Turnip-rooted, Early Dwarf Blood, Early White Scarcity, and Long Blood, are among the leading garden varieties. Of all the beets, three only need be cultivated in this country—the Wurtzel for feeding, and the Early Blood Turnip-rooted and Long Blood for the table. The Early Blood is the best through the whole season, comes early, and can be easily kept so as to be good for the table in the spring. The Long Blood is later, and very much esteemed. Beets may be easily forwarded in hotbeds. Sow seed early, and transplant in garden as soon as the soil is warm enough to promote their growth. When well done, the removal retards their growth but little.
Of this excellent root, there are quite a few varieties. Mangel-Wurtzel is the top choice for field cultivation and is widely used for feeding livestock; it's not typically eaten by humans. French Sugar or Amber Beet is also good for field culture, both in terms of quality and yield, but it can't match the Wurtzel. Yellow-Turnip-rooted, Early Blood-Turnip-rooted, Early Dwarf Blood, Early White Scarcity, and Long Blood are among the top garden varieties. In this country, only three types of beets really need to be grown—the Wurtzel for animal feed, and the Early Blood Turnip-rooted and Long Blood for eating. The Early Blood is the best all season, matures early, and can be stored well to stay good for spring meals. The Long Blood matures later and is highly valued. Beets can be easily started in hotbeds. Plant the seeds early and transplant them into the garden as soon as the soil is warm enough to encourage growth. When done right, the transplanting slows their growth only a little.
Young beets are universally esteemed. To have them of excellent quality during all the winter, it is only necessary to plant on the last days of July. If the weather be dry, water well, so as to get them up,[Pg 78] and they will attain the size and age at which they are most valued. Keep them in the cellar for use, as other beets. They will keep as well as old ones.
Young beets are highly regarded everywhere. To ensure they are of great quality throughout the winter, you just need to plant them in the last days of July. If it's dry, make sure to water them well so they can sprout,[Pg 78] and they will grow to the size and age that everyone values the most. Store them in the cellar for later use, just like other beets. They will last as long as older ones.
Field-Culture.—Make the soil very mellow, fifteen to eighteen inches deep. Soil having a little sand in its composition is always best. Even very sandy land is good if it be sufficiently enriched. Choose land on which water will not stand in a wet season. Beets endure drought better than extreme wet. Having made the surface perfectly mellow, and free from clods, weeds, and stones, sow in drills, with a machine for the purpose, two feet apart. This is wide enough for a small cultivator to pass between them. After planting, roll the surface smooth and level; this will greatly facilitate early cultivation. On a rough surface you can not cultivate small plants without destroying many of them; hence the necessity of straight rows and thorough rolling. The English books recommend planting this and other roots on ridges: for their climate it is good, but for ours it is bad. They have to guard against too much moisture, and we against drought; hence, they should plant on ridges, and we on an even surface. To get the largest crop, plow a deep furrow for each row, put in plenty of good manure, cover it with the plow and level the surface, and plant over the manure. When well growing, they should be thinned to six or eight inches in the row. Often stirring the earth while they are young is of great benefit. The quality and quantity of a root-crop depend much upon the rapidity of its growth. Slow growth gives harder roots of worse flavor, as well as a stinted crop.
Field-Culture.—Prepare the soil to be very loose, about fifteen to eighteen inches deep. Soil that contains some sand is always ideal. Even very sandy soil can be good if it's enriched enough. Choose land where water won’t pool during wet seasons. Beets handle drought better than excessive moisture. Once the surface is perfectly loosened and free from clumps, weeds, and stones, sow in rows two feet apart using a seed drill. This spacing allows for a small cultivator to pass between the rows. After planting, roll the surface to make it smooth and level; this will make early cultivation much easier. On a rough surface, it's difficult to cultivate small plants without damaging many of them, which is why straight rows and thorough rolling are essential. English texts suggest planting this and other root crops on ridges; that's good for their climate, but not for ours. They need to prevent too much moisture, while we need to combat drought, so they should plant on ridges, and we should stick to an even surface. To achieve the largest crop, plow a deep furrow for each row, add plenty of good manure, cover it with soil, and then plant over it. Once they are growing well, thin the plants to six or eight inches apart in the row. Regularly turning the soil while they are young is very beneficial. The quality and quantity of a root crop greatly depend on how quickly it grows. Slow growth results in tougher roots with worse flavor and smaller yields.
Harvesting should be done just before severe frosts. They will grow until frost comes, however early they[Pg 79] were planted, or whatever size they may have attained. They grow as rapidly after light frosts as at any time in the season; but very severe frosts expose them to rot during winter.
Harvesting should be done right before heavy frosts. They will continue to grow until frost hits, no matter how early they[Pg 79] were planted or how big they are. They grow just as quickly after light frosts as they do at any other time of the season; however, very harsh frosts can make them prone to rot during winter.
Preserving for table use is usually done by putting in boxes with moist sand, or the mould in which they grew. This excludes air, and, if kept a little moist, will preserve them perfectly. Roots are always better buried below frost out-door on a dry knoll, where water will not stand in the pits. But in cold climates it is necessary to have some in the cellar for winter use. The common method of burying beets, and turnips, and all other roots out-door, is well understood. The only requisites are, a dry location secured from frost, straw next the roots, a covering of earth, not too deep while the weather is yet mild; as it grows cold, put on another covering of straw, and over it a foot of earth; as it becomes very cold, put on a load or two of barnyard manure: this will save them beyond the power of the coldest winter. Vast quantities of roots buried outdoor are destroyed annually by frost, and there is no need of ever losing a bushel. You "thought they would not freeze," is not half as good as spending two hours' time in covering, so that you know they can not freeze. There is hardly a more provoking piece of carelessness, in the whole range of domestic economy, than the needless loss of so many edible roots by frost.
Preserving vegetables for later use typically involves placing them in boxes filled with moist sand or in the mold they grew in. This keeps the air out and, if kept slightly moist, preserves them perfectly. Roots are best stored buried below the frost line outdoors on a dry rise, where water won't accumulate in the holes. However, in colder climates, it's important to have some stored in the cellar for winter use. The common practice of burying beets, turnips, and other roots outdoors is well known. The main requirements are a dry spot sheltered from frost, straw next to the roots, and a layer of soil that's not too deep while the weather is still mild; as it gets colder, add another layer of straw and cover it with about a foot of soil; when it gets very cold, add one or two loads of barnyard manure: this will protect them through even the harshest winter. Every year, vast amounts of roots buried outdoors are ruined by frost, and there's no reason to lose even a bushel. You "thought they wouldn’t freeze" is not nearly as effective as spending two hours to cover them properly so that you know they won’t freeze. There’s hardly anything more frustrating in domestic management than the unnecessary loss of so many edible roots to frost.
The table use of beets is everywhere known; their value for feeding animals is not duly appreciated in this country. No one who keeps domestic animals or fowls should fail to raise a beet-crop; it is one of the surest crops grown; it is never destroyed by insects, and drought affects it but very little. On good soil,[Pg 80] beets produce an enormous weight to the acre. The lower leaves may be stripped off twice during the season, to feed to cows or other stock, without injury to the crop. Cows will give more milk for fifteen days, fed on this root alone, than on any other feed; they then begin to get too fat, and decline in milk: hence, they should be fed beets and hay or other food in about equal parts, on which they will do better than in any other way. Horses do better on equal parts of beet and hay than on ordinary hay and grain. Horses fed thus will fatten, needing only the addition of a little ground grain, when working hard. Plenty of beets, with a little other food, makes cows give milk as well as in summer. Raw beets cut fine, with a little milk, will fatten hogs as fast as boiled potatoes. All fowls are fond of them, chopped fine and mixed with other food. Sheep, also, are fond of them. They are very valuable to ewes in the spring when lambs come, when they especially need succulent food. The free use of this root by English farmers is an important reason of their great success in raising fine sheep and lambs. They promote the health of animals, and none ever tire of them. As it needs no cooking, it is the cheapest food of the root kind. Beets will keep longer, and in better condition, than any other root. They never give any disagreeable flavor to milk. It is considered established, now, that four pounds of beet equal in nourishment five pounds of carrot. Every large feeder should have a cellar beyond the reach of frosts, and of large dimensions, accessible at all times, in which to keep his roots. These beets should be piled up there as cord-wood, to give a free circulation of the air.
The use of beets is well-known; their value for feeding animals isn't fully appreciated in this country. Anyone who keeps livestock or poultry should definitely grow a beet crop; it's one of the most reliable crops available. It’s never harmed by insects, and drought doesn't affect it much. On good soil, [Pg 80] beets yield a tremendous weight per acre. You can strip the lower leaves off twice during the season to feed to cows or other livestock without hurting the crop. Cows will produce more milk for fifteen days when they're fed this root alone than any other feed; after that, they start to get too fat and produce less milk. So, it’s better to feed them beets along with hay or other food in about equal portions, which will work better than any other method. Horses do better on equal portions of beet and hay than on regular hay and grain. Horses fed this way will gain weight and only need a bit of ground grain when they’re working hard. Plenty of beets, with a little other food, keeps cows producing milk like in summer. Raw beets, chopped finely and mixed with a little milk, will fatten pigs as quickly as boiled potatoes. Chickens love them, finely chopped and mixed with their other food. Sheep also enjoy them, especially ewes in spring when they need fresh food for their lambs. The widespread use of this root by English farmers is a big reason for their success in raising top-quality sheep and lambs. Beets promote the health of animals, and they never tire of them. Since they don’t require cooking, they’re the cheapest root food available. Beets can be stored longer and in better condition than any other root. They also never give milk an unpleasant flavor. It’s well-established now that four pounds of beet are equivalent in nutrition to five pounds of carrot. Every large farmer should have a frost-proof cellar that’s spacious and accessible at all times to store their roots. These beets should be stacked there like firewood to allow for good air circulation.
In Germany, the beet-crop takes the place of much[Pg 81] of their meadows, at a great saving of expense, producing remarkably fine horses, and fattening immense herds of cattle, which they export to France. We insist upon the importance of a beet-crop to every man who owns an acre of land and a few domestic animals, or only a cow and a few fowls.
In Germany, the beet crop replaces a lot[Pg 81] of their meadows, saving a significant amount of money, producing exceptionally good horses, and allowing for the fattening of large herds of cattle that are exported to France. We emphasize how crucial a beet crop is for anyone who owns even just an acre of land with a few domestic animals, or just a cow and some chickens.
BENE PLANT.
Introduced into the Southern states by negroes from Africa. They boil a handful of the seed with their allowance of Indian corn. It yields a larger proportion than any other plant of an excellent oil. It is extensively cultivated in Egypt as food for horses, and for culinary purposes. It is remarkable that this native of a southern clime should flourish well, as it does, in the Northern states. It should be cultivated throughout the North as a medicinal herb.
Introduced to the Southern states by Africans, they boil a handful of the seeds with their share of corn. It produces more excellent oil than any other plant. It is widely grown in Egypt for horse feed and cooking. It's striking that this plant, native to warmer regions, thrives so well in the Northern states. It should be grown across the North as a medicinal herb.
A Virginia gentleman gave Thorburn & Son, seed-dealers of New York, the following account of its virtues: a few green leaves of the plant, plunged a few times in a tumbler of cold water, made it like a thin jelly, without taste or color. Children afflicted with summer-complaint drink it freely, and it is thought to be the best remedy for that disease ever discovered; it is believed that three thousand children were saved by it in Baltimore the first summer after its introduction. Plant in April, in the middle states, about two feet apart. When half grown, break off the plants, to increase the quantity of leaves. We recommend to all families to raise it, and try its virtues, under the advice of their family physicians.[Pg 82]
A Virginia gentleman told Thorburn & Son, seed dealers in New York, about its benefits: a few green leaves of the plant, dipped a few times in a glass of cold water, turn it into a thin jelly, with no taste or color. Kids with summer sickness drink it without hesitation, and it's thought to be the best remedy for that illness ever found; it's believed that three thousand children were saved by it in Baltimore the summer after it was introduced. Plant in April, in the mid-Atlantic states, about two feet apart. When they're halfway grown, break off the plants to produce more leaves. We recommend that all families grow it and test its benefits, with guidance from their family doctors.[Pg 82]
BIRDS.
These are exceedingly useful in destroying insects. So of toads and bats. No one should ever be wantonly killed. Boys, old or young, should never be allowed to shoot birds, or disturb their nests, only as they would domestic fowls, for actual use. A wanton recklessness is exhibited about our cities and villages, in killing off small birds, that are of no use after they are dead. Living, they are valuable to every garden and fruit-orchard. In every state, stringent laws should be made and enforced against their destruction. Even the crow, without friends as he is, is a real blessing to the farmer: keep him from the young corn for a few days, as it is easy to do, and, all the rest of the year, his destruction of worms and insects is a great blessing. Birds, therefore, should be baited, fed, and tamed, as much as possible, to encourage them to feel at home on our premises. Having protected our small fruits, they claim a share, and they have not always a just view of the rights of property, nor do they always exhibit good judgment in dividing it. It is best to buy them off by feeding them with something else. If they still prefer the fruit, hang little bells in the trees, where they will make a noise; or hang pieces of tin, old looking-glass, or even shingles, by strings, so that they will keep in motion, and the birds will keep away. Images standing still are useless, as the birds often build nests in the pockets.[Pg 83]
These are extremely helpful in getting rid of insects, just like toads and bats. No one should be killed for no reason. Boys, whether young or old, should never be allowed to shoot birds or disrupt their nests, except when it's for practical purposes like domestic poultry. There’s a careless attitude in our cities and towns towards the killing of small birds, which becomes pointless once they are dead. Alive, they are beneficial for every garden and orchard. In every state, strict laws should be created and enforced to protect them. Even the crow, despite being unpopular, is a true asset to farmers: keep him away from young corn for a few days, which is easy to do, and his role in devouring worms and insects throughout the rest of the year is invaluable. Therefore, birds should be attracted, fed, and domesticated as much as possible to encourage them to make our spaces their home. When they help protect our fruits, they may also want to take a share, and they don't always understand property rights or show good judgment in dividing it. It’s better to distract them by feeding them something else. If they still prefer the fruit, hang little bells in the trees that will make noise, or attach pieces of tin, old mirrors, or even shingles with strings so they’ll move around and keep the birds away. Static images are ineffective, as birds often build nests in the pockets.[Pg 83]
BLACKBERRY.
This berry grows wild, in great abundance, in many parts of the country. It has been so plentiful, especially in the newer parts, that its cultivation has not been much attended to until recently. Like all other berries, the cultivated bear the largest and best fruit.
This berry grows wild in large numbers in many areas of the country. It's been so plentiful, especially in the newer regions, that people haven't paid much attention to cultivating it until recently. Like all other berries, the cultivated ones produce the largest and best fruit.
Uses.—It is one of the finest desert berries; excellent in milk, and for tarts, pies, &c. Blackberries make the best vinegar for table use, and a wine that retains the peculiar flavor, and of a beautiful color.
Uses.—It’s one of the best desert berries; great in milk, and for tarts, pies, etc. Blackberries make the best vinegar for table use and create a wine that keeps its unique flavor and has a beautiful color.
This berry comes in after the raspberries, and ripens long in succession on the same bush.
This berry comes after the raspberries and ripens over an extended period on the same bush.
 Highbush Blackberry.
Varieties of wild ones, usually found growing in the borders of fields and woods, are the low-bush and the high-bush. Downing gives the first place to the low. Our experience is, that the high is the best bearer of the best fruit. We have often gathered them one and one fourth inches in length, very black, and of delicious sweetness. The low ones that have come under our observation have been smaller and nearer round, and not nearly so sweet.[Pg 84]
Varieties of wild ones, usually found growing along the edges of fields and woods, include the low-bush and the high-bush. Downing prioritizes the low-bush. However, in our experience, the high-bush produces the best fruit. We have often picked berries that are one and a quarter inches long, very dark, and incredibly sweet. The low-bush berries we’ve seen have been smaller, rounder, and not nearly as sweet.[Pg 84]
The best cultivated varieties are—
The best cultivated varieties are—
The Dorchester—Introduced from Massachusetts, and a vigorous, large, regular bearer.
The Dorchester Hotel—Brought in from Massachusetts, it is a strong, large, and consistent producer.
Lawton, or New Rochelle.—This is the great blackberry of this country, by the side of which, no other, yet known, need be cultivated. It is a very hardy, great grower. It is an enormous bearer of such fruit that it commands thirty cents per quart, when other blackberries sell for ten. On a rather moist, heavy loam, and especially in the shade, its productions are truly wonderful. Continues to ripen daily for six weeks.
Lawton or New Rochelle.—This is the amazing blackberry of this country, beside which no other known variety needs to be grown. It is very hardy and grows well. It produces so much fruit that it demands thirty cents per quart, while other blackberries sell for ten. On moist, thick soil, especially in the shade, its yield is truly impressive. It continues to ripen daily for six weeks.
Propagation is by offshoots from the old roots, or by seeds. When by seeds, they should be planted in mellow soil, and where the sun will not shine on them between eight and five o'clock in hot weather. In transplanting, much care is requisite. The bark of the roots is like evergreens, very tender and easily broken, or injured by exposure to the atmosphere; hence, take up carefully, and keep covered from sun and air until transplanted. This is destined to become one of the universally-cultivated small fruits—as much so as the strawberry. The best manures are, wood-ashes, leaves, decayed wood, and all kinds of coarse litter, with stable manure well incorporated with the soil, before transplanting. Animal manure should not be very plentifully applied.
Propagation is done through offshoots from the old roots or by seeds. When using seeds, they should be planted in soft soil, and placed in a location that doesn’t get direct sunlight between eight in the morning and five in the evening during hot weather. When transplanting, extra care is needed. The bark on the roots is very delicate, similar to evergreens, and can easily break or get damaged when exposed to air; therefore, handle them with care and keep them protected from the sun and air until they are transplanted. This plant is set to become one of the commonly cultivated small fruits, just like strawberries. The best fertilizers are wood ashes, leaves, decayed wood, and all types of coarse organic matter, along with stable manure that is well mixed into the soil before transplanting. Animal manure shouldn’t be applied too abundantly.
We have seen in Illinois a vigorous bush, and apparently good bearer, of perfect fruit—a variety called white blackberry. The fruit was greenish and pleasant to the taste.[Pg 85]
We have observed a strong bush in Illinois that produces apparently good fruit—it's a variety known as white blackberry. The fruit was greenish and tasted nice.[Pg 85]
BLACK RASPBERRY.
The common wild, found by fences, especially in the margin of forests, in most parts of the United Sates, is very valuable for cultivation in gardens. Coming in after the red raspberry, and ripening in succession until the blackberry commences, it is highly esteemed. Cultivated with little animal manure, but plenty of sawdust, tan-bark, old leaves, wood, chips, and coarse litter, it improves very much from its wild state. Fruit is all borne on bushes of the previous year's growth; hence, after they have done bearing, cut away the old bushes. To secure the greatest yield on rich land, cut off the tops of the shoots rising for next year's fruit, when they are four or five feet high. The result will be, strong shoots from behind all the leaves on the upper part of the stalk, each of which will bear nearly as much fruit as would the whole have done without clipping. A dozen of these would occupy but a small place in a border, or by a wall. Not an American garden should be found without them.
The wild ones typically found near fences, especially along the edges of forests in most parts of the United States, are really valuable for garden cultivation. They come in after red raspberries and keep ripening until blackberries start, which makes them highly prized. They can be grown with just a bit of animal manure, but a lot of sawdust, bark, old leaves, wood chips, and rough litter really help them thrive compared to their wild state. The fruit grows on bushes that are a year old, so after they've finished bearing fruit, cut down the old bushes. To maximize yield on rich soil, trim the tops of the shoots that will produce next year's fruit when they reach four or five feet tall. This will encourage strong shoots to grow from behind the leaves at the top of the stalk, and each of these will produce nearly as much fruit as the whole stalk would without trimming. A dozen of these plants would only take up a small space in a border or against a wall. No American garden should be without them.
BONES.
Bones are one of the most valuable manures. They yield the phosphates in large measure. On all land needing lime, they are very valuable. The heads, &c., about butchers' shops will bear a transportation of twenty miles to put upon meadows. Break them with the head of an axe, and pound them into the sod, even with the surface. They add greatly to the products of a meadow. Ground, they make one of the best manures of commerce. A cheap method for the farmer is to[Pg 86] deposite a load of horse-manure, and on that a load of bones, and alternate each, till he has used up all his bones. Cover the last load of bones deep with manure. It will make a splendid hotbed, and the fermentation of the manure will dissolve or pulverize the bones, and the heap will become one mass of the most valuable manure, especially for roots and vines, and all vegetables requiring a rich, fine manure.
Bones are one of the most valuable fertilizers. They provide a lot of phosphates. On any land that needs lime, they are extremely useful. The heads and other remains from butcher shops can be transported up to twenty miles to use on meadows. Break them up with the axe and pound them into the soil so they're level with the surface. They significantly boost the yield of a meadow. When ground, they become one of the best fertilizers available. A cost-effective method for farmers is to[Pg 86] place a load of horse manure down first, add a load of bones, and then alternate between the two until all the bones are used. Cover the final load of bones thoroughly with manure. This will create an excellent hotbed, and the heat from the manure will break down the bones, turning the pile into a rich fertilizer, especially beneficial for roots, vines, and all vegetables that need high-quality, fine fertilizer.
BORECOLE, OR KALE.
There are some fifteen or twenty kinds cultivated in Europe. Two only, the green and the brown, are desirable in this country. Cultivate as cabbage. In portions of the middle states they will stand the frosts of winter well, without much protection; further north, they need protection with a little brush and straw during severe frosts. Those grown on rather hard land are better for winter; being less succulent, they endure cold better. Cut them off for use whenever you choose. They do not head like cabbage; they have full bunches of curled leaves. Cut off so as to include all, not over eight inches long. In winter, after having been pretty well exposed to the frost, they are very fine. Set out the stumps early in spring, and they will yield a profusion of delicious sprouts. This would be a valuable addition to many of our kitchen gardens.
There are about fifteen to twenty types grown in Europe. Only two, the green and the brown, are desirable here. Grow them like cabbage. In some areas of the Midwest, they can withstand winter frosts well with little protection; further north, they need some coverage with brush and straw during harsh frosts. Those grown in tougher soil are better for winter; being less juicy, they handle the cold better. You can cut them for use whenever you want. They don’t form heads like cabbage; instead, they have full clusters of curled leaves. Cut them so that no piece is longer than eight inches. In winter, after being exposed to frost, they taste great. Plant the stumps early in spring, and they will produce a lot of tasty shoots. This could be a valuable addition to many of our kitchen gardens.
BROCCOLI.
This may be regarded as a late flowering species of cauliflower. It should be planted and treated as cab[Pg 87]bage, and fine heads will be formed, in the middle states, in October: at the South much earlier, according to latitude. Take up in November, and preserve as cabbage, and good ones may be had in winter. To prevent ravages of insects, mix ashes in the soil when transplanting, or fresh loam or earth from a new field; or trench deep, so as to throw up several inches of subsoil, which had not before been disturbed.
This can be seen as a late-blooming type of cauliflower. It should be planted and cared for like cabbage, and good heads will form in the Midwest by October; in the South, they'll be ready much earlier, depending on the latitude. Harvest in November and store them like cabbage, and you'll have decent ones through the winter. To keep pests away, mix ashes into the soil when transplanting or use fresh loam from a new field; alternatively, dig deep to bring up several inches of undisturbed subsoil.
To save seed, transplant some of the best in spring; break off all the lower sprouts, allowing only a few of the best centre ones to grow. Tie them to stakes, to prevent destruction by storms. Be sure to have nothing else of the cabbage kind near your seed broccoli.
To save seeds, transplant some of the best ones in spring; remove all the lower sprouts, leaving only a few of the best central ones to grow. Tie them to stakes to protect them from storms. Make sure there’s nothing else from the cabbage family near your seed broccoli.
BROOM CORN.
Cultivated like other corn, only that this is more generally planted in drills. Three feet apart, and six inches in the drill, it yields more weight of better corn to the acre than to have it nearer. The great fault in raising this crop is getting it too thick. The finest-looking brush is of corn cut while yet so green that the seed is useless. But the brush is stronger, and will make better brooms for wear, when the corn is allowed to stand until the seed is hard, though not till the brush is dry. The land should be rich. This is a hard, exhausting crop for the soil. To harvest, bend down, two feet from the ground, two rows, allowing them so to fall across each other as to expose all the heads. Cut off the heads, with six or eight inches of the stalk, and place them on top of the bent rows to dry. In a week, in dry weather, they will be well[Pg 88] cured, and should be then spread thin, under cover, in plenty of air. There is no worse article to heat and mould. In large crops, they usually take off the seed before curing; it is much lighter to handle, and less bulky. It may be done then, or in winter, as you prefer. The seed is removed on a cylinder eighteen inches long, and two and a half feet in diameter, having two hundred wrought nails with their points projecting. It is turned by a crank, like a fanning mill. The corn is held in a convenient handful, like flax on a hatchel. Where large quantities are to be cleaned of the seed, power is used to turn the machine. Ground or boiled, the seed makes good feed for most animals. Dry, it has too hard a shell. Fowls, with access to plenty of gravel, do well on it. Broom-corn is not a very profitable crop, except to those who manufacture their own corn into brooms. There is much labor about it, and considerable hazard of injuring the crop, by the inexperienced; hence, young farmers had, generally, better let it alone. There are two varieties—they may be forms of growth, from peculiar habits of culture—one, short, with a large, stiff brush running up through the middle, with short branches to the top, called pine-top: it is of no value;—the other is a long, fine brush, the middle being no coarser than the outside. It should be planted with a seed-drill, to make the rows straight and narrow for the convenience of cultivation. Harrowing with a span of horses, with a V drag, one front tooth out, as soon as the corn is up, is beneficial to the crop.[Pg 89]
Cultivated like other types of corn, but this variety is usually planted in rows. Three feet apart and six inches within the row, it produces a higher yield of better-quality corn per acre than when planted closer together. A common mistake when growing this crop is planting it too densely. The best-looking brush comes from corn that’s cut while still green enough that the seed is unusable. However, the brush is stronger and makes better brooms for durability when the corn is left to mature until the seeds are hard, but not until the brush is completely dry. The soil should be rich, as this crop is hard on the land and can deplete it. To harvest, bend down two rows two feet from the ground, allowing them to fall across each other to expose all the heads. Cut off the heads with six to eight inches of the stalk attached, and place them on top of the bent rows to dry. In a week, during dry weather, they will be well cured and should then be spread out thinly under cover, ensuring plenty of air circulation. There's nothing worse than letting them heat up and mold. For large crops, they usually remove the seeds before curing, as it makes them lighter and less bulky to handle. This can be done either then or in the winter, depending on your preference. The seed is removed using a cylinder that’s eighteen inches long and two and a half feet in diameter, equipped with two hundred wrought nails with their points sticking out. It’s turned by a crank, similar to a fanning mill. Hold the corn in a handful, like flax on a hackle. For large quantities, a powered machine is used to clean the seeds. Ground or boiled, the seeds make good feed for most animals, but when dry, they have too tough a shell. Poultry that have access to plenty of gravel do well on it. Broom corn isn’t a highly profitable crop unless you’re making your own brooms from it. There’s a lot of labor involved, and inexperienced growers risk damaging the crop, so young farmers might be better off avoiding it. There are two varieties—they might be different growth forms due to specific farming practices. The first is short with a large, stiff brush running up through the middle and short branches at the top, called pine-top; it isn’t valuable. The second has a long, fine brush that’s the same thickness in the middle as it is on the outside. It should be planted with a seed drill to ensure the rows are straight and narrow for easier cultivation. Harrowing with a span of horses using a V drag, with one front tooth out, as soon as the corn is up, is beneficial for the crop.
BRUSSELS SPROUTS.
This is a species of cabbage. A long stem runs up, on which grow numerous cabbage-heads in miniature. The centre head is small and of little use, and the large leaves drop off early. It will grow among almost anything else, without injury to either. It is raised from seed like cabbage, and cultivated in all respects the same. Eighteen inches apart each way is a proper distance, as the plant spreads but little. Good, either as a cabbage, or when very small, as greens. They are good even after very hard frosts. By forwarding in hotbed in the spring, and by planting late ones for winter, they may be had most of the year. If they are disposed to run to seed too early, it may be prevented by pulling up, and setting out again in the shade. Save seed as from cabbage, but use great caution that they are not near enough to receive the farina from any of the rest of the cabbage-tribe.
This is a type of cabbage. A long stem grows upward, and many small cabbage heads develop along it. The center head is small and not very useful, and the large leaves fall off early. It can grow alongside almost anything else without causing harm to either. It's started from seed like cabbage and is grown in all the same ways. Keeping them eighteen inches apart in all directions is a good distance, as the plant doesn’t spread much. They're good whether used as cabbage or when they're very small, as greens. They remain good even after severe frosts. By starting them in a hotbed in the spring and planting late ones for winter, you can have them most of the year. If they tend to bolt too early, you can prevent this by pulling them up and replanting them in the shade. Save seeds just like you would from cabbage, but be very careful that they are not close enough to receive pollen from any other type of cabbage.
BUCKTHORN.
This is the most valuable of the thorn tribe, for hedge, in this country. It never suffers from those enemies that destroy so much of the hawthorn. This is also used for dyeing and for medicine.[Pg 90]
This is the most valuable of the thorn trees in this country. It doesn’t get affected by the pests that harm so much of the hawthorn. It's also used for dyeing and medicine.[Pg 90]
BUCKWHEAT.
This will grow well on almost any soil; even that too poor for most other crops will yield very good buckwheat—though rich land is better for this, as for all other crops. The heat of summer is apt to blast it when filling; hence, in the middle states, it is not best to sow it until into July. It fills well in cool, moist weather, and is quite a sure crop if sowed at the right time. On poor land, one bushel of seed is required for an acre, while half a bushel is sufficient on rich land, where stalks grow large.
This plant can thrive in almost any type of soil; even in soil that’s too poor for most other crops, you can still get good buckwheat yields—though richer land is better for this, just like with all other crops. Hot summer weather can damage it while it’s filling, so in the midwestern states, it’s best to wait until July to sow it. It does well in cool, moist weather, and if you plant it at the right time, it’s quite a reliable crop. On poor land, you’ll need one bushel of seed per acre, while on rich land, half a bushel is enough, where the stalks will grow larger.
The blossoms yield to the honey-bee very large quantities of honey, much inferior to that made of white clover; it may be readily distinguished in the comb by its dark color and peculiar flavor. Ground, it is good for most animals, and for fowls unground, mixed with other grain. It remains long in land; but it is a weed easily killed with the hoe; or a farmer may set apart a small field for an annual crop, keeping up the land by the application of three pecks of plaster per acre each year. It is very popular as human food, and always made into pancakes. The free use of it is said to promote eruptive diseases. The India buckwheat is more productive, but of poorer quality. The bran is the best article known to mix with horse-manure and spade into radish beds, to promote growth and kill worms.[Pg 91]
The blossoms provide the honeybee with a large amount of honey, but it's much less quality than that produced from white clover. You can easily recognize it in the comb by its dark color and unique flavor. When ground, it's good for most animals, and for chickens, it's better unground and mixed with other grains. It stays in the soil for a long time, but it's a weed that can be easily removed with a hoe. Alternatively, a farmer could dedicate a small field for an annual crop, maintaining the land with three pecks of plaster per acre each year. It's very popular as a human food and is often made into pancakes. Excessive consumption is said to encourage skin diseases. The India buckwheat is more productive but of lower quality. The bran is the best material to mix with horse manure and incorporate into radish beds to enhance growth and eliminate worms.[Pg 91]
BUDDING.
This is usually given under the article on peaches. But, as it is a general subject, it should be in a separate article, reserving what is peculiar to the different fruits to be noticed under their respective heads.
This is usually included in the article about peaches. However, since it covers a general topic, it should be in a separate article, saving the specific details about each fruit for their respective sections.
 Emerging.
Budding small trees should usually be performed very near the ground, and on a smooth place. Any sharp pocket-knife will do; but a regular budding knife, now for sale in most hardware-stores, is preferable. Cut through the bark in the form of a horizontal crescent (a in the cut). Split the bark down from the cut three fourths of an inch, and, with the ivory-end of the knife, raise the corners and edges of the bark. Select a vigorous shoot of this year's growth, but having buds well matured—select a bud that bids fairest to be a leaf-bud, as blossom-buds will fail—insert the knife half an inch below the bud, and cut upward in a straight line, severing the bark and a thin piece of the wood to one half inch above the bud, and let the knife run out:[Pg 92] you then have a bud ready for insertion (c in cut). The English method is to remove the wood from the bud before inserting it; this is attended with danger to the vitality of the bud, and is, therefore, less certain of success, and it is no better when it does succeed. Hence, American authorities favor inserting the bud with the wood remaining. Insert the lower end of this slip between the two edges of the bark, passing the bud down between those edges, until the top of the slip comes below the horizontal cut, and remaining contiguous to it. If the bud slip be too long, after it is sufficiently pressed down, cut off the top so as to make a good fit with the bark above the cut (b in cut). The lower end of the bud will have raised the split bark a little more to make room for itself, and thus will set very close to the stalk. Tie the bud in with a soft ligature; commence at the bottom of the split, and wind closely until the whole wound is covered, leaving only the bud exposed (d in cut). It is more convenient to commence at the top, but it is less certain to confine the slip opposite the bud in close contact with the stalk: this is indispensable to success. We have often seen buds adhere well at the bottom, but stand out from the stalk, and thus be ruined.
Budding small trees should generally be done close to the ground and on a flat surface. Any sharp pocket knife will work, but a proper budding knife, which you can find in most hardware stores, is better. Make a cut in the bark shaped like a horizontal crescent (a in the cut). Then, split the bark down from the cut for about three-quarters of an inch. Using the ivory end of the knife, lift the corners and edges of the bark. Choose a strong shoot from this year's growth, making sure the buds are well matured—pick a bud that is likely to be a leaf bud, as blossom buds will fail. Insert the knife about half an inch below the bud and cut straight up, severing the bark and a thin slice of wood about half an inch above the bud, and let the knife exit: [Pg 92] now you have a bud ready to be inserted (c in cut). The English method involves removing the wood from the bud before inserting it, which risks harming the bud's vitality and makes success less likely, and even when it does succeed, it’s not better. Therefore, American experts recommend inserting the bud with the wood still attached. Position the lower end of this slip between the two edges of the bark, sliding the bud down between those edges until the top of the slip is just below the horizontal cut and closely aligned with it. If the bud slip is too long, after pressing it down adequately, trim the top to ensure a snug fit with the bark above the cut (b in cut). The lower end of the bud will have slightly raised the split bark to make room for itself, so it will sit very close to the stalk. Secure the bud in place with a soft tie; start at the bottom of the split and wrap tightly until the entire wound is covered, leaving only the bud exposed (d in cut). It’s more convenient to start at the top, but it’s less reliable for keeping the slip in close contact with the stalk, which is crucial for success. We’ve often seen buds adhere well at the bottom but stick out from the stalk and end up failing.
Preparation of Buds.—Take thrifty, vigorous shoots of this year's growth, with well-matured buds; cut off the leaves one half inch from the stalks (e in cut); wrap them in moist moss or grass, or put them in sawdust, or bury them one foot in the ground.
Preparation of Buds.—Take healthy, strong shoots from this year's growth, with well-developed buds; cut off the leaves half an inch from the stalks (e in cut); wrap them in damp moss or grass, or place them in sawdust, or bury them one foot in the ground.
Bands.—The best yet known is the inside bark of the linden or American basswood. In June, when the bark slips easily, strip it from the tree, remove the coarse outside, immerse the inside bark in water for twenty[Pg 93] days; the fibres will then easily separate, and become soft and pliable as satin ribbon. Cut it into convenient lengths, say one foot, and lay them away in a dry state, in which they will keep for years. This will afford good ties for many uses, such as bandages of vegetables for market, &c. Matting that comes around Russia iron and furniture does very well for bands; woollen yarn and candle-wicking are also used; but the bass-bark is best. After ten days the bands should be loosened and retied; then, if the bud is dried, it is spoiled, and the tree should be rebudded in another place; at the end of three weeks, if the bud adheres firmly, remove the band entirely. Better not bud on the south side; it is liable to injury in winter. In the spring, after the swelling of buds, but before the appearance of leaves, cut off the top four inches above the bud; when the bud grows, tie the tender shoot to the stalk (growing bud in cut, f). In July, cut the wood off even with the base of the bud and slanting up smoothly.
Bands.—The best option known so far is the inner bark of the linden or American basswood. In June, when the bark peels off easily, strip it from the tree, remove the rough outer layer, and soak the inner bark in water for twenty[Pg 93] days; the fibers will then separate easily and become soft and flexible like satin ribbon. Cut it into manageable lengths, about one foot, and store them dry; they will last for years. This will provide good ties for various uses, such as tying vegetables for market, etc. The matting that comes around Russian iron and furniture works well for bands; wool yarn and candle wicking are also used, but the bass bark is the best. After ten days, the bands should be loosened and retied; if the bud has dried out, it's spoiled, and the tree should be rebudded in another spot. After three weeks, if the bud is still firmly attached, remove the band completely. It's better not to bud on the south side as it's more likely to be damaged in winter. In spring, after the buds start to swell but before the leaves appear, cut off the top four inches above the bud; as the bud grows, tie the new shoot to the stalk (growing bud in cut, f). In July, cut the wood off even with the base of the bud and make a smooth, slanted cut.
Causes of Failure.—If you insert a blossom-bud you will get no shoot, although the bud may adhere well. If scions cut for buds remain two hours in the sun with the leaves on, in a hot day, they will all be spoiled. The leaves draw the moisture from the bud, and soon ruin it. Cut the leaves off at once. If you use buds from a scion not fully grown, very few of them will live; they must be matured. If the top of the branch selected be growing and very tender, use no buds near the top of it. If in raising the bark to make room for the bud, you injure the soft substance between the bark and the wood, the bud will not adhere. If the bud be not brought in close contact with the stalk and firmly confined there, it will not grow. With rea[Pg 94]sonable caution on these points, not more than one in fifty need fail.
Causes of Failure.—If you insert a blossom-bud, you won’t get any shoots, even if the bud sticks well. If scions cut for buds are in the sun with the leaves on for two hours on a hot day, they will all be ruined. The leaves pull moisture from the bud and quickly damage it. Remove the leaves right away. If you use buds from a scion that isn’t fully grown, very few will survive; they need to be mature. If the top of the selected branch is growing and very soft, don’t use any buds near the top. If you damage the soft part between the bark and the wood while raising the bark to make space for the bud, it won’t stick. If the bud isn’t in close contact with the stalk and securely held in place, it won’t grow. With reasonable care regarding these points, not more than one in fifty should fail.
Time for Budding.—This varies with the season. In the latitude of central New York, in a dry season, when everything matures early, bud peaches from the 15th to the 25th of August—plums, &c., earlier. In wet and great growing seasons, the first ten days in September are best. Much budding is lost on account of having been done so late as to allow no time for the buds to adhere before the tree stops growing for the season. If budding is performed too early, the stalk grows too much over the bud, and it gums and dies. It is utterly useless to bud when the bark is with difficulty loosened; it is always a failure.
Time for Budding.—This changes with the season. In central New York, during a dry season when everything ripens early, bud peaches from August 15th to 25th—plums, etc., earlier. In wet and vigorous growing seasons, the first ten days of September are ideal. A lot of budding fails because it was done too late to allow the buds to attach before the tree stops growing for the season. If budding is done too early, the stalk grows too much over the bud, causing it to gum up and die. It's completely pointless to bud when the bark is difficult to loosen; it will always fail.
BUSHES.
The growth of bushes over pastures, along fences, and in the streets, shows a great want of thrift, and an unpardonable carelessness in a farmer. In pastures, so far from being harmless, they take so much from the soil as to materially injure the quality and quantity of the grass. The only truly effectual method of destroying noxious shrubs, is by grubbing them up with a mattock. Frequent cutting of bushes inclining to spread only increases the difficulty, by giving strength and extension to the roots. Cutting bushes thoroughly in August, in a wet season, and applying manure and plaster to promote the growth of grass, will sometimes quite effectually destroy them. Larger trees, as the sweet locust, that are troublesome on account of sprout[Pg 95]ing out from the roots, when cut down, are effectually killed by girdling two feet from the ground, and allowing to stand one year. The tree, roots, and all, are sure to die.
The growth of shrubs over pastures, along fences, and in the streets shows a real lack of care and an unacceptable level of negligence in a farmer. In pastures, rather than being harmless, they draw so much from the soil that they significantly harm the quality and quantity of the grass. The only truly effective way to get rid of harmful shrubs is by pulling them out with a mattock. Frequent cutting of bushes that tend to spread only makes it harder by strengthening and extending the roots. Cutting bushes back thoroughly in August during a wet season and adding manure and plaster to encourage grass growth can sometimes effectively eliminate them. Larger trees, like the sweet locust, which are a hassle because they sprout from the roots, can be effectively killed by girdling them two feet from the ground and letting them stand for a year. The tree, roots and all, will definitely die.
BUTTER.
Raising the cream, churning, working, and preserving, are the points in successful butter-making. To raise cream, milk may be set in tin, wood, or cast-iron dishes. The best are iron, tinned over on the inside. Tin is better than wood, only on account of its being more easily kept clean. No one can ever make good butter without keeping everything about the dairy perfectly clean and sweet. Milk should never stand more than three inches deep in the pans, to raise the best and most cream. It should be set in an airy room, containing nothing else. Butter and milk will collect and retain the flavor of any other substance near them, more readily than anything else; hence, milk set in a cellar containing onions, or in a room with new cheese, makes butter highly flavored with those articles.
Raising cream, churning, working, and preserving are the key elements of successful butter-making. To raise cream, milk can be placed in tin, wood, or cast-iron containers. The best option is iron, preferably with a tin lining on the inside. Tin is better than wood mainly because it’s easier to keep clean. You can't make good butter without keeping everything in the dairy clean and fresh. Milk should never be more than three inches deep in the pans to raise the best and most cream. It should be stored in a well-ventilated room that has nothing else in it. Butter and milk easily absorb the flavors of nearby substances; therefore, if milk is stored in a cellar with onions or in a room with new cheese, it will take on strong flavors from those items.
Temperature is an important matter. It should be regular, at from fifty to fifty-five degrees of Fahrenheit's thermometer. It is sometimes difficult to be exact in this matter, but come as near it as possible. This can be well regulated in a good cool cellar, into which air can be plentifully admitted at pleasure. Those who are so situated that their milk-house can stand over a spring, with pure water running over its stone floor, are favored. Those who will take pains to lay ice in[Pg 96] their milk-rooms, in very warm weather, will find it pay largely in the quality and quantity of their butter. Those who will not follow either of the above directions, must be content to make less butter, and of rather inferior quality, out of the same quantity of milk.
Temperature is crucial. It should be kept consistent, at around fifty to fifty-five degrees Fahrenheit. It can sometimes be tricky to get it just right, but aim to be as close as possible. This can be effectively managed in a good cool cellar, where you can easily let in fresh air. People who have their milk house situated over a spring with clean water flowing over the stone floor are in a fortunate position. Those who are willing to put ice in [Pg 96] their milk rooms during very warm weather will notice a significant improvement in both the quality and quantity of their butter. If you don’t follow either of these recommendations, you'll have to accept making less butter, and it will likely be of lower quality from the same amount of milk.
Skimming should be attended to when the milk has soured just enough to have a little of it curdle on the bottom of the pan. If it should nearly all curdle, it would not be a serious injury, unless it should become old. If you have not conveniences for keeping milk sufficiently warm in cold weather, place it over the stove at once, when drawn, and give it a scalding heat, and the cream will rise in a much shorter space of time, and more plentifully. Milk should be strained and set as soon as possible after being drawn from the cow, and with the least possible agitation. The unpleasant flavor imparted to milk from the food of the cows, such as turnips or leeks, may be at once removed by adding to the milk, before straining, one eighth of its quantity of boiling water; or two ounces of nitre boiled in one quart of water and bottled, and a small teacupful put in twelve quarts of milk, will answer the same purpose.
Skimming should be done when the milk has soured just enough to have a little curd form at the bottom of the pan. If most of it curdles, it won't be a big issue unless it gets old. If you don’t have the means to keep milk warm during cold weather, put it over the stove right after milking and heat it until it’s scalding. This will help the cream rise more quickly and in greater amounts. Milk should be strained and set as soon as possible after being milked, with as little agitation as possible. To remove the unpleasant taste that can come from the cows' diet, like turnips or leeks, you can add one-eighth of boiling water to the milk before straining; alternatively, adding two ounces of nitre boiled in one quart of water (and bottled), mixed with a small teacupful in twelve quarts of milk, will work just as well.
Milking should be performed with great care. Experiments have demonstrated that the last drawn from a cow yields from six to sixteen times as large a quantity of better cream than that first drawn. Careless milking will make the quantity of butter less, and the quality inferior, while it dries up the cows. There are probably millions of cows now in the United States that are indifferent milkers from this very cause. Quick and clean milking, from the time they first came in, would have made them worth twice as much, for butter and milk,[Pg 97] as they are now. Always milk as quickly as possible, and without stopping, after you commence, and as nearly as possible at the same hour of the day. Leaving a teacupful, or even half that quantity, in milking each cow, will very materially lessen the products of the dairy, and seriously injure the cows for future use. Great milkers will yield considerable more by having it drawn three times per day. The quantity of milk given by a cow will never injure her, provided she be well fed. As it takes food to make meat, so it does also to make milk; you can never get something for nothing. The best breeds of swine, cattle, or fowls, can not be fattened without being well fed: so the best cows will never give large messes of milk unless they are largely fed.
Milking should be done with great care. Studies have shown that the last bit of milk drawn from a cow produces six to sixteen times more higher quality cream than the first drawn. Careless milking will reduce the amount of butter and its quality, and could lead to the cows drying up. There are likely millions of cows in the United States that are poor milkers because of this issue. Quick and clean milking from the start would have made them worth twice as much in butter and milk,[Pg 97] as they are now. Always milk as quickly as possible without stopping once you begin, and try to do it at the same time each day. Leaving even a small amount, like a teacupful, of milk in each cow will significantly decrease dairy output and harm the cows for future use. Cows that are good milkers will produce considerably more if milked three times a day. The amount of milk a cow provides won’t harm her as long as she is well-fed. Just as it takes food to produce meat, it also takes food to produce milk; you can’t get something for nothing. The best breeds of pigs, cattle, or poultry can’t be fattened without proper feeding: similarly, the best cows won’t produce large amounts of milk without being well-fed.
Churning.—This is entirely a mechanical process. The agitation of the cream dashes the oily globules in the cream against each other, and they remain together and grow larger, until the butter is, what the dairy woman calls, gathered. The butter in the milk, when drawn from the cow, is the same as when on the table, only it is in the milk in the form of very small globes: churning brings them together. The object then to be secured, by any form of a churn, is agitation, or dashing and beating together.
Churning.—This is purely a mechanical process. The movement of the cream crashes the fat globules in the cream against one another, causing them to stick together and grow larger until the butter is, as the dairy woman puts it, gathered. The butter in the milk, when taken from the cow, is the same as what you see on the table; it's just in the milk as tiny globules. Churning unites them. The goal, using any type of churn, is to create agitation, or to dash and beat them together.
Temperature of the Cream should be from sixty to sixty-five degrees—perhaps sixty-two is best. This had better always be determined by a thermometer immersed in it.
Temperature of the Cream should be between sixty and sixty-five degrees—maybe sixty-two is the best. It’s best to always check this with a thermometer placed in it.
Many churns have been invented and patented; and every new one is, of course, the best. A cylinder is usually preferred as the best form for a churn, and the churning is performed by turning a crank. An oblong[Pg 98] square box is far better than a cylinder. In churning in a cylinder, it may often occur that the cream moves round in a body with the dasher, and so is but slightly agitated. But change that cylinder into an oblong square, and the cream is so dashed against the corners of the box that a most rapid agitation is the result, and the churning is finished in a short space of time.
Many churns have been invented and patented, and every new one claims to be the best. Generally, a cylinder is considered the best shape for a churn, and you usually churn by turning a crank. However, an oblong square box is far superior to a cylinder. When churning in a cylinder, sometimes the cream just moves in a lump with the dasher, resulting in only slight agitation. But if you switch that cylinder for an oblong square, the cream gets thrown against the corners of the box, leading to much more vigorous agitation, and the churning gets done in a much shorter time.
Any person of a little mechanical genius can construct a churn, equal to any in use, and at a trifling expense. It is well to make a churn double, leaving an inch between the two, into which cold or warm water can be poured, to regulate the temperature of the cream. This would be a great saving of time and patience in churning. Those who use the old-fashioned churns with dashes can most conveniently warm or cool their cream, by placing the churn containing it in a tub of cold or boiling water, as the case may require, until it comes to the temperature of sixty or seventy degrees.
Anyone with a bit of mechanical skill can build a churn that works just as well as any currently available, and it won't cost much. It's a good idea to make a double-layered churn, leaving an inch of space between the two layers where you can pour in cold or warm water to adjust the temperature of the cream. This would save a lot of time and effort when churning. Those who use traditional churns with plungers can easily warm or cool their cream by putting the churn in a tub of cold or boiling water, depending on what’s needed, until it reaches a temperature of sixty or seventy degrees.
To make butter of extra quality for the fair, or for a luxury on your own table, set only one third of the milk, and that the last drawn from the cow. The Scotch, so celebrated for making butter of more marrowy richness than any other, first let the calves draw half or two thirds of the milk, and then take the remainder. This makes the finest butter in the world.
To make high-quality butter for the fair or as a treat for your own table, use only one third of the milk, and make sure it's the last milk drawn from the cow. The Scots, famous for producing richer butter than anyone else, first let the calves have half or two thirds of the milk, and then take the rest. This method results in the finest butter in the world.
Preserving Butter depends upon the treatment immediately after churning. Success depends upon getting the buttermilk all out, and putting in all the salt you put in at all, immediately—say within ten minutes after churning. Some accomplish this by washing, and others by working it, being much opposed to putting in a drop of water. Those who use water in their butter, and those who do not, are equally confident of the su[Pg 99]periority of their own method. But all good butter-makers agree, that the less you work butter, and still remove all the milk, the better it will be; and the more you are obliged to work it, the more gluey, and therefore the poorer the quality. Very good butter is made by immediately working all the milk out and salting thoroughly—working the salt into every part, without the use of water.
Preserving Butter relies on how you handle it right after churning. Success hinges on getting all the buttermilk out and adding all the salt you need immediately—ideally within ten minutes of churning. Some people do this by washing the butter, while others prefer to work it, strongly opposing the use of any water. Those who add water to their butter and those who don’t both believe their method is best. However, all good butter-makers agree that the less you work the butter while still getting all the milk out, the better it will be. The more you have to work it, the more sticky and lower in quality it becomes. High-quality butter is made by working out all the milk and thoroughly salting it—making sure the salt gets into every part without using any water.
Working over butter, the next day after churning, should be nothing more than nicely forming it into rolls, without any further working or any more salt. An error, that spoils more butter than any other, is that of doing very little with butter when it first comes out of the churn, because it must be gone through with the next day. Many do not know why their butter has different colors in the same mass—some white, and some quite yellow, and all shades between. The reason always is, putting in the salt immediately on churning, but neglecting to incorporate that salt into every part of the mass equally: thus, where there is most salt there will be one color, and where less, another. Another evil is, when the salt is thus put in carelessly, while much buttermilk remains, that salt dissolves; and when the butter is worked over the next day, the salt is mostly worked out, with the milk or water left in, the previous day. The addition of more salt then will not save it. It has received an injury, by retaining the milk or water for twenty-four hours, from which no future treatment will enable it to recover. We recommend washing as preferable; it has the following advantages: it cools butter quickly in warm weather, bringing it at once into a situation to be properly worked and salted. The buttermilk is also removed[Pg 100] more speedily than in any other way; this is a great object. It removes the milk with less working, and consequently with less injury, than the other method. These three advantages, cooling in hot weather, expelling the milk in the shortest time, and working the butter the least, lead us to prefer using water, by one hundred per cent. We have for years used butter that has been made in this way, and never tasted better. Butter made in this way in summer will keep well till next summer, to our certain knowledge. Immediately after churning, pour off all the milk and put in half a pailful of water, more or less according to quantity; agitate the whole with the dasher, and pour off the water. Repeat this once or twice until the water runs off clear, without any coloring from the milk, and nearly all the buttermilk is out; this can all be done in five minutes after churning. Press out the very little water that will remain, and put in all the salt the butter will require, and work it thoroughly into every part. All this need occupy no more than ten minutes, and the butter is set away for putting up in rolls, or packing down in jars the next day. Such butter would keep tied up in a bag, and hung in a good airy place. Best to put it down in a jar, packed close; put a cloth over top, and cover with half an inch of fine salt. The only difficulty in keeping butter grows out of failure to get out all the milk, and thoroughly salt every particle, within fifteen minutes after churning. Speedy removal of buttermilk and water, and speedy salting, will make any butter keep.
Working over butter the day after churning should be just about forming it into rolls, without any extra work or added salt. A common mistake that ruins more butter than anything else is not handling the butter enough right after it comes out of the churn, as it needs to be processed the next day. Many people don’t understand why their butter has different colors in the same batch—some parts white, others very yellow, and everything in between. This happens because they add the salt right after churning but fail to mix it evenly throughout the mass. So, where there’s more salt, it will have one color, and where there’s less, another. Another problem occurs when the salt is added carelessly while there's still a lot of buttermilk left; the salt dissolves, and when the butter is worked the next day, most of the salt gets washed out along with the remaining milk or water from the previous day. Adding more salt won’t fix it. The butter has already been damaged by holding onto the milk or water for twenty-four hours, and no future method will help it recover. We suggest washing the butter as a better option; it has several advantages: it cools the butter quickly during warm weather, making it ready to be properly worked and salted right away. The buttermilk is also removed[Pg 100] more quickly than any other method, which is really important. This method gets rid of the milk with less handling and, therefore, less damage than the others. These three benefits—cooling in hot weather, quickly removing the milk, and minimizing the working of the butter—make us prefer using water significantly. We’ve used butter made this way for years and have never had better. Butter made like this in summer will stay good until next summer, as we know for sure. Immediately after churning, pour off all the milk and add about half a pailful of water, adjusting based on the amount of butter; agitate everything with the dasher and pour off the water. Repeat this one or two more times until the water runs clear, without any milk coloring, and most of the buttermilk is gone; you can do all of this within five minutes of churning. Squeeze out the little water that remains, then add all the salt the butter needs, mixing it thoroughly into every part. This should take no more than ten minutes, and then the butter is ready to be put into rolls or packed in jars the next day. Such butter can be kept in a bag hung in a well-ventilated spot. It’s best to store it in a jar, packed tightly; cover it with a cloth and add half an inch of fine salt on top. The main challenge in keeping butter comes from not removing all the milk and fully salting every bit within fifteen minutes after churning. Quickly removing buttermilk and water, along with fast salting, will ensure any butter is preserved.
This subject is so important, as good butter is such a luxury on every table, that we recapitulate the essentials of good butter making:[Pg 101]—
This topic is really significant because good butter is a luxury on every table, so let's summarize the essentials of making good butter:[Pg 101]—
1. Keep everything sweet and clean, and well dried in the sun.
1. Keep everything nice and tidy, and well dried in the sun.
2. Milk the cows, as nearly as possible, at the same hour, and draw the milk very quickly and very clean.
2. Milk the cows as close to the same time as you can, and collect the milk quickly and cleanly.
3. Set the milk, in pans three inches deep, in good air, removed from anything that might give it an unpleasant flavor, and where it will be at a temperature of fifty to sixty degrees.
3. Place the milk in pans that are three inches deep in a well-ventilated area, away from anything that could affect its taste negatively, and make sure it stays at a temperature between fifty and sixty degrees.
4. Churn the cream at a temperature of sixty-two degrees.
4. Churn the cream at a temperature of sixty-two degrees.
5. Get out the buttermilk, and salt thoroughly within fifteen minutes after churning, either with water or without, as you prefer. Mix the salt thoroughly in every particle. Put up in balls, or pack closely in jars the next day.
5. Take out the buttermilk and salt it well within fifteen minutes after churning, either with water or without, depending on your preference. Make sure to mix the salt thoroughly into every bit. Shape it into balls or pack it tightly into jars the next day.
6. Remember to work the butter as little as possible in removing the milk; the more it is worked, the more will it be like salve or oil, and the poorer the quality: hence, it is better to wash it with cold water, because you can wash out the buttermilk with much less working of the butter.
6. Remember to handle the butter as little as you can while removing the milk; the more you work it, the more it will resemble salve or oil, and the lower the quality will be: therefore, it's better to wash it with cold water, as you can rinse out the buttermilk with much less handling of the butter.
7. To make the best possible quality of butter, use only one third of the milk of the cows at each milking, and that the last drawn.
7. To achieve the highest quality butter, use only one-third of the milk from the cows at each milking, and make sure it's the last milk drawn.
8. In the winter, when cream does not get sufficiently sour, put in a little lemon-juice or calves' rennet. If too white, put in a little of the juice of carrot to give it a yellow hue.[Pg 102]
8. In the winter, when cream doesn't sour enough, add a little lemon juice or rennet. If it's too white, mix in some carrot juice to give it a yellow tint.[Pg 102]
BUTTERNUT.
This is a rich, pleasant nut, but contains rather too much oil for health. The oil, obtained by compression, is fine for clocks, &c.
This is a rich, nice nut, but it has a bit too much oil for health. The oil, extracted by pressing, is great for clocks, etc.
The root, like the branches, are wide-spreading, and hence injurious to the land about them. Two or three trees on some corner not desired for cultivation, or in the street, will be sufficient. A rough piece of ground, not suitable for cultivation, might be occupied by an orchard of butternut-trees, and be profitable for market and as a family luxury. The bark is often used as a coloring substance.
The roots, like the branches, spread out widely, which can be harmful to the surrounding land. Just two or three trees in an area that isn’t meant for farming, or on the street, would be enough. A rough patch of land that isn't good for farming could be turned into a butternut orchard, making it both profitable for the market and a nice addition for the family. The bark is often used as a dye.
CABBAGE.
The best catalogues of seeds enumerate over twenty varieties, beside the cauliflowers, borecoles, &c. A few are superior, and should, therefore, be cultivated to the exclusion of the others.
The best seed catalogs list over twenty varieties, in addition to cauliflowers, kale, etc. A few are superior and should be grown instead of the others.
Early York is best for early use. It is earlier than any other, and with proper treatment nearly every plant will form a small, compact, solid head, tender, and of delicious flavor. No garden is complete without it.
Early York is ideal for early planting. It’s earlier than all the others, and with the right care, almost every plant will develop a small, compact, solid head, tender, and flavorful. No garden is complete without it.
Early Dutch, and Early Sugarloaf, come next in season to the Early York, producing much larger heads.
Early Dutch, and Early Sugarloaf, come next in season after the Early York, producing much larger heads.
Large York is a good variety, maturing later than the preceding, and before the late drumheads.
Big York is a great variety, maturing later than the ones before it and earlier than the late drumheads.
Large Drumhead, Late Drumhead, or Large Flat Dutch, are the best for winter and spring use. There are many varieties under these names, so that cultivators often get disappointed in purchasing seeds. It[Pg 103] is now difficult to describe cabbages intelligibly. Every worthless hybrid goes under some excellent name.
Large Drumhead, Late Drumhead, or Large Flat Dutch are the best for winter and spring use. There are many varieties under these names, so cultivators often end up disappointed when they buy seeds. It[Pg 103] is now hard to describe cabbages clearly. Every useless hybrid is sold under some great name.
A Dutch cabbage, with a short stem and very small at the ground, is the best with which we are acquainted. Of this variety (the seed of which was brought from Germany), we have raised solid heads, larger than a half bushel, while others called good, standing by their side, did not grow to more than half that size. This variety may be distinguished by the purple on the top of the grown head, and by the decided purple of the young plants, resembling the Red Dutch, though not of quite so deep a color.
A Dutch cabbage, with a short stem and very small at the base, is the best one we know of. We got the seeds for this variety from Germany and have grown solid heads that are larger than a half bushel, while others considered good, standing next to them, didn’t grow to more than half that size. This variety can be recognized by the purple on the top of the mature head and the noticeable purple of the young plants, resembling the Red Dutch, though not quite as deep in color.
Red Dutch, having a very hard, small head, deep purple throughout, is the very best for pickling; every garden should have a few. They are also good for ordinary purposes.
Red Netherlands, with its small, tough head and deep purple color, is the best choice for pickling; every garden should include a few. They're also great for regular use.
Green Curled Savoy, when well grown, is a good variety.
Savoy Cabbage is a great variety when properly cultivated.
The Imperial, the Russian, Large Scotch for feeding, and others, are enumerated and described, but are inferior to the above. It is useless to endeavor to grow cabbages on any but the best of soil. Plant corn on poor land, and it will mature and yield a small crop. Plant cabbages on similar soil, and you will get nothing but a few leaves for cattle. Therefore, if your land designed for cabbages be not already very rich, put a load of stable-manure on each square rod. Cabbages are a very exhausting crop. The soil should be worked fully eighteen inches deep, and have manure well mixed with the whole. The best preparation we ever made was by double-plowing—not subsoiling, but plowing twice with similar plows: put on a good coat of manure, and plow with two teams in the same furrow, one[Pg 104] plow gauged so as to turn a light furrow, and the other a very deep one, throwing it out of the bottom of the first; when the first plow comes round, it will throw the light furrow into the bottom of the deep one. This repeated over the whole plot will stir the soil sixteen or eighteen inches deep, and put from four to six inches of the top, manure and all, in the bottom, under the other. We have done this admirably with one plow, changing the gauge of the clevis every time round, and going twice in a furrow: this is the best way for those who use but one team in plowing; it is worth much more than the additional time required in plowing. Enrich the surface a little with fine manure, and you have land in the best possible condition for cabbages. This is a fine preparation for onions and other garden vegetables, and for all kinds of berries. Subsoiling is good, but double-plowing is better in all cases, where you can afford to enrich the surface, after this deep plowing.
The Imperial, Russian, Large Scotch for feeding, and others are listed and described, but they are not as good as the ones mentioned earlier. It’s pointless to try to grow cabbages in anything but the best soil. If you plant corn on poor land, it will grow but produce a small harvest. Plant cabbages in similar soil, and you’ll only get a few leaves for the animals. So, if the soil you plan to use for cabbages isn’t already rich, add a load of stable manure on each square rod. Cabbages drain the soil of nutrients. The soil should be worked at least eighteen inches deep, with the manure thoroughly mixed in. The best preparation we achieved was through double-plowing—not subsoiling, but plowing twice with the same type of plow: apply a good layer of manure, and plow with two teams in the same furrow, one plow set to create a light furrow, and the other to dig a deep one, pushing it out from the bottom of the first. When the first plow circles back, it will fill the light furrow with the deeper soil. Repeating this across the entire area will mix the soil to a depth of sixteen or eighteen inches and deposit four to six inches of the topsoil, along with the manure, down below the other. We've accomplished this successfully with one plow, adjusting the gauge of the clevis each time round and plowing twice in each furrow; this is the best method for those using just one team for plowing; it’s far more valuable than the extra time spent. Enrich the surface a bit with fine manure, and you’ll have land that’s in the best possible condition for cabbages. This method is also excellent for onions and other garden vegetables, as well as all types of berries. Subsoiling is beneficial, but double-plowing is preferable in all cases where you can afford to enrich the surface after this deep plowing.
The alluvial soils of the West need no enriching after double-plowing. Land so level, or having so hard a subsoil as to allow water to stand on it in a wet season, is not good for cabbages. They also suffer more than most crops from drought. One of the most important offices of plenty of manure is its control of the moisture. Land well manured does not so soon feel the effects of drought. One of the best means of preserving moisture about the roots of cabbages, is to put a little manure in the bottom of the holes when transplanting; put it six inches below the surface. Manure from a spent hotbed is excellent for this purpose; it is in the best condition about the time for transplanting cabbages. It is then very wet, and has a wonderful power of retaining the[Pg 105] moisture. Manure from the blacksmith-shop, containing hoof-parings, &c., is very good. If the manure be too dry, pour in water and cover immediately. Set the plant in the soil, over the manure, the roots extending down into it, with a little fine mould mixed in it, and it will retain moisture through a severe drought; no further watering will be necessary, and not one out of twenty-five of all your plants will fail to make a good head. In climates subject to drought in summer, cabbages should be set out earlier; they require more time in dry weather than in wet. Should they incline to crack open from too rapid growth, raise them a little, and push them down again; this will break some roots, and so loosen the remainder that the growth will be checked and the heads saved. Winter cabbages should be allowed to stand in the ground as long as possible, without danger of freezing in. The question of transplanting, and of sowing the seed in the places where they are designed to head, has been much controverted. We have succeeded well in both ways, but prefer transplanting; it gives opportunity to stir the ground deep, and keep down weeds, and thus preserve moisture until summer, when it is time to transplant; it also makes shorter, smaller, and straighter stems, which is favorable to a larger growth of heads. Sow seed on poor land; the plants will be straighter, more hardy, and less affected by insects. Seed for early spring cabbages should be sown on poor soil in September or October; if inclined to get too forward, transplant, once or twice; late in fall, set them close together, lay poles in forks of limbs put down for the purpose, and cover with straw, as a protection from severe frost; the poles are to prevent the covering from lying on the plants.[Pg 106]
The alluvial soils of the West don’t need any extra nutrients after being double-plowed. Flat land, or land with a hard subsoil that holds water during wet seasons, isn’t suitable for cabbages. They also tend to struggle more than other crops during droughts. One of the key benefits of using plenty of manure is that it helps manage moisture. Manured land doesn’t feel the effects of drought as quickly. One effective way to keep moisture around cabbage roots is to place a bit of manure at the bottom of the holes when transplanting; it should be six inches below the surface. Manure from a used hotbed works great for this; it’s in the best condition right around the time for transplanting cabbages. It’s very wet and has an amazing ability to retain moisture. Manure from a blacksmith's shop, which includes hoof clippings and so on, is also very good. If the manure is too dry, add water and cover it immediately. Plant the cabbage in the soil over the manure, with its roots reaching down into it, mixed with a bit of fine soil. This will help retain moisture even during a serious drought; no additional watering will be needed, and about one in twenty-five of your plants should fail to produce a good head. In areas prone to summer drought, you should transplant cabbages earlier; they need more time in dry weather than in wet. If they start to crack open from growing too quickly, lift them slightly and push them back down; this will break some roots and loosen the others, slowing down growth and saving the heads. Winter cabbages should be left in the ground as long as possible without the risk of freezing. There’s been a lot of debate about whether to transplant or sow seeds where the cabbages are meant to grow. We’ve had success with both methods, but we prefer transplanting; it allows for deeper soil disturbance and weed control, helping to maintain moisture until summer when it’s time to transplant. It also leads to shorter, smaller, straighter stems, which is beneficial for larger heads. Sow seeds for early spring cabbages in poor soil in September or October; if they start to grow too quickly, transplant them once or twice. In late fall, plant them close together, set poles in the forks of branches laid down for this purpose, and cover with straw to protect against severe frost; the poles will keep the covering from resting on the plants.
Preserving, for winter or spring use, is best done by plowing a furrow on land where water will not stand, and placing the heads in the furrow with the roots up. Cover with earth from three to six inches deep, letting the roots protrude. The large leaves will convey all the water off from the heads, and they will come out as fresh and good as in the fall. If you wish some, more easily accessible, for winter use, set them in the cellar in a small trench, in which a little water should be kept, and they will not only be preserved fresh, but will grow all winter, if the cellar be free from frost. They are also well preserved put in trenches eighteen inches deep, out door, with a little good soil in the bottom, and protected with poles and straw as directed for winter plants. Cabbages that have scarcely any heads in the fall, so treated, will grow all winter, and come out good, tender, fresh heads in spring.
Preserving for winter or spring use is best achieved by digging a trench in land where water won't collect, and placing the heads in the trench with the roots facing up. Cover them with three to six inches of soil, allowing the roots to stick out. The large leaves will direct water away from the heads, and they will stay as fresh and good as they were in the fall. If you want some that are easier to access for winter use, place them in the basement in a small trench with a bit of water; they will not only remain fresh but will also grow throughout the winter, as long as the basement is frost-free. They can also be effectively preserved in trenches eighteen inches deep outdoors, with a bit of good soil at the bottom, and protected with poles and straw as suggested for winter plants. Cabbages that have minimal heads in the fall can be treated this way, and they will grow all winter, resulting in good, tender, fresh heads in the spring.
Transplanting.—This is usually done in wet weather: if it be so wet as to render the soil muddy by stirring, it injures the plants. This may be successfully done in dry weather, not excessively hot. Have a basin of water, in which dip the root and shake it, so as to wash off all the earth from the seed-bed that adheres to it. Put the plant in its place at once, and the soil in which it is to grow takes hold of the roots readily, and nearly every one will live. Transplant with your hand, a transplanting trowel, a stick, or a dibble made of a spade-handle, one foot long, sharpened off abruptly, and the eye left on for a handle. Put the plant in its place, thrust the dibble down at a sharp angle with the plant, and below it, and move it up to it. The soil will thus be pressed close around the roots, leaving no open space, and the plant will[Pg 107] grow. Do not leave the roots so long that they will be doubled up in transplanting—better cut off the ends.
Transplanting.—This is usually done in wet weather: if it’s too wet to the point that stirring makes the soil muddy, it harms the plants. You can also do this successfully in dry weather, as long as it’s not excessively hot. Have a basin of water ready, dip the roots in it, and shake them to wash off all the dirt that’s sticking from the seed-bed. Place the plant immediately, and the soil where it will grow will easily grip the roots, ensuring that almost all of them will survive. Transplant using your hand, a transplanting trowel, a stick, or a dibble made from a spade handle, about one foot long, sharpened at one end, leaving the other end for a handle. Place the plant in its spot, thrust the dibble down at a sharp angle beside the plant, then move it up to it. This will press the soil tightly around the roots, leaving no gaps, and the plant will[Pg 107] grow. Don’t keep the roots out too long to avoid them getting tangled when transplanting—it’s better to trim the ends.
Large cabbages should be three feet apart each way, and in perfectly straight rows; this saves expense in cultivating, as it can be done with a horse. The usual objections of farmers to gardening, on account of the time required to hoe and weed, would be remedied by planting in long, straight rows, at suitable distances apart, to allow the free use of horse, cultivator, and plow, in cultivating; thus, beets, carrots, cabbages, onions, &c., are almost as easily raised as corn. An easy method of raising good cabbages is on greensward. Put on a good dressing of manure, plow once and turn over handsomely, roll level, and harrow very mellow on the top, without disturbing the turf below; make places for planting seeds at the bottom of the turf; a little stirring of the surface, and destruction of the few weeds that will grow, will be all the further care necessary. The roots will extend under the sod in the manure below it, and will there find plenty of moisture, even when the surface is quite dry, and will grow profusely.
Large cabbages should be spaced three feet apart in every direction and planted in perfectly straight rows; this reduces the costs of cultivation since it can be done with a horse. The common concerns farmers have about gardening, due to the time needed for hoeing and weeding, can be addressed by planting in long, straight rows at proper distances apart, allowing for the efficient use of horses, cultivators, and plows during cultivation; thus, beets, carrots, cabbages, onions, etc., can be grown almost as easily as corn. A simple method for growing good cabbages is on grassland. Apply a good layer of manure, plow it once and turn it over well, roll it flat, and harrow the top to make it very fine, without disturbing the soil beneath the turf; create spots for planting seeds at the base of the turf; a little work on the surface and removing the few weeds that may grow will be all the care needed afterward. The roots will grow under the sod in the manure below, where they will find plenty of moisture, even when the surface is quite dry, and will thrive abundantly.
Seed.—Nothing is more difficult in cabbage culture than raising pure seed; nothing hybridizes worse, and in nothing else is the effect worse. It must not be raised in the same garden with anything else of the cabbage or turnip kind; they will mix in the blossoms, and the worse will prevail. Raise seeds only from the best heads, and only one variety; break off all the lower shoots, allowing only a few of the best to mature. Seeds raised from stumps, from which the head has been removed for use, will incline the leaves to grow down, as we often see, instead of closing up into heads.[Pg 108]
Seed.—Nothing is more challenging in cabbage cultivation than producing pure seed; nothing hybridizes worse, and the consequences are more significant. It should not be grown in the same garden as any other cabbage or turnip varieties; they will cross-pollinate in the flowers, and the less desirable traits will dominate. Only collect seeds from the best heads, and stick to a single variety; remove all the lower shoots, leaving only a few of the best to mature. Seeds taken from stumps, where the head has been harvested for use, will cause the leaves to grow downward, as we often observe, rather than forming proper heads.[Pg 108]
CALVES.
The best method of raising calves is of much importance. It controls the value and beauty of grown cattle. Stint the growth of a calf, and when he is old he will not recover from it. Much attention has been paid to the breed of cattle, and some are very highly recommended. It is true that the breed of stock has much to do with its excellence. It is equally true that the care taken with calves and young cattle, has quite as much to do with it. We can take any common breed, and by great care in raising, have quite as good cattle, for market or use, as can another, who has the best breed in the world, but keeps them indifferently. But good breeds and good keeping make splendid animals, and will constantly improve them. The old adage, "Anything worth doing at all, is worth doing well" is nowhere more true, than in the care of calves. We shall not pause to present the various and contradictory methods of raising calves, that are presented in the numerous books, on the subject, that have come under our observation. Hay-tea, various preparations of linseed-meal, oilcake-meal, oatmeal, and every variety of ground feed, sometimes mixed up with gin, or some kind of cheap spirits (for the purpose of keeping calves quiet), are recommended. The discussion of the merits of these, would be of no practical benefit to our readers.
The best way to raise calves is really important. It affects the value and quality of adult cattle. If you stunt a calf's growth, it won’t recover when it’s older. There’s been a lot of focus on cattle breeds, and some are highly recommended. It's true that the breed of livestock significantly impacts its quality. However, it's also true that the care given to calves and young cattle is just as important. We can take any common breed and, with great care in raising, produce cattle that are just as good for market or use as someone with the best breed in the world who doesn’t take proper care of them. But good breeds combined with good care produce outstanding animals and will continually improve them. The old saying, “Anything worth doing is worth doing well,” is especially true when it comes to taking care of calves. We won’t pause to discuss the various and conflicting methods of raising calves that are presented in the many books we've seen on the subject. Hay-tea, different preparations of linseed meal, oilcake meal, oatmeal, and all kinds of ground feed—sometimes mixed with gin or some cheap spirits to keep calves calm—are all recommended. Discussing the benefits of these would provide no practical value to our readers.
The following brief directions are sufficient:—
The following short instructions are enough:—
1. Seldom raise late calves. Their place is in the butcher's shop, after they are five weeks old.
1. Rarely raise calves past their prime. They belong in the butcher's shop once they’re five weeks old.
2. Raise only those calves that are well formed.[Pg 109] Straight back, small neck, not very tall, and a good expression of countenance, are the best marks.
2. Only raise calves that are well-shaped.[Pg 109] A straight back, short neck, not too tall, and a good facial expression are the best traits.
3. Let every calf suck its dam two days. It is for the health of the calf and the good of the cow.
3. Let every calf nurse from its mother for two days. It's for the health of the calf and the benefit of the cow.
4. To fatten a calf, let it suck one half the milk for two weeks, three fourths the third, and the whole the fourth. Continue it another week, and the veal will be better. But we think it preferable to take calves off from the cow after two days. Feed them the milk warm from the cow, and give them some warm food at noon. Feed three times a day, they will fatten faster. It also gives opportunity to put oatmeal in their food after the second week, which will improve the veal, and give you a little milk, if you desire it. Our first method is easier, and our last better, for fattening calves.
4. To fatten a calf, let it drink half the milk for two weeks, three-quarters the third week, and all of it in the fourth week. Continue this for another week, and the veal will be better. However, we think it's better to take calves off the cow after two days. Feed them warm milk from the cow, and give them some warm food at noon. Feeding them three times a day will help them gain weight faster. This also allows you to add oatmeal to their food after the second week, which will improve the veal and give you some milk if you want it. Our first method is easier, but our last method is better for fattening calves.
5. To raise calves for stock, take them from the cows after the second day. Feed them half the milk (if the cow gives a reasonable quantity) for the first two weeks. Begin then to put in a little oatmeal. After two weeks more, give one fourth of the milk, and increase the quantity of meal. When the calf is eight or ten weeks old, feed it only on meal and such skimmed milk, sour milk, or buttermilk, as you may have to spare. This is the course when the object is to save milk. If not, let the calf have the whole, with such addition of meal as you think desirable. The easiest way to raise calves, when you do not desire the milk for the family or dairy, is to let them run with the cows and have all the milk when they please.
5. To raise calves for stock, take them from the cows after the second day. Feed them half the milk (if the cow gives a reasonable amount) for the first two weeks. Then start adding a bit of oatmeal. After two more weeks, give one fourth of the milk and increase the amount of meal. When the calf is eight to ten weeks old, feed it only with meal and any skimmed milk, sour milk, or buttermilk that you can spare. This is the method to save milk. If you don't need to save milk, let the calf have all of it, along with whatever amount of meal you think is appropriate. The easiest way to raise calves when you don't need the milk for your family or dairy is to let them stay with the cows and have as much milk as they want.
Others let them suck a part of the milk, and feed them with meal, &c., besides. This is difficult. If you milk your own share first, you will leave much less for the calf than you suppose. If he gets his portion first,[Pg 110] he will be sure to get a part of yours also. This can only be well done by allowing the calf to suck all the udders, but not clean. The remainder, being the last of the milk will make the best of butter. But it is difficult to regulate it as you please, and more difficult to feed a calf properly, that sucks, than one that depends wholly upon what you feed him. Hence it is preferable to feed all your calves, whether for veal or stock. A little oilcake pulverized is a valuable addition. Indian-meal and the coarse flour of wheat are good for calves, but not equal to oatmeal. Good calves have been raised on gruels made of these meals, without any milk after the first two weeks.
Others let them drink some of the milk and feed them with meals, etc., in addition. This is tricky. If you milk your share first, you’ll leave much less for the calf than you think. If he gets his portion first, he will definitely get some of yours too. The only way to manage this well is to let the calf suck all the udders but not completely empty them. The leftover milk will make the best butter. However, it’s hard to regulate this as you want, and it’s even harder to properly feed a calf that sucks than one that relies entirely on what you feed him. So, it’s better to feed all your calves, whether for veal or for stock. A bit of crushed oilcake is a valuable addition. Cornmeal and coarse wheat flour are good for calves, but not as good as oatmeal. Healthy calves have been raised on gruels made from these meals without any milk after the first two weeks.
6. In winter, feed chopped roots and meal, mixed with plenty of hay and pure water, and always from a month old give salt twice a week.
6. In winter, provide chopped roots and feed, mixed with plenty of hay and clean water, and starting from one month old, give salt twice a week.
7. If calves are inclined to purge or scour, as the farmers call it, put a little rennet in their food. If they are costive, put in a little melted lard, or some kind of inoffensive oil. These will prove effectual remedies.
7. If calves are prone to diarrhea, as farmers say, add a little rennet to their food. If they're constipated, mix in some melted lard or a harmless oil. These will be effective remedies.
There is, however, very little danger of disease, to calves, well, regularly, and properly fed, as above.
There is, however, very little risk of disease for calves that are well, regularly, and properly fed, as mentioned above.
Fat calves are not apt to have lice. But should such a thing occur, washing in tobacco-water is a speedy and perfect remedy.
Fat calves are typically not likely to have lice. However, if that happens, washing them in tobacco water is a quick and effective solution.
8. During cold nights in fall, and all of the first winter, calves should be shut up in a warm dry place. Keep them curried clean.
8. During chilly nights in the fall and throughout the early winter, calves should be kept in a warm, dry space. Make sure to keep them clean and well-groomed.
The cold and wet of the first winter are very injurious. After they are a year old they will give very little trouble. The great difficulty with calves is a want of enough to eat. They should not only be kept growing,[Pg 111] but fat, all the first year. They will then make fine, healthy, and profitable animals.
The cold and wet of the first winter can be really harmful. After they turn a year old, they won't cause much trouble. The main issue with calves is that they don’t get enough to eat. They should not only be kept growing,[Pg 111] but also fat during their first year. This way, they'll become healthy and valuable animals.
Chalk or dry yellow loam, placed within their reach is very useful. They will eat of it, enough to correct the excessive acidity of their stomachs. The operation of changing calves into oxen, should be performed before they are twenty days old. It will then be only slightly injurious.
Chalk or dry yellow loam, placed within their reach, is very helpful. They will eat enough of it to balance out the excessive acidity in their stomachs. The process of turning calves into oxen should be done before they are twenty days old. It will then only be slightly harmful.
CANS.
These are much used for preserving fruits and vegetables. There are a number of patent articles said to work well. They are, in our opinion, more expensive, and more likely to fail in inexperienced hands, than those that an ordinary tinman can readily make. The best invention for general use is that that is most simple. Cans should be made in cylindrical form, with an orifice in the top large enough to admit whatever you wish to preserve, and should contain about two quarts. Fill the cans and solder on the top, leaving an opening as large as a pin-head, from which steam may escape. Set the cans in water nearly to their tops, and gradually increase the heat under them until the water begins to boil. Take out the cans, drop solder on the opening, and all will be air-tight. This operation requires at least three hours, as the heating must be moderate. You may preserve in glass bottles, filling and putting in a cork very tight, and well tied, and gradually heating as above; this will require four hours, as glass will be in danger of bursting by too rapid heating. But for tomatoes, or anything that you have no objection to[Pg 112] boiling and seasoning before preserving, the best way is to prepare and cook as for the table, putting in only pepper and salt, and fill cans while the mass is boiling, and, with a sealing-wax that you can get at any druggist's laid around the orifice, place the cover upon it; the heat will melt the wax, and when it cools, the cover will be fastened, and all will be air-tight. This will require no process of slow boiling. Set the cans or bottles in a cool cellar, and whatever they contain may be taken out, at the end of a year, as good as when put in. The last method is the best and most simple of all. The whole principle of preserving is to make the cans air-tight.
These are commonly used for preserving fruits and vegetables. There are several patented products that claim to work well. However, in our view, they are more expensive and more likely to fail in untrained hands than those that any average tinworker can easily make. The best invention for general use is the simplest one. Cans should be made in a cylindrical shape, with an opening at the top large enough to fit whatever you want to preserve, and should hold about two quarts. Fill the cans and solder the top on, leaving a hole as small as a pinhead for steam to escape. Place the cans in water almost up to the top and gradually increase the heat until the water starts to boil. Remove the cans, seal the opening with solder, and everything will be airtight. This process takes at least three hours, as the heating must be gentle. You can also preserve in glass bottles by filling them and inserting a tightly tied cork, then gradually heating them as mentioned before; this will take four hours since glass is at risk of breaking from quick heating. For tomatoes, or anything you don't mind boiling and seasoning beforehand, the best method is to prepare and cook them as you would for serving, adding only pepper and salt. Fill the cans while the mixture is boiling, apply sealing wax—available at any pharmacy—around the opening, and place the cover on top; the heat will melt the wax, and when it cools, the cover will be secure and airtight. This method doesn’t require slow boiling. Store the cans or bottles in a cool cellar, and anything inside can be taken out after a year, just as good as when it was put in. This last method is the best and simplest of all. The key to preserving is making the cans airtight.
CARROTS.
These are cultivated for the table, and for food for animals. Boiled and pickled, or eaten with an ordinary boiled dish, they are esteemed. They are really excellent in soups. As a root for animals, they are very valuable. They are often preferred to beets;—this is a mistake—four pounds of beet are equal to five pounds of carrot for feeding to domestic animals. Work the soil for carrots very deep, make it very rich with stable manure, with a mixture of lime; harrow fine and mellow, and roll entirely smooth. Plant with a seed-sower, that the rows may be straight; rows two feet apart will allow a horse and small cultivator to pass between them. Planted one foot apart, and cultivated with a horse, and a cultivator that will take three rows at once, they will yield much more to the acre, and may be cultivated at a moderate expense, exceed[Pg 113]ing but a little that of ordinary field-crops. Sow as early as convenient, as the longer time they have, the larger will be the product. They grow until hard frosts, whenever you may sow them. There are several varieties, but the Long Orange is the only one that it is ever best to grow; it is richer than the white, and yields as well: the earlier sorts are no better, as the carrot may be used at any stage of its growth. They should be kept in the ground as long as it is safe. They will stand hard frosts, but, if too much frozen, they are inclined to rot in winter. Dig in fair weather, dry in the sun, and keep dry. It is the best of all root crops, except the beet. All animals will eat it freely, while they have to acquire a taste for the beet.
These are grown for eating and as animal feed. They can be boiled, pickled, or served alongside regular boiled dishes, and are highly valued. They really shine in soups. As animal feed, they are very useful. People often prefer them over beets, which is a mistake—four pounds of beets are equivalent to five pounds of carrots for feeding domestic animals. Prepare the soil for carrots very deep and enrich it with stable manure and lime; then harrow it fine and smooth. Use a seed sower to plant in straight rows, spaced two feet apart so a horse and small cultivator can pass between them. When planted one foot apart and cultivated with a horse and a cultivator that handles three rows at once, they will yield significantly more per acre and can be cultivated at a reasonable cost, only slightly more than ordinary field crops. Sow as early as possible because the longer they have to grow, the larger the crop will be. They will continue to grow until hard frosts, no matter when you plant them. There are several varieties, but the Long Orange is the best choice to grow; it’s richer than the white variety and yields just as well. The earlier varieties aren’t any better, since carrots can be used at any growth stage. They should be left in the ground as long as it’s safe. They can handle hard frosts, but if they freeze too much, they tend to rot in winter. Dig them up in fair weather, dry them in the sun, and keep them dry. It’s the best root crop, except for beets. All animals will eat them readily, while they need to get used to beets.
CAULIFLOWER.
The two varieties known in this country are the English and the French—distinguished, also, as early and late. The French only is suitable for cultivation here; especially in the colder regions, as it is earlier. This is cultivated in every way like cabbage. In several respects it is preferable to cabbage; it has a more pleasant flavor, and is more easy of digestion. It is excellent for pickling. Seeds may be raised in the same way, and with the same precautions, as cabbage; but it is generally imported.[Pg 114]
The two varieties known in this country are the English and the French, also referred to as early and late. The French variety is the only one suitable for growing here, especially in the colder areas, since it matures earlier. It's grown in much the same way as cabbage. In several ways, it's better than cabbage; it has a nicer flavor and is easier to digest. It’s great for pickling. Seeds can be grown in the same manner and with the same care as cabbage, but it’s usually imported.[Pg 114]
CELERY.
This is one of the finest of our table vegetables, eaten raw with salt, or in soups. Sow seed, early in spring, in open ground; or sow in hotbeds, if you wish it very early. When the plants are six inches high, they should be transplanted in trenches eighteen inches deep, containing six inches of well-rotted manure or compost. This should be well watered, and fine mould mixed with it, and the plants placed in it eight inches apart. The trenches should be from four to six feet apart. If the weather be warm and sun bright at the time of transplanting, a board laid lengthwise over the top of the trench will afford perfect protection. As the plants grow, draw the earth up to them, not allowing it to separate the leaves; do this two or three times during the season, and the stalks will be beautifully bleached. Heavy loam is much better than sand.
This is one of the best vegetables for our meals, enjoyed raw with salt or in soups. Sow seeds early in the spring in open ground, or start them in hotbeds if you want them very early. When the plants reach six inches tall, they should be transplanted into trenches that are eighteen inches deep, filled with six inches of well-rotted manure or compost. This should be well-watered, mixed with fine soil, and the plants should be spaced eight inches apart. The trenches should be four to six feet apart. If it's warm and sunny when you transplant, place a board lengthwise over the trench for protection. As the plants grow, mound the soil around them without covering the leaves; do this two or three times during the season, and the stalks will turn out beautifully bleached. Heavy loam works much better than sand.
Preserving for winter is best done by taking up late in the fall, cutting the small roots off, and rounding down to a point the large root, removing the coarse, useless leaves, and placing in a trench at an angle of forty-five degrees, so that six inches of the upper end of the leaves will be above the surface. Cover with soil and place poles over, and cover with straw, and in a very cold climate cover with earth. Keep out the water. The end can be opened to take it out whenever you please, and it will be as fresh as in the fall. This is better than the methods of keeping in the cellar; it is more certain, and keeps the celery in perfect condition.[Pg 115]
Preserving for winter is best done by harvesting late in the fall, cutting off the small roots, and tapering the large root to a point. Remove the coarse, unnecessary leaves and place the roots in a trench at a forty-five-degree angle, leaving six inches of the upper end of the leaves above the surface. Cover them with soil and place poles on top, then cover with straw, and in extremely cold climates, add a layer of earth. Ensure to keep out the water. You can open the end to take out what you need whenever you want, and it will be as fresh as it was in the fall. This method is better than storing in the cellar; it is more reliable and keeps the celery in perfect condition.[Pg 115]
CHEESE.
The methods of cheese-making differ materially in different countries, and in different parts of the same country. It is also so much a matter of experience and observation, that we recommend to beginners to visit cheese-dairies, and get instructions from practical makers. But we give the following more general outlines, leaving our readers to learn all further details as recommended above.
The cheese-making methods vary significantly between different countries and even within different regions of the same country. Since it largely relies on experience and observation, we suggest that beginners visit cheese dairies and get guidance from experienced makers. However, we provide the following broader outlines, encouraging our readers to learn all additional details as mentioned above.
Rennet, or the calf's stomach, is used, as nature's agent to turn the milk, or to curdle it without having it sour. There are many fanciful ways of preparing the rennet, putting in sweet herbs, &c. But the ordinary plain method is quite sufficient—which is, to steep it in cold salt water. The milk should be set at once on coming from the cow. Setting it too hot, or cooling it with cold water, inclines the cheese to heave. Too much rennet gives it a strong, unpleasant smell and taste. Break the curd as fine as possible with the hand or dish, or better with a regular cheese-knife with three blades. This is especially important in making large cheeses; small ones need less care in this respect. If the curd be too soft, scald it with very hot whey or water; if it be hard, use a little more than blood-warm whey: it should stand a few minutes in this whey and then be separated, and the curd put into the cheese-hoop, making it heaped full, and pressed hard with the hand. Spread a cloth over it, and turn it out. Wash the hoop and put back the cheese, with the cloth between the curd and the hoop, and put it in the press. After a few hours take it out, wash the cloth and put it[Pg 116] again around the cheese, and return it to the press. After seven or eight hours more take it out again, pare off the edges if they need it, and rub salt all over it—as much as it will take in: this is the best way of salting cheese; the moisture in it at this stage will cause it to absorb just about as much salt as will be agreeable. Return it to the press in the hoop without the cloth; let it stand in the press over night; in the morning turn it in the hoop, and continue it in the press until the next morning. Place it upon the shelf in the cheese-room, and turn it every day, or at least every other day. If the weather be hot, the doors and windows of the cheese-room should be shut; if cool, they should be open to admit air.
Rennet, or the calf's stomach, is used as nature's way to turn milk into cheese without making it sour. There are many creative methods for preparing the rennet, like adding sweet herbs, but the standard method is quite sufficient, which is to soak it in cold salt water. The milk should be set right after coming from the cow. Setting it too hot, or cooling it with cold water, can cause the cheese to puff up. Using too much rennet results in a strong, unpleasant smell and taste. Break the curd as finely as possible with your hand or a dish, or better yet, use a dedicated cheese knife with three blades. This is particularly important when making large cheeses; small ones need less attention in this regard. If the curd is too soft, scald it with very hot whey or water; if it’s too hard, use slightly warmer whey: let it sit in this whey for a few minutes, then separate it and place the curd into the cheese hoop, filling it up and pressing it down firmly with your hand. Cover it with a cloth and flip it out. Clean the hoop and put the cheese back in, with the cloth between the curd and the hoop, and place it in the press. After a few hours, take it out, wash the cloth, and wrap it again around the cheese, then return it to the press. After seven or eight more hours, take it out again, trim the edges if necessary, and rub salt all over it, as much as it will absorb: this is the best way to salt cheese; the moisture at this stage will allow it to take in just the right amount of salt. Put it back in the press in the hoop without the cloth; let it sit in the press overnight; in the morning, turn it in the hoop and keep it in the press until the next morning. Place it on the shelf in the cheese room and turn it every day, or at least every other day. If the weather is hot, keep the doors and windows of the cheese room shut; if it's cool, open them to let in air.
Color.—The richest is supposed to be about that of beeswax. This is produced by annotta, or otter, rubbed into the milk at the time of setting, when warm from the cow—or, if the milk has stood till cold, after it has been warmed. Cold milk must, before setting, be warmed to about blood or milk heat. This coloring process has no virtue but in its influence on the looks of the cheese. Sage cheese is colored by the juice of pounded sage-leaves put into the fine curd before it is put in the hoop; this is the reason of its appearing in streaks, as it would not do if put into the milk, like the annotta. When the cheese is ten days old, it should be soaked in cold whey until the rind becomes soft, and then scraped smooth with a case-knife; then rinse, and wipe and dry it, and return it to the cheese-room, and turn it often until dry enough for market. Rich cheeses are apt to spread in warm weather; this is prevented by sewing them in common cheap cotton, exactly fitting.[Pg 117]
Color.—The richest color is thought to be similar to beeswax. This is achieved by adding annotta, or otter, to the milk while it's still warm from the cow—or, if the milk has cooled, after warming it up again. Cold milk must be heated to about blood temperature or milk temperature before setting. This coloring process doesn't add any value other than enhancing the appearance of the cheese. Sage cheese gets its color from the juice of crushed sage leaves mixed into the fine curd before it's put into the hoop; this is why it has streaks, unlike when annotta is added directly into the milk. Once the cheese is ten days old, it should be soaked in cold whey until the rind softens, then scraped smooth with a case knife. After that, rinse it, wipe it, and dry it, and return it to the cheese room, turning it frequently until it's dry enough for market. Rich cheeses tend to spread in warm weather; this can be prevented by wrapping them in inexpensive cotton that fits snugly.[Pg 117]
Skippers.—Some persons are very fond of skippery cheese. But few, however, like meat and milk together, especially if the meat be alive: hence, to remove skippers from cheese into which they have intruded is quite desirable. The following method is effectual:—wrap up the cheese in thin paper, through which moisture will readily strike; dig a hole two feet deep in pure earth, and bury the cheese;—in thirty-six hours every skipper will be on the outside; brush them off and keep the cheese from the flies, and you will have no further trouble. A mixture of Spanish brown and butter, rubbed on the outside of a cheese, frequently gives that yellow coating so often witnessed, and exerts some influence in preserving it. The rank and putrid taste sometimes observed in cheese may be prevented by putting a spoonful of salt in the bottom of each pan, before straining the milk; it will also preserve the milk in hot weather, and give more curd.
Skippers.—Some people really enjoy eating cheese with skippers. But not many like to mix meat and milk, especially if the meat is still alive: so, it's best to get skippers out of cheese that they've invaded. Here’s an effective method: wrap the cheese in thin paper that lets moisture through; dig a hole two feet deep in clean soil, and bury the cheese. In thirty-six hours, every skipper will be on the surface; just brush them off and keep the cheese protected from flies, and you won’t have any more issues. Rubbing a mixture of Spanish brown and butter on the outside of the cheese often gives it that yellow coating we frequently see, and helps in preserving it. That strong and rotten taste sometimes found in cheese can be avoided by putting a spoonful of salt at the bottom of each pan before straining the milk; this will also help keep the milk fresh in hot weather and yield more curd.
An English cheese called "Stilton cheese," from the name of the place most celebrated for making it, is a superior article, made in the following way: put the cream of the night's milk with the morning's milk; remove the curd with the least possible disturbance, and without breaking; drain and gradually dry it in a sieve; compress it gradually until it becomes firm; put it in a wooden hop on a board, to dry gradually; it should be often turned between binders, top and bottom, to be tightened as the cheese grows smaller. This makes the finest cheese known. As the size makes no difference, it can be made by a person having but one cow.
An English cheese called "Stilton cheese," named after the place famous for producing it, is a high-quality product made like this: mix the cream from the night’s milk with the morning’s milk; carefully remove the curd with minimal disturbance and without breaking it; drain and slowly dry it in a sieve; gradually press it until it becomes firm; place it in a wooden hoop on a board to let it dry slowly; it should be turned frequently between binders, top and bottom, to tighten it as the cheese shrinks. This creates the finest cheese known. Since its size doesn’t matter, it can be made by someone with just one cow.
To preserve cheese, keep it from flies, and in a place not so damp as to cause mould. Of cheese-pressers there is a great variety: each maker will select the one[Pg 118] which he considers best or most convenient, within his reach. In some places, as on the Western Reserve, in Ohio, one establishment makes all the cheese for the neighborhood, buying the curd from all the families around. In such places they have their own methods, which they have understood by all their customers.
To store cheese, keep it away from flies and avoid very damp places that could cause mold. There are many different types of cheese presses: each maker chooses the one[Pg 118] that they think is best or most convenient for them. In some areas, like the Western Reserve in Ohio, one factory produces all the cheese for the local community by purchasing curd from nearby families. In these places, they have their own methods that all their customers are familiar with.
CHERRY.
Cherries are among our first luxuries in the line of fruits. We have cultivated varieties, ripening in succession throughout the cherry season. There is no necessity for cultivating the common red and very acid cherry, except in climates too vigorous for the more tender cultivated varieties. The cherry is an ornamental tree, making a beautiful shade, besides the luxury of its fruit. It is one of the most suitable trees we have for the roadside;—it ought to be extensively planted by the highways throughout all our rural districts, as it is in some parts of Europe. In northern Germany the highways are avenues, shaded with cherry-trees for distances of fifty or sixty miles together: these trees have been planted by direction of the princes, and afford shade and refreshment to the weary pedestrian, who is always at liberty to eat as much of the fruit as he pleases; this is eminently worthy of imitation in our own country.
Cherries are one of our first luxuries when it comes to fruits. We have cultivated different varieties that ripen in succession during the cherry season. There's no need to grow the common red and very sour cherry, except in areas that are too harsh for the more delicate cultivated varieties. The cherry tree is also an attractive tree, providing beautiful shade along with its delicious fruit. It's one of the best trees for lining roadsides; it should be widely planted along highways in all our rural areas, just like in some parts of Europe. In northern Germany, the highways are lined with cherry trees for miles, thanks to the princes who had them planted, providing shade and refreshment for tired pedestrians, who can freely enjoy as many cherries as they want; this practice is certainly something we should consider adopting in our own country.
Extremes of cold and heat are not favorable to the cherry: hence, cool places must be selected in hot countries, and warm locations in cold regions. Very much, however, can be done by acclimation; it will, probably, yet naturalize the cherry throughout the con[Pg 119]tinent. A deep and moderately rich loam is the best soil for the cherry; very rich soil causes too rapid growth, which makes the tree tender. It will bear more moisture than the grape or peach, and requires less than the apple or pear. It will endure very dry situations tolerably well, while in very wet ones it will soon perish.
Extremes of cold and heat are not good for cherry trees: therefore, cool spots should be chosen in hot areas, and warmer locations in cold regions. However, acclimation can do a lot; it will likely naturalize the cherry across the whole continent. A deep, moderately rich loam is the best soil for cherries; overly rich soil leads to too fast of a growth rate, making the tree delicate. Cherries can handle more moisture than grapes or peaches, but need less than apples or pears. They can tolerate dry conditions fairly well, but will quickly die in very wet environments.
Propagation is generally by budding small trees near the ground. The best stocks are those raised from the seeds of the common black Mazzard. It makes a more thrifty tree than any other. The tree grows very large, and bears an abundance of medium black fruit, smallest at the blossom end, and having seeds very large in proportion to the size of the fruit. In White's Gardening for the South, it is stated that the common Morello of that region does better, by far, for seedling stocks for budding, than the Mazzard. Use, then, the Mazzard for the North, and the Mahaleb or common Morello for the South. Pick them when ripe; let them stand two or three days, till the pulp decays enough to separate easily from the seed by washing. Immediately plant the seeds in rows where you wish them to grow; this is better than keeping them over winter in sand, as a little neglect in spring will spoil them, they are so tender, when they begin to germinate. Keep them clean of weeds. The next spring, set them in rows ten inches or a foot apart, placing the different sizes by themselves, that large ones need not overshadow small ones and prevent their growth. In the following August, or on the last of July, bud them near the ground. The stocks are to be headed back the following spring, and the bud will make five or six feet of growth the same season. The cherry-tree seldom needs[Pg 120] pruning, further than to pinch off any little shoots that may come out in a wrong place (and they will be very few), and cut away dead branches. Any removal of large limbs will produce gum, which is apt to end in decay, and finally in the death of the tree. Whatever pruning you must do, do it in the hottest summer weather, and the wounds will dry and prevent the exudation of gum. Trees are generally trained horizontally. Some, however, are trained as espaliers against walls, and in fan shape. When once the form is perfected (as given under Training), nothing is necessary but to cut off—twice in each season, about six weeks apart, in the most growing time—all other shoots that come out within four inches of their base. New shoots will be constantly springing, and the tree will keep its shape and bear excellent fruit. Trees so trained are usually in warm locations, and where they can be easily protected in winter; hence, this is adapted to the finer and more tender varieties. The varieties of cherries are numerous, and rapidly increasing. They are less distinguishable than most other fruits. We shall only present a few of the best, and give only their general qualities, without any effort to enable our readers to identify varieties. (See our remarks on the nomenclature of apples.)
Propagation is usually done by budding small trees close to the ground. The best plants come from the seeds of the common black Mazzard. It produces a healthier tree than any other. The tree grows quite large and yields a lot of medium-sized black fruit, which is smallest at the blossom end, with seeds that are very large compared to the fruit size. In White's Gardening for the South, it's noted that the common Morello in that area performs much better as seedling stock for budding than the Mazzard. So, use the Mazzard in the North and the Mahaleb or common Morello in the South. Harvest the fruits when they're ripe; let them sit for two or three days until the pulp decays enough to wash off easily from the seeds. Plant the seeds immediately in rows where you want them to grow; this is better than storing them over winter in sand since a little neglect in spring can ruin them, as they are very delicate when they start to germinate. Keep them free of weeds. The following spring, plant them in rows spaced ten inches to a foot apart, keeping different sizes separate so that larger ones don’t overshadow smaller ones and hinder their growth. In late July or August, bud them close to the ground. The stocks should be pruned back the next spring, and the buds will grow five to six feet in the same season. The cherry tree usually doesn’t need[Pg 120] much pruning besides pinching off any stray shoots that may grow in the wrong places (which will be very few) and removing dead branches. Cutting large limbs will cause gum to exude, which can lead to decay and eventually kill the tree. Any necessary pruning should be done during the hottest summer weather, which will help the wounds dry and prevent gum from leaking. Trees are generally trained to grow horizontally. Some are, however, trained as espaliers against walls or in a fan shape. Once the shape is established (as detailed under Training), all you need to do is remove—twice each season, about six weeks apart during the peak growing times—any other shoots that sprout within four inches of their base. New shoots will keep appearing, and the tree will maintain its shape and produce great fruit. Trees trained this way are typically located in warm areas where they can be easily protected in winter, making this method suitable for finer, more delicate varieties. There are many types of cherries, and they are quickly increasing. They are not as easily distinguishable as most other fruits. We will only highlight a few of the best and provide general characteristics without attempting to help our readers identify varieties. (See our comments on apple nomenclature.)
Downing, in 1846, recommended the following, as choice and hardy, adapted to the middle states:—
Downing, in 1846, recommended the following, as excellent and resilient, suitable for the central states:—
1. Black Tartarean.
2. Black Eagle.
3. Early White Heart.
4. Downton.
5. Downer's Late.
6. Manning's Mottled.
7. Flesh-color'd Bigarreau
8. Elton.
9. Belle de Choisy.
10. May Duke.
11. Kentish.
12. Knight's Early Black.
[Pg 121]
Black Tartarean.
Black Eagle.
3. Early White Heart.
Downton Abbey.
Downer's running late.
Manning's Mottled.
Flesh-toned Bigarreau
Elton John.
9. Belle de Choisy.
May Duke.
Kent.
Knight's Early Black.
[Pg 121]
The National Convention of Fruit-growers recommend the following as the best for the whole country:—
The National Convention of Fruit Growers recommends the following as the best for the entire country:—
1. May Duke.
2. Black Tartarean.
3. Black Eagle.
4. Bigarreau.
5. Knight's Early Black.
6. Downer.
7. Elton.
8. Downton.
May Duke.
2. Black Tartarean.
3. Black Eagle.
4. Bigarreau.
5. Knight's Early Black.
6. Bummer.
7. Elton John.
8. Downton Abbey.
We recommend the following as all that need be cultivated for profit. They are adapted alike to the field and the garden. We omit the synonyms, and give only the predominant color. The figures in the cuts refer to our numbers in the list:—
We suggest the following as the only crops to grow for profit. They work well in both the field and the garden. We’ve left out the synonyms and only provided the main color. The numbers in the illustrations correspond to our list:—
| Name. | Color. | Time. | |
| 1. | Rockport Bigarreau, | red. | June 1st. |
| 2. | Knight's Early Black, | black. | June 5th. |
| 3. | Black Tartarean, | purplish. | June 15th. |
| 4. | Kirtland's Mary, | marbled, light-red. | June, July. |
| 5. | Delicate, | amber-yellow. | June 25th. |
| 6. | Late Bigarreau, | deep-yellow. | June 30th. |
| 7. | Late Duke, | dark-red. | Aug. 10th. |
| 8. | Cleveland Bigarreau, | red. | June 10th. |
| 9. | American Heart, | pale. | June 1st. |
| 10. | Napoleon, | purplish-black. | July 5th. |
 Cherries—Natural size and shape. (See Page 121)
The time is that of their greatest perfection, but varies with latitude and location.
The time is when they are at their best, but it changes depending on latitude and location.
We know none better than the foregoing. In the long lists of the fruit-books, there are others of great excellence, some of which are hardly distinguishable from our list. We recommend to all cultivators to procure the best in their localities, under the advice of the best pomologists in their vicinity. Such men as Barry will be consulted for the latitude of Western New York; Elliott and Kirtland for Cleveland, Ohio; Cole[Pg 123] and others for New England and Canada; Hooker and other great fruit-growers of Southern Ohio, &c., &c. These gentlemen, like all scientific men, are happy to communicate their knowledge for the benefit of others.
We know none better than the ones mentioned above. In the long lists of fruit books, there are others of great quality, some of which are barely different from our list. We encourage all growers to find the best options available in their areas, with guidance from the leading pomologists nearby. Experts like Barry will be consulted for the region of Western New York; Elliott and Kirtland for Cleveland, Ohio; Cole[Pg 123] and others for New England and Canada; Hooker and other prominent fruit growers of Southern Ohio, etc., etc. These individuals, like all scientific people, are eager to share their knowledge for the benefit of others.
We see no reason for cultivating more than ten or twelve varieties; and, as the above are productive and excellent, including all desirable colors and qualities, and ripening through the whole cherry season, we know not what more would be profitable to the cultivator. If you wish more for the sake of variety, your nurseryman will name them, and show the quality of each, that renders it "the best that ever was," until you will become tired of hearing, and more weary of paying for them.
We see no reason to grow more than ten or twelve varieties; and since the ones mentioned are productive and excellent, covering all the desirable colors and qualities and maturing throughout the cherry season, we don't see what else would be beneficial for the grower. If you're looking for more just for the sake of variety, your nursery supplier will list them and highlight the qualities of each, claiming they're "the best there ever was," until you get tired of hearing it and even more tired of paying for them.
Decayed wood, spent tanbark, and forest-leaves, are good for the cherry. In removing and transplanting, be careful not to injure the roots, or expose them to sun and air, as they are so tender, that a degree of exposure that would be little felt by the apple or peach tree will destroy the cherry. If you are going to keep a cherry-tree out of the ground half an hour, throw a damp mat, or damp straw, over the roots, and you will save disappointment. The rich alluvial soils of the West are regarded unfavorable to the cherry. We know from observation and experience that the common red cherry does exceedingly well there, while the best cultivated are apt to suffer much from the winters. One reason is, the common cherry is a slow-going, hardy tree, while the cultivated is more thrifty, and therefore more tender. We give the following as a sure method of raising the cultivated cherries in great perfection on all the rich prairies of the West. It is all included in dry locations, root-pruning, and slight heading-in:[Pg 124]—
Decayed wood, used tanbark, and fallen leaves are good for cherry trees. When removing and transplanting, be careful not to damage the roots or expose them to sun and air, as they are so delicate that even a small amount of exposure that wouldn’t bother an apple or peach tree can harm a cherry tree. If you'll be keeping a cherry tree out of the ground for half an hour, cover the roots with a damp mat or damp straw to avoid disappointment. The rich alluvial soils of the West are considered unfavorable for cherries. However, we know from observation and experience that the common red cherry does very well there, while the best cultivated varieties tend to struggle during the winters. One reason is that the common cherry is a slow-growing, hardy tree, whereas the cultivated ones are more vigorous and therefore more sensitive. We offer the following as a sure method for raising cultivated cherries to great perfection in all the rich prairies of the West. It all involves dry locations, root pruning, and light heading-in:[Pg 124]—
1. Dry locations. It is known that the rich alluvial soils of the West are remarkable for retaining water in winter. On level, and even high prairie land, water will stand in winter, and thoroughly saturate the soil and freeze up. This is very destructive to the tender, porous root of the cherry-tree. How shall such locations be made dry, and these evils prevented? By carting on gravel and sand. Put two or three loads of sand or gravel, or both, in the shape of a slight mound, for each cherry-tree. There should first be a slight excavation, that the sand and gravel may be about half below the level of the surrounding soil, and half above it: this will so elevate the tree that no water can stand around it, and none can stand in the gravel and sand below it. The freezing of such soil will not be injurious to the roots of the tree.
1. Dry locations. It's known that the rich alluvial soils of the West are great at holding water during the winter. On flat or even high prairie land, water will accumulate in winter, saturate the soil, and freeze. This is very harmful to the delicate, porous roots of the cherry tree. How can we dry out these areas and prevent these problems? By bringing in gravel and sand. Add two or three loads of sand or gravel, or a mix of both, in a slight mound for each cherry tree. First, dig a small hole so that the sand and gravel sit about half below the level of the surrounding soil and half above it: this will raise the tree enough that no water can gather around it, and none can stand in the gravel and sand below. The freezing of this soil won't harm the tree's roots.
2. Root-pruning is to prevent too rapid growth. Such growth is always more tender and susceptible of injury from sudden and severe freezing. (See Root-pruning.)
2. Root pruning helps prevent rapid growth. This type of growth is generally softer and more vulnerable to damage from sudden and severe freezing. (See Root-pruning.)
3. Heading-in puts back the growth and throws the sap into the lateral twigs, thus maturing the wood already grown, instead of producing new wood, so young and tender that it will die in winter and spread decay through the whole tree. Heading-in, with the cherry, must only be done with small twigs. Cultivators will see at a glance that this method will certainly succeed in all the West and Southwest.
3. Heading-in slows down growth and directs the sap into the side branches, which helps mature the wood that's already grown, instead of creating new, tender wood that will die in winter and cause decay throughout the tree. When working with cherry trees, heading-in should only be done on small twigs. Growers will quickly realize that this method will definitely work in the West and Southwest.
It is considered difficult to raise cherries at the South; the hot sun destroys the trees. Plant in the coolest situations, where there is a little shade from other trees, though not too near, or from buildings; cut them back, so as to cause shoots near the ground,[Pg 125] and then head-in as the peach, so as to keep the whole covered with leaves, to shade the trunk and large limbs, and perfect success will crown your efforts. But in all cutting-back and heading-in of cherry-trees, remove the limbs when very small.
It’s considered hard to grow cherries in the South; the intense heat damages the trees. Plant them in the coolest spots, where they get a bit of shade from other trees, but not too close, or from buildings; trim them back to encourage new shoots near the ground,[Pg 125] and then shape them like you would a peach tree to keep everything covered with leaves, which will protect the trunk and larger branches, leading to great success. But remember, when you’re trimming and shaping cherry trees, make sure to remove the smaller limbs.
CHARCOAL.
There are but few who realize the value of charcoal applied to the soil. Whoever will observe fields where coal has been burned, will see that grass or grain about the bed of the former pits, will be earlier and much more luxuriant than in any other portion of the field. This difference is discernible for twenty years. It is the best known agent for absorbing any noxious matter in the soil or in the moisture about the roots of the trees. No peach-tree should be planted without a few quarts of pulverized charcoal in the soil. This would also prove highly beneficial to cherry-trees on land where they might be exposed to too much moisture. Its color also renders it an excellent application to the surface of hills of vines. It is quite effectual against the ravages of insects, and so absorbs the rays of the sun as to promote a rapid growth of the plants.
There are very few who understand the benefits of using charcoal in the soil. If you look at areas where coal has been burned, you'll notice that the grass or grain around the former pits grows earlier and much more abundantly than in other parts of the field. This difference can be seen for twenty years. It's the best-known method for soaking up harmful substances in the soil or the moisture around tree roots. No peach tree should be planted without adding a few quarts of crushed charcoal to the soil. It would also greatly benefit cherry trees in areas that might have too much moisture. Its color makes it a great addition to the surface of grapevine hills. It effectively combats insect damage and helps absorb sunlight, which encourages rapid plant growth.
CHESTNUTS
Are among our best nuts, if not allowed to get too dry. When dried hard they are rather indigestible. The tree grows well in most parts of the United States, pro[Pg 126]vided the soil be light sand or dry gravel. If the soil be not suitable, every man may have a half-dozen chestnut-trees, at a trifling expense. Haul ten or fifteen loads of sand upon a square rod, and plant a tree in it, and it will flourish well. Five or six trees would afford the children in a family a great luxury, annually. The blossoms appear so very late, that they are seldom cut off by the frost. The second growth chestnut-tree is also decidedly ornamental.
Are among our best nuts, as long as they don't get too dry. When they dry out too much, they can be hard to digest. The tree grows well in most areas of the United States, as long as the soil is light sand or dry gravel. If the soil isn't suitable, anyone can plant a half-dozen chestnut trees for a low cost. Just haul ten or fifteen loads of sand onto a small area, and plant a tree in it, and it will thrive. Five or six trees would provide a family with a great treat every year. The blossoms come out so late that they're rarely damaged by frost. The second growth chestnut tree is also definitely attractive.
CIDER.
The usual careless way of making cider, in which is used all kinds of apples, even frozen and decayed ones, and without any reference to their ripeness; without straining, and neglecting all means of regulating the fermentation, is too well known. This is the more general practice throughout the country; but it makes cider only fit for vinegar, although it is used for general purposes. We give the most approved method of making and keeping cider, that is better for invalids than any of our adulterated wines (and this is the character of nearly all our imported wines). Our domestic wines, and bottled cider, should take the place of all others.
The typical careless way of making cider, where any kind of apples are used, including frozen and rotten ones, without considering their ripeness; without straining, and ignoring all methods to control fermentation, is widely known. This is the most common practice across the country, but it produces cider only suitable for vinegar, even though it is used for everyday purposes. We present the best approved method for making and storing cider, which is better for those who are unwell than any of our tainted wines (and most of our imported wines fall into this category). Our homemade wines and bottled cider should replace all others.
Select apples best suited for cider, and gather them at the commencement of hard frosts. Let them lie a few days, until they become ripe and soft. Then throw out all decayed and immature fruit. Grind fine and uniform. Let the pulp remain in the vat two days. It will increase the saccharine principle and improve the color. Put into the press in dry straw, and strain the juice into clean casks. Place the casks in an open shed[Pg 127] or cellar, if it be cold weather, give plenty of air and leave the bung out. As the froth works out of the bung, fill up every day or two, with some of the same pressing kept for the purpose. In three weeks or less this rising will cease, and the bung should be put in loose, and after three days driven in tight. Leave a small vent-hole near the bung. In a cool cellar the fermentation will cease in two days. This is known by the clearness of the liquor, the thick scum that rises, and the cessation of the escape of air.
Select apples that are best for cider, and collect them at the start of hard frosts. Let them sit for a few days until they ripen and soften. Then discard any rotten or underdeveloped fruit. Grind them finely and evenly. Allow the pulp to stay in the vat for two days. This will enhance the sweetness and improve the color. Pack the pulp into the press with dry straw, and strain the juice into clean barrels. Store the barrels in an open shed[Pg 127] or cellar; if it's cold, ensure good air circulation and leave the bung out. As the foam rises from the bung, top it off every day or two with some of the same pressing saved for this purpose. In three weeks or less, this bubbling will stop, and the bung should be placed loosely, then tightened after three days. Leave a small vent hole near the bung. In a cool cellar, fermentation will stop in two days. This is indicated by the clarity of the liquid, the thick foam that forms, and the ending of air escaping.
Draw off the clear cider into a clean cask. If it remains quiet it may stand till spring. A gill of fine charcoal added to a barrel will secure this end, and prevent fermentation from going too far. But if a scum collects on the surface, and the fermentation continues, rack it off again at once. Then drive the vent-spile tight. Rack it off again in early spring. If not perfectly clear, dissolve three quarters of an ounce of isinglass in cider, and put it in the barrel, and it will soon be perfectly fine. Bottle between this and the last of May. Fill the bottles within an inch of the bottom of the cork, and allow them to stand an hour, then drive the cork. Lay them in dry sand, in boxes in a cool cellar, and the cider will improve by age, and is better for the sick than imported wines.
Draw the clear cider into a clean cask. If it stays calm, it can sit until spring. Adding a gill of fine charcoal to a barrel will help with this and stop fermentation from progressing too much. But if a scum forms on the surface and fermentation keeps going, rack it off again immediately. Then tightly seal the vent-spile. Rack it off again in early spring. If it’s not perfectly clear, dissolve three quarters of an ounce of isinglass in cider, add it to the barrel, and it will soon be crystal clear. Bottle it between now and the end of May. Fill the bottles to within an inch of the cork, let them sit for an hour, then cork them. Place them in dry sand in boxes in a cool cellar, and the cider will improve with age; it’s better for the sick than imported wines.
CITRONS
Are only used for preserving. Their appearance and growth resemble in all respects the watermelon. Planted near the latter, they utterly ruin them, making them more citron than melon. They are injurious to most other[Pg 128] contiguous vines. They are to be planted and cultivated like the watermelon. Are very fine preserved; but we think the outside (removing the rind) of a watermelon better, and should not regret to know, that not another citron was ever to be raised.
Are only used for preserving. They look and grow just like a watermelon in every way. When planted near watermelons, they completely ruin them, making them more like citrons than melons. They harm most other[Pg 128] nearby vines. They should be planted and grown just like watermelons. They taste great when preserved, but we think the outside (after removing the rind) of a watermelon is better, and wouldn’t mind if no more citrons were ever grown.
CLOVER.
The only varieties successfully cultivated in this country, are the red and the white. Red clovers are divided into large, medium, and small. The white is all alike. The long-rooted clover of Hungary is an excellent productive variety, enduring successfully almost any degree of drought. But in all the colder parts of this country it winter-kills so badly as to render it unprofitable. Clover makes good pastures, being nutritious, and early and rapid growing. Red-clover makes fair hay, though inferior to timothy or red-top. White clover is unsuitable for hay; it shrinks so much in drying, that it is very unproductive. It is the best of all grasses for sheep pasture, and its blossoms afford in abundance the best of honey. Red clover plowed in, even when full-grown, is an excellent fertilizer. It begins to be regarded, in western New York, as productive of the weevil, so destructive to wheat. Further observation is necessary to settle this question.
The only types that can be successfully grown in this country are red and white clover. Red clovers come in large, medium, and small sizes, while the white clover is uniform. The long-rooted clover from Hungary is a great variety that can survive almost any drought. However, in the colder regions of this country, it often dies in winter, making it not worth growing. Clover creates good pastures because it’s nutritious and grows quickly. Red clover can make decent hay, but it’s not as good as timothy or red-top. White clover isn’t suitable for hay because it shrinks too much when it dries, making it unproductive. It’s actually the best grass for sheep pastures, and its flowers produce excellent honey in abundance. Red clover that’s plowed under, even when fully grown, is a great fertilizer. It’s starting to be seen in western New York as a contributor to weevil infestations which can be harmful to wheat. More observation is needed to determine if this is true.
Red-clover hay is too dusty for horses, and too wasteful for cattle. The stalks are so large a proportion, and so slightly nutritious, that it is unprofitable even as cut-feed. It is best to cultivate clover mainly for pastures and as a fertilizer. Sowing clover and timothy together for hay is much practised. The first year it[Pg 129] will be nearly all clover, and the second year mostly timothy. But sown together, they are not good for hay, because they do not mature within ten or fifteen days of the same time. But, for those who are determined to make hay out of red clover, the following directions for curing may be valuable: mow when dry, spread at once, and let it wilt thoroughly; then put up into small cocks, not rolled, but one fork full laid upon another until high enough;—it will then shed water; but when rolled up, water will run down through. Let it stand till thoroughly dried, and then draw into the barn; it will be bright and sweet. Another method is to cut when free from dew or rain, spread even, and allow it to wilt, and the leaves and smaller parts to dry; then draw into the barn, putting alternate loads of clover and dry straw into the mow, salting the clover very lightly. The clover is sometimes put in when quite green, and salted sufficiently to preserve it. It is injurious to cattle, by compelling them to eat more salt than they need. Cattle will eat but little salt in winter, when it stands within their reach; too much salt in hay compels them to eat more, which engenders disease. Clover cured as above makes the best possible clover-hay, if great care be used to prevent excessive salting.
Red clover hay is too dusty for horses and too wasteful for cattle. The stalks are so large and not very nutritious that it's not worth using as feed. It's better to grow clover mainly for pastures and as a fertilizer. Sowing clover and timothy together for hay is common. In the first year, it[Pg 129] will be mostly clover, and in the second year, mostly timothy. However, when sown together, they're not great for hay because they don't mature within ten to fifteen days of each other. For those who insist on making hay from red clover, here are some useful tips: mow when it's dry, spread it out right away, and let it wilt completely; then pile it into small cocks, laying forks of clover on top of one another until it's high enough to shed water; if you roll it up, water can run through. Let it stand until it's completely dried, then store it in the barn; it will be bright and sweet. Another method is to cut it when it's free of dew or rain, spread it evenly, let it wilt, and allow the leaves and smaller parts to dry before putting it in the barn, alternating loads of clover and dry straw, lightly salting the clover. Sometimes, clover is added when it's still quite green and salted enough to preserve it. However, this can be harmful to cattle, forcing them to consume more salt than necessary. Cattle tend to eat very little salt in winter when it's readily available; too much salt in hay makes them eat more, which can lead to illness. Clover cured this way makes the best clover hay possible, as long as you take care to avoid excessive salting.
Saving clover-seed is a matter of considerable importance. The large red clover is too late a variety to produce seed on a second crop the same season, as do the medium and small. The first growth must be allowed to ripen. Cut when the heads are generally dead, but before it has begun to shell. The medium and small red clovers will produce a good crop of seed from second growth, if it be not too dry, immediately[Pg 130] after mowing. Cut when the heads generally are dry, rake into small winrows at once, and soon put it in small bunches and let it stand until very dry, and then draw in. Raking and stirring after it becomes dry will waste one half of it.
Saving clover seed is really important. The large red clover variety is too late to produce seeds from a second crop in the same season, unlike the medium and small varieties. The first growth needs to fully ripen. Cut it when the heads are mostly dead, but before they start to shell. The medium and small red clovers can produce a good crop of seeds from the second growth, as long as it's not too dry, right after mowing. Cut when the heads are generally dry, rake them into small piles right away, and then form them into small bunches, letting them sit until they’re very dry before bringing them in. Raking and stirring after they dry will waste half of it.
COFFEE BEAN.
This grows in a pod somewhat resembling the pea; easily raised, as other beans; and is very productive. Browned and ground, it is used as a substitute for coffee. By many persons it is much esteemed. If this and the orange carrot were adopted extensively, instead of coffee, it would afford a great relief to the health, as well as the pockets, of the American people.
This grows in a pod that looks a bit like a pea; it's easy to grow, just like other beans; and it produces a lot. When browned and ground, it can be used as a coffee substitute. Many people really like it. If this and the orange carrot were widely used instead of coffee, it would greatly benefit the health and finances of the American people.
CORN.
This is the most valuable of all American products of the soil, not excepting wheat or cotton. It is used for human food all over the world. And there is no domestic animal or fowl, whose habits require grain, whether whole or ground, that is not fond of it. It is easily raised, and is a sure and abundant crop, in all latitudes south of forty-six degrees north. The varieties are few, and principally local. The soil can not be made too rich for corn. It should be planted in rows each way, to allow cultivating both ways with a horse. The distance of rows apart has been a subject of some differences of opinion; there is a disposition to[Pg 131] crowd it too near together. In western New York, where much attention has been given to it, the usual distance is three and one half feet each way; others plant four feet apart. On all land we have ever seen, we believe four feet apart each way, with four or five stalks in a hill, will produce the largest yield. It lets in the sun sufficiently around every hill, and the proportion of ears to the stalks will be larger than in any other distance. Planting with a span of horses, and a planter on which a man can ride and plant two rows at once, is the easiest and most expeditious. We can not too strongly recommend harrowing corn as soon as it comes out of the ground. It increases the crop, and saves much expense in cultivating. All planters should know that Indian corn is one of those plants which will come to maturity at a certain age, whether it be large or small; hence, anything that will increase the growth while young will add to the product. Corn neglected when small receives, thereby, an injury from which it will never recover; after-hoeing may help it, but never can fully restore it. If there are small weeds, the harrowing will destroy them, and give all the strength of the soil to the young corn; if there are no weeds, the effect of the harrowing will be to give the young plants twice as large a growth in the first two weeks as they would make without it. Harrow with a V drag, with the front tooth out, that the remaining teeth may go each side of the row. Use two horses, allowing the row to stand between them; let the harrow-teeth run as near the corn as possible. Never plant corn until the soil has become warm enough to make it come up quickly and grow rapidly. If you feed corn to cattle whole, feed it with the husks on, as it will compel them[Pg 132] to chew it better, and will thus be a great saving. Crib corn only when very dry, and avoid the Western and Southern method of leaving cribs uncovered; the corn thus becomes less valuable for any use. A little plaster or wood-ashes applied to corn on first coming up, and again when six inches high, will abundantly repay cost and labor;—it will pay even on the prairie-lands of the West, and is quite essential on the poorer soils of the East and North. It had better never be neglected. The crop will weigh more to the acre, by allowing it to stand as it grew, until thoroughly dry. The next larger crop is when the stalks are cut off above the ear (called topping) after it has become glazed. Still a little less will be the product when it is cut up at the ground, while the leaves are yet quite green. The two latter methods are adapted for the purpose of saving fodder in good condition for cattle. Intelligent farmers regard the fodder of much more value than the decrease in the weight of the grain. Corn thus cut up, and fed without husking, is the best possible way for winter-fattening cattle on a large scale, and where corn is abundant. To save the whole, swine should follow the cattle, changing yards once a week.
This is the most valuable of all American crops, surpassing wheat or cotton. It's used for human food all over the globe. Every domestic animal or bird that needs grain, whether whole or ground, loves it. It's easy to grow and consistently yields a large harvest in all areas south of forty-six degrees north. There aren’t many varieties, and they are mostly local. The soil can’t be too rich for corn. It should be planted in rows both ways to allow for cultivation from either direction with a horse. There’s been some debate about how far apart the rows should be; some tend to plant them too closely. In western New York, where it’s been carefully studied, the common spacing is three and a half feet apart in both directions; others plant four feet apart. From all the land we’ve seen, we believe four feet apart in each direction, with four or five stalks per hill, will yield the largest harvest. This spacing allows enough sunlight to reach each hill, resulting in a higher ratio of ears to stalks than with any other spacing. Plant with a span of horses and use a planter where one person can ride and plant two rows at once, as this is the easiest and fastest method. We highly recommend harrowing corn as soon as it emerges from the ground. It boosts the harvest and reduces cultivation costs. All planters should know that Indian corn matures at a specific age, regardless of its size; thus, anything that promotes growth while it's young will increase the yield. If corn is neglected when small, it suffers damage that it can’t recover from completely; extra hoeing may help, but won’t restore it fully. If there are small weeds, the harrowing will eliminate them and allow the young corn to access all the soil's nutrients; if there are no weeds, the harrowing will double the growth of the young plants in the first two weeks compared to if they were not harrowed. Use a V-shaped drag harrow with the front tooth removed, so the remaining teeth go on either side of the row. Use two horses, with the row in between them, and run the harrow teeth as close to the corn as possible. Never plant corn until the soil is warm enough for quick germination and rapid growth. If you feed whole corn to cattle, keep the husks on, as it will encourage them to chew it better, resulting in significant savings. Only crib corn when it's very dry, and avoid the Western and Southern practice of leaving cribs uncovered; this will decrease its value for any use. A bit of plaster or wood ashes applied to corn when it first comes up and again when it’s six inches high will be worth the cost and effort; it pays off even on the prairie lands of the West and is essential on the poorer soils of the East and North. It’s better not to neglect this. Allow the crop to dry thoroughly standing in the field to increase the weight per acre. The next largest yield comes when the stalks are cut above the ear (called topping) after they have glazed. Cutting the stalks at ground level, while the leaves are still green, results in a smaller yield. The latter two methods are meant to save fodder in good condition for cattle. Savvy farmers value fodder much more than the slight reduction in grain weight. Corn cut this way and fed without husking is the best method for winter-fatting cattle on a large scale, where corn is plentiful. To keep everything whole, pigs should follow the cattle, and yards should be changed weekly.
Seed-corn should be gathered from the first ripe large ears before frost, and while the general crop is yet green. Select ears above the average size, that are well filled out to the end, and your corn will improve from year to year. Take your seed indiscriminately from the crib at planting-time, and your corn will deteriorate. The largest and best ears ripen neither first nor last; hence, select the largest ears before all is ripe, and reject the small earliest ears. Soaking seed twenty-four hours, and then rolling in plaster before[Pg 133] planting, is recommended; it is conveniently practised only where you plant by hand. Soaking without rolling in plaster is good, if you plant in a wet time; but if in a dry time, it is absolutely injurious. Once in a while there occurs quite a general failure of seed-corn to come up. Farmers say that their corn looks as fair as ever, but does not vegetate well. When this is general, there is a remedy that every farmer can successfully apply. The difficulty is not (as we have often heard asserted) from the intense cold of the winter: it is sometimes the result of cold, wet weather after planting. But we do not believe that such would be the effect, with good seed, on properly-prepared land. The difficulty is, the fall was very wet, and the seed was allowed to stand out and get thoroughly soaked; when it was gathered it was damp, and the intense cold of winter destroyed its vitality, without injuring its appearance. There is no degree of cold, in a latitude where corn will grow, that will injure the seed, if it be gathered dry and kept so. Our rules for saving seed, given above, will always remedy this evil. This is, perhaps, the most profitable of all green crops for soiling cattle. Sown on clean, mellow land, it will produce an enormous weight of good green fodder, suitable for summer and early fall feeding of cows, just at a time when dry weather has nearly destroyed their pastures. Corn-fodder, well cured, is better for milch-cows than the best of hay. Cut fine and mixed with ground feed, it is excellent for cattle and horses. It is best preserved in small stacks or large shocks, that will perfectly dry through. The tops and leaves, removed while green, are very fine.[Pg 134]
Seed corn should be collected from the first ripe, large ears before frost, while the overall crop is still green. Choose ears that are bigger than average and fully developed to the end, and your corn will improve year after year. If you take your seed randomly from the crib at planting time, your corn quality will decline. The biggest and best ears won’t ripen first or last, so select the largest ears before everything is ripe, and discard the small, early ones. Soaking seeds for twenty-four hours and then coating them with plaster before[Pg 133] planting is recommended; this is typically done when planting by hand. Soaking without rolling in plaster is effective during wet weather; however, in dry conditions, it can be harmful. Occasionally, there can be a widespread failure of seed corn to sprout. Farmers often say their corn looks good but doesn’t grow well. When this happens generally, there’s a solution that every farmer can apply successfully. The issue isn’t, as we’ve often heard, the severe cold of winter; it can sometimes be due to cold, wet weather after planting. However, we don’t believe this would happen with good seed on well-prepared land. The problem arises when the fall is very wet, and the seed gets soaked while standing out. When gathered, if the seed is damp, the extreme cold of winter will kill its vitality without affecting its appearance. There isn’t a level of cold in regions where corn can grow that will harm the seed if it’s collected dry and kept that way. Our guidelines for saving seed, mentioned above, will always correct this problem. This is possibly the most profitable of all green crops for feeding cattle. When sown on clean, well-tilled land, it produces a huge amount of good green fodder, ideal for feeding cows in summer and early fall, especially when dry weather has nearly ruined their pastures. Well-cured corn fodder is better for milk cows than the best hay. When cut finely and mixed with ground feed, it’s excellent for cattle and horses. It keeps best in small stacks or large shocks that dry thoroughly. The tops and leaves, removed while still green, are very good.[Pg 134]
COTTON.
No product of the soil is more useful than this. To this country alone we give the highest value to Indian corn. But, in usefulness to the whole world, corn must yield the palm to cotton. It employs more hands and capital in manufacturing, and enters more largely into the clothing of mankind, than any other article. The history of cotton and the cotton-gin, and of the manufacture of cotton goods, is exceedingly interesting. The eminence of Great Britain as the first commercial nation of the world is due, in no small degree, to her cotton manufactures. And the influence of this great staple American product upon all the interests of this country, social and political, civil and religious, is universally felt and acknowledged. The cotton-fields of the South, at certain stages of growth, and especially when in bloom, present scenes of beauty unsurpassed by any other growing crop. It does not come within our design in this work to give a very extended view of cotton culture. This business in the United States is confined principally to a particular class of men, known as planters. They cultivate it on a large scale, having the control of large means. Such men seek knowledge of those of their own class, and would hardly condescend to listen to an essay on their peculiar business, written by a Northern man, not experienced in planting. And yet an article, not covering more than ten pages of this volume, might be written, condensing in a clear manner all that is established in this branch of American industry, as found in the publications of the South. Such an article, well written, by a man[Pg 135] who would be regarded good authority, would be of vast pecuniary value to the South. Whoever carefully reads Southern agricultural papers, and "Turner's Cotton-Planter's Manual," will see a great conflict of opinions on the subject, and yet a presentation of many facts, that one thoroughly conversant with soil culture in general would see to be true and important. The embodiment of these facts and principles in a brief, plain article that would be received and practised, would add value to the annual cotton crop, that would be counted by millions. What better service can some Southern gentleman do for his own chosen and favorite region than to write such an article? We give the following brief view of the whole subject, not presuming to teach cotton-planters what they are supposed to understand much better than we do, but to throw out some thoughts that may be suggestive of improvements that others may mature and carry out, and to lead young men, just commencing the business of planting, to look about and see if they may not make some improvements upon what they behold around them. This will not fail of being interesting to Northern men, most of whom know nothing of the cotton-plant, or the modes of its cultivation. It is interesting, too, that some of the most essential points are in perfect accordance with the great principles of soil culture throughout the world.
No product of the earth is more valuable than this. In this country, we hold Indian corn in high regard. However, when it comes to global usefulness, corn takes a backseat to cotton. Cotton employs more workers and capital in manufacturing and plays a bigger role in clothing people than any other product. The history of cotton, the cotton gin, and the manufacturing of cotton goods is quite fascinating. Great Britain's status as the leading commercial nation in the world is largely due to its cotton industries. The impact of this major American product on all aspects of life in this country—social, political, civil, and religious—is widely recognized and acknowledged. The cotton fields of the South, during certain growth stages, especially when blooming, showcase beauty that surpasses any other crop. This work doesn’t aim to provide an extensive look into cotton cultivation. This industry in the United States mainly involves a specific group of men known as planters. They farm on a large scale, having significant resources at their disposal. These men typically seek knowledge from their peers and would likely overlook an essay on their unique field written by a Northern individual who lacks planting experience. Yet, an article of just ten pages in this volume could concisely summarize all that’s established in this area of American industry, as outlined in Southern publications. Such an article, well-crafted by a respected author, would bring substantial economic benefit to the South. Anyone who reads Southern agricultural journals and "Turner's Cotton-Planter's Manual" will encounter a significant clash of opinions on the matter, yet also a presentation of many facts that someone familiar with soil cultivation would recognize as true and important. Summarizing these facts and principles in a brief, straightforward article that would be accepted and implemented could add immense value to the annual cotton crop, potentially amounting to millions. What better contribution can a Southern gentleman make for his region than to write such an article? We present the following brief overview of the entire topic, not intending to instruct cotton planters in what they already know better than we do, but to offer some ideas that might inspire improvements from others and guide young men new to planting to observe and consider potential enhancements to their surroundings. This will definitely be of interest to Northern individuals, most of whom are unfamiliar with the cotton plant or its cultivation methods. It's also noteworthy that many key aspects align perfectly with the fundamental principles of soil cultivation worldwide.
There are three species of cotton: tree-cotton, shrub-cotton, and herbaceous cotton. The tree-cotton is cultivated to considerable extent in northern Africa, and produces a fair staple of cotton for commerce; being produced on trees from ten to twenty-five feet high, it is not so easily gathered. The shrub-cotton is culti[Pg 136]vated in various parts of the world, particularly in Asia and South America. Growing in the form of small bushes, it is convenient, and the staple is fair. But these are both inferior to the herbaceous cotton. This is an herb growing annually, like corn, a number of feet in height, more or less according to soil and season, and producing the best known cotton. Under these species there are many varieties: we need speak only of the varieties of herbaceous cotton. Writers vary in their estimates of varieties; some say there are eight, and others put them as high as one hundred. This is a question of no practical moment. The sea-island cotton, called also "long staple" on account of its very long silky fibres, is the finest cotton known. Its name arose from the fact of its production in greatest perfection on the low, sandy islands near the coasts of some of the Southern states. It does well on low land near the seashore. The saltness and humidity of such locations seem peculiarly favorable to its greatest perfection. It yields about half as much as the "short staple" called Mexican and Petit gulf cotton, and known in commerce as upland cotton. But the sea-island, or long staple, sells for three or four times as much per pound, and, hence, is most profitable to the planter, in all regions where it will flourish well. The Mexican is very productive on most soils, and is easily gathered and prepared for market. There are quite a number of other varieties; as, banana, Vick's hundred-seed, Pitt's prolific, multibolus, mammoth, sugar-loaf, &c., &c. The sugar-loaf is highly commended, as are some of the others named. They have had quite a run among seed-sellers. Most of these varieties are the improved Mexican. It is well to get seed frequently[Pg 137] from a distance; but any extravagant prices are unwise. Improvement of cotton-seed is an important part of its most profitable culture. While much said about it by interested parties is doubtless mere humbug, yet there is great importance to be attached to improvement of seed. This is true of all agricultural products, and no less so of cotton than of others. Two things only are essential to constant improvement in cotton-seed—selection and care. Select from the best quality, producing the largest yield, and maturing early; pick it before much rain has fallen on it after ripening; dry it thoroughly before ginning, and dry it very thoroughly after it is clear of the fibre, before putting it in bulk. Cotton-seed, without extra care in drying, has moisture enough to make it heat in bulk, by which its germinating power is greatly impaired. It is this, and the effects of fall rains, that causes seed to trouble planters so seriously by not coming up: this makes it difficult to obtain good even stands, and causes much loss by diminished crops. Care in these respects would add many pounds to the acre in most cotton-fields of the land.
There are three types of cotton: tree cotton, shrub cotton, and herbaceous cotton. Tree cotton is grown extensively in northern Africa and produces a decent quality of cotton for trade; since it's harvested from trees that grow between ten to twenty-five feet tall, it is not as easy to harvest. Shrub cotton is grown in various parts of the world, especially in Asia and South America. It grows in the form of small bushes, making it convenient to harvest, and its quality is acceptable. However, both of these are inferior to herbaceous cotton. This type of cotton is a herb that grows annually, similar to corn, reaching several feet in height depending on the soil and season, and it produces the best-known cotton. Under these types, there are many varieties; we'll focus only on the varieties of herbaceous cotton. Authors differ in their counts of varieties; some claim there are eight, while others suggest as many as one hundred. This isn’t a major practical concern. Sea-island cotton, also known as "long staple" because of its very long, silky fibers, is considered the finest cotton. Its name comes from the fact that it grows most perfectly on the low, sandy islands near the coasts of some Southern states. It thrives on low land near the sea. The salinity and humidity of these locations seem particularly beneficial for its optimal growth. It yields about half as much as "short staple" cotton, known as Mexican and Petit Gulf cotton, which is referred to in trade as upland cotton. However, sea-island or long staple cotton sells for three to four times as much per pound, making it much more profitable for farmers in areas where it grows well. Mexican cotton is very productive in most soils and is easy to harvest and prepare for market. There are many other varieties, such as banana, Vick's hundred-seed, Pitt's prolific, multibolus, mammoth, sugar-loaf, etc. The sugar-loaf variety is highly praised, as are some of the others mentioned. They have been quite popular among seed sellers. Most of these varieties are improved versions of Mexican cotton. It’s a good idea to get seeds from different sources regularly, but paying excessive prices is unwise. Improving cotton seed is a crucial part of its most profitable cultivation. While a lot of what is said about it by interested parties is likely just hype, the improvement of seed is indeed important. This applies to all agricultural products, and cotton is no exception. Two things are essential for continually improving cotton seed—selection and care. Select the highest quality seeds that produce the largest yield and mature early; harvest them before too much rain falls on them after ripening; dry them thoroughly before ginning, and dry them very thoroughly after they are separated from the fiber before storing in bulk. Cotton seed, without proper drying, contains enough moisture to heat up when stored, which significantly reduces its ability to germinate. This, along with the effects of fall rains, seriously troubles farmers by preventing good germination: this makes it difficult to achieve even stands and leads to significant crop losses. Paying attention to these factors could increase yields by many pounds per acre in most cotton fields.
Preparing the Soil for Planting.—On all land not having a porous subsoil, plow very deep; it gives opportunity for the long tap-root of the plant to penetrate deep, and guard against excessive drought. The usual custom is to lay the ground into beds, elevated a little in the middle, and a depression between them, in which excessive moisture may run off; also to increase the action of the sun and air. The surface of the soil to be planted should be made very fine and smooth. This is true of everything planted—it should be in finely-pulverized soil; it comes up more readily and evenly. Soil left in coarse lumps or particles gives the air too[Pg 138] much action on the germinating seeds and young plants, and retards and stints their growth. Deep plowing guards alike against too much or too little moisture. Too much water has room to sink away from the surface and allow it to dry speedily. It also forms a sort of reservoir to hold water for use in a drought. The seed should be planted in as straight a line as possible, from three and a half to five and a half feet apart one way, and from fourteen to twenty-five inches the other, according to the quality of the land, and the growth of the variety planted. Rich lands will not bear the plants so close as the poor. Many are great losers by not securing plants enough on the ground. Straight lines greatly facilitate culture, as it can mostly be done with the plow or cultivator. Turning land over deep, just before planting, is the best known remedy for the cut-worm; it is said to put them back until the plants grow beyond their reach. The best planters generally cover with a piece of plank drawn over the furrow in which the seed is dropped. It would be far better to roll it, as some few planters do; the effect on the early vegetation of the seed and rapid growth of the young plant would be very great, on the general principles given on "Rolling." The object of cultivation is to keep down the grass, which is the great enemy of the cotton. Plowing the last thing before planting aids this, by giving the cotton quite as early a start as the weeds or grass. Cultivate early, and the grass will be easily covered and killed. Always plant when it will come up speedily and grow rapidly; this is better than very early planting, and certainly much better than very late. Thin out to one in a place, as early as the plants are out of danger of dying. Gathering[Pg 139] should commence as soon as bolls enough are in right condition to allow a hand to gather forty pounds per day. It is better and cheaper than to risk the injury from rains after the crop is ripe.
Preparing the Soil for Planting.—For any land that doesn’t have a porous subsoil, plow deeply; this allows the tap-root of the plant to grow deeper, helping it withstand drought. Typically, the ground is shaped into beds, slightly raised in the center with a dip in between to allow excess moisture to run off, improving sun and air exposure. The soil surface should be fine and smooth before planting. This applies to everything being planted—it should be in finely-pulverized soil to ensure it grows up evenly. Coarse clumps or particles in the soil expose germinating seeds and young plants to too much air, which stunts their growth. Deep plowing helps manage moisture, allowing excess water to drain and letting the surface dry quickly. It also acts as a reservoir to retain water during droughts. Seeds should be planted in a straight line, spaced three and a half to five and a half feet apart in one direction and fourteen to twenty-five inches apart in the other, depending on the land quality and the type of plant. Rich soil can’t support plants as closely together as poor soil. Many lose out by not planting enough. Straight lines make cultivation easier, as it can mainly be done with a plow or cultivator. Deeply turning the land just before planting is a well-known method to deal with cut-worms, as it delays them until the plants grow beyond their reach. Good planters often cover the seed furrow with a piece of plank. Rolling would be even better, as some planters do; this would greatly benefit the early growth of the seed and young plant, based on the principles outlined in "Rolling." The goal of cultivation is to keep grass, which is a major enemy of cotton, at bay. Last-minute plowing before planting helps cotton get an early start compared to weeds or grass. Cultivating early makes it easier to manage and eliminate grass. Always plant when seeds will sprout quickly and grow rapidly; this is better than very early or very late planting. Thin out to one plant per spot as soon as they are safe from dying. Gathering[Pg 139] should begin as soon as enough bolls are ready for picking, allowing a person to gather forty pounds per day. This is more efficient and cost-effective than risking damage from rain after the crop has ripened.
Manures.—Perhaps this is, at the present time, the greatest question for cotton-planters. The application of all the most approved principles and agents of fertilization would do more for the interests of the cotton crop than anything else. Cotton-plantations are sometimes said to run down so as to render it necessary to abandon portions of the land, and select new. Instead of this, land may not only be kept up with proper manuring, but made to yield larger crops from year to year. The following analysis of the ash of the cotton-plant will indicate the wants of the soil in which it grows:—
Fertilizers.—Right now, this is probably the biggest issue for cotton farmers. Using the best techniques and products for fertilization could really benefit cotton production more than anything else. It’s often said that cotton fields can degrade to the point where farmers have to give up parts of the land and find new areas to cultivate. However, by using proper fertilizers, land can not only be maintained but can also produce larger yields year after year. The following analysis of the ash from the cotton plant will show what the soil needs to support its growth:—
| 1. Potash | 29.58 |
| 2. Lime | 24.34 |
| 3. Magnesia | 3.73 |
| 4. Chloride | 0.65 |
| 5. Phosphoric acid | 34.92 |
| 6. Sulphuric acid | 3.54 |
| 7. Silica | 3.24 |
| —— | |
| 100.00 |
This analysis shows that the soil for cotton needs much lime, bones or bone-dust, and wood-ashes, besides the ordinary barn-yard and compost manures. All the preparations and applications of manures specified in this work, under the head of "Manures," are applicable to cotton. The usual recommendations of rotation in crops is, perhaps, more important in cotton culture than anywhere else. Judicious fallowing, on principles adapted to a[Pg 140] Southern climate, is another great means of keeping up and improving the land. This is also the only effectual means of guarding against the numerous enemies and diseases of the cotton-plant. The health of the plants is secured, and they are made to outstrip their enemies only by the fertility and fine tilth of the soil in which they grow. This is confirmed on every hand by the correspondence of the most intelligent planters of the South. Let cotton-growers go into a thorough system of fertilization of their soils, and attend personally to the improvement of their cotton-seed, by selection, as recommended above, and the result will be an addition of one eighth, or one fourth, to the products of cotton in the United States, without adding another acre to the area under cultivation. When this comes to be understood, men of small means will cultivate a little cotton by their own individual labor, as the poorer men do corn and other agricultural products, and thus improve their condition. The above suggestions are the conclusions to which we come, from a thorough examination of what has been published to the world on this subject. We recommend the careful perusal of "The Cotton-Planter's Manual," by Turner (published by Saxton and Co., New York), and increased attention to the subject, by the intelligent, educated, and practical men with whom the cotton-growing regions abound.
This analysis shows that cotton soil requires a lot of lime, bones or bone meal, and wood ashes, in addition to the usual barnyard and compost manures. All the preparations and applications of manures mentioned in this work, under the section "Manures," apply to cotton. The common advice about crop rotation is probably more important in cotton farming than anywhere else. Thoughtful fallowing, based on principles suited to a[Pg 140] Southern climate, is another great way to maintain and improve the land. This is also the only effective way to protect against the many pests and diseases that affect the cotton plant. The plants' health is ensured, allowing them to surpass their adversaries, only through the fertility and fine condition of the soil they grow in. This is confirmed by feedback from the most knowledgeable planters in the South. If cotton growers implement a thorough fertilization strategy for their soils and personally work on improving their cotton seeds through selection, as recommended above, the result will be an increase of one eighth to one fourth in cotton production in the United States, without having to add another acre of farmland. Once this is understood, individuals with limited resources will be able to grow a small amount of cotton through their own labor, just as poorer individuals do with corn and other crops, thereby improving their situation. The above recommendations are the conclusions we've reached after a thorough review of what has been published on this topic. We suggest carefully reading "The Cotton-Planter's Manual" by Turner (published by Saxton and Co., New York) and paying more attention to the subject by the intelligent, educated, and practical individuals prevalent in the cotton-growing regions.
COWS.
The cow occupies the first place among domestic animals, in value to the American people, not excepting even the horse. From the original stock, still kept as[Pg 141] a curiosity on the grounds of some English noblemen, cattle have been greatly improved by care in breeding and feeding. Those wild animals are still beautiful, but only about one third of the weight of the ordinary improved cattle, and not more than one fourth that of the most improved. Improving the breed of cattle is a subject by itself, demanding a separate treatise. It is not to be expected that we should go into it at length in a work like this. But so much depends upon the cow, that we can hardly write an article on her without giving those general principles that lie at the foundation of all improvement in cattle. The few suggestions that follow, if heeded, would be worth many times the value of this book to any farmer not already familiar with the facts. The cow affects all other stock in two ways; first, the form of calves, and consequently of grown cattle, is affected as much by the cow as by the bull. The quality and quantity of her milk, also, has a great influence upon the early growth of all neat stock. Cattle are usually named from their horns, as "short horns," &c. It is a means of distinction, like a name, but not expressive of quality. The leading marks of a good cow are, medium height for her weight, small neck, straight and wide back, wide breast—giving room for healthy action of the lungs—heavy hind-quarters, and soft skin with fine hair, skin yellowish, with much dandruff above the bag behind. A smart countenance is also expressive of good qualities; there is as much difference in the eyes and expression of cattle as of men. Select only such cows to raise stock from, and allow them to go to no bull that has not good marks, and is not of a superior form. Another important matter is to avoid breeding[Pg 142] in and in. This is injurious in all domestic animals and fowls. Always have the cow and the bull from different regions: attention to this would constantly improve any breed we have, and by improving the size of cattle, and milking qualities of cows, would add vast amounts to the wealth of farmers, without the necessity of purchasing, at a great price, any of the high-bred cattle. We have observed, in our article on calves, that abundant feeding during the first year has much to do with the excellence of stock. Unite with these regularity in feeding, watering, and salting, keeping dry and warm in stormy, cold weather, and well curried and clean, and a farmer's stock will be much more profitable to him. But this brief mention of the general principles must suffice, while we give all the further space we can occupy with this article to—
The cow holds the top spot among domestic animals in terms of value to the American people, even surpassing the horse. The original stock, still kept as[Pg 141] a curiosity on the properties of some English nobility, has been significantly improved through careful breeding and feeding. Those wild animals are still beautiful, but weigh only about a third of what typical improved cattle do and not more than a quarter of the weight of the most improved. Improving cattle breeds is a topic in itself, deserving a separate discussion. We can't go into it in depth in a work like this, but since so much relies on the cow, we can’t write an article about her without sharing the fundamental principles of cattle improvement. The few suggestions that follow, if taken seriously, could be worth many times the value of this book to any farmer who isn’t already aware of these facts. The cow affects all other livestock in two ways; first, the shape of calves, and therefore full-grown cattle, is influenced as much by the cow as by the bull. The quality and quantity of her milk also significantly impact the early growth of all beef cattle. Cattle are typically named based on their horns, like "short horns," etc. This is a form of distinction, similar to a name, but it doesn’t indicate quality. The main characteristics of a good cow include medium height for her weight, a small neck, a straight and broad back, a wide breast to allow for healthy lung activity, heavy hindquarters, and a soft skin with fine hair, which should be yellowish with plenty of dandruff above the udder. A keen expression is also indicative of good qualities; there’s just as much difference in the eyes and expressions of cattle as there is in humans. Choose only those cows to breed from, and ensure they mate with bulls that show good traits and have superior conformation. Another crucial factor is to avoid inbreeding[Pg 142]. This is harmful in all domestic animals and poultry. Always ensure that the cow and bull come from different areas: doing so would consistently enhance any breed we have and, by improving the size of cattle and the milking potential of cows, would significantly boost farmers' wealth without requiring them to spend a lot on high-bred cattle. In our article on calves, we noted that ample feeding during the first year greatly influences the quality of the stock. Combine this with regular feeding, watering, and salting, keep them dry and warm during severe, cold weather, and ensure they are well-groomed and clean, and a farmer's stock will be more profitable. But this brief overview of general principles will have to suffice, while we allocate all the additional space we can for this article to—
The Infallible Marks of the Milking Qualities of Cows.—M. Francis Guenon, of France, has published a treatise, in which he shows, by external marks alone, the quality and quantity of milk of any cow, and the length of time she will continue to give milk. These marks are so plain, that they are applicable to calves but a few weeks old, as well as to cows. Whoever will take a little pains to understand this, can know, when he proposes to buy a cow, how much milk she will give, with proper feed and treatment, the quality of her milk, and the length of time she will give milk after having been gotten with calf. If the farmer has heifer-calves, some of which he proposes to send to the butcher and others to raise, he may know which will make poor milkers, and which good ones, and raise the good and kill the poor. Thus, he may see a calf that his neighbor is going to slaughter, and, from these[Pg 143] external marks, he may discover that it would make one of the best milking cows of the neighborhood; it would then pay to buy and raise it, though he might have to kill and throw away his own, which he could see would make a poor cow if raised. Thus, all extraordinary milkers would be raised, and all poor ones be slaughtered: this alone would improve the whole stock of the country twenty-five per cent. in as many years. Attention has been called to this, in the most emphatic manner, by The New York Tribune—a paper that always takes a deep interest in whatever will advance the great industrial interests of the whole people—and yet, this announcement will be new to a vast number of farmers into whose hands this volume will fall. To many it will be utterly incredible, especially when we inform them that the indications are, mainly, the growth of the hair, on the cow behind, from the roots of the teats upward. "Impossible!" many a practical, common-sense man will say. But that same man will acknowledge that a bull has a different color, different neck, and different horns, left in his natural state, from those he would exhibit if altered to an ox. Why is it not equally credible that the growth of the hair, &c., should be affected by the secretion and flow of the milk on that part of the system where those operations are principally carried on? But, aside from all reasonings on the subject, the fact is certain, and whoever may read this article may test its correctness, as applied to his own cows or those of his neighbor. The great agriculturists of France (and it is no mean agricultural country) have tested it, under the direction of the agricultural societies, and pronounced it entirely certain. This was followed by an award, by[Pg 144] the French government, of a pension of three thousand francs per annum to Guenon, as a benefactor of the people by the discovery he had made. The same has been amply tested in this country, with the same certain results. It now only remains for every farmer to test it for himself, and avail himself of the profits that will arise from it. Guenon divides cows into eight classes, and has eight orders under each class, making sixty-four cows, of which he has cuts in his work. He also adds what he calls a bastard-cow in each class, making seventy-two in all. Now, to master all these nice distinctions in his classes and orders would be tedious, and nearly useless. Efforts at this would tend to confusion. We desire to give the indications in a brief manner, with a very few cuts; and yet, we would hope to be much better understood by the masses than we believe Guenon to be. We claim no credit; Guenon is the discoverer, and we only promulgate his discovery in the plainest language we can command; and if we can reach the ear of the American farmers, and call their attention to this, we shall not have labored in vain.
The Unfailing Signs of Cows' Milk Quality.—M. Francis Guenon from France has published a guide that shows, through visible marks alone, the quality and quantity of milk any cow can produce, along with how long she will continue to give milk. These marks are so clear that they can be used on calves just a few weeks old as well as on mature cows. Anyone who takes a little time to understand this can know, when considering the purchase of a cow, how much milk she will produce with proper feeding and care, the quality of her milk, and how long she will continue to give milk after calving. If a farmer has heifer calves, some of which he plans to send to the butcher and others to raise, he can identify which will be poor milkers and which will be good, so he can raise the good ones and sell the poor ones. This way, if he sees a calf that his neighbor intends to slaughter, he can use these[Pg 143] visible marks to realize that it could become one of the best milking cows in the area; it would then be worth buying and raising it, even if it means he has to kill his own calf that he sees will turn out to be a poor milker. As a result, all exceptional milkers could be raised, and the poor ones could be slaughtered: this alone could improve the overall livestock quality in the country by twenty-five percent in as many years. This has been emphasized strongly by The New York Tribune—a paper that is always interested in advancing the important industrial interests of the entire community—and yet, this announcement will be new to many farmers who will come across this volume. For a lot of them, it will be completely unbelievable, especially when we reveal that the main indicators are primarily found in the growth of the hair on the cow's rear, from the roots of the teats upward. "Impossible!" many practical, common-sense individuals will say. But that same individual will admit that a bull has a different color, neck, and horns in its natural state than it would if it were altered to become an ox. Why shouldn't it also be believable that the growth of the hair, etc., would be influenced by the secretion and flow of milk in the part of the body where these processes mainly occur? However, aside from all reasoning on this topic, the fact remains certain, and anyone who reads this article can verify its accuracy when applied to their own cows or those of their neighbor. The leading agriculturalists in France (which is no small agricultural nation) have tested this under the guidance of agricultural societies and have affirmed its complete accuracy. This led to the French government awarding Guenon a pension of three thousand francs per year as a benefactor to the public for his discovery. The same has been extensively tested in this country with similarly definitive results. Now, it is merely up to each farmer to test this for themselves and take advantage of the benefits that will come from it. Guenon categorizes cows into eight classes, each with eight orders, totaling sixty-four cows, for which he has illustrations in his work. He also includes what he calls a "bastard cow" in each class, making a total of seventy-two. However, mastering all these distinctions in his classes and orders would be cumbersome and nearly pointless. Trying to do so would likely lead to confusion. Our aim is to present the indications in a straightforward way, with very few illustrations; and we hope to be much more easily understood by the general public than we believe Guenon to be. We take no credit; Guenon is the original discoverer, and we merely aim to share his discovery in the clearest language we can muster; if we can reach American farmers and draw their attention to this, we will have not worked in vain.
The appearance of the hind-part of the cow, from a point near the gambrel-joint up to the tail, Guenon calls the escutcheon. The following cuts show the marks of all of Guenon's eight classes, the first and the last in each class. The intermediate ones are in regular gradation from the first to the eighth order. Each class is divided into high, medium, and low, yielding milk somewhat in proportion to their size. We give the quantity of milk which the large cows will yield. This also supposes cows to be well fed on suitable food. Smaller cows of the same class and order, or those that are poorly cared for and fed, will, of course, give less.[Pg 145]
The back end of the cow, from just above the hock to the tail, is referred to as the escutcheon by Guenon. The following images display the characteristics of all eight of Guenon's classes, showing the first and last representatives of each class. The in-between ones demonstrate a smooth transition from the first to the eighth class. Each class is categorized into high, medium, and low, producing milk in proportion to their size. We indicate the milk output for larger cows. This assumes the cows are well-nourished with appropriate food. Smaller cows within the same class and order, or those that are not well cared for and fed, will naturally produce less.[Pg 145]
The names of all these eight classes are entirely arbitrary—they mean nothing. M. Guenon adopted them on account of the shape of the escutcheon, or from the name of the place from which the cows came. But cows with these peculiar marks are found among all breeds, in all countries, and of all colors, sizes, and ages. These marks are certain, except the variations that are caused by extra care or neglect.
The names of all eight classes are completely random—they don't mean anything. M. Guenon chose them based on the shape of the shield or from the name of the location where the cows originated. However, cows with these unique markings can be found in all breeds, in every country, and of all colors, sizes, and ages. These markings are consistent, except for variations caused by extra care or neglect.
 Order 1: Flanders Cow. Order 8.
This class of cows has a delicate bag, covered with fine downy hair, growing upward from between the teats, and, above the bag behind, it blends itself with a growth of hair pointing upward, and covering the region marked in figure 1. This upward growth of hair begins on the legs just above the gambrel-joint, covers the inside of the thighs, and extends up to the tail, as in figure first. Above the hind teats they gene[Pg 146]rally have two oval spots, two inches wide by three long, formed by hair growing downward, and of paler color than the hair that surrounds them (E, E, in fig. 1). The skin covered by the whole of this escutcheon is yellowish, with a few black spots, and a kind of bran, or dandruff, detaches from it. Cows of this class and order, when well kept, give about twenty-two quarts of milk per day, when in full flow, and before getting with calf again; after this a little less, but still a large quantity. They will continue to give milk till eight months gone with calf, or till they calve again, if you continue to milk them. This, however, should never be done; it exposes the health of cows at the time of calving, and injures the young. From this there is a gradual diminution in the quantity of milk through the orders, down to the eighth.
This breed of cows has a delicate udder, covered with fine, soft hair that grows upwards from between the teats. Above the udder, at the back, it blends into a tuft of hair that points upwards, covering the area shown in figure 1. This upward hair growth starts on the legs just above the hock joint, covers the inner thighs, and extends up towards the tail, as seen in the first figure. Above the hind teats, they usually have two oval spots, about two inches wide and three inches long, created by hair growing downward and a lighter color than the surrounding hair (E, E, in fig. 1). The skin in this whole area, known as the escutcheon, is yellowish with a few black spots, and some flakes of a kind of dandruff come off it. Cows of this breed, when well cared for, can produce about twenty-two quarts of milk per day when fully in milk and before becoming pregnant again; after this, the amount decreases slightly but remains large. They can keep producing milk until eight months pregnant or until they calve again, as long as you continue to milk them. However, this should never be done, as it can jeopardize the health of cows at calving time and harm the calf. After this point, the quantity of milk gradually decreases through the stages, down to the eighth.
Cows of this order (fig. 2), or with the marks you see in the drawing, will never yield more than about five quarts per day in their best state, and they will only continue to give milk until two months with calf: hence, these are only fit for the butcher. The intervening six in Gruenon's classification are gradually poorer than the first, and better than the last, in our cuts. The marks are but very slightly different from the above, except in size; the difference is so trifling, that any one can at once see that they belong to this class;—and the comparative size of this mark will show, infallibly, their value compared with the above. In the intermediate grades, the spots (E, E, fig. 1) are smaller, and as the orders descend, these spots are wanting, and some slight changes in the form of the whole mark are observed, yet the general outline remains the same. Now, as the decrease in the eight orders in each class is[Pg 147] about from two and a half to three or three and a half quarts, no man with eyes need be deceived in buying a cow, or raising a calf, in the quantity of milk she may be made to give. Any man can tell, within one or two quarts, the yield of any cow or heifer. The only chance for mistake is in the case of bastard-cows, which rapidly dry up on getting with calf.
Cows of this type (fig. 2), or with the markings shown in the drawing, will never produce more than about five quarts of milk a day at their best, and they will only continue to provide milk for two months after having a calf: so, these are fit only for the butcher. The six types in Gruenon's classification are gradually less productive than the first group and better than the last in terms of our cuts. The markings are only slightly different from those mentioned above, except in size; the differences are so minor that anyone can easily tell they belong to this class;—and the relative size of these markings will clearly demonstrate their value compared to the first. In the intermediate grades, the spots (E, E, fig. 1) are smaller, and as you go down the orders, these spots may be absent, along with some minor changes in the overall shape of the markings, but the general outline stays the same. Now, as the decrease in the eight orders in each class is[Pg 147] about from two and a half to three or three and a half quarts, anyone with eyes can avoid being misled when buying a cow or raising a calf in terms of how much milk she can produce. Any person can estimate the milk yield of any cow or heifer within one or two quarts. The only chance for error is with crossbred cows, which quickly dry up after getting pregnant.
 Order 1. Selvage Cow. Order 8.
In this class, the shape of the escutcheon is entirely distinct, so that no one will confound it with the first. The gradations are the same as in the preceding, only this class, all through, is inferior to the other. The first (fig. 3) will give only twenty or twenty-one quarts, and the poorest only four quarts. This escutcheon is formed by ascending hair, but with a very different outline from the first class; it has the same spots above the hind teats as the first, formed by descending hair.[Pg 148] In the lower orders these disappear—first one, then one small one, and then none at all—and as they descend, similar spots appear, formed in the same way, on one or both sides of the vulva (F, fig. 3). The skin of the inside surface of the thigh is yellowish. The time of giving milk—viz., eight months gone with calf, or as long as you continue to milk them—is the same as in the first class. The last order (fig. 4) of this class give very little milk after getting with calf.
In this class, the shape of the escutcheon is completely different, so no one will mistake it for the first one. The gradations are the same as in the previous class, but throughout this class, it is inferior to the other. The first (fig. 3) will yield only twenty or twenty-one quarts, while the lowest quality will produce just four quarts. This escutcheon is made up of upward-growing hair, but has a very different outline compared to the first class; it has the same spots above the hind teats as the first, created by downward-growing hair.[Pg 148] In the lower orders, these spots disappear—first one, then a small one, and then none at all—and as they go down, similar spots appear on one or both sides of the vulva, formed in the same way (F, fig. 3). The skin on the inside of the thigh is yellowish. The duration of milk production—specifically, eight months pregnant with a calf, or as long as you keep milking them—is the same as in the first class. The last order (fig. 4) of this class produces very little milk once they are pregnant.
 Order 1. Curveline Cow. Order 8.
This escutcheon is easily distinguished from the others, by its outline figure. The spots on the bag above the hind teats are formed as in the preceding, and as gradually disappear in the lower orders. In those orders there is a slight difference in the outline, but its general form is the same. The first of this class (fig. 5) yields twenty or twenty-one quarts a day, and[Pg 149] gives milk till within a month of calving. The last order of the class (fig. 6) gives only three and a half quarts, and goes dry on getting with calf. The intermediate gradations between the first and eighth orders are the same as in the preceding classes.
This coat of arms is easily recognized from the others because of its shape. The spots on the bag above the hind teats are formed like in the previous examples and gradually disappear in the lower categories. In those categories, there's a slight difference in the shape, but its overall form remains the same. The first of this class (fig. 5) produces twenty or twenty-one quarts a day, and[Pg 149] continues to give milk until about a month before calving. The last category in this class (fig. 6) only produces three and a half quarts and goes dry when it gets pregnant. The intermediate stages between the first and eighth categories are the same as in the earlier classes.
 Order 1. Bicorn Cow. Order 8.
These escutcheons are unmistakably diverse from either of the others; gradations, from first to eighth orders, the same. The first order in this class (fig. 7) will give eighteen quarts a day, and give milk until eight months with calf. The dandruff which detaches from the skin within the escutcheon of the first order is yellowish or copperish color. The two marks on the sides of the vulva are narrow streaks of ascending hair, not in the general mark. The last order of the class (fig. 8) gives three and a half quarts only a day, and goes dry when with calf.[Pg 150]
These escutcheons are clearly different from the others; the gradations, from first to eighth orders, are the same. The first order in this category (fig. 7) produces eighteen quarts a day and continues to give milk for up to eight months with a calf. The dandruff that comes off the skin within the escutcheon of the first order is a yellowish or copperish color. The two marks on the sides of the vulva are narrow streaks of hair that grow upward, not part of the general marking. The last order of the class (fig. 8) only produces three and a half quarts a day and stops giving milk when with a calf.[Pg 150]
 Order 1. Demijohn Cow. Order 8.
Here is another general mark, easily distinguishable from all the others by its outline. The first order (fig. 9) will give eighteen quarts a day, and give milk eight months, or within a month of calving. Yellowish skin; delicate bag, covered with fine downy hair, as in the higher orders of all the preceding classes. The eighth order of this class (fig. 10) will give only two and a half quarts per day, and none after conceiving anew. The gradation from first to eighth order is regular, as in the others.
Here’s another general mark, clearly different from all the others by its shape. The first order (fig. 9) will produce eighteen quarts a day and will provide milk for eight months, or about a month before calving. It has a yellowish skin and a delicate bag covered with fine downy hair, similar to the higher orders of all the previous classes. The eighth order of this class (fig. 10) will only give two and a half quarts per day and will stop producing after conceiving again. The progression from the first to the eighth order is consistent, just like in the other classes.
SIXTH CLASS.
Yield of first order (fig. 11) eighteen quarts per day; time, eight months. Skin within the escutcheon same color, bag equally delicate, and hair fine, as in all the first orders. Eighth order (fig. 12) yields about two quarts per day, and dries up on getting with calf.[Pg 151]
Yield of first order (fig. 11) is eighteen quarts per day; duration is eight months. The skin within the shield is the same color, the bag is equally delicate, and the hair is fine, just like in all the first orders. Eighth order (fig. 12) yields about two quarts per day, and dries up when it becomes pregnant.[Pg 151]
 Order 1. Square Escutcheon Cow. Order 8.
 Order 1. Limousine Cow. Order 8.
First order in this class (fig. 13) gives fifteen quarts; time, eight months. The skin, bag, and hair, same as in the higher orders in all the classes. The eighth order (fig. 14) will yield two and a half quarts per day, and dry up when with calf.
First order in this class (fig. 13) produces fifteen quarts; time, eight months. The skin, bag, and hair are the same as in the higher orders in all the classes. The eighth order (fig. 14) will yield two and a half quarts per day and will dry up when it has a calf.
EIGHTH CLASS.
First order (fig. 15) will give fifteen quarts per day; time, eight months. Skin in escutcheon reddish-yellow and silky, hair fine, teats far apart. The eighth order (fig. 16) yields two and a half quarts a day, and dries up on getting with calf.[Pg 152]
First order (fig. 15) will produce fifteen quarts per day; duration, eight months. The skin in the escutcheon is reddish-yellow and silky, with fine hair and widely spaced teats. The eighth order (fig. 16) produces two and a half quarts a day and dries up when pregnant.[Pg 152]
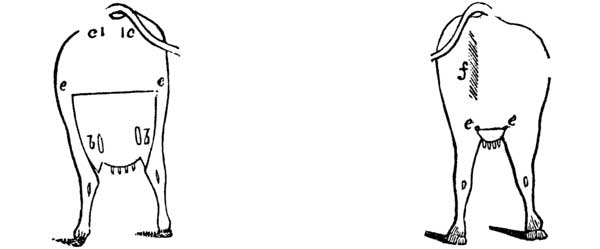 Order 1. Horizontal Cut Cow. Order 8.
Each class of cows has a kind called bastards, among those whose escutcheons would otherwise indicate the first order of their class: these often deceive the most practised eye. The only remedy is to become familiar with the infallible marks given by Guenon by which bastards may be known. This defect will account for the irregularity of many cows, and their suddenly going dry on becoming with calf, and often for the bad quality of their milk. They are distinguished by the lines of ascending and descending hair in their escutcheon.
Each type of cow has a category called bastards, which includes those whose markings would normally suggest they belong to the top tier of their breed: these often fool even the most experienced observer. The only solution is to learn the reliable signs provided by Guenon that can identify bastards. This issue can explain the irregularities in many cows, their sudden drying up when they become pregnant, and often the poor quality of their milk. They can be recognized by the patterns of hair that go both up and down in their markings.

In the Flanders cow (fig. 17) there are two bastards; one distinguished by the fact that the hair forming the line of the escutcheon bristles up, like beards on a head[Pg 153] of grain, instead of lying smooth, as in the genuine cow; they project over the intersection of the ascending and descending hair in a very bristling manner. The other bastard of the Flanders cow is known by having an oval patch of downward growing hair, about eight inches below the vulva, and in a line with it; in the large cows it is four inches long, and two and a half wide, and the hair within it always of a lighter color than that surrounding it. Cows of this mark are always imperfect. In the bastards, the skin on the escutcheon is usually reddish; it is smooth to the touch, and yields no dandruff.
In the Flemish cow (fig. 17), there are two variations; one is characterized by the hair on the escutcheon standing up like beards on a head[Pg 153] of grain, rather than lying flat like in a true cow. The hair sticks out prominently where the upward and downward strands meet. The other variation of the Flemish cow is recognized by an oval patch of hair that grows downward, located about eight inches below the vulva and in line with it; in larger cows, this patch measures four inches long and two and a half inches wide, with the hair inside always a lighter color than the hair around it. Cows with this marking are always considered flawed. In these variations, the skin on the escutcheon is typically reddish; it feels smooth to the touch and doesn’t produce any dandruff.
Bastards of the SELVAGE COW are known by two oval patches of ascending hair, one on each side of the vulva, four or five inches long, by an inch and a half wide (fig. 18). The larger the spot, and the coarser the hair, the more defective they prove, and vice versa.
Bastards of the Selvage Jeans are identified by two oval patches of upward-growing hair, one on each side of the vulva, measuring four or five inches long and one and a half inches wide (fig. 18). The bigger the patch and the thicker the hair, the more defective they tend to be, and the opposite is also true.
Bastards of the CURVELINE COW are known by the size of spots of hair on each side of the vulva (fig. 18). When they are of four or five inches by one and a half, and pointed or rounded at the ends, they indicate bastards. If they be small, the cow will not lose her milk very rapidly on getting with calf.
Bastards of the Curvy Cow are identified by the size of the hair spots on each side of the vulva (fig. 18). When these spots measure four or five inches by one and a half inches and are pointed or rounded at the ends, they indicate a bastard. If the spots are small, the cow won't quickly lose her milk when she becomes pregnant.
Bastards of the BICORN COW are indicated precisely as in the preceding—by the size of the spots of ascending hair, above the escutcheon and by the sides of the vulva (F, F, fig. 18).
Bastards of the Bicorned Cow are identified just like before—by the size of the spots of rising hair, above the escutcheon and by the sides of the vulva (F, F, fig. 18).
Bastards of the DEMIJOHN COW are distinguished precisely as the two preceding—size of the streaks (fig. 18).
Bastards of the Demijohn Cow are identified in the same way as the two previous ones—size of the streaks (fig. 18).
The SQUARE ESCUTCHEON COW indicates bastards, by a streak of hair at the right of the vulva (fig. 19).[Pg 154] When that ascending hair is coarse and bristly, it is a sure evidence that the animal is a bastard.
The SQUARE ESCUTCHEON COW shows that the animal is a hybrid, indicated by a streak of hair on the right side of the vulva (fig. 19).[Pg 154] If that upward hair is rough and bristly, it's a definite sign that the animal is a hybrid.
Limousine cows show their bastards precisely as do the CURVELINE and BICORN, by the size of the ascending streaks of hair, on the right and left of the vulva. (Fig. 19.)
Luxury cows display their offspring just like the CURVELINE and Bicorn, indicated by the size of the rising hair stripes on either side of the vulva. (Fig. 19.)
Bastards of the HORIZONTAL CUT COWS have no escutcheon whatever. By this they are always known.
Bastards of the HORIZONTAL CUT BEEF have no insignia at all. This is how they are always recognized.
Some bastards are good milkers until they get with calf, and then very soon dry up. Others are poor milkers. Those with coarse hair and but little of it, in the escutcheon, give poor, watery milk. Those of fine, thick hair will give good milk.
Some bulls are good milkers until they mate and then they dry up quickly. Others don't milk well at all. Bulls with coarse hair and not much of it in the escutcheon produce poor, watery milk. Bulls with fine, thick hair will give good milk.
Bulls have escutcheons of the same shape as the cows, but on a smaller scale. Whenever there are streaks of descending hair bristling up among the ascending hair of the escutcheon, rendering it quite irregular and rough in its appearance, the animal is regarded as a bastard. Never put a cow to any bull that has not a regular, well-defined, and smooth escutcheon. This is as fully as we have room to go into M. Guenon's details. We fear this will fall into the hands of many who will not take the pains to master even these distinctions. To those who will, we trust they will be found plain, and certain in their results. From all this, one thing is certain, and that is of immense value to the farmer: it is, that on general principles, without remembering the exact figure of one of the indications above given, or one of the arbitrary terms it has been necessary to use, any man can tell the quality and quantity of milk a cow will give, and the time she will give milk, with sufficient accuracy to buy no cow and raise no heifer that will not be a prof[Pg 155]itable dairy cow, if that is what he desires. The rules by which these things may be known are the following:
Bulls have escutcheons like cows, but smaller. If there are patches of hair that grow downward among the hair that grows upward on the escutcheon, making it look uneven and rough, the animal is considered a hybrid. Never pair a cow with a bull that has an irregular, undefined, or rough escutcheon. This is as much detail as we can provide from M. Guenon's work. We worry that many will not take the time to understand these distinctions. For those who do, we hope they find them clear and helpful in their outcomes. One thing is definitely valuable for farmers: generally speaking, without needing to remember the exact shape of any of the indicators mentioned, or any of the specific terms we've had to use, anyone can predict the quality and quantity of milk a cow will produce, and how long she will produce milk, accurately enough to avoid buying cows or raising heifers that won't be profitable dairy cows, if that’s their goal. The guidelines for determining these factors are as follows:
No cow, of any class, is ever a good milker, that has not a large surface of hair growing upward from the teats and covering the inner surface of the thighs, and extending up toward or to the tail.
No cow, regardless of type, is ever a good milker if it doesn't have a large area of hair growing upward from the teats, covering the inner thighs, and extending up toward or to the tail.
No cow that is destitute of this mark, or only has a very small one, is ever a good milker. Every cow having a scanty growth of coarse hair in the above mark will only give poor, watery milk; and every cow having a thick growth of fine hair on the escutcheon, or surface where it ascends, and considerable dandruff, will always give good rich milk, and be good for butter and cheese.
No cow that lacks this mark, or has just a tiny one, is ever a good milker. Any cow with a sparse amount of coarse hair in that area will only produce thin, watery milk; and any cow with a thick growth of fine hair on the escutcheon, or the area where it rises, and a lot of dandruff, will always produce rich milk and be good for butter and cheese.
Every cow on which this mark is small will give but little milk, and dry up soon after getting with calf, and is not fit to be kept.
Every cow with this small mark will produce very little milk, dry up quickly after calving, and isn't worth keeping.
Observe these brief rules, and milk your cows at certain hours every day—milk very quickly, without stopping, and very clean, not leaving a drop—and you never will have a poor cow on your farm, and at least twenty-five per cent. will be added to the value of the ordinary dairy, that is made up of cows purchased or raised in the usual, hap-hazard way.
Follow these simple guidelines, and milk your cows at specific times every day—milk swiftly, without pausing, and very cleanly, ensuring you don't leave a drop—and you will never have a low-quality cow on your farm. Additionally, you will increase the value of the average dairy by at least twenty-five percent, compared to cows bought or raised in a typical, random manner.
If your cows' udders swell after calving, wash them in aconite made weak with water; it is very good for taking out inflammation. Other common remedies are known. If your cow or other creature gets choked, pour into the throat half a pint, at least, of oil; and by rubbing the neck, the obstruction will probably move up or down. Curry your cows as thoroughly as you do your horses; and if they ever chance to get lousy, wash them in a decoction of tobacco.[Pg 156]
If your cows' udders swell after giving birth, wash them with weak aconite mixed with water; it’s really effective for reducing inflammation. There are other common remedies as well. If your cow or any other animal gets choked, pour at least half a pint of oil down their throat, and by rubbing their neck, the blockage will likely move either up or down. Groom your cows as thoroughly as you do your horses; and if they happen to get infested with lice, wash them in a tobacco decoction.[Pg 156]
CRANBERRY.

This is native in the northern parts of both hemispheres. In England and on the continents of Europe and Asia, native cranberries are inferior, in size and quality, to the American. Our own have also been greatly improved by cultivation. They have become an important article of commerce, and find a ready sale, at high prices, in all the leading markets of the country. Their successful cultivation, therefore, deserves attention, as really as that of other fruits. Mr. B. Eastwood has written a volume on the subject, which probably contains all the facts already established, together with many opinions of scientific and practical cultivators. The work is valuable, but much less so than it would have been, had the author put into a few pages the important facts, and left out all speculations and diversities of opinion. The objection to most of this kind of literature is the intermixture of facts and valuable sug[Pg 157]gestions with so much that is not only useless, but absolutely pernicious, by the confusion it creates. We think the following directions for the cultivation of the cranberry are complete, according to our present knowledge:—
This plant grows naturally in the northern regions of both hemispheres. In England and across Europe and Asia, native cranberries are smaller and of lower quality compared to American cranberries. Our own varieties have also improved significantly through cultivation. They've become an important commercial product, selling well at high prices in all major markets across the country. The successful cultivation of cranberries deserves just as much attention as other fruits. Mr. B. Eastwood has written a book on the subject, which likely includes all the established facts, along with many views from both scientific and practical cultivators. The book is valuable, but it would have been even more useful if the author had summarized the key facts in a few pages while omitting unnecessary speculations and differing opinions. The main issue with much of this type of literature is that it mixes facts and useful advice with a lot that is not only unhelpful but also harmful due to the confusion it causes. We believe the following guidelines for cranberry cultivation are comprehensive based on our current understanding:—
Soil.—It is universally agreed that beach sand is the best. Not from the beach of the ocean barely, but of lakes, ponds, or rivers. There is no evidence that any saline quality that may be in sand from the beach of the sea, is particularly useful. It is the cleanness of the sand, on which account it is less calculated to promote a growth of weeds, and allows a free passage of moisture toward the surface. Hence white sand is preferable, and the cleaner the better. Whoever has a moist meadow in the soil of which there is considerable sand has a good place for a cranberry bed. If you have not a sand meadow, select a plat of ground as moist as any you have, upon which water will not stand unless you confine it there, and draw on sand to the depth of four or six inches, having first removed any grass or break-turf, that may be in danger of coming up as weeds to choke the vines. If you make the ground mellow below and then put on the sand, you will have a bed that will give you but little further trouble. Peat soils will do, if you take off the top and expose to the weather, frosts and rains, one year before planting. The first year, peat will dry and crack, so as to destroy young cranberry vines. But after one winter's frost, it becomes pulverized and will not again bake. Hence it is next to sand for a cranberry bed.
Soil.—It's widely accepted that beach sand is the best. Not the sand from ocean beaches, but from lakes, ponds, or rivers. There’s no evidence that any saltiness in sand from the sea is particularly helpful. It's the cleanliness of the sand that makes it less likely to encourage weed growth and allows moisture to move freely towards the surface. Therefore, white sand is preferable, and the cleaner, the better. If you have a moist meadow with plenty of sand in the soil, it's a great spot for a cranberry bed. If you don’t have sandy meadow soil, choose a piece of ground that’s as moist as you can find, where water won’t pool unless you keep it there, and add sand to a depth of four to six inches after removing any grass or surface roots that might grow back as weeds to choke the vines. If you loosen the soil underneath and then add sand, you’ll have a bed that won’t give you much trouble afterwards. Peat soils can also work, but you need to remove the top layer and let it weather through frost and rain for a year before planting. In the first year, peat will dry out and crack, which can harm young cranberry vines. However, after one winter of freezing, it becomes crumbly and won’t harden again. So, it's nearly as good as sand for a cranberry bed.
Situation.—The shore of a body of water, or of a small pond is best, if it be not too much exposed to violent action of wind and waves. Land that retains much[Pg 158] moisture within a foot of the surface, but which does not become stagnant, is very valuable. The bottoms of small ponds that can be drained off are very good. Any land that can be flowed with water at pleasure is good. By flooding, the blossoms are kept back till late spring frosts are gone. Any upland can be prepared as above. But if it be a very dry soil it must have a liberal supply of water during dry weather, or success may not be expected.
Situation.—The best location is the shore of a body of water or a small pond, as long as it's not too exposed to strong winds and waves. Land that holds moisture within a foot of the surface without becoming stagnant is very valuable. The bottoms of small ponds that can be drained are excellent. Any land that can be flooded as needed is good. Flooding helps delay blossoms until after late spring frosts. Any upland can be prepared in this way, but if the soil is very dry, it will need a generous supply of water during dry spells, or success may not be guaranteed.
Planting.—There are several methods. Sod planting consists in preparing the land and then cutting out square sods containing vines, and setting them at the distances apart, you desire. This was the general method; but it is objectionable, on account of the weeds that will grow out of the sod and choke the vines. This method is improved by tearing away the sod, leaving the roots naked, and then planting. Another method is to cut off a vigorous shoot, and plant the middle of it, with each end protruding from the soil two or three inches apart. Roots will come out by all the leaves that are buried, and promote the springing of many new vines, and thus the early matting of the bed which is very desirable.
Planting.—There are several methods. Sod planting involves preparing the land, then cutting out square pieces of sod that include the vines, and placing them at your desired distances apart. This was the common method, but it's not ideal because weeds can grow from the sod and choke the vines. This method can be improved by removing the sod, exposing the roots, and then planting. Another method is to cut off a strong shoot and plant the middle, leaving each end sticking out of the soil by two or three inches. Roots will develop from all the buried leaves, promoting the growth of several new vines, which helps create a dense bed early on, and that’s very desirable.
Others take short slips and thrust four or five of them together down into the soil as they do slips of currant bushes, thus making a hill of as many plants. And yet another method is, to cut up the vines into pieces of two or three inches in length, and broad cast them on mellow soil, and harrow them in as wheat—Others bury the short pieces in drills. In either case they will soon mat the whole ground, if the land be not weedy. The best plan for small beds is probably the middle planting.
Others take small cuttings and push four or five of them into the soil like they do with currant bush cuttings, creating a cluster of plants. Another way is to cut the vines into two or three-inch pieces and scatter them over soft soil, then rake them in like wheat. Some bury the shorter pieces in rows. In either case, they will quickly cover the entire area if the land isn’t weedy. The best approach for small beds is probably planting them in the middle.
Distances apart depend upon your design in cultiva[Pg 159]ting. If your soil is such that so many weeds will grow as to require cultivating with a horse, or much hoeing, four feet one way and two the other is the best. Better have land so well covered with clean sand, that very few weeds will grow and no cultivation be needed. Then set vines one foot apart and very soon the whole ground will be perfectly matted and will need very little care for years. For two or three years pull out the weeds by hand, and the ground will be covered and need nothing more.
Distances apart depend on how you plan to farm. If your soil tends to grow a lot of weeds, making it necessary to cultivate with a horse or do a lot of hoeing, the best spacing is four feet in one direction and two feet in the other. It's better to have land that's well covered with clean sand so that very few weeds grow, and then no cultivation will be needed. In that case, plant the vines one foot apart, and soon the entire area will be fully covered and will require very little maintenance for years. For two or three years, just pull out the weeds by hand, and the ground will be covered and won’t need anything else.
Varieties.—There are three principal ones of the lowland species. The bell, the bugle, and the cherry cranberries. These are named from their shape. Probably the cherry is the best, being the size, shape, and color of the cultivated red cherries. There has recently been discovered an upland variety, on the shores of Lake Superior, that bids fair to be as hardy and productive as the common currant. On all poor, hard, and even very dry uplands, it does remarkably well. It grows extensively in the northern part of the British provinces. The fruit is smaller than the other varieties but is delicious, beautiful in color, and very abundant. It will probably be one of our great and universal luxuries.
Varieties.—There are three main types of the lowland species: the bell, the bugle, and the cherry cranberries. They're named for their shapes. The cherry variety is likely the best, resembling the size, shape, and color of cultivated red cherries. Recently, an upland variety has been discovered along the shores of Lake Superior, which seems to be just as hardy and productive as the common currant. It thrives remarkably well on poor, tough, and even very dry uplands. It grows widely in the northern part of the British provinces. The fruit is smaller than the other varieties but is delicious, visually appealing, and very plentiful. It will likely become one of our great and universal luxuries.
Healthy and Unhealthy Plants.—By this cultivators denote those that bear well and those that do not. And yet the unhealthy, or those that bear the least, are the larger, greener-leaved, and rapid-growing varieties. It is difficult to describe them so that an unpractised eye would know them from each other. The best way to be sure of getting the right kind is to purchase of a man you can trust, or visit the beds when the fruit is in perfection and witness where the crop is abundant, mark it, and let it remain until you are ready to plant.[Pg 160] This is always best done in the spring, or from May 15th to June 15th.
Healthy and Unhealthy Plants.—By this, cultivators mean those that produce well and those that don’t. However, the unhealthy ones, or those that yield the least, are often the bigger, greener-leafed, and faster-growing varieties. It’s hard to explain them in a way that someone inexperienced would be able to tell them apart. The best way to ensure you’re getting the right type is to buy from someone you trust, or to visit the plants when the fruit is at its best and see where the crop is plentiful, take note of it, and let it stay there until you’re ready to plant.[Pg 160] This is always best done in the spring, or from May 15th to June 15th.
Gathering—is performed by hand, or with a cranberry-rake. Hand-picking is best for the vines, but is more expensive. If a rake be used, it will draw out some small runners and retard the growth of young vines. But it is such a saving of expense, it had better be used, and always drawn the same way. The fruit should be cleared of leaves and decayed berries; and if intended for a near market, be packed dry in barrels. If to be transported far, put them in small casks, say half-barrels, with good water. They may thus be carried around the globe in good condition. To keep well they should not be exposed to fall frosts, and should not be picked before ripe. A little practice, and at first on a small scale, may enable American cultivators of the soil, generally, to have good cranberry beds. Much of the practical part of this can only be learned by experience. The above suggestions will save much loss and discouragement.
Gathering—is done by hand or with a cranberry rake. Hand-picking is better for the vines but costs more. If a rake is used, it can pull out some small runners and slow down the growth of young vines. However, it's a significant cost saver, so it's best to use it and always pull in the same direction. The fruit should be cleaned of leaves and spoiled berries; if it's meant for a nearby market, pack it dry in barrels. If it needs to be transported far, put it in smaller casks, like half-barrels, with plenty of water. This way, it can be shipped all over the world in good condition. To keep it fresh, avoid exposing it to fall frosts, and don’t pick it until it’s ripe. With a little practice, starting on a small scale, American farmers can successfully cultivate good cranberry beds. Much of the practical knowledge comes from experience. The tips above will help prevent a lot of loss and frustration.
Enemies—are worms that attack the leaves, and another species that attack the berries. There are only two remedies proposed, viz., fire and water. If you can flood your beds you will destroy them. If not, take a time not very dry so as to endanger burning the roots, and burn over your cranberry-beds, so as to consume all the vines. Next season new vines will grow up free from worms.[Pg 161]
Enemies—are bugs that damage the leaves, and another type that harms the berries. There are two suggested solutions: fire and water. If you can flood your beds, you'll get rid of them. If that's not possible, choose a time that's not too dry to avoid harming the roots, and burn your cranberry beds to get rid of all the vines. The next season, new vines will grow back free of bugs.[Pg 161]
CUCUMBERS.
There are quite a number of varieties. But a few only deserve attention. The best, for all uses, is the Early Cluster, a great bearer of firm, tender, brittle fruit. Early Frame, Long White, Turkey, and Long Green Turkey, are rather beautiful, but not prolific varieties. Long Prickly, is very good for pickles, and fills a cask rapidly, but is by no means so pleasant as the Early Cluster. The Short Prickly and White Spined are considerably used. The West India or small Gherkin is used only for pickling, and is considered fine. But we regard all these inferior to the Early Cluster.
There are quite a few varieties, but only a few are worth noting. The best for all purposes is the Early Cluster, which produces a lot of firm, tender, crunchy fruit. Early Frame, Long White, Turkey, and Long Green Turkey are quite attractive, but they don't produce as much. Long Prickly is great for pickles and fills a barrel quickly, but it's not as enjoyable as the Early Cluster. The Short Prickly and White Spined are quite common. The West India or small Gherkin is only used for pickling and is considered excellent. However, we think all these are inferior to the Early Cluster.
Soil should be made very rich with compost and vegetable mould, with a liberal application of sand. All vines do better in a sandy soil. Plant in the open air only after the weather has become quite warm. An effort to get early cucumbers by early out-door planting is usually a failure; seeds decay, or having come up, after a long while, they grow slowly, and vines and fruit are apt to be imperfect. Six feet apart, each way, is the best distance; and after the plants get out of the way of insects, and become well established, two vines in each hill is better than more: the fruit will be better and more abundant, and they will bear much longer than when vines are left to grow very thick. They need water in dry weather (see Watering). The first week in July is the best time to plant for pickling. In a warm, dry climate, cucumbers do better a little shaded, but not too much. Planted among young fruit-trees, or in alternate rows with corn,[Pg 162] they do well. If allowed to run up bushes like peas, they produce more and better fruit. Forcing for an early crop is often done, by digging a hole in the ground, two feet deep and two feet square, and filling with hot manure, stamped down well, and covered with six inches of fine mould. Put around a frame and cover with glass, at an angle of thirty-five degrees to the sun. Plant one hundred seeds on the two feet square; when they come up, put two plants in a pot, set in a regular hotbed, and keep well watered and aired until the weather be warm enough to transplant in the open air; then remove from the pots without breaking the ball of earth, and plant six feet apart. Four plants left in the original hill will bear earlier than those that have been removed. To get a large quantity of very early ones, plant a corresponding number of hills, with the two feet of manure, as above; whenever the weather becomes hot, they will need to be well watered, or they will dry up. All cucumber-plants forced should have the main runner cut off, after the second rough leaf appears; this brings fruit earlier and twice as abundant. On transplanting cucumbers, or any other vines, cover them wholly from the sun for three days, or, if the weather be dry, for a whole week. We once thought melons and cucumbers very difficult to transplant successfully; but we ascertained the only difficulty to be, the want of sufficient water and shade. When roots and soil were so dry that the dirt all fell off, we have transplanted with perfect success; but for a week the plants appeared to be ruined. We kept them covered and well watered, and they revived and made a great crop, much earlier than seeds planted at the same time. Protection of plants from insects has[Pg 163] been a subject of much study and many experiments. Ashes and lime, and various decoctions and offensive mixtures, have been recommended. We discard them all, as both troublesome and ineffectual. Our experience is, most decidedly, in favor of fencing each hill, of all vines, to keep off insects. A box a foot square and fifteen inches high, the lower edge set in the soil, will usually prove effectual. Put over a pane of glass, and it will be more sure, and increase the warmth and consequently the growth of the plants. Put millinet over the boxes, instead of glass, and not a hill will be lost. If a cutworm chances to be fenced in, he will show himself by cutting off a plant. Search him out and kill him, and all will be safe. Such boxes, well taken care of, will last for ten years. This, then, is a cheap as well as effectual method.
Soil should be enriched with compost and organic matter, along with plenty of sand. All vines thrive better in sandy soil. Only plant outdoors when the weather is warm. Trying to get early cucumbers by planting outside too soon usually fails; seeds can rot, or if they sprout, they grow slowly and the vines and fruit tend to be underdeveloped. The best spacing is six feet apart each way; once the plants are established and safe from insects, having two vines per hill is preferable to more: this results in better fruit and a greater yield, and they will produce longer than if the vines grow too thick. They need water during dry spells (see Watering). The first week of July is the ideal time to plant for pickling. In warm, dry climates, cucumbers do better with some shade, but not too much. Planting among young fruit trees or alternating rows with corn, [Pg 162] works well. If they are allowed to climb bushes like peas, they yield more and better fruit. Forcing for an early crop can be achieved by digging a hole two feet deep and two feet square, filling it with hot manure packed down well, and covering it with six inches of fine soil. Place a frame around it and cover with glass at a thirty-five-degree angle to the sun. Sow one hundred seeds in the two-foot square; once they sprout, transplant two plants into a pot, put them in a hotbed, and keep them well watered and ventilated until the weather is warm enough for outdoor planting; then carefully remove them from the pots without breaking the soil ball and plant them six feet apart. Four plants left in the original hill will yield fruit earlier than those that have been transplanted. To get a larger quantity of very early cucumbers, plant a corresponding number of hills with the two feet of manure as described above; when the weather gets hot, they will need plenty of water, or they will dry out. All forced cucumber plants should have the main runner cut off after the second rough leaf appears; this leads to earlier and more abundant fruit. When transplanting cucumbers or any other vines, keep them completely shaded from the sun for three days, or if the weather is dry, for a full week. We used to think melons and cucumbers were hard to transplant successfully, but we found the challenge to be insufficient water and shade. Even when the roots and soil were so dry that the dirt fell off, we successfully transplanted them; however, for a week, the plants seemed ruined. We kept them covered and well watered, and they revived, producing a large crop much earlier than seeds planted at the same time. Protecting plants from insects has[Pg 163] been extensively researched with many experiments. Ashes, lime, and various concoctions have been suggested. We dismiss all of them as both troublesome and ineffective. Our experience strongly supports fencing each hill of vines to keep insects away. A box one foot square and fifteen inches high, with the bottom edge buried in the soil, typically proves effective. Placing a pane of glass over it will increase warmth and promote plant growth. Using millinet over the boxes instead of glass ensures that no hill is lost. If a cutworm happens to get trapped inside, you'll notice it by the plant it cuts off. Find and eliminate it, and everything will be safe. Such boxes, if well maintained, can last for ten years. This, then, is a cost-effective and efficient method.
Cucumbers are a cooling, healthy article of diet, used in reasonable quantities. They should be sliced into cold water, taken out, and put in sharp vinegar with pepper and salt. Ripe cucumbers make one of the best of pickles: for directions in making, we refer to the cook-books. If you have room near your back door for one large hill of cucumbers, you may obtain a remarkable growth. Dig down deep enough to set in an old barrel, with head and bottom out, leaving the top even with the surface. Fill with manure from the stable, well trod down. In fine rich mould, around on the outside of the barrel, plant twenty or thirty cucumber-seeds. Put a pail of water in the barrel every day. The water comes up through the soil to the roots of the plants, bringing with it the stimulus of the manure, and the effect is wonderful. A large barrel has been filled with pickles from one such hill. If bushes be put up[Pg 164] to support the vines, it is still better. Neglect to pour in water, and they will dry up; but continue to water them, and they will bear till frost in autumn.
Cucumbers are a refreshing and healthy food when eaten in moderation. They should be sliced and soaked in cold water, then taken out and marinated in vinegar with pepper and salt. Ripe cucumbers make some of the best pickles; for instructions on how to make them, check the cookbooks. If you have space near your back door for one big mound of cucumbers, you can achieve amazing results. Dig deep enough to place an old barrel—without the top or bottom—so that the top is level with the ground. Fill it with well-compressed manure from the stable. In rich soil around the outside of the barrel, plant twenty or thirty cucumber seeds. Add a bucket of water to the barrel every day. The water will rise through the soil to the plant roots, carrying nutrients from the manure, and the results are incredible. A large barrel has been filled with pickles from just one such mound. It’s even better if you put up supports for the vines. If you forget to add water, they will wilt, but if you keep watering them, they will keep producing until frost hits in the fall.
CURRANTS.
These are among the very best of all the small fruits; immensely productive in all locations, and adapted to a great variety of uses, and hang long on the bushes after ripening.
These are some of the best small fruits; extremely productive in any location, suitable for a wide range of uses, and they stay on the bushes for a long time after ripening.
There is quite a number of varieties, some of which are probably the mere result of cultivation of others well known. The common red is too well known to need description—very acid, and always remarkably productive, in all soils and situations. The size and quality of the fruit are affected by location and culture. The native currants, as found in the north of Europe, are small and inferior; but all excellent modern varieties have sprung from them by cultivation. In working these important changes, the Dutch and French gardeners have been the chief agents: hence our names, Red and White Dutch currants.
There are quite a few varieties, some of which probably come from the cultivation of other well-known types. The common red currant is so familiar that it hardly needs a description—it's very tart and incredibly productive in all types of soil and conditions. The size and quality of the fruit depend on the location and how it's grown. The native currants found in northern Europe are small and not very good; however, all the great modern varieties have developed from them through cultivation. The Dutch and French gardeners have played the main role in these significant changes: that's why we call them Red and White Dutch currants.
The common red and the common white are still cultivated in the great majority of American gardens; and yet, they are not worthy to be named with the White Dutch and the Red Dutch, which may easily be obtained by every cultivator. These two varieties are all that ever need be cultivated. Long lists of currants are described in many of the fruit-books; the result, as in all such cases, is confusion and loss to the mass of growers. We will not even give the list. The com[Pg 165]mon red and the white currants are greatly improved by cultivation. But the Dutch have longer bunches, of larger fruit, the lower ones in the stem holding their size much better than common currants; the stems are usually full and perfect, and the fruit less acid and more pleasant.
The common red and common white currants are still grown in most American gardens, but they don't compare to the White Dutch and Red Dutch varieties, which are easily accessible for any grower. These two types are all you really need to cultivate. Many fruit books list numerous currant varieties, but this often leads to confusion and frustration for most growers, so we won't even provide that list. The common red and white currants benefit significantly from cultivation. However, the Dutch varieties have longer clusters and larger fruit, with the lower ones on the stem maintaining their size better than common currants. The stems are typically full and perfect, and the fruit is less tart and more enjoyable.
A new, strong-growing variety, called the "cherry currant" on account of its large size, is now considerably grown. A few bushes for variety, and for their beautiful appearance, may be well enough; but it is not a very good bearer, and therefore is not so profitable as the Dutch.
A new, fast-growing variety called the "cherry currant" because of its large size is now widely cultivated. A few bushes for variety and their attractive look can be nice, but they don’t produce well and aren’t as profitable as the Dutch variety.
The Attractor is a new French variety, said to be valuable. Knight's Early Red has the single virtue of ripening a few days earlier than the others. The Victoria is perhaps the latest of all currants, hanging on the bushes fully two weeks longer than others. The White Grape, the Red Grape, and the Transparent, are all good and beautiful. The utilitarian will cultivate the Red Dutch and the White Dutch as his main crop, with two or three of the others for a variety. The amateur will get all the varieties, and amuse himself by comparing their qualities, and trying his skill at modifying them. As these efforts have resulted, in past time, in the production of our best varieties, so they may, in future, in something far better than we yet have. There is no probability that any of our fruits have reached the acme of perfection.
The Attractor is a new French variety that is considered valuable. Knight's Early Red only has the advantage of ripening a few days earlier than the others. The Victoria is probably the latest of all currants, staying on the bushes a full two weeks longer than the rest. The White Grape, the Red Grape, and the Transparent are all good and attractive. The practical grower will plant the Red Dutch and the White Dutch as his main crop, adding a couple of other varieties for diversity. The hobbyist will try to collect all the varieties, enjoying the process of comparing their qualities and experimenting with modifications. Just as past efforts have led to the creation of our best varieties, the future may bring even better options than we currently have. It’s unlikely that any of our fruits have achieved the highest level of perfection.
The common black, or English black currant has long been cultivated. A jam made of it is valuable for sore throat. The highest medical authority pronounces black currant wine the best, in many cases of sickness, of any wine known. The Black Naples possesses the[Pg 166] same virtues, and being a much larger fruit, and more productive, should take the place of the English black, and exclude it from all gardens.
The common black currant, or English black currant, has been grown for a long time. Jam made from it is great for soothing sore throats. The top medical experts say that black currant wine is the best wine for many health issues. The Black Naples variety has the same benefits and, since it produces much larger fruit and yields more, it should replace the English black currant and be the only one grown in gardens.
Cultivation.—Currant-bushes should be set four feet apart each way, and the whole ground thoroughly mulched; it keeps down all weeds and grass, saving all further labor in cultivation, and greatly increases the size and quantity of the fruit. On nothing does mulching pay better. (See article Mulching.)
Cultivation.—Currant bushes should be planted four feet apart in all directions, and the entire area should be mulched well; this keeps weeds and grass at bay, reducing the amount of work needed for maintenance and significantly boosts the size and amount of the fruit. Mulching is one of the most beneficial practices you can invest in. (See article Mulching.)
Any good garden-soil is suitable for currants. On the north side of a wall or building, or in the shade of trees, they will be considerably later. The same effect may be produced by covering bushes a part of the time with blankets or mats. Some are retarded by this means, so as to be in perfection after others are gone: thus, the currant that naturally comes to perfection about midsummer is preserved on the bushes until October.
Any good garden soil works well for currants. On the north side of a wall or building, or in the shade of trees, they will take much longer to ripen. You can achieve the same effect by covering the bushes with blankets or mats for a while. Some are delayed this way, so they reach perfection after others have already finished: for example, the currants that usually ripen around midsummer can be kept on the bushes until October.
Many cultivate currants in the tree form; allowing no sprouts from the roots, and no branches within a foot or two of the ground. This object is secured by cutting from the slip you are to plant, from which to raise a bush, all the lower buds to within two or three of the top, and then pinching off at once all shoots that may start out of the stem below; this makes beautiful little shrubs, but the top is apt to be broken off by the wind, and they must be replaced by new ones every four or five years. Downing strongly recommends it, but we can not do so. Let bushes grow in the natural way, removing all old, decaying branches, and all suckers that rise too far from the parent-bush, and keep the clusters of bushes and leaves thin enough to allow the sun free access, and prevent continued moist[Pg 167]ure in wet weather, which will rot the fruit, and you will find it the cheapest and best. We have seen quite as large and as fine fruit grow on such bushes, that we knew to be more than twenty years old, as we ever saw of the same variety when cultivated in the tree form.
Many people grow currants in a tree shape, preventing any shoots from the roots and keeping branches at least a foot or two off the ground. This is achieved by cutting all the lower buds from the slip you’re going to plant, leaving only two or three buds near the top, and then pinching off any shoots that emerge from the stem below. This creates attractive little shrubs, but the tops can easily break off in strong winds, and they need to be replaced every four to five years. Downing strongly recommends this method, but we don’t agree. Let the bushes grow naturally, removing all old, dying branches and any suckers that grow too far from the parent bush. Ensure that the clusters of bushes and leaves are spaced out enough to let sunlight in, which helps prevent excess moisture during wet weather that could rot the fruit. You’ll find this method to be the most cost-effective and the best. We’ve seen equally large and fine fruit on such bushes, some over twenty years old, compared to those grown in the tree form.
DAIRY.
For cheese, the dairy should contain three rooms: one for setting the milk, with suitable boilers, &c.; next, a press-room, in which the cheese should be salted, as given under article Cheese; the third, a store-room. In all climates a cheese-house should be made as tight as possible;—thick stone walls are best; windows should be on two sides, north and west, but not on opposite sides, so as to create a draught: this is no better for cheese or butter, and is always dangerous to the operator. Let all persons who would enjoy good health avoid a draught of air as they would an arrow. If your cheese-house can be shaded on the east, south, and west, by trees, and have only a northern exposure, it will aid you much in guarding against extremes of heat and cold. Windows should be fitted closely, and covered with wire-cloth on the outside, so as to exclude all flies.
For cheese production, the dairy should have three rooms: one for setting the milk, equipped with the appropriate boilers, etc.; next, a press room where the cheese should be salted, as described in the section on Cheese; and the third, a storage room. In all climates, a cheese house should be as airtight as possible; thick stone walls are ideal. Windows should be placed on two sides, north and west, but not on opposite sides to avoid creating a draft. Drafts are harmful for cheese or butter and can pose risks to the operator. Everyone who wants to maintain good health should avoid drafts as if they were a danger. If your cheese house can be shaded on the east, south, and west by trees, allowing only a northern exposure, it will help keep temperatures stable against extremes of heat and cold. Windows should fit tightly and be covered with wire mesh on the outside to keep out flies.
A dairy for butter needs but two rooms, and a cool, dry cellar, with windows in north and west. The first room should be for setting and skimming the milk, and the other for churning and working the butter, and scalding and cleaning the utensils. If your milk-room can be a spring-house with stone-floor, and a little water[Pg 168] passing over it, you will find it a great benefit. The shade, situation of windows, avoiding a current, &c., should be the same as in the cheese-dairy.
A butter-making setup only requires two rooms and a cool, dry cellar, with windows facing north and west. The first room is for setting and skimming the milk, while the second is for churning and processing the butter, as well as scalding and cleaning the tools. If your milk room can be a spring house with a stone floor and a little water[Pg 168] flowing over it, you'll find it really helpful. The shade, window placement, and avoiding drafts should be similar to those in the cheese-making area.
To prevent the taste of turnips or other food of cows in milk and butter, put one quart of hot water into eight quarts of the milk just drawn from the cow, and strain it at once. It has been recently declared, by intelligent farmers, that if you feed the turnips to cows immediately after milking, the next milking, twelve hours after feeding the roots, will be free from their taste or odor. The easiest remedy is the boiling water.
To avoid the flavor of turnips or other cow feed in milk and butter, add one quart of hot water to eight quarts of fresh milk right after milking and strain it immediately. Recently, experienced farmers have stated that if you feed turnips to cows right after milking, the milk produced twelve hours later won’t have any taste or smell from the roots. The simplest solution is the boiling water.
DECLENSION OF FRUITS.
That there are instances of decided decline in the quality of fruits is certain. But on the causes of those changes pomologists do not agree. One theory is, that fruits, like animals and vegetables of former ages, may decline and finally become extinct. Should this theory be established, the declension would be so gradual that a century would make no perceptible change. But we do not credit the theory, even as applied to former geological periods in the history of our globe. The changes of past ages, as revealed in geology, have been brought about, not gradually, but by great convulsions of nature, such as volcanoes, or the deluge, that resulted in the destruction of the old order of things, and in a new creation.
It’s clear that there are noticeable declines in the quality of fruits. However, experts in fruit cultivation don’t agree on the reasons for these changes. One theory suggests that fruits, like the animals and plants of earlier times, might decline and eventually become extinct. If this theory holds true, the decline would be so slow that a century would show no noticeable difference. However, we don't support this theory, even regarding earlier geological periods in Earth's history. The changes from the past, as shown through geology, occurred not gradually but through major upheavals in nature, like volcanic eruptions or catastrophic floods, which led to the end of the old order and the beginning of a new one.
The true theory of this declension of varieties of fruits, is, that it is the result of repeated budding upon unhealthy stocks, and of neglect and improper cultiva[Pg 169]tion. Apply the specific manures—that is, those particularly demanded by a given fruit—prune properly, mulch well, and bud or graft only on healthy seedling stocks of the same kind, and, instead of declension, we may expect our best fruits to improve constantly, in quality and quantity.
The real reason for the decline in different types of fruits is that it comes from repeated budding on unhealthy plants, along with neglect and poor farming practices. Use the right fertilizers—those specifically needed for each type of fruit—prune correctly, mulch effectively, and bud or graft only on healthy seedling stocks of the same variety, and instead of a decline, we can expect our best fruits to continuously improve in both quality and quantity.
DILL.
An herb, native in the south of Europe, and on the Cape of Good Hope. It is grown, particularly at the South, as a medicinal herb. The leaves are sometimes used for culinary purposes; but it is principally cultivated for its sharp aromatic seed, used for flatulence and colic in infants, and put into pickled cucumbers to heighten the flavor. The seeds may be sown early in the spring, or at the time of ripening. A light soil is best. Clear of weeds, and thin in the rows, are the conditions of success.
An herb native to southern Europe and the Cape of Good Hope. It is mainly grown in the South as a medicinal herb. The leaves are occasionally used in cooking, but it is primarily cultivated for its strong aromatic seeds, which are used to relieve gas and colic in infants, and added to pickled cucumbers to enhance the flavor. The seeds can be sown early in spring or during the ripening period. A light soil is ideal. Keeping the area free of weeds and thinly spaced in rows are key to successful growth.
DRAINS.
Drains are of two kinds—under-drains and surface-drains. The latter are simply open ditches to carry off surface-water, that might otherwise stand long enough to destroy the prospective crop. These are frequently useful along at the foot of hills, when they should be proportioned to the extent of the surface above them. They are also very useful on low, level meadow-lands. Properly constructed, they will reclaim low swamps, and make them excellent land. Millions[Pg 170] of acres of land in the United States, as good as any we have, are lying useless, and spreading pestilence around, that by this simple method of ditching might be turned to most profitable account. The direction of these drains should be determined by the shape of the land to be drained by them—straight whenever they will answer the purpose, but crooked when they will do better. On low and very level land, they should be not more than five rods apart; they should be three times as wide at the top as they are at the bottom, and as deep as the width at the top; made so slanting, the sides will not fall in;—they should be so shaped as to allow only a very gentle flow of the water: if it flows too rapidly, it will wash down the sides, and obstruct the ditch, and waste the land. Excavations for under-draining are made in the same way, only the top need not be so much wider than the bottom; it would be a waste of labor in excavating a useless quantity of earth. There are four methods of filling up the ditch, viz., with brush; with small stones thrown in promiscuously; with a throat laid in the bottom and filled with small stones; and with a throat made of tile from the pottery. In all cases, that with which the ditch is filled must not come so near the surface as to be reached by the plow. Brush, put in green and covered with straw or leaves, will answer a good purpose for several years, and may be used where small stones can not easily be obtained. The tile is more expensive than either of the others, and not so good as the stones; it is so tight that the water does not enter it so readily; and if by any chance dirt gets into the throat, it obstructs it, and there is no other channel through which the water can pass off. Small stones thrown in promis[Pg 171]cuously serve a good purpose for a long time, if they be covered with straw or cornstalks before the earth is put in. But the best method is to make a throat, six inches square, in the bottom of the drain, laying the large stones over the top of it, and filling in the small stones above, and covering with straw;—the water will find its way into the throat through the numerous openings; and if the throat should ever be filled, the water could still pass off between the small stones above. Such drains will last many years, and add one half to the products of all wet springy land. The earth over the new drain should be six inches higher than the surface of the field, that, when well settled, it may be level. Leave no places open for surface-water to run in; that would soon fill up and ruin a drain. Drains made to carry off spring-water are often useless by being in a wrong location. Springs come out near the foot of rising ground. Just where they come out should be the location of the drain, which would then carry off the water and prevent it from saturating and chilling the soil in the field below. Many persons locate their ditch down in the centre of the wet level below the rise of ground; this is of no use to the surface above, to the point where the water springs. Locate the drain just at the point where the land begins to be unduly wet. On very wet, level land, a small drain may also be needed below the first and main one. The cost of a covered drain as described above will be from fifty to seventy-five cents per rod, and an uncovered one will cost from twenty to thirty cents. When you have low swamps to drain, you can realize more than the cost of draining, by carting the excavations upon other land, or into the barnyard as material for[Pg 172] compost. Perhaps no expenditure, on land needing it, pays so well as thorough draining. It is important, for all fruit-orchards on low land, to put a drain through under each row of trees: it is indispensable to cherries, and highly favorable to all other fruits.
Drains come in two types—under-drains and surface-drains. Surface-drains are just open ditches that carry away surface water, which could otherwise sit long enough to harm crops. They are often helpful at the base of hills, where they should be sized according to the area above them. They're also quite useful on low, flat meadows. When built properly, they can reclaim low swamps, turning them into high-quality land. Millions[Pg 170] of acres in the United States, just as good as any we have, are currently wasted and spreading disease, but could be made highly productive through this simple method of ditching. The direction of these drains should match the shape of the land being drained—straight where possible, but curvy when necessary. On very flat land, they should be no more than five rods apart; they should be three times wider at the top than at the bottom and as deep as the width at the top. With this slant, the sides won't collapse; they should also be shaped to allow for a slow flow of water: if it flows too quickly, it will erode the sides, block the ditch, and waste the land. Excavations for under-drains are done similarly, but the top doesn't need to be as wide as the bottom; otherwise, it's a waste of effort digging out extra dirt. There are four ways to fill the ditch: with brush, with small stones tossed in randomly, with a throat laid in the bottom and filled with small stones, and with a throat made of pottery tiles. In all cases, whatever fills the ditch shouldn't be close enough to the surface to be reached by a plow. Green brush covered with straw or leaves works well for several years and is useful when small stones are hard to find. Tile is more expensive than the other options and not as effective as stones; it's too tight for water to enter easily, and if dirt clogs the throat, there's no other way for the water to escape. Small stones tossed in randomly can be good for a long time if they're covered with straw or cornstalks before adding dirt. However, the best option is to create a six-inch square throat at the bottom of the drain, laying large stones over it and filling in with small stones on top, then covering with straw. Water will flow into the throat through the many openings, and even if the throat gets clogged, water can still flow through the gaps between the small stones above. These drains can last for years and significantly increase the yield of all wet, springy land. The soil over the new drain should be six inches higher than the field's surface so that, once settled, it will be level. Do not leave any open spots for surface water to enter; that would quickly fill and ruin a drain. Drains meant to remove spring water can often be ineffective if they're in the wrong spot. Springs typically emerge near the bottom of rising ground. The drain should be placed right where the spring appears to carry away the water and prevent it from saturating and cooling the soil in the field below. Many people mistakenly place their ditches in the center of the low, wet area, which does nothing for the surface above where the water springs from. The drain should be positioned right where the land starts to get excessively wet. On very wet, flat land, a smaller drain may be needed below the main one. The cost for a covered drain as described will be between fifty and seventy-five cents per rod, while an uncovered one will range from twenty to thirty cents. When draining low swamps, you can recover more than the cost of draining by moving the excavated material to other land or using it in the barnyard as compost material for[Pg 172]. No investment on land that needs it pays off as well as thorough drainage. It's essential for all fruit orchards on low land to have a drain under each row of trees: this is crucial for cherries and greatly benefits all other fruits.
DUCKS.
There are a number of varieties, the wild Black Spanish, the Canvass-Back, and the ordinary little duck of the farmyard, are all good. The common duck is the only one we recommend for the American poultry-yard. A close pasture, including a rivulet, or a small stream of water, affords facilities for raising ducks at a cheap rate. From one hundred to one thousand ducks may be raised in such an enclosure of an acre or two, quite profitably. If there is plenty of grass, they will still need a little grain. In the winter the cheapest feed is beets or potatoes cut fine, with a very little grain. Each duck, well kept, will lay from fifty to one hundred eggs, larger than hen's eggs, and about as good for cooking purposes. They may be picked as geese, for live feathers, though not quite so frequently. The feathers will nearly pay for keeping, leaving the eggs and increase as profit.[Pg 173]
There are several types of ducks, including the wild Black Spanish, the Canvasback, and the common little farm duck, all of which are good options. However, we recommend the common duck for American poultry farms. A fenced pasture that includes a stream or small water source makes it easy and affordable to raise ducks. You can raise between one hundred to one thousand ducks in a one- or two-acre area and still make a profit. If there’s plenty of grass, they will also need a bit of grain. During winter, the most cost-effective feed is finely chopped beets or potatoes, along with a small amount of grain. Each well-cared-for duck can lay between fifty to one hundred eggs, which are larger than hen's eggs and just as good for cooking. They can be harvested for their live feathers like geese, though not as often. The sale of the feathers can nearly cover their upkeep, leaving the eggs and any increase as pure profit.[Pg 173]
DWARFING.
This has some advantages in its application to fruit-trees. It will enable the cultivator to raise more fruit on a small plat of ground, to get fruit much earlier than from standard trees, and sometimes, with high cultivation, the fruit will be larger. Dwarfing is done by grafting into small slow-growing stocks. Almost all fruits have such kinds. Grafting into other stocks, as the pear into the foreign quince, is a very effectual method. The Paradise stock for the apple, the Canada and other slow-growing stocks for the plum, the dwarf wild cherry of Europe and the Mahaleb for cherries. Dwarfs produced by grafting upon other stocks are short-lived, compared with standards of the same varieties. They should only be used to economize room, to test varieties, and produce fruit while standards are coming into bearing.
This has some benefits when it comes to growing fruit trees. It allows growers to produce more fruit on a small plot of land, get fruit much sooner than from standard trees, and sometimes, with careful cultivation, the fruit will be larger. Dwarfing is achieved by grafting onto small, slow-growing rootstocks. Almost all fruit varieties have such options. Grafting onto other rootstocks, like pears onto foreign quinces, is a very effective method. The Paradise rootstock for apples, the Canada and other slow-growing stocks for plums, the dwarf wild cherry of Europe, and the Mahaleb for cherries. Dwarfs created by grafting onto other stocks tend to be short-lived compared to standard varieties. They should only be used to save space, test varieties, and produce fruit while standard trees are maturing.
Better and much longer-lived dwarfs may be produced by frequent transplanting, thorough trimming of the roots, and repeated heading-in. The fruit on such dwarfs must be well thinned out when young, or it will be smaller than is natural. The effect of heading in is to cause the sap to mature an abundance of fruit-buds. This will tax the tree too much, unless they be well thinned out. Root-pruning is an effectual method of dwarfing (see Pruning). Dwarfing by root-pruning, repeated transplanting, and thorough heading-in, will not render the trees very short-lived, and in many situations it is profitable. The same is true of the dwarf pear on the quince. All other dwarfing is more for the amateur than the utilitarian.[Pg 174]
Better and much longer-lived dwarf trees can be achieved through frequent transplanting, thorough root trimming, and repeated cutting back. The fruit on these dwarf trees needs to be well thinned when young, or it will be smaller than usual. Cutting back encourages the sap to produce a lot of fruit buds. This can strain the tree if not properly thinned. Root pruning is an effective method for creating dwarf trees (see Pruning). Dwarfing through root pruning, ongoing transplanting, and thorough cutting back won’t shorten the trees' lifespan significantly, and in many cases, it's beneficial. The same goes for dwarf pear trees grafted onto quince. Most other dwarfing methods are more suitable for hobbyists than for practical use. [Pg 174]
EARLY FRUITS AND VEGETABLES
Are often considered a great luxury, and always command a high price. Early vegetables are secured by hotbeds and the various methods of forcing, as given under the different species. Early fruits are obtained by dwarfing, as given on that subject. Location, soil, and mode of cultivation, also, have much to do with it. Warm location, finely-pulverized soil, often stirred and kept moist, will materially shorten the time of the maturity of fruits and vegetables. Seeds imported from the North, where seasons are shorter, will mature earlier. Another means of hastening maturity is to plant successively, from year to year, the very first that ripens; this tends to dwarf in proportion as the time of maturity is hastened. In this way such dwarfs as the little Canada corn, that will mature at the South in six weeks, have been produced. Various early plants, as tomatoes, cabbages, peppers, and egg-plants, may be started in boxes or flower-pots in the house. Planted in February here, or in January in the South, they will grow as well as house-plants, and acquire considerable size before it is time to place them in the open ground. This is convenient for those who have no hotbeds. They must be kept from frost, and occasionally set out in a warm day to harden, and they will do well.[Pg 175]
Are often seen as a high-end luxury and always come with a hefty price tag. Early vegetables are grown using hotbeds and various forcing methods, as detailed under the different types. Early fruits come from dwarfing techniques, as discussed in that section. The location, soil quality, and cultivation methods also play a significant role. A warm location with finely tilled soil that is regularly stirred and kept moist can greatly reduce the time it takes for fruits and vegetables to mature. Seeds brought in from the North, where the growing seasons are shorter, tend to ripen earlier. Another way to speed up maturity is to plant the earliest ripening varieties every year; this can lead to dwarf plants as the maturity time decreases. This is how small varieties like Canada corn, which can grow in the South in six weeks, have been developed. Various early plants, such as tomatoes, cabbages, peppers, and eggplants, can be started in boxes or flower pots indoors. If planted in February here, or January in the South, they will grow just like houseplants, becoming quite large before it’s time to move them outside. This is ideal for those without hotbeds. They should be protected from frost and occasionally taken outside on warm days to acclimate, and they will thrive.[Pg 175]
EGG PLANT.
The white is merely ornamental. The large purple is one of the greatest luxuries of the vegetable garden. Plant seeds in hotbed at the time of planting tomatoes or peppers. Set out in land made very rich with stable-manure and decayed forest-leaves, two feet and a half apart each way. Kept clean, and earthed up a little, and the bugs kept off while the plants are small, they will produce an abundance of fruit. There are two varieties of the purple—large prickly-stem purple, growing sometimes eight inches in diameter; and the long purple, bearing smaller, long fruit, but a large quantity, and considerably earlier than the large. Many do not like them at first; but after tasting a few times, almost all persons become very fond of them. If not properly cooked, they are not at all palatable. Although it belongs to the cook-book, yet, to save this excellent plant from condemnation, we give a recipe for cooking it. It is fit for use from one third grown, until the seeds begin to turn. Without paring, cut the fruit into slices one third of an inch thick; put it in a little water with plenty of salt, and let it stand over night, or six hours at least; take it out, and fry very soft and brown in butter or fresh lard—if not fried soft and brown, it is disagreeable. Salt, ashes, and bonedust, or superphosphate of lime, are the best manures, as more than two thirds of the fruit is made up of potash, soda, and phosphates, as shown by chemical analysis.[Pg 176]
The white one is just for decoration. The large purple variety is one of the greatest treasures of the vegetable garden. Plant seeds in a hotbed at the same time you plant tomatoes or peppers. Space them two and a half feet apart in soil enriched with manure and decayed leaves. If you keep them clean, mound the soil a bit around them, and protect the young plants from bugs, they will produce a lot of fruit. There are two types of purple: large prickly-stem purple, which can grow up to eight inches in diameter, and the long purple, which produces smaller, elongated fruits in larger quantities and matures significantly earlier than the large variety. Many people aren't fans of them at first, but after trying them a few times, most people really enjoy them. If they aren’t cooked properly, they can taste quite bad. While it’s typically found in cookbooks, to prevent this fantastic plant from getting a bad reputation, we’ll share a cooking method. It can be harvested when it’s one third grown, up until the seeds start to change color. Without peeling, slice the fruit into one-third-inch thick pieces; soak them in a little water with a lot of salt overnight or for at least six hours. Then, take them out and fry until they are very soft and browned in butter or fresh lard—if they aren’t cooked soft and brown, they won’t taste good. Salt, wood ash, and bone meal, or superphosphate of lime, are the best fertilizers since more than two-thirds of the fruit consists of potash, soda, and phosphates, according to chemical analysis.[Pg 176]
EGGS.
Of the quality of eggs you can always judge correctly by looking at them toward the light: if they are translucent they are good; if they look dark they are old—or you may get a chicken, when you only paid for an egg.
You can always tell the quality of eggs by holding them up to the light: if they are translucent, they are fresh; if they look dark, they are old—or you might end up with a chick when you only paid for an egg.
Many methods for preserving eggs are recommended. Packed away in fine salt they will keep, but, like salt meat, have not the same flavor as fresh. Set them on their small ends in a tight cask, and fill it with pure lime-water, and they will keep, but it changes their flavor. This, however, is a very common method. The best way known to us, is to pack fresh eggs down in Indian meal, allowing no two to touch each other. Keep very dry in a cool cellar, and they will remain for months unchanged.
Many ways to preserve eggs are suggested. Storing them in salt will keep them, but, like salted meat, they don't taste as good as fresh ones. If you place them on their small ends in a tight barrel and cover them with pure lime water, they will last, but their flavor will be altered. This is, however, a very common method. The best way we know is to pack fresh eggs in cornmeal, making sure no two eggs touch. Keep them very dry in a cool cellar, and they will stay unchanged for months.
ELDERBERRY.
This is a healthy berry, dried and used for making pies, especially mixed with some other fruit. The blossoms are much used as medicine for small children. The common sweet elder is the only kind cultivated. The earlier red are offensive and poisonous. They are easily grown on rough waste land, or in any situation you prefer. Of this berry is made a wine, superior in flavor and effect to any port wine now to be obtained in market; it has had the preference among the best judges in the country;—it is fast coming into notice and cultivation. The wine is so entirely superior to[Pg 177] the poisonous substances of that name in commerce, that it would be well for every neighborhood to make enough for their sick. The process is sure and easily intelligible to all. (See article Wine.)
This is a healthy berry, dried and used for making pies, especially when mixed with other fruits. The blossoms are often used as medicine for young children. The common sweet elder is the only variety that's cultivated. The earlier red ones are unpleasant and toxic. They can be easily grown on rough waste land or in any location you prefer. This berry is used to make a wine that is better in flavor and effects than any port wine available on the market; it has been favored by the best judges in the country and is quickly gaining attention and cultivation. The wine is far superior to[Pg 177] the toxic substances of that name sold in commerce, so it would be beneficial for every neighborhood to produce enough for their sick. The process is reliable and easy to understand for everyone. (See article Wine.)
ENDIVE.
This is a well-known winter-lettuce. Sow from July to September, according to latitude. It should come into maturity at the time of the first smart frosts. To get beautiful, white, tender bunches, they should be tied up when the leaves are about six inches long. When frost comes, protect by covering. In very cold climates, place it in the cellar, with the roots in moist earth, and it will keep for a long time. It will not be extensively used in this country for soups and stews, as it is in Europe; and but few of the American people care much about winter-lettuce. This is the best variety of lettuce, except for those who have hot-houses and attend to winter-gardening. They will prefer the other finer varieties. There are two varieties of endive cultivated in this country: green curled, which is the most common, and used principally as a salad; the broad-leaved, or Batavian, has thicker leaves and large heads, and is principally used in stews and soups. Still another variety, called succory, which is used to some extent in Europe as a winter-salad, but is cultivated mainly for the root. It is dried and ground to mix with coffee: some consider it quite as good. This is more cultivated at the South than at the North—their winters are much better adapted to it. The me[Pg 178]dicinal virtues of this plant are nearly equal to those of the dandelion. When it is bleached, by tying or earthing up, the bitterness is removed, and the taste is pleasant; this must be done when the plants are dry, or they will rot. Plant them in a sunny place and in a light soil.
This is a popular variety of winter lettuce. Plant seeds from July to September, depending on your location. It should reach maturity just in time for the first hard frosts. To yield nice, white, tender bunches, tie them up when the leaves are about six inches long. When frost hits, protect the plants with a cover. In very cold regions, store it in the cellar with the roots in damp soil, and it will last a while. It’s not typically used for soups and stews in this country like it is in Europe, and not many Americans are very interested in winter lettuce. This is the best type of lettuce, except for those with greenhouses who focus on winter gardening; they tend to prefer finer varieties. There are two kinds of endive grown in the U.S.: green curled, which is the most common and mainly used as a salad, and broad-leaved or Batavian, which has thicker leaves and large heads and is mostly used in stews and soups. Another type, called succory, is somewhat used in Europe as a winter salad but is primarily grown for its root. It’s dried and ground to mix with coffee; some people think it tastes just as good. It's more commonly grown in the South than in the North, as their winters are much more suitable for it. The medicinal benefits of this plant are nearly equal to those of the dandelion. When bleached by tying or mounding soil around, the bitterness is removed, and the flavor becomes pleasant; this should be done when the plants are dry, or else they will rot. Plant them in a sunny spot and in light soil.
FEEDING ANIMALS.
Feed as nearly as possible at the same hours. All creatures do much better for being so fed. Do not feed domestic animals too much: animals will be more healthy, grow faster, and fatten better, by being fed almost, but not quite as much as they will eat. Giving food to lie by them is poor economy; always let them eat it all up, and desire a little more;—at the same time, let it be remembered that creatures kept very poorly for a considerable time, especially while young, will never fully recover from it. This is often done under the idea of keeping them cheap, but it is dear keeping. They never can make as fine animals afterward.
Feed at the same times as much as you can. All animals do much better with regular feeding. Don’t overfeed domestic animals: they’ll be healthier, grow faster, and gain weight better if you feed them almost, but not quite, enough to satisfy them. Letting food sit around is wasteful; always allow them to finish it and still look for a bit more. However, it’s important to remember that animals kept in poor conditions for a long time, especially when they’re young, will never fully recover. This is often done to save money, but it's actually more expensive in the long run. They won't develop into as good animals afterward.
All grains and vegetables, except beets and turnips, are better for being boiled or steamed. The increased value is much more than the cost of cooking, provided persons are not so careless as to allow food to be injured by standing after cooking. Cooking is supposed to add one fourth to the value of food. Grinding dry grains adds nearly as much to their value, as feed for animals, as cooking. If you neither grind nor boil hard grain for feed, it will pay well to soak it somewhat soft before feeding. Variety of food is as pleasant and healthy for animals as for men.[Pg 179]
All grains and vegetables, except for beets and turnips, are better when boiled or steamed. The added value is much greater than the cost of cooking, as long as people don’t let food sit around and spoil after it's cooked. Cooking is believed to increase the value of food by about one-fourth. Grinding dry grains boosts their value for animal feed almost as much as cooking does. If you don't grind or boil hard grains for feed, it's a good idea to soak them until they're a bit softer before feeding. A variety of food is just as enjoyable and healthy for animals as it is for people.[Pg 179]
FENCES.
These are matters of great importance to the farmers of the whole country, but especially to those on the prairies of the west.
These are issues that matter a lot to farmers across the country, but especially to those on the western prairies.
In all localities where stone can be obtained from the fields or quarry, the best and cheapest fence is a stone wall. If the stones are flat, make the wall two feet thick at bottom, and one at top, five feet high. If the stones are very irregular the wall should be thicker. Stone walls should have transverse rows of shingles, boards, or split sticks, about half an inch thick, laid in the wall at suitable distances. If stones are quite flat three rows are desirable, one two, the next three, and the other four feet from the ground. If the wall is made of rough stones it will require one more course of sticks, leaving them only a foot apart. The sticks should be of such lengths as to come out just even with the wall, on each side. The lower courses will be longer than the upper ones. These sticks are to keep the wall from falling down. Dig a ditch one foot deep, two feet from the wall, and throw the earth excavated up against the wall, and the water will run off and prevent heaving by frost, and such a wall will need the merest trifle of attention during a generation, and will last for centuries. A cord of stones will make one rod. We can not too strongly recommend this kind of fence, in all places where stones can be obtained reasonably. The pieces of wood laid in a wall, will keep well for thirty years, when they will need replacing. Next to stone is a good board fence. Well made and of good materials, it is durable and always in its place. Hence it is a cheap fence.[Pg 180]
In areas where stone is available from fields or quarries, the best and most affordable fence is a stone wall. If the stones are flat, build the wall two feet thick at the bottom and one foot thick at the top, reaching a height of five feet. If the stones are very irregular, the wall should be thicker. Stone walls should include cross rows of shingles, boards, or split sticks about half an inch thick, placed in the wall at appropriate intervals. If the stones are quite flat, three rows are ideal: one at two feet, another at three feet, and the last at four feet from the ground. If the wall consists of rough stones, an additional row of sticks will be needed, spaced only one foot apart. The sticks should be cut to a length that makes them flush with the wall on both sides. The lower rows will be longer than the upper ones. These sticks help support the wall and prevent it from collapsing. Dig a ditch one foot deep, two feet away from the wall, and pile the excavated dirt against the wall. This will direct water away and help prevent frost heaving. Such a wall will require very little maintenance for a generation and can last for centuries. A cord of stones makes one rod. We highly recommend this type of fencing wherever stones can be obtained at a reasonable cost. The wooden pieces integrated into the wall will last about thirty years before needing replacement. A well-constructed wooden fence is also a good option. Made from quality materials, it is durable and always in place, making it a cost-effective solution.[Pg 180]
Of the various styles of picket, and other fancy fences for front yards, &c., it is more the province of the architect or the mechanic to treat. Styles vary and are constantly increasing in number. The great point to be secured in all such, to render them most durable, is to have the smallest possible points of contact. A picket fence with horizontal base should never have the pickets standing on the base board. They should be separated, from one quarter to one half an inch. A good style for villages, is a cap, water tight, and wide enough to cover the ends of the posts and pickets with a neat little cornice. It looks well and is very durable.
Of the various styles of picket and other decorative fences for front yards, it's more the job of the architect or the builder to address. Styles vary and are constantly increasing in number. The main thing to ensure for durability is to minimize points of contact. A picket fence with a horizontal base should never have the pickets resting directly on the baseboard. They should be separated by about a quarter to half an inch. A good style for villages includes a watertight cap that is wide enough to cover the ends of the posts and pickets with a neat little cornice. It looks nice and is very durable.
In all localities where timber is not too valuable, a cheap and substantial fence is made of split rails. The crooked rail-fence, with stakes and riders, is well known. Also that with upright stakes and caps, which is decidedly preferable. It will stand much longer, and the stakes are out of the way. No farmer should ever risk his crop with a rail-fence without stakes. But the best of all rail-fences, is that made of posts and rails. The rails are put in as bars, but so firmly that the fence can not be taken down, without commencing at the end. Where cedar or locust posts, and oak or cedar rails can be obtained, a fence may be made that will not get out of repair for twenty-five years. No creature can tear it down, for human hands can not take it down without tools, or without commencing at the end. This is considered expensive. But as the farmer may prepare his posts and rails in winter, and it will require no attention to keep it up, and is very durable and perfectly effectual against cattle, it is an economical fence. For hedges, see that article.[Pg 181]
In all areas where timber isn't too valuable, a cheap and sturdy fence is made of split rails. The crooked rail fence with stakes and riders is well-known, as is the version with upright stakes and caps, which is definitely better. It lasts much longer, and the stakes are out of the way. No farmer should ever risk their crops with a rail fence that doesn’t have stakes. But the best type of rail fence is made with posts and rails. The rails are installed as bars, but they're secured so firmly that the fence cannot be taken down without starting from the end. Where cedar or locust posts and oak or cedar rails are available, a fence can be built that won't need repairs for twenty-five years. No animal can demolish it, because human hands can't take it down without tools or without starting at the end. This is considered expensive. However, since the farmer can prepare the posts and rails in winter and it requires no maintenance, plus it's very durable and completely effective against cattle, it’s actually an economical fence. For hedges, see that article.[Pg 181]
FENNEL.
This is a hardy perennial plant of Southern Europe, and belongs to both the culinary and the medicinal departments. It grows well on almost any soil, and is propagated by seeds, offshoots, or by parting the roots. It is much inclined to spread. A few roots, kept within reasonable bounds, are enough for a family. It is much used in Europe for soups, salads, and garnishes. The Italians treat it as celery. In this country it is mostly used medicinally. It is stimulant and carminative. Very beneficial to children in cases of flatulency and colic.
This is a tough perennial plant from Southern Europe that is used for both cooking and medicine. It thrives in almost any type of soil and can be grown from seeds, offshoots, or by dividing the roots. It tends to spread easily. A few roots, when kept in check, are sufficient for a family. It is commonly used in Europe for soups, salads, and garnishes. Italians use it like celery. In this country, it is primarily used for medicinal purposes. It acts as a stimulant and a carminative and is very helpful for children with gas and colic.
FIGS.

This fruit is native in the warmer parts of Asia: hence, the cold winters of the Middle, Northern, and Western states, and of Canada, would destroy the trees in the open air without protection. But as the trees are low-growing shrubs, they may easily be protected either in cellars, greenhouses, or the open air, and uncovered or planted out in the beginning of warm weather. Frequent removals and[Pg 182] transplantings injure the fig less than any other fruit, and our summers are long enough to produce large crops of excellent figs. In New England they are raised in tubs, set out of the cellar in spring, and produce largely. South of Virginia, the fig is hardy, and may be cultivated with profit in the open air. The best method of raising all kinds of fruit, in climates where the winters are too cold for them, is to build a wall twelve feet high on one side, and six feet on the other, with the ends closed, and cover it with glass facing the south. This should only be kept warm enough to prevent freezing, which would require only a small outlay. Men of moderate means might thus have oranges, lemons, figs, &c., of their own raising. In all except our coldest latitudes, such fruits might be raised at a profit.
This fruit originates from the warmer regions of Asia; therefore, the cold winters in the central, northern, and western states, as well as in Canada, would kill the trees outdoors without protection. However, since the trees are low-growing shrubs, they can easily be protected in cellars, greenhouses, or even outside, and can be uncovered or planted out at the start of warm weather. Frequent moves and[Pg 182] transplanting harm figs less than most other fruits, and our summers are long enough to yield large crops of excellent figs. In New England, they are grown in tubs, taken out of the cellar in spring, and produce abundantly. South of Virginia, the fig is resilient and can be profitably grown outdoors. The best way to cultivate all types of fruit in climates with harsh winters is to build a wall twelve feet high on one side and six feet high on the other, with the ends sealed, and cover it with glass facing south. This should only be kept warm enough to prevent freezing, which would require only a minimal investment. People with moderate means could then grow their own oranges, lemons, figs, etc. In all areas except the coldest regions, such fruits could be grown profitably.
Soil.—The best is a deep, rich loam, with a dry subsoil.
Soil.—The ideal type is a deep, nutrient-rich loam, with a dry underground layer.
Propagation is by layers and cuttings. The latter should be taken off in the spring, be of last year's growth, with half an inch of the previous year's growth: they take root better.
Propagation is done by layering and cuttings. The cuttings should be taken in the spring, from last year's growth, with half an inch of the previous year's growth: this helps them root better.
Varieties are numerous, and names uncertain. White, in his Gardening for the South, says, some of the best varieties are not in the books, or so imperfectly described that they can not be recognised. This is true of all the fruits, and hence our decision, in this work, not to attempt to describe fruits with a view to their identification. As this fruit is more for the South than the North, we give the whole of White's list, as being adapted to those regions:—
Varieties are plentiful, and names are unclear. White, in his Gardening for the South, mentions that some of the best varieties aren't listed in the books, or they’re described so poorly that they can’t be identified. This applies to all fruits, which is why we’ve decided in this work not to try to describe fruits for the purpose of identification. Since this fruit is more suitable for the South than the North, we provide White's entire list, as it fits those regions:—
1, Brunswick; 2, Brown Turkey; 3, Brown Ischia; 4, Small Brown Ischia; 5, Black Genoa; 6, Celestial; 7, Common Blue; 8, Round White, Common White,[Pg 183] Lemon Fig; 9, White Genoa, White Italian; 10, Nerii; 11, Pregussatta; 12, Allicant; 13, Black Ischia; 14, White Ischia. These, with a few others, are those described in most of our fruit-books. The catalogue of the London Horticultural Society enumerates forty-two varieties. Only a few of them have been introduced into this country. Any of these varieties are good at the South. The five following are the most hardy, and, being in all respects good, are all we need in our more northern latitudes:—
1, Brunswick; 2, Brown Turkey; 3, Brown Ischia; 4, Small Brown Ischia; 5, Black Genoa; 6, Celestial; 7, Common Blue; 8, Round White, Common White,[Pg 183] Lemon Fig; 9, White Genoa, White Italian; 10, Nerii; 11, Pregussatta; 12, Allicant; 13, Black Ischia; 14, White Ischia. These, along with a few others, are the ones mentioned in most of our fruit books. The catalog from the London Horticultural Society lists forty-two varieties. Only a handful of them have made it to this country. Any of these varieties thrive in the South. The following five are the hardiest and are all we need in our colder northern regions:—
1. Brunswick.—Very hardy, productive, and excellent.
Brunswick.—Super hardy, productive, and excellent.
2. Brown Turkey.—The very hardiest, and one of the most regular and abundant bearers.
2. Brown Turkey.—The toughest variety, and one of the most consistent and generous producers.
3. Black Ischia.—Bears an abundance of medium-sized, excellent fruit, very dark-colored.
3. Black Ischia.—Produces a lot of medium-sized, high-quality fruit that is very dark in color.
4. Nerii.—Said to be the richest fig in Britain: from an acid mixture in its flavor, it is exceedingly delicious.
4. Nerii.—Considered the most luxurious fig in Britain: it has a wonderfully tasty flavor due to its acidic notes.
5. Celestial.—This may be the "Malta" of Downing. Under whatever name, though small, it is one of the very best figs grown in this country.
5. Celestial.—This could be the "Malta" of Downing. No matter what it’s called, even though it’s small, it is one of the absolute best figs grown in this country.
For forcing under glass, the best are the Allicant and Marseilles. With care, the first three of the above list may be raised in the Middle states, without removal in winter. Any variety may be protected by bending and tying down the branches, and covering with four inches of soil. Below Philadelphia, a little straw will be a sufficient protection.
For forcing under glass, the best choices are the Allicant and Marseilles. With proper care, the first three varieties from the list above can be grown in the Middle states without needing to be moved in winter. Any variety can be protected by bending and tying down the branches and covering them with four inches of soil. In areas below Philadelphia, a bit of straw will provide enough protection.
Dried figs are an important article of import into this country; yet they might be raised as plentifully and profitably in the Southern states. Prune only to keep the tree low and regular. The fig-tree is a great and regular bearer, only when the wood makes too[Pg 184] strong a growth, as it is somewhat apt to do. The remedy is root-pruning. Cut off, on the first of November, the roots to half the length of the branches from the tree, and occasionally shorten the branches a little, and the fruit will be abundant, and not fall off. The ripening of the fruit may be hastened and perfected by putting a drop of oil in the blossom-end of each fig. This is done by dipping the end of a straw in oil, and then putting it into the end of the fruit. This is extensively practised in France. Compost, containing a pretty liberal proportion of lime, is the best manure for the fig.
Dried figs are an important import for this country, but they could easily be grown abundantly and profitably in the Southern states. Prune just enough to keep the tree low and properly shaped. The fig tree produces a lot of fruit, but if the wood grows too strong—which it tends to do—you might run into problems. The solution is *root-pruning*. On November 1st, trim the roots to half the length of the branches above the ground, and every now and then, shorten the branches a bit. This will result in plenty of fruit that doesn't drop off. You can speed up the ripening process by adding a drop of oil to the blossom end of each fig. Do this by dipping the end of a straw in oil and then inserting it into the fruit. This method is commonly used in France. For fertilizing, compost with a generous amount of lime works best for figs.
FISH.
The cultivation of fish is attracting much attention in this country and in Europe. The study and experiments of scientific and practical men have established important facts upon this subject. Fish may be successfully cultivated wherever water can be conveniently obtained. The creeks, ponds, and small rivers of our land may be well stocked with fish. Fish may be raised as a source of profit and luxury, with as much ease and certainty, and at a much less expense than fowls. This is so important to the whole people, that it demands the earnest attention of our state authorities, as it has engaged that of the government of France. The species of fish best adapted to artificial culture, in particular climates and in different kinds of water, have been ascertained. A man may know what fish to put in his waters, as well as what crops to put on his land, or what stocks on his farm.[Pg 185]
The farming of fish is getting a lot of attention in this country and in Europe. Research and experiments by both scientists and practitioners have established significant facts on this topic. Fish can be successfully farmed wherever water is readily available. The streams, ponds, and small rivers in our region can be effectively stocked with fish. Fish farming can be a profitable and luxurious venture, just as easy and reliable, and at a much lower cost than raising chickens. This is so crucial for everyone that it requires the serious attention of our state officials, just as it has captured the interest of the French government. The types of fish that are best suited for farming in various climates and water types have been identified. A person can know which fish to stock in their waters just as well as they know what crops to grow on their land or what livestock to raise on their farm.[Pg 185]
The following brief synopsis of the best methods of cultivation will be sufficient to insure success. The first requisite is suitable water for hatching eggs that have been artificially fecundated, and for the occupancy of fish of different ages, and for different species of fish. Fish of different ages are much inclined to destroy each other for food; and hence, in order to multiply them most rapidly, they should be kept in separate ponds until considerably grown, when they will take care of themselves. A spring sending forth a rivulet of clear water, and not subject to overflow in freshets, is the best location. Clear, cool water is essential to the trout, while some other fish will do well in warm and even roily water. The rivulet running from the spring should be made to form a succession of ponds, three or four in number. These ponds should be connected with flumes made of plank. If the space they must occupy be small, make the flumes zigzag, to increase their length. Put across those flumes, once in four or five feet, a piece of plank half as high as the sides of the flume, with a notch cut in the centre of the top, that the fish may easily pass over: this will afford a succession of little falls, in which the trout very much delights. These different ponds are for the occupancy of fish of different ages, one age only inhabiting one pond. The flumes should have four inches of fine and coarse gravel in the bottom, making the most perfect spawning-ground. Although you would not wish the female-trout to deposite her eggs in the natural way, but will extrude them by the hand (as hereinafter directed), yet they must have these natural conveniences, or they will not incline to spawn at all. At the upper end of each of these flumes separating the ponds, there[Pg 186] should be a gate of wire-cloth, to prevent the passage of the fish from one pond to the other; also one at the outlet of the lower pond, to prevent egress of the fish. These must all be so arranged that freshets will not connect them all together. When trout are about to spawn in their natural waters, they select a gravelly margin, and remove, from a circle of about one foot or two feet in diameter, all the sediment, leaving only clean gravel, among which they deposite their eggs, where they are hatched. They want running water of three or four inches in depth for this purpose. A male and female occupy each nest. If left to themselves, they will gradually increase; but so many of their eggs fail of being fecundated, and so many are destroyed before they hatch, by enemies, and by the collection of sediment in the nest, that the number of young fish is small compared with the whole number of eggs deposited. Artificial spawning, fecundation, and hatching, are far more productive. The process is simple and easy: when the female-fish first begins to deposite her eggs, catch her with a small net. It can not be done with bait, for fish will bite nothing at the time of spawning. We recollect, often when a boy, of trying to catch trout out of the brooks in October, where we could see large, beautiful fish, lying lazily in the places from which we had caught many in the summer, and put our bait carefully on every side of them, and they would not bite. Then we knew not the cause: since studying the habits of fish, we have learned that they never will bite while spawning; with trout, this is done from the 1st to the 15th of October, some few spawning till the last of November. Having caught two fish, male and female, take the female in one hand, and press her abdomen[Pg 187] gently with the other hand, gradually moving it downward, and the eggs will be easily extruded, and should fall into an earthen vessel of pure water. Then take the male-fish, and go through the same process, which will press out the spermatic fluid, which should be allowed to fall into the same vessel with the eggs; stir up the whole together, and, after it has stood fifteen minutes, pour off the water, put in more and stir it up, and let it stand as before. This having been done three times, the eggs will be thoroughly fecundated, and are ready to be deposited in the nests for hatching. If the fish are caught before the time of beginning to spawn, the eggs and the spermatic fluid will not be mature, and will be only extruded by hard pressing, and failing to be fecundated, the eggs will perish. The fluid from one male will fecundate the eggs of half a dozen females. These eggs may be hatched in the flumes described above, though hatching-boxes are preferable. The old fish can be returned to the water, and may live many years and produce thousands of fish. These fish, carefully treated and fed, will become so tame as to eat out of your hand, like the "Naiad Queen" of Professors Ackley and Garlick, of Cleveland, Ohio. Among all the hatching apparatus we have seen described, we regard that of the above professors at Cleveland the best. To these gentlemen the country is much indebted for the knowledge derived from their zeal and success in fish culture. At the head of a spring they built a house eight by twelve feet; in the end of the house toward the spring they made a tank four feet wide, eight feet long, and two feet deep; this was made of plank. Water enters the tank through a hole near the top, and escapes through[Pg 188] a similar one at the other end, and is received into a series of ten successive boxes, each one a little lower than the preceding one. These boxes were eighteen inches long, eight inches wide, and six inches deep. These were filled to the depth of two inches with clean sand and gravel. The impregnated eggs were scattered among the gravel, care being exercised not to have them in piles or masses. Clean water is necessary, as the sediment deposited by impure water is very destructive to the eggs. If it be seen to be collecting, it should be removed by agitating the water with a goose-quill or soft brush, and allowing it to run off; continue this till it runs clear. But there is a method of preventing impurities in spring-water, that will be always effectual: just around on the upper side of the spring make a tight fence two feet high, and it will turn aside, and cause to run around the spring, all the water that may flow down the rise above in time of rains. The house being near the head, there will not water enough get into the spring, in any storm, to roil the water. On the side of the boxes where the water escapes should be wire-cloth, so fine as not to allow the eggs to pass through. Such an apparatus will be perfect. This great care is only necessary for trout. All other fish worthy of cultivation, will only need spawning-beds on the margin of their pond. A convenient hatching apparatus is a number of wicker-baskets, fine enough not to allow the eggs to pass through, set in a flume of clear running water.
The following brief summary of the best cultivation methods will ensure success. The first requirement is suitable water for hatching artificially fertilized eggs and for fish of different ages and species. Fish of different ages tend to eat each other, so to multiply them quickly, they should be kept in separate ponds until they grow significantly, at which point they can take care of themselves. The best location is a spring that flows clear water and isn’t prone to flooding. Clear, cool water is vital for trout, while some other fish can thrive in warmer or even murky water. The stream from the spring should create a series of three or four connected ponds that have flumes made of planks. If space is limited, make the flumes zigzag to extend their length. Place a plank that’s half the height of the flume across every four to five feet, with a notch cut in the center to allow fish to easily pass over—this creates small falls that trout enjoy. Each of these ponds should house fish of a single age. The flumes should have four inches of fine and coarse gravel at the bottom, creating the best spawning ground. Although you won't want the female trout to lay her eggs naturally but will extract them by hand (as explained later), they do need these natural conditions to encourage spawning. At the upper end of each flume separating the ponds, there should be a wire-cloth gate to prevent fish from moving between ponds, and one at the outlet of the lower pond to stop fish from leaving. These arrangements must ensure that flooding won't connect all the ponds. When trout are about to spawn in their natural waters, they look for a gravelly edge and clear away sediment from a circle about one to two feet in diameter, leaving only clean gravel to lay their eggs, where they will hatch. They prefer running water that's three to four inches deep for this. Each nest is occupied by one male and one female. If left alone, their numbers will gradually increase, but many eggs fail to get fertilized, and many are lost before they hatch due to predators and sediment accumulation, resulting in fewer young fish compared to the total number of eggs laid. Artificial spawning, fertilization, and hatching are much more effective. The process is simple: when the female fish begins to lay her eggs, catch her with a small net. You can't do it with bait, as fish won’t bite during spawning. I remember trying to catch trout in October when I’d see big, beautiful fish lounging where I’d caught many in the summer, carefully placing bait around them, and they wouldn’t bite. Back then, I didn’t know why. After studying fish habits, I learned they never bite while spawning; for trout, this typically happens from October 1 to 15, with a few continuing until late November. After catching one male and one female, hold the female in one hand and gently press her abdomen with the other hand, moving downward to release the eggs into a container of pure water. Then take the male fish and repeat the process to obtain the sperm fluid, which should also go into the same container as the eggs; gently mix everything and, after letting it sit for fifteen minutes, pour off the water, add more clean water, stir again, and let it sit as before. After doing this three times, the eggs will be properly fertilized and ready to be placed in nests for hatching. If the fish are caught before they start spawning, the eggs and sperm won't be mature and will require hard pressing to release, resulting in unfertilized eggs that will perish. The fluid from one male can fertilize the eggs of half a dozen females. These eggs can be hatched in the described flumes, although hatching boxes are preferable. The adult fish can be returned to the water, where they can live for many years and produce thousands of fish. With careful treatment and feeding, these fish can become so tame that they eat from your hand, like the "Naiad Queen" raised by Professors Ackley and Garlick from Cleveland, Ohio. Among all the hatching devices we have seen, we think those created by these professors in Cleveland are the best. The country owes them a lot for the insights gained from their dedication and success in fish culture. At the head of a spring, they built a house measuring eight by twelve feet; on the side toward the spring, they created a tank four feet wide, eight feet long, and two feet deep, constructed from planks. Water enters the tank through an opening near the top and flows out through a similar one at the other end, into a series of ten successive boxes, each slightly lower than the previous one. These boxes were eighteen inches long, eight inches wide, and six inches deep, filled to a depth of two inches with clean sand and gravel. The fertilized eggs were spread among the gravel, ensuring they were not piled up. Clean water is essential because sediment from dirty water is harmful to the eggs. If sediment starts to collect, it should be removed by gently stirring the water with a goose quill or soft brush and allowing it to flow out until it’s clear. However, there’s a way to prevent impurities in spring water: build a tight fence two feet high around the upper side of the spring, which will divert water during rains and keep it from muddying the spring. Since the house is close to the spring, not enough water will enter to muddy it during storms. On the side of the boxes where water escapes, there should be fine wire mesh to keep the eggs from passing through. This setup will be perfect. This level of care is only necessary for trout. Other fish suitable for cultivation only require spawning beds along the edge of their ponds. A practical hatching apparatus is a number of wicker baskets fine enough to keep the eggs from falling through, placed in a flume of clear running water.
The method of Gehen and Remy, the great fish-cultivators of France, whose efforts and discoveries have contributed more to this science than those of any, if not of all other men, was to place the eggs in zinc-[Pg 189]boxes of about one foot in diameter, having a lid over them—the top and sides of the boxes pierced with small holes, smooth on the inside; these boxes were partly filled with clean sand and gravel, and set in clear running water. M. Costa's method, at the college of France, is to arrange boxes in the form of steps, the top one being supplied with water by a fountain, and that passing from one to the other through all the series, and the eggs placed on willow-hurdles instead of gravel.
The method of Gehen and Remy, the leading fish cultivators in France, whose work and discoveries have advanced this field more than anyone else's, involved placing the eggs in zinc [Pg 189] boxes about one foot in diameter, covered with lids. The top and sides of the boxes were fitted with small holes, smooth on the inside; these boxes were partially filled with clean sand and gravel and positioned in clear running water. M. Costa's approach, used at the College of France, consists of arranging boxes in a stepped formation, with water supplied to the top box by a fountain, allowing it to flow down through the series, while the eggs were placed on willow hurdles instead of gravel.
Another very simple method may be arranged in the house. It is a reservoir—a barrel or cask—set perhaps two and a half feet from the floor, and a little hatching trough a few inches lower, into which water gradually runs through a faucet, from the reservoir. This water running through the hatching-box, escapes into a tub a little below. Whatever plan be adopted, great care is necessary in preventing sediment from depositing. Cleanliness is a principal condition of success. The eggs of the trout thus fecundated and deposited in October or November will hatch in the spring. Young trout need no feeding for a month after leaving the egg. There is a small bladder or vesicle under the fore part of the body, when they first come out, from which they derive their sustenance. After this disappears, or at the end of about a month, they should be fed, in very small quantities. Too much will leave a portion to decay on the bottom and injure the water. The best possible food (except the angle-worm) is lean flesh of animals, boiled and hashed fine for the young fish. The flesh of other kinds of fish, when they are plenty and not very valuable, would be very good. These young fish should be kept in the first pond until a year old.[Pg 190] Then let them into the second pond, closing the gate after them, to make room for another brood in the first pond. The next year let them into the third, and those into the second that are now in the first, and so on till the fourth. In the last pond, those of different ages will all be large enough to take care of themselves. But sometimes a trout two years old is said to swallow one a year old. But when they get to be three or four years old, this sort of cannibalism ceases. These principles can be carried out in small streams, by constructing gates to keep sections separate, and by forming banks and waste ways for water, with wire gates so high, that the water will not overflow in freshets, and carry the fish away. In taking trout use angle-worms or the fly. A fine light-colored small line is best. They are very shy. The following is a list of other fish, beside the trout, that are well worthy of cultivation:—
Another very simple method can be set up at home. It's a reservoir—a barrel or cask—placed about two and a half feet off the ground, with a small hatching trough a few inches lower, where water slowly flows through a faucet from the reservoir. This water flowing through the hatching box drains into a tub below. Whatever plan you choose, it's crucial to prevent sediment from building up. Cleanliness is key to success. The trout eggs that are fertilized and laid in October or November will hatch in the spring. Young trout don’t need feeding for a month after they hatch. When they first emerge, they have a small bladder or vesicle under the front part of their bodies, which provides them with nourishment. Once this disappears, or after about a month, you should start feeding them in very small amounts. Overfeeding can leave leftovers to rot on the bottom and harm the water. The best food, aside from angle-worms, is lean meat from animals, boiled and finely chopped for the young fish. The flesh of other fish, when abundant and not too valuable, can also work well. These young fish should stay in the first pond until they’re a year old.[Pg 190] Then you can move them to the second pond, closing the gate behind them to make room for another batch in the first pond. The next year, transfer them to the third pond, and move the ones from the second pond into the first, and so on until the fourth pond. In the last pond, fish of different ages will all be big enough to fend for themselves. However, sometimes a two-year-old trout may eat a one-year-old. But once they reach three or four years old, this cannibalism usually stops. These principles can also be applied in small streams by building gates to keep sections separate and constructing banks and drainage for water, with wire gates high enough to prevent flooding from carrying the fish away. When fishing for trout, use angle-worms or flies. A fine, light-colored small line works best since they are very skittish. Here's a list of other fish, besides trout, that are great candidates for farming:—
Black Bass.—When full grown, this fish is from twelve to eighteen inches in length. One of the better fish for the table, and profitable to raise in a pond covering not less than half an acre. Chub, being a very prolific little fish, may be kept in the same pond as food for the black bass and other large fish. They are very fond of them. Minnows are the best bait for these fish, though they will bite a trolling hook of any ordinary kind. You may raise them as given for the trout above, or allow them to deposite their eggs in spawn beds of their own selection in their pond. They will do well in water less pure than is demanded for the trout.
Black Bass.—When fully grown, this fish measures between twelve and eighteen inches long. It's one of the better table fish and can be profitable to raise in a pond that's at least half an acre in size. Chub, being a very prolific small fish, can be kept in the same pond to serve as food for the black bass and other larger fish, as they really enjoy them. Minnows are the best bait for these fish, though they'll also bite on any standard trolling hook. You can raise them as mentioned for trout above, or let them lay their eggs in spawn beds of their own choosing within their pond. They thrive in water that's not as pure as what trout typically require.
White Bass.—Not so large as the black bass. Seldom weighs more than two pounds. One of the best for food. Thrives well in small ponds. Requires the same[Pg 191] treatment as the preceding. Spawns in May and hatches soon. Easily caught, as he is a great biter, at almost any bait.
White Bass.—Not as large as black bass. Rarely weighs more than two pounds. One of the best fish for eating. Does well in small ponds. Needs the same[Pg 191] care as mentioned before. Spawns in May and hatches shortly after. Easy to catch because it's very eager to bite almost any bait.
Grass Bass or Roach.—One of the most beautiful of the bass kind, and as a panfish highly esteemed. It prefers sluggish water, and hence is well adapted to small artificial ponds. Spawns in May. May be treated as the preceding. Bites the angle-worm well, and several other kinds of bait.
Grass Bass or Roach.—One of the most beautiful types of bass and highly valued as a panfish. It prefers slow-moving water, making it well-suited for small artificial ponds. It spawns in May. It can be handled like the previous ones. It bites on angle-worms and several other types of bait.
Rock Bass.—A small fish seldom reaching a pound in weight, but is fine and very easily raised in small ponds of any kind of water. Spawns in May and may be treated in all respects as the rest of the bass family, only it will flourish well in quite small ponds.
Rock Bass.—A small fish that typically doesn't weigh more than a pound, but it’s great and can be easily raised in small ponds of any type of water. It spawns in May
Pickerel.—Is one of the best of fish, weighs from three to fifteen pounds. Suitable only for large ponds. Spawns early in the spring in the marshy edges of sluggish water. The eggs may be procured and treated as the trout, only cold running water is not necessary. Best caught by trolling. It is not a good fish to raise with others, as it is apt to eat them up.
Pickerel.—Is one of the best fish, weighing between three and fifteen pounds. Best suited for large ponds. It spawns in early spring at the marshy edges of slow-moving water. The eggs can be collected and handled like trout eggs, but cold running water isn't necessary. The best way to catch them is by trolling. It's not a good idea to raise them with other fish, as they tend to eat them.
Yellow Perch.—Is everywhere well known as a beautiful little fresh-water fish, and good for the table, at all seasons when the water is cool. Perfectly hardy and adapted to sluggish waters, it is one of the best for artificial ponds. Treat like all the preceding; or allowed to take its own course in the pond, it will increase rapidly.
Yellow Perch.—Is well known everywhere as a beautiful little freshwater fish that's great to eat during any cooler season. It’s very hardy and thrives in slow-moving waters, making it one of the best choices for artificial ponds. Treat it like the others mentioned before, or let it do its own thing in the pond, and it will grow quickly.
Sun-Fish.—Rarely weighs more than half a pound, but is a good pan-fish. This and the grass bass and yellow perch may be put together in the same pond.
Sun-Fish.—Usually weighs no more than half a pound, but makes for a good catch. This species, along with grass bass and yellow perch, can be stocked together in the same pond.
Eels.—May be cultivated with great success in almost any water. But we are so prejudiced against them,[Pg 192] never consenting to taste one, that we can not speak in their favor. Of the methods of introducing fish into our rivers and creeks, from which they have nearly all been taken by the fishermen, it is not our design to treat. That subject may be found fully presented in treatises on fish culture, and should command the immediate attention of the authorities in all the states.
Eels.—They can be successfully cultivated in almost any body of water. However, we have such a strong bias against them,[Pg 192] that we never even consider trying one, which makes it hard for us to speak positively about them. We won't cover the ways to reintroduce fish into our rivers and streams, from which they've mostly been removed by fishermen. That topic is thoroughly discussed in works on fish farming and deserves the immediate attention of authorities in all states.
We have here given all that is necessary to success among the masses all over the land. There is hardly a township in the United States or British provinces, where good fish-ponds might not be constructed so as to be a source of profit and luxury to the inhabitants.
We have provided everything needed to succeed with people everywhere in the country. There's barely a town in the United States or British territories where good fish ponds couldn't be created to bring both profit and enjoyment to the locals.
Fish are so certainly and easily raised, that the practice of cultivating them should be universally adopted.
Fish are so simple and straightforward to raise that everyone should really start farming them.
Transporting fish alive is somewhat hazardous, especially if they be of considerable size. The difficulty is greatly lessened by keeping ice in the water with the fish. Change water twice a day and keep ice in it, and you may safely transport fish around the globe. Eggs of fish are best transported in boxes six inches square, filled with alternate layers of sand and eggs scattered over. When full, make quite wet, and fasten on the cover. Other methods are adopted which will be easily learned of those engaged in the trade.
Transporting live fish can be risky, especially if they're large. The challenge is significantly reduced by adding ice to the water with the fish. Change the water twice a day and keep ice in it, and you can safely ship fish around the world. Fish eggs are best transported in boxes that are six inches square, filled with alternating layers of sand and eggs spread out. Once full, make it quite wet and secure the lid. There are other methods that those in the trade can easily teach you.
FLAX.
Change the seed every season. This will greatly increase the quantity, and improve the quality. In nothing else is it more important. In Ireland, the great flax-growing country of the world, they always sow foreign[Pg 193] seed when it can be procured. American seed is preferred, and brings the highest price. Experiments with different seeds, on varieties of soils, are much needed. Changing from all the soils and latitudes of our country would be useful. The general rule, however, as with all seeds, is to change from colder to warmer regions.
Change the seed every season. This will significantly increase the amount produced and improve the quality. It's especially important to do this. In Ireland, the world’s leading flax-growing country, they always plant foreign[Pg 193] seeds when available. American seeds are preferred and fetch the highest prices. Experiments with different seeds across various types of soil are greatly needed. It would be beneficial to switch up the soils and climates throughout our country. The general guideline, as with all seeds, is to transition from colder to warmer regions.
Soils.—The best are strong alluvial soils. Any soil good for a garden is good for flax. As much clay as will allow soil soon to become dry and easily to be made mellow, is desirable; black loam, with hard, poor clay-subsoil, is also good. Mellow, friable soils are not more important to any other crop than to flax. Land must not be worked when too wet. The land should be rich from a previous year's manuring. Salt, lime, ashes, and plaster, are good applications to flax after it has come up. On light soil with bad tillage, when the flax was so poor that the cultivator was about to plow it up, the application of three bushels of plaster, in the morning when the dew was on, produced a larger yield of better flax from an acre than adjoining growers got from two acres of their best land.
Soils.—The best types are strong alluvial soils. Any soil suitable for a garden is also good for flax. A balance of clay that helps the soil dry out quickly and become easy to work with is ideal; black loam with a tough, poor clay subsoil is good too. Mellow, crumbly soils are just as crucial for flax as they are for any other crop. The land shouldn't be worked when it's too wet. It should be rich from fertilization done the previous year. Salt, lime, ashes, and plaster are beneficial for flax after it sprouts. On light soil that was poorly tilled, when the flax was so weak that the farmer considered plowing it under, spreading three bushels of plaster in the morning while it was dewy resulted in a larger yield of better-quality flax from one acre than what neighboring farmers got from two acres of their best land.
FLOWERS.
Floriculture is an employment appropriate to all classes, ages, and conditions. No yard connected with a dwelling is complete without a flower-bed. The cultivation of flowers is eminently promotive of health, refinement of manners, and good taste. Constant familiarity with the most exquisite beauties of nature must refine[Pg 194] the feelings and produce gentleness of spirit. Association with flowers should be a part of every child's education. Their cultivation is suitable for children and young ladies in all the walks of life.
Floriculture is a job suitable for all social classes, ages, and backgrounds. No garden connected to a home is complete without a flower bed. Growing flowers greatly enhances health, improves manners, and fosters good taste. Being around the most beautiful aspects of nature must refine feelings and promote a gentle spirit. Involving flowers should be part of every child's education. Their cultivation is appropriate for children and young women in all walks of life.
House-plants, and bouquets in sick-rooms, are injurious; their influence on the atmosphere of the rooms is unhealthy. But the cultivation of flowers in the garden or yard is in every way beneficial. We earnestly recommend increased attention to flowers by the whole American people. The necessary limits of our article will allow us to do but little more than to call attention to the subject. Those who become interested will seek information from some of the numerous works devoted exclusively to ornamental flowers.
Houseplants and bouquets in hospital rooms can be harmful; they negatively affect the air quality in those spaces. However, growing flowers in gardens or yards is definitely beneficial. We strongly encourage everyone in America to pay more attention to flowers. Due to the limited scope of this article, we can only highlight the topic. Those who are interested will find more information in the many resources dedicated to ornamental flowers.
Flowers should be planted on rather level land, that the rains may not wash off the seeds and fine mould. Choose a southern or eastern exposure whenever practicable. Avoid, as much as possible, planting in the shade.
Flowers should be planted on relatively flat ground so that the rain doesn't wash away the seeds and fine soil. Whenever possible, choose a southern or eastern exposure. Try to avoid planting in the shade as much as you can.
Soil—Should be a deep, rich mould, neither too wet nor too dry, and should be enriched with a little compost, every year.
Soil—Should be deep and rich, not too wet or too dry, and should be enriched with some compost every year.
Sowing the Seeds is a most important matter in cultivating flowers. Many fail to come up, solely on account of improper planting. The seeds of most flowers are very fine and delicate. Planted in coarse earth, they will not vegetate; planted near the surface in a dry time, they usually perish. It is best to cover all small flower-seeds, by sifting fine mould upon them; and if the weather does not do it, use artificial means to keep the soil suitably moist until the seeds are fairly up. Stir the soil gently often, and keep out all weeds. It is always best to plant the seeds in rows or hills, with[Pg 195] small stakes to indicate their location; you can then stir the ground freely without destroying them. Flowers usually need more watering than most other plants. The usual application of water to the leaves by using a sprinkler is injurious; it may be better than no watering at all, but is the worst way to apply water. Make a basin in the soil near the plants, and fill it with water. The selection of suitable varieties for a small flower-garden is quite important. We shall only mention a brief list. Those who would make this more of a study, are recommended to study "Breck's Book of Flowers," which is quite as complete for American cultivators as anything we have. The principal divisions are, bulbous flowering roots, flowering shrubs, and flowering herbs—annual, biennial, and perennial—the first blossoming and dying the year they are sown; the second blossoming and dying the second year, without having blossomed the first; the last blossoming, and the top dying down and coming up the next spring, for a series of years.
Sowing the Seeds is really important for growing flowers. Many seeds fail to sprout because they are not planted properly. Most flower seeds are very small and delicate. If they are planted in rough soil, they won’t grow; if they are near the surface during a dry period, they usually die. It’s best to cover all small flower seeds by sifting fine soil over them; if the weather doesn’t do it, use artificial methods to keep the soil moist until the seeds have sprouted. Gently stir the soil frequently and remove any weeds. It’s always better to plant the seeds in rows or small groups, with[Pg 195] small stakes to mark their location; then you can freely work the soil without damaging them. Flowers typically need more water than most other plants. Watering the leaves with a sprinkler can harm them; while it may be better than not watering at all, it’s not the best way to do it. Create a small basin in the soil around the plants and fill it with water. Choosing the right types for a small flower garden is important. We’ll just mention a short list. Those who want to explore this further are encouraged to look at "Breck's Book of Flowers," which is as comprehensive for American gardeners as anything else available. The main categories are bulbous flowering roots, flowering shrubs, and flowering herbs—annuals, biennials, and perennials. Annuals bloom and die in the same year they are sown; biennials bloom and die in the second year without flowering the first; and perennials bloom, die back, and regrow each spring for several years.
Bulbous Flowering Roots.—These need considerable sand in their soil. They should be taken up after the foliage is all dead, and if they are hardy, put the soil in good condition, and dry the bulbs and reset them, and let them remain through the winter. They may need slight protection, by spreading coarse straw, manure, or forest-leaves over them late in the fall; but all the more tender bulbs do better kept in sand until early spring. The best list with which we are acquainted, for a small garden, is the following: the well-known lilies, the tulips, gladiolas, hyacinths, Feraria tigrida, crocus, narcissus, and jonquils.
Bulbous Flowering Roots.—These need a good amount of sand in their soil. They should be dug up after the leaves have completely died. If they're hardy, prepare the soil well, dry the bulbs, and replant them, allowing them to stay through the winter. They might need some light protection by spreading coarse straw, manure, or fallen leaves over them in late fall; however, more delicate bulbs do better if kept in sand until early spring. The best selection we know of for a small garden includes well-known lilies, tulips, gladiolas, hyacinths, Feraria tigrida, crocus, narcissus, and jonquils.
Flowering Shrubs.—The following is a select small[Pg 196] list: Roses, as large a variety as you please, out of the hundreds known; flowering almond, Indigo shrub, wahoo or fire-shrub, the mountain-ash, althea, snowball, lilac, fringe-tree, snow-drop, double-flowering peach, Siberian crab, the smoke-tree, or French tree, or Venitian sumach, honeysuckle, double-flowering cherry.
Flowering Shrubs.—Here’s a curated short[Pg 196] list: Roses, with as many varieties as you want, from the hundreds available; flowering almond, Indigo shrub, wahoo or fire-shrub, mountain-ash, althea, snowball, lilac, fringe-tree, snow-drop, double-flowering peach, Siberian crab, smoke-tree, or French tree, or Venetian sumach, honeysuckle, double-flowering cherry.
The list of beautiful herbaceous flowers is very lengthy. We give only a few of those most easily raised, and most showy; the list is designed only to aid the inquiries of those who are unacquainted with them: superb amaranth, tri-colored amaranth, China and German astors—the latter are very beautiful—Canterbury bell, carnation pinks (great variety), chrysanthemum (many varieties and splendid until very late in autumn), morning glory or convolvulus, japonicas, Cupid's car, dahlias, dwarf bush, morning bride or fading beauty, fox-glove, golden coreopsis (we have raised a variety that proved biennial, which was superb all the season), ice-plant, larkspur, passion-flower, peony, sweet pea, pinks, sweet-williams, annual China pink, polyanthus (a great beauty), hyacinth bean, scarlet-runner bean, poppy, portalucca, nasturtium, marigolds (especially the large double French, and the velvet variegated), martineau, cypress vine.
The list of beautiful herbaceous flowers is quite extensive. We only mention a few of the easiest to grow and most attractive; this list is meant to help those who are unfamiliar with them: superb amaranth, tri-colored amaranth, China and German asters—especially the latter, which are very stunning—Canterbury bell, carnation pinks (a great variety), chrysanthemums (many varieties that last beautifully until late autumn), morning glory or convolvulus, japonicas, Cupid's car, dahlias, dwarf bush, morning bride or fading beauty, foxglove, golden coreopsis (we have a variety that turned out to be biennial and was gorgeous all season), ice-plant, larkspur, passionflower, peony, sweet pea, pinks, sweet-williams, annual China pink, polyanthus (a real beauty), hyacinth bean, scarlet-runner bean, poppy, portulaca, nasturtium, marigolds (especially the large double French and the velvet variegated), martineau, and cypress vine.
FOWLS.
We are glad to believe that the hen mania, that has prevailed so extensively during the last fifteen or twenty years, has considerably abated. After all the extravagant notions about the profits of hens shall have passed[Pg 197] away, the truth will be seen to be about the following: Every farmer who has considerable waste grain about, and plenty more to supply the deficiency when the fowls shall have gathered up all the scatterings, had better keep a hundred hens. If he has sand and gravel, and wheat-bran and lime for shells, within their reach, and plenty of fresh water, they will do well, without much further care, in mild weather. In cold weather in winter, keep not more than forty hens together, in a tight, warm place, well ventilated; give them their usual food, with burnt bones pounded fine and mixed with mush, given warm, with occasionally a little animal food and boiled vegetables, and they will lay more than in summer. They will lay all winter without being inclined to set. Every family, who will treat them as above, may profitably keep one or two dozen through the winter. Most persons who undertake, with a few acres of land, to keep fowls as a business, will lose by it. A few only of the most experienced and careful can make money by it. It may be cheapest for some persons to raise a few chickens for their own use, although they cost them more than the market-price, though it would not be best to raise chickens in that way to sell. "But some one raised the chickens in market for the market-price, and why not I?" Because, they raised a few that got fat on waste grain, and you must buy grain for yours, and give more for it than you can get for your chickens. Whoever would make money by raising fowls on a large scale, must first serve some kind of an apprenticeship at it, as in all other business. Get this experience, and learn by experiment the cheapest and most profitable food, and keep from five hundred to a thousand fowls, and a reasonable though not[Pg 198] large profit may be realized. For store-fowls, boiled vegetables and beets cut very fine, with a little meal mixed in, are a good and cheap feed. When keeping fowls out-door in warm weather, keep no more than fifty together, and them on not less than one fourth of an acre of land. The expensive hen-houses and artificial nests are mostly humbugs. Have many places of concealment about, where they can make their nests as they please. When a hen begins to set, remove her, nest and all, to a yard to which layers have no access, and you need have no difficulty with her. Set a hen near the ground, in a dry place, on fifteen fresh eggs, all put under her at once, and they will hatch about the same time at the end of twenty days. Old hens, of the common kind, are best to set. Let them have their own way in everything but running in the wet with their young chickens—and that they will not be much inclined to do if they are well fed. Much is said about the diseases of fowls and their remedies. We have very little confidence in any of it. Sick chickens will die unless they get well. Time spent in doctoring them does not generally pay. Wormwood and tansy, growing, or gathered and scattered, or steeped and sprinkled about the premises occupied by hens, will protect them from small vermin. Never give them anything salt or sour, unless it be sour milk. The eggs of ducks, turkeys, or geese, may be hatched under hens. Time, thirty days. Hence, if put under with hens' eggs, they must be set ten days earlier, that they may all hatch at once. Fattening chickens may be well done in six days, by feeding rice, boiled rather soft in sweet skimmed milk, fed plentifully three times a day. Feed these in pans, well cleaned before each meal, and[Pg 199] give only what they will eat up at once, and desire a very little more. Put a little pounded charcoal within their reach, and a little rice-water, milk, or clear water. This makes the most beautiful meal at a low price. Never feed a chicken for sixteen or twenty-four hours before killing it.
We’re happy to think that the hen craze, which has been so common for the last fifteen or twenty years, has significantly decreased. After all the wild ideas about the profits from hens have faded[Pg 197], the reality will be clear: Any farmer who has a lot of leftover grain and enough more to cover the shortfall when the hens pick up all the scraps should ideally keep around a hundred hens. If there’s sand and gravel, wheat bran, and lime for shells available to them, plus plenty of fresh water, they’ll do well without too much extra care in mild weather. In winter, in colder weather, keep no more than forty hens together in a snug, warm, well-ventilated space; feed them their usual food, along with finely ground burnt bones mixed with mush (served warm), plus a bit of animal food and boiled vegetables, and they will lay more than in summer. They will lay all winter without wanting to sit on the eggs. Every household that treats them like this can profitably keep a dozen or two through the winter. Most people who try to raise hens as a business on just a few acres will end up losing money. Only a few very experienced and careful individuals can make a profit from it. It might be cheapest for some people to raise a few chickens for their own use, even if it costs them more than buying them in the market, but it’s generally not a good idea to raise chickens that way for resale. "But someone else raises chickens for the market price, so why shouldn’t I?" Because they raised a few that thrived on scraps, while you must buy grain for yours and pay more for it than you can sell your chickens for. Anyone wanting to make money from raising chickens on a larger scale must first go through some kind of training in it, just like in any other business. Gain that experience and experiment to discover the cheapest and most profitable feeds, and then raise between five hundred and a thousand chickens to potentially realize a reasonable, albeit not overly large, profit. For feeding store chickens, finely chopped boiled vegetables and beets, mixed with a bit of meal, provide an excellent and economical feed. When keeping chickens outdoors in warmer weather, no more than fifty should be kept together on at least one-fourth of an acre of land. The costly hen houses and artificial nests are mostly scams. Create various hiding spots around for them to build their nests as they prefer. When a hen decides to sit, move her, nest and all, to a pen where the layers cannot reach her, and you won't have any issues. Place a hen close to the ground in a dry area with fifteen fresh eggs under her all at once, and they will hatch around the same time after about twenty days. Old hens of the common type are best for sitting. Let them do as they wish in everything but running around in wet conditions with their young chicks—and they likely won’t be inclined to do that if they are well-fed. There’s a lot of talk about chicken diseases and their treatments, but we have very little faith in any of it. Sick chicks will die unless they recover. Time spent trying to nurse them back to health usually doesn’t pay off. Wormwood and tansy, whether growing, collected and scattered, or steeped and sprinkled around the hen area, can protect them from small pests. Never give them anything salty or sour, except possibly sour milk. Duck, turkey, or goose eggs can be set under hens to hatch. The timing is thirty days. Therefore, if they’re placed under alongside hens’ eggs, they should be set ten days earlier so that they all hatch simultaneously. Fattening chickens can be effectively done in six days by feeding them rice boiled fairly soft in sweet skim milk, served plentifully three times a day. Offer this in clean pans before each meal, and[Pg 199] give just enough for them to finish in one sitting, leaving them just wanting a little more. Provide a small amount of pounded charcoal within their reach, along with some rice-water, milk, or fresh water. This method yields the most appealing meal at a low cost. Never feed a chicken for sixteen to twenty-four hours prior to slaughter.
Varieties or Breeds.—This has been matter of much speculation. The result has been (what was probably a main object) the sale of many fowls and eggs at exorbitant prices. When chickens have sold at fifty dollars per pair, and eggs at six dollars a dozen, some persons must have made money, while others lost it. Yet, there is some choice in the breed of hens. The kind makes less difference, as far as flesh is concerned, than is usually imagined. It requires about a given quantity of grain to make a certain amount of flesh. Large fowls give us much larger weight of flesh than small ones, but they also eat a much larger quantity of grain. Large fowls are certainly large eaters. The three best layers are the black Polands, the Malayas, and the Shanghaes. Half-bloods, by crossing with the common fowl, are better for this country than either of the above, pure. Fowls are generally improved by frequent crossing. The best we have ever had, for their flesh, we produced by putting a black Poland rooster with common hens; they grew larger than either, and their flesh was very fine. Shanghaes and half-blood Shanghaes have proved permanently the best layers we have ever had. Early pullets make great fall and winter layers, and late chickens are great layers in the spring, when older ones wish to set.
Varieties or Breeds.—This has been a topic of much debate. The outcome has been (likely a main goal) the sale of many chickens and eggs at ridiculous prices. When chickens have sold for fifty dollars a pair and eggs for six dollars a dozen, some people must have profited while others took a loss. Still, there is some variety in the breed of hens. The type matters less, in terms of meat, than many usually think. It takes a specific amount of grain to produce a certain quantity of meat. Larger birds yield significantly more meat than smaller ones, but they also consume a lot more grain. Large birds are definitely big eaters. The top three layers are the black Polands, the Malayas, and the Shanghaes. Half-breeds, resulting from crossing with standard chickens, are more suitable for this country than any of those pure breeds. Chickens generally improve from frequent crossbreeding. The best ones we've ever had for meat came from mating a black Poland rooster with common hens; they grew larger than either breed and their meat was excellent. Shanghaes and half-blood Shanghaes have consistently been the best layers we’ve ever had. Early pullets are great layers in the fall and winter, while late chickens excel in the spring, when the older ones are ready to sit.
Ducks we have considered in a separate article. We shall do the same with turkeys. Killing, dressing,[Pg 200] and preparing all fowls for market, will be treated under the head of "Poultry." Geese will also be considered in another place. We should give drawings of aviaries, but we consider these generally worse than useless, as they are usually constructed. An airy place for summer, and a warm room for winter, poles with rough bark on for roosts, and plenty of feed and water, sand, gravel, and lime, will give abundant success.
Ducks have been covered in a separate article, and we will do the same with turkeys. The processes of killing, dressing,[Pg 200] and preparing all types of birds for sale will be discussed under "Poultry." Geese will also be addressed elsewhere. We should include drawings of aviaries, but we believe they are generally more harmful than helpful as they are typically built. An open space for summer and a warm area for winter, along with poles that have rough bark for roosting, plus plenty of food, water, sand, gravel, and lime, will ensure great success.
FRUIT.
The value of fruit is not fully appreciated in this country. As an article of diet nothing is more natural and healthy. The Creator gave this to man for food, when human nature, physically, was in its normal condition. And why meats have since been allowed, I know not, unless it be the reason why Moses allowed divorce in certain cases, although it was not so in the beginning, viz., the hardness of their hearts. Why the stomach, upon the healthy condition of which all physical, mental, and moral functions so materially depend, should be made the receptacle of dead animals, and especially those so long dead, as much of the meat offered in market, it would puzzle a philosopher to tell.
The value of fruit isn't fully recognized in this country. As a food option, nothing is more natural and healthy. The Creator gave this to people for nourishment when human nature was in its ideal state. I can't say why meats have been accepted since then, unless it’s similar to why Moses permitted divorce in certain situations, even though it wasn't like that originally, due to the hardness of their hearts. It’s perplexing why the stomach, which is crucial for all physical, mental, and moral functions, is expected to digest dead animals, especially when so much of the meat sold is from animals that have been dead for a long time.
But we will not write an elaborate article on the healthfulness of a diet composed mainly of milk, fruits, and vegetables. Suffice it to say that experience and observation, as well as analysis and physiology, unite in demonstrating that ripe fruits contain virtues, that go far toward preventing the ordinary diseases of men. They are good, plain or cooked, and for sick or well[Pg 201] persons, except in extreme cases. They regulate the bowels and control the secretions, better than any other article of food. They are so highly nutritious, that they sustain nature under arduous toil, better than either meat, fine bread, or the Irish potato. With proper care the fruits are cheaper than any other article of food. They can be raised cheaper than corn or potatoes. They may be enjoyed all the year, are profitable for market, and for food for animals.
But we won’t write a detailed article about the health benefits of a diet mainly consisting of milk, fruits, and vegetables. It’s enough to say that experience and observation, along with analysis and physiology, show that ripe fruits have qualities that significantly help prevent common illnesses. They are beneficial, whether eaten raw or cooked, and for both sick and healthy people, except in extreme cases. They help regulate digestion and manage bodily secretions better than any other type of food. They are so nutrient-rich that they support the body during hard work better than meat, fine bread, or potatoes. With proper care, fruits are cheaper than any other food item. They can be grown at a lower cost than corn or potatoes. They can be enjoyed year-round, are profitable for selling, and serve as feed for animals.
FRUITFULNESS.
Inducing it in Fruit-Trees.—Fruit-trees often grow luxuriantly, but bear no fruit, or very little. In nearly all cases the evil may be remedied. One remedy is shortening in. This is done by cutting off half the present year's growth in July. This checks the tendency of the sap to promote so large a growth, and forces it to mature blossom-buds for the next season. Another effectual means is to bend down all the principal branches and tie them down. This has a great influence in checking excessive growth and forming fruit-buds. Frequent transplanting has a tendency also to induce fruitfulness. Root pruning is one of the best means of securing this object. Lay bare the upper roots and cut off all the larger ones two feet from the tree. This will check excessive formation of wood and foliage, render the wood firm, and the organic matter of the sap will form abundance of fruit-buds. These methods will produce fruit in abundance on nineteen twentieths of barren or poor-bearing fruit-trees.[Pg 202]
Inducing it in Fruit-Trees.—Fruit trees often grow strongly, but produce little to no fruit. In most cases, this problem can be fixed. One solution is to shorten the growth. This involves cutting off half of the current year’s growth in July. This helps reduce how much sap encourages too much growth and pushes the tree to develop blossom buds for the next season. Another effective method is to bend down all the main branches and tie them down. This has a significant impact in controlling excessive growth and promoting the formation of fruit buds. Frequent replanting also tends to encourage fruitfulness. Root pruning is one of the best means to achieve this goal. Expose the upper roots and trim off all the larger ones two feet from the tree. This will limit excessive wood and leaf growth, strengthen the wood, and ensure that the sap’s organic matter creates plenty of fruit buds. These techniques will lead to abundant fruit on nineteen-twentieths of barren or poorly producing fruit trees.[Pg 202]
GARDEN.
The garden has been the most delightful abode of man ever since his creation, before and since the fall. One of the most pleasant pastimes, for ladies and children, is gardening. The flower, vegetable, and fruit departments are all pleasant and healthful.
The garden has been the most enjoyable home for humans since the beginning, both before and after the fall. One of the most enjoyable activities for women and children is gardening. The flower, vegetable, and fruit areas are all enjoyable and good for your health.
Situation of a garden is important. This varies with climates. In a cold country the warmest exposures are best, and in a hot climate select the coolest. A garden combining both is the best possible. The warmest exposure is good for early vegetables, and the cooler and more shady for the main crop. Much can be done to regulate this by fences and buildings. They will be warm and early on one side, and cool and late on the other.
The location of a garden is important. This varies with climates. In a cold country, the warmest spots are best, while in a hot climate, you should choose the coolest areas. A garden that combines both is ideal. The warmest spots are good for early vegetables, and the cooler, shadier areas are better for the main crop. You can do a lot to manage this with fences and buildings. They will be warm and early on one side, and cool and late on the other.
Soil.—A rich loam is always best. To convert stiff clay, or light sand and gravel, into a good loam, is an easy matter on so small a plat as is usually devoted to a garden. Draw an abundance of sand on clay-ground, plow deep and mix well, and one winter's frost will so pulverize the whole that it will be in excellent condition. In warm climates, the incorporation of the sand with the clay is effected by frequent plowing and rains. On sand and gravel draw plenty of clay and loam, if it can be easily procured; thus it is easy to form a good friable, retentive loam, adapted to every variety of soil-culture. Decayed wood and forest-leaves are excellent for garden-soils. Manure well; but remember that it is possible to overfeed the soil of a garden, so as to render it unproductive. Deep plowing or spading is very important; it is the best possible remedy for ex[Pg 203]cessive drought or unusual rains. The water will not stand on the surface when it first falls, and will be retained long in the soil for the use of the plants. The soil should be very mellow. Plowing or spading too early, in hope of getting earlier vegetables, is often a failure. The earlier the better, if you can pulverize the soil; otherwise not. Plowing when covered with a heavy dew, or when it rains gently, is equal to a good coat of manure. A garden should be on level land well drained; if much inclined, rains will wash off the best of the soil, and destroy many seeds and plants. No weeds should be allowed to grow to any considerable size in a garden. Early and frequent hoeings are important to success. Directions for the cultivation of each garden vegetable and fruit are given under each of those articles respectively. Methods of gardening at the South and the North vary but little in the main articles. At the North we have to guard against too much cool weather, and at the South against too much heat. Some vegetables that need planting on ridges in the North, to obtain more sun and heat, should be planted on level land at the South, to guard against too much heat and drought. Besides this, the main difference is in the time of planting, which varies more or less with every degree of latitude, or every five hundred feet of elevation. Have no fruit-trees in your vegetable or fruit garden, unless it may be a few dwarf-pears on the quince-stock, and these had better be by themselves.
Soil.—A rich loam is always the best choice. Turning stiff clay or light sand and gravel into good loam is easy on the small plot typically used for a garden. Add plenty of sand to clay soil, plow deeply, and mix well; after one winter frost, the soil will break down and be in great shape. In warmer climates, mixing sand with clay happens through frequent plowing and rain. For sandy or gravelly soil, add plenty of clay and loam if they’re easy to get; this will help create a good, crumbly, moisture-retaining loam suitable for all types of gardening. Decayed wood and forest leaves are great for garden soil. Use manure, but be cautious not to over-fertilize, as this can make the soil unproductive. Deep plowing or digging is crucial; it's the best way to handle excessive drought or unusual rainfall. Water won't pool on the surface right after it rains, and will stay in the soil longer for plants to use. The soil should be very soft. Plowing or digging too early, in hopes of getting early vegetables, often leads to failure. Earlier is better if you can break up the soil; otherwise, not. Plowing while the ground is covered in heavy dew or during light rain is as good as adding manure. A garden should be on flat land that drains well; if it's too sloped, rain will wash away topsoil and harm seeds and plants. No weeds should be allowed to grow to a large size in a garden. Early and frequent weeding is crucial for success. Instructions for growing each type of garden vegetable and fruit are provided under their respective sections. Gardening methods in the South and North don’t differ much in the key areas. In the North, we need to be cautious of too much cool weather, while in the South, we must watch out for excessive heat. Some vegetables that are planted on ridges in the North for more sunlight and warmth should be planted on flat land in the South to avoid heat and drought. Additionally, the primary difference is planting times, which vary somewhat with each degree of latitude or every 500 feet of elevation. Do not plant fruit trees in your vegetable or fruit garden unless it's just a few dwarf pears on quince stock, and they should preferably be planted separately.
The plan of a garden is a matter of taste, and depends much upon its size and necessary situation. We prefer ornamental shrubs in front of the house, the flowers adjoining it and passing the windows of those rooms that are constantly occupied, and the fruit-de[Pg 204]partment in the rear of the flowers, while the vegetable-garden should be at the right or left of the fruit, and in the rear of the kitchen. On the other side of the house should be the larger fruit-trees, extending back as far as the fruit and vegetable garden, and in the rear of it, the carriage-house and other out-buildings. The best fence is of good wrought iron, sharp and strong enough to exclude all intruders. When this can not be afforded, a good hedge, made of the plants best adapted to hedges in your latitude, is preferred; next to this a good tight board-fence.
The layout of a garden is a matter of personal preference and largely depends on its size and location. We like ornamental shrubs in front of the house, with flowers next to it, visible from the windows of the rooms that are frequently used, and the fruit garden behind the flowers. The vegetable garden should be to the right or left of the fruit garden and behind the kitchen. On the opposite side of the house, there should be larger fruit trees, stretching back as far as the fruit and vegetable garden, and behind that, the carriage house and other outbuildings. The best type of fence is made of good wrought iron, sturdy enough to keep out all intruders. If that’s not affordable, a solid hedge made from plants suitable for hedges in your area is preferred; following that, a solid board fence works well.
All fruit-gardens should have alleys, eight or ten feet wide, within four rods of each other, to afford space for carting on manures, &c. A vegetable-garden of one acre should have such an alley through the centre each way, with a place in the end, opposite the entrance, to turn around a summer-house, arbor, or tool-house. One rod from the fence, on all sides, should be an alley four or five feet wide; other small alleys as convenience or taste may require. The usual way is to sink the alleys three or four inches below the level of the beds, and cover with gravel, tanbark, shells, &c. We strongly recommend raising the alleys in their middle, at least four inches above the surface of the beds. The paths are always neater, and the moisture is retained for the use of the plants. Excessive rains can be allowed to pass off. This making alleys low sluice-ways for water is a great mistake in yards and gardens.[Pg 205]
All fruit gardens should have paths that are eight or ten feet wide, spaced within about 66 feet of each other, to provide room for hauling in manure, etc. A vegetable garden that covers one acre should have a path running through the center in both directions, with a spot at the end, opposite the entrance, to turn around a summer house, arbor, or tool shed. There should be a path four or five feet wide one rod from the fence on all sides, along with other smaller paths as needed for convenience or aesthetics. Typically, the paths are dug three or four inches lower than the level of the beds and covered with gravel, tanbark, shells, etc. We highly recommend raising the paths in the middle, at least four inches above the surface of the beds. This keeps the paths looking tidier, and moisture is retained for the plants. Excessive rain can easily flow away. It's a big mistake to make the paths low drainage areas for water in yards and gardens.[Pg 205]
GARLIC.
This is a hardy perennial plant, from the south of Europe, and has been in cultivation, as a garden vegetable, for hundreds of years. It is cultivated as the onion, and needs much ashes, bonedust, and lime, in the soil. It is much esteemed in some countries, in soups. It is but little used in the United States: it is used at the South as a medicinal herb. We know of no important use of garlic for which onions will not answer as well, and therefore do not recommend garlic as an American garden vegetable. Those who wish to cultivate it will pursue the same course as in raising onions from sets. This will always be successful.
This is a tough perennial plant from southern Europe that has been grown as a garden vegetable for hundreds of years. It's cultivated like onions and requires plenty of ashes, bone meal, and lime in the soil. In some countries, it’s highly valued for use in soups. However, it's not commonly used in the United States; in the South, it’s used as a medicinal herb. We know of no significant use for garlic that onions can't serve just as well, so we don't recommend garlic as an American garden vegetable. Those who want to grow it should follow the same method as planting onions from sets, which is always successful.
GATHERING FRUITS.
This is almost as important as proper cultivation. This is especially true of the pear. Many cultivators raise inferior pears from trees of the very best varieties, for want of a correct knowledge of the best methods of gathering, preserving, and ripening the fruit. Complete directions will be found under each fruit.
This is nearly as important as proper cultivation. This is especially true for pears. Many growers produce inferior pears from top-quality varieties due to a lack of understanding of the best ways to harvest, store, and ripen the fruit. You can find complete instructions for each type of fruit.
GEESE.
Farmers usually are opposed to keeping geese, believing them to destroy more than they are worth. If you have a suitable place to keep them, they may be profitable. They should have a pasture with a fence they can not pass, enclosing a spring, pond, or stream.[Pg 206] They do better to have a little grain the year round. This, with plenty of grass in summer and cut roots in winter, will keep them in fine condition. The feathers will pay the cost of keeping, leaving the increase and feathers of the young as profit. On an acre or two, one hundred geese may be kept, and if the proportion of males and females be right, they will yield a profit of two dollars each.
Farmers usually don't like keeping geese, thinking they damage more than they're worth. However, if you have the right space for them, they can be profitable. They need a fenced pasture that they can't escape from, with access to a spring, pond, or stream.[Pg 206] It's best if they have some grain year-round. Along with plenty of grass in the summer and cut roots in the winter, this will keep them in great shape. The feathers can cover the costs of care, and the young geese's increase and feathers will be pure profit. On an acre or two, you can keep a hundred geese, and if the ratio of males to females is good, they can bring in a profit of two dollars each.
GOOSEBERRY.
This is a native of the north of Europe and Asia, from which all our fine varieties have been produced by cultivation. Our own native varieties are not known to have produced any very desirable ones. Probably the zeal of the Lancashire weavers, in England, will surpass all that Americans will do for the next century in gooseberry culture. They publish a small book annually, giving an account of new varieties. The last catalogue of the London Horticultural Society mentions one hundred and forty-nine varieties, as worthy of cultivation. A few only should receive attention among us. Gooseberries delight in cool and rather moist situations. They do not flourish so naturally south of Philadelphia; though they grow well in all the mountainous regions, and may produce fair fruit in many cool, moist situations. Deep mulching is very beneficial; it preserves the moisture, and protects from excessive heat. The land must be trenched and manured deep. In November, cut out one half of the top, both old and new wood, and a good crop of fine fruit may be expected each year, for five or six years, when new bushes should take the place of old ones. Propagate by cut[Pg 207]tings of the last growth. Cut out all the eyes, below the surface, when planted. Plant six inches deep in loam, in the shade. Press the soil close around them. To prevent mildew, it is recommended to sprinkle lime or flour of sulphur over the foliage and flowers, or young fruit. The fruit-books recommend the best varieties, and very open tops, as not exposed to mildew. We recommend spreading dry straw, or fine charcoal, on the surface under the bushes, as a perfect remedy, if the top be not left too thick. There is no necessity for mildew on gooseberries. The fall is much the best season for trimming, though early spring will do. Varieties are divided into red, green, white, and yellow. These are subdivided into hundreds of others, with names entirely arbitrary. The following are the best varieties, generally cultivated in this country:—
This is a native of northern Europe and Asia, from which all our great varieties have been developed through cultivation. Our local varieties don’t seem to have produced any particularly desirable ones. It's likely that the enthusiasm of the Lancashire weavers in England will outshine anything Americans will achieve in gooseberry cultivation for the next century. They publish a small annual book detailing new varieties. The latest catalog from the London Horticultural Society lists one hundred and forty-nine varieties that are deemed worthy of cultivation. Only a few should truly be focused on here. Gooseberries thrive in cool and somewhat moist environments. They don’t naturally grow as well south of Philadelphia, although they do grow nicely in many mountainous areas and can yield decent fruit in various cool, moist spots. Deep mulching is very helpful; it retains moisture and shields against excessive heat. The soil should be dug and deeply manured. In November, trim away half of the top, including both old and new wood, and you can expect a good crop of quality fruit each year for five or six years, after which new bushes should replace the old ones. Propagate using cuttings from the most recent growth. Remove all the buds below the surface when planting. Plant them six inches deep in loamy soil, in the shade. Firm the soil around them tightly. To avoid mildew, it's advisable to sprinkle lime or sulfur flour over the leaves, flowers, or young fruit. Fruit guides recommend the best varieties and very open tops, as these are less prone to mildew. We suggest spreading dry straw or fine charcoal on the ground under the bushes as a perfect remedy, provided the top isn’t left too thick. There’s no reason for mildew on gooseberries. Fall is by far the best time for trimming, though early spring works too. Varieties are divided into red, green, white, and yellow, and these are broken down into hundreds of other names that are completely arbitrary. The following are the best varieties commonly grown in this country:—
1. Houghton's Seedling.—Flavor, superior; skin, thin and tender; color, reddish-brown. Prodigious grower and bearer—none better known. Free from mildew. Native of Massachusetts.
1. Houghton's Seedling.—Great flavor; skin is thin and tender; color is reddish-brown. An excellent grower and producer—none are better known. Resistant to mildew. Originates from Massachusetts.
2. Red Warrington.—Later and larger than the preceding; hangs long on the bush without cracking, and improves in flavor.
2. Red Warrington.—Bigger and later than the previous variety; stays on the bush for a long time without splitting and gets better in taste.
3. Woodward's Whitesmith—is one of the best of the white varieties.
3. Woodward's Whitesmith—is one of the best white varieties.
4. Cleworth's White Lion.—Large and late; excellent.
4. Cleworth's White Lion.—Big and late; outstanding.
5. Collier's Jolly Angler—is a good green gooseberry; fruit large, excellent, and late.
5. Collier's Jolly Angler—is a great green gooseberry; the fruit is large, excellent, and late.
6. Early Green Hairy.—Very early; rather small; prolific.
6. Early Green Hairy.—Very early; quite small; highly productive.
7. Buerdsill's Duckwing—is a good, late, yellow gooseberry; large fruit, and a fine-growing bush.[Pg 208]
7. Buerdsill's Duckwing—is a great, late yellow gooseberry; it has large fruit and a well-growing bush.[Pg 208]
8. Prophets Rockwood.—Very large fruit of excellent quality, ripening quite early.
8. Prophets Rockwood.—Very large fruit of excellent quality, ripening quite early.
The foregoing list, giving two of each of the four colors, and early and late, are all, we think, that need be cultivated. Many more varieties, nearly equalling the above, may be selected; but we are not aware that any improvement would be made. Downing gives the following list for a garden: —
The list above, which includes two of each of the four colors, both early and late, is, in our opinion, all that should be grown. There are many other varieties that come close to these, but we don't believe any improvements would result. Downing provides the following list for a garden: —
Red.—Red Warrington, Companion, Crown Bob, London, Houghton's Seedling.
Red.—Red Warrington, Companion, Crown Bob, London, Houghton’s Seedling.
Yellow.—Leader, Yellow Ball, Catharine, Gunner.
Yellow.—Leader, Yellow Ball, Catharine, Gunner.
White.—Woodward's Whitesmith, Freedom, Taylor's Bright Venus, Tally Ho, Sheba Queen.
White.—Woodward's Whitesmith, Freedom, Taylor's Bright Venus, Tally Ho, Sheba Queen.
Green.—Pitmaston Green Gage, Thumper, Jolly Angler, Massey's Heart of oak, Parkinson's Laurel.
Green.—Pitmaston Green Gage, Thumper, Jolly Angler, Massey's Heart of oak, Parkinson's Laurel.
Thus you have Downing's authority; his list includes most of those we have recommended above. The varieties are less important than in most fruits, provided only you get the large varieties of English gooseberry. Proper cultivation will insure success. Whoever cultivates, only tolerably well, the Houghton Seedling, will be sure to raise good berries, free from mildew.
Thus you have Downing's authority; his list includes most of those we've recommended above. The varieties are less important than in most fruits, as long as you get the larger varieties of English gooseberry. Proper cultivation will ensure success. Anyone who cultivates the Houghton Seedling reasonably well will definitely produce good berries that are free from mildew.
GRAFTING.
This is one of the leading methods of obtaining such fruits as we wish, on stocks of such habits of growth and degrees of hardiness, as we may desire. The stock will control, in some degree, the growth of the scion, but leave the fruit mainly to its habits on its original[Pg 209] tree. The advantages of grafting are principally the following:—
This is one of the main ways to grow the fruits we want, using rootstocks that have the growth traits and hardiness we prefer. The rootstock will influence the growth of the scion to some extent, but the fruit will mostly depend on the characteristics of its original[Pg 209] tree. The benefits of grafting are mainly as follows:—
Good varieties may be propagated very rapidly. A single tree may produce a thousand annually, for a series of years. Large trees of worthless fruit may be changed into any variety we please, and in a very short time bear abundantly. Fruits not easily multiplied in any other way, can be rapidly increased by grafting. Early bearing of seedlings can be secured by grafting on bearing trees.
Good varieties can be propagated quickly. One tree can produce a thousand fruits each year for several years. Large trees with poor-quality fruit can be transformed into any variety we want and will start producing abundantly in no time. Fruits that are hard to multiply in other ways can be quickly increased through grafting. You can ensure early fruiting of seedlings by grafting them onto trees that are already producing.
Tender and exotic varieties may be acclimated by grafting into indigenous stocks. Fruit can be raised on an uncongenial soil, by grafting into stocks adapted to that soil. Several varieties may be produced on the same tree, for ornament or economy of room. Dwarfs of any variety may be produced by grafting on dwarf stocks, and we may thus grow many trees on a small space. A slow-growing variety may be made to form a large top, by grafting into large vigorous-growing stocks. We are enabled to carry varieties to any part of the world, at a cheap rate, as the scions, properly done up, may safely be carried around the globe.
Tender and exotic varieties can be adapted by grafting onto local rootstocks. Fruit can be grown in unsuitable soil by grafting onto stocks that are suited for that type of soil. Multiple varieties can be produced on the same tree, either for decoration or to save space. Dwarfed versions of any variety can be created by grafting onto dwarf rootstocks, allowing us to grow many trees in a compact area. A slow-growing variety can be encouraged to develop a large canopy by grafting it onto large, fast-growing stocks. We can transport varieties anywhere in the world at a low cost since scions, when properly packaged, can be safely shipped around the globe.
Time of Grafting.—Grafts may be made to live, put in in any month of the year, but the beginning of the opening of the buds in spring, is the preferable season. Stone fruits should be budded; and all fruits may be made to do well budded. Budding is usually only practised on small trees, while grafting may be performed on trees of any size.
Time of Grafting.—You can graft any time of the year, but the best time is when the buds start to open in spring. Stone fruits should be budded, and all types of fruits can thrive when budded. Budding is typically done on small trees, while grafting can be done on trees of any size.
Cutting and preserving Scions.—Mature shoots of the previous year's growth are best. Those of the year before will also do. They may be cut at any time from November to time of setting. Perhaps the month of[Pg 210] February is best. They may be well preserved in moist sawdust in tight boxes. The more there are together the better they will keep. They keep better by being cut a little below the beginning of the last year's growth, but it is more injurious to the tree. They may be kept well in fine sand, moist and cool. Too much moisture is always injurious. Put the lower ends in shallow water, and they will look very fine, but not one of them will live. Scions cut in the fall and buried six inches deep in yellow loam or fine sand, will keep well till next spring. There are several methods of grafting only two of which deserve particular attention. These are cleft-grafting and tongue or splice grafting, see figures.
Cutting and preserving Scions.—Mature shoots from last year's growth are best. Those from the year before are also fine. They can be cut anytime from November until the time of planting. February is probably the best month. They can be well preserved in moist sawdust in sealed boxes. The more that are grouped together, the better they will stay fresh. They keep better when cut just below where last year's growth started, but this can be more damaging to the tree. They can also be stored well in fine sand, kept moist and cool. Too much moisture is always harmful. If you place the lower ends in shallow water, they may look great, but none will survive. Scions cut in the fall and buried six inches deep in yellow loam or fine sand will stay fresh until next spring. There are several methods for grafting, but only two are particularly noteworthy. These are cleft-grafting and tongue or splice grafting, see figures.
 Cleft grafting.
 Tongue grafting.
Cleft-Grafting is performed in most cases, when scions are grafted upon stocks much larger than themselves. It is too well known to need particular description. Tools should be sharp, and it should be performed before the bark slips so easily as to be started by splitting the stock. It endangers the growth of the scions. The requisite to success in all grafting, is to have some point of actual contact, between the inside barks of both the scion and the stock. This is more[Pg 211] certainly secured by causing the scion to stand at a slight angle with the stock.
Cleft-Grafting is usually done when grafting scions onto stocks that are much larger. It's well-known enough that it doesn't need detailed explanation. Tools should be sharp, and the procedure should be performed before the bark becomes so loose that it can split the stock. If that's the case, it can harm the growth of the scions. The key to successful grafting is having actual contact between the inner barks of both the scion and the stock. This is more[Pg 211]certainly achieved by positioning the scion at a slight angle to the stock.
Tongue-Grafting is generally used in grafting on small stocks—seedlings or roots. With a sharp knife, cut off the scion slanting down, and the stock slanting up, split each in the centre, and push one in to the other until the barks meet, and wind with thick paper or thin muslin, with grafting wax on one side. This is generally used in root-grafting. The question of root-grafting has excited considerable discussion recently. Many suppose it to produce unhealthy trees, and that retaining the variety is less certain than by other modes. Root-grafting is a cheap and rapid means of multiplying trees, and hence is greatly prized by nursery men. Practical cultivators of Illinois have assured us, that it is impossible to produce good Rhode Island greenings in that state, by root-grafting—that they will not produce the same variety. We see no principle upon which they should fail, but will not undertake to settle this important question. For ourselves we prefer to use one whole stock for each tree, cutting it off at the ground and grafting there.
Tongue-Grafting is typically used for grafting onto small stocks—like seedlings or roots. With a sharp knife, cut the scion at a downward angle and the stock at an upward angle, split each in the center, and fit one into the other until the barks align. Then wrap it with thick paper or thin muslin and seal with grafting wax on one side. This method is commonly used for root-grafting. There's been a lot of discussion lately about root-grafting. Many believe it leads to unhealthy trees and think it's not as reliable for maintaining the variety as other methods. Root-grafting is a cost-effective and quick way to propagate trees, which is why it's highly valued by nurserymen. Practical growers in Illinois have told us that it's impossible to produce good Rhode Island greenings in that state through root-grafting—that the same variety won't develop. We don't see any reason why this should be the case, but we won't try to resolve this important issue. Personally, we prefer to use one whole stock for each tree, cutting it at ground level to graft there.
Grafting Composition or Wax.—One part beef's tallow, two parts beeswax, and four parts rosin, make the best. Harder or softer, it is liable to be injured by the weather. Warm weather will melt it, and cold will crack it. Melt these together and pour them into cold water, and pull and work as shoemaker's wax. When using, it is to be kept in cool or warm water, as the weather may demand. In its application, it is to be pressed closely over all the wound made by sawing and splitting the limb, and close around the scions, so as to exclude air and water. Clay is often used for grafting,[Pg 212] but is not equal to wax. You can use grafting tools, invented especially for the purpose, or a common saw, mallet, knife, and wedge.
Grafting Composition or Wax.—Combine one part beef tallow, two parts beeswax, and four parts rosin for the best result. If it's too hard or too soft, it can be damaged by the weather. Warm temperatures will melt it, while cold can cause it to crack. Melt these ingredients together and pour them into cold water, then knead and shape it like shoemaker's wax. When in use, keep it in either cool or warm water depending on the weather. Apply it by pressing it tightly over all the cuts made by sawing and splitting the limb, and around the scions to keep out air and water. While clay is often used for grafting,[Pg 212] it’s not as effective as wax. You can use grafting tools made specifically for this, or you can use a regular saw, mallet, knife, and wedge.
GRAPES.
Those cultivated so extensively in Europe were natives of Persia—showing that they may be acclimated far from their native home. Foreign grapes are not suitable for out-door culture in this country, except a very few varieties, which do well in the Southern states. The native grapes of this country have produced some excellent varieties, which are now in general cultivation. Others are beginning to attract notice, and seedlings will probably multiply rapidly, and great improvements in our native grapes may be expected. The subject of grape-culture deserves greatly-increased attention. To all palates the grape is delicious; it is not only one of the most palatable articles of diet, but is more highly medicinal than any other fruit. It is the natural source of pure wine. Pure wine made of grapes is only to be procured, in this country, by domestic manufacture. Probably not one out of a thousand gallons of imported wines, sold as pure, contains a drop of the juice of the grape;—they are manufactured of poisonous drugs and ardent spirits—generally common whiskey. A French chemist discovered a method of imitating fermented liquor without fermentation, and distilled spirits without distillation. His process has been published in this country in book form, and by subscription; and while those books are unknown in the bookstores, they[Pg 213] are generally possessed by prominent liquor dealers;—and the practice of those secret arts is terribly dangerous to the community. Antecedent to this chemical manufacture of poisonous liquors, such a disease as delirium tremens was unknown. Thus the Frenchman's discovery filled the liquor-sellers' pockets with cash, and the land with mourning, over frequent deaths by a disease, the horror of which is equalled only by hydrophobia. In self-defence, all should give up the use of everything purporting to be imported wines or liquors. Wine should not be used as a common beverage by the healthy. The best medical authority in the world has pronounced it absolutely injurious. But in many cases of sickness, especially in convalescence from fevers, it is one of the very best articles that can be used; hence, a pure article, of domestic manufacture, should be accessible to all the sick. (See our article on "Wine.") The luxury of good grapes can be enjoyed by every family in the land who have a yard twenty feet square. In the cities, almost every house may have a grapevine or two where nothing else would grow. Allow a vine to run up trellis-work in the rear of the house, and over the roof of a wing, or rear-part, raised two feet above the roof, supported by a rack. In such situations they will bear better than elsewhere, will be out of the way, and decidedly ornamental. In such small yards, from five to twenty-five bushels have often grown in a season. Some climates and soils are much better suited to grape-culture than others. But we have varieties that will flourish wherever Indian corn will mature.
The grapes extensively cultivated in Europe originally come from Persia, which shows that they can adapt well outside their native region. Foreign grapes aren't suitable for outdoor growth in this country, except for a few varieties that thrive in the Southern states. The native grapes here have produced some excellent varieties that are now commonly grown. Others are starting to gain attention, and new seedlings will likely multiply quickly, leading to significant improvements in our native grapes. Grape cultivation needs a lot more focus. Grapes are delicious to everyone; they're not only one of the tastiest foods but also more medicinal than any other fruit. They are the natural source of pure wine. In this country, pure wine made from grapes can only be obtained through domestic production. Probably less than one out of a thousand gallons of imported wines sold as pure actually contains any grape juice; most are made from toxic chemicals and cheap spirits, often just common whiskey. A French chemist developed a way to imitate fermented drinks without fermentation and distilled spirits without distillation. His method has been published in this country in book form through subscriptions, and while these books aren’t found in bookstores, they're typically owned by major liquor dealers, making the practice of these secret methods incredibly harmful to the community. Before this chemical process for creating toxic liquors, there was no such disease as delirium tremens. So, the Frenchman’s discovery filled liquor sellers' pockets with money while causing widespread sorrow due to frequent deaths from a disease as terrifying as rabies. To protect ourselves, everyone should stop using anything that claims to be imported wines or liquors. Healthy people shouldn’t drink wine as a regular beverage. The best medical experts in the world say it's genuinely harmful. However, in many cases of illness, especially during recovery from fevers, it's one of the best things to use; therefore, a pure domestically-made option should be available to all the sick. (See our article on "Wine.") Every family with a yard that’s at least twenty feet square can enjoy the luxury of good grapes. In cities, almost every house can accommodate a grapevine or two where nothing else would thrive. You can allow a vine to grow up trelliswork at the back of the house and over the roof of a section that's raised two feet above the main roof, supported by a rack. In these spots, they'll produce better than anywhere else, will be out of the way, and will look great. In small yards, you can often harvest between five to twenty-five bushels in a season. Some climates and soils are significantly better for growing grapes than others. However, we have varieties that will thrive wherever corn can grow.
Location.—For vineyards, the sides of hills are usually chosen, sometimes for the purpose of a warm exposure, but generally to secure the most perfect drain[Pg 214]age. A northern exposure is preferable for all varieties adapted to the climate. To mature late varieties, choose a southern or eastern exposure.
Location.—For vineyards, hillside locations are typically selected, often for the benefit of warm sunlight, but generally to ensure the best drainage[Pg 214]. A northern exposure is ideal for all varieties suited to the climate. For ripening late varieties, opt for a southern or eastern exposure.
Soil.—Gravelly, with a little sand, on a dry subsoil, is preferable, though good grapes may be grown upon any land upon which water will not stand. Grapes always need much lime. If the vineyard is not located on calcareous soil, lime must be liberally supplied, especially for wine-making. A dry subsoil, or thorough draining, is indispensable to successful grape-culture. We prefer level land, wherever thorough draining is practicable.
Soil.—Gravelly, with some sand, on a dry subsoil is ideal, although good grapes can be grown on any land where water does not pool. Grapes always require a lot of lime. If the vineyard isn't on calcareous soil, lime should be added generously, especially for making wine. A dry subsoil or proper drainage is essential for successful grape growing. We prefer flat land whenever proper drainage is possible.
Propagation.—Choice grapes are propagated by grafts, layers, or cuttings. New ones are produced from seeds. The more kinds that are cultivated together, the greater will be the varieties raised from their seeds, by cross-fertilization in the blossoms. A small grape crossed with a large one, or an early with a late one, or two of different flavors, will produce mediums between them. Seeds should be cleaned, and planted in the fall, or kept in sand till spring. In the fall, cover up the young vines. The second or third year, the young vines should be set in the places where they are designed to remain. By efforts to get new varieties, we may adapt them to every latitude, from the gulf of Mexico to Pembina.
Propagation.—Quality grapes are propagated through grafting, layering, or cuttings. New plants can also come from seeds. The more varieties grown together, the more diverse the seeds produced through cross-pollination will be. A small grape crossed with a large one, an early variety with a late one, or two with different flavors will create hybrids with characteristics from both. Seeds should be cleaned and planted in the fall, or stored in sand until spring. In the fall, cover the young vines. In their second or third year, the young vines should be planted in their permanent locations. By working to create new varieties, we can adapt them to all climates, from the Gulf of Mexico to Pembina.
Layers.—These produce large vines and abundance of fruit earlier than any other method of propagation. Put down old wood in May or early June, and new wood a month later; fasten down with pegs having a hook to hold the vine, and cover up with earth; they will take root freely at the joints, and may be removed in autumn or spring. If you put down wood too late,[Pg 215] or do not keep it covered with moist earth, it will fail; otherwise it is always sure.
Layers.—These create large vines and lots of fruit earlier than any other way of propagation. Plant old wood in May or early June, and new wood a month later; secure it with pegs that have a hook to hold the vine, and cover it with soil; they will root easily at the joints and can be moved in autumn or spring. If you plant the wood too late,[Pg 215] or don’t keep it covered with moist soil, it will not succeed; otherwise, it’s always reliable.
Cuttings—may be from any wood you have to spare, and should be about a foot long, having two buds. Plant at an angle of forty-five degrees, one bud and two thirds of the cutting under the soil. A little shade and moisture will cause nearly all to grow. A little grafting-wax on the top will aid the growth, by preventing evaporation. The cutting, so buried as to have the top bud half an inch under fine mould, is said to be surer. Cuttings should be made late in fall, or early in winter, and preserved as scions for grafting. Cuttings made in the spring are less sure to grow, and their removal is much more injurious to the vine. Vines raised from cuttings may be transplanted when one or two years old.
Cuttings—can be taken from any spare wood you have, and should be about a foot long with two buds. Plant at a forty-five-degree angle, burying one bud and two-thirds of the cutting below the soil. A bit of shade and moisture will help most of them to root. Applying some grafting wax on the top will support growth by preventing evaporation. The cutting, buried so that the top bud is half an inch below fine soil, is said to be more reliable. Cuttings should be taken late in the fall or early in winter and stored as scions for grafting. Cuttings taken in the spring are less likely to thrive, and their removal can be much more damaging to the vine. Vines grown from cuttings can be transplanted when they are one or two years old.
Grafting—should be performed after the leaves are well developed in the spring. The sap becomes thick, which aids the process. Remove the earth, and saw off the vine two or three inches below the surface. Graft with scions of the previous year's growth, but well matured, and apply cement, to keep the sap from coming out. Cover all but the top bud. In stocks an inch in diameter put two scions. Very few need fail.
Grafting—should be done after the leaves have fully developed in the spring. The sap gets thick, which helps the process. Remove the soil, and cut the vine two or three inches below the surface. Graft with scions from the previous year's growth, but make sure they are fully matured, and use cement to seal it, preventing the sap from spilling out. Cover everything except the top bud. For stocks that are about an inch in diameter, use two scions. Very few should fail.
Budding—maybe done as in other cases, but always after the leaves are well developed, to avoid bleeding. These modes of propagation stand in the following order in point of preference, the best being named first: layers, cuttings, grafting, budding.
Budding—perhaps done like in other cases, but always after the leaves are fully developed to prevent bleeding. These methods of propagation are listed in order of preference, with the best named first: layers, cuttings, grafting, budding.
Culture and Manure.—Land prepared by deep subsoil plowing, highly manured and cultivated the previous season in a root-crop, is the best for a vineyard. The trenches for the rows should be spaded twenty[Pg 216] inches deep, and a part of the surface-soil put in the bottom. After planting the vines, stir the ground often and keep clear of weeds. At first, stir the soil deep; but, as the roots extend, avoid working among them, and never disturb the roots with a plow. Mulching preserves the soil in a moist, loose condition, and is a good preventive of mildew. In many instances it is said to have doubled the crop. Common animal-manures are good for young vines, and in preparing the soil, but are rather too stimulating for bearing vines, often injuring the fruit. Ashes and cinders from the smith's forge, wood-ashes, charcoal, soapsuds, bones and bonedust, lime, and forest and grape leaves and trimmings, carefully dug into the soil around the vines, are all very good. A liberal supply of suitable manures will keep the vines in a healthy condition, and preserve the fruit from disease and decay. This, with judicious pruning, will render the grape-crop regular and sure.
Culture and Manure.—Land that has been deeply plowed, well-manured, and previously cultivated with a root crop is ideal for a vineyard. The trenches for the rows should be dug twenty[Pg 216] inches deep, with some of the topsoil placed at the bottom. After planting the vines, frequently till the soil and keep it free of weeds. Initially, work the soil deeply, but as the roots grow, avoid disturbing them, and never use a plow near the roots. Mulching keeps the soil moist and loose and helps prevent mildew. In many cases, it is reported to have doubled the crop yield. Common animal manures are beneficial for young vines and when preparing the soil, but they can be too stimulating for mature vines, often harming the fruit. Ashes and cinders from the blacksmith's forge, wood ashes, charcoal, soap suds, bones and bone meal, lime, as well as forest and grape leaves and clippings, when turned into the soil around the vines, are all excellent additions. A generous supply of appropriate fertilizers will keep the vines healthy and protect the fruit from disease and spoilage. Combined with careful pruning, this will ensure a consistent and successful grape harvest.
Vineyards—should be in rows five feet apart, with vines four feet apart in the row. Layers of one, and cuttings of two years' growth, will bear the second year, and very plentifully the third year. A good vineyard in the latitude of Cincinnati yields about one hundred and fifty bushels of grapes per acre, making four hundred gallons of wine. The average yield of wine per acre, throughout the country, is estimated at two hundred gallons.
Vineyards—should be planted in rows five feet apart, with the vines spaced four feet apart in each row. Single-layer plants and cuttings that are two years old will produce fruit in the second year and a lot more in the third year. A good vineyard in the Cincinnati area yields about one hundred and fifty bushels of grapes per acre, producing four hundred gallons of wine. The average wine yield per acre across the country is estimated to be two hundred gallons.
Training under Glass.—By this means the fine foreign varieties may be brought to perfection in our high latitudes. With most of the best kinds, this can be done by solar heat alone. A house covered with glass at an angle of forty-five degrees, facing the south, will answer the purpose. With a slight artificial heat,[Pg 217] the finest varieties may be perfected, and others forwarded, so as to have fine grapes at most seasons of the year. The vines are planted on the outside of the grapehouse, and allowed to pass in through an aperture two feet from the ground, and are trained up near the glass on the inside. Protect the roots in winter by a covering of coarse straw manure. Wind the vines on the inside with straw, lay them down on the ground in the grape-house, and keep it closed during the winter. A house one hundred feet long and twenty-five feet wide, filled mainly with Black Hamburg, with a few other choice varieties, would afford a great luxury, and prove a profitable investment. From one such house, near a large city, a careful cultivator may realize a thousand dollars per annum. Native and even hardy varieties are often greatly improved by cultivation under glass, or by a little protection in winter.
Training under Glass.—This method allows us to perfect fine foreign grape varieties in our colder regions. For most of the best types, solar heat alone is sufficient. A greenhouse covered with glass at a forty-five-degree angle, facing south, works well. With a bit of artificial heat,[Pg 217] we can perfect the finest varieties and get others to ripen, ensuring we have great grapes throughout most seasons of the year. The vines are planted outside the greenhouse and pass through an opening two feet from the ground, where they are trained up close to the glass inside. In winter, protect the roots with a layer of coarse straw manure. Wind the vines inside with straw, lay them down on the ground in the greenhouse, and keep it closed during the winter. A greenhouse that is one hundred feet long and twenty-five feet wide, primarily filled with Black Hamburg grapes along with a few other select varieties, would provide a great indulgence and be a smart investment. A dedicated grower could expect to earn around a thousand dollars a year from such a greenhouse, especially if it's located near a big city. Native and even hardy varieties often see significant improvement when cultivated under glass or given some winter protection.
The Isabella grape is hardy and productive in western New York. In 1856, we noticed a vine that had been laid down in a dry place and covered slightly with earth, in autumn; the fruit was more abundant, and one fourth larger, than that on a similar vine by its side that had remained on the trellis during winter: this shows the value of protection even to hardy vines.
The Isabella grape is tough and fruitful in western New York. In 1856, we observed a vine that had been laid down in a dry spot and lightly covered with soil in the fall; the fruit was more plentiful and a quarter larger than that on a similar vine next to it that stayed on the trellis during the winter. This demonstrates the importance of protection even for hardy vines.
Training.—There are many methods, and the question of preference depends upon the location of the vines, the space they may occupy, and the taste of the cultivator. There are four principal systems—the cane or renewal system, spur system, fan-training, and spiral or hoop training.
Training.—There are a lot of ways to do it, and the choice depends on where the vines are located, the space they take up, and the grower's preferences. There are four main systems—the cane or renewal system, spur system, fan-training, and spiral or hoop training.
The renewal system we prefer for trellises. Put posts firmly in the ground eight feet apart, allowing them to be seven feet above ground after they are set; put[Pg 218] slats of wood or wire across these, a foot apart, commencing a foot above the ground. Set vines eight feet apart; let the vines be composed of two branches, coming out near the ground: these can be formed by cutting off a young vine near the ground, and training two of the shoots that will spring from the bottom. These two vines should be bent down in opposite directions, and tied horizontally to the lower slat of the trellis; cut these off, so as to have them meet similar vines from the next root; upright shoots from these will extend to the top of the trellis, and it is then covered, and the work is complete. After these upright canes have borne, cut off every alternate one, two or three inches from its base, and train up the strongest shoot for a bearer next year: thus cut off and train new alternate ones every year, and the vine will be constantly renewing, and be in the most productive state; keep the vines clipped at the top of the trellis, and the sap will mature strong buds for next year's fruit. We regard this the most effectual of all training. The principle of renewal can be applied to any form of vine, and eminently promotes fruitfulness. Many complain that their vines, though liberally pruned, do not bear well. The difficulty may be that the new wood is principally removed, while the old is left to throw out strong-growing shoots, bearing abundance of foliage and little fruit. More of the old wood removed, and more of the young saved, would have produced less vines and much more fruit.
The renewal system we recommend for trellises is straightforward. Place posts securely in the ground eight feet apart, ensuring they stand seven feet above ground once set. Then, add[Pg 218] wooden or wire slats across these posts, spaced a foot apart, starting a foot above the ground. Plant the vines eight feet apart; each vine should consist of two branches that emerge near the ground. You can create these by cutting a young vine close to the ground and training two shoots that grow from the base. Bend these two vines down in opposite directions and tie them horizontally to the lower slat of the trellis. Trim them so that they meet similar vines from the next root. Upright shoots from these vines will grow to the top of the trellis, completing the setup. Once these upright canes have produced fruit, trim every alternate one to two or three inches above the base, and train the strongest shoot to bear fruit the next year. Continue this process by cutting off and training new alternate vines each year, and the vine will continuously renew and remain productive. Keep the vines trimmed at the top of the trellis, and this will help develop strong buds for next year's fruit. We believe this is the most effective training method. The renewal principle can be applied to any type of vine and significantly encourages fruitfulness. Many people complain that their vines, even after generous pruning, don't produce well. This could be because they mainly remove the new wood while leaving the old wood, which tends to produce vigorous shoots with lots of leaves but little fruit. Removing more old wood and preserving more young wood would yield fewer vines and much more fruit.
Pruning—is the most important part of successful grape-culture. Mistakes on this subject are very injurious. Let vines grow in their own way, and you will have much wood and foliage, and very little, poor fruit.[Pg 219] Some cut off the shoots in summer just above the fruit, and remove most of the leaves around it to expose the fruit to the sun. This often proves to be a ruinous mistake; the sap ascends to the leaves, and there amalgamates with what they absorb from the atmosphere, and thus forms food for the vine and fruit. It is the leaves, and not the fruit, which need the sun: the leaves are the lungs, upon the action of which the life and health of the fruit depend. Blight of the leaves destroys the fruit, and a frequent repetition of it destroys the vine. Grape-vines should not be pruned at all until three years old, as it retards the growth of the roots, and thus weakens the vines. Older vines should be freely pruned in November or December; pruned in winter they may bleed in the spring, and pruned in the spring they certainly will bleed. Tender vines, not protected, may have an excess of wood left in the fall to allow for what may perish in winter; in this case, cut away the dead and surplus wood in spring, but never until the leaves are well developed, so as to prevent bleeding. Necessary summer-pruning is of much importance. Remove no leaves, except the ends of branches, that have already made as much wood as they can mature. In the Middle states this should be done about the last of July, and at the South a month earlier. Weak lateral branches, that bear no fruit, may be removed, but not all of them, for it is on the wood of this year's growth that the fruit will be found the following season. Old wood does not send out wood in spring that will bear fruit the same season; that wood will bear fruit next season if allowed to remain. Whoever observes will notice that grapes grow on young shoots of the same season; but they are shoots[Pg 220] from wood of the previous year's growth, and not from old wood. Many suppose if they trim their vines very closely, as the old vines send forth abundance of new wood, and it is new wood on which the fruit grows, of course they will have abundance of grapes; and they are disappointed by a failure. The explanation of the whole is, fruit grows on new wood, from wood of previous year's growth, and not from old vines; hence, in lessening a vine, remove old wood. This is the renewal system, whatever the form of the vine, and is the whole secret of successful pruning. This accounts for the great success of the Germans in producing such quantities of grapes on low vines. In their best vineyards, they do not allow their vines to grow more than six or seven feet high, and yet they produce abundantly for many years. They so prune as to have plenty of last year's wood for the production of fruit the current season; after this has borne fruit, they remove it to make room for the young wood that will produce the next season. This principle is applicable to vines of any shape or size you may choose to form. The removal, in summer, of excessive growth, and shortening the ends of those you design to retain, throws the strength of the vine into the fruit, and to perfect the wood already formed. Liberal fall-pruning is necessary to induce the formation of new wood the next season, for bearing the following year. Parts that grow late do not mature sufficiently to bear fruit the next season; hence, cut off the ends in summer, and let what remains have the benefit of all the sap.
Pruning is the most crucial part of successful grape cultivation. Mistakes in this area can be very damaging. If you let the vines grow freely, you'll end up with a lot of wood and leaves but very little, poor fruit.[Pg 219] Some people cut the shoots in summer just above the fruit and remove most of the leaves around it to let the fruit get more sun. This often turns out to be a disastrous mistake; the sap rises to the leaves, where it combines with what they take in from the air, creating food for the vine and fruit. It's the leaves, not the fruit, that need the sun: the leaves act as the lungs, and the health and life of the fruit depend on them. Damage to the leaves harms the fruit, and repeated damage can kill the vine. Grape vines shouldn’t be pruned at all until they’re three years old, as this slows down root growth and weakens the vines. Older vines should be pruned generously in November or December; if pruned in winter, they may bleed in spring, and if pruned in spring, they definitely will bleed. Delicate vines that aren't protected may have too much wood left in the fall to account for potential losses in winter; in that case, cut away the dead and excess wood in spring, but only once the leaves are well developed to avoid bleeding. Necessary summer pruning is very important. Do not remove any leaves, except for the tips of branches that have already matured as much wood as they can. In the Middle States, this should be done around the end of July, and in the South, a month earlier. Weak lateral branches that don’t produce fruit can be removed, but not all of them since fruit will appear on this year's growth next season. Old wood does not produce new wood in spring that will bear fruit that same season; if left alone, that wood will bear fruit next season. If you pay attention, you’ll see that grapes grow on young shoots from the same season, but these shoots come from the wood of the previous year's growth, not from old wood. Many people think if they trim their vines very closely, since the old vines produce a lot of new wood, and it’s that new wood that produces fruit, they will have an abundance of grapes; however, they end up disappointed. The explanation is simple: fruit grows on new wood from the previous year’s growth, not from old vines; therefore, if you're reducing a vine, remove old wood. This is the renewal approach, regardless of the vine’s shape, and it’s the key to successful pruning. This system explains why Germans are so successful at producing large amounts of grapes on low vines. In their best vineyards, they keep their vines at a height of no more than six or seven feet, yet they still yield abundantly for many years. They prune to ensure plenty of last year’s wood for producing fruit in the current season; after that wood has borne fruit, they remove it to make room for the young wood that will produce next season. This principle applies to vines of any shape or size you choose to form. Removing excessive growth in summer and shortening the ends of the wood you want to keep directs the vine's energy into the fruit and helps perfect the wood that has already formed. Generous fall pruning is necessary to encourage new wood growth for the next season's production. Parts that grow late in the season don't mature enough to bear fruit the following year; therefore, trim the ends in summer and let what remains benefit from all the sap.
Reduction of Fruit.—The grape is disposed to excessive bearing, which weakens the vine, and injures the quality of the fruit. Liberal pruning in autumn[Pg 221] does much to remedy this evil, by not leaving room for an excessive amount of fruit: hence, when you have a plenty of fruit-bearing wood, cut off the ends, so as to leave spurs with two buds, or at the most only four; when too much fruit sets, remove it very early, before the juices of the vine have been wasted upon it. A vine cut or wounded in spring will bleed profusely. Sheet India-rubber, or two or three thicknesses of a bladder, wet and bound closely around, may prevent the bleeding.
Reducing Fruit.—Grapes tend to produce too much fruit, which weakens the vine and harms the fruit's quality. Pruning generously in the autumn[Pg 221] significantly helps to fix this issue by limiting the amount of fruit. Therefore, when you have plenty of fruit-bearing wood, trim the ends to leave spurs with two buds, or at most, four; if too much fruit develops, remove it very early before the vine's juices are wasted on it. A vine that is cut or damaged in spring will bleed a lot. Using sheet rubber or two or three layers of wet bladder wrapped tightly around it can help stop the bleeding.
Mildew—is very destructive in confined locations, without a good circulation of air. Sulphur and quicklime, separate or combined, dug into the soil around the vines, is a preventive. Straw or litter of any kind, spread thick under the vines, is, perhaps, the best remedy—the action of it is in every way beneficial.
Mildew—is really damaging in enclosed spaces where there's not enough airflow. Using sulfur and quicklime, either separately or together, mixed into the soil around the vines can help prevent it. Spreading a thick layer of straw or any kind of litter under the vines might be the best solution—it's effective in many ways.
Insects.—The rosebug, spanworm, great greenworm, and many other insects, infest grapevines, and do much injury. The large worms are most easily destroyed by hand; the small insects by flour-of-sulphur, or by snuff, sprinkled over profusely when the vines are wet. The various applications recommended in this work for the destruction of insects, are useful on the grapevine. The principle is to apply something offensive to the insects, without being injurious to the vines.
Insects.—The rosebug, spanworm, great greenworm, and many other insects infest grapevines and cause a lot of damage. The large worms are easiest to remove by hand; the small insects can be controlled with flour of sulfur or snuff, sprinkled generously when the vines are damp. The different methods suggested in this work for getting rid of insects are effective on grapevines. The key is to use something that repels the insects without harming the vines.
Preserving Grapes.—Packed in sawdust or wheat-bran, always thoroughly dried by heat, they will keep well until spring. Another method is packing them in cotton-batting or wadding (the latter is best); or put them in baskets holding no more than four or five quarts, cover tight with cotton, and hang up in a cool, airy place, and they will long remain in good condition. In shallow boxes, six inches deep, put a sheet of wad[Pg 222]ding, and on it a layer of bunches of grapes, not allowed to touch each other; on the top of the grapes put another sheet of cotton, and then another layer of grapes, and so the third, covering the last with cotton, and put the cover on tight, and keep in a cool place. This is the most successful method.
Preserving Grapes.—If you pack them in sawdust or wheat bran, making sure it’s thoroughly dried by heat, they will stay fresh until spring. Another option is to pack them in cotton batting or wadding (the latter works best); or you can place them in baskets that hold no more than four or five quarts, cover them tightly with cotton, and hang them in a cool, well-ventilated area, and they will stay in good condition for a long time. In shallow boxes that are six inches deep, place a sheet of wadding, then arrange a layer of grape bunches without letting them touch each other; on top of the grapes, add another sheet of cotton, then another layer of grapes, repeating this for a third layer and covering the last layer with cotton, then put the cover on tightly and store it in a cool place. This is the most effective method.
A new method is to suspend hoops by three cords, like a baby-jumper, and hang the bunches of grapes all around it, as near as possible without touching, on little wire hooks, passing through the lower ends of the clusters, allowing the stem end to be suspended, and the grapes hang away from each other, and if the place be not damp enough to mould them, and not dry enough to cause them to shrivel, they keep exceedingly well. It requires more care and judgment, than the other methods. A very cool situation, without freezing, is essential in all cases. It is also necessary to remove all broken or immature grapes, from the clusters you would preserve.
A new method is to suspend hoops with three cords, like a baby jumper, and hang bunches of grapes all around it, as close as possible without touching, on small wire hooks that go through the lower ends of the clusters, allowing the stem end to hang while the grapes stay apart from each other. If the environment isn't too damp to mold them and not too dry to make them shrivel, they stay in great condition. This method requires more care and judgment than the others. A very cool spot, without freezing, is necessary in all cases. It's also important to remove any broken or immature grapes from the clusters you want to preserve.
Varieties are very numerous, and their nomenclature is confused, as that of other fruits. It is utterly useless to cultivate foreign grapes in the open air in this country. They succeed very imperfectly, even in the Southern states. But for cultivation under glass, they are preferable to any of our own. The following foreign grapes are preferred in this country:—
Varieties are very numerous, and their naming is confusing, like that of other fruits. It's completely pointless to grow foreign grapes outdoors in this country. They don't thrive very well, even in the Southern states. However, for growing under glass, they are better than any of our own. The following foreign grapes are favored in this country:—
Black Prince, White Muscat, White Constantia, White Muscadine, White Sweet-water, Early White Muscat, Black Cluster, Black Hamburg. The latter is the best of all foreign grapes for cultivation under glass. It is very delicious, a great bearer, of very large clusters. It requires only solar heat to bring it to perfection.[Pg 223]
Black Prince, White Muscat, White Constantia, White Muscadine, White Sweet-water, Early White Muscat, Black Cluster, Black Hamburg. The last one is the best foreign grape for growing in greenhouses. It’s extremely tasty, yields a lot, and produces very large bunches. It only needs sunlight to reach its peak quality.[Pg 223]
Native Grapes.—Of these we now have a large number, many of which are valuable. We call attention only to a very few of the best. The Isabella as a table luxury is hardly surpassed. In the Eastern, Middle, and Western states, it is generally hardy and prolific. In northern Maine, New Hampshire, and Vermont, it does not ripen well. The seasons are too short. It also feels somewhat the severity of the weather, on the western prairies. It is also apt to decay at the South. For all other parts it is one of the very best. It is an enormous bearer, one vine having been known to produce more than ten bushels, in a single year.
Native Grapes.—We now have a large variety of these, many of which are valuable. We will highlight only a few of the best. The Isabella is nearly unmatched as a table luxury. In the Eastern, Middle, and Western states, it is generally hardy and produces a lot of fruit. However, in northern Maine, New Hampshire, and Vermont, it doesn't ripen well due to the short growing seasons. It also feels the harshness of the weather on the western prairies. Additionally, it tends to spoil in the South. In all other regions, it is one of the best options available. It produces an incredible amount, with one vine having been known to yield over ten bushels in a single year.
 The Isabella Grape. The Catawba Grape.
Next is the Catawba, better for wine, more vinous but not so sweet as the Isabella, ripens two or three weeks later, and hence not so good in high latitudes.
Next is the Catawba, which is better for wine, more flavorful but not as sweet as the Isabella. It ripens two or three weeks later, making it less suitable for higher latitudes.
The Rebecca Grape.—This is a comparatively new variety, of great promise. White like the Sweet-water, flavor very fine, vine hardy and productive.
The Rebecca Grape.—This is a relatively new variety with a lot of potential. It's white like the Sweet-water, has a very nice flavor, and the vine is resilient and produces well.
The Diana is a small delicious grape, excellent flavor for the dessert, and ripens two weeks earlier than the Isabella. Hence good for northern latitudes.
The Diana is a small, tasty grape with an excellent flavor for desserts, and it ripens two weeks earlier than the Isabella. This makes it great for northern regions.
The Concord.—Large, showy, of good but not the best flavor, and ripens with the Diana. Should be cultivated at the North.
The Concord.—Big, eye-catching, with good but not exceptional flavor, and it ripens alongside the Diana. It should be grown in the North.
The York Madeira is similar to the Isabella, smaller and a few days earlier.[Pg 224]
The York Madeira is similar to the Isabella, just smaller and a few days earlier.[Pg 224]
 The Rebecca Grape.
 Delaware Grape.
The Delaware is a small brown grape, excellent and hardy. Ripens quite as early as the Isabella. Best outdoor grape, in many localities.[Pg 226]
The Delaware is a small brown grape that is excellent and tough. It ripens as early as the Isabella. It's the best outdoor grape in many areas.[Pg 226]
The Canadian Chief.—One of the very best grapes for Canada.
The Canadian Chief.—One of the best grapes for Canada.
Canby's August.—Very fine; considered better for the table than the Isabella, ripens ten days earlier, and as it is a good bearer, it should be generally cultivated.
Canby's August.—Very good; seen as superior for dining compared to the Isabella, it matures ten days earlier, and since it produces well, it should be widely grown.
The Ohio Grape is a good variety, beginning to attract much notice.
The Ohio Grape is a great variety that's starting to get a lot of attention.
The Scuppernong is the best of all grapes, for general cultivation at the South. It is never affected by the rot. Not easily raised from cuttings. Layers are better. It does best trained on an arbor.
The Scuppernong is the best type of grape for general growing in the South. It never gets affected by rot. It’s not easy to grow from cuttings; layering works better. It thrives best when trained on an arbor.
The soil and climate of the South are well adapted to the grape, even the finer varieties that do not flourish well at the North. They are, however, seriously affected by the rot, an evil incident to the heat and humidity of the climate. It being very warm, the dews and rains incline the fruit to decay. We think the evil may be prevented by two very simple means: Keep the vines very open, that they may dry very soon after rain; and train them to trellises, from six to ten feet high, and over the top put a coping of boards, in the shape of a roof, extending eighteen inches on each side of the trellis. It will prevent the rain and heavy dews from falling on the grapes, and is said to preserve them perfectly. This arrangement is about equal, in a warm climate, to cold graperies at the north. We recommend increased attention to this great luxury, in all parts of the country. Seedlings will arise, adapted to every locality on the continent.[Pg 227]
The soil and climate in the South are well-suited for grapes, even the finer varieties that don’t do as well up North. However, they are significantly impacted by rot, which is a common issue due to the heat and humidity of the climate. The warm conditions, along with the dews and rains, cause the fruit to spoil. We believe this problem can be prevented with two simple methods: Keep the vines spaced apart so they dry quickly after rain, and train them to trellises that are six to ten feet high, with a roof-like covering made of boards extending eighteen inches on each side. This setup will keep rain and heavy dew off the grapes, and it’s said to preserve them perfectly. In a warm climate, this setup is roughly equivalent to cold greenhouses in the North. We suggest paying more attention to this valuable luxury across the country. Seedlings will emerge that are suitable for every region on the continent.[Pg 227]
GRASSES.
There is a great number of varieties, adapted to cultivation in some countries and climates, but not suitable for American culture. On the comparative value of different grasses there is a diversity of opinions. The best course for the practical farmer is, having the best and surest, therewith to be content. Sir John Sinclair says there are two hundred and fifteen grasses cultivated in Great Britain. We shall notice a very few of them, with a view to their comparative value:—
There are many different types of grasses that work well in certain countries and climates but are not suited for farming in America. People have varying opinions on the value of different grasses. For practical farmers, the best approach is to have the best and most reliable options and be satisfied with that. Sir John Sinclair mentions that there are two hundred and fifteen grasses grown in Great Britain. We'll highlight just a few of them to compare their value:—
1. Sweet-scented Vernal Grass.—Small growth; yield of hay light. For pastures it is very early, and grows quickly after being cropped, and is excellent for milch-cows; grows well on almost any soil, but most naturally on high, well-drained meadows. It grows in great abundance in Massachusetts.
1. Sweet-scented Vernal Grass.—Small growth; light hay yield. It's very early for pastures and grows back quickly after cutting, making it great for dairy cows. It thrives in almost any soil, but ideally in high, well-drained meadows. It grows abundantly in Massachusetts.
2. Meadow Foxtail.—Early like the preceding, but more productive and more nutritious. It is one of the five or six kinds usually sown together in English pastures; best for sheep and horses.
2. Meadow Foxtail.—Early like the previous one, but more productive and more nutritious. It's one of the five or six types commonly sown together in English pastures; it’s ideal for sheep and horses.
3. Rough Cocksfoot.—Orchard-grass of the United States; cows are fond of it. In England it is taking the place of clovers and rye-grass. About Philadelphia it is supplanting timothy. It is earlier, and therefore better to mix with clover for hay, as they mature at the same time; grows well in the shade, and on both loams and sands; springs rapidly after being cropped. Colonel Powell, one of the best American farmers, says it produces more pasture than any other grass he has seen in this country. Two bushels of seed are sown on an acre.[Pg 228]
3. Rough Cocksfoot.—Orchard-grass found in the United States; cows really like it. In England, it's replacing clovers and rye-grass. Around Philadelphia, it's taking over from timothy. It grows earlier, making it a better option to mix with clover for hay since they mature around the same time; it thrives in the shade and on both loams and sandy soils; it shoots back quickly after being grazed. Colonel Powell, one of the top farmers in the U.S., claims it produces more pasture than any other grass he's seen in this country. Two bushels of seed are planted per acre.[Pg 228]
4. Tall Oat-Grass.—A valuable grass, deserving increased attention. It will produce three crops in a season; grows four or five feet high, and should be cut for hay when in blossom. Of all grasses, it is the earliest and best for green fodder.
4. Tall Oat-Grass.—A valuable grass that deserves more attention. It can produce three crops in a season, grows four to five feet tall, and should be cut for hay when it blossoms. Of all the grasses, it is the earliest and the best for green fodder.
5. Tall Fescue.—Cut in blossom, it contains more nutriment than any other known grass. Grows well by the sides of ditches, and is well adapted to wet bogs, as, by its rapid growth, it keeps down coarse, noxious grass and weeds.
5. Tall Fescue.—When cut in bloom, it has more nutrients than any other grass known. It thrives along ditches and is well-suited for wet areas, as its rapid growth suppresses coarse, harmful grasses and weeds.
6. Rye Grass.—This is extensively cultivated in Scotland and in the north of England. It is mixed with clover. Respecting its comparative value there is a diversity of opinion. Some do not speak well of it.
6. Rye Grass.—This is widely grown in Scotland and the north of England. It's mixed with clover. There are differing opinions about its relative value. Some people don't have a good opinion of it.
7. Red Clover and White Clover.—See article "Clover."
7. Red Clover and White Clover.—See the article "Clover."
8. Lucern.—This yields much more green feed at a single crop than any other grass. For soiling cattle it is one of the best, and may be cut twice as often as red clover. This makes a good crop, soon after time for planting corn. Common corn or pop-corn, and later, Stowell's evergreen sweet corn, are the best for soiling cattle; but for early soiling, use lucern, or some other quick-growing, large grass. Lucern needs clean land, or cultivation at first, as young plants are tender. The tap-root runs down very deep; hence, hard clay or wet soils are not favorable. It stands the cold, in latitudes forty to forty-five degrees in this country, better than red clover.
8. Lucerne.—This produces much more green feed from a single harvest than any other grass. It's one of the best options for feeding cattle and can be harvested twice as frequently as red clover. It makes a good crop, soon after the time for planting corn. Regular corn or popcorn, and later, Stowell's evergreen sweet corn, are the best for feeding cattle; but for early feeding, use lucerne or another quick-growing, large grass. Lucerne requires clean land or initial cultivation, as young plants are delicate. The taproot goes very deep, so hard clay or wet soils aren't ideal. It withstands cold better than red clover at latitudes of forty to forty-five degrees in this country.
9. Long-rooted Clover.—This is a Hungarian variety—biennial, but resows itself several years in succession, on good, clean land. Its yield of hay and seed is abundant. Needs a deep, dry soil, and stands a[Pg 229] drought better than any other grass. To plow in as a fertilizer, or for soiling cattle, it is valuable, wherever it will flourish.
9. Long-rooted Clover.—This is a Hungarian variety—biennial, but it self-seeds for several years in a row on good, clean land. It produces a lot of hay and seeds. It requires deep, dry soil and withstands drought better than any other grass. It is valuable for plowing in as fertilizer or for feeding cattle, wherever it can thrive.
10. Sain-Foin.—Adapted to calcareous or chalky soils; considered one of the best plants ever introduced into England; but in New England it proves almost a failure—it requires more cool moisture and less frost.
10. Sain-Foin.—Well-suited for calcareous or chalky soils; regarded as one of the best plants ever brought to England; however, in New England, it tends to struggle—it needs cooler moisture and less frost.
11. Timothy.—In England, Meadow Cats'-tail, and in New England, Herd's-grass. This is the most valuable of all the grasses, and wherever it will thrive well, should never be superseded by anything else for hay. It should be cut when the seed has begun to harden, but before it begins to shell, and never in the blossom. Let every farmer remember that timothy, cut in the seed, contains twice as much nutriment as when cut in the blossom; hence, it is not worth more than half as much for hay, sown among clover, as when sown by itself, as it must be cut too early, to avoid losing the clover.
11. Timothy.—In England, it's known as Meadow Cats'-tail, and in New England, Herd's-grass. This is the most valuable of all grasses, and wherever it grows well, it should never be replaced by anything else for hay. It should be cut when the seed starts to harden but before it begins to shell, and never while it's in bloom. Every farmer should remember that timothy cut when the seed is ripe has twice as much nutrition as when it’s cut in bloom; therefore, it’s not worth more than half as much for hay when sown with clover, as it has to be cut too early to avoid losing the clover.
12. Red Top.—We can not find this described in agricultural books; but we have been familiar with it for thirty-five years, and can not find a New York or New England farmer who does not know it well and prize it highly. For low, moist, rich meadows, the red top is the best for hay of any known grass. It yields abundantly, and may be cut at any time, from July to last of September. The hay is better for cattle than timothy. Many intelligent gentlemen insist that it is the most healthy hay for horses.
12. Red Top.—We can't find this in agricultural books, but we've known about it for thirty-five years, and we can't find a farmer in New York or New England who doesn't know it well and value it highly. For low, wet, rich meadows, red top is the best grass for hay. It produces a lot and can be harvested anytime from July to the end of September. The hay is better for cattle than timothy. Many knowledgeable people argue that it’s the healthiest hay for horses.
After all that has been written on the various grasses, we regard it best for farmers throughout the continent to cultivate only the following:—
After everything that's been said about the different types of grasses, we think it's best for farmers across the continent to grow only the following:—
For early pastures, vernal grass and meadow fox[Pg 230]tail; pastures through the season, white clover, cocks-foot, meadow foxtail, red clover, and timothy; for lowland pastures, red top and tall fescue; for hay, timothy, red top, orchard grass, and tall fescue; for the shade of fruit-trees, orchard grass; to be plowed in as fertilizers, red clover and white clover, for soiling cattle, tall oat-grass and lucern.
For early pastures, vernal grass and meadow fox[Pg 230]tail; pastures throughout the season, white clover, cocks-foot, meadow foxtail, red clover, and timothy; for lowland pastures, red top and tall fescue; for hay, timothy, red top, orchard grass, and tall fescue; for the shade of fruit trees, orchard grass; to be plowed in as fertilizers, red clover and white clover; for feeding cattle, tall oat-grass and lucern.
Time of sowing grass-seed is important. Some prefer the fall, and others the spring. Fall sowing should be very early or very late. Early sowing will give the young plants strength to endure the frosts of winter, which would kill late sown; but sow so late that it will not vegetate until spring, and it will come up early and get out of the way of the droughts of summer. Grass-seed sown late in the spring will always fail, except when followed by a very wet season. Sow timothy with fall grain, or late in the fall, or on a light snow toward the close of winter. Do not sow clover in the fall, as the young plants will generally fail in the cold winter;—sow it on the last light snow of winter, and it will always succeed. Roll the land in spring on which you have sown grass-seed in the last of winter; it will benefit the grain, and cause the grass-seed to catch well, and get an earlier and more rapid growth. Let all who would not lose their seed and labor, remember that grass-seed not sown so as to form good roots, before the frosts of winter or the drought of summer, will be lost; the plants will be killed. Timothy-seed sown in the fall, one peck to the acre, will produce a good crop the next season.[Pg 231]
The timing for sowing grass seed is important. Some people prefer to do it in the fall, while others choose spring. If you're sowing in the fall, aim for either very early or very late. Early sowing helps the young plants gain strength to survive winter frosts, which could kill those sown later. However, if you sow too late, ensuring it doesn’t sprout until spring, the grass will emerge early and avoid summer droughts. Grass seed sown late in spring typically fails unless there's a very wet season. Timothy should be sown with fall grain, late in the fall, or on a light snow at the end of winter. Avoid sowing clover in the fall, as young plants usually don't survive the cold winter; instead, plant it on the last light snow of winter, and it will thrive. Roll the land in spring where you've sown grass seed in late winter; this helps the grain and allows the grass seed to establish well, leading to earlier and faster growth. Anyone who wants to avoid losing their seed and hard work should remember that grass seed not sown to establish good roots before winter frost or summer drought will be lost; the plants will die. Sowing one peck of timothy seed per acre in the fall will yield a good crop the following season.[Pg 231]
GREENHOUSE.
Greenhouses vary as much in style and cost as dwellings. The simplest is any tight enclosure, covered with a glass roof at an angle of forty-five degrees, facing the south, and kept warm by artificial heat. The temperature is not allowed to be lower than forty nor higher than seventy degrees of Fahrenheit; this will keep plants growing and make them blossom, and affords a good place for starting plants to be transplanted to out-door hotbeds, and finally to the vegetable garden, after frosts are over. There is but one main danger in greenhouse culture, and that is obviated by a little care: it is, allowing the air to become too much heated for the health of the plants; they require but little heat, but need it regularly. Some greenhouses are warmed by stoves, and serve a good purpose; others have a stove set in a flue which is built in the wall, gradually rising until it has passed around two or three sides of the building. Place three or four sheet-iron pans over this flue, at different points, and keep them filled with water; the fire in the flue will heat the water, and impart both warmth and humidity to the atmosphere, which is very favorable to the health and growth of plants. Such a house is favorable to the growth of tender exotic fruits and plants. A similar house without any artificial heat affords an excellent place for the cultivation of the finest varieties of foreign grapes.[Pg 232]
Greenhouses come in many styles and price ranges, just like homes. The simplest type is a secure enclosure with a glass roof slanted at a forty-five-degree angle, facing south, and kept warm with artificial heat. The temperature should never drop below forty degrees or rise above seventy degrees Fahrenheit; this keeps plants growing and blooming, and provides a good space for starting plants that will be moved to outdoor hotbeds and eventually to the vegetable garden after the frost has passed. The main risk in greenhouse gardening, which can be managed with some care, is overheating the air, as plants don’t need a lot of heat, just a consistent amount. Some greenhouses use stoves for heating, while others have a stove installed in a flue built into the wall, which gradually rises and wraps around two or three sides of the building. If you place three or four sheet-iron pans filled with water over this flue at various points, the fire will heat the water, adding warmth and humidity to the air, which is great for the health and growth of plants. This type of greenhouse is ideal for growing delicate exotic fruits and plants. A similar structure without any artificial heating is a great space for cultivating the finest varieties of foreign grapes.[Pg 232]
GYPSUM, OR PLASTER OF PARIS.
The fertilizing properties of this article were discovered by a German laborer in a quarry, who observed the increased luxuriance of the grass by his path, when the dust fell from his shoes and clothes. This led to experiments which demonstrated its fertilizing power. With the protracted controversies on gypsum we have nothing to do; certain important facts are established which are valuable to agriculturists.
The fertilizing properties of this material were discovered by a German worker in a quarry, who noticed that the grass along his path grew more lush when dust fell from his shoes and clothes. This led to experiments that proved its fertilizing capabilities. We won’t dive into the ongoing debates about gypsum; there are certain key facts established that are valuable to farmers.
Gypsum is valuable as an application to the soil, at from three fourths to one and a quarter bushels to the acre. On poor land, for a flax crop three bushels per acre, applied after the plants were up, and when wet, produced a great crop. It should be applied only once in two years, or in very small quantities every year. Applied as a top-dressing, it will do no good until a considerable quantity of rain has fallen upon it. If it be applied in the spring, and the summer prove a dry one, its greatest effect will be felt the next season. Its most marked effects are on poor soils; on land already rich it seems to produce but little effect; on dry, sandy or gravelly soils, it will increase a clover crop from one fourth to two thirds; sowed among clover and immediately plowed in, it acts powerfully. Plants of large leaves feel its influence much more than those with small ones, hence its excellence on clover, potatoes, and vines. Some soils contain enough plaster already: the farmer must determine by analysis or experiment. On the compost heap it is valuable in small quantities; it is also useful on all long, coarse, or fresh manures of the previous winter. Seeds rolled in it before planting[Pg 233] vegetate sooner and stronger. Mixed with an equal quantity of ashes and a little lime, and applied to any crop immediately after hoeing, or when just coming up, it adds materially to its growth. It is better to apply it twice—on first coming up, and immediately after first hoeing; small quantities are best;—it will ten times repay the cost and labor. Upland pastures and meadows, except clay soils, are greatly benefited by it. A time-saving method of sowing plaster on fields of grass or grain, is to sow out of a wagon driven slowly through the field, the driver being guided by his former tracks, while two men sow out of the wagon. It is customary to put plaster and ashes, mixed, around the hills of corn, or throw it upon the plants. Sown on the field of hoed or hill crops, its effects are much greater than when only put on the hill. It should be sown equally over the whole ground.
Gypsum is useful for soil application, at three-quarters to one and a quarter bushels per acre. On poor land, applying three bushels per acre for a flax crop, after the plants have emerged and when the ground is wet, can lead to a great harvest. It should only be applied once every two years, or in very small amounts each year. When applied as a top-dressing, it won’t be effective until a decent amount of rain has fallen on it. If applied in the spring and the summer turns out to be dry, the best results will be noticeable the following season. Its most significant effects are seen on poor soils; on already rich land, it doesn’t seem to have much impact; on dry, sandy, or gravelly soils, it can boost a clover crop by a quarter to two-thirds; sown among clover and immediately plowed in, it works powerfully. Plants with large leaves respond better to it than those with small leaves, which is why it's excellent for clover, potatoes, and vines. Some soils already have enough gypsum; farmers need to determine this through analysis or experimentation. It’s valuable in small amounts on the compost heap and helps with all long, coarse, or fresh manures from the previous winter. Seeds treated with it before planting[Pg 233] sprout sooner and stronger. When mixed with an equal amount of ashes and a bit of lime, and applied to any crop right after hoeing or when just emerging, it significantly boosts growth. It’s better to apply it twice—once when the plants first come up and again right after the first hoeing; small amounts are ideal—it can easily repay the cost and labor tenfold. Upland pastures and meadows, except for clay soils, benefit greatly from it. A time-efficient way to spread gypsum on grass or grain fields is to do so from a slowly driven wagon, with the driver following previous tracks while two people sow from the wagon. It’s common to spread a mixture of gypsum and ashes around the bases of corn plants or directly on the plants. When sown on hoed or hill crops, its effects are much more pronounced than when applied only at the hill. It should be evenly spread across the entire area.
HARROWING.
The very liberal use of the harrow is one of the principal requisites of successful farming. No other single tool does so much to pulverize the soil, as the harrow. A full crop can only be raised on a fine mellow soil. Seeds planted in soil left coarse and uneven, will vegetate unevenly, grow unequally, ripen at different times, and produce unequal quantities. Many farmers insist that it is a mere notion, without reason, to harrow land four or five times, and roll it once or twice. Not one in five hundred believes in the full utility of such a thorough working of the soil. Coarse lumpy soils ex[Pg 234]pose the seeds and roots of young plants to drought, and to too strong action of the atmosphere. (See article on Rolling.)
The extensive use of the harrow is one of the main requirements for successful farming. No other single tool does as much to break up the soil as the harrow. A good crop can only be grown in fine, loose soil. Seeds planted in soil that is rough and uneven will sprout unevenly, grow inconsistently, ripen at different times, and yield varying amounts. Many farmers argue that it's just an idea without basis to harrow the land four or five times and roll it once or twice. Not one in five hundred actually believes in the full effectiveness of such thorough soil preparation. Coarse, lumpy soils expose the seeds and roots of young plants to drought and harsh weather conditions. (See article on Rolling.)
Harrow sandy and sod land whenever you please. If you work any other soil when very wet, it will not recover from the effects of it during the whole season. Harrow land the first time the same way it was plowed.
Harrow sandy and sod land whenever you want. If you work with any other soil when it's really wet, it won't bounce back from the damage for the entire season. Harrow the land the first time the same way it was plowed.
The form of a harrow is of no importance, except avoiding the butterfly drag, that seldom works well. The square harrow with thirty teeth is usually preferred. Every farmer should have a V drag also.
The shape of a harrow doesn't matter much, as long as you steer clear of the butterfly drag, which rarely performs well. The square harrow with thirty teeth is typically the go-to choice. Every farmer should also have a V drag.
Corn, potatoes, peas, and other crops that are planted in straight rows, should be harrowed just after coming up, with a V drag, drawn by two horses. The front teeth should be taken out that the row may pass between the teeth, as well as between the horses.
Corn, potatoes, peas, and other crops that are planted in straight rows should be harrowed right after they sprout, using a V drag pulled by two horses. The front teeth should be removed so the row can pass between the teeth and between the horses.
Such a cultivation will do more good than any other single subsequent one. It stirs the whole surface, pulverizing the soil, keeps it mellow and moist, and destroys the weeds, and all at the best possible time, for the benefit of the crop. No other form of cultivation is so good for a young crop. Try two acres, one in the usual way, and the other by harrowing, as we recommend, when it first comes up, and you will never after neglect harrowing all your hoed crops.
Such cultivation is more beneficial than any other method that comes after it. It loosens the entire surface, breaks up the soil, keeps it soft and damp, and gets rid of weeds, all at the perfect time to help the crop. No other cultivation method is better for a young crop. Try two acres: one the regular way and the other using harrowing, as we suggest, when it first sprouts, and you’ll never ignore harrowing for all your hoed crops again.
HAY.
Farmers differ in their modes of making and preserving hay. The following directions for timothy and clover, are applicable to all grasses suitable for hay, as[Pg 235] they are all divided into two classes, broad-leaved, and the fine-leaved, or grasses proper. The principles involved in these directions may be considered comparatively well settled, and they are sufficient for all purposes. Cut clover when half the blossoms are dried, and the other half in full bloom. Cut later, the stalks are so dried, that they are of much less value. Cut earlier, it is so immature, as to be of small value for hay. In case of great growth and lodging down, clover may be cut earlier, as it is better to save hay of less value, than to lose the whole. To cure clover for hay, spread it evenly, immediately after the scythe, let it thoroughly wilt, but not dry. Rake it up, before any of the leaves are dry so as to break, and put it in small cocks, such as a man can pitch upon a cart at once or twice with a fork. This should be laid on and not rolled up from a winrow. In the former case it will shed nearly all the water, and the latter method suffers the rain to run down through the whole.
Farmers have different ways of making and storing hay. The following tips for timothy and clover apply to all grasses suitable for hay, as[Pg 235] they are divided into two categories: broad-leaved and fine-leaved, or true grasses. The principles behind these tips are generally well established and are valid for all purposes. Cut clover when half the blossoms are dried and the other half are fully blooming. If you cut it later, the stalks become too dry and lose much of their value. If you cut it too early, it’s still immature and not very valuable for hay. If there’s a lot of growth and it starts to fall over, clover can be cut earlier since it’s better to harvest hay of lower quality than to lose the entire crop. To cure clover for hay, spread it out evenly right after cutting it with a scythe, allowing it to wilt thoroughly but not dry out. Rake it up before any of the leaves dry out and break, and gather it into small mounds that one person can easily pitch onto a cart. This should be laid on and not rolled up from a winrow. In the first method, it will shed almost all the water, while the latter allows rain to run through the entire pile.
Unless the weather be very wet, clover will cure in this way, without opening until time to haul it in, and will retain its beautiful green color, almost equal to that of England and Germany, cured in the shade, which, at two or three years old, appears almost as bright as though not cured at all. If the weather be quite wet, cut clover when free from dew or rain, wilt it at once, and draw it in, put as much as possible in thin layers on scaffolds, and under cover, to cure in the shade. Put the remainder in alternate layers with equal quantities of dry straw, with one peck of salt to a ton. A ton may bear half a bushel of salt, less is better, and more is injurious to stock, by compelling them to eat too much salt. The most beautiful and palatable clover hay is[Pg 236] that cured in the shade, on scaffolds and afterward mowed away.
Unless the weather is really wet, clover will dry this way without having to air it out until it’s time to bring it in, and it will keep its beautiful green color, almost as vibrant as that of England and Germany, which is dried in the shade. After two or three years, it looks almost as bright as if it hasn’t been cured at all. If the weather is quite wet, cut the clover when it’s dry and free of dew or rain, wilt it immediately, and bring it in, spreading as much as possible in thin layers on scaffolds and under cover to dry in the shade. Mix the rest in alternating layers with equal amounts of dry straw, adding one peck of salt for every ton. A ton can handle half a bushel of salt, but less is better, and too much can harm livestock by making them consume too much salt. The most beautiful and tasty clover hay is[Pg 236] the kind that’s dried in the shade on scaffolds and then mowed away.
Timothy should never be cut, until the seed is far enough advanced to grow. Careful experiments have shown that cut in the blossom, the hay will contain only about one half as much nutriment, as when cut in the full-grown seed, but before it commences shelling. Cure as clover, but in twice as large cocks, and never salt, unless compelled to draw in when damp or too green.
Timothy should not be cut until the seed is developed enough to grow. Careful experiments have shown that if it's cut when it's flowering, the hay will have about half as much nutrition compared to when it's cut at full seed maturity, just before it starts to shell. Cure it like clover, but in twice as large stacks, and only add salt if you absolutely have to bring it in when it's damp or too green.
HEDGE.
The question of fencing in this country, so much of which is prairie, and in other parts of which there is such a wanton waste of timber, gives great importance to successful hedging. The same plants are not equally good for hedge in all parts of the country. There are but few plants suitable for hedges in our climate.
The issue of fencing in this country, much of which is prairie land, and in other areas where there is a reckless use of timber, makes successful hedging really important. Not all plants work equally well for hedges in every part of the country. There are only a few plants that are suitable for hedges in our climate.
The Osage Orange—is the best, in all latitudes where it will flourish. It has no diseases or enemies by which it will be destroyed, except too cold winters. Of Southern origin, yet it flourishes in many places at the North. In cold localities, where there is but little snow, it suffers much until three or four years old. It is being extensively introduced into central and northern Illinois, where unusually cold winters destroy vast quantities of young plants, and kill the tops of much old hedge. It is still insisted that it will succeed; but we consider it too uncertain, and consequently too expensive, for general fencing in such climates. The roots and lower parts of the plants may be preserved,[Pg 237] however, by setting them out for a hedge on level ground, instead of ridges as usual, and plowing a furrow three feet from each side of the row, to drain off surplus water. Mulch thoroughly in the fall, and thus protect from frost until they have been set in the hedge for three years, and they may succeed and make a good live fence. To raise the plants, soak the seeds thoroughly, and, at the usual time of corn-planting, plant in straight rows, and keep clean of weeds. Set out in hedge the following spring. The soil of the hedge-row should be deep, mellow, and moderately, not excessively rich. Too rich soil makes a larger growth, of spongy and more tender wood. Plants should have a portion of the tap-root cut off, and be planted a foot apart in the row.
The Osage Orange is the best option in any area where it can thrive. It has no diseases or pests that can destroy it, except for extremely cold winters. It originates from the South, yet it grows well in many northern areas. In colder regions with little snowfall, it struggles significantly until it's about three or four years old. It's being widely introduced in central and northern Illinois, where unusually cold winters kill off many young plants and damage the tops of older hedges. People still insist it will succeed, but we think it's too unpredictable and therefore too costly for general fencing in those climates. However, the roots and lower parts of the plants can be preserved by planting them for a hedge on level ground instead of on ridges. Also, plow a furrow three feet from each side of the row to help drain excess water. Mulch well in the fall to protect against frost until the plants have been established in the hedge for three years; then they may thrive and create a good live fence. To grow the plants, soak the seeds thoroughly, and during the usual corn-planting season, plant them in straight rows, keeping them weed-free. Plant them in the hedge the following spring. The soil in the hedge-row should be deep, loose, and moderately rich, not overly rich. Too rich soil results in larger growth with spongy and more delicate wood. Cut a portion of the tap-root off, and plant the seedlings a foot apart in the row.
The Hawthorn—will never be extensively cultivated for live fence in this country, being subject to borers, as destructive as in fruit-trees.
The Hawthorn—will never be widely grown as a live fence in this country, as it's vulnerable to borers that are just as damaging as those found in fruit trees.
The Virginia Thorn—is equally uncertain.
The Virginia Thorn—is just as uncertain.
The Buck Thorn—after fifteen years' trial, in New England, bids fair to answer every purpose for American live fence: it is easily propagated, of rapid growth, very hardy, thickens up well at the bottom, and is exempt from the depredations of insects. It may yet prove the great American hedge-shrub.
The Buck Thorn—after fifteen years of testing in New England, looks promising for use as an American living fence: it's easy to grow, fast-growing, very resilient, fills in nicely at the bottom, and is free from insect damage. It may still become the go-to hedge shrub in America.
The Newcastle Thorn—cultivated in New England, is much more beautiful, and promises to rival the buck thorn, but has not been sufficiently tested to settle its claims. Much is anticipated from it.
The Newcastle Thorn—grown in New England, is far more beautiful and seems set to compete with the buckthorn, but hasn’t been tested enough to fully support its claims. There are high hopes for it.

There are plants well adapted to hedge at the South, which are too tender for the North. In White's Gardening for the South, we have the following given as hedge-shrubs, adapted to that region: Osage Orange,[Pg 238] Pyracanth, Cherokee, and single White Macartney roses. The Macartney, being an evergreen thorn, and said to make as close a hedge as the Osage Orange and much more beautiful, is quite a favorite at the South. They usually train the rose-shrubs for hedge on some kind of paling or wire fence. They render some of them impenetrable even by rabbits or sparrows; this is done by layers, and trimming twice a year, commencing after the first three months' growth. Pruning is the most important matter in the whole business of hedging. A hedge set out ever so well, and composed of the best variety of plants, if left in the weeds, without proper care in trimming, will be nearly useless. A well-trimmed hedge around a fruit-orchard will keep out all fruit-thieves. The great difficulty is the unwillingness of cultivators to cut off, so short and so frequently, the fine growth.
There are plants that are well-suited for hedges in the South but are too delicate for the North. In White's Gardening for the South, the following shrubs are suggested for hedges in that area: Osage Orange,[Pg 238] Pyracantha, Cherokee, and single White Macartney roses. The Macartney, being an evergreen thorn, is said to create a hedge as dense as the Osage Orange but much more beautiful, making it quite popular in the South. They typically train the rose shrubs for hedges on some kind of fence or wire. This makes them impenetrable even to rabbits or sparrows; this is achieved through layering and trimming twice a year, starting after the first three months of growth. Pruning is the most crucial aspect of the entire hedging process. A hedge that is planted well and made up of the best types of plants, if neglected and left in weeds without proper trimming, will be nearly useless. A well-trimmed hedge around a fruit orchard will deter all fruit theft. The main challenge is the unwillingness of gardeners to cut off, so short and so often, the fine growth.
Shear off the first year's growth (a) within three inches of the ground (b). Cut the vigorous shoots that will rise from this shearing, four inches higher, about the middle of July, and similar and successive cuttings, each a little longer, in the two following years; these will bring the hedge to a proper height. The form of trimming shown in end view of properly-trimmed hedge, protects the bottom from shade by too much foliage on the top: the effects of that shade are seen in neglected hedge in the cut.
Shear off the first year's growth (a) to within three inches of the ground (b). Cut the strong shoots that will grow from this shearing four inches higher, around the middle of July, and continue with similar cuttings that are each a little longer in the following two years; this will help the hedge reach the right height. The trimming shape shown in the end view of a properly trimmed hedge prevents too much foliage on top from shading the bottom: the effects of that shade can be seen in the neglected hedge in the cut.
HEMP.
This is one of the staple articles of American agriculture. It is much cultivated in Kentucky and other contiguous states. Its market value is so fluctuating that many farmers are giving up its cultivation. The substance of these directions is taken from an elaborate article from the pen of the honorable Henry Clay. Had not the length of that article rendered it inconsistent with the plan of this volume, we should have given it to the American people as it came from the hand of their greatest statesman, who was so eminently American in all his sentiments and labors.
This is a key product in American agriculture. It's widely grown in Kentucky and nearby states. Its market value varies so much that many farmers are stopping its cultivation. These instructions are based on a detailed article written by the honorable Henry Clay. If the article hadn't been too lengthy for the format of this book, we would have shared it with the American public as it was written by their greatest statesman, who embodied American ideals in all his thoughts and efforts.
Preparation of the Soil—should be as thorough as for flax;—this can not be too strongly insisted on. Much is lost by neglect, under the mistaken notion that hemp will do about as well on coarse, hard land. Plants for seeds should be sown in drills four feet apart, and separate from that designed only for the lint. The stalks should be allowed to stand about eight inches apart in the rows. Plants are male and female, distin[Pg 240]guished in the blossoms. When the farina from the blossoms on the male plants (the female plants do not blossom) has generally fallen, pull up the male plants, leaving only the females to mature. Cut the seed-plants after the first hard frost, and carry in wet, so as to avoid loss by shelling. Seed is easily separated by a common flail. After the seeds are thrashed out, they should be spread thin, and thoroughly dried, or their vegetative power will be destroyed by heat or decay. They should be spread to be kept for the next spring's planting, and not be kept in large bulk. Their vegetation is very uncertain after they are a year old. Sow hemp for lint broadcast, when the weather has become warm enough for corn-planting. Opinions vary as to the quantity of seed, from one bushel to two and a half bushels per acre. Probably a bushel and a peck is best. Plowing in the seed is good on old land; rolling is also useful. If it gets up six inches high, so that the leaves cover the ground well, few crops are less effected by the vicissitudes of the weather. Some sow a part of their hemp at different times, that it may not all ripen at once and crowd them in their labor. Cutting it ten days before it is ripe, or allowing it to stand two weeks after, will not materially injure it. Hemp is pulled or cut. Cutting, as near the ground as possible, is the better method. The plants are spread even on the ground and cured; bound up in convenient handfuls and shocked up, and bound around the top as corn. It is an improvement to shake off the leaves well before shocking up. If stacked after a while, and allowed to remain for a year, the improvement in the lint is worth more than the loss of time. There are two methods of rotting—dew-rotting, andwater-rot[Pg 241]ting—one by spreading out on grass-land, and the other by immersing in water; the latter is much the preferable mode. The question of sufficient rotting is determined by trial. Hemp is broken and cleaned like flax. The stalks need to be well aired and dried in the sun to facilitate the operation. Extremes in price have been from three to eight dollars per hundred pounds: five dollars renders it a very profitable crop. Thorough rotting, good cleaning, and neat order, are the conditions of obtaining the first market price. An acre produces from six hundred to one thousand pounds of lint—an average of about one hundred pounds to each foot of height of the stalks. Hemp exhausts the soil but a mere trifle, if at all; the seventeenth successive crop on the same land having proved the best. Nothing leaves the land in better condition for other crops; it kills all the weeds, and leaves the surface smooth and even.
Soil Preparation—should be as thorough as for flax; this cannot be emphasized enough. A lot is lost by neglect, under the false assumption that hemp can thrive on coarse, hard land. Seed plants should be sown in rows four feet apart, separate from those meant only for fiber. Stalks should be spaced about eight inches apart in the rows. There are male and female plants, identified by their flowers. Once the pollen from the blossoms on the male plants (the female plants do not flower) has mostly fallen, pull up the male plants, leaving only the females to mature. Cut the seed plants after the first hard frost and bring them in wet to prevent loss from shelling. Seeds can be easily separated using a common flail. After the seeds are threshed, they should be spread out thinly and thoroughly dried; otherwise, their viability will be affected by heat or decay. They should be stored for next spring's planting, not kept in large quantities. Their viability becomes very uncertain after they are a year old. Sow hemp for fiber broadly when the weather has warmed enough for corn planting. Opinions vary on the amount of seed needed, ranging from one bushel to two and a half bushels per acre. Probably a bushel and a peck is ideal. Plowing in the seeds works well on old land; rolling is also beneficial. If the plants grow six inches high, so that the leaves cover the ground well, few crops are less affected by weather changes. Some people sow part of their hemp at different times so that it doesn’t all ripen at once and crowd them with work. Cutting it ten days before it’s ripe or letting it stand two weeks after won’t cause major harm. Hemp can be pulled or cut. Cutting as close to the ground as possible is the better method. The plants are spread evenly on the ground to cure, then bundled in convenient handfuls and shocked, binding them at the top like corn. It helps to shake off the leaves well before shocking them together. If stacked for a while and allowed to sit for a year, the improvement in the fiber is worth the time lost. There are two methods of rotting—dew rotting and water rotting—one involves spreading out on grass land, and the other by immersing in water; the latter is definitely the preferred method. The sufficiency of rotting is determined by experimentation. Hemp is broken and cleaned like flax. The stalks need to be well aired and dried in the sun to make this easier. Prices have fluctuated from three to eight dollars per hundred pounds: five dollars makes it a very profitable crop. Thorough rotting, good cleaning, and neat arrangement are essential for getting the best market price. An acre produces between six hundred to one thousand pounds of fiber—averaging about one hundred pounds for each foot of stalk height. Hemp barely exhausts the soil, if at all; in fact, the seventeenth consecutive crop on the same land has been the best. Nothing leaves the land in better condition for other crops; it kills all the weeds and leaves the surface smooth and even.
HOEING.
Much depends upon the proper and timely use of the hoe. Never let weeds press you; hoe at proper times, and you never will have any large weeds. As soon as vegetables are up, so that you can do it safely, hoe them. The more frequent the hoeing while plants are young, the larger will be the crop. Premium crops are always hoed very frequently. Hoeing cabbages, corn, and similar smooth plants, when it rains slightly, is nearly equal to a coat of manure. But beans, potatoes, and vines, and whatever has a rough stalk, are much injured by stirring the ground about them while[Pg 242] they are wet, or even much damp. We have known promising crops of vines nearly destroyed by hoeing when wet. Hoeing near the roots of vines after they have formed runners one or two feet long, will also nearly ruin them;—the same is true of onions: hoe near them, cutting off the lateral roots, and you will lessen the crop one half. In hoeing, make no high hills except for sweet potatoes. High hilling up originated in England, where their cool, humid, cloudy atmosphere demands it, to secure more warmth. In this country we have to guard more against drought and heat.
Much depends on the proper and timely use of the hoe. Don’t let weeds overwhelm you; if you hoe at the right times, you won’t face large weeds. As soon as you see your vegetables sprouting and it’s safe to do so, hoe them. The more frequently you hoe while the plants are young, the bigger the crop will be. Premium crops are always hoed very often. Hoeing cabbages, corn, and other smooth plants during a light rain is almost as good as a layer of manure. However, beans, potatoes, and vines, as well as anything with a rough stalk, can be seriously harmed by disturbing the soil around them when they are wet or even damp. We’ve seen promising crops of vines nearly ruined by hoeing when they were wet. Hoeing close to the roots of vines after they’ve developed runners one or two feet long can also damage them; the same applies to onions: hoeing close to them and cutting off lateral roots will reduce the crop by half. When hoeing, don’t make high hills except for sweet potatoes. The practice of high hilling started in England, where their cool, humid, and cloudy climate requires it to retain warmth. Here, we need to be more concerned about drought and heat.
HOPS.
These are native in this country, being found, growing spontaneously, by many of our rivers. There are four or five varieties, but no preference has been given to any particular one. Moist, sandy loam is the best soil, though good hops may be grown in abundance on any land suitable for corn or potatoes. Plow the land quite deep in autumn; in the spring, harrow the same way it was plowed. Spread evenly over the surface sixteen cords of manure to the acre, if your soil be of ordinary richness; cross-plow as deep as the first plowing; furrow out as for potatoes, four feet apart each way. Plant hops in every other hill of every other row, making them eight feet apart each way. Plant all the remaining hills with potatoes. Four cuttings of running roots of hops should be planted in each hill. Many hop-yards are unproductive on account of being too thick;—less than eight feet each way deprives the[Pg 243] vines of suitable air and sun, and prevents plowing them with ease. The first year, they only need to be kept clean of weeds by hoeing them with the potatoes. In the fall of the first year, to prevent injury from hard frosts, put a large shovelful of good manure on the top of each hill. Each spring, before the hops are opened, spread on each acre eight cords of manure; coarse straw manure is preferable. Plow both ways at first hoeing. They require three hoeings, the last when in full bloom in the beginning of August. Open the hops every spring by the middle of May; at the South, by the last of April. This is done by making four furrows between the rows, turning them from the hills; the earth is then removed from the roots with a hoe, and all the running roots cut in with a sharp knife within two inches of the main roots. The tops of the main roots must also be cut in, and covered with earth two inches deep. Set the poles on the first springing of the vines; never have more than two poles in a hill, or more than two vines on a pole, and no pole more than sixteen feet high. Neglect this root-pruning, and multiply poles and crowd them with vines, and you will get very few hops. Select the most thrifty vines for the poles, and destroy all the others. Watch them during the summer, that they do not blow down from the poles. They must be picked as soon as they are ripe, and before frosts. The best picking-box is a wooden bin made of light boards, nine feet long, three feet wide, and two and a half feet deep; the poles are laid across this, and the hops picked into it by hand. In gathering hops, cut the vines two feet from the ground, that bleeding may not injure the roots.
These plants are native to this country and can be found growing naturally along many of our rivers. There are four or five varieties, but none are particularly favored. Moist, sandy loam is the best soil, although good hops can thrive on any land suitable for corn or potatoes. In the fall, plow the land deeply; in the spring, harrow it the same way it was plowed. Spread about sixteen cords of manure per acre evenly across the surface if your soil is of average quality; cross-plow as deeply as the initial plowing and create furrows for potatoes, four feet apart in both directions. Plant hops in every other hill of every other row, spacing them eight feet apart. Use the remaining hills for potatoes. Each hill should have four cuttings of running hops roots planted. Many hop fields don’t produce well because they are too dense; having less than eight feet between plants deprives the vines of enough air and sunlight, making them harder to plow. In the first year, simply keep the area weed-free by hoeing around the potatoes. In the fall of the first year, to protect against harsh frosts, place a large shovelful of good manure on top of each hill. Each spring, before the hops begin to grow, spread eight cords of manure per acre; coarse straw manure is preferred. Plow in both directions after the first hoeing. They require three hoeings, the last one when they’re in full bloom at the beginning of August. Open the hops every spring by mid-May; in the South, do this by the end of April. This involves making four furrows between the rows, moving soil away from the hills, removing earth from the roots with a hoe, and cutting all running roots within two inches of the main roots using a sharp knife. The tops of the main roots should also be trimmed and covered with two inches of soil. Set the poles when the vines first sprout; never use more than two poles per hill, more than two vines per pole, and ensure no pole exceeds sixteen feet in height. If you neglect root pruning and overcrowd the poles with vines, you’ll get very few hops. Choose the strongest vines for the poles and discard the rest. Monitor them throughout the summer to ensure they don’t topple from the poles. Pick the hops as soon as they’re ripe, before the frosts hit. The best picking box is a wooden bin made from light boards, measuring nine feet long, three feet wide, and two and a half feet deep; lay the poles across it, and hand-pick the hops into the bin. When harvesting hops, cut the vines two feet from the ground to avoid bleeding that could harm the roots.
Curing is the most important matter in hop-growing.[Pg 244] Hops would all be of one quality, and bring the first price, if equally well cured. The following description (with slight abbreviation) of the process of curing, by William Blanchard, Esq., is, perhaps, as complete as anything that can be obtained. Much depends upon having a well-constructed kiln. For the convenience of putting the hops on the kiln, a side hill is generally chosen for its situation; it should be a dry situation. It should be dug out the same bigness at the bottom as at the top; the side walls laid up perpendicularly, and filled in solid with stone to give it a tunnel form: twelve feet square at the top, two feet square at the bottom, and at least eight feet deep, is deemed a convenient size. On the top of the walls sills are laid, having joists let into them, as for laying a floor, on which laths, about one and a half inches wide, are nailed, leaving open spaces between them three fourths of an inch, over which a thin linen cloth is spread and nailed at the edges to the sills. A board about twelve inches wide is set up on each side of the kiln, on the inner edge of the sill, to form a bin to receive the hops. Fifty pounds, after they are dry, is all such a kiln will hold at once. The larger the stones made use of in the construction of the kiln the better, as it will give a more steady and dense heat. The inside of the kiln should be well plastered with mortar to make it air-tight. Charcoal is the best fuel. Heat the kiln well before putting on the hops; keep a steady and regular heat while drying. Hops must not remain in bulk long after being picked, as they will heat and spoil. Do not stir them while drying. After they are thoroughly dry, remove them into a dry room, and lay in heaps, and not stir unless they are gathering damp[Pg 245]ness that will change their color; then spread them. This will only occur when they have not been properly dried. They are bagged by laying cloth into a box, so made that it can be removed, and give opportunity to sew up the bag while in the press. The hops are pressed in by a screw. In bulk they will sweat a little, which will begin to subside in about eight days, at which time they should be bagged. If they sweat much and begin to change their color, they must be dried before bagging. The best size for bags is about two hundred and fifty pounds' weight, in a bag about five feet long. Common tow-cloth or Russia-hemp bags are best. Extensive hop-growers build houses over the kiln, that they may be able to use them in wet weather. In this case, keep the doors open as much as possible without letting in the rain. Dried without sufficient air, their color is changed, and their quality and market-value injured. These houses are made much larger than the kiln, in many instances, for the convenience of storing and bagging the hops when dry; in this case, tight partitions should separate the storerooms from the kiln, to avoid dampness from the drying hops.
Curing is the most important part of hop-growing.[Pg 244] Hops would all be of the same quality and fetch the highest price if they were all cured properly. The following description (with slight abbreviation) of the curing process, by William Blanchard, Esq., is probably as thorough as anything out there. A well-built kiln is crucial. For convenience in loading the hops onto the kiln, a hillside is typically chosen; it should be a dry spot. The kiln should be excavated to the same width at the bottom as at the top; the side walls should be vertical and packed tightly with stones to create a tunnel shape: twelve feet square at the top, two feet square at the bottom, and at least eight feet deep is considered a good size. On top of the walls, sills are placed with joists fitted into them, like a floor, onto which laths, about one and a half inches wide, are nailed, leaving gaps of three-fourths of an inch between them, covered by a thin linen cloth that is secured at the edges to the sills. A board about twelve inches wide is erected on each side of the kiln, on the inner edge of the sill, to form a bin for the hops. After drying, the kiln can hold only fifty pounds at once. Using larger stones in the kiln's construction is better, as it will provide a steadier and denser heat. The inside of the kiln should be well plastered with mortar to make it airtight. Charcoal is the best fuel. Preheat the kiln before adding the hops; maintain a steady and consistent heat during drying. Hops shouldn’t stay in bulk for long after being picked, as they will heat up and spoil. Do not stir them while they dry. Once they are completely dry, transfer them to a dry room and pile them up, stirring only if they collect moisture that could change their color; then spread them out. This issue only happens if they haven’t been dried properly. They are bagged by placing cloth into a box designed to allow removal, making it easy to sew up the bag while it’s compressed. The hops are compressed with a screw. In bulk, they will sweat a little, which should start to decrease after about eight days, at which point they should be bagged. If they sweat excessively and start to change color, they must be dried before bagging. The best bag size is about two hundred and fifty pounds, in a bag approximately five feet long. Common tow-cloth or Russia-hemp bags work best. Large-scale hop growers build structures over the kiln so they can use them during wet weather. In this case, keep the doors open as much as possible without letting in rain. If dried without enough airflow, their color changes, and their quality and market value decline. These structures are often much larger than the kiln for the convenience of storing and bagging the hops once dry; in this case, tight partitions should separate the storage rooms from the kiln to prevent moisture from the drying hops.
The form of manuring recommended is contrary to the old practice of putting a little manure only in the hill: that practice exposed vines to decay and destruction by worms, and this does not; our system also produces hops equal to new land.[Pg 246]
The recommended way of fertilizing is different from the old method of placing just a bit of manure in the planting hole. That approach put the vines at risk of rotting and getting destroyed by worms, while this method doesn’t. Our system also yields hops that are as good as those from new land.[Pg 246]
HORSE.
This noble animal is in general use, and everywhere highly prized. By the last census, we see that there are two thirds as many horses as cows in the United States—4,335,358 horses, and over six millions of cows. But, valuable as is the horse, he suffers much ill treatment and neglect from his master. To give a history of the horse, the various breeds of different countries, and the efforts to improve them, would be interesting, did it fall within the limits of our design. The patronage of the kings and nobility of England has done much to elevate the horse to his present standard of excellence. It has now become the custom for intelligent gentlemen in rural districts, in all enlightened countries, to give much attention to the improvement of horses. Unfortunately, some of that enthusiasm is perverted to the channel of horse-racing, a practice alike injurious to horses and the morals of men. A few brief hints are all we have space for, where a volume would be interesting and useful. The farmer should exercise constant care to improve the breed of his horses: it pays best to raise good horses. This depends upon the qualities of the dam and sire, and upon proper feed and care. This is a subject that farmers should carefully study from books and from their own observation. The most important matter in raising horses, is care in working and feeding. Nineteen out of twenty of all sick horses are made so by bad treatment. The prevention of disease is better than cure. Steady, and even hard work, will not injure a horse that is well and regularly fed. But a few moments of crowd[Pg 247]ing a horse's speed, or of an unnatural strain on his strength, may ruin him. Let it always be remembered that it is speed, and not heavy loads, that most injures a horse. A mile an hour too fast will soon run down your horse. A horse fed with grain, or watered, when warm, is liable to be foundered; and if not so fed as actually to be foundered, he will gradually grow stiff. Horses are liable to take cold by any unreasonable exposure to the weather, in the same circumstances as men, and the effects on health and comfort are very similar. A horse having become warm by driving, should never stand a minute without a blanket. When a man goes from a heated room, or in a perspiration, into inclement weather, he takes cold the moment the cold or storm strikes him: in a few moments the effects on the pores of the body are such that there is no particular exposure. It is so with a horse. He takes cold when you are only going to allow him to "stand but a minute," and during that time you leave him uncovered.
This noble animal is widely used and highly valued everywhere. According to the last census, there are about two-thirds as many horses as cows in the United States—4,335,358 horses and over six million cows. However, despite the horse's value, it often suffers from neglect and mistreatment by its owner. It would be fascinating to discuss the history of the horse, its various breeds around the world, and the efforts to improve them, but that’s beyond our focus. The support from the kings and nobility of England has greatly contributed to raising the horse to its current standard of excellence. Nowadays, it’s common for knowledgeable gentlemen in rural areas of all advanced countries to pay a lot of attention to improving horses. Unfortunately, some of that enthusiasm gets misdirected toward horse racing, which is harmful to both horses and human morals. We can only share a few brief tips, while a whole book would be interesting and beneficial. Farmers should consistently strive to improve their horse breeds because raising good horses is the most profitable. This depends on the quality of both the mother and father, as well as proper feeding and care. This is a topic that farmers should study carefully, both through books and their own experiences. The most crucial aspect of raising horses is being careful with their work and feeding. Nineteen out of twenty sick horses are that way because of poor treatment. Preventing disease is better than curing it. Steady, and even hard, work won't harm a horse that is well-fed and fed regularly. But a few moments of forcing a horse to go faster than it should or putting unnatural strain on its strength can ruin it. It's important to remember that speed, not heavy loads, is what mostly harms a horse. Going a mile an hour too fast can quickly tire your horse out. A horse that is fed grain or given water while warm can end up founder; even if it doesn't actually founder, it will gradually become stiff. Horses can catch a cold from unreasonable exposure to the weather, much like humans, and the impact on their health and comfort is very similar. A horse that has warmed up from being driven should never stand without a blanket for even a minute. When a person goes from a heated room or is sweating into cold weather, they catch a cold the moment the cold or storm hits them; within moments, the effects on the body's pores will be such that there is no particular exposure. It’s the same with a horse. It can catch a cold even if you’re just going to let it “stand for a minute,” especially if you leave it uncovered during that time.
If you are under the necessity of doing an unusual day's work with a horse, do not feed him heavily on that day. Unusual feed the day before and the day after will do him good; but on the day of excessive work it injures him. Never feed horses too much; they will often eat one third more than is good for their health. Keep the bottom of the trough in which you feed your horses grain, plastered over with a mixture of equal parts of salt and ashes, that they may eat a little of it when they please. When the water of your horse becomes thick and yellowish, or whitish, give him a piece of rosin as large as a walnut, pulverized and put in his grain. If a horse has the heaves,[Pg 248] give him no hay or oats; corn, ground or soaked, should be his only grain, and green corn-fodder in summer, and cornstalks, cut fine, with a little warm water on them, mixed with meal, should constitute his only food. All except a few of the most confirmed and long-standing cases of heaves are entirely relieved by this course of feeding, and that relief is permanent as long as the feed is continued, and it frequently effects a cure so radical that the disease will not return on a change of food. To bring up horses that have had hard usage and poor feed, and to secure growth in colts, feed them milk. The milk of a butter-dairy is not more profitably used in any other way, than fed to horses and colts. Give them no water for two or three days, and they will readily learn to drink all the sour, thick milk you will give them. Colts will grow faster on milk than on any other food.
If you need to have your horse do a heavy day's work, don’t feed him a lot that day. Giving him special feed the day before and the day after is beneficial, but on the day of intense work, it can do more harm than good. Never overfeed horses; they often consume about a third more than is healthy for them. Keep the bottom of the trough where you feed your horses grain coated with a mix of equal parts salt and ashes, so they can nibble on it whenever they want. If your horse's urine looks thick and yellowish or whitish, give him a piece of rosin the size of a walnut, crushed and mixed into his grain. If a horse has the heaves,[Pg 248] avoid giving him hay or oats; corn, either ground or soaked, should be his only grain, along with green corn fodder in summer, and finely cut cornstalks mixed with a bit of warm water and meal should be his entire diet. Most horses, except for a few severe and long-term cases of heaves, are totally relieved by this feeding approach, and that relief lasts as long as the diet is maintained, often resulting in such a complete recovery that the disease doesn’t come back with a change in food. To recover horses that have been badly treated and poorly fed, as well as to promote growth in colts, feed them milk. Milk from a butter-dairy is best used for feeding horses and colts. Don't give them water for two or three days, and they'll quickly learn to drink all the sour, thick milk you provide. Colts grow faster on milk than on any other food.
Horses should be often rubbed down and kept clean, and when put in the stable wet, they should be rubbed dry. It is very essential to the health of a horse that he have pure air. Stables in this country are usually airy enough. But if the stable be tight, it should be well ventilated. The gases from a wet stable floor are injurious. Disinfecting agents are good remedies; a little plaster-of-Paris spread over a stable-floor is very useful. These brief directions, followed, will prevent most of the diseases to which horses are subject; or in case a horse be attacked, he will have the disease lightly, as temperate men do epidemics.[Pg 249]
Horses should be regularly brushed and kept clean, and if they come into the stable wet, they should be dried off. It's very important for a horse's health to have fresh air. Stables in this country are usually well-ventilated. However, if the stable is enclosed, it should be properly ventilated. The fumes from a wet stable floor can be harmful. Disinfectants are effective treatments; sprinkling a bit of plaster of Paris on the stable floor is very helpful. Following these simple guidelines will help prevent most of the illnesses that affect horses. If a horse does get sick, it will likely have a milder case, similar to how healthy people experience epidemics.[Pg 249]
HORSERADISH.
This is regarded a healthy condiment, especially in the spring of the year. Grated, with a little vinegar, it may be eaten with any food you choose. Small shavings of the root are esteemed in mangoes. When steeped in vinegar for two weeks, it is said effectually to remove freckles from the face. Any pieces of the roots will grow in any good garden-soil. Larger and better roots may be produced, by trenching the bed two feet deep, and putting in the bottom, ten inches of good manure, and planting selected roots, about six inches deep.
This is considered a healthy condiment, especially in the spring. Grated with a bit of vinegar, it can be eaten with whatever food you like. Small shavings of the root are valued in mango dishes. When soaked in vinegar for two weeks, it’s said to effectively remove freckles from the face. Any pieces of the roots can grow in good garden soil. Larger and better roots can be produced by digging the bed two feet deep, putting ten inches of good manure at the bottom, and planting selected roots about six inches deep.
HOTBEDS.
These are designed to force an early growth of plants. It is done by the use of solar heat, and that arising from fermenting manures, combined. The following directions for constructing and managing hotbeds will enable every one to be successful. Nail boards on pieces of scantling placed in the inside corners, in the form of a box, sixteen feet long and six feet wide; make it three and a half feet high on the back-side, and two feet high in front, facing the sun; nail a piece of board across the middle, let in at the top, to prevent the box from spreading when filled. Fill that with good, fresh horse-manure, with but little straw; tread it down firmly. Put over the whole, sashes made with cross-pieces but one way, and filled with glass, lapped half an inch, like shingles on a roof,[Pg 250] to carry off the rain; putty in the glass lightly, or it may adhere to fresh-painted frames; let the frames be halved on their edges, so as to lap and be tight; put these over the filled hotbed, perfectly fitted all around, and enough of them to cover the whole bed; in two or three days the manure will become pretty warm, when it should be covered, four inches deep, with rich mould, sheltered for the purpose the previous fall, and the seeds planted. When the plants come up, see that they are kept sufficiently moist, and not have the hot sun pour upon them intensely, and they will grow rapidly; when too warm, they should be partly covered with mats, and the frames raised to let in air. Put small wedges between the sash and the boards, which will let in sufficient air. Keep it closed when the air is cold, and covered with mats when the sun is too hot. Plants are often destroyed by over-heating. When in danger of freezing, cover closely with mats or straw, or both. We have had plants growing in such a bed when the thermometer stood eight degrees below zero. If the heat of the manure subsides too early, pack fresh horse-manure all around the outside of the box, and as it heats it will communicate warmth to the inside of the bed. As plants grow up, transplant a part to a fresh bed, so as to give all a chance to grow stocky and strong. Almost everything that grows in the garden may be forwarded greatly in the hotbed. Vines, beets, tomatoes, cabbages, peppers, egg-plants, celery, beans, corn, and potatoes, may be obtained much earlier by this means. Those that are injured most by transplanting should be planted in the hotbed, on inverted sods, or grass turfs, six inches square, which can be removed with the growing plants on them, without seriously dis[Pg 251]turbing the roots. Plenty of shade and moisture on transplanting will save the most tender plants, and they will speedily recover. Make a hotbed of any size you may desire on the same principle. The boards and frames will last many years, with proper care, and occasional supply of a broken light of glass. Into such sash, broken glass of any size can be put, by cutting it to a proper width in one direction, no matter how far the points lap.
These are designed to encourage early plant growth. This is achieved by using solar heat combined with heat from fermenting manure. The following instructions for building and managing hotbeds will help everyone succeed. Nail boards onto pieces of timber placed in the inside corners to create a box that is sixteen feet long and six feet wide; make it three and a half feet high on the back side and two feet high in front, facing the sun. Nail a piece of board across the middle, let in at the top, to prevent the box from spreading when filled. Fill it with good, fresh horse manure, with very little straw; pack it down firmly. Cover the entire setup with sashes made with cross-pieces in one direction, filled with glass that overlaps half an inch like shingles on a roof,[Pg 250] to let rainwater drain off; lightly putty the glass to prevent it from sticking to freshly painted frames. Let the frames be halved on their edges, so they overlap and fit tightly; place these over the filled hotbed, making sure they fit perfectly around all sides, with enough to cover the entire bed. Within two or three days, the manure will become quite warm; at this point, cover it with four inches of rich soil, which you sheltered for this purpose the previous fall, and plant the seeds. When the plants sprout, ensure they stay moist and aren't exposed to harsh sunlight, and they will grow quickly; if it gets too warm, partially cover them with mats and raise the frames to let in air. Insert small wedges between the sash and the boards to allow air to flow in. Keep it closed when the air is cold and covered with mats when the sun is too intense. Plants can get damaged by overheating. If there's a risk of freezing, cover them closely with mats or straw, or both. We once had plants thriving in such a bed when the thermometer dropped to eight degrees below zero. If the heat from the manure drops too early, pack fresh horse manure around the outside of the box; as it heats up, it will transfer warmth to the inside of the bed. As plants grow, transplant some to a fresh bed to give all of them a chance to grow sturdy and strong. Almost anything you grow in the garden can be advanced in the hotbed. Vines, beets, tomatoes, cabbages, peppers, eggplants, celery, beans, corn, and potatoes can be grown much earlier using this method. Those plants most sensitive to transplanting should be planted in the hotbed on inverted sods or grass turfs, six inches square, which can be moved with the plants without seriously disturbing the roots. Providing plenty of shade and moisture during the transplanting process will help the most delicate plants recover quickly. You can make a hotbed of any size you like using the same principle. The boards and frames will last many years with proper care and occasional replacement of broken glass panels. For such sashes, broken glass of any size can be used; just cut it to the right width in one direction, regardless of how much the points overlap.
HOUSES.
It is not our design to give an extended view of rural architecture. But this work can not be complete without a brief notice of farm-buildings, and a few plans for such buildings, adapted to the wants of those possessing limited means. We hope these directions and plans will prove important aids in getting up cheap, yet convenient and beautiful, country residences, especially in all the newer parts of the country. Our reading on rural architecture, and an extensive observation in many states of the Union, have made us acquainted with nothing, combining beauty, cheapness, and utility, better than the following.
It’s not our intention to provide a detailed exploration of rural architecture. However, this work wouldn’t be complete without a brief mention of farm buildings and some designs for these structures, tailored for those with limited budgets. We hope these guidelines and plans will serve as valuable resources for creating affordable, yet practical and attractive homes in the countryside, especially in the newer regions of the country. Through our research on rural architecture and extensive observations in many states, we’ve found nothing that combines beauty, affordability, and functionality better than the following.
The scale at the bottom will enable any mechanic to determine the size of each of these buildings, and their relation to each other. They can, on the same general plan, be made of any dimensions, to suit the wishes of the proprietor.
The scale at the bottom will help any mechanic figure out the size of each of these buildings and how they relate to one another. They can be made in any dimensions based on the owner's preferences, following the same general plan.
The wagon-house in the range is forty feet long, affording ample shelter for all kinds of vehicles, connected by a covered way with the horse-stables and barn-floor.[Pg 252]
The wagon house in the range is forty feet long, providing plenty of shelter for all types of vehicles, and it’s linked by a covered walkway to the horse stables and barn floor.[Pg 252]
 Farm Buildings Range.
A lean-to is built on the north side of the wagon-house, in which is a tool-house opening into it, and a stable for eight milch-cows, that will thus be convenient for winter-milking; these cows are fed from the loft over the wagon-house. The barn is thirty by forty feet, with floor in the middle and bay on each side: this can be driven into on one side and out on the other. From the floor is a covered way to cattle and horse stables, and into the wagon and tool house, without going outdoor.
A lean-to is built on the north side of the barn, which includes a tool shed connected to it, as well as a stable for eight dairy cows, making winter milking easier. These cows are fed from the loft above the barn. The barn is 30 by 40 feet, with a floor in the middle and bays on each side; you can drive in on one side and out on the other. From the floor, there is a covered path to the cattle and horse stables, as well as to the wagon and tool shed, so you don’t have to go outside.
The Piggery.—Large and small swine do not do so well together; hence, the larger ones are to occupy the feeding-pen and bed on the right (in the cut), those of medium size on the left, and the smaller ones in the[Pg 253] rear. The dimensions and relative size of apartments can be determined from the plan.
The Piggery.—Large and small pigs don’t get along very well; therefore, the bigger ones will be in the feeding pen and sleeping area on the right (in the diagram), the medium-sized ones on the left, and the smaller ones in the[Pg 253] back. You can find the dimensions and sizes of the rooms in the plan.
The other buildings sufficiently explain themselves in the cut.
The other buildings explain themselves well in the image.
 Piggery floor plan.
With this range of buildings, let a farmer do his own thrashing, with a small horse-power, and thrash a part at a time during the winter, keeping the straw in an apartment in the bay, dry for litter, and for cut feed for cattle and horses, and it will be the best and most economical method of thrashing and keeping stock. Every farmer should do at least a part of his thrashing in this way, during the winter, for the benefit of fresh straw, &c.
With this variety of buildings, let a farmer handle his own threshing using a small horse-power and thresh a portion at a time during the winter, storing the straw in a dry space in the barn for bedding and as chopped feed for cattle and horses. This will be the most effective and cost-efficient way to thresh and manage livestock. Every farmer should do at least some of his threshing like this in the winter to take advantage of fresh straw, etc.
Country Residence.—This includes the range of buildings given opposite, their distance from the house, and all the parts of a complete residence, with all the comforts and conveniences that can be crowded into such a space, and at a very reasonable expense. Three fourths of an acre are devoted to the ornamental grounds; except the walks and small flower-beds, it is all green turf. Plowed very deep and thoroughly enriched, the trees are set out, and all then made very level, and one and a half bushels grass-seed sown on it and brushed in very smooth. This soon makes a very thick green turf, to be cut every ten days during the most growing season, and less frequently as the season advances. The trees, for a few years, need careful working around and mulching. The gravel carriage-road is twelve feet wide, and winding around shrubbery, it leads to the carriage-house in the range of buildings. The foot-walks are five feet wide. The curves in the walks may be accu[Pg 254]rately laid out in the following manner. Determine the general position by a few points measured off. Lay a pole upon the ground, in the direction of the walk; stick a peg in the ground at the first end and at its[Pg 255] middle; move the pole round a little, leaving the middle the same,—then stick a peg at its end, and move it forward—moving it forward and round equally, each time, by measurement. A longer or shorter curve is made by a greater or less side-movement of the pole. In a regular curve, the movements are the same; but in going from a shorter to a longer, or from a longer to a shorter curve, the side-measurement must increase or diminish regularly.
Country Residence.—This includes the range of buildings listed opposite, their distance from the house, and all components of a complete residence, packed with comforts and conveniences that can fit into such a space, and at a very reasonable cost. Three-quarters of an acre are set aside for the landscaped grounds; aside from the paths and small flowerbeds, it’s all green grass. The soil is plowed deeply and thoroughly enriched, the trees are planted, and everything is leveled. One and a half bushels of grass seed are sown and brushed in very smoothly. This quickly produces a thick green lawn that needs to be cut every ten days during the peak growing season, and less frequently as the season goes on. For the first few years, the trees require careful maintenance and mulching. The gravel driveway is twelve feet wide, winding around the shrubs, leading to the carriage house among the buildings. The walkways are five feet wide. The curves in the paths can be accurately laid out as follows. Determine the general position by measuring off a few points. Lay a pole on the ground in the direction of the path; place a peg in the ground at one end and at its midpoint; then slightly rotate the pole, keeping the midpoint in place—insert a peg at the end and move it forward—shifting it forward and around evenly each time, based on measurements. A longer or shorter curve is created by moving the pole to the side more or less. In a consistent curve, the movements are the same; however, when transitioning from a shorter to a longer curve, or vice versa, the side measurement must increase or decrease steadily.
 Country Home, Farm Structures, Grounds, and Fruit Gardens.
 Creating Curves.
 First floor. Chambers.
 Summer house.
The following cuts show the plan of the house: three principal rooms and a bed-room below, and four rooms above. The hall extends through the house, affording good ventilation in summer, and entrance to each room, without passing through another. The chimney in the centre economizes heat. This small and cheap house affords more conveniences than most large ones. One of the finest things about such a house is a good cellar. For a farm-house, the cellar should be under the whole; make it eight feet deep, gravel and water lime made smooth on the bottom, flagging under the bottom of the wall extending out a foot, the wall above ground built double, the inside four inches thick, with brick, with a space of two inches, and[Pg 256] outside stone wall a foot thick. The windows should be double and well fitted, the inside one hung on hinges; the outside one to be removed in spring, and its place supplied with a well-fitted frame, covered with wire-cloth to admit air and exclude intruders during summer. This will not freeze, and never need banking. No rat can enter, for they always work close to the wall, and coming to the projecting flat stone at the bottom, they give it up. On one side of the cellar, under the kitchen, make a large rain-water cistern, with a pump in the kitchen and a faucet in the cellar, and the whole arrangement is perfect. If the farm be large, you will need some of the good, but cheap houses described in the following part of this article, where your men will live and board themselves, which is always the best and cheapest way. An open view from the house in the country residence extends to the summer-house (b) on the right. This is one of the neatest cheap summer-houses that can be made. The following directions for making it may be useful. Set eight cedar posts, six inches in diameter, in the ground, in a circle; saw them off even at the top, and connect them by plank nailed on their tops. Make an eight-sided roof of boards; nail lath from post to post, forming lattice-work, leaving a space between two posts for a door. Put a seat around on the inside. Leave all the materials except the seat unplaned, and cover with a white or brown wash, and it need not cost more than five or six dollars,[Pg 257] and, covered with vines of some kind, it will be ornamental.
The following drawings show the layout of the house: three main rooms and a bedroom on the lower level, with four rooms upstairs. The hall runs through the house, providing good ventilation in the summer and allowing access to each room without going through another. The chimney in the center conserves heat. This small, affordable house offers more conveniences than many larger ones. One of the best features of such a house is a good cellar. For a farmhouse, the cellar should be underneath the entire structure; make it eight feet deep, with a bottom that’s smooth gravel and water lime, flagging beneath the wall extending out a foot, and a double wall above ground—four inches thick on the inside, made of brick, with a two-inch gap, and an outside stone wall that’s a foot thick. The windows should be double-glazed and well-fitted, with the inside one hung on hinges; the outside one can be removed in spring, replaced with a well-fitted frame covered with wire mesh to let in air and keep out pests during the summer. This setup won’t freeze and doesn’t need insulation. No rat can get in, as they always move close to the wall, and when they reach the flat stone at the bottom, they give up. On one side of the cellar, beneath the kitchen, build a large rainwater cistern with a pump in the kitchen and a faucet in the cellar, making the whole arrangement perfect. If the farm is large, you’ll need some of the good but affordable houses described in the next part of this article, where your workers can live and take care of their own meals, which is always the best and most cost-effective way. An open view from the house in the countryside looks out towards the summer-house (b) on the right. This is one of the neatest affordable summer-houses you can create. The following instructions for building it may be helpful. Set eight cedar posts, six inches in diameter, in the ground in a circle; cut them off evenly at the top and connect them with planks nailed on top. Create an eight-sided roof using boards; nail lath from post to post to form a lattice-work, leaving a space between two posts for a door. Add a seat around the inside. Leave all the materials except the seat unplaned, and cover them with a white or brown wash; it shouldn’t cost more than five or six dollars,[Pg 257] and, when covered in vines, it will look decorative.
 Worker's Cottage.
 Laborer's Cottage Plan.
This form of a cheap house is convenient and pleasant. Built of four-inch scantling, the plates and sills being connected only by the upright plank, and the wings thoroughly bracing the upright posts; when lumber is cheap, it may be built for one hundred and fifty or two hundred dollars, with cellar, well, and cistern. Occasional whitewash is as good as paint. With cellar under the whole, filled in with brick, and having blinds, it may cost three hundred and fifty dollars. The plan of the house sufficiently explains itself.
This type of affordable house is practical and comfortable. Made from four-inch lumber, the plates and sills connect only through upright planks, while the wings provide solid support to the vertical posts. When lumber prices are low, it can be built for around one hundred fifty to two hundred dollars, complete with a cellar, well, and cistern. An occasional coat of whitewash works just as well as paint. With a full cellar made of bricks and equipped with blinds, it could cost about three hundred fifty dollars. The layout of the house is quite straightforward.
The next cut illustrates a neat country-house, for a family who think more of neatness, comfort, and intellectual pursuits, than of mere ornament, and may serve the purpose of a farmhouse, or the residence of a retired[Pg 258] or professional gentleman. It has the unconstrained air of the Italian style, without a rigid adherence to any rules, and may therefore be altered or added to without destroying its effect.
The next section shows a tidy country house for a family that values neatness, comfort, and intellectual activities over simple decoration. It could function as a farmhouse or the home of a retired[Pg 258] or professional person. It has a relaxed vibe inspired by Italian architecture, without strictly following any specific rules, so it can be modified or expanded without losing its charm.
 Italian farmhouse.
 Italian Farmhouse Plan.
The plan is intelligible without explanation. Built in a plain way, the four large rooms not larger than fifteen by seventeen, and ten feet high, plain in its finish, it would cost about sixteen hundred dollars complete. It may go up from that, according to size and height of rooms, and style of finish, to three thousand dollars. It then makes as good a house as any person ever need to occupy, out of great cities.[Pg 259]
The plan is clear without needing any explanation. Designed simply, the four large rooms are each about fifteen by seventeen feet and ten feet high, with a basic finish, costing around sixteen hundred dollars in total. This price could increase based on the size and height of the rooms, as well as the finish style, reaching up to three thousand dollars. In that case, it would be a perfectly good house for anyone living outside of big cities.[Pg 259]
HYBRIDS.
Although this subject has received far too little attention, yet our limits will only allow us to mention a few facts, of the most practical moment.
Although this topic hasn't received enough attention, we can only mention a few important facts within our limits.
Plants hybridize only through their blossoms. This can only occur in plants of similarity, in nature and habits. Squashes and pumpkins planted near each other mix badly, and the poorer will prevail. Varieties of corn mix at considerable distances, by the falling of pollen from the tassel upon the silk of another variety. Watermelons are always ruined by being planted near citrons. The seeds from melons so grown will not produce one good melon. How far watermelons and muskmelons, or squashes with melons, will hybridize, is uncertain. By planting nutmeg muskmelons with the common roughskinned variety, we have produced a kind about half way between them, that was of great excellence. Two kinds of cabbage or turnip seed should never be raised in the same garden. Cabbage and turnip seed raised near together is valueless. In strawberries, different plants are essential to each other, the quality of the fruit being determined by the plant fertilized, and not by the fertilizer. This subject is further treated under articles on different plants.
Plants hybridize only through their flowers. This can only happen in plants that are similar in nature and habits. Squashes and pumpkins planted close to each other don’t mix well, and the weaker one will take over. Corn varieties can cross-pollinate even at significant distances, as pollen falls from the tassels onto the silks of a different variety. Watermelons are always ruined if they're planted near citrons. The seeds from such melons won't yield a single good watermelon. It’s uncertain how far watermelons and muskmelons, or squashes and melons, will hybridize. By planting nutmeg muskmelons with the common rough-skinned type, we've created a variety that’s about halfway in between, and it was excellent. Two types of cabbage or turnip seeds should never be grown in the same garden. Cabbage and turnip seeds grown close together are worthless. In strawberries, different plants are essential to each other; the quality of the fruit depends on the plant that gets fertilized, not on the pollen donor. This topic is further discussed in articles about different plants.
INARCHING.
This is a method of effecting a union of trees or branches, while both retain their hold in the ground. Shave off a little wood from each, and put them togeth[Pg 260]er, fitting closely, so that the barks will meet, as in grafting; tie firmly, and cover with wax. When they have got well to growing, cut off the top of the old one, and after a while cut the new one from the ground. When you have a tree that it is difficult to propagate in the usual way, you may transplant it to a thrifty stock. Vigorous branches may by this means be transferred to old, poor-bearing, or slow-growing trees. So also may a tree be prolonged beyond its ordinary age, as the pear on the quince, by inarching young shoots. We can only recommend this to the curious experimenter, who has little else to do.
This is a way to join trees or branches while both stay rooted in the ground. Trim a bit of wood from each and fit them together closely so that the bark meets, like in grafting; tie them securely and cover with wax. Once they've started to grow well, cut off the top of the old one, and after some time, cut the new one from the ground. If you have a tree that's hard to propagate in the usual way, you can graft it onto a healthy rootstock. Strong branches can be moved to old, low-yielding, or slow-growing trees. This method can also extend a tree's lifespan, like the pear on the quince, by connecting young shoots. We suggest this only for those curious experimenters who have spare time.
INSECTS.
These are the natural enemies of fruits and plants; and to prevent their depredations requires much care. There is no universal remedy. Birds and young fowls—especially ducks and chickens—are useful in a garden. The ducks must not be kept there too long. They will appropriate a little to their own use, but will save much more for the proprietor. Insects have their peculiar tastes for particular fruits and plants, of which we have treated, under those heads, respectively. Success in many branches of horticulture and pomology, depends upon attention to the habits of insects. The most general remedy is to wash trees or plants with a strong decoction of some offensive herb, or with whale-oil soapsuds. Tobacco is very useful for this purpose.[Pg 261]
These are the natural enemies of fruits and plants, and preventing their damage requires a lot of care. There isn't a one-size-fits-all solution. Birds and young livestock—especially ducks and chickens—are beneficial in a garden. Ducks shouldn't be left there for too long. They might take a bit for themselves, but they'll protect far more for the owner. Insects have specific preferences for certain fruits and plants, which we've discussed in separate sections. Success in various areas of gardening and fruit growing depends on being aware of insect behaviors. The most common solution is to wash trees or plants with a strong brew of some strong-smelling herb, or with whale-oil soap suds. Tobacco is very effective for this purpose.[Pg 261]
IRON FILINGS.
It has been ascertained by analysis, that iron enters largely into the composition of the pear. Iron filings spread under them, or worked into the soil, increases the growth of pear-trees, and improves the quality of the fruit.
It has been determined through analysis that iron is a significant part of a pear's composition. Iron filings spread underneath them or mixed into the soil help to enhance the growth of pear trees and improve the quality of the fruit.
IRRIGATION.
This is one of the most important matters, that can engage the attention of agriculturists of the present day. A stream of water that may be caused to flow gently over a field, or different parts of a farm, at pleasure, is a mine of wealth. Plants receive their food from the air and water. We shall discuss this more fully when treating of manures. A poor, porous, sandy, or gravelly soil usually produces a fine crop, in a wet season. That is an addition to the soil of nothing but water. Hence all springs and streams can be turned to great account, on a farm or garden. Watering gardens by hand or with a garden-pump, will often pay better than any other expenditure on the land. Employing a man, in a dry season, to spend his whole time in watering five acres of garden, of berries and vegetables, as cabbages, vines, onions, and potatoes, will pay a very large profit. Strawberries will bear twice as much and twice as long, for daily watering, after they begin to bud for blossoms, until the fruit is gone. It is a necessary caution not to water irregularly, and only occasion[Pg 262]ally, in a dry season. Better not commence than to leave off, or neglect it in a dry time, before a rain. Read further in our article on "Watering."
This is one of the most important issues that can capture the attention of today’s farmers. A stream of water that can be directed to flow gently over a field or different parts of a farm at will is a treasure. Plants get their nutrients from the air and water. We will go into more detail about this when we talk about fertilizers. A poor, loose, sandy, or gravelly soil often yields a fantastic crop during a wet season. This essentially adds nothing but water to the soil. Therefore, all springs and streams can be highly beneficial on a farm or in a garden. Watering gardens by hand or with a garden pump can often yield better returns than any other investment in the land. Hiring someone during a dry season to spend all their time watering five acres of garden filled with berries and vegetables like cabbages, vines, onions, and potatoes can result in significant profits. Strawberries will produce twice as much and for a longer time with daily watering after they start to bloom until the fruit is harvested. It's crucial to avoid irregular watering or only doing it occasionally during a dry season. It's better not to start than to stop or neglect it during a dry spell before it rains. Read more in our article on "Watering."
LABELS.
It is important, on many accounts, to have fruit-trees and shrubs well labelled. Many labels have been invented. We prefer Cole's, as given in his Fruit Book, to any other. Take a piece of sound pine or other soft wood, whittle two sides smooth, leaving one wider than the other, with a sharp corner between them. For one, cut one notch in the edge, and so up to four, four notches for four. For five, cut across the narrow side. For ten cut across the wide side, and a notch for every ten up to forty. For fifty, cut obliquely across the narrow side, and for one hundred cut obliquely across the wide side. Keep the names in a book, with numbers corresponding with the notches or numbers on the labels.
It's important for various reasons to have fruit trees and shrubs clearly labeled. Many types of labels have been created. We prefer Cole's, as described in his Fruit Book, over any others. Take a piece of solid pine or another type of soft wood, smooth down two sides, leaving one side wider than the other with a sharp edge between them. For one tree, make one notch on the edge, going up to four notches for four trees. For five trees, cut across the narrow side. For ten, cut across the wide side, and make a notch for every ten up to forty. For fifty, cut diagonally across the narrow side, and for one hundred, cut diagonally across the wide side. Keep the names in a book, with numbers that match the notches or labels.
Fasten these to trees, loosely, by a small copper or brass wire. Transported to any distance, exposed to any weather, or buried in the ground, they will not be obliterated. Pieces of sheet lead, tin, or zinc, cut wide at one end, and written on with a sharp awl, and narrow at the other end, to be bent around a limb, will answer a pretty good purpose. Any soft wood, made smooth, and a little white paint applied, and written on with a good pencil, will preserve the mark for a long time. Fasten with small wire. There are many labels, but we know none preferable to the above. By all means make labels accurate and permanent. Otherwise[Pg 263] great losses may occur by budding or grafting from wrong varieties.
Attach these to trees loosely using a small copper or brass wire. They won’t get destroyed no matter how far you transport them, what kind of weather they face, or if they’re buried in the ground. Take pieces of sheet lead, tin, or zinc; cut them wide at one end and write on them with a sharp awl, then make the other end narrow to bend around a branch. This will work pretty well. Any soft wood, smoothed out and painted white, with writing done in pencil, will keep the mark visible for a long time. Secure it with thin wire. There are many types of labels, but we believe none are better than the ones mentioned here. Make sure to create labels that are accurate and lasting. Otherwise[Pg 263], you might face significant losses from budding or grafting the wrong varieties.
LANDSCAPE GARDENS.
These deserve much more attention than they receive in this country. On most farms land enough is lying waste, to make a picturesque landscape, at a small expense. Trees planted, weeds destroyed, grass cultivated, and paths made, according to the most approved rules of carelessness, would secure this object. With a wealthy man, the omission of such a park about his dwelling is hardly pardonable. Landscape gardening is an extensive subject. We can only give a few of the most general simple rules, that may be practised, without the possession of very large means.
These deserve way more attention than they get in this country. On most farms, there's enough unused land to create a beautiful landscape at a low cost. Planting trees, removing weeds, cultivating grass, and making paths using some basic guidelines would achieve this goal. For a wealthy person, not having a park around their home is pretty much unacceptable. Landscape gardening is a broad topic. We can only provide a few of the most basic rules that can be applied without needing a lot of money.
1. Place the house some distance from the main street.
1. Position the house away from the main street.
2. Make the carriage-way leading to the house, at least twelve feet wide, and do not allow it to extend in a straight line, but in gentle curves, around clusters of trees and plats of grass, apparently rendering the curves necessary.
2. Make the driveway leading to the house at least twelve feet wide, and don’t let it go in a straight line; instead, have it curve gently around groups of trees and patches of grass, making the curves seem necessary.
3. Have no large trees directly in front of the house.
3. Avoid having big trees directly in front of the house.
4. Plant trees of the thickest and greenest foliage near the house, and those of more open tops at a greater distance. Standard pear, and handsome cherry trees, do well planted among the forest trees. Clusters of them, at suitable distances, are not only beautiful, but they bear exceedingly well. They are well protected by the forest trees, and standing alone are injured less by insects.
4. Plant trees with thick, green leaves close to the house and those with more open tops farther away. Standard pear trees and attractive cherry trees thrive when planted among the forest trees. Grouping them at appropriate distances not only looks nice but also produces a great harvest. The forest trees offer them good protection, and when they're by themselves, they are less affected by insects.
5. Never set trees in a landscape garden, in straight[Pg 264] rows, nor trees of similar size and form together. Nature never does so.
5. Never plant trees in a landscape garden in straight[Pg 264] rows, or group trees of the same size and shape together. Nature never does that.
6. Let none of the walks be straight lines, but curves, meandering among trees and grass. If there be any water in the vicinity, let there be an open space, giving a fair view of it from the house. If you have a stream, make rustic bridges over it, the plainer the better. Here and there have rustic arbors. Attached to all this should be three other gardens, one of flowers, another of vegetables, and the third of fruits. These three should never grow together. Fruit-trees ruin vegetables and injure flowers. And flowers in a vegetable garden are mere weeds. A separate plat for each is the correct rule, both for beauty and profit. All this need require but little time and expense. All landholders can, at a moderate cost, live amid scenes of perpetual beauty, while the rich may spend as much money in this way as they choose.
6. Make sure none of the paths are straight lines; they should curve and wind through the trees and grass. If there's any water nearby, create an open area that offers a good view of it from the house. If you have a stream, build simple rustic bridges over it. Include rustic arbors here and there. In addition to all this, there should be three other gardens: one for flowers, another for vegetables, and the third for fruits. These three gardens should never be planted together. Fruit trees can damage vegetables and harm flowers, while flowers in a vegetable garden just become weeds. Each type requires its own space, both for beauty and profit. All of this can be done with minimal time and cost. Any landowner can create a beautiful environment at a reasonable expense, while the wealthy can invest as much money as they like in this way.
LAYERING.
This is a method of propagation, by bending down a branch, and fastening it under the soil, leaving the upper end projecting, until it takes root. Cut half way through the branch so as to raise the top, and fasten it at the point where it is cut, in a trench, with a stick thrust into the ground over it nearly horizontally, or with a stick having a hook made by cutting off a limb. Cover well with soil, and mulch it, and water when dry. This done in the spring, in August the branch will be well rooted, and may be cut away from the parent stalk.[Pg 265] This is important in any tree or shrub (like the snowball), difficult to propagate by slips or grafting.
This is a method of propagation where you bend down a branch and secure it under the soil, leaving the top part exposed until it takes root. Make a cut halfway through the branch to raise the top, and secure it at the cut point in a trench with a stick laid almost horizontally over it, or use a stick with a hook created by trimming a branch. Cover it properly with soil, add mulch, and water it when it's dry. If you do this in the spring, by August, the branch will be well rooted and can be cut away from the main stalk.[Pg 265] This method is essential for any tree or shrub (like the snowball) that is hard to propagate through cuttings or grafting.
LAYING IN TREES.
Dig a trench where water will not stand, and lay the trees in at an angle of forty-five degrees, and cover the roots and lower part, very closely, with earth. In this way they may be well preserved through the winter, if buried so deep that the tap-root will not freeze, which is always injurious to trees that have been removed from their original soil. Such freezing is always destructive to trees out of the ground. Small trees and seedlings may be covered entirely, to be kept through the winter. Put coarse straw manure on the earth, over trees large enough for setting, that are to be preserved heeled in during winter; and straw or corn-fodder over the tops, during the coldest weather, and they will come out perfect in the spring.
Dig a trench where water won't collect, and place the trees at a forty-five-degree angle, then cover the roots and lower part thoroughly with soil. This way, they can be well-preserved through the winter, as long as they're buried deep enough to prevent the taproot from freezing, which can always harm trees that have been taken from their original soil. Freezing is always damaging to trees that are out of the ground. Smaller trees and seedlings can be completely covered to survive the winter. Use coarse straw manure on the soil over the larger trees that will be heeled in for the winter; cover the tops with straw or corn fodder during the coldest weather, and they will emerge healthy in the spring.
If not ready to set out your trees at once, you may preserve them in perfect condition to very late in spring, in this way, by raising them once, to check vegetation, and putting them back, and shading their stems and mulching the roots, after the commencement of warm weather. Trees may thus be preserved in better condition for transplanting than those left in the nursery, and they will make a larger growth the first season.[Pg 266]
If you're not ready to plant your trees right away, you can keep them in great shape until late spring by lifting them once to stop their growth, then putting them back, shading their trunks, and mulching their roots after the warm weather starts. This method helps trees stay in better condition for transplanting compared to those left in the nursery, and they’ll grow larger during the first season.[Pg 266]
LEEKS.
These are said to be natives of Switzerland. We think this doubtful, as they are an article of daily food in Egypt, and were so highly esteemed there, centuries ago, as to become an object of worship. They are used as a pot-herb, to give a flavor to soups and stews. They are not bulbous, like onions, but have a long stem, which is principally used. They are transplanted very deep, so as to obtain a long white neck. The ends of the roots are to be cut off when transplanted, and they should be set in rows a foot apart, and from four to six inches in the row. There are several varieties, distinguished mainly by the width of the leaves,—the Flanders (or narrow-leafed), the Scotch, and the Broad London.
These are said to be native to Switzerland. We find this hard to believe since they are a common food in Egypt and were so valued there centuries ago that they became an object of worship. They are used as a pot herb to enhance the flavor of soups and stews. Unlike onions, they don't have a bulb but feature a long stem that is primarily used. They are planted quite deep to achieve a long white neck. The ends of the roots need to be trimmed when they are transplanted, and they should be arranged in rows a foot apart, with four to six inches between plants in the row. There are several varieties, mainly distinguished by the width of the leaves: the Flanders (or narrow-leafed), the Scotch, and the Broad London.
We know no use of leeks for which onions would not be equally good, and, hence, do not recommend their cultivation.
We see no reason to use leeks when onions work just as well, so we don’t suggest growing them.
LEMON.
This is the finest acid fruit grown, and belongs to warm climates; but by getting good budded trees from the South, and setting in glass-houses, protected from severe frosts, we may grow lemons in abundance at the North.
This is the best acidic fruit available, and it thrives in warm climates; however, by obtaining good grafted trees from the South and placing them in greenhouses protected from harsh frost, we can grow lemons abundantly in the North.
By a system of acclimation and protection, we anticipate seeing oranges and other Southern fruits grown at the North as a domestic luxury, and perhaps at a profit for market. The houses necessary for protection may[Pg 267] be worth more for other purposes than their cost and care, without interfering with their use for orange and lemon culture.
By adapting and protecting the environment, we expect to see oranges and other Southern fruits being grown in the North as a local luxury, and maybe even profitably for resale. The facilities needed for this protection might[Pg 267]be more valuable for other uses than the expense and effort that goes into maintaining them, without disrupting their function in orange and lemon farming.
LETTUCE.
The varieties are numerous, and most of them do well on very rich land, well hoed. Only two kinds of summer-lettuce need be cultivated—the ice-head lettuce, and the brown. The ice-head has a very thick and tender leaf, continuing to be excellent up to midsummer, from one sowing; and if not allowed to stand nearer together than six inches, it will produce fine heads. The brown lettuce is very large and very good. There are other, earlier kinds, and many others that form large heads. But we can get the above kinds early, by sowing in a hotbed and transplanting; or by sowing so as to have plants get of considerable size in the fall, and protect by covering in winter. These will be suitable for the table early in the spring. Lettuce does better for transplanting; it forms larger heads than in the original bed, and is a little later. Make the soil very rich with stable-manure. Lettuce is more affected by the quality of the soil than most other vegetables. This is a pleasant and healthy article of food, in spring and early summer.[Pg 268]
The varieties are many, and most of them thrive in rich, well-tilled soil. Only two types of summer lettuce need to be grown—the ice-head lettuce and the brown. The ice-head has very thick and tender leaves, remaining excellent until midsummer from a single sowing. If spaced at least six inches apart, it will produce nice heads. The brown lettuce is quite large and very tasty. There are other, earlier varieties, and several that form large heads. However, we can get the mentioned types early by sowing in a hotbed and transplanting, or by sowing in the fall to grow substantial plants and then covering them in winter. These will be ready for the table early in spring. Lettuce generally does better when transplanted; it forms larger heads compared to those grown directly in the original bed, though it takes a bit longer. Enrich the soil well with stable manure. Lettuce is more influenced by soil quality than many other vegetables. This is a delightful and healthy food option in spring and early summer.[Pg 268]
LICORICE.
This is a hardy plant from Southern Europe. The root in substance, or the extracted dried juice, is much used. Needs a deep, rich soil. It is propagated by cuttings of roots set out in deeply-trenched land, in rows three feet apart, and one foot in the row. Small vegetables may be grown among the plants the first year; afterward keep clear of weeds, and manure every autumn. At the end of the third year, after the leaves are dead, take up the roots and dry them thoroughly. This does well at the South. A few roots are sufficient for a family, and the demand will not be sufficient to require its culture very extensively as an article of commerce. The low price of labor in Southern Europe enables them to supply the demand cheaper than can be afforded in this country.
This is a hardy plant from Southern Europe. The root or the dried juice extracted from it is widely used. It requires deep, rich soil. It's propagated by planting root cuttings in deeply-turned soil, spaced three feet apart in rows, with one foot between each plant. You can grow small vegetables among the plants during the first year; after that, keep it weed-free and fertilize every autumn. At the end of the third year, once the leaves have died, harvest the roots and dry them thoroughly. It thrives in the South. A few roots are enough for a family, and the demand isn’t high enough to make it necessary to grow it widely as a commercial product. Because labor is cheaper in Southern Europe, they can meet the demand at a lower cost than is possible here.
LIME.
This is a valuable application to the soil. For wheat it is very important, except on soil containing a large proportion of calcareous matter. Usually air-slaked, and applied as a top-dressing, or plowed or harrowed in, its effects are important. On moist, sour land, producing wild grass, it corrects the acidity, introduces other grass, and prepares the soil for cultivation. On hard, stiff lands, it has a tendency to make them friable, and keep them in a mellow condition, thus saving more than its cost, in the labor of cultivation.[Pg 269] Very valuable in a compost heap. So much may be applied as to burn the soil and prove injurious. It will not do as a substitute for everything else. See further on "Manures."
This is a valuable addition to the soil. It's crucial for wheat, unless the soil has a lot of chalky matter. Typically, it's air-slaked and either spread on top or worked into the soil, and it has significant effects. On damp, acidic land with wild grass, it neutralizes the acidity, introduces other types of grass, and gets the soil ready for farming. On hard, tough land, it helps break it up and keep it loose, which can save more in cultivation labor than it costs.[Pg 269] It's very useful in a compost pile. However, if too much is added, it can damage the soil and be harmful. It can't replace everything else. See more on "Manures."
LIME.
A fruit resembling the lemon, growing in the same climate, but of smaller size. It is used for the same purposes as the lemon, but is not so valuable. Preserved green, it is highly esteemed. It is cultivated as the orange and lemon, needing the same protection in cold climates. To preserve all these from destruction by insects, wash them in a strong decoction of bitter or offensive herbs, or with whale-oil soap-suds; tobacco is very effectual. These remedies are useful on all fruit-trees.
A fruit similar to a lemon, growing in the same climate but smaller in size. It’s used for the same purposes as a lemon, but isn’t as valuable. When preserved green, it’s highly regarded. It’s cultivated like oranges and lemons and needs the same protection in cold climates. To protect all of these from being destroyed by insects, wash them in a strong brew of bitter or unpleasant herbs, or with whale-oil soap suds; tobacco works very well. These remedies are effective for all fruit trees.
LOCATION.
This is important to everything we cultivate. But, as everything can not have the best location, we should study it with reference to those things most affected by it, especially fruits. Fruits escape late frosts when growing near rills or small brooks. Orchards near the shores of bodies of water—as on Lake Erie about Cleveland, Ohio—bear luxuriantly when all fruit a few miles back is cut off by late frosts. On the summits of hills, fruits escape late frosts, when they are all cut off in the valleys below. On the Ohio river above Cincinnati, peaches are very liable to destruction by[Pg 270] late frosts. We have seen them all frozen through in one night, and turned black the next day, in the month of May, after they had grown to the size of marrowfat-peas. One season, when there were no peaches in any other locality within a hundred miles, we knew an orchard, on a Kentucky hill, so high and steep, that it took miles of winding around the hill, to ascend it with a team. Those trees were perfectly loaded with peaches, that sold on the tree at four dollars per bushel, and in Cincinnati market at seven to eight dollars. In Ohio, Kentucky, and Virginia, there are such hills, that may be turned to more valuable account than any of the rest of their land, that are not now considered good for anything—even for sheep-pastures. The same is true in the hilly parts of all the states. Good fruit of some kind will grow on them all, every year.
This is crucial for everything we grow. However, since not everything can have the best location, we should examine it in relation to the things that are most affected by it, especially fruits. Fruits are less likely to be damaged by late frosts when they're near streams or small brooks. Orchards located by bodies of water—like Lake Erie near Cleveland, Ohio—thrive when all the fruit a few miles inland is ruined by late frosts. On the tops of hills, fruits avoid late frosts, while those in the valleys below are often lost. Along the Ohio River above Cincinnati, peaches are particularly vulnerable to late frosts. We’ve seen them frozen solid overnight, turning black the next day in May, after growing to the size of marrowfat peas. One season, when there were no peaches anywhere within a hundred miles, we knew of an orchard on a steep Kentucky hill, so high that it took miles of winding roads to reach it with a team. Those trees were loaded with peaches, selling for four dollars a bushel on the tree and seven to eight dollars in the Cincinnati market. In Ohio, Kentucky, and Virginia, there are hills that can be utilized more effectively than the rest of their land, which is not currently considered good for anything—even sheep pastures. This holds true in the hilly regions of all the states. Good fruit of some kind will grow on them every year.
LOCUST-TREES.
It will soon be a great object with American farmers to cultivate locust-trees, in all locations to which they are adapted. Even in this new world, we shall soon be dependent on cultivated timber for fence-posts, railroad-ties, and building purposes. Our native forests are rapidly disappearing, while demand for timber is as rapidly increasing. Probably no other tree is so profitable for cultivation in this country as the locust. It is of rapid growth, and hard and durable, and adapted to many uses. The second-growth locust is not so durable as the native forest-tree, as found in parts of Ohio; but, cut at a suitable age and at the[Pg 271] right season of the year, it is as durable as white cedar, and much more valuable. The profits of the culture would be great. An acre of locust-trees fifteen or twenty years old would be worth fifteen hundred or two thousand dollars. The expense of growing it, aside from the use of the land, would be trifling. The grove would afford a good place for fowls, while the blossoms would be nearly equal to white clover for honey. The limbs would make excellent wood, and the ground would need no planting for a second growth. Fortunate will be the men on the prairies of the West, and along the railroads and rivers of the land, who shall early plant fields of locust. The profits of it will greatly exceed the increase in the value of the land.
It will soon become a major focus for American farmers to grow locust trees in suitable areas. Even in this new world, we will quickly find ourselves reliant on cultivated timber for fence posts, railroad ties, and construction. Our native forests are disappearing rapidly, and the demand for timber is increasing just as fast. Probably no other tree is as profitable for cultivation in this country as the locust. It's fast-growing, hard, and durable, and it has many uses. The second-growth locust isn't as durable as native forest trees, like those found in parts of Ohio; however, if harvested at the right age and during the right season of the year, it's as durable as white cedar and much more valuable. The potential profits from cultivating it would be substantial. An acre of locust trees that are fifteen or twenty years old could be worth between fifteen hundred and two thousand dollars. The cost of growing them, aside from the land use, would be minimal. The grove would provide a great habitat for poultry, while the blossoms would be nearly as good as white clover for honey production. The branches would yield excellent firewood, and the ground wouldn't require replanting for a second growth. Those fortunate enough to be on the prairies of the West and along the railroads and rivers will benefit greatly by planting fields of locust early on. The profits will far exceed any increase in land value.
MANURES.
Soils, manures, and preparing the soil—plowing, harrowing, &c.—are the three great subjects in any good agricultural work. We shall treat this subject under the following divisions:—
Soils, fertilizers, and preparing the ground—plowing, harrowing, etc.—are the three main topics in any solid agricultural guide. We'll cover this subject in the following sections:—
1. The substances of which manures are composed.
1. The materials that make up fertilizers.
2. Preparation and saving of manures.
2. Making and storing fertilizers.
3. Time and modes of application.
3. Timing and methods of application.
4. The principles of their action upon plants.
4. The principles of how they affect plants.
Manures are of two classes—called putrescent and fossil. The putrescent are composed of decayed, or decaying, vegetable and animal substances. The fossil are those dug from the earth, as lime, marl, and gypsum. All vegetable substances not useful for other purposes are valuable for manure. Rotten wood, leaves,[Pg 272] straw, and all the vegetable parts of stable manure, and any spoiled vegetables or grain, are all valuable. At the South, their immense quantities of cotton-seed are a mine of wealth, if properly prepared and applied as manure. Animal manures consist of the animal parts of stable manure, dry and liquid, parts of bones, brine, spoiled meat, kitchen slops, soapsuds, and all dead animals. In decaying, these substances all pass through a process of fermentation. Left exposed without suitable care, they become unhealthy and offensive. It is probable that a large share of the diseases suffered in the rural districts are caused by these impurities; and the impossibility of keeping large cities free from these substances is the cause of their increased mortality. In the country, a little timely caution and labor, in removing these substances and regulating their fermentation, would save much sickness; while the labor would pay a larger per-cent. profit than any other performed on the soil. No manures should be allowed to ferment, or decay, without being mixed or covered with enough common earth, sand, peat, or muck, to retain all the gases and exhalations of such putrescence. The smallest quantity that will answer is one load of earth to two of the decaying substances. The proportions reversed would be better: put one bushel of lime to two loads, two quarts of ground plaster, and half a bushel of ashes, and you have the very best compost heap. The following are brief general rules for the preparation of manures. It is always most economical to feed cattle in the stable or under cover, and never have manure exposed to the weather. But if cattle must be fed outdoor, let them be fed in a yard, lowest in the centre, that the liquids and washings may run into the centre,[Pg 273] and be absorbed by straw and litter. Put manure on the land, or into heaps for compost, before very warm weather. Always feed sheep under cover, and keep their manure from rain; heap it together with earth in the spring, or apply it to the soil at once. Manure thrown out of a stable should be kept under cover, out of the rain, and not allowed to heat in winter; its best qualities are evaporated by fermentation in the yard. Manures often rained on in winter, or left in large piles without intermixture of earth, lime, plaster, and ashes, will ferment and waste. Construct your stables so that the liquid manure will run into a vat filled with earth; muck is best. Experiments have shown that the liquid manures are at least one sixth better than the solid. A gentleman dug a pit, thirty-six feet square and four feet deep, and walled it in on all sides. He filled his vat from a cultivated field, and so constructed his sewers from the stables adjoining that the urine saturated the whole. He kept fourteen head of cattle there for five months, allowing none but the liquid part of the manure to pass into the vat. He spread forty loads of this on an acre. For ten years he tried equal quantities of this and well rotted and prepared stable-manure, side by side, in the same field, and obtained great crops; but in no stage of their growth could he see that crops on the land manured from the stable were any better than those that had received only the soil from the vat. The latter were quite as good as the former. The contents of his vat manured seven acres, or half an acre to each creature stabled. The result is proof that one cow discharges urine sufficient in five months to manure abundantly half an acre of land. Save the solid manure equally well, and a cow will[Pg 274] make manure enough, in five or six months, to increase a crop sufficiently to pay for herself. It is certainly safe to say, that a careful man can make the manure of a cow pay for her body every year. Is not this an important branch of farming operations? Few pay sufficient attention to it. Fowls should roost where their droppings may be mixed with common garden soil or loam. The manure from each fowl, carefully saved and judiciously applied, will pay for its body twice a year. The hogstye may be very productive of manure, one fourth better than that from the stable. Connected with your hogpen, have a yard fifteen feet square for every five hogs; let that yard have no floor. Throw the straw out of their sleeping-room frequently to make room for new; throw into the yard, also, all sorts of weeds, refuse vegetables, corn-husks, peapods, &c.; also the dirt that will naturally accumulate in the backyard of a dwelling, including sawdust, fine chips, cleanings of cellars, scrapings of ditches, and occasionally a load of loam, muck, or clay—and six loads of manure to each hog may be made, that will prove far better than any stable manure; it has been known to produce fifty bushels of corn to the acre, when stable-manure produced but forty bushels. Old wood, brush, and chips, should never be allowed to remain on uncultivated, useless land. Wood throws out the same amount of heat in decaying as it does when consumed as fuel. The action of that heat on the soil is highly beneficial, retaining it long in a mellow state: hence, all wood, too old to be of value for any other purpose, should be put in heaps, covered up till decomposed, and then applied to the soil, as other manures. For potatoes or vines, but especially melons, it is preferable to[Pg 275] any other manure. Nothing is so good for muskmelons as old chips from the woodyard. Leaves of fruit and forest trees are also very good; blood and offal of animals, hair, hoofs, bones, horns, refuse feathers, woollen rags, mud from sewers, rivers, roads, swamps, or ponds, turf, ashes, old brine, soapsuds, all kinds of fish, oyster and clam shells—all are valuable, and no part of them should ever be thrown away or wasted; they are all good in compost heaps, or applied directly to the soil. Bones are best ground, but may be used whole, pounded, or chemically dissolved, or mixed with alternate layers of fresh horse-manure, they will be decomposed by the fermentation of the manure (see "Bones"). Perhaps there is as much imprudence in wasting manures as in any part of American domestic economy. One who leaves his stock without care, and so exposed to the weather as to lose half of them and injure the others, is not fit to be a farmer; yet, many waste manure that would produce plants for man and beast, of far more value than the loss of stock complained of, and yet no one notices it—it is a matter of course, exciting no surprise. Wastefulness in a family, if it be of bread, flour, or meat, is considered wicked and impoverishing; while ten times that amount may be wasted in manures, that would enrich the soil, and excite little or no disapprobation. We hope the agricultural periodicals will keep this subject before the people, until these mines of wealth will no longer be neglected or wasted.
Manures fall into two categories—putrescent and fossil. Putrescent manures are made up of decayed or decaying plant and animal materials. Fossil manures are those that are extracted from the earth, such as lime, marl, and gypsum. All plant materials that aren't useful for other purposes are valuable for manure. Rotting wood, leaves,[Pg 272] straw, all the plant parts of stable manure, and any spoiled vegetables or grains are all useful. In the South, the large amounts of cottonseed are a treasure if properly prepared and used as manure. Animal manures consist of the animal parts of stable manure, both dry and liquid, parts of bones, brine, spoiled meat, kitchen scraps, soapsuds, and all dead animals. As these substances decay, they go through a fermentation process. If left exposed without proper care, they can become unhealthy and offensive. It's likely that a significant portion of the diseases experienced in rural areas is due to these impurities; and the inability to keep large cities free from these substances contributes to their higher mortality rates. In the countryside, a bit of timely caution and effort to remove these substances and control their fermentation could prevent much illness; the labor would yield higher profits than any other work done on the soil. Manures should never be allowed to ferment or decay without being mixed or covered with enough common earth, sand, peat, or muck to capture all the gases and odors of such decay. The smallest effective amount is one load of earth for every two loads of decaying materials. However, a better ratio would be one bushel of lime to two loads, two quarts of ground plaster, and half a bushel of ashes, creating the best compost heap. The following are some general guidelines for preparing manures. It’s always more cost-effective to feed livestock in a stable or under cover, avoiding exposure to the weather. If cattle must be fed outside, they should be fed in a yard that is lowest in the center so that liquids and runoff can drain into the middle,[Pg 273] where they can be absorbed by straw and bedding. Apply manure to the land, or into heaps for compost, before it gets very warm. Always feed sheep under cover to keep their manure dry; pile it with earth in the spring, or apply it directly to the soil. Manure that is thrown out of a stable should be kept covered, out of the rain, and not allowed to heat during winter; its best qualities are lost to evaporation through fermentation outside. Manures that get rained on during winter or left in large piles without mixing with earth, lime, plaster, and ashes will ferment and waste. Design your stables so that liquid manure can flow into a vat filled with earth; muck is best. Experiments have shown that liquid manures are at least one-sixth more effective than solid ones. One individual dug a pit thirty-six feet square and four feet deep, lining it on all sides. He filled his vat with materials from a cultivated field and cleverly designed his sewer system from the stables so that the urine soaked everything. He kept fourteen cattle in there for five months, allowing only the liquid part of the manure to flow into the vat. He spread forty loads of this on an acre. For ten years, he compared equal amounts of this and well-rotted and prepared stable manure side by side in the same field and achieved great yields; yet at no growth stage did he find that crops on the land treated with stable manure were any better than those fed only by the soil from the vat. The latter were just as good. The contents of his vat fertilized seven acres—or half an acre for each animal stabled. This shows that one cow produces enough urine in five months to fertilize half an acre of land well. If the solid manure is also properly saved, a cow can produce enough waste in five or six months to yield a crop sufficient to pay for itself. It’s safe to say that a dedicated farmer can make a cow's manure cover her costs every year. Isn't this an important part of farming? Few people pay enough attention to it. Poultry should roost where their droppings can be mixed with common garden soil or loam. The manure from each bird, when carefully saved and wisely used, can pay for itself twice a year. The hogpen can be significantly productive, yielding about twenty-five percent more manure than from the stable. Set up a yard of fifteen feet square for every five pigs connected to your hogpen; this yard should have no floor. Frequently clean out the straw from their sleeping area to make room for new bedding; also add all types of weeds, kitchen scraps, corn husks, pea pods, etc., to the yard; furthermore, include dirt that naturally collects in a household's backyard, such as sawdust, fine chips, cellar cleanings, ditch scrapings, and occasionally a load of loam, muck, or clay—and each hog could produce up to six loads of manure, which is far superior to stable manure; it has been known to yield fifty bushels of corn per acre, while stable manure only produced forty bushels. Old wood, brush, and chips should never be left on unused land. Wood releases the same amount of heat while decaying as it does when used as fuel. This heat enriches the soil, helping it stay loose for a long time: therefore, all wood that is too old to have any other use should be piled up, covered until decomposed, and then added to the soil like other manures. For potatoes or vines, especially melons, this is preferable to[Pg 275] any other type of manure. Nothing is better for muskmelons than old wood chips from the yard. Leaves from fruit trees and forest trees are also very beneficial; blood and offal from animals, hair, hooves, bones, horns, discarded feathers, wool rags, mud from sewers, rivers, roads, swamps, or ponds, turf, ashes, old brine, soapsuds, and all kinds of fish, oyster, and clam shells—all are valuable, and every part should be saved and utilized; they are all great for compost heaps, or can be directly applied to the soil. Bones are best when ground, but can be used whole, crushed, or chemically processed, or layered between fresh horse manure; they will decompose through the fermentation of the manure (see "Bones"). There might be as much irresponsibility in wasting manure as in any other part of American household management. Someone who neglects their livestock and suffers losses due to exposure is not fit to be a farmer; yet many waste manure that could grow valuable plants for both people and animals, which is far more significant than the stock losses they lament, yet no one seems to notice—it goes unnoticed as a common issue. Waste in a household, whether it be bread, flour, or meat, is seen as sinful and impoverishing; whereas one could waste ten times that amount in manure, which could enrich the soil, with hardly any criticism. We hope agricultural publications will keep this topic in front of the public until these sources of wealth are no longer ignored or wasted.
Application of Manures is a subject that has been much discussed, and respecting which, intelligent agriculturists differ materially. Some apply them extensively as a top-dressing for grass lands. This does much good, but probably one half of their virtues is[Pg 276] lost by washing rains, and by evaporation. A better way is not to keep land down in grass long at a time, and, when under the plow, manure thoroughly. We knew a piece of light land that annually produced half a ton of hay per acre. The owner plowed it up, raised a crop, put a moderate quantity of stable-manure, and ten loads of leached ashes to the acre. We saw it in haying time, the third season after it had been manured and subsoiled and seeded down, and they were then taking fully three tons of timothy hay from an acre, which was the quantity it had yielded three years in succession, without any top-dressing. If a top-dressing of manure is to be applied, harrow the land quite thoroughly, and always apply the manure in the fall—it is worth twice as much as when applied in the spring. The rains and snows of winter cause it to sink into the soil, while the heat of spring and summer evaporate it. A mixture of plaster, lime, ashes, and a very little salt, sowed on meadows, immediately after haying, secures a good growth of feed, much sooner than it will come on other meadows. It also increases, quite considerably, the hay crop of the following season. It is a universal rule not to allow manure to lie long on the surface to which it is applied, before plowing in. Place manure in heaps, as large as will be convenient for spreading, and spread it just before the plow. Never spread manure one day to be plowed in the next. When manuring in the hill, have the planters follow the manure-cart. In manuring potatoes in the hill, drop the potatoes, and put the manure on them and cover at once. In a dry season, the yield will be double that of those planted in the usual way. For fall grains, plow in the manure, just before sowing the seed. This is bet[Pg 277]ter than plowing it in under the sod. If the land be not sod land, and you can plow the manure in only deep enough to cover it, and then, just before sowing the seed, plow again very deep, the effect is excellent. Apply manure to land in the fall, or just after harvest, and plow it in, let the land remain till spring, and then plow deep, and you get the best possible effect. On an onion crop, manure does the most good on the surface. On those raised from sets, or on any onions, after they get large enough to give room, put fine manure enough to keep down all weeds, and it will double the crop.
Application of Manures is a topic that has been widely debated, with knowledgeable farmers having significantly different opinions. Some use them extensively as a top-dressing for grasslands. This approach is beneficial, but likely about half of their advantages are[Pg 276] lost due to washing rains and evaporation. A better strategy is to avoid keeping land in grass for too long and to thoroughly apply manure when the land is plowed. We know of a piece of light land that produced half a ton of hay per acre each year. The owner plowed it, grew a crop, and added a moderate amount of stable manure along with ten loads of leached ashes per acre. We observed it during hay season, the third year after it was manured, subsoiled, and seeded down, and they were then harvesting fully three tons of timothy hay per acre, which was the same amount it had produced for three consecutive years without any top-dressing. If manure is to be used as a top-dressing, thoroughly harrow the land, and always apply it in the fall—it’s worth twice as much as when applied in the spring. The winter rains and snows help it soak into the soil, while the heat of spring and summer causes it to evaporate. A mix of plaster, lime, ashes, and a little salt, spread on meadows right after haying, ensures quicker growth of feed, much sooner than on other meadows. It significantly boosts the hay crop for the following season. A common rule is not to let manure sit on the surface for long before plowing it in. Pile manure in heaps that are manageable for spreading, and spread it right before plowing. Don’t spread manure one day and plow it in the next. When applying manure in hills, have the planters follow the manure cart. For potatoes planted in hills, drop the potatoes, add the manure on top, and cover immediately. In a dry season, this will yield double the amount compared to those planted in the usual manner. For fall grains, plow in the manure right before sowing the seeds. This is better than plowing it under the sod. If the land isn’t sod and you can only plow the manure in shallowly, then re-plow deeply just before sowing the seeds; the results will be excellent. Apply manure to the land in the fall or just after harvest, plow it in, let the land rest until spring, and then plow deeply for the best results. For onion crops, manure is most effective on the surface. For those grown from sets, or any onions once they have grown enough to allow space, apply enough fine manure to suppress all weeds, and it will double the crop.
Gypsum is better sowed than in any other way. Mixed with a little lime and salt, or wood-ashes and salt, the effect on corn is better than from either alone. To hoed crops apply these articles twice, and always by sowing, and not by putting it around or upon the hills; the effect is much greater sowed, besides the labor that is saved. In applying guano, do not allow it to come in contact with the plants, as it is apt to destroy them.
Gypsum is best applied by sowing it rather than using any other method. When mixed with a small amount of lime and salt, or wood ash and salt, it improves corn growth more effectively than using either ingredient alone. For crops that are hoed, these materials should be applied twice, always by sowing them rather than scattering them around or on top of the plants; this method is much more effective and saves labor. When using guano, make sure it doesn’t touch the plants, as it can harm them.
It only remains to consider the principles on which manure acts upon soils, and produces growth in plants. The action of manure on the soil, by which it is enabled to retain and appropriate moisture, constitutes its main, if not its whole benefit. It may afford a stimulus to the roots of plants. Even the specific manures, that are supposed to supply organic matter to particular plants, may impart their benefits by their action upon the air and water. Facts are certainly at hand to show that the great and leading benefits of manures are in their control of moisture, and where that control is not needed, plants get a great growth on what we call poor soil. No manures, either fossil or putrescent,[Pg 278] afford any considerable food for plants. Vegetation receives its growth mainly from water and from the atmosphere. Facts in support of this theory are abundant.
It only remains to look at the principles behind how manure affects soil and promotes plant growth. The main benefit of manure is its ability to help the soil retain and use moisture. It can stimulate plant roots. Even specific manures, which are thought to provide organic matter for certain plants, can be beneficial through their interaction with the air and water. There’s plenty of evidence showing that the primary advantages of manures lie in their moisture control, and when that control isn’t necessary, plants can thrive in what we refer to as poor soil. No manures, whether fossil or decayed, [Pg 278] provide significant nutrients for plants. Vegetation primarily grows from water and the atmosphere. There is abundant evidence to support this idea.
A trial was made to ascertain whence comes the matter of which a tree is composed. A quantity of kiln-dried earth was weighed and then put into a tight vessel. A willow shrub was also weighed and planted in that earth, and the vessel covered with perforated tin to keep out the dust; for a year and a half it was supplied only with pure water. The tree was then taken out, and found, by weight, to have gained one hundred and sixty pounds. The earth was then kiln-dried, as before, and weighed, and its weight was found to be only two ounces less than it was a year and a half before, when it was deposited there. The tree, then, must have received its growth, not from the soil, but from the water or the atmosphere, or both.
A test was conducted to find out where the material that makes up a tree comes from. A quantity of kiln-dried soil was weighed and placed in a sealed container. A willow sapling was also weighed and planted in that soil, and the container was covered with perforated metal to keep out dust; for a year and a half, it received only pure water. The tree was then removed and weighed, showing a gain of one hundred sixty pounds. The soil was then kiln-dried again and weighed, revealing that its weight was only two ounces less than it was a year and a half earlier, when it was first placed there. Therefore, the tree must have gained its mass not from the soil, but from the water or the air, or both.
Another fact: take a load of manure, dry it thoroughly, and weigh it. Then moisten it and apply it to the soil, and it will increase the weight of vegetation from ten to thirty or forty times its own weight when dry, and yet most of that manure may still be found in the soil. Hence it can only feed plants in a very limited degree. Its action must be on air and water, or the control it gives the soil over those elements.
Another fact: take a load of manure, dry it thoroughly, and weigh it. Then moisten it and apply it to the soil, and it will increase the weight of vegetation from ten to thirty or forty times its own weight when dry, and yet most of that manure may still be found in the soil. So, it can only feed plants to a very limited extent. Its effect must be on air and water, or the control it gives the soil over those elements.
It is also matter of common observation that soil well manured, will continue moist for a long time after similar land by its side, but which has not been manured, is dried up. Hard coarse soils dry up very quickly, while soft, mellow, and friable ones will endure a long drought. The gases and moisture generated by the decomposition of manures produce this mellow state.[Pg 279] Hence the necessity of having that decomposition take place under the soil, or of plowing in the manure.
It’s also commonly observed that well-fertilized soil stays moist for a long time, while adjacent unfertilized land dries out. Hard, coarse soils dry out quickly, whereas soft, loose, and crumbly soils can withstand drought for a longer period. The gases and moisture produced from the breakdown of manure contribute to this crumbly texture.[Pg 279] Therefore, it’s important to have that decomposition happen beneath the soil or to till in the manure.
Another important fact bearing on this question is, that what are regarded very poor soils, such as light sandy or gravelly land, will produce good crops in a season remarkable for the frequency of showers. On such soils crops are from twice to four times as large, in a wet season as in a dry, and yet there is an addition of nothing but moisture, and in such a manner, as not to have it stand and become stagnant among the roots of the plants.
Another important factor related to this question is that what are considered very poor soils, like light sandy or gravelly land, can produce good crops in a season that has a lot of rain. In these types of soils, crops can be two to four times larger in a wet season compared to a dry one, and the only thing added is moisture, without it pooling and becoming stagnant around the plants' roots.
Yet another evidence is in the strength of clay soils. A hard clay is very unproductive. But so disintegrated that plants can grow in it, it produces a great crop. This is because clay is of so close a texture, that when mixed with manure, turf, sand, or muck, although friable, it retains more moisture, than sand or ordinary loam. This is the reason of the superior fertility of land annually overflowed with water, as Egypt in the vicinity of the Nile. It is not that the Nile brings down deposites from the mountains of the Moon, so rich above all that is in the valleys below. The entire weight of all that a river deposites on ten acres would not equal in weight the increased vegetation of a single acre. The cause of the increased fertility is the fact that the deposite is so fine that it prevents rapid evaporation, and thus causes the soil to retain moisture for the large growth, and maturity of the plants.
Yet another piece of evidence is in the strength of clay soils. Hard clay is not very productive. However, when it's broken down enough for plants to grow in it, it can produce a great crop. This is because clay has such a fine texture that when mixed with manure, turf, sand, or muck, it remains crumbly yet retains more moisture than sand or regular loam. This explains the superior fertility of land that is regularly flooded with water, like the area around the Nile in Egypt. It's not that the Nile brings down deposits from the Mountains of the Moon, which are richer than anything in the valleys below. The total weight of all the deposits a river leaves on ten acres wouldn’t even match the increased vegetation of a single acre. The reason for the increased fertility is that the deposits are so fine they prevent rapid evaporation, which helps the soil hold moisture for the healthy growth and maturation of the plants.
One more evidence is found on our sandy pine plains. Our common forest-trees, as beech, maple, elm, or linden, will not flourish there. Such land will produce comparatively no corn, oats, or wheat. But rye that stands drought better than any other grain, grows tol[Pg 280]erably well. But such plains always produce an enormous growth of pine timber, hardly equalled in the number of cords to the acre, by the heaviest-timbered land of the river bottoms. Why is this? Does a maple need so much more food than a pine, or is it in the habits of the trees? It is not in the richness or poverty of the soil, but in the adaptation of the trees to reach and appropriate moisture. The roots of the maple and beech, spread out near the surface of the ground. And it being a light, porous, sandy soil, it does not retain moisture enough to promote their growth. But whoever notices a pine-tree that has been turned up from the roots by the wind, will see that the roots run down almost perpendicularly ten or fifteen feet into the sand. There they find plenty of moisture and hence their great growth. This principle explains the comparative productiveness of all soils.
One more piece of evidence can be found on our sandy pine plains. Our typical forest trees, like beech, maple, elm, or linden, won't thrive there. Such land produces almost no corn, oats, or wheat. However, rye, which withstands drought better than other grains, grows fairly well. But these plains always yield an enormous amount of pine timber, hardly matched in volume per acre by the densest timbered land along the river bottoms. Why is that? Does a maple tree need so much more nourishment than a pine, or is it related to the trees' habits? It's not about the richness or poverty of the soil, but rather how well the trees are adapted to reach and utilize moisture. The roots of maple and beech spread out near the surface of the ground. Since it's light, porous sandy soil, it doesn't hold enough moisture to support their growth. But if you observe a pine tree that has been uprooted by the wind, you'll see that its roots shoot down almost straight for ten or fifteen feet into the sand. There they discover ample moisture, which leads to their substantial growth. This principle clarifies the relative productivity of all types of soil.
A soil composed of light muck, or a kind of peet-soil, will dry up soon. There is nothing to prevent rapid evaporation; hence it is always unproductive, for want of suitable moisture. Mix with it clay, to render its texture more firm, and it will retain the moisture, and be very productive. Clay alone is too solid to retain moisture; it runs off, as from a brick. Mix sand with it, and it becomes mellow, and retains moisture, and produces great growth. Sand allows so free and rapid an evaporation that it is unproductive. We say it leaches and is hungry, and so it is, because it has little power to retain water. Our manures do it good, only as they are calculated to aid it in controlling moisture. If we apply a light manure as we would to clay, it is comparatively useless; it adds no firmness to the texture of the soil, and hence does not increase its capacity[Pg 281] for controlling water. On such land, the only good that manure does, is while decomposition is taking place in the soil, it renders it more moist, and hence more productive. Apply clay to such a soil, and it will increase its firmness and consequent capacity of retaining and appropriating moisture, and thus render it highly valuable. Dry straw manure is sometimes said to dry up land, and ruin crops. So of turf in a dry season. In a wet season they greatly increase the growth of crops. Now they contain just as much food for plants in one season as another. Hence a soil too easily impervious to the atmosphere, will be a poor soil, that is, will produce poorly, simply because it has no power to retain the necessary moisture.
A soil made up of light muck, or a type of peat soil, will dry out quickly. There’s nothing stopping rapid evaporation, so it’s always unproductive due to insufficient moisture. Mixing in clay will make it more solid and help retain moisture, making it very productive. Clay by itself is too dense to hold moisture; it runs off like water from a brick. When you add sand, it becomes softer and retains moisture, leading to significant growth. However, sand allows for such quick and excessive evaporation that it becomes unproductive. We say it leaches and is thirsty, and that’s true because it doesn’t hold much water. Our fertilizers only help as they improve its ability to manage moisture. If we use a light fertilizer as we would for clay, it’s pretty much ineffective; it doesn’t add any firmness to the soil’s texture, so it doesn’t enhance its ability to manage water. On this type of land, the only benefit of fertilizer comes during the decomposition process in the soil, which makes it more moist and therefore more productive. Adding clay to such soil will make it firmer and improve its capacity to retain and utilize moisture, making it highly valuable. Dry straw manure is sometimes said to dry out the land and ruin crops, just like turf in a dry season. However, in a wet season, they greatly boost crop growth. They provide just as much nutrition for plants in one season as they do in another. Therefore, soil that’s too easily sealed off from the atmosphere will be poor soil, meaning it will produce poorly, simply because it lacks the ability to retain the necessary moisture.
We suppose these facts and reasons to establish our theory, that the principal benefit of manures, and of mixing different soils, is in the control they give over the moisture and the atmosphere. Hence the greatly increased crop of clover from the application of three quarters of a bushel of plaster to an acre. The increased weight of clover on five square rods, would outweigh the plaster applied, and still that plaster remains, in almost its full weight, on the soil. This principle explains the benefit of mulching trees, plants, or vegetables. This is the best means of preserving trees, the first year after transplanting, and of securing a great growth, of any kind of shrubs or plants. This may be done with common straw or leaves. Now wherein is their utility? Not in the nourishment they afford the plants, but in the fact that mulching so covers the surface as to prevent rapid evaporation. In such cases, it is the more abundant moisture that secures the greater growth.[Pg 282]
We believe these facts and reasons support our theory that the main advantage of fertilizers and mixing different types of soil is their ability to manage moisture and the atmosphere. This is why adding three quarters of a bushel of plaster to an acre significantly boosts clover yield. The added weight of clover on five square rods exceeds the weight of the plaster used, yet the plaster remains nearly intact in the soil. This principle explains why mulching trees, plants, or vegetables is beneficial. It's the best way to protect trees in their first year after being transplanted and promotes vigorous growth for any type of shrubs or plants. This can be done using common straw or leaves. So, what is their benefit? It's not in the nourishment they provide to the plants, but rather in how mulching covers the surface to prevent fast evaporation. In these cases, it's the increased moisture that leads to greater growth.[Pg 282]
Hence the first study of a soil culturist should be to ascertain how he shall so mix and manage the materials at his command, as to cause them to retain moisture for the longest time, without leaving water to stand about the roots of his plants. On this depends the whole importance of deep plowing and ditching. On this theory we may also account for the fact that certain plants prefer a certain kind of manure to all others. It is that those plants act in a certain manner on the soil requiring a specific action of manure to enable it to appropriate moisture and tax the atmosphere for their growth. This theory explains why too much manure is bad. Not because we give too much food to plants, but because excess of manure dries up the land. But whatever theory we adopt, we all agree in the utility of fertilizers. And the experience of practical farmers is of more value in aiding us to reach right conclusions, than all chemical essays on the subject that have ever been written.
Therefore, the first task of a soil cultivator should be to determine how to mix and manage the materials available to him so that they retain moisture for the longest time without allowing water to accumulate around the roots of his plants. The entire importance of deep plowing and drainage relies on this. This theory also helps explain why certain plants prefer specific types of manure over others. These plants interact with the soil in a way that requires a particular type of manure to enable the soil to retain moisture and draw from the atmosphere for their growth. This theory clarifies why using too much manure is detrimental—not because we overfeed the plants, but because excess manure can dry out the soil. Regardless of the theory we choose to follow, we all agree on the value of fertilizers. The insights of experienced farmers are far more helpful in guiding us toward accurate conclusions than all the chemical studies ever written on the subject.
MARL.
This is one of the best distributed and most universal fertilizers. Marl proper contains nearly equal proportions of clay and lime. Sand-marl is spoken of, in which sand and lime are the main ingredients. Clay-marls are to be applied to sandy and gravelly soils, and sand-marls to clayey soils. Shell-marls are very valuable, and seldom contain clay. Marls may easily be known, even by those not at all acquainted with chemistry. Apply any mineral acid, or even very strong vinegar, and if it be a marl, an effervescence[Pg 283] will at once be observed: this effect is produced by acid upon lime.
This is one of the most widely used and universal fertilizers. Marl itself has nearly equal amounts of clay and lime. There's also what we call sand-marl, which primarily consists of sand and lime. Clay-marls are meant for sandy and gravelly soils, while sand-marls are suitable for clay soils. Shell-marls are highly valuable and rarely contain clay. Even those with no chemistry background can easily identify marls. Just apply any mineral acid, or even very strong vinegar, and if it’s a marl, you'll see an effervescence[Pg 283] right away: this reaction happens because of the acid reacting with the lime.
MARJORUM.
There are two varieties in cultivation—the sweet, an annual herb; and the winter, a hardy perennial. They are grown and used as summer savory—used green, or dried for winter. They give a sweet, aromatic flavor to soups, stews, and dressings. The cultivation is, in all respects, like other garden-herbs of the kind, whether for medicinal or culinary purposes.
There are two types that are grown— the sweet, which is an annual herb, and the winter, which is a hardy perennial. They are grown and used as summer savory—either fresh or dried for winter. They add a sweet, aromatic flavor to soups, stews, and dressings. The process of growing them is similar in every way to other garden herbs, whether for medicinal or cooking purposes.
MELONS.
There are two species—musk and water melons—which are subdivided into many varieties of each. These are among the most delicious of all the products of the garden. A little use makes all persons very fond of them. The climate of the Middle and Southern states is well adapted to raising melons; much better than the same latitudes in Europe. The following brief directions will insure success in their cultivation. A light, rich soil is always desirable. There should always be a little sand in the composition of soil for melons. If not there naturally, supply it; it will always pay. The warm sands of Long Island and New Jersey are the best possible for melons, especially for water-melons. It may be well to trench deep for the[Pg 284] hills, and mix in a little well-rotted manure, and cover it with fine mould. A quantity of manure, left in bulk under the hills, will dry them up at the worst possible time. When you plant only a few in a garden, mulch your musk-melons with chips or sawdust from the wood-yard, or leaves and decayed wood from the forest, and you will get a great growth. They will grow luxuriantly in a pile of chips, with a little soil, in a door-yard, where hardly any other plant would flourish. The water-melon does best in almost pure sand, if it be enriched with liquid or some other of the finer manures. Plant musk-melons six feet apart, and water-melons nine feet each way. When the plants become established, never leave more than two or three in a hill. The product will be greatly increased in number and size, by picking off the end bud of the first runners when they show their blossom-buds; this causes them to throw out many strong lateral vines, which will produce abundantly. The attacks of striped bugs, so well known as the enemies of vines, and also of the black fleas, or hoppers (very minute, but quite destructive to tender vines when first up), may be prevented (says Downing) by sprinkling near the plants a little guano. As but a small portion of cultivators will have it, or can obtain it, we recommend to put many seeds in a hill, to provide for the depredations of the bugs, and sprinkle offensive articles around them. These will not always be effectual. We have recommended elsewhere to fence each hill, as the most effectual method. A box, with gauze or a pane of glass over the top, is a certain remedy in every case; it also greatly promotes the growth of the young vines. This is equally effectual against the cutworm and all other insects; and, as the[Pg 285] boxes will last a dozen years or so, we should use them if we had ten acres of melons. But by early and late planting, and watchfulness, and replanting, you will succeed without protection. An excessive quantity of stable-manure does not increase the growth, especially of water-melons. Plaster, bonedust, and ashes, are good applications; hog-manure is the best of all. The seeds should be soaked two days, and planted an inch deep on broad hills, raised in the centre four inches above the level of the bed, that water may not stand around them; planted low, they sometimes perish in a few hours in a hot sun, after a rain. Hoe them often, but never when they are wet, and never hoe near them after they have commenced running; the roots spread, about as much as the vines, and hoeing deep near them cuts off the roots, and materially injures them. Many a promising plat of melons has been ruined by stirring the soil when they were wet, and hoeing around them after they had begun to run. In walking among melons, great harm is done by stepping on the ends of vines. No one should be allowed among melons but the one who hoes or picks them. Many are lost by drought, after great care. We have often used an effectual remedy; it consists in turning up the vines, if they have begun to run before the drought, and putting around each hill from a peck to half a bushel of wet, well rotted manure; that from a spent hotbed is excellent for this purpose; and hoe from a distance between the hills, and cover the manure an inch or two deep with fine mould, lay down the vines, and saturate the hill with water, and they will hardly get dry again during the season. A little judicious watering will give you a great crop in the most severe drought.[Pg 286]
There are two types of melons—musk and water—which are divided into many varieties. These are some of the most delicious garden produce. Even a small amount makes everyone very fond of them. The climate in the Middle and Southern states is ideal for growing melons, much better than in the same regions of Europe. The following brief tips will help ensure success in growing them. A light, rich soil is always preferable. There should be some sand mixed into the soil for melons. If it isn’t there naturally, add it; it will be worth it. The warm sands of Long Island and New Jersey are the best for melons, especially watermelons. It may help to dig deep for the hills, mix in some well-rotted manure, and cover it with fine soil. Leaving a bulk of manure under the hills will dry them out at the worst possible time. When planting only a few in a garden, mulch your musk melons with wood chips or sawdust from a lumber yard, or leaves and decayed wood from the forest, and you’ll encourage great growth. They will thrive in a pile of chips, with a little soil, in a yard where hardly any other plant would do well. Watermelons prefer almost pure sand if it's enriched with liquid or other fine manures. Space musk melons six feet apart and watermelons nine feet apart. Once the plants are established, don’t leave more than two or three in each hill. You can greatly increase the number and size of the fruit by pinching off the end bud of the first runners once they show their blossoms; this encourages the plants to produce many strong side vines, which will yield abundantly. To prevent common pests like striped bugs and black flea hoppers (which are very small but can be quite destructive to tender young vines), sprinkling a little guano near the plants can help (as Downing suggests). Since not many growers have guano or can get it, we suggest planting multiple seeds in each hill to account for bug damage and sprinkling unpleasant materials around them. These methods aren’t always foolproof. We have advised elsewhere that fencing each hill is the most effective strategy. A box covered with gauze or glass on top is a foolproof solution that also significantly boosts the growth of the young vines. This method works well against cutworms and other insects; plus, since the boxes can last about ten years, we would use them even if we had ten acres of melons. However, by planting early and late, staying vigilant, and replanting, you can succeed without protection. An excessive amount of stable manure doesn’t promote growth, especially for watermelons. Plaster, bonedust, and ashes are good to use; hog manure is the most effective of all. Soak the seeds for two days, and plant them an inch deep on broad hills raised in the center four inches above the level of the bed to prevent water from pooling around them. If planted too low, they can perish quickly in intense sunlight after a rain. Hoe them often, but never when they’re wet, and avoid hoeing near them once they start spreading; their roots spread as much as the vines do, and hoeing deep near them can cut off roots and significantly harm them. Many promising melon patches have been destroyed by stirring the soil when wet or hoeing around them after they’ve begun to spread. Walking among the melons can cause great damage by stepping on the ends of the vines. Only the person who weeds or picks should be allowed near the melons. Many are lost to drought after careful tending. We’ve used an effective method; it involves turning up the vines if they start to spread before a drought hits and placing between one peck to half a bushel of wet, well-rotted manure around each hill; manure from a spent hotbed works excellently for this purpose. Hoe from a distance between the hills and cover the manure with an inch or two of fine soil, lay the vines down, and soak the hill with water; they will hardly dry out again during the season. A little careful watering can yield a large crop even in severe drought.[Pg 286]
Varieties of the Musk-melon.—These are numerous, and the nomenclature uncertain. The London Horticultural Society's catalogue enumerates seventy. Most of them are of no use to any one. Two or three of the best are sufficient. There are three general classes of musk-melons—the green-fleshed, as the citron and nutmeg; yellow-fleshed, as the cantelope, or long yellow; and Persian melon. The last is the finest of all, but is too tender for general cultivation with us, requiring much care and very warm seasons. The yellow-fleshed are very large, but much inferior in quality to either of the others. The green-fleshed are the musk-melons for this whole country. The nutmeg has long been celebrated; but, it being much smaller than the citron, and in no way superior in quality, we think the latter the best for all American gardens.
Varieties of the Musk-melon.—There are many kinds, and the naming can be confusing. The London Horticultural Society's catalog lists seventy of them. Most aren’t useful to anyone. Two or three of the best varieties are enough. There are three main types of musk-melons: the green-fleshed, like the citron and nutmeg; the yellow-fleshed, like the cantaloupe or long yellow; and the Persian melon. The Persian melon is the best of all, but it’s too delicate for widespread growing here, needing a lot of care and very warm seasons. The yellow-fleshed varieties are quite large, but they’re much lower quality than the others. The green-fleshed types are the go-to musk-melons for this whole country. The nutmeg melon has long been popular, but since it’s much smaller than the citron and isn’t really better in quality, we believe the citron is the best choice for American gardens.
The following are enumerated in "White's Gardening for the South," as adapted to the latitude of the Southern states: Christiana, Beechwood, Hoosainee, Sweet Ispahan, Pineapple, Cassabar, Netted Citron, and Rock. These are doubtless all fine, and would do well at the North, with suitable care and protection. Downing's catalogue is nearly the same, with a very few additions.
The following are listed in "White's Gardening for the South," specifically for the Southern states: Christiana, Beechwood, Hoosainee, Sweet Ispahan, Pineapple, Cassabar, Netted Citron, and Rock. These are all excellent choices and would thrive in the North with the right care and protection. Downing's catalog is almost the same, with just a few additions.
Varieties of Water-melons—are also numerous, and names uncertain. The best varieties, however, are well known. The most choice are the following: Imperial, Carolina, Black Spanish, Mountain-Sprout, Mountain-Sweet, Apple-seeded, and Ice-cream. The following excellent water-melons all originated in South Carolina: Souter; Clarendon, or dark-speckled; Bradford, very dark-green, with stripes mottled and streaked with green; Ravenscroft, and Odell's large white. There is[Pg 287] a fine little melon, called the orange-melon, because the flesh and skin separate like an orange. These varieties will all do well with care. To preserve any one of them, it must be grown at some distance from other varieties. All water-melons should be far removed from citrons, which resemble them, raised only for preserving. They always ruin the next generation of water-melons. Different varieties of musk-melons planted together produce hybrids, partaking of the qualities of both, and are often very fine. We raised a cross between the yellow-fleshed cantelope and the nutmeg, which was excellent.
Watermelon Varieties—are numerous, and their names can be confusing. However, the best varieties are well recognized. The top choices include: Imperial, Carolina, Black Spanish, Mountain-Sprout, Mountain-Sweet, Apple-seeded, and Ice-cream. The following excellent watermelons all came from South Carolina: Souter; Clarendon, or dark-speckled; Bradford, which is very dark green with mottled stripes; Ravenscroft, and Odell's large white. There is[Pg 287] a delightful little melon called the orange-melon, because its flesh and skin separate like an orange. These varieties will thrive with proper care. To preserve any one of them, they need to be grown at some distance from other varieties. All watermelons should be kept far away from citrons, which look similar and are only grown for preserving. They always ruin the next generation of watermelons. If different varieties of cantaloupes are planted together, they produce hybrids that mix the qualities of both and are often very good. We grew a cross between the yellow-fleshed cantaloupe and the nutmeg, which turned out excellent.
Seeds of most vines are better for being two or three years old, as they produce less vines, but more fruit. Melons are a luxury that should grow in every garden, and the state should enact severe laws against stealing them, making the punishment no less than fine and imprisonment.
Seeds from most vines are better when they are two or three years old because they produce fewer vines but more fruit. Melons are a treat that should be grown in every garden, and the government should create strict laws against stealing them, with penalties including fines and imprisonment.
MILLET.
This is a species of grain, partaking much of the nature of a large grass. Sowed thin, it produces a good yield. The seed is excellent for fowls. Ground, it is good for keeping or fattening all domestic animals. It is about equal to Indian corn for bread. Cut while green, but when nearly ripe, it is a good substitute for hay, producing a much larger quantity per acre. All animals prefer millet, cut in the milk, to hay. It is a less profitable crop for grain, on account of the irregularity of its ripening, and its extreme liability to shell, when dry. It must be cut as soon as the seed begins[Pg 288] to harden. It also attracts swarms of birds, which are exceedingly fond of the seed. About three tons per acre is an average crop on tolerably good land. From one to three pecks of seed to the acre are sown broadcast. When sown in drills and cultivated, it grows very large, and requires only four quarts of seed per acre. It will make good fodder sown at any time from April to July. Its more extensive cultivation for fodder is recommended.
This is a type of grain that is quite similar to a large grass. When sown sparsely, it yields a good harvest. The seeds are great for poultry. When ground, it’s good for feeding or fattening all kinds of domestic animals. It’s about as good as corn for baking bread. If cut while still green but nearly ripe, it serves as a decent substitute for hay, providing a much larger quantity per acre. All animals prefer millet cut when it's milky over hay. It’s a less profitable crop for grain due to the inconsistency in its ripening and its high tendency to shell when dry. It should be cut as soon as the seeds start[Pg 288] to harden. It also attracts flocks of birds that love the seeds. On reasonably good land, an average crop is about three tons per acre. Generally, one to three pecks of seeds are sown per acre. When sown in rows and cultivated, it grows quite large and only needs four quarts of seeds per acre. It makes good fodder when sown anytime from April to July. Its wider cultivation for fodder is recommended.
MINT.
This genus of plants comprises twenty-four species. Those usually cultivated in gardens are three, Peppermint, Spearmint, and Pennyroyal mint. All mints are propagated by the same methods. Parting the roots, offset young plants, and cuttings from the stalks. Spearmint and peppermint like a moist and even wet soil. Pennyroyal does better in a rich loam. Plants come into use the same season they are set. Set the plants eight inches apart, and on beds four feet wide, leaving a path two feet between them. In field culture, for the oils and essences, place them two feet apart, for the convenience of going between the rows with a horse. Thus cultivation becomes easy. They should be cut in full blossom, and dried in small bunches in the shade, but better by artificial heat, like hops. They should be cut when dry. For domestic uses, dry quickly, and pulverize, and put away in tight glass bottles. They will retain all their strength, keep free from dust, and always be ready for use. The same is true of all the herbs for domestic use. As a field crop, mints are profitable.[Pg 289]
This group of plants has twenty-four species. The three commonly grown in gardens are Peppermint, Spearmint, and Pennyroyal mint. All mints are propagated using similar methods: by dividing the roots, planting young offsets, and taking cuttings from the stems. Spearmint and peppermint prefer moist or even wet soil, while pennyroyal thrives in rich loam. Plants can be harvested in the same season they’re planted. Space the plants eight inches apart in beds that are four feet wide, leaving a two-foot pathway between the beds. In field cultivation for oils and essences, plant them two feet apart to make it easier to navigate between the rows with a horse. This makes cultivation simpler. They should be harvested when in full bloom, dried in small bunches in the shade, or better yet, dried using artificial heat, similar to hops. Cut them when they're dry. For home use, dry them quickly, grind them up, and store them in airtight glass containers. This will help them retain their potency, keep dust out, and ensure they’re always ready to use. The same goes for all herbs used at home. As a field crop, mints are quite profitable.[Pg 289]
MULBERRY.
There are three varieties cultivated in this country. We place them in the order of their qualities:—
There are three types grown in this country. We rank them based on their qualities:—
1. The Johnson.—A new variety, thus described by Kirtland: "Fruit very large; oblong cylindric; blackish, subacid, and of mild and agreeable flavor. Growth of wood strong."
1. The Johnson.—A new variety, described by Kirtland as: "Very large fruit; oblong and cylindrical; dark, slightly tangy, and with a mild and pleasant flavor. The wood grows strong."
2. The Black Mulberry.—An Asiatic variety, rather tender for the North, though it succeeds tolerably well in some parts of New England. Fruit large and delicious; tree low and spreading. Easily cultivated on almost any soil. Propagated by seeds, layers, cuttings, or roots.
2. The Black Mulberry.—This is an Asian variety that's somewhat delicate for northern climates, but it grows fairly well in certain areas of New England. The fruit is large and delicious; the tree is short and spreads out. It's easy to grow in almost any type of soil. You can propagate it using seeds, layers, cuttings, or roots.
3. The Red Mulberry.—A native of this country. Fruit small and pleasant, but inferior to the two preceding.
3. The Red Mulberry.—A native of this country. The fruit is small and tasty, but not as good as the two mentioned before.
MULCHING.
This is placing around plants or trees, coarse manure or litter of any kind, to keep down weeds, and prevent too rapid evaporation of moisture. All straw, corn stalks, old weeds or stubble, forest leaves, seaweeds, old wood, sawdust, old tanbark, chips, &c., are good for mulching. Any tree taken up and planted with reasonable care, and well mulched and watered, will live. One of fifty need not die. Cover the loose earth deep enough to prevent the springing of weeds. Put a little earth on the outer edge of the manure, leaving it dishing about the tree. Fill that occasionally with water, and you will get a good growth, even in a dry season.[Pg 290]
This involves placing coarse manure or any type of litter around plants or trees to suppress weeds and slow down moisture evaporation. Straw, corn stalks, old weeds or stubble, forest leaves, seaweed, old wood, sawdust, used tanbark, chips, etc., are all great for mulching. Any tree that's carefully dug up, replanted, well-mulched, and watered will survive. Only one in fifty should die. Make sure to cover the loose soil deeply enough to stop weeds from growing. Add some soil to the outer edge of the manure, creating a dish around the tree. Occasionally fill that with water, and you'll see strong growth, even during dry seasons.[Pg 290]
Plant gooseberries or currants, and mulch the whole ground between the bushes, and give them no other cultivation, and the berries will grow nearly twice as large as the same varieties standing neglected, to grow up to weeds, in the usual way. Mulching with clean, dry straw, or with charcoal, is a preventive of mildew. It is the easiest method of taking care of strawberries after they are in blossom; the vines will bear much more and finer fruit, and it will be clean and neat. Mulching vines is a great means of insuring a crop. Every crop that can be mulched will be greatly benefited by it; hence, all the straw and litter that can be saved is money in the pocket; for mulching alone, it is worth five times as much as it can be sold for. Burning or in any way destroying cobs, cornstalks, stubble, old straw, or decaying wood, is extravagant wastefulness.
Plant gooseberries or currants, and cover the entire ground between the bushes with mulch, without doing any other cultivation, and the berries will grow nearly twice as large as the same varieties that are left to grow amidst weeds, as is usually done. Mulching with clean, dry straw or charcoal helps prevent mildew. This is the easiest way to care for strawberries once they bloom; the plants will produce a lot more and better fruit, and it will look clean and tidy. Mulching vines is a great way to ensure a good harvest. Any crop that can be mulched will benefit significantly from it; therefore, all the straw and debris that can be saved is like money in your pocket, as mulching alone is worth five times what it can be sold for. Burning or destroying cobs, cornstalks, stubble, old straw, or decaying wood is a wasteful extravagance.
MUSHROOMS
Are vegetables growing up in old pastures, or on land mulched and the straw partly covered with soil. They are also cultivated in beds for the purpose. Picked at the right stage, they are a fine article of diet, almost equalling oysters. The use of the wild ones, however, is attended with some danger, for the want of knowledge of the varieties, or of the difference between the genuine mushroom, and the toadstools that so much resemble them.
Are vegetables growing in old pastures, or on land that’s been mulched with straw and partially covered with soil? They're also grown in beds specifically for that purpose. When picked at the right time, they can be an excellent part of your diet, almost as good as oysters. However, eating wild ones comes with some risks, mainly due to a lack of knowledge about the different varieties, or how to tell genuine mushrooms from the poisonous look-alikes.
Persons have been poisoned unto death by eating toadstools instead of mushrooms. When of middle size, mushrooms are distinguished by the fine pink or flesh color of their gills, and by their pleasant smell.[Pg 291] In a more advanced stage, the gills become of a chocolate color; they are then apt to be confounded with injurious kinds. The toadstool that most resembles the true mushroom is slimy to the touch, and rather disagreeable to the smell. The noxious kind grows in the borders of woods, while the mushroom only grows in the open field. It is better, however, not to eat them unless gathered by a practised hand, so as to be sure of no mistake. With the help of one accustomed to gathering them, you will learn in a few moments, so as to be accurate and safe.
People have died from eating toadstools instead of mushrooms. Medium-sized mushrooms can be recognized by the fine pink or flesh-colored gills and their pleasant smell.[Pg 291] As they mature, the gills turn a chocolate brown; at this stage, they can easily be mistaken for harmful varieties. The toadstool that most closely resembles the true mushroom feels slimy and has an unpleasant odor. The toxic kind typically grows along the edges of woods, while mushrooms usually grow in open fields. However, it's best not to eat them unless they have been picked by someone experienced to avoid any mistakes. With the help of someone who knows how to gather them, you'll learn quickly and can be safe and accurate.
Mushroom Beds.—Prepare a bed in the corner of the hothouse, or, in the absence of that, in a warm, dry cellar. The first of October is the best time. Make the bed four feet wide, and as long as you require. It should be one foot high perpendicularly at the edges, and sloping toward the middle; it should be of horse-manure, well forked, and put in compact and even, so as to settle all alike. Cover it with long straw, to preserve heat and the exhalations that would rise. At the end of ten days, the heat will be such as to allow you to remove the straw, and put an inch of good mould over the top of the bed. On this put the spawn or seed of the mushroom, in rows of six inches apart. The spawn are white fibres, found in old pastures, where mushrooms grow, or in old spent hotbeds, and sometimes under old stable floors. The warmth of the bed will produce mushrooms plentifully for a considerable time. If the production diminishes and nearly ceases, it may be renewed by removing the mould, and putting on good horse-manure to the depth of twelve inches, and covering and planting as before, and the production will be plentiful for a number of weeks.[Pg 292]
Mushroom Beds.—Set up a bed in the corner of the greenhouse, or if that's not possible, in a warm, dry basement. The best time to start is the first of October. Make the bed four feet wide and as long as you need. It should be one foot high at the edges and slope down towards the center. Use horse manure that’s been well aerated, packed down evenly, so it settles uniformly. Cover it with long straw to keep in heat and the gases that rise. After ten days, the heat will be sufficient for you to remove the straw and add an inch of good soil on top of the bed. On this, place the mushroom spawn or seeds in rows six inches apart. The spawn looks like white fibers and can be found in old pastures where mushrooms grow, in spent hotbeds, and sometimes under old stable floors. The warmth from the bed will produce mushrooms abundantly for quite some time. If the yield starts to decrease or nearly stops, you can refresh it by removing the soil and adding good horse manure up to twelve inches deep, then covering and planting it as before, which will result in a plentiful harvest for several weeks.[Pg 292]
MUSTARD.
There are two kinds cultivated, the black and the white, annuals, and natives of Great Britain. The white mustard is cultivated in this country principally for greens, and sometimes for a small salad like the cress. It may be sown at any time from opening of spring to the beginning of autumn. But sown in hot weather, the bed must be shaded. The Spaniards prefer the white mustard for grinding for table use, because of its mildness and its whiter flour. White mustard-seed, being much larger than the black, is preferred for mangoes, and all pickling purposes.
There are two types grown, black and white, which are annuals and native to Great Britain. White mustard is mainly grown in this country for its greens and sometimes for use in small salads like cress. It can be sown anytime from the beginning of spring to the start of autumn. However, if sown in hot weather, the bed needs to be shaded. Spaniards prefer white mustard for grinding to use at the table because it’s milder and has a whiter flour. White mustard seeds, being significantly larger than black ones, are favored for making mangoes and for all pickling purposes.
Black mustard is cultivated principally in the field, for the mills. It is there ground, and makes the well known condiment found on most tables.
Black mustard is mainly grown in the fields for the mills. It is then ground and turned into the popular condiment that you find on most tables.
Sow in March or April, broadcast on land tolerably free from weeds, and if you get it too thick, hoe up a part. In July or August, you may get a good crop. Cradle it as wheat, before ripe enough to shell.
Sow in March or April, spreading the seeds on land that is fairly weed-free, and if it’s too thick, thin it out by hoeing up some. In July or August, you can expect a good harvest. Cut it like wheat, before it’s fully ripe enough to shell.
Mustard used in various ways is medicinal. It is one of the safest and most speedy emetics. Stir up a table-spoonful of the flour and drink it. Follow it with repeated draughts of warm water, and in half an hour, you will have gone through all the stages of a thorough emetic, without having been weakened by it.[Pg 293]
Mustard can be used in different ways for medicinal purposes. It's one of the safest and quickest ways to induce vomiting. Mix a tablespoon of the powder in water and drink it. Follow that up with several glasses of warm water, and within half an hour, you'll experience all the effects of a complete emetic without feeling weakened by it.[Pg 293]
NASTURTIUM.
This annual plant, found in most gardens, is too well known to need description. Were it not so common, its flowers, that appear in great profusion, from early summer till destroyed by frost, would be regarded very beautiful. Its main use is for pickles. Its green berries are nearly equal to capers for that purpose. It grows well on any good garden soil; bears more berries on less vines, planted on land not too rich. Single vines four feet apart, on rich land, do best.
This annual plant, commonly found in most gardens, doesn’t need much description. If it weren’t so common, its flowers, which bloom in abundance from early summer until frost kills them, would be seen as very beautiful. Its primary use is for pickles. Its green berries work almost as well as capers for that purpose. It grows well in any decent garden soil; it produces more berries on fewer vines when planted in land that isn't too rich. Single
NECTARINE.
This is only a fine variety of the peach, having a smooth skin. Downing gives instances of its return to the peach, and others of the production of nectarines and peaches on the same limb. The appearance of the tree is hardly distinguishable from the peach. It is one of the most beautiful of dessert fruits: it has no down on the skin, being entirely smooth and beautiful, like waxwork. Its smooth skin exposes it to the ravages of the curculio. It is longer-lived on plum-stocks, but is more generally budded on the peach. It is usually productive wherever peaches flourish, if not destroyed by the curculio. It is even more important than in the peach to head-in the trees often, to produce good large fruit.
This is just a fine variety of peach with smooth skin. Downing mentions cases where it reverts back to peach, as well as instances of nectarines and peaches growing on the same branch. The tree looks almost identical to a peach tree. It’s one of the most attractive dessert fruits: its skin is completely smooth and stunning, almost like it’s made of wax. However, its smooth skin makes it vulnerable to damage from the curculio. It tends to live longer on plum rootstocks but is generally budded onto peach rootstocks. It usually grows well wherever peaches do, unless affected by the curculio. It’s even more crucial than with peaches to frequently prune the trees to produce large, quality fruit.
Varieties—are divided into freestone and clingstone, with quite a number in each class. We give only a few of those most esteemed.[Pg 294]
Varieties—are divided into freestone and clingstone, with quite a few in each category. We present only a selection of those most valued.[Pg 294]
Boston.—Freestone, American seedling; hardy and productive; color deep-yellow, with a bright-red cheek. Time, September 1st.
Boston.—Freestone, American seedling; tough and fruitful; color deep yellow, with a bright red blush. Time, September 1st.
Due du Telliers.—Freestone, pale-green, with a marbled reddish cheek; flesh whitish, inclining to green; very fine; a great bearer of rather large fruit. Time, last of August.
Due du Telliers.—Freestone, pale green, with a marbled reddish blush; flesh is whitish, leaning toward green; very fine; produces a lot of fairly large fruit. Harvest time is the end of August.
Hunt's Tawny.—Very fine and early; a great bearer; tree hardy; color, pale-orange, with a dark-red cheek, with many russety specks. Time, forepart of August.
Hunt's Tawny.—Very good and early; produces a lot; tree is hardy; color, pale orange with a dark red blush and lots of russet speckles. Harvest time, early August.
Pitmaston Orange.—A fine yellow nectarine, maturing the last of August.
Pitmaston Orange.—A great yellow nectarine, ready to eat by the end of August.
The Early Violet—is an old French variety, everywhere esteemed; it has sixteen synonyms; fruit high-flavored. Time, last of August.
The Early Violet—is an old French variety, highly regarded everywhere; it has sixteen synonyms; the fruit is very flavorful. Harvest time is the end of August.
Newington.—A good clingstone; an English variety that has long been cultivated; it has many synonyms; the color dark-red when exposed. Time, 10th of September.
Newington.—A solid clingstone; an English variety that has been grown for a long time; it has many other names; the color is dark red when exposed. Date, September 10th.
Newington Early—Is one of the best, earlier, larger, and better, than the preceding; ripens first of September. The same varieties are excellent for the South, where they ripen considerably earlier. The following selection of choice, hardy nectarines for a small garden, is from Downing:—
Newington Early—Is one of the best, earlier, larger, and better than the previous ones; it ripens at the beginning of September. The same varieties are great for the South, where they ripen much earlier. The following selection of top-quality, hardy nectarines for a small garden is from Downing:—
Early Violet, Elruge, Hardwicke Seedling, Hunt's Tawny, Boston, Roman, and New White.[Pg 295]
Early Violet, Elruge, Hardwicke Seedling, Hunt's Tawny, Boston, Roman, and New White.[Pg 295]
NEW FRUITS.
That these are constantly appearing, is a matter of common observation; but the manner of their production has given rise to much diversity of opinion. The theory that they are the results of replanting, from the seeds of successive generations of the same tree, is called the Van Mons' theory, after Dr. Van Mons, of Belgium, who devoted many years of close study and application to the improvement of fruit, especially of pears, by this method. His directions may be briefly summed up as follows. Plant seeds from any good variety of fruit; let those seedlings stand without grafting, until they bear. Take the first fruit from the best of those seedlings, and plant it and produce other seedlings, and so on. The peach and plum are said to reach a high state of excellence in the third generation, while the pear requires the fifth. Seeds from old trees are said to have a great tendency to return to their wild origin, while those of young, improving trees will more generally produce a better fruit. The seeds from a graft from a young tree does not produce a better than itself. The succession must be of seedlings. This theory requires long practice, and is exposed to interruptions by the crosses that will necessarily occur between different trees in blossom. And we have in so many cases had a fruit of great perfection arise from a single planting of seed from some known variety, that we must conclude the improvement to be produced by some other principle than that of the Van Mons' theory. The evidence is in favor of the opinion that new varieties of fruit arise from cross-fertilization in the blos[Pg 296]soms of different kinds, and that the improvement of the qualities of any given variety is the result of cultivation. Some of the best plums we have are known to have been the product of fertilizing the blossoms of one tree from the pollen of another; this is constantly taking place with our fruits, and is consequent upon our mixed orchards. Let this be attended to artificially, by covering branches with gauze, to prevent the fertilization by bees and winds, and make the cross between any two varieties you choose, and the results may prove highly beneficial. The amateur cultivator may render essential service to pomology by this practice. We know that all our choice fruits have come from those not fit for use. It is not improved cultivation of the old, barely, but the production of new varieties. The subject of further improvement, therefore, demands careful study and practice. The seeds of established varieties, planted at once without drying, will often reproduce the same. We are not certain but they generally would, if not affected by blossoms of contiguous trees.
That these are constantly appearing is widely observed; however, the way they are produced has sparked much debate. The theory that they result from replanting seeds from successive generations of the same tree is known as the Van Mons' theory, named after Dr. Van Mons from Belgium, who spent many years studying and improving fruits, especially pears, using this method. His instructions can be summarized as follows: plant seeds from a good variety of fruit and let those seedlings grow without grafting until they bear fruit. Take the first fruit from the best seedlings, plant it, and produce more seedlings, and continue this process. The peach and plum are said to reach a high level of quality by the third generation, while the pear takes five generations. Seeds from old trees tend to revert to their wild origins, while seeds from young, improving trees are more likely to produce better fruit. Seeds from a graft of a young tree do not yield fruit superior to the parent. The succession must consist of seedlings. This theory requires extensive practice and is susceptible to interruptions from cross-pollination between different trees in bloom. In many cases, we have seen perfect fruit arise from a single seed planting from a known variety, leading us to conclude that improvement occurs through principles other than the Van Mons' theory. Evidence supports the view that new fruit varieties arise from cross-fertilization of blossoms from different types, and the enhancement of any given variety’s qualities results from cultivation. Some of our best plums are known to be the result of fertilizing the blossoms of one tree with pollen from another; this is consistently happening in our fruit orchards due to their mixed nature. If we artificially manage this by covering branches with gauze to prevent pollination by bees and wind, we can create crosses between any two varieties we choose, possibly yielding very beneficial results. Amateur cultivators can significantly contribute to the field of pomology through this practice. We know that all our choice fruits originated from those that were not suitable for consumption. It's not just about improved cultivation of the old varieties, but rather the production of new varieties. Thus, the topic of further improvement requires careful study and practice. Seeds from established varieties, when planted immediately without drying, often reproduce the same type. However, we can’t be certain that they will generally do so if they are influenced by the flowers of nearby trees.
NURSERY.
Of this subject we can only give the general outlines. This department of soil-culture is so distinct, that the few who engage in it as a business are expected to make it an especial study. In a work like this, it is only desirable to give those general principles that will enable the cultivator of the soil to raise such trees as he may desire on his own premises. These directions[Pg 297] may be considered reliable, and, as far as they go, are applicable to all nurseries.
Of this topic, we can only provide the basic outlines. This area of soil cultivation is so specific that the few people who pursue it as a business are expected to study it in depth. In a work like this, it’s best to share general principles that will help those growing plants to cultivate the trees they want on their own property. These guidelines[Pg 297] can be seen as reliable, and, as far as they apply, are suitable for all nurseries.
Location.—This is the first point demanding attention. If a piece of land containing a variety of soils can be selected, it will prove beneficial, as different trees require different soils for their greatest perfection. A situation through which a rivulet may run, or in which a pond may be constructed, fed by a spring or hydrant, is of great value for watering. The situation of the nursery, as it respects shade or exposure, is also important. Trees should generally be as much exposed to the elements, in the nursery, as they will be when transplanted in the orchard. Trees removed from shaded situations to the open field will be stinted in growth for some time, and may be permanently injured. Never allow your nursery to be shaded by large trees. Bearing trees, designed to show the quality of your fruit, should occupy a place by themselves.
Location.—This is the first factor to consider. If you can choose a piece of land with a variety of soil types, it will be beneficial since different trees thrive in different soils. A site that allows for a stream to run through it or where you can create a pond, supplied by a spring or hydrant, is highly valuable for watering. The nursery's location in relation to shade and exposure is also significant. Trees should generally be exposed to the elements in the nursery just like they will be when moved to the orchard. Trees moved from shaded areas to open fields might experience stunted growth for a while and could suffer long-term damage. Never let large trees shade your nursery. Fruit-bearing trees, meant to showcase the quality of your fruit, should have their own designated space.
Soil.—A theory that has had many adherents is that trees raised on poorer and harder land than that they will occupy in the orchard, will grow more vigorously, and do better, than those transplanted from better to worse soil. Thus, trees have often been preferred from high, hard hills, to transplant in good loam or alluvium. On the same principle, a calf or colt should be more healthy, and make a better creature, for having been nearly starved for the first year or two. Neither of these is true. Give fruit-trees as great a growth as possible while young, without producing too tender and spongy wood for cold winters. It is only desirable to check the early growth of fruit-trees on the rich prairies of the West, and that should be done, not by the poverty of the soil, but by root-pruning or heading-[Pg 298]in; this prevents a spongy, tender growth, that is apt to be injured by their trying winds. Trees that are brought from a colder to a warmer region, always do better.
Soil.—There’s a popular theory that trees grown in poorer and tougher soil than where they'll end up in the orchard will grow more vigorously and thrive better than those moved from better to worse soil. Because of this, trees are often chosen from high, rocky hills to be transplanted into rich loam or alluvial soil. Similarly, it’s thought that a calf or colt that has been nearly starved for the first year or two will be healthier and stronger. However, neither of these beliefs is true. Young fruit trees should be allowed to grow as much as possible without becoming too soft and spongy, which can be problematic in cold winters. In the rich prairies of the West, it’s only advisable to limit the early growth of fruit trees, and this should be done not by using poor soil, but through techniques like root-pruning or heading-[Pg 298]in; these practices help prevent weak, tender growth that can be damaged by harsh winds. Trees that are moved from a colder area to a warmer one typically perform better.
Preparation of the Soil.—It should be made quite rich with stable-manure, lime, and wood-ashes, and cultivated in a root-crop the previous year—any roots except potatoes. Those left in the ground will come up so early and vigorous in the spring, that you can not eradicate them without destroying many of your young seedlings. The land should be worked very deep by subsoiling, or better with double-plowing, by which the manure and top-soil are put in the bottom. As manure always works up, the effect will be excellent. Buckwheat is good to precede a nursery; it shades the ground so densely as to protect it from the scorching sun, and effectually destroy all weeds. Trees planted on land prepared by double-plowing (see our article on "Plowing") will make one third greater growth, in a given time, than those on land prepared in the ordinary way. In double-plowing, if the subsoil be very poor, it will be necessary to give a top-dressing of well-rotted manure, worked in with a cultivator. Thorough draining is also very essential to a nursery.
Preparation of the Soil.—It should be made very rich with compost, lime, and wood ashes, and cultivated with a root crop the year before—any roots except potatoes. The potatoes left in the ground will sprout so early and vigorously in the spring that you won’t be able to get rid of them without harming many of your young plants. The land should be worked quite deep through subsoiling or, even better, with double-plowing, which buries the manure and topsoil. Since manure always works its way up, the results will be great. Buckwheat is a good crop to grow before a nursery; it covers the ground so thickly that it protects it from harsh sunlight and effectively eliminates all weeds. Trees planted on land prepared by double-plowing (see our article on "Plowing") will grow one-third more in the same amount of time than those planted in the traditional way. In double-plowing, if the subsoil is very poor, it will be necessary to add a top-dressing of well-rotted manure, mixed in with a cultivator. Proper drainage is also crucial for a nursery.
Time of Planting.—The general practice is to plant in the fall, at any time before the ground freezes. The better way is to keep seeds in moist sand, or dry and spread thin, until spring, and plant as early as the ground will allow. Freezing apple-seeds is of no use. Hard-shelled seeds had better be frozen, to open the stones and give them an opportunity to germinate. The advantage of spring-planting is, the ground can be put in much better condition, and the seeds will start[Pg 299] quite as early as the weeds, and much labor may be saved in tending.
Time of Planting.—The usual practice is to plant in the fall, anytime before the ground freezes. A better approach is to keep seeds in moist sand or kept dry and spread thin until spring, and then plant as early as the ground allows. Freezing apple seeds is not helpful. Hard-shelled seeds are better off being frozen to break open the shells and give them a chance to germinate. The advantage of planting in spring is that the ground can be prepared much better, and the seeds will start[Pg 299] at the same time as the weeds, which can save a lot of labor in maintenance.
Method of Planting.—Plant with a drill that will run about an inch deep, putting the seeds in straight rows, not more than an inch wide, and two and a half feet apart; this will allow the use of a small horse and cultivator, which will destroy nearly all the weeds. Use a potato-fork or hoe, across the rows, among the seedlings, and very little weeding will be necessary. It is not more than one fourth of the ordinary work to keep a nursery clean in this way. Two thirds of those thus planted and cultivated will be large enough for root-grafting the first season, and for cleft-grafting the second. When your seedlings are six inches high, if you thoroughly mulch them with fine straw or manure, you will be troubled with no more weeds, and your trees will get a strong growth.
Method of Planting.—Plant using a drill that goes about an inch deep, placing the seeds in straight rows no more than an inch wide and two and a half feet apart. This setup allows you to use a small horse and cultivator, which will take care of almost all the weeds. Use a potato fork or hoe across the rows among the seedlings, and you’ll need to do very little weeding. This method requires only about one-fourth of the usual effort to keep a nursery clean. Two-thirds of those planted and taken care of this way will be big enough for root-grafting in the first season and cleft-grafting in the second. When your seedlings reach six inches tall, if you mulch them well with fine straw or manure, you won’t have to deal with any more weeds, and your trees will grow strong.
For root-grafting, pull up those of suitable size very late in the fall, cut off the tops eight inches from the root, and pack in boxes, in moist sand, and keep in a cellar that does not freeze; graft in winter, and repack them in the boxes with moist sand, sawdust, or moss, and keep them until time to transplant in spring. They should not be wet, but only slightly moist. In the spring, plant them in rows three feet apart, and ten inches in the row. The second year, if they are not wanted in market, they should be taken up and reset, in rows four feet apart, and two feet in the row. Cut off the ends of large roots, to encourage the growth of numerous fibrous roots. Large nursery-trees, that have not been transplanted, are of little value for the orchard, being nearly destitute of fibrous roots. But large trees, even of bearing size, when transplanted in[Pg 300] the orchard, do quite as well as small ones, provided they have been several times transplanted in the nursery. This produces many fibrous roots, upon which the health and life of the tree depend.
For root-grafting, dig up those that are the right size very late in the fall, cut the tops off about eight inches from the roots, and pack them in boxes with moist sand. Store the boxes in a cellar that doesn’t freeze; graft them in winter, then re-pack them in the boxes with moist sand, sawdust, or moss, and keep them until it’s time to transplant in the spring. They shouldn't be wet, just slightly moist. In the spring, plant them in rows that are three feet apart and ten inches apart in the row. The second year, if they’re not needed for market, they should be dug up and replanted in rows four feet apart and two feet apart in the row. Trim the ends of large roots to encourage the growth of more fibrous roots. Large nursery trees that haven’t been transplanted are not very useful for the orchard because they usually lack fibrous roots. However, large trees, even those that are already bearing fruit, do just as well as smaller ones when transplanted in[Pg 300] the orchard, as long as they have been transplanted several times in the nursery. This helps develop many fibrous roots, which are crucial for the health and survival of the tree.
In many regions, great care must be taken to prevent destruction of young trees by snow-drifts. This is done by selecting locations, and by constructing or removing fences, to allow the snow to blow off; treading it down as it falls is also very useful, both in protecting the trees from breaking down by the settling of drifts in a thaw, and from the depredations of mice under the snow.
In many areas, special precautions need to be taken to protect young trees from being damaged by snow drifts. This involves choosing the right spots and building or taking down fences to let the snow blow away. Walking on the snow as it falls is also helpful, as it protects the trees from collapsing due to the weight of the snow during a thaw and from mice lurking underneath the snow.
Trees should be taken up from the nursery with the least possible injury to the roots. Do not leave them exposed to the air for an hour, not even in a cloudy day. It is an easy matter to cover the roots with mats, straw, or earth. Protect also from frosts; many trees are ruined by exposure to air and frost, of which the nurseryman is very careful in all other respects. For transportation, they should be closely packed in moist straw, and wound in straw or mats, firmly tied and kept moist. Trees, cared for and packed in this way, may be transported thousands of miles, and kept for two months, without injury.
Trees should be taken from the nursery with minimal damage to the roots. Don’t leave them exposed to the air for even an hour, not even on a cloudy day. It’s simple to cover the roots with mats, straw, or dirt. Also, protect them from frost; many trees get damaged by exposure to air and frost, something that nurserymen are very careful about in all other respects. For transportation, they should be tightly packed in damp straw and wrapped in straw or mats, securely tied and kept moist. Trees that are taken care of and packed this way can be transported thousands of miles and stored for two months without damage.
NUTS.
More attention to the cultivation of nuts, would add materially to our domestic luxuries. There are so many nuts in market, that are the spontaneous productions of other countries, or raised where labor is cheap, that[Pg 301] we can not afford to raise them as an article of commerce. But a few trees of the various kinds, would be a great addition to every country residence. We could always be certain that our nuts were fresh and good. A small piece of ground devoted to nuts, and occupied by fowls, would be pleasant and profitable. English walnuts do well here. We have varieties of hickory nuts, native in this country, which, to our taste, are not surpassed by any other. Chestnuts are easily grown here (see our directions elsewhere in this volume). Butternuts, filberts, peanuts (growing in the ground like potatoes), and even our little forest beechnuts, are easily raised.
Paying more attention to growing nuts would really enhance our domestic luxuries. There are so many nuts available in the market that come from other countries or are grown where labor is cheaper, that[Pg 301] we can't afford to grow them for commercial purposes. However, having just a few trees of different types would be a fantastic addition to any country home. We would always know our nuts were fresh and high quality. A small piece of land dedicated to nut trees, especially if occupied by chickens, would be both enjoyable and profitable. English walnuts thrive here. We have native varieties of hickory nuts that, in our opinion, are unmatched by any others. Chestnuts grow easily here (see our instructions elsewhere in this volume). Butternuts, filberts, peanuts (which grow underground like potatoes), and even our little forest beechnuts can all be raised with ease.
The dwarf chestnut of the Middle and Southern states is decidedly ornamental in a fruit garden. Its qualities are in all respects like the common chestnut, only the fruit is but half the size, and the tree grows from five to ten feet high. In all our landscape gardens, and in all places where we retain forest trees for ornamental purposes, it is better to cultivate trees that will bear good nuts. The varieties of nut-bearing trees, interspersed with evergreens, make a beautiful appearance.
The dwarf chestnut found in the Middle and Southern states is definitely a great addition to a fruit garden. Its characteristics are very similar to those of the common chestnut, except the fruit is only about half the size, and the tree grows between five and ten feet tall. In all our landscape gardens and in places where we keep forest trees for decorative purposes, it's better to grow trees that produce good nuts. Having various nut-bearing trees mixed in with evergreens creates a beautiful look.
OAKS.
Raising oak-timber, on a large scale, will soon be demanded in this country. In some sections we have immense quantities of native oaks; but they are fast disappearing, and the present expense of transporting the timber, to places where it is needed, is much greater than would be the cost of raising it. A million of acres[Pg 302] of oaks ought to be planted within the next five years. A crop of white oak, of only twenty-five years' growth, would be very valuable; and twenty-five or fifty acres, of forty years' growth, would be worth a handsome fortune, especially in the West. On all the bluffs in the West they grow well, and on the prairies they will do even better, after they have been cultivated a few years. The application of a little common salt on rich alluvial soils, is a great advantage in growing timber.
Raising oak timber on a large scale will soon be in demand in this country. In some areas, we have huge amounts of native oaks, but they are quickly disappearing, and the current cost of transporting the timber to where it’s needed is much higher than the cost of growing it. We should plant a million acres[Pg 302] of oaks within the next five years. A crop of white oak that has grown for just twenty-five years would be very valuable, and twenty-five or fifty acres of oak that has grown for forty years would be worth a significant fortune, especially in the West. They thrive well on all the bluffs in the West, and they will do even better on the prairies after they've been cultivated for a few years. Using a little common salt on rich alluvial soils is a great help in growing timber.
Preserve acorns in moist sand during winter, and plant in the spring, in rows six feet apart, to give opportunity for other crops among them for a year or two, to encourage good cultivation. Plant a foot apart in the row, that, in thinning out, good straight trees may be left; at three or four years old, thin to four feet in the rows; afterward, only remove as appears absolutely necessary. Trim straight and smooth. The question of transplanting is important. Shall we plant thick, as in a nursery, and then transplant, or shall we plant where they are to grow? In fruit-trees, the object is to get a low, full, and spreading top, of horizontal branches, that will bear much fruit. This is eminently promoted by transplanting, root-pruning, and heading-in. But in raising timber, the object is to get trees of long, straight bodies, with the fewest possible low branches. Such are the native trees of the forest. This is best promoted by planting thick, never transplanting, and keeping all the lower limbs well trimmed off. These directions are for raising timber on good tillable land. Such groves may be good for pastures, and for poultry-yards, for a long time. Beside this, we have large areas of rough land, that will not soon be brought into cultivation for other purposes.[Pg 303] Fine timber may be grown on such land, with no care but trimming.
Store acorns in damp sand over the winter, and plant them in the spring in rows spaced six feet apart. This allows for other crops to grow between them for a year or two, promoting good care. Plant them a foot apart in the row so that when thinning out, you can keep straight, healthy trees. At three or four years old, thin them to four feet apart in the rows; after that, only remove trees as absolutely necessary. Trim them to be straight and smooth. The issue of transplanting is crucial. Should we plant them densely, like in a nursery, and then transplant, or should we plant them where they'll grow? With fruit trees, the goal is to create a low, full canopy with horizontal branches that can bear plenty of fruit. This is best achieved through transplanting, root-pruning, and cutting back. However, when it comes to growing timber, the aim is to cultivate trees with long, straight trunks and as few low branches as possible, similar to the native trees found in forests. This is best accomplished by planting them densely, avoiding transplanting, and keeping the lower limbs trimmed. These guidelines are for growing timber on good, arable land. Such groves can also be beneficial for pastures and poultry yards for an extended period. Additionally, we have vast tracts of rough land that won't be easily cultivated for other uses. Fine timber can be grown on such land with minimal care, just through trimming.[Pg 303]
OATS.
This is one of the great staple agricultural products of all regions, sufficiently moist and cool for their successful growth. Oatmeal makes the most wholesome bread ever eaten by man. For all horses, except those having the heaves, oats are the best grain; to such horses they should never be fed—corn, soaked or ground, is best. They are valuable for all domestic animals and fowls.
This is one of the main agricultural products found in all areas, ideally moist and cool for their successful growth. Oatmeal creates the healthiest bread ever consumed by humans. For all horses, except those with respiratory issues, oats are the top grain; these horses should never be fed oats—soaked or ground corn is better for them. They are valuable for all pets and poultry.
Varieties.—These are numerous. Those called side-oats yield the largest crops: but of these there are several varieties. The genuine Siberian oats are tall, heavy, dark-colored side-oats, the most productive of any known. Swedish oats, and other new varieties, are coming into notice; most of these are the Siberian, under other names, and perhaps slightly modified by location and culture. The barley-oats, Scotch oats, and those usually cultivated, will yield only about two thirds as much per acre as the true Siberian; the same difference is apparent in the growth of straw. Oats will produce something on poor land, with bad tillage, but repay thorough fertilization and tillage as well as most other crops. Enrich the land, work it deep and thoroughly, and roll after harrowing. Moist, cool situations are much preferable for oats: hence, success in warm climates depends upon very early sowing. Oats sowed as late as the first of July, in latitude forty-two and further north, will mature; yet, all late oats, even[Pg 304] with large straw and handsome heads, will be found to be only from one half to two thirds filled in proportion to the lateness of sowing. The entire profits of an oat-crop depend upon early sowing.
Varieties.—There are many. The ones called side-oats produce the largest yields, but there are several types within that group. The true Siberian oats are tall, heavy, dark-colored side-oats, and they're the most productive known. Swedish oats and other new varieties are gaining attention; most of these are actually Siberian oats under different names and possibly slightly altered by their growing conditions. Barley-oats, Scotch oats, and the commonly cultivated types yield only about two-thirds as much per acre as the true Siberian; and the same difference shows in the straw growth. Oats can produce something even on poor land with bad care, but they respond well to proper fertilization and cultivation, just like most other crops. Enrich the soil, work it deeply and thoroughly, and roll it after harrowing. Moist, cool locations are much better for growing oats, so in warmer climates, success relies on very early sowing. Oats sown as late as the beginning of July, at latitude forty-two and further north, will still mature; however, all late-sown oats, even[Pg 304] those with large straw and attractive heads, will only be half to two-thirds filled based on how late they were sown. The entire profits of an oat crop depend on early sowing.
Harvest as soon as the grain begins to harden, and the straw to turn yellow. Allowed to get quite ripe, they shell badly, and the straw becomes useless, except for manure. Cut with reaper or cradle, and bind: all grain so cut is more easily handled, thrashed, and fed. Mow no grain that is not so lodged down that a cradle or reaper can not be used. The straw of oats cut quite green is nearly as good as hay.
Harvest as soon as the grain starts to harden and the straw turns yellow. If you wait until it’s very ripe, it shells poorly, and the straw becomes useless except for fertilizer. Use a reaper or cradle to cut and bind the grain; this way, it’s easier to handle, thresh, and feed. Don’t cut any grain that’s not lying down enough so that a cradle or reaper can be used. The straw from oats that are cut while still green is almost as good as hay.
OKRA.
A valuable garden plant, easily propagated by seeds. It is excellent in cookery, as a sauce. Its ripe seeds, used as coffee, very much resemble the genuine article. The green pods are much used in the West Indies, in soups and pickles. Plant at the usual time of corn-planting, in rows four feet apart, two or three seeds in a place, eight inches apart in the row; leave but one in a place after they get a few inches high, and hoe as peas, and the crop will be abundant.
A valuable garden plant that you can easily grow from seeds. It works great in cooking, especially as a sauce. Its ripe seeds, when used as coffee, closely resemble the real thing. The green pods are commonly used in the West Indies for soups and pickles. Plant it at the usual time for corn, in rows four feet apart, with two or three seeds in each spot, eight inches apart in the row. Once they reach a few inches high, keep only one seedling per spot and care for them like peas, and you'll have a plentiful harvest.
OLIVES.
These are natives of Asia, but have, beyond date, been extensively cultivated in Southern Europe. Olive-oil is an important article of commerce in most coun[Pg 305]tries. Its use in all kinds of cookery, in countries where it flourishes, renders olives as important, to the mass of the people, as cows are in New England. It should be a staple product of the Southern states, to which it is eminently adapted. It is hardy further north than the orange. With protection, it may be cultivated, with the orange and lemon, all over the country. Olive-trees attain a greater age than any other fruit-tree. An Italian olive-plantation, near Terni, is believed to have stood since the days of Pliny. Once set out, the trees require very little attention, and they flourish well on the most rocky lands, that are utterly useless for any other purpose. Calcareous soils are most favorable to their growth. They are propagated by suckers, seeds, or by little eggs that grow on the main stalk, and are easily detached by a knife, and planted as potatoes or corn. Olives will bear at four or five years from the seed; they bear with great regularity, and yield fifteen or twenty pounds of oil per annum to each tree. There are several varieties. Plantations now growing at the South are very promising.
These trees are originally from Asia but have been widely cultivated in Southern Europe for a long time. Olive oil is a key product in commerce in most countries. Its use in cooking across regions where it grows makes olives as essential to the everyday person as cows are in New England. It should be a main product in the Southern states, where it grows particularly well. It's hardier than orange trees in cooler climates. With some care, it can be grown alongside oranges and lemons throughout the entire country. Olive trees live longer than any other fruit trees. An olive plantation in Italy, near Terni, is thought to have been around since Pliny's time. Once planted, the trees need very little maintenance and thrive well even on rocky soils that have no other use. Calcareous soil is especially good for their growth. They can be grown from suckers, seeds, or small buds that grow on the main trunk, which can easily be cut off and planted like potatoes or corn. Olive trees can start producing fruit about four or five years after planting from seed; they produce consistently and can yield fifteen to twenty pounds of oil per tree each year. There are several different varieties, and the plantations currently being developed in the South look very promising.
ONIONS.
Of this well-known garden vegetable there are quite a number of varieties.
Of this popular garden vegetable, there are several varieties.
1. The Large Red.—One of the most valuable.
1. The Large Red.—One of the most valuable.
2. The Yellow.—Large and profitable, keeping better than any other.
2. The Yellow.—Big and profitable, lasts longer than anything else.
3. The Silver-skin.—The handsomest variety, excellent for pickling, brings the highest price of all, but[Pg 306] is not quite so good a keeper as the red or yellow, and does not yield as well.
3. The Silver-skin.—The most attractive variety, great for pickling, has the highest price of all, but[Pg 306] isn't quite as long-lasting as the red or yellow ones and doesn't produce as much.
4. The White Portugal.—A larger white onion, often taken for the true silver-skin. It is a good variety. The preceding are all raised from the black seed, growing on the top.
4. The White Portugal.—A bigger white onion, often mistaken for the actual silver-skin. It’s a great variety. The ones mentioned before are all grown from the black seed, which grows on top.
5. The Egg Onion.—So called from its size and shape. On good rich soil, the average size may be that of a goose-egg, which it resembles in form. It is of a pale-red color, and more mild in flavor than any other. They are usually raised by sowing the black seed, very thick, to form sets for next year. Those sets, put out early, will form large onions for early market, that will sell more readily than any other offered.
5. The Egg Onion.—Named for its size and shape. In good, rich soil, the average size can be about that of a goose egg, which it looks like. It has a pale red color and is milder in flavor than others. They're typically grown by sowing the black seeds very densely to create sets for the following year. When these sets are planted early, they produce large onions for the early market, which sell more easily than any other variety available.
6. The Top Onion.—So called because the seed consists of small onions, growing on the top of the stalks, in place of the black seed of other onions. These are good for early use, grow large, but are poor keepers.
6. The Top Onion.—It's called that because the seed is made up of small onions that grow on top of the stalks, instead of the black seeds found in other onions. These are great for early use, grow large, but don’t store well.
7. The Hill or Potato Onion.—Of these there are several kinds, most of which are unworthy of cultivation. The Large English is the only valuable variety. The small onions, for sets, grow in the ground from the same roots, by the side of the main onion. Some of these grow large enough for cooking. The main onion is the earliest known, grows large, and has a mild, pleasant flavor;—they will mature at a certain season, whatever time you plant them; hence, they must be planted very early to produce a good crop. We have planted them on good ground so late as to get little more than the seed. They are fine for summer and fall use, but keep poorly. The foregoing are all that are necessary. They can all be brought forward by early planting of sets raised the previous season, by sowing[Pg 307] the black seed so thick that they can not grow larger than peas, or small cherries.
7. The Hill or Potato Onion.—There are several types of these, most of which aren't worth growing. The Large English is the only valuable variety. The small onions, used as sets, grow from the same roots in the ground, next to the main onion. Some of these can grow large enough for cooking. The main onion is the earliest known, grows large, and has a mild, pleasant flavor;—they will mature at a certain time, no matter when you plant them; therefore, they must be planted very early to yield a good crop. We've planted them in good soil so late that we got little more than the seed. They're great for summer and fall use, but don't store well. The above are all that are necessary. They can all be advanced by early planting of sets raised the previous season, by sowing[Pg 307] the black seed so densely that they can't grow larger than peas or small cherries.
Good sandy loam and black muck are the best soils for onions. Any good garden soil may be made to produce large crops; good, well rotted stable-manure and leached ashes are the best. The theory of shallow plowing, and treading down onion-beds is incorrect. The roots of onions are numerous and long. The land should be well-manured, double-plowed, and thoroughly pulverized. The only objection to a very mellow onion-bed is the difficulty of getting the seed up: this is obviated by rolling after sowing, which packs the mould around the seed, so as to retain moisture and insure vegetation. Fine manure, mixed in the surface of the soil for onions, is highly beneficial; on no other crop does manure on the surface do so much good. Mulching the whole bed, as soon as the plants are large enough, is in the highest degree beneficial, both in promoting growth, and keeping down weeds. An onion-bed must be made very smooth and level, to favor very early hoeing, without destroying the small plants. All root-crops that come up small, are tended with less than half the expense, if the surface be made very smooth and level. Never divide your onion-ground into small beds, but sow the longest way, in straight narrow rows, eighteen inches apart, for convenience of weeding and hoeing. Cultivate while very young, and work the soil toward the rows, so as to hill up the plants; this should be removed after they begin to form large bulbs. Breaking down the tops to induce them to bottom, is a fallacy: it will lessen the crop. Rich soil, deep plowing, thorough pulverizing, early sowing, and frequent hoeings, will insure success. Our system of double-[Pg 308]plowing is the best for this crop. They will do equally well, some say improve, for twenty years on the same bed. Work the tops into the soil where the plants grow. Let the rows be very narrow and very straight, and you will save half the ordinary expense of cultivation.
Good sandy loam and black muck are the best soils for onions. Any decent garden soil can be made to yield large crops; well-rotted stable manure and leached ashes are ideal. The idea of shallow plowing and pressing down onion beds is incorrect. Onion roots are numerous and long. The land should be well-manured, double-plowed, and thoroughly broken up. The only downside to a very loose onion bed is the difficulty in getting the seeds to sprout; this can be solved by rolling the soil after sowing, which helps pack the soil around the seeds to retain moisture and ensure germination. Mixing fine manure into the surface of the soil for onions is very beneficial; no other crop benefits from surface manure as much. Mulching the entire bed as soon as the plants are big enough is extremely helpful for promoting growth and keeping weeds down. An onion bed must be made very smooth and level to allow for early hoeing without damaging the small plants. All root crops that start small can be tended to for less than half the cost if the surface is kept very smooth and level. Never divide your onion area into small beds; instead, sow in long, straight narrow rows, eighteen inches apart, for easier weeding and hoeing. Cultivate when they’re very young and work the soil toward the rows to mound up the plants; this should be removed once they start forming large bulbs. Breaking down the tops to encourage them to grow underground is a myth; it will reduce the crop. Rich soil, deep plowing, thorough breaking up, early sowing, and frequent hoeing will guarantee success. Our method of double-[Pg 308]plowing is best for this crop. They say onions will thrive equally well, and some even improve, for twenty years in the same bed. Work the tops into the soil where the plants grow. Keep the rows very narrow and perfectly straight, and you'll save half the usual cost of cultivation.
To gather and preserve well, you should house them when very dry. A day's exposure to a warm autumn sun is very beneficial. Keep them in an open barn or shed until there is danger of frost. A warm, damp cellar always ruins them; keep them through winter in the coolest dry place possible, without severe freezing. Once freezing is not injurious, but frequent freezing and thawing ruins them. They are very finely preserved braided into strings and hung in a cool, dry room.
To gather and store properly, you should keep them when they're very dry. A day's exposure to the warm autumn sun is really helpful. Store them in an open barn or shed until there's a risk of frost. A warm, damp cellar will always spoil them; keep them through the winter in the coolest, driest spot possible, avoiding any harsh freezing. Occasional freezing isn't harmful, but repeated freezing and thawing will ruin them. They can be nicely preserved by braiding them into strings and hanging them in a cool, dry room.
ORANGES.
This name covers a variety of species of the same general habits. It flourishes well on the coast of Florida, and all along the gulf of Mexico. It will stand considerable freezing, if protected from sudden thawing. In southern Europe, they are grown abundantly by being protected by a shed of boards. They may become perfectly hardy, as far north as Philadelphia. And by a thorough system of acclimation, and a little winter protection, they may be grown abundantly, in every state of the Union. The great enemy of the orange-tree is the scaled insect. It has been very destructive in Florida. A certain remedy is said to have been discovered in the camomile. Cultivate the plant under orange-trees, and it will prevent their attacks. The herb hung[Pg 309] up in the trees, or the tree and foliage syringed with a decoction of it, will effectually destroy these insects. The orange is long-lived. A tree called "The Grand Bourbon" at Versailles was planted in 1421, and now, being 437 years old, is "one of the largest and finest trees in France." There are several varieties mentioned in the fruit books. The common Sweet Orange, the Maltese, the Blood Red—very fine with red flesh. The Mandarin Orange, an excellent little fruit from China. The St. Michael's is described as the finest of all oranges, and the tree the best bearer. Oranges are propagated by budding, and cultivated much in the same way as the peach.
This name refers to various species with similar habits. It grows well on the Florida coast and throughout the Gulf of Mexico. It can survive significant freezing as long as it's protected from abrupt thawing. In southern Europe, they are widely cultivated with the protection of wooden structures. They can be fully hardy as far north as Philadelphia. With a proper acclimation process and some winter protection, they can be grown abundantly in every state in the U.S. The main threat to the orange tree is the scale insect, which has caused considerable damage in Florida. A certain remedy purportedly discovered in the chamomile is effective. If you grow the plant under orange trees, it will help fend off these pests. Hanging the herb in the trees or spraying the tree and leaves with a decoction will effectively eliminate these insects. The orange tree has a long lifespan; a tree known as "The Grand Bourbon" at Versailles was planted in 1421 and is now 437 years old, making it "one of the largest and finest trees in France." Several varieties are mentioned in fruit guides, including the common Sweet Orange, the Maltese, and the Blood Red, which is notable for its red flesh. The Mandarin Orange is a delightful small fruit from China. St. Michael's is described as the finest of all oranges and is the best producer. Oranges are propagated by budding and are cultivated similarly to peaches.
ORCHARDS.
An orchard is a plat of ground, large or small, occupied by trees for the purpose of bearing fruit. The main directions for orchard culture, are given under the respective fruits. Any soil good for vegetables or grains, is suitable for orchards. Any land where excessive moisture will not stand, to the injury of the trees, may be adapted to any of the fruits. Set pears on the heaviest land, peaches on the lightest, and the other fruits on the intermediate qualities. Although peaches will do quite well on light soil, yet they do better on a rich deep loam, or alluvium. When it is desirable to set out an orchard on land originally too wet, a blind ditch must pass under each row, extending out of the orchard, and the place where each tree is to stand, should be raised a foot above the level around it.
An orchard is a piece of land, big or small, filled with trees that produce fruit. The main guidelines for growing orchards are provided under each type of fruit. Any soil that's good for vegetables or grains works well for orchards. Any land that doesn't retain too much moisture, to the detriment of the trees, can be used for various fruits. Plant pears in heavier soil, peaches in lighter soil, and the other fruits in soil of intermediate quality. While peaches can thrive in light soil, they grow best in rich, deep loam or alluvial soil. If you want to establish an orchard on land that’s too wet, you need to create a blind ditch under each row that drains out of the orchard, and each tree should be planted about a foot above the surrounding soil level.
The aspect is also important. A southern or east[Pg 310]ern exposure is preferable, in all latitudes where the transitions from summer to winter, and from winter to summer are so sudden as to allow but little alternate thawing and freezing. This would therefore be the rule in high latitudes. In climates of long changeable springs, a northern or western exposure is better. Trees may be made to start and blossom later in the spring by snow and ice about them, well pressed down in winter, and covered with straw. This will prevent the first warm weather from starting the leaves and blossoms, and cause them to be a little later, but surer and better.
The aspect is also important. A southern or eastern[Pg 310]ern exposure is preferable in regions where the shifts between summer and winter are abrupt, allowing little time for thawing and freezing in between. This rule applies in high latitudes. In areas with long and unpredictable springs, a northern or western exposure is better. Trees can be encouraged to start and bloom later in the spring by packing snow and ice around them during winter and covering it with straw. This will keep the first warm weather from triggering the leaves and blossoms too early, making them come out a bit later but more reliably and healthily.
Subsoiling ground for an orchard, is of great importance. Plant two orchards, one on land that has been subsoiled very deep, and the other upon that plowed in the ordinary way, and for ten years the difference will be discernable, as far as you can distinguish the trees in the two orchards.
Subsoiling soil for an orchard is very important. Plant two orchards, one on land that has been subsoiled deeply, and the other on soil that has been plowed normally. After ten years, the difference will be noticeable, as far as you can distinguish the trees in the two orchards.
Manures of all kinds, are good for orchards, except coarse stable manure, which should be composted. A bushel of fine charcoal, thoroughly mixed in the soil in which you set a fruit-tree, will exert a very beneficial influence, for a dozen years.
Fertilizers of all types are great for orchards, except for rough stable manure, which needs to be composted. A bushel of fine charcoal, mixed well into the soil where you plant a fruit tree, will have a positive effect for about twelve years.
Orchards should be cultivated every alternate three successive years, and the rest of the time be kept in grass. Just about the trees, the ground should be kept loose, and free from weeds and grass. This may be done by spading and hoeing, but better by thorough mulching.
Orchards should be cultivated every three years, and the remaining time should be kept in grass. The soil around the trees should be loose and free from weeds and grass. This can be done by digging and hoeing, but it's better to use thorough mulching.
Distances apart.—Apples thirty-three feet. Pears twenty feet. Peaches and plums, sixteen feet. Pruning, destroying insects, and all other matters bearing on successful fruit growing, are treated under the several fruits.[Pg 311]
Distances apart.—Apples 33 feet. Pears 20 feet. Peaches and plums, 16 feet. Pruning, pest control, and everything else related to successful fruit growing are discussed under each type of fruit.[Pg 311]
OXEN.
Every farmer who can afford to keep two teams, should have a pair of oxen. For many uses on a farm, they are preferable to horses; especially for clearing up new land. Oxen to be most valuable, should be large, well matched, ruly, and not very fat. They should be kept in good heart, by the quality of their food. Fast walking is one of the best qualities in both horses and oxen, for all working purposes, provided they are judiciously used and not overloaded. Well built, strong animals are best for work. Working oxen should be turned out for beef, at eight or nine years old.
Every farmer who can afford to keep two teams should have a pair of oxen. They’re often better than horses for many tasks on a farm, especially for clearing new land. To be most valuable, oxen should be large, well matched, manageable, and not overly fat. They should be kept in good condition by providing quality food. Having a good walking pace is one of the best qualities for both horses and oxen for all work purposes, as long as they are used wisely and not overloaded. Strong, well-built animals are ideal for work. Working oxen should be sent for beef at eight or nine years old.
To break oxen well, commence when they are very young. Put calves into yokes frequently, until they will readily yield to your wishes. Yoke them often, and tie their tails together to prevent them from turning the yoke and injuring themselves. If left without training, until they are three or four years old, they will improve every opportunity to run away, to the danger and damage of proprietor and driver. It is quite an art to learn oxen to back a load. Place them before a vehicle, in a locality descending in the rear. As it rolls down hill, they will easily learn to follow, backward. Then try them on level ground. Then accustom them to back up hill, and finally to back a load, almost as heavy as they can draw.
To train oxen properly, start when they are very young. Frequently put calves into yokes until they start to respond to your commands. Yoke them often, and tie their tails together to stop them from twisting the yoke and getting hurt. If they're left untrained until they're three or four years old, they'll take every chance to run away, which can be dangerous and damaging for the owner and driver. It takes skill to teach oxen to back up a load. Position them in front of a vehicle on a slope. As it rolls downhill, they'll quickly learn to move backward. Next, practice with them on flat ground. Then, train them to back up a hill, and finally, to back a load that is nearly as heavy as they can pull.
Breaking vicious animals is always best done by gentleness. We have known vicious horses whipped severely, and in every way treated harshly, and finally given up as useless. We have seen those same horses, in other hands, brought to be regular, gentle, and safe,[Pg 312] as could be desired, by mild means, without a blow or harsh word. Oxen should be driven in a low tone of voice, and without much use of the goad. The usual manner of driving, by whipping and bawling, to the annoyance of the whole neighborhood, and until the driver becomes hoarse with his perpetual screams, is one of the most pernicious habits on a farm. Oxen will grow lazy and insensible under threat, or scream, or goad. Driven in a low tone of voice, without confusion by rapid commands, and no whoa put in, unless you wish them to stand still, oxen may be made more useful on a farm than horses. Their gears are cheap and never in the way. They can draw more and in worse places than horses, and it costs less to keep them. The various methods of drawing with head or horns, in vogue in other countries, need not be discussed here, as the American people will not probably change their yoke and bows for any other method.
Breaking aggressive animals is always best done with gentleness. We've seen aggressive horses that were whipped hard and treated harshly, ultimately being given up as useless. Yet, those same horses, in different hands, became regular, gentle, and safe,[Pg 312] as anyone could want, through mild means, without a single blow or harsh word. Oxen should be driven with a soft voice and minimal use of the goad. The typical method of driving, which involves whipping and shouting, annoying the whole neighborhood, and leaving the driver hoarse from constant yelling, is one of the worst habits on a farm. Oxen will become lazy and indifferent under threats, screams, or the goad. When driven with a calm tone, without confusion from rapid commands, and no "whoa" unless you want them to stop, oxen can be even more useful on a farm than horses. Their harnesses are inexpensive and never obstructive. They can pull more and navigate tougher terrain than horses, and they are cheaper to maintain. We won't discuss the various methods of pulling with heads or horns used in other countries since it's unlikely that Americans will change their yoke and bows for any other method.
Feed oxen, as other animals, regularly, both in time and quantity. Curry them often and thoroughly. It improves their looks, health, and temper, and attaches them to their owner.
Feed oxen, like other animals, regularly, both at the right times and in appropriate amounts. Groom them often and well. It enhances their appearance, health, and disposition, and helps bond them to their owner.
PARSLEY.
This is a hardy biennial, highly prized as a garnish, and as a pot-herb for flavoring soups and boiled dishes. The large-rooted variety is used for the table, as carrots or parsnips. The principal varieties are—the double-curled, the dwarf-curled, the Siberian (single, very hardy, and fine-flavored), the Hamburgh (large-rooted, used as an edible root). The double-[Pg 313]curled is well known, easily obtained, and suitable for all purposes. Those who desire the roots instead of parsnips, &c., should cultivate the Hamburgh or large-rooted. It needs the same treatment as beets. Seed should always be of the previous year's growth, or it may not vegetate. It is four or five weeks in coming up, unless it be soaked twelve hours in a little sulphur-water, when it will vegetate in two weeks. By cutting the leaves close, even, and regular, a succession of fine leaves may be had for a whole year from the same plants, when they will go to seed, and new ones should take their place. In cold climates they should be covered in winter with straw or litter. The Siberian is cultivated in the field, sown with grass or the small grains. It is said to prevent the disease called "the rot" in sheep, and is good for surfeited horses. The large-rooted should not be sowed in an excessively rich soil, as it produces an undue proportion of tops.
This is a tough biennial, highly valued as a garnish and as a pot herb for adding flavor to soups and boiled dishes. The large-rooted variety is used like carrots or parsnips. The main varieties include the double-curled, the dwarf-curled, the Siberian (which is single, very hardy, and flavorful), and the Hamburgh (large-rooted and used as an edible root). The double-[Pg 313]curled variety is well known, easily available, and suitable for all purposes. Those looking for roots instead of parsnips, etc., should grow the Hamburgh or large-rooted variety. It requires the same care as beets. Seeds should always be from the previous year’s growth, or they might not germinate. It takes four or five weeks to sprout, unless soaked for twelve hours in a little sulfur water, in which case it will sprout in two weeks. By trimming the leaves evenly and regularly, you can have a continuous supply of nice leaves from the same plants for a whole year; when they go to seed, new ones should be planted in their place. In colder climates, they should be covered in winter with straw or litter. The Siberian variety is grown in fields, sown alongside grass or small grains. It is said to prevent a disease known as "the rot" in sheep and is beneficial for overfed horses. The large-rooted variety shouldn’t be planted in overly rich soil, as that will lead to an excess of tops.
PARSNIPS.
English authors speak of but one variety of this root in cultivation in England. The French have three—the Coquaine, the Lisbonaise, and the Siam. The first runs down, in rich mellow soil, to the depth of four feet, and grows from six to sixteen inches in circumference; the Lisbonaise is shorter and larger round; the Siam is smaller than the others, of a yellowish color, and of excellent quality. We are not aware that our little hollow-crown carrot, so early and good, is included in the French varieties. We cultivate only the[Pg 314] hollow-crown, and a common large variety; both are good for the table, and as food for animals. They need a light, deep, rich soil. A sandy loam is best, as for all roots. Seed kept over one season seldom vegetates. Should be soaked a day or two, and sown in straight rows, covered an inch deep, and the rows slightly rolled. It is much better, with this and the carrot, to sow radish-seed in the same rows. They come up so soon that they protect the parsnips and carrots from too hot a sun while tender, and also serve to mark the rows, so that they may be hoed early, without danger of destroying the young plants. Parsnips may be grown many years on the same bed without deterioration, provided a little decomposed manure or compost be annually added. Fresh manure is good if it be buried a foot deep. The yield will be greater if thinned to eight inches apart. Rows two feet apart, and the plants six inches in the row, are most suitable in field-culture. They will grow till frost comes, and are better for the table, when allowed to stand in the ground through the winter. They may be dug and preserved as other roots. Parsnips contain more sugar than any other edible root, and are therefore worth more per bushel for food. All domestic animals and fowls fatten on them very rapidly, and their flesh is peculiarly pleasant. Fed to cows, they increase the quantity of milk, and impart a beautiful color and agreeable flavor to the butter. It is superior to the beet, that we have so highly recommended elsewhere, in all respects except one—it is less easily tended and harvested. Still, they should be cultivated on every farm where cattle, hogs, or fowls, are kept.[Pg 315]
English authors mention only one type of this root being grown in England. The French have three varieties—the Coquaine, the Lisbonaise, and the Siam. The first can grow down to four feet in rich, mellow soil and can have a circumference of six to sixteen inches; the Lisbonaise is shorter and thicker; the Siam is smaller than the other two, has a yellowish color, and is of excellent quality. We are not aware that our small hollow-crown carrot, which is early and good, is included in the French varieties. We only grow the [Pg 314] hollow-crown and a common large variety; both are good for eating and for animal feed. They prefer light, deep, rich soil. Sandy loam is best for all root crops. Seeds that are kept for more than a season rarely germinate. They should be soaked for a day or two and sown in straight rows, covered about an inch deep, and the rows should be lightly rolled. It's much better to sow radish seeds in the same rows as these and carrots. They germinate quickly, protecting the parsnips and carrots from the hot sun when they're young, and they also help mark the rows so that they can be hoed early without risking damage to the young plants. Parsnips can be grown in the same bed for many years without losing quality, as long as some decomposed manure or compost is added each year. Fresh manure can be beneficial if it's buried a foot deep. The yield increases if thinned to eight inches apart. Rows two feet apart with six inches between plants in the row are most suitable for field cultivation. They will grow until frost comes, and they taste better when left in the ground through the winter. They can be harvested and stored like other roots. Parsnips have more sugar than any other edible root, making them more valuable per bushel for food. All domestic animals and poultry fatten quickly on them, and their meat is especially tasty. When fed to cows, they boost milk production and give the butter an appealing color and pleasant flavor. It's superior to beet, which we have highly recommended elsewhere, in every way except one—it's less easy to manage and harvest. Still, they should be grown on every farm that keeps cattle, pigs, or poultry.[Pg 315]
PASTURES.
These are very important to all who keep domestic animals. The following brief directions for successful pasturing are essential. It is very poor economy to have all your pasture-lands in one field, or to put all your animals together. Pasture fields in rotation, two weeks each, allowing rest and growth for six weeks: first horned cattle, next horses, then sheep. Horses feed closer than cattle, and sheep closer than horses; each also eats something that the others do not relish. Pasturing land with sheep thickens the grass on the ground. For the kinds of grass preferable for pastures, see our article on Grasses. Plaster sown on pastures containing clover, materially increases their growth. A little lime, plaster, and common salt, sown on any pasture, will prove very beneficial. Streams or springs in pastures double their value. The idea that creatures need no water when feeding on green grass is a mistake. Every pasture without a spring or stream should have a well. Cattle in a pasture in warm weather need shade. It is usual to advise the growth of trees in the borders, or scattered over the whole field. Sheds are much better. Trees absorb the moisture, stint the growth of the grass, and injure its quality. A pasture containing many trees is not worth more than half price; it will keep about half as much stock, and keep them poorly. Bushes, which so often occupy pastures, should be grubbed up, and by all means destroyed; so should all thistles, briers, and large weeds. Hogs and geese should be kept in no pastures but their own. Never turn into pastures when the ground is very soft and[Pg 316] wet, in the spring; the tread of the creatures will destroy much of the turf. Creatures in pasture should be salted twice a week. The age of grass, to make the best feed for animals, is often mistaken: most suppose that young and tender grass is preferable; this is far from correct. Grass that is headed out, and in which the seed has begun to mature, is far more nutritious, as every farmer can ascertain by easy experiments. Tall grass, approaching maturity, will fatten cattle much faster than the most tender young growth. Pasturing land enriches it. It is well to mow pastures and pasture meadows occasionally, though few meadows and pastures should lie long without plowing. Top-dressings of manure, on all grass-lands, are valuable; better applied in the fall than in the spring; evaporation is less, and it has opportunity to soak into the soil.
These guidelines are crucial for anyone who keeps domestic animals. Here are some essential tips for successful pasturing. It's not smart to keep all your pastureland in one field or to group all your animals together. Rotate the pasture fields every two weeks, allowing for rest and regrowth for six weeks: start with horned cattle, then horses, and finally sheep. Horses graze closer than cattle, and sheep graze closer than horses; each type also eats something that the others don’t prefer. Having sheep on pastureland helps to thicken the grass. For the best types of grass for pastures, check out our article on Grasses. Spreading plaster on pastures with clover significantly boosts their growth. Adding a little lime, plaster, and common salt to any pasture will be very beneficial. Having streams or springs in pastures doubles their value. It's a misconception that animals don't need water when grazing on green grass. Any pasture without a spring or stream should have a well. Cattle in a pasture during warm weather need shade. It’s recommended to grow trees along the borders or scattered throughout the field, but sheds are much better. Trees absorb moisture, hinder grass growth, and degrade its quality. A pasture with a lot of trees isn't worth much; it can only support about half the stock and will do so poorly. Bushes that often invade pastures should be removed and destroyed, along with all thistles, briars, and large weeds. Hogs and geese should only be kept in their designated pastures. Avoid using pastures when the ground is very soft and [Pg 316] wet in the spring; the animals' weight will damage the turf. Animals in pastures should be salted twice a week. Many people mistakenly believe that the best grass for feeding animals is young and tender; this is not true. Grass that has started to head out and where the seeds are beginning to mature is much more nutritious, as any farmer can confirm through simple tests. Tall grass nearing maturity will fatten cattle much faster than the most tender young shoots. Pasturing land enhances its quality. Occasionally mowing pastures and meadowlands is beneficial, although most meadows and pastures shouldn't go too long without being plowed. Applying top-dressing of manure to all grassland is valuable; it’s more effective in the fall than in the spring due to less evaporation and it has more time to soak into the soil.
PEAS.
These are sown in the field and garden. As a field-crop, peas and oats are sown together, and make good ground or soaked feed for horses, or for fattening animals. Early peas and large marrowfats are frequently sown broadcast on rich, clean land, near large cities, to produce green peas for market. It does not pay as well as to sow in rows three feet apart, and cultivate with a horse. All peas, for picking while green, are more convenient when bushed. They may produce nearly as well when allowed to grow in the natural way, but can not be picked as easily, and the second crop is less, and inferior, from the injury to the vines[Pg 317] by the first picking. Early Kent peas (the best early variety) mature so nearly at the same time that the vines may be pulled up at once. All other peas had better be bushed, that they may be easily picked, and that the later ones may mature. Bushes need not be set so close as usual. A good bush, put firmly in the ground, to enable it to resist the wind, once in two and a half feet, is quite sufficient. Those clinging to the bushes will hold up the others. To bush peas in this way is but little work, and pays well. It is often said that stable-manure does no good on pea-ground—-that peas are neither better nor more abundant for its use. We think this utterly a mistake. We have often raised twice the quantity on a row well manured, that grew on another row by its side, where no manure had been applied. If peas be sowed thick on thoroughly-manured land, the crop will be small: it is from this fact that the idea has gained currency. They are generally planted too thick on rich land. Peas planted six inches deep will produce nearly twice as much as those covered but an inch. Plowing in peas and leveling the surface is one of the best methods of planting. To get an early crop in a cold climate, they may be forced in hotbeds, or planted in a warm exposure, very early, and protected by covering, when the weather is cold. At the South, it is best to plant so as to secure a considerable growth in the fall, and protect by covering with straw during cold weather.
These are sown in fields and gardens. For a field crop, peas and oats are sown together, providing good pasture or soaked feed for horses or for fattening livestock. Early peas and large marrowfats are often sown broadcast on rich, clean land near big cities to produce green peas for the market. However, it’s more profitable to plant them in rows three feet apart and cultivate with a horse. All peas meant for picking while green are easier to harvest when they are bushy. They can almost produce the same yield when allowed to grow naturally, but they’re harder to pick, and the second crop is smaller and of lower quality due to damage to the vines from the first picking. Early Kent peas (the best early variety) mature so closely together that the vines can be pulled up all at once. Other types of peas should be bushy to make picking simpler and to allow the later varieties to mature. Bushes don’t need to be spaced as closely as usual. A good bush, securely planted to withstand the wind, every two and a half feet is sufficient. Those climbing on the bushes will support the others. Bushing peas this way requires little effort and is quite beneficial. It’s often said that stable manure doesn’t help pea ground—that peas aren’t better or more plentiful with its use. We believe this is a complete mistake. We have often harvested twice the amount from a well-manured row compared to another row beside it that didn’t have any manure. If peas are sown too thick on well-fertilized land, the crop will be small, and that’s how this belief has taken hold. They’re usually planted too densely on rich ground. Peas planted six inches deep will yield almost twice as much as those covered by just an inch. Plowing in peas and leveling the surface is one of the best planting methods. To get an early crop in a cold climate, they can be forced in hotbeds, or planted in a sunny spot very early, and covered for protection when it's cold. In the South, it’s best to plant them to secure significant growth in the fall, covering with straw during cold weather for protection.
The only known remedy for the bugs that are so common in peas, is late sowing. In latitude forty-two, peas sown as late as the 10th of June will have no bugs. Bugs in seed-peas may be killed by putting the peas into hot water for a quarter of a minute; plant[Pg 318] immediately, and they will come up sooner and do well. Seed imported from the more northern parts of Canada have no bugs; it is probably owing to the lateness of the season of their growth. But late peas are often much injured by mildew; this is supposed to be caused by too little moisture in the ground, and too much and too cool in the atmosphere, in dew or rain. Liberal watering then would prevent it.
The only known solution for the bugs that are often found in peas is to plant them late. In locations with a latitude of 42, peas planted as late as June 10th won’t have any bugs. You can get rid of bugs in seed peas by soaking them in hot water for 15 seconds; then plant[Pg 318] right away, and they will sprout faster and thrive. Seeds brought in from the more northern regions of Canada are free of bugs, probably due to the later growing season there. However, late-planted peas can often be damaged by mildew; this is thought to be caused by too little moisture in the soil and too much coolness in the air, whether from dew or rain. Giving them plenty of water would help to prevent it.
Varieties—are numerous. Two are quite sufficient. Early Kent the earliest we have ever been able to obtain, ripen nearly all at once; moderate bearers, but of the very best quality. This variety of pea is the only garden vegetable with which we are acquainted that produces more and better fruit for being sowed quite thick. The other variety that we recommend is the large Marrowfat. These should not stand nearer together, on rich land, than three or four inches, and always be bushed. There are many other varieties of both late and early peas, but we regard them inferior to these. White's "Gardening for the South" mentions Landreth's Extra Early, Prince Albert, Cedo-Nulli, Fairbank's Champion, Knight's tall Marrow, and New Mammoth. Whoever wishes a greater variety can get any of these under new names. The large blue Imperial is a rich pea, like many of the dwarfs, both of the large and small, but is very unproductive. We advise all to select the best they can find, and plant but two kinds, late and early.
Varieties—are many. Two are more than enough. Early Kent is the earliest variety we've been able to find; they ripen almost all at once and are moderate producers, but the quality is top-notch. This type of pea is the only garden vegetable we're aware of that yields more and better produce when sown rather thickly. The other variety we recommend is the large Marrowfat. These should be spaced no closer than three or four inches apart on rich soil, and they always need to be supported. There are various other kinds of both late and early peas, but we think these are the best. White's "Gardening for the South" lists Landreth's Extra Early, Prince Albert, Cedo-Nulli, Fairbank's Champion, Knight's tall Marrow, and New Mammoth. Anyone wanting a wider selection can find any of these under different names. The large blue Imperial is a rich pea, like many of the dwarf varieties, both large and small, but it's not very productive. We recommend everyone choose the best options available and only plant two types: one for late and one for early harvest.
Plant at intervals to get a succession of crops. But very late peas, in our dry climate, amount to but little, without almost daily watering.[Pg 319]
Plant at intervals to ensure a succession of crops. However, very late peas, in our dry climate, yield very little without almost daily watering.[Pg 319]
PEACH.
This native of Persia is one of the most healthy and universally-favorite fruits. In its native state, it was hardly suitable for eating, resembling an almond more than our present fine peaches. Perhaps no other fruit exhibits so wide a difference in the products of seeds from the same tree. All the fine varieties are what we call chance products of seeds, not one out of a thousand of which deserved further cultivation. The prevailing opinion is, that planting the seeds is not a certain method of propagating a given variety; hence the general practice of budding (which see). Others assert that there are permanent varieties, that usually produce the same from the seed, when not allowed to mix in the blossoms. Some prefer to raise the trees for their peach-orchards from seed, thinking them longer-lived and more healthy. Whole peaches planted when taken from the tree, or the pits planted before having become dry, are said to be much more certain to produce the same fruit. We know an instance in which the fruit of an early Crawford peach, thus planted, could not be distinguished from those that grew on a budded tree in the same orchard. One of the difficulties in reproducing the same from seed, is the great difficulty in getting the seed of any variety pure. We everywhere have so many varieties of fruit-trees in the same orchard, that the seeds of no one can be pure; they mix in the blossoms. On this account, the surest method of perpetuating a variety is by budding. This tree is of rapid growth, often bearing the third year from the seed, and producing abundantly the fifth. The peach-[Pg 320]tree is often called thrifty when its growth is very luxuriant, but tender and unhealthy, perishing in the following winter. A moderate, steady, hardy growth is most profitable. The following directions, though brief, are complete:—
This native of Persia is one of the healthiest and most popular fruits. In its natural state, it was barely edible, resembling an almond more than the delicious peaches we know today. No other fruit shows such a wide difference in the seeds produced from the same tree. All the great varieties are what we refer to as chance seedlings, with less than one out of a thousand worthy of further cultivation. The common belief is that planting the seeds is not a reliable way to propagate a specific variety; that’s why the usual practice is budding (which see). Others argue that there are stable varieties that generally produce the same fruit from seed, as long as they don’t cross-pollinate. Some people prefer to grow their peach orchards from seed, believing they are longer-lasting and healthier. Whole peaches planted immediately after being harvested or pits planted before drying are said to be much more likely to produce the same fruit. We know of an instance where a fruit from an early Crawford peach, planted this way, was indistinguishable from those grown on a budded tree in the same orchard. One challenge in reproducing the same fruit from seed is the difficulty of obtaining pure seeds of any variety. There are so many varieties of fruit trees in one orchard that the seeds cannot be pure; they mix during flowering. For this reason, the most reliable method of preserving a variety is by budding. This tree grows quickly, often bearing fruit by the third year from seed and producing abundantly by the fifth. The peach tree is often referred to as thrifty when its growth is lush, but it can be tender and unhealthy, dying in the next winter. A moderate, steady, and hardy growth is the most beneficial. The following instructions, though brief, are complete:—
Raising Seedlings.—Dry the pits in the shade; put them away till the last of winter; then soak them two days in water, and spread them on some place in the garden where water will not stand, and cover them an inch deep with wet sand, and leave them to freeze. When about time to plant them (which is early corn-planting time), take them up and select all those that are opened by the frost, and that are beginning to germinate, and plant in rows four feet apart and one foot in the row. These will grow and be ready for budding considerably earlier than those not opened by frost. Crack the others on a wooden block, by striking their side-edge with a hammer; you thus avoid injury to the germ that is endangered by striking the end. Plant these in rows like the others, but only six inches apart in the row, as they will not all germinate. Plant them on rich soil covering an inch or two deep. Keep them clear of weeds, and they will be ready for budding from August 15th to September 10th, according to latitude or season. In a dry season, when everything matures early, budding must not be deferred as long as in a wet season.
Raising Seedlings.—Dry the pits in the shade and store them until the end of winter. Then soak them in water for two days and spread them in a part of the garden where water won’t accumulate. Cover them with wet sand about an inch deep and leave them to freeze. When it’s close to planting time (which is early corn-planting season), take them out and select those that have opened due to the frost and are starting to germinate. Plant them in rows that are four feet apart and one foot apart in the row. These will grow and be ready for budding much earlier than those that haven’t opened from the frost. For the others, crack them on a wooden block by hitting the side edge with a hammer; this prevents damage to the germ, which is at risk if you hit the end. Plant these in rows like the others, but only six inches apart in the row, since not all will germinate. Use rich soil to plant them and cover with one to two inches of soil. Keep them weed-free, and they’ll be ready for budding between August 15th and September 10th, depending on your location or the season. In dry years, when everything ripens early, don’t wait as long to bud as you would in wet years.
For full directions for budding, see our article on that subject.
For complete instructions on budding, check out our article on that topic.
Transplanting.—Perhaps no other fruit-tree suffers so much from transplanting when too large. This should always be done, after one year's growth, from the bud. The best time for transplanting is the spring[Pg 321] in northern latitudes subject to hard frosts, and in autumn in warmer climates.
Transplanting.—No other fruit tree seems to struggle as much when transplanted while it's too big. This should always be done after a year of growth from the bud. The ideal time for transplanting is spring[Pg 321] in northern areas with harsh frost, and in autumn in warmer climates.
Soil and Location.—All intelligent fruit-growers are aware that these exert a great influence upon the size, quality, and quantity, of all varieties of fruits. An accurate description of a variety in one climate will not always identify it in another. Some few varieties are nearly permanent and universal, but most are adapted to particular localities, and need a process of acclimation to adapt them to other soils and situations. Light sandy soils are usually regarded best for the peach: it is only so because nineteen out of twenty cultivators will not take pains to suitably prepare other soils. Some of the best peaches we have ever seen grew on the richest Illinois prairie, and others on the limestone bluffs of the Ohio river. Thorough drainage is indispensable for the peach, on all but very light, porous soils: with such drainage, peaches will do best on soil best adapted to growing corn and potatoes. Bones, bonedust, lime, ashes, stable-manure, and charcoal, are the best applications to the soil of a peach-orchard. Whoever grows peaches should put at least half a bushel of fine charcoal in the earth in which he sets each tree. Mix it well with the soil, and the tree will grow better, and the fruit be larger and finer, for a dozen years. Any good soil, well drained and manured with these articles, will produce great crops of peaches. For the location of peach-orchards, see our general remarks on "Location of Fruit-trees." But we would repeat here the direction to choose a northern exposure, in climates subject to late frosts. Elevations are always favorable, as are also the shores of all bodies of water. In our remarks on location, we have[Pg 322] shown by facts the great value of hills, so high as to be useless for any other purpose. Between Pittsburgh and the mouth of the Ohio river, there are enough high elevations, now useless, to supply all the cities within fifty miles of the rivers, down to New Orleans, with the best of peaches every year. In no year will they ever be cut off by frost on those hills. Warm exposures, with a little winter protection, will secure good peaches in climates not adapted to them. In some parts of France, they grow large quantities for market by training them against walls, where they do not flourish in the open field. By this practice, and by enclosures and acclimation, the growth of this excellent fruit may be extended to the coldest parts of the United States.
Soil and Location.—All knowledgeable fruit growers know that these factors significantly impact the size, quality, and quantity of all types of fruit. A precise description of a variety in one climate won't always apply in another. A few varieties are almost permanent and universal, but most are suited to specific locations and require a process of acclimation to adapt to different soils and conditions. Light sandy soils are generally considered the best for peaches; this is mainly because 19 out of 20 growers don’t bother to properly prepare other soils. Some of the best peaches we've ever seen have grown on the rich prairie soils of Illinois, while others thrived on the limestone bluffs along the Ohio River. Proper drainage is essential for peaches, except in very light, porous soils: with good drainage, peaches can do best in soils that are also suitable for growing corn and potatoes. Bones, bone dust, lime, ashes, stable manure, and charcoal are the best amendments for peach orchard soil. Anyone growing peaches should mix at least half a bushel of fine charcoal into the soil where they plant each tree. Mixing it well with the soil will help the tree grow better, and result in larger and finer fruit for about twelve years. Any good soil that is well-drained and enriched with these materials will produce bountiful peach crops. For more details on peach orchard location, see our general notes on "Location of Fruit-trees." However, we want to emphasize again the importance of choosing a northern exposure in climates prone to late frosts. Elevated areas are always beneficial, as are the shores of any bodies of water. In our notes on location, we have[Pg 322] demonstrated the significant value of hills that are too high for any other use. Between Pittsburgh and the mouth of the Ohio River, there are enough high elevations, currently unused, to provide all the cities within fifty miles of the rivers, down to New Orleans, with excellent peaches each year. They will never be affected by frost on those hills. Warm exposures, with some winter protection, will ensure good peaches in climates not usually suitable for them. In some parts of France, large quantities are grown for the market by training them against walls, where they do not thrive in open fields. Through this method, as well as through the use of enclosures and acclimation, the growth of this exceptional fruit can be extended to the coldest areas of the United States.
Transplanting—should be performed with care, as in the case of all other fruit-trees. Every injured root should be cut off smooth from the under side, slanting out from the tree. Leave the roots, as nearly as possible, in the position in which they were before. Set the tree an inch lower than it stood in the nursery; it saves the danger of the roots getting uncovered, and of too strong action of the atmosphere on the roots, in a soil so loose. The opposite is often recommended, viz., to allow the tree in its new location to stand an inch or two higher than before; but we are sure, from repeated trials, that it is wrong. Shake the fine earth as closely around the roots as possible, mulch well, and pour on a pailful of tepid water, if it be rather a dry time, and the tree will be sure to live and make a good growth the first year. When a peach-tree is transplanted, after one year's growth from the bud, it should have the top cut off within eighteen inches or two feet of the ground, and all the limbs cut off at half their length.[Pg 323] This will induce the formation of a full, large head. A low, full-branching head is always best on a peach-tree.
Transplanting should be done with caution, just like with any other fruit trees. Every damaged root should be trimmed smoothly from the underside, slanting away from the tree. Try to keep the roots as close as possible to their original position. Plant the tree an inch lower than it was in the nursery to prevent the roots from being exposed and to reduce the impact of the atmosphere on the roots in loose soil. Some people suggest planting the tree an inch or two higher in its new spot, but our repeated experiments show that this is incorrect. Fill the area around the roots with fine soil as tightly as you can, apply a good layer of mulch, and if the weather is dry, water it with a bucket of lukewarm water. This will ensure that the tree survives and grows well in its first year. When transplanting a peach tree after it has grown for a year from the bud, you should trim the top to within eighteen inches or two feet of the ground and cut all the limbs back to half their length. This will encourage a full, large canopy. A low, bushy canopy is always best for a peach tree.[Pg 323]
Pruning is perhaps the most important matter in successful peach culture. The fruit is borne wholly on wood of the previous year's growth. Hence a tree that has the most of that growth, in a mature state, and properly situated, will bear the most and the finest fruit. A tree left to its natural state, with no pruning but of a few of the lower limbs from the main trunk, will soon exhibit a collection of long naked limbs, without foliage, except near their extremities (see the cut overleaf). In this case fruit will be too thick on what little bearing wood there is, and it should be thinned. But very few cultivators even attend to that. The fruit is consequently small, and it weakens the growth of the young wood above, for next year's fruiting, and thus tree and fruit are perpetually deteriorating.
Pruning is probably the most crucial aspect of successful peach cultivation. The fruit grows entirely on the branches from the previous year's growth. So, a tree with the most of that growth, in a mature condition, and properly positioned, will produce the most and the best fruit. A tree left to grow naturally, with minimal pruning aside from a few lower branches from the main trunk, will quickly develop a bunch of long bare limbs, with leaves only at the tips (see the illustration on the next page). In this situation, fruit will be overcrowded on the little bearing wood that exists, and it should be thinned out. However, very few growers even take that into account. As a result, the fruit becomes small, which weakens the growth of the young wood above for next year’s fruiting, causing both the tree and the fruit to keep deteriorating.
Observe a shoot of young peachwood, you will see near its base, leaf-buds. On the middle there are many blossom-buds, and on the top, leaf-buds again. The tendency of sap is to the extremity. Hence the upper leaf-buds will put out at once. And for their growth, and the maturity of the excessive fruit on the middle, the power of the sap is so far exhausted, that the leaf-buds at the base do not grow. Hence when the fruit is removed, nothing is left below the terminal shoots, but a bare pole. This is the condition in which we find most peach-trees.
Look at a young peach tree shoot, and you'll notice leaf buds near the base. In the middle, there are numerous blossom buds, and again leaf buds at the top. The sap tends to flow toward the ends. So, the upper leaf buds sprout quickly. But because the sap is mainly used for their growth and for the excess fruit in the middle, the lower leaf buds don't develop. This is why, when the fruit is taken off, all that remains below the top shoots is just a bare trunk. This is the state we often find most peach trees in.
For this there is a certain preventive. It consists in shortening in, by cutting off in the month of September, from a third to a half of the current season's growth. If the top be large, cut off one half the length of the new wood. If it be less vigorous and rank, and you[Pg 324] fear you will not have room for a fair crop of peaches, cut off but one third. This heading-in is sometimes recommended to be done in the spring. For forming a head in a young tree the spring is better. But to mature the wood, and increase the quantity, and improve the quality of the fruit, September is much the best.
For this, there’s a simple solution. It involves pruning in September by removing one-third to one-half of the current season's growth. If the top is large, trim half the length of the new wood. If it’s less vigorous and you’re concerned about having enough space for a good crop of peaches, just remove one-third. This pruning is sometimes suggested for spring. Spring is better for shaping the top of a young tree. However, to mature the wood, increase the quantity, and improve the quality of the fruit, September is the best time.
Such shortening in early in September, directs the sap to maturing the wood, already formed and developing fruit-buds, instead of promoting the growth of an undue quantity of young and tender wood, to be destroyed by the winter, or to hinder the growth of the fruit of the next season. This heading-in process, with these young shoots, is most easily performed with pruning shears, with wooden handles, of a length suited to the height of the tree.
Such shortening in early September guides the sap to focus on maturing the existing wood and developing fruit buds, rather than creating too much young and tender wood that could be damaged by winter or interfere with the growth of next season's fruit. This heading-in process for the young shoots is most easily done with pruning shears that have wooden handles, sized appropriately for the height of the tree.
 Neglected Peach Tree. Properly trimmed Peach Tree.
But a work to precede this annual shortening-in, is the original formation of a head to a peach-tree. Take a tree a year old from the bud, and cut it down to within two and a half feet from the ground. Below that numerous strong shoots will come out. Select three vigorous ones and let them grow as they please, carefully pinching off all the rest. In the fall you will have a tree of three good strong branches. In the next spring cut off these three branches, one half. Below these cuts,[Pg 325] branches will start freely. Select one vigorous shoot to continue the limb, and another to form a new branch. Check the growth of the shoots below, by cutting off their ends, but do not rub them off, as they will form fruit branches. At the close of the season you will have a tree with six main branches, and some small ones for fruit, on the older wood. Repeat this process the third year, and you have a tree with twelve main branches, and plenty smaller ones for fruit. All these small branches on the old wood, should be shortened in half their length, to cause the leaf-buds near their base to start, so as to produce large numbers of young shoots. Continue this as long as you please, and make just as large a head and just such a form as you may wish, being careful only to control the shape of the top so as to let the sun and air freely into every part.
But before cutting back each year, you need to shape the head of a peach tree. Take a one-year-old tree from the bud and trim it down to about two and a half feet from the ground. Strong shoots will sprout below that point. Choose three vigorous ones and let them grow freely, pinching off all the others. By fall, you'll have a tree with three solid branches. The following spring, trim these three branches back by half. Below these cuts, new branches will shoot out. Pick one strong shoot to keep as the main limb, and another to create a new branch. To manage the growth of the shoots below, cut off their tips, but don't remove them completely, as they'll develop into fruit branches. By the end of the season, you’ll have a tree with six main branches and some smaller ones for fruit on the older wood. Repeat this process in the third year, and you'll have a tree with twelve main branches and plenty of smaller ones for fruit. All of these small branches on the old wood should be trimmed to half their length to encourage leaf buds near the base to open up and produce many new shoots. Keep going as long as you like, shaping the head and structure however you want, just be sure to maintain the shape at the top to allow sunlight and air to reach every part.
Trees thus trained may be planted thick enough to allow four hundred to stand on an acre, and will bear an abundance of the finest fruit, and all low enough to be easily picked. This method of training is much better than allowing the tree to shoot out on all sides from the ground: in that case, the branches are apt to split down and perish. This system of heading-in freely every year, preserves the life and health of the tree remarkably. Many of the finest peach-trees in France are from thirty to sixty years old, and some a hundred. We may, in this country, have peach-trees live fifty years, in the most healthy bearing condition. By trimming in this way, and carrying out fully this system, some have thrifty-looking peach-trees, more than a foot in diameter, bearing the very best of fruit. It is sheer neglect that causes our peach-orchards to perish after having borne from three to six years. Let every man[Pg 326] who plants a peach-tree remember, that this system of training will make his tree live long, be healthy, grow vigorously, and bear abundantly.
Trees that are trained this way can be planted closely enough to have four hundred on an acre and will produce a lot of high-quality fruit, all at a height that's easy to reach. This method of training is far better than letting the tree grow out in every direction from the ground, as that can lead to branches splitting and dying. Regularly cutting back the branches every year significantly helps maintain the tree's life and health. Many of the best peach trees in France are between thirty to sixty years old, and some even reach a hundred. In our country, peach trees can live for up to fifty years while still producing healthy fruit. By pruning in this manner and fully embracing this system, some people have healthy peach trees over a foot in diameter that yield excellent fruit. It's pure neglect that causes our peach orchards to die after just three to six years of production. Every person who plants a peach tree should remember that this training method will help their tree live a long life, stay healthy, grow vigorously, and bear plenty of fruit.
Diseases of peach-trees have been a matter of much speculation. The result is, that the hope of the peach-grower is mainly in preventives.
Diseases of peach trees have been widely discussed. As a result, peach growers mainly rely on prevention methods for hope.
The Yellows is usually regarded as a disease. Imagination has invented many causes of this evil. Some suppose it to be produced by small insects; others that it is in the seed. Again, it is ascribed to the atmosphere. It has been supposed to be propagated in many ways—by trimming a healthy tree with a knife that had been used on a diseased one; by contagion in the atmostphere, as the measles or small-pox; by impregnation from the pollen, through the agency of winds or bees; by the migration of small insects; or by planting diseased seeds, or budding from diseased trees. This great diversity of opinion leaves room to doubt whether the yellows in peach-trees be a disease at all, or only a symptom of general decay. The symptoms, as given in all the fruit-books, are only such as would be natural from decay and death of the tree, from any cause whatever. This may result from neglect to supply the soil with suitable manures, and to trim trees properly, and especially from over-bearing. This view of the case is more probable, from the fact that none pretend to have found a remedy. All advise to remove the tree thus affected at once, root and branch. We have seen the following treatment of such trees tried with marked success. Cut off a large share of the top, as when you would renew an old, neglected tree; lay the large roots bare, making a sort of basin around the body of the tree, and pour in three pailfuls of boiling[Pg 327] water: the tree will start anew and do well. This is an excellent application to an old, failing peach-tree. The sure preventive of the yellows is, planting seeds of healthy trees, budding from the most vigorous, heading-in well, supplying appropriate manures, and general good cultivation.
The Yellows is usually seen as a disease. Imagination has come up with many reasons for this problem. Some think it’s caused by tiny insects; others believe it comes from the seeds. Again, it’s blamed on the atmosphere. It is thought to spread in various ways—by using a knife on a healthy tree that was previously used on a sick one; by contagion in the air, like measles or smallpox; by contamination from pollen carried by winds or bees; by the movement of tiny insects; or by planting infected seeds, or budding from sick trees. This wide range of theories makes it hard to determine whether the yellows in peach trees are an actual disease or just a sign of overall decline. The symptoms listed in all the fruit guides are merely what would naturally occur from the decline and death of the tree, for any reason. This can happen from a lack of proper nutrients in the soil, improper trimming of the trees, and especially from overbearing. This perspective seems more likely since nobody claims to have found a cure. Everyone suggests removing the affected tree entirely, roots and all. We have seen the following method for treating such trees successfully. Trim off a large portion of the top, as you would when renewing an old, neglected tree; expose the large roots, creating a sort of basin around the tree's base, and pour in three buckets of boiling[Pg 327] water: the tree will revive and flourish. This is an excellent remedy for an old, failing peach tree. The best way to prevent yellows is by planting seeds from healthy trees, budding from the strongest ones, pruning properly, providing appropriate nutrients, and ensuring good overall care.
Curled Leaves is another evil among peach-trees, occurring before the leaves are fully grown, and causing them to fall off after two or three weeks. Other leaves will put out, but the fruit is destroyed, and the general health of the tree injured. Elliott says the curl of the leaf is produced by the punctures of small insects. One kind of curled leaf is, but not this. But we have no doubt that Barry's theory is the correct one, viz., that it is the effect of sudden changes of the weather. We have noticed the curled leaf in orchards where the trees were so close together as to guard each other. On the side where the cold wind struck them, we noticed they were badly affected; while on the warm side, and in the centre where they were protected by the others, they exhibited very few signs of the curl. In western New York, unusual cold east winds always produce the curled leaves, on trees much exposed: hence, the only remedy is the best protection you can give, by location, &c.
Curled Leaves is another problem for peach trees, happening before the leaves fully develop and causing them to fall off after two or three weeks. New leaves may grow back, but the fruit is ruined, and the overall health of the tree suffers. Elliott suggests that the curl of the leaves is caused by small insect punctures. One type of curled leaf might be due to that, but not this one. However, we firmly believe that Barry's theory is the right one, that it's a result of sudden weather changes. We’ve observed curled leaves in orchards where the trees were packed tightly together, shielding each other. On the side facing the cold wind, we noticed they were severely affected; while on the warm side and in the center, where they were protected by the others, they showed very few signs of curling. In western New York, unusual cold east winds always cause curled leaves on trees that are highly exposed: therefore, the only solution is to provide the best protection possible through careful location, etc.
Mildew is a minute fungus growing on the ends of tender shoots of certain varieties, checking their growth, and producing other bad effects. Syringe the trees with a weak solution of nitre, one ounce in a gallon of water, which will destroy the fungus and invigorate the tree.
Mildew is a tiny fungus that grows on the tips of soft shoots of certain plant varieties, stunting their growth and causing other negative effects. Spray the trees with a diluted solution of nitrate, using one ounce per gallon of water, which will eliminate the fungus and boost the tree's health.
The Borer has been the great enemy of the peach-tree, since about the close of the last century. The[Pg 328] female insect, that produces the worms, deposites her eggs under rough bark, near the surface of the ground. This is done mostly in July, but occasionally from June to October. The eggs are laid in small punctures, and covered with a greenish glue; in a few days they come out, a small white worm, and eat through the bark where it is tender, just at, or a little below, the surface of the ground; they eat under the bark, between that and the wood, and, consuming a little of each, they frequently girdle the tree; as they grow larger, they perforate the solid wood; when about a year old, they make a cocoon just below the surface of the ground, change into a chrysalis state, and shortly come out a winged insect, to deposite fresh eggs. But the practical part of all this is the remedy: keep the ground clean around the trees, and rub off frequently all the rough bark; place around each tree half a peck of air-slaked lime, and the borer will not attack it. This should be placed there on the first of May, and be spread over the ground on the first of October; refuse tobacco-stems, from the cigar-makers, or any other offensive substance, as hen-manure, salt and ashes, &c., will answer the same purpose. We should recommend the annual cultivation of a small piece of ground in tobacco, for use around peach-trees. We have found it very successful against the borer, and it is an excellent manure; applied two or three times during the season, it proves a perfect remedy, and is in no way injurious, as an excessive quantity of lime might be.
The Borer has been the main enemy of the peach tree since the late 1800s. The[Pg 328] female insect that produces the worms lays her eggs under rough bark, close to the ground. This typically happens in July, but occasionally from June to October. The eggs are placed in small punctures and covered with a greenish glue; in a few days, they hatch into small white worms that eat through the bark where it’s tender, right at or just below the ground surface. They feed under the bark, between it and the wood, and by consuming a bit of each, they often girdle the tree. As they grow larger, they bore into the solid wood; when they’re about a year old, they make a cocoon just below the ground’s surface, transform into a chrysalis, and soon emerge as winged insects to lay new eggs. But what you really need to know is the remedy: keep the area around the trees clean and frequently scrape off any rough bark. Scatter half a peck of air-slaked lime around each tree, and the borer won’t attack it. This should be done on May 1st and spread over the ground again on October 1st; using tobacco stems from cigar makers or any other unpleasant substance like hen manure, salt, and ashes will work just as well. We recommend planting a small patch of tobacco annually for use around peach trees. We’ve found it very effective against the borer and it’s also a great fertilizer; applied two or three times during the season, it acts as a perfect solution and isn’t harmful, unlike using too much lime might be.
Leaf Insects.—There are several varieties, which cause the leaves to curl and prematurely fall. This kind of curled leaf differs from the one described as the result of sudden changes and cold wind; that appears[Pg 329] general wherever the cold wind strikes the tree, while this only affects a few leaves occasionally, and those surrounded by healthy leaves. The remedy is to syringe them with offensive mixtures, as tobacco-juice, or sprinkle them when wet with fine, air-slaked lime.
Leaf Insects.—There are several types that cause leaves to curl and fall off early. This type of curled leaf is different from the one caused by sudden changes and cold winds; that one usually appears[Pg 329] all over the tree wherever the cold wind hits, while this only affects a few leaves here and there, and those are surrounded by healthy leaves. The solution is to spray them with unpleasant mixtures, like tobacco juice, or sprinkle them when wet with fine, air-slaked lime.
Varieties.—Their name is legion, and they are rapidly increasing, and their synonyms multiplying. A singular fact, in most of our fruit-books, is a minute description of useless kinds, and such descriptions of those that they call good, as not one in ten thousand cultivators will ever try to master—they are worse than useless, except to an occasional amateur cultivator.
Varieties.—There are so many of them, and they keep growing in number, along with their synonyms. One peculiar thing in many of our fruit books is the detailed descriptions of useless types, as well as descriptions of those they claim are good, which not even one in ten thousand growers will ever bother to understand—they're more of a hindrance than help, except for the occasional hobbyist grower.
Elliott, in his fruit-book, divides peaches into three classes: the first is for general cultivation; under this class he describes thirty-one varieties, with ninety-eight synonyms. His second class is for amateur cultivators, and includes sixty-nine varieties, with eighty-four synonyms. His third class, which he says are unworthy of further cultivation, describes fifty-four varieties, with seventy-seven synonyms. Cole gives sixty-five varieties, minutely described, and many of them pronounced worthless. In Hooker's Western Fruit-Book, we have some eighty varieties, only a few of which are regarded worthy of cultivation. Downing gives us one hundred and thirty-three varieties, with about four hundred synonyms. In all these works the descriptions are minute. The varieties of serrated leaves, the glandless, and some having globose glands on the leaves, and others with reniform glands. Then we have the color of the fruit in the shade and in the sun, which will, of course, vary with every degree of sun or shade. We submit the opinion that those books would have possessed much more value, had they only described the best mode of[Pg 330] cultivating peaches, without having mentioned a single variety, thus leaving each cultivator to select the best he could find. Had they given a plain description of ten, or certainly of not more than fifteen varieties, those books would have been far more valuable for the people. We give a small list, including all we think it best to cultivate. Perhaps confining our selection to half a dozen varieties would be a further improvement:—
Elliott, in his fruit book, classifies peaches into three categories: the first is for general cultivation; in this category, he describes thirty-one varieties, along with ninety-eight synonyms. His second category is for amateur growers, featuring sixty-nine varieties and eighty-four synonyms. The third category, which he considers unworthy of further cultivation, includes fifty-four varieties and seventy-seven synonyms. Cole lists sixty-five varieties, described in detail, many of which he deems worthless. In Hooker's Western Fruit Book, there are about eighty varieties, only a few of which are seen as suitable for cultivation. Downing presents one hundred and thirty-three varieties, with roughly four hundred synonyms. Throughout these works, the descriptions are detailed, covering varieties with serrated leaves, those without glands, some with round glands on the leaves, and others with kidney-shaped glands. The color of the fruit varies in shade and sunlight, changing with different light conditions. We believe these books would have been much more valuable if they had focused on the best methods for [Pg 330] cultivating peaches without mentioning specific varieties, allowing each grower to choose the best ones available. If they had provided a straightforward description of ten or, at most, fifteen varieties, the books would have been significantly more useful for the people. We’ll include a small list of what we think should be cultivated. Narrowing our selection to six varieties could improve it even more:—
1. The first of all peaches is Crawford's Early. This is an early, sure, and great bearer, of the most beautiful, large fruit;—a good-flavored, juicy peach, though not the very richest. It is, on the whole, the very best peach in all parts of the country. Time, from July 15th to September 1st. Freestone.
1. The best peach is Crawford's Early. It's an early, reliable, and heavy producer, with beautiful, large fruit—a tasty, juicy peach, though not the absolute richest in flavor. Overall, it's the best peach found nationwide. Maturity is from July 15th to September 1st. Freestone.
2. Crawford's Late is very large and handsome; uniformly productive, though not nearly so good a bearer as Crawford's Early. Ripens last of September and in October. Fair quality, and always handsome; freestone; excellent for market.
2. Crawford's Late is quite large and attractive; consistently productive, though it doesn't yield as well as Crawford's Early. It ripens in late September and October. It has decent quality and is always good-looking; it's a freestone variety and excellent for the market.
3. Columbia.—Origin, New Jersey. It is a thoroughly-tested variety, raised and described by Mr. Cox, who wrote one of the earliest and best American fruit-books. Fine specimens were exhibited in 1856, grown in Covington, Ky. Excellent in all parts of the United States. Freestone.
3. Columbia.—Origin, New Jersey. It is a well-researched variety, developed and documented by Mr. Cox, who authored one of the earliest and most respected American fruit books. Great samples were showcased in 1856, cultivated in Covington, KY. It performs excellently throughout the United States. Freestone.
4. George the Fourth.—A large, delicious, freestone peach, an American seedling from Mr. Gill, Broad street, New York. The National Pomological Society have decided the tree to be so healthy and productive as to adapt it to all localities in this country. It has twenty-five synonyms.
4. George the Fourth.—A big, tasty, freestone peach, an American seedling from Mr. Gill, Broad Street, New York. The National Pomological Society has determined that the tree is so healthy and productive that it can thrive in any location in this country. It has twenty-five synonyms.
5. Early York.—Freestone; the best, and first really good, early peach. Time July at Cincinnati, and Au[Pg 331]gust at Cleveland. Time of ripening of all varieties varies with latitude, location, and season.
5. Early York.—Freestone; the best and the first truly great early peach. It ripens in July in Cincinnati and August in Cleveland. The ripening time for all varieties varies depending on latitude, location, and season.
6. Grass Mignonne.—A foreign variety, a great favorite in France, in the time of Louis XIV. Very rich freestone, flourishing in all climates from Boston south. The high repute in which it has long been held is seen in its thirty synonyms. One of the best, when you can obtain the genuine. Time, August.
6. Grass Mignonne.—A foreign variety that was very popular in France during the time of Louis XIV. It's a very rich freestone that thrives in all climates from Boston south. Its long-standing reputation is evident in its thirty synonyms. It’s one of the best when you can find the real deal. Time, August.
7. Honest John.—A large, beautiful, delicious, freestone variety. Highly prized as a late peach, maturing from the middle to the last of October. Indispensable in even a small selection.
7. Honest John.—A large, beautiful, delicious, freestone variety. Highly valued as a late peach, ripening from mid to late October. Essential in even a small selection.
8. Malacatune.—A very popular American freestone peach, derived from a Spanish, and is the parent of the Crawford peaches, both early and late.
8. Malacatune.—A very popular American freestone peach that comes from a Spanish variety and is the ancestor of both early and late Crawford peaches.
9. Morris White.—Everywhere well known; a good bearer; best for preserving at the North; a good dessert peach South.
9. Morris White.—Widely recognized; a reliable producer; ideal for canning in the North; a tasty dessert peach in the South.
10. Morris Red Rare-ripe.—A favorite, freestone, July peach. The tree is healthy and a great bearer.
10. Morris Red Rare-ripe.—A popular, freestone peach that's perfect for July. The tree is robust and produces a great harvest.
11. Old Mixon.—Should be found in all gardens and orchards; it is of excellent quality and ripens at a time when few good peaches are to be had; it endures spring-frosts better than any other variety; profitable.
11. Old Mixon.—This variety should be present in all gardens and orchards; it's of excellent quality and ripens when few good peaches are available; it withstands spring frosts better than any other variety; it's profitable.
12. Old Mixon Cling.—One of the most delicious early clingstones. Deserves a place in all gardens.
12. Old Mixon Cling.—One of the tastiest early clingstone peaches. It deserves a spot in every garden.
13. Monstrous Cling.—Not the best quality, but profitable for market on account of its great size.
13. Monstrous Cling.—Not of the highest quality, but still profitable for the market due to its large size.
14. Heath Cling.—Very good South and West. Wrapped in paper and laid in a cool room, it will keep longer than any other variety. Tree hardy and often produces when others fail. Excellent for preserving, and when quite ripe, is superior as a dessert fruit.[Pg 332]
14. Heath Cling.—Very good in the South and West. If you wrap it in paper and store it in a cool room, it will last longer than any other variety. The tree is hardy and often produces fruit when others do not. It's excellent for canning, and when fully ripe, it's a superior dessert fruit.[Pg 332]
15. Blood Cling.—A well-known peach, excellent for pickling and preserving. It sometimes measures twelve inches in circumference. The old French Blood Cling is smaller. Many of these varieties will be found under other names. You will have to depend upon your nursery-man to give you the best he has, and be careful to bud from any choice variety you may happen to taste. Difficulties and disappointments will always attend efforts to get desired varieties.
15. Blood Cling.—A well-known peach, great for pickling and preserving. It can sometimes measure twelve inches around. The old French Blood Cling is smaller. Many of these varieties might be found under different names. You'll need to rely on your nursery provider to offer you the best options, and make sure to bud from any premium variety you happen to try. There will always be challenges and disappointments in trying to get the varieties you want.
PEAR.
The pear is a native of Europe and Asia, and, in its natural state, is quite as unfit for the table as the crab-apple. Cultivation has given it a degree of excellence that places it in the first rank among dessert-fruits. No other American fruit commands so high a price. New varieties are obtained by seedlings, and are propagated by grafting and budding: the latter is generally preferred. Root-grafting of pears is to be avoided; the trees will be less vigorous and healthy. The difficulty of raising pear-seedlings has induced an extensive use of suckers, to the great injury of pear-culture. Fruit-growers are nearly unanimous in discarding suckers as stocks for grafting. The difficulty in raising seedling pear-trees is the failure of the seeds to vegetate. A remedy for this is, never to allow the seeds to become dry, after being taken from the fruit, until they are planted. Keep them in moist sand until time to plant them in the spring, or plant as soon as taken from the fruit. The spring is the best time for planting, as the[Pg 333] ground can be put in better condition, rendering after-culture much more easy. The pear will succeed well on any good soil, well supplied with suitable fertilizers. The best manures for the pear are, lime in small quantities, wood-ashes, bones, potash dissolved, and applied in rotten wood, leaves, and muck, with a little stable-manure and iron-filings—iron is very essential in the soil for the pear-tree. In all soils moderately supplied with these articles, all pear-trees grafted on seedling-stocks, and those that flourish on the foreign quince, will do well. A good yellow loam is most natural; light sandy or gravelly land is unfavorable. It is better to cart two or three loads of suitable soil for each tree on such land. The practice of budding or grafting on apple-stocks, on crab-apples, and on the mountain-ash, should be utterly discarded. For producing early fruit, quince-stocks and root-pruning are recommended.
The pear is native to Europe and Asia, and in its natural state, it's just as unfit for eating as the crab-apple. Cultivation has improved it to a level that makes it one of the best dessert fruits. No other American fruit sells for such a high price. New varieties are created from seedlings and are mostly propagated through grafting and budding, with the latter being the preferred method. Root-grafting pears should be avoided as the trees will be less vigorous and healthy. The challenge of raising pear seedlings has led to the widespread use of suckers, which harms pear cultivation. Fruit growers almost unanimously reject suckers as grafting stocks. The main issue with raising seedling pear trees is that the seeds often won’t sprout. To fix this, make sure not to let the seeds dry out after being taken from the fruit until they’re planted. Keep them in moist sand until spring planting, or plant them immediately after picking. Spring is the best time for planting because the ground can be prepared better, making future care easier. Pears thrive in any good soil that has the right fertilizers. The best fertilizers for pears are small amounts of lime, wood ashes, bone meal, potassium dissolved in rotten wood, leaves, and muck, along with a bit of stable manure and iron filings—iron is very important for pear trees. In soils that have a moderate amount of these nutrients, any pear trees grafted onto seedling stocks, and those that thrive on the foreign quince, will do well. A good yellow loam is ideal; light sandy or gravelly soil is not suitable. It’s better to bring in two or three loads of suitable soil for each tree on such land. The practice of budding or grafting onto apple stocks, crab apples, or mountain ash should be completely avoided. For early fruit production, quince stocks and root pruning are recommended.
Setting out pear-trees properly is of very great importance. The requisites are, to have the ground in good condition, from manure on the crop of the last season, and thoroughly subsoiled and drained. Pear-trees delight in rather heavy land, if it be well drained; but water, standing in the soil about them, is utterly ruinous. Pear-trees, well transplanted on moderately rich land, well subsoiled and well drained, will almost always succeed. By observing the following brief directions, any cultivator may have just such shaped tops on his pear-trees as he desires. Cut short any shoots that are too vigorous, that those around them may get their share of the sap, and thus be enabled to make a proportionate growth. After trees have come into bearing, symmetry in the form of their heads may be pro[Pg 334]moted by pinching off all the fruit on the weak branches, and allowing all on the strong ones to mature.
Setting up pear trees correctly is really important. You need to have the soil in good shape, enriched with manure from last season's crop, and it should be well subsoiled and drained. Pear trees thrive in moderately heavy soil, as long as it's well-drained; however, standing water in the soil will completely ruin them. If pear trees are transplanted on reasonably rich, well-subsoiled, and well-drained land, they will almost always thrive. By following these simple guidelines, any gardener can shape the tops of their pear trees as desired. Trim back any overly vigorous shoots so that the others can also receive their share of the sap, allowing for balanced growth. Once the trees start bearing fruit, you can encourage a symmetrical head shape by pinching off all the fruit on the weaker branches and letting the stronger ones mature.
Those two simple methods, removing the fruit from too vigorous shoots, and cutting in others, half or two-thirds their length, will enable one to form just such heads as he pleases, and will prove the best preventives of diseases.
Those two straightforward methods, taking the fruit off overly vigorous shoots and cutting back others to half or two-thirds of their length, will allow you to create the exact heads you want and will serve as the best ways to prevent diseases.
Diseases.—There are many insects that infest pear-orchards, in the same manner as they do apples, and are to be destroyed in the same way. The slugs on the leaves are often quite annoying. These are worms, nearly half an inch long, olive-colored, and tapering from head to tail, like a tadpole. Ashes or quicklime, sprinkled over the leaves when they are wet with dew or rain, is an effectual remedy.
Diseases.—There are many insects that invade pear orchards, just like they do with apples, and should be eliminated in the same way. The slugs on the leaves can be quite bothersome. These are worms, nearly half an inch long, olive-colored, and tapering from head to tail, similar to a tadpole. Sprinkling ashes or quicklime over the leaves when they are wet with dew or rain is an effective solution.
Insect-Blight.—This has been confounded with the frozen-sap blight, though they are very different. In early summer, when the shoots are in most vigorous growth, you will notice that the leaves on the ends of branches turn brown, and very soon die and become black. This is caused by a worm from an egg, deposited just behind or below a bud, by an insect. The egg hatches, and the worm perforates the bark into the wood, and commits his depredations there, preventing the healthy flow of the sap, which kills the twig above. Soon after the shoot dies, the worm comes out in the form of a winged insect, and seeks a location to deposite its eggs, preparatory to new depredations. The remedy is to cut off the shoots affected at once, and burn them. The insect-blight does not affect the tree far below the location of the worm. Watch your trees closely, and cut off all affected parts as soon as they appear, and burn them immediately, and you will soon[Pg 335] destroy all the insects. But very soon after the appearance of the blight they leave the limb; hence a little delay will render your efforts useless. These insects often commit the same depredations on apple and quince-trees. We had an orchard in Ohio seriously affected by them. We know no remedy but destruction as above.
Insect Blight.—This is often confused with the frozen-sap blight, though they are very different. In early summer, when the branches are growing vigorously, you'll notice that the leaves at the tips turn brown, then quickly die and turn black. This is caused by a worm that emerges from an egg laid just behind or below a bud by an insect. The egg hatches, and the worm burrows into the bark and wood, disrupting the healthy flow of sap, which kills the twig above it. Soon after the shoot dies, the worm emerges as a winged insect and looks for a place to lay its eggs, ready to cause new damage. The solution is to immediately cut off the affected shoots and burn them. The insect blight does not typically damage parts of the tree below where the worm is located. Keep a close eye on your trees, and remove any affected areas as soon as you spot them, burning them right away, and you'll soon[Pg 335] eliminate the insects. However, they often leave the limb shortly after the blight appears; therefore, a slight delay can make your efforts pointless. These insects can also cause similar damage to apple and quince trees. We had an orchard in Ohio that was seriously affected by them. We know of no remedy other than the destruction mentioned above.
The Frozen-Sap Blight is a much more serious difficulty. Its nature and origin are now pretty well settled. In every tree there are two currents of sap: one passes up through the outer wood, to be digested by the leaves; the other passing down in the inner bark, deposites new wood, to increase the size of the tree. Now, in a late growth of this kind of wood, the process is rapidly going on, at the approach of cold weather, and the descending sap is suddenly frozen, in this tender bark and growing wood. This sudden freezing poisons the sap, and renders the tree diseased. The blight will show itself, in its worst form, in the most rapid growing season of early summer, though the disease commenced with the severe frosts of the previous autumn. Its presence may be known by a thick, clammy sap, that will exude in winter or spring pruning, and in the discoloration of the inner bark and peth of the branches. On limbs badly affected on one side, the bark will turn black and shrivel up. But its effects in the death of the branches only occur when the growth of the tree demands the rapid descent of the sap: then the poisoned sap which was arrested the previous fall, in its downward passage, is diluted and sent through the tree; and when it is abundant, the whole tree is poisoned and destroyed in a few days; in others more slightly affected, it only destroys a limb or a small portion of the top. Another effect of this fall-freezing of[Pg 336] sap and growing wood, is to rupture the sap-vessels, and thus prevent the inner bark from performing its functions. This theory is so well established, that an intelligent observer can predict, in the fall, a blight-season the following summer. If the summer be cool, and the fall warm and damp, closed by sudden cold, the blight will be troublesome the next season, because the plentiful downward flow of sap, and rapid growth of wood, were arrested by sudden freezing. If the summer is favorable, and the wood matures well before cold weather, the blight will not appear. This is of the utmost practical moment to the pear-culturist. Anything in soil, situation, or pruning, that favors early maturity of wood, will serve as a preventive of blight; hence, cool, moist situations are not favorable in climates subject to sudden and severe cold weather in autumn. Root-pruning and heading-in, which always induce early maturity of wood, are of vast importance; they will, almost always, prevent frozen-sap blight. If, in spite of you, your pear-trees will make a late luxuriant growth, cut off one half of the most vigorous shoots before hard freezing, and you will check the flow of sap, by removing the leaves and shoots that control it, and save your trees. If blight makes its appearance, cut off at once all the parts affected. The effects will be visible in the wood and inner bark, far below the external apparent injury. Remove the whole injured part, or it will poison the rest of the tree. When this frozen sap is extensive, it poisons and destroys the whole tree; when slight, the tree often wholly recovers. If a spot of black, shrivelled bark appears, shave it off, deep enough to remove the affected parts, and cover the wound with grafting-wax. Remove all affected limbs.[Pg 337] These are the only remedies. But the practice of pruning both roots and branches will prove a certain preventive. A tree growing in grass, where it grows more slowly, and matures earlier in the season, will escape this blight; while one growing in very rich garden soil, and continuing to grow until cold weather, will suffer severely. The effects on orchards, in different soils and localities everywhere, confirm this theory. A little care then will prevent this evil, which has sometimes been so great as to discourage attempts at raising pears. In some localities, some of the finer varieties of pears, as the virgalieu, are ruined by cracking on the trees before ripening. Applications of ashes, salt, charcoal, iron-filings, and clay on light lands, will remedy this evil.
The Frozen-Sap Blight is a much more serious problem. Its nature and origin are now pretty well understood. Every tree has two sap currents: one moves up through the outer wood to be processed by the leaves, while the other moves down in the inner bark, depositing new wood to help the tree grow. As cold weather approaches, this downward sap can suddenly freeze in the tender bark and growing wood. This quick freezing poisons the sap and makes the tree unhealthy. The blight shows up most severely during the rapid growth of early summer, although the disease starts with the harsh frosts of the previous autumn. You can identify its presence by a thick, sticky sap that seeps out during winter or spring pruning, and by the discoloration of the inner bark and pith of the branches. On limbs that are severely affected on one side, the bark will turn black and shrivel. However, the branches only die when the tree requires a quick flow of sap; then the poisoned sap that was stopped from flowing down the previous fall gets diluted and spreads through the tree. If this sap is abundant, the entire tree can be poisoned and destroyed in just a few days, while trees that are less severely affected may only lose a limb or a small part of the top. Another consequence of the freezing of the sap and growing wood is that the sap vessels can rupture, preventing the inner bark from functioning properly. This theory is so well established that a knowledgeable observer can predict a blight season in the following summer based on conditions in the fall. If the summer is cool and the fall is warm and damp, followed by a sudden cold snap, the blight will likely be a problem the next season due to the extensive downward sap flow and rapid wood growth being interrupted by the sudden freeze. If the summer is favorable and the wood matures properly before the cold arrives, the blight won’t show up. This is extremely important for pear growers. Anything related to soil, location, or pruning that encourages early wood maturity will help prevent blight; thus, cool, damp areas aren't suitable in climates prone to sudden and severe autumn cold. Root pruning and heading-in, which promote early wood maturity, are very important; they will almost always prevent frozen-sap blight. If your pear trees are growing luxuriantly late in the season despite your efforts, trim off half of the most vigorous shoots before hard freezing to limit the sap flow by removing the leaves and shoots that control it, saving your trees. If blight appears, immediately cut off all the affected areas. The damage will be visible in the wood and inner bark, far below what looks bad on the surface. Remove the entire injured part, or else it will poison the rest of the tree. When this frozen sap damage is extensive, it can kill the whole tree; when it's slight, the tree often fully recovers. If you find black, shriveled bark, shave it off deep enough to remove the damaged parts, and cover the wound with grafting wax. Remove all affected limbs.[Pg 337] These are the only remedies. However, pruning both roots and branches will certainly prevent blight. A tree growing in grass, where it grows more slowly and matures earlier in the season, will avoid this blight, while one thriving in rich garden soil that continues to grow until cold weather will suffer significantly. Observations of orchards in various soils and locations support this theory. A little care can then prevent this issue, which has sometimes been so severe it has discouraged attempts to grow pears. In some areas, fine pear varieties, like the virgalieu, are damaged by cracking on the tree before ripening. Applying ashes, salt, charcoal, iron filings, and clay in light soils can remedy this issue.
Distances apart.—All fruit-trees had better occupy as little ground as is consistent with a healthy vigorous growth. They are manured and well cultivated, at a much less expense. The trees protect each other against inclement weather. The fruit is more easily harvested. And it is a great saving of land, as nothing else can be profitably grown in an orchard of large fruit-trees. The two kinds of pear-trees, dwarf and standard, may be planted together closely and be profitable for early and abundant bearing. The plan given on the next page of a pear-orchard, recommended in Cole's Fruit Book, is the best we have seen.
Distances apart.—All fruit trees should take up as little space as needed for strong, healthy growth. They are fertilized and well cared for at much lower cost. The trees shield each other from bad weather. The fruit is easier to pick. Plus, it saves a lot of land since nothing else can be grown profitably in a large fruit tree orchard. Dwarf and standard pear trees can be planted closely together and yield early and abundant fruit. The layout on the next page of a pear orchard, as suggested in Cole's Fruit Book, is the best we've seen.
In the plan the trees on pear-stocks, designed for standards, occupy the large black spots where the lines intersect. They are thirty-three feet apart. The small spots indicate the position of dwarf-trees on quince stocks. Of these there are three on each square rod. An acre then would have forty standard trees, and four hundred and eighty dwarfs. The latter will come into[Pg 338] early bearing, and be profitable, long before the former will produce any fruit. This will induce and repay thorough cultivation. They should be headed in, and finally removed, as the standards need more room. One acre carefully cultivated in this way, will afford an income sufficient for the support of a small family.
In the plan, the trees on pear rootstocks, intended to be standards, are placed in the large black spots where the lines cross. They are thirty-three feet apart. The small spots show where the dwarf trees on quince rootstocks are located. There are three of these in each square rod. So, an acre would have forty standard trees and four hundred eighty dwarf trees. The dwarfs will start producing fruit much earlier and be profitable long before the standards do. This will encourage and reward diligent cultivation. They should be pruned and eventually removed as the standards need more space. An acre carefully tended this way will provide enough income to support a small family.
 Pear Orchard Layout.
Gathering and Preserving.—Most fruits are better when allowed fully to ripen on the tree. But with pears, the reverse is true; most of them need to be ripened in the house, and some of them, as much as possible, excluded from the light. Gather when matured, and when a few of the wormy full-grown ones begin to fall, but while they adhere somewhat firmly to the tree. Barrel or box them tight, or put them in drawers in a cool dry place. About the time for them to become soft, put them in a room, with a temperature comfortable for a sitting-room, and you will soon have them in their greatest perfection. They do better in a warm room, wrapped in paper or cotton. A few only ripen well on the trees. Those ripened in the house keep much longer and better.[Pg 339]
Gathering and Preserving.—Most fruits are better when they’re allowed to fully ripen on the tree. But with pears, the opposite is true; most need to ripen indoors, and some should be kept out of direct light as much as possible. Pick them when they’re mature and when a few of the wormy, fully-grown ones start to fall, but while they’re still somewhat firmly attached to the tree. Pack them tightly in a barrel or box, or place them in drawers in a cool, dry area. When they’re about to become soft, move them into a room with a comfortable temperature, like that of a living room, and you’ll soon have them at their best. They do better in a warm room, wrapped in paper or cotton. Only a few ripen well on the trees. Those ripened indoors last much longer and stay in better condition.[Pg 339]
Varieties.—The London Horticultural Society have proved seven hundred varieties, from different parts of the world, in their experimental garden. Cole speaks of eight hundred and Elliott of twelve hundred varieties. There are now probably more than three thousand growing in this country. Many seedlings, not known beyond the neighborhood where they originated, may be among our very best. From six to ten varieties are all that need be cultivated. We present the following list, advising cultivators to select five or six to suit their own tastes and circumstances, and cultivate no more. We do not give the usual descriptions of the varieties selected. The mass of cultivators, for whom this work is specially intended, will never learn and test the descriptions. They will depend upon their nursery-man, and bud and graft from those they have tasted.
Varieties.—The London Horticultural Society has identified seven hundred varieties from different regions around the world in their experimental garden. Cole mentions eight hundred, and Elliott notes twelve hundred varieties. There are likely now over three thousand growing in this country. Many seedlings, known only in the local area where they originated, could be among our best options. Cultivators only need to grow six to ten varieties. We provide the following list, recommending that growers pick five or six that fit their preferences and situations, and cultivate no more. We won't include the usual descriptions of the selected varieties. The majority of cultivators, who are the primary audience for this work, may never learn or evaluate the descriptions. They will rely on their local nursery provider and propagate from the varieties they have tasted.
We give their names and some of their synonyms, their adaptation to quince or pear stocks, their manner of growth, and time of maturity. These will enable the culturist to select whatever best suits his taste; adapted to quince or pear stocks; for the table or kitchen; for summer, fall, or winter use, and for home or the market.
We provide their names and some of their synonyms, how they adapt to quince or pear rootstocks, their growth patterns, and their maturation times. This information will help growers choose what best fits their preferences; suited for quince or pear rootstocks; for dining or cooking; for summer, fall, or winter use, and for home or market sale.
Belle Lucrative.—Fondante d' Automne, Seigneur d' Esperin. Tree of moderate growth, but a great bearer. A fine variety, on quince or pear, better perhaps on the pear stock. Season, last of September.
Belle Business.—Fondante d' Automne, Seigneur d' Esperin. Medium-growing tree, but produces a lot of fruit. A great variety, grafted onto quince or pear, likely performs better on the pear rootstock. Harvest season is the end of September.
Beurré Easter with fifteen synonyms that few would ever read. Best on quince. Requires a warm soil and considerable care in ripening, when it proves one of the best. Its season—from January to May—makes it very desirable. Large, yellowish-green, with russet spots.[Pg 340]
Beurré Easter comes with fifteen synonyms that most people probably won't ever read. It's best paired with quince. It needs warm soil and a lot of attention while ripening, when it turns out to be one of the finest. Its season—from January to May—makes it highly sought after. The fruit is large, yellowish-green, and has russet spots.[Pg 340]
 Bartlett.
Bartlett.—William's, William's Bon Chretien, Poire Guilliaume. Tree, a vigorous grower, and a regular, early, good bearer, of long, handsome, perfectly-formed fruit; on the quince or pear stock. Time, August and September.[Pg 341]
Bartlett.—William's, William's Bon Chretien, Poire Guilliaume. The tree is a strong grower and produces a consistent, early, and high-quality harvest of long, beautiful, perfectly-shaped fruit; it can be grafted onto quince or pear rootstock. Harvest time is in August and September.[Pg 341]
 Beurré Diel.
Beurré Diel.—Diel, Diel's Butterbirne, Dorothee Royale, Grosse Dorothee, Beurré Royale, Des Trois Tours, De Melon, Melon de Kops, Beurré Magnifique, Beurré Incomparable. Grows well on quince or pear, but perhaps does best on quince. Large, beautiful, luscious fruit. Season, October to last of November.[Pg 342]
Beurré Diel.—Diel, Diel's Butterpear, Dorothee Royale, Grosse Dorothee, Beurré Royale, Des Trois Tours, De Melon, Melon de Kops, Beurré Magnifique, Beurré Incomparable. Grows well on quince or pear, but it seems to thrive best on quince. Large, beautiful, and juicy fruit. Season, October to the end of November.[Pg 342]
 White Doyenne.
White Doyenne.—Virgalieu. Tree vigorous and hardy on pear or quince. Everywhere esteemed as one of the very best. Needs care in supplying proper manure and clay on light soils, to prevent the fruit from cracking. September to November. If we could have but one we should choose this.
White Doyenne.—Virgalieu. A strong and resilient tree that grows well on pear or quince rootstock. It's highly regarded everywhere as one of the top choices. Requires careful attention to provide the right fertilizer and clay on lighter soils to avoid fruit cracking. Available from September to November. If we could only have one, this would be our choice.
Columbia.—Columbian Virgalieu. Native of New York, bearing abundantly, a uniformly smooth, fair, large fruit. Color, fine golden yellow, dotted with gray. Season, December and January.[Pg 343]
Columbia.—Columbian Virgalieu. Native to New York, produces generously, featuring consistently smooth, light-colored, large fruit. Color is a nice golden yellow, dotted with gray. Season is December and January.[Pg 343]
 Flemish Beauty.
Flemish Beauty.—Belle de Flanders, &c. This is a large, beautiful, and delicious pear. One of the finest in its season, but does not last long. Ripens last of September. Very fine on the quince, and is excellent on the rich prairie-lands of the West. Deserves increased attention.
Flemish Beauty.—Belle de Flanders, etc. This is a large, beautiful, and tasty pear. It's one of the best during its season, but it doesn’t last long. It ripens at the end of September. It's very good on quince and is excellent in the rich prairie lands of the West. It deserves more attention.
Beurré d'Aremberg.—Duc d'Aremberg, and eight other synonyms. Tree very hardy, does well on the pear stock, and bears early, annually, and abundantly.[Pg 344] A very fine foreign variety. The fruit hangs on the tree well, and may be ripened at will from December to February, by placing in a warm room, when you would ripen them.
Beurre d'Aremberg.—Duc d'Aremberg, and eight other names. This tree is very hardy, does well on pear rootstock, and produces fruit early, every year, and in large quantities.[Pg 344] It is a great foreign variety. The fruit stays on the tree well and can be ripened at your convenience from December to February by placing it in a warm room when you want to ripen it.
Buffum.—A native of Rhode Island, and very successful wherever grown. A great bearer of handsome fruit, though not of the best quality. It is, however, an excellent orchard pear. Fruit, medium size, ripening in September.
Buffum.—Originally from Rhode Island, this pear does really well wherever it's planted. It produces a lot of attractive fruit, although the quality isn't top-notch. Still, it's a great choice for orchards. The fruit is medium-sized and ripens in September.
Louise Bonne of Jersey.—William the Fourth, and three other useless foreign synonyms. Not surpassed, on the quince. Tree very vigorous, producing a great abundance of large fruit. Season, October.
Louise Bonne from Jersey.—William the Fourth, and three other pointless foreign terms. Unmatched for quince. The tree is very vigorous, yielding a large amount of big fruit. Season: October.
Madeleine.—Magdalen, Citron des Carmes. This bears an abundance of small but delicious fruit. Is valuable also on account of its season—the last half of July. Good on pear or quince. Must be checked in its growth, on very rich land, or it will be subject to the frozen sap-blight.
Madeleine.—Magdalen, Citron des Carmes. This produces a lot of small but tasty fruit. It's also valuable because of its season—the second half of July. It pairs well with pear or quince. It needs to be kept in check on very fertile land, or it may be prone to frozen sap-blight.
Onondaga.—American origin. Equally good on pear or quince. Large, hardy, and very productive tree. The fruit is very large, fine golden yellow when ripe. Excellent for market. Season, October and November.
Onondaga.—American origin. Works well on pear or quince. This tree is large, sturdy, and highly productive. The fruit is very large and a beautiful golden yellow when ripe. Great for selling. Harvest season is October and November.
Pound Pear.—Winter Belle, and twelve other synonyms, which are unimportant. This is the great winter-pear for cooking. The tree is a very vigorous grower and great bearer. A very profitable orchard variety. December to March.
Mash Pear.—Winter Belle, and twelve other names that aren't really worth mentioning. This is the top winter pear for cooking. The tree grows really well and produces a lot of fruit. It's a very profitable choice for orchards. Available from December to March.
Prince's St. Germain.—New St. Germain, Brown's St. Germain. Hardy and productive. Good keeper, ripening as easily and as well as an apple. December to March.[Pg 345]
Prince's St. Germain.—New St. Germain, Brown's St. Germain. Reliable and fruitful. Great for storage, ripening just as easily and well as an apple. December to March.[Pg 345]
 Seckel pear.
Seckel.—There are a number of synonyms, but it is always known by this name. Tree is small, but a good and regular bearer of small excellent fruit. Time in warm climates, September and October.
Seckel pear.—There are several other names for it, but it's always referred to as this. The tree is small, yet it consistently produces a good amount of small, high-quality fruit. In warm climates, its fruit ripens in September and October.
Steven's Genesee.—Stephen's Genesee, Guernsey. Desirable for all orchards and gardens, on quince or pear. Fine grower and very productive. Fruit large and excellent. Elliott says "even the wind-falls are very fine."
Steven's Genesee.—Stephen's Genesee, Guernsey. Great for all orchards and gardens, whether on quince or pear. It's a strong grower and very productive. The fruit is large and high quality. Elliott states, "even the windfalls are very impressive."
Vicar of Wakefield.—Eight synonyms, but it will hardly be mistaken by nursery-men. Does well on quince. It is thrifty and very productive of fruit of second quality. Yet it is generally profitable. November to January.
Vicar of Wakefield.—Eight synonyms, but it’s unlikely to be confused by nursery workers. It grows well on quince. It’s hardy and produces a lot of second-quality fruit. Still, it’s usually quite profitable. From November to January.
Winter Nellis.—Its six foreign synonyms are of no consequence. This is the best of all winter-pears, grown on quince or pear. Exceedingly well adapted to the rich western prairies. An early and great bearer. November to January 15.[Pg 346]
Winter Nellis.—Its six foreign names don't matter. This is the best winter pear, whether grown on quince or pear stock. It's really well-suited for the rich western prairies. It produces a lot of fruit early in the season. Available from November to January 15.[Pg 346]
 Gray Icon.
Gray Doyenne.—A superior October pear. Tree hardy and productive on both pear or quince. Partakes much of the excellence of the White Doyenne.
Gray Icon.—An excellent pear for October. The tree is strong and fruitful on both pear and quince. It shares many of the great qualities of the White Doyenne.
From these you can select five or six just adapted to your wishes. The diversity of views, of the merits of different varieties of pears, arises mainly from the influence of location, soil, and culture. The established known varieties, may be grown in great perfection anywhere, with suitable care. At the West they must be[Pg 347] root-pruned and headed-in until they are ten years old, after which they will be hardy and productive. If allowed to grow as fast as they will incline to, on alluvial soils, when they are exposed to severe winters, they will disappoint growers. With care they will be sure and profitable.
From these, you can choose five or six that fit your preferences. The variety of opinions on the benefits of different types of pears mainly comes from factors like location, soil, and cultivation methods. The established known varieties can be grown very well anywhere with the right care. In the West, they must be[Pg 347] root-pruned and headed-in until they are ten years old, after which they will be sturdy and fruitful. If they are allowed to grow as fast as they want in rich soils, they will let down growers during harsh winters. With proper care, they will definitely be reliable and profitable.
PEPPERS.
The red peppers, cultivated in this country, are used for pickling, for pepper-sauce, as a condiment for food, and as a domestic medicine.
The red peppers grown in this country are used for pickling, for hot sauce, as a food seasoning, and as a home remedy.
Varieties—are named principally from their shape. The large squash-pepper is best for green pickles, on account of its size and tenderness. The Cayenne, a small, long variety, much resembling the original from which it is named, is very pungent, used mostly for pepper-sauce. Grind, not very fine, any of the varieties, and they are useful on any food of a cold nature and not easily digestible. They are all good for medicinal purposes. The capsicum needs a dry, warm soil, with exposure to the sun. Plants should stand two feet apart each way; as they are slow growers, they should be started in an early hotbed. Many will ripen during summer, and may be gathered. In the fall, when frost comes, the vines will be covered with blossoms and with peppers of all sizes. Fall-grown green ones, strung on a thread, and hung in a warm, dry room, will ripen finely. They are very hardy, and may be transplanted without injury. Hen-manure is best for them.[Pg 348]
Varieties—are primarily named based on their shape. The large squash-pepper is ideal for making green pickles due to its size and tenderness. The Cayenne, a small, elongated variety similar to its original, is very spicy and mostly used for pepper sauce. Grind any of the varieties not too finely, and they work well with foods that are cold and hard to digest. They are also beneficial for medicinal uses. Capsicum needs dry, warm soil and plenty of sunlight. Plants should be spaced two feet apart in all directions; since they grow slowly, they should be started in a warm bed early on. Many will ripen during the summer and can be harvested. In the fall, when frost arrives, the vines will be filled with flowers and peppers of all sizes. Green ones that mature in the fall can be strung on a thread and hung in a warm, dry room to ripen nicely. They are very resilient and can be transplanted without harm. Hen manure is the best fertilizer for them.[Pg 348]
PEPPERGRASS.
This is a variety of cress, of quick growth, used as lettuce. On a rich, finely-pulverized soil, sow the seeds in drills, fifteen inches apart, and cover very lightly. Sow thick and water in dry weather. For use, cut the tops while they are very tender. A second crop will grow, but inferior to the first. The water-cress, growing spontaneously by rills and springs, is a kind of wild peppergrass, and is by some persons more esteemed than the garden variety. We prefer early lettuce to cresses or peppergrass, and see no reason for their cultivation, but their rapid growth.
This is a type of cress that grows quickly and is used like lettuce. In rich, finely tilled soil, plant the seeds in rows that are fifteen inches apart and cover them lightly. Plant them densely and water during dry spells. For harvesting, cut the tops when they are very tender. You can get a second crop, but it's not as good as the first one. Watercress grows naturally by streams and springs and is a kind of wild peppergrass, which some people prefer over the garden variety. We prefer early lettuce over cresses or peppergrass and see no reason to grow them other than their fast growth.
PLOWING.
This is one of the most important matters in soil-culture. When, how, and how much, shall we plow? are the three questions involving the whole. When should plowing be done? As it respects wet or dry, plow sandy or gravelly land whenever you are ready. It will neither be hard when dry, nor injured by being plowed when very wet. Good loams may be plowed at all times except when excessively wet. Clays can only be worked profitably when neither excessively wet or dry. Plowing land in a warm rain is almost equal to a coat of manure. Plowing in a light snow in the spring will injure it the whole season. We have noticed a marked difference in corn growing but a rod apart, on land where snow was plowed in, and the other plowed two or three days later, after the snow was gone; this[Pg 349] difference was noticeable in the rows throughout the entire field. Spring or fall plowing is a question that has been much discussed. Sod-land is better plowed in the fall. The action of winter rains and frosts on the turf is beneficial. The same is true of land trenched deep, where much of the hard, poor subsoil is brought to the surface: it is benefited by winter exposure. Other cultivated fields are injured by fall-plowing, unless it be very early. All stubble-land is much benefited by being plowed as soon as the grain is taken off. The weeds and stubble, plowed under, will be decomposed by the warm weather and rains, and benefit the soil almost as much as an ordinary coat of manure. Plowed late, such action does not take place, and the surface is injured by winter-exposure: hence, do all the early fall-plowing possible, but plow nothing late in the fall but sod-land.
This is one of the most important aspects of soil cultivation. When, how, and how much should we plow? These are the three questions that cover the entire process. When should plowing be done? For sandy or gravelly land, you can plow whenever you’re ready, whether it’s wet or dry. It won’t be difficult to work when dry, nor will it be harmed if plowed when very wet. Good loams can be plowed at any time, except when they are excessively wet. Clay can only be worked effectively when it’s neither too wet nor too dry. Plowing land during a warm rain is almost as beneficial as applying manure. Plowing in light snow during spring will negatively affect the land for the entire season. We've noticed a significant difference in corn growth just a rod apart on land where snow was plowed in compared to land plowed two or three days later, after the snow had melted; this[Pg 349] difference was visible in the rows throughout the entire field. The discussion surrounding spring versus fall plowing has been extensive. It’s better to plow sod land in the fall. Winter rains and frosts positively affect the turf. The same goes for land that has been deeply tilled, as the hard, poor subsoil that is brought to the surface benefits from exposure over the winter. However, other cultivated fields can be harmed by fall plowing unless it’s done very early. All stubble land greatly benefits from being plowed as soon as the grain has been harvested. The weeds and stubble, when plowed under, will decompose thanks to the warm weather and rains, enhancing the soil much like a typical application of manure. If plowed late, this process won’t happen, and the surface will suffer from winter exposure. So, make sure to do all the early fall plowing possible, but only plow late in the fall for sod land.
How shall we plow? All land should be subsoiled, except that having a light, porous subsoil; one deep plowing on such land is sufficient. Subsoiling is done by using two teams at once—one with a common plow, running deep, and the other with a subsoil-plow with no mould-board, and which will, consequently, stir and disintegrate the earth to the depth at which it runs, without throwing it to the surface. The next surface-furrow will cover up this loosened subsoil. In this way, land may be plowed eighteen inches deep, to the great benefit of any crop grown on it. If the surface be well manured, this method of plowing will place the manure between the first furrow and the subsoil, and increase its value. Such plowing is very valuable on land for young fruit-trees. There is another method, which we denominate double-plowing, which is more[Pg 350] beneficial than ordinary subsoiling: it is performed by two common plows, one following in the furrow of the other; the first furrow need not be very deep—let the furrow in the bottom of the first be as deep as possible, and thrown out upon the surface; the next furrow will throw the surface and manure into the bottom of the deep furrow; the next furrow will cover this surface-soil and manure very deep, and, as manure always works up, it will impregnate the whole. This, for garden-vegetables, berries, nurseries, or young orchards, is the best form of plowing that we have ever tried. It may be done with one team, by simply changing the gauge of the clevis every time round, gauging it light for the first furrow, and deep for the second. We once prepared a plat in this way with one team, on which cabbages made a remarkable growth, even in a dry season. Still a farther improvement would be a light coat of fine manure on the surface. All furrows, in every description of plowing, should be near enough together to move the whole, leaving no hard places between them. The usual "cut and cover" system, to get over a large area in a day, is miserable economy. The more evenly and flatly land can be turned over in plowing, the better it will be; it retards the growth of weeds, and secures a better action upon substances plowed under. An exception to deep plowing is in breaking up the original prairies of the West: they have to be broken with plows kept sharp as a knife, and not more than two inches deep. The grass then dies and the sod rots. But plowed deep, the grass comes up through the turf, and will prove troublesome for two or three years. It must also be broken at a certain season of the year, to insure success. It may[Pg 351] be profitably done for two months after the grass gets a good start in the spring.
How should we plow? All land should be subsoiled, except for areas with a light, porous subsoil; a single deep plowing on such land is enough. Subsoiling is done by using two teams simultaneously—one with a standard plow that goes deep, and the other with a subsoil plow that has no moldboard, which will stir and break up the soil without bringing it to the surface. The next surface furrow will cover this loosened subsoil. This method allows for plowing up to eighteen inches deep, greatly benefiting any crops grown there. If the surface is well manured, this plowing method will place the manure between the first furrow and the subsoil, enhancing its effectiveness. This technique is especially valuable for young fruit trees. Another method, known as double-plowing, is even more beneficial than ordinary subsoiling: it uses two common plows, one following in the furrow of the other. The first furrow doesn’t need to be very deep—make the furrow at the bottom of the first as deep as possible and throw it to the surface; the next furrow will push the surface and manure into the bottom of the deep furrow; the following furrow will cover this surface soil and manure deeply, and since manure works its way up, it will enrich the entire area. This is the best plowing method we’ve tried for garden vegetables, berries, nurseries, or young orchards. It can be done with one team by simply adjusting the clevis gauge each time around, setting it light for the first furrow and deep for the second. We once prepared a plot this way with one team, where cabbages grew remarkably well, even in a dry season. An additional improvement would be a light layer of fine manure on the surface. All furrows in every type of plowing should be close enough together to move the entire area, leaving no hard spots between them. The usual "cut and cover" system, aimed at covering large areas in a day, is poor economy. The more evenly and smoothly land can be turned over in plowing, the better it will be; it slows down weed growth and enhances the decomposition of substances plowed under. An exception to deep plowing exists in breaking up the original prairies of the West: they should be broken with plows that are sharp as a knife, and only two inches deep. The grass then dies, and the sod decomposes. However, if plowed deeply, the grass will grow back through the turf and be a nuisance for two or three years. It must also be broken at the right time of the year to ensure success. It can be done profitably for two months after the grass has established itself well in the spring.
How much is it best to plow land? Once double-plowed, or thoroughly subsoiled, and well turned over, is better than more. Land once plowed so as to disintegrate the whole to the depth of the furrow, will produce more, and require less care, than the same would do if cross-plowed once or twice. Excessive plowing is a positive injury. All land should be broken up once in three or four years, and not kept longer than that under the plow at one time. Some farmers keep land perpetually in grass, refusing to have a plow touch it on any condition. They see wrong tillage produce barrenness. But by this practice they are great losers; they never get over one half the hay or pasturage that could be obtained by frequent tillage and manuring, and a rotation of crops.
How much should we plow land? Once double-plowed, or thoroughly subsoiled, and well turned over is better than doing it more. Land that's plowed deep enough to break up the whole furrow will produce more and need less maintenance than if it were cross-plowed once or twice. Excessive plowing actually harms the soil. All land should be broken up once every three or four years, and it shouldn't be kept under the plow for longer than that at a time. Some farmers keep land permanently in grass, refusing to let a plow touch it at all. They mistakenly believe that improper tillage leads to barrenness. However, by doing this, they're missing out significantly; they never harvest more than half the hay or pasture they could get through regular tillage, fertilizing, and rotating crops.
PLUM.
This is one of our best fruits, but suffers more from enemies than any other.
This is one of our best fruits, but it faces more challenges from enemies than any other.
Propagation is by seeds or layers, budding or grafting. Seeds from trees not exposed to mixture with other varieties in the blossom, will produce the same; hence, this is the best method of propagating a given variety, standing alone. But, for most situations, budding is preferable to any other method. This should be performed earlier than on the peach. The plum matures earlier, and hence should be budded about the last of July, or first of August. Bud on the north side of the[Pg 352] tree to avoid the hot sun; and tie more tightly than in budding other trees. Bud plum-trees the second year from the seed. Grafting should be resorted to only when buds have failed, and there is a prospect that the trees will be too large for budding another season. The common wild plums make good stocks, if grafted at the ground. Thoroughly mulch all newly-grafted plum-trees. Root-grafting will succeed, but should never be practised. In all grafting of plums, put the graft in at the surface of the ground, and cover with sawdust or mould, leaving but one bud on the graft exposed.
Propagation is done through seeds or layering, budding or grafting. Seeds from trees not mixed with other varieties during flowering will produce the same type; therefore, this is the best way to propagate a specific variety when grown alone. However, for most situations, budding is the preferred method. This should be done earlier than with peaches. Plums mature sooner, so budding should occur around the end of July or the beginning of August. Bud on the north side of the [Pg 352] tree to protect it from the intense sun, and tie more tightly than you would when budding other trees. Bud plum trees in the second year after planting from seed. Grafting should only be considered if budding has not worked and there’s a chance the trees will be too large for budding the following season. Common wild plums are good stocks if grafted at the ground level. Be sure to thoroughly mulch all newly grafted plum trees. Root-grafting can be successful but should never be practiced. In all plum grafting, place the graft at the soil surface and cover it with sawdust or soil, leaving only one bud on the graft exposed.
Soil.—All soils are good for the plum, provided they be thoroughly drained, and properly fertilized.
Soil.—All soils are suitable for the plum, as long as they are well-drained and adequately fertilized.
Hard soils are recommended as being almost proof against the curculio. That a soil affording a rather hard, smooth surface, will afford less burrows for curculio, and consequently lessen their ravages, is no doubt true. But it is not a perfect remedy, and, on other accounts, such a soil is no better. A good firm loam is best. Plums will do well also on light land, but are more exposed to injury from the curculio.
Hard soils are recommended as being nearly resistant to the curculio. It's true that a soil with a hard, smooth surface will have fewer burrows for curculio, which means less damage. However, it's not a perfect solution, and for other reasons, such a soil isn't necessarily better. A good, firm loam is the best option. Plums can thrive on lighter soil, but they are more vulnerable to damage from the curculio.
Transplanting.—The plum being perfectly hardy, we recommend transplanting in autumn. Shorten in the top, cut off considerable of the tap-root, and the ends of the long roots, transplant well, and mulch so thoroughly as to prevent too strong action of the frost on the roots, and they will start early and do well. Twelve feet apart for small varieties, and twenty feet for larger growers, are the distances usually recommended. We think a rod apart each way will do well for all varieties.
Transplanting.—Since the plum tree is quite hardy, we suggest transplanting it in the fall. Trim the top, significantly shorten the tap root, and cut the ends of the long roots. Transplant carefully and mulch thoroughly to protect the roots from severe frost. This will help the tree start early and thrive. Generally, a spacing of twelve feet for small varieties and twenty feet for larger ones is recommended. However, we believe that a spacing of one rod apart in all directions will work well for all varieties.
Pruning.—Once started in a regular growth, in such a shape as you desire, no further pruning will be neces[Pg 353]sary but occasionally heading-in a too luxuriant shoot, and removing diseased and cross limbs. On rich Western lands, and in warm Southern climes, young plum-trees must be root-pruned and headed-in, or they will be unfruitful and unhealthy. Root-pruning should be done in August, in the following manner. In case of a tree ten feet high, take a sharp spade, and in a circle around the tree, two feet from the trunk (making the circle four feet in diameter), cut off all the roots within reach. In smaller trees, make the circle smaller, and in larger ones, larger. At the same time, shorten in the current year's growth, by cutting off one half the length of all the principal shoots; this will give vigor, symmetry, and fruitfulness, and prove a valuable preventive of disease. Plum-trees should always have good, clean cultivation.
Pruning.—Once your tree is growing regularly and shaped how you want, you won’t need to do much more pruning except to trim back any excessively vigorous shoots and remove any diseased or crossing branches. In fertile Western soil and warm Southern areas, young plum trees need to be root-pruned and trimmed back, or they’ll become unproductive and unhealthy. Root-pruning should take place in August, like this: for a tree that’s ten feet tall, use a sharp spade to cut around the base in a circle about two feet from the trunk (making the circle four feet across), removing all the accessible roots. For smaller trees, make the circle smaller; for larger trees, make it larger. At the same time, reduce the current year's growth by cutting half the length off all the main shoots; this will encourage vigor, symmetry, and fruit production, and help prevent disease. Plum trees should always be well-maintained and kept clean.
Manures from the stable and slaughter-house, with wood-ashes, lime, and plenty of salt, are the best for the plum. The following analysis, by Richardson, of the fruit of the plum, will aid the culturist in his selection of manures:—
Fertilizers from the barn and slaughterhouse, along with wood ashes, lime, and plenty of salt, are the best for plums. The following analysis by Richardson of plum fruit will help the gardener in choosing the right fertilizers:—
| Potash | 59.21 |
| Soda | .54 |
| Lime | 10.04 |
| Magnesia | 5.46 |
| Sulphuric acid | 3.83 |
| Silicic acid | 2.36 |
| Phosphoric acid | 12.26 |
| Phosphate of iron | 6.04 |
Hence, as wood-ashes contains much potash, and as this is the largest ingredient in the plum, it must be the best application to the soil for this fruit. Bones, dissolved in sulphuric acid, would also be very valuable. Bones, bonedust, salt, wood-ashes, and barnyard manure, with a little lime, will be all that will be necessary.[Pg 354]
So, since wood ashes have a lot of potash, and that's the main ingredient in plums, they are the best thing to add to the soil for this fruit. Bones treated with sulfuric acid would also be really useful. A combination of bones, bone dust, salt, wood ashes, and barnyard manure, along with a bit of lime, will cover everything you need.[Pg 354]
Diseases.—In most northern latitudes, the black wart, or knot, is fatal to many plum-trees. It is less prevalent at the South: its origin is not known. Many theories respecting it are put forth by different cultivators; they are unsatisfactory, and their enumeration here would be useless. It may be either the result of general ill health in the tree, from budding on suckers and unhealthy stocks, and a want of proper elements in the soil, or of improper circulation of sap, caused by the roots absorbing more than the leaves can digest. In the latter case, root-pruning and heading-in would be an effectual preventive. In the former, supply suitable manures, and give good cultivation. In every case, remove at once all affected parts, and wash the wounds and whole tree, and drench the soil under it, with copperas-water—one ounce of copperas to two gallons of water. This is stated to be a complete remedy.
Diseases.—In most northern regions, black wart, or knot, can be deadly to many plum trees. It's less common in the South, and its origin isn't known. Various theories about it have been proposed by different growers, but they are not satisfactory, and listing them here would be pointless. It could result from general poor health in the tree, such as budding on suckers and unhealthy rootstocks, a lack of proper nutrients in the soil, or improper sap circulation due to the roots absorbing more than the leaves can process. In the latter situation, root-pruning and trimming would be an effective preventive measure. In the former, provide appropriate fertilizers and ensure good care of the trees. In any case, promptly remove all affected parts, and clean the wounds and the entire tree, and saturate the soil underneath with copperas-water—one ounce of copperas to two gallons of water. This is said to be a complete remedy.
Defoliation of seedlings and bearing trees often occurs in July and August. Land well supplied with the manures recommended, especially wood-ashes, salt, and the copperas-water, has not been known to produce trees that drop their leaves.
Defoliation of seedlings and fruit-bearing trees often happens in July and August. Land that is well-fertilized with the recommended manures, especially wood ash, salt, and copperas water, has not been known to produce trees that lose their leaves.
Decay of the Fruit is another serious evil. Professor Kirtland and others suppose it to be a species of fungus. Poverty of soil, and wet weather, may be the cause. If the season be unusually wet, thin the fruit, so that no two plums shall touch each other. Keep the soil properly manured, and spread charcoal or straw under the tree, and you will generally be able to preserve your fruit.
Decay of the Fruit is another serious problem. Professor Kirtland and others believe it’s a type of fungus. Poor soil and wet weather could be the cause. If the season is particularly wet, space out the fruit so that no two plums touch each other. Keep the soil well-fertilized, and spread charcoal or straw under the tree, and you’ll usually be able to save your fruit.
The Curculio is the great enemy of the plum, and frequently of all smooth-skinned fruits, as the grape, nectarine, [Pg 355]&c.
The Curculio is the main enemy of plums and often of all smooth-skinned fruits, like grapes, nectarines, [Pg 355], etc.
 (1) Curculio, in the form of a beetle, at actual size. (2) Its posture when it feels threatened or falls from the tree.
(3) Larva, or worm, encountered in the fallen fruit. (4) Pupa, or chrysalis stage, where it exists in the soil.
Many remedies are proposed: making pavements, or keeping the ground hard and smooth, under the trees; pasturing swine and keeping fowls in the plum-orchard; syringing the whole tops of the trees four or five times with lime and salt water, or lime and sulphur-water—the proportions are not material, provided it be not excessively strong. It is recommended to apply with a garden-syringe. But, as few cultivators will have that instrument, they may sprinkle the mixture on the trees in any way most convenient. Salt, worked into the soil under plum-trees, is said to destroy this insect in its pupa state. At any rate, the salt is a good manure for the plum-tree. We know a remedy for the ravages of the curculio, unfailing in all seasons and localities—that is, to kill them: spread a cloth under the tree, and with a mallet having a head, covered with India-rubber or cloth that it may not injure the bark, strike the body and large limbs sudden blows, which will so jar them as to cause the insects to fall upon the cloth, and you can then burn them. Do this five or six times in the season, commencing when the fruit begins to set, and continuing till it becomes nearly full-grown. This is best done in the cool of the morning, while the insects are still; their habits of fear and quiet, when[Pg 356] there is a noise about, are greatly in favor of their destruction by this method. This is somewhat laborious, but is a sure remedy, and will pay well in all plum-orchards, large or small. After two or three years of this treatment, there will be few or none of those insects left.
Many solutions are suggested: paving the ground or keeping it hard and smooth under the trees; allowing pigs to graze and keeping chickens in the plum orchard; spraying the tops of the trees four or five times with a mix of lime and salt water, or lime and sulfur water—the exact proportions aren't crucial, as long as it's not too strong. It's recommended to apply this with a garden syringe. However, since not many growers will have that tool, they can sprinkle the mixture on the trees in whichever way is most convenient. Incorporating salt into the soil under plum trees is said to eliminate this insect in its pupa stage. In any case, salt is good fertilizer for plum trees. We know of a foolproof method to combat the damage caused by the curculio, effective in every season and location—simply kill them: lay a cloth under the tree, and using a rubber or cloth-covered mallet, strike the trunk and large branches with sudden force. This will shake the insects loose so they fall onto the cloth, allowing you to burn them. Do this five or six times per season, starting when the fruit begins to develop and continuing until it is nearly mature. It's best done in the cool of the morning, while the insects are still inactive; their natural tendency to freeze up in response to noise greatly aids in their destruction with this method. This process is somewhat labor-intensive but is a reliable solution and will yield good results in any plum orchard, big or small. After two or three years of this treatment, there will be few, if any, of these insects remaining.
Uses of the plum are various. The fine varieties, well ripened, are a good dessert-fruit; for sweetmeats and tarts they are much esteemed; they are one of the better and more wholesome dried fruits. The foreign ones are called prunes, and are an article of commerce. With a little care, we can raise much better prunes than the imported. Like all fruits, they are better for quick drying by artificial heat. The French prunes, the process of drying which is minutely described by Downing in his fruit-book, are no better than our best varieties, quickly dried by artificial heat in a dry house, or moderately-heated oven. All dried fruit is much better for having become perfectly ripe before picking. It is a great mistake to suppose unripe fruit will be good dried.
Uses of the plum vary widely. The best varieties, when fully ripe, make excellent dessert fruit; they're highly valued for jams and pies; and they're among the healthier dried fruits. The imported ones are referred to as prunes and are commercially important. With a little effort, we can produce much better prunes than those from abroad. Like all fruits, they dry better when done quickly using artificial heat. The French prunes, which Downing details in his fruit book, are no superior to our top varieties that are quickly dried in a dry house or a moderately heated oven. All dried fruit tastes significantly better if it's perfectly ripe before picking. It's a common misconception that unripe fruit will be good when dried.
 Lawrence's Fave.
Varieties are numerous, and many of them ought to[Pg 357] be forgotten, as is the case with all other fruits. We give a small list, containing all the good qualities of the whole:—
Varieties are countless, and many of them should[Pg 357] be forgotten, just like all other fruits. We present a brief list that includes all the good qualities of the entire group:—
Bleecker's Gage.—A hardy tree and sure bearer. Time, August.
Bleecker's Gage.—A resilient tree that consistently produces fruit. Season, August.
 Imperial Gage. Egg.
Imperial Gage.—This is an American variety. It is of a lightish-green color, and excellent flavor. Season, July at the South, and September at the North.
Imperial Gage.—This is an American variety. It has a light green color and great flavor. Season, July in the South, and September in the North.
Egg.—The above cut represents one of the egg-plums, of excellent quality in all respects. There are many of this name.
Egg.—The image above shows one of the egg-plums, which are of high quality in every way. There are many varieties of this type.
Lawrence's Favorite.—This is a fine plum, of the gage family. It was raised from the seed of the green gage; its qualities are seldom surpassed.[Pg 358]
Lawrence's Favorite.—This is a great plum, from the gage family. It was grown from the seed of the green gage; its qualities are rarely matched.[Pg 358]
Washington.—This is a very good plum for high latitudes. At the South it is too dry.
Washington.—This is a great plum for higher latitudes. In the South, it's too dry.
Green Gage. Jefferson.
Green Gage.—With fifteen synonyms. Excellent.
Green Gage.—With fifteen synonyms. Awesome.
Jefferson.—One of the very best. Time, last of August.
Jefferson.—One of the best. Late August.
Denniston's Purple, or Red.—Vigorous grower and very productive. Time, August 20.
Denniston's Purple, or Red.—Strong grower and highly productive. Time, August 20.
Madison.—A hardy, productive, and excellent October plum.
Madison.—A tough, fruitful, and outstanding October plum.
The foregoing varieties, with the little black damson-plum, so hardy and productive, and so much esteemed for preserving, will answer all needful purposes. You will find long lists in the fruit-books. Some of them are the above varieties, under different names. Procure four or five of the best you can find in your vicinity, and cultivate them, and you will need no others.[Pg 359]
The varieties mentioned earlier, along with the hardy and productive little black damson-plum, which is highly regarded for preserving, will meet all your needs. You’ll come across lengthy lists in fruit books, some of which repeat the above varieties under different names. Get four or five of the best ones you can find nearby, and cultivate them; you won't need any others.[Pg 359]
 Washington, D.C.
POMEGRANATE.
This is one of the most delicious and beautiful of all the dessert-fruits. Native in China, and much cultivated in Southern Europe. It will do quite well as far north as the Ohio river. Trained as an espalier, with protection of straw or mats, it will do tolerably well throughout the Middle states. The fruit is about as large as an ordinary apple, and has a tough, orange-colored skin, with a beautiful red cheek. The tree is of low growth. Blossoms are highly ornamental, as is also the fruit, during all the season. It is cultivated as the orange.
This is one of the most delicious and beautiful dessert fruits. It's originally from China and is widely grown in Southern Europe. It can thrive as far north as the Ohio River. When trained as an espalier and given protection with straw or mats, it can do fairly well in the Middle states. The fruit is roughly the size of a regular apple and has a tough, orange-colored skin with a lovely red blush. The tree is low-growing, and its blossoms are very decorative, just like the fruit throughout the season. It's cultivated in the same way as oranges.
There are several varieties: the sweet-fruited, the sub-acid, and the wild or acid-fruited. The first is the[Pg 360] best, and the second the one most cultivated in this country; the latter yields a very pleasant acid, making an excellent sirup. Pomegranates should be extensively cultivated at the South, and form an important article of commerce for Northern cities.
There are several types: the sweet-fruited, the sub-acid, and the wild or acid-fruited. The first is the[Pg 360] best, and the second is the one most grown in this country; the last produces a very enjoyable tartness, making great syrup. Pomegranates should be widely grown in the South and become a significant commercial product for Northern cities.
POTATO.
This is far the most valuable of all esculent roots; supposed to be a native of South America. It is called the Irish potato, because it was grown extensively first in Ireland. It was first planted on the estate of Sir Walter Raleigh in 1602. It was introduced into England in 1694. It has been represented as having been introduced into England from Virginia as early as 1586, but attracted no attention, and for two centuries formed no considerable part of British agriculture. It has become naturalized in all temperate regions, and in many locations in high latitudes. In tropical climates, it flourishes on the mountains, at an elevation sufficient to secure a cool atmosphere. Cool moist regions, as Ireland and the northern parts of the United States, are most favorable for potatoes. In warm climates the potato grows less luxuriantly, yields much less, and is liable to be ruined by a second growth. In the latitude of southern Ohio, a severe drought, while the tubers are small, followed by considerable rain, causes the young potatoes to sprout, and send up fresh shoots, and often make a very luxuriant growth of tops, to the complete ruin of the tubers. This is called second growth. In cooler climates this second growth simply makes prongs[Pg 361] on the tubers, thus injuring the appearance and quality, but increasing the crop. The only preventive is watering regularly in a dry time. This can be done advantageously in a garden, and on a small scale. In field culture, when second growth occurs, dig your potatoes at once, if they are large enough to be of much use. If not they will all be lost.
This is by far the most valuable of all edible roots; it is believed to have originated in South America. It’s known as the Irish potato because it was first widely cultivated in Ireland. It was initially planted on Sir Walter Raleigh's estate in 1602. It was brought to England in 1694. There are claims that it was introduced to England from Virginia as early as 1586, but it didn’t gain much attention, and for two centuries it wasn’t a significant part of British agriculture. It has become common in all temperate regions and in many areas at high latitudes. In tropical climates, it thrives in the mountains, where the elevation provides a cooler atmosphere. Cool, moist areas like Ireland and the northern parts of the United States are the most favorable for potatoes. In warmer climates, the potato grows less vigorously, produces much less, and is prone to damage from a second growth. In southern Ohio, a severe drought while the tubers are small, followed by heavy rain, can cause the young potatoes to sprout and send up new shoots, often leading to a very lush growth of tops, which completely ruins the tubers. This phenomenon is called second growth. In cooler climates, this second growth simply creates prongs[Pg 361] on the tubers, harming their appearance and quality but increasing the overall yield. The only way to prevent this is by regularly watering during dry periods. This is easily done in a garden and on a small scale. In field cultivation, when second growth happens, harvest your potatoes immediately if they are large enough to be useful. If not, they will all be lost.
Propagation is by annually planting the tubers. No mixture of sorts ever takes place from planting different varieties together. This can only be done in the blossoms, and will consequently appear in young seedlings. To raise good potatoes, always plant ripe seed, and the largest and best, and leave them whole. Selecting small potatoes for seed, and cutting them up, and planting mere eyes and pearings as some do, has done much to injure the health, quality, and quantity of yield of the potato. Selecting the poorest for seed, will run out anything we grow in the soil. New varieties have been multiplying within the past few years from seed. Some gentlemen are raising varieties by thousands. Not more than one out of a thousand prove truly valuable. The quality of a new variety can not be established earlier than the fifth year. Many that promised well at first proved worthless.
Propagation is done by planting tubers every year. There’s no blending of types when you plant different varieties together; that only happens with the blossoms and shows up in young seedlings. To grow good potatoes, always use ripe, whole seed tubers that are the largest and best. Picking small potatoes for seed, cutting them up, and planting just the eyes and pieces like some people do has greatly harmed the health, quality, and quantity of potato yields. Choosing the poorest seed will deplete anything we grow in the soil. New varieties have been increasing over the past few years from seed. Some growers are developing thousands of new varieties. However, only about one in a thousand ends up being truly valuable. The quality of a new variety can’t be determined until at least the fifth year. Many that seemed promising at first turned out to be worthless.
To raise from seed, gather the balls after they have matured, hang them in a dry place till they become quite soft, when separate the seeds and dry them as others, and plant as early as the temperature of the soil favors vegetation. Chance varieties from seed of balls left to decay in the fall, as tomatoes, are recorded. Probably our present best varieties had such an origin. Raising new varieties requires much care and patience. Keep each one separate, plant only the best, and then[Pg 362] you must wait four or five years to determine whether, out of a thousand, you have one good variety.
To grow from seed, collect the seed balls once they're fully mature, hang them in a dry place until they're really soft, then separate the seeds and dry them like you would with others. Plant them as soon as the soil temperature is good for growth. Random varieties can come from seeds of balls that were left to decompose in the fall, like with tomatoes. It's likely that our best current varieties came from such origins. Developing new varieties takes a lot of care and patience. Keep each one separate, only plant the best, and then[Pg 362] you'll need to wait four or five years to see if, out of a thousand, you've identified one good variety.
Varieties.—These are numerous. Those best adapted to one locality, are often inferior in another. That excellent potato, the Carter, so firm in New England and western New York, is ill-shapen and inferior in many localities in Illinois. The Neshannock or common Mercer produces a larger yield in Illinois than in the Eastern states, but of a slightly inferior quality. Most seeds do better transported from a colder to a warmer climate, but with the potato the reverse is true. The best potatoes of Ireland are usually inferior in the warmer latitudes of this country. In ordering potatoes for seed it is better to describe the quality than to order by the name. We omit any list, of even the best varieties. They are known by different names, and are not equally good in all localities. And all varieties are scattered over the whole country, very soon, by dealers, and through the agency of agricultural societies and periodicals. Different varieties should be kept separate, as they look better for market, and no two will cook in precisely the same time.
Varieties.—There are many. Those best suited to one area are often not as good in another. The excellent Carter potato, which is firm in New England and western New York, is oddly shaped and not as good in many places in Illinois. The Neshannock or common Mercer produces a larger yield in Illinois than in the Eastern states, but the quality is slightly lower. Most seeds thrive better when moved from a colder to a warmer climate, but with potatoes, it's the opposite. The best potatoes from Ireland are usually not as good in the warmer regions of this country. When ordering seed potatoes, it's better to describe their quality instead of just using their names. We won't provide a list, even of the best varieties, since they are known by different names and don't perform equally well in all locations. Additionally, all varieties are quickly distributed across the country by dealers and through agricultural societies and publications. Different varieties should be kept separate because they appear better for sale and no two will cook in exactly the same time.
Plant the large potatoes and plant them whole. From a small eye or a small potato to the largest they will vegetate equally well. And in a wet, cool season, the small seed will produce nearly as good a crop as the large. But the large seed matures earlier, and in a dry season produces a much larger crop. The moisture in a large potato decaying in the hill, is of great use to the growing plants, in a dry season. It is also generally conceded that potatoes growing from cut seed are more liable to be affected by the rot.
Plant the large potatoes whole. Whether you start with a small eye or a small potato, they will all grow just as well. In a wet, cool season, small seeds can produce almost as good of a crop as large ones. However, large seeds mature faster and yield a much bigger crop in dry seasons. The moisture from a large potato breaking down in the soil is really beneficial for the growing plants during dry times. It's also widely accepted that potatoes grown from cut seed are more susceptible to rot.
Quantity of seed per acre.—The practices of farmers[Pg 363] vary from five to twenty bushels. It takes a less number of bushels per acre when the seed is cut. The quantity is also affected by the size of the seed, the larger the potatoes the more will it take to seed an acre.
Quantity of seed per acre.—The practices of farmers[Pg 363] vary from five to twenty bushels. It requires fewer bushels per acre when the seed is cut. The amount needed also depends on the size of the seed; the larger the potatoes, the more it will take to plant an acre.
Plentiful, but not excessive, seeding is best. It is a universal fact that you can never get something for nothing. Hence light seeding will bring a light yield. We think it best to put one good-sized potato in a place and make the rows three feet apart each way. We think they yield better than at any other distances or in any other way. We have often tried drills, and found them more trouble, with no greater yield. The soil should be disintegrated to the depth of sixteen inches and the potatoes planted four inches deep, and cultivated with subsoil plow, and other suitable tools, in a manner to leave the surface nearly flat. Hilling up potatoes never does any good. We advise always to harrow the crop, as soon as they begin to appear through the soil.
Plenty, but not too many, seeds are ideal. It's a universal truth that you can't get something for nothing. So, planting a few seeds will result in a small harvest. We believe it's best to place one good-sized potato in each spot and keep the rows three feet apart both ways. We find they yield better this way than at any other spacing or method. We've tried drills often and found them more of a hassle without any increased yield. The soil should be broken up to a depth of sixteen inches, and the potatoes should be planted four inches deep. Cultivate using a subsoil plow and other appropriate tools to keep the surface almost flat. Mounding potatoes doesn’t help at all. We always recommend harrowing the crop as soon as they start to come up through the soil.
Soil.—Any good rich garden soil is good for this crop, provided it be well drained. Potatoes like moisture, but are ruined by having water stand in the soil. New land and newly broken-up old pastures are best.
Soil.—Any rich, healthy garden soil works for this crop, as long as it's well-drained. Potatoes enjoy moisture, but they'll be damaged if water accumulates in the soil. Freshly cleared land and recently tilled old pastures are the best options.
Manures.—All the usual fertilizers are good for potatoes, but especially ashes and plaster. The application above all others, for potatoes, is potash. Dissolve it in water, making it quite weak, and saturate your other manures with it, and the effect will always be marked. The tops contain a great deal of potash, and should always be plowed in and decay in the soil where they grow, otherwise they will rapidly exhaust the land. It is supposed that nothing will do more to restore the former vigor and health of the potato than a liberal[Pg 364] application of potash in the soil in which they grow. The crop will be much increased in a dry season by manuring in the hill, dropping the potato first and putting the manure on the top of it.
Fertilizers.—All the common fertilizers are effective for potatoes, but especially ashes and gypsum. The best application for potatoes is potash. Mix it with water until it's quite weak, and soak your other fertilizers in it; the results will always be noticeable. The plant tops contain a lot of potash and should always be tilled into the soil where they grow; otherwise, they will quickly deplete the land. It's believed that nothing helps restore the previous strength and health of the potato like a generous application of potash to the soil in which they grow. During a dry season, the crop will be significantly boosted by applying fertilizer in the hill, placing the potato first and putting the fertilizer on top of it.
Gathering and Preserving.—The usual hand-digging with hoe or potato-fork are well known, and do well when the crop is not large. But for those who grow potatoes for market, it is better to employ the plow in digging. Modern inventions for this purpose can everywhere be found in the agricultural warehouses. Potatoes are well preserved in a good cool cellar, in boxes or barrels; and are better for being covered with moist sand. The usual method of burying them outdoor is effectual and safe, if they be covered beyond the reach of frost, and have a small airhole at the apex, filled with straw.
Gathering and Preserving.—The typical hand-digging with a hoe or potato fork is well-known and works fine when the crop isn't large. However, for those who grow potatoes for sale, it's better to use a plow for digging. You can find modern tools for this purpose in agricultural supply stores everywhere. Potatoes are best kept in a cool, dry cellar, stored in boxes or barrels, and they stay fresher when covered with damp sand. The common method of burying them outdoors is effective and safe, as long as they're covered to prevent frost damage and have a small airhole at the top, packed with straw.
The Potato Disease.—This is altogether atmospherical. A new piece of land was cleared for potatoes. In the middle was a close muck, on a coarse, gravelly subsoil. In the lowest place a ditch was dug, to carry off the superabundance of water; from that ditch the coarse gravel was thrown out on one side, and suffered to remain at considerable depth. Only two or three rods distant, on one side the plat extended over a knoll of loose sand. Potatoes were planted, from the same seed, at the same time, and in the same manner, on these three kinds of land, side by side. They were all tended alike, needing little hoeing or care, the land being new. The rot prevailed badly that season. On digging the potatoes, it was found that in the coarse gravel, where the air could circulate almost as freely as in a pile of stove-wood, all the potatoes were rotten: on the muck, which was unlike a peat-bog, very[Pg 365] fine and tight, almost impervious to the atmosphere, they were nearly all sound; on the sand, which was quite open, but tighter than the gravel, part were decayed and the rest sound. Their condition was graduated entirely by the condition of the soil. It is an apparent objection to this theory, that when the rot prevails, the best potatoes are raised on light, sandy soils. It is said that they are open to the action of air. To this it is replied, that whether they rot or not, in sandy soils, depends on the kind of sand. On some sand they rot very badly, on others hardly at all. Sandy soils differ very materially: some are almost pure silex; while others are filled with a fine dust, and, although apparently loose, are much more nearly impervious to the air than heavier soils; on the former, nearly all will decay, and on the latter, most will be preserved.
The Potato Disease.—This is completely related to the atmosphere. A new plot of land was cleared for potatoes. In the center, there was dense muck over a rough, gravelly subsoil. A ditch was dug in the lowest area to drain excess water; the gravel from that ditch was piled to one side and left at a significant depth. Just a couple of rods away, on one side, the plot stretched over a rise of loose sand. Potatoes were planted from the same seed, at the same time, and in the same way across these three types of land, side by side. They all received the same care, needing little hoeing or attention since the land was new. That season, rot was quite severe. When the potatoes were harvested, it was found that in the coarse gravel, where air could circulate almost as freely as in a pile of firewood, all the potatoes had rotted; in the muck, which differed from a peat bog by being very[Pg 365] fine and dense, almost sealed off from the atmosphere, they were mostly healthy; in the sand, which was fairly open but denser than the gravel, some were rotten while the rest were fine. Their condition was entirely determined by the soil type. It seems contradictory to this theory that when rot is common, the best potatoes are often grown in light, sandy soils. It's said that these soils allow better air action. In response, it's argued that whether they rot or not in sandy soils depends on the specific type of sand. Some sands cause significant rot, while others barely affect the potatoes. Sandy soils can vary greatly: some are nearly pure silica, while others contain fine dust and, although they appear loose, are much more resistant to air than denser soils; in the former, almost all will decay, while in the latter, most will be preserved.
Look at the immense potato crops near Rochester, N. Y., on sandy land. We have personally examined it, and find it to be filled with dust, that excludes the air, and saves the potato from rot. Why, then, is a heavy clay useless for potatoes? Is not clay a very tight soil? Unbroken it is; but, when plowed, it is always left in larger particles than other land—it is but seldom pulverized. The spaces between the particles are all open to the free action of the air; hence, instead of being close, it is one of the most open of all our soils. This confirms the theory.
Check out the huge potato farms near Rochester, N.Y., on sandy soil. We’ve looked into it ourselves and found it packed with dust, which keeps the air out and protects the potatoes from rotting. So, why is heavy clay bad for potatoes? Isn’t clay a really compact soil? It is when it's not broken up, but when it’s plowed, it’s usually left in bigger clumps than other types of soil—it rarely gets finely crushed. The gaps between the clumps are all exposed to air, so instead of being dense, it’s actually one of the most open types of soil we have. This supports the theory.
The influence of manuring land is still another confirmation. We are directed not to manure our land for potatoes when the disease prevails. It is said we can raise no sound potatoes on rich land when the rot is abroad. This is an error. The richness of the soil does not promote the disease; but if any kind of ma[Pg 366]nure be applied that, from its bulk and coarseness, keeps the soil open to the air, the potatoes will rot. But fertilize to the highest extent, in any way that does not make the soil too open, and let in the air, and the crop will be greatly increased with perfect safety. Thus, this theory, like every truth, perfectly fits in all its bearings.
The effect of fertilizing land is yet another confirmation. We are told not to fertilize our land for potatoes when the disease is spreading. It's said that we can't grow healthy potatoes on rich land when rot is a problem. This is a misconception. The richness of the soil does not cause the disease; however, if any type of manure is applied that, due to its bulk and coarseness, keeps the soil open to the air, the potatoes will rot. But if you fertilize as much as possible, in a way that doesn't overly aerate the soil, the crop will significantly increase with complete safety. Thus, this theory, like all truths, fits perfectly in all its aspects.
There is, then, no perfect remedy for the disease but in the power of Him who can purify the atmosphere. Numerous remedies and preventives have been recommended, by those who suppose they have tried them with success. But in other localities and soils, all their remedies have failed, as will all others that will yet be discovered. A careful examination of the texture of the soils, upon the principles here indicated, and a repetition of their experiments, will show the discoverers that their success depended upon their soils, while others failed in using the same remedies on other soils. The practical uses of this theory are obvious. When the disease is abroad, we should select soil that excludes, as much as possible, the atmosphere, and plant deep; on all land not liable to have water stand on the subsoil. Do not be deceived into the belief that all sandy land will bear good potatoes, in the seasons when the disease prevails. The worst rot we ever had was in 1855, on very sandy land. This year (1857) we have witnessed the worst rot in open sand and gravel. Add to this, great care in preserving the health of the tubers. Plant very early, only whole potatoes, and of mature growth, thoroughly ripe; apply a little salt and lime, plaster rather plentifully, and potash, or plenty of wood-ashes—and you will succeed in the worst of seasons.[Pg 367]
There’s no perfect cure for the disease except through the power of Him who can cleanse the air. Many treatments and preventive measures have been suggested by those who believe they’ve had success with them. However, in different locations and types of soil, all their solutions have failed, just like any future remedies will too. A careful analysis of soil composition, based on the principles mentioned here, and repeating their experiments, will reveal to the researchers that their success was due to their specific soils, while others failed when applying the same treatments in different soils. The practical implications of this theory are clear. When the disease is widespread, we should choose soil that minimizes exposure to the air as much as possible and plant deep; on any land not prone to standing water in the subsoil. Don’t fall for the misconception that all sandy land will produce good potatoes during disease outbreaks. The worst rot we ever experienced was in 1855 on very sandy land. This year (1857), we saw the worst rot in open sand and gravel. Additionally, take great care in keeping the tubers healthy. Plant very early, using only whole, mature potatoes that are thoroughly ripe; apply a little salt and lime, spread plaster generously, and include potash or plenty of wood ashes—and you will succeed even in the toughest seasons.[Pg 367]
PRESERVING FRUITS, &c.
The essentials in preserving fruits, berries, and vegetables, during the whole year, are, a total exclusion from atmospheric action, and, in some vegetables, a strong action of heat. We have a variety of patent cans, and several processes are recommended. The patent cans serve a good purpose, but, for general use, are inferior to those ordinarily made by the tinman. The patent articles are only good for one year, and are used with greater difficulty by the unskilful. The ordinary tin cans, made in the form of a cylinder, with an orifice in the top large enough to admit whatever you would preserve, will last ten years, with careful usage, and they are so simple that no mistakes need be made. It is usually recommended to solder on the cover, which is simply a square piece of tin large enough to cover the orifice. Soldering may be best for those cans that are to be transported a long distance, but it is troublesome, and is entirely unnecessary for domestic use. A little sealing-wax, which any apothecary can make at a cheap rate, laid on the top of the can when hot, will melt, and the cover placed upon it will adhere and cause it to be air-tight. All articles that do not part with their aroma by being cooked, may be perfectly preserved in such cans, by putting them in when boiling, seasoned to your taste, and putting on the covers at once. The cans should be full, and set in a cool place, and the articles will remain in a perfect state for a year. The finest articles of fruit, as peaches and strawberries, may be preserved so as to retain all their peculiar aroma, by putting them into such cans, filled with a[Pg 368] sirup of pure sugar, and placing the cans so filled in a kettle of water, and raising it to a boiling heat, and then putting on the cover as above; the heat expels the air, and the cover and wax keep it out. Stone jugs are used for the same purposes, but are not sufficiently tight to keep out the air, unless well painted after having become cold. Wide-mouthed glass bottles are excellent. But, in using glass or stone ware, the corks must be put in and tied at the commencement, leaving a small aperture for the escape of steam, and the process of raising the water to a boiling heat must be gradual, requiring three or four hours, or the bottles will be broken by sudden expansion. Make the corks air-tight by covering with sealing-wax on taking from the boiling water. Some vegetables, as peas, beans, cauliflowers, &c., need considerable boiling, in order to perfect preservation. Tin cans may stand in the water and boil an hour or two, if you choose, and then be sealed. The bottles should be corked tight, have the cork tied in, and then be immersed and boil for an hour: take them out, and dip the cork and mouth of the bottles in sealing-wax, and all will be safe.
The key to preserving fruits, berries, and vegetables all year round is to keep them completely away from the air, and for some vegetables, to apply enough heat. There are various patented cans and several recommended methods. While the patent cans are useful, they are generally not as effective as regular ones made by a tinman. Patent cans are only good for one year and are more difficult to use for those who are inexperienced. Regular tin cans, shaped like cylinders with a wide enough opening on top to fit whatever you're preserving, can last ten years if used carefully, and they’re so straightforward that mistakes are unlikely. It's usually suggested to solder the cover on, which is just a square piece of tin that covers the opening. Soldering is better for cans that will be transported long distances, but it's a hassle and not necessary for home use. A little sealing wax, which any pharmacist can make cheaply, placed on top of the can when hot will melt, and the cover put on will stick, making it airtight. Items that don’t lose their aroma when cooked can be perfectly preserved in these cans by adding them while boiling, seasoned to your liking, and immediately sealing the covers. The cans should be full and stored in a cool place, allowing the contents to remain fresh for a year. The best fruits, like peaches and strawberries, can maintain their unique aroma by being put into cans filled with a syrup made of pure sugar, then placed in a pot of water, brought to a boil, and covered as mentioned; the heat drives out the air, and the cover along with the wax keeps it out. Stone jars can also be used for this purpose, but they often aren't airtight unless well-painted after cooling. Wide-mouth glass bottles are great too. However, if using glass or stoneware, you must insert and tie the corks at the start, leaving a small opening for steam to escape, and gradually bring the water to a boil over three or four hours to avoid breaking the bottles from sudden expansion. Seal the corks airtight with wax after taking them out of the boiling water. Some vegetables, such as peas, beans, and cauliflower, require significant boiling to ensure preservation. Tin cans can boil in the water for an hour or two if desired before being sealed. The bottles should be tightly corked with the cork secured, then submerged and boiled for an hour; after removing them, dip the cork and the bottle's mouth in sealing wax to ensure safety.
By one of these processes, exclusion of the atmosphere and thorough boiling, we may preserve any fruit or vegetable, so as to have an abundance, nearly as good as the fresh in its season, the whole year, and that at a trifling expense. All fruits and vegetables may also be preserved by drying. By being properly dried, the original aroma can be mostly retained. The essentials in properly drying are artificial heat and free circulation of the air about the drying articles. Fruit dried in the sun is not nearly so fine as that dried by artificial heat. An oven from which bread has just[Pg 369] been taken is suitable for this purpose; but a dry-house is better. A tight room, with a stove in the bottom, and the fruit in shallow drawers, put in from the outside, serves a good purpose. Construct the room so as to give a draft, the heated air passing out at the top, and the process of drying will be greatly facilitated, and the more rapid the process, without cooking the fruit, the better will be its quality. This process is applicable to all kinds of vegetables. Roots, as beets, carrots, parsnips, or potatoes, should be sliced before drying. The object in drying the latter articles would be to afford the luxury of good vegetables for armies and ships' crews, in distant regions, and in climates where they are not grown. Milk can be condensed and preserved for a long time, and, being greatly reduced in quantity, it is easily transported. It is not generally known in the country that Mr. Gail Borden, of New York, has invented a method of condensing milk, fresh from the cow, so that it will perfectly retain all its excellences, including the cream, and by being sealed up in tin cans, as above, may be kept for many months. The milk and the process of condensation have been scientifically examined by the New York Academy of Medicine, and pronounced perfect, and of great value to the world. We have used the condensed milk, which was more than a month old; it had been kept in a tin can without sealing and without ice, but in a cool place. It was sweet and good, differing in no respect from fresh milk from the cow, except that the heat employed in condensing it gave it the taste of boiled milk. If kept in a warm place, and exposed to the atmosphere, it may sour nearly as soon as other milk: but it may be sealed up and kept cool so as to be good for a long[Pg 370] time. The condensation is accomplished by simple evaporation of the watery part, in pans in vacuo. No substance whatever is put into the milk. Four gallons of fresh milk are condensed into one. When wanted for use, the quantity desired is put into twice the quantity of water, which makes good cream for coffee; or one part to four of water makes good new milk; and one part to five or six makes a better milk than that usually sold in cities. Steamers now lay in a supply for a voyage to Liverpool and return, and on arrival in New York, the milk is as good as when taken on board. The advantages will be numerous. Such milk will be among regular supplies for armies and navies, and for all shipping to distant countries. All cities and villages may have pure, cheap milk, as the condensation will render transportation so cheap that milk can be sent from any part of the country where it is most plenty and cheapest. The process is patented, but will be granted to others at reasonable rates, by Borden & Co.; and eventually it will become general, when farmers can condense and lay by, in the season when it is abundant, milk for use in the winter, when cows are dry. This will make milk abundant at all seasons of the year, and plenty wherever we choose to carry it. It will also save the lives of thousands of children, in cities, that are fed on unwholesome milk or poisonous mixtures. There is no temptation to adulterate such milk, for the process of condensation is cheaper than any mixture that could be passed.
By using one of these methods, like removing the air and boiling thoroughly, we can preserve any fruit or vegetable, making it nearly as good as fresh in its season throughout the year, and at a low cost. All fruits and vegetables can also be preserved by drying. If dried properly, the original flavor can mostly be maintained. The key elements for effective drying are artificial heat and good airflow around the items being dried. Sun-dried fruit is not nearly as good as fruit dried with artificial heat. An oven just emptied of bread is suitable for this task; however, a drying room is better. A sealed room with a stove at the bottom and the fruit placed in shallow trays from the outside works well. Design the room to create a draft, with heated air exiting at the top, and the drying process will be significantly improved. The quicker this process occurs, without cooking the fruit, the better the quality. This method applies to all kinds of vegetables. Roots like beets, carrots, parsnips, or potatoes should be sliced before drying. The goal of drying these items would be to provide good vegetables for armies and ship crews in far-off locations and climates where they aren't grown. Milk can be condensed and preserved for long periods, making it easier to transport since it is significantly reduced in volume. It's not widely known that Mr. Gail Borden of New York has developed a method to condense fresh milk straight from the cow, retaining all its quality, including the cream, and by sealing it in tin cans, it can be kept for many months. The milk and the condensing method have been scientifically evaluated by the New York Academy of Medicine and deemed perfect and highly valuable. We tried condensed milk that was more than a month old; it had been stored in a tin can without sealing and without ice, but kept cool. It was sweet and tasty, indistinguishable from fresh milk from the cow, except that the heat used in condensing gave it a cooked milk flavor. If stored in a warm place and exposed to the air, it can sour almost as quickly as regular milk; but if sealed and kept cool, it can stay good for a long time. The condensation process is achieved simply by evaporating the water content in pans under vacuum. No additives are added to the milk. Four gallons of fresh milk can be condensed into one. When it’s time to use it, the desired amount can be mixed with twice that amount of water for a good cream for coffee; or one part with four parts of water makes decent fresh milk; and one part with five or six parts makes even better milk than what's typically sold in cities. Steamships now stock up before a trip to Liverpool and back, and upon arrival in New York, the milk is just as good as when it was loaded. The benefits will be numerous. Such milk will become a regular supply for armies, navies, and all shipping to distant countries. Cities and towns could have access to pure, affordable milk, as condensation will make transportation so inexpensive that milk can be shipped from any area where it's abundant and cheap. The process is patented but will be made available to others at reasonable rates by Borden & Co.; eventually, it will become commonplace when farmers can condense and store milk in the plentiful season for use in winter when cows are dry. This will mean milk is available year-round and plentiful wherever we decide to send it. It will also save countless children's lives in cities who currently consume unhealthy milk or toxic mixtures. There’s no incentive to adulterate this milk because the condensation process is cheaper than any mix that could be made.
Preserving hams is effectually done by either of the following methods. After well curing and smoking, sew them up in a bag of cotton cloth, fitting closely, and dip them into a tub of lime-whitewash, nearly as[Pg 371] thick as cream, and hang up in a cool room. This is a good method, though they will sometimes mould. The other process, and the one we most recommend, is to put well cured and smoked hams in a cask, or box, with very fine charcoal; put in a layer of charcoal, and then one of hams; cover with another layer of coal and then of hams, and so on, until the cask is full, or all your hams are deposited. No mould will appear, and no insect will touch them. This method is perfect.
Preserving hams can be effectively done using either of the following methods. After properly curing and smoking them, sew them up in a closely fitting cotton cloth bag, then dip them into a tub of lime-whitewash that’s about as[Pg 371] thick as cream, and hang them in a cool room. This method works well, although they might sometimes develop mold. The other process, which we highly recommend, involves placing well-cured and smoked hams in a barrel or box with very fine charcoal. Start with a layer of charcoal, then add a layer of hams; cover with another layer of charcoal and then hams, repeating this until the barrel is full or all your hams are in. This way, no mold will form, and no insects will bother them. This method is ideal.
Another process, involving the same principles as the preceding, is to wrap the hams in muslin, and bury them in salt. The muslin keeps the salt from striking in, and the salt prevents mould and insects.
Another process, using the same principles as the one before, is to wrap the hams in muslin and bury them in salt. The muslin keeps the salt from absorbing too much moisture, and the salt prevents mold and insects.
PUMPKIN.
There are some five or six varieties in cultivation. Loudon says six, and Russell's catalogue has five. The number is increasing, and names becoming uncertain. Certain varieties are called pumpkins by some, and squashes by others. The large yellow Connecticut, or Yankee pumpkin, is best for all uses. The large cheese pumpkin is good at the South and West. The mammoth that has weighed as high as two hundred and thirty pounds, is a squash, more ornamental than useful. The seven years' pumpkin is a great keeper. It has doubtless been kept through several years without decay. Pumpkins will grow on any good rich soil, but best on new land, and in a wet season. Do best alone, but will grow well among corn and better with potatoes. A good crop of pumpkins can seldom be raised, two years in succession, on the same land. Care in saving seed is very important. The spot on the end that was origi[Pg 372]nally covered by the blossom, varies much in dimensions, on pumpkins of the same size. Seeds from those having small blossom-marks, bear very few, and from those having large ones, produce abundantly.
There are about five or six varieties being grown. Loudon mentions six, while Russell's catalog lists five. The number is increasing, and the names are getting confusing. Some varieties are called pumpkins by some people and squashes by others. The large yellow Connecticut, or Yankee pumpkin, is the best for just about everything. The large cheese pumpkin does well in the South and West. The mammoth, which can weigh as much as two hundred and thirty pounds, is more ornamental than useful. The seven years' pumpkin is great for keeping; it can definitely last several years without going bad. Pumpkins can grow well in any good rich soil, but they do best on new land and during a wet season. They thrive when grown alone but also do well among corn, and even better with potatoes. It's rare to get a good crop of pumpkins two years in a row from the same land. Careful seed saving is really important. The spot at the end where the blossom was originally varies a lot in size among pumpkins of the same size. Seeds from pumpkins with small blossom marks tend to produce very few, while those with large marks yield a lot.
They are good fall and winter feed for most animals. They will cause hogs to grow rapidly, if boiled with roots, and mixed with a little grain. Fed raw to milch cows and fattening cattle, they are valuable. Learn a horse to eat them raw, and if his work be not too hard, he will fatten on them. They may be preserved in a dry cellar, in a warm room as sweet potatoes, or in a mow of hay or straw, that will not freeze through. But for family use they are better stewed green, and dried.
They make great fall and winter feed for most animals. If you boil them with roots and mix them with a bit of grain, they help hogs grow quickly. When fed raw to dairy cows and cattle meant for fattening, they're really valuable. Teach a horse to eat them raw, and if his work isn't too strenuous, he will gain weight on them. You can store them in a dry cellar, in a warm room like sweet potatoes, or in a stack of hay or straw that won't freeze. However, for family use, they're best stewed while green and then dried.
QUINCE.
This fruit, with its uses, for drying, cooking, marmalades, flavors to tarts and pies made of other fruits, and for preserving as a sweetmeat, is well known and highly esteemed.
This fruit is well known and highly valued for its various uses, including drying, cooking, making marmalades, adding flavors to tarts and pies with other fruits, and preserving as a sweet treat.
The quince is rather a shrub than a tree. It should be set ten feet apart each way, in deep, rich soil. It needs little pruning, except removing dead or cross branches, and cutting off and burning at once, twigs affected with the insect-blight, as mentioned under pears. The soil should be manured every year, by working-in a top-dressing of fine manure, including a little salt.
The quince is more of a shrub than a tree. It should be planted ten feet apart in all directions, in deep, rich soil. It requires minimal pruning, just removing dead or crossing branches, and cutting off and burning any twigs affected by insect blight, as noted for pears. The soil should be fertilized every year by mixing in a top-dressing of fine manure, along with a little salt.
Propagation—is by seeds, buds, or cuttings. Budding does very well. Seedlings are not always true to the varieties. Cuttings, put out early and a little in the shade, nearly all take. This is the best and easiest method of propagation.[Pg 373]
Propagation—is done using seeds, buds, or cuttings. Budding works quite well. Seedlings don't always match the original varieties. Cuttings, when taken early and kept slightly shaded, almost always succeed. This is the best and simplest method of propagation.[Pg 373]
There are several varieties; the apple-shaped, pear-shaped, and the Portugal, are the principal.
There are several varieties: the apple-shaped, pear-shaped, and Portugal are the main ones.
The apple-shaped, or orange quince (and perhaps the large-fruited may be the same) is, on the whole, the best of all. Early, a great bearer, and excellent for all uses. The pear-shaped is smaller, harder, and later. It may be kept longer in a green state, and therefore be carried much farther. The only reason for cultivating it would be its lateness and its keeping qualities. The Portugal quince is the finest fruit of all, but is such a shy bearer as to be unprofitable. The Rea quince is a seedling raised by Mr. Joseph Rea, of Greene county, New York, and is pronounced by Downing "an acquisition." The fruit is very handsome, and one third larger than the common apple or orange quince. The tree is thrifty, hardy, and productive. It is a valuable modification of the apple-shaped or orange quince, superior to the original. Such varieties may be multiplied and improved, by new seedlings and high cultivation.
The apple-shaped or orange quince (and possibly the large-fruited variety) is generally the best of all. It produces a lot early on and is great for all purposes. The pear-shaped quince is smaller, tougher, and ripens later. It can stay green for a longer time, which means it can be transported much farther. The only reason to grow it would be its late ripening and storage ability. The Portugal quince is the finest fruit of all, but it produces so little that it's not worth the effort. The Rea quince is a seedling developed by Mr. Joseph Rea from Greene County, New York, and Downing calls it "an acquisition." The fruit is very attractive and about one-third larger than the typical apple or orange quince. The tree is robust, hardy, and productive. It is a valuable variation of the apple-shaped or orange quince, better than the original. These varieties can be multiplied and enhanced through new seedlings and better cultivation.
RABBITS.
To prevent rabbits and mice from girdling fruit-trees in winter, is very important to fruit-growers. The meadow-mouse is very destructive to young trees, under cover of snow. Rabbits will girdle trees after the green foliage on which they delight to feed is gone. Take four quarts of fresh-slaked lime, the same quantity of fresh cows' dung, two quarts of salt, and a handful of flour of sulphur; mix all together, with just enough water to bring it to the consistency of thick paint. At the commencement of cold weather, paint the trunks of the trees two feet high with this mixture,[Pg 374] and not a tree will suffer from rabbits or mice. Treading own the snow does good, but it is very troublesome, and not a perfect remedy. Experience has never known the foregoing wash to fail.
To prevent rabbits and mice from damaging fruit trees in winter, it's really important for fruit growers. The meadow mouse can really harm young trees while covered by snow. Rabbits will damage trees once the green leaves they love to eat are gone. Take four quarts of fresh slaked lime, the same amount of fresh cow manure, two quarts of salt, and a handful of sulfur flour; mix everything together with just enough water to make it the consistency of thick paint. When the cold weather starts, paint the trunks of the trees up to two feet high with this mixture,[Pg 374] and no tree will be harmed by rabbits or mice. Walking on the snow helps, but it's quite a hassle and not a perfect solution. Experience has shown that this wash never fails.
RADISH.
This is a well-known root, eaten only raw, and when young and tender. A rich sandy soil is best. Like most turnips, the roots are more tender and perfect when grown in rather cool weather; hence, those grown in early spring are better than a summer growth. They do well in an early hotbed.
This is a well-known root that is only eaten raw and when it's young and tender. It grows best in rich, sandy soil. Like most turnips, the roots are more tender and ideal when grown in cooler weather, so those planted in early spring are better than those grown in summer. They also thrive in an early hotbed.
The Scarlet and White Turnip-rooted are fine for early use. They are always small, but fair, and very early.
The Scarlet and White Turnip-rooted are great for early use. They’re always small, but nice, and very early.
The Scarlet Short-top comes next, and is a very fine variety. These may be had through the whole season, by sowing at proper intervals; hence, others are unnecessary. Other good varieties are the Summer, or Long White Naples; Long Salmon, a large, gray radish, not generally described in the books (a splendid variety in southern Ohio); and the Black Spanish for fall and winter use. This grows large like a turnip, and is preserved in the same way. The best method of guarding against worms is to take equal quantities of fresh horse-manure and buckwheat-bran, and mix and spade them into the bed. Active fermentation follows, and toadstools will grow up within forty-eight hours, when you should spade up the bed again and sow the seed; they will grow very quickly, be very tender, and entirely free from worms.
The Scarlet Short-top comes next and is a really excellent variety. You can have these throughout the entire season by planting them at the right intervals; so, there's no need for other kinds. Other good options include the Summer or Long White Naples; Long Salmon, a large gray radish not typically mentioned in books (it’s a fantastic variety in southern Ohio); and the Black Spanish for fall and winter use. This one grows large like a turnip and is stored the same way. The best way to prevent worms is to mix equal parts of fresh horse manure and buckwheat bran into the soil. This will kick off active fermentation, and mushrooms will start growing within forty-eight hours. At that point, you should turn the soil again and plant the seeds; they will grow quickly, be very tender, and completely free from worms.
Radish-seed is sown with slow-vegetating seeds, as[Pg 375] carrots, beets, parsnips, &c. The radishes mark the rows, so that they may be cleared of weeds, and the ground stirred before the plants would otherwise be discernible, and also shade the germinating seeds and the young plants from destruction from a hot sun. The radishes may be pulled out when the main crop needs the ground and sun. For this purpose the scarlet short-top variety is used, because the long root loosens the soil in pulling; and as the crown stands so much above the surface, they may be crushed down with a small roller, and thus destroyed without the labor of pulling. Sowing radish-seed among root-crops, and cultivating early with a root-cleaner, an acre of roots can be raised with about the same labor as an acre of corn.
Radish seeds are planted alongside slow-growing seeds like[Pg 375] carrots, beets, and parsnips. The radishes help mark the rows, making it easier to clear weeds and cultivate the ground before the other plants are visible, while also providing shade for the germinating seeds and young plants from harsh sunlight. You can pull out the radishes when the main crop needs more space and sunlight. The scarlet short-top variety is used for this because its long roots loosen the soil when pulled. Since the crown sits high above the ground, you can crush them down with a small roller, effectively destroying them without the effort of pulling. By sowing radish seeds among root crops and cultivating early with a root-cleaner, you can grow an acre of roots with about the same amount of work as an acre of corn.
RASPBERRY.
The common black raspberry we have noticed elsewhere as one of the most profitable in cultivation. The other varieties, worthy of general cultivation, are the Franconia, the Fastollf, the red, and the white or yellow Antwerp. Any good garden-soil is suitable for raspberries. It should be worked deep, and have decayed wood and leaves mixed with barnyard manure and wood-ashes. In all but very cold latitudes, raspberries should be planted where they may be a little shaded. None of the finer old varieties produce a good crop of fruit without winter-protection. The canes may live without it, but will bear but little fruit. The best method of protection is to bend down the canes at the beginning of winter, before the ground freezes, and cover them lightly, with the soil around them. They should first have some well-rotted manure put around[Pg 376] the canes. Stools should be four feet apart, and have about five or six canes in a stool. Cut away the rest. The best of all manures for raspberries is said to be spent tan-bark. Put it around in the fall to the depth of two inches; work it into the soil in the spring, and put around fresh tan-bark, to the same depth.
The common black raspberry has proven to be one of the most profitable crops to grow. Other varieties that are also great for general cultivation include Franconia, Fastollf, red, and white or yellow Antwerp. Any good garden soil works well for raspberries, which should be tilled deeply and mixed with decomposed wood, leaves, barnyard manure, and wood ash. In all but very cold regions, raspberries should be planted in slightly shaded areas. Most of the better old varieties won't produce a good fruit yield without winter protection. The canes might survive without it, but they will yield very little fruit. The best way to protect them is to bend the canes down before winter sets in, before the ground freezes, and lightly cover them with soil. You should first apply some well-rotted manure around[Pg 376] the canes. Space the plants four feet apart, ensuring there are about five or six canes in each group, and trim away the excess. It’s said that the best manure for raspberries is spent tan-bark. Spread it around in the fall to a depth of two inches; till it into the soil in the spring, and then add fresh tan-bark to the same depth.
The varieties for general cultivation are few. The common black is one of the best. The common wild American red, native in all the Middle and Eastern states, is greatly improved by cultivation. As it is perfectly hardy, and a great and early bearer, it should have a place in every collection. The Franconia is a fine fruit, and, among those generally cultivated, occupies the first place. The yellow Antwerp is fine-flavored and good-sized, but too soft for a general market-berry. The same is true of the Fastollf. The red Antwerp is good, but quite inferior to the new red Antwerp, or Hudson River Antwerp. The Ohio Evergreen is a new variety, hardy, prolific, and a long bearer, fine fruit in considerable quantities having been picked on the 1st of November. On this account, it should be in every garden. There are two kinds of red raspberries brought to notice by Mr. Lewis P. Allen, of Black Rock, N. Y., that deserve extensive cultivation, if they warrant his recommendation. Mr. Allen says he has cultivated them for a number of years, and, with no winter protection, they have borne a large crop of excellent fruit every year, pronounced by dealers in Buffalo market superior to any other variety. Should these varieties prove equally good elsewhere, they deserve a place in every garden in the land.[Pg 377]
The options for general cultivation are limited. The common black raspberry is one of the best. The American wild red raspberry, which is native to all the Middle and Eastern states, is significantly improved through cultivation. Being fully hardy and a prolific early bearer, it should be included in every collection. The Franconia raspberry is an excellent fruit and ranks first among those commonly cultivated. The yellow Antwerp has a great flavor and is a good size, but it's too soft for the general market. The same goes for the Fastollf. The red Antwerp is good but notably inferior to the new red Antwerp, or Hudson River Antwerp. The Ohio Evergreen is a new variety that is hardy, productive, and bears fruit for a long time; a considerable amount of excellent fruit has been harvested as late as November 1st. For this reason, it should be in every garden. Mr. Lewis P. Allen from Black Rock, N.Y., has brought attention to two kinds of red raspberries that deserve wider cultivation, assuming they live up to his recommendation. Mr. Allen states that he has grown them for several years without any winter protection, and they have produced large crops of excellent fruit every year, which dealers in the Buffalo market have rated as superior to any other variety. If these varieties prove to be just as good elsewhere, they should have a spot in every garden across the country.[Pg 377]
RHUBARB.
There are several varieties of rhubarb now in cultivation.
There are several types of rhubarb being grown now.
The Victoria, Mammoth, and Scotch Hybrid, all of which (if they be really distinct) are fine and large, under proper culture. There is much of the old inferior kind, which generally affords only small short leaves, and which is of no value, compared with the large varieties. The method of growing is very simple, and yet the value of the plant depends mainly on right cultivation.
The Victoria, Mammoth, and Scotch Hybrid are all impressive and large when grown correctly. There are still many of the older, lesser kind, which usually only produces small, short leaves and is not valuable compared to the larger varieties. The growing method is quite straightforward, but the plant's value largely relies on proper cultivation.
Propagation is by seeds, or by dividing the roots. By seed is preferable. The idea that the largest kinds will not produce seed is incorrect. We raised four or five quarts of seed from a single plant of the largest variety, in one season. Young plants are suitable for transplanting after the first year's growth. They should be set three feet apart each way. The soil should be thoroughly enriched and trenched two feet deep, with plenty of well-rotted manure in the bottom, and mixed in all the soil. Plant the crowns two or three inches below the surface to allow stirring the ground in the spring, without injury. After this they will only want enriching with well-rotted manure in rather liberal quantities, worked in with a fork in the fall or spring. Covering up with manure in the fall is good. Those who raise the largest leaves, lay bare the crowns in spring, and with a sharp knife, remove all the smaller crown-buds. The leaves will be greatly reduced in number, but increased in size. We have often seen a single stem of a leaf that weighed a full pound.
Propagation is done by seeds or by dividing the roots, but using seeds is the better option. The belief that the biggest types won’t produce seeds is wrong. We collected four or five quarts of seeds from one plant of the largest variety in just one season. Young plants can be transplanted after their first year of growth. They should be spaced three feet apart in all directions. The soil needs to be well-enriched and dug two feet deep, with plenty of well-rotted manure at the bottom and mixed into the soil. Plant the crowns two or three inches below the surface so you can stir the ground in the spring without causing damage. After planting, they only need to be enriched with well-rotted manure in generous amounts, mixed in with a fork during the fall or spring. Covering them with manure in the fall is beneficial. Those who want to grow the largest leaves should expose the crowns in spring and use a sharp knife to remove all the smaller crown buds. This will reduce the number of leaves but increase their size. We have often seen a single leaf stem that weighed a full pound.
The roots live many years. We know a single root,[Pg 378] in St. Lawrence county, N. Y., from which we ate pies and tarts twenty-two years ago, and which is now so vigorous as to yield more than a supply for two families through the season. The only care it has ever had, has been liberal supplies of well-rotted manure. The seed stocks have generally been broken off. They should always be, unless you wish to raise seed, then save one or two of the strongest. New crowns come out on the sides, from year to year, until each plant will cover a considerable space. The one mentioned, as being twenty-two years old, has never been moved during the whole time. It is not the giant kind, but the leaves are large and long. Rhubarb has a better flavor and requires much less sugar, by blanching. This is best done by placing an old barrel, without a bottom, over the hill as it begins to grow. The leaves will grow long, with white tender stems. Use it when the leaves are half or full grown, as you please.
The roots can live for many years. We know of a single root, [Pg 378], in St. Lawrence County, NY, from which we made pies and tarts twenty-two years ago, and it’s still so strong that it produces enough for two families throughout the season. The only care it’s ever received is plenty of well-rotted manure. The seed stocks are usually broken off. They should always be unless you want to grow seeds; in that case, save one or two of the strongest ones. New crowns appear on the sides each year, and soon each plant will spread over a significant area. The one we mentioned, which is twenty-two years old, has never been moved during its entire life. It’s not the giant type, but the leaves are large and long. Rhubarb tastes better and needs much less sugar when blanched. This is best done by placing an old barrel, without a bottom, over the hill as it starts to grow. The leaves will grow long with white, tender stems. Use it when the leaves are half or fully grown, as you prefer.
RICE.
This, in its value to the world as an article of food, is next to Indian corn. It is the main article of diet for one third of the human race. It is produced only in certain parts of the world, and its cultivation is so simple and easy, and so much a department of agriculture by itself, that we omit directions for growing it. The ravages of the rice-weevil, so destructive to rice lying in bulk, are prevented by the application of common salt, at the rate of half a pound to the bushel.[Pg 379]
This, in terms of its importance as food, is second only to corn. It is the main food source for one-third of the global population. It is grown only in specific regions of the world, and its farming is so straightforward and distinct that we won't include instructions for cultivating it. The damage caused by rice weevils, which are harmful to stored rice, can be prevented by using regular salt at a rate of half a pound per bushel.[Pg 379]
ROCKS.
We frequently find, on some of our best land, large boulders, very hard, and too large to be removed, with any team we can command, and which would be in the way, in any place to which we might remove them. The best way to get rid of them, when it can be afforded, is to burn or blast them into pieces small enough to be easily handled. When this can not be afforded, the best method is to make an excavation by the side of them, deep enough to let them sink below the reach of the plow, and allow them to fall in, being careful not to get caught by them.
We often find large boulders on some of our best land that are really hard and way too big to remove with any team we have. They would just get in the way no matter where we tried to move them. The best way to get rid of them, if we can manage it, is to burn or blast them into smaller pieces that are easy to handle. If that’s not an option, the best solution is to dig a hole next to them deep enough to let them sink out of the way of the plow, making sure to be careful not to get caught by them.
ROLLER.
This is quite as indispensable to good farming and gardening as any other tool. It serves a great variety of useful purposes. The first is to pulverize soils. No man can get a full crop on a soil not made fine on the surface, however rich that soil may be. It is often the case that land needs rolling two or three times before the last harrowing and sowing the seed. Another purpose is, on all light soils, to place the soil close around the seeds after they have been covered. When this is not done, seeds will vegetate very unevenly, and, in dry weather, some of them not at all. Another advantage of rolling a field-crop is the greater facility and economy with which it can be harvested. It makes a level, smooth surface, sinking small stones out of the way of the scythe or reaper. Rolling makes grass-seed catch, when sown with a spring-crop. All beds[Pg 380] of small seeds—as onions, beets, carrots, parsnips, &c.—should be rolled after planting. It will so smooth the surface, that hoeing and cultivating can be done without injury to the plants. The rows are also much more easily seen while the plants are young. Any crop will grow better and larger by not being too much exposed to the action of the atmosphere on its roots. When the soil is coarse, part of the seeds and roots are greatly exposed to the action of the atmosphere, and this exposure is very irregular. The roller so crushes the lumps and fills up the openings in the soil as to cause the atmosphere to act regularly on the whole crop. Few farmers stop to think that the pressure of the atmosphere on their soils is fifteen pounds' weight on every square inch, and that, hence, the air must penetrate to a considerable depth into the soil; and where the soil is coarse, the air enters too freely, and acts too powerfully for the good of the plants. Rollers are made of wood, iron, or freestone. For most purposes, wood is best. A log made true and even, or, better, narrow plank nailed on cylindrical ends, are the usual forms. From eighteen inches to three feet in diameter is the better size. Iron or stone rollers, in sections, are best for pulverizing soil disposed to cake from being annually overflowed with water, or from other causes.
This is just as essential for good farming and gardening as any other tool. It serves many useful purposes. The first is to break up the soil. No one can achieve a full crop on soil that isn’t finely prepared on the surface, no matter how rich it is. Often, land needs to be rolled two or three times before the final harrowing and sowing of seeds. Another purpose, especially for light soils, is to pack the soil tightly around the seeds after they’ve been covered. If this isn’t done, seeds will germinate unevenly, and in dry weather, some may not sprout at all. Another benefit of rolling a field crop is that it makes harvesting easier and more efficient. It creates a level, smooth surface, moving small stones out of the way of the scythe or reaper. Rolling helps grass seeds to take hold when sown with spring crops. All beds[Pg 380] of small seeds—like onions, beets, carrots, and parsnips—should be rolled after planting. This smooths the surface so that hoeing and cultivating can be done without harming the plants. The rows are also much easier to see while the plants are young. Any crop will grow better and larger if its roots aren't overly exposed to the air. When the soil is coarse, part of the seeds and roots are left exposed to the atmosphere, which is very uneven. The roller compresses the lumps and fills in the gaps in the soil, causing the air to interact evenly with the entire crop. Few farmers consider that atmospheric pressure on their soils is fifteen pounds per square inch, meaning that air must penetrate fairly deep into the soil; in coarse soil, the air enters too easily and exerts too much influence, which isn’t good for the plants. Rollers can be made of wood, iron, or stone. For most purposes, wood is best. A true and even log, or preferably, narrow planks nailed to cylindrical ends, are the typical designs. A diameter of eighteen inches to three feet is ideal. Iron or stone rollers, in sections, are best for breaking up soil that tends to cake due to annual flooding or other reasons.
ROOT CROPS.
It is important that American farmers learn to attach much greater importance to the culture of roots. The potato is the best of all roots for feeding; but, as the yield has become so light in most localities, and the demand for it for human food has so greatly increased,[Pg 381] it will no longer be grown extensively as food for animals. Farmers must, therefore, turn their attention to beets, carrots, and parsnips. Reasonable tillage will produce one thousand bushels to the acre of beets and carrots, and two hundred more of parsnips. These roots, raw or cooked, are valuable for all domestic animals. A horse will do better on part oats and part carrots, or beets, than upon clear oats. For milch cows, young stock, and fattening cattle, and for sheep and fowls, they are highly valuable. With the facilities now enjoyed, they may be raised at a cheap rate. Plant scarlet short-top radish-seed in the rows, to shade the vegetating seed and young plants, and to mark the rows, to facilitate clearing and stirring the ground, while the plants are very young, and using the most approved root-cleaners, and the same amount of food can not be grown at the same price in any other crops.
It’s really important for American farmers to focus more on growing root vegetables. The potato is the top choice for feeding, but since yields have dropped significantly in many areas and the demand for it as human food has skyrocketed, [Pg 381] it won't be widely produced for animal feed anymore. Farmers should shift their focus to beets, carrots, and parsnips. With proper cultivation, you can harvest around a thousand bushels per acre of beets and carrots, and another two hundred of parsnips. These roots, whether raw or cooked, are great for all farm animals. A horse will actually perform better on a mix of oats and carrots or beets than just oats alone. They are extremely beneficial for milk cows, young livestock, fattening cattle, sheep, and poultry. Thanks to current resources, these can be grown affordably. Plant scarlet short-top radish seeds in rows to provide shade for the germinating seeds and young plants, as well as to help mark the rows for easier weeding and tilling while the plants are still young. You won’t find any other crops that can produce the same amount of food at the same cost.
SAFFRON.
This is a well-known medicinal herb, as easily grown as a bean or sunflower. It is principally used in eruptive diseases, to induce moisture of the skin and keep the eruption out. Sow in any good soil, in rows eighteen inches apart, and keep clean of weeds. When in full bloom, the flowers are gathered and dried.
This is a popular medicinal herb that's just as easy to grow as beans or sunflowers. It's mainly used for skin rashes, helping to keep the skin moist and the rash from spreading. Plant it in any good soil, with rows spaced eighteen inches apart, and make sure to keep it weed-free. When it blooms fully, the flowers are harvested and dried.
SAGE.
This is a hardy garden-herb, easily grown. Its value for medicinal and culinary purposes is well known. It is propagated by seeds, or by dividing the roots. With suitable protection in winter, roots will live for a number of years, bearing seed after the first.[Pg 382]
This is a resilient garden herb that's easy to grow. Its benefits for medicine and cooking are widely recognized. You can propagate it by seeds or by dividing the roots. With proper winter protection, the roots can last for several years, producing seeds after the first year.[Pg 382]
Varieties are, the red, the broad-leaved, the green, and the small-leaved green. The red is most used for culinary purposes, and the broad-leaved is most medicinal. All the varieties may be used for the same purposes. Any garden-soil, not decidedly wet, is suitable for sage. Raise new plants once in three or four years. Plants may be renovated, by certain culture and care, but it is better to grow new ones. Cut the leaves two or three times in the season, and dry quickly, and put away in paper bags; or, better, pulverize and cork up in glass bottles. This is the best method of preserving all herbs for domestic use.
Varieties include the red, the broad-leaved, the green, and the small-leaved green. The red variety is most commonly used for cooking, while the broad-leaved variety is primarily used for medicinal purposes. All the varieties can be utilized for similar uses. Any garden soil that isn't overly wet is suitable for sage. Start new plants every three to four years. While plants can be refreshed with specific care and cultivation, it's generally better to grow new ones. Cut the leaves two or three times during the season, dry them quickly, and store them in paper bags; or, preferably, grind them and store them in glass bottles with corks. This is the best way to preserve all herbs for home use.
SALSIFY, OR VEGETABLE OYSTER.
This is a hardy biennial vegetable, resembling a small parsnip, and as easily grown. When properly cooked, its flavor resembles the oyster, whence its name. Sow and cultivate as parsnips or carrots. It is suitable for use from November to May. It is better for being allowed to remain in the ground until wanted for use, though it may be well kept, in moist sand in the cellar. Care is necessary in saving seed as it shells and blows away like thistle seed, as soon as ripe. It must be sown quite thick, on account of its proneness not to vegetate. It should be more extensively cultivated.
This is a tough biennial vegetable that looks like a small parsnip and is just as easy to grow. When cooked properly, its taste is similar to that of an oyster, which is where it gets its name. Plant and care for it like you would parsnips or carrots. It's good to eat from November to May. It's best to leave it in the ground until you're ready to use it, although you can store it in moist sand in the cellar. You need to be careful when saving the seeds because they can easily blow away like thistle seeds as soon as they're ripe. It should be sown fairly densely since it tends not to germinate well. It deserves to be grown more widely.
SCRAPING LAND.
This is a process needed only on land that has not been under cultivation long enough to become level. All new land has many knolls of greater or less size. As soon as the roots are out sufficiently to allow it,[Pg 383] the knolls should be plowed and leveled with a common scraper. Most farmers neglect it as injurious to the soil, and too expensive. But when we consider that rough land never gets well plowed, and that the gradual wearing away of the knolls will continue their unproductiveness for a number of years, it will be seen that the cheapest way is to plow and scrape the land level at once, and thoroughly manure the places from which the soil has been scraped.
This process is only necessary on land that hasn't been farmed long enough to be flat. All new land has various bumps of different sizes. Once the roots are loose enough to allow it, [Pg 383] the bumps should be plowed and leveled using a standard scraper. Many farmers overlook this because they think it harms the soil and costs too much. However, if we think about it, rough land doesn't get plowed properly, and the slow erosion of the bumps will keep the land unproductive for several years. So, the most cost-effective solution is to plow and level the land right away and add plenty of manure to the areas where the soil has been scraped away.
SEEDS.
The best of everything should be saved for seed. Peas, beans, corn, tomatoes, &c., should not be gathered promiscuously, finally preserving the last that matures, for seed. Leave some of the finest and earliest stocks, and from them save seed, not from the first or the last that matures, but from the earliest that grows large and fair. Save tomato-seed from those that grow largest, but near the root. Gather all seeds as soon as mature, as remaining exposed to the weather is unfavorable to vegetation. Dry in a warm place in the shade, but not too near a stove or fire. Keep in paper bags, hung in a dry airy place, beyond the reach of mice.
The best of everything should be kept for seeds. Peas, beans, corn, tomatoes, etc., shouldn't be collected randomly; instead, save some of the best and earliest varieties for seeds. Choose the largest and healthiest ones, not just the first or last to mature. For tomatoes, save seeds from the biggest ones, but take them from near the root. Gather all seeds as soon as they’re mature, since exposure to the weather can harm their ability to grow. Dry them in a warm, shaded area, but not too close to a stove or fire. Store them in paper bags and hang those in a dry, airy spot that mice can't reach.
Trying the quality of seeds is important, as it may save loss and disappointment, from sowing seeds that will not vegetate. A little cotton wool or moss in a tumbler containing a little water, and placed in a warm room, will afford a good means of testing seeds. Seeds placed on that wool, will vegetate sooner than they would do in the soil. But a more speedy, and generally sure method, is by putting a few seeds on the top of a hot stove. If they are good they will crack like[Pg 384] corn in parching; otherwise they will burn without noise, and with very little motion. The improvement or declension of fruits, grains, and vegetables, depend very materially upon the manner of gathering and preserving seeds. Gather promiscuously and late, and keep without care, and rapid declension will be the result. Gather the earliest and best, and plant only the very best of that saved, and constant improvement will be secured.
Testing the quality of seeds is important because it can prevent loss and disappointment from planting seeds that won’t grow. A bit of cotton wool or moss in a glass with some water, placed in a warm room, provides a good way to test seeds. Seeds put on that wool will sprout faster than they would in the soil. However, a quicker and generally more reliable method is to place a few seeds on top of a hot stove. If they’re good, they will pop like popcorn; otherwise, they’ll burn quietly with little movement. The quality of fruits, grains, and vegetables relies heavily on how seeds are gathered and stored. If you gather them carelessly and late, and store them without care, you’ll see a quick decline. If you gather the earliest and best seeds, and only plant the very best of those, you’ll ensure continuous improvement.
SHEEP.
These are the most profitable of all domestic animals. The original cost is trifling, and the expense of raising and keeping is so light, and the sale of meat, tallow, hide, and wool, is so ready, that sheep-growing is always profitable. So important has this always been considered, that in all ages of the world, there have been shepherds, whose sole business it has been to tend their flocks. Were the flesh of sheep and lambs more extensively substituted for that of swine, in this country, it would be equally healthy and economical. American farmers do not attach to sheep-growing half the importance it deserves. We recommend a thorough study of the subject, in the use of the facilities afforded by the writings of practical men. We can only give the outlines of the subject in a work like this. A theory has been scientifically established by Peter A. Brown LL. D. of Philadelphia, in which it is shown that all sheep are divided into two species, Hair-bearing and Wool-bearing. These species crossed, produce sheep that bear both wool and hair, as the two never change. The hair makes blankets that will not shrink. The[Pg 385] wool is good for making fulled cloth. Blankets made from the fleeces of sheep that are the product of the cross of these two species, will shrink in some places and not in others, just as the hair or wool prevails. It is also true that the hair-bearing sheep delight in low, moist situations and sea-breezes, while the wool-bearing sheep does best on high, airy, and dry land. These fleeces all pass as wool, but the microscope shows a marked and permanent difference, and one can easily learn to distinguish it at once, by the touch and with the naked eye. This is thrown out here to induce a thorough examination of the whole subject. There are three staples of wool, short, three inches long, middling, five inches, and long, eight inches. Varieties of sheep are numerous. We shall only mention a few. The question of the best breeds has been warmly controverted. We have no disposition to try to settle it. The question of the best variety must depend upon locality and design. If the wool is the object, then the Vermont Merino for the North, and the pure Saxony for the South, are evidently the best. If located near large cities, where the flesh is the main object, then the large-bodied, long-wooled breeds are much preferable. Among those much esteemed we note the following:—
These are the most profitable domestic animals. The initial cost is low, and the expenses for raising and keeping them are minimal, plus the sale of meat, tallow, hide, and wool is straightforward, making sheep farming consistently profitable. This has always been considered so important that throughout history, there have been shepherds whose only job has been to look after their flocks. If the meat from sheep and lambs were more commonly used instead of pork in this country, it would be just as healthy and cost-effective. American farmers do not recognize the importance of sheep farming nearly enough. We suggest a comprehensive study of the subject, using the resources available from the writings of experienced practitioners. In a work like this, we can only outline the topic. A theory established by Peter A. Brown LL.D. of Philadelphia scientifically shows that all sheep are categorized into two species: Hair-bearing and Wool-bearing. When these species are crossed, they produce sheep that have both wool and hair, as these traits remain constant. The hair creates blankets that don't shrink. The wool is good for making fulled cloth. Blankets made from the fleeces of sheep resulting from this cross will shrink in some areas but not others, depending on whether hair or wool is more prevalent. Importantly, hair-bearing sheep prefer low, damp areas and sea breezes, while wool-bearing sheep thrive best on high, dry, and airy lands. All these fleeces are classified as wool, but a microscope reveals a clear and lasting difference, which can be easily distinguished by touch and sight. This is mentioned to encourage thorough exploration of the whole topic. There are three lengths of wool staples: short, three inches; medium, five inches; and long, eight inches. There are numerous varieties of sheep. We'll only mention a few. The debate over the best breeds has been heated, and we don’t intend to settle it. The ideal variety depends on location and purpose. If wool is the primary goal, then the Vermont Merino is best for the North, and pure Saxony for the South. If near large cities, where meat is the main focus, then large-bodied, long-wooled breeds are much better. Among those highly regarded, we note the following:—
The Cotswold mature young, and the flesh will vary in weight from fifteen to thirty pounds per quarter. The New Leicester is less hardy than the Cotswold, but heavier, weighing from twenty-four to thirty-six pounds per quarter. The Teeswater sheep, improved by a cross with the Leicester, is considered valuable. The Bampton is one of the very best grown in England. Fat ewes average twenty pounds per quarter, and wethers from thirty to thirty-five pounds. The Sussex,[Pg 386] Hampshire, and Shropshire varieties of the Down sheep, are all highly esteemed. The Leicester are very valuable. An ordinary fleece weighs from three to five pounds. Mr. Joseph Beers of New Jersey had one that sheared thirteen pounds at one time, and the live weight of the sheep was 378 pounds.
The Cotswold matures young, with the meat weighing between fifteen to thirty pounds per quarter. The New Leicester is less hardy than the Cotswold but heavier, ranging from twenty-four to thirty-six pounds per quarter. The Teeswater sheep, improved through crossbreeding with the Leicester, is considered valuable. The Bampton is one of the best types raised in England. Fat ewes usually weigh around twenty pounds per quarter, while wethers weigh between thirty to thirty-five pounds. The Sussex, [Pg 386] Hampshire, and Shropshire varieties of Down sheep are all highly regarded. The Leicester sheep are very valuable, with an average fleece weighing from three to five pounds. Mr. Joseph Beers from New Jersey had one that sheared thirteen pounds at once, with a live weight of 378 pounds.
There are French, Silesian, and Spanish Merinoes, much esteemed in Vermont and elsewhere. The average weight of a flock of ewes of French merinoes after shearing was 103 pounds. Their fleeces averaged twelve pounds and eight ounces. The fleece of one buck of the same flock weighed twenty pounds and twelve ounces.
There are French, Silesian, and Spanish Merinoes, highly valued in Vermont and beyond. The average weight of a flock of ewes from the French merinoes, after shearing, was 103 pounds. Their fleeces averaged twelve pounds and eight ounces. The fleece of one buck from the same flock weighed twenty pounds and twelve ounces.
 The French Merino Sheep.
The Silesian Merinoes are smaller, but produce beautiful fleeces. In a flock of nineteen ewes, the average weight of fleece was seven pounds and ten ounces, and that of the buck weighed ten and a half pounds.
The Silesian Merinoes are smaller, but they produce beautiful fleeces. In a flock of nineteen ewes, the average fleece weight was seven pounds and ten ounces, while the buck's fleece weighed ten and a half pounds.
A large flock of Spanish Merinoes yielded an average of a little over five pounds of well-washed wool. All these varieties are valuable for wool. The wool of the pure Saxony sheep, however, is best.
A large flock of Spanish Merinoes produced an average of just over five pounds of well-washed wool. All these breeds are valuable for wool. However, the wool from pure Saxony sheep is the best.
The Tartar sheep, called also Shanghae and Broadtail,[Pg 387] is a recently-imported breed, of great promise for mutton. Their fleece is a fine silky hair, making fine blankets that will not shrink, but not good for fulled cloths. The ewes are remarkably prolific, producing sometimes five lambs at a time, and often twice a year. One ewe bore seven lambs in one year, all living and being healthy. The flesh is of the highest quality. This may stand at the head of all our sheep as a market animal. The cross of this with our common sheep has proved fine. They need to be further tested in this country. A new kind of sheep has also been imported from Africa, within a few years; a variety unknown to naturalists, but having some points in common with the Tartar sheep.
The Tartar sheep, also known as Shanghae and Broadtail,[Pg 387] is a recently introduced breed with a lot of potential for mutton. Their fleece consists of fine, silky hair that makes excellent blankets that won’t shrink, but it’s not suitable for making fulled cloths. The ewes are incredibly prolific, sometimes having five lambs at once and often giving birth twice a year. One ewe even had seven lambs in a single year, all of which were healthy and survived. The meat is of the highest quality. This breed could be one of the best for the market. Crossing this breed with our common sheep has shown great results. They need more testing in this country. A new type of sheep has also been imported from Africa in recent years; it’s a variety unknown to naturalists but shares some characteristics with the Tartar sheep.
Diseases of Sheep.—There are several that have been very troublesome, but which experience has enabled us to cure. Scours is often very injurious. A little common soot from the chimney, or pulverized charcoal, is a sure remedy. Mix it with water, not so thick as to make it difficult to swallow, and give a teaspoonful every two hours, and relief will soon be experienced.
Sheep Diseases.—There are several that have been quite problematic, but we've gained enough experience to treat them. Diarrhea is often very damaging. A bit of regular soot from the chimney, or powdered charcoal, works as a reliable remedy. Mix it with water, keeping it thin enough to swallow easily, and give a teaspoonful every two hours, and you’ll soon see relief.
Water in the head is a disease caused by long exposure to wet and cold. This is prevented by a small blanket on the back of the sheep. The wool on the backs of sheep will be seen to be often parted, exposing the skin. Water falling on the back will penetrate the wool and run down, and wet and chill the whole body. A small cotton blanket, fifteen inches wide, and long enough to reach from the neck to the tail, fastened to its place by tying to the wool, and painted on the outside, will cause all the water to run off, saving the health of the sheep, and causing him to require less food. In the cold, wet season, every sheep should have[Pg 388] such a blanket; they would cost three or four cents each, and be worth many times their cost in the saving of feed for the animals. The more comfortable an animal is, the less food will he require. Applying tar above the noses of sheep at shearing, that they may be compelled to smell it and eat a little for a long time, is considered favorable to their general health, and a preventive of rot.
Water in the head is a condition caused by prolonged exposure to damp and cold. To prevent this, a small blanket is placed on the back of the sheep. You’ll often notice that the wool on sheep’s backs is parted, exposing the skin. When water falls on the back, it seeps through the wool and runs down, making the whole body wet and chilly. A small cotton blanket, fifteen inches wide and long enough to cover from neck to tail, secured by tying it to the wool and painted on the outside, will help all the water run off, keeping the sheep healthy and reducing their food requirements. During the cold, wet season, every sheep should have[Pg 388] such a blanket; they would cost three or four cents each and be worth many times their cost in the savings on feed for the animals. The more comfortable an animal is, the less food it will need. Applying tar above the noses of sheep during shearing, so they are tempted to smell it and eat a little over time, is thought to be beneficial for their overall health and a way to prevent rot.
The foot-rot, in cattle, sheep, and hogs, is a prevalent disease. Boys walking the path, barefoot, where such diseased animals frequently pass, may contract the disease. This is always cured by washing in blue vitriol. Most cases are cured by one application, and the most confirmed by two or three. Make a narrow passage, where only one animal can pass at once. Put in a trough twelve feet long, twelve inches wide, and as many deep. Put in that fifty pounds of blue vitriol and fill with water, throwing a little straw over the top. Cause the diseased animals to pass through that, and they will be cured. This is thought to be an invariable remedy. If sheep do not appear healthy on lowland pasture, give them small quantities of fine charcoal and salt, and they will be as healthy as on the hills. A little salt for sheep is useful during the whole year. The health of sheep is injured more in fall than at any other season; they are very apt to be neglected at the beginning of winter. They grow poor rapidly when their green feed first fails; a little hay and grain and a few roots then will keep them up, prevent disease, and make it less expensive to keep them through the winter. Feed in racks or troughs, when they can not get their food under foot, and as far as practicable, under shelter, and in a warm place. It is much cheaper,[Pg 389] and keeps the sheep much more healthy. They should have fresh water, where they can drink, two or three times a day. Salt, mixed with wood-ashes and pulverized charcoal, should also be constantly within their reach. A few beets, carrots, or parsnips, are always valuable. Some green feed is very essential for ewes, for some time before the yeaning season. Corn is good for fattening sheep; but, for increasing the wool, it is not half as valuable as beans. Good bean-straw is better than hay. Corn-fodder is excellent. The product of one and a half acres of land, sowed with corn, will winter, in fine condition, one hundred sheep—the corn sowed the 20th of June, and cut up after it has begun to lose its weight slightly, and shocked up closely, bound round the top with straw, and then allowed to stand till wanted for feeding. To have healthy sheep, do not use a ram under two, or over six or seven years old, and raise no lambs from unhealthy ewes or rams. The expense of keeping sheep, as all other animals, is much less when they are kept warm. Much feed is wasted in keeping up animal heat, which would be saved by warm quarters.
Foot rot in cattle, sheep, and hogs is a common disease. Boys walking barefoot on paths where these sick animals often tread can catch it. This can usually be treated by washing with blue vitriol. Most cases get better with one treatment, while more severe cases may need two or three. Create a narrow passage that only allows one animal to pass at a time. Install a trough that's twelve feet long, twelve inches wide, and just as deep. Add fifty pounds of blue vitriol and fill it with water, covering the top with a little straw. Make the sick animals walk through this, and they'll be cured. This is considered a reliable remedy. If sheep don’t look healthy on lowland pastures, give them small amounts of fine charcoal and salt, and they'll be just as healthy as those on hills. A bit of salt is beneficial for sheep all year round. The health of sheep tends to decline more in fall than at any other time; they often get overlooked as winter begins. They quickly lose weight when their green feed runs out; providing some hay, grain, and a few roots will keep them healthy, prevent illness, and reduce winter feeding costs. Feed them in racks or troughs when they can’t access food from the ground, and whenever possible, do so in shelter and a warm area. This is much cheaper and keeps the sheep healthier. They should have fresh water available for drinking two or three times a day. Salt mixed with wood ashes and ground charcoal should always be within their reach. A few beets, carrots, or parsnips are always beneficial. Some green feed is essential for ewes for a while before they give birth. Corn is good for fattening sheep, but it’s not as valuable as beans for increasing wool production. Good bean straw is better than hay. Corn fodder is excellent. The yield from one and a half acres of land sown with corn can keep one hundred sheep in good condition through winter—the corn should be planted on June 20 and harvested after it begins to lose some weight, then shocked tightly and covered at the top with straw until it's needed for feeding. To ensure healthy sheep, don’t use a ram younger than two years or older than six or seven years, and avoid breeding lambs from unhealthy ewes or rams. The cost of keeping sheep, like all other animals, is lower when they’re kept warm. Much feed is wasted in maintaining animal heat that could be saved with warm quarters.
Sheep-manure is better than any other, except that of fowls. No other parts with its qualities by exposure so slowly. Some farmers save all labor of carting and spreading sheep-manure, by having movable wire fences, and putting their sheep on one acre for a few days, and then removing to another. One hundred sheep may thus be made to manure an acre of land in ten days, better than any ordinary dressing of other manure. We should prefer carefully collecting and saving it under cover, mixed with muck or loam, and apply where and when we choose. Keeping a suitable num[Pg 390]ber of sheep on a farm is very important in keeping up the farm. A farm devoted to grain or vegetables, without a suitable number of animals, usually runs down.
Sheep manure is better than any other, except for that of birds. It breaks down and loses its properties more slowly than anything else. Some farmers save time and effort by using movable wire fences, keeping their sheep on one acre for a few days before moving them to another. One hundred sheep can effectively fertilize an acre of land in ten days, better than any usual application of other manure. We would recommend collecting and storing it under cover, mixed with muck or loam, so we can apply it where and when we want. Keeping an appropriate number of sheep on a farm is crucial for maintaining its productivity. A farm focused on growing grain or vegetables without having enough animals tends to decline.
The time when lambs should be allowed to come is important. We much prefer letting them come when they please, if we have warm quarters, and can take a little extra care of them. This will give a larger growth, and furnish large lambs for market, at a season of the year when they are most desired, and bring the greatest price. For those who will not take the necessary pains, let them come when the weather has become warm and grass plenty. Sometimes a ewe loses her lamb, and you wish her to raise one of another ewe's, that has two. To make a ewe own another's lamb, take off the skin of her dead lamb, and bind it on to the other lamb, and she will smell it and own the lamb; after which the skin may be removed.
The timing for letting lambs come is important. We prefer to let them come whenever they want, especially if we have warm shelter and can take extra care of them. This leads to better growth and yields larger lambs for the market during peak demand, which means better prices. For those who aren't willing to put in the necessary effort, they should wait until the weather warms up and there’s plenty of grass. Sometimes a ewe loses her lamb, and you might want her to adopt another ewe's lamb that has two. To help a ewe accept another lamb, take the skin of her deceased lamb and attach it to the other lamb. She will smell it and accept the lamb; after that, you can remove the skin.
Sheep-culture is a subject to which farmers should give increased attention, until the average weight of sheep in the United States shall become one third greater than at present, and until there shall be ten sheep to one of all we have at present.
Sheep farming is an area that farmers should focus on more, until the average weight of sheep in the United States increases by one third and there are ten sheep for every one we currently have.
SHEPHERDIA OR BUFFALO BERRY.

This is an ornamental shrub, growing from six to fifteen feet high,
bearing a roundish red fruit, much esteemed for preserves. Trees are of
two kinds, male and female, one bearing staminate and the other
pistillate flowers. Hence no fruit can be grown[Pg 391] without setting out the
trees in pairs from six to fifteen feet apart. If you set out only two,
and they chance to be of the same kind, you will get no fruit.
This is a decorative shrub that grows between six to fifteen feet tall, producing round red fruit that is greatly valued for making preserves. There are two types of trees, male and female, with one producing staminate flowers and the other producing pistillate flowers. As a result, fruit cannot be produced[Pg 391] without planting the trees in pairs at a distance of six to fifteen feet apart. If you only plant two trees and they happen to be the same type, you won't get any fruit.
SOILS.
The nature and management of soils must be measurably understood by any one who would be a thorough cultivator. The productive power of a soil depends much upon the character of the subsoil. A gravelly subsoil is, on the whole, the best. A thin soil lying on a cold clay subsoil—the hardpan of the East, and the crowfish clay of the West—however rich it may be, will be unproductive; while the same soil, on a gravelly subsoil, would produce abundantly. The best soils, for all purposes, are the brown or hazel-colored. Plowed in wet weather, they do not make mortar, and in dry weather they will not break in clods. Dark-mixed and russet moulds are considered the next best. The worst are the dark-gray or ash-colored. The deep-black alluvial soils of the Western prairies are an exception to all other soils, possessing, under proper treatment, great powers of production. Soils do not, to any considerable extent, afford food for plants. A willow-tree has been known to gain one hundred and fifty pounds' weight, without exhausting more than two or three ounces of the soil, and even that might have been wasted in drying and weighing.
The nature and management of soils need to be clearly understood by anyone looking to be a skilled farmer. The productivity of a soil heavily depends on the type of subsoil underneath it. Generally, a gravelly subsoil is the best. A thin layer of soil sitting on a cold clay subsoil—like the hardpan in the East or the crowfish clay in the West—no matter how rich it is, will be unproductive; whereas the same soil on a gravelly subsoil would yield abundantly. The best soils for any purpose are those that are brown or hazel-colored. When plowed in wet weather, they don’t turn into mortar, and in dry conditions, they won’t break into clods. Dark-mixed and russet soils are seen as the next best option. The worst types are dark-gray or ash-colored soils. The deep-black alluvial soils of the Western prairies are an exception, as they can have high productivity with the right care. Soils don’t contribute significantly to plant food. For example, a willow tree has been known to gain 150 pounds without depleting more than two or three ounces of soil, and even that amount could have been lost through drying and weighing.
In our article on manures, we have shown that it is the texture of soils, and their power to control moisture and heat, that renders them productive: hence, no soil can be poor that is stirred deep and kept in a friable condition, without being too open and porous; and no[Pg 392] soil can be good that is hard and not retentive of moisture, without having water stand upon it. Hence, the great secret of successful farming, is, such a mixture of the soils, and of fertilizers with the soil, as shall keep it friable and moist, and such thorough drainage as will prevent water from standing so as to become stagnant, and to unduly chill the roots of growing plants. Nature has provided, near at hand, all that is essential to productiveness; all that is necessary is to properly mix them. We do not believe that there is an acre of land now under cultivation in the United States, in a latitude where corn will grow, on which we can not raise a hundred bushels of shelled Indian corn, without applying anything but what may be raised out of that soil, and procured in the shape of manure by animals in consuming that product. The poorest farm in America may be brought up to a state of great fertility, without applying one dollar's worth of any foreign substance. Plow deep, turn under all the green substances possible, and feed out the products on the farm and apply the manure, and mix opposite soils, that may be found in different localities. Three years will secure great productiveness, and the same course will increase its value, from year to year, without cost. Three things only are essential to convert poor land into the best; deep and thorough stirring and pulverization, suitable draining, and thorough mixture of soils of different qualities, and the incorporation of such animal and vegetable substances as can be produced on the land itself. We would not declare against foreign manures, but insist that the necessary ingredients are found, or may be manufactured near at hand. The philosophy of deep plowing and thorough pulverization[Pg 393] is obvious. A fine soil will retain and appropriate moisture in an eminent degree, on the principle of capillary attraction, or as a sponge or a piece of loaf sugar will take up water. There is also room for excess of water to sink away from the surface, and return again when needed. It also affords room for the roots of plants. Such a soil also receives moisture from the atmosphere. The atmosphere also contains much water, and more in the heat of summer than at any other time. The air also, with a constant pressure of fifteen pounds to the square inch, enters to a considerable depth into the soil, and the deeper it is stirred, and the more thoroughly it is pulverized, the more it will enter. In coming in contact with the cool moisture below, it is condensed and waters the soil, on the principle that a pitcher of cold water in a warm room has large drops of water on the outside; that water is a mere condensation of moisture in the atmosphere. The cool subsoil acts in the same way upon the atmosphere at night. A deeply disintegrated soil, also, seldom washes by rain. Shallow-plowed and coarse land sends off the water after a slight rain, while deep-plowed and thoroughly pulverized land retains it. The philosophy of manures involves the same principles. All the fertilizers act upon soils in such a manner as to render them fine, and open an immense surface to the action of the atmosphere, and form large reservoirs for moisture through their innumerable fine pores. Draining is to carry off an excess of water that would stand on an unfavorable subsoil. That water, on undrained land, causes two evils; it stagnates and renders plants unhealthy, and it is too cool, rendering land what we call cold. Thus, the deeper you plow land, and the finer you make it, the[Pg 394] warmer it will be, and the more perfectly it will control moisture. Mixing soils by subsoiling, trenching, and deep plowing, and by carting on foreign substances, is wholly on this principle. Sand that drifts about with the wind is too light to retain moisture, and needs clay carted on. By this means the poorest white sand has often been converted into the most productive soil. Definite rules for this mixture of soils can not be safely given. The rules must differ in different localities and circumstances; it must, therefore, be determined by experiment. Analyzing soils is sometimes of use, but usually has too much importance attached. We do not advise farmers to study it. Let them try applications and mixtures, at first on a small scale: they will soon learn what is best on their farms, and may then proceed without loss. Some lands are of such a character that the carting on, and suitably mixing, the substances in which they are deficient, may cost as much as it did to clear the land of its original forest; but it will pay well for a long series of years. So well are we persuaded of the utility and correctness of these brief hints, that, in selecting a farm, we should regard the location more than the quality of the soil. The latter we could mend easily; while we should find it difficult to move our farm to a more favorable location. Poor land near a city or large town, or on some great thoroughfare, we should much prefer to good land far removed from market, or in an unpleasant location.
In our article about fertilizers, we've demonstrated that the texture of soils, along with their ability to manage moisture and heat, is what makes them productive. Therefore, no soil can be considered poor if it's well-turned and kept loose, without being overly open and porous; similarly, no soil can be good if it's hard and fails to retain moisture without having standing water. The key to successful farming lies in creating a blend of soils and fertilizers that keeps the soil loose and moist, along with proper drainage to prevent water from pooling and chilling the roots of plants. Nature has provided everything needed for productivity nearby; all that's necessary is to mix them properly. We believe that there's no acre of land currently cultivated in the U.S., in a region where corn can grow, that can't produce a hundred bushels of shelled corn using only what can be generated from that soil and manure from animals consuming that crop. Even the poorest farm in America can be made highly fertile without spending a dime on external products. Just plow deep, turn under as much green matter as possible, feed the farm's products to livestock, apply the manure, and mix different soils found in various locations. In three years, you can achieve great productivity, and this method will continue to increase the land's value year after year at no cost. Only three things are essential to transform poor land into the best: deep and thorough cultivation and breaking up the soil, proper drainage, and mixing soils of different qualities while incorporating animal and plant matter produced on-site. We don't dismiss external fertilizers, but we argue that the necessary ingredients can be found or made nearby. The reasoning behind deep plowing and thorough breaking up of the soil is clear. A fine soil will hold and absorb moisture very well due to capillary action, like a sponge or a piece of sugar taking up water. There is also space for excess water to drain away from the surface and return when needed. This type of soil also absorbs moisture from the air, which contains more water in the summer heat than at other times. The air, under a constant pressure of fifteen pounds per square inch, penetrates considerably into the soil; the deeper the soil is worked and the finer it is made, the deeper the air can go. When it contacts the cool moisture below, it condenses and waters the soil, similar to how a cold pitcher of water in a warm room collects drops of water on the outside; that water is just condensation from the atmosphere. The cool subsoil behaves the same way at night. Deeply broken-up soil also rarely erodes from rain. Soil that is plowed shallowly and left coarse sheds water even from light rains, while deeply plowed and finely worked land retains it. The principles of fertilizers operate under the same concepts. All fertilizers interact with the soil to make it fine and create a wide surface area exposed to the air, forming large reservoirs for moisture through countless tiny pores. The purpose of draining is to remove excess water that would accumulate on an unfavorable subsoil. On undrained land, this water causes two problems: it becomes stagnant, which harms plants, and it makes the land too cool, which we call cold. Thus, the deeper you plow the land and the finer you make it, the warmer it will be, and the better it will manage moisture. Mixing different soils through subsoiling, trenching, and deep plowing, and adding foreign substances is based entirely on this principle. Sand that shifts with the wind is too light to retain moisture, so clay needs to be added. This way, even the poorest white sand can be turned into productive soil. However, specific guidelines for mixing soils cannot be clearly defined; they must vary based on different places and conditions, so experimentation is necessary. Analyzing soils can be helpful at times, but often too much importance is placed on it. We suggest that farmers don't focus on this too much. Instead, they should try applications and mixtures on a small scale first: they will quickly learn what works best on their farms and can then proceed without loss. Some lands are of such a nature that bringing in and adequately mixing the necessary materials may cost as much as clearing the original forest from the land, but it will pay off well over many years. We are so convinced of the usefulness and accuracy of these basic tips that when choosing a farm, we would prioritize location over soil quality. The latter can be improved easily, while moving the farm to a better location is far more challenging. We would much prefer poor land near a city or large town, or along a major route, to good land that is far from the market or in an undesirable location.
SPINAGE, OR SPINACH.
Both these names are correct; the former is the general one among Americans. This plant is used in[Pg 395] soups, but more generally boiled alone and served as greens. In the spring of the year, this is one of the most wholesome vegetables. By sowing at different times, we may have it at any season of the year, but it is more tender and succulent in the spring. The male and female flowers are produced on separate plants. The male blossoms are in long, terminal spikes, and the female in clusters, close at the stalk, on each joint.
Both of these names are correct; the first one is the more common term among Americans. This plant is used in[Pg 395] soups, but it's usually boiled on its own and served as greens. In the spring, this is one of the healthiest vegetables. By planting at different times, we can have it available all year round, but it's more tender and juicy in the spring. The male and female flowers grow on separate plants. The male flowers are in long spikes at the top, while the female ones are clustered close to the stem at each joint.
Varieties—The two best are the broad, or summer, and the prickly, or fall. There are three others—the English Patience Dock, the Holland, or Lamb's Quarter, and the New Zealand. The first two are sufficient. Sow in August and September for winter and spring use, and in spring for summer. Sow in rich soil, in drills eighteen inches apart. Thin to three inches in the row, and when large enough for use, remove every other one, leaving them six inches apart. To raise seed, have male plants at convenient distances, say one in two or three feet. When they have done blossoming, remove the male plants, giving all the room to the others, for perfecting the seed. Success depends upon very rich soil and plenty of moisture.
Varieties—The two best are the broad, or summer, and the prickly, or fall. There are three others—the English Patience Dock, the Holland, or Lamb's Quarter, and the New Zealand. The first two are sufficient. Sow in August and September for winter and spring use, and in spring for summer. Sow in rich soil, in rows eighteen inches apart. Space them three inches apart in the row, and when they are large enough to use, remove every other one, leaving them six inches apart. To grow seeds, plant male plants at convenient distances, say one every two or three feet. After they’ve finished flowering, remove the male plants to give the others more space to develop the seeds. Success depends on very rich soil and plenty of moisture.
SQUASH.
There are several varieties of both summer and winter squashes. All the summer varieties have a hard shell, when matured. They are usually eaten entire, outside, seeds and all, while young and tender, from one quarter to almost full grown. They are also used as a fall and winter squash, rejecting the shell and that portion of the inside which contains the seeds. The Summer Crookneck, and Summer Scolloped, both white and[Pg 396] yellow, are the principal summer squashes. The finest is the White Scolloped. The best winter varieties are the Acorn, Valparaiso, Winter Crookneck, and Vegetable Marrow or Sweet Potato squash. The latter is the best known.
There are several types of both summer and winter squashes. All the summer types have a hard shell when they’re mature. They are usually eaten whole, skin, seeds, and all, while they are still young and tender, from about a quarter size to almost fully grown. They can also be used as fall and winter squash, with the shell and the part inside that contains the seeds removed. The Summer Crookneck and Summer Scolloped, both in white and yellow, are the main summer squashes. The best one is the White Scolloped. The top winter varieties are the Acorn, Valparaiso, Winter Crookneck, and Vegetable Marrow or Sweet Potato squash. The latter is the most popular.
Cultivate as melons, but leave only two plants in a hill. They do best on new land. Varieties should be grown far apart, and far removed from pumpkins, as they mix very easily, and at a great distance. Bugs eat them worse than any other garden vegetable. The only sure remedy is the box covered with gauze or glass. As they are great runners, they do better with their ends clipped off. Used as a vegetable for the table, and in the same manner as pumpkins, for pies.
Cultivate them like melons, but only keep two plants per hill. They thrive best in fresh soil. Make sure to plant different varieties far apart, and keep them away from pumpkins, as they can easily cross-pollinate, even from a distance. Pests attack them more than any other garden vegetable. The only reliable solution is a box covered with gauze or glass. Since they spread out quite a bit, they grow better if you trim the ends. They can be used as a vegetable for the table and prepared the same way as pumpkins, like in pies.
STRAWBERRY.
None of our small fruits are more esteemed, or more easily raised, and yet none more frequently fails. Failures always result from carelessness, or the want of a little knowledge of the best methods of cultivation. We omit much that might be said of the history and uses of the strawberry, and confine ourselves to a few brief directions, which, if strictly followed, will render every cultivator uniformly successful. No one need ever fail of growing a good crop of strawberries. In 1857, we saw plats of strawberries in Illinois, in the cultivation of which much money had been expended, and which were remarkably promising when in blossom, but which did not yield the cultivators five dollars' worth of fruit. In the language of the proprietors, "they blasted." Strawberries never blast; but, for the want of fertilizers at suitable distances, they[Pg 397] may not fill. There are but three causes of failure—want of fertilizers, excessive drought, and allowing the vines to become too thick. Of most of our best varieties, the blossoms are of two kinds—pistillate and staminate, or male and female—and they are essential to each other. The pistillate plants bear the fruit, and the staminates are the fertilizers, without which the pistillates will be fruitless. There are three kinds of blossom—pistillate, staminate, and perfect, as seen in the cut.
None of our small fruits are more valued or easier to grow, yet none fail as often. Failures usually come from carelessness or a lack of knowledge about the best farming practices. We won’t go into all the history and uses of strawberries, but we’ll stick to a few quick tips that, if followed closely, will ensure every grower succeeds. No one should ever struggle to grow a good crop of strawberries. In 1857, we saw strawberry fields in Illinois where a lot of money had been invested, and they looked very promising while blooming, yet they didn’t produce even five dollars’ worth of fruit. According to the owners, "they blasted." Strawberries don’t actually blast; instead, they might not produce well due to poor fertilizer placement. There are only three reasons for failure—lack of fertilizers, excessive drought, and overcrowding of the vines. Most of our best varieties have two types of blossoms—pistillate and staminate, or male and female—and they depend on each other. The pistillate plants produce the fruit, while the staminate ones provide the pollen, without which the pistillate plants won't yield any fruit. There are three types of blossoms—pistillate, staminate, and perfect, as shown in the illustration.
 1. Perfect flower. 2. Male flower. 3. Female flower.
The first (1) is perfect; that is, has both the stamens and pistils well developed: this will produce a fair crop of fruit, without the presence of any other variety. The second (2) has the stamens large, while the pistils (the apparently small green strawberry in the centre) are not sufficiently developed to produce fruit: such plants seldom bear more than a few imperfectly-formed berries. The third (3) has pistils in abundance, but is destitute of stamens, and hence, will not bear alone. The two latter are to be placed near each other, to render them productive; they may be readily distinguished when in blossom. It is always safe to cultivate the hermaphrodite plants; that is, those producing perfect blossoms; but the pistillates and staminates, in due proportions, produce the largest crops, and finer fruit.
The first type is perfect; it has both well-developed stamens and pistils, which means it can produce a good amount of fruit on its own. The second type has large stamens, but the pistils (the tiny green strawberry in the center) aren’t developed enough to produce fruit, so these plants usually only bear a few poorly-formed berries. The third type has plenty of pistils but lacks stamens, so it cannot bear fruit by itself. The latter two types should be planted close together to make them productive; they can easily be identified when they're in bloom. It’s always a good idea to grow the hermaphroditic plants, which produce perfect flowers. However, having the right balance of pistillate and staminate plants will yield the largest crops and better fruit.
Soil.—Much has been said against high fertilization[Pg 398] with animal manures, and in favor of vegetable mould only. We feel entirely satisfied that the largest crops of strawberries are grown on land highly manured with common barnyard manure. To plant and manure a strawberry-bed, begin on one side, and dig a trench eighteen inches deep (from two to three feet is much better) and as wide; put six inches of common manure in the bottom; dig another trench as deep, and place the soil upon the manure in the first trench; fill the last with manure as the first, and so on over the whole plat. Manure the surface lightly with very fine manure and wood-ashes.
Soil.—A lot has been said against using high amounts of animal manure for fertilization and in favor of just vegetable matter. However, we are completely convinced that the biggest strawberry crops are grown in soil that has been richly fertilized with regular barnyard manure. To plant and fertilize a strawberry bed, start on one side by digging a trench eighteen inches deep (two to three feet deep is preferable) and as wide. Add six inches of regular manure to the bottom; then dig another trench to the same depth and move the soil from the second trench onto the manure in the first trench. Fill the last trench with manure like the first, and continue this process across the entire area. Finally, lightly cover the surface with very fine manure and wood ashes.
Transplanting is usually better in the month of August. If done at that season, and it be not too dry, the plants will get such a growth the same season as to produce quite a good crop of fruit the next season. Planted as early in the spring as it will do to stir the soil, they are more sure to grow and yield a very few berries the first season, and very abundantly the next. If you would cultivate in hills, put them two feet apart each way; if otherwise, two feet one way, and one foot the other. Cut off the roots to two or three inches in length, and remove all the dead leaves; dip them in mud, which is a great means of causing them to grow; and set them in fine mould, the crown one inch below the level of the soil around, and leave it in a slight basin, and water it, unless the weather be damp. Many plants are lost from not being set low enough to escape drought. The basin will hold water, and nearly every plant will grow; excessive water will destroy them. Set out three or four rows of pistillate plants, and then one of the staminates, or fertilizers. Some set them out in beds and allow them to cover the whole ground,[Pg 399] and cultivate by spading up the bed in alternate sections of eighteen inches or two feet each year, turning under, in the spring, that portion that bore fruit the previous season—which has long been recommended by good authority. This was the lamented Downing's method. We think rows preferable for this reason. The young plants formed by the runners are less vigorous after the first; hence, the tendency is to deterioration by this mode of culture. And this method does not afford so good an opportunity for stirring the soil around the plants as planting in rows; this stirring the soil is a great means of protecting from drought, and securing the most vigorous growth. Deep subsoiling between the rows early in the spring, or after fruiting, is valuable; hence, we always advise to cultivate in hills two feet apart each way, and renew them after they have borne two, or at most three crops.
Transplanting is generally best done in August. If you do it during that time and it’s not too dry, the plants will grow enough that they can produce a decent crop of fruit the following season. If you plant them early in the spring when the soil can be worked, they are more likely to grow and yield a few berries in the first season, with a much more abundant harvest the next. If you're planting in hills, space them two feet apart in all directions; if not, two feet in one direction and one foot in the other. Trim the roots to two or three inches in length and remove any dead leaves; dipping them in mud can help them grow. Plant them in good soil, making sure the crown is one inch below the soil level, and leave it in a slight dip. Water them unless the weather is damp. Many plants die because they aren't planted deep enough to avoid drought. The dip will hold water, and nearly all plants will thrive; too much water will harm them. Plant three or four rows of female plants, followed by one row of male plants for pollination. Some choose to plant them in beds and let them spread out, [Pg 399] and they cultivate by turning over sections of the bed that are eighteen inches or two feet wide each year, burying the part that bore fruit the previous season—which has been recommended by many experts. This method was favored by the late Downing. However, we believe that rows are preferable for this reason. The young plants produced by the runners tend to be less vigorous after the first harvest, leading to a decline in quality with this type of cultivation. Plus, planting in rows allows for better soil management around the plants, which helps protect against drought and promotes strong growth. Deep subsoiling between the rows early in the spring or after fruiting is beneficial; therefore, we always suggest cultivating in hills spaced two feet apart and renewing them after they have produced two or, at most, three crops.
Hermaphrodites are best for cultivation in beds. Many strawberry-beds do well the first year of their bearing, but are almost useless afterward. The cultivator says they all run to vines. In such cases, they overlook the fact that the staminate plants grow altogether the fastest, because their strength goes to support foliage in the absence of fruit, while bearing vines require much of their strength to mature the fruit; hence, if they are allowed to run together the second, or at most the third year, the fertilizers will monopolize the ground and prevent fruiting. This is the greatest cause of failure of a crop, next to a want of both kinds of plants. This is the origin of fears of having land too rich. It is said it all runs to vines without fruit; this is because the wrong vines have intruded—the staminates have overcome the pistillates. We[Pg 400] reject the whole theory of the luxuriance of the vines preventing the production of fruit. The larger the vines the more fruit, provided only the vines are bearers, and not too thick: hence this invariable rule—always have fertilizers within five feet, and never allow the two kinds to run together. Manures should be applied in August, well spaded in. Applying in the spring to increase the crop for that season, is like feeding chickens in the morning to fatten them for dinner—it is too late. Fertilizing in August is a good preparation for a large crop for the next season. Strawberry-vines, in all freezing climates, should be covered, late in the fall, with forest-leaves or straw, to protect from the severity of winter, and enrich the land by what can be dug into the soil in spring. Rotten wood, fine chips, sawdust, &c., are all good for a fall top-dressing. After well hoeing and weeding in spring, until blossom-buds appear, just before the blossoms open, cover the bed thoroughly with spent tanbark, sawdust, or fine straw. This will keep down weeds, preserve moisture in the soil, enrich the ground, and protect the fruit from injury by rains, and in part from worms and insects. This should never be omitted.
Hermaphrodites are best for growing in beds. Many strawberry beds thrive during their first year of production, but are almost useless afterward. Growers often complain that they all turn into vines. In these cases, they overlook the fact that male plants grow the fastest because their energy goes into producing leaves instead of fruit, while fruit-bearing vines need a lot of energy to mature the fruit; therefore, if they’re allowed to grow together in the second, or at most the third year, the fertilizers will take over the soil and prevent fruiting. This is the biggest reason for a crop failure, next to not having both types of plants. This is where the fear of having overly rich soil comes from. It's said that it all turns into vines with no fruit; this is because the wrong vines have intruded—the males have dominated the females. We[Pg 400] reject the idea that the lushness of the vines stops fruit production. The larger the vines, the more fruit you get, as long as the vines are producers and not too dense: hence this consistent rule—always have fertilizers within five feet, and never allow the two types to grow together. Fertilizers should be applied in August, well worked into the soil. Applying them in spring to boost that season's crop is like feeding chickens in the morning to fatten them for dinner—it's too late. Fertilizing in August prepares the ground for a big crop the following season. In freezing climates, strawberry vines should be covered late in the fall with forest leaves or straw to protect them from harsh winter conditions and enrich the soil with what can be worked in during spring. Rotten wood, fine chips, sawdust, etc., are all good for a fall top-dressing. After hoeing and weeding well in the spring, until bloom buds appear, cover the bed thoroughly with used tanbark, sawdust, or fine straw just before the blossoms open. This will help control weeds, maintain soil moisture, enrich the ground, and protect the fruit from damage due to rain and to some extent from pests. This step should never be skipped.
Varieties are numerous, and, from the ease with which they are raised from seed, will rapidly increase; it is so frequent to have blossoms fertilized by pollen from several different varieties. Some of the most marked varieties are known in different parts of the country by very different names; hence, we advise cultivators to select the best in their locality. Every valuable variety is soon scattered over the country. The following are good:—
Varieties are plentiful, and because they can be easily grown from seed, they will quickly multiply; it's common for flowers to be fertilized by pollen from several different varieties. Some of the most distinct varieties are known by very different names in different regions of the country; therefore, we recommend that growers choose the best ones available in their area. Every valuable variety spreads across the country quickly. The following are recommended:—
Burr's New Pine.—Originated at Columbus, Ohio,[Pg 401] in 1856. Hardy, vigorous, and quite productive; very early; tender for market, but superior for a private garden.
Burr's New Pine.—Started in Columbus, Ohio,[Pg 401] in 1856. It's tough, strong, and quite fruitful; very early to produce; not ideal for selling, but it’s excellent for a home garden.
Western Queen.—Originated at Cleveland, Ohio, by Professor J. P. Kirtland, 1849. Very hardy and productive; larger than the Hudson or the Willey; good for market; bears carriage well.
Western Queen.—Originated in Cleveland, Ohio, by Professor J. P. Kirtland, 1849. Very resilient and productive; larger than the Hudson or the Willey; great for the market; handles transport well.
Longworth's Prolific.—Origin, Cincinnati, 1848. Regular, sure, full bearer of large, delicious fruit; good for market; an independent bearer.
Longworth's Prolific.—Origin, Cincinnati, 1848. Consistent, reliable, and abundant producer of large, tasty fruit; great for selling; self-sufficient producer.
M'Avoy's Superior.—Cincinnati, 1848. Received one-hundred-dollar prize from the Cincinnati Horticultural Society in 1851. Exceedingly large; hardy; female or pistillate flowers; needs fertilizers, and then is one of the best ever grown; rather tender for carriage, though it is extensively sold in Western markets.
M'Avoy's Superior.—Cincinnati, 1848. Received a one-hundred-dollar prize from the Cincinnati Horticultural Society in 1851. Very large, hardy, with female or pistillate flowers. It needs fertilizers and then is one of the best ever grown; however, it is quite delicate for transport, even though it is widely sold in Western markets.
Jenney's Seedling.—Valuable for ripening late; fruit large and regular; very productive, 3,200 quarts having been gathered from three quarters of an acre.
Jenney's Seedling.—Valuable for late ripening; the fruit is large and consistent; very productive, with 3,200 quarts harvested from three-quarters of an acre.
Hovey's Seedling.—Elliott puts it in his second class; but we can not avoid the conviction that it is one of the best that ever has been raised. It is pistillate, but with fertilizers it yields immense crops, of very fine large fruit. Boston Pine is one of the best fertilizers for the Hovey Seedling.
Hovey's Seedling.—Elliott categorizes it as second class; however, we can’t help but feel that it’s one of the best ever produced. It has female flowers, but when fertilized, it produces huge harvests of very large, excellent fruit. Boston Pine is one of the best fertilizers for the Hovey Seedling.
Hudson Bay.—A hardy and late variety, highly esteemed.
Hudson Bay.—A tough and late variety, highly valued.
Pyramidal Chilian.—Hermaphrodite, highly valued.
Pyramidal Chilian.—Intersex, highly valued.
Crimson Cone.—An old variety, quite early, and something of a favorite in Eastern markets.
Crimson Cone.—An older variety, quite early, and somewhat of a favorite in Eastern markets.
Peabody's New Hautbois.—Originated in Columbus, Georgia, by Charles A. Peabody. Said to bear more degrees of heat and cold than any other variety. Very[Pg 402] vigorous, fruit of the largest size, very many of the berries measuring seven inches in circumference. Flesh firm, sweet, and of a delicious pine-apple flavor. Rich, deep crimson. It may be seen in full size in the patent office report on agriculture for 1856. If this new fruit sustains its recommendations, it will prove the best of all strawberries.
Peabody's New Hautbois.—Created in Columbus, Georgia, by Charles A. Peabody. It’s said to handle more heat and cold than any other type. Very[Pg 402] vigorous, with the largest fruit, many of the berries measuring seven inches around. The flesh is firm, sweet, and has a delicious pineapple flavor. Rich, deep crimson color. You can see it in full size in the patent office report on agriculture for 1856. If this new fruit lives up to its claims, it will be the best of all strawberries.
Downing describes over one hundred varieties. We repeat our recommendation to select the best you can find near home. The following rules will insure success:
Downing describes more than a hundred varieties. We encourage you to choose the best options available near you. The following tips will ensure success:
1. Make the ground very rich.
Significantly enrich the soil.
2. Put fertilizers within five feet of each other, and never allow different kinds to run together.
2. Place fertilizers within five feet of each other, and never let different types mix together.
3. Cover the ground two inches deep with tan-bark, sawdust, or fine straw, just before the blossoms open; tan-bark is best.
3. Spread tan-bark, sawdust, or fine straw about two inches deep over the ground right before the flowers start to bloom; tan-bark works best.
4. Never allow the vines to become very thick, but thin them out.
4. Never let the vines get too thick; instead, thin them out.
5. Water every day from the appearance of the blossoms until done gathering the fruit; this increases the crop largely, and, at the South, has continued the vines in bearing until November. Daily watering will prolong the bearing season greatly in all climates, and greatly increase the crop.
5. Water every day from the time the blossoms appear until you're done gathering the fruit; this significantly boosts the yield, and in the South, it keeps the vines producing until November. Daily watering will greatly extend the bearing season in all climates and will greatly increase the harvest.
6. Protect in winter by a slight covering of forest-leaves, coarse straw, or cornstalks.
6. Protect during winter with a light covering of forest leaves, coarse straw, or cornstalks.
7. To get a late crop, keep the vines covered deep with straw. You can retard their maturity two weeks, and daily watering will prolong it for weeks.
7. To harvest a late crop, keep the vines well-covered with straw. This can delay their maturity by two weeks, and watering them daily will extend this delay for several weeks.
8. Apply, twice in the fall and once in the spring, a solution of potash, one pound in two pails of water, or two pounds in a barrel of water in which stable-manure has been soaked.[Pg 403]
8. Apply a solution of potash twice in the fall and once in the spring: one pound in two buckets of water, or two pounds in a barrel of water that has soaked stable manure.[Pg 403]
9. The best general applications to the soil, in preparing the bed, are lime, charcoal, and wood-ashes—one part of lime to two of ashes and three of charcoal. The application of wood-ashes will render less dissolved potash necessary.
9. The best materials to add to the soil when preparing the bed are lime, charcoal, and wood ashes—one part lime to two parts ashes and three parts charcoal. Using wood ashes will reduce the amount of dissolved potash needed.
These nine rules, strictly observed, will render every cultivator successful in all climates and localities.
These nine rules, if followed closely, will make every farmer successful in any climate or location.
SUGAR.
There have, until recently, been but two general sources of our supply of sugar—the sugar-cane of the South, and the sugar-maple of the North. Beet-sugar will not be extensively manufactured in this country. We now have added the Sorgho, or Chinese sugar-cane, and the Imphee, or African sugar-cane, adapted to the North and the South, flourishing wherever Indian corn will grow, and raised as easily and surely, and much in the same way. Of the methods of making sugar from the old sugar-cane of the South, we need give no account. It is not an article of general domestic manufacture. It is made on a large scale on plantations, and is in itself simple, and easily learned by the few who become sugar-planters.
Until recently, there were just two main sources for our sugar supply—the sugar cane from the South and the sugar maple from the North. Beet sugar won't be produced on a large scale in this country. We've now introduced Sorgho, or Chinese sugar cane, and Imphee, or African sugar cane, which are suitable for the North and South, thriving wherever corn grows and cultivated just as easily and reliably. We don't need to explain the methods of producing sugar from the traditional sugar cane of the South. It's not typically made at home; it's produced on a large scale on plantations and is simple to learn for those who become sugar planters.
The process of manufacturing sugar from the maple-tree is very simple and everywhere known. It is to be regretted that our sugar-maples are being so extensively destroyed, and that those we pretend to keep for sugar-orchards are so unmercifully hacked up, in the process of extracting the sap. To so tap the trees as to do them the least possible injury, is a matter of much importance. Whether it should be done by boring and plugging up with green maple-wood after[Pg 404] the season is over, or be done by cutting a small gash with an axe and leaving open, has been a disputed point. Many prefer the axe, and think the tree will be less blackened in the wood, and will last longer, provided it be judiciously performed. Cut a small, smooth gash; one year tap the tree low, and another high, and on alternate sides; scatter the wounds, made from year to year, as much as possible. Another process of tapping is now most popular with all who have tried it. Bore into the tree half an inch, with a bit not larger than an inch, slanting slightly up, that standing sap or water may not blacken the wood. Make the spout out of hoop-iron one and a fourth inches wide; cut the iron, with a cold chisel, into pieces four inches long; grind one end sharp; lay the pieces over a semicircular groove in a stick of hard wood, and place an iron rod on it lengthwise over the groove—slight blows with a hammer will bend it. These can be driven into the bark, below the hole made by the bit. They need not extend to the wood, and hence make no wound at all. If the wound dries before the season is over, deepen it a little by boring again, or by taking out a small piece with a gouge. This process will injure the trees less than any other. The spouts will be cheaper than wooden ones, and may last twenty years. Always hang buckets on wrought nails, that may be drawn out. Buckets made of tin, to hold three or four gallons, need cost only about twenty-five cents each, and, with good care, may last twenty years. A crook in the wire of the rim will make a good place to hang upon the nail. A hole bored in the ear of other buckets will answer the same purpose. In all windy situations, the bucket must be near the end of the spout, or much will[Pg 405] be lost by being blown over by the wind. Great care to keep all vessels used, clean and sweet, and not burn the sugar in finishing it, will enable any one to succeed in making good maple-sugar. The various forms in which it is put up, and the manner of draining, are familiar to all makers. It is only necessary to add, that there are few small farms on which the sugar-maple will grow, where there might not be raised two or three hundred maples, within fifteen or twenty years, that would add greatly to the beauty, comfort, and value of the farm. On the highway as shade-trees, or on the side of lots, they would be very ornamental and profitable, without doing injury. We can not too strongly recommend raising sugar-maples. Always cultivate trees that will bear fruit, yield sugar, or be good for timber.
The process of making sugar from maple trees is pretty straightforward and well-known everywhere. It’s unfortunate that our sugar maples are being so widely destroyed and that those we claim to keep for sugar orchards are being roughly damaged while harvesting the sap. Tapping the trees in a way that causes the least harm is very important. There’s been a debate about whether to bore and plug the hole with green maple wood after[Pg 404] the season ends or to make a small cut with an axe and leave it open. Many people prefer the axe method, believing it’ll leave the wood less dark and help the tree last longer if done carefully. Make a small, smooth cut; one year tap the tree low, and the next year high, alternating sides; try to spread the wounds made each year as much as possible. Another method of tapping has become very popular among those who have tried it. Bore into the tree half an inch with a drill bit no larger than an inch and angle it slightly upward so that sap doesn’t sit and darken the wood. Create the spout using hoop iron that’s one and a fourth inches wide; cut the iron into four-inch pieces with a cold chisel; sharpen one end; place the pieces over a semicircular groove on a hard wood stick, then put an iron rod along the groove—gentle taps with a hammer will bend it. These can be inserted into the bark below the hole made by the drill. They don’t have to reach the wood, so they won’t cause any wounds at all. If the wound dries up before the season ends, you can deepen it a little by drilling again or removing a small piece with a gouge. This method will cause less damage to the trees than any other. The spouts will be cheaper than wooden ones and may last up to twenty years. Always hang buckets on wrought nails that can be easily removed. Tin buckets that hold three or four gallons should only cost about twenty-five cents each, and with good care, they can last twenty years. A twist in the wire rim will provide a good spot to hang them on the nail. A hole drilled in the handle of other buckets will work the same way. In windy areas, the bucket should be placed near the end of the spout, or a lot will[Pg 405] be lost due to the wind blowing it over. It’s crucial to keep all containers clean and sweet, and not to burn the sugar while finishing it, to successfully make good maple sugar. The different ways it’s packaged and drained are common knowledge among sugar makers. It's important to add that on most small farms where sugar maples can grow, it’s possible to cultivate two or three hundred maples in fifteen to twenty years, which would greatly enhance the beauty, comfort, and value of the land. As shade trees along roads or on lot borders, they would be both attractive and beneficial without causing harm. We strongly recommend planting sugar maples. Always cultivate trees that produce fruit, yield sugar, or provide good timber.
Sorgho, or Chinese sugar-cane, is raised much as Indian corn—only, it will bear some ten or twelve stalks in a hill, instead of three or four. In all parts of our continent, it produces enormous crops of stalks. The trials thus far indicate, that the quantity of saccharine matter it contains is not quite equal to that of the common sugar-cane; but, with the necessary facilities for manufacturing, it makes quite as good sugar and as fine sirups as the other cane. Suitable machinery, that need not be expensive, owned by a neighborhood of farmers, may enable all Northern men, where other cane will not grow, to make their own sugar cheaper than to buy. But it will be made probably by large establishments as other sugar. We give no method of making it. The subject is so new, that every method of manufacture finds its way into all the newspapers, and what might appear the best to-day would be quite[Pg 406] antiquated to-morrow. We have seen as fine sugars and sirups, of all the different grades, made from this new cane, as any others we have ever tasted. The question is settled that imphee and sorgho will make good sugar in abundance. A few years will place such sugars among the great staple products of the country.
Sorghum, or Chinese sugar cane, is grown similarly to corn, but it typically produces about ten to twelve stalks per hill instead of just three or four. It yields huge amounts of stalks across the continent. So far, tests show that the amount of sugar it contains isn’t quite as high as that of regular sugar cane; however, with the right manufacturing setup, it can produce sugar and syrup just as good as the other cane. Affordable machinery owned by local farmers could allow people in Northern areas, where traditional cane won’t grow, to make their own sugar more cheaply than buying it. But in all likelihood, it will still be produced by larger companies like other sugars. We aren't sharing a method for production because the field is so new that every manufacturing technique is appearing in various newspapers, and what seems best today might be outdated tomorrow. We’ve tasted some excellent sugars and syrups from this new cane that are as good as any we’ve had before. It's clear now that sorghum and imphee can produce quality sugar in large quantities. In a few years, these sugars will likely become major staple products in the country.
SUMMER-SAVORY.
This is a hardy annual, raised from seed on any good soil, with no care but keeping free from weeds. The seed is small, and may not vegetate well in dry, warm weather, without a little shade or regular watering. Its use for culinary and medicinal purposes is well known. Gather and dry when nearly ripe. Keep in paper bags, or pulverize and put in glass bottles. For the benefit of persons who keep those sprightly pets called fleas, we mention the fact that dry summer-savory leaves, put in the straw beds, will expel those insects.
This is a tough annual plant that can be grown from seed in any good soil, requiring little more than keeping it weed-free. The seeds are small and may not sprout well in dry, hot weather without some shade or regular watering. Its culinary and medicinal uses are well-known. Harvest and dry when almost ripe. Store in paper bags or crush and place in glass bottles. For those who have lively pets called fleas, it’s worth noting that dried summer-savory leaves placed in straw bedding can help get rid of those pests.
SUNFLOWER.
This large, hardy, annual plant would be considered very beautiful, were it not so common. Three quarts of clear, beautiful oil are expressed from a bushel of the seed, in the same way as linseed-oil. The seed, in small quantities, is good for fowls. It may be grown with less labor than corn.
This large, tough, annual plant would be seen as quite beautiful if it weren't so common. You can get three quarts of clear, beautiful oil from a bushel of the seeds, just like linseed oil. The seeds, in small amounts, are good for chickens. It can be grown with less effort than corn.
SWEET POTATO.
This is a Southern plant, but is now being acclimated in Northern latitudes. Good sweet potatoes are[Pg 407] now grown in the colder parts of Vermont, Wisconsin, and Minnesota. There are many varieties, and they are increasing by seedlings. Not long since, they were said to bear no seed; but recently, in different parts of the country, seeds have been found, and new varieties grown from them. Certain varieties are best in different localities. They will always find their way through growers of plants. The process of growing is simple, but must be carefully followed to insure success. Plant the seed potatoes in a moderate hotbed, at the time when grass begins to start freely. Keep well watered, and do not allow them to get too warm. An hour's over-heating will cause them all to decay. The heat, when it begins to rise too high, is at once checked by a thorough drenching with cold water: if too low, the heat is raised by a tight cover, in a warm sun, and by watering with warm water. Water them every day after they are up. The sprouts, when six inches high, are pulled off from the potato, and set out as cabbage-plants; this should be done as soon as all danger of frost has ceased. The same potatoes will sprout as many times as they are pulled off.
This is a Southern plant, but it's now being adapted to Northern climates. Good sweet potatoes are[Pg 407] now being grown in the colder regions of Vermont, Wisconsin, and Minnesota. There are many varieties, and they are multiplying through seedlings. Not long ago, it was believed they produced no seeds; however, recently, seeds have been found in various parts of the country, leading to new varieties being cultivated from them. Certain varieties thrive better in different areas. They will always reach growers of plants. The process of growing is straightforward but needs to be followed carefully to ensure success. Plant the seed potatoes in a moderately warm bed when the grass begins to grow actively. Keep them well-watered and avoid overheating. Just an hour of excessive heat can cause them to rot. If the temperature starts to rise too high, it is immediately lowered by giving them a thorough soaking with cold water; if it’s too low, the heat is increased by covering them tightly in the warm sun and watering them with warm water. Water them every day after they sprout. When the sprouts reach six inches in height, they should be pulled off from the potato and planted like cabbage; this should be done as soon as there is no longer a risk of frost. The same potatoes can sprout multiple times as the sprouts are removed.
Sweet potatoes need much sun and warmth; they are, therefore, planted on round hills, or, better, on ridges, which may be principally thrown up with a plow, and made from a foot to eighteen inches high. Set the plants in the top, about fifteen inches or two feet apart; keep clear of weeds, making the hill or ridge a little larger by each hoeing. The tops, being long running vines, will soon cover the ground. They produce better tubers for throwing the vines, in a twist, up over the top of the rows. They will take root at each joint of vine, when undisturbed, which roots will[Pg 408] draw from the main tuber. These roots would be as good and large as any, if they had time: hence, at the South, one half of the crop is grown from sets, from cuttings of the ends of the early-planted vines. At the North, where seasons are short, these joints must be prevented—by throwing up, as above, or loosening—from taking root. The tubers will need all the strength; the plant and tuber are tender, and a little frost will kill the vines and cause the potatoes to decay. They may be kept for use until January by packing, when dug in a warm day, in the soil in which they grew;—kept through winter, packed in straw or chaff, in boxes that will contain about two or three bushels each, and kept in a room with a fire: the room should be at a temperature of from forty to sixty degrees; fifty-five is best, though seventy will not destroy them; more or less will cause them to decay. The boxes may be placed one upon another, but should be left open, that their moisture may evaporate. Dry sand (kiln-dried), sifted over and close among them, will preserve them. Free circulation of air is indispensable. It is usually cheapest to buy the plants of those who make a business of raising them. They are very hardy—may be transported one thousand miles and do just as well. To transplant with perfect safety in a dry time, after the plant has been put in its place, pour in a pint of water, and cover it with a little dry soil to prevent baking—and not one out of fifty will perish.
Sweet potatoes need a lot of sunlight and warmth, so they are typically planted on rounded hills or, better yet, on ridges, which can be mostly formed with a plow and should be about one foot to eighteen inches high. Place the plants at the top, spaced about fifteen inches to two feet apart; keep the area free of weeds, making the hill or ridge a bit larger with each hoeing. The tops have long, creeping vines that will quickly cover the ground. They produce better tubers by twisting the vines over the tops of the rows. The vines will take root at every joint when left undisturbed, and these roots will draw from the main tuber. These roots could be just as good and large as any if they had enough time; thus, in the South, half of the crop is grown from sets, using cuttings from the ends of the early-planted vines. In the North, where the growing season is shorter, these joints should be prevented—from being rooted, by piling up soil as described or by loosening the soil. The tubers need all the energy they can get; the plant and tuber are delicate, and any frost can kill the vines and lead to potato decay. They can be stored for use until January by packing them, when harvested on a warm day, in the soil where they grew. To keep them through winter, pack them in straw or chaff in boxes that hold about two to three bushels each, and store them in a room with a fire: the room's temperature should be between forty and sixty degrees; fifty-five is ideal, but seventy won't ruin them; any more or less temperature will cause decay. The boxes can be stacked but should be left open to allow moisture to escape. Sprinkling dry sand (kiln-dried) over and around them will help preserve them. Good air circulation is crucial. It's usually cheaper to buy plants from those who specialize in growing them. They are quite hardy and can be transported up to one thousand miles without any issues. To transplant safely during dry spells, after setting the plant in its spot, pour in a pint of water and cover it with a bit of dry soil to prevent hardening—and not one out of fifty will die.
These few brief directions will enable any one to be successful wherever corn will grow. A new variety has just been brought into Alabama from Peru, that is pronounced superior to all others; a prodigious bearer, even on poor sandy land, and far more hardy than[Pg 409] other varieties, the root retaining its excellence as it came out of the ground till the following May.
These simple instructions will help anyone succeed wherever corn can be grown. A new variety has just been introduced in Alabama from Peru, which is said to be better than all the others; it's a huge producer, even in poor sandy soil, and much tougher than[Pg 409] other varieties, with the roots maintaining their quality from when they were harvested until the following May.
SWINE.
Hogs are evil in their propensities, mischievous and filthy in their habits, and yet profitable to the farmer. Every farmer should keep a few in proportion to the refuse grain and various slops that his establishment may afford. Buying hogs and then purchasing grain on which to fatten them in the usual way is the poorest economy. Such pork is often made to cost from twelve to twenty cents per pound.
Hogs have a bad reputation due to their mischievous and dirty habits, but they're still beneficial for farmers. Every farmer should keep a few, depending on the leftover grain and different scraps that their operation can provide. Buying hogs and then buying grain to fatten them up is not a smart way to manage expenses. Often, this kind of pork ends up costing between twelve to twenty cents per pound.
There are many breeds of swine highly recommended. Some of the varieties of the Chinese are the most prolific and have the greatest tendency to fattening of any known. They have formed the basis of the great improvements in the breeds in Great Britain. Farmers will be able to select the best breed from their own knowledge and observation, better than from any directions we can give them. Every new variety will be introduced by dealers, and farmers must be cautious how they accept their representations.
There are many pig breeds that come highly recommended. Some of the Chinese varieties are the most prolific and have the greatest tendency to gain weight of any known. They have been the foundation for significant improvements in breeds in Great Britain. Farmers will be better equipped to choose the best breed based on their own knowledge and observations than from any advice we can provide. Dealers will introduce every new variety, and farmers need to be careful about how they accept their claims.
Age of Swine for Pork.—It is most profitable and least troublesome, to keep over winter, no swine but breeding sows, to have pigs early in spring, to kill in autumn. Of any of the good breeds, they can be made to weigh from 300 to 350 pounds, by the proper time for killing. The practice of keeping swine till eighteen or twenty-four months old, and only fattening them late in the fall and beginning of winter, is very unprofitable. It is best to give pigs about what they will eat, from the time of beginning to feed them until they are slaugh[Pg 410]tered. This is in every way most economical. It secures fattening in the hot weather in summer, when pork can be made faster and cheaper than at any other time. Many farmers begin to fatten their pork, after the season in which it can most rapidly and cheaply be done.
Age of Swine for Pork.—It’s most profitable and least hassle to only keep breeding sows over the winter, so you can have piglets early in spring and slaughter them in autumn. From any good breed, they can be made to weigh between 300 and 350 pounds by the right time for butchering. Keeping pigs until they’re eighteen to twenty-four months old and only fattening them late in the fall and early winter is really unprofitable. It’s best to give pigs as much as they’ll eat from the time you start feeding them until they’re slaughtered. This is by far the most economical approach. It ensures they get fattened in the hot summer months when pork can be produced faster and cheaper than at any other time. Many farmers start fattening their pigs after the season when it can be done most efficiently and cost-effectively.
Hogs having been kept poor, on being fed freely for fattening, become cloyed, and much time is lost, while those that always have had what they would eat, of good wholesome food, always have a good appetite for as much as they need, and not root over and injure more.
Hogs that have been kept underfed will overeat when they're suddenly given plenty of food for fattening, which leads to excessive weight gain and wasted time. In contrast, those that have always had enough nutritious food tend to have a healthy appetite for what they need without overeating or causing damage by rooting around excessively.
Food for Swine.—They do better shut up in a pen, but where they can get access to the ground. All edible roots are good and all the grains. But grain should be ground or soaked. It pays well to cook all food for swine. Boiled potatoes, carrots, beets, and parsnips, are all good. Ground feed should be mixed with cooked vegetables. The disposition that swine have to root deep in the ground, indicates the want of something, not found in sufficient quantities in their ordinary food. Numerous experiments show that that deficiency is abundantly supplied by having charcoal within their reach. The stories of fattening pork wholly on charcoal, which we find in the books, we do not credit. But that small quantities of it are uniformly healthy for swine, is an established fact. The question of sour food has many respectable advocates. Cultivators and writers take different sides of the question, based as they say upon their carefully-tried and noted experiments, one affirming that fermented food is superior, and others that it has done his hogs positive injury. This discrepancy grows out of not carefully distinguishing the different kinds of fermentation, the sweet, the vinous, the acid, and the putrid. The first makes ex[Pg 411]cellent food, the second will do quite well, the third is injurious, and the last absolutely poisonous. As it requires much care and observation to get this right, and mistakes are easy, it is best to take the sure method, give them food in a natural state, ground, and either cooked or fed raw. Either will make good pork at a reasonable cost, but cooked food is preferable.
Food for Swine.—They do better kept in a pen, but with access to the ground. All edible roots are good, as are all grains. However, grains should be ground or soaked. It's beneficial to cook all food for swine. Boiled potatoes, carrots, beets, and parsnips are all good options. Ground feed should be mixed with cooked vegetables. The tendency of swine to root deeply in the ground indicates a lack of something not found in sufficient quantities in their usual diet. Numerous experiments show that this deficiency can be adequately addressed by providing access to charcoal. We don't believe the claims in books about fattening pigs entirely on charcoal. However, it's a well-established fact that small amounts of it are consistently healthy for swine. The issue of sour food has many credible supporters. Farmers and authors take different sides on this matter, claiming their conclusions are based on carefully observed experiments, with some stating that fermented food is better, while others report it has harmed their pigs. This disagreement arises from not carefully distinguishing between the different types of fermentation: sweet, vinous, acid, and putrid. The first type makes excellent food, the second is quite acceptable, the third is harmful, and the last is completely toxic. Since it requires considerable care and attention to get this right with a high chance of mistakes, it's best to play it safe and provide them food in its natural state, either ground or cooked, or fed raw. Either option will produce good pork at a reasonable cost, but cooked food is preferable.
Sows are prevented from destroying their young by quiet, plenty of food, and little animal food, and but a very little straw in a dry pen, or washing the pig's backs with a strong decoction of aloes.
Sows are kept from harming their young by providing a calm environment, ample food, minimal animal feed, only a small amount of straw in a dry space, or by washing the piglets' backs with a strong solution of aloes.
TOBACCO.
This is a plant abhorred by everything but man and the tobacco-worm. Its use for chewing and snuffing is happily becoming more and more offensive to refined society, and we hope it may, after a long struggle, go out of use. For those who will cultivate it as an article of commerce, the following brief directions are sufficient. Burn over a small bed, on which sow the seed early in March. When the leaves are as large as a quarter of a dollar, transplant them in deep, rich soil, or on new land, in rows three feet apart each way, or four feet one way and two the other. Tend as cabbage. It is necessary, twice in the season, to destroy, by hand, the large green worms that feed on this plant. When the plants are from two and a half to three and a half feet high, according to the richness of the soil on which they grow, pick out the head or blossom-buds, except in the few plants you would have go to seed. Pinch off also the suckers, or shoots behind the leaves, as they come out. When the leaves are full grown and[Pg 412] begin to ripen, which is known by the small, dusky spots appearing on the leaves, cut up the stalks and lay them down singly to wilt; when they are thoroughly wilted, lay them together, that they may sweat for forty-eight hours, then hang them up in a tolerably tight room to dry—hang across poles, one on each side. A sharp stick put through the but of the stalks and laid over the pole, leaving one stalk on each side, is a very good method. When it becomes well dried, pick off the leaves, and tie the stems together in small bunches, and pack away in hogsheads or boxes, in a dry place.
This is a plant disliked by everyone except for humans and the tobacco worm. Its use for chewing and snuffing is thankfully becoming increasingly unacceptable in refined society, and we hope that, after a long struggle, it will fall out of use. For those who want to grow it as a cash crop, the following brief instructions will suffice. Burn over a small area where you sow the seeds early in March. When the leaves are the size of a quarter, transplant them into deep, rich soil or new land, in rows three feet apart each way, or four feet apart one way and two the other. Care for them like you would cabbage. It’s essential to eliminate, by hand, the large green worms that feed on this plant twice during the season. When the plants reach between two and a half to three and a half feet tall, depending on how rich the soil is, remove the heads or flower buds, except for a few plants you want to go to seed. Also, pinch off any suckers or shoots that grow behind the leaves as they appear. When the leaves are fully grown and start to ripen, indicated by small, dark spots on the leaves, cut the stalks and lay them down individually to wilt; once they are thoroughly wilted, gather them together so they can sweat for forty-eight hours, then hang them up in a moderately tight room to dry—using poles, one on each side. A sharp stick inserted through the base of the stalks and laid over the pole, leaving one stalk on each side, works well. Once they are well dried, remove the leaves and tie the stems into small bunches, then store them in hogsheads or boxes in a dry place.
We recommend to every agriculturist to cultivate a little tobacco—not for himself or others to chew, snuff, or smoke, but to use in destroying insects. A strong decoction, used in washing animals, will destroy lice on horses and cattle, and ticks on sheep. Tobacco-water applied to plants, or trees, will effectually destroy all insects with which they may be infested. Boil tobacco-stems or stalks, or the refuse-tobacco of the cigar-makers, until you make a strong decoction, and apply with a syringe, or in any other way, and it will prove more effectual than anything else known. Tobacco-stems, stalks, or leaves, laid around peach-trees in the month of May, will protect them from the attacks of the borer. This is also a good manure for peach-trees.
We suggest that every farmer grow a little tobacco—not for chewing, snuffing, or smoking, but to use for pest control. A strong brew, when used to wash animals, will get rid of lice on horses and cattle, and ticks on sheep. Tobacco water sprayed on plants or trees will effectively kill any insects infesting them. Boil tobacco stems, stalks, or leftover tobacco from cigar-making until you create a strong solution, and apply it with a syringe or in any other way; it will be more effective than anything else available. Laying tobacco stems, stalks, or leaves around peach trees in May will protect them from borers. This is also a good fertilizer for peach trees.
TOMATO.
This vegetable is well known, and has recently come to be generally esteemed. It can always be grown without failure, and more easily and at one fourth of the cost of potatoes. Its use for cooking, eating raw, and[Pg 413] pickling in various forms, is known to all. There are several varieties. The best of all is the large red—not the largest, but the smooth ones: although smaller, they contain more, and are much more conveniently used, than the very large rough or scolloped variety. The large yellow are less liable to decay on the vines, and have less of the tomato taste. The small plum-tomato, both red and yellow, and the pear or bell-shaped, are good for preserving as a common sweetmeat, and for pickling whole. They should be started in early hotbed—in February in the Middle States—and transplanted after frosts are over, in rows eight feet apart each way. That distance will leave none too much room for letting in the sun and for the convenience of picking. They will mature on the poorest land; but the amount of the crop is graduated altogether by the richness of the soil, and the care given them. They will produce frequently a bushel to a vine, lying on the ground. But they ripen better, and as the vines are not injured by picking the early ones, they will produce more, by being trained up. A few sticks to hold them up at first, and let them break down over them later, is of no use. Train them, and tie up all the principal bunches, and they will be greatly benefited thereby. Tied to slats, or any board fence, in a kind of fan-training form, they do very well. In all cities and villages, enough for a large family can be grown on twenty-five feet of board-fence, exposed to the southern or eastern sun, and not occupy the ground a single foot from the fence. Drive in nails, and tie up the branches as they grow. Removing some of the branches and leaves, and letting in the sun, or placing the fruit on a shingle or stone, hastens its ripening.[Pg 414]
This vegetable is well known and has recently become highly valued. It can always be grown reliably and is easier to cultivate at a quarter of the cost of potatoes. Its uses for cooking, eating raw, and [Pg 413] pickling in various forms are widely recognized. There are several varieties. The best one is the large red—not the biggest, but the smooth ones; even though they're smaller, they have more flavor and are much easier to use than the very large, rough or scolloped type. The large yellow ones are less likely to rot on the vines and have less of a tomato flavor. The small plum tomatoes, both red and yellow, as well as the pear or bell-shaped ones, are great for making preserves and for pickling whole. They should be started in a hotbed in early February in the Middle States and transplanted after the last frost, in rows eight feet apart. That distance allows enough sunlight and makes picking easier. They can thrive on poor soil, but the amount you harvest is heavily influenced by the soil quality and the attention given to them. They can often yield a bushel per vine when left on the ground. However, they ripen better and produce more if you pick the early ones and train the vines upward. A few stakes can support them initially, and they can lean on those later. If you tie up all the main clusters, you will see significant benefits. Tied to slats or any board fence in a fan shape, they do quite well. In all cities and towns, you can grow enough for a large family on just twenty-five feet of board fence facing south or east, without taking up any ground space. Drive in nails and tie up the branches as they grow. Trimming some branches and leaves to let in sunlight, or placing the fruit on a shingle or stone, speeds up ripening. [Pg 414]
TOOLS.
It is no part of our design to go into any general description of agricultural implements. There are constant changes and improvements, and they are introduced at once to the whole country by the inventors or dealers. We also wish to avoid all participation in the controversies respecting the merits of various new inventions. We have several forms of cultivators, horse-hoes, subsoil-plows, drills, seed-sowers, land-diggers, and drainers, various formed plows, root-cleaners, corn-planters, &c., &c. These possess different degrees of merit; all have their day, and will be superseded by others, in the general advancement that marks the science of soil-culture. We strongly recommend the use of the best tools, especially subsoil-plows, seed-planters, and root-cleaners. Always have a tool-house, as much as you do a kitchen. Use the best tools; never lay them down but in their proper place; and always clean them before putting them away. Keep all the wood-work of tools well painted, and the iron and steel in a condition, by the application of oil and otherwise, to prevent rust. Good tools facilitate and cheapen cultivation, and increase the yield of crops, Money paid out for such tools is well expended.
It’s not our goal to provide a broad overview of agricultural tools. There are constant changes and improvements, and inventors or dealers introduce them nationwide right away. We also want to stay out of the debates regarding the value of various new inventions. We have several types of cultivators, horse-hoes, subsoil plows, drills, seed sowers, land diggers, and drainers, as well as various plow designs, root cleaners, corn planters, etc. Each has its own level of effectiveness; all have their time in the spotlight and will eventually be replaced by others in the ongoing progress of soil-cultivation science. We strongly recommend using the best tools, especially subsoil plows, seed planters, and root cleaners. Always have a tool shed just like you do a kitchen. Use the best tools; never leave them lying around, but always put them back in their designated spots, and be sure to clean them before storing them away. Keep all wooden parts of your tools well-painted, and maintain the iron and steel with oil and other methods to prevent rust. Good tools make cultivation easier and cheaper while boosting crop yields. Money spent on quality tools is money well spent.
TRAINING.
This is a matter that has received much attention from all fruit-growers. The influence of different modes of training and pruning is very great on the bearing qualities of trees. The peculiarities demanded by the various fruit-trees, vines, and bushes, are given under these[Pg 415] articles respectively. We give here only some general principles. The health, beauty, and profit, of most fruit-trees depend upon judicious pruning and training. The following are the general objects:—
This is a topic that has attracted a lot of attention from all fruit growers. The impact of different training and pruning methods is significant on how well trees bear fruit. The specific requirements for various fruit trees, vines, and bushes are detailed in these[Pg 415] articles. Here, we will only cover some general principles. The health, appearance, and profitability of most fruit trees rely on careful pruning and training. The following are the main objectives:—
1. To secure regular growth and prevent deformities, and thus promote the health of trees.
1. To ensure consistent growth and prevent deformities, thereby promoting the health of trees.
2. To secure a sufficient number of fruit-bearing shoots, and in right locations, and to throw sufficient sap into those shoots to enable them to mature the fruit. With a certain amount of pruning, you may double the quantity of fruit, or destroy half that the trees would have produced if not trained at all. One half of the fruit of any orchard depends upon correct pruning. It also has a great influence upon the quality of fruit. The cherry is almost the only fruit-tree that throws out nearly the right number of branches, and in the right places. It needs a very little direction while young, and afterward only the removal of decaying branches. The quince needs considerable trimming at first; but, the head once formed, it will need very little after-pruning. Next comes the plum, needing, perhaps, a little more pruning than the cherry or quince, but much less than the other fruits. The plum is apt to throw out strong branches, in some directions, quite out of proportion with the rest of the top. Such need shortening in, to distribute the sap equally through the tree, and thus produce a symmetrical form. This is all the trimming necessary. The roots of a plum-tree are usually stronger than the top, and absorb more than the leaves can digest; hence some of its diseases. The natural remedy would be root-pruning, and leaving the top in its natural state, except shortening-in the disproportioned branches. Removing much of the top of a[Pg 416] plum-tree would ordinarily prove injurious. The apple needs considerable pruning, but not of the spurs and side-twigs which bear the fruit, but of limbs that grow too thick, and of disproportioned luxuriance. (See under Apple.) So the pear must be often slightly pruned to check the too vigorous growth and encourage the too tardy. The peach must be so pruned as to prevent the long bare poles so often seen, and to secure annually the growth of a large number of shoots for next year's bearing, and to check the flow of the sap by cutting off the ends of the growing young shoots, so as to cause the formation on each, of a few vigorous fruit-buds. Peach-trees, so pruned, will be healthy and do well for fifty years, and produce a larger number of better peaches than will grow on trees left in the usual way. By a system of pruning that will equalize the growth and strength, the bearing will be general on all the branches of the tree. This will make the fruit more abundant and of better quality. The following six principles—first stated by M. Dubreuil, of France, and since presented to the American people in Barry's "Fruit-Garden," and still later in Elliott's "Fruit-Book"—will guide any attentive cultivator into the correct method of pruning and training:—
2. To ensure a good number of fruit-bearing shoots in the right spots and to direct enough sap into those shoots to help mature the fruit. With some pruning, you can double the amount of fruit or reduce the yield by half compared to what the trees would produce if they weren’t trained at all. About half of the fruit from any orchard relies on proper pruning. It also significantly impacts the quality of the fruit. The cherry tree is nearly the only fruit tree that naturally grows the right number of branches in the right places. It requires very little guidance while young and only needs decaying branches removed afterward. The quince needs quite a bit of trimming at first, but once the shape is established, it will require minimal after-pruning. Next is the plum, which may need slightly more pruning than the cherry or quince, but much less than other fruits. The plum tends to develop strong branches in certain directions, which can be out of proportion with the rest of the tree. These should be shortened to evenly distribute the sap throughout the tree and achieve a balanced shape. That's all the trimming needed. A plum tree’s roots are usually stronger than its top and absorb more nutrients than the leaves can process, leading to some health issues. The natural solution would be root pruning and leaving the top untouched, aside from shortening the unbalanced branches. Removing too much from the top of a plum tree would generally be harmful. The apple requires significant pruning, but not of the spurs and side-twigs that bear the fruit; instead, focus on limbs that are too dense and overly vigorous growth. (See under Apple.) Similarly, the pear should be pruned slightly and regularly to manage its rapid growth and support slower growth. The peach tree should be pruned to avoid the long, bare branches seen often and to ensure a good number of new shoots for next year’s fruiting while also controlling the sap flow by trimming the ends of the young shoots to promote a few strong fruit buds on each. Well-pruned peach trees can stay healthy and productive for fifty years, yielding more and better peaches than those left untrimmed. A pruning system that balances growth and strength will allow all branches to bear fruit evenly. This will lead to a more plentiful and higher quality harvest. The following six principles—first introduced by M. Dubreuil of France, later shared with American growers in Barry's "Fruit-Garden," and more recently in Elliott's "Fruit-Book"—will guide any dedicated cultivator in the proper methods of pruning and training:—
1. The vigor of a tree, subject to pruning, depends, in a great measure, upon the equal distribution of sap in all its branches.
1. The strength of a tree, which undergoes pruning, largely depends on the even distribution of sap throughout all its branches.
2. The sap acts with greater force, and produces more vigorous growth on a branch pruned short than on one pruned long.
2. The sap works more effectively and leads to stronger growth on a branch that's been pruned short compared to one that's been pruned long.
3. The sap, tending always to the extremities, causes the terminal shoots to push with more vigor than the laterals.[Pg 417]
3. The sap, always moving towards the ends, makes the terminal shoots grow more strongly than the lateral ones.[Pg 417]
4. The more the sap is obstructed in its circulation, the more likely it will be to produce fruit-buds.
4. The more the sap is blocked in its flow, the more likely it is to create fruit buds.
5. The leaves serve to prepare the sap for the nourishment of the tree, and to aid in the formation of fruit-buds. Therefore, trees deprived of their foliage are liable to perish, and they are injured in proportion to their defoliation.
5. The leaves help prepare the sap to nourish the tree and assist in forming fruit buds. So, trees without their leaves are likely to die, and they suffer more damage the more leaves they lose.
6. When the buds of any shoot or branch do not develop before the age of two years, they can only be forced into activity by very close pruning; and this will often fail, especially in the peach.
6. When the buds of any shoot or branch don’t develop before they’re two years old, the only way to encourage them to grow is through some heavy pruning; however, this often doesn’t work, especially with peach trees.
Observe the foregoing, and never cut large limbs from any tree, except in grafting an old tree (and then only graft a part of the top in one year, especially in the pear), and of old, neglected peach-trees, to renew the top, and any careful cultivator can raise an orchard of healthy, beautiful, and profitable trees. There are different forms of training that have gone the rounds of the fruit-books, that are nearly all more fanciful than useful. There are four forms of fan-training, and several of horizontal and conical. The following only are useful:—
Observe the points above, and never remove large branches from any tree, except when grafting an old tree (and then only graft a section of the top in one year, especially with pears), and with old, neglected peach trees to renew the top. Any diligent cultivator can grow an orchard of healthy, beautiful, and productive trees. There are various training methods detailed in fruit-growing books, most of which are more imaginative than practical. The four types of fan-training and several horizontal and conical forms are among them. Only the following methods are truly useful:—
Fan-Training.—A tree but one year from the graft, or bud, is planted and headed down to within four buds of the ground, the buds so situated as to throw out two shoots on each side (see fan-training, first stage).
Fan-Training.—A tree just one year after being grafted or budded is planted and trimmed down to four buds above the ground, with the buds placed to produce two shoots on each side (see fan-training, first stage).
 Fan training, Stage 1. Fan training, Stage 2.
 Fan training, 3D stage.
 Fan training complete.
The following season, the two upper shoots are to be cut back to three buds, so as throw out one leading shoot, and one shoot on each side. The two lower shoots are to be cut back to two buds, so as to throw out one leading shoot, and one shoot on the upper side. In this second stage, you will have a tree with five leading shoots on each side (see cut, fan-training, 2d stage). These shoots form the future tree, and should neither be shortened in, nor allowed to bear fruit this year.
The following season, cut back the two upper shoots to three buds, allowing for one leading shoot and one shoot on each side. Cut back the two lower shoots to two buds for one leading shoot and one shoot on the upper side. In this second stage, you'll have a tree with five leading shoots on each side (see cut, fan-training, 2d stage). These shoots will become the future tree and should not be shortened or allowed to bear fruit this year.
Each shoot should now be allowed to produce three shoots, one leading one, and two others on the upper side, one near the bottom, and the other half way up the stem. All others should be pinched off when they first appear. At the end of the third year you will have[Pg 419] the appearance in the cut (Fan-training, third stage). After this it may bear fruit, but not too much, as a young tree so trained, is disposed to over-bearing. These shoots, except the leading ones, should be shortened back; but to what length depends upon the vigor of the tree. This is to be continued and extended as the grower may choose, always preventing the top from becoming too dense, and the shoot too long for a proper flow of sap, and maturity of fruit-buds. A good form, though slightly irregular, is seen in the cut (Fan-training, complete). Such trees trained against walls, or better, on trellis-work, are beautiful and very productive.
Each shoot should now be allowed to create three branches: one main one and two smaller ones on the upper side, with one near the bottom and the other halfway up the stem. All other shoots that appear should be pinched off as soon as they show up. By the end of the third year, you will have[Pg 419] the appearance shown in the cut (Fan-training, third stage). After this, it may produce fruit, but not too much, since a young tree trained this way tends to overproduce. These shoots, except for the main ones, should be trimmed back, but the length depends on the tree's vigor. This process should continue and be adjusted according to the grower's preference, always making sure the top doesn't become too dense and the shoots aren't too long to allow for proper sap flow and fruit-bud maturity. A good shape, though slightly irregular, is shown in the cut (Fan-training, complete). Trees trained against walls or, even better, on trellis-work, look beautiful and are very productive.
 Horizontal Training, phase one.
 Horizontal Training, senior year.
Horizontal Training is another form contributing to fruitfulness, by regulating the flow of the sap. This is done by preserving an upright leader with lateral shoots at regular distances. To secure this, such shoots as you wish to train must be tied in a horizontal position, and all others pinched off on first appearance.
Horizontal Training is another method that helps with growth by managing the flow of sap. This is achieved by maintaining a central upright shoot with side branches spaced evenly. To do this, the branches you want to train need to be tied horizontally, while any others should be pinched off as soon as they appear.
The process is simple and easy, continued as long as you please. Head in the shoots of these lateral branches to two or three buds and they will bear abundantly. As the growth increases, remove all that are not in the right places, and train all you spare, as before. In the fourth year, you will have trees of the appearance in the cut (Horizontal Training, fourth year).
The process is straightforward and can continue for as long as you want. Cut the tips of these side branches back to two or three buds, and they will produce plenty of fruit. As growth happens, get rid of any branches that aren't positioned correctly, and train the ones you keep, just like before. By the fourth year, your trees will look like the one shown in the cut (Horizontal Training, fourth year).
Conical Training.—The Quenouille (pronounced kenoole) of the French, is the best of all forms of training, especially for the pear. To produce conical standards, plant young trees four or five feet high, and after the first year's growth, head back the top, and cut in the side branches, as in the cut (Progressive stages of conical training).
Conical Training.—The Quenouille (pronounced kenoole) in French is the best form of training, especially for pears. To create conical shapes, plant young trees that are four or five feet tall, and after the first year’s growth, trim the top and shape the side branches, as shown in the cut (Progressive stages of conical training).
 Progressive stages of Conical Training. Conical Training is finished.
The next season several tiers of side branches will shoot out. The lowest should be left about eighteen[Pg 421] inches from the ground, and by pinching off a part, others may be made to grow, at such distances as you may desire. At the end of the second year, the leader is headed back to increase the growth of the side shoots. The laterals will constantly increase, and you must save only a sufficient number. The third or fourth year, the lateral branches may be bent down and tied to stakes. The branches must be tied down from year to year, and the top so shortened in as to prevent too vigorous growth, and throw the sap into the laterals. This may be continued until the tree will exhibit the appearance in the cut (conical training complete). When the tree has become thoroughly formed it will retain its shape without keeping the branches tied. The fan and horizontal training are valuable for fruits that need winter protection, and they are also very ornamental, and enable us to cultivate much fruit on a small place. All these forms of training increase largely the productiveness of fruit-trees. It is recommended for all small gardens and yards, and will pay in growing fruit for market.
In the next season, several layers of side branches will sprout. The lowest should be left about eighteen[Pg 421] inches from the ground, and by pinching off part of it, you can encourage others to grow at whatever distance you want. At the end of the second year, the main branch is trimmed back to promote the growth of the side shoots. The lateral branches will continue to grow, and you should keep only as many as you need. In the third or fourth year, the lateral branches can be bent down and tied to stakes. The branches need to be tied down year after year, and the top should be trimmed to prevent excessive growth and direct the sap into the laterals. This can continue until the tree takes on the shape shown in the drawing (complete conical training). Once the tree is well-shaped, it will maintain its form without needing the branches tied. Fan and horizontal training are great for fruit that requires winter protection, and they also look nice, allowing you to grow a lot of fruit in a small area. All these training methods significantly boost the productivity of fruit trees. They're recommended for all small gardens and yards and will be profitable for growing fruit to sell.
TRANSPLANTING.
Trees should be transplanted in spring in cold climates, and in autumn in warm regions. The top should be lessened about as much as the roots have been by removal. Cutting off so large a part of the top as we often see is greatly injurious. Trees frequently lose one or two years' growth, by being excessively trimmed when transplanted. The leaves are the lungs of the tree, and how can it grow if they are mostly removed? All injured roots should be cut off smoothly on the lower[Pg 422] side, slant out from the tree, and just above the point of injury. Places for the trees should be prepared as given under the different fruits and the trees set firmly in them an inch lower than they stood in the nursery. The great point is to get the fine mould very close around all the roots, leaving them in the most natural position. Trees dipped in a bucket of soil or clay and water, thick enough to form a coat like paint, just at the time of transplanting, are said to be less liable to die. Every transplanted tree should have a stake, and be thoroughly mulched. Trees properly transplanted will grow much faster, and bear a year or two earlier, than those that have been carelessly set out. For further remarks on this important matter, see under the different fruits.
Trees should be transplanted in the spring in cold climates and in the fall in warmer regions. The top of the tree should be reduced roughly the same amount as the roots that were removed. Cutting off too much of the top, as is often seen, can be very harmful. Trees often lose one or two years of growth due to excessive pruning during transplanting. The leaves act like the lungs of the tree, so how can it grow if most of them are taken away? Any damaged roots should be smoothed off on the bottom side, angled away from the tree, just above the injury. Prepare spots for the trees as outlined under the different fruits, and plant them firmly an inch deeper than they were in the nursery. The key is to make sure fine soil is packed tightly around all the roots, keeping them in their most natural position. Dipping trees in a bucket of soil or clay mixed with water, thick enough to coat like paint, right before transplanting is said to make them less likely to die. Every transplanted tree should have a stake and be well mulched. Trees that are properly transplanted will grow much faster and produce fruit a year or two earlier than those that were carelessly planted. For more information on this important topic, see the sections under the different fruits.
TURNIP.
This is one of the great root crops of England, and to considerable extent in this country, for feeding purposes. We think it should be displaced, mostly, by beets, carrots, and parsnips. They are more nutritious, as easily raised, and more conveniently fed. The Rutabaga is a productive variety, and possesses a good deal of nutriment. The essentials in raising good turnips of most varieties, are very rich soil, worked deep, and finely pulverized. They should stand in rows two feet apart, and one foot apart in the rows. They may be mainly tended with a small cultivator or root-cleaner.
This is one of the major root vegetables in England and, to a significant extent, in this country, used for feeding purposes. We believe it should be largely replaced by beets, carrots, and parsnips. They are more nutritious, just as easy to grow, and simpler to feed. The Rutabaga is a productive variety and contains a good amount of nutrients. The key to growing good turnips of most types is very rich soil that is well-worked and finely tilled. They should be planted in rows two feet apart, with one foot between plants in the rows. They can mostly be tended with a small cultivator or root-cleaner.
English turnips are extensively grown as a second crop on wheat stubble, &c. The soil is highly enriched and the seed sown in rows to allow cultivation. The best method, however, is to turn over old greensward[Pg 423] say June 1, and yard cattle or sheep on it till July 10, and then harrow thoroughly, and sow the seed broadcast. The yield will usually be large, and they will need very little weeding. If it is not convenient to yard cattle on the turnip-ground, apply fifteen double wagon loads of fine manure with a few bushels of lime to the acre, and the crop will be large. The usual time of sowing turnips is from the 10th to the 25th of July. We think the yield is larger when sown by the middle of June. The only way to get good early turnips is to sow them very early. The flat, or common field turnip, is easily grown on new land, or on any rich soil tolerably free from weeds and not infested with worms.
English turnips are widely grown as a second crop after harvesting wheat stubble, etc. The soil is well-enriched, and the seeds are sown in rows to enable cultivation. However, the best approach is to turn over old grassland[Pg 423] around June 1, then graze cattle or sheep on it until July 10, and afterward harrow it thoroughly before sowing the seeds broadcast. The yield is usually substantial, and they require very little weeding. If it's not possible to graze cattle on the turnip field, apply fifteen double wagon loads of fine manure along with a few bushels of lime per acre, and the crop will be abundant. The typical sowing period for turnips is from July 10 to July 25. We believe the yield is higher when sown by mid-June. The only way to get good early turnips is to plant them very early. The flat, or common field turnip, is easy to grow on new land or any rich soil that is relatively free from weeds and not infested with worms.
WHEAT.
This is the most highly esteemed of all grains, and has more enemies, and is more affected in its growth by the weather, than any other. It has engaged more attention in the study and writings of agriculturists than all other cereals. The outlines only of the results of the vast field of investigation and experiment on wheat-growing can be presented here. There are doubts respecting the origin of wheat. The more general and probable theory is, that it is the product of the cultivation, for a series of years, of a species of grass called Ægilops. This is indigenous on the shores of the Mediterranean, in those countries which, from time immemorial, have been the sources of our wheat. No one has ever found wild wheat in any country; it would be as strange as a wild cabbage or turnip. But the practical question is, How can wheat be most surely and profitably grown? The first requisite is a suit[Pg 424]able soil. A clay or limestone soil is usually considered best, as there is much lime in wheat-bran. Such soil is better than light sand, or some of the poorer loams. But the large yields of wheat on the Western prairies, and on the rich alluvial soils of California river-bottoms, shows that the best of wheat may grow on other than clay lands. The truth of the matter respecting soils for wheat, is, that any soil good for corn, potatoes, or a garden, may, with proper tillage, produce the best of wheat. Experience in England, and in all the old countries on the continent of Europe, shows us that old land may be made to yield as large crops of wheat as the virgin soil of the New World. The production of wheat at suitable intervals, for a century, on the same land, need not lessen its power to produce good wheat in large quantities. Wheat is a plant demanding a rich soil, worked deep, and not too wet: these three things will produce a good crop on any land. We say to all farmers, raise wheat on any land that you can afford to prepare. First, if your land has not a dry subsoil, underdrain it thoroughly: water standing in the soil, and becoming cold or stagnant, is very injurious to wheat. Drainage is hardly more essential to any other crop than this. Next, plow deep. Subsoiling, on most lands, is very important to wheat. Manure highly, and put the manure between the soil and the subsoil: this attracts the roots deep into the soil, which is the greatest protection against winter-killing, and the effects of excessive drought. Render the surface of the soil as fine as possible. A finely-pulverized soil is as essential for wheat as for onions. Coarse lumpy soils are so open to the action of the atmosphere as to render the growth unequal, and cause the[Pg 425] roots of the plant to grow too near the surface, for dry weather or the cold of winter. Always apply lime to wheat-lands, unless it be a limestone soil—not too much at once, but a few bushels to the acre annually. On no other crop do wood-ashes and dissolved potash, applied in the coarse manures, pay so well as on wheat. Sowing the seed is next in importance. The three questions in sowing are the manner, the depth, and the quantity. Shall it be drilled or sowed broadcast? Broadcast sowing requires more seed, and is liable to be less evenly covered; hence, we should prefer drilling. The depth of the seed is to be determined by the texture of the soil. Careful experiments have shown, that on clay land there is no perceptible difference in the growth of the plants, at any of the stages, in seed sown at any depth, from a slight covering to three or four inches. At a greater depth, it comes up less regularly, and in every way is in a worse condition. But on a light soil, it is, no doubt, best to plant it from four to six inches deep. On very loose soils, as muck land and alluvial soils, the roots of the plants grow too near the surface, and are exposed to being thrown out by winter frosts, and destroyed. The remedy is deep sowing and thorough rolling. The quantity of seed now more generally sown is from five pecks to two bushels per acre. Rich land will not bear so much seed as the poorer. It will grow so thick as to render the straw tender, and expose it to lodge and ruin the crop. Wheat tillers, or thickens up at the bottom, making many stalks from a single seed, quite as much as any other grain; hence, we believe that if it be sown at a proper time on very rich land, three pecks to the acre would be better than more. Such sowing would[Pg 426] make more vigorous plants, with much stronger roots, which would withstand cold and unfavorable weather better than any other. We should still more strongly recommend another form of sowing, practised by some European cultivators with great success: it is, to drill in wheat, in rows two feet apart, and give it a spring cultivation; this gives great strength to the plants, destroys the weeds, promotes rapid growth by stirring the soil, and favors tillering, so that the rows will meet, and give a great growth. We doubt not this will yet be extensively adopted in this country. All wheat-land had better be rolled after sowing, and light lands, with a very heavy roller. Light sandy land, having a little clay mixed in as recommended under soils, well manured, the seed planted six inches deep, and the whole rolled with a heavy roller, will bear great crops of wheat.
This is the most highly regarded of all grains, and it faces more challenges and is more impacted by weather than any other. It has attracted more attention from researchers and authors in agriculture than all other cereals combined. Here, we can only outline the findings from the extensive research and experimentation on wheat cultivation. There are uncertainties about the origin of wheat. The more common and likely theory is that it resulted from cultivating a grass species called Ægilops over many years. This grass is native to the shores of the Mediterranean, in those regions that have long been the sources of our wheat. No one has ever discovered wild wheat in any country; it would be as unusual as finding wild cabbage or turnip. The key practical question is, how can wheat be grown most reliably and profitably? The first requirement is suitable soil. A clay or limestone soil is typically considered the best, as wheat-bran contains a lot of lime. Such soil is better than light sand or some of the poorer loams. However, the high yields of wheat from the Western prairies and the rich alluvial soils of California river bottoms demonstrate that the best wheat can thrive in other types of land. The reality regarding soils for wheat is that any soil good for corn, potatoes, or a garden can, with the right care, produce excellent wheat. Experience in England and in all the established countries in Europe shows that old land can yield just as much wheat as the virgin soil of the New World. Growing wheat at appropriate intervals for a century on the same land does not necessarily diminish its ability to produce high-quality wheat in large quantities. Wheat is a plant that needs rich, deep soil and should not be too wet; having those three elements will result in a good crop on any land. We encourage all farmers to grow wheat on any land they can afford to prepare. Firstly, if your land doesn’t have a dry subsoil, make sure to drain it properly—standing water can become cold or stagnant and is very harmful to wheat. Drainage is nearly as crucial for this crop as it is for any other. Next, plow deep. Subsoiling is very important for wheat on most lands. Fertilize generously and place the manure between the soil and the subsoil. This encourages roots to grow deep, which provides the best protection against winter kill and the effects of severe drought. Make the surface of the soil as fine as possible. A finely pulverized soil is just as essential for wheat as it is for onions. Coarse, lumpy soils are too exposed to the atmosphere, causing uneven growth and resulting in the plant’s roots being too close to the surface, making them vulnerable to dry weather and winter cold. Always apply lime to wheat fields unless you have limestone soil—not all at once, but a few bushels per acre every year. No other crop benefits as much from wood ashes and dissolved potash applied in coarse manures than wheat does. Next in importance is sowing the seed. The three key questions in sowing are how, how deep, and how much. Should it be drilled or sown broadcast? Broadcast sowing uses more seeds and may not cover them as evenly; therefore, we recommend drilling. The depth for sowing seeds should depend on the soil texture. Careful experiments have shown that on clay land, there’s no significant difference in plant growth from seeds sown at various depths, ranging from a light covering to three or four inches. At greater depths, the plants come up less uniformly and are in poorer condition overall. However, on lighter soils, it’s usually best to plant the seeds four to six inches deep. On very loose soils, such as muck land and alluvial soils, plant roots grow too close to the surface, making them susceptible to being uprooted by winter frost and getting damaged. The solution is to sow deeply and roll the soil thoroughly. The current common practice is to sow between five pecks to two bushels per acre. Rich soil won’t support as much seed as poorer soil. It may grow too densely, resulting in weak straw that can fall over and ruin the crop. Wheat tends to tiller, or thicken, at the bottom, producing many stalks from a single seed, just like any other grain; therefore, we believe that if seeded at the right time on very rich land, three pecks per acre would be better than more. Such sowing would produce stronger plants with much deeper roots, better able to withstand cold and unfavorable weather than any others. We strongly recommend another sowing method practiced successfully by some European farmers: drilling wheat in rows two feet apart and cultivating in the spring. This method strengthens the plants, eliminates weeds, promotes faster growth by aerating the soil, and encourages tillering, so the rows can meet and produce abundant growth. We have no doubt this practice will be widely adopted in this country. All wheat land should preferably be rolled after sowing, especially lighter soils, with a heavy roller. Light sandy soil, mixed with a little clay as previously recommended, when well-fertilized and with seeds planted six inches deep, rolled with a heavy roller, will yield bountiful wheat crops.
As it respects fall or spring wheat, no positive directions can be given, adapted to all climates. In many localities it is of little use to sow winter wheat, as it is very uncertain. In other localities winter wheat almost always succeeds best. This question then must be determined by circumstances. The time of sowing winter wheat varies in different climates, according as it may be exposed to depredations of worms and insects in the fall. Farmers are not liable to mistake in this matter. Spring wheat, in all climates, should be sowed very early. It is hardly possible in all the Middle and Northern states to prepare the ground in spring, and get in wheat in suitable season.
When it comes to fall or spring wheat, there aren't any universal guidelines that work for every climate. In many areas, planting winter wheat is not very effective because it's unpredictable. However, in some places, winter wheat almost always does well. This depends on the specific conditions. The timing for planting winter wheat differs across climates, particularly due to potential damage from worms and insects in the fall. Farmers generally make the right call in this regard. Spring wheat should be planted early in all climates. In most of the Middle and Northern states, it's nearly impossible to prepare the soil in the spring and get the wheat planted on time.
The yield of a crop of spring wheat, depends materially upon the growth in the cool and moist weather of spring, when it spreads and its roots get a strong[Pg 427] hold before the hot weather, that hurries up the stalks and ears to maturity. Hence plow in the fall, and harrow in the wheat, as early as possible, in the spring.
The yield of a spring wheat crop largely depends on the growth during the cool and moist weather of spring, when it spreads and establishes strong roots before the heat arrives, which speeds up the growth of the stalks and ears to maturity. Therefore, plow in the fall and harrow the wheat as early as possible in the spring.
The varieties of wheat are numerous and uncertain. In the state of Maine, an intelligent cultivator, in 1856, recommended Java wheat as having a very stiff straw, and producing a very heavy yield. The Mediterranean wheat is also a favorite variety. Club wheat has also had a great run, and is now very popular at the West. But of varieties no one can be confident. We notice in the discussions of the best agriculturists of England and Scotland, that they have doubts of the proper names of some of the best varieties. In a certain rich part of Illinois we know an unusually popular wheat, sold at high prices for seed, under the name of mud club, as being much better than the ordinary club. We happened to learn that it was nothing but common club wheat, sown on rather low ground, where it happened to grow very fair that season. It is only occasionally that such tricks are successfully played, but it is true that many varieties are the result of extra good or chance cultivation. The celebrated Chidham wheat, named from a place where it was successfully grown, was also called Hedge wheat, because a head found growing in a hedge was supposed to be the origin of it. Now it is not probable that that head was the only one of the kind in all the country, and it would by no means be identified in all localities. And as all wheat is the result of the cultivation of the Ægilops or some other wild grass, it shows us that varieties may be produced by cultivation. Great importance is therefore to be attached to frequently changing seed; especially bringing it from colder into warmer climates, and changing from one[Pg 428] soil to a very different one. Thus seed raised on hard hills is highly valuable for alluvial soils. Thus the efforts to introduce so many new varieties from the dominions of the sultan, will prove of vast advantage to wheat culture in America. So let us be constantly importing the best from Great Britain and the British provinces and from California, and all the extremes of our own country. Such wheats are worth more for seeds than others, but any extravagant prices for seed wheat, under the idea of almost miraculous powers of production, are unwise.
The varieties of wheat are numerous and uncertain. In the state of Maine, a knowledgeable farmer, in 1856, recommended Java wheat for its very sturdy straw and high yield. The Mediterranean wheat is also a popular variety. Club wheat has had significant popularity and is now very favored in the West. However, no one can be entirely sure about the varieties. In discussions among leading farmers in England and Scotland, they express doubts regarding the proper names of some of the best types. In a certain rich area of Illinois, there’s a particularly sought-after wheat, sold at high prices for seed, called mud club, which is claimed to be much better than the regular club. We discovered that it was simply common club wheat, planted in lower ground where it happened to grow exceptionally well that season. Such deceptions occur only occasionally, but it’s true that many varieties stem from unusually good or accidental cultivation. The well-known Chidham wheat, named after the location where it was successfully cultivated, was also referred to as Hedge wheat because a head found growing in a hedge was believed to be its origin. However, it’s unlikely that that head was the only one of its kind in the entire country, and it certainly wouldn’t be found in all areas. Since all wheat comes from the cultivation of the Ægilops or another wild grass, it indicates that varieties can emerge through cultivation. Therefore, it’s crucial to frequently change seeds; particularly by introducing them from colder to warmer climates and switching between different[Pg 428] soils. Thus, seeds raised on hard hills are highly valuable for alluvial soils. The efforts to introduce many new varieties from the sultan's territories will greatly benefit wheat farming in America. So let’s keep importing the best from Great Britain, the British provinces, California, and all regions of our own country. These wheat types are worth more as seeds than others, but paying extravagant prices for seed wheat based on the belief in almost miraculous yields is unwise.
It would be useless to go into a more extended notice of varieties, as some do best in certain localities, and all are rapidly spread through the dealers, and by the influence of agricultural periodicals. The best time to harvest wheat is when the straw below the head has turned yellow, and the grain is so far out of the milk as not to be easily mashed between the fingers, but before it has become hard. The grain is heavier and of better quality, and wastes far less in harvesting, than when allowed to ripen and dry standing in the field. Drying in good shocks is far better than drying before cut. Some have gone to extremes in early cutting, and harvested their wheat while in the milk, and suffered serious loss in its weight. We sometimes have rain in harvest, which causes all the wheat in a large region to grow before getting it dry enough to house. A remedy is, to go right on and cut your wheat, rain or shine, and put it up, without binding, in large cocks of from three to five bushels, packing together as close as possible, however wet, and cover the centre with a bundle of wheat to shed rain. It will dry out without growing; and, although the straw will be somewhat mouldy,[Pg 429] the grain will be perfectly good, even when it has been so wet as to make the top of the shocks perfectly green with grown wheat. This process is of great value in a wet season. To prepare seed-wheat for sowing, soak it for a day or two in very strong brine; skim off all that rises; remove the grain from the brine, and while wet, sift on fresh-slaked lime until it slightly coats the whole grain; put on a little plaster to render the sowing more pleasant to the hand. Wheat will lie in this condition for days without injury. So prepared, it will exhibit a marked superiority in the growing crop.
It would be pointless to discuss the different varieties of wheat in detail, as some thrive best in specific areas, and all are quickly circulated by vendors and agricultural magazines. The ideal time to harvest wheat is when the straw beneath the head has turned yellow, and the grain is firm enough that it can't be easily smashed between your fingers, but not so hard that it has fully dried. The grain will be heavier and of better quality, and you’ll lose much less during harvesting compared to letting it ripen and dry in the field. Drying in well-made shocks is much more effective than drying it before cutting. Some people have gone to extremes by cutting their wheat too early, while it's still in the milk stage, leading to significant weight loss. Sometimes it rains during harvest, making it hard for farmers in a large area to get the wheat dry enough to store. A solution is to keep cutting your wheat, no matter the weather, and stack it in large mounds of three to five bushels, pressing it tightly together regardless of how wet it is, and cover the top with a bundle of wheat to protect against rain. It will dry out without sprouting, and while the straw might be a bit mouldy, the grain will remain perfectly good, even if the top of the mounds turns completely green with sprouting wheat. This method is extremely useful in wet seasons. To prepare seed wheat for sowing, soak it in very strong brine for a day or two; skim off anything that rises to the surface; take the grain out of the brine, and while it's still wet, dust it with fresh-slaked lime until the grains are lightly coated; add a bit of plaster to make handling easier. Wheat can stay like this for days without damage. When prepared this way, it will show a significant improvement in the resulting crop.
Enemies of wheat are numerous, and various remedies are proposed. The wire-worm is sometimes very destructive. Wheat planted with a drill, with a heavy cast-iron roller behind each tooth, will not suffer by them; they will only work in the mellow ground between the drills. Drive over a field of wheat exposed to injury from wire-worms with a common ox-cart, and you will notice a marked difference; wherever the cartwheel passed over, the wheat remains unharmed by the wire-worm, while on either side much of it will be destroyed. But the wheat-midge, or weevil, is the great enemy, rendering the cultivation of wheat in some localities useless. One precaution is, to get the wheat forward so early and fast as to have it out of the way before they destroy it. This is often done by early sowing, high fertilization, and warm land. Sometimes wheat is too late for them, and then a good crop is secured. But this can only be relied on in cool, moist climates. Our hot, dry seasons are not suitable for wheat, late enough to be out of the way of the weevil. The great remedy for this enemy is his destruction. Burning the chaff at thrashing is useless for this pur[Pg 430]pose. The worm has entered the ground to remain for the winter, before the wheat is harvested. We know of but one way to kill the weevil, and that is, by insect lamps or torches in the field in the evening. The flies are inactive until evening, when, from dusk till eight or nine o'clock, they deposite their eggs in the blossoms and chaff of the wheat. Now, it is ascertained that this fly, like many other insects, will fly several rods to a light. Twenty-five torches at equal distances, in a ten-acre lot of wheat, would be near enough. Nearly all the flies in a field would fly to them in half an hour. These need be lighted only on pleasant evenings, as weevils will not work in wind or rain, and they only commit their depredations during the time the wheat is in blossom. Let twenty-five racks, or holders of some kind, be put up on ten acres of wheat, and have pitch-pine put in them and ignited, after the manner of night fishermen, and let this be done a few nights, during the blossoming season of wheat, and the fly will be destroyed and the crop saved, in the worst weevil-season that ever occurred. In the absence of pitch-pine, some other light can be devised—as, balls of rags dipped in turpentine and sulphur, as in a torchlight procession. Something can be devised that will burn brilliantly for an hour: this will not cost fifty cents an acre, during the weevil-season, and will prove almost a perfect remedy.
Enemies of wheat are many, and various solutions are suggested. The wire-worm can be very damaging. Wheat sown with a drill, followed by a heavy cast-iron roller behind each tooth, will not be affected by them; they will only thrive in the loose soil between the drills. If you drive a common ox-cart over a field of wheat at risk from wire-worms, you'll see a clear difference; where the cartwheel rolls, the wheat stays unharmed by the wire-worm, while on either side much of it gets destroyed. However, the wheat midge, or weevil, is the main threat, making wheat farming in certain areas pointless. One way to prevent this is to grow the wheat quickly and early enough to avoid their damage. This is often achieved through early sowing, heavy fertilization, and planting on warm soil. Sometimes, wheat is harvested just in time to escape them, resulting in a good yield, but this only works in cooler, wetter climates. Our hot, dry seasons aren't ideal for wheat to be late enough to evade the weevil. The main solution for this pest is to eliminate it. Burning the chaff after threshing doesn’t help because the larvae have already burrowed into the ground to wait out the winter before the wheat is harvested. We know of only one effective method to kill the weevil: using insect lamps or torches in the field in the evening. The flies are inactive until dusk, when, from evening until about eight or nine o’clock, they lay their eggs in the wheat’s blossoms and chaff. It’s been found that this fly will be attracted to a light from several yards away. Setting up twenty-five torches at equal distances across a ten-acre wheat field would be sufficient. Almost all the flies in that area would be drawn to them within half an hour. These should only be lit on pleasant evenings since weevils don’t operate in wind or rain, and they cause damage only while the wheat is blooming. If twenty-five racks or holders are set up on ten acres of wheat, filled with pitch-pine and ignited like night fishermen do, and if this is done for a few nights during the wheat's blooming period, the flies can be eliminated and the crop saved, even during the worst weevil season ever. If pitch-pine isn’t available, some other light source can be created—like balls of rags soaked in turpentine and sulfur, similar to torches used in a parade. Something can be made that burns brightly for an hour; this won’t cost more than fifty cents an acre during the weevil season and will serve as almost a perfect solution.
Rust in wheat is only avoided by getting your wheat to maturity before the rust strikes it. If it is nearly mature, and the rust strikes it, cut it and shock it up in the shortest time possible.
Rust in wheat can only be avoided by getting your wheat to maturity before the rust hits. If it's almost mature and the rust does hit, harvest it and stack it as quickly as you can.
Wheat is a great subject in agriculture, on which many volumes have been written, and on which it is[Pg 431] customary to write long articles. We trust the recapitulation of what we have said, in the following brief rules, is more valuable to the practical wheat-culturist than any large volume could be. Analyses of wheat-bran and straw, the philosophy of rust in wheat, the length, size, and color of the weevil, and the great diversity of opinions on wheat-growing, are not what practical men regard. The one question is, How can I grow wheat surely and profitably? The following rules answer this important question, rendering failure unnecessary:—
Wheat is a vital topic in agriculture, with many books written about it, and it's common to write lengthy articles on the subject. We believe that our summary of what we've discussed in the following brief guidelines is more beneficial to the practical wheat farmer than any extensive book could be. Analysis of wheat bran and straw, the science behind rust affecting wheat, the characteristics of the weevil in terms of length, size, and color, as well as the many differing opinions on wheat cultivation, aren't what practical people focus on. The main question is, how can I grow wheat reliably and profitably? The following rules provide an answer to this crucial question, making failure unnecessary:—
1. Make your soil very rich, putting the manure as deep as convenient. Apply lime, wood-ashes, and potash, the latter dissolved and applied to your coarse manure.
1. Enrich your soil by mixing in manure as deeply as possible. Add lime, wood ashes, and potash, with the potash being dissolved and mixed into your coarse manure.
2. Under-drain thoroughly all wheat-land, except that on a dry subsoil.
2. Thoroughly drain all wheat fields, except for those on dry subsoil.
3. Plow deep and subsoil all wheat-lands, except those on a gravelly or sandy bottom.
3. Plow deeply and break up the soil in all wheat fields, except for those on a gravelly or sandy base.
4. Plant wheat from two to six inches deep, according to the texture of the soil—deepest on the lightest soil. Roll after sowing, and roll light lands with a heavy roller.
4. Plant wheat two to six inches deep, depending on the soil texture—plant deeper in lighter soil. Roll the area after sowing, and use a heavy roller for lighter lands.
5. Always get your wheat in early, and in a finely-pulverized soil, and be careful not to seed too heavy.
5. Always plant your wheat early, in well-ground soil, and be careful not to plant too densely.
6. Sow seed that has not long been grown in your vicinity, and steep it two days, before sowing, in a brine, with as much salt as the water will dissolve, sifting fine, fresh lime over the wet grain, after removing it from the brine; put on, also, plaster-of-Paris or wood-ashes.
6. Plant seeds that haven't been grown in your area for long, and soak them for two days in a brine with as much salt as the water can dissolve. After taking them out of the brine, sprinkle fine, fresh lime over the wet seeds, and also add plaster of Paris or wood ashes.
7. Harvest wheat before the straw becomes dry, or the grain hard.[Pg 432]
7. Harvest wheat before the straw gets dry, or the grain hard.[Pg 432]
8. Destroy weevil by lights in the field, on the pleasant evenings during the blossoming season.
8. Get rid of weevils using lights in the field on nice evenings during the blooming season.
WHORTLEBERRY.
Of this excellent berry there are several varieties, distinguished by the height of the bushes, or by the color of the fruit. The main divisions are, the Swamp and the Plain Whortleberries. The swamp variety has been transferred to gardens, in Michigan, and has proved valuable. The shrub attains considerable size, producing fruit more surely and regularly than in its wild state, and of an improved quality and larger size. It may be grown as well as currants all over the country. The small plain variety is usually found on sandy plains, and is a great bearer of fruit everywhere highly prized. It may be transferred to all our gardens, by making a bed of sand six inches or a foot deep, or it may be so acclimated as to grow well in any good garden soil, and become a universal luxury. We recommend it as a standing fruit for all gardens.
Of this excellent berry, there are several varieties, distinguished by the height of the bushes or the color of the fruit. The main types are the Swamp and the Plain Whortleberries. The swamp variety has been taken to gardens in Michigan, where it has proven to be valuable. The shrub grows quite large, producing fruit more consistently and regularly than in the wild, and the quality and size are better. It can be grown just like currants all over the country. The small plain variety is typically found on sandy plains and is a heavy producer of fruit that is highly valued everywhere. It can be moved to any of our gardens by creating a bed of sand that is six inches to a foot deep, or it can be adapted to thrive in any good garden soil, becoming a universal treat. We recommend it as a staple fruit for all gardens.
WILLOW.
The cultivation of willow for osier-work is pursued to some extent in this country, and might be greatly increased. At one fourth the present prices, it would pay as well as any other branch of agriculture. Some varieties will grow on land of little value for other purposes, and all on any good land. Willows will take care of themselves after the second or third year. The more usual method of planting is of slips, ten inches long, set in mellow ground about eight inches deep, in[Pg 433] straight rows four or six feet apart, and one foot apart in the rows—except the green willow, which is put two feet apart in the row. They should be kept clear of weeds for the first two years. The osiers are to be cut when the bark will peel somewhat easily, and may be put through a machine for the purpose, invented by J. Colby, of Jonesville, Vermont, at the rate of two tons per day, removing all the bark, without injuring the wood. Different opinions prevail respecting the varieties most profitable for cultivation; they vary in different localities. The manufacture of willow-ware will increase with the increased production of osiers, and the consequent reduction of their cost.
The cultivation of willow for basket-making is done to some extent in this country and could be greatly expanded. At a quarter of the current prices, it would be as profitable as any other type of agriculture. Some varieties can thrive on land that’s not very useful for other purposes, and they all do well on quality land. Willows will take care of themselves after the second or third year. The most common method of planting involves using cuttings that are ten inches long, placed in soft soil about eight inches deep, in[Pg 433] straight rows four to six feet apart, with one foot between each cutting—except for the green willow, which should be spaced two feet apart in the row. They need to be kept weed-free for the first two years. The osiers are cut when the bark peels off somewhat easily and can be processed using a machine created by J. Colby, of Jonesville, Vermont, capable of handling two tons per day while removing all the bark without damaging the wood. There are differing opinions on which varieties are the most profitable for cultivation, and these opinions can vary by location. The production of willow products will grow as the supply of osiers increases, leading to lower costs.
WINE.
We have elsewhere stated that our only hope for pure wine in this country is in domestic manufacture. We shall here give two recipes that will insure better articles than are now offered under the name of imported wines.
We have mentioned before that our only chance for quality wine in this country is through local production. Here, we will provide two recipes that will guarantee better options than those currently available under the label of imported wines.
Currant Wine.—This, as usually manufactured, is a mere cordial, rather than a wine. The following recipe gathered from the Working Farmer, is all that need be desired, on making wine from currants, cherries, and most berries, that are not too sweet. Take clean ripe currants and pass them between two rollers, or in some other way, crush them, put them in a strong bag, and under a screw or weight, and the juice will be easily expressed. To each quart of this juice, add three pounds of double-refined loaf sugar (no other sugar will do) and water enough to make a gallon. Or in a cask that will hold thirty gallons, put thirty quarts of the[Pg 434] juice, ninety pounds of the sugar, and fill to the bung with water. Put in the bung and roll the cask until you can not hear the sugar moving on the inside of the barrel, when it will all be dissolved. Next day roll it again, and place it in a cellar of very even temperature, and leave the bung out to allow fermentation. This will commence in two or three days and continue for a few weeks. Its presence may be known by a slight noise like that of soda water, which may be heard by placing the ear at the bung hole. When this ceases drive the bung tight and let it stand six months, when the wine may be drawn off and bottled, and will be perfectly clear and not too sweet. No alcohol should be added. Putting in brandies or other spirituous liquors prevents the fermentation of wine, leaving the mixture a mere cordial. The use of any but double-refined sugar is always injurious, and yet many will persist in using it, because it is cheaper. The reason for discarding, for wine-making, all but double-refined sugar, may be easily understood. Common sugar contains one half of one per cent. of gum, that becomes fetid on being dissolved in water. The quantity of this gum in the sugar, for a barrel of wine, is considerable—enough to give a bad flavor to the wine. This is avoided by using double-refined sugar, which contains no gum. This recipe is equally good for cherry wine.
Currant Wine.—As it's typically made, this is more of a cordial than a wine. The following recipe from the Working Farmer is all you need for making wine from currants, cherries, and most berries that aren’t too sweet. Start with clean, ripe currants and crush them, either by passing them through two rollers or using another method. Place the crushed currants in a strong bag and apply pressure using a screw or weight; this will easily extract the juice. For each quart of juice, add three pounds of double-refined loaf sugar (no other type of sugar will work) and enough water to make a gallon. If you're using a cask that holds thirty gallons, mix thirty quarts of the juice with ninety pounds of sugar and fill it to the top with water. Seal the cask and roll it until you can’t hear the sugar moving inside, indicating it's dissolved. Roll it again the next day and store it in a cellar with a stable temperature, leaving the bung out to allow for fermentation. This should start in two or three days and last for a few weeks, indicated by a faint noise similar to soda water, which you can hear if you lean close to the bung hole. When that noise stops, seal the bung tightly and let it sit for six months. After that, you can draw off the wine and bottle it; it will be clear and not too sweet. Do not add any alcohol. Adding brandy or other spirits will stop the wine from fermenting and result in just a cordial. Using any sugar other than double-refined is always harmful, yet many still opt for it because it’s cheaper. The need to avoid any sugar but double-refined for winemaking is straightforward: regular sugar contains half of one percent gum, which becomes unpleasant when dissolved in water. The amount of this gum in the sugar for a barrel of wine can significantly affect the flavor. Double-refined sugar avoids this problem because it contains no gum. This recipe also works well for cherry wine.
The following recipe for making Elderberry Wine, produces an article that the best judges in New York and elsewhere have pronounced equal to any imported wine. Its excellence has made quite a market for elderberries in New York. These berries are so easily grown, and the wine so excellent, that their growth will be encouraged throughout the country. It is not only[Pg 435] an exceedingly palatable wine, but is better for the sick, than any other known.
The following recipe for making Elderberry Wine produces a drink that top judges in New York and beyond have deemed equal to any imported wine. Its quality has created a strong demand for elderberries in New York. These berries are easy to grow, and the wine is so good that more people will be encouraged to grow them across the country. It’s not only[Pg 435] a very tasty wine, but it’s also better for the sick than any other known option.
To every quart of the berries, put a quart of water and boil for half an hour. Bruise them from the skin and strain, and to every gallon of the juice add three pounds of double-refined sugar and one quarter of an ounce of cream of tartar and boil for half an hour. Take a clean cask and put in it one pound of raisins to every three gallons of the wine, and a slice of toasted bread covered over with good yeast. When the wine has become quite cool, put it into the cask, and place it in a room of even temperature to ferment. When the fermentation has fully ceased, put the bung in tight. No brandy or alcohol of any kind will be necessary. Any one following this recipe exactly, will be surprised at the excellence of the wine that will be the result.
For every quart of berries, add a quart of water and boil for half an hour. Smash them to break the skin and strain, then for every gallon of juice, add three pounds of double-refined sugar and a quarter ounce of cream of tartar, and boil for another half hour. Take a clean barrel and add one pound of raisins for every three gallons of wine, along with a slice of toasted bread spread with good yeast. Once the wine has cooled down completely, transfer it into the barrel and keep it in a room with a stable temperature to ferment. When fermentation has fully stopped, seal it tight. No brandy or any type of alcohol is needed. Anyone who follows this recipe exactly will be amazed at the quality of the wine produced.
Of Grape Wines, there are several varieties, whose peculiarities are determined mainly by the process of manufacturing. A full treatment of the subject would require a volume. The following brief directions will insure success in making the most desirable grape wines:
Of Grape Wines, there are several types, and their unique characteristics are largely shaped by the production process. A comprehensive discussion of the subject would need an entire book. The following short guidelines will guarantee success in creating the best grape wines:
1. Let the grapes become thoroughly ripe before gathering, to increase their saccharine qualities and make a stronger wine. All fruits make much better wine for being fully ripe. Cut the bunches with a sharp knife and move carefully to avoid bruising. Spread them in a dry shade to evaporate excessive moisture.
1. Let the grapes fully ripen before picking them, to boost their sweetness and create a stronger wine. All fruits produce much better wine when they’re completely ripe. Use a sharp knife to cut the bunches and handle them carefully to prevent bruising. Lay them out in a dry, shaded area to let excess moisture evaporate.
2. Assort the grapes before using, removing all decayed, green, or broken ones, using only perfect berries.
2. Sort the grapes before using them, discarding all the bad, green, or broken ones, and use only the perfect berries.
3. Mash the grapes with a beater in a tub, or by passing them through a cider-mill. "Treading the wine vat" was the ancient method of mashing the grapes, not now practised except in some parts of Europe.[Pg 436]
3. Crush the grapes with a beater in a tub or by using a cider press. "Treading the wine vat" was the old way of crushing grapes, which is rarely done now except in some parts of Europe.[Pg 436]
4. To make light wines put them at once into press, as apple pomace in a cider-press.
4. To make light wines, put them directly into the press, similar to how apple pulp is used in a cider press.
5. To make higher-colored wines let the pomace stand from four to twenty-four hours before pressing. They will be dark in proportion to the length of time the pomace stands.
5. To create richer colored wines, let the grape skins sit for four to twenty-four hours before pressing. The longer the grape skins sit, the darker the wine will be.
6. To make wines resembling the Austere wines of France and Spain, let the pomace stand until the first fermentation is over, called "fermenting in the skin."
6. To create wines similar to the bold wines of France and Spain, allow the pomace to sit until the initial fermentation is complete, known as "fermenting in the skin."
7. The "must" or grape-juice is to be put into casks, the larger the better, but only one pressing should be put into one cask. Put in a cellar of even temperature, not lower than fifty nor higher than sixty-five degrees of Fahrenheit, and where there is plenty of air.
7. The "must" or grape juice should be placed in casks, the larger the better, but only one pressing should go into each cask. Store it in a cellar with a consistent temperature, not lower than fifty or higher than sixty-five degrees Fahrenheit, and ensure there's plenty of airflow.
Prepare the cask by burning in it a strip of paper or muslin, dipped in melted sulphur, and suspended by a wire across the bung-hole. Fermentation commences very soon and will be completed within a few days or weeks according to the temperature. Its completion is marked by the cessation of the escape of gas. No sugar, brandy, or any other substance, should be added to the grape-juice to make good wine. They are all adulterations. The wine having settled after this fermentation, may be racked off into clean casks, prepared as before. A second fermentation will take place in the spring. It should not be bottled until after this second fermentation, as its expansion will break the glass. While in the casks they should always be kept full, being occasionally filled from a small cask, kept for the purpose. When this fermentation ceases, bottle and cork tight, and lay the bottles on their sides, in a cool cellar. The wine will improve with age.
Prepare the cask by burning a strip of paper or muslin that has been dipped in melted sulfur, suspended by a wire across the bung-hole. Fermentation starts soon after and will finish within a few days or weeks, depending on the temperature. You'll know it's done when gas stops escaping. Do not add sugar, brandy, or any other substances to the grape juice to make good wine; these are all adulterations. Once the wine has settled after fermentation, you can rack it off into clean casks, prepared as before. A second fermentation will occur in the spring. It should not be bottled until after this second fermentation, as the expansion could break the glass. While in the casks, they should always be kept full, occasionally topped up from a small cask reserved for this purpose. When fermentation stops, bottle and cork tightly, and lay the bottles on their sides in a cool cellar. The wine will improve with age.
Sometimes it remains on the lees without racking and[Pg 437] is drawn off and bottled. Frequently the wine does not become wholly clear and needs fining. Various substances are used for this purpose, as fish-glue, charcoal, starch, rice, milk, &c. The best of these substances is charcoal, or the white of eggs and milk. Add by degrees according to the foulness of the wine. An ounce of charcoal to a barrel of wine is an ordinary quantity; or a pint of milk with the white of four eggs—more or less according to the state of the wine.
Sometimes it stays on the sediment without being racked and[Pg 437] is drawn off and bottled. Often, the wine doesn’t become completely clear and requires fining. Different substances are used for this, like fish glue, charcoal, starch, rice, milk, etc. The best options are charcoal or egg whites and milk. Add gradually depending on how cloudy the wine is. An ounce of charcoal for a barrel of wine is a typical amount; or a pint of milk with the whites of four eggs—more or less depending on the condition of the wine.
Rhine Wine of Germany may be made as follows:—
Rhine Wine from Germany can be made like this:—
Take good Catawba or Isabella grapes, and pound or grind them so as to crush every seed and leave them in that state for twenty-four hours. Fumigate the cask by burning strips of muslin dipped in sulphur as in the preceding recipe. Strain or press out the juice into the cask filling it and keeping it entirely full, that impurities may run out of the bung, during fermentation. In the spring prepare another cask in the same way and rack it off into that. When a year old bottle it and it is fit for use.
Take good Catawba or Isabella grapes and crush or grind them until every seed is broken, then leave them like that for twenty-four hours. Fumigate the barrel by burning strips of muslin soaked in sulfur like in the previous recipe. Strain or press the juice into the barrel, filling it and making sure it is completely full so that impurities can run out of the spout during fermentation. In the spring, prepare another barrel the same way and transfer the juice into that. When it’s a year old, bottle it, and it will be ready to use.
Sweeter wines than any of the above are made by adding sugar to the must before fermentation. It should be double-refined sugar, and still it is an adulteration.
Sweeter wines than any of the above are made by adding sugar to the must before fermentation. It should be double-refined sugar, and still, it is an adulteration.
WOODLANDS.
One of the greatest errors of American farmers is their neglect to cultivate groves of trees for woodlands, in all suitable places. Our primeval forests have been wantonly destroyed, and the country is not yet old enough to feel the full force of neglecting to replenish them, by new groves, in suitable localities. On the points of hills, rough stony places, sides of steep hills,[Pg 438] ravines that can not be cultivated, and by the side of all the highways of the land, trees should be cultivated: in some places fruit-trees, but in most places forest-trees. The advantages would be manifold; they would afford shade for cattle, groves for birds, which would destroy the worms; they would break off the cold winds from crops, cattle, fruit-orchards, and dwellings; would greatly enrich the soil by their annual foliage, afford abundance of fuel at the cheapest rates, give much good timber, provide for fine maple-sugar, and be the greatest ornaments of the rural districts. Only think of the comfort and beauty of fifty miles square, in which not a street could be found which had not trees on each side, not more than twelve feet apart. When such trees should become twenty years old, the pedestrian or the carriage could move all day in the shade, listening to the music of the birds, and inhaling the aroma of the foliage or flowers. To every owner or occupant of the soil we say, plant trees.
One of the biggest mistakes American farmers make is not growing trees for woodlands in all the right places. Our ancient forests have been recklessly destroyed, and the country is still too young to fully understand the consequences of failing to replace them with new groves in suitable areas. On hilltops, rocky terrains, steep slopes, [Pg 438] uncultivable ravines, and along all the highways, trees should be planted: in some areas fruit trees, but mostly forest trees. The benefits would be numerous; they would provide shade for livestock, create habitats for birds that eat worms, break cold winds for crops, animals, orchards, and homes; significantly improve the soil with their yearly leaves, offer a plentiful supply of inexpensive fuel, supply valuable timber, produce high-quality maple syrup, and beautify rural areas. Just imagine the comfort and beauty of a fifty-mile square area where every street has trees planted on both sides, no more than twelve feet apart. When those trees reach twenty years old, walkers or carriages could travel all day in the shade, enjoying the melodies of birds and the scent of foliage or flowers. To every landowner or resident, we say, plant trees.
POULTRY.
Fattening and preparing poultry for the market are important items in rural economy. Plenty of sweet food and pure water given at regular times, and the fowls not allowed to wander, are the requisites of successful fattening. The best feed for fattening fowls is oat-meal. Next to this is corn-meal. Three things are essential in food for fattening animals, flesh-forming, fat-forming, and heat-producing substances. Of all the grains ordinarily fed, oat-meal contains these in the best proportions, and next to this comes yellow Indian corn meal. Fat is good, but must be given in a hard[Pg 439] form as in mutton or beef suet. Rice boiled in sweet milk, fed for a day or two before killing fowls is said to render the flesh of a white delicate color.
Fattening and preparing poultry for the market are key parts of rural economies. Providing plenty of sweet food and clean water at regular intervals, while keeping the birds from wandering, are essential for successful fattening. The best feed for fattening chickens is oatmeal, followed by cornmeal. Three things are necessary in the diet for fattening animals: substances that build flesh, create fat, and generate heat. Of all the grains typically used, oatmeal has these in the best proportions, with yellow cornmeal coming in next. Fat is beneficial but should be given in a hard form, like mutton or beef suet. Rice cooked in sweet milk, fed for a day or two before slaughtering the chickens, is said to give the meat a white, delicate color.[Pg 439]
At least one third of the value of poultry in the market depends upon properly preparing and transporting it.
At least one third of the value of poultry in the market relies on proper preparation and transportation.
1. Do not feed fowls at all for twenty-four hours before killing them.
1. Do not feed the birds for twenty-four hours before you kill them.
2. Kill by cutting the jugular vein with a sharp pen-knife, just under the sides of the head, and hang them up to bleed.
2. Kill by slicing the jugular vein with a sharp pocketknife just below the sides of the head, and hang them up to let them bleed out.
3. Pick carefully and very clean, without tearing the skin, and without scalding. Singe slightly if need be. Dip in hot water for three or four seconds and in cold water half a minute.
3. Pick carefully and very clean, without tearing the skin, and without scalding. Singe slightly if necessary. Dip in hot water for three or four seconds and in cold water for half a minute.
4. Do not open the breast at all, but remove the entrails from the hind opening, leaving the gizzard in its place. Put no water in but wipe out the blood with a dry cloth. Leaving the entrails in is injurious, tending to sour the meat and taint it with their flavor.
4. Do not cut open the breast at all, but take out the insides from the back opening, keeping the gizzard in its spot. Do not add any water; just clean out the blood with a dry cloth. Leaving the insides in is harmful, as it can spoil the meat and affect its taste.
5. Do not allow your poultry to freeze by any means. For transporting to a distant market, pack in shallow boxes never containing over three hundred pounds each and in clean straw without chaff or dust, and in such a manner that no two fowls will touch each other.
5. Make sure your poultry doesn't freeze. When transporting to a faraway market, pack them in shallow boxes that hold no more than three hundred pounds each, using clean straw free of chaff or dust, and arrange them so that no two birds touch each other.
6. Geese and ducks look better with the heads cut off. But all fowls having their heads removed must have the skin drawn down and tightly tied over the end of the neck bone. This will preserve them well and give a good appearance.
6. Geese and ducks look better when their heads are removed. However, all birds that have their heads taken off need to have the skin pulled down and tightly tied over the end of the neck bone. This will help keep them fresh and make them look good.
To preserve fowls for a long time in a perfectly sweet condition for family use, fill them half full or more with pulverized charcoal, which will act as an absorbent and prevent every particle of taint.
To keep poultry fresh and in good condition for family use, fill them halfway or more with crushed charcoal, which will absorb odors and prevent any spoilage.
AGRICULTURAL PERIODICALS.
The following list of Agricultural Periodicals embraces all that have come to our knowledge. In a subsequent edition we shall endeavor to render the list more complete, and give the special design of each, with the frequency of publication, form, price, editor's and publisher's names, etc.
The following list of agricultural periodicals includes everything we know of. In a future edition, we will try to make the list more complete and provide details about each one, including its purpose, how often it is published, format, price, and the names of the editor and publisher, etc.
| NAME OF PAPER. | PLACE OF PUBLICATION. |
|---|---|
| American Farmers' Magazine | New York City. |
| American Farmer | Baltimore, Md. |
| Alabama Planter | Mobile, Ala. |
| American Agriculturist | New York City. |
| Canadian Agriculturist | Toronto, C. W. |
| Cultivator | Albany, N. Y. |
| Cotton Planter | Montgomery, Ala. |
| Cultivator | Columbus, Ohio. |
| Cultivator | Boston, Mass. |
| California Farmer | San Francisco, Cal. |
| Country Gentleman | Albany, N. Y. |
| Farmer and Planter | Pendleton, S. C. |
| Granite Farmer | Manchester, N. H. |
| Genesee Farmer | Rochester, N. Y. |
| Horticulturist | Albany, N. Y. |
| Homestead | Hartford, Ct. |
| Journal of Agriculture | Chicago, Ill. |
| Maine Farmer | Augusta, Me. |
| Michigan Farmer | Detroit, Mich. |
| Magazine of Horticulture | Boston, Mass. |
| Massachusetts Ploughman | Boston, Mass. |
| New England Farmer | Boston, Mass. |
| New Jersey Farmer | Trenton, N. J. |
| North Carolina Planter | Raleigh, N. C. |
| Ohio Valley Farmer | Cincinnati, Ohio. |
| Ohio Farmer | Cleveland, Ohio. |
| Prairie Farmer | Chicago, Ill. |
| Rural New Yorker | Rochester, N. Y. |
| Rural Southerner | Ellicott's Mills, Md. |
| Rural American | Utica, N. Y. |
| Southern Planter | Richmond, Va. |
| Southern Cultivator | Augusta, Ga. |
| Southern Homestead | Nashville, Tenn. |
| Valley Farmer | St. Louis, Mo. |
| Vermont Stock Journal | Middlebury, Vt. |
| Wisconsin Farmer | Madison, Wisc. |
| Working Farmer | New York City. |
INDEX.
- Acclimation; 9
- Agricultural Periodicals, List of; 440
- Almonds; 10
- Animals, Rules for feeding; 178
- Apples; 12
- Apple-Tree Wood, Analysis of; 14
- Apple-Worm, Remedy for; 22
- Apricot; 50
- Artichoke; 52
- Ashes; 53
- Asparagus; 54
- Atmosphere, Important Auxiliary in the Growth of Plants; 278
- Balm; 56
- Barberry; 56
- Barley; 57
- Barns; 59
- Bean, Coffee; 130
- Beans; 60
- Bees and Beehives; 64
- Beets; 77
- Bene Plant; 81
- Berries, Preservation of; 367
- Birds useful in destroying Insects; 82
- Blackberry; 83
- Black Currant; 165
- Black Raspberry; 85
- Board Fences; 179
- Bones, their Value as a Fertilizer; 85, 275
- Borden's Milk Condensation; 369
- Borecale; 86
- Borer, Preventive and Remedy for; 23
- Breck's Book of Flowers; 195
- Breeding in, Deteriorating Effects of; 142
- Broccoli; 86
- Broom-Corn; 87
- Brussels Sprouts; 89
- Buckthorn; 89
- Buckwheat; 90
- Budding; 91
- Buffalo Berry; 390
- Bulbous Flowering Roots; 195
- Bushes, Eradication of Noxious; 94
- Butter; 95
- Butter Dairy; 167
- Butter-Making, Essential Rules for; 100
- Butternuts; 102
- Cabbage; 102
- Calves; 108
- Canker-Worm, Remedy for; 25
- Cans; 111, 367
- Carrots; 112
- Caterpillars, how destroyed; 24
- Cauliflower; 113
- Celery; 114
- Charcoal; 125
- Cheese; 115
- Cheese-House; 167
- Cherries; 118
- Chestnuts; 125
- Chickens; 197-199
- Churn, Best Form of; 98
- Churning, Brief Rules for; 97
- Cider; 126
- Citron; 127
- Cleft-Grafting; 210
- Clover; 128, 235
- Coffee Bean; 130
- Colts, Milk from the Dairy Excellent food for; 248
- Conical Training; 420
- Corn; 131
- Corn, Broom; 87
- Cottage, Economical Plan of a Laborer's; 257
- Cotton; 134
- Cotton Plant, Analysis of; 139
- Country Residence, Plan of; 255
- Cows; 140
- Cranberry; 156
- Cucumber; 161
- Curculio on Plum-Trees, Unfailing Remedy for; 355
- Currants; 164
- Currants, Black; 165
- Currant Wine, Recipe for making; 433
- Dairy; 167
- Declension of Fruits, Cause of and Remedy for; 168
- Dill; 169
- Downing's List of Gooseberries; 208
- Drains; 170
- Ducks; 172
- Dwarfing Fruit-Trees, Process of; 173
- Early Fruits and Vegetables, how produced; 174
- Eastern States, Varieties of Apples adapted to; 20
- Eastwood's Work on Cranberry Culture; 156
- Egg Plant; 175
- Eggs, how to test and preserve them; 176
- Elderberry; 176
- Elderberry Wine, a Recipe for Making; 434
- Endive; 177
- Fan Training of Trees; 417
- Farm-Buildings; 251
- Feeding Animals; 178
- Fences; 179
- Fennel; 181
- Figs; 181
- Fish; 184
- Flax; 192
- Flowering Shrubs; 195
- Flowers; 193
- Foot-Paths, Circular, how laid out; 254
- Foot-Rot in Animals, Remedy for; 388
- Forest Trees; 437
- Fowls; 196
- Fruit; 200
- Fruits, Declension of; 168
- Fruits, Early, how produced; 174
- Fruits, Preservation of; 367
- Fruits, Manner of Gathering; 205
- Fruit-Trees, Location of; 269
- Fruit-Trees, how to induce Productiveness in; 201
- Garden; 202
- Garlic; 205
- Gathering Fruits; 205
- Geese; 205
- Gooseberry; 206
- Grafting; 208
- Grafting-Wax, how made; 211
- Grapes; 212
- Grape-Wine, Method of making; 435
- Grasses; 227
- Greenhouse; 231
- Guano, Care requisite in the Application of; 277
- Guenon's Treatise on the Milking Qualities of Cows; 142
- Gypsum; 232, 247
- Hams, Preservation of; 370
- Harrowing; 233
- Hay, making and preserving of; 234
- Hedge; 236
- Hedge-Pruning; 238
- Hedges, Shrubs suitable for the Formation of; 57, 89, 236-238
- Hemp; 239
- Hens; 196
- Herbaceous Flowers; 196
- Hive, Proper Construction of; 74
- Hoeing; 241
- Hogs; 409
- Hogstye, Plan of; 252
- Hogstye, Manure from the; 274
- Hops; 242
- Hops, Method of curing; 244
- Horizontal Training; 419
- Horse; 246
- Horseradish; 249
- Hotbeds; 249
- Hothouse; 231
- Houses; 251
- Hybrids; 259
- Inarching; 259
- Insects; 260
- Iron-Filings, Beneficial to Pear-Trees 261
- Irrigation; 261
- Italian Farmhouse, Plan of; 228
- Kale; 86
- Labels for Fruit-Trees; 202
- Laborer's Cottage, Plan of; 257
- Landscape Gardens; 263
- Lawton Blackberry; 84
- Layering; 264
- Laying in Trees; 265
- Leeks; 266
- Lemon; 266
- Lettuce; 267
- Licorice; 268
- Lime, Value of as a Fertilizer; 268
- Limes; 269
- Liquid Manures, Value of; 273
- Location; 269
- Locust-Trees; 270
- Manures; 271
- Maple-Trees, Best Method of tapping; 404
- Marjorum; 283
- Marl; 282
- Melons; 283
- Mice, Protection of Fruit-Trees from in Winter; 373
- Milk, Condensation and Preservation of; 369
- Milking Qualities of Cows, Infallible Marks of; 142-155
- Milking, Rules for; 96, 155
- Milk, Value of for Horses; 248
- Millet; 287
- Mint; 288
- Moisture, Retention of, leading Benefit of Manure; 277
- Mulberry; 289
- Mulching; 289
- Mushrooms; 290
- Muskmelons; 283
- Mustard; 292
- Nasturtium; 293
- Nectarine; 293
- New Fruits; 295
- New Rochelle (Lawton) Blackberry 84
- Northern States, Varieties of Apples suitable for; 30
- Nursery; 296
- Nuts; 300
- Oaks; 301
- Oats; 303
- Okra; 304
- Olives; 304
- Onions; 305
- Oranges; 308
- Orchards; 309
- Orchards, Favorable Locations for; 269
- Osage Orange; 236
- Oxen; 311
- Parsley; 312
- Parsnips; 313
- Pastures; 315
- Peas; 316
- Peach; 319
- Pear; 332
- Pear-Orchard, Plan of; 337
- Pennyroyal Mint; 288
- Peppers; 347
- Peppergrass; 348
- Peppermint; 288
- Picket Fences; 180
- Piggery, Plan of; 252
- Plaster of Paris; 232
- Plowing; 348
- Plum; 351
- Plum, Analysis of; 353
- Pomegranate; 359
- Potato; 360
- Potato-Rot, Cause of and Remedy for; 364
- Potato, Sweet; 406
- Poultry; 438
- Preserving Fruits and Vegetables 367
- Protection of Trees for Transplanting 265, 300
- Prunes, Domestic; 356
- Pruning and Training; 414
- Pruning Peach-Trees; 323
- Pumpkin; 371
- Quince; 372
- Rabbits, a Protection of Fruit-Trees from in Winter; 373
- Radish; 374
- Rail Fences; 180
- Raspberry; 375
- Raspberry, Black; 85
- Rennet, how prepared; 115
- Rhubarb; 377
- Rice; 378
- Rocks, Methods of removing; 379
- Rollers; 379
- Root Crops; 380
- Root-Pruning, Method of; 353
- Saffron; 381
- Sage; 381
- Salsify or Vegetable Oyster; 382
- Scraping Land; 382
- Seeds; 383
- Shade-Trees; 437
- Sheep; 384
- Sheep-Manure, Value of; 389
- Shepherdia, or Buffalo Berry; 390
- Skippers in Cheese; 117
- Soils; 391
- Sorgho, or Chinese Sugarcane; 405
- South, Apples adapted to the Climate of the; 31
- Spearmint; 288
- Spinage or Spinach; 394
- Squash; 395
- Stable; 59
- Stilton Cheese, Method of Making; 117
- Strawberry; 396
- Subsoil Plowing; 349
- Succory; 177
- Sugar; 403
- Summer-House, Plan of; 256
- Summer Savory; 406
- Sunflower; 406
- Sweet Potato; 406
- Swine; 409
- Tobacco; 411
- Tomato; 412
- Tongue-Grafting; 211
- Tools; 414
- Training and Pruning; 414
- Transplanting; 421
- Turnip; 422
- Van Mon's Theory of the Production of New Fruits; 295
- Vegetables, Early; 174
- Vegetable Oyster; 382
- Vineyards; 213, 216
- Wagon-House; 251
- Walls, Stone; 179
- Watering Gardens in Dry Seasons, Benefits of; 261
- Watermelons; 283
- Wax-Moth, Protection against; 73
- Weevil, or Wheat Midge, Remedy for; 430
- Western States, Varieties of Apples suitable for the; 30, 48
- Wheat; 423
- White Blackberry; 84
- Whortleberry; 432
- Willow; 432
- Wine; 433
- Wines, Adulteration of Imported; 212
- Winter Lettuce; 177
- Wood-Ashes, Value of as a Manure; 53
- Woodlands; 437
- Woolly Aphis, Remedy for; 23
AGRICULTURAL BOOKS,
PUBLISHED BY
A. O. MOORE,
(LATE C. M. SAXTON & CO.)
(LATE C. M. SAXTON & CO.)
140 FULTON STREET, NEW YORK,
140 Fulton St, New York,
And sent by mail to any part of the United States on receipt of the price.
And sent by mail to any part of the United States upon receiving the payment.
| 1 | American Farmers' Encyclopedia. A work of great value | $4 00 |
| 2 | Dadd's Modern Horse Doctor | 1 00 |
| 3 | Dadd's Anatomy and Physiology of the Horse | 2 00 |
| 4 | Dadd's Anatomy and Physiology of the Horse-colored plates | 4 00 |
| 5 | Dadd's American Cattle Doctor | 1 00 |
| 6 | The Stable Book | 1 00 |
| 7 | The Horse's Foot, and how to keep it sound; paper 25 cts., cloth | 50 |
| 8 | Bridgeman's Gardener's Assistant | 1 50 |
| 9 | Bridgeman's Florist's Guide, half cloth 50 cts., cloth | 60 |
| 10 | Bridgeman's Gardener's Instructor, half cloth 50 cts., cloth | 60 |
| 11 | Bridgeman's Fruit Cultivator, half cloth 50 cts., cloth | 60 |
| 12 | Field's Hand-Book of Pear Culture | 60 |
| 13 | Cole's American Fruit Book | 50 |
| 14 | Cole's American Veterinarian | 50 |
| 15 | Buist's American Flower Garden Directory | 1 25 |
| 16 | Buist's Family Kitchen Gardener | 75 |
| 17 | Browne's American Bird Fancier; paper 25 cts., cloth | 50 |
| 18 | Dana's Muck Manual, cloth | 1 00 |
| 19 | Dana's Prize Essay on Manures | 25 |
| 20 | Stockhardt's Chemical Field Lectures | 1 00 |
| 21 | Norton's Scientific and Practical Agriculture | 60 |
| 22 | Johnston's Catechism of Agricultural Chemistry (for Schools) | 25 |
| 23 | Johnston's Elements of Agricultural Chemistry and Geology | 1 00 |
| 24 | Johnston's Lectures on Agricultural Chemistry and Geology | 1 25 |
| 25 | Downing's Landscape Gardening | 3 50 |
| 26 | Fessenden's Complete Farmer and Gardener | 1 25 |
| 27 | Fessenden's American Kitchen Gardener | 50 |
| 28 | Nash's Progressive Farmer | 60 |
| 29 | Richardson's Domestic Fowls | 25 |
| 30 | Richardson on the Horse | 25 |
| 31 | Richardson on the Hog | 25 |
| 32 | Richardson on the Pests of the Farm | 25 |
| 33 | Richardson on the Hive and Honey Bee | 25 |
| 34 | Milburn and Stevens on the Cow and Dairy Husbandry | 25 |
| 35 | Skinner's Elements of Agriculture | 25 |
| 36 | Topham's Chemistry Made Easy | 25 |
| 37 | Breck's Book of Flowers | 1 00 |
| 38 | Leuchar's Hot Houses and Green Houses | 1 25 |
| 39 | Chinese Sugar Cane and Sugar Making | 25 |
| 40 | Turner's Cotton Planter's Manual | 1 00 |
| 41 | Allen on the Culture of the Grape | 1 00 |
| 42 | Allen's Diseases of Domestic Animals | 75 |
| 43 | Allen's American Farm Book | 1 00 |
| 44 | Allen's Rural Architecture | 1 25 |
| 45 | Pardee on the Strawberry | 60 |
| 46 | Peddar's Farmer's Land Measurer | 50 |
| 47 | Phelp's Bee-keeper's Chart | 25 |
| 48 | Guenon's Treatise on Milch Cows; paper 38 cts., cloth | 60 |
| 49 | Domestic and Ornamental Poultry, plain $1.00, colored plates | 2 00 |
| 50 | Randall's Sheep Husbandry | 1 25 |
| 51 | Youatt, Randall, and Skinner's Shepherd's Own Book | 2 00 |
| 52 | Youatt on the Breed and Management of Sheep | 75 |
| 53 | Youatt on the Horse | 1 25 |
| 54 | Youatt, Martin, and Stevens, on Cattle | 1 25 |
| 55 | Youatt and Martin on the Hog | 75 |
| 56 | Barry's Fruit Garden | 1 25 |
| 57 | Munn's Practical Land Drainer | 50 |
| 58 | Stephens' Book of the Farm, complete, 450 illustrations | 4 00 |
| 59 | The American Architect, or Plans for Country Dwellings | 6 00 |
| 60 | Thaer, Shaw, and Johnson's Principles of Agriculture | 2 00 |
| 61 | Smith's Landscape Gardening, Parks, and Pleasure Grounds | 1 25 |
| 62 | Weeks on the Bee: paper 25 cts., cloth | 50 |
| 63 | Wilson on Cultivation of Flax | 25 |
| 64 | Miner's American Bee-keeper's Manual | 1 00 |
| 65 | Quinby's Mysteries of Bee-keeping | 1 00 |
| 66 | Cottage and Farm Bee-keeper | 50 |
| 67 | Elliott's American Fruit Grower's Guide | 1 25 |
| 68 | The American Florist's Guide | 75 |
| 69 | Hyde on the Chinese Sugar Cane, paper | 25 |
| 70 | Every Lady her own Flower Gardener; paper 25 cts., cloth | 50 |
| 71 | The Rose Culturist; paper 25 cts., cloth | 50 |
| 72 | History of Morgan Horses | 1 00 |
| 73 | Moore's Rural Hand Books, 4 vols. | 5 00 |
| 74 | Rabbit Fancier; paper 25 cts., cloth | 50 |
| 75 | Reemelin's Vine-Dresser's Manual | 50 |
| 76 | Neill's Fruit, Flower, and Vegetable Gardener's Companion | 1 00 |
| 77 | Browne's American Poultry Yard | 1 00 |
| 78 | Browne's Field Book of Manures | 1 25 |
| 79 | Hooper's Dog and Gun | 50 |
| 80 | Skilful Housewife; paper 25 cts., cloth | 50 |
| 81 | Chorlton's Grape Grower's Guide | 60 |
| 82 | Sorgho and Imphee, Sugar Plants | 1 00 |
| 83 | White's Gardening for the South | 1 25 |
| 84 | Eastwood on the Cranberry | 50 |
| 85 | Persoz on the Culture of the Vine | 25 |
| 86 | Boussingault's Rural Economy | 1 25 |
| 87 | Thompson's Food of Animals; paper 50 cts., cloth | 75 |
| 88 | Richardson on Dogs; paper 25 cts., cloth | 50 |
| 89 | Liebig's Familiar Letters to Farmers | 50 |
| 90 | Cobbett's American Gardener | 50 |
| 91 | Waring's Elements of Agriculture | 75 |
| 92 | Blake's Farmer at Home | 1 25 |
| 93 | Rural Essays | 3 00 |
| 94 | Fish Culture | 1 00 |
| 95 | Flint on Grasses | 1 25 |
| 96 | Warder's Hedges and Evergreens | 1 00 |
Download ePUB
If you like this ebook, consider a donation!