This is a modern-English version of Advanced Toy Making for Schools, originally written by Mitchell, David M..
It has been thoroughly updated, including changes to sentence structure, words, spelling,
and grammar—to ensure clarity for contemporary readers, while preserving the original spirit and nuance. If
you click on a paragraph, you will see the original text that we modified, and you can toggle between the two versions.
Scroll to the bottom of this page and you will find a free ePUB download link for this book.
E-text prepared by Chris Curnow
and the Online Distributed Proofreading Team
(http://www.pgdp.net)
from page images generously made available by
Internet Archive
(http://www.archive.org)
| Note: | Images of the original pages are available through Internet Archive. See http://www.archive.org/details/advancedtoymakin00mitc |

ADVANCED TOY MAKING
FOR SCHOOLS
BY
David M. Mitchell
Instructor Manual Arts
Willson Junior High School, Cleveland, Ohio

The Manual Arts Press
Peoria, IL
Copyright 1922
David M. Mitchell
12 B 22
Printed in United States of America
Copyright 1922
David M. Mitchell
12 B 22
Printed in the United States of America
PREFACE

oys are today regarded as educational factors in the life of boys and girls. New toys come into demand at frequent intervals in the growth and mental development of the child. On account of the unfailing interest on the part of the pupils in toys and because of the unlimited educational possibilities contained in toy making, this work is rightfully taking an increasingly important place in the manual arts program in the schools.
Toys are now seen as important educational tools in the lives of both boys and girls. New toys are frequently in demand as children grow and develop mentally. Because students have a constant interest in toys and because toy making offers endless educational possibilities, this area is rightfully becoming a more significant part of the manual arts curriculum in schools.
This book is the outgrowth of toy-making problems given to junior-high and high-school pupils. The author claims no originality for some of the toys. However, most of them have been originated or improved upon in the author's classes.
This book comes from toy-making challenges given to middle school and high school students. The author doesn't claim to have created everything from scratch. However, most of the toys have been developed or enhanced in the author's classes.
While it is entirely satisfactory to have any of the toys mentioned in this book made as individual projects, they are here offered as suitable group projects or production projects, and it is hoped that the suggested form of shop organization for production work as treated in Part I is flexible enough so that the plan can be applied to most any shop conditions.
While it's perfectly fine to make any of the toys mentioned in this book as individual projects, they are presented here as suitable group or production projects. We hope that the suggested form of shop organization for production work discussed in Part I is flexible enough to be applied to most shop conditions.
The drawings of toys in Part II will suggest a variety of articles which may be used in carrying out the production work.
The drawings of toys in Part II will suggest a range of items that can be used to carry out the production work.
Of course, the success of organizing and conducting classes for this kind of work depends largely upon the instructor. He must know definitely what he is trying to get done. He must adopt and pursue such methods of dealing with both the members of the class and the material as will contribute directly towards the desired end.
Of course, the success of organizing and running classes for this kind of work largely depends on the instructor. They must clearly understand what they are aiming to accomplish. They must adopt and pursue methods of engaging with both the students and the material that will directly contribute to achieving the desired outcome.
Toy making carried on by the so-called productive plan, if handled properly, will bring out many of the essentials of an organization typical of the commercial industries. Together with its educational possibilities and its power to attract the attention of those engaged in this activity, toy making will rightfully take its place alongside other important subjects offered in a complete industrial arts course.
Toy making, when approached through the productive plan and managed well, can reveal many key elements of an organization typical of commercial industries. Along with its educational potential and its ability to engage those involved in this activity, toy making deserves its rightful position alongside other important subjects included in a comprehensive industrial arts course.
The author wishes to acknowledge his[Pg 4] indebtedness to William E. Roberts, supervisor of manual training, Cleveland Public Schools, for valuable suggestions and inspiration; to Joseph A. Shelley, Jersey City, N. J., for suggestions on finishing kiddie car wheels; to the Eclipse Air Brush Company, Newark, N. J., for valuable information and photographs of air brush equipment; and to the American Wood Working Machinery Co., for the use of the illustrations showing the operation of the turning lathe, universal saw, and other woodworking machines.
The author would like to thank[Pg 4] William E. Roberts, the manual training supervisor at Cleveland Public Schools, for his valuable suggestions and inspiration; Joseph A. Shelley from Jersey City, N.J., for his input on finishing kiddie car wheels; the Eclipse Air Brush Company in Newark, N.J., for their helpful information and photos of airbrush equipment; and the American Wood Working Machinery Co. for allowing the use of the illustrations that demonstrate the operation of the turning lathe, universal saw, and other woodworking machines.
Cleveland, Ohio, 1921.
Cleveland, Ohio, 1921.
D. M. Mitchell
D. M. Mitchell
CONTENTS
PART I
Toy Making Operations
| __A_TAG_PLACEHOLDER_0__ Productive Work | 11 |
| 1. Suggested plan for shop organization. 2. Grouping of students. 3. The time clerk and tool-room clerk. 4. Recording attendance. 5. Time cards. 6. Using time card. 7. Grading students. 8. Preliminary discussion and preparation for shopwork. 9. Bazaars, toy sales, etc. | |
| __A_TAG_PLACEHOLDER_0__ Coloring Toys | 21 |
| 10. Sanitation emphasized. 11. Preparation of surfaces. 12. Application of water colors. 13. Analine water stains. 14. Formulas for analine water stains. 15. Oil stains. 16. Shellacking. 17. Varnishing. 18. Points on Varnishing. 19. Colored varnish. 20. Another suggestion for finishing. 21. Use of paint. 22. Ingredients of good paint. 23. Application of paint. 24. Preparation of surface. 25. Tinting materials. 26. Mixing paints. 27. Paint formulas. 28. Formulas for making tinted paint. 29. Enameling. 30. The dipping method. 31. Polishing by tumbling. 32. Care of brushes. 33. Paint application by means of compressed air. 34. Uses of pneumatic sprayers. 35. Construction of pneumatic painting outfit. 36. Special attachments for different surfaces. 37. Cleaning pneumatic machines. 38. Directions for cleaning machine. 39. Directions for operating pneumatic equipment. 40. Preparing colors. | |
| __A_TAG_PLACEHOLDER_0__ Common Woods Used for Making Toys | 42 |
| 41. Economy in selecting material. 42. Qualities of different woods used. | |
| __A_TAG_PLACEHOLDER_0__ Use of Jigs and Fixtures | 43 |
| 43. Value of jigs and fixtures. 44. Cutting small wheels. 45. Turning wheels. 46. Use of wheel cutter. 47. Use of coping saw. 48. Cutting sharp corners. 49. Removing the saw-blade from frame. 50. Making heavy wheels. 51. Designs for wheels. 52. Cutting wheels on band-saw. 53. Boring holes in wheels. | |
| __A_TAG_PLACEHOLDER_0__ Woodworking Machines Operation | 54 |
| 54. Importance of machine operations. 55. Operating the lathe. 56. Face plate turning. 57. The universal saw. 58. The hand jointer. 59. The sander. |
PART II
Toy Designs
| PAGE | ||
| Plate | 1. Fox and Geese Game | 64 |
| " | 2. Ring Toss | 65 |
| " | 3. Baby's Cart | 66 |
| " | 4. Hay Cart | 67 |
| " | 5. Horse Head | 68 |
| " | 6. Horse on Wheels | 69 |
| " | 7. Kido Kar Trailer | 70 |
| " | 8. Auto Roadster | 71 |
| " | 9. Auto Racer | 72 |
| " | 10. Passenger Car | 73 |
| " | 11. Milk Wagon | 74 |
| " | 12. Table for Doll House | 75 |
| " | 13. Chair and Rocker | 76 |
| " | 14. Buffet | 77 |
| " | 15. Toy Wheel-Barrow | 78 |
| " | 16. Horse Barrow | 79 |
| " | 17. Doll's Carriage | 80 |
| " | 18. Noah's Ark | 81 |
| " | 19. "Bean Bag" Game Board | 82 |
| " | 20. Child's Swing No. 1 | 83 |
| " | 21. Child's Swing No. 2 | 84 |
| " | 22. Doll's Bed, No. 1 | 85 |
| " | 23. Doll's Bed, No. 2 | 86 |
| " | 24. Adjustable Stilts | 87 |
| " | 25. Scooter | 88 |
| " | 26. Steering Coaster | 89 |
| " | 27. Kido Kar | 90 |
| " | 28. Kid Kar Junior | 91 |
| " | 29. Pony Kar | 92 |
| " | 30. Duplex Speedster | 93 |
| " | 31. Rock-a-Doodle | 94 |
| " | 32. Sled | 95 |
| " | 33. "Sturdy Flyer" Sled | 96 |
| " | 34. Ducky Loo | 97 |
| " | 35. Duck Rocker | 98 |
| " | 36. Jitney | 99 |
| " | 37. Junior Roadster | 100 |
| " | 38. Details of Junior Roadster | 101 |
| " | 39. Senior Coaster | 102 |
| " | 40. Details of Senior Coaster | 103 |
| " | 41. Auto-Kar | 104 |
| " | 42. Choo-Choo-Kar | 105 |
| " | 43. Teeter-Totter | 106 |
| " | 44. Teeter Rocker | 107 |
| " | 45. Checker Board | 108 |
| " | 46. Child's Costumer | 109 |
| " | 47. Baby's Chair | 110 |
| " | 48. Children's Sand Box | 111 |
| " | 49. Sand Box No. 2 | 112 |
| " | 50. Doll's House No. 1 | 113 |
| " | 51. Doll's House No. 2 | 114 |
| " | 52. Doll's House No. 2 | 115 |
| " | 53. Dumb Bell & Indian Club | 116 |
| " | 54. Bats | 117 |
SUGGESTIONS TO TEACHERS
Where the work is to be done on the so-called productive basis, it is of utmost importance that, before starting, the classes should be so organized as to allow the work to be carried on in the most efficient, progressive manner. The form of shop organization suggested in this book is recommended. However, the instructor may, particularly if he has had good practical shop experience, employ other methods of organization that are just as good and possibly even better for his particular class and the conditions under which he has to work.
Where the work is to be done on a productive basis, it's essential that, before starting, the classes are organized in a way that allows the work to be carried out efficiently and effectively. The type of shop organization proposed in this book is recommended. However, the instructor may, especially if they have good practical shop experience, use other organizational methods that could be just as effective, or even better, for their specific class and the conditions they are working in.
It is also of great importance that the instructor should acquaint himself with the processes involved in the making of each toy before allowing the class to begin it. This may be accomplished by the making of a sample of the contemplated project, carefully analyzing its different parts and arranging the operations in a logical sequence. This phase of the work may be done during class discussions and demonstrations at which time the different jigs and fixtures needed for progressive production may also be developed.
It is also very important for the instructor to become familiar with the processes involved in making each toy before letting the class start. This can be done by creating a sample of the planned project, closely examining its different parts, and organizing the steps in a logical order. This part of the work can take place during class discussions and demonstrations, where the various jigs and fixtures needed for efficient production can also be developed.
The different methods of coloring toys have been suggested with the hope that the student will gain a realization of the importance of finishing, from both the artistic and the practical point of view. The application of paint by means of compressed air is the latest development in the coloring of toys, and an equipment in the school shop illustrating the principles of compressed air as applied to productive finishing of toys, is a step forward in making school shops function as they should.
The various ways of coloring toys have been proposed with the expectation that students will understand the significance of finishing, from both an artistic and a practical perspective. Using compressed air to apply paint is the newest advancement in toy coloring, and having equipment in the school shop that demonstrates how compressed air can be used for finishing toys is a step forward in making school shops operate effectively.
The working drawings in this book should serve as suggestions. They have been so constructed as to be free from unnecessary technicalities, and to leave as much opportunity as possible for the exercise and development of the student's judgment.
The working drawings in this book should serve as suggestions. They've been designed to avoid unnecessary technical details and to provide as much opportunity as possible for the student to use and develop their judgment.
It will be found that toy making offers itself readily to the desired co-operation and correlation with other departments in the school. For instance, the art department may aid with the designing and color scheme to be used on toys; the general metal shop may help in the making of necessary metal parts: the mechanical [Pg 8] drawing department can co-operate in the making of working drawings; the mathematics department can figure the costs of production, etc., etc.
It turns out that toy making easily lends itself to collaboration and connection with other school departments. For example, the art department can help with designing and choosing colors for the toys; the general metal shop can assist in creating the necessary metal parts; the mechanical [Pg 8] drawing department can work on generating working drawings; and the mathematics department can calculate production costs, and so on.
It is hoped that the purpose of this book is not merely to set forth a few plans and drawings for the construction of toys, but to give the work the broadest possible application; creating a constructive influence on the minds of the students, in which case it will also act as a means of bringing into closer relationship their life outside of school with the work in school.[Pg 9]
It is hoped that the purpose of this book is not just to present a few plans and designs for building toys, but to provide the widest possible application; fostering a positive influence on the minds of students, thereby also serving as a way to connect their lives outside of school with their work in school.[Pg 9]

PART I
Toy Making Operations
CHAPTER I
Effective Work
1. Suggested Plan for Shop Organization.—While it is entirely satisfactory to have any of the toys mentioned in this book made as individual projects, they are here offered as suitable group projects or production projects. Production work may be defined as work done by a class to turn out a number of similar projects that have a marketable value, with the aid of jigs, fixtures, and other means of duplication, illustrating the industrial or practical application to the tasks in hand, Figs. 1, 2, and 3. This does not mean, however, that the school shops be transformed into a factory in the full sense of the word. It should differ from a factory in that the education of the student is the major part of the product, while in the factory production is the foremost aim.
1. Suggested Plan for Shop Organization.—While it’s perfectly fine to have any of the toys mentioned in this book made as individual projects, they are presented here as suitable group projects or production projects. Production work can be defined as work done by a class to create a number of similar projects that have market value, using jigs, fixtures, and other duplication methods, demonstrating the industrial or practical application of the tasks at hand, Figs. 1, 2, and 3. However, this doesn’t mean that the school shops should be turned into a factory in the traditional sense. It should be different from a factory in that the education of the student is the primary product, whereas in a factory, production is the main goal.
In doing work by the productive plan two important problems will present themselves at the outset; first, the time element; and second, industrial or practical application to the tasks in hand.
In following the productive plan, two important issues will arise at the beginning: first, the time factor; and second, the practical application of industrial tasks at hand.
A brief explanation of the plan of organization in one of the author's classes will attempt to show how nearly these problems can be solved.
A short explanation of the organizational plan in one of the author's classes will try to demonstrate how closely these issues can be resolved.

2. Grouping of Students.—Classes are divided into groups of between four and six boys, with a boy foreman appointed at the head of each group. The foreman is held responsible for the work turned out by his boys. He is to see that they understand just what is to be done and how it is to be done. All the group foremen are directly responsible to the general foreman who in turn is responsible to the instructor. The [Pg 12]general foreman is to act as an inspector of finished work after it has received the group foreman's O.K. He is also held responsible for the condition of the shop during his class hour. This includes looking after all material, the manner in which stock is put away after class, and adherence to all shop rules that have been adopted to help in the efficiency of shop procedure.
2. Grouping of Students.—Classes are divided into groups of four to six boys, with a boy in charge as the foreman of each group. The foreman is responsible for the work produced by his group. He must ensure that they understand what needs to be done and how to do it. All group foremen report directly to the general foreman, who in turn answers to the instructor. The [Pg 12]general foreman acts as an inspector of the completed work once it has been approved by the group foreman. He is also responsible for the state of the shop during class time. This includes managing all materials, how supplies are stored after class, and making sure that all shop rules designed to improve the efficiency of shop operations are followed.

3. The Time Clerk and Tool-Room Clerk.—A "Time Clerk" is appointed to take charge of the time cards. He is also held responsible for all the clerical work that is to be done in the shop.
3. The Time Clerk and Tool-Room Clerk.—A "Time Clerk" is assigned to manage the time cards. He is also responsible for all the clerical tasks that need to be completed in the shop.
A Tool-Room Clerk is appointed to take charge of the shop tool room. He is to keep check of all tools given out and taken in. His spare time should be devoted to the care of tools.
A Tool-Room Clerk is assigned to manage the shop tool room. He is responsible for tracking all tools that are checked out and returned. His free time should be focused on maintaining the tools.
If possible, each boy in the class should be given an opportunity to act in each capacity that has been created, so that he may get the most varied experience in shop procedure. This will necessitate the changing of boys from one[Pg 14] group to another; the changing of foremen, clerks, etc., at intervals which will of course be governed by the size of the class and the number of hours devoted to the work.
If possible, each boy in the class should have the chance to try out every role that's been set up, so he can gain the most diverse experience in shop procedures. This will require moving boys from one[Pg 14] group to another and rotating positions like foremen, clerks, etc., at intervals that will depend on the size of the class and the number of hours dedicated to the work.


4. Recording Attendance.—Boys, upon entering the shop, register their presence at the Time-Card Rack, Fig. 4. This is done by turning the time card shown in Fig. 5, so that the back side, which has the word present printed at top, is exposed. The time clerk then inspects the cards and notes those that have not been turned, and records the absences. He then fills in the date and passes the cards out to the boys in the shop. Toward the latter part of the period, a few minutes time is given the boys to fill in the necessary data on the time card.[Pg 15]
4. Recording Attendance.—When the boys arrive at the shop, they check in at the Time-Card Rack, Fig. 4. They do this by flipping the time card shown in Fig. 5, so the back side, which says "present" at the top, is visible. The time clerk then looks over the cards and notes any that haven’t been flipped, recording the absences. He also fills in the date and hands the cards out to the boys in the shop. Towards the end of the period, a few minutes are allowed for the boys to complete the necessary information on the time card.[Pg 15]
The time cards are then collected by the time clerk and put into a box where the time cards of all the classes are kept. In the meantime the time clerk puts back into the time rack the cards of the incoming class. This duty is performed by the time clerks of all the classes, thereby necessitating the use of only one time card rack.
The time cards are collected by the time clerk and placed in a box where all the class time cards are stored. Meanwhile, the time clerk returns the cards of the incoming class to the time rack. This task is carried out by the time clerks of all the classes, which is why only one time card rack is needed.
5. Time Cards.—Referring to the time card mentioned in Fig. 5 it will be seen that the workman's shop number is filled in at the top. Then under the heading of "Woodworking Department" are two horizontal rows of items which need very little explanation. Following are three columns headed "Operation," "Assignment," and "Time." Below the word "Operation" are set down the various operations undertaken in the woodworking department, with several vacant spaces provided where other and special operations can be filled in. It will also be noticed that "Operations" are divided into two kinds, machine work and bench work. The instructor's glance at the time card will tell him at once what phase of the work the boy has been employed in and will help him in apportioning the work so that the boy is offered a varied experience.[Pg 16]
5. Time Cards.—Looking at the time card shown in Fig. 5, you’ll notice that the worker’s shop number is entered at the top. Under the "Woodworking Department" heading, there are two horizontal rows of items that don’t require much explanation. Following that, there are three columns labeled "Operation," "Assignment," and "Time." Below "Operation," the various tasks in the woodworking department are listed, with some empty spaces for any additional or special tasks that might be added. You’ll also see that "Operations" are categorized into two types: machine work and bench work. A quick look at the time card will immediately inform the instructor about which type of work the student has been doing and will assist in distributing tasks to provide the student with a range of experiences.[Pg 16]
6. Using Time Card.—For shops that are not equipped with the kind of machines marked on the illustrated card, it would be well to omit the names of machines in the "operation" column. The instructor may then fill in the operation whatever it may be.
6. Using Time Card.—For shops that don’t have the machines listed on the illustrated card, it’s best to leave out the names of machines in the "operation" column. The instructor can then write in the operation, whatever it may be.
Under the heading "Assignment" and against the operation which is to be undertaken by the student, the instructor writes in the name of the part to be made. This is the student's assignment and it should be read by him at the time he records his presence at the time-card rack upon entering the shop.
Under the heading "Assignment" and next to the task the student is required to complete, the instructor writes the name of the part to be created. This is the student's assignment, and it should be read by them when they check in at the time-card rack upon arriving in the shop.
In making assignments, the instructor may find it rather difficult to keep up with large classes of boys. This difficulty may be overcome by making an assignment to an entire group instead of to each boy. For example, in a class of twenty-five that would probably be divided into five groups, the instructor may make the assignment to the foreman of each group and each foreman in turn can inform the boys of his group as to the nature of the assignment. The boys can then enter the assignment on their time cards at the end of the period when the time spent on the job at hand is also recorded.
In assigning tasks, the instructor may find it quite challenging to manage large classes of students. This issue can be resolved by assigning work to a whole group instead of each individual. For instance, in a class of twenty-five that is likely divided into five groups, the instructor can assign the task to the leader of each group, who can then explain the assignment to the members of his group. The students can then log the assignment on their time cards at the end of the period, when the time spent on the task at hand is also recorded.

The student's shop number, name, and grade should be filled in by the time clerk who can get out a number of cards for each student in advance and these are kept ready for use by the instructor. The instructor can then mark the project and the job number together with the student's assignment. At the same time he estimates the journeyman's time and rate and enters them in the space provided.
The student's shop number, name, and grade should be filled out by the time clerk, who can prepare several cards for each student in advance. These cards are kept ready for the instructor's use. The instructor can then mark the project and job number along with the student's assignment. At the same time, they estimate the journeyman's time and rate and enter them in the designated space.
The time card in Fig. 5, is 3½ inches by 9 inches, made of three-ply bristol board. All worker's cards are printed on white colored bristol while those of the foremen are of blue colored bristol. This plan is for the instructor's convenience to be able to pick out the foremen's time cards at a glance.
The time card in Fig. 5 is 3½ inches by 9 inches, made of three-ply bristol board. All workers' cards are printed on white bristol, while the foremen's cards are on blue bristol. This design helps the instructor easily identify the foremen's time cards at a glance.
In the triple column under the heading "TIME" is provided room for the date and spaces in which the student can write the time in minutes spent on the various operations on that date. The triple columns on each side of the card allow of the cards being used for six days. If a job lasts longer than six days another card should be used marking them No. 1 and[Pg 17] No. 2, respectively, in the space marked "Card No." Both cards should be fastened and kept together.
In the three-column section under the heading "TIME," there's space for the date and areas where the student can write down the time in minutes spent on various tasks for that date. The three columns on each side of the card make it possible to use the cards for six days. If a job takes longer than six days, another card should be used, marking them No. 1 and [Pg 17] No. 2 in the space labeled "Card No." Both cards should be attached and kept together.
Effort should always be made to have all the assignments short (less than six days) so that the student's record may be computed at the end of each week by the time clerk.
Effort should always be made to keep all the assignments short (less than six days) so that the student's record can be updated at the end of each week by the time clerk.
7. Grading Students.—The next four spaces contain in condensed form, the information itemized in other parts of the card. This, together with other information set down by the instructor, is the vital material sought for.
7. Grading Students.—The next four sections summarize the information listed in other parts of the card. This, along with additional information provided by the instructor, is the essential material needed.
The item A "Journeyman's Time" is very easily recorded by the instructor. It is arrived at in the same way as in making out the estimate for any piece of work and can be recorded almost at once. The main purpose here is to set for the student a standard of time on which to work.
The item A "Journeyman's Time" is very easy for the instructor to record. It’s calculated in the same way as creating an estimate for any job and can be noted down almost immediately. The main goal here is to establish a time standard for the student to follow.
The item B is the rate in points per hour, based on the journeyman's time.
The item B is the points-per-hour rate, based on the journeyman's time.
The item C is the total of the student's time added together from the various spaces under "Time."
The item C is the total of the student's time combined from the different sections under "Time."
Item D "Quality Decimal" is the quality of the student's job expressed in the form of a[Pg 18] decimal, with 100% as the maximum. This mark should be filled in by the instructor when the student completes his job.
Item D "Quality Decimal" is the quality of the student's work expressed as a [Pg 18] decimal, with 100% being the highest score. This score should be filled in by the instructor when the student finishes their work.
The next item, the number of points the student earns is found by the formula Points = (A×B)D
The next item, the number of points the student earns, is determined by the formula Points = (A×B)D
| Points earned per hour = | (A×B)D C |

For example, a student receives an assignment to cut to thickness, width, and length, sixty chair legs. The size of the legs he is to get from the job blueprint. He spends 60 minutes a day, for three days, making a total of 180 minutes or 3 hours. The time it would take a journeyman to do the same job is estimated at 2 hours. The rate adopted is at 80 points per hour; the journeyman therefore earns A×B = 2×80 = 160 Points. The quality of the student's job is graded by the instructor as 75%. The number of points the student earns is found by the formula Points = (A×B)D = (2×80).75 = 120 Points. To find the number of points the student earns per hour, divide 120 points by the number of hours it took the student to complete the job, which equals 120 ÷ 3 = 40, the number of points the student earns per hour. However, if the student would be graded 100%, he would earn the same number of points as the journeyman. But of course, he would have done it in three hours where the journeyman has earned[Pg 19] the same number of points in two hours. It will readily be seen that this scheme offers the student an everlasting incentive to equal the journeyman's record.
For example, a student gets an assignment to cut sixty chair legs to specific thickness, width, and length. The dimensions of the legs come from the job blueprint. He spends 60 minutes a day for three days, totaling 180 minutes or 3 hours. A journeyman is estimated to complete the same job in 2 hours. The rate used is 80 points per hour, so the journeyman earns A×B = 2×80 = 160 Points. The instructor grades the quality of the student's work at 75%. The number of points the student earns is calculated using the formula Points = (A×B)D = (2×80)×0.75 = 120 Points. To find the number of points the student earns per hour, divide 120 points by the number of hours it took the student to complete the job, which equals 120 ÷ 3 = 40, the number of points the student earns per hour. However, if the student were graded 100%, he would earn the same number of points as the journeyman. But, of course, he would have taken three hours while the journeyman earned[Pg 19] the same number of points in two hours. It will be clear that this system gives the student a constant incentive to match the journeyman's record.
Having obtained the points on the time card or assignment card as it may be called, these are then transferred to a monthly accomplishment sheet as shown in Fig. 6, which is provided for all the students in all classes.
Having collected the points from the time card, or assignment card as it may be called, these are then entered onto a monthly accomplishment sheet as shown in Fig. 6, which is provided for all students in all classes.
The total number of points for each boy, group, and class can then be easily obtained. These totals can be put up in poster form and hung on the shop's bulletin board, showing the standing of each boy, group, and class. It is surprising the amount of interest and competition that can be aroused; everyone working for the highest honors, unconsciously, with a competitive spirit that will bring out considerable thought and effort to the matter of handling material for maximum production.
The total number of points for each boy, group, and class can be easily gathered. These totals can be displayed in poster form and posted on the shop's bulletin board, showing the ranking of each boy, group, and class. It's surprising how much interest and competition this can generate; everyone strives for the highest honors, driven by a competitive spirit that encourages significant thought and effort in managing materials for maximum production.
8. Preliminary Discussion and Preparation for Shopwork.—Of course, no time card or assignment-record scheme can hope entirely to eliminate the necessary preliminary discussions and preparation. The author has found it of material help to meet the foremen of all the classes at hours other than their regular class hour and discuss such topics as "Securing Cooperation," "Instructing Workers," "Maintaining Cleanliness and Order," "Records and Reports," "Inspecting Work," "Routing Material Thru Shop," "Care of Stock," etc.
8. Preliminary Discussion and Preparation for Shopwork.—Of course, no time card or assignment tracking system can completely eliminate the need for preliminary discussions and preparation. The author has found it very helpful to meet with the foremen of all the classes at times outside of their regular class hour and discuss topics like "Securing Cooperation," "Instructing Workers," "Maintaining Cleanliness and Order," "Records and Reports," "Inspecting Work," "Routing Material Through the Shop," "Care of Stock," etc.
Details regarding construction and assembling should be worked out by the instructor beforehand, and also developed with the class as the work progresses. Care should be taken that plans are carefully made regarding the storage of stock and unfinished parts.
Details about construction and assembly should be figured out by the instructor in advance and also discussed with the class as the project moves forward. It’s important to make careful plans for the storage of materials and unfinished parts.
The old saying, "An ounce of prevention is worth a pound of cure," is an old one, but a good one.
The old saying, "An ounce of prevention is worth a pound of cure," may be ancient, but it still holds true.
9. Bazaars, Toy Sales, Etc.—The plan of selling toys, that are made in the school shop, to the boys and girls of the school is a plausible one. It can very easily be accomplished in the form of bazaars, exhibitions, or school toy sales.
9. Bazaars, Toy Sales, Etc.—The idea of selling toys made in the school shop to the students is a good one. It can be easily done through bazaars, exhibitions, or school toy sales.
The writer has had a number of samples of different toys made and put on exhibition, and orders taken, requiring a deposit on each order. These were then turned in to the shop department and the toys made on the productive plan.[Pg 20]
The writer had several samples of different toys made and displayed, taking orders that required a deposit for each. These orders were then sent to the shop department, and the toys were produced according to the production plan.[Pg 20]
The boys in the shop would receive school checks, Fig. 7, for the total number of points that they earned for the semester. These checks could then be used by them towards the purchasing of any of the toys that were put on sale; a certain number of points required for the purchase of different toys.
The boys in the shop would get school checks, Fig. 7, for the total number of points they earned for the semester. They could then use these checks to buy any of the toys that were on sale; a specific number of points was needed for the purchase of different toys.

This plan was made possible by adding on to the number of orders received an additional number equal to the number of boys in the shop. For example, twenty-four orders for toy milk wagons were received by a class of twenty-four boys. Then instead of making twenty-four toy milk wagons we doubled the number and made forty-eight of them. The price that was figured on for the twenty-four orders would more than cover the cost of material for the other twenty-four articles that the boys would be able to buy with their earned checks.
This plan was made possible by adding the number of orders received to an extra amount equal to the number of boys in the shop. For example, if a class of twenty-four boys received twenty-four orders for toy milk wagons, instead of making just twenty-four, we doubled the number and made forty-eight. The price calculated for the twenty-four orders would more than cover the cost of materials for the additional twenty-four items that the boys could buy with their earned checks.
CHAPTER II
Coloring Toys
10. Sanitation Emphasized.—All application of color to toys should carry with it a realization that toys are meant primarily for children and that all paints should therefore be free from poisonous compounds.
10. Sanitation Emphasized.—Any use of color on toys should recognize that toys are mainly for children, and all paints should be free of harmful chemicals.
All paints used should be of good quality so that it will not come off easily to discolor the hands or tongues of children who cannot resist the temptation of sticking everything possible into their mouths.
All paints used should be high quality so they won't easily come off and stain the hands or mouths of children who can't resist the urge to stick everything they can into their mouths.
11. Preparation of Surfaces.—Wooden toys may be finished quite bright and in various colors.
11. Surface Preparation.—Wooden toys can be finished to a high shine and in a variety of colors.
Before applying the color it is absolutely necessary that every part of the toy has been thoroly sanded. Where sanding is done by machine, care should be taken not to sand the wood too much. Many difficulties may arise from too much as well as from too little sanding. In hand sanding, the use of a block 2½" × 3½", to which is glued a piece of cork, is recommended.
Before applying the color, it’s crucial that every part of the toy has been thoroughly sanded. When sanding is done by machine, be careful not to sand the wood too much. A lot of issues can come from both excessive and insufficient sanding. For hand sanding, it’s recommended to use a block that measures 2½" × 3½", to which a piece of cork is glued.
12. Application of Water Colors.—Toys may be colored by the use of different materials and by various methods. Kalsomine colors, opaque water colors, variously known as show card colors, liquid tempera, and letterine,—all come under the heading of water colors. All but the kalsomine may be obtained in small jars and ready for use. Kalsomine colors come in powder form in various colors and may easily be prepared by mixing with water and a little glue to bind the parts together. They are much cheaper than the ordinary forms of transparent and opaque water colors. They may be applied with the ordinary water color brushes.
12. Using Water Colors.—Toys can be colored using different materials and methods. Kalsomine colors, opaque water colors also known as show card colors, liquid tempera, and letterine all fall under the category of water colors. All except for kalsomine are available in small jars and ready to use. Kalsomine colors come in powder form in various shades and can be easily mixed with water and a little glue to hold the parts together. They are much cheaper than regular transparent and opaque water colors. You can apply them with regular water color brushes.
After a coat of water color has been applied to the toy, it may be necessary to remove the rough parts with very fine sand paper. Care should be taken not to "cut thru" when sanding.
After applying a coat of watercolor to the toy, you might need to smooth out the rough parts with very fine sandpaper. Be careful not to "cut through" while sanding.
To preserve and protect the water color on the toy a coat of white shellac may be applied. If a more durable finish is desired a coat of good clear varnish over the shellac will serve the purpose.[Pg 22]
To keep the color of the water on the toy intact, you can apply a layer of white shellac. If you want a more long-lasting finish, putting a coat of good clear varnish over the shellac will do the job.[Pg 22]
13. Analine Water Stains.—For general finishing of toys analine water stains will produce excellent results. They are known for their ability to penetrate the wood deeply and the ease with which any shade can be produced. Water stain raises the grain of the wood more than any other. This makes it necessary to sandpaper down the raised grain until smooth and then proceed with the shellacking and varnishing until the desired results are obtained.
13. Analine Water Stains.—For finishing toys, analine water stains work really well. They're great because they soak into the wood deeply and you can easily create any shade you want. Water stains cause the wood grain to rise more than anything else. This means you need to sand down the raised grain until it's smooth and then continue with shellacking and varnishing until you achieve the desired results.
In preparing analine water stains, only analines that are soluble in water are used. Place an ounce of the analine to a quart of hot or boiling water, pouring the water over the dye-stuff and stirring meanwhile with a wooden paddle or stick. Soft water is the best. In about an hour the dye may be filtered thru a piece of fine woven cloth. As metal is apt to discolor the dye, it is better to use a glass container. If the prepared solution is too strong it may be diluted in more water. Use hot water for diluting the stain.
In making water-based aniline stains, only anilines that dissolve in water should be used. Mix one ounce of aniline with a quart of hot or boiling water, pouring the water over the dye while stirring with a wooden paddle or stick. Soft water works best. After about an hour, the dye can be filtered through a piece of fine cloth. To avoid discoloration from metal, it's better to use a glass container. If the solution is too concentrated, it can be diluted with more water. Use hot water for diluting the stain.
The work with water stain must be done quickly in order to obtain a uniform coloring on the surface. Water stains are used a great deal where the dipping process is employed in the finishing of toys. A hot dipping stain is preferable to a cold dipping stain, first, because it penetrates more readily and second, because it dries quicker.
The work with water stains needs to be done quickly to achieve an even color on the surface. Water stains are commonly used in the dipping process for finishing toys. A hot dipping stain is better than a cold dipping stain, mainly because it soaks in more easily and dries faster.
14. Formulas for Analine Water Stains.—(Stock Solutions).
14. Formulas for Aniline Water Stains.—(Stock Solutions).
Red: Rose benzol five parts, water ten parts.
Red: 5 parts rose benzol, 10 parts water.
Rose Red: Dissolve 3 oz. Rose Bengal in 5 pints of water.
Rose Red: Mix 3 oz. of Rose Bengal into 5 pints of water.
Blue: (a) Dissolve 1 oz. of the best indigo carmine in 8 oz. of water. (b) Prussian blue dissolved in water.
Blue: (a) Mix 1 oz. of high-quality indigo carmine in 8 oz. of water. (b) Prussian blue mixed with water.
Dark Blue: Dissolve 3 oz. Bengal blue in 3½ pints of boiling water, and stir and filter the fluid in ten minutes time.
Dark Blue: Dissolve 3 oz. Bengal blue in 3½ pints of boiling water, then stir and filter the mixture after ten minutes.
Green: Mix Prussian blue and raw sienna in such proportions as will give the desired color. Mix in water.
Green: Combine Prussian blue and raw sienna in the right amounts to achieve the desired color. Add water to mix.
Brown: Dissolve 3 oz. of Bismark brown in ½ gal. of water.
Brown: Mix 3 oz. of Bismark brown into ½ gallon of water.
Yellow: Auramine 4 parts, sulphate of soda 10 parts, mixed in water.
Yellow: Auramine 4 parts, sodium sulfate 10 parts, mixed in water.
Black: Nigrosine black, four ounces, dissolved in one gallon of boiling water.
Black: Four ounces of nigrosine black, dissolved in one gallon of boiling water.
When wanted for use, these analines may be[Pg 23] diluted with water. The rule is, an ounce of analine to the gallon of water to form a working stain. Or to a pint of the stock solution, as it is called, you may add three pints of water.
When you want to use these analines, you can dilute them with water. The guideline is to use an ounce of analine for every gallon of water to create a working stain. Alternatively, you can mix three pints of water with a pint of the stock solution, as it's called.
15. Oil Stains.—It will be found that quicker work can be done with oil stain than with water colors. For that reason, oil stains are also used a great deal as a dipping stain. In preparing oil stains, the best mineral or earth pigments to dissolve with turpentine are Van Dyke brown, chrome green, burnt and raw sienna, and lamp black.
15. Oil Stains.—You'll find that oil stains work faster than watercolors. Because of this, they are often used as dipping stains. When making oil stains, the best mineral or earth pigments to mix with turpentine are Van Dyke brown, chrome green, burnt and raw sienna, and lamp black.
16. Shellacking.—There are two kinds of shellac, orange and white. The white shellac is orange shellac that has been bleached. The purpose of shellac as commonly understood is to give a quick coat over the stain. The thin coat formed serves as a protector for the stain and also as an undercoater for the following coat of varnish. In this way at least one coat of varnish is eliminated and a great deal of time saved because the shellac dries within a few minutes. To thin shellac use denatured alcohol.
16. Shellacking.—There are two types of shellac, orange and white. White shellac is just orange shellac that has been bleached. The main purpose of shellac is to quickly coat over the stain. The thin layer it creates protects the stain and also acts as a primer for the next layer of varnish. This means you can skip at least one coat of varnish and save a lot of time since shellac dries in just a few minutes. To thin shellac, use denatured alcohol.
On cheaper toys a coat of shellac only may be used as a covering for the color stain. If orange shellac is used it will be found that it effects the color of the stain used. White shellac also produces a slight change in color and for this reason many working with toys will use a good clear varnish instead.
On cheaper toys, a layer of shellac may be used as a coating for the color stain. If orange shellac is used, it will affect the color of the stain. White shellac also slightly alters the color, which is why many people working with toys prefer to use a good clear varnish instead.
17. Varnishing.—Two or three coats of varnish will produce a very durable finish. The first coat of varnish ought not be quite as heavy as the succeeding coats. If the varnish is of extra heavy body it should be reduced slightly for the first coat. The best varnish reducer is thin varnish. To prepare this reducer, take one part varnish (the same varnish to be reduced), and two parts of turpentine. Shake these together well and let stand twenty-four hours before using. This will reduce the consistency of the varnish without tearing down the body as pure turpentine would. The first coat of varnish should be allowed to dry thoroly before the second coat is applied.
17. Varnishing.—Two or three coats of varnish will create a very durable finish. The first coat of varnish shouldn't be as heavy as the subsequent coats. If the varnish is really thick, it should be thinned out a bit for the first coat. The best varnish thinner is thin varnish. To make this thinner, mix one part varnish (the same varnish that needs thinning) with two parts turpentine. Shake them together well and let it sit for twenty-four hours before using. This will thin out the varnish without affecting its quality like pure turpentine would. The first coat of varnish should be allowed to dry completely before applying the second coat.
Oil varnishes made from good hard gums, pure linseed oil, and turpentine, are the most valuable. In using turpentine to thin varnish care should be taken that adulterated turpentine is not used. To play the game safe it is advisable to use a little benzine, for it will not injure the varnish, but will evaporate entirely,[Pg 24] and not flatten the varnish as turpentine does.
Oil varnishes made from quality hard resins, pure linseed oil, and turpentine are the most valuable. When using turpentine to dilute varnish, it's important to ensure that you don't use adulterated turpentine. To play it safe, it's better to use a small amount of benzene, as it won't harm the varnish, will evaporate completely,[Pg 24] and won't make the varnish flat like turpentine does.
18. Points on Varnishing.—(1) The less varnish is worked under the brush the better its luster. (2) Use clean brush and pot, and clean varnish. See that the surface is clean before beginning to varnish. (3) Allow a coat of varnish plenty of time for drying until it becomes hard.
18. Points on Varnishing.—(1) The less you work the varnish with the brush, the better the shine. (2) Use a clean brush and container, and make sure the varnish is clean. Ensure the surface is clean before you start varnishing. (3) Give each coat of varnish enough time to dry until it’s hard.
19. Colored Varnish.—Colored varnish is that in which a proportion of varnish is added to the pigment and thinned. The base is usually an earth color such as ochre, sienna, venitian red, Van Dyke brown, umber, lamp black, etc.
19. Colored Varnish.—Colored varnish is when a certain amount of varnish is mixed with the pigment and thinned out. The base is typically an earthy color like ochre, sienna, Venetian red, Van Dyke brown, umber, lamp black, etc.
With this the work can be done in one coat. This method of finishing is usually employed on the cheaper class of toys where it isn't advisable to apply an expensive finish.
With this, the job can be completed in one coat. This finishing method is typically used on lower-cost toys where it's not practical to use an expensive finish.
20. Another Suggestion for Finishing.—Tint a gallon of benzine or gasoline with chrome green, chrome yellow, and vermilion, ground in Japan until the desired shade is obtained. This formulae is especially good for dipping purposes.
20. Another Suggestion for Finishing.—Color a gallon of benzine or gasoline with chrome green, chrome yellow, and vermilion, ground in Japan, until you achieve the desired shade. This formula is particularly effective for dipping purposes.
21. Use of Paint.—Although paint can be bought ready prepared and in any color, as has been stated, it is advisable to have the students mix their own colors and choose their own color scheme.
21. Use of Paint.—Even though you can buy paint that’s already mixed and in any color, as mentioned before, it’s a good idea for students to mix their own colors and pick their own color scheme.
22. Ingredients of good Paint.—The best paints are usually made by mixing together white lead, linseed oil, pigment of the desired color (colors ground in oil), and a drier.
22. Ingredients of good Paint.—The best paints are typically made by mixing white lead, linseed oil, the pigment of the desired color (colors ground in oil), and a drier.
While white lead is sufficient as the pigment for white paint, a better result is obtained by mixing zinc oxide with the white lead. These two substances have the convenient property of balancing each other's disadvantages. For instance, zinc oxide has a tendency to crack and to peal, which is overcome by the tougher coating formed by the white lead. Again, when white lead is exposed to light and weathering, it becomes chalky, which fault is remedied by the property possessed by zinc oxide, of remaining hard.
While white lead is good enough as the pigment for white paint, a better result comes from mixing zinc oxide with the white lead. These two materials balance out each other's downsides. For example, zinc oxide tends to crack and peel, but this is countered by the tougher coating created by white lead. Additionally, when white lead is exposed to light and the elements, it becomes chalky, a problem that zinc oxide addresses with its ability to stay hard.
The linseed oil used is obtained from flaxseed by pressing the thoroly ground seed. About twenty-three gallons of oil can be obtained from one bushel of the seed. By boiling the oil with lead oxide or manganese oxide it can take more oxygen from the air, and thereby its drying powers are increased.
The linseed oil used comes from flaxseed, which is extracted by pressing the finely ground seeds. Approximately twenty-three gallons of oil can be obtained from one bushel of seeds. By heating the oil with lead oxide or manganese oxide, it can absorb more oxygen from the air, which enhances its drying abilities.
Driers are substances that absorb oxygen[Pg 25] from the air and give part of it to the oil. The raw linseed oil absorbs the oxygen from the air very slowly, but the addition of turpentine is a great aid in overcoming this defect.
Driers are substances that absorb oxygen[Pg 25] from the air and transfer some of it to the oil. Raw linseed oil absorbs oxygen from the air quite slowly, but adding turpentine helps to fix this issue significantly.
To insure the best results in painting, one must first consider the kind and condition of the surface to be painted, and to what use the toy will be put; then decide on the proper composition and consistency of the paint.
To achieve the best results in painting, you first need to think about the type and condition of the surface you’re painting, and how the toy will be used; then choose the right composition and thickness of the paint.
23. Application of Paint.—In applying the paint to the toy the first coat should be thinned. This will act as a primer or undercoat for the succeeding coats of paint. Care should be taken that plenty of time is allowed between coats for the paint to dry thoroly. Three coats of paint will produce a good finish.
23. Application of Paint.—When applying paint to the toy, the first coat should be thinned out. This will serve as a primer or undercoat for the following layers of paint. Make sure to allow enough time between coats for the paint to dry completely. Three coats of paint will result in a nice finish.
24. Preparation of surface.—All woodwork must be sanded and thoroly dry before any paint is applied. Care should be taken to see that all knots and sappy streaks shall be covered with a coat of orange shellac. Then apply the first coat.
24. Preparation of surface.—All woodwork must be sanded and thoroughly dry before any paint is applied. Make sure to cover all knots and sappy streaks with a coat of orange shellac. Then apply the first coat.
After the priming coat of paint is thoroly dry, putty up all knot holes, dents, cracks, and other defects in the surface with a pure linseed oil putty composed of equal parts of white lead and whiting. When putty is dry, proceed with the other coats.
After the primer coat of paint is fully dry, fill in all knot holes, dents, cracks, and other surface imperfections with a pure linseed oil putty made of equal parts of white lead and whiting. Once the putty is dry, move on to the other coats.
25. Tinting Materials.—Formulas for making tints are to be followed only in a general way. Make some allowance for slight variations in the strength and tone of different makes of colors. Chromes and ochres vary noticeably. Weigh out your color and add it gradually, not all at once, noting the effect as you go. When you reach the desired shade, stop, regardless of what the formula calls for. Turpentine and dark driers will slightly alter shades. Make allowance for this.
25. Tinting Materials.—Follow the formulas for creating tints as a general guide. Expect some differences in strength and tone among different brands of colors. Chromes and ochres can vary quite a bit. Measure your color and add it gradually, not all at once, and pay attention to the effect as you mix. Once you achieve the shade you want, stop, regardless of what the formula suggests. Turpentine and dark driers can subtly change the shades, so keep that in mind.
26. Mixing Paints.—Faulty mixing, even with the best of materials, is not likely to make durable paint. The important thing is to give the lead and oil a chance to incorporate themselves in that close union which they always make if allowed to do so. The following directions give best results. The order is important.
26. Mixing Paints.—Poor mixing, even with top-quality materials, probably won't create long-lasting paint. The key is to let the lead and oil blend together properly, forming the close union they naturally achieve if given the opportunity. The following instructions provide the best results. The order is crucial.
(1) Break up the white lead with a paddle, using only enough oil to bring it to the consistency of colors in oil.
(1) Break up the white lead with a paddle, using just enough oil to get it to the consistency of oil paints.
(2) Add your colors for tinting. Coloring matter added after the paint has been thinned is likely to break up in lumps which leave streaks[Pg 26] when brushed out.
(2) Add your colors for tinting. Coloring materials added after the paint has been thinned are likely to clump together, leaving streaks when brushed out.[Pg 26]
(3) Put in drier.
Put in the dryer.
(4) Add remainder of oil, stirring well.
(4) Add the rest of the oil, stirring thoroughly.
(5) Last of all, put in turpentine.
Finally, add some turpentine.
Thinners help only the flow of the paint never the quality.
Thinners only improve the flow of the paint, not the quality.
To strain paint thru cheese cloth before using will be a safeguard against lumpy colors and streakiness. Paint also spreads further if strained.
To strain paint through cheesecloth before using it will help prevent lumps and streaks. Straining also allows the paint to spread more smoothly.
27. Paint Formulas.—As most toys are exposed to the weather a great deal, the following formulas are recommended. These take no account of tinting materials.
27. Paint Formulas.—Since most toys are often exposed to the elements, the following formulas are suggested. These do not consider any tinting materials.
(a) Priming Coat:
Primer Coat:
25 pounds pure white lead
1 gallon pure raw linseed oil
½ gallon pure turpentine
¼ pint drier, free from rosin
25 pounds of pure white lead
1 gallon of pure raw linseed oil
½ gallon of pure turpentine
¼ pint of drier, free from rosin
(b) Body Coat:
Body Coat:
25 pounds pure white lead
3⁄8 gallon pure raw linseed oil
3⁄8 gallon pure turpentine
¼ pint drier, free from rosin
25 pounds of pure white lead
3⁄8 gallon of pure raw linseed oil
3⁄8 gallon of pure turpentine
¼ pint of drier, free from rosin
(c) Finishing Coat:
Final Coat:
25 pounds pure white lead
1 gallon pure raw linseed oil
¼ pint pure turpentine
¼ pint drier.
25 pounds of pure white lead
1 gallon of pure raw linseed oil
¼ pint of pure turpentine
¼ pint of drier.
One must exercise his own discretion in using a larger or smaller quantity of oil according to whether the wood is oil absorbing, as white pine, poplar, and basswood, or less permeable, as yellow pine, cypress, spruce, and hemlock.
One should use their own judgment when deciding how much oil to apply, based on whether the wood absorbs oil easily, like white pine, poplar, and basswood, or is less absorbent, like yellow pine, cypress, spruce, and hemlock.
28. Formulas for Making Tinted Paint.—Any color or tint may be obtained by varying the addition of tinting colors. These tinting colors are called "colors in oil." The colors should be added to the white lead before the paint is thinned.
28. Formulas for Making Tinted Paint.—You can create any color or shade by adjusting the amount of tinting colors you add. These tinting colors are referred to as "colors in oil." Make sure to mix the colors into the white lead before thinning the paint.
To twenty-five pounds of white lead ground in oil add colors in oil as follows:
To twenty-five pounds of white lead mixed in oil, add colors in oil as follows:
| Medium Blue Slate | 3½ oz. lamp black |
| Gray Blue | ¼ oz. lamp black |
| 1 oz. Prussian blue | |
| ¼ oz. medium chrome green | |
| Dark Drab | 5 lbs. French ochre |
| ½ lb. lamp black | |
| ¼ lb. Venitian red | |
| [Pg 27] | |
| Dark Slate | 2 oz. lamp black |
| 3 oz. medium chrome yellow | |
| Dark Lilac | 1 oz. lamp black |
| 5 oz. Venitian red | |
| Lilac | ½ oz. lamp black |
| 1½ oz. Venitian red | |
| Forest Green | 1½ oz. lamp black |
| 8 lbs. light green | |
| 5 oz. medium chrome yellow | |
| Buff | 1½ lb. French ochre |
| 3⁄8 oz. Venitian Red | |
| Cream | 5 oz. French ochre |
| Sea Green | 3⁄8 oz. lamp black |
| ½ oz. medium chrome green | |
| 1¼ oz. medium chrome yellow | |
Where tinting colors are used in sufficiently large quantities to alter the consistency of the paint, add one-half as much linseed oil and turpentine, by weight, as you add tinting material.
Where tinting colors are used in large enough amounts to change the thickness of the paint, add half as much linseed oil and turpentine, by weight, as you add tinting material.
29. Enameling.—When using enamel as a finish for toys, care should be taken that the surface of the toy is in proper condition. To obtain good results proceed as follows: Give the wood a coat of shellac. Sand lightly and dust. The following coat should consist of part of white paint and one part of the enamel to be used. This coat should be slightly tinted with the finishing color, if the finishing coat is not white. Allow twenty-four hours for drying thoroly; then sand with No. OO sand paper. Next apply a coat of enamel of the color desired for the finished work. (Enamels may be tinted with colors ground in oil.)
29. Enameling.—When using enamel as a finish for toys, make sure that the surface of the toy is in good condition. To achieve the best results, follow these steps: Apply a coat of shellac to the wood. Lightly sand and dust it off. The next coat should be a mixture of part white paint and part enamel you plan to use. This coat should be slightly tinted with the final color, unless the finishing coat is white. Let it dry thoroughly for twenty-four hours; then sand it with No. OO sandpaper. After that, apply a coat of enamel in the desired finish color. (Enamels can be tinted with colors ground in oil.)
Should the enamel not work freely, add a spoonful of benzine to a gallon of enamel. Turpentine may also be used as a thinner for enamel.
Should the enamel not flow smoothly, add a spoonful of benzine to a gallon of enamel. Turpentine can also be used as a thinner for enamel.
A better finish of enamel consists of two coats of paint before applying the enamel. This gives it a stronger body and of course makes it more durable.
A better enamel finish involves applying two coats of paint before the enamel. This provides a stronger base and definitely makes it more durable.
Because of its durability and for sanitary reasons enamel is the most desirable finish for toys. Its glossy finish is attractive and very appealing to children.[Pg 28]
Because it's durable and hygienic, enamel is the preferred finish for toys. Its shiny surface is attractive and very appealing to kids.[Pg 28]
30. The Dipping Method.—When a considerable quantity of toys is to be finished, the problem to be faced will be the cost of application of the paint rather than the cost of the paint itself. The dipping process, (immersing the material to be covered) is found to be the most successful, especially in toy making, where so many small parts are used.
30. The Dipping Method.—When you have a large number of toys to finish, the main concern will be the cost of applying the paint rather than the price of the paint itself. The dipping process, which involves immersing the material to be covered, is proven to be the most effective, especially in toy making, where there are many small parts involved.
Many of the small pieces made can be subjected to the dipping process at quite a saving of time and labor, with probably better results than where the application of paint or stain is done with a brush.
Many of the small items produced can go through the dipping process, which saves time and effort, likely resulting in better outcomes than applying paint or stain with a brush.
The success of the dipping process depends on the arrangement adopted for holding the toys while the actual dipping is done and while they are drying. Here the exercise of a little ingenuity on the part of the students and teacher, will overcome most difficulties.
The success of the dipping process depends on how the toys are held during the dipping and drying. Here, a bit of creativity from both the students and the teacher will solve most problems.
Supposing that a number of checkers, or handles, or small wheels are to be stained. A dipping frame as shown in Fig. 8 could very easily be prepared. You will notice the screen tray (which is removable), and the tin sheet which slopes towards the container. The small pieces to be stained can be handled in wire baskets with mesh just small enough so that the pieces will not fall thru.
Suppose you need to stain some checkers, handles, or small wheels. You can easily set up a dipping frame like the one shown in Fig. 8. You'll see the removable screen tray and the tin sheet that slopes toward the container. You can use wire baskets with a mesh size small enough to keep the pieces from falling through to handle the small items you want to stain.
The wire basket is then immersed in the container and worked up and down, so that the liquid will penetrate and touch all pieces. It is then pulled up and swung over the screen tray, where the contents of the wire basket is dumped. Here, the superfluous paint will drip off on the tin sheet, which, because of its slope, will cause the superfluous paint to flow back in to the container. Fig. 9 shows the dipping frame in use.
The wire basket is then lowered into the container and moved up and down, allowing the liquid to soak into all the pieces. It is then lifted and swung over the screen tray, where the contents of the wire basket are poured out. Here, the excess paint will drip off onto the sloped tin sheet, which will direct the extra paint back into the container. Fig. 9 shows the dipping frame in action.
The screen tray can be removed and placed in a rack to allow for further drying. Several trays could then be made and a rack to hold them could very easily be constructed.
The screen tray can be taken out and put in a rack for additional drying. Several trays can be made, and a rack to hold them can be easily built.
The paint used for dipping purposes must so be prepared that too much does not run off or too much stay on, for this is surely one way to spoil the work. It should be thinned to the right consistency and care should be taken that the thinners used are of the best quality.
The paint used for dipping should be prepared in a way that prevents excess from running off or being left on, as this can ruin the work. It should be thinned to the right consistency, and it's important to ensure that the thinners used are of high quality.
Where larger pieces of work are to be dipped, wire attachments could be devised and each part hung separately over the dipping frame until ready to be placed in a rack. If the wire[Pg 29] attachment forms a hook on one end, it will be possible to hang up the toy until drained and dried. In removing the toy from the paint it should be drawn out very slowly so that the surface of the paint may be left as smooth as possible.
Where larger items need to be dipped, wire attachments can be created to hang each piece separately over the dipping frame until they're ready to be placed in a rack. If the wire[Pg 29] has a hook on one end, you can hang the toy until it drains and dries. When pulling the toy out of the paint, do it slowly to keep the paint surface as smooth as possible.
Where one desires line effects on toys, these may be lined in afterwards with a small size striping brush or sign painter's pencil.
Where you want line effects on toys, you can add them later with a small striping brush or a sign painter's pencil.


31. Polishing by Tumbling.—-Excellent results in polishing large quantities of small pieces, may be obtained by tumbling. The material to be polished should be thoroly dry. The parts are then placed in a tumbler as shown in Fig. 10. Cut up paraffine wax into small pieces, using about one-fourth pound to each tumbler full of toys. Allow these to tumble several hours. This will distribute the wax evenly over the parts and produce a polished surface.
31. Polishing by Tumbling.—You can achieve great results in polishing large quantities of small pieces by tumbling. The material to be polished should be completely dry. The parts are then placed in a tumbler as shown in Fig. 10. Cut paraffin wax into small pieces, using about a quarter of a pound for each tumbler full of toys. Let them tumble for several hours. This will evenly distribute the wax over the parts and create a polished surface.
The tumbler as shown in Fig. 10 is turned by hand, altho it could very easily be placed in a lathe, where one is available.
The tumbler shown in Fig. 10 is turned by hand, although it could easily be placed in a lathe if one is available.

32. Care of Brushes.—A suitable place should be provided for brushes that are not in use. A tin-lined keeper is recommended. Brushes should be suspended so that their bristles will not touch the bottom of the keeper, and have the liquid in which they are kept come well up over the bristles, so that none of the paint or varnish may dry in the butt of the brush.
32. Care of Brushes.—You should have a proper spot for brushes that you're not using. A tin-lined container is suggested. Brushes should be hung up so that their bristles don't touch the bottom of the container, and the liquid they are stored in should cover the bristles completely, to prevent any paint or varnish from drying at the base of the brush.
33. Paint Application by Means of Compressed Air.—In recent years, great advancement has been made in the application of paint by means of compressed air. The early use of pneumatic painting equipment was confined almost exclusively to the application of finishing materials such as japans, enamels, lacquers, varnishes, etc., on manufactured products. But in the past few years improvements have been made which eliminate all of the difficulties originally experienced and make possible the use of this method for interior and exterior painting, such as buildings, ships, etc.; and at present, a large portion of factory maintenance work is done in this manner. Excessive fumes have been eliminated and all materials can be applied without removing the volatile thinners, solvents, binders, etc., thru air reduction. This is brought about thru the use of low pressure and the perfection of ingenious patent nozzles and other improvements.[Pg 32]
33. Paint Application Using Compressed Air.—In recent years, there have been significant advancements in applying paint with compressed air. Initially, pneumatic painting equipment was mostly used for finishing materials like japan, enamel, lacquer, varnish, and similar products on manufactured goods. However, improvements made over the last few years have resolved many of the original challenges and enabled the use of this method for both interior and exterior painting, including buildings, ships, and more. Currently, a substantial amount of factory maintenance work is performed this way. Excessive fumes have been reduced, and all materials can now be applied without needing to remove the volatile thinners, solvents, and binders by reducing air pressure. This has been achieved through the use of low pressure and the development of innovative patented nozzles and other enhancements.[Pg 32]
34. Uses of Pneumatic Sprayers.—Pneumatic paint sprayers, or air brushes, are extensively used in the manufacture of toys, furniture, automobile bodies, sewing machines, telephones, electrical equipment; in fact, very nearly all manufactured products, as well as on ships, structural steel and iron work, bridges and buildings.
34. Uses of Pneumatic Sprayers.—Pneumatic paint sprayers, or air brushes, are widely used in making toys, furniture, car bodies, sewing machines, phones, and electrical equipment; essentially, almost all manufactured products, as well as on ships, structural steel and ironwork, bridges, and buildings.
The speed of the air brush is very great compared with hand-brush work. Usually, an air-brush operator will accomplish as much in one hour as a hand or bristle-brush worker will in one day; and it is possible to obtain an even coating, free from sags, runs or brush-marks and better results are obtained than with the hand brush method. A film of paint can be applied in one operation equal to two hand-brush coats, as it is not necessary to reduce paints by thinning as much for air brush application, in a great many instances, as is the usual practice for hand-brushing. The air sprayer can also reach places inaccessible to the hand brush, and a perfect coat can be applied over rough, uneven surfaces, which could not be obtained by hand-brushing.
The speed of the airbrush is significantly faster compared to hand-brushing. Typically, an airbrush operator can achieve as much in one hour as a hand or bristle brush worker does in an entire day; plus, it’s possible to get an even coat without sags, runs, or brush marks, leading to better results than with hand brushing. An application of paint can be done in one go that’s equivalent to two hand-brushed coats, as it’s often not necessary to thin the paint as much for airbrush use compared to hand brushing. The air sprayer can also access areas that a hand brush can’t reach, allowing for a perfect coat to be applied over rough, uneven surfaces that wouldn’t be feasible with hand brushing.
In considering pneumatic painting equipment, the most important thing to be kept in mind is the proper application of materials. This can be successfully accomplished only thru the use of compressed air at low pressures. By this is meant using only sufficient main-line air to lay the paint, enamel, varnish or whatever finish may be used, on the object. Excessive pressure results in fumes, waste of material and air reduction taking place. By air reduction is meant the removal of the more volatile solvents, thinners, binders, etc., thru evaporation, and the material thus loses its adherent and coherent properties.
When considering pneumatic painting equipment, the key thing to remember is the proper application of materials. This can only be achieved effectively by using compressed air at low pressures. This means using just enough main-line air to apply the paint, enamel, varnish, or whatever finish is being used on the object. Excessive pressure leads to fumes, waste of materials, and a decrease in air quality. By "air reduction," we refer to the removal of the more volatile solvents, thinners, binders, etc., through evaporation, which causes the material to lose its ability to adhere and stay together.
Both types of air-brush equipment illustrated here require three cubic feet of air per minute to operate and the pressure necessary depends on the density, consistency or viscosity of the material used. For example, undercoaters, japans, etc.; require from twelve to fifteen pounds of pressure to apply perfectly; while enamels and varnishes take from eighteen to twenty-five pounds. Water stains require about five pounds of pressure.
Both types of airbrush equipment shown here need three cubic feet of air per minute to work, and the necessary pressure depends on the density, consistency, or viscosity of the material used. For example, undercoaters, japans, etc., require about twelve to fifteen pounds of pressure for a perfect application, while enamels and varnishes need eighteen to twenty-five pounds. Water stains require around five pounds of pressure.
35. Construction of Pneumatic Painting Outfit.—A pneumatic painting outfit for finishing work consists essentially of an air brush, either of the[Pg 34] attached-container type or the gun-type with separate paint tank, and a small compressor of sufficient capacity to operate the air brush, which can be belt-driven from shafting or direct connected. An exhaust hood with fan, for the removal of fumes, is advisable where the operation is reasonably continuous and especially where lacquers are used. The paint, ready for application, is poured into the tank; and the compressed air line leads to the tank with a branch line for air and paint from the tank to the nozzle of the gun type of machine; while only the air line is required with the attached-container type.
35. Construction of Pneumatic Painting Outfit.—A pneumatic painting outfit for finishing work basically consists of an airbrush, which can be either of the[Pg 34]attached-container type or the gun type with a separate paint tank, and a small compressor that's powerful enough to operate the airbrush. The compressor can be belt-driven from shafting or directly connected. An exhaust hood with a fan is recommended to remove fumes, especially if the operation is fairly continuous and particularly when using lacquers. The paint, ready for use, is poured into the tank; the compressed air line connects to the tank and has a branch line for air and paint from the tank to the nozzle for the gun-type machine, while only the air line is needed for the attached-container type.
The air hose used is 5/16" in diameter while the paint or fluid hose is the same size. The paint hose is made of a special compound to resist the action of the thinners, solvents, etc., used in the paint; and it is important to have this correct, so that the lining will not disintegrate and clog the air brush or gun.
The air hose used is 5/16" in diameter, and the paint or fluid hose is the same size. The paint hose is made from a special material that can withstand the effects of thinners, solvents, and other substances used in the paint, and it's crucial to get this right to prevent the lining from breaking down and blocking the airbrush or gun.
Fig. 11 shows a five-gallon container type. It will be noticed that the fluid connection is nearest the nozzle and that the air connection is at the bottom of the grip.
Fig. 11 shows a five-gallon container type. You’ll notice that the fluid connection is closest to the nozzle and the air connection is at the bottom of the grip.

36. Special Attachments for Different Surfaces.—A cone nozzle is furnished for painting irregular surfaces and a fan nozzle for wide, flat work. Adjusting and locking the nozzle regulates the degree of atomization. The jets of the fan nozzle are depressed to prevent being knocked out of alignment. Final regulation of the flow of material is made on the back of the gun, independent of the pressure on the material container. A wide variety of adjustment is possible with this positive regulation.
36. Special Attachments for Different Surfaces.—A cone nozzle is provided for painting uneven surfaces, while a fan nozzle is used for broad, flat areas. Adjusting and locking the nozzle controls how fine the spray is. The jets of the fan nozzle are angled down to keep them from getting out of alignment. The final adjustments for the flow of material are made at the back of the gun, separate from the pressure in the material container. There are many options for adjustment with this precise regulation.
The first pull on the trigger gives air only, which can be used for dusting ahead of the work; and as the trigger is released, the air valve closes last, which prevents clogging and dripping. When adjustments have been made the trigger action is the only moving part of the machine. Figs. 12 and 13 show the five-gallon container type in actual use.
The first pull of the trigger releases only air, which can be used to clear dust before starting the work; and when the trigger is released, the air valve closes last, preventing any clogging or dripping. Once adjustments have been made, the trigger action is the only moving part of the machine. Figs. 12 and 13 show the five-gallon container type in action.


37. Cleaning Pneumatic Machines.—It is not necessary to take the gun apart nor disconnect the hose to clean the machine. Thinner can be run thru the device without loss by placing a small can of reducer of the last material used in the machine, and forcing it thru in the usual manner.[Pg 35]
37. Cleaning Pneumatic Machines.—You don't need to take apart the gun or disconnect the hose to clean the machine. You can run thinner through the device without any loss by placing a small can of the last material used in the machine and forcing it through as usual.[Pg 35]
38. Directions for Cleaning Machine.—Close right-hand Air Valve and open release valve. Unscrew air nozzle a few turns. Obstruct outlet with thumb and pull trigger. Spraying pressure is thus forced thru gun and fluid hose and the material backed into the container. It is advisable frequently to run thinner thru the machine as follows: (1) Place small can of thin[Pg 36]ner in center of container directly beneath fluid tube. (2) Replace cover and tighten wing-nuts. (3) Close left-hand air valve and open right-hand air valve. Pressure on container will force thinner thru the machine and clean perfectly without loss. Do not use spraying pressure in cleaning. The thinner can be used again for either cleaning or thinning purposes.
38. Directions for Cleaning Machine.—Close the right-hand air valve and open the release valve. Unscrew the air nozzle a few turns. Block the outlet with your thumb and pull the trigger. This forces spraying pressure through the gun and fluid hose, which sends the material back into the container. It's a good idea to run thinner through the machine regularly as follows: (1) Place a small can of thinner in the center of the container directly beneath the fluid tube. (2) Replace the cover and tighten the wing nuts. (3) Close the left-hand air valve and open the right-hand air valve. The pressure in the container will push the thinner through the machine, cleaning it perfectly without any waste. Do not use spraying pressure for cleaning. The thinner can be reused for either cleaning or thinning purposes.

39. Directions for Operating Pneumatic Equipment.—
39. Instructions for Using Pneumatic Equipment.—
1. Attach main-line air hose to air filter.
1. Connect the main air hose to the air filter.
2. Attach fluid hose to connection marked "Fluid" on tank and to the front connection near air nozzle on hand-piece.[Pg 37]
2. Connect the fluid hose to the "Fluid" connection on the tank and to the front connection near the air nozzle on the handpiece.[Pg 37]
3. Attach air hose to connection marked "Air" on cover and to the handle connection on hand-piece.
3. Connect the air hose to the "Air" connection on the cover and to the handle connection on the handpiece.
4. Thoroly mix and strain material so that it is entirely free from skins, lumps, and foreign materials.
4. Thoroughly mix and strain the material so that it is completely free from skins, lumps, and any foreign materials.
5. Tighten wing-nuts until paint container is air-tight.
5. Tighten wing nuts until the paint container is airtight.
6. See that release valve is closed. Then open right-hand air valve, turn fluid-pressure regulator until gage shows 5 lbs. pressure in container. Pull trigger and use fluid regulator[Pg 38] on gun to control the flow. If material is heavy, increase pressure in container.
6. Make sure the release valve is closed. Then open the right-hand air valve and adjust the fluid-pressure regulator until the gauge reads 5 lbs. of pressure in the container. Pull the trigger and use the fluid regulator[Pg 38] on the gun to control the flow. If the material is thick, increase the pressure in the container.
7. Open left-hand air valve and turn spraying pressure regulator until sufficient pressure (5 lbs. to 25 lbs.), is obtained to lay the material on.
7. Open the left-hand air valve and adjust the spraying pressure regulator until you reach enough pressure (5 lbs. to 25 lbs.) to apply the material.
8. Make final adjustment of the flow of material with fluid regulator on back of hand-piece and get proper spray by adjusting the air nozzle.
8. Make the final adjustments to the flow of material using the fluid regulator on the back of the handpiece and achieve the right spray by adjusting the air nozzle.
9. Spraying pressure and pressure in the container depends upon the density of the material used and the size of the surface to be coated. A little experimenting on the part of the operator will determine the best pressure to use. When the fan nozzle is used, 3 to 5 lbs. more pressure should be applied to the material container and from 5 to 8 lbs. more atomizing or spraying pressure used.
9. The spraying pressure and pressure in the container depend on the density of the material used and the size of the surface to be coated. A bit of experimentation by the operator will help find the best pressure to use. When using the fan nozzle, 3 to 5 lbs. more pressure should be applied to the material container, and 5 to 8 lbs. more atomizing or spraying pressure should be used.
Fig. 14 shows a complete attached container which operates on identically the same principles as the type shown in Fig. 11. It consists of a 1½ pint container, reducing outfit, compressor, and air tank. The 1½ pint container as shown in Fig. 15 is supplied complete with two fluid tips, gasket, agitator tube, cup-holder, hose union, and six feet of air hose.
Fig. 14 shows a fully attached container that works on exactly the same principles as the type shown in Fig. 11. It includes a 1½ pint container, a reducing outfit, a compressor, and an air tank. The 1½ pint container, as shown in Fig. 15, comes complete with two fluid tips, a gasket, an agitator tube, a cup holder, a hose union, and six feet of air hose.


The reducing outfit in Fig. 16 consists of a regulative valve, an air gage, and an air filter, complete with connections and fittings. This outfit is for the purpose of maintaining an even low spraying pressure.
The reducing setup in Fig. 16 includes a control valve, an air gauge, and an air filter, along with the necessary connections and fittings. This setup is designed to keep a consistent low spraying pressure.
Regulated pressure is applied to the air-tight material container, raising the coating[Pg 39] material to the nozzle where only sufficient main-line pressure is used to lay the coating on. The spraying pressure necessarily depends on the density, consistency and viscosity of the material used.
Regulated pressure is applied to the airtight material container, raising the coating[Pg 39] material to the nozzle where only enough main-line pressure is used to apply the coating. The spraying pressure depends on the density, consistency, and viscosity of the material used.
For fine finishing work, where the quantity of materials used each day is not great, or where the colors are changed frequently, the attached container type is recommended.
For detailed finishing work, where the daily amount of materials used is not high, or where the colors are changed often, the attached container type is recommended.
40. Preparing Colors.—The three primary colors are red, blue and yellow. With the three primary colors at hand, almost every variety of color desirable for ordinary use can be easily prepared. Fig. 17 shows a color chart.
40. Preparing Colors.—The three primary colors are red, blue, and yellow. With these three colors, you can easily mix almost any color you might need for everyday use. Fig. 17 shows a color chart.
Red mixed with yellow will result in orange.
Red mixed with yellow will create orange.
Red mixed with blue will result in purple.
Red mixed with blue will create purple.
Yellow mixed with blue will result in green.
Yellow mixed with blue will create green.
The colors obtained by mixing any two[Pg 40] primaries are called secondary colors. Therefor the secondary colors are orange, purple and green.
The colors you get by mixing any two[Pg 40] primary colors are called secondary colors. So, the secondary colors are orange, purple, and green.
Orange mixed with purple will result in brown.
Orange mixed with purple will create brown.
Orange mixed with green will result in olive.
Orange mixed with green will create olive.
Purple mixed with green will result in slate.
Purple mixed with green will create slate.
The colors obtained by mixing any two secondaries are called tertiary colors.
The colors created by mixing any two secondary colors are known as tertiary colors.
The tertiary colors are brown, olive and slate.
The tertiary colors are brown, olive, and slate.
Of course different tones of each color can be made up by mixing unequal proportions.
Of course, different shades of each color can be created by mixing different amounts.

CHAPTER III
Common Woods Used in Toy Manufacturing
41. Economy in Selecting Material.—Economic use of materials should be encouraged at all times. Toy making offers an excellent opportunity where economy may be taught in the most practical way.
41. Economy in Selecting Material.—The efficient use of materials should always be promoted. Toy making provides a great opportunity to teach this concept in a practical manner.
Where toys are to be painted, more than one kind of wood may be used in the same toy and thereby using up small pieces of wood that would otherwise be called scrap. Yet, it is not advisable to sacrifice the strength and durability of the whole toy for the sake of using up a piece of scrap wood which weakens the particular part of the toy where it is used. For that, in the long run, is not economy.
Where toys are meant to be painted, multiple types of wood can be used in the same toy, allowing for the use of small wood scraps that would otherwise be wasted. However, it's not wise to compromise the strength and durability of the entire toy just to use a piece of scrap wood that weakens a specific part of the toy. In the long run, that isn't cost-effective.
42. Qualities of Different Woods Used.—The following are some of the common woods used in toy making.
42. Qualities of Different Woods Used.—The following are some of the most common types of wood used in making toys.
Maple: hard, fine grained, compact, tough, used for wheels, axles, handles, dowel rods, etc.
Maple: strong, finely grained, sturdy, and tough, used for wheels, axles, handles, dowel rods, and more.
Ash: white, strong, open grained, easily worked; used for bodies of coasters, wheels, axles, oars, etc.
Ash: light in color, strong, with an open grain, easy to work with; used for the bodies of coasters, wheels, axles, oars, etc.
Oak: hard, firm and compact, strong and durable, hard to work.
Oak: tough, solid, dense, strong, and long-lasting, but difficult to work with.
Birch: moderately hard and heavy, even grained; difficult to split, but easily worked.
Birch: moderately hard and heavy, with a consistent grain; tough to split, but easy to work with.
Chestnut: resembles oak in appearance, is much softer, moderately hard, course grained, not strong, but durable.
Chestnut: looks like oak, is much softer, somewhat hard, has a rough grain, isn’t very strong, but is durable.
Cypress: moderately hard, very fine and close grained, virtually indestructable; known as "the wood eternal".
Cypress: moderately hard, very fine, and tightly grained, practically indestructible; known as "the eternal wood."
Basswood: white, light, soft, tough, closed grained, easily worked, not strong, but durable; used for almost any part of a toy where much strength is not required.
Basswood: white, light, soft, tough, with a fine texture, easy to work with, not very strong, but durable; used for almost any part of a toy where a lot of strength isn’t needed.
White Pine: very light, soft, close and straight grained, inferior; easy to work.
White Pine: very light, soft, with a fine and straight grain, of lower quality; easy to work with.
Yellow Pine, yellowish, grain noticeable, harder than white pine, stronger.
Yellow Pine, yellowish, grain visible, harder than white pine, stronger.
Tulip (yellow poplar): light, soft, close and straight grained; tougher than many woods equally soft, compact, not very strong or durable, easily worked.
Tulip (yellow poplar): light, soft, fine and straight grained; tougher than many similarly soft woods, compact, not very strong or durable, and easy to work with.
Spruce: straight growing, light, straight and even in grain, tough, elastic, easy to work.
Spruce: grows straight, light, with a straight and even grain, strong, flexible, and easy to work with.
CHAPTER IV
Using Jigs and Fixtures
43. Value of Jigs and Fixtures.—The use of jigs, fixtures, and other labor-saving devices is an important factor in illustrating industrial and practical applications in the school shop. It is advisable to let each group of boys work out its own jig or fixture for the particular job they have on hand.
43. Value of Jigs and Fixtures.—Using jigs, fixtures, and other labor-saving tools is crucial for demonstrating industrial and practical applications in the school workshop. It's a good idea to have each group of students design their own jig or fixture for the specific task they're working on.
The three most common forms of jigs are cutting jigs, boring jigs, and assembling jigs. The important reasons for the use of such devices are: (1) They illustrate the speed of output in shop work. (2) They give the student a good idea of machine operation. (3) They help in making the parts interchangeable. (4) They offer an opportunity for getting first hand information on cutting edge tools and their proper uses. (5) They show the boy the value of the use of jigs in factory work.
The three most common types of jigs are cutting jigs, boring jigs, and assembling jigs. The key reasons for using these devices are: (1) They demonstrate the speed of production in workshop tasks. (2) They provide students with a solid understanding of how machines operate. (3) They assist in creating interchangeable parts. (4) They provide a chance to gain firsthand experience with cutting edge tools and their correct uses. (5) They teach young people the importance of using jigs in factory work.
The toys illustrated in this book have many simple operations, such as cutting stock to length, drilling holes, surfacing, etc., that can be easily done by the use of the proper fixtures.
The toys shown in this book have a lot of simple tasks, like cutting materials to size, drilling holes, and smoothing surfaces, that can be easily accomplished using the right tools.
For that reason toys are desirable projects to be made by the productive plan. Fig. 18 shows the use of a jig and the miter box.
For that reason, toys are great projects to create with a productive plan. Fig. 18 shows the use of a jig and a miter box.
44. Cutting Small Wheels.—A circle of the desired size wheel may be laid out on the wood with the aid of a compass, and cut in the outline with a coping saw or band saw. Of course, it would take quite a long time by this method to make the small wheels in large quantities and besides the result would not be as good as when the wheels are made by machine.
44. Cutting Small Wheels.—You can draw a circle of the desired wheel size on the wood using a compass, then cut out the outline with a coping saw or band saw. However, this method would take a long time to produce small wheels in large quantities, and the results wouldn't be as good as when the wheels are made by machine.
45. Turning Wheels.—Another way to produce wheels is to turn a cylinder to the required diameter, on the turning lathe. Then cut the cylinder on the circular saw into required thicknesses of wheels desired. This method is recommended for quick work.[Pg 44]
45. Turning Wheels.—Another way to make wheels is to shape a cylinder to the needed diameter on a lathe. Then, use a circular saw to slice the cylinder into the desired thicknesses for the wheels. This method is suggested for efficiency.[Pg 44]


If it is desired to round the end of wheels the operation can be done by leaving the cylinder in the lathe and applying the broad side of the skew chisel as shown in Fig. 33. The wheels may then be polished with a cloth after they have been sanded and while rotating in the lathe as shown in Fig. 34. In sanding, use first a fairly course grade of sandpaper, No. 1 or 1½ and afterwards a fine grade, No. O or OO. Before applying the cloth the wood may be varnished lightly while the lathe is not running, taking care to wipe off all the surplus varnish. The varnish will assist in giving the surface a fine polish when the cloth is applied. For further explanations of the use of the turning lathe, see Sec. 55.
If you want to round the ends of wheels, you can do this by leaving the cylinder in the lathe and using the broad side of the skew chisel as shown in Fig. 33. After sanding, you can polish the wheels with a cloth while they rotate in the lathe, as depicted in Fig. 34. Start with a coarse grade of sandpaper, No. 1 or 1½, and then switch to a fine grade, No. O or OO. Before using the cloth, you might want to lightly varnish the wood while the lathe isn't running, making sure to wipe off any excess varnish. The varnish will help achieve a nice shine when you apply the cloth. For more details on using the turning lathe, see Sec. 55.
46. Use of Wheel Cutter.—Still another method of making small wheels is by use of the wheel cutter as shown in Fig. 19. This wheel cutter may be used in the ordinary bit brace. Good results may be obtained where the wheels are made out of thin, soft wood.
46. Use of Wheel Cutter.—Another way to create small wheels is by using the wheel cutter shown in Fig. 19. This wheel cutter can be used with a standard bit brace. Good results can be achieved when the wheels are made from thin, soft wood.
This wheel cutter is known on the market as a leather washer cutter. If one cannot be obtained it can easily be made in the school machine shop at a small cost. Fig. 20 shows a drawing of a wheel cutter.
This wheel cutter is commonly referred to as a leather washer cutter. If you can't find one, it can be easily made in the school machine shop for a low cost. Fig. 20 shows a drawing of a wheel cutter.
You will notice that the blade can be adjusted to cut any diameter desired.
You’ll see that the blade can be adjusted to cut any diameter you want.
47. Use of Coping Saw.—Where a band saw is not included in the shop equipment, many articles such as animal forms and small wheels could very easily be cut out with a coping saw.
47. Use of Coping Saw.—If a band saw isn’t part of the workshop equipment, many items like animal shapes and small wheels can be easily cut out with a coping saw.
A saw board, as shown in Fig. 21 should be fastened to a table top with an iron clamp; or, a saw board made to fasten in a vise may also be used.
A saw board, as shown in Fig. 21, should be secured to a tabletop with an iron clamp, or a saw board designed to attach in a vise can also be used.
When cutting out the toy part, the coping saw should be held in a vertical position as shown in Fig. 22, and in an up-and-down motion,[Pg 46] with short fast strokes, following the outline carefully. Cut on the line. Do not press hard on the saw for the blade is very thin and can very easily be broken, but it should last a long time if used correctly.
When cutting out the toy part, hold the coping saw vertically as shown in Fig. 22, using an up-and-down motion,[Pg 46] with short, quick strokes, carefully following the outline. Cut along the line. Don’t apply too much pressure on the saw because the blade is very thin and can break easily, but it should last a long time if used properly.


48. Cutting Sharp Corners.—When cutting a sharp turn in the wood with the coping saw, care should be taken not to twist the saw blade out of shape. Upon reaching the sharp turn, continue the up-and-down motion, but without doing any cutting; turn the wood very slowly until you have made the complete turn, then continue with the sawing and follow the rest of[Pg 48] the outline carefully.
48. Cutting Sharp Corners.—When making a sharp turn in the wood with the coping saw, be careful not to twist the saw blade. As you approach the sharp turn, keep the up-and-down motion going, but without cutting; rotate the wood slowly until you’ve completed the turn, then continue sawing and follow the rest of[Pg 48] the outline carefully.
49. Removing the Saw-Blade from Frame.—To remove the saw-blade from the frame, place the head of the frame against the table top as shown in Fig. 23. Pressing down on the handle will release the saw-blade. When inserting the blade into the frame the same method may be followed, being careful that the teeth of the saw-blade point toward the handle of the frame. The blade may be put in the end or the side slots of the frame, using the side slots only when the end slots will not serve the purpose.
49. Removing the Saw-Blade from Frame.—To take the saw-blade out of the frame, position the head of the frame against the tabletop as shown in Fig. 23. Pressing down on the handle will release the saw-blade. When putting the blade back into the frame, use the same method, ensuring that the teeth of the saw-blade face toward the handle of the frame. The blade can be inserted into the end or side slots of the frame, using the side slots only when the end slots aren't suitable.
50. Making Heavy Wheels.—In turning heavier wheels that are to be used for coasters, kiddie cars, etc., the work is done with the head stock only, the wood being supported by the screw-center chuck or face plate.
50. Making Heavy Wheels.—When turning heavier wheels intended for coasters, kiddie cars, etc., the process is carried out using only the headstock, with the wood being supported by the screw-center chuck or faceplate.
In turning the wheel the first step is the scraping cut as shown in Fig. 24. This cut is properly made with the concave chisel held in such a position as to give a light scraping cut. Care should be exercised not to allow the chisel to extend too deeply, otherwise the material will chip with the grain.
In turning the wheel, the first step is the scraping cut, as shown in Fig. 24. This cut should be made with the concave chisel held in a way that delivers a light scraping cut. Be careful not to let the chisel go too deep, or the material will chip with the grain.
After the desired circumference has been obtained the surface should be worked to the desired form as shown in Fig. 25. This is accomplished by using the lathe rest, set at right angles with the bed or parallel with the face plate. The illustration in Fig. 26 shows the use of the dividers in marking off the position of the various corrugations in the wheel that is being turned. The sanding should be done while[Pg 49] the wheel is in the lathe. Use first a fairly course grade of sand paper and afterwards a fine grade, No. O or OO.
After achieving the desired circumference, the surface should be shaped to the desired form as shown in Fig. 25. This is done by using the lathe rest, positioned at a right angle to the bed or parallel to the faceplate. The illustration in Fig. 26 demonstrates how to use dividers to mark the locations of the various corrugations on the wheel being turned. Sanding should be done while[Pg 49] the wheel is still in the lathe. Start with a relatively coarse grade of sandpaper and then switch to a finer grade, No. O or OO.
51. Designs for Wheels.—Suggestions for wooden toy wheels are shown in Fig. 27. Those numbered 1, 2, 3, 4, 5, 6, and 7 are plain wooden wheels varying in design only. No. 8 and 9 are re-enforced with zinc and large iron washers. No. 10 shows a segment of an iron pipe fitted in the center of the wheel to prevent wearing away of material. No. 11 shows a spoke wheel. The spokes are made of dowel rods; these fitting into a hub that can easily be turned out on the lathe. No. 13 shows a wheel built in segments which is then cut out on the band saw to resemble a standard spoke wheel. The rim is 1/8" steel, fastened to spokes with very small rivets.
51. Designs for Wheels.—Suggestions for wooden toy wheels are shown in Fig. 27. Those numbered 1, 2, 3, 4, 5, 6, and 7 are plain wooden wheels differing only in design. Nos. 8 and 9 are reinforced with zinc and large iron washers. No. 10 features a segment of an iron pipe fitted in the center of the wheel to prevent wear on the material. No. 11 displays a spoke wheel. The spokes are made of dowel rods, which fit into a hub that can be easily turned on a lathe. No. 13 illustrates a wheel built in segments that is then cut on the band saw to resemble a standard spoke wheel. The rim is 1/8" steel, attached to the spokes with very small rivets.

52. Cutting Wheels on Band-Saw.—A circle of the required size wheel may be marked off on the wood with a compass, then cut in the outline on the band-saw. This method will leave square corners and will be more or less out of truth with the center of the wheel. To true up and smooth the outside of the wheel the lathe attachment as shown in Fig. 28 can be easily prepared. This attachment consists of a block A fastened to the lathe bed with a single bolt, and a stop B fastened to the upper face of the block A. The carriage C is a loose piece the same thickness as the stop B and is provided with a dowel rod to fit the central hole in the wheel. This dowel rod is so located that when the edge of the carriage C is tight against the edge of the stop D, the distance from the center of the dowel rod to the face of the abra[Pg 50]sive material on the disk, will be equal to the radius of the finished wheel.
52. Cutting Wheels on Band-Saw.—You can mark a circle of the desired size on the wood using a compass, then cut along the outline with the band-saw. This method will leave square corners and may not align perfectly with the center of the wheel. To ensure the wheel's outside is true and smooth, you can easily prepare the lathe attachment shown in Fig. 28. This attachment consists of a block A secured to the lathe bed with a single bolt, and a stop B attached to the upper face of the block A. The carriage C is a loose piece that's the same thickness as the stop B and has a dowel rod that fits the central hole in the wheel. The dowel rod is positioned so that when the edge of the carriage C is snug against the edge of the stop D, the distance from the center of the dowel rod to the face of the abra[Pg 50]sive material on the disk will equal the radius of the finished wheel.
The wood is cut out on the band saw a scant 1/16" over-size in diameter, and is then placed on the dowel rod in the carriage C which is held flat on block A while the edge of the blank is brought in contact with the grinding disc face by pushing the carriage forward with the left hand while the blank is slowly revolved with the right. This grinding is continued until the edges of stop B and carriage C will remain in contact during a complete revolution of the wheel blank. During this grinding process, the carriage should be moved back and forth from the edge to the center of the grinding disc so that the wear on the abrasive material may be equalized.
The wood is cut on the band saw to just over 1/16" in diameter and is then placed on the dowel rod in carriage C, which is held flat on block A. The edge of the blank is made to touch the grinding disc by pushing the carriage forward with the left hand while slowly rotating the blank with the right. This grinding continues until the edges of stop B and carriage C stay in contact throughout a complete turn of the wheel blank. During this grinding process, the carriage should be moved back and forth from the edge to the center of the grinding disc to ensure even wear on the abrasive material.


A similar device used for chamfering the edges of the blanks is also shown in Fig. 28, as it looks when viewed from the front of the lathe. The preceding description will suffice for this as the same system of lettering has been used. It differs only in that block A is made to set at an angle of 45 degrees instead of being level.[Pg 51]
A similar tool used for beveling the edges of the blanks is also shown in Fig. 28, as it appears when seen from the front of the lathe. The description above is enough for this since the same lettering system has been applied. The only difference is that block A is set at a 45-degree angle instead of being flat.[Pg 51]


Grinding discs may be made either of metal or wood. Metal is preferable but a hardwood disc fastened to a metal face plate will answer very well. There are many methods of fastening the abrasing material to the disc but the most convenient way is by the use of stick belt dressing. The disc is coated with dressing by holding the stick against it as it revolves and the abrasive is applied before the dressing has set. A pair of dividers or trammels is used to cut the abrasive material to the same diameter as the disc and it should be warmed on the uncoated side before it is applied. It sticks tightly to the disc but is easily removed and replaced with fresh material in a few minutes.
Grinding discs can be made from either metal or wood. Metal is preferable, but a hardwood disc attached to a metal faceplate works just as well. There are several ways to attach the abrasive material to the disc, but the easiest method is using stick belt dressing. You coat the disc with dressing by holding the stick against it while it spins, and the abrasive is applied before the dressing dries. A pair of dividers or trammels is used to cut the abrasive material to match the diameter of the disc, and it should be warmed on the uncoated side before applying. It adheres tightly to the disc but can be easily removed and replaced with fresh material in just a few minutes.
53. Boring Holes in Wheels.—The center holes in wheels may be bored with bit and brace, but better results are obtained if the holes are bored in the lathe. A drill chuck fitted to the live spindle and a drilling pad for the tail stock spindle will be required to do this job efficiently. The tail stock is locked fast and the wheel to be drilled is placed against the drilling pad and fed up to the revolving bit by turning the tail spindle feed wheel. This method will produce a cleaner hole and one that is square with the wheel face.
53. Boring Holes in Wheels.—You can bore the center holes in wheels using a bit and brace, but you'll get better results if you use a lathe. To do this efficiently, you'll need a drill chuck attached to the live spindle and a drilling pad for the tailstock spindle. Lock the tailstock in place, then position the wheel against the drilling pad and move it towards the spinning bit by turning the tailstock feed wheel. This method will create a cleaner hole that is perfectly squared with the wheel face.
CHAPTER V
Operating Woodworking Machines
54. Importance of Machine Operations.—A fair understanding of what is the correct position to take at some of the principal machines such as the lathe, universal saw, jointer, and sander, is very important to the student in the wood-working department. Such knowledge is of special importance to the one engaged in toy making, where every knowledge of use of machines, is put to the test.
54. Importance of Machine Operations.—A good understanding of the proper stance to take at key machines like the lathe, universal saw, jointer, and sander is crucial for students in the woodworking department. This knowledge is particularly important for those involved in toy making, where every aspect of machine use is tested.


Sufficient examples are given to enable the student to arrive at a fair understanding of the correct postures.[Pg 55]
Sufficient examples are provided to help the student gain a good understanding of the correct postures.[Pg 55]
55. Operating the Lathe.—The lathe is perhaps one of the most important machines used in toy making. It lends itself to unlimited varieties of work and for that reason is really indispensible in the shop.
55. Operating the Lathe.—The lathe is probably one of the most important machines used in toy making. It can handle countless types of work, which is why it's truly essential in the workshop.
In Fig. 29 the student is preparing to take the roughing cut in turning a cylinder. This operation consists of removing the corners of the square piece and is done with the tool known as the gouge.
In Fig. 29, the student is getting ready to make the roughing cut while turning a cylinder. This step involves cutting off the corners of the square piece and is performed using the tool called the gouge.
After the roughing cut has been taken, calipers set to the diameter desired will determine the depth of the next cut, sizing cut. The illustration in Fig. 30 shows the student performing this operation with the cut-off tool.
After the rough cut has been made, calipers set to the desired diameter will be used to measure the depth of the next cut, sizing cut. The illustration in Fig. 30 shows the student carrying out this operation with the cut-off tool.


When the correct dimension has been found, the next step in the process of turning a cylinder is the paring cut or finishing cut, Fig. 31. This is done with the skew or bevel chisel. A very thin shaving is removed by this operation.[Pg 56]
When the right size has been determined, the next step in shaping a cylinder is the paring cut or finishing cut, Fig. 31. This is done with the skew or bevel chisel. A very fine shaving is taken off in this process.[Pg 56]
The ends are then cut by using the cut-off tool as shown in Fig. 32. It is merely taking a slice off the end. If a very thin slice is to be removed, it is usually made by the long point of the skew chisel. If it is more than a quarter of an inch it should be sized and then removed by the skew.
The ends are then cut using the cut-off tool as shown in Fig. 32. It's just taking a slice off the end. If a very thin slice needs to be removed, it's usually done with the long point of the skew chisel. If it’s more than a quarter of an inch, it should be sized and then removed with the skew.
If it is desired to round the end of a piece or to produce a convex surface the operation can be done by applying the broad side of the skew chisel, as in Fig. 33.
If you want to round the end of a piece or create a convex surface, you can do this by using the flat side of the skew chisel, as shown in Fig. 33.
56. Face Plate Turning.—The preceding paragraphs describe the process of turning when the piece is supported between the live and the dead centers. The processes shown in Figs. 24, 25 and 26, illustrate the character of the work done with the head stock only when the piece is supported by the screw-center chuck or face plate.
56. Face Plate Turning.—The previous sections explain the turning process when the workpiece is held between the live and dead centers. The methods shown in Figs. 24, 25, and 26 illustrate the type of work done using just the headstock when the piece is held by the screw-center chuck or face plate.


The first step in face plate turning is the[Pg 57] scraping cut, Fig. 24. This cut is properly made with the concave chisel held in such a position as to give a light scraping cut. Care should be exercised not to allow the chisel to extend too deeply, otherwise the material will chip with the grain. After the desired circumference has been obtained the surface should be smoothed with the skew chisel.
The first step in face plate turning is the[Pg 57] scraping cut, Fig. 24. This cut is best done with the concave chisel held in a way that produces a light scraping cut. Be careful not to let the chisel go too deep, or the material will chip along the grain. Once you've achieved the desired circumference, the surface should be smoothed with the skew chisel.


Fig. 25 shows the student modeling a rosette, using the rest, set at right angles with the bed or parallel with the face plate. Prior to the modeling a shearing cut should be taken with[Pg 58] the skew chisel to face off the material to an even surface.
Fig. 25 shows the student shaping a rosette, using the rest positioned at right angles with the bed or parallel to the face plate. Before starting the shaping process, a shearing cut should be made with[Pg 58] the skew chisel to create a smooth, even surface on the material.
The illustration in Fig. 26 shows the use of the dividers. The student is marking off to a uniform scale the position of the various corrugations in the rosette he is turning.
The illustration in Fig. 26 shows how to use the dividers. The student is marking off the position of the different corrugations in the rosette he is shaping to a consistent scale.
57. The Universal Saw.—The operations that can be performed on the universal saw are so many that no attempt will be made to illustrate them all here. But enough are given to show the characteristic operations involved in cross-cutting, ripping, and dadoing,—the three basic uses of a circular saw.
57. The Universal Saw.—There are so many operations that can be performed on the universal saw that we won’t try to list them all here. However, enough examples are provided to illustrate the key operations involved in cross-cutting, ripping, and dadoing—the three basic uses of a circular saw.


It is a more dangerous tool than the lathe and the guard should be kept over the saw at all times, except of course, in dadoing when it can not be used.
It is a more dangerous tool than the lathe, and the guard should always be over the saw, except, of course, during dadoing when it cannot be used.
Figs. 35, 36, 37, 38, 39, illustrate the basic uses of a circular saw.
Figs. 35, 36, 37, 38, 39, show the basic uses of a circular saw.


58. The Hand Jointer.—The great variety of work that can be done on a hand jointer depends very largely upon the knowledge and skill of the operator. It lends itself to so many operations, that the student gains much in knowledge and efficiency.[Pg 60]
58. The Hand Jointer.—The wide range of work that can be accomplished with a hand jointer relies heavily on the operator’s knowledge and skill. It supports many different tasks, allowing the student to enhance their understanding and efficiency.[Pg 60]


The five operations shown in Figs. 40, 41, 42, 43 and 44, give a fair idea of the scope of work that is usually accomplished on a hand jointer and show something of the method by which the work should be done.
The five operations shown in Figs. 40, 41, 42, 43, and 44 provide a good understanding of the range of tasks typically performed on a hand jointer and demonstrate the method by which the work should be completed.
The jointer is another tool where the use of the guard should never be omitted.[Pg 61]
The jointer is another tool where the guard should never be left off.[Pg 61]


59. The Sander.—The sander is an interesting machine in the school shop for on it considerable "forming" can be done as with the lathe, altho its prime use is to make smooth or polish.
59. The Sander.—The sander is an intriguing machine in the school workshop because it can perform a significant amount of "shaping" like a lathe, although its main purpose is to smooth or polish surfaces.
In Fig. 45 the boy at the left is forming a mitre while the one on the right is smoothing surface.
In Fig. 45, the boy on the left is shaping a mitre while the one on the right is smoothing the surface.

PART II.
Toy Drawings


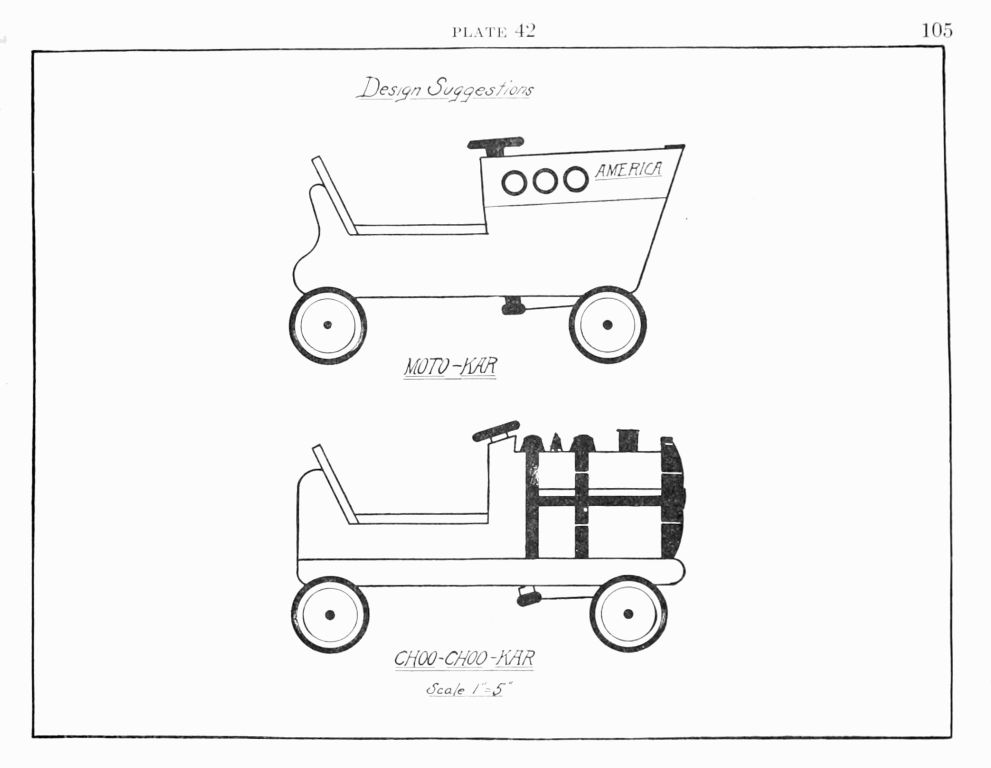


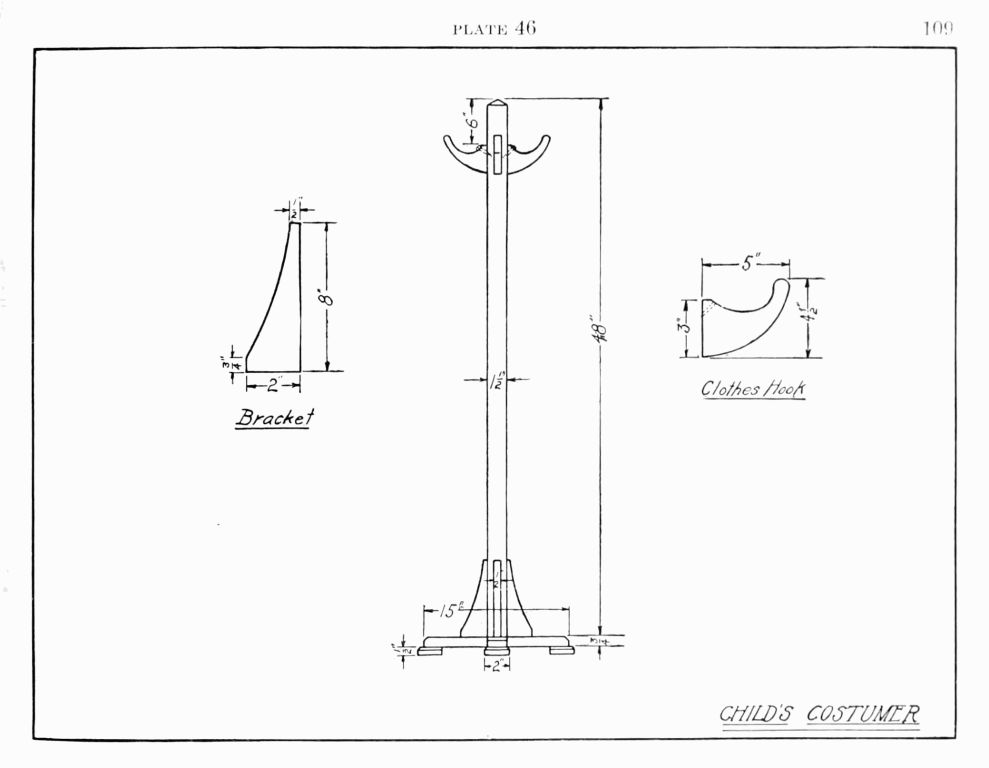


INDEX
| PAGE | |
| A | |
| Auto kar, Plate 41 | 104 |
| Auto racer, Plate 9 | 72 |
| Auto Roadster, Plate 8 | 71 |
| B | |
| Bats, base ball, Plate 54 | 117 |
| Bazaars, toy sales, etc. | 19 |
| Bed, doll's, Plates 22, 23 | 85, 86 |
| Boring holes in wheels | 53 |
| Brushes, care of | 31 |
| Buffet, Plate 14 | 77 |
| C | |
| Car, baby's, Plate 36 | 99 |
| Car, passenger, Plate 10 | 73 |
| Cars, auto, motor, choo-choo, Plates 41, 42 | 104, 105 |
| Cart, baby's, Plate 3 | 66 |
| Cart, hay, Plate 4 | 67 |
| Carriage, dolls, Plate 17 | 80 |
| Chair & rocker, Plate 13 | 76 |
| Chair, baby's, Plate 47 | 110 |
| Checker board, Plate 45 | 108 |
| Check, credit, Fig. 7 | 20 |
| Coasters, Plates 26, 37, 39 | 89, 101, 103 |
| Coloring toys | 21 |
| Sanitation emphasized | 21 |
| Preparation of surfaces | 21 |
| Application of water colors | 21 |
| Analine water stains | 22 |
| Formulas for analine water stains | 22 |
| Oil stains | 23 |
| Shellacking | 23 |
| Varnishing | 23 |
| Points on varnishing | 24 |
| Color varnish | 24 |
| Use of paint | 24 |
| Dipping method | 28, 30 |
| Polishing by tumbling | 31 |
| Paint application by compressed air | 31 |
| Colors, preparing | 39 |
| Color chart, Fig. 17 | 41 |
| Contents, Table of | 5 |
| Coping saw, use of | 45 |
| Correlation | 7 |
| Costumer, child's, Plate 46 | 109 |
| D | |
| Doll's house, Plates 50, 51, 52 | 113, 114, 115 |
| Dipping frame | 29 |
| Drawings for toys | 63 |
| Dumb bell, Plate 53 | 116 |
| E | |
| Enameling | 27 |
| F | |
| Foremen, shop | 11 |
| Fox & geese game, Plate 1 | 64 |
| Furniture, doll[Pg 119] | 75, 76, 77 |
| G | |
| Game board, "Bean Bag," Plate 19 | 82 |
| Game board, "Fox & Geese," Plate 1 | 64 |
| Grading students | 17 |
| H | |
| Horse head, Plate 5 | 68 |
| Horse on wheels, Plate 6 | 69 |
| House, doll's, Plates 50, 51, 52 | 113, 114, 115 |
| I | |
| Indian club, Plate 53 | 116 |
| J | |
| Jigs & fixtures | 43 |
| Jointer, hand | 59 |
| K | |
| Kiddie kars, Plates 27, 28, 29 | 90, 91, 92 |
| L | |
| Lathe, operating the | 54, 55, 56, 57 |
| M | |
| Machines, operating of woodworking | 54 |
| N | |
| Noah's ark, Plate 18 | 81 |
| O | |
| Organization, plan for shop | 11 |
| P | |
| Paint, use of | 24 |
| Ingredients of | 24 |
| Application | 25 |
| Preparation of surface | 25 |
| Tinting materials | 25 |
| Mixing | 25 |
| Formulas | 26 |
| Formulas for tinted paint | 26 |
| Enameling | 27 |
| Plan for shop organization | 11 |
| Grouping students | 11 |
| Time clerk | 13 |
| Tool-room clerk | 13 |
| Recording attendance | 14 |
| Time-card rack | 14 |
| Time cards | 15 |
| Grading students | 17 |
| Accomplishment sheet | 18 |
| Preparation for shop work | 19 |
| Pneumatic equipment | 36 |
| Preface | 3 |
| Productive work | 11 |
| R | |
| Ring toss, Plate 2 | 65 |
| Rocking chair, Plate 13 | 76 |
| Rocker, duck, Plate 35 | 98 |
| Rocker, ducky loo, Plate 34 | 97 |
| Rock-a-doodle, Plate 31 | 94 |
| S | |
| Sand box, Plates 48, 49 | 111, 112 |
| Sander | 60, 62 |
| Saw, universal | 58 |
| Scooter, Plate 25 | 88 |
| Sleds, Plates 32, 33 | 95, 96 |
| Sprayer, pneumatic air[Pg 120] | 31, 33, 34 |
| Sprayer, directions for operating | 36 |
| Speedster, duplex, Plate 30 | 93 |
| Stain, oil | 23 |
| Stain, analine water | 22 |
| Stilts, adjustable, Plate 24 | 87 |
| Suggestions to teachers | 7 |
| Swing, child's, Plates 20, 21 | 83, 84 |
| T | |
| Table for doll house, Plate 12 | 75 |
| Teeter-totter, Plate 43 | 106 |
| Teeter-rocker, Plate 44 | 107 |
| Time clerk | 13 |
| Time cards | 15 |
| Tool-room clerk | 13 |
| Toy sales | 19 |
| Trailer, kido-kar, Plate 7 | 70 |
| Tumbler, drawing of | 32 |
| Tumbling, polishing by | 31, 32 |
| V | |
| Varnishing | 23 |
| Varnish, colored | 24 |
| Varnishing, points on | 24 |
| W | |
| Wagon, milk, Plate 11 | 74 |
| Water colors | 21 |
| Wax polishing | 31 |
| Wheel-barrow, toy, Plate 15 | 78 |
| Wheel-barrow, horse design, Plate 16 | 79 |
| Wheel cutter | 45, 46 |
| Wheels, cutting small | 43 |
| Wheels, designs, Fig. 27 | 49, 51 |
| Wheels, turning | 43 |
| Woods used in toy making | 42 |
Download ePUB
If you like this ebook, consider a donation!