This is a modern-English version of Self-instructor in the art of hair work, dressing hair, making curls, switches, braids, and hair jewelry of every description., originally written by Campbell, Mark.
It has been thoroughly updated, including changes to sentence structure, words, spelling,
and grammar—to ensure clarity for contemporary readers, while preserving the original spirit and nuance. If
you click on a paragraph, you will see the original text that we modified, and you can toggle between the two versions.
Scroll to the bottom of this page and you will find a free ePUB download link for this book.
Self-taughtIN THE
ART OF HAIR WORK,DRESSING HAIR,
Curls, twists, braids, AND HAIR JEWELRY OF ALL KINDS. ——————— Compiled from Original Designs and the Latest Parisian Patterns BY MARK CAMPBELL. ——————— NEW YORK: M. CAMPBELL, 737 BROADWAY. ———— CHICAGO: 81 SOUTH CLARK STREET. 1867. |
MARK CAMPBELL,
In the Clerk's Office of the District Court of the United States, for the Northern
District of Illinois.
PREFACE.
The necessity for a comprehensive work, giving a full and detailed explanation of the Art of manufacturing Hair Work in all its various branches, has been so frequently urged upon the attention of the author, that, in compliance with an almost universal demand, he has concluded to publish a book which will clearly illustrate the Art of Hair Dressing, and making Hair Jewelry and Hair Work of every description. His perfect familiarity with the business—the result of many years' successful experience—renders him eminently competent to impart the fullest information upon the subject of which he treats, while the great consumption and rapidly increasing demand for every description of Hair Goods, will make this work he now presents to the public, one of particular interest to all classes. Heretofore the Art of making these goods has been zealously guarded by a few dealers, who have accumulated fortunes, and would still retain it a profound secret but for the publication of this book. This is the only descriptive volume ever published on Hair Work. It is an elaborate, carefully prepared book, containing over one thousand drawings, devices and diagrams, engraved at great expense to the publisher, and accompanied with the most comprehensive instructions. It not only reveals to the most ordinary comprehension the hitherto concealed mysteries of the Art, but will prove an indispensable adjunct to every lady's toilet table, as by its aid she will not only be able to dress her own hair in every variety of style, but make her own Hair Jewelry and articles of Hair work, including Switches, Braids, Curls, Waterfalls, &c., assisted by a reference to plates of the most modern European and American styles. For children, no art or accomplishment is more useful than the ability to make articles of tasteful ornament in Hair Work. This work will open[6] to all such persons a path to agreeable and profitable occupation. Jewelry Dealers, from the clear instructions herein given, can manufacture any required pattern of Hair Jewelry, and add, without extra expense, a new and lucrative branch to their business.
The need for a comprehensive guide that fully explains the art of hair manufacturing in all its different forms has been repeatedly brought to the author's attention. In response to this overwhelming request, he has decided to publish a book that will clearly demonstrate the art of hairdressing and the creation of hair jewelry and various hair products. His extensive experience in the field makes him highly qualified to provide complete information on the subject, while the growing demand for all types of hair goods ensures that this book will be of great interest to everyone. Until now, the art of creating these products has been closely kept by a few dealers who have made fortunes and would continue to keep it a secret if not for this publication. This is the only book ever published that describes hair work in detail. It is a thorough, well-prepared book with over a thousand illustrations, designs, and diagrams, created at great expense to the publisher, and includes the most detailed instructions. It not only clarifies the previously hidden secrets of this art for even the most casual reader, but it will also be an essential addition to every woman’s vanity, allowing her to style her hair in various ways and create her own hair jewelry and hair products, including switches, braids, curls, waterfalls, etc., with the reference to illustrations of current European and American styles. For children, learning to craft decorative items using hair work is incredibly useful. This book will provide all interested individuals with a pathway to enjoyable and profitable activities. Jewelry dealers can use the clear instructions provided here to create any required style of hair jewelry and add a new, profitable branch to their business without extra cost.
Persons wishing to preserve and weave into lasting mementos, the hair of a deceased father, mother, sister, brother, or child, can also enjoy the inexpressible advantage and satisfaction of knowing that the material of their own handiwork is the actual hair of the "loved and gone."
People who want to keep and turn the hair of a deceased father, mother, sister, brother, or child into lasting memorials can also experience the indescribable benefit and fulfillment of knowing that the material they worked with is the actual hair of their "loved and lost."
No other work ever met with such an earnest demand as this treatise upon the art of Hair Braiding. It must certainly commend itself to the ladies of our country as invaluable. Even a hasty perusal will convince every one of its utility and worth. Translations in French and German are in progress.
No other work has ever faced such high demand as this guide on the art of Hair Braiding. It will surely be appreciated by the women of our country as invaluable. Even a quick read will show everyone its usefulness and value. Translations in French and German are underway.

INTRODUCTORY REMARKS.
In this book of instruction, I have introduced for practice the easiest braids first—which are chain braids. The first pattern, found on page 9, is a very easy and handsome one, and should be practiced to perfection before trying any other, as it will enable the beginner to execute all others after the first is perfected. A new beginner should be particular to place the strands correctly upon the table, and mark the cover with precision, after the manner shown in the diagram. I have, by the introduction of plates, diagrams and explanatory remarks, made comprehensive and simple the execution of all the braids herein contained. The novice should first give special attention to preparing the hair for braiding, the adjustment of it to the bobbins, weights, molds, &c., of which plates, and full explanations are to be found elsewhere in this book. I wish to impress upon the mind of the worker, that every change made with the strands changes the numbers of them to correspond with the numbers on the table. For example: lift No. 1 over No. 2, which would make No. 1 No. 2, and No. 2 No. 1, &c.
In this instructional book, I've started with the simplest braids, which are chain braids. The first pattern, found on page 9, is really easy and attractive, and you should practice it until you master it before moving on to anything else, as it will help you learn all the others once you've perfected this one. A beginner should pay special attention to arranging the strands correctly on the table and marking the cover carefully, just like shown in the diagram. I've used plates, diagrams, and clear explanations to make it easy to understand how to do all the braids included in this book. The novice should first focus on getting the hair ready for braiding, including how to adjust it to the bobbins, weights, molds, etc., which are detailed with plates and full explanations in other parts of this book. I want to emphasize that any change you make with the strands will change their numbers corresponding to the numbers on the table. For instance: lift No. 1 over No. 2, which will make No. 1 become No. 2, and No. 2 become No. 1, etc.


AKE sixteen strands, eighty hairs in a strand, and place on table like pattern. Commence at A, take Nos. 1,—one in each hand—lift them over the table, one on each side of the mold, and lay them between Nos. 1 at B, and bring back the Nos. 2 from B, one on each side of the mold, and lay them between Nos. 2 at A; then go to C, lift Nos. 1 over between Nos. 1 at D, passing one strand each side of the mold, and bring back Nos. 2 from D, and lay between Nos. 2 at C. Then you are through the braid, ready to commence at A, as at first, and repeat until finished.
Braid this over a mold, made of small wire, with a hole in one end like the eye of a needle, so as to draw a small cord in the place of the wire. When you have it braided, take off the weights, tie the ends fast on the wire, and push the braid tight together; then boil in water about ten minutes, and take it out and put in an oven as hot as it will bear without burning, until quite dry; then slip it off the wire on to the cord, sew the ends of the braid so it will not slip, and put a little shellac on the end to keep it fast. If you want it elastic, use elastic cord. To vary the size of the braid, vary the number of hairs in a strand.
Braid this over a small wire mold that has a hole at one end like the eye of a needle, so you can thread a small cord instead of the wire. Once you've finished braiding, remove the weights, securely tie the ends to the wire, and push the braid tightly together. Then, boil it in water for about ten minutes, take it out, and place it in an oven that's as hot as it can be without burning, until it’s completely dry. After that, slide it off the wire onto the cord, sew the ends of the braid to prevent slipping, and apply a little shellac to the end to keep it secure. If you want it to be elastic, use elastic cord. To change the size of the braid, adjust the number of hairs in each strand.

Take sixteen strands and place on table like pattern. Commence at A with sixty hairs in a strand. Take Nos. 2, lift over table to B, lay them in between Nos. 1 at B, and bring back Nos. 2 from B, and lay in between Nos. 1 at A. Then walk around table to C; take Nos. 1 and lift over table and lay them in between Nos. 1 at D, and bring back Nos. 1 from D to C; then take Nos. 2 at C, lift over table and lay them inside of Nos. 2 at D, and bring back Nos. 2 from D to C. After braiding several times round to suit your taste, say five, reverse the braid by commencing at C, and braiding as you did at A, by taking Nos. 2 at C, lift over table to D, and lay them in between Nos. 1 at D, and bring back Nos. 2 from D, and lay in between Nos. 1 at C. Then go to A and take Nos. 1, lift over table and lay in between Nos. 1 at B, and bring back Nos. 1 from B to A, then take Nos. 2 at A, lift over table and lay in between Nos. 2 at B, and fetch back Nos. 2 from B to A, then commence at C again and braid five times. Then commence at A as you did at first, reversing it every time you braid it five times through. Braid it over a small wire, tie the ends on the wire, boil and dry the same as chain on page nine, only you need not press the braid together on the wire.
Take sixteen strands and lay them out on the table in a pattern. Start at A with sixty hairs in one strand. Take the second group, lift it over the table to B, place them between the first group at B, then bring back the second group from B and lay them between the first group at A. Next, walk around the table to C; take the first group and lift it over the table to lay it between the first group at D, then bring back the first group from D to C. Now take the second group at C, lift it over the table, and place it inside the second group at D, then bring back the second group from D to C. After braiding several times to your liking, say five times, reverse the braid by starting at C and braiding as you did at A: take the second group at C, lift it over to D, and lay it between the first group at D, then bring back the second group from D and lay it between the first group at C. Then go to A, take the first group, lift it over the table to lay it between the first group at B, and bring back the first group from B to A. After that, take the second group at A, lift it over to lay it between the second group at B, and bring back the second group from B to A. Then start at C again and braid five times. Repeat the process starting at A as you did before, reversing it each time you braid it five times. Braid it over a small wire, tie the ends to the wire, boil and dry it the same way as the chain on page nine, but you don't need to press the braid together on the wire.

Take sixteen strands, with eighty hairs in a strand, and place on table like pattern. Commence at A and B; take No. 1 at A in right hand, and No. 1 at B in left hand, and swing them around the table to the right, changing places with them. Then take Nos. 1 at C and D and change as at A and B. Then go to B and take Nos. 2 at B and A, and change them by taking No. 2 at B in right hand and No. 2 at A in left hand, and swing them around table to the right as before, changing places with them. Then go around the table to D, and take Nos. 2 at D and C, and change places as before, then take Nos. 3 at A and B and change as before. Then take Nos. 3 at C and D and change places with them. Then take Nos. 4 at B and A and change as before. Then take Nos. 4 at D and C and change as before. Then commence at A, as at first, repeating until the braid is finished.
Take sixteen strands, with eighty hairs in each strand, and lay them out on the table in a similar pattern. Start at A and B; hold No. 1 at A in your right hand and No. 1 at B in your left hand, then swing them around the table to the right, swapping their positions. Next, take Nos. 1 at C and D and switch them just like you did at A and B. Then move to B and take Nos. 2 at B and A, swapping them by holding No. 2 at B in your right hand and No. 2 at A in your left hand, swinging them around the table to the right as before. After that, go to D and take Nos. 2 at D and C, and switch places as you did before, then take Nos. 3 at A and B and switch as before. Next, take Nos. 3 at C and D and swap them. Then take Nos. 4 at B and A and switch as before. Finally, take Nos. 4 at D and C and change places as before. Start again at A, just like at the beginning, repeating until the braid is complete.

Take thirty-two strands with twelve hairs in a strand, or any number that can be divided by four, and sixty strands for usual size, and place them on table like pattern. Have every alternate two strands of black hair, and the others of light hair. Commence at A, taking two strands of light hair in left hand, Nos. 1 and 2, and take two strands of black hair in right hand, Nos. 3 and 4, and cross No. 2 (light) over No. 3 (dark), then No. 1 (light) under No. 3 (dark), then No. 4 (dark) over Nos. 1 and 2 (light); so on around the table to the right until you get to A; then commence and work back to the left by taking light hair in left hand and dark hair in right hand, as before, and put No. 3 (dark) over No. 2 (light), and No. 4 (dark) under No. 2 (light), and No. 1 (light) over Nos. 3 and 4 (dark), so on around the table till you get to A; then commence as at first, so on, braiding first one way around the table then the other till you have the chain completed.
Take thirty-two strands with twelve hairs in each strand, or any number that can be divided by four, using sixty strands for the usual size, and arrange them on the table in a specific pattern. Use every other two strands of black hair, with the rest being light hair. Start at A, taking two strands of light hair in your left hand, labeled 1 and 2, and two strands of black hair in your right hand, labeled 3 and 4. Cross strand No. 2 (light) over strand No. 3 (dark), then strand No. 1 (light) under strand No. 3 (dark), followed by strand No. 4 (dark) over strands 1 and 2 (light); continue this pattern around the table to the right until you return to A. Then begin working back to the left by taking light hair in your left hand and dark hair in your right hand, as before, placing strand No. 3 (dark) over strand No. 2 (light), and strand No. 4 (dark) under strand No. 2 (light), followed by strand No. 1 (light) over strands 3 and 4 (dark); continue this pattern around the table until you reach A again. Then start as you did at first, repeating the process of braiding first one way around the table and then the other until you complete the chain.
Braid it over wood, or brass wire, the size and length you wish your chain. When braided take off your weights, tie the ends fast and boil and dry, then take out the mold and put a cord through with some cotton wrapped around it so it will be soft and pliable. This is called the Striped Snake Braid, and can be braided all of one color if desired.
Braid it over wood or brass wire, depending on the size and length you want for your chain. Once braided, remove your weights, tie the ends securely, and then boil and dry it. After that, take out the mold and thread a cord through it, wrapping some cotton around the cord to make it soft and flexible. This is called the Striped Snake Braid, and you can braid it using just one color if you like.

Take any number of strands that can be divided by two, eighty hairs in a strand, twenty strands for usual size, place on table like pattern. Commencing, take No. 1 at A in right hand and No. 1 at B in left hand, and swing around the table to the right, and lay the one in right hand at No. 1 at B, and the one in left hand at No. 1 at A; then bring back No. 2 at B with right hand, and No. 2 at A in left hand, to the left, then take No. 3 and swing to the right, then No. 4 and swing to the left, so on, round first to the right then to the left, with every number of strands till you get to No. 1; then commence as at first, and so on till the chain is as long as required.
Grab any number of strands that can be divided by two, with eighty hairs in a strand, twenty strands for the usual size, and lay them out on the table in a pattern. Begin by taking No. 1 at A in your right hand and No. 1 at B in your left hand, then swing around the table to the right and place the one in your right hand at No. 1 at B, and the one in your left hand at No. 1 at A. Next, bring back No. 2 at B with your right hand and No. 2 at A with your left hand to the left. Then take No. 3 and swing to the right, followed by No. 4 and swinging to the left, and so on, alternating between right and left with every strand number until you reach No. 1 again. Then start over as before, and continue until the chain is as long as you need.
Braid this over a small wire, with a hole in one end like the eye of a needle, so as to draw a small cord in the place of the wire. When you have it braided take off your weights, tie the ends fast on the wire, and push the braid together on the wire; boil in water about ten minutes, then take it out and put it in an oven as hot as it will bear without burning, until it is quite dry; then take it out and slip off the wire on to the cord, and sew the ends of the braid so it will not slip on the cord, and put a little shellac on the end to keep it fast. If you want it elastic, use elastic cord. To vary the size of the braid, vary the number of hairs in a strand.
Braid this over a small wire, making a hole at one end like a needle's eye, so you can draw a small cord in place of the wire. Once you’ve braided it, remove your weights, securely tie the ends onto the wire, and squeeze the braid together on the wire. Boil it in water for about ten minutes, then take it out and place it in an oven that’s hot enough to dry it without burning. Once it’s completely dry, remove it from the wire and slide it onto the cord, then sew the ends of the braid to prevent it from slipping on the cord, and apply a little shellac at the end to keep it in place. If you want it to be stretchy, use elastic cord. To vary the size of the braid, change the number of hairs in each strand.

Take thirty-two strands, or any number that can be divided by four, twelve hairs in a strand, and sixty strands for usual size; place them on table like pattern. Commence at A, lift No. 2 in your right hand, and put your left under your right hand and take up No. 3 and bring it back of No. 1, and lay them both down; then take No. 4 up and lay it between Nos. 1 and 2, then take the next four to the right, and so on till you get around the table; then commence and braid back around the table to the left, but reverse the braid by braiding it this way: lift No. 3 with your left hand, pass your right under and take No. 2 and bring it back over No. 4, and lay them both down; then take No. 1 and lift it over in between Nos. 3 and 4, and so on, till you get around the table. Then commence as at first, braid one way, then the other, till you have it as long as required. Braid it over wood or brass wire the size and length you wish your chain; when braided take off your weights, tie the ends fast, and boil and dry them; take out the mold and put a cord through with some cotton wrapped around it so that it will be soft and pliable. This is called the Snake Chain Braid.
Take thirty-two strands, or any number that can be divided by four, with twelve hairs in each strand, and sixty strands for a typical size. Arrange them on the table in a pattern. Start at A, lift No. 2 with your right hand, and use your left hand underneath to grab No. 3. Bring it behind No. 1 and lay both down. Then pick up No. 4 and place it between Nos. 1 and 2, then take the next four to the right, and continue this until you’ve gone all the way around the table. After that, start braiding back around to the left, but change the direction of the braid like this: lift No. 3 with your left hand, pass your right hand underneath to grab No. 2, and bring it back over No. 4, then lay them both down. Next, take No. 1 and lift it over into the space between Nos. 3 and 4, and keep going until you make it all the way around the table. Then start again, braiding one way, then the other, until it’s as long as you want. Braid it over wood or brass wire to the size and length you want your chain. Once braided, remove your weights, tie the ends securely, and boil and dry them. Take out the mold and thread a cord through with some cotton wrapped around it so it’s soft and flexible. This is called the Snake chain braid.

Take sixteen strands, eighty hairs in a strand, and place them on the table like pattern. Commence at A, take Nos. 1 strands, lift across the table and lay down inside of Nos. 1 at B, and bring back Nos. 1 from B to A, then lift Nos. 2 at A over inside Nos. 2 at B and bring Nos. 2 from B to A, then lift Nos. 3 from A to B, and bring back Nos. 3 from B to A, then lift Nos. 4 from A to B and bring back Nos. 4 from B to A, then commence at Nos. 1 again and repeat until the chain is completed.
Grab sixteen strands, with eighty hairs in each strand, and spread them out on the table in a pattern. Start at A, take the strands numbered 1, move them across the table and place them inside the strands numbered 1 at B, then bring the strands numbered 1 back from B to A. Next, lift the strands numbered 2 at A over the strands numbered 2 at B and bring the strands numbered 2 back from B to A. Then, lift the strands numbered 3 from A to B and bring back the strands numbered 3 from B to A. After that, lift the strands numbered 4 from A to B and bring back the strands numbered 4 from B to A. Finally, start again from the strands numbered 1 and repeat until the chain is finished.
Braid this over a small wire, with a hole in one end like the eye of an needle, so as to draw a small cord in the place of the wire. When you have it braided, take off your weights, tie the ends fast on the wire and push the braid together on the wire; then boil in water about ten minutes; then take it out and put in an oven as hot as it will bear without burning, until it is quite dry; then take it out and slip it off of the wire on to the cord, and sew the ends of the braid so it will not slip on the cord, and put a little shellac on the end to keep it fast. If you want it elastic, use elastic cord. To vary the size of the braid, vary the number of hairs in a strand.
Braid this over a small wire that has a hole in one end like the eye of a needle, so you can thread a small cord instead of the wire. Once you have it braided, remove your weights, tie the ends securely on the wire, and push the braid together on the wire. Then, boil it in water for about ten minutes. After that, take it out and place it in an oven that is as hot as it can get without burning, until it’s completely dry. Next, take it out and slide it off the wire onto the cord, sew the ends of the braid so it doesn't slip on the cord, and apply a bit of shellac on the end to secure it. If you want it to be elastic, use elastic cord. To change the size of the braid, adjust the number of hairs in each strand.

Take sixteen strands or any number that can be divided by two, usually eighty hairs in a strand. Commence at A and B, take No. 1 at A in right hand, and No. 1 at B in left hand, and swing them around table to right, and lay the one in right hand down at B across over No. 2, and the one in right hand lay down across over No. 2 at A; then go to C and D, and change No. 1 as before at A and B; then go to the next two strands and change as before, so on around the table, taking the next two each time until the chain is completed. Directions same as on page 9.
Grab sixteen strands or any amount that can be divided by two, usually eighty hairs in a strand. Start at A and B, take No. 1 at A in your right hand, and No. 1 at B in your left hand, then swing them around the table to the right. Lay the one in your right hand down at B across No. 2, and the one in your right hand down across No. 2 at A; then go to C and D, and swap No. 1 as before at A and B; then move to the next two strands and swap as before, continuing around the table, taking the next two each time until the chain is complete. Directions same as on page 9.

Take sixteen strands, eighty hairs in a strand, and place on table like pattern. Commence at A, lift Nos. 1 across table and lay in between Nos. 1 at B, and bring back Nos. 1 from B to A; then go to C, take Nos. 1 and lift across table and lay in between Nos. 1 at D, and bring back Nos. 1 from D to C; then go to A, take Nos. 2 and lift across inside of Nos. 2 at B, and bring back Nos. 2 from B to A; then go to C, lift Nos. 2 across inside of Nos. 2 at D, and bring back Nos. 2 from D to C; then go to A and commence as at first, and repeat until it is the required length.
Take sixteen strands, with eighty hairs in each strand, and arrange them on the table in a pattern. Start at A, lift the strands numbered 1 across the table and place them between the strands numbered 1 at B, then return the strands numbered 1 from B back to A; next, move to C, take the strands numbered 1 and lift them across the table, placing them between the strands numbered 1 at D, and then bring the strands numbered 1 from D back to C; then go back to A, take the strands numbered 2 and lift them across inside the strands numbered 2 at B, and bring the strands numbered 2 from B back to A; then head to C, lift the strands numbered 2 across inside the strands numbered 2 at D, and bring the strands numbered 2 from D back to C; finally, return to A and repeat the process as initially done until you reach the desired length.
Braid this over a small wire, with a hole in one end like the eye of a needle, so as to draw a small cord in the place of the wire. When you have it braided, take off your weights, tie the ends fast on the wire, and push the braid close together; then boil in water about ten minutes, and take it out and put it in an oven as hot as it will bear without burning, until it is quite dry; then take it out and slip it off the wire on to the cord, sew the ends of the braid so it will not slip, and put a little shellac on the ends to keep it fast. If you want it elastic, use elastic cord. To vary the size of the braid, vary the number of hairs in a strand.
Braid this over a small wire, with a hole at one end like the eye of a needle, so you can thread a small cord in place of the wire. Once you've braided it, remove your weights, securely tie the ends on the wire, and compress the braid tightly together; then boil it in water for about ten minutes, take it out, and place it in an oven that’s as hot as it can get without burning, until it’s completely dry; then remove it and slip it off the wire onto the cord, sew the ends of the braid to prevent slipping, and apply a little shellac on the ends to secure them. If you want it to be elastic, use elastic cord. To change the size of the braid, adjust the number of hairs in each strand.

Take sixteen strands, eighty hairs in a strand, and place them on table like pattern. Commence at A and B with Nos. 1, passing them around table to the right, and leave No. 1 from A at B, and No. 1 from B at A. Then take Nos. 7 at A and B, and pass around table to right, and leave the one from A at B, and the one from B at A. Then take Nos. 2 at A and B, changing places with them; then take Nos. 8 and change as before; then take Nos. 3 at A and B and change them as before; then take Nos. 1 at A and B and change as at first; then take Nos. 4 and change as before; then take Nos. 2 and change as before; then take Nos. 5 and change as before, so on until the braid is finished, all the time taking the third strand to the right, or forward, and the second one to the left, or backward.
Grab sixteen strands, with eighty hairs in each strand, and lay them out on the table in a pattern. Start at points A and B with number 1, passing them around the table to the right, leaving number 1 from A at B and number 1 from B at A. Next, take number 7 from A and B and pass them around the table to the right, again leaving the one from A at B and the one from B at A. Then take number 2 from A and B, swapping them; then take number 8 and switch as before; then take number 3 from A and B and switch them as before; then take number 1 from A and B and swap as you did first; then take number 4 and switch as before; then take number 2 and switch as before; then take number 5 and switch as before, continuing until the braid is finished, always taking the third strand to the right, or forward, and the second one to the left, or backward.
Braid this over a small wire, with a hole in one end like the eye of a needle, so as to draw a small cord in the place of the wire. When you have it braided, take off your weights, tie the ends fast on the wire and push the braid together on the wire; then boil in water about ten minutes; then take it out and put in an oven as hot as it will bear without burning, until it is quite dry; then take it out and slip it off of the wire on to the cord, and sew the ends of the braid so it will not slip on the cord, and put a little shellac on the end to keep it fast. If you want it elastic, use elastic cord. To vary the size of the braid, vary the number of hairs in a strand.
Braid this over a small wire that has a hole at one end like a needle's eye, so you can pull a small cord instead of the wire. Once you’ve braided it, remove the weights, tie the ends securely on the wire, and push the braid together on the wire; then boil it in water for about ten minutes. After that, take it out and place it in an oven as hot as it can handle without burning, until it’s completely dry. Next, take it out and slide it off the wire onto the cord, and sew the ends of the braid to prevent it from slipping on the cord, adding a bit of shellac on the end to hold it in place. If you want it to be stretchy, use elastic cord. To change the size of the braid, adjust the number of hairs in each strand.

Take eighteen strands, eighty hairs in a strand, and place on table like pattern. Commence at A and B, take Nos. 1 and swing around table to the right, and place the No. 1 from A over the Nos. 2 and 3 at B, and the No. 1 from B over the Nos. 2 and 3 at A; then go to C and D, take the Nos. 1 and change the same; then go to E and F and change the same; then go to B and A, and change as at first,—all the time taking the Nos. 1, and swinging to the right, for when you lay them over the Nos. 2 and 3 it makes them Nos. 3, and makes Nos. 2 Nos. 1—and so on, until the chain is finished.
Grab eighteen strands, with eighty hairs each, and lay them out on the table in a pattern. Start at A and B, take the strands labeled 1, swing them around the table to the right, and place the strand 1 from A over the strands 2 and 3 at B, and the strand 1 from B over the strands 2 and 3 at A. Next, go to C and D, take the strands 1, and swap them. Then, move on to E and F and do the same. After that, return to B and A and swap them like you did at the beginning—all the while taking the strands labeled 1 and swinging to the right. When you lay them over strands 2 and 3, they become strands 3, and strands 2 become strands 1—and so forth, until the chain is complete.
Braid this over a small wire, with a hole in one end like the eye of a needle, so as to draw a small cord in the place of the wire. When you have it braided, take off your weights, tie the ends fast on the wire, and push the braid close together; then boil in water about ten minutes, and take it out and put it in an oven as hot as it will bear without burning, until it is quite dry; then take it out and slip it off the wire on to the cord, sew the ends of the braid so it will not slip, and put a little shellac on the ends to keep it fast. If you want it elastic, use elastic cord. To vary the size of the braid, vary the number of hairs in a strand.
Braid this over a small wire that has a hole at one end like a needle's eye, so you can pull a small cord through instead of the wire. Once you've braided it, remove your weights, securely tie the ends onto the wire, and compress the braid together. Boil it in water for about ten minutes, then take it out and place it in an oven as hot as it can get without burning, until it's completely dry. Next, take it out and slide it off the wire onto the cord, sew the ends of the braid so it doesn't slip, and apply a bit of shellac on the ends to hold it steady. If you want it to be elastic, use elastic cord. To adjust the size of the braid, change the number of hairs in each strand.

Take sixteen strands, eighty hairs in a strand, and place them on table like pattern. Commence at A and B, take No. 1 at A in right hand and No. 1 at B in left hand and swing them around the table to the right and lay the one in the right hand down at B, over across Nos. 2, 3 and 4, and the one in the left hand at A over across Nos. 2, 3 and 4, then go to C and take No. 1 at C and D and change as before at A and B; then go to B and take No. 1 at B and A and change them by taking No. 1 at B in right hand, and No. 1 at A in left hand and swing them round the table to the right as before, laying them across over Nos. 2, 3 and 4; so on braiding around the table to the right until you have it the required length.
Grab sixteen strands, with eighty hairs in each strand, and arrange them on the table in a pattern. Start at A and B, take No. 1 at A in your right hand and No. 1 at B in your left hand, then swing them around the table to the right and place the one in your right hand down at B, over Nos. 2, 3, and 4, and place the one in your left hand at A over Nos. 2, 3, and 4. Next, go to C and take No. 1 at C and D and switch them as you did at A and B. Then go back to B and take No. 1 at B and A, and switch them by taking No. 1 at B in your right hand and No. 1 at A in your left hand, swinging them around the table to the right as before, laying them across Nos. 2, 3, and 4; continue braiding around the table to the right until it reaches the desired length.
Braid this over a small wire, with a hole in one end like the eye of a needle, so as to draw a small cord in the place of the wire. When you have it braided, take off your weights, tie the ends fast on the wire and push the braid together on the wire; then boil in water about ten minutes; then take it out and put in an oven as hot as it will bear without burning, until it is quite dry; then take it out and slip it off of the wire on to the cord, and sew the ends of the braid so it will not slip on the cord, and put a little shellac on the end to keep it fast. If you want it elastic, use elastic cord. To vary the size of the braid, vary the number of hairs in a strand.
Braid this over a small wire with a hole in one end like a needle's eye, so you can pull a small cord through instead of the wire. Once you’ve braided it, remove your weights, securely tie the ends onto the wire, and compact the braid on the wire; then boil it in water for about ten minutes. After that, take it out and place it in an oven as hot as it can get without burning, until it's completely dry. Next, take it out and slide it off the wire onto the cord, then sew the ends of the braid to prevent slipping on the cord and apply a little shellac on the end to keep it secure. If you want it to be elastic, use elastic cord. To change the size of the braid, adjust the number of hairs in a strand.

Take sixteen strands, eighty hairs in a strand, and place them on table like pattern. Commence at A, take Nos. 2 and lift over across table outside of Nos. 2 at B, and bring back Nos. 1 from B to A outside of Nos. 1 at A, then take Nos. 1 at C and cross over inside of Nos. 1 at D, and bring back Nos. 2 from D inside of Nos. 2 at C, then go back to A and braid as before, so on repeating until it is finished.
Grab sixteen strands, with eighty hairs in each strand, and lay them out on the table in a pattern. Start at A, take Nos. 2 and lift them over to the outside of Nos. 2 at B, then bring Nos. 1 back from B to A on the outside of Nos. 1 at A. Next, take Nos. 1 at C and cross them over to the inside of Nos. 1 at D, and bring Nos. 2 back from D to the inside of Nos. 2 at C. Then return to A and braid as before, continuing to repeat this until it's finished.
Braid this over a small wire, with a hole in one end like the eye of a needle, so as to draw a small cord in the place of the wire. When you have it braided, take off your weights, tie the ends fast on the wire and push the braid together on the wire; then boil in water about ten minutes; then take it out and put in an oven as hot as it will bear without burning, until it is quite dry; then take it out and slip it off of the wire on to the cord, and sew the ends of the braid so it will not slip on the cord, and put a little shellac on the end to keep it fast. If you want it elastic, use elastic cord. To vary the size of the braid, vary the number of hairs in a strand.
Braid this over a thin wire with a hole at one end like the eye of a needle, so you can pull a small cord in place of the wire. Once you’ve braided it, remove your weights, securely tie the ends to the wire, and push the braid together on the wire; then boil it in water for about ten minutes. Take it out and place it in an oven that’s as hot as it can handle without burning, until it’s completely dry. After that, remove it and slide it off the wire onto the cord, and sew the ends of the braid to prevent it from slipping on the cord. Apply a little shellac to the end to keep it secure. If you want it to be stretchy, use elastic cord. To change the size of the braid, adjust the number of hairs in each strand.


Take ten strands, eighty hairs in a strand, and place them on the table like pattern. Commence at A and B, take Nos. 1 and swing them around the table to the right, and leave No. 1 from A at B and the No. 1 from B at A, then take the Nos. 2 and swing them around the table to the right and change places with each other, then take Nos. 3 and change places as before; then take Nos. 4 and change places as before; then take Nos. 5 and change places as before; then commence at Nos. 1 and repeat until the braid is finished.
Take ten strands, each with eighty hairs, and lay them out on the table in a pattern. Start at points A and B, take the first strands and swing them around the table to the right, leaving the strand from A at B and the strand from B at A. Next, take the second strands and swap them as before; then do the same with the third strands; repeat this with the fourth strands; then the fifth strands. Finally, go back to the first strands and repeat the process until the braid is complete.
Braid this over a small wire, with a hole in one end like the eye of a needle, so as to draw a small cord in the place of the wire. When you have it braided, take off your weights, tie the ends fast on the wire and push the braid together on the wire; then boil in water about ten minutes; then take it out and put in an oven as hot as it will bear without burning, until it is quite dry; then take it out and slip it off of the wire on to the cord, and sew the ends of the braid so it will not slip on the cord, and put a little shellac on the end to keep it fast. If you want it elastic, use elastic cord. To vary the size of the braid, vary the number of hairs in a strand.
Braid this over a small wire with a hole in one end, like the eye of a needle, so you can pull a small cord in place of the wire. Once you’ve braided it, remove your weights, securely tie the ends onto the wire, and push the braid together on the wire. Then boil it in water for about ten minutes. After that, take it out and place it in an oven as hot as it can handle without burning until it's completely dry. Then, take it out and slide it off the wire onto the cord, sew the ends of the braid so it won’t slip off the cord, and apply a little shellac on the end to keep it secure. If you want it to be elastic, use elastic cord. To change the size of the braid, adjust the number of hairs in each strand.


Take sixteen strands, seventy-five hairs in a strand, and place on the table like pattern. Commence at A take Nos. 1 and 2, lift across the table to B, and lay No. 1 outside of No. 4, and lay No. 2 between Nos. 1 and 2, and bring back Nos. 1 and 2 from B to A, and lay No. 1 outside of No. 4, and No. 2 outside of No. 1 at A; then go to C and take Nos. 1 and 2, lift over table to D and lay No. 1 outside of No. 4, and lay No. 2 between Nos. 1 and 2, and bring back Nos. 1 and 2 from C, and lay No. 1 outside of No. 4, and No. 2 outside of No. 1 at C; then go to B and change the same, and so on around the table to the right until the braid is finished.
Take sixteen strands, with seventy-five hairs in each strand, and arrange them on the table in a pattern. Start at A, take strands 1 and 2, lift them across the table to B, and place strand 1 outside of strand 4, and place strand 2 between strands 1 and 2. Then bring strands 1 and 2 back from B to A, and lay strand 1 outside of strand 4, and strand 2 outside of strand 1 at A. Next, go to C and take strands 1 and 2, lift them over the table to D, and place strand 1 outside of strand 4, and place strand 2 between strands 1 and 2. Bring strands 1 and 2 back from C, and lay strand 1 outside of strand 4, and strand 2 outside of strand 1 at C. Then go to B and switch them similarly, and continue around the table to the right until the braid is complete.
Braid this over a small wire, with a hole in one end like the eye of a needle, so as to draw a small cord in the place of the wire. When you have it braided, take off your weights, tie the ends fast on the wire and push the braid together on the wire; then boil in water about ten minutes; then take it out and put in an oven as hot as it will bear without burning, until it is quite dry; then take it out and slip it off of the wire on to the cord, and sew the ends of the braid so it will not slip on the cord, and put a little shellac on the end to keep it fast. If you want it elastic, use elastic cord. To vary the size of the braid, vary the number of hairs in a strand.
Braid this over a small wire that has a hole at one end like the eye of a needle, so you can draw a small cord in place of the wire. Once you’ve braided it, take off your weights, tie the ends securely on the wire, and push the braid together on the wire. Then boil it in water for about ten minutes. After that, take it out and put it in an oven as hot as it can get without burning, until it’s completely dry. Next, take it out and slide it off the wire onto the cord, sew the ends of the braid so it won’t slip on the cord, and apply a little shellac to the end to keep it secure. If you want it to have some stretch, use elastic cord. To change the size of the braid, vary the number of hairs in each strand.


Take twenty strands, seventy-five hairs in a strand, place on table like pattern. Commence at A, lift Nos. 1 over across the table inside of Nos. 1 at B, and bring back Nos. 1 from B to A; then take Nos. 2 at A, cross over and lay them between Nos. 2 at B, and carry back Nos. 2 from B to A; then take Nos. 3 at A, cross over inside of Nos. 3 at B, and bring back Nos. 3 from B to A; then take Nos. 4 at A and cross over inside of Nos. 4 at B, and bring back Nos. 4 from B to A; then take Nos. 5 at A, cross over inside of Nos. 5 at B, and bring back Nos. 5 from B to A; then take Nos. 1 at B, cross over inside of Nos. 1 at A, and bring back Nos. 1 from A to B; then take Nos. 2 at B and cross over inside of Nos. 2 at A, and bring back Nos. 2 from A to B; then take Nos. 3, so on around the table to the right until the braid is finished, all the time taking the next two.
Take twenty strands, with seventy-five hairs in each strand, and lay them on the table in a pattern. Start at A, lift Nos. 1 over and across the table inside of Nos. 1 at B, and bring Nos. 1 back from B to A; then take Nos. 2 at A, cross over, and place them between Nos. 2 at B, and carry Nos. 2 back from B to A; then take Nos. 3 at A, cross over inside of Nos. 3 at B, and bring Nos. 3 back from B to A; then take Nos. 4 at A, cross over inside of Nos. 4 at B, and bring back Nos. 4 from B to A; then take Nos. 5 at A, cross over inside of Nos. 5 at B, and bring back Nos. 5 from B to A; then take Nos. 1 at B, cross over inside of Nos. 1 at A, and bring back Nos. 1 from A to B; then take Nos. 2 at B and cross over inside of Nos. 2 at A, and bring back Nos. 2 from A to B; then take Nos. 3, and continue around the table to the right until the braid is finished, always taking the next two.
Braid this over a small wire, with a hole in one end like the eye of a needle, so as to draw a small cord in the place of the wire. When you have it braided, take off your weights, tie the ends fast on the wire and push the braid together on the wire; then boil in water about ten minutes; then take it out and put in an oven as hot as it will bear without burning, until it is quite dry; then take it out and slip it off of the wire on to the cord, and sew the ends of the braid so it will not slip on the cord, and put a little shellac on the end to keep it fast. If you want it elastic, use elastic cord. To vary the size of the braid, vary the number of hairs in a strand.
Braid this over a small wire with a hole at one end like a needle's eye, so you can draw a small cord where the wire is. Once you’ve braided it, remove your weights, tie the ends securely on the wire, and push the braid together on the wire; then boil it in water for about ten minutes. After that, take it out and place it in an oven as hot as it can handle without burning, until it’s completely dry; then take it out and slide it off the wire onto the cord, sew the ends of the braid so it doesn’t slip on the cord, and put a little shellac on the end to keep it secure. If you want it to be elastic, use elastic cord. To change the size of the braid, adjust the number of hairs in a strand.


Take thirty-two strands, fifty hairs in a strand, and place on table like pattern. Commence at A, lift Nos. 1 across inside of Nos. 1 at B, and bring back Nos. 1 from B to A; then change at C and D, E and F, and G and H the same, then go to A, lift Nos. 2 across in place of Nos. 2 at B, and bring back Nos. 2 from B to A; then change at C and D, E and F, and G and H the same. Then you are through the braid, ready to commence at A, as at first, repeating the changes until the braid is finished.
Grab thirty-two strands, fifty hairs in each strand, and lay them on the table in a pattern. Start at A, lift the strands numbered 1 across the strands numbered 1 at B, and bring back the strands numbered 1 from B to A; then switch at C and D, E and F, and G and H in the same way. Next, go back to A, lift the strands numbered 2 in place of the strands numbered 2 at B, and bring back the strands numbered 2 from B to A; then switch at C and D, E and F, and G and H the same way. After that, you're done with the braid and ready to start again at A, just like before, repeating the switches until the braid is complete.
Braid this over a small wire, with a hole in one end like the eye of a needle, so as to draw a small cord in the place of the wire. When you have it braided, take off your weights, tie the ends fast on the wire, and push the braid close together; then boil in water about ten minutes, and take it out and put it in an oven as hot as it will bear without burning, until it is quite dry; then take it out and slip it off the wire on to the cord, sew the ends of the braid so it will not slip, and put a little shellac on the ends to keep it fast. If you want it elastic, use elastic cord. To vary the size of the braid, vary the number of hairs in a strand.
Braid this over a small wire with a hole at one end like a needle's eye, so you can pull a small cord in place of the wire. Once you’ve braided it, remove your weights, tie the ends securely on the wire, and push the braid close together. Then boil it in water for about ten minutes, take it out, and place it in an oven as hot as it can get without burning, until it’s completely dry. After that, take it out and slip it off the wire onto the cord, sew the ends of the braid to prevent it from slipping, and apply a little shellac on the ends to hold it tight. If you want it to be elastic, use elastic cord. To change the size of the braid, adjust the number of hairs in each strand.


Take sixteen strands, eighty hairs in a strand, and place them on the table like pattern. Commence at A and B, take No. 1 at A in right hand and No. 1 at B in left hand, and swing them around to the right and change places with them; then take No. 1 at C in right hand and No. 1 at D in left hand, and swing around table to the right and change places as before; then take No. 2 at B in right hand and No. 2 at A in left hand and swing to the right and change as before; then take No. 2 at D in right hand and No. 2 at C in left hand and swing to the right and change as before; then take No. 3 at A in right hand and No. 3 at B in left hand and change as before; then take No. 3 at C in right hand and No. 3 at D in left hand and change as before; then take No. 4 at B in right hand and No. 4 at A in left hand and change as before then take No. 4 at D in right hand and No. 4 at C in left hand and change as before. Then commence at A as at first and repeat till the braid is finished.
Grab sixteen strands, with eighty hairs in each strand, and lay them out on the table like a pattern. Start at A and B, take No. 1 at A in your right hand and No. 1 at B in your left hand, swing them to the right, and swap places; then take No. 1 at C in your right hand and No. 1 at D in your left hand, swing around the table to the right, and swap places like before; then take No. 2 at B in your right hand and No. 2 at A in your left hand and swing to the right and swap as before; then take No. 2 at D in your right hand and No. 2 at C in your left hand and swing to the right and swap as before; then take No. 3 at A in your right hand and No. 3 at B in your left hand and swap as before; then take No. 3 at C in your right hand and No. 3 at D in your left hand and swap as before; then take No. 4 at B in your right hand and No. 4 at A in your left hand and swap as before; then take No. 4 at D in your right hand and No. 4 at C in your left hand and swap as before. Then start again at A like at first and repeat until the braid is finished.
For further directions see page 9.
For more directions, see __A_TAG_PLACEHOLDER_0__.


Take twenty-four strands, seventy hairs in a strand, and place on table like pattern. Commence at A—change Nos. 1 at A across inside of Nos. 1 at B, and bring back Nos. 1 from B to A, then go to C, change Nos. 1 across inside of Nos. 1 at D, and bring back Nos. 1 from D to C, then take Nos. 1 at E in right hand and No. 1 at F in left hand, lift across table in place of Nos. 1 at G and H, and bring back Nos. 1 from G and H to F and E; then take Nos. 2 at E and F and change across to G and H, and lay in place of Nos. 2, and bring back Nos. 2 from G and H to F and E; then take Nos 3 and change across to G and H as before; then take Nos. 4 at F and E and change across to G and H as before; then go to C and change the Nos. 1 across to D, and bring the Nos. 1 from D to C; then go to A and change the Nos. 1 across to B, and bring back Nos. 1 from B to A; then go to E and H, take No. 4 at H in right hand, and No. 4 at E in left hand, and lift across in place of Nos. 4 at F and G, and bring back Nos. 4 from F and G to E and H; then take Nos. 3 at E and H and change across in place of Nos. 3 at F and G, and bring back Nos. 3 from F and G to E and H; then take Nos. 2 at E and H and change across in place of Nos. 2 at F and G and bring back Nos. 2 from F and G to E and H; then take Nos. 1 at E and H, and change across in place of Nos. 1 at F and G, and bring back Nos. 1 from F and G to E and H; then go to A and commence as at first, and repeat till the chain is finished.
Grab twenty-four strands, seventy hairs in each strand, and arrange them on the table in a pattern. Start at A—swap Nos. 1 at A with the inside of Nos. 1 at B, and bring Nos. 1 back from B to A. Then move to C, swap Nos. 1 with the inside of Nos. 1 at D, and bring Nos. 1 back from D to C. Next, take Nos. 1 at E in your right hand and Nos. 1 at F in your left hand, lift them across the table to replace Nos. 1 at G and H, and bring back Nos. 1 from G and H to F and E. Then take Nos. 2 at E and F, swap them across to G and H, and lay them down in place of Nos. 2, bringing back Nos. 2 from G and H to F and E. Now take Nos. 3 and swap them across to G and H as before. Then take Nos. 4 at F and E and swap them across to G and H as before. Next, go to C, swap Nos. 1 to D, and bring Nos. 1 back from D to C. Then go to A, swap Nos. 1 to B, and bring back Nos. 1 from B to A. Now go to E and H, take No. 4 at H in your right hand and No. 4 at E in your left hand, lift them across to replace Nos. 4 at F and G, and bring back Nos. 4 from F and G to E and H. Then take Nos. 3 at E and H and swap them in for Nos. 3 at F and G, bringing back Nos. 3 from F and G to E and H. After that, take Nos. 2 at E and H and swap them for Nos. 2 at F and G, and bring back Nos. 2 from F and G to E and H. Finally, take Nos. 1 at E and H, swap them for Nos. 1 at F and G, and bring back Nos. 1 from F and G to E and H. Then go back to A and start over as before, repeating until the chain is complete.
For further directions see page 9.
For more directions see __A_TAG_PLACEHOLDER_0__.


Take twenty-four strands, seventy hairs in a strand, and place on table like pattern. Commence at A, lift Nos. 1 across inside of No. 1 at B, and bring back Nos. 1 from B to A; then change Nos. 1 at C and D the same; then change Nos. 1 at E and F the same; then go to A, lift Nos. 2 across to B, and bring back Nos. 2 from B to A; then change Nos. 2 at C and D the same; then change Nos. 2 at E and F the same, and you are through the braid ready to commence at A as at first.
Take twenty-four strands, with seventy hairs in each strand, and lay them out on the table in a pattern. Start at A, lift the first strands across inside the first at B, and bring them back from B to A; then swap the first strands at C and D in the same way; then swap the first strands at E and F the same way; next, return to A, lift the second strands across to B, and bring back the second strands from B to A; then change the second strands at C and D the same way; and then change the second strands at E and F the same way, and you're done with the braid, ready to start again at A as you did at first.
Braid this over a small wire, with a hole in one end like the eye of a needle, so as to draw a small cord in the place of the wire. When you have it braided, take off your weights, tie the ends fast on the wire and push the braid together on the wire; then boil in water about ten minutes; then take it out and put in an oven as hot as it will bear without burning, until it is quite dry; then take it out and slip it off of the wire on to the cord, and sew the ends of the braid so it will not slip on the cord and put a little shellac on the end to keep it fast. If you want it elastic, use elastic cord. To vary the size of the braid, vary the number of hairs in a strand.
Braid this over a small wire, with a hole at one end like the eye of a needle, so you can pull a small cord in place of the wire. Once you've braided it, take off your weights, tie the ends securely on the wire, and push the braid together on the wire; then boil it in water for about ten minutes; after that, remove it and place it in an oven as hot as it can get without burning until it's completely dry; then take it out and slide it off the wire onto the cord, sew the ends of the braid to keep it from slipping on the cord, and apply a little shellac on the end to hold it in place. If you want it to be elastic, use elastic cord. To change the size of the braid, adjust the number of hairs in each strand.


Take sixteen strands, eighty hairs in a strand, and place them on the table like pattern. Commence at A, change the Nos. 1 across inside of Nos. 1 at B, and bring back Nos. 1 from B to A; then take No. 2 at A change over in place of Nos. 2 at B and bring back Nos. 2 from B to A; then go to C, and change the Nos. 1 from C to D, and bring back Nos. 1 from D to C; then take Nos. 2 at C and change over in place of Nos. 2 at D, and bring back Nos 2 from D to C; then go to A and begin as at first, repeating until the braid is finished.
Grab sixteen strands, with eighty hairs in each strand, and lay them out on the table in a pattern. Start at A, switch the strand numbers 1 across the inside of numbers 1 at B, and bring them back from B to A; then take number 2 at A, switch it in place of numbers 2 at B, and bring them back from B to A; next, go to C, and switch numbers 1 from C to D, then bring them back from D to C; then take numbers 2 at C and switch them in place of numbers 2 at D, and bring them back from D to C; finally, return to A and begin as you did initially, repeating this process until the braid is complete.
Braid this over a small wire, with a hole in one end like the eye of a needle, so as to draw a small cord in the place of the wire. When you have it braided, take off your weights, tie the ends fast on the wire and push the braid together on the wire; then boil in water about ten minutes; then take it out and put in an oven as hot as it will bear without burning, until it is quite dry, then take it out and slip it off of the wire on to the cord, and sew the ends of the braid so it will not slip on the cord, and put a little shellac on the end to keep it fast. If you want it elastic, use elastic cord. To vary the size of the braid, vary the number of hairs in a strand.
Braid this over a small wire with a hole at one end like the eye of a needle, so you can pull a small cord in place of the wire. Once you've braided it, remove your weights, tie the ends securely on the wire, and push the braid together on the wire. Then boil it in water for about ten minutes; take it out and place it in an oven as hot as it can get without burning until it's completely dry. After that, take it out and slide it off the wire onto the cord, and sew the ends of the braid to keep it from slipping off the cord. Put a little shellac on the end to secure it. If you want it to be elastic, use elastic cord. To adjust the size of the braid, change the number of hairs in each strand.


Take thirty-two strands, fifty hairs in a strand, and place on table like pattern. Change Nos. 1 at A across inside of Nos. 1 at B, and bring back Nos. 1 from B to A; then change in the same way, successively, the Nos. 3, 5, 2, 4, 6, 3, 5, 7, 4, 6, 8, 5, 7, 1, 6, 8, 2, 7, 1, 3, 8, 2, 4—then you are through, ready to commence as at first.
Take thirty-two strands, fifty hairs in each strand, and arrange them on the table in a pattern. Swap the strands labeled 1 at position A with those at position B, and bring the strands labeled 1 from B back to A; then repeat this process successively for strands labeled 3, 5, 2, 4, 6, 3, 5, 7, 4, 6, 8, 5, 7, 1, 6, 8, 2, 7, 1, 3, 8, 2, 4—then you're done and ready to start over as you did before.
Braid this over a small wire, with a hole in one end like the eye of a needle, so as to draw a small cord in the place of the wire. When you have it braided, take off your weights, tie the ends fast on the wire and push the braid together on the wire, then boil in water about ten minutes; then take it out and put in an oven as hot as it will bear without burning, until it is quite dry; then take it out and slip it off of the wire on to the cord, and sew the ends of the braid so it will not slip on the cord, and put a little shellac on the end to keep it fast. If you want it elastic, use elastic cord. To vary the size of the braid, vary the number of hairs in a strand.
Braid this over a small wire that has a hole in one end like the eye of a needle, so you can draw a small cord in place of the wire. Once you've braided it, remove the weights, tightly tie the ends to the wire, and push the braid together on the wire. Then boil it in water for about ten minutes. After that, take it out and put it in an oven as hot as it can handle without burning until it is completely dry. Next, take it out and slide it off the wire onto the cord, and sew the ends of the braid to prevent slipping on the cord, putting a little shellac on the end to keep it secure. If you want it to be elastic, use elastic cord. To change the size of the braid, adjust the number of hairs in each strand.


Take sixteen strands, eighty hairs in a strand, and lay on table like pattern. Commence at A and B—take No. 1 at A in left hand and No. 1 at B in right hand, swing around table to the left, and change places with them; then take No. 7 at B in right hand and No. 7 at A in left hand, and swing around the table to the right and change places with them; then take No. 5 at A in right hand and No. 5 at B in left hand, and swing around the table to the left, and change places as before; then take No. 8 at A in right hand and No. 8 at B in left hand and swing around table to the left and change as before; then take No. 6 at A in left hand, and No. 6 at B in right hand and swing around table to the right and change as before; then take No. 4 at A in right hand and No. 4 at B in left hand, and swing around table to the left and change as before; then take No. 7 at A in right hand and No. 7 at B in left hand, swing around table to the left and change as before, then take No. 5 at A in left hand and No. 5 at B in right hand, swing around table to the right and change as before; then take No. 3 at A in right hand and No. 3 at B in left hand and swing around table to the left and change as before; then take No. 6 at A in right hand and No. 6 at B in left hand and swing around table to the left and change as before; then take No. 4 at A in left hand and No. 4 at[32] B in right hand and swing around table to the right and change as before; then take No. 2 at A in right hand and No. 2 at B in left hand and swing around table to the left and change as before; then take No. 5 at A in right hand and No. 5 at B in left hand and swing around table to the left and change as before, then take No. 3 at A in left hand and No. 3 at B in right hand, and swing around table to the right and change as before. Then commence at A as at first.
Grab sixteen strands, with eighty hairs in each strand, and lay them on the table in a pattern. Start at A and B—hold No. 1 at A in your left hand and No. 1 at B in your right hand, swing around the table to the left, and switch places with them; then hold No. 7 at B in your right hand and No. 7 at A in your left hand, and swing around the table to the right and switch places with them; then hold No. 5 at A in your right hand and No. 5 at B in your left hand, and swing around the table to the left, switching places as before; then hold No. 8 at A in your right hand and No. 8 at B in your left hand and swing around the table to the left and switch as before; then hold No. 6 at A in your left hand and No. 6 at B in your right hand and swing around the table to the right and switch as before; then hold No. 4 at A in your right hand and No. 4 at B in your left hand, and swing around the table to the left and switch as before; then hold No. 7 at A in your right hand and No. 7 at B in your left hand, swing around the table to the left and switch as before; then hold No. 5 at A in your left hand and No. 5 at B in your right hand, swing around the table to the right and switch as before; then hold No. 3 at A in your right hand and No. 3 at B in your left hand and swing around the table to the left and switch as before; then hold No. 6 at A in your right hand and No. 6 at B in your left hand and swing around the table to the left and switch as before; then hold No. 4 at A in your left hand and No. 4 at B in your right hand and swing around the table to the right and switch as before; then hold No. 2 at A in your right hand and No. 2 at B in your left hand and swing around the table to the left and switch as before; then hold No. 5 at A in your right hand and No. 5 at B in your left hand and swing around the table to the left and switch as before; then hold No. 3 at A in your left hand and No. 3 at B in your right hand, and swing around the table to the right and switch as before. Then start again at A as at first.
Braid this over a small wire, with a hole in one end like the eye of a needle, so as to draw a small cord in the place of the wire. When you have it braided, take off your weights, tie the ends fast on the wire and push the braid together on the wire; then boil in water about ten minutes; then take it out and put in an oven as hot as it will bear without burning, until it is quite dry; then take it out and slip it off of the wire on to the cord, and sew the ends of the braid so it will not slip on the cord, and put a little shellac on the end to keep it fast. If you want it elastic, use elastic cord. To vary the size of the braid, vary the number of hairs in a strand.
Braid this over a small wire that has a hole on one end like a needle’s eye, so you can pull a small cord instead of the wire. Once you’ve braided it, remove the weights, tie the ends securely on the wire, and push the braid together on the wire. Then, boil it in water for about ten minutes. After that, take it out and place it in an oven as hot as it can get without burning, until it’s completely dry. Next, take it out and slide it off the wire onto the cord, and sew the ends of the braid so it doesn’t slip off the cord, adding a bit of shellac on the end to keep it secure. If you want it to be stretchy, use elastic cord. To change the size of the braid, adjust the number of hairs in each strand.


Take eighteen strands, eighty hairs in a strand, and place on table like pattern. Commence at A and B—take No. 1 at A in right hand and No. 1 at B in left hand and swing them around the table to the right and change places with them; then change the Nos. 8, 6 and 4 the same way; then count back five to the left (not counting the one last braided), bringing you to No. 9—swing as before to the right and change places; then change the Nos. 7, 5 and 3 the same way; then count back five, bringing you to No. 8—change the same; and so on, first counting two forward and change three times, and then count five back and change the same, so on until the braid is finished.
Grab eighteen strands, with eighty hairs in each strand, and lay them out on the table in a pattern. Start at points A and B—hold No. 1 at A in your right hand and No. 1 at B in your left hand, then swing them around the table to the right and swap their places; do the same for Nos. 8, 6, and 4; then count back five to the left (not including the last braided one), landing you on No. 9—swing to the right again and swap places; then change Nos. 7, 5, and 3 the same way; count back five more, ending up at No. 8—swap that too; and keep repeating this, first counting two forward and changing three times, then counting five back and changing the same way, and continue until the braid is complete.
Braid this over a small wire, with a hole in one end like the eye of a needle, so as to draw a small cord in the place of the wire. When you have it braided, take off your weights, tie the ends fast on the wire and push the braid together on the wire; then boil in water about ten minutes; then take it out and put in an oven as hot as it will bear without burning, until it is quite dry; then take it out and slip it off of the wire on to the cord, and sew the ends of the braid so it will not slip on the cord, and put a little shellac on the end to keep it fast. If you want it elastic, use elastic cord. To vary the size of the braid, vary the number of hairs in a strand.
Braid this over a small wire that has a hole at one end like a needle's eye to thread a small cord in place of the wire. Once you’ve braided it, remove your weights, securely tie the ends onto the wire, and push the braid together on the wire. Then, boil it in water for about ten minutes; afterward, take it out and place it in an oven that’s as hot as it can get without burning until it's completely dry. Then, remove it and slide it off the wire onto the cord, sew the ends of the braid to prevent it from slipping on the cord, and apply a little shellac on the end to secure it. If you want it to be stretchy, use elastic cord. To change the size of the braid, adjust the number of hairs in each strand.


Take sixteen strands, eighty hairs in a strand, and place them on the table like pattern. Commence at A and B, take No. 1 at A in right hand and No. 1 at B in left hand, and swing them around to the left and change places with them; then take successively Nos. 3, 5, 2, 4, 6, 3, 5, 7, 4, 6, 8, and change the same; then commence as at first with No. 1, so on repeating until the braid is finished.
Grab sixteen strands, with eighty hairs in each strand, and lay them out on the table in a pattern. Start at A and B, hold No. 1 at A in your right hand and No. 1 at B in your left hand, then swing them around to the left and switch their places; next, take Nos. 3, 5, 2, 4, 6, 3, 5, 7, 4, 6, 8 in succession, and switch those as well; then start again like you did in the beginning with No. 1, and keep repeating this until the braid is complete.
Braid this over a small wire, with a hole in one end like the eye of a needle, so as to draw a small cord in the place of the wire. When you have it braided, take off your weights, tie the ends fast on the wire and push the braid together on the wire; then boil in water about ten minutes; then take it out and put in an oven as hot as it will bear without burning, until it is quite dry then take it out and slip it off of the wire on to the cord, and sew the ends of the braid so it will not slip on the cord, and put a little shellac on the end to keep it fast. If you want it elastic, use elastic cord. To vary the size of the braid, vary the number of hairs in a strand.
Braid this over a small wire with a hole at one end like a needle’s eye, so you can thread a small cord in place of the wire. Once you’ve braided it, remove the weights, tie the ends securely on the wire, and push the braid together. Then boil it in water for about ten minutes. After that, take it out and place it in an oven as hot as it can get without burning, until it’s completely dry. Next, remove it and slide it off the wire onto the cord, sewing the ends of the braid so it doesn’t slide off the cord, and apply a little shellac on the end to keep it secure. If you want it to be elastic, use elastic cord. To change the size of the braid, adjust the number of hairs in a strand.


Take twenty four strands, seventy hairs in a strand, and arrange like pattern. Commence at A, take Nos. 1 and lay them in the place of Nos. 1 at B, and bring back Nos. 1 from B to A; then take Nos. 2 at C and lay in the place of Nos. 2 at D and bring back Nos. 2 from D to C. Then take the Nos. 3 from H and lay between the Nos. 3 at G, and bring back the Nos. 3 from G to H; then take the Nos. 4 at H and place between the Nos. 4 at G, and bring back the Nos. 4 from G to H; then take Nos. 5 at E and place between Nos. 5 at F, and bring back the Nos. 5 from F to E; then take the Nos. 6 at E and place them inside of Nos. 6 at F, and bring back the Nos. 6 from F to E. Commence at A as at first, and repeat until the braid is finished.
Grab twenty-four strands, seventy hairs in each strand, and arrange them in a pattern. Start at A, take No. 1 and place it where No. 1 is at B, then bring No. 1 back from B to A; next, take No. 2 from C and place it where No. 2 is at D, then bring No. 2 back from D to C. After that, take No. 3 from H and place it between the No. 3s at G, then bring No. 3 back from G to H; then take No. 4 from H and place it between the No. 4s at G, and bring No. 4 back from G to H; then take No. 5 from E and place it between the No. 5s at F, and bring No. 5 back from F to E; then take No. 6 from E and place it inside the No. 6s at F, and bring No. 6 back from F to E. Start again at A as before, and repeat until the braid is finished.
Braid this over a small wire, with a hole in one end like the eye of a needle, so as to draw a small cord in the place of the wire. When you have it braided, take off your weights, tie the ends fast on the wire and push the braid together on the wire; then boil in water about ten minutes; then take it out and put in an oven as hot as it will bear without burning, until it is quite dry; then take it out and slip it off of the wire on to the cord, and sew the ends of the braid so it will not slip on the cord, and put a little shellac on the end to keep it fast. If you want it elastic, use elastic cord. To vary the size of the braid, vary the number of hairs in a strand.
Braid this over a small wire that has a hole at one end, like the eye of a needle, so you can pull a small cord through instead of the wire. Once you’ve finished braiding, remove your weights, tie the ends securely onto the wire, and push the braid together on the wire. Then boil it in water for about ten minutes. After that, take it out and place it in an oven that’s as hot as it can get without burning until it’s completely dry. Next, take it out and slide it off the wire onto the cord. Sew the ends of the braid so it won't slip on the cord, and add a bit of shellac at the end to keep it in place. If you want it to be elastic, use elastic cord. To change the size of the braid, adjust the number of hairs in each strand.


Take twenty-four strands, and place on table like pattern. Commence at A, take Nos. 1 and place between Nos. 1 at B, and bring back Nos. 1 from B and lay in place of Nos. 1 at A; then change the Nos. 2 at A, and B the same way; then change the succeeding numbers, 3, 4, 5 and 6, all the same way. Then you are through the braid, ready to commence at Nos. 1 again, as at first, and repeat until the braid is the desired length.
Take twenty-four strands and lay them out on the table in a pattern. Start at A, take strand 1 and place it between the strands at B, then bring strand 1 back from B and lay it in the spot of strand 1 at A. Next, switch strand 2 at A and B in the same way; then continue with the following strands, 3, 4, 5, and 6, all in the same manner. Once you've completed this braid, you can start again at strand 1, just like at the beginning, and repeat until the braid reaches your desired length.
Braid this over a small wire, with a hole in one end like the eye of a needle, so as to draw a small cord in the place of the wire. When you have it braided, take off your weights, tie the ends fast on the wire, and push the braid close together; then boil in water about ten minutes, and take it out and put it in an oven as hot as it will bear without burning, until it is quite dry; then take it out and slip it off the wire on to the cord, sew the ends of the braid so it will not slip, and put a little shellac on the ends to keep it fast. If you want it elastic, use elastic cord. To vary the size of the braid, vary the number of hairs in a strand.
Braid this over a small wire, with a hole at one end like the eye of a needle, so you can pull a small cord in place of the wire. Once you’ve braided it, remove your weights, tie the ends securely on the wire, and push the braid tightly together; then boil it in water for about ten minutes, take it out, and place it in an oven as hot as it can get without burning, until it’s completely dry; then take it out and slip it off the wire onto the cord, sew the ends of the braid so it won’t slip, and apply a little shellac on the ends to keep it secure. If you want it to be elastic, use elastic cord. To change the size of the braid, adjust the number of hairs in each strand.


Take eight strands, ninety hairs in a strand, and place on table like pattern. Commence, take No. 1 at A in right hand, and No. 1 at B in left hand, and swing around table to the right—the No. 1 in the right hand over across Nos. 2, 3 and 4 at B, and the No. 1 in the left hand over across Nos. 2, 3 and 4 at A; repeat until the braid is finished.
Grab eight strands, with ninety hairs in each strand, and lay them out on the table in a pattern. Start by taking No. 1 in your right hand at A and No. 1 in your left hand at B, and swing around the table to the right—the No. 1 in your right hand goes over Nos. 2, 3, and 4 at B, and the No. 1 in your left hand goes over Nos. 2, 3, and 4 at A; keep repeating this until the braid is complete.
Braid this over a small wire, with a hole in one end like the eye of a needle, so as to draw a small cord in the place of the wire. When you have it braided, take off your weights, tie the ends fast on the wire and push the braid together on the wire; then boil in water about ten minutes; then take it out and put in an oven as hot as it will bear without burning, until it is quite dry; then take it out and slip it off of the wire on to the cord, and sew the ends of the braid so it will not slip on the cord, and put a little shellac on the end to keep it fast. If you want it elastic, use elastic cord. To vary the size of the braid, vary the number of hairs in a strand.
Braid this over a small wire with a hole in one end, like the eye of a needle, so you can draw a small cord in place of the wire. Once you've finished braiding, remove your weights, tie the ends securely on the wire, and push the braid together on the wire. Then, boil it in water for about ten minutes; take it out and place it in an oven as hot as it can get without burning until it's completely dry. After that, take it out and slip it off the wire onto the cord, sew the ends of the braid so it won't slip on the cord, and apply a little shellac on the end to keep it secure. If you want it to be stretchy, use elastic cord. To change the size of the braid, just adjust the number of hairs in each strand.


Take sixteen strands, eighty hairs in a strand, and place them on the table like pattern. Commence at A, take both No. 1 strands and cross over in between Nos. 1 on the opposite side to B, then bring back both Nos. 2 from B to A, and place them in between Nos. 2; then walk around table to C and braid it across table to D as before. Then commence at A and repeat until braid is finished.
Take sixteen strands, with eighty hairs in each strand, and lay them on the table like a pattern. Start at A, take both No. 1 strands and cross them over between the No. 1 strands on the opposite side to B. Then bring back both No. 2 strands from B to A and place them between the No. 2 strands. Next, walk around the table to C and braid it across the table to D as before. Then start at A and repeat until the braid is complete.
Braid this over a small wire, with a hole in one end like the eye of a needle, so as to draw a small cord in the place of the wire. When you have it braided, take off your weights, tie the ends fast on the wire and push the braid together on the wire; then boil in water about ten minutes; then take it out and put in an oven as hot as it will bear without burning, until it is quite dry; then take it out and slip it off of the wire on to the cord, and sew the ends of the braid so it will not slip on the cord, and put a little shellac on the end to keep it fast. If you want it elastic, use elastic cord. To vary the size of the braid, vary the number of hairs in a strand.
Braid this over a small wire with a hole at one end like the eye of a needle, so you can pull a small cord in place of the wire. Once you've braided it, remove your weights, secure the ends tightly on the wire, and push the braid together on the wire. Then boil it in water for about ten minutes. After that, take it out and place it in an oven as hot as it can get without burning, until it's completely dry. Then take it out and slide it off the wire onto the cord, sew the ends of the braid to prevent it from slipping on the cord, and apply a little shellac at the end to secure it. If you want it to be stretchy, use elastic cord. To change the size of the braid, adjust the number of hairs in each strand.


Take any number of strands that can be divided by two, eight hairs in a strand, and place on table like pattern. Commence by taking No. 1 at A and B and change places by swinging them to the right; then take No. 2 at A and B and change places with them by swinging to the left; then take No. 3 at A and B and change places by swinging them to the right; then Nos. 4, and change places by swinging them to the left, and so on, swinging to the right and left alternately, until the braid is finished.
Grab any number of strands that can be divided by two, eight hairs in each strand, and arrange them on the table in a pattern. Start by taking No. 1 at A and B and switch their positions by swinging them to the right; then take No. 2 at A and B and switch places with them by swinging to the left; next, take No. 3 at A and B and switch places by swinging them to the right; then Nos. 4, and switch places by swinging to the left, and continue alternating swinging to the right and left until the braid is complete.
Braid this over a small wire, with a hole in one end like the eye of a needle, so as to draw a small cord in the place of the wire. When you have it braided, take off your weights, tie the ends fast on the wire and push the braid together on the wire; then boil in water about ten minutes; then take it out and put in an oven as hot as it will bear without burning, until it is quite dry; then take it out and slip it off of the wire on to the cord, and sew the ends of the braid so it will not slip on the cord, and put a little shellac on the end to keep it fast. If you want it elastic, use elastic cord. To vary the size of the braid, vary the number of hairs in a strand.
Braid this over a small wire with a hole at one end like the eye of a needle, so you can draw a small cord in place of the wire. Once you've braided it, remove your weights, tightly tie the ends to the wire, and push the braid together on the wire. Then boil it in water for about ten minutes. After that, take it out and put it in an oven as hot as it can get without burning until it's completely dry. Once dry, take it out and slide it off the wire onto the cord, and sew the ends of the braid to prevent it from slipping on the cord. Add a little shellac to the end to keep it secure. If you want it to be elastic, use elastic cord. To change the size of the braid, adjust the number of hairs in each strand.

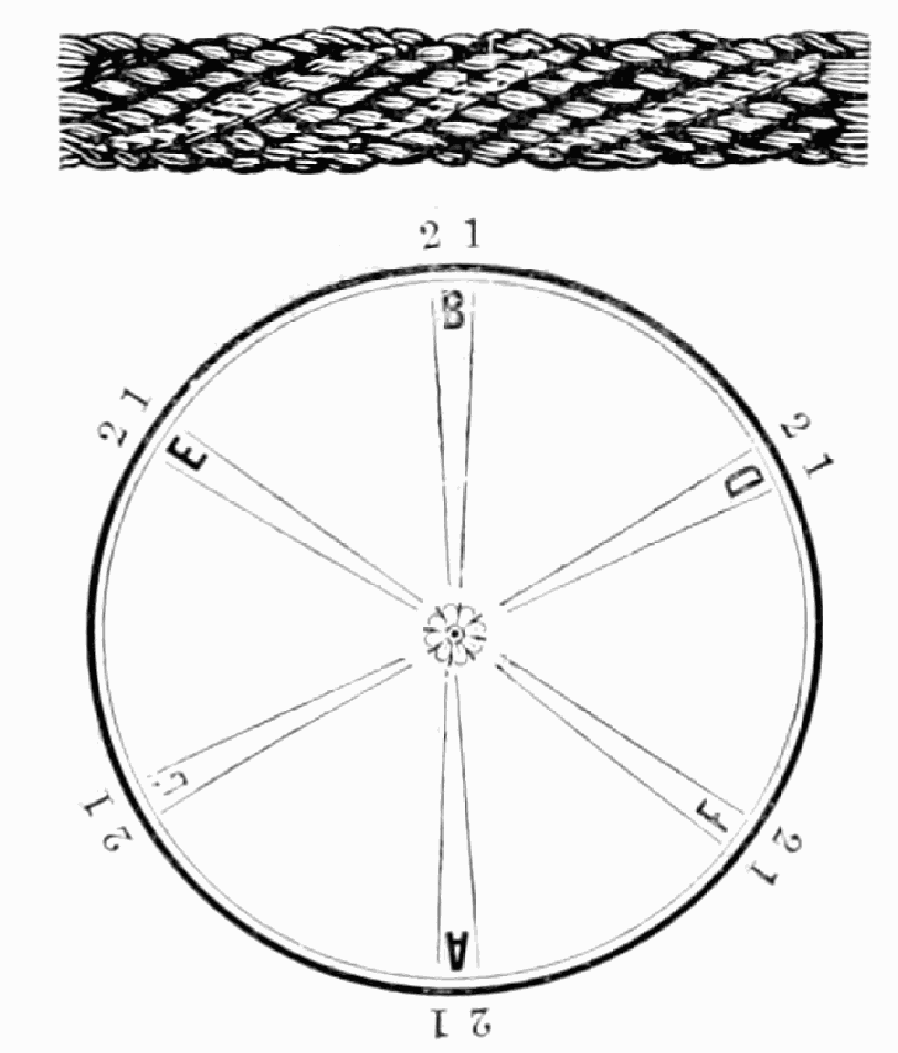
Take any number of strands that can be divided by two, eighty hairs in a strand, and place on table like pattern. Commence at A and B, take Nos. 1 and swing them around table to the right—No. 1 from A around to B across No. 2 at B, and No. 1 from B across No. 2 at A; then take Nos. 1 at C and D and change as before; then change the same at E and F and at B and A, so on around the table to the right until the chain is completed. Any number of strands can be used by increasing the number in each place, or by having three, four, five or six in a place, care being taken to cross all the strands. For instance, there are four strands, No. 1 must be crossed over all as you braid around the table. By adding strands a different braid is formed.
Grab any number of strands that can be divided by two, eighty hairs in each strand, and arrange them on the table in a pattern. Start at points A and B, take the strands numbered 1 and swing them around the table to the right—strand No. 1 from A around to B across strand No. 2 at B, and strand No. 1 from B across strand No. 2 at A; then take strands 1 at C and D and swap them as before; then swap the same at E and F and at B and A, continuing around the table to the right until the chain is complete. You can use any number of strands by increasing the count in each spot or by having three, four, five, or six in a spot, making sure to cross all the strands. For example, if there are four strands, strand No. 1 must cross over all of them as you braid around the table. By adding strands, you create a different braid.
Braid this over a small wire, with a hole in one end like the eye of a needle, so as to draw a small cord in the place of the wire. When you have it braided, take off your weights, tie the ends fast on the wire and push the braid together on the wire; then boil in water about ten minutes; then take it out and put in an oven as hot as it will bear without burning, until it is quite dry; then take it out and slip it off of the wire on to the cord, and sew the ends of the braid so it will not slip on the cord, and put a little shellac on the end to keep it fast. If you want it elastic, use elastic cord. To vary the size of the braid, vary the number of hairs in a strand.
Braid this over a small wire, with a hole at one end like a needle's eye, so you can thread a small cord in place of the wire. Once you’ve finished braiding, remove your weights, securely tie the ends onto the wire, and push the braid together on the wire; then boil it in water for about ten minutes. After that, take it out and place it in an oven as hot as it can get without burning, until it’s completely dry. Once dry, remove it and slide it off the wire onto the cord, then sew the ends of the braid to prevent it from slipping on the cord, and apply a little shellac on the end to hold it secure. If you want it to be stretchy, use elastic cord. To change the size of the braid, adjust the number of hairs in a strand.


Take twenty strands, seventy hairs in a strand, and place on table like pattern. Commence at A, cross No. 1 in the right hand over the No. 1 in the left hand, and then go to B and cross No. 1 in the left hand over No. 1 in the right hand; then go back to A and take Nos. 1 and cross inside of Nos. 1 at B, and bring back Nos. 1 from B to A; then take Nos. 2 and change the same; then change Nos. 3 the same; then go to C and take Nos. 1 and cross inside of Nos. 2 at D, and bring back Nos. 1 from D and lay inside of Nos. 2 at C; then commence at A as at first, and repeat until the braid is finished.
Grab twenty strands, each with seventy hairs, and lay them on the table in a pattern. Start at A, crossing No. 1 in the right hand over No. 1 in the left hand, then go to B and cross No. 1 in the left hand over No. 1 in the right hand. Next, go back to A and take Nos. 1, crossing them inside Nos. 1 at B, and bring Nos. 1 back from B to A. Then take Nos. 2 and do the same; then do the same for Nos. 3. After that, go to C and take Nos. 1, crossing them inside Nos. 2 at D, and bring Nos. 1 back from D and lay them inside Nos. 2 at C. Start again at A as before and repeat until the braid is finished.
Braid this over a small wire, with a hole in one end like the eye of a needle, so as to draw a small cord in the place of the wire. When you have it braided, take off your weights, tie the ends fast on the wire and push the braid together on the wire; then boil in water about ten minutes; then take it out and put in an oven as hot as it will bear without burning, until it is quite dry; then take it out and slip it off of the wire on to the cord, and sew the ends of the braid so it will not slip on the cord, and put a little shellac on the end to keep it fast. If you want it elastic, use elastic cord. To vary the size of the braid, vary the number of hairs in a strand.
Braid this over a small wire with a hole at one end like the eye of a needle, so you can draw a small cord in place of the wire. Once you’ve braided it, remove your weights, tie the ends securely onto the wire, and push the braid together on the wire; then boil it in water for about ten minutes. After that, take it out and put it in an oven as hot as it can handle without burning, until it’s completely dry. Next, take it out and slide it off the wire onto the cord, sew the ends of the braid so it won't slip on the cord, and apply a little shellac on the end to keep it secure. If you want it to be elastic, use elastic cord. To change the size of the braid, adjust the number of hairs in each strand.


Take twenty strands, seventy hairs in a strand, and place on table like pattern. Commence take No. 1 at A in right hand and No. 1 at B in left hand, swing to the right and change places with them; then take Nos. 3 at A and lay inside of Nos. 2 at B, and bring Nos. 3 from B and lay inside of Nos. 2 at A; then go to C and take No. 1 in right hand and No. 1 at D in left hand, swing to the right and change places with them; then take Nos. 3 at C and lay inside of Nos. 2 at D, and bring back Nos. 3 from D and lay inside of Nos. 2 at C. Then commence at A as at first, and repeat until the braid is finished.
Take twenty strands, with seventy hairs in each strand, and lay them on the table in a pattern. Start with No. 1 at A in your right hand and No. 1 at B in your left hand, swing to the right, and swap their places. Then take Nos. 3 from A and place them inside Nos. 2 at B, and bring Nos. 3 from B and place them inside Nos. 2 at A. Next, go to C and take No. 1 in your right hand and No. 1 at D in your left hand, swing to the right, and swap their places. Then take Nos. 3 from C and place them inside Nos. 2 at D, and bring back Nos. 3 from D and place them inside Nos. 2 at C. After that, start at A again as you did before, and continue repeating this process until the braid is complete.
Braid this over a small wire, with a hole in one end like the eye of a needle, so as to draw a small cord in the place of the wire. When you have it braided, take off your weights, tie the ends fast on the wire and push the braid together on the wire; then boil in water about ten minutes; then take it out and put in an oven as hot as it will bear without burning, until it is quite dry, then take it out and slip it off of the wire on to the cord, and sew the ends of the braid so it will not slip on the cord, and put a little shellac on the end to keep it fast. If you want it elastic, use elastic cord. To vary the size of the braid, vary the number of hairs in a strand.
Braid this over a small wire that has a hole at one end like the eye of a needle, so you can draw a small cord in place of the wire. Once you've braided it, remove your weights, securely tie the ends to the wire, and push the braid together on the wire; then boil it in water for about ten minutes. After that, take it out and place it in an oven as hot as it can get without burning, until it's completely dry. Next, remove it and slide it off the wire onto the cord, sew the ends of the braid to prevent it from slipping on the cord, and apply a little shellac to the end to keep it secure. If you want it to be elastic, use elastic cord. To change the size of the braid, alter the number of hairs in a strand.

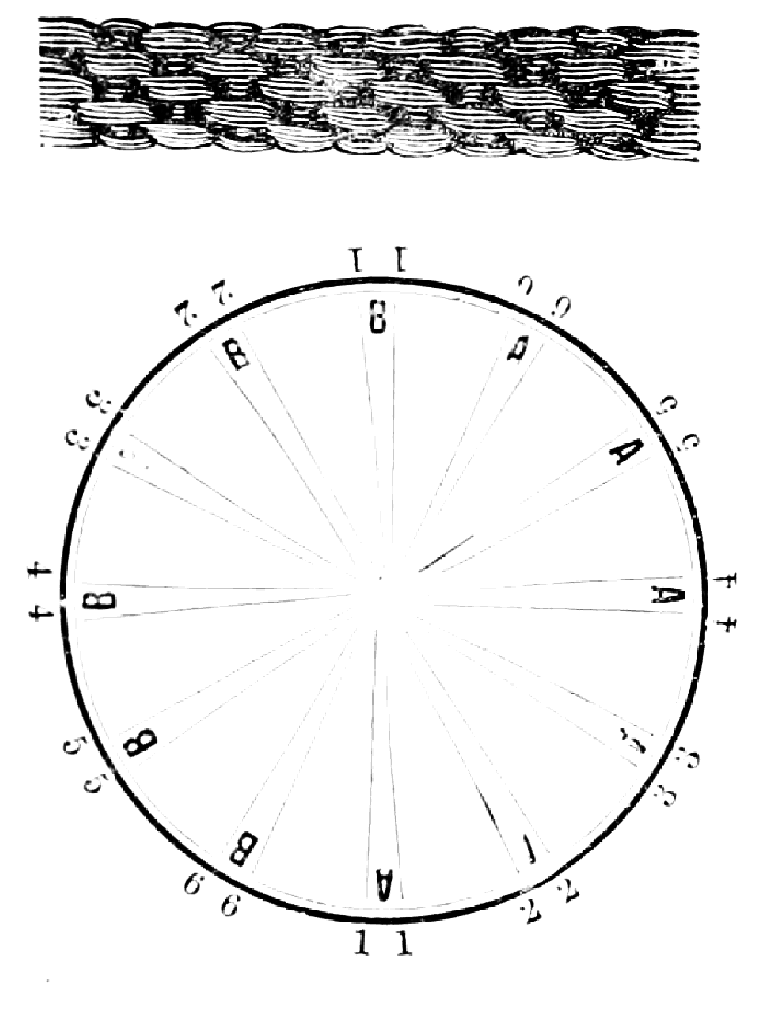
Take twenty-four strands, sixty hairs in a strand, and place on table like pattern. Commence at A and B: take Nos. 1 at A, and lift them across the table, and lay the one in left hand between Nos. 1 at B, and the one in right hand on the outside of Nos. 1 at B, and bring back the Nos. 1 from B to A. Then pass round the table to the right, and change (in the same manner) successively, the Nos. 3, 5, 6, 2, 4, 6, 2, 4, 5, 1, 3 and 5; then commence at A with Nos. 1, as at first, and repeat until the braid is finished.
Take twenty-four strands, with sixty hairs in each strand, and arrange them on the table in a pattern. Start at A and B: take strand No. 1 from A and lift it across the table, placing the one in your left hand between strand Nos. 1 at B and the one in your right hand on the outside of strand Nos. 1 at B, then bring back strand Nos. 1 from B to A. Next, move around the table to the right and change (in the same way) successively strands No. 3, 5, 6, 2, 4, 6, 2, 4, 5, 1, 3, and 5; then go back to A with strand Nos. 1 and repeat the process until the braid is complete.
Braid this over a small wire, with a hole in one end like the eye of a needle, so as to draw a small cord in the place of the wire. When you have it braided, take off your weights, tie the ends fast on the wire, and push the braid close together; then boil in water about ten minutes, and take it out and put it in an oven as hot as it will bear without burning, until it is quite dry; then take it out and slip it off the wire on to the cord, sew the ends of the braid so it will not slip, and put a little shellac on the ends to keep it fast. If you want it elastic, use elastic cord. To vary the size of the braid, vary the number of hairs in a strand.
Braid this over a small wire, with a hole at one end like the eye of a needle, so you can pull a small cord in place of the wire. Once you have it braided, remove your weights, tie the ends securely on the wire, and push the braid close together; then boil it in water for about ten minutes. Take it out and place it in an oven set as hot as it can go without burning, until it's completely dry. After that, take it out and slide it off the wire onto the cord, sew the ends of the braid so it won’t slip, and put a little shellac on the ends to keep it secure. If you want it to be elastic, use elastic cord. To change the size of the braid, vary the number of hairs in each strand.


Take thirty-two strands with fifty hairs in a strand, and place them on table like pattern. Commence at A, take Nos. 4 and lift over across table, and lay outside of Nos. 1 at B, then bring back Nos. 4 from B and lay outside of Nos. 1 at A; then take Nos. 3 at A and lift over across table and lay outside of Nos. 1 at B, and bring back Nos. 3 from B and lay outside of Nos. 1 at A; then change Nos. 2 at A and B the same; then take Nos. 1 and change the same; then go to D and change the same as at A; then go to B and change the same; then go to C and change the same, and you are ready to commence again at A, as at first: repeat until braid is finished.
Grab thirty-two strands with fifty hairs in each strand, and lay them out on the table like a pattern. Start at A, take strands 4 and lift them across the table, laying them outside of strand 1 at B. Then bring strands 4 back from B and lay them outside of strand 1 at A. Next, take strands 3 at A and lift them across the table, laying them outside of strand 1 at B, and bring strands 3 back from B to lay outside of strand 1 at A. Then switch strands 2 at A and B the same way; then do the same with strands 1; next, move to D and do the same as at A; then go to B and do the same; then go to C and do the same, and you'll be ready to start again at A, just like before: repeat until the braid is complete.
Braid this over a small wire, with a hole in one end like the eye of a needle, so as to draw a small cord in the place of the wire. When you have it braided, take off your weights, tie the ends fast on the wire and push the braid together on the wire; then boil in water about ten minutes; then take it out and put in an oven as hot as it will bear without burning, until it is quite dry; then take it out and slip it off of the wire on to the cord, and sew the ends of the braid so it will not slip on the cord, and put a little shellac on the end to keep it fast. If you want it elastic, use elastic cord. To vary the size of the braid, vary the number of hairs in a strand.
Braid this over a small wire with a hole at one end like the eye of a needle to guide a small cord instead of the wire. Once you've braided it, remove your weights, securely tie the ends on the wire, and push the braid together on the wire. Then, boil it in water for about ten minutes. After that, take it out and place it in an oven as hot as it can get without burning, until it's completely dry. Next, take it out and slide it off the wire onto the cord, and sew the ends of the braid so it won't slip on the cord. Apply a little shellac to the end to keep it secure. If you want it to be elastic, use elastic cord. To change the size of the braid, adjust the number of hairs in each strand.


Take thirty-two strands, sixty hairs in a strand and place on table like pattern. Commence at A, take Nos. 4 and lift over table and lay outside of Nos. 1 at B, and bring back Nos. 4 from B and lay outside of Nos. 1 at A; then go to D and change the Nos. 4 the same as at A and B; then go to B and change the same as at A; then go to C and change the same way, and then to A and change as at first, and so on, repeating the changes until the braid is finished.
Grab thirty-two strands, with sixty hairs in each strand, and lay them on the table in a pattern. Start at A, take No. 4 and lift it over the table, placing it outside of No. 1 at B, then bring No. 4 back from B and lay it outside of No. 1 at A. Next, go to D and make the same change with No. 4 as you did at A and B. Then go to B and change it in the same way as at A. After that, go to C and make the same change, and then return to A to change it like you did at the beginning. Continue repeating these changes until the braid is complete.
Braid this over a small wire, with a hole in one end like the eye of a needle, so as to draw a small cord in the place of the wire. When you have it braided, take off your weights, tie the ends fast on the wire, and push the braid close together; then boil in water about ten minutes, and take it out and put it in an oven as hot as it will bear without burning, until it is quite dry; then take it out and slip it off the wire on to the cord, sew the ends of the braid so it will not slip, and put a little shellac on the ends to keep it fast. If you want it elastic, use elastic cord. To vary the size of the braid, vary the number of hairs in a strand.
Braid this over a small wire, with a hole at one end like a needle's eye, so you can thread a small cord in place of the wire. Once you've braided it, remove your weights, tie the ends securely to the wire, and push the braid close together. Then boil it in water for about ten minutes, take it out, and place it in an oven as hot as it can get without burning until it’s completely dry. After that, take it out and slide it off the wire onto the cord, sew the ends of the braid to prevent it from slipping, and apply a little shellac to the ends to hold everything in place. If you want it to be elastic, use elastic cord. To change the size of the braid, adjust the number of hairs in each strand.


Take sixteen strands eighty hairs in a strand, and place on table like pattern. Commence at A, change Nos. 1 across inside of Nos. 1 at B, and bring back Nos. 1 from B to A; then take Nos. 2 at A and change across inside of Nos. 2 at B, and bring back Nos. 2 from B to A; then go to C and change the Nos. 1 and the Nos. 2 across with the numbers at D the same as at A; then return to A and commence as at first and repeat ten times. Then change the figures on the table to correspond with the following diagram:
Take sixteen strands with eighty hairs in each strand, and arrange them on the table in a pattern. Start at A, swap Nos. 1 across with the inside of Nos. 1 at B, and bring Nos. 1 back from B to A; then take Nos. 2 at A and swap across with the inside of Nos. 2 at B, and bring Nos. 2 back from B to A; next, go to C and swap Nos. 1 and Nos. 2 across with the numbers at D just like at A; then return to A and start over as before and repeat this ten times. After that, adjust the figures on the table to match the following diagram:

Then commence at A and B, take No. 1 at A in right hand and No. 1 at B in left hand, and swing around the table to the right, changing places with them; then take Nos. 1 at C and D and change the same; then change Nos. 2 at B and A the same; then change the Nos. 2 at D and C the same; then take Nos. 3 at A and B and change the same; then change the Nos. 3 at C and D; then the Nos. 4 at B and A; then the Nos. 4 at P and C; then commence at A as at first, and repeat ten times, so on braiding alternately ten rounds by the directions of each pattern until the braid is finished.
Then start at A and B, take No. 1 at A in your right hand and No. 1 at B in your left hand, and swing around the table to the right, swapping places with them. Next, take Nos. 1 at C and D and switch those too. Then swap Nos. 2 at B and A in the same way, and then change the Nos. 2 at D and C the same way. After that, take Nos. 3 at A and B and change those, then switch the Nos. 3 at C and D. Next, change the Nos. 4 at B and A, then the Nos. 4 at P and C. Finally, start again at A like before and repeat this ten times, continuing to alternate braids for ten rounds following the directions of each pattern until the braid is finished.


Take sixteen strands eighty hairs in a strand, and place on table like pattern. Commence at A, change Nos. 1 across inside of Nos. 1 at B, and bring back Nos. 1 from B to A; then take Nos. 2 at A and change across inside of Nos. 2 at B, and bring back Nos. 2 from B to A; then go to C and change the Nos. 1 and the Nos. 2 across with the numbers at D the same as at A; then return to A and commence as at first and repeat ten times. Then change the figures on the table to correspond with the following diagram:
Take sixteen strands with eighty hairs in each strand, and arrange them on the table in a pattern. Start at A, switch Nos. 1 with Nos. 1 at B, and bring Nos. 1 back from B to A; then take Nos. 2 at A and switch them with Nos. 2 at B, and bring Nos. 2 back from B to A; next, go to C and switch Nos. 1 and Nos. 2 with the numbers at D just like at A; then return to A and start over as before, repeating this ten times. After that, change the numbers on the table to match the following diagram:

Then commence at A, take Nos. 1 and 2, lift across table to B and lay No. 1 outside of No. 4, and No. 2 between Nos. 1 and 2, and bring back Nos. 1 and 2 from B to A, and lay No. 1 outside of No. 4, and No. 2 outside of No. 1 at A; then go to C and take Nos. 1 and 2 and lift over table to D, and lay No. 1 outside of No. 4, and No. 2 between Nos. 1 and 2, and bring back Nos. 1 and 2 from C and lay No. 1 outside of No. 4 and No. 2 outside of No. 1 at C; then go to B and change the same, and so on around the table to the right, braiding alternately ten rounds by each diagram until the braid is finished.
Then start at A, pick up Nos. 1 and 2, lift them across the table to B and place No. 1 outside of No. 4, and No. 2 between Nos. 1 and 2. Bring Nos. 1 and 2 back from B to A, placing No. 1 outside of No. 4, and No. 2 outside of No. 1 at A. Next, go to C and take Nos. 1 and 2, lift them over the table to D, and position No. 1 outside of No. 4, and No. 2 between Nos. 1 and 2. Bring Nos. 1 and 2 back from C, laying No. 1 outside of No. 4 and No. 2 outside of No. 1 at C. Then head to B and repeat this process, continuing around the table to the right, alternating ten rounds by each diagram until the braid is complete.


Take sixteen strands eighty hairs in a strand, and place them on table like pattern. Commence at A, lift Nos. 1 over across the table and lay them in between Nos. 1 at B, and bring back Nos. 1 from B to A; then go to C and change the Nos. 1 across with the Nos. 1 at D the same; then take Nos. 2 at A and change across inside of Nos. 2 at B, and bring back Nos. 2 from B to A; then change the Nos. 2 at C across inside of Nos. 2 at D the same; then commence at A as at first, and repeat ten times. Then change the numbers on table to correspond with the following pattern or diagram:
Grab sixteen strands with eighty hairs in each strand, and arrange them on the table in a pattern. Start at A, lift the first strands over the table and place them between the first strands at B, then bring the first strands from B back to A; next, go to C and switch the first strands with the first strands at D in the same way; then take the second strands at A and switch them inside the second strands at B, and bring the second strands from B back to A; after that, switch the second strands at C inside the second strands at D in the same manner; then go back to A as before and repeat this process ten times. Finally, change the arrangement on the table to match the following pattern or diagram:

Then commence at A, take Nos. 1 and 2, lift across table to B and lay No. 1 outside of No. 4, and No. 2 between Nos. 1 and 2, and bring back Nos. 1 and 2 from B to A, and lay No. 1 outside of No. 4, and No. 2 outside of No. 1 at A; then go to C and take Nos. 1 and 2 and lift over table to D, and lay No. 1 outside of No. 4, and No. 2 between Nos. 1 and 2, and bring back Nos. 1 and 2 from C and lay No. 1 outside of No. 4 and No. 2 outside of No. 1 at C; then go to B and change the same, and so on around the table to the right, braiding alternately ten rounds by each diagram until the braid is finished.
Then start at A, pick up Nos. 1 and 2, move them across the table to B, and place No. 1 outside of No. 4, and No. 2 between Nos. 1 and 2. Then bring Nos. 1 and 2 back from B to A, and lay No. 1 outside of No. 4, and No. 2 outside of No. 1 at A. Next, go to C, take Nos. 1 and 2, lift them over to D, and place No. 1 outside of No. 4, and No. 2 between Nos. 1 and 2. Then bring Nos. 1 and 2 back from C, and lay No. 1 outside of No. 4 and No. 2 outside of No. 1 at C. After that, go to B and repeat the process, continuing this way around the table to the right, alternating braiding ten rounds for each diagram until the braid is complete.


Take sixteen strands, eighty hairs in a strand, and place them on the table like pattern. Commence at A and B, take No. 1 at A in right hand and No. 1 at B in left hand, swing around the table to the right and change places with them; then take Nos. 1 at C and D and change as at A and B; then change Nos. 2 at B and A the same; then change the Nos. 2 at D and C the same; then take Nos. 3 at A and B and change the same; then change the Nos. 3 at C and D; then the Nos. 4 at B and A, and also the Nos. 4 at D and C, all the time swinging to the right. Braid around ten times.
Take sixteen strands, with eighty hairs in each strand, and lay them out on the table in a pattern. Start at A and B, taking No. 1 at A in your right hand and No. 1 at B in your left hand. Swing around the table to the right and swap places with them; then take Nos. 1 at C and D and switch as you did at A and B. Next, swap Nos. 2 at B and A the same way; then change Nos. 2 at D and C the same way. After that, take Nos. 3 at A and B and switch them; then swap Nos. 3 at C and D. Continue with Nos. 4 at B and A, and also with Nos. 4 at D and C, all while swinging to the right. Braid around ten times.

Then commence at A, take Nos. 1 and 2, lift across table to B and lay No. 1 outside of No. 4, and No. 2 between Nos. 1 and 2, and bring back Nos. 1 and 2 from B to A, and lay No. 1 outside of No. 4, and No. 2 outside of No. 1 at A; then change the same at C, B and D; then commence again at A and braid ten rounds, so on braiding alternately ten rounds by the directions of each pattern until the braid is finished.
Then start at A, take Nos. 1 and 2, lift them across the table to B, and place No. 1 outside of No. 4, with No. 2 between Nos. 1 and 2. Bring Nos. 1 and 2 back from B to A, and place No. 1 outside of No. 4, and No. 2 outside of No. 1 at A. Next, do the same at C, B, and D. Then start again at A and braid for ten rounds, continuing to braid alternately for ten rounds according to the instructions of each pattern until the braid is complete.


Take sixteen strands eighty hairs in a strand, and place on table like pattern. Commence at A, change Nos. 1 across inside of Nos. 1 at B, and bring back Nos. 1 from B to A; then take Nos. 2 at A and change across inside of Nos. 2 at B, and bring back Nos. 2 from B to A; then go to C and change the Nos. 1 and the Nos. 2 across with the numbers at D the same as at A; then return to A and commence as at first and repeat ten times. Then change the figures on the table to correspond with the following diagram:
Grab sixteen strands with eighty hairs in each strand, and arrange them on the table like the pattern. Start at A, swap Nos. 1 with the inside of Nos. 1 at B, and bring back Nos. 1 from B to A; then take Nos. 2 at A and swap inside Nos. 2 at B, and bring back Nos. 2 from B to A; next, go to C and swap Nos. 1 and Nos. 2 with the numbers at D just like you did at A; then return to A and start over as you did before, repeating this ten times. After that, change the figures on the table to match the following diagram:

Then commence at A and B, take No. 1 at A in right hand and No. 1 at B in left hand, and swing them around the table to the right, and lay the one in right hand down at B over across Nos. 2, 3 and 4, and the one in left hand at A over across Nos. 2, 3 and 4; then go to C and change the Nos. 1 at B and D the same; then go to B and change the Nos. 1 at B and A the same; so on, braiding around the table to the right, alternately braiding ten rounds by the directions of each pattern until the braid is finished.
Then start at A and B, take No. 1 at A in your right hand and No. 1 at B in your left hand, and swing them around the table to the right. Place the one in your right hand down at B over across Nos. 2, 3, and 4, and the one in your left hand at A over across Nos. 2, 3, and 4. Next, go to C and switch the Nos. 1 at B and D in the same way. Then go to B and switch the Nos. 1 at B and A the same way. Continue braiding around the table to the right, alternating between braiding ten rounds according to each pattern until the braid is finished.


Take sixteen strands, eighty hairs in a strand, and place them on table like pattern. Commence at A, lift Nos. 1 over across the table and lay them in between Nos. 1 at B, and bring back Nos. 1 from B to A; then go to C and change the Nos. 1 across with the Nos. 1 at D the same; then take Nos. 2 at A and change across inside of Nos. 2 at B, and bring back Nos. 2 from B to A; then change the Nos. 2 at C across inside of Nos. 2 at D the same; then commence at A as at first, and repeat ten times. Then change the numbers on table to correspond with the following pattern or diagram:
Grab sixteen strands, with eighty hairs in each strand, and lay them out on the table in a pattern. Start at A, lift the strands labeled 1 across the table, and place them between the strands labeled 1 at B, then bring the strands labeled 1 from B back to A. Next, move to C and swap the strands labeled 1 with those at D in the same way. Then take the strands labeled 2 at A and swap them inside the strands labeled 2 at B, bringing the strands labeled 2 from B back to A. After that, swap the strands labeled 2 at C inside the strands labeled 2 at D in the same manner. Then start again at A as you did initially and repeat this process ten times. Finally, change the labels on the table to match the following pattern or diagram:

Then commence at A and B, take No. 1 at A in right hand and No. 1 at B in left hand, and swing them around the table to the right, and lay the one in right hand down at B over across Nos. 2, 3 and 4, and the one in left hand at A over across Nos. 2, 3 and 4; then go to C and change the Nos. 1 at B and D the same; then go to B and change the Nos. 1 at B and A the same; so on, braiding around the table to the right, alternately braiding ten rounds by the directions of each pattern until the braid is finished.
Then start at A and B, take No. 1 at A in your right hand and No. 1 at B in your left hand, and swing them around the table to the right. Lay the one in your right hand down at B over Nos. 2, 3, and 4, and place the one in your left hand at A over Nos. 2, 3, and 4. Next, go to C and switch the No. 1s at B and D in the same way. Then, go to B and switch the No. 1s at B and A likewise. Continue braiding around the table to the right, alternating and braiding ten rounds according to the instructions of each pattern until the braid is complete.


Take twenty-six strands, sixty hairs in a strand, and place on table like pattern. Commence at A and B, take Nos. 1 and change places by swinging them around the table to the left; then take the third strands to the right of A and B, and change places by swinging them around the table to the right; then take the fourth strands to the right of the ones last taken, and change places by swinging them around the table to the left, and so on working around the table to the right; first swinging the strands to the left, and then to the right, taking alternately the third and fourth strands to the right of the ones last used, until the braid is finished.
Grab twenty-six strands, with sixty hairs in each strand, and arrange them on the table in a pattern. Start at A and B, take the first strands and swap their positions by swinging them around the table to the left. Next, take the third strands to the right of A and B, and swap them by swinging them around the table to the right. Then, take the fourth strands to the right of the last strands you took and swap them by swinging them around the table to the left. Continue this pattern, working around the table to the right, first swinging the strands to the left and then to the right, alternately taking the third and fourth strands to the right of the last ones used, until the braid is complete.
Braid this over a small wire, with a hole in one end like the eye of a needle, so as to draw a small cord in the place of the wire. When you have it braided, take off your weights, tie the ends fast on the wire, and push the braid together; then boil in water about ten minutes, and then take out and put it in an oven as hot as it will bear without burning, until it is quite dry; then take it out and slip it off the wire and on the cord, and sew the ends so it will not slip, and put a little shellac on the end to keep it fast. If you want it elastic, use elastic cord. To vary the size of the braid vary the number of hairs in a strand.
Braid this over a small wire with a hole in one end, like the eye of a needle, so you can draw a small cord in place of the wire. Once you’ve braided it, remove your weights, tie the ends securely to the wire, and push the braid together; then boil it in water for about ten minutes. After that, take it out and put it in an oven as hot as it can handle without burning, until it’s completely dry. Then, take it out and slip it off the wire and onto the cord, and sew the ends to prevent it from slipping. Add a little shellac on the end to keep it secure. If you want it to be elastic, use elastic cord. To change the size of the braid, adjust the number of hairs in each strand.


Take twenty-four strands, sixty hairs in a strand, and place on table like pattern. Commence at A, take No. 2 in right hand, swing around the table to the right and lay in place of No. 2 at B, and bring back No. 2 from B and lay in place of No. 2 at A; then take No. 1 at A in left hand, and change places with No. 1 at B by swinging around to the left; then go to C, take Nos. 3 and lift over table and lay inside of Nos. 3 at D, and bring back Nos. 3 from D and lay in place of Nos. 3 at C; then go to E and change the Nos. at E and F the same as at A and B; then go to G and change the same as at C and D, and so on, alternately changing, first as at A and B, and then as at C and D, until the braid is finished.
Grab twenty-four strands, with sixty hairs in each strand, and lay them out on the table in a pattern. Start at A, take No. 2 in your right hand, swing around the table to the right, and place it where No. 2 was at B. Then, bring No. 2 back from B and position it where No. 2 was at A. Next, take No. 1 at A in your left hand, and swap it with No. 1 at B by swinging around to the left. After that, go to C, take Nos. 3, lift them over the table, and lay them inside Nos. 3 at D. Then, bring Nos. 3 back from D and put them where Nos. 3 were at C. Next, go to E and switch the Nos. there and at F the same way you did at A and B. Then go to G and switch them just like you did at C and D, and keep alternating changes, first like at A and B, then like at C and D, until the braid is complete.
Braid this over a small wire, with a hole in one end like the eye of a needle, so as to draw a small cord in the place of the wire. When you have it braided, take off your weights, tie the ends fast on the wire, and push the braid together; then boil in water about ten minutes, and then take out and put it in an oven as hot as it will bear without burning, until it is quite dry; then take it out and slip it off the wire and on the cord, and sew the ends so it will not slip, and put a little shellac on the end to keep it fast. If you want it elastic, use elastic cord. To vary the size of the braid, vary the number of hairs in a strand.
Braid this over a small wire, with a hole at one end like the eye of a needle, so you can thread a small cord in place of the wire. Once you’ve braided it, remove your weights, tie the ends securely on the wire, and push the braid together; then boil it in water for about ten minutes, and afterward, take it out and place it in an oven as hot as it can handle without burning, until it’s completely dry. After that, remove it and slide it off the wire and onto the cord, sew the ends so it won’t slip, and apply a little shellac on the end to secure it. If you want it to be stretchy, use elastic cord. To change the size of the braid, adjust the number of hairs in each strand.


Take twenty-four strands, seventy hairs in a strand, and place on the table like pattern. Commence at A, take Nos. 2 lift across table and lay in between Nos. 2 at B, and bring back Nos. 2 from B to A; then take Nos. 1 at A and lift across table and lay between Nos. 1 at B, and bring back Nos. 1 from B to A; then go to F, take No. 1 in right hand, swing around to the right and lay in place of No. 4 at E; then take No. 1 at E in left hand and swing around to the left and lay in place of No. 4 at F; then go to C, take Nos. 2 lift across table, and lay them in between Nos. 2 at D, and bring back Nos. 2 from D to C; then take Nos. 1 at C, lift across the table and lay between Nos. 1 at D, and bring back Nos. 1 from D to C; then you are through the braid, ready to commence as at first.
Grab twenty-four strands, with seventy hairs in each strand, and arrange them on the table in a pattern. Start at A, lift Nos. 2 across the table and place them between Nos. 2 at B, then bring Nos. 2 back from B to A; next, take Nos. 1 at A, lift them across the table, and place them between Nos. 1 at B, then bring Nos. 1 back from B to A; then move to F, take No. 1 in your right hand, swing it to the right, and place it where No. 4 is at E; then take No. 1 at E in your left hand, swing it to the left, and place it where No. 4 is at F; next, go to C, lift Nos. 2 across the table, place them between Nos. 2 at D, and bring Nos. 2 back from D to C; then take Nos. 1 at C, lift them across the table, and place them between Nos. 1 at D, and bring Nos. 1 back from D to C; now you have finished the braid and are ready to start again as before.
Braid this over a small wire, with a hole in one end like the eye of a needle, so as to draw a small cord in the place of the wire. When you have it braided, take off your weights, tie the ends fast on the wire, and push the braid together; then boil in water about ten minutes, and then take out and put it in an oven as hot as it will bear without burning, until it is quite dry; then take it out and slip it off the wire and on the cord, and sew the ends so it will not slip, and put a little shellac on the end to keep it fast. If you want it elastic, use elastic cord. To vary the size of the braid, vary the number of hairs in a strand.
Braid this over a small wire that has a hole in one end like the eye of a needle, so you can pull a small cord in place of the wire. Once you've braided it, remove the weights, tie the ends securely onto the wire, and push the braid together; then boil it in water for about ten minutes. After that, take it out and place it in an oven as hot as it can get without burning, until it's completely dry. Then, remove it and slip it off the wire and onto the cord, sewing the ends to prevent slipping, and applying a little shellac at the end to keep it secure. If you want it to be elastic, use elastic cord. To change the size of the braid, adjust the number of hairs in a strand.


Take twenty-four strands, eighty hairs in a strand, and place on table like pattern. Commence at A, take No. 1 in right hand, swing around to the right and lay in place of No. 4 at B; then take No. 1 at B in left hand, swing around table to the left and lay in place of No. 4 at A; then go to C, take No. 2 in right hand, swing around the table to the right and lay outside of No. 2 at D, and bring back No. 2 from D to C; then take No. 1 at C in left hand, swing around the table to the left and lay outside of No. 1 at D, and bring back No. 1 from D to C; then go to E and change the Nos. at E and F the same as you did at A and B; then change the Nos. at G and H the same as you did at C and D. Then you are through the braid, ready to commence at A, as at first.
Take twenty-four strands, with eighty hairs in each strand, and arrange them on the table in a pattern. Start at A, take No. 1 in your right hand, swing it to the right, and place it where No. 4 is at B; then take No. 1 at B in your left hand, swing around the table to the left, and place it where No. 4 is at A; next, go to C, take No. 2 in your right hand, swing around the table to the right, and lay it outside of No. 2 at D, then bring No. 2 back from D to C; now take No. 1 at C in your left hand, swing around the table to the left, and lay it outside of No. 1 at D, then bring No. 1 back from D to C; after that, go to E and swap the numbers at E and F just like you did at A and B; then swap the numbers at G and H just like you did at C and D. Once that's done, you're finished with the braid and ready to start again at A, just like before.
Braid this over a small wire, with a hole in one end like the eye of a needle, so as to draw a small cord in the place of the wire. When you have it braided, take off your weights, tie the ends fast on the wire, and push the braid together; then boil in water about ten minutes, and then take out and put it in an oven as hot as it will bear without burning, until it is quite dry; then take it out and slip it off the wire and on the cord, and sew the ends so it will not slip, and put a little shellac on the end to keep it fast. If you want it elastic, use elastic cord. To vary the size of the braid, vary the number of hairs in a strand.
Braid this over a small wire with a hole at one end like the eye of a needle, so you can draw a small cord instead of the wire. Once you’ve braided it, take off your weights, securely tie the ends to the wire, and push the braid together. Then boil it in water for about ten minutes, take it out, and put it in an oven as hot as it can get without burning until it's completely dry. After that, take it out and slide it off the wire and onto the cord. Sew the ends to prevent it from slipping and apply a bit of shellac to the end to keep it secure. If you want it to be elastic, use elastic cord. To change the size of the braid, adjust the number of hairs in each strand.


Take twenty-four strands, eighty hairs in a strand, and place on table like pattern. Commence at A, take No. 1 in right hand, swing around to the right and lay in place of No. 4 at B; then take No. 1 at B in left hand, swing around table to the left and lay in place of No. 4 at A; then go to C, take Nos. 1 and lift them across the table and lay in between Nos. 1 at D, and bring back Nos. 1 from D to C; then go to E, and change the Nos. at E and F the same as you did at A and B; then go to G, and change the Nos. at G and H the same as you did at C and D. Then you are through the braid, ready to commence at A, as at first.
Grab twenty-four strands, with eighty hairs in each strand, and arrange them on the table in a pattern. Start at A, take the strand No. 1 in your right hand, swing it around to the right, and place it in the spot of No. 4 at B; then take the strand No. 1 at B in your left hand, swing it around the table to the left, and put it in the spot of No. 4 at A; next, move to C, take strands Nos. 1 and lift them across the table, placing them between strands Nos. 1 at D, then bring back strands Nos. 1 from D to C; after that, go to E, and switch the strands at E and F just like you did at A and B; finally, head to G, and switch the strands at G and H in the same way you did at C and D. Then you’ve completed the braid and are ready to start again at A, just like before.
Braid this over a small wire, with a hole in one end like the eye of a needle, so as to draw a small cord in the place of the wire. When you have it braided, take off your weights, tie the ends fast on the wire, and push the braid together; then boil in water about ten minutes, and then take out and put it in an oven as hot as it will bear without burning, until it is quite dry; then take it out and slip it off the wire and on the cord, and sew the ends so it will not slip, and put a little shellac on the end to keep it fast. If you want it elastic, use elastic cord. To vary the size of the braid, vary the number of hairs in a strand.
Braid this over a small wire that has a hole at one end like a needle's eye, so you can pull a small cord in place of the wire. Once you’ve braided it, remove your weights, tie the ends securely on the wire, and push the braid together. Then, boil it in water for about ten minutes. After that, take it out and place it in an oven as hot as it can get without burning, until it's completely dry. After removing it, slide it off the wire and onto the cord, and sew the ends to prevent slipping. Apply a bit of shellac on the end to keep it secure. If you want it to be elastic, use elastic cord. To change the size of the braid, adjust the number of hairs in each strand.

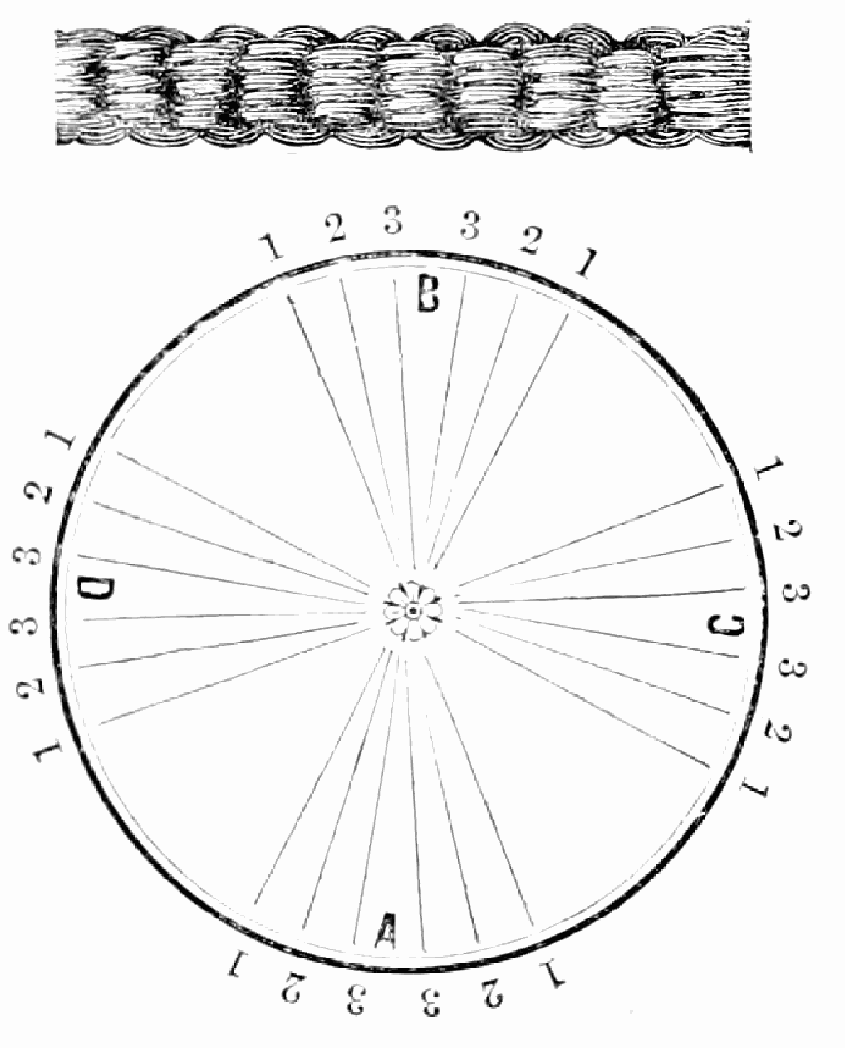
Take twenty-four strands, eighty hairs in a strand, and place on table like pattern. Commence at A, take No. 1 at the left side of A in the right hand, and No. 1 at the left of B in the left hand, swing them around the table to the right and lay the one from B at the right of A, and the one from A at the right of B; then go to C, take No. 1 at the left side of C in the right hand, and No. 1 at the left side of D in the left hand, swing them around the table to the right, and lay the one from C at the right of D, and the one from D at the right of C; then go to B, take Nos. 3 and lift them across table and lay between Nos. 3 at A, and bring back Nos. 3 from A to B; then change Nos. 2 and 1 the same way; then go to C, take Nos. 3 and lift across the table and lay between Nos. 3 at D, and bring back Nos. 3 from D to C; then change Nos. 2 and 1 the same way. Then you are through the braid, ready to commence as at first, at A.
Take twenty-four strands, with eighty hairs in each strands, and arrange them on the table in a pattern. Start at A, take No. 1 on the left side of A in your right hand, and No. 1 on the left side of B in your left hand. Swing them around the table to the right and place the one from B to the right of A, and the one from A to the right of B; then move to C, take No. 1 on the left side of C in your right hand, and No. 1 on the left side of D in your left hand. Swing them around the table to the right and place the one from C to the right of D, and the one from D to the right of C; then go to B, take Nos. 3 and lift them across the table, placing them between Nos. 3 at A, and bring back Nos. 3 from A to B; then switch Nos. 2 and 1 in the same way; then head to C, take Nos. 3 and lift them across the table, placing them between Nos. 3 at D, and bring back Nos. 3 from D to C; then switch Nos. 2 and 1 the same way. Now you have completed the braid and are ready to start again at A.
For explanation see page 9.
For explanation see page __A_TAG_PLACEHOLDER_0__.


Take twenty-four strands, eighty hairs in a strand, and place on table like pattern. Commence at A, take Nos. 2 and lift across the table and lay between Nos. 2 at B, and bring back Nos. 2 from B to A; then change Nos. 1 the same way; then go to C, take Nos. 2 and lift them across the table and lay between Nos. 2 at D, and bring back Nos. 2 from D to A; then change Nos. 1 the same way; then go to E, take Nos. 1 and 2 and lift them across the table to F, and lay No. 1 from E at the right of No. 1 at F, and No. 2 from E at the right of No. 2 at F, and bring back the Nos. 1 and 2 from F to E; then go to G and change the same from G to H as you did at E and F. Then you are through the braid, ready to commence at A, as at first.
Grab twenty-four strands, with eighty hairs in each strand, and lay them out on the table in a pattern. Start at A, take Nos. 2 and lift them across the table, placing them between Nos. 2 at B, then bring Nos. 2 back from B to A; next, change Nos. 1 in the same manner. Then move to C, take Nos. 2 and lift them across the table to lay them between Nos. 2 at D, and bring Nos. 2 back from D to A; change Nos. 1 in the same way. After that, go to E, take Nos. 1 and 2, lift them across the table to F, laying No. 1 from E to the right of No. 1 at F, and No. 2 from E to the right of No. 2 at F, then bring Nos. 1 and 2 back from F to E; proceed to G and change the same from G to H as you did at E and F. Then you will have completed the braid and be ready to start again at A, just like before.
Braid this over a small wire, with a hole in one end like the eye of a needle, so as to draw a small cord in the place of the wire. When you have it braided, take off your weights, tie the ends fast on the wire, and push the braid together; then boil in water about ten minutes, and then take out and put it in an oven as hot as it will bear without burning, until it is quite dry; then take it out and slip it off the wire and on the cord, and sew the ends so it will not slip, and put a little shellac on the end to keep it fast. If you want it elastic, use elastic cord. To vary the size of the braid, vary the number of hairs in a strand.
Braid this over a small wire that has a hole in one end like the eye of a needle, so you can draw a small cord instead of the wire. Once you have it braided, remove your weights, tie the ends securely onto the wire, and push the braid together; then boil it in water for about ten minutes, and afterward take it out and place it in an oven as hot as it can handle without burning, until it's completely dry. Once dry, take it out and slide it off the wire and onto the cord, and sew the ends to prevent slipping, then apply a little shellac on the end to keep it secure. If you want it to be elastic, use elastic cord. To change the size of the braid, adjust the number of hairs in a strand.


Take twenty-four strands, seventy hairs in a strand, and place on table like pattern. Commence at A, take Nos. 1 cross over and lay between Nos. 1 at B, and bring back Nos. 2 from B and lay between Nos. 2 at A; then go to E, take Nos. 1 and 2 and cross over to F, and lay No. 1 down at the right of No. 1 at F, and No. 2 at the right of No. 2 at F, and and bring back Nos. 1 and 2 from F to E; then go to C, and change the Nos. at C and D the same as you did at A and B; then go to G, and change the Nos. at G and H the same as you did at E and F. Then you are through the braid, ready to commence at A, as at first.
Grab twenty-four strands, seventy hairs in each strand, and arrange them on a table in a similar pattern. Start at A, take strand 1, cross it over, and place it between strand 1 at B. Then bring back strand 2 from B and place it between strand 2 at A. Next, go to E, take strands 1 and 2, cross them over to F, and lay strand 1 down to the right of strand 1 at F, along with strand 2 to the right of strand 2 at F. Bring back strands 1 and 2 from F to E. After that, go to C, and swap the strands at C and D just like you did at A and B. Then proceed to G and swap the strands at G and H the same way you did at E and F. Once you finish that, you’re back at the beginning to start at A again.
Braid this over a small wire, with a hole in one end like the eye of a needle, so as to draw a small cord in the place of the wire. When you have it braided, take off your weights, tie the ends fast on the wire, and push the braid together; then boil in water about ten minutes, and then take out and put it in an oven as hot as it will bear without burning, until it is quite dry; then take it out and slip it off the wire and on the cord, and sew the ends so it will not slip, and put a little shellac on the end to keep it fast. If you want it elastic, use elastic cord. To vary the size of the braid vary the number of hairs in a strand.
Braid this over a small wire that has a hole in one end, like the eye of a needle, so you can pull a small cord through instead of the wire. Once you've braided it, remove your weights, tie the ends securely on the wire, and compress the braid. Then boil it in water for about ten minutes, take it out, and place it in an oven that's as hot as it can get without burning, until it’s completely dry. After that, take it out and slide it off the wire and onto the cord, sewing the ends to keep it from slipping, and apply a bit of shellac on the end to hold it in place. If you want it to be stretchy, use elastic cord. To change the size of the braid, adjust the number of hairs in each strand.


Take twenty-four strands, seventy hairs in a strand, and place on table like pattern. Commence at A, take Nos. 1 and change places by crossing one over the other; then go to B and cross the Nos. 1 the same way; then go back to A, take Nos. 1 and cross over and lay between Nos. 1 at B, and bring back Nos. 1 from B to A; then take Nos. 2 at A, and cross over and lay between Nos. 2 at B, and bring back Nos. 2 from B to A; then change Nos. 3 and 4 the same way; then go to C, take Nos. 1 and 2 and cross over to D, and lay the No. 1 from C down at the left of No. 1 at D, and the No. 2 from C down at the left of No. 2 at D, and bring back the Nos. 1 and 2 from D to C; then take the Nos. 3 and 4, cross over to D and lay the No. 3 from C down at the right of No. 3 at D, and the No. 4 from C down at the right of No. 4 at D, and bring back Nos. 3 and 4 from D to C. Then you are through the braid, ready to commence at A, as at first.
Grab twenty-four strands, seventy hairs in each strand, and lay them out on a table in a pattern. Start at A, take the strands numbered 1 and switch their positions by crossing one over the other; then go to B and cross the strands numbered 1 the same way; next, go back to A, take strands numbered 1, cross them over, and place them between the strands numbered 1 at B, and bring strands numbered 1 back from B to A; then take strands numbered 2 at A, cross them over, and place them between the strands numbered 2 at B, and bring strands numbered 2 back from B to A; then switch the strands numbered 3 and 4 in the same manner; then go to C, take strands numbered 1 and 2 and cross them over to D. Place the strand numbered 1 from C down to the left of the strand numbered 1 at D, and the strand numbered 2 from C down to the left of the strand numbered 2 at D, and bring back the strands numbered 1 and 2 from D to C; then take the strands numbered 3 and 4, cross over to D, and place the strand numbered 3 from C down to the right of the strand numbered 3 at D, and the strand numbered 4 from C down to the right of the strand numbered 4 at D, and bring back strands numbered 3 and 4 from D to C. Once you finish, you’re done with the braid and ready to start again at A, just like before.
For explanation see page 9.
For details see page __A_TAG_PLACEHOLDER_0__.


Take sixteen strands, twenty hairs in a strand, and place on table like pattern. Commence at A, take Nos. 1 and 4 left across to B, lay in place of Nos. 1 and 4 at B, and bring back Nos. 1 and 4 from B to A; then take No. 2 at A in right hand and No. 3 in left hand, pass right hand round table to the right to B, and lay the No. 2 from A in place of No. 3 at B, and bring back No. 2 from B to A in right hand, and pass left hand round table to the left, and lay No. 3 from A in place of No. 2 at B, and bring back No. 3 from B to A, and lay No. 3 from B down at No. 2 at A, and lay No. 2 from B down at No. 3 at A, then go to C and take Nos. 1 across over inside of Nos. 1 at D, and bring back Nos. 1 from D to C; then go to A and repeat this all three times; then the fourth time at C you take Nos. 1 at C across over to D and lay outside of Nos. 2 at D, bring back the Nos. 1 from D to C and lay them outside of Nos. 2 at C; then you are through the braid, ready to commence as at first at A. Braid it over a small cord so as to put it up together.
Take sixteen strands, twenty hairs in each strand, and arrange them on the table in a pattern. Start at A, take strands 1 and 4 from the left to B, place them at B, and then bring strands 1 and 4 back from B to A. Next, take strand 2 in your right hand and strand 3 in your left hand, move your right hand around the table to the right to B, place strand 2 from A where strand 3 is at B, and bring strand 2 back from B to A in your right hand. Then, use your left hand to move around the table to the left, place strand 3 from A where strand 2 is at B, and bring strand 3 back from B to A. Lay strand 3 from B down at position 2 at A, and lay strand 2 from B down at position 3 at A. Then go to C and take strands 1 across over the inside of strands 1 at D, and bring them back from D to C. Then go to A and repeat this three times; on the fourth time at C, take strands 1 at C across to D and lay them outside of strands 2 at D. Bring strands 1 back from D to C and lay them outside of strands 2 at C. After that, you’re finished with the braid and ready to start again at A. Braid it over a small cord to keep it together.


Take sixteen strands, twenty hairs in a strand, and place on table like pattern. Commence at A, take Nos. 1 at A lift across inside of Nos. 1 at B, and bring back Nos. 1 from B to A; then go to C, take Nos. 1 at C lift across inside of Nos. 1 at D, and bring back Nos. 1 from D to C; then commence at A again and repeat it three times; then commence at A, take Nos. 1 across to B and lay them outside of Nos. 2 at B, and bring back Nos. 1 from B to A and lay outside of Nos. 2 at A; then go to C and change from C to D the same as from A to B; then you are through the braid, ready to commence as at first.
Take sixteen strands, with twenty hairs in each strand, and arrange them on the table in a pattern. Start at A, take the first hairs at A, lift them across inside the first hairs at B, and bring the first hairs back from B to A; then move to C, take the first hairs at C, lift them across inside the first hairs at D, and bring the first hairs back from D to C; then start again at A and repeat this three times; then start at A, take the first hairs across to B and lay them outside the second hairs at B, and bring the first hairs back from B to A and lay them outside the second hairs at A; then go to C and transition from C to D just like you did from A to B; then you have finished the braid and are ready to start again as before.
Braid this over a small wire, with a hole in one end like the eye of a needle, so as to draw a small cord in the place of the wire. When you have it braided, take off your weights, tie the ends fast on the wire and push the braid together on the wire; then boil in water about ten minutes; then take it out and put in an oven as hot as it will bear without burning, until it is quite dry; then take it out and slip it off of the wire on to the cord, and sew the ends of the braid so it will not slip on the cord, and put a little shellac on the end to keep it fast. If you want it elastic, use elastic cord. To vary the size of the braid, vary the number of hairs in a strand.
Braid this over a small wire with a hole at one end like a needle’s eye, so you can pull a small cord through instead of the wire. Once you’ve braided it, remove your weights, tie the ends securely on the wire, and push the braid together on the wire. Then boil it in water for about ten minutes; after that, take it out and place it in an oven as hot as it can be without burning, until it’s completely dry. After that, take it out and slide it off the wire onto the cord, sew the ends of the braid to keep it from slipping on the cord, and put a bit of shellac on the end to hold it in place. If you want it to be elastic, use elastic cord. To change the size of the braid, adjust the number of hairs in each strand.

Take sixteen strands, twenty hairs in a strand, and place on table like pattern. Commence at A, take Nos. 1 at A across over inside of Nos. 1 at B, and bring back Nos. 1 from B to A; then take Nos. 2 at A across over inside of Nos. 2 at B, and bring back Nos. 2 from B to A; then take No. 1 at C in right hand and No. 1 at D in left hand and change them, lay the No. 1 from C in place of No. 1 at D, and lay the No. 1 from D in place of No. 1 at C; then change the Nos. 1 and 2 at A and B as at first; then change the Nos. 2 at C and D, as you did the Nos. 1 at C and D; then change the Nos. 1 and 2, as before, at A and B; then take Nos. 3 at C and D and change as you did the Nos. 2 at C and D; then change again Nos. 1 and 2 at A and B as at first; then take the Nos. 4 at C and D and change as you did the Nos. 3 at C and D; then you are through the braid, ready to commence as at first.
Pick up sixteen strands, twenty hairs in each strand, and lay them out on a table in a pattern. Start at A, take strands 1 at A and cross them over inside strands 1 at B, then bring strands 1 back from B to A; next, take strands 2 at A and cross them over inside strands 2 at B, then bring strands 2 back from B to A; now take strand 1 at C with your right hand and strand 1 at D with your left hand and swap them, placing strand 1 from C where strand 1 at D was, and placing strand 1 from D where strand 1 at C was; then swap strands 1 and 2 at A and B as you did at first; then swap strands 2 at C and D, just like you did with strands 1 at C and D; then swap strands 1 and 2 again at A and B; now take strands 3 at C and D and swap them as you did with strands 2 at C and D; next, swap strands 1 and 2 at A and B again as you did at first; then take strands 4 at C and D and swap them just like you did with strands 3 at C and D; then you’re done with the braid and ready to start over as you did at the beginning.
Braid this without cord or wire.
Braid this without using cord or wire.

Take sixteen strands, twenty hairs in a strand, and place on table like pattern. Commence at A, take Nos. 1 lift over to B in place of Nos. 1 at B, and bring back Nos. 1 from B to A; then take Nos. 2 at A and change over in place of Nos. 2 at B, and bring back Nos. 2 from B to A; then take No. 3 at A in right hand and No. 3 at B in left hand, and lay them inside of Nos. 1 at D, and bring back Nos. 1 from D and lay in place of Nos. 3 at A and B; then take No. 4 at A in left hand and No. 4 at B in right hand, and lay inside of Nos. 1 at C, and bring back Nos. 1 from C to A and B, and lay in place of Nos. 4; then commence as at first and repeat this three times, then take Nos. 1 at A, lift over to B in place of Nos. 1 at B, and bring back Nos. 1 from B to A; then take Nos. 2 at A and change over in place of Nos. 2 at B, and bring back Nos. 2 from B to A; then take Nos. 3 at A and B, lay inside of Nos. 1 at D; then take Nos. 4 at A and B, lay inside of Nos. 1 at C; then take Nos. 2 at A and lay outside of Nos. 1 at B, and bring back Nos. 2 from B and lay outside of Nos. 1 at A; then take Nos. 1 at C, lift over inside of Nos. 1 at D and bring back Nos. 1 from D and lay inside of Nos. 1 at C; then take No. 1 at C, on the side next to B, in right hand, and lay it inside of No. 1 at B; then take the No. 1 at D, next to B, in left hand, and lay it inside of No. 1 at B; then take the No. 1 at C, next to[65] A, in right hand, and lay it inside of No. 1 at A; then take No. 1 at D, next to A, and lay it inside of No. 1 at A; then take the Nos. 3 and 4 at A, lift over to B, and lay outside of Nos. 1 at B, and bring back Nos. 3 and 4 from B and lay outside of Nos. 1 at A; then lift Nos. 2 at A over and lay in place of Nos. 2 at B, and bring back Nos. 2 from B to A, and lay in place of Nos. 2 at A; then take No. 4 at A, in left hand, and No. 4 at B in right hand, and lay them inside of Nos. 1 at C, and bring the Nos. 1 from C back in place of the Nos. 4 at A and B; then take No. 3 at B in left hand, and No. 3 at A in right hand, and lay them inside of Nos. 1 at D, and bring back Nos. 1 from D and lay in place of Nos. 3 at A and B; then you are through the braid, ready to commence as at first.
Take sixteen strands, twenty hairs in each strand, and lay them on the table in a pattern. Start at A, move Nos. 1 over to B in place of Nos. 1 at B, and bring Nos. 1 back from B to A; then take Nos. 2 at A and swap them for Nos. 2 at B, and return Nos. 2 from B to A; then take No. 3 at A in your right hand and No. 3 at B in your left hand, and position them inside Nos. 1 at D, and bring Nos. 1 from D and position them in place of Nos. 3 at A and B; next, take No. 4 at A in your left hand and No. 4 at B in your right hand, and lay them inside Nos. 1 at C, then bring back Nos. 1 from C to A and B, and position them in place of Nos. 4; then start again as you did before and repeat this three times, then take Nos. 1 at A, move them over to B in place of Nos. 1 at B, and take Nos. 1 back from B to A; afterward, take Nos. 2 at A and swap them for Nos. 2 at B, and return Nos. 2 from B to A; then take Nos. 3 at A and B, position them inside Nos. 1 at D; then take Nos. 4 at A and B, position them inside Nos. 1 at C; then take Nos. 2 at A and position them outside of Nos. 1 at B, and bring back Nos. 2 from B and position them outside of Nos. 1 at A; then take Nos. 1 at C, move them inside Nos. 1 at D and return Nos. 1 from D to place them inside of Nos. 1 at C; then take No. 1 at C, on the side next to B, in your right hand, and position it inside of No. 1 at B; then take the No. 1 at D, next to B, in your left hand, and position it inside of No. 1 at B; then take the No. 1 at C, next to [65] A, in your right hand, and position it inside of No. 1 at A; then take No. 1 at D, next to A, and position it inside of No. 1 at A; then take the Nos. 3 and 4 at A, move them over to B, and lay them outside of Nos. 1 at B, and bring back Nos. 3 and 4 from B and lay them outside of Nos. 1 at A; then move Nos. 2 at A over and lay them in place of Nos. 2 at B, and bring back Nos. 2 from B to A, and position them in place of Nos. 2 at A; then take No. 4 at A, in your left hand, and No. 4 at B in your right hand, and position them inside of Nos. 1 at C, and bring the Nos. 1 from C back to replace the Nos. 4 at A and B; then take No. 3 at B in your left hand, and No. 3 at A in your right hand, and position them inside of Nos. 1 at D, and return Nos. 1 from D and place them where Nos. 3 were at A and B; then you’re done with the braid and ready to start over again as you did before.

Take twenty-two strands, fifteen hairs in a strand, and place on table like pattern. Have the strands at A and B black hair, and those at C and D light hair. Commence at A, take Nos. 1 and cross over inside of Nos. 1 at B, and bring back Nos. 1 from B and lay in place of Nos. 1 at A, then take Nos. 2 at A, cross over inside of Nos. 2 at B, and bring back Nos. 2 from B and lay inside of Nos. 2 at A; then take No. 1 at C in right hand, and No. 1 at D in left hand, cross over and lay the No. 1 from C at D, and the No. 1 from D at C; then change the Nos. 1 and 2 at A and B as at first; then take the Nos. 2 at C and D and change them as you did the Nos. 1; then change again at A and B as at first; then take the Nos. 3 at C and D, and change as you did the Nos. 2; then change again at A and B, and so on till you get to Nos. 7, and after changing that, change again at A and B; then change Nos. 7 again, then those at A and B, then Nos. 6, then at A and B, then Nos. 5, and so on back to No. 1, and change No. 1 there as you did Nos. 7. Always braid those at A and B between each of those at C and D.
Take twenty-two strands, with fifteen hairs in each strand, and lay them out on the table in a specific pattern. The strands at A and B should be black, while those at C and D should be light. Start at A, take the strands labeled 1 and cross them over inside the strands labeled 1 at B. Then bring the strands labeled 1 from B back and place them in the position of the strands labeled 1 at A. Next, take the strands labeled 2 at A, cross them over inside the strands labeled 2 at B, and bring the strands labeled 2 from B back to place inside the strands labeled 2 at A. Then, take the strand labeled 1 from C with your right hand and the strand labeled 1 from D with your left hand; cross them over and lay the strand labeled 1 from C at D, and the strand labeled 1 from D at C. Afterward, switch the strands labeled 1 and 2 at A and B as you did before. Then take the strands labeled 2 at C and D and switch them as you did the strands labeled 1. After that, switch again at A and B as before. Next, take the strands labeled 3 at C and D and switch them like you did the strands labeled 2. Then switch again at A and B, and continue this process until you reach the strands labeled 7. After switching those, switch again at A and B; then switch the strands labeled 7 again, followed by those at A and B, then switch the strands labeled 6, and so on all the way back to the strands labeled 1, changing the strands labeled 1 there just like you did the strands labeled 7. Always braid the strands at A and B between each of those at C and D.

Take 24 strands, twenty-five hairs in a strand, and place on table like this pattern. Commence at A, take Nos. 1 lift across inside of Nos. 1 at B, and bring back Nos. 1 from B to A, then go to C and take Nos. 1 at C and cross inside of Nos. 1 at D, and bring back Nos. 1 from D to C, then go to A and change Nos. 1 from A to B, as at first, then take Nos. 1 at E and F and swing round table with the same, and lay down in between Nos. 1 at A and B, and lay the No. 1 at A and B in the place of No. 4 at E and F, then change the Nos. 1 at C across inside of Nos. 1 at D, and bring back Nos. 1 from D to C, then change Nos. 1 at A and B the same, then the Nos. 1 at C and D again, then take Nos. 1 at H and G, swing round table with the same, and lay in between Nos. 1 at C and D, and lay the right hand ones at C and D up in place of No. 4 at H and G, then you are through the braid ready to commence as at first. Braid it over a cord so to push it together.
Take 24 strands, with twenty-five hairs in each strand, and lay them on the table in this pattern. Start at A, take Nos. 1 and lift them across inside of Nos. 1 at B, then bring back Nos. 1 from B to A. Next, go to C and take Nos. 1 at C, cross them inside of Nos. 1 at D, and bring back Nos. 1 from D to C. Then return to A and switch Nos. 1 from A to B as you did at first. After that, take Nos. 1 at E and F, swing around the table with those, and place them in between Nos. 1 at A and B. Put the No. 1 strands from A and B in the spot of No. 4 at E and F. Then switch the Nos. 1 at C across inside of Nos. 1 at D, bringing back Nos. 1 from D to C, and repeat the change for Nos. 1 at A and B. Do the same for Nos. 1 at C and D again, then take Nos. 1 at H and G, swing around the table with those, and lay them between Nos. 1 at C and D. Place the right-hand strands from C and D in the spot of No. 4 at H and G. You are now finished with the braid and ready to start as before. Braid it over a cord to push it together.


Take sixteen strands, fifteen hairs in a strand, and place on table like pattern. Commence at A, lift Nos. 2 across inside of Nos. 2 at B, and bring back Nos. 2 from B to A; then take Nos. 1 at A, lift across inside of Nos. 1 at B, and cross them, the one in right hand over the left, and bring back Nos. 1 from B to A, and cross the right over the left; then go to D, lift Nos. 1 across inside of Nos. 1 at C, cross the right over the left, and bring back Nos. 1 from C to D, and cross the right over the left; then repeat all from the beginning three times round the table. Then go to D, lift Nos. 3, cross the right over the left, and lay them outside of Nos. 1 at C; then go to A, lift Nos. 2 across inside of Nos. 2 at B, and bring back Nos. 2 from B to A; then take Nos. 1 at A, lift across inside of Nos. 1 at B, cross the right over the left, and bring back Nos. 1 from B to A, and cross them; then go to D, lift Nos. 1 across inside of Nos. 1 at C, cross the right over the left, and bring back Nos. 1 from C to D; then take Nos. 3 at C, and lay inside of Nos. 2 at D, and leave them there. Then you are through the braid, ready to commence at A, as at first.
Take sixteen strands, with fifteen hairs in each strand, and arrange them on the table like a pattern. Start at A, lift the 2 strands across inside of the 2 strands at B, and bring them back from B to A; then take the 1 strands at A, lift them across inside of the 1 strands at B, cross the one in your right hand over the left, and bring them back from B to A, crossing the right over the left again; then go to D, lift the 1 strands across inside of the 1 strands at C, cross the right over the left, and bring back the 1 strands from C to D, crossing the right over the left again; then repeat all of this from the beginning three times around the table. Next, go to D, lift the 3 strands, cross the right over the left, and lay them outside of the 1 strands at C; then go to A, lift the 2 strands across inside of the 2 strands at B, and bring them back from B to A; then take the 1 strands at A, lift them across inside of the 1 strands at B, cross the right over the left, and bring them back from B to A, crossing them again; then go to D, lift the 1 strands across inside of the 1 strands at C, cross the right over the left, and bring back the 1 strands from C to D; then take the 3 strands at C, lay them inside the 2 strands at D, and leave them there. Then you’re done with the braid, ready to start again at A, just like before.
See explanation on page 9.
See details on __A_TAG_PLACEHOLDER_0__.


Take twenty-four strands, eighty hairs in a strand, and place on table like pattern. Commence at A, lift Nos. 1 and 2 across inside of Nos. 1 and 2 at B, and bring back Nos. 1 and 2 from B to A; then go to C, lift Nos. 1 and 2 across inside of Nos. 1 and 2 at D, and bring back Nos. 1 and 2 from D to C; then go to A and change the Nos. 1 and 2 from A to B the same as at first; then take Nos. 1 at E and F, swing round table to the left, and lay them down between Nos. 1 and 2 at A and B; then lay the Nos. 2 at A and B in place of Nos. 4 at E and F; then change the Nos. 1 and 2 at C across inside of Nos. 1 and 2 at D, and bring back Nos. 1 and 2 from D to C; then change the same at A and B; then change again at C and D the same; then take Nos. 1 at H and G, swing round table to the left, and lay them between Nos. 1 and 2 at C and D, and lay the Nos. 2 at C and D in place of Nos. 4 at H and G. Then you are through the braid, ready to commence at A, as at first.
Grab twenty-four strands, with eighty hairs in each strand, and arrange them on the table in a pattern. Start at A, lift strands 1 and 2 across inside strands 1 and 2 at B, then bring strands 1 and 2 back from B to A; next go to C, lift strands 1 and 2 across inside strands 1 and 2 at D, and bring strands 1 and 2 back from D to C; then return to A and switch strands 1 and 2 from A to B, just like before; then take strands 1 at E and F, swing around the table to the left, and place them between strands 1 and 2 at A and B; then put strands 2 at A and B in the spot of strands 4 at E and F; next switch strands 1 and 2 at C inside strands 1 and 2 at D, and bring strands 1 and 2 back from D to C; then do the same switch at A and B; repeat the switch again at C and D; then take strands 1 at H and G, swing around the table to the left, and lay them between strands 1 and 2 at C and D, and set strands 2 at C and D in the place of strands 4 at H and G. Then you're done with the braid, ready to start again at A, just like before.
Braid it over a strong cord, and when braided push it close together, tie the ends, and boil in water five minutes; then heat it in an oven until it is quite dry, and it is ready for use.
Braid it over a sturdy cord, and when it's braided, push it tightly together, tie the ends, and boil it in water for five minutes; then heat it in an oven until it's completely dry, and it's ready to use.


Take thirteen strands, fifteen hairs in a strand, and place on table like pattern. Commence at A, lift No. 5 over between Nos. 2 and 3 at A; then take No. 1 at A, and lift over between Nos. 2 and 3 at B; then take No. 1 at B, and lift over between Nos. 2 and 3 at C; then lift No. 1 at C over between Nos. 2 and 3 at C; then lift No. 4 at C over between Nos. 2 and 3 at B; then lift No. 4 at B over between Nos. 2 and 3 at A. Then you are through the braid, ready to commence as at first, and repeating until it is the required length. Then tie it out straight on a flat stick, boil it in water five minutes, then heat it in an oven as hot as it will bear without burning, until it is quite dry, and then it is ready for use.
Take thirteen strands, with fifteen hairs in each strand, and lay them out on a table in a pattern. Start at A, lift strand No. 5 over between strands 2 and 3 at A; then pick up strand No. 1 at A and lift it over between strands 2 and 3 at B; next, take strand No. 1 at B and lift it over between strands 2 and 3 at C; then lift strand No. 1 at C over between strands 2 and 3 at C; after that, lift strand No. 4 at C over between strands 2 and 3 at B; then lift strand No. 4 at B over between strands 2 and 3 at A. Now you've finished the braid, ready to start again just like before, and repeat until it reaches the desired length. Then tie it straight onto a flat stick, boil it in water for five minutes, and then place it in an oven as hot as it can get without burning until it’s completely dry, and then it’s ready to use.
The above directions, after braiding, will suffice for finishing all Ring Braids, unless other directions are given.
The above guidelines, after braiding, will be enough to finish all Ring Braids, unless stated otherwise.


Take twenty-four strands, twenty hairs in the strands at C and D, and ten hairs in the strands at A and B, and place on table like pattern. Commence at A, take Nos. 1 and lift across table and lay inside of Nos. 1 at B, and bring back Nos. 2 from B and lay outside of Nos. 2 at A; then go to C, take Nos. 1, cross over and lay in between Nos. 1 at D, and bring back Nos. 1 from D to C; then take Nos. 3 at C, cross inside of Nos. 3 at D, and bring back Nos. 3 from D to C; then take Nos. 4 at C, cross over inside of Nos. 4 at D, and bring back Nos. 4 from D to C; then commence at A, and change them at A and B as at first; then go to C and commence with the Nos. 2. You must leave the Nos. 1 every other time and the Nos. 2 every other time, and braid it as at first.
Take twenty-four strands, with twenty hairs in the strands at C and D, and ten hairs in the strands at A and B, and arrange them on the table in a similar pattern. Start at A, take strands 1 and lift them across the table to place inside strands 1 at B, then bring strands 2 back from B and lay them outside strands 2 at A. Next, go to C, take strands 1, cross over, and place them between strands 1 at D, then bring strands 1 back from D to C. After that, take strands 3 at C, cross inside strands 3 at D, and bring strands 3 back from D to C. Then take strands 4 at C, cross over inside strands 4 at D, and bring strands 4 back from D to C. Now go back to A and switch them at A and B as before. Finally, go to C and start with strands 2. You must skip strands 1 every other time and strands 2 every other time, and braid it as you did at first.


Take nineteen strands, twenty hairs in a strand, and place on table like pattern. Commence at A, take No. 1 and lift over Nos. 2 and 3, under 4 and 5, over 6, 7, 8, 9 and 10, and lay over to B; then take No. 1 at B, lift over Nos. 2 and 3, under 4 and 5, over 6, 7, 8, 9 and 10, and lay over to A; then you are through the braid, ready to commence at A, as at first,—first round to the left, and then to the right, and so on, repeating the changes as above, until the braid is finished. Then tie it out straight on a flat stick, boil in water five minutes, then heat it in an oven as hot as it will bear without burning until it is quite dry, and then it is ready for use.
Grab nineteen strands, with twenty hairs in each strand, and lay them on the table in a pattern. Start at A, take No. 1 and lift it over Nos. 2 and 3, under 4 and 5, over 6, 7, 8, 9, and 10, and then lay it over to B; then take No. 1 at B, lift over Nos. 2 and 3, under 4 and 5, over 6, 7, 8, 9, and 10, and lay it back over to A; now you're through the braid, ready to start again at A, just like before—first round to the left, then to the right, and keep repeating the changes as mentioned until the braid is finished. After that, tie it straight on a flat stick, boil it in water for five minutes, then heat it in an oven as hot as it can get without burning until it's completely dry, and then it's ready to use.


Take twenty strands, twenty hairs in a strand, and place on table like pattern. Commence at A, take the Nos. 1 and lift across the table and lay in place of Nos. 1 at B, and bring back Nos. 1 from B to A; then take the Nos. 2, 3 and 4, and change the same; then go to C, take the Nos. 1 and lift across the table and lay in place of Nos. 1 at D, and bring back Nos. 1 from D to C; then commence again at A, take Nos. 1 and lift over the table and lay in the place of Nos. 1 at B, and bring back the Nos. 1 from B to A; then change the Nos. 2 and 3 the same as the Nos. 1; then go to C and change the Nos. 1 over in the place of Nos. 1 at D, and bring back the Nos. 1 from D to C; then go to A, and take the Nos. 1, 2 and 3, and change the same as before; then go to C and change the same as before. Then you are through the braid ready to commence at A, as at first, and repeat until the braid is finished.
Grab twenty strands, with twenty hairs in each strand, and lay them on the table in a pattern. Start at A, take the strands numbered 1 and move them across the table to their new position at B, then bring them back from B to A; next, take strands 2, 3, and 4 and switch them in the same way. Then go to C, take the strands numbered 1, move them across the table to D, and bring them back from D to C. Start again at A, take strands 1, and move them over the table to their position at B, bringing strands 1 back from B to A; then swap strands 2 and 3 just like you did with strands 1. Next, go to C and swap strands 1 in place of strands 1 at D, and bring them back from D to C. Then return to A, take strands 1, 2, and 3, and swap them as before; then go to C and do the same again. Now you’ve completed the braid and are ready to start at A again, just like you did at the beginning, and repeat until the braid is finished.


Take twenty strands, twenty hairs in a strand, and place on table like pattern. Commence at A, take Nos. 1 and lift over across the table, and lay in place of Nos. 1 at B, and bring back Nos. 1 from B and lay in place of Nos. 1 at A; then take Nos. 2, 3 and 4, and change their places the same as Nos. 1; then go to C, take Nos. 1 and lift over across the table and lay in place of Nos. 1 at D, and bring back Nos. 1 from D to C; then go to A, take Nos. 1 and lift them over the table and lay in place of Nos. 1 at B, and bring back Nos. 1 from B to A; then take Nos. 3 and 4 and change the same; then go to C, take Nos. 1 and lift them over the table and lay in place of Nos. 1 at D, and bring back Nos. 1 from D to C. Then you are through the braid, ready to commence at A, as at first, and repeat the changes until the braid is finished.
Take twenty strands, with twenty hairs in each strand, and lay them on the table in a pattern. Start at A, take Nos. 1 and lift them over the table, placing them where Nos. 1 were at B, then bring Nos. 1 back from B and lay them in place of Nos. 1 at A. Next, take Nos. 2, 3, and 4, and swap their positions just like you did with Nos. 1; then move to C, take Nos. 1 and lift them over the table, placing them where Nos. 1 are at D, and bring Nos. 1 back from D to C. After that, go back to A, take Nos. 1 and lift them over the table, placing them back where Nos. 1 were at B, then bring Nos. 1 back from B to A. Then take Nos. 3 and 4 and swap them out the same way; return to C, lift Nos. 1 over the table, place them where Nos. 1 are at D, and bring Nos. 1 back from D to C. Now you've completed the braid and can start again at A, repeating the swaps until the braid is finished.


Take twenty strands, fifteen hairs in a strand, and place on table like pattern. Commence at A, take Nos. 1, lift across to B, and lay inside of Nos. 1, and bring back Nos. 2 from B and lay in between Nos. 2 at A; then go to C, take Nos. 1 and lift over inside of Nos. 1 at D, and bring back Nos. 1 from D to C; then take Nos. 2 at C, and cross over inside of Nos. 2 at D, and bring back Nos. 2 from D to C; then take Nos. 3 at C, cross over inside of Nos. 3 at D, and bring back Nos. 3 from D to C; then commence again at A, as at first, and repeat until it is braided the desired length.
Grab twenty strands, with fifteen hairs in each strand, and lay them on the table in a pattern. Start at A, take No. 1, lift it across to B, and place it inside No. 1. Then bring back No. 2 from B and lay it between No. 2 at A; next, move to C, take No. 1 and lift it over inside No. 1 at D, and bring back No. 1 from D to C; then take No. 2 at C, cross it over inside No. 2 at D, and bring back No. 2 from D to C; then take No. 3 at C, cross it over inside No. 3 at D, and bring back No. 3 from D to C; then start again at A, just like at the beginning, and repeat until it’s braided to the desired length.
When the braid is finished, tie it out straight on a flat stick, boil in water five minutes, and heat in an oven until perfectly dry, and then it is ready for use.
When the braid is done, secure it straight on a flat stick, boil it in water for five minutes, and then heat it in an oven until completely dry, and then it’s ready to use.


Take twenty strands, twenty hairs in a strand, and lay on table like pattern. Commence at A, take Nos. 1 and lift over table and lay in place of Nos. 1 at B, and bring back Nos. 1 from B to A; then take Nos. 2 and change the same; then the Nos. 3, and change the same; then go to C, take the Nos. 2 and lay outside of the Nos. 1; then go to D, and take the Nos. 2 and lay outside of the Nos. 1; then go to C, and take Nos. 2 and lift over table and lay in place of Nos. 2 at D, and bring back the Nos. 2 from D to C; then go to A, take Nos. 1 and lift across the table and lay in place of Nos. 1 at B, and bring back Nos. 1 from B to A; then take Nos. 3 at A, and lift across table in place of Nos. 3 at B, and bring back Nos. 3 from B to A; then go to C, take Nos. 2 and lay outside of Nos. 1; then go to D, take Nos. 2 and lay outside of Nos. 1; then go to C, take Nos. 2 and lift over table in place of Nos. 2 at D, and bring back Nos. 2 from D to C. Then you are ready to commence at A, as at first, and repeat until finished.
Grab twenty strands, twenty hairs in each strand, and arrange them on the table like a pattern. Start at A, take Nos. 1 and lift them over the table, placing them where Nos. 1 were at B, then bring Nos. 1 back from B to A; next, take Nos. 2 and do the same; then Nos. 3, and do the same; then go to C, take Nos. 2 and place them outside of Nos. 1; then go to D, and take Nos. 2 and place them outside of Nos. 1; then return to C, take Nos. 2, lift them over the table, and place them where Nos. 2 were at D, then bring Nos. 2 back from D to C; next, go to A, take Nos. 1, lift them across the table, and place them where Nos. 1 were at B, then bring Nos. 1 back from B to A; then take Nos. 3 at A, lift them across the table to where Nos. 3 are at B, and bring back Nos. 3 from B to A; then go to C, take Nos. 2 and place them outside of Nos. 1; then go to D, take Nos. 2 and place them outside of Nos. 1; then return to C, take Nos. 2, lift them over the table to where Nos. 2 were at D, and bring Nos. 2 back from D to C. Then you're ready to start again at A, just like before, and keep repeating until you're done.

Take fifteen strands, twenty hairs in a strand, and place on table like pattern. Commence at A, by taking No. 1 and lifting it over Nos. 2, 3 and 4, under Nos. 5, 6, 7 and 8, and pass it over to B; then take No. 1 at B, lift over Nos. 2, 3 and 4, under 5, 6, 7 and 8, and pass it over to A; then you are through, ready to commence at A, as at first, and repeat until the braid is finished,—first round to the left, and then round to the right.
Grab fifteen strands, twenty hairs in each strand, and lay them out on the table in a pattern. Start at A by taking strand No. 1 and lifting it over strands 2, 3, and 4, under strands 5, 6, 7, and 8, and then pass it over to B. Next, take No. 1 at B, lift it over strands 2, 3, and 4, under strands 5, 6, 7, and 8, and pass it over to A. Once you’ve done that, you’re ready to start again at A, just like before, and repeat until the braid is complete—first moving to the left, then to the right.

Take nineteen strands, ten hairs in a strand, and place on table like pattern. Commence at A, take No. 1 and lift over Nos. 2, 3 and 4, under 5 and 6, over 7 and 8, under 9 and 10, and pass it over to B; then take No. 1 at B, and lift over Nos. 2, 3 and 4, under 5 and 6, over 7 and 8, under 9 and 10, and lay it over to A; then go to A and commence at No. 1, as at first, and repeat over and over, first to the left and then to the right, and so on, until the braid is finished. Then tie it out straight on a flat stick, boil in water five minutes, and heat it in an oven as hot as it will bear without burning, until it is quite dry, and then it is ready for use.
Take nineteen strands, with ten hairs in each strand, and lay them on the table in a pattern. Start at A, take No. 1 and lift it over Nos. 2, 3, and 4, under 5 and 6, over 7 and 8, under 9 and 10, and pass it over to B; then take No. 1 at B and lift it over Nos. 2, 3, and 4, under 5 and 6, over 7 and 8, under 9 and 10, and lay it over to A; then go back to A and start at No. 1, just like before, and repeat this over and over, first to the left and then to the right, and so on, until the braid is done. After that, tie it straight on a flat stick, boil it in water for five minutes, and dry it in an oven at the hottest temperature it can handle without burning, until it is completely dry, and then it's ready to use.

Take twenty-four strands, and place on table like pattern. Commence at A, take Nos. 1 and lift across inside of Nos. 1 at B, and bring back Nos. 2 inside of Nos. 2 at A; then go to C, and take Nos. 1 and cross over inside of Nos. 1 at D, and bring back Nos. 1 from D to C; then take Nos. 2 at C, and cross over inside of Nos. 2 at D, and bring back Nos. 2 from D to C; then take Nos. 3 at C, and cross over inside of Nos. 3 at D, and bring back Nos. 3 from D to C; then take Nos. 4 at C, and cross over inside of Nos. 4 at D, and bring back Nos. 4 from D to C; if you wish to reverse every other time, you may leave the Nos. 1 and not braid them; then you are ready to commence at A as at first.
Grab twenty-four strands and arrange them on the table in a pattern. Start at A, take the strands labeled 1 and lift them across the strands labeled 1 at B, then bring the strands labeled 2 back inside the strands labeled 2 at A; next, move to C, take the strands labeled 1 and cross them over inside the strands labeled 1 at D, then bring the strands labeled 1 back from D to C; now take the strands labeled 2 at C and cross them over inside the strands labeled 2 at D, and bring the strands labeled 2 back from D to C; then take the strands labeled 3 at C and cross them over inside the strands labeled 3 at D, and bring the strands labeled 3 back from D to C; next, take the strands labeled 4 at C, cross them over inside the strands labeled 4 at D, and bring the strands labeled 4 back from D to C; if you want to alternate by reversing every other time, you can leave the strands labeled 1 unbraided; then you’re ready to start at A just like before.

Take twenty-four strands, sixteen hairs in a strand, and place on the table like pattern. Commence at A, take Nos. 1 and cross over to B, lay in between Nos. 1 at B, and bring back Nos. 1 from B and lay in place of Nos. 1 at A; then take Nos. 2 at A, and change them the same way; then Nos. 3 the same; then Nos. 4 the same. Then take Nos. 1 at C and D, and lift over Nos. 2; then lift Nos. 1 at C over in place of Nos. 1 at D, and bring back Nos. 1 from D to C; then go to A, and take Nos. 2, cross over between Nos. 2 at B, and bring back Nos. 2 from B to A; then take Nos. 3 and change the same way; then take Nos. 4 and change the same. Then go to C and D, and lift Nos. 1 over Nos. 2, and then lift Nos. 1 at C over and lay in place of Nos. 1 at D, and bring back Nos. 1 from D and lay in place of Nos. 1 at C; then you are ready to commence as at first, at A, and repeat until the braid is finished. You will place double weight on the strands at C and D.
Take twenty-four strands, with sixteen hairs in each strand, and lay them out on the table in a pattern. Start at A, take the strands numbered 1 and cross them over to B, placing them in between the strands numbered 1 at B, then bring the strands numbered 1 back from B and place them where the strands numbered 1 were at A; next, take the strands numbered 2 at A and switch them in the same way; then do the same with strands numbered 3; and then with strands numbered 4. After that, take strands numbered 1 at C and D, and lift them over strands numbered 2; then lift strands numbered 1 at C to replace strands numbered 1 at D, and bring the strands numbered 1 back from D to C; now go to A and take strands numbered 2, cross them over between strands numbered 2 at B, and bring the strands numbered 2 back from B to A; then take strands numbered 3 and switch them in the same way; and then take strands numbered 4 and switch them the same. Next, go to C and D, lift strands numbered 1 over strands numbered 2, then lift strands numbered 1 at C over and place them instead of strands numbered 1 at D, and bring strands numbered 1 back from D to place them instead of strands numbered 1 at C; then you’re ready to start again at A and repeat until the braid is finished. You will apply extra weight to the strands at C and D.

Take twenty-eight strands, of twelve hairs, and place on table like pattern. Commence at A, take Nos. 1 and cross over the table and lay in place of Nos. 1 at B, and bring back Nos. 1 from B to A; then change the Nos. 2 the same. Then take Nos. 4 at A, and lift over the table in place of Nos. 4 at B, and bring back Nos. 4 from B to A; then take Nos. 5 and change the same way. Then go to C and D, and lift the Nos. 1 over the Nos. 2; then take Nos. 1 at C, and lift them over the table inside of Nos. 1 at D, and bring back the Nos. 1 from D and lay in place of Nos. 1 at C; then go to A, and take Nos. 1 and cross over in place of Nos. 1 at B, and bring back Nos. 1 from B to A; then take Nos. 2, 3, 4 and 5, and change all the same. Then go to C and D, and lift Nos. 1 over Nos. 2; then lift Nos. 1 at C over the table, and lay them inside of Nos. 1 at D, and bring back Nos. 1 from D to C. Then you are through the braid, ready to commence at A, as at first, and repeat until the braid is finished. Place extra weight on the strands at C and D.
Take twenty-eight strands, each made of twelve hairs, and arrange them on the table in a pattern. Start at A, take strand No. 1, cross it over to the table, and replace it with strand No. 1 at B, then bring the strand No. 1 from B back to A; next, do the same with strand No. 2. Now take strand No. 4 at A, lift it over the table in place of strand No. 4 at B, and bring strand No. 4 back from B to A; then take strand No. 5 and repeat the same process. After that, move to C and D, and lift strand No. 1 over strand No. 2; then take strand No. 1 at C and lift it over the table inside strand No. 1 at D, and bring strand No. 1 back from D and place it where strand No. 1 was at C. Next, return to A, take strand No. 1, cross it over in place of strand No. 1 at B, and bring strand No. 1 back from B to A; then take strands No. 2, 3, 4, and 5 and repeat the changes. Move back to C and D, lift strand No. 1 over strand No. 2; then lift strand No. 1 at C over the table, place it inside strand No. 1 at D, and bring strand No. 1 back from D to C. After that, you're done with the braid, ready to go back to A and start over, repeating until the braid is complete. Make sure to put extra weight on the strands at C and D.


Take twenty-four strands, twenty hairs in a strand, and place on table like pattern, thirteen on the right side and eleven on the left. Take No. 1 at right hand, lift over Nos. 2 3 and 4, and under Nos. 5 and 6, and over No. 7; then take No. 1 again, in right hand, and lift over Nos. 2 3 and 4, and under Nos. 5 and 6; then take the same two that you have braided along, and lift over two strands, and under two, till you get to the center; then pass the same two strands across to the left side, and lay them down next to No. 11; then commence on the left side with No. 1, and braid the left side as you did the right; then the braid is through, ready to commence as at first, with No. 1 at right hand, and so on. Repeat till finished.
Grab twenty-four strands, with twenty hairs in each strand, and arrange them on the table in a pattern: thirteen on the right side and eleven on the left. Take the first strand on the right, lift it over strands two, three, and four, and under strands five and six, and over strand seven; then take the first strand again in your right hand, and repeat lifting it over strands two, three, and four, and under strands five and six; next, take the same two that you've braided together, lift them over two strands, and under two, until you reach the center; then move these two strands across to the left side and place them next to strand eleven; now start on the left side with the first strand and braid it just like you did on the right; once done, you can start again with the first strand on the right and continue this pattern until you're finished.

Take thirteen strands, twelve hairs in a strand, and place on table like pattern. Commence by lifting No. 7 over Nos. 6 and 5, and under Nos. 4 and 3, and over Nos. 2 and 1, and lay it next to No. 1 on the left side, making seven on the left side; then commence on the left side, take the outside one and braid it into the middle, over two and under two, till you get to the center, and lay it across on the opposite side; then you are through with the braid, and ready to commence as at first, with the No. 7 at right hand. You can have any odd number of strands you please.
Grab thirteen strands, with twelve hairs in each strand, and arrange them on the table in a pattern. Start by lifting No. 7 over Nos. 6 and 5, and under Nos. 4 and 3, then over Nos. 2 and 1, and place it next to No. 1 on the left side, which will give you seven on the left. Next, begin on the left side, take the outermost strand and braid it into the center, going over two and under two, until you reach the middle, then lay it across to the opposite side. Once you've done that, you’re done with the braid and can start again with No. 7 on the right. You can use any odd number of strands you want.

Take twenty strands, ten hairs in a strand, and lay on table like pattern. Commence at A, take No. 2 in right hand and swing it round the table to the right, and lay it across No. 2 at B, and bring back No. 2 from B to A; then take No. 1 at A in left hand, and swing it round the table to the left, and lay it across No. 1 at B, and bring back No. 1 from B to A. Then commence at C and D; take No. 1 at C in left hand, and No. 1 at D in right hand, and change places with them by passing the left hand over the right; then take Nos. 2 at C and D, and change the same way; then take Nos. 3 and change the same way; then take Nos. 4 and change the same way. Then go to B, and change the Nos. 1 at E and F as you did at C and D, by commencing at Nos. 1 first, then the Nos. 2, 3 and 4, in succession. Then you are through the braid, ready to commence as at first, at A. Braid it over a small wire.
Grab twenty strands, with ten hairs in each strand, and lay them on the table in a pattern. Start at A, hold No. 2 in your right hand, swing it around the table to the right, place it across No. 2 at B, and bring No. 2 back from B to A. Next, take No. 1 at A in your left hand, swing it around the table to the left, lay it across No. 1 at B, and bring No. 1 back from B to A. Then move to C and D; take No. 1 at C in your left hand and No. 1 at D in your right hand, and swap their places by passing your left hand over your right. After that, take No. 2 at C and D and swap them the same way, then do the same for Nos. 3 and 4. Next, go to B and swap Nos. 1 at E and F like you did at C and D, starting with Nos. 1, then moving to Nos. 2, 3, and 4 successively. Once you’ve completed the braid, you'll be ready to start over again at A. Braid it over a small wire.


Take any number of strands that can be divided by four,—sixty being the usual number—fifteen hairs in a strand, and place on table like pattern. Commence at A, with the inside row of figures, lift No. 3 over No. 2, and Nos. 1 and 3 over Nos. 2 and 4, and so on round table to the left, till you get to A; then go to C, braid to the left, lift Nos. 1 and 2 over Nos. 3 and 4, and so on round to A; then commence at A and braid round to the right; lift No. 2 over No. 3, and Nos. 3 and 4 over Nos. 2 and 1, and so on round table to A; then go to C, braid round to the right, and lift Nos. 2 and 4 over Nos. 3 and 1, and so on round to A. Then you are through the braid, ready to commence as at first.
Take any number of strands that can be divided by four—sixty is the usual number—fifteen hairs per strand, and lay them on the table in this pattern. Start at A with the inside row of figures, lift No. 3 over No. 2, and lift Nos. 1 and 3 over Nos. 2 and 4, continuing around the table to the left until you reach A. Then go to C, braid to the left, lifting Nos. 1 and 2 over Nos. 3 and 4, and continue around to A. Next, start at A and braid to the right, lifting No. 2 over No. 3, and lifting Nos. 3 and 4 over Nos. 2 and 1, going around the table to A. Then go to C, braid to the right, and lift Nos. 2 and 4 over Nos. 3 and 1, and continue around to A. Then you’re finished with the braid, ready to start again as before.
Braid this over a round stick, the size you want the braid for use, varying the number of strands according to the size of the stick; then slip the braid from the stick on to the mold you wish to use, tying it so it will fit the mold exactly, and then boil in water five minutes, and take it out and put it in an oven as hot as it will bear without burning, until it is quite dry. Then it is ready for use.
Braid this over a round stick, the size you want the braid for, adjusting the number of strands based on the stick's size; then slide the braid off the stick onto the mold you want to use, securing it so it fits the mold perfectly. Boil it in water for five minutes, then take it out and place it in an oven as hot as it can get without burning, until it’s completely dry. After that, it's ready to use.


Take sixteen strands, thirty hairs in a strand, and place on the table like pattern. Commence at A, take the Nos. 1 and 2 and lay them over Nos. 3 right and left; then lay the Nos. 1 at A over Nos. 1 at C and D, and bring back the Nos. 1 from C and D and lay outside of Nos. 3 at A; then lay the Nos. 2 at A over Nos. 1; then go to B and repeat the same as at A, only change the Nos. 1 at B with the Nos. 2 at C, instead of the Nos. 1 at C; then lift the Nos. 1 at A over and lay between Nos. 1 at B, and bring back Nos. 1 from B to A; then go to C and lift Nos. 1 and 2 over between Nos. 1 and 2 at D, and bring back the Nos. 1 and 2 from D to C. Then you are through the braid, ready to commence at A, as at first. Braid this over a small wire, and place double weight on the strands at C and D, and Nos. 1 at A and B.
Grab sixteen strands, thirty hairs in each strand, and lay them out on the table in a pattern. Start at A, pick up strands 1 and 2 and lay them over strands 3, one on the right and one on the left; then place the strands 1 at A over the strands 1 at C and D, and bring strands 1 from C and D back, laying them outside of strands 3 at A; next, place strands 2 at A over strands 1; then move to B and do the same as you did at A, but swap strands 1 at B with strands 2 at C, instead of strands 1 at C; then lift strands 1 at A over and position them between strands 1 at B, and bring the strands 1 from B back to A; then go to C and lift strands 1 and 2 over between strands 1 and 2 at D, and bring strands 1 and 2 from D back to C. At this point, you’ve completed the braid and are ready to restart at A as you did initially. Braid this over a small wire, and add double weight to the strands at C and D, as well as to strands 1 at A and B.


Take any number of strands that can be divided by four,—forty being the usual number for this braid—twelve hairs in a strand, and place on table like pattern. Commence at A, with the inside row of figures, and lift No. 3 over No. 2; then No. 1 over No. 2; then No. 4 over Nos. 3 and 2; then go to B and change the same way, and so on round the table to A. Then go to C, commence with the outside row of figures, and braid round to the left; lift No. 2 over No. 3; then No. 3 over No. 4; then No. 2 over No. 1; then No. 2 over No. 3, and so on round the table to A; then you will be through the braid, ready to commence as at first.
Grab any number of strands that can be divided by four—forty is usually the number for this braid—using twelve hairs in each strand, and lay them out on the table in a similar pattern. Start at A with the inner row of figures and lift No. 3 over No. 2; then lift No. 1 over No. 2; then lift No. 4 over both Nos. 3 and 2; then move to B and change in the same way, continuing around the table back to A. Then go to C, starting with the outer row of figures, and braid to the left; lift No. 2 over No. 3; then lift No. 3 over No. 4; then lift No. 2 over No. 1; then lift No. 2 over No. 3, and continue around the table back to A; then you’ll have finished the braid and be ready to start again as you did before.
Braid this over a round stick, the size you want the braid for use, varying the number of strands according to the size of the stick; then slip the braid from the stick on to the mold you wish to use, tying the braid so it will fit the mold exactly, and then boil in water five minutes, and take it out and put it in an oven, as hot as it will bear without burning, until it is quite dry. Then it is ready for use.
Braid this around a round stick, the size you want the braid to be. Adjust the number of strands based on the size of the stick. Then, slide the braid off the stick onto the mold you intend to use, tying the braid so it fits the mold perfectly. Boil it in water for five minutes, then take it out and place it in an oven that's as hot as it can get without burning. Leave it there until it's completely dry. It will then be ready for use.

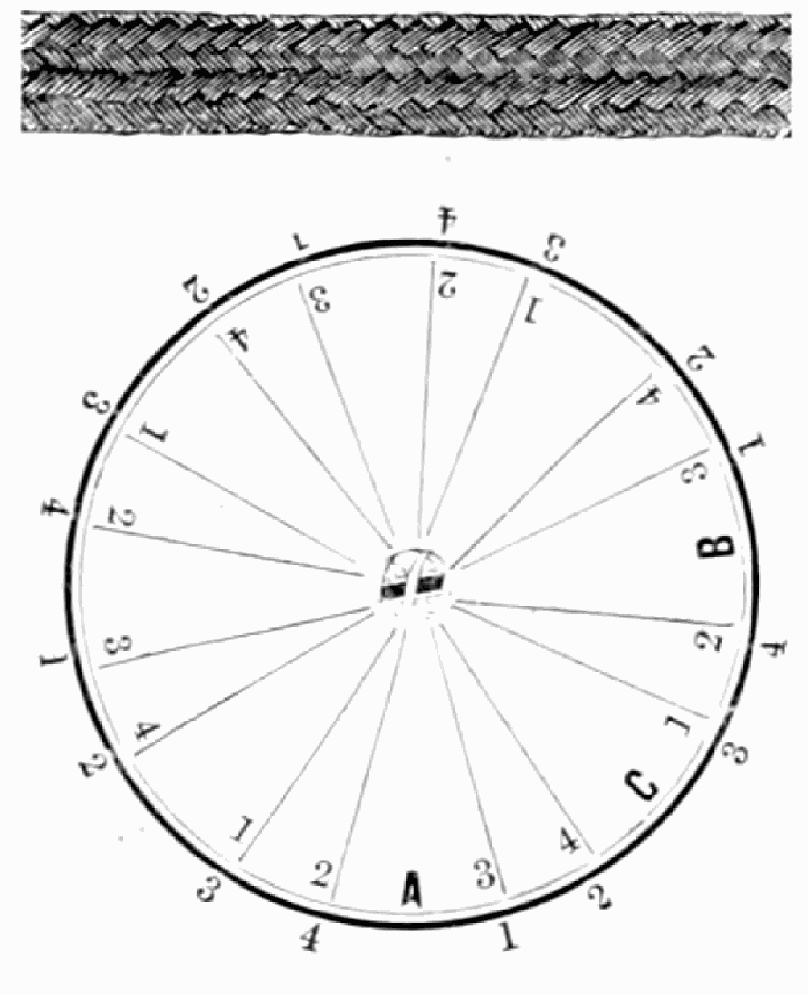
Take any number of strands that can be divided by four,—forty being the usual number for this braid—fifteen hairs in a strand, and place on table like pattern. Commence at A, with the inside row of figures, lift No. 2 in right hand, and put your left hand under the right hand, and take Nos. 3 and 4 and bring them back, and cross them over No. 1, and lay them all down; then go to B, and change the same way, and so on round the table to A. Then go to C, commence with the outside row of figures, and braid round to the left; lift No. 3 in left hand, and put your right hand under the left hand and take Nos. 1 and 2, bring them back, cross them over No. 4, and lay them all down, and so on round the table to A; then you will be through the braid, ready to commence as at first.
Take any number of strands that can be divided by four—forty is the typical number for this braid—fifteen hairs in a strand, and arrange them on the table in the same pattern. Start at A, with the inside row of strands, lift No. 2 in your right hand, place your left hand underneath your right hand, and take Nos. 3 and 4, bring them back, cross them over No. 1, and lay them all down. Then move to B and switch them the same way, and continue around the table to A. Next, go to C, start with the outside row of strands, and braid to the left; lift No. 3 in your left hand, place your right hand under your left hand, take Nos. 1 and 2, bring them back, cross them over No. 4, and lay them all down, and continue around the table to A. Then you will have finished the braid and be ready to start again like before.
Braid this over a round stick, the size you want the braid for use, varying the number of strands according to the size of the stick; then slip the braid from the stick on to the mold you wish to use, tying the braid so it will fit the mold exactly, and then boil in water five minutes, and take it out and put it in an oven, as hot as it will bear without burning, until it is quite dry. Then it is ready for use.
Braid this over a round stick, the size you want the braid for, changing the number of strands based on the size of the stick; then slide the braid off the stick onto the mold you want to use, tying the braid so it fits the mold perfectly. Next, boil it in water for five minutes, then take it out and place it in an oven as hot as it can get without burning, until it's completely dry. Then it’s ready to use.


Take any number of strands that can be divided by four—sixty being the usual number for this braid—fifteen hairs in a strand, and place on table like pattern. Commence at A, with the inside row of figures, and braid round table to the right; lift No. 1 over No. 2, and No. 4 over Nos. 3 and 2; then repeat with the same strands, the No. 1 over No. 2, and No. 4 over Nos. 3 and 2. Then go to B and braid the same, and so on round table to A. Then go to C, commence with the outside row of figures, and braid round table to the left; lift No. 1 over No. 2, and No. 4 over Nos. 3 and 2; then repeat with the same strands, the same as you did at A and B, and so on round table to A. Then you are through the braid, ready to commence as at first. After it is braided turn the braid inside out.
Grab any number of strands that can be divided by four—sixty is the usual number for this braid—fifteen hairs in each strand, and lay them out on the table in a pattern. Start at A, with the inside row of figures, and braid around the table to the right; lift strand No. 1 over No. 2, and No. 4 over Nos. 3 and 2; then repeat the same with those strands, lifting No. 1 over No. 2, and No. 4 over Nos. 3 and 2. Next, move to B and braid the same way, and continue around the table back to A. Then go to C, start with the outside row of figures, and braid around the table to the left; lift No. 1 over No. 2, and No. 4 over Nos. 3 and 2; then repeat with those same strands, just like you did at A and B, and continue around until you return to A. Once you've completed the braid, turn it inside out.
Braid this over a round stick, the size you want the braid for use, varying the number of strands according to the size of the stick; then slip the braid from the stick on to the mold you wish to use, and push it tight together, tying it so it will fit the mold exactly, and then boil in water five minutes, and take it out and put it in an oven as hot as it will bear without burning, until it is quite dry. Then it is ready for use.
Braid this over a round stick that's the size you want your braid to be. Adjust the number of strands based on the size of the stick. Then, slide the braid off the stick onto the mold you want to use and compress it tightly, tying it so it fits the mold perfectly. Next, boil it in water for five minutes, take it out, and place it in an oven as hot as it can get without burning until it's completely dry. Once it's dry, it's ready to use.


Take any number of strands that can be divided by four—sixty being the usual number for this braid—fifteen hairs in a strand, and place on table like pattern. Commence at A, with the inside row of figures; and braid round table to the right; cross No. 4 over No. 3, and No. 1 over Nos. 2 and 3; then repeat with the same strands. Then go to B, and braid the same, and so on round table to the right, until you get to A. Then go to C, and braid back round table to the left, by crossing No. 2 over No. 1, and No. 3 over No. 4, and No. 2 over No. 3; then repeat with the same strands, and so on round table till you get to A. Then you are through the braid, ready to commence as at first.
Grab any number of strands that can be divided by four—sixty is usually the number for this braid—fifteen hairs in each strand, and lay them on the table in that pattern. Start at A, using the inside row of figures; braid around the table to the right; cross No. 4 over No. 3, and No. 1 over Nos. 2 and 3; then repeat with the same strands. Next, go to B and braid the same way, and continue around the table to the right until you return to A. Then move to C and braid back around the table to the left by crossing No. 2 over No. 1, No. 3 over No. 4, and No. 2 over No. 3; then repeat with the same strands, and continue around the table until you reach A. At this point, you're done with the braid and ready to start again as you did initially.
Braid this over a round stick, the size you want the braid for use, varying the number of strands according to the size of the stick; then slip the braid from the stick on to the mold you wish to use, and push it tight together, tying it so it will fit the mold exactly, and then boil in water five minutes, and take it out and put it in an oven as hot as it will bear without burning, until it is quite dry. Then it is ready for use.
Braid this over a round stick that’s the size you want your braid to be. Change the number of strands based on the size of the stick. Then, slide the braid off the stick onto the mold you plan to use and press it tightly together, tying it so that it fits the mold perfectly. Boil it in water for five minutes, take it out, and place it in an oven that's as hot as it can get without burning, until it’s completely dry. Then, it’s ready to use.


Take any number of strands that can be divided by four,—sixty being the usual number—fifteen hairs in a strand, and place on table like pattern. Commence at A, with the inside row of figures, lift No. 3 over No. 2, and Nos. 1 and 3 over Nos. 2 and 4; then go to B, and braid the same to the left until you get to A; then commence at C, with the outside row of figures, and braid round table to the left again; lift Nos. 1 and 2 over Nos. 3 and 4, and so on round table till you get to A. Then commence with the inside row of figures at A, and lift No. 2 over No. 3, and Nos. 2 and 4 over Nos. 3 and 1; then go to B, and braid the same to the right, and so on round table to A; then commence at C with the outside row of figures, and braid round to the right, lift Nos. 3 and 4 over Nos. 2 and 1, and so on round table to A; then you are through the braid, ready to commence as at first. Be sure and braid the first two times round table to the left, and the last two to the right.
Take any number of strands that can be divided by four—sixty is the usual number—fifteen hairs in a strand, and place them on the table in a similar pattern. Start at A, using the inside row of figures, lift No. 3 over No. 2, and Nos. 1 and 3 over Nos. 2 and 4; then go to B and braid the same way to the left until you reach A. Next, start at C with the outside row of figures and braid around the table to the left again; lift Nos. 1 and 2 over Nos. 3 and 4, and continue around the table until you get back to A. Then begin with the inside row of figures at A again, and lift No. 2 over No. 3, and Nos. 2 and 4 over Nos. 3 and 1. After that, go to B and braid the same way to the right, and keep going around the table to A. Then start at C with the outside row of figures and braid around to the right. Lift Nos. 3 and 4 over Nos. 2 and 1, and so on around the table until you reach A. Then you’re done with the braid and ready to start again like the first time. Make sure to braid the first two times around the table to the left and the last two times to the right.
Braid this over a round stick, the size you want the braid for use, varying the number of strands according to the size of the stick; then slip the braid from the stick on to the mold you wish to use, tying it so it will fit the mold exactly, and then boil in water five minutes, and take it out and put it in an oven as hot as it will bear without burning, until it is quite dry. Then it is ready for use. To have it elastic use elastic cord.
Braid this over a round stick, the size you want the braid to be, adjusting the number of strands based on the size of the stick. Then, slide the braid off the stick onto the mold you intend to use, tying it so it fits the mold perfectly. Next, boil it in water for five minutes, take it out, and place it in an oven as hot as it can handle without burning, until it’s completely dry. Then it’s ready to use. To make it elastic, use elastic cord.


Take any number of strands that can be divided by four,—sixty being the usual number—fifteen hairs in a strand, and place on table like pattern. Commence at A, with the inside row of figures, lift No. 3 over No. 2, and No. 1 over No. 2, then No. 4 over Nos. 3 and 2; then go to B and change the same to the left, and so on round table to A; then go to C, braid to the left with the outside row of figures, lift Nos. 3 and 4 over Nos. 1 and 2, and so on round to A. Then commence again at A and braid round to the right; lift No. 2 over No. 3, then No. 2 over No. 1, and Nos. 2 and 3 over No. 4, and so on round table to A; then commence at C and braid to the right, lift Nos. 1 and 2 over Nos. 3 and 4, and so on round to A. Then you are through the braid, ready to commence as at first.
Grab any number of strands that can be divided by four—sixty is the usual number—with fifteen hairs in each strand, and lay them out on the table in a pattern. Start at A with the inner row of figures: lift No. 3 over No. 2, then lift No. 1 over No. 2, followed by lifting No. 4 over Nos. 3 and 2. Then move to B and shift the same to the left, continuing around the table back to A. Next, go to C and braid to the left with the outer row of figures: lift Nos. 3 and 4 over Nos. 1 and 2, and continue back to A. Now start again at A and braid to the right: lift No. 2 over No. 3, then lift No. 2 over No. 1, and lift Nos. 2 and 3 over No. 4, and go around the table back to A. Finally, start at C and braid to the right, lifting Nos. 1 and 2 over Nos. 3 and 4, then continue around to A. That completes the braid, and you’re ready to start over as before.
Braid this over a round stick, the size you want the braid for use, varying the number of strands according to the size of the stick; then slip the braid from the stick on to the mold you wish to use, tying it so it will fit the mold exactly, and then boil in water five minutes, and take it out and put it in an oven as hot as it will bear without burning, until it is quite dry. Then it is ready for use.
Braid this over a round stick, the size you want the braid to be, adjusting the number of strands based on the stick's size; then slide the braid off the stick onto the mold you want to use, securing it so it fits the mold perfectly. Next, boil it in water for five minutes, take it out, and place it in an oven as hot as it can get without burning, until it’s completely dry. Then it’s ready to use.


Take any number of strands that can be divided by four,—sixty being the usual number—fifteen hairs in a strand, and place on table like pattern. Commence at A, with the inside row of figures, lift No. 3 over No. 2, and No. 1 over No. 2, then No. 3 over No. 4, and No. 3 over No. 2; braid round table to the left till you get to A, then repeat the same at C with the outside row of figures. After braiding the second time round, commence again at A, with the inside row of figures, and braid round to the right; lift Nos. 3 and 4 over Nos. 1 and 2, and so on round to A; then repeat, at C, with the outside row of figures. Then you are through the braid, ready to commence as at first.
Take any number of strands that can be divided by four—sixty is the usual amount—with fifteen hairs in each strand, and lay them on the table in a similar pattern. Start at A, using the inside row of figures. Lift No. 3 over No. 2, and then No. 1 over No. 2. Next, lift No. 3 over No. 4, and No. 3 over No. 2; braid around the table to the left until you get back to A, then do the same at C with the outside row of figures. After completing the second round of braiding, start again at A with the inside row of figures and braid to the right; lift Nos. 3 and 4 over Nos. 1 and 2, and continue round to A. Then repeat at C with the outside row of figures. After that, you're done with the braid and ready to start again like before.
Braid this over a round stick, the size you want the braid for use, varying the number of strands according to the size of the stick; then slip the braid from the stick on to the mold you wish to use, tying it so it will fit the mold exactly, and then boil in water five minutes, and take it out and put it in an oven as hot as it will bear without burning, until it is quite dry. Then it is ready for use.
Braid this over a round stick that's the size you want the braid to be, adjusting the number of strands based on the stick's size; then slide the braid off the stick onto the mold you want to use, tying it so it fits the mold perfectly. Boil it in water for five minutes, then take it out and place it in an oven as hot as it can get without burning, until it's completely dry. After that, it's ready to use.


Take any number of strands that can be divided by four,—sixty being the usual number—fifteen hairs in a strand, and place on table like pattern. Commence at A, with the inside row of figures, lift No. 1 over No. 2, No. 4 over No. 3, No. 1 over No. 2, and No. 4 over No. 3; then No. 3 over No. 2, No. 1 over No. 2, and No. 4 over Nos. 2 and 3. Braid round table to the left till you get to A, then repeat the same at C, only braid the outside row of figures. Then you are through the braid, ready to commence as at first.
Grab any number of strands that can be divided by four—sixty is the usual number—fifteen hairs in a strand. Lay them out on the table in a similar pattern. Start at A with the inside row of figures. Lift No. 1 over No. 2, No. 4 over No. 3, No. 1 over No. 2, and No. 4 over No. 3. Then, lift No. 3 over No. 2, No. 1 over No. 2, and No. 4 over both No. 2 and No. 3. Braid around the table to the left until you reach A, and then repeat the same process at C, but braid the outside row of figures this time. After that, you’ll be done with the braid and ready to start again as before.
Braid this over a round stick, the size you want the braid for use, varying the number of strands according to the size of the stick; then slip the braid from the stick on to the mold you wish to use, tying it so it will fit the mold exactly, and then boil in water five minutes, and take it out and put it in an oven as hot as it will bear without burning, until it is quite dry. Then it is ready for use.
Braid this over a round stick, the size you want the braid to be, adjusting the number of strands based on the stick's size; then slide the braid off the stick onto the mold you want to use, securing it so that it fits the mold perfectly. Next, boil it in water for five minutes, then take it out and place it in an oven as hot as it can get without burning, until it's completely dry. After that, it's ready to use.


Take any number of strands that can be divided by four,—eighty being The usual number for this braid—four hairs in a strand, and place on table like pattern. Commence at A, with the inside row of figures, lift No. 2 over No. 3; then No. 2 over No. 1; then No. 2 over No. 3; then Nos. 2 and 3 over No. 4; then No. 2 over No. 1. Then go to B and change the same way, and so on round the table to A. Then go to C, and commence with the outside row of figures, and change the same as you did at A, and so on round the table, when you will be through the braid, ready to commence at A, as at first.
Take any number of strands that can be divided by four—eighty is the usual amount for this braid. Use four hairs per strand and lay them out on the table in the same pattern. Start at A with the inside row of figures: lift No. 2 over No. 3; then No. 2 over No. 1; then No. 2 over No. 3 again; then lift Nos. 2 and 3 over No. 4; then No. 2 over No. 1 again. Next, go to B and repeat the same process, and continue this around the table back to A. Then move to C, starting with the outside row of figures, and change them the same way you did at A. Keep going around the table, and you’ll finish the braid, ready to start again at A, just like at the beginning.
Braid this over a round stick, the size you want the braid for use, varying the number of strands according to the size of the stick; then slip the braid from the stick on to the mold you wish to use, tying the braid so it will fit the mold exactly, and then boil in water five minutes, and take it out and put it in an oven, as hot as it will bear without burning, until it is quite dry. Then it is ready for use.
Braid this over a round stick, keeping in mind the size you want the braid to be; adjust the number of strands based on the size of the stick. Next, slide the braid off the stick onto the mold you want to use, tying it so it fits the mold perfectly. Boil it in water for five minutes, then take it out and place it in an oven at a high temperature, being careful not to burn it, until it’s completely dry. After that, it’s ready to use.


Take any number of Strands that can be divided by four,—eighty being the usual number for this braid—four hairs in a strand, and place on table like pattern. Commence at A, with the inside row of figures, lift No. 1 over Nos. 2, 3 and 4; then No. 3 over Nos. 2 and 1; then No. 2 over Nos. 3 and 4; then No. 2 over No. 1. Then go to B and change the same, and so on round the table to A. Then go to C, and commence with the outside row of figures, and change the same as you did at A, and so on round the table, when you will be through the braid, ready to commence at A, as at first.
Take any number of strands that can be divided by four—eighty is the usual amount for this braid—four hairs in each strand, and lay them out on the table in a pattern. Start at A with the inside row of strands: lift No. 1 over Nos. 2, 3, and 4; then No. 3 over Nos. 2 and 1; then No. 2 over Nos. 3 and 4; then No. 2 over No. 1. Next, move to B and repeat the same process, continuing around the table back to A. Then go to C and start with the outside row of strands, changing them the same way you did at A, and continue around the table. You will then have completed the braid and will be ready to start again at A, just like before.
Braid this over a round stick, the size you want the braid for use, varying the number of strands according to the size of the stick; then slip the braid from the stick on to the mold you wish to use, tying the braid so it will fit the mold exactly, and then boil in water five minutes, and take it out and put it in an oven, as hot as it will bear without burning, until it is quite dry. Then it is ready for use.
Braid this over a round stick, the size you want the braid to be. Change the number of strands based on the size of the stick; then slide the braid off the stick onto the mold you want to use, tying the braid so it fits the mold perfectly. Boil in water for five minutes, then take it out and place it in an oven that's as hot as it can get without burning, until it’s completely dry. Then it's ready to use.


Take any number of strands that can be divided by four,—sixty being the usual number—fifteen hairs in a strand, and place on table like pattern. Commence at A, with the inside row of figures, lift No. 3 over No. 2, No. 3 over No. 4, No. 1 over No. 2, No. 3 over No. 2, and so on round the table to the left to A; then commence at C, lift No. 3 over No. 2, No. 3 over No. 4, No. 1 over No. 2, No. 3 over No. 2, No. 1 over No. 2 and No. 3 over No. 4. Then you are through the braid, ready to commence as at first.
Grab any number of strands that can be divided by four—sixty is the usual choice—with fifteen hairs in each strand, and arrange them on the table in a patterned layout. Start at A with the inner row of numbers: lift No. 3 over No. 2, No. 3 over No. 4, No. 1 over No. 2, No. 3 over No. 2, and continue around the table to the left back to A. Then, begin at C, lifting No. 3 over No. 2, No. 3 over No. 4, No. 1 over No. 2, No. 3 over No. 2, No. 1 over No. 2, and No. 3 over No. 4. After that, you’ll have completed the braid and can start again as before.
Braid this over a round stick, the size you want the braid for use, varying the number of strands according to the size of the stick; then slip the braid from the stick on to the mold you wish to use, tying it so it will fit the mold exactly, and then boil in water five minutes, and take it out and put it in an oven as hot as it will bear without burning, until it is quite dry. Then it is ready for use.
Braid this over a round stick, the size you want the braid to be. Change the number of strands based on the stick's size; then slide the braid off the stick onto the mold you want to use, tying it so it fits the mold perfectly. Boil it in water for five minutes, then take it out and place it in an oven that's as hot as it can get without burning, until it's completely dry. Then it's ready to use.


Take any number of strands that can be divided by four,—eighty being the usual number for this braid—four hairs in a strand, and place on table like pattern. Commence at A, with the inside row of figures, lift No. 3 over No. 2; then No. 3 over No 4; then No. 1 over No. 2; then No. 3 over No. 2; then No. 1 over No. 2; then No. 3 over No. 4. Then go to B and change the same way, and so on round the table to A. Then go to C, and commence with the outside row of figures, and change the same as you did at A, and so on round the table, when you will be through the braid, ready to commence at A, as at first.
Take any number of strands that can be divided by four—eighty is the usual number for this braid—four hairs in each strand, and arrange them on the table in a similar pattern. Start at A with the inside row of figures: lift No. 3 over No. 2; then No. 3 over No. 4; then No. 1 over No. 2; then No. 3 over No. 2; then No. 1 over No. 2; then No. 3 over No. 4. Next, move to B and change them the same way, and continue around the table back to A. After that, go to C and start with the outside row of figures, changing it the same way you did at A, and continue around the table until you've finished the braid, ready to start back at A as you did at the beginning.
Braid this over a round stick, the size you want the braid for use, varying the number of strands according to the size of the stick; then slip the braid from the stick on to the mold you wish to use, tying the braid so it will fit the mold exactly, and then boil in water five minutes, and take it out and put it in an oven, as hot as it will bear without burning, until it is quite dry. Then it is ready for use.
Braid this over a round stick, the size you want the braid to be, adjusting the number of strands based on the stick's size; then slide the braid off the stick onto the mold you want to use, tying the braid so it fits the mold perfectly. Next, boil it in water for five minutes, then take it out and place it in an oven as hot as it can get without burning, until it is completely dry. Then it’s ready to use.

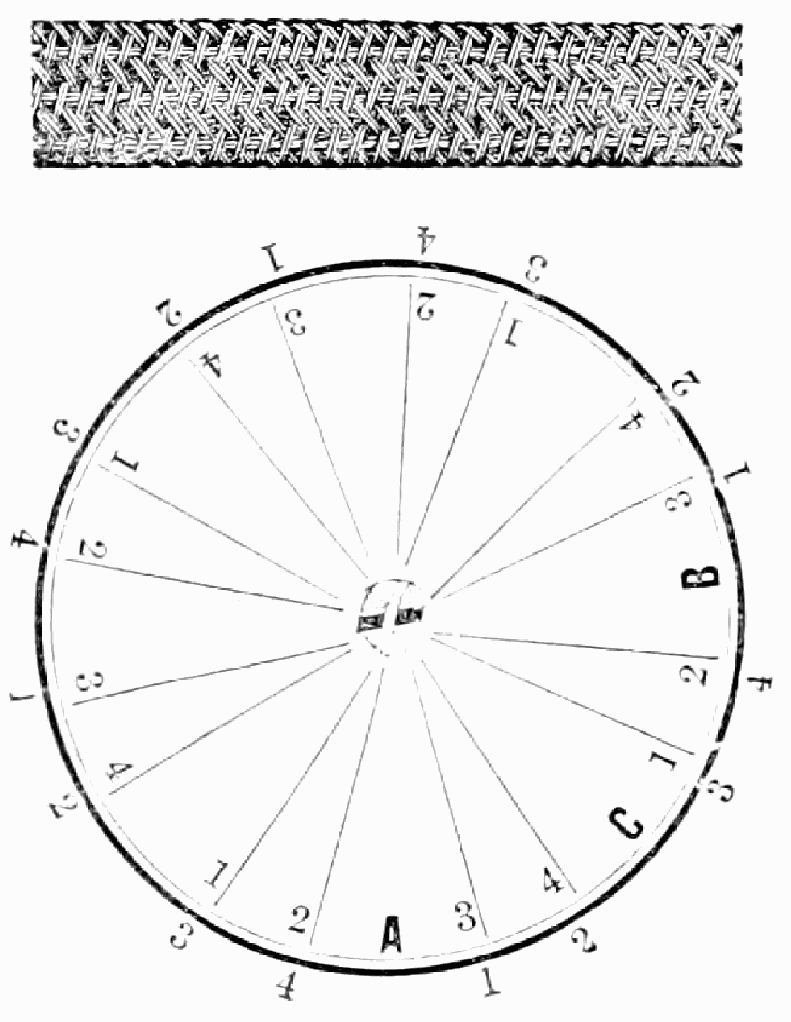
Take thirty-two strands, or any number that can be divided by four, fifteen hairs in a strand, and place on table like pattern. Commence at A, with the inside row of figures, and braid round the table to the left; lift No. 3 over No. 2, No. 1 over No. 2, and No. 3 over No. 4; then commence at C, with the outside row of figures, and braid round the table to the left; lift Nos. 1 and 2 over Nos. 3 and 4; then commence at A, as before, and braid round the table to the right; put No. 3 under No. 2, and lift No. 2 over No. 1, and No. 3 over No. 4; then commence at C, as before, and braid round the table to the right, and put Nos. 1 and 2 under Nos. 3 and 4. Then you are through the braid, ready to commence at A, as at first.
Grab thirty-two strands, or any number that can be divided by four, with fifteen hairs in each strand, and lay them out on the table in a pattern. Start at A with the inside row of figures and braid around the table to the left; lift No. 3 over No. 2, No. 1 over No. 2, and No. 3 over No. 4. Then start at C with the outside row of figures and braid around the table to the left; lift Nos. 1 and 2 over Nos. 3 and 4. Next, start at A again and braid around the table to the right; put No. 3 under No. 2, then lift No. 2 over No. 1, and No. 3 over No. 4. After that, start at C again and braid around the table to the right, putting Nos. 1 and 2 under Nos. 3 and 4. Now you're done with the braid and ready to start at A like you did initially.
Braid this over a round stick, the size you want the braid for use, varying the number of strands according to the size of the stick; then slip the braid from the stick on to the mold you wish to use, tying the braid so it will fit the mold exactly, and then boil in water five minutes, and take it out and put it in an oven, as hot as it will bear without burning, until it is quite dry. Then it is ready for use.
Braid this over a round stick, the size you want the braid to be, adjusting the number of strands based on the size of the stick; then slide the braid off the stick onto the mold you want to use, tying the braid so it fits the mold perfectly. Boil it in water for five minutes, then take it out and place it in an oven as hot as it can get without burning, until it’s completely dry. Then it’s ready to use.


Take any number of strands that can be divided by four,—forty being the usual number—twelve hairs in a strand, and place on table like pattern. Commence at A, with the inside row of figures, and lift Nos. 1 and 2 over Nos. 3 and 4; then go to B and change the same way, and so on round table to A. Then go to C, commence with the outside row of figures, and braid round to the left; lift Nos. 3 and 4 over Nos. 1 and 2, and so on round the table to A. Then you will be through the braid, ready to commence as at first.
Take any number of strands that can be divided by four—forty is the usual amount—twelve hairs in each strand. Lay them out on the table in a similar pattern. Start at A with the inside row of figures and lift strands 1 and 2 over strands 3 and 4; then move to B and do the same, and continue around the table back to A. Next, go to C, start with the outside row of figures, and braid to the left; lift strands 3 and 4 over strands 1 and 2, and continue around the table back to A. At this point, you'll have finished the braid and be ready to start again as before.
Braid this over a round stick, the size you want the braid for use, varying the number of strands according to the size of the stick; then slip the braid from the stick on to the mold you wish to use, tying it so it will fit the mold exactly, and then boil in water five minutes, and take it out and put it in an oven as hot as it will bear without burning, until it is quite dry. Then it is ready for use.
Braid this over a round stick, the size you want the braid to be, adjusting the number of strands based on the size of the stick. Then, slide the braid off the stick onto the mold you want to use, tying it so it fits the mold perfectly. Boil it in water for five minutes, take it out, and place it in an oven as hot as it can handle without burning until it's completely dry. Now it’s ready to use.


Take any number of strands that can be divided by four,—sixty being the usual number—fifteen hairs in a strand, and place on table like pattern. Commence at A, with the inside row of figures, lift No. 2 over No. 3, No. 4 over No. 3, No. 1 over No. 2, and No. 3 over No. 2, and so on round table to the right till you get to A; then commence at C, braid round to the right, lift Nos. 3 and 4 over Nos. 1 and 2, and so on round table to A. Then you are through the braid, ready to commence at A, as at first.
Grab any number of strands that can be divided by four—usually, that's sixty—each containing fifteen hairs, and lay them out on the table in that pattern. Start at A with the inside row of strands. Lift No. 2 over No. 3, No. 4 over No. 3, No. 1 over No. 2, and No. 3 over No. 2, continuing around the table to the right until you reach A. Then, start at C, braid to the right, lifting Nos. 3 and 4 over Nos. 1 and 2, and keep going around the table until you get back to A. Once you finish the braid, you’re ready to begin again at A, just like before.
Braid this over a round stick, the size you want the braid for use, varying the number of strands according to the size of the stick; then slip the braid from the stick on to the mold you wish to use, tying it so it will fit the mold exactly, and then boil in water five minutes, and take it out and put it in an oven as hot as it will bear without burning, until it is quite dry. Then it is ready for use.
Braid this over a round stick, the size you want the braid to be. Adjust the number of strands based on the size of the stick. Once you've finished braiding, slide it off the stick onto the mold you're using, tying it so it fits the mold perfectly. Boil it in water for five minutes, then take it out and place it in an oven as hot as it can be without burning, until it's completely dry. Then it's ready to use.


Take any number of strands that can be divided by four,—sixty being the usual number—fifteen hairs in a strand, and place on table like pattern. Commence at A, with the inside row of figures, lift No. 3 over No. 2, and Nos. 1 and 3 over Nos. 2 and 4, and so on round table to A; then commence at C with the outside row of figures, lift No. 2 over No. 3, No. 2 over No. 1, No. 2 over No. 3, Nos. 2 and 3 over No. 4, and No. 2 over No. 1, and so on round table to A. Then you are through the braid, ready to commence at A, as at first.
Take any number of strands that can be divided by four—sixty is the usual number—with fifteen hairs in each strand, and arrange them on the table in a similar pattern. Start at A with the inside row of figures; lift No. 3 over No. 2, and then lift Nos. 1 and 3 over Nos. 2 and 4, and continue this around the table back to A. Next, begin at C with the outside row of figures; lift No. 2 over No. 3, then No. 2 over No. 1, again lift No. 2 over No. 3, lift Nos. 2 and 3 over No. 4, and finally lift No. 2 over No. 1, continuing this around the table back to A. Then you’re done with the braid and ready to start at A again, just like before.
Braid this over a round stick, the size you want the braid for use, varying the number of strands according to the size of the stick; then slip the braid from the stick on to the mold you wish to use, tying it so it will fit the mold exactly, and then boil in water five minutes, and take it out and put it in an oven as hot as it will bear without burning, until it is quite dry. Then it is ready for use.
Braid this over a round stick, the size you want the braid to be, varying the number of strands based on the size of the stick; then slide the braid off the stick onto the mold you want to use, tying it so it fits the mold perfectly. Next, boil it in water for five minutes, then take it out and place it in an oven as hot as it can get without burning, until it’s completely dry. Then it's ready to use.


In this pattern you braid with eight strands, or with two groups of fours. Commence at B, lift No. 4 in left hand and lay down between Nos. 3 and 4 at C, and take No. 4 at C in right hand; then lift No. 3 at B over between Nos. 2 and 3 at C, and take No. 3 at C in right hand; then lift No. 2 at B over between Nos. 1 and 2 at C, and take No. 2 at C in right hand; then lift No. 1 at B over next to No. 1 at C, and take No. 1 at C in right hand, and then lift those in right hand over to B, and lay them all down. Braid round to the right till you get to A, then take the next eight strands, and braid round table to the left; lift No. 1 at C over between Nos. 1 and 2 at B, and take No. 1 at B in left hand; then lift No. 2 at C over between Nos. 2 and 3 at B, and take No. 2 at B in left hand; then lift No. 3 at C over between Nos. 3 and 4 at B, and take No. 3 at B in left hand; then lift No. 4 at C over next to No. 4 at B, and take No. 4 at B in left hand, and then lift those in left hand over to C and lay them all down, and so on round table, taking the next eight strands, till you get to A. Then you are through the braid, ready to commence as at first.
In this pattern, you braid with eight strands or with two groups of four. Start at B, pick up No. 4 with your left hand and place it between Nos. 3 and 4 at C, then take No. 4 at C in your right hand. Next, lift No. 3 at B over between Nos. 2 and 3 at C, and take No. 3 at C in your right hand. Then, lift No. 2 at B over between Nos. 1 and 2 at C, and take No. 2 at C in your right hand. After that, lift No. 1 at B over next to No. 1 at C, and take No. 1 at C in your right hand. Finally, lift those in your right hand over to B and lay them all down. Braid to the right until you reach A, then take the next eight strands and braid around the table to the left. Lift No. 1 at C over between Nos. 1 and 2 at B, and take No. 1 at B in your left hand. Then, lift No. 2 at C over between Nos. 2 and 3 at B, and take No. 2 at B in your left hand. Next, lift No. 3 at C over between Nos. 3 and 4 at B, and take No. 3 at B in your left hand. Then, lift No. 4 at C over next to No. 4 at B, and take No. 4 at B in your left hand. After that, lift those in your left hand over to C and lay them all down, and continue around the table, taking the next eight strands, until you get to A. Then you are done with the braid and ready to start again like before.
See explanation on page 100.
See details on page __A_TAG_PLACEHOLDER_0__.


Take any number of strands that can be divided by four,—eighty being the usual number for this braid—four hairs in a strand, and place on table like pattern. Commence at A, with the inside row of figures, lift No. 3 over No. 2; then No. 3 over No. 4; then No. 1 over No. 2; then No. 3 over No. 2. Then go to B and change the same way, and so round the table to A. Then go to C, and commence with the outside row of figures, and change the same as you did at A, and so on round the table, when you will be through the braid, ready to commence at A, as at first.
Grab any number of strands that can be divided by four—eighty is the usual number for this braid—four hairs in a strand, and place them on the table in a similar pattern. Start at A, with the inside row of figures, lift No. 3 over No. 2; then No. 3 over No. 4; then No. 1 over No. 2; then No. 3 over No. 2. Next, go to B and change in the same way, and continue around the table back to A. Then move to C and start with the outside row of figures, changing in the same manner as you did at A, and continue around the table until you finish the braid, ready to start at A again, just like before.
Braid this over a round stick, the size you want the braid for use, varying the number of strands according to the size of the stick; then slip the braid from the stick on to the mold you wish to use, tying it so it will fit the mold exactly, and then boil in water five minutes, and take it out and put it in an oven as hot as it will bear without burning, until it is quite dry. Then it is ready for use.
Braid this over a round stick, the size you want the braid to be. Change the number of strands based on the size of the stick. Then, slide the braid off the stick and onto the mold you want to use, tying it tightly so it fits the mold perfectly. Boil it in water for five minutes, then take it out and place it in an oven as hot as it can get without burning until it's completely dry. After that, it's ready to use.


Take any number of strands that can be divided by four,—sixty being the usual number—fifteen hairs in a strand, and place on table like pattern. Commence at A, with the inside row of figures, lift No. 3 over No. 2, No. 3 over No. 4, No. 1 over No. 2, and No. 3 over No. 2, and so on round table to A; then go to C, take the outside row of figures, and make the same changes round to A, and repeat alternately at A and C, until the braid is long enough to cover the bottom of the acorn, and then commence at A with the inside row of figures; lift No. 3 over No. 2, No. 3 over No. 4, No. 1 over No. 2, No. 3 over No. 2, No. 1 over No. 2, and No. 3 over No. 4, and so on round to A; then go to C, take the outside row of figures, and make the same changes round to A; then repeat until the braid is long enough to make the top or bur of the acorn. Then you are through the braid, ready to commence as at first.
Grab any number of strands divisible by four—sixty is the standard number—fifteen hairs in each strand, and arrange them on the table in a similar pattern. Start at A with the inner row of numbers: lift No. 3 over No. 2, No. 3 over No. 4, No. 1 over No. 2, and No. 3 over No. 2, continuing this around the table to A. Then move to C, take the outer row of numbers, and make the same moves around to A. Alternate between A and C until the braid is long enough to cover the bottom of the acorn. Then start again at A with the inner row of numbers: lift No. 3 over No. 2, No. 3 over No. 4, No. 1 over No. 2, No. 3 over No. 2, No. 1 over No. 2, and No. 3 over No. 4, continuing around to A. Next, go to C, take the outer row of numbers, and repeat the same moves around to A. Continue this until the braid is long enough to form the top or cap of the acorn. Then you're done with the braid and ready to start over as before.
Braid this over a round stick, the size you want the braid for use, varying the number of strands according to the size of the stick; then slip the braid from the stick on to the mold you wish to use, tying it so it will fit the mold exactly, and then boil in water five minutes, and take it out and put it in an oven as hot as it will bear without burning, until it is quite dry. Then it is ready for use.
Braid this over a round stick, the size you want the braid to be, changing the number of strands based on the size of the stick. Then, slide the braid off the stick onto the mold you want to use, tying it so it fits the mold perfectly. Boil it in water for five minutes, then take it out and place it in an oven as hot as it can get without burning, until it's completely dry. Then it's ready to use.


Take any number of strands that can be divided by four,—sixty being the usual number—fifteen hairs in a strand, and place on table like pattern. Commence at A, with the inside row of figures, lift No. 1 over between Nos. 2 and 3 at B; then lift No. 1 at B over between Nos. 2 and 3 of the next four strands, and so on round table to the left to A; then go to C, take the outside row of figures, lift No. 2 over No. 3, No. 2 over No. 1, Nos. 2 and 3 over No. 4; then No. 3 over No. 4, and No. 2 over No. 1, and so on round the table to the right, till the braid is finished.
Take any number of strands that can be divided by four—sixty is the typical number—fifteen hairs in a strand, and arrange them on the table in a pattern. Start at A with the inside row of figures, lift No. 1 over between Nos. 2 and 3 at B; then lift No. 1 at B over between Nos. 2 and 3 of the next four strands, and continue around the table to the left back to A; then move to C, take the outside row of figures, lift No. 2 over No. 3, No. 2 over No. 1, and Nos. 2 and 3 over No. 4; then lift No. 3 over No. 4, and No. 2 over No. 1, and keep going around the table to the right until the braid is complete.
Braid this over a round stick, the size you want the braid for use, varying the number of strands according to the size of the stick; then slip the braid from the stick on to the mold you wish to use, tying it so it will fit the mold exactly, and then boil in water five minutes, and take it out and put it in an oven as hot as it will bear without burning, until it is quite dry. Then it is ready for use.
Braid this around a round stick, sized according to how thick you want the braid. Adjust the number of strands based on the stick's size. After that, slide the braid off the stick onto the mold you want to use, tying it securely so it fits the mold perfectly. Boil it in water for five minutes, then take it out and place it in an oven that’s as hot as it can get without burning the braid, until it’s completely dry. Then it’s ready to use.


Take any number of strands that can be divided by four,—sixty being the usual number—fifteen hairs in a strand, and place on table like pattern. Commence at A, with the inside row of figures, braid to the right, lift No. 2 over Nos. 3 and 4, No. 1 over No. 2, and No. 3 over No. 2, and so on round to A; then go to C and repeat the same changes, with the outside row of figures, round to A; then commence at A with the inside row of figures, and braid to the left; lift No. 3 over Nos. 1 and 2, No. 4 over No. 3, and No. 2 over No. 3, and so on round to A; then go to C, and repeat the same changes, with the outside row of figures, round to A. Then you are through the braid, ready to commence as at first.
Grab any number of strands that can be divided by four—sixty is the usual number—each with fifteen hairs, and arrange them on the table in a pattern. Start at A with the inside row of figures, braid to the right, lifting No. 2 over Nos. 3 and 4, No. 1 over No. 2, and No. 3 over No. 2, and continue this way back to A; then go to C and repeat the same process with the outside row of figures back to A. Next, start again at A with the inside row of figures and braid to the left; lift No. 3 over Nos. 1 and 2, No. 4 over No. 3, and No. 2 over No. 3, and keep going back to A; then move to C and repeat the same process with the outside row of figures back to A. After that, you are done with the braid and ready to start again as you did at first.
Braid this over a round stick, the size you want the braid for use, varying the number of strands according to the size of the stick; then slip the braid from the stick on to the mold you wish to use, tying it so it will fit the mold exactly, and then boil in water five minutes, and take it out and put it in an oven as hot as it will bear without burning, until it is quite dry. Then it is ready for use.
Braid this over a round stick, sized according to your needs for the braid. Adjust the number of strands based on the size of the stick. Next, slide the braid off the stick onto the mold you plan to use, tying it to fit the mold perfectly. Then boil it in water for five minutes, take it out, and place it in an oven that’s as hot as it can get without burning. Leave it there until it’s completely dry. Then it’s ready to use.


Take any number of strands that can be divided by four,—sixty being the usual number—fifteen hairs in a strand, and place on table like pattern. Commence at A, with the inside row of figures, and have Nos. 1 and 2 of white hair, and Nos. 3 and 4 of black hair; lift Nos. 1 and 2 over Nos. 3 and 4, and so on round table to the left, to A; then go to C, and braid round table to the right; lift Nos. 3 and 4 over Nos. 1 and 2, and so on round table to A. Then you are through the braid, ready to commence as at first.
Take any number of strands that can be divided by four—sixty is the typical amount—fifteen hairs in each strand, and lay them on the table in a similar pattern. Start at A, with the inside row of figures, using Nos. 1 and 2 for white hair and Nos. 3 and 4 for black hair; lift Nos. 1 and 2 over Nos. 3 and 4, and continue around the table to the left, back to A; then move to C and braid around the table to the right; lift Nos. 3 and 4 over Nos. 1 and 2, and continue around the table to A. Then you’re done with the braid, ready to start again as before.
Braid this over a round stick, the size you want the braid for use, varying the number of strands according to the size of the stick; then slip the braid from the stick on to the mold you wish to use, tying it so it will fit the mold exactly, and then boil in water five minutes, and take it out and put it in an oven as hot as it will bear without burning, until it is quite dry. Then it is ready for use.
Braid this over a round stick, the size you want the braid to be; adjust the number of strands based on the size of the stick. Slip the braid off the stick onto the mold you intend to use, tying it so it fits the mold perfectly. Then, boil it in water for five minutes, take it out, and place it in an oven as hot as it can get without burning, until it’s completely dry. Now it’s ready to use.


Take any number of strands that can be divided by four,—sixty being the usual number—fifteen hairs in a strand, and place on table like pattern. Commence at A, with the inside row of figures, and have alternately four strands of white hair and four of black; braid round table to the left, lift Nos. 1 and 2 over Nos. 3 and 4, and so on round table to A; then go to C, braid round table to the right, lift Nos. 3 and 4 over Nos. 1 and 2, and so on round to A. Then you are through the braid, ready to commence as at first.
Grab any number of strands that can be divided by four—sixty is the usual number—fifteen hairs in each strand, and lay them out on the table in a pattern. Start at A with the inner row of strands, alternating four strands of white hair and four strands of black. Braid around the table to the left, lifting strands 1 and 2 over strands 3 and 4, and continue around the table back to A. Then go to C and braid around the table to the right, lifting strands 3 and 4 over strands 1 and 2, and continue around back to A. Now you have completed the braid and are ready to start again as before.
Braid this over a round stick, the size you want the braid for use, varying the number of strands according to the size of the stick; then slip the braid from the stick on to the mold you wish to use, tying it so it will fit the mold exactly, and then boil in water five minutes, and take it out and put it in an oven as hot as it will bear without burning, until it is quite dry. Then it is ready for use.
Braid this over a round stick, sized to your preferences for the braid. Adjust the number of strands based on the stick's size; then carefully slide the braid off the stick onto the mold you plan to use, tying it to fit the mold perfectly. Boil it in water for five minutes, then take it out and place it in an oven as hot as it can handle without burning, until it's completely dry. Once dried, it's ready for use.


Take any number of strands that can be divided by four,—sixty being the usual number—fifteen hairs in a strand, and place on table like pattern. Commence at A, with the inside row of figures, lift No. 3 over No. 2, No. 1 over No. 2, No. 3 over No. 4, and No. 3 over No. 2; braid round table to the left till you get to A, then go to C, take the outside row of figures, and braid round to the right; lift Nos. 3 and 4 over Nos. 1 and 2, and so on round to A, and repeat with the inside row of figures, and then repeat again with the outside row; then you are through the braid, ready to commence at A, as at first. Commence at C every other time, for you only braid the first change of figures once, and the last change three times.
Grab any number of strands that can be divided by four—sixty is the usual number—with fifteen hairs in each strand, and arrange them in a pattern on the table. Start at A with the inside row of figures, lifting No. 3 over No. 2, No. 1 over No. 2, No. 3 over No. 4, and No. 3 over No. 2; braid around the table to the left until you reach A, then move to C, take the outside row of figures, and braid around to the right; lift Nos. 3 and 4 over Nos. 1 and 2, and continue around to A, then repeat with the inside row of figures, and then do the outside row again; after that, you’re done with the braid, ready to start at A like before. Start at C every other time, since you only braid the first figure change once, and the last change three times.
Braid this over a round stick, the size you want the braid for use, varying the number of strands according to the size of the stick; then slip the braid from the stick on to the mold you wish to use, tying it so it will fit the mold exactly, and then boil in water five minutes, and take it out and put it in an oven as hot as it will bear without burning, until it is quite dry. Then it is ready for use.
Braid this over a round stick, sized according to what you want the braid for, adjusting the number of strands based on the size of the stick; then slide the braid off the stick onto the mold you want to use, tying it so it fits the mold perfectly. Boil it in water for five minutes, then remove it and place it in an oven that’s hot enough without burning it, until it’s completely dry. Then it’s ready to use.

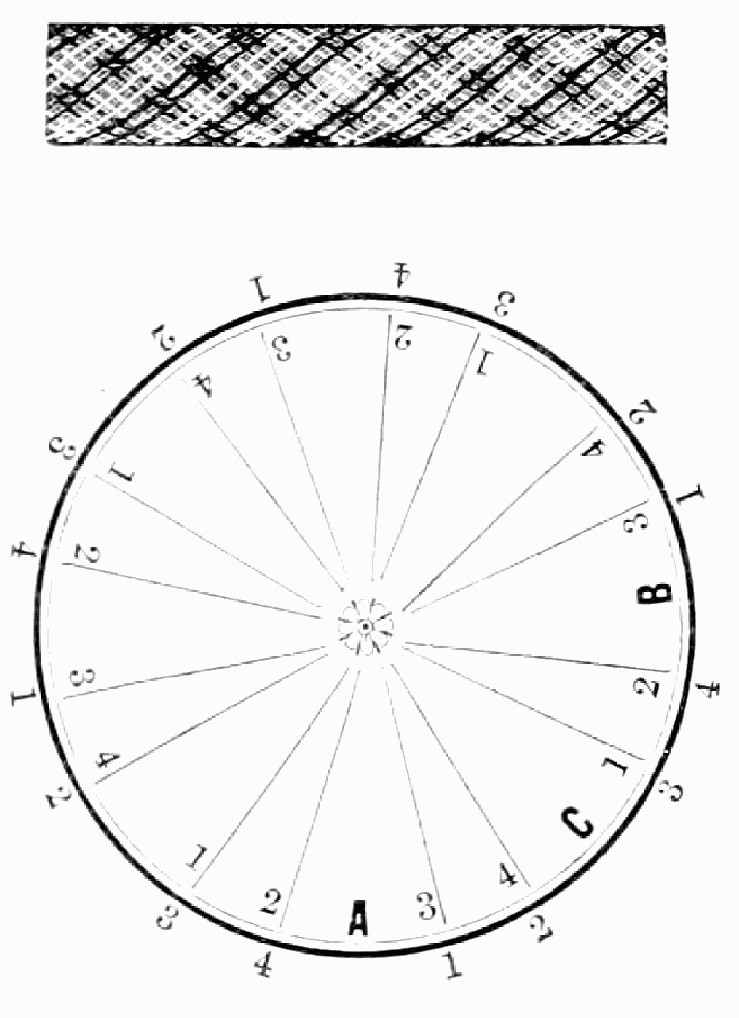
Take any number of strands that can be divided by four,—eighty being the usual number—four hairs in a strand, and place on table like pattern. Have one-half the strands white and one-half black, and place on table alternately, four white and four black. Commence at A, with the inside row of figures, lift No. 2 over No. 3, No. 2 over No. 1, No. 2 over No. 3, Nos. 2 and 3 over No. 4, and No. 2 over No. 1. Then go to B and change the same way, and so on round table to A. Then go to C, commence with the outside row of figures, and change the same as you did at A, and so on round the table; then you will be through the braid, ready to commence at A, as at first.
Grab any number of strands that can be divided by four—eighty is the usual number—four hairs in each strand, and arrange them on the table in a pattern. Have half of the strands white and half black, placing them alternately—four white and four black. Start at A with the inside row of figures: lift No. 2 over No. 3, No. 2 over No. 1, No. 2 over No. 3, Nos. 2 and 3 over No. 4, and No. 2 over No. 1. Then move to B and change in the same way, and continue around the table back to A. Next, go to C, start with the outside row of figures, and change just like you did at A, continuing around the table; then you will be done with the braid and ready to start at A like before.
Braid this over a round stick, the size you want the braid for use, varying the number of strands according to the size of the stick; then slip the braid from the stick on to the mold you wish to use, tying it so it will fit the mold exactly, and then boil in water five minutes, and take it out and put it in an oven as hot as it will bear without burning, until it is quite dry. Then it is ready for use.
Braid this over a round stick, the size you want the braid for, varying the number of strands based on the size of the stick; then slide the braid off the stick onto the mold you want to use, tying it so it fits the mold perfectly, and then boil in water for five minutes. Take it out and place it in an oven as hot as it can go without burning, until it’s completely dry. Then it’s ready to use.


Take any number of strands that can be divided by four,—eighty being the usual number—four hairs in a strand, and place on table like pattern. Have one-third the strands white hair, one-third black, and one-third red, and place on table alternately, four white, four black, and four red. Commence at A, with the inside row of figures, lift No. 2 over No. 3, No. 2 over No. 1, No. 2 over No. 3, Nos. 2 and 3 over No. 4, and No. 2 over No. 1. Then go to B and change the same way, and so on round table to A. Then go to C, commence with the outside row of figures, and change the same as you did at A, and so on round the table; then you will be through the braid, ready to commence at A, as at first.
Grab any number of strands that can be divided by four—eighty is the usual number. Use four hairs in each strand and lay them out on the table in a pattern. Have one-third of the strands white, one-third black, and one-third red, placing them on the table alternately: four white, four black, and four red. Start at A with the inside row of figures. Lift No. 2 over No. 3, No. 2 over No. 1, No. 2 over No. 3, Nos. 2 and 3 over No. 4, and No. 2 over No. 1. Then move to B and change them in the same way, and continue around the table back to A. Next, go to C, start with the outside row of figures, and change them the same way you did at A, and keep going around the table. Then you'll be finished with the braid and ready to start again at A, just like you did at the beginning.
Braid this over a round stick, the size you want the braid for use, varying the number of strands according to the size of the stick; then slip the braid from the stick on to the mold you wish to use, tying it so it will fit the mold exactly, and then boil in water five minutes, and take it out and put it in an oven as hot as it will bear without burning, until it is quite dry. Then it is ready for use.
Braid this over a round stick, the size you want the braid to be, adjusting the number of strands based on the stick's size; then slide the braid off the stick onto the mold you plan to use, tying it so it fits the mold perfectly. Boil it in water for five minutes, then remove it and place it in an oven as hot as it can go without burning, until it is completely dry. Then it's ready to use.


Take any number of strands that can be divided by four,—sixty being the usual number—fifteen hairs in a strand, and place on table like pattern. Commence at A, with the inside row of figures, lift No. 3 over No. 2, No. 3 over No. 4, No. 1 over No. 2, and No. 3 over No. 2; braid half way round the table, and then braid the last half by lifting No. 3 over No. 2, No. 3 over No. 4, No. 1 over No. 2, No. 3 over No. 2, No. 1 over No. 2, and No. 3 over No. 4, and so on round to A; then go to C and repeat the same. Then you are through the braid, ready to commence as at first.
Take any number of strands that can be divided by four—sixty is the typical amount—fifteen hairs in each strand, and arrange them on the table in that pattern. Start at A, using the inside row of figures, lift No. 3 over No. 2, No. 3 over No. 4, No. 1 over No. 2, and No. 3 over No. 2; braid halfway around the table, and then for the last half, lift No. 3 over No. 2, No. 3 over No. 4, No. 1 over No. 2, No. 3 over No. 2, No. 1 over No. 2, and No. 3 over No. 4, continuing around to A; then go to C and repeat the same. After that, you’re done with the braid and ready to start again just like before.
Braid this over a round stick, the size you want the braid for use, varying the number of strands according to the size of the stick; then slip the braid from the stick on to the mold you wish to use, tying it so it will fit the mold exactly, and then boil in water five minutes, and take it out and put it in an oven as hot as it will bear without burning, until it is quite dry. Then it is ready for use.
Braid this over a round stick, the size you want the braid to be, adjusting the number of strands based on the stick's size. Then, slide the braid off the stick onto the mold you want to use, tying it to fit the mold perfectly. Boil in water for five minutes, then remove it and place it in an oven as hot as it can get without burning until it’s completely dry. Then it’s ready to use.


Take any number of strands that can be divided by four,—eighty being the usual number—four hairs in a strand, and place on table like pattern. Commence at A, with the inside row of figures, and have one-half the strands white hair, and one-half black, and place alternately one strand of white, and one strand of black; lift No. 2 over No. 3, No. 2 over No. 1, No. 2 over No. 3, Nos. 2 and 3 over No. 4, and No. 2 over No. 1. Then go to B and change the same way, and so on round table to A. Then go to C, commence with the outside row of figures, and change the same as at A, and so on round table; then you will be through the braid, ready to commence as at first.
Grab any number of strands that can be divided by four—eighty is the usual number—four hairs in a strand, and lay them on the table in a pattern. Start at A with the inside row of figures, using half the strands for white hair and half for black, placing them alternately one strand of white and one strand of black. Lift No. 2 over No. 3, No. 2 over No. 1, No. 2 over No. 3, Nos. 2 and 3 over No. 4, and No. 2 over No. 1. Then move to B and change them in the same way, continuing around the table to A. Next, go to C, start with the outside row of figures, and change them the same way as at A, and continue around the table; then you will have completed the braid and be ready to start again as before.
Braid this over a round stick, the size you want the braid for use, varying the number of strands according to the size of the stick; then slip the braid from the stick on to the mold you wish to use, tying it so it will fit the mold exactly, and then boil in water five minutes, and take it out and put it in an oven as hot as it will bear without burning, until it is quite dry. Then it is ready for use.
Braid this around a round stick, sized according to how thick you want the braid to be, adjusting the number of strands based on the size of the stick. Once you’ve braided it, slide the braid off the stick and onto the mold you plan to use, securing it so it fits the mold perfectly. Next, boil it in water for five minutes, then remove it and place it in an oven that’s as hot as it can get without burning. Keep it in there until it’s completely dry, and then it will be ready to use.


Take any number of strands that can be divided by four,—eighty being the usual number—four hairs in a strand, and place on table like pattern. Commence at A, with the inside row of figures, and have one-half of the strands white hair, and one-half black, and place alternately two strands of white and two of black; lift No. 2 over No. 3, No. 2 over No. 1, No. 2 over No. 3, Nos. 2 and 3 over No. 4, and No. 2 over No. 1; then go to B and change the same way, and so on round table to A. Then go to C, commence with the outside row of figures, and change the same as you did at A, and so on round table. Then you will be through the braid, ready to commence at A, as at first.
Grab any number of strands that can be divided by four—eighty is the usual amount—with four hairs in each strand, and arrange them on the table in a similar pattern. Start at A with the inner row of figures, using half of the strands as white hair and half as black, and alternate between two strands of white and two of black; lift No. 2 over No. 3, No. 2 over No. 1, No. 2 over No. 3, then Nos. 2 and 3 over No. 4, and finally No. 2 over No. 1; after that, move to B and make the same changes, continuing around the table back to A. Next, go to C, start with the outer row of figures, and change them the same way you did at A, continuing around the table. You’ll be done with the braid, ready to start again at A, just like before.
Braid this over a round stick, the size you want the braid for use, varying the number of strands according to the size of the stick; then slip the braid from the stick on to the mold you wish to use, tying it so it will fit the mold exactly, and then boil in water five minutes, and take it out and put it in an oven as hot as it will bear without burning, until it is quite dry. Then it is ready for use.
Braid this over a round stick, the size you want the braid to be. Adjust the number of strands based on the size of the stick. Once finished, slide the braid off the stick onto the mold you want to use, securing it so it fits the mold perfectly. Boil in water for five minutes, then remove it and place it in an oven that's as hot as it can get without burning, until it's completely dry. Then it's ready to use.

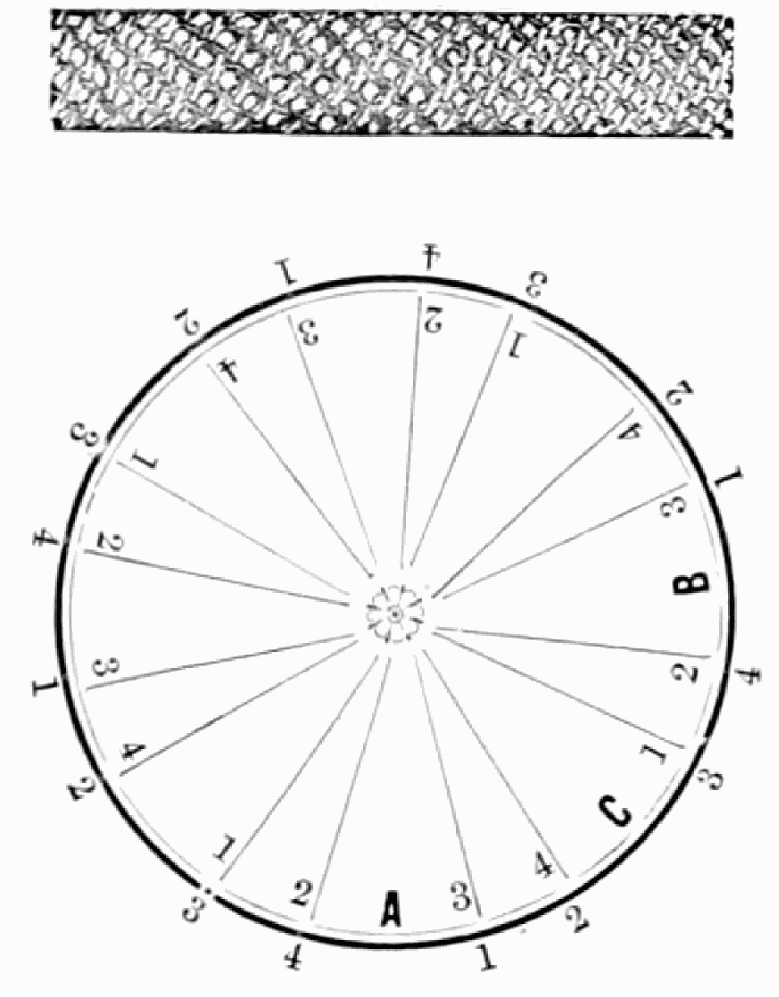
Take any number of strands that can be divided by four,—eighty being the usual number—four hairs in a strand, and place on table like pattern. Commence at A, with the inside row of figures, and have one-half the strands white hair, and one-half black, and place alternately two strands of white, and two strands of black; lift No. 3 over No. 2, No. 3 over No. 4, No. 1 over No. 2, No. 3 over No. 2, No. 1 over No. 2, and No. 3 over No. 4. Then go to B and change the same way, and so on round to A. Then go to C, commence with the outside row of figures, and change the same as you did at A, and so on round table; then you will be through the braid, ready to commence at A, as at first.
Grab any number of strands that can be divided by four—eighty is the usual number—four hairs in a strand, and lay them out on the table in a similar pattern. Start at A with the inside row of figures, using half the strands as white hair and the other half as black, and place two strands of white and two strands of black alternately. Lift No. 3 over No. 2, No. 3 over No. 4, No. 1 over No. 2, No. 3 over No. 2, No. 1 over No. 2, and No. 3 over No. 4. Next, move to B and change in the same way, and continue around to A. Then go to C, start with the outside row of figures, and change in the same way you did at A, continuing around the table. After that, you will have finished the braid and be ready to start again at A, just like before.
Braid this over a round stick, the size you want the braid for use, varying the number of strands according to the size of the stick; then slip the braid from the stick on to the mold you wish to use, tying it so it will fit the mold exactly, and then boil in water five minutes, and take it out and put it in an oven as hot as it will bear without burning, until it is quite dry. Then it is ready for use.
Braid this over a round stick, the size you want the braid for. Change the number of strands based on the size of the stick. Then slip the braid off the stick and onto the mold you plan to use, tying it so it fits the mold perfectly. Boil it in water for five minutes, then take it out and place it in an oven as hot as it can get without burning, until it is completely dry. Then it’s ready to use.


Take any number of strands that can be divided by four,—sixty being the usual number—fifteen hairs in a strand, and place on table like pattern. Commence at A, with the inside row of figures, and have one-half the strands white hair, and one-half black, and place alternately Nos. 1 and 2 of white, and Nos. 3 and 4 of black; lift No. 1 over No. 2, and No. 4 over Nos. 3 and 2; then repeat with the same strands, the No. 1 over No. 2, and No. 4 over Nos. 3 and 2. Then go to B and braid the same, and so on round table to A. Then go to C, commence with the outside row of figures, and braid round to the left; lift No. 1 over No. 2, and No. 4 over Nos. 3 and 2; then repeat with the same strands, the same as at A and B, and so on round to A. Then you are through the braid, ready to commence as at first. After it is braided, turn the braid inside out.
Take any number of strands that can be divided by four—sixty is the usual amount—with fifteen hairs in each strand, and arrange them on the table in a pattern. Start at A with the inside row of figures, using half of the strands as white hair and half as black, alternating between Nos. 1 and 2 for white and Nos. 3 and 4 for black; lift No. 1 over No. 2, and No. 4 over Nos. 3 and 2; then repeat the same strands with No. 1 over No. 2, and No. 4 over Nos. 3 and 2. Next, go to B and braid the same way, and continue around the table back to A. Then proceed to C, starting with the outside row of figures, and braid to the left; lift No. 1 over No. 2, and No. 4 over Nos. 3 and 2; repeat with the same strands just like at A and B, and continue around to A. Once you finish the braid, turn it inside out.
Braid this over a round stick, the size you want the braid for use, varying the number of strands according to the size of the stick; then slip the braid from the stick on to the mold you wish to use, tying it so it will fit the mold exactly, and then boil in water five minutes, and take it out and put it in an oven as hot as it will bear without burning, until it is quite dry. Then it is ready for use.
Braid this around a round stick, adjusting the size based on how thick you want the braid to be, and change the number of strands depending on the size of the stick. After that, slide the braid off the stick onto the mold you want to use, tying it to fit the mold perfectly. Then boil it in water for five minutes, take it out, and place it in a very hot oven that won’t burn it until it’s completely dry. At that point, it will be ready to use.


Take any number of strands that can be divided by four,—sixty being the usual number—fifteen hairs in a strand, and place on table like pattern. Commence at A, with the inside row of figures, and have one-half of the strands white hair, and one-half black, and place alternately one strand of white and one of black; lift No. 1 over No. 2, and No. 4 over Nos. 3 and 2; then repeat with the same strands, the No. 1 over No. 2, and No. 4 over Nos. 3 and 2. Then go to B and braid the same, and so on round table to A. Then go to C, commence with the outside row of figures, and braid round to the left; lift No. 1 over No. 2, and No. 4 over Nos. 3 and 2; then repeat with the same strands, the same as at A and B, and so on round to A. Then you are through the braid, ready to commence as at first. After it is braided, turn the braid inside out.
Grab any number of strands that can be divided by four—sixty is the usual number—with fifteen hairs in each strand, and arrange them on the table in a like pattern. Start at A with the inside row of figures, using half of the strands as white hair and half as black, placing them alternately: one strand of white and one of black. Lift No. 1 over No. 2, and No. 4 over Nos. 3 and 2; then repeat the same lifts: No. 1 over No. 2, and No. 4 over Nos. 3 and 2. Next, move to B and braid in the same way, continuing around the table back to A. Then go to C, starting with the outside row of figures, and braid to the left; lift No. 1 over No. 2, and No. 4 over Nos. 3 and 2; repeat these lifts the same way as at A and B, and continue around to A. Once you finish the braid, turn it inside out.
Braid this over a round stick, the size you want the braid for use, varying the number of strands according to the size of the stick; then slip the braid from the stick on to the mold you wish to use, tying it so it will fit the mold exactly, and then boil in water five minutes, and take it out and put it in an oven as hot as it will bear without burning, until it is quite dry. Then it is ready for use.
Braid this over a round stick, the size you want the braid to be, adjusting the number of strands based on the size of the stick; then slip the braid off the stick onto the mold you want to use, tying it to fit the mold perfectly. Boil it in water for five minutes, then take it out and place it in an oven as hot as it can get without burning, until it's fully dry. Then it's ready to use.


Take any number of strands that can be divided by four,—eighty being the usual number,—four hairs in a strand, and place on table like pattern. Commence at A, with the inside row of figures, and have one-fourth of the strands white hair, and three-fourths black, and place all the white strands on one side of the table, and all of the black on the other side; lift No. 2 over No. 3, No. 2 over No. 1, No. 2 over No. 3, Nos. 2 and 3 over No. 4, and No. 2 over No. 1. Then go to B and change the same way, and so on round table to A. Then go to C, commence with the outside row of figures, and change the same as at A, and so on round table; then you are through the braid, ready to commence as at first.
Grab any number of strands that can be divided by four—eighty being the usual number—four hairs in a strand, and arrange them on the table in a similar pattern. Start at A, using the inside row of figures, and make one-fourth of the strands white hair, and three-fourths black. Place all the white strands on one side of the table, and all of the black on the other side; lift No. 2 over No. 3, No. 2 over No. 1, No. 2 over No. 3, Nos. 2 and 3 over No. 4, and No. 2 over No. 1. Then go to B and change the same way, and continue around the table to A. Next, go to C, start with the outside row of figures, and change in the same way as at A, and continue around the table; then you are done with the braid, ready to start over as you did before.
Braid this over a round stick, the size you want the braid for use, varying the number of strands according to the size of the stick; then slip the braid from the stick on to the mold you wish to use, tying it so it will fit the mold exactly, and then boil in water five minutes, and take it out and put it in an oven as hot as it will bear without burning, until it is quite dry. Then it is ready for use.
Braid this over a round stick, the size you want the braid to be. Adjust the number of strands based on the size of the stick; then slide the braid off the stick onto the mold you want to use, tying it so it fits the mold perfectly. Boil it in water for five minutes, then take it out and place it in an oven as hot as it can go without burning, until it’s completely dry. Then it’s ready to use.


Take any number of strands that can be divided by four,—eighty being the usual number—four hairs in a strand, and place on table like pattern. Commence at A, with the inside row of figures, and have one-fourth of the strands white hair, and three-fourths black,—the Nos. 1 white, and the Nos. 2, 3 and 4 black; lift No. 3 over No. 2, No. 3 over No. 4, No. 1 over No. 2, and No. 3 over No. 2. Then go to B and change the same way, and so on round table to A. Then go to C, commence with the outside row of figures, and change the same as at A, and so on round table; then you are through the braid, ready to commence as at first.
Take any number of strands that can be divided by four—eighty is the usual amount—four hairs in a strand, and lay them on the table in a similar pattern. Start at A, using the inside row of figures, and make one-fourth of the strands white and three-fourths black—label No. 1 as white, and No. 2, 3, and 4 as black. Lift No. 3 over No. 2, No. 3 over No. 4, No. 1 over No. 2, and No. 3 over No. 2. Then move to B and repeat the same changes, and continue around the table back to A. Next, go to C, start with the outside row of figures, and change in the same way as at A, and keep going around the table; then you’ll be done with the braid and ready to start again as before.
Braid this over a round stick, the size you want the braid for use, varying the number of strands according to the size of the stick; then slip the braid from the stick on to the mold you wish to use, tying it so it will fit the mold exactly, and then boil in water five minutes, and take it out and put it in an oven as hot as it will bear without burning, until it is quite dry. Then it is ready for use.
Braid this over a round stick, the size you want the braid for, changing the number of strands based on the stick's size; then slide the braid off the stick onto the mold you want to use, tying it so it fits the mold perfectly. Next, boil it in water for five minutes, take it out, and place it in an oven as hot as it can handle without burning, until it's completely dry. Then it's ready to use.


Take any number of strands that can be divided by four,—eighty being the usual number for this braid—four hairs in a strand, and place on table like pattern. Commence at A, with the inside row of figures, lift No. 3 over No. 2; then No. 3 over No. 4; then No. 1 over No. 2; then No. 3 over No. 2. Then go to B and change the same way, and so round the table to A. Then go to C, and commence with the outside row of figures, and change the same as you did at A, and so on round the table, when you will be through the braid, ready to commence at A, as at first.
Take any number of strands that can be divided by four—eighty is the typical number for this braid. Use four hairs per strand and lay them out in a pattern on the table. Start at A with the inside row of strands: lift strand 3 over strand 2; then lift strand 3 over strand 4; next, lift strand 1 over strand 2; and finally, lift strand 3 over strand 2. After that, move to B and repeat the same steps, continuing around the table back to A. Next, move to C and start with the outside row of strands, changing them just like you did at A, and continue around the table. By the time you finish, you'll be done with the braid and ready to start again at A, just like before.
Braid this over a round stick, the size you want the braid for use, varying the number of strands according to the size of the stick; then slip the braid from the stick on to the mold you wish to use, tying the braid so it will fit the mold exactly, and then boil in water five minutes, and take it out and put it in an oven, as hot as it will bear without burning, until it is quite dry. Then it is ready for use.
Braid this over a round stick, the size you want the braid to be. Change the number of strands based on the size of the stick; then slip the braid off the stick and onto the mold you want to use, tying it so it fits the mold perfectly. Boil it in water for five minutes, take it out, and place it in an oven as hot as it can get without burning, until it’s completely dry. Then it’s ready to use.

The hair to be used in braiding should be combed perfectly straight, and tied with a string at the roots, to prevent wasting. Then count the number of hairs for a strand, and pull it out from the tips, dip it in water and draw it between the thumb and finger to make it lie smoothly; then tie a solid, single knot at one end, the same as you would with a sewing thread.
The hair used for braiding should be combed straight and tied with a string at the roots to avoid waste. Then, count how many hairs there are for a strand, pull it out from the tips, dip it in water, and run it between your thumb and finger to smooth it out; afterward, tie a firm single knot at one end, just like you would with sewing thread.
THE BOBBIN.
To prepare the bobbin for the hair, wind it with white thread, as shown in the plate, and fasten it with a slip-knot over the knob, leaving an end of some three inches, with a solid knot tied at the end of it. To adjust the hair to the bobbins, take the prepared strands of hair and tie the knotted ends in a square knot to the ends of the strings on the bobbins. When each strand is thus prepared and tied to the bobbin strings, place them even, and tie the ends with a string to prevent their slipping.
To get the bobbin ready for the hair, wrap it with white thread, as shown in the illustration, and secure it with a slip-knot over the knob, leaving about three inches of thread with a solid knot at the end. To attach the hair to the bobbins, take the prepared strands of hair and tie the knotted ends to the bobbin strings using a square knot. Once each strand is prepared and secured to the bobbin strings, align them evenly and tie the ends together with a string to keep them from slipping.
See cut of Bobbins on another page.
See the cut of __A_TAG_PLACEHOLDER_0__ on another page.
HOW TO PLACE THEM ON THE TABLE-COVER FOR BRAIDING.
Place the strands across the table-cover, over the numbers, as shown in the diagram, and fasten a weight to the end of them, under the table, through the center of cover; then tie the mold or form to be braided, around in the center, and you are ready for braiding.
Place the strands on the tablecloth, over the numbers, as shown in the diagram, and attach a weight to the ends of them underneath the table, at the center of the cover; then secure the mold or form you'll be braiding around the center, and you’re all set to start braiding.
For further reference, see plate of table, with explanations.[123]
For more information, check out the table with explanations.[123]

The Table Cover, as shown in diagram No. 1, represents the under side of the cover, showing the rim that fits over the cap, allowing the cover to revolve, for the convenience of the braider. The cavity through the cover and cap allows the braid, with the weight attached, to pass through as fast as braided.
The Table Cover, shown in diagram No. 1, illustrates the underside of the cover, highlighting the rim that fits over the cap, enabling the cover to spin for the convenience of the braider. The opening through the cover and cap allows the braid, with the weight attached, to pass through as it is braided.

The above cut represents Braiding Table No. 2, complete, showing the strands over the cover, with Bobbins attached; also, the weight attached to the braid, showing the manner of its passing through the table.[125]
The cut above shows Braiding Table No. 2, fully assembled, displaying the strands over the cover, with bobbins attached; it also shows the weight connected to the braid, illustrating how it moves through the table.[125]


The above cut shows the Wood Bobbins, for fine open work or tight braids. No. 1 is used for braiding any pattern of from one to four hairs in a strand. No. 2 is used for braiding any pattern of from five to twenty hairs in a strand. To prepare the Bobbins for use, see explanations on page 121.
The above cut shows the Wood Bobbins for fine open work or tight braids. No. 1 is used for braiding any pattern from one to four hairs in a strand. No. 2 is used for braiding any pattern from five to twenty hairs in a strand. To prepare the Bobbins for use, see explanations on page 121.

The above cut shows the size and shape of the Lead Bobbins. The No. 1 size is used for braiding Rings and Chains, that have but few hairs in a strand—from twenty to forty. No. 2 is used for braiding Chains that have from forty to one hundred hairs in a strand. Either size will answer for any pattern of Chain or Ring, but to vary the size of the Bobbin according to the number of hairs in a strand, gives it a nicer finish. To prepare the Bobbin, wind it with thread, as shown in the cut, leaving the thread some three inches long, with a solid knot tied at the end.[129]
The above image shows the size and shape of the Lead Bobbins. Size No. 1 is used for braiding Rings and Chains that have only a few hairs in a strand—between twenty and forty. Size No. 2 is for braiding Chains that have between forty and one hundred hairs in a strand. Either size can work for any pattern of Chain or Ring, but adjusting the Bobbin size according to the number of hairs in a strand gives it a nicer finish. To prepare the Bobbin, wrap it with thread as shown in the image, leaving the thread about three inches long, with a solid knot tied at the end.[129]

The above cut shows the weight used for drawing the work through the center of the table as fast as braided, and to balance the bobbins. Attention should be given to have the weight balance the bobbins properly, as too great a weight will make the braid loose, or too light a weight will leave it rough. Use any number of weights required to balance the bobbins.
The above cut shows the weight used to draw the work through the center of the table as quickly as braided, and to balance the bobbins. It's important to ensure the weight balances the bobbins properly, as too heavy a weight will make the braid loose, while too light a weight will leave it rough. Use as many weights as needed to balance the bobbins.

The above cuts are made of wire and wood, for braiding over. The Nos. 1 and 2 are for braiding chains over—the No. 1 for small chains, and the No. 2 for large sizes. No. 3 is used for braiding tight or open work braids, of from thirty to forty strands. No. 4 is used for the same braids, with from forty to sixty strands in a braid. The mold may be made any length, to accommodate the work.
The cuts mentioned above are made of wire and wood for braiding. No. 1 and No. 2 are for braiding chains—No. 1 is for small chains, while No. 2 is for larger ones. No. 3 is used for braiding tight or open work braids with thirty to forty strands. No. 4 is for the same type of braids but with forty to sixty strands. The mold can be made any length to fit the work.

The above cuts show the size of forms used for tight or open work braids. The No. 5 is used for braids of from sixty to eighty strands, No. 6 of from eighty to one hundred, and No. 7 from one hundred to one hundred and twenty, according to the fineness of the braid.
The above cuts show the sizes of forms used for tight or open work braids. No. 5 is used for braids with sixty to eighty strands, No. 6 for eighty to one hundred, and No. 7 for one hundred to one hundred and twenty, depending on the thickness of the braid.

The above cuts represent the completed Bracelet Braid. The No. 1 is formed from fourteen small braids, braided according to diagram and explanation on page 104,—using, however, but thirty-two strands, instead of eighty.
The cuts above show the finished Bracelet Braid. No. 1 is made from fourteen small braids, braided according to the diagram and explanation on page 104, but using only thirty-two strands instead of eighty.
After you have the small braids all completed and prepared, as required in the explanation, sew them together at one end, so they all lie smooth and flat, then divide them off in twos, using each two as one strand, and plait them together; commence at the right side, take one strand at a time, and lift over one and under two till you get to the center, then commence on the left side and braid the same way, and so on till finished. Then sew the ends well, trim them, and put on a little shellac to fasten them in the clasps.
After you’ve finished the small braids as instructed, sew them together at one end so they lie smooth and flat. Then, group them in pairs, using each pair as one strand, and braid them together. Start on the right side, taking one strand at a time, lifting it over one and under two until you reach the center. Then, start on the left side and braid the same way, continuing until you’re done. Finally, sew the ends securely, trim them, and apply a little shellac to hold them in the clasps.
No. 2 is from the same pattern, and is prepared and finished up in the same manner. For this Bracelet you use fifteen small braids, divide them into threes for each strand, and lift over one and under one, from each side to the center.
No. 2 is from the same pattern and is prepared and finished in the same way. For this bracelet, you use fifteen small braids, divide them into threes for each strand, and weave over one and under one, from each side to the center.

The No. 1 cut of the above Bracelet Braids, is formed from patterns on pages 87 and 97, and instead of using forty and sixty strands, use but thirty-two for each. Braid six small braids from pattern on page 87, and three from pattern on page 97. Sew them tight together at one end, divide them off in threes, with the open work braid between the two tight ones, use each three as one strand, and plait them together in a common three strand braid.
The No. 1 cut of the above Bracelet Braids is made from patterns on pages 87 and 97, and instead of using forty and sixty strands, use just thirty-two for each. Braid six small braids from the pattern on page 87, and three from the pattern on page 97. Sew them tightly together at one end, group them in threes, with the open work braid in between the two tight ones, use each group of three as one strand, and braid them together into a standard three-strand braid.
No. 2 is braided according to pattern on page 89. Have three of the braids, sew them fast at one end, and then twist them carefully and evenly together; then sew and fasten with shellac, and it is ready for being gold mounted.
No. 2 is braided following the pattern on page 89. Have three of the braids, sew them tightly at one end, and then twist them gently and evenly together; then sew and secure with shellac, and it's ready to be gold mounted.


The No. 1 cut of the above Bracelet Braids, is formed from patterns on pages 26 and 86. Have two small braids from each of the patterns, lay them side by side, as in cut, and sew them firmly together, either with some of the hair, or with very fine silk of the same color. Then sew and trim the ends, and fasten with shellac.
The first style of the Bracelet Braids is made from patterns on pages 26 and 86. Take two small braids from each pattern, lay them next to each other like in the cut, and sew them tightly together, using either some of the hair or very fine silk in the same color. After that, sew and trim the ends, and secure with shellac.


The patterns used for the No. 1, represented above, are found on pages 63 and 95. Have one braid from pattern on page 63, and two from that on page 95. Place them side by side, as in cut, sew the ends firmly together, either with some of the hair, or with very fine silk of the same color. Then sew and trim the ends, and fasten with shellac.
The patterns for No. 1, shown above, can be found on pages 63 and 95. Take one braid from the pattern on page 63, and two from the one on page 95. Position them side by side, as in the cut, and sew the ends securely together, either with some of the hair or with very fine silk in the same color. Then sew and trim the ends, and secure them with shellac.


The No. 1 of the above Bracelet Braids, is made up of two small braids from pattern on page 97, and three from pattern on page 101, using, however, but thirty-two strands, instead of sixty. Place them side by side, as in cut, and sew them together with some of the hair, or with fine silk of the same color. Sew, trim and shellac the ends, and they are ready for the gold mounting.
The No. 1 of the above Bracelet Braids consists of two small braids from the pattern on page 97, and three from the pattern on page 101, using only thirty-two strands instead of sixty. Place them side by side, as shown in the cut, and sew them together with some of the hair or with fine silk of the same color. Sew, trim, and shellac the ends, and they are ready for the gold mounting.
No. 2 is formed of four small braids, from pattern on page 97, and is prepared, sewed and finished up the same as No. 1.
No. 2 is made up of four small braids, based on the pattern on page 97, and is prepared, sewn, and finished just like No. 1.
The following Lithographic designs of Hair Jewelry, Flowers and Pictures, are given for the purpose of showing a few of the many beautiful forms into which the human hair may be transposed. Each and every one of the devices on the following pages, with the exception of the flowers and pictures, can be braided from the diagrams and explanations given in the first one hundred and twenty pages of this book. Select any article you may wish to make, and by referring to the patterns, you can easily find the style and directions whereby to braid it. We might have given twice the number of patterns, or even more, but any person can, after a little experience, readily invent new and different styles of braids, and by so doing, each can satisfy their own peculiar taste.
The following lithographic designs of hair jewelry, flowers, and pictures are provided to show some of the many beautiful forms that human hair can be transformed into. Every single design on the following pages, except for the flowers and pictures, can be made using the diagrams and instructions found in the first one hundred and twenty pages of this book. Choose any item you want to create, and by looking at the patterns, you can easily find the style and instructions to braid it. We could have included many more patterns, but anyone can, with a little practice, easily come up with new and different styles of braids that suit their own unique taste.
The making of Hair Flowers is very simple, and yet, of course, every one has first to learn it. Supply yourself with as many different colors of hair as you can, and by applying Gum Tragacanth, it renders it capable of being cut in any shape you may wish—such as leaves, twigs, buds, &c., and by judiciously arranging the colors, the effect will be very pleasing. Pictures are made in the same manner, and any one possessing the least artistic skill, can make any flower or picture they may desire, and many pleasing adornments and lasting mementos may thereby be had.
Making Hair Flowers is really simple, but of course, everyone has to learn it first. Gather as many different colors of hair as you can, and by using Gum Tragacanth, you can cut it into any shape you want—like leaves, twigs, buds, etc. By carefully arranging the colors, the result will be very nice. You can create pictures in the same way, and anyone with even a little artistic skill can make any flower or picture they want, resulting in many charming decorations and lasting keepsakes.
All articles intended to be worn as jewelry, should, of course, be mounted with gold, and as this kind of work is not done in all jewelry establishments, I wish to say that my facilities for this branch of business is complete, and the work done is in the best possible manner. I can guarantee satisfaction in all cases, let the style desired be what it may. In sending braids to be mounted, draw on paper, as near as can be, the style or design you want.
All jewelry pieces should definitely be set in gold, and since not every jewelry shop offers this service, I want to emphasize that I have everything needed for this type of work, and it's done to the highest standard. I promise satisfaction in every case, no matter what style you want. When sending braids to be set, please sketch the style or design you want as closely as possible on paper.


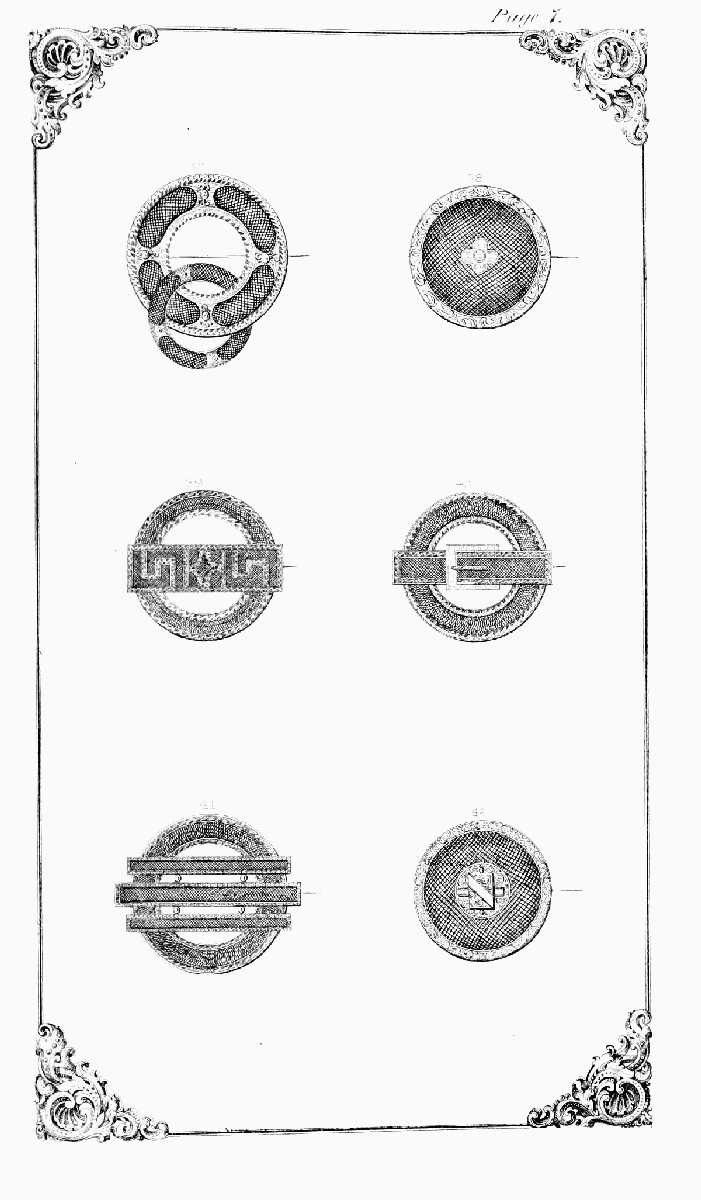


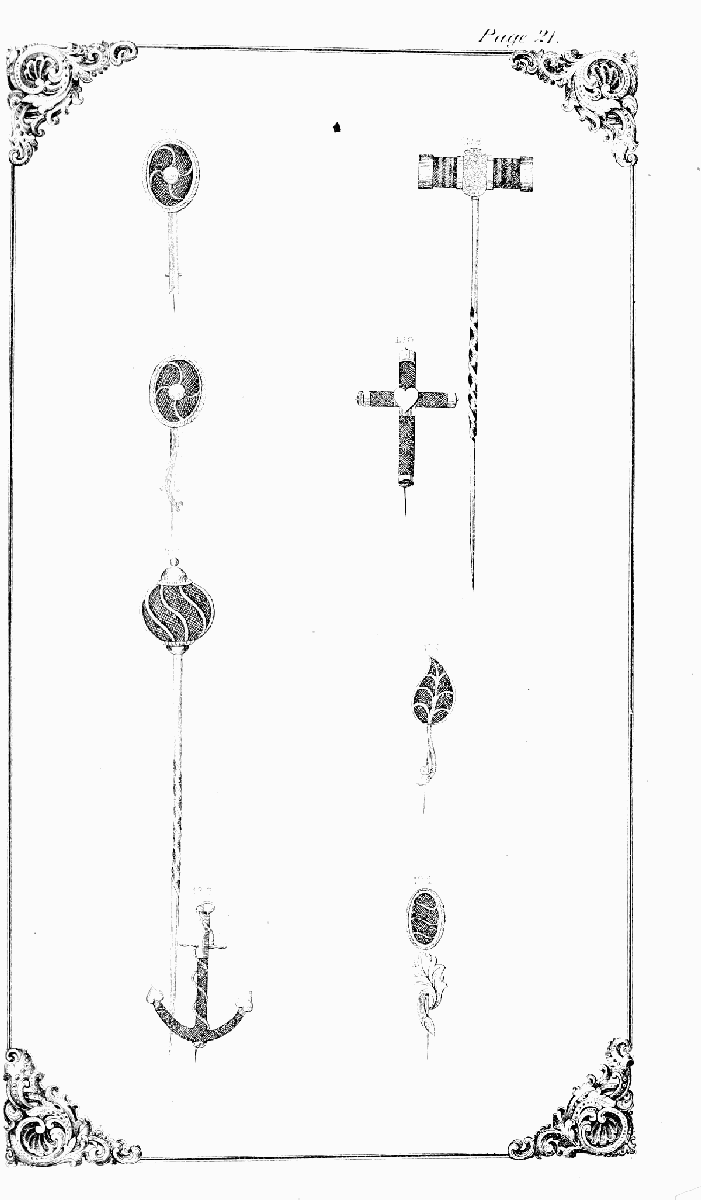


 Making hair for switches.
The above cut represents the apparatus used for weaving hair into Switches, Curls, Wigs, &c. It is a very simple arrangement, and can be easily constructed. Provide two straight sticks, about twelve inches long, and in one of them bore three small holes, two inches apart, in which to place as many thumb-screws, to be used for tightening or loosening the cords; in the other, have a single wooden pin or nail, to fasten the cords to. Place the sticks in a firm, upright position, about three feet apart, either by boring holes through a table, or by using mortised blocks, such as is plainly shown in cut, at the right end. After placing them in position, put on three cords, as shown in diagram, numbered 1, 2 and 3. For this weft use linen thread, at Nos. 1, 2 and 3.
The above cut illustrates the tool used for weaving hair into switches, curls, wigs, etc. It's a straightforward setup that can be easily made. Gather two straight sticks, about twelve inches long. In one of them, drill three small holes, two inches apart, to insert thumb-screws for tightening or loosening the cords. In the other stick, attach a single wooden pin or nail to secure the cords. Position the sticks upright about three feet apart, either by drilling holes into a table or using mortised blocks, as clearly shown in the diagram on the right. Once they are set up, attach three cords as demonstrated in the diagram, labeled 1, 2, and 3. For this weft, use linen thread for cords 1, 2, and 3.
In commencing to weave, place the hair between two cards, as shown in diagram, and draw out with the right hand, between the thumb and fore-finger, the quantity of hair required for the size of the weft; then change it into the left hand, and place it up to the threads, Nos. 1, 2 and 3, as shown in diagram; lay the strand over No. 1, under No. 2, over No. 3, around under No. 3, over Nos. 2 and 1, around under Nos. 1 and 2, over No. 3, around under Nos. 3 and 2, and over No. 1. Then push the strands together, as in cut.
To start weaving, hold the hair between two cards, as illustrated in the diagram, and pull out the amount of hair you need for the size of the weft using your right hand, between your thumb and forefinger. Then switch it to your left hand and position it next to threads No. 1, 2, and 3, as shown in the diagram. Place the strand over No. 1, under No. 2, over No. 3, then around and under No. 3, over Nos. 2 and 1, around and under Nos. 1 and 2, over No. 3, around and under Nos. 3 and 2, and finally over No. 1. After that, push the strands together, as shown in the cut.

The No. 1 of the above cuts represents the winding and sewing of the switch after it is woven. For sewing a switch on points, after weaving, take Berlin cord, about one-sixteenth of an inch thick, and tie a solid knot at the end, and sew the end of the weft to the knotted end of the cord; then wind the weft around the cord, as shown in cut, the length of point desired, turning the end of the cord over to form a loop. Cut the weft according to the number of points desired in the switch. Cut No. 2 shows the switch all complete.
The No. 1 section above shows the process of winding and sewing the switch after it's woven. To sew a switch onto points, first take some Berlin cord that's about one-sixteenth of an inch thick, tie a solid knot at one end, and attach the end of the weft to the knotted end of the cord. Then wrap the weft around the cord, as illustrated in the cut, for the length of the point you want, and fold the end of the cord over to create a loop. Cut the weft based on the number of points you want in the switch. Cut No. 2 shows the completed switch.

In commencing to weave, place the hair between two cards, or stiff brushes, as shown in diagram, pressing them tight together, so that in drawing out, it is perfectly free from tangles; draw out with the right hand, between the thumb and fore-finger, the quantity of hair required for the size of the weft; then change it into the left hand, and lift it up to the No. 1 cord, as shown in diagram; lay the strand over No. 1, under No. 2, over No. 3, around under No. 3, over Nos. 2 and 1, around under Nos. 1 and 2, over No. 3, around under No. 3, over No. 2, and under No. 1. Then push the strands together, as shown in diagram. For this weft use fine, strong linen thread.
To start weaving, hold the hair between two cards or stiff brushes, pressing them tightly together so that when you pull it out, it’s completely tangle-free. With your right hand, take out the amount of hair needed for the size of the weft, then switch it to your left hand and lift it up to the No. 1 cord, as shown in the diagram. Place the strand over No. 1, under No. 2, over No. 3, around and under No. 3, over Nos. 2 and 1, around and under Nos. 1 and 2, over No. 3, around and under No. 3, over No. 2, and under No. 1. Then, push the strands together, as shown in the diagram. For this weft, use fine, strong linen thread.

After weaving, according to directions on page 241, take a piece of ribbon an inch wide, the same color of hair, and as long as you wish the curls to be in width, and sew the weft to it back and forth. After that is done, pipe them, which is done in this manner: Dampen the hair, comb each curl out straight, and wind it tightly on a rattan stick about four inches long, having each curl on a separate stick, and commencing to wind at the tip end, tying them firmly to keep in place. Then boil in water for thirty minutes, and place in an oven as hot as they will bear without burning, until quite dry. When dry and perfectly cool, take them off the sticks, and smooth over a curling iron, the size you wish the curls. Side curls and frizzes should be prepared the same way.
After weaving, according to the instructions on page 241, take a piece of ribbon that's an inch wide, the same color as the hair, and as long as you want the curls to be in width. Sew the weft to it back and forth. Once that’s done, pipe them by doing the following: Damp the hair, comb each curl straight, and tightly wind it around a rattan stick about four inches long, making sure each curl is on a separate stick and starting to wind at the tip end, tying them securely to hold them in place. Then boil in water for thirty minutes, and place in an oven as hot as they can take without burning, until completely dry. When dry and entirely cool, remove them from the sticks and smooth them using a curling iron of the size you want for the curls. Side curls and frizzes should be prepared the same way.
Cut No. 2 represents a set of Curls and Puffs. For explanation of Puffs, see page 245.
Cut No. 2 features a collection of Curls and Puffs. For an explanation of Puffs, see page 245.

In commencing to weave, place the hair between two cards, or stiff brushes, as shown in diagram, pressing them tight together, so that in drawing out, it is perfectly free from tangles; draw out with the right hand, between the thumb and fore-finger, the quantity of hair required for the size of the weft; then change it into the left hand, and lift it up to the No. 1 cord, as shown in diagram; lay the strand over No. 1, under No. 2, over No. 3, around under No. 3, over Nos. 2 and 1, around under Nos. 1 and 2, over No. 3, around under No. 3, over Nos. 2 and 1, around under Nos. 1 and 2, over No. 3 around under Nos. 3 and 2, and over No. 1. Then push the strands together, as shown in diagram. For this weft use sewing silk.
To start weaving, place the hair between two cards or stiff brushes, as shown in the diagram, pressing them tightly together to keep it tangles-free when drawing it out. Use your right hand to pull out the amount of hair needed for the size of the weft, then switch it to your left hand and lift it up to the No. 1 cord, as illustrated in the diagram. Lay the strand over No. 1, under No. 2, over No. 3, around under No. 3, over Nos. 2 and 1, around under Nos. 1 and 2, over No. 3, around under No. 3, over Nos. 2 and 1, around under Nos. 1 and 2, over No. 3, around under Nos. 3 and 2, and over No. 1. Then push the strands together, as shown in the diagram. For this weft, use sewing silk.
WEAVING HAIR FOR WATERFALLS AND BOWS
WEAVING HAIR FOR WATERFALLS AND BOWS
Prepare the same as above, and place the strand under No. 1, over Nos. 2 and 3, around under Nos. 3 and 2, over No. 1, around under Nos. 1 and 2, over No. 3, around under No. 3, and over Nos. 2 and 1. Aside from these changes, follow directions given above.
Prepare the same as described above, and place the strand under No. 1, over Nos. 2 and 3, around under Nos. 3 and 2, over No. 1, around under Nos. 1 and 2, over No. 3, around under No. 3, and over Nos. 2 and 1. Aside from these changes, follow the instructions provided above.

In making a Chignon, you have first to make the cushion. Take the combings or waste hair, which is of no other use, and place it between the cards or stiff brushes, the same as for weaving. Use the weaving apparatus, with two piping cords, instead of three small ones, and wind the hair all up, by passing over, between and under the cords. Boil and dry it, and then pull out the cord, which leaves it all crimped, ready to weave, according to directions on page 239. Then sew it on a cord, the same as a switch, and form it in any shape you desire, for a Waterfall, Bow or Puffs. This completes the cushion. Then weave the long hair for the covering, according to directions on page 243, and sew it to the top end of the cushion; comb it out smooth, cover the cushion, and tie a cord around it immediately at the bottom; then bring up the end of the hair, and pin it to the inside. Cut No. 1 is intended to represent the cushion, and No. 2 the complete Waterfall.
To create a Chignon, you first need to make the cushion. Start by taking combings or waste hair that you can't use for anything else, and place it between two stiff brushes or cards, similar to the weaving process. Use the weaving tool with two piping cords instead of three small ones, and wind the hair up by passing it over, between, and under the cords. Boil and dry it, then pull out the cord, which will crimp the hair and prepare it for weaving, as described on page 239. Next, sew it onto a cord like a switch and shape it however you want, whether that’s a Waterfall, Bow, or Puffs. This completes the cushion. Then, weave the long hair for the covering following the instructions on page 243, and sew it to the top of the cushion. Comb it out smoothly, cover the cushion, and tie a cord around it right at the bottom; then bring up the end of the hair and pin it inside. Cut No. 1 is for the cushion, and No. 2 shows the finished Waterfall.
Cut No. 3 represents the Bow, which is made in the same manner, by using two small cushions, like cut No. 1, and placing between them a strand of smooth or braided hair.
Cut No. 3 represents the Bow, which is made in the same way, using two small cushions, like cut No. 1, and placing a strand of smooth or braided hair between them.
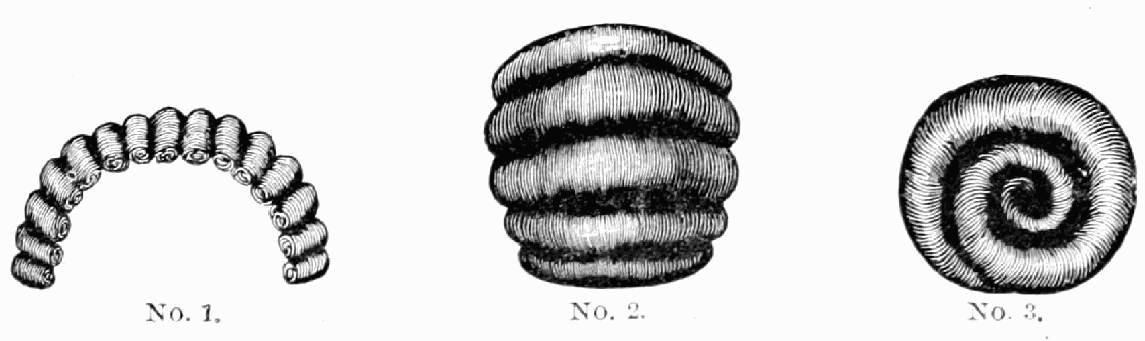
To make Puffs for front of head, from false hair, similar to cut No. 1, weave hair from eight to twelve inches long, according to directions on page 241; then take a ribbon, about one and a half inches wide, any length required, and tack it on a wig block, or straight piece of board, and sew the weft crossways a quarter of an inch apart, till the ribbon is entirely covered; then divide it off in as many puffs as desired, comb each out straight, and wind it over the two fore-fingers, close up to ribbon, and put in a hair-pin to retain it.
To create puffs for the front of the head using false hair, similar to cut No. 1, weave hair that's eight to twelve inches long, following the instructions on page 241; then take a ribbon about one and a half inches wide, cut to the required length, and attach it to a wig block or a flat piece of board. Sew the weft horizontally, spaced a quarter of an inch apart, until the ribbon is fully covered. Then, divide it into as many puffs as you want, comb each one out straight, wrap it around your two forefingers near the ribbon, and secure it with a hairpin.
To make Puffs for back of head, cut No. 2, prepare the same way; make the foundation the shape and size you wish the puffs, and sew it on the same way you want the puffs to run. The puffs may be made over a cushion, formed of crimped hair the shape wanted, and wound over that instead of the fingers. Ladies not wearing false hair, can have her own hair dressed by following the above directions.
To create puffs for the back of the head, cut No. 2 and prepare it the same way; shape the foundation to the size and shape you want the puffs to be, and sew it on in the way you want the puffs to be styled. The puffs can be made over a cushion shaped from crimped hair, using it as a base instead of your fingers. Ladies who don't wear false hair can style their own hair by following these instructions.
Cut No. 3 represents a coil, which is made from a switch, and wound over a long roll of crimped hair. They are much nicer, but more expensive, by being made altogether from a switch, as that can be twisted into a rope or braided, before coiling.
Cut No. 3 is a coil made from a switch, wound around a long roll of crimped hair. They look better but are pricier because they’re made entirely from a switch, which can be twisted into a rope or braided before being coiled.

I herewith present, on the following pages, a number of engravings illustrative of a few of the many styles of Hair Dressing, accompanied with explanatory remarks as to their execution. They are the latest and most fashionable European and American styles, and will prove indispensable to every lady's toilet, as, from the explanations, they will be able, with very little practice, to dress their own hair in any desired style; and when any new style is inaugurated, after studying and practicing the directions given with each illustration, she will find it an easy matter to arrange it accordingly.
I’m presenting several engravings on the following pages that show some of the many styles of hairdressing, along with explanations of how to achieve them. These are the latest and most fashionable styles from Europe and America, and they will be essential for every woman’s beauty routine. With the guidance provided, anyone can easily style their own hair with a bit of practice. When a new style becomes popular, after studying and practicing the instructions that come with each illustration, it will be simple to replicate it.
Any one learning Hair Dressing, should acquire perfectly the execution of the first pattern—the Promenade Head-Dress—as that is very easily arranged, and when you have once executed it in a perfect manner, the others will prove comparatively easy.
Anyone learning hairdressing should master the first pattern—the Promenade Head-Dress—because it’s really easy to style. Once you’ve done it perfectly, the other styles will be much easier to handle.
The manner of dressing the hair at the present day calls for much attention, and many inquiries are addressed us on the subject. It is plain, however, that what would correspond with the complexion and physiognomy of one, would certainly have a distasteful appearance on another; consequently, in answering inquiries, I can do nothing more than give the different styles worn. Before giving my illustrations on Hair Dressing, I have given instructions how to weave hair for chignons, curls, switches, &c., and how to put them in shape, and with the directions given with each illustration on Hair Dressing, it will certainly be an easy task to arrange the hair in any style that is now or may be in fashion.[247]
The way people style their hair today requires a lot of attention, and we receive many questions about it. However, it’s clear that what looks good on one person might not look good on another; therefore, when answering these questions, I can only share the various styles that are popular. Before showing my illustrations on hair styling, I have provided instructions on how to weave hair for chignons, curls, and extensions, as well as how to shape them. With the directions included with each hair styling illustration, it will definitely be easy to arrange hair in any style that is currently in fashion or may become popular in the future.[247]

Our first cut represents the Promenade Head-Dress, but is worn as frequently in the drawing-room, and even at public and private assemblies—in fact, a common and very pretty style.
Our first version shows the Promenade Head-Dress, but it's often worn in the living room and even at public and private gatherings—in fact, it's a popular and really lovely style.
Explanation: Comb the front hair between the temples straight back, over a cushion of crimped hair, forming a Chignon; then make two braids of two small switches, and place one of them over the top of the Chignon, and the other across the forehead, forming a diadem, turning the ends under; then comb the hair from temples over the braids, and put back under the Chignon, and fasten. Place a net of pearl or gilt beads over the Chignon, as in cut. You can use false hair for covering cushion, if desired.[248]
Explanation: Brush the front hair between the temples straight back over a cushion of crimped hair to create a Chignon. Then, make two braids from two small sections of hair, placing one braid over the top of the Chignon and the other across the forehead to form a diadem, tucking the ends underneath. Next, comb the hair from the temples over the braids, and secure it under the Chignon. Finish by placing a net of pearls or gold beads over the Chignon, as shown in the cut. You can use fake hair to cover the cushion if you want.[248]

This Head-Dress is a most charming composition, and entirely new. It is adapted either for a brown or fair complexion, to be worn at grand dinners or receptions. Ornamented with pearl or gilt, it is in good taste for evening parties.
This headpiece is a lovely design and completely new. It works well for either a brown or fair complexion and is perfect for formal dinners or receptions. Beautifully decorated with pearls or gold, it’s a stylish choice for evening parties.
Explanation: Curl the hair across forehead, or use false curls, combing the hair straight back, and form a chignon of curls at the back. Place a diadem plait across forehead, and raise the hair from the temples over the plait. Trim with roses and ribbans, or to suit dress.[249]
Explanation: Style the hair across the forehead, or use fake curls, combing the hair straight back, and create a bun of curls at the back. Place a braided headband across the forehead and lift the hair from the temples over the braid. Decorate with roses and ribbons, or to match the outfit.[249]

This cut illustrates the Soiree or Evening Head-Dress. It is a very unique and modern style, suited for almost any complexion, and very easily executed.
This design showcases the Soiree or Evening Head-Dress. It's a truly unique and modern style that's flattering for nearly any skin tone and can be created with ease.
Explanation: Comb the hair straight back between the temples, tie it, and curl the ends, or use a set of long false curls. Place a diadem plait, made from a switch, across the forehead; then comb the hair back from the temples, over the ends of the plait, twist it, pass it back under the curls, and fasten firmly. Use a fancy back-comb on top of curls, and pin an ornament to diadem plait, with feather and chain attached, as in cut, or trim to suit dress.[250]
Explanation: Brush the hair straight back from the temples, secure it, and curl the ends, or use a set of long fake curls. Place a braided headband made from a hairpiece across the forehead; then brush the hair back from the temples, over the ends of the braid, twist it, tuck it under the curls, and secure it tightly. Use a decorative back-comb on top of the curls, and attach an ornament to the braided headband, with feathers and a chain added, like in the picture, or adjust it to match the outfit.[250]

A very graceful Head-Dress, of a bold style, suited for a young lady of brown or fair complexion, and is in good taste to be worn at the theatre or Grand Evening Parties.
A very stylish headpiece, in a bold design, perfect for a young woman with a fair or tan complexion, and it's great to wear at the theater or formal evening events.
Explanation: Make a parting over the head, from ear to ear, two inches from front; on the forehead, between the temples, curl the hair in small friz curls, and from the temple to the ear, make loose puffs. Divide the hair in three partings over the head, and roll each in a large puff; then form a large puff of the back hair, round the nape of the neck, as in cut. Fasten a large set of loose curls over the puff, with a comb or other ornament. For reference, see page 245.[251]
Explanation: Create a part from ear to ear, about two inches from the front. On the forehead, between the temples, curl the hair into small, tight curls, and from the temple to the ear, make loose puffs. Divide the hair into three sections on top of the head, and roll each into a big puff. Then form a large puff with the back hair around the nape of the neck, as shown in the cut. Secure a large set of loose curls over the puff using a comb or another accessory. For reference, see page 245.[251]

A charming Head-Dress, and entirely new, perfectly suiting a fair complexion. It may serve for the theatre or evening parties. When powdered it preferably suits a brown or brunette.
A lovely headpiece that's completely new and goes well with a fair complexion. It can be worn for the theater or evening parties. When styled with powder, it ideally suits a brown or brunette.
Explanation: Make a front parting, and a cross one from ear to ear. Divide each side into five parts; of the front parting make three puffs on each side. The remaining four make into long puffs, as in cut, according to explanations on page 245. The back hair may be arranged in the same style of puffs, or with a double Chignon, placing a single, long false curl or braid, back of each ear. Trim with orange leaves, or to suit dress.[252]
Explanation: Create a front part and a cross part from ear to ear. Split each side into five sections; from the front part, make three puffs on each side. The other four should be styled into long puffs, as detailed in the instructions on page 245. The back hair can be styled in the same puff style or arranged in a double Chignon, with a long false curl or braid placed behind each ear. Decorate with orange leaves, or whatever matches your outfit.[252]

This Head-Dress, both bold and graceful, is suitable for any complexion or age, when the physiognomy allows it.
This headpiece, both striking and elegant, is suitable for any skin tone or age, as long as the face shape permits it.
Explanation: Comb back the hair from the forehead between the temples, make a large puff on the temples, and three puffs above each ear. Place a cushion at the back of head, and comb the hair over it, forming a chignon; then place a diadem plait, or twist, made from a large switch, round on the top of head, trimmed with leaves or ribbon, as shown in cut.[253]
Explanation: Brush the hair back from the forehead between the temples, create a big puff on the temples, and form three puffs above each ear. Put a cushion at the back of your head and comb the hair over it to create a chignon; then place a twisted or braided diadem made from a large extension around the top of your head, decorated with leaves or ribbon, as shown in the picture.[253]

This Head-Dress is one of the most graceful styles. It was worn in the time of Louis XIVth, and well agrees with the fashion of the present day. With some modifications, it is suited to every complexion.
This headpiece is one of the most elegant styles. It was popular during the reign of Louis XIV, and it fits well with today’s fashion. With a few tweaks, it looks good on everyone.
Explanation: Crimp the front hair, and raise it over the temples with a puff comb. Comb the hair just above the ear back, and friz the ends, and curl the back hair in large flowing curls, as shown in the cut.[254]
Explanation: Crimp the front hair and lift it over the temples using a puff comb. Comb the hair just above the ear back and frizz the ends. Curl the back hair into large, flowing curls, as illustrated in the image.[254]

A Head-Dress of elegant composition, coming down from antiquity, suitable for a young and pretty woman, and perfectly agreeing with a fair complexion.
A beautifully designed headpiece, passed down from ancient times, ideal for a young and attractive woman, and perfectly matching a fair complexion.
Explanation: Part the hair from temple to temple, one inch from front, comb it up on the forehead, and curl the ends in small snap curls; then comb the hair back from the temples, and form a loose puff. Make three partings across the head, and form a puff of each. Of the back hair, make a braided or plaited chignon, with a few friz curls underneath; then make two puffs back of the ear, as shown in cut. Wear a fancy comb or band over the top of chignon.[255]
Explanation: Part your hair from temple to temple, one inch from the front, comb it up on your forehead, and curl the ends into small snap curls; then comb the hair back from the temples and create a loose puff. Make three partings across your head and form a puff with each. For the back hair, create a braided or plaited chignon, with a few frizzy curls underneath; then make two puffs behind your ears, as shown in the cut. Wear a decorative comb or band over the top of the chignon.[255]

A Head-Dress of extraordinary simplicity, and of a most genteel kind, becoming a dark complexion. It may be adapted for the opera by changing the trimming.
A headpiece of amazing simplicity and a very stylish look that suits a dark complexion. It can be dressed up for the opera by altering the trim.
Explanation: First crimp all the hair, then place a cushion high up under the hair at the back, forming a chignon, and friz the ends of the hair from ear to ear under the chignon. Tuck the hair high up on the forehead, place bands of ribbon over the head with a net at the back, and bring the hair above the ear up, and fasten to the ribbon. Pin a ribbon streamer to the net, as in cut.[256]
Explanation: First, crimp all the hair, then place a cushion high up under the hair at the back to create a chignon, and frizz the ends of the hair from ear to ear underneath the chignon. Tuck the hair high on the forehead, place strips of ribbon over the head with a net at the back, and pull the hair above the ear up, fastening it to the ribbon. Pin a ribbon streamer to the net, as shown in the cut.[256]

An elegant Head-Dress, and was worn in the time of Louis XVI, for balls and evening parties, or as a disguise when powdered.
An elegant headpiece, worn during the time of Louis XVI, for balls and evening parties, or as a disguise when powdered.
Explanation: Separate the hair across the head from ear to ear, three inches from front, and roll it in puffs according to directions on page 245. Do up the back hair in a double chignon, either with your own or false hair; add a set of false curls underneath the chignon, extending from ear to ear. Trim to suit dress with leaves, flowers and ribbon, as shown in illustration.[257]
Explanation: Part the hair across the head from ear to ear, about three inches from the front, and style it in puffs according to the instructions on page 245. Gather the back hair into a double chignon, using either your own hair or fake hair; add a set of false curls underneath the chignon, stretching from ear to ear. Trim it to match your outfit with leaves, flowers, and ribbon, as shown in the illustration.[257]

A rich Head-Dress, having a great stamp of distinction, and for that reason will be adapted for a Court Head-Dress, or Grand Evening Parties.
A lavish headpiece, featuring a striking design, is perfect for formal court occasions or grand evening events.
Explanation: Make a parting over the head from ear to ear, two inches from front, and form a row of nine small puffs over the forehead. Comb the remaining hair back, and divide into four partings around the head, and form each parting in a large puff, as in cut. Add a few small friz curls and orange blossoms between the puffs. For reference see page 245.[258]
Explanation: Create a parting across the head from ear to ear, two inches from the front, and shape a row of nine small puffs over the forehead. Comb the rest of the hair back and divide it into four sections around the head, making each section into a large puff, as shown. Add a few small curly frizz and orange blossoms between the puffs. For reference see page 245.[258]

An exquisite Head-Dress, of a very graceful style, and well agreeing with a fair or brown complexion, to be worn by a young bride, or at grand assemblies.
A beautiful headpiece, in a very elegant style, that complements a light or tan complexion, perfect for a young bride or at formal gatherings.
Explanation: Comb the hair back and place a set of small loose curls across the forehead; place a diadem plait over the top of the curls, and comb the hair off the temples over the ends of the plait, and form a chignon or bow of the back hair, and place a three-strand braid around the chignon, made either from the ends of hair from the temple or a switch. Add a crown of white blossoms and a veil, as shown in the engraving. If not for a bride, trim to match dress.[259]
Explanation: Style the hair by brushing it back and creating a few loose curls across the forehead; add a braided headband over the top of the curls, then smooth the hair from the sides over the ends of the braid. Shape the remainder of the hair into a chignon or bow at the back, and wrap a three-strand braid around the chignon using hair from the sides or a hairpiece. Finish the look with a crown of white flowers and a veil, as shown in the illustration. If it’s not for a bride, adjust the style to complement the dress.[259]

An exquisite Head-Dress, of exceedingly graceful and modern style, agreeing with nearly every complexion; may be worn as a promenade or at small parties.
An elegant headpiece with a very stylish and modern design that complements almost every skin tone; it can be worn for casual outings or small gatherings.
Explanation: Part the hair from front to crown, and from ear to ear; crimp the front, and braid the ends in a three-strand braid, and trim the ends with ribbon. Either braid or twist the back hair, and form into a coil. Place a small plait across the forehead, as shown in the engraving. Deck the hair with flowers or beads, to suit the occasion.
Explanation: Part the hair from the front to the crown and from ear to ear; crimp the front and braid the ends into a three-strand braid, then trim the ends with ribbon. Either braid or twist the back hair and shape it into a coil. Place a small braid across the forehead, as shown in the picture. Decorate the hair with flowers or beads to match the occasion.

In placing before the public the only book ever published in the "Art of Hair Work," it is but due to the purchasers of it to say something in relation to the trade in Human Hair. It is not my intention, however, to enter into an extended detail and complete history, but simply give a few items that will serve to show what enormous strides have been taken within the last few years in this branch of business. It is a business that but few know anything about—at least in this country, for it is comparatively new here—but it is one that is very rapidly increasing, and is now almost doubling itself each year.
In presenting the only book ever published on the "Art of Hair Work," I feel it's necessary to share some insights about the trade in Human Hair. However, I don't plan to provide an extensive history or detailed account, but rather just a few points to illustrate the significant progress made in this field over the past few years. It's a business that not many people are familiar with—at least in this country, as it's relatively new here—but it's rapidly growing and is nearly doubling in size each year.
The larger quantity, in fact nearly the whole amount of hair retailed in this country is imported from Europe, where the dealing in human hair has been made an established and legitimate business for years, and a great deal of attention is paid in purchasing and preparing it for the market. Paris is the greatest market for the sale of human hair in the world; but the amount of superfluous hair used and worn throughout all Europe, could we give the figures, would seem incredible. The amount imported to the United States in the years of 1859 and 1860 was not far from 150,000 and 200,000 pounds, which was valued at that time at from $800,000 to $1,000,000. Since that time it has been steadily increasing, and the amount imported last year may be set down at three times as much as during the years above mentioned. Paris also finds as great a sale for the article in Russia as in America—the shipments to each being about equal. Thus, it will be seen, that if all the hair reserved in Europe for the home demand were added to that which is imported, the amount would be almost beyond conception; and yet, but about one-tenth part of the whole production ever leaves its native country.[261]
Most of the hair sold in this country actually comes from Europe, where the trade in human hair has been an established and legitimate business for years. A significant amount of attention is given to buying and preparing it for the market. Paris is the largest market in the world for human hair; however, the total amount of excess hair used and worn throughout Europe would be hard to believe if we had the figures. In 1859 and 1860, the amount imported to the United States was nearly 150,000 to 200,000 pounds, valued at approximately $800,000 to $1,000,000 at that time. Since then, it has been steadily increasing, and the amount brought in last year may be about three times what it was in those earlier years. Paris also sees significant sales for hair in Russia, similar to what it sells in America, with shipments to both being roughly equal. Therefore, if we consider all the hair set aside in Europe for local demand along with what is imported, the total would be nearly unimaginable. Still, only about one-tenth of the overall production ever leaves Europe.[261]
It is mostly procured from the markets of France, Italy, Russia and Germany, and large quantities are obtained from Norway and Sweden.
It is mainly sourced from the markets of France, Italy, Russia, and Germany, with significant amounts also coming from Norway and Sweden.
The Norwegians were among the first to make ornaments of hair to be worn as jewelry, but, in a great measure, we are indebted to the French for the perfection to which the art has attained. Of the different varieties of hair, that which is obtained in France and Italy is by far the best, being of a much finer texture, even color, and of a more glossy appearance than that from other countries.
The Norwegians were among the first to create hair ornaments to wear as jewelry, but we owe a lot to the French for perfecting this art. Of the various types of hair, the ones sourced from France and Italy are by far the best, as they have a much finer texture, more even color, and a glossier appearance than those from other countries.
The principal requirement in hair to make it valuable is length, and after it is thrown upon the market it is all assorted—the long from the short—which is a task of extreme difficulty.
The main requirement for hair to be valuable is its length, and once it hits the market, it’s all sorted—long from short—which is a very challenging task.
The prices of hair range all the way from $15 to $200 per pound, (a wide range, but certainly not too large,) and is rated according to hue, length and texture. The smallest price paid is for the short, coarse hair of the poorest quality, and which can be used only for certain purposes. Hair of the ordinary colors range in price from $15 to $100 per pound, but that of gray and white from $100 to $200 per pound, and even then is not considered exorbitant. In fact, hair is worth any and all prices. We know of one dealer who had in his possession a very small quantity, weighing but a half pound and measuring seventy inches, for which he was offered four hundred dollars! and, strange as it may appear, he refused to accept it. White hair is mostly obtained by being picked from the gray, and it not unfrequently happens that many hundred pounds have to be assorted before being able to secure one single pound of pure white. It is mainly used in the manufacture of wigs, and it frequently puzzles the dealer to prepare one for a customer that will exactly match, and this, with the scarcity of the article, cause the extraordinary price.
The prices of hair range from $15 to $200 per pound, which is quite a range but not overly large, and they are rated based on color, length, and texture. The lowest price is for short, coarse hair of the lowest quality, which can only be used for specific purposes. Hair in standard colors goes for $15 to $100 per pound, while gray and white hair ranges from $100 to $200 per pound, and even then it's not seen as outrageous. In fact, hair can command any price. There’s a dealer who once had a very small amount—half a pound and measuring seventy inches—who was offered four hundred dollars! and, surprisingly, he turned it down. White hair is mainly collected from gray hair, and it’s not uncommon for hundreds of pounds to be sorted to find just one pure pound of white. It’s mainly used for making wigs, and dealers often find it challenging to prepare one for a customer that matches perfectly, which, along with its scarcity, drives up the price.
Hair is shipped in both a prepared and unprepared state. That which is prepared undergoes a process of washing, scouring and cleansing, which leaves it in the nicest possible state; all the oil, dirt and other unhealthy substances are completely separated from[262] it, leaving it perfectly free from all unhealthy influences. That which is shipped in an unprepared, or raw state, is subjected to the same process of cleansing after its arrival, and it is so thorough that it is altogether impossible for anything except the hair to remain. It has frequently been examined with a microscope, which has proved in every case how successful the cleansing process had been, for it revealed nothing whatever of a foreign nature, and, in fact, after its extraordinary cleaning it would be simply impossible.
Hair is shipped in both prepared and unprepared states. The prepared hair goes through a process of washing, scrubbing, and cleaning, which makes it as clean as possible; all the oil, dirt, and other unhealthy substances are completely removed, leaving it free from any unhealthy influences. The hair shipped in an unprepared or raw state is cleaned thoroughly once it arrives, and the process is so effective that nothing but the hair remains. It has often been examined under a microscope, which has shown every time that the cleaning process was successful, revealing no foreign substances at all, and, in fact, after such an extensive cleaning, it would be simply impossible.
After being fully prepared it is then made into switches, curls, plaits, fronts, wigs, chignons, and not a small amount is used in the manufacture of hair jewelry, and such other articles as are worn for ornaments. The jewelry manufactured at this time is as durable as the all gold jewelry, and is done in a style of surpassing neatness, thus rendering it beautiful, either as an ornament or memento. There are but very few places in the United States where hair jewelry is made, and as it is comparatively a new business, but few have learned it. It is surprising, however, to notice the many beautiful patterns and elegant designs into which it is transformed. There is nothing in the way of jewelry or ornament of any description but what is or may be made from human hair; and, after being gold-mounted, the contrast between them makes the hair jewelry preferable to the all gold.
After being fully prepared, it is then crafted into switches, curls, braids, bangs, wigs, chignons, and a significant amount is used to make hair jewelry and other decorative items. The jewelry created at this time is just as durable as solid gold pieces and is made with exceptional neatness, making it beautiful both as an ornament and as a keepsake. There are very few places in the United States where hair jewelry is created, and since it's a relatively new industry, not many people have learned the craft. However, it’s surprising to see the many beautiful patterns and elegant designs it can take. There’s nothing in the realm of jewelry or ornaments that can't be made from human hair, and when gold-mounted, the contrast between them makes hair jewelry preferable to solid gold.
There are many strange incidents related of the human hair suddenly changing its color—many of which it is hard to believe—and the causes assigned are various. We are told of persons who, from excessive grief, found their hair had gradually changed from a dark brown to an almost perfect white; others, from the same cause, in the short space of one week discovered their hair plentifully streaked with grey, giving them the appearance, although young, of being quite old. Many have had their hair change on account of extreme fright, but we have now to give the first instance we have ever heard of its turning from white to that of any other color, except by the aid of dyes.[263]
There are many strange stories about human hair suddenly changing color—many of which are hard to believe—and the reasons given are various. People have reported that those who experienced intense grief found their hair gradually changing from dark brown to almost pure white; others, for the same reason, discovered within a week that their hair was heavily streaked with gray, making them look much older despite being young. Many have seen their hair change due to extreme fear, but we now have to mention the first instance we've ever heard of it turning from white to any other color without the help of dyes.[263]
A Parisian, M. Stanislaus Martin, has published in the Bulletin de Therapeutique the curious case of a worker in metals who had wrought in copper only five months, and whose hair, which was lately white, is now of so decided a green that the man cannot appear in the street without immediately becoming the object of general curiosity. He is perfectly well, his hair alone being affected by the copper, notwithstanding the precautions taken by him to protect it from the action of the metal. Chemical analysis shows that his hair contains a notable quantity of acetate of copper, and that it is to this circumstance that it owes its beautiful green color, which is most singular and remarkable.
A Parisian, M. Stanislaus Martin, has published in the Bulletin de Therapeutique the strange case of a metal worker who had only been working with copper for five months, and whose hair, which was recently white, is now such a bright green that he can't walk down the street without attracting a lot of attention. He is completely healthy; only his hair has been affected by the copper, despite his efforts to protect it from the metal. Chemical analysis reveals that his hair contains a significant amount of copper acetate, and it's this that gives it its striking green color, which is quite unusual and noteworthy.
The practice of wearing false hair, although it was not generally dealt in as traffic, has been in vogue many hundred years. The Greek and Roman ladies were, in olden times, as active in their toilet for the head as the fashionable ladies of the present day, and false hair was always brought into requisition, which was then obtained from the Germans, and they in turn from their slaves.
The practice of wearing fake hair, although it wasn't usually traded commercially, has been popular for many hundreds of years. Greek and Roman women, back in the day, were just as careful about their hairstyles as the fashionable women today, and they always used fake hair, which was then sourced from the Germans, who in turn got it from their slaves.
Powdering the hair, which is now the rage in all fashionable circles, is also an ancient practice, and was as much indulged in by the men as the women. History tells us that the consumption of hair powder by the soldiers of George II was enormous. It was calculated, that inasmuch as the military force of England and the colonies was, including cavalry, infantry, militia and fensibles, 250,000, each man used a pound of flour a week, simply for powdering their hair. The quantity consumed in this way was 6,500 tons per annum; an amount sufficient to sustain 30,000 persons on bread. Gold and silver hair powder was also plentifully used, and at a time much earlier in the world's history, than is generally supposed. Josephus relates that Solomon's horse-guards daily strewed their heads with gold-dust, which glittered in the sun; and there are similar instances of different personages recorded in the bible.
Powdering hair, which is currently trending in all fashionable circles, is also an ancient practice that was embraced by both men and women. History shows that the use of hair powder among the soldiers of George II was vast. It was estimated that, considering the military forces of England and the colonies—counting cavalry, infantry, militia, and local defense units—totaled 250,000, each soldier used a pound of powder each week just for their hair. The total amount consumed this way was 6,500 tons a year, enough to feed 30,000 people on bread. Gold and silver hair powder was also commonly used, and this practice dates back much further in history than most people think. Josephus mentions that Solomon's horse guards would sprinkle their heads with gold dust daily, which sparkled in the sunlight; there are similar accounts of various individuals recorded in the Bible.
The human hair seems to have been given us both for an ornament and covering—being susceptible of transformation in[264] almost any desired shape, and apparently indispensable for covering and protecting the head. The ancient Greeks were very partial to long hair, considering it by far the more becoming; but the Egyptians regarded it as an incumbrance, shaved their heads, and substituted wigs. The ancients, generally speaking, strangely considered a fine head of hair so desirable, that it became sacred. They frequently dedicated it to the gods, on important occasions of marriage, victory, escape from death and danger, and the burial of friends. Different styles of wearing the hair, was resorted to for denoting the various grades, or positions in life, of the people, some wearing it quite long, others short, and some dressing it in a peculiar manner,—each style, or length, being according to the condition, wealth, or social standing of the wearer. Plucking it out, or neglecting it, was a token of affliction.
Human hair seems to serve both as an ornament and a covering—it can be styled into almost any shape and is essential for protecting the head. The ancient Greeks favored long hair, believing it was far more attractive, while the Egyptians saw it as a burden, shaving their heads and opting for wigs. Generally, the ancients found a beautiful head of hair so desirable that it became sacred. They often dedicated it to the gods during significant events like marriage, victories, escapes from danger, and funeral rites for friends. Different hairstyles indicated various social ranks or positions in life; some wore it long, others short, and some styled it in unique ways—each style or length reflecting the wearer’s condition, wealth, or social status. Pulling it out or neglecting it symbolized grief.
Hair contains a very small quantity of water, manganese, iron, and various salts of lime, which have been found by the various methods of analyzation, and it is owing to these properties that it is peculiarly indestructible. It has been found on mummies, more than twenty centuries old, in a perfect and unaltered state, and many instances are related, which are now admitted to be facts, of the hair continuing to grow, for a time, after death.
Hair contains a tiny amount of water, manganese, iron, and various lime salts, which have been identified through different methods of analysis. Because of these properties, hair is uniquely resilient. It has been discovered on mummies that are over twenty centuries old, still in perfect and unaltered condition. There are many documented cases—now considered facts—of hair continuing to grow for a time after death.
There has never before been a book written and published, that was particularly dedicated to the subject of Hair, and as the field is a vast one, both as regards the importance of the subject, and the information to be gained thereby, it is simply strange that no one has ever entered it. It has been too long neglected, and the increasing necessity for a treatise of this kind, has been pressed upon the attention of the author, and induced the publication of this work, which will certainly meet the necessities of the age.
There has never been a book dedicated specifically to the topic of hair, and since this area is extensive in both its significance and the information available, it's surprising that no one has tackled it before. It has been overlooked for too long, and the growing need for a guide like this has motivated the author to publish this work, which will definitely address the demands of our time.
There is much else that might be said on this subject that would prove both interesting and instructive, but we prefer for the present to let it rest. We have endeavored in preparing this book both to instruct and amuse; for, by following its instructions, it may be made to be profitable and highly remunerative, and in making[265] articles, either for gifts, mementoes, or otherwise, it will certainly be amusing and entertaining. We have given the instructions in a way that all may readily understand, and as the patterns are numerous, and the designs elegant, we think there can be nothing lacking to make the book all it claims to be.
There’s a lot more that could be said on this topic that would be both interesting and informative, but for now, we’ll leave it at that. In putting this book together, we aimed to both teach and entertain; by following its guidance, it can be both valuable and rewarding. Plus, when creating[265] items, whether as gifts, keepsakes, or for other purposes, it will definitely be fun and enjoyable. We’ve presented the instructions in a way that’s easy for everyone to understand, and since there are plenty of patterns and stylish designs, we believe the book has everything it promises.
The principal offices for the sale of these books, will be at my establishments, No. 737 Broadway, New York, and No. 81 South Clark Street, Chicago.
The main offices for selling these books will be at my locations, 737 Broadway, New York, and 81 South Clark Street, Chicago.


In placing before the trade my list of Hair Jewelry and Hair Goods, I beg sincerely to thank my customers for the increasing support I have received from them, and let them be assured I shall do all on my part to merit a continuance of the same. The following is a list of some of the leading articles I import, manufacture and sell, at wholesale and retail, and at prices less than can be found in any other House on this continent. I import
In sharing my list of Hair Jewelry and Hair Goods with the trade, I sincerely want to thank my customers for their growing support. Rest assured, I will do everything I can to deserve your continued trust. Below is a list of some of the top items I import, manufacture, and sell, both wholesale and retail, at prices lower than what's available anywhere else on this continent. I import
of every length and shade, prepared and unprepared, which I furnish the trade at low prices:
of all lengths and colors, both ready-made and custom, which I supply to the industry at affordable prices:
Ladies' Wigs, Switches, Braids, Curls, Waterfalls, Frizettes, Coils, Bows,
Fronts, Scratches, Bands, Hair-Nets, Ornamental Hair, Partings,
Whiskers, Beards, Mustaches, Puffs, Curling-Irons,
Curling-Sticks, Crimping-Irons, Perfumery, Pomades
and Creams, Soaps, Hair Brushes, Combs,
Hair Oils, Cosmetiques, Crimping-Pins.
For restoring the growth and natural color of the hair, and beautifying the complexion.
For restoring hair growth and its natural color, and enhancing the complexion.
ROUGES AND
French Enamel.
HAIR POWDER—
Diamond dust,
Gold powder,
Silver powder.
Wig Material, and Tools of Every Description!
In conclusion, I again renew my thanks to my customers, and trust, by the best attention to all orders, to give them increased satisfaction, as well as to merit the support of any portion of the trade who have not heretofore favored me with their commands. All orders sent by mail, accompanied by a Post Office Certificate, will be promptly filled and a safe return guaranteed.
In conclusion, I want to thank my customers once again, and I hope that by giving my full attention to all orders, I can provide even more satisfaction and earn the support of any part of the trade that hasn’t worked with me before. All orders sent by mail, along with a Post Office Certificate, will be processed quickly, and a safe return is guaranteed.

The great success I have met with, and the rapidly increasing demand for Goods of my manufacture, is owing mainly to the superior quality of hair which I import exclusively for my trade, and the superior workmanship in their manufacture.
The great success I've had and the quickly growing demand for the goods I produce is mainly due to the high quality of hair that I exclusively import for my business, along with the excellent craftsmanship in their production.
I have the largest assortment of Wigs in the United States, and manufacture to order any and every style.
I have the biggest variety of wigs in the United States, and I can make any style to order.
short or long glossy hair, straight, natural curly or frizzed. Also Fronts and Bandoes.
short or long shiny hair, straight, naturally curly, or frizzy. Also, headbands and bandanas.

To measure for Toupee or Scratch, cut a piece of paper the exact size and shape of bald spot. Send your orders according to the above directions, and we will warrant a fit.
To measure for a toupee or patch, cut a piece of paper that matches the exact size and shape of the bald spot. Submit your orders following the instructions above, and we guarantee a fit.

I manufacture and sell, at Wholesale and Retail,
I make and sell, at Wholesale and Retail,
AND
GOLD MOUNTINGS FOR HAIR JEWELRY,
OF EVERY STYLE AND TOOL,
Persons buying books, and wishing to procure
Persons buying books and wanting to get
| BRAIDING TABLES, |
| Weights |
| Bobbins, |
| Molds |
| OR FORMS, |

FOR
Restoring the COLOR and Growth of the Hair, Purifying,
Whitening and Beautifying the Complexion.
IT IS A PREVENTIVE
AND
SURE CURE FOR BALDNESS,
Cleansing the Scalp of Dandruff and all Impurities, Invigorating the
Roots of the Hair, giving it Life, Health, and its
NATURAL COLOR.
IT IS A SURE CURE FOR
ROUGH SKIN, FRECKLES, SUNBURN, AND ALL
IMPURITIES OF THE COMPLEXION.
 CAMPBELL'S CHREVOLION.
FOR
Restoring the Hair to its Natural Color.
This wonderful Preparation needs only to be used to be appreciated. It is free from those objections that accompany preparations compounded from minerals, which have been offered to the public in
This amazing preparation only needs to be used to be appreciated. It's free from the problems that come with preparations made from minerals, which have been offered to the public in
It's a common practice among compounders when presenting an article __A_TAG_PLACEHOLDER_0__.
to the public, to promote a variety of testimonials claiming
to be from respected individuals, but I prefer to
rest the success of the Chrevolion strictly
based on its effective merit,

PURIFYING AND WHITENING THE COMPLEXION
AND
Restoring the Growth of the Hair.
This Complexion Purifyer is a Magical Curative for the Face and Scalp. It will allay all Feverish Humor of the Skin, and remove Freckles, Pimples Sunburn and other eruptions, leaving the Face soft, white and beautiful, with
This Complexion Purifier is a magical remedy for your face and scalp. It will soothe all irritated skin, and get rid of freckles, pimples, sunburn, and other blemishes, leaving your face soft, fair, and beautiful, with
Hundreds of cases, where the Hair was dropping, and Baldness seemed inevitable,
have been effectually cured by the use of the Chrevolion.
PREPARED ONLY BY
M. Campbell.
Sold by all the principal Druggists in this country. Price $1.00 per Bottle.

| No. | Mount's. | Compl't. |
| 1 | $ 5 50 | $ 8 00 |
| 2 | 3 75 | 6 00 |
| 3 | 3 00 | 5 00 |
| 4 | 5 25 | 8 00 |
| 5 | 4 00 | 7 00 |
| 6 | 4 50 | 7 00 |
| 7 | 6 00 | 10 00 |
| 8 | 5 50 | 8 00 |
| 9 | 11 00 | 15 00 |
| 10 | 10 00 | 12 50 |
| 11 | 5 75 | 8 00 |
| 12 | 5 00 | 7 00 |
| 13 | 8 00 | 10 00 |
| 14 | 6 00 | 8 00 |
| 15 | 4 50 | 6 00 |
| 16 | 9 00 | 10 00 |
| 17 | 7 50 | 10 00 |
| 18 | 6 50 | 8 00 |
| 19 | 10 00 | 12 50 |
| 20 | 9 00 | 12 50 |
| 21 | 7 50 | 10 00 |
| 22 | 10 00 | 12 50 |
| 23 | 8 00 | 10 00 |
| 24 | 7 50 | 10 00 |
| 25 | 10 00 | 15 00 |
| 26 | 12 50 | 15 00 |
| 27 | 4 00 | 7 00 |
| 28 | 4 00 | 8 00 |
| 29 | 10 00 | 12 50 |
| 30 | 10 00 | 12 50 |
| 31 | 15 00 | 17 50 |
| 32 | 15 00 | 17 50 |
| 33 | 12 50 | 15 00 |
| 34 | 12 50 | 15 00 |
| 35 | 12 50 | 15 00 |
| 36 | 12 50 | 15 00 |
| 37 | 13 00 | 15 00 |
| 38 | 11 00 | 12 50 |
| 39 | 13 00 | 15 00 |
| 40 | 13 00 | 15 00 |
| 41 | 12 50 | 15 00 |
| 42 | 11 00 | 12 50 |
| 43 | 10 00 | 12 50 |
| 44 | 8 00 | 10 00 |
| 45 | 6 50 | 8 00 |
| 46 | 6 50 | 8 00 |
| 47 | 8 50 | 10 00 |
| 48 | 10 00 | 12 00 |
| 49 | 4 00 | 5 00 |
| 50 | 4 00 | 5 00 |
| 51 | 3 50 | 5 00 |
| 52 | 7 00 | 8 00 |
| 53 | 5 00 | 6 00 |
| 54 | 6 50 | 8 00 |
| 55 | 10 00 | 12 00 |
| 56 | 5 00 | 6 00 |
| 57 | 5 50 | 6 00 |
| 58 | 7 00 | 8 00 |
| 59 | 6 50 | 8 00 |
| 60 | 8 50 | 10 00 |
| 61 | 8 00 | 10 00 |
| 62 | 6 00 | 7 00 |
| 63 | 12 50 | 15 00 |
| 64 | 15 00 | 17 50 |
| 65 | 12 50 | 15 00 |
| 66 | 15 00 | 17 50 |
| 67 | 12 50 | 15 00 |
| 68 | 12 50 | 15 00 |
| 69 | 13 00 | 15 00 |
| 70 | 11 00 | 12 50 |
| 71 | 13 00 | 15 00 |
| 72 | 13 00 | 15 00 |
| 73 | 12 50 | 15 00 |
| 74 | 11 00 | 12 50 |
| 75 | 10 00 | 12 50 |
| 76 | 8 00 | 10 00 |
| 77 | 6 50 | 8 00 |
| 78 | 6 50 | 8 00 |
| 79 | 8 50 | 10 00 |
| 80 | 10 00 | 13 00 |
| 81 | 10 00 | 12 50 |
| 82 | 8 00 | 10 00 |
| 83 | 13 00 | 15 00 |
| 84 | 6 00 | 8 00 |
| 85 | 8 00 | 10 00 |
| 86 | 10 00 | 12 50 |
| 87 | 8 00 | 10 00 |
| 88 | 6 50 | 8 00 |
| 89 | 10 00 | 12 00 |
| 90 | 8 00 | 10 00 |
| 91 | 6 00 | 8 00 |
| 92 | 4 50 | 6 00 |
| 93 | 12 50 | 15 00 |
| 94 | 6 00 | 8 00 |
| 95 | 13 00 | 15 00 |
| 96 | 12 00 | 15 00 |
| 97 | 10 00 | 12 50 |
| 98 | 10 00 | 12 50 |
| 99 | 10 00 | 12 00 |
| 100 | 5 00 | 7 00 |
| 101 | 8 00 | 10 00 |
| [273]102 | 12 50 | 15 00 |
| 103 | 8 00 | 10 00 |
| 104 | 10 00 | 12 00 |
| 105 | 7 00 | 9 00 |
| 106 | 6 00 | 8 00 |
| 107 | 7 00 | 8 00 |
| 108 | 6 00 | 7 00 |
| 109 | 9 00 | 10 00 |
| 110 | 6 00 | 7 00 |
| 111 | 12 00 | 15 00 |
| 112 | 13 00 | 15 00 |
| 113 | 13 00 | 15 00 |
| 114 | 12 00 | 15 00 |
| 115 | 4 50 | 6 00 |
| 116 | 4 00 | 5 00 |
| 117 | 5 00 | 7 00 |
| 118 | 5 00 | 7 00 |
| 119 | 7 00 | 8 00 |
| 120 | 5 00 | 6 00 |
| 121 | 5 00 | 6 00 |
| 122 | 7 00 | 8 00 |
| 123 | 9 00 | 10 00 |
| 124 | 6 00 | 7 00 |
| 125 | 5 00 | 6 00 |
| 126 | 6 00 | 7 00 |
| 127 | 4 50 | 5 00 |
| 128 | 7 00 | 8 00 |
| 129 | 4 50 | 5 00 |
| 130 | 5 00 | 6 00 |
| 131 | 7 00 | 8 00 |
| 132 | 5 50 | 6 00 |
| 133 | 5 00 | 6 00 |
| 134 | 5 50 | 6 00 |
| 135 | 6 00 | 7 00 |
| 136 | 5 50 | 6 00 |
| 137 | 4 00 | 5 00 |
| 138 | 4 25 | 5 00 |
| 139 | 4 25 | 5 00 |
| 140 | 6 00 | 8 00 |
| 141 | 6 00 | 7 00 |
| 142 | 5 00 | 6 00 |
| 143 | 4 00 | 5 00 |
| 144 | 3 00 | 5 00 |
| 145 | 2 50 | 3 50 |
| 146 | 4 00 | 5 00 |
| 147 | 6 50 | 8 00 |
| 148 | 4 00 | 5 00 |
| 149 | 8 00 | 10 00 |
| 150 | 10 00 | 12 00 |
| 151 | 4 25 | 5 00 |
| 152 | 10 00 | 12 00 |
| 153 | 3 50 | 4 00 |
| 154 | 3 50 | 4 00 |
| 155 | 4 00 | 5 00 |
| 156 | 5 25 | 6 00 |
| 157 | 3 50 | 4 00 |
| 158 | 3 50 | 4 50 |
| 159 | 5 00 | 6 00 |
| 160 | 3 00 | 3 50 |
| 161 | 4 00 | 5 00 |
| 162 | 3 50 | 4 00 |
| 163 | 5 00 | 6 00 |
| 164 | 4 50 | 5 00 |
| 165 | 5 00 | 6 00 |
| 166 | 4 00 | 4 50 |
| 167 | 6 00 | 7 00 |
| 168 | 4 00 | 4 50 |
| 169 | 7 00 | 8 00 |
| 170 | 6 00 | 7 00 |
| 171 | 1 00 | 1 50 |
| 172 | 4 50 | 5 00 |
| 173 | 11 00 | 12 00 |
| 174 | 3 50 | 4 00 |
| 175 | 1 00 | 1 50 |
| 176 | 9 50 | 10 00 |
| 177 | 5 50 | 6 00 |
| 178 | 3 00 | 4 00 |
| 179 | 6 00 | 7 00 |
| 180 | 1 50 | 2 00 |
| 181 | 6 00 | 7 00 |
| 182 | 2 50 | 3 00 |
| 183 | 6 00 | 7 00 |
| 184 | 4 50 | 5 00 |
| 185 | 6 00 | 7 00 |
| 186 | 4 50 | 5 00 |
| 187 | 7 50 | 8 00 |
| 188 | 5 50 | 6 00 |
| 189 | 9 00 | 10 00 |
| 190 | 11 00 | 12 00 |
| 191 | 9 00 | 10 00 |
| 192 | 3 50 | 5 00 |
| 193 | 8 50 | 10 00 |
| 194 | 3 50 | 5 00 |
| 195 | 10 00 | 15 00 |
| 196 | 5 00 | 8 00 |
| 197 | 4 50 | 7 00 |
| 198 | 4 00 | 6 00 |
| 199 | 4 00 | 6 00 |
| 200 | 6 00 | 10 00 |
| 201 | 10 00 | 10 00 |
| 202 | 12 00 | 15 00 |
| 203 | 10 00 | 12 00 |
| 204 | 6 50 | 8 00 |
| 205 | 4 00 | 5 00 |
| 206 | 10 00 | 12 00 |
| 207 | 8 00 | 10 00 |
| 208 | 10 00 | 12 00 |
| 209 | 6 50 | 8 00 |
| 210 | 12 00 | 13 00 |
| 211 | 8 50 | 10 00 |
| 212 | 9 00 | 10 00 |
| 213 | 8 50 | 10 00 |
| 214 | 10 00 | 12 00 |
| 215 | 8 50 | 10 00 |
| 216 | 6 00 | 7 00 |
| 217 | 13 00 | 15 00 |
| 218 | 13 00 | 15 00 |
| 219 | 8 50 | 10 00 |
| 220 | 8 50 | 10 00 |
| 221 | 7 00 | 8 00 |
| 222 | 10 00 | 12 00 |
| 223 | 7 00 | 8 00 |
| [274]224 | 8 50 | 10 00 |
| 225 | 10 50 | 12 00 |
| 226 | 8 50 | 10 00 |
| 227 | 10 50 | 12 00 |
| 228 | 14 00 | 15 00 |
| 229 | 10 00 | 10 00 |
| 230 | 14 00 | 15 00 |
| 231 | 8 50 | 10 00 |
| 232 | 8 50 | 10 00 |
| 233 | 10 00 | 12 00 |
| 234 | 7 50 | 9 00 |
| 235 | 7 50 | 9 00 |
| 236 | 6 75 | 8 00 |
| 237 | 2 25 | 6 00 |
| 238 | 11 00 | 15 00 |
| 239 | 5 00 | 10 00 |
| 240 | 3 50 | 7 00 |
| 241 | 3 50 | 6 00 |
| 242 | 4 50 | 7 00 |
| 243 | 6 00 | 8 00 |
| 244 | 12 00 | 20 00 |
| 245 | 20 00 | 28 00 |
| 246 | 8 00 | 12 00 |
| 247 | 8 00 | 12 00 |
| 248 | 8 00 | 10 00 |
| 249 | 10 00 | 12 00 |
| 250 | 25 00 | 30 00 |
| 251 | 25 00 | 30 00 |
| 252 | 13 00 | 15 00 |
| 253 | 8 00 | 12 00 |
| 254 | 18 00 | 20 00 |
| 255 | 10 00 | 12 00 |
| 256 | 12 00 | 15 00 |
| 257 | 8 00 | 10 00 |
| 258 | 10 00 | 12 00 |
| 259 | 9 50 | 12 00 |
| 260 | 10 00 | 12 00 |
| 261 | 10 00 | 12 00 |
| 262 | 8 00 | 10 00 |
| 263 | 16 00 | 20 00 |
| 264 | 10 00 | 12 00 |
| 265 | 21 00 | 25 00 |
| 266 | 25 00 | 30 00 |
| 267 | 6 00 | 8 00 |
| 268 | 20 00 | 25 00 |
| 269 | 10 00 | 12 00 |
| 270 | 3 50 | 6 00 |
| 271 | 4 00 | 7 00 |
| 272 | 4 50 | 8 00 |
| 273 | 4 00 | 6 00 |
| 274 | 9 00 | 12 00 |
| 275 | 9 00 | 12 00 |
| 276 | 7 50 | 10 00 |
| 277 | 3 50 | 6 00 |
| 278 | 18 00 | 20 00 |
| 279 | 18 00 | 20 00 |
| 280 | 17 00 | 20 00 |
| 281 | 9 00 | 12 00 |
| 282 | 12 00 | 15 00 |
| 283 | 9 00 | 12 00 |
| 284 | 16 00 | 20 00 |
| 285 | 30 00 | 40 00 |
| 286 | 9 00 | 12 00 |
| 287 | 9 00 | 14 00 |
| 288 | 4 50 | 6 00 |
| 289 | 4 00 | 7 00 |
| 290 | 18 00 | 20 00 |
| 291 | 22 00 | 25 00 |
| 292 | 6 50 | |
| 293 | 6 00 | |
| 294 | 4 00 | |
| 295 | 5 00 | |
| 296 | 4 50 | |
| 297 | 5 50 | |
| 298 | 8 00 | |
| 299 | 6 00 | |
| 300 | 2 25 | |
| 301 | 4 50 | |
| 302 | 2 50 | |
| 303 | 7 50 | |
| 304 | 6 00 | |
| 305 | 18 00 | 20 00 |
| 306 | 18 00 | 20 00 |
| 307 | 23 00 | 25 00 |
| 308 | 15 00 | 17 50 |
| 309 | 22 00 | 25 00 |
| 310 | 12 00 | 15 00 |
| 311 | 23 00 | 25 00 |
| 312 | 18 00 | 20 00 |
| 313 | 23 00 | 25 00 |
| 314 | 12 00 | 15 00 |
| 315 | 15 00 | 18 00 |
| 316 | 22 00 | 25 00 |
| 317 | 18 00 | 20 00 |
INDEX.
Introductory Remarks, 7
Position in Braiding, 8
Square Chain Braid, 9
Reverse Braid, 10
Sixteen Twist Chain Braid, 11
Striped Snake Chain Braid, 12
Cable Chain Braid, 13
Snake Chain Braid, 14
Eight Square Chain Braid, 15
Half Twist Chain Braid, 16
Square Chain Braid, 17
Cable Twist Chain Braid, 18
Twist Chain Braid, 19 to 20
Rib Chain Braid, 21
Twist Chain Braid, 22
Half Twist Chain Braid, 23
Cable Chain Braid, 24
Sixteen Square Chain Braid, 25
German Twist Chain Braid, 26
Fancy Square Chain Braid, 27 to 28
Square Chain Braid, 29
Fancy Twist Chain Braid, 30 to 32
Double Chain Braid, 33
Fancy Cable Chain Braid, 34
Half Square Chain Braid, 35
Twelve Square Chain Braid, 36
Flat Twist Chain Braid, 37
Rib Chain Braid, 38
Fancy Cable Chain Braid, 39
Square Chain Braid, 40
Fob Chain Braid, 41
Square Rib Chain Braid, 42
Double Loop Chain Braid, 43
Knot Chain Braid, 44
Double Rib Chain Braid, 45
Fancy Chain Braid, 46 to 51
Double Rib Chain Braid, 52
Rope Chain Braid, 53
Diamond Shaped Chain Braid, 54
Fancy Square Chain Braid, 55 to 58
Fancy Twist Chain Braid, 59
Flat Chain Braid, 60
Necklace Pattern Braid, 61 to 67
Necklace or Edging Braid, 68
Necklace or Head Dress Braid, 69
Ring Pattern Braids, 70 to 81
Ring or Bracelet Braids, 82 to 84
Bracelet Tight Braids, 85 to 87
[276]Elastic Bracelet Braids, 88 to 89
Double Elastic Bracelet Braid, 90
Fancy Tight Bracelet Braid, 91
Reverse Tight Bracelet Braid, 92
Banded Tight Bracelet Braid, 93
Plain Open Braid, 94
Open Fine Braid, 95
Open Fine Braid, 96
Open Fine Lace Braid, 97 to 98
Basket Tight Braid, 99
Tight Braid, 100
Acorn Tight Braid, 101
Half Tight Braid, 102
Fancy Tight Braid, 103
Plain Tight Braid, 104
Acorn Braid, 105
Half Open Braid, 106
Overshot Braid, 107
Diamond Tight Braid, 108
Spiral Striped Braid, 109
Empress Tight Braid, 110
Open Check Braid, 111
Scotch Plaid Braid, 112
Half Open Braid, 113
Open Striped Braid, 114
Chinchilla Open Braid, 115
Fancy Lace Braid, 116
Striped Elastic Braid, 117
Open Striped Braid, 118
Wide Striped Braid, 119
Neapolitan Tight Braid, 120
Open Braid, 121
Directions for New Beginners, 122
Braiding Table No. 1, 123
Braiding Table No. 2, 124
Braiding Table and position in Braiding, 125
Wood Braiding Bobbins, 127
Lead Braiding Bobbins, 128
Lead Weight Bobbins, 129
Forms for Braiding Over, 130 to 131
Explanations on Bracelets, 132 to 136
Lithograph Designs, 137 to 238
Weaving Hair for Switches, 239
Sewing Switches, 240
Weaving Hair for Curls, 241
Making and Preparing Curls, 242
Weaving Hair for Wigs, 243
Making Waterfalls or Bows, 244
Making Puffs and Coils, 245
Explanations on Hair Dressing, 246
Hair Dressing, 247 to 259
Synoptic of Human Hair, 260 to 265
Retail Department, 266
Wig Manufactory, 267
Manufacturing Department, 268
Campbell's Chrevolion, 269
Campbell's Chrevolion, No. 1, 270
Campbell's Chrevolion, No. 2, 271
Price List, 272 to 274
Index, 275 to 276
Transcriber's Notes:
Obvious punctuation errors repaired.
Punctuation errors fixed.
Some patterns began with small caps and some did not. For the sake of consistancy, all patterns now begin with small caps.
Some patterns started with small caps and some didn’t. To keep things consistent, all patterns now begin with small caps.
Index, the page numbers were missing and the transcriber supplied them for the following entries: Preface; Introductory Remarks; Position in Braiding; and Square Chain Braid.
Index, the page numbers were missing and the transcriber added them for the following entries: Preface; Introductory Remarks; Position in Braiding; and Square Chain Braid.
The remaining corrections made are indicated by dotted lines under the corrections. Scroll the mouse over the word and the original text will appear.
The remaining corrections are marked with dotted lines underneath. Hover your mouse over the word, and the original text will appear.
Download ePUB
If you like this ebook, consider a donation!