This is a modern-English version of The Book of Camp-Lore and Woodcraft, originally written by Beard, Daniel Carter.
It has been thoroughly updated, including changes to sentence structure, words, spelling,
and grammar—to ensure clarity for contemporary readers, while preserving the original spirit and nuance. If
you click on a paragraph, you will see the original text that we modified, and you can toggle between the two versions.
Scroll to the bottom of this page and you will find a free ePUB download link for this book.

THE BOOK OF CAMP-LORE
AND WOODCRAFT
FOUNDER OF THE FIRST BOY SCOUTS SOCIETY
WITH 377 ILLUSTRATIONS BY THE AUTHOR

Garden City Publishing Co., Inc.
Garden City NYC
THE RIGHTS OF TRANSLATION ARE RESERVED
PRINTED IN THE UNITED STATES OF AMERICA
George DuPont Pratt
COMMISSIONER OF CONSERVATION, STATE OF NEW YORK
SCOUT, SPORTSMAN AND OUTDOOR MAN
FOREWORD TO THE SECOND
EDITION
Boys, if this foreword is too "highbrow" for your taste, skip it, but the author don't believe you will, and even if he has used some dictionary words he feels that you will forgive him after he tells you that he did so only because of the lack of time to think up more simple terms. What he wants to say is that. . . .
Hey everyone, if this introduction feels too "fancy" for you, feel free to skip it, but the author thinks you won’t. Even though he used some complicated words, he hopes you’ll forgive him since he just didn’t have time to come up with simpler ones. What he really wants to say is that...
Boyhood is a wonderful and invaluable asset to the nation, for in the breast of every boy there is a divine spark, materialists call it the "urge of youth," others call it the "Christ in man," the Quakers call it the "inner light," but all view it with interest and anxiety, the ignorant with fear and the wise with understanding sympathy, but also with a feeling akin to awe.
Boyhood is a wonderful and priceless asset to the nation, because in every boy lies a divine spark. Materialists refer to it as the "urge of youth," while others call it the "Christ in man." The Quakers call it the "inner light." Everyone observes it with interest and concern: the ignorant with fear, the wise with understanding and sympathy, but also with a sense of awe.
Those of us who think we know boys, feel that this "inner light" illuminating their wonderful powers of imagination, is the compelling force culminating in the vigorous accomplishments of manhood. It is the force which sent Columbus voyaging over the unknown seas, which sent Captain Cook on his voyage around the world, the same force which carried Lindbergh in his frail airship across the Atlantic. Yes, it is the sublime force which has inspired physicians and laymen to cheerfully risk and sacrifice their lives in search of the cause of Yellow Fever, Anthrax, Hydrophobia and other communicable diseases . . . no, not for science but for
Those of us who think we understand boys believe that this "inner light" shining on their incredible imagination is the driving force behind the strong achievements of adulthood. It's the force that led Columbus to explore uncharted seas, that took Captain Cook on his journey around the world, and that helped Lindbergh fly his fragile plane across the Atlantic. Yes, it’s the powerful force that has motivated both doctors and everyday people to bravely risk their lives in the pursuit of understanding Yellow Fever, Anthrax, Rabies, and other contagious diseases... no, not for science but for
As a boy, the author dreamed of wonderful municipal playgrounds, of organizations giving the boys opportunity to camp in the open, of zoological and botanical gardens planned and adapted to the understanding of youth. His busy life as a civil engineer, surveyor, and work in the open gave him no opportunity to develop his dreams, but at the end of a five year tour of the United States and Canada, made over fifty years ago, he drifted into New York City and was shocked beyond expression by the almost total lack of breathing spaces for our boys, in the greatest of American cities. True, it then had Central Park; but fifty years ago Central Park was out among the goats, only to be reached by a long and tiresome horse car journey.
As a boy, the author dreamed of amazing public playgrounds, of organizations giving kids the chance to camp outdoors, and of zoological and botanical gardens designed for young people's understanding. His busy life as a civil engineer and surveyor, along with work outside, didn’t allow him to pursue these dreams. However, after a five-year trip across the United States and Canada over fifty years ago, he found himself in New York City and was shocked by the almost complete lack of open spaces for children in one of the largest cities in America. Yes, it had Central Park, but back then, Central Park felt far away, only accessible after a long and exhausting horse-drawn car ride.
This lamentable state of affairs caused the writer so much real pain and concern that he then and there inaugurated a personal crusade for the benefit of the boys, a crusade with the avowed object of winning for them the peoples' interest in the big outdoors.
This unfortunate situation caused the writer so much genuine pain and worry that he immediately started a personal campaign for the boys, a campaign aimed at gaining public interest in the great outdoors.
The most difficult part of his task was to convince the men of the swivel chairs that boys' leisure should be spent in the open; that the blue sky is the only proper roof for a normal boy's playground; also that the open spaces are the places where God intended young people to live, work and play.
The hardest part of his job was convincing the guys in the office chairs that boys should spend their free time outdoors; that the blue sky is the only real roof for a normal boy's playground; and that the open spaces are where God meant young people to live, work, and play.
No great crusade, no great movement of any kind is one man's work, nevertheless, every successful movement must have one enthusiast in the front rank, one who knows the trail and comprehensively envisions the objective—objectum quod complexum. Others may and will join him, and occasionally spurt ahead of the leader, like the hare in the fable, but the enthusiast keeps right on just the same.
No major crusade or movement of any kind is solely the work of one person, yet every successful movement needs one passionate individual leading the way, someone who understands the path and fully envisions the goal—objectum quod complexum. Others might join him and sometimes even outpace the leader, like the hare in the fable, but the passionate individual keeps moving forward regardless.
Pray do not understand by this that the writer claims[iii] that he alone is responsible for this bloodless revolution. No, no, his propaganda work did however win for him the moral support of the editorial staff of St. Nicholas, Youth's Companion and Harpers. Later he was openly backed and encouraged by such distinguished sportsmen as President Roosevelt, his chief forester Governor Pinchot, and his Chief of Staff Major General Bell. While the stalwart men of the Camp Fire Club of America worked hand and glove with him, all similar organizations failed not in voicing their approval. Furthermore he was always helped by his loyal friends of the daily press. Many famous writers lent their influence, all working consciously or unconsciously to help the great cause of boyhood.
Please don't think that the writer is claiming[iii] that he alone is responsible for this peaceful revolution. No, his efforts in promoting it did earn him the moral support of the editorial teams at St. Nicholas, Youth's Companion, and Harpers. Later, he received open backing and encouragement from notable figures like President Roosevelt, his chief forester Governor Pinchot, and his Chief of Staff Major General Bell. The strong men of the Camp Fire Club of America worked closely with him, and all similar organizations were vocal in their support. Moreover, he was consistently aided by his loyal friends in the daily press. Many well-known writers used their influence, whether intentionally or not, to advance the important cause of boyhood.
The author only claims that, in all these fifty long years, he has never ceased to work for the boys, never wavered in his purpose, and now?—well, when he marched at the head of fifty thousand Scouts in the great muddy outdoor Scout camp at Birkenhead, England, he realized that his ephemeral air castles had settled down to a firm foundation upon Mother Earth.
The author asserts that, throughout these fifty long years, he has consistently worked for the boys and never strayed from his goal, and now?—well, when he led fifty thousand Scouts in the vast, muddy outdoor Scout camp in Birkenhead, England, he understood that his fleeting dreams had solidified into a stable reality on solid ground.
Yes, boys we have won a great victory for boyhood! We have won it by iteration and reiteration, in other words, by shouting outdoors, talking outdoors, picturing outdoors, singing outdoors and above all by writing about the outdoors, and constantly hammering on one subject and keeping one purpose always in view. By such means we have at last, not only interested the people of the United States in the open, but stampeded the whole world to the forests and the fields. So let us all join in singing the old Methodist hymn:—
Yes, guys, we’ve achieved an amazing victory for boyhood! We did it through repetition and emphasis, in other words, by shouting outdoors, talking outdoors, picturing outdoors, singing outdoors, and especially by writing about the outdoors, keeping one goal in mind and sticking to one topic. Through these efforts, we have not only sparked interest among the people of the United States in the outdoors, but we’ve also inspired the entire world to explore the forests and fields. So let’s all join in singing the old Methodist hymn:—
Glory, Hallelujah!
We will bring down the Devil's kingdom,
"Glory, Hallelujah!"
The Devil's kingdom in this case is the ill-ventilated school rooms, offices and courts.
The Devil's kingdom in this case is the stuffy classrooms, offices, and courtrooms.
It is well to note that the work in this book was not done in the library, but either in the open itself or from notes and sketches made in the open. When telling how to build a cooking fire, for instance, the author preferred to make his diagrams from the fires built by himself or by his wilderness friends, than to trust to information derived from some other man's books. It is much easier to make pictures of impractical fires than to build them. The paste pot and scissors occupy no place of honor in our woodcraft series.
It’s important to mention that the work in this book wasn't done in a library, but in the great outdoors or based on notes and sketches made outside. For example, when explaining how to build a cooking fire, the author chose to create his diagrams from fires he made himself or with his wilderness friends, rather than relying on information from someone else’s books. It’s much simpler to draw pictures of impractical fires than to actually build them. The glue and scissors don't hold a prominent place in our woodcraft series.
So, Boys of the Open, throw aside your new rackets, your croquet mallets, and your boiled shirts—pull on your buckskin leggings, give a war whoop and be what God intended you should be; healthy wholesome boys. This great Republic belongs to you and so does this
So, boys of the outdoors, put down your new rackets, your croquet mallets, and your fancy shirts—put on your leather leggings, let out a war cry, and be what you're meant to be; healthy, strong boys. This great country belongs to you, and so does this
December first,
1930.
FOREWORD
Hidden in a drawer in the antique highboy, back of the moose head in my studio, there are specimens of Indian bead work, bits of buckskin, necklaces made of the teeth of animals, a stone calumet, my old hunting knife with its rawhide sheath and—carefully folded in oiled paper—is the jerked tenderloin of a grizzly bear!
Hidden in a drawer in the antique highboy, behind the moose head in my studio, are pieces of Indian beadwork, scraps of buckskin, necklaces made from animal teeth, a stone peace pipe, my old hunting knife in its rawhide sheath, and—carefully folded in oiled paper—is the jerky tenderloin of a grizzly bear!
But that is not all; for more important still is a mysterious wooden flask containing the castor or the scentgland of a beaver, which is carefully rolled up in a bit of buckskin embroidered with mystic Indian signs.
But that's not all; even more important is a mysterious wooden flask containing the castor or scent gland of a beaver, which is carefully wrapped in a piece of buckskin decorated with mystical Indian symbols.
The flask was given to me as "big medicine" by Bow-arrow, the Chief of the Montinais Indians. Bow-arrow said—and I believe him—that when one inhales the odor of the castor from this medicine flask one's soul and body are then and forever afterwards permeated with a great and abiding love of the big outdoors. Also, when one eats of the mystic grizzly bear's flesh, one's body acquires the strength and courage of this great animal.
The flask was given to me as "big medicine" by Bow-arrow, the Chief of the Montinais Indians. Bow-arrow said—and I believe him—that when you inhale the scent of the castor from this medicine flask, your soul and body are forever filled with a deep and lasting love for the great outdoors. Also, when you eat the flesh of the mystical grizzly bear, your body gains the strength and courage of this powerful animal.
During the initiation of the members of a Spartan band of my boys, known as the Buckskin Men, each candidate is given a thin slice of the grizzly bear meat and a whiff of the beaver castor.
During the initiation of the members of a Spartan group of my boys, called the Buckskin Men, each candidate is given a thin slice of grizzly bear meat and a whiff of beaver castoreum.
Of course, we know that people with unromantic and unimaginative minds will call this sentimentalism. We people of the outdoor tribes plead guilty to being sentimentalists; but we know from experience that old Bow-arrow was right, because we have ourselves eaten of the grizzly bear and smelled the castor of the beaver!
Of course, we know that people with unromantic and unimaginative minds will call this sentimentalism. We outdoorsy folks admit to being sentimentalists; but we know from experience that old Bow-arrow was right, because we have personally eaten grizzly bear and smelled the beaver's castor!
While the writer cannot give each of his readers a taste of this coveted bear meat in material form, or a whiff of the beaver medicine, direct from the wooden flask made by the late Bow-arrow's own hands, still the author hopes that the magical qualities of this great medicine will enter into and form a part of the subject matter of this book, and through that medium inoculate the souls and bodies of his readers, purify them and rejuvenate them with a love of the World as God Made It.
While the writer can't give each of his readers a sample of this prized bear meat or a sniff of the beaver medicine straight from the wooden flask crafted by the late Bow-arrow himself, he still hopes that the magical qualities of this powerful medicine will become part of the content of this book and, through that, enrich the souls and bodies of his readers, purifying and rejuvenating them with a love for the The World God Made.
June, 1920
June 1920
CONTENTS
| Chapter | Page | |
| I. | FIRE MAKING BY FRICTION | 1 |
How to Make a Fire-board, Bow, Drill and Thimble. Indian Legend of the Source of Fire. Record Fire-makers. Rubbing-stick Outfit. Eskimo Thimble. Bow, Bow-string, Thimble, Fire-board, Fire-pan. Tinder, Charred Rags, Puff Balls. Fire-makers of the Balkan. Fire Without a Bow, Co-li-li, the Fire Saw. Fire Pumping of the Iroquois. Pyropneumatic Apparatus |
||
| II. | FIRE MAKING BY PERCUSSION | 21 |
The White Man's Method, How to Use Flint and Steel. Where to Obtain the Flint and Steel. Chucknucks, Punk Boxes, Spunks and Matches. Real Lucifer Matches. Slow Match. How to Catch the Spark. Substitutes for Flint and Steel |
||
| III. | HOW TO BUILD A FIRE | 33 |
How to Lay and Light a Fire. An Experience with Tenderfeet. Modern Fear of Doing Manual Labor. Matches. Fire-makers and Babylonians. The Palpitating Heart of the Camp. Gummy Fagots of the Pine. How to Make a Fire in Wet Weather. Backwoodsmen's Fire. The Necessity of Small Kindling Wood. Good Firewood. Advantage of Split Wood. Fire-dogs. How to Open a Knife. How to Whittle, How to Split a Stick with a Knife. Bonfires and Council Fires. Camp Meeting Torch Fires. Exploding Stones. Character in Fire. Slow Fires, Signal Fires and Smudges |
||
| IV. | HOW TO LAY A GOOD COOKING FIRE | 53 |
A Personal Experience on Short Rations. The Most Primitive of Cooking Outfits. Camp Pot-hooks, the Gallow-crook, the Pot-claw, the Hake, the Gib, the Speygelia and the Saster. Telegraph Wire Cooking Implements, Wire Grid-iron, Skeleton Camp Stove. Cooking Fires, Fire-dogs, Roasting Fire-lay. Campfire Lay, Belmore Lay, Frying Fire Lay, Baking Fire Lay. The Aures Crane |
||
| V. | CAMP KITCHENS | 79 |
Camp Pit-fires, Bean Holes. Cowboy Fire-hole. Chinook Cooking Fire-hole. Barbecue-pits. The Gold Digger's Oven. The Ferguson Camp Stove. The Adobe Oven. The Altar Campfire Place. Camp Kitchen for Hikers, Scouts, Explorers, Surveyors and Hunters. How to Cook Meat, Fish and Bread Without Pots, Pans or Stoves. Dressing Small Animals. How to Barbecue Large Animals |
||
| VI. | CAMP FOOD | 101 |
How to Make Ash Cake, Pone, Corn Dodgers, Flapjacks, Johnny-cake, Biscuits and Doughgod. Making Dutch Ovens. Venison. Banquets in the Open. How to Cook Beaver Tail, Porcupines and Muskrats. Camp Stews, Brunswick Stews and Burgoos |
||
| VII. | PACKING HORSES | 23 |
How to Make a Pack Horse of Your Own. How to Make an Aparejo. How to Make a Cincha. How to Make a Latigo. How to Throw a Diamond Hitch. How to Throw a Squaw Hitch. How to Hitch a Horse in Open Land Without Post, Tree or Stick or Stone. Use of Hobbles and How to Make Them. How the Travois is Made and Used. Buffalo Bill and General Miles. How to Throw Down a Saddle. How to Throw a Saddle on a Horse. How to Mount a Horse. How to Know a Western Horse [viii] |
||
| VIII. | THE USE OF DOGS. MAN PACKING | 145 |
Hiking Dogs, Pack Dogs. How to Pack a Dog. How to Throw the Dog Hitch. How to Make Dog Travois. Dog as a Beast of Burden in Europe and Arctic America. Man Packing. Pack Rats. Don't Fight Your Pack. Portage Pack. Great Men Who Have Carried a Pack. Kinds of Packs. Alpine Rucksack. Origin of Broad Breast Straps. Make Your Own Outfits |
||
| IX. | PREPARING FOR CAMPING TRIP | 165 |
Porters of the Portage. Old-time Indian Fighters and Wild Animals. Modern Stampede for the Open. How to Get Ready for Camp. Cut Your Finger Nails. Go to Your Dentist. Get a Hair Cut. A Buckskin Man's Pocket. Fly Dope. Protection Against Black Flies, Mosquitoes, Midgets and No-see-ums. The Call of the Wild |
||
| X. | SADDLES | 183 |
How to Choose a Saddle. Evolution of the Mexican Saddle. Birth of the Bluff Fronted Saddle. The Cowboy Age. Sawbucks or Pack Saddles. Straight Leg and Bent Knee. Names of Parts of Saddle. Center Fire and Double Cinch |
||
| XI. | CHOOSING A CAMP SITE | 196 |
'Ware Single Trees or Small Groups of Trees. Safety in Woods or Forest. Keep Your Eyes Open for Good Camp Sites. Cross Streams While Crossing is Good. Keep to Windward of Mosquito Holes. 'Ware Ants' Nests. How to Tell when Wind Blows. Evolution of the Shack. How to Sweep. How to Make Camp Beds. How to Divide Camp Work. Tent Pegs. How to Pitch a Tent Single-handed. How to Ditch a Tent. Use of Shears, Gins and Tripods |
||
| XII. | AXE AND SAW | 217 |
Our Greatest Axeman. Importance of the Axe. What Kind of Axe to Use. How to Swing an Axe. How to Remove a Broken Axe Handle. How to Tighten the Handle in the Head. Accidents. The Brains of an Axe. Etiquette of the Axe. How to Sharpen an Axe. How to "Fall" a Tree. How to Swamp. How to Make a Beetle or Mall. How to Harden Green Wood. How to Make a Firewood Hod. How to Make a Chopping Block. The Proper Way to Chop. How to Make Sawbucks for Logs. How to Use a Parbuckle. How to Split a Log. How to Use a Sawpit |
||
| XIII. | COUNCIL GROUNDS AND FIRES | 245 |
Cherokee Indian Council Barbecue. Camp Meeting Council Ground. The Indian Palisaded Council Fire. Indian Legends of the Fire. Stealing the Fire from the Sun-Maidens of the East. Myths of the Mewan Indians. Totems of the Four Winds, Four Mountains and Four Points of the Compass. Impractical Council Fires. Advantages of the Oval Council Ground. How to Make an Ellipse. How to Divide the Council Ground in Four Courts. Council Ceremonies. Ghost Walk and Path of Knowledge. What the Different Colors Stand for. Patriotism, Poetry and Americanism. Camp Meeting Torch Fires |
||
| XIV. | RITUAL OF THE COUNCIL FIRE | 265 |
Program of a Council Fire. Invocation. The Pledge and Creed of All Americans. Appeal |
||
CHAPTER I
FIRE MAKING BY FRICTION
- HOW TO MAKE A FIRE-BOARD, BOW, DRILL AND THIMBLE
- INDIAN LEGEND OF THE SOURCE OF FIRE
- RECORD FIRE-MAKERS
- RUBBING-STICK OUTFIT
- ESKIMO THIMBLE
- BOW, BOW-STRING, THIMBLE, FIRE-BOARD, FIRE-PAN
- TINDER, CHARRED RAGS, PUFF BALLS
- FIRE-MAKERS OF THE BALKAN
- FIRE WITHOUT A BOW, CO-LI-LI, THE FIRE SAW
- FIRE PUMPING OF THE IROQUOIS
- PYROPNEUMATIC APPARATUS
FIRE MAKING BY FRICTION
When the "what-is-its" of Pithecantropus erectus age and other like hob-goblin men were moping around the rough sketch of an earth, there were no camp-fires; the only fire that these creatures knew was that which struck terror to their hearts when it was vomited forth from volcanic craters, or came crashing among them in the form of lightning. No wonder that the primitive men looked upon fire as a deity, no doubt an evil deity at first but one who later became good.
When the "what-is-its" of the Pithecantropus erectus era and other similar goblin-like beings were wandering around a rough version of the earth, there were no campfires; the only fire these creatures were familiar with was the kind that filled them with fear when it erupted from volcanic craters or struck down from the sky as lightning. It's no surprise that early humans viewed fire as a god, probably seen as a malevolent one at first, but later regarded as benevolent.
When the vast fields of ice covered Europe during the glacier period and forced men to think or die, necessity developed a prehistoric Edison among the Neanderthal men, who discovered how to build and control a fire, thus saving his race from being frozen in the ice and kept on cold storage, like the hairy rhinoceros and elephant of Siberia.
When the huge ice fields blanketed Europe during the Ice Age and pushed humans to adapt or perish, necessity sparked a prehistoric inventor among the Neanderthals, who figured out how to create and manage fire, saving his people from freezing in the ice and being put on ice, like the woolly rhinoceros and elephant of Siberia.
The fire of this forgotten and unknown glacier savage was the forerunner of our steam-heaters and kitchen ranges; in fact, without it we could have made no progress whatever, for not only the humble kitchen range, but the great factories and power-plants are all depending upon the discovery made by the shivering, teeth-chattering savage who was hopping around and trying to keep himself warm among the European glaciers.
The fire from this forgotten and unknown savage glacier was the precursor to our steam heaters and kitchen stoves; without it, we wouldn't have made any progress at all. Not only the basic kitchen stove but also the large factories and power plants rely on the discovery made by the shivering, teeth-chattering savage trying to stay warm among the European glaciers.
But we people of the camp-fires are more interested in primitive fires just as the Neanderthal men built them, than[4] we are in the roaring furnaces of the steel works, the volcano blast furnaces, or any of the scientific, commercialized fires of factory and commerce.
But we folks around the campfires are more interested in primitive fires like the ones the Neanderthals built than[4] we are in the roaring furnaces of the steel mills, the volcano blast furnaces, or any of the scientific, commercialized fires of factories and business.

What we love is the genial, old-fashioned camp-fire in the open, on the broad prairie, on the mountainside, or in the dark and mysterious forests, where, as our good friend Dr. Hornaday says,
What we love is the friendly, old-fashioned campfire outside, on the wide prairie, on the mountainside, or in the dark and mysterious forests, where, as our good friend Dr. Hornaday says,
Mesquite roots and sagebrush loose,
Dead bamboo and smelly teak,
And with fagots blazing bright
Burn a hole into the night—
Not long ago the author was up North in the unmapped lake country of Canada, and while camping on the portage between two wild and lonely lakes, Scout Joe Van Vleck made himself a fire outfit consisting of Fig. 1, a thimble made of a burl, with which to hold Fig. 2, the spindle made of balsam. Fig. 3 is a bow cut from a standing bush; not an elastic bow,[5] such as one uses with which to shoot arrows, but a bow with a permanent bend to it. Fig. 4 is the fire-pan which is placed under the fire-board to catch the charcoal dust as it falls through the slot when the spindle is twirled.
Not long ago, the author was up North in the uncharted lake region of Canada, and while camping on the portage between two wild and isolated lakes, Scout Joe Van Vleck made himself a fire kit consisting of Fig. 1, a thimble made from a burl to hold Fig. 2, the spindle made of balsam. Fig. 3 is a bow cut from a standing bush; it's not an elastic bow,[5] like the ones used for shooting arrows, but a bow with a permanent curve. Fig. 4 is the fire-pan placed under the fire-board to catch the charcoal dust as it falls through the slot when the spindle is spun.
Fig. 5 is the fire-board, made of a dead balsam tree which was standing within three yards of the camp-fire.
Fig. 5 is the fireboard, made from a dead balsam tree that was standing just three yards from the campfire.
In order to make his fire it was necessary for our Scout to have some tinder, and this he secured from the bark of cedar trees, also within a few yards of our camp. This indeed was a novel experience, for seldom is material so convenient. The fire was built in a few seconds, much to the wonderment of our Indian guide, and the delight of some moose hunters who chanced to be crossing the portage on which our camp was located.
To start his fire, our Scout needed some tinder, which he got from the bark of cedar trees just a few yards away from our camp. It was definitely a unique experience, as it’s not often that materials are so easy to find. The fire was set up in seconds, leaving our Indian guide amazed and delighting a group of moose hunters passing by the portage where our camp was situated.
It was an American, Dr. Walter Hough of the U. S. National Museum of Washington, who first proved that a modern up-to-date civilized white man can make a fire with rubbing-sticks, as well as the primitive man. But it was an Englishman who popularized this method of making fire, introduced it among the Boy Scouts of England and America, and the sister organizations among the girls.
It was an American, Dr. Walter Hough of the U.S. National Museum in Washington, who first showed that a modern, civilized white man can make a fire with rubbing sticks, just like primitive man. But it was an Englishman who made this method of starting a fire popular, introducing it to the Boy Scouts in England and America, as well as to their sister organizations for girls.
According to the American Indian legend the animal people who inhabited the earth before the Redmen lived in darkness in California. There was the coyote man, the vulture man, the white-footed mouse man, and a lot of other fabled creatures. Away over East somewhere there was light because the sun was over there, and the humming-bird man among the animal people of our Indians is the one, according to Dr. Merriman, who stole the fire from the East and carried it under his chin. The mark of it is still there. The next time you see a humming-bird note the brilliant spot of red fire under his chin.
According to American Indian legend, the animal people who lived on Earth before the Redmen existed in darkness in California. There was the coyote man, the vulture man, the white-footed mouse man, and many other mythical creatures. Far to the East, there was light because the sun was there, and the hummingbird man among our Indian animal people is, according to Dr. Merriman, the one who stole fire from the East and carried it under his chin. The mark of it is still there. The next time you see a hummingbird, notice the brilliant spot of red fire under its chin.
Now you understand why the king-pin in fire making at your camp deserves the title of Le-ché-ché (the humming-bird).
Now you see why the top person for making fire at your camp deserves the nickname Le-ché-ché (the hummingbird).
If one gets the fire from a fire-board, spindle and bow in record time, then the title of Le-ché-ché is all the more appropriate because it was the humming-bird man who hid the fire in the oo-noo tree, and to this day, when the Indian wants fire, he goes to the oo-noo (buckeye) tree to get it; that is, provided he has no matches in the pockets of his store clothes and that some white boy, like the Scout previously mentioned, has taught him how to make fire as did the Indian's own ancestors. But even then the oo-noo[A] wood must be dead and dry.
If someone gets fire from a fireboard, spindle, and bow quickly, then the title of Le-ché-ché makes even more sense since it was the hummingbird man who hid the fire in the oo-noo tree. To this day, when an Indian wants fire, he goes to the oo-noo (buckeye) tree to get it—unless he has matches in his store clothes pockets, or if some white boy, like the Scout mentioned earlier, has taught him how to make fire just like his ancestors did. But even then, the oo-noo[A] wood has to be dead and dry.
Austin Norton of Ypsilanti, Michigan, April, 1912, made fire in thirty-nine and one-fifth seconds; Frederick C. Reed of Washington, in December, 1912, made fire in thirty-one seconds; Mr. Ernest Miller of St. Paul made fire in thirty seconds, but it was Mr. Arthur Forbush, one of the author's Scouts of the Sons of Daniel Boone (the scout organization which preceded both the English Boy Scouts and the Boy Scouts of America) who broke the record time in making fire with "rubbing-sticks" by doing it in twenty-nine seconds at the Sportsman's Show at Madison Square Garden, New York. Mr. Forbush made this record in the presence of the author and many witnesses. Since then the same gentleman reduced his own world-record to twenty-six and one-fifth seconds; by this time even that record[B] may have been broken.
Austin Norton from Ypsilanti, Michigan, in April 1912, created fire in thirty-nine and one-fifth seconds; Frederick C. Reed from Washington, in December 1912, made fire in thirty-one seconds; Mr. Ernest Miller from St. Paul made fire in thirty seconds. However, it was Mr. Arthur Forbush, one of the author's Scouts of the Sons of Daniel Boone (the scout organization that came before both the English Boy Scouts and the Boy Scouts of America), who set the record for making fire with "rubbing-sticks" in twenty-nine seconds at the Sportsman's Show at Madison Square Garden in New York. Mr. Forbush achieved this record in front of the author and many witnesses. Since then, he has lowered his own world record to twenty-six and one-fifth seconds; by now, even that record[B] may have been broken.
The "rubbing-stick" is a picturesque, sensational and[7] interesting method of building a fire, but to-day it is of little practical use outside of the fact that it teaches one to overcome obstacles, to do things with the tools at hand, to think and act with the vigor, precision and self-confidence of a primitive man.
The "rubbing-stick" is a vivid, exciting, and[7] interesting way to start a fire, but today it’s not very useful except for teaching us how to overcome challenges, use the tools we have, and think and act with the energy, accuracy, and confidence of our ancestors.

Ever since the writer was a small boy he has read about making fire by rubbing "two chips" or "two sticks" together, and he was under the impression then, and is under the impression now, that no one can build a fire in that manner. When we find reference to rubbing-sticks it is probably a slovenly manner of describing the bow and drill and the other similar friction fire implements. For the bow and drill one requires first a
Ever since the writer was a young boy, he has read about starting a fire by rubbing "two sticks" together, and he believed then, as he does now, that no one can actually build a fire that way. When we see references to rubbing sticks, it's likely a careless way of describing the bow drill and other similar friction fire tools. For the bow drill, one first needs a
(Figs. 1, 1A, 1B, 1C and 1D). This is a half round stone or pebble, a half round burl or knot of wood, or it may be made of soft wood with an inlay of a piece of stone. In the bottom of the thimble there is always a shallow hole or socket; see S on Figs. 1, 1A, 1B, 1C and 1D. The thimble is an invention of the Eskimos (Fig. 1C); they keep the spindle upright by holding the pointed upper end of it in a hole (S) drilled into a piece of serpentine, or soapstone.
(Figs. 1, 1A, 1B, 1C and 1D). This is a half-round stone or pebble, a half-round burl or knot of wood, or it might be made from soft wood with a piece of stone inlaid. At the bottom of the thimble, there's always a shallow hole or socket; see S on Figs. 1, 1A, 1B, 1C and 1D. The thimble is an invention by the Eskimos (Fig. 1C); they keep the spindle upright by placing the pointed upper end into a hole (S) drilled into a piece of serpentine or soapstone.
The author has a thimble personally made for him by Major David Abercrombie. This beautiful implement is made of hard fine-grained wood carved into the form of a beetle (Fig. 1B). It is inlaid with copper and semi-precious stones. The socket hole was drilled into a piece of jade (B), using for the purpose some sand and the drill shown in Fig. 23. There was a piece of steel pipe set into the end of the wooden drill with which to bore a hole into the hard jade. The jade was then inlaid or set into the middle of the bottom of the thimble, and cemented there, Fig. 1B. The author also has a thimble made for him by Edmund Seymour of the Camp-fire Club of America. This thimble is a stone fossil with a hole drilled in it, Fig. 1A.
The author has a thimble custom-made for him by Major David Abercrombie. This beautiful tool is crafted from durable, fine-grained wood shaped like a beetle (Fig. 1B). It's inlaid with copper and semi-precious stones. A socket hole was drilled into a piece of jade (B) using some sand and the drill shown in Fig. 23. A piece of steel pipe was fitted into the end of the wooden drill to make the hole in the hard jade. The jade was then set into the center of the bottom of the thimble and cemented in place, Fig. 1B. The author also has a thimble made for him by Edmund Seymour from the Camp-fire Club of America. This thimble is a stone fossil with a drilled hole in it, Fig. 1A.
It is not necessary to tell the reader that when using the bow for power, the twirling spindle cannot be held down with the bare hand, consequently the use of the thimble for that purpose is necessary. Fig. 1C shows an Eskimo thimble so fashioned that it may be held in the fire-maker's mouth.
It’s not needed to explain to the reader that when using the bow for power, you can’t hold the spinning spindle down with your bare hand, so using a thimble for that purpose is essential. Fig. 1C shows an Eskimo thimble designed to be held in the fire-maker's mouth.
Is a stick or branch of wood (Figs. 3, 3E, 3F and 3G) about a foot and a half long and almost an inch in diameter, which[9] has a permanent bend in it—the bend may be natural or may have been made artificially. To the bow is attached a slack thong, or durable string of some kind. The Eskimos, more inventive than the Indians, made themselves beautiful bows of ivory, carving them from walrus tusks, which they shaved down and strung with a loose strip of walrus hide.
Is a stick or branch of wood (Figs. 3, 3E, 3F and 3G) about a foot and a half long and nearly an inch in diameter, which[9] has a permanent curve in it—the curve can be natural or made artificially. To the bow is attached a loose thong or a strong string of some kind. The Eskimos, more inventive than the Indians, crafted beautiful bows out of ivory, carving them from walrus tusks, which they shaped down and strung with a loose strip of walrus hide.
The objection to whang string or belt lacing is that it is apt to be too greasy, so if one can secure a strip of buckskin, a buckskin thong about two inches wide, and twist it into a string, it will probably best serve the purpose (Fig. 6).
The issue with whang string or belt lacing is that it tends to get too greasy, so if you can get a strip of buckskin, a buckskin thong about two inches wide, and twist it into a string, it will likely work best for the purpose (Fig. 6).
The spindle is the twirling stick (Figs. 2, 2A, 2B and 2C) which is usually about a foot long and was used by our American Indians without the bow (Fig. 7). The twirling stick or spindle may be three-quarters of an inch in diameter at the middle; constant use and sharpening will gradually shorten the spindle. When it becomes too short a new one must be made. The end of the spindle should not be made sharp like a lead pencil, but should have a dull or rounded end, with which to bore into the fire-board, thus producing fine, hot charcoal, which in time becomes a spark: that is, a growing ember.
The spindle is the spinning stick (Figs. 2, 2A, 2B and 2C) that is usually about a foot long and was used by our American Indians without the bow (Fig. 7). The spinning stick or spindle may be three-quarters of an inch in diameter at the middle; regular use and sharpening will gradually shorten the spindle. When it gets too short, a new one must be made. The end of the spindle shouldn’t be sharp like a pencil, but should have a dull or rounded end to bore into the fireboard, creating fine, hot charcoal, which eventually turns into a spark: that is, a growing ember.
The fire-board (Figs. 5 and 5A) should be made of spruce, cedar, balsam, tamarack, cottonwood root, basswood, and even dry white pine, maple and, probably, buckeye wood. It should not be made of black walnut, oak or chestnut, or any[10] wood which has a gummy or resinous quality. The fire-board should be of dry material which will powder easily. Dr. Hough recommends maple for the fire-board, or "hearth," as it is called in the Boy Scout Handbook. Make the fire-board about eleven inches long, two inches wide and three-quarters of an inch thick.
The fireboard (Figs. 5 and 5A) should be made from spruce, cedar, balsam, tamarack, cottonwood root, basswood, and even dry white pine, maple, and probably buckeye wood. It shouldn't be made from black walnut, oak, chestnut, or any wood that has a gummy or resinous quality. The fireboard should be made from dry material that will easily turn to powder. Dr. Hough suggests maple for the fireboard, or "hearth," as it's referred to in the Boy Scout Handbook. Make the fireboard about eleven inches long, two inches wide, and three-quarters of an inch thick.
Near the edge of the board, and two inches from the end, begin a row of notches each three-quarter inch long and cut down through the fire-board so as to be wider at the bottom. At the inside end of each notch make an indenture only sufficiently deep to barely hold the end of your spindle while you make the preliminary twirls which gradually enlarge the socket to fit the end of your spindle.
Near the edge of the board, and two inches from the end, start a row of notches, each three-quarters of an inch long and cut down through the fireboard so that they're wider at the bottom. At the inside end of each notch, make a small indent just deep enough to barely hold the end of your spindle while you do the initial twirls, which gradually enlarge the socket to fit the end of your spindle.
When you can procure them, charred rags of cotton or linen make excellent tinder, but the best fabric for that purpose is an old Turkish towel.
When you can get them, charred rags of cotton or linen make great tinder, but the best material for that purpose is an old Turkish towel.
Find a flat stone (Fig. 10), a broad piece of board, a smooth, hard, bare piece of earth; set your cloth afire and after it begins to blaze briskly, smother it out quickly by using a[11] folded piece of paper (Fig. 9), a square section of birch bark or another piece of board. This flapped down quickly upon the flames will extinguish them without disturbing the charred portion (Fig. 10). Or with your feet quickly trample out the flames. Keep your punk or tinder in a water-tight box; a tin tobacco box is good for that purpose, or do like our ancestors did—keep it in a punk horn (Fig. 30).
Find a flat stone (Fig. 10), a wide piece of board, or a smooth, hard patch of soil; light your cloth and once it starts to burn strongly, quickly smother it using a [11] folded piece of paper (Fig. 9), a square piece of birch bark, or another piece of board. This will put out the flames without disturbing the burnt area (Fig. 10). Alternatively, you can stomp out the flames with your feet. Keep your punk or tinder in a waterproof container; a tin tobacco box works well for this, or you can do as our ancestors did—store it in a punk horn (Fig. 30).

Very fine dry grass is good tinder, also the mushroom, known as the puff-ball or Devil's snuff-box. The puff-balls, big ones, may be found growing about the edges of the woods and they make very good punk or tinder. They are prepared by hanging them on a string and drying them out, after which they are cut into thin slices, laid on the board and beaten until all the black dust ("snuff") is hammered out of them, when they are in condition to use as punk or tinder (Fig. 11). In olden times there was a mushroom, toadstool or fungus imported from Germany, and used as punk, but woodcraft consists in supplying oneself with the material at hand; therefore do not forget that flying squirrels (Figs. 12 and 13), white-footed mice (Fig. 14) and voles, or short-tailed meadow mice, are all addicted to collecting good
Very fine dry grass makes great tinder, and so does the mushroom known as the puff-ball or Devil's snuff-box. You can find big puff-balls growing around the edges of the woods, and they work really well as punk or tinder. To prepare them, hang them on a string to dry out, then cut them into thin slices, lay them on a board, and beat them until all the black dust ("snuff") comes out. Once that's done, they're ready to be used as punk or tinder (Fig. 11). In the past, there was a mushroom, toadstool, or fungus that came from Germany and was used as punk, but woodcraft is all about using what you have available. So, remember that flying squirrels (Figs. 12 and 13), white-footed mice (Fig. 14), and voles, or short-tailed meadow mice, all like to collect good

Cedar bark, both red (Fig. 15) and white, the dry inner bark of other trees, dry birch bark, when shredded up very fine, make good tinder. Whether you use the various forms of rubbing-sticks or the flint and steel, it is necessary to catch the spark in punk or tinder in order to develop the flame.
Cedar bark, both red (Fig. 15) and white, along with the dry inner bark of other trees and finely shredded dry birch bark, makes good tinder. Whether you’re using different types of rubbing sticks or flint and steel, it's essential to catch the spark in punk or tinder to create a flame.
First find a level solid foundation on which to place your fire-board, then make a half turn with the string of the bow around the spindle, as in the diagram (Fig. 16); now grasp the thimble with the left hand, put one end of the drill in the socket hole of the thimble, the other end in the socket hole on the fire-board, with your left foot holding the fire-board down. Press your left wrist firmly against your left shin. Begin work by drawing the bow slowly and horizontally back and forth until it works easily, work the bow as one does a fiddle bow when playing on a bass viol, but draw the bow its whole length each time. When it is running smoothly, speed it up.
First, find a flat, solid surface to set your fireboard on. Then, make a half turn with the bowstring around the spindle, as shown in the diagram (Fig. 16). Now hold the thimble with your left hand, placing one end of the drill into the socket hole of the thimble and the other end into the socket hole on the fireboard, using your left foot to keep the fireboard steady. Press your left wrist firmly against your left shin. Start by moving the bow slowly and horizontally back and forth until it glides easily. Use the bow like you would when playing a bass viol, but draw it the full length each time. Once it’s running smoothly, pick up the speed.


Or when you feel that the drill is biting the wood, press harder on the thimble, not too hard, but hard enough to hold the drill firmly, so that it will not slip out of the socket but will continue to bite the wood until the "sawdust" begins to appear. At first it will show a brown color, later it will become black and begin to smoke until the thickening smoke[14] announces that you have developed the spark. At this stage you gently fan the smoking embers with one hand. If you fan it too briskly, as often happens, the powder will be blown away.
Or when you feel the drill gripping the wood, press down firmly on the thimble— not too hard, but enough to keep the drill steady so it doesn’t slip out of the socket and keeps biting into the wood until you start to see some "sawdust." At first, it’ll be brown; eventually, it will turn black and start to smoke until the thickening smoke[14] tells you that you’ve created a spark. At this point, gently fan the smoking embers with one hand. If you fan too hard, which often happens, the powder will just blow away.
As soon as you are satisfied that you have secured a spark, lift the powdered embers on the fire-pan and place carefully on top of it a bunch of tinder, then blow till it bursts into flame (Fig. 8A). Or fold the tinder over the spark gently, take it up in your hand and swing it with a circular motion until the flame flares out.
As soon as you're sure you've got a spark, lift the powdered embers on the fire-pan and carefully place a bunch of tinder on top of it, then blow until it catches fire (Fig. 8A). Alternatively, you can gently fold the tinder over the spark, pick it up in your hand, and swing it in a circular motion until the flame ignites.

Even to this day peasantry throughout the Carpathian and Balkan peninsulas build their fires with a "rubbing-stick." But these people not being campers have a permanent fire machine made by erecting two posts, one to represent the fire-stick and the other the socket thimble. The spindle runs horizontally between these two posts and the pressure is secured by a thong or cord tied around the two posts, which tends to pull them toward each other. The spindle is worked by a bow the same as the one already described and the fire is produced in the same manner.
Even today, people in the Carpathian and Balkan peninsulas start their fires using a "rubbing-stick." However, since these folks aren't campers, they have a permanent fire setup made by putting up two posts, one acting as the fire-stick and the other as the socket thimble. The spindle runs horizontally between these two posts, and pressure is maintained by a thong or cord tied around the posts, which pulls them toward each other. The spindle is operated with a bow, just like the one described earlier, and the fire is created in the same way.
My pupils in the Woodcraft Camp built fires successfully by using the rung of a chair for the spindle, a piece of packing case for a fire-board, and another piece for the socket wood and the string from their moccasins for a bow string. They used no bow, however, and two or three boys were necessary to make a fire, one to hold the spindle and two others to saw on the moccasin string (Fig. 17).
My students at the Woodcraft Camp successfully built fires using a chair rung as the spindle, a piece of packing crate for the fireboard, and another piece for the socket wood, along with the string from their moccasins for the bowstring. They didn’t actually use a bow, though, and it took two or three boys to start a fire—one to hold the spindle and two others to saw on the moccasin string (Fig. 17).

is made of two pieces of bamboo, or fish pole. This is the oldest instrument for fire making used by the Bontoc Igorot and is now seldom found among the men of the Philippines. Practically all Philippine boys, however, know how to make and use it and so should our boys here, and men, too. It is called "co-li-li" and is made of two pieces of dry bamboo. A two-foot section of dead and dry bamboo is first split lengthwise and in one piece, a small area of the stringy tissue lining of the tube is splintered and picked until quite loose (Fig. 18). Just over the picked fibres, but on the outside of the bamboo, a narrow groove is cut across it (Fig. 18G). This[16] piece of bamboo is now the stationary lower part or "fire-board" of the machine. One edge of the other half of the original tube is sharpened like a chisel blade's edge (Fig. 19); it is then grasped with one hand at each end and is slowly and heavily sawed backward and forward through the groove in the board, and afterwards worked more rapidly, thus producing a conical pile of dry dust on the wad of tinder picked from the inside of the bamboo or previously placed there. (Figs. 20 and 21). Fig. 22 is the fire-pan.
is made of two pieces of bamboo, or a fishing pole. This is the oldest tool for making fire used by the Bontoc Igorot and is now rarely seen among the men of the Philippines. Almost all Filipino boys, however, know how to make and use it, and so should our boys here, as well as the men. It’s called "co-li-li" and consists of two pieces of dry bamboo. A two-foot section of dead, dry bamboo is first split lengthwise, and in one piece, a small section of the stringy inner lining of the tube is shredded and picked until quite loose (Fig. 18). Just above the shredded fibers, but on the outside of the bamboo, a narrow groove is carved into it (Fig. 18G). This[16] piece of bamboo is now the stationary lower part or "fire-board" of the tool. One edge of the other half of the original tube is sharpened like a chisel blade's edge (Fig. 19); it is then held with one hand at each end and is slowly and heavily sawed back and forth through the groove in the board, and then worked more quickly, producing a conical pile of dry dust on the wad of tinder picked from the inside of the bamboo or previously placed there. (Figs. 20 and 21). Fig. 22 is the fire-pan.
"After a dozen strokes," says our authority, Mr. Albert Ernest Jenks, "the sides of the groove and the edge of the piece are burned down; presently a smell of smoke is plain and before three dozen strokes have been made, smoke may be seen. Usually before a hundred strokes a larger volume of smoke tells us that the dry dust constantly falling on the pile has grown more and more charred until finally a tiny spark falls, carrying combustion to the already heated dust cone."
"After about twelve strokes," says our expert, Mr. Albert Ernest Jenks, "the sides of the groove and the edge of the piece start to burn. Soon, you can clearly smell smoke, and before you reach thirty strokes, you might actually see smoke. Typically, before you hit a hundred strokes, a thicker cloud of smoke indicates that the dry dust continuously landing on the pile has become increasingly charred, until finally a small spark falls, igniting the already heated dust pile."
The fire-board is then carefully lifted and if the pinch of dust is smouldering it may now be gently fanned with the hand until the tinder catches; then it may be blown into a flame.
The fireboard is then carefully lifted, and if the pinch of dust is smoldering, it can be gently fanned with the hand until the tinder catches; then it can be blown into a flame.

Fig. 23 shows another form of drill. For this one it is necessary to have a weight wheel attached to the lower part of the spindle. A hole is made through its center and the drill fitted to this. The one in Fig. 23 is fitted out with a rusty iron wheel which I found under the barn. Fig. 23C shows a pottery weight wheel which I found many years ago in a gravel-pit in Mills Creek bottoms at Cincinnati, Ohio. It was brick-red in color and decorated[17] with strange characters. For many, many years I did not know for what use this unique instrument was intended. I presented it to the Flushing High School (Long Island), where I trust it still remains. The fire-drill is twirled by moving the bow up and down instead of backward and forward.
Fig. 23 shows another type of drill. For this one, you need to attach a weight wheel to the lower part of the spindle. A hole is made through its center, and the drill fits into this. The one in Fig. 23 has a rusty iron wheel that I found under the barn. Fig. 23C shows a pottery weight wheel I discovered many years ago in a gravel pit in Mills Creek bottoms in Cincinnati, Ohio. It was brick-red and decorated[17] with odd characters. For a long time, I didn’t know what this unique tool was used for. I donated it to Flushing High School (Long Island), where I hope it still is. The fire-drill is spun by moving the bow up and down instead of back and forth.
Many of the American Indians made friction fire in this manner. They spun the thin spindle by rolling it between the palms of their hands and as pressure was exerted the hands gradually slid down to the thick lower end of the spindle. To again get the hands to the top of the drill requires practice and skill. Personally the writer cannot claim any success with this method.
Many Native Americans made fire through friction in this way. They spun a slender spindle by rolling it between their palms, and as they applied pressure, their hands slowly moved down to the thicker bottom end of the spindle. Getting their hands back to the top of the drill takes practice and skill. Personally, the writer cannot say they've had any success with this method.

The simplest method of friction is that of the plow, which requires only a fire-board with a gutter in it and a rubbing-stick to push up and down the gutter (Fig. 24). Captain Belmore Browne of Mt. McKinley fame made a fire by this last method when his matches were soaked with water. It is, however, more difficult to produce the fire this way than with the thong and[18] bow. It is still used in the Malay Islands; the natives place the fire-board on a stump or stone, straddle it and with a pointed drill plow the board back and forth until they produce fire. Time: Forty seconds.
The simplest way to create fire through friction is with a plow method, which just needs a fireboard with a groove in it and a rubbing stick to move up and down the groove (Fig. 24). Captain Belmore Browne, known for his adventures on Mt. McKinley, used this method to start a fire when his matches got wet. However, it's actually harder to make fire this way than with the thong and bow technique. This method is still used in the Malay Islands; the locals place the fireboard on a stump or stone, straddle it, and use a pointed drill to push the board back and forth until they create fire. Time: Forty seconds.
Of course it is unnecessary to tell anyone that he can start a fire with a sunglass (Fig. 25) or with the lens of a camera, or with the lens made from two old-fashioned watch crystals held together. But as the sun is not always visible, as lenses are not supposed to grow in the wild woods and were not to be found in the camps and log cabins of the pioneers, and as watch crystals have short lives in the woods, we will pass this method of fire making without matches as one which properly belongs in the classroom.
Of course, it's unnecessary to remind anyone that they can start a fire using sunglasses (Fig. 25) or the lens of a camera, or with the lens made from two old-fashioned watch crystals held together. But since the sun isn't always shining, lenses don’t grow in the wild woods and aren’t available in the camps and log cabins of the pioneers, and watch crystals don’t last long in the woods, we'll skip over this method of making fire without matches, as it really belongs in a classroom setting.

Before or about the time of the American Revolution some gentleman invented a fire piston (Fig. 26) with which he ignited punk made of fungus by the heat engendered by the sudden compression of the air.
Before or around the time of the American Revolution, some gentleman invented a fire piston (Fig. 26) that ignited punk made of fungus using the heat generated by the sudden compression of air.
The ancient gentleman describes his invention as follows: "The cylinder is about nine inches long, and half an inch in diameter; it terminates in a screw on which screws the magazine intended to hold a bougie, and some fungus. A steel rod is attached to a solid piston, or plunger, not shown in the figure, it being within the tube. This rod has a milled head and there is a small hole in the tube to admit the air, when the piston is drawn up to the top, where a piece unscrews, for the purpose of applying oil or grease to the piston. I have found lard to answer the end best."
The old gentleman describes his invention like this: "The cylinder is about nine inches long and half an inch wide; it ends with a screw on which the magazine, meant to hold a bougie and some fungus, attaches. A steel rod is connected to a solid piston, or plunger, which isn’t shown in the figure since it's inside the tube. This rod has a notched head, and there’s a small hole in the tube to let air in when the piston is pulled up to the top, where a piece unscrews to allow for applying oil or grease to the piston. I’ve found that lard works best for this purpose."

"Take from the magazine a small piece of fungus, place it in the chamber, screw the piece tight on and draw the piston up by the end, till it stops. Hold the instrument with both hands in the manner represented in Fig. 26, place the end on a table or against any firm body, either in a perpendicular, horizontal or vertical direction, and force the piston down with as much rapidity as possible. This rapid compression of the air will cause the fungus to take fire. Instantly after the stroke of the piston, unscrew the magazine, when the air will rush in, and keep up the combustion till the fungus is consumed. Observe, in lighting the tinder, the fungus must be lifted up a little from the chamber, so as to allow the tinder to be introduced beneath it, otherwise it will not kindle.
"Take a small piece of fungus from the magazine, place it in the chamber, screw it tight, and pull the piston up by the end until it stops. Hold the instrument with both hands as shown in Fig. 26, and set the end on a table or against a solid surface, either vertically, horizontally, or at an angle, then push the piston down as quickly as you can. This fast compression of air will make the fungus catch fire. Right after you push the piston, unscrew the magazine, and the air will rush in to keep the fire going until the fungus is burned up. Note that when lighting the tinder, the fungus should be lifted slightly from the chamber to allow the tinder to be placed underneath; otherwise, it won't ignite."
"Here it may be remarked that the instrument thus constructed has a decided advantage over the fire-cane, where the fungus is inserted at such a depth as not easily to be reached."
"Here it can be noted that the instrument built this way has a clear advantage over the fire-cane, where the fungus is placed at a depth that’s not easy to access."
But in Burmah they had the same idea. There the coolies still light their cigarettes with a fire-piston. The Philippinos also use the same machine and ignite a wad of cotton stuck on the end of the piston by suddenly forcing the piston into air-tight cylinders, and when the piston is quickly withdrawn the cotton is found to be aflame, so it may be that the Colonial gentleman had traveled to the Indies and borrowed his idea from the Burmahs, or the Philippinos. At any rate we do not use it to-day in the woods, but it finds place here because it belongs to the friction fires and may be good as a suggestion for those among my readers of experimental and inventive minds.
But in Burma, they had the same idea. There, the workers still light their cigarettes with a fire-piston. The Filipinos also use the same device and ignite a cotton wad stuck on the end of the piston by quickly forcing the piston into air-tight cylinders, and when the piston is swiftly pulled out, the cotton is on fire. So, it’s possible that the Colonial gentleman traveled to the Indies and borrowed his idea from the Burmese or the Filipinos. At any rate, we don’t use it today in the woods, but it’s worth mentioning here because it’s related to friction fires and might be a useful suggestion for those among my readers who have experimental and inventive mindsets.
FOOTNOTES:
CHAPTER II
FIRE MAKING BY PERCUSSION
- THE WHITE MAN'S METHOD; HOW TO USE FLINT AND STEEL
- WHERE TO OBTAIN THE FLINT AND STEEL
- CHUCKNUNCKS, PUNK BOXES, SPUNKS AND MATCHES
- REAL LUCIFER MATCHES
- SLOW MATCH
- HOW TO CATCH THE SPARK
- SUBSTITUTES FOR FLINT AND STEEL
FIRE MAKING BY PERCUSSION
The preceding methods of producing fire by friction are not the white man's methods, and are not the methods used by our pioneer ancestors. The only case the writer can remember in which the pioneer white people used rubbing-sticks to produce fire, is one where the refugees from an Indian uprising and massacre in Oregon made fire from rubbing-sticks made of the bits of the splintered wood of a lightning stricken tree. On that occasion they evidently left home in a great hurry, without their flints and steels.
The previous ways of starting a fire by friction aren’t the methods used by white settlers, nor were they used by our pioneer ancestors. The only instance I can recall where early white settlers used rubbing sticks to create fire is when refugees from an Indian uprising and massacre in Oregon made fire using sticks made from splintered wood of a lightning-struck tree. In that situation, they clearly left home in a hurry, without their flints and steels.
But this one instance in itself is sufficient to show to all outdoor people the great importance of the knowledge and ability to make friction fires. Like our good friend, the artist, explorer and author, Captain Belmore Browne, one may at any time get in a fix where one's matches are soaked, destroyed or lost and be compelled either to eat one's food raw or resort to rubbing-sticks to start a fire.
But this one example is enough to demonstrate to all outdoor enthusiasts the significant value of knowing how to make friction fires. Like our good friend, the artist, explorer, and author, Captain Belmore Browne, you could find yourself in a situation where your matches are wet, ruined, or missing and you might have to either eat your food raw or use rubbing sticks to start a fire.
It is well, however, to remember that the flint and steel is
It is good to remember that the flint and steel is
And notwithstanding the fire canes of our Colonial dudes, or the Pyropneumatic apparatus of the forgotten Mr. Bank, fire by percussion, that is, fire by friction of flint and steel, was universal here in America up to a quite recent date, and it is still in common use among many of my Camp-fire Club friends, and among many smokers.
And despite the fancy fire-starting tools of our Colonial guys, or the outdated Pyropneumatic device of the forgotten Mr. Bank, starting a fire by striking flint and steel was common here in America until quite recently, and it’s still widely used among many of my Camp-fire Club friends and many smokers.
In the age of flint and steel, the guns were all fired by this method. Fig. 33 shows the gun-lock of an old musket; the hammer holds a piece of flint, a small piece of buckskin is folded around the inside edge of the flint and serves to give a grip to the top part of the hammer which is screwed down. To fire the gun the hammer is pulled back at full cock, the steel sets opposite the hammer and is joined to the top of the powder-pan by a hinge. When the trigger is pulled the hammer comes down, striking the flint against the steel, throwing it back and exposing the powder at the same time to the sparks which ignite the powder in the gun by means of the touch hole in the side of the barrel of same. This is the sort of a hammer and lock used by all of our ancestors up to the time of the Civil War, and it is the sort of a hammer used by the Confederates as late as the battle of Fort Donaldson. In the olden times some people had flint lock pistols without barrels, which were used only to ignite punk for the purpose of fire-building. But when one starts a fire by means of flint and steel one's hands must act the part of the hammer, the back of one's knife may be the steel, then a piece of flint or a gritty rock and a piece of punk will produce the spark necessary to generate the flames.
In the era of flint and steel, all guns were fired using this technique. Fig. 33 shows the gun-lock of an old musket; the hammer holds a piece of flint, and a small piece of buckskin is folded around the inner edge of the flint to provide a grip for the top part of the hammer, which is secured with a screw. To fire the gun, the hammer is pulled back to full cock. The steel rests opposite the hammer and is connected to the top of the powder-pan by a hinge. When the trigger is pulled, the hammer descends, striking the flint against the steel, which sends it back and simultaneously exposes the powder to the sparks that ignite the powder in the gun through the touch hole on the side of the barrel. This type of hammer and lock was used by all our ancestors up until the Civil War, and it was also used by the Confederates as late as the battle of Fort Donelson. In earlier times, some people had flint lock pistols without barrels, which were only used to ignite punk for starting fires. However, when starting a fire with flint and steel, one's hands must act as the hammer. The back of a knife can serve as the steel, and a piece of flint or a gritty rock along with some punk can produce the spark needed to create flames.
In the good old pioneer days, when we all wore buckskin clothes and did not bother about the price of wool, when we wore coonskin caps and cared little for the price of felt hats, everybody, from Miles Standish and George Washington to Abraham Lincoln, used flint and steel. Fig. 27 shows ten different forms of steel used by our grandsires and granddames.
In the good old pioneer days, when we all wore leather clothes and didn’t think about the price of wool, when we wore coonskin caps and didn’t care much for the price of felt hats, everyone, from Miles Standish and George Washington to Abraham Lincoln, used flint and steel. Fig. 27 shows ten different types of steel used by our grandparents.

Flint in its natural condition may be found in many states,
but, as a rule, any stone which was used by the Indians for[25]
[26]
[27]
arrowheads will answer as a substitute for flint,[C] that is,
any gritty or glassy stone, like quartz, agate, jasper or iron
pyrites. Soft stones, limestones, slate or soapstones are not
good for this purpose.
Flint can be found in its natural state in many places, but generally, any stone used by the Native Americans for arrowheads will work as a substitute for flint, such as any gritty or glassy stone like quartz, agate, jasper, or iron pyrites. However, soft stones like limestones, slate, or soapstones aren’t suitable for this purpose.
Most of the old steels were so made that one might grasp them while thrusting one's fingers through the inside of the oval steel, Fig. 28 (left handed). Some of the Scoutmasters of the Boy Scouts of America make their own steels of broken pieces of flat ten-cent files, but this is unnecessary because every outdoor man, and woman, too, is supposed to carry a good sized jack-knife and the back of the blade of the jack-knife, or the back of the blade of one's hunting knife is good enough steel for anyone who has acquired the art of using it as a steel.
Most of the old steels were designed so that you could hold them while pushing your fingers through the inside of the oval steel, Fig. 28 (left-handed). Some of the Scoutmasters of the Boy Scouts of America make their own steels from broken pieces of flat ten-cent files, but this isn't necessary because every outdoor person, including women, is expected to carry a good-sized jackknife, and the back of the blade of the jackknife or the back of the blade of a hunting knife is suitable steel for anyone who has learned how to use it as a steel.
But if you must have steels manufactured at the machine shop or make them yourself, let them be an inch wide, a quarter of an inch thick, and long enough to form an ellipse like one of those shown in Fig. 27. Have the sharp edges rounded off. If you desire you may have your steel twisted in any of the shapes shown in Fig. 27 to imitate the ones used by your great granddaddies.
But if you need to get steel made at the machine shop or make it yourself, let it be an inch wide, a quarter of an inch thick, and long enough to create an ellipse like the ones shown in Fig. 27. Make sure the sharp edges are rounded off. If you want, you can have your steel twisted into any of the shapes shown in Fig. 27 to replicate the ones your great-grandparents used.
But the neatest thing in the way of flint and steel which has come to the writer's attention is shown by Fig. 31. This[28] is a small German silver box which still contains some of the original fungus used for punk and an ancient, well-battered piece of flint. Around the box is fitted the steel in the form of a band, and the whole thing is so small that it may be carried in one's vest pocket. This was once the property of Phillip Hagner, Lieutenant, of the City of Philadelphia at the time of the Revolution, that is, custodian of city property. He took the Christ Church bells from Philadelphia to Bethlehem by ox-cart before the city was occupied by the British. Phillip Hagner came from Saxony about 1700 and settled in Germantown, Philadelphia. This silver box was presented to the National Scout Commissioner by Mr. Isaac Sutton, Scout Commissioner for Delaware and Montgomery Counties, Boy Scouts of America.
But the coolest thing related to flint and steel that I've come across is shown by Fig. 31. This[28] is a small German silver box that still holds some of the original fungus used for tinder and an old, well-worn piece of flint. The box is surrounded by a steel band, and it's so compact that it can fit in your vest pocket. This once belonged to Phillip Hagner, a Lieutenant of the City of Philadelphia during the Revolution, meaning he was responsible for the city's assets. He transported the Christ Church bells from Philadelphia to Bethlehem by ox-cart before the British took over the city. Phillip Hagner arrived from Saxony around 1700 and settled in Germantown, Philadelphia. This silver box was given to the National Scout Commissioner by Mr. Isaac Sutton, Scout Commissioner for Delaware and Montgomery Counties, Boy Scouts of America.
The cowhorn punk box is made by sawing off the small end and then the point of a cow's horn (Fig. 30). A small hole is next bored through the solid small end of the horn to connect with the natural open space further down, a strip of rawhide or whang string larger than the hole is forced through the small end and secured by a knot on the inside, which prevents it from being pulled out. The large end of the horn is closed by a piece of thick sole leather attached to the thong, by tying a hard knot in the end and pulling the thong through a hole in the center of the stopper until the knot is snug against the leather disk; this should be done before the wet leather is allowed to dry. If the thong and leather stopper are made to fit the horn tightly, the dry baked rags, the charred cotton, or whatever substance you use for punk, when placed in the horn will be perfectly protected from moisture or dampness.
The cowhorn punk box is created by cutting off the small end and then the tip of a cow's horn (Fig. 30). A small hole is then drilled through the solid small end of the horn to connect with the open space further down. A strip of rawhide or a thicker string, larger than the hole, is pushed through the small end and secured with a knot inside, which keeps it from being pulled out. The large end of the horn is sealed with a piece of thick sole leather attached to the thong, by tying a strong knot at the end and pulling the thong through a hole in the center of the stopper until the knot is snug against the leather disk; this should be done before the wet leather dries. If the thong and leather stopper fit tightly in the horn, the dry baked rags, charred cotton, or whatever material you use for punk, when placed inside the horn, will remain perfectly protected from moisture or dampness.
These old sulphur "spunks" were nothing more than kindling wood or tinder, because they would not ignite by rubbing but were lighted by putting the sulphur end in the flame. According to our modern ideas of convenience they appear very primitive. They were called "spunks" in England and "matches" in America, and varied in length from three to seven inches, were generally packed in bundles from a dozen to two dozen and tied together with bits of straw. Some spunks made as late as 1830 are considered rare enough to be carefully preserved in the York Museum in England (Fig. 32½). The ones illustrated in Fig. 32 are a Long Island product, and were given to the author by the late John Halleran, the most noted antique collector on Long Island. These are carefully preserved among the antiquities in the writer's studio. But they are less than half the length of the ones formerly used on the Western Reserve. With the ancient matches in the studio are also two old pioneer tinder boxes with flints and steels. The tinder boxes are made of tin and contain a lot of baked rags. The inside lid acts as an extinguisher with which to cover up the punk or tinder in the box after you have lighted the candle in the tin lid of the box (Fig. 32).
These old sulfur "spunks" were just kindling wood or tinder because they wouldn't ignite by rubbing but were lit by placing the sulfur end in the flame. By today's standards of convenience, they seem very primitive. They were called "spunks" in England and "matches" in America, ranging in length from three to seven inches, and were usually packed in bundles of a dozen to two dozen, tied together with bits of straw. Some spunks made as late as 1830 are considered rare enough to be carefully preserved in the York Museum in England (Fig. 32½). The ones shown in Fig. 32 are a Long Island product and were given to the author by the late John Halleran, the most well-known antique collector on Long Island. These are carefully stored among the antiques in the writer's studio. However, they are less than half the length of those formerly used in the Western Reserve. Alongside the ancient matches in the studio are also two old pioneer tinder boxes with flints and steels. The tinder boxes are made of tin and contain a lot of baked rags. The inside lid works as an extinguisher used to cover the punk or tinder in the box after lighting the candle in the tin lid of the box (Fig. 32).
The matches we use today are evolved from these old sulphur spunks. When the writer was a little fellow up in the Western Reserve on the shores of Lake Erie, he was intensely interested in an old lady making sulphur matches. Over the open fire she melted the sulphur in an iron kettle in which she dipped the ends of some pine slivers. The sulphur on the end of the sticks was then allowed to cool and harden. These matches were about the length of a lead pencil and could only be lighted by thrusting the sulphur[30] into the flame. So, although having been born in the age of Lucifer matches, the writer was yet fortunate enough to see manufactured and to remember the contemporary ancestors of our present-day "safety" match.
The matches we use today have come a long way from those old sulfur sticks. When I was a kid in the Western Reserve by Lake Erie, I was really fascinated by an elderly woman who made sulfur matches. Over an open fire, she melted sulfur in an iron pot, dipping the ends of some pine sticks into it. The sulfur on the ends of the sticks was then left to cool and harden. These matches were about the size of a pencil and could only be lit by pushing the sulfur into the flame. So, even though I was born in the age of Lucifer matches, I was lucky enough to see and remember the early versions of our modern "safety" match.
That is, the match which lights from friction, is the invention of Isaac Holden, M. P. According to the Pall Mall Gazette, Mr. Holden said, "In the morning I used to get up at 4 o'clock in order to pursue my studies, and I used at that time the flint and steel, in the use of which I found very great inconvenience. Of course, I knew, as other chemists did, the explosive material that was necessary in order to produce instantaneous light, but it was very difficult to obtain a light on wood by that explosive material, and the idea occurred to me to put sulphur under the explosive mixture. I did that and showed it in my next lecture on chemistry, a course of which I was delivering at a large academy."
That is, the friction match was invented by Isaac Holden, M.P. According to the Pall Mall Gazette, Mr. Holden said, "In the morning I used to get up at 4 o'clock to study, and I used flint and steel at that time, which I found very inconvenient. Of course, I knew, like other chemists, about the explosive material needed to produce instantaneous light, but it was very hard to get a flame on wood using that explosive. Then I had the idea to put sulfur under the explosive mixture. I did that and demonstrated it in my next chemistry lecture, which I was giving at a large academy."
Because every real woodsman is a student, as well as a sentimentalist, a brief history is given of these fire implements to entertain him as we jog along the "trace." All these things are blazes which mark the trail to the button in our wall which now produces the electric light. Some of them, like the clay cylinders found in the ruins of Babylon, are only useful in a historical sense, but many of them are essentially practical for woodcraft.
Because every true woodsman is a learner as well as a sentimentalist, a quick history of these fire tools is provided to engage him as we stroll along the trail. All these items are signs that lead to the switch in our wall that now powers the electric light. Some of them, like the clay cylinders discovered in the ruins of Babylon, serve only a historical purpose, but many of them are fundamentally practical for outdoor skills.
The slow match or punk rope to fit in the brass cylinder may be made of candle wick or coach wick purchased at the hardware store; such wick is about three-eighths of an inch in diameter. Scout Commissioner John H. Chase of Youngstown,[31] Ohio, suggests that the rope may be made from the wastes of a machine shop or a garage; but one of the best woodsmen I know is Mr. Frederick K. Vreeland, and he uses the apparatus shown by Fig. 34, which is made of the yellow fuse rope, or punk rope, which may be purchased at cigar stores. He fastens a cork in one end of the rope by a wire, he pulls the other end of the rope through the end of the brass cartridge shell which has been filed off for that purpose. The end of the fuse rope must be charred, so as to catch the spark. To get the spark he takes the back of the blade of his knife (Fig. 35), and strikes the bit of flint as you would with flint and steel, holding the charred end of the punk against the flint, as shown by the diagram (Fig. 29). Loose cotton and various vegetable fibers twisted into a rope soaked in water and gunpowder will make good punk when dry.
The slow match or punk rope that fits in the brass cylinder can be made from candle wick or coach wick bought at a hardware store; this wick is about three-eighths of an inch in diameter. Scout Commissioner John H. Chase from Youngstown, [31] Ohio, suggests that the rope could be made from scraps in a machine shop or garage; however, one of the best woodsmen I know, Mr. Frederick K. Vreeland, uses the setup shown by Fig. 34, which consists of yellow fuse rope, or punk rope, available at cigar stores. He secures a cork at one end of the rope with a wire, then threads the other end through the prepared end of the brass cartridge shell that has been filed down. The end of the fuse rope needs to be charred to catch the spark. To create the spark, he takes the back of his knife blade (Fig. 35) and strikes it against a piece of flint, similar to using flint and steel, while holding the charred end of the punk against the flint, as illustrated in the diagram (Fig. 29). Loose cotton and different plant fibers twisted into a rope and soaked in water and gunpowder can also make good punk when dried.
Place the charred end of the rope on the flint, the charred portion about one thirty-second of an inch back of the edge of the flint where the latter is to be struck by the steel; hold the punk in place with the thumb of the left hand, as in the diagram (Fig. 29). Hold the knife about six inches above at an angle of about forty-five degrees from the flint, turn your knife so that the edge of the back of the blade will strike, then come down at an angle about thirty-five degrees with a sharp scraping blow. This should send the spark into the punk at the first or second blow. Now blow the punk until it is all aglow and you are ready to set your tinder afire. Push the punk into the middle of a handful of tinder and blow it until it is aflame, and the deed is done!
Place the burned end of the rope on the flint, with the burned part about one thirty-second of an inch behind the edge of the flint that will be struck by the steel; hold the punk in place with your left thumb, as shown in the diagram (Fig. 29). Hold the knife about six inches above at a forty-five-degree angle to the flint, position the knife so that the back edge of the blade will hit, then bring it down at about a thirty-five-degree angle with a strong scraping motion. This should produce a spark into the punk with the first or second strike. Now blow on the punk until it glows, and you're ready to ignite your tinder. Push the punk into the middle of a handful of tinder and blow on it until it catches fire, and the job is done!
All these pocket contrivances for striking fire were formerly known as "striker-lights" or "chucknucks."
All these small gadgets for making fire were once called "striker-lights" or "chucknucks."
The Malays having neither flint nor steel ingeniously substitute for the flint a piece of broken chinaware, and for the steel a bamboo joint, and they produce a spark by striking the broken china against the joint of the bamboo, just as we do with the flint and steel.
The Malays, lacking flint and steel, cleverly use a piece of broken china in place of flint and a bamboo joint instead of steel. They create a spark by striking the broken china against the bamboo joint, similar to how we use flint and steel.
FOOTNOTE:
[C] Today flint may be obtained at Bannermans, 501 Broadway, New York City, where they also have ancient steels which were used by the U. S. soldiers. The flints may also be purchased from Wards Natural Science Establishment at Rochester, New York, and the author found a plentiful supply of flints at one of the Army and Navy stores in New York.
[C] Today, you can get flint at Bannermans, 501 Broadway, New York City, where they also have old steel tools used by U.S. soldiers. You can also buy flint from Wards Natural Science Establishment in Rochester, New York, and the author found a good supply of flint at an Army and Navy store in New York.
CHAPTER III
HOW TO BUILD A FIRE
- HOW TO LAY AND LIGHT A FIRE
- AN EXPERIENCE WITH TENDERFEET
- MODERN FEAR OF DOING MANUAL LABOR
- MATCHES
- FIRE-MAKERS AND BABYLONIANS
- THE PALPITATING HEART OF THE CAMP
- GUMMY FAGOTS OF THE PINE
- HOW TO MAKE A FIRE IN WET WEATHER
- BACKWOODSMEN'S FIRE
- THE NECESSITY OF SMALL KINDLING WOOD
- GOOD FIREWOOD
- ADVANTAGE OF SPLIT WOOD
- FIRE-DOGS
- HOW TO OPEN A KNIFE
- HOW TO WHITTLE; HOW TO SPLIT A STICK WITH A KNIFE
- BONFIRES AND COUNCIL FIRES
- CAMP MEETING TORCH FIRES
- EXPLODING STONES
- CHARACTER IN FIRE
- SLOW FIRES, SIGNAL FIRES AND SMUDGES
HOW TO BUILD A FIRE
"By thy camp-fire they shall know thee."
A party of twenty or thirty men once called at the author's studio and begged that he would go with them on a hike, stating that they intended to cook their dinner out-of-doors. We went on the hike. The author asked the gentlemen to collect the wood for the fire; they did so enthusiastically and heaped up about a quarter of a cord of wood. There was no stick in the pile less than the thickness of one's arm, and many as thick as one's leg. A fine misty rain was falling and everything was damp. While all the other hikers gathered around, one of them carefully lighted a match and applied it to the heap of damp cord wood sticks. Match after match he tried, then turned helplessly to the writer with the remark, "It won't light, sir," and none there saw the humor of the situation!
A squad of twenty or thirty guys once came to the author's studio and asked him to join them for a hike, explaining that they planned to cook their dinner outside. We set off on the hike. The author asked the guys to gather firewood; they eagerly collected and stacked about a quarter of a cord of wood. There wasn't a stick in the pile thinner than a person's arm, and many were as thick as a leg. A light, misty rain was falling, making everything damp. While the other hikers gathered around, one of them carefully struck a match and tried to ignite the pile of wet wood. He tried match after match, then turned to the writer with a helpless remark, "It won't light, sir," and no one there saw the humor in the situation!
Had anyone told the writer that from twenty-five to thirty men could be found, none of whom could build a fire, he would have considered the statement as highly improbable, but if he had been told that any intelligent man would try to light cord wood sticks, wet or dry, by applying a match to them, he would have branded the story as utterly beyond belief. It is, however, really astonishing how few people there are who know how to build a fire even when supplied with plenty of fuel and abundant matches.
Had anyone told the writer that between twenty-five to thirty men could be found, none of whom knew how to build a fire, he would have thought that claim was pretty unlikely. But if someone had told him that any smart person would try to light cordwood sticks, wet or dry, by just putting a match to them, he would have dismissed that story as completely unbelievable. It’s truly surprising how few people know how to build a fire even when they have plenty of fuel and lots of matches.
It may be well to call the reader's attention to the fact that it takes very little moisture to spoil the scratch patch[36] on a box of safety matches and prevent the match itself from igniting. The so-called parlor match, which snaps when one lights it and often shoots the burning head into one's face or on one's clothes, is too dangerous a match to take into the woods. The bird's-eye match is exceedingly unreliable on the trail, but the old-fashioned, ill-smelling Lucifer match, sometimes called sulphur match, the kind one may secure at the Hudson Bay Trading Post, the kind that comes in blocks and is often packed in tin cans, is the best match for woodcrafters, hunters, explorers, and hikers. Most of the outfitting stores in the big cities either have these matches or can procure them for their customers. When one of these matches is damp it may be dried by running it through one's hair.
It’s important to note that it takes very little moisture to ruin the striking surface on a box of safety matches and prevent the match from lighting. The so-called parlor match, which snaps when you try to light it and often sends the burning head flying into your face or onto your clothes, is too dangerous to take into the woods. The bird's-eye match is highly unreliable on the trail, but the old-fashioned, smelly Lucifer match, sometimes called a sulfur match—the kind you can get at the Hudson Bay Trading Post, which comes in blocks and is often packed in tin cans—is the best choice for woodcrafters, hunters, explorers, and hikers. Most outfitting stores in large cities either carry these matches or can get them for their customers. If one of these matches gets damp, you can dry it by running it through your hair.[36]

Nowadays manual labor seems to be looked upon by everyone more in the light of a disgrace or punishment than as a privilege; nevertheless, it is a privilege to be able to labor, it is a privilege to have the vim, the pep, the desire and the ability to do things. Labor is a necessary attribute[37] of the doer and those who live in the open; no one need attempt so simple a thing as the building of a fire and expect to succeed without labor.
These days, manual labor is seen by many more as a shame or punishment than as a privilege; however, it is a privilege to be able to work, it is a privilege to have the energy, enthusiasm, the desire, and the ability to get things done. Work is a fundamental quality[37] of those who act and those who embrace the outdoors; no one should think they can do something as straightforward as building a fire without putting in effort.
The shirk, the quitter, or the side-stepper has no place in the open; his habitat is on the Great White Way among the Babylonians of the big cities. He does not even know the joys of a fire; he never sees a fire except when some building is burning. His body is heated by steam radiators, his food is cooked in some mysterious place beyond his ken, and brought to him by subservient waiters. He will be dead and flowers growing on his grave when the real fire-makers are just attaining the full vigor of their manhood.
The slacker, the quitter, or the one who avoids responsibility has no place in the open; his territory is on the busy streets among the people of the big cities. He doesn’t even know the pleasures of a fire; he only sees fire when a building is burning down. His body is warmed by steam radiators, his food is prepared in some unknown place, and brought to him by obedient waitstaff. He will be long gone, with flowers on his grave, when the true creators are just reaching their full strength as adults.
Captain Belmore Browne says that the trails of the wilderness are its arteries; we may add that all trails proceed from camp or lead to camp, and that the camp-fire is the living, life-giving, palpitating heart of the camp; without it all is dead and lifeless. That is the reason that we of the outdoor brotherhood all love the fire; that is the reason that the odor of burning wood is incense to our nostrils; that is the reason that the writer cannot help talking about it when he should be telling
Captain Belmore Browne says that the trails in the wilderness are like its arteries; we can add that all trails start from camp or lead to camp, and that the campfire is the living, life-giving heart of the camp; without it, everything is dead and lifeless. That's why those of us in the outdoor brotherhood love the fire; that's why the smell of burning wood is like incense to us; that's why the writer can't help but talk about it when he should be sharing
Do not forget that lighting a fire in hot, dry weather is child's play, but that it takes a real camper to perform the same act in the damp, soggy woods on a cold, raw, rainy day, or when the first damp snow is covering all the branches of the trees and blanketing the moist ground with a slushy mantle of white discomfort! Then it is that fire making[38] brings out all the skill and patience of the woodcrafter; nevertheless when he takes proper care neither rain, snow nor hail can spell failure for him.
Don't forget that starting a fire in hot, dry weather is easy, but it takes a true camper to do the same in the wet, soggy woods on a cold, dreary, rainy day, or when the first wet snow covers the branches of the trees and blankets the damp ground with a slushy layer of uncomfortable white! That's when fire-making[38] really showcases all the skill and patience of a woodcrafter; however, when he takes proper care, neither rain, snow, nor hail can defeat him.
In the mountains of Pennsylvania the old backwoodsmen, of which there are very few left, invariably build their fires with dry pine, or pitch pine sticks.
In the mountains of Pennsylvania, the old backwoodsmen, of which there are very few left, always build their fires with dry pine or pitch pine sticks.
With their axe they split a pine log (Fig. 42), then cut it into sticks about a foot long and about the thickness of their own knotted thumbs, or maybe a trifle thicker (Fig. 40); after that they proceed to whittle these sticks, cutting deep shavings (Fig. 37), but using care to leave one end of the shavings adhering to the wood; they go round and round the stick with their knife blade making curled shavings until the piece of kindling looks like one of those toy wooden trees one used to find in his Noah's Ark on Christmas morning (Fig. 37).
With their axe, they split a pine log (Fig. 42), then cut it into sticks about a foot long and about the thickness of their knotted thumbs, or maybe just a bit thicker (Fig. 40); after that, they start to whittle these sticks, cutting deep shavings (Fig. 37), but making sure to leave one end of the shavings attached to the wood. They go around the stick with their knife blade, making curled shavings until the piece of kindling looks like one of those toy wooden trees you used to find in your Noah's Ark on Christmas morning (Fig. 37).
Before they do this, however, they are careful to have a supply of small slivers of pitch pine, white pine or split pine knots handy (Fig. 36). These they set up around the shaved sticks, maybe adding some hemlock bark, and by the time it is all ablaze they are already putting on larger sticks of ash, black birch, yellow birch, sugar maple or oak.
Before doing this, though, they make sure to have a supply of small slivers of pitch pine, white pine, or split pine knots ready (Fig. 36). They place these around the shaved sticks, maybe adding some hemlock bark, and by the time it’s all on fire, they’re already adding larger sticks of ash, black birch, yellow birch, sugar maple, or oak.

For be it known that however handy pitch pine is for
starting a fire, it is not the material used as fuel in the fire
itself, because the heavy smoke from the pitch blackens up
the cooking utensils, gives a disagreeable taste to the food,[39]
[40]
[41]
spoils the coffee and is not a pleasant accompaniment
even for a bonfire.
In the North woods, in the land of the birch trees, green birch bark is universally used as kindling with which to start a fire; green birch bark burns like tar paper. But whether one starts the fire with birch bark, shaved pine sticks or miscellaneous dry wood, one must remember that
In the North woods, in the land of the birch trees, green birch bark is commonly used as kindling to start a fire; green birch bark burns like tar paper. However, whether you start the fire with birch bark, shaved pine sticks, or various dry wood, you must remember that
Burns much better than wood in its natural form, and that logs from twelve to fourteen inches are best for splitting for fuel (Fig. 42); also one must not forget that in starting a fire the smaller the slivers of kindling wood are made, the easier it is to obtain a flame by the use of a single match (Fig. 36), after which the adding of fuel is a simple matter. A fire must have air to breathe in order to live, that is a draught, consequently kindling piled in the little wigwam shape is frequently used.
Burns much better than wood in its natural state, and logs that are twelve to fourteen inches in diameter are ideal for splitting for fuel (Fig. 42); also, it’s important to remember that when starting a fire, the smaller the pieces of kindling wood are, the easier it is to get a flame from just one match (Fig. 36), after which adding more fuel is straightforward. A fire needs air to survive, which means it requires a draft, so kindling is often arranged in a small teepee shape.
For an ordinary, unimportant fire the "turkey-lay" (Fig. 54) is handy, but for camp-fires and cooking fires we use andirons on which to rest the wood, but of course in the forests we do not call them andirons. They are not made of iron; they are either logs of green wood or stones and known to woodsmen by the name of "fire-dogs."
For a regular, unremarkable fire, the "turkey-lay" (Fig. 54) is useful, but for campfires and cooking fires, we use andirons to hold the wood. However, in the forests, we don’t call them andirons. They aren’t made of iron; they’re either logs of green wood or stones, and woodsmen refer to them as "fire-dogs."
While we are on the subject of fire making it may be worth while to call the reader's attention to the fact that every outdoor person should know how to use a pocket knife, a jack-knife or a hunter's knife with the greatest efficiency and the least danger.
While we're on the topic of making fire, it’s important to highlight that every outdoor enthusiast should know how to use a pocket knife, a jack-knife, or a hunter's knife effectively and safely.
To those of us who grew up in the whittling age, it may seem odd or even funny that anyone should deem it necessary[42] to tell how to open a pocket knife. But today I fail to recall to my mind a single boy of my acquaintance who knows how to properly handle a knife or who can whittle a stick with any degree of skill, and yet there are few men in this world with a larger acquaintance among the boys than myself. Not only is this true, but I spend two months of each year in the field with a camp full of boys, showing them how to do the very things with their knives and their axes described in this book.
To those of us who grew up in the era of whittling, it might seem strange or even amusing that anyone would feel the need[42] to explain how to open a pocket knife. But today, I can't think of a single boy I know who knows how to properly handle a knife or can whittle a stick with any skill, and yet there are few men in this world who have a broader circle of boys than I do. Not only is this the case, but I also spend two months each year in the field with a camp full of boys, teaching them how to do the very things with their knives and axes described in this book.

It is safe to say that when the old-timers were boys themselves, there was not a lad among them who could not whittle with considerable skill and many a twelve year old boy was an adept at the art. I remember with the keenest pleasure the rings, charms and knick-knacks which I carved with a pocket knife before I had reached the scout age of twelve. Today, however, the boys handle their knives so awkwardly as to make the chills run down the back of an onlooker.
It’s safe to say that when the older guys were boys themselves, there wasn't a kid among them who couldn’t whittle pretty well, and many twelve-year-olds were really skilled at it. I remember with great fondness the rings, charms, and little trinkets I carved with a pocket knife before I turned twelve and became a scout. Today, though, the boys handle their knives so clumsily that they send chills down the spine of anyone watching.
In order to properly open a knife, hold it in your left hand, and with the thumbnail of your right hand grasp the blade at the nail notch (Fig. 45) in such a manner that the line of the nail makes a very slight angle; that is, it is as near perpendicular[43] as may be (Fig. 46), otherwise you will bend back your thumbnail until it hurts or breaks. Pull the blade away from your body, at the same time drawing the handle of the knife towards the body (Figs. 47 and 48). Continue this movement until the blade is fully open and points directly from your body (Fig. 49).
To properly open a knife, hold it in your left hand, and with the thumbnail of your right hand, grip the blade at the nail notch (Fig. 45) in such a way that your nail forms a slight angle; ideally, it should be almost perpendicular[43] (Fig. 46). If not, you risk bending your thumbnail back to the point of pain or breaking it. Pull the blade away from your body while simultaneously pulling the handle of the knife toward you (Figs. 47 and 48). Keep this motion going until the blade is fully open and points directly away from your body (Fig. 49).
Practise this and make it a habit; you will then never be in danger of stabbing yourself during the process of opening your knife—you will open a knife properly and quickly by what is generally termed intuition, but what is really the result of training and habit.
Practice this and make it a habit; you'll never be at risk of stabbing yourself while opening your knife—you’ll open a knife properly and quickly by what’s generally called intuition, but what’s actually the result of training and habit.
The age of whittling began with the invention of the pocket knife and reached its climax about 1840 or '50, dying out some time after the Civil War, probably about 1870. All the old whittlers of the whittling age whittled away from the body. If you practise whittling that way it will become a habit.
The era of whittling started with the creation of the pocket knife and peaked around 1840 or '50, fading out after the Civil War, likely around 1870. All the old whittlers from that time carved away from their bodies. If you practice whittling this way, it will become a habit.
Indians use a crooked knife and whittle towards the body, but the queer shape of their knife does away with the danger of an accidental stab or slash. Cobblers use a wicked sharp knife and cut towards their person and often are severely slashed by it, and sometimes dangerously wounded, because a big artery runs along the inside of one's leg (Fig. 41½) near where most of the scars on the cobbler's legs appear. When you whittle do not whittle with a stick between your legs as in Fig. 41, and always whittle away from you as in Fig. 44.
Indians use a curved knife and carve towards their bodies, but the unique shape of their knife reduces the risk of accidentally stabbing or cutting themselves. Cobblers use a really sharp knife and cut towards themselves, often resulting in severe cuts and sometimes serious injuries, because a major artery runs along the inside of the leg (Fig. 41½) where many of the scars on the cobbler's legs appear. When you carve, do not carve with a stick between your legs as in Fig. 41, and always carve away from yourself as in Fig. 44.
Fig. 40 shows the proper way to use the knife in splitting a stick, so that it will not strain the spring at the back of the[44] handle of the knife, and at the same time it will help you guide the knife blade and tend to make a straight split. Do not try to pry the stick apart with a knife or you will sooner or later break the blade, a serious thing for a wilderness man to do, for it leaves him without one of the most useful tools.
Fig. 40 demonstrates the right way to use the knife for splitting a stick, ensuring it doesn’t put stress on the spring at the back of the [44] knife handle, while also helping you control the knife blade to make a straight cut. Don't try to pry the stick apart with a knife, or you'll eventually break the blade, which is a significant issue for someone in the wilderness, as it means losing one of the most useful tools.
Remember that fine slivers of wood make a safer and more certain start for a fire than paper. All tenderfeet first try dry leaves and dry grass to start their fires. This they do because they are accustomed to the use of paper and naturally seek leaves or hay as a substitute for paper. But experience soon teaches them that leaves and grass make a nasty smudge or a quick, unreliable flame which ofttimes fails to ignite the wood, while, when proper care is used, small slivers of dry wood never fail to give satisfactory results.
Remember that small pieces of dry wood are a safer and more reliable way to start a fire than paper. All beginners first try using dry leaves and dry grass to get their fires going. They do this because they’re used to using paper and naturally look for leaves or hay as a replacement. But experience quickly shows them that leaves and grass create a dirty smoke or a fast, unreliable flame that often won’t light the wood. On the other hand, when handled properly, small pieces of dry wood always deliver great results.
There are many sorts of fires used by campers and all are dependent upon the local supply of fuel; in the deforested districts of Korea the people use twisted grass for fuel, on our Western plains the hunters formerly used buffalo chips and now they use cow chips, that is, the dry manure of cattle, with which to build their fires for cooking their meals and boiling their coffee. In the Zurn belt, in Tartary and Central India cattle manure is collected, piled up like cord wood and dried for fuel. A few years ago they used corn on the cob for firewood in Kansas. It goes without saying that buffalo chips are not good for bonfires or any fire where a big flame or illumination is an object.
There are many types of fires used by campers, and they all depend on the local supply of fuel. In the deforested areas of Korea, people use twisted grass as fuel; on our Western plains, hunters used to rely on buffalo chips, and now they use cow chips—essentially, the dry manure of cattle—to build their fires for cooking meals and boiling coffee. In the Zurn belt, in Tartary and Central India, cattle manure is collected, stacked like firewood, and dried for fuel. A few years ago, people in Kansas even used corn on the cob as firewood. It's obvious that buffalo chips aren’t ideal for bonfires or any fire where a big flame or lots of light is needed.

In both of these forms there are air spaces purposely left between the sticks of wood, which insure a quick and ready draught the moment the flames start to flicker in the kindling.
In both of these forms, there are gaps intentionally left between the sticks of wood, which ensure a quick and easy draft as soon as the flames begin to flicker in the kindling.
The best form of council fire is shown by Fig. 52, and known as the
The best type of council fire is illustrated by Fig. 52, and recognized as the
The tower is built exactly similar to the Boy Scout signal towers but on a smaller scale (Fig. 52).
The tower is built exactly like the Boy Scout signal towers, just smaller in size (Fig. 52).
However tempting a smooth rock may look as a convenient spot on which a fire may be built, do not fail to spread a few shovels of sand, earth or clay on the stone as a fire bed, for the damp rock on becoming heated may generate steam and either expand with some violence or burst like a bomb-shell and scatter far and wide the fragments, even endangering the lives of those gathered around the fire.
However tempting a smooth rock may look as a convenient spot to build a fire, make sure to spread a few shovels of sand, dirt, or clay on the stone as a fire bed. A damp rock, when heated, can create steam and either expand violently or explode like a bomb, scattering fragments far and wide and potentially endangering the lives of those gathered around the fire.
The natives of Australia take dry logs, 6 ft. or more in length, and laying them down 3 ft. or 4 ft. apart, set them on fire in several places. Letting shorter logs meet them from the outside, and placing good-sized pebbles around them, they then stretch themselves on the ground and sleep between the two lines of fire, and when the wood is consumed the stones continue for some time to radiate the heat they have previously absorbed. Many tribes of American Indians have their own special fashion of fire building, so that a deserted camp fire will not infrequently reveal the identity of the tribe by which it was made.
The Indigenous people of Australia take dry logs, 6 feet or longer, and lay them down 3 to 4 feet apart, lighting them on fire in several places. They position shorter logs so that they connect from the outside and place good-sized pebbles around them. Then, they lie down on the ground and sleep between the two lines of fire, and once the wood is burned down, the stones continue to radiate heat for a while, having absorbed it earlier. Many tribes of Native Americans have their own unique way of building fires, so a deserted campfire often reveals the identity of the tribe that made it.
The camper's old method of making a slow fire was also used by housekeepers for their open fire-places, and consisted of placing three logs with their glowing ends together.
The camper's old way of building a slow fire was also used by housekeepers for their open fireplaces, and involved placing three logs with their glowing ends together.
As the ends of the logs burned off the logs were pushed forward, this being continued until the logs were entirely consumed. Three good logs thus arranged will burn all day or all night, but someone must occasionally push them so that their ends come together, when they send their heat from one to the other, backwards and forwards, and thus keep the embers hot (Fig. 53). But who wants to sit up all night watching a fire? I prefer to use the modern method and sleep all night.
As the ends of the logs burned, they were pushed forward, and this continued until the logs were completely consumed. Three good logs set up like this can burn all day or all night, but someone has to occasionally push them so their ends touch, allowing them to transfer heat back and forth and keep the embers hot (Fig. 53). But who wants to stay up all night watching a fire? I’d rather use a more modern approach and sleep through the night.
Sharpen the ends of two strong heavy stakes each about 5 ft. in length, cut a notch in the rear of each near the top, for the support or back to key into, drive the stakes into the ground about 6 ft. apart. Place three logs one on the other, making a log wall for the back of your fire-place. Next take two shorter logs and use them for fire-dogs, and on these lay another log and the arrangement will be complete. A fire of this kind will burn during the longest night and if skillfully made will cause little trouble. The fire is fed by placing fuel between the front log and the fire-back.
Sharpen the ends of two sturdy, heavy stakes, each about 5 feet long. Cut a notch near the top of each stake for support. Drive the stakes into the ground about 6 feet apart. Stack three logs on top of each other to create a log wall for the back of your fireplace. Then, take two shorter logs and use them as fire-dogs, placing another log on top of them to complete the setup. This type of fire will burn all night long, and if built properly, it won't give you much hassle. Feed the fire by placing fuel between the front log and the fire-back.
When the greatest elevations of land are selected the smoke signals may be seen at a distance of from twenty to fifty miles. Signal fires are usually made with dry leaves, grass and weeds or "wiry willows," balsam boughs, pine and cedar boughs, because such material produces great volumes of smoke and may be seen at a long distance. The Apaches have a simple code which might well be adopted by all outdoor people. According to J. W. Powell, Director of U. S. Bureau of Ethnology, the Indians use but three kinds of signals, each of which consists of columns of smoke.
When the highest points of land are chosen, smoke signals can be seen from twenty to fifty miles away. Signal fires are usually made with dry leaves, grass, weeds, or "wiry willows," as well as balsam, pine, and cedar branches, because these materials create large amounts of smoke that can be spotted from far away. The Apaches have a simple signaling system that could be adopted by anyone who spends time outdoors. According to J. W. Powell, Director of the U.S. Bureau of Ethnology, the Indians use only three types of signals, each consisting of columns of smoke.
Three or more smoke columns reads impending danger from flood, fire or foe. This signal may be communicated from one camp to another, so as to alarm a large section of the country in remarkably quick time. The greater the haste desired the greater the number of smokes used. These fires are often so hastily made that they may resemble puffs of smoke caused by throwing heaps of grass and leaves upon the embers again and again.
Three or more columns of smoke indicate imminent danger from floods, fires, or enemies. This signal can be communicated from one camp to another, quickly alerting a large area. The more urgent the situation, the more smoke columns are used. These fires are often made so quickly that they look like puffs of smoke from repeatedly throwing piles of grass and leaves onto the embers.
"This signal is generally made by producing one continuous column and signifies attention for several purposes, viz., when a band had become tired of one locality, or the grass may have been consumed by the ponies, or some other cause necessitated removal, or should an enemy be reported which would require further watching before a decision as to future action would be made. The intention or knowledge of anything unusual would be communicated to neighboring bands by causing one column of smoke to ascend."
"This signal is usually made by creating one continuous column of smoke and indicates attention for various reasons, like when a group gets tired of one location, the ponies have eaten all the grass, or some other reason calls for a move. It can also be used if an enemy is reported, requiring further observation before deciding on future actions. Any awareness of something unusual would be shared with nearby groups by sending up one column of smoke."
"When a removal of camp has been made, after the signal for Attention has been given, and the party have selected a place where they propose to remain until there may be a necessity or desire for their removal, two columns of smoke are made, to inform their friends that they propose to remain at that place. Two columns are also made at other times during a long continued residence, to inform the neighboring bands that a camp still exists, and that all is favorable and quiet."
"When a campsite is established after the signal for Notice has been given, and the group has chosen a spot to stay until they need or want to move, they create two columns of smoke to let their friends know they plan to stay there. They also make two columns of smoke at other times during a long stay to inform nearby groups that the camp is still active and everything is okay and calm."
Therefore, Three or more smokes in daylight, or Three or more flames at night, is a signal of alarm, One smoke a signal for attention, Two smokes tells us that all is well, peaceful and happy.
Therefore, Three or more smokes during the day, or Three or more flames at night, is a sign of alarm, One smoke is a call for attention, and Two smokes indicate that everything is okay, peaceful, and happy.
The usual way of signalling with smoke is to make a smudge fire of browse or grass and use a blanket as an extinguisher. By covering the fire with the blanket and suddenly removing it, a large globular puff of smoke is made to suddenly appear, and is certain to attract the attention of anyone who happens to be looking toward the site of the fire.
The common method for signaling with smoke is to create a smudge fire using twigs or grass and use a blanket to put it out. By covering the fire with the blanket and then quickly taking it off, a big, round puff of smoke suddenly appears, which is sure to grab the attention of anyone looking in the direction of the fire.
If it is practical it is naturally better to shovel away the snow, but personally I have never done this except in case of newly fallen snow. Old snow which is more or less frozen to the ground may be tramped down until it is hard and then covered with a corduroy of sticks for a hearth (Figs. 55 and 56) or with bark (Fig. 57) and on top of this flooring it is a simple matter to build a fire. Use the turkey-"lay" in which one of the sticks acts the part of the fire-dog (Fig. 56).
If it’s practical, it’s obviously better to shovel the snow, but personally, I’ve only done this when there’s fresh snow. Old snow that’s frozen to the ground can be packed down until it’s hard and then covered with a layer of sticks for a makeshift hearth (Figs. 55 and 56) or with bark (Fig. 57), and on top of this flooring, it’s easy to build a fire. Use the turkey-"lay" where one of the sticks serves as the fire-dog (Fig. 56).
The reader will note that in all these illustrations (Figs. 55, 56, and 57), there is either a log or stone or a bank for a back to the fire-place. When everything is covered with snow it is perfectly safe to use a log for a back (Fig. 56) but on other occasions the log may smoulder for a week and then start a forest fire.
The reader will notice that in all these illustrations (Figs. 55, 56, and 57), there is either a log, rock, or a bank used as a back for the fireplace. When everything is blanketed in snow, it’s completely safe to use a log as a back (Fig. 56), but at other times, the log could smolder for a week and then ignite a forest fire.
No one but an arrant, thoughtless, selfish Cheechako will use a live growing tree against which to build a fire.[50] A real woodcraft knows that a fire can ruin in a few minutes a mighty forest tree that God himself cannot replace inside of from forty to one hundred years.
No one but a careless, selfish newcomer would use a live tree to build a fire.[50] A true woodsman knows that a fire can destroy in just a few minutes a majestic tree that God himself cannot replace in less than forty to a hundred years.
While we are talking of building fires in the snow, it may be well to remark that an uninhabitable and inaccessible swamp in the summer is often the best of camping places in the winter time. The water freezes and falls lower and lower, leaving convenient shelves of ice (Fig. 57) for one's larder. The dense woods and brush offer a splendid barrier to the winter winds. Fig. 59 shows an arrangement for a winter camp-fire.
While we're discussing how to build fires in the snow, it's worth noting that a swamp that's unlivable and hard to get to in the summer can actually be one of the best camping spots in winter. The water freezes and recedes, creating handy ice shelves (Fig. 57) for your supplies. The thick trees and underbrush provide an excellent shield against the winter winds. Fig. 59 shows a setup for a winter campfire.
Spread a piece of bark on the ground to serve as a hearth on which to start your fire. Seek dry wood by splitting the log and taking the pieces from the center of the wood, keep the wood under cover of your tent, poncho, coat or blanket. Also hold a blanket or some similar thing over the fire while you are lighting it. After the blaze begins to leap and the logs to burn freely, it will practically take a cloud-burst to extinguish it.
Spread a piece of bark on the ground to create a base for your fire. Look for dry wood by splitting the log and taking pieces from the center. Keep the wood protected under your tent, poncho, coat, or blanket. Also, hold a blanket or something similar over the fire while you're lighting it. Once the flames start jumping and the logs are burning well, it would take a downpour to put it out.

CHAPTER IV
HOW TO LAY A GOOD COOKING FIRE
- A PERSONAL EXPERIENCE ON SHORT RATIONS
- THE MOST PRIMITIVE OF COOKING OUTFITS
- CAMP POT-HOOKS, THE GALLOW-CROOK, THE POT-CLAW, THE HAKE, THE GIB, THE SPEYGELIA AND THE SASTER
- TELEGRAPH WIRE COOKING IMPLEMENTS, WIRE GRID-IRON, SKELETON CAMP STOVE
- COOKING FIRES, FIRE-DOGS, ROASTING FIRE-LAY, CAMP-FIRE LAY, BELMORE LAY, FRYING FIRE LAY, BAKING FIRE LAY
- THE AURES CRANE
HOW TO LAY A GOOD COOKING FIRE
No matter where the old camper may be, no matter how long a time may have elapsed since last he slept in the open, no matter how high or low a social or official position he may now occupy, it takes but one whiff of the smoke of an open fire, or one whiff of the aroma of frying bacon, to send him back again to the lone trail. In imagination he will once more be hovering over his little camp-fire in the desert, under the shade of the gloomy pines, mid the snows of Alaska, in the slide rock of the Rockies or mid the pitch pines of the Alleghenies, as the case may be.
No matter where the old camper is, no matter how long it's been since he last slept outside, no matter what social or official status he currently holds, just one whiff of an open fire's smoke, or the delicious smell of frying bacon, can instantly take him back to the solitary trail. In his mind, he'll once again find himself gathered around his small campfire in the desert, beneath the dark pines, in the snowy expanses of Alaska, on the rocky slopes of the Rockies, or among the pitch pines of the Alleghenies, depending on the situation.
That faint hint in the air of burning firewood or the delicious odor of the bacon, for the moment, will not only wipe from his vision his desk, his papers and his office furniture, but also all the artificialities of life. Even the clicking of the typewriter will turn into the sound of clicking hoofs, the streets will become canyons, and the noise of traffic the roar of the mountain torrent!
That faint smell of burning firewood or the appetizing scent of bacon, for a moment, will not just erase from his sight his desk, his papers, and his office furniture, but also all the artificial aspects of life. Even the clicking of the typewriter will transform into the sound of hoofbeats, the streets will become canyons, and the noise of traffic will be the roar of a mountain stream!
There is no use talking about it, there is no use arguing about it, there is witchcraft in the smell of the open fire, and all the mysteries and magic of the Arabian Nights dwell in the odor of frying bacon.
There’s no point in discussing it, there’s no point in arguing about it, there is something magical in the scent of an open fire, and all the mysteries and magic of the Arabian Nights are wrapped up in the smell of frying bacon.
Some years ago Mr. Arthur Rice, the Secretary of the Camp-fire Club of America, and Patrick Cleary, a half-breed Indian, with the author, became temporarily separated from their party in the Northern wilds. They found themselves on a lonely wilderness lake surrounded by picture mountains, and dotted with tall rocky islands covered with Christmas trees, giving the whole landscape the appearance[56] of the scenery one sometimes sees painted on drop-curtains for the theatre. Everything in sight was grand, everything was beautiful, everything was built on a generous scale, everything was big, not forgetting the voyagers' appetites!
Some years ago, Mr. Arthur Rice, the Secretary of the Camp-fire Club of America, and Patrick Cleary, a half-breed Indian, along with the author, temporarily got separated from their group in the Northern wilderness. They found themselves on a secluded lake surrounded by stunning mountains and dotted with tall rocky islands covered in Christmas trees, giving the whole view the look of a picturesque scene often painted on theater drop curtains. Everything in sight was magnificent, everything was beautiful, everything was built on a grand scale, everything was large, not to mention the voyagers' appetites!
Unfortunately the provisions were in the missing canoe; diligent search, however, in the bottom of Patrick Cleary's ditty bag disclosed three small, hard, rounded lumps, which weeks before might have been bread; also a handful of tea mixed with smoking tobacco, and that was all! There was no salt, no butter, no pepper, no sugar, no meat, no knives, no forks, no spoons, no cups, no plates, no saucers and no cooking utensils; the party had nothing but a few stone-like lumps of bread and the weird mixture of tea and tobacco with which to appease their big appetites. But in the lake the trout were jumping, and it was not long before the hungry men had secured a fine string of spotted beauties to add to their menu.
Unfortunately, the supplies were in the missing canoe. A thorough search of Patrick Cleary's ditty bag revealed three small, hard, rounded lumps that might have been bread weeks earlier; also, there was a handful of tea mixed with smoking tobacco, and that was it! They had no salt, no butter, no pepper, no sugar, no meat, no knives, no forks, no spoons, no cups, no plates, no saucers, and no cooking utensils; the group had nothing but a few stone-like lumps of bread and the strange mix of tea and tobacco to satisfy their big appetites. But in the lake, the trout were jumping, and it wasn’t long before the hungry men had caught a nice string of spotted beauties to add to their menu.
Under the roots of a big spruce tree, at the bottom of a cliff on the edge of the lake, a fountain of cold crystal water spouted from the mossy ground. Near this they built a fire while Mr. Rice fashioned a little box of birch bark, filled it with water and placed it over the hot embers by resting the ends of the box on fire-dogs of green wood. Into the water in the birch bark vessel was dumped the tea (and—also tobacco)!
Under the roots of a large spruce tree, at the base of a cliff by the lake, a stream of cold, clear water bubbled up from the mossy ground. Nearby, they made a fire while Mr. Rice crafted a small box out of birch bark, filled it with water, and set it over the hot coals by resting the ends of the box on green wooden fire-dogs. Into the water in the birch bark container, they added the tea (and—also tobacco)!
To the amazement and delight of the Indian half-breed, the tea was soon boiling. Meanwhile the half-breed toasted some trout until the fish were black, this being done so that the charcoal or burnt skins might give a flavor to the fish, and in a measure compensate for the lack of salt. The hunks of bread were burned until they were black, not for flavor this time, but in order that the bread might be brittle enough[57] to allow a man to bite into it with no danger of breaking his teeth in the attempt.
To the surprise and pleasure of the Indian half-breed, the tea was soon boiling. Meanwhile, the half-breed cooked some trout until the fish were charred; this was done so the burnt skin could add flavor to the fish and somewhat make up for the lack of salt. The pieces of bread were also burnt until they were black, not for flavor this time, but to make the bread brittle enough[57] so a person could bite into it without risking breaking their teeth.
To-day it seems to the author that that banquet on that lonely lake, miles from the nearest living human being, was more delicious and more satisfying than any of the feasts of Belshazzar he has since attended in the wonder city of New York.
To day it seems to the author that that banquet on that lonely lake, miles from the nearest living human being, was more delicious and more satisfying than any of the feasts of Belshazzar he has since attended in the wonder city of New York.
Therefore, when taking up the subject of cooking fire and camp kitchen, he naturally begins with
Therefore, when discussing cooking fires and camp kitchens, he naturally starts with
If any one of the camp pot-hooks had been drawn in the old-time writing book or copybook, it would have brought down the wrath (with something else) of the old-fashioned school-master, upon the devoted head of the offending pupil. For these pot-hooks are not regular in form and the shape[58] and designs largely depend upon the available material from which they are fashioned, and not a little upon the individual fancy of the camper. For instance the one known as
If any of the camp pot-hooks had been drawn in an old-fashioned writing book or copybook, it would have triggered the anger (along with other things) of the traditional schoolmaster, directed at the unfortunate student who made the mistake. These pot-hooks aren't consistent in shape, and their design mostly depends on the materials available for making them, as well as the personal creativity of the camper. For example, the one known as
When the waugan-stick has been thrust through the loop of the gallow-crook, the former is replaced in the crotches of the two forked sticks, as in Fig. 63, and the pot or kettle, pail or bucket, is hooked on to the lower fork. You will note that the lower fork is upon the opposite side of the main stick from that from which the switch prong of the upper fork springs. This arrangement is not necessary to make the pot balance properly over the fire; the same rule holds good for all the other pot-hooks.[D]
When the waugan-stick is pushed through the loop of the gallow-crook, it's placed back in the splits of the two forked sticks, as shown in Fig. 63, and the pot or kettle, pail or bucket, is hung on the lower fork. You'll notice that the lower fork is on the opposite side of the main stick from where the switch prong of the upper fork comes out. This setup isn't necessary for the pot to balance correctly over the fire; the same rule applies to all the other pot-hooks.[D]

[60]
[61] fork may be hooked over the waugan-stick and the cooking utensils, pots or kettles may be hung over the fire by slipping their handles into the notch cut in the stick on the side opposite to the fork and near the lower end of the pot-claw. This is a real honest-to-goodness Buckskin or Sourdough pot-hook; it is one that requires little time to manufacture and one that is easily made wherever sticks grow, or wherever "whim" sticks or driftwood may be found heaped upon the shore.
In a book of this kind the details of all these designs are given not because any one camper is expected to use them all, but because there are times when any one of them may be just the thing required. It is well, however, to say that the most practicable camp pot-hooks are the pot-claw and the hake.
In a book like this, the details of all these designs are included not because any camper is expected to use them all, but because there might be times when any one of them is exactly what you need. That said, it's important to note that the most practical camp pot-hooks are the pot-claw and the hake.
In making a pot-claw care should be taken to cut the notch on the opposite side of the forked branch, and at the other end of the claw, deep enough to hold the handle of the cooking utensils securely.
In making a pot-claw, you should be careful to cut the notch on the opposite side of the forked branch, and at the other end of the claw, deep enough to securely hold the handle of the cooking utensils.
While the author was on an extended trip in the blustering North land his party had a pot-claw as crooked as a yeggman, and as knotty as a problem in higher mathematics. While there can be no doubt that one of the party made this hoodoo affair it has never yet been decided to whom the credit belongs—because of the innate modesty of the men no one claims the honor. This misshapen pot-claw was responsible for spilling the stew on several occasions, not to speak of losing the boiled rice. Luckily one of the party was a stolid Indian, one a consistent member of the Presbyterian church, one a Scout and one a member of the Society of Friends, consequently the air was not blue and the only remarks made were, "Oh my!" "Bless my soul!" and "Gee willikens!"
While the author was on a long trip in the windy North, his group had a pot-claw that was as twisted as a criminal and as complicated as a math problem. Although it’s clear that someone in the group caused this bad luck, it has never been agreed upon who deserves the credit—thanks to the natural modesty of the men, no one steps up to take the honor. This misshapen pot-claw spilled the stew several times and even caused the boiled rice to go missing. Fortunately, one of the group was a calm Indian, another was a dedicated member of the Presbyterian church, one was a Scout, and one was part of the Society of Friends, so the atmosphere was not tense and the only exclamations made were, "Oh my!" "Bless my soul!" and "Gee willikens!"
The cook in despair put the wicked thing in the fire with muttered hints that the fire might suggest the region where such pot-hooks belong. While it burned and its evil spirit dissolved in smoke, the Indian made a new pot-claw, a respectable pot-claw with a straight character, and a more secure notch. This one by its benign presence brought peace and good will to the camp and showed the necessity of taking pains and using care in the manufacture of even so lowly a thing as a pot-claw.
The cook, feeling hopeless, threw the nasty thing into the fire, mumbling that the flames might indicate where such pot-hooks should be. As it burned and its bad energy turned to smoke, the Indian fashioned a new pot-claw, a decent pot-claw with a straight design and a stronger notch. This one, with its positive presence, brought peace and kindness to the camp, demonstrating the importance of putting in effort and being careful when making even something as humble as a pot-claw.
The camp pot-hooks should be of various lengths; long[63] ones to bring the vessels near the fire where the heat is more intense; short ones to keep the vessels further from the fire so that their contents will not cook but only keep warm; and medium ones for simmering or slow cooking.
The camp pot-hooks should come in different lengths; long ones to bring the pots closer to the fire where the heat is stronger; short ones to keep the pots further away from the fire so their contents won't cook, just warm up; and medium ones for simmering or slow cooking.
Many campers are fond of making for themselves cooking utensils improvised from ordinary telegraph wire. In the old time open fire-places of our grandsires' kitchen there were trammels consisting of chains hanging down the chimney on which things were hooked by short pot-hooks to hang over the fire; there were also rakens made of bands of iron with holes punched in them for the attachment of short iron pot-hooks[64] (Fig. 76). With these ancient implements in their minds, some ingenious campers manufacture themselves rakens and short pot-hooks from telegraph wire (Fig. 77). By twisting the wire in a series of short loops, each loop can be made to serve as a place for attaching the pot-hooks as did the holes in the old-fashioned rakens. The advantages they claim for the telegraph wire raken are lightness and its possibility of being readily packed.
Many campers enjoy making their own cooking utensils from regular telegraph wire. In the old open fireplaces of our grandparents' kitchens, there were trammels made of chains hanging down from the chimney, where items were attached with short pot-hooks to hang over the fire. There were also rakens made of iron strips with holes punched in them to attach short iron pot-hooks[64] (Fig. 76). Inspired by these old tools, some resourceful campers create their own rakens and short pot-hooks from telegraph wire (Fig. 77). By twisting the wire into a series of short loops, each loop can be used as a spot to attach the pot-hooks, similar to the holes in traditional rakens. The benefits they mention for the telegraph wire raken are its lightness and the ease of packing it up.


The disadvantage of all these implements is that they
must be toted wherever one goes, and parts are sure to be
lost sooner or later, whereupon the camper must resort to
things "with the bark on 'em," like the gallow-crook, the
pot-claw, the hake, the gib, the speygelia, or the saster, or[65]
[66]
[67]
he may go back to the first principles and sharpen the forks
of a green wand and impale thereon the bacon, game or fish
that it may be thus toasted over the hot embers (Fig. 80).
We do not put meat over the fire because it will burn on the
outside before it cooks and the fumes of the smoke will
spoil its flavor.
The downside of all these tools is that you have to carry them wherever you go, and parts are bound to get lost sooner or later. When that happens, the camper has to resort to using things "with the bark on them," like the gallow-crook, the pot-claw, the hake, the gib, the speygelia, or the saster, or[65]
[66]
[67] they might go back to basics and sharpen the forks of a green stick to impale the bacon, game, or fish so that it can be toasted over the hot embers (Fig. 80). We don’t put meat over the fire because it will burn on the outside before it cooks through, and the smoke will ruin its flavor.
According to Mr. Seton, away up in the barren lands they use the saster with a fan made of a shingle-like piece of wood, fastened with a hitch to a piece of wire and a bit of string; the wind—when it is good-natured—will cause the cord to spin round and round. But the same result is secured with a cord which has been soaked in water to prevent it from burning, and which has also been twisted by spinning the meat with one's hands (Fig. 75). Such a cord will unwind and wind more or less slowly for considerable time, thus causing the meat to expose all sides of its surface to the heat of the roasting fire in front of which it hangs. You will note we say in front; again let us impress upon the reader's mind that he must not hang his meat over the flame. In Fig. 75 the meat is so drawn that one might mistake its position and think it was intended to hang over the fire, whereas the intention is to hang it in front of the fire as in Fig. 74. In the writer's boyhood days it was his great delight to hang an apple by a wet string in front of the open fire, and to watch it spin until the heat sent the juices bubbling through the skin and the apple gradually became thoroughly roasted.
According to Mr. Seton, way out in the barren lands, they use a saster with a fan made from a shingle-like piece of wood, attached with a hitch to a piece of wire and a bit of string; the wind—when it's good-natured—will cause the cord to spin round and round. But you can achieve the same effect with a cord that's been soaked in water to keep it from burning, and which has also been twisted by spinning the meat with your hands (Fig. 75). This kind of cord will unwind and wind more or less slowly for quite a while, allowing the meat to expose all sides to the heat of the roasting fire in front of which it hangs. You’ll notice we say in front; let us remind the reader that you shouldn’t hang your meat over the flame. In Fig. 75, the meat is positioned in such a way that you might think it’s meant to hang over the fire, but the intention is actually to hang it in front of the fire as in Fig. 74. During the writer’s childhood, he loved to hang an apple by a wet string in front of the open fire and watch it spin until the heat made the juices bubble through the skin and gradually roasted the apple completely.
Campers have been known to be so fastidious as to demand a broiler to go with their kit; at the same time there was enough of the real camper in them to cause them to avoid carrying unwieldy broilers such as are used[68] in our kitchens. Consequently they compromise by packing a handful of telegraph wires of even length with their duffel (Fig. 81), each wire having its ends carefully bent in the form of a hook (Fig. 82), which may be adjusted over two green sticks resting upon two log fire-dogs (Fig. 83), and upon the wires, so arranged, meat and fish may be nicely broiled.
Campers are often so particular that they insist on having a broiler with their gear; at the same time, there's enough genuine camper spirit in them to avoid bringing along bulky broilers like those used in our kitchens. So they find a middle ground by packing several lengths of evenly cut telegraph wire with their gear (Fig. 81), each wire having its ends carefully bent into hooks (Fig. 82), which can be adjusted over two green sticks resting on two log fire-dogs (Fig. 83). With these wires set up, they can easily broil meat and fish.
But if one is going to use the telegraph wire camp stove there is no necessity of carrying a lamp. The stove is made so that it may be taken apart and packed easily and the weight is trifling, but a lamp of any kind, or even a lantern, is a nuisance to carry.
But if you're going to use the telegraph wire camp stove, there's no need to carry a lamp. The stove is designed to be easily taken apart and packed up, and it’s very lightweight, but any kind of lamp or even a lantern is a hassle to carry.
The telegraph wire camp stove, however, may be made by bending the wires as shown in Fig. 90, but the only object in so doing is to develop one's ingenuity, or for economy sake,[69] otherwise one may purchase at the outfitter's folding wire camp broilers for a trifle, made on the same principle and with legs which may be thrust into the ground surrounding the fire, as in Figs. 88 and 89, and, after the broiler is folded in the middle, the legs may be folded back so that it will all make a flat package. But leaving the artificialities of telegraph wire let us go back to the real thing again and talk about laying and lighting a genuine
The telegraph wire camp stove can be made by bending the wires as shown in Fig. 90, but the main purpose is to encourage creativity or save money,[69] otherwise you can easily buy folding wire camp broilers at the outfitter’s for just a bit of cash. These work on the same principle and have legs that can be pushed into the ground around the fire, as in Figs. 88 and 89. Once the broiler is folded in half, the legs can be folded back so that it becomes a flat package. But instead of focusing on the complexities of telegraph wire, let's return to the real thing and discuss how to set up and light a genuine
The more carefully the fire is planned and built the more easily will the cooking be accomplished. The first thing to be considered in laying one of these fires is the
The more thoughtfully the fire is planned and built, the easier the cooking will be. The first thing to consider when setting up one of these fires is the
The camp-fire is made with two fire-dogs pushed back against a back log (Fig. 95A and B), which form the foundation for the camp-fire. Two upright green sticks C (Fig. 95) are placed in a slanting position and supported by other sticks, D (Fig. 95), the top ends of which rest in notches cut in C stick at E (Fig. 95), and the bottom ends of which are thrust into the ground. Against the upright sticks C, and the logs F are heaped to form the back of the fire. The fire is then built on the two fire-dogs AA, and against the F logs, the latter will burn slowly and at the same time reflect the heat into the open tent front. This same fire is sometimes used for a baking fire, but the real fire for this purpose is made by the
The campfire is set up with two fire-dogs pushed back against a log (A and B), which form the base for the fire. Two upright green sticks C (A_TAG_PLACEHOLDER_1) are positioned at an angle and supported by other sticks, D (A_TAG_PLACEHOLDER_2), the top ends of which rest in notches cut into stick C at E (A_TAG_PLACEHOLDER_3), while the bottom ends are pushed into the ground. Sticks C and logs F are piled up to create the back of the fire. The fire is then built on the two fire-dogs AA, and against the logs F, which will burn slowly and also reflect heat into the open tent front. This same fire is sometimes used for baking, but the actual fire for this purpose is made by the
Figs. 96 and 97. The first sketch shows the plan and the second the perspective view of the fire. The stove is made by two side logs or fire-dogs over which the fire is built and after it has fallen in, a mass of red hot embers, between the fire-dogs, two logs are laid across the dogs and one log is placed atop, so that the flame then comes up in front of them (Fig. 97) and sends the heat against the bread or bannock.
Figs. 96 and 97. The first sketch shows the layout, while the second shows the perspective view of the fire. The stove is made from two side logs or fire-dogs, on which the fire is built. After it has burned down to a pile of red-hot embers between the fire-dogs, two logs are laid across them and one log is placed on top, allowing the flames to rise in front of them (Fig. 97) and direct heat toward the bread or bannock.

At a convenient distance in front of the fuel logs, a waugan-stick is placed, reaching from one fire-dog to the other.
At a comfortable distance in front of the fuel logs, a waugan-stick is positioned, extending from one fire-dog to the other.
In wilderness work the frying pan is about the only domestic utensil carried and is used as a toaster, a baker, a broiler, a fryer, and a stew pan all combined. In it the Buckskin man and the Sourdough make their bread, and after the bread has been baked over the coals on the bottom, it is browned nicely on its top by tilting the pans in front of the fire and resting their handles against the waugan-stick (Fig. 97). I have seen the baking fire used from British Columbia to Florida, but it was the explorer, Captain Belmore Browne, who showed me the use of the waugan-stick in connection with the baking fire, hence I have called this the Belmore Lay.
In outdoor cooking, the frying pan is pretty much the only kitchen tool you'll take along, and it serves as a toaster, a baker, a broiler, a fryer, and a stew pot all in one. The Buckskin man and the Sourdough use it to make their bread, and once the bread is baked on the bottom over the coals, they tilt the pans in front of the fire to brown the top while resting the handles against the waugan-stick (Fig. 97). I've seen this baking method used from British Columbia to Florida, but it was the explorer, Captain Belmore Browne, who showed me how to use the waugan-stick with the baking fire, which is why I call this the Belmore Lay.
You have been told how to select the firewood, make the kindling and start a fire in the preceding chapter on how to build a fire; all you have to remember now is that in certain particulars all fires are alike; they all must have air to breathe and food to eat or they will not live.
You learned how to choose firewood, prepare kindling, and start a fire in the previous chapter about building a fire; all you need to remember now is that in some key ways all fires are the same; they all need air to breathe and fuel to survive, or they won’t last.
In the case of the fire we do not call the air breath, but we give it a free circulation and call it a draught. Wood is the food that the fire eats and it must be digestible, a fire with indigestion is a fire fed with punky, damp wood carelessly thrown together in place of well-selected dry split wood which the fire can consume cleanly, digest evenly, and at the same time give out the greatest amount of heat.
In the case of a fire, we don’t refer to the air as breath; instead, we allow it to circulate freely and call it a draft. Wood is the fuel that the fire uses, and it needs to be easy to burn. A fire with "indigestion" happens when it’s fed with punky, damp wood that’s carelessly tossed together instead of well-chosen, dry, split wood that the fire can burn cleanly, digest evenly, and generate the maximum amount of heat.

To produce a draught the fire must, of course, be raised from the ground, but do not build it in a careless manner like a pile of jack-straws. Such a fire may start all right, but when the supporting sticks have burned away it will fall in a heap and precipitate the cooking utensils into the flames, upsetting the coffee or teapot, and dumping the bacon "from the frying pan into the fire."
To create a draft, the fire needs to be elevated off the ground, but don’t build it haphazardly like a pile of sticks. While that type of fire might start okay, once the supporting logs burn away, it will collapse and drop the cooking pots into the flames, knocking over the coffee or teapot, and spilling the bacon "from the frying pan into the fire."
Be it man, woman, boy or girl, if he, she or it expects to be a camper, he, or she or it must learn to be orderly and tidy around camp. No matter how soiled one's clothes may be, no matter how grimy one's face may look, the ground around the camp-fire must be clean, and the cooking utensils and fire wood, pot-hooks and waugan-sticks, all orderly and as carefully arranged as if the military officer was expected the next minute to make an inspection.
Whether it’s a man, woman, boy, or girl, anyone who wants to be a camper needs to learn how to be organized and neat around the campsite. It doesn’t matter how dirty your clothes are or how messy your face looks; the area around the campfire must be clean, and the cooking tools, firewood, pot hooks, and sticks should all be arranged neatly, as if a military officer were about to arrive for an inspection at any moment.
All my readers must remember that By Their Camp-fire They Will be Known and "sized up" as the real thing or as chumps, duffers, tenderfeet and cheechakos, by the first Sourdough or old-timer who cuts their trails.
All my readers should keep in mind that By Their Campfire They Will Be Known and will be judged as the real deal or as amateurs, clueless beginners, newcomers, and city folks by the first Sourdough or old-timer who crosses their path.
FOOTNOTE:
CHAPTER V
CAMP KITCHENS
- CAMP PIT-FIRES, BEAN HOLES
- COW-BOY FIRE-HOLE
- CHINOOK COOKING FIRE-HOLE
- BARBECUE-PITS
- THE GOLD DIGGER'S OVEN
- THE FERGUSON CAMP STOVE
- THE ADOBE OVEN
- THE ALTAR CAMPFIRE PLACE
- CAMP KITCHEN FOR HIKERS, SCOUTS, EXPLORERS, SURVEYORS, AND HUNTERS
- HOW TO COOK MEAT, FISH, AND BREAD WITHOUT POTS, PANS OR STOVES
- DRESSING SMALL ANIMALS
- HOW TO BARBECUE LARGE ANIMALS
CAMP KITCHENS
Real camp kitchens are naught but well arranged fire-places with rustic cranes and pot-hooks as already described, but in deforested countries, or on the plains and prairies, pit-fires are much in vogue. The pit itself shelters the fire on the windswept plain, which is doubly necessary because of the unprotected nature of such camping places, and because of the kind of fuel used. Buffalo-chips were formerly used on the Western plains, but they are now superseded by cattle chips. The buffalo-chip fire was the cooking fire of the Buckskin-clad long-haired plainsmen and the equally picturesque cowboy; but the buffalo herds have long since hit the trail over the Great Divide where all tracks point one way, the sound of the thunder of their feet has died away forever, as has also the whoop of the painted Indians. The romantic and picturesque plainsmen and the wild and rollicking cowboys have followed the herds of buffalo and the long lines of prairie schooners are a thing of the past, but the pit-fires of the hunters are still in use.
Real camp kitchens are just well-organized fire pits with simple cranes and pot hooks as mentioned earlier, but in areas with fewer trees, or on the plains and prairies, pit fires are very common. The pit itself protects the fire from the strong winds on the open plains, which is especially important because of the exposed nature of these camping spots and the type of fuel used. Buffalo chips were once the go-to fuel on the Western plains, but they have now been replaced by cattle chips. The buffalo-chip fire was the cooking fire for the long-haired, buckskin-clad plainsmen and the equally colorful cowboys; however, the buffalo herds have long since moved beyond the Great Divide where all paths lead the same way, and the sound of their thundering hooves has vanished forever, along with the whoops of the painted Indians. The adventurous and colorful plainsmen, along with the wild and carefree cowboys, have followed the buffalo herds, and the long lines of prairie wagons are now a thing of the past, but the pit fires of the hunters are still in use.
Fig. 106 shows a half section of a bean hole lined with stones. The bean hole may, however, be lined with clay or[82] simply the damp earth left in its natural state. This pit-fire place is used differently from the preceding one, for in the bean hole the fire is built and burns until the sides are heated good and hot, then the fire is removed and the bean pot put in place, after which the whole thing is covered up with ashes and earth and allowed to cook at its leisure.
Fig. 106 shows a half section of a bean hole surrounded by stones. However, the bean hole can also be lined with clay or[82] just left as damp earth in its natural state. This pit-fire setup is used differently from the previous one; in the bean hole, the fire is built and burned until the sides are really hot. Then, the fire is taken out, and the bean pot is placed inside, after which the whole thing is covered with ashes and dirt and left to cook at its own pace.
The cowboy pit-fire is simply a trench dug in the earth (Fig. 107), with a basin-shaped hole at the beginning. When obtainable, sticks are laid across the trench and sods laid upon the top of the sticks. Fig. 107 shows a section of view of the pit-fire and trench chimney, and Fig. 108 shows the top view of the same.
The cowboy pit-fire is just a trench dug into the ground (Fig. 107), with a bowl-shaped hole at the start. When available, sticks are placed across the trench and sods are put on top of the sticks. Fig. 107 shows a side view of the pit-fire and trench chimney, and Fig. 108 shows a top view of the same.
In removing the sod one should be careful not to break them, then even though there be no sticks one may be able to cover the draught chimney with the sods themselves by allowing them to bridge the trench. At the end of the trench the sods are built up, making a short smokestack.
In taking off the grass, you should be careful not to break it. Even if there aren't any sticks, you can still use the grass pieces to cover the draft chimney by letting them bridge the trench. At the end of the trench, stack the grass up to create a short smokestack.

The chinook fire-pit is one which is used in the northwestern
part of the United States, and seems to be a combination
of the ordinary camp fire-dogs with cross logs and the
cowboy fire-pit. Fig. 109 shows a perspective view of this
lay. Fig. 110 shows the top view of plan of the lay. Fig. 111
shows a steeper perspective view than that of Fig. 109, and
Fig. 112 shows a sectional view. By examining the sectional
view and also the deeper perspective view, as well as the plan,
you will note that the two logs are placed across the fire-dogs
with space between. The back-log is placed upon the top
of another back-log A and B (Fig. 112). The fire-dogs have[83]
[84]
[85]
their ends shoved against the bottom back-logs B, the two
back-logs are kept in place by the stakes C, C. Between the
two top logs D and A (Figs. 112 and 110), the smaller fuel
or split wood is placed.
The chinook fire pit is used in the northwestern part of the United States and appears to be a mix of regular campfire grates with cross logs and the cowboy fire pit. Fig. 109 shows a side view of this setup. Fig. 110 provides the top view of the layout. Fig. 111 offers a steeper side view compared to Fig. 109, and Fig. 112 shows a cross-section. By looking at the cross-section and the deeper side view, as well as the layout, you’ll see that the two logs are placed across the fire grates with some space in between. The back log sits on top of another back log A and B (Fig. 112). The fire grates have[83]
[84]
[85] their ends pressed against the bottom back logs B, with the two back logs secured by stakes C, C. Between the two top logs D and A (Figs. 112 and 110), smaller fuel or split wood is placed.
As the fire burns the hot coals drop into the pit, and when sufficient quantity of embers are there they may be raked forward and the frying pan placed on top of them (Fig. 112). The chinook fire is good for baking, frying, broiling, toasting, and is an excellent all-around kitchen camp stove.
As the fire burns, the hot coals fall into the pit, and when there are enough embers, they can be pulled forward, and the frying pan can be set on top of them (Fig. 112). The chinook fire is great for baking, frying, broiling, toasting, and is an excellent all-around camp kitchen stove.
At the old-fashioned barbecue where our ancestors roasted whole oxen, the ox was placed on a huge spit, which was turned with a crank handle, very similar to the old-fashioned well handle as used with a rope or chain and bucket.
At the traditional barbecue where our ancestors cooked whole oxen, the ox was put on a large spit, which was rotated with a crank handle, much like the old well handles used with a rope or chain and bucket.

The fire-pit is about four feet wide and four feet deep and is long enough (Fig. 114) to allow a fire to be built at each end of the pit, there being no fire under the meat itself for the very good reason that the melted fat would drop into the fire, cause it to blaze up, smoke and spoil the meat.
The fire pit is about four feet wide and four feet deep and is long enough (Fig. 114) to build a fire at each end of the pit, ensuring there’s no fire directly under the meat. This is important because the melted fat would drip into the fire, causing it to flare up, produce smoke, and ruin the meat.
The late Homer Davenport (the old-time and famous cartoonist) some years ago gave a barbecue at his wild animal farm in New Jersey. When Davenport was not drawing cartoons he was raising wild animals. At the Davenport[86] barbecue there was a fire-pit dug in the side of the bank (Fig. 115); such an arrangement is known as
The late Homer Davenport, a well-known cartoonist from back in the day, hosted a barbecue a few years ago at his wildlife farm in New Jersey. When he wasn't busy drawing cartoons, he was raising wild animals. At the Davenport[86] barbecue, there was a fire pit dug into the side of the bank (Fig. 115); this kind of setup is called

In the diagram it will be seen that the carcass is fastened to a spit of green wood, which runs thru a hole in a cross log and fits in the socket D in the bottom log; the spit is turned by handles arranged like A, B or C. The pit is lined with either stones or bricks, which are heated by a roaring big fire until hot enough to bake the meat.
In the diagram, you can see that the carcass is secured to a green wooden spit, which goes through a hole in a cross log and fits into the socket D in the bottom log; the spit is turned using handles arranged like A, B, or C. The pit is lined with either stones or bricks, which are heated by a roaring fire until they're hot enough to cook the meat.
We next come to the ovens, the first of which is known as
We next come to the ovens, the first of which is known as
It is made by building a rounded hut of stones or sod (Fig. 118), and covering the same with branches over which sod, or clay, or dirt is heaped (Fig. 119). The oven is heated by building the fire inside of it, and when it is very hot and the fire has burned down, the food is placed inside and the opening stopped up so as to retain the heat and thus cook the food.
It’s created by constructing a rounded hut using stones or sod (Fig. 118), then covering it with branches, over which sod, clay, or dirt is piled (Fig. 119). The oven is heated by starting a fire inside it, and once it gets really hot and the fire has died down, the food is placed inside, and the opening is sealed to keep the heat in and cook the food.

[90]
[91] on the plan of the well-known campfire (Fig. 129), is made with stones and sometimes used when clay is unobtainable.

The advantage of the altar fire and the matasiso is that the cook does not have to get the backache over the fire while he cooks. All of these ovens and fire-places are suitable[92] for more or less permanent camps, but it is not worth while to build these ovens and altar fire-places for quick and short camps.
The benefit of the altar fire and the matasiso is that the cook doesn’t have to strain his back over the fire while cooking. All of these ovens and fireplaces are suitable[92] for more or less permanent camps, but it's not worth it to build these ovens and altar fireplaces for quick and short camps.

It is proper and right in treating camp cooking that we should begin with the most primitive methods. For when one has no cooking utensils except those fashioned from the material at hand, he must, in order to prepare appetizing food, display a real knowledge of woodcraft.
It makes sense to start with the most basic methods when discussing camp cooking. Because when you only have cooking tools made from what's available, you need to really know your woodcraft to make tasty meals.

Therefore, start by spearing the meat on a green twig of sweet birch, or some similar wood, and toast it before the fire or pinch the meat between the split ends of a twig (Fig. 133) or better still
Therefore, start by skewering the meat on a green twig from a sweet birch or a similar type of wood, and toast it over the fire, or press the meat between the split ends of a twig (Fig. 133) or even better.
In order to do this select a wand with a fork to it, trim off the prongs of the forks, leaving them rather long (Fig. 134), then sharpen the ends of the prongs and weave them in and out near the edges of the meat (Fig. 135), which is done[93] by drawing the prongs slightly together before impaling the meat on the second prong. The natural spring and elasticity of the branches will stretch the meat nice and flat (Fig. 135), ready to toast in front of the flames, not over the flame.
To do this, choose a forked branch for your wand, trim the tines of the fork, leaving them relatively long (Fig. 134). Then, sharpen the ends of the tines and weave them in and out near the edges of the meat (Fig. 135). This is done[93] by pulling the tines slightly together before spearing the meat with the second tine. The natural spring and flexibility of the branches will flatten the meat nicely (Fig. 135), making it ready to toast in front of the flames, not over the flame.
A very thick steak of moose meat or beef may be cooked in this manner. Remember to have fire-dogs and a good back log; there will then be hot coals under the front log and flame against the back log to furnish heat for the meat in front. Turn the meat every few minutes and do not salt it until it is about done. Any sort of meat can be thus cooked; it is a favorite way of toasting bacon among the sportsmen, and I have seen chickens beautifully broiled with no cooking implements but the forked stick. This was done by splitting the chicken open and running the forks through the legs and sides of the fowl.
A very thick steak of moose or beef can be cooked this way. Make sure to have fire-dogs and a good back log; this will create hot coals under the front log and flames against the back log to provide heat for the meat in front. Turn the meat every few minutes and don’t salt it until it’s nearly done. You can cook any type of meat this way; it’s a popular method for toasting bacon among hunters, and I’ve seen chickens perfectly broiled with nothing more than a forked stick. This involves splitting the chicken open and running the forks through the legs and sides of the bird.
Twist is a Boy Scout's name for this sort of bread. The twist is made of dough and rolled between the palms of the hands until it becomes a long thick rope (Fig. 138), then it is wrapped spirally around a dry stick (Fig. 139), or one with bark on it (Fig. 137). The coils should be close together but without touching each other. The stick is now rested in the forks of two uprights, or on two stones in front of the roasting fire (Figs. 140 and 141), or over the hot coals of a pit-fire. The long end of the stick on which the twist is coiled is used for a handle to turn the twist so that it may be nicely browned on all sides, or it may be set upright in front of the flames (Fig. 142).
Twist is what Boy Scouts call this type of bread. The twist is made from dough that’s rolled between your palms until it turns into a long, thick rope (Fig. 138). Then, it’s wrapped spirally around a dry stick (Fig. 139), or one with bark on it (Fig. 137). The coils should be close together but not touching. The stick is then rested in the forks of two upright supports or on two stones in front of the roasting fire (Figs. 140 and 141), or over the hot coals of a pit fire. The long end of the stick, where the twist is coiled, is held as a handle to turn the twist so it gets nicely browned on all sides, or it can be propped upright in front of the flames (Fig. 142).
Dressing in this case really means undressing, taking their coats off and removing their insides. In order to prepare for broiling or baking any of the small fur-bearing animals, make yourself a skinning stick, using for the purpose a forked branch; the forks being about an inch in diameter, make the length of the stick to suit your convenience, that is, long enough to reach between the knees whether you are sitting on a camp stool or squatting on the ground, sharpen the lower end of the stick and thrust it into the ground, then take your coon, possum, squirrel or muskrat, and punch the pointed ends of the forked stick thru the thin place at the[95] point which corresponds to your own heel, just as the stick in Fig. 155 is punched through the thin place behind the heels of the small animals there sketched. Thus hung the animal may be dressed with comfort to the workmen. If one is squatting, the nose of the animal should just clear the ground. First take off the fur coat. To do this you split the skin with a sharp knife, beginning at the center of the throat and cut to the base of the tail, being careful not to cut deep enough to penetrate the inside skin or sack which contains the intestines; when the base of the tail is reached, use your fingers to roll back the skin. If skinning for the pelt, follow directions given later, but do not destroy any skin as the hide is useful for many purposes around camp. After the coat is removed and all the internal organs taken out, remove the scent glands from such animals as have them, and make a cut in the forearms and the meaty parts of the thigh, and cut out the little white things which look like nerves, to be found there. This will prevent the flesh from having a strong or musky taste when it is cooked.
Dressing in this case really means undressing, taking off their coats and removing their insides. To prepare any small fur-bearing animals for broiling or baking, make a skinning stick using a forked branch; the forks should be about an inch in diameter. Make the length of the stick suitable for your convenience, meaning it should be long enough to reach between your knees whether you’re sitting on a camp stool or squatting on the ground. Sharpen the lower end of the stick and push it into the ground, then take your raccoon, opossum, squirrel, or muskrat, and push the pointed ends of the forked stick through the thin spot at the point that corresponds to your own heel, just like the stick in Fig. 155 is pushed through the thin spot behind the heels of the small animals sketched there. Once the animal is hung this way, it can be skinned comfortably. If you’re squatting, the animal's nose should just clear the ground. First, take off the fur coat. To do this, split the skin with a sharp knife, starting at the center of the throat and cutting to the base of the tail, being careful not to cut deep enough to penetrate the inner skin or sack that contains the intestines. When you reach the base of the tail, use your fingers to roll back the skin. If you're skinning for the pelt, follow the instructions given later, but don’t damage any skin as the hide is useful for many purposes around camp. After the coat is removed and all the internal organs are taken out, remove the scent glands from animals that have them, and make cuts in the forearms and the meaty parts of the thighs, and cut out the little white things that look like nerves found there. This will prevent the meat from having a strong or musky taste when it’s cooked.
First dress the carcass and then stretch it on a framework of black birch sticks, for this sweet wood imparts no disagreeable odor or taste to the meat.
First, prepare the carcass and then stretch it on a frame made of black birch sticks, as this nice wood doesn’t add any unpleasant smell or flavor to the meat.
Next build a big fire at each end of the pit (Fig. 114), not right under the body of the animal, but so arranged that when the melted fat drops from the carcass it will not fall on the hot coals to blaze up and spoil your barbecue. Build big fires with plenty of small sticks so as to make good red hot coals before you put the meat on to cook.
Next, build a big fire at each end of the pit (Fig. 114), not directly under the animal but positioned so that when the fat drips from the carcass, it won’t hit the hot coals and catch fire, ruining your barbecue. Create large fires with plenty of small sticks to get a nice bed of red-hot coals before you put the meat on to cook.
First bake the inside of the barbecued beast, then turn it over and bake the outside. To be well done, an animal the[96] size of a sheep should be cooking at least seven or eight hours over a charcoal fire. Baste the meat with melted bacon fat mixed with any sauce you may have or no sauce at all, for bacon fat itself is good enough for anyone, or use hot salt water.
First, cook the inside of the barbecued meat, then flip it over and cook the outside. To be fully cooked, a creature about the size of a sheep should be on the grill for at least seven to eight hours over a charcoal fire. Baste the meat with melted bacon fat mixed with any sauce you have, or skip the sauce altogether, because bacon fat alone is tasty enough for anyone, or use hot salt water.
Of course, it is much better to use charcoal for this purpose, but charcoal is not always handy. One can, however,
Of course, it's much better to use charcoal for this, but charcoal isn't always available. One can, however,
A day or two ahead of the barbecue day, by building big fires of wood about the thickness of one's wrist. After the fire has been burning briskly for a while, it should be covered up with ashes or dirt and allowed to smoulder all night, and turn the wood into charcoal in place of consuming it.
A day or two before the barbecue, start big fires using wood about the thickness of your wrist. Once the fire has been going strong for a while, cover it with ashes or dirt and let it smolder all night to turn the wood into charcoal instead of burning it all up.
Roll the top of your flour bag back (Fig. 136), then build a cone of flour in the middle of the bag and make a crater in the top of the flour mountain.
Roll the top of your flour bag back (Fig. 136), then create a cone of flour in the center of the bag and make a well in the top of the flour mound.
In the crater dump a heaping teaspoon—or, to use Mr. Vreeland's expression, put in "one and a half heaping teaspoonfuls of baking powder," to which add a half spoonful of salt; mix these together with the dry flour, and when this is thoroughly done begin to pour water into the crater, a little at a time, mixing the dough as you work by stirring it around inside your miniature volcano. Gradually the flour will slide from the sides into the lava of the center, as the water is poured in and care taken to avoid lumps.
In the crater dump, add a heaping teaspoon—or, as Mr. Vreeland puts it, "one and a half heaping teaspoonfuls of baking powder," plus a half teaspoon of salt. Mix these with the dry flour, and once that's well combined, start pouring water into the crater a bit at a time, stirring the dough as you go by moving it around inside your small volcano. Gradually, the flour will slide from the edges into the lava in the center as you pour in the water, making sure to avoid lumps.
Make the dough as soft as may be, not batter but very soft dough, stiff enough, however, to roll between your well-floured hands.
Make the dough as soft as possible, not a batter but a very soft dough, still stiff enough to roll between your well-floured hands.
Put the potatoes with their skins on them on a bed of hot embers two or three inches thick, then cover the potatoes[97] with more hot coals. If this is done properly the spuds will cook slowly, even with the fire burning above them. Don't be a chump and throw the potatoes in the fire where the outer rind will burn to charcoal while the inside remains raw.
Put the potatoes with their skins on a layer of hot embers about two or three inches thick, then cover the potatoes[97] with more hot coals. If you do this right, the potatoes will cook slowly, even with the fire above them. Don't be foolish and toss the potatoes into the fire where the outer skin will burn to charcoal while the inside stays raw.
In preparing a small and tender fish, where possible, the point under the head, where the gills meet, is cut, fingers thrust in and the entrails drawn through this opening; the fish is then washed, cleaned and wrapped in a coating of paper or fallen leaves, before the clay is applied. Place the fish upon a pancake of stiff clay (Fig. 147), fold the clay over the fish (Fig. 148), press the edges together, thus making a clay dumpling (Fig. 149); cook by burying the dumpling in the embers of an ordinary surface fire, or in the embers in a pit-fire (Fig. 150).
In preparing a small and tender fish, if possible, cut the point under the head, where the gills meet, insert your fingers, and pull out the entrails through this opening; then wash the fish, clean it, and wrap it in paper or fallen leaves before applying the clay. Place the fish onto a pancake of stiff clay (Fig. 147), fold the clay over the fish (Fig. 148), press the edges together to create a clay dumpling (Fig. 149); cook by burying the dumpling in the embers of a regular surface fire or in the embers of a pit-fire (Fig. 150).
A brace of partridges may be beheaded, drawn, washed out thoroughly and stuffed with fine scraps of chopped bacon or pork, mixed with bread crumbs, generously seasoned with salt, pepper and sage, if you have any of the latter. The birds with the feathers on them are then plastered over with clean clay made soft enough to stick to the feathers, the outside is wrapped with stiffer clay and the whole molded into a ball, which is buried deep in the glowing cinders and allowed to remain there for an hour, and at the end of that time the clay will often be almost as hard as pottery and must be broken open with a stick. When the outside clay comes off the feathers will come with it, leaving the dainty white meat of the bird all ready to be devoured.
A pair of partridges can be cleaned, fully washed, and stuffed with small pieces of chopped bacon or pork, mixed with bread crumbs, and generously seasoned with salt, pepper, and sage, if you have it. The birds, with their feathers on, are then coated with soft, clean clay that sticks to the feathers. The outside is wrapped with firmer clay, and the whole thing is shaped into a ball, which is buried deep in the hot coals and left there for an hour. After that time, the clay will often be nearly as hard as pottery and needs to be broken open with a stick. When the outer clay is removed, the feathers will come off with it, leaving the tender white meat of the bird ready to eat.
Woodchucks, raccoons, opossums, porcupines, rabbits had better be barbecued (see Figs. 114, 115, and 155), but squirrels and small creatures may be baked by first removing[98] the insides of the creatures, cleaning them, filling the hollow with bread crumbs, chopped bacon and onions, then closing the opening and plastering the bodies over with stiff clay and baking them in the embers. This seals the meat inside of the mud wrapper and when it is cooked and the brick-like clay broken off, the skin comes off with the broken clay, leaving the juicy meat exposed to view.
Woodchucks, raccoons, opossums, porcupines, and rabbits should definitely be barbecued (see Figs. 114, 115, and 155), but squirrels and smaller animals can be baked by first removing[98] their insides, cleaning them out, filling the cavity with bread crumbs, chopped bacon, and onions, then sealing the opening and covering the bodies with thick clay before baking them in the embers. This method traps the meat inside the clay wrapper and once it’s cooked, breaking off the hard clay also removes the skin, revealing the juicy meat inside.

Cut off the head of the fish and clean by splitting it through the back, in place of the usual way of splitting up the belly. To salt red meat before you cook it is to make it dry and tough, but the fish should be salted while it is damp with its own juices.
Cut off the fish's head and clean it by cutting along the back, instead of the usual way of cutting through the belly. Salting red meat before cooking makes it dry and tough, but you should salt the fish while it's still moist with its own juices.
Heat the plank in front of the fire and then spread your fish out flat on the hot puncheon or plank, and with your hunting knife press upon it, make slit holes through the fish (Fig. 145) with the grain of the wood; tack your fish on with[99] wooden pegs cut wedge shape and driven in the slits made by your knife blade (Figs. 143 and 144). Prop the puncheon up in front of a fire which has a good back-log and plenty of hot coals to send out heat (Fig. 146).[E]
Heat the plank by the fire, then lay your fish flat on the hot board or plank. Use your hunting knife to cut slits through the fish (Fig. 145) along the grain of the wood; secure the fish with[99] wooden pegs shaped like wedges, pushed into the slits made by your knife (Figs. 143 and 144). Prop the board up in front of a fire that has a solid back-log and plenty of hot coals to emit heat (Fig. 146).[E]
Water may be boiled in a birch bark vessel made by folding up a more or less square piece of bark, bending in the corner (Fig. 157) folds and holding them in place by thorns or slivers (Fig. 156). Or the stomach of a large animal or piece of green hide may be filled with water and the latter made hot by throwing in it hot stones (Fig. 158). Dig a hole in the ground, fit the rawhide in the hole, bringing the edges up so as to overlap the sod, weigh down the edges with stones, fill the hide with water and heat with hot stones. Figs. 159 and 160 show how to make tongs with which to handle the stones.
Water can be boiled in a vessel made from birch bark by folding a roughly square piece of bark, bending in the corners (Fig. 157) and securing them with thorns or slivers (Fig. 156). Alternatively, you can fill the stomach of a large animal or a piece of green hide with water and heat it by adding hot stones (Fig. 158). Dig a hole in the ground, place the rawhide in the hole, and fold the edges over to cover the sod. Weigh down the edges with stones, fill the hide with water, and heat it with hot stones. Figs. 159 and 160 show how to make tongs for handling the stones.
FOOTNOTE:
[E] The best plank is made from the oaks grown on the hammocks of Southern Florida and the peculiar flavor this plank gives to shad has made Planked Shad famous.
[E] The best plank is made from oak trees grown in the hammocks of Southern Florida, and the unique flavor this plank imparts to shad has made Planked Shad well-known.
CHAPTER VI
CAMP FOOD
- HOW TO MAKE ASH CAKE, PONE, CORN DODGERS, FLAPJACKS, JOHNNY-CAKE, BISCUITS AND DOUGHGOD
- MAKING DUTCH OVENS
- VENISON
- BANQUETS IN THE OPEN
- HOW TO COOK BEAVER TAIL, PORCUPINES AND MUSKRATS
- CAMP STEWS, BRUNSWICK STEWS AND BURGOOS
CAMP FOOD
When America gave Indian corn to the world she gave it a priceless gift full of condensed pep. Corn in its various forms is a wonderful food power; with a long, narrow buckskin bag of nocake, or rock-a-hominy, as parched cracked corn was called, swung upon his back, an Indian or a white man could traverse the continent independent of game and never suffer hunger. George Washington, George Rodgers Clark, Boone, Kenton, Crockett, and Carson all knew the sustaining value of parched corn.
When America shared Indian corn with the world, she offered a priceless gift packed with energy. Corn in its many forms is an incredible source of nourishment; with a long, narrow buckskin bag of nocake, or rock-a-hominy—what parched cracked corn was known as—slung over his back, a Native American or a white person could cross the continent without relying on game and never go hungry. George Washington, George Rogers Clark, Boone, Kenton, Crockett, and Carson all recognized the sustaining power of parched corn.
The pioneer farmers in America and many of their descendants up to the present time, dry their Indian corn by the methods the early Americans learned from the Indians. The corn drying season naturally begins with the harvesting of the corn, but it often continues until the first snow falls.
The pioneer farmers in America and many of their descendants today dry their Indian corn using the techniques the early Americans learned from the Indigenous people. The corn drying season usually starts with the corn harvest but often continues until the first snowfall.
On account of the danger from corn-eating birds and beasts, these drying poles are usually placed near the kitchen door of the farmhouse, and sometimes in the attic of the old farmhouse, the woodshed or the barn.
Because of the threat from birds and animals that eat corn, these drying poles are typically set up near the farmhouse kitchen door, and sometimes in the attic of the old farmhouse, the woodshed, or the barn.
Of course, the Indians owned no corn mills, but they used bowl-shaped stones to hold the corn and stone pestles like crudely made potato mashers with which to grind the corn. The writer lately saw numbers of these stone corn-mills in the collection of Doctor Baldwin, of Springfield, Mass.
Of course, the Native Americans didn’t have corn mills, but they used bowl-shaped stones to hold the corn and stone pestles that looked like rough potato mashers to grind the corn. The writer recently saw several of these stone corn mills in Doctor Baldwin's collection in Springfield, Mass.

In the southwest much grit from the stone used is unintentionally mixed with the corn, and hence all the elderly Indians' teeth are worn down as if they had been sandpapered.
In the southwest, a lot of grit from the stone used accidentally gets mixed in with the corn, so all the older Indians' teeth are worn down as if they’ve been sandpapered.
But the reader can use a wooden bowl and a potato masher with a piece of tin or sheet iron nailed to its bottom with which to crush the corn and make meal without grit. Or he can make a pioneer mill like Figs. 163 or 164, from a log. The pestle or masher in Fig. 164 is of iron.
But the reader can use a wooden bowl and a potato masher with a piece of tin or sheet metal nailed to its bottom to crush the corn and make meal without grit. Or he can build a pioneer mill like Figs. 163 or 164 from a log. The pestle or masher in Fig. 164 is made of iron.
There is a way to preserve corn which a few white people still practice just as they learned it from the Indians. First[105] they dig long, shallow trenches in the ground, fill them with dried roots and small twigs with which they make a hot fire and thus cover the bottom of the ditch with glowing embers. The outer husks of the fresh green corn are then removed and the corn placed in rows side by side on the hot embers (Fig. 167). This practice gave the name of Roasting Ear Season to July and August.
There’s a way to preserve corn that a few white people still practice, just like they learned from the Indigenous people. First[105] they dig long, shallow trenches in the ground, fill them with dried roots and small twigs, and make a hot fire to cover the bottom of the ditch with glowing embers. The outer husks of the fresh green corn are then removed, and the corn is placed in rows side by side on the hot embers (Fig. 167). This practice gave July and August the name "Roasting Ear Season."

As the husks become scorched the ears are turned over, and when browned on all sides they are deftly tossed out of the ditch by means of a wand or stick used for that purpose.
As the husks get burnt, the ears are flipped over, and when they're browned all over, they are skillfully tossed out of the ditch using a stick or wand specifically for that job.
The burnt husks are now removed and the grains of corn are shelled from the cob with the help of a sharp-edged, fresh water "clam" shell; these shells I have often found in the old camping places of the Indians in the half caves of Pennsylvania.
The burnt husks are now gone, and the corn kernels are taken off the cob using a sharp, fresh water "clam" shell; I've often found these shells in the old camping spots of the Native Americans in the half caves of Pennsylvania.
The corn is then spread out on a clean sheet or on pieces of paper and allowed to dry in the sun. It is "mighty" good food, as any Southern born person will tell you. One can keep a supply of it all winter.
The corn is then spread out on a clean sheet or pieces of paper and left to dry in the sun. It’s "really" good food, as any Southern-born person will tell you. You can keep a supply of it all winter.
When I was a little shaver in old Kentucky, the children were very fond of the Southern field corn parched in a frying pan (Fig. 161), and then buttered and salted while it was still hot; we parched field corn, sugar corn and the regular pop corn, but none of us had ever seen cracked corn or corn meal parched and used as food, and I am inclined to think that the old pioneers themselves parched the corn as did their direct descendants in Kentucky, and that said corn was crushed or ground after it had been parched. Be this as it may, we know that our bordermen traveled and fought on a parched corn diet and that Somoset, Massasoit, Pocahontas, Okekankano, Powhatan, all ate corn cakes and that it was either them or the squaws of their tribes who taught bold Captain Smith's people on the southern coast, and the Pilgrims further north, the value of corn as an article of diet. The knowledge of how to make the various kinds of corn bread and the use of corn generally from "roasting-ears" to corn puddings was gained from the American Indians. It was from them we learned how to make the
When I was a little kid in old Kentucky, the kids really liked Southern field corn that was roasted in a frying pan (Fig. 161). We would butter and salt it while it was still hot; we roasted field corn, sweet corn, and regular popcorn, but none of us had ever seen cracked corn or cornmeal roasted and eaten as food. I suspect that the old pioneers roasted the corn just like their descendants in Kentucky did, and after roasting, the corn was probably crushed or ground. Regardless, we know that our frontier folks traveled and fought on a diet of roasted corn, and that Somoset, Massasoit, Pocahontas, Okekankano, Powhatan, all ate corn cakes. It was either them or the women of their tribes who taught Captain Smith's people on the southern coast, and the Pilgrims further north, about the importance of corn in their diet. We learned from the American Indians how to make different kinds of cornbread and use corn in everything from "roasting ears" to corn puddings.
This ancient American food dates back to the fable times which existed before history, when the sun came out of a hole in the eastern sky, climbed up overhead and then dove through a hole in the western sky and disappeared. The sun no more plays such tricks, and although the humming-bird, who once stole the sun, still carries the mark under his chin, he is no longer a humming-birdman but only a little buzzing bird; the ash cake, however, is still an ash cake and is made in almost as primitive a manner now as it was then.
This ancient American food goes back to the mythic times before recorded history, when the sun rose from a hole in the eastern sky, traveled overhead, and then plunged through a hole in the western sky to vanish. The sun doesn’t perform those tricks anymore, and even though the hummingbird, who once stole the sun, still has a mark under its chin, it is no longer a sun-stealing creature but just a small buzzing bird; the ash cake, however, remains an ash cake and is made in almost as simple a way now as it was back then.
Mix half a teaspoonful of salt with a cup of corn meal, and add to it boiling hot water until the swollen meal may be[107] worked by one's hand into a ball, bury the ball in a nice bed of hot ashes (glowing embers) and leave it there to bake like a potato. Equalling the ash cake in fame and simplicity is
Mix half a teaspoon of salt with a cup of cornmeal, and add boiling water until the meal expands enough to be[107] shaped into a ball by hand. Place the ball in a cozy bed of hot ashes (glowing embers) and leave it there to bake like a potato. On par with the ash cake in popularity and simplicity is
Pone is made by mixing the meal as described for the ash cake, but molding the mixture in the form of a cone and baking it in an oven.
Pone is made by mixing the meal as described for the ash cake, but shaping the mixture into a cone and baking it in an oven.
In the North they also call this camp corn bread "Johnny-cake," but whatever it is called it is wholesome and nourishing. Take some corn meal and wheat flour and mix them fifty-fifty; in other words, a half pint each; add a teaspoon[108] level full and a teaspoon heaping full of baking powder and about half a teaspoonful of salt; mix these all together, while dry, in your pan, then add the water gradually. If you have any milk go fifty-fifty with the water and milk, make the flour as thin as batter, pour it into a reflector pan, or frying pan, prop it up in front of a quick fire; it will be heavy if allowed to cook slowly at the start, but after your cake has risen you may take more time with the cooking. This is a fine corn bread to stick to the ribs. I have eaten it every day for a month at a time and it certainly has the food power in it. When made in form of biscuits it is called "corn dodgers."
In the North, they also refer to this camp corn bread as "Johnny-cake," but no matter what you call it, it's nutritious and filling. Mix equal parts cornmeal and wheat flour—half a pint of each. Add one level teaspoon and one heaping teaspoon of baking powder, along with about half a teaspoon of salt. Combine these dry ingredients in your pan, then gradually add water. If you have milk, use half water and half milk, making the mixture thin like batter. Pour it into a reflector pan or frying pan, and prop it up in front of a hot fire; it will be dense if cooked slowly at first, but once your cake has risen, you can take more time with the cooking. This is a hearty corn bread. I've eaten it every day for a month at a time, and it definitely has the energy you need. When made into biscuits, it's called "corn dodgers."
Take two cups full of flour and one level teaspoonful and one heaping teaspoonful of baking powder and half a teaspoonful of salt, and mix them together thoroughly while dry. To this you add milk and water, if not milk straight water, mixing it as described for the flapjacks. Make a dough soft but stiff enough to mold with well floured hands, make it into biscuits about half an inch thick, put them into a greased pan, bake them in any one of the ovens already described, or by propping them up in front of the fire. If the biscuits have been well mixed and well baked they will prove to be good biscuits.
Take two cups of flour, one level teaspoon of baking powder, one heaping teaspoon of baking powder, and half a teaspoon of salt, and mix them together thoroughly while dry. Then add milk and water, or just milk, mixing it the same way as you would for flapjacks. Make a dough that’s soft but stiff enough to mold with well-floured hands, shaping it into biscuits about half an inch thick. Place them in a greased pan and bake them in any oven described earlier, or hold them in front of the fire. If the biscuits are mixed and baked well, they’ll turn out to be good biscuits.
Fred tells me that he makes this the same as he would biscuits and bakes it in a frying pan. The frying pan is heated and greased before the dough is dropped into it, making a cake about a half inch thick. The frying pan is then placed over the slow fire to give the bannock a chance to rise and harden enough to hold its shape, then the frying[109] pan is propped up with a stick and the bannock browned by reflected heat, it must be cooked slowly and have "a nice brown crust." I have never made bannocks but I have eaten some of Vreeland's, and they are fine.
Fred tells me that he makes this just like he would biscuits and bakes it in a frying pan. The frying pan is heated and greased before the dough is dropped in, creating a cake about half an inch thick. The frying pan is then placed over a low fire to give the bannock time to rise and harden enough to hold its shape. After that, the frying pan is propped up with a stick, and the bannock is browned by reflected heat; it needs to be cooked slowly and have "a nice brown crust." I've never made bannocks, but I've had some of Vreeland's, and they are great.
A fellow who cannot throw a flapjack is sadly lacking in the skill one expects to find in a real woodcrafter. A heavy, greasy flapjack is an abomination, but the real article is a joy to make and a joy to eat.
A guy who can't flip a pancake really doesn't have the skill you expect from a true woodworker. A thick, greasy pancake is just awful, but the real thing is a pleasure to make and a delight to eat.
Put a large tin cupful of flour in the pan, add half a teaspoonful of salt, also one heaping teaspoonful and one level teaspoonful of baking powder; mix the salt and baking powder well with the flour while it is dry. Then build your little mountain or volcano of flour with its miniature crater in the middle, into which pour water little by little; making the lava by mixing the dough as you go. Continue this process until all the flour is batter; the batter should be thin enough to spread out rapidly into the form of a pancake when it is poured into the skillet or frying pan, but not watery.
Put a large cup of flour in the pan, add half a teaspoon of salt, along with one heaping teaspoon and one level teaspoon of baking powder; mix the salt and baking powder well with the flour while it's dry. Then shape the flour into a little mountain or volcano with a small crater in the middle, into which you pour water gradually; mixing the dough as you go along. Keep doing this until all the flour becomes batter; the batter should be thin enough to quickly spread into the shape of a pancake when poured into the skillet or frying pan, but not too watery.
Grease the frying pan with a greasy rag fastened to the end of a stick or with a piece of bacon rind. Remember that the frying pan only needs enough grease to prevent the cake from sticking to the pan; when one fries potatoes the pan should be plentifully supplied with very hot grease, but flapjacks are not potatoes and too much grease makes the cakes unfit to eat. Do not put too much batter in the pan, either; I tried it once and when I flapped the flapjack the hot batter splattered all over my face, and that batter was even hotter than my remarks.
Grease the frying pan with a greasy cloth tied to the end of a stick or with a piece of bacon rind. Keep in mind that the frying pan only needs enough grease to stop the cake from sticking; when frying potatoes, the pan should have plenty of really hot grease, but flapjacks aren’t potatoes, and too much grease makes the cakes inedible. Don’t put too much batter in the pan either; I tried it once, and when I flipped the flapjack, the hot batter splattered all over my face, and that batter was even hotter than what I said.
Pour enough batter into the pan to spread almost but not quite over the bottom; when the bubbles come thickly[110] in the middle and the edges begin to smoke a bit, it is time to flap the flapjack. Do so by loosening the edges with a knife blade, then dip the far side of the pan downward and bring it up quickly, sending the cake somersaulting in the air; catch the cake as it falls batter side down and proceed to cook that side.
Pour enough batter into the pan so it spreads almost, but not quite, across the bottom; when bubbles start to form densely in the middle and the edges begin to smoke a little[110], it’s time to flip the flapjack. Do this by loosening the edges with a knife, then tilt the far side of the pan downwards and quickly bring it back up, flipping the cake in the air; catch the cake as it falls batter side down and continue cooking that side.
The penalty of dropping a flapjack in the fire is to be made to eat it without wiping off the ashes.
The punishment for dropping a pancake in the fire is that you have to eat it without cleaning off the ashes.
First fry some bacon or boil it until it is soft, then chop up the bacon into small pieces quite fine, like hash. Save the grease and set the bacon to one side; now take a pint of flour and half a teaspoon of salt, a spoonful of brown sugar and a heaping spoonful of baking powder and mix them all while they are dry, after which stir in the water as already described until it is in the form of batter; now add the chopped bacon and then mix rapidly with a spoon; pour it into a Dutch oven or a pan and bake; it should be done in thirty-five or forty minutes, according to the condition of the fire.
First, fry some bacon or boil it until it's soft, then chop the bacon into small pieces, like hash. Save the grease and set the bacon aside; now take a pint of flour, half a teaspoon of salt, a spoonful of brown sugar, and a heaping spoonful of baking powder, and mix them all together while they’re still dry. After that, stir in the water as described earlier until it turns into batter; now add the chopped bacon and mix quickly with a spoon. Pour it into a Dutch oven or a pan and bake; it should be done in thirty-five to forty minutes, depending on how hot the fire is.
When your campfire is built upon a hearth made of stones, if you brush the ashes away from the hot stone and place your doughgod upon it, then cover it with a frying pan or some similar vessel, and put the hot cinders on top of the frying pan, you will find that it will bake very nicely and satisfactorily on the hearthstone.
When your campfire is set up on a stone hearth, if you clear the ashes off the hot stone and put your dough on it, then cover it with a frying pan or a similar pot, and put hot coals on top of the frying pan, you’ll see that it bakes really well and turns out great on the hearthstone.
In the old-fashioned open fire-places where our grandparents did their cooking, a Dutch oven was considered essential. The Dutch oven is still used by the guides and cowboys and is of practically the same form as that used by Abraham Lincoln's folks; it consists of a more or less shallow dish of metal, copper, brass or iron, with four metal legs[111] that may be set in the hot cinders. Over that is a metal top which is made so as to cover the bottom dish, and the edges of the cover are turned up all around like a hat with its brim turned up. This is so made to hold the hot cinders which are dumped on top of it, but a
In the traditional open fireplaces where our grandparents cooked, a Dutch oven was seen as a must-have. The Dutch oven is still used by guides and cowboys today, and it is pretty similar in design to what Abraham Lincoln’s family used; it consists of a shallow dish made of metal, copper, brass, or iron, with four metal legs[111] that can be placed in the hot coals. On top, there’s a metal lid designed to fit over the bottom dish, and the edges of the lid are turned up all around like a hat with its brim lifted. This design is meant to hold the hot coals that are piled on top of it, but a
Slice bacon as thin as possible and place a layer over the bottom and around the sides of the Dutch oven like a pie-crust. Slice venison, moose meat or bear steak, or plain beef, medium thin and put in to the depth of 2½ inches, salting each layer. Chop a large onion and sprinkle it over the top, cover with another layer of bacon and one pint of water and put on the lid. Fill the hole half full of hot embers, place the Dutch oven in the center and fill the space surrounding the oven full of embers. Cover all with about 6 inches of dirt, then roll yourself up in your blanket and shut your eyes—your breakfast will cook while you sleep and be piping hot when you dig for it in the morning.
Slice the bacon as thin as you can and lay a layer over the bottom and sides of the Dutch oven like you would a pie crust. Cut the venison, moose meat, bear steak, or regular beef into medium-thin slices and fill it up to 2½ inches deep, salting each layer. Dice a large onion and sprinkle it on top, then cover with another layer of bacon and add one pint of water before putting on the lid. Fill the hole halfway with hot embers, place the Dutch oven in the center, and fill the space around it with more embers. Cover everything with about 6 inches of dirt, then wrap yourself in your blanket and close your eyes—your breakfast will cook while you sleep and be piping hot when you dig it out in the morning.
The bean hole is far from a modern invention and the dried droppings of animals, like "buffalo chips," were used for fuel away back in Bible times; in ancient Palestine they stewed their meat in a pot set in a hole filled in with stones over which burned a fire of "chips" gathered where the flocks pastured.
The bean hole isn't a new idea; even in Biblical times, people used dried animal droppings, like "buffalo chips," for fuel. In ancient Palestine, they cooked their meat in a pot placed in a hole filled with stones, over which they burned a fire fueled by the "chips" collected from where their flocks grazed.
When the wood is of such a nature that it is difficult to obtain a bed of live coals for toasting, meat may, in a pinch, be cooked upon a clean flat stone (Figs. 116, 117, and 128). Be certain that the stone is a dry one, otherwise the heat may burst it. If satisfied that it is dry, heat it good and hot and spread your thick slice of venison, moose, bear or sheep or even beef upon the very hot stone; leave it there about twenty minutes and allow it to singe, sizzle and burn on one side, then turn it over and burn the other side until the charred part is one-quarter or even a half inch deep. Now remove the meat and with your hunting knife scrape away all the charred meat, season it and toast some bacon or pork on a forked stick and, after scoring the steak deeply and putting the pork or bacon in the cuts, the meat is ready to serve to your hungry self and camp mates.
When the wood is such that it's hard to get a bed of live coals for toasting, you can, in a pinch, cook meat on a clean flat stone (Figs. 116, 117, and 128). Make sure that the stone is dry; if it's not, the heat could crack it. If you're sure it's dry, heat it up really well and place your thick slice of venison, moose, bear, sheep, or even beef on the hot stone; leave it there for about twenty minutes and let it sear, sizzle, and char on one side, then flip it over and char the other side until the burnt area is about a quarter inch to half an inch deep. Now take the meat off and use your hunting knife to scrape off all the charred bits, season it, and toast some bacon or pork on a stick. After scoring the steak deeply and putting the pork or bacon in the cuts, the meat is ready to serve to you and your hungry campmates.
If you want to know how real wild meat tastes, drop a sleek buck with a shot just over the shoulder—no good sportsman will shoot a doe—dress the deer and let it hang for several days; that is, if you wish tender meat. Cut a steak two inches thick and fry some bacon, after which put the steak in the frying pan with the bacon on top of it, and a cover on the frying pan. When one side is cooked, turn the meat over and again put the bacon on top, replace the cover and let that side cook. Serve on a hot plate and give thanks[113] that you are in the open, have a good appetite and you are privileged to partake of a dish too good for any old king. The gravy, oh my word! the recollection of it makes me hungry! I have eaten moose meat three times a day for weeks at a time, when it was cooked as described, without losing my desire for more.
If you want to know what real wild meat tastes like, take down a sleek buck with a shot just above the shoulder—no good sportsman will shoot a doe. Dress the deer and let it hang for several days; that is, if you want tender meat. Cut a steak two inches thick and fry some bacon, then put the steak in the frying pan with the bacon on top of it, and cover the frying pan. When one side is cooked, flip the meat over and put the bacon on top again, replace the cover and let that side cook. Serve on a hot plate and give thanks[113] that you're outdoors, have a good appetite, and are lucky enough to enjoy a dish fit for any old king. The gravy, oh my goodness! just thinking about it makes me hungry! I have eaten moose meat three times a day for weeks on end when it was cooked this way, without losing my craving for more.
When you need a real warm fire for cooking, do not forget that dry roots make an intensely hot fire with no smoke; look for them in driftwood piles, as they are sure to be there; they are light as a cork and porous as a sponge, and burn like coke.
When you need a really hot fire for cooking, remember that dry roots create an intensely hot and smokeless fire; you can find them in driftwood piles since they are usually there. They're as light as cork and as porous as a sponge, and they burn like coal.
No one with truth may say that he is a real woodcrafter unless he is a good camp cook. At the same time it is an error to think that the outdoor men live to eat like the trencher men of old England, or the degenerate epicures of ancient Rome. Neither are the outdoor men in sympathy with the Spartans or Lacedemonians and none of them would willingly partake of the historic and disgusting black broth of Lacedemonia. Woodcrafters are really more in sympathy with cultured Athenians who strove to make their banquets attractive with interesting talk, inspiring and patriotic odes and delightful recitations by poets and philosophers. As a campfire man would say: "That's me all over, Mable" and he might add that like all good things on this earth
No one who speaks the truth can claim to be a true woodcrafter unless he’s also a skilled camp cook. At the same time, it’s a mistake to think that outdoor enthusiasts live to eat like the hearty diners of old England or the lavish foodies of ancient Rome. They're also not aligned with the Spartans or Lacedemonians, and none of them would willingly eat the infamous and unappetizing black broth from Lacedemonia. Woodcrafters actually relate more to the cultured Athenians, who aimed to make their feasts enjoyable with engaging conversations, uplifting patriotic songs, and charming recitations by poets and philosophers. As a campfire enthusiast might say: "That's me all over, Mable," and he could add that, like all good things in this world
Wash the beans first, then half fill a pail with them, put them over the fire and parboil them until their skins are ready to come off; they are now ready for the pot. But before putting them in there, peel an onion and slice it, placing the slices in the bottom of the bean pot. Now pour half of the beans over the onions and on top of them spread the slices of another onion. Take some salt pork and cut it into square pieces and place the hunks of pork over the onions, thus making a layer of onions and pork on top of the beans. Over this pour the remainder of the beans, cover the top of the beans with molasses, on the top of the molasses put some more hunks of pork, put in enough water to barely cover the beans. Over the top of all of it spread a piece of birch bark, then force the cover down good and tight.
Wash the beans first, then fill a pail halfway with them, put them over the fire, and parboil them until their skins are ready to come off; they are now ready for the pot. But before adding them in, peel and slice an onion, placing the slices at the bottom of the bean pot. Now pour half of the beans over the onions and spread the slices of another onion on top of them. Take some salt pork and cut it into square pieces, then place the chunks of pork over the onions, creating a layer of onions and pork on top of the beans. Pour the remaining beans over this, cover the top of the beans with molasses, and add some more chunks of pork on top of the molasses. Pour in enough water to barely cover the beans. On top of everything, spread a piece of birch bark, then press the cover down tightly.
Meanwhile a fire should have been built in the bean hole (Fig. 105). When the fire of birch has been burnt to hot cinders, the cinders must be shoveled out and the bean pot put into the hole, after which pack the cinders around the bean pot and cover the whole thing with the dead ashes, or as the lumbermen call them, the black ashes.
Meanwhile, a fire should have been set up in the bean hole (Fig. 105). Once the birch fire has burned down to hot coals, you need to shovel out the coals and place the bean pot into the hole. Then, pack the coals around the bean pot and cover everything with the dead ashes, or what the lumbermen refer to as the black ashes.
If the beans are put into the bean hole late in the afternoon and allowed to remain there all night, they will be done to a[115] turn for breakfast; the next morning they will be wholesome, juicy and sweet, browned on top and delicious.
If the beans are placed in the bean hole late in the afternoon and left there overnight, they'll be perfectly cooked by breakfast; the next morning they will be healthy, juicy, and sweet, with a nice brown top and delicious flavor.
A bean hole is not absolutely necessary for a small pot of beans. I have cooked them in the wilderness by placing the pot on the ground in the middle of the place where the fire had been burning, then heaping the hot ashes and cinders over the bean pot until it made a little hill there, which I covered with the black ashes and left until morning. I tried the same experiment on the open hearth to my studio and it was a wonderful success.
A bean hole isn't really essential for cooking a small pot of beans. I’ve made them in the wild by setting the pot directly on the ground in the spot where the fire had been, then piling hot ashes and cinders over the bean pot until it looked like a small hill, which I then covered with black ashes and left until morning. I also tried the same method on the open hearth in my studio, and it worked great.
This may sound funny, but I have experimented, unintentionally, by seating myself upon a porcupine quill. I can assure the reader that there is nothing humorous in the experience to the victim, however funny it may appear to those who look on.
This might sound funny, but I accidentally sat on a porcupine quill. I can assure you there’s nothing funny about the experience for the person affected, no matter how amusing it might seem to onlookers.
After thoroughly singeing the porcupine you roll it in the grass to make certain that the burnt quills are rubbed off its skin, then with a sharp knife slit him up the middle of the belly from the tail to the throat, pull the skin carefully back and peel it off. When you come to the feet cut them off. Broiled porcupine is the Thanksgiving turkey of the Alaskan and British Columbia Indian, but unless it has been boiled in two or three waters the taste does not suit white men.
After thoroughly singeing the porcupine, roll it in the grass to make sure the burnt quills are rubbed off its skin. Next, use a sharp knife to make a slit down the middle of the belly from the tail to the throat, gently pulling the skin back and peeling it off. When you reach the feet, cut them off. Broiled porcupine is like the Thanksgiving turkey for the Alaskan and British Columbia Native Americans, but unless it's been boiled in two or three waters, the taste doesn’t appeal to white people.
After it has been parboiled, suspend the porcupine by its forelegs in front of a good roasting fire, or over a bed of hot coals, and if well seasoned it will be as good meat as can be found in the wilderness. The tail particularly is very meaty and is most savory; like beef tongue it is filled with fine bits of fat. Split the tail and take out the bone, then roast the meaty part.
After it's been partially cooked, hang the porcupine by its front legs in front of a nice roasting fire, or over a bed of hot coals, and if well-seasoned, it will be some of the best meat you can find in the wild. The tail, in particular, is very meaty and incredibly tasty; like beef tongue, it's packed with fine bits of fat. Split the tail and remove the bone, then roast the meaty part.
Porcupine stuffed with onions and roasted on a spit before the fire is good, but to get the perfection of cooking it really should be cooked in a Dutch oven, or a closed kettle or an improvised airtight oven of some sort and baked in a bean hole, or baked by being buried deep under a heap of cinders and covered with ashes. Two iron pans that will fit together, that is, one that is a trifle larger than the other so that the smaller one may be pushed down into it to some extent, will answer all the purposes of the Dutch oven. Also two frying pans arranged in the same manner.
A porcupine stuffed with onions and roasted on a spit over the fire is tasty, but to truly perfect the cooking, it should really be done in a Dutch oven, a closed kettle, or some kind of improvised airtight oven, and baked in a bean hole, or buried deep under a pile of cinders and covered with ashes. Two iron pans that fit together, meaning one is slightly larger than the other so that the smaller one can be pushed down into it a bit, will serve all the purposes of a Dutch oven. The same goes for two frying pans arranged in the same way.
Always remember that after the porcupine is skinned, dressed and cleaned, it should be put in a pot and parboiled, changing the water once or twice, after which it may be cooked in any way which appeals to the camper. The
Always remember that after the porcupine is skinned, dressed, and cleaned, it should be put in a pot and parboiled, changing the water once or twice, after which it can be cooked in any way that appeals to the camper. The
On top of the porcupine lay a nice slice or two of fat pork and place another layer of soaked hard biscuit or hard-tack on the pork, put it in a Dutch oven and place the Dutch oven[117] on the hot coals, put a cover on the Dutch oven and heap the living coals over the top of it and the ashes atop of that; let it bake slowly until the flesh parts from the bones. Thus cooked it will taste something like veal with a suggestion of sucking pig. The tail of the porcupine, like the
On top of the porcupine, lay a couple of nice slices of fatty pork and place another layer of soaked hard biscuits or hardtack on the pork. Put it in a Dutch oven and set the Dutch oven[117] on the hot coals. Cover the Dutch oven and pile the hot coals on top of it, with ashes on top of that. Let it bake slowly until the meat falls off the bones. When cooked this way, it will taste somewhat like veal with a hint of suckling pig. The tail of the porcupine, like the
A man who was hunting in North Michigan said, "Although I am a Marylander, and an Eastern Shore one at that, and consequently know what good things to eat are, I want to tell you that I'll have to take off my hat to the lumber camp cook as the discoverer, fabricator and dispenser of a dish that knocks the Eastern Shore cuisine silly. And that dish is beaver-tail soup. When the beaver was brought into camp the camp cook went nearly wild, and so did the lumbermen when they heard the news, and all because they were pining for beaver-tail soup.
A guy who was hunting in Northern Michigan said, "Even though I’m from Maryland, specifically the Eastern Shore, which means I know good food when I taste it, I have to give props to the lumber camp cook for creating a dish that puts Eastern Shore cuisine to shame. And that dish is beaver-tail soup. When the beaver arrived at the camp, the cook nearly lost it, and so did the lumberjacks when they heard, all because they were craving beaver-tail soup."
"The cook took that broad appendage of the beaver, mailed like an armadillo, took from it the underlying bone and meat[118] and from it made such a soup as never came from any other stock, at the beck of the most expert and scientific chef that ever put a kettle on."
"The cook took that thick part of the beaver, which was tough like an armadillo's shell, removed the bone and meat from it[118] and created a soup that no one had ever made from any other ingredient, guided by the skills of the most talented and knowledgeable chef ever to boil water."
At Dover the writer has had it served at the hotel under its own name; the dish was "muskrats and toast." For the benefit of those who revolt at the muskrat as food, it is well to state that it is one of the cleanest of all creatures, that it carefully washes all its own food and in every way conducts itself so as to recommend its flesh even to the most fastidious. As a matter of fact the flesh of the muskrat, though dark, is tender and exceedingly sweet. Stewed like rabbit it looks and tastes like rabbit, save that it lacks a certain gamy flavor that some uneducated persons find an unpleasant characteristic of the latter. But to the writer's way of thinking, while the muskrat is good to eat, there are many things much better; the point is, however, that everything which tastes good and is not indigestible is good to eat no matter what its name may be.
At Dover, the author had it served at the hotel under its own name; the dish was "muskrats and toast." For those who are turned off by muskrat as food, it's worth mentioning that it's one of the cleanest creatures. It carefully washes all its food and behaves in a way that makes its meat appealing even to the most picky eaters. In fact, the meat of the muskrat, though dark, is tender and extremely sweet. When stewed like rabbit, it looks and tastes similar to rabbit, except it lacks the certain gamey flavor that some unrefined individuals find off-putting in rabbit. But in the author's opinion, while muskrat is good to eat, there are many things that are much better; the important thing is that anything that tastes good and isn't hard to digest is worth eating, no matter what it's called.
Of all the camp stews and hunters' stews of various names and flavors, the Kentucky burgoo heads the list; not only is[119] it distinguished for its intrinsic qualities, its food value and delicious flavor, its romance and picturesque accompaniment, but also because of the illustrious people whose names are linked in Kentucky history with the burgoo. One such feast, given some time between 1840 and 1850, was attended by Governor Owlsley (old stone-hammer), Governor Metcalf, Governor Bob Letcher, Governor Moorhead, General George Crittenton, General John Crittenton, General Tom Crittenton, James H. Beard, and other distinguished men.
Of all the camp and hunters' stews with their various names and flavors, Kentucky burgoo tops the list. It's not only known for its great ingredients, nutritional value, and amazing taste, but also for the stories and colorful history surrounding it, especially the notable people from Kentucky history associated with burgoo. One such feast, held sometime between 1840 and 1850, was attended by Governor Owlsley (Old Stone-Hammer), Governor Metcalf, Governor Bob Letcher, Governor Moorhead, General George Crittenton, General John Crittenton, General Tom Crittenton, James H. Beard, and other prominent figures.
All Kentuckians will vow they understand the true meaning of the word "burgoo." But an article in the Insurance Field says, "It is derived from the low Latin burgus, fortified (as a town) and goo-goo, very good." Hence the word, "burgoo," something very good, fortified with other good things, as will be found in "Carey's Dictionary of Double Derivations": "Burgoo is literally a soup composed of many vegetables and meats delectably fused together in an enormous caldron, over which, at the exact moment, a rabbit's foot at the end of a yarn string is properly waved by a colored preacher, whose salary has been paid to date. These are the good omens by which the burgoo is fortified."
All Kentuckians will insist they know the real meaning of the word "burgoo." However, an article in the Insurance Field states, "It comes from the low Latin ‘burgus,’ meaning fortified (like a town) and ‘goo-goo,’ meaning very good." Thus, the term "burgoo" refers to something very good, enhanced with other great things, as noted in "Carey’s Dictionary of Double Derivations": "Burgoo is literally a soup made from a mix of various vegetables and meats deliciously blended together in a huge pot, over which, at just the right moment, a rabbit's foot tied to a string is ceremoniously waved by a Black preacher, who has been paid up to date. These are the good omens that enhance the burgoo."
Anything from an ordinary pail to one or many big caldrons, according to the number of guests expected at the camp, will serve as vessels in which to serve the burgoo. The excellence of the burgoo depends more upon the manner of cooking and seasoning it than it does on the material used in its decoction.
Anything from a regular bucket to one or several large pots, depending on how many guests are expected at the camp, can be used as containers for serving the burgoo. The quality of the burgoo relies more on how it's cooked and seasoned than on the ingredients used to make it.
To-day the burgoo is composed of meat from domestic beasts and barnyard fowls with vegetables from the garden, but originally it was made from the wild things in the woods,[120] bear, buffalo, venison, wild turkey, quails, squirrels and all the splendid game animals that once roamed through Kentucky.
Today, burgoo is made with meat from farm animals and poultry along with vegetables from the garden, but originally it consisted of wild game from the woods, like bear, buffalo, venison, wild turkey, quail, squirrels, and all the amazing game animals that used to wander through Kentucky.[120]
As this book is for woodcrafters we will take it for granted that we are in the woods, that we have some venison, moose, bear meat, rocky mountain goat, big horn, rabbit, ruffed grouse, or some good substitutes. It would be a rare occasion indeed when we would really have these things. If, for instance, we have a good string of grouse we will take their legs and wings and necks for the burgoo and save their breasts for a broil, and if we have not many grouse we will put in a whole bird or two. We will treat the rabbits the same way, saving the body with the tenderloin for broiling. When cleaned and dressed the meat of a turtle or two adds a delicious flavor to the burgoo; frogs legs are also good, with the other meat.
As this book is for woodcrafters, we’ll assume we’re in the woods, possibly with some venison, moose, bear meat, Rocky Mountain goat, bighorn sheep, rabbit, ruffed grouse, or some decent substitutes. It would be quite rare for us to actually have all these items. For example, if we have a good number of grouse, we’ll use their legs, wings, and necks for the burgoo and save the breasts for grilling. If we don’t have many grouse, we might throw in a whole bird or two. We’ll treat the rabbits the same way, keeping the body and tenderloin for grilling. When cleaned and prepared, the meat from one or two turtles adds a great flavor to the burgoo; frog legs also work well with the other meats.
Cut all the meat up into pieces which will correspond, roughly speaking, to inch cubes; do not throw away the bones; put them in also. Now then, if you were wise enough when you were outfitting for the trip to secure some of the ill-smelling but palatable dried vegetables, they will add immensely to the flavor of your burgoo. Put all the material in the kettle, that is, unless you are using beans and potatoes as vegetables; if so, the meats had better be well cooked first, because the beans and potatoes have a tendency to go to the bottom, and by scorching spoil the broth.
Cut all the meat into pieces that are roughly one-inch cubes; don't throw away the bones; add those too. Now, if you were smart enough to bring along some of the smelly but tasty dried vegetables for the trip, they'll really enhance the flavor of your burgoo. Put everything in the pot, unless you're using beans and potatoes as your vegetables; if that's the case, it's better to cook the meat well first, because beans and potatoes tend to sink to the bottom and can scorch, ruining the broth.
Fill your kettle, caldron or pot half full of water and hang it over the fire; while it is making ready to boil get busy with your vegetables, preparing them for the stew. Peel the dry outer skin off your onions and halve them, or quarter them, according to their size; scrape your carrots and slice them into little disks, each about the size of a quarter, peel your potatoes and cut them up into pieces about the size[121] of the meat, and when the caldron is boiling dump in the vegetables. The vegetables will temporarily cool the water, which should not be allowed to again boil, but should be put over a slow fire and where it will simmer. When the stew is almost done add the salt and other seasonings. There should always be enough water to cover the vegetables. Canned tomatoes will add to the flavor of your broth. In a real burgoo we put no thickening like meal, rice or other material of similar nature, because the broth is strained and served clear. Also no sweet vegetables like beets.
Fill your kettle, pot, or cauldron halfway with water and hang it over the fire. While it's getting ready to boil, start preparing your vegetables for the stew. Peel off the dry outer skin of the onions and cut them in half or quarters, depending on their size. Scrape the carrots and slice them into small disks, each about the size of a quarter. Peel the potatoes and cut them into pieces about the same size as the meat. When the pot is boiling, throw in the vegetables. The vegetables will temporarily cool the water, which should not boil again; instead, lower the heat so it simmers. When the stew is almost done, add the salt and other seasonings. There should always be enough water to cover the vegetables. Canned tomatoes will enhance the flavor of your broth. In a traditional burgoo, we don't add thickening agents like meal, rice, or similar materials because the broth is strained and served clear. Also, avoid using sweet vegetables like beets.
When the burgoo is done dip it out and drink it from tin cups. Of course, if this is a picnic burgoo, you add olive juice to the stew, while it is cooking, and then place a sliced lemon and an olive in each cup and pour the hot strained liquid into the cups.
When the burgoo is ready, ladle it out and drink it from tin cups. If this is a picnic burgoo, add olive juice to the stew while it’s cooking, then place a sliced lemon and an olive in each cup and pour the hot strained liquid into the cups.
The burgoo and the barbecue belong to that era when food was plenty, feasts were generous and appetites good. These historic feasts still exist in what is left of the open country and rich farming districts, particularly in Kentucky and Virginia. In Kentucky in the olden times the gentlemen were wont to go out in the morning and do the hunting, while the negroes were keeping the caldrons boiling with the pork and other foundation material in them. After the gentlemen returned and the game was put into the caldron, the guests began to arrive and the stew was served late in the afternoon; each guest was supposed to come supplied with a tin cup and a spoon, the latter made of a fresh water mussel shell with a split stick for a handle. Thus provided they all sat round and partook of as many helps as their hunger demanded.
The burgoo and barbecue come from a time when food was abundant, feasts were lavish, and appetites were strong. These traditional gatherings can still be found in the remaining open country and fertile farming areas, especially in Kentucky and Virginia. Back in the day in Kentucky, gentlemen would head out in the morning to hunt while the Black cooks kept the cauldrons boiling with pork and other key ingredients. Once the gentlemen returned and added the game to the cauldron, the guests started to arrive, and the stew was served in the late afternoon. Each guest was expected to bring a tin cup and a spoon, the latter made from a freshwater mussel shell with a split stick for a handle. Equipped this way, they all sat around and enjoyed as much as they wanted to satisfy their hunger.
Since we have given Kentucky's celebrated dish, we will add "Ole Virginny's" favorite dish, which has been named after the county where it originated.
Since we've mentioned Kentucky's famous dish, we'll also add "Ole Virginny's" favorite dish, which is named after the county where it came from.
"Take two large squirrels, one quart of tomatoes, peeled and sliced, if fresh; one pint of lima beans or butter beans, two teaspoonfuls of white sugar, one minced onion, six potatoes, six ears of corn scraped from the cob, or a can of sweet corn, half a pound of butter, half a pound of salt pork, one teaspoonful of salt, three level teaspoonfuls of pepper and a gallon of water. Cut the squirrels up as for fricassee, add salt and water and boil five minutes. Then put in the onion, beans, corn, pork, potatoes and pepper, and when boiling again add the squirrel.
"Take two large squirrels, one quart of fresh tomatoes, peeled and sliced; one pint of lima beans or butter beans; two teaspoons of white sugar; one chopped onion; six potatoes; six ears of corn scraped from the cob, or a can of sweet corn; half a pound of butter; half a pound of salt pork; one teaspoon of salt; three level teaspoons of pepper; and a gallon of water. Cut the squirrels into pieces like you would for fricassee, add salt and water, and boil for five minutes. Then, add the onion, beans, corn, pork, potatoes, and pepper. Once it’s boiling again, add the squirrel."
"Cover closely and stew two hours, then add the tomato mixed with the sugar and stew an hour longer. Ten minutes before removing from the fire cut the butter into pieces the size of English walnuts, roll in flour and add to the stew. Boil up again, adding more salt and pepper if required."
"Cover tightly and simmer for two hours, then add the tomato mixed with the sugar and simmer for another hour. Ten minutes before taking it off the heat, cut the butter into pieces the size of English walnuts, coat them in flour, and add them to the stew. Bring it back to a boil, adding more salt and pepper if needed."
The above is a receipt sent in to us, and I would give credit for it if I knew from whence it came. I do know that it sounds good, and from my experience with other similar dishes, it will taste good.
The above is a receipt sent to us, and I would give credit for it if I knew where it came from. I do know that it sounds good, and based on my experience with other similar dishes, it will taste great.
I am not writing a cook book but only attempting to start the novice on his way as a camp chef, and if he succeeds in cooking in the open the dishes here described, he need not fear to tackle any culinary problem which conditions may make it necessary for him to solve.
I’m not writing a cookbook; I’m just trying to help beginners get started as camp chefs. If they can successfully cook the dishes described here in the great outdoors, they shouldn’t be afraid to take on any cooking challenge that comes their way.
CHAPTER VII
PACKING HORSES
- HOW TO MAKE A PACK HORSE OF YOUR OWN
- HOW TO MAKE AN APAREJO
- HOW TO MAKE A CINCHA
- HOW TO MAKE A LATIGO
- HOW TO THROW A DIAMOND HITCH
- HOW TO THROW A SQUAW HITCH
- HOW TO HITCH A HORSE IN OPEN LAND WITHOUT POST, TREE OR STICK OR STONE
- USE OF HOBBLES AND HOW TO MAKE THEM
- HOW THE TRAVOIS IS MADE AND USED
- BUFFALO BILL AND GENERAL MILES
- HOW TO THROW DOWN A SADDLE
- HOW TO THROW A SADDLE ON A HORSE
- HOW TO MOUNT A HORSE
- HOW TO KNOW A WESTERN HORSE
PACKING HORSES
If one is going on a real camping excursion where one will need pack horses, one should, by all means, familiarize oneself with the proper method of packing a pack horse. This can be done in one's own cellar, attic or woodshed and without hiring a horse or keeping one for the purpose. The horse will be expensive enough when one needs it on the trail.
If you're going on a serious camping trip that involves pack horses, you should definitely learn how to properly pack a pack horse. You can practice this in your own cellar, attic, or shed without needing to rent or own a horse for the purpose. The horse will already be costly enough when you need it on the trail.
The drill in packing a horse should be taught in all scout camps, and all girl camps and all Y.M.C.A. camps, and all training camps; in fact, everywhere where anybody goes outdoors at all, or where anybody pretends to go outdoors; and after the tenderfeet have learned how to pack then it is the proper time to learn what to pack; consequently we put packing before outfitting, not the cart, but the pack before the horse, so to speak.
The skill of packing a horse should be taught in all scout camps, girl camps, Y.M.C.A. camps, and training camps; basically, anywhere anyone spends time outdoors or even pretends to. Once the beginners have learned how to pack, that's the right time to figure out what to pack. Therefore, we prioritize packing before outfitting—it's about the pack before the horse, so to speak.
When the Boy Scout Movement started in America it had the good aggressive American motto, "Be Sure You're Right, Then Go Ahead," which was borrowed from that delightful old buckskin man, Davy Crockett.
When the Boy Scout Movement began in America, it adopted the enthusiastic American motto, "Make sure you're certain, then proceed.," which was taken from that charming old frontiersman, Davy Crockett.
A few years later, when the scout idea was taken up in England, the English changed the American motto to "Be Prepared;" because the English Boy Scout promoter was a military man himself and saw the necessity of preparedness by Great Britain, which has since become apparent to us all.
A few years later, when the scout idea was adopted in England, the English changed the American motto to "Be Ready;" because the English Boy Scout promoter was a military man himself and recognized the importance of preparedness for Great Britain, which has since become clear to all of us.
And in order to be prepared to pack a horse, we must first be sure we are right, then "go ahead" and practice packing at home.
And to get ready to pack a horse, we first need to be sure we're on the right track, then "go ahead" and practice packing at home.
One of the most useful things to the outdoor person is a
One of the most useful things for someone who spends time outdoors is a
All of us do not own a horse, but there is not a reader of this book so poor that he cannot own the horse shown by Fig. 174.
All of us don’t own a horse, but there isn’t a reader of this book so poor that they can’t own the horse shown by Fig. 174.
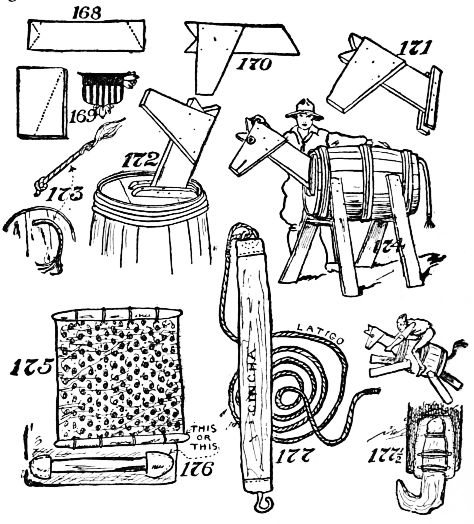
There are but few people in the United States who cannot honestly come into possession of a barrel with which to build a pack horse or on which to practice throwing the diamond hitch. They can also find, somewhere, some pieces of board with which to make the legs of the horse, its neck and head.
There are only a few people in the United States who can't honestly get a barrel to build a pack horse or to practice throwing the diamond hitch. They can also find, somewhere, some boards to make the horse's legs, neck, and head.
Fig. 168 shows the neck-board, and the dotted lines show where to saw the head to get the right angle for the head and ears, with which the horse may hear. Fig. 169 shows the head-board, and the dotted line shows how to saw off one corner to give the proper shape to this Arabian steed's intelligent head-piece.
Fig. 168 shows the neck board, and the dotted lines indicate where to cut the head to achieve the correct angle for the head and ears, which allows the horse to hear properly. Fig. 169 shows the head board, and the dotted line illustrates how to trim one corner to shape this Arabian horse’s smart headpiece correctly.
Fig. 170 shows how to nail the head on the neck. The nails may be procured by knocking them out of old boards; at least that is the way the writer supplied himself with nails. He does not remember ever asking his parents for money with which to buy nails, but if it is different nowadays, and if you do not feel economically inclined, and have the money, go to the shop and buy them. Also, under such circumstances, go to the lumber yard and purchase your boards.
Fig. 170 shows how to attach the head to the neck. You can get nails by removing them from old boards; that's how the writer got his nails. He doesn’t recall ever asking his parents for money to buy nails, but if things have changed now, and if you don’t want to spend money but have it anyway, just go to the store and buy them. Also, in that case, head over to the lumber yard and get your boards.
Fig. 171 shows how to nail two cleats on the neck, and Fig. 172 shows how to nail these cleats onto the head of the barrel. If you find the barrel head so tough and elastic that a nail cannot be easily hammered in, use a gimlet and bore holes into the cleats and into the barrel head, and then fasten the cleats on with screws.
Fig. 171 shows how to attach two cleats on the neck, and Fig. 172 shows how to attach these cleats to the top of the barrel. If you find the barrel head too hard and flexible for a nail to go in easily, use a gimlet to drill holes into the cleats and into the barrel head, and then secure the cleats with screws.
The tail of the nag is made out of an old piece of frayed rope (Fig. 173), with a knot tied in one end to prevent the tail from pulling out when it is pulled through a hole in the other end of the barrel (Fig. 173). The legs of the horse are made like those of a carpenter's wooden horse, of bits of plank or boards braced under the barrel by cross-pieces (Fig. 174).
The tail of the horse is made from an old frayed rope (Fig. 173), with a knot tied in one end to stop the tail from coming out when it’s pulled through a hole in the other end of the barrel (Fig. 173). The legs of the horse are constructed like those of a carpenter's sawhorse, made from pieces of plank or boards, supported beneath the barrel by cross-pieces (Fig. 174).
Now you have a splendid horse! "One that will stand without hitching." It is kind and warranted not to buck, bite or kick, but nevertheless, when you are packing him remember that you are doing it in order to drill yourself to pack a real live horse, a horse that may really buck, bite and kick.
Now you have a fabulous horse! "One that will stand still without tying." It's gentle and guaranteed not to buck, bite, or kick, but still, when you’re loading him up, remember that you’re doing it to train yourself to handle a real live horse, one that might actually buck, bite, or kick.
There are a lot of words in the English language not to be found in the dictionary. I remember a few years ago when one could not find "undershirt" or "catboat" in the dictionary. But in the dictionaries of to-day you will even find "aparejo" and "latigo," although neither of these words was in the dictionaries of yesterday.
There are a lot of words in the English language that can't be found in the dictionary. I remember a few years ago when you couldn't find "undershirt" or "catboat" in the dictionary. But in today's dictionaries, you can even find "aparejo" and "latigo," even though neither of these words was in the dictionaries of the past.
Make your own aparejo of anything you can find. The real ones are made of leather, but at the present time, 1920, leather is very expensive. We can, however, no doubt secure some builders' paper, tar paper, stiff wrapping paper, a piece of old oilcloth, which, by the way, would be more like leather than anything else, and cover these things with a piece of tent cloth, a piece of carpet, or even burlap. The oilcloth inside will stiffen the aparejo. At the bottom edge of it we can lash a couple of sticks (Fig. 175), or if we want to do it in a real workmanlike manner, we can sew on a couple of leather shoes, made out of old shoe leather or new leather if we can secure it, and then slip a nice hickory stick through the shoes, as shown in the diagram (Fig. 176).
Make your own aparejo from anything you can find. The real ones are made of leather, but right now, in 1920, leather is really expensive. However, we can probably get some builder's paper, tar paper, stiff wrapping paper, or a piece of old oilcloth, which would be the closest thing to leather. We can cover these materials with a piece of tent fabric, a piece of carpet, or even burlap. The oilcloth inside will make the aparejo stiff. At the bottom edge, we can tie a couple of sticks (Fig. 175), or if we want to do it properly, we can sew on a couple of leather shoe pieces made from old shoe leather or new leather if we can find it. Then, we can slide a nice hickory stick through the shoes, as shown in the diagram (Fig. 176).
The aparejo is to throw over the horse's back as in Fig. 178, but in order to fasten it on the back we must have a latigo which is the real wild and woolly name for the rope attached to a cincha strap (Fig. 177). But when you are talking about packing the pack horses call it "cinch," and spell it "cincha." Make your cincha of a piece of canvas, and in one end fasten a hook—a big strong picture hook will do; Fig. 177½ shows a cinch hook made of an oak elbow invented by Stewart Edward White, and in the other end an iron ring; to the iron ring fasten the lash rope (Fig. 177).
The aparejo is to throw over the horse's back as in Fig. 178, but to secure it on the back, we need a latigo, which is the real wild and woolly name for the rope attached to a cincha strap (Fig. 177). But when you’re packing the pack horses, it's called a “cinch,” and spelled “cincha.” Make your cincha from a piece of canvas, and attach a hook on one end—a sturdy picture hook will work; Fig. 177½ shows a cinch hook made from an oak elbow designed by Stewart Edward White, and on the other end, attach an iron ring; tie the lash rope to the iron ring (Fig. 177).
For the real horse and outfit one will need an aparejo,[129] a pack blanket, a lash rope with a cincha, a sling rope, a blind for the horse, and a pack cover. But here again do not call it a pack cover, for that will at once stamp you as a tenderfoot. Assume the superior air of a real plainsman and speak of it as a "manta." The aparejo and pack saddle are inventions of the Arabians away back in the eighth century. When the Moors from Africa overran Spain, these picturesque marauders brought with them pack mules, pack saddles, and aparejos. When General Cortez and Pizarro carried the torch and sword through Mexico in their search for gold, they brought with them pack animals, pack saddles, aparejos, latigos, and all that sort of thing with which to pack their loot.
For the real horse and gear, you'll need an aparejo,[129] a pack blanket, a lasso with a cinch, a sling rope, a blindfold for the horse, and a pack cover. But don’t just call it a pack cover, because that will immediately give away that you're a newbie. Carry yourself like a real cowboy and refer to it as a "manta." The aparejo and pack saddle were invented by the Arabs way back in the eighth century. When the Moors from Africa took over Spain, these colorful raiders brought with them pack mules, pack saddles, and aparejos. When General Cortez and Pizarro marched through Mexico in search of gold, they brought pack animals, pack saddles, aparejos, latigos, and all the gear they needed to haul their treasure.
When the forty-niners went to California in search of gold they found that the Arabian Moorish-Spanish-Mexican method of packing animals was perfectly adapted to their purposes and they used to pack animals, the aparejos, the latigos, and all the other kinds of gos. The lash rope for a real pack horse should be of the best Manila ½ inch or 5/8 inch, and forty feet long; a much shorter one will answer for the wooden horse.
When the forty-niners traveled to California looking for gold, they discovered that the Arabian Moorish-Spanish-Mexican way of packing animals was ideal for their needs. They would use animal packs, aparejos, latigos, and all the other necessary gear. The lash rope for a true pack horse should be the best Manila, either ½ inch or 5/8 inch thick, and forty feet long; a much shorter rope will work for the wooden horse.

Back in 1879, Captain A. B. Wood, United States Army, introduced a knowledge of the proper use of the pack saddle and the mysteries of the diamond hitch into the United States Army. The Fourth Cavalry, United States Army, was the first to become expert with the diamond hitch and taught it to the others; but recently a military magazine has asked permission, and has used the author's diagrams, to explain to the Cavalry men how this famous hitch is thrown.
Back in 1879, Captain A. B. Wood of the United States Army introduced the proper use of the pack saddle and the secrets of the diamond hitch to the United States Army. The Fourth Cavalry was the first unit to master the diamond hitch and taught it to others; however, a military magazine recently requested permission to use the author's diagrams to explain to Cavalry soldiers how to tie this famous hitch.
It stands to reason that in order to pack one horse one[130] must have some packs. But these are the easiest things imaginable to secure. A couple of old potato or flour bags, stuffed with anything that is handy—hay, grass, leaves, rags or paper—but stuffed tight (Fig. 179), will do for our load.
It makes sense that to pack a horse, you need some packs. But these are super easy to find. A couple of old potato or flour bags, stuffed with whatever is available—hay, grass, leaves, rags, or paper—but packed tightly (Fig. 179), will work for our load.

When packing a horse, except with such hitches as the
"one man hitch," it requires two men or boys to "throw" the
hitch. The first one is known as the head packer, and the
other as the second packer. Remember that the left-hand
side of the horse is the nigh side. The head packer stands
on the nigh side of the horse and he takes the coiled lash rope
in the left hand and lets the coils fall astern of the pack
animal (Fig. 180); with the right hand he takes hold of the
rope about three or four feet from the cincha (Fig. 180) and
hands the hook end under the animal to the second packer,
who stands on the right-hand side of the horse (Fig. 180).
The right hand of the head packer, with the palm upwards,
so holds the rope that the loop will fall across his forearm;
the left hand with the palm downward holds the rope about
half way between the loop that goes over the forearm and the
loop that lies along the back of the pack animal (Fig. 181).
The head packer now throws the loop from his forearm across[131]
[132]
[133]
the pack on the back of the animal, allowing the left hand to
fall naturally on the neck of the animal. The second packer
now runs the rope through the hook and pulls up the cincha
end until the hook is near the lower edge of the off side of the
aparejo (Fig. 183).
When packing a horse, except for situations like the "one man hitch," it takes two people to throw the hitch. The first person is called the head packer, and the second is the second packer. Keep in mind that the left side of the horse is the near side. The head packer stands on the near side of the horse, holding the coiled lash rope in their left hand and letting the coils drop behind the pack animal (Fig. 180). With their right hand, they grab the rope about three or four feet from the cincha (Fig. 180) and passes the hook end under the animal to the second packer, who stands on the right side of the horse (Fig. 180). The head packer's right hand, palm facing up, holds the rope so the loop rests on their forearm, while the left hand, palm facing down, holds the rope about halfway between the loop over the forearm and the loop along the back of the pack animal (Fig. 181). The head packer then throws the loop from their forearm across the pack on the animal's back, allowing their left hand to drop naturally onto the animal's neck. The second packer then runs the rope through the hook and pulls up the cincha end until the hook is close to the lower edge of the off side of the aparejo (Fig. 183).
The head packer next grasps the rope A (Fig. 185) and tucks a loop from the rear to the front under the part marked B (Figs. 185 and 186), over the inner side pack (Figs. 184 and 187). Next the second packer passes the loose end of the rope under the part marked D (Fig. 187), and throws it on the nigh (left) side of the pack animals.
The head packer then takes the rope A (Fig. 185) and tucks a loop from the back to the front under the section marked B (Figs. 185 and 186), over the inner side pack (Figs. 184 and 187). Next, the second packer passes the loose end of the rope under the section marked D (Fig. 187) and throws it onto the near (left) side of the pack animals.
The head packer now draws the tucked loop forward and tucks it under the corners and the lower edge of the nigh side of the aparejo (Fig. 188), then holds it taut from the rear corner, and the second packer takes hold of the rope at E (Fig. 189) with his left hand, and at F (Fig. 187) with his right hand. He passes the rope under the corners and lower edge of the off side of the aparejo (G, H, Fig. 189, and G, H, Fig. 191). The second packer now takes the blind off his pack animal and is supposed to lead it forward a few steps while the head packer examines the load from the rear to see if it is properly adjusted.
The head packer now pulls the tucked loop forward and tucks it under the corners and the lower edge of the near side of the aparejo (Fig. 188). Then he holds it tight from the back corner, and the second packer grabs the rope at E (Fig. 189) with his left hand, and at F (Fig. 187) with his right hand. He passes the rope under the corners and lower edge of the off side of the aparejo (G, H, Fig. 189, and G, H, Fig. 191). The second packer then removes the blindfold from his pack animal and is expected to lead it forward a few steps while the head packer checks the load from the back to make sure it’s properly adjusted.
Then the blind is again put upon the animal for the final tightening of the rope. While the second packer is pulling the parts taut, the head packer takes up the slack and keeps the pack steady. The tightening should be done in such a manner as not to shake the pack out of balance or position, (Figs. 188 and 190).
Then the blindfold is put back on the animal for the final tightening of the rope. While the second packer pulls the parts tight, the head packer takes up the slack and keeps the pack steady. The tightening should be done carefully so as not to shake the pack out of balance or position, (Figs. 188 and 190).
The second (or off side) packer grasps the lash rope above the hook, and puts his knee against the stern corner of the aparejo, left-hand group (Fig. 188). The head packer takes hold with his right hand of the same part of the rope where it[134] comes from the pack on the inner side, and with the left hand at J (Fig. 189), and his right shoulder against the cargo to steady it, he gives the command "Pull!" Without jerks, but with steady pulls, the second packer now tightens the rope, taking care not to let it slip back through the hook. He gives the loose part to the head packer, who takes up the slack by steady pulls.
The second (or offside) packer grabs the lash rope above the hook and presses his knee against the stern corner of the aparejo, left-hand group (Fig. 188). The head packer grips the same section of the rope where it comes from the pack on the inner side with his right hand, and with his left hand at J (Fig. 189), and his right shoulder against the cargo to stabilize it, he calls out, "Pull!" Without any jerking, but with steady pulls, the second packer tightens the rope, making sure not to let it slip back through the hook. He hands the loose end to the head packer, who takes up the slack with steady pulls.

When the second packer is satisfied that it is all right he cries, "Enough!" The head packer then holds steady with his right hand and slips the other hand down to where the rope passes over the front edge of the aparejo. There he[135] holds steady; his right hand then takes hold of the continuation of the rope at the back corner of the pad and pulls tight. Placing his right knee against the rear corner of the pad he pulls hard with both hands until the rope is well home, left-hand group (Fig. 188).
When the second packer is confident everything is good, he shouts, "Enough!" The head packer then stabilizes things with his right hand and moves his other hand down to where the rope goes over the front edge of the aparejo. There he[135] keeps it steady; his right hand then grips the continuation of the rope at the back corner of the pad and pulls tight. With his right knee against the rear corner of the pad, he pulls hard with both hands until the rope is secured, left-hand group (Fig. 188).
The second packer now takes up the slack by grasping the rope with both hands, E (Fig. 189).
The second packer now tightens the rope by grabbing it with both hands, E (Fig. 189).
The head packer steps to the front to steady the pack. The second packer pulls taut the parts on his side, taking up the slack. This draws the part of the lash rope K, K (Fig. 189), well back at middle of the pack, giving the center hitch the diamond shape from which the name is derived, X (Fig. 191). He then, with the left hand at the rear corner H, pulls taut and holds solid, while with the right hand in front of G, he takes up slack. Next with both hands at the front corner and with his knee against it (Fig. 188), the second packer pulls taut, the head packer at the same time taking up the slack on his side and then pulls steady, drawing the part L, L (Fig. 189), of the rope leading from the hook well forward at the middle of the pack, finishing off the diamond at X. He then carries the loose end under the corners and ends of the aparejo, and draws that taut and ties the end fast by a half hitch near the cincha end of the lash rope.
The head packer moves to the front to secure the pack. The second packer tightens the parts on his side, taking up the slack. This pulls the lash rope K, K (Fig. 189) back at the center of the pack, giving the center hitch its diamond shape, X (Fig. 191). He then, keeping his left hand at the back corner H, pulls tight and holds steady, while with his right hand in front of G, he takes up the slack. Next, with both hands at the front corner and his knee pressed against it (Fig. 188), the second packer pulls tight, while the head packer simultaneously takes up the slack on his side and then pulls steadily, bringing the part L, L (Fig. 189) of the rope leading from the hook well forward at the center of the pack, completing the diamond at X. He then tucks the loose end under the corners and ends of the aparejo, tightens that, and secures the end with a half hitch near the cincha end of the lash rope.
After passing under the corners, if the rope is long enough to reach over the load, it can then be passed over and made fast on the off side by tying around both parts of the lash rope above the hook and by drawing them well together (Fig. 191).
After going under the corners, if the rope is long enough to go over the load, it can be passed over and secured on the opposite side by tying it around both parts of the lash rope above the hook and pulling them tightly together (Fig. 191).
Alongside of Fig. 190 are a series of sketches showing how to lash and cinch two parcels or bags together; one bag is made black so that its position can better be understood. In other words, it makes it easier to follow the different hitches.[136] Learn to pack at home and you will not lose your packs on the trail.
Along with Fig. 190, there are a series of sketches demonstrating how to tie and secure two parcels or bags together; one bag is colored black to make its position clearer. In other words, it helps to follow the different knots. [136] Learn to pack at home and you won’t lose your packs on the trail.
In following these instructions, whenever in doubt forget the perspective views and keep in mind Figures 181, 183, 185, 187, 189 and 191, which tell the whole story. The perspective views are principally to show the relative position of the packers; the position of the rope can best be seen by looking on top of the pack.
In following these instructions, whenever you're unsure, ignore the perspective views and remember Figures 181, 183, 185, 187, 189 and 191, which explain everything. The perspective views are mainly meant to show the relative positions of the packers; you can see the position of the rope best by looking from above the pack.

In packing a live horse you will learn by practice not to pull in such a way as to cause the horse to step on your feet; you will also learn that a live horse will not stand as still as a wooden horse, but when you have learned to pack a wooden horse quickly and well, it will only take you a short time to become expert with a live horse.
In packing a live horse, you will discover through experience not to pull in a way that makes the horse step on your feet; you will also realize that a live horse won’t stand as still as a wooden one. However, once you’ve learned to pack a wooden horse quickly and effectively, you’ll find it won’t take long to become skilled with a live horse.
These are useful when one has no one to help in packing the animal, and when one has no pack saddle like Fig. 200. With this squaw hitch you must throw your burden across the back of the horse, over the pad made by a blanket (Fig.[137] 192), then put a loop over the end M, see X (Fig. 192), and another one over the end N, see Y (Fig. 192). At the end of the lash rope Z make a loop; now pass that loop down under the horse's belly and through Y (Fig. 193), bring the end Z back again over the horse's back, also pass the end T down through X, and bring it back over the horse's back, also pass the end Z down through Y, and bring it back over the horse's back, pass T through Z (Fig. 193), cinch tight and fasten on top of pack (Fig. 194). Fig. 195 shows another throw in another squaw hitch. Fig. 196 shows the next position. Fig. 197 shows the thing made fast.
These are handy when you have no one to help you pack the animal and when you don’t have a pack saddle like Fig. 200. With this squaw hitch, you need to throw your load across the horse's back, over the pad made by a blanket (Fig.[137] 192), then put a loop over the end M, see X (Fig. 192), and another one over the end N, see Y (Fig. 192). At the end of the lash rope Z, make a loop; now pass that loop down under the horse's belly and through Y (Fig. 193), bring the end Z back over the horse's back, also pass the end T down through X, and bring it back over the horse's back. Pass the end Z down through Y, and bring it back over the horse's back. Pass T through Z (Fig. 193), cinch it tight, and secure it on top of the pack (Fig. 194). Fig. 195 shows another throw in a different squaw hitch. Fig. 196 shows the next position. Fig. 197 shows everything secured.

Anyone who travels with pack horses should know how to arrange the lead rope in a manner so that it may be quickly and easily loosened, and at the same time be out of the way, so that the horse will not get his foot over it when climbing or descending steep places, which often happens when the lead rope is fastened to the pack in the usual manner. If you will take the rope and wind it loosely around the horse's[138] neck, behind his left ear and in front of his right ear (Figs. 198 and 199), then tuck the end under the strands, as shown in Fig. 198, the thing may be undone in an instant, and in the meantime the rope is out of the way where it will not bother either the man or the horse.
Anyone who travels with pack horses should know how to tie the lead rope so that it can be quickly and easily loosened while also staying out of the way. This prevents the horse from getting its foot caught when climbing or descending steep areas, which often happens when the lead rope is attached to the pack in the usual way. If you take the rope and wrap it loosely around the horse's[138] neck, behind his left ear and in front of his right ear (Figs. 198 and 199), then tuck the end under the strands, as shown in Fig. 198, it can be undone in an instant, and in the meantime, the rope is out of the way where it won't disturb either the person or the horse.
Practise all this on the wooden horse, then it will come natural when the time comes to handle a real horse. The manner of looping up the lead rope, just described, I learned from the explorers of the Mt. McKinley expedition, who had many occasions to test the best, as well as the worst methods of packing and arranging their duffel. There are a number of other hitches, some given by Stewart Edward White, in Outing, called the Miner's Hitch, the Lone Packer's Hitch, but possibly we have given the reader enough to start him on his way; remember for the pack horse the necessary outfit is a horse blanket, the cincha and lash rope, the sling rope, the lead rope, the manta, which is a cover for the pack, sometimes called the tarp—short for tarpaulin, and the blind, but as a rule a handkerchief is used for a blinder. The aparejo is a sort of a leather mattress which goes over the horse's back and on which the pack rests, but you will find all about that when you hit the trail with a pack train. The alforjas is a Spanish name for the saddle-bags used on a pack horse. When the reader knows how to pack his horse, knows all the Spanish names for the pack saddle and all that sort of thing, there may come a time when he will have a horse which needs to be hitched at night, and it may happen he must needs
Practice all this on the wooden horse, and when the time comes to handle a real horse, it will feel natural. I learned the way to loop up the lead rope from the explorers of the Mt. McKinley expedition, who had plenty of chances to test the best and worst methods of packing and organizing their gear. There are several other hitches, some described by Stewart Edward White in Outing, like the Miner's Hitch and the Lone Packer's Hitch, but we’ve probably given you enough to get started. Remember, for the pack horse, the essential gear includes a horse blanket, cinch and lash rope, sling rope, lead rope, manta (a cover for the pack, sometimes called a tarp, short for tarpaulin), and the blind, though a handkerchief is usually used as a blinder. The aparejo is a type of leather pad that goes over the horse's back to support the pack, but you’ll learn more about that when you hit the trail with a pack train. Alforjas is the Spanish term for the saddle-bags used on a pack horse. Once you know how to pack your horse and familiarize yourself with all the Spanish names for the pack saddle and such, there may come a time when you'll have a horse that needs to be tied up at night, and it might happen that you'll need to...
[140]
[141] possible in the earth, then he will tie a knot in the end of the picket rope and drop the knot to the bottom of the hole (Fig. 201) (the picket rope in reality should be one-half inch rope, fifty feet long); the only way to get that knot out of the hole is to stand directly over the opening and pull the knot up perpendicularly. It will never occur to the horse to shorten the line by taking hold of it with his teeth, so that it may stand over the hole and pull up the knot, consequently the animal will be as securely hitched as if tied to a post.

General Miles once told the author that the handsomest man he had ever seen came dashing into their camp in a cloud of alkali dust; having ridden right through bands of hostile Indians which surrounded the camp, he dismounted, took off his saddle and threw it on the ground, put the bridle bit, girth, etc., inside the saddle, put the saddle-cloth over it, then he calmly stretched himself out in front of the campfire. "That man," said General Miles, "was Bill Cody, Buffalo Bill!"
General Miles once told the author that the best-looking man he had ever seen came rushing into their camp in a cloud of dust. After riding straight through groups of hostile Indians surrounding the camp, he got off his horse, took off his saddle and tossed it on the ground, put the bridle bit, girth, and other gear inside the saddle, draped the saddlecloth over it, and then casually stretched out in front of the campfire. "That man," said General Miles, "was Bill Cody, Buffalo Bill!"
When Cody put the saddle on the ground he placed it on its side (Fig. 206); in placing the saddle in this position it preserves the curve of the skirts, and thus the form of the saddle is not destroyed and the reins and the stirrup straps are protected; at the same time the saddle makes a good pillow, and if it should rain at night the saddle blanket is the only thing, besides the rider, which gets a ducking, unless the latter has a good waterproof sleeping-bag.
When Cody set the saddle on the ground, he laid it on its side (Fig. 206); putting the saddle in this position helps maintain the curve of the skirts, so the shape of the saddle stays intact, and the reins and stirrup straps are safe. Meanwhile, the saddle acts as a decent pillow, and if it rains at night, the saddle blanket is the only thing that gets soaked, besides the rider, unless the rider has a good waterproof sleeping bag.
So manage the saddle that with one swing it will 'light on the horse's back with the pummel towards the horse's head (Fig. 207). Grasp with your right hand the horn of the saddle, and as you swing the saddle on the horse with a graceful sweep, use your left hand to push the further skirt outward and thus prevent it from doubling up on the horse's back. Be careful to throw the girth far enough so that it will hang down so as to be easily reached under the horse. I once had an English farm hand who put a western saddle on a horse with the pummel towards the tail, and was very indignant when I told him that a pummel should face the bow of a craft; he told me he knew more about horses than I did, which is possibly true, as I am not a horseman; he also said that in the "hold country" he used to ride to "the 'ounds," all of which goes to prove customs are different in different countries. Here we put the pummel of the saddle towards the horse's head; we won't argue about it; we may be wrong, but it is a matter of custom, and right or wrong is the rule the reader must follow in America, even though the reader may have ridden to the "'ounds" while abroad. Do not misunderstand me, some of the best horsemen in the world are English, but this fellow was not one of them.
So handle the saddle so that with one swing it lands on the horse's back with the pommel facing the horse's head (Fig. 207). Grasp the horn of the saddle with your right hand, and as you swing the saddle onto the horse with a smooth motion, use your left hand to push the far skirt outward to keep it from folding over on the horse's back. Be sure to throw the girth out far enough so that it hangs down to be easily reached under the horse. I once had an English farmhand who put a western saddle on a horse with the pommel towards the tail, and he was quite upset when I pointed out that the pommel should face the bow of a craft; he claimed to know more about horses than I did, which might be true since I’m not a horseman; he also mentioned that in the "old country" he used to ride to "the hounds," which just shows that customs vary from place to place. Here, we position the pommel of the saddle towards the horse's head; we won't debate it; we might be wrong, but this is a matter of tradition, and right or wrong is what the reader must follow in America, even if they’ve ridden to the "hounds" while overseas. Don’t get me wrong, some of the best horsemen in the world are English, but this guy was not one of them.
Years ago when the rider was in Montana on Howard Eaton's Ranch, near the celebrated ranch of Theodore Roosevelt, he had his first experience with Western horses, and being sensitive and standing in great terror of being called a tenderfoot, he shyly watched the others mount before he attempted to do so himself. Each one of these plainsmen, he noticed, took the reins in his left hand while standing on the left-hand side of the horse; then holding the reins over the shoulders of the horse he grasped the mane with the same hand, and put his left foot into the stirrup; but to put the left foot in the stirrup he turned the stirrup around so that he could mount while facing the horse's tail, then he grabbed hold of the pummel with his right hand and swung into the saddle as the horse started.
Years ago, when the rider was in Montana at Howard Eaton's Ranch, near Theodore Roosevelt's famous ranch, he had his first experience with Western horses. Feeling anxious and afraid of being called a tenderfoot, he quietly watched the others mount before trying to do it himself. He noticed that each of these plainsmen took the reins in their left hand while standing on the left side of the horse. Then, holding the reins over the horse's shoulders, they grabbed the mane with the same hand and put their left foot into the stirrup. To get into the stirrup, they turned it around so they could mount while facing the horse's tail, then grabbed the pommel with their right hand and swung into the saddle as the horse began to move.
That looked easy; the writer also noticed that just before the others struck the saddle they gave a whoop, so without showing any hesitation the author walked up to his cayuse, took the reins confidently in his left hand, using care to stand on the left-hand side of the horse; then he placed the left hand with the reins between the shoulders of the horse and grabbed the mane, then he turned the stirrup around, turned his back to the horse's head, put his left foot in the stirrup and gave a yell.
That looked simple; the writer also noticed that just before the others jumped into the saddle, they let out a whoop. So without hesitating, the author walked up to his horse, confidently took the reins in his left hand, and made sure to stand on the horse's left side. He placed his left hand, holding the reins, between the horse's shoulders and grabbed its mane. Then he turned the stirrup around, faced away from the horse's head, put his left foot in the stirrup, and shouted.
On sober afterthought he decided that he gave that yell too soon; the horse almost went out from under him, or at least so it seemed to him, or maybe the sensation would be better described to say that it appeared to him as if he went a mile over the prairie with his right leg waving in the air like a one-winged aeroplane, before he finally settled down into the saddle.
On second thought, he realized that he had shouted too soon; the horse almost threw him off, or at least that's how it felt to him. It might be better to say that it seemed like he traveled a mile across the prairie with his right leg flailing in the air like a one-winged airplane before he finally got himself settled back into the saddle.
But this could not have been really true, because everybody[144] applauded and the writer was at once accepted by the crowd without question as a thoroughbred Sourdough. Possibly they may have thought he was feeling good and just doing some stunts.
But this couldn’t have really been true, because everyone[144] applauded and the writer was immediately accepted by the crowd without question as a genuine Sourdough. They probably thought he was just feeling good and showing off some tricks.
It may interest the reader to state that the author did his best to live up to the first impression he had made, but he did not go riding the next day, there were some books he thought necessary to read; he discovered, however, that even lounging was not without some discomfort; for instance, he could not cross his knees without helping one leg over with both his hands; in fact, he could find no muscle in his body that could be moved without considerable exertion and pain.
It might interest the reader to know that the author tried his best to live up to his first impression, but he didn’t go riding the next day. There were some books he thought he needed to read. However, he found that even lounging wasn’t without its discomforts. For example, he couldn’t cross his knees without using both hands to help one leg over. In fact, he realized there was no muscle in his body that he could move without significant effort and pain.
But this is the point of the story: Had the author tried to mount that cayuse in any other way he would have been left sprawling on the prairie. The truth is that if you mount properly when the horse starts, even if he begins to buck and pitch, the action will tend to throw you into the saddle, not out of it.
But this is the point of the story: If the author had tried to get on that horse in any other way, he would have ended up falling flat on the prairie. The truth is that if you get on properly when the horse takes off, even if he starts to buck and kick, the motion will likely throw you into the saddle, not out of it.
When you approach a horse which has a brand on it, always approach from the left-hand side, because practically all the Western horses have brands on them, and you can, as a rule, count on a branded horse being from the West, with the hale and hearty habits of the West, which to be appreciated must be understood. If you want to make a real cayuse out of your wooden horse, brand it and any cowboy who then sees it will take off his hat.
When you approach a horse that has a brand on it, always come from the left side, because almost all Western horses have brands. Generally, you can expect a branded horse to be from the West, embodying the rugged and healthy lifestyle of the region, which needs to be understood in order to be appreciated. If you want to turn your wooden horse into a real cayuse, brand it, and any cowboy who sees it will tip his hat.
CHAPTER VIII
THE USE OF DOGS. MAN PACKING
- HIKING DOGS, PACK DOGS
- HOW TO PACK A DOG
- HOW TO THROW THE DOG HITCH
- HOW TO MAKE DOG TRAVOIS
- DOG AS A BEAST OF BURDEN IN EUROPE AND ARCTIC AMERICA
- MAN PACKING
- PACK RATS
- DON'T FIGHT YOUR PACK
- PORTAGE PACK
- GREAT MEN WHO HAVE CARRIED A PACK
- KINDS OF PACKS
- ALPINE RUCKSACK
- ORIGIN OF BROAD BREAST STRAPS
- MAKE YOUR OWN OUTFITS
THE USE OF DOGS. MAN PACKING
There is no good reason why every hiker should not be accompanied by
There is no good reason why every hiker shouldn't be accompanied by
But if a dog is going to enjoy the pleasure of a hike with you, if it is a good square dog it should be willing to also share the hardships of the hike with you, and to help carry the burdens on the trail. Any sort of a dog can be trained as
But if a dog is going to enjoy the pleasure of a hike with you, if it’s a good, sturdy dog, it should also be willing to share the hardships of the hike and help carry the burdens on the trail. Any kind of dog can be trained as
Slip the breast band over the dog's head, put the saddle-bags well forward on the dog's shoulders, tie the cinch around its waist, after which spread the cover or manta over the bag, and throw the hitch as shown by Figs. 211 and 214. Fig. 213 shows a bundle with a breast band made of the lash rope, in which case the lash rope is usually made of cloth like that in Fig. 211; the whole thing is simplicity itself and a good dog can carry quite a load packed in this manner.
Slip the breast band over the dog's head, place the saddle-bags well forward on the dog's shoulders, and tie the cinch around its waist. Then, spread the cover or manta over the bag and throw the hitch as shown by Figs. 211 and 214. Fig. 213 shows a bundle with a breast band made of the lash rope, in which case the lash rope is typically made of cloth like that in Fig. 211. The whole setup is really simple, and a good dog can carry quite a load packed this way.

[150]
[151] travois on dogs the same as they did upon horses and the sudden appearance of game often produced a stampede of dog travoises, scattering the duffel, including papooses, loaded on the travois.
It is not expected that the reader will make every one of these contrivances, but if he does he will learn How, and to be a good woodsman he should know how, so as to be prepared for any emergency. It is possible to make the whole pack for the dog from birch bark, but however it is made, if it serves the purpose of making the dog carry part of the pack, when you put the bark on the dog's back, you will teach the animal that there are two kinds of barks; one of which is useful as a duffel bag, and the other as an alarm.
It’s not expected that the reader will make every one of these creations, but if they do, they will learn how, and to be a good woodsman, they *should* know how, so they’re prepared for any emergency. It’s possible to make the entire pack for the dog from birch bark, but however it's made, if it serves the purpose of having the dog carry part of the load, when you put the bark on the dog's back, you’ll teach the animal that there are two kinds of *barks;* one of which is useful as a duffel bag, and the other as an alarm.
In Alaska and other parts of the far North, as well as in Holland and other parts of Europe, the dog is generally used as a beast of burden; it draws sleds in North America and milk carts and market wagons in Holland, but it is not necessary for us to live in Holland or in the far North in order to make use of the dog; a good dog will cheerfully carry the packs on the trail, loyally guard the camp at night, and, if necessary, die in defense of its master.
In Alaska and other remote northern regions, as well as in the Netherlands and other parts of Europe, dogs are commonly used as working animals; they pull sleds in North America and transport milk and supplies in the Netherlands. However, you don’t need to live in the Netherlands or the far North to benefit from a dog; a good dog will happily carry backpacks on the trail, faithfully watch over the campsite at night, and, if needed, risk its life to protect its owner.
Any uncomfortable pack is an abomination; too heavy a pack is an unhappy burden, no pack at all is fine—until you reach camp and hunt around for something to answer for a toothbrush, comb and brush, something on which to sit and sleep, something overhead to protect you from the rains and dews of heaven, something to eat and something to eat with besides your fingers, something from which to drink which holds water better than the hollow of your hand or the brim of your hat, and, in fact, all those necessary little comforts that a fellow wants on an overnight hike. Without these useful articles one will wish that he had[152] subjected himself to the slight fatigue necessary to pack a small pack on his back.
Any uncomfortable backpack is a complete nightmare; a pack that's too heavy is an unhappy burden, and having no pack at all is fine—until you get to camp and start searching for something to use as a toothbrush, comb, and brush, something to sit and sleep on, something overhead to protect you from the rain and dew, something to eat and something to eat with besides your fingers, something to drink from that holds water better than your hand or the brim of your hat, and, really, all those essential little comforts that anyone wants on an overnight hike. Without these handy items, you'll regret not putting in the slight effort needed to carry a small pack on your back.[152]
The word "pack" itself is a joy to the outdoor man, for it is only outdoor men who use the word pack for carry, and who call a bundle or load a pack. The reason for this is that the real wilderness man, explorer, prospector, hunter, trapper or scout, packs all his duffel into a bundle which he carries on his back, in two small saddle-bags which are carried by his husky dogs, or a number of well-balanced bundles which are lashed on the pack saddle with a diamond hitch over the back of a pack horse.
The word "pack" brings joy to those who love the outdoors because it’s only outdoor enthusiasts who use "pack" to mean carry, and who refer to a bundle or load as a pack. This is because the true wilderness adventurer—an explorer, prospector, hunter, trapper, or scout—packs all his gear into a bundle that he carries on his back, in two small saddle bags carried by sturdy dogs, or in several well-balanced bundles secured to the pack saddle with a diamond hitch over the back of a pack horse.
You see we have pack dogs, pack horses and pack animals, pack saddles and packers, as well as the packs themselves, which the packers pack and these animals pack on their backs, or which the man himself packs on his own back. Then we also have the pack rat, but the pack rat does not carry things with our consent. The pack rat comes flippity-flop, hopping over the ground from the old hermit, Bill Jones's, packing with him Bill Jones's false teeth which he has abstracted from the tin cup of water at the head of Bill Jones's bunk. The pack rat deposits the teeth at the head of your cot, then deftly picking up your watch, the rat packs it back to Bill Jones's cot and drops it in the tin cup of water, where it soaks until morning.
You see, we have pack dogs, pack horses, and pack animals, pack saddles, and packers, along with the packs themselves, which the packers load onto the animals' backs or that the person carries on their own back. Then we also have the pack rat, but the pack rat doesn't take things with our permission. The pack rat comes hopping around, snatching stuff from the old hermit, Bill Jones, lugging along Bill Jones's false teeth that it stole from the tin cup of water at the top of Bill Jones's bed. The pack rat drops the teeth at the head of your cot, then skillfully grabs your watch, taking it back to Bill Jones's bed and dropping it in the tin cup of water, where it soaks until morning.
It is easy to see that however funny the pack rat may be, and however useful he might be to the Sunday comic paper, the rat's humor is not appreciated by the campers in the Rocky Mountains, where it is called a pack rat from its habit of carrying things. Thus it is that in a newly settled country the word "carry" is almost forgotten; one "packs" a letter to the post box, or packs a horse to water, or packs a box of candy to his best girl, or a pail of water from the spring.
It’s clear that no matter how amusing the pack rat is, and how valuable it might be to the Sunday comics, campers in the Rocky Mountains don’t appreciate its humor. The name "pack rat" comes from its habit of carrying things. In newly settled areas, the word "carry" has nearly faded away; people "pack" a letter to the mailbox, or pack a horse to go get water, or pack a box of candy for their girlfriend, or a bucket of water from the spring.
When you, my good reader, get the pack adjusted on your back and the tump line across your forehead (Fig. 226), remember that you are being initiated into the great fraternity of outdoor people. But no matter how tough or rough you may appear to the casual observer, your roughness is only apparent; a boy or man of refinement carries that refinement inside of him wherever he goes; at the same time when one is carrying a pack on one's back and a tump line on one's forehead (Fig. 226½), or a canoe on one's head, even though a lady should be met on the trail it would not be necessary for one to take off one's hat, for even a foolish society woman would not expect a man to doff the canoe he might be carrying on his head. Under all circumstances use common sense; that is the rule of the wilderness and also of real culture.
When you, my dear reader, get the pack adjusted on your back and the strap across your forehead (Fig. 226), remember that you're being welcomed into the great community of outdoor enthusiasts. But no matter how tough or rugged you may seem to a casual observer, that roughness is just a facade; a refined person carries that refinement within them wherever they go. At the same time, when you’re carrying a pack on your back and a strap on your forehead (Fig. 226½), or a canoe on your head, even if you meet a lady on the trail, you don't need to take off your hat. After all, even an oblivious society woman wouldn't expect a man to remove the canoe he's carrying on his head. In all situations, use common sense; that’s the rule of the wilderness and true culture.
The most important thing that you must learn on the trail is not to fret and fume over trifles, and even if your load is heavy and irksome, even though the shoulder straps chafe and the tump line makes your neck ache
The most important thing you need to learn on the trail is not to stress out over little things. Even if your load is heavy and annoying, and even if the shoulder straps rub you the wrong way and the tump line makes your neck hurt
When we speak of "fighting the pack" we mean fighting the load; that does not mean getting one's load up against a tree and punching it with one's fists or "kicking the stuffings out of it," but it means complaining and fretting because the load is uncomfortable.
When we talk about "fighting the pack," we're referring to struggling with the burden. That doesn't mean leaning against a tree and punching the load or trying to beat it up, but it means grumbling and stressing out because the load is uncomfortable.
There are two kinds of "packs"—the pack that you carry day after day on a long hike, and the pack that you carry when on a canoe trip and you are compelled to leave the water and carry your canoe and duffel overland around some bad[154] rapids or falls. The first-named pack should be as light as possible, say between 30 and 40 pounds, for on a long tramp every pound counts, because you know that you must carry it as long as you keep going, and there is no relief in sight except when you stop for your meals or to camp at night. But the last-named pack, the
There are two types of "packs"—the one you carry day after day on a long hike, and the one you carry when you're on a canoe trip and have to leave the water, hauling your canoe and duffel overland around some rough[154] rapids or waterfalls. The first pack should be as light as possible, ideally between 30 and 40 pounds, because every pound matters on a long trek. After all, you know that you have to carry it for as long as you're moving, and there's no break except when you stop for meals or to set up camp at night. But the second pack, the
When I asked a friend, who bears the scars of the pack
straps on his body, how it was that he managed to endure
the torture of such a load, he replied with a grin that as soon
as he found that to "fight his pack" meant to perish—meant
death!—he made up his mind to forget the blamed thing and
so when the pack wearied him and the straps rubbed the skin
off his body, he forced himself to think of the good dinners
he had had at the Camp-fire Club of America, yum! yum!
Also, of all the jolly stories told by the toastmaster, and of
the fun he had had at some other entertainments. Often
while thinking of these things he caught himself laughing out
loud as he trudged along the lone trail, Forgetting the hateful
pack on his back. "In this way," said he, with a winning
smile upon his manly and weather-beaten face, "I learned
how not to fight the pack but to Forget It!" Then he braced[155]
[156]
[157]
himself up, looked at the snow-capped mountain range ahead,
hummed a little cowboy song and trudged on over the frozen
snow at a scout's pace.
When I asked a friend, who has the scars of the pack straps on his body, how he managed to endure the pain of such a heavy load, he replied with a grin that as soon as he realized that to "fight his pack" meant certain death, he decided to forget about it. So, when the pack started to tire him out and the straps rubbed his skin raw, he made himself think about the delicious dinners he had enjoyed at the Camp-fire Club of America, yum! yum! He also thought about all the funny stories told by the toastmaster and the fun times he had at other events. Often, while he was lost in these thoughts, he found himself laughing out loud as he trudged along the lonely trail, Forgetting the annoying pack on his back. "In this way," he said, with a charming smile on his rugged and sunburned face, "I learned how not to fight the pack but to Forget it.!" Then he straightened up, looked at the snow-covered mountain range ahead, hummed a little cowboy song, and continued over the frozen snow at a steady scout's pace.

Now that you know what a pack is, and what "fighting a pack" means, remember that if one's studies at school are hard, that is one's pack. If the work one is doing is hard, difficult or tiresome, that is one's pack. If one's boss is cross and exacting, that is one's pack. If one's parents are worried and forget themselves in their worry and speak sharply, that is one's pack. Don't fight your pack; remember that you are a woodcrafter; straighten your shoulders, put on your scout smile and hit the trail like a man!
Now that you understand what a pack is and what it means to "fight a pack," keep in mind that if your schoolwork is tough, that's your pack. If your workload is hard, challenging, or exhausting, that's your pack. If your boss is upset and demanding, that's your pack. If your parents are stressed and lose their temper, that's your pack. Don’t fight against your pack; remember that you are a woodcrafter; stand tall, put on your scout smile, and tackle the journey like a man!
If you find that you are tempted to break the Scout Law, that you are tempted at times to forget the Scout Oath, that because your camp mates use language unfit for a woodcrafter or a scout, and you are tempted to do the same, if your playmates play craps and smoke cigarettes, and laugh at you because you refuse to do so, so that you are tempted to join them, these temptations form your pack; don't give in and fall under your load and whimper like a "sissy," or a "mollycoddle," but straighten up, look the world straight in the eye, and hit the trail like a man!
If you feel tempted to break the Scout Law, if you find yourself wanting to forget the Scout Oath, and your campmates use language that isn't suitable for a woodcrafter or a scout, and you're tempted to follow along, if your friends gamble and smoke cigarettes, laughing at you for refusing to join them, making you feel like giving in, remember that these temptations surround you; don't give in and collapse under the pressure or act weak, but stand tall, face the world head-on, and move forward like a person!
Some of us are carrying portage packs which we can dump off our shoulders at the end of the "carry," some of us are carrying hiking packs which we must carry through life and can never dump from our shoulders until we cross the Grand Portage from which no voyagers ever return. All our packs vary in weight, but none of them is easy to carry if we fret and fume and complain under the load.
Some of us are carrying portage packs that we can drop off our shoulders at the end of the "carry," while others are carrying hiking packs that we have to carry through life and can never take off until we reach the Grand Portage, from which no travelers ever come back. All our packs weigh differently, but none of them is easy to carry if we worry, get frustrated, and complain about the load.
We outdoor folks call our load "pack," but our Sunday School teachers sometimes speak of the pack they bear as a "cross." Be it so, but don't fight your pack.
We outdoor enthusiasts call our gear a "pack," but our Sunday School teachers sometimes refer to the burden they carry as a "cross." That may be true, but don't struggle against your pack.
The whole north country is sprinkled with the bones of the men who fought their packs. Our own land is also sprinkled with men we call "misfits" and failures, but who are really men who have fought their packs. But every post of eminence in the United States is occupied by a man who forgot his pack; this country was built by men who forgot their packs. George Washington carried a portage pack in weight all through his life, but it was a proud burden and he stood straight under it. Good old Abe Lincoln had even a heavier pack to carry, but in spite of the weight of it he always had a pleasant scout smile for everyone and a merry story to send the visitor away smiling. If Daniel Boone and Simon Kenton had fought their packs we would never have heard of them!
The entire northern region is filled with the remains of the men who struggled against their burdens. Our own place is populated by those we refer to as "misfits" and failures, but they’re really just people who have battled their burdens. Yet, every prominent position in the United States is held by someone who forgot their burden; this nation was built by people who chose to leave their burdens behind. George Washington carried a heavy load throughout his life, but it was a source of pride, and he held his head high under it. Good old Abe Lincoln had an even heavier load to bear, but despite its weight, he always greeted everyone with a friendly smile and a funny story to send visitors away happy. If Daniel Boone and Simon Kenton had let their burdens defeat them, we would never have even known their names!
In the illustrations are shown many figures, and one should not forget that these are sketches of real men in the real wilderness, and not fancy pictures drawn from imagination. Figs. 230, 231, and 232 show many different methods of carrying big game on one's shoulders or back. Fig. 232 also shows a couple of prospectors on the trail. One has the bag on his back, held in place by shoulder straps; the other has a bag thrown over his shoulder like a ragman.
In the illustrations, you'll see many figures, and it's important to remember that these are sketches of real people in the actual wilderness, not fanciful images from someone's imagination. Figs. 230, 231, and 232 show various ways to carry large game on your shoulders or back. Fig. 232 also depicts a couple of prospectors on the trail. One has a bag on his back, secured with shoulder straps; the other has a bag tossed over his shoulder like a ragman.
The alpine rucksack will carry—or to speak more properly—with it one can pack a camera, notebook, sketching material, lunch and all those things which a fellow wants on an enjoyable hike. The alpine rucksack is a many-gored poke about 18 inches wide and about 22 inches long without the gores. These pokes can be made so that the gores fold in and produce an ordinary-sized pack, or they may be pushed out like an umbrella so as to make a bag in which one can carry a good-sized boy.
The alpine backpack can hold—or more accurately, you can pack—a camera, notebook, sketching supplies, lunch, and all the essentials for a great hike. The alpine backpack is a multi-panel bag that's about 18 inches wide and around 22 inches long when it’s not expanded. These bags can be designed to fold in, creating a standard-sized pack, or they can be expanded like an umbrella to create a space large enough to carry a decent-sized child.

Fig. 232D shows the broad band used by the men of the far north. The reader will note that the broad canvas bands come over the shoulders from the top of the pack; also that a broad breast band connects the shoulder bands, while rope, whang strings or thongs run through eyelets in the band and to the bottom of the pack. This is said to be the most comfortable pack used and has an interesting history; it was evolved from an old pair of overalls. There was a Hebrew peddler who followed the gold seekers and he took a pair of canvas overalls and put them across his breast, and to the legs he fastened the pack upon his back. The overalls being wide and broad did not cut his chest, as do smaller straps, thongs or whang strings.
Fig. 232D shows the wide band used by the men from the far north. You'll notice that the broad canvas bands go over the shoulders from the top of the pack; also, a wide breast band connects the shoulder bands, while rope, whang strings, or thongs run through eyelets in the band and down to the bottom of the pack. This is said to be the most comfortable pack used and has an interesting history; it came from an old pair of overalls. There was a Hebrew peddler who followed the gold seekers, and he took a pair of canvas overalls and put them across his chest, fastening the pack to his back with the legs of the overalls. The overalls being wide and broad did not cut into his chest, unlike smaller straps, thongs, or whang strings.
But breast straps of any kind are not now recommended by all authorities. It is claimed that they interfere with the breathing and a fellow "mouching" along the trail needs to have his chest free to expand, for not only his speed but his endurance depends upon the free action of his lungs.
But breast straps of any kind are no longer recommended by all experts. It's said that they hinder breathing, and a person "mouching" down the trail needs to have their chest free to expand, as both their speed and endurance rely on the unrestricted movement of their lungs.
Fig. 226½ shows how the tump line is made. It is a strap or lash rope with a broad band to fit over the packer's head, and thus relieve the weight which the shoulders have to bear.
Fig. 226½ shows how the tump line is made. It is a strap or rope with a wide band designed to fit over the packer's head, helping to reduce the weight that the shoulders have to carry.
Fig. 218 shows the well-known portage pack basket which is used by the guides in the Adirondack regions. Fig. 219 shows the Nessmuk knapsack. Fig. 222 shows a pack harness[162] of straps by which two duffel bags are borne on the back. Fig. 225 shows a duffel bag which is laced up at one end with a thong; also the end of the bag open.
Fig. 218 displays the well-known portage pack basket that guides use in the Adirondack region. Fig. 219 shows the Nessmuk knapsack. Fig. 222 illustrates a pack harness[162] made of straps that allows two duffel bags to be carried on the back. Fig. 225 features a duffel bag that is laced up at one end with a thong, along with the other end of the bag being open.
The duffel bag is the ideal poke in which to pack one's, belongings. It is waterproof, it makes a good pillow, a far better pillow than an axe and pair of boots on which I myself have rested my weary head many a night, and it also makes a good cushion upon which to sit. The duffel bag may be procured from any outfitting establishment. The ones I own are now shiny with dirt and grease, gathered from the camps and forests extending from Maine to the State of Washington, from Northern Quebec to Florida. I love the old bags, for even though they be greasy and shiny, and blackened with the charcoals of many campfires, they are chuck full of delightful memories.
The duffel bag is the perfect place to pack your belongings. It’s waterproof, works great as a pillow—way better than resting my tired head on an axe and a pair of boots like I’ve done countless nights—and it also makes a comfortable seat. You can get a duffel bag at any outfitting store. The ones I have are now glossy with dirt and grease from the camps and forests stretching from Maine to Washington State, and from Northern Quebec to Florida. I love those old bags because even though they're greasy, shiny, and stained with the ashes from many campfires, they're filled with wonderful memories.
Fig. 220 is the old-time poke made of a bandanna handkerchief, with its ends tied together and swung over a stick.
Fig. 220 is the classic bundle made from a bandana handkerchief, with its ends tied together and slung over a stick.
This is the pack, a cut of which may be found in all the old newspapers antedating the Civil War, where runaway negroes are advertised. It is the sort of pack respectable tramps used to carry, back in the times when tramps were respectable. It is the kind of pack I find represented in an old oil painting hanging on my dining-room wall, which was painted by some European artist back in the seventeenth century. When fellows carry the runaway pack they are "traveling light."
This is the pack, a version of which can be found in all the old newspapers before the Civil War, where runaway Black people were advertised. It’s the kind of pack respectable drifters used to carry when drifters had respect. It resembles the pack I see in an old oil painting that hangs on my dining room wall, created by some European artist in the seventeenth century. When guys carry the runaway pack, they’re "traveling light."
For a long hike thirty pounds is enough for a big boy to carry, and it will weigh three hundred and fifty pounds at the end of a hard day's tramp. Heavy packs, big packs, like those shown in Fig. 223, are only used on a portage, that is, for short distance. Of course, you fellows know that in all canoe trips of any consequence one must cross overland from one lake to another, or overland above a waterfall to a safe place below it, or around quick water, or to put it in the words of tenderfeet, water which is too quick for canoe travel, around tumultuous rapids where one must carry his canoe and duffel. But these carries or portages are seldom long. The longest I remember of making was a trifle over five miles in length.
For a long hike, thirty pounds is a manageable weight for a big kid to carry, and by the end of a tough day’s trek, it will feel like three hundred and fifty pounds. Heavy packs, like those shown in Fig. 223, are only used for portages, which means for short distances. Of course, you guys know that on any significant canoe trip, you have to go overland from one lake to another, or overland above a waterfall to a safe spot below it, or around rapid water—what beginners might call water that's too fast for canoeing, or around wild rapids where you need to carry your canoe and gear. But these carries or portages are rarely long. The longest I remember doing was just over five miles.
Remember that the weight of a load depends a great deal upon your mind. Consequently for a long distance the load should be light; for a short distance the only limit to the load is the limit of the packer's strength.
Remember that how heavy a load feels depends a lot on your mindset. So for a long distance, the load should be lighter; for a short distance, the only limit to the load is the packer's strength.
CHAPTER IX
PREPARING FOR CAMPING TRIP
- PORTERS OF THE PORTAGE
- OLD-TIME INDIAN FIGHTERS AND WILD ANIMALS
- MODERN STAMPEDE FOR THE OPEN
- HOW TO GET READY FOR CAMP
- CUT YOUR FINGER NAILS
- GO TO YOUR DENTIST
- GET A HAIR CUT
- A BUCKSKIN MAN'S POCKET
- FLY DOPE
- PROTECTION AGAINST BLACK FLIES, MOSQUITOES, MIDGETS AND NO-SEE-UMS
- THE CALL OF THE WILD
PREPARING FOR CAMPING TRIP
Many people are so accustomed to have other people wait upon them that they are absolutely funny when you meet them in the woods; when their canoe runs its prow up upon the sandy beach and there is a portage to make, such people stand helplessly around waiting for some red-capped porter to come and take their baggage, but the only red caps in the woods are the red-headed woodpeckers and they will see you in Germany before they will help tote your duffel across the portage.
Many people are so used to having others wait on them that they're actually amusing when you encounter them in the woods; when their canoe hits the sandy beach and there’s a portage to tackle, these individuals just stand around helplessly, waiting for some red-capped porter to come and carry their bags. But the only red caps in the woods are the red-headed woodpeckers, and they’ll help you in Germany before they’ll assist you in hauling your stuff across the portage.
When one gets into the real woods, even if it is only in Maine, Wisconsin, the Adirondacks, or the Southern pine forests, one soon discovers that there are no drug stores around the corner, the doctor is a long way off, the butcher, the baker, the candle-stick maker, trolley cars, telephone and taxi cabs are not within reach, sight or hearing; then a fellow begins to realize that it is "up to" himself to tote his own luggage, to build his own fires, to make his own shelters, and even to help put up the other fellows' tents, or to cook the meals. Yes, and to wash the dishes, too!
When you step into the real woods, whether it's in Maine, Wisconsin, the Adirondacks, or the Southern pine forests, you quickly realize that there are no drugstores around the corner, the doctor is far away, and you won't find a butcher, baker, or candlestick maker nearby. Trolley cars, telephones, and taxis are nowhere to be seen or heard. That's when you start to understand that it’s up to you to carry your own bags, build your own fires, make your own shelters, and even help set up other people’s tents or cook the meals. And yes, you have to wash the dishes too!
One reason we outdoor people love the woods is that it develops self-reliance and increases our self-respect by increasing our ability to do things; we love the work, we love the hardship, we like to get out of sight of the becapped maids, the butler and the smirking waiters waiting for a tip, and for the same reason the real honest-to-goodness American boys love a camp. Why bless your soul!—every one of them in his inmost heart regrets that he did not live away back in the time when the long-haired Wetzel, Daniel Boone and[168] Simon Kenton roved the woods, or at least back when Colonel Bill Cody, Buffalo Jones and Yellowstone Kelly were dashing over the plains with General Miles, General Bell and the picturesque blond, long-haired General Custer.
One reason we outdoor enthusiasts love the woods is that it builds self-reliance and boosts our self-respect by enhancing our ability to get things done; we enjoy the work, we embrace the challenges, we like to escape the view of the cap-wearing maids, the butler, and the smirking waiters waiting for a tip. For the same reason, the true, genuine American boys love camping. You know what?—deep down, every one of them wishes they had lived back in the days when the long-haired Wetzel, Daniel Boone, and [168] Simon Kenton roamed the woods, or at least during the time when Colonel Bill Cody, Buffalo Jones, and Yellowstone Kelly were charging across the plains with General Miles, General Bell, and the memorable, long-haired General Custer.
Sometimes the author is himself guilty of such wishes, and he used to dream of those days when he was a barefooted boy. But, honest now, is it not really too bad that there are no longer any hostile Indians? And what a pity that improved firearms have made the big game so very shy that it is afraid of a man with a gun!
Sometimes the author feels the same way, and he used to dream about the days when he was a barefoot kid. But honestly, isn’t it a shame that there are no more hostile Indians? And what a pity that better firearms have made the big game so shy that it’s scared of a man with a gun!
But cheer up, the joy of camping is not altogether ruined, because we do not have to fight all day to save our scalps from being exported, or even because the grizzly bears refuse to chase us up a tree, and the mountain lions or "painters" decline to drop from an overhanging limb on our backs.
But don't worry, the fun of camping isn’t completely lost, because we don’t have to spend all day trying to keep our heads attached, or even because the grizzly bears won’t chase us up a tree, and the mountain lions or "painters" won’t jump down from a branch onto our backs.
Remember that all things come to him who will but wait: that is, if he works for these things while he is doing the waiting. The Chief has spent his time and energy for the last thirty odd years hammering away at two ideas: the big outdoors for the boys, and Americanism for all the people. Thank the Lord, he has lived long enough to see the boys stampede for the open and the people for Americanism.
Remember that good things come to those who wait: but that means they have to work for these things while they’re waiting. The Chief has dedicated his time and energy for the last thirty years to two ideas: the great outdoors for the boys and Americanism for everyone. Thank goodness he has lived long enough to see the boys rush into the wilderness and the people embrace Americanism.
Because of the stampede for the open, in which people of all ages have joined, there are so many kinds of camps nowadays: scout camps, soldier camps, training camps, recreation camps, girls' camps and boys' camps, that it is somewhat difficult for a writer to tell what to do in order to "Be Prepared." There are freight car side-track camps, gypsy wagon camps, houseboat camps, old-fashioned camp-meeting camps and picnic camps; the latter dot the shores of New Jersey, the lake sides at Seattle, and their tents are mingled with big black boulders around Spokane; you will find them on the[169] shores of Devil's Lake, North Dakota, and in the few groves that are back of Winnipeg, Manitoba.
Because of the rush to explore the outdoors, which people of all ages have joined, there are so many types of camps these days: scout camps, military camps, training camps, recreational camps, girls' camps, and boys' camps, that it can be somewhat challenging for a writer to figure out how to "Be Prepared." There are freight car side-track camps, gypsy wagon camps, houseboat camps, traditional camp-meeting camps, and picnic camps; the latter can be found along the shores of New Jersey, by the lakesides in Seattle, and their tents blend with big black boulders around Spokane; you’ll spot them on the[169] shores of Devil's Lake, North Dakota, and in the few groves behind Winnipeg, Manitoba.
But such camps have little attraction for the real hard-boiled camper, and have no better claim to being the real thing than the more or less grand palaces built in the woods, camouflaged outside with logs or bark, and called "camps" by their untruthful owners; such people belittle the name of camp and if they want to be honest they should stick to the bungling bungalow—but wait a minute—even that is far-fetched; the bungalow belongs in East India and looks as much like one of these American houses as a corn-crib does like a church.
But these kinds of camps don’t attract true hardcore campers, and they don't have any better claim to being the real deal than the more or less extravagant cabins built in the woods, disguised on the outside with logs or bark, and referred to as "camps" by their dishonest owners; these people diminish the meaning of the word camp, and if they want to be truthful, they should just call it what it is—a clumsy bungalow—but hold on—even that’s a stretch; the bungalow is from East India and looks as much like these American homes as a corn crib does like a church.
When we talk of camping we mean living under bark, brush or canvas in the "howling wilderness," or as near a howling wilderness as our money and time will permit us to reach; in other words, we want a camp in the wildest place we can find, except when we go to our own scout camp, and even then we like it better if it is located in a wild, romantic spot.
When we talk about camping, we mean staying in a tent, shelter, or under the open sky in the wilderness, or as close to it as our budget and schedule allow; in other words, we want to camp in the wildest place we can find, unless we're at our own scout camp, and even then, we prefer it to be in a wild, scenic location.
There are some little personal things to which one should give one's attention before starting on a long trip. If it is going to be a real wild camping trip it is best to go to the barber shop and get a good hair cut just before one starts. Also one should trim one's nails down as close as comfort will allow. Long nails, if they are well manicured, will do for the drawing room and for the office, but in camp they have a habit of turning back (Fig. 232)—and gee willikens, how they hurt! Or they will split down into the quick (Fig. 233) and that hurts some, too! So trim them down snug and close; do it before you start packing up your things, or you may hurt your fingers while packing. But even before trimming your nails
There are a few personal things you should take care of before heading out on a long trip. If it's going to be a genuine wild camping adventure, it's a good idea to visit a barber and get a fresh haircut right before you leave. You should also trim your nails as short as is comfortable. Long nails, even if they're well-groomed, are fine for the living room and the office, but when you're camping, they tend to break (Fig. 232)—and boy, does that hurt! They might even split down to the quick (Fig. 233), which hurts a lot too! So, keep them short and neat; do this before you start packing your stuff, or you might hurt your fingers while packing. But even before you trim your nails
The writer could not help it; he was thoughtlessly cruel and he laughed at his friend's lugubrious expression—Take heed, do not be as cruel as was the writer, for sooner or later you will pay for such thoughtless levity. It was only next season, away up in the mountains of the British possessions on the Pacific Coast, that the friend's turn came to laugh at the author as the latter nursed an ulcerated tooth. Wow! Wow! Wow!
The writer couldn’t help himself; he was thoughtlessly cruel and laughed at his friend’s sad expression—Be careful, don’t be as cruel as the writer was, because sooner or later you’ll face the consequences of such careless joking. It was just the next season, way up in the mountains of the British territories on the Pacific Coast, that it was the friend’s turn to laugh at the author as he dealt with a painful toothache. Wow! Wow! Wow!
Well, never mind the details, they are too painful to talk about, but remember the lesson that they teach—Go to the Dentist and get a clean bill of health on the tooth question before you start for a lengthy camp.
Well, forget the details; they're too painful to discuss. Just remember the lesson they teach—Visit the dentist and get a clean bill of health regarding your teeth before heading out for a long camping trip.

When we speak of his pocket that includes all of his
clothes, because on the inside of his coat, if he wears one,
are stuck an array of safety pins (Fig. 234), but usually the
pins are fastened onto his shirt. A safety pin is as useful to
a man in camp as is a hairpin to a woman, and a woman can
camp with no other outfit but a box of hairpins. One can[171]
[172]
[173]
use safety pins for clothespins when one's socks are drying at
night, one can use them to pin up the blankets and thus
make a sleeping-bag of them, or one can use them for the
purpose of temporarily mending rips and tears in one's
clothes. These are only a few of the uses of the safety pin
on the trail. After one has traveled with safety pins one
comes to believe that they are almost indispensable.
When we talk about his pocket that holds all his clothes, it includes a bunch of safety pins stuck inside his coat, if he happens to be wearing one. But usually, the pins are attached to his shirt. A safety pin is as useful to a guy camping as a hairpin is to a woman, and a woman can manage with nothing but a box of hairpins while camping. You can use safety pins as clothespins when your socks are drying at night, you can pin up blankets to create a sleeping bag, or you can use them to temporarily fix rips and tears in your clothes. These are just a few of the many ways safety pins are handy on the trail. After you've traveled with safety pins, you start to think they’re almost essential.
In one of the pockets there should be a lot of bachelor buttons, the sort that you do not have to sew on to your clothes, but which fasten with a snap, something like glove buttons. There should be a pocket made in your shirt or vest to fit your notebook (Fig. 244), and a part of it stitched up to hold a pencil and a toothbrush. Your mother can do this at home for you before you leave. Then you should have a good jack-knife; I always carry my jack-knife in my hip pocket. A pocket compass, one that you have tested before starting on your trip, should lodge comfortably in one of your pockets, and hitched in your belt should be your noggin carved from a burl from a tree (Fig. 235); it should be carried by slipping the toggle (Fig. 236) underneath the belt. Also in the belt you should carry some whang strings (Fig. 237); double the whang strings up so that the two ends come together, tuck the loop through your belt until it comes out at the other side, then put the two ends of the string through the loop and the whang strings are fast but easily pulled out when needed; whang strings are the same as belt lashings. A small whetstone (Fig. 238) can find a place somewhere about your clothes, probably in the other hip pocket, and it is most useful, not only with which to put an edge on your knife but also on your axe.
In one of the pockets, there should be plenty of snap buttons, the kind that don’t require sewing onto your clothes but fasten with a snap, like glove buttons. You should have a pocket in your shirt or vest for your notebook (Fig. 244), and there should be a section stitched to hold a pencil and a toothbrush. Your mom can do this for you at home before you leave. Then you should have a good jackknife; I always carry mine in my back pocket. A pocket compass, one that you’ve checked before setting off on your trip, should fit comfortably in one of your pockets, and you should have your noggin, carved from a tree burl (Fig. 235), hitched to your belt; it should be carried by tucking the toggle (Fig. 236) under your belt. You should also carry some whang strings (Fig. 237) in your belt; double them up so the ends come together, slip the loop through your belt until it comes out the other side, then put the two ends of the string through the loop, and the whang strings will be secure but easily pulled out when needed; whang strings are like belt lashings. A small whetstone (Fig. 238) can fit somewhere in your clothes, probably in your other hip pocket, and it’s very useful not just for sharpening your knife but also your axe.
Inside the sweat band of your hat, or around the crown on the outside of your hat, carry a gut leader with medium-sized[174] artificial flies attached, and around your neck knot a big gaudy bandanna handkerchief (Fig. 239); it is a most useful article; it can be used in which to carry your game, food or duffel, or for warmth, or worn over the head for protection from insects (Fig. 240). In the latter case put it on your head under your hat and allow it to hang over your shoulders like the havelock worn by the soldiers of '61.
Inside the sweatband of your hat, or around the outside edge, keep a gut leader with medium-sized artificial flies attached, and around your neck tie a big colorful bandana; it’s really useful. You can use it to carry your game, food, or gear, as a warm wrap, or over your head for protection from bugs. If you’re using it for bug protection, put it on your head under your hat and let it hang over your shoulders like the havelock worn by the soldiers of '61.
Carry your belt axe thrust through your belt at your back (Fig. 241), where it will be out of the way, not at your side as you do on parade.
Carry your belt axe tucked into your belt at your back (Fig. 241), where it won't be in the way, not at your side like you do when you're on parade.
No camper, be he hunter, fisherman, scout, naturalist, explorer, prospector, soldier or lumberman, should go into the woods without a notebook and hard lead pencil (Fig. 242). Remember that notes made with a hard pencil will last longer than those made with ink, and be readable as long as the paper lasts.
No camper, whether a hunter, fisherman, scout, naturalist, explorer, prospector, soldier, or lumberjack, should head into the woods without a notebook and a sturdy lead pencil (Fig. 242). Keep in mind that notes made with a hard pencil will last longer than those written in ink and will remain readable as long as the paper holds up.
Every scientist and every surveyor knows this and it is only tenderfeet, who use a soft pencil and fountain pen for making field notes, because an upset canoe will blur all ink marks and the constant rubbing of the pages of the book will smudge all soft pencil marks.
Every scientist and every surveyor knows this, and it’s only newcomers who use a soft pencil and fountain pen to make field notes because a tipped-over canoe will smear all ink marks, and the constant rubbing of the book’s pages will smudge all soft pencil marks.
Therefore, have a pocket especially made (Fig. 244), so that your notebook, pencil and fountain pen (Fig. 243), if you insist upon including it—will fit snugly with no chance of dropping out; also make a separate pocket for your toothbrush which should be kept in an oil-skin bag (Fig. 243).
Therefore, have a special pocket made (Fig. 244) to ensure that your notebook, pencil, and fountain pen (Fig. 243), if you really want to include it, will fit securely without the risk of falling out; also create a separate pocket for your toothbrush, which should be stored in an oilskin bag (Fig. 243).
A piece of candle (Fig. 245) is not only a most convenient thing with which to light a fire on a rainy day, but it has ofttimes proved a life saver to Northern explorers benumbed with the cold.
A candle (Fig. 245) is not just a really handy way to start a fire on a rainy day, but it has often proven to be a lifesaver for Northern explorers who are freezing in the cold.
It is a comparatively easy thing to light a candle under the shelter of one's hat or coat, even in a driving rain. When[175] one's fingers are numb or even frosted, and with the candle flame one can start a life-saving fire; so do not forget your candle stub as a part of your pocket outfit.
It’s pretty easy to light a candle under your hat or coat, even in heavy rain. When[175] your fingers are cold or even frozen, you can use the candle flame to start a fire that could save your life; so don’t forget to keep a candle stub in your pocket gear.
In the black fly belt it is wise to add a bottle of fly dope (Fig. 251) to one's personal equipment. If you make your own fly dope have a slow fire and allow to simmer over it
In the black fly zone, it's smart to bring a bottle of fly repellent (Fig. 251) in your gear. If you're making your own fly repellent, use a low flame and let it simmer.
- 3 oz. pine tar
- 2 oz. castor oil
- 1 oz. pennyroyal
If you propose traveling where there are black flies and mosquitoes, let your mother sew onto a pair of old kid gloves some chintz or calico sleeves that will reach from your wrists to above your elbow (Fig. 246), cut the tips of the fingers off the gloves so that you may be able to use your hands handily, and have an elastic in the top of the sleeve to hold them onto your arm. Rigged thus, the black flies and mosquitoes can only bite the ends of your fingers, and, sad to say, they will soon find where the ends of the fingers are located.
If you're thinking about traveling to places with black flies and mosquitoes, have your mom sew some chintz or calico sleeves onto a pair of old kid gloves that go from your wrists to above your elbows (Fig. 246). Cut the tips off the fingers of the gloves so you can use your hands easily, and put an elastic at the top of the sleeve to keep them on your arms. With this setup, the black flies and mosquitoes can only bite the tips of your fingers, but unfortunately, they'll soon figure out where those tips are.
A piece of cheese cloth, fitted over the hat to hang down over the face, will protect that part of your anatomy from insects (Fig. 246), but if they are not very bad use fly dope (Fig. 251), and add a bottle of it to your pocket outfit. One doesn't look pretty when daubed up with fly dope, but we are in the woods for sport and adventure and not to look pretty. Our vanity case has no lip stick, rouge or face powder; it only possesses a toothbrush and a bottle of fly dope.
A piece of cheesecloth, draped over the hat to hang down over your face, will keep that part of your body safe from insects (Fig. 246), but if the bugs aren't too bad, use bug spray (Fig. 251), and throw a bottle of it in your pocket. You might not look great when covered in bug spray, but we're in the woods for fun and adventure, not to look good. Our vanity kit doesn’t have any lipstick, blush, or face powder; it only contains a toothbrush and a bottle of bug spray.
Certain times of year, when one goes camping in the neighborhood of the trout brooks, one needs to Be Prepared, for one can catch more trout and enjoy fishing better if protected[176] against the attacks of the black flies, mosquitoes, midges and "no-see-ums."
Certain times of the year, when you go camping near the trout streams, you need to Be Ready, because you can catch more trout and have a better fishing experience if you're protected[176] from the onslaught of black flies, mosquitoes, midges, and "no-see-ums."

Anything swung by a strap across one's shoulder will in time "cut" the shoulders painfully unless they are protected by a pad (Fig. 246½). A few yards of mosquito netting or cheese cloth occupies little space and is of little weight, but is very useful as a protection at night. Bend a wand (Fig. 247) into a hoop and bind the ends together (Fig. 247A), with safety pins; pin this in the netting and suspend the net from its center by a stick (Fig. 248).
Anything that’s carried by a strap across your shoulder will eventually "cut" into your skin painfully unless you protect it with a pad (Fig. 246½). A few yards of mosquito netting or cheesecloth don't take up much space or weigh much, but they’re really useful for protection at night. Bend a stick (Fig. 247) into a hoop and tie the ends together (Fig. 247A) with safety pins; pin this into the netting and hang the net from its center using a stick (Fig. 248).
There are many kinds of mosquitoes; all of them are Bolsheviks, and with the black flies and other vermin they argue that since nature made them with blood suckers and provided you with the sort of blood that they like, they have an inherent right to suck your blood—and they do it!
There are many types of mosquitoes; all of them are Bolsheviks, and along with the black flies and other pests, they argue that since nature made them blood suckers and gave you the kind of blood they prefer, they have a natural right to suck your blood—and they definitely do!
But some mosquitoes are regular Huns and professional germ carriers, and besides annoying one they skillfully insert the germs of malaria and yellow fever into one's system. The malaria mosquitoes are known as anopheles. The highbrow name for the United States malaria distributor is "Anopheles quadrimaculatus" (Fig. 250F). It is only the females that you need fear; drone bees do not sting and buck mosquitoes do not bite.
But some mosquitoes are just typical pests and professional germ carriers, and in addition to being annoying, they skillfully inject malaria and yellow fever germs into your system. The mosquitoes that carry malaria are called anopheles. The fancy name for the malaria-carrying mosquito in the United States is "Anopheles quadrimaculatus" (Fig. 250F). It’s only the females you need to worry about; male mosquitoes don’t bite, just like drone bees don’t sting.
Of course, you will not need fly dope on the picnic grounds, and you will not need your pocket compass on the turnpike hike, and you will not need your jack-knife with which to eat at the boarding house or hotel, but we Boy Scouts are the real thing; we go to hotels and boarding houses and picnics when we must, but not when we can find real adventure in wilder places. We shout:
Of course, you won't need bug spray at the picnic area, and you won't need your pocket compass on the highway hike, and you won't need your jackknife to eat at the boarding house or hotel, but we Boy Scouts are the real deal; we go to hotels and boarding houses and picnics when we have to, but not when we can find true adventure in wilder places. We shout:
There is joy in the campfire's blaze at night.
Hark! the elk bugles, the panther screams!
And the shaggy bison roll and fight.
Let your throbbing heart surge and bound,
List to the whoop of the painted Reds;
Pass the flapjacks merrily round
As the gray wolf howls in the river beds.
We weary of our cushions of rest;
God of our Fathers, give back our West.
What care we for luxury and ease?
Darn the tall houses, give us tall trees!
However crude these verses may be, the sentiment is all right. But may be it will express our idea better if we do not attempt rhyme. Suppose we try it this way—
However rough these lines may be, the sentiment is fine. But maybe it will convey our idea better if we skip the rhyme. Let's try it this way—
The hooting of the barred owl, the bugling of the elk!
The yap, yap, yap of the coyote, the wild laugh of the loon;
The dismal howl of the timber wolf,
The grunting of the bull moose, the roaring of the torrent,
And the crashing thunder of the avalanche!
Ah, that's the talk; these are the words and sounds that make the blood in one's veins tingle like ginger ale. Why do all red-blooded men and real American boys like to hear
Ah, that's the talk; these are the words and sounds that make the blood in your veins tingle like soda. Why do all red-blooded guys and real American boys love to hear
The flap, flap, flap of snowshoes;
The clinking of the spurs and bits;
The creaking of the saddle leather;
The breathing of the bronco;
The babbling of the rivulet;
The whisper of the pines,
The twitter of the birds.
And the droning of bees.
Why? Because in these sounds we get the dampness of the moss, the almond-like odor of twin flowers, the burning dryness of the sand, the sting of the frost, the grit of the rocks and the tang of old mother earth! They possess the magic power of suggestion. By simply repeating these words we transport our souls to the wilderness, set our spirits free, and we are once again what God made us; natural and normal boys, listening to nature's great runes, odes, epics, lyrics, poems, ballads and roundelays, as sung by God's own bards!
Why? Because in these sounds we experience the dampness of the moss, the almond-like scent of twin flowers, the scorching dryness of the sand, the bite of the frost, the grit of the rocks, and the essence of old mother earth! They hold the magical power of suggestion. By simply repeating these words, we can transport our souls to the wilderness, set our spirits free, and become once again what God intended us to be; natural and ordinary boys, listening to nature’s great chants, odes, epics, lyrics, poems, ballads, and songs, as sung by God’s own poets!

CHAPTER X
SADDLES
- HOW TO CHOOSE A SADDLE
- EVOLUTION OF THE MEXICAN SADDLE
- BIRTH OF THE BLUFF FRONTED SADDLE
- THE COWBOY AGE
- SAWBUCKS OR PACK SADDLES
- STRAIGHT LEG AND BENT KNEE
- NAMES OF PARTS OF SADDLES
- CENTER FIRE AND DOUBLE CINCH
SADDLES
We know that comparatively few of our boys take their hikes on horseback, especially their camping hikes. But a lot of their daddies and big brothers do take their horse, and the pack horse on their hunting and fishing trips, and every boy wants to know how to do the things his daddy knows how to do. Besides all that, the author is aware of the fact that the daddies and the uncles and the big brothers are reading all the stuff he puts out for the boys. They are constantly quoting to the author things that he has said to the boys, so that now in writing a book for the boys he must count them in.
We know that relatively few of our boys go on their hiking trips on horseback, especially when camping. However, many of their dads and older brothers do take their horses, along with pack horses, on their hunting and fishing trips, and every boy wants to learn how to do the things his dad knows how to do. Besides that, the author realizes that the dads, uncles, and older brothers are reading everything he puts out for the boys. They're always quoting things he's said to the boys, so now when he writes a book for the boys, he has to include them too.
Everyone knows the misery of an ill-fitting shoe, and no one in his right mind would think of taking a prolonged hike in shoes that pinched his feet, but everybody does not know that a saddle should fit the rider; an ill-fitting saddle can cause almost as much discomfort as an ill-fitting shoe. The best all-around sportsman's saddle in the world is the cowboy saddle of the West. A writer in the Saturday Evening Post, who has written a delightfully intelligent article on saddles, in speaking of the Western cow-puncher's saddle, says:
Everyone knows the discomfort of wearing shoes that don’t fit right, and no one in their right mind would consider going on a long hike in shoes that pinch their feet. However, not everyone realizes that a saddle should also fit the rider; a poorly fitting saddle can cause nearly as much pain as a bad pair of shoes. The best all-purpose sportsman's saddle out there is the cowboy saddle from the West. An author in the Saturday Evening Post wrote a wonderfully insightful article about saddles, and when discussing the Western cowpuncher’s saddle, they say:
"There are many good riders who have never thrown a leg over any other sort of saddle, and for work on the plains or in the mountains no man who has used one would ever care for any other type. It is as much a distinct product of this continent as is the birch bark canoe or the American axe or rifle."
"There are many skilled riders who have only ever used this type of saddle, and for work on the plains or in the mountains, no one who has tried it would prefer anything else. It’s just as much a unique product of this continent as the birch bark canoe or the American axe or rifle."
Like the cowboy hat, the diamond hitch and the lariat, the cowboy saddle is evolved from the Spanish adaptation of the Moorish saddle. The old-fashioned Spanish saddle with the heavy wooden block stirrups, not the bent wood stirrups, but the big stirrups made out of blocks of wood (Fig. 273); such a saddle with stirrups often weighed over sixty pounds. These saddles were garnished with silver and gold, and the spurs that the rancheros wore had big wheels with "bells" on them, and spikes long enough to goad the thick skin of an elephant. I formerly possessed one of the picturesque old saddles on which all the leather work was engraved by hand, by the use of some tool like a graver, probably a sharpened nail; consequently none of the designs was duplicated.
Like the cowboy hat, the diamond hitch, and the lasso, the cowboy saddle has evolved from the Spanish version of the Moorish saddle. The old-school Spanish saddle, with its heavy wooden block stirrups—not the bent wood stirrups, but the big ones made from blocks of wood (Fig. 273); a saddle like this often weighed over sixty pounds. These saddles were decorated with silver and gold, and the spurs that the ranchers wore had large wheels with "bells" on them, along with spikes long enough to pierce the thick skin of an elephant. I used to own one of those beautiful old saddles where all the leatherwork was hand-engraved, probably done with a tool like a graver, possibly a sharpened nail; as a result, none of the designs were duplicated.
In the good old cow days there were two sorts of saddles: the "California Center Fire" and the "Texas Double Chinch," and all those that I remember seeing had rather a short horn at the bow with a very broad top sometimes covered with a silver plate; the seat was also much longer than it is to-day.
In the good old cow days, there were two types of saddles: the "California Center Fire" and the "Texas Double Chinch." All the ones I remember seeing had a pretty short horn at the front with a wide top that was sometimes covered with a silver plate; the seat was also a lot longer than it is today.
In the olden days there were no societies for the prevention of cruelty to animals, and on the ranges horses were plenty; therefore, when one of the long-haired plainsmen, with his long rifle in front of him on the long saddle, and the heavy Spanish-American trappings to the horse, killed the horse by overwork, he simply took off his saddle and trappings, caught another horse, mounted it and continued his journey; there were plenty of horses—why should he worry?
In the past, there were no organizations dedicated to preventing cruelty to animals, and there were lots of horses out on the ranges. So, when a long-haired plainsman, with his long rifle resting on the saddle and the heavy Spanish-American gear on his horse, worked a horse to death, he would just remove the saddle and gear, grab another horse, hop on it, and keep going. There were plenty of horses—why should he care?
Later when the cowboy age came in, the cowboys themselves
on the Southern ranges used the Spanish-American[187]
[188]
[189]
outfit; the only blessing the poor horse had was the blanket
under the saddle.
Later, when the cowboy era began, the cowboys on the Southern ranges adopted the Spanish-American outfit; the only comfort the poor horse had was the blanket under the saddle.

When the block wooden stirrups were abandoned and the thinner oval stirrups adopted, the latter were protected by long caps of leather, the dangling ends of which were silver tipped. The cowboys themselves wore heavy leather breeches called chaps (an abbreviation of the Spanish chaparejo). Thus with the feet and legs protected they could ride through the cactus plants and dash through the mesquite country without fear of being pricked by the thorns, no matter what happened to the horse. Not only did this leather armor protect them from thorns and branches, but it also prevented many a broken leg resulting from kicks by burros, mules and horses.
When block wooden stirrups were replaced by thinner oval ones, the new stirrups were covered with long leather caps that had silver-tipped ends. The cowboys wore tough leather pants called chaps (short for the Spanish chaparejo). With their feet and legs protected, they could ride through cactus and speed through mesquite areas without worrying about getting pricked by thorns, no matter what happened to the horse. This leather gear not only shielded them from thorns and branches but also helped prevent many broken legs from kicks by burros, mules, and horses.
The rolled coat or blanket, which the bronco busters on the lower ranges in early times lashed across the horse in front of their seat, is the thing from which the bucking roll was evolved, and the buckskin bucking roll, we are told, is the daddy of the swell or bulged front saddle now used.
The rolled coat or blanket that the bronco busters on the lower ranges used to tie across the horse in front of their seat is what inspired the bucking roll. It's said that the buckskin bucking roll is the predecessor of the modern swell or bulged front saddle that we use today.
The old-fashioned cowboy saddle has a narrow front, but about two decades ago
The old-school cowboy saddle has a narrow front, but about twenty years ago
It is an odd thing, this law of growth or evolution, and it is a law, and a fixed law, certain peculiarities go together; for instance, if one goes systematically to work to produce fan-tail pigeons, one finds that he is also producing pigeons with feathered legs. The breeders have also discovered that in producing a chicken with silky white feathers they unwillingly produce a fowl with black meat. What has this got to do with saddles? Only that the same law holds good here: the more the front bulges in the saddle the more the horns shrivel, developing a tendency to rake forward and upward; the stirrups also dwindle in size. The saddle, which the writer possessed, has stirrups made of iron rings covered with leather and the caps were lined with sheep's wool. We read that now the narrow half-round oval stirrup is a favorite with the cow-punchers, which the cowboy uses with his foot thrust all the way in so that the weight of the rider rests upon the middle of the foot. This is as disturbing to the European idea of "proper form" as was the Declaration of Independence, but the Declaration of Independence has proved its efficiency by its results; so also has it been proved that for those who ride all day long the nearer they can come to standing on their feet, and at the same time relieving the feet of the total weight of the body by resting it on the saddle, the easier it is to stay in the saddle for long stretches of time; in other words, the more comfortable the saddle, the longer one can occupy it without discomfort, and that is the reason a saddle should fit the rider.
It's a strange thing, this law of growth or evolution, and it is a law, a strict one; certain peculiarities go hand in hand. For example, if someone systematically breeds fan-tail pigeons, they'll also end up creating pigeons with feathered legs. Breeders have also found that if they create a chicken with silky white feathers, they inadvertently produce a bird with black meat. What does this have to do with saddles? Just that the same principle applies here: the more the front of the saddle bulges, the more the horns shrink, tending to tilt forward and upward; the stirrups also get smaller. The saddle I owned had stirrups made from iron rings covered in leather, with caps lined in sheep's wool. Nowadays, we see that the narrow, half-round oval stirrup is popular among cowboys; they use it with their foot all the way in, so the rider's weight is distributed over the middle of the foot. This concept is as shocking to the European idea of "proper form" as the Declaration of Independence was, but the Declaration has proven its effectiveness by its outcomes; similarly, it's been shown that for those who ride all day, the closer they can get to standing on their feet—while relieving their feet of their full weight by distributing it on the saddle—the easier it is to stay in the saddle for long periods. In other words, the more comfortable the saddle, the longer someone can use it without discomfort, which is why a saddle should fit the rider.
One must use Western ways; remember the horses were educated in the West if you were not, but it is not necessary to use the cruel, old jaw-breaking Spanish bits with a ring on them. I have one, but it only hangs on the studio wall as a souvenir and a curious object of torture. But don't try a straight bit on a Western horse; he may spit it out and laugh at you; use the modern Western bits, saddles, and cinch and you will not go far wrong. Of course
One should use Western methods; keep in mind that the horses were trained in the West even if you weren't, but there's no need to use the harsh, old jaw-breaking Spanish bits with a ring on them. I have one, but it just hangs on the studio wall as a souvenir and a weird torture device. But don't try a straight bit on a Western horse; he might just spit it out and laugh at you; use the modern Western bits, saddles, and cinches, and you won't go wrong. Of course
Of course, one could write a whole book on horseback work, saddles and pack saddles. The truth is that one could write a whole book on any subject or any chapter in this book. But my aim is to start you off right; I believe that the way to learn to do a thing Is To Do It, and not depend upon your book knowledge. Therefore, when I write a book for you boys, I do the best I know how to make you understand[192] what I am talking about, and to excite in your mind and heart a desire to do the things talked of; you must remember, however, that no one ever could learn to skate from a school of correspondence or a book, but one could gain a great deal of useful knowledge about anything from a useful book, knowledge that will be of great help when one is trying to do the things treated of in the book.
Of course, someone could write an entire book about horseback riding, saddles, and pack saddles. The truth is, you could write a whole book on any topic or any chapter in this book. But my goal is to get you started the right way; I believe that the best way to learn something Get It Done, rather than relying solely on what you read in books. So, when I write a book for you guys, I do my best to make sure you understand[192] what I’m saying and to inspire a desire in your mind and heart to take action on these topics; however, you must remember that no one has ever learned to skate through a correspondence course or a book, but you can definitely gain a lot of useful knowledge from a good book, knowledge that will be incredibly helpful when you’re trying to do the things covered in it.
I can tell you with the aid of diagrams how to pack a blanket, and you can follow my diagrams and pack your blanket; but in order to ride, skate, swim or dance, you must gain the skill by practice. A book, however, can tell you the names of the part of the things.
I can show you with diagrams how to pack a blanket, and you can follow my diagrams to pack your blanket. But to ride, skate, swim, or dance, you need to practice to gain those skills. A book, though, can only tell you the names of the parts involved.
For instance (Fig. 272), T is the saddle-tree; a good saddle-tree is made of five stout pieces of cottonwood which are covered with rawhide; when the rawhide shrinks it draws the pieces together more tightly and perfectly than they could be fastened by tongue and groove, glue, screws or nails; in fact, it makes one solid piece of the whole. The horn is fastened on to the tree by its branched legs, and covered with leather or braided rawhide. The shanks are covered first and then attached to the tree and the thongs are tacked to the saddle-tree, after which the bulged cover is fitted on. When a good saddle-tree is finished it is as much one piece as is the pelvis of a skeleton.
For example (Fig. 272), T is the saddle tree; a good saddle tree is made from five sturdy pieces of cottonwood that are covered with rawhide. When the rawhide shrinks, it pulls the pieces together tighter and more perfectly than they could be secured with tongue and groove, glue, screws, or nails; in fact, it creates a solid piece out of the whole. The horn is attached to the tree by its branched legs and is covered with leather or braided rawhide. The shanks are covered first and then attached to the tree, and the thongs are nailed to the saddle tree, after which the bulged cover is fitted on. When a good saddle tree is finished, it is as much one piece as the pelvis of a skeleton.
P is the pummel, A is the cantle. S is the side bar of the saddle-tree, C is a quarter strap side, B is the quarter strap cantle, E is the stirrup buckle, F is the outer strap safe, G is the cincha ring, H is the cincha cover; the cincha strap is unlettered but it connects the cincha ring with the quarter strap ring D; J is the cap or leather stirrup cover, L is the[193] wooden stirrup, K is the horsehair cincha. Fig. 275 is one of the saddle pads to fit under the saddle. On Fig. 274M is the horn, N the cantle, O the whang leather, which your saddler will call tie strings.
P is the pummel, A is the cantle. S is the side bar of the saddle tree, C is a quarter strap side, B is the quarter strap cantle, E is the stirrup buckle, F is the outer strap safe, G is the cinch ring, H is the cinch cover; the cinch strap is unlettered but it connects the cinch ring with the quarter strap ring D; J is the cap or leather stirrup cover, L is the [193] wooden stirrup, K is the horsehair cinch. Fig. 275 is one of the saddle pads to fit under the saddle. On Fig. 274M is the horn, N the cantle, O the whang leather, which your saddler will call tie strings.
You will note that in Fig. 274 there are two cinchas, and in Fig. 272 but one. You will also note that in Fig. 274 the skirt of your saddle seems to be double, or even triple, and the stirrup rigging comes on top of the skirt, and this is made up of the back jockey, front jockey, and side jockey or seat. Now then, you know all about horseback; there is nothing more I can tell you about the pack horse, but remember not to swell up with pride because of your vast knowledge, and try to ride an outlaw horse with an Eastern riding school bit. But acknowledge yourself a tenderfoot, a short horn, a shavetail, a Cheechako, and ask your Western friends to let you have a horse that knows all the tricks of his trade, but who has a compassionate heart for a greenhorn. There are lots of such good fellows among the Western horses, and they will treat you kindly. I know it because I have tried them, and as I said before, I make no boast of being a horseman myself. When I get astride of a Western horse I lean over and whisper in his ear, and confess to him just how green I am, and then put him on his honor to treat me white, and so far he has always done so.
You’ll notice that in Fig. 274 there are two cinchas, and in Fig. 272 there’s only one. You’ll also see that in Fig. 274 the skirt of your saddle appears to be double, or even triple, and the stirrup rigging sits on top of the skirt, made up of the back jockey, front jockey, and side jockey or seat. Now, you know all about horseback riding; there's nothing more I can tell you about the pack horse, but don’t let your pride get the best of you because of your extensive knowledge, and don’t try to ride a wild horse with an Eastern riding school bit. Instead, recognize that you’re a novice, a beginner, a rookie, a newcomer, and ask your Western friends to give you a horse that knows all the tricks of the trade but also has some patience for a newcomer. There are plenty of kind horses in the West, and they will treat you well. I know this because I’ve experienced it myself, and as I mentioned before, I don’t claim to be an expert horseman. When I get on a Western horse, I lean over and whisper in his ear, admitting just how inexperienced I am, and then I trust him to treat me right, and so far, he always has.
CHAPTER XI
CHOOSING A CAMP SITE
- 'WARE SINGLE TREES OR SMALL GROUPS OF TREES
- SAFETY IN WOODS OR FOREST
- KEEP YOUR EYES OPEN FOR GOOD CAMP SITES
- CROSS STREAMS WHILE CROSSING IS GOOD
- KEEP TO WINDWARD OF MOSQUITO HOLES
- 'WARE ANTS' NESTS
- HOW TO TELL WHEN WIND BLOWS
- EVOLUTION OF THE SHACK
- HOW TO SWEEP
- HOW TO MAKE CAMP BEDS
- HOW TO DIVIDE CAMP WORK
- TENT PEGS
- HOW TO PITCH A TENT SINGLE-HANDED
- HOW TO DITCH A TENT
- USE OF SHEARS, GINS AND TRIPODS
CHOOSING A CAMP SITE
When choosing a camp site, if possible, choose a forest or grove of young trees. First, because of the shade they give you; secondly, because they protect you from storms, and thirdly, because they protect you from lightning.
When selecting a campsite, if you can, opt for a forest or a grove of young trees. First, because of the shade they provide; second, because they shield you from storms; and third, because they guard you against lightning.
Single trees, or small groups of trees in open pastures are exceedingly dangerous during a thunder storm; tall trees on the shores of a river or lake are particularly selected as targets for thunder bolts by the storm king. But the safest place in a thunder storm, next to a house, is a forest. The reason of this is that each wet tree is a lightning rod silently conducting the electric fluid without causing explosions. Do not camp at the foot of a very tall tree, or an old tree with dead branches on it, for a high wind may break off the branches and drop them on your head with disastrous results; the big tree itself may fall even when there is no wind at all.
Single trees or small clusters of trees in open fields are extremely hazardous during a thunderstorm; tall trees along the banks of a river or lake are especially chosen as targets for lightning by the storm. However, the safest spot during a thunderstorm, besides being in a house, is a forest. This is because each wet tree acts like a lightning rod, silently directing the electric charge without causing any explosions. Avoid camping under a very tall tree or an old tree with dead branches, since strong winds could snap off the branches and drop them on you with harmful consequences; the large tree itself could even fall, even without any wind.
Once I pitched my camp near an immense tree on the Flathead Indian Reservation. A few days later we returned to our old camp. As we stopped and looked at the site where our tents had been pitched we looked at each other solemnly, but said nothing, for there, prone upon the ground, lay that giant veteran tree!
Once I set up my camp next to a huge tree on the Flathead Indian Reservation. A few days later, we went back to our old campsite. As we paused and gazed at the spot where our tents used to be, we exchanged solemn looks but didn’t say anything, because there, lying flat on the ground, was that giant old tree!
But young trees do not fall down, and if they did they could not create the havoc caused by the immense bole of the patriarch of the forest when it comes crashing to the earth. A good scout must "Be Prepared," and to do so must remember that safety comes first, and too close neighborhood to a big tree is often unsafe.
But young trees don't fall down, and even if they did, they wouldn't cause the destruction that happens when the massive trunk of the oldest tree in the forest crashes to the ground. A good scout must "Be Prepared," and to do that, they need to remember that safety comes first, and being too close to a big tree can often be dangerous.
Remember to choose the best camp site that can be found; do not travel all day, and as night comes on stop at any old place; but in the afternoon keep your eyes open for likely spots.
Remember to choose the best campsite available; don't travel all day, and as night approaches, don't just stop anywhere; instead, keep an eye out for good spots in the afternoon.
Halt early enough to give time to have everything snug and in order before dark.
Stop early enough to make sure everything is tidy and in place before it gets dark.
In selecting camping ground, look for a place where good water and wood are handy. Choose a high spot with a gentle slope if possible; guard your spring or water hole from animals, for if the day is hot your dog will run ahead of the party and jump into the middle of the spring to cool himself, and horses and cattle will befoul the water.
When choosing a campsite, look for a spot with easy access to good water and firewood. If possible, pick a high area with a gentle slope; make sure to protect your water source from animals, because on a hot day, your dog might run ahead of the group and jump into the spring to cool off, and horses and cattle could contaminate the water.
If camping in the Western states on the shores of a shallow stream which lies along the trail, cross the stream before making camp or you may not be able to cross it for days. A chinook wind suddenly melting the snows in the distant mountains, or a cloud-burst miles and miles up stream, may suddenly send down to you a dangerous flood even in the dry season. I have known of parties being detained for days by one of these sudden roaring floods of water, which came unannounced, the great bole of mud, sticks and logs sweeping by their camp and taking with it everything in its path.
If you're camping in the Western states by a shallow stream along the trail, cross the stream before setting up camp, or you might not be able to cross it for days. A chinook wind can quickly melt snow in the distant mountains, or a cloudburst miles upstream can suddenly send a dangerous flood your way, even in dry season. I've heard of groups being stuck for days by one of these sudden, raging floods, which came out of nowhere, sweeping past their camp with mud, sticks, and logs, taking everything in its way.
A belt of dense timber between camp and a pond or swamp will act as a protection from mosquitoes. As a rule, keep to windward of mosquito holes; the little insects travel with the wind, not against it. 'Ware ant hills, rotten wood infested with ants, for they make poor bedfellows and are a nuisance where the food is kept.
A thick area of trees between your campsite and a pond or swamp will help protect you from mosquitoes. Generally, stay upwind of mosquito nests; those little bugs fly with the wind, not against it. Be cautious of ant hills and decaying wood full of ants, as they make for uncomfortable sleeping companions and can be a hassle where food is stored.
A bare spot on the earth, where there are no dry leaves, is a wind-swept spot; where the dust-covered leaves lie in heaps the wind does not blow. A windy place is generally free from mosquitoes, but it is a poor place to build a fire;[199] a small bank is a great protection from high wind and twisters. During one tornado I had a camp under the lee of a small elevation; we only lost the fly of one tent out of a camp of fifty or more, while in more exposed places nearby great trees were uprooted and houses unroofed.
A bare patch of ground, where there are no dry leaves, is a windy spot; where the dust-covered leaves pile up, the wind doesn't blow. A windy area usually has fewer mosquitoes, but it's not ideal for starting a fire; [199] a small hill offers good shelter from strong winds and tornadoes. During one tornado, I set up camp on the sheltered side of a small rise; we only lost the cover of one tent out of a camp of fifty or more, while in more exposed areas nearby, large trees were uprooted and roofs were blown off houses.
It must not be supposed that the camping season is past because the summer vacation is over. The real camping season begins in the Wild Rice Moon, that is, September. Even if school or business takes all our time during the week, we still have week-ends in which to camp. Saturday has always been a boys' day. Camping is an American institution, because America affords the greatest camping ground in the world.
It shouldn't be assumed that the camping season is over just because summer vacation ended. The true camping season kicks off in the Wild Rice Moon, which is September. Even if school or work consumes our weekdays, we still have weekends to go camping. Saturday has always been a day for boys. Camping is an American tradition because America offers some of the best camping grounds in the world.
The author is seated in his own log house, built by himself, on the shores of Big Tink Pond. Back of him there is pitched a camp of six rows of tents, which are filled with a joyful, noisy crowd of youngsters.
The author is sitting in his own log cabin, which he built himself, on the shores of Big Tink Pond. Behind him, there’s a campsite with six rows of tents, bustling with a lively, noisy group of kids.
It is here in the mountains of Pike County, Pennsylvania, where the bluestone is stratified in horizontal layers, that one may study the camp from its very birth to the latest and finished product of this century.
It’s in the mountains of Pike County, Pennsylvania, where the bluestone is layered horizontally, that you can explore the camp from its very beginnings to the latest completed version of this century.
Everywhere in these mountains there are outcroppings of the bluestone, and wherever the face of a ridge of this stone is exposed to the elements, the rains or melting snows cause the water to drip from the earth on top of the stone and trickle down over the face of the cliff. Then, when a cold snap turns the moisture into ice in every little crack in the rock, the expansion of the ice forces the sides of the cracks apart at the seams in the rock until loose pieces from the undersides slide off, leaving small spaces over which the rock projects. The little caves thus made make retreats for white-footed mice and other small mammals, chipmunks and cave[200] rats. When these become deeper they may become dens in which snakes sleep through the winter.
Everywhere in these mountains, there are outcrops of bluestone. Wherever the face of a ridge made of this stone is exposed to the elements, rain or melting snow causes water to drip down from the earth above and trickle over the rock face. When a cold snap freezes the moisture in every little crack in the rock, the expansion of the ice pushes the sides of the cracks apart until loose pieces from the underside slide off, creating small overhangs. The little caves formed this way provide shelters for white-footed mice and other small mammals, like chipmunks and cave[200] rats. As these caves deepen, they can become dens where snakes hibernate during the winter.
The openings never grow smaller, and in course of time are large enough for the coon, then the fox, and in olden times they made dens for wolves and panthers, or a place where the bear would "hole" up for the winter.
The openings never shrink, and over time they become big enough for raccoons, then for foxes, and in the past, they provided dens for wolves and panthers, or spots where bears would hibernate for the winter.
Time is not considered by Dame Nature; she has no trains to catch, and as years and centuries roll by the little openings in the bluestone become big enough to form a shelter for a crouching man, and the crouching man used them as a place in which to camp when the Norsemen in their dragon ships were braving the unknown ocean. When Columbus, with his toy boats, was blundering around the West Indies, the crouching man was camping under the bluestone ledges of old Pike County, Pennsylvania. There he built his campfires and cooked his beaver and bear and deer and elk, using dishes of pottery of his own make and ornamented with crude designs traced in the clay before the dishes were baked.
Time doesn’t matter to Mother Nature; she doesn’t have trains to catch. As years and centuries go by, the small openings in the bluestone become large enough to serve as shelters for a crouching man. This man used them as a camping spot while the Norsemen sailed the unknown ocean in their dragon ships. While Columbus was clumsily exploring the West Indies with his small boats, the crouching man was camping beneath the bluestone ledges of old Pike County, Pennsylvania. There, he built campfires and cooked beaver, bear, deer, and elk, using pottery dishes he made himself, decorated with simple designs he traced in the clay before firing them.
We know all this to be true history, because within a short walk of the author's log house there are overhanging ledges of bluestone, and underneath these ledges we, ourselves, have crouched and camped, and with sharp sticks have dug up the ground from the layer of earth covering the floor rock. And in this ground we have found bits of pottery, the split bones of different wild animals—split so that the savage camper might secure the rich marrow from the inside of the bones—arrowheads, bone awls and needles, tomahawks, the skulls of beaver and spearheads; all these things have been found under the overhanging bluestone.
We know this is true history because just a short walk from the author’s log cabin, there are overhanging ledges of bluestone. Underneath these ledges, we have crouched and camped, digging into the earth covering the bedrock with sharp sticks. In this ground, we discovered pieces of pottery, split bones from various wild animals—split so that the campfire could access the rich marrow inside—arrowheads, bone awls and needles, tomahawks, beaver skulls, and spearheads; all these items have been found beneath the overhanging bluestone.
Wherever such a bluestone ledge exists, one may make a good camp by closing up the front of the cave with sticks against the overhanging cliff and thatching the sticks with[201] browse or balsam boughs, thus making the simplest form of a lean-to. The Indians used such shelters before the advent of the white man; Daniel Boone used them when he first visited Kentucky and, in spite of the great improvement in tents, the overhanging ledge is still used in Pennsylvania by fishermen and hunters for overnight camps.
Wherever there's a bluestone ledge, you can set up a good campsite by closing off the front of the cave with sticks against the overhanging cliff and covering the sticks with[201] leaves or balsam branches, creating the simplest type of lean-to. Native Americans used these shelters before white settlers arrived; Daniel Boone used them when he first came to Kentucky, and even with all the advancements in tents, campers still use the overhanging ledge in Pennsylvania for overnight stays.
But if one uses such a site for his overnight camp or his week's-end camp, one should not desecrate the ancient abode by introducing under its venerable roof, modern up-to-date cooking and camp material, but should exercise ingenuity and manufacture, as far as possible, the conveniences and furniture necessary for the camp.
But if someone uses such a site for their overnight camp or weekend camping, they shouldn't disrespect the ancient place by bringing in modern cooking and camping gear under its respected roof. Instead, they should be creative and make, as much as possible, the necessary conveniences and furniture for the camp.
Since the author is writing this in a camp in the woods, he will tell the practical things that confront him, even though he must mention a white man's shop broom.
Since the author is writing this in a campsite in the woods, he will share the practical issues he's facing, even if it means mentioning a white man's shop broom.
In the first place, the most noticeable defect in the tenderfoot's work is the manner in which he handles his broom and wears the broom out of shape. A broom may be worn to a stub when properly used, but the lopsided broom is no use at all because the chump who handled it always used it one way until the broom became a useless, distorted, lopsided affair, with a permanent list to starboard or port, as the case may be.
In the first place, the most obvious flaw in the beginner's work is how he uses his broom, causing it to become misshapen. A broom can be worn down properly, but a lopsided broom is completely useless because the person using it always handled it the same way until it became a distorted, uneven mess, permanently tilted to one side or the other.
To sweep properly is an art, and every all-around outdoor boy and man should learn to sweep and to handle the broom as skillfully as he does his gun or axe. In the first place, turn the broom every time you notice a tendency of the latter to become one-sided, then the broom will wear to a stub and still be of use. In the next place, do not swing the broom up in the air with each sweep and throw the dust up in the clouds, but so sweep that the end of the stroke keeps the broom near the floor or ground.
To sweep properly is a skill, and every well-rounded outdoor boy and man should learn to sweep and handle the broom as skillfully as they do their gun or axe. First, turn the broom each time you notice it starting to wear unevenly; this way, the broom will last longer and still be effective. Next, don’t lift the broom high with each sweep and send the dust flying into the air. Instead, sweep in a way that keeps the broom close to the floor or ground.
Now a word about making beds. In all books on woodcraft you are directed to secure balsam boughs from which to make your beds, and there is no better forest bedding than the fragrant balsam boughs, but unfortunately the mountain goose, as the hunters call it, from which you pluck the feathers to make your camp bed, is not to be found in all localities.
Now a word about making beds. In all books on woodcraft, you are advised to gather balsam boughs to create your beds, and there’s no better forest bedding than the aromatic balsam boughs. However, the mountain goose, as hunters refer to it, from which you get the feathers for your camp bed, isn't found everywhere.
A bag filled with dry leaves, dry grass, hay or straw will make a very comfortable mattress; but we are not always in the hay and straw belt and dry leaves are sometimes difficult to secure; a scout, however, must learn to make a bed wherever he happens to be. If there happens to be a swale nearby where brakes and ferns grow luxuriantly, one can gather an armful of these, and with them make a mattress. The Interrupted fern, the Cinnamon, the Royal fern, the Lady fern, the Marsh fern and all the larger ferns are useful as material.
A bag filled with dry leaves, dry grass, hay, or straw makes a really comfy mattress, but we’re not always around hay and straw, and dry leaves can be hard to find. A scout, however, needs to know how to create a bed wherever they are. If there’s a low, damp area nearby with plenty of ferns and brakes, you can gather a bunch of them and use them to make a mattress. The Interrupted fern, Cinnamon fern, Royal fern, Lady fern, Marsh fern, and all the larger ferns are great materials to use.
A camping party should have their work so divided that each one can immediately start at his own particular job the moment a halt is made. One chops up the firewood and sees that a plentiful supply of firewood is always on hand; usually he carries the water. One makes camp, puts up the tents, clears away the rubbish, fixes the beds, etc., while a third attends strictly to kitchen work, preparing the meals, and washing up the dishes.
A camping group should divide their tasks so that everyone can start on their specific job as soon as they stop. One person chops firewood and makes sure there's always enough on hand; they usually handle the water too. Another person sets up camp, puts up the tents, cleans up the area, sets up the beds, and so on, while a third person focuses on kitchen duties, preparing meals and washing the dishes.
With the labor divided in this manner, things run like clock work and camp is always neat and tidy. Roughing it is making the best of it; only a slob and a chump goes dirty and has a sloppy-looking camp. The real old time veteran and sourdough is a model of neatness and order. But a clean, orderly camp is much more important than a clean-faced camper. Some men think so much of themselves and their own personal cleanliness that they forget their duty to the[203] others. One's duty is about in this proportion: first to the animals if any, secondly to the men, and lastly to oneself.
With the work divided this way, everything runs smoothly and the camp is always neat and tidy. Roughing it means making the best of things; only a slacker and a fool would let things get dirty and have a messy camp. The true, old-time veteran and seasoned camper is a model of cleanliness and organization. However, a clean and organized camp is much more important than an impeccably groomed camper. Some people are so focused on their own personal hygiene that they forget their responsibilities to others. One's responsibilities should be prioritized like this: first to the animals, if there are any, then to the other campers, and lastly to oneself.
Before pitching your tent, clear out a space for it to occupy; pick up the stones, rubbish and sticks, rake off the ground with a forked stick. But do not be rude to your brother, the ground pine; apologize for disturbing it; be gentle with the fronds of the fern; do not tear the trailing arbutus vine up by its roots, or the plant of the almond scented twin flowers; ask pardon of the thallus of the lichen which you are trampling under your feet. Why? O! well—because they had first right to the place, and because such little civilities to the natural objects around you put your own mind in accord with nature, and make camping a much more enjoyable affair.
Before setting up your tent, clear out a space for it; remove any stones, trash, and sticks, and rake the ground with a forked stick. But don’t be rude to your brother, the ground pine; apologize for disturbing it; be gentle with the fern fronds; don’t rip the trailing arbutus vine from its roots, or the plant with the almond-scented twin flowers; be sure to apologize to the lichen that you’re stepping on. Why? Well, because they had the first claim to that spot, and showing these small courtesies to the natural things around you aligns your own mind with nature, making camping a much more enjoyable experience.
When you feel you are sleeping on the breast of your mother, the earth, while your father, the sky, with his millions of eyes is watching over you, and that you are surrounded by your brother, the plants, the wilderness is no longer lonesome even to the solitary traveler.
When you feel like you're sleeping on the breast of your mother, the earth, while your father, the sky, with his millions of eyes, is watching over you, and you find yourself surrounded by your brother, the plants, the wilderness is no longer lonely even for the solitary traveler.
Another reason for taking this point of view is that it has a humanizing effect and tends to prevent one from becoming a wilderness Hun and vandal. It also not only makes one hesitate to hack the trees unnecessarily, but encourages the camper to take pride in leaving a clean trail. As my good friend, John Muir, said to me: "The camping trip need not be the longest and most dangerous excursion up to the highest mountain, through the deepest woods or across the wildest torrents, glaciers or deserts, in order to be a happy one; but however short or long, rough or smooth, calm or stormy, it should be one in which the able, fearless camper sees the most, learns the most, loves the most and leaves the cleanest track; whose camp grounds are never[204] marred by anything unsightly, scarred trees or blood spots or bones of animals."
Another reason to take this point of view is that it has a humanizing effect and helps prevent someone from becoming a wild and destructive person. It not only makes you think twice about cutting down trees unnecessarily, but it also encourages campers to take pride in leaving a clean trail. As my good friend, John Muir, told me: "The camping trip doesn't have to be the longest or most dangerous journey up the highest mountain, through the deepest woods, or across the wildest rivers, glaciers, or deserts to be a happy one; but no matter how short or long, rough or smooth, calm or stormy, it should be one where the capable, brave camper sees the most, learns the most, loves the most, and leaves the cleanest path; whose campsites are never[204] ruined by anything ugly, scarred trees, blood stains, or animal bones."
It is not the object of this book to advertise, or even advise the use of any particular type of outfitting apparatus other than the plain, everyday affairs with which all are familiar. What we want to do is to start the reader right, then he may make his own choice, selecting an outfit to suit his own taste. There are no two men, for instance, who will sing the praise of the same sort of a tent, but there is perhaps no camper who has not used, and been very comfortable in, the old style wall tent. It has its disadvantages, and so has a house, a shack or a shanty. As a rule, the old wall tent is too heavy to carry with comfort and very difficult for one man to pitch alone—unless one knows how.
It’s not the purpose of this book to promote or even recommend any specific type of camping gear other than the basic, everyday items that everyone knows. What we want to do is set the reader on the right path so they can choose an outfit that matches their own preferences. For example, no two people will rave about the same type of tent, but there's probably not a camper out there who hasn't used and felt at home in a traditional wall tent. It has its downsides, just like a house, a cabin, or a shack. Generally, the old wall tent is too heavy to carry comfortably and can be very tricky for one person to set up alone—unless they know how to do it.

See that the ground is comparatively level, but with a slant in one direction or another so that water will drain off in case of rain. Never, for instance, pitch your tent in a hollow or basin of ground, unless you want to wake up some night slopping around in a pool of water. Do not pitch your tent near a standing dead tree; it is liable to fall over and crush you in the night. Avoid camping under green trees with heavy dead branches on them. Remember the real camper always has an eye to safety first, not because he is a coward, but because the real camper is as brave a person as you will find anywhere, and no real brave person believes in the carelessness which produces accidents. Do not pitch your tent over protruding stones which will make stumbling-blocks for you on which to stub your toes at night, or torture you when you spread your blankets over them to sleep. Use common sense, use gumption. Of course, we all know that it hurts one's head to think, but we must all try it, nevertheless, if we are going to live in the big outdoors.
Make sure the ground is fairly level, but with a slight slope in one direction or another so that water can drain off if it rains. For example, don't set up your tent in a low area or a depression unless you want to wake up one night wading through a pool of water. Avoid pitching your tent near a standing dead tree; it could fall over and crush you while you sleep. Stay away from green trees with heavy dead branches. Remember, a true camper always prioritizes safety first, not because they're afraid, but because a real camper is one of the bravest people you'll ever meet, and no truly brave person believes in carelessness that leads to accidents. Don't set your tent over sticking-out rocks that could trip you at night or make it uncomfortable when you spread your blankets over them to sleep. Use common sense, be smart. We all know that thinking can be a hassle, but we have to give it a shot if we're going to enjoy the great outdoors.
At a famous military academy the splendid cavalrymen gave a brilliant exhibition of putting up wall tents; it required four men to put up each tent. Immediately following this some of the scouts took the same tents, with one scout to each tent, and in less time than the cavalrymen took for the same job, the twelve year old boys, single-handed, put up the same tents.
At a well-known military academy, the impressive cavalry soldiers showcased their skills in setting up wall tents; it took four men to pitch each tent. Right after this, some of the scouts took the same tents, with one scout assigned to each tent, and in less time than the cavalry soldiers took to complete the task, the twelve-year-old boys, working alone, set up the same tents.
Spread out your tent all ready to erect, put your ridge pole and your two uprights in place, and then drive some tent stakes, using the flat of your axe with which to drive them, so that you will not split the tops of the stakes (Fig. 287); drive the two end stakes A and B (Fig. 289) at an[208] angle to the ends of the tent. After the tent stakes are arranged in a row, like the ones in Fig. 289, adjust the forks of the uprights two inches from the ends of the ridge pole (Fig. 288), then make fast the two extreme end guy ropes A and B to the tent pegs; the others are unimportant for the present, after that is done, raise one tent pole part of the way up (Fig. 290), then push the other part of the way up (Fig. 291); gradually adjust these things until the strain is even upon your guy ropes. You will now find that your tent will stand alone, because the weight is pulling against your guy ropes (Fig. 292). This will hold your tent steady until you can make fast the guy ropes to the pegs upon the other side, not too tightly, because you need slack to straighten up your tent poles.
Spread out your tent, ready to set up, then put in place your ridge pole and two uprights. Next, drive in some tent stakes using the flat side of your axe to avoid splitting the tops of the stakes (Fig. 287); drive the two end stakes A and B (Fig. 289) at an angle to the ends of the tent. Once the tent stakes are lined up like those in Fig. 289, adjust the forks of the uprights to be two inches from the ends of the ridge pole (Fig. 288), then fasten the two outer guy ropes A and B to the tent pegs. The other ropes aren't important right now. After that, raise one tent pole partway up (Fig. 290), then lift the other part the rest of the way (Fig. 291); gradually adjust everything until the tension is even on your guy ropes. You’ll now notice that your tent stands on its own because the weight is pulling against your guy ropes (Fig. 292). This will keep your tent stable until you can secure the guy ropes to the pegs on the other side, not too tightly, as you'll need some slack to straighten your tent poles.
Next see that the back guy pole is perpendicular, after which it is a very easy matter to straighten up the front pole and adjust the guy rope so that it will stand stiff as in Fig. 293.
Next, check that the back guy pole is vertical, then it's pretty simple to straighten the front pole and adjust the guy rope so that it stands firm like in Fig. 293.
Remember, when you are cutting the ridge poles and the uprights, to select fairly straight sticks, and they should be as free as possible from rough projections, which might injure the canvas; also the poles should be as stiff as possible so as not to sag or cause the roof to belly.
Remember, when you're cutting the ridge poles and the uprights, choose fairly straight sticks, and they should be as free as possible from rough bumps that could damage the canvas; also, the poles should be as sturdy as possible to avoid sagging or making the roof bow.
Just as soon as your tent is erected and you feel like
resting, get busy on ditching; no matter how dry the weather
may be at the time, put a ditch around the tent that will
drain the water away from your living place. There is no
positive rule for digging this ditch; it varies according to
surface of ground, but the gutter should be so made that
the water will run away from the tents and not to it, or stand
around it (Fig. 294). Fig. 295 shows how to make a tent by[209]
[210]
[211]
folding a floor cloth or piece of tarpaulin; of course it must
have a tent pole to support the top, and the floor pieces may
be drawn together in the center. Make one out of a piece
of writing paper and you will learn how to do it, because
although the paper is small, the folds would be just the same
as if it was as large as a church.
As soon as your tent is set up and you want to take a break, start digging a ditch. No matter how dry it is outside, create a ditch around the tent to direct water away from your living space. There's no strict rule for how to dig this ditch; it depends on the ground's surface, but the gutter should be designed so that water flows away from the tents rather than toward them, or collects around them (Fig. 294). Fig. 295 shows how to set up a tent by[209]
[210]
[211] folding a floor cloth or piece of tarpaulin. It should have a pole to hold the top up, and the floor pieces can be gathered in the center. Try making one out of a piece of writing paper to practice, because even though the paper is small, the folds will be the same as if it were as large as a church.

In sandy or soft ground it often taxes one's ingenuity to supply anchors for one's tent; an anchor is a weight of some sort to which the guy ropes may be attached. Fig 296 shows a tent anchored by billets of wood; these are all supposed to be buried in the ground as in Fig. 308, and the ground trampled down over and above them to keep them safe in their graves. Fig. 297 shows the first throw in the anchor hitch, Fig. 298 the second throw, and Fig. 299 the complete hitch for the anchor. Fig. 303 shows the knot by which the anchor rope is tied to the main line. Figs. 300, 301, and 302 show the detail of tying this knot, which is simplicity itself, when you know how, like most knots. Fig. 303 shows the anchor hitch complete.
In sandy or soft ground, it can be a challenge to find anchors for your tent; an anchor is a weight that you can attach the guy ropes to. Fig 296 shows a tent secured by pieces of wood; these are meant to be buried underground as in Fig. 308, with the soil packed down over them to keep them secure in their spots. Fig. 297 illustrates the first step in the anchor hitch, Fig. 298 the second step, and Fig. 299 the complete hitch for the anchor. Fig. 303 shows the knot used to tie the anchor rope to the main line. Figs. 300, 301, and 302 detail how to tie this knot, which is very simple once you know how, like most knots. Fig. 303 shows the anchor hitch finished.


Fig. 309 shows some of the ordinary forms of tents, the wall tent, the Baker tent and the canoe tent. Fig. 310 shows a tent with a fly extending out in front, thus giving the piazza or front porch. In the background is a tepee tent. Fig. 311 shows two small Baker tents in the background, and the Dan Beard tent in the foreground. These comprise the principal forms, but the open-front tents to-day are much in vogue with the campers. A mosquito netting in front will keep out the insects and allow the air to come in freely, whereas the old-fashioned way of closing the tent flap stops circulation of air and makes conditions as bad as that of a closed room in a big house, and the air becomes as foul as it did in the little red school houses and does now in the Courts of Justice, jails and other places of entertainment.
Fig. 309 displays some common types of tents: the wall tent, the Baker tent, and the canoe tent. Fig. 310 features a tent with a fly extending outward in front, creating a porch area. In the background, there's a tepee tent. Fig. 311 shows two small Baker tents in the background and the Dan Beard tent in the foreground. These are the main styles, but open-front tents are currently very popular among campers. A mosquito netting in front keeps insects out while allowing fresh air to flow in, whereas the old-fashioned way of closing the tent flap stops air circulation and makes the inside as stuffy as a closed room in a big house, causing the air to get as stale as it did in the little red schoolhouses and does now in courthouses, jails, and other places for recreation.
CHAPTER XII
AXE AND SAW
- OUR GREATEST AXEMAN
- IMPORTANCE OF THE AXE
- WHAT KIND OF AXE TO USE
- HOW TO SWING AN AXE
- HOW TO REMOVE A BROKEN AXE HANDLE
- HOW TO TIGHTEN THE HANDLE IN THE HEAD
- ACCIDENTS
- THE BRAINS OF AN AXE
- ETIQUETTE OF THE AXE
- HOW TO SHARPEN AN AXE
- HOW TO "FALL" A TREE
- HOW TO SWAMP
- HOW TO MAKE A BEETLE OR MALL
- HOW TO HARDEN GREEN WOOD
- HOW TO MAKE A FIREWOOD HOD
- HOW TO MAKE A CHOPPING BLOCK
- THE PROPER WAY TO CHOP
- HOW TO MAKE SAWBUCKS FOR LOGS
- HOW TO USE A PARBUCKLE
- HOW TO SPLIT A LOG
- HOW TO USE A SAWPIT
AXE AND SAW
To all good, loyal Americans, the axe is almost a sacred tool, for our greatest American, Abraham Lincoln, was one of our greatest axemen. When he was President of the United States he used to exercise by chopping wood, then laughingly extended his arm holding the axe in a horizontal position by the extreme end of the handle. This he would do without a tremor of the muscle or movement of the axe—some stunt! Try it and see if you can do it!
To all good, loyal Americans, the axe is almost a sacred tool because our greatest American, Abraham Lincoln, was one of the best at using it. When he was President of the United States, he would work out by chopping wood, then jokingly extend his arm, holding the axe horizontally by the very end of the handle. He could do this without any muscle tremor or movement of the axe—what a feat! Give it a try and see if you can do it!
The American Indians, and practically all savages, used stone and bone implements, and with such implements the Redmen were wont to build the most beautiful of all crafts, the birch bark canoe. If an American Indian produced such wonders with implements made of stones, flint and bones, a good red-blooded American boy should be able to do the same with a sharp axe; therefore it should not only be his pleasure but his duty to learn to be a skillful axeman.
The Native Americans, like nearly all indigenous people, used tools made of stone and bone. With these tools, the Native Americans crafted some of the most beautiful creations, like the birch bark canoe. If Native Americans could create such wonders using tools made from stone, flint, and bones, then a good American boy should be able to do the same with a sharp axe. Therefore, it should be not just his enjoyment but also his responsibility to learn to be a skilled axeman.
Brother Jonathan, the imaginary character who represented the American people, was almost invariably pictured with a jack-knife whittling a stick, because all early Americans were skillful in the use of the jack-knife, but they were also skilled in the use of the axe, and every boy of twelve years of age knew how to handle an axe.
Brother Jonathan, the fictional character who represented the American people, was typically shown with a jackknife carving a stick, because all early Americans were skilled with a jackknife, but they were also proficient with an axe, and every twelve-year-old boy knew how to use an axe.
While lecturing at the Teachers' College, Columbia University, I was asked to give a demonstration of the use of the axe. It then and there suddenly occurred to me that if these[220] grown men needed and asked for instructions in the use of this typical American tool, a talk on the same subject would be welcomed by the American boys.
While teaching at Teachers' College, Columbia University, I was asked to give a demonstration on how to use an axe. It suddenly struck me that if these grown men needed and requested guidance on this classic American tool, then a discussion on the same topic would also be appreciated by American boys.
The axe is the one necessary tool of the woodsmen; the axe occupies the same position to the wilderness man that the chest of tools does to the carpenter; with the axe the woodsman cuts his firewood; with the axe he makes his traps; with the axe he splits the shakes, clapboards, slabs and shingles from the balsam tree, or other wood which splits readily, and with the shakes, clapboards, or slabs he shingles the roof of his hogan, his barabara, or makes the framework to his sod shack or his dugout, or with them builds the foundation of a bogken. With his axe he cuts the birch for his birch bark pontiac, for his lean-to or his log cabin. Without an axe it is most difficult for one to even build a raft or to fell a tree to get the birch bark for one's canoe, or to "fall" the tree to make a dugout canoe. A tree may be felled by fire, as the Indians of old used to "fall" them, but this takes a wearisome time.
The axe is the essential tool for woodsmen; it holds the same importance for a wilderness man as a toolbox does for a carpenter. With the axe, the woodsman gathers firewood; with the axe, he builds traps; with the axe, he splits shakes, clapboards, slabs, and shingles from balsam trees or other wood that splits easily. He uses the shakes, clapboards, or slabs to shingle the roof of his hogan or barabara, or to create the framework for his sod shack or dugout, or to build the foundation of a bogken. With his axe, he cuts birch for his birch bark canoe, lean-to, or log cabin. Without an axe, it's incredibly hard to even build a raft or fell a tree for birch bark for a canoe, or to "fall" a tree to make a dugout canoe. A tree can be felled by fire, as the Native Americans used to do, but that takes a lot of time and effort.
When bound for a real camp, take along with you a real axe. Never take an axe which is too large and heavy for you to swing with comfort. It is also best to avoid an axe which is too light, as with such a tool you must use too much labor to cut the wood. You should select your own axe according to your strength. Pick up the axe, go through the motions of chopping and see if it feels right, if its balance suits you; hold up the axe and sight along the top of the handle as you would along the barrel of a gun to see that your handle is not warped.
When heading to a real campsite, bring a good axe with you. Don’t choose an axe that’s too big and heavy for you to handle comfortably. It’s also wise to skip an axe that’s too light, since you’ll have to work too hard to chop the wood with it. You should pick an axe that matches your strength. Pick it up, go through the motions of chopping, and see if it feels right and balanced; hold the axe upright and look down the top of the handle like you would along the barrel of a gun to make sure the handle isn’t warped.

Axes may be had of weight and size to suit one's taste. In New England they use short-handled axes which are not popular in the woods. The axe handles should be well seasoned, second growth hickory; a ¼ axe has a 19-inch handle and weighs two pounds. A ½ axe has a 24-inch handle and weighs two and a half pounds. A ¾ axe has a 28-inch handle and weighs three pounds. A full axe has a 36-inch handle and weighs five pounds.
Axes can be found in various weights and sizes to match personal preference. In New England, they use short-handled axes, which aren't favored in the woods. Axe handles should be made from well-seasoned second-growth hickory; a ¼ axe has a 19-inch handle and weighs two pounds. A ½ axe has a 24-inch handle and weighs two and a half pounds. A ¾ axe has a 28-inch handle and weighs three pounds. A full axe has a 36-inch handle and weighs five pounds.
Probably the best axe for camp work, when you must carry the axe on your back, is one with a 30-inch second growth hickory handle, weight about two and three-quarter pounds, or somewhere between two and three pounds. A light axe of this kind will cut readily and effectively provided it has a slender bit; that is, that it does not sheer off too bluntly towards the cutting edge. When you look at the top of such an axe and it appears slender and not bulky, it will cut well and can be wielded by a boy and is not too light for a man (Fig. 322).
The best axe for camping, especially if you have to carry it on your back, is one with a 30-inch hickory handle that weighs about two and three-quarters pounds, or around two to three pounds. A light axe like this will cut easily and effectively as long as it has a slim blade; in other words, it shouldn’t taper off too bluntly towards the cutting edge. When you look at the top of such an axe and it looks slim and not bulky, it will cut well and can be used by a boy, yet it’s still sturdy enough for a man (Fig. 322).
Fig. 321 shows the long-handled Hudson Bay axe used much in the North country. It is made after the tomahawk form to save weight, but the blade is broad, you notice, to give a wide cutting edge. The trouble with this axe is that it is too light for satisfactory work. Fig. 323 shows a belt axe of a modified tomahawk shape, only three of which are in existence; one was in the possession of the late Colonel Roosevelt, one in the possession of a famous English author, and one in the possession of the writer. These axes were made for the gentlemen to whom they were presented by the President of a great tool works; they are made of the best gray steel and are beautiful tools. Fig. 324 is an ordinary belt axe practically the same as those used by the Boy Scouts. When it was proposed to arm the Boy Scouts with guns, the[224] writer put in strenuous objections and suggested belt axes in place of guns; the matter of costume and arms was finally referred to him as a committee of one. The uniform was planned after that of the Scouts of the Boy Pioneers of America, and the belt axe adopted is the same as that carried by the Scouts of the Sons of Daniel Boone, which axes are modelled after Daniel Boone's own tomahawk. Fig. 325 is a very heavy axe.
Fig. 321 shows the long-handled Hudson Bay axe commonly used in the North. It’s designed in the shape of a tomahawk to keep it light, but you’ll notice the blade is wide to provide a broad cutting edge. The problem with this axe is that it’s too light for effective work. Fig. 323 shows a belt axe with a modified tomahawk shape; only three of these exist—one belonged to the late Colonel Roosevelt, one to a well-known English author, and one to the writer. These axes were made for the gentlemen who received them as gifts from the President of a major tool company; they’re crafted from the best gray steel and are beautiful tools. Fig. 324 is a standard belt axe, basically the same as those used by the Boy Scouts. When it was suggested to equip the Boy Scouts with guns, the[224] writer strongly opposed this and recommended belt axes instead; the issue of attire and weapons was ultimately entrusted to him as the sole committee member. The uniform was developed based on that of the Scouts of the Boy Pioneers of America, and the belt axe adopted is the same as that carried by the Scouts of the Sons of Daniel Boone, which axes are modeled after Daniel Boone's own tomahawk. Fig. 325 is a very heavy axe.
Grasp the axe with the left hand, close to the end of the handle, even closer than is shown in the diagram (Fig. 326); with the right hand grasp the handle close to the head of the axe, then bring the axe up over your shoulder and as you strike the blow, allow the right hand to slide down naturally (Fig. 327), close to the left hand; learn to reverse, that is, learn to grasp the lower end of the handle with the right hand and the left hand near the top, so as to swing the axe from the left shoulder down, as easily as from the right shoulder.
Grasp the axe with your left hand near the end of the handle, even closer than shown in the diagram (Fig. 326); with your right hand, hold the handle close to the head of the axe. Then lift the axe over your shoulder and, as you strike, let your right hand slide down naturally (Fig. 327) until it's near your left hand. Practice reversing your grip so that you hold the lower end of the handle with your right hand and the upper end with your left, allowing you to swing the axe down from your left shoulder just as easily as from your right shoulder.
To be a real axeman, a genuine dyed-in-the-wool, blown-in-the-glass type, each time you make a stroke with the axe you must emit the breath from your lungs with a noise like Huh! That, you know, sounds very professional and will duly impress the other boys when they watch you chop, besides which it always seems to really help the force of the blow.
To be a true axeman, a real diehard, each time you swing the axe, you should exhale sharply with a sound like "Huh!" This definitely sounds impressive to the other guys when they see you chop, and it actually seems to add power to your swing.
It was from a colored rail splitter from Virginia, who worked for the writer, that the latter learned how to burn out the broken end of the handle from the axe head. Bury the blade of your axe in the moist earth and build a fire over[225] the protruding butt (Fig. 328); the moist earth will prevent the heat from spoiling the temper of your axe blade while the heat from the fire will char and burn the wood so that it can easily be removed.
It was from a Black rail splitter in Virginia, who worked for the author, that the author learned how to burn out the broken end of the handle from the axe head. Bury the blade of your axe in the damp ground and build a fire over the sticking out part; the damp earth will keep the heat from ruining the temper of your axe blade while the fire will char and burn the wood so that it can be easily removed.[225]
If you are using a double-bitted axe, that is, one of those very useful but villainous tools with two cutting edges, and the handle breaks off, make a shallow trench in the dirt, put the moist soil over each blade, leaving a hollow in the middle where the axe handle comes and build your fire over this hollow (Fig. 329).
If you're using a double-bitted axe, which is one of those handy yet dangerous tools with two sharp edges, and the handle breaks off, dig a shallow trench in the dirt, cover each blade with wet soil, leaving a space in the middle for where the axe handle goes, and build your fire over this space (Fig. 329).
If your axe handle is dry and the head loosens, soak it over night and the wood will swell and tighten the head. Scoutmaster Fitzgerald of New York says, "Quite a number of scouts have trouble with the axe slipping off the helve and the first thing they do is to drive a nail which only tends to split the helve and make matters worse. I have discovered a practical way of fixing this. You will note that a wire passes over the head of the axe in the helve in the side view. Then in the cross-section in the copper wire is twisted and a little staple driven in to hold it in place." This may answer for a belt axe but the hole in the handle will weaken it and would not be advisable for a large axe (Fig. 330).
If your axe handle is dry and the head becomes loose, soak it overnight and the wood will swell and tighten the head. Scoutmaster Fitzgerald from New York says, "Many scouts have issues with the axe slipping off the handle, and the first thing they do is drive a nail, which tends to split the handle and make things worse. I've found a practical way to fix this. You'll see that a wire runs over the head of the axe in the handle in side view. Then, in the cross-section, the copper wire is twisted and a small staple is driven in to hold it in place." This might work for a small axe, but the hole in the handle will weaken it and isn't advisable for a large axe (Fig. 330).
We have said that the axe is a chest of tools, but it is a dangerous chest of tools. While aboard a train coming from one of the big lumber camps, the writer was astonished to find that although there were but few sick men aboard, there were many, many wounded men in the car and none, that he[226] could find, wounded by falling trees; all were wounded by the axe itself or by fragments of knots and sticks flying from blows of the axe and striking the axeman in the eyes or other tender places.
We’ve mentioned that the axe is a chest of tools, but it’s a dangerous one. While on a train coming from one of the major lumber camps, the writer was shocked to see that even though there were only a few sick men on board, there were many wounded men in the car, and none, as far as he[226] could tell, were hurt by falling trees; all were injured by the axe itself or by pieces of knots and sticks flying from axe strikes, hitting the axeman in the eyes or other sensitive areas.
I have often warned my young friends to use great care with firearms, because firearms are made for the express purpose of killing. A gun, having no brains of its own, will kill its owner, his friends, his brother or sister, mother or father, just as quickly and as surely as it will kill a moose, a bear or a panther. Therefore it is necessary for the gunner to supply the brains for his gun.
I have often warned my young friends to be very careful with guns, because guns are specifically made to kill. A gun, having no intelligence of its own, can just as easily kill its owner, their friends, brothers or sisters, and parents, as it can a moose, bear, or panther. So, it’s crucial for the person using the gun to use their own judgment.
The same is true with the axeman. Edged tools are made for the express purpose of cutting, and they will cut flesh and bone as quickly and neatly as they will cut wood, unless the user is skillful in the use of his tool; that is, unless he supplies the brains which the tools themselves lack.
The same goes for the axeman. Sharp tools are designed specifically for cutting, and they can slice through flesh and bone just as quickly and cleanly as they can through wood, unless the person using them knows how to handle the tool; in other words, unless they bring the skill that the tools themselves don’t have.
So you see that it is "up to you" boys to supply the brains for your axes, and when you do that, that is, when you acquire the skill in the use, and judgment in the handling, you will avoid painful and may be dangerous or fatal accidents, and at the same time you will experience great joy in the handling of your axe. Not only this but you will acquire muscle and health in this most vigorous and manly exercise.
So you see, it's "up to you" guys to use your brains when handling your axes. When you learn the skills and make smart decisions, you'll prevent painful and potentially dangerous or fatal accidents. Plus, you'll really enjoy using your axe. Not only that, but you'll also build muscle and improve your health through this intense and masculine activity.
We are not telling all this to frighten the reader but to instil into his mind a proper respect for edged tools, especially the axe.
We’re not sharing all this to scare the reader but to instill a proper respect for sharp tools, especially the axe.
1. An axe to be respected must be sharp and no one who has any ambition to be a pioneer, a sportsman or a scout, should carry a dull axe, or an axe with the edge[227] nicked like a saw blade. It may interest the reader to know that the pencil I am using with which to make these notes was sharpened with my camp axe.
1. A respected axe needs to be sharp, and anyone who wants to be a pioneer, athlete, or scout shouldn't carry a dull axe or one with its edge[227] damaged like a saw blade. You might find it interesting that the pencil I’m using to write these notes was sharpened with my camp axe.
2. No one but a duffer and a chump will use another man's axe without that other man's willing permission.
2. No one but a fool and an idiot would use someone else's axe without that person’s willing permission.
3. It is as bad form to ask for the loan of a favorite axe as it is to ask for the loan of a sportsman's best gun or pet fishing rod or toothbrush.
3. It's just as rude to ask to borrow someone's favorite axe as it is to ask to borrow a hunter's best gun, a fisher's favorite rod, or their toothbrush.

4. To turn the edge or to nick another man's axe is a very grave offense.
4. To sharpen someone else's axe or to damage it is a very serious offense.
5. Keep your own axe sharp and clean, do not use it to cut any object lying on the ground where there is danger of the blade of the axe going through the object and striking a stone; do not use it to cut roots of trees or bushes for the same reason. Beware of knots in hemlock wood and in cold weather beware of knots of any kind.
5. Keep your axe sharp and clean. Don’t use it to cut anything lying on the ground where the blade might go through and hit a stone. Also, don’t use it to cut tree or bush roots for the same reason. Be cautious of knots in hemlock wood, and in cold weather, watch out for knots of any kind.
When not in use an axe should have its blade sheathed in leather (Figs. 331, 332, 333 and 334), or it should be struck[228] into a log or stump (Fig. 335). It should never be left upon the ground or set up against a tree to endanger the legs and feet of the camper. Fig. 341 shows how a firewood hod is made and used.
When it's not in use, an axe should have its blade covered with leather (Figs. 331, 332, 333 and 334), or it should be struck into a log or stump (Fig. 335). It should never be left on the ground or propped against a tree, as this can endanger the legs and feet of the camper. Fig. 341 illustrates how to make and use a firewood hod.
On the trail we have no grindstones, and often have recourse to a file with which to sharpen our axe; sometimes we use a whetstone for the purpose. New axes are not always as sharp as one would wish; in that case if we use a grindstone to put on an edge we must be sure to keep the grindstone wet in the first place, and in the second place we must be careful not to throw the edge of the blade out of line. When this occurs it will cause a "binding strain" on the blade which tends to stop the force of the blow. If the edges are at all out of line, the probabilities are one will knock a half moon out of the blade in the first attempt to cut frozen timber. The best axe in the world, with an edge badly out of line, cannot stand the strain of a blow on hard frozen wood. While grinding the axe take a sight along the edge every once in a while to see if it is true.
On the trail, we don’t have grindstones, so we often use a file to sharpen our axe; sometimes we use a whetstone too. New axes aren't always as sharp as we'd like; in that case, if we use a grindstone to sharpen it, we have to make sure to keep the grindstone wet, and also be careful not to misalign the edge of the blade. If we do, it will create a "binding strain" on the blade that can reduce the effectiveness of the strike. If the edges are misaligned, it’s likely that we’ll chip a half-moon out of the blade the first time we try to cut through frozen wood. The best axe, no matter how high-quality, cannot handle the strain of striking hard, frozen timber if the edge is poorly aligned. While sharpening the axe, check the edge periodically to make sure it's straight.

With pine trees, however, this is not always the case, because the pitchy nature of the sap of the pine prevents it from fermenting like beech sap; in fact, the pitch acts as a preservative and mummifies, so to speak, the wood. Pine knots will last for a hundred years lying in the soft, moist ground and for aught I know, longer, because they are fat with pitch and the pitch prevents decay.
With pine trees, though, this isn’t always true, because the sticky sap from the pine stops it from fermenting like beech sap; actually, the sap works as a preservative and effectively mummifies the wood. Pine knots can last for a hundred years lying in soft, damp ground, and for all I know, even longer, since they’re full of sap and the sap prevents decay.
Beech when cut in June is unfit for firewood the following winter, but authorities say that the same trees cut in August and left with the branches still on them for twenty or thirty days, will make firmer and "livelier" timber than that cut under any other conditions.
Beech trees cut in June aren’t good for firewood the following winter, but experts say that if you cut the same trees in August and leave the branches on for twenty to thirty days, they will produce stronger and "livelier" timber than if cut in any other way.
An expert lumberman in ten minutes' time will cut down a hardwood tree one foot in diameter, and it will not take him over four minutes to cut down a softwood tree of the same size.
An experienced lumberjack can fell a hardwood tree that's one foot in diameter in ten minutes, and it will take him no more than four minutes to take down a softwood tree of the same size.
Before attempting to chop down a tree; in fact, before attempting to chop anything, be careful to see that there are no clothes lines overhead, if you are chopping in your backyard, or if you are chopping in the forests see that there are no vines, twigs, or branches within swing of your axe. By carefully removing all such things you will remove one of the greatest causes of accidents in the wilderness, for as slight a thing as a little twig can deflect, that is, turn, the blade of your axe from its course and cause the loss of a toe, a foot, or even a leg. This is the reason that swamping is the most dangerous part of the lumberman's work.
Before you try to chop down a tree, or really anything, make sure there are no clotheslines overhead if you're in your backyard, or if you're in the woods, check for any vines, twigs, or branches within the swing of your axe. By carefully clearing away all these obstacles, you'll reduce the risk of accidents in the wild, because even a small twig can deflect your axe and result in losing a toe, a foot, or even a leg. This is why swamp work is considered the most dangerous aspect of a lumberjack's job.
If the tree, in falling, must pass between two other trees where there is danger of its "hanging," so cut your kerf that[232] the tree in falling will strike the ground nearest the smallest of the trees, or nearest the one furthest away. Then, as the tree falls, and brushes the side of the smallest tree or the one furthest away, it will bounce away, thus giving the fallen tree an opportunity to bump its way down to the place on the ground selected for it, in place of hanging by its bough in the boughs of other trees.
If the tree has to fall between two other trees where it might get stuck, make your cut so that[232] it will hit the ground closest to the smaller tree or the one that’s farthest away. Then, as the tree falls and brushes against the smaller tree or the one that's farthest, it will bounce away, giving the fallen tree a chance to land in the designated spot on the ground instead of getting caught up in the branches of other trees.
Do not try to "fall" a tree between two others that are standing close together; it cannot be successfully done, for the tops of the three trees will become interlaced, and you will find it very difficult and hazardous work to attempt to free your fallen tree from its entanglement; probably it cannot be done without cutting one or both of the other trees down. The truth is, one must mix brains with every stroke of the axe or one will get into trouble.
Don't try to fell a tree between two others that are standing close together; it just won't work. The tops of the three trees will get tangled, and you'll find it really difficult and dangerous to remove your fallen tree from that mess; you might have to cut down one or both of the other trees to do it. The reality is, you need to think carefully with every swing of the axe, or you'll end up in trouble.
Where possible select a tree that may be made to fall in an open space where the prostrate trunk can be easily handled. Cut your kerf on the side toward the landing place, let the notch go half-way or a trifle more through the trunk. Make the notch or kerf as wide as the radius, that is, half the diameter of the tree trunk (Fig. 344), otherwise you will have your axe pinched or wedged before you have the kerf done and will find it necessary to enlarge your notch or kerf. Score first at the top part of the proposed notch, then at the bottom, making as big chips as possible, and hew out the space between, cutting the top parts of the notch at an angle but the bottom part nearly horizontal. When this notch or kerf is cut to half or a little more than half of the diameter of the tree, cut another notch upon the opposite side of the tree at a point a few inches higher than the notch already cut; when this notch is cut far enough the tree will begin to tremble and crack to warn you to step to one side. Don't get behind[233] the tree; it may kick and kill you; step to one side and watch the tree as it falls; there are many things that may deflect it in falling, and one's safety lies in being alert and watching it fall. Also keep your eye aloft to watch for limbs which may break off and come down with sufficient force to disable you; accidents of this kind frequently happen, but seldom or never happen where the axeman uses common sense or due caution.
Where possible, choose a tree that can fall in an open area where the fallen trunk can be easily managed. Cut your notch on the side facing the landing area, making it go halfway or a bit more through the trunk. Make the notch as wide as the radius, which is half the diameter of the tree trunk (Fig. 344), otherwise, your axe may get stuck before you finish the notch, requiring you to make it wider. Start by scoring the top of the proposed notch, then the bottom, taking out as large chips as possible, and clear the space in between, cutting the top parts of the notch at an angle and keeping the bottom nearly horizontal. When this notch is cut to halfway or a little more than halfway through the diameter of the tree, make another notch on the opposite side at a point a few inches higher than the first; when this second notch is deep enough, the tree will start to shake and crack to signal you to move aside. Don’t stand behind the tree; it could kick back and harm you. Step aside and watch it fall; various factors can cause it to change direction, so staying alert is crucial. Also, be aware of overhead branches that might break off and fall with enough force to injure you; these types of accidents happen often, but they're unlikely if the axeman uses common sense and takes proper precautions.
After a tree is felled, the swampers take charge of it and cut away all the branches, leaving the clean log for the teamsters to "snake." They do the swamping by striking the lower side of the branch with the blade of the axe, the side towards the root of the tree, what might be called the underside, and chopping upwards towards the top of the tree. Small branches will come off with a single blow of the axe.
After a tree is cut down, the swampers take over and remove all the branches, leaving the clean log for the teamsters to haul away. They do the swamping by hitting the lower side of the branch with the axe blade, the side facing the tree's root, which could be called the underside, and chopping upwards towards the top of the tree. Small branches come off with just one swing of the axe.
When the tree has been swamped and the long trunk lies naked on the turf, it will, in all probability, be necessary to cut it into logs of required lengths. If the trunk is a thick one it is best to cut it by standing on the tree trunk with legs apart (Fig. 336), and chopping between one's feet, making the kerf equal to the diameter of the log. Do this for two reasons: it is much easier to stand on a log and cut it in two that way than to cut it part the way through the top side, and then laboriously roll it over and cut from the underside; also when you make the notch wide enough you can cut all the way through the log without wedging your axe. To split up the log you should have
When the tree has fallen and the long trunk is exposed on the ground, you will likely need to cut it into logs of the desired lengths. If the trunk is thick, it’s best to stand on it with your legs apart (Fig. 336) and chop between your feet, making the cut equal to the diameter of the log. There are two reasons for this: it's much easier to stand on the log and cut it in half that way than to cut partway through from the top and then try to roll it over to cut from the bottom; also, if you make the notch wide enough, you can cut all the way through the log without getting your axe stuck. To split the log, you should have
Farmers claim that the best wedges are made of applewood, or locust wood; never use green wedges if seasoned ones may be obtained, for one seasoned wedge is worth many green ones. In the north woods, or, in fact, in any woods, applewood cannot be obtained, but dogwood and ironwood make good substitutes even when used green (Figs. 338 and 357).
Farmers say that the best wedges are made from applewood or locust wood; never use green wedges if you can get seasoned ones, because one seasoned wedge is worth many green ones. In the northern woods, or really in any woods, you can't find applewood, but dogwood and ironwood are good substitutes even when used green (Figs. 338 and 357).
Many of the Southern Indians in the early history of
America tipped their arrows with bits of cane; these green
arrow points they hardened by slightly charring them with
the hot ashes of the fire. Gluts may be hardened in the
same manner; do not burn them; try to heat them just sufficiently[235]
[236]
[237]
to force the sap out and harden the surface. Where
dogwood, ironwood and applewood are not to be obtained,
make your gluts of what is at hand; that is true woodcraft
(Fig. 337).
Many of the Southern Indians in early American history tipped their arrows with pieces of cane; they would harden these green arrow tips by lightly charring them with hot ashes from the fire. You can harden gluts in the same way; don’t burn them; just heat them enough to draw out the sap and toughen the surface. If dogwood, ironwood, and applewood aren’t available, use whatever wood you have; that’s real woodcraft. [235]
[236]
[237]

A year or two ago, while trailing a moose, we ran across the ruins of a lumber camp that had been wiped out by fire, and here we picked up half a dozen axe heads among the moose tracks. These axe heads we used as gluts to split our wood as long as we remained in that camp, and by their aid we built a shack of board rived from balsam logs.
A year or two ago, while following a moose, we stumbled upon the remains of a lumber camp that had been destroyed by fire, and here we found half a dozen axe heads among the moose tracks. We used these axe heads as wedges to split our wood for as long as we stayed in that camp, and with their help, we built a shack from boards split from balsam logs.
Fig. 341 shows how to make and how to use firewood hods on farms or at permanent camps.
Fig. 341 shows how to make and how to use firewood hods on farms or at permanent camps.
After you have cut the crotch and trimmed it down into the form of Fig. 339, you may find it convenient to flatten the thing on one side. This you do by hewing and scoring; that is, by cutting a series of notches all of the same depth, and then splitting off the wood between the notches, as one would in making a puncheon (Fig. 342). (A puncheon is a log flattened on one or both sides.) With this flattened crotch one may, by sinking another flattened log in the earth and placing the chopping block on top, have a chopping block like that shown in Fig. 343. Or one may take the crotch, spike a piece of board across as in Fig. 339 and use that, and the best chopping block or crotch block is the one shown in Fig. 339, with the puncheon or slab spiked onto the ends of the crotch. In this case the two ends of the crotch should be cut off with a saw, if you have one, so as to give the proper flat surface to which to nail the slab. Then the kindling wood may be split without danger to yourself or the edge of the hatchet.
After you've cut the crotch and shaped it into the form of Fig. 339, you might find it useful to flatten one side. You do this by hewing and scoring; that is, by making a series of notches all at the same depth, and then splitting off the wood between the notches, similar to making a puncheon (Fig. 342). (A puncheon is a log flattened on one or both sides.) With this flattened crotch, you can sink another flattened log into the ground and place the chopping block on top, creating a chopping block like the one shown in Fig. 343. Alternatively, you can take the crotch, fasten a piece of board across as in Fig. 339, and use that, with the best chopping block or crotch block being the one shown in Fig. 339, where the puncheon or slab is spiked onto the ends of the crotch. In this case, you should cut off the two ends of the crotch with a saw, if you have one, to create the proper flat surface for nailing the slab. Then, you can split the kindling wood safely without risking injury to yourself or damaging the edge of the hatchet.
If you are using an ordinary stick of wood for a chopping block, and the stick you are about to chop rests solidly on top of the block where the axe strikes it will cut all right, but if you strike where the stick does not touch the chopping block the blow will stun the hand holding the stick in a very disagreeable manner. If you hold your stick against the chopping block with your foot, there is always danger of cutting off your toe; if you hold the stick with your hand and strike it with the axe, there is danger of cutting off your fingers. When I say there is danger I mean it. One of our scouts cut his thumb off, another cut off one finger, and one of my friends in the North woods of Canada cut off his great toe. In hunting for Indian relics in an old camping cave in Pennsylvania, my companion, Mr. Elmer Gregor, made the gruesome find of a dried human finger near the embers of an ancient campfire, telling the story of a camping accident ages ago, but evidently after white man's edged tools were introduced.
If you're using a regular stick of wood as a chopping block, and the stick you're about to chop is sitting firmly on top of the block where the axe strikes, it will chop just fine. But if you hit where the stick isn't touching the chopping block, the impact will really hurt the hand holding the stick. If you press the stick against the chopping block with your foot, there's always a risk of chopping off your toe; if you hold the stick with your hand and hit it with the axe, you might chop off your fingers. When I say there's a risk, I mean it. One of our scouts chopped off his thumb, another lost a finger, and one of my friends in the northern woods of Canada chopped off his big toe. While searching for Indian relics in an old camping cave in Pennsylvania, my buddy, Mr. Elmer Gregor, made the creepy discovery of a dried human finger near the ashes of an ancient campfire, which tells the story of a camping accident from long ago, but clearly after white men started using edged tools.
If you have no chopping block and wish to cut your firewood into smaller pieces, you can hold the stick safely with the hand if you use the axe as shown in Fig. 345. This will give you as a result two sticks, and the upper one will have some great splinters.
If you don't have a chopping block and want to cut your firewood into smaller pieces, you can safely hold the stick with your hand while using the axe as shown in Fig. 345. This will give you two sticks, and the upper one will have some nice splinters.
When splitting wood for the fire or kindling, make the first blow as in Fig. 346, and the second blow in the same place, but a trifle slanting as in Fig. 347; the slanting blow wedges the wood apart and splits it. If the wood is small and splits readily, the slanting blow may be made first. These[239] things can only be indicated to the readers because there are so many circumstances which govern the case. If there is a knot in the wood, strike the axe right over the knot as in Figs. 348 and 349.
When chopping wood for the fire or kindling, make the first strike like in Fig. 346, and the second strike in the same spot, but slightly at an angle like in Fig. 347; the angled strike will help wedge the wood apart and split it. If the wood is small and splits easily, you can start with the angled strike. These[239] techniques can only be suggested to the readers because there are many factors that affect the situation. If there's a knot in the wood, hit the axe directly over the knot as seen in Figs. 348 and 349.
If you are chopping across the grain do not strike perpendicularly as in Fig. 350, because if the wood is hard the axe will simply bounce back, but strike a slanting blow as in Fig. 351, and the axe blade will bite deeply into the wood; again let us caution you that if you put too much of a slant on your axe in striking the wood, it will cut out a shallow chip without materially impeding the force of the blow, and your axe will swing around to the peril of yourself or anyone else within reach; again this is a thing which you must learn to practice.
If you're chopping across the grain, don’t hit straight down like in Fig. 350, because if the wood is hard, the axe will just bounce back. Instead, go for a slanted swing like in Fig. 351, and the axe blade will dig into the wood. Also, be careful not to angle your axe too much when striking the wood, or it will just take out a shallow chip without really affecting the force of the blow, causing your axe to swing around and potentially harm you or anyone nearby. This is something you'll need to practice.
In using the chopping block be very careful not to put a log in front of the crotch as in Fig. 340, and then strike a heavy blow with the axe, for the reason that if you split the wood with the first blow your axe handle will come down heavily and suddenly upon the front log, and no matter how good a handle it may be, it will break into fragments, as the writer has discovered by sad experience. A lost axe handle in the woods is a severe loss, and one to be avoided, for although a makeshift handle may be fashioned at camp, it never answers the purpose as well as the skillfully and artistically made handle which comes with the axe.
When using the chopping block, be careful not to place a log in front of the crotch as mentioned in Fig. 340, and then swing the axe hard. If you split the wood with your first strike, the axe handle will come down hard and quickly onto the front log. No matter how good the axe handle is, it will shatter, as I’ve unfortunately learned from experience. Losing an axe handle in the woods is a significant setback and should be avoided. While you can create a makeshift handle at camp, it never works as well as the expertly crafted handle that comes with the axe.
Select two saplings about five inches in diameter at the butts, bore holes near the butts about six inches from the end for legs, make a couple of stout legs about the size of an old-fashioned drey pin, and about twenty inches long, split the ends carefully, sufficiently to insert wedges therein, then[240] drive the wedge and ends into the hole bored for the purpose. When the sticks are driven home the wedge will hold them in place. You now have a couple of "straddle bugs," that is, poles, the small ends of which rest upon the ground and the butt ends supported by two legs. In the top of the poles bore a number of holes for pins, make your pins a little longer than the diameter of the log you intend to saw; the pins are used exactly like the old-fashioned drey pins, that is, you roll the log up the incline to the two straddle bugs and hold the logs in place by putting pins in the nearest holes. Of course, the pins should work easily in and out of the holes (Fig. 357).
Select two saplings about five inches in diameter at the base, drill holes near the bottom about six inches from the end for legs, create a couple of sturdy legs roughly the size of an old-fashioned drey pin and about twenty inches long, then carefully split the ends enough to insert wedges. Next, drive the wedges and ends into the holes you drilled for this purpose. When the sticks are secured, the wedges will keep them in place. You now have a couple of "straddle bugs," which are poles with the small ends resting on the ground and the thick ends supported by two legs. At the top of the poles, drill several holes for pins, making the pins slightly longer than the diameter of the log you plan to saw; the pins are used just like traditional drey pins, allowing you to roll the log up the incline to the two straddle bugs and hold the logs in place by inserting pins into the nearest holes. Of course, the pins should fit easily in and out of the holes. (Fig. 357)
With such an arrangement one man can unaided easily roll a log two feet in diameter up upon the buck; the log is then in a position to be cut up with a cross-cut saw (Fig. 357). Another form of sawbuck may be made of a puncheon stool (Fig. 358), with holes bored diagonally in the top for the insertion of pins with which to hold the log in place while it is being sawed. But with this sawbuck one cannot use as heavy logs as with the first one because of the difficulty in handling them.
With this setup, one person can easily lift a log that's two feet in diameter onto the sawbuck by themselves; the log is then ready to be cut with a cross-cut saw (Fig. 357). Another type of sawbuck can be made from a puncheon stool (Fig. 358), featuring holes drilled diagonally in the top for inserting pins to secure the log while it's being sawed. However, this sawbuck isn't suitable for heavier logs as the first one due to the challenges in handling them.
I have just returned from a trip up into the woods where they still use the primitive pioneer methods of handling and cutting timber, and I note up there in Pike County, Pennsylvania, they make the sawbuck for logs by using a log of wood about a foot in diameter and boring holes diagonally through the log near each end (Fig. 359); through these holes they drive the legs so that the ends of them protrude at the top and form a crotch to hold the wood to be sawed. The sawbuck is about ten or twelve feet long; consequently, in order to provide for shorter logs there are two sets of pegs driven in holes bored for the purpose between the ends of the buck.
I just got back from a trip to the woods where they still use basic pioneer techniques for handling and cutting timber. I noticed that up in Pike County, Pennsylvania, they create a sawbuck for logs by using a log that's about a foot in diameter and boring holes diagonally through it near each end (Fig. 359). They then drive the legs through these holes so that the ends stick out at the top and form a fork to hold the wood being sawed. The sawbuck is around ten or twelve feet long; therefore, to accommodate shorter logs, there are two sets of pegs driven into holes made for this purpose between the ends of the buck.
When one person is handling a heavy log it is sometimes difficult, even with the lumberman's canthook, to roll it, but if a loop is made in a rope and placed over a stump or a heavy stone (Fig. 360), and the ends run under the log, even a boy can roll quite a heavy piece of timber by pulling on the ends of the rope (Fig. 360).
When one person is trying to move a heavy log, it can be tough, even with a lumberjack's canthook, to roll it. However, if you make a loop in a rope and put it over a stump or a heavy stone (Fig. 360), and then run the ends under the log, even a boy can roll a pretty heavy piece of timber just by pulling on the ends of the rope (Fig. 360).
The method used by all woodsmen in splitting a log is the same as used by quarrymen in splitting bluestone, with this difference: the quarryman hunts for a natural seam in the stone and drives the wedge in the seam, while the lumberman makes a seam in the form of a crack in the log by a blow from his axe. In the crack he drives the wedge (Figs. 352 and 353). But if the log is a long one he must lengthen the crack or seam by driving other wedges or gluts (Fig. 353), or he may do it by using two or more axes (Fig. 352).
The method used by all lumberjacks to split a log is the same as the one used by stoneworkers to split bluestone, with one key difference: the stoneworker looks for a natural seam in the stone and drives the wedge into that seam, while the lumberjack creates a seam in the form of a crack in the log by striking it with an axe. In the crack, he drives the wedge (Figs. 352 and 353). If the log is long, he has to extend the crack or seam by driving in other wedges or gluts (Fig. 353), or he can do this by using two or more axes (Fig. 352).
If he wishes to split the logs up into shakes, clapboards or splits, he first halves the log, that is, splitting it across from A to B (Fig. 356), and then quarters it by splitting from C to D, and so on until he has the splits of the required size.
If he wants to break the logs down into shakes, clapboards, or splits, he first cuts the log in half, splitting it across from A to B (Fig. 356), and then quarters it by splitting from C to D, and continues this process until he has the splits of the desired size.
In the olden times, the good old times, when people did things with their own hands, and thus acquired great skill with the use of their hands, boards were sawed out from the logs by placing the log on a scaffolding over a sawpit (Fig. 361).
In ancient times, the good old days, when people crafted with their own hands and became very skilled, boards were cut from logs by placing the log on scaffolding over a sawpit (Fig. 361).
In the good old times, the slow old times, the safe old times, a house was not built in a week or a month; the timber was well seasoned, well selected, and in many cases such[242] houses are standing to-day! On the next block where I live and from where I am writing, and across the street, there stands a house still occupied which was built in 1661. It is the house that Fox, the Quaker, was quartered in when he was preaching under the spreading oaks on Long Island. The timbers of this house are still sound and strong, although the woodwork in nearby modern houses is decaying.
In the good old days, the slow, safe days, a house wasn’t built in just a week or a month; the wood was well-aged, carefully chosen, and many of those houses are still standing today! On the next block where I live and where I’m writing from, there’s a house across the street that’s still occupied, built in 1661. This is the house where Fox, the Quaker, stayed when he was preaching under the large oak trees on Long Island. The timbers of this house are still sturdy and in great shape, while the wood in nearby modern houses is rotting.
Of course, the boy readers of this book are not going to be top sawyers or make use of a sawpit; that is a real man's work, a big He man's work, but the boys of to-day should know all these things; it is part of history and they can better understand the history of our own country when they know how laboriously, cheerily and cheerfully their ancestors worked to build their own homesteads, and in the building of their own homesteads they unconsciously built that character of which their descendants are so proud; also they built up a physique that was healthy, and a sturdy body for which their descendants are particularly thankful, because good health and good physique are hereditary, that is, boys, if your parents, your grandparents and your great grandparents were all healthy, wholesome people, you started your life as a healthy, wholesome child.
Of course, the boys reading this book aren’t going to be expert sawyers or use a sawpit; that’s something only a real man would do, a big (He) man’s job. But today’s boys should know about these things; it’s part of history. They can better understand the history of our country when they realize how hard and happily their ancestors worked to build their homes. In building their homesteads, they unknowingly developed the character that their descendants are so proud of. They also built a strong, healthy physique, which their descendants are especially grateful for because good health and fitness are inherited. So, boys, if your parents, grandparents, and great-grandparents were all healthy, strong individuals, you started your life as a healthy, wholesome child.
In this chapter the writer has emphasized the danger of edged tools for beginners, but he did that to make them careful in the use of the axe, not to discourage them in acquiring skill with it. We must remember that there is nothing in life that is not dangerous, and the greatest danger of all is[243] not firearms, is not edged tools, is not wild beasts, is not tornadoes or earthquakes, avalanches or floods, but it is Luxury; expressed in boy language, it is ice cream, soda water, candy, servants and automobiles; it is everything which tends to make a boy dependent upon others and soft in mind and muscle and to make him a sissy. But hardship, in the sense of undergoing privation and doing hard work like chopping trees and sawing logs, makes a rugged body, a clean, healthy mind, and gives long life. So, boys, don't be afraid to build your own little shack, shanty or shelter, to chop the kindling wood for your mother, to split up logs for the fun of doing it, or just to show that you know how. Don't be afraid to be a real pioneer so that you may grow up to be a real Abe Lincoln!
In this chapter, the author highlights the risks of using sharp tools for beginners, but he does this to encourage caution when using an axe, not to discourage them from developing their skills. We must remember that there's nothing in life that isn't dangerous, and the biggest danger of all is [243]—it's not firearms, sharp tools, wild animals, tornadoes or earthquakes, avalanches or floods, but rather Luxury; in a kid's terms, it’s ice cream, soda, candy, housekeepers, and cars; it’s everything that makes a boy reliant on others and weak in both mind and body, turning him into a softie. However, facing challenges, like managing hardships and doing tough tasks like chopping wood and sawing logs, builds a strong body, a clear and healthy mind, and promotes longevity. So, kids, don’t hesitate to build your own small cabin, hut, or shelter, to chop kindling for your mom, to split logs just for fun, or simply to show that you can do it. Don’t shy away from being a real pioneer so you can grow up to be a genuine Abe Lincoln!
If I am talking to men, they need no detailed definition of luxury; they know all about it, its cause and its effect; they also know that luxury kills a race and hardship preserves a race. The American boy should be taught to love hardship for hardship's sake, and then the Americans as a race will be a success, and a lasting one.
If I'm speaking to men, they don’t need a detailed explanation of luxury; they understand it well, its reasons and its consequences. They also recognize that luxury can destroy a race while hardship helps preserve it. American boys should be taught to embrace hardship for its own sake, and then Americans as a race will thrive and endure.
CHAPTER XIII
COUNCIL GROUNDS AND FIRES
- CHEROKEE INDIAN COUNCIL BARBECUE
- CAMP MEETING COUNCIL GROUND
- THE INDIAN PALISADED COUNCIL FIRE
- INDIAN LEGENDS OF THE FIRE
- STEALING THE FIRE FROM THE SUN-MAIDENS OF THE EAST
- MYTHS OF THE MEWAN INDIANS
- TOTEMS OF THE FOUR WINDS, FOUR MOUNTAINS AND FOUR POINTS OF THE COMPASS
- IMPRACTICAL COUNCIL FIRES
- ADVANTAGES OF THE OVAL COUNCIL GROUND
- HOW TO MAKE AN ELLIPSE
- HOW TO DIVIDE THE COUNCIL GROUND IN FOUR COURTS
- COUNCIL CEREMONIES
- GHOST WALK AND PATH OF KNOWLEDGE
- WHAT THE DIFFERENT COLORS STAND FOR
- PATRIOTISM, POETRY AND AMERICANISM
- CAMP MEETING TORCH FIRES
COUNCIL GROUNDS AND FIRES
Now that we have learned about the serious part of camping, hiking and woodcraft, about fire-building, cooking and axe work, we will leave the long trail and the hard trail and dump our duffel bag in a recreation camp, a Boy Scout camp, a Y.M.C.A. camp, or a school camp, and after we have pitched our tent and arranged our cot to suit our own convenience and everything is ship-shape for the night, it is time for us to get busy on our "good turn" and do something for the crowd.
Now that we've learned about the serious aspects of camping, hiking, and outdoor skills—like building fires, cooking, and using an axe—we're going to take a break from the long and tough trails. We'll drop our duffel bag at a recreation camp, a Boy Scout camp, a Y.M.C.A. camp, or a school camp. Once we've set up our tent and arranged our cot to our liking, making everything ready for the night, it’s time to focus on our "good turn" and do something helpful for the group.
Like the great Boy Scout Movement, the council fire is also a product of America. The council fires were burning all over this land when Columbus discovered America. It was around the council fires that the Indians gathered in solemn conclave to consult and discuss the affairs of their tribes.
Like the great Boy Scout Movement, the council fire is also a product of America. The council fires were burning all over this land when Columbus discovered America. It was around the council fires that the Native Americans gathered in serious meetings to talk about the issues facing their tribes.
Originally the council ground was surrounded by a palisade; that is, the fire was in the center of a circular fort. Around this fire the old men of the tribe made their eloquent addresses; also around this fire the warriors danced the scalp dance, the corn dance, the buffalo dance, and all their various religious dances.
Originally, the council ground was surrounded by a stockade; that is, the fire was in the middle of a circular fort. Around this fire, the elders of the tribe gave their passionate speeches; also around this fire, the warriors performed the scalp dance, the corn dance, the buffalo dance, and all their different religious dances.
Later the Cherokee Indians changed the council fire into a barbecue, where they roasted whole beefs in pits of glowing coals. This custom was adopted by the politicians in Kentucky, and the Kentucky barbecues became very famous; they were what might be called a by-product of the old Indian council fires and a European feast combined. But in 1799 the old Indian council fires became camp meetings,[248] and around the blazing fagots the pioneers gathered to engage in religious revivals. It was at one of these meetings that Daniel Boone's great friend, Simon Kenton, was converted and became a Methodist.
Later, the Cherokee Indians transformed the council fire into a barbecue, where they roasted whole cows in pits filled with glowing coals. This tradition was picked up by politicians in Kentucky, and the Kentucky barbecues became very famous; they turned out to be a mix of the old Indian council fires and a European feast. But in 1799, the old Indian council fires evolved into camp meetings,[248] and around the blazing logs, the pioneers gathered for religious revivals. It was at one of these meetings that Daniel Boone's great friend, Simon Kenton, was converted and became a Methodist.
The camp meetings were originated by two brothers by the name of McGee. Bill McGee was a Presbyterian, and John McGee a Methodist minister. They came to Kentucky from West Tennessee. John McGee was such a great backwoods preacher (a pioneer Billy Sunday) that he drew immense crowds of buckskin-clad men, each of whom carried a cow's horn powder flask and a long barreled rifle.
The camp meetings were started by two brothers named McGee. Bill McGee was a Presbyterian, and John McGee was a Methodist minister. They came to Kentucky from West Tennessee. John McGee was an incredible backwoods preacher (a pioneer Billy Sunday) who attracted huge crowds of men in buckskin, each carrying a cow's horn powder flask and a long-barreled rifle.
The small buildings used for churches in the pioneer settlements could not hold the crowd, so they gathered around blazing council fires, and from this beginning came the great religious revival which swept the border with a wave of religious enthusiasm.
The small buildings used for churches in the pioneer settlements couldn’t accommodate the crowd, so they gathered around roaring council fires. From this beginning, a massive religious revival arose that brought a wave of religious enthusiasm across the border.
It is a far call back to the old Indian council fire, and the blazing council fires of the pioneer camp meetings, but to-day all over this land we are holding similar council fires, many of them conducted with much ceremony, and not a few with religious fervor. The summer hotels have their council fires; the great Camp Fire Club of America, composed of all the famous big game hunters, have lately bought a tract of land for the purpose of holding their council fires in the open, and the writer interrupted the writing of this chapter to attend one of the club's council fires. The military schools are holding council fires, and everywhere the Boy Scouts have their council fires blazing; even the girls have fallen in line, and this is as it should be. Therefore it is time that some regular plan was made for these assemblies, and some suggestion of ceremony and some meaning given to the council grounds.
It’s a long way back to the old Indian council fire and the lively campfire meetings of pioneers, but today all across the country, we’re holding similar gatherings, many of them with a lot of ceremony, and quite a few with genuine religious passion. Summer hotels have their campfires; the great Camp Fire Club of America, made up of well-known big game hunters, has recently purchased land to hold their fires outdoors, and the writer paused work on this chapter to attend one of the club’s gatherings. Military schools are hosting campfires, and everywhere the Boy Scouts have their fires burning; even the girls have joined in, and that’s exactly how it should be. So, it’s time to establish a regular plan for these assemblies, including some suggestions for ceremony and meaningful use of the council grounds.
We have searched the legends of the Red Man for suggestions, and from various sources have learned that the Indian had a general belief that at the north there is a yellow or black mountain, at the east there is a white mountain of light, at the south there is a red mountain, and at the west there is a blue mountain. At the east and west there are also holes in the sky, through which the sun comes to light us by day, and through which the sun disappears so that we may sleep by night. That is news to most of my readers, but not to the Red Men.
We’ve explored the legends of the Native Americans for insights, and from different sources, we’ve discovered that they generally believed there’s a yellow or black mountain in the north, a white mountain of light in the east, a red mountain in the south, and a blue mountain in the west. In the east and west, there are also holes in the sky, through which the sun shines to light our days, and through which the sun sets so we can sleep at night. This might be new information for most of my readers, but it’s not for the Native Americans.
In the "Dawn of the World," Dr. C. Hart Merriam gives a collection of "The Myths and Weird Tales told by the Mewan Indians of California," which are full of poetry and suggestions useful for the council fire work.
In the "Dawn of the World," Dr. C. Hart Merriam presents a collection of "The Myths and Weird Tales told by the Mewan Indians of California," which are rich in poetry and offer insights valuable for council fire activities.
It seems that when the white-footed mouse man, and some other of the animal people, were trying to steal the sun, or the fire from which the sun was made, the robin man, Wit-tab-bah, suspected these visitors to be sort of German spies, and so he hovered over the fire, spreading his wings and tail to protect it. Now if you don't believe this you look at the robin's breast and you will see that he still carries the red marks of the fire, which is proof enough for anyone; hence we will give the fire-keeper for our council the name of Wit-tab-bah, the robin.
It seems that when the white-footed mouse man and some of the other animal folks were trying to steal the sun, or the fire that created the sun, the robin man, Wit-tab-bah, suspected these visitors were like German spies. So, he hovered over the fire, spreading his wings and tail to protect it. Now, if you don't believe this, just look at the robin's breast, and you'll see that he still carries the red marks of the fire, which is proof enough for anyone. Therefore, we will name the fire-keeper for our council Wit-tab-bah, the robin.
Since the north is presided over by the totem of the mountain lion, or panther, we will give the officer occupying that court the Indian name of the mountain lion, He-le-jah. The totem of the east is the white timber wolf, Too-le-ze; the color of that court is white, representing light. The totem of the south court is the badger; the color is red and the[250] Indian name is Too-winks. The color of the west court is blue and the totem is the bear; Kor-le is the Indian name of the bear, and the title of the officer presiding over the blue totem.
Since the north is represented by the totem of the mountain lion, or panther, we will give the officer in that court the Indian name of the mountain lion, He-le-jah. The totem of the east is the white timber wolf, Too-le-ze; the color of that court is white, symbolizing light. The totem of the south court is the badger; the color is red, and the Indian name is Too-winks. The color of the west court is blue, and the totem is the bear; Kor-le is the Indian name of the bear, and the title of the officer overseeing the blue totem.
The golden or yellow court is the throne of the presiding officer, the scoutmaster of the troop, the headmaster of the school, the gangmaster of your gang, the campmaster of your camp, or the captain of your team. The second in command occupies the white court, the third the red court, and the fourth the blue court. If your council is a military school the commandant occupies the yellow court, the lieutenant-colonel the white court, the major the red court and the first captain the blue court. Now that you have that straight in your heads we will proceed to lay out the court.
The golden or yellow court is where the leader sits: the scoutmaster of the troop, the head of the school, the leader of your group, the camp director of your camp, or the captain of your team. The second-in-command takes the white court, the third takes the red court, and the fourth takes the blue court. If your council is a military school, the commandant sits in the yellow court, the lieutenant colonel in the white court, the major in the red court, and the first captain in the blue court. Now that you've got that clear, we will move on to set up the court.
The author is aware of the fact that the general reader may be more interested in scout camping, summer camping, and recreation camps than in real wilderness work, but he has tried to impress upon the boys and girls, too, for that matter, the fact that the knowledge of real wilderness work will make even the near-at-home camping easier for them, and very much more interesting; it will also cause them to enjoy the council fire better and have a greater appreciation for everything pertaining to outdoor life. The wilderness campfire over which the solitary explorer or hunter hovers, or around which a group of hunters assemble and spin their yarns, magnified and enlarged to a big blazing fire becomes the council fire around which gather all the members of a recreation camp, the pupils of an outdoor school, a troop or many troops of Boy Scouts; therefore we have given the council fire serious study, because the most inconvenient as well as the most romantic place to talk is at
The author understands that the average reader might be more interested in scout camping, summer camping, and recreational camps rather than actual wilderness experiences. However, he has tried to emphasize to both boys and girls that having knowledge of real wilderness work will make even local camping easier and much more enjoyable. It will also enhance their experience around the campfire and deepen their appreciation for all aspects of outdoor life. The wilderness campfire, where a lone explorer or hunter gathers, or where a group of hunters come together to share stories, grows into a large, roaring fire. This transforms into the council fire, where all members of a recreational camp—students from an outdoor school, a troop, or multiple troops of Boy Scouts—come together. That’s why we’ve devoted serious attention to the council fire, because it is both the most challenging and the most romantic setting for conversation.

There could be no more impractical plan for a place to speak than a circle with a big fire in the middle of it, and that is the plan of all the council grounds. The audience must be seated on the circumference of the circle, and the Master of Ceremonies must stand necessarily with his face to the fire and his back to part of his audience, or his back to the fire and consequently also to the part of the audience on the other side of the fire. Having had occasion over and over again to address the scouts at a council fire, the writer has had all the discomforts impressed upon him many times. As a rule, the boys are enthusiastic, and so are the men, and the enthusiasm is most often displayed by the size of the fire; the bigger the fire the greater the delight of the boys and the more difficult the position of the orator or Master of Ceremonies. All this may be overcome, however, if in place of a circle the council grounds are laid out in an oval or an ellipse, and the fire-place located near one end of the ellipse (Fig. 371).
There can't be a more impractical setup for speaking than a circle with a big fire in the middle, and that's how all the council grounds are designed. The audience has to sit around the edge of the circle, and the Master of Ceremonies has to face the fire, turning his back to part of the audience, or face away from the fire, which also means turning his back on part of the audience on the opposite side. Having frequently addressed the scouts at a council fire, I've experienced all the challenges that come with it. Generally, the boys are excited, and so are the men, with that excitement often shown by how big the fire is; the bigger the fire, the more joy the boys have, and the tougher it is for the speaker or Master of Ceremonies. However, this can be resolved if instead of a circle, the council grounds are arranged in an oval or ellipse, placing the fire near one end of the ellipse (Fig. 371).

After you have decided upon the size of your council grounds, drive two stakes A and B (Figs. 363 and 365) firmly into the ground; then take a cord, clothesline, or some kind of twine (Fig. 362), and tie the ends together, thus forming a loop (Fig. 363); put the loop over the two stakes A and B; next make a marker stake C (Fig. 366), and with it draw the slack of the line taut as in Fig. 364. The ellipse is marked out as in Fig. 365. This is done by taking firm hold of the top of the stake and using care to keep the line taut while the marker walks around the ground scratching the earth with the point of the marking stick, and allowing[254] the cord to slip smoothly across the stick while the marking is being done (Fig. 364).
After you've decided on the size of your council grounds, drive two stakes A and B (Figs. 363 and 365) firmly into the ground. Then take a cord, clothesline, or some kind of twine (Fig. 362) and tie the ends together to form a loop (Fig. 363); place the loop over the two stakes A and B. Next, make a marker stake C (Fig. 366) and use it to pull the slack in the line taut as shown in Fig. 364. The ellipse is marked out as outlined in Fig. 365. To do this, hold the top of the stake firmly while ensuring the line stays taut as the marker walks around, scratching the ground with the point of the marking stick, letting the cord slide smoothly across the stick as the marking is done (Fig. 364).
An ellipse might be called a flattened circle. If you take a tin can and press the two sides of the open end of it inwards, it will form an ellipse. The dictionary says that an ellipse is a conic which does not extend to infinity and whose intersections with the line of infinity are imaginary. Now that is a very lucid explanation! I hope you understand it, it is so simple, but it is just like a dictionary to say such terrible things about a harmless ellipse. To tell the truth, I thought I knew all about an ellipse until I read this explanation; but never mind, we know what it looks like and if we do not know what it is, we do know that there are a lot of things besides ellipses that do not extend to infinity, and we also know that an ellipse is a practical form for a council fire in spite of the hard names the dictionary calls it. This oval is really shaped like the body of a theatre and it gives the audience a chance to see what is doing on the stage, and the people on the stage a chance to see and address the audience.
An ellipse can be thought of as a flattened circle. If you take a tin can and squeeze the two sides of the open end inward, it will create an ellipse. According to the dictionary, an ellipse is a conic that doesn’t go on forever and whose intersections with the line of infinity are imaginary. Now that’s a pretty clear explanation! I hope you get it; it’s so straightforward, but it’s just like a dictionary to use such complicated terms for a simple shape like an ellipse. Honestly, I thought I understood everything about ellipses until I read that definition; but anyway, we know what it looks like, and even if we don’t know all the details, we realize there are plenty of things besides ellipses that don’t go on forever. Plus, we know that an ellipse is actually a practical shape for a campfire, despite the fancy terms the dictionary uses. This oval shape resembles the layout of a theater, allowing the audience to see what’s happening on stage, and giving the performers a chance to see and interact with the audience.
This infinity talk has suggested to us a good idea, so we must thank our highbrow dictionary while we lay our council ground out with the major axis (the longest diameter) extending due north and south, and the minor axis (the shortest diameter) extending due east and west, like any other well regulated council or lodge, and we will put the fire-place near the southern end S (Fig. 371), while around the ellipse we will arrange the seats, which may be of logs or stumps or sections[255] of logs set up on end, as I used in one of my camps, or the seats may be rough plank benches, or they may be ponchos spread upon the ground with the shiny side down to keep the dampness from the audience as it squats tailor-fashion upon the ponchos.
This talk about infinity has given us a great idea, so we should thank our fancy dictionary as we plan our council layout with the major axis (the longest diameter) running north and south and the minor axis (the shortest diameter) running east and west, like any other well-organized council or lodge. We'll place the fireplace near the southern end S (Fig. 371), while around the ellipse we’ll arrange seats that could be logs, stumps, or sections of logs standing on end, like I used in one of my camps. Alternatively, the seats could be rough plank benches or ponchos spread out on the ground with the shiny side down to keep the moisture away from the audience as they sit cross-legged on the ponchos.
In the diagram (Fig. 370), the staff is short, but it should be long enough to place the torch as high above the ground as a chandelier is above the floor at home. Fig. 372 shows the method of piling up the wood for the council fire. The kindling wood is first placed upon the ground ready to light at a moment's notice; over that the heavy wood is piled, as shown in the diagram. This fire should never be lighted with a match; that is terrible bad form. The use of flint and steel or a rubbing stick to make fire is the proper ceremony for such occasions.
In the diagram (Fig. 370), the staff is short, but it needs to be long enough to hold the torch as high above the ground as a chandelier is above the floor at home. Fig. 372 shows how to stack the wood for the council fire. The kindling is placed on the ground, ready to ignite at a moment's notice; over that, the heavier wood is stacked, as shown in the diagram. This fire should never be lit with a match; that’s really poor form. Using flint and steel or a rubbing stick to start the fire is the right way to do it on such occasions.
Fig. 374 shows how to make a fire box of sticks. This is[256] an aeroplane view of a fire box, that is, a view from above, looking down upon it. This box should be filled with sand, clay or dirt, upon which the fire is built. Fig. 375 and Fig. 376 show you how to lash the framework together. Fig. 377 shows how to put up the framework. Fig. 369 is the finished torch.
Fig. 374 explains how to create a fire box using sticks. This is[256] an aerial view of the fire box, meaning a view from above, looking down on it. Fill this box with sand, clay, or dirt, where the fire will be built. Fig. 375 and Fig. 376 show you how to tie the framework together. Fig. 377 demonstrates how to set up the framework. Fig. 369 is the completed torch.
The idea of this torch is to have the light above the heads of the campers. The trouble with a fire upon the ground is that while the flames give light they also hide part of the crowd, and the smoke is always in someone's face. This elevated torch is a brand new idea for this purpose. It will be adopted all over the country and credited to all sorts of sources and people, but you must remember that it was designed for the readers of this book.
The idea behind this torch is to keep the light above the campers' heads. The problem with having a fire on the ground is that while the flames provide light, they also obscure part of the group, and the smoke always seems to end up in someone's face. This elevated torch is a completely new concept for this purpose. It will be embraced nationwide and attributed to various sources and individuals, but remember that it was created for the readers of this book.
If milled lumber is used in building the shacks for the four courts, it should be camouflaged with paint or stain so as to look rustic. It may be roofed with boards and the boards covered with tar paper, or any of the modern roofing materials to be had, but in that case the roof should be camouflaged by laying poles over the top of it, or, if poles are not available, covering the top with sods.
If processed lumber is used to build the shacks for the four courts, it should be painted or stained to give it a rustic look. It can be roofed with boards, which should then be covered with tar paper or any other modern roofing materials available. However, in this case, the roof should be camouflaged by laying poles on top, or if poles aren't available, by covering the top with sod.
You see the idea is this: we are having a Council Fire—not something else—and we want the thing to look wild and rustic because that is part of the game, and if we are compelled to go to the lumberyard for our material, which most of us will have to do, then we must conceal this fact as far as possible by camouflage. In front of the South Court on Fig. 371 is the fire-place made of flat stones set in the earth.
You see, here's the deal: we're having a Council Meeting—not anything else—and we want it to look wild and rustic because that's part of the vibe. If we have to go to the lumberyard for materials, which most of us will, we need to hide that fact as much as we can with some camouflage. In front of the South Court on Fig. 371 is the fireplace made of flat stones set in the ground.
On entering the council grounds always enter from the
east, salute Too-le-ze, the white wolf, then go across the[257]
[258]
[259]
Ghost Walk with the sun to the West Court, and salute
Kor-le, the bear; about face and march back to the South
Court and salute Too-winks, the badger; then about face and
march up and salute He-le-jah, the panther; remain standing
at salute until He-le-jah who is the commanding officer,
gives you permission to retire, or gives you orders what to do;
then go back, always moving along these walks like a soldier,
to your seat.
On entering the council grounds, always come in from the east, salute Too-le-ze, the white wolf, then cross the[257]
[258]
[259]
Ghost Walk with the sun towards the West Court, and salute Kor-le, the bear; about face and march back to the South Court and salute Too-winks, the badger; then about face and march up and salute He-le-jah, the panther; remain standing at attention until He-le-jah, who is the commanding officer, gives you permission to leave or gives you orders on what to do; then return, always moving along these paths like a soldier, to your seat.
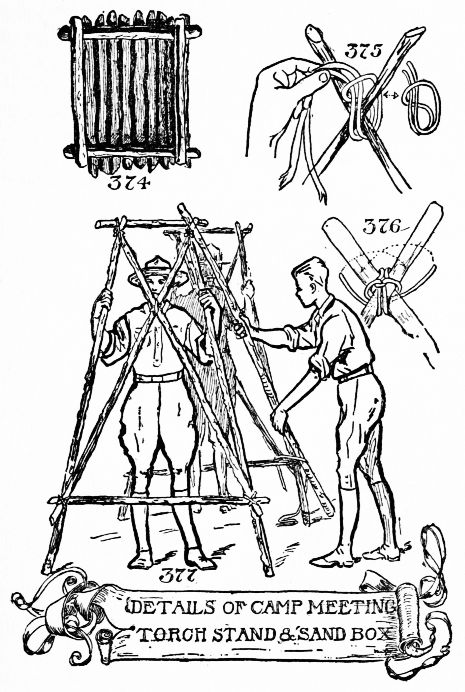
On Sundays the council ground is a splendid place for holding religious services. On such occasions the minister sits in the Court of Knowledge, the North Court on the right-hand side of the presiding officer, and the two torches in the daytime are replaced by flags or banners. The one on the right-hand side of the presiding officer must be Old Glory, the one on the left the flag of the school, the troop or the club to which the council fire belongs.
On Sundays, the council grounds are a great spot for religious services. During these times, the minister sits in the Court of Knowledge, which is the North Court on the right side of the presiding officer, and the two torches during the day are swapped out for flags or banners. The one on the right side of the presiding officer must be the American flag, while the one on the left is the flag of the school, troop, or club associated with the council fire.
The center of the council fire may be occupied by a "Liberty Pole," which is the good old American name for the flag pole, from which Old Glory flies. Never forget to respect the colors and greet them with the greatest ceremonial deference, for those colors possess a magic quality; they represent to you everything that is grand, noble and inspiring, and if you have any other kind of thoughts, this country is no place for you. Remember that the council fire is American, and we are proud to be called Americans.
The center of the council fire may be occupied by a "Liberty Pole," which is the classic American term for a flagpole, from which Old Glory flies. Always remember to respect the colors and greet them with the utmost ceremonial respect, as these colors have a special significance; they represent everything that is great, honorable, and inspiring. If you have any different thoughts, this country isn’t the right place for you. Keep in mind that the council fire is American, and we take pride in being called Americans.
The walk, or path from the east to the west is the Ghost Walk, or the Spirit's Walk; it is the path which Indians believe the spirit takes after leaving the body, an idea which was consciously or unconsciously adopted by our brave boys during the recent war and it explains what they meant when, with bowed heads, they reported that their bunky, pal or friend had "gone West."
The walk, or path from the east to the west, is known as the Ghost Walk or the Spirit's Walk; it’s the route that Native Americans believe the spirit takes after leaving the body. This concept was either consciously or unconsciously embraced by our brave soldiers during the recent war, and it clarifies what they meant when, with their heads bowed, they reported that their buddy, pal, or friend had "gone West."
The Western Court has the totem animal of the black bear; the color of the court, however, is not black but blue, blue from the blue Pacific; the totem object is a blue mountain.
The Western Court has the totem animal of the black bear; however, the color of the court isn't black but blue, blue from the blue Pacific; the totem object is a blue mountain.
The walk from the south to the north is the Path of Knowledge; anyone traveling that trail is seeking further knowledge of the benefits of woodcraft, nature and the big outdoors; the totem animal of the North Court is the American panther, cougar or mountain lion; the color of the North Court is yellow or black, the latter representing the long arctic night.
The walk from the south to the north is the Path of Knowledge; anyone traveling that trail is looking for more understanding of the advantages of woodworking, nature, and the great outdoors; the totem animal of the North Court is the American panther, cougar, or mountain lion; the color of the North Court is yellow or black, with the latter symbolizing the long Arctic night.
The Southern Court has the badger for its totem animal, and the red mountain for the totem object; red is its totem color.
The Southern Court has the badger as its totem animal, and the red mountain as its totem object; red is its totem color.
Thus we have white for the totem color of the east, meaning light, peace and purity; red for the south, meaning violence, disturbance, auction, danger, revolution, love and life. This color is both stimulating and disturbing to man, animal and plant.
Thus we have white for the totem color of the east, representing light, peace, and purity; red for the south, representing violence, disturbance, auction, danger, revolution, love, and life. This color is both stimulating and unsettling to humans, animals, and plants.
Perhaps when we read of the turmoil that is constantly disturbing our southern border, we may think that the Indians had a knowledge of the real meaning of red when they made the totem of the south a red mountain. Red is the ruling color, the king of color, the dominant color, the strong color, and symbolizes the blossoming of plants and is the color of berries and fruit. Red tints the spring leaves and stains the fall leaf. In the spring the thickets and tree trunks are tinged with red; they are blushing, so to speak, as Ruskin says, "in order to show the waiting of love." Red is emphatically a masculine color, a Man's Color.
Perhaps when we read about the chaos that constantly affects our southern border, we might think that the Native Americans understood the true significance of red when they created the totem of the south as a red mountain. Red is the dominant color, the king of colors, the powerful color, and it represents the blooming of plants as well as being the color of berries and fruit. Red adorns the spring leaves and colors the fall foliage. In the spring, the thickets and tree trunks are tinted with red; they are blushing, so to speak, as Ruskin says, "to show the waiting of love." Red is definitely a masculine color, a Man's Color.
Blue is a feminine color; it stands for sentimental affections, blue light has a depressing effect and creates nervousness.
Blue is a feminine color; it represents sentimental feelings. Blue light can have a depressing effect and causes nervousness.
Black is the ogre among colors; it devours every other color; sometimes the North Court is black; black stands for[261] war and death, and yet the path to the north is the path of knowledge. It may be that some of the Indians used black for the north because they may have noted that climate affects the color of birds and animals. According to Frank Chapman, the famous ornithologist at the Museum of Natural History in New York, the animals of the humid climate of the northwest are especially dark in color.
Black is the ogre among colors; it consumes every other color. Sometimes the North Court appears black. Black represents[261] war and death, yet the path to the north is also the path of knowledge. It's possible that some of the Indigenous people used black to represent the north because they observed that climate influences the color of birds and animals. According to Frank Chapman, the renowned ornithologist at the Museum of Natural History in New York, animals in the humid northwest are particularly dark in color.
If you use yellow for the north color, yellow means laughter and mirth. Notwithstanding the fact that we use yellow as a sign for contagious disease, women suffragists and cowardice, a yellow light makes a gathering cheerful and merry; so in approaching the North Court you may sing.
If you use yellow for the north color, yellow represents laughter and joy. Even though we often associate yellow with contagious diseases, women's suffrage, and cowardice, a yellow light makes a gathering bright and cheerful; so as you approach the North Court, feel free to sing.
The Indian names for the four courts are Too-le-ze, the east, for the south Too-winks, for the west Kor-le, and for the north Kon-win. He-le-jah is the Indian name for the panther or mountain lion that guards the north mountain.
The Indian names for the four courts are Too-le-ze for the east, Too-winks for the south, Kor-le for the west, and Kon-win for the north. He-le-jah is the Indian name for the panther or mountain lion that watches over the north mountain.
Now then you have the symbolism; in other words, know what these things stand for, and that will give a meaning to your ceremony around the council fire. Since red means life and black means death, possibly the Indians have placed a deep significance on the path from the Red Court to the Black Court, from life to death! when they call it the Path of Knowledge. At any rate, we will take it as we find it and adapt ourselves to the suggestions these meanings give us.
Now that you understand the symbolism, in other words, know what these things represent, it will give meaning to your ceremony around the council fire. Since red represents life and black represents death, it’s possible that the Indigenous people have attached a deep significance to the path from the Red Court to the Black Court, from life to death, when they refer to it as the Path of Knowledge. In any case, we will accept it as it is and adapt ourselves to the insights these meanings provide.
We will claim that colors are the spirits, fairies or what not who govern the council fire. Wit-tab-bah is the name of the fire itself or the fire-place. When the fire is built, placed near the Southern or Red Court, it gives the chief, the captain, the superintendent, or the scoutmaster, who occupies the North Court, a space in front of him big enough to accommodate his audience. The real way to illuminate, or light up, the council grounds is by having
We will say that colors are the spirits, fairies, or whatever else that watch over the council fire. Wit-tab-bah is the name of the fire itself or the fireplace. When the fire is set up near the Southern or Red Court, it provides the chief, the captain, the superintendent, or the scoutmaster, who is positioned in the North Court, with a space in front of him that's big enough for his audience. The true way to light up the council grounds is by having
Erected at each of the four courts. These fire torches at the four courts, if kept replenished with dry wood, will light up the council grounds and give a most picturesque and wild appearance, and at the same time will not interfere with the ceremonies nor will they scorch the back or face of the speaker. Wit-tab-bah may be used on occasions when the crowd is not large.
Erected at each of the four courts. These fire torches at the four courts, if kept stocked with dry wood, will illuminate the council grounds and create a very striking and wild look, while also not disrupting the ceremonies or causing discomfort to the speaker's back or face. Wit-tab-bah can be used when the crowd isn't large.
No council fire anywhere within the borders of the United States should open without the pledge to the American flag, and the reciting in unison by all present of the American creed. (See page 268.)
No council fire anywhere in the United States should start without the pledge to the American flag and everyone present reciting the American creed together. (See page 268.)
The council should close with the singing of "America." Especially should these ceremonies be gone through with when the assembly is composed of many young people, because what George Washington said in his farewell address is as true to-day as it was a hundred years ago.
The council should wrap up with the singing of "America." These ceremonies are especially important when the gathering includes many young people because what George Washington said in his farewell address is just as true today as it was a hundred years ago.
"Against the insidious wiles of foreign influences I conjure you to believe me, fellow citizens, the jealousy of a free people ought to be constantly awake, since history and experience prove that foreign influence is one of the most powerful foes of republican government."
"Against the sneaky tactics of foreign influences, I urge you to trust me, fellow citizens. The vigilance of a free people needs to be always alert, because history and experience show that foreign influence is one of the strongest enemies of republican government."
There is no reason why we should not have a lot of fun at the council fires, and at times it may even be riotous fun, but always American fun, and the patriotic spirit should never for a moment be forgotten, nor yet the poetic spirit which links us up in bonds of sympathy with all created things so that we may, with seriousness, recite the
There’s no reason we shouldn’t have a great time at the council fires, and sometimes it can even get wild, but it should always be American fun. We should never forget our patriotic spirit, nor the poetic spirit that connects us with all living things so that we can, with sincerity, recite the
That we may walk reverently
Beneath Lah-pah our brothers, the trees.
That we may step lightly
On Kis-so our kinsmen, the grasses.
That we may walk lovingly
Over Loo-poo-oi-yes our brothers, the rocks.
That we may rest trustfully
Where the O-lel-le bird sings—
Beside Ho-ha-oe, the talking waters.
A bright blanket of wisdom;
Make the warp the color of Father Sky,
Let He-koo-las, the sun-woman.
Lend her bright hair for the weft.
And mingle with it the red and gold threads of evening.
O Great Mystery; O Mother Earth! O Father Sky!
We, your children, love the things you love;
Therefore, let the border of our blanket
Be bending Ku-yet-tah, the rainbow.
And the fringe be glittering Nuk-kah, the slashing rain.
Who, laughing at everything, laugh at ourselves.
If Fortune's wheel is broken.
Hey, we can throw a wrench in it.
Misfortune strikes without warning,
But we can include a joke in it.
The owl can think for us.
As he sits, winking and blinking.
We act on intuition,
Having fun and causing a little trouble is our goal;
We have no serious responsibilities.
What we do is just for fun;
Fun is not something to take lightly.
Thought is nothing more than the imagination's escape.
Folly's fun, wit is smart,
Laughter, after all, is good.
FOOTNOTE:
CHAPTER XIV
RITUAL OF THE COUNCIL FIRE
- PROGRAM OF A COUNCIL FIRE
- INVOCATION
- THE PLEDGE AND CREED OF ALL AMERICANS
- APPEAL
RITUAL OF THE COUNCIL FIRE
The ceremonies of the Council Fire may be conducted with the accompaniment of pageantry to any extent desirable. At the Council Fire of the Dan Beard Outdoor School, the officers dress in costume; not masquerade costumes but the real ones. The Man of the North, who attends to the Northern Lights, is garbed in the blanket clothes of a northern lumberman and carries an axe. The Man of the East, who attends the fire where the sun maidens dwell, may be arrayed in the clothes of one of our Pilgrim fathers. The Man of the West, who attends the fire of the Blue Mountain, is decked in the fringed buckskin clothes of the trapper, plainsman, or mountaineer. The Man of the South, who guards the fire of the Red Mountain, is dressed in the picturesque costume of a Mexican with a high-crowned sombrero. The seats of the different courts are draped with the colors of the courts.
The ceremonies of the Council Fire can include as much pageantry as desired. At the Council Fire of the Dan Beard Outdoor School, the leaders wear costumes; not masquerade outfits, but authentic ones. The Northern Man, who oversees the Northern Lights, is dressed in the blanket clothes of a northern lumberjack and carries an axe. The East Man, who tends the fire where the sun maidens live, may wear the clothing of one of our Pilgrim fathers. The Western Man, who looks after the fire of the Blue Mountain, is adorned in the fringed buckskin attire of a trapper, plainsman, or mountaineer. The Southern Guy, who watches over the fire of the Red Mountain, is dressed in the colorful outfit of a Mexican with a high-crowned sombrero. The seats of the various courts are draped with the colors of those courts.
The guests enter and take their seats, then the Herald enters dressed in the costume of a scout, a frontiersman, or a medicine man, according to the plan of the particular Council Fire. The Herald faces the north from his stand in the center of the council ground and blows assembly call, or a blast on a cow's horn, then wheels about and faces the east, then the south and then the west, and at each he blows assembly. With the last notes and the last call the Scouts, Woodcrafters, Pioneers or students enter the circle, marching single-file around until the circle is complete, and they stand opposite where they are to sit. The Herald now blows a fanfare[268] and the officers march into the council ground with the colors and the color guard. The officers group themselves around their Chief, the Scout Executive, the Scout Commissioner, the Headmaster or the man in authority at the North Court.
The guests arrive and take their seats. Then, the Herald enters dressed as a scout, frontiersman, or medicine person, depending on the theme of the specific Council Fire. The Herald stands in the center of the council area, facing north, and blows a call to assemble using a blast from a cow's horn. He then turns to face the east, south, and west, blowing the assembly call each time. As the last notes sound, the Scouts, Woodcrafters, Pioneers, or students enter the circle, marching single-file until they complete the circle and stand across from their designated seats. The Herald then plays a fanfare[268], and the officers march into the council area with the colors and the color guard. The officers gather around their Chief, the Scout Executive, the Scout Commissioner, the Headmaster, or the person in charge at the North Court.
The Leader, or head officer, steps forward and throwing both hands up in a gesture of appeal, in which he is imitated by the assembly, he repeats:
The Leader, or head officer, steps forward and raises both hands in a gesture of appeal, a motion mirrored by the assembly, and he repeats:
Then he cries:
Then he cries:
Wind of the North, from whence come our snow and ice,
Wind of the East, from whence come our clouds and rains,
Wind of the West, from whence comes our sunshine,
Wind of the South, from whence comes our warmth,
Send us your men to guard the mystic fires.
The Men of the North, East, West and South, now step in front of the Chief, and he directs them to
The men from the North, East, West, and South now step in front of the Chief, and he tells them to
Are the mystic Northern Lights burning at Kon-win?
Is He-le-jah, the Mountain-lion, on guard on the yellow mountain of the North?
Man of the North. . . . Chief, the Medicine fire has been lighted, the Mountain-lion is guarding the yellow mountain of the North,
[269]All good.
Chief. . . . Man of the East, is the Medicine Fire at Too-le-ze blazing?
Is the White Wolf on guard at the White Mountain, where the sun-maidens dwell?
Man of the East. . . . Chief, Too-le-ze blazes in the East, the White Wolf is on guard. Wah-tab-bah, the robin, shields the fire,
All good.
Chief. . . . Man of the West, man of the plains and mountains, does the mystic fire at Kor-le blaze?
Is the Black Bear guarding the Blue Mountain, where the sun sets?
Man of the West. . . . Chief, Kor-le is ablaze, the Black Bear's growls may be heard in the torrent that guards the Blue Mountain.
All good.
Chief. . . . Man of the South, how blazes the fire at Too-winks?
Has the Red Badger come from its burrow to stand guard on the Red Mountain?
Man of the South. . . . Chief, Too-winks flames to the sky. The Red Badger is on guard.
All's good.
The Color Guard now enters, marches up to in front of the officers and all stand at salute. The Color Guard with colors about faces and the guests and all present recite in unison:
The Color Guard now enters, marches up to in front of the officers, and everyone stands at salute. The Color Guard, colors in hand, and the guests all recite together:
"I believe in the people of the United States, I believe in the United States form of government, I believe in the preamble of the Declaration of Independence, I believe that all men are created equal, that they are endowed by their Creator with certain inalienable rights, among which are Life, Liberty, and the pursuit of Happiness.
"I believe in the people of the United States, I believe in the United States government, I believe in the introduction of the Declaration of Independence, I believe that all people are created equal, that they are given by their Creator certain inalienable rights, including Life, Liberty, and the pursuit of Happiness."
"I believe in our Government of the People, by the People and for the People, a government whose just powers are derived from the consent of the governed, a Sovereign Nation of many Sovereign States, a Democracy in a Republic, a perfect Union, one and inseparable.
"I believe in our government of the people, by the people, and for the people, a government whose fair powers come from the consent of the governed, a sovereign nation made up of many sovereign states, a democracy within a republic, a perfect union that is one and inseparable."
"A Union which will live because of the vital principles of[270] Freedom, Equality, Justice, Humanity and Kindness which it contains, and for which American Patriots have willingly sacrificed their lives and fortunes.
"A Union that will thrive because of the essential principles of[270] Freedom, Equality, Justice, Humanity, and Kindness that it embodies, and for which American Patriots have willingly sacrificed their lives and fortunes."
"I therefore believe that in order to respect my own manhood I must love my country, support its Constitution and obey its Laws; also that I must respect its Flag, and defend it against all enemies."
"I believe that to respect my own manhood, I must love my country, support its Constitution, and obey its laws; I also must respect its flag and defend it against all enemies."
After which may come the Scout oath, Pioneer oath or Camp-fire oath, as the case may be. Then the command is given to "spread ponchos," followed by the command "squat!" when all the Scouts, Woodcrafters, Pioneers, or students squat tailor-fashion upon their ponchos, and the guests seat themselves on the benches which have been provided for them.
After that, the Scout oath, Pioneer oath, or Camp-fire oath can be recited, depending on the situation. Then the command is given to "spread out the ponchos," followed by the command "squat!" when all the Scouts, Woodcrafters, Pioneers, or students sit down cross-legged on their ponchos, and the guests take their seats on the provided benches.
Following this comes the address by the speakers, the entertainments and exhibitions of woodcraft, scoutcraft, or handicraft, the games, and other entertainment; then follows the awarding of honors. After which all stand to sing "America." Then the Chief or Leader steps forward and repeats the following
Following this is the speech by the speakers, the entertainments and exhibits of woodcraft, scoutcraft, or handicrafts, the games, and other fun activities; then comes the awarding of honors. After that, everyone stands to sing "America." Then the Chief or Leader steps forward and repeats the following
O Great Mystery, we beseech thee (as previously given) and ends up with the benediction, in which he uses the Indian phraseology:
O Great Mystery, we ask you (as previously stated) and concludes with the blessing, in which he uses the Indian expressions:
"May the Great Mystery put sunshine in all your hearts. Good-night."
"May the Great Mystery fill your hearts with sunshine. Goodnight."
Obvious punctuation errors repaired. The text sometimes had very narrow spaces between words this was not retained. Varied hyphenation was retained.
Obvious punctuation errors fixed. The text sometimes had very narrow spaces between words, which was not kept. Varied hyphenation was preserved.
Page ii, "quad" changed to "quod" (objectum quod complexum)
Page ii, "quad" changed to "quod" (object that is complex)
Page 103, "Rodger" changed to "Rodgers" (Washington, George Rodgers Clark)
Page 103, "Rodger" changed to "Rodgers" (Washington, George Rodgers Clark)
Page 137, an upside down 1 was present in the number "192". ((Fig. 192), then put a loop)
Page 137, an upside-down 1 was present in the number "192". ((Fig. 192), then add a loop)
Page 189, illustration of a Pack Train Outfit is missing letters for Q and R.
Page 189, the illustration of a Pack Train Outfit is missing the letters Q and R.
Page 202, "confortable" changed to "comfortable" (a very comfortable mattress)
Page 202, "confortable" changed to "comfortable" (a very comfortable mattress)
Download ePUB
If you like this ebook, consider a donation!