This is a modern-English version of Things Worth Doing and How To Do Them, originally written by Beard, Adelia B. (Adelia Belle), Beard, Lina.
It has been thoroughly updated, including changes to sentence structure, words, spelling,
and grammar—to ensure clarity for contemporary readers, while preserving the original spirit and nuance. If
you click on a paragraph, you will see the original text that we modified, and you can toggle between the two versions.
Scroll to the bottom of this page and you will find a free ePUB download link for this book.
THINGS WORTH DOING
AND HOW TO DO THEM

AND HOW TO DO THEM
By LINA and ADELIA B. BEARD
Things Worth Doing and How to Do Them. Illustrated by the authors. $2.00.
Things Worth Doing and How to Do Them. Illustrated by the authors. $2.00.
Recreations for Girls. Illustrated by the authors. $2.00 (postage extra).
Recreations for Girls. Illustrated by the authors. $2.00 (shipping extra).
What a Girl Can Make and Do. New Ideas for Work and Play. Illustrated by the authors. $2.00.
What a Girl Can Make and Do. New Ideas for Work and Play. Illustrated by the authors. $2.00.
The American Girl’s Handy Book; or, How to Amuse Yourself and Others. Illustrated by the authors. $2.00.
The American Girl’s Handy Book; or, How to Amuse Yourself and Others. Illustrated by the authors. $2.00.
By DANIEL C. BEARD
The Field and Forest Handy Book. New Ideas for Out of Doors. Illustrated by the author. $2.00.
The Field and Forest Handy Book. New Ideas for the Outdoors. Illustrated by the author. $2.00.
The Jack of All Trades; or, New Ideas for American Boys. Illustrated by the author. $2.00.
The Jack of All Trades; or, New Ideas for American Boys. Illustrated by the author. $2.00.
The Outdoor Handy Book. New and Cheaper Edition of The American Boy’s Book of Sport. Illustrated by the author. $2.00.
The Outdoor Handy Book. New and Affordable Edition of The American Boy’s Book of Sport. Illustrated by the author. $2.00.
The American Boy’s Handy Book; or, What to Do and How to Do It. Illustrated by the author. $2.00.
The American Boy’s Handy Book; or, What to Do and How to Do It. Illustrated by the author. $2.00.
Worth
Doing
and
How
To Do Them
BY
and
NYC
Charles
Scribner’s
Sons
1906
Copyright, 1906 by
CHARLES SCRIBNER’S SONS
Copyright, 1906 by
CHARLES SCRIBNER’S SONS
SPECIAL NOTICE
Important Announcement
The publishers hereby give warning that the unauthorized printing of any portion of the text of this book, and the reproduction of any of the illustrations or diagrams, are expressly forbidden.
The publishers want to remind you that printing any part of this book without permission, as well as reproducing any illustrations or diagrams, is strictly prohibited.
TO
OUR
LITTLE NIECE
BARBARA BEARD
To Our Little Niece Barbara Beard
PREFACE
We know our girls. We know and sympathize with their restless longing for activity. The normal girl simply must be doing something, and this ceaseless energy, at times rather appalling to her elders, is but natural and right. It is in the young blood coursing so swiftly and joyously through her veins, and it must find vent in one way or another. But there is no need of doing that which brings neither true pleasure nor the joy of accomplishing something worth while, for the world is full of delightful things really worth the doing. We have only to open our eyes and ears to find them crowding forward to claim our attention, and the choice is between better and best.
We understand our girls. We relate to their constant desire for activity. A typical girl just has to be doing something, and this nonstop energy, which can sometimes be overwhelming for adults, is completely natural and right. It's the young blood flowing quickly and joyfully through her, and it needs an outlet. But there’s no need to engage in activities that don’t bring genuine pleasure or the satisfaction of achieving something meaningful, because the world is full of wonderful things that are truly worth pursuing. We just need to open our eyes and ears to see them all around us, and the choice lies between better and best.
There are merry frolics and active games that stimulate the health and renew the vitality of the body and there are scores of charming things for willing hands to make which are not only worth the making but which bring skill to the fingers and breadth and energy to the mind.
There are fun activities and lively games that boost health and revive the body's energy, and there are plenty of delightful things for eager hands to create that are not only worth making but also enhance dexterity and broaden and energize the mind.
In this, our fourth book for girls, we are giving some of the things we have found well worth the doing, and it is our hope that our girl friends will also see their worth and find in them inspiration for further experiments in pastime and frolics.
In this, our fourth book for girls, we are sharing some of the things we’ve found to be really worthwhile, and we hope our girl friends will also recognize their value and find inspiration for more fun activities and adventures.
The Authors
The Authors
July 3, 1906.
July 3, 1906.
CONTENTS
| PART I PARTIES, SHOWS AND ENTERTAINMENTS |
|
CHAPTER I |
PAGE |
| A Fourth of July Lawn Party | 3 |
CHAPTER II |
|
| A Fantastic Circus at Home with Animated Animals | 15 |
CHAPTER III |
|
| A Fresh Easter Celebration with Exciting New Games | 33 |
CHAPTER IV |
|
| A Doorway Punch and Judy Show | 45 |
The Stage, 45; To Make Punch’s Head, 46; Punch’s Dress, 50; Judy’s Head, 51; The Baby, 52; Drama of Punch and Judy, 53. [x] |
|
CHAPTER V |
|
| Halloween Celebrations | 55 |
CHAPTER VI |
|
| Dance of Titania, the Fairy Queen | 75 |
CHAPTER VII |
|
| Thanksgiving Celebration | 85 |
CHAPTER VIII |
|
| Spontaneous Videos for Thanksgiving | 97 |
CHAPTER IX |
|
| A Valentine Event with Original Valentines | 103 |
CHAPTER X |
|
| The Wild West Show on a Table | 113 |
| [xi] | |
CHAPTER XI |
|
| Roof Picnic with a Stream to Cross and Flowers to Pick | 127 |
CHAPTER XII |
|
| The Magic Hypnotist Show | 137 |
CHAPTER XIII |
|
| Plant Your Garden if You Can | 153 |
CHAPTER XIV |
|
| Cheerful Santa Claus with His Reindeer and Sleigh | 163 |
CHAPTER XV |
|
| A Real Christmas Tree | 173 |
CHAPTER XVI |
|
| How to Attend a Girls' Fair | 179 |
| [xii] | |
CHAPTER XVII |
|
| Camping in Your Backyard | 194 |
CHAPTER XVIII |
|
| Outdoor Fun with Homemade Tetherball | 207 |
PART II |
|
| MINIATURE SEVEN WONDERS OF THE WORLD | |
CHAPTER XIX |
|
| The Egyptian Pyramids | 219 |
CHAPTER XX |
|
| The Colossus of Rhodes | 233 |
CHAPTER XXI |
|
| The Lighthouse of Alexandria and the Mausoleum at Halicarnassus | 245 |
| [xiii] | |
CHAPTER XXII |
|
| The Statue of Zeus at Olympia | 259 |
CHAPTER XXIII |
|
| The Temple of Diana in Ephesus | 269 |
CHAPTER XXIV |
|
| Hanging Gardens of Babylon | 279 |
PART III |
|
| THINGS TO MAKE FOR HOME, GIFT DAYS AND FAIRS | |
CHAPTER XXV |
|
| New Holiday Decorations | 303 |
Paper, 303; Holly, 304; Holly Berries, 307; Wreaths, 310; For Mistletoe, 310; Stems, 311; Ropes of Evergreen, 312. [xiv] |
|
CHAPTER XXVI |
|
| Cardboard Dollhouse | 315 |
CHAPTER XXVII |
|
| Making a Bayberry Candle | 326 |
CHAPTER XXVIII |
|
| Water Toys—Small Wax Figures that Swim and Float on Rafts | 338 |
CHAPTER XXIX |
|
| How to Weave Without a Loom | 349 |
CHAPTER XXX |
|
| How to Create Your Own Easter Cards and Gifts | 358 |
Cards Representing Easter Flowers, 358; The Cross, 360; The Tulip Bud, 361; The Dainty Bloodroot, 363; Easter Egg Card, 363; Easter Bells, 364; To Make the Turtle, 366; The Pig, 367; The Spoon, 368; An Umbrella, 369; The Doll’s Chair, 370; Strawberry, 371; Doll’s Cradle, 372; Bird’s Nest, 373; Sail Boat, 373; Napoleon, 375; Josephine, 379. |
|
| [xv] | |
CHAPTER XXXI |
|
| Homemade Candlesticks | 385 |
CHAPTER XXXII |
|
| Understanding Bananas, Oranges, and Apples | 399 |
CHAPTER XXXIII |
|
| Little Paper Columbus and His Paper Ship | 405 |
CHAPTER XXXIV |
|
| How to Befriend the Stars | 418 |
CHAPTER XXXV |
|
| Stencil Painting and How to Make Stencils | 426 |
PART I
PARTIES, SHOWS, AND
ENTERTAINMENTS
CHAPTER I
A FOURTH OF JULY
LAWN FROLIC

Prepare your guests for something novel by issuing your invitations in the form of giant firecrackers.
Get your guests excited for something new by sending out your invitations as giant firecrackers.
Decorate Your Grounds
Decorate Your Property
and make them as festive as possible with fluttering flags, floating streamers, red, white, and blue bunting, and Japanese lanterns. Also provide a number of small flags, one for each guest, to be worn in the hat, hair, belt, and buttonhole. This little touch of uniform will not only make the scene gayer and more exhilarating, but, like badges of an order, will have the effect of dispelling the stiffness of new acquaintances, and bringing the party closer together as members of one band of merrymakers.
and make them as festive as possible with fluttering flags, colorful streamers, red, white, and blue bunting, and Japanese lanterns. Also, provide small flags, one for each guest, to wear in their hats, hair, belts, and buttonholes. This little touch of uniformity will not only make the scene more cheerful and exciting but, like badges of an order, will help break the ice among new acquaintances and bring the party closer together as one group of merry-makers.
For the Giant Firecracker Invitations
For the Giant Firework Invitations
you will need several sheets of bright red tissue paper, more of white tissue paper, and some white unlined writing paper. A ball of soft white cotton string will also be required.
You will need several sheets of bright red tissue paper, more white tissue paper, and some white unlined writing paper. A ball of soft white cotton string will also be required.

Cut an oblong of red tissue paper, a circular piece of white tissue paper, and a square of writing paper for each invitation. Make the red oblong six inches long and three inches wide, the circle six inches in diameter, and the writing paper four inches square. Of the paper square make a cylindrical roll that will measure about three-quarters of an inch across the end. The easiest way to do this is to roll the paper on a candle, keeping the end edges even, and paste the side edge down while still wrapped around the candle. Pull the candle out of the paper and you have a perfect cylinder. Place the paper cylinder on the red tissue paper oblong so that there will be an even inch of red paper at each end (Fig. 1). Paste one long edge of the red paper to the cylinder and roll it on the table, bringing the opposite edge up smoothly, then paste that edge also in place (Fig. 2).
Cut a piece of red tissue paper in an oblong shape, a circular piece of white tissue paper, and a square of writing paper for each invitation. Make the red oblong six inches long and three inches wide, the circle six inches in diameter, and the writing paper four inches square. Roll the square piece of paper into a cylinder that measures about three-quarters of an inch across the end. The easiest way to do this is to roll the paper around a candle, ensuring the ends are even, and glue the side edge down while it's still wrapped around the candle. Pull the candle out of the paper, and you’ll have a perfect cylinder. Place the paper cylinder on the red tissue paper oblong so that there's an equal inch of red paper at each end (Fig. 1). Glue one long edge of the red paper to the cylinder and roll it on the table, bringing the opposite edge up smoothly, then glue that edge in place as well (Fig. 2).

Now prepare and write the note of invitation to be put in the firecracker envelope.
Now get ready to write the invitation note to be placed in the firecracker envelope.
With Short Brush Strokes,
With Short Brushstrokes,
from inside to edge, paint an irregular band of blue, half an inch wide, around the edge of the tissue paper circle, using water colors for the purpose. Write the invitation with red ink around the circle just inside the blue border, or straight across above and below the centre.
from inside to edge, paint an uneven strip of blue, half an inch wide, around the edge of the tissue paper circle, using watercolors for this. Write the invitation in red ink around the circle just inside the blue border, or straight across above and below the center.
Although the party is to be informal, a note written in the first person does not harmonize with the impersonal nature of a firecracker, therefore it is better to word the invitation something like this:
Although the party is going to be casual, a note written in the first person doesn't fit with the impersonal vibe of a firecracker, so it's better to phrase the invitation like this:
Miss Mary Brown requests the pleasure of the Misses Green’s company at an informal lawn frolic on Wednesday, the Fourth of July, from four to six o’clock. Active games.
Miss Mary Brown invites the Misses Green to join her for a casual lawn party on Wednesday, July Fourth, from four to six PM. There will be active games.

When the ink is quite dry pinch the paper together at the centre, making it look something like a paper flower, twist it a little, and tie on the point a piece of the white cotton string. The string should be about ten inches long and must be tied at the middle (Fig. 3). Drop one end of the string through the[6] cylinder and, taking hold of the end, draw the invitation into its envelope. Crush in the extra red paper at each end until it fills the opening and leaves the string extending from the centre (Fig. 4). Write the address and the words, “Pull the long string,” on the outside of the now almost perfect giant firecracker, and deliver by hand, for such an invitation would be broken and spoiled in going through the mail.
When the ink is completely dry, pinch the paper together at the center so it resembles a flower, twist it a bit, and tie a piece of white cotton string around the tip. The string should be about ten inches long and tied in the middle (Fig. 3). Drop one end of the string through the [6] cylinder, and hold the end to pull the invitation into its envelope. Tuck in the extra red paper at both ends until it fills the opening, leaving the string sticking out from the center (Fig. 4). Write the address and the words, “Pull the long string,” on the outside of the almost perfect giant firecracker, and hand-deliver it, since such an invitation would get damaged in the mail.

The following
The following
Order of Entertainment
Entertainment Schedule
is well adapted to the Fourth of July lawn frolic:
is well suited for the Fourth of July lawn party:
- Out-of-door Pantomime Charades.
- Shuffle Race.
- Hurling the Lance.
- Daylight Fireworks.
The programme opens with the not too vigorous game of
The program starts with a not-so-intense game of
Pantomime Charades.
Pantomime Charades.
This will give all the opportunity of taking part and alternately acting and resting. Stake out the four corners of your stage with groups of flags, driving their sticks into the ground to hold them upright. Provide seats for the audience in front of the stage and at the back or side arrange a screen as dressing and green room for the actors.
This will give everyone a chance to participate while taking turns to act and rest. Mark the four corners of your stage with groups of flags, sticking their poles into the ground to keep them standing. Set up seats for the audience in front of the stage, and place a screen in the back or on the side to serve as a dressing room and green room for the actors.

Divide the party into two sides of equal numbers and let the[7] first side choose a proverb to be acted out in pantomime and guessed by the opposite side, which is taking the part of audience. When the proverb is guessed the actors must retire and the other side take the stage. If the subject of the first charade is not guessed the same side must present another proverb, putting new actors in the place of those who have just taken part. Not a word must be spoken in the charade, but the actors must make their meaning as clear as possible by good acting.
Split the party into two equal groups and let the[7] first group choose a proverb to act out in pantomime for the other group, who will be the audience. Once the proverb is guessed, the performers must step back and the other group takes their turn. If the first charade isn't guessed, the same group must present another proverb with new actors replacing the previous ones. No words should be spoken during the charade; the actors must communicate their meaning as clearly as possible through their performance.
Our first illustration shows the out-of-door pantomime charade in progress. The proverb is: “Make hay while the sun shines.” This requires but one act as the first part, “Make hay,” and the last part, “while the sun shines,” are both represented. Making hay is acted out and that the sun is shining is implied by the quaint sunbonnets and wide-brimmed hats worn by the actors.
Our first illustration shows the outdoor pantomime charade in progress. The saying is: “Make hay while the sun shines.” This only needs one act since the first part, “Make hay,” and the last part, “while the sun shines,” are both acted out. Making hay is performed, and the shining sun is implied by the charming sunbonnets and wide-brimmed hats worn by the actors.
The Costumes Are Impromptu,
The Costumes Are Spontaneous,
and may be prepared in a few minutes. The odd and most charmingly becoming bonnets, somewhat resembling Dutch caps, are made of newspapers, pinned in shape. The men’s wide-brimmed hats are simply ordinary hats with wide brims made of wrapping paper. Black derby hats were worn on this occasion, but straw hats are better. The girls’ dresses are turned up in front and pinned at the back. If checked gingham aprons are worn looped up at one side they will add to the color effect of the costume.
and can be put together in just a few minutes. The unusual and charming bonnets, somewhat like Dutch caps, are made from newspapers, pinned into shape. The men’s wide-brimmed hats are just standard hats with wide brims made of wrapping paper. Black derby hats were worn on this occasion, but straw hats work better. The girls’ dresses are gathered up in front and pinned at the back. If checked gingham aprons are worn looped up on one side, they will enhance the colorful effect of the outfit.
To Make the Sun-bonnet,
To Create the Sun-bonnet,
take one folded sheet of a newspaper and turn the folded edge back four inches (Fig. 5). Fold down the corners like Fig. 6, put it on the head, bring the straight edge together at the back and pin it with a large pin. Bend out the laps at the sides and[8] you have made Fig. 7; Fig. 8 gives the pattern of the boy’s hat. Cut a large circle from rather stiff, new wrapping paper; press it down upon the top of the crown of a man’s straw hat; crease it along the edge of the crown, then cut a hole in the centre two inches within the creased line. Slash from the inner edge to the creased line as shown in Fig. 8, fit the paper brim over the crown of the straw hat and pin in place to the hat band.
take one folded sheet of a newspaper and turn the folded edge back four inches (Fig. 5). Fold down the corners like Fig. 6, place it on the head, bring the straight edge together at the back and pin it with a large pin. Bend out the flaps at the sides and[8] you have made Fig. 7; Fig. 8 provides the pattern for the boy’s hat. Cut a large circle from somewhat stiff, new wrapping paper; press it down onto the top of the crown of a man’s straw hat; crease it along the edge of the crown, then cut a hole in the center two inches within the creased line. Slash from the inner edge to the creased line as shown in Fig. 8, fit the paper brim over the crown of the straw hat and pin it in place to the hat band.


High peaked hats, wide collars, and even short capes may be quickly manufactured from paper and the effect of the impromptu costume is marvelously good.
High-peaked hats, wide collars, and even short capes can be quickly made from paper, and the result of the last-minute costume looks surprisingly great.


The Shuffle Race,
The Shuffle Race,
next in order, is new and it is funny. Its requisites are, for the girls, short skirts, held well above the ankles, and low shoes or slippers many times too large, worn over ordinary shoes. Unless the foot can be lifted out of the shoe without touching it with the hands the shoe is too small. For the boys you must provide the largest sized slippers obtainable, having uppers only at the toes.
next in order, is new and it is funny. Its requirements are, for the girls, short skirts, worn well above the ankles, and oversized shoes or slippers often much too big, worn over regular shoes. Unless the foot can be lifted out of the shoe without using the hands, the shoe is too small. For the boys, you need to provide the largest slippers available, with only the toes covered.
The course should be about one hundred feet over a smoothly shaven lawn. The contestants must stand in line at the starting point and at the word “go,” start off on the race, shuffling along as fast as possible. The boys have no advantage over the girls in this game, for it is no easier for one to cover the distance quickly, shuffling along in the large shoes, than for the other, and both look equally ridiculous in their absurdly frantic efforts to win the race.
The course should be about one hundred feet over a neatly trimmed lawn. The contestants must line up at the starting point, and at the word “go,” they take off on the race, shuffling as fast as they can. The boys don’t have any advantage over the girls in this game, since it's just as hard for one to cover the distance quickly while shuffling in the big shoes as it is for the other, and both look just as silly in their ridiculously frantic efforts to win the race.
After resting from the shuffle race allow your guests to try their skill at
After taking a break from the shuffle race, let your guests test their skills at
Hurling the Lance.
Throwing the Lance.
From the limb of a tree have suspended five or six feet from the ground a small wooden hoop, about eighteen inches in diameter, covered like a drumhead with white tissue paper.
From the branch of a tree, about five or six feet off the ground, hangs a small wooden hoop, around eighteen inches wide, covered like a drumhead with white tissue paper.
Provide each player with a round, green, tapering stake, white tipped and five feet long—the kind used for propping up plants. On the blunt end of each stake, or lance, should be tied streamers of red, white, and blue, which will make streaks of color as they are sent hurtling through the air.
Provide each player with a round, green, tapered stake, white-tipped and five feet long—the kind used for propping up plants. At the blunt end of each stake or lance, tie streamers of red, white, and blue, which will create streaks of color as they fly through the air.

Clear the space on the far side of the hoop that no one may be hurt by the falling lances, then have each player in turn throw[11] his or her lance with the object of piercing the paper and sending the lance entirely through the ring. Each player may have three trials in succession, and unless her lance passes through the hoop at least once she is counted out. There are three rounds and the player wins who, at the end, has succeeded most frequently in sending her lance through the hoop.
Clear the area on the far side of the hoop so no one gets hurt by the falling lances. Then, have each player take turns throwing[11] their lance with the goal of piercing the paper and getting the lance completely through the ring. Each player gets three attempts in a row, and if her lance doesn’t go through the hoop at least once, she’s out. There are three rounds, and the player who successfully sends her lance through the hoop the most times by the end wins.
Let the farewell be a
Let the goodbye be a
Burst of Daylight Fireworks.
Burst of Daylight Fireworks.
Strings of firecrackers stretched from tree to tree, bunches hidden under barrels, harmless torpedoes for your guests to explode, and any other fireworks that do not need darkness for a background may be used.
Strings of firecrackers were draped from tree to tree, clusters hidden under barrels, harmless poppers for your guests to set off, and any other fireworks that don’t require darkness as a backdrop could be used.
It is a good idea to make
It is a good idea to make
The Balloon Ascension
The Balloon Launch
an especial feature of the display. In the early days of our country “Independence Day” was not to be thought of without a balloon ascension, and the time-honored custom may be observed, but in a new way. This part of the programme should come as a complete surprise, and all the preparation for it be kept secret, that none of your guests may suspect what you have in store for them. The old observances always included a patriotic speech, and that, too, should form a part of the ceremony, being used as an introduction to the balloon ascension. You may make the speech yourself or get some one to do it for you, but in either case let it be quite short. Balloons should not be mentioned, but in some way the old Grecian myth of Pandora and her wonderful box must be brought in.
an especial feature of the display. In the early days of our country, “Independence Day” wasn’t complete without a balloon ascension, and while this beloved tradition can still be celebrated, it can be done in a fresh way. This part of the program should be a total surprise, so keep all the preparations under wraps to ensure your guests don’t suspect what you have planned. The old traditions always included a patriotic speech, and that should also be part of the ceremony, serving as an introduction to the balloon ascension. You can give the speech yourself or ask someone else to do it, but either way, keep it brief. Balloons shouldn’t be mentioned, but somehow, the ancient Greek myth of Pandora and her incredible box should be incorporated.
The Myth
The Legend
can be used quite appropriately and effectively for, as you will remember, it was to punish Prometheus, and mankind in general, for stealing fire that Zeus commanded Hephæstus to form from earth this most beautiful Pandora, in order that by the charms with which the other gods endowed her, she might bring trouble and vexation upon them. It does not appear to have been altogether her charms, however, that worked the mischief, for we are told it was curiosity that induced her to open the box, or cask, which was filled with winged blessings for men, thus allowing all of the blessings except hope to escape. As the remarks are being brought to a close have your
can be used quite appropriately and effectively for, as you will remember, it was to punish Prometheus, and humanity in general, for stealing fire that Zeus commanded Hephæstus to create from earth this beautiful Pandora, so that through the charms the other gods gave her, she might cause trouble and distress for them. However, it seems it wasn't just her charms that caused the trouble, because we are told it was curiosity that led her to open the box, or cask, which was filled with winged blessings for people, thus letting all the blessings escape except for hope. As the remarks are coming to a close, have your
Pandora Box
Pandora's Box
carried out and placed in front of the speaker.
carried out and set in front of the speaker.
In this case the box is to be a good-sized sugar-barrel, wrapped in flags, or red, white, and blue bunting, and having a lid that is easily lifted. With the final words let the speaker step forward and suddenly raise the lid of the barrel. This will set free not the things that were in the original Pandora box, but a number of gas-filled, rubber, toy balloons, that will burst out like a volley of fireworks, for a moment filling the air with color and movement, then sailing upward and away to finally disappear from view in the blue sky overhead.
In this case, the box should be a decent-sized sugar barrel, wrapped in flags or red, white, and blue bunting, and it should have a lid that’s easy to lift. With the final words, the speaker should step forward and lift the lid of the barrel. This will release not the items from the original Pandora's box, but a bunch of gas-filled rubber toy balloons that will burst out like a fireworks show, briefly filling the air with color and movement before floating up and away, eventually disappearing into the blue sky above.
In preparing your Pandora box choose a barrel that is perfectly smooth inside, without long splinters or nails to pierce the fragile balloons. Then see that the cover has a handle or knob by which it can be lifted. A spool fastened on with a screw will serve very well and is easily grasped by the hand.
In getting your Pandora box ready, pick a barrel that is completely smooth on the inside, free of long splinters or nails that could pop the delicate balloons. Also, make sure the cover has a handle or knob for easy lifting. A spool secured with a screw works great and can be easily held in your hand.
The Balloons
The Balloons
are the kind one sees for sale on the streets tied in great bunches by their long strings. Red is the most common color, but sometimes they vary. Frequently there are white ones with red or yellow lettering and bands, and again, just before the Fourth, red, white, and blue ones may be found. Have all the colors possible, and crowd in as many as the barrel will hold, cutting the strings off close to the balloons that they may not become entangled, and taking great care that they do not escape, like the blessings, before their time.
are the kind you find for sale on the streets, tied in big bunches with long strings. Red is the most common color, but sometimes they come in different colors. Often, there are white ones with red or yellow writing and bands, and right before the Fourth of July, you might see red, white, and blue ones. Use all the colors available, and pack in as many as the barrel can hold, cutting the strings off close to the balloons so they don’t get tangled, and making sure they don’t escape, like blessings, before their time.

CHAPTER II
A WONDERFUL CIRCUS AT
HOME WITH MOVING ANIMALS

MAKE your poster as nearly as possible like the one on the opposite page. Paint the lettering in gay colors on a big sheet of paper and a day before the show tack it up in a conspicuous place where all the family will see it, for, of course, your show must have an audience, and if you follow out all directions very carefully it will be well worth seeing.
MAKE your poster look as much like the one on the opposite page as you can. Use bright colors for the lettering on a large piece of paper and a day before the show, hang it up in a noticeable spot where everyone in the family will see it. After all, your show needs an audience, and if you follow all the instructions very carefully, it will definitely be worth watching.
Have your circus on top of a large table, or on the floor, or out of doors on the bare ground. Almost any place will do where there is a good-sized level surface.
Have your circus on a big table, on the floor, or outside on the ground. Almost any spot will work as long as there's a decent level surface.
Make the circus ring about forty inches in diameter, outline it with chalk and cover the marked line with either sawdust or dry corn meal built into a narrow ridge similar to that of earth around the large rings; then your circle will look just like the ring of a real circus.
Make the circus ring about forty inches in diameter, outline it with chalk, and cover the marked line with either sawdust or dry cornmeal, forming a narrow ridge similar to the earth surrounding the large rings; then your circle will look just like a real circus ring.
Be sure to have some kind of music at your show, if only music on a comb. Place a piece of paper over the comb and play a lively march. Let all the music be sprightly and gay.
Make sure to have some kind of music at your show, even if it's just music on a comb. Put a piece of paper over the comb and play a lively march. Let all the music be upbeat and cheerful.
Following the method given for making the horse and elephant, you can make various other moving animals.
Following the method provided for creating the horse and elephant, you can create different other moving animals.
Fig. 9 shows
Fig. 9 illustrates
Mademoiselle Rosebud
Miss Rosebud
standing firm and upright without the slightest tremor as her Kentucky charger leaps high in the air over an outstretched banner.
standing firm and upright without the slightest shake as her Kentucky horse jumps high in the air over an extended banner.
Fig. 10 gives the pattern of the horse and rider, which you can trace on stiff cardboard, not too heavy. If enlarged to twice the size given they will be more imposing, but this is not necessary, as the size of pattern is very good.
Fig. 10 shows the design of the horse and rider, which you can trace onto stiff cardboard that isn't too heavy. If you enlarge it to twice the size shown, they will look more impressive, but that's not necessary, as the original size of the pattern is just fine.
When outlined cut out the design, let the horse remain white, and with pen and ink draw the lines which give him form, shaping the head and neck, and separating the legs, as in Fig. 9.
When you cut out the design, keep the horse white, and use pen and ink to draw the lines that give it shape, defining the head and neck, and separating the legs, as in Fig. 9.


Paint Mademoiselle’s face, arms, and neck flesh color; her waist, skirt, stockings, and slippers light blue; make a full double tissue-paper[17] skirt of the same color by gathering a strip of light-blue tissue paper through the lengthwise centre, folding the edges together and tying this double skirt around the little lady’s waist. Cut a narrow strip of the same blue paper and fasten one end[18] around each wrist that it may float freely in the air as she gallops around the ring.
Paint Mademoiselle’s face, arms, and neck skin tone; her waist, skirt, stockings, and slippers light blue; create a full double tissue-paper[17] skirt of the same color by gathering a strip of light-blue tissue paper along the center, folding the edges together, and tying this double skirt around the little lady’s waist. Cut a narrow strip of the same blue paper and attach one end[18] around each wrist so it can float freely in the air as she gallops around the ring.
To Give the Horse Ability to Move,
To Give the Horse the Ability to Move,
pierce four holes through the body with a large needle, as in Fig. 10. Be sure to have the holes in the right places that the horse may balance perfectly; then when the threads are in position there will be no difficulty in making the horse stand and walk alone, as a well-trained steed should.
pierce four holes through the body with a large needle, as in Fig. 10. Be sure to have the holes in the right places so that the horse can balance perfectly; then, when the threads are in position, there will be no difficulty in making the horse stand and walk on its own, as a well-trained steed should.
Use four pieces of strong black thread, all of the same length, about forty inches, for leading the horse. Tie all four ends of the thread together, and make a large knot in each strand seventeen inches from the joined ends. Run each thread through a separate hole in the body of the horse. Slide the horse against the knots tied in the thread and then tie a second knot in each thread close up to the other side of the horse.
Use four pieces of strong black thread, all the same length, about forty inches, for leading the horse. Tie all four ends of the thread together, and make a large knot in each strand seventeen inches from the joined ends. Run each thread through a separate hole in the body of the horse. Slide the horse against the knots tied in the thread and then tie a second knot in each thread close to the other side of the horse.
Be very particular about these knots; they should rest against the body of the horse, that the animal may be firmly inserted between eight knots, four knots tight up against each side of his body. Sew a tag of black tape on the thread where the ends are tied together and pin the tag down to the floor in the centre of the circus ring.
Be very precise about these knots; they should sit against the horse's body so that the animal is securely held between eight knots, with four knots snug against each side of its body. Sew a piece of black tape onto the thread where the ends are tied together and pin the tape down to the floor in the center of the circus ring.
Tie the Ends
Finish the details
E and F (Fig. 11) together and fasten them to a piece of pasteboard; do likewise with the ends of the threads G and H, then hold the two threads which are near the front of the horse, E and F (Fig. 11), in one hand and the other two threads, G and H, in the other hand while you walk slowly around the outside of the ring, allowing little Rosebud to ride demurely around in a circle, as such performers always do when they first enter a real circus ring.
E and F (Fig. 11) together and attach them to a piece of cardboard; do the same with the ends of the threads G and H. Then hold the two threads near the front of the horse, E and F (Fig. 11), in one hand, and the other two threads, G and H, in the other hand while you walk slowly around the outside of the ring, letting little Rosebud ride gracefully around in a circle, like performers always do when they first enter a real circus ring.

After the audience has been duly impressed by the novel sight of a paper horse and rider moving, apparently without aid, around the ring, the black threads being practically invisible, let the horse stand alone while you bring out two or three brightly colored tissue-paper banners, with each end of each scarf pasted on the top of a spool. Place the banners at various distances around the ring; then again take up the threads and
After the audience has been properly amazed by the unusual sight of a paper horse and rider moving, seemingly on their own, around the ring, with the black threads nearly invisible, let the horse stand alone while you bring out two or three brightly colored tissue-paper banners, with each end of each scarf glued to the top of a spool. Place the banners at different points around the ring; then pick up the threads again and
Make the Horse Run and Jump Over Each Banner.
Make the horse run and jump over each banner.


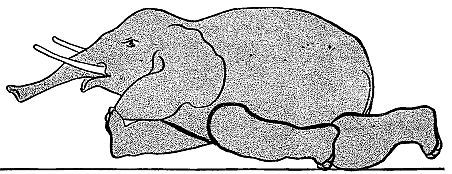
Fig. 13 gives the different parts of
Fig. 13 shows the various parts of
Bob the Wonderful Elephant.
Bob the Amazing Elephant.
Make them all of stiff cardboard and larger if possible than the
diagram; then with pen and ink draw the ears, eyes, and tusks
(Fig. 14); waterproof drawing ink is best for this purpose, but
common ink will do. When the ink is dry give all parts, except
the tusks, a light wash of India ink, to turn the animal a natural
dull gray color. With black thread fasten the leg A on the far
side of the elephant, running the thread through the hole A in
the elephant and tying the thread into a large knot on the leg,
then making another knot on the near side of the body; the leg[21]
[22]
and body are fastened to each other in this way between two knots
of thread. Have the pieces close together, but loose enough to
allow the leg to move easily. Attach the next leg, B, on the near
side of the body at the hole B. The leg C goes on the far side
of the body at the hole C, and the leg D on the near side at the
hole D. The legs A and C are on the far side, and B and D on
the near side of the animal (Fig. 14). Sew one end each of two
strands of black thread to a small piece of black tape. Make a
large knot in each thread, eighteen inches from the tape, run the
free end of each thread through one of the two holes high on the
elephant’s body (Fig. 13), and slide the elephant on the threads
close to the knots. Make other knots on this side of the body,
in the same way you managed the Kentucky charger, then pin the
tape to the centre of the ring and
Make all the parts out of stiff cardboard and, if possible, larger than the diagram; then use pen and ink to draw the ears, eyes, and tusks (Fig. 14); waterproof drawing ink works best for this, but regular ink will also suffice. Once the ink dries, give all parts, except the tusks, a light wash of India ink to give the animal a natural dull gray shade. Use black thread to attach leg A on the far side of the elephant, threading the thread through hole A in the elephant and tying it into a large knot on the leg, then making another knot on the near side of the body; this method connects the leg[21]
[22] and body between two knots of thread. Keep the pieces close together, but loose enough to let the leg move freely. Attach the next leg, B, on the near side of the body at hole B. Leg C goes on the far side of the body at hole C, and leg D goes on the near side at hole D. Legs A and C are on the far side, while B and D are on the near side of the animal (Fig. 14). Sew one end of each of two strands of black thread to a small piece of black tape. Make a large knot in each thread, eighteen inches from the tape, run the free end of each thread through one of the two holes high on the elephant’s body (Fig. 13), and slide the elephant on the threads up to the knots. Make additional knots on this side of the body, just like you did with the Kentucky charger, then pin the tape to the center of the ring and
Start Your Elephant on a Walk
Take Your Elephant for a Walk
around the ring.
around the circle.


If the horse and rider interfere, take them away and let the
unparalleled animal have the field to himself. When Bob goes
around the ring he always gets tired and draws back, declining to
move another step. Make him do this by gently pulling the back
thread backward. Bob is very comical when assuming this pose
(Fig. 15). Raise the front thread and the little fellow will sit up[25]
[26]
[27]
(Fig. 16). Slowly and gently raise both threads a trifle and Bob
will begin to dance (Fig. 17). Raising the back thread a little,
not enough to take his foot from the ground, and at the same
time lowering the front thread, will cause Bob to crouch and crawl
along (Fig. 18). Fig. 19 shows Bob when he is in a hurry. Make
this by lowering the front thread of Fig. 18.
If the horse and rider get in the way, remove them and let the amazing animal have the arena to himself. When Bob goes around the ring, he always gets tired and holds back, refusing to take another step. Make him move by gently pulling the back thread backward. Bob is really funny when he takes this position (Fig. 15). Raise the front thread and the little guy will sit up[25]
[26]
[27] (Fig. 16). Slowly and gently lifting both threads a bit will make Bob start to dance (Fig. 17). Lifting the back thread slightly, just enough to keep his foot on the ground, while lowering the front thread, will cause Bob to crouch and crawl along (Fig. 18). Fig. 19 shows Bob when he's in a hurry. You can do this by lowering the front thread of Fig. 18.


Now Stand a Spool in the Ring
Now Stand a Spool in the Ring
raise the clumsy little fellow up on his feet and walk him over to the spool, where he will naturally rest one foot on top while he takes a long breath before climbing up (Fig. 20). Move the threads carefully and the elephant will climb on the spool (Fig. 21). Lift[29] the back thread, and Bob will slowly and cumbersomely raise up until he balances himself on one fore foot on top of the spool (Fig. 22). By cautiously moving the threads you can make the elephant lower himself and step down and off (Fig. 23). When the animal is entirely off the spool, raise up and back the front thread and he will sit down upon the top of the spool to rest (Fig. 24). Without any trouble Bob can stand erect on the spool, as in Fig. 25.
raise the clumsy little guy up onto his feet and walk him over to the spool, where he’ll naturally rest one foot on top as he takes a deep breath before climbing up (Fig. 20). Move the threads carefully and the elephant will climb onto the spool (Fig. 21). Lift[29] the back thread, and Bob will slowly and awkwardly raise himself until he balances on one forefoot on top of the spool (Fig. 22). By carefully moving the threads, you can make the elephant lower himself and step down and off (Fig. 23). Once the animal is completely off the spool, pull up and back the front thread and he will sit down on top of the spool to rest (Fig. 24). Without any trouble, Bob can stand upright on the spool, as in Fig. 25.

All the poses given were taken direct from those actually assumed by Bob while he performed to the accompaniment of music, when rehearsing to a small but appreciative audience, preparatory to appearing before the public in print. The Kentucky charger also went through all his acts to the same music.
All the poses shown were taken directly from those actually made by Bob while he performed with music, during rehearsals for a small but appreciative audience, getting ready to appear before the public in print. The Kentucky charger also went through all of his acts to the same music.

Remember to mark and color the wrong side of each figure as it should appear, so that the animals and rider may look well from all sides of the ring.
Remember to mark and color the back of each figure as it should look, so that the animals and rider appear nice from all sides of the ring.

The horse can go rapidly, but the elephant, to be lifelike, must move slowly. When the circus is over roll the threads on their respective pieces of cardboard and bits of tape to avoid tangling them, and have a box ready in which the animals may lie flat until again needed.
The horse can move quickly, but the elephant, to look realistic, has to move slowly. After the circus is done, wrap the threads around their cardboard pieces and use tape to keep them from tangling, and have a box ready where the animals can lay flat until they're needed again.
This little circus will make a fine parlor entertainment, or would do admirably as a side show at your next fair, when a small extra admission could be charged and wee glasses of lemonade and tiny popcorn balls passed around to the audience in true circus style.
This little circus will make great entertainment for your living room, or it would work perfectly as a side show at your next fair, where you could charge a small extra admission and serve little glasses of lemonade and tiny popcorn balls to the audience in classic circus fashion.
CHAPTER III
A NOVEL EASTER PARTY WITH
NEW EASTER GAMES

THERE are no end of delightful things to do at an Easter party, and every game may be in keeping with the season.
THERE are countless fun things to do at an Easter party, and every game can fit the season perfectly.
The game of
The game of
Egg Tennis
Egg Tennis

is particularly pretty. As you play this new Easter game, showers of color will fill the air, sometimes descending in sparkling bits of orange, again reds, then greens or blues, yellows or purples, with all their beautiful tints. Quivering and shimmering, down the colored rain will fall, lightly covering your hair, clothing, and surrounding objects, while you stand, racket in hand, watching the result of your stroke. Your companions, seeing your success, will be eager to try their skill, also, with one of the pretty magic eggs. These colored showers do not even look wet, and they will not injure the most delicate of fabrics, for they are composed of countless bits of bright tissue paper.
is particularly pretty. As you play this new Easter game, showers of color will fill the air, sometimes raining down in sparkling bits of orange, then reds, greens or blues, yellows or purples, all with their beautiful shades. Quivering and shimmering, the colored rain will fall, lightly covering your hair, clothes, and everything around you, while you stand with your racket in hand, watching the result of your swing. Your friends, seeing your success, will be eager to try their skill too, with one of the pretty magic eggs. These colorful showers don’t even look wet and they won’t damage the most delicate fabrics because they’re made of countless bits of bright tissue paper.
The Number of Eggs
Egg Count

needed for the game depends upon the number of players. There should be three eggs provided for every two players. In case the first player succeeds in breaking two eggs in succession, the[34] third egg will not be used during the game, but may do duty at another time in another game. Should the first player fail in breaking the second egg, then all three eggs will be required.
The number of eggs needed for the game depends on how many players there are. You should provide three eggs for every two players. If the first player manages to break two eggs in a row, the [34] third egg won't be used in this game but can be saved for another game later. If the first player fails to break the second egg, then all three eggs will be needed.

How to Prepare the Eggs
How to Cook the Eggs
Select eggs as nearly of a size as possible; take one egg at a time and with a very coarse needle carefully bore a hole in each end by pressing the point of the needle against the shell and then turning the needle around and around until a little hole appears. Be very careful when boring not to press the needle with too great a force, as there is danger in so doing of cracking the shell and rendering it useless. When both holes are made, increase the hole on the large end of the egg until it is about as large around as the head of a common hat-pin (Fig. 26), then place the small end to your lips and blow out the contents.
Select eggs that are as similar in size as possible; take one egg at a time and with a very coarse needle carefully make a hole in each end by pressing the needle's point against the shell and turning the needle around until a small hole appears. Be very careful while boring not to apply too much pressure, as this can crack the shell and make it unusable. Once both holes are made, enlarge the hole on the larger end of the egg until it’s about as wide as the head of a common hat pin (Fig. 26), then place the small end to your lips and blow out the contents.

After the Shells Are Emptied
After the Shells Are Used
leave one white and color all the others, making each shell of a
different color. When this is done, allow the inside of the shells
to become thoroughly dry; then fill them with pieces of tissue
paper cut in small squares a
quarter of an inch or less in
size. These can be quickly
made by folding the tissue
paper like Fig. 27 and cutting
it into strips of fringe
(Fig. 28); then cutting off the
ends of the fringe little by[35]
[36]
little (Fig. 29). Fill the red
egg-shell with bits of red paper,
the yellow shell with yellow
paper, and so on, making
leave one white and color all the others, making each shell a different color. When that's done, let the insides of the shells dry completely; then fill them with small squares of tissue paper cut to a quarter inch or smaller. You can quickly make these by folding the tissue paper like Fig. 27 and cutting it into fringe strips (Fig. 28); then trimming the ends of the fringe a little at a time (Fig. 29). Fill the red eggshell with bits of red paper, the yellow shell with yellow paper, and so on, making

The Shower of Paper
The Paper Shower
in each egg-shell correspond to the color of the shell. Fill the white shell with squares of white tissue paper, and when the shell breaks in mid-air, the shower will resemble the dainty petals of cherry blossoms as they fall when shaken from the trees by a light breeze. The effect is very pretty, calling to mind the Feast of Cherry Blossoms in Japan, when the girls and boys accompany their elders to see the cherry trees in full bloom.
in each eggshell correspond to the color of the shell. Fill the white shell with squares of white tissue paper, and when the shell breaks in mid-air, the shower will look like the delicate petals of cherry blossoms falling when shaken from the trees by a gentle breeze. The effect is very pretty, reminiscent of the Feast of Cherry Blossoms in Japan, when kids go with their elders to see the cherry trees in full bloom.

Cut Gilt Paper Disks
Cut Gold Leaf Disks
two inches in diameter (Fig. 30); fold each disk through the centre (Fig. 31), then fold again crosswise through the middle of the first fold (Fig. 32). Fold once more (Fig. 33), and, following the dotted lines on Fig. 33, cut the points as shown in Fig. 34 and you will have[37] the eight-pointed star (Fig. 35). While the point is still folded with a sharp pair of scissors clip off the point (A, Fig. 34). This makes the hole in the centre of the star (B, Fig. 35). Through the hole in each star thread the two ends of a strong string. Cover the under side of the star with paste, separate the two ends of the string and hold them down on each side of the egg (Fig. 36), then draw the star down on to the shell over the strings, and press tightly in place until the paste holds (Fig. 37). Clip off the ends of the string that extend below the star.
two inches in diameter (Fig. 30); fold each disk in half (Fig. 31), then fold it again crosswise through the middle of the first fold (Fig. 32). Fold one more time (Fig. 33), and, following the dotted lines on Fig. 33, cut the points as shown in Fig. 34 and you will have[37] the eight-pointed star (Fig. 35). While the point is still folded with a sharp pair of scissors, clip off the tip (A, Fig. 34). This creates the hole in the center of the star (B, Fig. 35). Through the hole in each star, thread the two ends of a strong string. Cover the underside of the star with glue, separate the two ends of the string and hold them down on each side of the egg (Fig. 36), then position the star onto the shell over the strings, and press tightly in place until the glue holds (Fig. 37). Clip off the ends of the string that extend below the star.


When the paste is quite dry and the paper firmly attached to the shell,
When the paste is fully dry and the paper is securely attached to the shell,
Hang One of the Eggs
Hang an Egg
directly in the middle of a wide doorway so that the egg will be about as high as the shoulders of the players. If there is a curtain pole in the doorway tie the string to the pole; if not, drive a tack on top of the door frame and suspend the egg from that. Where the doorway is quite wide, like the old-fashioned doors between two parlors, two eggs may be hung and four players take part at one time. In that case you will need four rackets; ordinarily two rackets are sufficient.
directly in the center of a wide doorway so that the egg will be about as high as the players' shoulders. If there’s a curtain rod in the doorway, tie the string to the rod; if not, drive a pushpin into the top of the doorframe and hang the egg from that. If the doorway is very wide, like the old-style doors between two parlors, you can hang two eggs and have four players at once. In that case, you'll need four rackets; usually, two rackets are enough.
Make the Rackets
Make the Rackets
of flat rattan, taking two pieces, twenty-seven inches long for each racket. Soak the rattan to make it pliable, then bind the two pieces together with string as in Fig. 38. Bend the now double rattan to form a loop, bring the four ends together and wrap them into a straight piece for the handle (Fig. 39).
of flat rattan, taking two pieces, twenty-seven inches long for each racket. Soak the rattan to make it flexible, then tie the two pieces together with string as in Fig. 38. Bend the now doubled rattan to create a loop, bring the four ends together, and wrap them into a straight piece for the handle (Fig. 39).


Lay the frame you have just made down on a large piece of strong writing-paper and mark a line on the paper one inch from and entirely surrounding the outer edge of the frame down to the handle. Draw another line close to the outer edge of the frame, then cut out the design along the outside line. Slash the edge up to, but not across, the remaining pencil line (Fig. 39). Cover one side of the slashed border with paste or glue, and, again placing the frame on the paper, turn the flaps, one at a[39] time, over the edge of the frame and attach them firmly to the frame and to the inside of the paper (Fig. 40). When the paste is perfectly dry, make another paper cover in the same manner and paste its slashed edge over the frame on top of the first, putting one cover directly over the other and so making it double; this will make the racket quite strong and firm.
Lay the frame you've just made down on a large piece of sturdy writing paper and draw a line on the paper one inch from the outer edge of the frame, surrounding it completely down to the handle. Draw another line close to the outer edge of the frame, then cut out the design along the outer line. Make slashes along the edge up to, but not crossing, the remaining pencil line (Fig. 39). Cover one side of the slashed border with paste or glue, and again placing the frame on the paper, turn the flaps over the edge of the frame one at a time and attach them securely to the frame and to the inside of the paper (Fig. 40). When the paste is completely dry, create another paper cover in the same way and paste its slashed edge over the frame on top of the first, putting one cover directly over the other, making it double; this will strengthen the racket and make it quite sturdy.


The Game of Egg Tennis
The Egg Tennis Game
is played in couples, and the object is to break the egg-shell and send the paper rain flying in the air. The sport is adapted to[40] all ages, from the little child scarcely large enough to wield the racket to grown girls and boys, and even older people will become excited as they try to strike the fragile toy.
is played in pairs, and the goal is to break the eggshell and send the paper rain flying into the air. The game is suitable for[40] all ages, from young children who can barely hold the racket to older girls and boys, and even adults will get excited as they try to hit the delicate toy.
The players must stand facing each other at equal distances from and on opposite sides of the suspended egg. The distance is decided by swinging the egg and then placing the players within easy reach of it before it swings above their heads. This is done by the umpire, who takes charge of the game and decides any disputes.
The players must stand facing each other at equal distances from each other on opposite sides of the suspended egg. The distance is determined by swinging the egg and then positioning the players within easy reach of it before it swings above their heads. This is handled by the umpire, who oversees the game and resolves any disputes.
Promptly at the signal,
At the signal,
“Ready,”
“Ready,”
given distinctly by the umpire, the player who has been appointed starter gently swings the egg outward toward her opponent, and the egg is then “in play.” The other player immediately tries to strike the egg with her racket, using sufficient force to break the shell or send it flying swiftly toward the first player, who in turn promptly hits or misses the egg. Whether struck or not, the egg will return to the other player, who will surely be able to strike it the second time it comes to her, if not the first. And so the egg is kept swinging rapidly back and forth between the two players until the shell is broken. With the breaking of the shell comes the beautiful shower of tissue paper which is sent flying through the room by the stroke, and the player who releases it wins a point in the game.
Given distinctly by the umpire, the player designated as the starter gently swings the egg outward toward her opponent, and the egg is then "in play." The other player immediately tries to hit the egg with her racket, using enough force to break the shell or send it flying quickly toward the first player, who then promptly hits or misses the egg. Whether hit or not, the egg will return to the other player, who will definitely be able to hit it the second time it comes to her, if not the first. The egg continues to swing rapidly back and forth between the two players until the shell breaks. When the shell breaks, it releases a beautiful shower of tissue paper that flies through the room, and the player who initiated it wins a point in the game.
When the First Egg is Broken
When the First Egg is Cracked
a second one must be put in its place, and the unsuccessful contestant has another opportunity to make good her record, playing with the same opponent. If the breaking of the second egg proves a tie—that is, if it is broken by the player who was at first unsuccessful—a third egg must be suspended and the same[41] couple continue to play until that, too, is broken. Then the unsuccessful player drops out of the game, and the winner of two points to his opponent’s one steps aside to await his final play after the other couples have had their turn. Should one player win two points in succession the third is not played, for two points lost sends a player out of the game.
a second one must be put in its place, and the unsuccessful contestant has another chance to improve her record, playing against the same opponent. If the second egg is broken in a tie—that is, if it is broken by the player who was initially unsuccessful—a third egg must be set up, and the same[41] couple continues to play until that, too, is broken. Then the unsuccessful player drops out of the game, and the winner of two points to his opponent’s one waits to make his final play after the other couples have taken their turns. If one player wins two points in a row, the third point is not played because losing two points eliminates a player from the game.
When all the couples have played, the successful competitors alone remain in the game. These form new couples and play as before, each in his order. This time there is but one egg for each couple, and the player who fails to break the shell must withdraw, giving his place to the next player, while the successful one holds his place until another breaks the egg. In this way but one player comes out victorious.
When all the couples have played, only the winning ones stay in the game. They pair up again and play as before, taking turns. This time, there's only one egg for each couple, and the player who can't break the shell has to step out, letting the next player take their place, while the one who succeeds keeps playing until someone else breaks the egg. This way, only one player emerges victorious.
When space allows two eggs to be hung in the doorway and two couples take part at the same time, there must be two umpires, one for each couple, for in the excitement of the fray, one person cannot watch all the play.
When there's enough space to hang two eggs in the doorway and two couples are participating at the same time, there needs to be two referees, one for each couple, because in the heat of the moment, one person can't watch everything that's happening.
RULES OF THE GAME
GAME RULES
1. The umpire may not take part in the game while acting as umpire. She shall keep tally and decide all questions which arise regarding the game.
1. The umpire can't participate in the game while serving as umpire. She will keep score and make decisions on all questions that come up about the game.
2. The egg shall not be struck except with the flat face of the racket.
2. The egg must only be hit with the flat side of the racket.
3. When an egg is broken by striking against the surrounding woodwork, or in any other manner other than with the face of the racket, it counts one against the player who made the stroke and scores one for his opponent.
3. When an egg is broken by hitting it against the surrounding woodwork, or in any way other than with the face of the racket, it counts as one point against the player who made the stroke and scores one point for their opponent.
4. Two points scored during one play declares the successful competitor the victor.
4. Two points scored in one play declares the winning competitor the victor.
5. A play consists of any number of trials until the two eggs are broken.
5. A game includes as many attempts as it takes until both eggs are broken.
6. Two eggs shall constitute a play when there is no tie; in case of a tie there shall be three eggs.
6. Two eggs will make a play when there's no tie; in the case of a tie, there will be three eggs.
Butterflies as well as eggs are appropriate for Easter and the
Butterflies and eggs are suitable for Easter and the
Butterfly Game
Butterfly Game
will come in well as second on your programme.
will come in as a solid second on your schedule.
All the girls are butterflies in this game and all the boys are collectors. The collectors are stationed in different parts of the room and stand some distance, at least six feet, apart. They may not move their feet to step in any direction, but, standing in one spot, may reach out on all sides with their hands as they try to catch the butterflies flitting past them.
All the girls are butterflies in this game, and all the boys are collectors. The collectors are positioned in various spots around the room, standing at least six feet apart. They can’t move their feet in any direction, but while staying in one place, they can reach out with their hands on all sides to try to catch the butterflies fluttering by.
Each Butterfly
Every Butterfly
must lift the skirt of her dress with both hands and move it back and forth as she flies among, around and between the collectors. This moving of skirts as mimic wings makes the game appear very pretty to the onlookers, and the collectors find it difficult to grasp the fluttering draperies.
must lift the skirt of her dress with both hands and move it back and forth as she flies among, around and between the collectors. This movement of skirts like mimicked wings makes the game look very beautiful to the spectators, and the collectors find it hard to catch the fluttering fabric.
It is the Part of Every Collector
It’s the Responsibility of Every Collector
to catch as many butterflies as possible and as each butterfly is caught she must stand close behind the collector to whom she belongs. The second captive stands behind the first with her hands on the shoulders of number one. The third takes her place behind number two with her hands on the shoulders of number two and so on to
to catch as many butterflies as possible, and each time a butterfly is caught, she has to stand right behind the collector she belongs to. The second captive stands behind the first with her hands on the shoulders of number one. The third takes her place behind number two, with her hands on the shoulders of number two, and so on to
The Last Captive
The Last Captive
The game becomes exciting when but one free butterfly is left, darting about, skilfully evading the outstretched hands of the collectors, each intent upon capturing this last and greatly valued prize. For in the count the last butterfly captured is equal to two of the others.
The game gets thrilling when there’s only one free butterfly left, flitting around and expertly dodging the outstretched hands of the collectors, each one determined to catch this final and highly sought-after prize. That's because in the count, the last butterfly caught is worth double the others.
The game ends when all are caught and the winner is he who possesses the greatest number of butterflies, counting the last one caught as two.
The game ends when everyone is caught, and the winner is the one who has the most butterflies, counting the last one caught as two.
The Magic Dye Kettle
The Enchanted Dye Kettle
will be a unique, amusing and mystifying feature in the entertainment of your guests. For this some preparation is necessary.
will be a unique, fun, and intriguing addition to the entertainment of your guests. For this, some preparation is needed.
First you must have the tinsmith remove the bottom of a new, inexpensive, tin kettle, one that has a lid to fit and will hold several quarts. Then in the bottom of a square wooden box, about as large as a small table, have a hole cut a trifle smaller than the bottom of the kettle. Knock out one side of the box, stand it bottom side up so that the round hole will be on top, place it in the position it is to occupy, and throw over it some kind of a cover which will reach to the floor and hide the box completely on all sides. In this cover you must cut a hole to fit the hole in the box, and place the hole in the cover directly over the hole in the box. Place the lid on the kettle and stand the kettle over the hole and it will appear to be merely sitting on the table, as there will be nothing to indicate the opening beneath.
First, have the tinsmith take off the bottom of a new, cheap tin kettle that has a lid and can hold several quarts. Next, in the bottom of a square wooden box about the size of a small table, cut a hole that's slightly smaller than the kettle's bottom. Remove one side of the box, turn it upside down so the round hole is on top, and position it where it will stay. Cover the box completely with something that reaches the floor. In this cover, cut a hole to match the one in the box, making sure it's directly over it. Put the lid on the kettle and place the kettle over the hole; it will look like it’s just sitting on the table, with nothing to show that there’s an opening underneath.
Under the Box,
Under the Box,
ready for use, place a shallow tin pan larger around than the bottom of the kettle, and cover the bottom of the pan with sawdust; also place under the box a basket filled with hard boiled eggs of various colors, three eggs of each color.
ready for use, place a shallow tin pan larger than the bottom of the kettle and cover the bottom of the pan with sawdust; also place under the box a basket filled with hard-boiled eggs of various colors, three eggs of each color.
In another part of the room have ready another basket containing the same number of hard boiled eggs but all uncolored.
In another part of the room, have another basket ready with the same number of hard-boiled eggs, but all uncolored.
While the Butterfly game is in progress let some one who is in the
While the Butterfly game is happening, let someone who is in the
Secret of the Magic Kettle,
Secret of the Magic Pot,
hide under the improvised table and at a given signal lift the shallow pan and hold it tightly under the hole in the box.
hide under the makeshift table and at a given signal lift the shallow pan and hold it securely under the hole in the box.
Explain to your guests that you have for the occasion a magic kettle, which, while they wait, will color eggs for them without water and without heat. Pass around the basket of uncolored eggs and invite each one to take an egg. Tell three members of the party to decide upon a color they wish their eggs dyed (all three must be the same color) then, as you raise the lid, to shout the color in unison, and carefully place their eggs in the kettle.
Explain to your guests that you have a magic kettle for the occasion that will color eggs for them without water or heat while they wait. Pass around the basket of uncolored eggs and invite everyone to take one. Tell three people from the group to choose a color they want their eggs dyed (they all need to pick the same color) and then, as you lift the lid, to shout the color together and carefully place their eggs in the kettle.
As soon as the eggs are in quickly replace the lid and wave your hands back and forth over the kettle. Apparently you will be working a charm, but in reality you will be keeping the too curious from taking a peep into the kettle to see what process is going on.
As soon as the eggs are in, quickly put the lid back on and wave your hands back and forth over the kettle. It seems like you’re casting a spell, but in reality, you’re just stopping the overly curious from peeking into the kettle to see what’s happening.
When the uncolored
When the uncolored
Eggs are in the Kettle
Eggs are in the pot
and the lid is on, your assistant underneath must gently and without the least noise lower the pan she is holding, and in which the eggs have been deposited, remove the uncolored eggs and substitute three others of the color she has heard wished for. Then lifting the pan she must again hold it close under the kettle until
and with the lid on, your assistant beneath must quietly and without making any noise lower the pan she’s holding, where the eggs have been placed, take out the uncolored eggs, and replace them with three others of the color she has been told to get. Then, raising the pan, she must hold it close under the kettle until
The Colored Eggs are Taken Out
The Colored Eggs are Taken Out
and three more put in to be dyed.
and three more were added to be dyed.
Give your assistant several minutes to make the exchange of eggs, then lift the lid and allow the eggs, so quickly and so marvellously colored, to be lifted out by their owners.
Give your assistant a few minutes to swap the eggs, then lift the lid and let the eggs, so quickly and beautifully colored, be taken out by their owners.
When all the eggs have been dyed lead your guests from the room without allowing any investigation of the workings of the magic kettle and while they are out have box, kettle and eggs taken away so that the charm of mystery may not be broken.
When all the eggs have been dyed, guide your guests out of the room without letting them look into how the magic kettle works. While they're gone, have the box, kettle, and eggs removed so that the mystery remains intact.
CHAPTER IV
A DOORWAY PUNCH AND JUDY SHOW

The only material necessary for
The only materials needed for
The Stage
The Stage
will be a piece of plain solid-colored cloth, which must reach across an open doorway, be tacked upon each side and extend down to the floor, where it should be again fastened that there may be no danger of its blowing aside. Put this curtain up high enough in the doorway to reach a trifle above your head, for you must be completely hidden from the audience. The full-page illustration shows the back of the stage and gives the manner in which Punch and his family are made to move about in[46] the opening between the top of the doorway and the curtain. It is this opening which constitutes the stage. The illustration also shows a band of cloth stretched across the extreme top of the doorway, and short side curtains added to the outside of the stage to improve its appearance.
will be a piece of plain, solid-colored fabric that needs to stretch across an open doorway, attached at each side and hanging down to the floor, where it should be secured again to prevent it from blowing away. Hang this curtain high enough in the doorway so that it extends a little above your head, as you need to be completely hidden from the audience. The full-page illustration shows the back of the stage and demonstrates how Punch and his family move around in[46] the space between the top of the doorway and the curtain. This gap serves as the stage. The illustration also features a strip of fabric stretched across the very top of the doorway, along with short side curtains added to the exterior of the stage to enhance its appearance.

To Make Punch’s Head,
Create Punch's Head,
cut a piece of unruled white writing-paper eight inches long and
five inches wide, to allow a generous margin, and on it draw Fig.
42, making the head 6 inches across one way and 4 inches the
other. Paste a strip of thin cloth over the neck which includes the
entire space between the four corners marked A-A-A-A, and
over this cloth paste two more cloth strips in the spaces marked
B-B and B-B. The cloth strengthens the neck and prevents it
from tearing while the head is in motion. Carefully mark the[47]
[48]
[49]
features, copying them also on the right-hand side of the face (D).
Cut out the head, including flaps, and the ears along their outer
edge. Cut the line of the chin into each side of the neck as far as
the second strips of cloth (B-B and B-B). Roll the neck until it fits
loosely on your first finger, then paste it together like a ring. Paste
the tips of each side of the nose together, also those of the chin.
Cut a piece of blank white writing paper that is eight inches long and five inches wide to leave a generous margin. On it, draw Fig. 42, making the head six inches wide in one direction and four inches in the other. Paste a strip of thin fabric over the neck that covers the entire area between the four corners marked A-A-A-A, and on top of this fabric, paste two more strips in the spaces marked B-B and B-B. The fabric reinforces the neck and prevents it from tearing while the head is being moved. Carefully outline the features, also copying them on the right side of the face (D). Cut out the head, including the flaps and the ears along their outer edges. Cut the line of the chin into each side of the neck as far as the second strips of fabric (B-B and B-B). Roll the neck until it fits loosely on your first finger, then paste it together to form a ring. Glue the tips of each side of the nose together, as well as those of the chin.


Bend the flaps at the dotted line on the edge of the face and paste the other side of the face part way over the flaps, covering the spaces C-C-C-C. If the head seems too narrow, bend the paper out to make it appear wider. Roll an extra piece of writing-paper and fit it inside the head. Be sure that the roll lies evenly and is close up against the inside of the head; then bend out the ears, paste the paper lining in place and paint the entire head pink except the eyes and teeth. When the first color is dry, paint the markings on the ears red; the hair and eyebrows, markings for teeth and the eyes black; the lips, nose, chin and cheeks a brilliant red.
Bend the flaps at the dotted line on the edge of the face and stick the other side of the face partially over the flaps, covering the spaces C-C-C-C. If the head looks too narrow, bend the paper out to make it look wider. Roll up an extra piece of writing paper and fit it inside the head. Make sure the roll is even and pressed up against the inside of the head; then bend out the ears, glue the paper lining in place and paint the entire head pink except for the eyes and teeth. Once the first coat is dry, paint the markings on the ears red; the hair and eyebrows, as well as the markings for the teeth and the eyes black; and the lips, nose, chin, and cheeks a bright red.
The top of Punch’s head is open (Fig. 43), but we will cover it with a high, pointed cap, and the uncovered space where the chin comes forward beyond the neck will not be noticed when Punch is dressed, for the double ruffle around his neck hides all deficiencies. Make each arm of a roll of writing-paper pasted together along the edge. The roll must be about four and three-quarter inches long. Flatten and paste together one end of each arm, and on these flat ends draw the outline of a mitten, which will serve as a hand; when the paste is dry, cut out the mitten (Fig. 44). Paint the hands and arms pink.
The top of Punch’s head is open (Fig. 43), but we’ll cover it with a tall, pointed cap, and the gap where the chin sticks out beyond the neck won’t be noticeable once Punch is dressed because the double ruffle around his neck hides any flaws. Make each arm from a roll of writing paper glued together along the edge. The roll should be about four and three-quarter inches long. Flatten and glue one end of each arm, and on these flat ends, draw the outline of a mitten, which will act as a hand; when the glue is dry, cut out the mitten (Fig. 44). Paint the arms and hands pink.


The arms should fit loosely over the ends of your thumb and forefinger. Fig. 45 gives the pattern of
The sleeves should fit loosely over the ends of your thumb and forefinger. Fig. 45 shows the pattern of
Punch’s Dress
Punch's Outfit
Make it much larger, according to the dimensions given on patterns, and let it be of soft material in very bright, gay colors. The front and back are exactly alike, and the two pieces are sewed together at the sides, the seams extending to within two inches of the bottom of the skirt, leaving the sides split up that distance. Slide the paper arms up in the sleeves and fasten them in place at the top with a drop or two of glue. Make a wide, white double ruffle, slip it on Punch’s neck and push it up against the head. Then gather the top of the dress so that it will fit Punch’s neck, and fasten it on under the ruffle with strong glue, allowing the bottom of the paper neck to extend down below the gathered top of the dress. Make a high cap of brilliant red cloth to fit Punch’s head; trim it with a[51] turned up band of vivid green edged with white and glue the cap to the head. With a stitch or two or an elastic band fasten an inked paper lighter in his right hand to serve as a stick.
Make it a lot bigger, following the dimensions given on the patterns, and use soft material in really bright, cheerful colors. The front and back are identical, and the two pieces are sewn together at the sides, with the seams going up to two inches from the bottom of the skirt, leaving the sides split that much. Slide the paper arms into the sleeves and secure them in place at the top with a drop or two of glue. Create a wide, white double ruffle, put it around Punch’s neck, and push it up against the head. Then gather the top of the dress so it fits Punch’s neck and glue it underneath the ruffle securely, letting the bottom of the paper neck hang down below the gathered top of the dress. Make a tall cap from bright red fabric to fit Punch’s head; decorate it with a turned-up band of vivid green trimmed with white and glue the cap onto the head. With a stitch or two or an elastic band, attach an inked paper lighter in his right hand to act as a stick.

Now slip the first finger of your left hand up in Punch’s neck, run your thumb and second finger of the same hand in the paper arms, and make Punch turn and twist his head while he gesticulates with both arms. You will laugh before you know it, and be delighted with your funny old Punch (Fig. 46).
Now slide the first finger of your left hand up into Punch’s neck, use your thumb and second finger to move the paper arms, and make Punch turn and twist his head while he gestures with both arms. You'll find yourself laughing before you realize it, and you'll be entertained by your funny old Punch (Fig. 46).
Make Judy’s Head
Make Judy's Head
by the pattern used for the head of Punch, but omit the ears and cut off the ends of both nose and chin. They should not be so long for Judy. Strengthen the neck with cloth and fasten the head together as you did that of Punch. Make blond hair of two pieces of yellow tissue paper pasted in narrow irregular folds on the inside of the top opening of the head; then bring over and down on the outside as if combed loosely over Judy’s ears. Paste the lower ends of the paper hair above the neck on the back of the head. Paint Judy’s eyes blue. In all other respects than the details mentioned, make Judy’s head the same as you did that of Punch. Make her arms and hands the same, the double ruffle for the neck[52] the same, the dress the same cut but of contrasting color. Cut Judy’s cap from thin white material, make it circular and gather it entirely around, about one inch from the edge. Attach strings of the same material, and tie them under Judy’s chin (Fig. 47).
by the pattern used for the head of Punch, but leave out the ears and shorten both the nose and chin. They shouldn't be as long for Judy. Reinforce the neck with fabric and attach the head together like you did with Punch's. Create blond hair using two pieces of yellow tissue paper pasted in narrow, uneven folds inside the top opening of the head; then bring it over and down on the outside, as if loosely combed over Judy’s ears. Glue the ends of the paper hair above the neck on the back of the head. Paint Judy’s eyes blue. Aside from the details mentioned, make Judy’s head the same as Punch's. Make her arms and hands the same, use the same double ruffle for the neck, and give her a dress with the same cut but in a contrasting color. Cut Judy’s cap from thin white material, make it circular, and gather it completely around, about one inch from the edge. Attach strings of the same material, and tie them under Judy’s chin (Fig. 47).
The Baby
The Baby
must be quite light in weight. Make it of a piece of pink tissue paper about eight inches square. Draw the paper through your hands several times to crush it into small folds, then, while it is crushed together, double at the middle and wind a thread around near the folded end to form a neck, leaving half an inch above for the head. Gather a piece of white tissue paper around the baby’s neck to make its dress, and cut a straight strip of white tissue paper for the baby’s cap. Lay it flat on top of the head and bring the two ends down straight on each side of the face. Gather the cap at the back, add strings and fasten it on the baby’s head. Features may be marked on the face with paint, but be very careful not to use much water with the colors, for water will melt the tissue paper face.
must be quite light in weight. Make it out of a piece of pink tissue paper about eight inches square. Rub the paper between your hands several times to crush it into small folds, then, while it’s crumpled, fold it in half and wrap a thread around near the folded end to create a neck, leaving half an inch above for the head. Gather a piece of white tissue paper around the baby’s neck to create its dress, and cut a straight strip of white tissue paper for the baby’s cap. Lay it flat on top of the head and bring the two ends straight down on each side of the face. Gather the cap at the back, add strings, and secure it on the baby’s head. You can mark features on the face with paint, but be very careful not to use too much water with the colors, as water will dissolve the tissue paper face.
When All is Ready
When Everything is Set
slip Judy on one hand, Punch on the other hand, and make them talk and act to the best of your ability. Assume deep tones of voice when you talk for Punch, and high, shrill tones for Judy; make the play short, full of life and action, and as funny as possible. Of course, you will have to practise with Punch, Judy and the baby in front of a mirror before giving your show in order to see how they will look as you make them act, and to learn just how to manage them.
slip Judy on one hand, Punch on the other hand, and make them talk and act to the best of your ability. Use deep tones of voice for Punch and high, sharp tones for Judy; keep the play short, lively, and as funny as possible. Of course, you’ll need to practice with Punch, Judy, and the baby in front of a mirror before your show to see how they’ll look as you make them act and to figure out how to manage them.
Drama of Punch and Judy
Punch and Judy Show
Punch (below): Wait a minute, sha’n’t be long putting on my new boots (pops up singing). Trala-la-la-la-la-la-la. Hello, there! Watch me dance (dances, singing a lively tune to music; music stops and he leans down, calls below). Judy! Judy! Judy, come here.
Punch (below): Hold on, it won't take me long to put on my new boots (pops up singing). Trala-la-la-la-la-la-la. Hey there! Check out my dance (dances, singing a lively tune to music; music stops and he leans down, calls below). Judy! Judy! Judy!, come here.
Judy (pops up): Well, Mr. Punch; what do you want? I’m dreadfully busy just now.
Judy (pops up): So, Mr. Hit; what do you need? I'm really busy right now.
Punch: Oh! nothing, only want to know if you’d like a box of French candy, the delicious kind that melts in your mouth; but never mind, I can get it for you next Christmas (Punch turns his back and walks off).
Punch: Oh! It's nothing, just wondering if you'd like a box of French candy, the kind that melts in your mouth; but never mind, I can get it for you next Christmas (Punch turns his back and walks off).
Judy (running after Punch): Punchy-munchy, I wish I had it now; do, Punchy, give it to me.
Judy (running after Punch): Punchy-munchy, I wish I had it right now; come on, Punchy, give it to me.
Punch (turning): You must give me a kiss first (they hug each other and have a merry time dancing and singing to lively music).
Hit (turning): You have to give me a kiss first (they hug each other and enjoy themselves dancing and singing to upbeat music).
Judy: Oh! Oh! I forgot the baby. I’ll go and get him (disappears).
Judy: Oh no! I forgot the baby. I’ll go get him (disappears).
Punch (calling after her): Well, hurry up, and don’t forget our dog Toby (calls). Toby! Old dog Toby—come and jump over my stick (bangs his stick about, striking everything, accidentally strikes his nose). Oh! Oh! Oh! my poor nose, my best Sunday nose, my beautiful long nose (calls). Judy! J-u-d-y, where’s the baby? (Enter Judy with baby).
Punch (calling after her): Come on, hurry up, and don’t forget our dog. Toby (calls): Toby! Hey, old dog Toby—come and jump over my stick! (bangs his stick around, accidentally hitting his nose). Oh! Oh! Oh! My poor nose, my best Sunday nose, my beautiful long nose! (calls). Judy! J-u-d-y, where's the baby? (Enter Judy with baby).
Judy: Here, Punch; catch him (tosses baby to Punch, who catches him; dances about, then tosses the baby back to Judy, who fails to catch him).
Jude: Here, Hit; catch him (tosses baby to Punch, who catches him; dances around, then tosses the baby back to Judy, who misses the catch).
Judy: Punch! Punch! Where’s the baby?
Judy: Punch! Punch! Where's the baby?
Punch: Gone down-stairs. I’ll fetch him up (disappears).
Punch: Gone downstairs. I'll go get him (disappears).
Judy: Just think! the little dear went down-stairs all alone!
Judy: Can you believe it? The little one went downstairs all by herself!
(Punch reappears.)
(Punch comes back.)
Punch: Here’s the little darling; pity his nose is not longer. Do you think it will grow, Judy? (baby cries; Punch tosses him up in the air singing). He didn’t dance, dance, dance; he didn’t dance all day nor yesterday.
Hit: Here’s the little cutie; too bad his nose isn’t longer. Do you think it will grow, Judy? (baby cries; Punch tosses him up in the air singing). He didn’t dance, dance, dance; he didn’t dance at all yesterday or today.
(Judy tries to catch the baby.)
(Judy tries to catch the baby.)
Punch: Take him! Now we will both sing while I keep time with my stick. Begin, I say; quick, hurry, quick! (Judy runs away with the baby while Punch is talking and not watching her; turning, Punch finds himself alone).
Hit: Grab him! Now we’ll both sing while I keep the beat with my stick. Start, I’m telling you; come on, hurry up, quick! (Judy runs off with the baby while Punch is talking and not paying attention; turning, Punch finds himself alone).
Punch (calls): Baby! Baby! Come and see your daddy’s beautiful nose (baby is tossed up from below). See! See! my boy can fly through the air (knocks with his stick, then calls). Judy! Why don’t you come? (Judy appears with baby, walks back and forth).
Punch (calls): Baby! Baby! Come check out your daddy’s beautiful nose (baby is tossed up from below). Look! Look! my boy can fly through the air (knocks with his stick, then calls). Judy! Why aren’t you coming? (Judy appears with baby, walks back and forth).
Judy: I must get this child to sleep.
Judy: I need to get this kid to sleep.
Punch: Nonsense, I’ll amuse him (grabs child and disappears with him; baby heard crying, “Mama! I want my Mama!”).
Hit: Nonsense, I’ll entertain him (grabs child and disappears with him; baby can be heard crying, “Mama! I want my Mama!”).
Judy: Just listen to that (waves her arms frantically around and disappears.)
Judy: Just listen to that! (waves her arms frantically around and disappears.)
Punch (reappearing with a flag in each hand): We haven’t given you our flag dance. Judy! girl, come along.
Hit (reappearing with a flag in each hand): We still haven't shown you our flag dance. Judy! Come on, girl.
Judy (jumps up with a flag in each hand): Hush, Punch, you’ll wake the baby.
Judy (jumps up with a flag in each hand): Be quiet, Punch, you'll wake the baby.
Punch: Now let’s dance. (The music plays and the two dance and sing some popular air, then together bow to the audience, saying:) Good-by little girls and boys, good-by, everybody. We’ve had such a good time. Good-by, good-by.
Hit: Now let’s dance. (The music plays and the two dance and sing a popular song, then together bow to the audience, saying:) Goodbye little girls and boys, goodbye, everyone. We’ve had such a great time. Goodbye, goodbye.
The flags may be of home or store manufacture, but they must be fastened on paper sticks, made like Punch’s paper-lighter stick. They can all be American flags, or three other nations may be represented, or each flag can be of solid color, differing from all the others, as red, green, yellow and blue.
The flags can be made at home or purchased, but they need to be attached to paper sticks, similar to Punch’s paper-lighter stick. They can all be American flags, or represent three different countries, or each flag can be a solid color that’s different from the others, like red, green, yellow, and blue.
If a companion will help with the show by taking complete charge of Judy while you attend to Punch, the management will be much easier, for then you will have only one doll to make talk and act.
If someone can help with the show by taking full responsibility for Judy while you focus on Punch, it will make managing things much easier since you’ll only have one doll to voice and animate.
CHAPTER V
HALLOWE’EN MERRYMAKING
Novel Ways of Telling Fortunes
Creative Fortune Telling Methods

Ask the fairies, gnomes and elves to your Hallowe’en frolic; they will be delighted to come, though of course, you cannot invite them in the usual fashion. Instead of writing notes, you must braid three
Ask the fairies, gnomes, and elves to your Halloween party; they will be thrilled to join, but of course, you can’t invite them in the usual way. Instead of writing notes, you must braid three
Invitation Rings of Grass—
Invitation to Grass Rings—
fresh grass is best, but the dried will do—and hang the rings on bushes (Fig. 48), or lay them on the outside window-sill, making a wish on each grass ring as it is put into place. To insure the fulfilment of the wish, you must not see the rings again until after Hallowe’en. The fairy troupe will find the green circles as they come floating along through the air on gay-colored bubbles[56] from the magic spring waters of Fairyland. During the last days of October fairies are always looking for such invitations.
Fresh grass is the best, but dried grass will work too—just hang the rings on bushes (Fig. 48), or place them on the outside window sill, making a wish with each grass ring as you set it down. To make sure your wish comes true, you shouldn’t see the rings again until after Halloween. The fairies will discover the green circles as they float by on colorful bubbles[56] from the magical spring waters of Fairyland. During the last days of October, fairies are always on the lookout for such invitations.

Here are some of the ceremonies and games newly revealed to me by the old witch who lives in the black clouds that sail southward on the northwest wind.
Here are some of the ceremonies and games newly revealed to me by the old witch who lives in the dark clouds that move southward on the northwest wind.
Black Cats,
Black Cats,
the friends and companions of witches, are wonderful creatures to conjure with, but all cats can work a charm, and it is cats, or preferably kittens, you must have for the first rite. There must be a pussy in hiding for each girl and boy present at the Hallowe’en frolic. With different colored bright ribbons tie a tinkling bell around the neck of every cat, leaving one end of the ribbon one yard long. Seat your Hallow-e’en guests in a semicircle around the room. Ask them to sit quietly for a few moments, and suddenly put out the lights. With the room in total darkness let absolute stillness ensue for a second; then say very slowly and distinctly:
the friends and companions of witches are amazing beings to summon, but every cat can cast a spell, and it's cats, or better yet, kittens, that you need for the first ritual. There should be a kitty hidden for each girl and boy at the Halloween party. Use brightly colored ribbons to tie a jingling bell around the neck of each cat, leaving one end of the ribbon one yard long. Arrange your Halloween guests in a semicircle around the room. Ask them to sit quietly for a moment, then suddenly turn off the lights. Once the room is completely dark, let complete silence settle for a second, then say very slowly and clearly:

“Hold out your right hand and there will come to each one of you a disguised gnome or fairy. Be very gentle and kind to the little creature (here pause for a moment); for if by any[57] chance ill befall the disguised sprite the fairies will be angry and will do nothing for you until next Hallowe’en.” Again pause; then say: “So I caution you once more—be kind and gentle.”
“Hold out your right hand and a disguised gnome or fairy will appear to each of you. Be very gentle and kind to the little creature (pause here for a moment); because if anything bad happens to the disguised sprite, the fairies will be angry and won't help you until next Halloween.” Pause again; then say: “So I warn you once more—be kind and gentle.”
Have some one keep the kittens near by, in readiness, so that you may lead all into the darkened room without a moment’s delay. Hold the ends of the ribbons in one hand while with the other you take one ribbon at a time, and as you pass along the line place it in the outstretched hand of each successive guest, saying as you do so, “Hold fast this magic clue.” The instant the last ribbon has been given to a guest, turn on the lights and while the girls and boys are looking with surprise at the little creature they hold captive and laughingly exchanging comments, you must pin a piece of white tape on the floor across one end of the room about four feet from the wall. Request the guests to kneel, with their funny little gnomes, in a row on the enclosed space next to the wall, and face the tape. Announce that there will now take place the race of fate. Each player must hold his or her pussy with its fore paws directly on the tape, and at a given signal all the girls and boys must exclaim in unison, “Run!” at the same time releasing the kittens that they may scamper away in any direction they choose. The guests should remain stationed back of the tape line and watch them as they scatter wildly over the room trailing their bright streamers. No one may touch or in any way molest a kitten after the signal has been given to let them go. The girl or boy whose pussy first reaches the centre of the room, which has previously been marked with a second strip of tape, will be the first to marry.
Have someone keep the kittens nearby, ready, so you can lead everyone into the darkened room without any delay. Hold the ends of the ribbons in one hand and with the other, take one ribbon at a time, and as you move down the line, place it in the outstretched hand of each guest, saying, “Hold on to this magic clue.” As soon as the last ribbon has been given out, turn on the lights. While the girls and boys look at the little creature they hold and laugh while chatting, you should pin a piece of white tape on the floor across one end of the room about four feet from the wall. Ask the guests to kneel with their funny little gnomes in a row in the marked space next to the wall, facing the tape. Announce that the race of fate will now begin. Each player must hold their kitten with its front paws directly on the tape, and at a given signal, all the girls and boys must shout in unison, “Run!” while releasing the kittens to scamper in any direction they want. The guests should stay behind the tape line and watch as the kittens scatter wildly around the room, trailing their bright streamers. No one is allowed to touch or interfere with a kitten after the signal has been given. The girl or boy whose kitten reaches the center of the room first, which has been marked with a second strip of tape, will be the first to marry.
Do not wait for the other kittens to make the goal, but gather up the little creatures and lead them away to be seen no more, or the spell will be broken.
Do not wait for the other kittens to score the goal, but gather up the little creatures and take them away out of sight, or the spell will be broken.
Old shoes possess strange and occult powers as we all know, else why should we throw them after the coach of a newly wedded couple? So we must have a
Old shoes have weird and mysterious powers, as we all know, otherwise why would we throw them after the carriage of a newly married couple? So we need to have a
Pair of Old Slippers
Old Slippers
After the last cat has disappeared, bring out the slippers; any kind except toy ones will do. Place the slippers on a sheet of white paper laid on the top of a table where all present may see.
After the last cat has vanished, bring out the slippers; any kind except toy ones will work. Set the slippers on a sheet of white paper placed on the table where everyone can see.

Explain to the girls and boys that they must take one turn each in trying their fortunes by putting one slipper crosswise on top of the other, both right side up (Fig. 49), and while holding them so, repeat the following verse:
Explain to the girls and boys that they should take turns trying their fortunes by placing one slipper crosswise on top of the other, both facing right side up (Fig. 49), and while holding them this way, say the following verse:
Lift the paper and give the slippers a slight upward toss to fall on the floor as they may, and the manner in which they reach the floor indicates the fortune:
Lift the paper and toss the slippers lightly upward to let them fall to the floor however they might, and the way they land reveals your fortune:
When both slippers land upside down and do not touch, the player will be a great traveller and have no settled home.
When both slippers land upside down and don’t touch, the player will be a great traveler and have no permanent home.
When both slippers land right side up and do not touch, the player will go on the stage.
When both slippers land right side up and don’t touch, the player will take the stage.
When the right slipper is upside down, the future mate will be cross and selfish.
When the right slipper is upside down, the future partner will be angry and self-centered.
When the left slipper is upside down, the future mate will be unselfish and kind.
When the left slipper is turned upside down, the future partner will be generous and kind.
When the slippers are crossed there will be an early marriage.
When the slippers are crossed, it means there will be a quick marriage.


When the toes of the slippers point in opposite directions, there will be decided difference of opinion between husband and wife (Fig. 50).
When the toes of the slippers point in different directions, there will be a clear disagreement between husband and wife (Fig. 50).
When the toes of the slippers point in the same direction, husband and wife will be very congenial (Fig. 51).
When the toes of the slippers point in the same direction, husband and wife will get along very well (Fig. 51).
When the soles cross, lying one on top of the other, the player will own a gold mine.
When the soles cross, lying one on top of the other, the player will possess a gold mine.
Cups and Bowls
Cups and Bowls
have supernatural power on this night and exercise a peculiar influence over marbles placed under them; consequently you must get three china cups and three marbles, a crystal (clear glass marble), a commie (ordinary brown marble), and a china (a white marble crossed by different colored lines).
have supernatural power on this night and exert a unique influence over marbles placed beneath them; therefore, you need to get three china cups and three marbles: a crystal (clear glass marble), a commie (regular brown marble), and a china (a white marble with different colored stripes).
Set three cups in a row (Fig. 52), under one place a “crystal,” under another a “commie,” and under the last a “china.” Blindfold each player in turn and let the girl or boy raise one of the cups. If the marble under the lifted cup is the crystal, the husband or wife will be young and life will be easy and full of sunshine. If it is the china, the husband or wife will be middle aged[60] and life will be hard but famous. If the commie, the husband or wife will be old, and life will be filled with adventure. The marbles must be changed into different cups after blindfolding each player.
Set three cups in a row (Fig. 52), under one place a “crystal,” under another a “commie,” and under the last a “china.” Blindfold each player in turn and let the girl or boy lift one of the cups. If the marble under the lifted cup is the crystal, the husband or wife will be young and life will be easy and full of sunshine. If it is the china, the husband or wife will be middle-aged[60] and life will be tough but famous. If it’s the commie, the husband or wife will be old, and life will be filled with adventure. The marbles must be switched into different cups after blindfolding each player.

As no Hallowe’en ceremonies are complete without
As no Halloween celebrations are complete without
The Apple,
The Apple,
there must be a dish of apples and a box of wooden toothpicks.
there must be a bowl of apples and a box of wooden toothpicks.
With the apples and toothpicks you can ascertain for your guests the nationality of their future mates.
With the apples and toothpicks, you can help your guests figure out the nationality of their future partners.


Give every one an apple and a wooden toothpick. Each player may push the toothpick in any part of the apple; the spot occupied by the toothpick tells the fortune, but the apple must be kept in one position, and on no account turned after the toothpick is once in. When all have inserted the toothpicks[61] each boy and girl in turn must hold up his or her apple that all may see while you read the fortune.
Give everyone an apple and a wooden toothpick. Each player can push the toothpick into any part of the apple; the spot where the toothpick is placed reveals the fortune, but the apple must stay in one position and must not be turned after the toothpick goes in. Once everyone has inserted their toothpicks[61], each boy and girl must take turns holding up their apple so everyone can see while you read the fortune.
When the toothpick stands straight and erect in the top of the apple, the life partner will be an American (Fig. 53); if in the left side of the apple, the mate will be English (Fig. 54); in the right side, French (Fig. 55), in the back, German; in the front, Italian; sideways at the top of the apple, the mate will be a West Indian; sideways in the right side, the mate will be a Japanese; in the left side, a Russian; in the front, Spanish. When the toothpick breaks the player will not marry.
When the toothpick stands straight up in the top of the apple, the life partner will be American (Fig. 53); if it’s on the left side of the apple, the partner will be English (Fig. 54); on the right side, French (Fig. 55); at the back, German; at the front, Italian; sideways at the top of the apple, the partner will be West Indian; sideways on the right side, the partner will be Japanese; on the left side, a Russian; at the front, Spanish. When the toothpick breaks, the player will not marry.

Now comes the fun of forecasting to learn where the wedding will take place, so prepare for
Now comes the exciting part of figuring out where the wedding will happen, so get ready for
The Wedding Race
The Wedding Race
For this you must have a card like Fig. 56; fill in the spaces under “The way you go” with the following words according to the numbers: (1) Walk slowly,(2) Walk backward, (3) Walk on toes, (4) Walk on heels, (5) Run, (6) Walk fast, (7) Skip, (8) Walk without raising feet, (9) Run on toes, (10) Walk on toes of one foot and the heel of the other, (11) Run on heels, (12) Walk sideways.
For this, you need a card like Fig. 56; fill in the spaces under “The way you go” with the following words based on the numbers: (1) Walk slowly, (2) Walk backward, (3) Walk on your toes, (4) Walk on your heels, (5) Run, (6) Walk fast, (7) Skip, (8) Walk without lifting your feet, (9) Run on your toes, (10) Walk on the toes of one foot and the heel of the other, (11) Run on your heels, (12) Walk sideways.
In the spaces under “Wedding” insert: (1) Church, (2) On shipboard, (3) Boarding[62] house, (4) Hotel, (5) Home, (6) Friend’s home, (7) Top of mountain, (8) Minister’s house, (9) Tent, (10) Out of Doors, (11) Courthouse, (12) Cave. Inform the guests that each in turn must go the length of the room. He or she may walk slowly, walk fast, walk sideways, walk backward, walk on toes, walk on heels, walk on the toes of one foot and the heel of the other, etc., etc.
In the sections under “Wedding,” insert: (1) Church, (2) On a ship, (3) Boarding house, (4) Hotel, (5) Home, (6) Friend’s house, (7) Top of a mountain, (8) Minister’s house, (9) Tent, (10) Outdoors, (11) Courthouse, (12) Cave. Let the guests know that each person will take turns walking the length of the room. They can walk slowly, quickly, sideways, backward, on their toes, on their heels, or even on the toes of one foot and the heel of the other, etc., etc.
If many guests are present, start two at a time crossing the
room, one from each end. Write the initial of every player on
the line of the card corresponding to the manner in which he or
she crosses the room; for example, if the first player’s name is
Barbara Carter, and she runs across the room, put down her
initials B. C. on the line No. 5 on which is written the word
“Run.” If the second player’s name is Jamie Bartlett and he also
runs write his initials J. B. on the same line of the card, but,
should Jamie decide to go backward across the room his initials
would then belong on line No. 2. When all the girls and boys
have crossed the room, and quiet again reigns, read to them the
various places where the different players will be married, for instance,
if referring to your card you find the initials of Jessie
Douglass on line No. 12, you should read, “Because Jessie
Douglass walked sideways across the room, she will be married
in a cave. Won’t that be romantic?” Always add some pleasant
remark after reading each record; such remarks make things
run easier and add to the fun. Probably you will be able to
think of many delightful little speeches, but in case you find any
difficulty, the following list may be of some assistance. Remark
for line No. 1: There could not be a better place. No. 2, How
charming. No. 3, Better there than not at all. No. 4, I wonder
if that will be a runaway match. No. 5, The dearest spot on
earth. No. 6, A friend in need is a friend indeed. No. 7, I[63]
[64]
[65]
hope we will all be invited. No. 8, An elopement, you may be
certain. No. 9, Delightful. So gypsy-like. No. 10, I am sure
there will be room for us all at this wedding. No. 11, Many a
happy marriage has taken place in a court-house. No. 12, Won’t
that be romantic?
If there are a lot of guests, start two people at a time crossing the room, one from each end. Write the initials of each player on the line of the card that corresponds to how they cross the room; for example, if the first player's name is Barbara Carter and she runs across, write her initials B. C. on line No. 5, which says “Run.” If the second player is Jamie Bartlett and he also runs, write his initials J. B. on the same line of the card, but if Jamie decides to go backward across the room, his initials would go on line No. 2. Once all the girls and boys have crossed the room and it's quiet again, read to them the different places where the various players will be married. For example, if you see Jessie Douglass's initials on line No. 12, you should say, “Since Jessie Douglass walked sideways across the room, she will be married in a cave. Won’t that be romantic?” Always add a nice comment after reading each record; these remarks make things flow smoothly and increase the fun. You might come up with lots of charming little comments, but if you're having a hard time, the following list might help. Comment for line No. 1: There couldn’t be a better place. No. 2: How charming. No. 3: Better there than not at all. No. 4: I wonder if that will be a runaway match. No. 5: The dearest spot on earth. No. 6: A friend in need is a friend indeed. No. 7: I hope we will all be invited. No. 8: An elopement, you can be sure. No. 9: Delightful. So gypsy-like. No. 10: I’m sure there will be room for all of us at this wedding. No. 11: Many happy marriages have taken place in a courthouse. No. 12: Won’t that be romantic?
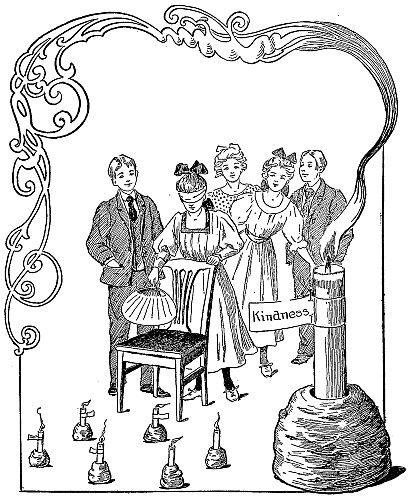
The communicative old witch of the northwest wind imparted so many methods of Hallowe’en fortune telling you can take your choice. Here are the rest just as she told them.
The chatty old witch of the northwest wind shared so many ways to tell your fortune on Halloween that you can pick your favorite. Here are the rest exactly as she explained them.
The Vesper Rite,
The Evening Ceremony,
if observed with due solemnity, will disclose the principal characteristics of any one submitting to the test.
If looked at seriously, it will reveal the main traits of anyone taking the test.
Take six large potatoes and cut them in half. Shape each half into a candlestick by scooping out a round hole in the small end, making it large enough to hold a candle.
Take six large potatoes and cut them in half. Shape each half into a candlestick by scooping out a round hole in the small end, making it big enough to hold a candle.
Place a half candle in each of the potato candlesticks and pin around each candle a strip of paper on which is written one word indicating a trait of character, such as “modesty,” “bashfulness,” “vanity,” etc.
Place a half candle in each of the potato candlesticks and attach a strip of paper around each candle with a word written on it that describes a character trait, such as “modesty,” “bashfulness,” “vanity,” etc.
Then form a magic ring of the candles in the centre of a dimly lighted room. The ring should be about three feet in diameter.
Then create a circle of candles in the center of a softly lit room. The circle should be about three feet in diameter.
Blindfold one of the players and have the entire party join hands and run three times around the lighted candles.
Blindfold one of the players and have everyone in the group hold hands and run around the lit candles three times.
Then, leaving the blindfolded player standing two feet from and facing the ring, let the others fall back while a chair is placed before her, a fan is handed to her and she is told to make three trials at fanning out the candles over the back of the chair.
Then, leaving the blindfolded player standing two feet away from and facing the ring, let the others step back while a chair is placed in front of her, a fan is given to her, and she is told to try fanning out the candles over the back of the chair three times.
After the third trial she must remove the bandage from her eyes and examine the papers on the candles that are left burning, reading aloud the words which reveal her character.
After the third trial, she needs to take off the blindfold and look at the papers on the candles that are still burning, reading the words out loud that show her true character.
To avoid any danger of skirts catching fire, care must be taken that no one approaches the candles too closely after they are lighted.
To prevent any risk of skirts catching fire, it's important to ensure that no one gets too close to the candles once they are lit.
Another game is called the
Another game is known as the
Bean Bag Test
Bean Bag Challenge
Into a bag that will hold four or five quarts, pour three quarts of dried beans and in their midst hide a ring, a thimble and a brass button.
Into a bag that can hold four or five quarts, pour three quarts of dried beans and hide a ring, a thimble, and a brass button among them.
Have ready a bright new tin cup and let each player in turn dip into the bag and take out a cupful of beans which must be emptied into a plate.
Have a shiny new tin cup ready and let each player take turns dipping into the bag to grab a cupful of beans, which should be emptied onto a plate.
If either a girl or boy finds the ring in the beans it is a sign of an early marriage. If a girl gets the thimble she will be an old maid, and when the thimble falls to the lot of a boy he will marry an old maid.
If a girl or a boy finds the ring in the beans, it's a sign they’ll marry young. If a girl gets the thimble, she’ll end up an old maid, and if a boy gets the thimble, he’ll marry an old maid.
The brass button in a girl’s cup of beans denotes that she will marry a widower, but in a boy’s cup it is a bachelor’s button and shows that he will be a bachelor all his life and will sew on his buttons himself.
The brass button in a girl’s cup of beans means she will marry a widower, but in a boy’s cup, it’s a bachelor’s button, which indicates that he’ll remain a bachelor for life and will have to sew on his own buttons.
Each player can have but one trial, and if only beans fall to her share, it signifies that her fate is still undecided.
Each player gets only one chance, and if all that comes her way are beans, it means her fate is still uncertain.
Here is another test called
Here’s another test called
The Witch Screen
The Witch Screen

Across the end or corner of the room fasten a breadth of inexpensive cloth for the witch screen; old muslin or any material most convenient will answer the purpose if not too thin. Through the lengthwise centre of the cloth cut two[67] slits for each player. Fig. 57 has eight slits and is intended for four players. Seat the company in a row near to and facing the witch screen, adjust it so that the slits will come on a level with the hands of the players, then, standing behind the screen and looking over the top, say, “I have some wonderful treasures which the witches have loaned us for this evening, but, as the objects are very valuable and must be returned, I ask that you use the utmost caution in handling them, and take great care not to drop or break any of the things while passing them from one to another down the line.
Across the end or corner of the room, attach a piece of inexpensive fabric for the witch screen; old muslin or any available material will work as long as it's not too thin. Cut two slits down the middle of the fabric for each player. Fig. 57 has eight slits and is meant for four players. Seat everyone in a row near and facing the witch screen, adjusting it so the slits align with the players' hands. Then, standing behind the screen and looking over the top, say, “I have some amazing treasures that the witches have lent us for tonight, but since these items are very valuable and need to be returned, I ask that you handle them with the utmost care, making sure not to drop or break anything while passing them along the line."

“The first charm is
“The first charm is”
A Piece of Lava
A Piece of Lava
brought from Mt. Pelee in a witch’s pocket (Fig. 58). If you will all kindly slip both of your hands through openings directly opposite you in the witch screen (Fig. 59), you may have the pleasure of passing the lava from one to another. Receiving and giving the lava according to rule means a successful year, but woe to the one who drops it, for to him will come disappointment.”
brought from Mt. Pelee in a witch’s pocket (Fig. 58). If you all kindly slip both of your hands through the openings directly in front of you in the witch screen (Fig. 59), you can enjoy passing the lava from one person to another. Receiving and giving the lava according to the rules means a successful year, but woe to the person who drops it, for disappointment will come to them.

After you have made your little speech, sit down and, hidden by the screen, take from a tray at your side a hot potato (Fig. 58), which has been in the oven only long enough to become thoroughly heated; place it in the hand at the head of the line with the words, “I give you the charmed lava; pass it on.” Though the girls and boys may not see what they have, they can assuredly feel it, and there comes in the fun, for each in turn will be sorely tempted to drop the hot potato and yet not dare to do so, and no hint being given, the next neighbor will in turn be equally startled. When the lava reaches the last player, some one back of the screen at that end must receive the precious object and store it away on a tray.
After you've finished your little speech, sit down and, out of sight of the audience, grab a hot potato (Fig. 58) from a tray next to you that’s been warmed up just enough. Hand it to the person at the front of the line while saying, “I give you the charmed lava; pass it on.” Even though the kids can’t see what they’ve got, they can definitely feel it, and that’s where the fun is, because each person will be tempted to drop the hot potato but won’t want to. Since no hints are given, the next person will be equally surprised. When the lava gets to the last player, someone behind the screen on that end needs to take the precious item and set it on a tray.

As soon as the hot lava is disposed of, arise and tell the company that the next charm is a piece of
As soon as the hot lava is taken care of, get up and tell everyone that the next charm is a piece of
Wonderful Japanese Crystal
Amazing Japanese Crystal
(Fig. 60). It will enable them to see and understand everything more quickly and clearly; it will also gain new friends and delightful surprises. To drop the crystal brings dulness of comprehension, no friends and no surprises. Use a piece of ice for this. The third charm is a rare natural history specimen, called
(Fig. 60). It will allow them to see and understand everything more quickly and clearly; it will also attract new friends and delightful surprises. Dropping the crystal leads to a dull understanding, no friends, and no surprises. Use a piece of ice for this. The third charm is a rare natural history specimen, called

The Baby Porcupine
The Baby Porcupine
A Harmless Serpent
A Friendly Snake
forms the fourth charm; it renders all girls and boys proof against fear of wild animals, and imparts the faculty of taming and making pets of many inhabitants of the forest, but the charm will be lost with one failing to pass it on its way. The serpent is a snake made of soft dough.
forms the fourth charm; it makes all girls and boys immune to the fear of wild animals, and gives them the ability to tame and make pets of many creatures in the forest, but the charm will be lost if someone fails to pass it on in its journey. The serpent is a snake made of soft dough.
One of the best fairy gifts is
One of the best fairy gifts is
A Treasure from the Great Blue Sea
A Treasure from the Great Blue Sea
It means a joyous ocean voyage to new and beautiful lands, but if dropped, the player will encounter storms and perils. Hand the first player a slippery raw oyster.
It means a joyful ocean journey to new and beautiful places, but if it slips, the player will face storms and dangers. Give the first player a slippery raw oyster.
When all the charms have been tested, announce that before returning the treasures to the witches you will place them on exhibition; then turn back the witch screen and let the girls and boys gather around the tray of queer charms, where they can laugh and exchange comments to their hearts’ content. The effect of the witch screen may be enhanced by using a breadth of brilliant-red muslin and pasting on it black moons, stars, cats, etc. Erect at each end of the screen a comic pumpkin lantern head, with white paper fastened on the inside over the features to light them up, instead of a real light placed inside. Slide each pumpkin head on the end of a pole, and rest the pumpkin firmly on four long, strong nails driven in around near the top of the pole. The lower end of each pole may be steadied and supported by being inserted in a hole bored through the centre of a heavy piece of plank, where it must form a very tight fit; or you can sink the pole into a deep pail of stones and earth.[70] If it is possible to have the only light in the room placed back of the screen, the effect produced will add to the mystery and enchantment. Make all decorations as funny as you like, but avoid anything grotesquely unpleasant. Let every item be agreeable, from the least to the most important arrangement for the evening’s fun.
When all the charms have been tested, announce that before returning the treasures to the witches, you will put them on display. Then pull back the witch screen and let the girls and boys gather around the tray of unusual charms, where they can laugh and share comments at their leisure. The effect of the witch screen can be enhanced by using a wide piece of bright red muslin and pasting black moons, stars, cats, and so on onto it. At each end of the screen, set up a funny pumpkin lantern head, with white paper attached inside to highlight the features instead of using a real light inside. Slide each pumpkin head onto the end of a pole and secure the pumpkin firmly on four long, strong nails driven in around the top of the pole. The lower end of each pole can be steadied and supported by inserting it into a hole bored through the center of a heavy piece of plank, ensuring a very tight fit; or you can sink the pole into a deep bucket of stones and dirt.[70] If you can place the only light in the room behind the screen, the resulting effect will add to the mystery and charm. Make all decorations as entertaining as you like, but avoid anything that is grotesquely unpleasant. Let every item be pleasant, from the smallest to the most significant arrangement for the evening’s enjoyment.
A very pretty way of telling fortunes is with
A really nice way to tell fortunes is with
Fairy Airships
Fairy Airships
made of feathers. Take as many fluffy feathers as there are girls and boys in the party and paste on each feather a prophecy written on a bit of paper, such as:
made of feathers. Take as many fluffy feathers as there are girls and boys at the party and stick a prophecy written on a small piece of paper to each feather, such as:
- Yes,
- No,
- Sometime,
- Possibly,
- Never,
- At twenty-five,
- Probably,
- Depends on myself,
- If I can,
- I’ll try,
- When the time comes,
- Of course,
- Three times,
- Before you know it,
- Not if I can help it,
- Certainly,
- Doubtful,
- Surely.
Put all the fairy airships into a pasteboard box-lid, which you have previously punched full of holes, and, standing on a stool or chair, hold the box-lid high in the air while you slowly and impressively say to the company: “These fairy airships will decide your fate regarding marriage. Will you marry?” At the word “marry” launch the ships of fate by fanning vigorously under the box-lid with a large palm-leaf fan, which will send the ships flying in every direction; as they sail through the air each player must endeavor to catch one before it falls.
Put all the fairy airships into the lid of a cardboard box that you’ve already poked full of holes. Then, standing on a stool or chair, hold the lid high in the air while you slowly and dramatically say to everyone: “These fairy airships will determine your fate when it comes to marriage. Will you marry?” As you say the word “marry,” launch the ships of fate by fanning vigorously under the box lid with a large palm-leaf fan, which will send the ships flying in every direction. As they fly through the air, each player must try to catch one before it falls.
When order has been restored and all have their airships, each[71] girl and boy in turn must read aloud the prophecy brought by the fairy vessel.
When order has been restored and everyone has their airships, each[71] girl and boy must take turns reading aloud the prophecy brought by the fairy ship.
All the party will enjoy the
All the party will enjoy the
Blarney Stone Game
Blarney Stone Game
Place a large, clean stone on a doily-covered fancy plate which rests on a table in the centre of the room, and tell your guests that a certain spell cast on the famous Blarney Stone in Ireland caused the virtues of that wonderful stone to be transmitted to the stone in the very room where they stand, and that if a girl or boy, when blindfolded, can walk up to the table and kiss the Hallowe’en Blarney Stone, she or he will ever after be jolly and happy and prove a most agreeable companion. Then tie a handkerchief across the eyes of each of the players in turn and let them walk up to and try to kiss the stone before the witches come to take away the magic spell, which they will do long before the clock strikes twelve at midnight.
Place a large, clean stone on a fancy plate covered with a doily, which sits on a table in the center of the room. Tell your guests that a special spell cast on the famous Blarney Stone in Ireland transferred its amazing qualities to the stone in the room where they are standing. Explain that if a girl or boy, while blindfolded, can walk up to the table and kiss the Hallowe’en Blarney Stone, they will be happy and cheerful forever and will be a delightful companion. Then, tie a handkerchief around the eyes of each player in turn and let them approach and try to kiss the stone before the witches come to take away the magic spell, which they will do well before the clock strikes midnight.
During the evening be sure to try fortunes by the
During the evening, be sure to try your luck with the
Fortune Jingle
Fortune Jingle
On different sheets of paper write one of the following verses:
On separate sheets of paper, write one of the following lines:
Place each verse in a separate envelope and hang all on a string stretched and tied to the backs of two chairs. Distribute squares of paper each marked with a number beginning at number one. The player receiving number one has first choice of envelopes from the line. Two brings second choice, and so on. When all missives have been taken and the signal given for opening the envelopes, the player receiving verse one reads aloud, “One is good fortune”; immediately after the person with number two reads, and the other verses follow in numerical succession, every envelope bringing its gift to the recipient.
Place each verse in a separate envelope and hang them all on a string tied between the backs of two chairs. Hand out squares of paper, each marked with a number starting from one. The player who gets number one has the first pick of envelopes from the line. Number two gets the second pick, and so on. Once all the envelopes have been chosen and the signal to open them is given, the player with verse one reads aloud, “One is good fortune”; right after, the player with number two reads, and the other verses follow in order, with each envelope delivering its gift to the recipient.

CHAPTER VI
DANCE OF TITANIA, QUEEN OF THE FAIRIES

Have Titania’s Stage Ready
Prepare Titania’s Stage
that she may not be kept waiting, for queens and fairies will brook no delay (Fig. 62). Find a wooden box 18½ inches long by 13 inches wide or larger (Fig. 63). With a heavy hammer or a hatchet pry up and knock off the top and one of the long sides (Fig. 64). The open side forms the front of the roofless stage.
that she may not be kept waiting, because queens and fairies won’t tolerate any delay (Fig. 62). Find a wooden box that is 18½ inches long by 13 inches wide or larger (Fig. 63). Using a heavy hammer or a hatchet, pry up and knock off the top and one of the long sides (Fig. 64). The open side will become the front of the roofless stage.


The coloring of the stage should be a light sage green. If possible, procure this color in cartridge wallpaper wider than the stage. With a string measure the distance across the back[76] wall of stage from top to bottom (A to B Fig. 64), continue the measurement in the same straight line across the floor of the stage from back B to front C. After allowing five extra inches for turning the paper over the top edge of the back wall A and front edge of floor C, cut the length according to measurement. To make the strip of green paper the required width measure the exact distance across the inside back wall from side wall D to side wall E, then fold the paper evenly along each lengthwise[77] edge, making it the width needed; unfold and adjust the paper against the back wall over its top edge and over the floor of the stage. Cut short slits on each side of the paper where the floor and wall meet, that the extra width may lie flat up against the side walls. Bend the top edge of the paper over the top of the back wall, again slashing a little on each side to make it fit top edge of wall. In the same way bend the paper over the front edge of the floor; see that the paper lies perfectly smooth, then fasten it in place with small tacks, using three tacks on the outside at the back, one at each corner and one in the middle; two tacks where floor and wall meet, and three underneath front of floor. Measure the side walls, cut paper to fit and fasten the paper on the walls with as few tacks as possible.
The stage should be painted a light sage green. If possible, get this color in cartridge wallpaper wider than the stage. Use a measuring tape to measure the distance across the back wall of the stage from top to bottom (A to B Fig. 64), and then continue the measurement straight across the floor of the stage from the back B to the front C. After allowing five extra inches for folding the paper over the top edge of the back wall A and the front edge of the floor C, cut the length according to the measurement. To make the strip of green paper the right width, measure the exact distance across the inside back wall from side wall D to side wall E, then fold the paper evenly along each lengthwise edge to achieve the needed width; unfold and adjust the paper against the back wall over its top edge and over the floor of the stage. Cut small slits on each side of the paper where the floor and wall meet, allowing the extra width to lie flat against the side walls. Bend the top edge of the paper over the top of the back wall, again making a small cut on each side for a better fit at the top edge of the wall. Similarly, bend the paper over the front edge of the floor; ensure the paper lies perfectly smooth, then secure it with small tacks, using three tacks on the outside at the back, one at each corner and one in the middle; two tacks where the floor and wall meet, and three underneath the front of the floor. Measure the side walls, cut the paper to fit, and secure it on the walls with as few tacks as possible.


When the inside papering is finished, cover the outside of the stage with pretty cretonne. Make four inside wings, two for each side of the stage, to represent the foliage of trees. Cut two like Fig. 65, from paper of a darker green than the walls of the stage and reverse one of them that they may face each other. Then make two wings, like Fig. 66, from paper of a lighter green than the walls, and reverse one of these also. The walls of the stage[78] with the two sets of wings will make three different tones of green forming the background. Cut the wings long enough to extend up as high or higher than the side walls of the stage. Bend each strip lengthwise at dotted line and paste the bent margin of one wing from Fig. 65 on each side wall, running the wing up from the floor to the top of the wall about four inches from the back wall. In the same manner fasten the wings (Fig. 66) on each side wall three inches in front of the first or back wing (Fig. 67).
When the interior is done, cover the outside of the stage with nice fabric. Create four inner wings, two for each side of the stage, to mimic tree foliage. Cut two like Fig. 65, from darker green paper than the stage walls and flip one so they face each other. Then make two wings like Fig. 66, using lighter green paper than the walls, and also flip one of these. The stage walls[78] along with the two sets of wings will create three different shades of green as the background. Cut the wings long enough to reach as high or higher than the side walls of the stage. Fold each strip lengthwise at the dotted line and glue the bent edge of one wing from Fig. 65 onto each side wall, going from the floor up to the top of the wall about four inches from the back wall. Similarly, attach the wings (Fig. 66) on each side wall three inches in front of the first or back wing (Fig. 67).

Cut the arch (Fig. 68) of stiff pasteboard. The cover of a pasteboard box will do. Make the arch long enough to span the space across the front of the stage and let the lower edge of the curve in the centre of the arch be five and a half inches higher than its two ends (see dotted line, Fig. 68). Cover both sides of the arch with green paper, gluing it on only along the edges. Tack the ends of the arch to the top of the two side walls (Fig. 69).
Cut the arch (Fig. 68) from stiff cardboard. You can use the cover of a cardboard box. Make sure the arch is long enough to stretch across the front of the stage and that the lowest point of the center of the arch is five and a half inches higher than the ends (see dotted line, Fig. 68). Cover both sides of the arch with green paper, gluing it only along the edges. Attach the ends of the arch to the top of the two side walls (Fig. 69).

Cut two pieces of pasteboard like Fig. 70, making each six inches wide and almost as high from floor of stage as is the top of the centre of the arch. Paper these also with green, both front and back. Tack one piece of the pasteboard on the front edge of each side wall of the stage, allowing it to extend out from and beyond the side wall (Fig. 71). Bore a hole with a gimlet through the centre of the back wall of the stage five inches up from the inside floor, and your stage will be finished.
Cut two pieces of cardboard like Fig. 70, making each six inches wide and nearly as high from the stage floor as the top center of the arch. Cover both the front and back with green paper. Attach one piece of cardboard to the front edge of each side wall of the stage, letting it extend beyond the side wall (Fig. 71). Use a gimlet to drill a hole in the center of the back wall of the stage, five inches above the inside floor, and your stage will be ready.

Make Titania
Create Titania
(Fig. 72) of light-weight cardboard. When finished she should be ten inches in height from her toes to the top of her head. Fig. 73 is the diagram of the body and arms, measuring three and five-eighths inches from top of head to lower edge of body. Cut the two upper portions of the legs (length two and one-half inches, greatest width one inch) from Fig. 74, and the two lower portions (length three and three-eighths inches) from Fig. 75. Join the two parts of each leg together, according to the[80] dots, with a strong thread and needle, and fasten with a knot on front and back, so that the two pieces will be strung upon the same thread and sandwiched between two knots of the thread. Attach the legs to the body in the same manner. The small[81] circles A, A on the doll’s body (Fig. 73) give the exact spots where the thread should pass through, and the curved line above each letter shows where the upper edge of the top part of the leg should reach. Dot B marks the point on the upper part of the leg (Fig. 74) where the thread goes through, joining the leg to the body. Have all the joints of the doll securely fastened and only loose enough to move easily.
(Fig. 72) made of lightweight cardboard. When finished, she should be ten inches tall from her toes to the top of her head. Fig. 73 is the diagram of the body and arms, measuring three and five-eighths inches from the top of the head to the lower edge of the body. Cut the two upper parts of the legs (length two and one-half inches, greatest width one inch) from Fig. 74, and the two lower parts (length three and three-eighths inches) from Fig. 75. Join the two parts of each leg together, according to the[80] dots, using a strong thread and needle, and secure with a knot on the front and back, so that the two pieces will be threaded on the same line and sandwiched between two knots of the thread. Attach the legs to the body in the same way. The small[81] circles A, A on the doll’s body (Fig. 73) indicate the exact spots where the thread should go through, and the curved line above each letter shows where the top edge of the upper part of the leg should reach. Dot B marks the point on the upper part of the leg (Fig. 74) where the thread goes through, connecting the leg to the body. Make sure all the joints of the doll are securely fastened but loose enough to move easily.


Find a pretty head in some old paper or advertisement, cut it out and gum it on the pasteboard head. Remember, though, that the printed head must not be of very heavy paper, as the upper part of the doll should be lighter in weight than the lower, otherwise the figure will not balance. If you cannot find a head in colors, you must paint the printed black-and-white one; give the face, neck and arms a flat wash of light-pink water-color paint; color the lips and cheeks red, the eyes blue and the hair[82] brown. Make the long stockings a darker pink than the light flesh tones, and paste slippers of gilt paper on the feet.
Find a nice head in some old paper or advertisement, cut it out, and glue it onto the cardboard head. However, keep in mind that the printed head shouldn’t be made of very heavy paper, as the top part of the doll should be lighter than the bottom; otherwise, the figure won’t balance. If you can’t find a colored head, you’ll need to paint the black-and-white one. Use a flat wash of light pink watercolor paint for the face, neck, and arms; color the lips and cheeks red, the eyes blue, and the hair brown. Make the long stockings a darker pink than the light flesh tones, and paste slippers made of gold paper on the feet.
Puncture a hole with a coarse needle through the centre of the belt-line (C, Fig. 76). For
Puncture a hole with a coarse needle through the center of the belt-line (C, Fig. 76). For
Titania’s Costume
Titania's Outfit
make a skirt of plain white tissue paper. Cut it sixteen inches wide and three and a half inches long, after creasing the skirt by gathering up the fulness with your fingers and drawing the skirt lengthwise from top to bottom through your partially closed hand. Gather the top of the skirt with thread and needle, and fasten it on the doll, then slit up each side from the lower edge to allow of the free motion of the doll’s limbs.
Make a skirt out of plain white tissue paper. Cut it sixteen inches wide and three and a half inches long. Gather the fullness by pinching it with your fingers and pulling the skirt lengthwise from top to bottom through your partially closed hand. Secure the top of the skirt with thread and a needle, then attach it to the doll. Cut up each side from the bottom edge to allow the doll's limbs to move freely.

Make the dress of pink chiffon. Cut the dress skirt three and three-fourth inches long and one yard wide, press it in knife-blade plaits, running up and down, then gather and tie it on the doll over the white tissue-paper skirt. Do not attempt to hem any portion of the clothing, as the object is to keep it all light and airy. Fashion the waist of a smooth strip of pink chiffon tied with narrow pink ribbons at the shoulders and brought down to the[83] belt-line into a point back and front, and sewed in place. Form a silver girdle of the tinsel ruching used on Christmas trees; place the tinsel around the Queen’s waist, allowing the two free ends to hang down over the front of the dress. Glue a little of the same tinsel around the front of her dark hair, where it will shine like a crown of diamonds. Make Titania daintily hold up and out each side of her dress. Do this by stretching out the sides of the dress skirt and gumming the material to each wrist.
Make the dress out of pink chiffon. Cut the skirt to three and three-quarter inches long and one yard wide, press it into knife-blade pleats running up and down, then gather and tie it on the doll over the white tissue-paper skirt. Don’t try to hem any part of the clothing since the goal is to keep it all light and airy. Create the waist from a smooth strip of pink chiffon tied with narrow pink ribbons at the shoulders and tapering down to a point in the front and back at the belt-line, sewing it in place. Make a silver belt from the tinsel fabric used for Christmas trees; wrap the tinsel around the Queen’s waist, letting the two free ends hang down over the front of the dress. Glue a bit of the same tinsel around the front of her dark hair, where it will sparkle like a crown of diamonds. Have Titania delicately hold up and out each side of her dress. Do this by spreading the sides of the skirt and gluing the fabric to each wrist.
Cut a scarf of pink chiffon four inches wide and sixteen inches long, fasten one end in each hand of the fairy Queen and let the scarf fall in a graceful loop.
Cut a pink chiffon scarf that’s four inches wide and sixteen inches long. Hold one end in each hand of the fairy Queen and let the scarf hang in a graceful loop.
Queen Titania’s Wings
Queen Titania's Wings


Take a needle threaded with black thread, two or three yards long; run the needle through the centre of the belt-line of the dressed fairy at the point C (Fig. 76); then thread it through the gimlet hole at the back of the stage and tie a button on the end of the thread which extends outside of the back wall. Pull the thread on the inside of the stage until the button lies tight up against the outside of the back wall. Allow sufficient length of thread to bring the Queen within about three inches of the front edge of the stage, then make a knot in the thread immediately[84] back of and another in front of the Queen to prevent her from slipping either forward or backward. Tie the long, loose end of the thread on a small empty spool, that it may be wound up and kept from tangling when not in use.
Take a needle with black thread about two or three yards long; run the needle through the center of the belt-line of the dressed fairy at point C (Fig. 76); then thread it through the hole at the back of the stage and tie a button on the end of the thread that extends outside of the back wall. Pull the thread on the inside of the stage until the button is tight against the outside of the back wall. Leave enough thread to bring the Queen within about three inches of the front edge of the stage, then tie a knot in the thread right behind and another in front of the Queen to keep her from slipping either forward or backward. Tie the long, loose end of the thread onto a small empty spool so it can be wound up and kept from tangling when not in use.
Place the Stage on a Chair
Put the Stage on a Chair
facing the light and, carrying the thread in your hand, take your station two yards or more away from and in front of the stage; then practise moving Titania by means of the thread until you can make her glide, pose and dance in many graceful attitudes. She will lean to the right and to the left, will stand on her toes, then curtsey, making her dress touch the floor; she will move gently and slowly, again faster and faster until her feet seem to fairly twinkle over the stage floor; she will pass back and forth almost as if floating from side to side of the stage, or stand in the centre and dance. Titania is ever fascinating, beautiful and graceful in all her movements. Ask some one to play on the piano while you make the fairy Queen dance and she will keep time to the music. When you have learned to make Titania dance her prettiest invite your friends in to see the little fairy.
Facing the light and holding the thread in your hand, stand about two yards or more away from the front of the stage. Then practice moving Titania using the thread until you can make her glide, pose, and dance in various graceful positions. She will lean to the right and left, stand on her toes, and then curtsy, letting her dress touch the floor. She will move gently and slowly, then faster and faster until her feet seem to twinkle across the stage floor. She will glide back and forth as if floating from side to side or stand in the center and dance. Titania is always captivating, beautiful, and graceful in all her movements. Ask someone to play the piano while you make the fairy queen dance, and she will keep time with the music. Once you've learned to make Titania dance beautifully, invite your friends over to see the little fairy.
CHAPTER VII
THANKSGIVING PARTY
Apple, Orange and Pumpkin Games
Apple, Orange, and Pumpkin Games


Little Pumpkins
Little Pumpkins
Select apples about two inches in diameter, all as near of a size as possible and preferably somewhat flattened at top and bottom. Cut a square of orange-colored tissue paper and stand an apple, stem uppermost, on its centre (Fig. 79). Bring one side of the tissue paper up[86] to the top of the apple and take a wee plait in the paper, at the same time smoothing it up from the bottom of the apple (Fig. 80). Make several more plaits and bring the nearest corner of the paper up to the apple top. Continue plaiting the tissue paper around the apple (Fig. 81) while constantly smoothing it up from the bottom and over the apple until the apple is completely covered and all the edges and corners of the orange-colored paper are folded and brought together at the top of the apple (Fig. 82). Hold the covered apple in your left hand and with your right hand twist the ends of the tissue paper around the stem (Fig. 83).
Choose apples that are about two inches in diameter, making sure they are as similar in size as possible and preferably a bit flattened on the top and bottom. Cut a square of orange tissue paper and place an apple, stem side up, in the center (Fig. 79). Bring one side of the tissue paper up[86] to the top of the apple and create a small pleat in the paper while smoothing it from the bottom of the apple (Fig. 80). Make a few more pleats and bring the nearest corner of the paper up to the top of the apple. Keep pleating the tissue paper around the apple (Fig. 81) while continuously smoothing it from the bottom over the apple until it is fully covered and all the edges and corners of the orange paper are folded together at the top of the apple (Fig. 82). Hold the covered apple in your left hand and with your right hand twist the ends of the tissue paper around the stem (Fig. 83).


Examine the apple and make sure there are no raised ridges in the paper and that the entire covering lies flat and smooth. Tie one end of a piece of brown thread around the base of the stem. Wind the long end of the thread once tightly around the apple, giving it a twist around the stem to secure it in place (Fig. 84). The thread must pass across the exact centre of the blossom end of the apple. As you wind the thread turn the fruit and watch the thread that it may not swerve either to this side or that. A second time wind the thread around the apple, making[90] the first encircling thread band double. Cross this double band with another double band, marking the apple into quarters, secure the thread about the stem, and again wind it around the apple, dividing two opposite quarters each into two pieces.
Examine the apple and ensure there are no raised ridges in the paper and that the entire covering lies flat and smooth. Tie one end of a piece of brown thread around the base of the stem. Wrap the long end of the thread tightly around the apple once, making sure to twist it around the stem to keep it in place (Fig. 84). The thread should go across the exact center of the blossom end of the apple. As you wrap the thread, turn the fruit and watch to make sure the thread doesn’t veer off to either side. Wrap the thread around the apple again, making the first wrap double. Cross this double wrap with another double wrap, marking the apple into quarters, secure the thread around the stem, and wrap it around the apple again, dividing two opposite quarters each into two pieces.


Divide all the quarters in the same way, then pinch a small square of bright green tissue paper over the covered stem (Fig. 85), smooth it down close and tight and tie a thread around the base (Fig. 86). Bend the extreme end of the stem until it curls, and the result will be a cunning little yellow pumpkin (Fig. 87). Fig. 88 shows how the cross threads should meet at the centre of the blossom end of the fruit.
Divide all the quarters the same way, then wrap a small square of bright green tissue paper around the covered stem (Fig. 85), smooth it down firmly, and tie a thread around the base (Fig. 86). Bend the very end of the stem until it curls, and you'll have a cute little yellow pumpkin (Fig. 87). Fig. 88 shows how the cross threads should meet at the center of the blossom end of the fruit.

An ordinary pastry-board about twenty-six inches long and nineteen inches wide must do duty for
An ordinary pastry board that's about twenty-six inches long and nineteen inches wide has to work for
The Game Court
The Game Arena
(Fig. 89). Find the centre of the board by running two straight lines diagonally across from corner to corner, the spot where the[91] two lines meet and cross marks the centre of the board (Fig. 90). Make a small circle two inches in diameter around centre spot, surround this circle with a larger circle seven inches in diameter. Erase the diagonal lines within the circles and run straight lines radiating outward midway between the diagonal lines from the edge of the larger circle across the face of the pastry-board. With four more lines cut off the four corners of the court, number the divisions as in Fig. 91, and the game court will be finished.
(Fig. 89). Locate the center of the board by drawing two straight lines diagonally from corner to corner; the point where the[91] lines intersect marks the center of the board (Fig. 90). Draw a small circle with a diameter of two inches around the center point, and then surround this circle with a larger circle that has a diameter of seven inches. Erase the diagonal lines inside the circles and draw straight lines radiating outward, positioned midway between the diagonal lines, extending from the edge of the larger circle across the face of the pastry board. With four additional lines, trim off the four corners of the court, label the sections as shown in Fig. 91, and the game court will be complete.

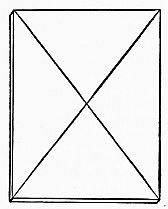

Stand the little pumpkins, at equal distances apart, on the larger circle of the court, and on the small circle stand a natural, large, round apple without tissue paper cover.
Stand the little pumpkins at equal distances apart on the larger circle of the court, and on the small circle, place a natural, large, round apple without a tissue paper cover.
The Game
**The Game**
may be played by any number. The object of the game is to spin the apple so that it will hit one or more of the surrounding pumpkins and roll or shove them on to the highest marked divisions of the game-court.
may be played by any number. The goal of the game is to spin the apple so that it hits one or more of the nearby pumpkins and rolls or pushes them onto the highest marked sections of the game court.
Each player is allowed only one trial at a time, turns being taken successively by the different players. The spinning of the apple must always be started on the small central circle where the apple is stationed. When the apple rolls off the board the player may have another trial; if the apple rolls off on the second trial she simply loses her turn, there being no other penalty. When a pumpkin lands on one of the dividing lines it counts ten against the player. Often an apple will strike several pumpkins, sending them off on different divisions. Every pumpkin then counts the number in the division on which it stops; sometimes more than one pumpkin will land in the same division, and each pumpkin so landing counts the number in that division. When the apple sends but one pumpkin, the player scores merely the number of that one division on which it lands. After each play the pumpkins must be replaced in the circle ready for the next player.
Each player gets only one turn at a time, taking turns one after the other. The apple must always be spun from the small central circle where it sits. If the apple rolls off the board, the player can have another turn; if it rolls off again on the second try, she just loses her turn, with no other penalties. When a pumpkin lands on one of the dividing lines, it counts as ten against the player. Often, an apple will hit several pumpkins, sending them into different divisions. Each pumpkin then counts based on the division where it stops; sometimes more than one pumpkin will land in the same division, and each pumpkin that lands there counts the number in that division. If the apple sends only one pumpkin, the player scores just the number for that one division where it lands. After each player’s turn, the pumpkins must be put back in the circle, ready for the next player.
Five rounds constitute a game and the highest record scored wins. When played by sides there must be an equal number of players on each side. The side making the highest score wins the game.
Five rounds make up a game, and the team with the highest score wins. When played with teams, there must be an equal number of players on each side. The team with the highest score wins the game.
For the next game let all the players sit on the floor in a ring and by the light of only wee pumpkin lanterns tell a
For the next game, let all the players sit on the floor in a circle and, lit only by small pumpkin lanterns, tell a
Rapid-Transit Thanksgiving Story
Thanksgiving Story on Rapid Transit
The leader must begin the tale, which may or may not be original. He must speak for only a few minutes, then stop, when his right[93]-hand neighbor, without hesitation, must take up the story and carry it on for a few moments. In this way the story goes the round, each right-hand player in turn telling his part. Every player has the privilege of making his portion of the tale original, even though the preceding part may not be so. It is also the privilege of every one to change the story to a dream, or a fairy tale. Quotations may be introduced, verses recited, or snatches of song sung; in fact, the oftener the story is twisted and turned the greater the interest; but there must always be some connection between the part being told and that which has gone before. The entire romance must be finished before the light in the wee pumpkins burns out. If a player should fail to continue the story when his turn comes, he must pay a forfeit, and when the story is finished, redeeming the forfeits adds to the fun.
The leader should kick off the story, which can be original or not. He should talk for just a few minutes, then stop, and his right-hand neighbor must immediately pick up the story and continue it for a bit. This way, the story goes around, with each person on the right taking their turn. Everyone has the chance to make their part of the story original, even if the parts before aren’t. Each player can also change the story into a dream or a fairy tale. Quotes can be included, verses recited, or snippets of songs sung; basically, the more the story twists and shifts, the more interesting it becomes, but there should always be some connection between the current part and what’s come before. The whole story must be wrapped up before the light in the little pumpkins runs out. If a player fails to continue the story when it’s their turn, they have to pay a forfeit, and redeeming those forfeits at the end adds to the fun.
If many guests are present, divide them into small groups for the rapid-transit story.
If there are a lot of guests, split them into small groups for the quick story session.
Make a miniature
Create a miniature
Pumpkin Lantern
Jack-o'-lantern
for each girl and boy present. Take a symmetrical apple which stands firm and steady on the blossom end. Select the best side for the face, and with the small blade of a penknife cut on it a crescent with ends turned upward for the mouth. Cut a triangle for the nose, two small squares for eyes, and two short crescents, points turned upward, for eyebrows (Fig. 92).
for each girl and boy present. Take a symmetrical apple that stands firm and steady on the blossom end. Choose the best side for the face, and with the small blade of a penknife, carve a crescent with the ends turned upward for the mouth. Cut a triangle for the nose, two small squares for the eyes, and two short crescents, points turned upward, for eyebrows (Fig. 92).
Turn the apple over and cut an opening in the back as shown at Fig. 93. Be extremely cautious not to break or tear the edges of the apple skin while cutting the features and back opening. With the small blade of the penknife inserted at the back opening cut away the inside of the apple little by little, taking great care not to drive the knife far enough into the apple to puncture the skin.[94] When you reach the core, screw the large blade of the knife around until the core is sufficiently broken to allow of being cut away without danger of injuring the apple skin by accidental stabs.
Turn the apple over and cut a hole in the back as shown at Fig. 93. Be very careful not to break or tear the edges of the apple skin while cutting the features and back opening. With the small blade of the penknife inserted at the back opening, gradually cut away the inside of the apple, making sure not to push the knife too deep and puncture the skin. [94] When you reach the core, twist the large blade of the knife around until the core is broken enough to be cut away without accidentally stabbing the apple skin.


After most of the inside has been removed turn the apple around and look at the features; if you cannot yet see daylight through them, insert the small blade from the outside of the apple, through each feature in turn, and by degrees cut away the meat, without enlarging the openings of the different features. Should this prove ineffectual, again turn to the back of the apple and work from the inside, removing more of the contents and making the layer of apple thinner next to the skin. Then once more try through the features from the outside. This time the result should be distinctly clear openings for all the features. You cannot help smiling when you look at the apple now, for you see such a comical little face.
After most of the inside has been taken out, turn the apple around and check its features; if you still can't see light through them, use a small blade to carefully cut away the flesh from each feature one at a time, without making the openings any larger. If that doesn’t work, turn the apple over and scoop out more of the inside, making the layer of apple next to the skin thinner. Then try again from the outside through the features. This time, you should have clear openings for all the features. You can't help but smile when you look at the apple now, because it has such a funny little face.

Cut a short section from an ordinary wax candle (Fig. 94), shave down the sides, making[95] the bottom heavier and larger than the top (Fig. 95). Run a pin through the centre of the candle from bottom to top; then pull it out. Fit the candle inside on the centre of the bottom of the apple, hold it in place while you run the pin up from the outside of the apple, through the skin and into the pinhole in the centre of the little candle. The pin should hold the candle firmly in place; if it does not do so, pull the pin out and see what is the matter; possibly the candle needs hollowing out a trifle at the base in order to fit the slight rise in the apple on which the candle stands. Put on your thinking cap, examine and make the candle stand absolutely straight and firm.
Cut a short piece from an ordinary wax candle (Fig. 94), shave down the sides, making[95] the bottom heavier and wider than the top (Fig. 95). Run a pin through the center of the candle from bottom to top; then pull it out. Fit the candle into the center of the bottom of the apple, holding it in place while you push the pin in from the outside of the apple, through the skin and into the pinhole in the center of the candle. The pin should hold the candle securely in place; if it doesn’t, pull the pin out and check what’s wrong; maybe the candle needs a little hollowing out at the base to fit the slight curve of the apple where the candle sits. Put on your thinking cap, inspect and make the candle stand completely straight and secure.


Manufacture all the other individual pumpkin lanterns in the same way, and when story-telling time arrives set a lantern in front of every girl and boy in the circle and light the candle in each little pumpkin. The effect will be charming and inspiring for the story-tellers. Oranges with all the pulp extracted also makes very pumpkin-like lanterns when cut in a similar way to the apple lanterns (Figs. 96 and 97).
Make all the other individual pumpkin lanterns in the same way, and when it’s story time, set a lantern in front of each girl and boy in the circle and light the candle in every little pumpkin. The effect will be charming and inspiring for the storytellers. Oranges with all the pulp taken out also make great pumpkin-like lanterns when cut in a similar way to the apple lanterns (Figs. 96 and 97).
Anything may be given as
Anything can be given as
A Forfeit
An Owe
and the forfeits are redeemed in the good old way. The leader is blindfolded and seated. A girl or boy stands back of the[96] leader, and, taking one of the forfeits, holds it over her head, while repeating these words, “Heavy, heavy hangs over your head.” The leader replies with the question: “Fine or superfine?” If the forfeit belongs to a girl, the answer is “superfine,” if to a boy, “fine.” The same player adds, “What shall the owner do to redeem it?” The leader names a penalty, such as, kneel to the prettiest, bow to the wittiest, or, look angry, then smile your sweetest. The leader may inflict one of these, or any other, making the penalty as funny as she desires, but it must never cause a player to feel in the least uncomfortable, for every girl and boy should be given just as good a time as possible, that all may return to their homes from the Thanksgiving games happy and pleased with their evening’s fun.
and the forfeits are redeemed in the classic way. The leader is blindfolded and seated. A girl or boy stands behind the [96] leader and, taking one of the forfeits, holds it over their head while saying, “Heavy, heavy hangs over your head.” The leader responds with the question: “Fine or superfine?” If the forfeit belongs to a girl, the answer is “superfine,” if to a boy, “fine.” The same player continues, “What should the owner do to redeem it?” The leader names a penalty, like kneeling to the prettiest, bowing to the wittiest, or looking angry and then smiling sweetly. The leader can choose one of these or come up with something else, making the penalty as funny as they want, but it must never make a player feel even slightly uncomfortable, because every girl and boy should have just as much fun as possible, so they can all go home from the Thanksgiving games happy and pleased with their evening’s fun.
CHAPTER VIII
IMPROMPTU MOVING PICTURES FOR
THANKSGIVING

First make the poster, to be hung in a conspicuous place in hall or parlor. Print it in large black letters on a good-sized sheet of wrapping paper:
First, create the poster to display in a visible spot in the hallway or living room. Print it in big black letters on a decent-sized sheet of wrapping paper:
There Will be To-night
An Exhibition of
The World-Renowned
Moving Pictures
Taken by Madam Moselle at Great Risk of Life and Property.
No Expense or Effort Being Spared to Obtain the
Real Characters and Settings
of a
Puritan Thanksgiving
And Other Scenes from the Life
of Our Forefathers.
Tonight
There's an Exhibition of
World-Famous
Moving Pictures
Captured by Madam Moselle at Great Risk to Life and Property.
No Cost or Effort Was Spared to Capture the
Authentic Characters and Settings
of a
Puritan Thanksgiving
And Other Scenes from the Lives
of Our Ancestors.


Make the picture screen by stretching a large white sheet on the back wall of the room where the performance is to be held, as you would for a magic lantern exhibition. Then get your costumes ready. These may be made up very quickly from materials at hand.
Set up the picture screen by stretching a large white sheet on the back wall of the room where the performance will take place, just like you would for a magic lantern show. Next, prepare your costumes. You can make these quickly using materials you have on hand.
The Puritan Woman’s Dress
The Puritan Woman's Outfit
as well as that of the man must be entirely of black and white, and to carry out the effect of black and white pictures their faces and hands should be made perfectly white with chalk, their eyebrows blackened and black wigs made of fringed tissue paper. Only a little of the woman’s hair will show but the man’s should be long and hang down to his shoulders. A tight black waist and skirt nearly to her ankles; a long white apron, white kerchief and cuffs (cut from old muslin) and a tightly fitting little black cap with a turned over edge of white form the costume of the woman. With these should be worn low black shoes and white stockings. For the
as well as the man must be completely in black and white, and to achieve the effect of black and white pictures, their faces and hands should be made perfectly white with chalk, their eyebrows darkened, and they should wear black wigs made of fringed tissue paper. Only a little of the woman's hair will show, but the man's should be long and hang down to his shoulders. A tight black waist and a skirt that nearly reaches her ankles; a long white apron, a white kerchief, and cuffs (cut from old muslin), along with a snug little black cap with a turned-up edge of white complete the woman's outfit. She should also wear low black shoes and white stockings. For the
Puritan Man’s Costume
Puritan Man's Outfit
have short, full, black trousers, long black or white coat with
wide white collar and cuffs, a high-crowned, broad-brimmed
black hat and low shoes with black stockings. A black leather
trunk strap buckled across one shoulder may be added, also a
long black cloak and staff. Cut the man’s collar and cuffs like[99]
[100]
[101]
Figs. 98 and 99, and the woman’s cuffs like Fig. 99. Fig. 100
shows how the Puritan hat is made of stiff brown paper over an
ordinary straw hat. Fig. 101 is the brim, Fig. 102 the crown,
which must be pinned together along its straight edges.
wear short, full black trousers, a long black or white coat with a wide white collar and cuffs, a high-crowned, broad-brimmed black hat, and low shoes with black stockings. You might also add a black leather trunk strap buckled across one shoulder, as well as a long black cloak and a staff. Cut the man's collar and cuffs like [99]
[100]
[101] Figs. 98 and 99, and the woman’s cuffs like Fig. 99. Fig. 100 shows how to make the Puritan hat from stiff brown paper over an ordinary straw hat. Fig. 101 is the brim, and Fig. 102 is the crown, which needs to be pinned together along its straight edges.


The Properties
The Features
for the Thanksgiving dinner scene are a long, narrow table spread for dinners, and chairs enough for the actors, six or eight taking part.
for the Thanksgiving dinner scene, there's a long, narrow table set for meals, with enough chairs for the actors, six or eight involved.

Before showing her pictures Madam Moselle should stand in front of the screen and say a few words extolling the pictures she is about to present.
Before showing her pictures, Madam Moselle should stand in front of the screen and say a few words praising the pictures she is about to present.
The girl who represents Madam Moselle should deliver an amusing little speech, giving a foreigner’s idea of our first Thanksgiving, and it can be made absurdly funny with its many ludicrous mistakes.
The girl who stands in for Madam Moselle should give a funny little speech, sharing a foreigner’s take on our first Thanksgiving, and it can be made hilariously funny with all its ridiculous mistakes.
At the close of her address the lights must be put out and the scene quickly arranged close to the screen, all the actors except two being seated at the table. Thus remain two empty chairs.
At the end of her speech, the lights need to be turned off and the scene quickly set up near the screen, with all the actors except for two sitting at the table. This leaves two empty chairs.
As quickly as possible the light should be turned on and at the same time the actors must begin
As quickly as possible, the light should be turned on, and at the same time, the actors must start.
A Pantomime
A Panto
of eating, drinking and talking.
of eating, drinking, and chatting.
They should express anxiety for the safety of the tardy guests, some of them leaving the table to appear to look out of a door or window.
They should show concern for the safety of the late guests, with some of them getting up from the table to check through a door or window.
All the while (this is the great point) the actors must shake and quiver in imitation of the queer trembling and quivering always seen in the moving pictures; and their movements must be very rapid.
All this time (this is the key point) the actors must shake and tremble, mimicking the strange shaking and trembling often seen in moving pictures; and their movements need to be very quick.
Soon the missing couple should appear, coming in hurriedly and by gestures telling of an encounter with the Indians.
Soon the missing couple will show up, rushing in and using gestures to indicate they had an encounter with the Indians.
Their clothes should be pierced with arrows, and the Puritan’s hat must be bristling with them.
Their clothes should be shot with arrows, and the Puritan's hat must be filled with them.
All this will be very laughable if the acting is good, and absurd little by-plays introduced; but the whole thing will be spoiled unless the constant quivering and shaking is kept up by all of the actors.
All of this will be pretty funny if the acting is good and there are some ridiculous little side plays added in; however, it will all fall apart unless all the actors keep up the constant trembling and shaking.
The picture can be “flashed off” the screen by simply turning out the light, and others may be shown giving various incidents in Puritan life or the early history of our country.
The image can be “flashed off” the screen just by turning off the light, and others may be shown illustrating different moments in Puritan life or the early history of our country.
CHAPTER IX
A VALENTINE ENTERTAINMENT WITH ORIGINAL
VALENTINES


To make the design, fold through the centre a square piece of paper measuring five and one-half inches along each edge. Fold this oblong crosswise through its centre, and you will make a small square of four layers of paper. On one side of this square mark the outline of a heart, allowing the corner of the small four-folded square, which is also[104] the centre of the large square of paper before it is folded, to form the point of the heart (Fig. 105). Cut out the top of the heart through all four layers of paper, also the curves of the sides of the heart; cut these only part way down as shown by A and A (Fig. 105). The dotted lines in Fig. 104 represent creases.
To make the design, fold a square piece of paper that is 5.5 inches on each side. Fold this rectangle in half across the middle, and you’ll create a small square with four layers of paper. On one side of this square, draw the outline of a heart, making sure the corner of the four-folded square, which is also the center of the larger square before it's folded, becomes the point of the heart (Fig. 105). Cut out the top of the heart through all four layers of paper, and also the curves of the heart's sides; cut these only partway down as shown by A and A (Fig. 105). The dotted lines in Fig. 104 represent creases.

Answers to the invitations might read:
Answers to the invitations might say:
“My dear Miss Darling and Miss Love, too,
I’ve opened your heart and will come to you
On the day you’ve appointed, the pleasure is mine,
And I hope you’ll accept me as your Valentine.”
“My dear Miss Darling and Miss Love, too,
I’ve opened my heart and will come to you
On the day you’ve chosen, the pleasure is mine,
And I hope you’ll accept me as your Valentine.”
Make as many valentines as there are guests, that all may be sure of receiving at least one. Address each of the girls’ valentines “To My Sweetheart,” and each of the boys’ valentines, “To My Valentine.”
Make as many valentines as there are guests, so that everyone can be sure to get at least one. Address each of the girls' valentines "To My Sweetheart," and each of the boys' valentines, "To My Valentine."
Let either a girl or a boy be selected to run
Let either a girl or a boy be chosen to run
The Post-Office
The Post Office
which you can make of a clothes-horse draped with sheets. Place a table inside across the opening, and on the table, resting on a pile of large books, stand an empty wooden box minus top and bottom. Set it up on one end to serve as the post-office window. The table and space on each side of the window should be screened with sheets. Across the outside top of the window fasten a pasteboard sign marked in large letters:
which you can create with a clothes-horse covered in sheets. Put a table inside across the opening, and on the table, resting on a stack of thick books, position an empty wooden box missing its top and bottom. Set it on one end to act as the post-office window. The table and the area on either side of the window should be covered with sheets. On the outside top of the window, tape a cardboard sign written in big letters:
ST. VALENTINE’S POST-OFFICE
VALENTINE’S DAY POST OFFICE
and decorate the white sheets covering the clothes-horse with
red paper hearts of various sizes fastened on singly, doubly and
in festoons. On the table at the right-hand side of the window[105]
[106]
[107]
place the girls’ valentines and on the left-hand side of the window
the boys’ valentines.
and decorate the white sheets draped over the clothes horse with red paper hearts of different sizes attached one by one, in pairs, and in garlands. On the table to the right of the window[105]
[106]
[107]
set out the girls' valentines, and on the left side of the window, display the boys' valentines.

Ask all the girls to form in line and march around the room to the post-office, while some one plays a suitable lively air on the piano. Each girl in turn must stop at the post-office window, where a box of St. Valentine’s stamps is set before her with one of the boys’ valentines. She must close her eyes and take one stamp from the box, then open her eyes, read the stamp and on it sign her name at the right-hand corner, then fasten the stamp on the valentine with paste given her by the postmaster, and move onward to give place to the next girl in line.
Ask all the girls to line up and march around the room to the post office while someone plays a lively tune on the piano. Each girl, in turn, must stop at the post office window, where there is a box of St. Valentine’s stamps along with one of the boys' valentines. She must close her eyes and take one stamp from the box, then open her eyes, read the stamp, and sign her name in the right-hand corner. After that, she should stick the stamp on the valentine using the paste provided by the postmaster and move on to make space for the next girl in line.
When all the boys’ valentines have been stamped, the girls take their seats and the boys form in line and stamp the girls’ valentines in the same manner.
When all the boys' valentines have been stamped, the girls sit down and the boys line up to stamp the girls' valentines in the same way.
The Valentine Stamps
The Valentine Stamps
should be previously prepared. They are made uniform in size of small squares of white writing paper, on which is written any kind of a wish which may add to the fun, such as:
should be previously prepared. They are made the same size, as small squares of white writing paper, on which is written any kind of wish that could add to the fun, such as:
When entering the room each guest is given a card. On one card is written,
When entering the room, each guest receives a card. On one card is written,
“When the Bell Rings
"When the Bell Rings"
once go to the post-office”; on another, “When the bell rings twice go to the post-office,” and so on, each card designating a[108] specified number of rings. The postmaster sounds the bell at intervals, giving a different number of taps at each ring, until every girl and boy is supplied with a valentine; then each boy seeks the girl who has signed the stamp on his valentine and she asks that the wish be fulfilled. The request is, of course, laughingly and courteously granted. The valentines being sealed with St. Valentine’s stamps, the mystery of the sentiment enclosed cannot be revealed until the wish on the stamp is granted, and neither the girls nor the boys are aware of the contents of the valentines they stamp. Later in the evening the girls find the boys who have signed their stamps, and then, entering into the spirit of the fun, they grant the boys’ wishes as written on their stamps.
Once it's time to go to the post office,” and on another, “When the bell rings twice, go to the post office,” and so on, each card indicating a[108] specific number of rings. The postmaster rings the bell at intervals, giving a different number of taps for each ring, until every girl and boy gets a valentine; then each boy finds the girl who signed the stamp on his valentine, and she asks for the wish to be fulfilled. The request is, of course, playfully and politely granted. The valentines are sealed with St. Valentine’s stamps, so the mystery of the sentiment inside can't be revealed until the wish on the stamp is granted, and neither the girls nor the boys know what’s inside the valentines they stamp. Later in the evening, the girls find the boys who signed their stamps, and then, joining in on the fun, they grant the boys’ wishes as written on their stamps.
The guests may bring extra valentines made especially for and directed to either hostess or guests. These are not sent through St. Valentine’s post-office. The hostess keeps one door of the parlor closed for the benefit of those desiring to send special valentines. A sign posted upon it reads:
The guests can bring extra valentines made just for and addressed to either the hostess or the guests. These aren't sent through St. Valentine’s post office. The hostess keeps one door of the parlor closed for those who want to send special valentines. A sign posted on it says:
CUPID’S DOOR
CUPID'S DOOR
and quantities of paper flowers with gilded pasteboard hearts, bows and arrows adorn it, giving it a very festive appearance. Each guest is at liberty at any time during the evening to slip from the company, make her way through the hall to Cupid’s door, slide her valentine under the door, give a quick knock and scamper off before she is caught. Only the hostess has the privilege of opening Cupid’s door, and to her belongs the pleasure of delivering these valentines to the various guests for whom they are intended.
and clusters of paper flowers with shiny cardboard hearts, bows and arrows decorate it, giving it a very festive look. Each guest is free at any point during the evening to sneak away from the group, make her way through the hall to Cupid’s door, slide her valentine under the door, give a quick knock, and dash away before she gets caught. Only the hostess has the right to open Cupid’s door, and it is her pleasure to deliver these valentines to the different guests for whom they are meant.

The Heart Valentine
The Heart Valentine
use a plain white card about four and one-half inches long and three and one-half inches wide for the foundation. Make four hearts graduated in size, the largest of red paper, the next gold, then green, and the smallest of blue paper. Cut a small slit in each heart a short distance from the top centre (Fig. 106). String the hearts on a narrow ribbon and tie one end of the ribbon through two slits cut in the lower left-hand corner of the card, and run the other end of the ribbon through two slits in the upper right-hand corner, then tie. Write across the top of the card, “Make your choice.”
use a plain white card about four and a half inches long and three and a half inches wide for the base. Create four hearts in sizes that graduate, with the largest one made of red paper, the next one in gold, followed by green, and the smallest in blue paper. Cut a small slit in each heart a short distance from the top center (Fig. 106). String the hearts onto a narrow ribbon and tie one end of the ribbon through two slits cut in the lower left-hand corner of the card, then run the other end of the ribbon through two slits in the upper right-hand corner, and tie. Write “Make your choice” across the top of the card.
Beneath it write this verse:
Beneath it, write this verse:

The World Valentine
The Global Valentine
is another design. For this use a circular piece of white paper about four inches in diameter. Shade it around the edge a little to give an idea of roundness (Fig. 107), then with ink draw on the disk the outlines of North and South America to represent the world (Fig. 108). Paint the continent a light yellow. Put the lettering[110] on in bright colors, placing an awl drawn in outline (Fig. 109) and a figure 2 in the position shown in Fig. 110. Paint the awl red.
is another design. For this, use a circular piece of white paper about four inches in diameter. Shade it around the edge a bit to give a sense of roundness (Fig. 107), then with ink, draw the outlines of North and South America on the disk to represent the world (Fig. 108). Color the continents a light yellow. Add the lettering[110] in bright colors, placing an awl drawn in outline (Fig. 109) and a figure 2 in the position shown in Fig. 110. Paint the awl red.


This message is a rebus and reads: “You are all the world to your Valentine.”
This message is a rebus and says: “You mean everything to your Valentine.”
Next Comes the Daisy Valentine
Next is the Daisy Valentine
(Fig. 111). On a piece of paper six inches long and three and a half inches wide draw a circle near the top, making it not quite three inches in diameter. Paint the circle bright green as a background for the white daisy. Make the daisy of three or four layers of white tissue paper folded like Fig. 112 and cut along the scalloped outline shown in Fig. 112. Unfold the petals and they will be like Fig. 113; but as the number should be odd, you[111] must cut off one of the petals. Sew the centre of the daisy to the centre of the green circle, then paste a small yellow paper disk (Fig. 114) over the stitches. Paint a small red heart at each upper corner of the valentine and paint a narrow blue ribbon tied to each heart and looped between, as in Fig. 111. If the valentine is intended for a girl write under the green circle in red letters:
(Fig. 111). On a piece of paper six inches long and three and a half inches wide, draw a circle near the top, making it not quite three inches in diameter. Paint the circle bright green as a background for the white daisy. Make the daisy using three or four layers of white tissue paper folded like Fig. 112 and cut along the scalloped outline shown in Fig. 112. Unfold the petals, and they will be like Fig. 113; but since the number needs to be odd, you must cut off one of the petals. Sew the center of the daisy to the center of the green circle, then paste a small yellow paper disk (Fig. 114) over the stitches. Paint a small red heart at each upper corner of the valentine and paint a narrow blue ribbon tied to each heart and looped between, as shown in Fig. 111. If the valentine is for a girl, write under the green circle in red letters:


When the valentine is for a boy substitute the pronoun She in place of He.
When the valentine is for a boy, replace the pronoun She with He.
Love’s Palette,
Love's Palette,

the last valentine (Fig. 115), is to be made of light cardboard cut in the shape of a palette. The palette should be about six inches high and four and one-half inches wide at the broadest part. Beginning near the top, cut short slits in pairs in the palette, placing the pairs one inch and a half apart (Fig. 116).[112] Get a quarter of a yard each of narrow blue, red, white, yellow, pink and green ribbon, and slipping the ends through the slits in the palette tie them in bows as shown in Fig. 115. In the centre write in red ink, “Love’s Palette,” and on the back the following lines:
the last valentine (Fig. 115) should be made from lightweight cardboard shaped like a palette. The palette needs to be about six inches tall and four and a half inches wide at its widest point. Starting near the top, cut short slits in pairs on the palette, with the pairs spaced one and a half inches apart (Fig. 116).[112] Get a quarter of a yard each of narrow blue, red, white, yellow, pink, and green ribbon, and thread the ends through the slits in the palette to tie them into bows as shown in Fig. 115. In the center, write in red ink, “Love’s Palette,” and on the back, write the following lines:


CHAPTER X
THE WILD WEST SHOW ON A TABLE

But did it ever occur to you that the show could come to you—that is, you might organize a show of your own and arrange things to suit yourself? If you want the Wild West Show first and a circus after you can have them. Should you prefer both shows at the same time they are yours, for you can make the entire affair—horses, riders, Indians, wild animals and tent. You may do even more—you can cause all the performers actually to move, and that by the mere turn of your wrist, because your show will be in reality the moving pictures of
But have you ever thought that the show could come to you? That is, you could organize your own show and set it up however you want? If you want the Wild West Show first and a circus afterward, you can have that. If you'd rather have both shows at the same time, that's your choice too, since you can create the whole experience—horses, riders, Indians, wild animals, and tents. You can do even more—you can make all the performers actually move, and all it takes is a flick of your wrist, because your show will really be the moving pictures of
A Panorama
A View


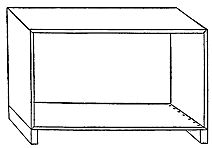
Find or make a wooden
box about twelve inches
high, eighteen inches wide
and eight inches deep; carefully
pry off one of the eighteen-inch
sides and cut two
round holes through the top
of the box, one at each end,
two inches from the front and
one and one-fourth inch from
the end; then turn the box
over and cut corresponding
holes through the bottom;
reverse the box again, bringing
the right side up (Fig.
118). The holes on the bottom
must be exactly under
those on the top and all four
holes must be only large
enough to allow the roller to
slip in, and while in, to turn
easily (see Fig. 119). Remove
the rollers and nail a strip of
wood two inches thick across
each end of the bottom of the
box (Fig. 120). Then hammer
two strong staple-tacks on each roller two and one-half inches
from the top, or smaller end, and on opposite sides of the stick;[115]
[116]
[117]
guide the tacks so they will incline very slightly upward while
being hammered in (Fig. 121).
Find or make a wooden box that’s about twelve inches high, eighteen inches wide, and eight inches deep. Carefully pry off one of the eighteen-inch sides and cut two round holes in the top of the box, one at each end, two inches from the front and one and a quarter inches from the end. Then, turn the box over and cut matching holes in the bottom. Flip the box back so the right side is facing up (Fig. 118). The holes in the bottom must be directly beneath those on the top, and all four holes should be just big enough for the roller to slide in and be able to turn easily (see Fig. 119). Remove the rollers and nail a two-inch thick strip of wood across each end of the bottom of the box (Fig. 120). Then, hammer two strong staple tacks on each roller, two and a half inches from the top or smaller end, and on opposite sides of the stick; guide the tacks so that they tilt slightly upward while being hammered in (Fig. 121).


Fit an empty spool on one end of a piece of wood, one inch wide, three inches long and not less than one-fourth of an inch thick. Slide a large-headed screw in the hole of the spool until the screw rests on the block of wood; then screw it down tight, fastening the spool securely on the wood (Fig. 122); screw a second spool on another piece of wood of the same size as the first (Fig. 123, D and E). Fit the free end of the block of wood over the top of the roller and mark off the space on the block occupied by the end of the roller; with a gimlet bore a hole through the centre of this space, and also in the centre of the top of the roller; place the block of wood over the top of the roller, bringing[118] one hole on top of the other, and fasten the roller and block together with a screw. In like manner screw the other block to the top of the second roller; these blocks and spools form the crank-handles for turning the rollers (Fig. 124).
Fit an empty spool on one end of a piece of wood that is one inch wide, three inches long, and at least one-fourth of an inch thick. Slide a large-headed screw into the hole of the spool until it rests on the block of wood; then tighten it securely, fastening the spool to the wood (Fig. 122); attach a second spool to another piece of wood of the same size as the first (Fig. 123, D and E). Position the free end of the wood block over the top of the roller and mark the area on the block where the end of the roller sits; using a gimlet, drill a hole through the center of this marked area, and also in the center of the top of the roller. Place the block of wood over the top of the roller, aligning one hole with the other, and secure the roller and block together with a screw. Similarly, attach the other block to the top of the second roller; these blocks and spools serve as the crank-handles for turning the rollers (Fig. 124).

Unscrew the blocks from the rollers and carefully remove the staple-tacks, in order that
Unscrew the blocks from the rollers and carefully take out the staple-tacks, so that
A Strip of Cloth
A Piece of Fabric
may be tacked to the rollers and the rollers replaced in the box.
may be attached to the rollers and the rollers put back in the box.


Purchase two yards of low-priced white cambric dress skirt lining; fold the cambric lengthwise into three equal divisions; then cut the folds apart, making three lengths each two yards long and about eight and one-fourth inches wide; sew the pieces together along the end edges, lapping one over the other that the seam may be as thin and flat as possible (Fig. 125). This will give you a strip almost six yards long for the panorama. Do not hem either the top or bottom. Allow a blank space[120] of white cloth, sixteen and one-half inches long, at the beginning of the panorama; then commence
Purchase two yards of inexpensive white cambric for the dress skirt lining; fold the cambric lengthwise into three equal parts; then cut the folds apart, making three lengths, each two yards long and about eight and one-fourth inches wide. Sew the pieces together along the ends, overlapping them so that the seam is as thin and flat as possible (Fig. 125). This will give you a strip that's almost six yards long for the panorama. Do not hem either the top or bottom. Leave a blank space of white cloth, sixteen and one-half inches long, at the start of the panorama; then begin
Pasting Pictures
Posting Pictures
on the strip. Colored newspaper pictures are best, because the paper is thin and easily pasted on the cambric. Almost all leading newspapers publish in their issues from time to time colored pictures of wild animals, rough riders, Indians and circus performers.
on the strip. Colorful newspaper pictures are best because the paper is thin and easy to paste onto the fabric. Almost all major newspapers occasionally publish color images of wild animals, rodeo riders, Native Americans, and circus performers.
When you have a collection of the pictures you want, cut each one out neatly. When all are ready, sort them over, selecting the one you wish to come first on the panorama; then the second picture and so on. Have them all in order so you need waste no time hunting for a print while pasting the pictures on the cambric.
When you have a collection of the pictures you want, cut each one out neatly. Once they're all ready, go through them and choose the one you want to be first in the panorama; then the second picture, and so on. Keep them all in order so you don’t waste any time looking for a print while you’re gluing the pictures onto the fabric.
Make a good paste of flour and water, allowing it to boil well before using. A drop or two of oil of cloves mixed with the paste after it has cooked will keep it fresh a long time.
Make a smooth paste of flour and water, letting it boil thoroughly before using. Adding a drop or two of clove oil to the paste after it has cooked will help keep it fresh for a long time.
Select an attractive, comical picture for the first design on the panorama; but save the best and most startling picture for the very last.
Choose an appealing and funny image for the first design on the panorama; but keep the best and most surprising image for the very end.
You should arrange
You should organize
The Performers
The Artists
in your panorama in much the same way as a story is written or a play put on the stage. Always begin with something which will cause the audience to want to see more; then paste on various pictures, but toward the last lead up to the best and most exciting design; the last picture stands for the climax in a story or a play.
In your panorama, just like how a story is written or a play is performed, always start with something that makes the audience want to see more. Then, add various images, but as you approach the end, build up to the best and most thrilling design; the final picture represents the climax of the story or the play.
When placing the pictures on the strip of cambric, remember[121] not to have them close together; keep them apart, allowing a little blank space between each successive object, so your audience will have an opportunity of enjoying every one of the performers and wild animals as it first appears peeping from behind the roll at one side of the tent, showing only its head, then coming in full view and passing slowly before them until it finally disappears around the roll at the other side (Fig. 123).
When you place the pictures on the strip of fabric, remember[121] not to keep them too close together; space them out a bit, leaving some blank space between each one. This way, your audience will get a chance to appreciate each performer and wild animal as it first shows its head peeking out from behind the roll on one side of the tent, then stepping into full view and moving slowly past them until it finally vanishes around the roll on the other side (Fig. 123).
When the Pictures Are All Pasted
When the Pictures Are All Stuck On

on the strip, turn over and crease down half an inch of cambric along the edge of the first end of the panorama; tack this end on one of the rollers. If the thickness of the top of your box is one-half an inch, tack the end of your panorama fully four and one-half inches below the top or smaller end of the stick. Should the thickness of the lid be one inch, the cambric strip must be tacked on still lower—about five inches from the top.
on the strip, fold down half an inch of fabric along the edge of the first end of the panorama; attach this end to one of the rollers. If the thickness of the top of your box is half an inch, attach the end of your panorama four and a half inches below the top or shorter end of the stick. If the thickness of the lid is one inch, the fabric strip should be attached even lower—about five inches from the top.
You cannot be too particular about having the edge of the cambric perfectly even and straight on the roller, so the strip will lie at a true right angle to the roller when laid out flat (Fig. 126).
You can’t be too picky about making sure the edge of the fabric is perfectly even and straight on the roller, so the strip will sit at a true right angle to the roller when laid out flat (Fig. 126).
Having tacked the cambric on, gradually roll it around the stick, keeping the strip running over, not under the stick, so the roller will stand behind the cambric; have the cloth perfectly even as it winds around and around. When the end of the cloth is reached, turn in one-half an inch[122] of the end edge and tack the cambric to the second roller as you tacked the beginning on the first roller (Fig. 127).
Having attached the cambric, gradually roll it around the stick, making sure the strip goes over, not under the stick, so the roller stays behind the cambric; ensure the cloth is perfectly even as it winds around. When you reach the end of the cloth, fold in half an inch of the end edge and attach the cambric to the second roller in the same way you attached the beginning to the first roller (Fig. 127).
Use the same precaution and wind in the same manner but in an opposite direction when rolling the cambric on the second stick. With a strong hammer strike the top or lid of the box along the edges from underneath until it loosens and can be removed; take it off and slide the rollers with the attached panorama into the holes on the bottom of the box (Fig. 123).
Use the same care and roll in the same way but in the opposite direction when placing the fabric on the second stick. With a firm hammer blow, hit the top or lid of the box along the edges from underneath until it loosens and can be taken off; remove it and slide the rollers with the connected panorama into the holes at the bottom of the box (Fig. 123).

Replace the lid of the box, passing the top ends of the rollers through the holes, and nail the lid down to the sides of the box; then refit the staple-tacks in their respective places and see that they are in tight; restore the crank-handles on top of the rollers and rescrew them in position (Fig. 124). Now the panorama is ready to go into
Replace the lid of the box, passing the top ends of the rollers through the holes, and nail the lid down to the sides of the box; then reinsert the staple-tacks in their respective places and make sure they are tight; put the crank-handles back on top of the rollers and reattach them in position (Fig. 124). Now the panorama is ready to go into
A Tent
A Tent


Cut a stiff piece of pasteboard box like the tent design (Fig. 128) with an opening to fit the strip of muslin, spanning the space between the two rollers; the edges of the opening must cover both top and bottom edges of the cambric. Cover the pasteboard with white muslin cut into four pieces—one piece for the top, one for the bottom and one for each side. Cut the bottom piece into a strip to fit, slashed on all edges (Fig. 129, A). Paste this on the tent (Fig. 128) first, turning the slashed portion over and fastening it on the back of the pasteboard; then fasten a curtain on each side (Fig. 130) and paste the top piece of the tent on last; scallop this along the bottom edge and paste it only along the two slanting slashed top lines; turn the slashes over on the wrong side of the pasteboard and paste. When dry, fit the tent over the front[124] of the box and tack it firmly in place. Make three little flags of gay paper, paste on sticks and glue the sticks to the top peak and sides of the tent (Fig. 130); paste strips of paper over and across the flag handle to the pasteboard to hold the flag more securely on the tent (Fig. 131). Your show will then appear to be moving inside of a white circus tent.
Cut a stiff piece of cardboard like the tent design (Fig. 128) with an opening to fit the strip of muslin that stretches between the two rollers; the edges of the opening should cover both the top and bottom edges of the cambric. Cover the cardboard with white muslin cut into four pieces—one for the top, one for the bottom, and one for each side. Cut the bottom piece into a strip that fits, with slits on all edges (Fig. 129, A). Attach this to the tent (Fig. 128) first, folding the slashed portion over and securing it on the back of the cardboard; then attach a curtain on each side (Fig. 130) and paste the top piece of the tent on last; scallop this along the bottom edge and paste it only along the two slanted slashed top lines; fold the slashes over on the back side of the cardboard and paste. When it’s dry, place the tent over the front[124] of the box and anchor it securely in place. Make three little flags from colorful paper, glue them to sticks and attach the sticks to the top peak and sides of the tent (Fig. 130); paste strips of paper over the flag handles to the cardboard to hold the flags more securely on the tent (Fig. 131). Your display will then look like it’s moving inside a white circus tent.

Set the box upon a table with the entire panorama wound[125] on the second roller, leaving only the blank portion of the cloth visible, and while the audience is seated in front, begin slowly turning the crank-handle of the first roller; at the same time telling in clear, well enunciated words all about your Wild West Show. Do not try to have your remarks sound as though learned from a book; that would be stiff and unnatural. Talk in an every-day way, exactly as though you were speaking only to your most intimate friend, and wanted to tell her all about the strange sights and queer people, and the funny bears who are not afraid of any man woman or child.
Set the box on a table with the whole panorama rolled up[125] on the second roller, leaving only the empty part of the cloth visible. While the audience sits in front of you, start slowly turning the crank-handle of the first roller; at the same time, speak in clear, well-articulated words about your Wild West Show. Don’t try to make your comments sound like they're straight from a book; that would come off as stiff and unnatural. Talk in a casual way, just as if you were talking to your closest friend and wanted to share all about the strange sights, the quirky people, and the funny bears who aren’t afraid of any man, woman, or child.
If you have been to a real Wild West Show, that will give you ideas, or if you have traveled way out West and seen the actual Wild West life it will be an inspiration for your show. Even to have read about the life with its daring riders, wild horses, buffaloes, hazardous stage coach drives, Indians and their war dances will be an immense help in aiding you to enter into the spirit of the show.
If you’ve been to a real Wild West Show, that will spark some ideas, or if you’ve traveled out West and experienced the Wild West life firsthand, it will inspire your show. Even just reading about the daring riders, wild horses, buffaloes, risky stagecoach rides, Native Americans and their war dances will help you get into the spirit of the show.

CHAPTER XI
ROOF PICNIC WITH BROOK TO CROSS AND FLOWERS
TO PICK


Sunflowers
Sunflowers
can be fashioned rapidly by cutting orange-colored tissue paper into strips twenty-five inches long and six inches wide, pointing[128] the strips into petals three inches deep and two and a half inches wide at the base (Fig. 132), ten petals to each strip; then creasing each petal lengthwise through its centre to give stiffness (Fig. 133), and gathering each strip separately along its straight edge with needle and thread (Fig. 134); in this way forming the two strips into two pointed circles (Fig. 135). These circles, together with a brown centre, make one sunflower.
can be made quickly by cutting orange-colored tissue paper into strips that are twenty-five inches long and six inches wide, shaping the strips into petals three inches deep and two and a half inches wide at the base (Fig. 132), with ten petals for each strip; then folding each petal lengthwise down the center to add stiffness (Fig. 133), and gathering each strip separately along its straight edge with a needle and thread (Fig. 134); this way, forming the two strips into two pointed circles (Fig. 135). These circles, along with a brown center, create one sunflower.


Cut a strip of brown tissue paper nine inches long and two inches wide for the centre, gather the paper tightly along one lengthwise edge and tie it close up under and against the head of a slender nail (Fig. 136). Around the nail under the brown centre, slide on first one, then the other, circle of gathered yellow petals, taking care to have the petal points of the lower circle lie between and not over those of the top circle. Finish by driving the nail which runs through the sunflower, into[129] one side of a stick or broom-handle, with the lower end sharpened (Fig. 137).
Cut a strip of brown tissue paper that’s nine inches long and two inches wide for the center. Gather the paper tightly along one long edge and tie it close up under and against the head of a slender nail (Fig. 136). Around the nail, under the brown center, slide on one circle of gathered yellow petals first, then the other, making sure the petal points of the lower circle sit between, not over, the points of the top circle. Finish by driving the nail that runs through the sunflower into [129] one side of a stick or broom handle, with the lower end sharpened (Fig. 137).


Hollyhocks
Hollyhocks
of every color can be made of circles of tissue paper five and a half inches in diameter, held at the centre, two circles one inside of the other, and the centre pushed and squeezed together, causing the edges to fold and turn until they resemble the real flower (Fig. 138). Smaller circles, crimped by drawing the paper through the partially closed hand (Fig. 139), can be made into pinks, and you may have brilliant, nodding poppies in the same way, only these are of smooth, uncrimped circles (Fig. 140), placed one inside the other, with a small circle of dark-green paper for the centre, and all three layers pinched together at the extreme centre (Fig. 141). Large peonies[130] are similar in construction to some of the flowers you have made, so try to work these out yourself.
You can create flowers of every color using circles of tissue paper that are five and a half inches in diameter, held at the center. Use two circles, one inside the other, and push and squeeze the center together, making the edges fold and twist until they look like real flowers (Fig. 138). For smaller circles, crimp the paper by drawing it through your partially closed hand (Fig. 139), which can be turned into pinks. You can also make bright, swaying poppies in a similar way, using smooth, uncrimped circles (Fig. 140), layering them one inside the other, with a small circle of dark-green paper in the center, and pinching all three layers together at the very center (Fig. 141). Large peonies[130] have a similar structure to some of the flowers you've made, so try to figure those out on your own.

A simple way to make
An easy way to make
Roses
Roses
is to cut tissue paper into strips two and a half inches deep; cut the square-cornered slashes two inches wide, then with knife or scissors blade curl the sharp corners of each separate division, making the slashes into rose petals. Curl the corners of the petals along half of the strip inward, and those along the other half, outward. Fold two or three plaits in the straight bottom edge of each petal; then begin with the half where the petals curl inward and wind the strip around the end of a slender stick. The first petals form the central group and are curled inward; the remainder, curled outward, form the outward circle of petals (Fig. 142). Make a generous supply of blossoms and tie them on bushes. Let each bush bear but one kind, that the flowers may appear natural and as if actually growing.
is to cut tissue paper into strips that are two and a half inches deep; cut the square-cornered slashes two inches wide, then use a knife or scissors to curl the sharp corners of each separate section, turning the slashes into rose petals. Curl the corners of the petals along one half of the strip inward and the other half outward. Fold two or three pleats in the straight bottom edge of each petal; then start with the half where the petals curl inward and wrap the strip around the end of a slender stick. The first petals form the central group and curl inward; the rest, curled outward, form the outer circle of petals (Fig. 142). Make a good number of blossoms and tie them to bushes. Let each bush have only one type, so the flowers look natural and as if they are actually growing.
Get a Variety of Fruit, Peaches, Plums, Apples
Get a variety of fruits: peaches, plums, apples
or any other sort you may prefer. Tie the fruit to those bushes which have no blossoms, allowing each fruit bush to bear only one kind of fruit.
or any other type you’d like. Tie the fruit to those bushes that don’t have flowers, allowing each fruit bush to produce only one kind of fruit.

In case there are no bushes, or if the bushes are too few in number, use branches or sticks with natural foliage, or leaves[131] made of green tissue paper; make the latter of paper in several layers, that a number may be cut at a time like the pattern (Fig. 143). Crimp through the centre by folding lengthwise over a hat-pin and pushing the folded centre together (Fig. 144). The method is quick and gives satisfactory leaves (Fig. 145). Cut leaves in different sizes as you will need some larger than others.
If there aren’t any bushes, or if there are only a few, use branches or sticks with natural leaves, or leaves made of green tissue paper. To create the latter, layer the paper several times so you can cut multiple pieces at once like the pattern (Fig. 143). Fold the center lengthwise over a hat pin and press the folded center together (Fig. 144). This method is quick and produces decent leaves (Fig. 145). Cut leaves in various sizes since you'll need some larger than others.
The sticks used as bushes should be of varying heights sharpened at the lower end and driven into the ground.
The sticks used as bushes should be different heights, pointed at the bottom, and pushed into the ground.
Pretend the sticks are fruit trees and flower bushes and plant them where they will appear to best advantage.
Pretend the sticks are fruit trees and flower bushes, and place them where they'll look their best.

If your yard happens to be
If your yard happens to be
On the Roof
On the Roof
of the house, as often occurs in large cities, there will probably be no earth in which to plant things; then you must fill flower pots and deep boxes with earth, sand, or gravel, and plant your make-believe trees and shrubs in them; such a garden will be entirely different from all others.
of the house, as often happens in big cities, there probably won’t be any soil to plant things in; so you’ll have to fill flower pots and deep boxes with dirt, sand, or gravel, and plant your fake trees and shrubs in them; such a garden will be completely different from all others.

Build a wooden fence over which the girls[132] and boys climb to enter the picnic grounds; even though the improvised fence may not closely resemble the real article, it will help to render the feeling of being in the open country more realistic.
Build a wooden fence that the girls[132] and boys can climb over to get into the picnic area; even if the makeshift fence doesn’t look exactly like a real one, it will help create a more authentic feeling of being in the countryside.
Make the fence by sinking the legs of two strong kitchen chairs partially but firmly into the earth. Place the two chairs facing each other and a short distance apart; then run a large, strong pole or narrow board for a rail, across the chair seats, allowing the rail to extend out beyond the back of the chairs. Lash the rail securely to the chairs with the heaviest twine or slender rope, and place very heavy weights on the seat to keep the chair steady, and avoid all possibility of the rail slipping or chairs tipping.
Make the fence by partially but firmly sinking the legs of two sturdy kitchen chairs into the ground. Position the two chairs facing each other and a short distance apart; then place a large, strong pole or narrow board across the chair seats for a rail, letting the rail extend beyond the back of the chairs. Securely tie the rail to the chairs with the thickest twine or thin rope, and place very heavy weights on the seats to keep the chairs steady, preventing any chance of the rail slipping or the chairs tipping over.
If possible get either a swing, a teeter or a jogging board; all these will afford a lively time for your guests, as will also a wheelbarrow in which the girls and boys may take turns in riding and pushing or wheeling each other.
If you can, get a swing, a teeter-totter, or a jogging board; all of these will provide a fun time for your guests, just like a wheelbarrow where the girls and boys can take turns riding and pushing each other.
If you want to make the affair seem just like a regular
If you want to make the situation seem just like a normal
Country Picnic
Country Picnic
let each guest bring his or her own little basket of lunch.
let each guest bring their own little basket of lunch.
As your guests arrive, usher them into the house and do not let them even see the yard if it can be avoided; keep the grounds for a pleasant surprise a little later.
As your guests arrive, lead them into the house and try to keep them from seeing the yard, if possible; save the grounds for a nice surprise a bit later.
Form the girls and boys into a single file and lead them marching around the room while they join in singing some lively air. After winding in and out among the chairs and tables, open the door, let them look out into the pretty garden, and, while still singing,
Form the girls and boys into a single line and guide them as they march around the room while singing a catchy tune. After weaving in and out among the chairs and tables, open the door, let them peek out into the beautiful garden, and, while still singing,
Climb Over the Fence
Climb the Fence
and march among the flowers and fruit trees; end the procession by circling around the spot chosen for your dinner table, where[133] all must deposit their lunch baskets. Of course you will not have an actual table, as the tablecloth must be spread on the ground and the girls and boys sit around it.
and walk among the flowers and fruit trees; finish the procession by going around the area chosen for your picnic, where[133] everyone must place their lunch baskets. Of course, you won’t have a real table, since the tablecloth will be spread on the ground and the girls and boys will sit around it.
Mark the four corners of the space reserved as a table with sticks about forty-six inches high, decorated with bright flowers (Fig. 146), and the sharpened ends planted in the earth, or in flower pots.
Mark the four corners of the space set aside for a table with sticks about forty-six inches tall, decorated with bright flowers (Fig. 146), and with the pointed ends stuck in the ground or in flower pots.
Spread the Tablecloth,
Lay out the Tablecloth,
bringing each corner to meet a garland pole; then let the guests take from their baskets the different articles. Reserve some space at the centre of the table for fruit, and let each boy and girl in turn walk about the grounds and select one piece of fruit, pick it, bring it to the table, and lay the chosen piece on the centre of the tablecloth. No person may pick more than one piece of fruit during one turn. Each player is privileged to place his fruit in any way he desires, remembering always that each piece goes to form the centre-piece, which should always be made as decorative as possible.
bringing each corner to meet a garland pole; then let the guests take from their baskets the different items. Save some space in the center of the table for fruit, and let each boy and girl take turns walking around the grounds to select one piece of fruit. They should pick it, bring it to the table, and place their chosen piece in the center of the tablecloth. No one can pick more than one piece of fruit during their turn. Each player can arrange their fruit however they like, keeping in mind that all the pieces contribute to the centerpiece, which should be as decorative as possible.

Crossing the Brook
Crossing the Stream
is a lively game and great fun. Get a number of flat stones that will lie steady, and are large enough to step upon; arrange them[134] about eighteen or twenty inches apart, in an irregular line, over a stretch of ground twenty or more feet across. Let the players in turn tip-toe on the stones just as though they were crossing a brook of running water, each girl and boy being obliged to pay a forfeit for every misstep into the make-believe water. If stones are not to be had, use blocks of wood, or, if need be, pieces of paper in place of stones. As each player crosses the brook, the rest of the party must call to her to be careful, not to fall, that she is going too fast, that she is going too slow, or make similar comments. They can cheer her, and in many harmless ways try to confuse the player with their calls, but it is against the rules to touch or even go nearer to her than two yards.
is a lively game and a lot of fun. Get some flat stones that can stay steady and are big enough to step on; arrange them[134] about eighteen or twenty inches apart, in a random line, over a stretch of ground that’s twenty feet or more across. Let the players take turns tip-toeing on the stones as if they were crossing a flowing brook, with each girl and boy having to pay a forfeit for every misstep into the pretend water. If you can’t find stones, use blocks of wood, or if needed, pieces of paper instead. As each player crosses the brook, the rest of the group must shout to her to be careful, not to fall, that she's going too fast, that she's going too slow, or make similar comments. They can cheer her on, and in many playful ways try to confuse the player with their calls, but it’s against the rules to touch her or even get closer than two yards.
After all the girls and boys have taken their turn at crossing the brook, try
After all the girls and boys have had their chance to cross the brook, try
Japanese Tag
Japanese Tag
Each player must keep her hand on the spot where she was last tagged, making the game present a most laughable appearance, with all the young people dancing about in strange attitudes, holding a hand on the top of the head, on the knee, chest, back, or foot, as it happens. The players are not allowed to remove the hand until tagged in another spot. When tagged in the middle of the back or any spot difficult to reach, the player may hold a stick in his hand with one end resting on the spot where he was tagged.
Each player has to keep her hand on the spot where she was last tagged, making the game look pretty funny, with all the young people moving around in weird positions, holding a hand on their head, knee, chest, back, or foot, depending on where they were tagged. Players can't take their hand off until they're tagged in a different spot. If someone gets tagged on the middle of their back or in a hard-to-reach place, they can use a stick to rest on the spot where they were tagged.
In starting
Starting out
The Game
The Game
any person who first shouts, “Pick her up and stone holder,” may hold both hands in front of her, each doubled up tight and one clasping a small stone, immediately some one calls out “First[135] knock,” another player cries “Second knock,” another “Third knock,” and so on, according as they are able to get the call in after the preceding cry. The player calling
any person who first shouts, “Pick her up and stone holder,” may hold both hands in front of her, each clenched tight with one holding a small stone, and immediately someone calls out “First[135] knock,” another player yells “Second knock,” another “Third knock,” and so on, depending on who can get their call in after the previous shout. The player calling
“First Knock”
"First Knock"
taps one hand of the girl or boy holding the stone; if the hand touched contains the stone, the player knocking is “it,” and the game begins, but if the hand is empty, the player is free and the stone-holder puts her hand back of her while she does or does not change the stone to the other hand; again stretching her clinched hands forward, she allows the player calling “Second knock” to try her luck by tapping one of the outstretched hands. The trials are continued until a player taps the hand holding the stone and becomes “it,” then
taps one hand of the girl or boy holding the stone; if the hand they touched has the stone, the player who tapped is “it,” and the game starts. But if the hand is empty, the player is free, and the stone-holder puts her hand behind her back while she either switches the stone to the other hand or not. Again, she stretches her clenched hands forward, allowing the player who calls “Second knock” to try their luck by tapping one of the outstretched hands. The attempts continue until a player taps the hand holding the stone and becomes “it,” then
The Others Scatter
The Others Scatter
and “it” endeavors to tag some one, who in turn becomes “it,” and so the game goes on.
and “it” tries to tag someone, who then becomes “it,” and so the game continues.
After the players have grown tired of this game, there are many others which will suggest themselves to the young people, and it will be found a good plan to alternate the livelier kind with those of a more quiet nature.
After the players get tired of this game, there are plenty of other options that will come to mind for the young people, and it’s a good idea to alternate the more energetic types with those that are more relaxing.
When the picnic is over give each guest one of the pretty paper flowers to carry home, and your roof or back-yard picnic will have been an event long to be remembered.
When the picnic is finished, give each guest one of the beautiful paper flowers to take home, and your rooftop or backyard picnic will be an event that everyone will remember for a long time.

CHAPTER XII
THE MAGIC PEEP SHOW


Cut a large square opening in the end of the box, leaving a margin one-half inch wide at the top and sides (Fig. 147). Make a small round hole in the centre of the front of the box, only large enough for one eye to look through, and cut a slit a quarter of an inch wide on each side of the box half an inch from the open end and half an inch from the top; extend the slit to the bottom of the box (Fig. 148). Fig. 149 shows the box with the front, sides, and back cut.
Cut a large square opening in the end of the box, leaving a half-inch margin at the top and sides (Fig. 147). Make a small round hole in the center of the front of the box, just big enough for one eye to look through, and cut a quarter-inch wide slit on each side of the box, half an inch from the open end and half an inch from the top; extend the slit to the bottom of the box (Fig. 148). Fig. 149 shows the box with the front, sides, and back cut.


If the bent-down edges of the box-lid are wide, cut them off within half an inch of the top; then put the lid on the box and it will be ready for the slides (Fig. 150).
If the bent-down edges of the box lid are wide, trim them to half an inch from the top; then put the lid on the box and it's ready for the slides (Fig. 150).

The Slides
The Slides
must be stiff and perfectly opaque, so they will appear black when held up to the light. Make them of pieces of pasteboard boxes cut to fit in the side slits and long enough to extend a trifle beyond on each side of the box (Fig. 151).
must be stiff and completely opaque, so they look black when held up to the light. Cut them from pieces of cardboard boxes to fit in the side slits and long enough to stick out slightly on each side of the box (Fig. 151).

Draw the different designs given here on separate slides, and with a sharp penknife cut them out, leaving holes in the slides exactly the shape of the designs. The holes should appear with clean-cut edges.
Draw the various designs shown here on separate slides, and with a sharp knife, cut them out, leaving holes in the slides that match the shapes of the designs. The holes should have clean edges.

Of course, the complete designs on the slides must be drawn much larger than in these printed diagrams, but you can enlarge the drawings by the system of squares. Explained in Chapter XIV.
Of course, the full designs on the slides need to be drawn much larger than in these printed diagrams, but you can enlarge the drawings using the grid method. Explained in Chapter XIV.

After the designs are cut out, paste colored tissue paper over[139] the openings, and when you look through the little hole you will see wonderfully bright and gay scenes all in transparent colors. An ambitious red cow will be found jumping over a yellow moon, and instead of being accompanied by the usual dish running away with a spoon, you will find an energetic wood sprite dressed all in Lincoln-green. The sprite has tied a rope of wild grape-vine to the cow, and, clinging to the rope, is sailing through the air and over the moon with his queer steed. Fig. 152 shows
After you cut out the designs, glue colorful tissue paper over the openings, and when you look through the little hole, you'll see wonderfully bright and cheerful scenes in transparent colors. An ambitious red cow will be jumping over a yellow moon, and instead of a dish running away with a spoon, you'll find an energetic wood sprite dressed entirely in Lincoln green. The sprite has tied a wild grapevine rope to the cow, and hanging onto the rope, he’s sailing through the air and over the moon with his quirky steed. Fig. 152 shows
“The Cow Jumped Over the Moon”
“The Cow Jumped Over the Moon”
Cut out the group and paste a piece of dark-red tissue paper over the entire cow with the exception of the horns. Across these paste white tissue paper. Cover the moon with one piece of yellow tissue paper and the sprite with green, all except his face; have that pink. Cut out a thin line for the rope and paste a bit of brown tissue paper over it. Fig. 153 shows[140] the wrong side of the slide and explains how the work is done; dotted lines designate the openings, which are covered with tissue paper, in the manner described.
Cut out the group and paste a piece of dark red tissue paper over the entire cow, leaving out the horns. Paste white tissue paper across these. Cover the moon with one piece of yellow tissue paper and the sprite with green, except for his face, which should be pink. Cut out a thin line for the rope and paste a bit of brown tissue paper over it. Fig. 153 shows[140] the wrong side of the slide and explains how the work is done; dotted lines indicate the openings, which are covered with tissue paper as described.


The tissue-paper coverings may be cut in any shape, but each piece must cover well the opening of the figure or portion of figure intended to be the color of the paper. Have the white paper across the horns lap less than one-eighth inch over the red paper of the cow (Fig. 154), and manage the pink paper of the sprite’s face in the same way where it meets the green of his cap and clothing.[141]
The tissue paper covers can be cut into any shape, but each piece needs to properly cover the opening of the figure or part of the figure that is meant to be the color of the paper. Make sure the white paper across the horns overlaps the red paper of the cow by less than one-eighth of an inch (Fig. 154), and handle the pink paper of the sprite’s face in the same manner where it meets the green of his cap and clothing.[141]

In making the other slides, follow this method throughout whenever two pieces of tissue paper come in contact on the figure, and when pasting paper over designs on the remaining slides always use one large piece of paper in preference to several small pieces for covering different parts of the design, which are the same in color. Figs. 155, 156 and 157 give the cow, sprite and moon for you to copy or trace.
In creating the other slides, use this approach throughout whenever two pieces of tissue paper touch on the figure. When applying paper over designs on the remaining slides, always opt for one large piece of paper rather than several small pieces to cover different parts of the design that are the same color. Figs. 155, 156 and 157 show the cow, sprite, and moon for you to copy or trace.

Life in Fairy Waters
Life in Fairy Springs
Fig. 158 shows how dark the slides appear when seen in the peep show and gives an idea of the decided contrast of the light design against the dark background, only the black and white print cannot give the charm of the clear, bright, transparent coloring of the mermaid feeding her many-hued pets as she rides her sea-horse in the fairy waters.
Fig. 158 shows how dark the slides look when viewed in the peep show and gives a sense of the strong contrast between the light design and the dark background. However, the black and white print can't capture the charm of the clear, bright, transparent colors of the mermaid feeding her colorful pets as she rides her sea-horse in the magical waters.
The different parts of the composition are Figs. 159, 160, 161 and 162, and the food merely little[142] oval-shaped holes covered with white tissue paper. Make the mermaid’s hair and ribbon brown; her face, arms and body to the waist line, pink; the remaining portion of the mermaid’s figure orange-color. The fish, scarlet, purple and white. Paste wee round pieces of black paper on the fish for the eyes.
The different parts of the composition are Figs. 159, 160, 161, and 162, and the food is just small oval-shaped holes covered with white tissue paper. Make the mermaid’s hair and ribbon brown; her face, arms, and body to the waist pink; the rest of the mermaid’s figure orange. The fish should be scarlet, purple, and white. Stick tiny round pieces of black paper on the fish for their eyes.


As soon as you finish the slide, fit it in the peep show box, turn your face to the light, then peep through the hole and find how pretty the bright group looks with all the eager fish gathering around the little mermaid as she calls them to breakfast.
As soon as you finish the slide, put it in the peep show box, turn your face to the light, then look through the hole and see how beautiful the bright group looks with all the excited fish gathering around the little mermaid as she calls them to breakfast.
Next comes Fig. 163, the
Next comes __A_TAG_PLACEHOLDER_0__, the
Easter Chicks
Easter Chicks
Make Fig. 164 light yellow; Fig. 165, blue; Fig. 166, orange chick, white shell; Fig. 167 A, green, B, purple; Fig. 168, white chick, scarlet shell; the broken shells (Fig. 169) red, blue and white. The poor little chicks are glad to escape from the shells even though the shells have been gayly painted.
Make Fig. 164 light yellow; Fig. 165, blue; Fig. 166, orange chick, white shell; Fig. 167 A, green, B, purple; Fig. 168, white chick, scarlet shell; the broken shells (Fig. 169) red, blue and white. The poor little chicks are happy to get out of the shells even though the shells have been brightly painted.


In the Three Blind Mice
In the Three Blind Mice
(Fig. 170), which are pursued by the knife belonging to the farmer’s wife, the first mouse can be orange-color; the second, white, and last one brown. The blade of the knife, scarlet, and its handle green, or any other colors which may please your fancy. Remember, this is a magic peep show, and often the natural color of animals is changed to more brilliant hues in order to secure a more vivid effect.
(Fig. 170), which are chased by the knife of the farmer’s wife, the first mouse can be orange; the second, white, and the last one brown. The blade of the knife is red, and its handle is green, or any other colors that you might like. Keep in mind, this is a magic peep show, and often the natural colors of animals are changed to brighter hues to create a more striking effect.


The next illustration will undoubtedly prove to be the most amusing of all, and will bring forth gales of laughter from your little brothers, sisters or friends. It is the
The next illustration is sure to be the funniest of all and will have your little brothers, sisters, or friends laughing out loud. It is the

Dance of the Dolls (Fig. 173)
Dance of the Dolls (__A_TAG_PLACEHOLDER_0__)
On Fig. 174 paste orange-colored hair, a scarlet dress and green shoes; then over all paste one large piece of white tissue paper which will make the doll’s face, neck, arms and stockings white. The layer of white paper placed over these colors does not affect them in the least.
On Fig. 174 paste orange hair, a red dress, and green shoes; then, over everything, paste a large piece of white tissue paper that will make the doll’s face, neck, arms, and stockings white. The layer of white paper placed over these colors doesn’t affect them at all.
Cut a circular hole for the ball and cover it with brown tissue paper. Dress Fig. 175 in the same manner as the doll just described, but in other colors. For instance, make her hair[146] brown, her dress light purple, her shoes yellow, and her face, arms and stockings white. If you want features on the faces, use a very soft lead-pencil and draw eyes, nose and mouth, though features are not really necessary, and, as a matter of fact, the dolls look very well without.
Cut a circular hole for the ball and cover it with brown tissue paper. Dress Fig. 175 the same way as the doll mentioned earlier, but use different colors. For example, make her hair brown, her dress light purple, her shoes yellow, and her face, arms, and stockings white. If you'd like to add facial features, use a very soft pencil to draw the eyes, nose, and mouth, although features aren't really necessary, and the dolls actually look great without them.


Let Jumping Jack (Fig. 176) be all in blue, except his face—make that white. Joints on all the toys, as seen in the illustrations, are indicated by pasting thread lines of black paper and pin-head dots of black paper over the places where joints should be, according to the outlines and dots at the elbows of the girl dolls and the shoulders and hips of dancing Jack.
Let Jumping Jack (Fig. 176) be all in blue, except for his face—make that white. Joints on all the toys, as shown in the illustrations, are indicated by sticking thread lines of black paper and pin-head dots of black paper over the places where the joints should be, based on the outlines and dots at the elbows of the girl dolls and the shoulders and hips of dancing Jack.
The Bouquet
The Flower Arrangement
(Fig. 177) consists of a red tulip (Fig. 178); a deep-yellow ox-eye daisy with a brown centre pasted over the yellow—in this case it can be done (Fig. 179)—a bluebell (Fig. 180); and a white daisy with yellow centre (Fig. 181). You will find that this piece, with all its bright colors, will be one of the prettiest of your designs. Fig. 182 is a branch of green leaves.
(Fig. 177) features a red tulip (Fig. 178); a deep-yellow ox-eye daisy with a brown center placed over the yellow—in this case, it can be done (Fig. 179)—a bluebell (Fig. 180); and a white daisy with a yellow center (Fig. 181). You'll find that this piece, with all its bright colors, will be one of the most beautiful of your designs. Fig. 182 is a branch of green leaves.

Cover each blossom with its respective color, and then paste one piece of green tissue paper over all the leaves and stems and the effect will be very natural.
Cover each flower with its specific color, and then place a piece of green tissue paper over all the leaves and stems for a very natural effect.


The Little Sun-bonnet Girl
The Little Sun Hat Girl
(Fig. 183), playing with a lot of bright-colored balloons, forms the last slide. Make the little girl’s dress blue, her sun-bonnet white and her hands, feet and ankles pink (Fig. 184). Let the strings of the balloons be of white tissue paper and each balloon of a different color from all the others; one may be dark red, the others green, pink, purple, light yellow, blue, scarlet, orange, brown, light green, white and vivid yellow. The slide will be very brilliant.
(Fig. 183), playing with a bunch of bright-colored balloons, creates the last slide. Change the little girl’s dress to blue, her sunbonnet to white, and make her hands, feet, and ankles pink (Fig. 184). The strings of the balloons should be made of white tissue paper, and each balloon should be a different color from the others; one can be dark red, and the rest can be green, pink, purple, light yellow, blue, scarlet, orange, brown, light green, white, and bright yellow. The slide will be very vibrant.

Invent other designs yourself. Think of something[150] you would like to see and try it on a new slide; when you succeed with one, you will want to make another and another. The more slides you have for your magic peep show the longer the fun will last, and you will be able to give no end of pleasure to your little friends.
Invent your own designs. Think of something[150] you want to see and try it on a new slide; once you succeed with one, you’ll want to make another and another. The more slides you have for your magic peep show, the longer the fun will last, and you'll be able to bring endless joy to your little friends.

When exhibiting the peep show set the box on top of a table where the light will shine through the slides and let the party take turns facing the window and peeping through the little hole at the novel, brilliant scenes beyond.
When showing the peep show, place the box on a table where the light can shine through the slides. Let the guests take turns standing in front of the window and looking through the small hole at the exciting, colorful scenes beyond.

CHAPTER XIII
PLANT YOUR GARDEN IF YOU CAN
A New Flower Game
A New Flower Game

I have it! A game of flowers with roses that will not wilt or fade but last for a long time fresh and bright. We will call it “Plant Your Garden if You Can,” because one cannot always be absolutely sure of planting the flowers, and that is part of the fun.
I’ve got it! A flower game with roses that won’t wilt or fade but will stay fresh and bright for a long time. We’ll call it “Plant Your Garden if You Can,” because you can’t always be completely sure about planting the flowers, and that’s part of the fun.

Two Dozen Roses
24 Roses
will be needed for this garden game, half a dozen white, half a dozen red, half a dozen yellow and half a dozen pink. The flowers are of tissue paper and very pretty.
will be needed for this garden game, six white, six red, six yellow, and six pink. The flowers are made of tissue paper and are really pretty.
Cut squares measuring twelve inches along each of the four sides, from white, pink, yellow and red tissue paper; the dotted lines on the diagrams indicate where the paper must be folded (Fig. 185). Fold each square across the centre (Fig. 186). Fold again crosswise through the centre, forming a small square of four layers (Fig. 187). Again fold, this time diagonally (A to B, Fig. 187), and you will have a triangle (Fig. 188). Fold once more diagonally (Fig. 188) A to C; this will give Fig. 189. Cut straight across from E to dot D (Fig. 189), then cut a slash an inch and three-quarters deep in the centre of the edges as shown by the line F in Fig. 190. Open out the paper (Fig. 191). The slashed edges will form the petals of the rose. Curl each corner edge of every petal with a blade of a pair of scissors according to dotted lines on the petal (Fig. 192).
Cut squares that are twelve inches on each side from white, pink, yellow, and red tissue paper. The dotted lines on the diagrams show where the paper should be folded (Fig. 185). Fold each square in half (Fig. 186). Then fold it again in the other direction, making a small square with four layers (Fig. 187). Next, fold it diagonally (A to B, Fig. 187), and you will have a triangle (Fig. 188). Fold it diagonally again (A to C, Fig. 188); this will give Fig. 189. Cut straight across from E to dot D (Fig. 189), then make a cut one and three-quarters inches deep in the center of the edges, as shown by the line F in Fig. 190. Unfold the paper (Fig. 191). The slashed edges will create the petals of the rose. Curl the corner edge of each petal with the blade of a pair of scissors, following the dotted lines on the petal (Fig. 192).


Begin by holding one corner of one petal between the thumb
of your right hand and one blade of the scissors; gently pull your[155]
[156]
thumb and the scissors blade outward, sliding them along each
side of the petal, while you hold the remainder of the paper
steady with your left hand.
The thumb rubs over the
petal; at the same time the
edge of the scissors blade
scrapes the under side of the
petal, which causes the paper
to curl. Fig. 192 shows one
petal with both of the side corners
curled. When you have
curled around the first half of the circle, turn the paper over and
curl the petals around the other half of the circle in an opposite
direction. Fig. 193
gives two petals
curled forward and
two backward, representing
two petals
on each half of
the tissue-paper
rose. After all the
petals are curled
lay the centre of
the tissue paper
out flat and place
on it three level teaspoonfuls
of flour; then gather up the edges
of the rose and wind a strong thread several times around below
the petals and above the flour-bag formed by the centre
of the paper (Fig. 194). Tie the string, adjust the petals and
the rose will be finished (Fig. 195).
Start by holding one corner of a petal between the thumb of your right hand and one blade of the scissors. Gently pull your[155]
[156] thumb and the scissors blade outward, sliding them along each side of the petal, while you keep the rest of the paper steady with your left hand. Your thumb rubs over the petal; at the same time, the edge of the scissors blade scrapes the underside of the petal, causing the paper to curl. Fig. 192 shows one petal with both side corners curled. Once you've curled the first half of the circle, flip the paper over and curl the petals around the other half of the circle in the opposite direction. Fig. 193 shows two petals curled forward and two backward, representing two petals on each half of the tissue-paper rose. After all the petals are curled, lay the center of the tissue paper flat and place three level teaspoons of flour on it; then gather up the edges of the rose and wrap a strong thread several times around below the petals and above the flour bag made by the center of the paper (Fig. 194). Tie the string, adjust the petals, and the rose will be complete (Fig. 195).


Mark Out Two Flower Beds
Mark Out Two Planters
where the roses are to be planted. Each bed must measure three yards in length and one yard in width. The beds must run parallel to each other and be separated by a space of three yards. Each of the two flower beds must then be divided crosswise through the centre, making four flower beds in all, two on each side—one for every player. Fig. 196 shows the plan with flower beds divided. The circles denote the station points or places where the players stand, and the dotted line the direction the roses should take when played by the girl or boy stationed at the position marked “Barbara.” The other players send their roses in like manner over the intervening space to the flower bed diagonally across from their position.
where the roses are to be planted. Each bed must be three yards long and one yard wide. The beds must run parallel to each other and be separated by a space of three yards. Each of the two flower beds must then be divided in the middle, making four flower beds in total, two on each side—one for each player. Fig. 196 shows the plan with the divided flower beds. The circles mark the spots where the players stand, and the dotted line indicates the path the roses should follow when played by the girl or boy at the spot marked “Barbara.” The other players send their roses in the same way over the space to the flower bed diagonally opposite their position.

That there may be no mistake regarding each particular enclosure where the different-colored roses should be planted,
That there is no confusion about where each type of rose should be planted,
Use Flags
Use Flags
to designate the color of the various flower beds. From inexpensive cotton cloth of a solid red color cut a flag eighteen inches long and twelve inches wide; hem the raw edges; then tack one end of the flag on a slender stick one yard or more in length; sharpen the free end of the stick and push it down into the earth[158] at the outer back corner of the flower bed intended for the red roses. Have the flag stand straight and firm. Make a white, a yellow and a pink flag in the same way. Erect each in the outer back corner of its own bed, which will be the bed where roses of corresponding color are to be planted. All the flags must be of equal height.
to mark the color of the different flower beds. Cut a flag from inexpensive red cotton cloth that is eighteen inches long and twelve inches wide; hem the raw edges; then attach one end of the flag to a slender stick that is one yard or more in length; sharpen the free end of the stick and push it into the ground[158] at the outer back corner of the flower bed meant for the red roses. Make sure the flag stands straight and firm. Create a white, a yellow, and a pink flag in the same way. Place each in the outer back corner of its respective bed, which will be the bed where roses of that color are to be planted. All the flags should be of equal height.

If the game is played at the seashore on a smooth, hard beach, mark out the flower beds by running the end of a stick along in the sand. If the game takes place on a level lawn, use white tape for marking the beds; peg the tape down to the earth with common wooden clothespins (Fig. 197), first sliding the tape in the clothespin (Fig. 198).
If the game is played at the beach on a flat, hard surface, outline the flower beds by dragging the end of a stick in the sand. If the game is happening on a flat lawn, use white tape to mark the beds; secure the tape to the ground with standard wooden clothespins (Fig. 197), making sure to slide the tape into the clothespin first (Fig. 198).

The Four Rackets for the Game
The Four Rackets for the Game
are ordinary flat palm-leaf fans, one fan to each player.
are regular flat palm-leaf fans, one fan for each player.
The game is played by sides, and calls for four players, two on each side.
The game is played in teams and requires four players, with two on each team.
The Game
The Game
is that each player in turn shall plant as many roses in her own garden as she can. Every player has six roses of one color; the two holding respectively the white and the red roses are on one side, while the two with the yellow and the pink roses take the opposite side. When all is ready and the players are at their stations, a signal is given and the game begins.
is that each player, in turn, will plant as many roses in her own garden as she can. Every player has six roses of one color; the two holding the white and red roses are on one side, while the two with the yellow and pink roses are on the opposite side. When everything is set and the players are in position, a signal is given and the game starts.
The first player holds one of her roses out with the left hand, strikes it with the fan-racket held in the right hand, and endeavors to send the rose flying and land it in her own garden. If she succeeds, the rose is said to be “planted,” and scores her one point, but should the rose go beyond the boundary line of her flower bed, fall short of it, or the flour-bag of the rose be broken, the play is a “failure” and scores one point for the opposite side. When a rose falls on the boundary line of its own flower bed, the play is a “fault,” and the player may try again with the same flower. After the first player has had her turn, a player on the opposite side tries her skill, for the turns must alternate from side to side. The game ends with the playing of the last rose, and the side scoring the greatest number of points wins the game. All roses when played must remain where they fall until the close of the game, with the exception of those falling on the boundary line of their own beds.
The first player holds one of her roses out with her left hand, hits it with the fan-racket in her right hand, and tries to send the rose flying into her own garden. If she succeeds, the rose is considered "planted," earning her one point. However, if the rose goes beyond the boundary of her flower bed, falls short, or the flour-bag of the rose breaks, it counts as a "failure," giving one point to the other side. If a rose lands on the boundary line of its flower bed, it's called a "fault," and the player can try again with the same flower. After the first player has taken her turn, a player from the opposite side takes hers; the turns must alternate. The game ends when the last rose is played, and the side with the most points wins. All roses played must stay where they land until the end of the game, except for those that land on the boundary line of their own beds.
A Tally Card
A Tally Card
will be required for keeping a record of the game. Make one of white pasteboard (Fig. 199). The initials can be changed to those taking part in the sport. Every point scored must be written under the color and initial or name of the person who scores it. When, because of the failure of one player, the opposite[160] side scores a point, the score must be recorded in the third column belonging to that side on the tally card under the word “Won.”
will be needed to keep a record of the game. Create one from white cardboard (Fig. 199). The initials can be updated to reflect those participating in the sport. Every point scored must be noted under the color and initial or name of the person who scores. If one player fails and the opposing side scores a point, the score should be recorded in the third column for that side on the tally card under the word “Won.”

To Determine the Choice of Sides,
To Decide Which Side to Choose,
which shall be first, and the distribution of colors, draw straws for the colors and toss for position of sides. To draw straws, take four straws of varying lengths, and grasp them in your hand in such a way that the extending ends of the straws seen by the other players are the same in length, while the uneven ends are closed within the hand; allow each player to draw a straw. The girl or boy taking the longest straw has first choice of colors; the player holding the straw next in length has second choice, and so on.
which will go first, and for the distribution of colors, draw straws for the colors and flip a coin for position on the sides. To draw straws, take four straws of different lengths and hold them in your hand so that the ends sticking out are the same length, while the uneven ends are hidden in your hand; let each player draw a straw. The girl or boy who draws the longest straw gets first choice of colors; the player with the next longest straw gets second choice, and so on.
To toss for position of sides means that a player from each[161] side shall toss a small stone toward a stick laid on the ground two yards distant from the spot where the players stand. A twig placed on the spot may mark the point from which the stones are to be tossed. The stones must be tossed in turn, not at the same time, and the player whose stone comes nearest to the mark wins the right for his side to the choice of position on the grounds, also the right of first play.
To decide which side goes first, a player from each side will toss a small stone toward a stick on the ground that is two yards away from where they stand. A twig placed on the spot can mark the point for the stone toss. The stones should be tossed one at a time, not simultaneously, and the player whose stone lands closest to the mark wins the right for their side to choose their position on the field and to play first.
One charm of this game is that the roses when volleyed by the players invariably land on the ground blossom uppermost, and these twenty-four bright blossoms scattered over the green lawn or sandy beach, with gay, colored flags outlining the four corners of the garden court, and, best of all, the group of merry boys and girls, make a very attractive and pretty scene.
One of the appealing features of this game is that the roses hit by the players always land on the ground with the blossoms facing up. These twenty-four vibrant flowers spread out across the green lawn or sandy beach, with colorful flags marking the corners of the garden court, and, best of all, the cheerful group of boys and girls create a really charming and beautiful scene.
The game, though intended for four players, may also be played by either two or eight players. When only two take part, each must play the twelve roses belonging to his side; in other respects the rules are the same as in a four-handed game. When there are eight players, four must stand on each side and each player have three roses, two players necessarily playing the same color, but not in the same bed, as the garden on both sides must be divided into four beds that every player may plant roses in a separate flower bed; otherwise the original rules hold good.
The game is designed for four players but can also be played with just two or up to eight players. If only two people are playing, each one must use the twelve roses from their side; otherwise, the rules are the same as in a four-player game. When there are eight players, four will be on each team, and each player gets three roses. Two players will be using the same color, but they have to play in different beds since the garden is divided into four beds, allowing each player to plant their roses in their own area; otherwise, the standard rules apply.
“Plant Your Garden if You Can” may be adapted to the house when chill Autumn days appear and the weather grows cold and rainy. When played indoors the beds may be marked out by white tape as on the green lawn, only in this case wooden clothespins would be of no use, and thumb tacks, such as are used by artists, must take their place to fasten the tape down on a bare wooden floor, and safety-pins when the floor is carpeted.
“Plant Your Garden if You Can” can be adjusted for indoor play when chilly autumn days come and the weather starts to get cold and rainy. When played inside, you can outline the garden beds using white tape just like on the green lawn, but this time wooden clothespins won't work. Instead, use thumbtacks, like those used by artists, to secure the tape to a bare wooden floor, and safety pins if the floor is carpeted.

CHAPTER XIV
JOLLY LITTLE SANTA CLAUS
WITH HIS REINDEER AND
SLEIGH

It would be difficult to say positively how long Santa Claus has lived, or when he first made his appearance, but we all know just how he looks,
It’s hard to say for sure how long Santa Claus has been around or when he first showed up, but we all know what he looks like,
We know that he is sure to come every Christmas, and the girls and boys look forward gladly to his visit. The little Hollanders[164] name our Christmas Saint Santa Claus, the same as we do, though sometimes we call him Kris Kringle. In England he is both Santa Claus and St. Nicholas, in Switzerland Samiklaus, in Russia he is St. Nicholas. But no matter by what name he may be called, he is always the same, always the jolly little fellow bringing good cheer to every one. Santa Claus takes great delight in driving his tiny reindeer and sleigh full of toys over roofs of houses for the special benefit of the girls and boys he knows, and that includes all of them.
We know he’s sure to come every Christmas, and the kids look forward to his visit with excitement. The little kids in Holland call our Christmas Saint Santa Claus, just like we do, although sometimes we refer to him as Kris Kringle. In England, he’s both Santa Claus and St. Nicholas, in Switzerland, he’s Samiklaus, and in Russia, he’s St. Nicholas. But no matter what name he goes by, he’s always the same—always the cheerful little guy bringing joy to everyone. Santa Claus loves driving his tiny reindeer and sleigh full of toys over the rooftops for the special enjoyment of the kids he knows, and that includes all of them.

Possibly Santa Claus will drive only two reindeer in his sleigh this year. He is willing, however, to bring them all if you wish.
Possibly Santa Claus will drive just two reindeer in his sleigh this year. He's ready to bring all of them if you want.


An ordinary sled (Fig. 201) will do for the foundation of
An ordinary sled (Fig. 201) will work just fine for the base of
The Sleigh,
The Sleigh,
and a box for the body of the sleigh (Fig. 202) to set on the sled (Fig. 203). Find some furs to use as robes to hang over the sides and back of the sleigh; any kind will do—boas, collars, circulars or rugs. Fit them in and over the sides of the box. If you have no furs, try plush or colored blankets. Tack gay-colored paper over those portions of the box which are not concealed by the robes, and lay a small, light[165] board over the top front of the box, resting the ends of the board on the sides of the box to make the seat on the sleigh. Cover the board with the same paper as that tacked on the box.
and a box for the body of the sleigh (Fig. 202) to set on the sled (Fig. 203). Find some furs to use as robes to hang over the sides and back of the sleigh; any kind will do—boa, collars, circulars, or rugs. Fit them in and over the sides of the box. If you don’t have furs, try plush or colored blankets. Tack bright-colored paper over those parts of the box that aren’t covered by the robes, and lay a small, light [165] board over the top front of the box, resting the ends of the board on the sides of the box to create the seat on the sleigh. Cover the board with the same paper that’s tacked on the box.
Make two
Create two
Reindeer
Reindeer
of stiff pasteboard like Fig. 204. Now, do not think you cannot make the deer because you may not be skilled in drawing, for you can do so easily. Take a large sheet of paper and draw on it an oblong forty-eight inches wide and thirty-six inches high; divide the oblong into squares measuring six inches on each of the four sides, which will give eight squares in width and six squares in height. With the aid of these squares it will be fun to copy the reindeer. Number the side lines of your oblong and letter the top and bottom lines as in Fig. 205. Examine the lower corner space of Fig. 205 enclosed by the lines A-5, and you will find the hind hoof and part of the hind leg stretching diagonally across the space. Use a soft lead-pencil and begin copying the deer by drawing a slanting fine from the extreme outward lower corner upward about one-third of the distance from the bottom to the top of the space A-5. This short slanting line forms the bottom of the hoof, the little space, enclosed between the hoof and the long toe above it reaches very nearly to the centre of the lower part of the square A-5. Make yours so. Draw the upper edge of the long toe; then run a slanting line up to the top line of the square space A-5, and make it touch the top line 5 less than one-quarter the distance from the side line A to the opposite[166] line of the same square. Return to the lower part of the hoof already begun and draw the inside line of the hoof and portion of the leg in the same space, A-5.
of stiff cardboard like Fig. 204. Now, don't think you can't make the deer just because you might not be good at drawing, because you can do it easily. Take a large sheet of paper and draw a rectangle that is forty-eight inches wide and thirty-six inches high; divide that rectangle into squares measuring six inches on each side, which will give you eight squares across and six squares down. With the help of these squares, it will be fun to copy the reindeer. Number the side lines of your rectangle and label the top and bottom lines as in Fig. 205. Look at the lower corner space of Fig. 205 enclosed by the lines A-5, and you will see the hind hoof and part of the hind leg stretching diagonally across the space. Use a soft pencil and start copying the deer by drawing a slanting line from the far outward lower corner upward about one-third of the way from the bottom to the top of the space A-5. This short slanted line forms the bottom of the hoof; the small space between the hoof and the long toe above it will nearly reach the center of the lower part of the square A-5. Make yours like this. Draw the upper edge of the long toe; then draw a slanting line up to the top line of square A-5, making sure it touches the top line about less than one-quarter of the way from the side line A to the opposite line of the same square. Go back to the bottom part of the hoof you've already started and draw the inside line of the hoof and the part of the leg in the same space, A-5.

In the space 4-5, immediately above the space A-5, you will perceive that only a lower corner is drawn in and that all the four squares above the square 4-5 are vacant, so continue your drawing on the bottom space A-B. The extreme upper corner of this is cut off by a short straight line; then a shallow scallop extends entirely across the upper part and runs into the third lower space B-C. If you notice closely the space enclosed by the lines 4-5, A-B, immediately over the one you have been working[167] on, you will see that the corner on the line 4-A is vacant, while all three of the other corners are occupied by portions of the hind leg, and that the empty space extending from the vacant corner 4-A forms almost a square with two lines slightly curved and the corner diagonally across from the vacant corner 4-A, on the line 4, cut off by a short line bent bow-shaped. Draw it in the same way over the corresponding space on your paper. Look at Fig. 206, following the line on the space 4-5, A-B, and you will discover that it is the same as in Fig. 205, only smaller, and by carefully comparing the two diagrams, Fig. 205 and Fig. 206, you will find the lines are formed alike in each, differing only in size; thus you will understand how you can make your deer very much larger simply by drawing it on larger squares. Continue as you have begun, taking one square space at a time, and copy on your large squares the outline of the entire deer as given on the squares of Fig. 206.
In the space 4-5, right above space A-5, you'll notice that only a lower corner is filled in and that all four squares above square 4-5 are empty. So, continue your drawing in the bottom space A-B. The far upper corner of this space is cut off by a short straight line; then a shallow scallop stretches all the way across the top and connects to the third lower space B-C. If you look closely at the area marked by lines 4-5 and A-B, directly above the one you've been working on, you'll see that the corner on the line 4-A is empty while the other three corners are filled with sections of the hind leg. The empty space extending from the vacant corner 4-A almost forms a square with two slightly curved lines, and the diagonally opposite corner from the vacant corner 4-A on line 4 is cut off by a short line that bends in a bow shape. Draw it the same way over the corresponding space on your paper. Look at Fig. 206, following the lines in space 4-5 and A-B, and you’ll find it matches Fig. 205, just smaller. By carefully comparing the two diagrams, Fig. 205 and Fig. 206, you'll see that the lines are shaped the same in each, differing only in size; this way, you'll realize how you can make your deer significantly larger just by drawing it on bigger squares. Continue as you started, taking one square at a time, and replicate the outline of the entire deer as shown on the squares of Fig. 206.

When the drawing is finished, go over all the pencil lines which form the deer with black paint or ink, making the lines heavy and plain, that they may be seen from across the room. As soon as the paint is absolutely dry erase the pencil-lined squares.
When the drawing is done, trace over all the pencil lines that make up the deer with black paint or ink, making the lines bold and clear so they can be seen from across the room. Once the paint is completely dry, erase the pencil-lined squares.

To make sure that the deer will stand firmly, extend downward a slanting line from the top of each hoof and draw another level line out from the bottom of each hoof to meet it, according to dotted lines in Fig. 204.
To ensure the deer stands firm, draw a diagonal line down from the top of each hoof and then draw a horizontal line out from the bottom of each hoof to meet it, as shown by the dotted lines in Fig. 204.
Cut out your deer and with pins or thumb-tacks fasten him[168] out flat on another large sheet of paper; then with the soft lead-pencil run a line on the paper around the deer, which will give you the second deer; outline the markings on this like those on the first deer; then cut it out. If you want six deer for Santa Claus’ sleigh make them as you did the second deer. Back each deer with very heavy, stiff pasteboard and nail a thin strip of wood on each of them. Let the wood reach from the middle of the head to the edge of the hind leg (Fig. 207). Fasten the two animals together with three narrow flat sticks tacked across from deer to deer, one stick at the centre and one on each of the two ends of the slanting strips of wood fastened on each deer. The framework will then rudely resemble an inclined ladder. Stand the reindeer in front of Santa Claus’ sleigh and see how fine they look.
Cut out your deer and use pins or thumbtacks to attach it flat onto another large sheet of paper. Then, with a soft lead pencil, trace a line around the deer on the paper, which will give you a second deer. Outline the markings on this one just like those on the first deer, and then cut it out. If you want six deer for Santa Claus’ sleigh, make them the same way you did the second deer. Back each deer with very heavy, stiff cardboard and attach a thin strip of wood to each of them. The wood should extend from the middle of the head to the edge of the hind leg (Fig. 207). Connect the two animals with three narrow flat sticks nailed across from one deer to the other—one stick in the center and one at each end of the slanting strips of wood attached to each deer. The framework will then roughly resemble an inclined ladder. Position the reindeer in front of Santa Claus’ sleigh and see how great they look.


To represent
To represent
Santa Claus,
Santa Claus
make a large rag doll stuffed with straw or excelsior. It is not necessary to spend much time on making the doll, as it will be used only once, and will then be almost entirely covered, showing only the upper portion of the face for which you can mark easily with features. Make the boots (Fig. 208) like stockings of black muslin; have them long and loose enough at the ankle to form wrinkles. The trousers (Fig. 209) should be of scarlet cotton flannel, fleece side out; the coat (Fig. 210) cut of the same material; the cap (Fig. 211) of the red cloth cut melon shape, and sewed together. Santa Claus’ costume must be[169] trimmed with bands of fur. Ermine will look best, and it is easiest to make. Cut strips of white cotton flannel and mark them with black ink to represent the little black elongated spots on real ermine. Trim the tops of the boots (Fig. 208), the neck, sleeves and edge of the coat (Fig. 210) and edge of the cap (Fig. 212) with fur. Make the wig of raw white cotton, and fasten it on the doll’s head (Fig. 213), then the beard, moustache and eyebrows also of raw cotton (Fig. 214), and glue them on the face. Paint Santa Claus’ face pink, his cheeks and the end of[170] his nose bright red, and his eyes blue. When dressing him, bring the fur-topped boots up over the trousers (Fig. 200).
make a large rag doll stuffed with straw or excelsior. You don’t need to spend too much time on the doll since it will only be used once and will mostly be covered, showing just the upper part of the face where you can easily add features. Make the boots (Fig. 208) like long black muslin stockings; they should be loose enough at the ankle to create wrinkles. The trousers (Fig. 209) should be made of scarlet cotton flannel, fleece side out; the coat (Fig. 210) should be cut from the same material; and the cap (Fig. 211) should be red cloth cut in a melon shape and sewn together. Santa Claus’ costume must be[169] trimmed with fur bands. Ermine will look best and is the easiest to make. Cut strips of white cotton flannel and mark them with black ink to mimic the little black spots found on real ermine. Trim the tops of the boots (Fig. 208), the neck, sleeves, and edges of the coat (Fig. 210) and cap (Fig. 212) with fur. Make the wig from raw white cotton and attach it to the doll’s head (Fig. 213), then add the beard, mustache, and eyebrows also made from raw cotton (Fig. 214), gluing them to the face. Paint Santa Claus’ face pink, his cheeks and the tip of[170] his nose bright red, and his eyes blue. When dressing him, pull the fur-topped boots up over the trousers (Fig. 200).
With tacks and string fasten Santa Claus in an upright sitting position on the seat of the sleigh. Tie a long, narrow red ribbon around the neck of each reindeer and pin or tie the ends of these ribbon reins on to the mitten-covered ends of the arms which form his hands. He will then seem to be gayly driving his reindeer.
With tacks and string, secure Santa Claus in an upright position on the seat of the sleigh. Tie a long, narrow red ribbon around the neck of each reindeer and attach the ends of these ribbon reins to the mitten-covered ends of his arms, which act as his hands. He will then look like he’s happily driving his reindeer.

Fill the box of the sleigh with
Fill the box of the sleigh with
Christmas Gifts
Holiday Gifts
wrapped in bright colored tissue paper. Any article liable to break should receive special attention. A cup and saucer (Fig. 215) is one of the most difficult articles to manage, and if you can wrap this up, properly, the wrapping of all other gifts will be easy.
wrapped in brightly colored tissue paper. Any item that might break should get special care. A cup and saucer (Fig. 215) is one of the hardest items to wrap, and if you can wrap this properly, wrapping all other gifts will be a breeze.

Take the saucer first, place it on the centre of a piece of tissue paper (Fig. 216), fold the paper up around it, bringing the ends together at the centre (Fig. 217). Do the same with the cup (Fig. 218); then crush down the top of the paper over the saucer and set the paper-covered cup on it (Fig. 219). Now place the two on more paper and wrap up both together (Fig. 220).
Take the saucer first and place it in the center of a piece of tissue paper (Fig. 216). Fold the paper around it, bringing the ends together in the center (Fig. 217). Do the same with the cup (Fig. 218); then press down the top of the paper over the saucer and set the paper-covered cup on it (Fig. 219). Now put both on more paper and wrap them together (Fig. 220).


If there are not enough gifts to fill the box of the sleigh, open newspapers and crush them into the bottom of the box to fill up the extra space; spread white paper over the top of the newspapers, and fill in with the prettily wrapped gifts. Each parcel should be tied with a ribbon and decorated with holly, mistletoe or evergreen (Fig. 220). Cover the top of the paper parcels with various toys (Fig. 200), and Santa Claus with sleigh and reindeer will be ready to surprise the family early Christmas morning.
If there aren't enough gifts to fill the sleigh's box, grab some newspapers and crumple them up to fill the extra space at the bottom; then, lay white paper over the top of the newspapers and fill it in with the nicely wrapped gifts. Each package should be tied with a ribbon and decorated with holly, mistletoe, or evergreen (Fig. 220). Cover the top of the paper packages with different toys (Fig. 200), and Santa Claus with his sleigh and reindeer will be all set to surprise the family on Christmas morning.


Try to have as many home-made gifts in the sleigh as possible.
Try to pack as many homemade gifts in the sleigh as you can.
Your Christmas Cards
Your Holiday Cards
can be plain white pieces of cardboard decorated with the head of Santa Claus made of an almond on which is inked a face; the long hair and beard of refined white cotton being glued on the nut and a red peaked cap fastened on the top of the head; this makes a fine Santa Claus. The head should be glued on the left side of the card, and on the blank portion should be inscribed the greeting, “Merry Christmas.”
can be simple white pieces of cardboard decorated with the head of Santa Claus made from an almond with a face drawn on it; the long hair and beard made of soft white cotton glued onto the nut and a red pointed cap attached on top; this creates a nice Santa Claus. The head should be glued on the left side of the card, and the blank space should have the greeting, “Merry Christmas,” written on it.
CHAPTER XV
A LIVING CHRISTMAS TREE

You can keep the preparation of the living tree absolutely secret and make it a complete surprise, for it does not have to be set up where all may see in order to be decorated, and no hint of its existence need be given until the time arrives, the door is thrown open and the beautiful, sparkling Christmas tree glides slowly into the room.
You can keep the setup of the living tree completely under wraps and make it a total surprise since it doesn’t have to be decorated in plain sight, and you don’t need to give any clues about its existence until the moment comes when the door is flung open and the stunning, shimmering Christmas tree rolls into the room.
How to Prepare the Living Christmas Tree.
How to Get Ready for the Living Christmas Tree.
Choose quite a tall girl for the angel of the tree and from dark green, undressed cambric cut a long, plain cloak that will fit smoothly over her shoulders and hang like an inverted cornucopia from neck to feet.[174]
Choose a fairly tall girl to be the angel of the tree and from dark green, unadorned fabric, cut a long, simple cloak that will fit nicely over her shoulders and hang like an upside-down cornucopia from neck to feet.[174]

Make the Peaked Hat
Make the Pointed Hat
out of stiff brown paper, cutting it like Fig. 221, and pasting it together like Fig. 222. Cover the hat with some of the green cambric, allowing a cape of the material to fall from hat to shoulders at the back (Fig. 223). Get three or four quires of moss-green tissue paper, cut it into strips six inches wide and cut each strip into rather coarse fringe, leaving a solid strip for heading at the top, two inches wide. Beginning at the bottom sew the fringe around the cloak, allowing it to reach just to the edge of the cloth.
out of stiff brown paper, cutting it like Fig. 221, and pasting it together like Fig. 222. Cover the hat with some of the green fabric, allowing a cape of the material to fall from the hat to the shoulders at the back (Fig. 223). Get three or four sheets of moss-green tissue paper, cut it into strips six inches wide, and cut each strip into a coarse fringe, leaving a solid strip for the top that is two inches wide. Starting at the bottom, sew the fringe around the cloak, allowing it to reach just to the edge of the cloth.

Above the first row of fringe, and overlapping it, sew the second row, bringing its lower edge within three inches of the bottom edge of the first row.
Above the first row of fringe, and overlapping it, sew the second row, bringing its lower edge within three inches of the bottom edge of the first row.
In this way put on row after row of fringe, always overlapping it, until the cloak is entirely covered, then cover the hat and its cape in the same manner.
In this way, add layer after layer of fringe, always overlapping it, until the cloak is completely covered, then cover the hat and its cape in the same way.
Take a light wooden hoop—one of the kind the children roll on the pavements in “hoop time,” and, turning the edge of the cloak up once, fit the hoop in the fold and hem the edge over it. This will hold the cloak out firmly at the bottom and it should hang smooth and straight from the shoulders with a generous lap where it closes in front.
Take a light wooden hoop—one of those that kids roll on the sidewalks during "hoop time"—and, folding up the edge of the cloak once, place the hoop in the fold and sew the edge over it. This will keep the cloak out firmly at the bottom, and it should hang smoothly and straight from the shoulders with a nice overlap where it meets in front.

Pin the fronts together, leaving an opening only large enough to slip over the head.
Pin the fronts together, leaving an opening just big enough to slip over the head.
Now suspend the cloak on a waisthanger in such a way that you can reach it from all sides, and proceed
Now hang the cloak on a hanger so that you can easily access it from all sides, and continue.
To Decorate
For Decoration

Around the bottom sew a row of small bells, and here and there all over the cloak, sew large dress hooks, on which to hang the fragile glass ornaments and small presents. Pin on the tinsel decorations and strings of popcorn with safety pins and leave the finishing touches until the angel has entered her tree.
Around the bottom, sew a row of small bells, and here and there all over the cloak, sew large dress hooks to hang the delicate glass ornaments and small gifts. Use safety pins to attach the tinsel decorations and strings of popcorn, and leave the final touches until the angel has entered her tree.
The tall hat, tipped by its bright star, may be completely trimmed and put safely away until needed. All decorations and presents must be light in weight.
The tall hat, adorned with its bright star, can be fully decorated and stored safely until it's needed. All decorations and gifts should be light in weight.
On the eventful night let the Christmas tree angel slip into the tree, and, after it is nicely adjusted, hang around her neck strings of colored glass balls, and suspend from the hooks the glass ornaments and presents. Put the peaked hat on her head, and the living Christmas tree will be ready for her triumphant entry. To avoid the danger of accident do not allow the tree in a room where there are unprotected gas lights, candles or open fire, and let the cloak be put on the angel in a room adjoining the one in which she is to appear, for going up or down stairs incased in the cloak is not to be thought of.
On the exciting night, let the Christmas tree angel slip into the tree, and once she's nicely positioned, hang strings of colored glass balls around her neck and attach the glass ornaments and presents to the hooks. Place the pointed hat on her head, and the live Christmas tree will be ready for her grand entrance. To prevent any accidents, keep the tree out of rooms with uncovered gas lights, candles, or open flames, and have the angel's cloak put on in a room next to where she will appear because it’s not safe to go up or down stairs wearing the cloak.

CHAPTER XVI
HOW TO GET UP A GIRLS’ FAIR

Form a Managing Committee
Create a Management Committee

and talk over arrangements with them.
and talk about plans with them.
If the fair is to be large, you will need either one large room or several small ones.
If the fair is going to be big, you'll need either one big room or several smaller ones.
When the question of place has been settled to the satisfaction of all, make out a list of the various girls and boys who will help with the entertainment, and divide the list into as many parts as there are young people on your managing committee, including yourself. Give each member of the committee his or her portion of the list, with instructions to see every person whose name is on the paper and find out what each particular one will promise to make for the fair. Do not confine the soliciting to[180] young people of your own little circle, ask for contributions from all the girls and boys your managing committee are able to reach. Some may want to make several articles each, others may wish to do the decorating, and so on. Space must be provided on the list of names for writing down under each name the articles promised (Fig. 224).
When the location is agreed upon by everyone, create a list of the different girls and boys who will assist with the entertainment. Split the list into as many sections as there are young people on your planning committee, including yourself. Give each committee member their share of the list and instruct them to contact every person listed to find out what each one will commit to making for the fair. Don’t limit your requests to just the young people in your immediate circle; reach out to all the girls and boys your committee can connect with. Some may want to contribute several items each, while others might prefer to handle decorating, and so on. Make sure there's space on the list to write down, next to each name, the items they promise to provide (Fig. 224).
Let each contributor understand that every article sent in must have the name, age, and address of the sender written in ink and fastened securely on each separate article, that every girl and boy may receive full credit for what she or he has made (Fig. 225).
Let each contributor know that every article submitted must include the name, age, and address of the sender clearly written in ink and securely attached to each individual item so that every girl and boy can receive full credit for their work (Fig. 225).
In addition to the attractive booths you should have the ever popular grab-bag and the
In addition to the attractive booths, you should have the ever-popular grab bag and the
will be just the thing.
will be just right.


Take an ordinary wooden tub (Fig. 226), cover the outside with gay tissue paper laid on in flat plaits from top to bottom. Paste the paper along the inside of the top edge, carry it over on[181] the outside down under the bottom edge. Cover the handles with the same paper, and fasten ribbon bows on the outside of the handles (Fig. 227). If the tub is covered with pink tissue paper, tack pink ribbons on the handles; if red paper is used fasten green on the handles.
Take an ordinary wooden tub (Fig. 226), cover the outside with colorful tissue paper arranged in flat folds from top to bottom. Glue the paper along the inside of the top edge and wrap it over the outside down underneath the bottom edge. Cover the handles with the same paper and tie ribbon bows on the outside of the handles (Fig. 227). If the tub is covered with pink tissue paper, attach pink ribbons to the handles; if red paper is used, attach green ribbons to the handles.


Fill the bottom of the tub with large, lightly crushed pieces of newspaper, cover these with a double layer of smooth paper, leaving sufficient space at the top for a layer of sawdust, bran or sand, deep enough to cover the different sized articles intended for the grab-bag. Each separate article must be wrapped in paper and tied with a string (Fig. 228).
Fill the bottom of the tub with large, lightly crushed pieces of newspaper, cover them with a double layer of smooth paper, leaving enough space at the top for a layer of sawdust, bran, or sand, deep enough to cover the various items meant for the grab-bag. Each individual item must be wrapped in paper and tied with a string (Fig. 228).
Make as many
Create as many
Blackbirds
Blackbirds
as you can place conveniently, without too much crowding, on top of the pie.
as you can easily place, without too much crowding, on top of the pie.
Use medium stiff cardboard or smooth water color paper, not[182] too limber, for the birds. Cut them from an enlarged pattern of Fig. 229, as the birds must be life-size. Paint or ink the bird black on both sides and, when it is dry, bend up the tail in a curve. Bend up the neck at dotted line of Fig. 229. Pinch together the beak and bend it downward, bringing the head forward at dotted line of Fig. 229. Turn up the wings according to dotted lines on Fig. 229, and curve them over and outward at the top (Fig. 230). Puncture two holes in the back of the bird at the dots A and B (Fig. 229).
Use medium stiff cardboard or smooth watercolor paper, not too flexible, for the birds. Cut them from an enlarged pattern of Fig. 229, as the birds must be life-size. Paint or ink the bird black on both sides and, when it's dry, bend up the tail in a curve. Bend up the neck at the dotted line of Fig. 229. Pinch together the beak and bend it downward, bringing the head forward at the dotted line of Fig. 229. Turn up the wings according to the dotted lines on Fig. 229, and curve them over and outward at the top (Fig. 230). Puncture two holes in the back of the bird at the dots A and B (Fig. 229).


There must be a handle for lifting the blackbirds; make it of a hairpin. Bend one end of a wire hairpin into a square hook (Fig. 231) and slide the longer end up through the foremost hole on the underside of the bird; tie the centre of a string, nine inches long, on the horizontal bend of the hooked end of the hairpin; then push the short end of the hook up through the other hole in the bird, bringing the string up close against the bird’s breast. Bend the short end of the hairpin down on the bird’s back and flatten it with a hammer. Curve the top of the hairpin[183] into a handle (Fig. 232) and fasten the hooked end of the hairpin more securely to the breast and back of the bird by pasting a piece of paper over the short portion of the hairpin lying over the back (Fig. 233). Push the paper up tight around the edge of the wire. Paste another piece of paper over the short length of hairpin on the bird’s breast in the same manner (Fig. 234).
There needs to be a handle for lifting the blackbirds; use a hairpin for this. Bend one end of a wire hairpin into a square hook (Fig. 231) and slide the longer end through the first hole on the underside of the bird. Tie the middle of a string, nine inches long, to the horizontal bend of the hooked end of the hairpin. Then push the short end of the hook through the other hole in the bird, pulling the string up close to the bird’s chest. Bend the short end of the hairpin down on the bird’s back and flatten it with a hammer. Curve the top of the hairpin[183] into a handle (Fig. 232) and secure the hooked end of the hairpin more firmly to the chest and back of the bird by pasting a piece of paper over the short part of the hairpin resting on the back (Fig. 233). Push the paper tightly around the edge of the wire. Paste another piece of paper over the short length of the hairpin on the bird’s chest in the same way (Fig. 234).


Set the blackbird away until next day, when it will be perfectly dry, and you will find the hairpin secure in its place, standing straight and steady.
Set the blackbird aside until tomorrow, when it will be perfectly dry, and you’ll find the hairpin secure in its place, standing straight and steady.
Instead of making one complete blackbird at a time, it will be much quicker and easier to make a pattern and cut out all your blackbirds first; then ink or paint them all, and continue working on them in this way until all are finished about the same time. It will not take long when once you have the pattern enlarged, and you can make the pattern the proper size by the system of squares, large and small, as explained in Chapter XIV.
Instead of creating one blackbird at a time, it’ll be much faster and easier to make a pattern and cut out all your blackbirds first; then ink or paint them all, and keep working on them in this way until they’re all done around the same time. It won’t take long once you’ve enlarged the pattern, and you can get the pattern to the right size by using the square system, both large and small, as explained in Chapter XIV.

When the birds are made and ready for the pie, hook
When the birds are prepared and ready for the pie, hook
A Package on Each Blackbird
A Package on Every Blackbird
(Fig. 237), and hide the parcel and string down under the sawdust, resting the bird on top of the pie; then when any one wants to purchase a “grab” let him lift any bird he chooses from the pie by means of the hairpin in the bird’s back.
(Fig. 237), and tuck the parcel and string under the sawdust, placing the bird on top of the pie; then when someone wants to buy a “grab,” let them lift any bird they choose from the pie using the hairpin in the bird’s back.
The girl or boy in charge must take the parcel from the hook, give it to the purchaser, quickly slide another package on the hook and sink it down in the pie in place of the first one. While the purchaser is left entirely free to choose, she should take care not to disarrange the packages in the pie.
The girl or boy in charge must take the package from the hook, give it to the buyer, quickly slide another package onto the hook, and lower it into the pie in place of the first one. While the buyer is completely free to choose, she should be careful not to mess up the packages in the pie.

Extra packages must be kept in a covered box or basket at one side, back of the “Blackbird Pie.”
Extra packages must be stored in a covered box or basket on one side, behind the “Blackbird Pie.”
Another original idea for your fair will be
Another original idea for your fair will be
The Express Office
The Express Office
At this table each article must be daintily tied up in white paper and the package labelled with the Christian name of one of the young people. Wrap up a number of articles that your friends may find parcels waiting for them when they call at the express office. The packages should also bear the name of the city from which they are supposed to have been sent. For instance, if you have a friend named Mary, and Mary happens to be acquainted with some young people in Cincinnati, mark the parcel for her with the name Mary and the place Cincinnati, Ohio. The addition of the name of some city will add greatly to the interest and excitement when the package is received.
At this table, each item should be neatly wrapped in white paper, and the package labeled with the first name of one of the young people. Wrap up several items so that your friends may find packages waiting for them when they visit the express office. The packages should also include the name of the city where they are said to have been sent from. For example, if you have a friend named Mary, and Mary knows some young people in Cincinnati, label her package with the name Mary and the location Cincinnati, Ohio. Adding the name of a city will greatly increase the interest and excitement when the package is received.
Though a package may be intended for a certain person, any one with the same Christian name may purchase the article, but it cannot be sold to a buyer bearing another Christian name, and should some one come for an express package and the express agent be unable to find a parcel labelled with the purchaser’s name, the would-be buyer must leave the office empty-handed.
Though a package may be meant for a specific person, anyone with the same first name can buy the item, but it can't be sold to someone with a different first name. If someone comes to pick up an express package and the express agent can't find a parcel labeled with the buyer's name, the attempted buyer has to leave the office without anything.
The uncertainty of finding a package at the express office lends a certain charm to this table, for every one will feel some curiosity to ascertain for a surety whether he or she is included with the fortunate ones whose names appear upon packages.
The uncertainty of finding a package at the express office adds a certain charm to this table, as everyone will feel some curiosity to find out for sure whether they are among the lucky ones whose names are on packages.
Arrange all your articles for the express office in alphabetical order, those on one side of the table for girls, and on the other side for boys; then the parcel bearing the name called for may be quickly handed out to the inquiring purchaser.
Arrange all your items for the express office in alphabetical order, with those for girls on one side of the table and those for boys on the other side; this way, the package with the requested name can be quickly handed over to the customer.
Letters to Girls
Letters to Girls
and letters to boys are easy to write. Ask as many friends as possible to write one or more letters to any companions they choose whom they think will attend the fair. The letters must be signed by fictitious names, never the writer’s own name or the name of any real person; then those receiving the missives will have the sport of trying to find out which of their friends actually wrote the letters.
and letters to boys are easy to write. Ask as many friends as possible to write one or more letters to any friends they choose who they think will go to the fair. The letters must be signed with fake names, never the writer’s real name or the name of any actual person; then those receiving the letters will have the fun of trying to figure out which of their friends actually wrote them.
Several days before the fair opens all the mail, after being addressed and sealed, should be sent under additional cover to you personally.
Several days before the fair opens, all the mail should be sent to you personally under additional cover after it's been addressed and sealed.
The Post-office
The Post Office
must be made very attractive, though it need not occupy much space. A mere corner of the room screened off with dividing drapery of turkey-red cotton cloth or any gay material will answer the purpose. Open the drapery at the centre division and make a three-cornered tent-like window in front between the two curtains with the aid of a chair. Place a box on the chair reaching to the top of the chair-back, set the chair between the two curtains, turn its back toward the people and cover it with the same material used for the curtains; then pin this drapery to the curtains on each side.
must be made very attractive, but it doesn't need to take up much space. A simple corner of the room blocked off with dividing curtains of bright red cotton cloth or any cheerful fabric will do. Open the curtains at the center and create a triangular tent-like window in front between the two drapes with the help of a chair. Put a box on the chair so that it reaches the top of the chair's back, place the chair between the two curtains, face its back towards the people, and cover it with the same fabric used for the curtains; then pin this fabric to the curtains on each side.
The Decorations
The Decor
must be very simple and inexpensive; something which can be made easily and quickly, and when finished they should be bright and effective.
must be very simple and cheap; something that can be made easily and quickly, and when finished they should be bright and impactful.


Paste the straight dotted edge of each flag over a strong string long enough to extend in a graceful loop from the centre of the ceiling to the side wall (Fig. 240). Place the flags about twelve inches apart on the string and make four strings to reach to the four corners if the room is small, if large, a dozen or more flag-strings, according to the size of the room. Have a generous supply.
Paste the straight dotted edge of each flag over a sturdy string long enough to create a graceful loop from the center of the ceiling to the side wall (Fig. 240). Space the flags about twelve inches apart on the string and make four strings to reach the four corners if the room is small; if it's large, make a dozen or more flag strings, depending on the size of the room. Have plenty on hand.

Tie one end of each of the flag-strings close to the ceiling on the chandelier or lamp hook. Wind an extra string tight around and over the string-knots on the chandelier to hold the[189] strings in place and keep them from slipping down. Tie the free ends of the flag-strings to picture-hooks and fasten the hooks on the picture-moulding. In this way you can obtain good results without the slightest injury to the walls. Should there be no picture-moulding, fasten the strings to large, strong tacks or small wire nails driven in on the top ledge of the window and door frames where they will do no harm.
Tie one end of each flag string near the ceiling on the chandelier or lamp hook. Wrap an extra string tightly around the knots on the chandelier to secure the[189] strings and prevent them from slipping down. Attach the free ends of the flag strings to picture hooks and secure the hooks onto the picture molding. This way, you can achieve great results without damaging the walls. If there’s no picture molding, attach the strings to large, strong tacks or small wire nails driven into the top ledge of the window and door frames where they won’t cause any damage.


Fasten extra strings from top of window and door frames, and draw them taut along the walls, then tie the intervening flag-strings on these and the effect will be much the same as with picture-moulding, almost like a tent of small flags.
Secure additional strings from the tops of window and door frames, and pull them tight against the walls. Then, tie the flag strings between these, and the result will be very similar to using picture molding, resembling a tent made of small flags.
Hang a long, gay tassel on the wall at the end of each flag-string. Make the tassels of bright tissue paper. Take the once folded sheets of the variously-colored tissue paper as they come from the store, and cut them into long fringe, lengthwise of the folded sheets (Fig. 241), making each separate strand of fringe not less than one inch wide. Pinch the twenty-inch-length[190] fringe together at the top, wind and tie it with a string (Fig. 242), allowing one end of the string to extend out at the top; wind farther down and tie again to form the head of the tassel four and one-half inches from the extreme top (Fig. 243).
Hang a long, colorful tassel on the wall at the end of each string of flags. Make the tassels out of bright tissue paper. Take the sheets of tissue paper in various colors straight from the store and cut them into long strips along the folded edge (Fig. 241), making each strip at least one inch wide. Gather the twenty-inch-long[190] fringe at the top, wrap and tie it with a string (Fig. 242), allowing one end of the string to hang out at the top; wrap it further down and tie again to create the top of the tassel about four and a half inches from the very top (Fig. 243).
These large tassels tied to picture-hooks by eight or twelve inch lengths of string wound with gay paper and attached to the picture-moulding at the end of each line of flags make a fine finish and form a decoration for the walls.
These large tassels are tied to picture hooks with eight or twelve-inch lengths of string wrapped in colorful paper and attached to the picture molding at the end of each line of flags, creating a stylish finish and adding decoration to the walls.
Let your tables be of different sizes, and cover them with white cotton sheets folded in such a way that the sheet will fall within one inch of the floor at the front and at the two sides.
Let your tables be of varying sizes, and drape them with white cotton tablecloths folded so that the cloth hangs within an inch of the floor at the front and on both sides.

Decorate the white covering in various ways, making the tables gay with inexpensive colored cambric, or crimped tissue paper. The plain tissue paper will not be strong enough to use for this purpose.
Decorate the white covering in different ways, making the tables bright with affordable colored cambric or crimped tissue paper. The regular tissue paper won't be durable enough for this purpose.

The first covering of white gives value to the colors, causing them to appear even more brilliant than they are in reality, and it also renders it possible to use much less colored material than would otherwise be required, in this way lessening the outlay for decorations. But in order not to tear the muslin sheets while fastening on the decorations, paste must be used in place of tacks or pins.
The initial layer of white enhances the colors, making them look even more vibrant than they truly are, and it allows for the use of significantly less colored material than would typically be needed, which reduces the costs for decorations. However, to avoid ripping the muslin sheets while attaching the decorations, paste should be used instead of tacks or pins.

Make the colored material into wide strips cut into points or fanciful designs and paste the strips at their upper edges along the top of front and sides of the white covered tables, allowing the lower edge to hang entirely free, except where pendant portions are inclined to stand out; these may be fastened in place with a little paste.
Make the colored material into wide strips cut into points or fun designs and glue the strips at their upper edges along the top of the white-covered tables, letting the lower edge hang freely, except where parts are sticking out; these can be secured with a bit of glue.

Cut some of the strips about fourteen inches wide; others wider, a few narrower; and make each strip long enough to reach around the front and two sides of one table. Lay a brilliant red[191] strip eighteen inches wide down on a flat surface and fold crosswise through the centre; fold again and again until the piece is of the desired width, about two and one-half inches; then cut according to dotted lines (Fig. 244). Open out and cut off every other lower ornament and you will have Fig. 245. Attached to a table this decoration gives the effect seen in the first illustration.
Cut some strips about fourteen inches wide; others wider, a few narrower; and make each strip long enough to wrap around the front and two sides of a table. Lay a bright red[191] strip eighteen inches wide on a flat surface and fold it crosswise down the middle; fold it again and again until the piece is about two and a half inches wide; then cut along the dotted lines (Fig. 244). Open it up and cut off every other lower ornament, and you'll have Fig. 245. When attached to a table, this decoration creates the effect shown in the first illustration.

You can devise many other decorative designs fully as attractive as these, and it is well to experiment with pieces of old newspaper, cutting them into various designs until you find just what you think will make good patterns. In this way your originality is brought out and in a measure your artistic sense developed.
You can come up with plenty of other decorative designs that are just as attractive as these, and it’s a good idea to experiment with old newspaper pieces, cutting them into different designs until you find what you think will create great patterns. This way, your originality shines through and, to some extent, your artistic sense gets developed.
Select a cheery, happy girl for
Select a cheerful, happy girl for
Postmaster
Postal Worker
—one who cannot help giving a bright smile with every letter, and try to induce her to make some pleasant appropriate remark when handing out the mail, as this will add much to the enjoyment of the occasion.
—someone who can't help but smile brightly with every letter, and I suggest encouraging her to make some cheerful, fitting comment when handing out the mail, as this will greatly enhance the enjoyment of the event.
More important though than anything else will be the large, the small, the useful, the beautiful and the odd articles for sale made by the girls and boys. There should be a lot of original valentines, May baskets, Easter-egg novelties, paper fireworks,[193] Hallowe’en games, funny and instructive toys, tiny log cabins, scenes from Japan, Russia, the Philippines, and many other interesting things, not forgetting the Punch and Judy shows, the circus, the seven wonders of the world, and the home-made rugs, candles and candlesticks.
More importantly than anything else will be the large, small, useful, beautiful, and unique items for sale made by the kids. There should be plenty of original valentines, May baskets, Easter egg novelties, paper fireworks,[193] Halloween games, funny and educational toys, tiny log cabins, scenes from Japan, Russia, the Philippines, and many other fascinating things, not to mention the Punch and Judy shows, the circus, the seven wonders of the world, and the homemade rugs, candles, and candlesticks.
The post-office entails little or no extra expense and money taken in for letters will be almost clear gain. Expense incurred by the entire fair need be but slight and all the proceeds might be devoted to some charitable purpose.
The post office has little to no extra cost, and the money collected for letters will be almost pure profit. The expenses for the whole fair will be minimal, and all the proceeds could be used for a charitable cause.
One of the best of objects for the money obtained by your fair is the “Fresh Air Fund,” which helps the poor little suffering city children to a breath of pure fresh air and saves the lives of many frail girls and boys. Think how glad you can make some of these young people; then, of all the enjoyment your own companions will have in getting up the fair, and how proud and happy your parents and teachers will feel when they see the result of your work. If a “Fresh Air Fund” does not exist in your locality there are other methods of using your profits to good ends. Really there is no telling how much good your fair may accomplish in many ways.
One of the best ways to use the money you raise at your fair is for the “Fresh Air Fund,” which offers city kids in need a chance to breathe in clean, fresh air and helps save the lives of many delicate girls and boys. Just think about how happy you can make some of these young people; also, consider all the fun your friends will have putting together the fair, and how proud and happy your parents and teachers will be when they see what you’ve achieved. If there isn’t a “Fresh Air Fund” in your area, there are other ways to use your profits for good causes. Honestly, there’s no telling how much good your fair could do in various ways.
CHAPTER XVII
CAMPING OUT IN YOUR BACK YARD

It is a wild land, full of wild creatures if you choose to believe in them. Cats you will probably meet on the trail, and they are wild ones if you will. Wolves, too, may prowl around, for what else are Tramp and Nipper, your own dearly loved dogs, but descendants of the wild wolf. There will be plenty of sailing, fishing and outdoor sports. Guides can be secured at headquarters and you will not have to travel far, for the camping ground is your own back yard.
It’s a wild area, teeming with untamed creatures if you believe in them. You’ll likely encounter some cats on the trail, and they’re definitely wild. Wolves might also be lurking around, because what else are Tramp and Nipper, your beloved dogs, but descendants of wild wolves? There will be plenty of sailing, fishing, and outdoor activities. You can find guides at headquarters, and you won’t have to go far, since the camping ground is right in your backyard.

You must have your
You must have your
Camping Outfit,
Camping Gear,
as all campers do, and it is the proper thing to think, plan and
talk much about this same outfit. As the trip is to be made
overland and you will have no camping wagon, use bags for
carrying the various articles needed in camp. Old flour bags
are just the thing. Into these you can put all your things except
perhaps the camp kettle. The camping party should be supplied
with a tent, a hatchet, a camp kettle, coffee pot, tin plates
and cups, old knives, fork and spoons, a tin pail and dipper
and a tin wash-basin; all these, as well as provisions must be
taken on the journey in true campers’ fashion, for there should[195]
[196]
[197]
be no running back from Make-Believe Land to get forgotten
articles. Shawls and blankets to spread on the ground if it
seem too damp will be a welcome addition to the outfit, and the
party should be provided with sharp pocket knives for whittling
stakes and for other needs.
As all campers do, it's important to think, plan, and discuss your gear a lot. Since the trip will be overland and you won’t have a camping wagon, use bags to carry the various items needed for camp. Old flour bags work perfectly. You can put everything in these bags except maybe the camp kettle. The camping group should have a tent, a hatchet, a camp kettle, a coffee pot, tin plates and cups, old knives, forks, and spoons, a tin pail and dipper, and a tin washbasin. All of these, along with food, must be packed for the journey in true camper style, because there shouldn't be any going back from Make-Believe Land to retrieve forgotten items. Shawls and blankets to lay on the ground if it’s too damp will be a great addition to your gear, and the group should have sharp pocket knives for carving stakes and other needs.


Select the site of your camp and pitch your tent with reference to the clothes line, for the line is to support the tent and act as a ridge pole.
Choose the location for your camp and set up your tent with the clothesline in mind, as the line will help support the tent and serve as a ridge pole.
Make the Tent
Set Up the Tent

of two muslin sheets sewed together along two of the edges, one edge on each sheet, which run from the wide hem at the head to the narrow hem at the foot of the sheet. Tie a tape on each of the four corners (Fig. 250) and tie a tape at the centre of the ends of the tent sheet-covering. This will give three tapes on each side of the tent—six tapes in all (Fig. 251).
of two muslin sheets stitched together along two edges, one edge on each sheet, which run from the wide hem at the top to the narrow hem at the bottom of the sheet. Tie a ribbon on each of the four corners (Fig. 250) and tie a ribbon at the center of the ends of the tent sheet cover. This will give three ribbons on each side of the tent—six ribbons in total (Fig. 251).
Make six wooden pegs resembling Fig. 252. You can have them either round, square, three-cornered or irregular; the only essentials are that the pegs be strong and large enough to hold the tent securely. Have a notch cut near the top for the tape and a point whittled at the bottom that the peg may be easily driven into the ground.[198]
Make six wooden pegs that look like Fig. 252. They can be round, square, triangular, or an odd shape; the important things are that the pegs need to be sturdy and big enough to hold the tent firmly in place. Cut a notch near the top for the rope and shape the bottom into a point so it's easy to drive the peg into the ground.[198]
Look about carefully and decide exactly where you want the tent placed on the clothesline; then hang the crosswise centre of the covering evenly over the line. Hold the top ridge centre in place with clothespins while you stretch one side out away from the clothesline, and peg it to the ground by tying the tapes around the pegs and pushing the pegs slantingly into the ground, with the peg head running from and the point directed toward the tent (Fig. 253). Remove the clothespins and peg down the other side of the tent in the same way.
Look around carefully and figure out exactly where you want the tent set up on the clothesline; then hang the center of the cover evenly over the line. Use clothespins to hold the top ridge center in place while you stretch one side away from the clothesline and secure it to the ground by tying the straps around the pegs and pushing the pegs in at an angle, with the heads of the pegs facing away from the tent and the points directed toward it (Fig. 253). Take off the clothespins and secure the other side of the tent in the same way.


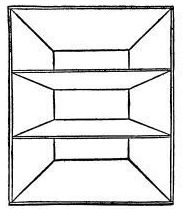
Find the best place near the tent for
Find the best spot near the tent for
A Table,
A Table,
and make the table in true woodsman fashion. Take four strong forked sticks, sharpened on the lower end, and drive two of them into the ground in a straight line about one foot or more apart, and the remaining two in a line with, and two feet from the first sticks (Fig. 254). Have the sticks stand above the ground about two feet, or the height you want the table, and keep the crotch, or angle where the two forks separate, on all the sticks at an equal height from the ground. Lay a stick across each pair of[199] forked sticks. Get a piece of board, rest one end on each of the supports you have just made, and you will have a rustic table, strong and suitable for any camp (Fig. 255). Use wooden boxes for seats. Select one box for your
and make the table in true woodsman style. Take four sturdy forked sticks, sharpened at the lower end, and drive two of them into the ground in a straight line about one foot or more apart, and the other two in a line with, and two feet from, the first sticks (Fig. 254). Have the sticks stand above the ground about two feet, or to the height you want the table, and keep the crotch, or angle where the two forks separate, on all the sticks at the same height from the ground. Lay a stick across each pair of [199] forked sticks. Get a piece of board, rest one end on each of the supports you've just made, and you’ll have a rustic table, strong and perfect for any camp (Fig. 255). Use wooden boxes for seats. Choose one box for your
Safe or Cupboard
Safe or Cabinet
in which to keep supplies and camping utensils. Fit one or two shelves, made from a side of another wooden box, in the cupboard.[200] Do this by first nailing strips of wood, for cleats, on the inside of each side of the cupboard at equal distances from the bottom (Fig. 256). Slide in the shelves, resting each on two pieces of wood (Fig. 257). Set a lot of lids of tin cans in the cupboard to serve as camping plates, also a few tin spoons, an old table knife, a kitchen fork or two, three tin cups, and a smooth, clean, folded piece of white paper for a tablecloth.
in which to store supplies and camping gear. Install one or two shelves, made from a side of another wooden box, in the cupboard.[200] To do this, first nail strips of wood, acting as cleats, on the inside of each side of the cupboard at equal distances from the bottom (Fig. 256). Slide in the shelves, resting each on two pieces of wood (Fig. 257). Keep several lids from tin cans in the cupboard to use as camping plates, along with a few tin spoons, an old table knife, a couple of kitchen forks, three tin cups, and a smooth, clean, folded piece of white paper for a tablecloth.


Now for
Now for
The Spring
Spring
Ask your mother to let you have a large, clean pail suitable for drinking water. Carry the pail to the opposite side of the yard from your tent. There dig a hole large enough to sink the pail down about half its height (Fig. 258). Bank the loose earth up[201] all around the pail (Fig. 259), and cover the earth with leaves, grass, moss and vines; hiding the pail completely with the greenery; then fill the pail with fresh, cool water, and lo: there is your mountain spring (Fig. 260).
Ask your mom to give you a large, clean bucket that's good for drinking water. Take the bucket to the far side of the yard, away from your tent. There, dig a hole that's big enough to sink the bucket down about halfway (Fig. 258). Pile the loose dirt around the bucket (Fig. 259) and cover it with leaves, grass, moss, and vines, completely hiding the bucket with the greenery; then fill the bucket with fresh, cool water, and there you have your mountain spring (Fig. 260).


A clean tomato can, free from rust, with the top removed, will make
A clean tomato can, free from rust, with the top taken off, will make
A Fine Pail
A Great Bucket
for carrying water. You can make a hole in the tin, near the top on each side of the can, by hammering a good-sized wire nail through, and then form a handle to the pail by threading one end of a piece of twine through each hole and tying a large knot on the outside to prevent the string from sliding out of place (Fig. 261). When you need water in the camp, always go to the spring for it, and carry the water in the little tin pail.
for carrying water. You can make a hole in the tin, near the top on each side of the can, by hammering a good-sized wire nail through, and then create a handle for the pail by threading one end of a piece of twine through each hole and tying a large knot on the outside to keep the string from sliding out of place (Fig. 261). When you need water in the camp, always go to the spring to get it, and carry the water in the little tin pail.
It is not necessary to have a real
It is not necessary to have a real
Camp Fire,
Campfire
but you can pretend there is one. Drive two forked sticks in the ground a short distance from each other; lay a stout stick across from one to the other forked stick; then pile up some dry twigs[202] midway between the stakes. Tie a strong cord on the centre of the cross stick, leaving one end long enough to loop down and under the handle of a pail or kettle and reach up and tie to the short end of the cord. You can put various things into the camp kettle and pretend to cook them over the make-believe fire (Fig. 262).
but you can act like there is one. Drive two split sticks into the ground a short distance apart; lay a sturdy stick across from one split stick to the other; then pile up some dry twigs[202] in the middle of the sticks. Tie a strong cord to the center of the cross stick, leaving one end long enough to loop down and under the handle of a bucket or pot and reaching up to tie to the short end of the cord. You can put various items into the camp pot and pretend to cook them over the imaginary fire (Fig. 262).


Of course you must have a boat, for there are lakes in Make-Believe Land and plenty of fish to be caught, so
Of course you need a boat, because there are lakes in Make-Believe Land and plenty of fish to catch, so
Make a Boat
Build a Boat

for your camp. Select a rather long, narrow wooden packing-box (Fig. 263), and on each end tack an extra pointed pasteboard end (Fig. 264). To make the pasteboard end you will have to measure the height of the packing-box, and cut from an old[203] pasteboard box a strip of pasteboard wide enough to fit the height of the wooden box and long enough to allow for tacking on the end of the wooden box and extending far enough out beyond the box to form half, or one side, of the pointed end with two inches over. Score the extra two inches and bend (Fig. 265); the bend A forms the extreme end when the pasteboard point is bent in shape. Cut another strip of pasteboard two inches shorter than the first strip, and sew it on the two-inch bent flap of the first strip (Fig. 266). Score the two ends of the long strip and be careful to score them on the side that will cause the pasteboard to bend outward in the right direction, then bend (Fig. 267).
for your camp. Choose a long, narrow wooden packing box (Fig. 263), and on each end attach an extra pointed piece of cardboard (Fig. 264). To make the cardboard end, measure the height of the packing box, and cut from an old [203] cardboard box a strip of cardboard that's tall enough to match the height of the wooden box and long enough to allow for tacking onto the end of the wooden box, also extending out enough to create half, or one side, of the pointed end with an extra two inches. Score the extra two inches and fold (Fig. 265); the fold A creates the tip when the cardboard point is shaped. Cut another strip of cardboard that is two inches shorter than the first strip, and attach it to the two-inch folded flap of the first strip (Fig. 266). Score the two ends of the long strip and be careful to score them on the side that will allow the cardboard to bend outward in the correct direction, then fold (Fig. 267).


Tack the pasteboard strip on the end of the wooden box and make another pasteboard point for the other end of the box (Fig. 264). Cover both pasteboard ends with stout paper by gumming the paper over and down on the outside top edge of the pasteboard points.
Tack the cardboard strip on the end of the wooden box and make another cardboard point for the other end of the box (Fig. 264). Cover both cardboard ends with thick paper by gluing the paper over and down on the outside top edge of the cardboard points.

Make the boat seats of short boards laid across from side to side of the wooden box and nailed in place (Fig. 268). Use broom-sticks for oars, and make believe the boat is off on the water, a long distance from the tent.[204]
Make the boat seats from short boards placed across the wooden box and nailed down. Use broomsticks for oars, and pretend the boat is out on the water, far away from the tent.[204]

If you want to play that you are
If you want to pretend that you are
Out Fishing
Out Fishing
in the boat, take any kind of long sticks or walking canes for fishing poles, with common string for line and a bit of paper tied to the end of the string for bait. When you want to turn the[205] row-boat into a sail-boat, you can tack a three-cornered piece of white cloth on the end of a pole and rig up a sail (Fig. 269). Cut a hole in the forward centre of the bottom of the boat immediately next to the covered bow, run the pole through the hole down into the earth until it is well planted in the ground and stands straight and steady; then tie a string to the free end of the sail and fasten the string to the boat to keep the sail stretched out, just as if there were truly a good stiff breeze and you were sailing along at a rapid rate with the spray dashing upon, and at times over, the sides of the boat.
in the boat, grab any long sticks or walking canes to use as fishing poles, with regular string for the line and a piece of paper tied to the end as bait. If you want to turn the[205] rowboat into a sailboat, you can attach a triangle-shaped piece of white cloth to the end of a pole and set up a sail (Fig. 269). Cut a hole in the front center of the bottom of the boat right next to the covered bow, push the pole through the hole down into the ground until it’s firmly planted and stands upright; then tie a string to the free end of the sail and attach it to the boat to keep the sail extended, just as if there were a strong wind and you were sailing along quickly with the spray splashing against, and sometimes over, the sides of the boat.
If your back yard is large and you need more tents for friends, erect several, one on each stretch of the clothesline. Should the line be fastened to four posts, a tent can be put up on each of the four turns of the clothesline, making a little settlement of tents.
If your backyard is big and you need more tents for friends, set up several, one on each section of the clothesline. If the line is attached to four posts, you can put up a tent on each of the four sections of the clothesline, creating a small village of tents.

CHAPTER XVIII
OUTDOOR FUN WITH
HOME-MADE TETHER-BALL

The Pole
The North Pole
may be a stationary clothesline post, a small, unused flagstaff, an extra long clothesline pole, a long curtain pole, or a very long, straight bean pole, and for smaller children the handle of an old long-handled broom will answer.
may be a stationary clothesline post, a small, unused flagpole, an extra long clothesline pole, a long curtain rod, or a very long, straight beanpole, and for smaller children, the handle of an old long-handled broom will work.
Use strong, soft twine to make
Use strong, soft twine to make
The Cover for Your Ball
Your Ball's Cover
Cut twelve pieces, each twenty-four inches in length; place all the lengths straight and evenly together; then tie a string around the entire bunch, an inch and one-half from the centre (Fig. 270). In this figure and several other diagrams the single strands of twine are not drawn in detail, because, should every separate thread be outlined, much confusion might ensue.[208]
Cut twelve pieces, each twenty-four inches long; lay all the pieces straight and evenly together; then tie a string around the whole bunch, an inch and a half from the center (Fig. 270). In this illustration and several other diagrams, the individual strands of twine are not shown in detail, because outlining every single thread could create a lot of confusion.[208]


After tying the lengths of twine together, separate the longest part into three divisions of four strands each (Fig. 271). Braid these strands together in one braid, beginning close to the string tied around the bunch; continue braiding firmly and tightly for the distance of two and a half or three inches (Fig. 272), then untie and remove the string from around the bunch (Fig. 273); bring the two ends of the braid together, and joining all the loose strands into three bunches of eight strands each, braid all into one braid (Fig. 274). When this larger braid is one inch long, with another string tie the loose ends of it firmly together close up to the[209] braid. You will then have a braided ring on a braided stem. Wind the stem with an extra string; then tie a hard knot and cut away the ends of the string (Fig. 275).
After tying the lengths of twine together, split the longest part into three sections of four strands each (Fig. 271). Braid these strands into a single braid, starting close to the string tied around the bundle; keep braiding tightly for about two and a half to three inches (Fig. 272), then untie and remove the string from around the bundle (Fig. 273); bring the two ends of the braid together, and combine all the loose strands into three groups of eight strands each, braiding them all together into one braid (Fig. 274). When this larger braid is one inch long, tie the loose ends firmly together with another piece of string, close to the braid.[209] You will then have a braided ring on a braided stem. Wrap the stem with an extra piece of string; then tie a tight knot and cut the ends of the string off (Fig. 275).


Divide the loose strands into bunches of three strands each, making eight bunches (Fig. 275). Pin the stem down to something stationary and firm; then take three strands, or one bunch, in each hand, and pass the first finger of your left hand between the two bunches; hold it there while you carry the bunch in your right hand across the bunch in your left hand; this forms a loop. Do not take your finger out of the loop until the entire double knot is made. Bring the bunch from your right hand under and through the loop formed by the crossing of the bunches; this will give Fig. 276. Pull the strings until the tie is a short distance from the stem; then tie the same strands again to form a firm knot. Fig. 277 shows the method.
Divide the loose strands into groups of three, making eight groups (Fig. 275). Secure the stem to something stable and sturdy; then take three strands, or one group, in each hand, and slide the index finger of your left hand between the two groups; hold it there while you bring the group in your right hand across the group in your left hand; this creates a loop. Keep your finger in the loop until the entire double knot is completed. Bring the group from your right hand underneath and through the loop created by the crossing of the groups; this will produce Fig. 276. Pull the strings until the knot is a short distance from the stem; then tie the same strands again to create a secure knot. Fig. 277 illustrates the method.
Tie together two more bunches, and two more, until all the bunches have been used and you have made four knots (Fig. 278).
Tie together two more bunches, then two more, until all the bunches are used and you've made four knots (Fig. 278).


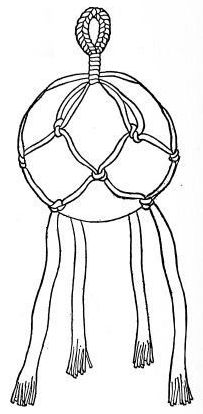


Fit the network over your ball (Fig. 279), allowing the covering to remain on the ball while you tie the bunches of strands into another row of four knots below the first row. Look at Fig. 278. The bunches are all numbered, showing[211] how they are to be united. Corresponding numbers must be tied together: 1 with 1, 2 with 2, and so on. The result will be like Fig. 280.
Fit the net over your ball (Fig. 279), keeping the cover on the ball while you tie the bundles of strands into another row of four knots below the first row. Check Fig. 278. The bundles are all numbered, indicating[211] how they should be connected. You need to tie the corresponding numbers together: 1 with 1, 2 with 2, and so on. The outcome will look like Fig. 280.
Keep the ball in the net and make another lower row of knots, which will give you Fig. 281.
Keep the ball in the net and make another lower row of knots, which will give you Fig. 281.
Now turn the ball over and tie two opposite bunches of strands up tight and firm against the bottom of the ball (Fig. 282 A). Bring together the remaining two bunches, B and C, and tie them over the knot A. Again tie in a hard, firm knot; then bind all the strands together by winding with a separate piece of string. Fasten securely.
Now flip the ball over and tightly tie two opposite bunches of strands against the bottom of the ball (Fig. 282 A). Gather the other two bunches, B and C, and tie them over knot A. Again, make a strong, firm knot; then wrap all the strands together with a separate piece of string. Secure it tightly.
It is necessary for the ball to be covered, so that it may have a strong yet harmless ring at the top, for no metal may be used on the ball.
It’s important for the ball to be covered so that it has a strong but safe ring at the top since no metal can be used on the ball.


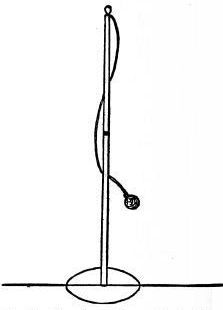
Before erecting the pole you must mark out
Before setting up the pole you need to mark out
A Court on the Grounds.
A Court on the Grounds.
Drive a stick in the earth where you want your pole to stand. On this stick tie a piece of string close to the ground; then sharpen the end of another short stick and tie the other end of the string on the second stick near its top; let the string measure two and one-half feet from one stick to the other stick. Pressing the point of the second stick slantingly against the earth, run it around and around in a[212] circle until a circular line is distinctly marked (Fig. 283), then you can pull out the stake and dig a hole where it stood at the centre, and plant your pole. Mark a straight line across the centre of the circle and extend this straight line beyond the edge of the circle six feet on each side. On opposite sides of each of the straight lines running out from the circle mark a cross about two and one-half feet from the circle and two and one-half feet from the line, F and F (Fig. 284). The cross designates the spot where the player on either side must stand to serve the ball when the[213] game begins. The crosses are called service crosses.
Drive a stick into the ground where you want your pole to be. Tie a piece of string to this stick, close to the ground; then sharpen the end of another short stick and tie the other end of the string to the second stick near its top; the string should measure two and a half feet from one stick to the other. Angle the point of the second stick against the ground and move it around in a circle until a clear circular line is marked (Fig. 283), then you can pull out the stick and dig a hole where it stood at the center to plant your pole. Draw a straight line across the center of the circle and extend this line six feet beyond the edge of the circle on each side. On opposite sides of each straight line extending from the circle, mark a cross about two and a half feet from the circle and two and a half feet from the line, F and F (Fig. 284). The cross indicates where the player on either side must stand to serve the ball when the game begins. These crosses are called service crosses.


The length of the tether pole you are to use depends upon your height and that of your young friends. Make the pole long enough to allow being planted sufficiently deep to be firm and steady and extend up above the surface of the ground, vertically, to the height of about three feet above your head. Cut a notch near the top of the pole before erecting it (Fig. 285). Tie one end of a long string fast around the notch. The string must be well waxed, twisted and doubled and waxed again, and it must reach within two feet of the ground. Tie the ball on the loose end of the string and erect your pole so firmly that it will not even tremble when you bat the attached ball ever so vigorously (Fig. 286). Fig. 287 gives the first step in tying the ball on the pole string. D is the end attached to the pole, E is the loose end. Pass E under D, then around back again over D and through the loop (Fig. 288);[214] repeat this stitch over and over, drawing the string very tight each time. Finish by tying the E end of the string on the D end in several knots. Examine Fig. 289. It will give you the process of tying, but the knots are drawn loose that you may see how each is made. Paint a red ring around the pole just above the height of your head. Make
The length of the tether pole you need to use depends on your height and that of your young friends. Make the pole long enough to be planted deep enough to be firm and steady, extending vertically above the ground to a height of about three feet above your head. Cut a notch near the top of the pole before putting it up (Fig. 285). Tie one end of a long string tightly around the notch. The string should be well waxed, twisted and doubled, and then waxed again, reaching within two feet of the ground. Tie the ball on the loose end of the string and set up your pole securely so it won't even shake when you hit the attached ball hard (Fig. 286). Fig. 287 shows the first step in tying the ball on the pole string. D is the end attached to the pole, E is the loose end. Pass E under D, then around and back over D, pulling it through the loop (Fig. 288);[214] repeat this stitch over and over, pulling the string tight each time. Finish by tying the end E of the string to end D in several knots. Check Fig. 289. It will show you how to tie it, but the knots are loose so you can see how each one is made. Paint a red ring around the pole just above the height of your head. Make
A Pattern for the Rackets
A Template for Sports
of a piece of paper twelve inches long and five and one-half inches wide; fold the paper lengthwise through the centre and cut according to curved line in Fig. 290. Open the pattern and lay it over a shingle, the handle at the thickest part; draw a pencil line around it and carefully whittle out the racket. Smooth down the rough edges with sandpaper (Fig. 291). Make a second racket in the same way. Now let us thoroughly understand the meaning of the divisions of the court before attempting the game. Inside the ground circle no one shall go, for it is not allowable at any time during the game to step on, or within, or reach over the circle line on the ground surrounding the tether pole. The straight line is used to divide the ground into two courts, one on each side of the line, making a separate court for each player.
of a piece of paper twelve inches long and five and a half inches wide; fold the paper lengthwise down the center and cut along the curved line in Fig. 290. Open the pattern and lay it over a shingle, with the handle at the thickest part; trace around it with a pencil and carefully whittle out the racket. Smooth the rough edges with sandpaper (Fig. 291). Make a second racket in the same way. Now let’s clearly understand the meaning of the divisions of the court before we start the game. No one is allowed in the ground circle, as you cannot step on, within, or reach over the circle line on the ground surrounding the tether pole at any time during the game. The straight line is used to divide the ground into two courts, one on each side of the line, creating a separate court for each player.

The cross in each court is intended to mark the spot where[215] a player must stand to “serve” or strike the ball when the game first begins. The player must stand on the cross of the chosen court while serving; at other times during the game she may go any place within her court, but she must stay in her own court on her own side of the line.
The cross in each court is meant to indicate where[215] a player has to stand to "serve" or hit the ball when the game starts. The player must stand on the cross of the chosen court while serving; at other times during the game, she can move anywhere within her court, but she must remain on her side of the line.
The Object of the Game
The Goal of the Game
is for each player to strike the ball on the end of the string in such a way as to cause the string with ball attached to wind completely around the pole above the red band.
is for each player to hit the ball at the end of the string in such a way that the string with the ball attached winds completely around the pole above the red band.
The game is intended for two players, and it begins by each one, in turn, tossing a small stone or piece of wood as near as possible to the tether pole while standing at a spot, previously marked, ten feet from the pole. The girl landing a stone nearest the pole has first turn and choice of courts; the other player must go in the court on the opposite side and beyond the circle.
The game is for two players, and it starts with each player taking turns to toss a small stone or piece of wood as close as possible to the tether pole from a marked spot ten feet away. The girl who lands her stone closest to the pole gets to take the first turn and choose her court; the other player has to go to the court on the opposite side, beyond the circle.
The server holds the ball in her hand and, striking it with her racket, endeavors to send the ball winding around the pole, but as the ball approaches the other player or opponent, the opponent tries to stop the progress of the ball with her racket and send the ball back to wind around the pole in the opposite direction. As the ball returns toward the first player, a second time she endeavors to strike it and wind the string her way around the pole. In this manner the ball is kept going back and forth between the two players until one player succeeds in winding the entire string and ball above the red band; this wins the game, and the girl winning the greatest number of games out of eleven wins the set.
The server holds the ball in her hand and, hitting it with her racket, tries to send the ball around the pole. As the ball gets closer to the other player, the opponent attempts to block its path with her racket and send it back to wrap around the pole in the opposite direction. When the ball comes back to the first player, she tries again to hit it and wrap the string her way around the pole. This way, the ball keeps going back and forth between the two players until one player manages to wind the entire string and ball above the red band; this wins the game, and the girl who wins the most games out of eleven wins the set.
While playing the game the ball may be struck but once at a time, no player being allowed to have two or more trials during one turn.[216]
While playing the game, the ball can only be hit once at a time, and no player is allowed to take two or more swings during a single turn.[216]
The turns shall alternate between the two players.
The turns will alternate between the two players.
If a player fails to send the ball into her opponent’s court on its way around the pole, the failure is called a fault, and the player making the fault loses her turn. The lost turn goes to the opponent, who then stands on the cross in her own court and has a free strike at the ball.
If a player doesn’t successfully hit the ball into her opponent’s court while going around the pole, that’s called a fault, and the player who faults loses her turn. The turn then goes to the opponent, who stands on the cross in her own court and gets a free hit at the ball.
If a player strikes the ball more than once during one turn, she is guilty of a fault, and loses her next turn. If a player over-steps the boundary of her own court in any way, she is guilty of a fault and loses a turn. When the string winds around the handle of the racket, or winds about the tether pole below the red band, the player so winding the string commits a fault and loses a turn.
If a player hits the ball more than once in a single turn, she is committing a fault and will lose her next turn. If a player steps outside the boundary of her own court in any way, she is also guilty of a fault and loses a turn. When the string gets tangled around the handle of the racket, or wraps around the tether pole below the red band, the player who causes the string to wind up is committing a fault and loses a turn.
All faults give the opponent a free hit from the cross on her own court.
All faults give the opponent a free shot from the cross on her own court.
When grown-up girls and boys play tether-ball, the pole must stand nine feet high when erected. The red band on the pole must be six feet above the ground. The circle on the ground around the pole must be three feet in diameter. The straight line dividing the courts must extend ten feet outward from each side of the pole, making the entire length twenty feet. The ball must hang, when at rest, two and one-half feet from the ground.
When adult girls and boys play tetherball, the pole needs to be nine feet tall when set up. The red band on the pole should be six feet above the ground. The circle on the ground around the pole must have a diameter of three feet. The straight line that separates the courts should extend ten feet out from each side of the pole, making the total length twenty feet. The ball should hang, when it's not in use, two and a half feet above the ground.
This game may be played by sides, of equal numbers.
This game can be played by teams of equal size.
PART II
MINIATURE SEVEN WONDERS
OF THE WORLD
CHAPTER XIX
THE PYRAMIDS OF EGYPT

Cheops’s Home
King Khufu's Home
was in Egypt, where there are more crocodiles than you can count, and doubtless the little brown fellow, at a safe distance, enjoyed watching the sleepy creatures while he vaguely wondered why crocodiles always crawled up on the banks to lie so long and still in the sun. There were many other strange animals and queer Egyptian things—unlike any you have ever seen—that interested and delighted the child. When Khufu grew to be a man he was
was in Egypt, where there are more crocodiles than you can count, and doubtless the little brown guy, at a safe distance, enjoyed watching the sleepy creatures while he vaguely wondered why crocodiles always crawled up on the banks to lie so long and still in the sun. There were many other strange animals and odd Egyptian things—unlike anything you have ever seen—that interested and delighted the child. When Khufu grew to be a man he was
A Great Monarch,
A Great Ruler,
an Egyptian King, and instead of watching crocodiles busied himself watching and ruling a nation. The King did not bother greatly about the house he lived in, but spent much energy and many years in building an enormous pyramid, the largest ever erected at any time. When you grow older you may possibly take a trip to Egypt and see this
an Egyptian King, and instead of just watching crocodiles, he focused on watching over and ruling a nation. The King didn’t care much about the house he lived in, but he dedicated a lot of energy and many years to building an enormous pyramid, the largest ever constructed. When you get older, you might take a trip to Egypt and see this.
Wonderful Structure,
Awesome Structure,
built 900 B.C. It is made of huge stones, most of them thirty feet long, five feet high and four or five feet wide. How do you suppose men ever managed to lift such monstrous blocks to build the pyramid? Well, they were obliged to labor very hard, for it took two hundred layers of stones for the pile, and all the work was done with the utmost care and precision.
built 900 B.C. It is made of huge stones, most of them thirty feet long, five feet high, and four or five feet wide. How do you think people ever managed to lift such massive blocks to construct the pyramid? Well, they had to work extremely hard because it took two hundred layers of stones to create the structure, and all the work was done with great care and precision.

You must also use care and precision in building your Egyptian pyramids. Have them exact, and in place of the heavy stone blocks use
You must also be careful and precise when constructing your Egyptian pyramids. Make them exact, and instead of the heavy stone blocks, use
Coarse Sandpaper
Rough Sandpaper
If possible, get it of a tawny yellow hue, that the miniature pyramids may be the same color as the originals, now that the outside casings of the latter are off. King Cheops had an army of one hundred thousand men laboring constantly during twenty long years to pile up his stones. You can make your Khufu Pyramid in twenty minutes and need employ only ten fingers instead of one hundred thousand men.
If you can, choose a shade of tawny yellow so that the small pyramids match the color of the originals, now that the outer casings are removed. King Cheops had a workforce of one hundred thousand people working continuously for twenty long years to build his stones. You can create your Khufu Pyramid in twenty minutes using just ten fingers instead of one hundred thousand workers.


Cut one side of
Cut one side of
The Pyramid
The Pyramid
from sandpaper (Fig. 292); if the paper is not stiff enough, paste it on a piece of cardboard; an old box-lid will do. Make[221] two more sides like the first and gum narrow strips of muslin along the right side edge of each (Fig. 293). The dotted line shows the edge of the pasteboard underneath the cloth. Join all the parts together by means of these strips (Fig. 294). When making the fourth side, extend it out into the projection (T, Fig. 294) and cut a corresponding slit in the first side (U, Fig. 294). Place the pyramid down flat on a level surface under a weight[222] to dry. When ready remove it and cut off the ends of the strips (S, V, O, Fig. 294); then bend the toy into shape by bringing the first and fourth sections together and sliding T into U (Fig. 294). The pyramid must stand erect and firm as in Fig. 295. Remember that the four sides of the real pyramid are built upon
from sandpaper (Fig. 292); if the paper is too flexible, attach it to a piece of cardboard; an old box lid works well. Make[221] two more sides, similar to the first, and glue narrow strips of muslin along the right side edge of each (Fig. 293). The dotted line indicates the edge of the pasteboard beneath the cloth. Connect all the parts using these strips (Fig. 294). When creating the fourth side, extend it out into the projection (T, Fig. 294) and cut a matching slit in the first side (U, Fig. 294). Lay the pyramid flat on a level surface and place a weight on top[222] to let it dry. Once it's ready, remove it and trim the ends of the strips (S, V, O, Fig. 294); then shape the toy by bringing the first and fourth sections together and sliding T into U (Fig. 294). The pyramid should stand upright and stable as shown in Fig. 295. Remember that the four sides of the actual pyramid are constructed upon
A Perfect Square,
A Perfect Square,
and the base lines of yours should also form a true square. If you can get some tough paper which will fold together in a flat crease without breaking, you may make the pyramid of one piece instead of four, by cutting it the shape of Fig. 296 and bending[223] it evenly along the dotted lines to form the four slanting sides. The loose ends must be fastened together by means of extension and slit. If you have no regular sandpaper make some. Give the paper a thin wash of glue, and before it dries sprinkle it evenly with sand. An old kitchen pepper-box filled with sand will make a fine sprinkler. If you cannot get the pepper-box, take a small empty baking-powder can and punch tiny holes in the cover by hammering a fine wire nail through the tin in many places; use it as a sprinkler. You must prepare the paper and have it evenly sanded before cutting out the design.
and your base lines should also create a perfect square. If you can find some sturdy paper that will fold flat without tearing, you can make the pyramid out of one piece instead of four by cutting it into the shape of Fig. 296 and folding it evenly along the dotted lines to form the four slanting sides. The loose ends need to be secured together with an extension and slit. If you don’t have regular sandpaper, you can make some. Apply a thin layer of glue to the paper, and before it dries, sprinkle it evenly with sand. An old kitchen pepper shaker filled with sand works well as a sprinkler. If you can't find a pepper shaker, take a small empty baking powder can and punch tiny holes in the lid using a fine wire nail; use it as a sprinkler. You need to prepare the paper and make sure it's evenly sanded before cutting out the design.

In Egypt there are three famous structures in addition to the Sphinx: the great pyramid, the middle-sized pyramid and[224] the little pyramid—like the big bear, the middle-sized bear and the little wee bear in the story book. Each
In Egypt, there are three well-known structures besides the Sphinx: the Great Pyramid, the Medium Pyramid, and[224] the Small Pyramid—similar to the big bear, the medium bear, and the little bear in the storybook. Each
Pile of Stones
Rock Stack
was set up by a different king, and each one is named for the monarch who built it. The largest is called for Cheops; the second is named Chephren (pronounced Kefren) and the smallest has the longest name Mycerinus (pronounced Me-ker-in-us). Make the colossal Cheops as large as the dimensions of your paper will admit. The original is like a mountain, measuring 746 feet each side of the square foundation and reaching up 450 feet and nine inches in height.
was set up by a different king, and each one is named after the monarch who built it. The largest is named after Cheops; the second is named Chephren (pronounced Kefren), and the smallest has the longest name, Mycerinus (pronounced Me-ker-in-us). Make the colossal Cheops as large as the dimensions of your paper will allow. The original is like a mountain, measuring 746 feet on each side of the square foundation and reaching a height of 450 feet and nine inches.
King Chephren did not build his stones quite as high; he was satisfied with a base, each side of which is 690 feet and nine inches and a height of 447 feet and six inches. The last, King Mycerinus, must have grown tired of playing with the stone blocks, for his pyramid is merely a hill 203 feet high, with each side of the foundation 354 feet and six inches, not nearly so tall as Cheops’s monument. Build your little pyramid about half as high as the second one.
King Chephren didn’t stack his stones as high; he was happy with a base that measures 690 feet and nine inches on each side and a height of 447 feet and six inches. The last one, King Mycerinus, must have gotten bored with the stone blocks since his pyramid is just a hill, 203 feet tall, with a foundation measuring 354 feet and six inches on each side, which is nowhere near as tall as Cheops’s monument. Build your little pyramid to about half the height of the second one.
After making the Egyptian structures, naturally you might think that they could be grouped as you pleased to place them, but these pyramids are
After building the Egyptian structures, you might naturally think that you could organize them however you wanted, but these pyramids are
Different from Ordinary Toys
Different from Regular Toys
and must always be fixed in certain positions. Stand them in a diagonal row, each one facing exactly E. W. N. S. Fig. 297 gives their correct positions. The first must stand to the northeast of the second, the second to the northeast of the third, and the Sphinx east of the second monument.
and must always be positioned in specific places. Arrange them in a diagonal line, each one facing directly E, W, N, S. Fig. 297 indicates their correct locations. The first should be positioned to the northeast of the second, the second to the northeast of the third, and the Sphinx should be to the east of the second monument.


There, they are finished. Now that we have built the pyramids, let us
There, they are done. Now that we’ve built the pyramids, let’s

Carve the Wonderful Sphinx
Carve the Amazing Sphinx
with its body like a crouching lion and its head, like a man’s, modelled from that of an ancient Egyptian. The original is an enormous queer creature hewn from stone and made before the pyramids were built; consequently, it is very old. It was on the[226] plains more than 4,000 years before the birth of Christ. Little wonder that it now appears worn and chipped and that, like your small sister’s doll its nose is broken off.
with its body resembling a crouching lion and its head, like a man’s, modeled after that of an ancient Egyptian. The original is a massive, strange creature carved from stone and created before the pyramids were built; as a result, it is very old. It stood on the[226] plains more than 4,000 years before the birth of Christ. It's no surprise that it now looks worn and chipped and that, like your little sister's doll, its nose is broken off.


Begin carving the Sphinx by cutting a larger size from Fig. 298 of stiff sandpaper. Mark the head with ink as nearly as possible like Fig. 299. Should you fail in this, find a print of the head in some old paper or magazine, cut it out and paste it on Fig. 298. Bend the design across the dotted line, and the Sphinx will be ready to crouch close down on your sandy plain. There is no need of carving the body, because that of the real Sphinx is entirely covered with sand, with only the head above ground, and we want ours to look like the original.
Begin carving the Sphinx by cutting a larger piece from Fig. 298 of stiff sandpaper. Mark the head with ink to resemble Fig. 299 as closely as possible. If you can't do this, find a picture of the head in an old paper or magazine, cut it out, and paste it on Fig. 298. Fold the design along the dotted line, and the Sphinx will be ready to crouch down on your sandy plain. There's no need to carve the body because the real Sphinx is completely covered with sand, with only the head above ground, and we want ours to look like the original.

In parts of Egypt the wind sweeps the sand in great masses against and over all objects, so the people had their
In some areas of Egypt, the wind blows the sand in large waves against and over everything, so the people had their
Buildings Made with Slanting Sides
Buildings with Slanted Sides
that the sand might slip off when it struck them. Try pouring some sand on your pyramids and you will understand the[227] reason of the peculiar style of architecture. The land in Egypt on which the Sphinx and pyramids stand is the plain of Gizeh; consequently, you must give that name to the place where you set up your structures. The
that the sand might slip off when it hit them. Try pouring some sand on your pyramids, and you will understand the[227] reason for the unique style of architecture. The land in Egypt where the Sphinx and pyramids are located is the Giza Plateau; therefore, you should name the place where you build your structures that. The
Tall Date Palm
Tall Date Palm
is a beautiful tree. The leaves are glossy and spread out in a graceful crown; its stem is marked with old leaf scars, giving it a very different appearance from the bark of our native trees.
is a beautiful tree. The leaves are shiny and fan out in a graceful crown; its trunk is marked with old leaf scars, giving it a very different look from the bark of our native trees.


Several date palms, either grouped or scattered, would look well and tend to relieve the severity[228] of the landscape. A thin layer of sand sprinkled over the plain, the stand of the Sphinx and the paper roots or stands of the trees will give the place a realistic appearance, and the scene will then be ready for the camels and Arabs. You may own
Several date palms, whether grouped together or spaced out, would look nice and help soften the harshness of the landscape.[228] A light layer of sand spread across the plain, along with the sight of the Sphinx and the paper roots or clusters of trees, will create a lifelike appearance. Then, the scene will be set for the camels and Arabs. You may own
As Many Camels as You Desire;
As Many Camels as You Want;
all you have to do is to use the old Egyptian method of squares, as explained in Chapter XIV, and it will enlarge the camel in[229] Fig. 303; then cut out the figure, lay it down flat on cardboard and run a lead pencil around its edge. Cut out this second animal and repeat the outline as often as you want camels. You will then have fine camels which will stand firm on four feet and be strong enough to carry burdens.
All you need to do is use the old Egyptian method of squares, as described in Chapter XIV, and it will enlarge the camel in[229] Fig. 303; then cut out the figure, lay it flat on cardboard, and trace around its edge with a pencil. Cut out this second camel and repeat the outline as many times as you want. You'll end up with sturdy camels that will stand on four legs and be strong enough to carry loads.


Make the Saddle
Make the Saddle


Cut out the Arab (Fig. 306), being sure to make the short slit in the back of the drapery so that the man will sit well on the[231] saddle. Along the dotted lines place a strip of paste and fold the figure at the back, pasting the two sides together at the centre (Fig. 307). When dry mark as in Fig. 308 and mount him on the animal. As a harness tie a string on the camel’s head, ornament[232] it with tiny tassels (Fig. 309) and give the end of the string to the Arab, threading the string through the hole in his right hand (Fig. 308).
Cut out the Arab (Fig. 306), making sure to create a small slit in the back of the drapery so that the man can sit comfortably on the[231] saddle. Along the dotted lines, apply a strip of paste and fold the figure at the back, gluing the two sides together at the center (Fig. 307). Once dry, mark as in Fig. 308 and attach him to the animal. For a harness, tie a string around the camel’s head, decorate[232] it with small tassels (Fig. 309) and give the end of the string to the Arab, threading it through the hole in his right hand (Fig. 308).
The trees, animals and men must be placed some distance in front of the pyramids, that the latter may seem to be a long way off; otherwise, all your objects will be out of proportion, because when a live camel stands close up to the Grand Pyramid it looks very small. Have several
The trees, animals, and people should be positioned a bit farther away from the pyramids so that the pyramids appear distant; otherwise, everything will look out of proportion. For instance, when a real camel stands too close to the Grand Pyramid, it looks tiny. Have several
Camels with Men Riding
Riding Camels
them, some free from harness and rider, others held with the halter by Bedouins seated on paper rocks, which you can make by bending a piece of cardboard the right height.
them, some free from harness and rider, others held with the halter by Bedouins sitting on paper rocks, which you can make by bending a piece of cardboard to the right height.
All the objects given can be enlarged to any desired size by the system of squares shown in Chapter 14, and the entire Egyptian scene may be taken up, each piece folded flat and placed in a large envelope when not in use.
All the items provided can be resized to any preferred dimensions using the grid system shown in Chapter 14, and the whole Egyptian scene can be taken apart, with each piece folded flat and stored in a large envelope when not in use.
CHAPTER XX
THE COLOSSUS OF RHODES


Now, we will play that
Now, let’s play that
Your Name is Chares
Your Name is Chares
of Lindus, that you are a great sculptor and can model all sorts of wonderful and beautiful objects, and that the city of Rhodes has commissioned you to make a gigantic bronze statue of Apollo,[234] their sun god. So you must pretend that you have built two small islands at the entrance to the port of Rhodes, and that on each island you have erected immense stone pedestals fifty feet high, so that your Colossus need not be obliged to stand in the water. The statue must be made to span the harbor with “legs wide apart,” as Napoleon stands in the pictures of history.
of Lindus, you’re known as a great sculptor capable of creating all kinds of amazing and beautiful works. The city of Rhodes has hired you to create a massive bronze statue of Apollo, their sun god,[234]. You need to act as if you’ve built two small islands at the entrance to the port of Rhodes, each with huge stone pedestals that are fifty feet high, so that your Colossus won’t have to stand in the water. The statue should be designed to stretch across the harbor with “legs wide apart,” similar to how Napoleon is depicted in historical paintings.
Apollo must be very large, about one hundred and eleven feet high, in order that every ship entering the harbor may pass between the legs of this
Apollo must be really big, around one hundred and eleven feet tall, so that every ship coming into the harbor can fit between his legs.
Towering Colossus
Towering Giant
as a tribute to the god; and when sailors approach the statue and pass beneath it they will marvel at the beautiful figure of polished metal and carry news of it all over the world.
as a tribute to the god; and when sailors come near the statue and walk beneath it, they marvel at the beautiful figure made of polished metal and share news of it all over the world.
Make the Colossus of bronze filled
in with stone. Use stiff fine lawn or
fine batiste as the outer bronze covering
of the statue; let the cloth be perfectly
smooth, without a wrinkle.
Take raw cotton batting for the stone
filling. Enlarge very carefully on stiff,
smooth paper the pattern (Fig. 310);
make it measure nine and one-fourth
inches from the tip-top line to the
bottom line; then cut it out and lay
the paper pattern down flat over a
double fold of the cloth. With a soft
lead pencil run a line on the cloth
entirely around the figure; be particular
about having all the curves of[235]
[236]
the figure correct. Baste the two layers of cloth together and
machine-stitch them around the outside edge of the pencil
outline.
Make the Colossus out of bronze filled with stone. Use stiff, fine lawn or fine batiste as the outer bronze covering of the statue; the fabric should be perfectly smooth, without any wrinkles. Use raw cotton batting for the stone filling. Carefully enlarge the pattern on stiff, smooth paper (Fig. 310); it should measure nine and one-fourth inches from the top line to the bottom line; then cut it out and lay the paper pattern flat over a double fold of the fabric. With a soft lead pencil, trace a line on the fabric completely around the figure; make sure all the curves of[235]
[236] the figure are accurate. Baste the two layers of fabric together and machine-stitch them around the outside edge of the pencil outline.

Do not Sew the Lines Straight
Don't Sew in Straight Lines
where they should curve; remember this and devote the best of your talents to the work.
where they should curve; keep this in mind and dedicate your best skills to the task.
Leave a half-inch opening at the shoulder of the upraised arm A (Fig. 311). Pull off a bit of the soft, raw cotton and force it in at the opening A (Fig. 311) between the front and back of the figure. With a smooth, slender, dull-pointed stick push the cotton well up into one of the points surrounding the head, which represent the rays of the sun. When you have the cotton in the tip of the point, pack in another piece and continue to stuff the point with cotton until it is filled out firmly. Stuff all the points and the head in the same way; then fill the opposite shoulder and upper part of the arm which is held down at the side, and next the uplifted hand and arm, and the body.
Leave a half-inch opening at the shoulder of the raised arm A (Fig. 311). Take a small piece of soft, raw cotton and push it into the opening A (Fig. 311) between the front and back of the figure. Using a smooth, slender, dull-pointed stick, push the cotton deep into one of the points around the head, which represent the rays of the sun. Once the cotton is in the tip of the point, pack in another piece and keep stuffing the point with cotton until it is completely filled. Stuff all the points and the head the same way; then fill the opposite shoulder and the upper part of the arm that is down at the side, followed by the raised hand and arm, and finally the body.

Begin at the Sole
Start at the Sole
of the left foot and stuff the lower half of the partially filled hanging arm, then the lower part of the body and the entire length of the leg, and fill in the other leg. Before stuffing the feet take[237] two strong, stiff hat-pins and break off the heads. If you bend the ends in removing the heads, hammer them out straight again; the pins must be perfectly straight. Very carefully work a pin, broken end first, up each leg well into the body. The dotted lines along the legs in Fig. 311 represent the pins placed inside; the points of the pins extend not less than an inch and a half below the feet B, B (Fig. 311). C, C (Fig. 311) shows the raw cotton, which has not yet been packed into the feet. Lift the figure by the two pin points, and if it is firm and stiff finish stuffing the feet; if it bends when held by the pin points, carefully twist out the pins and insert them again, adjusting them until they keep the figure stiffly upright when held by the points.
of the left foot and stuff the lower half of the partially filled hanging arm, then the lower part of the body and the entire length of the leg, and fill in the other leg. Before stuffing the feet, take[237] two strong, stiff hat pins and break off the heads. If you bend the ends while removing the heads, hammer them straight again; the pins must be perfectly straight. Very carefully work a pin, broken end first, up each leg deep into the body. The dotted lines along the legs in Fig. 311 represent the pins placed inside; the points of the pins extend at least an inch and a half below the feet B, B (Fig. 311). C, C (Fig. 311) shows the raw cotton, which hasn't been packed into the feet yet. Lift the figure by the two pin points, and if it is firm and stiff, finish stuffing the feet; if it bends when held by the pin points, carefully twist out the pins and insert them again, adjusting them until they keep the figure stiffly upright when held by the points.
Sew up all the openings and
Sew up all the openings and
Cut Out the Statue,
Remove the statue,
then slowly punch open the centre of the divisions between the rays around the head and the uplifted arm, with the point of a blade of the scissors. Enlarge each hole by twisting the pointed end of a penholder around and around until the opening is sufficiently large. Turn the Colossus over on the other side and carefully cut away the fringe of cloth that surrounds each opening. In like manner open the space between the body and the arm extending down the side.
then slowly punch open the center of the divisions between the rays around the head and the raised arm, using the point of a blade from the scissors. Make each hole bigger by twisting the pointed end of a penholder around and around until the opening is large enough. Flip the Colossus over to the other side and carefully cut away the fringe of cloth that surrounds each opening. Similarly, open the space between the body and the arm extending down the side.
When stuffing the figure, use the cotton soft; do not roll it into hard wads, and be careful not to run the end of the stick through the cloth covering and tear it; the same care must be taken when inserting the pins up the legs. With thread and needle stitch an outline between the fingers and around the lower portion of the raised hand. Filling in the figure with cotton will give you an idea of the labor your great-grandmothers expended upon their bedquilts when they stuffed elaborate designs[238] of grapes and vines on the coverings. Such quilts are now highly valued. Give Apollo an
When stuffing the figure, use soft cotton; don’t pack it into hard clumps, and be careful not to push the end of the stick through the fabric and tear it. You should take the same care when inserting the pins up the legs. With thread and needle, stitch an outline between the fingers and around the bottom part of the raised hand. Filling in the figure with cotton will help you understand the effort your great-grandmothers put into their bed quilts when they stuffed intricate designs[238] of grapes and vines on the coverings. Such quilts are now highly valued. Give Apollo an
All-over Coat of Varnish
Full Coat of Varnish
When the statue is perfectly dry bronze it with liquid bronze, and if the small openings by the side of the arms seem partially to have closed, twist the end of the pen handle through each one to enlarge the spaces.
When the statue is completely dry, coat it with liquid bronze, and if the small openings near the arms appear to be partially closed, use the end of the pen handle to twist through each one and make the spaces larger.

Cut a strip of cloth according to Fig. 312 for drapery. Hold one end against the figure at the side where the arm joins the body and fold the cloth loosely across the front and around the back of the figure, bringing the other end of the drapery forward through the space between the arm and the body. Fasten it in place with a pin (Fig. 313). Bronze the scarf so that no portion of unbronzed cloth is visible; then allow the statue to dry, and with sharp scissors trim off any little ravellings along the edges of the stitching. With pen and ink
Cut a strip of cloth according to Fig. 312 for drapery. Hold one end against the figure at the side where the arm meets the body and loosely fold the cloth across the front and around the back of the figure, bringing the other end of the drapery forward through the space between the arm and the body. Secure it with a pin (Fig. 313). Bronze the scarf so that no part of unbronzed cloth is visible; then let the statue dry, and with sharp scissors trim off any little frays along the edges of the stitching. With pen and ink
Mark the Features
Highlight the Features
on the face. The chin being held up foreshortens the face; this
means that the position causes the features to look as if they
were closer together than they actually are, and that the eyebrows
are nearer the top of the head, which makes all the features
seem higher than when the chin is held level. Do not forget
this while inking the face. Draw rather high on the forehead
two curved lines for the eyebrows; under these mark two curved
oblongs for the eyes, a curve for the nose, with two elongated
dots for nostrils, a larger curve for the mouth and a little one[239]
[240]
for the lower lip. Practise drawing the face on a piece of paper
before attempting to ink it on the bronze head.
on the face. Tilting the chin up shortens the face; this means that this position makes the features appear closer together than they really are, and that the eyebrows seem nearer to the top of the head, which makes all the features look higher compared to when the chin is level. Keep this in mind while inking the face. Draw two curved lines high on the forehead for the eyebrows; below these, sketch two curved oblongs for the eyes, a curve for the nose with two elongated dots for nostrils, a larger curve for the mouth, and a smaller one for the lower lip. Practice drawing the face on a piece of paper before you try inking it on the bronze head.

Find or make two boxes of heavy cardboard each about two and a half inches high, an inch and a half wide, and two and a half inches deep. Open the boxes and give the outside a thin coating of glue. While the glue is wet sprinkle with sand, and, when dry, replace the covers and the boxes will be two stone pedestals for the statue.
Find or create two heavy cardboard boxes, each about two and a half inches high, one and a half inches wide, and two and a half inches deep. Open the boxes and apply a thin layer of glue on the outside. While the glue is still wet, sprinkle sand over it, and when it’s dry, put the covers back on. These will serve as two stone pedestals for the statue.
Erect Apollo
Raise Apollo
upon the stone foundation by pushing the projecting pin points through the tops of the boxes; work a cork on the end of each pin point, having the cork large enough to rest firmly on the bottom of the box after it is attached to the pin point; then, holding each cork in place, fasten them in turn to the bottom of the box by pushing a common pin up through the bottom of the box into the cork. Fig. 314 shows the inside of the sanded box with the point of the hat-pin firmly planted in the top of the cork, while the cork is held securely to the bottom of the box by means of the pin run into it from the outside of the box. Apollo must stand firm; the statue and foundation boxes should be so securely fastened together as to seem made in one piece.
upon the stone foundation by pushing the protruding pin points through the tops of the boxes; attach a cork on the end of each pin point, ensuring the cork is large enough to rest securely on the bottom of the box after it's attached to the pin point; then, while holding each cork in place, fasten them in turn to the bottom of the box by pushing a common pin up through the bottom of the box into the cork. Fig. 314 shows the inside of the sanded box with the tip of the hat pin firmly embedded in the top of the cork, while the cork is held securely to the bottom of the box by a pin inserted from the outside of the box. Apollo must stand steady; the statue and foundation boxes should be fastened together so securely that they appear to be one solid piece.

There, the famous Colossus of Rhodes, one of the renowned Seven Wonders of the World, is completed,[241] and now that you have made the statue you can never forget it. Pretend that Apollo towers in the air at least one hundred and fifty feet when on the pedestals. Of course, such a remarkable piece of sculpture could not be constructed in a moment’s time, so make-believe that you, the sculptor, Chares, of Lindus, have been twelve years at work on the wonderful bronze figure. Get a sheet of blue tissue paper to serve as the water, stand Apollo on it, and make two or three
There, the famous Colossus of Rhodes, one of the renowned Seven Wonders of the World, is finished,[241] and now that you’ve created the statue, you’ll never forget it. Imagine that Apollo stands tall in the air, at least one hundred and fifty feet on his pedestal. Of course, such an incredible piece of art couldn’t be made in an instant, so pretend that you, the sculptor Chares from Lindus, have spent twelve years crafting this amazing bronze figure. Grab a sheet of blue tissue paper to represent the water, place Apollo on it, and create two or three
Tiny Paper Boats with Masts;
Small Paper Boats with Masts;
set them on the water under the bronze statue that the vessels may be sailing beneath the statue into the harbor of Rhodes (Fig. 313).
set them on the water under the bronze statue so the ships can sail beneath it into the harbor of Rhodes (Fig. 313).
When you have erected the Colossus on a table and everything is ready, invite the girls and boys in to see the work; tell them all about the statue’s being one of the “Seven Wonders of the World” and what fun you had making Apollo, and that you intend to make another of the “Wonders,” which you will show to them.
When you have set up the Colossus on a table and everything is ready, invite the girls and boys to check out your work; tell them about how the statue is one of the “Seven Wonders of the World” and how much fun you had making Apollo, and that you plan to create another one of the “Wonders,” which you will show them.
Play that the Colossus has stood guard over the harbor of Rhodes for fifty-six years; then make an earthquake
Play that the Colossus has been standing watch over the harbor of Rhodes for fifty-six years; then cause an earthquake.
Tumble it Down
Knock it Down
Double up your hand and give a hard knock on the under side of the top of the table, exactly beneath the spot on which Apollo stands. With a little aid of the imagination the noise produced will sound like the rumbling of an earthquake, and the shock will cause the earth, or the top of the table, to tremble and quake violently, and down will fall the Colossus.
Make a fist and hit the underside of the table hard, right beneath where Apollo is standing. With a bit of imagination, the sound will mimic an earthquake, and the impact will make the ground, or the table's surface, shake and tremble violently, causing the Colossus to fall.
Make believe that
Pretend that
The Statue is Broken
The statue's broken
in many pieces and that the people of Rhodes allow the fragments to lie scattered on the ground, for you know that after the real Colossus had been thrown down, it remained where it had fallen for many centuries, until the year 656 A.D., when Rhodes was conquered by the Saracens, who sold many of the pieces of the bronze sun god to a Jew of Syria Edessa. This man had nine hundred camels carry the fragments on their backs to Alexandria.
in many pieces and that the people of Rhodes let the fragments lie scattered on the ground, since you know that after the actual Colossus was knocked down, it stayed where it fell for many centuries, until the year 656 A.D., when Rhodes was conquered by the Saracens, who sold many of the pieces of the bronze sun god to a Jew from Edessa in Syria. This man had nine hundred camels carry the fragments on their backs to Alexandria.
Nearly three centuries after the disaster, Pliny saw the pieces of the Colossus still lying where it fell: “And even as it lies there prostrate,” he reports, “it stirs to wonder. Few men can clasp its thumb with their arms; the fingers alone are greater than most statues; vast caverns yawn in its shattered limbs; within one sees blocks of stone by whose weight the builder established it.”
Nearly three hundred years after the disaster, Pliny saw the remnants of the Colossus still lying where it fell: “And even as it lies there on the ground,” he reports, “it inspires wonder. Few men can wrap their arms around its thumb; the fingers alone are bigger than most statues; enormous gaps open up in its broken limbs; inside, you can see stone blocks so heavy that the builder used them to erect it.”
The Colossus
The Colossus
cost about $500,000, which was obtained from the sale of the engines of war presented to the Rhodians by a man named Demetrios Poliorketes, after they had made him give up the siege of their city, 303 B.C.
cost about $500,000, which was obtained from the sale of the engines of war presented to the Rhodians by a man named Demetrios Poliorketes, after they had made him give up the siege of their city, 303 B.C.
There were several thousand statues in Rhodes but none so large as the Colossus, which is said to have weighed 720,900 pounds. The famous Laocoön and the Farnese Bull were both modelled in Rhodes. In Roman time Rhodes was thought the fairest city in the world and is described by historians as superior to all other cities of its era, for the beauty and convenience of its ports, streets, walls and public edifices, all of which were profusely adorned with works of art. Among the students in its university were Brutus, Cassius, Cæsar and Cicero, and the first Greek grammar, the one which became the model of Greek and[243] Latin grammars, was written in this city, so you find that Rhodes has played a very important part in the world. But the island of Rhodes is no more a powerful state; it is now a possession of Turkey, and is ruled by a pasha, who holds office for life, governing also the adjoining islands belonging to Turkey, and collects the revenues. We will have interesting news from time to time from this same island, for one of the newspapers has stated that a Danish scientific expedition will go to discover all that remains of the Colossus of Rhodes. You must be on the lookout, therefore, to know how much they find of the statue and how the pieces look; then you will wish to compare your Colossus of Rhodes with the facts stated and any pictures which may be published on the subject to see how closely your Apollo resembles the original “Wonder” of the world.
There were thousands of statues in Rhodes, but none as huge as the Colossus, which is said to have weighed 720,900 pounds. The famous Laocoön and the Farnese Bull were both crafted in Rhodes. During Roman times, Rhodes was considered the most beautiful city in the world and is described by historians as being better than all other cities of its time, with its stunning and convenient ports, streets, walls, and public buildings, all richly decorated with art. Among the students at its university were Brutus, Cassius, Cæsar, and Cicero, and the first Greek grammar, which became the model for Greek and Latin grammars, was written in this city. This shows that Rhodes has played a significant role in history. However, the island of Rhodes is no longer a powerful state; it is now a territory of Turkey, ruled by a pasha who serves for life, governing the nearby islands also owned by Turkey, and collecting taxes. We will receive interesting updates from this island from time to time, as one newspaper reported that a Danish scientific expedition will search for the remnants of the Colossus of Rhodes. So, you should keep an eye out to see how much of the statue they find and what the pieces look like; then you can compare your Colossus of Rhodes with the facts and any images that may be published to see how closely your version resembles the original "Wonder" of the world.

CHAPTER XXI
THE PHAROS OF ALEXANDRIA AND THE MAUSOLEUM
OF HALICARNASSUS

The First Lighthouse Ever Known
The First Known Lighthouse
Think what that means: When it is finished the people from other countries will see your Pharos and wonder why it never occurred to them to build a lighthouse, and they will hurry to erect similar structures on their coasts, that sailors on all the seas may have guides in times of danger and not be dependent upon bonfires burning at the entrances of harbors. These chance watch-fires are now the only kind of lighthouses the people have, so get ready your material and make preparations for building, that you may help the poor sailors. Remember, though, that we are[246] living in the third century B.C., and that we are not in the United States but on the island of Pharos.
Think about what that means: When it’s done, people from other countries will see your lighthouse and wonder why they never thought of building one themselves. They’ll rush to put up similar structures along their coasts, so sailors everywhere can have guides during dangerous times and not rely on bonfires at harbor entrances. Right now, those random watchfires are the only lighthouses people have, so gather your materials and get ready to build, so you can assist the sailors in need. Keep in mind, though, that we’re living in the third century B.C., and we’re not in the United States but on the island of Pharos.

Select the eastern extremity of the island for
Select the eastern tip of the island for
Your Building Lot
Your Property Lot
It happens that your lighthouse will be on an island in the identical
Mediterranean Sea in which the Colossus was reared, only
not on the same side of the water. The island of Pharos has a
neck of land, built by men, which stretches through the water
to the city of Alexandria, making it easy to go back and forth
for building material. You must have plenty of ground space
for your new style of beacon-light, because the foundation is to
be very large, about six hundred feet square, and the building[247]
[248]
will be many stories, growing smaller and smaller in size as the
stories extend upward. The lighthouse must be five hundred
feet high, that the light may be seen miles out at sea.
Your lighthouse will be on an island in the same Mediterranean Sea where the Colossus was built, but not on the same side. The island of Pharos has a man-made causeway that connects it to the city of Alexandria, making it easy to transport building materials. You’ll need a lot of ground space for your new beacon light because the foundation will be quite large, about six hundred feet square, and the building will have multiple stories, becoming smaller as it goes up. The lighthouse must be five hundred feet tall so that the light can be seen from miles away at sea.

Stiff, white paper will answer for the stone.
Stiff, white paper will serve as the stone.


Cut the Foundation
Undermine the Foundation
piece like Fig. 315 with a square centre measuring five inches along the dotted lines on each of the four edges. Near two of the edges are long slits (A A). Extending out from the centre square are the four sides of the square, each an inch and a half in depth. On one end of each side there is a flap, C, at the opposite end a slit, B, and two of the sides have an extra extension, or bottom flap, D. Cut all of the heavy lines and carefully crease the dotted lines. The best way to make Fig. 315 is to cut a piece of paper eight inches wide and eleven inches long (Fig. 316). Run a line lengthwise across one inch and a half from the outer edge (Fig. 317); repeat the same on the opposite edge (Fig. 318); then mark a line across each of the ends three inches from the edge (Fig. 319). Make another line midway between this line and the edge at each end, which will bring the division one inch and a half from the edge E, E (Fig. 320). Crease all the lines, bending[249] them inward. Open out the paper after each folding, and when all lines have been creased and opened you will find it very easy to mark and cut the sides and flaps of Fig. 315.
piece like Fig. 315 with a square center measuring five inches along the dotted lines on each of the four edges. Near two of the edges are long slits (A A). Extending from the center square are the four sides of the square, each an inch and a half deep. At one end of each side, there's a flap, C, at the opposite end a slit, B, and two of the sides have an extra extension, or bottom flap, D. Cut along all the heavy lines and carefully crease the dotted lines. The best way to make Fig. 315 is to cut a piece of paper eight inches wide and eleven inches long (Fig. 316). Draw a line lengthwise one and a half inches from the outer edge (Fig. 317); repeat the same on the opposite edge (Fig. 318); then mark a line across each end three inches from the edge (Fig. 319). Make another line midway between this line and the edge at each end, which will position the division one and a half inches from the edge E, E (Fig. 320). Crease all the lines, bending them inward. Open the paper after each fold, and once all lines have been creased and opened, you will find it very easy to mark and cut the sides and flaps of Fig. 315.


Cut three more papers for
Cut three more papers for
The Next Three Stories;
The Next 3 Stories;
divide them with lines like Figs. 316, 317, 318, 319, 320, and cut them like Figs. 322, 323, 324. The centres of these must each be smaller than the last, measuring respectively four, three and two inches square, but the depth of the sides remains the same. The size of your second-story paper will be ten by seven inches, the third, nine by six inches, and the fourth, having the bottom flaps, measure one instead of one and a half inches, as do the[250] others, requires paper seven by five inches. Figs. 321, 322, 323, 324 are given to show the relative sizes of the four stories when the paper is cut and laid out flat; the diagrams are also intended to explain the cutting of the slits on the centre squares. Notice that in the first story (Fig. 321), as in the additional three stories, neither of the ends of the left-hand slit reaches to the edge of the square, while the right-hand slit (H H, Fig. 321) touches at one edge. In the second story (Fig. 322) the right-hand slit not only runs to the edge of the square, but there turns at right angles and extends through the edge of the paper (G G). The right-hand slit of the third story (Fig. 323) differs from the[251] other two; it runs within a short distance of the edge of the square, where it turns at right angles, making a straight line to the adjoining side of the square, there turning again at a sharp angle; the slit reaches entirely through the edge of the paper H, H (Fig. 323). In the fourth story (Fig. 324) the slits are cut like those in the first story I, I (Fig. 324), being the long slit. Fig. 325 gives the diagram for the fifth story, which is the top one.
divide them with lines like Figs. 316, 317, 318, 319, 320, and cut them like Figs. 322, 323, 324. The centers of these must each be smaller than the last, measuring four, three, and two inches square, but the depth of the sides stays the same. The size of your second-story paper will be ten by seven inches, the third, nine by six inches, and the fourth, having the bottom flaps, should measure one inch instead of one and a half inches, like the others, requiring paper that's seven by five inches. Figs. 321, 322, 323, 324 are provided to show the relative sizes of the four stories when the paper is cut and laid out flat; the diagrams are also meant to explain how to cut the slits on the center squares. Notice that in the first story (Fig. 321), as in the additional three stories, neither end of the left-hand slit reaches the edge of the square, while the right-hand slit (H H, Fig. 321) touches at one edge. In the second story (Fig. 322), the right-hand slit not only reaches the edge of the square but also turns at right angles and extends through the edge of the paper (G G). The right-hand slit of the third story (Fig. 323) differs from the other two; it runs close to the edge of the square, where it turns at right angles, making a straight line to the adjacent side of the square, turning again at a sharp angle; the slit goes completely through the edge of the paper H, H (Fig. 323). In the fourth story (Fig. 324), the slits are cut like those in the first story I, I (Fig. 324), which is the long slit. Fig. 325 provides the diagram for the fifth story, which is the top one.


This Room
This Room
has large openings in the four sides to allow the beacon-light to shine out into the dark night. The centre of the diagram (Fig. 325) is one inch square; two of the sides have slits cut near each side edge of the windows; on the other sides of the squares are extending flaps. Cut all the heavy lines, and bend inward and crease all the dotted lines, then put the top story together in proper form by sliding the four side edge flaps through the slits, which will bring the edges of the sides together, forming the four corners of the room. Bend back and crease down the portion of the flaps which extend inside of the room; do this to make the fastenings secure. Use strips of bright-red and orange-colored tissue paper cut into fringe on one edge and twisted together into a bunch, as in Fig. 326, for the
has large openings on all four sides to let the beacon light shine out into the dark night. The center of the diagram (Fig. 325) is one inch square; two of the sides have slits cut near each edge of the windows; the other sides of the squares have flaps extending out. Cut all the heavy lines, and fold inward and crease all the dotted lines, then assemble the top story correctly by sliding the four side edge flaps through the slits, which will bring the sides together, forming the four corners of the room. Fold back and crease down the part of the flaps that extend inside the room; do this to make the fastenings secure. Use strips of bright red and orange tissue paper cut into fringe on one edge and twisted together into a bunch, as in Fig. 326, for the
Pitch-Wood Fire
Pitchwood Fire
which is to gleam out upon the treacherous approaches to the harbor.
which is to shine out on the dangerous paths to the harbor.
Having fuel for the make-believe fire, and white stone, or paper, cut ready for building, your lighthouse may be erected in a few moments. Pierce a small hole in the exact centre of Fig. 324 C, and bend down the sides, allowing the side flap of each to extend around the corner and on the outside of the adjoining side. Slip the end of each flap through the slit which it covers, shown by B, Fig. 315, and bend back the end that comes through on the inside; fit the end of the fire (Fig. 326) tightly into the hole C on the top of Fig. 324 and the work will resemble Fig. 327. Through the two slits on each side of the fire slide the two bottom flaps of the fifth or top story; flatten the ends of the flaps up tight to the under side of the top of the fourth story. Be sure to keep the front side of each succeeding story directly under the front side of the one over it, that the steps may fit in place. Fasten each lower story to the one above in the same way that you attached the fourth to the fifth.
Having fuel for the pretend fire, and white stone, or paper cut ready for building, your lighthouse can be put together in just a few moments. Make a small hole in the exact center of Fig. 324 C, and fold down the sides, letting the side flap of each extend around the corner and outside the adjoining side. Slip the end of each flap through the slit it covers, shown by B, Fig. 315, and bend back the end that comes through on the inside; fit the end of the fire (Fig. 326) snugly into the hole C on the top of Fig. 324 and the structure will resemble Fig. 327. Through the two slits on each side of the fire, slide the two bottom flaps of the fifth or top story; flatten the ends of the flaps up tightly to the underside of the top of the fourth story. Be sure to keep the front side of each succeeding story directly under the front side of the one above it so that the steps can fit in place. Secure each lower story to the one above in the same way you attached the fourth to the fifth.

When the Pharos is finished make the three flights of
When the lighthouse is finished, complete the three flights of
White Marble Steps
White Marble Stairs
leading to the top of the lighthouse. Cut the top flight (Fig. 328) of stiff white paper. Let it measure one-half inch in width and four and one-half inches in length, including the top landing.[253] The side extension K of the landing should be three-quarters of an inch long. Fold the flat, straight strip of paper back and forth many times, in fan fashion and crease firmly to form steps (Fig. 329). Slip the extension K into the slit I on the right-hand side of the top of the fourth story, and slide the bottom of the stairs into the slit H on the left-hand edge of the third story. Make the next flight of steps like the top ones, only longer—five and one-half inches in length before being creased. Place the end of the platform extension over the bottom of the top flight; run it through the slit H which turns at right angles from the edge and fasten the bottom of the steps in the right-hand slit edge (G) of the second story. Attach the third flight of marble steps diagonally across the second story in the same manner. The paper strip for these last should measure when flat seven inches in length.
leading to the top of the lighthouse. Cut the top flight (Fig. 328) of stiff white paper. It should be half an inch wide and four and a half inches long, including the top landing.[253] The side extension K of the landing should be three-quarters of an inch long. Fold the flat, straight strip of paper back and forth many times, in a fan fashion, and crease it firmly to create steps (Fig. 329). Insert the extension K into the slit I on the right side at the top of the fourth story, and slide the bottom of the stairs into the slit H on the left edge of the third story. Make the next flight of steps like the top ones, but longer—five and a half inches in length before being creased. Place the end of the platform extension over the bottom of the top flight; run it through the slit H that turns at a right angle from the edge and secure the bottom of the steps in the right-hand slit edge (G) of the second story. Attach the third flight of marble steps diagonally across the second story in the same way. The paper strip for these last steps should measure seven inches in length when flat.


The real Sostratus of Cnidus had a
The real Sostratus of Cnidus had a
Natural Island
Eco Island
on which to erect his lighthouse, but you may have the fun of making one for your Pharos. Find a box a little larger than the lighthouse and cover it loosely with any kind of stiff cloth; have the cloth smooth and tight only over the space on which the Pharos is to stand. On all the other portions of the box the covering should be irregularly placed, so that it will jut out in[254] places; fold in others and have as much the appearance of an immense rough rock as possible. If the box is of pasteboard, sew the cover on with a stitch here and there; if of wood, tack the cover on. When ready glue or
on which to build his lighthouse, but you can have fun creating one for your Pharos. Find a box that's slightly larger than the lighthouse and cover it loosely with any stiff fabric; keep the fabric smooth and tight only over the area where the Pharos will sit. On the other parts of the box, the covering should be placed irregularly so it sticks out in[254] some areas; fold in other parts to make it look as much like a huge rough rock as possible. If the box is made of cardboard, sew the cover on with a few stitches here and there; if it's wooden, just tack the cover on. When you're done, glue or
Tack the Island
Conquer the Island
on a foundation of wood or one of heavy pasteboard covered with sea-blue cloth or paper to represent the waters of the Mediterranean Sea; give the island a very light coat of varnish or glue, except the central space reserved for the lighthouse. Be careful not to allow the glue to dampen the cloth sufficiently to make it limp. While the glue is moist, sprinkle generously with sand. When dry, glue on the Pharos. Turn inward the down-hanging bottom flaps and glue them down securely to the stone. Draw the statue (Fig. 330) on white paper and cut it out. Then cut a slip up through the centre of its stand, bend the stand at the dotted line, one half of it forward, the other half backward, and paste the statue upright on top of the building.
on a base of wood or a sturdy pasteboard covered with sea-blue fabric or paper to symbolize the waters of the Mediterranean Sea; give the island a light coat of varnish or glue, except for the central area reserved for the lighthouse. Be careful not to let the glue soak through the fabric enough to make it droopy. While the glue is still wet, sprinkle it generously with sand. Once dry, attach the Pharos. Fold the bottom flaps that hang down inward and secure them with glue to the stone. Draw the statue (Fig. 330) on white paper and cut it out. Then make a slit up through the center of its stand, bend the stand at the dotted line, one half forward and the other half backward, and glue the statue upright on top of the building.
If you would like to do just as the real architect Sostratus did, write your name in this way:
If you want to do exactly what the real architect Sostratus did, write your name like this:
SOSTRATUS OF CNIDUS TO THE RESCUING
GODS, FOR THE BENEFIT OF SAILORS
SOSTRATUS OF CNIDUS TO THE RESCUING
GODS, FOR THE BENEFIT OF SAILORS
on one side of the first story of the Pharos; then paint over it with white paint so that the name cannot be seen. After the paint has dried, write over the white paint, “King Ptolemy.” Sostratus of old carved his name deep on the stone wall of the[255] building, then plastered over it and set the King’s name in the plaster. Instead of the plaster you have used paint.
on one side of the first floor of the Pharos; then cover it with white paint so that the name is hidden. Once the paint has dried, write over the white paint, “King Ptolemy.” Sostratus of old carved his name deep into the stone wall of the[255] building, then plastered over it and put the King’s name in the plaster. Instead of plaster, you have used paint.
Now place the Pharos in the bright sunlight; let it stand between you and the light, with the corners of one of the front edges toward you, and see how well it appears, and how closely the colored tissue resembles real fire burning and shining brightly from the top openings. Make tiny paper boats, not over an inch in length, with wee paper sails, and scatter them on the make-believe water. The contrast in size of the Pharos and boats will give a faint idea of the huge proportions of the lighthouse. Call in
Now put the lighthouse in bright sunlight; position it between you and the light, with one of the front corners facing you, and see how great it looks, and how closely the colored tissue looks like real fire burning and shining brightly from the top openings. Make tiny paper boats, no more than an inch long, with small paper sails, and scatter them on the pretend water. The size difference between the lighthouse and the boats will give a hint of the enormous scale of the lighthouse. Call in
Your Friends
Your Friends
and let them enjoy the lighthouse with you; tell them they must pretend that the structure is gigantic in size, that the laborers were paid only twenty cents a day, and even with such low wages, the Pharos cost over a million dollars. Explain to them how all lighthouses of the Roman world were named Pharos, after your building, because yours was the first and marks an epoch in the world’s history. Say to the boys and girls that this white building you are showing them is one of the Seven Wonders of the World, and beside being very beautiful, it is one of the most useful of all the “Seven Wonders.” You must make believe that your Pharos was completed in the year 282 B.C., and remained standing sixteen centuries.
and let them enjoy the lighthouse with you; tell them they must pretend that the structure is enormous, that the workers were paid only twenty cents a day, and even with such low pay, the Pharos cost over a million dollars. Explain to them how all lighthouses of the Roman world were called Pharos, named after your building, because yours was the first and marks a significant moment in history. Tell the boys and girls that this white building you are showing them is one of the Seven Wonders of the World, and besides being very beautiful, it is one of the most useful of all the “Seven Wonders.” You should pretend that your Pharos was finished in the year 282 B.C. and stood for sixteen centuries.

The Mausoleum of Halicarnassus.
The Mausoleum at Halicarnassus.
Turn a square or nearly square pasteboard box upside down.
On the centre of the top glue a pasteboard cella made like the one
in the Temple of Diana, Chapter XXIII. Surround the cella
with paper pillars made in the same manner as those in Chapter
XXIII, and glue them along the four edges of the box. Cover[256]
[257]
all with a pasteboard ceiling glued on; then make a pyramid of
white pasteboard, similar to the Egyptian pyramid, but let this
one have a flat top. Fasten the pyramid on top of the ceiling
and paste four paper horses with chariot and driver on a small
box on top of the pyramid. Glue the structure on a board and
make two small boxes for each ground corner. Fasten these in
place and paste a paper horse with rider on top of each box, then
your Mausoleum will be finished (Fig. 331). The building should
be white. The original was a monument in memory of Mausolos,
and was built by his wife Artemisia. It stood in the city of Caria
on the southwestern tip of Asia Minor in the year 353 B.C.
Turn a square or nearly square cardboard box upside down. In the center of the top, glue a cardboard cella made like the one in the Temple of Diana, Chapter XXIII. Surround the cella with paper pillars made in the same way as those in Chapter
XXIII, and glue them along the four edges of the box. Cover[256]
[257]everything with a cardboard ceiling glued on; then create a pyramid of white cardboard, similar to the Egyptian pyramid, but let this one have a flat top. Attach the pyramid on top of the ceiling and paste four paper horses with chariot and driver on a small box on top of the pyramid. Glue the structure onto a board and create two small boxes for each ground corner. Secure these in place and paste a paper horse with rider on top of each box, and then your Mausoleum will be complete (Fig. 331). The building should be white. The original was a monument in memory of Mausolos, built by his wife Artemisia. It stood in the city of Caria on the southwestern tip of Asia Minor in the year 353 B.C.

CHAPTER XXII
THE STATUE OF ZEUS AT OLYMPIA


You can make a little statue of Zeus, but you must pretend that
You can create a small statue of Zeus, but you have to act as if
You Are the Sculptor Phidias
You Are the Sculptor Phidias
and that you are actually modelling the real giant statue. Make believe that hundreds of elephant tusks have been sent to you from distant regions to supply enough[260] ivory for the work, and that you have an abundance of gold, precious stones and ebony. Make Zeus of a doll (Fig. 332) five and one-half or six inches in length. Pry off its wig, then give the doll a coat of varnish. Should the arms be flat, round them out with a layer of raw cotton glued on and paint the doll white all over. You must make the entire doll absolutely white.
and that you are actually modeling the real giant statue. Imagine that hundreds of elephant tusks have been sent to you from faraway places to provide enough [260] ivory for the project, and that you have plenty of gold, precious stones, and ebony. Make Zeus from a doll (Fig. 332) that is five and a half or six inches long. Take off its wig, and then give the doll a coat of varnish. If the arms are flat, round them out with a layer of raw cotton glued on and paint the doll completely white. You need to make the entire doll entirely white.


Gild Hair, Beard and Mustache
Gold Hair, Beard, and Mustache
on the head (Figs. 333 and 334). Gild the sandals (Fig. 335). Make a crown of green tissue paper olive leaves. Fold and cut like Figs. 336 and 337, and fasten together on the back of the head with glue. Bend and bind Fig. 338 into a sitting position with feet crossed; keep the statue so until you glue it on the throne. Cut the
on the head (Figs. 333 and 334). Decorate the sandals (Fig. 335). Create a crown using green tissue paper for the olive leaves. Fold and cut like Figs. 336 and 337, and secure it at the back of the head with glue. Bend and position Fig. 338 into a seated position with feet crossed; hold the statue like that until you glue it onto the throne. Cut the
Throne of White Cardboard
White Cardboard Throne
(Fig. 339); the back, seat and front from top of centre ornament to extreme edge of front are six and three-quarter inches. The seat is one and one-quarter inch wide and two and three-quarter inches long. The arms are one inch high and the top of arm half an inch wide; the length of arm is an inch and a quarter. The front is one inch wide, the feet G and F, on each side are half an inch long not including the flaps. Length of back of throne is four and one-half inches. Each side is an inch and one-quarter wide; their greatest length, counting the entire length of one of the feet, is an inch and a half. The width of back piece (Fig. 340), not including X and X, is two and three-quarter inches. The sides X and X are one and one-half inch in length, as they fit exactly the under side of the throne sides J and J.
(Fig. 339); the back, seat, and front from the top of the center ornament to the extreme edge of the front measure six and three-quarter inches. The seat is one and one-quarter inches wide and two and three-quarter inches long. The arms are one inch high and the top of the arm is half an inch wide; the length of the arm is one and a quarter inches. The front is one inch wide, and the feet G and F on each side are half an inch long, not including the flaps. The length of the back of the throne is four and a half inches. Each side is one and a quarter inches wide; their greatest length, including the entire length of one of the feet, is one and a half inches. The width of the back piece (Fig. 340), not including X and X, is two and three-quarter inches. The sides X and X are one and a half inches in length, as they fit exactly the underside of the throne sides J and J.


Lightly Score.
Score lightly.
then bend dotted lines and cut heavy lines. Bend inward the side part A (Fig. 339) including D and L; then bend forward the top part B; slide C through D from outside and bend inward[264] the box-like arm at E. Bend the other arm likewise. Bend backward the sides extending along the dotted lines F F and G G, then the front along dotted line H; at the same time slide I and I against the inner sides of the throne J and J. Bend forward the back of the throne at K. Bring forward the arms and run L and L through M and M, then pass L and L forward through N and N, and slide them back through O and O. Bring the extension P, including T and Q, across the front; run the tongue Q through R. Bend the left side, passing S through T and U, which fits directly under T; S must go through the two slits to the under side of the chair.
then bend the dotted lines and cut the solid lines. Fold in the side part A (Fig. 339) that includes D and L; then fold down the top part B; slide C through D from the outside and fold in the box-like arm at E. Fold the other arm in the same way. Fold back the sides along the dotted lines F F and G G, then the front along dotted line H; at the same time, slide I and I against the inner sides of the throne J and J. Fold forward the back of the throne at K. Bring forward the arms and run L and L through M and M, then pass L and L forward through N and N, and slide them back through O and O. Bring the extension P, which includes T and Q, across the front; run the tongue Q through R. Fold the left side, passing S through T and U, which fits directly under T; S must go through the two slits to the underside of the chair.
Use the Blade of a Penknife
Use the Blade of a Pocket Knife
in sliding tongues and flaps through slits and use it to straighten out the points of tongues after they are through the slits. Bend down and backward W and W (Fig. 340); then bend back X and X and fasten Fig. 340 to the throne by sliding V through Y on back of throne. Rest the seat of throne over W and W and the sides J and J (Fig. 339) over X and X (Fig. 340). Attach the throne to the
in sliding tongues and flaps through slits and use it to straighten out the points of tongues after they’ve gone through the slits. Bend down and backward W and W (Fig. 340); then bend back X and X and fasten Fig. 340 to the throne by sliding V through Y on the back of the throne. Rest the seat of the throne over W and W and the sides J and J (Fig. 339) over X and X (Fig. 340). Attach the throne to the
Upper Dais
Upper Stage
by lower flaps. Fig. 341 shows the upper dais. The four sides are each one inch high, its top is three and one-half inches on each of the sides; all four extensions are one inch and a quarter long, tongues not counted, and the four slits are each an inch and one-quarter from the edges of the sides.
by lower flaps. Fig. 341 shows the upper platform. The four sides are each one inch high, with the top measuring three and a half inches on each side; all four extensions are one and a quarter inches long, excluding the tongues, and the four slits are each one and a quarter inches from the edges of the sides.
The two slits marked, one with a square, the other with a diamond, hold the flaps of the footstool (Fig. 342) marked with same designs. In the diagrams of footstool and dais the slits are marked with designs like the designs on flaps and tongues, which slide through them.
The two slits are marked, one with a square and the other with a diamond, holding the flaps of the footstool (Fig. 342) marked with the same designs. In the diagrams of the footstool and dais, the slits are marked with designs similar to those on the flaps and tongues that slide through them.

Bring the two correct parts of the upper dais (Fig. 341) together by matching them, as heart to heart, etc. Cut heavy lines, lightly score and bend dotted lines of the upper dais and put it in shape. Make the top of
Bring the two right parts of the upper dais (Fig. 341) together by matching them, like heart to heart, etc. Cut heavy lines, lightly score, and bend the dotted lines of the upper dais to shape it. Make the top of
Footstool
Ottoman
(Fig. 342) an inch and a half long and one inch wide; let the front, back and sides each be half an inch high, the back extensions one inch long, the two side flaps each one inch long, front extensions an inch and a half long, not including tongues. Cut heavy lines, score lightly and bend dotted lines and slip tongues through slits.
(Fig. 342) an inch and a half long and one inch wide; let the front, back, and sides each be half an inch high, the back extensions one inch long, the two side flaps each one inch long, and front extensions an inch and a half long, not including tongues. Cut solid lines, score lightly, and fold along dashed lines then slide tongues through slots.

Attach the Stool
Attach the stool
to upper dais by bottom side flaps; bend the flaps up flat against the under part of the dais. In the same way fasten the throne on the upper dais by sliding the four down-hanging extensions through the four remaining slits on top of the upper dais marked with the same designs. Bend and put together the lower dais (Fig. 343) and fasten the upper dais on it. Make the lower dais five inches square on top and one inch high. Glue the bottom flaps of lower dais down on stiff cardboard or thin wood, in size about eight by ten inches.
to the upper platform by the bottom side flaps; bend the flaps up flat against the underside of the platform. Similarly, attach the throne to the upper platform by sliding the four hanging extensions through the four remaining slits on top of the upper platform marked with the same designs. Assemble the lower platform (Fig. 343) and attach the upper platform to it. The lower platform should be five inches square on top and one inch high. Glue the bottom flaps of the lower platform down on sturdy cardboard or thin wood, sized about eight by ten inches.

Inlay the Throne with Ebony
Inlay the throne with ebony
by painting a black band across the top, down each side of the back and down the front of the arms; keep the lines straight and neat. Gild the centre and two side ornaments on top of the throne.
by painting a black band across the top, down each side of the back and down the front of the arms; keep the lines straight and tidy. Gold leaf the center and the two side decorations on top of the throne.

Trace the panel with the two lions (Fig. 344), gild the lions and gum the panel on the front of footstool; then unbend Zeus and place him on his throne, bringing him well to the front that his feet may rest on the footstool. Fasten the statue firmly in place with glue and pins. Pin one folded end of a strip of smoothly ironed starched cloth on the back of Zeus, bring the cloth up over the left shoulder down across the knees in folds like those in Fig. 345, the statue of Zeus, and with glue and pins
Trace the panel with the two lions (Fig. 344), gold-plate the lions and attach the panel to the front of the footstool; then straighten Zeus and position him on his throne, making sure he is pushed forward so his feet can rest on the footstool. Secure the statue in place with glue and pins. Attach one folded end of a strip of neatly ironed starched fabric to the back of Zeus, bring the fabric up over the left shoulder and down across the knees in folds like those in Fig. 345, the statue of Zeus, and secure with glue and pins.
Fasten the Drapery
Secure the Curtains
loosely here and there, then gild the entire strip of cloth. Make the sceptre of a headless hat-pin. Trace the gold eagle from Fig. 346; gild and cut it out, then taking a stitch through the eagle’s body with the hat-pin, slide the eagle up to the top of the pin and glue it in place. Make Zeus grasp the eagle-crowned sceptre by binding his hand and sceptre tightly together with thread. Add a little glue to make sure they stick fast; steady the sceptre by running its point down into the small needle hole that has been previously punctured in the dais, and paint the sceptre white.
loosely here and there, then cover the entire strip of cloth with gold. Create the scepter of a headless hat pin. Outline the gold eagle from Fig. 346; cover it in gold and cut it out, then stitch through the eagle’s body with the hat pin, sliding the eagle up to the top of the pin and gluing it in place. Have Zeus hold the eagle-crowned scepter by tightly wrapping his hand and the scepter together with thread. Add a bit of glue to ensure they stick firmly; stabilize the scepter by pushing its point into the small hole previously made in the dais, and paint the scepter white.

Trace and cut out the
Trace and cut out the

Winged Figure of Victory
Winged Victory
(Fig. 347), glue it to the empty hand of Zeus and glue the hand tight on the top of the arm of the throne. Then, to give an idea of the immense size of the statue, place a one-inch doll in front of the throne, glue a bit of drapery on it, and let the doll represent a worshipper at the shrine of Zeus. Play that the ivory, gold and ebony throne is glittering with precious stones and golden pictures from the stories of the gods, and that the arms of the throne are supported by two sphinxes.
(Fig. 347), attach it to the empty hand of Zeus and secure the hand tightly at the top of the throne's arm. To show just how massive the statue is, place a one-inch doll in front of the throne, stick a little drapery on it, and let the doll stand in for a worshipper at Zeus's shrine. Imagine that the ivory, gold, and ebony throne sparkles with precious stones and golden images depicting the stories of the gods, and that the throne's arms are held up by two sphinxes.
The real statue was in the chief temple of Olympia in Greece, where the Olympic games were held every fourth year, and Zeus was so large, it was said, that
The real statue was in the main temple of Olympia in Greece, where the Olympic games were hosted every four years, and Zeus was so enormous, it was said that
Should He Rise from His Throne
Should He Rise from His Throne
he would lift the roof off the building; also, that the statue was the supreme masterpiece of art. Everyone was anxious to see it. The people believed that should one stand before the figure and gaze upon it, he would immediately forget all worry and care. Possibly this charm may be transmitted to your little Zeus. The next time you are worried, try it, and see if you do not find yourself smiling as you contemplate the little statues.
he would lift the roof off the building; also, that the statue was the greatest masterpiece of art. Everyone was eager to see it. People believed that if you stood in front of the figure and looked at it, you would instantly forget all your worries and cares. Perhaps this magic can be passed on to your little Zeus. The next time you feel anxious, give it a try and see if you find yourself smiling as you look at the little statues.
You might let your young friends come to see your Zeus for four successive days and play that each day is a century, because for four centuries the real Zeus attracted crowds of people, as it was held a calamity to die without having seen Zeus of Olympia.
You might let your young friends come and see your Zeus for four days in a row and pretend that each day represents a century, because for four centuries, the real Zeus drew huge crowds, as it was considered a disaster to die without having seen the Zeus of Olympia.
CHAPTER XXIII
THE TEMPLE OF DIANA AT EPHESUS

Look at Your Column;
Check Your Column;
see how gracefully the capital curves into a roll on each side, reminding one of a blossom on the end of a stem. The column you have made is called Ionic, and when you examine the columns or pillars of buildings, you will easily recognize those with Ionic capitals. It was principally because of the beautiful rolled capitals crowning its columns that the temple of Diana was[270] known as one of the Wonders of the World, for it was the first structure that utilized this beautiful style of architecture.
See how elegantly the capital curves into a roll on each side, resembling a flower at the end of a stem. The column you've created is called Ionic, and when you look at the columns or pillars of buildings, you'll easily spot those with Ionic capitals. It was mainly because of the beautiful rolled capitals atop its columns that the temple of Diana was[270] considered one of the Wonders of the World, as it was the first structure to use this stunning style of architecture.


Find a piece of extra stiff white cardboard, nineteen by eleven inches, and on it draw
Find a piece of extra stiff white cardboard, 19 by 11 inches, and on it draw
The Ground Plan
The Blueprint
of your temple (Fig. 350). The distance from the outside edge of one ladder-like strip to the outside edge of the other is nine inches. The strips are each sixteen inches long, two inches wide and divided into six spaces. Make the spaces by folding a sixteen-inch strip of paper exactly crosswise through the centre, then folding each half of the paper three times. Place this strip along the edge of the sixteen-inch lines on the ground plan and mark the spaces. Draw the oblong for the cella on the centre[271] (Fig. 350). Make it four inches wide and ten and one-half inches long, leaving half an inch space between this oblong and the inner sides of the ladder-like strips. Take one column at a time and glue the slashed portion firmly on the ladder-like strip. Begin at A, Fig. 350, and
of your temple (Fig. 350). The distance from the outer edge of one ladder-like strip to the outer edge of the other is nine inches. The strips are each sixteen inches long, two inches wide, and divided into six sections. Create the sections by folding a sixteen-inch strip of paper exactly in half, then folding each half three times. Line this strip up along the edge of the sixteen-inch lines on the ground plan and mark the sections. Draw the rectangle for the cella in the center[271] (Fig. 350). Make it four inches wide and ten and a half inches long, leaving half an inch of space between this rectangle and the inner sides of the ladder-like strips. Take one column at a time and glue the slashed part firmly onto the ladder-like strip. Start at A, Fig. 350, and
Erect the Outer Row of Columns,
Set up the Outer Row of Columns,
allowing each column to stand immediately along the inside of the outer line AB, Fig. 350, with its exact centre over the short cross-line, as in Fig. 351 (circles indicate columns). Each column must stand erect and plumb. Place the next row of columns just within the long inner line as in Fig. 352. In the same way erect the second double-columned row on the opposite side of the foundation and glue together the sides of the rolled capitals which touch at the top of each pair of pillars on both rows.
allowing each column to be positioned right against the inside of the outer line AB, Fig. 350, with its exact center over the short cross-line, as shown in Fig. 351 (the circles indicate columns). Each column must be straight and vertical. Place the next row of columns just inside the long inner line as in Fig. 352. Similarly, set up the second double-column row on the opposite side of the foundation and glue together the sides of the rolled capitals that touch at the top of each pair of pillars on both rows.

For the oblong centre,
For the rectangular center,
Make a Cella
Create a Cella
of a coverless white cardboard box minus the two ends (Fig. 353). Let the cella be four inches wide, ten and one-half inches long, and five and one-half inches high. When making any article of cardboard, always lightly score every line intended to be bent; this is very important to insure good work. Glue the cella or inner temple on the boundary lines marked for the purpose on[272] the centre of the foundation board, and glue the outside of the two walls firmly to the edges of the rolled capitals of the columns which touch them.
of a coverless white cardboard box minus the two ends (Fig. 353). Make the cella four inches wide, ten and a half inches long, and five and a half inches high. When creating any cardboard item, always lightly score every line that will be bent; this is very important to ensure good work. Glue the cella or inner temple along the boundary lines marked for this purpose on[272] the center of the foundation board, and securely glue the outside of the two walls to the edges of the rolled capitals of the columns that touch them.

Cut Out the Goddess Diana
Remove the Goddess Diana
(Fig. 355). Bend the extension beneath Diana’s feet half forward and half backward, then glue Diana on top of the dais in the centre at the back.
(Fig. 355). Bend the extension underneath Diana's feet halfway forward and halfway backward, then attach Diana to the top of the platform in the center at the back.

Build on the ceiling and roof of the temple. Make the ceiling of cardboard ten by sixteen inches, and cut the two gables, one for each end of the roof, like Fig. 356, two and three-quarter inches high and ten inches long, not counting the extensions on the three sides, which must be bent and glued to the ceiling and roof. When the gables are fastened securely on each end of the ceiling, cut the roof of white cardboard seventeen by twelve inches, bend it lengthwise through the centre and glue it on top of the ceiling by fastening the ends tight to the upright[273] gables. Allow the roof to extend a trifle beyond and over the edges of the ceiling and also project half an inch over front and back of the temple. Fit the roof-covered ceiling over the top of the temple; see that everything is properly placed, then remove the ceiling; drop a little glue on top of each roll of the capitals on all of the pillars, again adjust the roofed ceiling and hold it steady until it adheres firmly to the temple.
Build the ceiling and roof of the temple. Make the ceiling out of cardboard measuring ten by sixteen inches, and cut two gables, one for each end of the roof, to the dimensions of Fig. 356, standing two and three-quarter inches high and ten inches long, not including the extensions on the three sides, which need to be bent and glued to the ceiling and roof. Once the gables are securely attached to each end of the ceiling, cut the roof from white cardboard measuring seventeen by twelve inches, fold it lengthwise down the center, and glue it on top of the ceiling, securing the ends tightly to the upright gables. Let the roof extend slightly beyond the edges of the ceiling and also project half an inch over the front and back of the temple. Place the roof-covered ceiling on top of the temple; ensure everything is positioned correctly, then remove the ceiling. Apply a little glue on top of each roll of the capitals on all the pillars, re-adjust the roofed ceiling, and hold it steady until it sticks firmly to the temple.


Take a box eleven inches long, nine inches wide and three inches high; turn it bottom side up and glue your foundation with its stately temple securely on the box.
Take a box that is eleven inches long, nine inches wide, and three inches high; turn it upside down and glue your foundation with its impressive temple securely onto the box.
Use white passe-partout strips to fasten the box down tight on a light-weight board, twenty-seven by sixteen inches.
Use white mat board strips to secure the box tightly onto a lightweight board, measuring twenty-seven by sixteen inches.


Get medium light-weight, smooth white water-color paper, for making
Get medium weight, smooth white watercolor paper for making
The Marble Steps
The Marble Steps
on each of the four sides of the temple. Each flight must be made in two pieces or sections. In all there will be eight sections. Cut paper for the right-hand section of front steps nine and one-half by six inches, the left-hand front section nine by six inches. Make the two sections for back steps the same.
on each of the four sides of the temple. Each flight must be made in two pieces or sections. In total, there will be eight sections. Cut paper for the right-hand section of the front steps to measure nine and a half by six inches, and for the left-hand front section, nine by six inches. Make the two sections for the back steps the same.
Cut the right-hand side steps in sections thirteen by six inches, and twelve and one-half by six inches. Make the other side sections the same.
Cut the right side steps into sections that are thirteen by six inches, and twelve and a half by six inches. Make the sections on the other side the same.
Now be very careful in your measurements. If your measurements are not exact your steps will not fit together. Divide each section of paper lengthwise from side to side into half-inch spaces by drawing twelve lines across, beginning half an inch from the top of the paper. This will make thirteen spaces (Fig. 357) which, when creased backward and forward, fan fashion, will form seven steps, counting top and bottom landings or treads. Take the longest section of the front steps and square off one end with lines half an inch apart and of varying lengths running down across the first line (Fig. 357).
Now be really careful with your measurements. If your measurements aren't precise, your steps won't fit together properly. Divide each section of paper lengthwise from side to side into half-inch spaces by drawing twelve lines across, starting half an inch from the top of the paper. This will create thirteen spaces (Fig. 357) which, when folded back and forth like a fan, will form seven steps, including the top and bottom landings or treads. Take the longest section of the front steps and square off one end with lines half an inch apart and of varying lengths running down across the first line (Fig. 357).
Begin at the Top
Start at the Top
square, C, and draw a diagonal line across it; continue the diagonal lines across every other descending square (Fig. 358). Cut away the squared marked paper from the diagonal lines and the squares marked D D D D D D in Fig. 358 as shown by heavy line in Fig. 359. This makes the corner of the stairs. Lightly score all the horizontal lines, then crease the steps backward and forward along the horizontal lines. Make the other half section of front steps same as first, with the exception that[275] the corner must run out to the left instead of the right hand, so draw the vertical lines (Figs. 357, 358, 359) at the left side of the section and make that corner like the right-hand one, only reversed.
square, C, and draw a diagonal line across it; continue the diagonal lines through every other descending square (Fig. 358). Cut away the marked paper from the diagonal lines and the squares marked D D D D D D in Fig. 358 as indicated by the heavy line in Fig. 359. This creates the corner of the stairs. Lightly score all the horizontal lines, then fold the steps back and forth along the horizontal lines. Make the other half of the front steps the same as the first, except that[275] the corner should extend to the left instead of the right, so draw the vertical lines (Figs. 357, 358, 359) on the left side of the section and make that corner similar to the right one, just reversed.


Make a Brace
Make a bracelet
for the centre where the two sections join, of a two and one-half by three-inch piece of cardboard ruled in half-inch squares and cut like the heavy line on Fig. 360. The steps on this must be cut still deeper, each one-half inch, according to the heavy lines in Fig. 360, and the extensions bent over at dotted lines as in Fig. 361. Fit and glue the straight edge of the left-hand front section of steps on this brace; have the brace flush with the edge of the steps. The brace should not reach to the tops as the tread of that step lies upon the foundation of the temple. When the brace is on, lap the edge of the right-hand section over[276] the left-hand section half an inch; glue the two together, and the front flight of steps will be finished.
for the center where the two sections meet, of a 2.5 by 3-inch piece of cardboard marked with half-inch squares and cut along the heavy line on Fig. 360. The steps here must be cut deeper, each one-half inch, following the heavy lines in Fig. 360, and the extensions bent over at the dotted lines as shown in Fig. 361. Fit and glue the straight edge of the left front section of steps onto this brace; make sure the brace is flush with the edge of the steps. The brace shouldn’t extend to the tops since the tread of that step rests on the foundation of the temple. Once the brace is in place, overlap the edge of the right section over the left section by half an inch; glue them together, and the front flight of steps will be complete.
Make the back flight in like manner.
Make the back flight the same way.
The Side Steps
The Side Steps
have no square corner extensions like Fig. 359; the corners are cut according to the heavy line in Fig. 358. Each of the side flights of steps must have its central brace, the same as the front (Fig. 361), and the two sections of each side must be joined together as you joined the front flight.
have no square corner extensions like Fig. 359; the corners are shaped according to the heavy line in Fig. 358. Each side flight of steps needs to have its central brace, just like the front (Fig. 361), and the two parts of each side must be connected together in the same way you joined the front flight.


Make four more braces, one for each corner, by dividing with horizontal lines a piece of cardboard for each into six half-inch spaces, then crossing these lines by vertical lines wider apart, the width being the exact diagonal distance across a half-inch square, for they must fit the diagonal edges of the steps at the corners[277] of the four flights. There must be five of these wider spaces (Fig. 362).
Make four more braces, one for each corner, by dividing a piece of cardboard into six half-inch sections using horizontal lines, then crossing these lines with vertical lines spaced farther apart. The width should be the exact diagonal distance across a half-inch square so they fit the diagonal edges of the steps at the corners[277] of the four flights. You need five of these wider spaces (Fig. 362).
Cut along the heavy lines and bend down the point along dotted lines (Fig. 363).
Cut along the bold lines and fold the tip along the dotted lines (Fig. 363).
Fit and Glue
Fit and Glue
one of these braces at each end of the two side flights, then glue the side flights on the sides of the temple foundation and the ground board. Fasten the extensions D D D D D D (Fig. 359) of the corners of front and back steps to the side steps by binding them over and pasting them on the side steps. At the same time glue the front and back steps on the temple foundation and ground board.
one of these braces at each end of the two side flights, then glue the side flights to the sides of the temple foundation and the ground board. Attach the extensions D D D D D D (Fig. 359) at the corners of the front and back steps to the side steps by securing them over and gluing them onto the side steps. At the same time, glue the front and back steps onto the temple foundation and ground board.
Set the temple up on a double pile of books placed on a table. The temple must be elevated that your friends may look in at the open front and behold the Goddess Diana. Your beautiful little classic temple will give some idea of the grand original structure rebuilt in Asia about 356 B.C., whose marble columns numbering one hundred and twenty-seven, were sixty feet in height and each the gift of a king.
Set up the temple on a double stack of books on a table. The temple needs to be elevated so your friends can look inside through the open front and see the Goddess Diana. Your lovely little classic temple will give a sense of the magnificent original structure rebuilt in Asia around 356 B.C., which had one hundred and twenty-seven marble columns that were sixty feet tall, each donated by a king.

CHAPTER XXIV
HANGING GARDENS OF BABYLON

These are the famous Hanging Gardens and you are in the ancient city of Babylon where Nebuchadnezzar is king, and the time is about the year 580 B.C.
These are the famous Hanging Gardens, and you are in the ancient city of Babylon, where Nebuchadnezzar is king, around the year 580 B.C.
The King’s Wife, Amytis,
The Queen, Amytis,
used to live in the mountainous country of Media, and when she married and came to Babylon, she longed for the sight of a hill, so her husband, King Nebuchadnezzar, had the Hanging Gardens built for her. Pretend that
used to live in the mountainous country of Media, and when she married and came to Babylon, she longed for the sight of a hill, so her husband, King Nebuchadnezzar, had the Hanging Gardens built for her. Pretend that

The Queen Has Invited You
The Queen Invites You
to explore the gardens with her. Up, up the many flights of marble steps you go to the tip-top of the beautiful hill, and standing there by her side you have a splendid view of the surrounding flat country as well as of the River Euphrates, which divides the[280] city into two equal parts, half on the east and half on the west side of the river. The Gardens are built as high as the walls of the city (three hundred feet) so you can readily look over the walls to the stretch of land on all sides.
to explore the gardens with her. Up, up the many flights of marble steps you go to the top of the beautiful hill, and standing there by her side you have an amazing view of the surrounding flat country as well as of the River Euphrates, which splits the[280] city into two equal parts, half on the east and half on the west side of the river. The Gardens are built as high as the city walls (three hundred feet) so you can easily look over the walls to the land stretching out on all sides.
If you will find some very
If you find some very
Stiff Pasteboard
Rigid Cardboard

we can go to work immediately and build toy Hanging Gardens. Cut a piece of the pasteboard exactly square, measuring on each of the four sides eighteen and one-half inches (Fig. 364). Of this we will make a box-like foundation. Draw a straight line three inches from each edge, as shown by the dotted lines in Fig. 365. Take each line in turn and, placing the edge of a straight ruler along it, score the line; that means, run the knife-blade along the pencil line at the edge of the ruler, cutting the pasteboard only partially through. As each line is scored, raise the pasteboard and bend it away from you along the scored line, then allow the pasteboard to lie out flat again.
we can start working right away and create toy Hanging Gardens. Cut a piece of cardboard into a perfect square, measuring eighteen and a half inches on all four sides (Fig. 364). From this, we will make a box-like base. Draw a straight line three inches from each edge, as indicated by the dotted lines in Fig. 365. Take each line one at a time and, placing the edge of a straight ruler along it, score the line; this means, run the knife blade along the pencil line at the edge of the ruler, cutting the cardboard only partway through. As each line is scored, lift the cardboard and bend it away from you along the scored line, then let the cardboard lie flat again.

After all the lines are properly scored, cut the lines A A[281] and B B (Fig. 365) only far enough inward to meet the lines C C and D D (Fig. 365). Allowing a scant half-inch extension at each corner on the lines C C and D D, cut the corners out as in Fig. 366. Bend the four little extensions, then the sides E and F (Fig. 366). Cover the extensions with strong glue and, bending the remaining sides G and H (Fig. 366), glue the extensions, one at a time, securely on these sides.
After all the lines are properly scored, cut the lines A A[281] and B B (Fig. 365) just enough inward to meet the lines C C and D D (Fig. 365). Leave a small half-inch extension at each corner on the lines C C and D D, and cut the corners out as in Fig. 366. Fold the four small extensions, then the sides E and F (Fig. 366). Apply strong glue to the extensions, and while bending the remaining sides G and H (Fig. 366), glue the extensions one at a time firmly onto these sides.
Hold Each Extension Tight
Grip Each Extension Firmly
to the side until it sticks fast. In this way the cardboard will be made into a large, square box, which, when perfectly dry, must have openings cut through all the sides that it may resemble closely the foundation platform of the real Hanging Gardens.
to the side until it sticks firmly. This way, the cardboard will be turned into a large, square box, which, once it’s completely dry, needs openings cut into all sides to closely resemble the foundation platform of the real Hanging Gardens.

To Make the Twelve Openings
To Create the Twelve Openings
on each of the sides of the foundation platform, cut a strip of cardboard twelve and one-half inches long, and three inches wide. Across the entire length of the strip draw lines half an inch apart, as I I (Fig. 367). Cross these short lines by a long line running lengthwise one inch from the top edge, J J (Fig. 367). Between this line and the upper edge draw another line, running lengthwise, a quarter of an inch from the line J J, as K K, Fig. 367. You now have a strip of cardboard twelve and one-half inches long and three inches wide. Across its entire length[282] you have run two long lines, and across the entire width many short lines.
on each side of the foundation platform, cut a strip of cardboard that is twelve and a half inches long and three inches wide. Draw lines across the entire length of the strip, half an inch apart, like I I (Fig. 367). Cross these short lines with a long line running lengthwise, one inch from the top edge, J J (Fig. 367). Between this line and the upper edge, draw another line, running lengthwise, a quarter of an inch from line J J, as K K, Fig. 367. You now have a strip of cardboard that is twelve and a half inches long and three inches wide. Across its entire length[282] you have drawn two long lines and many short lines across the entire width.
Begin with the Second Division
Start with the Second Division

The diagram Fig. 367 is merely intended as a guide, giving only portions of the twelve and one-half inch strip you are making. Begin at the lower corner of the small division under L (Fig. 367) and draw a curved line up to L; draw another curved line from the opposite corner of the same division up to the same point. The two lines will
The diagram Fig. 367 is just meant to be a guide, showing only parts of the twelve and a half inch strip you're creating. Start at the lower corner of the small section under L (Fig. 367) and draw a curved line up to L; then draw another curved line from the opposite corner of that same section up to the same point. The two lines will
Form an Arch
Make an Arch
as in M (Fig. 367). Skip one division and draw another arch on the fourth division in the same way that you drew the arch of the second division. In like manner draw an arch in the space between the lines K K and J J of every other division on the strip. This will make twelve arched divisions, leaving a solid division or pillar at each end of the strip and also between each opening. With the point of your knife-blade
as in M (Fig. 367). Skip one section and draw another arch on the fourth section just like you drew the arch for the second section. Similarly, draw an arch in the space between the lines K K and J J of every other section on the strip. This will create twelve arched sections, leaving a solid section or pillar at each end of the strip and also between each opening. Using the tip of your knife blade
Pierce Holes
Make Holes
around the edge of all the arches as shown by the arch N (Fig. 367); then with scissors cut the two sides of the second division[283] up to the arch and, holding the cut piece with your thumb and first finger, bend it backward and forward until it breaks away from the strip, leaving an arched opening. Smooth the rough edge of the arch by cutting away the uneven particles. Cut all arches in like manner O O (Fig. 367) and cut the least bit from across each end of your strip—not more than a sixteenth of an inch—that the strip may slide inside of the box foundation. The strip will be a guide in making all of the arches of your Garden.
around the edge of all the arches as shown by the arch N (Fig. 367); then with scissors, cut the two sides of the second section[283] up to the arch and, holding the cut piece with your thumb and index finger, bend it back and forth until it breaks away from the strip, leaving an arched opening. Smooth the rough edge of the arch by trimming away any uneven bits. Cut all arches in the same way O O (Fig. 367) and trim just a tiny bit from across each end of your strip—not more than a sixteenth of an inch—so that the strip can slide into the box foundation. The strip will be a guide for making all of the arches in your Garden.
Stand the Box on One Side
Lay the Box on Its Side
and slip the strip inside of it; lay the strip down flat on top of the lower side of the box (Fig. 368) and, holding it firmly in place, mark the divisions and arches on the box by running a pencil line around the edge of each opening arch of the strip. Remove the strip, and one side of the foundation will be marked ready for the twelve archways to be cut out. Repeat the markings on each of the four sides of the box foundation, cut open the archways as you cut those in the strip and you will have made a garden foundation like the first story of Fig. 369.
and slip the strip inside it; lay the strip flat on top of the lower side of the box (Fig. 368) and, holding it firmly in place, mark the divisions and arches on the box by tracing a pencil line around the edge of each opening arch of the strip. Remove the strip, and one side of the foundation will be marked and ready for the twelve archways to be cut out. Repeat the markings on each of the four sides of the box foundation, cutting open the archways as you cut those in the strip, and you will have created a garden foundation like the first story of Fig. 369.
The Babylonians
The Babylonians
used arches to support their enormously heavy structures because arches are the strongest kind of foundations. Make another box of a perfect square of pasteboard measuring thirteen and[284] one-half inches on each of the four sides, to form the second platform. Mark off the two and one-half inch sides and your box will be eight and one-half inches square, with a height of two and one-half inches. After the glue of this is thoroughly dry, cut the arches. Use the same strip for a guide that did duty for the first platform arches. Cut four arches from one end of the strip and shave off the outside edge of the solid fifth division which forms the end of the strip where the portion has been taken off. The strip will now
used arches to support their incredibly heavy structures because arches are the strongest type of foundations. Make another box that is a perfect square using pasteboard measuring thirteen and[284] one-half inches on each of the four sides to create the second platform. Mark off the two and one-half inch sides, and your box will be eight and one-half inches square, with a height of two and one-half inches. Once the glue on this is completely dry, cut the arches. Use the same strip for a guide that was used for the first platform arches. Cut four arches from one end of the strip and shave off the outside edge of the solid fifth division that forms the end of the strip where the piece has been removed. The strip will now
Fit in the Second Box Platform.
Fit in the Second Box Platform.
When this is all complete, make a third box still smaller, of pasteboard nine and one-half inches square. Measure off a two-inch border on every side to form the sides of the platform. The box should be five and one-half inches square and two[285] inches high. Cut arches in this platform with the aid of the same guiding strip of open archways after first cutting off three additional openings to make it fit the new box. You can also trim off the bottom of the pillars along the lengthwise lower edge of the strip that it may be narrow enough to fit more perfectly in the third platform.
When everything is finished, make a third box that’s even smaller, measuring nine and a half inches square. Leave a two-inch border on every side to create the platform's edges. The box should be five and a half inches square and two[285] inches tall. Cut arches into this platform using the same guiding strip of open archways after cutting three additional openings to fit the new box. You can also trim the bottoms of the pillars along the lower edge of the strip so that they can fit more snugly in the third platform.

Make the fourth and
Make the fourth and
Last Platform
Final Platform
of pasteboard six inches square. When finished let the box measure three and one-half inches square and one and one-quarter inch high. Two more openings must be cut from your arched strip to shorten it sufficiently to fit in the last box platform, for this platform must also be cut into open arches. Build up the four platforms one on top of the other, as in Fig. 369.
of cardboard six inches square. When done, the box should measure three and a half inches square and one and a quarter inch high. You need to cut two more openings from your arched strip to make it short enough to fit in the last box platform, since this platform should also be cut into open arches. Stack the four platforms one on top of the other, as in Fig. 369.
Place the centre of each platform exactly over the centre of the one beneath it.
Place the center of each platform directly over the center of the one below it.
To Find the Centre
Finding the Center
take each platform in turn and lay a ruler very lightly on its top that no pressure may bend the arched sides; draw a pencil line across from the upper right-hand corner to the lower left-hand corner P, Q (Fig. 370); cross this line with another drawn diagonally across the square from the other two corners R, S (Fig. 371). The exact centre of the square top of the platform is at the dot T (Fig. 371), where the two lines meet and cross each other. Find the centre of each platform and very carefully puncture a hole through the centre with a coarse darning needle. You will have use for these centre marks when fastening the platforms together.
take each platform one by one and lightly place a ruler on top so that no pressure bends the curved sides; draw a pencil line from the upper right corner to the lower left corner P, Q (Fig. 370); intersect this line with another line drawn diagonally across the square from the other two corners R, S (Fig. 371). The exact center of the square top of the platform is at the dot T (Fig. 371), where the two lines cross. Find the center of each platform and carefully puncture a hole through the center with a thick darning needle. You'll need these center marks when you attach the platforms together.
The Four Different Floors
The Four Levels
of the original Gardens were supported by pillars and arches, as you have made yours, only the real platforms had more pillars under them. Between the pillars which formed the square of the first lower platform twelve arched passageways ran, entering from each of the four sides and dividing the ground beneath, equally between pillars and passages. There were rows and rows of pillars and arches that gave the effect of a honeycomb with open-sided cells. The arches proper were formed at the top of the many pillars which supported them, and all were built of the
of the original Gardens were supported by pillars and arches, just like you've created yours, but the actual platforms had more pillars underneath. Between the pillars that made up the square of the first lower platform, there were twelve arched passageways that came in from each of the four sides, dividing the space below evenly between the pillars and the passages. There were numerous rows of pillars and arches that created a honeycomb-like effect with open-sided cells. The arches themselves were formed at the top of the many pillars that supported them, and all were built of the
Queer Square Bricks
Queer Square Blocks
which had the king’s name stamped on them, with other writing in a square bounded centre. The bricks were twelve inches long, twelve inches wide, and three inches thick and looked like Fig. 372. You must pretend that your pasteboard pillars between each opening are made of just such bricks and that there are many, many more brick pillars throughout the entire space beneath the floors.
which had the king’s name stamped on them, along with other writing in a square center. The bricks were twelve inches long, twelve inches wide, and three inches thick and looked like Fig. 372. You need to imagine that your cardboard pillars between each opening are made of bricks like these and that there are many, many more brick pillars throughout the entire space beneath the floors.


Cut Light-Green Tissue Paper
Cut light green tissue paper
into strips wide enough to extend a trifle over the edge of the platforms while reaching in across the top far enough to have the inner edge of the strip covered by the platform resting over it. The tissue paper should form a flat green band bordering the entire top ledge of the first three platforms.
into strips wide enough to extend just a bit over the edge of the platforms while reaching in across the top far enough so that the inner edge of the strip is covered by the platform resting over it. The tissue paper should form a flat green band around the entire top edge of the first three platforms.
Cover the entire top of the fourth and last platform with the green tissue paper.
Cover the whole top of the fourth and final platform with green tissue paper.
Before you can
Before you can
Plant the Shrubs and Trees
Plant the shrubs and trees
you must dig holes in the earth for their roots. Take each platform in turn and, with a coarse darning needle, puncture holes entirely through both green paper and pasteboard. Let the holes be in straight rows; make them on the projection or step of each platform, midway between the extreme edge and the walls of the next higher story. On the first, second and third platforms the holes should be an inch and a half apart. Pierce three holes through the top of the fourth platform, one at the back on the extreme left-hand corner and one on each side of that hole, but much nearer the centre.
you need to dig holes in the ground for their roots. Take each platform one at a time and, using a thick darning needle, poke holes completely through both the green paper and the cardboard. The holes should be in straight lines; place them on the edge or step of each platform, halfway between the outer edge and the walls of the next higher level. On the first, second, and third platforms, the holes should be an inch and a half apart. Make three holes in the top of the fourth platform: one at the back in the far left corner and one on each side of that hole, but much closer to the center.
You Will Need Ground
You Will Need Ground Beef
upon which to erect your Hanging Gardens. Get a piece of heavy, stiff pasteboard which will not bend, or a light board about seventeen inches wide and nineteen inches long. Cover it with green blotting paper, allowing the paper to extend over all the edges. Paste the four turned-over portions of green paper on the under side of the board or ground.
upon which to build your Hanging Gardens. Get a piece of heavy, stiff cardboard that won't bend, or a lightweight board about seventeen inches wide and nineteen inches long. Cover it with green blotting paper, letting the paper hang over all the edges. Glue the four folded edges of the green paper to the underside of the board or base.
Now build up the Gardens. First
Now build up the Gardens. First
Stick a Long Hat-Pin
Pin with a Long Hat Pin
through the centre of the fourth or top platform. Then run the hat-pin through the centre of the third platform; slide this up next to the top platform, keeping the sides straight and parallel. Add the second and the first platforms to the others, running the pin each time through the centre of the top of the platform. Place the structure on the ground with one of its sides flush with—that is—along the edge of the ground, and its adjoining side two inches from the adjoining edge of the ground, leaving about five inches of ground in front and four inches of ground at the other side of the Gardens. Then stick the hat-pin firmly down into the ground and leave it there until the structure is all glued together. In fitting the building on the ground be certain that it is turned so that the back of the top platform on which you have pierced the hole at the extreme left-hand corner lies along the back edge of the ground O (Fig. 373).
through the center of the fourth or top platform. Then run the hat pin through the center of the third platform; slide this up next to the top platform, keeping the sides straight and parallel. Add the second and the first platforms to the others, running the pin each time through the center of the top of the platform. Place the structure on the ground with one of its sides flush with—that is—along the edge of the ground, and its adjoining side two inches from the adjoining edge of the ground, leaving about five inches of ground in front and four inches of ground at the other side of the Gardens. Then stick the hat pin firmly down into the ground and leave it there until the structure is all glued together. In fitting the building on the ground, make sure it is turned so that the back of the top platform where you have pierced the hole at the extreme left-hand corner lies along the back edge of the ground O (Fig. 373).


To Bind the Different Parts
To Connect the Different Parts
of the structure firmly together and fasten the whole building to the ground, cut sixteen strips of white writing paper two inches[289] long and a scant half-inch wide; fold each strip crosswise through the centre; then, paste half of one strip on the fourth platform upward from the right-hand lower corner; bring the free half of the strip out flat on top of the next platform, which extends immediately beneath it, and gum down securely (Fig. 374). Bind the other three lower corners of the top platform down to the top of the next platform in the same manner; then fasten the third to the second and the second to the first platform, also the first platform to the ground. When the paste is perfectly dry, cautiously remove the hat-pin.
of the structure firmly together and fasten the whole building to the ground, cut sixteen strips of white writing paper two inches[289] long and just under half an inch wide; fold each strip in half crosswise; then, glue half of one strip onto the fourth platform up from the lower right corner; lay the free half of the strip flat on top of the next platform directly beneath it, and glue it down securely (Fig. 374). Secure the other three lower corners of the top platform to the top of the next platform in the same way; then fasten the third to the second and the second to the first platform, and also attach the first platform to the ground. Once the glue is completely dry, carefully remove the hat pin.


Build the Four Flights of Steps
Build the Four Flights of Steps
from stiff white writing paper. Cut Fig. 375, for the first flight of steps; make them exactly according to the dimensions or sizes[290] of the different parts given. You will find that the stairs themselves C, C (Fig. 375) must be four and one-eighth inches long and an inch and one-eighth wide. The height of the side of the stairs D, D (Fig. 375) is three inches. The length of the bottom of the side of the stairs D, E (Fig. 375) is four inches. The top of the side of the stairs D, F (Fig. 375) is one inch, and the width of the back, one and one-eighth inch; this should be the same width as the stairs C, C (Fig. 375) because it is intended to fit on and over the flap H that turns down from the top landing and is the same width as the stairs C, C (Fig. 375).
from stiff white writing paper. Cut Fig. 375, for the first flight of steps; make them exactly according to the dimensions or sizes[290] of the different parts provided. You will find that the stairs themselves C, C (Fig. 375) must be four and one-eighth inches long and one and one-eighth inches wide. The height of the side of the stairs D, D (Fig. 375) is three inches. The length of the bottom of the side of the stairs D, E (Fig. 375) is four inches. The top of the side of the stairs D, F (Fig. 375) is one inch, and the width of the back is one and one-eighth inches; this should be the same width as the stairs C, C (Fig. 375) because it is meant to fit on and over the flap H that turns down from the top landing and is the same width as the stairs C, C (Fig. 375).
The height of the back is three inches. The
The height of the back is three inches. The
Top Landing of the Stairs
Top of the Stairs
(L, Fig. 375) is one inch by five-eighths of an inch. Cut all of
the heavy lines of the stairs and bend backward all of the dotted
lines except that along the flap
G at the bottom of the side
which must be bent forward
that it may lie flat on the
ground. Open out the stairs
flat and with pen and ink
draw straight lines from side
to side of C C; the lines will
serve for steps. In like manner
make lines on each of the three
other flights of steps. Bend
down the two flaps H and J
on the top landing (Fig. 375),
then the line F E along one edge of the steps; turn outward the flap
G, bend down the line F L at the head of the stairs, which will bring
the flap J under the top of the side D F. Turn back the line[291]
[292]
D D that the back may cover the flap H. Crease down the flap
K tight and flat; let its top M extend around and lie flat against
the under side corner N of the flap H, and your flight of stairs
will be able to stand alone (Fig. 376).
(L, Fig. 375) is one inch by five-eighths of an inch. Cut all the solid lines of the stairs and fold back all the dotted lines except for the one along the flap G at the bottom of the side, which needs to be folded forward so it lies flat on the ground. Unfold the stairs flat and, using pen and ink, draw straight lines from side to side of C C; these lines will represent the steps. Do the same for the three other flights of steps. Fold down the two flaps H and J on the top landing (Fig. 375), then fold down the line F E along one edge of the steps; turn the flap G outward, fold down the line F L at the top of the stairs, which will position the flap J underneath the top of the side D F. Fold back the line D D so the back covers the flap H. Press down the flap K firmly and flat; let its top M extend around and lie flat against the underside corner N of the flap H, and your flight of stairs will be able to stand on its own (Fig. 376).

Gum the Extension
Gum the Extension
of the top landing securely along the front edge of the extreme left-hand corner of the first story of your Gardens and fasten the flap G to the ground. Make three more flights of stairs in the same way, only let the second flight run in the opposite direction from the first, as shown in Fig. 377. To do this, simply bend the dotted lines forward instead of backward, except the lower flap at bottom of the side, which should be bent backward; this method of folding turns the stairs around, bringing the under side of the paper topmost after the stairs are bent into shape. Let the second flight of stairs measure in length from C to C (Fig. 375) three and one-half inches, in width seven-eighths of an inch, height from D to D two and one-half inches, length D E three and one-eighth inches, length of top of side D F three-quarters of an inch, height of back two and one-half inches, width of back seven-eighths of an inch; top landing, three-quarters of an inch by three-eighths of an inch.
of the top landing securely along the front edge of the far left corner of the first story of your Gardens and secure flap G to the ground. Create three more flights of stairs in the same way, but let the second flight run in the opposite direction from the first, as shown in Fig. 377. To do this, simply bend the dotted lines forward instead of backward, except for the lower flap at the bottom of the side, which should be bent backward; this folding method flips the stairs around, bringing the underside of the paper to the top after the stairs are shaped. The second flight of stairs should measure from C to C (Fig. 375) three and a half inches in length, seven-eighths of an inch in width, two and a half inches in height from D to D, three and an eighth inches in length from D to E, three-quarters of an inch for the top of side D to F, two and a half inches for the height of the back, seven-eighths of an inch for the width of the back, and the top landing should be three-quarters of an inch by three-eighths of an inch.
Fasten the
Buckle the
Second Flight of Stairs
Second Flight of Steps
at the right of the second story as you glued the first on the left hand of the first story. Crease the third stairway in the same way as the first, for it is to run in the same direction. Let these stairs measure in length from C to C (Fig. 375) two and seven-eighths inches, in width five-eighths of an inch, height from D to D two inches, length D E two and one-half inches, top of side D F half an inch, height of back two inches, width five-eighths[293] of an inch; the top landing one-half inch by one inch. Fasten this stairway at the left-hand corner of the third platform.
at the right of the second story as you attached the first on the left side of the first story. Fold the third stairway the same way as the first since it’s going in the same direction. Make these stairs measure in length from C to C (Fig. 375) two and seven-eighths inches, in width five-eighths of an inch, height from D to D two inches, length D E two and one-half inches, top of side D F half an inch, height of back two inches, width five-eighths[293] of an inch; the top landing one-half inch by one inch. Secure this stairway at the left-hand corner of the third platform.

Make the fourth and last stairs turn in the same direction as the second. These are the smallest: Length from C to C (Fig. 375) one and three-quarters inches, width three-eighths of an inch, height from D to D one and one-quarter inch, length D E one and one-half inch, top of side D F one-quarter of an inch, width of back three-eighths of an inch, height of back one and one-quarter inch. Top of landing one-quarter of an inch by five-eighths of an inch. Bend into shape and glue this flight of steps at the right-hand corner of the top platform of the Gardens.
Make the fourth and last stair turn in the same direction as the second. These are the smallest: Length from C to C (Fig. 375) one and three-quarters inches, width three-eighths of an inch, height from D to D one and one-quarter inch, length D E one and one-half inch, top of side D F one-quarter of an inch, width of back three-eighths of an inch, height of back one and one-quarter inch. Top of landing one-quarter of an inch by five-eighths of an inch. Bend into shape and glue this flight of steps at the right-hand corner of the top platform of the Gardens.

Now go to work on the
Now go to work on the
Stone Broad-Fronted Bulls
Stone Wide-Fronted Bulls
which are to stand in pairs at the landing of each stairway.
which are to stand in pairs at the landing of each staircase.
Make Fig. 378 of white paper and with ink draw the wings, face and hat like Fig. 379. Then cut out the strange animal, part bull, part bird, and part man. Bend at dotted line on top of wings (Fig. 378); bend outward all four[294] of the extensions under the hoofs and stand the creature at the top of the first stairway. Paste the extensions out from the hoofs firmly to the platform. Carve or cut out seven more stone bulls and place two at the head of each stairway as in Fig. 377. Gum each stone bull securely in place. One more bull is needed which must stand up high on top of a stone shaft (Fig. 380). Height of shaft is three and one-fourth inches, not counting flaps or bull; width of same pattern at top fully two and one-half inches, width at bottom three and one-fourth inches. Height of bull from top of wings to bottom of feet one and one-fourth inch. Mark and fold it along dotted lines like Fig. 381, sliding the two flaps P P (Fig. 380) through the slits Q Q; crease the flaps backward to form paper hooks that hold fast. Turn out the extensions R R, which must be pasted down flat near the right hand on the back part of the top of the third story. The shaft will extend up high above the fourth story, as in Fig. 377.
Make Fig. 378 out of white paper and use ink to draw the wings, face, and hat like Fig. 379. Then cut out the unusual creature, which is part bull, part bird, and part man. Bend along the dotted line at the top of the wings (Fig. 378); bend outward all four extensions under the hooves and position the creature at the top of the first staircase. Secure the extensions out from the hooves firmly to the platform. Carve or cut out seven more stone bulls and place two at the head of each staircase as in Fig. 377. Glue each stone bull in place securely. You’ll need one more bull that should stand high on top of a stone shaft (Fig. 380). The height of the shaft is three and one-fourth inches, not counting the flaps or the bull; the width of the same pattern at the top is fully two and one-half inches, and the width at the bottom is three and one-fourth inches. The height of the bull from the top of the wings to the bottom of its feet is one and one-fourth inches. Mark and fold it along the dotted lines like Fig. 381, sliding the two flaps P P (Fig. 380) through the slits Q Q; crease the flaps backward to create paper hooks that hold securely. Extend the extensions R R, which should be pasted down flat near the right side on the back part of the top of the third story. The shaft will rise high above the fourth story, as shown in Fig. 377.


Make Two Statues
Create Two Statues
a little larger than diagram and glue one at the right-hand corner
of the front of the first platform, and the other on the right-hand
corner of the back of the first platform as in Fig. 377. Use
two pieces of white stiff writing paper for the two statues (Fig.
382). Cut all the heavy lines and bend back all the dotted lines[295]
[296]
[297]
except the extensions V V; bend these forward. Slip the flap S
through the slit T; bend down and fit in the top U; then glue
the statues in place. Color all of the white extensions of stairs,
bulls, and statues with green paint or with green tissue paper
pasted over them.
a little larger than the diagram and glue one in the right-hand corner of the front of the first platform, and the other in the right-hand corner of the back of the first platform as shown in Fig. 377. Use two pieces of white stiff writing paper for the two statues (Fig.
382). Cut along all the heavy lines and fold back all the dotted lines[295]
[296]
[297] except for the extensions V V; fold these forward. Slide the flap S through the slit T; fold down and fit in the top U; then glue the statues in place. Color all of the white extensions of stairs, bulls, and statues with green paint or by applying green tissue paper over them.

The Garden will now be ready for
The Garden will now be ready for
The Shrubbery
The Shrubbery
Use different tones of green tissue paper for the three varieties of trees (Figs. 383, 384, 385). Make several trees of each kind and have all of the same variety, made of one tone of paper. For Fig. 383 fringe the paper as in Fig. 386; have four layers of paper for the fringe and one layer for the unfringed part; begin with the plain strip and roll it around and around a slender stick (Fig. 386). Bend the top over to prevent its unrolling (Fig. 383).
Use different shades of green tissue paper for the three types of trees (Figs. 383, 384, 385). Make several trees of each type and keep all of the same variety made from one shade of paper. For Fig. 383, fringe the paper as shown in Fig. 386; use four layers of paper for the fringe and one layer for the part without fringe. Start with the plain strip and roll it around a slim stick (Fig. 386). Bend the top over to stop it from unrolling (Fig. 383).
Plant This Tree
Plant This Tree
in the hole you dug for it on the first platform just back of the front statue (Fig. 377); alternate these trees with the palm trees, extending the line entirely around the top of the first platform of the Gardens. Fig. 387 gives the pattern for the palm; cut[298] the six leaves and strip all in one piece, fold each leaf lengthwise through the centre W, and fringe as in X; unfold the leaves and double the strip on dotted line Y and roll it on a slender round stick as you did the first tree.
in the hole you dug for it on the first platform just behind the front statue (Fig. 377); alternate these trees with the palm trees, extending the line all the way around the top of the first platform of the Gardens. Fig. 387 shows the pattern for the palm; cut[298] the six leaves and strip them all in one piece, fold each leaf lengthwise down the center W, and fringe as in X; unfold the leaves and double the strip on dotted line Y and roll it onto a slender round stick as you did with the first tree.

For the other tree use six layers of fringe which you have cut like Fig. 386, and afterward crimped with a blade of the scissors. This time begin at the top of the stick instead of the bottom and with the narrow top of the fringe roll the paper down to the pointed end of the stick. This gives the tree a bushy foliage (Fig. 385).
For the other tree, use six layers of fringe that you've cut like Fig. 386, and then crimped with the scissors. This time start at the top of the stick instead of the bottom, and with the narrow top of the fringe, roll the paper down to the pointed end of the stick. This will give the tree a bushy look (Fig. 385).


Cut circles of dark olive-green paper to
Cut circles of dark olive-green paper to
Make Plants
Grow Plants
like Fig. 388. Fold the circle evenly four times and cut like Fig. 389, stopping at dotted line before reaching the centre.[299] Unfold and the papers will resemble Fig. 390. Hold each of these at the centre, and twist a few times to make the stems (Fig. 391). Plant the shrubs between the trees on top of the second platform. Cut a number of light sage-green tissue paper shapes like Fig. 392 for plants. Holding each of the plants at the centre, crease by drawing it lightly through the fingers of the other hand, twist the stems (Fig. 393) and plant between trees.
like Fig. 388. Fold the circle evenly in four and cut like Fig. 389, stopping at the dotted line without reaching the centre.[299] Unfold, and the papers will look like Fig. 390. Hold each of these at the centre and twist a few times to create the stems (Fig. 391). Plant the shrubs between the trees on top of the second platform. Cut out several light sage-green tissue paper shapes like Fig. 392 for the plants. Holding each plant at the centre, crease it by lightly sliding it through the fingers of the other hand, twist the stems (Fig. 393), and plant them between the trees.


Arrange Your Plants
Organize Your Plants

Make vines of rather long, very finely cut and crimped tissue paper fringe; paste the vines between the row of trees on the first platform, allowing portions of the vine to hang over the edge. Make a number of palm trees and plant the roots or ends of the tree trunks in button moulds. Glue the moulds at equal distances apart and in a straight line along the ground on the three sides of the gardens.
Make vines using long, finely cut and crimped tissue paper fringe; glue the vines between the rows of trees on the first platform, letting some parts of the vine hang over the edge. Create several palm trees and place the roots or bottoms of the tree trunks in button molds. Glue the molds at equal distances apart in a straight line along the ground on three sides of the gardens.
Play that in the highest platform of the pyramid
Play that at the highest level of the pyramid
An Engine Pumps up the Water
An Engine Pumps up the Water
from the river Euphrates, that runs along below on one side of the structure, to supply the garden with fountains which you can make believe are sparkling and dashing here and there among rare shrubs and many-colored, fragrant flowers. You must pretend that the spaces between the arches on the different platforms are made into magnificent apartments and banquet rooms and below in the vaulted corridors the money changers and politicians ply their trades, while outside on the terraces are to be found the simple, sweet pleasures of wholesome Nature.
from the river Euphrates, which flows along one side of the structure, to provide the garden with fountains that you can imagine are sparkling and splashing among rare shrubs and colorful, fragrant flowers. You need to envision that the spaces between the arches on the different levels are transformed into grand apartments and dining halls, while down in the vaulted corridors, the money changers and politicians conduct their business, and outside on the terraces, you'll find the simple, sweet joys of wholesome Nature.
PART III
THINGS TO MAKE FOR HOME, GIFT DAYS,
AND FAIRS

CHAPTER XXV
NEW CHRISTMAS DECORATIONS

Paper
Document
enough for the making of Christmas greens to decorate an ordinary room quite lavishly may be bought for fifty cents or less. One sheet of tissue paper will make thirty-two holly leaves. One sheet of tissue paper will make a large bunch of mistletoe and one sheet of tissue paper will make one yard of evergreen rope. Complete success in this work depends largely upon the paper used and great care must be taken in selecting the colors. The quality should be good, else it will lack the necessary crispness and staying properties.
Enough supplies to create Christmas decorations to beautify an ordinary room can be bought for fifty cents or less. One sheet of tissue paper can make thirty-two holly leaves. One sheet can also create a large bunch of mistletoe, and another sheet can produce one yard of evergreen rope. Achieving great results in this project largely depends on the type of paper used, so it's important to carefully select the colors. The quality should be good; otherwise, it will lack the necessary crispness and durability.
For the holly and evergreen choose a dark moss-green paper, which is a yellow green with no tinge of blue. For the mistletoe you must have a light gray-green, also of a yellow tone, a light cardinal red for the brilliant holly berries, white for the waxy mistletoe berries and dark gray-brown for holly stems. One[304] sheet each of the red and white paper will probably be sufficient for all the berries you will want, and one sheet of gray-brown will answer for the stems. Besides the paper you must have a spool of fine wire or coarse thread for winding and some natural bare branches or twigs, or a roll of heavy bonnet wire for stems.
For the holly and evergreen, choose a dark moss-green paper, which is a yellow-green with no hint of blue. For the mistletoe, you need a light gray-green, also with a yellow tone, a light cardinal red for the bright holly berries, white for the waxy mistletoe berries, and dark gray-brown for the holly stems. One[304] sheet each of the red and white paper should be enough for all the berries you'll want, and one sheet of gray-brown will work for the stems. In addition to the paper, you'll need a spool of fine wire or coarse thread for winding, and some natural bare branches or twigs, or a roll of heavy bonnet wire for the stems.


Begin with the
Begin with the
Holly
Holly
and cut one sheet of the dark moss-green tissue paper in half (Fig. 395). Fold the half sheet according to the dotted lines through the middle and you will have Fig. 396. Fold Fig. 396 through the middle as shown by the dotted line and there will be Fig. 397. Bring the two ends of Fig. 397 together, folding at the dotted line, and it will give you Fig. 398. Again fold along the dotted central line and you will have Fig. 399. Fold through the middle, along[305] the dotted line, for the last time and there will be an oblong, one and three-quarter inches wide by five inches long.
and cut one sheet of the dark moss-green tissue paper in half (Fig. 395). Fold the half sheet along the dotted lines in the middle and you will have Fig. 396. Fold Fig. 396 in the middle as indicated by the dotted line and there will be Fig. 397. Bring the two ends of Fig. 397 together, folding at the dotted line, and it will give you Fig. 398. Again fold along the dotted central line and you will have Fig. 399. Fold in the middle, along[305] the dotted line, for the last time and there will be an oblong, one and three-quarter inches wide by five inches long.


With a soft lead pencil draw the outline of a half holly leaf after the pattern (Fig. 400), the fold of the paper forming the straight edge of the outline. Cut along the pencil line, open the fold and there will be sixteen leaves like Fig. 401. The dotted line[306] running lengthwise through the middle of the leaf shows where the paper was folded. Have a damp sponge ready and slightly moisten the fingers of your right hand on the sponge—never with your lips in handling green paper. Take one leaf in your left hand and with the moist fingers of your right hand twist each point of the leaf into a sharp spike, beginning at the top of the leaf as in Fig. 402. Twist the lower part of the leaf into a stem (Fig. 403) and, refolding the leaf down the middle, pinch the underside of the fold to form the mid-rib, bringing your[307] two hands together and puffing the paper a little as you do so (Fig. 403). The finished leaf should resemble Fig. 404. The crinkled appearance given by pinching and twisting adds much to the natural look of the leaf. You may vary the size, making some leaves smaller than others, but keep as nearly as possible to the pattern, for experiment has proved it to be a good one.
With a soft lead pencil, draw the outline of a half holly leaf based on the pattern (Fig. 400), with the fold of the paper forming the straight edge of the outline. Cut along the pencil line, open the fold, and you will have sixteen leaves like Fig. 401. The dotted line[306] running down the center of the leaf indicates where the paper was folded. Have a damp sponge ready and slightly moisten the fingers of your right hand with the sponge—never wet your lips when handling green paper. Take one leaf in your left hand and with the moist fingers of your right hand, twist each point of the leaf into a sharp spike, starting at the top of the leaf as shown in Fig. 402. Twist the lower part of the leaf into a stem (Fig. 403) and, refolding the leaf down the middle, pinch the underside of the fold to create the mid-rib, bringing your[307] hands together and puffing the paper slightly as you do so (Fig. 403). The finished leaf should look like Fig. 404. The crinkled effect from pinching and twisting enhances the natural look of the leaf. You can vary the size, making some leaves smaller than others, but try to stick as closely as possible to the pattern since experience has shown it to be a good one.


Before putting your leaves on the stems make the
Before attaching your leaves to the stems, make sure to
Holly Berries,
Holly Berries,
for they must be fastened on first.
for they have to be attached first.


From your red tissue paper cut a number of pieces two and
a half inches square, make a little ball of raw cotton a trifle larger[308]
[309]
than a good sized pea and place it in the centre of one of the
squares of paper (Fig. 405). Draw the paper up and around
the ball, completely covering it, then twist the remainder of the
paper into a stem (Fig. 406). Make three berries, twisting their
stems as tightly as
possible and bunch
them. With your fine
wire or thread, wrap
the three stems closely
together (Fig. 407)
and cut off the ragged
ends (Fig. 408). Take
up a natural branch
and wrap the stems
of the berries to the
end of a twig (Fig.
409). Cut a strip of
the gray-brown paper
half an inch wide
and about four inches
long, and, beginning
close to the berries
(Fig. 410), wrap the
stem with the paper
as shown in Fig. 411.
Fasten three leaves
to the stem close to the berries as in Fig. 412, and place other
leaves about one inch apart, alternating first on one side then on
the other side of the stem (Fig. 413).
From your red tissue paper, cut several pieces that are two and a half inches square. Make a small ball of raw cotton slightly larger than a good-sized pea and place it in the center of one of the paper squares (Fig. 405). Gather the paper up and around the cotton ball, completely covering it, then twist the remaining paper into a stem (Fig. 406). Create three berries by twisting their stems as tightly as you can and group them together. Using your fine wire or thread, tightly wrap the three stems together (Fig. 407) and trim the uneven ends (Fig. 408). Take a natural branch and attach the berry stems to the end of a twig (Fig. 409). Cut a strip of gray-brown paper that is half an inch wide and about four inches long, and starting near the berries (Fig. 410), wrap the stem with the paper as shown in Fig. 411. Attach three leaves to the stem close to the berries as shown in Fig. 412, and space out additional leaves about one inch apart, alternating sides of the stem (Fig. 413).
When the holly is to be made into
When the holly is going to be made into
Wreaths,
Wreaths,
the branches should not be large and a small wooden or wire hoop should form the foundation of the wreath. Upon this hoop the small branches of holly must be bound, overlapping one another and extending out beyond the hoop to form a generous wreath. A bright red ribbon bow, fastened at the top of the holly wreath, gives it a still more realistic effect.
The branches shouldn't be big, and a small wooden or wire hoop should form the base of the wreath. On this hoop, the small branches of holly need to be attached, overlapping each other and extending beyond the hoop to create a full wreath. A bright red ribbon bow, tied at the top of the holly wreath, makes it look even more realistic.

For Mistletoe
For Mistletoe
cut the gray-green tissue paper into pieces eight and one-half inches long by one and a half inches wide. Bring the two ends of a strip together, folding through the middle, to form the oblong (Fig. 414). Fold Fig. 414 lengthwise through the middle along the dotted line and on it draw the outline of half of a mistletoe leaf, with the straight edge on the long fold and the stem end on the short fold of the paper (Fig. 415). Cut along this outline, open the folds and you will have twin leaves like Fig. 416. Bring the two open leaves together and twist the connecting part into[311] a stem like Fig. 417. Make a number of white mistletoe berries according to the directions given for the red holly berries and wrap them together in pairs; then nestling a couple close in between two leaves (Fig. 418) wrap them on the stem. The
cut the gray-green tissue paper into pieces eight and a half inches long by one and a half inches wide. Bring the two ends of a strip together, folding through the middle, to form the oblong (Fig. 414). Fold Fig. 414 lengthwise through the middle along the dotted line and on it draw the outline of half of a mistletoe leaf, with the straight edge on the long fold and the stem end on the short fold of the paper (Fig. 415). Cut along this outline, open the folds and you will have twin leaves like Fig. 416. Bring the two open leaves together and twist the connecting part into[311] a stem like Fig. 417. Make several white mistletoe berries according to the directions for the red holly berries and wrap them together in pairs; then, tucking a couple snugly between two leaves (Fig. 418), wrap them on the stem. The
Stems
Stems
of the mistletoe should be very irregular and branching, and it may be necessary to make them of bonnet wire in order to produce the proper shape.
of the mistletoe should be quite irregular and branching, and it might be necessary to make them from bonnet wire to achieve the right shape.


Fig. 419 shows the branching irregular stem and the position of leaves and berries. Some of the twigs should be left bare, as they are so often on the natural mistletoe branch.
Fig. 419 shows the irregularly branching stem and the placement of leaves and berries. Some of the twigs should be kept bare, as they frequently are on the natural mistletoe branch.
Fasten on the leaves and berries by wrapping with fine wire and then cover the stems with strips of the gray-green tissue paper, wrapping it as directed in making the holly branch. The only difference being that while the holly stem is wrapped with paper only far enough to cover the red stems of the berries and the leaves are put on afterwards, the mistletoe leaves must be[312] fastened on with the berries and the entire stem then covered with the paper. You will remember that the stems of the natural mistletoe are as pale in color as the leaves, so no dark wood must show in your branch.
Wrap the leaves and berries with fine wire, and then cover the stems with strips of gray-green tissue paper, just like you did when making the holly branch. The only difference is that while the holly stem is wrapped with paper just enough to hide the red stems of the berries and the leaves are added afterward, the mistletoe leaves need to be[312] attached along with the berries, and then the whole stem is covered with the paper. Remember, the stems of real mistletoe are light-colored like the leaves, so no dark wood should show in your branch.

Hang your bunch of mistletoe from the chandelier and you will find that no one will stop to examine it too closely, and the Christmas games can be played just as merrily under the paper as under the real mistletoe.
Hang your bunch of mistletoe from the chandelier, and you’ll see that no one will stop to look at it too closely, and the Christmas games can be enjoyed just as cheerfully under the fake stuff as under the real mistletoe.
There now remains but the
There now remains only the
Ropes of Evergreen
Evergreen Ropes
to complete the time-honored Christmas decorations.
to finish the traditional Christmas decorations.


Fold a sheet of the dark moss-green tissue paper crosswise, then fold again and you will have an oblong a little less than four[313] inches wide and the length of the paper’s width. Press the folds down flat and cut them open with a paper knife, then, keeping the strips together, fold crosswise through the middle; again fold crosswise through the middle and there will be an oblong like Fig. 420. Cut this oblong into a fringe, bringing the slits to within one inch of the top edge and making each strip not more than one-quarter of an inch wide (Fig. 420). Unfold and separate four pieces to loosen the fringe, then place the top edges of the four pieces together once more and, taking a long piece of strong twine, curl the right hand upper corner of the heading of[314] the fringe over the twine near the end (Fig. 421). From this start to wrap the fringe around and around the twine forming the rope shown in Fig. 422.
Fold a sheet of dark moss-green tissue paper in half, then fold it again, and you'll have a rectangle a little less than four[313] inches wide and the length of the paper's width. Press the folds flat and cut them open with a paper knife. Then, keeping the strips together, fold them in half crosswise; fold in half again, and you'll have a rectangle like Fig. 420. Cut this rectangle into a fringe, making slits that go within one inch of the top edge and ensuring each strip is no wider than a quarter of an inch (Fig. 420). Unfold and separate four pieces to loosen the fringe, then align the top edges of the four pieces again. Take a long piece of strong twine and curl the upper right corner of the fringe's heading over the twine near the end (Fig. 421). From this point, begin wrapping the fringe around the twine to form the rope shown in Fig. 422.
When you have almost reached the ends of the first four strips of fringe, paste the ends of the headings of four more strips on to the first and continue to wrap as before. In this way you may make your evergreen rope as long as you wish.
When you’ve nearly finished the first four strips of fringe, attach the ends of the headings of four more strips to the first ones and keep wrapping as you did before. This way, you can make your evergreen rope as long as you want.
There is just one word of caution which must go with the assurance of the real beauty of these Christmas decorations and that is: Remember to hang your wreaths and ropes where they will not be exposed to the flames of gas, candle or lamp, for while they are scarcely more inflammable than the natural greens, it is not well to take any risks and neither is it at all necessary. With this in mind your rooms may be inexpensively, prettily and safely decorated with the tissue paper Christmas greens.
There’s just one word of caution that you should keep in mind along with the assurance of how beautiful these Christmas decorations are: Make sure to hang your wreaths and garlands where they won’t be exposed to gas flames, candles, or lamps. While they’re not much more flammable than real greens, it’s best not to take any chances, and it’s really not necessary. Keeping this in mind, you can decorate your rooms in a pretty, affordable, and safe way with tissue paper Christmas greens.
CHAPTER XXVI
DOLL HOUSE OF PASTEBOARD


A Large Spool
A Big Spool
and you will have a pretty little table; paint it a red brown to resemble mahogany. If you need more suggestions, spool furniture may be found in “What a Girl Can Make and Do.”
and you will have a cute little table; paint it a reddish-brown to look like mahogany. If you need more ideas, you can find spool furniture in “What a Girl Can Make and Do.”

To make the doll house. Get three stiff pasteboard boxes about fourteen inches long, thirteen inches wide and six and[316] one-half inches high (Fig. 423). Cut the thirteen-inch front and the right-hand side from the first box (Fig. 424). Take the second box and lay the fourteen-inch front down flat on top of an old, common wooden table which can be used without fear of injury, and with the aid of a ruler, draw two straight lines across the front on the inside of the box; let each line be about one and one-fourth inch from the side. Keep the box as it is while you score the lines with a sharp penknife; then cut out the front, leaving the upright pieces to form the corners at each end (Fig. 425). Cut the thirteen-inch front and left-hand side from the third box (Fig. 426). Mark two high windows (Fig. 427) on the inside, near the front of the left side of the first box (Fig. 424). Make each window two and one-half inches high and two and one-half inches wide, leaving a space of three-fourths of an inch between them. Lay this left side of the box flat down on the table[317] and use the sharp penknife to score the dotted lines and cut the heavy lines. Always cut and score from the inside of the box, otherwise the shutters will turn inward.
To make the dollhouse, get three sturdy cardboard boxes measuring about fourteen inches long, thirteen inches wide, and six and a half inches high (Fig. 423). Cut the thirteen-inch front and the right side from the first box (Fig. 424). Take the second box and place the fourteen-inch front flat on an old, common wooden table that you can use without worrying about damage. With a ruler, draw two straight lines across the front on the inside of the box; each line should be about one and a quarter inches from the side. Keep the box in position while you score the lines with a sharp knife, then cut out the front, leaving the upright pieces to form the corners at each end (Fig. 425). Cut the thirteen-inch front and the left side from the third box (Fig. 426). Mark two high windows (Fig. 427) on the inside, near the front of the left side of the first box (Fig. 424). Each window should be two and a half inches high and two and a half inches wide, leaving a space of three-quarters of an inch between them. Place this left side of the box flat on the table[317] and use the sharp knife to score the dotted lines and cut the heavy lines. Always cut and score from the inside of the box; otherwise, the shutters will turn inward.

When the window is scored and cut, throw
When the window is marked and cut, toss
Open the Shutters
Open the Windows
and look out through the little opening of the doll’s kitchen window (Fig. 428).
and look out through the small opening of the doll’s kitchen window (Fig. 428).


In the second box (Fig. 425) cut a door five and one-half inches high and three inches wide through the left side wall, one and three-fourths of an inch from the back wall. The two high windows, each two and one-fourth inches wide and two inches high and the one ordinary large window, four inches high and two and one-fourth inches wide, must be marked on the back wall (Fig. 429) and cut (Fig. 430). Cut another door in the room through the right-hand side wall near the front (Fig. 431) and bend it wide open (Fig. 432).
In the second box (Fig. 425), cut a door that is five and a half inches high and three inches wide on the left side wall, one and three-fourths inches from the back wall. The two tall windows, each two and a fourth inches wide and two inches high, along with the one standard large window, which is four inches high and two and a fourth inches wide, need to be marked on the back wall (Fig. 429) and cut out (Fig. 430). Cut another door in the room through the right side wall near the front (Fig. 431) and swing it wide open (Fig. 432).

Make Doorknobs
Create Doorknobs
of large-sized beads, and fasten one on each side of both doors with a strong, heavy piece of broom-straw run through and[318] glued in a hole punctured through the door with a coarse darning needle or hat-pin. Slide a bead on each end of the broom-straw and glue them securely in place. Strengthen the hinges of each door with a narrow strip of thin white cotton cloth pasted lengthwise on the open door, half on the door and half on the wall.
of large beads, and attach one on each side of both doors with a sturdy piece of broomstick run through and[318] glued into a hole made in the door with a thick darning needle or hat pin. Slide a bead onto each end of the broomstick and glue them firmly in place. Reinforce the hinges of each door with a narrow strip of thin white cotton cloth glued lengthwise on the open door, half on the door and half on the wall.


Excellent
Awesome
Window Glass Can Be Made
Window glass can be made
of white tissue paper cut to fit the various windows, allowing one-fourth of an inch extension on all four sides. Immerse the paper thoroughly on both sides in oil; with a dry, clean cloth wipe off the oil; again immerse the[319] papers, let them remain in the oil for some minutes and a second time wipe the oil from both sides of each paper. This makes the paper almost transparent.
of white tissue paper cut to fit the various windows, allowing for a quarter-inch extension on all four sides. Soak the paper thoroughly on both sides in oil; then use a dry, clean cloth to wipe off the oil. Immerse the papers again, let them sit in the oil for a few minutes, and wipe the oil off both sides of each paper a second time. This makes the paper almost transparent.

The window frame or sash, is made of strips of black or inked paper, one long, narrow strip pasted down the entire centre length of each window glass and a wider strip fastened across the first strip at the centre, from side to side of the glass (Fig. 434). Keep the glass and the sash divisions perfectly smooth while fastening them together.
The window frame or sash is made of strips of black or inked paper: one long, narrow strip glued down the entire center length of each window glass and a wider strip attached across the first strip at the center, spanning from side to side of the glass (Fig. 434). Ensure the glass and the sash divisions are perfectly smooth while securing them together.

When all are ready, close the shutters of each room in turn, and place first one and then another side flat down on top of the table and brush a little glue all around the edges of the window opening (Fig. 435); lay the glass over the opening, making sure that the edges of the glass extend evenly out on the wall surface from all sides. Do not rub the glass, press it tightly down with a dry cloth.
When everyone is ready, close the shutters in each room one by one, then lay one side flat on the table and apply a bit of glue around the edges of the window opening (Fig. 435); place the glass over the opening, ensuring that the edges of the glass extend evenly beyond the wall surface on all sides. Avoid rubbing the glass; instead, press it down firmly with a dry cloth.


After the windows have been glazed cut strips of fresh, smooth, ordinary wrapping-paper, not less than one-fourth of an inch[320] wide, and cover the edges of each window glass with the strips, paste them on straight and even to form woodwork around the window as well as to cover the edges of the glass (Fig. 436). Fit the second box (Fig. 425) in the first one (Fig. 424), mark and cut off the portion of the first box (Fig. 424) extending beyond the front of Fig. 425; do the same with the third box (Fig. 426), that all three boxes may be of equal depth, and when fastened together the long front line may be straight and even.
After the windows are glazed, cut strips of fresh, smooth, ordinary wrapping paper that are at least one-fourth of an inch wide, and cover the edges of each window pane with these strips. Paste them on straight and evenly to create a frame around the window and to cover the edges of the glass (Fig. 436). Fit the second box (Fig. 425) into the first one (Fig. 424), then mark and cut off the part of the first box (Fig. 424) that extends beyond the front of Fig. 425; do the same with the third box (Fig. 426) so that all three boxes are of equal depth. This way, when they are fastened together, the long front edge will be straight and even.
If You Want the Doll House to Last for Years,
If You Want the Doll House to Last for Years,

Be sure that your flour paste has boiled well and is strong and thick, for fastening the three rooms together. Give the kitchen (Fig. 437) a generous layer of paste down the inside edge of the back wall and along the edge of the floor at the open side; then fit the left-hand edge of the floor and back wall of the living-room (Fig. 438) over the paste and press it firmly in place. Fasten the bedroom (Fig. 439) on the right-hand side of Fig. 438 in the same manner.
Make sure your flour paste has boiled thoroughly and is strong and thick enough to connect the three rooms together. Apply a generous layer of paste along the inside edge of the back wall and the floor edge on the open side of the kitchen (Fig. 437); then, fit the left-hand edge of the living-room's floor and back wall (Fig. 438) over the paste and press it down firmly. Attach the bedroom (Fig. 439) to the right side of Fig. 438 in the same way.


Close the little shutters and
Close the small shutters and
Place the Doll House on the Floor
Put the Doll House on the Floor
of a real room, tight up against the wall; then put weights along on the inside edges of the floor of the toy living-room and pile books up close against the back wall; at the same time do not press the side walls out of plumb; keep them straight.
of a real room, pressed right against the wall; then place weights along the inside edges of the floor of the toy living room and stack books tightly against the back wall; while doing this, make sure not to push the side walls out of alignment; keep them straight.

When the house is perfectly dry, tack one thin strip of wood across the entire length of the top of the back wall of the house from end to end. You can manage[322] this very readily by turning the house and laying the back wall flat on the table, the top edge of the wall barely covering the strip of wood; then you can tack at long intervals from the inside of the wall and fasten the pasteboard walls to the wood. Be sure to glue the ends of the side wall strips securely to the back wall strip.
When the house is completely dry, attach a thin strip of wood all the way across the top of the back wall from one end to the other. You can easily do this by turning the house and laying the back wall flat on the table, with the top edge of the wall just covering the strip of wood; then you can secure it at intervals from the inside of the wall and attach the pasteboard walls to the wood. Make sure to glue the ends of the side wall strips firmly to the back wall strip.
Set the house upright in proper position and tack thin strips of wood along the under edge of the bottom of the house. Fit one strip under the house at a time and tack from the inside of the house through the pasteboard floor into the wood. Make the ends of the upright side wall strips fast to the underfloor strip. When finished, the bottom of the house should resemble Fig. 440.
Set the house upright in the correct position and attach thin strips of wood along the bottom edge of the house. Fit one strip under the house at a time and secure it from the inside of the house through the pasteboard floor into the wood. Fasten the ends of the vertical side wall strips to the underfloor strip. When you're done, the bottom of the house should look like Fig. 440.

Make the Frieze
Create the Frieze
for every room of three strips of tissue paper cut five-eighths of an inch wide. Fold each separate strip crosswise through the centre; again fold through the centre, and fold a third time, making eight layers of paper. Cut the folded strip like Fig. 441, unfold, and you will have Fig. 442. Try for a different pattern in each room, and let the colors vary. A soft yellow for kitchen, sage green for living-room, and a light, warm yellow pink for bedroom are a pleasing variety.
for every room, cut three strips of tissue paper that are five-eighths of an inch wide. Fold each strip in half crosswise, then fold it in half again, and fold it a third time to create eight layers of paper. Cut the folded strip like Fig. 441, unfold it, and you'll get Fig. 442. Try a different pattern in each room, and mix up the colors. A soft yellow works well for the kitchen, sage green for the living room, and a light, warm pinkish yellow for the bedroom offers a nice variety.

Cut a Rug for the Living-Room
Get a Rug for the Living Room
from sage-green tissue paper; make it ten inches long and seven and one-half inches wide. Fold the paper lengthwise through the centre, then crosswise through the centre, and a second time crosswise, making eight layers. Cut according to Fig. 443, unfold once (Fig. 444), and cut the designs K and N; fold diagonally the loose corners L according to dotted line and cut design M (Fig. 445). Open out the rug (Fig. 446).
from sage-green tissue paper; make it ten inches long and seven and a half inches wide. Fold the paper lengthwise in half, then crosswise in half, and again crosswise, creating eight layers. Cut according to Fig. 443, unfold once (Fig. 444), and cut out designs K and N; fold the loose corners L diagonally along the dotted line and cut design M (Fig. 445). Open up the rug (Fig. 446).

Cover the required space on the living-room floor with a thin layer of paste, place the rug down over it, using both hands, to avoid wrinkles.
Cover the needed area on the living room floor with a thin layer of paste, then lay the rug down on top of it, using both hands to prevent any wrinkles.
With the same kind of wrapping-paper used for the woodwork you can make projecting window-sills. Fold and crease the paper into a narrow box-lid long enough to extend across the window, including the woodwork; glue one of the lengthwise turned-down edges on the wall below the window glass.
With the same wrapping paper used for the woodwork, you can create projecting window sills. Fold and crease the paper into a narrow box lid that’s long enough to extend across the window, including the woodwork; glue one of the lengthwise turned-down edges to the wall below the window glass.


Make three
Make 3
Shelves for Books,
Bookshelves,
with the ends of the shelves turned up to hold the books in place. Fasten the lengthwise turned-down edge of the first shelf on the wall three-quarters of an inch below the high window in the living-room, and paste the other two shelves below at short distances apart.
with the ends of the shelves turned up to hold the books in place. Secure the lengthwise turned-down edge of the first shelf to the wall three-quarters of an inch below the high window in the living room, and attach the other two shelves below it at short distances apart.

You can easily make tiny books of several pieces of folded paper cut the desired size and sewed together through the centre fold. Hang red
You can easily make small books using several pieces of folded paper cut to your desired size and sewn together through the center fold. Hang red
Tissue Paper Curtains
Tissue Paper Drapes
in the living-room, white tissue-paper curtains in the bedroom, and yellow ones in the kitchen, as seen in Fig. 447.
in the living room, white tissue-paper curtains in the bedroom, and yellow ones in the kitchen, as seen in Fig. 447.
Little shelves over the tops of the doors may be made in like manner, also a cunning little three-cornered bracket to fit the[325] corner of the room for holding a tiny Japanese vase of satiny yellow ware, the straight up-and-down kind, made of a three-fourth-inch length section of common straw pasted on a wee round disk of paper. Fill the vase with tiny red paper flowers fastened on broom-straws.
Little shelves above the doors can be made in the same way, along with a clever little triangular bracket that fits the [325] corner of the room to hold a small Japanese vase made of smooth yellow pottery, the straight kind, created from a three-fourths inch length of regular straw glued to a tiny round piece of paper. Fill the vase with small red paper flowers attached to broom straws.

CHAPTER XXVII
THE MAKING OF A BAYBERRY CANDLE

A quart of bayberries, a little time, a little trouble, and we have a beautiful green wax candle, hard, brittle and smooth, that hot weather will not melt and whose expiring flame yields an incense sweet and aromatic.
A quart of bayberries, a little time, a little effort, and we have a beautiful green wax candle, hard, brittle, and smooth, that hot weather won't melt and whose dying flame gives off a sweet and fragrant scent.
There is a peculiar joy in using the raw material fresh from Mother Nature’s hands and starting at the beginning of things—a joy unknown to those who work only with materials that are manufactured—and to get the most out of the work of making bayberry candles you must begin with the bayberries. First locate your
There is a unique joy in using the raw materials straight from Mother Nature and starting from scratch—something those who only work with manufactured materials don’t experience. To truly make the most out of crafting bayberry candles, you have to start with the bayberries. First, find your
Bayberry-Bushes;
Bayberry Bushes;
then, just the time when out-of-door exercise begins to be a delight, the latter part of September or early in October, gather the berries and take them home for future use.
Then, just when outdoor exercise starts to feel enjoyable, in late September or early October, gather the berries and bring them home for later use.
The bayberries, which seem to be nothing but tiny stones covered with a coating of wax, do not decay quickly, but shrivel up into small gray pellets that will keep, it is said, a year or more.
The bayberries, which look like tiny stones covered in wax, don’t spoil easily; instead, they shrivel into small gray pellets that are said to last a year or more.

Look for a bush that is stiff and irregular, generally growing low in closely crowded patches like the blueberry, though at times reaching the height of eight feet. It appears to thrive best and is most often seen in sandy soil, but it will grow in almost any kind and flourish even amid the rocks on a barren hillside.
Look for a bush that is firm and uneven, usually growing low in tightly packed clusters like blueberries, although it can sometimes grow as tall as eight feet. It seems to thrive best and is most commonly found in sandy soil, but it can grow in almost any type of soil and even thrive among the rocks on a barren hillside.

The Leaves
The Leaves
are oblong and from two to three and a half inches in length (Fig. 448). They usually have several teeth, or notches, near[330] the tip and are quite narrow at the base. Sometimes they are scattered and again in close bunches. The young leaves are a pale green frequently tinged with red; when matured they are a bright green, glossy, and of a leathery texture and they are very fragrant when crushed in the hands. The bark is brownish gray and the young stems light, or golden brown.
are elongated and measure between two to three and a half inches long (Fig. 448). They typically have several teeth or notches near[330] the tip and are quite narrow at the base. Sometimes they grow scattered and other times in close clusters. The young leaves are a light green often touched with red; when they mature, they turn a bright green, glossy, and have a leathery texture. They also release a strong fragrance when crushed in your hands. The bark is a brownish-gray color and the young stems are light or golden brown.
The Berries
The Berries
are quite small and grow in thick clusters on short stems. Fig. 449 gives the berries, drawn from nature and of actual size. They are green at first, but, when ripe, turn a light silvery gray. As it will take about one quart of berries to make one candle you may adapt your picking to the number of candles you want.
are pretty small and grow in dense clusters on short stems. Fig. 449 shows the berries, taken from nature and to scale. They start out green but turn a light silvery gray when ripe. Since it takes about one quart of berries to make one candle, you can adjust your picking based on how many candles you want.

Keep the berries in a dry place until
Keep the berries in a dry place until
You are Ready to Make your Candles,
You’re Ready to Make Your Candles,
then into a six-quart preserve-kettle pour three quarts of berries and fill to the brim with cold water. This allows two quarts of water to one quart of berries. Put the kettle on the range and let it boil steadily four hours—actually boil, remember—and whenever the water gets three inches below the brim fill it up with hot water. The boiling berries will perfume the house with a spicy balsamic odor that is delightful. When the four hours[331] are up set the kettle back and let the berries simmer for an hour or two, then farther back where it will simply keep hot. At night take them off the range and set away to cool without removing them from the kettle. The cooling down from the boiling point to the point where the wax begins to form should be very gradual to obtain the best results, therefore the simmering and keeping hot after boiling.
Then, in a six-quart preserve kettle, pour in three quarts of berries and fill it to the brim with cold water. This means using two quarts of water for every quart of berries. Put the kettle on the stove and let it boil steadily for four hours—actually boil, keep that in mind—and whenever the water level drops three inches below the brim, top it off with hot water. The boiling berries will scent the house with a delightful spicy balsamic aroma. Once the four hours[331] are up, move the kettle back and let the berries simmer for an hour or two, then shift it further back on the stove just to keep it warm. At night, take it off the stove and let it cool down without removing it from the kettle. The cooling process from boiling to the point where the wax starts to form should be very gradual to get the best results, which is why you simmer and keep it warm after boiling.
Having put the berries away for the night, try to forget them, and do not be tempted to disturb the wax as it forms and floats in little cakes on top of the water, for breaking through the gathering crust will cause much of the wax to sink and cling to the berries beneath. When left undisturbed until morning, the wax forms into a large cake, hard and ready to be lifted out.
Having stored the berries away for the night, try to forget about them, and resist the urge to disturb the wax as it forms and floats in small cakes on the water's surface. Breaking through the developing crust will cause much of the wax to sink and stick to the berries below. If left undisturbed until morning, the wax will form a large, hard cake that can be easily lifted out.
The Bayberry Wax
Bayberry Wax
is never, at first, free from impurities, such as bits of dried leaves, stems and occasionally whole berries, and it must be strained. Break up the wax and put it in a porcelain-lined, shallow saucepan and set it on the range where it will melt slowly; then strain through a fine wire strainer into a shallow bowl or soup-plate. Let the wax become quite cold and hard, melt and strain again, this time through a piece of cheese-cloth or fine sheer lawn. So much for the bayberry wax. But there must also be
is never, at first, free from impurities, like bits of dried leaves, stems, and sometimes whole berries, and it has to be strained. Break up the wax and place it in a porcelain-lined, shallow saucepan and set it on the stove where it will melt slowly; then strain it through a fine wire strainer into a shallow bowl or soup plate. Let the wax cool and harden completely, then melt and strain it again, this time using a piece of cheesecloth or fine sheer fabric. So much for the bayberry wax. But there must also be


Candle-Moulds
Candle Molds
for making bayberry candles, and not many of us possess these old-fashioned treasures. Even if you happen to be one of the fortunate few, you will find it takes a great deal of the precious wax to fill these old moulds, and the candles made in them are really larger than you need; so the home-made candle-moulds will be best in any case.[332]
for making bayberry candles, and not many of us have these old-fashioned treasures. Even if you are one of the lucky few, you'll find that it takes a lot of precious wax to fill these old molds, and the candles made in them are actually larger than you need; so, homemade candle molds will be the best option anyway.[332]

From a sheet of legal-cap writing-paper cut a strip eleven and a half inches long and four inches wide (Fig. 450). Take an ordinary adamantine half candle, which is neither tallow nor wax, and, placing the paper on the table, short edge toward you, lay the candle down on it and bring the edge of the paper over the candle, as in Fig. 451. Press the paper down firmly and roll the candle away from you, in this way wrapping the paper closely around it. If the edges are not even, unwrap and try again. To have a perfect mould[333] you must keep one edge of the paper exactly on a line with the bottom edge of the candle. When the paper is wrapped around the candle to within one inch of the end of the paper, brush glue across the end of the paper as in Fig. 452. Bring the edge over the roll and press down (Fig. 453).
From a sheet of legal-sized writing paper, cut a strip that's eleven and a half inches long and four inches wide (Fig. 450). Take a regular adamantine half candle, which is neither made of tallow nor wax. Place the paper on the table with the short edge facing you, then lay the candle on it and fold the edge of the paper over the candle, as shown in Fig. 451. Press the paper down firmly and roll the candle away from you, wrapping the paper tightly around it. If the edges don't line up, unwrap it and try again. To create a perfect mold[333], you need to keep one edge of the paper aligned with the bottom edge of the candle. Once the paper is wrapped around the candle up to about an inch from the end, brush glue over the edge of the paper as shown in Fig. 452. Fold the edge over the roll and press down (Fig. 453).
Take another candle of the same size, stand it on a piece of paper and, with a lead-pencil, draw around the bottom edge, pressing the pencil point close to the candle. Cut around the circle you have made, leaving a border on its edge half an inch wide, as in Fig. 454, and slash the border up to the inner circle, as in Fig. 455.
Take another candle of the same size, place it on a piece of paper, and use a pencil to draw around the bottom edge, pressing the pencil point close to the candle. Cut around the circle you made, leaving a half-inch border on the edge, like in Fig. 454, and make slashes in the border up to the inner circle, as shown in Fig. 455.


Draw another circle, this time using the roll with the candle in it to mark the size, and cut around it, leaving a border three-quarters of an inch wide, then slash the border as you did the first. Cover the laps of Fig. 455 with glue, set the roll containing the candle exactly within the penciled circle, and turn up the laps, one at a time, lapping them over one another in regular order, as in Fig. 456. Hold the laps in place until they are firmly glued to the roll, then make a dot with your pencil on the bottom exactly in the centre of the circle, and lay the roll aside for the glue to harden while you prepare
Draw another circle, this time using the roll with the candle to mark the size, and cut around it, leaving a border that's three-quarters of an inch wide. Then, make slashes in the border like you did the first time. Apply glue to the laps of Fig. 455, position the roll with the candle right in the center of the penciled circle, and fold up the laps one at a time, overlapping them in order, as in Fig. 456. Hold the laps in place until they're securely glued to the roll. Next, make a dot with your pencil right in the center of the circle on the bottom and set the roll aside for the glue to harden while you prepare.

The Candlewicks.
The Candlewicks.
Candlewick comes in balls. It is composed of cotton strands which must be braided to make a finished wick. Cut from the wick several pieces nine inches long, select three strands for each candle, tie them together in bunches of threes, and braid, as shown in Fig. 457.
Candlewick comes in balls. It's made of cotton strands that need to be braided to create a finished wick. Cut several pieces of the wick, each nine inches long, choose three strands for each candle, tie them together in groups of three, and braid, as shown in Fig. 457.
Take the candle from the roll, and in the top edge of the roll cut two notches directly opposite each other (Fig. 458), then melt the candle and pour it while hot into the mould, emptying it again directly. This will give the inside a coating of[335] wax which will keep the paper from absorbing the bayberry wax.
Take the candle from the roll, and on the top edge of the roll, cut two notches directly opposite each other (Fig. 458). Then, melt the candle and pour it while hot into the mold, emptying it out right away. This will leave a layer of [335] wax on the inside, which will prevent the paper from soaking up the bayberry wax.

Puncture a small hole through the dot in the bottom of the mould and, after waxing the end to stiffen it, thread one of the wicks through the hole from the outside. Cut off the knot and draw the wick up to within half an inch of the end, then separate the strands, spread them out flat and glue them to the bottom (Fig. 459). Glue the last disk you made, over the wick on the bottom of the mould, arranging the laps in order as you did those of the first. Be very careful that none of the slashes run even the shortest distance across the bottom, and do not use the moulds until the glue is perfectly hard.
Puncture a small hole through the dot at the bottom of the mold, and after waxing the end to stiffen it, thread one of the wicks through the hole from the outside. Cut off the knot and pull the wick up to within half an inch of the end, then separate the strands, spread them out flat, and glue them to the bottom (Fig. 459). Glue the last disk you made over the wick at the bottom of the mold, arranging the overlaps in the same order as you did with the first. Be very careful that none of the slashes run even the shortest distance across the bottom, and do not use the molds until the glue is completely dry.
You will need a separate mould for each candle, and when all are ready
You’ll need a separate mold for each candle, and when they’re all ready
Make a Stand of a Box.
Make a Stand of a Box.

In the bottom of the box, cut three round holes just large enough to admit the candle-moulds (Fig. 460). Set the box in a small meat-platter to catch any spilled wax, and slip three moulds into the holes, allowing them to stand on the plate. Draw the wick of each up tightly and run a long hat pin through all three, resting the pin in the notches at the top and bringing each wick in the middle of its mould (Fig. 461). If this is done properly the wicks will not sag, but will be held taut by the pin.[336]
At the bottom of the box, cut three round holes just big enough for the candle molds (Fig. 460). Place the box on a small meat platter to catch any spilled wax, and insert three molds into the holes, allowing them to rest on the platter. Pull each wick up tightly and run a long hat pin through all three, resting the pin in the notches at the top and positioning each wick in the center of its mold (Fig. 461). If done correctly, the wicks won’t droop, but will stay taut thanks to the pin.[336]
Break up and
Break up and
Melt the Bayberry Wax
Melt the Bayberry Wax
slowly, never allowing it to get hot enough to smoke, and fill each mould up to the hat pin. In a short time the wax will settle and leave a hollow at the top of the candle. Fill up the hollow each time this occurs until the wax remains even across the top.
slowly, never letting it get hot enough to smoke, and fill each mold up to the hat pin. After a short time, the wax will settle and leave a hollow at the top of the candle. Fill in the hollow every time this happens until the wax is even across the top.


Leave the candles in their moulds until they are hard and almost, but not quite cold, then draw the hat pin from the wicks and, taking one mould, begin at the top and peel off the[337] paper, carrying it around and around spirally, as in Fig. 462. Insert the blade of a penknife between the bottom of the candle and the bottom of the mould, and cut around the edge. Remove first one layer of the bottom, then the other layer, after which you can draw the candle from the remainder of the mould.
Leave the candles in their molds until they’re firm and almost cold, but not completely. Then pull the hat pin out from the wicks and, taking one mold, start at the top and peel off the[337] paper, spiraling it around and around, as in Fig. 462. Insert the blade of a pocket knife between the bottom of the candle and the bottom of the mold, and cut around the edge. Remove the first layer from the bottom, then the second layer, and after that, you can pull the candle out from the rest of the mold.
Cut the bottom end of the wick close to the candle, and also trim off the top of the wick, making it about one inch long above the candle (Fig. 463).
Cut the bottom of the wick close to the candle, and trim the top of the wick so that it’s about one inch long above the candle (Fig. 463).
CHAPTER XXVIII
WATER TOYS—LITTLE WAX PEOPLE THAT SWIM AND
RIDE ON RAFTS

The Patterns for the Little People
The Patterns for the Little People
are given in Figs. 464, 466, 477 and 480. Cut ten girls from ten pieces of folded white writing-paper after first tracing the lengthwise half of Fig. 464 on half of the paper (Fig. 465). Cut ten boys (Fig. 466) from white writing-paper (Fig. 467). Paint each girl’s hair a different color, varying from light brown to raven black, from golden blond to dark auburn. Paint their[339] bathing dresses red, blue, pink, orange, brown, green, yellow, purple, striped red and white, and spotted blue and white. Paint the boys’ bathing suits in a similar manner; mark the features of both girls and boys in ink, then color face, hands, arms, legs and feet pink. Use water-colors, and paint the back as well as the front of the dolls. When the paint is dry, take two girls and two boys and bend their arms forward at the shoulders; bend several dolls in a sitting position; take others and bend one leg forward and one backward, as if they were walking, and bend the hands together in front on those you wish to dive into the water from a height.
are given in Figs. 464, 466, 477 and 480. Cut out ten girls from ten pieces of folded white writing paper after first tracing the lengthwise half of Fig. 464 on half of the paper (Fig. 465). Cut out ten boys (Fig. 466) from white writing paper (Fig. 467). Paint each girl’s hair a different color, ranging from light brown to raven black, from golden blonde to dark auburn. Paint their bathing suits red, blue, pink, orange, brown, green, yellow, purple, striped red and white, and spotted blue and white. Paint the boys’ bathing suits in a similar way; mark the features of both girls and boys in ink, then color their faces, hands, arms, legs, and feet pink. Use watercolors, and paint the back as well as the front of the dolls. Once the paint is dry, take two girls and two boys and bend their arms forward at the shoulders; bend several dolls into a sitting position; take others and bend one leg forward and one leg backward, as if they were walking, and bend the hands together in front of those you want to make look like they’re diving into the water from a height.


When all are ready,
When everyone is ready,
Dip Each Doll in Melted Wax.
Dip Each Doll in Melted Wax.
One-half a wax-candle will be sufficient for the work. Be sure that each doll is completely covered on both sides with wax, and instead of paper dolls you will have twenty funny little wax dolls, the coloring showing distinctly through the wax. With a coarse needle and thread make
One-half of a wax candle will be enough for the job. Make sure each doll is fully covered on both sides with wax, and instead of paper dolls, you'll have twenty cute little wax dolls, with the colors clearly visible through the wax. Using a thick needle and thread, make
A Toy Life Rope
A Toy Life Rope
and string on the thread four dolls with arms bent forward—a boy, a girl, a boy and a girl—by piercing the hands of each with the needle and drawing the thread through. In this way they are made to hold on to the thread rope.
and string on the thread four dolls with their arms sticking out— a boy, a girl, a boy, and a girl—by piercing the hands of each with a needle and pulling the thread through. This way, they hold onto the thread rope.


Choose a clear, shallow pool or the edge of a pond for
Choose a clear, shallow pool or the edge of a pond for
The Bathing Place
The Pool


Tie the thread to a stick, the lower end of which must be fastened securely in the ground under water while its top end stands out above the water. Hold the loose end of the thread taut in one hand as you carefully slide the bathers along the life rope until all stand in shallow water. The life rope reaches from the land out into the water. Stir the water and cause the waves to rise while you keep the thread moving up and down to make the dolls jump and frolic like real bathers (Fig. 468).
Tie the thread to a stick, making sure the lower end is securely anchored in the ground underwater while the top end sticks out above the water. Hold the loose end of the thread tight in one hand as you gently slide the floaters along the lifeline until everyone is in shallow water. The lifeline stretches from the shore out into the water. Splash the water to create waves while you keep the thread moving up and down to make the dolls jump and play like real swimmers (Fig. 468).
For the Raft
For the Raft

make fifteen paper lighters of strips of writing paper nine inches long and three-quarters of an inch wide (Fig. 469). Begin at[342] one corner and roll the paper into a long round stick; fold over the top to keep the lighter from unrolling (Fig. 470). Dip each lighter in melted wax until it is completely coated all over; then wax two pieces of common string, each one a generous half yard in length. Tie or cross the centre of each string on a waxed lighter one inch from each end. Lay this lighter on a table in front of and parallel to you; place another lighter up against the ties, allowing one string from each tie to come over and one under the second lighter (Fig. 471). Cross the two lengths of each string over the last lighter, bringing the lower string up and the upper string down (Fig. 472); then lay another lighter up against the crossed strings, carrying the strings in turn over this lighter (Fig. 473). Again bring the lower string up and the upper string down before placing in another lighter, and always alternate the large and small ends of the lighters as in Fig. 474 in order to have them equally balanced and to avoid bringing all the small ends on one side and the large ends on the other side of the raft. Continue crossing the strings and adding lighters until fourteen are bound into a float; then[343] tie the ends of the strings on each line securely together (Fig. 475), and your work will be ready for the fitting of the little mast, which must stand erect at one end of the raft.
Make fifteen paper lighters using strips of writing paper that are nine inches long and three-quarters of an inch wide (Fig. 469). Start at one corner and roll the paper into a long round stick; fold over the top to keep the lighter from unrolling (Fig. 470). Dip each lighter in melted wax until it's completely coated; then wax two pieces of common string, each about a generous half yard long. Tie or cross the center of each string on a waxed lighter one inch from each end. Lay this lighter on a table in front of you and parallel to you; place another lighter against the ties, allowing one string from each tie to come over and one under the second lighter (Fig. 471). Cross the two lengths of each string over the last lighter, bringing the lower string up and the upper string down (Fig. 472); then lay another lighter against the crossed strings, carrying the strings in turn over this lighter (Fig. 473). Again bring the lower string up and the upper string down before placing another lighter, always alternating the large and small ends of the lighters as in Fig. 474 to ensure they are evenly balanced and to prevent having all the small ends on one side and the large ends on the other side of the raft. Keep crossing the strings and adding lighters until fourteen are bound into a float; then[343] tie the ends of the strings securely together (Fig. 475), and your work will be ready for fitting the little mast, which must stand upright at one end of the raft.


Use the remaining lighter, which is the fifteenth, for the mast; flatten out the large end and slide it through the central opening or crack of the raft between the seven lighters on each side; then bend the flat end of the mast along the under side of the next[344] lighter, up through the next space, over the next lighter and down through the forward space. Weaving it over and under the lighters of the raft keeps the mast firm and steady (Fig. 476).
Use the last lighter, which is the fifteenth, for the mast; flatten the large end and slide it through the central opening or crack of the raft between the seven lighters on each side; then bend the flat end of the mast underneath the next[344] lighter, up through the next space, over the next lighter, and down through the forward space. Weaving it over and under the lighters of the raft keeps the mast firm and steady (Fig. 476).


Make a Little Lumberman
Become a Little Lumberjack

like Fig. 477. Fold a piece of white writing paper; trace one-half of the lumberman on it (Fig. 478), and cut out the figure. When he has been painted and waxed, stand him by the mast with one arm around it. Weave his feet in the raft as you[345] wove the mast, and he will stand up as straight as a good soldier (Fig. 476).
like Fig. 477. Fold a sheet of white writing paper; trace half of the lumberjack on it (Fig. 478), and cut out the figure. After painting and waxing, position him by the mast with one arm around it. Weave his feet into the raft like you[345] did with the mast, and he will stand up as straight as a good soldier (Fig. 476).
Launch the Raft
Start the Raft
on the water; it will dance merrily over the waves, and you can have some of the other wax children climb up and sit on the raft as it goes floating about. Should the children tumble off into the water, let them swim for a while, for that is what they want to do. Then you can help them on the raft again or bring them to land.
on the water; it will dance happily over the waves, and you can have some of the other wax kids climb up and sit on the raft as it floats around. If the kids fall into the water, let them swim for a bit, because that's what they want to do. Then you can help them back onto the raft or bring them to shore.
When the raft is riding the waves, the four bathers holding on the life-line and the other wax girls and boys playing in the sand, wading and diving in the water, let a mermaid come slowly swimming through the water toward them.
When the raft is riding the waves, the four bathers holding on to the life-line and the other wax girls and boys playing in the sand, wading, and diving in the water, a mermaid slowly swims through the water toward them.
Make the Mermaid
Create the Mermaid
of paper and her flowing tresses, also of paper. Mermaids are famous for their beautiful hair, which they seem to be always combing with a golden comb. Your mermaid, though, must be content to swim and enjoy herself without the golden comb.
of paper and her flowing hair, also of paper. Mermaids are known for their beautiful hair, which they always seem to be brushing with a golden comb. Your mermaid, however, must be satisfied to swim and have fun without the golden comb.
Fold a piece of white writing paper; trace the lengthwise half of the figure on it (Fig. 479) and cut out the mermaid (Fig. 480); then cut two pieces of rather long, finely fringed paper (Fig. 481) for the hair, and paint them golden brown on both sides. Paint the back of the mermaid’s head and the hair around her face the same color. Mark the features with ink; when dry, color the face, arms and body pink; paint the remaining part of the figure gray. After the paint has dried mark fish scales from the waist down; then glue the straight top fringe of hair across the centre of the back of the mermaid’s head from side to side. Glue the other piece at the extreme[347] top of the back of the head. After the mermaid is thoroughly dry, bend all of the hair out from her head. Do not allow any of it to lie down flat. Bend the body a little backward in a curve from the waist-line, the arms forward; then wax the mermaid, hair and all (Fig. 482). When the mermaid is in the water, the little wax children will make friends with her, and she will perhaps tell them fairy stories of the beautiful life under the waves.
Fold a piece of white writing paper in half lengthwise; trace half of the figure on it (Fig. 479) and cut out the mermaid (Fig. 480); then cut two long, finely fringed pieces of paper (Fig. 481) for the hair and paint them golden brown on both sides. Paint the back of the mermaid’s head and the hair around her face the same color. Outline the features with ink; when it's dry, color the face, arms, and body pink; paint the rest of the figure gray. After the paint dries, draw fish scales from the waist down; then glue the straight top fringe of hair across the center of the back of the mermaid’s head from side to side. Glue the other piece at the very top of the back of the head. Once the mermaid is completely dry, bend all of the hair out from her head. Make sure none of it lies flat. Bend the body slightly backward in a curve from the waist, with the arms forward; then wax the mermaid, hair and all (Fig. 482). When the mermaid is in the water, the little wax children will befriend her, and she might even tell them fairy tales about the beautiful life beneath the waves.


These water toys will last a long time if well cared for and kept in a cool place where the wax will not melt.
These water toys will last a long time if you take good care of them and store them in a cool place where the wax won't melt.

CHAPTER XXIX
HOW TO WEAVE WITHOUT A LOOM
Method Invented by the Author
Method Created by the Author

A Board
A Board
forty inches long will answer for weaving anything one yard or less in width and is of a convenient size to handle. The one-yard width is what an ordinary loom produces, but if you would[350] have your rug or portière wider there is no reason why the board should not be longer. To prevent the material from catching, your board must be smooth on both sides and on the edge and it should be as wide as possible. A good-sized pastry board is excellent for weaving a piece less than twenty-two inches in width.
Forty inches long will work for weaving anything one yard or less in width and is a convenient size to handle. The one-yard width is what a standard loom produces, but if you want your rug or curtain to be wider, there's no reason the board can't be longer. To prevent the material from catching, your board needs to be smooth on both sides and on the edge, and it should be as wide as possible. A good-sized pastry board is great for weaving a piece less than twenty-two inches wide.
Rags are Used
Old rags are repurposed
for both warp and woof; if old and soft they should be more tightly packed than when new and firm. The warp is composed of the strips which run up and down in the work, the woof of those that are woven in and out across the warp, and the process is like that of weaving a splint basket. The following directions are for making
for both warp and weft; if they're old and soft, they should be packed more tightly than when they were new and firm. The warp consists of the strips that run vertically in the work, while the weft consists of those woven in and out across the warp, and the process is similar to weaving a splint basket. The following instructions are for making
A Blue and White Cotton Rug
A Blue and White Cotton Rug
for bedroom or bathroom. Heavy, new canton flannel is a good material for the rug and it is better to have new goods where the weave, as in this case, is to be smooth and flat.
for bedroom or bathroom. Heavy, new canton flannel is a great material for the rug, and it's better to use new items where the weave, like in this case, is smooth and flat.

Cut the canton flannel, do not tear it, into strips half an inch wide, but do not sew the strips together, and make into balls as for loom weaving; piece them as needed while the work progresses. Draw a straight line the whole length of the board one inch below the top edge, then along this line
Cut the canton flannel into strips that are half an inch wide, but don't tear it. Instead of sewing the strips together, roll them into balls like you would for loom weaving; join them as needed while you work. Draw a straight line all the way down the board, one inch below the top edge, then along this line.
Tack the Warp
Tack the Warp
As there is to be a blue border four inches wide, entirely around the rug, the warp at first must be all blue.
Since there will be a blue border that is four inches wide all around the rug, the warp must initially be completely blue.

Take one strip of the blue and tack it on the line at the upper left-hand corner of the board about two inches from the side edge. Leave one end of the warp longer than the other and drive the tack only part of the way in (Fig. 483). Give the strip[351] two twists toward you, close to the tack, and fasten it down with another tack on the line just half an inch from the first tack. See Fig. 484.
Take one strip of blue and tack it to the line at the upper left corner of the board, about two inches from the edge. Leave one end of the warp longer than the other and only drive the tack partway in (Fig. 483). Give the strip[351] two twists towards you, close to the tack, and secure it with another tack on the line just half an inch from the first tack. See Fig. 484.
Fasten your strips on in this way with the tacks half an inch apart and you will have eight ends or eight strips of warp which will form the side border. For the top border cut the blue strips into ten-inch pieces, twist them at the middle so that the ends will be of an even length, and tack them along the line as far as you wish the centre to extend; then add the longer strips of warp for the other side border, as in Fig. 485. To the ends of the short blue warp sew strips of white, lapping the ends with the blue on top.[352] Sew them securely like Fig. 486 and whip the end edges to make them lie perfectly flat.
Fasten your strips this way with the tacks spaced half an inch apart, and you’ll have eight ends or eight strips of warp to create the side border. For the top border, cut the blue strips into ten-inch pieces, twist them in the middle so the ends are of even length, and tack them along the line for as far as you want the center to extend; then add the longer strips of warp for the other side border, as in Fig. 485. To the ends of the short blue warp, sew strips of white, overlapping the ends with the blue on top.[352] Sew them securely like Fig. 486 and whip the end edges to make them lie perfectly flat.

This will give a white centre of warp with a blue border at the top and sides. Draw each strip of warp down until it is smooth and taut and tack it near the bottom edge of the board. Be very careful to have the warp of the border and the centre measure the same distance across the bottom as across the top and keep each strip in a straight line from the top (Fig. 487). Frequent measurements while weaving will keep your rug true and prevent narrowing between the two rows of tacks.
This will create a white center with a blue border at the top and sides. Pull each strip of warp down until it's smooth and tight, and then tack it near the bottom edge of the board. Make sure that the warp for the border and the center measure the same distance across the bottom as they do at the top, and keep each strip in a straight line from the top (Fig. 487). Regular measurements while weaving will help keep your rug even and avoid any narrowing between the two rows of tacks.

When the warp is ready take a strip of blue and begin
When the warp is ready, take a strip of blue and start.
To Weave.
Weaving.
Tack the end of the strip, which is now the warp, a little to the left and a trifle below the upper left-hand tack (Fig. 487) and, starting under the first strip of warp, weave it in and out several times; then draw the warp out its full length as you do a needle and thread after taking several stitches. Keep the warp flat and even when it is woven and push it up close to the[353] tacks. Weave across in this way, always under one and over the next, and drawing out the end of the woof every little while. When you have reached the last strip of warp on the right, turn the woof over it and weave back again in the same manner (Fig. 487).
Tack the end of the strip, which is now the warp, a bit to the left and slightly below the upper left-hand tack (Fig. 487). Start under the first strip of warp and weave it in and out several times; then pull the warp out to its full length, just like you would with a needle and thread after taking a few stitches. Keep the warp flat and even as you weave it, pushing it up close to the[353] tacks. Weave across this way, always going under one and over the next, while pulling out the end of the woof every so often. When you reach the last strip of warp on the right, flip the woof over it and weave back the same way (Fig. 487).
The woof for this rug is entirely of blue, and as you weave across the white warp you will find that it makes a blue and white checker-board centre.
The fabric of this rug is completely blue, and as you weave across the white threads, you'll see it creates a blue and white checkerboard pattern in the center.

When you have woven as much as you can between the two rows of tacks, take the tacks out,
When you've woven as much as you can between the two rows of tacks, remove the tacks,
Move the Woven Part Up
Shift the Woven Part Up

and tack across again along the second or third row of woof from the bottom, putting a tack through the woof into each strip of warp; then draw the warp down as at first and tack in place. Fig. 488 shows the two rows of tacks after the rug has been moved up and also the effect of the checker-board weaving and blue border. This manner of moving up the woven part makes it possible to weave any length you may desire.
and tack across again along the second or third row of fabric from the bottom, putting a tack through the fabric into each strip of thread; then pull the thread down as before and tack in place. Fig. 488 shows the two rows of tacks after the rug has been moved up and also the effect of the checkerboard weaving and blue border. This way of moving up the woven part allows you to weave any length you want.
Lengthen the Warp
Extend the Warp
as you weave by sewing on new pieces, and when the centre is almost as long as you want it, cut off the white warp evenly and[354] sew on blue, then weave until the border at the bottom is the width of that at the top and sides. Cut off the woof that is left after weaving the last row, and, turning in the end, sew it securely to the last row of warp.
as you create by stitching on new pieces, and when the center is nearly the length you want, cut off the white warp evenly and[354]attach blue, then weave until the border at the bottom matches the width of the top and sides. Cut off the leftover woof after weaving the last row, and, tucking in the end, sew it securely to the last row of warp.
Cut Off the Warp,
Stop the Warp,
leaving ends about one and one-half inches long; turn each end of the warp over the last row of woof and sew it down. One end will turn on one side of the rug, the next on the other side, as splints turn over the edge in binding off a splint basket.
leaving ends about one and a half inches long; fold each end of the warp over the last row of weft and sew it down. One end will fold on one side of the rug, the other end on the opposite side, similar to how splints fold over the edge when binding off a splint basket.


It is best to cut off
one end of the warp
and sew it down before
cutting the next, as this will prevent the woof from slipping
out of place during the binding off. Tuck each end of the warp
under the row of woof just above it and sew again. Fig. 489
shows how this is done. G, H and I are the ends of the warp
cut off evenly, F is an end turned up and sewed to the bottom
row of woof. E is an end which is to turn under and be brought
up on the other side of the rug. D has been turned up, sewed
to the last row of woof and is just being slipped under the third[355]
[356]
[357]
row of woof, J. C is turned under and fastened in place on the
other side of the rug, and B has been turned up, sewed,
tucked under the third row
of woof and sewed again. The
end is shown above the woof
to make the idea plainer, but
in reality it should be hidden
under the woof.
It's best to cut off one end of the warp and sew it down before cutting the next, as this will prevent the weft from slipping out of place during the binding off. Tuck each end of the warp under the row of weft just above it and sew again. Fig. 489 shows how this is done. G, H, and I are the ends of the warp cut off evenly, F is an end turned up and sewn to the bottom row of weft. E is an end that's to be turned under and brought up on the other side of the rug. D has been turned up, sewn to the last row of weft, and is just being slipped under the third[355]
[356]
[357] row of weft, J. C is turned under and fastened in place on the other side of the rug, and B has been turned up, sewn, tucked under the third row of weft, and sewn again. The end is shown above the weft to make the concept clearer, but in reality, it should be hidden under the weft.
When the last end of the warp has been secured and the first end of the woof (Letter A, Fig. 487) has been turned over and sewed to the warp, your rug is finished and will look like Fig. 490. This rug is photographed from one made by the writer on a pastry board. Its size is twenty-two by thirty-four inches. Three-quarters of a yard of white canton flannel and one yard and a half of blue were used for weaving.
When the last end of the warp is secured and the first end of the weft (Letter A, Fig. 487) has been flipped over and sewn to the warp, your rug is complete and will look like Fig. 490. This rug is photographed from one made by the author on a pastry board. Its dimensions are 22 by 34 inches. Three-quarters of a yard of white canton flannel and one and a half yards of blue were used for weaving.
To Make a Heavier Rug
To Create a Thicker Rug
with the flat weave, double the warp. That is, lay one piece of warp directly on top of another, giving two thicknesses to each strip. A close weave is made by using soft material, tacking the strips close together for the warp and pushing the woof up tightly, crushing it together as in loom weaving.
with the flat weave, double the warp. That means laying one piece of warp directly on top of another, which gives two thicknesses to each strip. A close weave is created by using soft material, tacking the strips closely together for the warp and pushing the woof tightly, compressing it together like in loom weaving.
Diamonds, squares and Indian zigzag patterns are easy and you can work out others quite original with yourself.
Diamonds, squares, and Indian zigzag patterns are simple, and you can come up with other unique designs on your own.
CHAPTER XXX
HOW TO MAKE YOUR OWN EASTER
CARDS AND GIFTS


A simple, inexpensive Easter card may carry with it happiness, for “it is sweet to be remembered,” and you can think of many designs from which to choose a cheery greeting to send to every one.
A simple, affordable Easter card can bring joy because “it’s nice to be remembered,” and you can think of plenty of designs to pick a cheerful message to send to everyone.

Cards Made to Represent Easter Flowers
Cards Designed to Show Easter Flowers
are always welcome. Trace Fig. 491 on heavy paper; paint the flowers to resemble as nearly as possible the natural blossoms, shading the lily lightly and coloring the passion flower in natural hues. Paint the violet a light blue purple and its foliage green. When dry cut out the design; then bend the card at the dotted[359] lines that each flower may stand erect, supported by the blank back piece in tent-like fashion. When bent the card will form three tents in a row, with the smallest in front, as in Fig. 492.
are always welcome. Trace Fig. 491 on sturdy paper; paint the flowers to closely match the real blossoms, lightly shading the lily and using natural colors for the passion flower. Paint the violet a light blue-purple and its leaves green. Once it's dry, cut out the design; then fold the card at the dotted[359] lines so each flower stands upright, supported by the blank back piece like a tent. When folded, the card will create three tents in a row, with the smallest one in front, as shown in Fig. 492.


If you are not able to paint the flowers satisfactorily, use any colored, printed flowers you happen to have, either the embossed ones that come for scrap books, or those cut from colored advertisements or newspapers. Select three different blossoms or groups of flowers and, taking the largest first, lay it down flat on a strip of stiff paper with the stems or lower part toward the edge of the paper; then run a pencil line entirely around the edge of the flower; this will give a blank enclosed by the outline of the flower. Place the same blossom on the paper again, being sure to bring the top of the flower to meet the top of the outline[360] flower, in order that the two parts may fit; then make a second tracing. Examine the lily in Fig. 491 and you will understand more clearly. Unless the two flower tops meet, one side of the flower tent will be upside down.
If you can’t paint the flowers well, use any colored, printed flowers you have, whether they’re the embossed ones meant for scrapbooks or cutouts from colored ads or newspapers. Choose three different flowers or groups of flowers and start with the largest. Lay it flat on a piece of stiff paper, with the stems or bottom part toward the edge of the paper. Then, trace around the edge of the flower with a pencil; this will create a blank area shaped like the flower. Place the same flower back on the paper, making sure the top of the flower aligns with the top of the outline so that the two parts fit together; then make a second tracing. Check out the lily in Fig. 491 to get a clearer idea. If the two flower tops don’t meet, one side of the flower tent will end up upside down.[360]

Place the middle-sized blossom on the paper with the lower part next to the lower portion of the first and largest flower, in the same way that the back support of the passion flower meets the lily stems in Fig. 491. Trace this twice as you did the first design. The last and smallest flower must be traced in like manner. Notice in Fig. 491 that the leaves of the violet meet the lower part of the passion flower, while the blossom of the violet meets the outline of the blossom.
Place the medium-sized flower on the paper with the bottom part next to the lower section of the first and largest flower, just like how the back support of the passion flower connects with the lily stems in Fig. 491. Trace this twice, as you did with the first design. The last and smallest flower should be traced in the same way. Note in Fig. 491 that the leaves of the violet connect with the bottom part of the passion flower, while the violet's blossom aligns with the outline of the flower.
When you comprehend the principle the work will be very easy. Paste each bright blossom immediately in front of its back support; then cut out the entire long card and bend it into three tents which will enable the flowers to stand up and look very attractive. These floral cards may be folded and brought together in flat layers, to be sent by mail without danger of injury.
When you understand the principle, the task will be very easy. Glue each bright flower directly onto its backing; then cut out the entire long card and fold it into three tents that allow the flowers to stand upright and look really nice. These floral cards can be folded and stacked flat, making them safe to send by mail without risk of damage.

The Cross
The Cross

is a most appropriate design for Easter. You can make one of cardboard which will stand alone. Cut Figs. 493 and 494 from stiff paper, and make the slit down through the top of one and up through the bottom of the other; then slide the two crosses[361] together by placing Fig. 493 at right angles down through the top of Fig. 494, adjust the two pieces and your cross will resemble Fig. 495. The card may be closed flat by turning the two crosses until they lie closely against each other. You can decorate this double cross by painting or pasting flowers on it, or lettering it with the words, “Easter Greeting.”
is a great design for Easter. You can make one out of cardboard that will stand on its own. Cut Figs. 493 and 494 from stiff paper, and create a slit down through the top of one and up through the bottom of the other; then slide the two crosses[361] together by placing Fig. 493 at right angles down through the top of Fig. 494, adjust the two pieces and your cross will look like Fig. 495. The card can be closed flat by turning the two crosses until they lie closely against each other. You can decorate this double cross by painting or gluing flowers on it, or writing the words, “Easter Greeting.”
Another new design is
A new design is
The Tulip Bud
The Tulip Bud
(Fig. 496). This you can open at will and make it blossom. Open it still further and the petals appear as if ready to fall, as in Fig. 497. Cut Fig. 498 of white paper and paint it to resemble a tulip petal; make five more petals, then trace Fig. 499 on a piece of cardboard, fit the six petals together and place them on top of the tulip stem (Fig. 499). Hold the petals firmly in position while you run a coarse needle and thread through the petals and cardboard back in order to fasten the flowers on the stem. Knot the thread on the outside of[362] the petals and also on the wrong side of the pasteboard card. Fig. 500 shows the knot on the lower portion of the petals. Draw the thread tight to keep the petals firmly in place. Paint the stem and leaves green and paste a small round piece of paper over each of the knots which fasten the flower on its stem as shown in Fig. 501. When the bit of paper is painted it will never be noticed.
(Fig. 496). You can open this whenever you want and make it bloom. Open it even more and the petals seem ready to fall, like in Fig. 497. Cut out Fig. 498 from white paper and paint it to look like a tulip petal; create five more petals, then trace Fig. 499 on a piece of cardboard, fit the six petals together, and place them on top of the tulip stem (Fig. 499). Hold the petals firmly in place while you use a thick needle and thread to sew through the petals and cardboard back to secure the flowers onto the stem. Tie the thread on the outside of[362] the petals and also on the back side of the cardboard. Fig. 500 shows the knot on the lower part of the petals. Pull the thread tight to keep the petals securely in place. Paint the stem and leaves green and glue a small round piece of paper over each of the knots that attach the flower to its stem as shown in Fig. 501. Once the paper is painted, it won't be noticeable.


You can use this idea with another flower if you do not understand painting in water colors.
You can use this idea with another flower if you don’t know how to paint in watercolors.
The Dainty Bloodroot
The Delicate Bloodroot
wildflower blossom is pure white and you can cut the petals of white paper, and fasten the flowers on gray-green cardboard. Paste the stem securely down and sew the petals in place in the same manner as those of the tulip. The bloodroot will look especially pretty when you move the petals and cause the snowy flowers to open.
wildflower blossom is bright white, and you can cut the petals from white paper and attach the flowers to gray-green cardboard. Glue the stem down firmly and sew the petals in place just like you would with tulip petals. The bloodroot will look especially lovely when you adjust the petals and make the white flowers bloom.


One of the most beautiful of manufactured Easter eggs was the one presented to an Infanta of Spain some years ago. The Gospel of Easter day was inscribed on the inside of the white enamelled shell, and when a secret spring was touched a little bird would fly out and sing. It was said to have cost four thousand dollars. We can make an
One of the most beautiful manufactured Easter eggs was the one given to an Infanta of Spain a few years ago. The Gospel of Easter Sunday was inscribed on the inside of the white enamel shell, and when a hidden spring was pressed, a small bird would fly out and sing. It was said to be worth four thousand dollars. We can make an
Easter Egg Card
Easter Egg Gift Card
that will give almost, if not quite as much pleasure, for not more than four cents. This will be of pasteboard and will fold flat like the cross, but when opened a little chicken will sit up on[364] the inside with its beak wide open and its wings lifted as if ready to sing its little chickie song. More than that, our egg will stand firmly on one end as Christopher Columbus made his famous egg stand.
that will give almost, if not quite as much pleasure, for not more than four cents. This will be made of cardboard and will fold flat like the cross, but when opened, a little chicken will sit up on[364] the inside with its beak wide open and its wings lifted as if ready to sing its little chickie song. More than that, our egg will stand firmly on one end just like Christopher Columbus made his famous egg stand.


Trace Figs. 502, 503 and 504. Slide the first egg (Fig. 502) in at right angles through the second (Fig. 503); fit the slits into each other. Paint the chicken (Fig. 504) a soft light yellow, and when dry make the markings with ink; then slide the slit at the feet of the chicken diagonally over the lower cross portion of the two eggs and you will have Fig. 505.
Trace Figs. 502, 503, and 504. Slide the first egg (Fig. 502) in at a right angle through the second one (Fig. 503); fit the slits together. Paint the chicken (Fig. 504) a soft light yellow, and once it’s dry, make the markings with ink; then slide the slit at the feet of the chicken diagonally over the lower cross section of the two eggs, and you will have Fig. 505.

In Jerusalem the
In Jerusalem the

Easter Bells
Easter Bells

ring out at precisely nine o’clock in the morning, telling the people that the religious ceremony of the washing of the feet is about to take place in the large court just outside the Church of the Holy Sepulchre. On Easter morning in our own land the church bells ring out joyously; and the gladdened note seems to[365] be given unconsciously by the bell ringer, some of his Easter joy having entered into his work.
ring out at exactly nine o’clock in the morning, signaling to the people that the religious ceremony of washing the feet is about to happen in the large courtyard just outside the Church of the Holy Sepulchre. On Easter morning in our own country, the church bells ring cheerfully; and the happy sound seems to[365] be created unconsciously by the bell ringer, as some of his Easter joy seems to have infused his work.

Our Easter card of bells is fashioned after the old Spanish style of architecture, in which the church bells are often seen suspended in open alcoves which are built up flat above the body of the church. Copy Fig. 506 on cardboard and cut it out. Make three bells like Fig. 507 and fasten one on each of the three round dots on the church belfry (Fig. 506). Sew the bells in place as you did the tulip petals, but in this case allow the thread to be a trifle looser[366] that the bells may sway back and forth, as if ringing, when you move the card. Cut up the slit through the centre of the stand of the card and crease along the dotted line, bending half of the stand forward and the other half backward. This will give a good platform and the card will stand alone (Fig. 508). Make the belfry (Fig. 506) of a warm gray-colored cardboard and gild the cross and bells. When dry indicate a slight shading with pen and ink.
Our Easter card with bells is designed in the old Spanish architectural style, where church bells are often found hanging in open alcoves built above the church. Copy Fig. 506 onto cardboard and cut it out. Make three bells like Fig. 507 and attach one to each of the three round dots on the church belfry (Fig. 506). Sew the bells in place like you did the tulip petals, but this time let the thread be a bit looser[366] so the bells can sway back and forth, as if ringing, when you move the card. Cut the slit in the center of the stand of the card and crease along the dotted line, bending one half of the stand forward and the other half backward. This will create a sturdy platform, allowing the card to stand on its own (Fig. 508). Make the belfry (Fig. 506) from warm gray cardboard and gild the cross and bells. Once dry, add slight shading with pen and ink.
Here are some original Easter toys to be used as small gifts or novel dinner cards.
Here are some original Easter toys to use as small gifts or fun dinner cards.
Let the Comical Little Turtle
Let the Funny Little Turtle
be the first you make.
be the first to do.

Draw on heavy writing paper Fig. 509. Cut it out, and from white tissue paper make two strips like Fig. 510. Paint eyes and mouth on the head and mark the feet; then with strong glue or sealing wax cover the edges of an egg-shell cut lengthwise and place it on Fig. 509; next fasten a strip of tissue paper (Fig. 510) along the side of the turtle between the fore and hind foot, making the strip reach partly on the egg-shell and partly underneath on the writing paper; this is to make the egg-shell and the heavy writing-paper adhere more firmly together. Fasten the remaining strip on the other side of the turtle in the same way, bend the head up[367] a little and the tail down, also bend all the feet down and the result will be a queer little Easter turtle able to stand alone (Fig. 511).
Draw on thick writing paper Fig. 509. Cut it out, and from white tissue paper, make two strips like Fig. 510. Paint eyes and mouth on the head and mark the feet; then with strong glue or sealing wax, cover the edges of an eggshell cut lengthwise and place it on Fig. 509; next, attach a strip of tissue paper (Fig. 510) along the side of the turtle between the front and back feet, making the strip extend partly onto the eggshell and partly underneath on the writing paper; this is to help the eggshell and the thick writing paper stick together more securely. Attach the remaining strip to the other side of the turtle in the same way, bend the head up[367] a little and the tail down, also bend all the feet down, and the result will be a quirky little Easter turtle that can stand on its own (Fig. 511).


Now for the Funny Little Pig
Now for the Funny Little Pig
(Fig. 512). Select a good-sized white egg and blow out its contents in this way: carefully bore a hole at each end of the egg, enlarging them only sufficiently to enable you to send its contents out of one end by blowing in the hole at the other end of the egg; this done, cut from strong, stiff paper or cardboard diagram,[368] Fig. 513, the tail; Fig. 514, the fore leg; Fig. 515, the hind leg; Fig. 516, the ear. Make two ears, two fore and two hind legs. Mark eyes, nose, and mouth on the small end of the shell; curl the tail with a penknife or scissors and glue it on the pig by spreading out the slits and fastening them on the back of the pig; then in turn glue in place the legs and ears and behold! the pig (Fig. 512).
(Fig. 512). Choose a medium-sized white egg and empty its contents like this: carefully make a small hole at each end of the egg, just big enough to blow out its contents from one end by blowing into the hole at the other end; once that's done, cut shapes from sturdy paper or cardboard for the diagram,[368] Fig. 513, the tail; Fig. 514, the front leg; Fig. 515, the back leg; Fig. 516, the ear. Make two ears, two front legs, and two back legs. Draw the eyes, nose, and mouth on the small end of the shell; curl the tail with a penknife or scissors and glue it onto the pig by spreading out the slits and attaching them to the back of the pig; then glue the legs and ears in place, and there you have it! the pig (Fig. 512).


The Spoon
The Spoon
(Fig. 517) requires a lengthwise half of an egg-shell, a piece of stiff cardboard and a bit of plain white tissue paper for its manufacture.[369] Cut the edges of half a shell evenly all around with a pair of sharp scissors, being careful not to crack the shell during the operation; then cut the handle from cardboard (Fig. 518). Glue and attach the handle with sealing wax on the outside of the small end of the shell, bending the handle down a little where it joins the shell, secure the handle still more tightly in place by fastening a piece of tissue paper (Fig. 519) over that portion of the handle which is glued to the egg-shell, allowing the tissue paper to extend out a little beyond either side of the handle and fasten the extensions tight down on the shell. When finished the spoon can be gilded along its edges or otherwise ornamented (Fig. 517).
(Fig. 517) needs half of an eggshell, a stiff piece of cardboard, and a bit of plain white tissue paper to make it.[369] Cut the edges of the half shell evenly all around with a pair of sharp scissors, being careful not to crack the shell while doing this; then cut the handle from the cardboard (Fig. 518). Glue and attach the handle with sealing wax on the outside of the small end of the shell, bending the handle down slightly where it connects to the shell, and secure the handle even more tightly by placing a piece of tissue paper (Fig. 519) over the part of the handle that is glued to the eggshell, letting the tissue paper extend a little beyond both sides of the handle and pressing the extensions down tightly onto the shell. Once you're done, you can gild the edges of the spoon or decorate it in other ways (Fig. 517).


An Umbrella
A Rain Brolly
made of half an egg-shell would protect us from the rain if only it were large enough, but such an umbrella is a good size for your purpose, because you desire an odd little toy and here it is (Fig. 520). To make the umbrella, cut from paper (Fig. 521), fold it together as in Fig. 522, turn down and outward the upper flaps; then glue the two[370] sides of the folded handle tightly together; next fasten the spread-out flaps down on the inside centre of half an egg-shell with sealing wax; be sure to make the handle come in the middle of the shell, otherwise the umbrella will lop over a little to one side. The rim and handle may be painted brown or black, and lines to represent the seams of a real umbrella can be made on the outer surface of the shell.
made of half an egg-shell would protect us from the rain if only it were big enough, but this umbrella is a good size for what you need because you want a quirky little toy, and here it is (Fig. 520). To make the umbrella, cut from paper (Fig. 521), fold it together like in Fig. 522, then fold down and outward the upper flaps; next, glue the two[370] sides of the folded handle tightly together; then attach the spread-out flaps down on the inside center of half an egg-shell with sealing wax; make sure the handle is in the middle of the shell; otherwise, the umbrella will tilt to one side. You can paint the rim and handle brown or black, and you can draw lines on the outer surface of the shell to mimic the seams of a real umbrella.


The Doll’s Chair
The Doll's Chair
is not difficult to make. Cut Fig. 523 from medium-weight paper, not too heavy, ornament it as in Fig. 524 or in any other way you may fancy, then take half an egg-shell and glue the[371] chair seat over the open end with melted sealing wax, bend the back in an upright position and allow the slit edges of the seat to be bent down on the egg-shell and fasten in place. The bottom of the shell must be levelled off a little and the hole covered with a piece of paper, in order to make the chair stand up as it should. If tinted paper be used in making this toy it enhances the appearance, though the colored paper is not necessary, as white ornamented makes a very pretty little chair.
Making it is not hard. Cut Fig. 523 from medium-weight paper, not too thick, and decorate it as shown in Fig. 524 or however you like. Then take half an eggshell and glue the[371] chair seat over the open end with melted sealing wax. Bend the back into an upright position and let the edges of the seat be bent down on the eggshell and secure them. The bottom of the shell should be evened out a bit, and the hole covered with a piece of paper to make the chair stand correctly. Using colored paper for this toy makes it look better, though white decorated paper can create a very cute little chair too.


Strawberry
Strawberry

The strawberry is in reality a candy box. Take a fine-looking egg and blow out its contents, then dye or paint it red and with black ink mark the dots as in Fig. 525. Next fill the egg-shell with small candies and cover the opening at the top with a piece of green tissue paper cut like Fig. 526. Fasten the paper on the shell with paste used sparingly and only where it is necessary. On the top of the strawberry glue a bow of narrow green ribbon[372] and the candy box will be finished and ready for a unique Easter gift.
The strawberry is actually a candy box. Take a nice-looking egg and blow out its contents, then dye or paint it red and use black ink to mark the seeds like Fig. 525. Next, fill the eggshell with small candies and cover the opening at the top with a piece of green tissue paper cut like Fig. 526. Attach the paper to the shell with a little bit of paste where it's needed. On top of the strawberry, glue a bow made of narrow green ribbon[372], and your candy box will be complete and ready for a special Easter gift.

A Little Hanging Basket
A Small Hanging Basket
can be fashioned from half an egg-shell with narrow ribbon pasted over its edge, a bow of the ribbon on the bottom and two more at the sides covering the ends of a loop of the same narrow ribbon securely glued on the shell (Fig. 527).
can be made from half an eggshell with narrow ribbon glued over its edge, a bow made from the ribbon at the bottom, and two more bows on the sides covering the ends of a loop of the same narrow ribbon securely attached to the shell (Fig. 527).
The Doll’s Cradle
The Doll's Cradle


Bird’s Nest
Bird's Nest
The bird’s nest is simply half of an egg-shell, the outside covered first with a thin coat of glue and then with moss. This is to be filled with candy eggs (Fig. 530).
The bird's nest is just half of an eggshell, with the outside first covered in a thin layer of glue and then with moss. This will be filled with candy eggs (Fig. 530).
Sail Boat
Sailboat
The egg-shell boat will sail very prettily in a basin of water. It is half of a shell, with a tissue-paper sail (Fig. 531), the mast cut of stiff paper (Fig. 532), folded at the dotted line. Fig. 533 is the sail cut from colored or white tissue paper. The straight edge of the sail is placed in the fold of the mast and the two halves of the mast pasted[374] together down to the cross line at the bottom. This lower part is slit up, as in diagram 532, and the flaps bent in opposite direction. These are used for braces in holding the mast upright and are glued to the bottom of the boat. The pennant (Fig. 534) is cut of bright-colored tissue paper, and fastened on the top of the sail (Fig. 531).
The egg-shell boat will sail very nicely in a bowl of water. It's half of a shell, with a tissue-paper sail (Fig. 531), and the mast made from stiff paper (Fig. 532), folded at the dotted line. Fig. 533 is the sail made from colored or white tissue paper. The straight edge of the sail fits into the fold of the mast, and the two halves of the mast are glued together down to the cross line at the bottom. This lower part is cut up, as shown in diagram 532, and the flaps are bent in opposite directions. These are used for braces to keep the mast upright and are glued to the bottom of the boat. The pennant (Fig. 534) is cut from bright-colored tissue paper and attached to the top of the sail (Fig. 531).


Fig. 535 represents the head of
Fig. 535 shows the head of
The Mikado
The Mikado
fashioned from an egg. The egg must first be pierced at both ends, and the contents blown out, leaving the hollow shell; then a face, as nearly as possible resembling the Mikado, painted on the egg. A narrow strip of black paper (that encasing needles will answer the purpose) must be pasted on the back of the head, and made to stand erect with the[375] top end curled forward as in Fig. 535; the egg should then be painted black, except the face, as seen in the picture. The head must be made to stand in the same manner that Columbus made his egg stand, by levelling off a portion of the end.
fashioned from an egg. First, you need to pierce the egg at both ends and blow out the contents, leaving just the empty shell. Then, paint a face that closely resembles the Mikado on the egg. A thin strip of black paper (wrapping from needles will work) should be glued on the back of the head and made to stand upright, with the top end curled forward like in Fig. 535; then paint the egg black, except for the face, as shown in the picture. The head should be made to stand similarly to how Columbus made his egg stand, by flattening a bit off one end.

To Make the Pin-Cushion
To Make the Pincushion
(Fig. 536), cut two pieces of satin or silk of any desired color by pattern (Fig. 537); sew the two pieces together, leaving a small opening; fill the bag with bran, sew up the opening, and tie around the egg cushion a narrow ribbon matching the color of the cushion, making a fancy bow at one end, and a bow and loops at the other. Place in pins to form the word “Easter” (Fig. 536).
(Fig. 536), cut two pieces of satin or silk in any color you like by pattern (Fig. 537); sew the two pieces together, leaving a small opening; fill the bag with bran, sew up the opening, and tie a narrow ribbon around the egg cushion that matches the color of the cushion, making a fancy bow at one end and a bow with loops at the other. Insert pins to spell out the word “Easter” (Fig. 536).

Fig. 538 shows the head of
Fig. 538 shows the head of
Napoleon,
Napoleon,
and that you may not be behind the times in your hero worship, I am going to tell how you may make a little Napoleon for yourself. At least you may make a Napoleon head, and Napoleon’s head was really the greatest part of him; his heart, I fear, was not so great, and his body, we know, was insignificant.
and so you won’t fall behind in your admiration for heroes, I’m going to show you how to create your own little Napoleon. At the very least, you can make a Napoleon head, and Napoleon’s head was truly his best feature; his heart, I’m afraid, wasn’t as admirable, and his body, we know, was quite unremarkable.
Use a goose egg for the head; the dimensions given for the hat are intended for a large egg. Blow the egg from the shell in the manner described. Make the largest hole in the small end of the shell and enlarge this hole to the size of a silver dime.
Use a goose egg for the head; the measurements provided for the hat are meant for a large egg. Blow out the egg from the shell as described. Make the biggest hole at the small end of the shell and widen this hole to the size of a silver dime.

Now, Napoleon had what is called a well-balanced head. That was one cause of his greatness; it could not be upset by anything that went on around him. So, to make a head that will bear the stamp of Napoleon’s character, we must contrive to have it keep its position, or balance; to stand erect, unaided and alone, and it can be done in this way:
Now, Napoleon had what’s known as a well-balanced mind. That was one reason for his greatness; it couldn’t be shaken by anything happening around him. So, to create a mind that reflects Napoleon’s character, we must ensure it maintains its position or balance; it should stand tall, unaided and alone, and this can be achieved this way:

When the egg has been blown from the shell place the shell in a perfectly upright position, large end down, in an egg-cup, or anything that will hold it steady. Into the large hole pour a little melted sealing wax, and on top of that pour a little melted[377] lead, or some pieces of shot, taking care to have the weight fall directly in the centre to make a perfect balance.
When the egg has been emptied from the shell, place the shell upright, with the larger end down, in an egg cup or anything that will keep it steady. Pour a bit of melted sealing wax into the large hole, and then pour some melted[377] lead or some pieces of shot on top. Be sure to let the weight fall directly in the center to achieve perfect balance.
Fig. 539 is Napoleon’s face, which you must draw on one side of the egg with black ink. Ink the hair black. Blacken the shell on the other side, too, for the hair on the back of the head. In drawing the face on the shell remember that the largest end of the shell is the chin, the smallest end the top of the head. To be sure, the real Napoleon never had a hole in the top of his head that we ever heard of, but the hole in the top of our Napoleon’s head will not show when his hat is on, and as the hat is to be glued in place no one will ever be any the wiser.
Fig. 539 shows Napoleon’s face, which you need to draw on one side of the egg with black ink. Color the hair black. Also, darken the shell on the other side for the hair on the back of his head. When drawing the face on the shell, remember that the wider end of the shell is the chin, and the narrower end is the top of the head. Sure, the real Napoleon never had a hole in the top of his head that we know of, but the hole in our Napoleon’s head won’t be visible once his hat is on, and since the hat will be glued in place, no one will ever find out.

To make the hat, or
To create the hat, or
“Chapeau Bras,”
“Hat and Cane,”
as Napoleon would have called it, and which means a military cocked hat, you must have some black paper. For the brim a[378] piece five inches square will be needed, as it measures just that many inches from front to back and from side to side. Cut out the brim from pattern (Fig. 540). Cut the hole near the centre and cut the slits around it as shown by the heavy lines. Bend up the little strips or laps, as denoted by the dotted line around the hole. The other dotted lines show where the brim is to be turned up front and back, but the crown must be glued on first.
as Napoleon would have called it, which means a military cocked hat, you need some black paper. For the brim, a [378] piece five inches square will be needed, as it measures exactly that from front to back and from side to side. Cut out the brim using pattern (Fig. 540). Cut the hole near the center and cut the slits around it as shown by the heavy lines. Bend up the little strips or laps, as indicated by the dotted line around the hole. The other dotted lines show where the brim should be turned up at the front and back, but the crown must be glued on first.

Fig. 541 is the pattern of the crown. From front to back it measures three inches; from side to side, at its widest part, three and a quarter inches; at the narrowest part the measure is two inches. The heavy line shows where it is to be cut, the dotted line where it is to be folded. Turn in the laps at the sides, bring them together and paste neatly. Fit the crown on the brim, over the laps of the brim, and paste the laps of the brim to the inside of the crown. Turn up the brim according to the dotted lines on Fig. 540. At the points shown by the crosses on the front of the brim put a drop of paste and bring them up to meet the crosses on the crown of the chapeau. Place Napoleon’s chapeau on Napoleon’s head as in Fig. 538, and glue it to the shell. Now set the little hero before you on the table, touch him with your finger, and, if the weight has been well placed, he will nod and bow, but his head will always regain its level position.
Fig. 541 shows the crown pattern. From front to back, it measures three inches; from side to side, at its widest point, it's three and a quarter inches; at the narrowest point, it measures two inches. The heavy line indicates where to cut, while the dotted line shows where to fold. Tuck in the flaps at the sides, bring them together, and glue them neatly. Fit the crown onto the brim, over the flaps of the brim, and glue the flaps of the brim to the inside of the crown. Turn up the brim according to the dotted lines on Fig. 540. At the points marked by the crosses on the front of the brim, apply a drop of glue and bring them up to meet the crosses on the crown of the hat. Place Napoleon’s hat on his head as shown in Fig. 538, and glue it to the shell. Now set the little hero in front of you on the table, touch him with your finger, and if the weight is balanced correctly, he will nod and bow, but his head will always return to its upright position.
Hero though he is, Napoleon is the better for a companion, and we will give him his first wife, Josephine, whom he crowned Empress of France on December 2, 1805, the day of his own coronation.[379]
Hero though he is, Napoleon is better with a companion, and we will give him his first wife, Josephine, whom he crowned Empress of France on December 2, 1805, the day of his own coronation.[379]

To express in a measure the regal dignity of
To convey the royal dignity of
Josephine
Josephine
on that occasion, her head must also be held erect; prepare the shell, therefore, as you did the one for Napoleon’s head, with this difference—place the weight in the small end of the egg-shell, instead of the large end.
on that occasion, her head must also be held up; prepare the shell, therefore, just like you did for Napoleon’s head, but this time—put the weight in the small end of the eggshell, instead of the large end.

Draw Josephine’s queenly countenance (Fig. 542) on the egg-shell, placing her chin at the small end. Make her tiara of gold paper, which you can spangle, if you like, to represent the diamonds of which it was composed. Fig. 543 shows how to cut it. Fig. 544 is the pattern for her crown and should also[380] be made of gold paper. Paste the two ends of the band of the crown together to form a circle, then draw the ends of the arches together to meet in the middle, over the top. Fasten these together with needle and thread on which a small glass bead has been strung. The bead will hide the stitches and also take the place of the small cross which occupies that position on the crown of the real Empress. With your finger curve the arches out as shown in the sketch of the finished head (Fig. 545).
Draw Josephine’s queenly face (Fig. 542) on the egg-shell, placing her chin at the smaller end. Make her tiara out of gold paper, which you can decorate, if you want, to represent the diamonds it was made from. Fig. 543 shows how to cut it. Fig. 544 is the pattern for her crown and should also[380] be made of gold paper. Glue the two ends of the crown band together to form a circle, then bend the ends of the arches together to meet in the middle at the top. Secure these together with a needle and thread that has a small glass bead strung on it. The bead will cover the stitches and also serve as the small cross that appears on the crown of the real Empress. Use your finger to curve the arches out as shown in the sketch of the finished head (Fig. 545).

The crown and tiara are not fastened together, but are placed on separately, for Josephine wore the diamond tiara when she was crowned. Glue the tiara to the head first, bringing the ends around to meet rather low down at the back; then set the crown back of the tiara and glue in place.
The crown and tiara are not attached, but are placed on separately since Josephine wore the diamond tiara during her coronation. First, glue the tiara to the head, bringing the ends around to meet fairly low down at the back; then set the crown behind the tiara and glue it in place.
From a piece of white tissue paper cut a ruff, after pattern (Fig. 546); crimp the ruff with the blade of a knife or scissors and glue to the back and sides of Josephine’s head.
From a piece of white tissue paper, cut a ruff according to the pattern (Fig. 546); crimp the ruff with a knife or scissors and glue it to the back and sides of Josephine’s head.

These little heads will be very amusing if you place them opposite each other and set them nodding and bowing, Josephine to Napoleon and Napoleon to Josephine.
These little heads will be really entertaining if you position them facing each other and get them to nod and bow, Josephine to Napoleon and Napoleon to Josephine.
The materials used for the
The materials used for the
Good-morning Chick
Good morning, Chick
are simply an egg-shell, a piece of wire, some light-yellow worsted, two black beads and a small piece of writing paper.
are just an eggshell, a piece of wire, some light yellow yarn, two black beads, and a small piece of writing paper.


Select a nice large egg, and with a sharp knife cut off the small end, as evenly as possible, Fig. 547. After emptying the shell rinse it carefully, and while it is drying make the chicken’s head (Fig. 548); cut from a light quality of cardboard[382] two rings like Fig. 549, place them together, and with the worsted wrap the rings over and over, as shown in Fig. 549, until the hole in the centre is nearly filled up; then, holding it firmly between the forefinger and thumb, insert the point of a pair of sharp scissors in the outer edge, slipping it between the two rings; cut the worsted all the way around, and, still holding it firmly, slide a piece of strong thread between the rings, and, drawing it around once, tie tightly. Take the rings from the ball thus made, and clip and trim it perfectly round. Sew the two round black beads on the head for eyes; make the beak of writing paper after Figs. 550 and 551. Fig. 550 is the upper, Fig. 551 the lower part of beak. Pinch into shape as shown by dotted lines; and with a little mucilage stick the upper end of Fig. 551 to the underside[383] of Fig. 550, as in Fig. 552. Paint the beak a light yellow, and gum to the head. Fig. 548 shows the head complete.
Select a nice large egg, and with a sharp knife cut off the small end as evenly as possible, Fig. 547. After emptying the shell, rinse it carefully, and while it’s drying, make the chicken’s head (Fig. 548); cut two rings from a light quality of cardboard[382] like Fig. 549, place them together, and wrap the rings with some worsted over and over, as shown in Fig. 549, until the hole in the center is almost filled; then, holding it firmly between your forefinger and thumb, insert the point of a pair of sharp scissors in the outer edge, slipping it between the two rings; cut the worsted all the way around, and, still holding it firmly, slide a piece of strong thread between the rings and tie it tightly after drawing it around once. Take the rings off the ball you've created, and clip and trim it perfectly round. Sew on two round black beads for the eyes; make the beak out of writing paper following Figs. 550 and 551. Fig. 550 is the upper part, Fig. 551 is the lower part of the beak. Pinch it into shape as shown by the dotted lines; and with a little glue, stick the upper end of Fig. 551 to the underside[383] of Fig. 550, as in Fig. 552. Paint the beak light yellow, and glue it to the head. Fig. 548 shows the head completed.


Holes must now be made in the shell for the legs to come through, as shown in Fig. 547. This is done by boring carefully with a large, sharp-pointed needle (being cautious not to crack the shell in the process), until the holes are large enough to admit the wire. Use a piece of ordinary black hat-wire, four inches long, for the legs, bend in the shape of Fig. 553 and slip through the holes in the shell. Cut a piece of wire two inches long, and another one inch in length, for the foot; bend in the shape of Fig. 554 and fasten to the leg by wrapping tightly with black linen thread.
Holes need to be made in the shell for the legs to fit through, as shown in Fig. 547. This is done by carefully boring with a large, sharp needle (being careful not to crack the shell in the process) until the holes are big enough for the wire. Use a piece of regular black hat wire, four inches long, for the legs, bend it into the shape of Fig. 553 and thread it through the holes in the shell. Cut a piece of wire two inches long, and another one inch long, for the foot; bend them into the shape of Fig. 554 and secure them to the leg by wrapping tightly with black linen thread.


Fit the head in the hole left in the small end of the shell, and if the work has been well done the chicken will look very natural indeed. The small piece of shell taken from the end will give it a still more cunning appearance if fastened on the chicken’s head (Fig. 555). This little trifle makes a very pretty bonbonnière, as the shell is quite strong enough to hold candy, and the head may be removed to allow of its being filled or emptied.
Fit the head into the hole left in the small end of the shell, and if the work has been done well, the chicken will look quite natural. The small piece of shell taken from the end will give it an even cuter look if attached to the chicken’s head (Fig. 555). This little trinket makes a lovely bonbonnière, as the shell is strong enough to hold candy, and the head can be removed for filling or emptying.
To make the
To create the
Good-night Chick
Good night, Chick
first blow the egg, then, boring with a needle in the manner previously described, run a line of perforations lengthwise around the shell, as seen in Fig. 556. This will allow of the shells being opened quite evenly. Cover the edges neatly with lutestring ribbon pasted down on both sides like a binding. Paste a piece of the same ribbon, twelve inches long, across the two halves of the shell, to connect them, as in Fig. 557. Make the little chicken, which should nestle coseyly within the shell, of two worsted balls, using rings two inches in diameter for the body. Trim the body into a slightly oval shape. The chicken’s head is made in the same way as described for “Good Morning.” Glue it to the body. In the illustration (Fig. 558) the egg is shown both closed and open, which will give some idea of what a pretty little gift it really makes. The entire chicken must be glued in the shell as it is not intended to come out.
first, blow out the egg, then, using a needle as described earlier, create a line of small holes all around the shell, as seen in Fig. 556. This will help open the shells evenly. Cover the edges neatly with lutestring ribbon glued down on both sides like a binding. Attach a piece of the same ribbon, twelve inches long, across the two halves of the shell to connect them, as shown in Fig. 557. Make the little chicken, which should fit snugly inside the shell, from two worsted balls, using rings that are two inches in diameter for the body. Trim the body into a slightly oval shape. The chicken’s head is made the same way as explained for “Good Morning.” Glue it onto the body. In the illustration (Fig. 558), the egg is shown both closed and open, which gives an idea of how pretty this little gift really is. The entire chicken must be glued inside the shell as it is not meant to come out.
CHAPTER XXXI
HOME-MADE CANDLESTICKS


Candlesticks are always decorative; even the old tin candlestick with its half burnt tallow candle has a certain picturesqueness that the artist recognizes when he chooses that as an accessory to his picture instead of the prosaic oil lamp. Then again, candlesticks give a wide scope to individuality in design, and that it gives expression to one’s originality is one of the greatest charms of pottery making.
Candlesticks are always decorative; even the old tin candlestick with its half-burnt tallow candle has a certain charm that artists appreciate when they choose it as an accessory for their art instead of the ordinary oil lamp. Moreover, candlesticks allow for a lot of personal expression in design, and the way they showcase one’s originality is one of the most appealing aspects of pottery making.
A potter’s wheel is not at all necessary. The primitive method of coiling the clay and gradually, without hurry, building it up into the form desired is far the better way for home workers.
A potter’s wheel isn't really necessary. The basic method of coiling the clay and slowly, without rushing, shaping it into the desired form is a much better approach for those working at home.
Get Your Clay
Grab Your Clay
at the nearest pottery where anything finer than flower pots is made, and if it is a place where they turn out only earthenware ask for their finest clay. Very frequently they make a quantity[386] of extra pieces for holiday trade and for these prepare a finer clay than they ordinarily use. Fifty pounds of clay will keep you busy a long while and twenty-five pounds will be sufficient for a number of small pieces. It sells at about one and a half cents per pound at most of the potteries.
at the nearest pottery where anything more delicate than flower pots is made, and if it’s a place that only produces earthenware, ask for their best clay. Often, they create extra pieces for holiday sales, and for those, they prepare a higher-quality clay than what they usually use. Fifty pounds of clay will keep you occupied for a while, and twenty-five pounds will be enough for several small pieces. It costs about one and a half cents per pound at most potteries.

Break your dry clay into small pieces with a hammer and then pound to a powder. Put it into an earthen crock that has a cover of its own, and mix with water until it is of the consistency of dough. If you are not to use it immediately, and it is rather stiff, make several holes in the clay with your finger, fill each hole with water, cover the crock closely with its lid and set away until wanted.
Break your dry clay into small pieces with a hammer and then crush it into a powder. Place it in a clay pot with its own lid, and mix it with water until it reaches the consistency of dough. If you're not going to use it right away and it’s pretty stiff, make several holes in the clay with your finger, fill each hole with water, cover the pot tightly with its lid, and set it aside until you need it.


When you are
When you're
Ready for Work
Prepared for Work
take out a good sized lump of clay, put it on a pastry board and knead it like bread. This is to work out all the air and make the grain close and fine. If the clay seems too stiff spread it out in a flat cake, pour a little water in the middle, bring the edges together and knead again until the whole piece is softened. When the clay is too soft spread it out and put it in the air where it will soon stiffen. If it is freezing out of doors do not expose the clay but let it dry off in the house. From time to time, while you are working the clay, cut the lump in two with a palette knife or ordinary table knife (A, B, Fig. 559).[387] Put the outside edges together (C, D, Fig. 560) and continue kneading. The professional potter has a wire strung above his table and on it cuts his clay quickly and neatly in half, but a knife will answer very well. You may have a number of
take out a good-sized chunk of clay, place it on a pastry board, and knead it like dough. This process helps to remove all the air and make the texture smooth and fine. If the clay feels too stiff, flatten it into a disk, pour a bit of water in the center, pull the edges together, and knead again until the entire piece is softened. When the clay is too soft, spread it out and leave it in the air to firm up. If it’s freezing outside, don't expose the clay; let it dry indoors. Occasionally, while you’re working with the clay, cut the lump in half with a palette knife or a regular table knife (A, B, Fig. 559).[387] Bring the outer edges together (C, D, Fig. 560) and keep kneading. A professional potter usually has a wire strung above his table to quickly and neatly cut the clay in half, but a knife works just fine. You might have a number of
Modelling Tools
Modeling Tools
or a few, and you can do very well with two or three contrived by yourself. A wire tool like Fig. 561 is useful in cutting away the clay when the walls of a piece are too thick, but a wire hairpin answers the purpose almost as well. A wooden skewer, used by butchers for pinning meat, is also good for some purposes. In my own work one summer, when far out of reach of modelling tools, I found use for a palette knife, the handle of an old spoon, a hairpin and a steel ink eraser with a curved blade. But best of all and most to be depended upon are the fingers, for these sensitive, flexible, natural tools can perform most of the work alone. Fig. 562 is a small jar made entirely with the hands, no tool of any kind, save the fingers, having been used in the modelling. You should have a good
or a few, and you can do very well with two or three made by yourself. A wire tool like Fig. 561 is handy for cutting away clay when the walls of a piece are too thick, but a wire hairpin works almost just as well. A wooden skewer, used by butchers for pinning meat, is also good for some tasks. In my own work one summer, when I was far from any modeling tools, I found uses for a palette knife, the handle of an old spoon, a hairpin, and a steel ink eraser with a curved blade. But the best and most reliable tools are your fingers, as these sensitive, flexible, natural tools can handle most of the work on their own. Fig. 562 is a small jar made entirely by hand, with no tools used besides the fingers during the modeling. You should have a good
Strong Table,
Strong Table,
one you have no fear of harming, and that stands firmly and evenly on the floor; a piece of smooth, rather thick board about[388] ten inches square upon which to build your pottery and a small pastry board. Place the table near a window where there is plenty of light and under it lay a piece of oilcloth to protect the floor; thus prepared you may plunge into your work and accomplish wonders without disturbing the general order of the room. At a convenient place on the table set a small bowl of water and a cup of slip. The slip is simply clay softened in water until it is about as thick as cream. A large piece of old muslin, that you can tear in pieces as needed, should always be at hand, and a wet sponge on which to wipe your fingers.
one you don’t have to worry about damaging, and that stands solidly on the floor; a smooth, fairly thick board about[388] ten inches square for building your pottery and a small pastry board. Position the table near a window with plenty of light, and put a piece of oilcloth underneath to protect the floor; with this setup, you can dive into your work and create amazing things without messing up the overall neatness of the room. In a convenient spot on the table, keep a small bowl of water and a cup of slip. The slip is just clay mixed with water until it's about as thick as cream. Always have a large piece of old muslin that you can tear into pieces as needed, and a wet sponge for cleaning your fingers.
Place your pastry board on the table and when the clay is kneaded lay it to one side and scrape the board, clearing off all dried particles. Unless this precaution is taken crumbs of dry clay are apt to mix with the moist clay and make it rough and gritty.
Set your pastry board on the table, and once the clay is kneaded, set it aside and scrape the board to remove any dried bits. If you don’t take this step, the crumbs of dry clay can mix with the wet clay, making it rough and gritty.

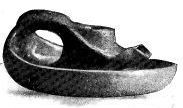


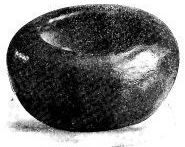

Have ready a rather deep
Have a pretty deep
China Saucer,
China Plate,
tear off a square of muslin large enough to cover the inside of the saucer and to extend over its edge. Dip the muslin in the bowl of water and lay it flat in the saucer, pressing it down as evenly as possible and smoothing out the air bubbles.
tear off a square of muslin large enough to cover the inside of the saucer and extend over its edge. Dip the muslin in the bowl of water and lay it flat in the saucer, pressing it down as evenly as you can and smoothing out the air bubbles.
Now take
Now take
A Large Handful of Clay,
A Big Handful of Clay,

roll it between your palms, lay it on the pastry board in front of you and with an even pressure of your hands roll it back and forth until it lengthens out and forms a snake-like piece a little[389] more than half an inch in diameter (Fig. 566). Do not let the roll flatten, keep it as round as possible and of an equal size from end to end, then press it with your fingers and flatten the top just enough to take off its roundness. When this is done place one end of the roll narrow side up exactly in the centre of the saucer and make
roll it between your palms, lay it on the pastry board in front of you, and using even pressure from your hands, roll it back and forth until it stretches out and forms a snake-like piece a little[389] more than half an inch in diameter (Fig. 566). Don’t let the roll flatten; keep it as round as possible and maintain an equal size from end to end. Then, press it with your fingers and flatten the top just enough to remove its roundness. Once that's done, place one end of the roll narrow side up right in the center of the saucer and form
A Close Coil
A Close Coil

Continue to coil the clay until the saucer is filled to the edge, then build it up[390] one coil higher on the edge and cut the last end of the roll as you did the first. Press this end down to join the roll beneath it, making the joint invisible. Now
Continue to roll the clay until the saucer is filled to the edge, then build it up[390] one more coil higher on the edge and trim the last end of the roll, just like you did with the first. Press this end down to connect it with the roll below, making the joint seamless. Now
Dip Your Fingers in Water
Dip Your Fingers in Water
and rub them gently over the coiled clay in the saucer to smooth it, but be careful not to get it too wet and not to lower the coil on the edge in the process. If depressions occur fill them with fresh clay joining the edges of the new clay to the coiled clay, making it one piece with no cracks or seams. In adding clay at any time the new piece must always become one with the old, else it will crack when dry or in the firing, and it is best to brush the place to be filled with slip before adding the clay. Set your saucer away at this stage of the work until the clay stiffens a little and the piece becomes what is called “set.” It is just here that you must use patience, for to continue to work while the clay is too soft will frequently spoil the whole thing and the only remedy is to bunch the clay and begin over again. To be successful in the making of pottery one’s enthusiasm must be of the kind that will not cool during the necessary waiting periods.
and rub them gently over the coiled clay in the saucer to smooth it out, but be careful not to make it too wet and not to push down the coil on the edge while doing so. If you see any dips, fill them with fresh clay, making sure to blend the edges of the new clay with the coiled clay, creating one solid piece with no cracks or seams. Anytime you add clay, it needs to become one with the old clay; otherwise, it will crack when it dries or during firing. It’s best to brush the area that needs filling with slip before adding the new clay. Set your saucer aside at this stage until the clay stiffens a bit and the piece reaches what’s called “set.” This is where you need to be patient, because continuing to work while the clay is too soft can ruin everything, and the only fix is to gather the clay and start over. To succeed in making pottery, your enthusiasm must be the kind that doesn't fade during the necessary waiting times.

When the clay in your saucer has become firm but is still quite pliable, dip another square of muslin in water, spread it inside the clay saucer and
When the clay in your saucer has hardened but is still somewhat flexible, dip another piece of muslin in water, lay it inside the clay saucer and
Fit in Another Saucer
Make Room for Another Saucer
of china a trifle smaller than the first. This will give you a pile of three saucers one within the other, first china, then clay, then china. Now cover your small board with wet muslin and turn[391] your stack of saucers upside down on the board. Lift off the top saucer and you have your clay saucer inverted on top of the smaller china saucer. You will find all the seams of the coil showing on this underside and must join them and make the clay one piece as you did on the inside. With your wire tool (Fig. 561) or a hairpin, carefully
of china a bit smaller than the first. This will create a stack of three saucers nesting inside each other: first china, then clay, then china. Now, cover your small board with damp muslin and flip your stack of saucers upside down on the board. Remove the top saucer and you'll have your clay saucer flipped on top of the smaller china saucer. You will see all the seams of the coil visible on this underside and need to join them to make the clay one piece, just like you did on the inside. Using your wire tool (Fig. 561) or a hairpin, carefully

Cut Down the Parts
Trim the Parts
that seem too thick, but at the same time beware of making them so thin as to weaken the walls of the saucer. It is better to fill out and make a piece rather heavy than to try at first to obtain the delicacy one naturally desires, for thin walls often collapse in unaccustomed hands. As you work, turn the board around and around to be sure the contour is symmetrical. It is often a good thing to raise the work to the level of the eye in order the better to detect inaccuracies of outline.
that seem too thick, but at the same time be careful not to make them so thin that the walls of the saucer become weak. It's better to fill them out and make a piece somewhat heavy rather than trying to achieve the delicacy that one naturally wants, because thin walls often collapse in inexperienced hands. As you work, rotate the board to ensure the shape is symmetrical. It’s often helpful to raise the work to eye level to better spot any outline inaccuracies.

When you have finished the underside and the clay seems firm enough to stand without support, turn it right side up on the board, always with the wet muslin between to keep it from sticking. Lift out the small saucer which is still in the clay saucer and proceed to remove all traces of the line in the clay made by the ridge on the bottom of the china saucer. This can be done by smoothing down and adding more clay to make a curve instead of an angle.
When you've completed the underside and the clay feels firm enough to stand on its own, flip it over onto the board, always placing wet muslin underneath to prevent it from sticking. Take out the small saucer that's still in the clay saucer and start removing any marks left in the clay by the ridge on the bottom of the china saucer. You can do this by smoothing it out and adding more clay to create a curve instead of a sharp angle.
With the wooden skewer make a dot in the centre of the clay saucer, measuring the distance to be sure it is exact, then take
With a wooden skewer, make a mark in the center of the clay saucer, measuring the distance to ensure it's accurate, then take
A Half Candle,
A Half Candle,
wrap it spirally and closely with a narrow strip of wet muslin (Fig. 569) and stand it directly over the mark (Fig. 570). Make little crossed lines with a sharp tool, or hat pin, around the candle[392] like Fig. 571; then roll some clay for coiling the candle holder, flattening the roll as you did for the saucer.
wrap it spirally and tightly with a narrow strip of wet muslin (Fig. 569) and position it directly over the mark (Fig. 570). Make small crossed lines with a sharp tool or hat pin around the candle[392] like Fig. 571; then roll some clay for coiling the candle holder, flattening the roll as you did for the saucer.


Before beginning to coil cover the roughened surface around the candle with slip, then press one sharpened end of the clay roll onto the saucer close to the candle (Fig. 572) and bring the roll once around the candle. Make crossed lines on top of the coil, brush with slip and coil again. Continue roughening the top of the coil and covering with slip until[393] you have built the holder up a little over two inches from the saucer, then sharpen the end of your roll and join it to the top (E, Fig. 573). With a brush dipped in slip, fill up, to some extent the creases between the coils and make the coil even and round where it may have been pressed out of shape, for in this part we allow the coil to show.
Before you start coiling, cover the rough surface around the candle with slip. Then, press one sharpened end of the clay roll onto the saucer near the candle (Fig. 572) and wrap the roll around the candle once. Create crossed lines on top of the coil, brush it with slip, and coil again. Keep roughening the top of the coil and covering it with slip until[393] you’ve built the holder up to a little over two inches from the saucer. Then sharpen the end of your roll and attach it to the top (E, Fig. 573). Using a brush dipped in slip, fill in the creases between the coils and make the coil even and round where it may have lost its shape, as we want the coil to be visible in this part.

When the walls of the holder are firm enough gently remove the candle and
When the holder's walls are sturdy enough, carefully take out the candle and
Smooth the Inside of the Holder
Smooth the Inside of the Holder
with a finger wet with slip. If this does not fill up the cracks use a rounded tool, but be very careful not to press the holder out of shape or enlarge the opening.
with a finger damp with slip. If this doesn't fill the cracks, use a curved tool, but be very careful not to distort the holder or make the opening bigger.

Make the Handle
Make the Handle
of a coil of clay as shown in Fig. 574. First the small coil, joining the base of the holder to the saucer, then the larger coil which connects the small coil, and the inside and the outside of the saucer. Use your first finger for keeping the hole in the centre of the large coil the proper size. Build up the edge of the saucer slantingly[394] to join the inner coil of the handle (F, Fig. 574) and allow a ridge to extend from the outer coil a short distance along the outside of the saucer (G, Fig. 574).
of a coil of clay as shown in Fig. 574. First, create a small coil that connects the base of the holder to the saucer, followed by a larger coil that links the small coil to both the inside and outside of the saucer. Use your index finger to maintain the right size for the hole in the center of the large coil. Gradually build up the edge of the saucer at an angle[394] to connect with the inner coil of the handle (F, Fig. 574) and allow a ridge to extend from the outer coil a short distance along the outside of the saucer (G, Fig. 574).
This Blending of Decoration with the Article
This Combination of Decoration with the Article
itself, making it appear a natural outgrowth from it, is a law of beauty in modeled decoration, which should always be kept in mind. No part of a piece of pottery should look as if it were simply stuck on and might drop off again, but rather as though it were a necessary part of the whole.
itself, making it appear a natural outgrowth from it, is a law of beauty in modeled decoration, which should always be kept in mind. No part of a piece of pottery should look as if it were simply stuck on and might drop off again, but rather as though it were a necessary part of the whole.
When your candlestick is in good shape and still moist, go over it with a camel’s-hair brush dipped in water, smoothing down any little unevenness in this way. Sometimes a coating of slip, well worked in with the brush will give a good surface. Set the piece away after this and let it stand undisturbed for several days, or until the clay has become quite dry and has turned almost white, then if it is still imperfect in shape
When your candlestick is in good condition and still damp, use a camel’s-hair brush dipped in water to smooth out any small uneven spots. Sometimes, applying a layer of slip, thoroughly blended with the brush, will create a nice surface. After this, put the piece aside and let it sit undisturbed for several days, or until the clay is completely dry and has turned almost white. Then, if it’s still not perfect in shape,
Scrape it Down
Scrape It Down
with a steel tool or pocket knife. The clay is so easily shaved off at this stage the danger lies in making too deep a cut and the work should be done gradually and patiently. For the final rubbing use a piece of fine emery paper. Even this must be carefully handled, for if pressed heavily on the clay it, also, will cut too deeply.
with a metal tool or pocket knife. The clay is so easy to shave off at this stage that the risk is in making too deep a cut, so the work should be done slowly and carefully. For the final smoothing, use a piece of fine sandpaper. Even this must be handled with care, because if pressed too hard on the clay, it can also cut too deeply.
Do not put your work away to dry in the sun or near a fire. If dried too rapidly the clay will crack. Sometimes it will crack when it dries, never so gradually; it may be from shrinkage or because the clay has not been sufficiently kneaded.
Do not leave your work out to dry in the sun or near a fire. If it dries too quickly, the clay will crack. Sometimes it will crack while drying, not gradually; this can happen due to shrinkage or because the clay hasn't been kneaded enough.
If Cracks Occur
If Cracks Form
while the clay is still moist fill in with new clay and slip. If the piece is perfectly dry mix some finely powdered baked clay with[395] water, making a thick paste, and fill the opening. You may be able to get the unglazed baked clay at the pottery, but if not put a thin cake of clay in any kind of a very hot oven and allow it to bake several hours, then grind to a fine powder. Keep this powder in a labelled box that it may always be at hand when needed.
while the clay is still wet, fill in with new clay and slip. If the piece is completely dry, mix some finely powdered baked clay with[395] water to create a thick paste, and fill the opening. You might be able to find unglazed baked clay at the pottery, but if not, place a thin layer of clay in any very hot oven and let it bake for several hours, then grind it into a fine powder. Keep this powder in a labeled box so it's always available when you need it.
It is generally supposed that when a piece of pottery cracks in the firing there is no remedy. This is very likely true with pieces that have been glazed, but with unglazed ware my own experience has proved that it can be mended. When an unglazed piece comes from the firing showing cracks, large or small, mix a thin slip of clay with a little finely powdered flint and run into the cracks until they are more than filled, then rub or scrape off the surplus. This formula was given me by a prominent art potter who also furnished the mixture.
It's generally believed that when a piece of pottery cracks during firing, there's no way to fix it. This is probably true for glazed pieces, but in my experience, unglazed pottery can be repaired. When an unglazed piece comes out of the kiln with cracks, whether big or small, mix a thin slip of clay with a bit of finely powdered flint and fill the cracks until they overflow, then rub or scrape off the excess. A well-known art potter gave me this method and provided the mixture as well.
In putting away
Putting away
Unfinished Work,
Incomplete Work,
cover with a damp cloth and keep the cloth damp until you are ready to go on with your modeling. Once hard the clay can no longer be worked, and unfinished pottery must always be kept moist. In the case of a piece having handles, spouts and like projections, place something under the cloth to hold it away from these parts and prevent its pushing them out of shape.
cover with a damp cloth and keep the cloth damp until you are ready to continue your modeling. Once the clay hardens, it can no longer be worked, so unfinished pottery must always be kept moist. If a piece has handles, spouts, or similar projections, place something under the cloth to keep it off these parts and prevent it from pushing them out of shape.
You May Glaze Your Candlestick
You Can Glaze Your Candlestick
with colored glaze before it is fired or you may have it fired and returned to you in “the bisque,” when it can be glazed and sent to be fired the second time. One firing really seems all that is necessary for small pieces, however. Fig. 563 was fired but once, the glaze having been applied to the unbaked clay and[396] it came from the pottery in a perfectly satisfactory condition, without crack or blemish.
with colored glaze before it is fired, or you can have it fired and returned to you in “the bisque,” at which point it can be glazed and sent for a second firing. For small pieces, one firing usually seems sufficient. Fig. 563 was fired only once, with the glaze applied to the unbaked clay, and[396] it came from the pottery in perfect condition, without cracks or blemishes.
The glaze used for all the pottery in the little group in our full-page illustration, is Marshing’s soft Limoges glaze which may be obtained where mineral colors for pottery and china painting are sold. The glaze is transparent when fired and is to be mixed with color unless the piece has underglaze decoration or the clay is colored. The proportion is one part dry color to nine parts dry glaze. Both come in powders and must be thoroughly mixed, then dissolved in a solution of gum arabic. Eight and one-half teaspoonfuls of glaze to one-half teaspoonful of underglaze color is sufficient for two candlesticks. Apply this with a No. 8 camel’s-hair brush and give the piece three coats, waiting each time for one coat to become thoroughly dry before putting on the next. Lay the color on evenly and do not allow little streams of glaze to run over the edges.
The glaze used for all the pottery in the illustrated group is Marshing’s soft Limoges glaze, which can be found where mineral colors for pottery and china painting are sold. The glaze is clear when fired and should be mixed with color unless the piece has underglaze decoration or the clay is already colored. The ratio is one part dry color to nine parts dry glaze. Both come in powder form and need to be thoroughly mixed, then dissolved in a solution of gum arabic. Eight and a half teaspoons of glaze to half a teaspoon of underglaze color is enough for two candlesticks. Apply this with a No. 8 camel’s-hair brush and give the piece three coats, making sure to let each coat dry completely before applying the next one. Apply the color evenly and avoid letting any streams of glaze run over the edges.
There are various
There are several
Other Methods of Coloring Pottery.
Other Ways to Color Pottery.
One is to work the dry color into the moist clay by kneading. For the little pitcher (Fig. 575) one tablespoonful of raw sienna was thoroughly worked into a lump of clay the size of a large apple and the pitcher then modelled from the colored clay. Prepared mineral color was not used, but dry “raw or green” color purchased at an ordinary paint shop. When quite dry the pitcher turned a beautiful ivory yellow, but became almost terra cotta when fired. The uncolored glaze was dissolved in gum arabic and applied after the first firing, and the pitcher was fired a second time.
One way to mix dry color into the wet clay is by kneading it. For the small pitcher (Fig. 575), one tablespoon of raw sienna was thoroughly blended into a lump of clay about the size of a large apple, and then the pitcher was shaped from the colored clay. Prepared mineral color wasn’t used; instead, dry "raw or green" color bought from a regular paint store was used. Once it dried, the pitcher turned a lovely ivory yellow but became nearly terracotta when fired. The uncolored glaze was mixed with gum arabic and applied after the first firing, and then the pitcher was fired again.
Another way to color your pottery is to mix the raw color with slip the consistency of cream and with it paint a design on the[397] unbaked clay. A little gum arabic added to the slip will make it adhere more closely and prevent its rubbing off. This must be fired before the uncolored glaze is applied. The little bowl (Fig. 576) was decorated in this way and the colors used were raw sienna and burnt sienna. But one coat of glaze was given the bowl which makes it look more like old Indian ware than if it had the very glossy surface.
Another way to add color to your pottery is to mix the raw color with a slip that has a creamy consistency, and then use it to paint a design on the[397] unbaked clay. Adding a bit of gum arabic to the slip will help it stick better and stop it from rubbing off. This needs to be fired before applying the uncolored glaze. The little bowl (Fig. 576) was decorated this way, using raw sienna and burnt sienna. It received one coat of glaze, which gives it a look more similar to old Indian pottery rather than a shiny surface.
Colored pottery
Colorful pottery
“In the Bisque”
“In the Bisque”
or unglazed state is often very beautiful and if designed to hold water or liquid of any kind the inside alone may be glazed, leaving the outside in its natural dull and porous condition.
or unglazed state is often very beautiful, and if it's designed to hold water or any liquid, the inside can be glazed while leaving the outside in its natural dull and porous condition.
Of the various designs shown here the saucers were used only for Fig. 563, and the sooner you are able to discard all such aids and depend upon your eye alone to guide your hands the more you will enjoy your work.
Of the different designs shown here, the saucers were used only for Fig. 563, and the sooner you can get rid of all those aids and rely on your eye alone to guide your hands, the more you'll enjoy your work.
Probably you can have your candlesticks fired at the pottery where you get your clay, but if you wish to carry on the work and experiment for yourself secure a kiln of your own by all means.
You can probably have your candlesticks fired at the pottery where you get your clay, but if you want to continue the work and experiment on your own, definitely get a kiln for yourself.

CHAPTER XXXII
WHAT TO MAKE OF BANANAS, ORANGES, AND APPLES

In the orange groves the great golden balls are ripening, and on the long-leaved banana trees hang the queer bunches of bananas, growing in their funny upside-down fashion. Pineapples, lemons and many other fruits are there, all growing and ripening that the children of the North may have them when their own delicious strawberries, peaches and plums have gone.
In the orange groves, the big golden oranges are ripening, and on the tall banana trees, the odd bunches of bananas hang, growing in their funny upside-down way. Pineapples, lemons, and many other fruits are there, all growing and ripening so that the kids from the North can have them when their own tasty strawberries, peaches, and plums are gone.
We are very glad of these Southern fruits, even the skins seem too good to throw away. And so they are.
We really appreciate these Southern fruits; even the peels feel too valuable to toss aside. And they are.
Save Your Orange, and Banana, and Apple Skins,
Save your orange, banana, and apple peels,
too, and see what delightful things you can make of them.
too, and see what great things you can create with them.
Long, long ago, before there were any steamboats, sailboats or even rowboats in the British Isles, when men’s clothes were[400] merely the skins of wild beasts tied on with leather thongs, the people went on the water in little circular boats called coracles. These boats were wickerwork baskets covered with the hides of animals and resembled bowls in shape. They were sent skimming over the water very rapidly by means of a paddle which was dipped in first on one side of the boat then on the other. The coracles were so small a man easily carried his boat on his back to transport it over dry land, looking, one would think, very much like a huge turtle walking on its hind legs.
A long time ago, before there were any steamboats, sailboats, or even rowboats in the British Isles, when men's clothing was just animal skins tied on with leather thongs, people traveled on the water in small circular boats called coracles. These boats were woven wicker baskets covered with animal hides and looked like bowls. They skimmed quickly across the water using a paddle, which was dipped first on one side and then on the other. The coracles were so small that a man could easily carry his boat on his back to transport it over land, making him resemble a giant turtle walking on its hind legs.
It is a boat like this most primitive one that you can make of
It’s a boat like this most basic one that you can create.
Half of an Orange Skin
Half an Orange Peel
It will float, too, and ride safely the roughest waves of the bathtub sea. As it is perfectly water-tight, Miss Dolly need have no fear of wetting her dainty skirts as she sits in the bottom of the boat.
It will float too and ride safely over the roughest waves of the bathtub sea. Since it is completely waterproof, Miss Dolly doesn’t need to worry about getting her delicate skirts wet while sitting in the bottom of the boat.


Cut an orange exactly in halves like Fig. 577. Slide the blade of a penknife around the edge, loosening the pulp from the skin, then cut the pulp in quarters and remove it piece by piece as in Fig. 578. When all is taken out you have your little boat (Fig. 579) and your orange besides.
Cut an orange in half like Fig. 577. Use a penknife to slide the blade around the edge, loosening the pulp from the skin, then cut the pulp into quarters and take it out piece by piece, just like in Fig. 578. Once everything is removed, you'll have your little boat (Fig. 579) and the empty orange shell.

Place the coracle in a basinful of[401] water, put a small doll in it, stir the water round and round with a stick, and watch the boat glide along as swiftly as if its little occupant were paddling with all her might.
Place the coracle in a basin full of[401] water, put a small doll in it, stir the water round and round with a stick, and watch the boat glide along as if its little occupant were paddling with all her might.
From the skin of the banana an almost
From the skin of the banana an almost
Perfect Canoe
Ideal Kayak
can be made, which will look very much like those used by the Indians at the time when Columbus discovered America. You know, of course, that a banana has several ridges on its surface with wide, smooth spaces between and that the stem end curves up more decidedly than the other. Along the middle of the smooth space which takes the upward curve of the stem you must make a slit with the sharp point of your knife, as shown by the black line on the banana in Fig. 580. Open the slit carefully, cut the banana in small pieces and take out one piece at a time (Fig. 581).
can be made, which will look very similar to those used by the Native Americans when Columbus discovered America. You know that a banana has several ridges on its surface with wide, smooth spaces between them, and that the stem end curves up more noticeably than the other end. Along the middle of the smooth space that curves up toward the stem, you need to make a slit with the sharp point of your knife, as shown by the black line on the banana in Fig. 580. Carefully open the slit, cut the banana into small pieces, and take out one piece at a time (Fig. 581).


In selecting a banana for the canoe choose a symmetrical or even-sided one, that it may not tip but sit squarely on the water. In case the banana is not perfect and the canoe does tip to one side, place in it a small weight and the balance will be regulated.
In choosing a banana for the canoe, pick one that is symmetrical or evenly shaped so it won't tip and will sit evenly on the water. If the banana isn't perfect and the canoe does tip to one side, add a small weight to balance it out.

The apple lantern, or
The apple lantern, or
Fairy Lamp
Fairy Lamp
(Fig. 585) requires a little more time and patience in its preparation than the boats, but it is not difficult to make. Find a rather small, perfectly round, red apple without bruise or blemish. Hold it in both hands and gently press it with your two thumbs, beginning close to the stem and gradually working down to the blossom end. Be careful not to break the skin, but press and press until every part is loosened and the apple feels pulpy like a grape—every part except the blossom; that holds fast because it is attached to the core. When no hard spots can be found cut a circle around the stem as shown in Fig. 586, and little by little dig out the apple until nothing but the skin remains (Fig. 587); then you will find a small lump at the bottom which must be left, since cutting it out would result in a hole in the skin. With a pair of sharp scissors trim away all unevenness or raggedness that may be found on the edge. This will make the opening a trifle larger.
(Fig. 585) takes a bit more time and patience to prepare than the boats, but it’s not hard to make. Find a small, perfectly round, red apple that's free from bruises or blemishes. Hold it in both hands and gently press it with your thumbs, starting near the stem and gradually working your way down to the blossom end. Be careful not to break the skin, but keep pressing until every part is loosened and the apple feels soft like a grape—everything except the blossom, which stays attached to the core. When there are no hard spots left, cut a circle around the stem as shown in Fig. 586, and gradually scoop out the apple until you’re left with just the skin (Fig. 587); you'll find a small lump at the bottom that should be left intact, as cutting it out would create a hole in the skin. Use a pair of sharp scissors to trim away any uneven edges or rough spots you find on the opening. This will slightly enlarge the opening.


Cut a Slice from an Ordinary Candle
Cut a Slice from a Regular Candle

about half an inch thick (A, Fig. 588) and hollow out the under side enough to allow the candle to fit over the lump in the bottom of the apple skin (B, Fig. 588). Fit the candle in place, and when it is lit you will have the prettiest, daintiest little fairy lamp imaginable. The light shining through the rosy, semi-transparent apple skin gives the effect of Bohemian glass and casts a red glow all around it.
about half an inch thick (A, Fig. 588) and hollow out the underside enough to let the candle fit over the bump in the bottom of the apple skin (B, Fig. 588). Place the candle in position, and when it’s lit, you’ll have the prettiest, daintiest little fairy lamp you can imagine. The light shining through the rosy, semi-transparent apple skin creates an effect similar to Bohemian glass and casts a red glow all around it.
The fairy lamp looks very pretty floating in water in a glass bowl, and a number of lamps around your birthday cake will be a new way of telling how old you are.
The fairy lamp looks really nice floating in water in a glass bowl, and having several lamps around your birthday cake will be a fresh way to show how old you are.
CHAPTER XXXIII
LITTLE PAPER COLUMBUS AND HIS PAPER SHIP


Before we make the little paper people, let us build
Before we create the little paper people, let’s build
Columbus’ Ship.
Columbus' Ship.
This ship is to be as nearly like the Santa Maria, the real ship in which Columbus sailed, as is possible to make of paper. Cut a piece of light-weight cardboard fifteen and three-fourths inches long and seven and one-half inches wide; on this draw the diagram of the boat (Fig. 589), making the greatest lengths of the diagram exactly as long and the greatest widths as wide as the cardboard. Find the lengthwise centre of the cardboard, which will be three and three-fourths inches from each[407] long side line, as the cardboard is seven and one-half inches wide. Draw a line along the centre from end to end, to guide you in making the diagram of the boat; this central line will also be the centre of your ship. Commence drawing the bottom A—A (Fig. 589) at a distance of two and one-fourth inches from the end of the cardboard; the bottom must measure seven inches from its extreme front point A to the back line A, and two and three-eighths inches at its widest point from B to B. The point A of the bottom must come on the long central line, and the straight back line of the bottom A must be one and three-fourths inches across.
This ship should be as close to the Santa Maria, the actual ship that Columbus sailed, as possible to create from paper. Cut a lightweight piece of cardboard that is fifteen and three-fourths inches long and seven and one-half inches wide; on this, draw the diagram of the boat (Fig. 589), ensuring the longest lengths of the diagram match the cardboard's length and the widest widths match its width. Find the lengthwise center of the cardboard, which will be three and three-fourths inches from each[407] long side, since the cardboard is seven and one-half inches wide. Draw a line along the center from one end to the other to help you create the boat's diagram; this central line will also be the center of your ship. Start drawing the bottom A—A (Fig. 589) two and one-fourth inches from the end of the cardboard; the bottom should measure seven inches from its frontmost point A to the back line A, and two and three-eighths inches at its widest point from B to B. Point A of the bottom must be on the long central line, and the straight back line of the bottom A must measure one and three-fourths inches across.


The length of the extension at the back of the boat from C to D is three and one-half inches; the deck from D to E, three inches. The greatest width of the deck, E, not including the two flaps, is two and three-fourth inches, and the narrowest part at the line D one inch. The sides of the boat are slashed and the last slash or side piece, F, at its greatest height touches the edge of the cardboard, while the side pieces G and G, are the lowest, and so are the longest distance from the cardboard edge. When you have drawn the diagram cut out the little craft.
The extension at the back of the boat from C to D is three and a half inches long; the deck from D to E is three inches. The widest part of the deck, E, excluding the two flaps, is two and three-quarters inches, while the narrowest part at D is one inch. The sides of the boat are slashed, and the last slash or side piece, F, at its highest point touches the edge of the cardboard, while the side pieces G and G are the lowest and farthest from the edge of the cardboard. Once you’ve drawn the diagram, cut out the little craft.
Cut along all the heavy lines. Bend the four dotted lines of the prow ledge (H, I and H, I) backward. All other dotted lines must be bent forward, and care taken to keep the bends exactly on the dotted lines. Do not bend the laps enclosed by the tiny circles along the sides J, J, J, J, J, J. These circles merely show how far the slashed sides lap over each other to form the correct shape of the Santa Maria, for you must know that Columbus’ vessel was very different in build and appearance from any ships we find at the present time. The prow and stern were much higher than the middle of the boat and at the top the stern was quite narrow while at the bottom it was[408] wide, making the rear of the ship big at the bottom and small at the top.
Cut along all the thick lines. Fold the four dotted lines of the prow ledge (H, I and H, I) backward. All other dotted lines should be folded forward, and make sure to keep the folds exactly on the dotted lines. Do not fold the laps marked by the tiny circles along the sides J, J, J, J, J, J. These circles simply indicate how far the slashed sides overlap each other to create the correct shape of the Santa Maria, because you should know that Columbus’ ship was built and looked very different from any ships we see today. The front and back were much higher than the middle of the boat, and at the top, the back was quite narrow while at the bottom it was[408] wide, making the rear of the ship large at the bottom and small at the top.
Now put the little craft together. Bend the sides up and fasten each lap on the edge of the next side piece with glue or strong, thick paste. Bend up the back and paste the three laps of each edge over onto the sides, fitting the short laps on the section K over the projections L and L of the sides.
Now assemble the small craft. Fold the sides up and attach each flap on the edge of the next side piece with glue or a strong, thick paste. Fold up the back and glue the three flaps of each edge onto the sides, fitting the short flaps on section K over the projections L and L of the sides.
Make the Mizzenmast
Set up the Mizzenmast

of a paper lighter, ten inches high after the end has been bent (Fig. 590). Slide the small end of the mast, from beneath, up through the hole K in the after deck (Fig. 589). The hole should be a tight fit. Paste the bent end of the mast flat and tight to the bottom of the boat; bring the flaps of the deck down over the top of the sides and paste them securely in place.
of a paper lighter, ten inches tall after the end has been bent (Fig. 590). Slide the small end of the mast, from underneath, up through the hole K in the back deck (Fig. 589). The hole should be a snug fit. Glue the bent end of the mast flat and tight to the bottom of the boat; bring the flaps of the deck down over the top of the sides and secure them in place.
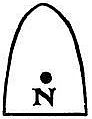
Next bend up the prow, lapping the flap O (Fig. 589) over the side edge of the prow, O, and the flap P over the prow, P.
Next, fold up the front, laying the flap O (Fig. 589) over the edge of the front, O, and the flap P over the front, P.
Cut the Bowsprit
Trim the Bowsprit
(Fig. 591) of cardboard six and one-half inches long, split the wide end up lengthwise through the centre two and one-fourth inches, then fold the remainder lengthwise through the centre according to the dotted lines[409] Fig. 592. Open the split end and place one-half on the inside of one side of the prow, and the second half opposite on the inside of the other side of the prow. Leave these ends loose, resting the bowsprit in the short opening at the centre top of the point of the prow, where the two short ledges, H and I (Fig. 589), meet.
(Fig. 591) Take a piece of cardboard that is six and a half inches long. Cut a lengthwise slit of two and a quarter inches at the wide end, then fold the remaining piece in half lengthwise along the dotted lines[409] Fig. 592. Open the split end and position one half on the inside of one side of the prow, and the other half on the inside of the opposite side. Make sure these ends are loose, resting the bowsprit in the small opening at the center top of the prow's tip, where the two short ledges, H and I (Fig. 589), meet.
Make the forward Deck
Build the front deck
of cardboard (Fig. 593) two and one-fourth inches long and at its widest part a generous one and one-eighth inch. Cut the hole N, five-eighths of an inch from the wide, straight edge; then cut a strip five and five-eighths inches in length and three-fourths of an inch in width, slash as in diagram and bend at dotted line (Fig. 594). Cut the slit M, and fasten the strip on the deck by pasting the flaps over the top of the curved edge of the deck (Fig. 595). Slide the flat point of the projecting bowsprit through the slit M (Fig. 594), and run a paper lighter foremast, nine and one-half inches long, not including the bent end, through the hole N (Fig. 593). Bring[410] the deck down over the prow, adjust the bowsprit to the inclined height of the bowsprit in the illustration and paste the two split halves of the end of the bowsprit on each side of the inside of the prow. Fasten the foremast tight on the bottom of the boat and paste the deck on the ledges, H, I, H, I (Fig. 589). Make a
of cardboard (Fig. 593) two and a quarter inches long and at its widest part a generous one and one-eighth inch. Cut the hole N, five-eighths of an inch from the wide, straight edge; then cut a strip five and five-eighths inches long and three-fourths of an inch wide, slash as shown in the diagram, and bend at the dotted line (Fig. 594). Cut the slit M, and attach the strip to the deck by pasting the flaps over the top of the curved edge of the deck (Fig. 595). Slide the flat point of the projecting bowsprit through the slit M (Fig. 594), and insert a paper lighter foremast, nine and a half inches long, not including the bent end, through the hole N (Fig. 593). Lower the deck down over the prow, adjust the bowsprit to the inclined height shown in the illustration, and paste the two split halves of the end of the bowsprit on each side of the inside of the prow. Secure the foremast tightly at the bottom of the boat and paste the deck on the ledges, H, I, H, I (Fig. 589). Make a

Deck-Fence
Deck Railing
for the stern of a piece of paper seven and one-half inches long and one inch wide. Cut it in a fringe with every other short strip of the fringe cut out like Fig. 596. Paste the loose fringe ends along the three outside top edges of the after deck, allowing the solid border of the fringe to form the fence rail. See illustration. Cover the lower ends of the fence when they are pasted to the deck with a band of paper seven and one-half inches long and three-eighths of an inch wide (Fig. 597).
for the back of a piece of paper that’s seven and a half inches long and one inch wide. Cut it into a fringe, removing every other short strip of the fringe like Fig. 596. Glue the loose fringe ends along the three outside top edges of the back deck, letting the solid border of the fringe create the fence rail. See the illustration. Cover the bottom ends of the fence when they are glued to the deck with a strip of paper that is seven and a half inches long and three-eighths of an inch wide (Fig. 597).
Make a Spar
Make a Spar

For the Mainmast
For the main mast
at the centre of the boat make another paper lighter eleven inches high. Do not bend the end, but paste the bottom lapped edges together and run the mast through a common wooden spool (Fig. 598). Glue the spool tight on the bottom of the boat, a trifle forward of the centre, and your ship is ready for the sails, as you can see from the picture.
at the center of the boat, make another paper lighter eleven inches high. Don’t bend the end, but glue the bottom lapped edges together and run the mast through a common wooden spool (Fig. 598). Glue the spool tightly to the bottom of the boat, a bit forward of the center, and your ship is ready for the sails, as you can see from the picture.

The illustration shows little paper Columbus in his red cloak and cap, standing on the stern of his vessel, one of the sailors in the centre, and a wild Indian peeping over the side of the boat. We must make our
The illustration shows a small paper Columbus in his red cloak and cap, standing on the back of his ship, one of the sailors in the center, and a wild Indian peeking over the side of the boat. We must make our
Santa Maria Watertight
Santa Maria Waterproof
before the sails are set. Melt half of a wax candle in a tin piepan and set the ship down into the melted hot wax to cover the bottom thoroughly. Use a teaspoon for pouring the liquid wax over all sides, about one inch up from the bottom of the boat. This bath of wax should render your ship perfectly water-tight, but test the little craft on water to make sure that it does not leak.
before the sails are set. Melt half of a wax candle in a tin pie pan and dip the ship into the hot wax to completely cover the bottom. Use a teaspoon to pour the liquid wax over all sides, about one inch up from the bottom of the boat. This wax bath should make your ship completely water-tight, but test the little craft on water to ensure it doesn't leak.
Cut the Sails
Trim the Sails

of very light-weight writing-paper, the top edge straight, side edges slanting, and bottom edge curved inward. Make the greatest height of the foresail for the bow four inches, the width three and one-half inches. With the scissors point, punch two small holes in this foresail, one in the middle at the top and one[412] in the middle at the bottom. Enlarge the holes slightly by inserting the point of a lead pencil and twisting the pencil gently around (Fig. 599). Remember that all holes for the masts to run through must be made rather small, to prevent the sails from sliding too far down the masts. Bend the top and bottom of the sails together to curve the paper, that the sails may appear to be in a good stiff breeze when fastened on the masts. Slide the foresail you have just made on the foremast; it will stay in place without glue. Make
of very lightweight writing paper, with a straight top edge, slanted side edges, and a curved bottom edge. Set the height of the foresail at the bow to four inches and the width to three and a half inches. Use the point of scissors to punch two small holes in this foresail, one in the middle at the top and one in the middle at the bottom. Slightly enlarge the holes by inserting the point of a pencil and gently twisting it around (Fig. 599). Keep in mind that all holes for the masts must be relatively small to prevent the sails from sliding too far down the masts. Bend the top and bottom of the sails together to curve the paper so that the sails look like they're catching a good stiff breeze when attached to the masts. Slide the foresail you've just made onto the foremast; it will stay in place without glue.

A Paper Flag
A Paper Flag
like Fig. 600, for the mainmast, one and three-fourths inches long and one and one-half inches wide. Cut two holes at one side as shown in the diagram, divide the remaining space into four squares and paint the two diagonal squares, Q and Q, red.
like Fig. 600, for the mainmast, one and three-fourths inches long and one and one-half inches wide. Cut two holes on one side as shown in the diagram, divide the remaining space into four squares, and paint the two diagonal squares, Q and Q, red.

Make the Main-Topsail
Raise the Mainsail
three and one-fourth inches long and three and three-fourths inches wide (Fig. 601). For the
three and a quarter inches long and three and three-quarters inches wide (Fig. 601). For the
Crow’s-Nest
Crow's Nest


The Mainsail
The Main Sail
(Fig. 603) must be four and one-half inches long and five inches wide. Paint a red cross on it as shown in the diagram. Slide the mainsail well down on the mainmast; over it place the spool top “crow’s-nest”; next run on the main-topsail and slip the flag on the tip-top.
(Fig. 603) must be 4.5 inches long and 5 inches wide. Paint a red cross on it as shown in the diagram. Slide the mainsail down on the mainmast; over that, place the spool top "crow's nest"; then run on the main topsail and slip the flag on the very top.

The Jigger Sail
The Jigger Sail
for the mizzenmast at the stern of the boat must be five inches high and five inches wide (Fig. 604). Paint the paper pennant (Fig. 605) blue, and bend it into several waves. Slide the jigger sail in place on the mizzenmast and top it with the blue pennant. Your finished[414] vessel should resemble closely the illustration. If you want to
for the mizzenmast at the back of the boat must be five inches tall and five inches wide (Fig. 604). Paint the paper pennant (Fig. 605) blue, and curve it into several waves. Slide the jigger sail into position on the mizzenmast and top it with the blue pennant. Your finished[414] vessel should closely resemble the illustration. If you want to


Paint the Santa Maria
Paint the Santa Maria
do so before giving it the wax bath. Color the hull a reddish brown, the masts brown, and the sails a light orange; this will give a very pretty effect.
do this before giving it the wax bath. Paint the hull a reddish-brown, the masts brown, and the sails a light orange; this will create a very nice effect.

Now for the characters of our little drama. Make
Now for the characters of our little drama. Make
Columbus
Columbus
of heavy stiff writing-paper or very light-weight cardboard, like the pattern (Fig. 606), which measures from the top of the head to the lowest edge of the stand, four and three-fourths inches. Without the stand the[415] figure measures four inches. Carefully cut out Columbus, mark his features, hair, and clothing in black ink. Cut his cloak (Fig. 607) of red tissue paper, bend at dotted lines across the shoulders, and fold back the open front as in Fig. 608. Make the red tissue paper cap (Fig. 609), and fold lengthwise across centre (Fig. 610); then put both cloak and hat on Columbus, that he may be ready to start on his journey (Fig. 611). Cut out a number of[416] sailors (Fig. 612) to go on the boat with Columbus, and a lot of Indians (Fig. 613) for Columbus to find when he lands on the shores of America, at the other end of the bathtub.
of heavy, stiff writing paper or very lightweight cardboard, like the pattern (Fig. 606), which measures from the top of the head to the bottom edge of the stand, four and three-fourths inches. Without the stand, the[415] figure measures four inches. Carefully cut out Columbus, marking his features, hair, and clothing in black ink. Cut his cloak (Fig. 607) from red tissue paper, bend it at the dotted lines across the shoulders, and fold back the open front as shown in Fig. 608. Make the red tissue paper cap (Fig. 609), and fold it lengthwise down the center (Fig. 610); then put both the cloak and the hat on Columbus so he is ready to start his journey (Fig. 611). Cut out several[416] sailors (Fig. 612) to accompany Columbus on the boat, and a lot of Indians (Fig. 613) for Columbus to find when he lands on the shores of America, at the other end of the bathtub.


Make Wigwams
Build Wigwams
for the Indians of paper cut in half circles. Bend back narrow, pie-shaped pieces along the two straight edges of each half circle, make the pie-shaped pieces reach midway up toward the centre; then bend the half circles into tent-like forms, pin the two top edges of each one together, and you will have wigwams, with the doorway flaps bent back. Cut off the top peak of each,[417] wigwam and stand some heavy long broom straws in the opening to represent poles used in real wigwams (Fig. 614).
for the Indians of paper cut in half circles. Bend back narrow, pie-shaped pieces along the two straight edges of each half circle, make the pie-shaped pieces reach midway up toward the center; then bend the half circles into tent-like shapes, pin the two top edges of each one together, and you will have wigwams, with the doorway flaps bent back. Cut off the top point of each wigwam and stand some heavy long broom straws in the opening to represent poles used in real wigwams (Fig. 614).
Fig. 615 shows
Fig. 615 displays
King Ferdinand and Queen Isabella
King Ferdinand and Queen Isabella
of Spain, seated on their pasteboard throne, ready to receive Columbus.
of Spain, sitting on their cardboard throne, prepared to welcome Columbus.
Queen Isabella gave three ships to Columbus, but the Santa Maria was the largest vessel, and the one which carried Columbus. The two smaller boats were named the Pinta and the Nina. You can make these smaller ships or use any little boats you happen to have; they are not very important.
Queen Isabella gave three ships to Columbus, but the Santa Maria was the largest vessel and the one that carried Columbus. The two smaller boats were called the Pinta and the Nina. You can use these smaller ships or any little boats you have; they’re not that important.

CHAPTER XXXIV
HOW TO MAKE FRIENDS WITH
THE STARS


There is one animal in particular with which you must make friends—a bear, an immense creature called
There is one animal in particular you need to befriend—a bear, a huge creature called
Ursa Major.
Ursa Major.
Never could an earthly bear have such a tail as you see in Fig. 616. However, the Great Bear is very different from the ordinary bear, and needs the big, bushy tail for three bright stars. Four more equally bright stars are on the creature’s side. Trace the big bear on cardboard, and be sure to get the stars in the[419] right places. Cut out the pasteboard bear, and with a large, coarse pin or needle pierce a hole in the centre of each star; then hold the bear up to the light, as the little girl holds the lion in Fig. 617. Look through the bear and you will see seven tiny, twinkling stars forming a dipper. Pretend you have stretched a string from star to star, and what you will see will resemble Fig. 618. Look again and if the dipper is not distinct, make the holes in the centres of the stars larger.
Never could an earthly bear have such a tail as you see in Fig. 616. However, the Great Bear is very different from a regular bear and needs the big, bushy tail for three bright stars. Four more equally bright stars are on the creature's side. Trace the big bear on cardboard, making sure to get the stars in the[419] right places. Cut out the cardboard bear, and with a large, coarse pin or needle, poke a hole in the center of each star; then hold the bear up to the light, just like the little girl holds the lion in Fig. 617. Look through the bear and you will see seven tiny, twinkling stars forming a dipper. Imagine you've stretched a string from star to star, and what you see will resemble Fig. 618. Look again, and if the dipper isn't clear, make the holes in the centers of the stars larger.

After you have learned precisely how Ursa Major looks with its starry dipper, and can see it even with your eyes closed, peep out into the night and try to find your friend up in the real sky. The bear is there, but you must recognize it by the dipper, for of course you cannot really see the animal itself. When you find the dipper you will know that the Great Bear is in the sky looking down upon you. You can see the big bear during the early evening hours of March, April, May, June and July.
After you’ve learned exactly how Ursa Major looks with its starry dipper and can visualize it even with your eyes closed, step outside at night and try to spot your friend in the actual sky. The bear is up there, but you have to identify it by the dipper since you can’t really see the animal itself. Once you find the dipper, you’ll know that the Great Bear is in the sky watching over you. You can see the big bear in the early evening during March, April, May, June, and July.

Fig. 619 gives another bear, a little one, whose name is
Fig. 619 shows another bear, a small one, whose name is
Ursa Minor;
Little Dipper;
he also has a long tail spangled with stars and four more stars on the side of his body which form a little dipper; the three stars on the tail make the handle. Though the bear is small, he is very important because of the large star on the end of his tail, which you must call the Pole star. This star shines out to show which direction is north when one gets lost or confused about his way. The Pole star may always be depended upon as a guide, and sailors look for it to help them find their course through the waters.
He also has a long tail decorated with stars and four more stars on the side of his body that form a little dipper; the three stars on the tail make the handle. Even though the bear is small, he is very important because of the big star at the end of his tail, which you should call the Pole Star. This star shines to show which direction is north when someone gets lost or confused about their way. The Pole Star can always be relied upon as a guide, and sailors look for it to help them navigate through the waters.

Ursa Minor is turned in an opposite direction and position from the Great Bear, and the pose makes it easy for us to find the Pole star, because when we once trace out the stars of the Great Bear in the real sky we will see that the two outermost stars of the four which form its bowl, point to the Pole star. We can pretend that we have tied a string on the star in the outside top end of the Big Dipper (Figs. 616 and 618 A),[421] and that we are stretching that string out from the Dipper star in a direct line; then we can tie the string on the Pole star in the end of the Little Bear’s tail, as shown in Figs. 618 and 620, where the dotted line represents a string.
Ursa Minor is positioned opposite to Ursa Major, and this arrangement helps us locate the North Star. Once we identify the stars of Ursa Major in the night sky, we'll notice that the two outermost stars that form its bowl point toward the North Star. We can imagine that we’ve tied a string to the star at the outer top end of the Big Dipper (Figs. 616 and 618 A),[421] and that we’re stretching that string directly from the Dipper star; then we can tie the string to the North Star at the end of the Little Bear’s tail, as shown in Figs. 618 and 620, where the dotted line represents the string.
Trace on cardboard and cut out Ursa Minor, punch holes through the stars and hold the little fellow up to the light, head down. The Little Bear, too, is visible shining not far from the Big Bear during the same months.
Trace on cardboard and cut out Ursa Minor, punch holes through the stars, and hold the little guy up to the light, head down. The Little Bear can also be seen shining not far from the Big Bear during the same months.
There is
There exists
A Fairy Tale
A Fairy Tale

about the starry bears. The story tells us that a long time ago these animals were not bears and did not live among the stars. The Great Bear was a gentle lady, and the Little Bear her son. The poor mother and son were turned into bears by the goddess Juno, and their friend Jupiter had not enough power to disenchant them and restore to them their human forms. So he did what he thought was next best; he placed the two bears, mother and son, up in the sky among the stars, where they remain to this day.
about the starry bears. The story tells us that a long time ago these animals weren't bears and didn't live among the stars. The Great Bear was a kind lady, and the Little Bear was her son. The poor mother and son were transformed into bears by the goddess Juno, and their friend Jupiter didn't have enough power to turn them back and give them their human forms. So he did what he thought was the next best thing; he put the two bears, mother and son, up in the sky among the stars, where they remain to this day.
Fig. 621 is
Fig. 621 is
Cassiopeia
Cassiopeia

In the sky all of her stars are brilliant, except the one marked K. This is a shy little twinkler and appears rather faint at times; but in the Autumn when you hunt for Cassiopeia, you will be able to see the star K, if your eyes are bright. This lady with uplifted arms is the wife of a king. Trace her and cut her out, punch[422] holes through the centres of the seven stars, then catch hold of the sweeping train of the queen’s dress and hold her up to the light, when the pinholes will look like Fig. 622, reminding one of a chair turned upside down, with its feet toward the queen’s head and its back down toward her feet. You will be delighted with this constellation, for it is very beautiful, and you may find Cassiopeia any night of August, September, October, November, December, January and February, as she is always then visible after dark.
In the sky, all her stars shine brightly, except for the one labeled K. This little twinkler is a bit shy and sometimes appears faint; but in the autumn, when you look for Cassiopeia, you’ll be able to see star K if your eyes are sharp. This woman with her arms raised is the wife of a king. Trace her outline and cut her out, punch holes through the centers of the seven stars, then grab the flowing train of the queen’s dress and hold her up to the light, when the pinholes will look like Fig. 622, resembling an upside-down chair with its legs pointing toward the queen’s head and the back facing her feet. You’ll be delighted by this constellation, as it is truly beautiful, and you can spot Cassiopeia any night from August to February, as she’s always visible after dark.


Now we will make the king of beasts,
Now we will create the king of beasts,
Leo, the Lion,
Leo the Lion
for he is very fine-looking with his starry mane and a star almost in his mouth (Fig. 623). Trace the lion carefully, name him Leo, and cut him out; pierce holes through the stars and hold the figure up to the light. The little girl in Fig. 617 is enjoying her Leo very much. Notice how earnestly she peers through the holes, for she is determined to know the constellation. When you look through the pinholes of Leo, you will find that the constellation resembles a sickle, as in Fig. 624. The lion is in plain sight during[423] February, March, April, May and June, so you have a long time to make friends with him.
for he is very good-looking with his starry mane and a star almost in his mouth (Fig. 623). Trace the lion carefully, name him Leo, and cut him out; pierce holes through the stars and hold the figure up to the light. The little girl in Fig. 617 is enjoying her Leo very much. Notice how earnestly she peeks through the holes, for she is determined to know the constellation. When you look through the pinholes of Leo, you will find that the constellation looks like a sickle, as in Fig. 624. The lion is clearly visible during[423] February, March, April, May, and June, so you have plenty of time to get to know him.

During the Spring you can see all the constellations we have made, and also the beautiful starry
During Spring, you can see all the constellations we've created, along with the beautiful starry sky.
Northern Crown
Northern Crown

The little twin brothers,
The twin boys,
Castor and Pollux,
Castor and Pollux,
sons of Jupiter; always sit together up among the stars. The constellation is called Gemini (Fig. 627). When stars are clustered together, we say the group is a constellation. All of the starry people and animals are only different constellations. In this group each boy has a star on his head, a star on one knee and a star on[424] one foot, which makes six stars. Trace the twins on cardboard, cut them out together in one piece and punch a hole through the centre of each star. Hold the constellation up to the light, and the group of wee, sparkling stars seen through the pinholes will resemble Fig. 628. Look for the twins during the months of December, January, February, March, April and May, and remember you must find the group of stars like Fig. 628.
sons of Jupiter; always sit together up among the stars. The constellation is called Gemini (Fig. 627). When stars are clustered together, we say that group is a constellation. All of the starry people and animals are just different constellations. In this group, each boy has a star on his head, a star on one knee, and a star on one foot, which makes six stars. Trace the twins on cardboard, cut them out together in one piece, and punch a hole through the center of each star. Hold the constellation up to the light, and the group of tiny, sparkling stars seen through the pinholes will look like Fig. 628. Look for the twins during December, January, February, March, April, and May, and remember you must find the group of stars like Fig. 628.


Winter will bring
Winter is coming
Orion
Orion
(Fig. 629). He appears in November and remains where we can see him through December, January, February and March. Orion is one of the most brilliant of constellations. The strenuous hunter has but one visible foot, the other being hidden by his pet hare seated in front of it; so we are obliged to make the star, man with one foot. The fairy tale says that he was a giant and the mightiest hunter ever known. There is a star on each of his shoulders and one on his cheek, forming a triangle; then there is another star down on his left foot and one on his right knee. Trace the mighty hunter and cut him out as you did the other[425] constellations. Draw a line from star to star and, after adding the three stars which form Orion’s belt, pierce holes in all, look through them (Fig. 630) and make friends with the harmless, starry giant. Fig. 631 is
(Fig. 629). He shows up in November and stays visible through December, January, February, and March. Orion is one of the brightest constellations. The strong hunter has only one visible foot, with the other hidden by his pet hare sitting in front of it; so we have to think of him as a one-footed man. The story says he was a giant and the greatest hunter ever known. There’s a star on each of his shoulders and one on his cheek, forming a triangle; then there’s another star on his left foot and one on his right knee. Trace the mighty hunter and outline him just like you did with the other[425] constellations. Draw a line from star to star, and after adding the three stars that form Orion’s belt, poke holes in all of them, look through them (Fig. 630) and befriend the harmless, starry giant. Fig. 631 is

Taurus,
Taurus,
a very lively-looking bull for one so aged; possibly the stars, being bright and cheery, keep the milk-white creature from growing old. Only a portion of the bull can be seen; other stars hide the remainder. Taurus must be greatly dazzled by the stars, for there is actually one in each of his eyes, the two forming the ends of the V-shaped group of stars across his face. The tip of each horn is decked with a glorious star, while on the Bull’s neck is a cluster of stars called the Pleiades. These stars were in all seven beautiful sisters, daughters of the giant Atlas; but one star daughter married a mortal and lost her brightness for doing so; consequently you can now see but six star sisters.
a very lively-looking bull for one so old; maybe the bright and cheerful stars keep this milk-white creature from aging. Only part of the bull is visible; other stars conceal the rest. Taurus must be quite dazzled by the stars, as there’s actually one in each of his eyes, with the two making up the ends of the V-shaped group of stars across his face. The tip of each horn is adorned with a glorious star, while on the Bull’s neck is a cluster of stars called the Pleiades. These stars were originally seven beautiful sisters, daughters of the giant Atlas; but one star sister married a mortal and lost her brilliance for doing so; as a result, you can now see only six star sisters.

In Fig. 632 you will find the constellation of Taurus as it looks when seen through the pinholes in the stars of the Bull, and also as the constellation appears in the sky on a clear night during November, December, January, February and March.
In Fig. 632 you will find the Taurus constellation as it appears through the pinholes in the stars of the Bull, as well as how the constellation looks in the sky on a clear night during November, December, January, February, and March.
CHAPTER XXXV
STENCIL PAINTING AND HOW TO
MAKE THE STENCILS

With the stencil you can decorate a window curtain, portière, table cover, bedspread, bureau scarf, screen or the walls of your room. You may even paint the trimmings for a dress if you like; it has been done.
With the stencil, you can decorate a window curtain, drape, table cover, bedspread, bureau scarf, screen, or the walls of your room. You can even paint the trim for a dress if you want; people have done that.


Stencilling is effective on almost any material: silk, cotton, linen and wool. Swiss and cheese-cloth sash curtains are particularly attractive decorated in this way, and swiss bureau and pin-cushion covers are very dainty. The drawing on page 427 is of a white cheese-cloth short sash curtain stencilled in pink and light apple-green. Both dye and oil paints may be used, but for anything washable
Stenciling works well on almost any material: silk, cotton, linen, and wool. Swiss and cheesecloth sash curtains look especially nice when decorated this way, and Swiss bureau and pin-cushion covers are very cute. The drawing on page 427 shows a white cheesecloth short sash curtain stenciled in pink and light apple-green. You can use both dye and oil paints, but for anything washable
Dyes
Colors
are the best, inasmuch as they are supposed to be fast colors. There is an inexpensive dye now on the market that comes in tubes like oil paint and does not require boiling. This is convenient to handle, as it is merely necessary to dissolve it in water.[427] Tapestry dyes may also be used but are much more expensive. Heavy, non-washable material may be stencilled with oil colors. The color is not used as a paint but as a stain and must be entirely dissolved in turpentine to make it flow easily. Our first drawing shows
are the best since they're meant to be fast colors. There’s an affordable dye available now that comes in tubes like oil paint and doesn’t need boiling. This makes it easy to use, as you only need to dissolve it in water.[427] Tapestry dyes can also be used but are much more expensive. Heavy, non-washable material can be stenciled with oil colors. The color is not used like paint but as a stain and has to be fully dissolved in turpentine to flow easily. Our first drawing shows
A Portière
A Door Operator
made of heavy unbleached sheeting stencilled in a Persian pattern with dull-red, moss-green, yellow and black. Curtains may also be made of denim, crash, burlap and a number of other materials. The simplest way to
made of heavy unbleached fabric printed with a Persian pattern in dull red, moss green, yellow, and black. Curtains can also be made from denim, crash, burlap, and various other materials. The easiest way to
Make Your Stencil
Create Your Stencil
if you have no especial ideas of your own to carry out, will be to select a graceful embroidery pattern or one intended for decorative painting and adapt it to your use. With a little practice this becomes quite easy. The principal things to remember are that a good stencil design should be simple, bold and conventional; the unbroken lines must not be too long nor the spaces to be cut out too narrow, between the cut-out parts there must be space wide enough to hold firmly. It is also necessary to break the lines once in a while with little bridges.
If you don't have any specific ideas of your own to implement, you should choose a nice embroidery pattern or one meant for decorative painting and adjust it for your needs. With a bit of practice, this becomes pretty simple. The main things to keep in mind are that a good stencil design should be straightforward, bold, and traditional; the continuous lines shouldn't be too long, and the spaces that need to be cut out shouldn't be too narrow; there should be enough space between the cut-out sections to hold them securely. It's also important to occasionally break the lines with small bridges.

Suppose we take the pattern (Fig. 633). To make it into
Here is the paragraph: Suppose we take the pattern (Fig. 633). To make it into
A Design for Stencilling
A Stenciling Design
we must cut off connections and separate it into many parts, at the same time keeping the effect of the long curves. Beginning with the flower we will separate the petals and calyx (A, Fig. 633, and A, Fig. 634), and widen the stem (B, Fig. 633, and B, Fig. 634). Instead of continuing the curve we will break it at C and D, with two little bridges. This divides the stem into three parts, and, to give variety and interest to an otherwise monotonous line, we will widen the first and second parts of the stem at the[429] lower ends, curving the wide end inward and rounding the end of the next section to give the idea of its fitting the joint. The suggestion of the various parts fitting together in stencil designing is the means of carrying the eye over necessary bridges or intervening spaces and conveying the impression of continuous lines. The third section of the stem, where it disappears under the flower in Fig. 633, we will bring to a point in Fig. 634 to indicate its vanishing behind the flower. The buds which fill in the curve of this stem in Fig. 633 we will leave out altogether, for they would crowd the design. We will conventionalize the leaves, dispense with the small stems, broaden the main leaf stem, separate it from the flower stem and curve each end, one to fit the base of the end leaf, the other to follow the curve of the flower stem.
we need to cut off connections and break it into many parts while maintaining the effect of the long curves. Starting with the flower, we will separate the petals and calyx (A, Fig. 633, and A, Fig. 634), and widen the stem (B, Fig. 633, and B, Fig. 634). Instead of continuing the curve, we will break it at C and D with two small bridges. This divides the stem into three parts, and to add variety and interest to an otherwise dull line, we will widen the first and second parts of the stem at the lower ends, curving the wider end inward and rounding the end of the next section to suggest it fits into the joint. The idea of the various parts fitting together in stencil design helps lead the eye over necessary bridges or gaps and creates the impression of continuous lines. The third section of the stem, where it disappears under the flower in Fig. 633, we will bring to a point in Fig. 634 to show that it vanishes behind the flower. We will omit the buds that fill in the curve of this stem in Fig. 633, as they would clutter the design. We will simplify the leaves, remove the small stems, widen the main leaf stem, separate it from the flower stem, and curve each end—one to fit the base of the end leaf, and the other to follow the curve of the flower stem.

This furnishes one section of the pattern; the rest is but a repetition of the same, which is reversed as the curves alternate.
This provides one part of the pattern; the rest is just a repetition of it, reversed as the curves change.
Now for the making of the stencil.
Now let’s create the stencil.
Fig. 635 is a section of the design, actual size, which you can use immediately, without waiting to develop a design for yourself.
Fig. 635 is a section of the design, actual size, that you can use right away, without having to wait to create your own design.
Take a piece of smooth white tissue paper, lay it over the pattern (Fig. 635) and, with a very soft lead pencil, trace the pattern carefully. Fig. 635 is reversed, especially for tracing. Have ready a perfectly smooth piece of heavy Manila wrapping paper seventeen inches long and seven inches wide. With the aid of a ruler draw two straight lines lengthwise across the paper, the first line two and a half inches from the top edge of the paper (E, Fig. 636), the next one and three-eighths inches below the first line (F). One-half of an inch above the first line E draw another line (G), and one-half of an inch below the line F draw another line (H).
Take a piece of smooth white tissue paper, lay it over the pattern (Fig. 635) and, using a very soft lead pencil, carefully trace the pattern. Fig. 635 is reversed, especially for tracing. Have a perfectly smooth piece of heavy Manila wrapping paper that is seventeen inches long and seven inches wide ready. With a ruler, draw two straight lines lengthwise across the paper; the first line should be two and a half inches from the top edge of the paper (E, Fig. 636), and the second one should be three-eighths of an inch below the first line (F). Draw another line half an inch above the first line E (G), and another line half an inch below line F (H).


Lay the tracing, pencilled side down, on the wrapping paper, with the upper and lower curves of the flower stem just fitting between the lines G and F (Fig. 637). Transfer the tracing to the wrapping paper by going over the lines of the design with your soft pencil; then turn the tracing over and bottom edge up to reverse it and lay it again on the paper, this time with the curves of the flower stem between the lines E and H, and go over the lines of the design again with your soft pencil. Once more reverse the design and bring the curves of the flower stem between the lines G and F. This last section will finish the pattern. In reversing the tracing always allow one-quarter of[432] an inch space between the tips of the two flower petals I and J (Fig. 637), and the leaf K (Fig. 637).
Lay the tracing, pencil side down, on the wrapping paper, so that the upper and lower curves of the flower stem fit nicely between the lines G and F (Fig. 637). Transfer the tracing to the wrapping paper by tracing over the design lines with your soft pencil; then flip the tracing over with the bottom edge up to reverse it and lay it back on the paper, this time positioning the curves of the flower stem between the lines E and H, and trace over the design lines again with your soft pencil. Flip the design once more and align the curves of the flower stem between the lines G and F. This final part will complete the pattern. When reversing the tracing, always leave a quarter-inch space between the tips of the two flower petals I and J (Fig. 637), and the leaf K (Fig. 637).

With a pair of sharp scissors
With a pair of sharp scissors
Cut Out Your Design
Trim Your Design
taking great care to keep within the outlines, for a snip beyond will let in color in the wrong place and spoil your stencil. Remember you are not to cut the paper away from the design but cut the design out leaving the surrounding paper intact. This makes the stencil (Fig. 638). When all of the design is cut out place your stencil flat on a board and give it a coat of white shellac, then lift it and move to another place on the board to prevent its sticking. When quite dry turn the stencil over and shellac the other side. Be sure the edges of the cut-out parts are covered with shellac as well as the rest of the paper. The shellac makes the paper waterproof and durable. Do not use the stencil until it is absolutely dry.
taking great care to stay within the lines, because cutting too far will let color into the wrong spot and ruin your stencil. Remember, you’re supposed to cut the paper around the design, not cut the design out and leave the surrounding paper intact. This creates the stencil (Fig. 638). Once you've cut out the entire design, lay your stencil flat on a board and apply a coat of white shellac, then lift it and place it somewhere else on the board to avoid it sticking. Once it's completely dry, flip the stencil over and shellac the other side. Make sure the edges of the cut-out areas are covered with shellac along with the rest of the paper. The shellac makes the paper waterproof and durable. Don’t use the stencil until it’s completely dry.

Trace Fig. 639 which is the conventionalized flower, and transfer it to the centre of a four-inch square of the wrapping paper, or make the flower smaller if you prefer to have it the size of the one in the border. Cut out the design and shellac the little stencil as you did the larger one (Fig. 640).
Trace Fig. 639 which is the traditional flower, and move it to the center of a four-inch square of wrapping paper, or make the flower smaller if you'd rather have it the same size as the one in the border. Cut out the design and apply shellac to the little stencil just as you did with the larger one (Fig. 640).
The closer the weave of the cloth the easier is the work of stencilling, but the dye penetrates entirely through thin material, and the effect is so attractive I will describe the
The tighter the weave of the fabric, the easier it is to stencil, but the dye completely soaks through thin material, and the result is so appealing that I will describe the
Cheese-cloth Curtains
Cheesecloth Curtains
and the process given for stencilling these will answer for any other material.
and the method provided for stenciling these will work for any other material.

One width of cheese-cloth for each half of the short Dutch curtains is sufficient for quite a wide window. If the curtain is too full much of the effect of the decoration is lost.
One piece of cheesecloth for each half of the short Dutch curtains is enough for a pretty wide window. If the curtain is too full, a lot of the decorative effect is lost.
Select the finest quality of[434] cheese-cloth and cut it the required length. Hem the bottom edge and lay the curtain, right side up, smoothly on a lap-board with the hem at the top. Place your stencil on the curtain so that the design will be about one inch and a half from the hem. Slide a new piece of blotter paper under the curtain to absorb the extra moisture, then tack the stencil down with rather small pins. Drive a pin in the centre of each flower, at the point of each petal and at the point of each leaf, between the petals and between the leaves, also in every bridge and along the edges of the design wherever the paper is inclined to lift (Fig. 641). In short, your endeavor must be to keep the stencil perfectly flat on the cloth so that the dye will not penetrate beyond the openings and blur the outlines.
Select the best quality of [434] cheesecloth and cut it to the required length. Hem the bottom edge and lay the curtain, right side up, smoothly on a board with the hem at the top. Place your stencil on the curtain so that the design will be about one and a half inches from the hem. Slide a new piece of blotter paper under the curtain to absorb any excess moisture, then tack down the stencil with small pins. Drive a pin into the center of each flower, at the point of each petal, and at the tip of each leaf, between the petals and leaves, also in every bridge and along the edges of the design wherever the paper tends to lift (Fig. 641). In short, your goal is to keep the stencil perfectly flat on the cloth so that the dye doesn't seep beyond the openings and blur the outlines.

Before tacking the stencil in place
Before putting the stencil in place
Make Your Dye Ready
Prepare Your Dye
Buy a tube of olive green dye, one of yellow and one of cardinal red. Squeeze about a teaspoonful of dye into a teacup, add two tablespoonfuls of boiling water, stir until dissolved, then[435] add enough boiling water to give the desired shade. You can test the depth of color by dipping bits of white cloth in the dye. Each dye must be in a separate cup and a little yellow should be added to the green after it is dissolved, but before it is diluted with the extra water. Have ready
Buy a tube of olive green dye, one of yellow, and one of cardinal red. Squeeze about a teaspoon of dye into a teacup, add two tablespoons of boiling water, stir until it dissolves, then[435] add enough boiling water to achieve the desired shade. You can check the color depth by dipping pieces of white cloth in the dye. Each dye should be in a separate cup, and a little yellow should be added to the green after it dissolves, but before you dilute it with the extra water. Have ready
Two Stiff Bristle Brushes,
Two Hard Bristle Brushes,
such as are used for oil painting, and a piece of old white muslin. With your stencil in place, take the board on your lap, set the dye on a stand at your side and lay the old muslin folded on the board above your curtain. Dip a brush in the dye and rub it on the muslin to remove some of the moisture, for a brush too wet will cause the dye to spread and spoil the outline of the design.
such as those used for oil painting, and a piece of old white muslin. With your stencil in place, take the board on your lap, set the dye on a stand at your side, and lay the old muslin folded on the board above your curtain. Dip a brush in the dye and rub it on the muslin to remove some of the moisture, because a brush that's too wet will cause the dye to spread and ruin the outline of the design.
Beginning at the left hand of your stencil, scrub the cheese-cloth in the openings of the design until it becomes the right shade and the dye sinks entirely through the cloth. The flowers must be pink and the leaves green, but you can make the flowers darker at the centre if you wish by applying more color. Use separate brushes for the green and red dye. Hold the brush firmly and in an upright position.
Starting at the left side of your stencil, scrub the cheesecloth in the spaces of the design until it reaches the right shade and the dye fully penetrates the cloth. The flowers should be pink and the leaves green, but you can darken the center of the flowers if you want by adding more color. Use different brushes for the green and red dye. Hold the brush firmly and upright.


When you have stencilled the entire design
When you've stenciled the whole design
Pull Out the Pins,
Remove the Pins,
move the stencil farther along on the curtain, tack it down and continue stencilling until the border is finished; then take the small stencil of the single flower (Fig. 640) and stencil the flower at irregular intervals over the curtain. For
move the stencil further along on the curtain, secure it in place, and keep stenciling until the border is complete; then take the small stencil of the single flower (Fig. 640) and stencil the flower at random intervals across the curtain. For
The Tassels
The Tassels
which finish the curtains use cheese-cloth colored with the green
dye. Cut a strip of cheese-cloth two and a half inches wide, spread[436]
[437]
it flat on the board and paint it with the dye, using your bristle
paint brush for the purpose. When the cloth is dry cut it into
pieces four inches long. Dye a number of strands of white
linen floss, or use green linen or silk floss for tying the tassels.
which finish the curtains use cheesecloth dyed green. Cut a strip of cheesecloth two and a half inches wide, lay it flat on the board and paint it with the dye using your bristle paintbrush. When the cloth is dry, cut it into pieces four inches long. Dye several strands of white linen floss, or use green linen or silk floss to tie the tassels.


Fold one piece of the dyed cheese-cloth crosswise through the centre and crease it (Fig. 642). Thread a coarse needle with a strand of the floss and run it through the crease, leaving several inches of the floss at each end (Fig. 643). Draw the material into gathers and tie securely (Fig. 644). Then bring the two ends together. Make a loop of the floss about one inch long (Fig. 645), and fasten by taking one or two stitches in the gathers. Open the fold, bring the ends of the floss on the underside of the tassel, tie close to the gathers and cut off the ends. Run another gathering thread across each half of the tassel, half an inch below the gathers at the top (Fig. 646). Draw the thread tight, wrap it around several times to form the neck (Fig. 647), and fasten with several stitches. Cut the floss close to the wrapping and with the scissors trim off the bottom of the[438] tassel until it is perfectly even (Fig. 648). Sew the tassels several inches apart on the bottom edge of the curtains, as shown in illustration. When the curtains are
Fold one piece of the dyed cheesecloth in half through the center and crease it (Fig. 642). Thread a thick needle with a strand of floss and run it through the crease, leaving several inches of floss at each end (Fig. 643). Gather the material together and tie it securely (Fig. 644). Then bring the two ends together. Make a loop with the floss about one inch long (Fig. 645) and secure it by taking one or two stitches in the gathered part. Open the fold, bring the ends of the floss to the underside of the tassel, tie it close to the gathers, and cut off the excess. Run another gathering thread across each half of the tassel, half an inch below the gathers at the top (Fig. 646). Pull the thread tight, wrap it around several times to create the neck (Fig. 647), and secure it with several stitches. Cut the floss close to the wrapping, and with scissors, trim the bottom of the[438] tassel until it's perfectly even (Fig. 648). Sew the tassels a few inches apart along the bottom edge of the curtains, as shown in the illustration. When the curtains are
To be Laundered
To be cleaned
soak them for an hour or more in a strong solution of salt and water, then wash carefully in the suds of a pure white soap and rinse thoroughly. Do not rub the soap on the material, and before putting the curtain in water shake and brush out all loose dust. Dry in the shade.
soak them for an hour or more in a strong saltwater solution, then wash carefully with some pure white soap suds and rinse thoroughly. Don’t rub the soap directly onto the material, and before putting the curtain in water, shake and brush out all the loose dust. Dry it in the shade.
INDEX
A
Airships, fairy, 70
Alexandria, Pharos of, 245
Amytis, 279
Animal circus, 15
Apollo, Statue of, 233
Apple, Hallowe’en, 60
Apple games, 85
Ascension, balloon, 11
B
Baby, Punch and Judy, 52
Baby porcupine, 68
Babylon, hanging gardens of, 279
Babylonians, 283
Backyard camp, 194
Ball, tether, 207
Balloon ascension, 11
Banana canoe, 401
Basket, hanging, 372
Bathing place, 341
Bayberry candle, 326
Bead door knobs, 317
Bean bag test, 66
Bells, Easter, 364
Berries, holly, 307
Blackbirds, girls’ fair, 181
Blarney stone game, 71
Blind mice, three, 144
Bloodroot, 363
Board, weaving, 349
Boat, backyard camp, 202
Boot, Santa Claus, 169
Bouquet, 147
Bowls and cups, 59
Bowsprit, 408
Box, Pandora, 12
Bricks, Babylonian, 286
Broad-fronted bulls, 293
Brook, crossing the, 133
Bud, tulip, 361
Bulls, Babylonian, 293
Bushes, bayberry, 326
Butterfly game, 42
C
Camels, Egyptian, 228
Camp, backyard, 194
Camp-fire, backyard, 201
Camping outfit, 194
Candle, bayberry, 326
Candle-moulds, 331
Candlesticks, home-made, 385
Candlewicks, 334
Canoe, banana, 401
Card, Easter egg, 363
Card, tally, 159
Cardboard Pharos, 244
[440]Cards, Easter, 358
Caria, 257
Cassiopeia, 421
Castor, 423
Cats, black, 56
Cella, 271
Chair, doll’s, 370
“Chapeau Bras,” 377
Charades, Pantomime, 6
Chares, 233
Charm, lava, 67
Cheops, 219
Chephren, King, 224
Chick, good-morning, 381
Chicks, Easter, 143
Christmas, decorations, 303
Christmas tree, living, 173
Circus, home, 15
Claus, jolly little Santa, 163
Clay candlesticks, 386
Cnidus, Sostratus, 253
Coat, Santa Claus’, 169
Coloring pottery, 396
Colossus of Rhodes, 233
Columbus, paper, 405
Columbus, to make, 414
Columns, temple, 269
Coracle, orange skin, 400
Costume, Puritan man’s, 98
Costume, Titania’s, 82
Costumes, Charades, 7
Cotton, stuffing, 237
Country picnic, 132
Court, pumpkin game, 90
Court, tether-ball, 211
Cow jumped over the moon, to make, 139
Cradle, doll’s, 372
Cross, to make, 360
Crossing the brook, 133
Crow’s-nest, 412
Crystal, Japanese, 68
Cupid’s door, 108
Cups and bowls, 59
Cups, Santa Claus’, 170
Curtains, tissue paper, 324
D
Dainty bloodroot, 363
Dais, upper, 264
Daisy Valentine, 110
Dance of the dolls, 145
Dance, of Titania, 75
Date palm, 227
Daylight fireworks, 11
Deck, forward, 409
Deck-fence, 410
Decorations, living Christmas tree, 177
Diana, temple of, 269
Disks, gilt paper, 36
Doll house, 315
Doll’s chair, 370
Dolls, dance of the, 145
Door, Cupid’s, 108
Doorknobs, bead, 317
Drama, Punch and Judy, 53
Dress, Punch’s, 50
Dress, Puritan woman’s, 98
Dye kettle, magic, 43
E
Easter bells, 364
Easter cards, 358
Easter chicks, 143
Easter egg cards, 363
Easter party, 33
[441]Egg card, 363
Egg tennis, 33
Eggs, to prepare for tennis, 34
Egypt, pyramids of, 219
Elephant, 20
Empress Josephine, 379
Entertainment, Valentine, 103
Ephesus, temple of Diana at, 269
Euphrates, 279
Evergreen ropes, 312
Express office, girls’ fair, 186
F
Fair, girls’, 179
Fairy airships, 70
Fairy lamp, 403
Fairy waters, life in, 141
Fence, picnic, 132
Fire, backyard, 201
Firecracker invitations, 4
Fireworks, daylight, 11
Flag, 412
Flags, flower beds, 157
Footstool, Zeus, 265
Forfeits, 95
Fortune jingle, 71
Fortune telling, novel, 55
Fourth of July lawn frolic, 3
Frieze, doll house, 322
Frolic, Fourth of July, 3
G
Game, Blarney Stone, 71
Game, butterfly, 42
Game of egg tennis, 39
Games, new Easter, 33
Garden, plant your, 151
Garden planting game, 159
Gardens, hanging, 279
Giant firecracker invitation, 4
Gilt paper disks, 36
Girl, sun-bonnet, 149
Girls’ fair, 179
Glazing candlesticks, 395
Goddess Diana, 272
Good-night chick, 384
Grass, invitation rings of, 55
H
Half candle, 391
Halicarnassus, Mausoleum of, 245
Hallowe’en apple, 60
Hallowe’en merrymaking, 55
Handle, candle, 393
Hanging basket, 372
Hanging gardens, 279
Harmless serpent, 69
Hat, peaked, 174
Head, Judy’s, 51
Heart, Valentine, 109
Heavier rug, 357
Holly, 304
Holly berries, 307
Hollyhocks, paper, 129
Home circus, 15
Home-made candlesticks, 385
Horse, Rosebud’s, 18
House, doll, 315
Hurling the lance, 10
I
Impromptu moving pictures, 97
Inlaying Zeus’ throne, 267
[442]Invitation, giant firecrackers, 4
J
Japanese crystal, 68
Japanese tag, 134
Jigger sail, 413
Jingle, fortune, 71
Jolly little Santa Claus, 163
Josephine, 379
Judy’s head, 51
K
Kettle, magic dye, 43
L
Lamp, fairy, 403
Lance, hurling the, 10
Lantern, pumpkin, 93
Lava charm, 67
Lawn frolic, Fourth of July, 3
Leaves, bayberry, 326
Leo, 422
Life rope, toy, 340
Lighthouse, first, 245
Living Christmas tree, 173
Loom, to weave without, 349
Love’s palette, 111
Lumberman, 344
M
Mademoiselle Rosebud, 16
Magic dye kettle, 43
Magic peep show, 137
Mainmast, 411
Mainsail, 413
Main topsail, 412
Man, Puritan, 98
Marble steps, 252
Mausoleum of Halicarnassus, 245
Media, 279
Mermaid, 142
Mermaid, 345
Merrymaking Hallowe’en, 55
Mice, three blind, 144
Mikado, 374
Mistletoe, 310
Mizzenmast, 408
Modelling tools, 387
Moon, cow that jumped over, 141
Moulds, candle, 331
Moving animal circus, 15
Moving pictures, impromptu, 97
Myth, 12
N
Napoleon, 375
Nebuchadnezzar, 279
Nest, bird’s, 373
Northern crown, 423
Novel Easter party, 33
Novel fortune telling, 55
O
Office, express, girls’ fair, 186
Olympia, statue of Zeus at, 259
Orange games, 85
Orange-skin coracle, 400
Order of entertainment, 6
Original Valentine, 103
Orion, 424
Outdoor fun, 207
Outfit, camping, 194
Oyster, sea treasure, 69
P
Palette, love’s, 111
Palm, date, 227
Pandora box, 12
[443]Pantomime, 102
Pantomime, charades, 6
Paper Columbus, 405
Paper disks, 36
Paper shower, 36
Party, novel Easter, 33
Party, Thanksgiving, 85
Pasteboard doll house, 315
Peaked hat, 174
Peep show, magic, 137
Performers, wild west show, 120
Pharos of Alexandria, 244
Phidias, 259
Picnic, roof, 127
Pig, to make, 367
Pin cushion, 375
Pitch-wood fire, 252
Plant your garden, 151
Plants, Babylonian, 299
Platforms, hanging gardens’, 284
Pole, tether-ball, 207
Pollux, 423
Porcupine, 68
Post-office, 104
Postmaster, girls’ fair, 192
Pottery, coloring, 396
Properties, Thanksgiving stage, 101
Pumpkin games, 85
Punch and Judy show, 45
Punch’s head, 46
Puritan woman, 98
Pyramids, 219
Q
Queen Titania, 75
R
Race, shuffle, 10
Race, wedding, 61
Rackets, egg tennis, 38
Rackets, palm-leaf fan, 158
Rackets, tether-ball, 214
Raft, toy, 341
Rapid-transit story, 92
Reindeer, Santa Claus, 165
Rhodes, Colossus of, 233
Rings of grass, invitation, 55
Rite, vesper, 65
Roof picnic, 127
Ropes, evergreen, 312
Rosebud, mademoiselle, 16
Roses, paper, 130
Rug, doll house, 323
Rules of egg tennis, 41
S
Saddle, camel, 230
Safe, backyard, 199
Sail boat, 373
Sails, Columbus’ ship, 411
Sandpaper for pyramids, 221
Santa Claus, 163
Santa Maria, 411
Saucers, Santa Claus, 171
Screen, witch, 66
Sea treasure, 69
Secret of magic kettle, 43
Serpent, 69
Shelves, 324
Ship, Columbus’, 405
Show, magic peep, 137
Show, Punch and Judy, 45
Show, wild west, 113
Shower of paper, 36
Shrubbery, Babylonian, 297
Shuffle race, 10
Side steps, Diana’s temple, 276
Sides, choice of, 160
Sleigh, Santa Claus, 164
[444]Slides, peep show, 138
Slippers, old, 58
Sostratus, 253
Sphinx, 225
Spool table, 315
Spoon, 368
Spring, tin-pail, 200
Stage, Punch and Judy, 45
Stage, Titania’s, 75
Stamps, Valentine, 107
Statue of Zeus, 259
Statues, Babylonian, 294
Stems, 311
Stencil painting, 426
Stencils, to make, 426
Steps, Diana’s temple, 274
Steps, marble, 252
Story, rapid transit, 92
Strawberry, 371
Sun-bonnet, charade, 7
Sun-bonnet girl, 149
Sunflowers, paper, 127
T
Table, backyard camp, 198
Table, spool, 315
Table, wild west show, 113
Tag, Japanese, 134
Tally card, 159
Taurus, 425
Temple of Diana, 269
Tennis, egg, 33
Tent, backyard, 197
Tent, to make, 123
Test, bean bag, 66
Tether-ball, 207
Thanksgiving party, 85
Three blind mice, 144
Throne of Zeus, 263
Tissue paper glass, 318
Titania’s dance, 75
Tools, clay modelling, 387
Toys, water, 338
Tree, living Christmas, 173
Trousers, Santa Claus, 169
Tulip bed, 361
Turtle, 366
U
Umbrella, 369
Upper dais, 264
Ursa major, 418
Ursa minor, 420
V
Valentine entertainment, 103
Vesper rite, 65
Victory, winged, 268
W
Warp, 350
Water life, 141
Water toys, 338
Wax, bayberry, 331
Weaving, 349
Wedding race, 61
Wicks, candle, 334
Wig, Santa Claus, 169
Wigwams, 416
Wild west show, 113
Window glass, 318
Winged victory, 268
Wings, Titania’s, 83
Witch screen, 66
World, valentine, 109
Wreaths, 310
Y
Yard, camping in back, 194
Z
Zeus, statue of, 259
A
Airships, fairy, 70
Alexandria, Pharos of, 245
Amytis, 279
Animal circus, 15
Apollo, Statue of, 233
Halloween apple, 60
Apple games, 85
Ascension, balloon, 11
B
Baby, Punch and Judy, 52
Baby porcupine, 68
Babylon, hanging gardens of, 279
Babylonians, 283
Backyard camp, 194
Tetherball, 207
Balloon ascension, 11
Banana canoe, 401
Hanging basket, 372
Bathing place, 341
Bayberry candle, 326
Bead door knobs, 317
Bean bag test, 66
Easter bells, 364
Holly berries, 307
Blackbirds, girls’ fair, 181
Blarney stone game, 71
Three blind mice, 144
Bloodroot, 363
Weaving board, 349
Backyard camp boat, 202
Santa Claus boot, 169
Bouquet, 147
Bowls and cups, 59
Bowsprit, 408
Pandora's box, 12
Babylonian bricks, 286
Broad-fronted bulls, 293
Brook crossing, 133
Tulip bud, 361
Babylonian bulls, 293
Bayberry bushes, 326
Butterfly game, 42
C
Egyptian camels, 228
Backyard camp, 194
Backyard campfire, 201
Camping outfit, 194
Bayberry candle, 326
Candle molds, 331
Homemade candlesticks, 385
Candlewicks, 334
Banana canoe, 401
Easter egg card, 363
Tally card, 159
Cardboard Pharos, 244
[440]Easter cards, 358
Caria, 257
Cassiopeia, 421
Castor, 423
Black cats, 56
Cella, 271
Doll’s chair, 370
“Chapeau Bras,” 377
Pantomime charades, 6
Chares, 233
Lava charm, 67
Cheops, 219
Chephren, King, 224
Good-morning chick, 381
Easter chicks, 143
Christmas decorations, 303
Living Christmas tree, 173
Home circus, 15
Jolly little Santa Claus, 163
Clay candlesticks, 386
Cnidus, Sostratus, 253
Santa Claus coat, 169
Coloring pottery, 396
Colossus of Rhodes, 233
Paper Columbus, 405
To make Columbus, 414
Temple columns, 269
Orange skin coracle, 400
Puritan man's costume, 98
Titania’s costume, 82
Charade costumes, 7
Stuffing cotton, 237
Country picnic, 132
Pumpkin game, 90
Tether-ball court, 211
To make a cow that jumped over the moon, 139
Doll’s cradle, 372
To make a cross, 360
Crossing the brook, 133
Crow’s nest, 412
Japanese crystal, 68
Cupid’s door, 108
Cups and bowls, 59
Santa Claus cups, 170
Tissue paper curtains, 324
D
Dainty bloodroot, 363
Upper dais, 264
Daisy Valentine, 110
Dance of the dolls, 145
Titania’s dance, 75
Date palm, 227
Daylight fireworks, 11
Forward deck, 409
Deck fence, 410
Living Christmas tree decorations, 177
Temple of Diana, 269
Gilt paper disks, 36
Dollhouse, 315
Doll’s chair, 370
Dance of the dolls, 145
Cupid’s door, 108
Bead doorknobs, 317
Punch and Judy drama, 53
Punch’s dress, 50
Puritan woman's dress, 98
Magic dye kettle, 43
E
Easter bells, 364
Easter cards, 358
Easter chicks, 143
Easter egg cards, 363
Easter party, 33
[441]Egg card, 363
Egg tennis, 33
Preparing eggs for tennis, 34
Pyramids of Egypt, 219
Elephant, 20
Empress Josephine, 379
Valentine entertainment, 103
Temple of Diana at Ephesus, 269
Euphrates, 279
Evergreen ropes, 312
Express office, girls’ fair, 186
F
Girls’ fair, 179
Fairy airships, 70
Fairy lamp, 403
Life in fairy waters, 141
Picnic fence, 132
Backyard fire, 201
Firecracker invitations, 4
Daylight fireworks, 11
Flag, 412
Flower bed flags, 157
Footstool for Zeus, 265
Forfeits, 95
Fortune jingle, 71
Novel fortune telling, 55
Fourth of July lawn frolic, 3
Dollhouse frieze, 322
Fourth of July frolic, 3
G
Blarney Stone game, 71
Butterfly game, 42
Egg tennis game, 39
New Easter games, 33
Plant your garden, 151
Garden planting game, 159
Hanging gardens, 279
Giant firecracker invitation, 4
Gilt paper disks, 36
Sun-bonnet girl, 149
Girls’ fair, 179
Glazing candlesticks, 395
Goddess Diana, 272
Good-night chick, 384
Grass rings for invitations, 55
H
Half candle, 391
Mausoleum of Halicarnassus, 245
Halloween apple, 60
Halloween merrymaking, 55
Candle handle, 393
Hanging basket, 372
Hanging gardens, 279
Harmless serpent, 69
Peaked hat, 174
Judy’s head, 51
Valentine heart, 109
Heavier rug, 357
Holly, 304
Holly berries, 307
Paper hollyhocks, 129
Home circus, 15
Homemade candlesticks, 385
Rosebud’s horse, 18
Dollhouse, 315
Hurling the lance, 10
I
Impromptu moving pictures, 97
Inlaying Zeus’ throne, 267
[442]Invitation, giant firecrackers, 4
J
Japanese crystal, 68
Japanese tag, 134
Jigger sail, 413
Fortune jingle, 71
Jolly little Santa Claus, 163
Josephine, 379
Judy’s head, 51
K
Magic dye kettle, 43
L
Fairy lamp, 403
Hurling the lance, 10
Pumpkin lantern, 93
Lava charm, 67
Fourth of July lawn frolic, 3
Bayberry leaves, 326
Leo, 422
Toy life rope, 340
First lighthouse, 245
Living Christmas tree, 173
Weaving without a loom, 349
Love’s palette, 111
Lumberman, 344
M
Mademoiselle Rosebud, 16
Magic dye kettle, 43
Magic peep show, 137
Main mast, 411
Main sail, 413
Main topsail, 412
Puritan man, 98
Marble steps, 252
Mausoleum of Halicarnassus, 245
Media, 279
Mermaid, 142
Mermaid, 345
Halloween merrymaking, 55
Three blind mice, 144
Mikado, 374
Mistletoe, 310
Mizzenmast, 408
Modeling tools, 387
The cow that jumped over the moon, 141
Candle molds, 331
Moving animal circus, 15
Impromptu moving pictures, 97
Myth, 12
N
Napoleon, 375
Nebuchadnezzar, 279
Bird’s nest, 373
Northern crown, 423
Novel Easter party, 33
Novel fortune telling, 55
O
Girls’ fair express office, 186
Olympia, statue of Zeus at, 259
Orange games, 85
Orange-skin coracle, 400
Order of entertainment, 6
Original Valentine, 103
Orion, 424
Outdoor fun, 207
Camping outfit, 194
Sea treasure oyster, 69
P
Love's palette, 111
Date palm, 227
Pandora's box, 12
[443]Pantomime, 102
Charades pantomime, 6
Paper Columbus, 405
Paper disks, 36
Paper shower, 36
Novel Easter party, 33
Thanksgiving party, 85
Pasteboard dollhouse, 315
Peaked hat, 174
Magic peep show, 137
Wild west show performers, 120
Pharos of Alexandria, 244
Phidias, 259
Roof picnic, 127
To make a pig, 367
Pin cushion, 375
Pitch-wood fire, 252
Plant your garden, 151
Babylonian plants, 299
Hanging gardens’ platforms, 284
Tether-ball pole, 207
Pollux, 423
Porcupine, 68
Post-office, 104
Girls’ fair postmaster, 192
Coloring pottery, 396
Thanksgiving stage properties, 101
Pumpkin games, 85
Punch and Judy show, 45
Punch’s head, 46
Puritan woman, 98
Pyramids, 219
Q
Queen Titania, 75
R
Shuffle race, 10
Wedding race, 61
Egg tennis rackets, 38
Palm-leaf fan rackets, 158
Tether-ball rackets, 214
Toy raft, 341
Rapid-transit story, 92
Santa Claus reindeer, 165
Colossus of Rhodes, 233
Grass invitation rings, 55
Vesper rite, 65
Roof picnic, 127
Evergreen ropes, 312
Mademoiselle Rosebud, 16
Paper roses, 130
Dollhouse rug, 323
Rules of egg tennis, 41
S
Camel saddle, 230
Backyard safe, 199
Sailboat, 373
Santa Claus' sails, 411
Sandpaper for pyramids, 221
Santa Claus, 163
Santa Maria, 411
Santa Claus saucers, 171
Witch screen, 66
Sea treasure, 69
Secret of the magic kettle, 43
Serpent, 69
Shelves, 324
Columbus’ ship, 405
Magic peep show, 137
Punch and Judy show, 45
Wild west show, 113
Paper shower, 36
Babylonian shrubbery, 297
Shuffle race, 10
Side steps, temple of Diana, 276
Choice of sides, 160
Santa Claus sleigh, 164
[444]Peep show slides, 138
Old slippers, 58
Sostratus, 253
Sphinx, 225
Spool table, 315
Spoon, 368
Tin-pail spring, 200
Punch and Judy stage, 45
Titania’s stage, 75
Valentine stamps, 107
Statue of Zeus, 259
Babylonian statues, 294
Stems, 311
Stencil painting, 426
Making stencils, 426
Temple steps, 274
Marble steps, 252
Rapid transit story, 92
Strawberry, 371
Sun-bonnet charade, 7
Sun-bonnet girl, 149
Paper sunflowers, 127
T
Backyard camp table, 198
Spool table, 315
Wild west show table, 113
Japanese tag, 134
Tally card, 159
Taurus, 425
Temple of Diana, 269
Egg tennis, 33
Backyard tent, 197
To make a tent, 123
Bean bag test, 66
Tether-ball, 207
Thanksgiving party, 85
Three blind mice, 144
Throne of Zeus, 263
Tissue paper glass, 318
Titania’s dance, 75
Clay modeling tools, 387
Water toys, 338
Living Christmas tree, 173
Santa Claus trousers, 169
Tulip bed, 361
Turtle, 366
U
Umbrella, 369
Upper dais, 264
Ursa Major, 418
Ursa Minor, 420
V
Valentine entertainment, 103
Vesper rite, 65
Winged victory, 268
W
Warp, 350
Water life, 141
Water toys, 338
Bayberry wax, 331
Weaving, 349
Wedding race, 61
Candle wicks, 334
Santa Claus wig, 169
Wigwams, 416
Wild west show, 113
Window glass, 318
Winged victory, 268
Titania’s wings, 83
Witch screen, 66
Valentine world, 109
Wreaths, 310
Y
Camping in the backyard yard, 194
Z
Statue of Zeus, 259
By LINA and ADELIA B. BEARD
Profusely illustrated by the authors. 8vo, $2.00
————
By LINA and ADELIA B. BEARD
Richly illustrated by the authors. 8vo, $2.00
————
This new book for girls, by Lina and Adelia Beard, whose previous books on girls’ sports have become classic, combines a mass of practical instruction on handicrafts and recreations. No more charming book for girls could be desired.
This new book for girls, by Lina and Adelia Beard, whose earlier books on girls' sports have become classics, blends a ton of practical guidance on crafts and activities. There couldn't be a more delightful book for girls.
“It teaches how to make serviceable and useful things of all kinds out of every kind of material. It also tells how to play and how to make things to play with. The girl who gets this book will not lack for occupation and pleasure.”—Chicago Evening Post.
“It teaches how to create practical and useful items from various materials. It also explains how to play and how to make toys. The girl who has this book will always have something to do and enjoy.” —Chicago Evening Post.
SOME OF THE CHAPTERS
SOME CHAPTERS
- A Home-made Loom
- How to Spin Flax
- Pottery Without a Wheel
- Hallowe’en Revels
- The Magic Cloth
- A New Race of Dolls
- Modeling in Tissue Paper
- Open Air Play Houses
- May Day Amusements
- An Indian Encampment
- A Toy Colonial Kitchen
AND HOW TO DO THEM
By LINA and ADELIA B. BEARD
Profusely illustrated by the authors. 8vo, $2.00
————
By LINA and ADELIA B. BEARD
Richly illustrated by the authors. 8vo, $2.00
————
An infinite variety of things worth doing is comprised in the latest Beard book for girls, which is in every way equal to its widely popular predecessors, and contains a wealth of absolutely new material. How to do the various things worth doing is set forth with that simplicity of direction which has been one of the chief factors in the success of these authors. The text is supplemented by some six hundred drawings.
An endless range of activities worth pursuing is included in the latest Beard book for girls, which matches the popularity of its previous editions and features a ton of brand new content. Instructions on how to do these various activities are presented with the straightforward guidance that has been a key factor in the success of these authors. The text is accompanied by about six hundred illustrations.
The book tells of such things as these: A Wonderful Circus at Home, A Valentine Entertainment, A Novel Easter Party, Hallowe’en Merrymaking, How to Get Up a Girls’ Fair.
The book covers topics like this: A Fantastic Circus at Home, A Valentine Celebration, An Innovative Easter Party, Halloween Festivities, How to Organize a Girls' Fair.
HOW TO AMUSE YOURSELF AND OTHERS
By LINA and ADELIA B. BEARD
With nearly 500 Illustrations by the Authors
One volume, square 8vo, $2.00
————
By LINA and ADELIA B. BEARD
With almost 500 Illustrations by the Authors
One volume, square 8vo, $2.00
————
Eight new chapters have been added to the forty-two which have carried this famous book to the hearts of all the young people since its first appearance, and everything that the girls of to-day want to know about their sports, games, and winter afternoon and evening work, is told clearly and simply in this helpful and entertaining volume. The volume is fully and handsomely illustrated from drawings by the authors, whose designs are in the best sense illustrative of the text.
Eight new chapters have been added to the forty-two that have made this famous book beloved by young people since it was first published, and everything that today's girls want to know about their sports, games, and winter afternoon and evening activities is explained clearly and simply in this helpful and entertaining book. The book is fully and beautifully illustrated with drawings by the authors, whose designs effectively complement the text.

SUMMARY OF CONTENTS
SUMMARY
First of April—Wild Flowers and Their Preservation—The Walking Club—Easter-Egg Games—How to Make a Lawn Tennis Net—May-Day Sports—Midsummer-Eve Games and Sports—Sea-side Cottage Decoration—A Girl’s Fourth of July—An Impression Album—Picnics, Burgoos, and Corn-Roasts—Botany as Applied to Art—Quiet Games for Hot Weather—How to Make a Hammock—Corn-Husk and Flower Dolls—How to Make Fans—All Hallow Eve—Nature’s Fall Decorations and How to Use Them—Nutting Parties—How to Draw, Paint in Oil-colors, and Model in Clay and Wax—China Painting—Christmas Festivities, and Home-made Christmas Gifts—Amusements and Games for the Holidays—Golf—Bicycling—Swimming—Physical Culture—Girls’ Clubs—A New Seashore Game—Apple Target Shooting—Water Fairies.
First of April—Wild Flowers and Their Preservation—The Walking Club—Easter Egg Games—How to Make a Lawn Tennis Net—May Day Sports—Midsummer Eve Games and Sports—Seaside Cottage Decoration—A Girl’s Fourth of July—An Impression Album—Picnics, Burgoos, and Corn Roasts—Botany as Applied to Art—Quiet Games for Hot Weather—How to Make a Hammock—Corn Husk and Flower Dolls—How to Make Fans—All Hallows' Eve—Nature’s Fall Decorations and How to Use Them—Nutting Parties—How to Draw, Paint in Oil Colors, and Model in Clay and Wax—China Painting—Christmas Festivities and Homemade Christmas Gifts—Amusements and Games for the Holidays—Golf—Bicycling—Swimming—Physical Culture—Girls’ Clubs—A New Seashore Game—Apple Target Shooting—Water Fairies.
Louisa M. Alcott wrote: “I have put it in my list of good and useful books for young people, as I have many requests for advice from my little friends and their anxious mothers. I am most happy to commend your very ingenious and entertaining book.”
Louisa May Alcott wrote: “I have added it to my list of great and helpful books for young people, as I often get requests for advice from my little friends and their worried mothers. I’m very pleased to recommend your clever and enjoyable book.”
Grace Greenwood wrote: “It is a treasure which, once possessed, no practical girl would willingly part with. It is an invaluable aid in making a home attractive, comfortable, artistic, and refined. The book preaches the gospel of cheerfulness, industry, economy, and comfort.”
Grace Greenwood wrote: “It’s a treasure that, once you have it, no practical girl would want to give up. It’s an invaluable help in making a home appealing, cozy, stylish, and sophisticated. The book promotes the values of happiness, hard work, thriftiness, and comfort.”
Or, What To Do and How To Do It
By DANIEL C. BEARD
One volume, 8vo, fully Illustrated by the Author, $2.00
————
By DANIEL C. BEARD
One volume, 8vo, fully illustrated by the author, $2.00
————
Mr. Beard’s book tells the active, inventive, and practical American boy the things he really wants to know; the thousand things he wants to do, and the ten thousand ways in which he can do them, with the helps and ingenious contrivances which every boy can either procure or make. The author divides the book among the sports of the four seasons; and he has made an almost exhaustive collection of the cleverest modern devices, besides himself inventing an immense number of capital and practical ideas.
Mr. Beard’s book gives the energetic, creative, and hands-on American boy the information he truly wants; the countless things he wants to do, and the many ways he can achieve them, with tools and clever gadgets that any boy can either get or create. The author organizes the book around the sports of the four seasons, and he has compiled an extensive collection of the smartest modern inventions, in addition to coming up with a huge number of great and practical ideas himself.

SUMMARY OF CONTENTS
SUMMARY OF CONTENTS
Kite Time—War Kites—Novel Modes of Fishing—Home-made Fishing Tackle—How to Stock, Make, and Keep a Fresh-water Aquarium—How to Stock and Keep a Marine Aquarium—Knots, Bends, and Hitches—Dredge, Tangle, and Trawl Fishing—Home-made Boats—How to Rig and Sail Small Boats—How to Camp Out Without a Tent—How to Rear Wild Birds—Home-made Hunting Apparatus—Traps and Trapping—Dogs—Practical Taxidermy for Boys—Snow Houses and Statuary—Winged Skaters—Winter Fishing—Indoor Amusements—How to Make a Magic Lantern—Puppet Shows—Home-made Masquerade and Theatrical Costumes—With many other subjects of a kindred nature.
Kite Time—War Kites—Novel Fishing Techniques—DIY Fishing Gear—How to Set Up, Create, and Maintain a Freshwater Aquarium—How to Set Up and Maintain a Marine Aquarium—Knots, Bends, and Hitches—Dredge, Tangle, and Trawl Fishing—DIY Boats—How to Rig and Sail Small Boats—How to Camp Outdoors Without a Tent—How to Raise Wild Birds—DIY Hunting Gear—Traps and Trapping—Dogs—Practical Taxidermy for Kids—Snow Houses and Statues—Winged Skaters—Winter Fishing—Indoor Fun—How to Create a Magic Lantern—Puppet Shows—DIY Masquerade and Theatrical Costumes—Along with many other related topics.
“It is an excellent publication, and is heartily recommended to parents.”—The Brooklyn Eagle.
“It’s a great publication, and I strongly recommend it to parents.”—The Brooklyn Eagle.
“The book has this great advantage over its predecessors, that most of the games, tricks, and other amusements described in it are new. It treats of sports adapted to all seasons of the year; it is practical, and it is well illustrated.”—The New York Tribune.
“The book has a big advantage over earlier ones because most of the games, tricks, and other fun activities in it are new. It covers sports suitable for every season of the year; it’s practical and well illustrated.”—The New York Tribune.
“It tells boys how to make all kinds of things—boats, traps, toys, puzzles, aquariums, fishing tackle; how to tie knots, splice ropes, to make bird calls, sleds, blow guns, balloons; how to rear wild birds, to train dogs, and do the thousand and one things that boys take delight in. The book is illustrated in such a way that no mistake can be made; and the boy who gets a copy of this book will consider himself set up in business.”—The Indianapolis Journal.
“It shows boys how to create all sorts of things—boats, traps, toys, puzzles, aquariums, fishing gear; how to tie knots, splice ropes, make bird calls, sleds, blow guns, balloons; how to raise wild birds, train dogs, and do the countless things that boys enjoy. The book is illustrated so clearly that there’s no chance of making mistakes; any boy who gets a copy of this book will feel like he’s started his own business.”—The Indianapolis Journal.
FOR PLAYGROUND, FIELD AND FOREST
By DANIEL C. BEARD
With more than 300 Illustrations by the Author. Square 8vo, $2.00
————
By DANIEL C. BEARD
With over 300 illustrations by the author. Square 8vo, $2.00
————
“It tells how to play all sorts of games with marbles, how to make and spin more kinds of tops than most boys ever heard of, how to make the latest things in plain and fancy kites, where to dig bait and how to fish, all about boats and sailing, and a host of other things which can be done outdoors. The volume is profusely illustrated and will be an unmixed delight to any boy.”—New York Tribune.
“It explains how to play various marble games, how to create and spin more types of tops than most boys have ever known, how to build the newest styles of both simple and fancy kites, where to find bait and how to fish, everything about boats and sailing, and many other outdoor activities. The book is richly illustrated and will be a pure joy to any boy.”—New York Tribune.

SUMMARY OF CONTENTS
CONTENT SUMMARY
Marbles—Tops—Latest Things in Kites—Aerial Fish and Dragons—Hoops and Wheels—How to Make the Sucker—Up in the Air on Stilts—Bait, Live and Dead—Fishing—Aquatic Sports—Rigs of All Kinds for Small Boats—Shells and Canoes—Hints for Collectors—Honey-Bee Messengers—A “Zoo”—Choosing Up and “It”—Counting Out Rhymes—Swimming—Games of Tag—I Spy—Leap Frog—Various Sports for Hot Days—Tip Cat—Games of Ball—Mumbly Peg, Hop-Scotch, and Jack Stones—Hints for Bicyclists—Camping Out—Boy’s Ballista—“Tally-ho!” and Other Cries—Indian Games for Boys—Football—Golf, Hockey, and Shinny—Turtle Hunting—Skating—Stunning Muskrats and Fish—Snowball Battle and Snow Tag—Sleds.
Marbles—Tops—The Latest Trends in Kites—Aerial Fish and Dragons—Hoops and Wheels—How to Make the Sucker—Up in the Air on Stilts—Bait, Live and Dead—Fishing—Water Sports—All Kinds of Rigs for Small Boats—Shells and Canoes—Tips for Collectors—Honey-Bee Messengers—A “Zoo”—Choose Up and “It”—Counting Out Rhymes—Swimming—Tag Games—I Spy—Leap Frog—Various Sports for Hot Days—Tip Cat—Ball Games—Mumbly Peg, Hop-Scotch, and Jacks—Tips for Cyclists—Camping Out—Boy's Ballista—“Tally-ho!” and Other Calls—Indian Games for Boys—Football—Golf, Hockey, and Shinny—Turtle Hunting—Skating—Stunning Mus
From Charles Dana Gibson: “It makes a man of a boy and a boy of a man.”
From Charles Dana Gibson: “It turns a boy into a man and a man into a boy.”
“This book is praiseworthy from end to end, and will find favor even with those who have long since passed to man’s estate.”—The Nation.
“This book is commendable throughout, and will appeal even to those who have long since reached adulthood.”—The Nation.
“It is one of the completest things of the kind ever written, and with it one can hardly conceive how a boy could be without pleasant and profitable amusement at any time. It treats of directions for every season of the year, in and out of doors, and on land and water. One of the best things about it is that it furnishes employment for a boy’s ingenuity and mechanical skill. It seems as if this book must be destined to an immense popularity.”—The Advance.
“It’s one of the most complete books of its kind ever written, and it’s hard to imagine how a boy could ever be without enjoyable and rewarding activities. It covers ideas for every season of the year, both indoors and outdoors, as well as on land and water. One of the best aspects of it is that it provides opportunities for a boy’s creativity and mechanical skills. It feels like this book is bound to become extremely popular.” —The Advance.
OR, NEW IDEAS FOR AMERICAN BOYS
By DANIEL C. BEARD
Profusely Illustrated. Square 8vo, $2.00
————
By DANIEL C. BEARD
Richly Illustrated. Square 8vo, $2.00
————

“Every boy who is handy with tools of any sort will enjoy this book.”—Youth’s Companion.
“Every boy who knows how to use tools of any kind will enjoy this book.” —Youth’s Companion.
“This book is a capital one to give any boy for a present at Christmas, on a birthday, or indeed at any time.”—The Outlook.
“This book is an excellent gift for any boy at Christmas, on a birthday, or really at any time.”—The Outlook.
“Full of new ideas for active boys who like to use tools and see interesting things growing under their hands.”—N. Y. Tribune.
“Packed with fresh ideas for energetic boys who enjoy using tools and watching fascinating things grow with their own hands.” —N. Y. Tribune.
“A perfect treasure-house of things that delight the soul of a boy and keep him happy and busy.”—The Interior.
“A perfect treasure trove of things that bring joy to a boy's heart and keep him entertained and engaged.” —The Interior.
CONTENTS
Part I. Fair Weather Ideas
CONTENTS
Part I. Sunny Day Ideas
Tree-Top Club-Houses—How to Capture and Trap Small Live Animals—The Back-Yard Zoo—A Back-Yard Fish-Pond—Pigeon and Bantam Coops—How to Make a Back-Yard Aviary—A Boy’s Back-Yard Workshop—How to Build an Underground Club-House—A Boys’ Club-House on the Water—How to Have Fun on a Picnic—How to Build and How to Furnish a Daniel Boone Cabin—Flat Boatman’s House—The American Boy’s House Boat—Back-Yard Switchback—How to Build a Toboggan Slide in the Back-Yard.
Tree-Top Clubhouses—How to Capture and Trap Small Live Animals—The Backyard Zoo—A Backyard Fish Pond—Pigeon and Bantam Coops—How to Create a Backyard Aviary—A Boy’s Backyard Workshop—How to Build an Underground Clubhouse—A Boys’ Clubhouse on the Water—How to Enjoy a Picnic—How to Build and Furnish a Daniel Boone Cabin—Flatboat Man’s House—The American Boy’s Houseboat—Backyard Switchback—How to Build a Toboggan Slide in the Backyard.
Part II. Rainy Weather Ideas
Part II. Ideas for Rainy Days
A Home-Made Circus—Good Games with Toothpicks and Matches—Fun with Scissors and Pasteboard and Paper—How to Prepare and Give a Boys’ Chalk Talk—A Christmas Novelty for Boys—How to Make Two Boys into One Santa Claus—A Circus in the Attic—A Boys’ Stag Party—A Wild West Show in the House—How to Have a Panorama Show.
A DIY Circus—Fun Games with Toothpicks and Matches—Activities with Scissors, Cardboard, and Paper—How to Set Up and Present a Boys’ Chalk Talk—A Holiday Surprise for Boys—How to Transform Two Boys into One Santa Claus—An Attic Circus—A Boys’ Stag Party—An Indoor Wild West Show—How to Host a Panorama Show.
————
CHARLES SCRIBNER’S SONS, Publishers
153-157 Fifth Avenue, New York
————
Scribner's, Publishers
153-157 Fifth Avenue, New York
Transcriber’s Notes:
Transcription Notes:
Obvious punctuation errors repaired.
Punctuation errors fixed.
Page 129, Fig. 138, “holyhock” changed to “hollyhock” (Paper hollyhock tied)
Page 129, Fig. 138, “holyhock” changed to “hollyhock” (Paper hollyhock tied)
Page 165, “pastboard” change to “pasteboard” (stiff pastboard like)
Page 165, “pasteboard” change to “pasteboard” (stiff pasteboard like)
Page 168, text obscurred, word “of” presumed and added (of black muslin)
Page 168, text obscured, word “of” presumed and added (of black muslin)
Page 171, Fig. 220, “sleighs” changed to “sleigh” (ready for the sleigh)
Page 171, Fig. 220, “sleighs” changed to “sleigh” (ready for the sleigh)
Page 192, “at” changed to “as” (attractive as these)
Page 192, “as” changed to “as” (attractive as these)
Page 222, the text references Fig. 295, but the text omits a figure with that name.
Page 222, the text mentions Fig. 295, but it doesn't include a figure by that name.
Page 236, “edtire” changed to “entire” (and the entire length)
Page 236, “edtire” changed to “entire” (and the entire length)
Page 315, “sitff” changed to “stiff” (three stiff pasteboard)
Page 315, “stiff” changed to “stiff” (three stiff pasteboard)
Page 320, “thes ame” changed to “the same” (do the same with)
Page 320, “the same” changed to “the same” (do the same with)
Page 435, word “a” added to text (two and a half)
Page 435, the word “a” added to the text (two and a half)
Download ePUB
If you like this ebook, consider a donation!